1
USER MANUAL
FOR
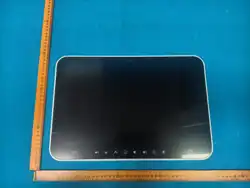
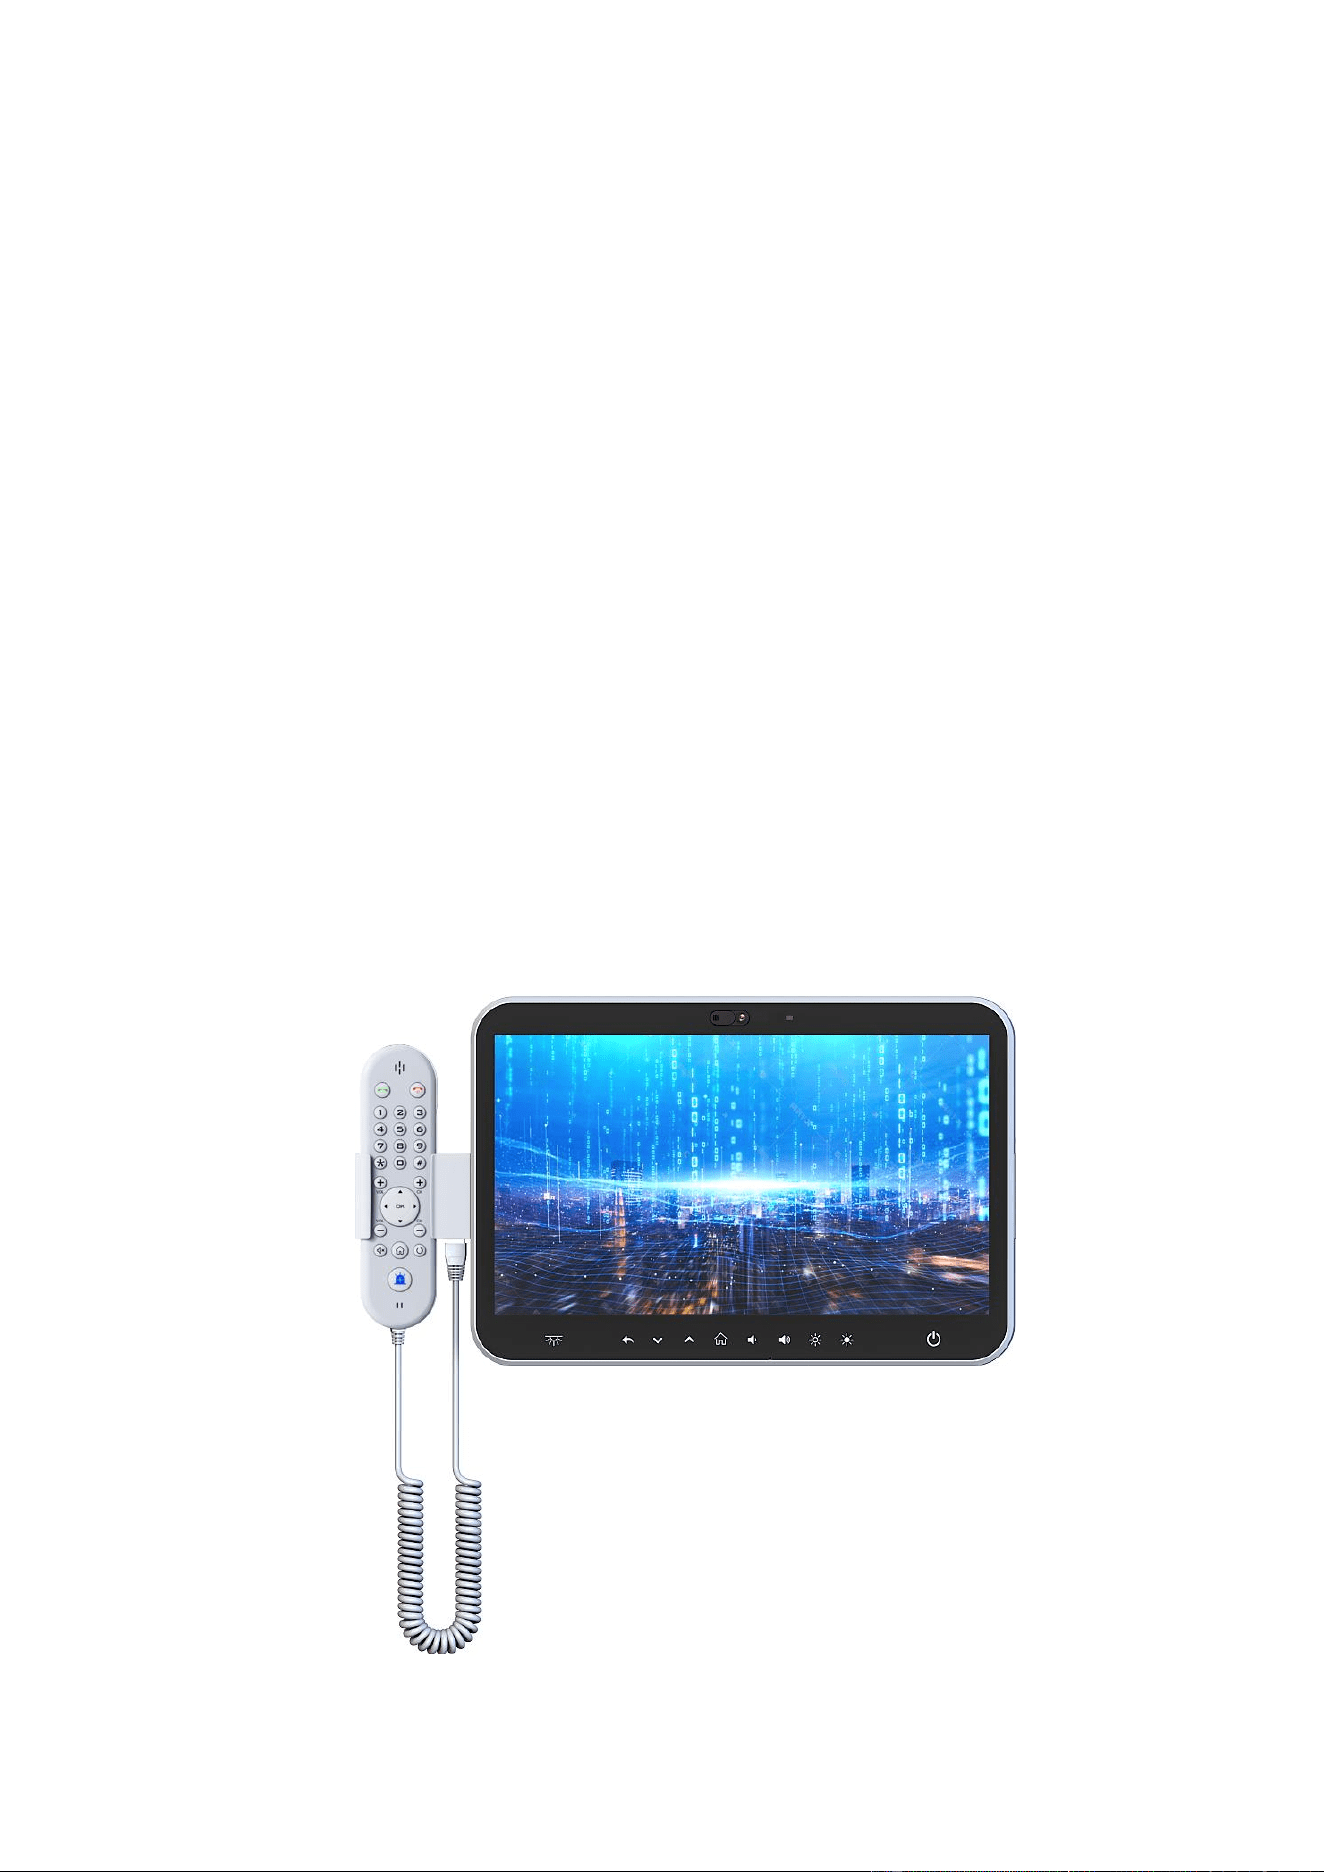
15.6 " Bedside Infotainment Terminal

2
Important Safety Instructions
Read these safety instructions carefully:
⚫ Keep this equipment away from humidity and extreme temperature.
⚫ Avoid exposing the device to direct sunlight or strong ultraviolet light for a long
time.
⚫ Do not drop the device or expose it to strong vibrations.
⚫ Do not scratch or rub the screen with a hard or sharp object.
⚫ Please turn off the power and unplug the power cable before cleaning the device,
then wipe it with a moist and soft cloth.
⚫ Do not disassemble or repair the device by yourselves without our authorization.
If the damage is caused during the disassembly or repair, it will be out of warranty.
⚫ Do not place your device or its accessories with flammable liquids, gases or
explosive materials to avoid danger.
FCC Warning
This device complies with part 15 of the FCC rules. Operation is subject to the following two conditions: (1) this
device may not cause harmful interference, and (2) this device must accept any inte rference received, including
interference that may cause undesired operation.
Changes or modifications not expressly approved by the party responsible for compliance could void the user's
authority to operate the equipment.
NOTE: This equipment has been tested and found to comply with the limits for a Class B digital device, pursuant to
part 15 of the FCC Rules. These limits are designed to provide reasonable protection against harmful interference in
a residential installation. This equipment generates uses and can radiate radio frequency energy and, if not installed
and used in accordance with the instructions, may cause harmful interference to radio communications. However,
there is no guarantee that interference will not occur in a particular installation. If this equipment does cause
harmful interferenceto radio or television reception, which can be determined by turning the equipment off and on,
the user is encouraged to try to correct the interference by one or more of the following measures:
• Reorient or relocate the receiving antenna.
• Increase the separation between the equipment and receiver.
• Connect the equipment into an outlet on a circuit different from that to which the receiver is connected.
• Consult the dealer or an experienced radio/TV technician for help.
Radiation Exposure Statement
This equipment complies with FCC radiation exposure limits set forth for an uncontrolled environment. This
equipment should be installed and operated with minimum distance 20cm between the radiator and your body.

3
Content
Chapter 1 Introduction ............................................................................................... 4
1.1 Product Features ....................................................................................................................... 4
1.2 Product Specifications ............................................................................................................... 5
Chapter 2 Parts Of The Device ..................................................................................... 8
2.1 The Details Of Button ............................................................................................................... 8
2.2 The Details Of Back Interface .................................................................................................... 9
2.3 The Details Of Handset ........................................................................................................... 10
Chapter 3 Functions Of The Device ............................................................................ 11
3.1 Power On/Off .......................................................................................................................... 11
3.2 Functions Of The Desktop ....................................................................................................... 11
3.3 The Usage Of Settings ............................................................................................................. 16
Chapter 4 Root Access Switch Steps ........................................................................... 22
Chapter 5 Device Files Transfer ................................................................................. 24
Chapter 6 Icons ........................................................................................................ 26
Chapter 8 Accessories .............................................................................................. 29
Chapter 9 Troubleshooting ....................................................................................... 30

4
Chapter 1 Introduction
1.1 Product Features
⚫ 15.6" 1920 × 1080 IPS LCD
⚫ 10-point capacitive touchscreen with anti-bacteria, antivirus and anti-alcohol,
supporting gloves touch
⚫ High-performance Qualcomm ARM KryoTM260 processor, Octa-core 64bit
⚫ Android 13.0 system, 4G RAM +64G Flash (8G+128G is optional)
⚫ Handset for service call (optional)
⚫ Built-in 16 MP × CMOS camera
⚫ Built-in reading light
⚫ With Ethernet port, supporting PoE+ (optional)
⚫ Support Wi-Fi and Bluetooth 5.0
⚫ NFC/RFID reader (optional)
⚫ Optical Bonding & lP65 Front Panel
⚫ Comply with IEC60601-1, EN60601-1, ISO22196, CE, FCC
5
1.2 Product Specifications
SYSTEM
Processor
Qualcomm ARM KryoTM260 processor,
Octa- core 64bit
Graphic
Adreno TM 610
RAM
4G DDR4 (default) / 8GB (optional)
ROM
64G eMMC (default) / 128GB (optional)
OS
Android 13.0
Video
Encoding: 4K@30fps, H.264/VP8;
Decoding: 4K@30fps, H.264/VP8/VP9,
1080p@30fps, MPEG-2
DISPLAY
Audio
EVRC, EVRC-B, EVRC-WB, G.711,
G.729A/AB, GSM- FR, GSM-EFR, GSM-H,
AMR-NB, AMR-WB, AMR- eAMR, AMR-
BeAMR
LCD panel
15.6 ", IPS
Resolution
1920(H) × 1080(V)
Brightness
300 cd/m² (optional: 500 cd/m²)
Contrast Ratio
800:1
View Angle
85°/85°(L/R), 85°/85°(U/D)
Touch Panel
Sensitive 10-point capacitive touchscreen
FUNCTION
WIFI
IEEE802.11a/b/g/n/ac; 2.4GHz & 5GHz
Bluetooth
2402MHz~2480MHz
6
NFC/RFID
Combo smart card reader & Mifare RFID
(optional) Read/Write Mode: ISO/IEC
14443 A&B up to 848 kbit/s, IS014443-
4T=CL, FeliCa at 212&424 kbit/s, ISO/EC
15693 read/write and iClass UID, ISO/1EC
18000 P3M3, MIFARE Classic encryption
in read/write mode, MIFARE DESfire/EV1
/EV2/EV3 in Native mode and ISO mode,
MIFARE PIus/EV1NFC Forum type 1, 2, 3,
4, 5 tags NDEF read/write. Auto-list card
mode.
Camera
16 MP CMOS front camera
Handset
Full-function handset with remote control
(optional)
Speaker
6Ω/2W
Sensor
Light Sensor
Function Key
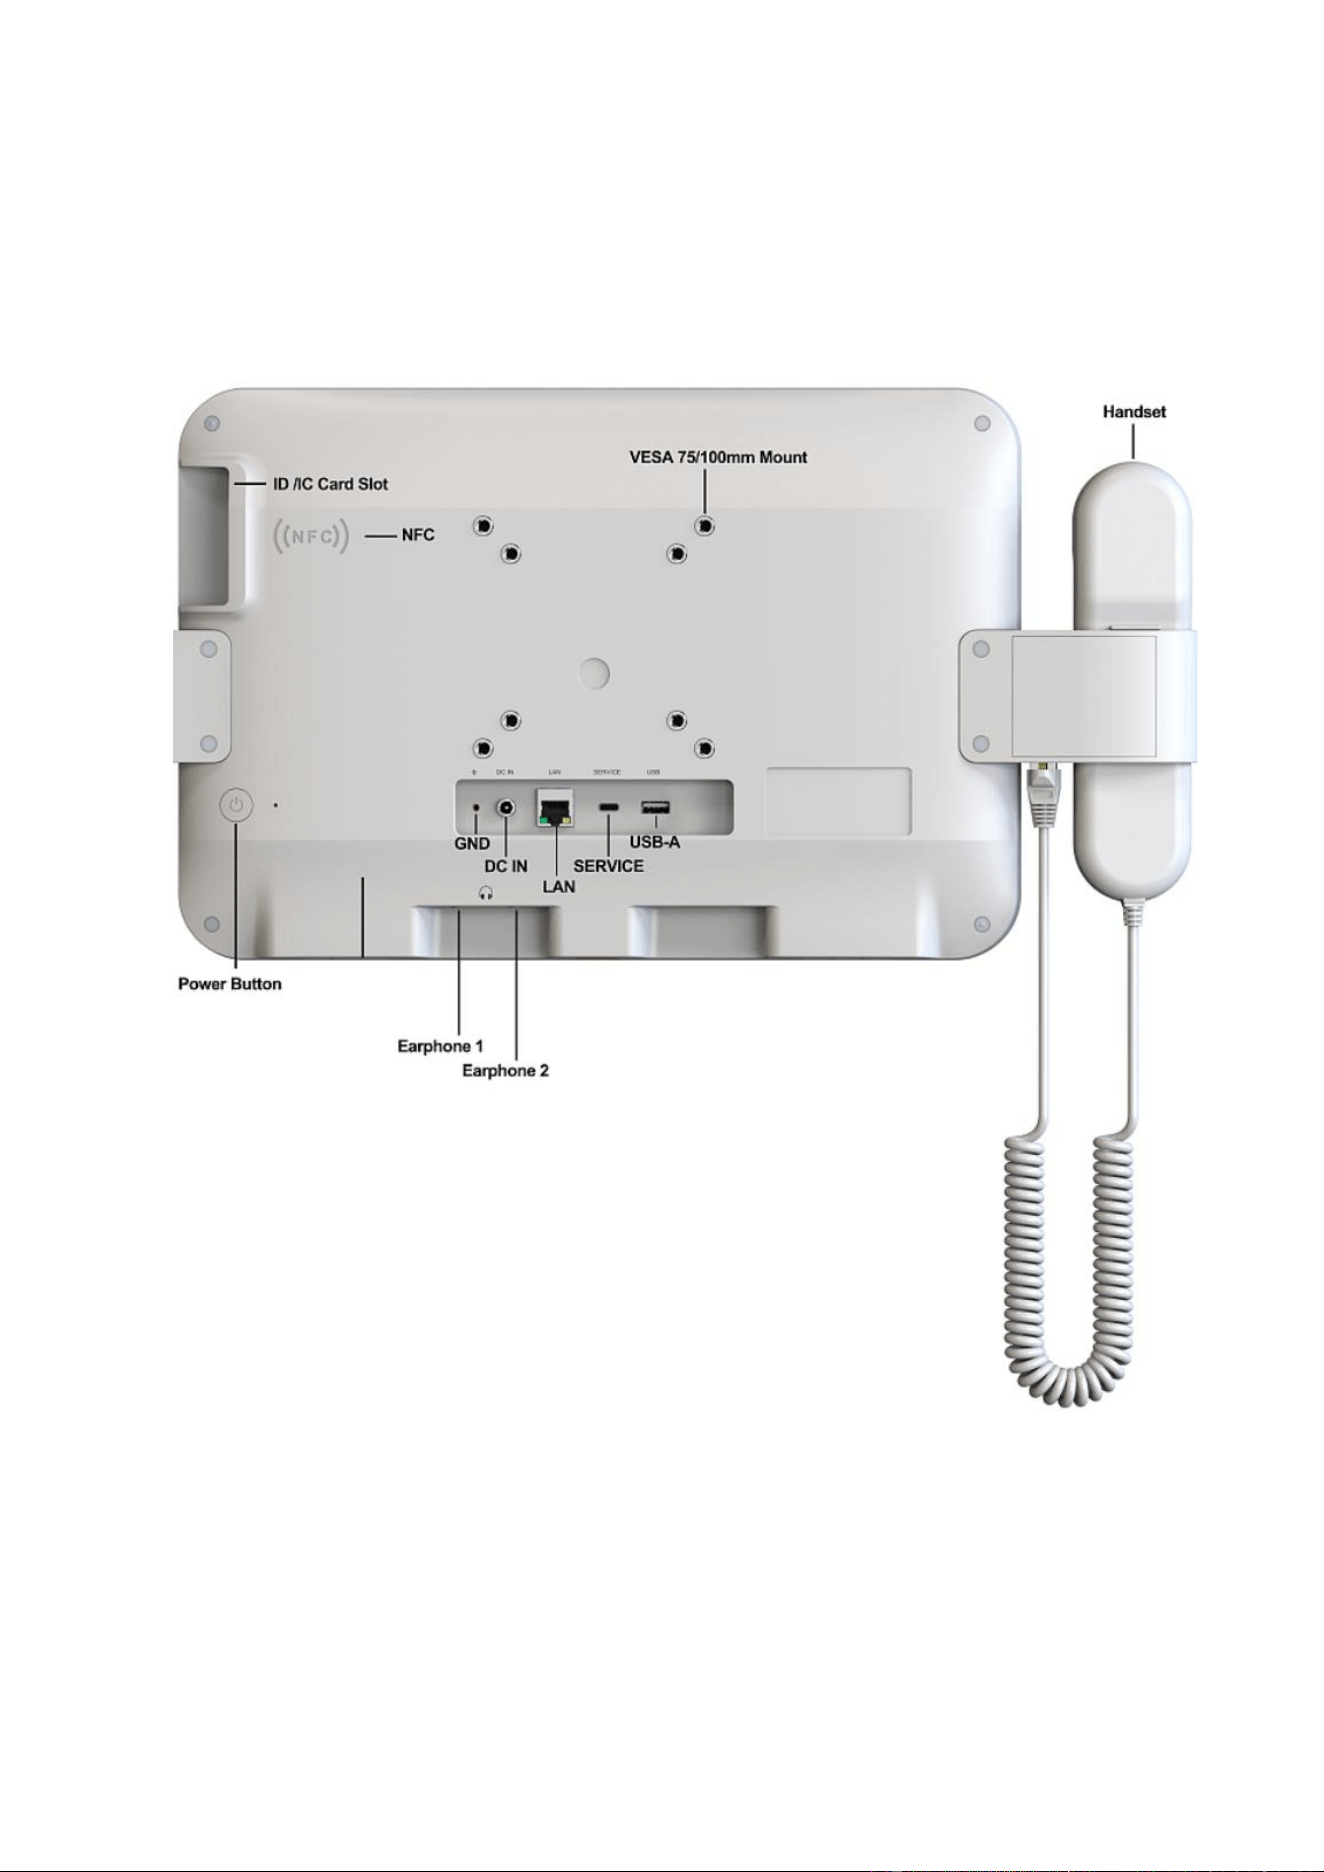
Home, Return, Channel-, Channel+, Vol-,
Vol+, Brightness+, Brightness+,
Lamp,Power
USER INTERFACE
I/O ports
Earphone Jack × 2
Handset Jack × 1
USB HOST 2.0 × 1
DC × 1
RJ45 100M × 1 (PoE+ is optional)
Internal Microphones × 2
Type C(Service) × 1
OTHERS
DC IN
8 - 36V DC
Power
Consumption
<17W
Operating Temp.
0°C to +50°C
Storage Temp.
-20°C to +60°C
Dimensions (LWD)
399.7 x 268.3 x 39 mm

7
Weight
2.15kg (without handset); 2.45kg (with
handset)
ACCESSORIES
Standard
Power adaptor
Optional
Handset
CERTIFICATION
IEC 60601-1, EN 60601-1, CE, FCC
ISO 22196
8
Chapter 2 Parts Of The Device
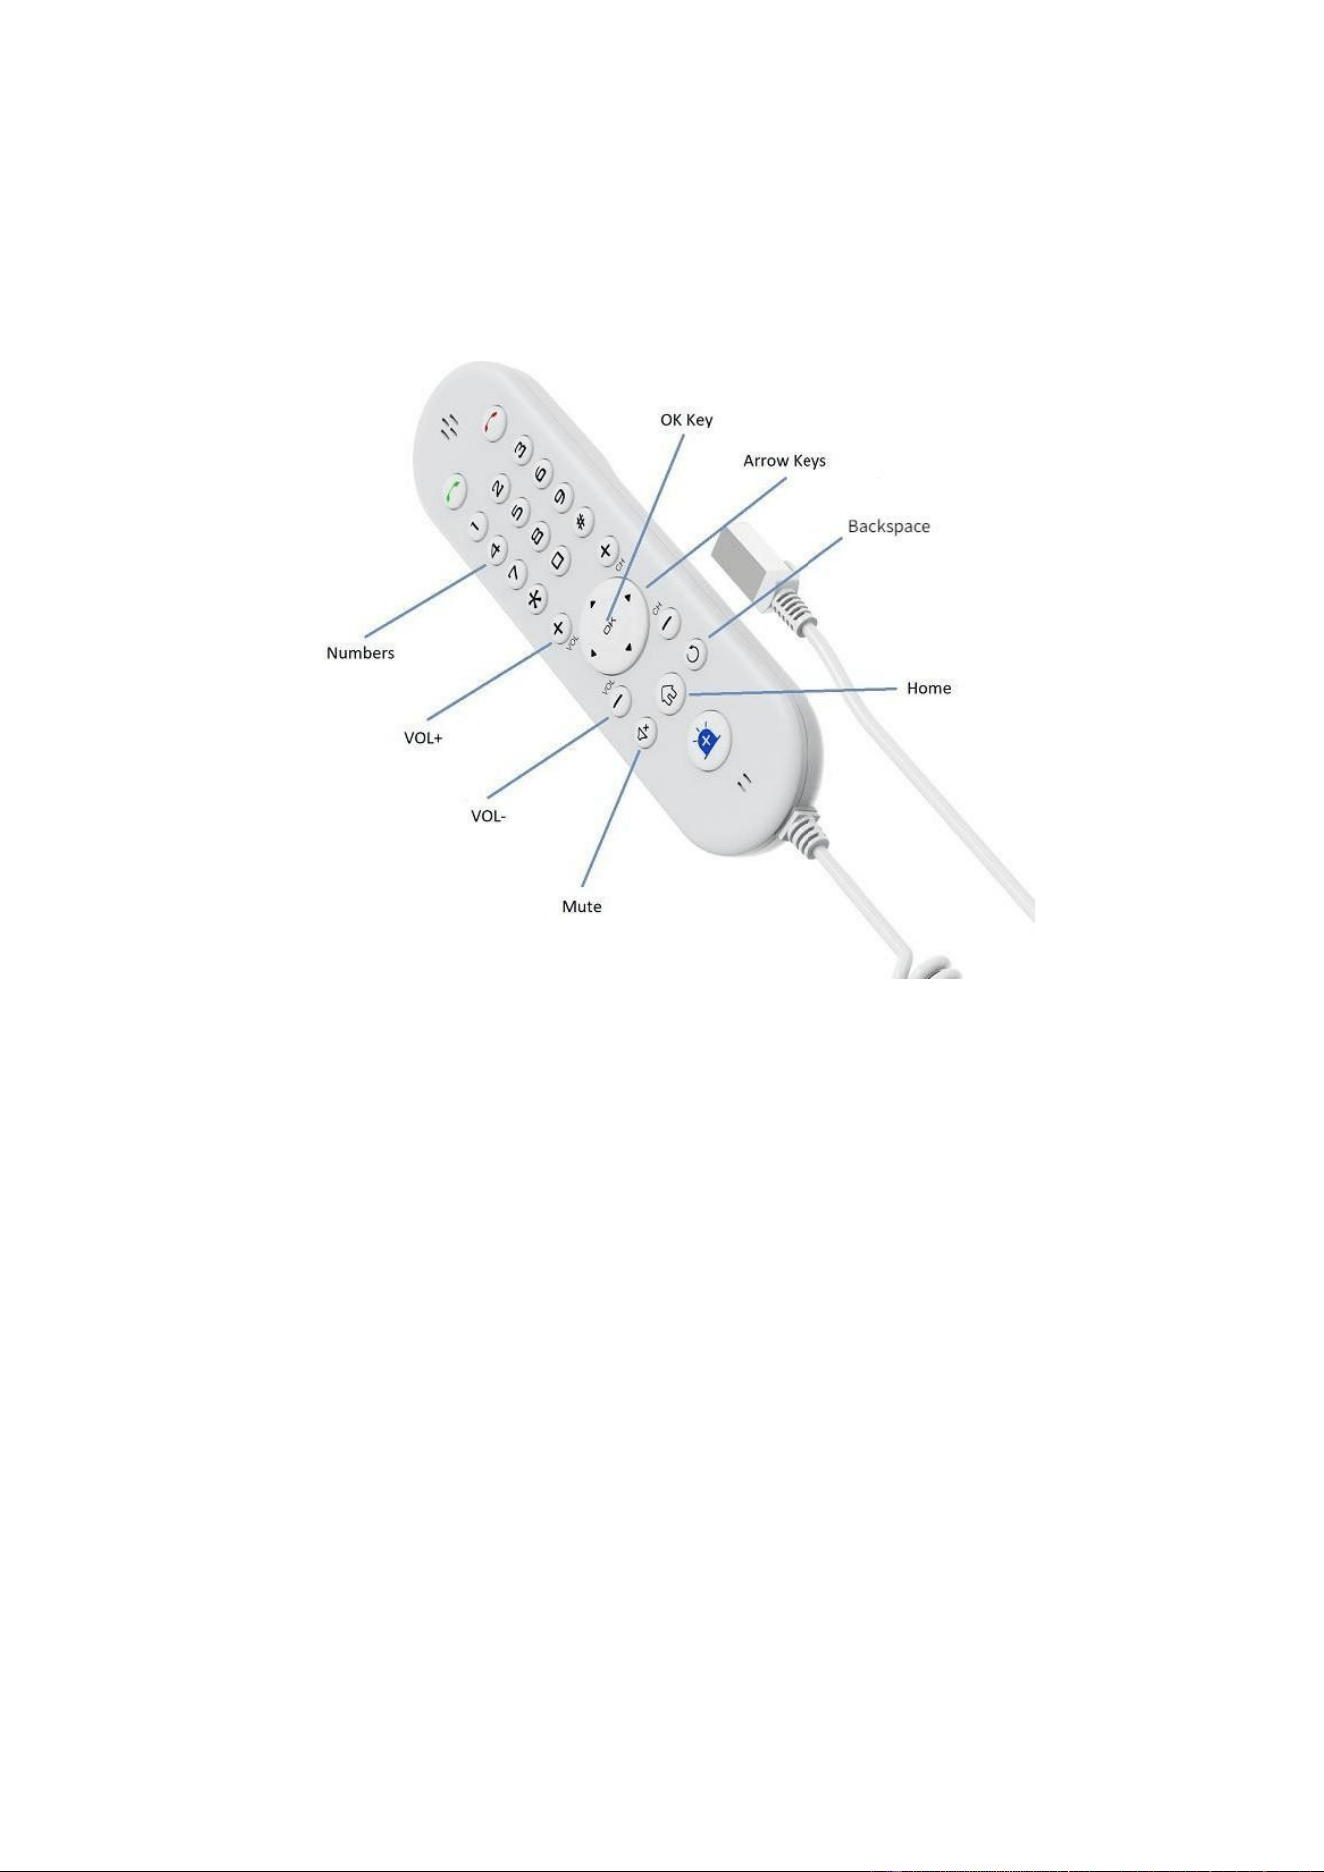
2.1 The Details Of Button
9
2.2 The Details Of Back Interface
10
2.3 The Details Of Handset

11
Chapter 3 Functions Of The Device
3.1 Power On/Off
● Power On
1. When connect the power supply to the DC jack, the system will turn on
automatically.
● Power Off
2. When the power is unplugged from the DC jack, the system will automatically
turn off.
3. Press and hold the power button for about 2-3 seconds to display the shutdown
menu, select the option to power off and then turn off the device, or chose to
restart.
3.2 Functions Of The Desktop
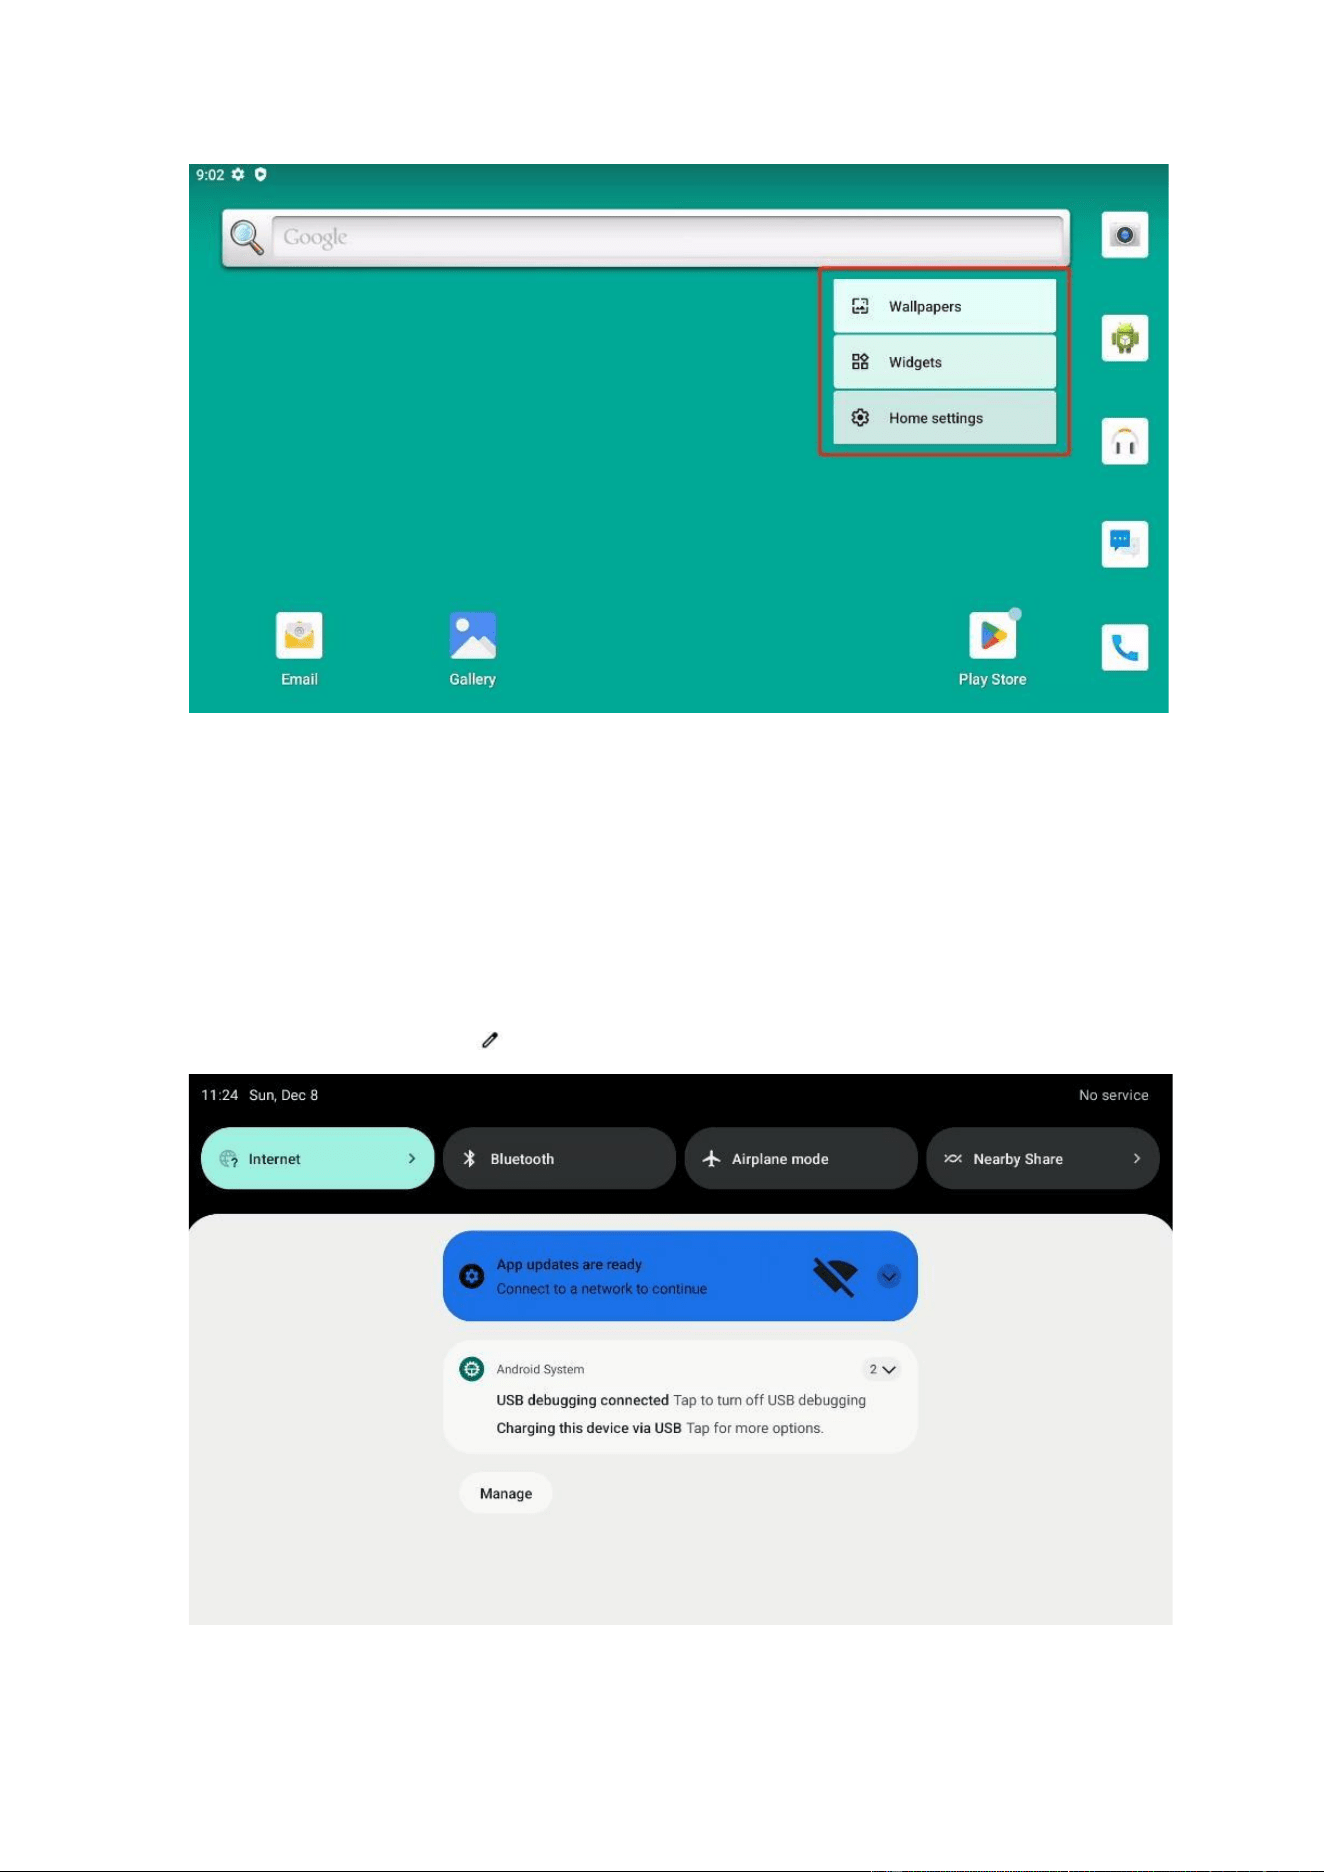
● Shortcut Menu
Press and hold the desktop that will appear a menu, you can choose the wallpapers,
widgets & home setting. See the image as below:
12
Figure 3.1.1 Shortcut Menu
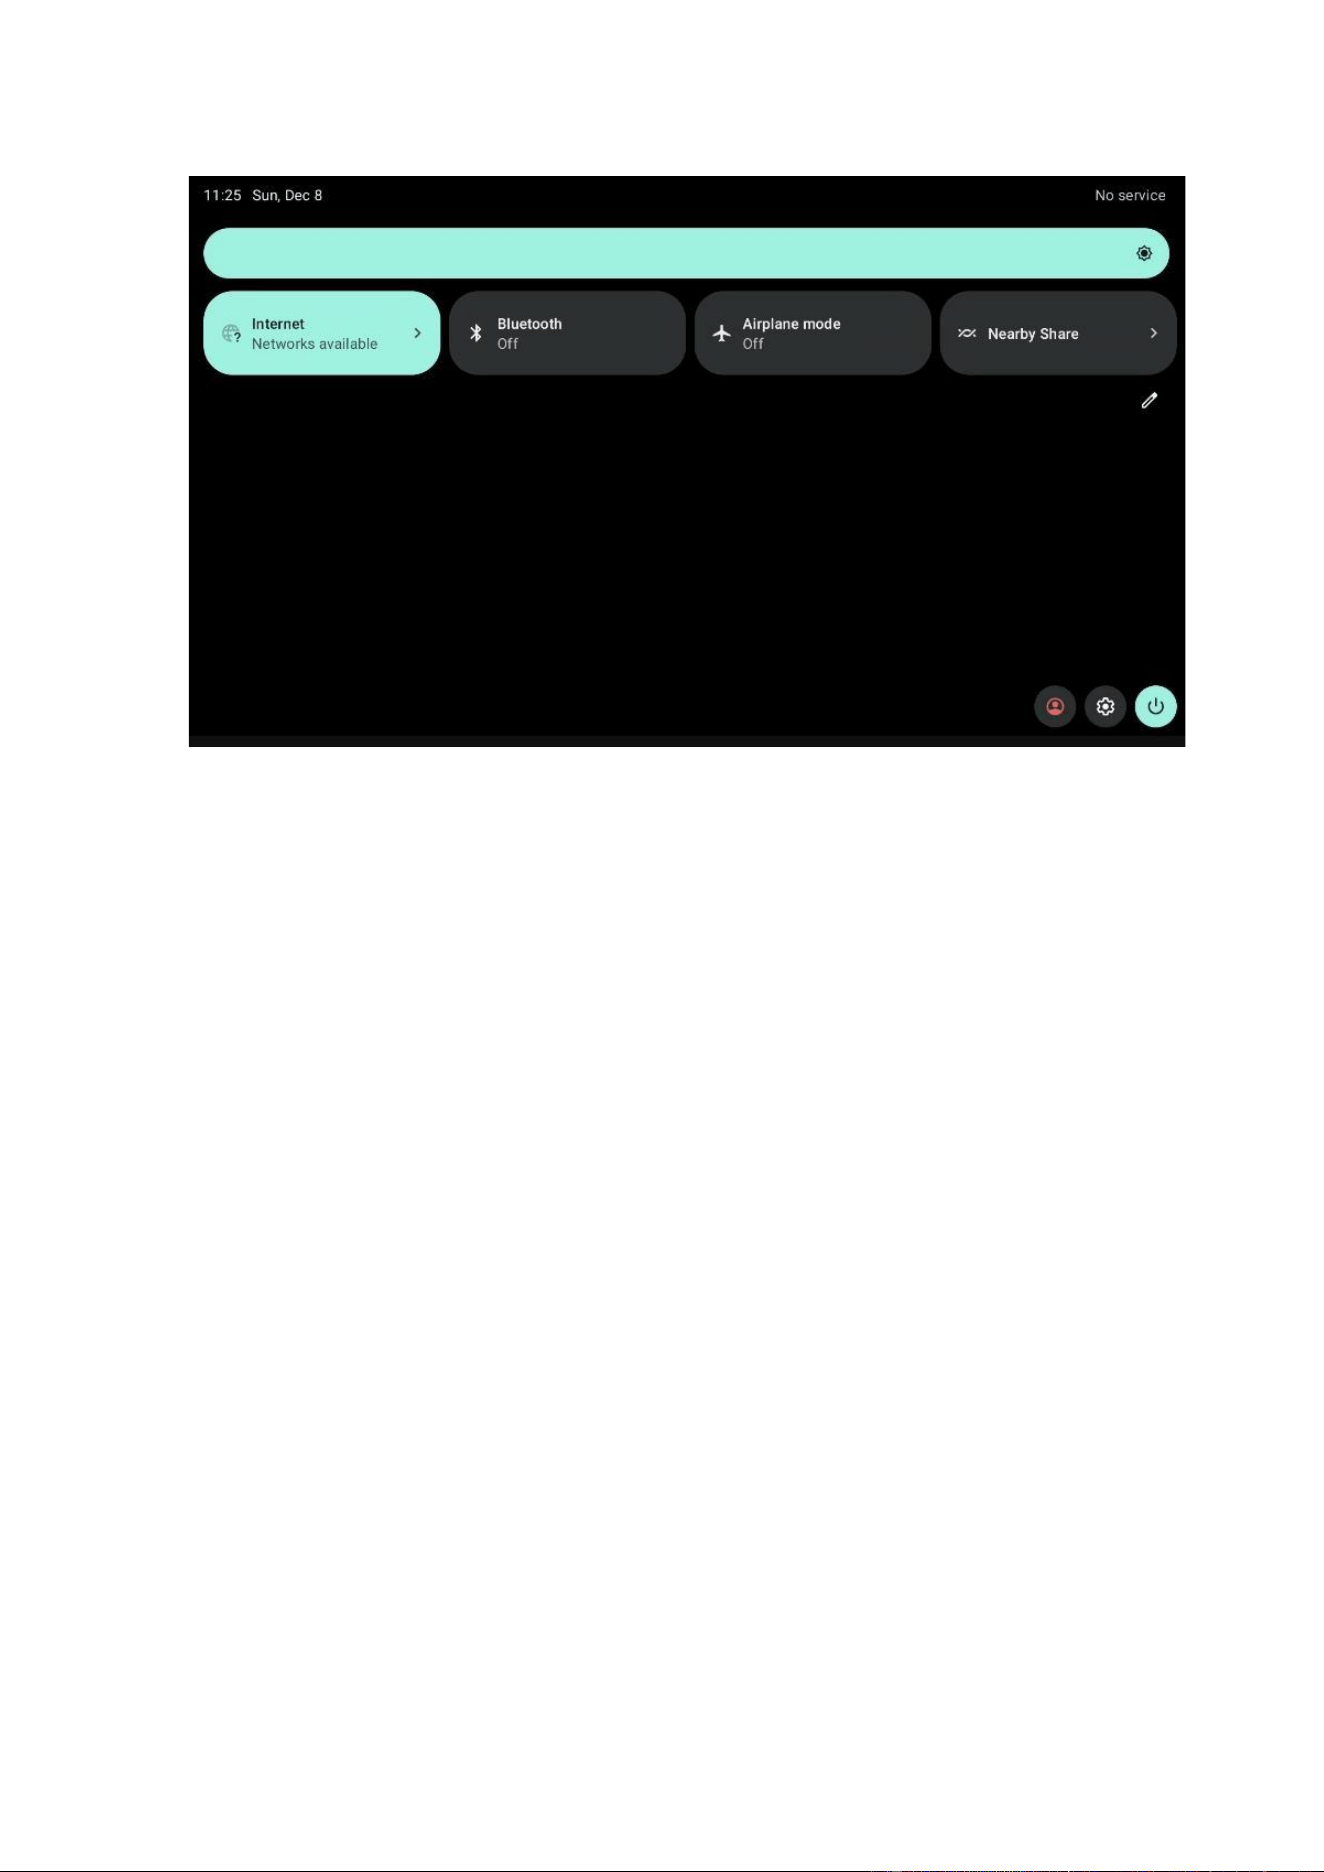
● Notification Panel
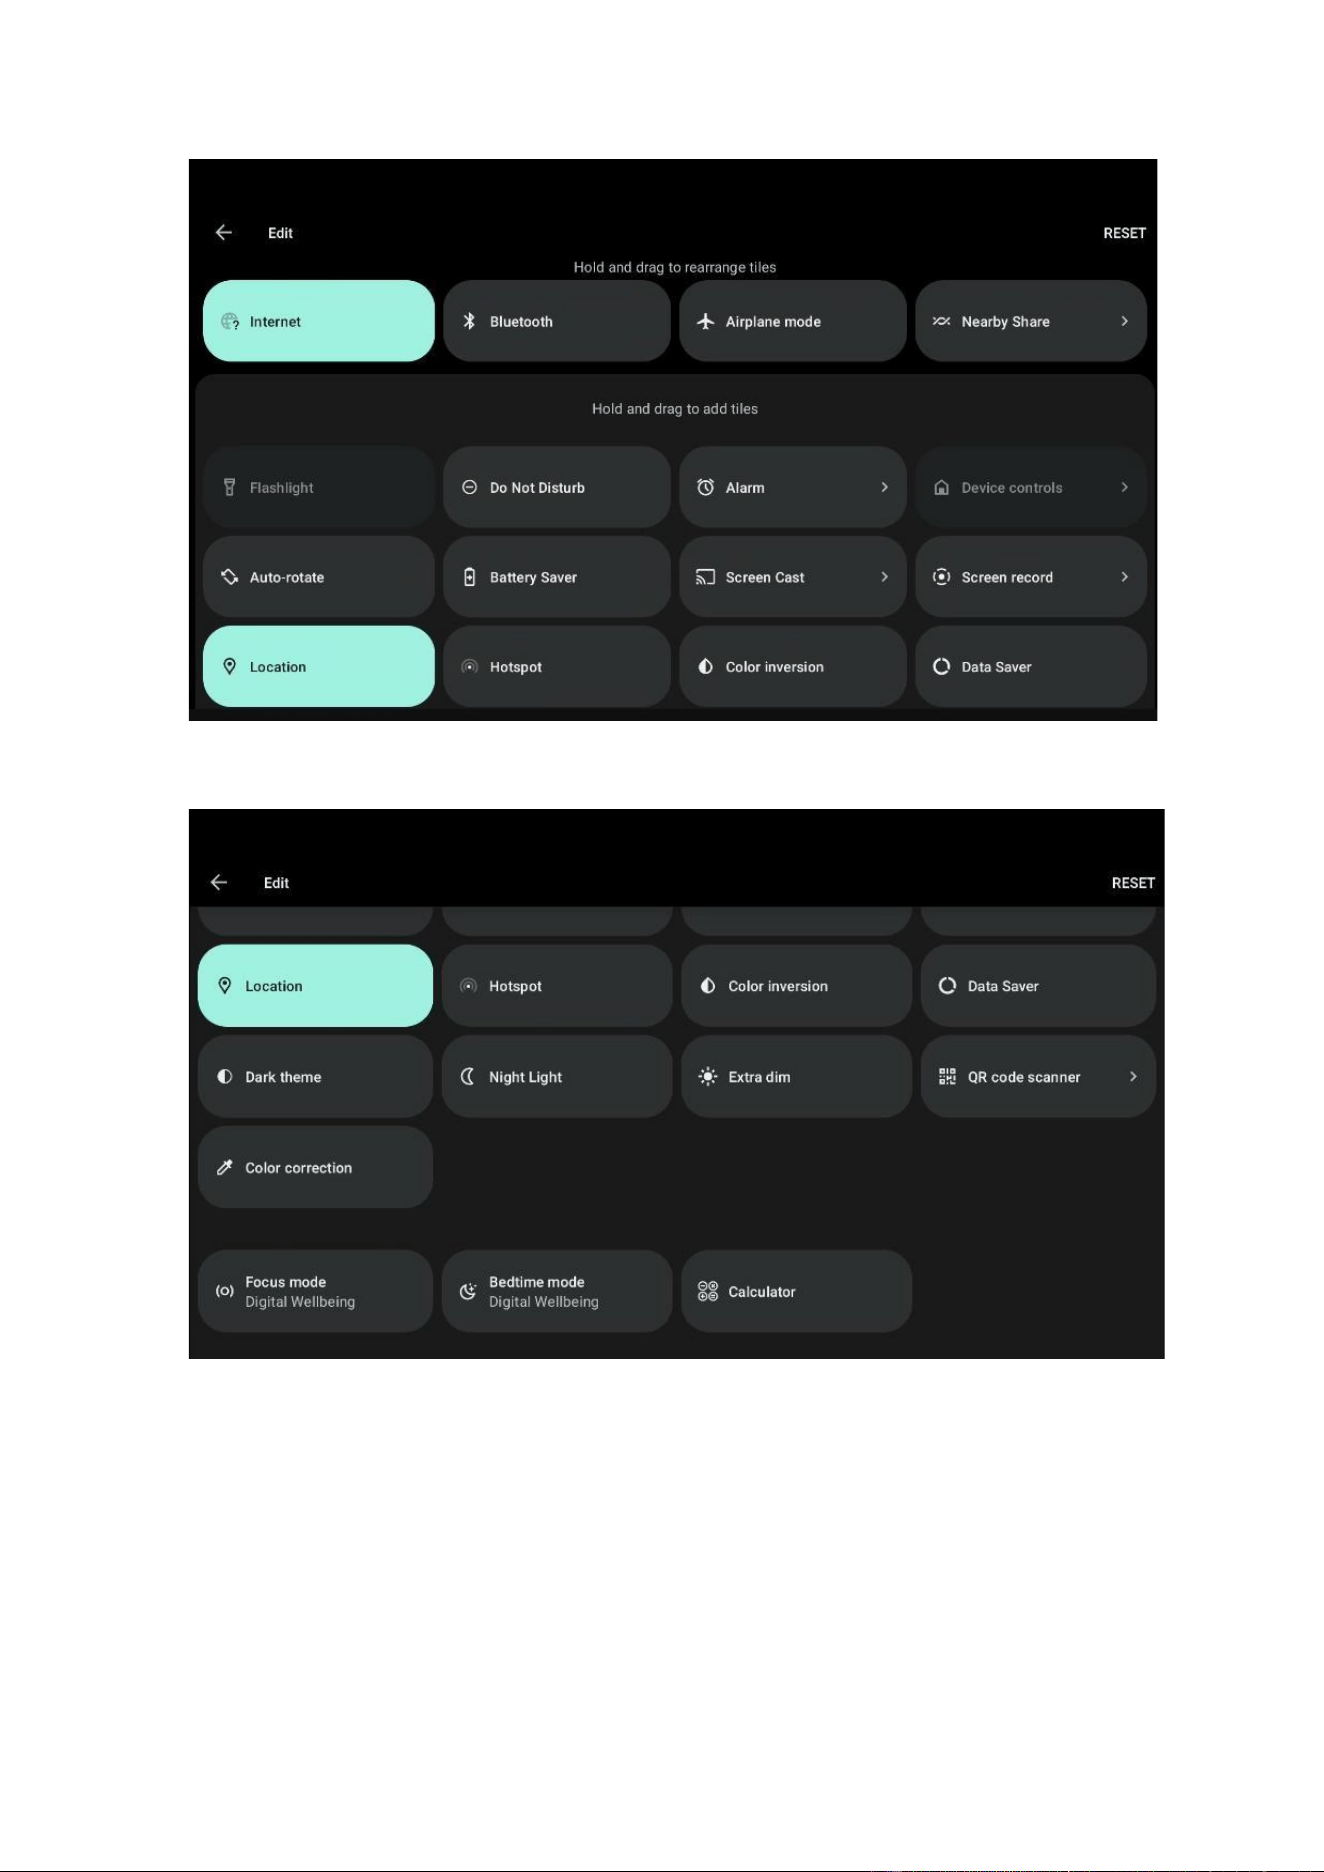
Swipe your finger down at the top, and the notification bar will appear at the top of
the main screen. Sliding down on the status bar will open the full screen notification
panel. And click this icon , users can get more icons.
Figure 3.1.2
13
Figure 3.1.3 Notification Panel
14
Figure 3.1.4
Figure 3.1.5 Full Screen Notification Panel
● Application Interface
Slide the finger up at the button and the applications interface will appear on the
main screen. And if users want to use the application more quickly, long press the
application icon, drag it up, and then drop it. When moving the wrong application,
you can move it up and choose to cancel or uninstall it. The application that has
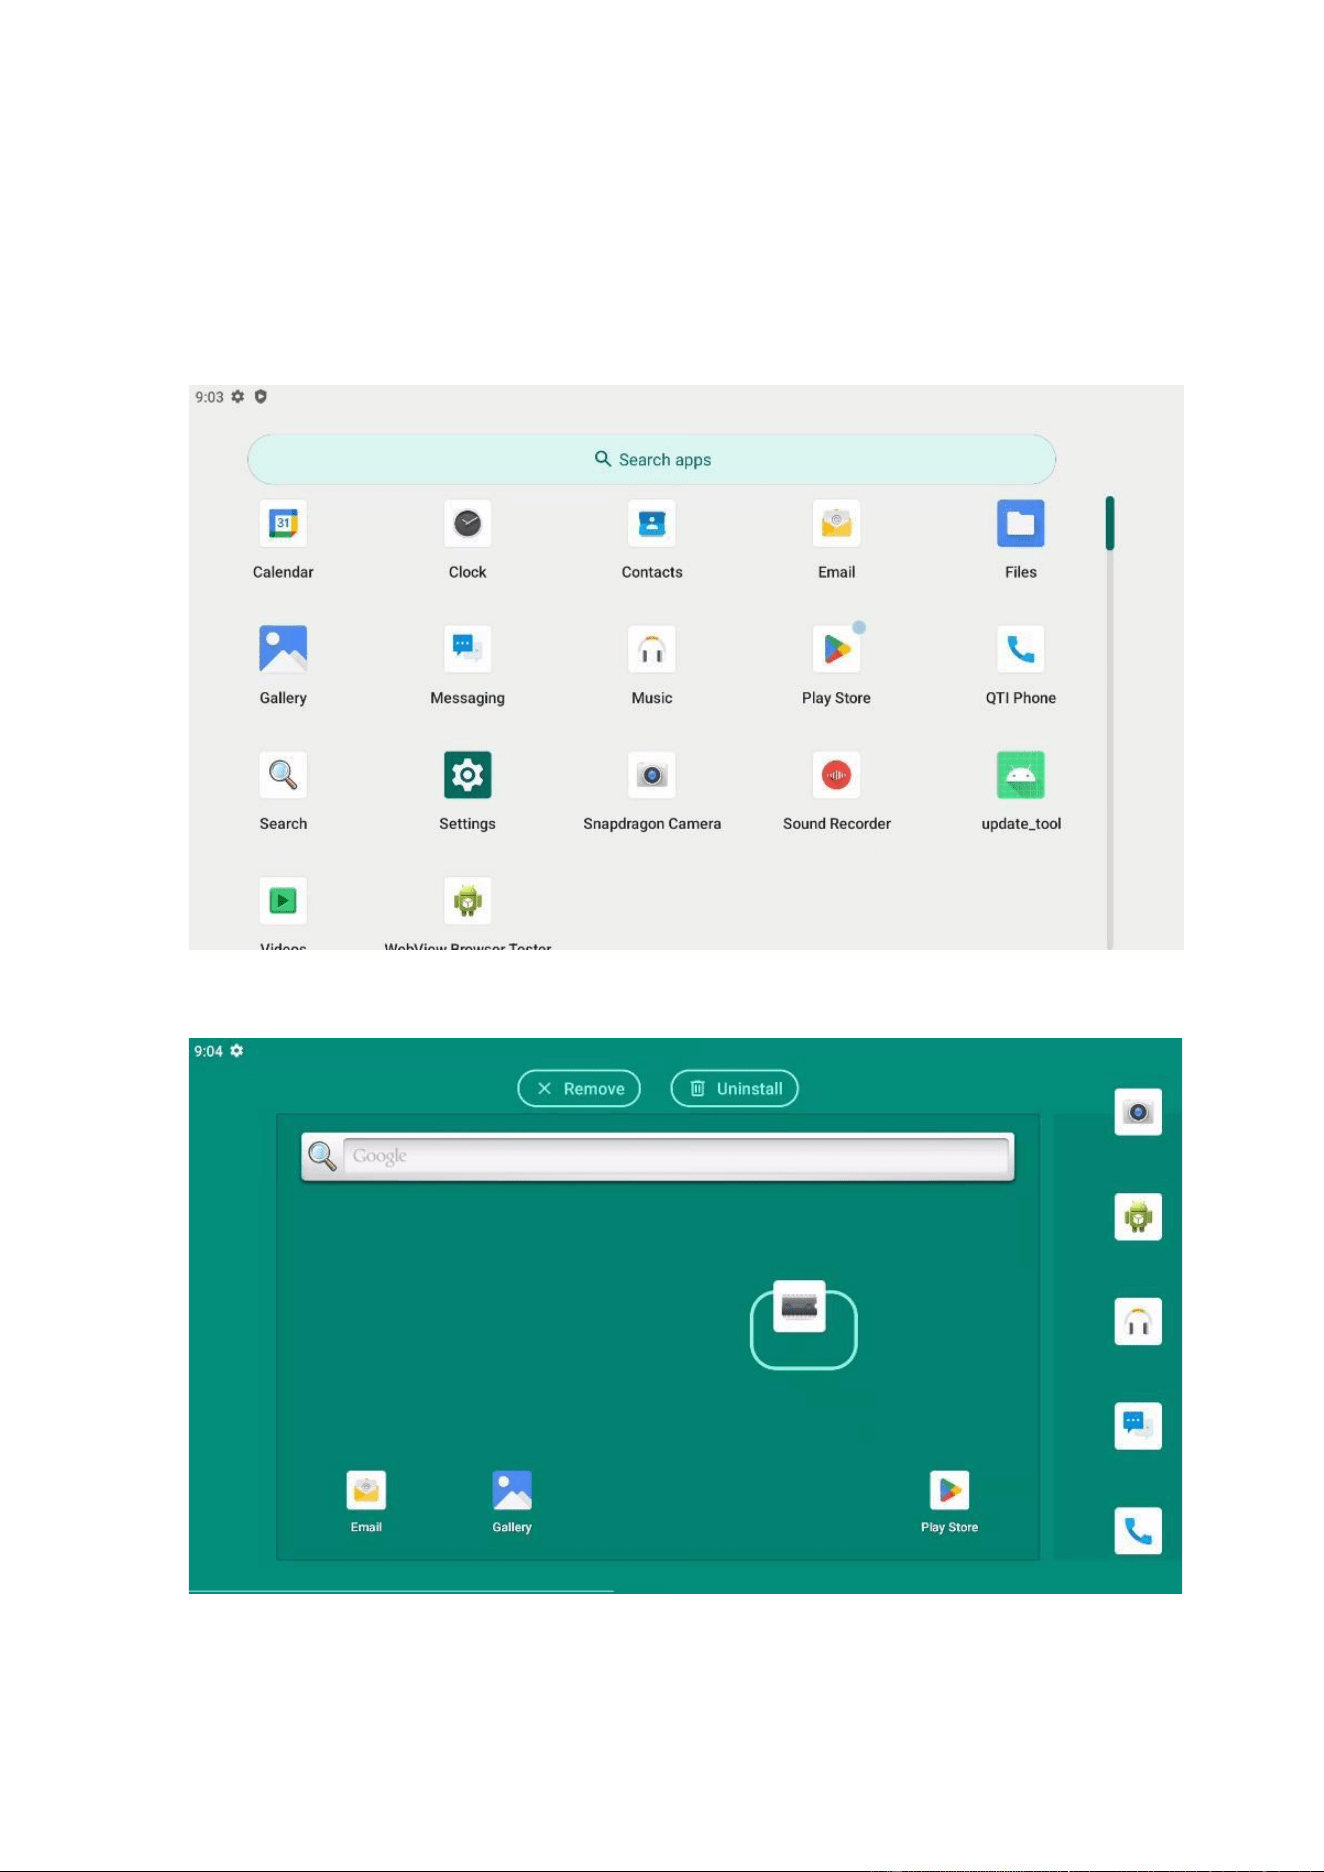
15
already appeared on the main screen, and if the users want to cancel, uninstall or
move it to the other interface, see the Figure 3.1.7 Remove & Uninstall. (Only the
applications by installing can be uninstalled, and the system's built-in applications
cannot be uninstalled.)
Figure 3.1.6 Apps Interface
Figure 3.1.7 Remove & Uninstall

16
3.3 The Usage Of Settings
● Apps Settings
1. Click on this icon , and click “Apps” to view the details of each application.
2. All apps: View all apps.
3. Default apps: Click to view default applications.
4. Screen time: View the usage time of the application and set timers for your
applications.
5. Unused apps: Click to view unused apps.
6. Special app access: The setting and access of some special applications.
●
Notifications Settings
1. Manage app settings and notification history.
2. Change conversation settings and bubbles. After turning on the function of
allowing apps to show bubbles, some conversations will appear as floating icons on
other apps.
3. Set device and app notifications, lock screen notifications.
4. Set Do Not Disturb mode, wireless emergency alerts, turn on or off hide silent
notifications in status bar, allow notification delay snoozing, notification dots on app
icon, and enhanced notifications.
●
Sound & Vibration Settings
Set sound, adjust volume, and switch between sound modes to ensure the best user
experience.
1. Set the volume of media, calls, ring & notification and alarm by sliding back and
forth.

17
2. Select the sounds of media, notification and alarm.
3. Turn on or off sounds: Dial pad, Screen locking, Charging, Vibration and Touch
sounds.
● Display Settings
Adjust the display settings to suit the usage environment.
1. Brightness level: Adjust the screen brightness.
2. Adaptive brightness: Enable the device to automatically change the screen
brightness to match the surrounding lighting conditions. (Increasing the brightness
through the panel backlight button, it will automatically turn off.)
3. Lock screen: Show all notification content.
4. Screen timeout: The screen will turn off after being idle for a set period of time.
5. Dark theme: Uses a black background to help keep battery alive longer on some
screen. Dark theme schedules waits to turn on until your screen is off.
6. Display size and text: Adjust the text size on the screen and the size of items / icons
on the screen.
7. Night light: Eye care mode.
8. Auto-rotate screen: Turn automatic screen rotation on or off.
● Accessibility
1. Display: Setting display size and text, color and motion, Extra dim, Magnification,
navigation switch.
2. Interface controls: It can get some functions through turning on / off the buttons.
Like Accessibility Menu shortcut, Large buttons, powers button ends call, Auto-
rotate screen etc.
3. Captions: Turn on the caption, it can choose live caption, and choose language,
caption size and style.
5.
Audio description & Audio adjustment: Hear a description of what’s happening on
screen in supported movies and shows. Combine channels when playing audio

18
through turning on / off the buttons.
6.
Text-to-speech output: It can choose the use system language, and adjust speech
rate & pitch via sliding the small circle left or right.
7.
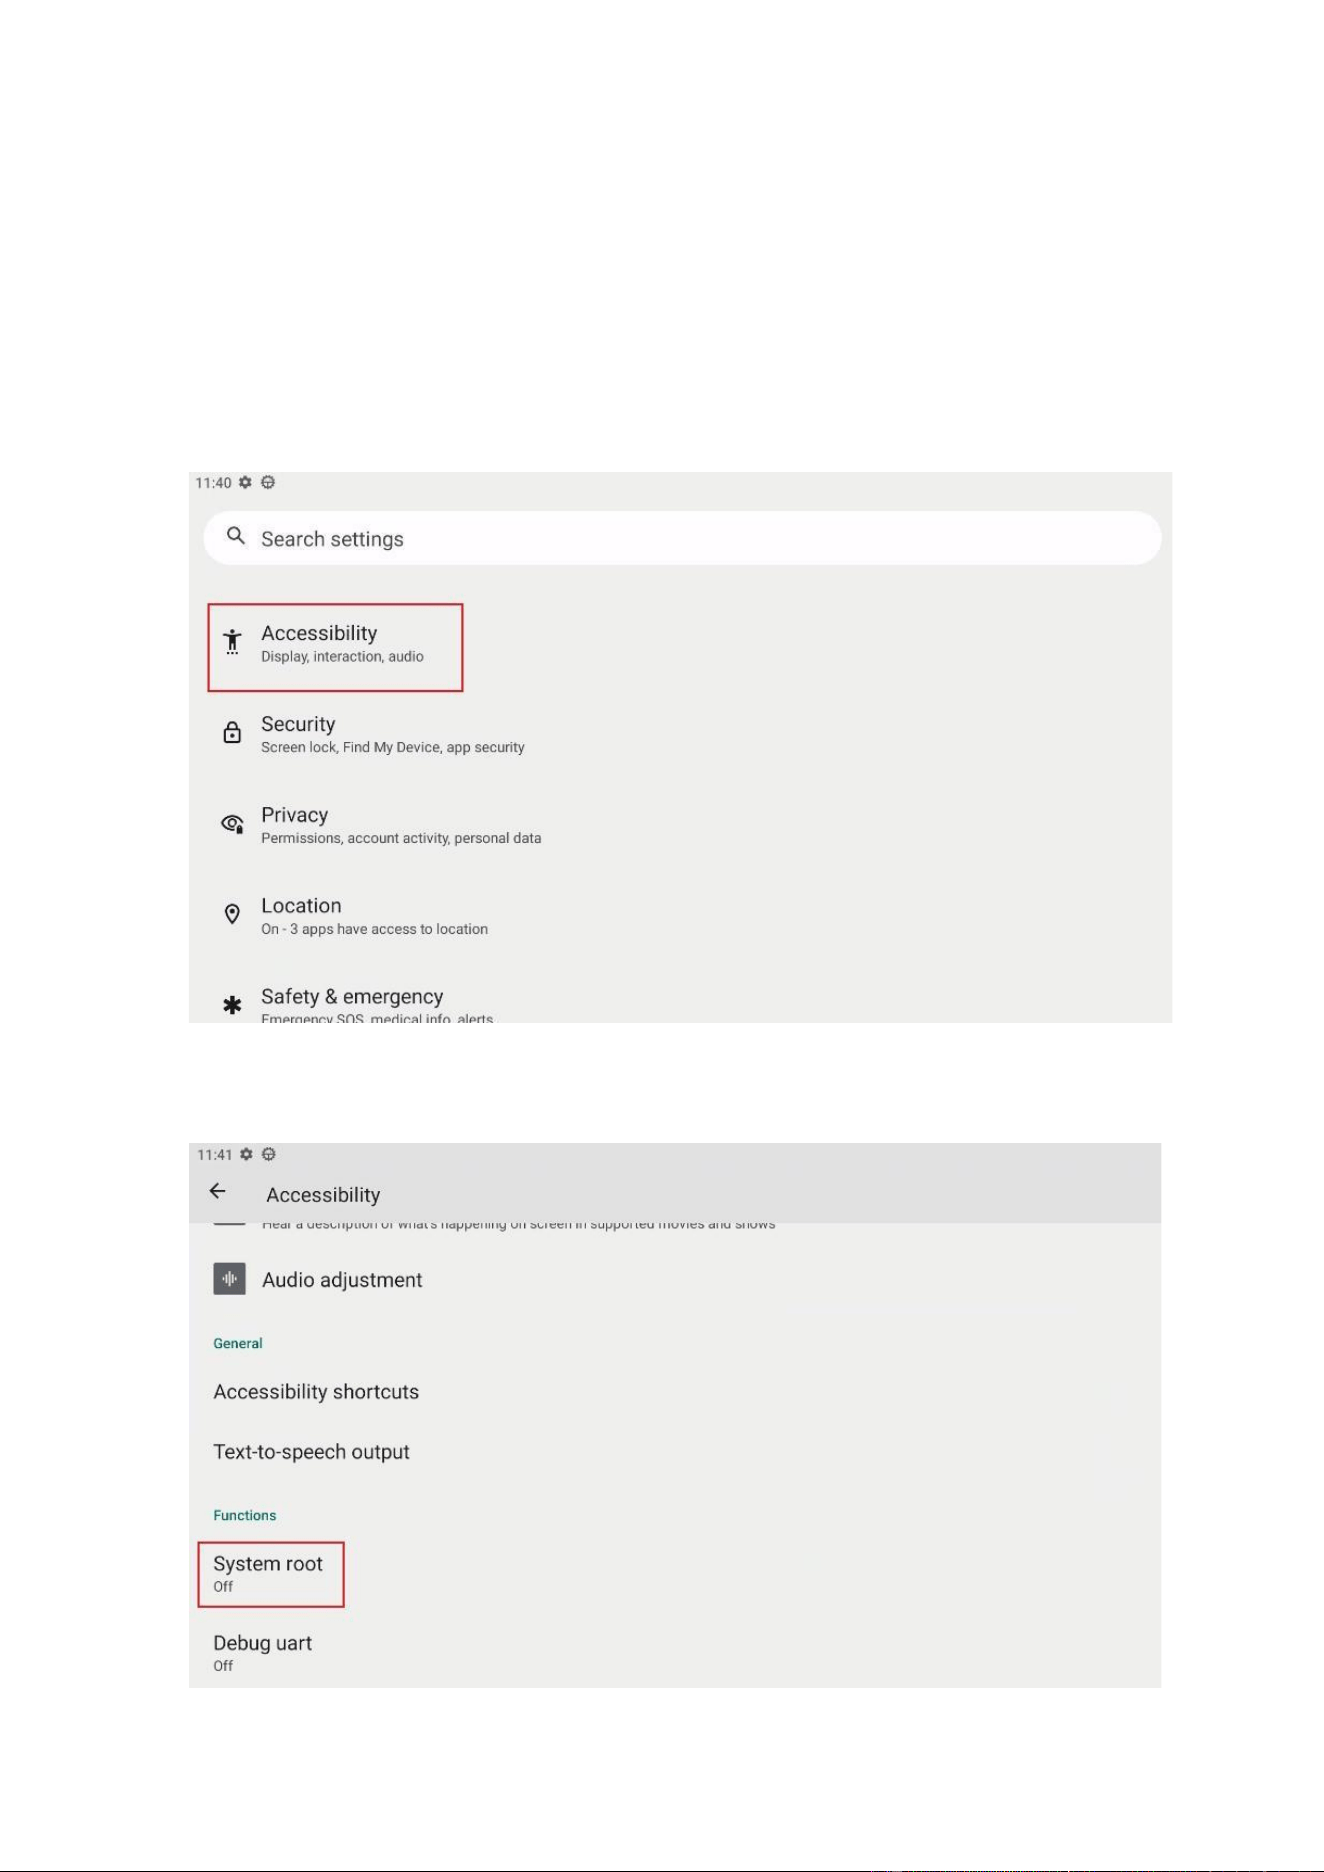
Functions: Click on system root, debug uart mode function to turn on / off. A
password is required to turn on the function.
● Security
2. Google Play Protect: Regularly check apps and devices for harmful behavior, and
notify you if any security risks are found.
3. Find My Device: After adding a Google account, you can turn on the “Use Find My
Device” feature to find, lock, or reset this device if it’s lost.
4. Screen lock: Select the screen lock method as None, Swipe, Pattern, PIN, and
Password.
5. More security settings: Allow “Find My Device” to lock or erase a lost device;
encrypt the device and credentials; turn on the "Use app pinning" feature to pin the
current app until it is unpinned.
● Location
1. Turn on the “Use location” function to view the location information accessed by
the app.
2. App location information permission: Apps with this permission can access this
device’s location.
3. Location Services: Location Service may use sources like GPS, Wi-Fi, mobile
networks, and sensors to help estimate the device’s location.
● Digital Wellbeing & Parental Controls
It can view specific usage times, set up bedtime mode and focus Mode. Manage
notifications, set the Do Not Disturb mode for the application. And set up parental
controls to supervise this phone remotely with the Family Link application for parents
and keep an eye on screen time and set limits.
19
● System
1.
Languages & input:
I.
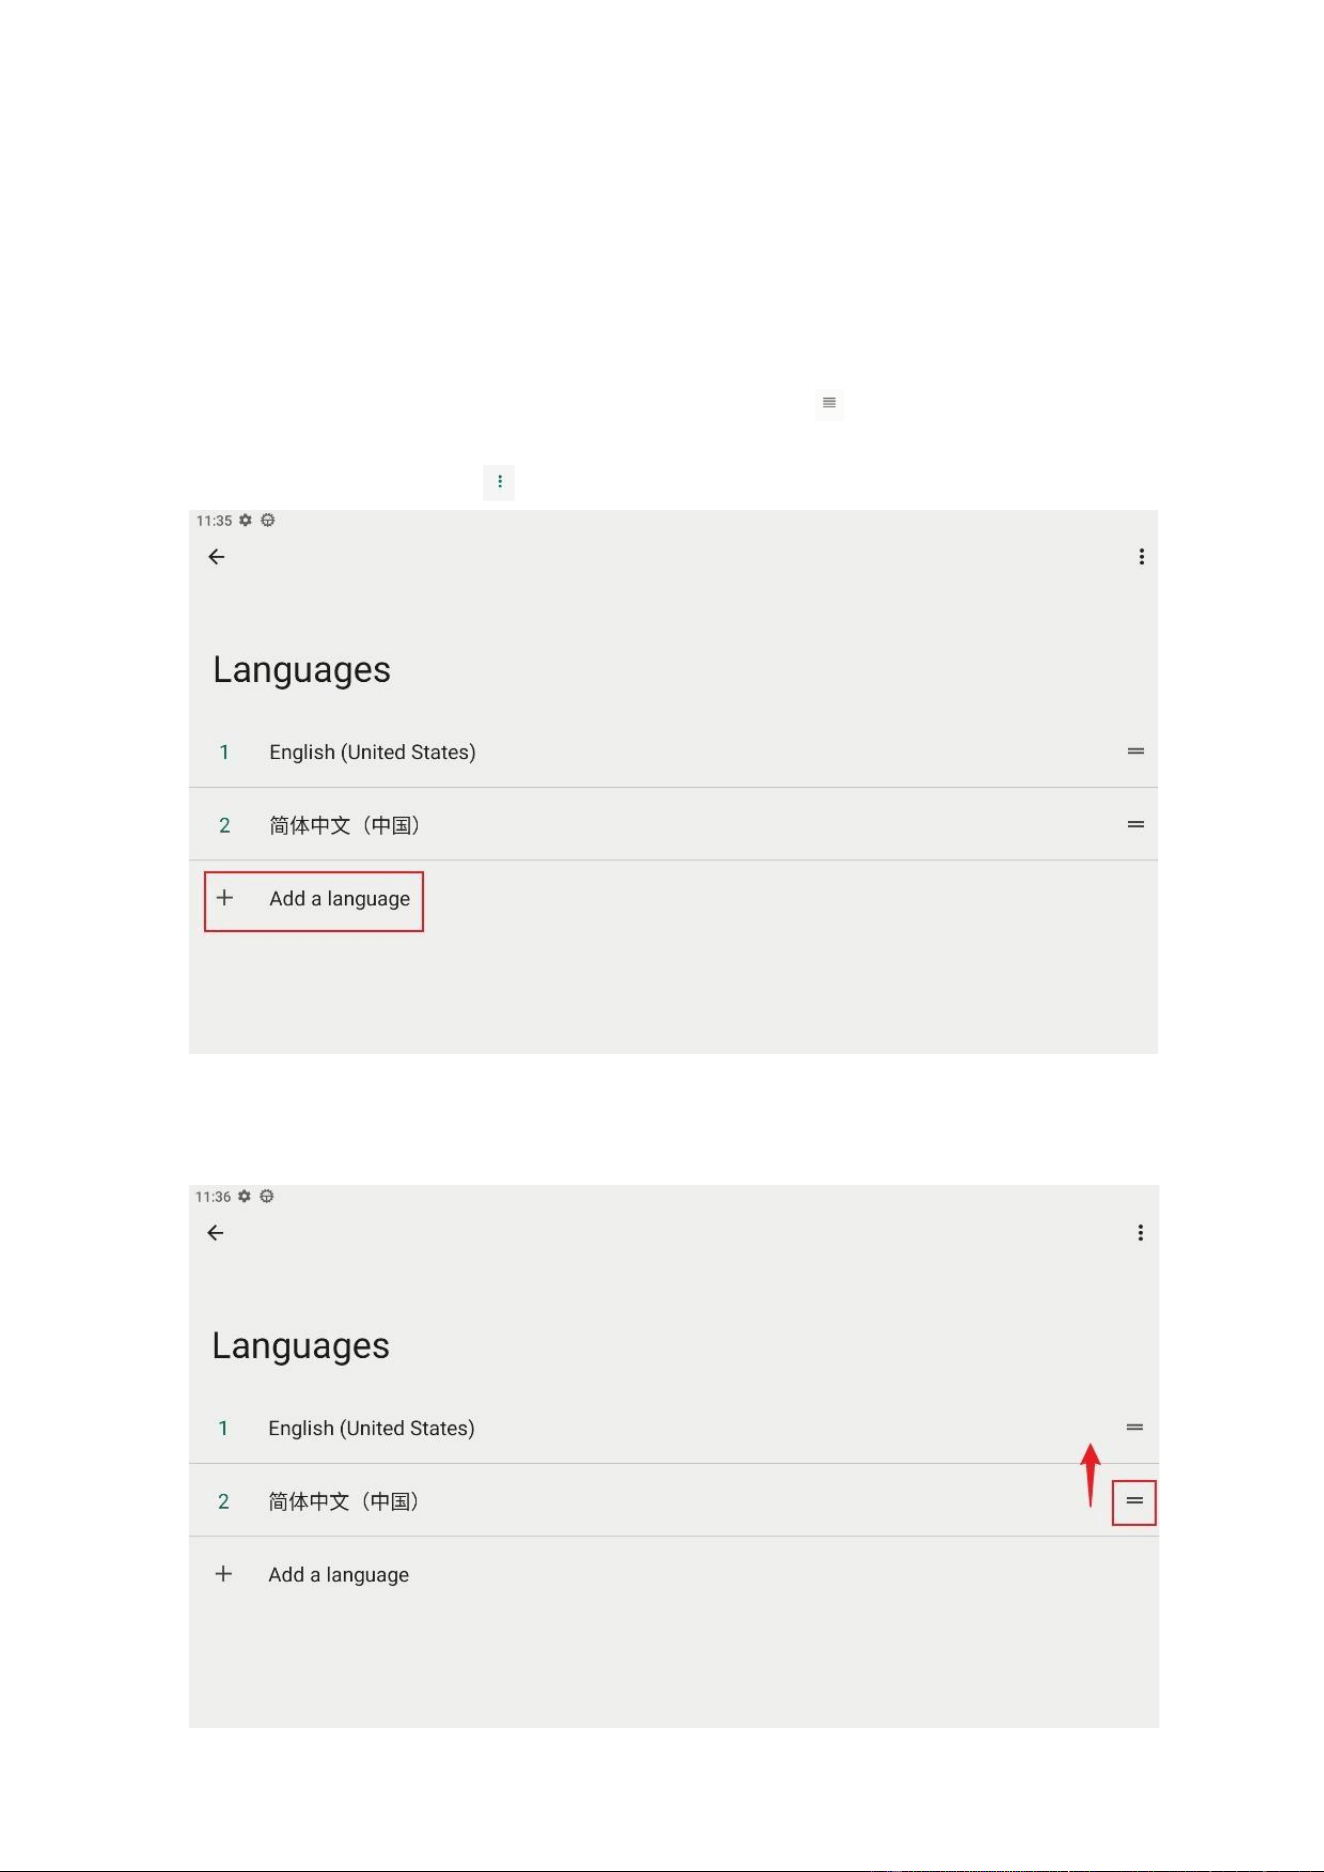
Languages: Setting the language, users need to click on the language, tap add
Language and select the language. Then click on this icon and drag it up to the
first position. Tap the icon
, can remove the other language.
Figure 3.1.8 Add Language

20
Figure 3.1.9 Change Language Preference
II.
Keyboard:
i. On-screen keyboard: Turn on or off Gboard and Google voice typing.
ii. Physical keyboard: Choose whether to connect a physical keyboard and display
available keyboard shortcuts.
III.
Speech:
i. Voice input: Setting speech recognition and synthesis from google.
ii. On-device recognition: Languages can be added and automatically updated.
iii. Text-to-speech output: Tapping it can select languages, speed rate and pitch.
V. Tools:
i. Spell checker: Users can select the language, and system can check according to
this language.
II. Personal dictionary: Tap this icon to add some words.
iii. Pointer speed: Adjust the pointer speed by dragging the line.
2.
Gestures:
It can set gesture navigation “3-button” navigation and power button navigation. Go
back, Home, and switch apps with buttons at the bottom of your screen when setting
3-button navigation.
3.
Date & time: It can manually or automatically set the date and time, time zone,
as well as ues location info to set time zone, use locale default and 24-hour format.
4.
Backup: When it is turned on, the backups are uploaded to google and encrypted
using google account password.
5.
Multiple users: There are owner and guests, users can tap “Add user” to add
more guests.
6.
Reset options: It can choose to reset the following three options.

21
Wi-Fi, mobile & Bluetooth,
App preferences,
Erase all data (factory reset).
●
About Device
Users can check the device name, MDN, Legal information, SIM status, Model, IMEI,
Android version, IP address, Wi-Fi MAC address, Bluetooth address, Up time and Build
number.
22
Chapter 4 Root Access Switch Steps
Step 1: Enter the interface of the Root Access setting from “Settings”-> “Accessibility”
-> “System root”, as shown in the Figure 6.1 & 6.2.
Figure 4.1
Figure 4.2
23
Step 2:
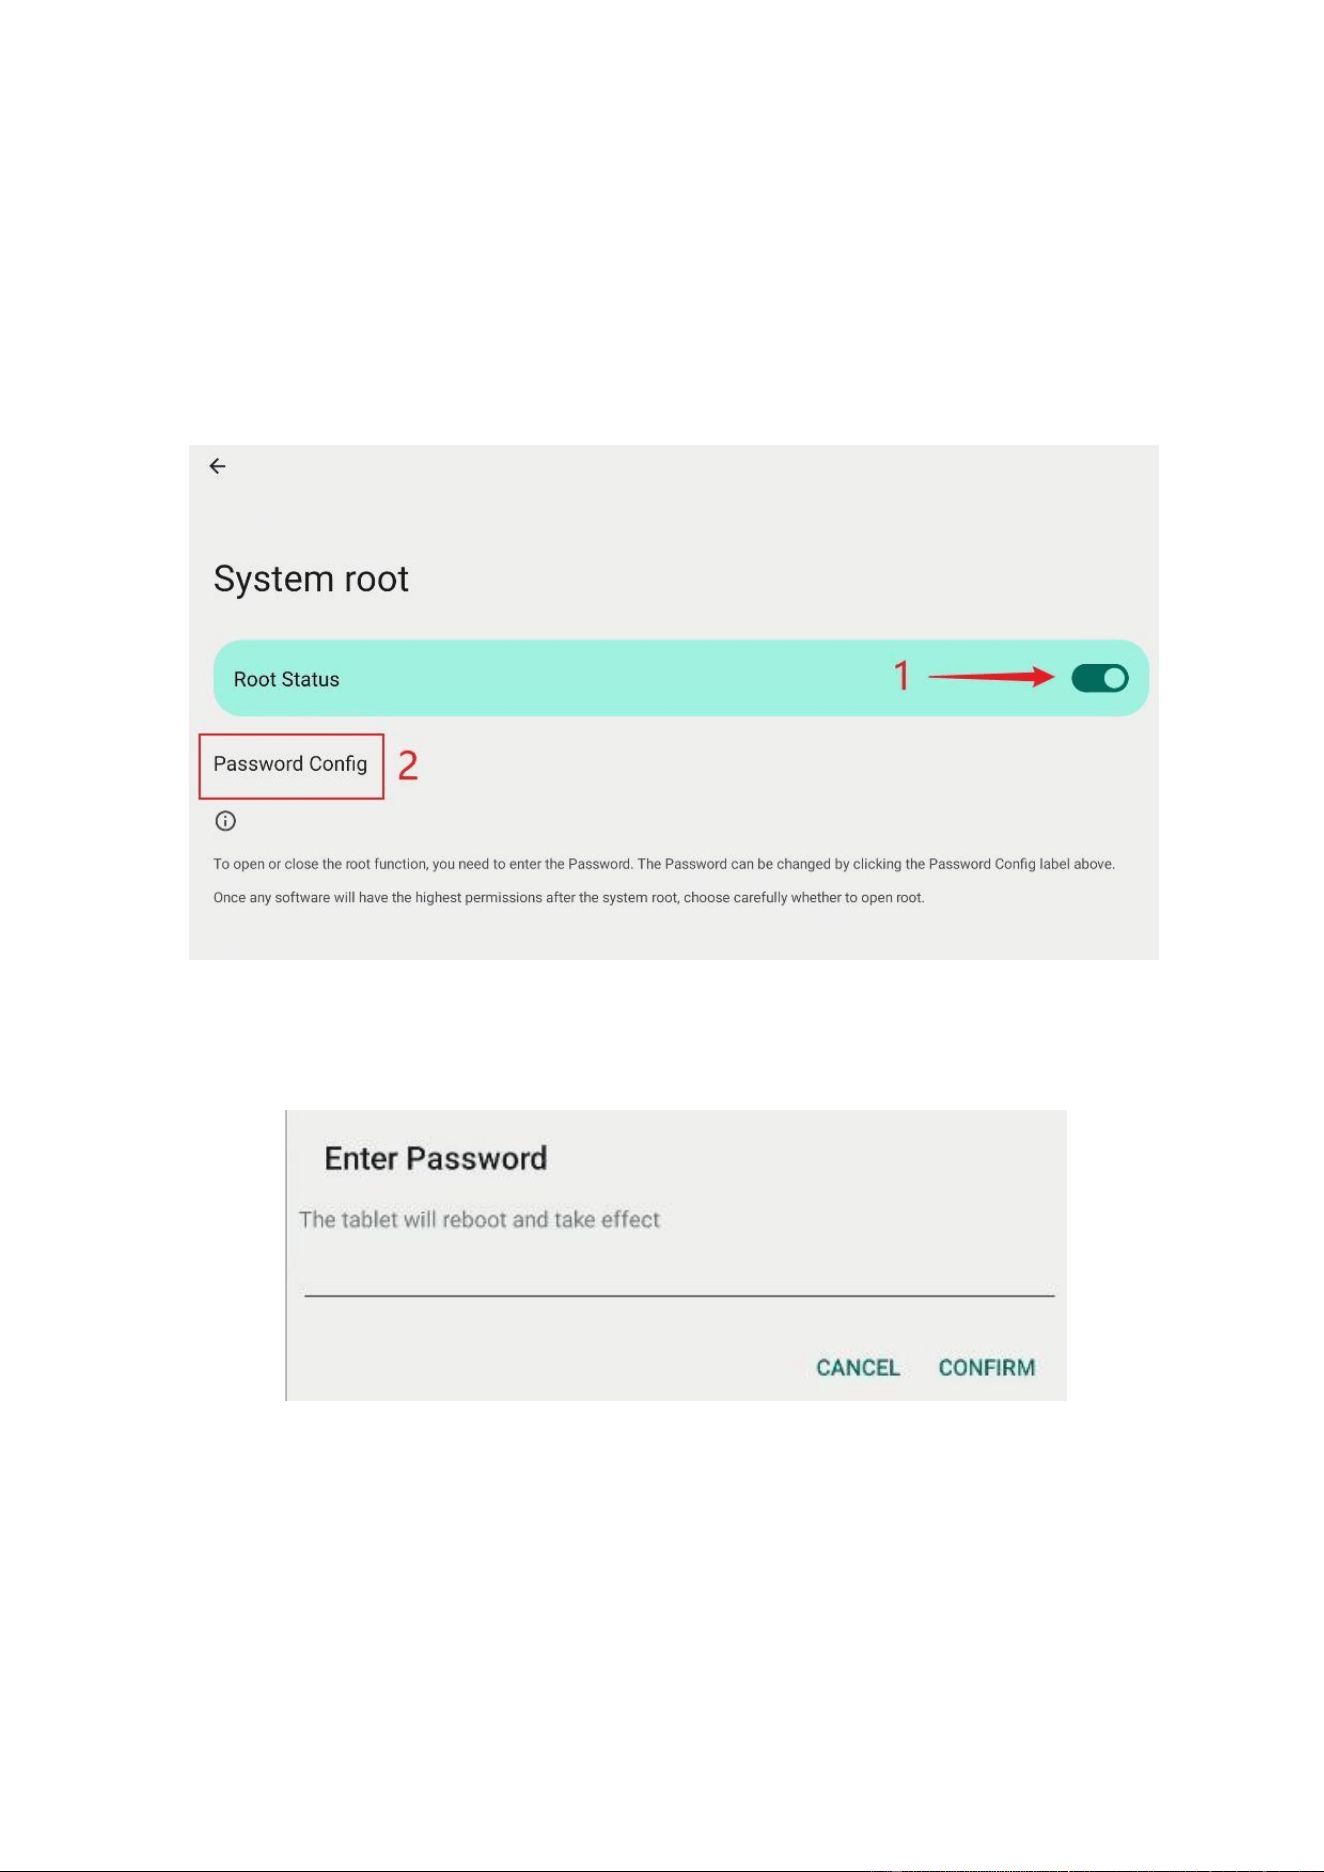
1) Turn on / off the Root Status. A dialog box as shown in Figure 6.4 will pop up
and please enter the password (The initial password is qwertyuiop).
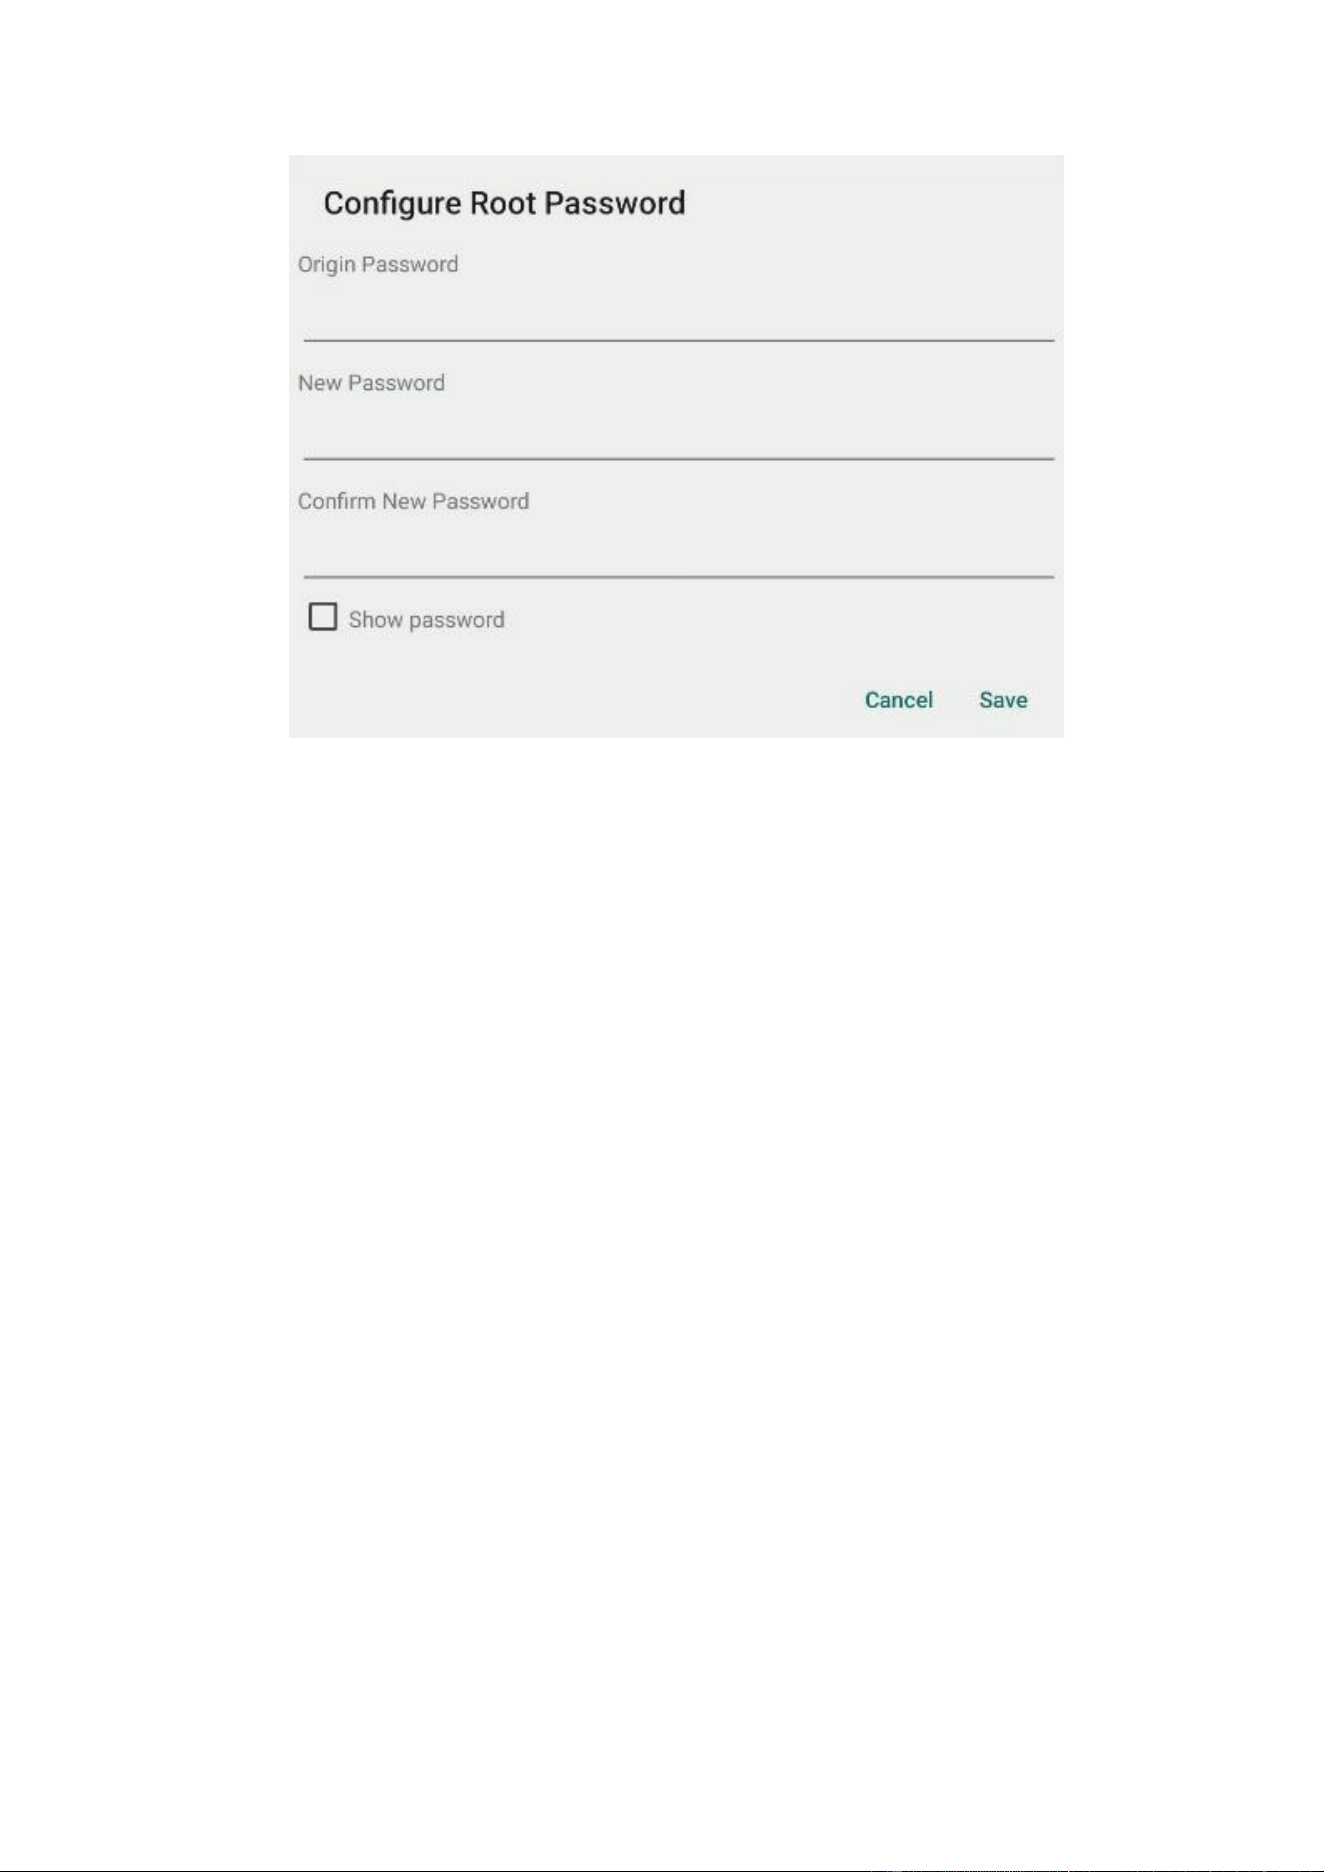
2) Modify the password after clicking the Password Config. A dialog box will pop up,
as shown in Figure 6.5.
Figure 4.3 The Interface of Root Status Setting
Figure 4.4 Enter Password
24
Figure 4.5 The Dialog Box of Modifying Password
Note: If the device is restored to the factory setting, the root setting state will not be
reset, and the password will be restored to the initial password.
Chapter 5 Device Files Transfer
The files, such as pictures and audio files, can be transferred between your computer
and your device by an USB Type-C cable.
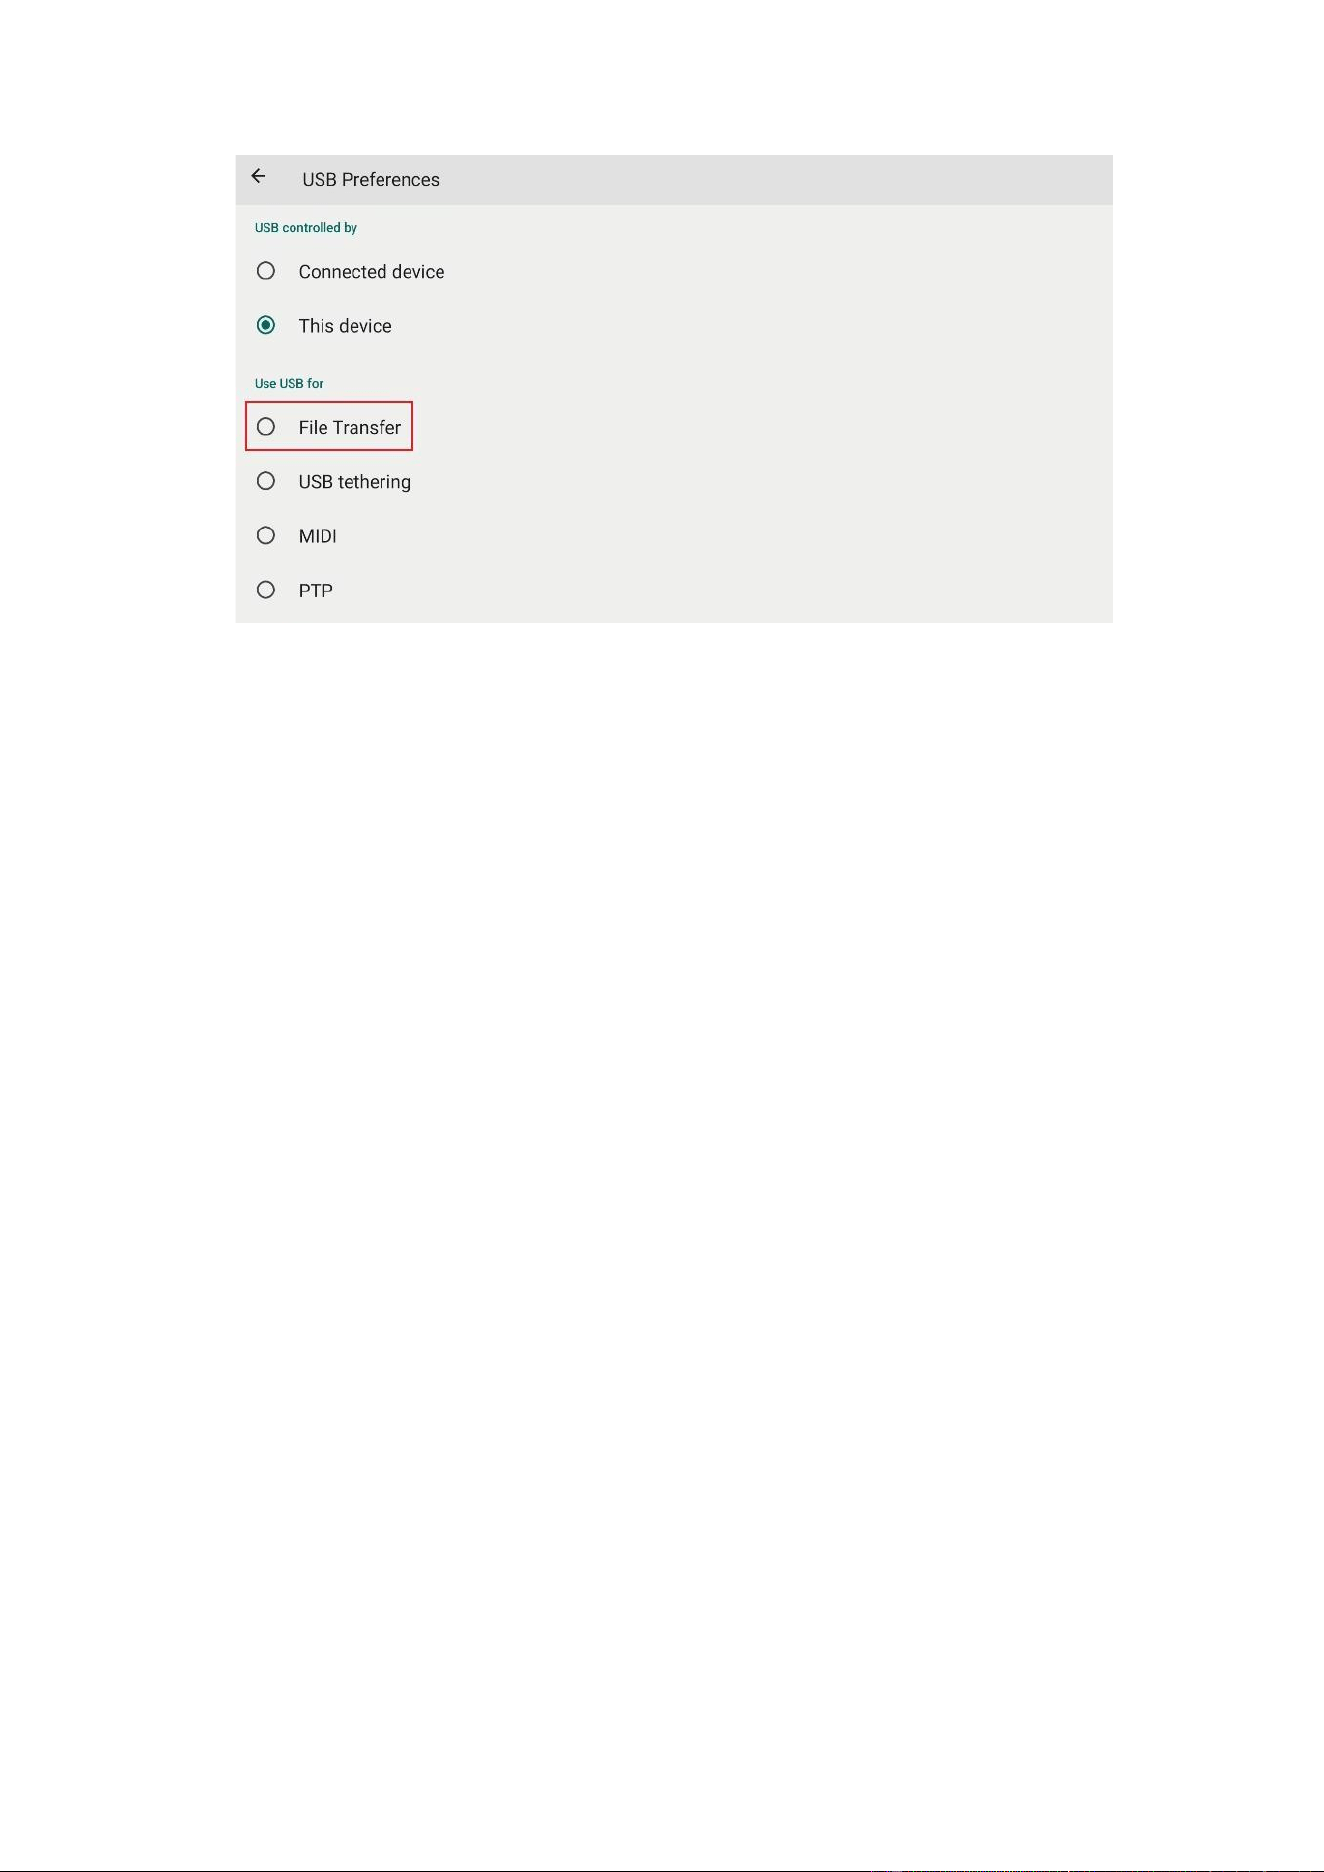
Connect the device to the computer by an USB Type-C cable, and open the prompt
message of the device, and then select “File Transfer”.
25
26
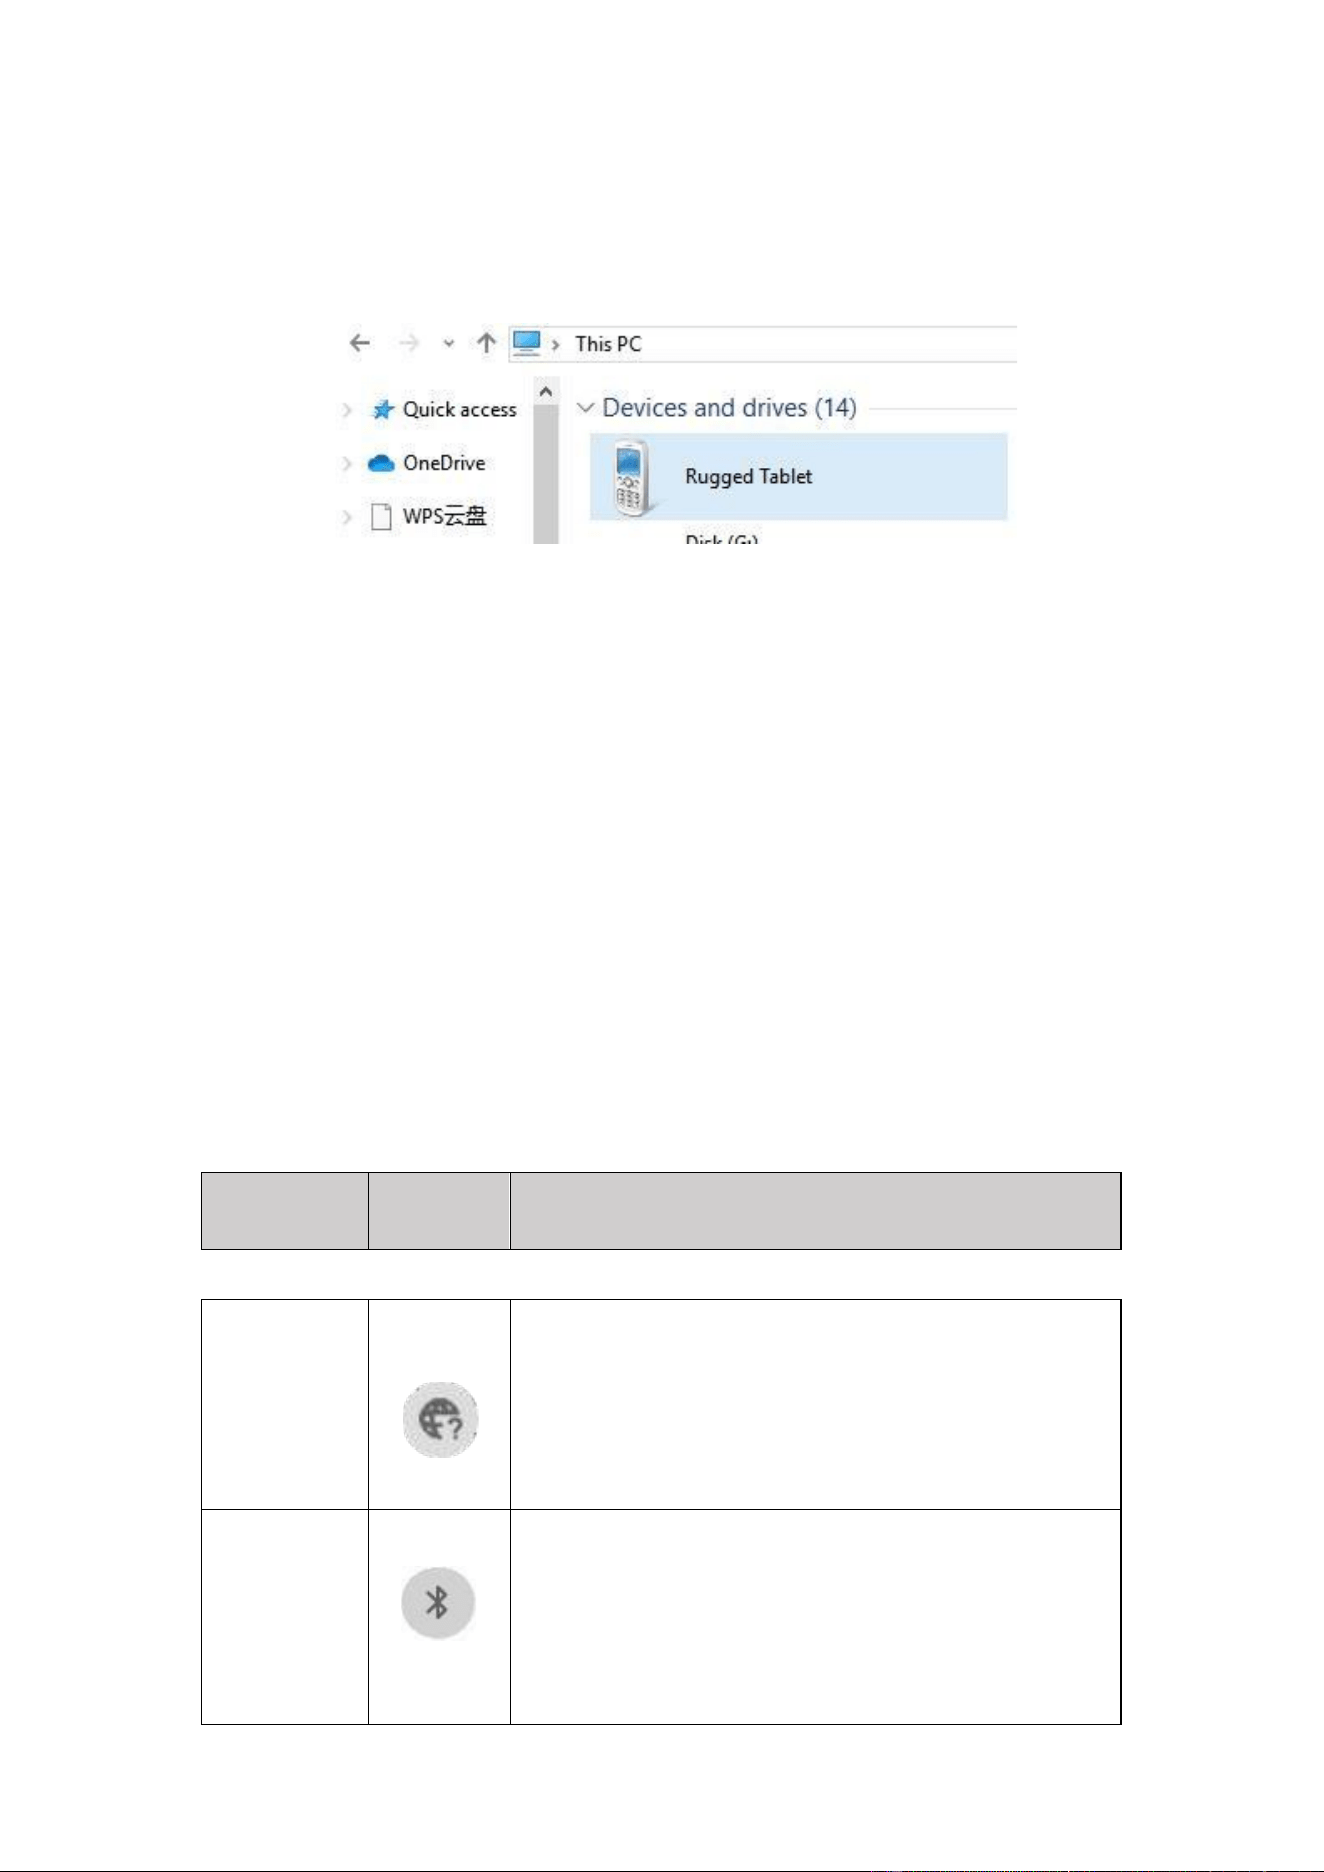
Figure 5.1
Find out the “Device” in “This PC”.
Figure 5.2
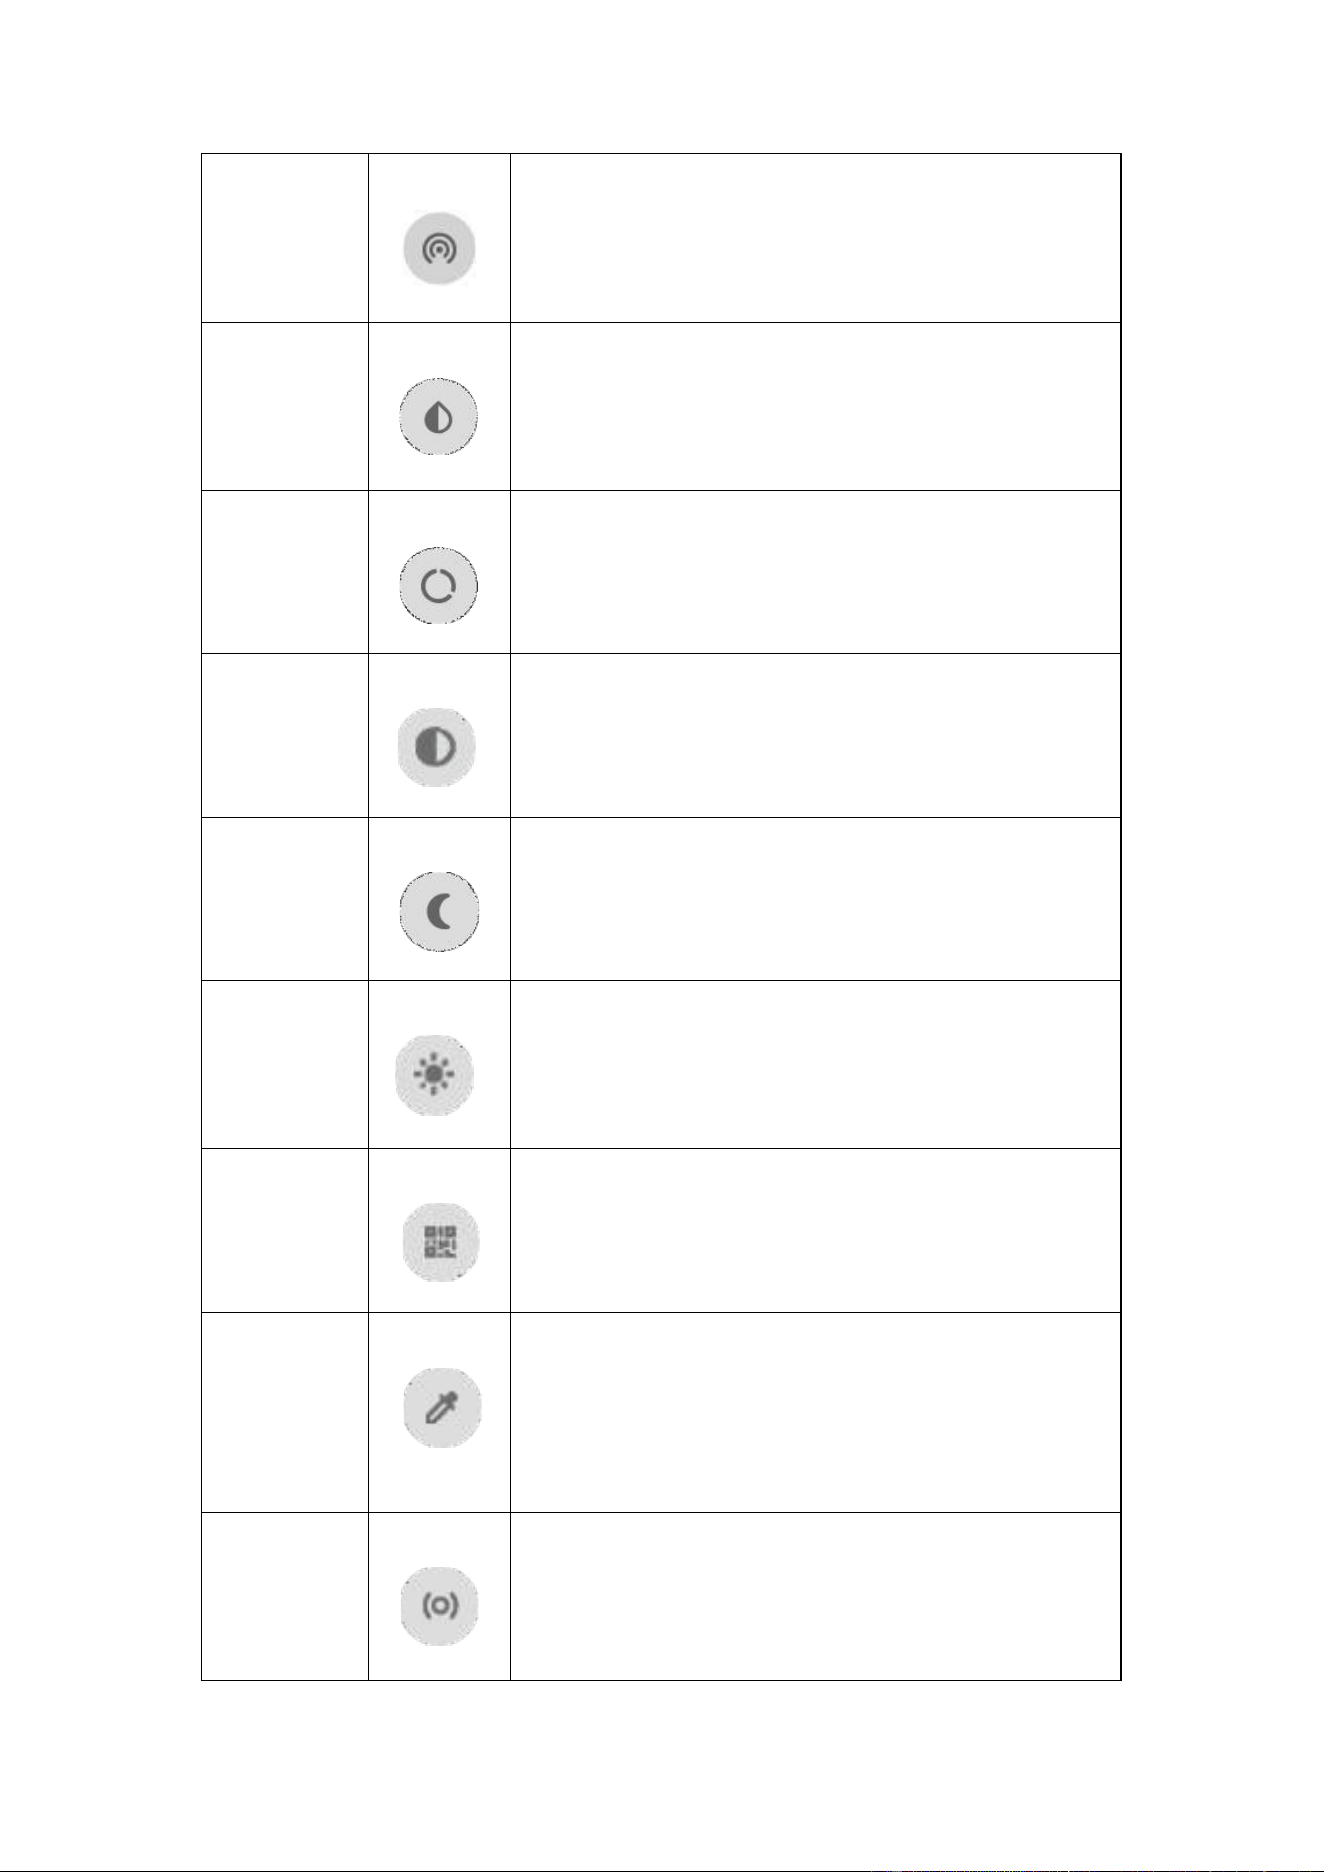
Chapter 6 Icons
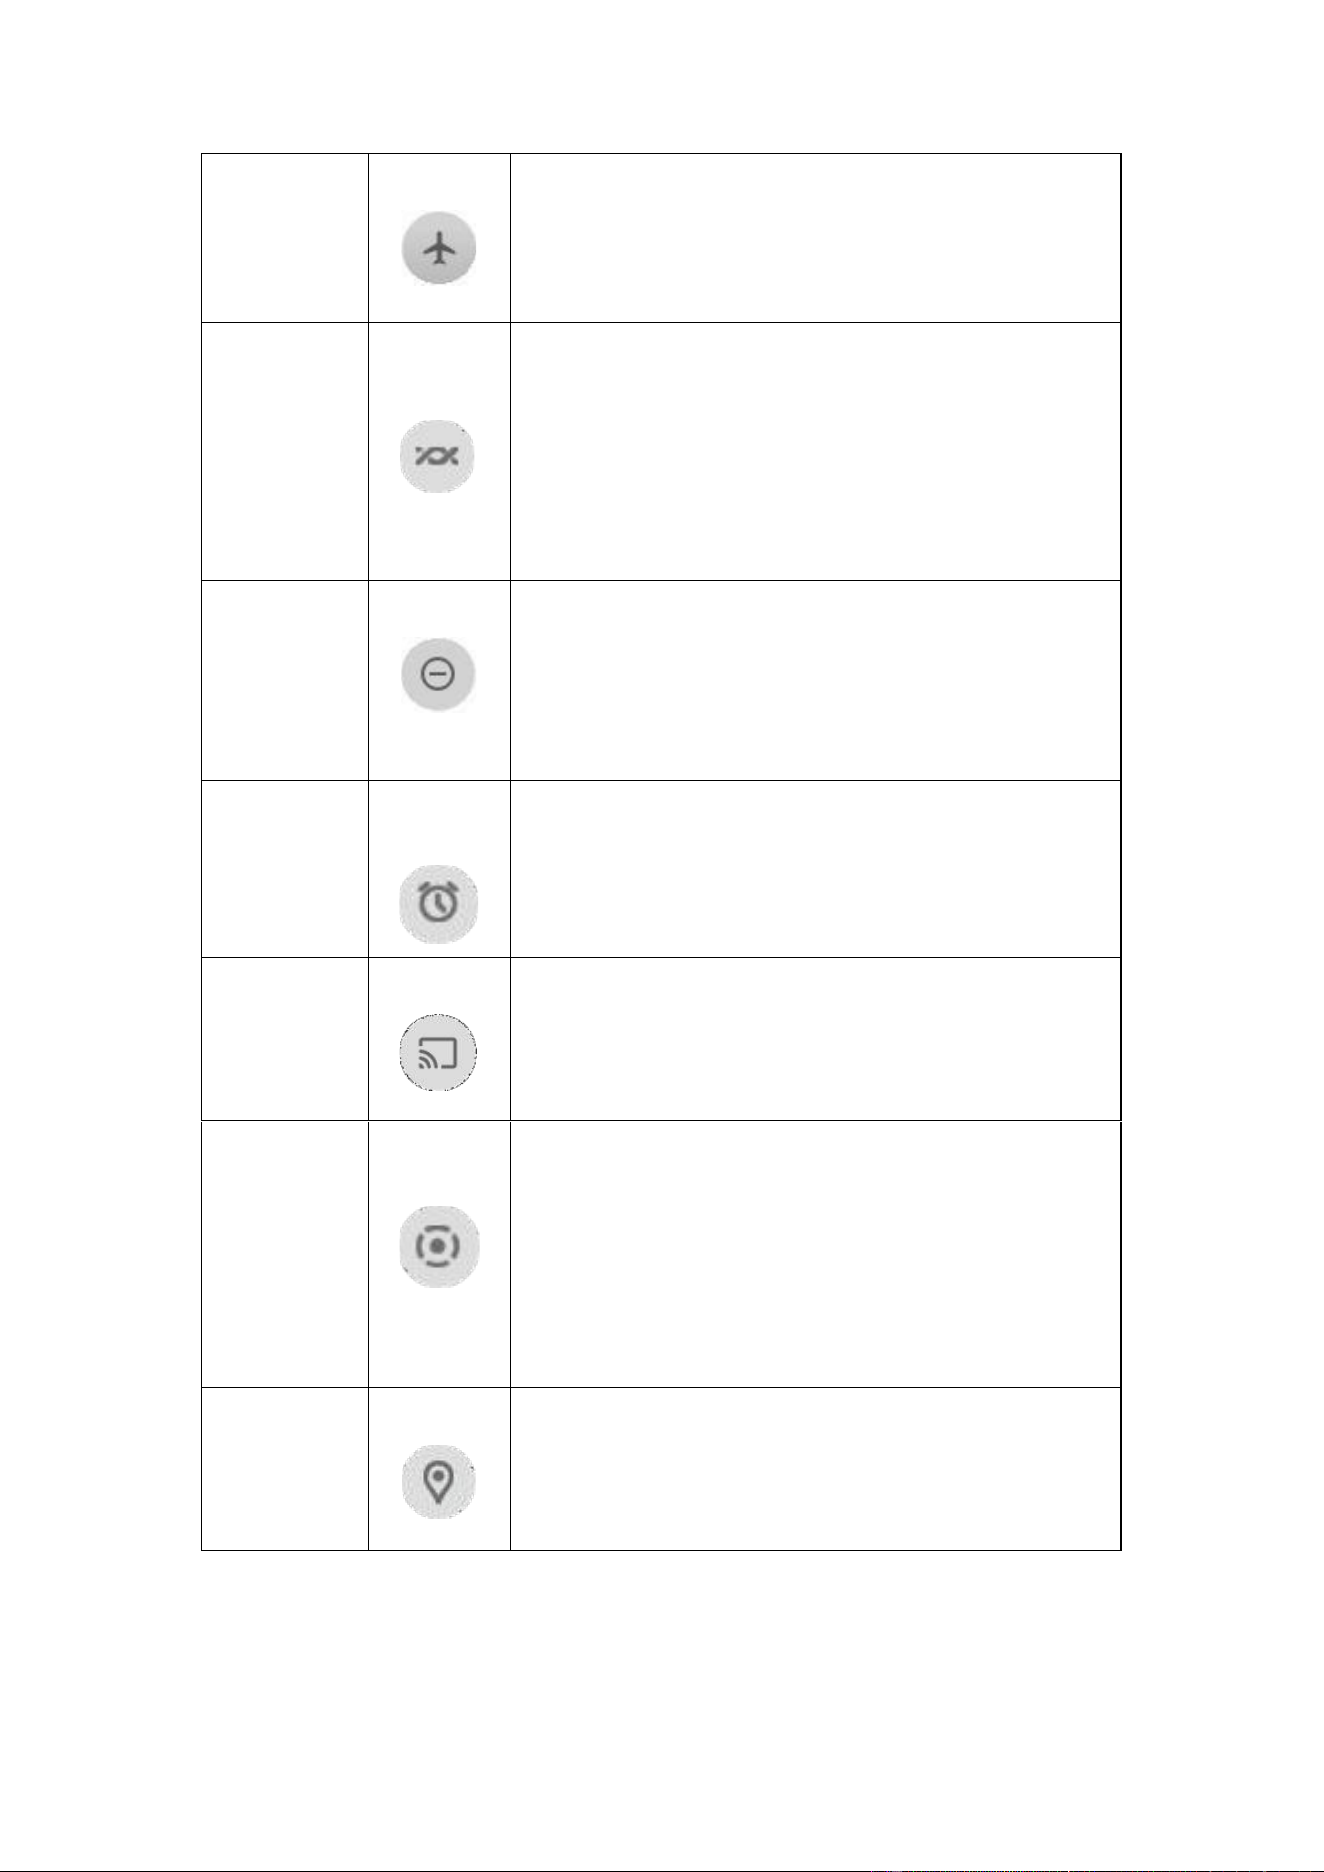
There is a drop-down notice bar in the Home Page.
Name
Icon
Description
Internet
Long press to enter the setting windows. Choose a
available network to connect. The number of displayed
signal bars indicates the strength of the connection
signal.
Bluetooth
Long press to open the bluetooth setting, choose the
bluetooth name of the corresponding device to
connect. After successfully connect, files can be sent
and transferred.
27
Airplane mode
When the airplane mode is activated, the phone call,
WiFi, Cellular Network and Bluetooth cannot be used.
Nearby Share
After opening, users can wirelessly transfer files
between nearby Android devices (such as using
Bluetooth for transmission), long press to enter the
settings interface, where
they
can
set
the device
name, whether it is visible to nearby devices, etc.
Do Not Disturb
After activating the Do not Disturb mode, the device
will be in a silent state, no notifications are displayed,
and no notification sound.
Alarm
Click to enter the alarm setting interface.
Screen Cast
Activate / Deactivate the cast screen function.
Screen record
Click to enable screen recording. While recording,
android system can capture any sensitive information
visible on the screen or playing on the device. This
includes passwords, payment information, photos,
messages, and audio.
Location
Click to enable device positioning.
28
Hotspot
After activating the Wi-Fi hotspot, the device can be
used as a Wi-Fi transmitter.
Color inversion
After activating, the UI interface will show as invert
colors.
Data Saver
After activating, it can help users save the data usage.
Dark theme
Click to turn on dark theme.
Night Light
Eye protection mode.
Extra dim
After turning it on, the screen will dim. Long press to
set the brightness and darkness intensity.
QR code
scanner
Click to enter the QR code scanning interface.
Color
correction
Turn on the screen color correction function and long
press to set specific parameters. (Adjust how colors
display on your tablet)
Focus mode
When you need time to focus, you can pause
distracting apps and hide their notifications.
29
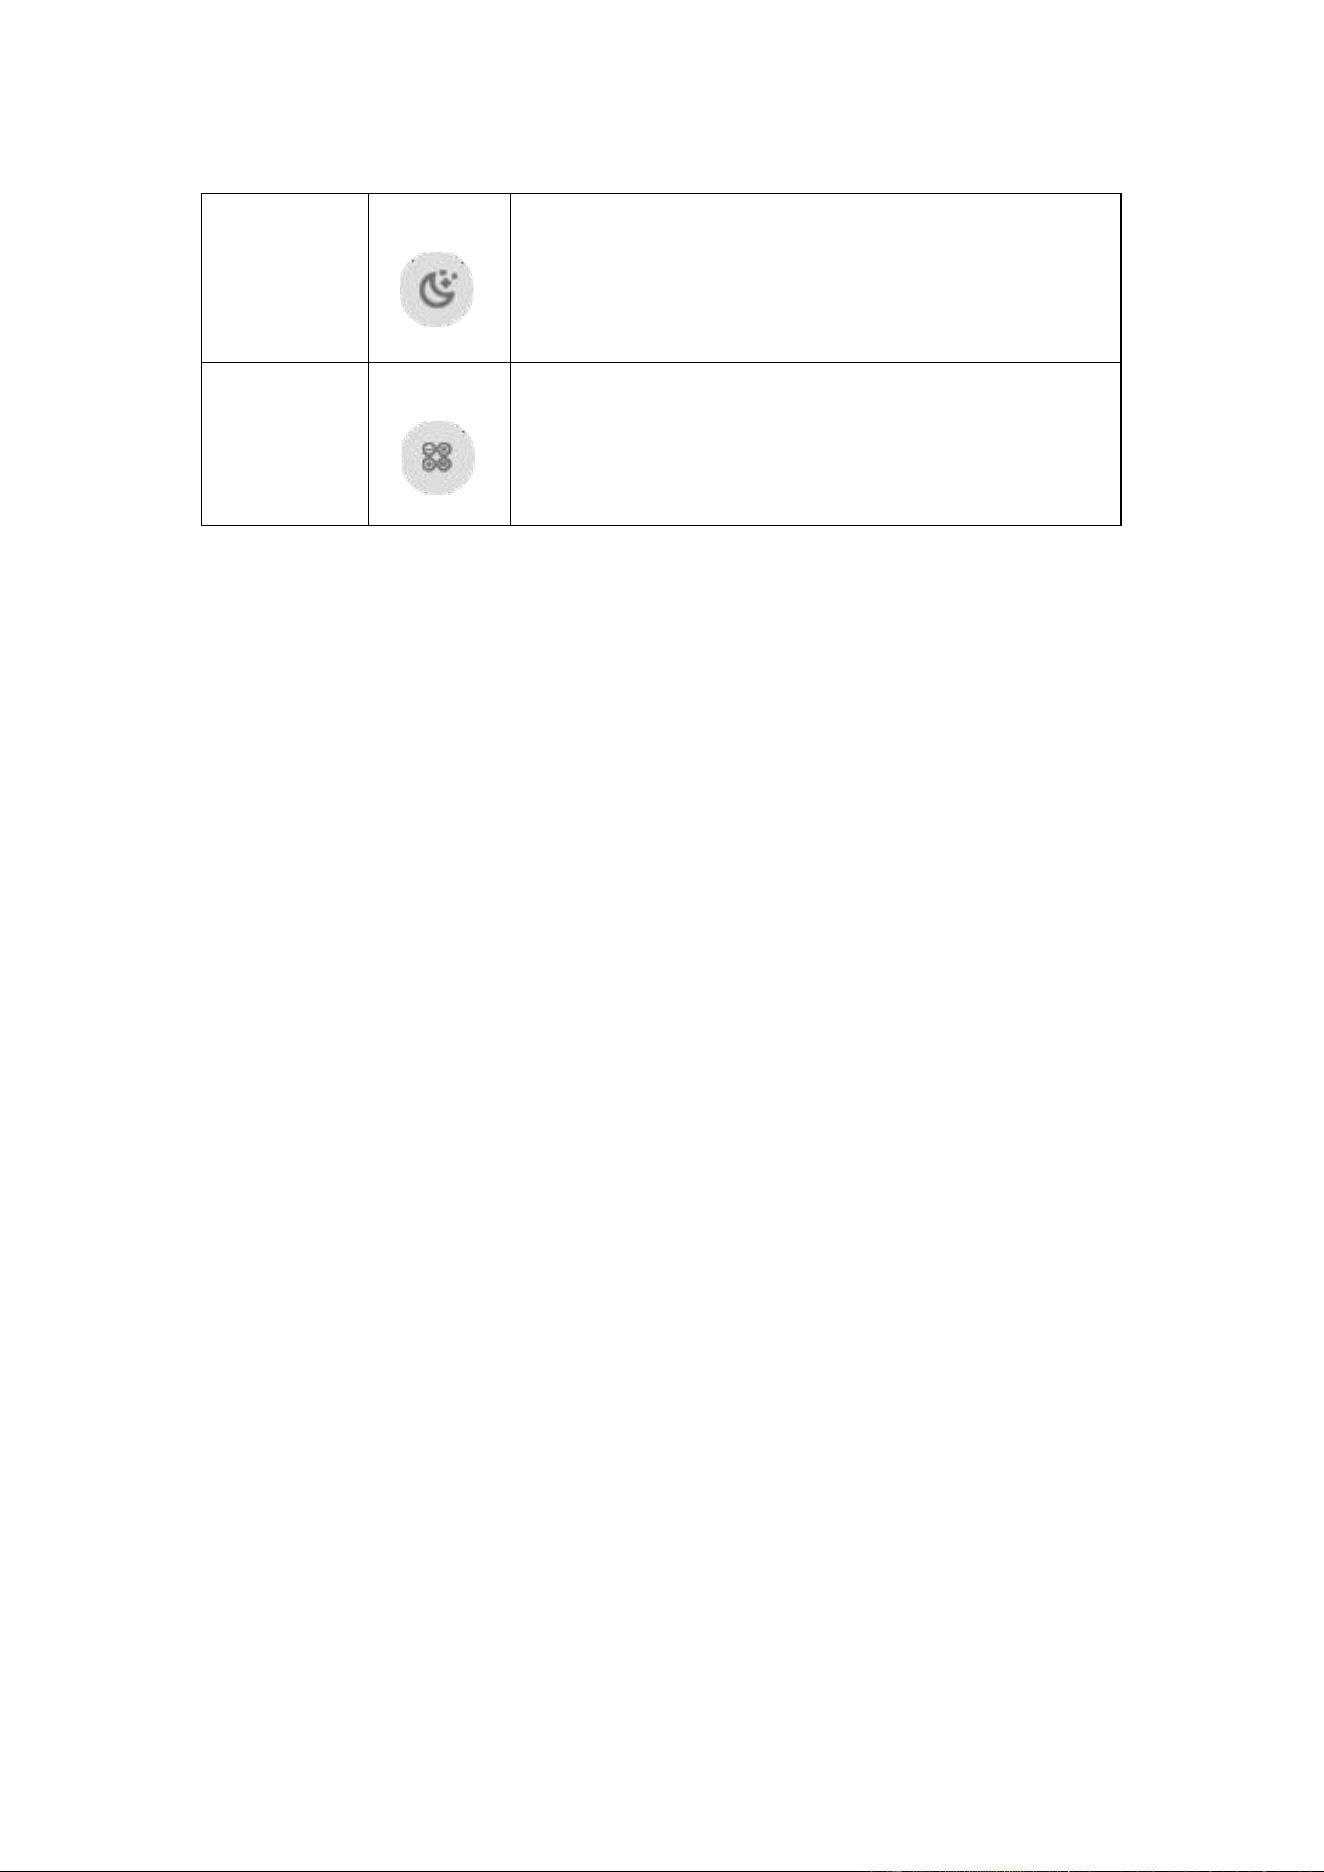
Bedtime mode
Silence your phone, dim the wallpaper, and change
the screen to black and white at bedtime.
Calculator
Open Calculator.
Chapter 8 Accessories
1) DC 12V power adaptor 1pcs
2) User manual card 1pcs
3) Handset (optional) (With buttons or without buttons) 1pcs
30
Chapter 9 Troubleshooting
Problems
Problem Description
Solutions
Power Problems
Unable to boot.
Please check if the connection
is correct.
Bad contact: please check the
power socket and plug.
Display
Problems
No display.
Please restart the system.
When clicking a function, the
execution time is too long to
activate.
The screen switching process is
delayed and stagnant, causing the
screen to fail to switch smoothly.
Blurred display.
Check whether there is dust on
the surface of the display. If yes,
please wipe the dust on the
surface with a soft cloth that
does not drop cotton chips.