
Technical Support and E-Warranty Certificate
www.vevor.com/support
GOLF PUTTING GREEN MAT
We continue to be committed to provide you products with competitive price.
"Save Half", "Half Price" or any other similar expressions used by us only represents an
estimate of savings you might benefit from buying certain products with us compared to the
major top brands and does not necessarily mean to cover all categories of products offered
by us. You are kindly reminded to verify carefully when you are placing an order with us if
you are actually saving half in comparison with the top major brands.


1
MODEL: GPLXQ1D19250;GPLXQ2D30300;GPLXQ5D30300
Have product questions? Need technical support? Please feel free to
contact us:
Technical Support and E-Warranty Certificate
www.vevor.com/support
NEED HELP? CONTACT US!
This is the original instruction, please read all manual instructions
carefully before operating. VEVOR reserves a clear interpretation of
our user manual. The appearance of the product shall be subject to
the product you received. Please forgive us that we won't inform you
again if there are any technology or software updates on our product.
GOLF PUTTING GREEN MAT

2
TECHNICAL SPECIFICATIONS
Model
Main Material
Product Specification
GPLXQ1D
19250
Fiber cut pile mat surface +
TPE bottom; Pine solid wood
base (Color: Walnut)
2585*275*160mm
GPLXQ2D
30300
Fiber cut pile mat surface +
TPE bottom; Pine solid wood
base (Color: Walnut)
3140*385*505mm
GPLXQ5D
30300
Fiber cut pile mat surface +
TPE bottom; Pine solid wood
base (Color: Walnut)
3090*385*180
INSTALLATION INSTRUCTIONS
1. Please dispose of all plastic bags carefully and keep them away from children
and pet.
2. Check all components provided according to the list in this manual.Make sure
you have all of the parts listed.
3. Although paying particular attention when manufacturing this product, you must
be careful during the assembly process to avoid being scratched by sharp edges.
4. Wear protective gloves during assembly and use.
5. The product should be placed on a flat surface.
INSTALLATION STEPS
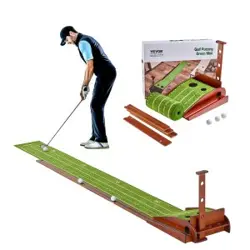
MODEL: GPLXQ1D19250
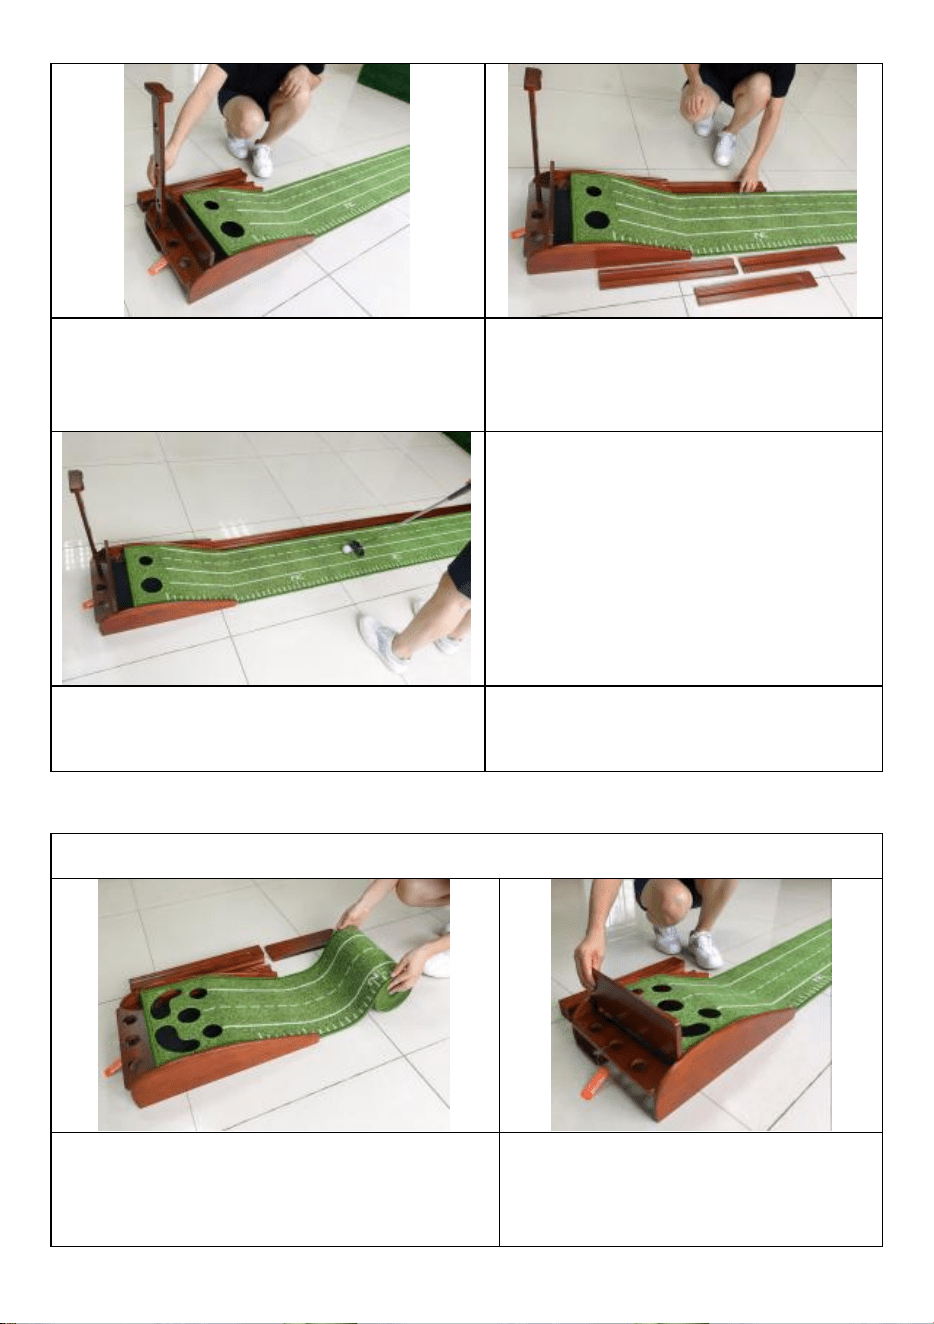
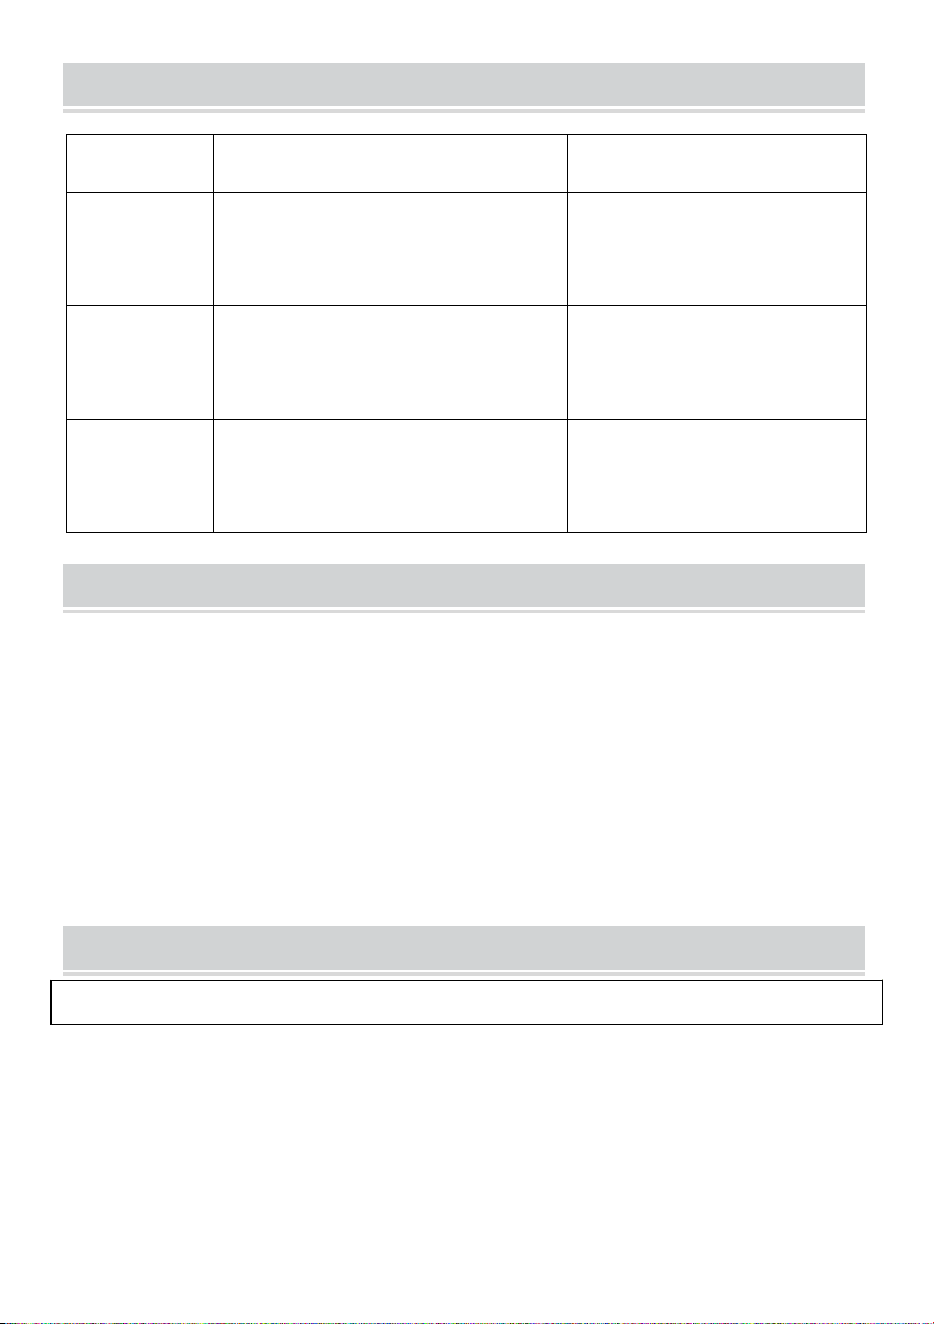
1. Open the box, take out the
pieces and roll out the mat.
2. Start by placing the back stop into
the slot located at the back of the
base.
3
3. Line up the Ball Return Tracks
starting from the Base to the end of
the Mat.
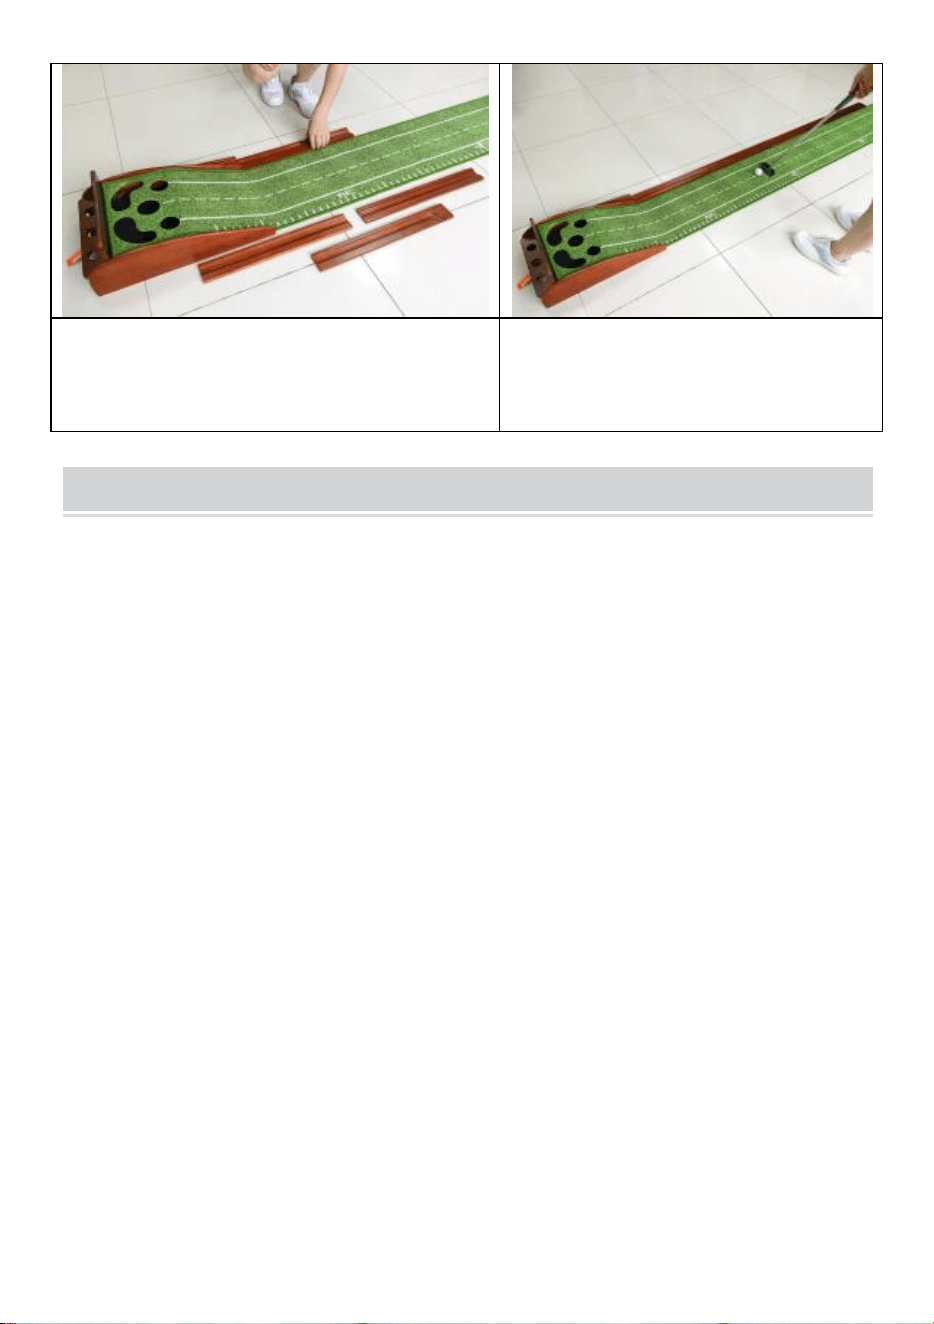
4. Take your golf game to the next
level by putting with your new
Putting Mat.
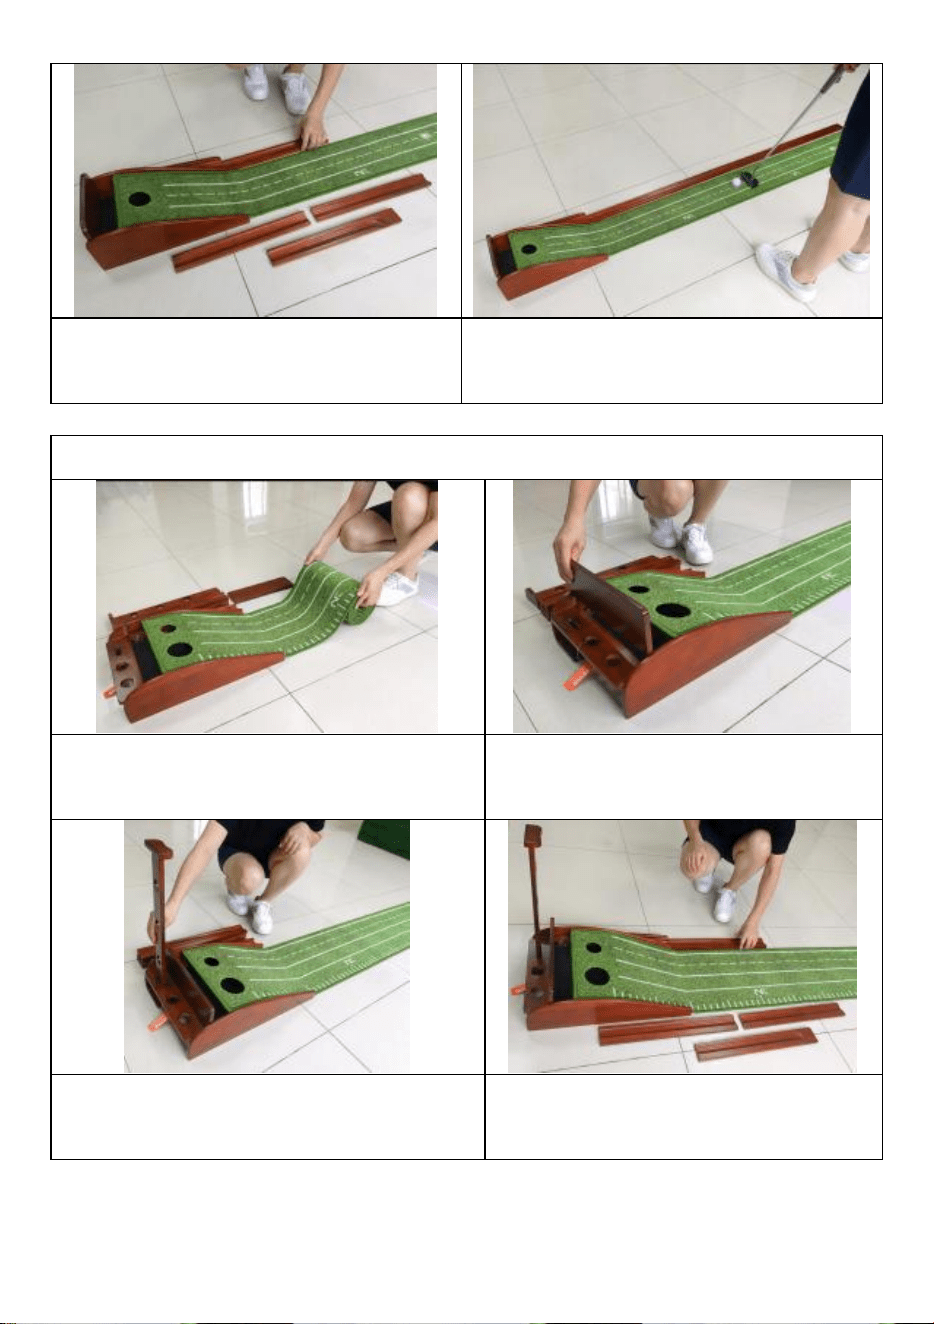
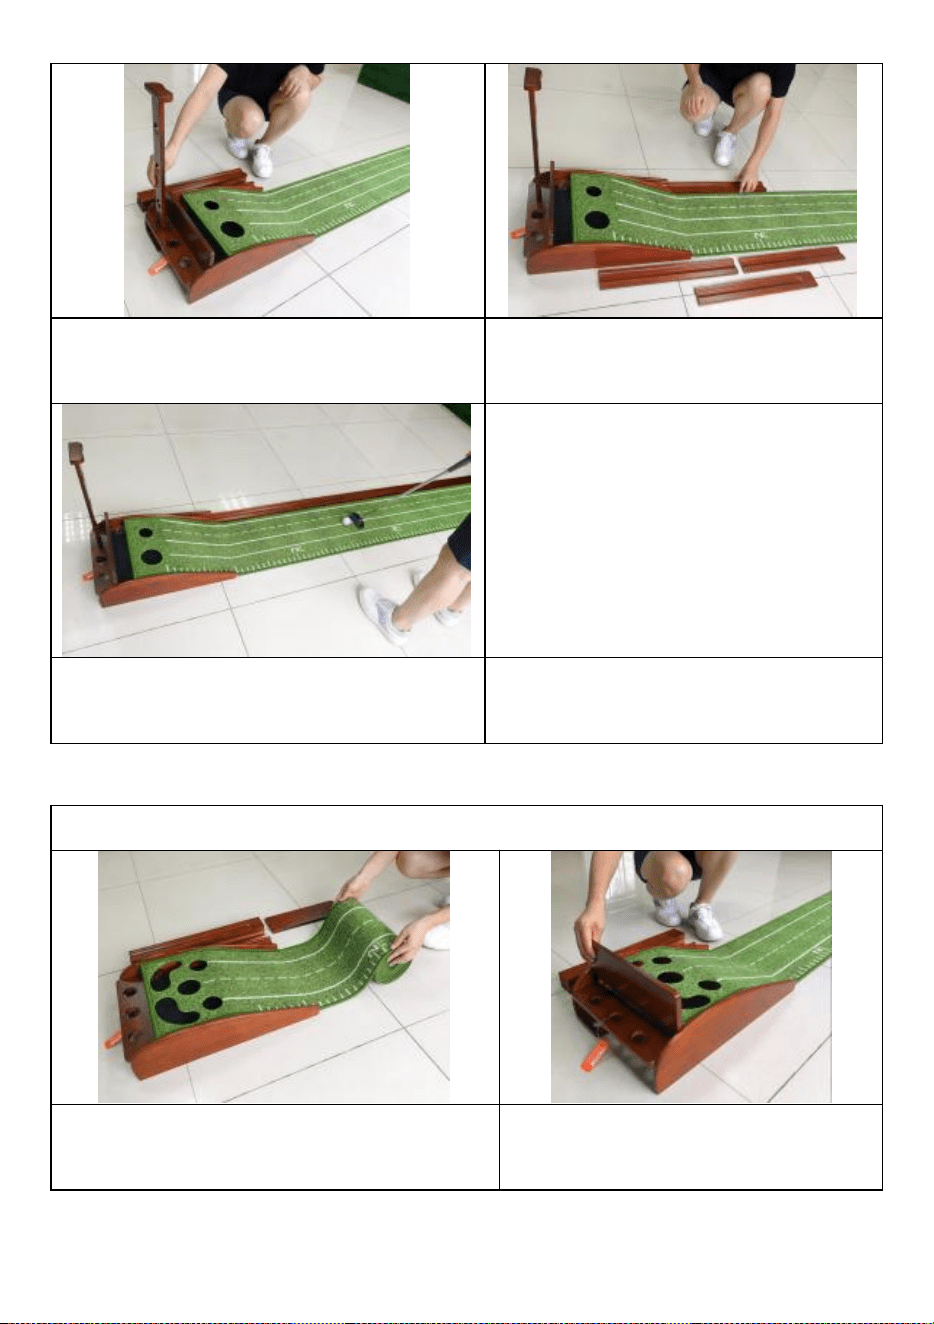
MODEL: GPLXQ2D30300
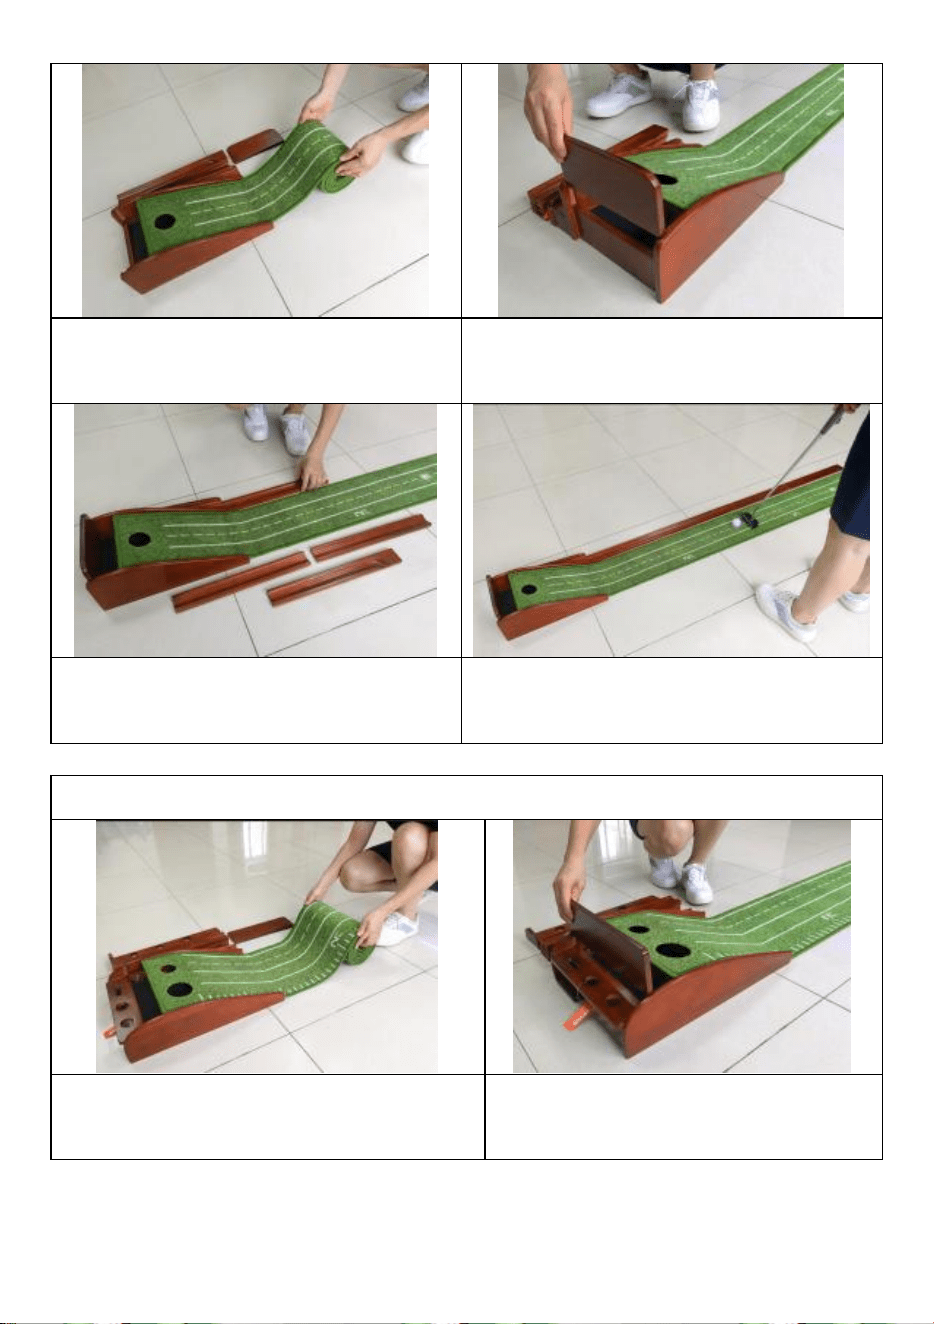
1. Open the box, take out the pieces
and roll out the mat.
2. Start by placing the back stop
into the slot located at the back of
the base.
3. A stand for putting club into the slot
located at the back of the base.
4. Line up the Ball Return Tracks
starting from the Base to the end
of the Mat.

4
5. Take your golf game to the next
level by putting with your new Putting
Mat.
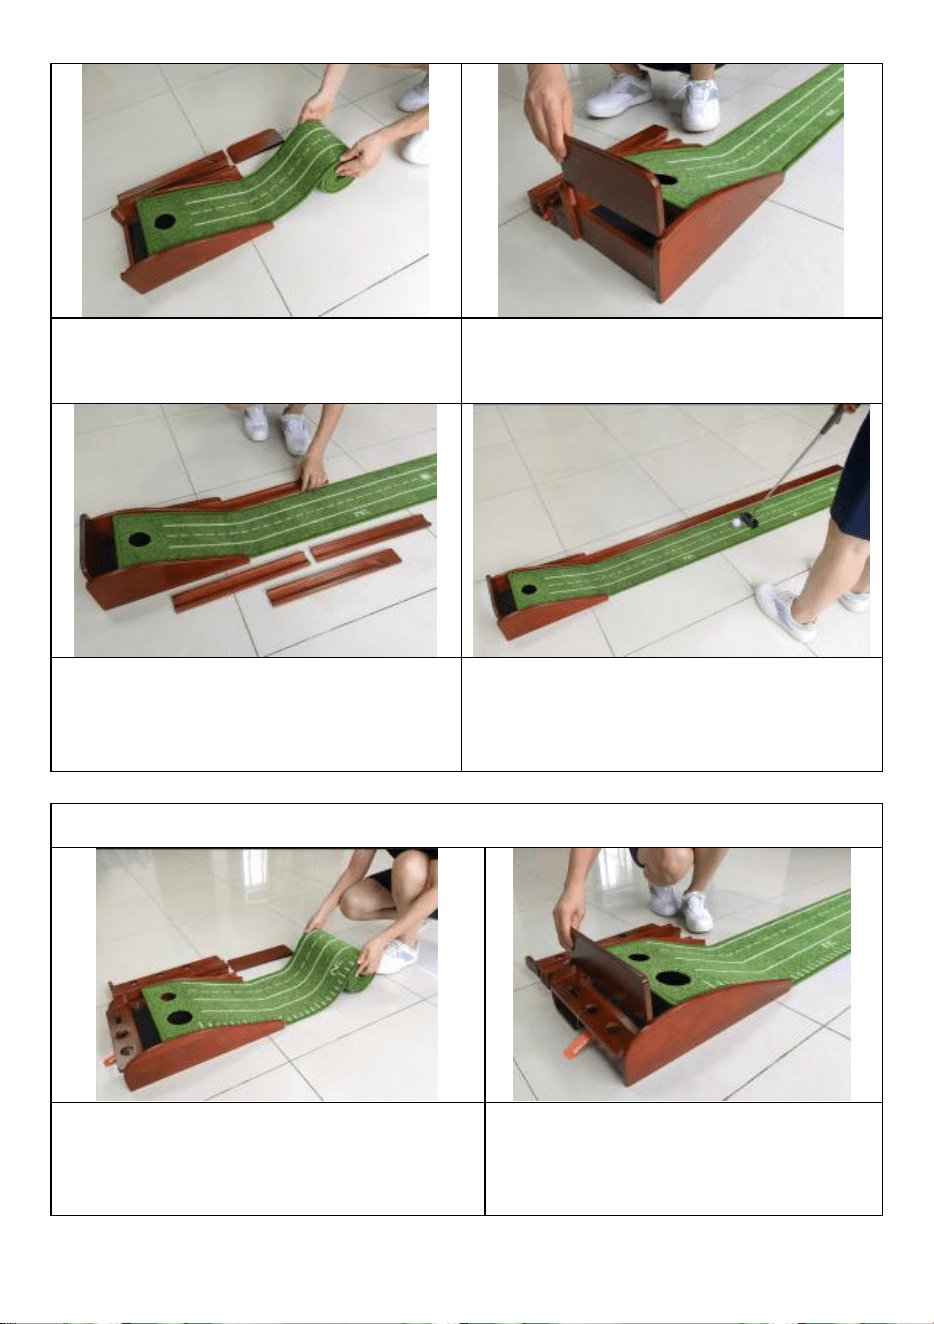
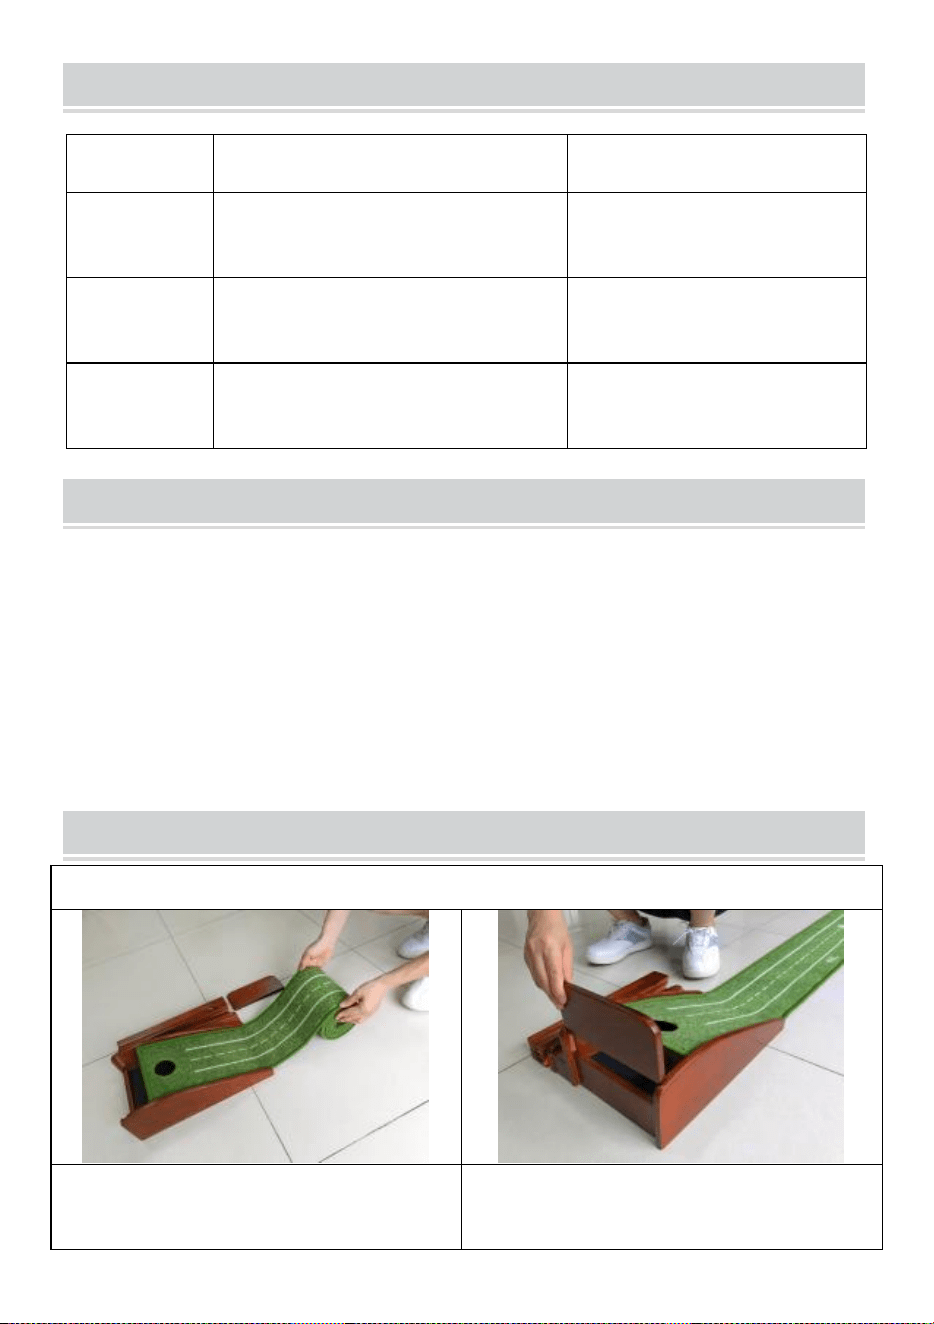
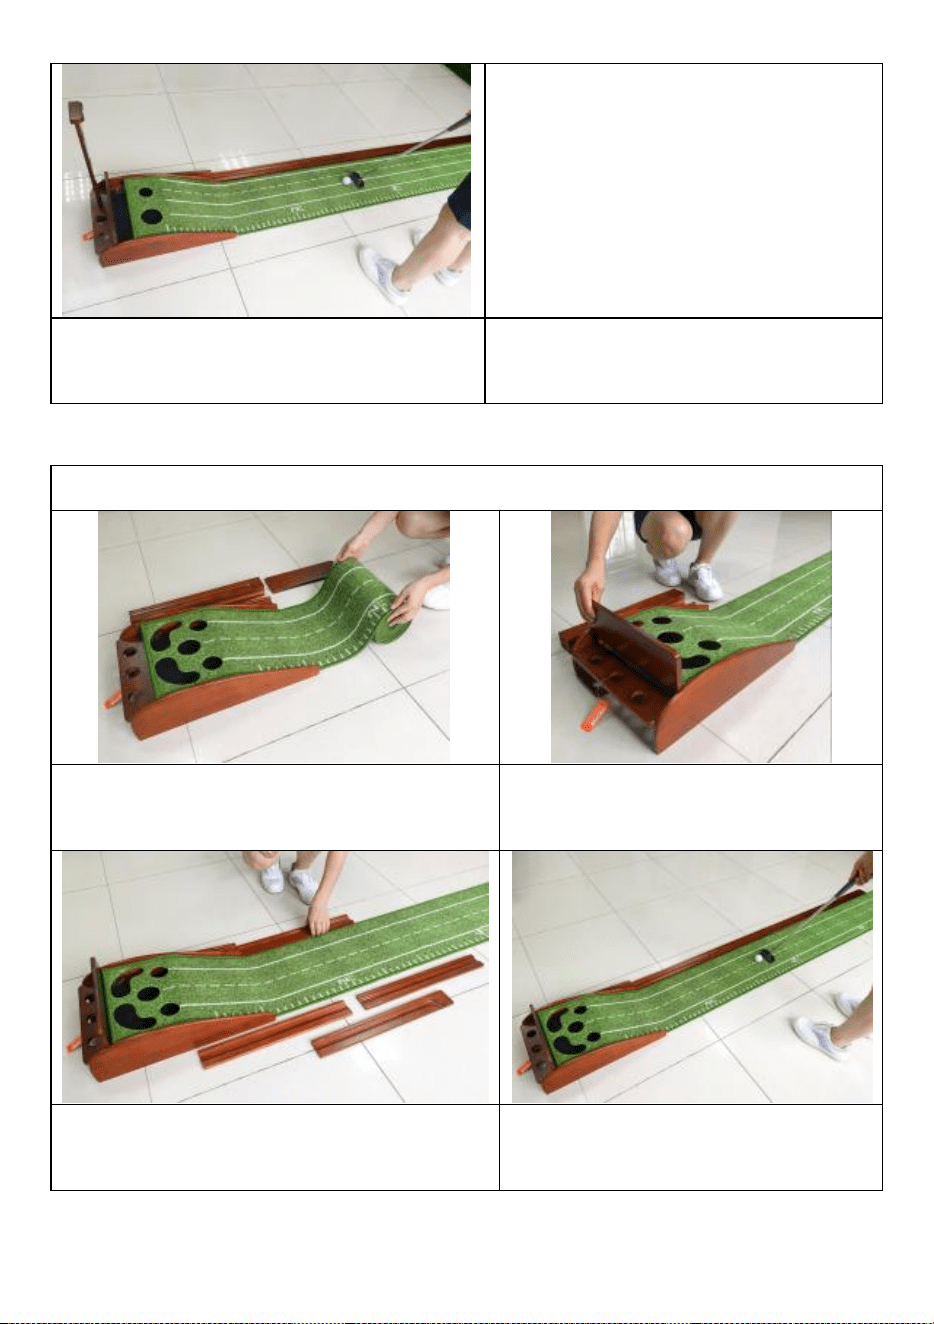
MODEL: GPLXQ5D30300
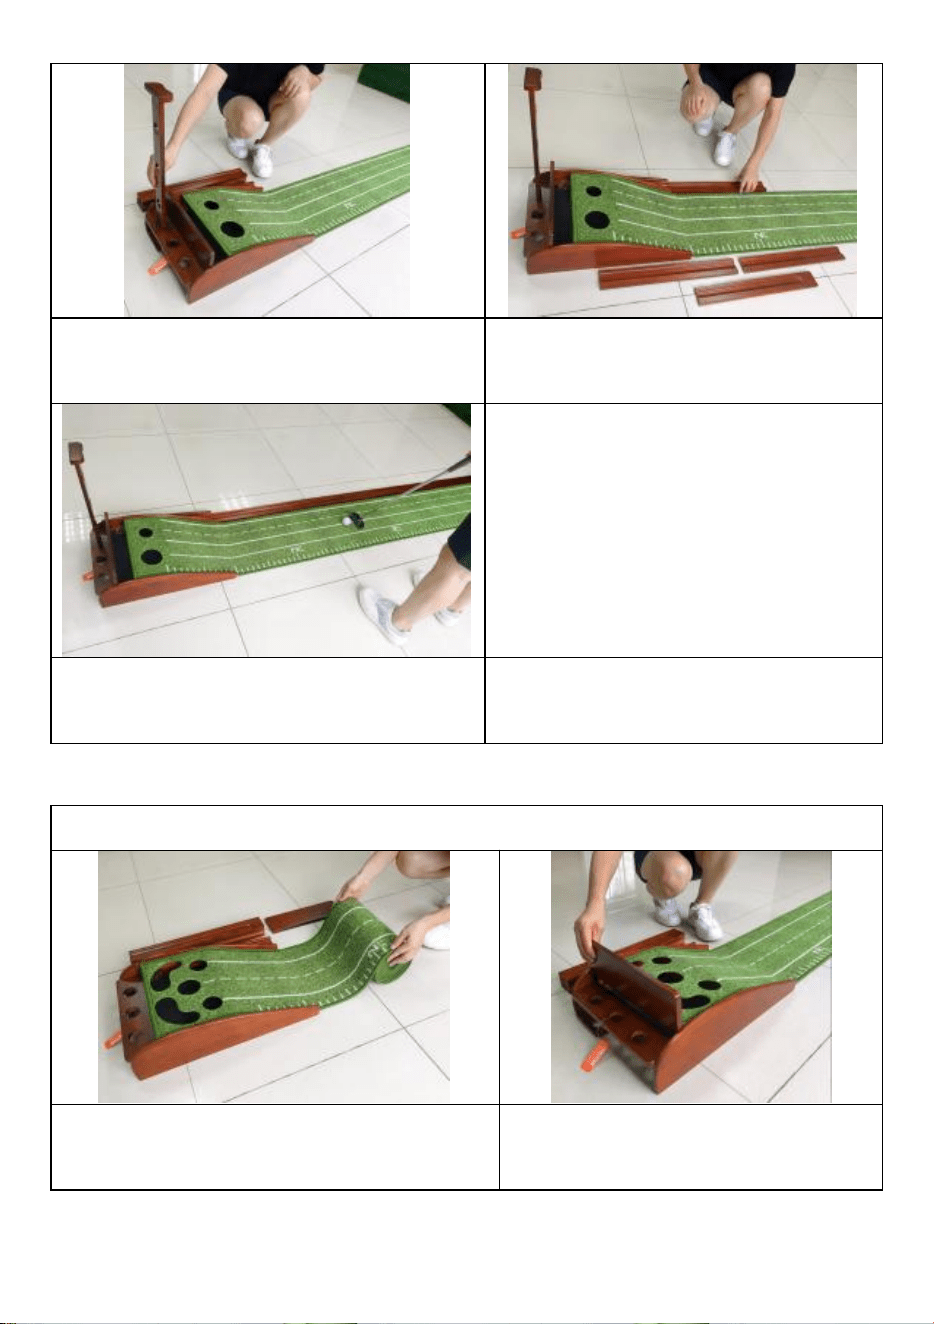
1. Open the box, take out the pieces
and roll out the mat.
2. Start by placing the back stop
into the slot located at the back
of the base.
3. Line up the Ball Return Tracks
starting from the Base to the end of the
Mat.
4. Take your golf game to the
next level by putting with your
new Putting Mat.

5
SAFETY WARNINGS AND PRECAUTIONS
Thank you for using this product. To ensure you can operate the machine
correctly, read this instruction carefully before operating it and keep it properly for
future reference. Please read the precautions and safety rules on this page to
ensure your safe use. This manual will outline safety. warnings and precautions,
operating, maintenance, and cleaning. The warnings and instructions reviewed in
this manual cannot cover all possible conditions and situations that may occur.
Caution and common sense are not built into this product since the uses will
comply with these codes.
Please read ALL the instructions before using your machine.
1. Assemble needs to follow these instructions. Incorrect assembly can be a
hazard. Wear heavy-duty work gloves during assembly.
2. Do not assemble when tired or when under the influence of alcohol, drugs or
medication.
3. Weight and elastic and other product properties are only applicable to
correctly and completely assembled products.
4. Keep the assembly area clean and well-lit.
5. Keep bystanders out of the area during assembly.
6. This is a sports training equipment, not a toy, it needs to be used under the
guidance of a coach.Do not allow children and pets to play alone or approach
this item. Can't Climb Products.
7. Use as intended only. Do not sit or stand on the product.
8. Inspect before every use. Do not use it if parts are loose or damaged.
9. People or objects hanging on the product will cause the product to fall.
10. Pay attention to pedestrians and vehicles when using.
11. Do not apply this unit to any other purposes than the indicated usage.
12. Golf Putting Green Mat cannot place items to avoid damage.
13. Do not use it for commercial purposes.
14. Do not clean it with any abrasive material.
15. Never leave it unattended while in use.
16. Pet urine and feces can damage the product, please keep away.
17. Do not place the product on or near hot air, electric burners or
heaters.Fireworks, cigarettes, flares, and other items can ignite the product.
Please stay away from them.
18. The product should be placed on a flat surface. And it should be installed in
an open and safe place, avoiding places near windows, roads, railways,
rivers, etc.

6
19. Sports equipment (soccer boots, football gloves, etc.) should be worn during
use. Do not place it in a damp environment.
WARNING:
20. This appliance is not intended for use by young or infirm persons
unless supervised by a responsible person to ensure that they can use
the appliance safely. Young children should be supervised to ensure
that they do not play with the product. Pets should stay away from the
product.
The use of this product is limited to indoor environments only. Use beyond
this specified range may cause damage to the product, for which our
company will not be held responsible.
TIP FOR REMOVING CREASES
This is normal lay the mat flat for 24 hours for the rug to fully flatten.
You may find creases on putting green surface once opening box,please note
that this is a normal phenomenon because the foam has memory.To help
remove creases please lay down our product to open air and put weights on the
top where creases showed up,and it will lay perfectly flat after a few days.
MAINTENANCE/ SERVICE
Have a qualified repair person serviced your Golf Putting Green Mat pad using
only identical replacement parts.This will ensure that the safety of the Golf
Putting Green Mat pad is maintained.A dusty, damp or corrosive environment
can cause damage to the Golf Putting Green Mat pad .
Please note that: Lack of maintenance may result in warranty cancellation. The
guarantee of this tool will be void if the Golf Putting Green Mat pad had been
modified without the consent of an authorized manufacturer representative.
Warranty
1. This warranty shall only cover claims for damage due to a fault in the
product's manufacture.
2. If a warranty claim is made, the party entitled to warranty cover must
present the proof of purchase, including the purchase date
3. Customers’ satisfaction is always the motivation of our brand growth.
We promise to help you solve any issues . Please just let us know if you
need help.

7
OUR SERVICE TEAM PROMISES TO REPLY TO YOUR MESSAGE WITHIN
24H.
Scope of Warranty
1. We guarantee that VEVOR products are produced in accordance with
ISO9001 Quality Management procedures and are free of manufacturing
defects for the period of warranty.
2. This warranty covers faults in the products due to manufacturing defects
within 1 year from date of purchase.After inspection by sales
representative, defective products will be replaced or repaired with
equivalent goods free of charge.
3. Any warranty claim made during warranty period shall not extend the
overall warranty coverage period.
4. Warranty periods:Warranty claim date.

Manufacturer: Shanghaimuxinmuyeyouxiangongsi
Address: Shuangchenglu 803nong11hao1602A-1609shi, baoshanqu, shanghai
200000 CN.
EC REP: E-CrossStu GmbH
Mainzer Landstr.69, 60329 Frankfurt am Main.
UK REP: YH CONSULTING LIMITED.
C/O YH Consulting Limited Office 147, Centurion House, London Road, Staines-
upon-Thames, Surrey, TW18 4AX
Imported to AUS: SIHAO PTY LTD.
1 ROKEVA STREETEASTWOOD NSW 2122 Australia
Imported to USA: Sanven Technology Ltd.
Suite 250, 9166 Anaheim Place, Rancho Cucamonga, CA 91730


Technique Assistance et certificat de garantie électronique
www.vevor.com/support
TAPIS DE GOLF PUTTING GREEN
We continue to be committed to provide you products with competitive price.
"Save Half", "Half Price" or any other similar expressions used by us only represents an
estimate of savings you might benefit from buying certain products with us compared to the
major top brands and does not necessarily mean to cover all categories of products offered
by us. You are kindly reminded to verify carefully when you are placing an order with us if
you are actually saving half in comparison with the top major brands.


1
MODÈLE : GPLXQ1D19250 ; GPLXQ2D30300 ; GPLXQ5D30300 .
Have product questions? Need technical support? Please feel free to
contact us:
Technical Support and E-Warranty Certificate
www.vevor.com/support
NEED HELP? CONTACT US!
This is the original instruction, please read all manual instructions
carefully before operating. VEVOR reserves a clear interpretation of
our user manual. The appearance of the product shall be subject to
the product you received. Please forgive us that we won't inform you
again if there are any technology or software updates on our product.
GOLF PUTTING GREEN MAT
2
TECHNICAL SPECIFICATIONS
Modèle
Matériau principal
Spécification de
produit
GPLXQ1D
19250
Surface du tapis à poils
coupés en fibres + fond en
TPE ; Base en bois massif de
pin (Couleur : Noyer)
2585*275*160mm
GPLXQ2D
30300
Surface du tapis à poils
coupés en fibres + fond en
TPE ; Base en bois massif de
pin (Couleur : Noyer)
3140*385*505mm
GPLXQ5D
30300
Surface du tapis à poils
coupés en fibres + fond en
TPE ; Base en bois massif de
pin (Couleur : Noyer)
3090*385*180
INSTALLATION INSTRUCTIONS
6. Veuillez jeter soigneusement tous les sacs en plastique et les garder hors de
portée des enfants et des animaux domestiques.
7. Vérifiez tous les composants fournis selon la liste de ce manuel . Assurez-
vous d'avoir toutes les pièces répertoriées.
8. Bien que vous accordiez une attention particulière lors de la fabrication de ce
produit, vous devez être prudent lors du processus d'assemblage pour éviter
d'être rayé par des arêtes vives.
9. Portez des gants de protection lors du montage et de l'utilisation.
10. Le produit doit être placé sur une surface plane.
INSTALLATION STEPS
MODÈLE : GPLXQ1D19250

3
5. Ouvrez la boîte, sortez les
morceaux et déroulez le tapis.
6. Commencez par placer la butée
arrière dans le fente située à
l'arrière de la base.
7. Alignez les pistes de retour de
balle en commençant de la base à
la fin du tapis.
8. Faites passer votre jeu de golf au
niveau supérieur en putting avec
votre nouveau tapis de putting.
MODÈLE : GPLXQ2D30300
6. Ouvrez la boîte, sortez les
morceaux et déroulez le tapis.
7. Commencez par placer la
butée arrière dans le fente située
à l'arrière de la base.

4
8. Un support pour mettre le club
dans le fente située à l'arrière de la
base.
9. Alignez les pistes de retour de
balle en commençant de la base à
la fin du tapis.
10. Faites passer votre jeu de golf au
niveau supérieur en putting avec
votre nouveau tapis de putting.
MODÈLE : GPLXQ5D30300
5. Ouvrez la boîte, sortez les
morceaux et déroulez le tapis.
6. Commencez par placer la
butée arrière dans le fente située
à l'arrière de la base.

5
7. Alignez les pistes de retour de balle
en commençant de la base à la fin du
tapis.
8. Faites passer votre jeu de golf
au niveau supérieur en putting
avec votre nouveau tapis de
putting.
SAFETY WARNINGS AND PRECAUTIONS
Merci d'avoir utilisé ce produit. Pour vous assurer que vous pouvez utiliser la
machine correctement, lisez attentivement ces instructions avant de l'utiliser et
conservez-la correctement pour référence future. Veuillez lire les précautions et
les règles de sécurité sur cette page pour garantir votre utilisation en toute
sécurité. Ce manuel décrira la sécurité. avertissements et précautions,
fonctionnement, entretien et nettoyage. Les avertissements et instructions
examinés dans ce manuel ne peuvent pas couvrir toutes les conditions et
situations possibles qui peuvent survenir. La prudence et le bon sens ne sont pas
intégrés à ce produit puisque les utilisations seront conformes à ces codes.
Veuillez lire TOUTES les instructions avant d'utiliser votre machine.
21. L'assemblage doit suivre ces instructions. Un montage incorrect peut
constituer un danger. Portez des gants de travail résistants pendant
l’assemblage.
22. Ne vous rassemblez pas lorsque vous êtes fatigué ou sous l’influence de
l’alcool, de drogues ou de médicaments.
23. Le poids, l'élasticité et les autres propriétés du produit ne s'appliquent qu'aux
produits correctement et complètement assemblés.
24. Gardez la zone de rassemblement propre et bien éclairée.
25. Gardez les spectateurs hors de la zone pendant l’assemblage.
26. Il s'agit d'un équipement d'entraînement sportif, pas d'un jouet, il doit être
utilisé sous la direction d'un entraîneur. Ne laissez pas les enfants et les
animaux domestiques jouer seuls ou s'approcher de cet article. Impossible
de grimper sur les produits.

6
27. Utiliser uniquement comme prévu. Ne vous asseyez pas et ne vous tenez
pas debout sur le produit.
28. Inspectez avant chaque utilisation. Ne l'utilisez pas si les pièces sont
desserrées ou endommagées.
29. Les personnes ou les objets accrochés au produit feront tomber le produit.
30. Faites attention aux piétons et aux véhicules lors de l'utilisation.
31. N'utilisez pas cet appareil à d'autres fins que l'utilisation indiquée.
32. Golf Putting Green Mat ne peut pas placer d'objets pour éviter les dommages.
33. Ne l'utilisez pas à des fins commerciales.
34. Ne le nettoyez pas avec un matériau abrasif.
35. Ne le laissez jamais sans surveillance pendant son utilisation.
36. L'urine et les excréments d'animaux peuvent endommager le produit, veuillez
le tenir à l'écart.
37. Ne placez pas le produit sur ou à proximité d'air chaud, de brûleurs ou de
radiateurs électriques. Les feux d'artifice, les cigarettes, les fusées
éclairantes et autres objets peuvent enflammer le produit. S'il vous plaît,
restez loin d'eux.
38. Le produit doit être placé sur une surface plane. Et il doit être installé dans
un endroit ouvert et sûr, en évitant les endroits proches des fenêtres, des
routes, des voies ferrées, des rivières, etc.
39. Les équipements de sport (chaussures de football, gants de football, etc.)
doivent être portés lors de l'utilisation. Ne le placez pas dans un
environnement humide.
AVERTISSEMENT:
40. Cet appareil n'est pas destiné à être utilisé par des personnes jeunes
ou infirmes, à moins d'être supervisées par une personne responsable
pour garantir qu'elles peuvent utiliser l'appareil en toute sécurité. Les
jeunes enfants doivent être surveillés pour s'assurer qu'ils ne jouent
pas avec le produit. Les animaux domestiques doivent rester à l'écart
du produit.
L'utilisation de ce produit est limitée aux environnements intérieurs
uniquement. Une utilisation au-delà de cette plage spécifiée peut causer des
dommages au produit, dont notre société ne pourra être tenue responsable.
TIP FOR REMOVING CREASES
C'est normal posez le tapis à plat pendant 24 heures pour qu'il s'aplatisse
complètement.

7
Vous pouvez trouver des plis sur la surface du green une fois la boîte ouverte.
Veuillez noter qu'il s'agit d'un phénomène normal car la mousse a de la mémoire.
Pour vous aider
Pour enlever les plis, veuillez poser notre produit à l'air libre et mettre des poids
sur le dessus là où les plis sont apparus, et il reposera parfaitement à plat après
quelques jours.
MAINTENANCE/ SERVICE
Demandez à un réparateur qualifié d'entretenir votre tapis de golf Putting Green
en utilisant uniquement des pièces de rechange identiques. Cela garantira que la
sécurité du tapis de golf Putting Green est maintenue. Un environnement
poussiéreux, humide ou corrosif peut endommager le tapis de golf Putting Green.
tampon.
Veuillez noter que : Le manque d'entretien peut entraîner l'annulation de la
garantie. La garantie de cet outil sera nulle si le tapis Golf Putting Green Mat a
été modifié sans le consentement d'un représentant autorisé du fabricant.
garantie
4. Cette garantie ne couvre que les réclamations pour dommages dus à
un défaut de fabrication du produit .
5. En cas de demande de garantie, la partie ayant droit à la couverture de
garantie doit présenter la preuve d'achat, y compris la date d'achat.
6. La satisfaction des clients est toujours la motivation de la croissance de
notre marque. Nous nous engageons à vous aider à résoudre tous les
problèmes. S'il vous plaît laissez-nous savoir si vous avez besoin d'aide.
NOTRE SERVICE ÉQUIPE PROMESSES À RÉPONDRE À TON MESSAGE
DANS 24 heures .
Portée de la garantie
5. Nous garantissons que les produits VEVOR sont fabriqués
conformément aux procédures de gestion de la qualité ISO 9001 et sont
exempts de défauts de fabrication pendant la période de garantie.
6. Cette garantie couvre les défauts des produits dus à des défauts de
fabrication dans un délai d'un an à compter de la date d'achat. Après
inspection par un représentant commercial, les produits défectueux seront
remplacés ou réparés gratuitement par des produits équivalents.

8
7. Toute réclamation au titre de la garantie effectuée pendant la période
de garantie ne prolongera pas la période globale de couverture de la
garantie.
8. Périodes de garantie : Date de demande de garantie .

Fabricant : Shanghaimuxinmuyeyouxiangongsi
Adresse : Shuangchenglu 803nong11hao1602A-1609shi, baoshanqu, Shanghai
200000 CN.
REPRÉSENTANT CE : E-CrossStu GmbH
Mainzer Landstr.69, 60329 Francfort-sur-le-Main.
REPRÉSENTANT DU ROYAUME-UNI : YH CONSULTING LIMITÉE.
C/O YH Consulting Limited Bureau 147, Centurion House, London Road, Staines-
upon-Thames, Surrey, TW18 4AX
Importé en Australie : SIHAO PTY LTD.
1 ROKEVA STREETASTWOOD NSW 2122 Australie
Importé aux États-Unis : Sanven Technology Ltd.
Bureau 250, 9166 Anaheim Place, Rancho Cucamonga, CA 91730


Technisch Support und E-Garantie-Zertifikat
www.vevor.com/support
Golf Putting Green Matte
We continue to be committed to provide you products with competitive price.
"Save Half", "Half Price" or any other similar expressions used by us only represents an
estimate of savings you might benefit from buying certain products with us compared to the
major top brands and does not necessarily mean to cover all categories of products offered
by us. You are kindly reminded to verify carefully when you are placing an order with us if
you are actually saving half in comparison with the top major brands.


1
MODELL: GPLXQ1D19250 ;GPLXQ2D30300 ; GPLXQ5D30300
Have product questions? Need technical support? Please feel free to
contact us:
Technical Support and E-Warranty Certificate
www.vevor.com/support
NEED HELP? CONTACT US!
This is the original instruction, please read all manual instructions
carefully before operating. VEVOR reserves a clear interpretation of
our user manual. The appearance of the product shall be subject to
the product you received. Please forgive us that we won't inform you
again if there are any technology or software updates on our product.
GOLF PUTTING GREEN MAT

2
TECHNICAL SPECIFICATIONS
Modell
Hauptmaterial
Produktspezifikation
GPLXQ1D
19250
Oberfläche aus
Faserflormatte + Unterseite
aus TPE; Basis aus
massivem Kiefernholz (Farbe:
Walnuss)
2585 x 275 x 160 mm
GPLXQ2D
30300
Oberfläche aus
Faserflormatte + Unterseite
aus TPE; Basis aus
massivem Kiefernholz (Farbe:
Walnuss)
3140 x 385 x 505 mm
GPLXQ5D
30300
Oberfläche aus
Faserflormatte + Unterseite
aus TPE; Basis aus
massivem Kiefernholz (Farbe:
Walnuss)
3090*385*180
INSTALLATION INSTRUCTIONS
11. Bitte entsorgen Sie alle Plastiktüten sorgfältig und bewahren Sie sie
außerhalb der Reichweite von Kindern und Haustieren auf.
12. Überprüfen Sie alle mitgelieferten Komponenten anhand der Liste in diesem
Handbuch . Stellen Sie sicher, dass Sie alle aufgeführten Teile haben.
13. Obwohl bei der Herstellung dieses Produkts besondere Sorgfalt angewendet
wurde, müssen Sie beim Zusammenbau vorsichtig sein, um Kratzer durch scharfe
Kanten zu vermeiden.
14. Tragen Sie bei der Montage und Handhabung Schutzhandschuhe.
15. Das Produkt sollte auf einer ebenen Fläche platziert werden.
INSTALLATION STEPS
MODELL: GPLXQ1D19250
3
9. Öffnen Sie die Schachtel,
nehmen Sie die Teile heraus und
rollen Sie die Matte aus.
10. Legen Sie zunächst den
hinteren Anschlag in die Schlitz auf
der Rückseite des die Basis.
11. Richten Sie die
Ballrücklaufschienen aus,
beginnend von der Basis bis zum
Ende der Matte.
12. Bringen Sie Ihr Golfspiel auf die
nächste Ebene, indem Sie Putten
mit Ihrer neuen Putting-Matte.
MODELL: GPLXQ2D30300
11. Öffnen Sie die Schachtel,
nehmen Sie die Teile heraus und
rollen Sie die Matte aus.
12. Legen Sie zunächst den
hinteren Anschlag in die
Steckplatz auf der Rückseite der
Basis.
4
13. Ein Ständer zum Einlegen des
Schlägers in die Schlitz auf der
Rückseite des die Basis.
14. Richten Sie die
Ballrücklaufschienen aus,
beginnend von der Basis bis zum
Ende der Matte.
15. Bringen Sie Ihr Golfspiel auf die
nächste Ebene, indem Sie Putten mit
Ihrer neuen Putting-Matte.
MODELL: GPLXQ5D30300
9. Öffnen Sie die Schachtel, nehmen
Sie die Teile heraus und rollen Sie die
Matte aus.
10. Legen Sie zunächst den
hinteren Anschlag in die
Steckplatz auf der Rückseite der
Basis.
5
11. Richten Sie die
Ballrücklaufschienen aus, beginnend
von der Basis bis zum Ende der Matte.
12. Bringen Sie Ihr Golfspiel auf
die nächste Ebene, indem Sie
Putten mit Ihrer neuen Putting-
Matte.
SAFETY WARNINGS AND PRECAUTIONS
Vielen Dank, dass Sie dieses Produkt verwenden. Um sicherzustellen, dass Sie
die Maschine richtig bedienen können, lesen Sie diese Anleitung vor der
Inbetriebnahme sorgfältig durch und bewahren Sie sie für spätere Verwendung
auf. Bitte lesen Sie die Vorsichtsmaßnahmen und Sicherheitsregeln auf dieser
Seite, um eine sichere Verwendung zu gewährleisten. In diesem Handbuch
werden Sicherheit, Warnungen und Vorsichtsmaßnahmen, Bedienung, Wartung
und Reinigung beschrieben. Die in diesem Handbuch behandelten Warnungen
und Anweisungen können nicht alle möglichen Bedingungen und Situationen
abdecken, die auftreten können. Vorsicht und gesunder Menschenverstand sind
bei diesem Produkt nicht angebracht, da die Verwendung diesen Vorschriften
entspricht.
Bitte lesen Sie ALLE Anweisungen, bevor Sie Ihre Maschine verwenden.
41. Beim Zusammenbau müssen diese Anweisungen befolgt werden. Ein
falscher Zusammenbau kann gefährlich sein. Tragen Sie beim
Zusammenbau strapazierfähige Arbeitshandschuhe.
42. Nicht zusammenbauen, wenn Sie müde sind oder unter Einfluss von Alkohol,
Drogen oder Medikamenten stehen.
43. Gewicht, Elastizität und sonstige Produkteigenschaften gelten nur für korrekt
und vollständig montierte Produkte.
44. Halten Sie den Versammlungsbereich sauber und gut beleuchtet.
45. Halten Sie während der Montage unbeteiligte Zuschauer vom Bereich fern.
46. Dies ist ein Sporttrainingsgerät und kein Spielzeug. Es darf nur unter
Anleitung eines Trainers verwendet werden. Erlauben Sie Kindern und

6
Haustieren nicht, alleine mit dem Gerät zu spielen oder sich diesem zu
nähern. Produkte, die nicht zum Klettern geeignet sind.
47. Nur bestimmungsgemäß verwenden. Nicht auf dem Produkt sitzen oder
stehen.
48. Vor jedem Gebrauch überprüfen. Nicht verwenden, wenn Teile lose oder
beschädigt sind.
49. Wenn Personen oder Gegenstände am Produkt hängen, kann das Produkt
herunterfallen.
50. Achten Sie bei der Benutzung auf Fußgänger und Fahrzeuge.
51. Verwenden Sie das Gerät ausschließlich für den angegebenen Zweck.
52. Auf der Golf-Putting-Green-Matte können keine Gegenstände platziert
werden, um Schäden zu vermeiden.
53. Verwenden Sie es nicht für kommerzielle Zwecke.
54. nicht mit scheuernden Materialien.
55. Lassen Sie es während des Gebrauchs niemals unbeaufsichtigt.
56. Urin und Kot von Haustieren können das Produkt beschädigen, bitte
fernhalten.
57. Platzieren Sie das Produkt nicht auf oder in der Nähe von Heißluft,
elektrischen Brennern oder Heizgeräten. Feuerwerkskörper, Zigaretten,
Fackeln und andere Gegenstände können das Produkt entzünden. Bitte
halten Sie sich von ihnen fern.
58. Das Produkt sollte auf einer ebenen Fläche platziert werden. Und es sollte
an einem offenen und sicheren Ort installiert werden. Vermeiden Sie Orte in
der Nähe von Fenstern, Straßen, Eisenbahnen, Flüssen usw.
59. Während der Verwendung sollten Sportgeräte (Fußballschuhe,
Fußballhandschuhe usw.) getragen werden. Platzieren Sie das Gerät nicht in
einer feuchten Umgebung.
WARNUNG:
60. Dieses Gerät ist nicht für die Benutzung durch junge oder gebrechliche
Personen bestimmt, es sei denn, sie werden von einer verantwortlichen
Person beaufsichtigt, um sicherzustellen, dass sie das Gerät sicher
benutzen können. Kleine Kinder sollten beaufsichtigt werden, um
sicherzustellen, dass sie nicht mit dem Produkt spielen. Haustiere
sollten sich vom Produkt fernhalten.
Die Verwendung dieses Produkts ist ausschließlich auf Innenräume
beschränkt. Eine Verwendung außerhalb dieses angegebenen Bereichs
kann zu Schäden am Produkt führen, für die unser Unternehmen nicht
haftbar gemacht werden kann.

7
TIP FOR REMOVING CREASES
Das ist normal Legen Sie die Matte 24 Stunden lang flach hin, damit der
Teppich vollständig flach wird.
Möglicherweise finden Sie Falten auf der Putting Green-Oberfläche, sobald Sie
die Box öffnen. Bitte beachten Sie, dass dies ein normales Phänomen ist, da der
Schaum ein Gedächtnis hat.
Um Falten zu entfernen, legen Sie unser Produkt bitte an die Luft und legen Sie
Gewichte auf die Stellen, an denen Falten aufgetreten sind. Nach einigen Tagen
liegt es vollkommen flach.
MAINTENANCE/ SERVICE
Lassen Sie Ihre Golf Putting Green Mat-Auflage von einem qualifizierten
Reparaturfachmann reparieren und verwenden Sie dabei ausschließlich
identische Ersatzteile. Dadurch wird sichergestellt, dass die Sicherheit der Golf
Putting Green Mat-Auflage erhalten bleibt. Eine staubige, feuchte oder korrosive
Umgebung kann die Golf Putting Green Mat-Auflage beschädigen.
Bitte beachten Sie: Mangelnde Wartung kann zum Erlöschen der Garantie
führen. Die Garantie für dieses Werkzeug erlischt, wenn die Golf Putting Green
Mat-Unterlage ohne Zustimmung eines autorisierten Herstellervertreters
verändert wurde.
Garantie
7. Diese Garantie deckt ausschließlich Schadensersatzansprüche ab, die
auf einen Herstellungsfehler des Produkts zurückzuführen sind .
8. Bei Inanspruchnahme der Garantie muss der Garantieberechtigte den
Kaufbeleg mit Kaufdatum vorlegen.
9. Die Zufriedenheit unserer Kunden ist immer die Motivation für unser
Markenwachstum. Wir versprechen, Ihnen bei der Lösung aller Probleme
zu helfen. Bitte lassen Sie uns einfach wissen, wenn Sie Hilfe benötigen.
UNSER SERVICE TEAM VERSPRECHEN ZU ANTWORT ZU DEIN
NACHRICHT INNERHALB 24 H .
Umfang der Garantie

8
9. Wir garantieren, dass VEVOR- Produkte gemäß den
Qualitätsmanagementverfahren von ISO 9001 hergestellt werden und für
den Zeitraum frei von Herstellungsfehlern sind von Garantie.
10. Diese Garantie deckt Produktfehler aufgrund von Herstellungsfehlern
innerhalb eines Jahres ab Kaufdatum ab. Nach Prüfung durch einen
Vertriebsmitarbeiter werden defekte Produkte kostenlos ersetzt oder durch
gleichwertige Ware repariert.
11. Durch einen während der Garantiezeit geltend gemachten
Garantieanspruch wird die Gesamtgarantiezeit nicht verlängert.
12. Garantiezeiträume: Datum des Garantieanspruchs .

Hersteller: Shanghaimuxinmuyeyouxiangongsi
Adresse : Shuangchenglu 803nong11hao1602A-1609shi, Baoshanqu, Shanghai
200000 CN.
Vertreter der EG: E-CrossStu GmbH
Mainzer Landstr.69, 60329 Frankfurt am Main.
UK REP: YH CONSULTING LIMITED.
C/O YH Consulting Limited Office 147, Centurion House, London Road, Staines-
upon-Thames, Surrey, TW18 4AX
Nach AUS importiert: SIHAO PTY LTD.
1 ROKEVA STREETEASTWOOD NSW 2122 Australien
In die USA importiert: Sanven Technology Ltd.
Suite 250, 9166 Anaheim Place, Rancho Cucamonga, CA 91730


Tecnico Supporto e certificato di garanzia elettronica
www.vevor.com/support
TAPPETO PUTTING GREEN GOLF
We continue to be committed to provide you products with competitive price.
"Save Half", "Half Price" or any other similar expressions used by us only represents an
estimate of savings you might benefit from buying certain products with us compared to the
major top brands and does not necessarily mean to cover all categories of products offered
by us. You are kindly reminded to verify carefully when you are placing an order with us if
you are actually saving half in comparison with the top major brands.


1
MODELLO: GPLXQ1D19250 ;GPLXQ2D30300 ; GPLXQ5D30300
Have product questions? Need technical support? Please feel free to
contact us:
Technical Support and E-Warranty Certificate
www.vevor.com/support
NEED HELP? CONTACT US!
This is the original instruction, please read all manual instructions
carefully before operating. VEVOR reserves a clear interpretation of
our user manual. The appearance of the product shall be subject to
the product you received. Please forgive us that we won't inform you
again if there are any technology or software updates on our product.
GOLF PUTTING GREEN MAT

2
TECHNICAL SPECIFICATIONS
Modello
Materiale principale
Specifiche di
prodotto
GPLXQ1D
19250
Superficie del materassino in
pelo tagliato in fibra + fondo in
TPE; Base in legno massello
di pino (colore: noce)
2585*275*160 mm
GPLXQ2D
30300
Superficie del materassino in
pelo tagliato in fibra + fondo in
TPE; Base in legno massello
di pino (colore: noce)
3140*385*505 mm
GPLXQ5D
30300
Superficie del materassino in
pelo tagliato in fibra + fondo in
TPE; Base in legno massello
di pino (colore: noce)
3090*385*180
INSTALLATION INSTRUCTIONS
16. Si prega di smaltire con cura tutti i sacchetti di plastica e di tenerli lontano
dalla portata dei bambini e degli animali domestici.
17. Controllare tutti i componenti forniti secondo l'elenco contenuto in questo
manuale . Assicurati di avere tutte le parti elencate.
18. Pur prestando particolare attenzione durante la fabbricazione di questo
prodotto, è necessario prestare attenzione durante il processo di assemblaggio
per evitare di graffiarsi con gli spigoli vivi.
19. Indossare guanti protettivi durante il montaggio e l'uso.
20. Il prodotto deve essere posizionato su una superficie piana.
INSTALLATION STEPS
MODELLO: GPLXQ1D19250

3
13. Aprire la scatola, estrarre i
pezzi e stendere il tappetino.
14. Inizia posizionando il fermo
posteriore nel slot situato sul retro di
la base.
15. Allinea le tracce di ritorno della
palla iniziando dalla Base alla fine
del Tappetino.
16. Porta il tuo gioco di golf al livello
successivo putting con il tuo nuovo
tappetino da putting.
MODELLO: GPLXQ2D30300
16. Aprire la scatola, estrarre i pezzi
e stendere il tappetino.
17. Inizia posizionando il fermo
posteriore nel slot situato sul retro
della base.

4
18. Uno stand per mettere il club nel
slot situato sul retro di la base.
19. Allinea le tracce di ritorno
della palla iniziando dalla Base
alla fine del Tappetino.
20. Porta il tuo gioco di golf al livello
successivo putting con il tuo nuovo
tappetino da putting.
MODELLO: GPLXQ5D30300
13. Aprire la scatola, estrarre i pezzi e
stendere il tappetino.
14. Inizia posizionando il fermo
posteriore nel slot situato sul
retro della base.

5
15. Allinea le tracce di ritorno della
palla iniziando dalla Base alla fine del
Tappetino.
16. Porta il tuo gioco di golf al
livello successivo putting con il
tuo nuovo tappetino da putting.
SAFETY WARNINGS AND PRECAUTIONS
Grazie per aver utilizzato questo prodotto. Per essere sicuri di poter utilizzare
correttamente la macchina, leggere attentamente queste istruzioni prima di
utilizzarla e conservarle adeguatamente per riferimento futuro. Si prega di leggere
le precauzioni e le regole di sicurezza in questa pagina per garantire un utilizzo
sicuro. Questo manuale illustrerà la sicurezza. avvertenze e precauzioni,
funzionamento, manutenzione e pulizia. Le avvertenze e le istruzioni contenute
nel presente manuale non possono coprire tutte le possibili condizioni e situazioni
che potrebbero verificarsi. Attenzione e buon senso non sono incorporati in
questo prodotto poiché gli usi saranno conformi a questi codici.
Si prega di leggere TUTTE le istruzioni prima di utilizzare la macchina.
61. Il montaggio deve seguire queste istruzioni. Un montaggio errato può
rappresentare un pericolo. Indossare guanti da lavoro pesanti durante il
montaggio.
62. Non montare in caso di stanchezza o sotto l'effetto di alcol, droghe o farmaci.
63. Il peso, l'elasticità e altre proprietà del prodotto si applicano solo ai prodotti
correttamente e completamente assemblati.
64. Mantenere l'area di assemblaggio pulita e ben illuminata.
65. Tenere gli astanti lontani dall'area durante il montaggio.
66. Questa è un'attrezzatura per l'allenamento sportivo, non un giocattolo, deve
essere utilizzata sotto la guida di un allenatore. Non permettere a bambini e
animali domestici di giocare da soli o di avvicinarsi a questo oggetto.
Impossibile arrampicarsi sui prodotti.
67. Utilizzare solo come previsto. Non sedersi o stare in piedi sul prodotto.
68. Ispezionare prima di ogni utilizzo. Non utilizzarlo se le parti sono allentate o
danneggiate.

6
69. Persone o oggetti appesi al prodotto ne causeranno la caduta.
70. Prestare attenzione ai pedoni e ai veicoli durante l'utilizzo.
71. Non utilizzare questa unità per scopi diversi dall'uso indicato.
72. Il tappetino da golf Putting Green non può posizionare oggetti per evitare
danni.
73. Non utilizzarlo per scopi commerciali.
74. N on pulirlo con materiali abrasivi.
75. Non lasciarlo mai incustodito durante l'uso.
76. L'urina e le feci degli animali domestici possono danneggiare il prodotto,
tenere lontano.
77. Non posizionare il prodotto sopra o vicino ad aria calda, fornelli elettrici o
stufe. Fuochi d'artificio, sigarette, razzi e altri oggetti possono accendere il
prodotto. Per favore, stai lontano da loro.
78. Il prodotto deve essere posizionato su una superficie piana. E dovrebbe
essere installato in un luogo aperto e sicuro, evitando luoghi vicino a finestre,
strade, ferrovie, fiumi, ecc.
79. Durante l'uso è necessario indossare attrezzature sportive (scarpe da calcio,
guanti da calcio, ecc.). Non posizionarlo in un ambiente umido.
AVVERTIMENTO:
80. Questo apparecchio non è destinato all'uso da parte di persone giovani
o inferme a meno che non siano supervisionate da una persona
responsabile per garantire che possano utilizzare l'apparecchio in
sicurezza. I bambini piccoli devono essere sorvegliati per assicurarsi
che non giochino con il prodotto. Gli animali domestici devono stare
lontani dal prodotto.
L'uso di questo prodotto è limitato ai soli ambienti interni. L'uso oltre
questo intervallo specificato può causare danni al prodotto, per i quali la
nostra azienda non sarà ritenuta responsabile.
TIP FOR REMOVING CREASES
E 'normale appoggiare il tappetino piatto per 24 ore affinché il tappeto si
appiattisca completamente.
Potresti trovare delle pieghe sulla superficie verde una volta aperta la scatola,
tieni presente che questo è un fenomeno normale perché la schiuma ha
memoria. Per aiutare
rimuovere le pieghe, adagiare il nostro prodotto all'aria aperta e mettere dei pesi
sulla parte superiore dove sono apparse le pieghe, e dopo pochi giorni si

7
appiattirà perfettamente.
MAINTENANCE/ SERVICE
Richiedere la manutenzione del tappetino del putting green da golf a un tecnico
qualificato utilizzando solo parti di ricambio identiche. Ciò garantirà il
mantenimento della sicurezza del tappetino del putting green da golf. Un
ambiente polveroso, umido o corrosivo può causare danni al tappetino del
putting green da golf. tampone.
Si prega di notare che: La mancanza di manutenzione può comportare
l'annullamento della garanzia. La garanzia di questo strumento sarà nulla se il
tappetino da golf Putting Green è stato modificato senza il consenso di un
rappresentante autorizzato del produttore.
Garanzia
10. Questa garanzia coprirà solo le richieste di risarcimento danni dovuti a
difetti di fabbricazione del prodotto .
11. Se viene presentata una richiesta di garanzia, la parte avente diritto
alla copertura della garanzia deve presentare la prova d'acquisto, inclusa
la data di acquisto
12. La soddisfazione dei clienti è sempre la motivazione della crescita del
nostro marchio. Promettiamo di aiutarti a risolvere qualsiasi problema. Per
favore, facci sapere se hai bisogno di aiuto.
NOSTRO SERVIZIO SQUADRA PROMESSE A RISPONDERE A TUO
MESSAGGIO ENTRO 24 ore .
Ambito della garanzia
13. Garantiamo che i prodotti VEVOR sono realizzati in conformità con le
procedure di gestione della qualità ISO 9001 e sono esenti da difetti di
fabbricazione per il periodo Di garanzia.
14. Questa garanzia copre i difetti dei prodotti dovuti a difetti di
fabbricazione entro 1 anno dalla data di acquisto. Dopo l'ispezione da
parte del rappresentante di vendita, i prodotti difettosi verranno sostituiti o
riparati gratuitamente con prodotti equivalenti.
15. Qualsiasi richiesta di garanzia avanzata durante il periodo di garanzia
non estenderà il periodo complessivo di copertura della garanzia.
16. Periodi di garanzia: data della richiesta di garanzia .

8

Produttore: Shanghaimuxinmuyeyouxiangongsi
Indirizzo : Shuangchenglu 803nong11hao1602A-1609shi, baoshanqu, shanghai
200000 CN.
REP CE: E-CrossStu GmbH
Mainzer Landstr.69, 60329 Francoforte sul Meno.
REP. DEL REGNO UNITO: YH CONSULENZA LIMITATA.
C/O YH Consulting Limited Office 147, Centurion House, London Road, Staines-
upon-Thames, Surrey, TW18 4AX
Importato in Australia: SIHAO PTY LTD.
1 ROKEVA STREETEASTWOOD NSW 2122 Australia
Importato negli Stati Uniti: Sanven Technology Ltd.
Suite 250, 9166 Anaheim Place, Rancho Cucamonga, CA 91730


Técnico Certificado de soporte y garantía electrónica
www.vevor.com/support
ALFOMBRA VERDE DE GOLF
We continue to be committed to provide you products with competitive price.
"Save Half", "Half Price" or any other similar expressions used by us only represents an
estimate of savings you might benefit from buying certain products with us compared to the
major top brands and does not necessarily mean to cover all categories of products offered
by us. You are kindly reminded to verify carefully when you are placing an order with us if
you are actually saving half in comparison with the top major brands.


1
MODELO: GPLXQ1D19250 ;GPLXQ2D30300 ; GPLXQ5D30300
Have product questions? Need technical support? Please feel free to
contact us:
Technical Support and E-Warranty Certificate
www.vevor.com/support
NEED HELP? CONTACT US!
This is the original instruction, please read all manual instructions
carefully before operating. VEVOR reserves a clear interpretation of
our user manual. The appearance of the product shall be subject to
the product you received. Please forgive us that we won't inform you
again if there are any technology or software updates on our product.
GOLF PUTTING GREEN MAT

2
TECHNICAL SPECIFICATIONS
Modelo
Material principal
Especificaciones del
producto
GPLXQ1D
19250
Superficie de estera de pelo
cortado con fibra + fondo de
TPE; Base de madera maciza
de pino (Color: Nogal)
2585*275*160mm
GPLXQ2D
30300
Superficie de estera de pelo
cortado con fibra + fondo de
TPE; Base de madera maciza
de pino (Color: Nogal)
3140*385*505mm
GPLXQ5D
30300
Superficie de estera de pelo
cortado con fibra + fondo de
TPE; Base de madera maciza
de pino (Color: Nogal)
3090*385*180
INSTALLATION INSTRUCTIONS
21. Deseche todas las bolsas de plástico con cuidado y manténgalas alejadas de
los niños y las mascotas.
22. Verifique todos los componentes proporcionados de acuerdo con la lista de
este manual . Asegúrese de tener todas las piezas enumeradas.
23. Aunque se presta especial atención a la hora de fabricar este producto, se
debe tener cuidado durante el proceso de montaje para evitar rayarse con bordes
cortantes.
24. Utilice guantes protectores durante el montaje y uso.
25. El producto debe colocarse sobre una superficie plana.
INSTALLATION STEPS
MODELO: GPLXQ1D19250
3
17. Abre la caja, saca las piezas y
extiende el tapete.
18. Comience colocando el tope
trasero en el ranura ubicada en la
parte posterior de la base.
19. Alinee las pistas de retorno de
la bola comenzando desde la Base
hasta el final del Tapete.
20. Lleva tu juego de golf al
siguiente nivel Putting con tu nuevo
tapete de Putting.
MODELO: GPLXQ2D30300
21. Abre la caja, saca las piezas y
extiende el tapete.
22. Comience colocando el tope
trasero en el ranura ubicada en la
parte posterior de la base.
4
23. Un soporte para poner el palo en
el ranura ubicada en la parte
posterior de la base.
24. Alinee las pistas de retorno de
la bola comenzando desde la
Base hasta el final del Tapete.
25. Lleva tu juego de golf al siguiente
nivel Putting con tu nuevo tapete de
Putting.
MODELO: GPLXQ5D30300
17. Abre la caja, saca las piezas y
extiende el tapete.
18. Comience colocando el tope
trasero en el ranura ubicada en
la parte posterior de la base.

5
19. Alinee las pistas de retorno de la
bola comenzando desde la Base hasta
el final del Tapete.
20. Lleva tu juego de golf al
siguiente nivel Putting con tu
nuevo tapete de Putting.
SAFETY WARNINGS AND PRECAUTIONS
Gracias por usar este producto. Para asegurarse de que puede operar la
máquina correctamente, lea atentamente estas instrucciones antes de operarla y
consérvelas adecuadamente para consultarlas en el futuro. Lea las precauciones
y reglas de seguridad en esta página para garantizar su uso seguro. Este manual
describirá la seguridad. advertencias y precauciones, operación, mantenimiento y
limpieza. Las advertencias e instrucciones revisadas en este manual no pueden
cubrir todas las condiciones y situaciones posibles que puedan ocurrir. Este
producto no incluye precaución ni sentido común, ya que sus usos cumplirán con
estos códigos.
Lea TODAS las instrucciones antes de utilizar su máquina.
81. El montaje debe seguir estas instrucciones. El montaje incorrecto puede ser
un peligro. Use guantes de trabajo resistentes durante el montaje.
82. No se reúna cuando esté cansado o bajo la influencia de alcohol, drogas o
medicamentos.
83. El peso, la elasticidad y otras propiedades del producto sólo son aplicables a
productos correctamente y completamente ensamblados.
84. Mantenga el área de reunión limpia y bien iluminada.
85. Mantenga a los transeúntes fuera del área durante el montaje.
86. Este es un equipo de entrenamiento deportivo, no un juguete, debe usarse
bajo la guía de un entrenador. No permita que los niños y las mascotas
jueguen solos ni se acerquen a este artículo. No puedo subir productos.
87. Úselo únicamente según lo previsto. No se siente ni se pare sobre el
producto.
88. Inspeccione antes de cada uso. No lo utilice si las piezas están sueltas o
dañadas.

6
89. Las personas u objetos que cuelguen del producto harán que éste se caiga.
90. Preste atención a los peatones y vehículos cuando lo utilice.
91. No utilice esta unidad para ningún otro propósito que no sea el uso indicado.
92. Golf Putting Green Mat no puede colocar artículos para evitar daños.
93. No lo utilice con fines comerciales.
94. No lo limpie con ningún material abrasivo.
95. Nunca lo dejes desatendido mientras esté en uso.
96. La orina y las heces de las mascotas pueden dañar el producto; manténgalo
alejado.
97. No coloque el producto sobre o cerca de aire caliente, quemadores o
calentadores eléctricos. Los fuegos artificiales, cigarrillos, bengalas y otros
artículos pueden encender el producto. Por favor manténgase alejado de
ellos.
98. El producto debe colocarse sobre una superficie plana. Y debe instalarse en
un lugar abierto y seguro, evitando lugares cercanos a ventanas, carreteras,
vías de ferrocarril, ríos, etc.
99. Durante su uso se debe utilizar equipo deportivo (botas de fútbol, guantes de
fútbol, etc.). No lo coloque en un ambiente húmedo.
ADVERTENCIA:
100. Este aparato no está diseñado para que lo utilicen personas jóvenes o
enfermas a menos que esté supervisado por una persona responsable
para garantizar que puedan utilizar el aparato de forma segura. Se debe
supervisar a los niños pequeños para asegurarse de que no jueguen
con el producto. Las mascotas deben mantenerse alejadas del
producto.
El uso de este producto está limitado únicamente a ambientes interiores. El
uso más allá de este rango especificado puede causar daños al producto,
de los cuales nuestra empresa no será responsable.
TIP FOR REMOVING CREASES
Esto es normal Coloque la alfombra en posición horizontal durante 24 horas
para que se aplane completamente.
Es posible que encuentre arrugas en la superficie del green una vez que abra la
caja. Tenga en cuenta que esto es un fenómeno normal porque la espuma tiene
memoria. Para ayudar
elimine las arrugas, coloque nuestro producto al aire libre y coloque pesas en la
parte superior donde aparecieron las arrugas, y quedará perfectamente plano

7
después de unos días.
MAINTENANCE/ SERVICE
Haga que un técnico calificado realice el mantenimiento de la alfombrilla de su
tapete de golf para putting green utilizando únicamente piezas de repuesto
idénticas. Esto garantizará que se mantenga la seguridad de la almohadilla de su
tapete de golf para putting green. Un ambiente polvoriento, húmedo o corrosivo
puede causar daños a la alfombra de golf para putting green. almohadilla.
Tenga en cuenta que: La falta de mantenimiento puede dar lugar a la
cancelación de la garantía. La garantía de esta herramienta quedará anulada si la
almohadilla del tapete del green de golf ha sido modificada sin el consentimiento
de un representante autorizado del fabricante.
Garantía
13. Esta garantía sólo cubrirá reclamaciones por daños debidos a un fallo
en la fabricación del producto .
14. Si se realiza un reclamo de garantía, la parte con derecho a la
cobertura de la garantía debe presentar el comprobante de compra,
incluida la fecha de compra.
15. La satisfacción de los clientes es siempre la motivación del
crecimiento de nuestra marca. Nos comprometemos a ayudarle a resolver
cualquier problema. Por favor, háganos saber si necesita ayuda.
NUESTRO SERVICIO EQUIPO PROMESAS A RESPONDER A SU
MENSAJE DENTRO 24H .
Alcance de la garantía
17. Garantizamos que los productos VEVOR se producen de acuerdo con
los procedimientos de Gestión de Calidad ISO 9001 y están libres de
defectos de fabricación durante el período de garantía.
18. Esta garantía cubre fallas en los productos debido a defectos de
fabricación dentro de 1 año a partir de la fecha de compra. Después de la
inspección por parte del representante de ventas, los productos
defectuosos serán reemplazados o reparados con productos equivalentes
sin cargo.
19. Cualquier reclamo de garantía realizado durante el período de
garantía no extenderá el período de cobertura general de la garantía.

8
20. Períodos de garantía: Fecha de reclamación de garantía .

Fabricante: Shanghaimuxinmuyeyouxiangongsi
Dirección : Shuangchenglu 803nong11hao1602A-1609shi, baoshanqu, shanghai
200000 CN.
REPRESENTANTE DE LA CE: E-CrossStu GmbH
Mainzer Landstr.69, 60329 Fráncfort del Meno.
REPRESENTANTE DEL REINO UNIDO: YH CONSULTING LIMITADO.
C/O YH Consulting Limited Oficina 147, Centurion House, London Road, Staines-
upon-Thames, Surrey, TW18 4AX
Importado a AUS: SIHAO PTY LTD.
1 ROKEVA STREET ASTWOOD NSW 2122 Australia
Importado a EE. UU.: Sanven Technology Ltd.
Suite 250, 9166 Anaheim Place, Rancho Cucamonga, CA 91730


Techniczny Certyfikat wsparcia i e-gwarancji
www.vevor.com/support
ZIELONA MATA DO GOLFA
We continue to be committed to provide you products with competitive price.
"Save Half", "Half Price" or any other similar expressions used by us only represents an
estimate of savings you might benefit from buying certain products with us compared to the
major top brands and does not necessarily mean to cover all categories of products offered
by us. You are kindly reminded to verify carefully when you are placing an order with us if
you are actually saving half in comparison with the top major brands.


1
MODELU: GPLXQ1D19250 ;GPLXQ2D30300 ; GPLXQ5D30300
Have product questions? Need technical support? Please feel free to
contact us:
Technical Support and E-Warranty Certificate
www.vevor.com/support
NEED HELP? CONTACT US!
This is the original instruction, please read all manual instructions
carefully before operating. VEVOR reserves a clear interpretation of
our user manual. The appearance of the product shall be subject to
the product you received. Please forgive us that we won't inform you
again if there are any technology or software updates on our product.
GOLF PUTTING GREEN MAT
2
TECHNICAL SPECIFICATIONS
Model
Glowny material
Specyfikacja produktu
GPLXQ1D
19250
Powierzchnia maty z włókna
ciętego + spód z TPE;
Podstawa z litego drewna
sosnowego (kolor: orzech)
2585*275*160mm
GPLXQ2D
30300
Powierzchnia maty z włókna
ciętego + spód z TPE;
Podstawa z litego drewna
sosnowego (kolor: orzech)
3140*385*505mm
GPLXQ5D
30300
Powierzchnia maty z włókna
ciętego + spód z TPE;
Podstawa z litego drewna
sosnowego (kolor: orzech)
3090*385*180
INSTALLATION INSTRUCTIONS
26. Prosimy o ostrożną utylizację wszystkich plastikowych toreb i
przechowywanie ich z dala od dzieci i zwierząt domowych.
27. Sprawdź wszystkie dostarczone komponenty zgodnie z listą zawartą w tej
instrukcji . Upewnij się, że masz wszystkie wymienione części.
28. Chociaż przy wytwarzaniu tego produktu należy zachować szczególną
ostrożność, należy zachować ostrożność podczas procesu montażu, aby uniknąć
zarysowania ostrymi krawędziami.
29. Podczas montażu i użytkowania należy nosić rękawice ochronne.
30. Produkt należy umieścić na płaskiej powierzchni.
INSTALLATION STEPS
MODEL: GPLXQ1D19250

3
21. Otwórz pudełko, wyjmij
elementy i rozłóż matę.
22. Zacznij od umieszczenia tylnego
ogranicznika w gniazdo znajdujące
się z tyłu baza.
23. Zaczynając od ułożenia torów
powrotu piłki od podstawy do końca
maty.
24. Przenieś swoją grę w golfa na
wyższy poziom dzięki układanie za
pomocą nowej maty do układania.
MODELU: GPLXQ2D30300
26. Otwórz pudełko, wyjmij elementy i
rozłóż matę.
27. Zacznij od umieszczenia
tylnego ogranicznika w szczelina
znajdująca się z tyłu podstawy.

4
28. Stojak do umieszczania klubu
gniazdo znajdujące się z tyłu baza.
29. Zaczynając od ułożenia torów
powrotu piłki od podstawy do
końca maty.
30. Przenieś swoją grę w golfa na
wyższy poziom dzięki układanie za
pomocą nowej maty do układania.
MODEL: GPLXQ5D30300
21. Otwórz pudełko, wyjmij elementy i
rozłóż matę.
22. Zacznij od umieszczenia
tylnego ogranicznika w szczelina
znajdująca się z tyłu podstawy.

5
23. Zaczynając od ułożenia torów
powrotu piłki od podstawy do końca
maty.
24. Przenieś swoją grę w golfa
na wyższy poziom dzięki
układanie za pomocą nowej
maty do układania.
SAFETY WARNINGS AND PRECAUTIONS
Dziękujemy za skorzystanie z tego produktu. Aby mieć pewność, że będziesz
mógł prawidłowo obsługiwać maszynę, przeczytaj uważnie niniejszą instrukcję
przed jej uruchomieniem i zachowaj ją odpowiednio do wykorzystania w
przyszłości. Aby zapewnić bezpieczne użytkowanie, prosimy o zapoznanie się ze
środkami ostrożności i zasadami bezpiecze
ń
stwa zamieszczonymi na tej stronie.
Niniejsza instrukcja opisuje zasady bezpiecze
ń
stwa. ostrzeżenia i środki
ostrożności, obsługa, konserwacja i czyszczenie. Ostrzeżenia i instrukcje
omówione w tej instrukcji nie obejmują wszystkich możliwych warunków i sytuacji,
które mogą wystąpić. Ten produkt nie wymaga ostrożności ani zdrowego
rozsądku, ponieważ jego zastosowanie będzie zgodne z tymi kodami.
Przed użyciem urządzenia przeczytaj WSZYSTKIE instrukcje.
101. Montaż musi przebiegać zgodnie z tymi instrukcjami. Nieprawidłowy montaż
może stanowić zagrożenie. Podczas montażu należy nosić grube rękawice
robocze.
102. Nie należy montować, gdy jest się zmęczonym lub pod wpływem alkoholu,
narkotyków lub leków.
103. Waga, elastyczność i inne właściwości produktu mają zastosowanie
wyłącznie do produktów prawidłowo i całkowicie zmontowanych.
104. Utrzymuj miejsce zbiórki w czystości i dobrze oświetlone.
105. Podczas montażu trzymaj osoby postronne z dala od obszaru.
106. Jest to sprzęt do treningu sportowego, a nie zabawka, należy go używać pod
okiem trenera. Nie pozwalaj dzieciom i zwierzętom na samotną zabawę ani
nie zbliżaj się do tego przedmiotu. Nie można wspinać się po produktach.

6
107. Używaj wyłącznie zgodnie z przeznaczeniem. Nie siadaj ani nie stawaj na
produkcie.
108. Sprawdź przed każdym użyciem. Nie używaj go, jeśli części są luźne lub
uszkodzone.
109. Osoby lub przedmioty wiszące na produkcie spowodują upadek produktu.
110. Podczas korzystania z urządzenia należy zwracać uwagę na pieszych i
pojazdy.
111. Nie używaj tego urządzenia do celów innych niż wskazane.
112. Zielona mata do gry w golfa nie może umieszczać przedmiotów, aby uniknąć
uszkodzeń.
113. Nie używaj go do celów komercyjnych.
114. Nie czyść go żadnymi materiałami ściernymi.
115. Nigdy nie pozostawiaj go bez nadzoru podczas użytkowania.
116. Mocz i odchody zwierząt domowych mogą uszkodzić produkt, należy je
trzymać z daleka.
117. Nie umieszczaj produktu na lub w pobliżu gorącego powietrza, palników
elektrycznych lub grzejników. Fajerwerki, papierosy, flary i inne przedmioty
mogą zapalić produkt. Proszę, trzymaj się od nich z daleka.
118. Produkt należy umieścić na płaskiej powierzchni. I powinien być
zainstalowany w miejscu otwartym i bezpiecznym, unikając miejsc w pobliżu
okien, dróg, linii kolejowych, rzek itp.
119. Podczas użytkowania należy mieć na sobie sprzęt sportowy (buty piłkarskie,
rękawice piłkarskie itp.). Nie umieszczaj go w wilgotnym środowisku.
OSTRZEŻENIE:
120. To urządzenie nie jest przeznaczone do użytku przez osoby młode lub
niedołężne, chyba że będzie nadzorowane przez osobę odpowiedzialną,
która zapewni im bezpieczne korzystanie z urządzenia. Małe dzieci
należy nadzorować, aby mieć pewność, że nie bawią się produktem.
Zwierzęta powinny trzymać się z daleka od produktu.
Użycie tego produktu jest ograniczone wyłącznie do pomieszczeń
zamkniętych. Użycie wykraczające poza ten zakres może spowodować
uszkodzenie produktu, za co nasza firma nie ponosi odpowiedzialności.
TIP FOR REMOVING CREASES
To normalne połóż matę płasko na 24 godziny, aby dywanik całkowicie się
rozpłaszczył.
Po otwarciu pudełka mogą pojawić się zagniecenia na zielonej powierzchni.

7
Należy pamiętać, że jest to normalne zjawisko, ponieważ pianka ma pamięć. Aby
pomóc
usuń zagniecenia, połóż nasz produkt na świeżym powietrzu i połóż ciężarki na
górze, gdzie pojawiły się zagniecenia, a po kilku dniach będzie leżał idealnie
płasko.
MAINTENANCE/ SERVICE
Zleć wykwalifikowanemu serwisantowi naprawę podkładki do zielonej maty do
golfa przy użyciu wyłącznie identycznych części zamiennych. Zapewni to
bezpieczeństwo podkładki do zielonej maty do puttowania do golfa. Środowisko
zakurzone, wilgotne lub korozyjne może spowodować uszkodzenie maty do
puttowania do golfa Podkładka .
Należy pamiętać, że: Brak konserwacji może skutkować unieważnieniem
gwarancji. Gwarancja na to narzędzie utraci ważność w przypadku modyfikacji
podkładki do golfa Putting Green Mat bez zgody autoryzowanego
przedstawiciela producenta.
Gwarancja
16. Niniejsza gwarancja obejmuje wyłącznie roszczenia z tytułu szkód
powstałych na skutek wady produkcyjnej produktu .
17. W przypadku zgłoszenia roszczenia gwarancyjnego osoba uprawniona
do ochrony gwarancyjnej musi przedstawić dowód zakupu zawierający
datę zakupu
18. Zadowolenie klientów jest zawsze motywacją do rozwoju naszej marki.
Obiecujemy, że pomożemy Ci rozwiązać wszelkie problemy. Jeśli
potrzebujesz pomocy, po prostu daj nam znać .
NASZ PRACA ZESPÓŁ OBIETNICE DO ODPOWIEDŹ DO TWÓJ
WIADOMOŚĆ W 24 godz .
Zakres gwarancji
21. Gwarantujemy, że produkty VEVOR są produkowane zgodnie z
procedurami zarządzania jakością ISO 9001 i są wolne od wad
produkcyjnych przez okres z Gwarancja.
22. Niniejsza gwarancja obejmuje wady produktów wynikające z wad
produkcyjnych w ciągu 1 roku od daty zakupu. Po sprawdzeniu przez

8
przedstawiciela handlowego wadliwe produkty zostaną bezpłatnie
wymienione lub naprawione na równorzędne towary.
23. Wszelkie roszczenia gwarancyjne zgłoszone w okresie gwarancyjnym
nie przedłużają całkowitego okresu gwarancji.
24. Okresy gwarancji:Data zgłoszenia gwarancyjnego .

Producent: Shanghaimuxinmuyeyouxiangongsi
Adres : Shuangchenglu 803nong11hao1602A-1609shi, baoshanqu, szanghaj
200000 CN.
Przedstawiciel KE: E-CrossStu GmbH
Mainzer Landstr.69, 60329 Frankfurt nad Menem.
REPREZENTANT Wielkiej Brytanii: YH CONSULTING SPÓŁKA Z
OGRANICZONĄ ODPOWIEDZIALNOŚCIĄ.
C/O YH Consulting Limited Office 147, Centurion House, London Road, Staines-
upon-Thames, Surrey, TW18 4AX
Import do AUS: SIHAO PTY LTD.
1 ROKEVA STREETEASTWOOD NSW 2122 Australia
Import do USA: Sanven Technology Ltd.
Apartament 250, 9166 Anaheim Place, Rancho Cucamonga, Kalifornia
91730


Technisch Ondersteuning en e-garantiecertificaat
www.vevor.com/support
GOLF DAT GROENE MAT ZET
We continue to be committed to provide you products with competitive price.
"Save Half", "Half Price" or any other similar expressions used by us only represents an
estimate of savings you might benefit from buying certain products with us compared to the
major top brands and does not necessarily mean to cover all categories of products offered
by us. You are kindly reminded to verify carefully when you are placing an order with us if
you are actually saving half in comparison with the top major brands.


1
MODEL: GPLXQ1D19250 ; GPLXQ2D30300 ; GPLXQ5D30300
Have product questions? Need technical support? Please feel free to
contact us:
Technical Support and E-Warranty Certificate
www.vevor.com/support
NEED HELP? CONTACT US!
This is the original instruction, please read all manual instructions
carefully before operating. VEVOR reserves a clear interpretation of
our user manual. The appearance of the product shall be subject to
the product you received. Please forgive us that we won't inform you
again if there are any technology or software updates on our product.
GOLF PUTTING GREEN MAT

2
TECHNICAL SPECIFICATIONS
Model
Hoofd materiaal
Productspecificatie
GPLXQ1D
19250
Oppervlak van vezel
gesneden poolmat + TPE-
bodem; Basis van grenen
massief hout (kleur: walnoot)
2585*275*160mm
GPLXQ2D
30300
Oppervlak van vezel
gesneden poolmat + TPE-
bodem; Basis van grenen
massief hout (kleur: walnoot)
3140*385*505mm
GPLXQ5D
30300
Oppervlak van vezel
gesneden poolmat + TPE-
bodem; Basis van grenen
massief hout (kleur: walnoot)
3090*385*180
INSTALLATION INSTRUCTIONS
31. Gooi alle plastic zakken zorgvuldig weg en houd ze uit de buurt van kinderen
en huisdieren.
32. Controleer alle geleverde componenten volgens de lijst in deze handleiding .
Zorg ervoor dat u alle genoemde onderdelen heeft.
33. Hoewel u bijzondere aandacht besteedt aan de vervaardiging van dit product,
moet u tijdens het montageproces voorzichtig zijn om te voorkomen dat u door
scherpe randen wordt bekrast.
34. Draag tijdens montage en gebruik beschermende handschoenen.
35. Het product moet op een vlakke ondergrond worden geplaatst.
INSTALLATION STEPS
MODEL: GPLXQ1D19250

3
25. Open de doos, haal de stukken
eruit en rol de mat uit.
26. Begin met het plaatsen van de
achteraanslag in de sleuf aan de
achterkant van de basis.
27. Zet de balretourtracks op een
rij, beginnend van de basis tot het
einde van de mat.
28. Breng uw golfspel naar een
hoger niveau door putten met uw
nieuwe puttingmat.
MODEL: GPLXQ2D30300
31. Open de doos, haal de stukken
eruit en rol de mat uit.
32. Begin met het plaatsen van de
achteraanslag in de gleuf aan de
achterkant van de basis.
4
33. Een standaard om de club in de
kast te zetten sleuf aan de achterkant
van de basis.
34. Zet de balretourtracks op een
rij, beginnend van de basis tot het
einde van de mat.
35. Breng uw golfspel naar een hoger
niveau door putten met uw nieuwe
puttingmat.
MODEL: GPLXQ5D30300
25. Open de doos, haal de stukken
eruit en rol de mat uit.
26. Begin met het plaatsen van
de achteraanslag in de gleuf aan
de achterkant van de basis.

5
27. Zet de balretoursporen op een rij
van de basis tot het einde van de mat.
28. Breng uw golfspel naar een
hoger niveau door putten met uw
nieuwe puttingmat.
SAFETY WARNINGS AND PRECAUTIONS
Bedankt voor het gebruik van dit product. Om er zeker van te zijn dat u de
machine correct kunt bedienen, dient u deze instructie aandachtig te lezen
voordat u de machine gebruikt en bewaart u deze op de juiste manier voor
toekomstig gebruik. Lees de voorzorgsmaatregelen en veiligheidsregels op deze
pagina om een veilig gebruik te garanderen. In deze handleiding wordt de
veiligheid beschreven. waarschuwingen en voorzorgsmaatregelen, bediening,
onderhoud en reiniging. De waarschuwingen en instructies die in deze
handleiding worden besproken, kunnen niet alle mogelijke omstandigheden en
situaties dekken die zich kunnen voordoen. Voorzichtigheid en gezond verstand
zijn niet ingebouwd in dit product, aangezien het gebruik in overeenstemming zal
zijn met deze codes.
Lees ALLE instructies voordat u uw machine gebruikt.
121. Monteer moet deze instructies volgen. Een onjuiste montage kan een gevaar
vormen. Draag tijdens de montage stevige werkhandschoenen.
122. Niet monteren als u moe bent of onder invloed bent van alcohol, drugs of
medicijnen.
123. Gewichts- en elastische en overige producteigenschappen zijn alleen van
toepassing op correct en compleet gemonteerde producten.
124. Houd de verzamelplaats schoon en goed verlicht.
125. Houd omstanders tijdens de montage uit de buurt.
126. Dit is een sporttrainingsapparaat, geen speelgoed. Het moet worden gebruikt
onder begeleiding van een coach. Laat kinderen en huisdieren niet alleen
spelen of in de buurt van dit artikel komen. Kan producten niet beklimmen.
127. Alleen gebruiken zoals bedoeld. Ga niet op het product zitten of staan.

6
128. Inspecteer vóór elk gebruik. Gebruik het niet als onderdelen loszitten of
beschadigd zijn.
129. Mensen of voorwerpen die aan het product hangen, zullen ervoor zorgen dat
het product valt.
130. Let tijdens het gebruik op voetgangers en voertuigen.
131. Gebruik dit apparaat niet voor andere doeleinden dan het aangegeven
gebruik.
132. Golf Putting Green Mat kan geen items plaatsen om schade te voorkomen.
133. Gebruik het niet voor commerciële doeleinden.
134. Maak het niet schoon met schurend materiaal.
135. Laat het nooit onbeheerd achter terwijl het in gebruik is.
136. Urine en uitwerpselen van huisdieren kunnen het product beschadigen, blijf
uit de buurt.
137. Plaats het product niet op of in de buurt van hete lucht, elektrische branders
of verwarmingstoestellen. Vuurwerk, sigaretten, fakkels en andere
voorwerpen kunnen het product ontsteken. Blijf alsjeblieft uit hun buurt.
138. Het product moet op een vlakke ondergrond worden geplaatst. En het moet
op een open en veilige plaats worden geïnstalleerd, waarbij plaatsen in de
buurt van ramen, wegen, spoorwegen, rivieren, enz. worden vermeden.
139. Tijdens het gebruik moet sportuitrusting (voetbalschoenen,
voetbalhandschoenen, enz.) worden gedragen. Plaats het niet in een
vochtige omgeving.
WAARSCHUWING:
140. Dit apparaat is niet bedoeld voor gebruik door jonge of zwakke
personen, tenzij onder toezicht van een persoon die verantwoordelijk is
om ervoor te zorgen dat zij het apparaat veilig kunnen gebruiken. Op
jonge kinderen moet toezicht worden gehouden om ervoor te zorgen
dat ze niet met het product spelen. Huisdieren moeten uit de buurt van
het product blijven.
Het gebruik van dit product is uitsluitend beperkt tot binnenomgevingen.
Gebruik buiten dit gespecificeerde bereik kan schade aan het product
veroorzaken, waarvoor ons bedrijf niet verantwoordelijk kan worden
gehouden.
TIP FOR REMOVING CREASES
Dit is normaal Leg de mat 24 uur plat zodat het tapijt volledig plat is.
Het kan zijn dat u kreukels op het groene oppervlak tegenkomt zodra u de doos

7
opent. Houd er rekening mee dat dit een normaal verschijnsel is omdat het
schuim een geheugen heeft. Om u te helpen
Om vouwen te verwijderen, leg ons product in de open lucht en plaats gewichten
op de bovenkant waar de vouwen zichtbaar zijn, en het zal na een paar dagen
perfect plat liggen.
MAINTENANCE/ SERVICE
Laat een gekwalificeerde reparateur uw Golf Putting Green Mat-pad
onderhouden en gebruik alleen identieke vervangingsonderdelen. Dit zorgt
ervoor dat de veiligheid van de Golf Putting Green Mat-pad behouden blijft. Een
stoffige, vochtige of corrosieve omgeving kan schade aan de Golf Putting Green
Mat veroorzaken stootkussen.
Houd er rekening mee dat: Gebrek aan onderhoud kan leiden tot annulering
van de garantie. De garantie op dit gereedschap vervalt als de Golf Putting Green
Mat-pad is aangepast zonder toestemming van een geautoriseerde
vertegenwoordiger van de fabrikant.
Garantie
19. Deze garantie dekt alleen claims voor schade als gevolg van een fout
in de productie van het product .
20. Indien een garantieclaim wordt ingediend, moet de partij die recht
heeft op garantiedekking het aankoopbewijs overleggen, inclusief de
aankoopdatum
21. De tevredenheid van klanten is altijd de motivatie van onze merkgroei.
Wij beloven u te helpen eventuele problemen op te lossen. Laat het ons
weten als u hulp nodig heeft.
ONS DIENST TEAM BELOFTEN NAAR ANTWOORD NAAR JOUW
BERICHT BINNENIN 24 uur .
Omvang van de garantie
25. Wij garanderen dat VEVOR- producten worden geproduceerd in
overeenstemming met de ISO 9001-kwaliteitsmanagementprocedures en
vrij zijn van fabricagefouten gedurende de periode van garantie.
26. Deze garantie dekt defecten aan de producten als gevolg van
fabricagefouten binnen 1 jaar vanaf de datum van aankoop. Na inspectie
door een verkoopvertegenwoordiger worden defecte producten gratis
vervangen of gerepareerd door gelijkwaardige goederen.

8
27. Elke garantieclaim die tijdens de garantieperiode wordt ingediend,
verlengt de totale garantiedekkingsperiode niet.
28. Garantietermijnen: Datum garantieclaim .

Fabrikant: Shanghaimuxinmuyeyouxiangongsi
Adres : Shuangchenglu 803nong11hao1602A-1609shi, baoshanqu, shanghai
200000 CN.
EG-REP: E-CrossStu GmbH
Mainzer Landstr.69, 60329 Frankfurt am Main.
VK REP: YH CONSULTING LIMITED.
C/O YH Consulting Limited Office 147, Centurion House, London Road, Staines-
upon-Thames, Surrey, TW18 4AX
Geïmporteerd naar AUS: SIHAO PTY LTD.
1 ROKEVA STREETEASTWOOD NSW 2122 Australië
Geïmporteerd naar de VS: Sanven Technology Ltd.
Suite 250, 9166 Anaheim Place, Rancho Cucamonga, CA 91730


Teknisk Support och e-garanticertifikat
www.vevor.com/support
GOLF PUTTING GREEN MATTA
We continue to be committed to provide you products with competitive price.
"Save Half", "Half Price" or any other similar expressions used by us only represents an
estimate of savings you might benefit from buying certain products with us compared to the
major top brands and does not necessarily mean to cover all categories of products offered
by us. You are kindly reminded to verify carefully when you are placing an order with us if
you are actually saving half in comparison with the top major brands.


1
MODELL: GPLXQ1D19250 ;GPLXQ2D30300 ; GPLXQ5D30300
Have product questions? Need technical support? Please feel free to
contact us:
Technical Support and E-Warranty Certificate
www.vevor.com/support
NEED HELP? CONTACT US!
This is the original instruction, please read all manual instructions
carefully before operating. VEVOR reserves a clear interpretation of
our user manual. The appearance of the product shall be subject to
the product you received. Please forgive us that we won't inform you
again if there are any technology or software updates on our product.
GOLF PUTTING GREEN MAT
2
TECHNICAL SPECIFICATIONS
Modell
Huvudmaterial
Produktspecifikation
GPLXQ1D
19250
Fiberskuren luggmattayta +
TPE-botten; Fot av massivt
trä (Färg: Valnöt)
2585*275*160mm
GPLXQ2D
30300
Fiberskuren luggmattayta +
TPE-botten; Fot av massivt
trä (Färg: Valnöt)
3140*385*505mm
GPLXQ5D
30300
Fiberskuren luggmattayta +
TPE-botten; Fot av massivt
trä (Färg: Valnöt)
3090*385*180
INSTALLATION INSTRUCTIONS
36. Kassera alla plastpåsar försiktigt och förvara dem borta från barn och husdjur.
37. Kontrollera alla komponenter som tillhandahålls enligt listan i denna handbok .
Se till att du har alla delarna i listan.
38. Även om du är särskilt uppmärksam när du tillverkar denna produkt, måste du
vara försiktig under monteringsprocessen för att undvika att bli repad av vassa
kanter.
39. Använd skyddshandskar vid montering och användning.
40. Produkten ska placeras på en plan yta.
INSTALLATION STEPS
MODELL: GPLXQ1D19250
29. Öppna lådan, ta ut bitarna och
rulla ut mattan.
30. Börja med att placera
bakstoppet i öppning placerad på
baksidan av basen.

3
31. Rada upp bollreturspåren med
start från basen till slutet av mattan.
32. Ta ditt golfspel till nästa nivå
genom att putting med din nya
puttmatta.
MODELL: GPLXQ2D30300
36. Öppna lådan, ta ut bitarna och
rulla ut mattan.
37. Börja med att placera
bakstoppet i öppningen på
baksidan av basen.
38. Ett stativ för att sätta klubban i
öppning placerad på baksidan av
basen.
39. Rada upp bollreturspåren med
start från basen till slutet av
mattan.
4
40. Ta ditt golfspel till nästa nivå
genom att putting med din nya
puttmatta.
MODELL: GPLXQ5D30300
29. Öppna lådan, ta ut bitarna och rulla
ut mattan.
30. Börja med att placera
bakstoppet i öppningen på
baksidan av basen.
31. Rada upp bollreturspåren med
start från basen till slutet av mattan.
32. Ta ditt golfspel till nästa nivå
genom att putting med din nya
puttmatta.

5
SAFETY WARNINGS AND PRECAUTIONS
Tack för att du använder den här produkten. För att säkerställa att du kan
använda maskinen korrekt, läs denna instruktion noggrant innan du använder den
och förvara den på rätt sätt för framtida referens. Vänligen läs
försiktighetsåtgärderna och säkerhetsreglerna på denna sida för att säkerställa
din säker användning. Denna manual kommer att beskriva säkerheten. varningar
och försiktighetsåtgärder, drift, underhåll och rengöring. Varningarna och
instruktionerna som granskas i denna handbok kan inte täcka alla möjliga tillstånd
och situationer som kan uppstå. Försiktighet och sunt förnuft är inte inbyggt i
denna produkt eftersom användningen kommer att följa dessa koder.
Läs ALLA instruktioner innan du använder din maskin.
141. Montering måste följa dessa instruktioner. Felaktig montering kan vara en
fara. Använd kraftiga arbetshandskar vid montering.
142. Sätt dig inte ihop när du är trött eller påverkad av alkohol, droger eller
mediciner.
143. Vikt och elasticitet och andra produktegenskaper gäller endast för korrekt
och färdigmonterade produkter.
144. Håll monteringsområdet rent och väl upplyst.
145. Håll åskådare borta från området under monteringen.
146. Detta är en träningsutrustning, inte en leksak, den måste användas under
ledning av en tränare. Tillåt inte barn och husdjur att leka ensamma eller
närma sig det här föremålet. Kan inte klättra på produkter.
147. Använd endast som avsett. Sitt eller stå inte på produkten.
148. Inspektera före varje användning. Använd den inte om delar är lösa eller
skadade.
149. Människor eller föremål som hänger på produkten kommer att få produkten
att falla.
150. Var uppmärksam på fotgängare och fordon vid användning.
151. Använd inte denna enhet för andra ändamål än den angivna användningen.
152. Golf Putting Green Mat kan inte placera föremål för att undvika skador.
153. Använd den inte för kommersiella ändamål.
154. Rengör den inte med något slipande material.
155. Lämna den aldrig utan uppsikt när den används.
156. Urin och avföring från husdjur kan skada produkten, håll undan.
157. Placera inte produkten på eller nära varmluft, elektriska brännare eller
värmare. Fyrverkerier, cigaretter, bloss och andra föremål kan antända
produkten. Vänligen håll dig borta från dem.

6
158. Produkten ska placeras på en plan yta. Och den bör installeras på en öppen
och säker plats, undvik platser nära fönster, vägar, järnvägar, floder, etc.
159. Sportutrustning (fotbollsskor, fotbollshandskar, etc.) bör bäras under
användning. Placera den inte i en fuktig miljö.
VARNING:
160. Denna apparat är inte avsedd att användas av unga eller handikappade
personer om den inte övervakas av en ansvarig person för att
säkerställa att de kan använda apparaten på ett säkert sätt. Små barn
bör övervakas för att säkerställa att de inte leker med produkten.
Husdjur bör hålla sig borta från produkten.
Användningen av denna produkt är endast begränsad till inomhusmiljöer.
Användning utanför detta specificerade intervall kan orsaka skada på
produkten, vilket vårt företag inte kommer att hållas ansvarigt för.
TIP FOR REMOVING CREASES
Det här är normalt lägg mattan platt i 24 timmar så att mattan blir helt platt.
Du kan hitta veck på den gröna ytan när du öppnar lådan, observera att detta är
ett normalt fenomen eftersom skummet har minne.
ta bort veck, lägg ner vår produkt utomhus och lägg vikter på toppen där veck
dök upp, så kommer den att ligga perfekt platt efter några dagar.
MAINTENANCE/ SERVICE
Låt en kvalificerad reparatör serva din Golf Putting Green Mat-dyna med endast
identiska reservdelar. Detta kommer att säkerställa att säkerheten för Golf
Putting Green Mat-dynan bibehålls. En dammig, fuktig eller frätande miljö kan
orsaka skada på Golf Putting Green Mat pad .
Observera att: Brist på underhåll kan leda till att garantin upphävs. Garantin för
detta verktyg upphör att gälla om Golf Putting Green Mat-dynan hade
modifierats utan tillstånd från en auktoriserad tillverkarrepresentant.
Garanti
22. Denna garanti täcker endast skadeanspråk på grund av ett fel i
produktens tillverkning .
23. Om garantianspråk görs måste den som är berättigad till
garantiskyddet uppvisa inköpsbeviset inklusive inköpsdatum
24. Kundernas tillfredsställelse är alltid motivationen för vårt varumärkes

7
tillväxt. Vi lovar att hjälpa dig att lösa eventuella problem. Säg bara till om
du behöver hjälp.
VÅR SERVICE TEAM LÖFTEN TILL SVAR TILL DIN MEDDELANDE MED
IN 24 H.
Omfattning av garantin
29. Vi garanterar att VEVOR- produkter tillverkas i enlighet med ISO 9001
kvalitetsledningsprocedurer och är fria från tillverkningsfel under perioden
av garanti.
30. Denna garanti täcker fel på produkterna på grund av tillverkningsfel
inom 1 år från inköpsdatum. Efter inspektion av försäljningsrepresentant
kommer defekta produkter att ersättas eller repareras med likvärdiga varor
utan kostnad.
31. Eventuella garantianspråk som görs under garantiperioden förlänger
inte den övergripande garantitiden.
32. Garantiperioder: Datum för garantianspråk .

Tillverkare: Shanghaimuxinmuyeyouxiangongsi
Adress : Shuangchenglu 803nong11hao1602A-1609shi, baoshanqu, shanghai
200000 CN.
EC REP: E-CrossStu GmbH
Mainzer Landstr.69, 60329 Frankfurt am Main.
UK REP: YH CONSULTING LIMITED.
C/O YH Consulting Limited Office 147, Centurion House, London Road, Staines-
upon-Thames, Surrey, TW18 4AX
Importerad till AUS: SIHAO PTY LTD.
1 ROKEVA STREETEASTWOOD NSW 2122 Australien
Importerad till USA: Sanven Technology Ltd.
Suite 250, 9166 Anaheim Place, Rancho Cucamonga, CA 91730


