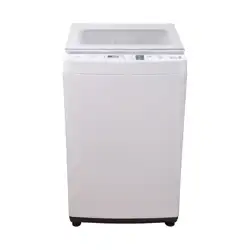

OWNER’S MANUAL
Fully Automatic
Washing Machine
Model:
AW-DQ950FPH(WW)
AW-DQ110JPH(WW)
Read This Manual
Read and
Keep the OWNER'S MANUAL handy for
future use .
follow the instructions carefully.
Thank you for purchasing TOSHIBA automatic
washing machine.
1
CONTENTS
SAFETY INSTRUCTIONS
Safety instructions ...................................... .................................
INSTALLATION
Product description ............................................ .......................
Packing the washing machine ................................................
Unpacking the washing machine ..................... ....................
Levelling the washing machine ..............................................
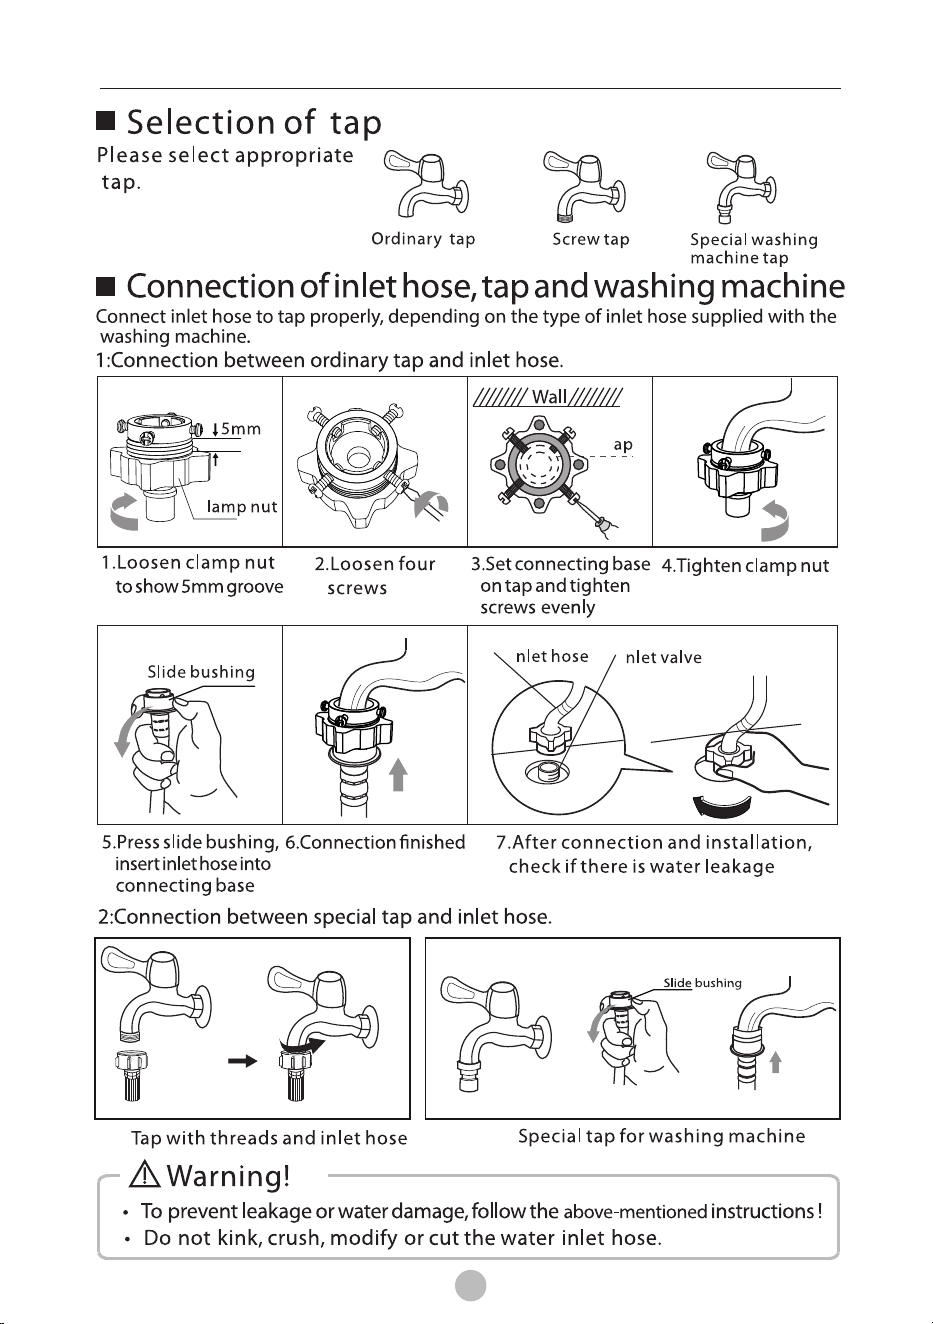
Selection of tap .................................................... ... ......................
Connection of inlet hose, tap and washing machine......
Preparation before washing................................. ....................
Washing
.......................................................... ....... .... ......................
After washing................................................. ...... .... ......................
Washing matters needing attention ................ .....................
The usage of detergent and washing powder.... ...............
Control pan ...........................................................el ......................
Option............................................................ ... .......... ......................
Personalized setting of washing ...... ... ......course .......... ......
Operations of washing process................ ...............................
Washing table .............................. ...........course .......................
Maintenance
Cleaning and care .............................................. ..........................
Cleaning the cabinet............................................ ... .... ................
Trouble hooting.................................................. ... ..s .................. ...
Technical ...................................... . .........specifications . ..............
2
8
9
9
10
11
11
12
12
12
13
13
14
15
16
16
17
19
19
21
22
Installation of the cabinet base cover...................................
10
OPERATION
Cleaning the inlet filter ................................... ............................
19
18
Recommended detergent amount.............................
18
When using softener....................................................................
Cleaning drain pump filter................................ ... .................... ...
20
Installation area ................................................. .. ... .....................
9

2
SAFETY INSTRUCTIONS
For your safety, the information in this manual must be
followed to minimize the risk of fire or explosion, electric
shock, or to prevent property damage, personal injury or
loss of life.
− Staff kitchen areas in shops, offices and other working
environments;
− Farm houses;
− By clients in hotels, motels and other residential type
environments;
− Bed and breakfast type environments;
• This appliance is not intended for use by persons
(including children) with reduced physical, sensory
or mental capabilities or lack of experience and
knowledge unless they have been given supervision
or instruction concerning use of the appliance by a
person responsible for their safety.
• Children should be supervised to ensure that they do
not play with the appliance.
• If the supply cord is damaged, it must be replaced by
the manufacturer, its service agent or similarly qualified
persons in order to avoid a hazard.
• The new hose-sets supplied with the appliance are to
be used and that old hose-sets should not be reused.
• The openings must not be obstructed by a carpet.
• This appliance is intended to be used in household only
and it is not intended to be used such as:
Important safety precautions
CAUTION: In order to avoid a hazard due to inadvertent
resetting of the thermal cut-out, this appliance must not
be supplied through an external switching device, such
as a timer, or connected to a circuit that is regularly
switched on and off by the utility.
3
SAFETY INSTRUCTIONS
Model
Washing Capacity
Standard Water Pressure
Warning!
This combination of symbol and word
indicates a potentially dangerous situation which may
result in death or serious injuries unless it is avoided.
descriptive
Explanation of the symbols:
Caution!
This combination of symbol and word
indicates a potentially dangerous situation which may
result in slight or minor injuries or damage to property
and the environment.
descriptive
Note!
This combination of symbol and word
indicates a potentially dangerous situation which may
result in slight or minor injuries.
descriptive
0.03MPa~0.8MPa
8.5kg
AW-DQ950FPH(WW)
0.03MPa~0.8MPa
10.0kg
AW-DQ110JPH(WW)
4
SAFETY INSTRUCTIONS
The electric shock!
Warning!
• washing machine
• Do not put this washing machine in a humid place.
• Before doing any maintenance the unit, unplug the
appliance from the electrical source.
• Always unplug the machine and turn off the water supply
after use. Be aware of the maximum and minimum inlet
water pressure which is in megapascals (MPa)
• To ensure your safety, power plug must be inserted into
an earthed three-pole socket. Check carefully and make
sure that your socket is properly and reliably earthed.
• Make sure that the water and electrical devices provisions
are connected by a qualified technician in accordance with
the manufacturer's instructions and local safety regulations
• If the supply cord is damaged, it must be replaced by
the manufacturer, its service agent or similarly qualified
persons in order to avoid a hazard.
This is for indoor use only.

5
Risk of explosion!
•
washed in, soaked in, or dabbed with combustible or
explosive substances( such as wax, oil, paint, gasoline,
degreasers , dry-cleaning solvents, kerosene, etc.)
This may result in fire or explosion.
Do not wash or dry articles that have been cleaned in,
.
SAFETY INSTRUCTIONS
• Animals and children can not climb into the machine.
Check the machine before every operation.
• Children should be supervised that they do not play with
the appliance.
• Keep children and animals far away from the machine
during operation.
• This appliance is not intended for use by persons
(including children) with reduced physical, sensory
or mental capabilities or lack of experience and
knowledge unless they have been given supervision
or instruction concerning use of the appliance by a
person responsible for their safety.
• The appliance can not be used by children
with reduced physical sensory or mental capabilities or
lack of experience and knowledge if they have been
given supervision or instruction concerning use of the
appliance in a safe way and understand the hazards
involved.
Cleaning and user maintenance shall not be done by
children without supervision.
and persons
Risk to children!
6
• This washing machine is for indoor use only.
• It is not intended for built-in using.
• The openings must not be obstructed by a carpet.
• The washing machine shall not be installed in bath rooms
or very wet rooms as well as in the rooms with explosive
or caustic gases.
• Remove all packaging materials before using
Otherwise, serious damage may result.
the appliance.
• The washing machine with single inlet valve may only
connected to a cold water supply. be
• The plug must be accessible after installation.
• Avoid place where the machine is exposed to direct
sunlight .Plastic parts may become deformed or discolored .
Avoid place where the machine may become frozen
during cold weather.
• This appliance is intended to be used in household.
• The new hose-sets supplied with the appliance are to
be used and that old hose-sets should not be reused.
• Do not wash, spin, or dry water-proof seats, mats, or
clothing.
Do not wash thick, hard mats even if the washer mark
is on the care label.
This may result in injury or damage to the washer, walls,
floor, or clothing due to abnormal vibrations.
SAFETY INSTRUCTIONS
Installing the product!
Caution!
7
Operating the appliance!
• Before washing the clothes for the first time, the product
shall be operated without clothes using tub clean as the
displayed program on the control panel.
• Flammable and explosive or toxic solvents are forbidden.
Gasoline and alcohol etc. Shall not be used as detergents.
Please only select the detergents suitable for machine
washing, especially for top-loading fully automatic washing
machines.
• Make sure that all pockets are emptied. Sharp and rigid
items such as coins, brooches, nails, screws or ston s etc.
may cause serious damage to this machine.
e
• Hands should not be inserted into the rotating drum .
• This product is for domestic use only.
• This appliance is intended to be used in household.
SAFETY INSTRUCTIONS
Risk of damaging appliance!
• Your product is only for home use and is only designed
for textiles suitable for machine washing.
• Do not climb up and sit on the glass lid of the machine.
• Cautions during Machine Handling and transport:
1.The accumulated water shall be drained out of the
machine.
2.Handle the machine carefully. Never hold protruding
parts of the machine while lifting.
3.This appliance is heavy, it should be transported carefully.
• Please do not close the glass lid with excessive force.
• It is forbidden to wash carpets.
8
INSTALLATION
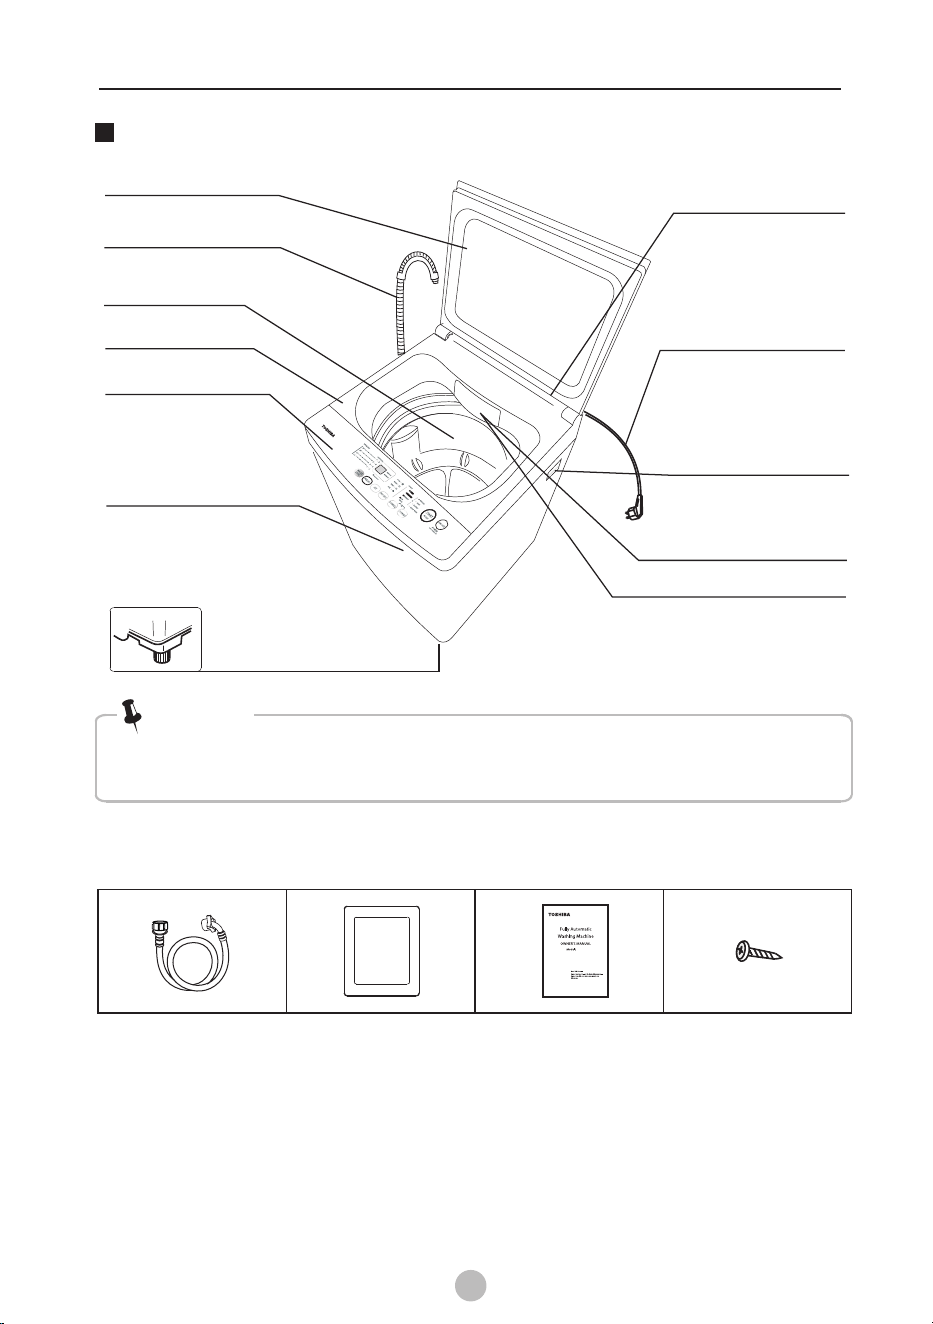
Product description
• ll illustrations in this manual are for reference only.
lease refer to the product ,for actual appearance of the parts
A
P .
Note!
Accessories
Inlet hose assy Manual
S
c
rew
Adjustable foot
Glass lid
Drum
Frame
Control panel
Cabinet
Water inlet valve
Power and plug cord
Handle
Drain hose
Cabinet base cover
Detergents
Softeners
Refer to P12 and P18 for the
specific operation mode of
detergents and softeners
9
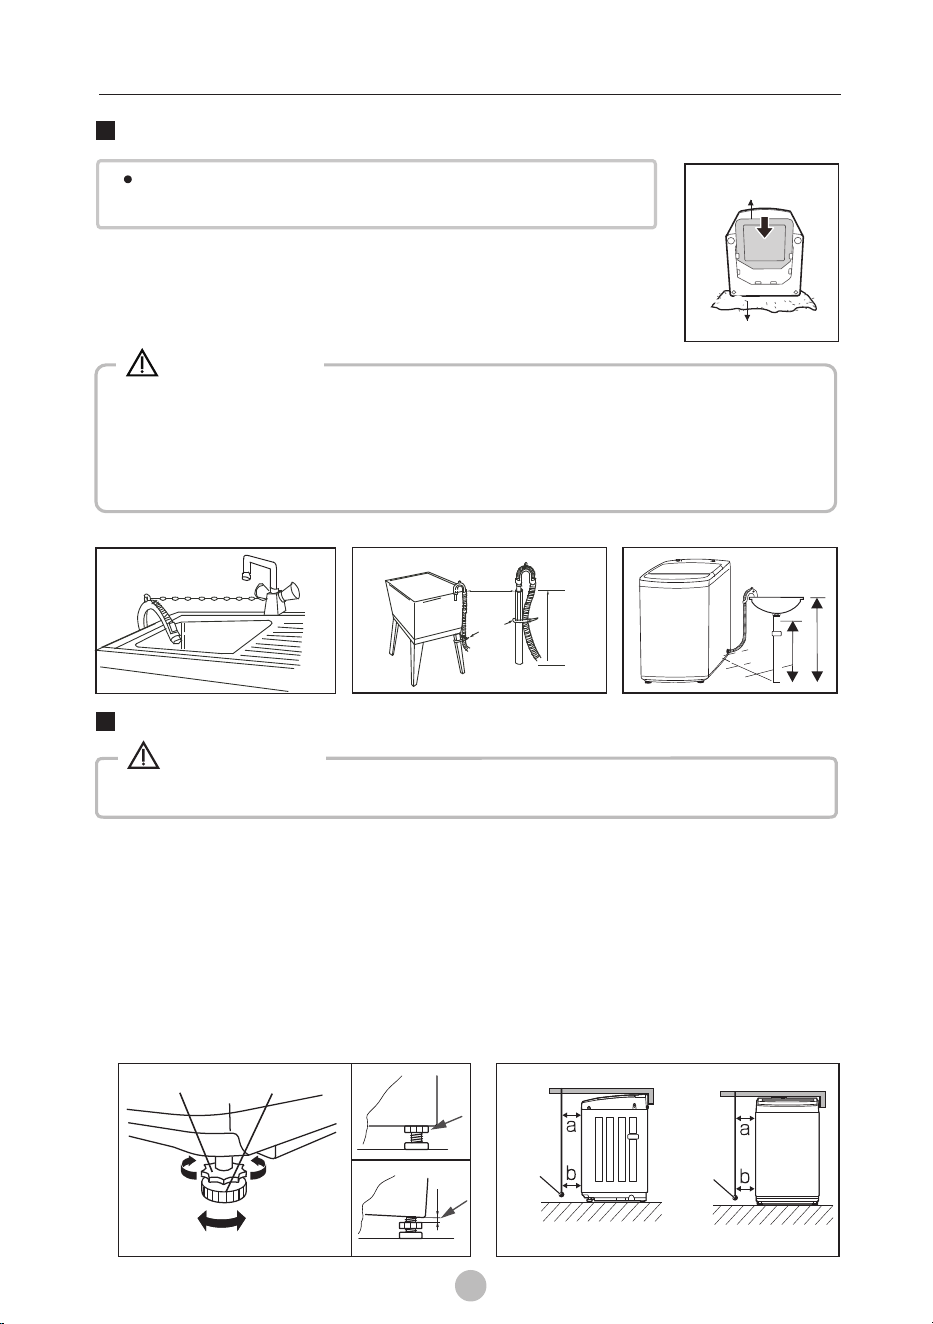
• Maintain clearance: The clearance on the side of the machine
with drainage pipes is 50mm, and the clearance on the side
without drainage pipes is 20mm
Installation Area
Before installing the machine, the location characterized
as follows shall be selected:
1.Rigid, dry, and level surface
2.Avoid direct sunlight
3.Sufficient ventilation
4.Room temperature is above 0 ℃
5.Keep far away from fuel sources such as coal or gas
• Stability is important to prevent the product from moving!
• Make sure that the product does not stand on the power cord.
Warning!
INSTALLATION
W
w
W≥20mm
• be
•
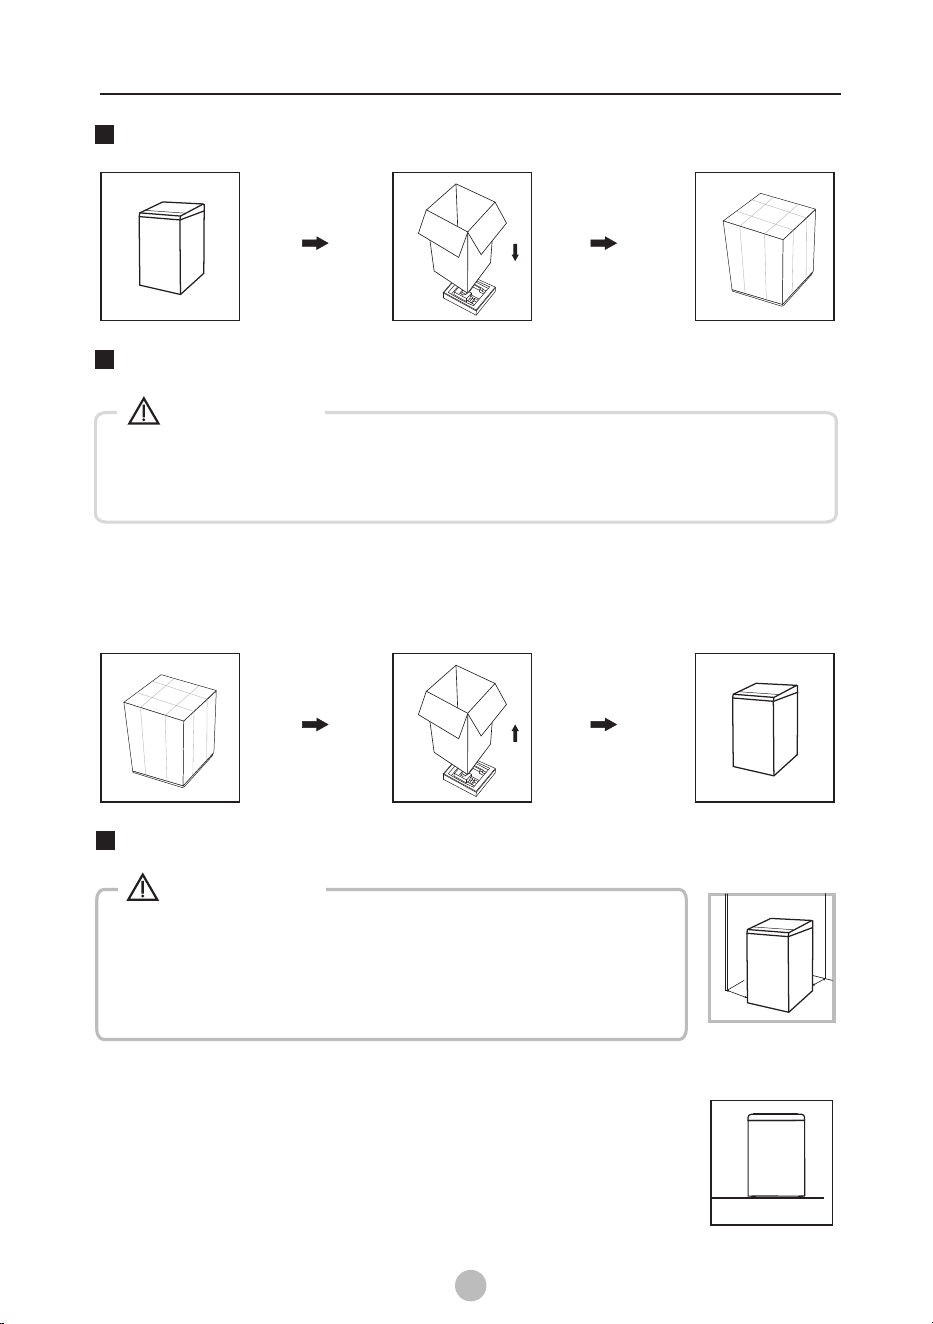
Packaging material (e.g. Films, Styrofoam) can dangerous for children.
There is a risk of suffocation ! Keep all packaging well away from
children.
materials
Warning!
Unpacking the washing machine
1. Remove the cardboard box and styrofoam packing.
2. Lift the washing machine and remove the base packing.
3. Remove the tape securing the power supply cord and drain hose.
4. Remove the inlet hose from the drum.
Packing the washing machine
9
10
•
• Position drain hose properly otherwise damage might result due
to water leakage.
Do not kink protract the drain hose.
or compress
, ,
• If drain hose is too long, do not force it into washing machine as this will
cause abnormal noises.
the
Trough
Hose
Retainer
B
ind
Min.86cm
Max.100cm
Warning!
M
in.
86
cm
1
00cm
Ma
x.
INSTALLATION
• The lock nuts on all four feet must be screwed tightly against the housing.
Levelling the washing machine
Warning!
1. Check if the feet are properly attached to the cabinet. If not, please rotate them to their
original position and tighten the nuts.
2. Check alignment of the product with a leveler and do the succeeding steps if necessary.
3. Loosen the lock nut and rotate the foot either clockwise or counter clockwise ,until it
closely contacts with the floor.
4. Assure that the lock is secure and then alternately press the four top corners of the
machine, to check if the proper adjustment has been done.
5. It is necessary to confirm whether the machine is horizontal, hang the weight with a rope
and hang it down, and then confirm that the gap between the upper and lower parts,
that is, the difference of ab, cannot be more than one centimeter
WeightsWeights
a - b≤1cm & b - a≤1cm
Wrong
Right
Foot
Lock nut
Loosen
Lock
Raise
Lower
The way to place the end of drain hose:
Installation of the cabinet base cover
Soft fabric
Cabinet
base cover
Running the machine or washing while placing on
the bottom foam is strictly forbidden
Lay the washing machine backward on the soft fabric .
Then Insert the cabinet base cover into washing machine
base trough, push into the end and tighten screw at one
position.
10
11
C
T
I
I
INSTALLATION
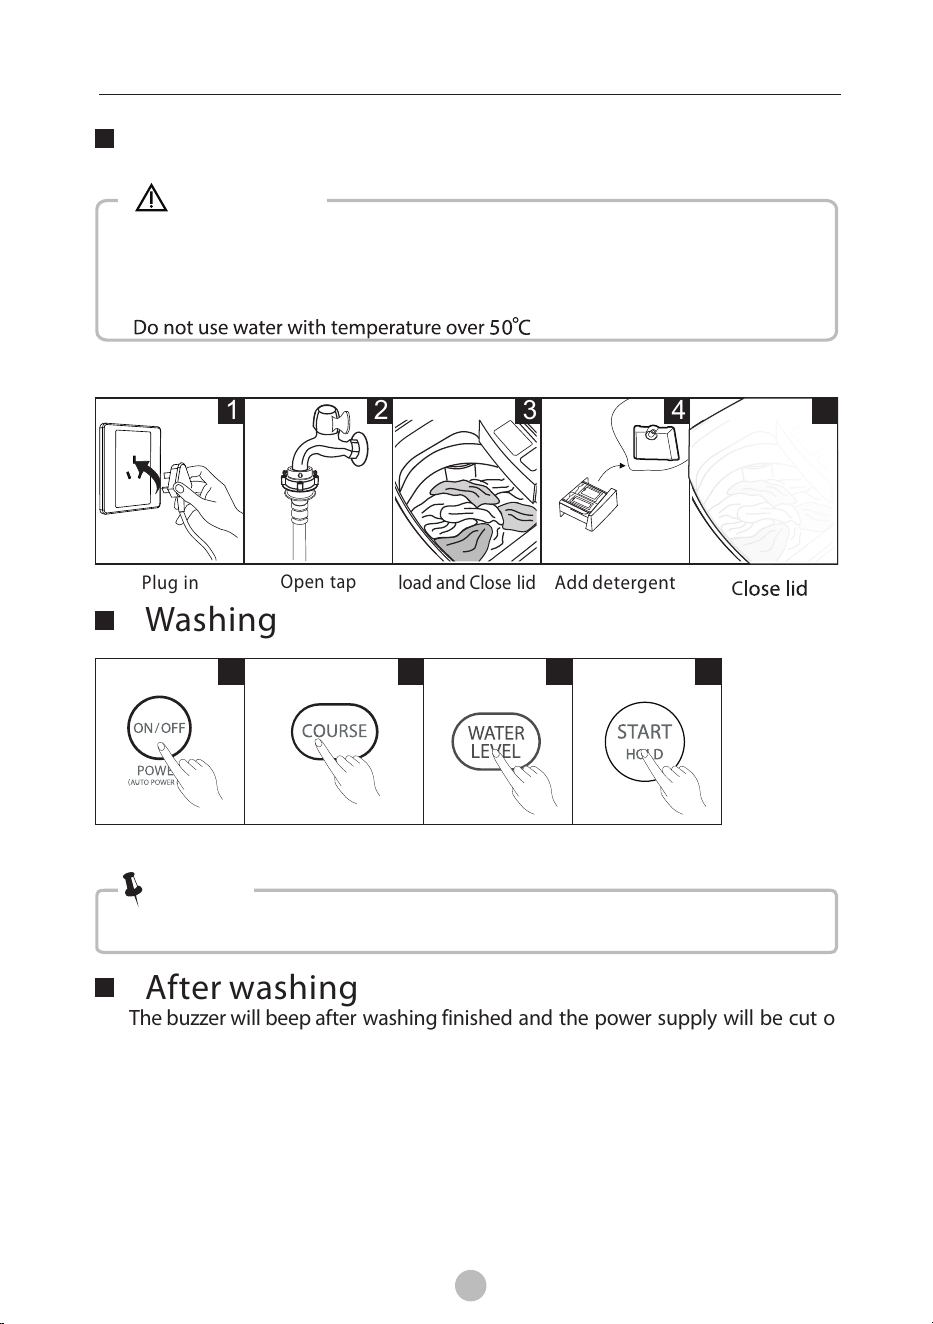
Caution!
Before washing, please make sure that the unit is installed properly.
• Before washing for the first time, the washing machine shall be operated
in one complete cycle but without clothes round of the whole procedures
without clothes in as follows.
•
Open tap
Plug in
Add detergent
After washing
1 2 3 4
Washing
10
12
load and Close lid
The buzzer will beep after washing finished and the power supply will be cut off
automatically . At this point , you may unload the laundry.
Preparation before washing
OPERATION
A complete cycle is as shown below
C
5
Liquid detargent
Case
•
• , If default operation is selected, step 2 3 may be skipped.
Note!
Power On
Start up
1 2 3 4
Select COURSE Select water level
10
13
Washing matters needing attention
OPERATION
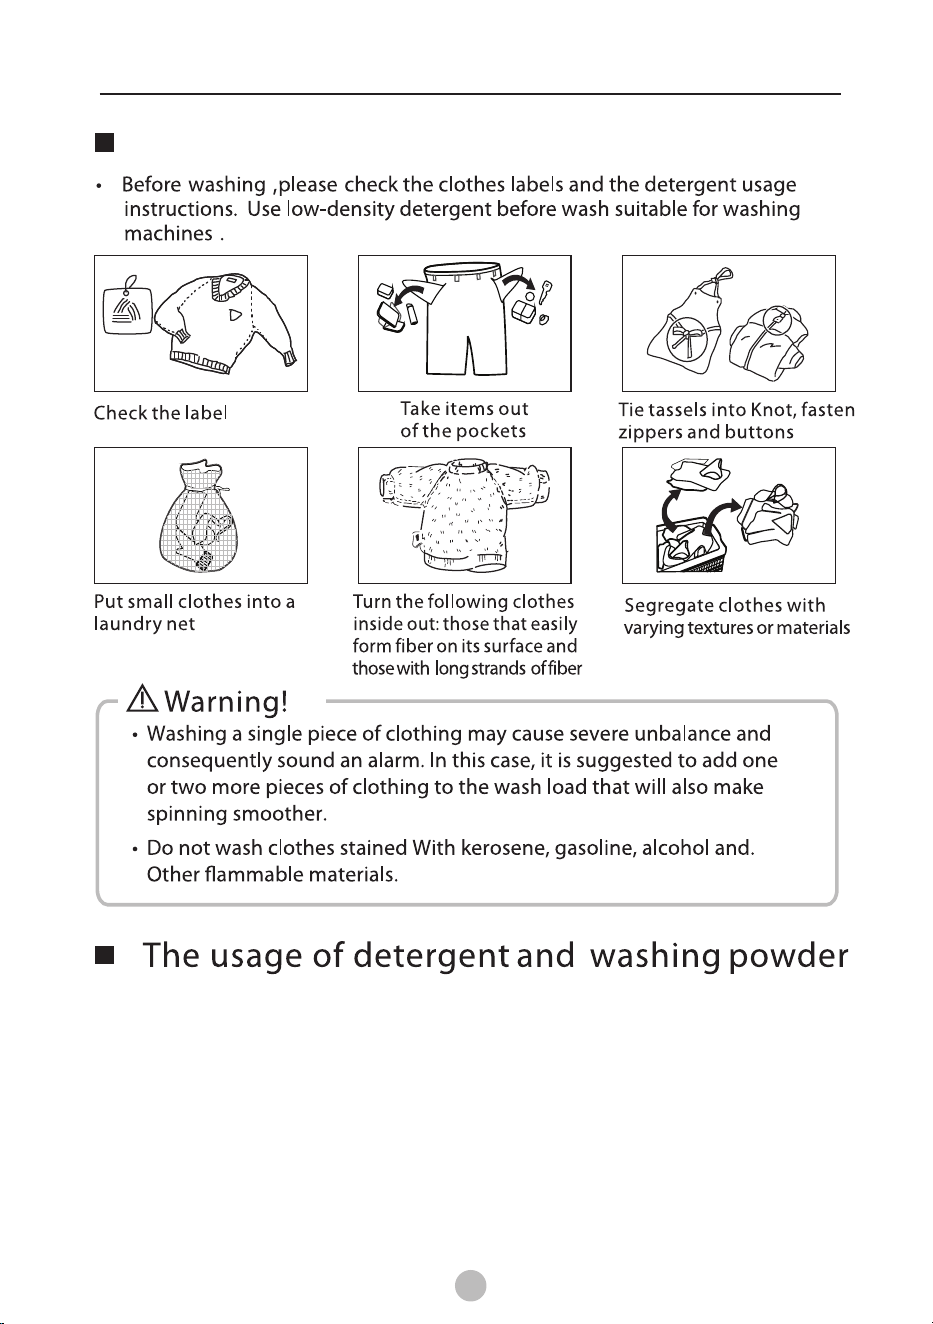
• Choose the suitable type of detergent for the various washing temperature to get
the best washing effect with less water and energy consumption.
• Washing powder can only be put directly into the tub if you want. As for powder
detergent that can form into clusters or masses, it is suggested to dilute the detergent
with some water before pouring into the tub.
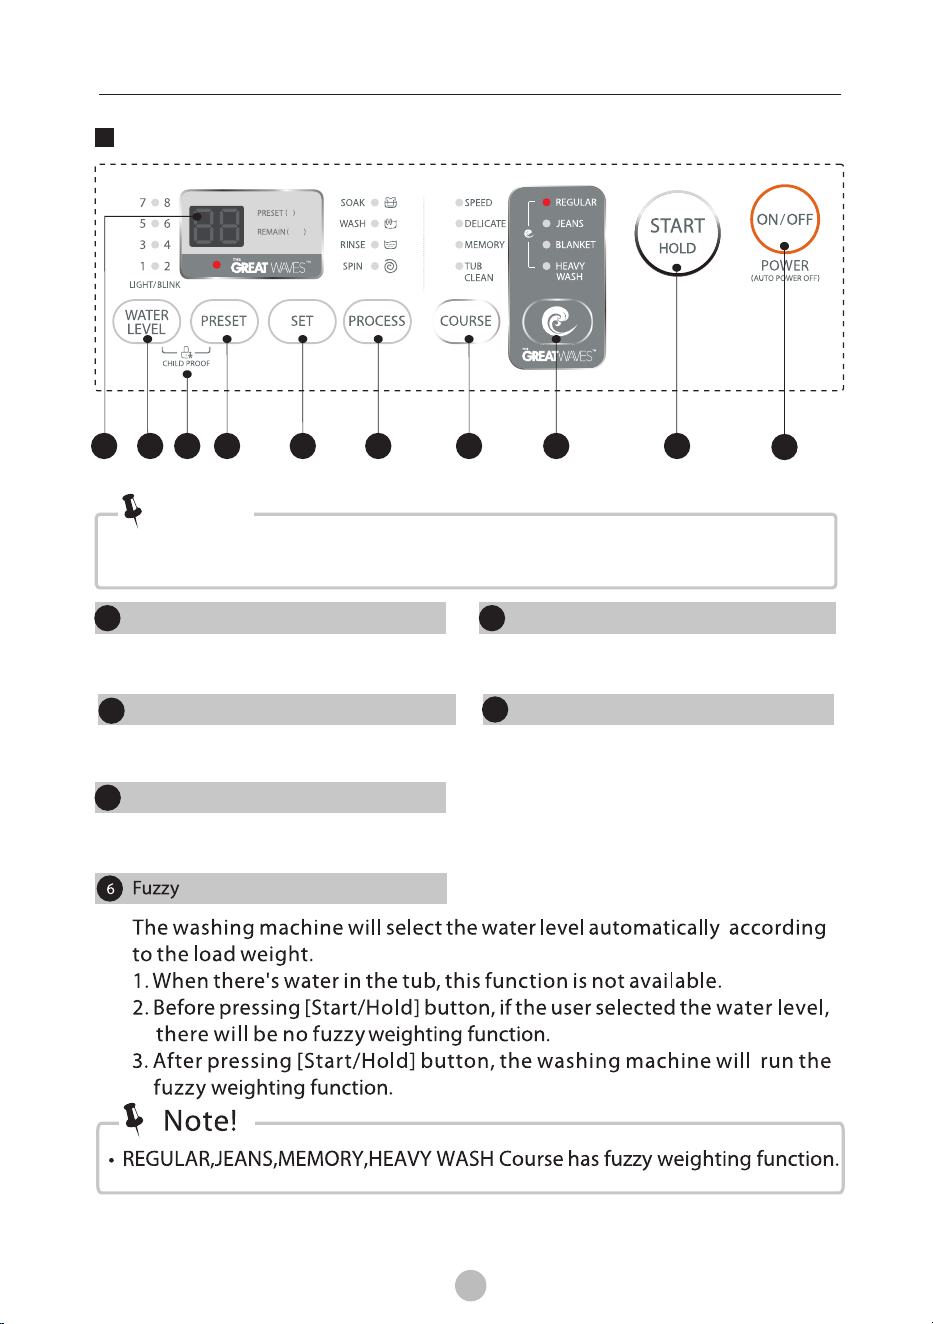
Control panel
10
14
OPERATION
On/Off
Turns the unit on and off.
Start/Pause
Press this button to start or pause the
washing cycle.
Course
Available according to the
laundry type.
Option
This allows you to select an additional
function and will light up when selected.
Note!
• This illustration is for reference only. Please refer to the product ,for
actual appearance
1
1
4
1
2
3
Display
The display shows the settings, estimated remaining time , options, and status
messages for your washer. The display will remain on throughout the cycle.
5
5
1
2
4 4
4
4 4 3
4
min
h
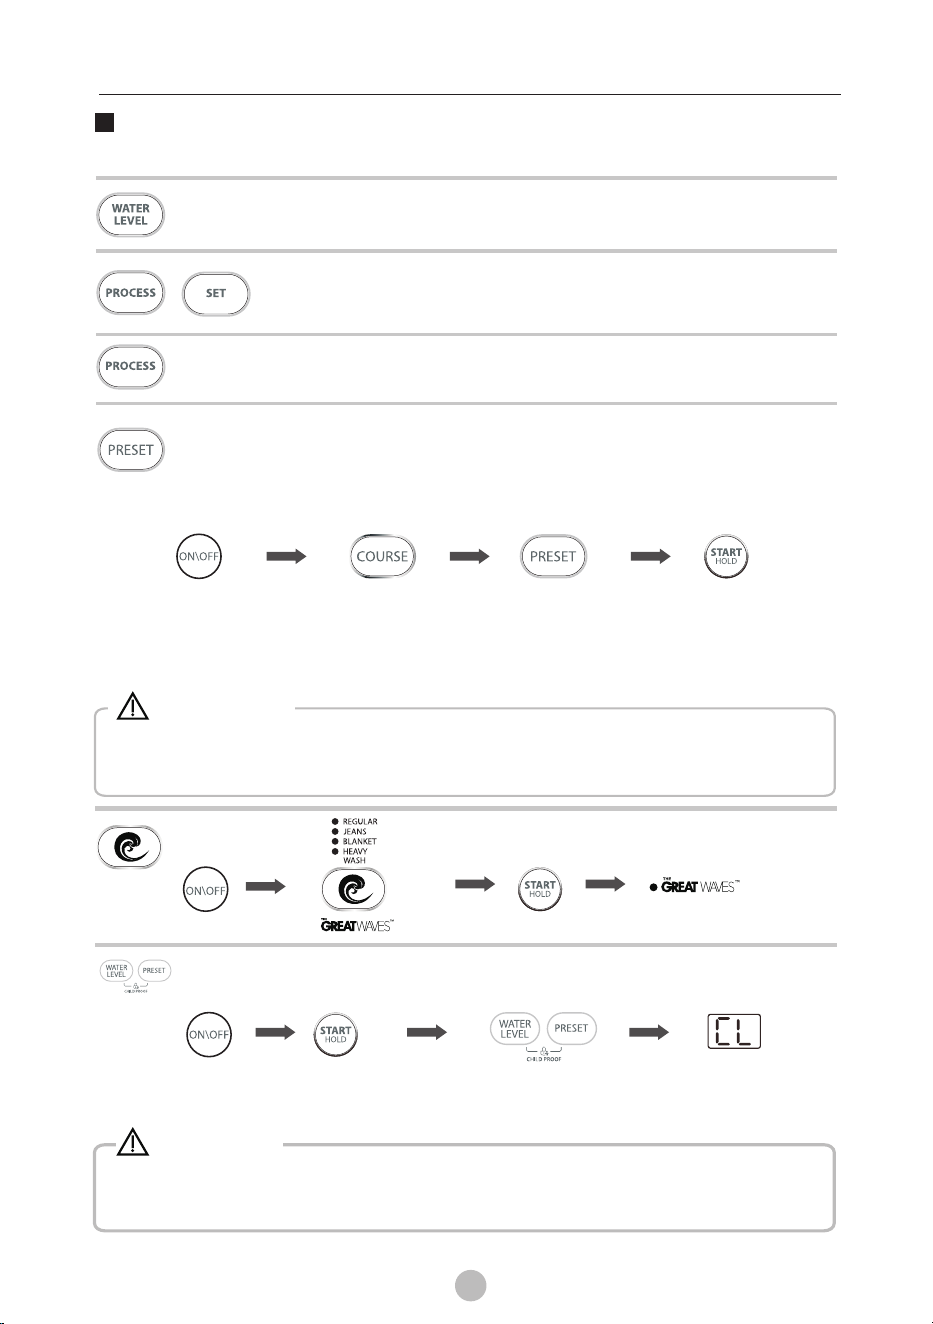
Option
15
OPERATION
Child Lock
To avoid mis operation by children.
Start
To activate child lock
press the two buttons
at the same time
select the water level according to clothing categories, degree of soiling
and washing habits of users
Soaking time,washing time, number of rinses , spinning time and
other settings can be selected
Start
Preset
1. Select a program
2.Press the PRESET button to choose the delay time before operation starts.
3.Press [Start/Pause] to commence the delay operation
Choose the course
Start
On
Setting time
Press the [PRESET] button repeatedly , to see delay time choices ,The delay time
should be set , before starting the program. If you want to set the delay time ,
after the program has already started, the on/off button should be pressed to
reset the program
Caution!
•
.
If there is any interruption in the power supply while the machine is operating,
a special memory stores the selected program and recalls the memory setting
when the power is restarted
Function
To select one of the following functions, Soaking , washing, rinsing or spinning
Only for models having these functions.
• Press the two button again (at the same time ) will deactivate the
“ Child Lock” function
• The “ Child Lock” will lock all buttons except [ On/Off ].
Water level
Soak/Wash/Rinse/Spin
The GREAT waves light
+
On
On
Caution!
Shown as CL
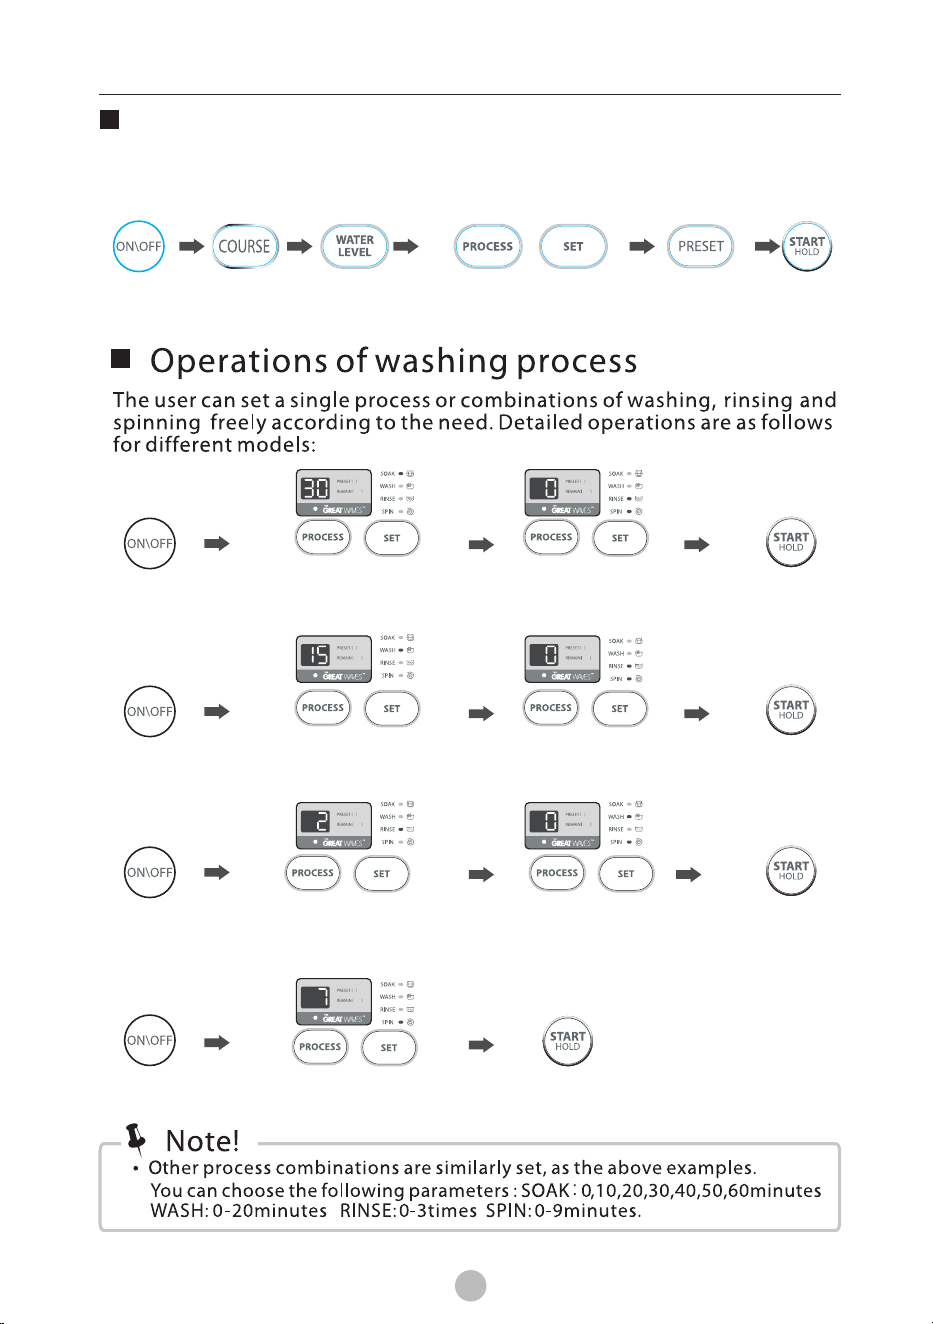
10
16
OPERATION
Water Level
Program
Personalized setting of washing program
The user can select washing program according to the actual need, and set washing
time, number of rinses, spinning time, water volume and program start time.
StartOn
+
Set soak/washing/spinning
time,rinsing times
Preset
Wash
On Start
Soak
On Start
Rinse
On
Start
Press the PROCESS button
Press the SET button for setting
RINSE times during blink
Press the PROCESS button
Press the SET button for setting
WASH and SPIN time to “0” during
blink
Spin
On
Start
Press the PROCESS button
Press the SET button for
setting SPIN time
/
/ /
/
/
Press the PROCESS button
Press the SET button for setting
RINSEtimes and SPIN time to “0”
during blink
Press the PROCESS button
Press the SET button for setting
SOAK time during blink
Press the PROCESS button
Press the SET button for setting
RINSEtimes and SPIN time to “0”
during blink
/
/
Press the PROCESS button
Press the SET button for setting
WASH times during blink
min
h
min
h
min
h
min
h
min
h
min
h
min
h
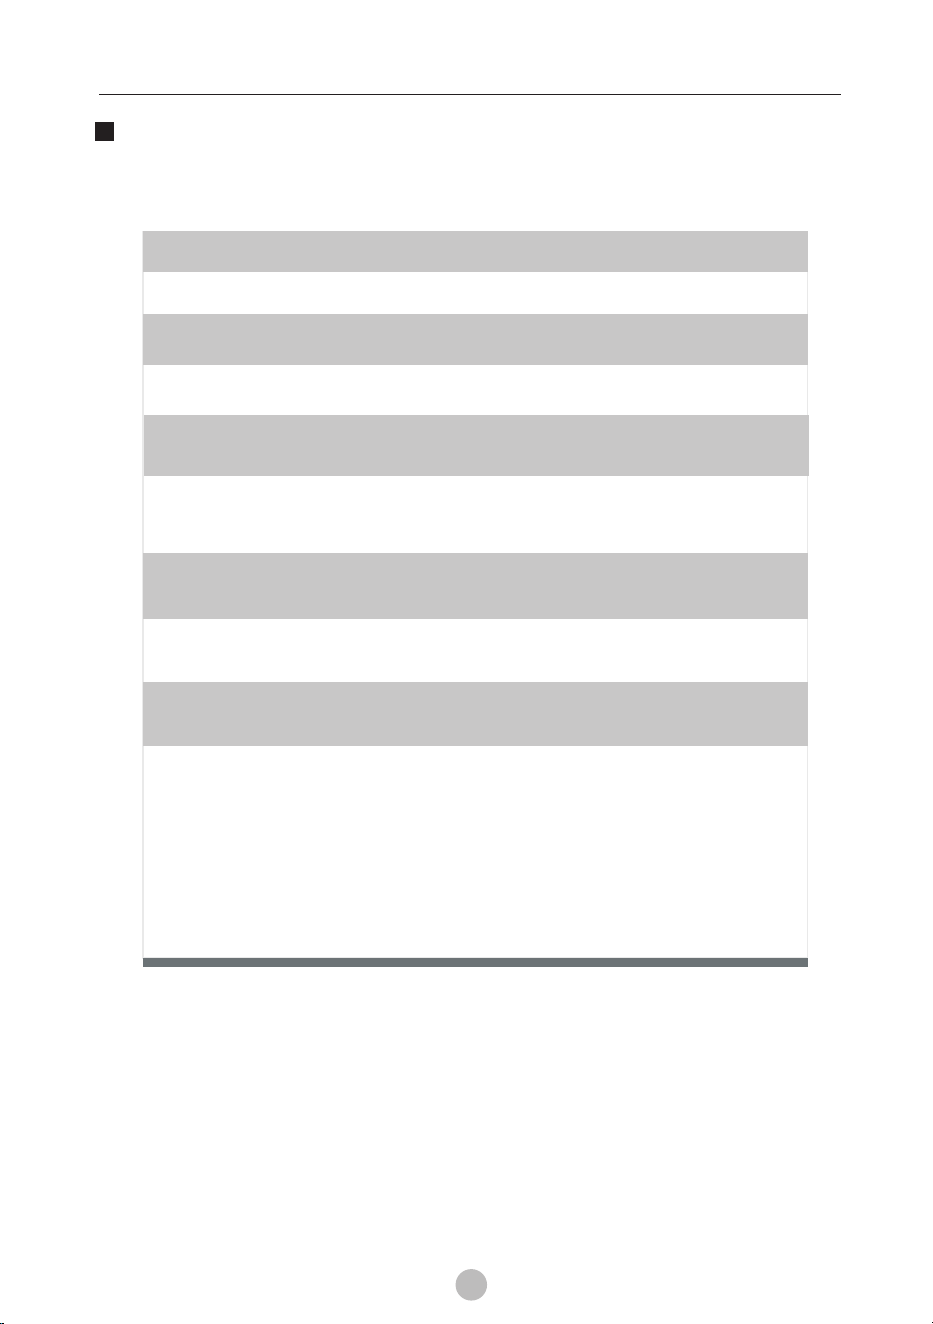
10
17
OPERATION
Washing course table
Course
The washing machine will select the water level automatically
according to the load weight.
1. When there's water in the tub, this function is not available;
2. Before pressing [Start/Pause] button, if The user selected the
water level, there will be no fuzzy weighing function;
3. After pressing [Start/Pause] button, the washing machine will
run the fuzzy weighing function. The user can also select the
water level to set the water level as needed.
REGULAR
Standard fabric washing program, suitable to wash ramie cotton fabric.
Washing is done once, twice for rinsing and the spin time is a bit long.
SPEED:
Suitable to wash lightly- stained clothes and clothes for summer.
MEMORY:
JEANS:
Suitable to wash heavily-stained/thick clothes.
Fuzzy
weighing:
HEAVY WASH:
BLANKET :
Course are available according to the laundry type.
Only for models having these functions
heavily-stained/thick clothes.
The wash time is longer, the water action stronger, so the
washing effect is better.
DELICATE:
Mid/High/Low water level selection, the tempo is soft, slow
washing and spinning speed, for minimal wear and deformation.
With intermittent spinning the dirt on the inner & outer surfaces
of the drum, as well as the pulsafor are removed.
TUB CLEAN:
Press "Start \Pause " to set the memory .To recall the memory ,press
Power on ,select the memory course and the stored cycle will come up
10
18
73
62
48
29
55 100
35
50
55
75
33 55
11
33
11
10
18
9
10 20
36
18
9
14
12
18
18
25
36
55
20
35
50
75
10kg
25
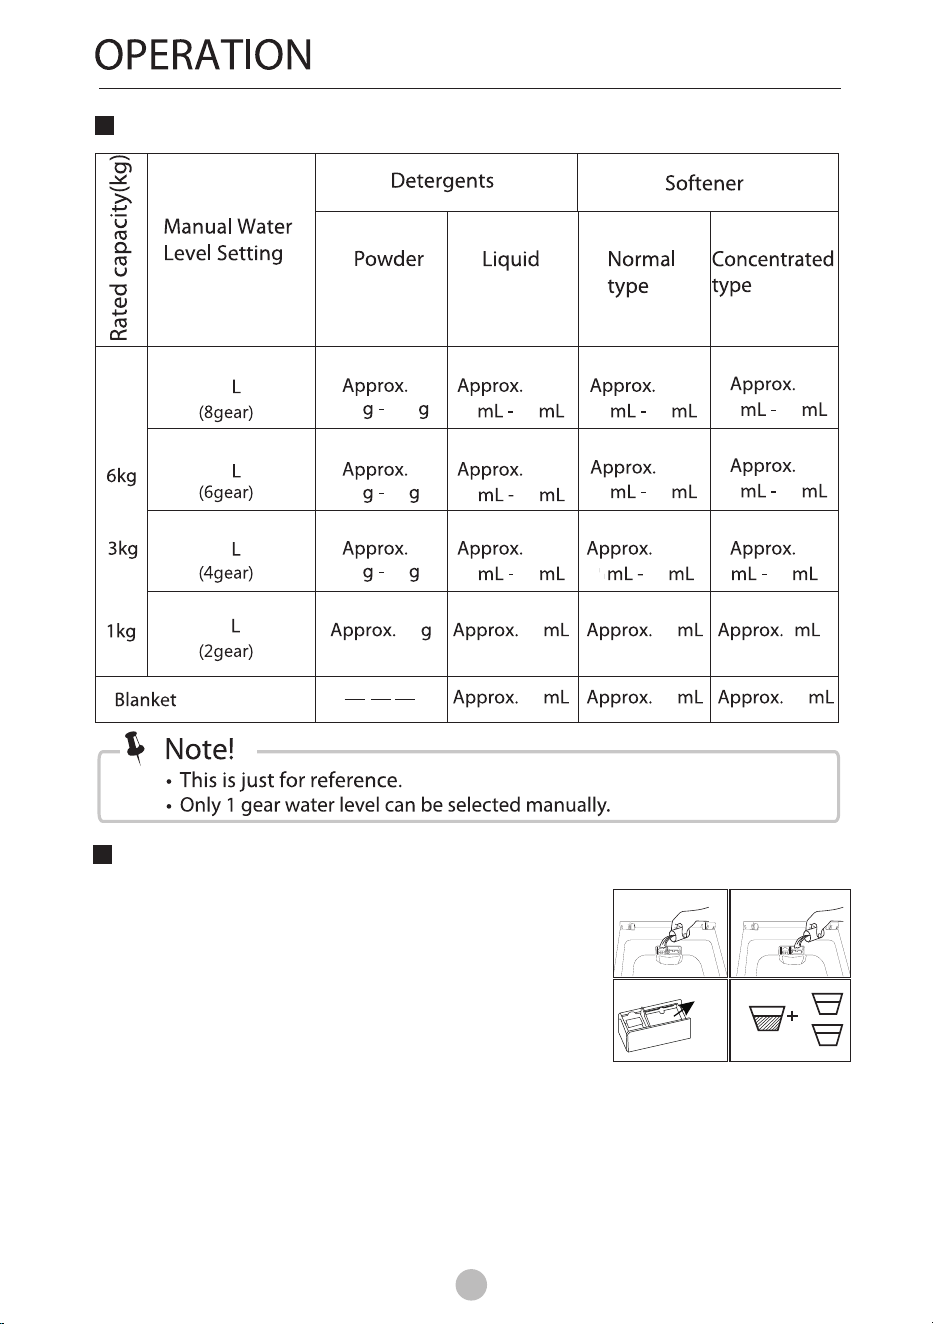
Recommended detergent amount
1. Add softener to the softener case at the top of the basket.
2. The softener automatically flow into the basket during
final rinse.
the
3. The amount of softener varies with brands.
softener
Weighting cap
water
water
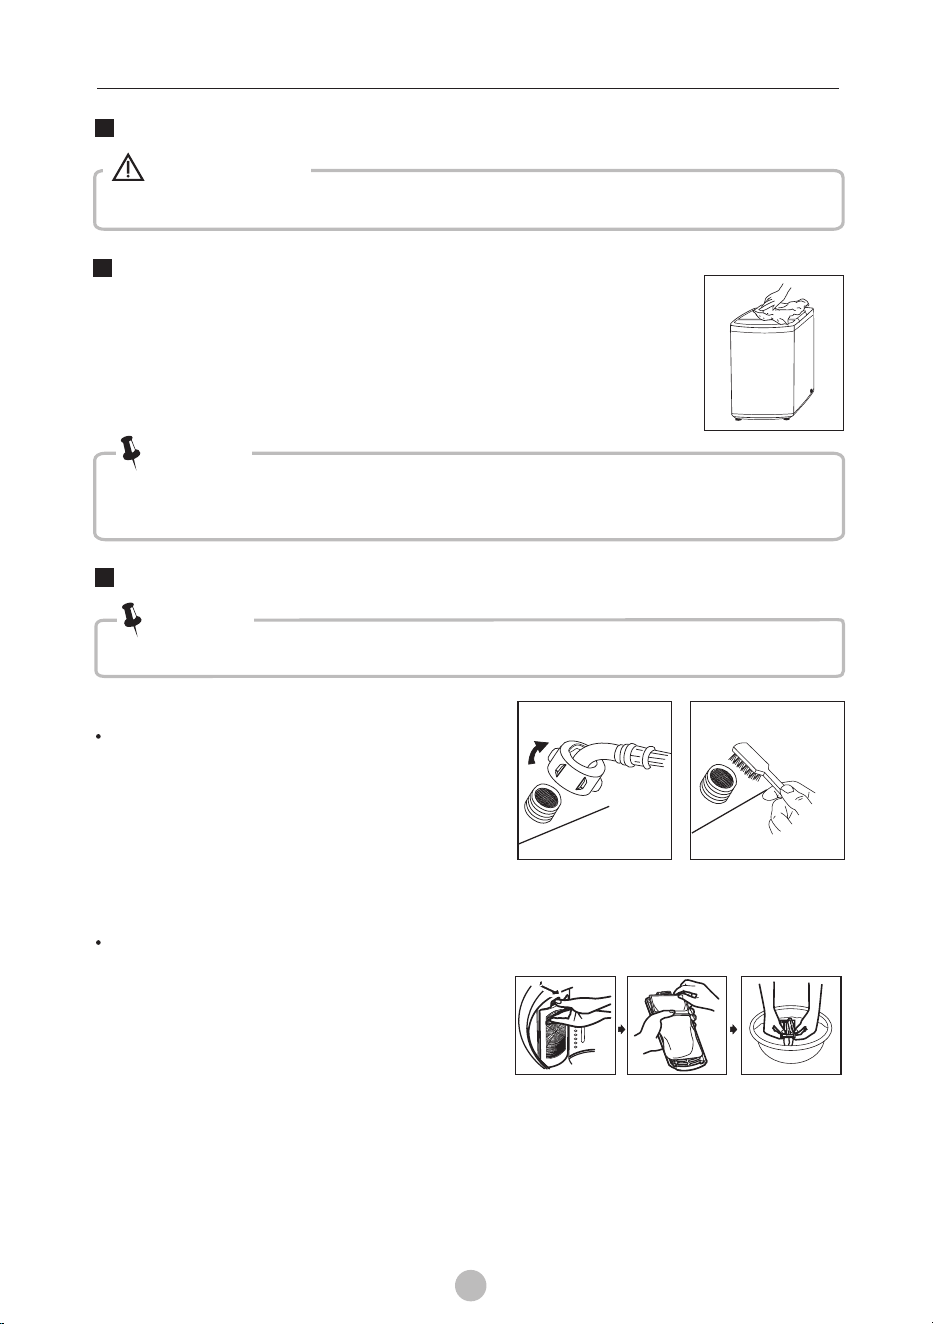
When using softener
If the concentrated softener is used, dilute it with
third of its original concentration before pouring it into the
insertion case.
water one
Follow the instruction on the softener label.
Detergent inlet
Softener
Washing powder inlet
10
19
• Before your maintenance starts, please unplug the machine and close the tap.
Formic acid and its diluted solvents or equivalent are forbidden, such as
solvents or chemical products ,etc.
•
alcohol,
Warning!
Note!
Cleaning and care
Cleaning the inlet filter
Inlet filter must be cleaned if pressure of water from the inlet drops.
Note!
MAINTENANCE
Water inlet valve filter cleaning.
Lint filter cleaning
Proper maintenance the washing machine can extend
its working life. The surface can be cleaned with diluted
non-abrasive neutral detergents when necessary.
If there is any water overflow, use a wet cloth to wipe it off
immediately. No sharp items are allowed.
Cleaning the cabinet
•
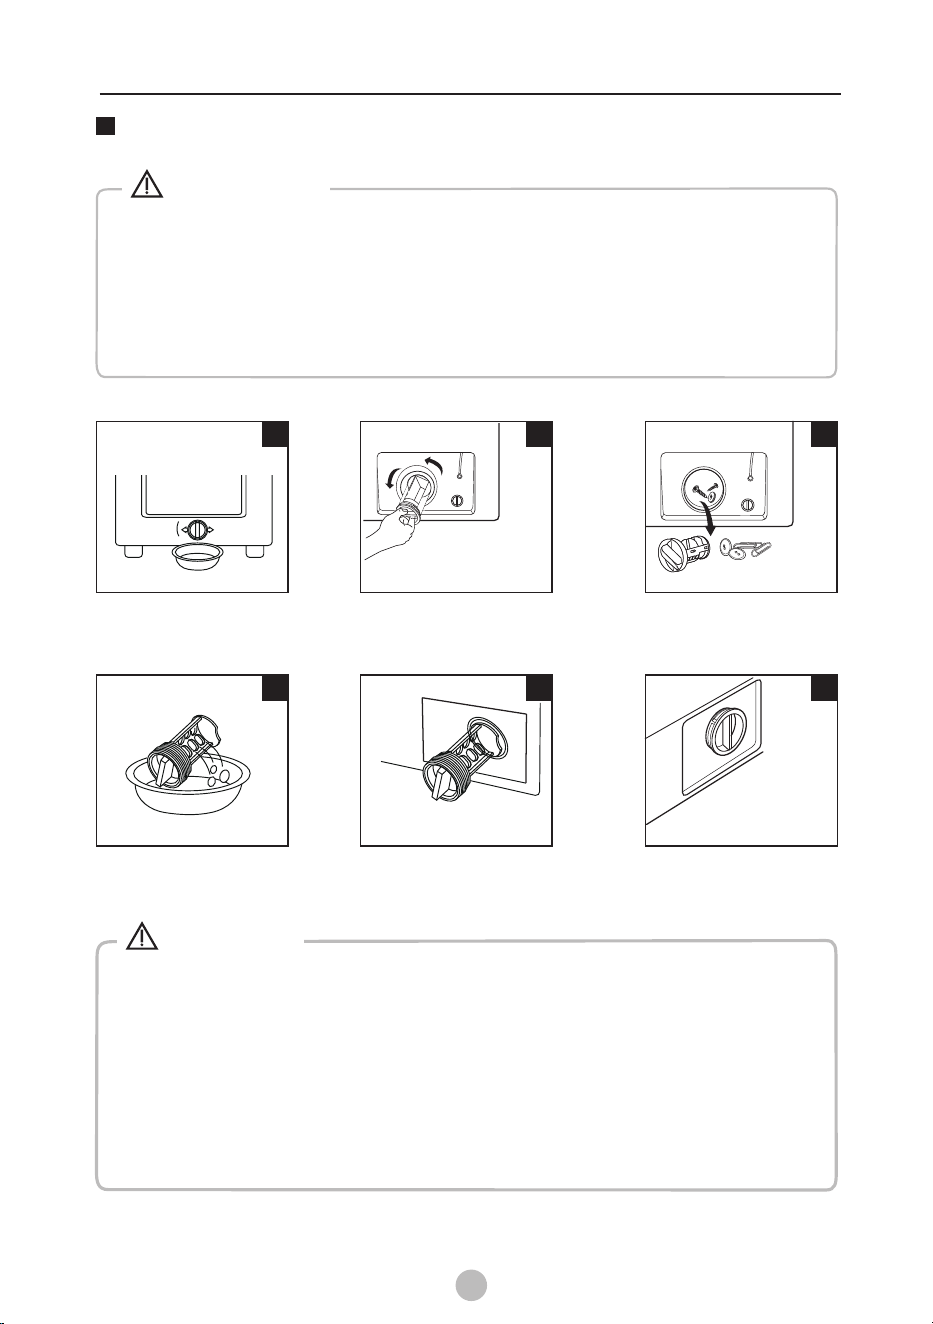
Washing the filter in washing machine:
1.Screw off the inlet hose from the back
of the machine.
2.Pull out the filter with a pair of long nose
pliers and reinstall it back after being
washed.
3.Use a brush to clean the filter.
4.Reconnect the inlet hose.
1.There is a built-in lint filter in your
washer. It can help to collect lint
during washing cycle.
2.It is suggested to clean the lint filter
every 10 cycles.
3.Take it out and clean the filter with
water. Then place it back into the washer.
• Make sure that valve cap and emergency drain hose are reinstalled properly,
cap plates should be inserted aligning to hole plates otherwise water may leak;
• Some machines don’t have emergency drain hose, so step 2 and step 3 can be
skipped. Rotate lower cover cap directly to make water run into basin.
• Never remove the pump cover during a wash cycle lways wait until the
appliance has finished the cycle, and is empty. When replacing the cover,
ensure it is securely re-tightened.
,
a
. A
Cleaning drain pump filter
Allow detergent solution to cool down.•
• Unplug the machine to avoid electrical shock .
• Drain pump filter can the yarns and small foreign from the
wash load.
• Clean the filter periodically to ensure normal operation of washing
machine.
collect matter
the
1
2
3
5
4
Warning!
10
20
Caution!
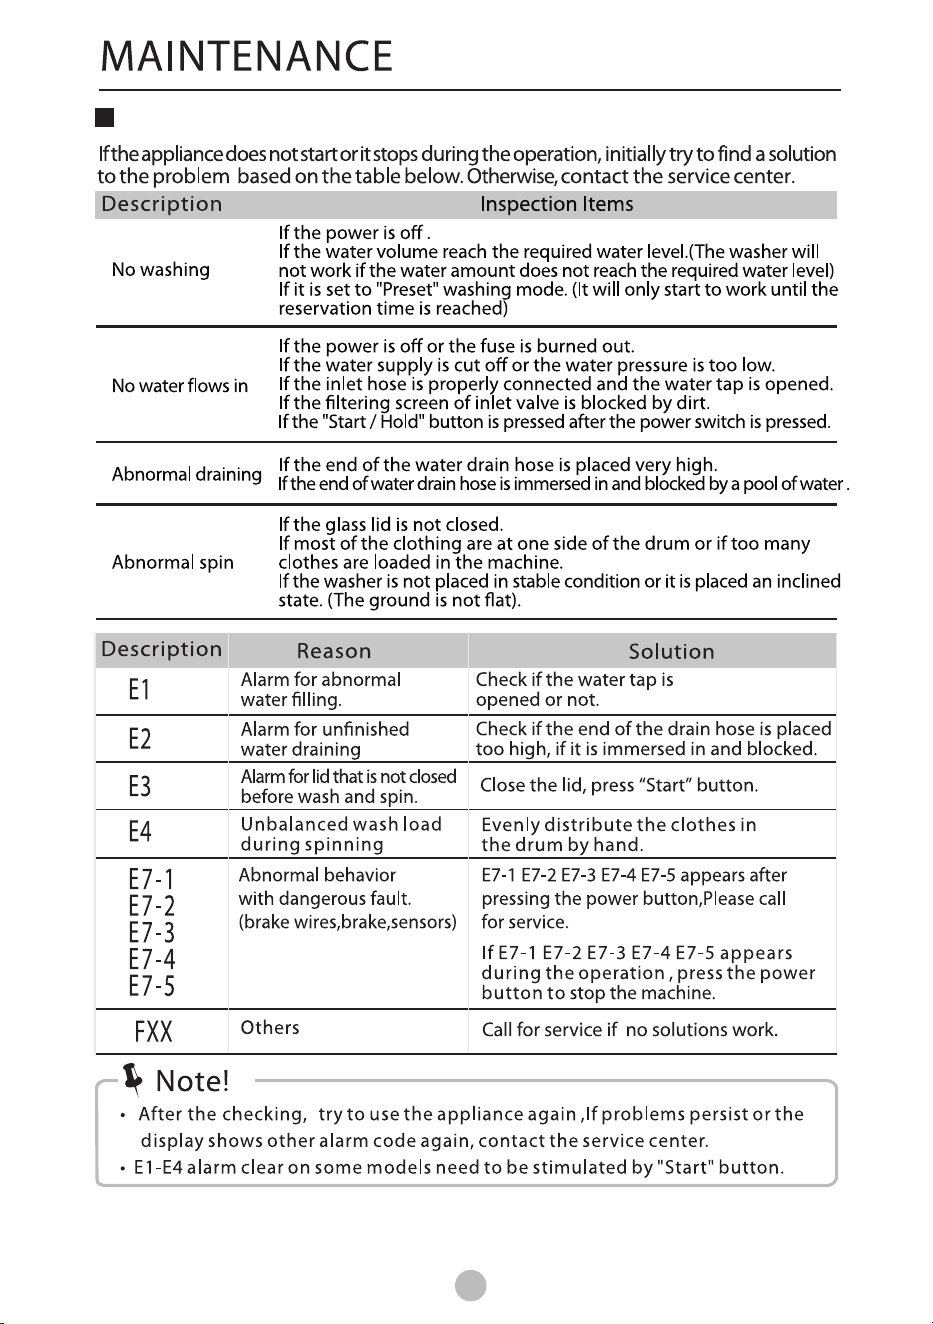
Open the filter by turning
kwise counter cloc
Remove matterfareign
Drain the water out of the
pump, use a container to
collect the water.
Restore it and adjust the convex
po mp hole.rtion to align with the pu
Clean the filter.
Tighten the pump
cover clockwise.
6
MAINTENANCE
• Correct specifications depend on actual model.
10
21
Trouble shooting
10
24
10
22
Technical specifications
MAINTENANCE
Standard Water Pressure
0.03MPa~0.8MPa
Net dimension
(W*D*Hmm)
Rated
Power
Net
Weight
Washing
Capacity
Power
Supply
Model
10.0kg 40kg
390W
AW-DQ110JPH(WW)
220-240V~,
50Hz
AW-DQ950FPH(WW)
8.5kg
220-240V~,
50Hz
40kg
550x565x965
390W
Including drain hose
550x565x965
550x635x965
(W*D*Hmm)
550x635x965

