Advanced User Guide
EN
CT2-D339-A
© CANON INC. 2024

Contents
Introduction
. . . . . . . . . . . . . . . . . . . . . . . . . . . . . . . . . . . . . . . . . . . . . . . . 3
Printer and Included Accessories. . . . . . . . . . . . . . . . . . . . . . . . . . . . . . . . . . . . 4
Manuals and Software. . . . . . . . . . . . . . . . . . . . . . . . . . . . . . . . . . . . . . . . . . . . 5
About This Guide. . . . . . . . . . . . . . . . . . . . . . . . . . . . . . . . . . . . . . . . . . . . . . . . 6
Safety Instructions. . . . . . . . . . . . . . . . . . . . . . . . . . . . . . . . . . . . . . . . . . . . . . . 7
Part Names. . . . . . . . . . . . . . . . . . . . . . . . . . . . . . . . . . . . . . . . . . . . . . . . . . . . 8
Preparations and Printing. . . . . . . . . . . . . . . . . . . . . . . . . . . . . . . . . . . . 10
Charging the Battery. . . . . . . . . . . . . . . . . . . . . . . . . . . . . . . . . . . . . . . . . . . . 11
Installing SELPHY Photo Layout. . . . . . . . . . . . . . . . . . . . . . . . . . . . . . . . . . . 12
Preparing the Printer and Printing. . . . . . . . . . . . . . . . . . . . . . . . . . . . . . . . . . 13
Printing Precautions. . . . . . . . . . . . . . . . . . . . . . . . . . . . . . . . . . . . . . . . . . . . . 20
Reference. . . . . . . . . . . . . . . . . . . . . . . . . . . . . . . . . . . . . . . . . . . . . . . . 21
Troubleshooting. . . . . . . . . . . . . . . . . . . . . . . . . . . . . . . . . . . . . . . . . . . . . . . . 22
Storing Prints. . . . . . . . . . . . . . . . . . . . . . . . . . . . . . . . . . . . . . . . . . . . . . . . . . 28
After Printing. . . . . . . . . . . . . . . . . . . . . . . . . . . . . . . . . . . . . . . . . . . . . . . . . . 29
Handling and Maintenance. . . . . . . . . . . . . . . . . . . . . . . . . . . . . . . . . . . . . . . 30
Security. . . . . . . . . . . . . . . . . . . . . . . . . . . . . . . . . . . . . . . . . . . . . . . . . . . . . . 31
Before Repair, Disposal, or Transfer of Ownership. . . . . . . . . . . . . . . . . . . . . 32
Specifications. . . . . . . . . . . . . . . . . . . . . . . . . . . . . . . . . . . . . . . . . . . . . . . . . . 33
Trademarks and Licensing. . . . . . . . . . . . . . . . . . . . . . . . . . . . . . . . . . . . . . . . 36

Introduction
Read this guide carefully to ensure correct use.
Contents subject to change without notice.
Illustrations in this guide may differ slightly from the actual equipment.
The above items notwithstanding, Canon cannot be held liable for any loss arising from
use of the product or software.
Images printed with this product are to be used for personal enjoyment. Unauthorized
printing of copyrighted material is prohibited.
• Printer and Included Accessories
• Manuals and Software
• About This Guide
• Safety Instructions
• Part Names
3
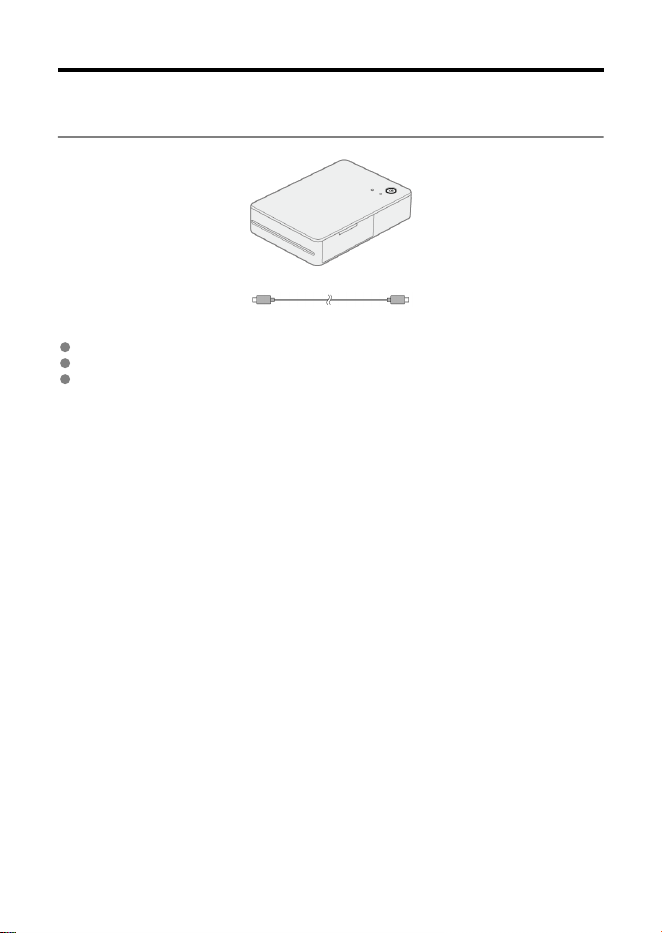
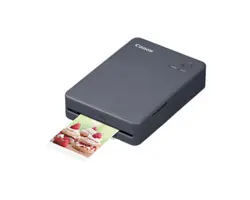
Printer and Included Accessories
Before use, make sure the following items are included in the package. If anything is
missing, contact your dealer.
SELPHY printer
Charging cable
Printed matter is also included.
Purchase a Color Ink / Label Set separately (XC-20L, XS-20L).
The included charging cable is only for charging. It is not used for communication.
4
Manuals and Software
Instruction Manual (included with the printer)
Read this manual before use.
Advanced User Guide
Complete instructions are provided in this Advanced User Guide.
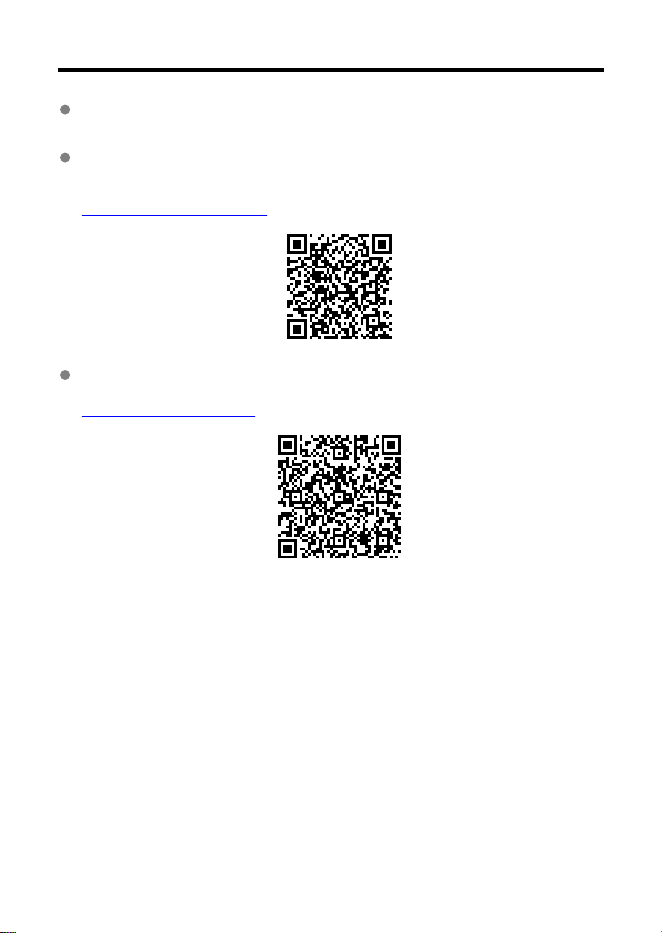
For the latest Advanced User Guide, refer to the following website.
https://cam.start.canon/P002/
SELPHY Photo Layout
The mobile app SELPHY Photo Layout can be downloaded from the following website:
https://cam.start.canon/spl/
5
About This Guide
Icons in This Guide
In this guide, the product is referred to as “SELPHY” or “the printer.”
Instructions in this guide apply to the printer under default settings.
For convenience, smartphones and tablets are collectively referred to as “smartphones.”
The mobile app SELPHY Photo Layout is referred to as “the app.”
Icons in This Guide
Links to pages with related topics.
Warnings to prevent printing problems.
Supplemental information.
6
WARNING
CAUTION
Safety Instructions
Be sure to read these instructions in order to operate the product safely.
Follow these instructions to prevent injury or harm to the operator of the product or others.
Denotes the risk of serious injury or death.
Use only power sources specified in this instruction manual for use with the product.
Do not disassemble or modify the product.
Do not expose the product to strong shocks or vibration.
Do not touch any exposed internal parts.
Stop using the product in any case of unusual circumstances such as the presence of
smoke or a strange smell.
Do not use organic solvents such as alcohol, benzine or paint thinner to clean the
product.
Do not get the product wet. Do not insert foreign objects or liquids into the product.
Do not use the product where flammable gases may be present.
This may cause electric shock, explosion or fire.
Do not touch the product connected to a power outlet during lightning storms.
This may cause electric shock.
Periodically remove any dust buildup from the power plug and power outlet using a dry
cloth.
Do not plug in or unplug the product with wet hands.
Do not use the product if the power plug is not fully inserted into the power outlet.
Do not expose the power plug and terminals to dirt or let them come into contact with
metallic pins or other metal objects.
Do not place heavy objects on the power cord. Do not damage, break or modify the
power cord.
Do not wrap the product in cloth or other materials when in use or shortly after use when
the product is still warm in temperature.
Do not leave the product connected to a power source for long periods of time.
Do not charge the product at temperatures outside the range of 5 – 40 °C (41 – 104 °F).
This may cause electric shock, explosion or fire.
Follow any indications to turn off the product in places where its use is forbidden.
Not doing so may cause other equipment to malfunction due to the effect of electromagnetic
waves and even result in accidents.
Follow the cautions below. Otherwise physical
injury or property damage may result.
Do not touch any parts inside the product.
This may cause injury.
7
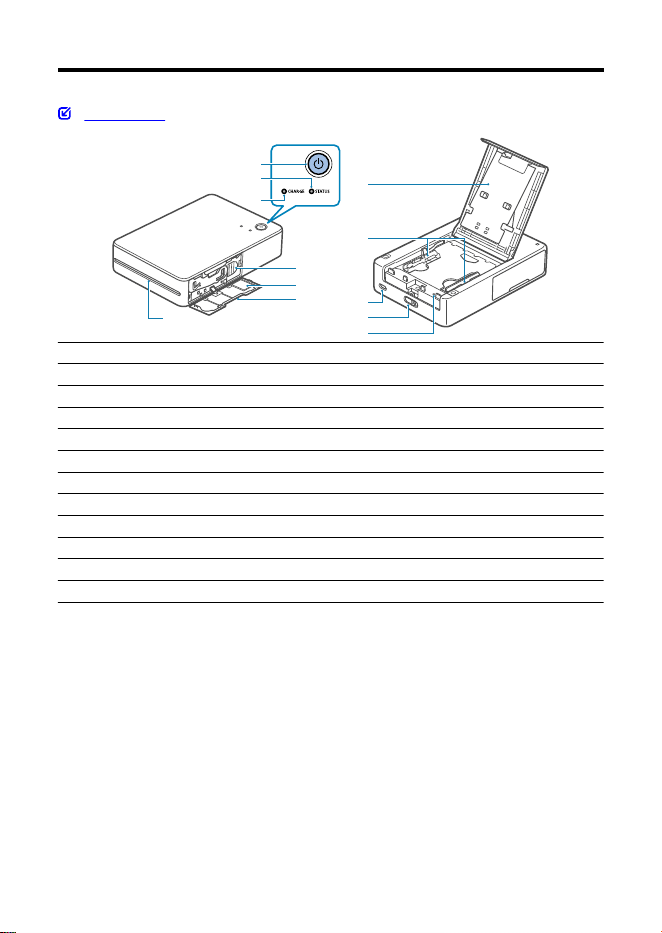
Part Names
Lamp Display
(1)
(2)
(3)
(4)
(5)
(6)
(7)
(8)
(9)
(10)
(11)
(12)
(1) Power button
(2) STATUS lamp
(3) CHARGE lamp
(4) Eject lever
(5) QR code label
(6) Ink cassette compartment cover
(7) Delivery outlet
(8) Paper compartment cover
(9) Paper guides
(10) Charging terminal
(11) Open lever
(12) Forced shutdown switch
8
Lamp Display
STATUS Lamp CHARGE Lamp Status
Off
Off Power off (not charging)
Blinks once in green Power off (charging: battery level low)
Blinks twice in green Power off (charging: battery level medium)
Blinks three times in green Power off (charging: battery level high)
Lit in green
Power off (fully charged)*
1
Blinks slowly in white Off Printer starting up
Blinks in white Off Busy
Blinks quickly in white Off Remove the printout.
Lit in white
Off
Ready to print (not charging)*
2
Blinks in green Ready to print (not charging: battery level low)
Blinks once in green Ready to print (charging: battery level low)
Blinks twice in green Ready to print (charging: battery level medium)
Blinks three times in green Ready to print (charging: battery level high)
Lit in green Ready to print (fully charged)
Blinks slowly in red Blinks slowly in green
Charging paused. Outside of operating temperature
range.
Blinks in red
Off Error. Check the app for messages.
Blinks in green Battery level too low to print. Charge the battery.
Blinks quickly in red
Off Error. Restart the printer.
Blinks quickly in green Battery error
*1: The CHARGE lamp will turn off after a while.
*2: You can check the battery level by pressing the power button when the printer is ready to print (not
charging).
• CHARGE lamp blinks once:
Battery level low. Charge soon.
• CHARGE lamp blinks twice:
Battery level low, but printing is still possible.
• CHARGE lamp blinks three times:
Battery level is sufficient.
9


Charging the Battery
1.
Use the included charging cable to connect the printer to a USB AC
adapter.
The CHARGE lamp starts to blink in green, and charging begins.
Charging is complete when the lamp remains lit in green.
Note
Use of an optional USB Power Adapter PD-E2 or PD-E1 is recommended for
charging and powering the printer. You can also use commercially available
products.
For charging, use a battery charger with a rated output of at least DC 5.0 V, 1.5 A.
Charging at room temperature takes approx. 80 min. Charging time varies greatly
depending on ambient temperature and remaining capacity.
11

Installing SELPHY Photo Layout
This product is designed for printing via the mobile app SELPHY Photo Layout.
1.
Download and install the latest version of SELPHY Photo Layout ( ).
2.
Start SELPHY Photo Layout.
Turn on location services on the smartphone.
Turn off power-saving mode and other functions that reduce
smartphone battery consumption.
Follow the instructions displayed.
12

Preparing the Printer and Printing
Follow these steps to load the paper and the ink cassettes in the printer and print.
1.
Turn the printer on.
Hold down the power button until the STATUS lamp starts blinking in
white. Wait until the lamp remains lit.
13
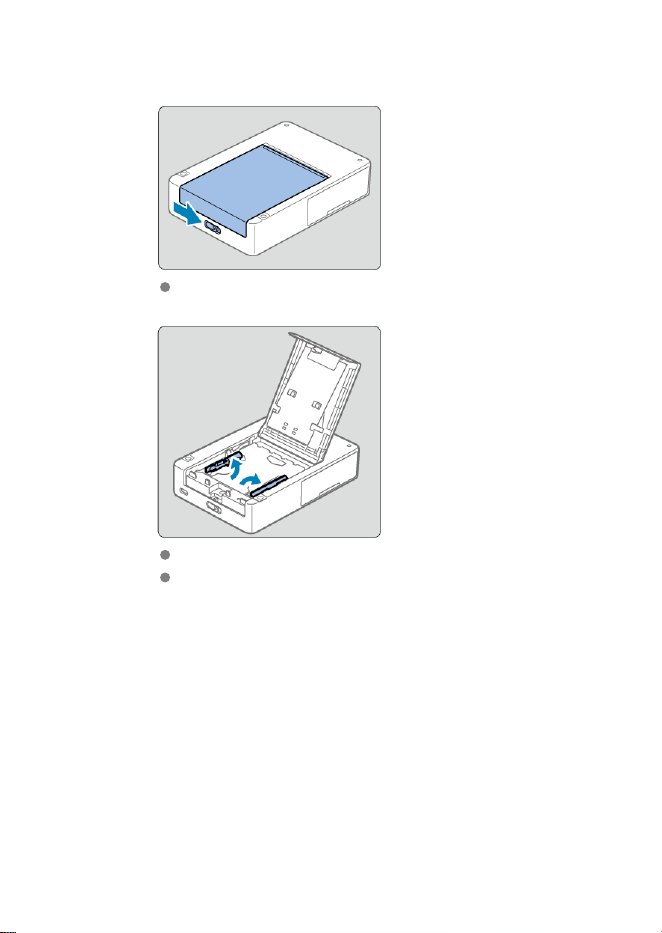
2.
Load paper.
Slide the open lever to release the lock, and open the paper
compartment cover.
Raise the paper guides.
Do not raise the paper guides when loading square format paper.
14
Load the paper (up to 10 sheets) with the printing surface (without the
Canon logo) face-down, being careful not to touch the printing surface.
Align the paper with the circled parts, not against the back of the
compartment.
Close the paper compartment cover.
15
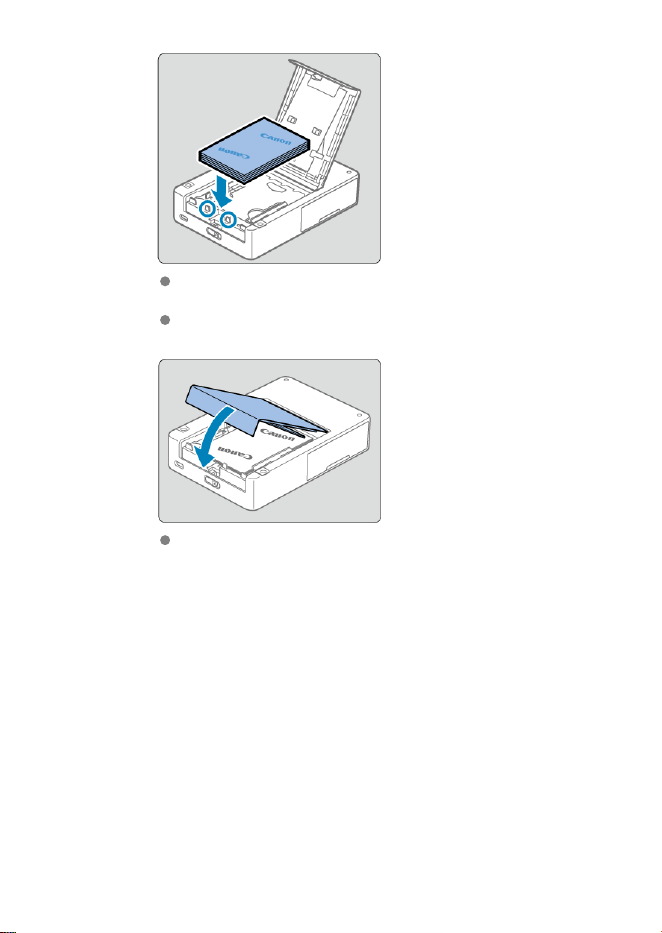
3.
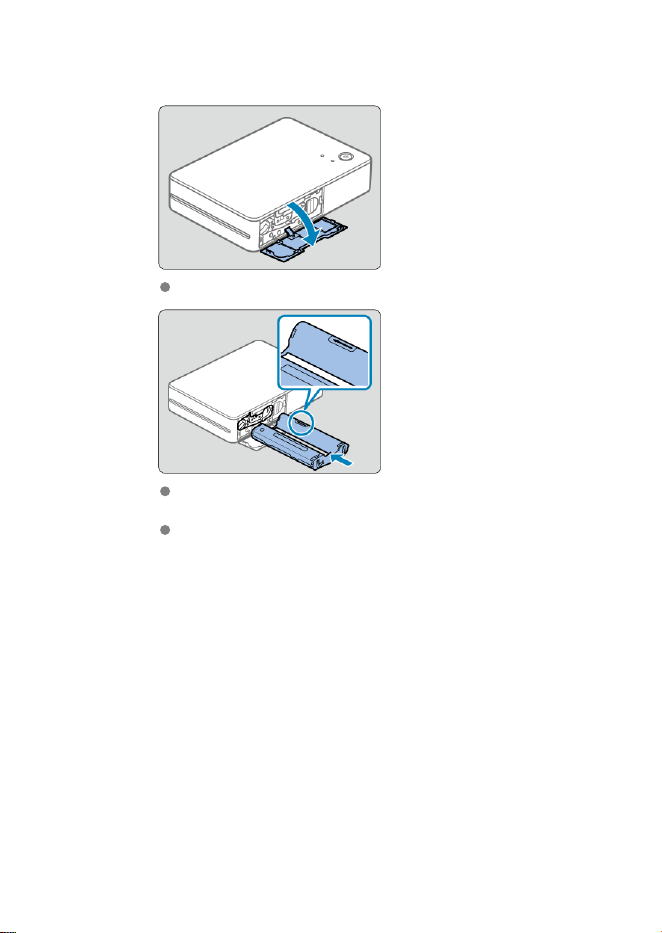
Load the ink cassette.
Open the ink cassette compartment cover.
With the new ink cassette correctly oriented, insert it in the printer until
it clicks into place.
Use a suitable ink cassette for the size of paper loaded.
16
4.
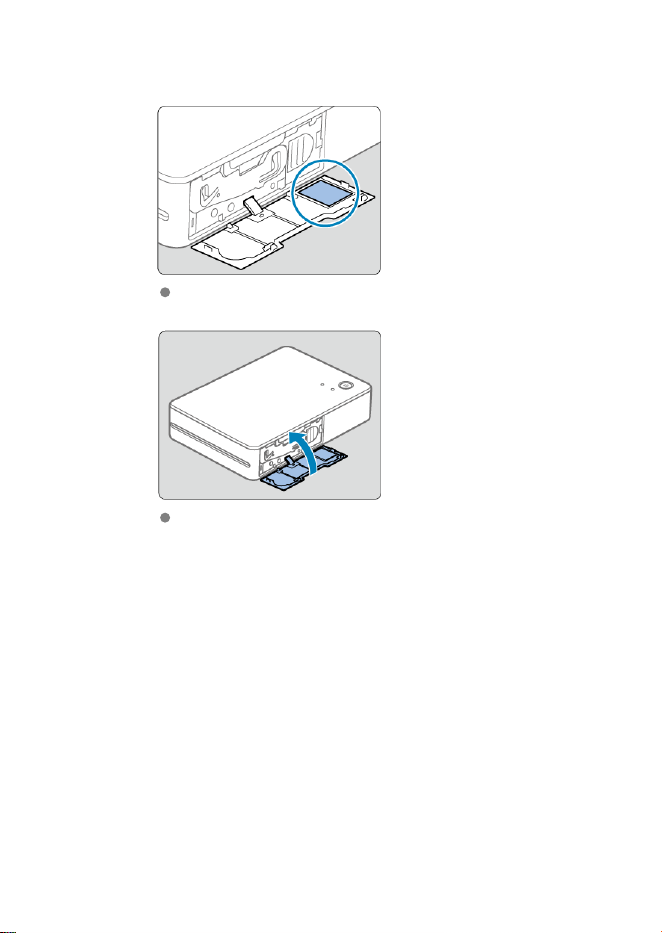
Scan the QR code to connect to the printer and register it.
Following the SELPHY Photo Layout instructions, scan the QR code to
connect to the printer and register it.
Close the ink cassette compartment cover.
17
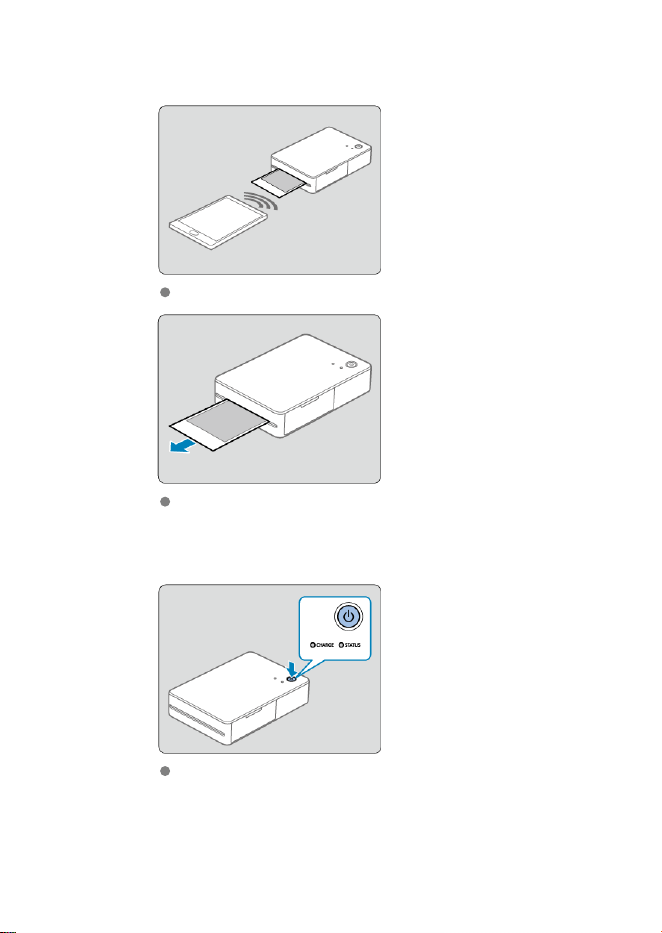
5.
Print.
Print from SELPHY Photo Layout.
Remove the printouts after printing is finished.
6.
Turn the printer off.
After use, hold down the power button until the STATUS lamp turns off.
18
Caution
Place the printer on a table or other flat, stable surface. Never place the printer on
an unstable or tilted surface.
Leave space for printouts by the delivery outlet.
The QR code label will be required if you need to register the printer again—for
example, if you switch smartphones. Keep a record by taking a photo of it with a
smartphone camera or other device.
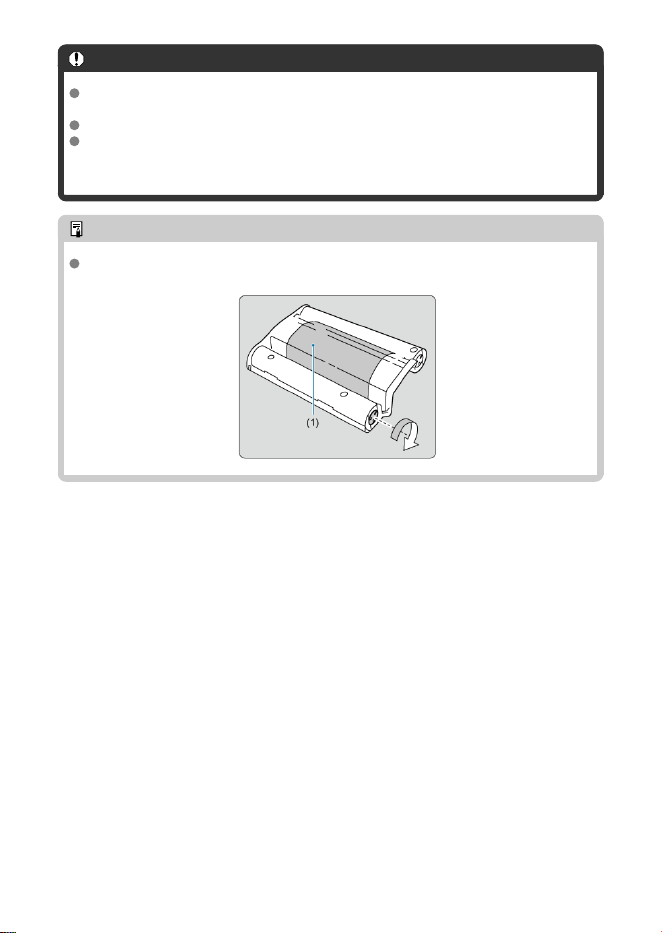
Note
If the ink sheet is loose, turn the sprocket gently to tighten it. Do not touch the ink
sheet (1).
19
Printing Precautions
Take the following precautions to avoid failure or malfunction.
When loading paper, keep the printing surface (without Canon logos) face-down and
avoid touching it.
Do not use paper that has started to peel away from the backing or that has portions
peeled off.
Do not use paper that has already been printed or written on.
The paper will emerge from the printer several times during printing, but do not pull on it
until a removal message is displayed on your smartphone.
Do not interrupt communication until printing is finished. If communication is interrupted,
printing may be incomplete.
Do not open the ink cassette or paper compartment cover while the printer is operating.
The printer may produce poor results if the ambient temperature is too high or low. If so,
try printing again in a location where the temperature is 15
–35°C (59–95°F).
Note
The printer automatically turns off if left idle for approx. 10 min. To resume printing,
press the power button.
20


Troubleshooting
Power
Charging
Printing
Paper
Wi-Fi
App
Error messages
App and printer updates
Troubleshoot any printer issues as described in this section. If the problem persists after
troubleshooting, contact your nearest customer support help desk.
Power
Cannot turn on the printer.
Check the remaining battery level ( ).
If connecting the printer to a power source does not charge the battery, press the forced
shutdown switch ( ) with a thin, pointed object and try charging again.
22
Charging
Battery cannot be charged.
Charging is not possible during printing. Charge when the printer is ready to print or with
the power turned off.
Use a battery charger specified for the printer ( ).
If connecting the printer to a power source does not charge the battery, try reconnecting
the charging cable. If the battery still will not charge, press the forced shutdown switch
( ) with a thin, pointed object and confirm that charging has commenced.
Battery runs out of power quickly.
Battery performance is reduced at low temperatures.
Battery power may be consumed faster under some print settings.
Battery power is consumed while the printer is waiting to print. To be able to print as
much as possible before charging again, turn the printer off after printing.
Battery level indicators on the printer and in the app are for reference only. The battery
may run out of power quickly under some printing conditions. Charge the battery as
soon as possible after use.
Charging error: STATUS lamp blinks slowly in red and CHARGE lamp
blinks slowly in green.
Although charging will stop if the printer temperature rises past a certain level, this does
not indicate a problem. Disconnect the battery charger, turn off the printer, and wait for it
to cool down. This charging error is more likely to occur during continuous printing or
when the ambient or internal printer temperature is high.
Charging takes longer, or a charging error occurs (STATUS lamp blinks
quickly in red and CHARGE lamp blinks quickly in green).
Charging may take longer or a charging error may occur if the printer is not used over an
extended period. If so, reconnect the charging cable and charge the printer again.
Use a battery charger specified for the printer ( ).
If the problem persists, contact a customer support help desk.
23

Printing
Cannot print.
Confirm that the printer is on ( ).
Confirm that the paper and the ink cassette are loaded correctly ( ).
Confirm that the ink sheet is taut ( ).
Confirm that you are using paper designed especially for the printer ( ).
Replace the ink cassette and replenish the paper as needed ( ).
Print quality is poor.
Confirm that the ink sheet and paper are free of dirt or dust.
Confirm that the inside of the printer is free of dust.
Confirm that no condensation has formed on the printer.
Confirm that the printer is away from sources of electromagnetic waves or strong
magnetic fields.
Printed colors do not match the colors on the smartphone screen.
Color is produced in different ways by the smartphone screen and the printer. Colors
may also look different depending on screen color calibration and the brightness and
color temperature of lighting in the screen viewing environment.
Printing takes too long.
Although printing will be paused if the printer temperature rises past a certain level, this
does not indicate a problem. Wait a while before printing, or turn off the printer and wait
for it to cool down before you continue. Occasional pauses will cause printing to take
longer than usual if you print continuously or use the printer in hot environments, or
when the printer becomes hot internally.
Pausing may be more frequent under certain print settings.
Cannot cancel printing.
Even if you cancel printing in progress, the current print job will still be printed.
Canceling a multi-sheet print job in progress will stop printing after the current sheet is
printed.
24
Paper
Paper feed problems or frequent paper jams occur.
Confirm that paper is loaded correctly ( ).
Confirm that the paper is not folded, peeling away from the backing, or previously
printed on.
Confirm that no more than 10 sheets are loaded.
Confirm that you are using paper designed especially for the printer ( ).
The printer may produce poor results if the ambient temperature is too high or low. If so,
try printing again in a location where the temperature is 15
–35°C (59–95°F).
Cannot print the correct quantity (unused paper left after ink runs out).
Some unused paper may remain if the ink runs out first, depending on how the printer is
used.
Paper is not ejected.
Any paper left sticking out of the front of the printer should be carefully pulled out. If you
cannot remove the paper by gently pulling it out, never force it out. Turn the printer off
and then on. Repeat until the paper is ejected. If you accidentally turn the printer off
while printing, restart it and wait until the paper is ejected.
If paper jams and cannot be removed, contact your dealer or a customer support help
desk. Do not attempt to remove jammed paper by force, which may damage the printer.
25

Wi-Fi
“Connection has failed.
” is displayed.
Confirm that the printer is on ( ).
Turn on location services on the smartphone.
To register a new printer in the app, tap [ ] in the upper left on the app home screen,
then tap [Register/reregister printer].
Registration using the QR code will not be possible if you have changed the password
by using [Change the password]. If so, register the printer manually.
If you forgot the password after changing it, reset the printer settings as follows, then
register the printer again in the app.
Turn the printer on. → Press and hold the power button for at least 1 sec., which will turn
off the STATUS lamp.
→ Keep pressing the power button. → When the STATUS lamp
starts blinking, release the power button.
Printing takes too long.
Do not use the printer near sources of Wi-Fi signal interference, such as microwave
ovens, Bluetooth devices, or other equipment operating on the 2.4 GHz band.
Keep the printer near the smartphone, without objects between them.
26

App
QR code cannot be scanned.
Confirm that the QR code is not obscured by shadows, and that you are scanning it
straight-on.
It may not be possible to scan the QR code well on some smartphones. If so, register
the printer manually.
“This photo cannot be used.
” is displayed.
If “This photo cannot be used.” is displayed in the app, the image may be too large.
Before you attempt printing again, try to make the image smaller by reducing or cropping
it.
Error messages
In case of printer problems, lamps on the printer are activated and a message is
displayed on the smartphone. When error messages include troubleshooting tips, follow
the instructions. If only an error message is displayed, follow the suggestions in
“Troubleshooting.
” If the problem persists, contact a customer support help desk.
If you will restart the printer, make sure the paper and the ink cassette are loaded
correctly before you turn it on.
App and printer updates
Always use the latest version of the app ( ).
The printer firmware may need to be updated before you can print. This requires a
sufficient battery level.
Do not turn the printer off or press the forced shutdown switch during firmware updates.
27

Storing Prints
When writing on prints, use an oil-based pen.
To prevent discoloration, do not store prints where temperatures exceed 40°C (104°F),
in humid or dusty places, or in direct sunlight.
Do not apply adhesive tape to the printed surface, keep the surface away from vinyl or
plastic desk mats, business card cases, and erasers, do not leave the surface pressed
against other objects, and do not wipe with alcohol or volatile solvents, which may cause
discoloration, fading, or color transfer.
When storing prints in an album, choose an album with photo covers made of nylon,
polypropylene, or cellophane.
Caution
Color may change over time or depending on storage conditions. Canon cannot be
held liable for discoloration.
28

After Printing
Turn the printer off.
Leave the paper and the ink cassette in the printer.
Store the printer on a flat surface, away from sunlight and dust. Any dust that enters the
printer may cause white banding on photos or malfunctioning.
CAUTION
Store any unused paper or ink cassettes in their unopened packages, away from
sunlight.
29
Handling and Maintenance
Do not subject the printer to excessive force or vibration, which may damage it or cause
paper jams.
Do not expose the printer to insecticides or volatile substances. Additionally, do not
store the printer in contact with rubber or vinyl products over extended periods, which
may cause deformation of the casing.
Avoid condensation on the printer, which may happen when moving it from cold to warm
environments. Put the printer in a sealed plastic bag and allow it to adjust to the new
temperature before removing the bag. If condensation forms, allow the printer to dry
naturally at room temperature before using again.
Wipe away any dirt with a soft, dry cloth.
Caution
Never wipe the printer with detergent or organic solvents such as benzene or paint
thinner.
30

Security
Because wireless LAN uses radio waves to transmit signals, security precautions more
stringent than when using a LAN cable are required.
Keep the following points in mind when using wireless LAN.
Transmission monitoring
Third parties with malicious intent may monitor wireless LAN transmissions and attempt
to acquire the data you are sending.
Unauthorized network access
Third parties with malicious intent may use the product illegally if they can view the
information in the QR code.
You can change the network password from the mobile app SELPHY Photo Layout as
needed.
Changing Wi-Fi security settings
You can change the printer security settings from a smartphone as follows. Normally there is
no need to change these settings.
1. Turn the printer on.
2. In the smartphone Wi-Fi settings, add the SELPHY network and join it.
SSID (network name): QX20-xxx
(xxx: last three letters or numbers below the QR code inside the printer ink cassette
compartment cover)
Password: Nine letters or numbers below the QR code inside the printer ink cassette
compartment cover
3. Using the smartphone browser, access the following URL, download the certificate, and
install it on the smartphone.
http://192.168.0.1:8008/
4. Using the smartphone browser, access the following URL. On the [Wi-Fi Security]
screen, change the security settings as needed.
https://192.168.0.1/
5. Delete the SELPHY network added in step 2.
• Changing Wi-Fi security settings may prevent you from connecting, depending on the
smartphone OS, software version, or other factors. If so, reset the printer settings ( ).
31

Before Repair, Disposal, Lending, or Transfer of
Ownership
Before transferring ownership, lending the product, disposing of it, or sending it for repair, do
the following to reset the settings.
Turn the printer on. → Press and hold the power button for at least 1 sec., which will turn
off the STATUS lamp. → Keep pressing the power button.
→ When the STATUS lamp
starts blinking, release the power button.
32

Specifications
Printing method
Printing method
Dye-sublimation thermal transfer
Printing resolution
287 × 287 dpi
Gradation
256 shades per color
Print speed (per sheet)
Approx. 40 sec. (at room temperature)
Number of printable sheets
Approx. 20 sheets (at room temperature, using a new, fully charged battery)
*
Each printout must be removed when finished.
Paper feed capacity
10 sheets
Dimensions / weight
Dimensions
(W) × (H) × (D) Approx. 102.2 × 32.9 × 145.8 mm (Approx. 4.02 × 1.30 × 5.74 in.)
* Excluding protrusions
Weight
Approx. 455 g (Approx. 16.05 oz.)
*
Excluding ink cassette and label
Operating environment
Operating temperature
5–40°C (41–104°F)
Operating humidity
20–80%
33

Power source
Battery charge
Rated input (voltage) DC 5.0 V ± 0.5 V
Rated input (current) Max. 1.5 A
Charging time (at 23°C/
73°F)
Approx. 80 min.
• Charge via charging cable
• Takes approx. 4 hours if the battery is fully discharged, such as when initially
charged or after extended storage
Wi-Fi
Specifications
IEEE 802.11b/g compliant
Frequency
2.4 GHz
Connection method
Direct connection*
• Simultaneous connections: 6 devices
• Can be paired with smartphones via a QR code
*
Printer serves as a basic access point for device connections. Internet connectivity may not be
available during direct connections, depending on the type of smartphone.
Channels
1–11 ch
Security
WPA3-Personal Transition Mode
SELPHY Photo Layout
Compatible version
SELPHY Photo Layout ver. 4.0.0 or later for iOS and Android
34

Color ink / label set
Ink cassette
Colors Overcoat
XS-20L
• Yellow
• Magenta
• Cyan
Provided
XC-20L
Label set
Paper Specifications Paper Size
XS-20L Square format sticker paper 72.0 × 85.0 mm (2.84 × 3.35 in.)
XC-20L Card-size sticker paper 54.0 × 85.0 mm (2.13 × 3.35 in.)
• All measurements based on Canon testing standards.
• Printer specifications and appearance are subject to change without notice.
35

Trademarks and Licensing
Android is a trademark of Google LLC.
QR Code is a trademark of Denso Wave Inc.
Wi-Fi
®
, Wi-Fi Alliance
®
, WPA
™, WPA2™, and WPA3™ are trademarks or registered
trademarks of the Wi-Fi Alliance.
USB Type-C™ and USB-C™ are trademarks of USB Implementers Forum.
All other trademarks are the property of their respective owners.
36
