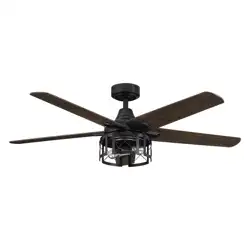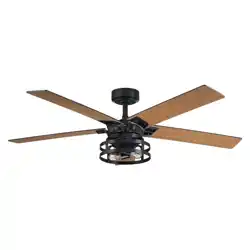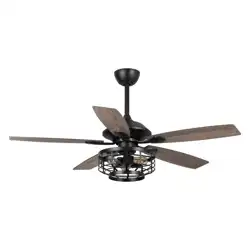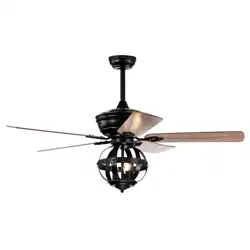
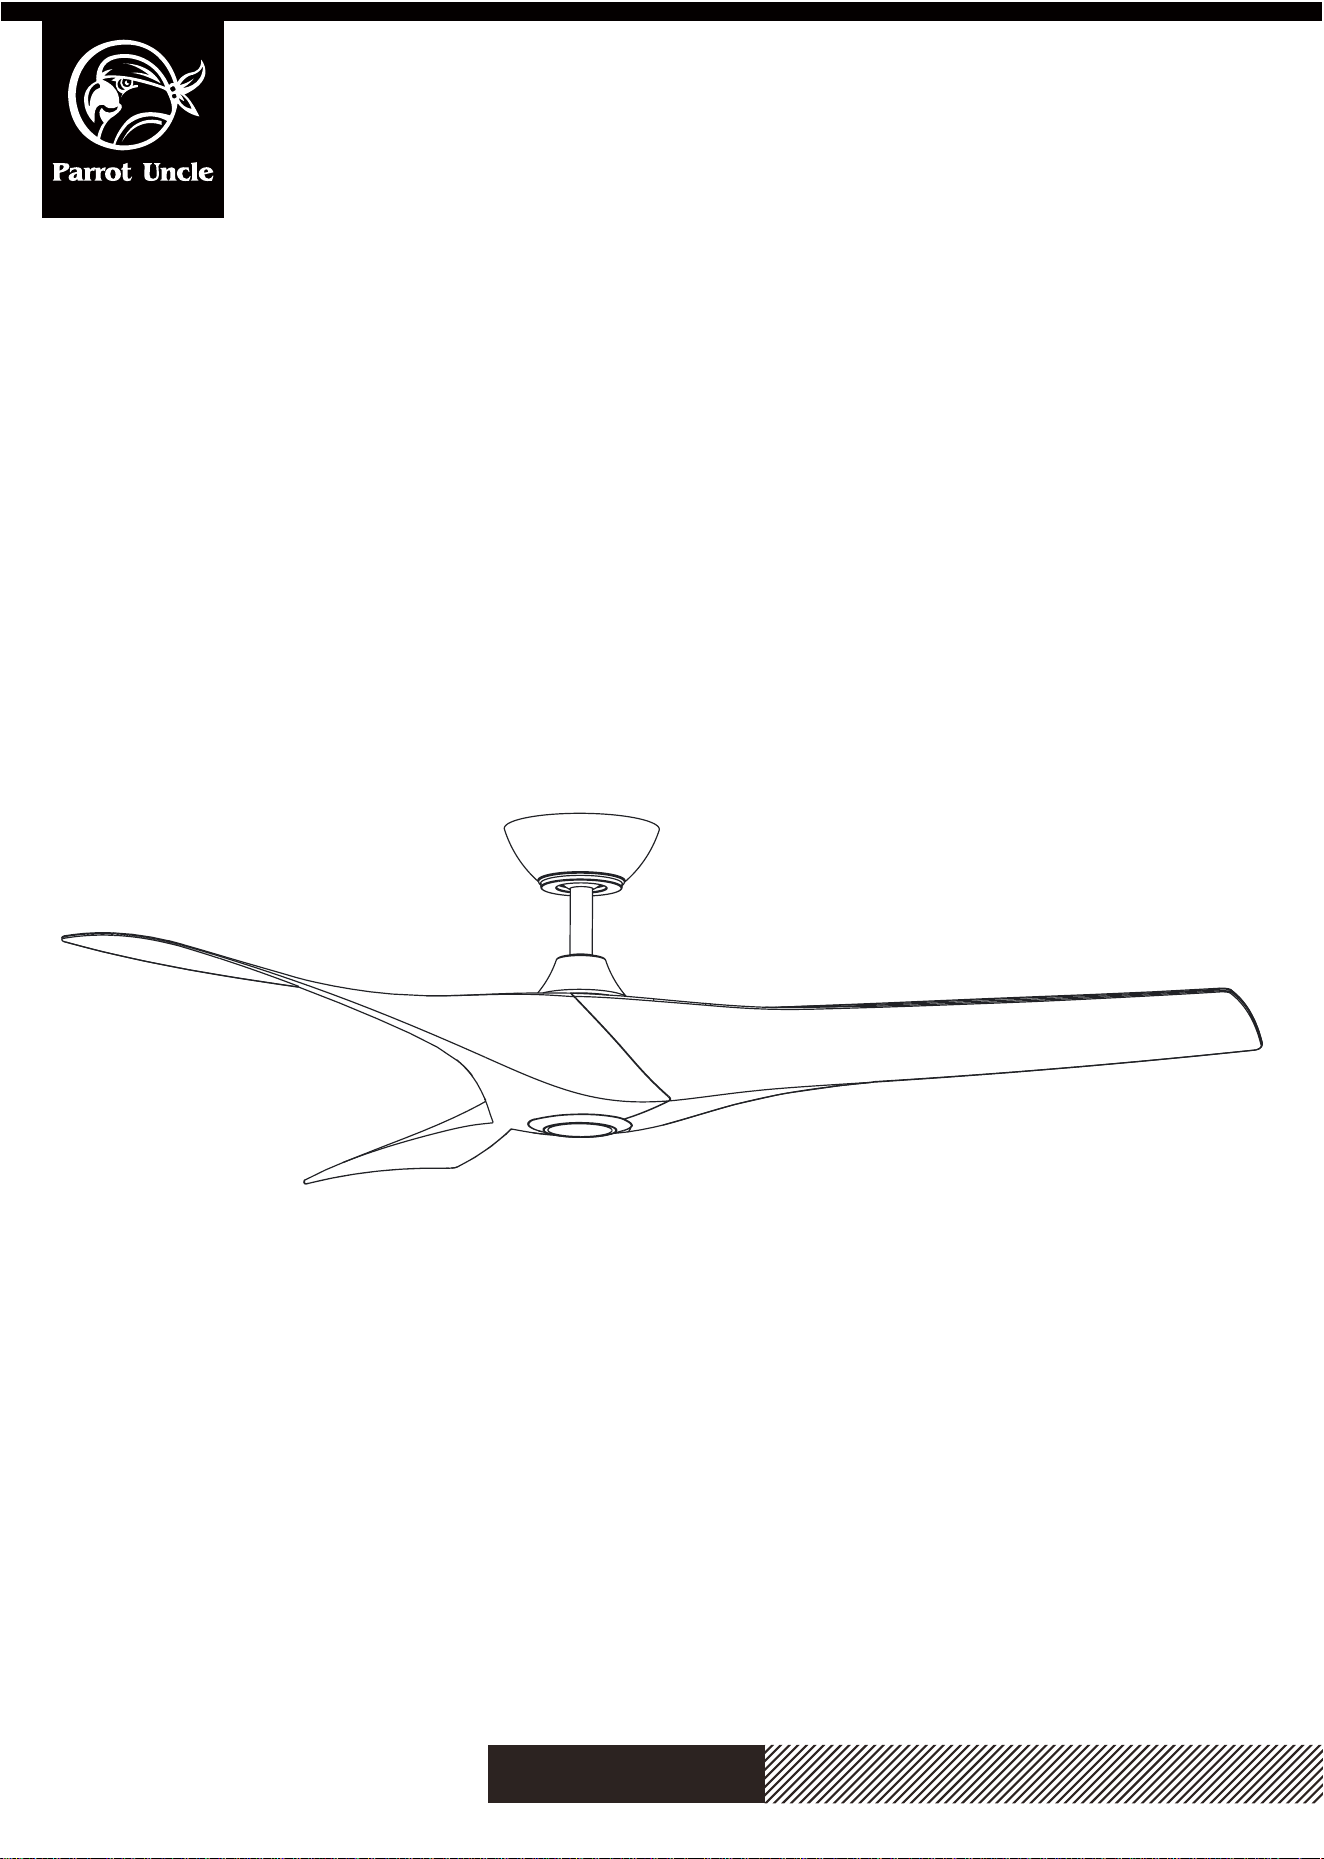
F6116BK110V / F6116110V
www.parrotuncle.com
English / Español / Français
F6116BK110V / F6116110V
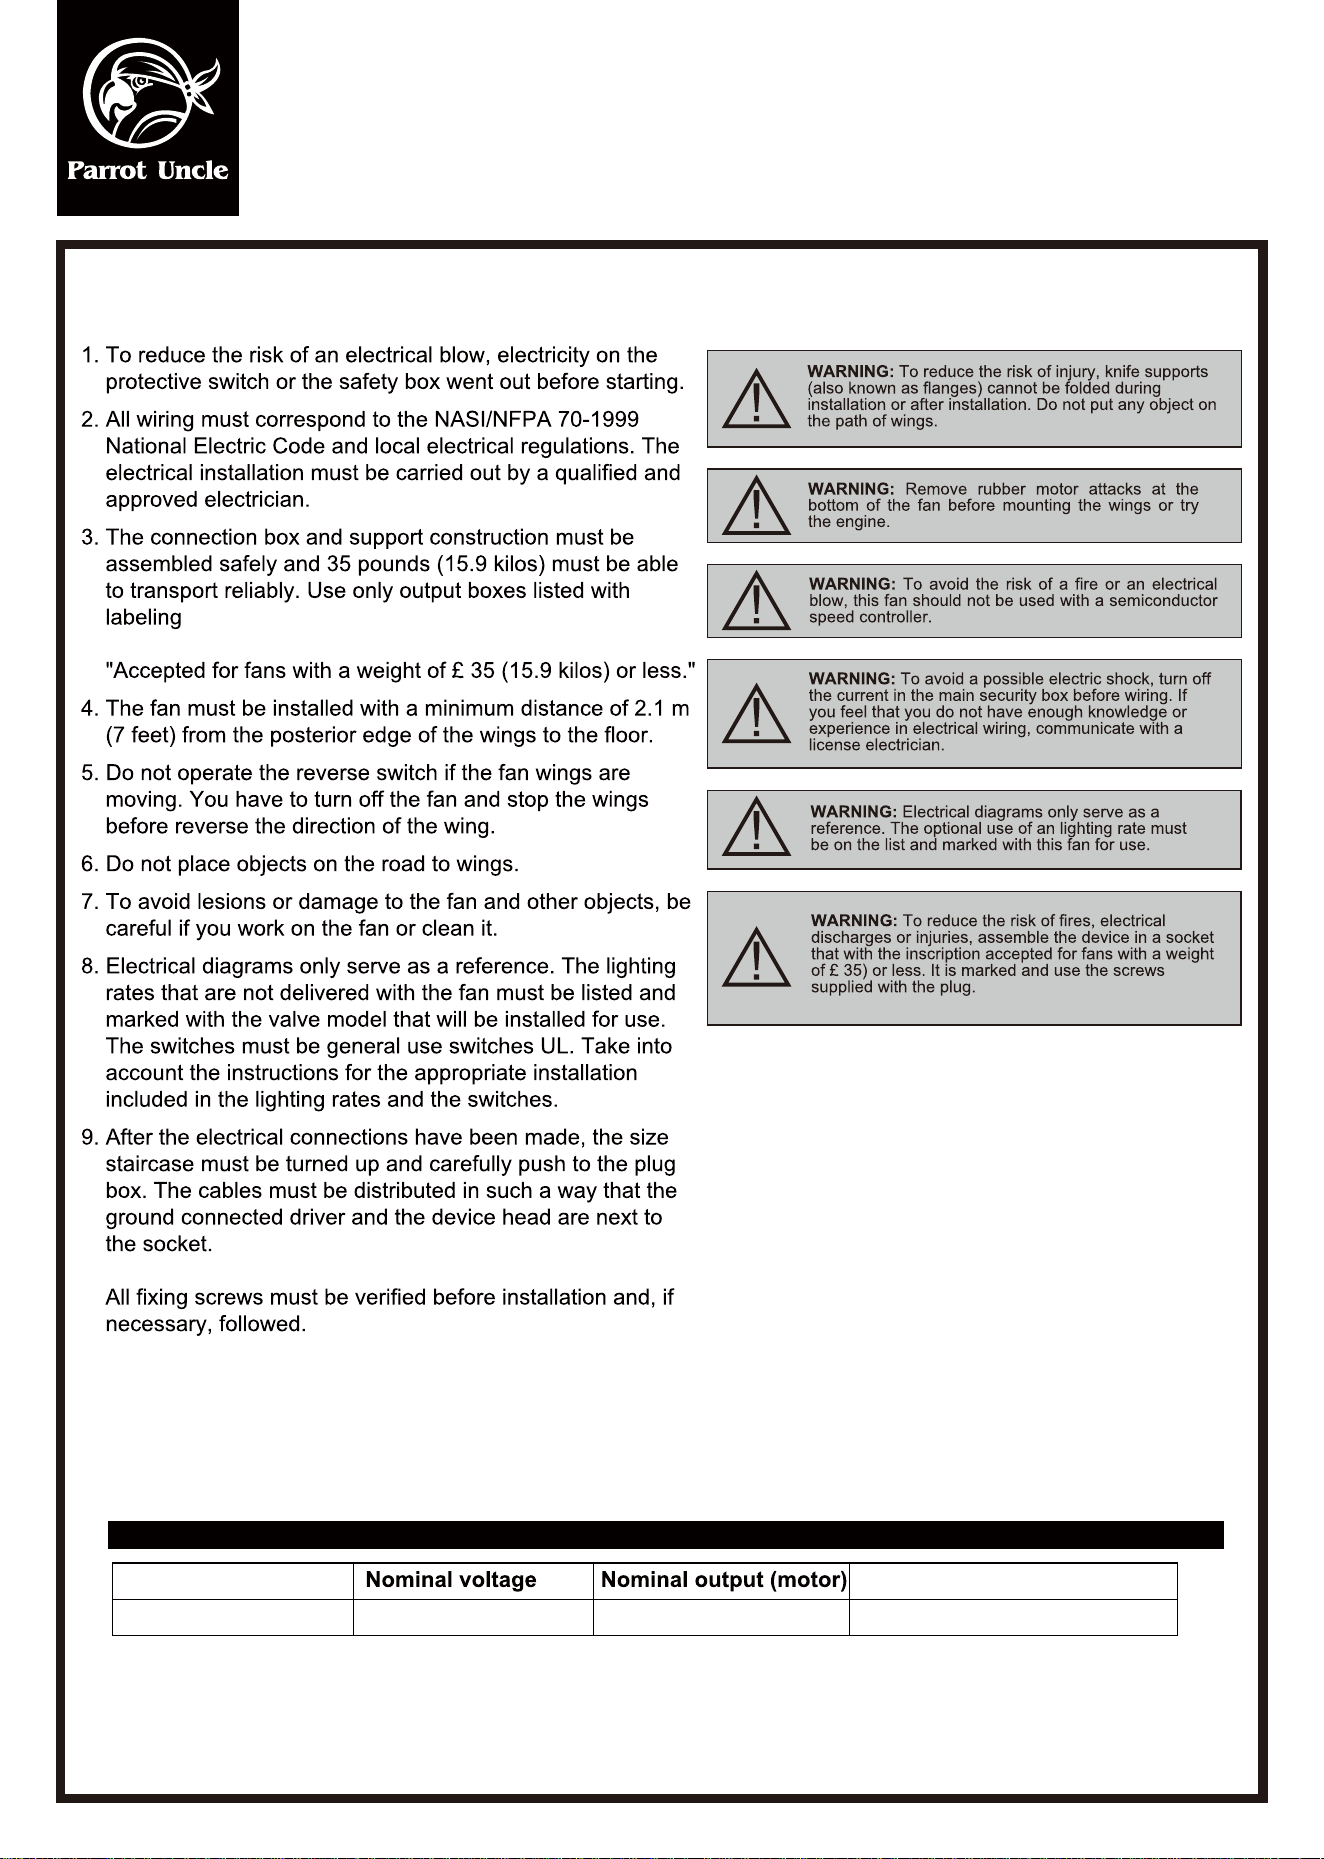
WARNING: SHUT POWER OFF AT FUSE OR CIRCUIT BREAKER
Sicherheit information
TECHNICAL INFORMATION
SKU
F6116BK110V / F6116110V
120V AC
35W
N/A
light
Installation & Operating Instructions for the
Parrotuncle Owner's Installation ,Manual
WARNING: SHUT POWER OFF AT FUSE OR CIRCUIT BREAKER
Installation & Operating Instructions for the
Parrotuncle Owner's Installation ,Manual
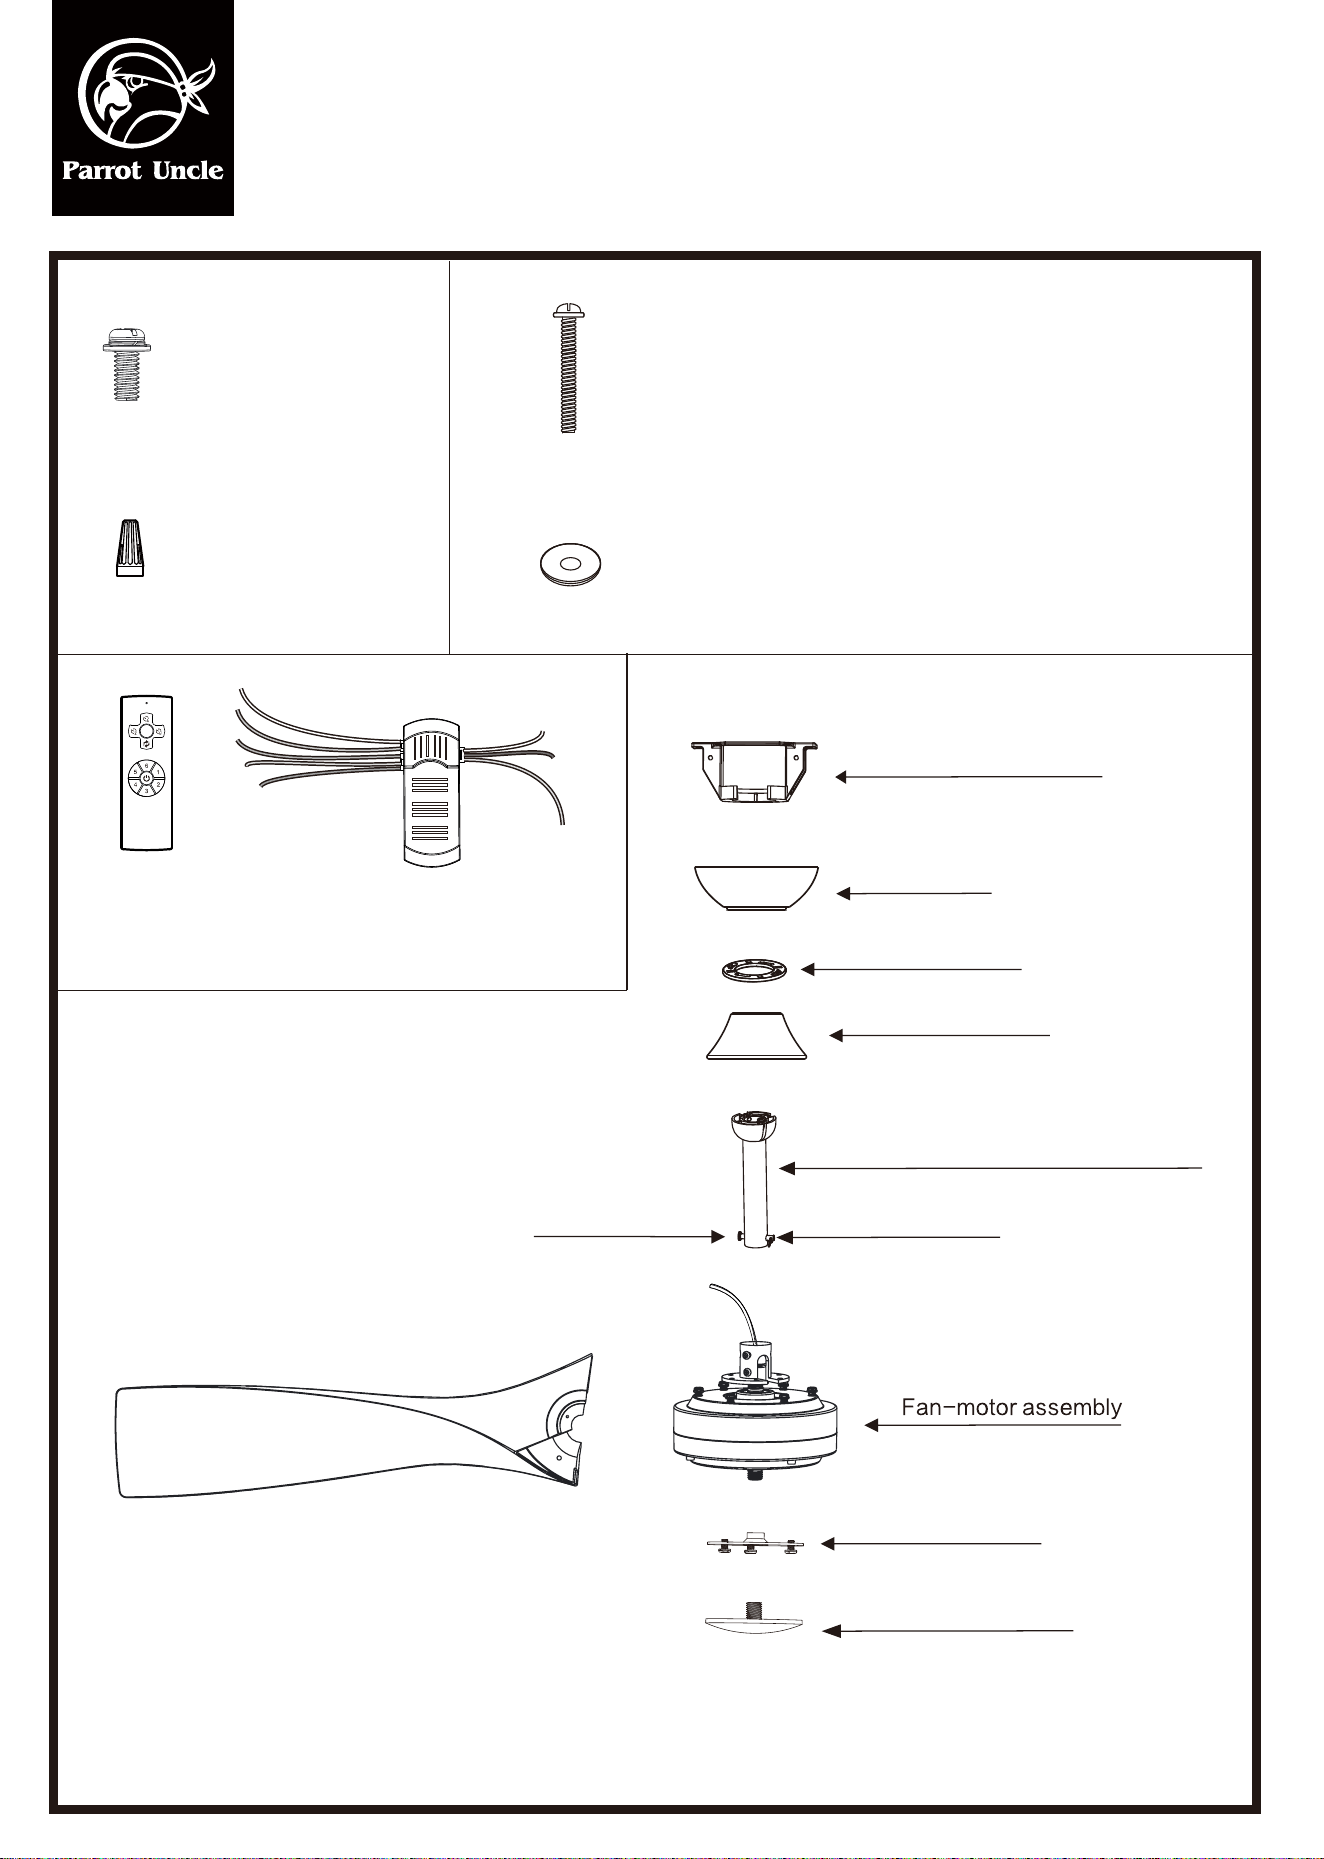
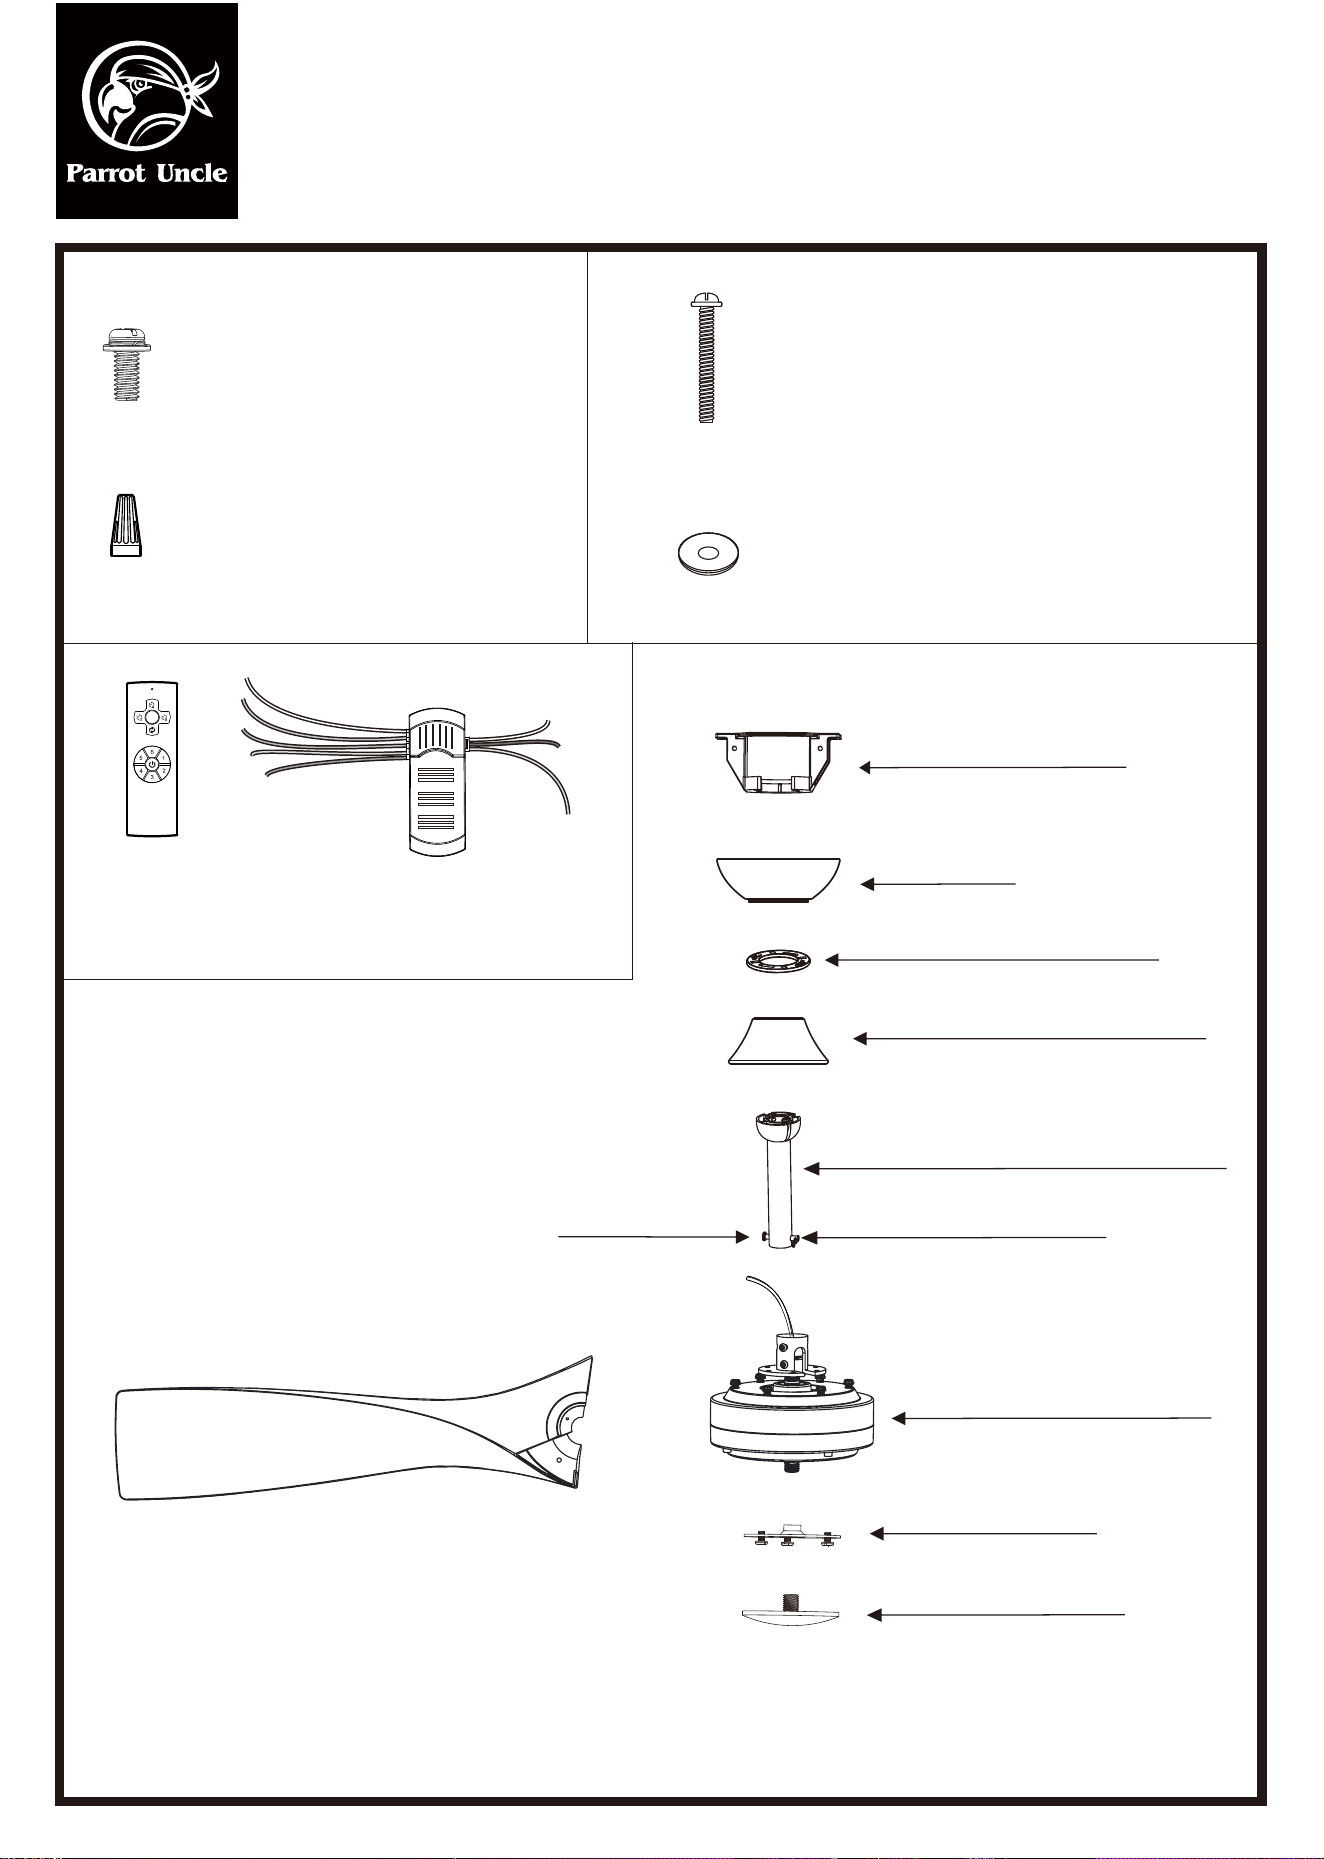
Blade screws (1 PCS)
REMOTE CONTROL (1 SET)
Pls check whether above accessories are completed or not.Yes,and install.
Mounting bracket
6”Ball/downrod assembly (pre-assembly)
Canopy cover
Canopy
Coupling cover
Hanging Pin
“R” Locking Pin
Blade (3 PCS)
Flywheel
Flywheel cover
Mounting screws (2 PCS)
Washer (2 PCS)
Wire nuts (7 PCS)
F6116BK110V / F6116110V
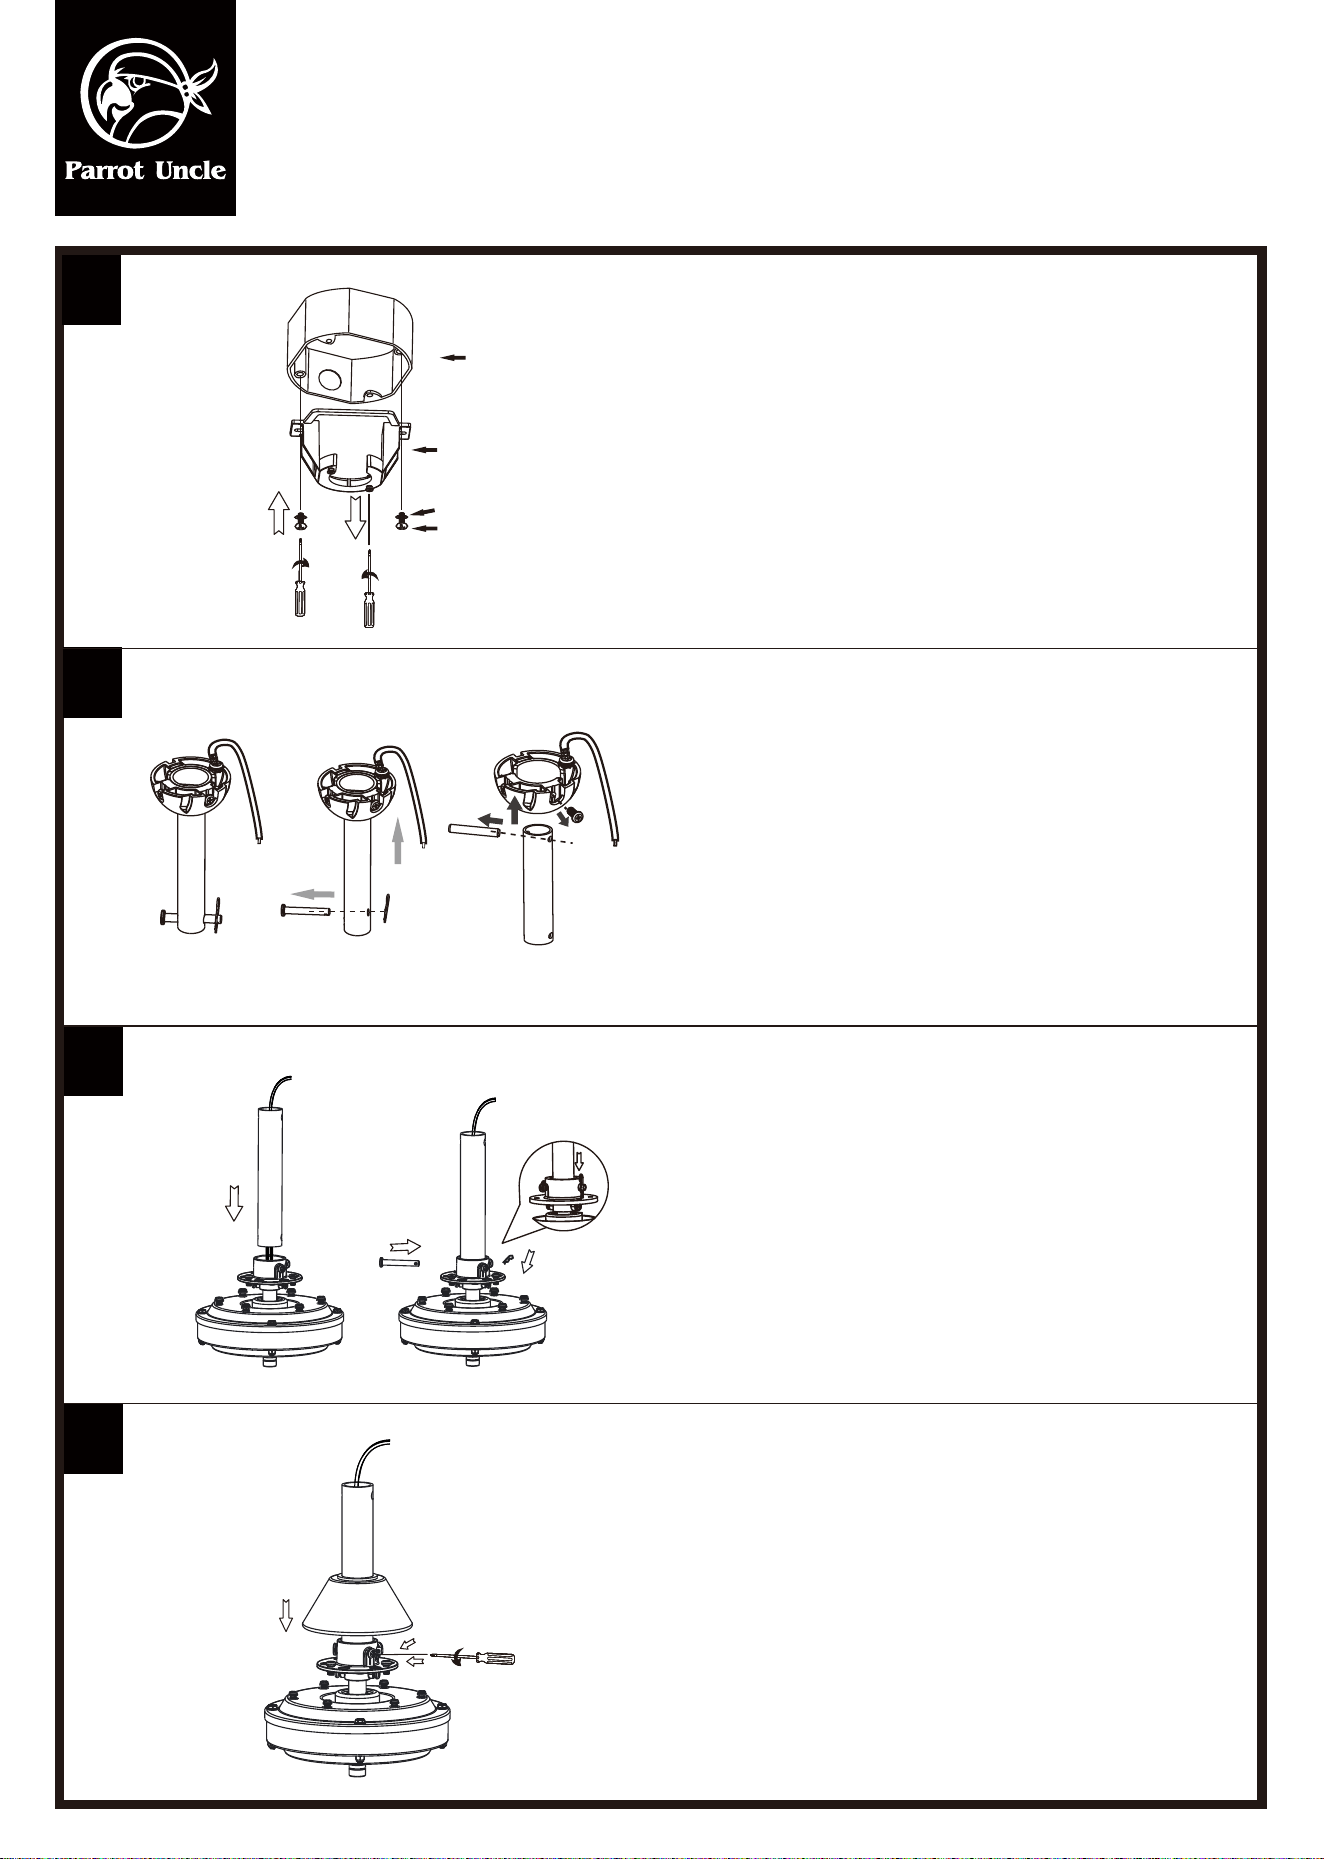
Securely attach the mounting bracket to the
outlet box, using the self tapping screw and
the washers.
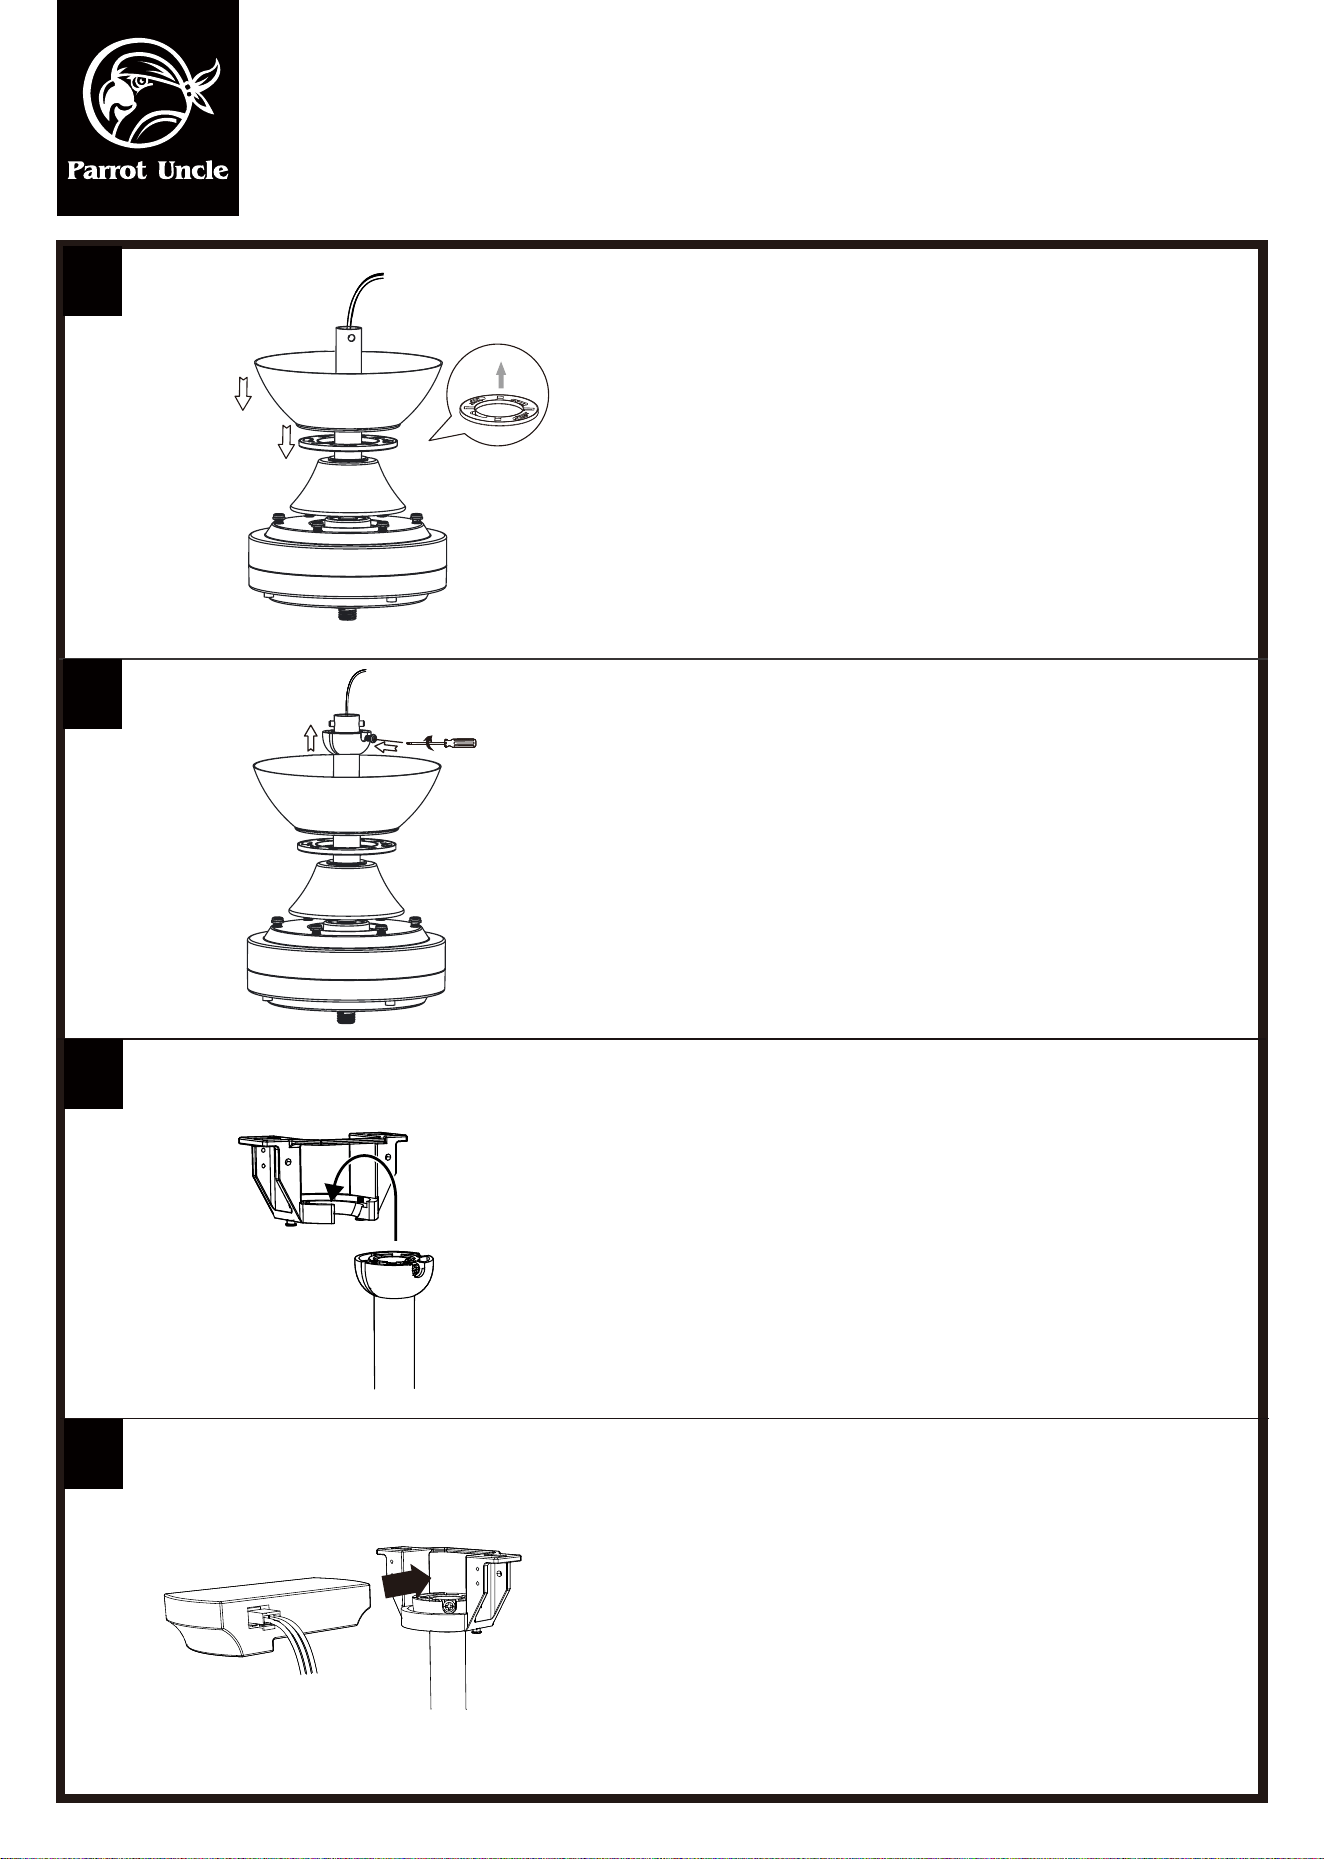
Remove "R"locking pin and hanging pin;
remove the cross pin on the ball and the
pre-assembled screw.
Loose the pre-assembled screws on the collar;
Thread the motor wires through the downrod;
slide hanging pin and "R"locking pin.
Tighten the collar screws and slide the coupling
cover.
1
2
3
4
WARNING: SHUT POWER OFF AT FUSE OR CIRCUIT BREAKER
Installation & Operating Instructions for the
Parrotuncle Owner's Installation ,Manual
Outlet box
Mounting Bracket
washers
Self tapping screw
X2
X1
X2
F6116BK110V / F6116110V
5
6
7
8
WARNING: SHUT POWER OFF AT FUSE OR CIRCUIT BREAKER
Installation & Operating Instructions for the
Parrotuncle Owner's Installation ,Manual
X1
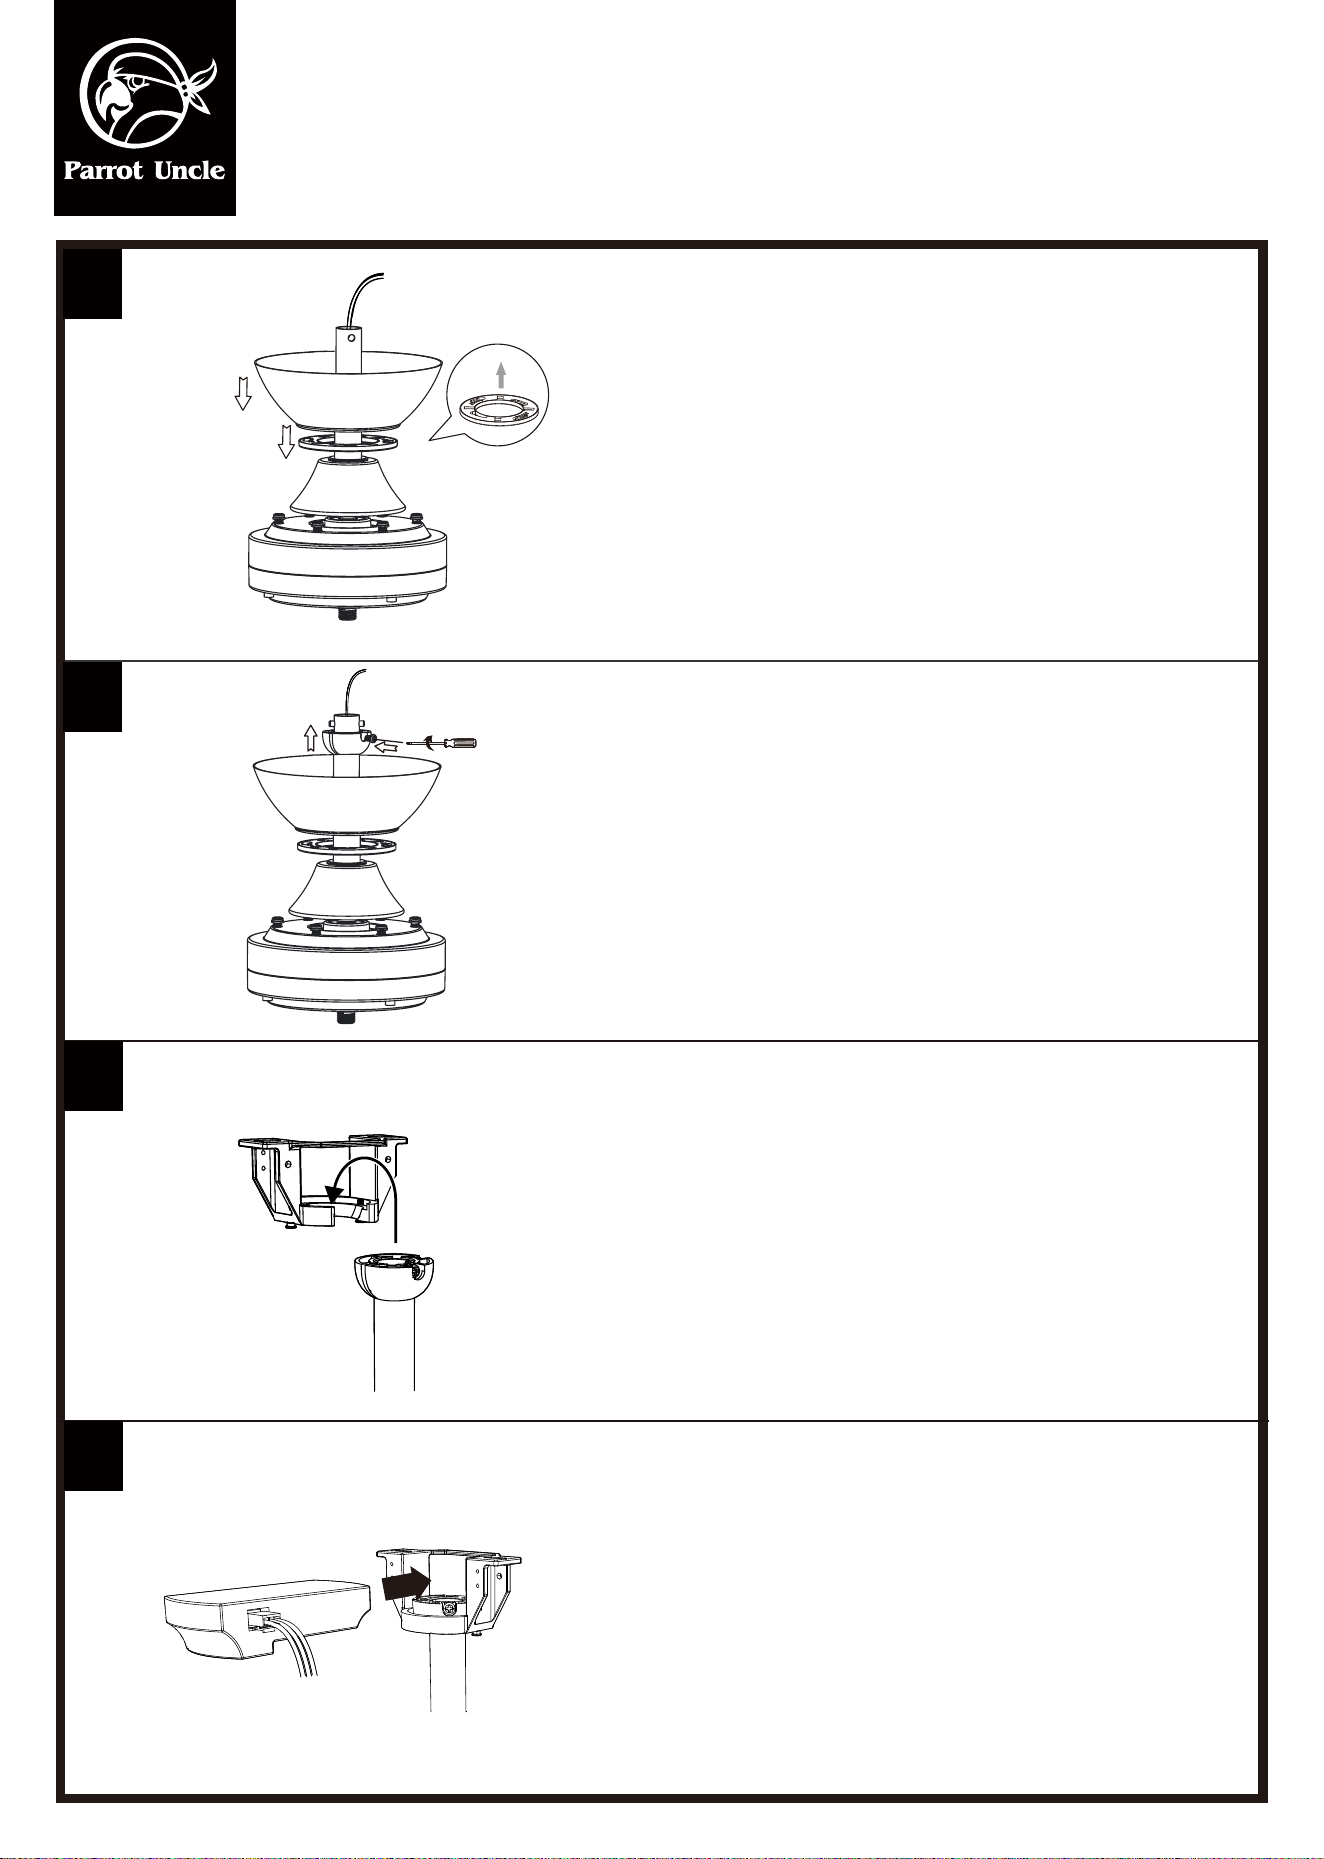
Slide canopy cover and canopy over the downrod.
Tighten the screw on the ball.
Hang the fan onto the mounting bracket in the
right position.
Insert receiver into hanger bracket with the at
side of the receiver facing the ceiling.
F6116BK110V / F6116110V
11
10
9
WARNING: SHUT POWER OFF AT FUSE OR CIRCUIT BREAKER
Installation & Operating Instructions for the
Parrotuncle Owner's Installation ,Manual
X1
X6
X6
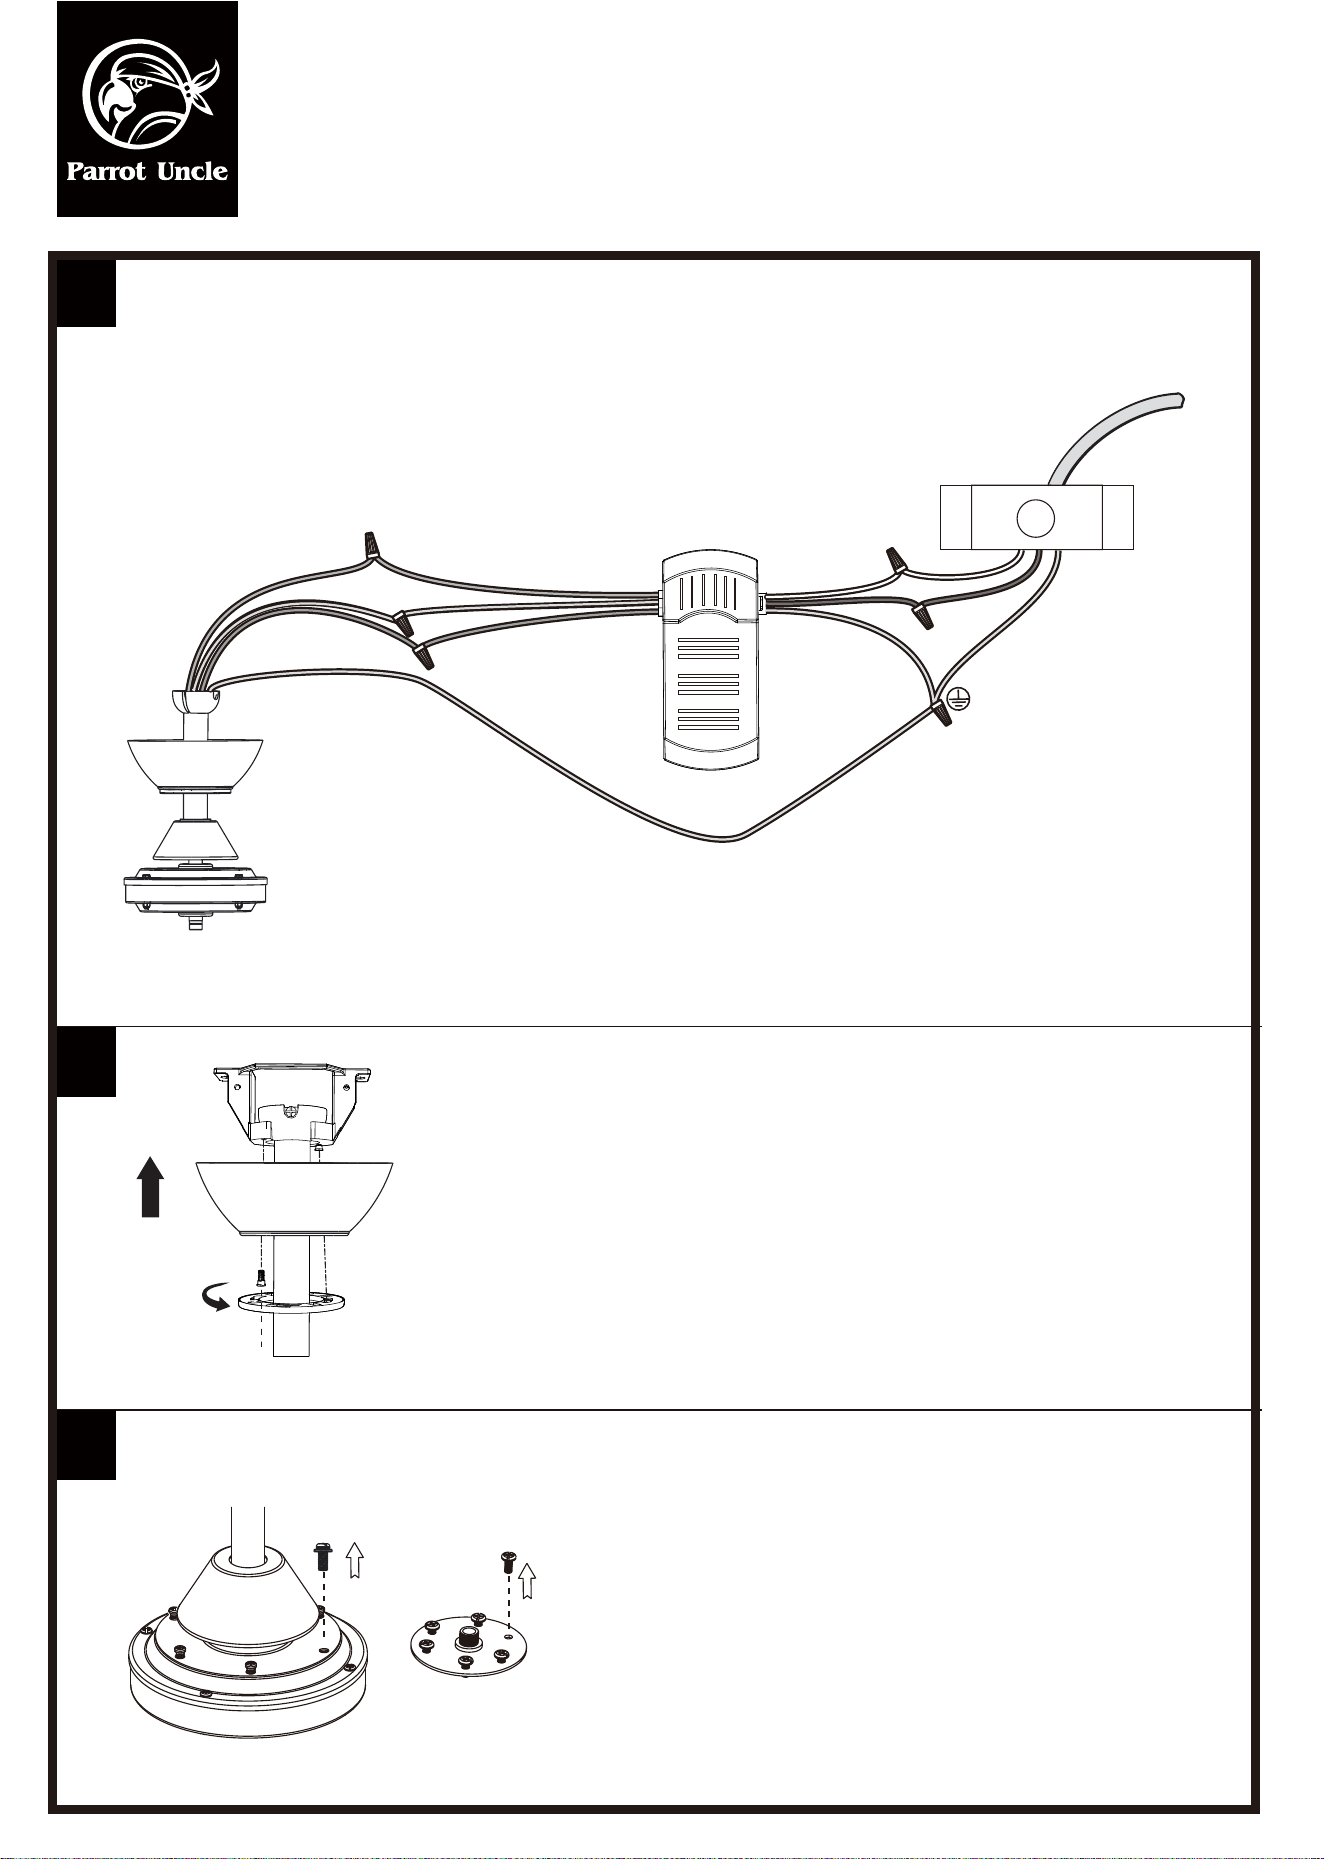
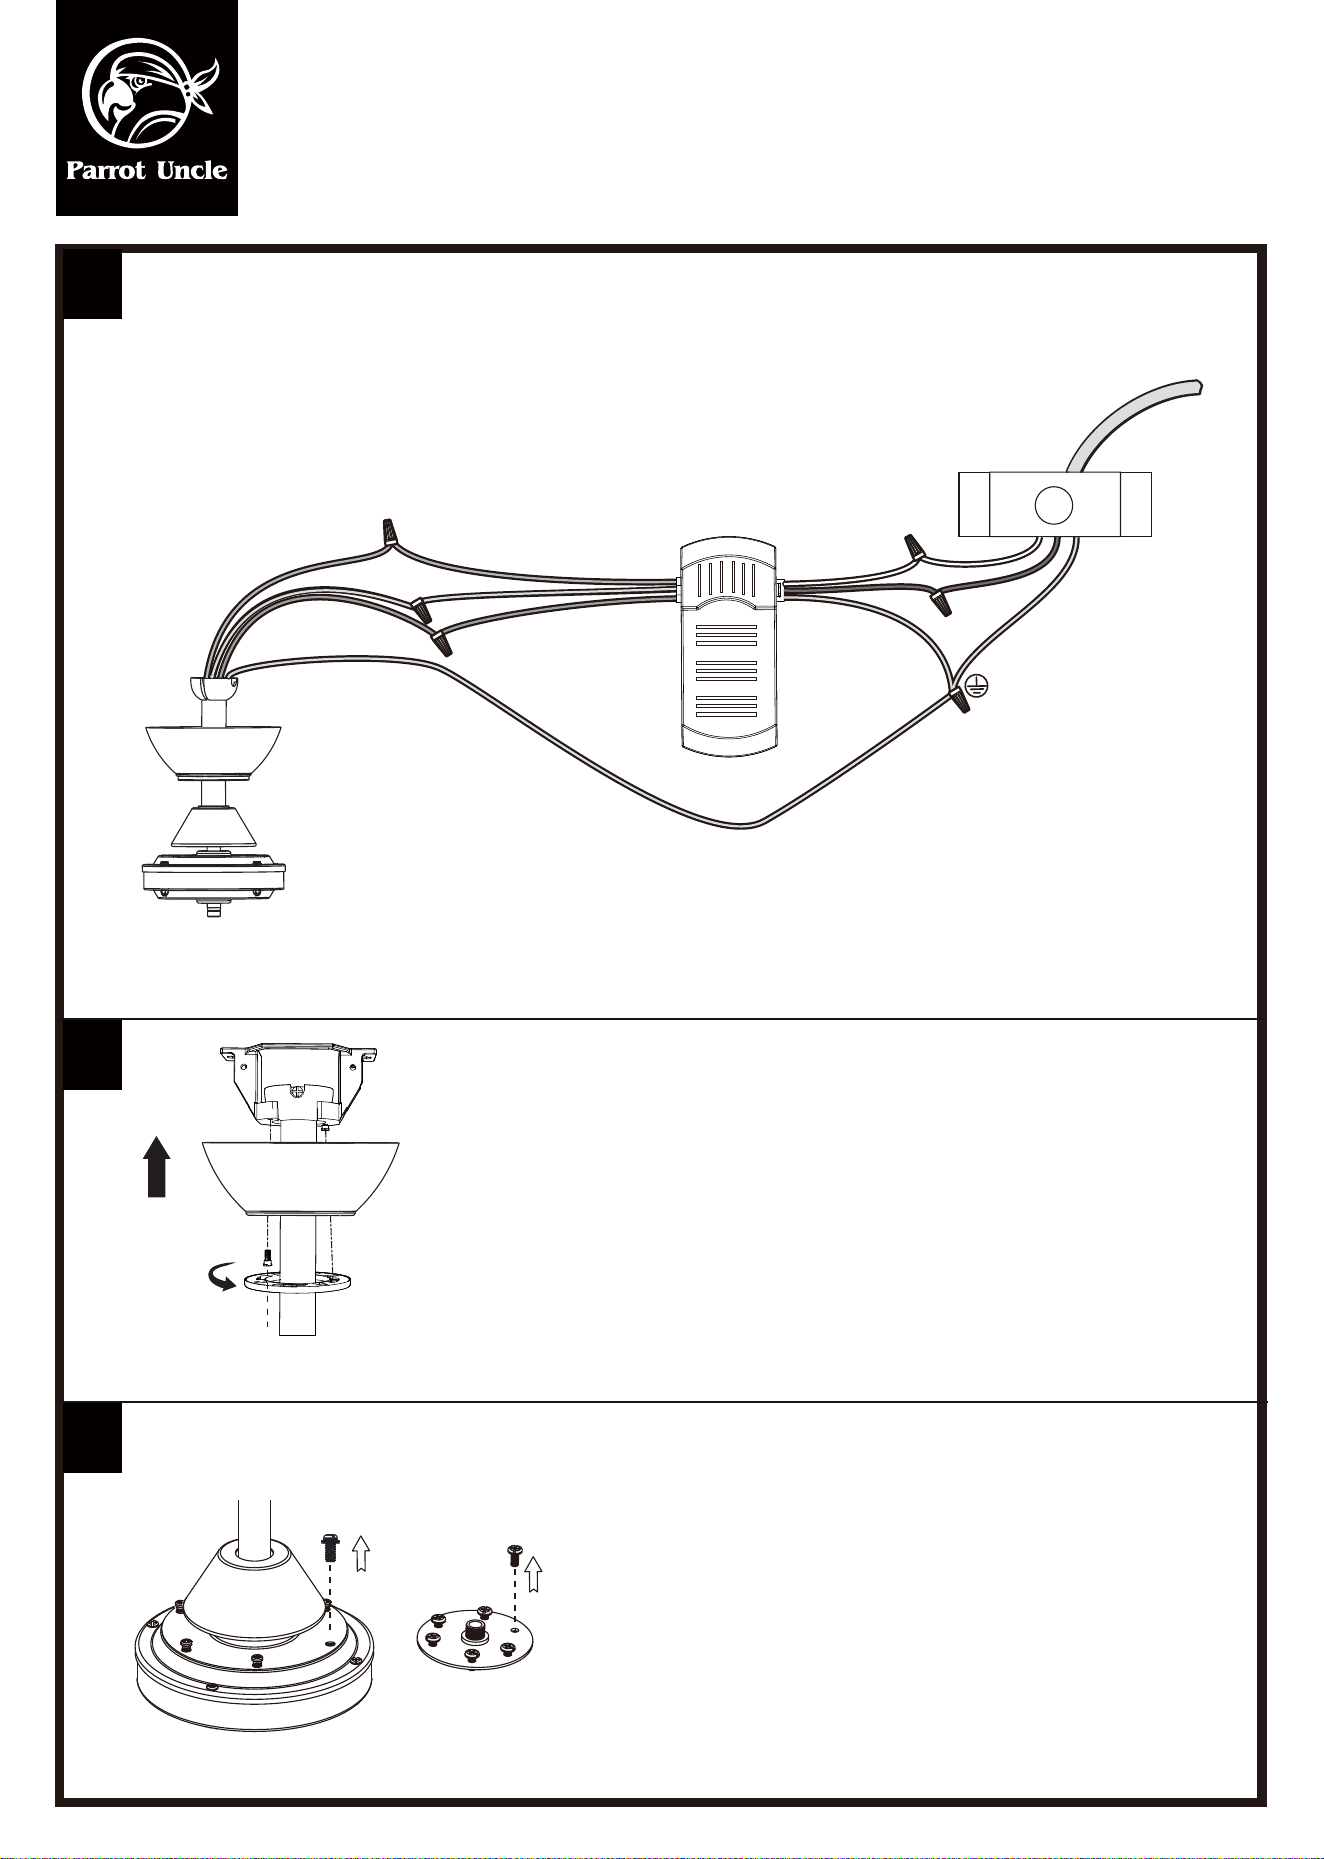
Connect the wires
Remove the six blade screws from the fan motor assembly;
Remove the six ywheel screws from the ywheel.
Remove 1 of the 2 screws from the bottom of the mounting
bracket, and loosen the other one;
Slide the canopy up towards the mounting bracket and place
the key hole on the canopy over the screw on the mounting
bracket, then turn canopy until it locks in place at the narrow
section of the key holes, secure with those two mounting
bracket screws;
Push up the canopy cover until the screw heads engage to the
slots on the canopy cover and rotate to securely attach to the
canopy.
G
N
AC IN N
YELLOW
YELLOW
GREY
GREY
RED
RED
TO MOTOR
AC IN L
L
F6116BK110V / F6116110V
14
13
12
WARNING: SHUT POWER OFF AT FUSE OR CIRCUIT BREAKER
Installation & Operating Instructions for the
Parrotuncle Owner's Installation ,Manual
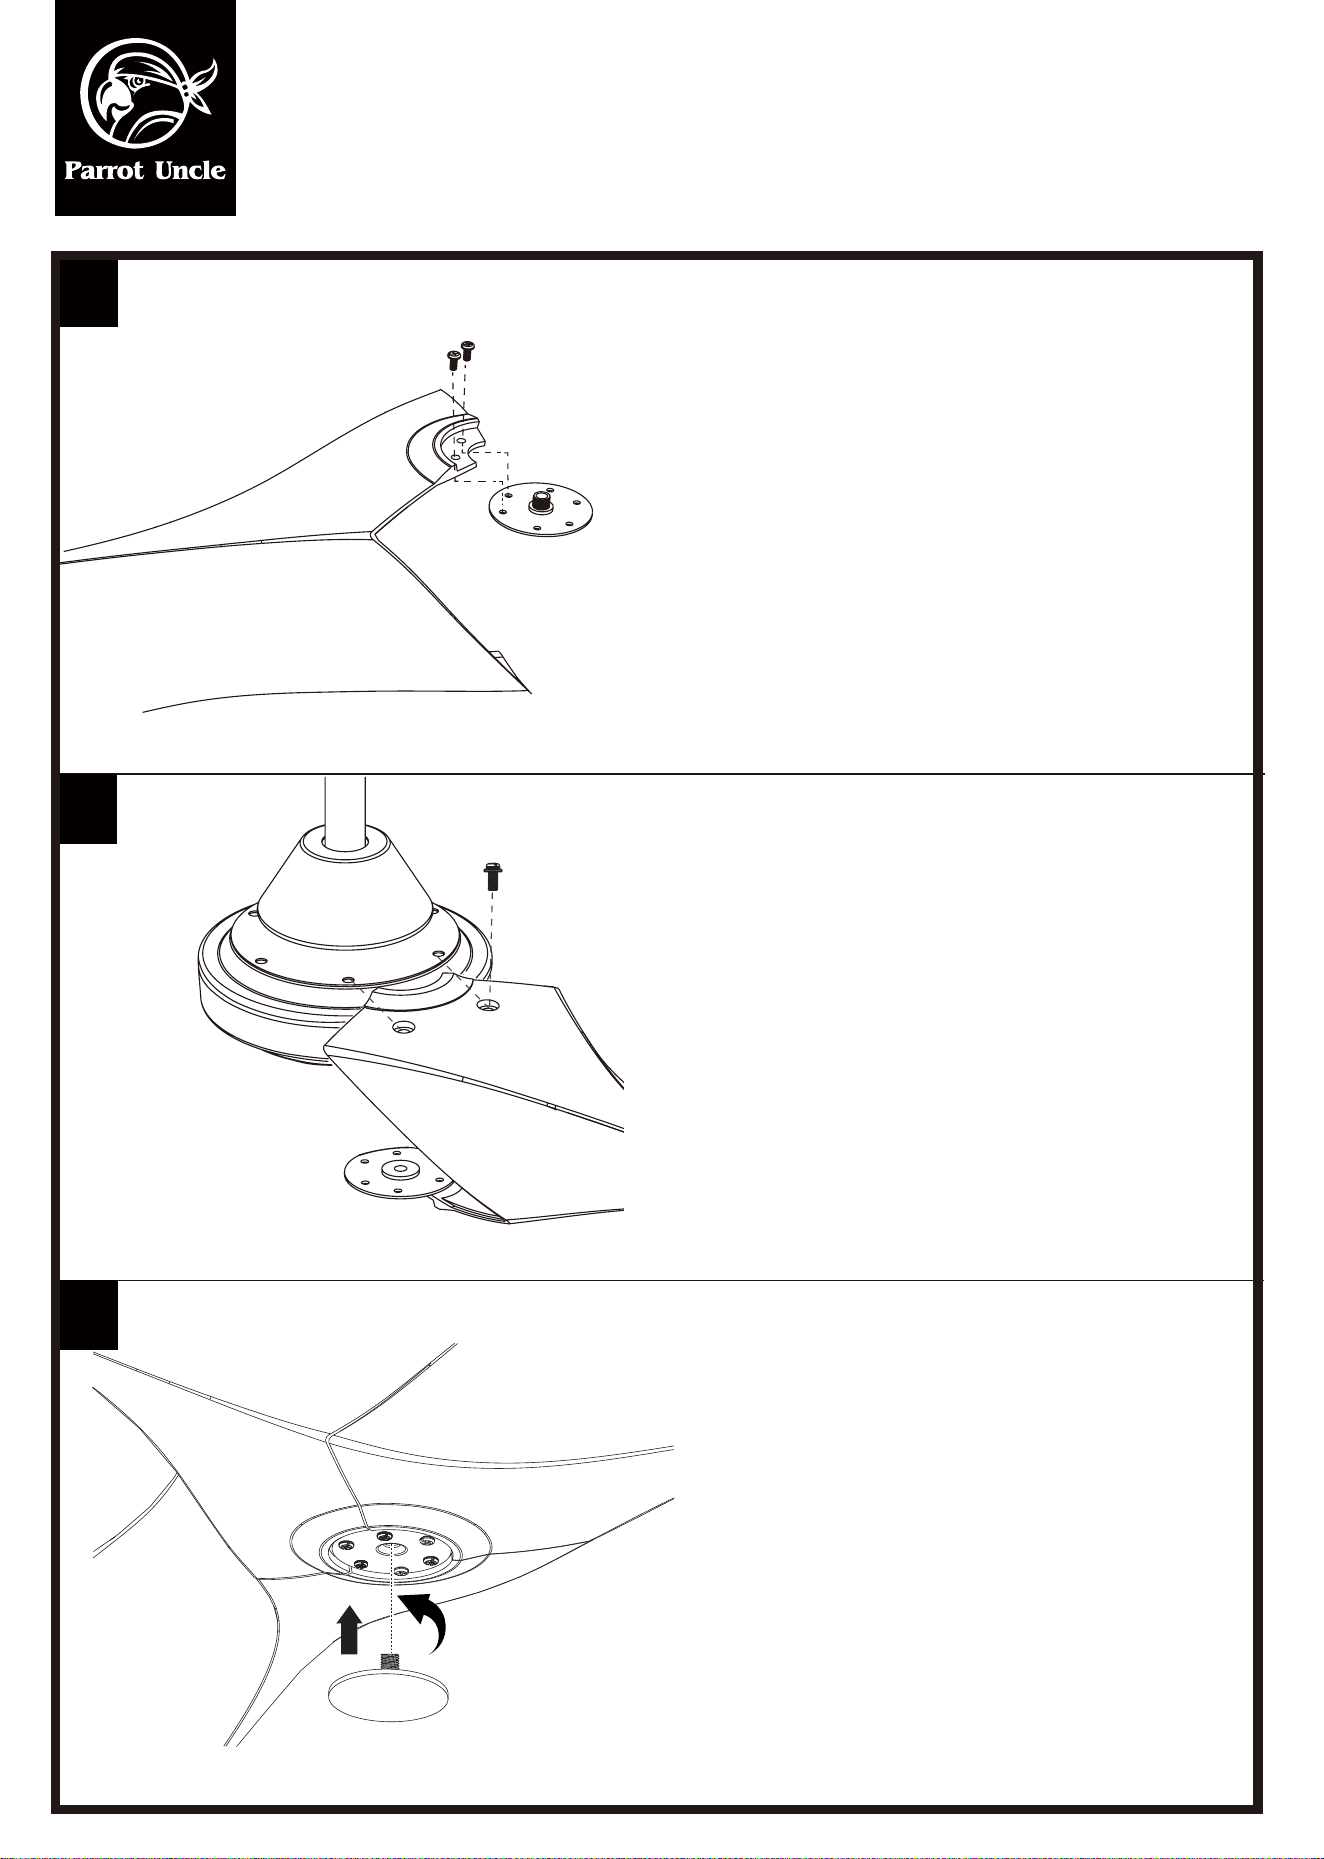
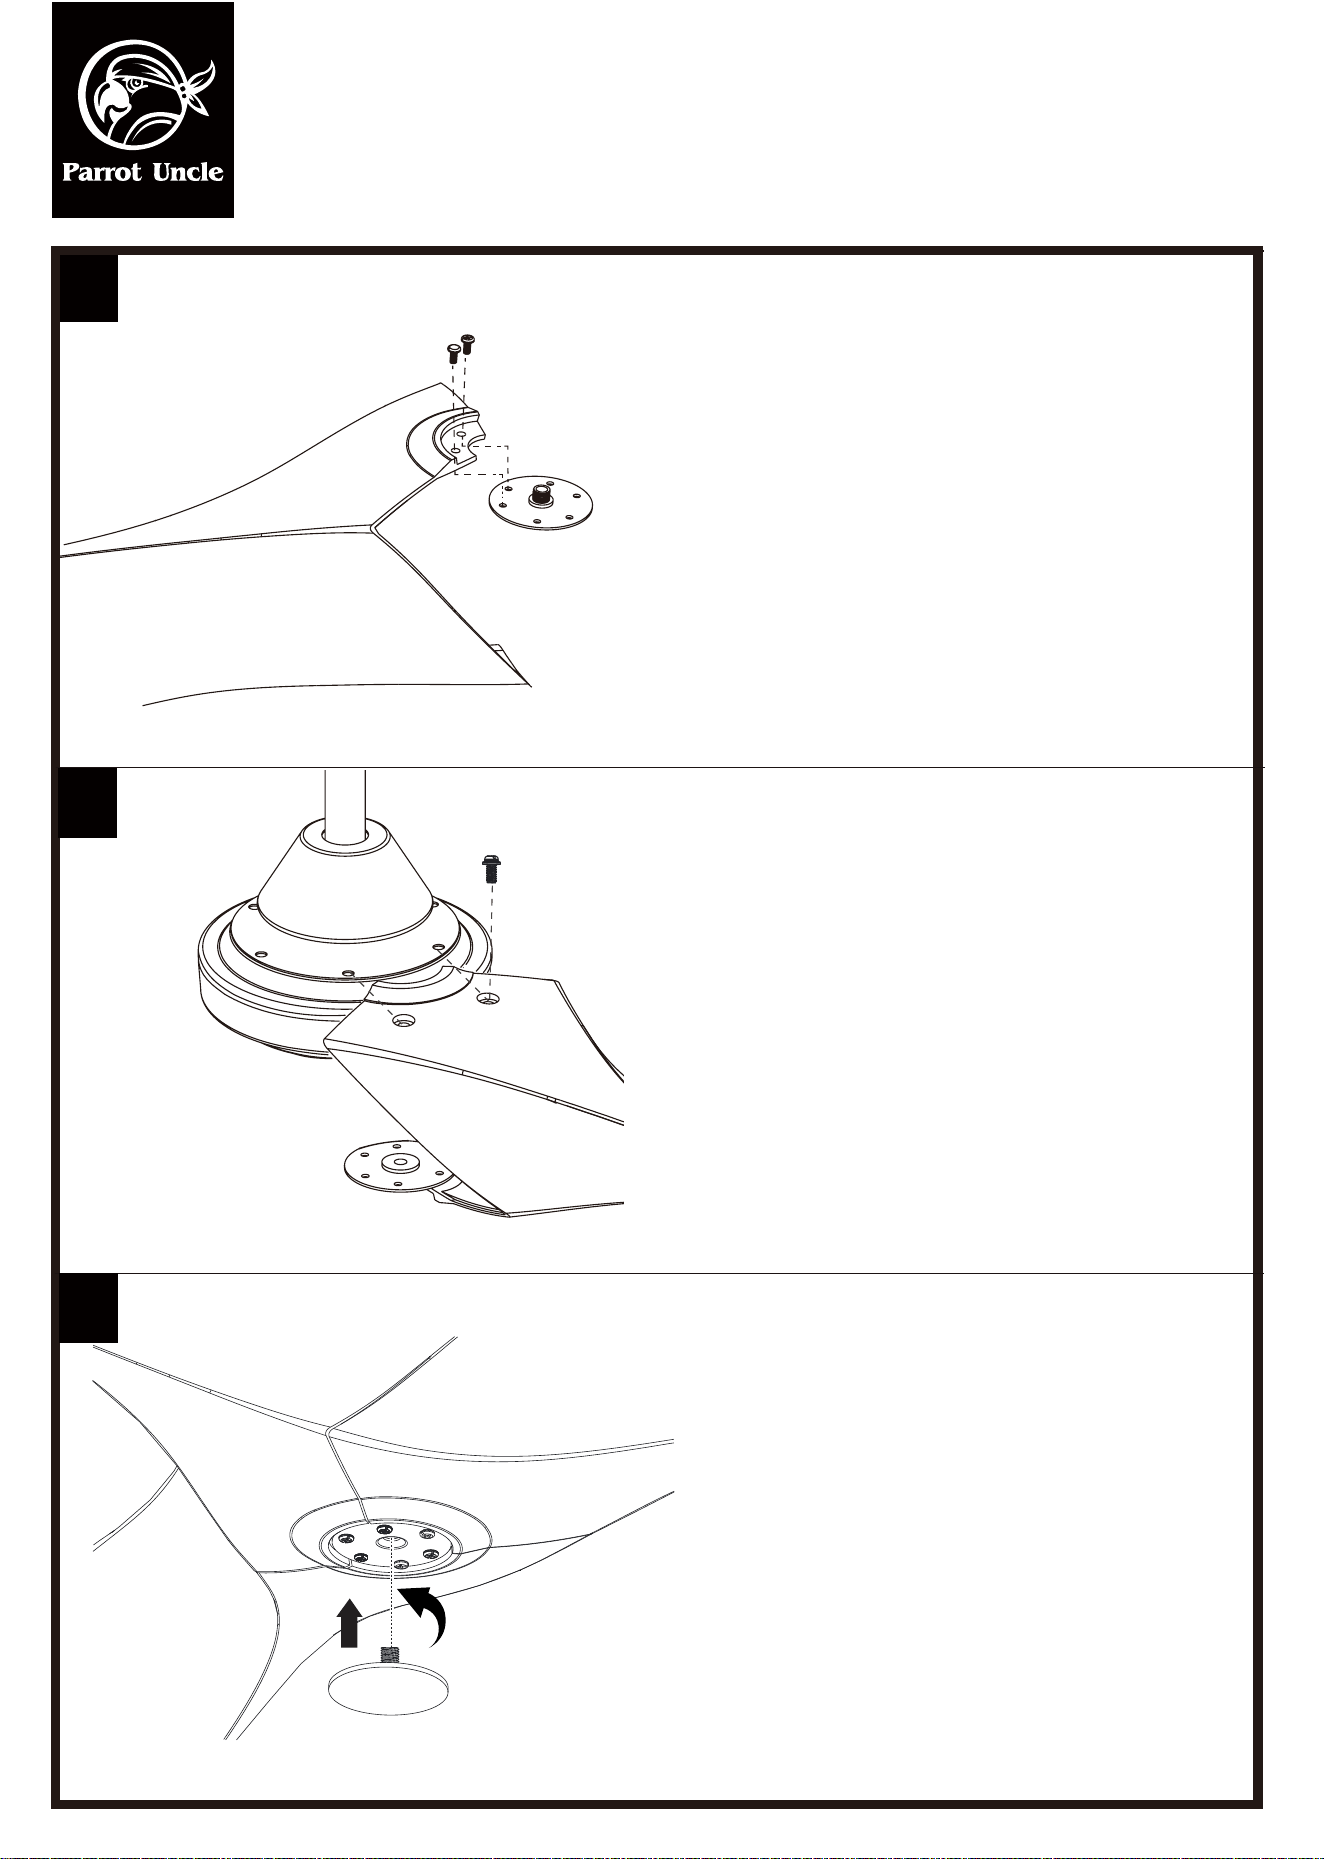
Attach the ywheel to one of the three blades
using two ywheel screws.
Attach the blade with the ywheel to the fan
motor assembly using two blade screws. Attach
the other two blades to the fan motor assembly.
Reinstall the rest four ywheel screws to the
ywheel. Screw the ywheel cover to the ywheel.
Ensure the ywheel cover is tight.
F6116BK110V / F6116110V
However, there is no guarantee that interference will not occur in a particular installation. If the equipment does cause harmful interference to
radio or television reception, which can be determined by turning the equipment off and on, the user is
encouraged to try to correct the interference by one or more of the following measures:
--- Reorient or relocate the receiving antenna.
--- Increase the separation between the equipment and receiver.
--- Connect the equipment into an outlet on a circuit different from that to which the receiver is connected.
--- Consult the dealer or an experienced radio/ TV technician for help.
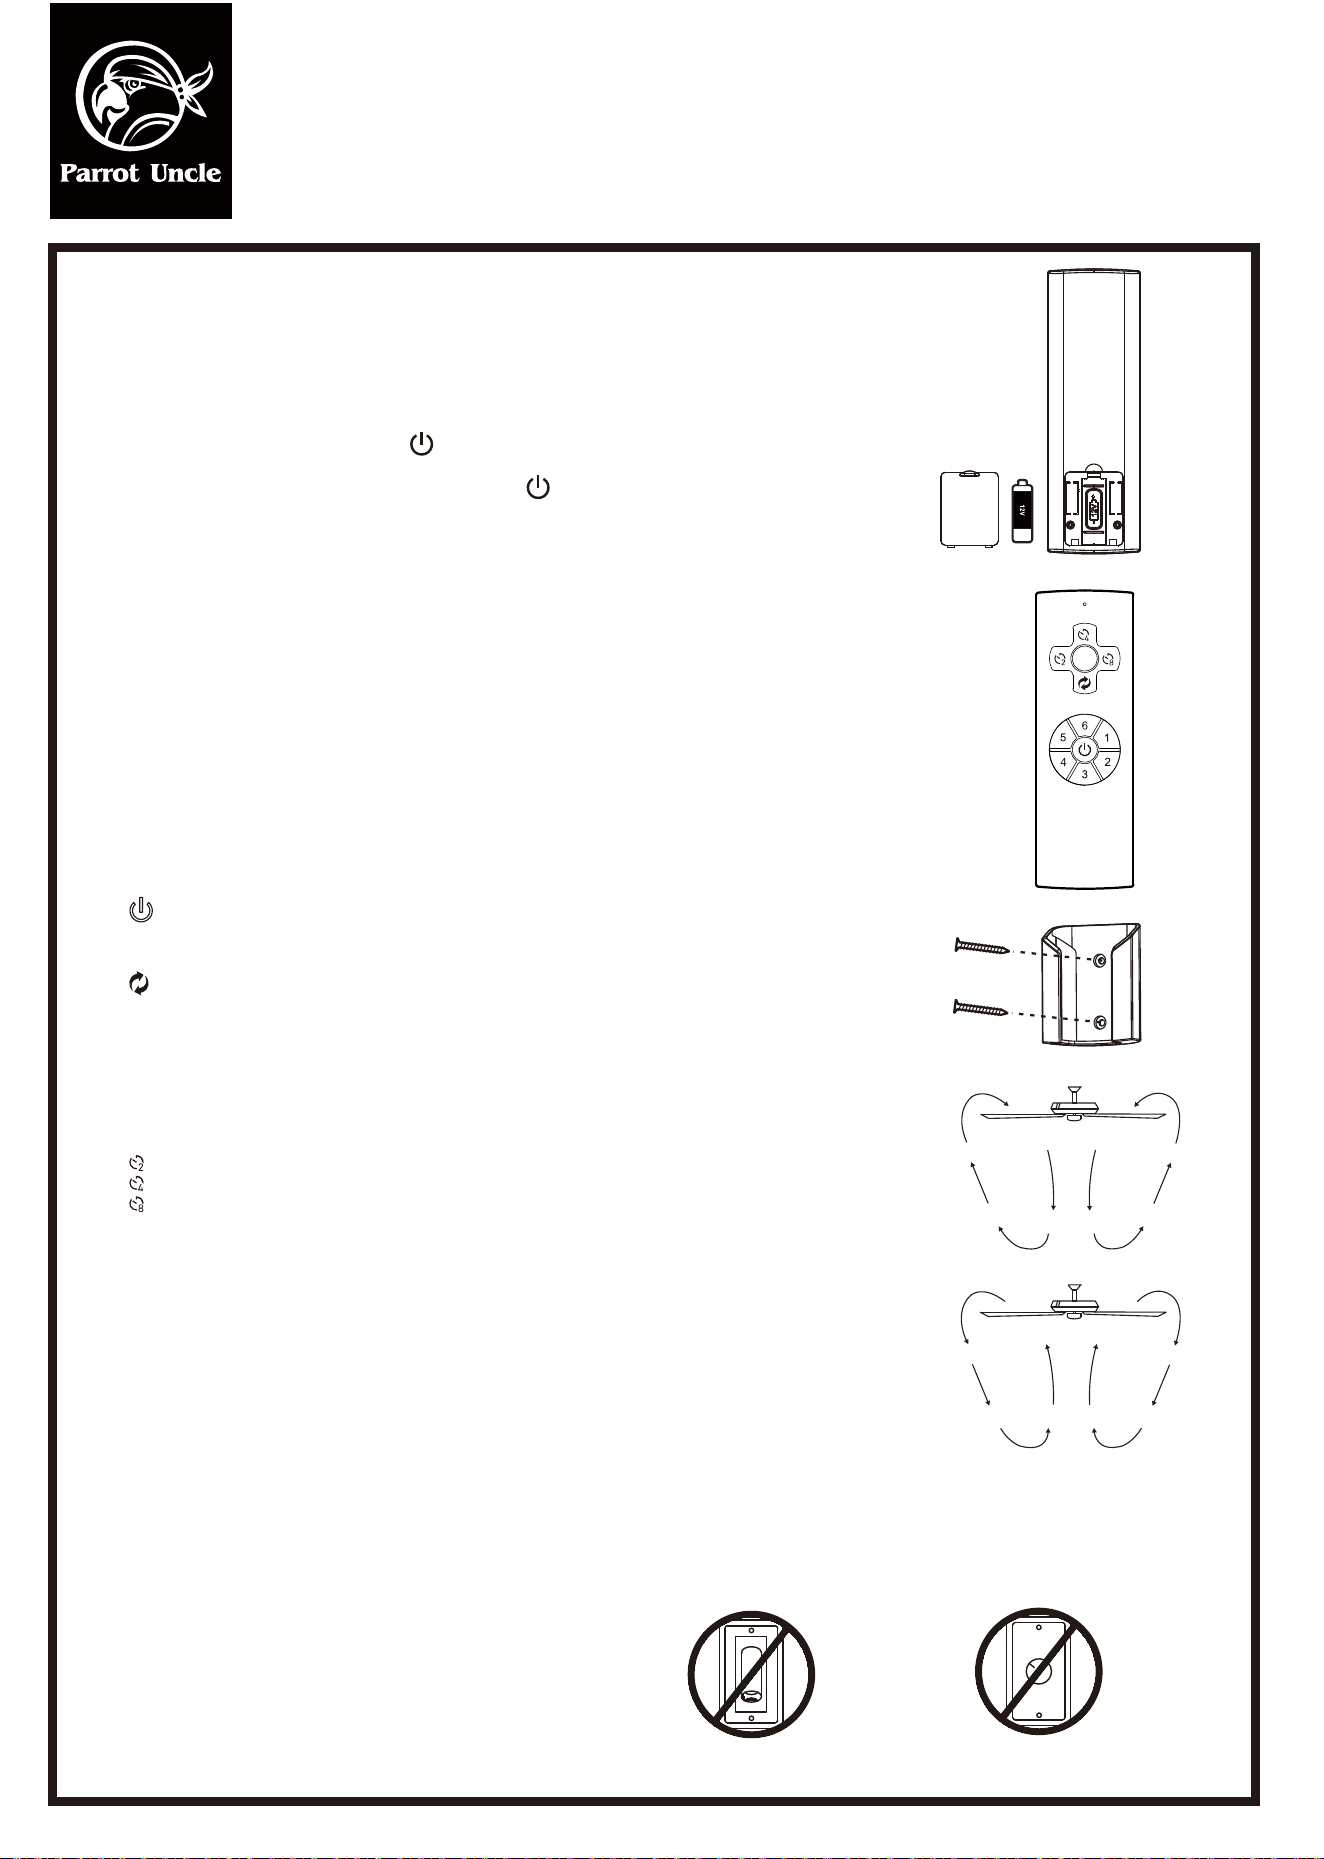
WARNING:
Do NOT install this fan with variable speed wall
control or wall-mounted dimmer switch. It will
permanently damage the fan's remote control
and cause the fan's function to fail.
NO Variable speed wall control
NO Dimmer switch
WARNING: SHUT POWER OFF AT FUSE OR CIRCUIT BREAKER
Installation & Operating Instructions for the
Parrotuncle Owner's Installation ,Manual
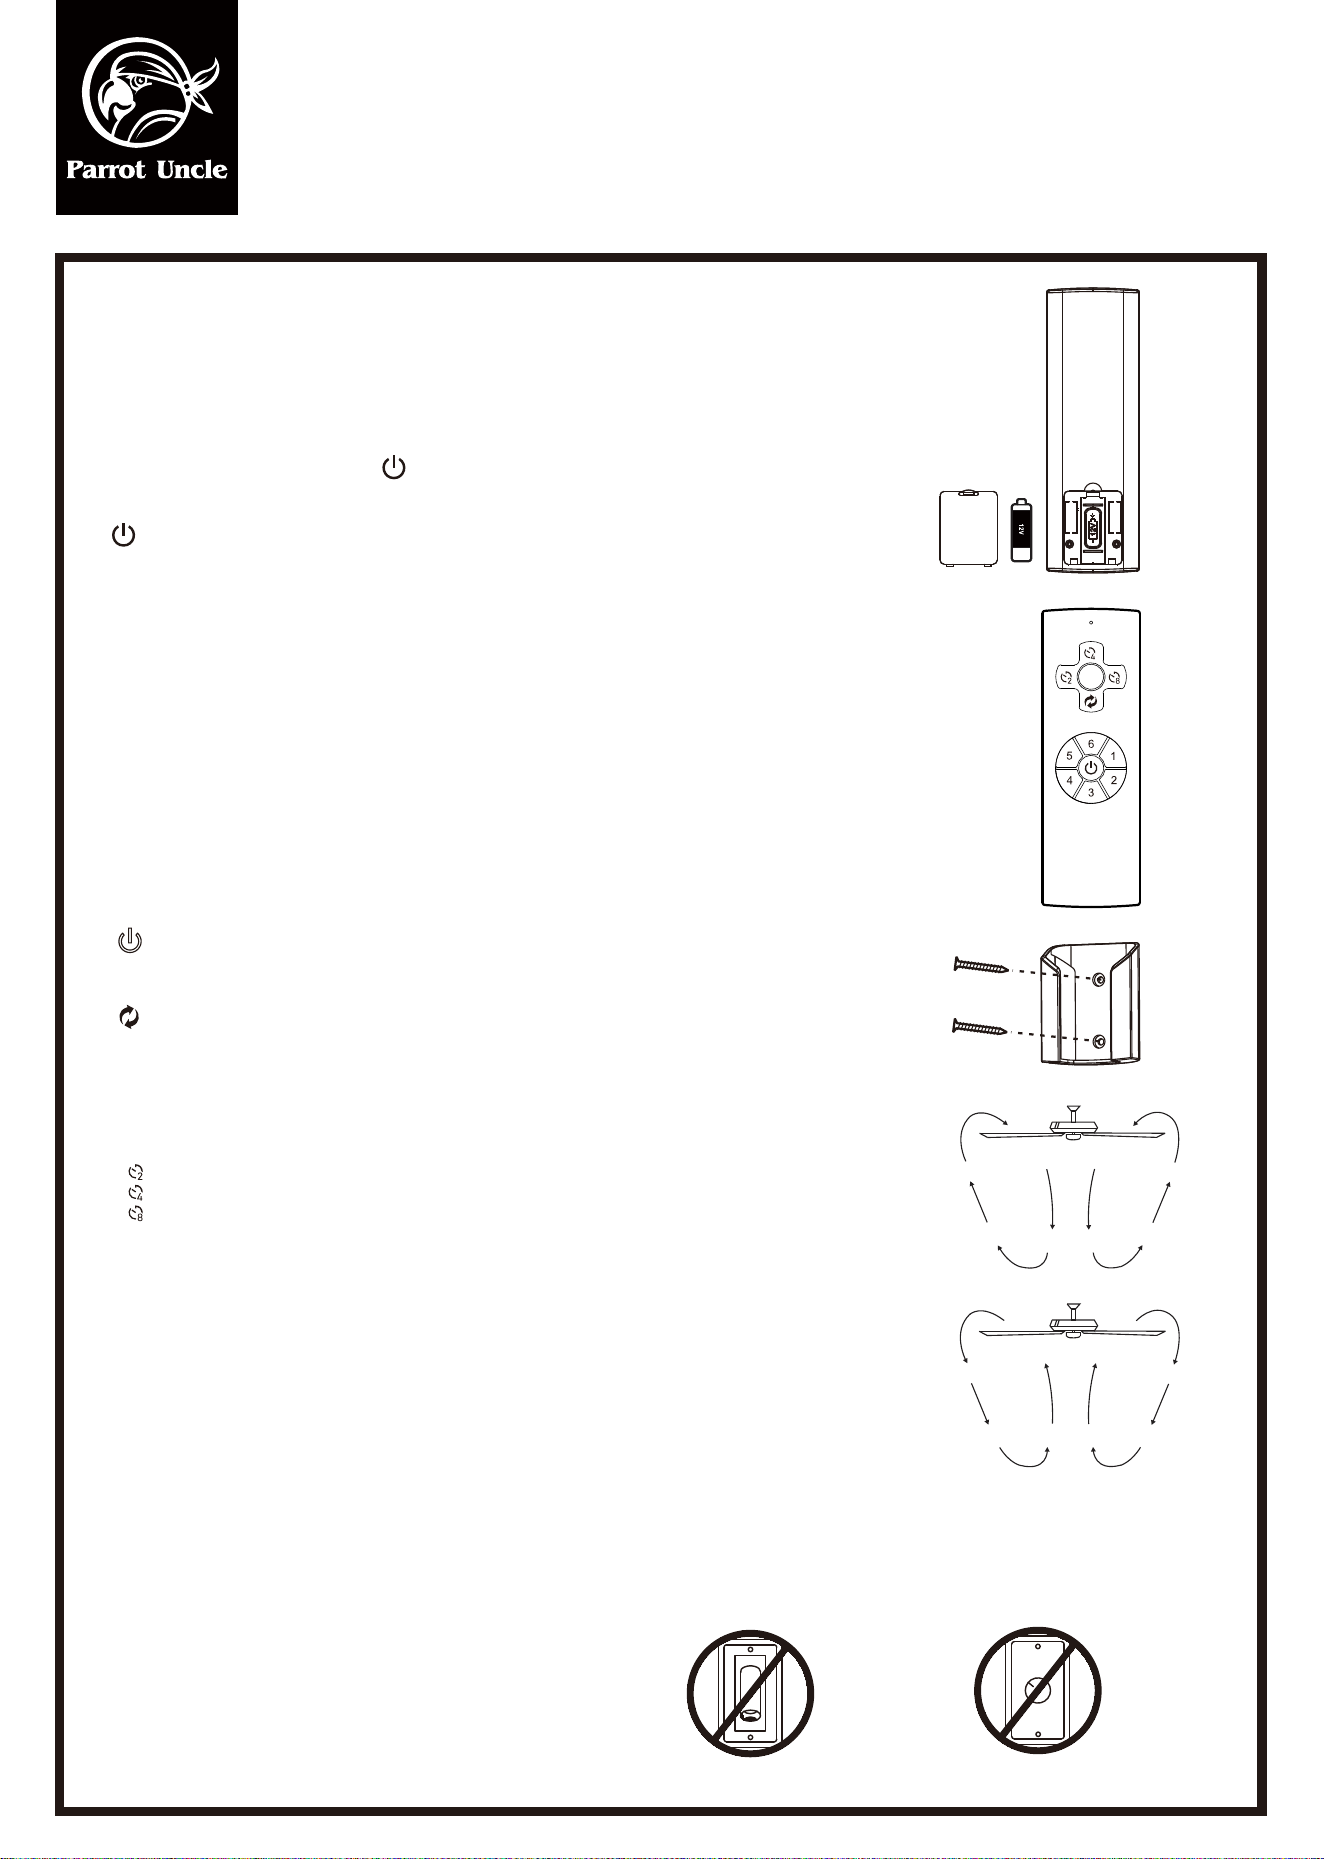
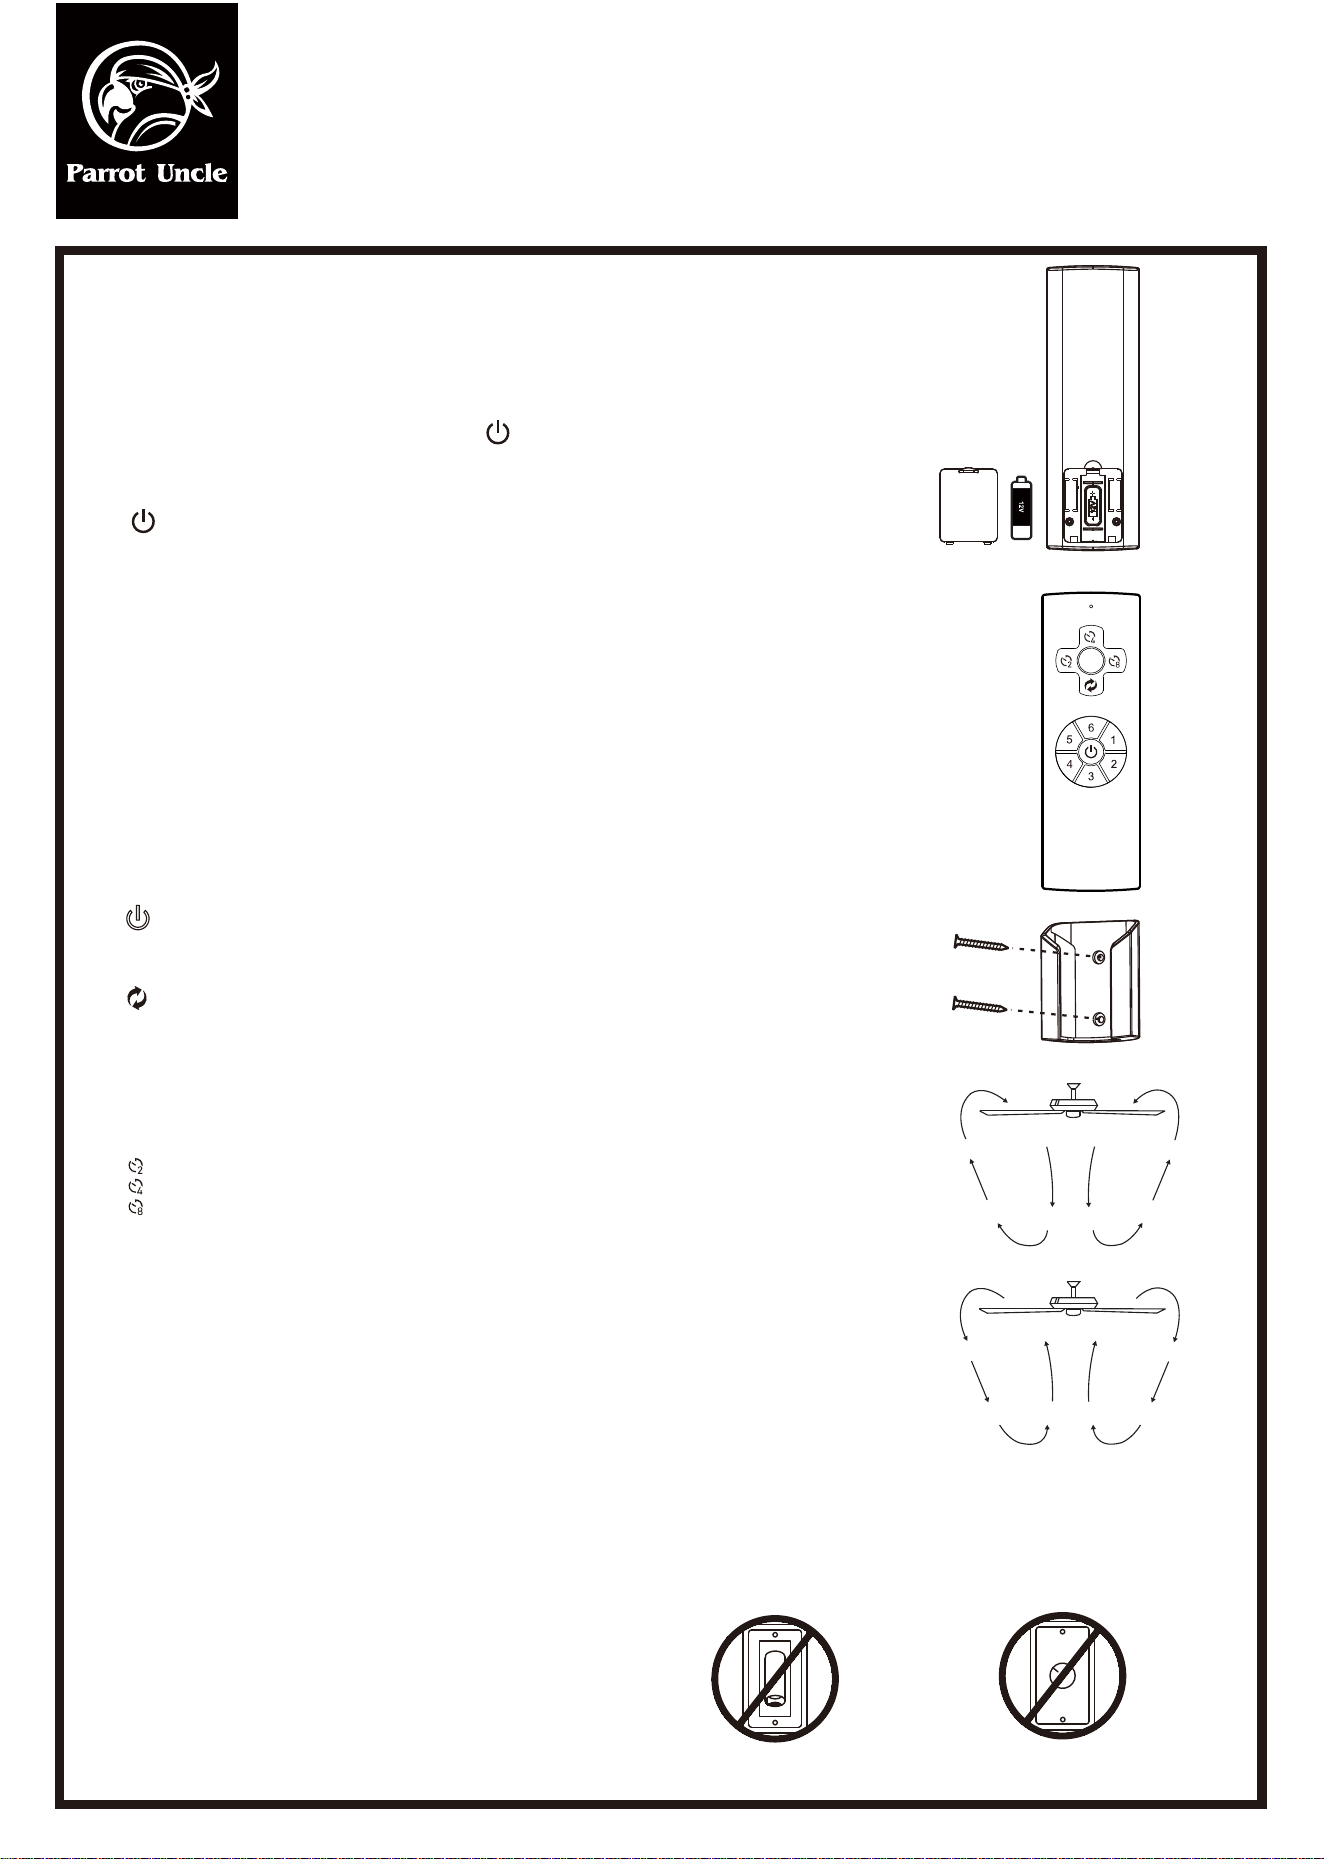
INSTALLING THE BATTERY
INSTALLING THE TRANSMITTER HOLDER
LEARNING PROCESS
NOTE: After turning the AC power back on, do not press any other button on the
remote control before pressing the button. Doing so will cause the learning
procedure to fail and the power to the fan will have to be turned off again to start over.
Turn main power to fan back on and within 30 seconds press and hold the
button on the remote for 5 seconds to sync the transmitter to the fan.
Once the fan has detected the remote, the light on the fan will blink twice to indicate
your fan is now ready to use.
Fans without light-kits have no indicator but will be ready to use after holding the button
for the 5 seconds.
Attach the remote control holder with the two remote control holder mounting screws.
OPERATING YOUR TRANSMITTER
Restore power to ceiling fan and test for proper operation.
D.Sleep Timer:
With the timer function, the ceiling fan will be turned off automatically after a set number
(2/4/8) of hours. During normal operation, press timer buttons directly to set the timer
and a beep will be heard to indicate the timer control is activated.
: The fan will turn off after 2 hours.
:The fan will turn off after 4 hours.
: The fan will tum off after 8 hours.
A. 1,2,3,4,5,6 buttons:
These six buttons are used to set the fan speed as follows:
1 = low speed 2 = medium low speed 3 = medium speed
4 = medium high speed 5 = high speed 6 = Extra high speed
B. button:
This button turns the fan off. Hitting any speed button turns fan on.
C. button:
Fan reverse button
NOTE: To operate the reverse function on this fan, press the reverse button while the
fan is running at any speed.
Speed settings for warm or cool weather depend on factors such as the room size.
Ceiling height, number of fans and so on.
Warm weather - (Forward) A downward airflow creates a cooling effect.This allows you
to set your air conditioner on a warmer setting without affecting your comfort.
Cool weather - (Reverse) An upward airflow moves warm air off the ceiling area. This
allows you to set your heating unit on a cooler setting without affecting your comfort.
Remove the back cover on the transmitter and install a 12V battery with the remote
control.
F6116BK110V / F6116110V
WARNING: SHUT POWER OFF AT FUSE OR CIRCUIT BREAKER
Installation & Operating Instructions for the
Parrotuncle Owner's Installation ,Manual
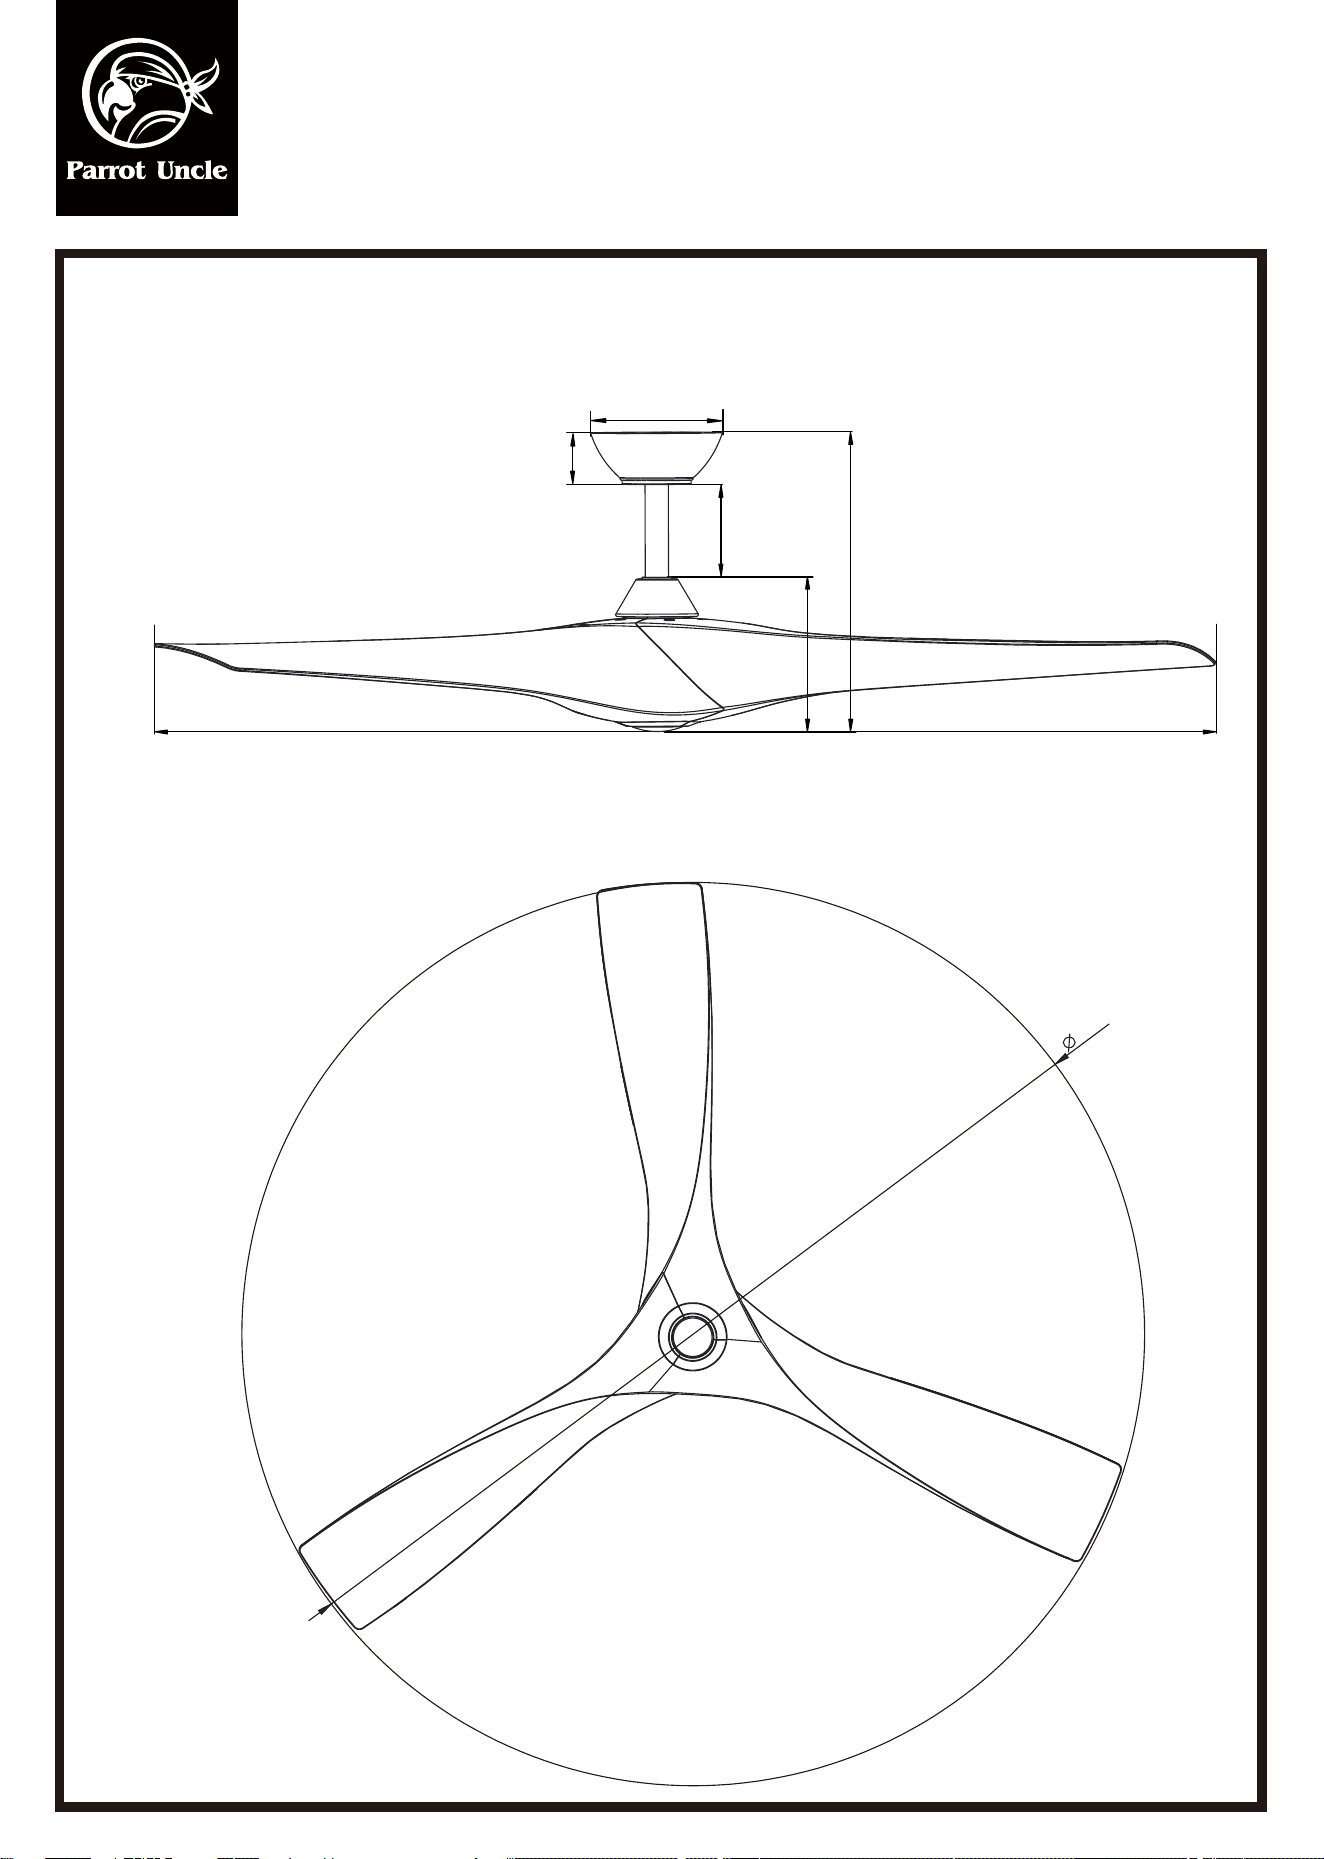
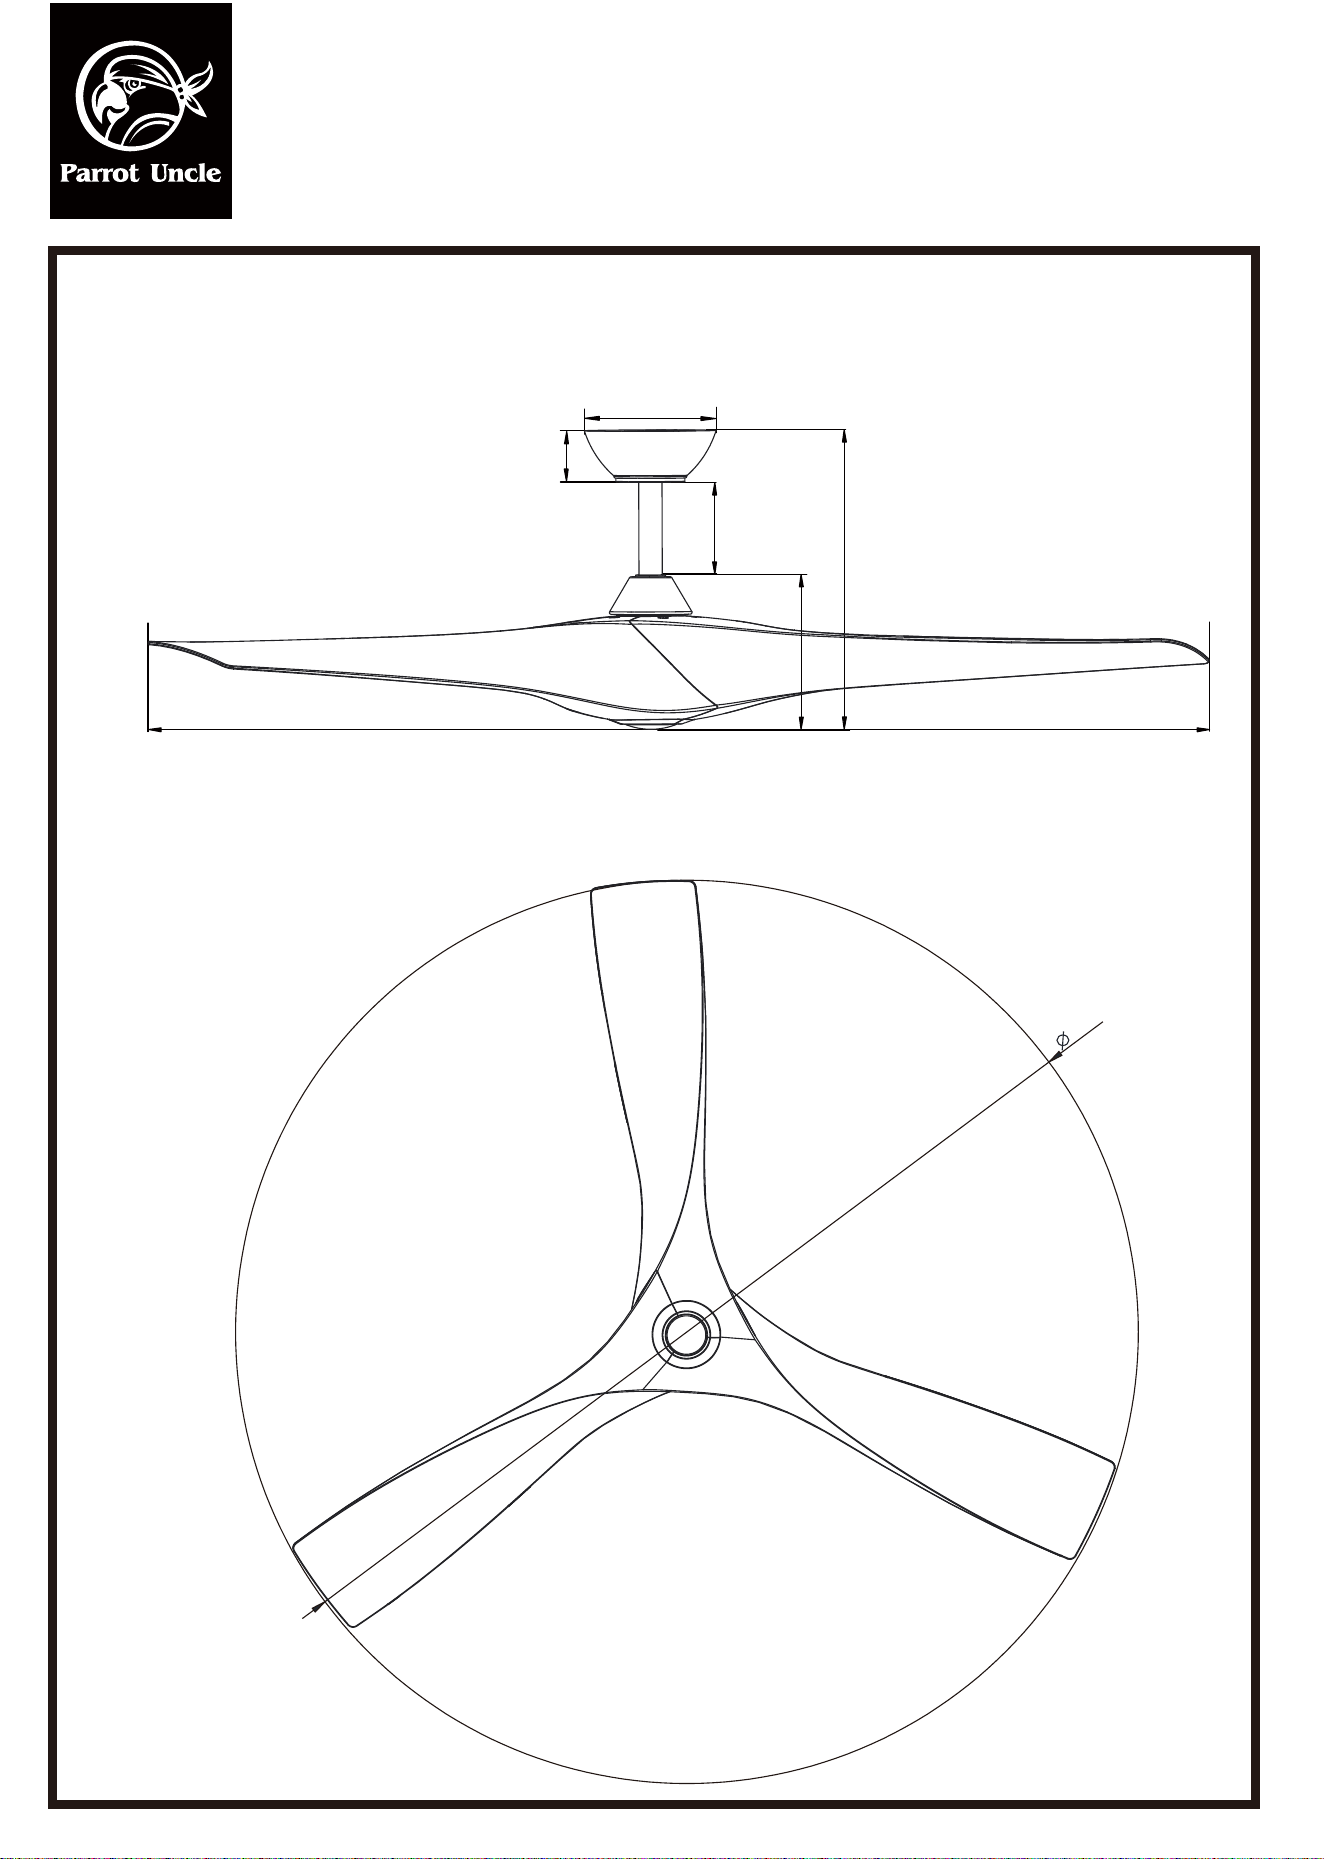
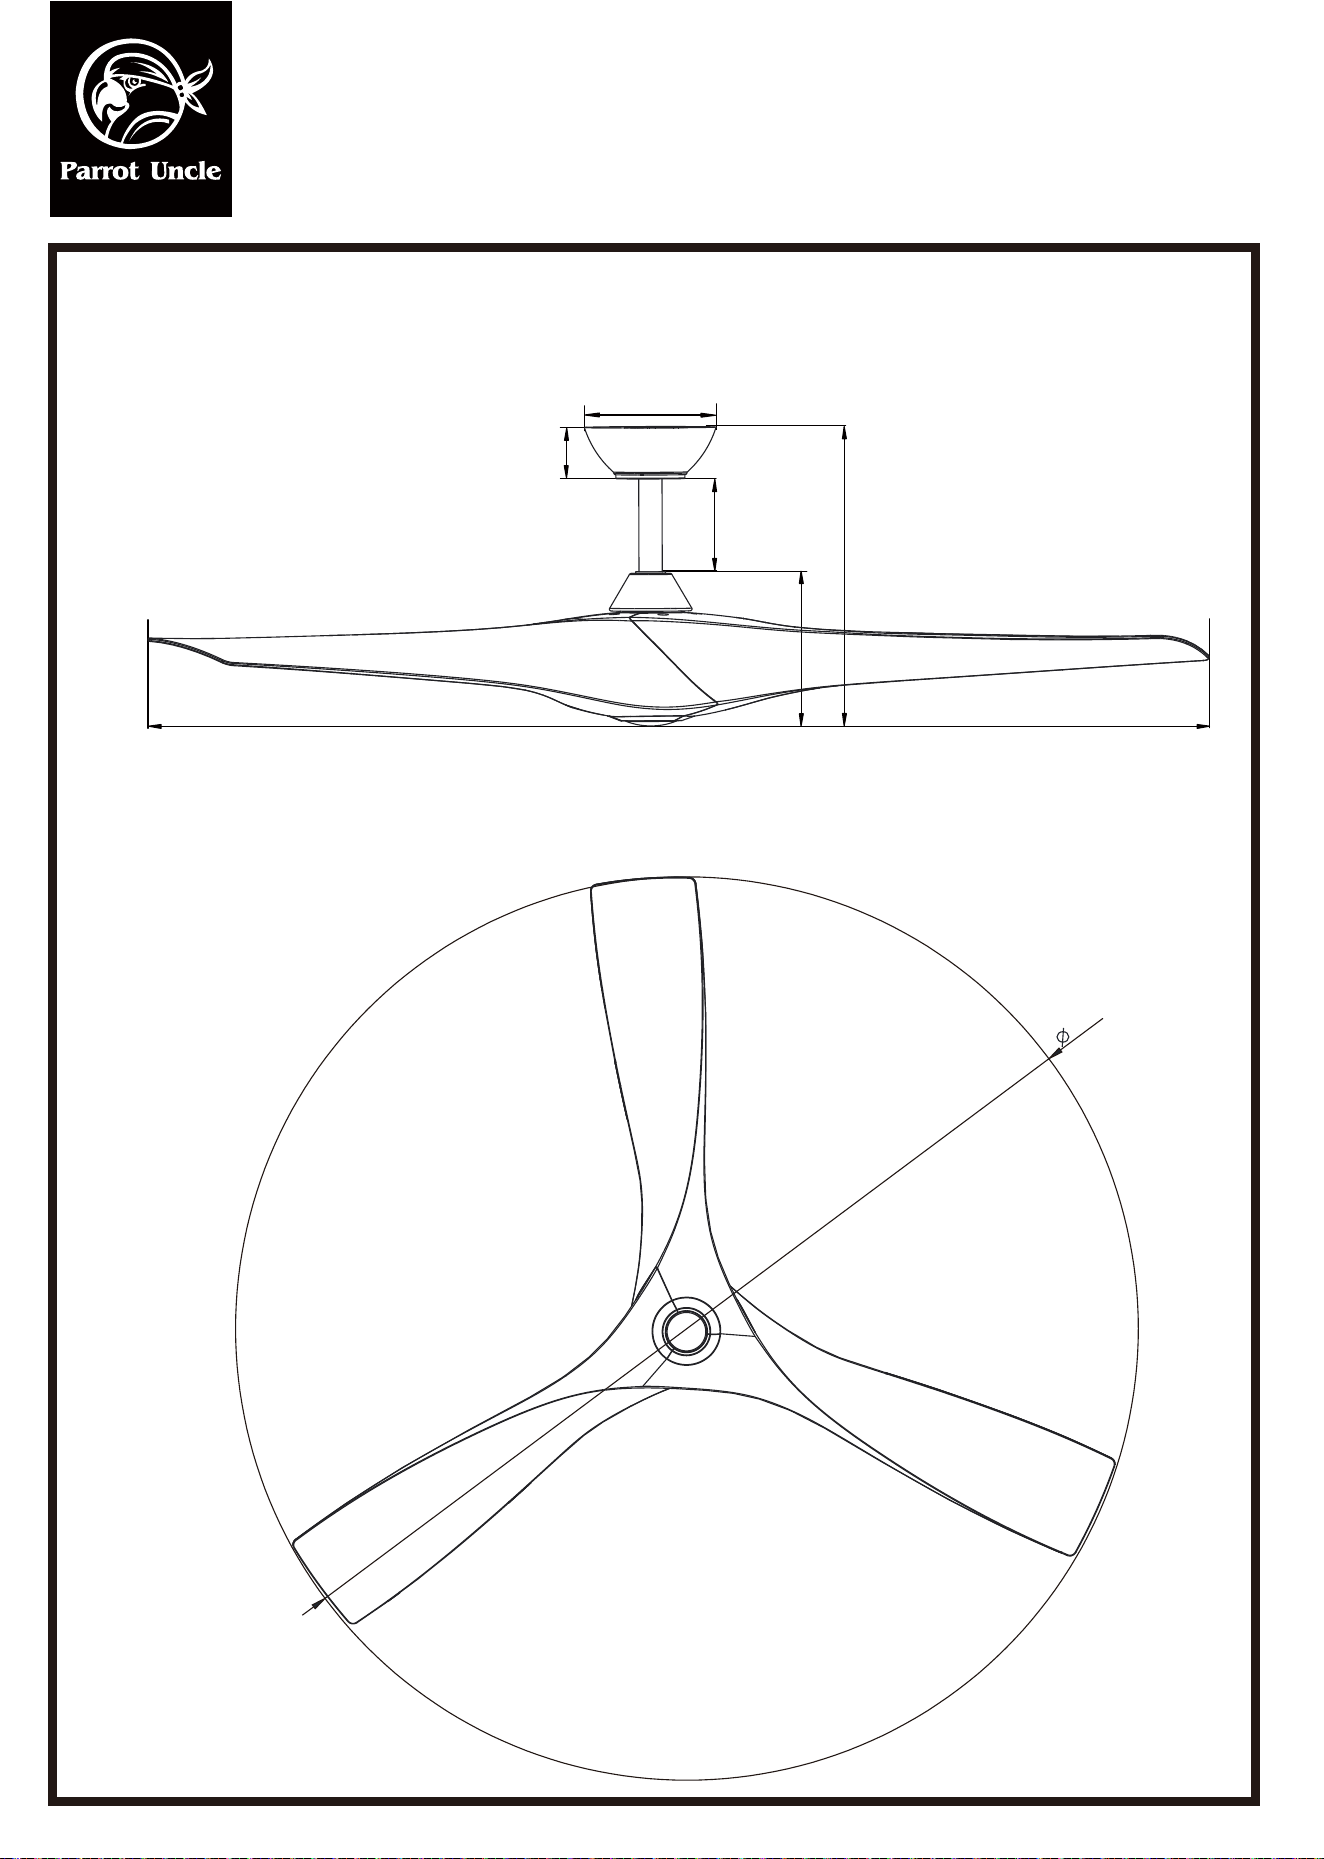
size of product
52”
52in
6”
13.37”
6”
2.13”
6.81”
F6116BK110V / F6116110V
AFTER INSTALLATION
The fan blades have been adjusted in the factory to minimize any wobble
NOTE:CEILING FANS TEND TO MOVE DURING OPERATION DUE TO THE FACT THAT THEY
ARE MOUNTED ON A RUBBER CROMMET. IF THE FAN WAS MOUNTED RIGIDLY TO THE
CEILING, IT WOULD CAUSE EXCESS VIBRATION. MOVEMENT OF A FEW CENTIMENTERS
IS QUITE ACCEPTABLE AND DOES NOT SUGGEST ANY PROBLEM
WOBBLE”
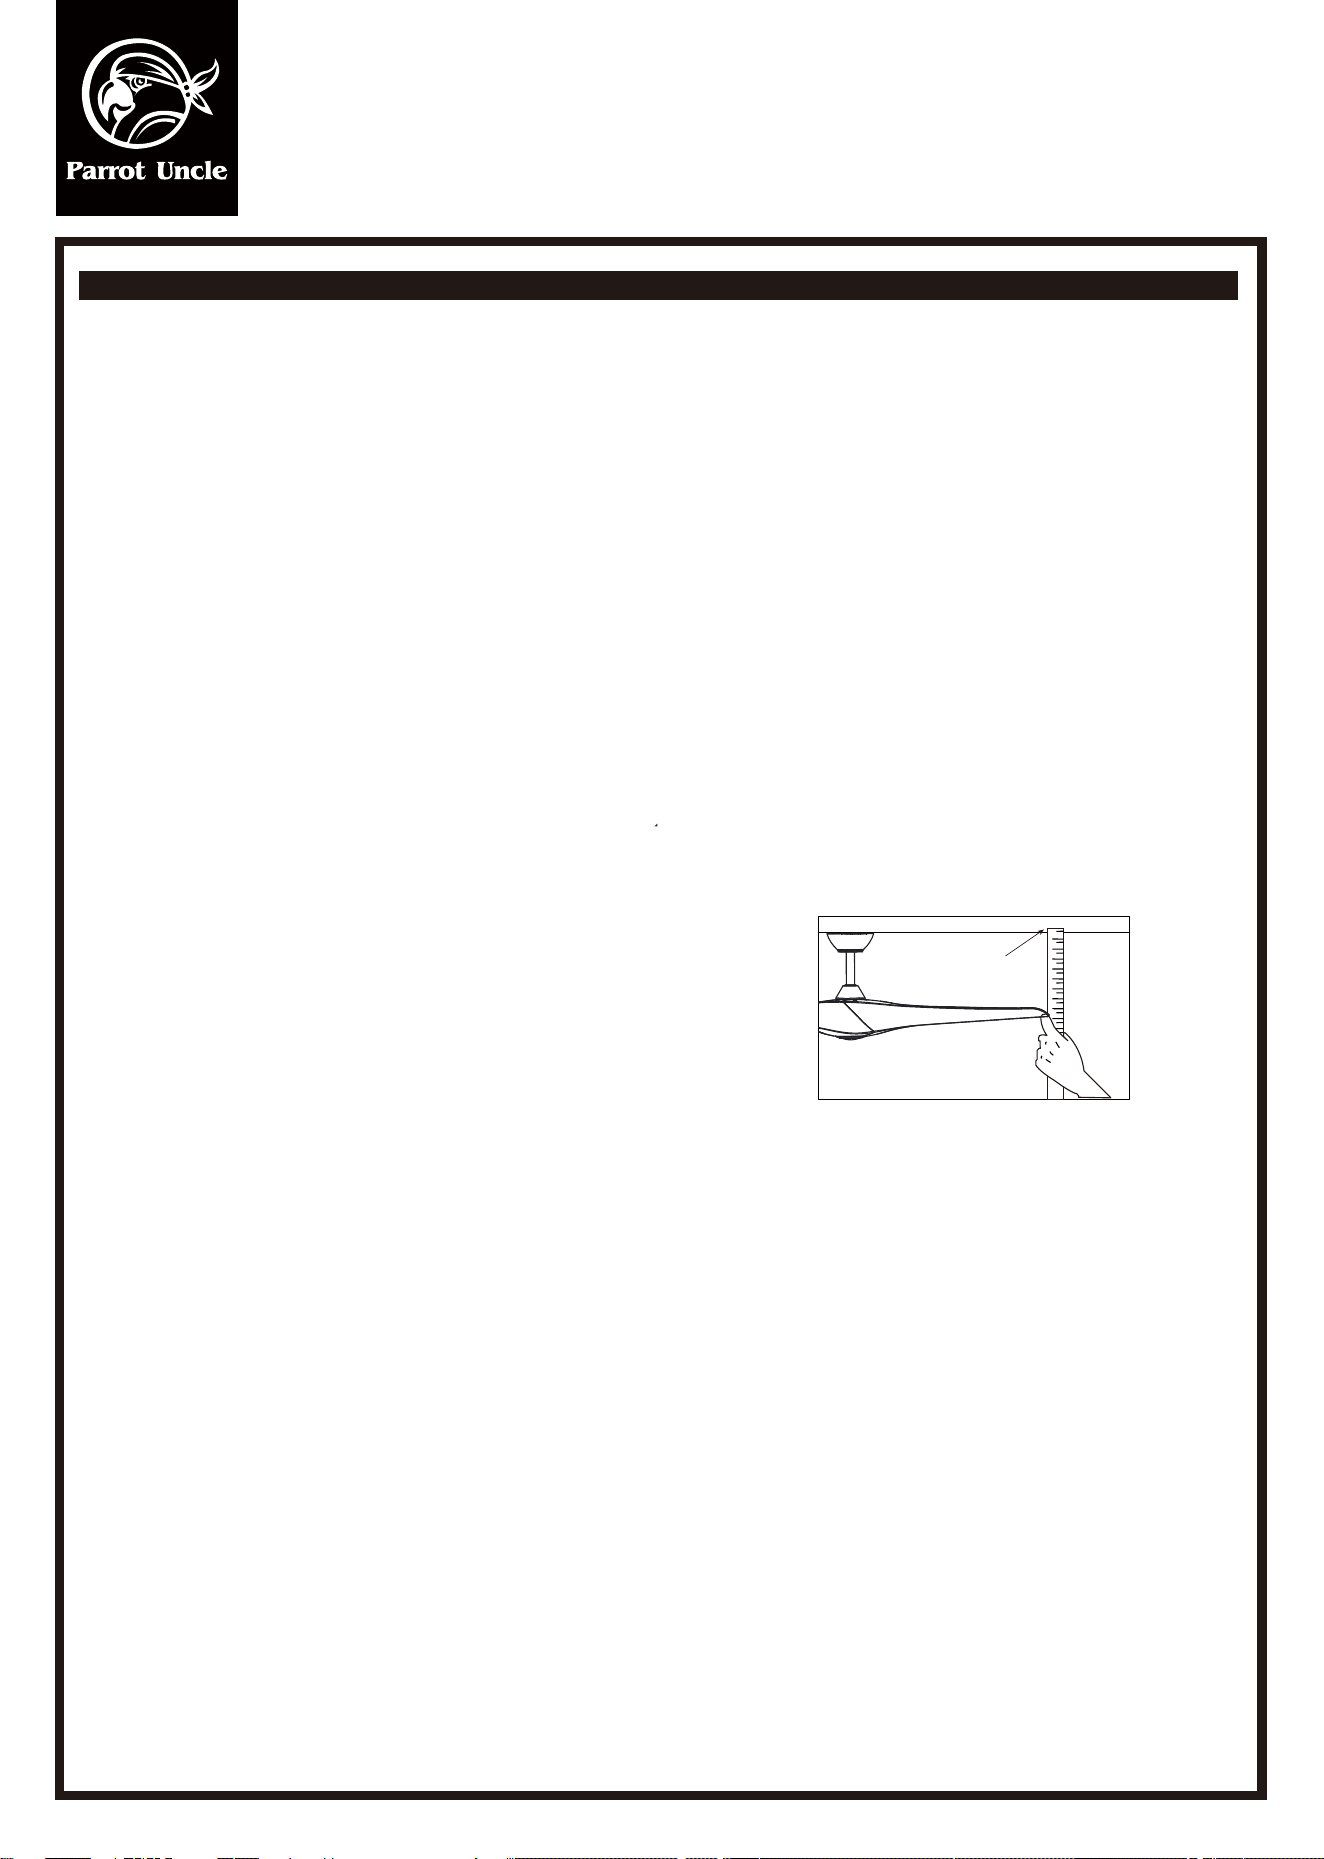
TO REDUCE THE FAN WOBBLE: PLEASE CHECK THAT ALL SCREWS WHICH SECURED THE MOUNTING
BRACKET AND DOWNROD ARE SECURE.
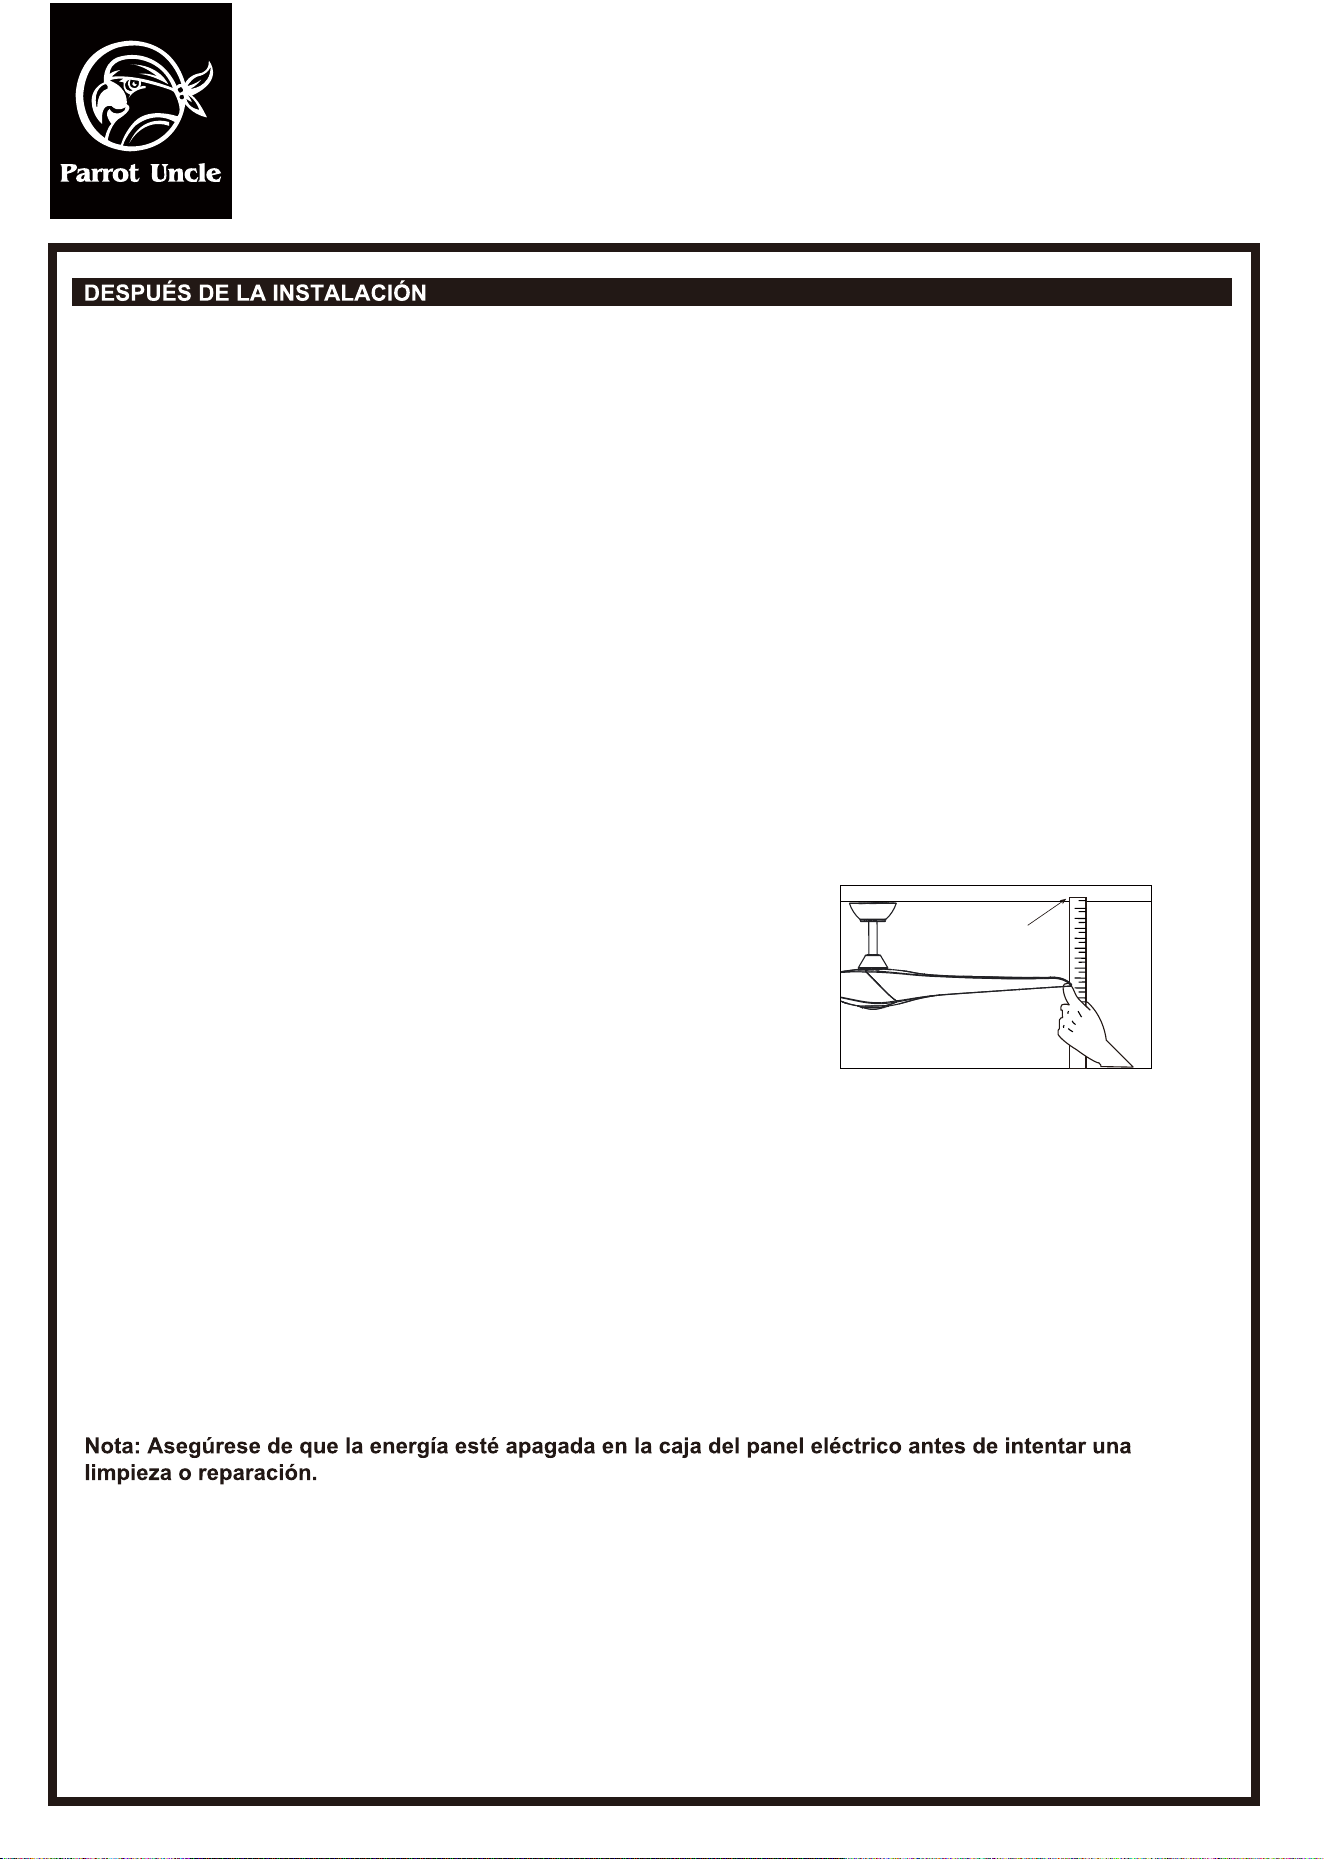
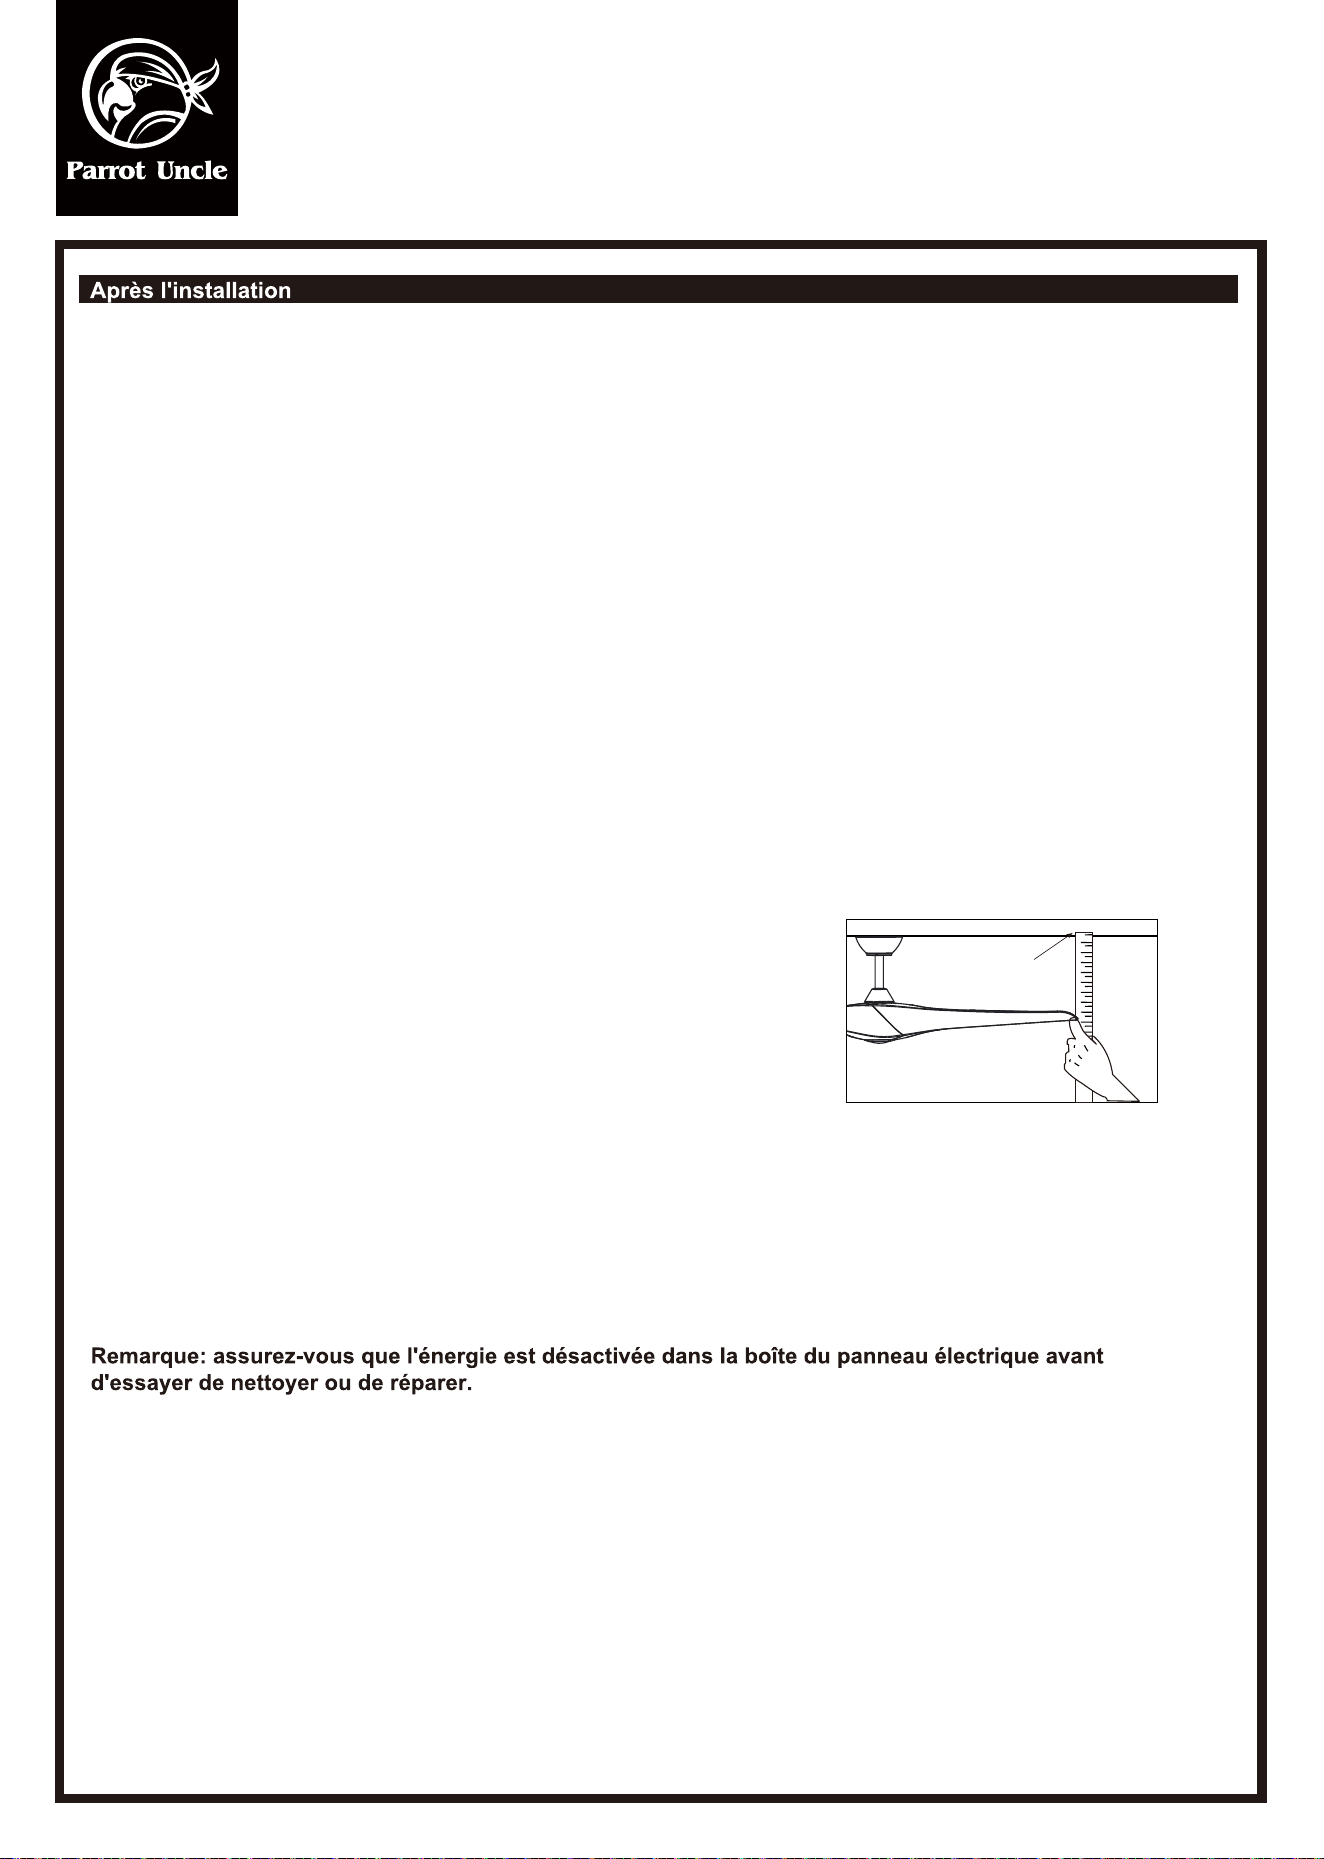
BALANCING A WOBBLING CEILING FAN:
1.Check that all blade and blade arm screws are secure.
2.Most fan wobbling problems are caused when blade levels are unequal. Check this level by
selecting a point on the ceiling above the tip of one of the
blades. Measure this distance.Rotate the fan until the next blade is positioned for
measurement. Repeat for each blade. The distance deviation should be equal within
1/8"(0.32cm).
3.If the blade wobble is still noticeable, interchanging two
adjacent (side by side) blades can redistribute the weight
and possibly result in smoother operation. WARNING: TO REDUCE THE RISK OF PERSONAL
INJURY, DO NOT BEND THE BLADE ARM WHILE INSTALLING, BALANCING THE BLADES, OR
CLEANING THE FAN. DO NOT INSERT FOREIGN OBJECTS BETWEEN ROTATING FAN BLADES.
NOISE
When it is quiet(especially at night) you may hear occasional small noises. This is normal. Please allow a 24-
hour “breaking-in” period, most noises associated with a new fan disappear during the time.
CARE AND CLEANING
1.Periodic cleaning of your ceiling fan is the only maintenance required. Use a soft brush or lint free cloth to
avoid scratching the paint finish. Please make sure to
turn off electricity power before you clean your fan
2.Do not use water when cleaning your ceiling fan. It could damage the motor or the blades
and create the possibility of an electrical shock.
3.Motor has permanently lubricated ball bearing. No need to oil
NOTE: MAKE SURE THE POWER IS OFF AT THE ELECTRICAL PANEL BOX BEFORE YOU
ATTEMPT ANY CLEANING OR REPAIRS.
WARNING: SHUT POWER OFF AT FUSE OR CIRCUIT BREAKER
Installation & Operating Instructions for the
Parrotuncle Owner's Installation ,Manual
Touching
ceiling
F6116BK110V / F6116110V
F6116BK110V / F6116110V
N/A
Instrucciones de instalación y operación para la
instalación del propietario de Parrotuncle, manual
ADVERTENCIA: Apague la energía en el fusible o el interruptor de circuito
INFORMACIÓN TÉCNICA
voltaje nominal
120V AC
35W
Salida nominal (motor) luz
F6116BK110V / F6116110V
Instrucciones de instalación y operación para la
instalación del propietario de Parrotuncle, manual
ADVERTENCIA: Apague la energía en el fusible o el interruptor de circuito
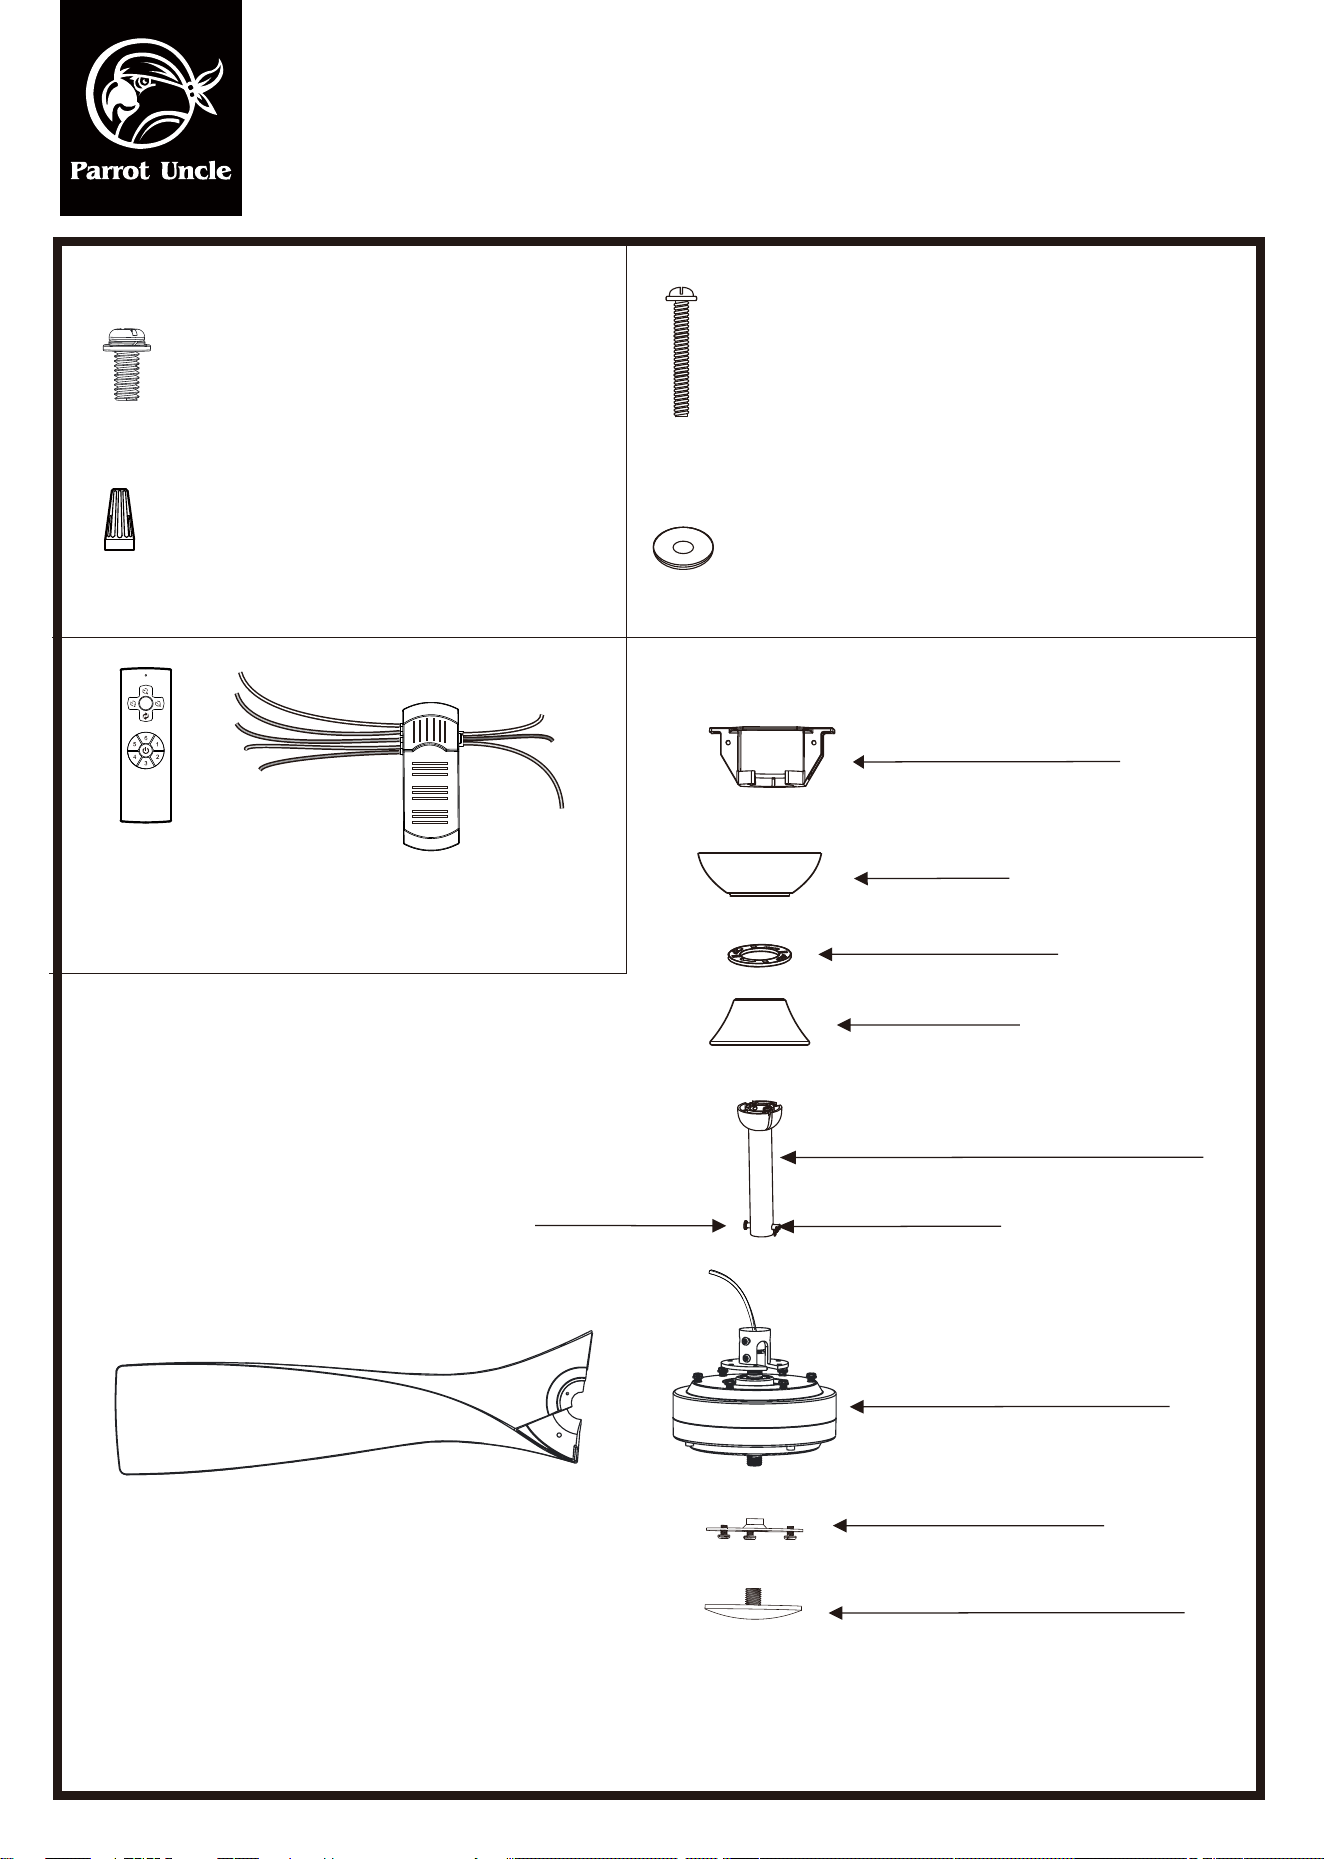
Tornillos de hoja (1 unidades)
Control remoto (1 set)
Pls comprobar si los accesorios anteriores se han completado o no. Sí, e instalar.
Soporte de montaje
Montaje de bolas/varilla de 6 "(premontaje)
Cubierta del dosel
Tianpeng
Fabricación
El Pin
Pin de bloqueo "R"
Conjuntos, partes y piezas
componentes
Hoja (3 unidades)
Volante de inercia
Cubierta volante de inercia
Tornillos de montaje (2 unidades)
Lavadora (2 unidades)
Tuercas de alambre (7 unidades)
F6116BK110V / F6116110V
Instrucciones de instalación y operación para la
instalación del propietario de Parrotuncle, manual
ADVERTENCIA: Apague la energía en el fusible o el interruptor de circuito
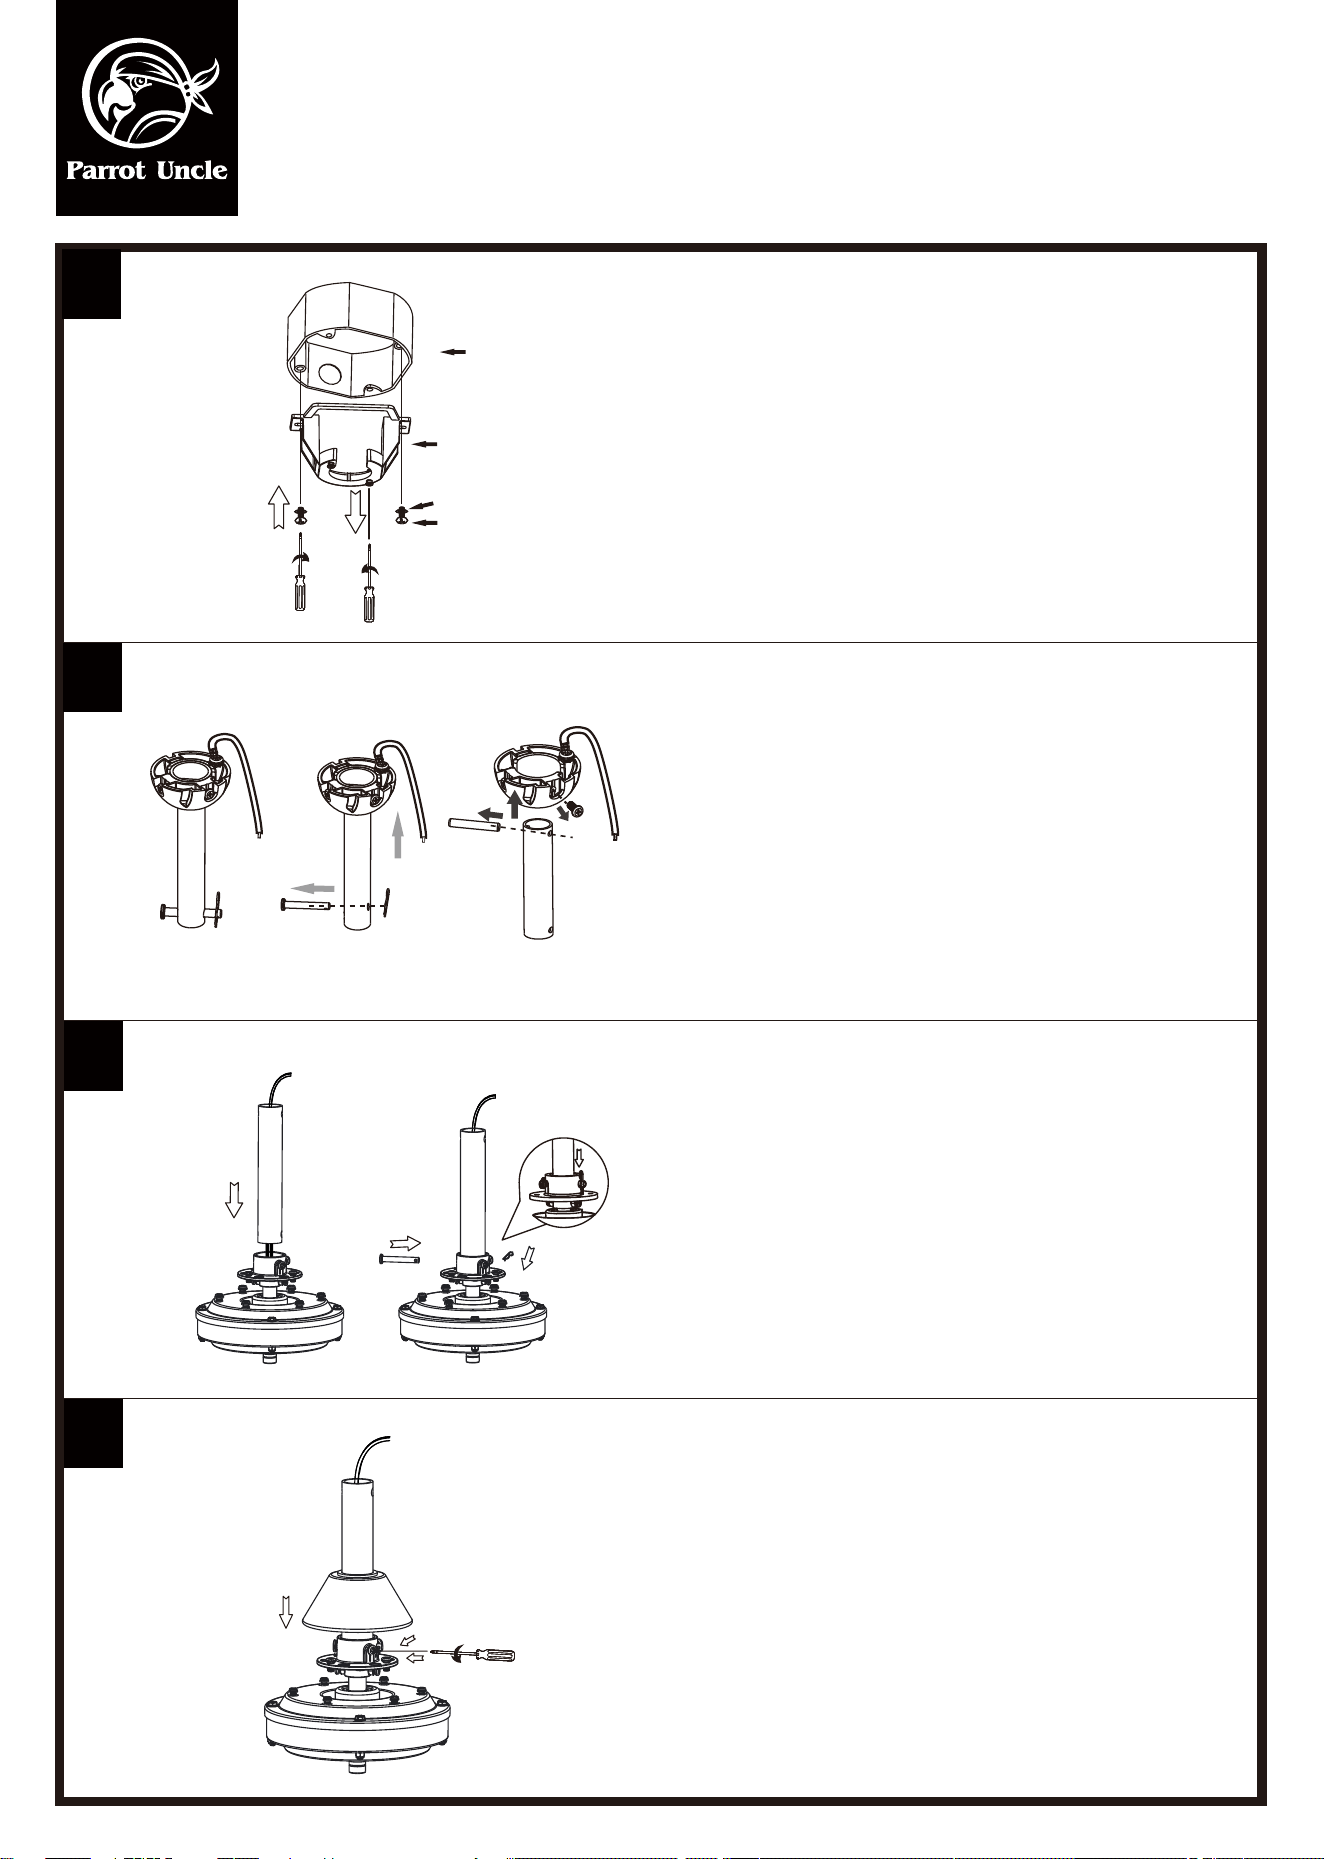
Fije el soporte de montaje de forma segura a la
Caja de salida, utilizando el tornillo de rosca y
Las lavadoras.
Quitar el pasador de bloqueo "R" y el pasador de
colgar; Quitar el pin cruz en la bola y el Tornillo
premontado.
Suellos tornillos premontados en el cuello;
Pasar los cables del motor a través de la varilla de abajo;
Pasador de diapositivas y pasde de bloqueo "R".
Apriete los tornillos de cuello y deslice la cubierta
de acopl.
1
2
3
4
Caja de salida
Soporte de montaje
Junta
El tornillo de rotación automática
X2
X1
X2
F6116BK110V / F6116110V
Instrucciones de instalación y operación para la
instalación del propietario de Parrotuncle, manual
ADVERTENCIA: Apague la energía en el fusible o el interruptor de circuito
5
6
7
8
Deslizcubierta de dosel y dosel sobre la barra
de abajo.
Apriete el tornillo de la bola.
Cuelel en el soporte de montaje en la posición
correcta.
Inserte el receptor en el soporte de suspensión
con el lado plano del receptor hacia el techo.
X1
F6116BK110V / F6116110V
Instrucciones de instalación y operación para la
instalación del propietario de Parrotuncle, manual
ADVERTENCIA: Apague la energía en el fusible o el interruptor de circuito
11
10
9
X1
Conectar los cables
Retire los seis tornillos de la hoja del conjunto del motor del
ventilador;
Quite los seis torndel volante de inercia del volante de inercia.
Quitar 1 de los 2 tornillos de la parte inferior del soporte de
montaje y aojar el otro;
Deslice la campana hacia arriba hacia el soporte de montaje
y coloque el oricio de la llave en la campana sobre el tornillo
en el soporte de montaje, a continuación, gire la campana
hasta que se bloquea en su lugar en la sección estrecha de los
agujeros de la llave, seguro con esos dos tornillos de soporte
de montaje;
Empuje hacia arriba la cubierta de la cubierta del dosel hasta
que las cabezas de los tornillos se conecten a las ranuras de la
cubierta del dosel y roten para adherirse de forma segura a la
cubierta Dosel.
X6
X6
G
En N
amarillo
amarillo
gris
gris
rojo
rojo
A MOTOR
En L
N
L
F6116BK110V / F6116110V
Instrucciones de instalación y operación para la
instalación del propietario de Parrotuncle, manual
ADVERTENCIA: Apague la energía en el fusible o el interruptor de circuito
12
14
13
Fije el volante de inercia a una de las tres palas
usando dos tornillos.
Sujela hoja con el volante de inercia al ventilador
Montaje del motor con dos hélices. Fije las otras
dos cuchilal conjunto del motor del ventilador.
Reinstalar el resto de los cuatro tornillos del volante
de inercia a la Volante de inercia. Atornilla cubierta
del volante de inercia al volante de inercia.
Asegúrese de que la cubierta del volante de inercia
esté ajustada.
F6116BK110V / F6116110V
Instrucciones de instalación y operación para la
instalación del propietario de Parrotuncle, manual
ADVERTENCIA: Apague la energía en el fusible o el interruptor de circuito
Sin embargo, no hay garantía de que la interferencia no ocurra en una instalación particular. Si el equipo causa una interferencia dañina a la
recepción de radio o televisión, que se puede determinar apagando y encendido, el usuario está
Alentado a tratar de corregir la interferencia por una o más de las siguientes medidas:
--- Reorientar o reubicar la antena receptora.
--- Aumente la separación entre el equipo y el receptor.
--- Conecte el equipo en una salida en un circuito diferente al del que está conectado el receptor.
--- Consulte al concesionario o un técnico experimentado de radio/ televisión para obtener ayuda.
ADVERTENCIA:
No instale este ventilador con pared de velocidad variable
Control o interruptor de atenuador montado en la pared. Va a
dañar permanentemente el control remoto del ventilador
y hacer que la función del ventilador falle.
Sin control de la pared de
velocidad variable
Sin interruptor de atenuación
Instalación de la batería
Instalación del transmis
Proceso de aprendizaje
Nota: después de volver a encender la alimentación de ca, no presione ningún otro
botón del mando a distancia antes de pulsar el botón. Hacerlo hará que el procedimiento
de aprendizaje para fally la energía del ventilador tendrá que ser apagado de nuevo para
empezar de nuevo.
Gire el poder principal a ventilador de nuevo y dentro de 30 segundos pulse y mantenga
el Botón en el control remoto durante 5 segundos para sincronizar el transmiscon el
ventilador.
Una vez que el ventilador ha detectado el control remoto, la luz del ventilador
parpadeará dos veces para indicar que tu ventilador está listo para usarse.
Los ventilsin kits de luz no tienen indicador, pero estarán listos para usar después de
presionar el botón durante 5 segundos.
Conecte el soporte del control remoto con los dos tornillos de montaje del soporte del control remoto.
El funcionamiento de su transmis
Restaurar la energía al ventilador de techo y comprobar su correcto funcionamiento.
A. 1,2,3,4,5,6 botones:
Estos seis botones se utilizan para ajustar la velocidad del ventilador de la siguiente manera:
1 = baja velocidad 2 = media baja velocidad 3 = media velocidad
4 = media alta velocidad 5 = alta velocidad 6 = Extra alta velocidad
B. botón:
Este botón apaga el ventilador. Al pulsar cualquier botón de velocidad se enciende el ventilador.
C. botón:
Botón de retroceso del ventilador
Nota: para operar la función invertir en este ventilador, presione el botón invertir mientras el
ventilador está funcionando a cualquier velocidad.
Los ajustes de velocidad para clima cálido o frío dependen de factores como el tamaño de
la habitación. Altura del techo, número de ventil, etc.
Clima cálido - (adelante) un flujo de aire hacia abajo crea un efecto de enfriamiento. Esto le
permite ajustar su aire acondicionado en un ambiente más cálido sin afectar su comodidad.
Clima frío - (inverso) un flujo de aire hacia arriba mueve el aire caliente fuera del área del
techo. Esto le permite ajustar su unidad de calefacción en un entorno más fresco sin afectar
a su comodidad.
Retire la cubierta trasera del transmise instaluna batería de 12V con el mando a distancia.
D.Sleep Timer:
Con la función timer, el ventilador de techo se apaga automáticamente después de un número de
ajuste (2/4/8) de horas. Durante el funcionamiento normal, presione los botones del temporizador
directamente para ajustar el temporizador Y se escuchará un pitido para indicar que el control del
temporizestá activado.
: el ventilador se apaga después de 2 horas.
: el ventilador se apaga después de 4 horas.
: el ventilador se apagará después de 8 horas.
F6116BK110V / F6116110V
Instrucciones de instalación y operación para la
instalación del propietario de Parrotuncle, manual
ADVERTENCIA: Apague la energía en el fusible o el interruptor de circuito
Tamaño del producto
52in
52”
6”
13.37”
6”
2.13”
6.81”
F6116BK110V / F6116110V
Instrucciones de instalación y operación para la
instalación del propietario de Parrotuncle, manual
ADVERTENCIA: Apague la energía en el fusible o el interruptor de circuito
TAMBALEARSE"
Las cuchillas del ventilador se han ajustado en la fábrica para minimizar cualquier bamboleo
Nota: Los ventiladores de techo tienden a moverse durante la operación debido al hecho de que están
montados en un crucero de goma. Si el ventilador se montara rígidamente hasta el techo, causaría un exceso
de vibración. Movimiento de algunos centímetros
Es bastante aceptable y no sugiere ningún problema
Para reducir el bamboleo del ventilador: verifique que todos los tornillos que aseguraron el montaje
El soporte y la reducción son seguros. Equilibrar un ventilador de techo tambaleante:
1. Verifique que todos los tornillos de brazo de cuchilla y cuchilla sean seguros.
2. La mayoría de los problemas de bamboleo de los fanáticos son causados cuando los niveles de cuchilla son
desiguales. Verifique este nivel seleccionando un punto en el techo sobre la punta de uno de los cuchillas.
Mida esta distancia. Rote el ventilador hasta que la siguiente cuchilla esté posicionada para la medición.
Repita para cada cuchilla. La desviación de distancia debe ser igual dentro de 1/8 "(0.32 cm).
3. Si el bamboleo de la cuchilla todavía se nota, intercambiando dos cuchillas adyacentes (lado a lado) pueden
redistribuir el peso y posiblemente resulte en una operación más suave. Advertencia: para reducir el riesgo de
personal
Lesión, no doble el brazo de la cuchilla mientras se instala, equilibra las
cuchillas o limpia el ventilador. No inserte objetos extraños entre las palas
giratorias del ventilador.
RUIDO
Cuando esté tranquilo (especialmente por la noche), puede escuchar
pequeños ruidos ocasionales. Esto es normal. Permita que un período
de "ruptura" de 24 horas, la mayoría de los ruidos asociados con un nuevo
ventilador desaparezcan durante el tiempo.
CUIDADO Y LIMPIEZA
1. La limpieza periódica de su ventilador de techo es el único mantenimiento requerido. Use un cepillo suave o
un paño sin pelusa para evitar rascar el acabado de pintura. Asegúrese de girar la energía de electricidad
antes de limpiar su ventilador
2. No use agua al limpiar el ventilador de su techo. Podría dañar el motor o las cuchillas y crear la posibilidad
de una descarga eléctrica.
3. El motor tiene rodamiento de bolas lubricado permanentemente. No hay necesidad de aceite
Touching
ceiling
F6116BK110V / F6116110V
F6116BK110V / F6116110V
N/A
120V AC
INFORMATION TECHNIQUE
SKU
35W
Installations d'installation et de fonctionnement pour
l'installation du propriétaire de Parrotuncle, manuel
AVERTISSEMENT: éteignez l'énergie dans le fusible ou l'interrupteur de circuit
F6116BK110V / F6116110V
Installations d'installation et de fonctionnement pour
l'installation du propriétaire de Parrotuncle, manuel
AVERTISSEMENT: éteignez l'énergie dans le fusible ou l'interrupteur de circuit
Vis à lame (1 PCS)
Télécommande (1 SET)
Pls vérifier si les accessoires ci-dessus sont complétés ou non. Oui, et installer.
Support de montage
6 "boule /downrod assemblage
(pré-assemblage)
Couverture de la canopée
Canopée
Couverture d’accouplement
Aiguilles de levage
Pin de verrouillage "R"
Ensemble ventilateur-moteur
Lame (3 PCS)
Volant d’inertie
Couverture de volant
Vis de montage (2 PCS)
Rondelle (2 PCS)
Écrous de fil (7 PCS)
F6116BK110V / F6116110V
Installations d'installation et de fonctionnement pour
l'installation du propriétaire de Parrotuncle, manuel
AVERTISSEMENT: éteignez l'énergie dans le fusible ou l'interrupteur de circuit
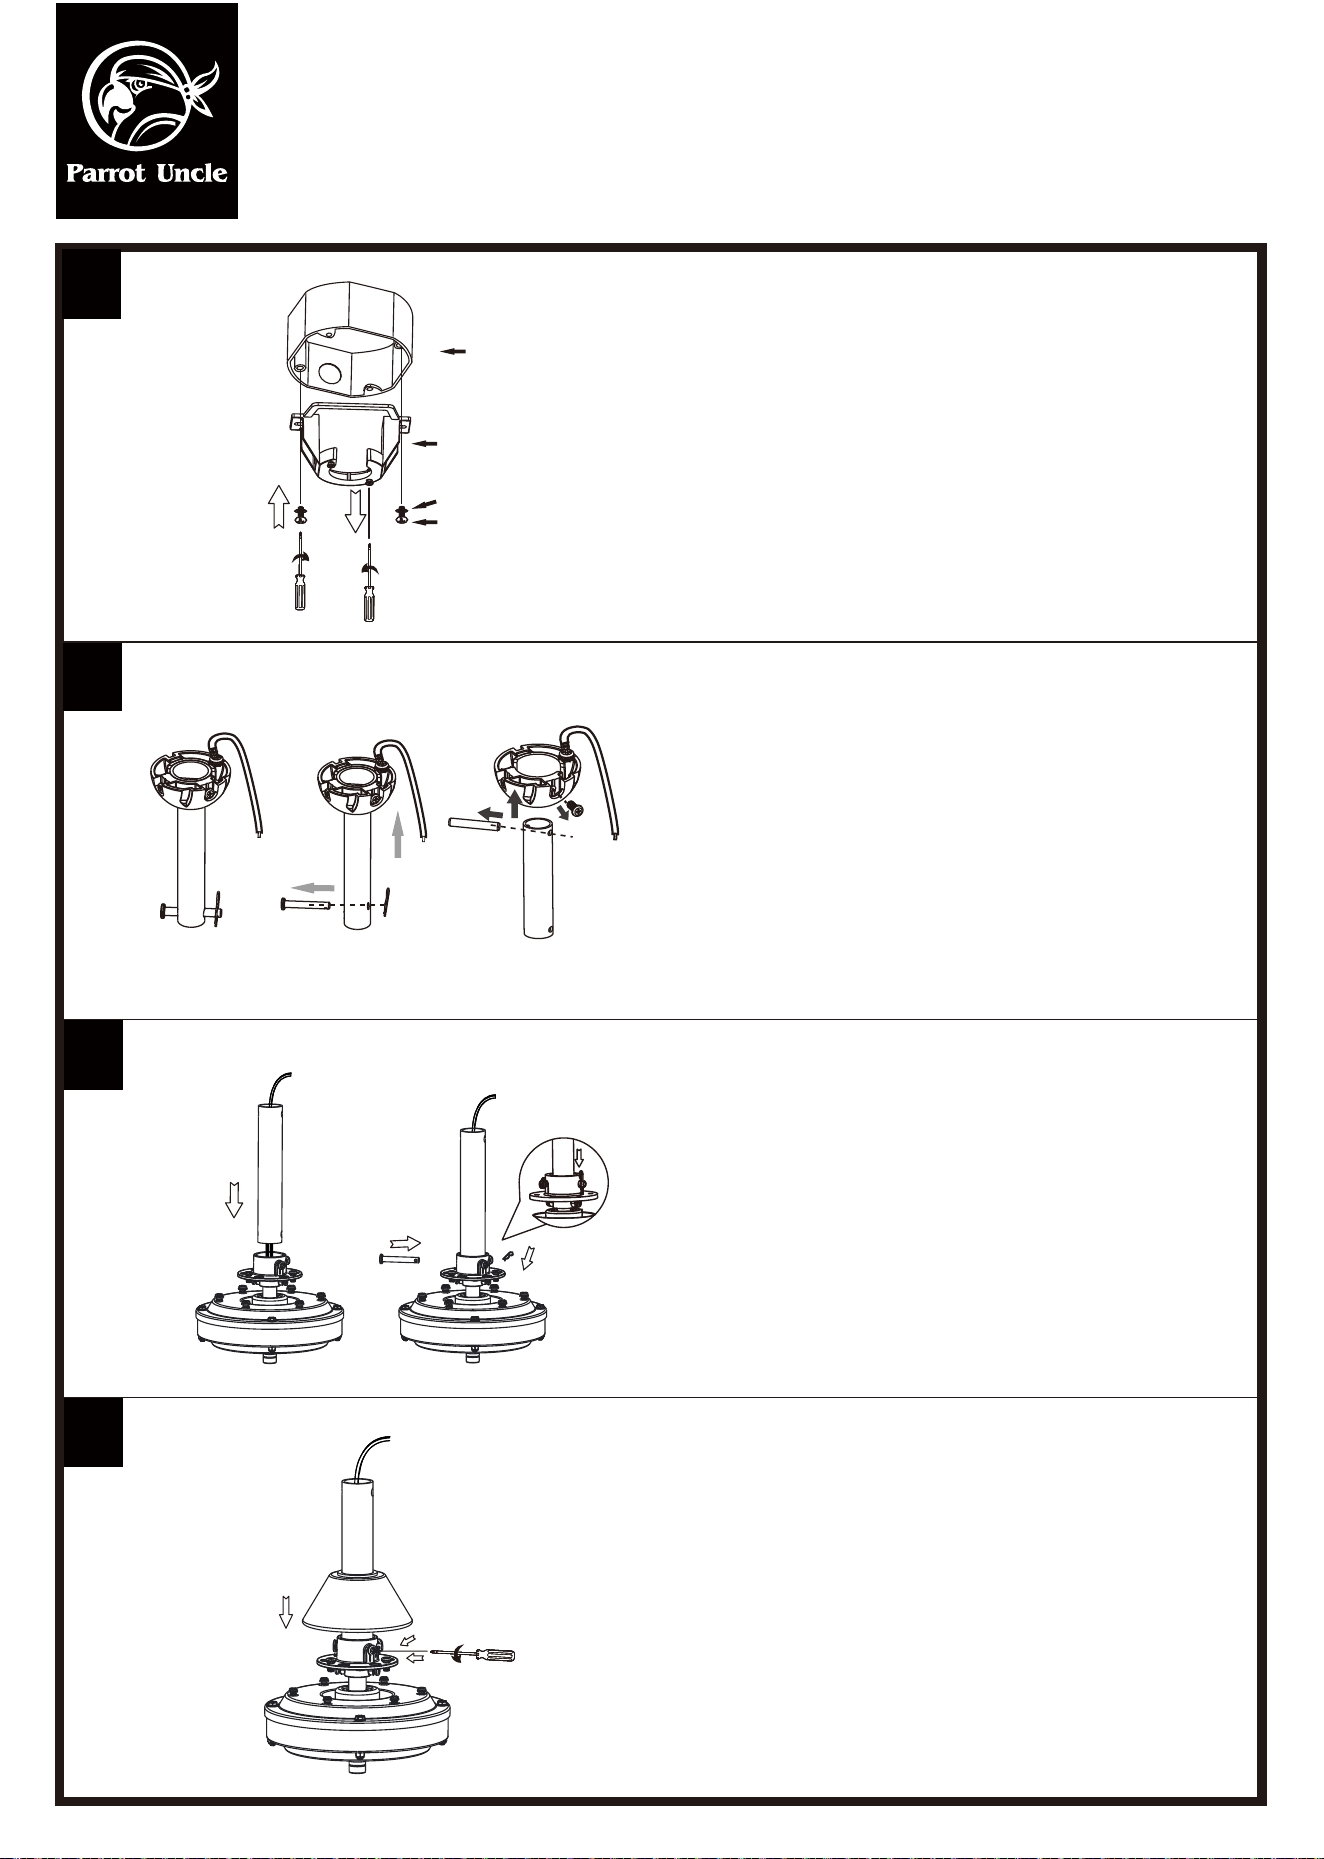
Fixez solidement le support de montage à la
Boîte de sortie, utilisant la vis auto-taraudeuse et
Les rondelles.
Retirez la goupille de verrouillage «R» et la goupille
de suspension;
Enlevez la goupille de croix sur la balle et le Vis
pré-assemblée.
Desserrer les vis pré-assemblées sur le collier;
Filtrer les ls du moteur à travers la tringle
descendante;
Glissez la goupille suspendue et la goupille de
verrouillage "R".
Serrez les vis à collier et faites glisser le couvercle
de l’accouplement.
1
2
3
4
Boîte de sortie
Support de montage
rondelles
Vis autotaraudeuses
X2
X1
X2
F6116BK110V / F6116110V
Installations d'installation et de fonctionnement pour
l'installation du propriétaire de Parrotuncle, manuel
AVERTISSEMENT: éteignez l'énergie dans le fusible ou l'interrupteur de circuit
5
6
7
8
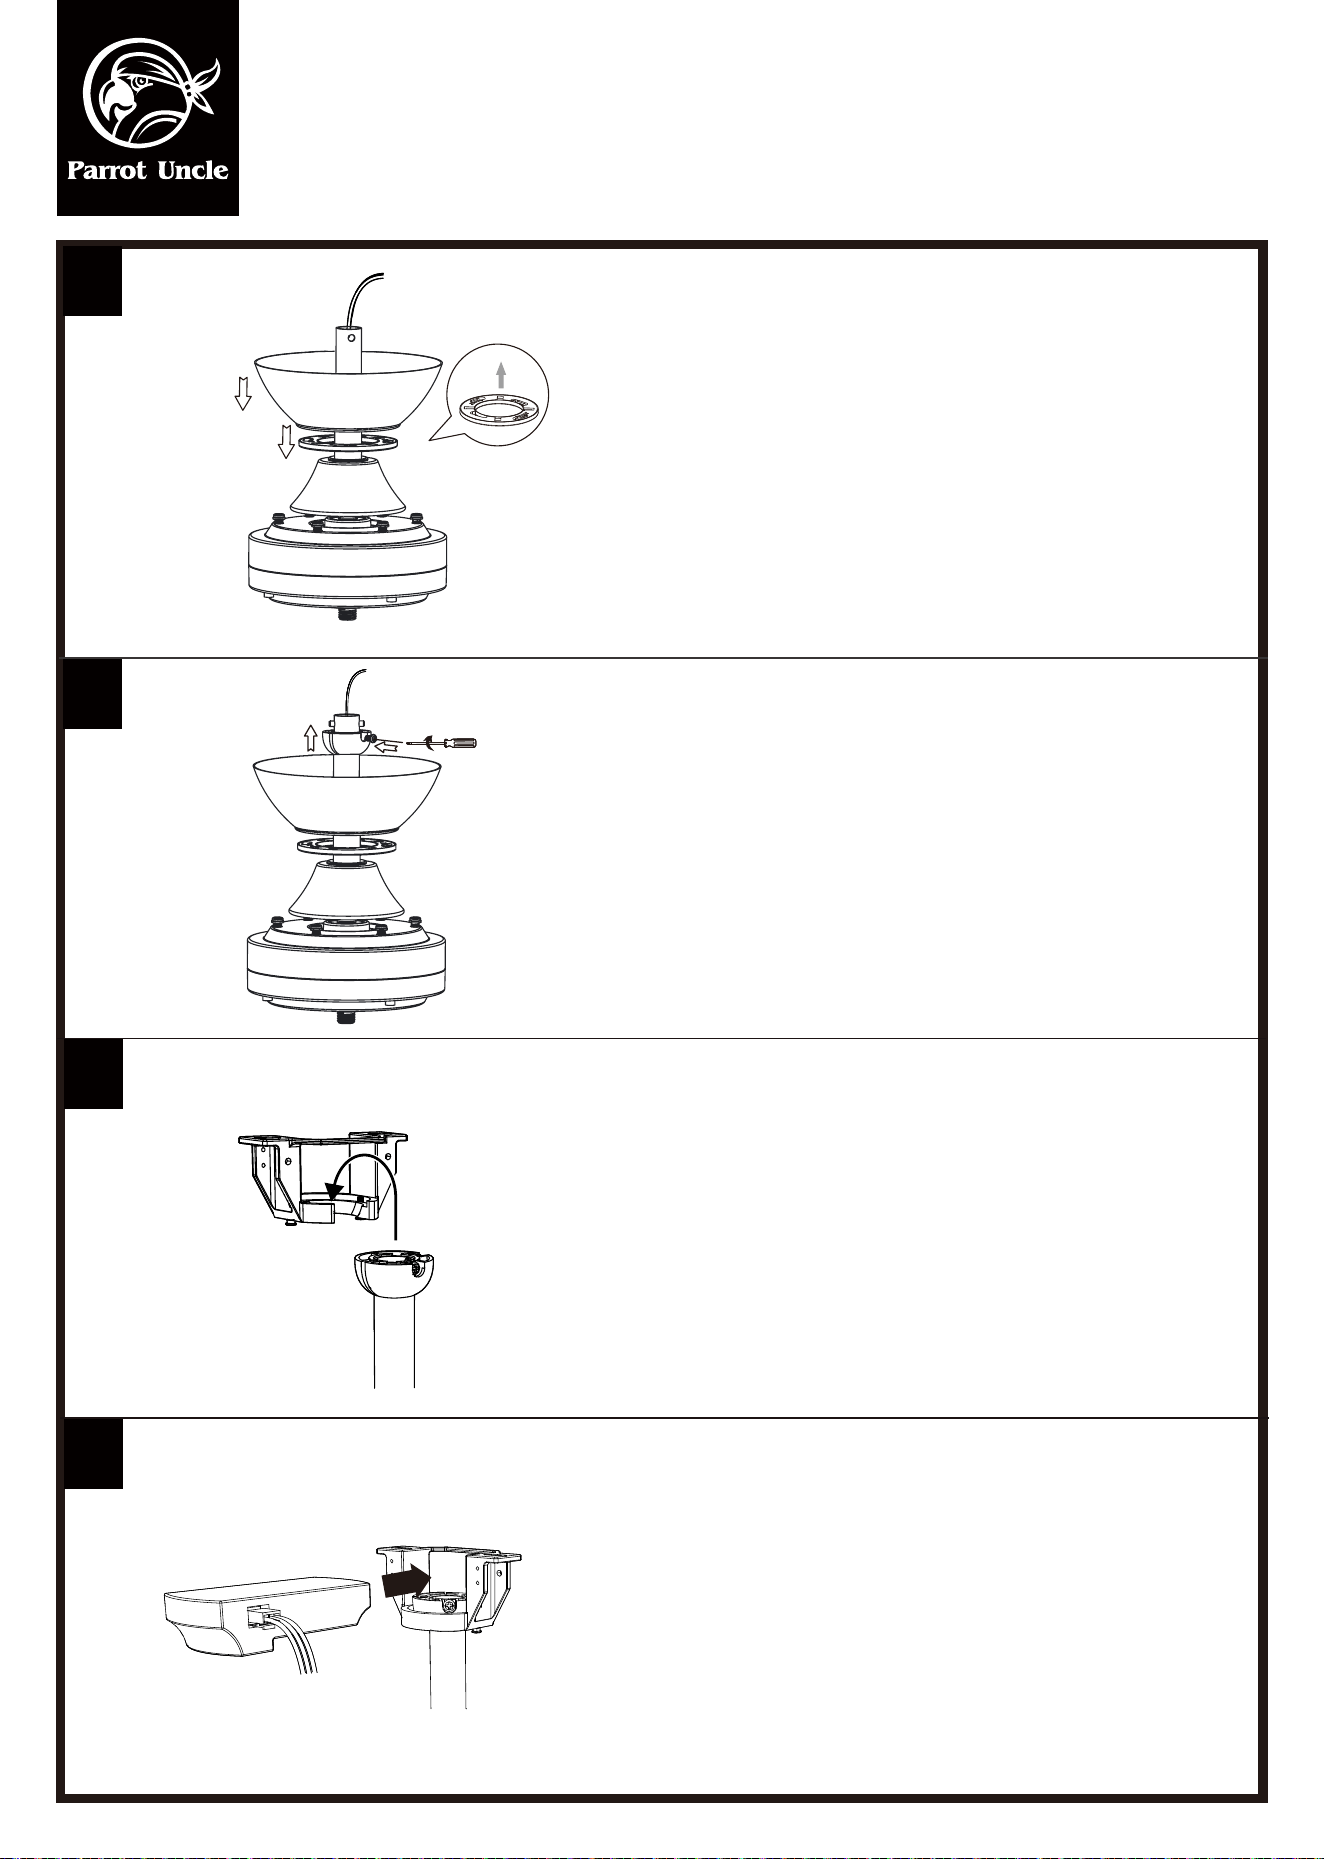
Couverture de la canopée et de la canopée au-dessus
de la canopée.
Serrez la vis sur la boule.
Accrochez le ventilateur sur le support de montage
dans la bonne position.
Insérez le récepteur dans le support de suspension
avec le côté plat du récepteur face au plafond.
X1
F6116BK110V / F6116110V
Installations d'installation et de fonctionnement pour
l'installation du propriétaire de Parrotuncle, manuel
AVERTISSEMENT: éteignez l'énergie dans le fusible ou l'interrupteur de circuit
11
10
9
X1
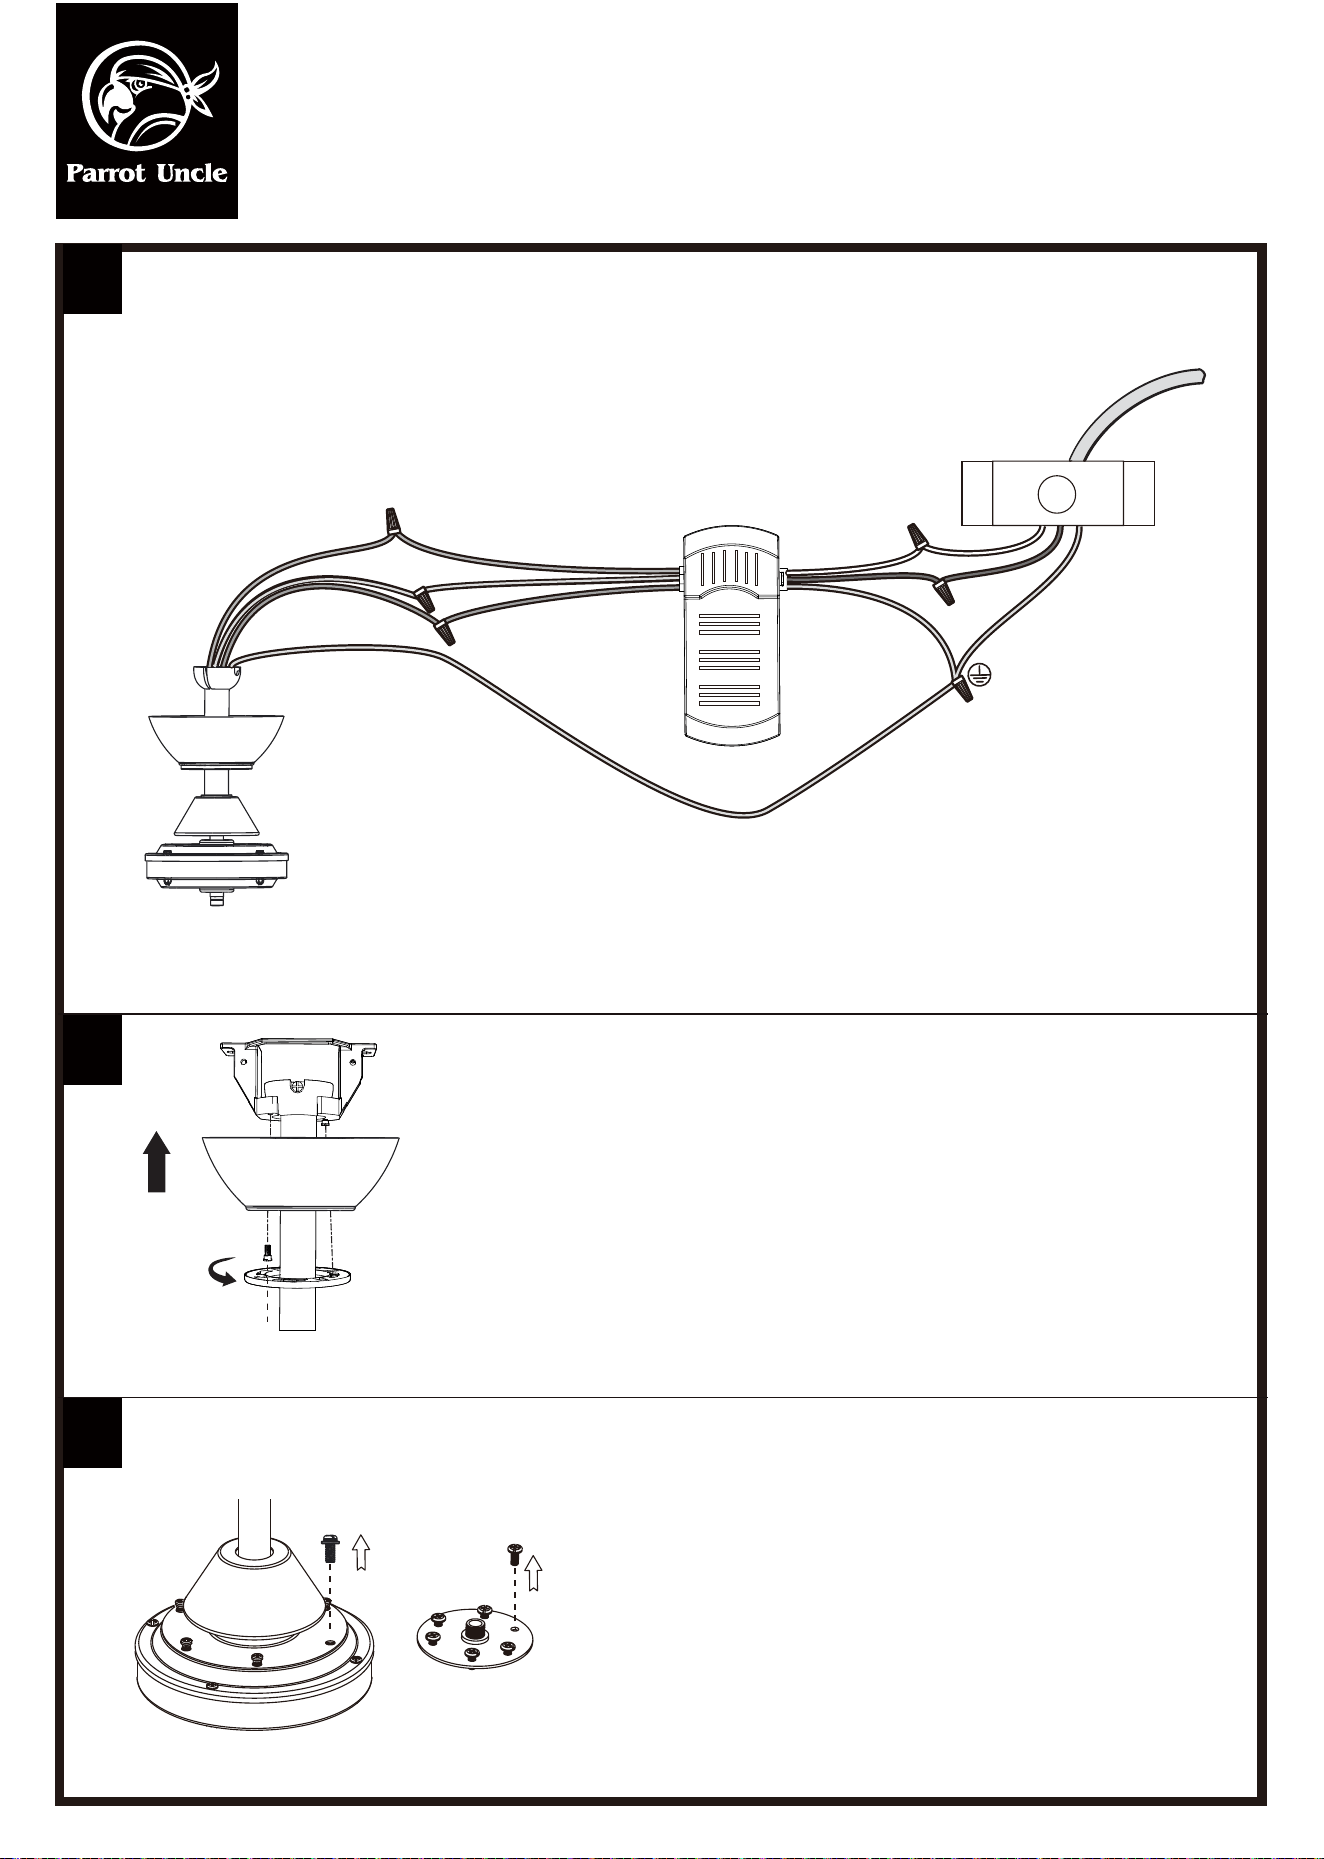
Connectez les ls
Retirer les six vis à lame de l’ensemble moteur du ventilateur;
Retirez les six vis du volant.
Retirer 1 des 2 vis du bas du support de xation et desserrer
l’autre vis;
Faites glisser la verrière vers le support de montage et placez
le trou de clé sur la verrière au-dessus de la vis sur le support
de montage, puis tournez la verrière jusqu’à ce qu’elle se
verrouille à la section étroite des trous de clé, puis xez-la
avec ces deux vis de support de montage;
Poussez le couvercle de l’auvent jusqu’à ce que les têtes de
vis engagent les fentes sur le couvercle de l’auvent et tournent
pour se xer solidement au Canopée.
X6
X6
G
jaune
jaune
gris
gris
rouge
rouge
Au moteur
N
AC IN N
AC IN L
L
F6116BK110V / F6116110V
Installations d'installation et de fonctionnement pour
l'installation du propriétaire de Parrotuncle, manuel
AVERTISSEMENT: éteignez l'énergie dans le fusible ou l'interrupteur de circuit
12
14
13
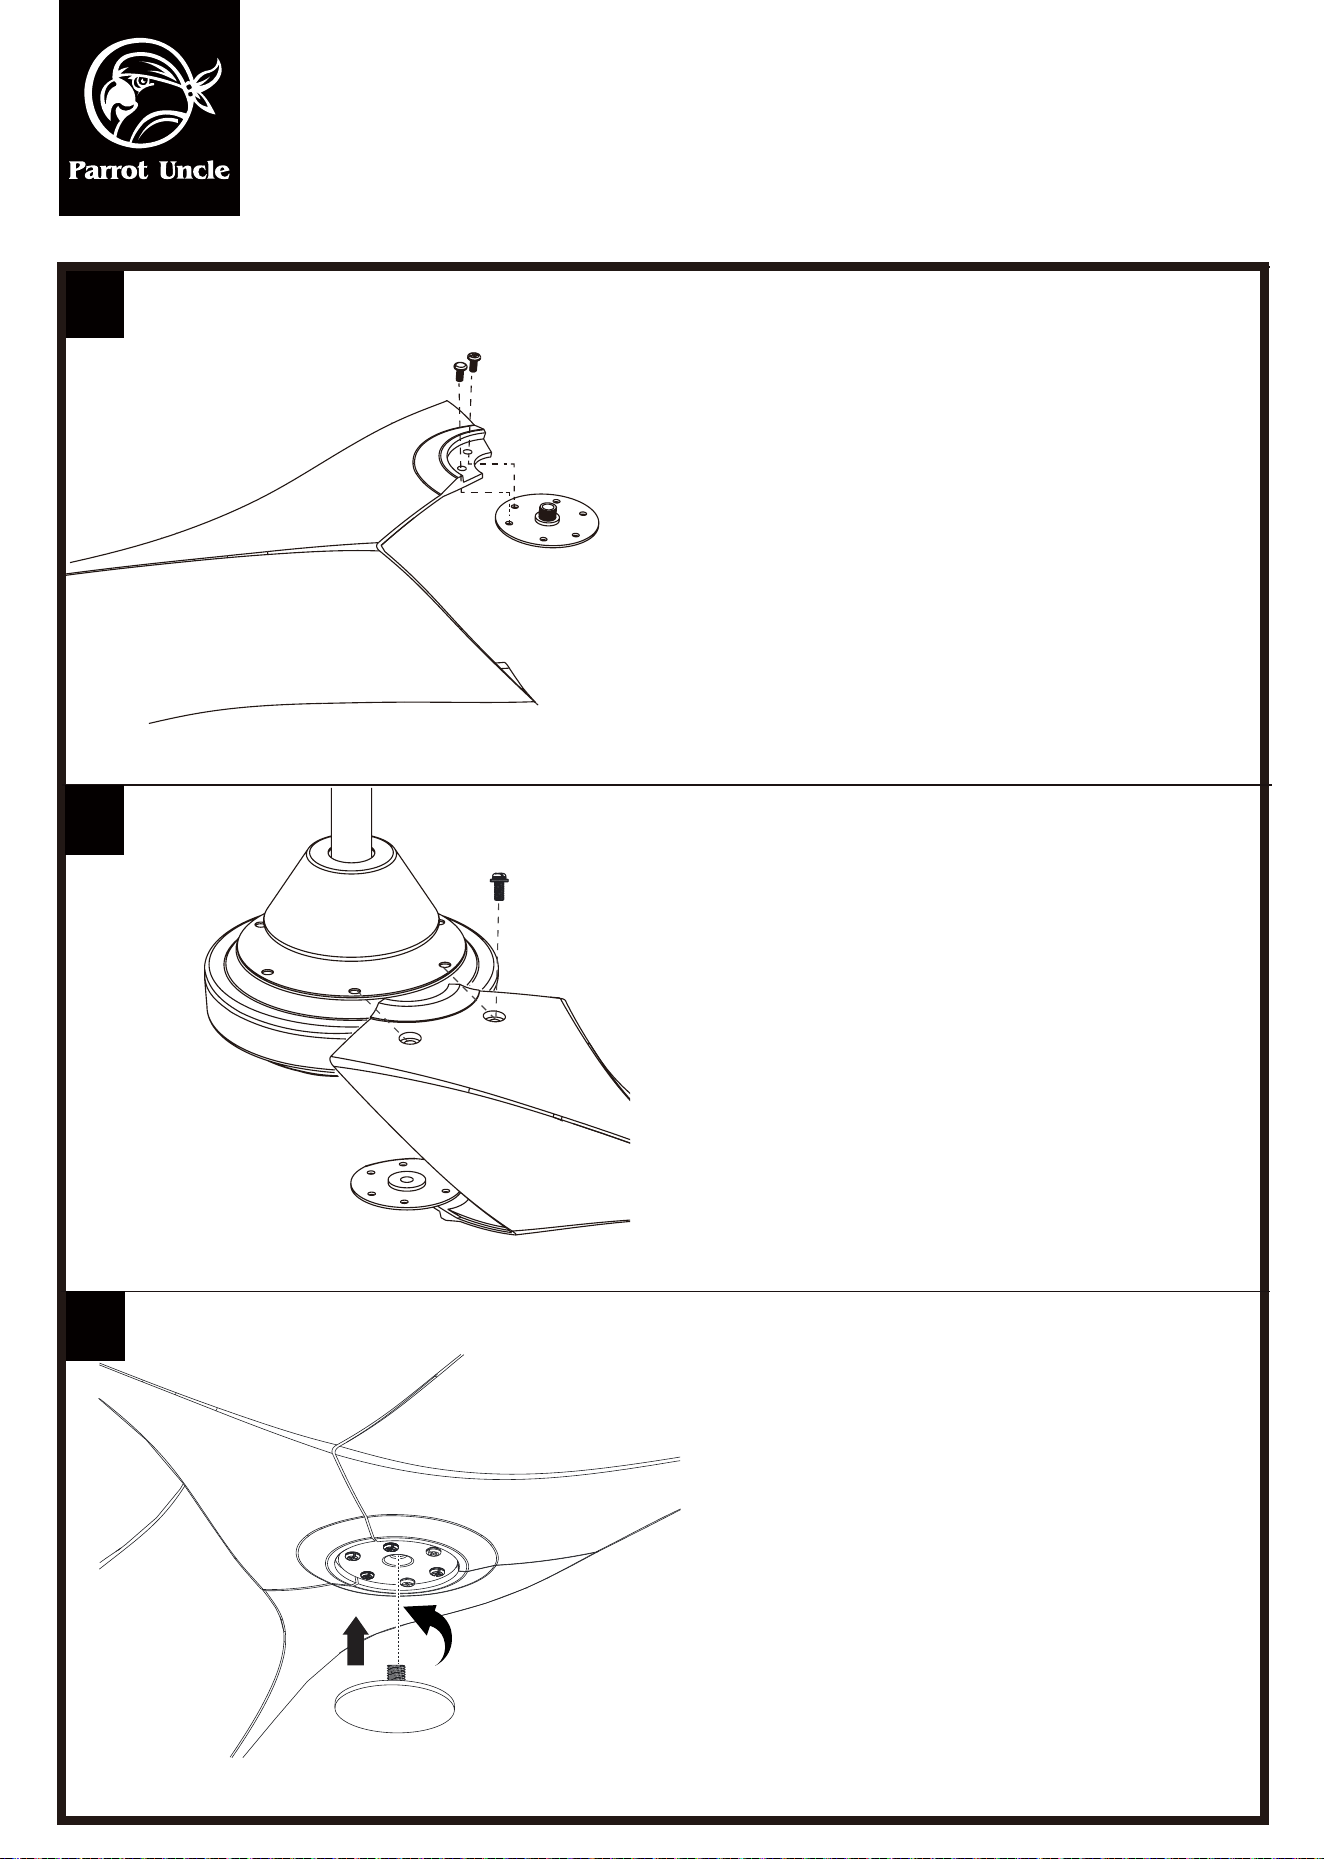
Fixez le volant à l’une des trois lames à l’aide de
deux vis de volant.
Fixer la lame avec le volant au ventilateur
Ensemble moteur à l’aide de deux vis à lame.
Fixer les deux autres pales au moteur du
ventilateur.
Réinstallez les quatre autres vis de volant à la
Volant d’inertie. Vissez le couvercle du volant sur
le volant.
Assurez-vous que le couvercle du volant est serré.
F6116BK110V / F6116110V
--- Réorientez ou déplacez l'antenne réceptrice.
--- Augmentez la séparation entre l'équipement et le récepteur.
--- Connectez l'équipement dans une prise sur un circuit différent de celui auquel le récepteur est connecté.
--- Consultez le concessionnaire ou un technicien en radio / télévision expérimenté pour obtenir de l'aide.
AVERTISSEMENT:
N'installez pas ce ventilateur avec un mur de vitesse variable
Contrôle ou gradateur mural. Ce sera
endommager en permanence la télécommande du ventilateur
et faire échouer la fonction du ventilateur.
Aucun contrôle de mur à vitesse variable
Pas de gradateur
Installations d'installation et de fonctionnement pour
l'installation du propriétaire de Parrotuncle, manuel
AVERTISSEMENT: éteignez l'énergie dans le fusible ou l'interrupteur de circuit
Cependant, rien ne garantit que des interférences ne se produiront pas dans une installation particulière.
Si l’équipement provoque des interférences nuisibles à la réception de la radio ou de la télévision, qui peuvent
être déterminées en éteignant et en allumant l’équipement, l’utilisateur est encouragé à essayer de corriger
l’interférence par une ou plusieurs des mesures suivantes:
INSTALLATION DE LA BATTERIE
INSTALLATION DU SUPPORT DE L’ÉMETTEUR
PROCESSUS D’APPRENTISSAGE
Remarque: après avoir rallumé le courant alternatif, n’appuyez sur aucun autre bouton de la
télécommande avant d’appuyer sur le bouton. Cela fera échouer la procédure d’apprentissage
et le courant du ventilateur devra être coupé de nouveau pour recommencer.
Mettez le courant principal en marche et enfoncez le bouton de la télécommande pendant 5
secondes dans les 30 secondes pour synchroniser l’émetteur avec le ventilateur.
Une fois que le ventilateur a détecté la télécommande, la lumière sur le ventilateur clignote deux
fois pour indiquer que votre ventilateur est maintenant prêt à l’emploi.
Les ventilateurs sans kits d’éclairage n’ont pas d’indicateur mais seront prêts à être utilisés après
avoir maintenu le bouton pendant les 5 secondes.
Fixez le support de la télécommande avec les deux vis de montage du support de la télécommande.
FAIRE FONCTIONNER VOTRE ÉMETTEUR
Rétablir l’alimentation du ventilateur de plafond et vérifier son bon fonctionnement.
A. 1,2,3,4,5,6 boutons:
Ces six boutons sont utilisés pour régler la vitesse du ventilateur comme suit:
1 = basse vitesse
2 = moyenne basse vitesse 3 = moyenne vitesse
4 = moyenne grande vitesse 5 = grande vitesse 6 = très grande vitesse
B. boutons:
Ce bouton éteint le ventilateur. Appuyer sur n’importe quel bouton de vitesse allume le ventilateur.
C. boutons:
Bouton inverse de Fan
Remarque: pour actionner la fonction inverse sur ce ventilateur, appuyez sur le bouton inverse
lorsque le ventilateur fonctionne à n’importe quelle vitesse.
Les réglages de vitesse pour un temps chaud ou frais dépendent de facteurs tels que la taille de la
pièce. Hauteur de plafond, nombre de fans et ainsi de suite.
Temps chaud - (vers l’avant) un flux d’air descendant crée un effet de refroidissement. Cela vous permet
Pour régler votre climatiseur sur un cadre plus chaud sans affecter votre confort.
Temps frais - (inverse) un flux d’air ascendant déplace l’air chaud hors de la zone du plafond. cette
Vous permet de régler votre unité de chauffage sur un réglage plus frais sans affecter votre confort.
Retirez le couvercle arrière de l’émetteur et installez une batterie 12V avec la télécommande.
D. Minuterie de D.Sleep:
Avec la fonction de minuterie, le ventilateur de plafond sera éteint automatiquement après un nombre
défini (2/4/8) d’heures. Pendant le fonctionnement normal, appuyez sur les boutons de minuterie
directement pour régler la minuterie Et un bip sonore sera entendu pour indiquer que le contrôle de
minuterie est activé.
: le ventilateur s’éteint après 2 heures.
: le ventilateur s’éteint après 4 heures.
: le ventilateur s’éteindra après 8 heures.
F6116BK110V / F6116110V
Installations d'installation et de fonctionnement pour
l'installation du propriétaire de Parrotuncle, manuel
AVERTISSEMENT: éteignez l'énergie dans le fusible ou l'interrupteur de circuit
Aucun interrupteur de gradateur
52in
52”
6”
13.37”
6”
2.13”
6.81”
F6116BK110V / F6116110V
OSCILLER"
Les lames de ventilateur se sont ajustées dans l'usine pour minimiser tout bamboleo
Remarque: les ventilateurs de plafond ont tendance à se déplacer pendant l'opération en raison du fait qu'ils
sont montés sur une croisière en caoutchouc. Si le ventilateur était monté de manière rigide au plafond, cela
entraînerait des vibrations excessives. Mouvement de certains centimètres
Il est tout à fait acceptable et ne suggère aucun problème
Pour réduire le ventilateur du ventilateur: vérifiez que toutes les vis qui ont sécurisé l'assemblage
Le soutien et la réduction sont sûrs. Équilibrez un ventilateur de toit stupéfiant:
1. Vérifiez que toutes les vis à lame et à la lame sont sûres.
2. La plupart des problèmes de bambou fanatiques sont causés lorsque les niveaux de lame sont inégaux.
Vérifiez ce niveau en sélectionnant un point sur le toit sur la pointe de l'une des lames. Mesurez cette distance.
Faites pivoter le ventilateur jusqu'à ce que la lame suivante soit positionnée pour la mesure. Répétez pour
chaque lame. L'écart de distance doit être le même à 1/8 "(0,32 cm).
3. Si la lame de la lame est toujours perceptible, l'échange de deux lames adjacentes (côté à côté) peut
redistribuer le poids et éventuellement entraîner une opération plus douce. Avertissement: réduire le risque du
personnel
Blessure, pas le double du bras de la lame pendant l'installation, équilibre le pales ou nettoyer le ventilateur.
N'insérez pas d'objets étrangers entre les lames ventilateur tournant.
BRUIT
Lorsque vous êtes calme (surtout la nuit), vous pouvez écouter de petits
bruits occasionnels. C'est normal. Prévoyez une période de «rupture» de
24 heures, la plupart des bruits associés à un nouveau ventilateur
disparaissent pendant le temps.
Soins et nettoyage
1. Le nettoyage périodique de son ventilateur de plafond est le seul entretien requis. Utilisez une brosse douce
ou un chiffon sans peluches pour éviter de gratter la finition de la peinture. Assurez-vous de tourner l'énergie
de l'électricité avant de nettoyer votre ventilateur
2. N'utilisez pas d'eau lors du nettoyage de votre ventilateur de toit. Il pourrait endommager le moteur ou les
lames et créer la possibilité d'un choc électrique.
3. Le moteur a un roulement à billes lubrifié en permanence. Il n'y a pas de besoin d'huile
Installations d'installation et de fonctionnement pour
l'installation du propriétaire de Parrotuncle, manuel
AVERTISSEMENT: éteignez l'énergie dans le fusible ou l'interrupteur de circuit
Touching
ceiling
F6116BK110V / F6116110V

Uncle