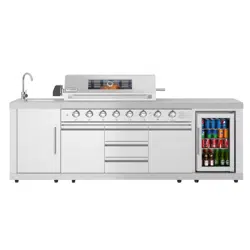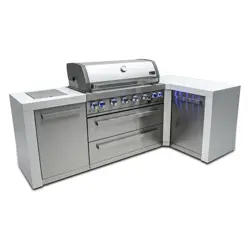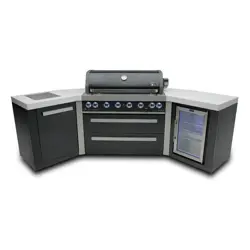
OUTDOOR KITCHEN
Outdoor Kitchen Suite With White Rock
Beam Counter-top and Sides, 4 Burner Grill
With 453 Sq. In. of Cooking Area And Stain-
less-Steel Sink and Faucet
USER MANUAL
Before using, please read the operating instructions carefully to
ensure proper application and achieve satisfactory results.
For any service related issues, please contact us:
718-576-6342
suppor[email protected]
Model: KM-OKS-3585

Stay informed with the latest information for your
KoolMore Appliance.
Scan the QR code below to access the most recent user manual
on our website, which is constantly being updated and improved.
If you need any assistance or have questions, our customer support
team is here to help.
Phone- 718-576-6342 Email- suppor[email protected]
Please write down the model number and serial number below for future reference. Both numbers are located on the
rating label on the back of your unit or inside of the unit and are needed to obtain warranty service. You may also
want to staple your receipt to this manual as it is your proof of purchase and may also be needed for service
under warranty.
Model Number:
Serial Number:
Date of Purchase:
To better serve you, please do the following before contacting customer service:
If you received a damaged product, immediately contact the retailer or dealer that sold you the product.
Read and follow this User Manual carefully to help you install, use, and maintain your unit.
Refer to the Troubleshooting section of this manual as it will help you diagnose and solve many common issues.

3
Contents
Safety ............................................................................................. 4
Parts .............................................................................................. 6
Installation ..................................................................................... 7
Specication .................................................................................. 13
Operation ....................................................................................... 14
Maintenance .................................................................................. 18
Troubleshooting ............................................................................. 21
Fuel Type Conversion ..................................................................... 22
Refrigerator User Manual ............................................................... 29
Warranty ......................................................................................... 36

4
Safety
General Warnings
• Do not store or use gasoline, ammable liquids, or vapors near this or any other appliance.
• An LP cylinder not connected for use must not be stored near this or any appliance.
California Proposition 65 Warning
Chemicals, including chromium (hexavalent compounds), known to the State of California to
cause cancer, birth defects, or other reproductive harm, are found in and/or created by the com-
bustion of natural gas, propane, butane, and other fuels. Always operate this appliance as instruct-
ed and only in well-ventilated areas.
For more information, visit www.P65Warnings.ca.gov
Placement and Location
• For outdoor use only.
• Never operate the grill in an enclosed area such as a garage, shed, breezeway, or under a
sealed overhead structure.
• Keep the grill clear of trees, shrubs, windows, doors, and vents that may allow fumes to enter
your home.
• This appliance is not intended for installation on recreational vehicles or boats.
• Maintain adequate clearance from overhead combustible materials such as patio covers.
• Keep the area around the grill clean and free of ammable materials, including rags, brooms,
solvents, cleaning uids, and gasoline.
• Do not use the grill, grill cabinet, or surrounding area as storage for ammable or plastic items.
• Do not store an LP cylinder near this or any appliance when not in use.
Set-Up
Before installing a built-in grill, record the model number, serial number, and fuel type. This infor-
mation is on the product label and should be stored for future reference.
All installations must comply with local codes, or in their absence:
• ANSI Z223.1 / NFPA 54 (Natural Gas and Propane Installation Code),
• CSA B149.1 (Natural Gas and Propane Installation Code), or
• CSA B149.2 (Propane Storage and Handling Code), as applicable.
• This grill must be connected to a grounded 120V outlet with a dedicated 15A GFCI breaker.
• Do not use extension cords unless absolutely necessary. If used, they must be outdoor-rated
(W-A), GFCI-protected, and properly grounded.
• Do not install a fuse in the neutral or ground circuit.
• Do not ground the appliance to a gas or hot-water pipe.
• Keep electrical cords and the fuel supply hose away from heated surfaces.
• Remove all packaging material before operating the grill to avoid re and smoke damage.
• Before rst use, clean the entire grill—including grates—with hot, soapy water to remove manu-
facturing oils and residue.
Danger — If You Smell Gas
• Turn off the gas at the source immediately.

5
• Extinguish all open ames.
• Open the grill lid.
• If the odor persists, move away from the appliance and contact your gas supplier or re depart-
ment.
Operation
• Use the grill only for its intended purpose.
• If a burner goes out, turn all burner knobs to the OFF position, open the lid fully, and allow the
gas to dissipate before re-igniting.
• Never operate the grill without the drip pan properly installed. Fire or explosion may result.
• Keep all electrical cords away from heated surfaces.
• Avoid operating the grill in windy conditions. If installed in a consistently windy area, a wind-
break may be required.
• Do not line the grill with aluminum foil.
• When not in use, turn off the gas at the LP tank.
• Do not block required ventilation openings. Proper airow is crucial in preventing gas buildup.
• Handle LP gas lines and connectors carefully. Do not drop or allow them to come into contact
with metal cabinet surfaces.
• Do not use charcoal or charcoal briquettes in a gas grill.
• Regulators must always be installed. Operating without a regulator can lead to re or explo-
sion.
• Never leave the grill or side burners unattended while in use.
• Do not use water on grease res.
• For internal grease res: turn off the heat and cover with a lid, cookie sheet, or tray.
• For external grease res: use baking soda or a dry-chemical/foam extinguisher.
• Keep clothing, pot holders, and other ammable materials away from hot surfaces. Avoid
loose-tting garments.
• Use only dry pot holders—moist ones can cause severe burns.
• Do not heat unopened containers on the grill; pressure buildup may cause an explosion.
• Avoid reaching over hot surfaces during use.
Maintenance and Repair
• Insects, such as spiders, can build nests in burners, blocking airow and potentially causing
res. Inspect and clean burners regularly.
• Unless instructed in this manual, do not attempt to repair or replace any part of the grill your-
self.
• All services must be performed by a qualied technician. Unauthorized repairs may void the
warranty.
Storage
• Turn off the gas supply at the cylinder when the grill is not in use.
• Indoor storage is only permitted when the LP cylinder is disconnected and removed.
Precautions Regarding Children
• Never leave children unattended near the grill.
• Do not store items that attract children near or under the appliance.
• Do not allow children to sit or stand on any part of the grill.

6
Parts

7
Proper Location of the Grill
When selecting a location for your new grill, always ensure that the installation complies with all
applicable State and local safety codes and requirements.
When planning the installation layout, consider access to gas lines and a 120V electrical outlet.
This model is factory-congured for liquid propane (LP) and can be converted for natural gas (NG)
using the appropriate conversion kit. If natural gas is used, select a location that minimizes the
length of the gas line.
Because this unit includes a built-in refrigerator and other electrical components, a grounded, ded-
icated 15A / 120V power outlet is required. A GFCI-protected outlet may also be required, depend-
ing on local electrical codes.
When determining a suitable placement, consider exposure to wind, proximity to trac paths, and
the position of windows or doors that open directly into your home.
Place the grill enclosure only in areas with adequate ventilation. The size and conguration of
your home and yard will inuence the ideal location; however, as a general guideline, avoid placing
the grill under or near windows that open into your home. Additional ventilation requirements are
detailed later in this section.
The sides, bottom, and back of the grill enclosure must be at least 36 inches away from any com-
bustible construction.
To reduce the risk of burn injury caused by reaching over a hot surface, avoid locating overhead
cabinets or storage directly above the grill.
This grill is designed for outdoor use only.
Carbon Monoxide Hazard
• This appliance can produce carbon monoxide, an odorless and potentially deadly gas.
• Using this appliance in an enclosed space can kill you.
• Never operate the grill in enclosed spaces such as a camper, tent, car, or home.
Installation
Ensuring Proper Ventilation
Do not install your grill or barbecue island in any enclosed or partially enclosed area that is walled
on two, three, or four sides. Such areas include—but are not limited to—garages, sheds, breeze-
ways, patios, cabanas, or similar structures.
Even if an area has windows, screens, or ventilation systems, it may still be considered enclosed
and hazardous for grill operation. Enclosed areas are not approved locations for installation.
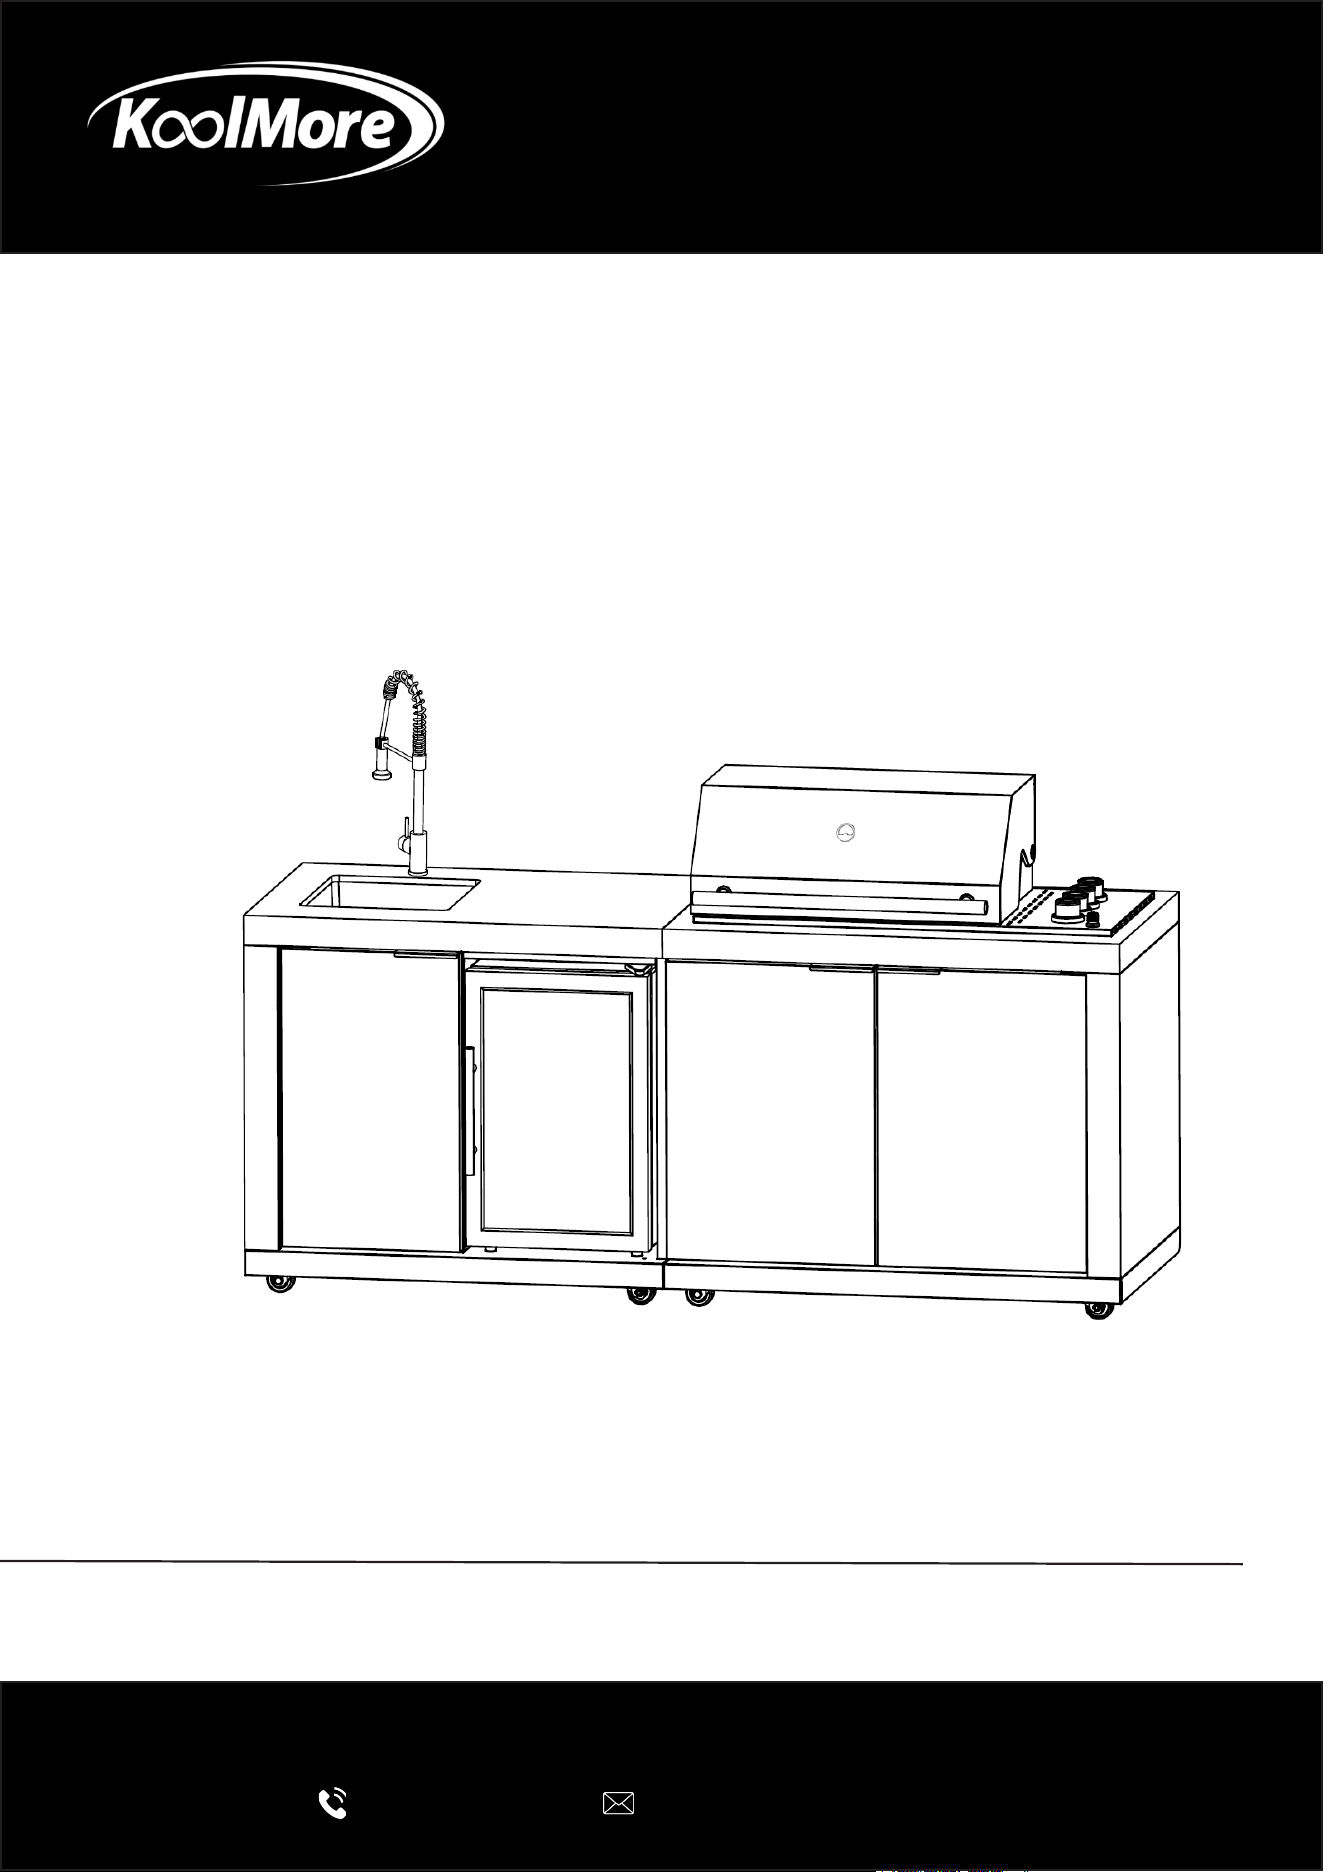
Do not install your grill beneath a sealed overhead structure. Acceptable overhead structures must
allow airow, such as open or louvered pergolas.
8
An awning may be installed over the grill, provided it is high enough to prevent heat damage or re.
Maintain a minimum overhead clearance of 6 feet (72 inches) from the top of the grill hood to any
overhead material.
A suitable installation location must include:
• Solid foundation
• Open airow on at least three sides
• Minimum 6 ft of overhead clearance from combustible materials
• No overhead enclosure
• No adjacent windows
• No overhead storage
• No combustible materials stored in proximity
Explicit ventilation and clearance requirements are necessary to prevent heat damage, re haz-
ards, and the accumulation of unburned gas.
Construction Materials
KoolMore is not responsible for damage, injury, or death caused by installing a grill enclosure in a
non-approved location or using non-approved construction materials.
Do NOT use combustible materials for built-in construction.
Acceptable building materials (non-combustible):
• Brick
• Cinder block
• Steel framing
• Hardiboard
• Granite
• Tile
• Glass brick
• Concrete
• Cement
• Stucco
• Stone
9
Unacceptable building materials (combustible or heat-sensitive):
• Wood of any type
• Laminate or synthetic materials
• Plastics
• Linoleum
• Fiberglass
Avoid materials that may deteriorate or warp due to heat or weather, such as drywall or plaster.
Distance of Product From Wall
Maintain the specied minimum clearances between the grill and combustible construction on the
sides and back of the outdoor cooking appliance. The grill must also not be installed under over-
head combustible construction.
10
11
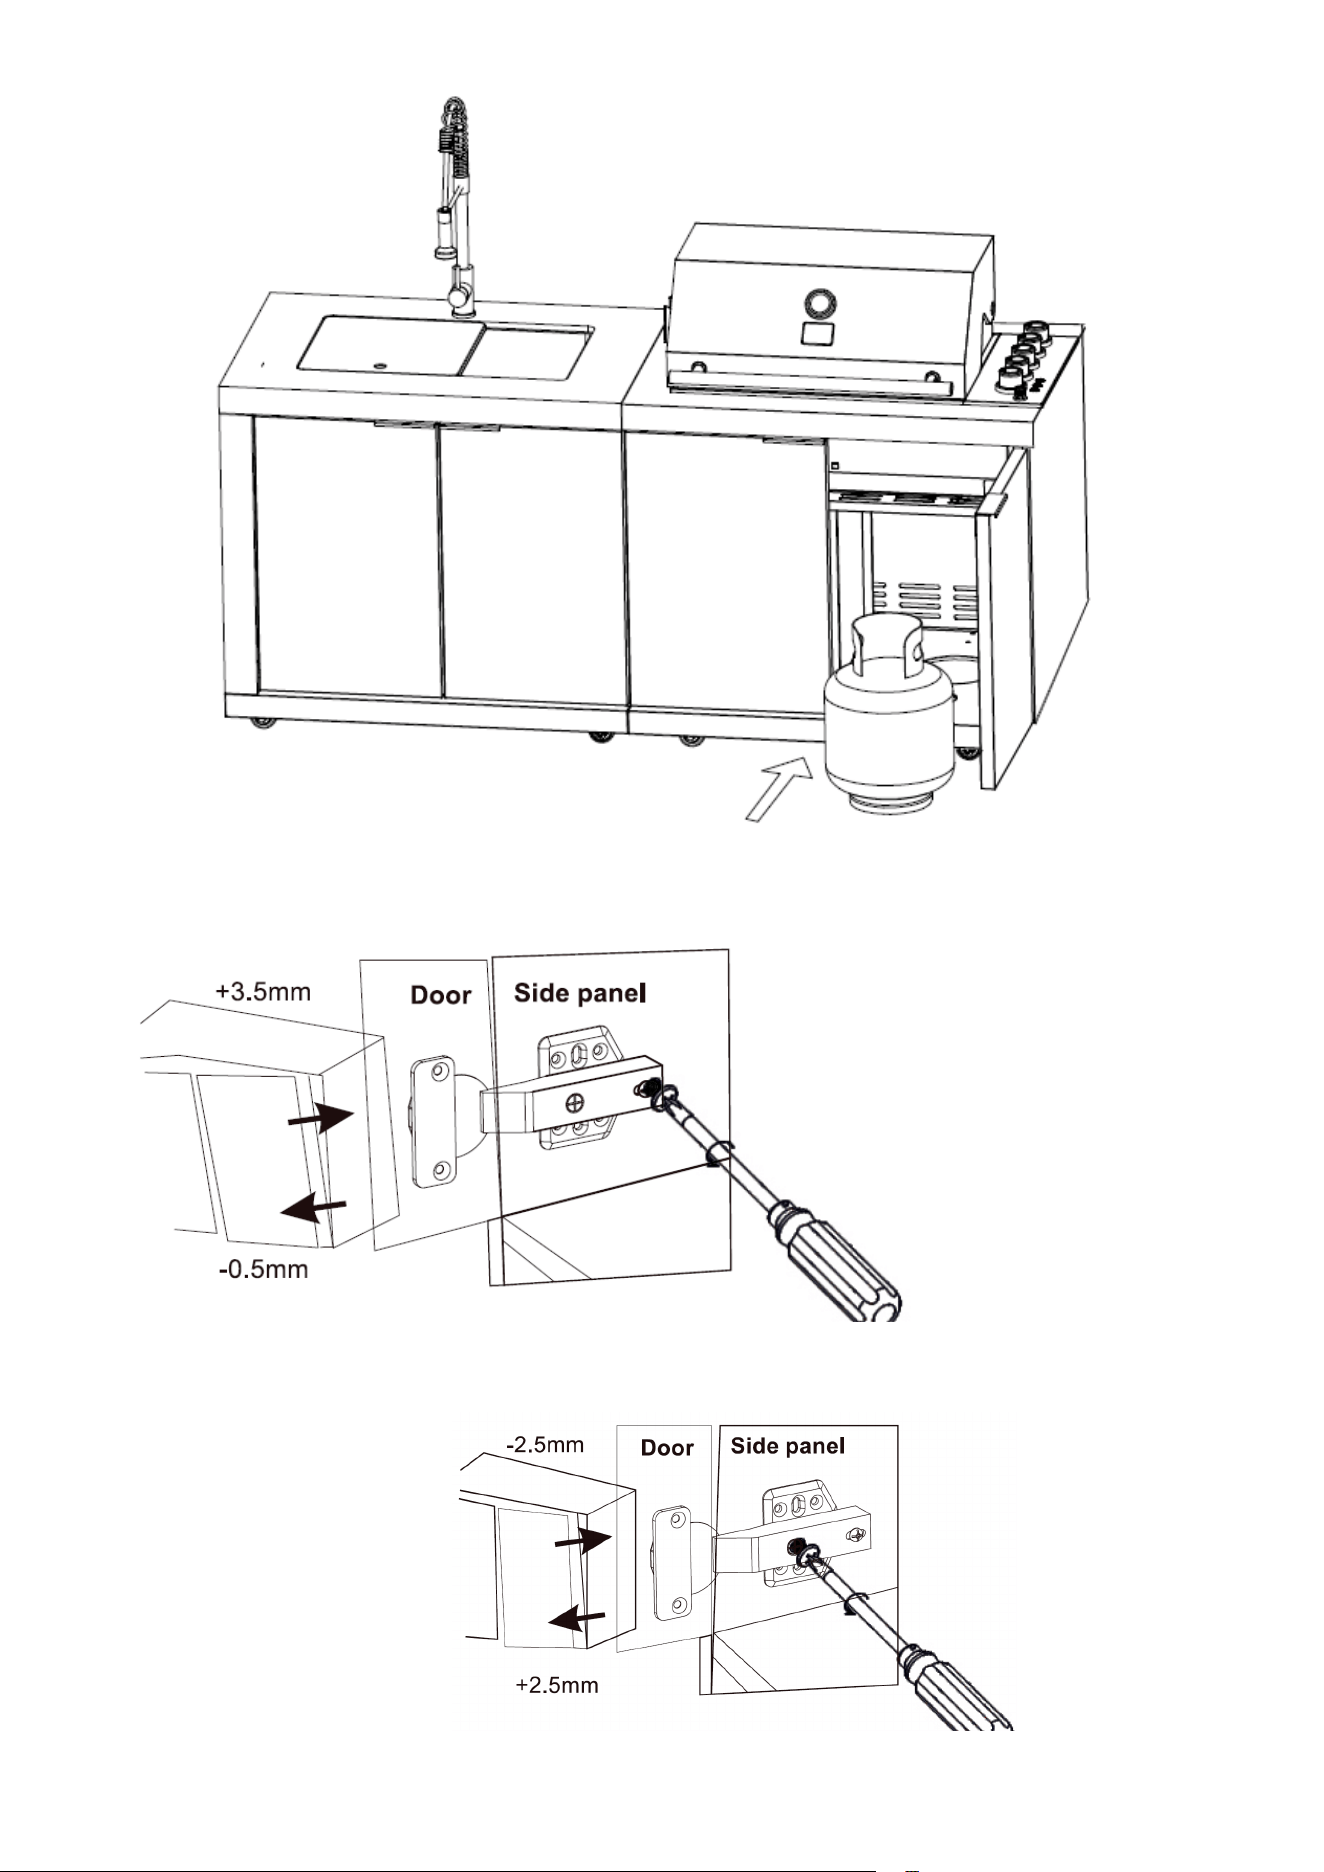
Adjustment of Door Hinge
1. Left and right adjustment.
2. Depth adjustment.
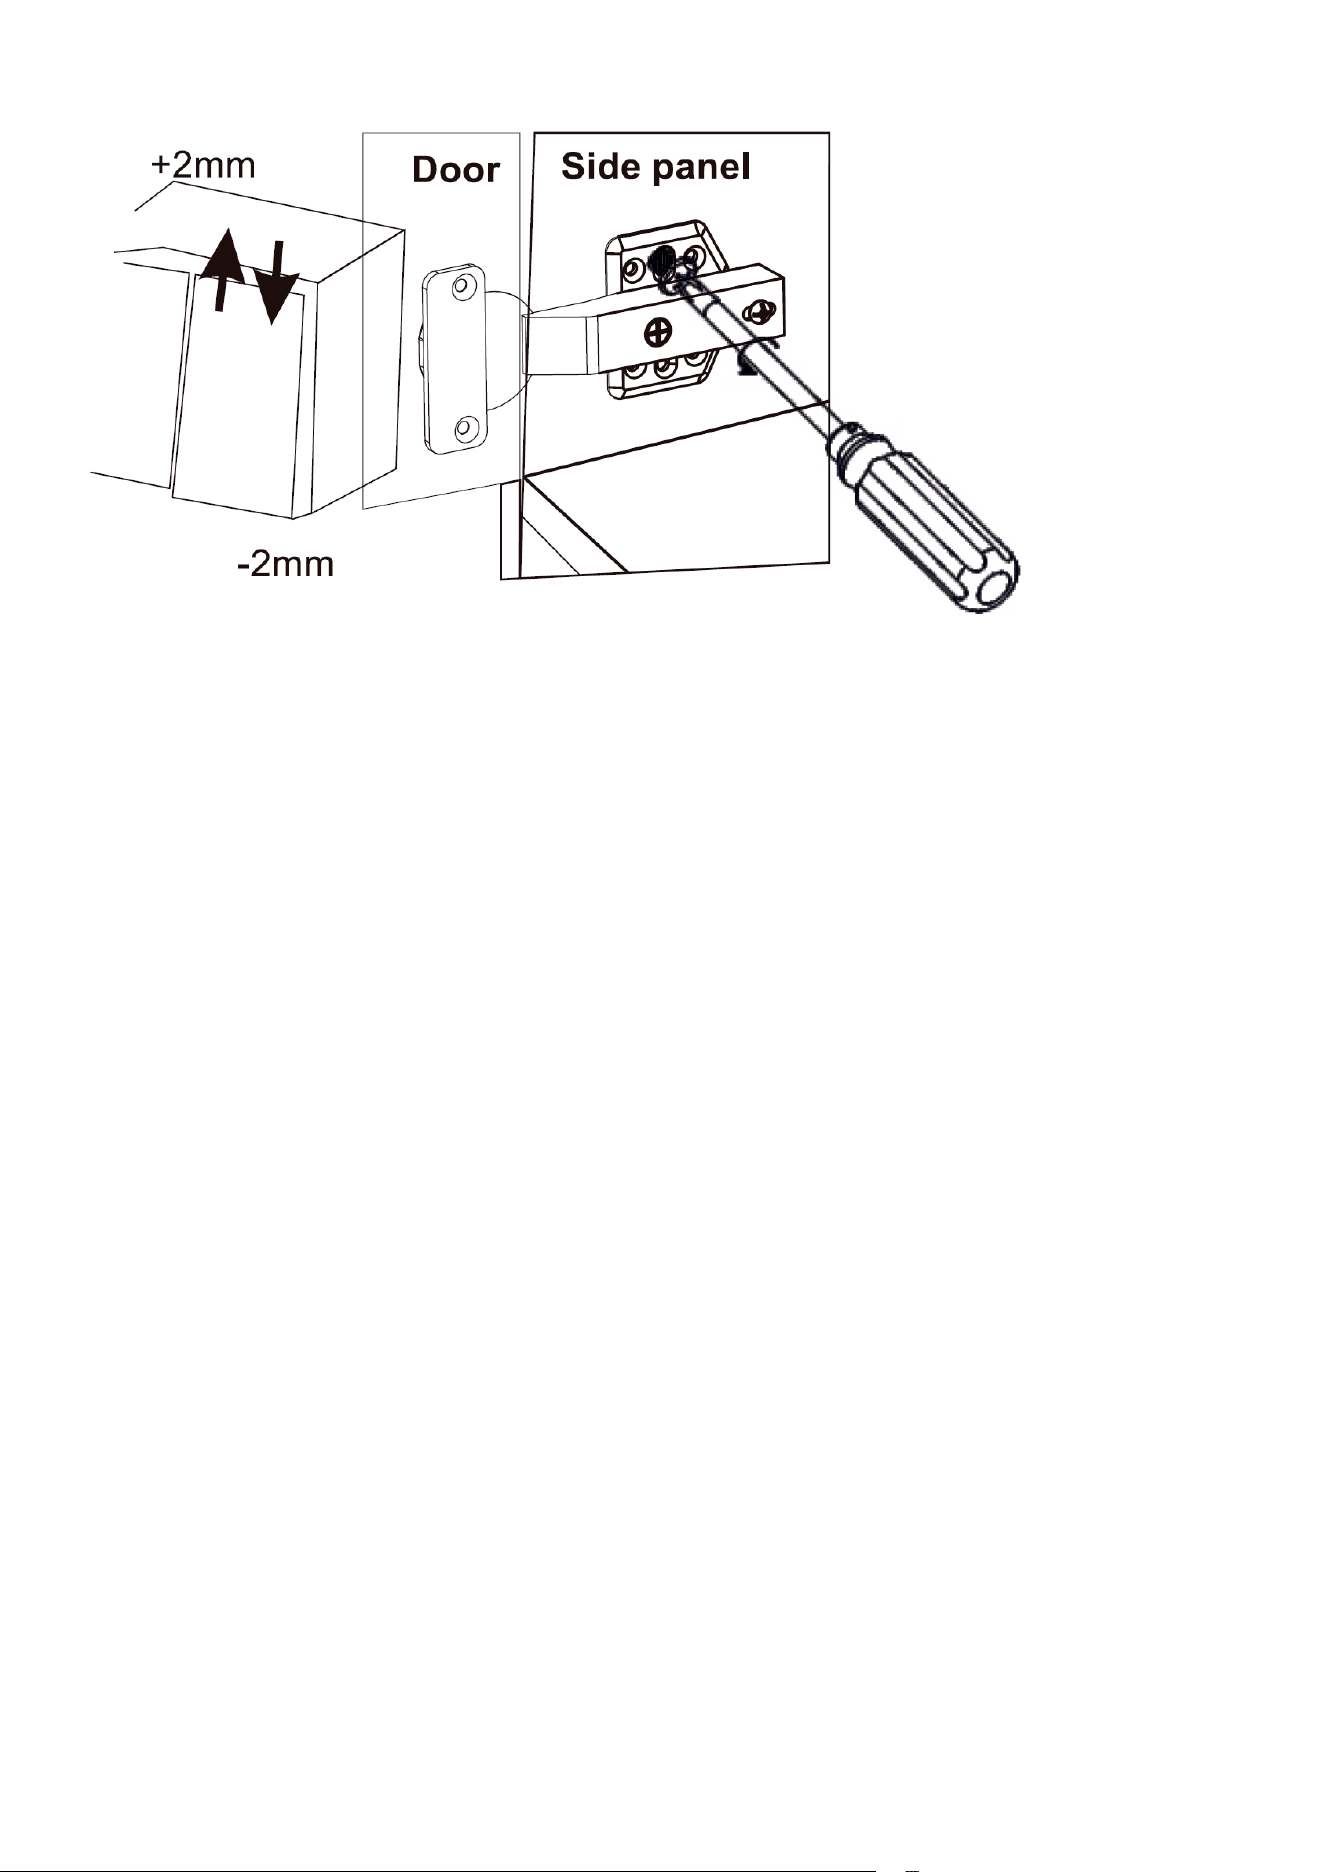
12
3. Up and down adjustment.

13
Specification
Model Information
Model No: KM-OKS-3585
Gas Type: Liquid Propane (LP)
Main Burner Input Rate: 12,000 BTU/hr (per burner)
LP Orice Size: 1.02 mm
Natural Gas (NG) Orice Size: 1.4 mm
Total Input Rate: 48,000 BTU/hr
CSA/ANSI Z21.58-22 CSA
1.6-22
Outdoor Cooking Gas
Appliance
Clearance Requirements
Minimum clearance from combustible construction:
• 36 inches from the sides
• 36 inches from the back
WARNING:
Do not install or operate this appliance under any overhead combustible surface.
LP Gas Safety Warning
WARNING:
a. Do not store a spare LP gas cylinder under or near this appliance.
b. Never ll the LP gas cylinder beyond 80% capacity.
Failure to follow these instructions exactly may result in a re, explosion, or serious injury.
Electrical Information
Electrical Rating: 120V AC, 60Hz
• This appliance must be connected to a GFCI-protected outlet.
• Do not use extension cords unless absolutely necessary. If used, they must be outdoor-rated
(W-A), GFCI-protected, and properly grounded.
Gas Regulator Information
CAUTION:
Use only the gas pressure regulator supplied with this appliance.
The regulator is factory-set for an outlet pressure of 11 inches water column (W.C.).
• Turn off the LP gas supply at the cylinder when the appliance is not in use.
• This appliance is congured for LP gas and may be converted to natural gas using an approved
conversion kit.
Outdoor Use Notice
FOR OUTDOOR USE ONLY
If the appliance is stored indoors, the LP gas cylinder must be disconnected and stored outdoors
in a well-ventilated area.
14
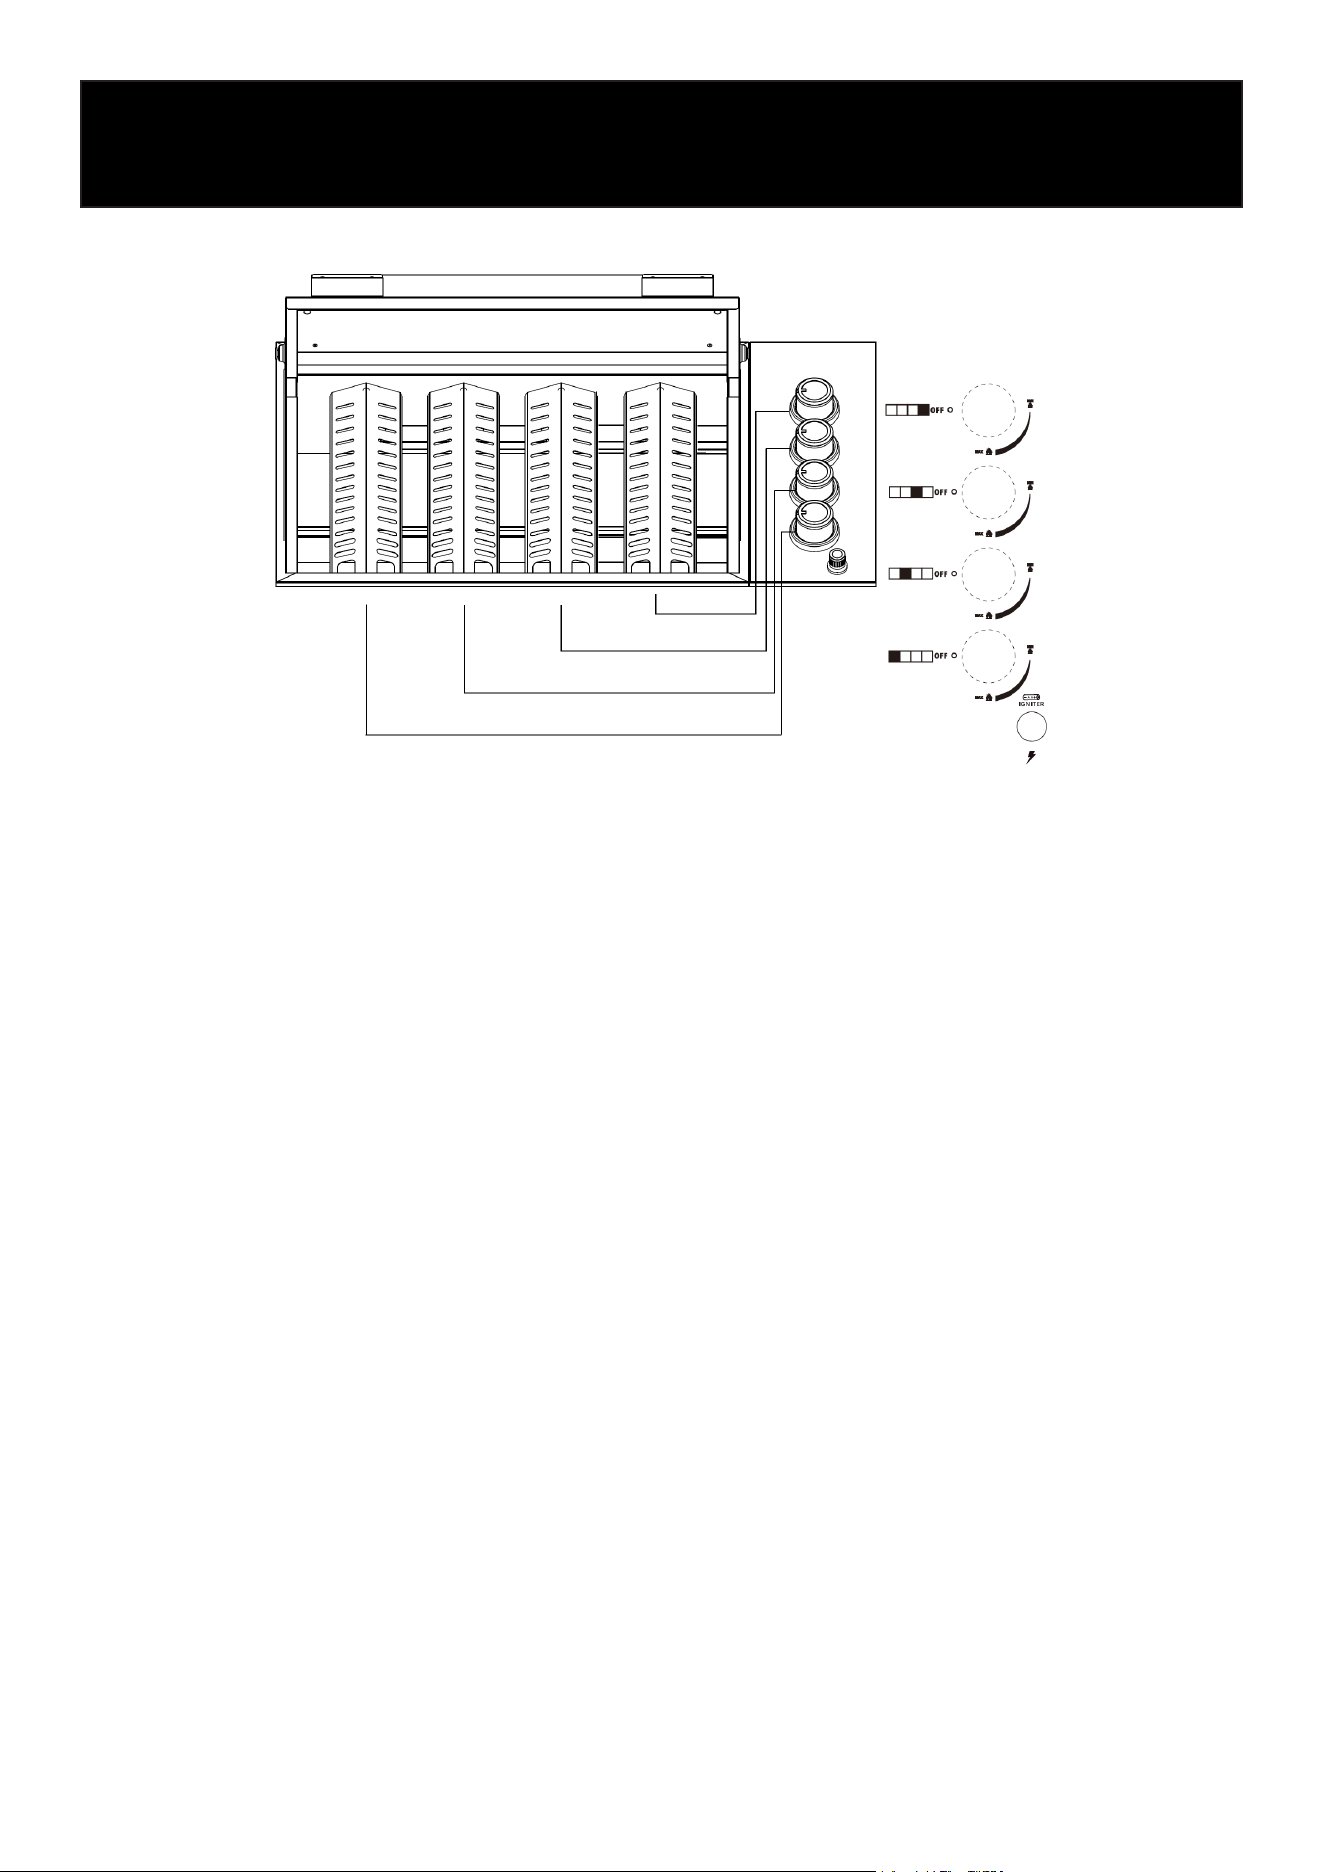
Control Panel Instruction
Operation
Lighting the Grill
Before Lighting
• Inspect the gas hose for cuts, wear, or abrasion. Replace if damaged.
• Keep the area around the grill clear of ammable materials.
• Ensure ventilation openings are free of obstructions.
• Keep propane cylinders, regulators, and hoses away from temperatures above 125°F (51°C).
• Make sure all burner control knobs are in the OFF position.
• Do not operate side or rear burners with their covers closed.
Electronic Ignition Lighting
1. Open the grill lid.
2. Push in and turn the control knob to the MAX position for 2–5 seconds, then turn it back to
OFF. This allows trapped air in the gas line to clear.
3. Push in and turn the control knob to MAX again. While holding the knob in, press the igniter
button for 2–5 seconds.
4. Once the burner ignites, release both the control knob and the igniter button.
5. If the burner does not ignite within 5 seconds, turn the control knob to OFF, wait 5 minutes, and
repeat Step 2.
6. Repeat the procedure for any additional burners.
Manual Shutdown
• To turn off the grill, rotate all control knobs to the OFF position.
• A popping sound when shutting off the burners is normal.
Important Safety Information
FOR OUTDOOR USE ONLY
• Turn off the LP gas supply at the cylinder when the grill is not in use.
• WARNING: Accessible parts may become very hot during operation. Keep young children away
from the appliance.
15
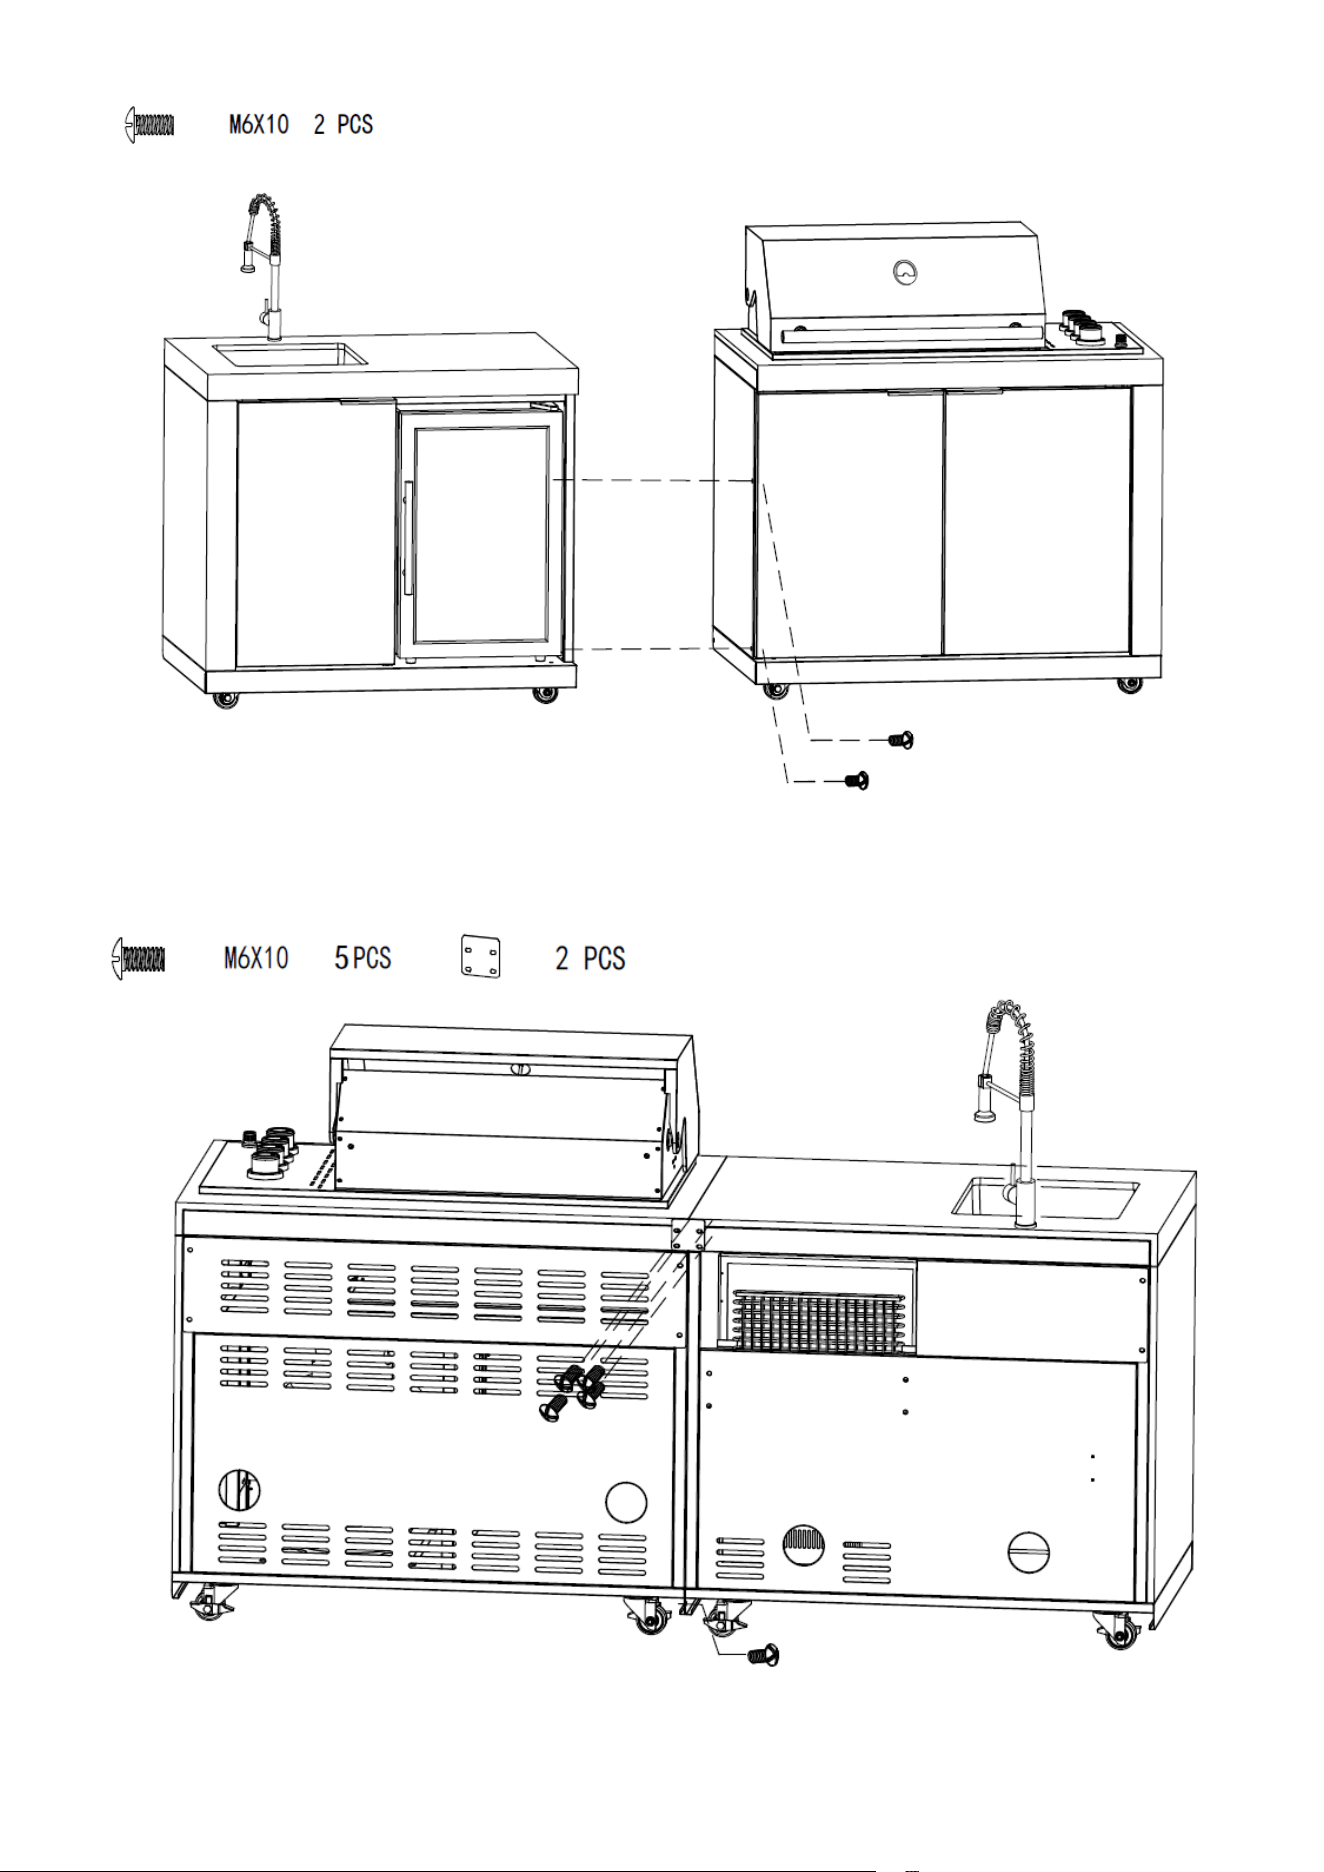
Connecting the Gas Line to the Grill
Connecting the Grill
Connect the gas line to the grill using the appropriate connection for your gas type.
Other gas cylinders may be acceptable for use with this appliance if they are compatible with the
cylinder retention system. Refer to the illustrations to ensure the cylinder is secured correctly and
that the points of contact between the cylinder and retention mechanism are correct.
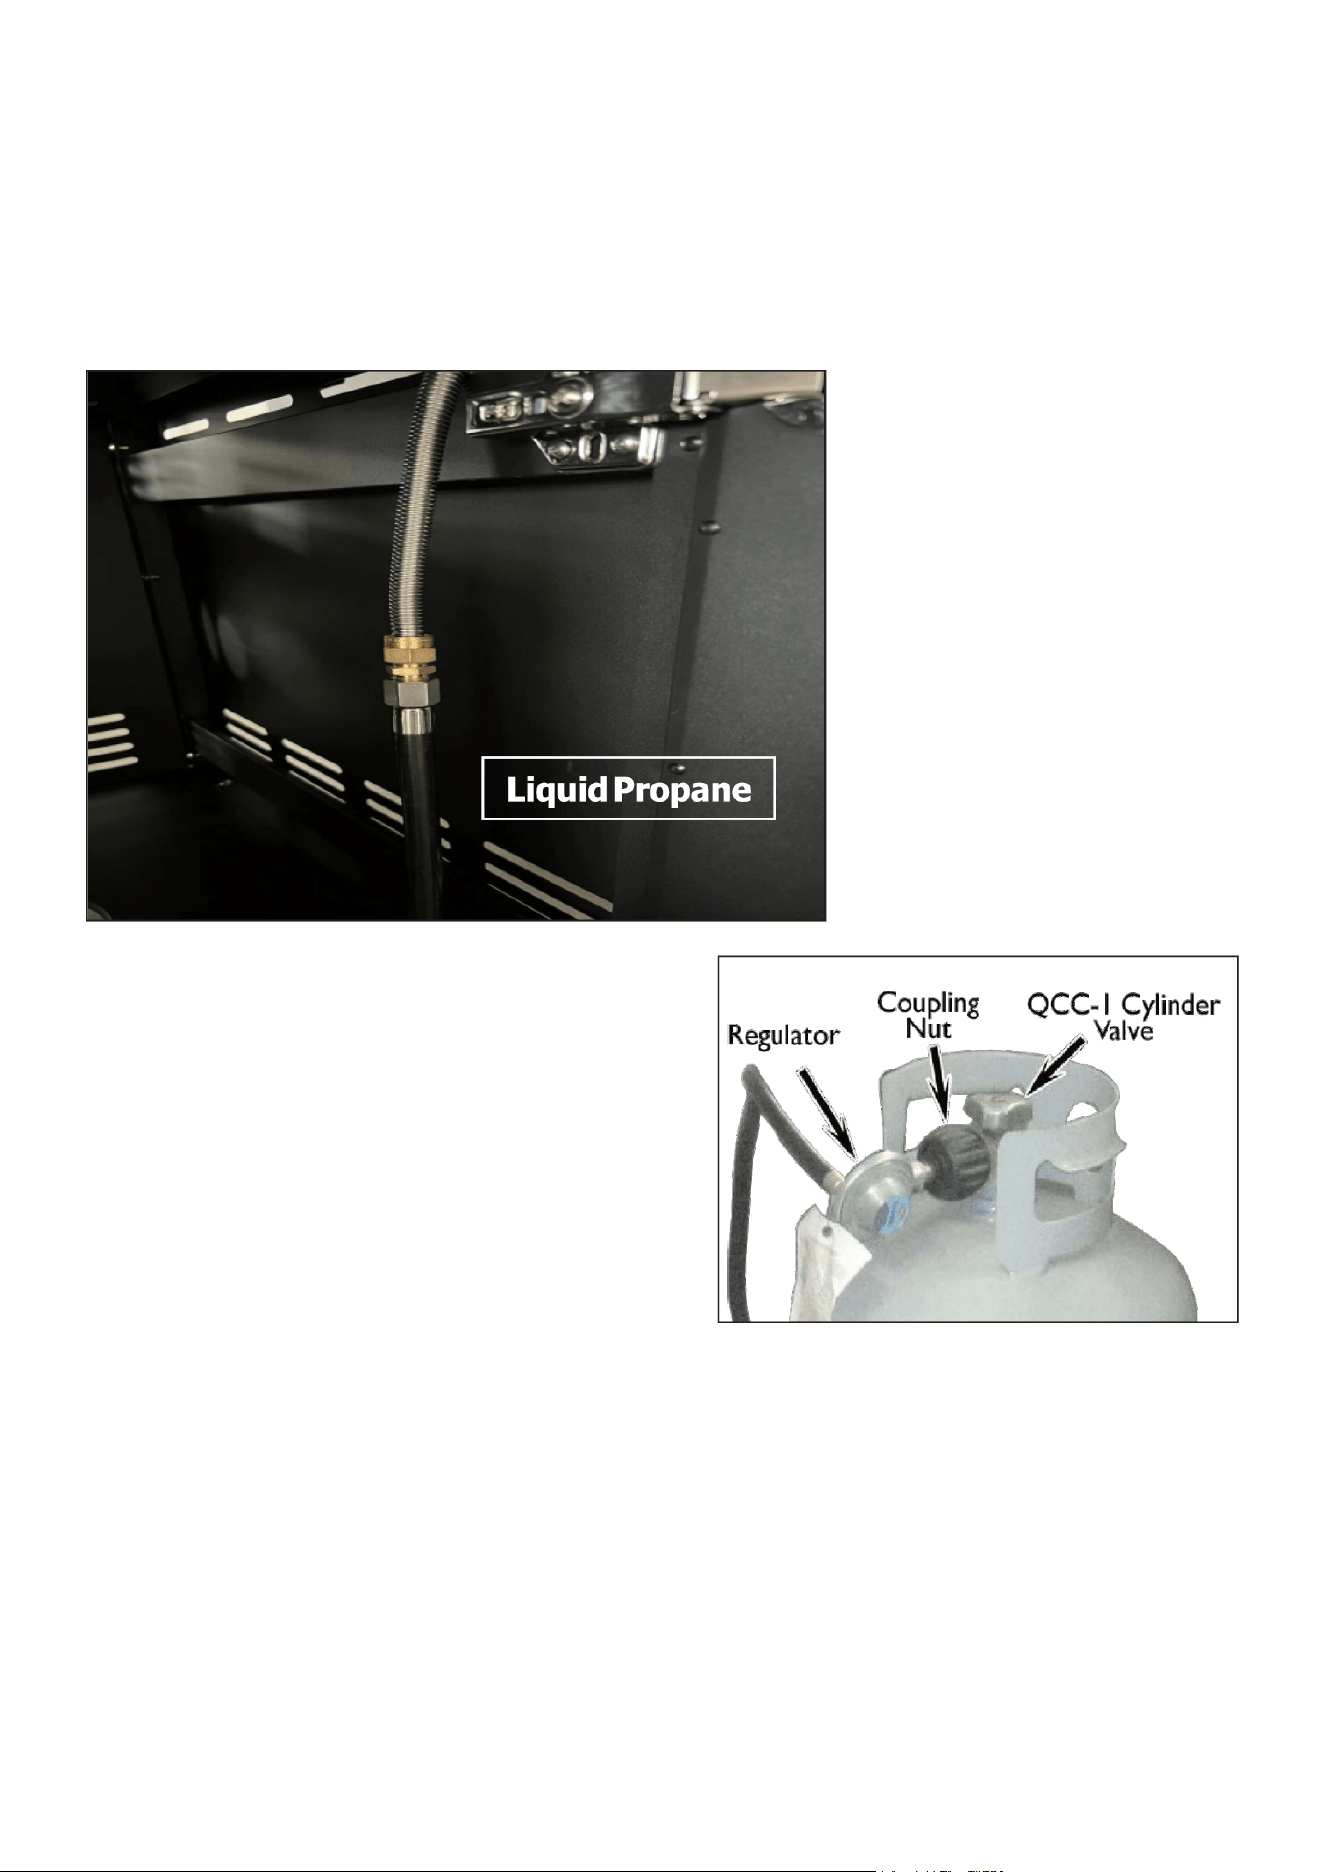
Connecting to a Gas Source
Liquid Propane (LP) Connection
• Use the pressure regulator and hose assembly
supplied with the grill, or an equivalent regulator
and hose with the exact specications.
• Replacement LP regulators and hoses must
include a coupling nut compatible with a QCC-1
LP cylinder valve on one end and a 3/8” tapered
female tting on the other end for connection to
the grill manifold.
• Connect the brass tting to the manifold inside the grill. Do not use Teon tape or pipe sealant.
• Do not remove the natural gas regulator from the manifold.
• Securely connect the coupling nut to the LP cylinder valve.
After completing the connection, perform a leak test before operating the grill.
Natural Gas (NG) Connection
• Connect the gas supply line to the NG stub located inside the barbecue island.
• Follow the instructions on Page 23 for proper natural gas connection.
After completing the connection, perform a leak test.

16
Leak Testing Procedure
Perform a leak test at least once per year, and any time the gas cylinder is replaced, disconnected,
or when any part of the gas system is serviced.
Always perform leak tests outdoors in a well-ventilated area.
Never smoke or use open ames during leak testing.
To Perform a Leak Test:
1. Prepare a leak-testing solution by mixing one part liquid dish soap with one part water in a
spray bottle.
2. Ensure all control knobs are in the OFF position.
3. Turn on the gas supply:
• For natural gas, open the main gas valve.
• For LP gas, turn the cylinder valve counterclockwise one full turn to open.
4. Spray the soapy solution on all gas connections and joints.
• Bubbles indicate a gas leak.
5. Stop any leaks by tightening connections or replacing defective parts with manufacturer-rec-
ommended components.
• Do not attempt to repair a damaged cylinder valve. Replace the cylinder immediately.
6. Turn all control knobs back to the OFF position.
If You Are Unable to Stop a Leak:
1. Turn all control knobs to OFF.
2. Shut off the gas supply and release pressure in the hose and manifold by pushing in and turn-
ing any control knob one-quarter turn counterclockwise.
3. For LP systems, remove the cylinder from the grill.
4. Contact an authorized gas appliance service technician or LP gas supplier.
Do not use the appliance until the leak has been fully corrected.
Using Your Grill
Before operating the grill, read all instructions carefully.
Before rst use, wash the entire grill with mild soap and water to remove manufacturing oils or
residues. Dry thoroughly.
Cover the grill when not in use to minimize dust, dirt, and weather exposure, and to extend the
appliance’s life.
Important Safety Reminders
• Use the grill only for its intended purpose.
• Never use charcoal in a gas grill.
• Do not heat sealed containers (such as cans or jars) on the grill. Pressure buildup may cause
them to explode.
• Never place ammable materials (paper, cloth, gasoline, or lighter uid) on or near the grill,
including shelves or cabinets.
Basic Grill Operation
Before lighting the grill:
• Ensure all burner control knobs are in the OFF position.
17
• Do not attempt to light the grill if you smell gas.
• After connecting the hose, check all connections with a soap-and-water solution.
1. Ensure the drip tray is installed correctly.
2. Light the grill according to the lighting instructions provided previously.
3. Turn the control knob to HIGH and preheat the grill for 15 minutes with the lid closed.
4. Place food on the grill and cook as desired. Adjust heat as needed.
5. Allow the grill to cool and clean the drip tray after each use.
Do not leave the grill unattended while it is in use.
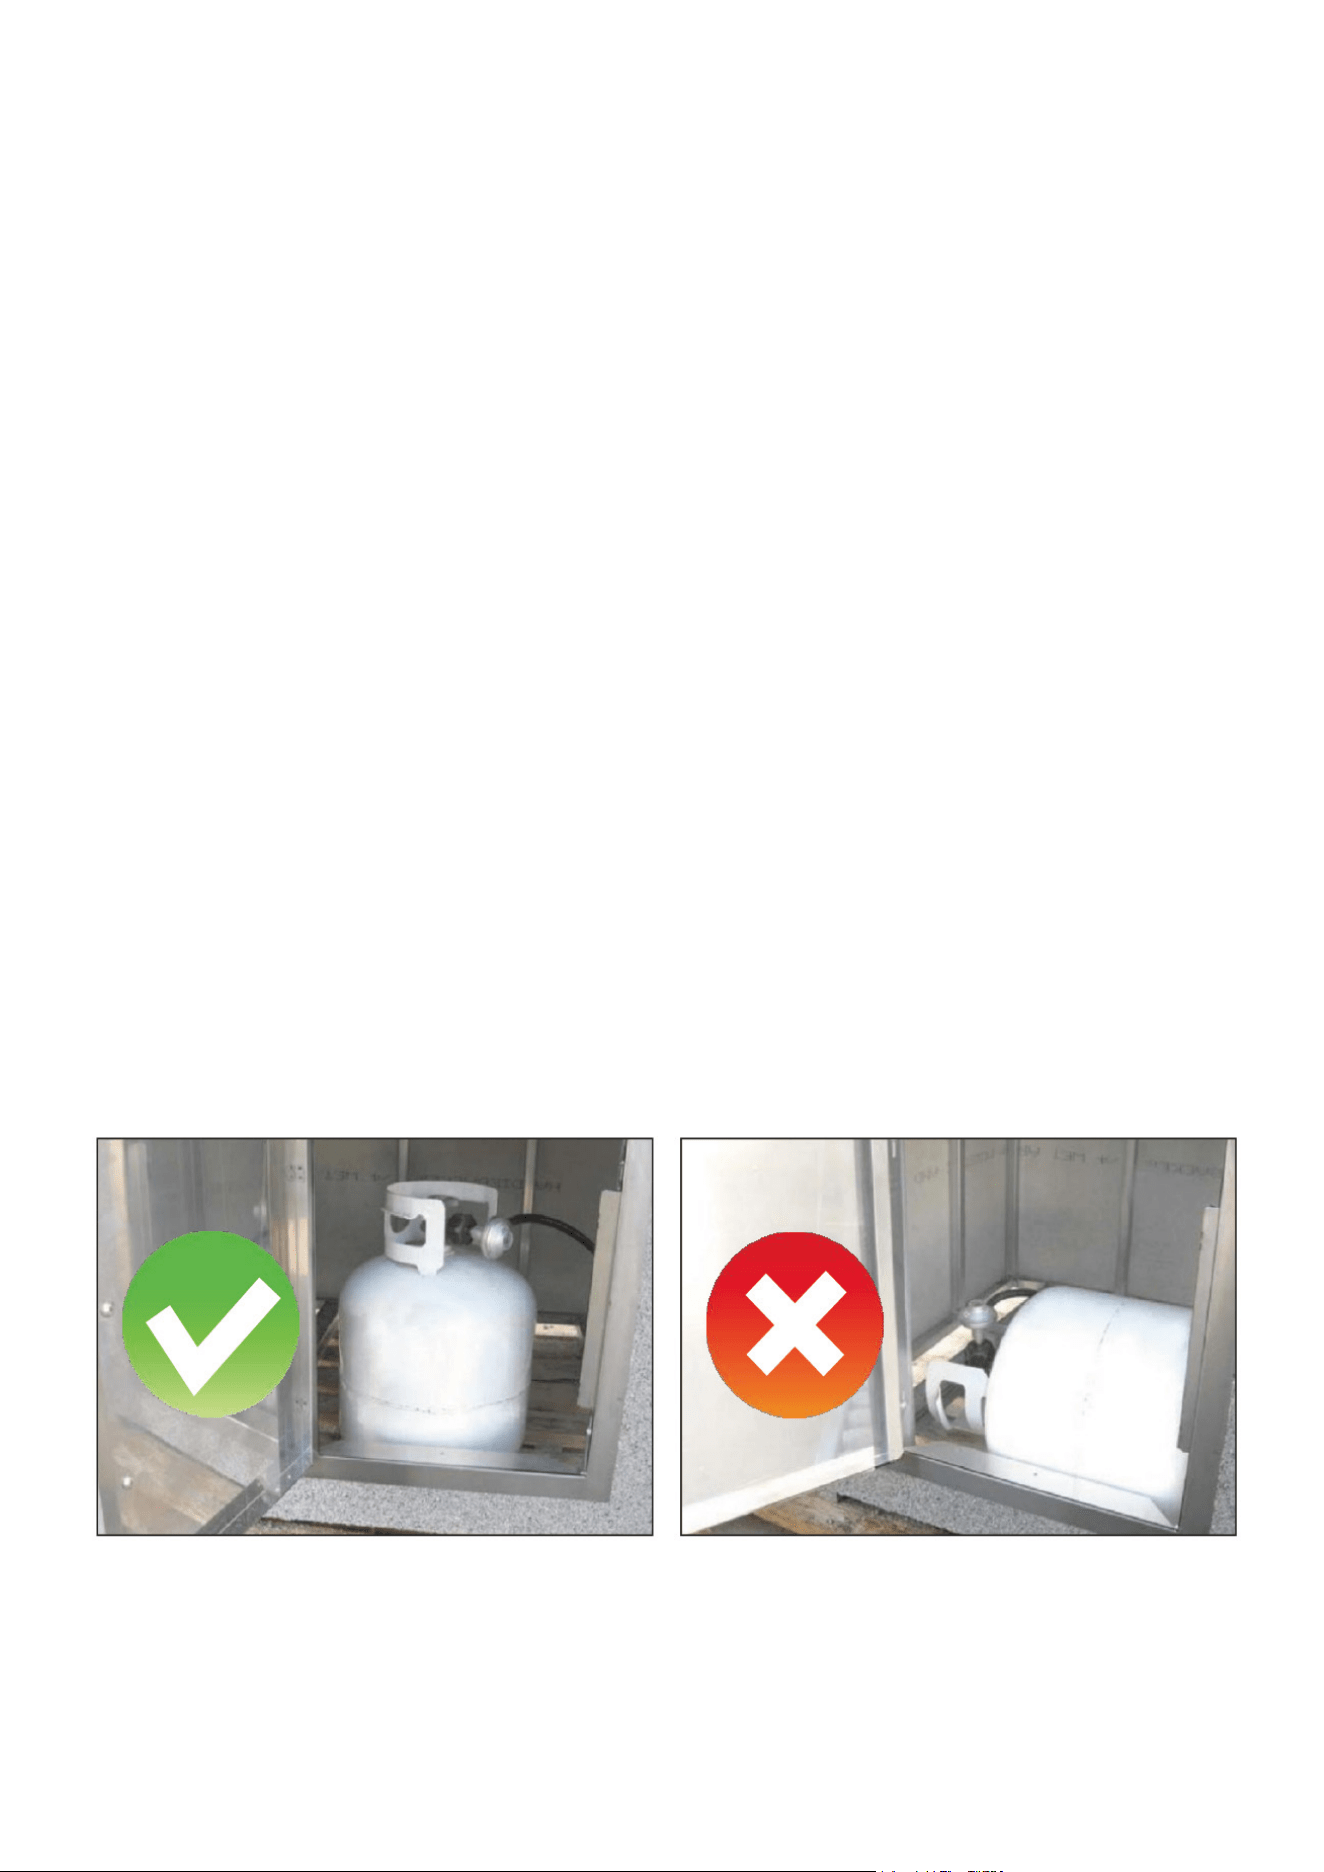
Gas Cylinder Orientation
The LP gas cylinder must remain upright during operation to allow proper vapor withdrawal. Op-
erating the grill with the cylinder on its side may allow liquid gas to enter the regulator, causing
erratic ames, are-ups, or explosions.
Warnings & Cautions
WARNING:
Do not use matches or cigarette lighters for lighting procedures. Severe burns may occur and light-
ers can explode.
WARNING:
Do not cover the entire cooking surface with griddles or pans. Trapped heat may cause overheat-
ing and improper burner operation.
CAUTION:
Do not spray water on a hot gas unit. Sudden cooling may damage porcelain or cast-iron compo-
nents.

18
Cleaning and General Maintenance
To ensure safe operation and long service life, follow these maintenance instructions carefully.
Clean the interior components of the grill regularly based on frequency of use and the types of
food cooked. The entire grill should be thoroughly cleaned at least once per year.
Always keep the area surrounding the grill clear of combustible materials, gasoline, and other
ammable liquids or vapors. Do not obstruct the airow required for proper combustion and venti-
lation.
Before cleaning any part of the grill, disconnect the electrical power supply.
These instructions apply to grills and barbecue islands with stainless steel components.
Although stainless steel resists rust and corrosion better than ordinary steel, it is not rust-proof.
Regular cleaning and periodic protection are necessary to maintain its appearance and prevent
corrosion.
For best results, clean the grill shortly after cooking, once it has cooled enough to handle safely.
This helps prevent grease buildup, reduces re risk, and keeps the grill looking its best.
Stainless Steel Care and Cleaning
All exposed stainless steel surfaces require proper care to maintain their nish.
Basic Cleaning Steps
1. Clean
Use a sponge or soft cloth with warm water and mild dish soap to remove grease, food resi-
due, and stains. For heavier soil, products such as Formula 409 or Fantastik may be used.
2. Rinse
Rinse all surfaces thoroughly and dry completely with a clean towel. Do not allow stainless
steel to air-dry.
3. Polish
Apply a stainless steel surface protectant to all exposed stainless steel surfaces to help pre-
vent smudging, stains, and corrosion.
Approved and Prohibited Cleaning Products
DO NOT USE the following, as they may damage stainless steel surfaces:
• CLR
• Lime-Away
• Oven cleaner
• Abrasive cleansers (Ajax®, Comet®, etc.)
Maintenance

19
• Ammonia
• Bleach or chlorine
• Steel wool pads
• Wire brushes
• Scrapers
• Pumice
Recommended Cleaning Products
• Mild dish detergent (such as Dawn®)
• Formula 409®
• Fantastik®
• Instant Rust Out® (exterior surfaces only)
• WD-40® (exterior surfaces only)
• Sheila Shine® (exterior surfaces only)
Baking soda, lemon oil, olive oil, vinegar, or club soda may also be effective for removing light soil.
Do not use steel wool or wire brushes on stainless steel surfaces.
For light soil, use a soft cloth or sponge. For heavier buildup, a Scotch-Brite® pad may be used
with caution.
Apply WD-40 or Sheila Shine to a paper towel (not directly to the grill), then wipe in the direction of
the grain. Buff with a clean cloth until dry. A slight residue is acceptable.
WARNING:
Do not use Instant Rust Out, WD-40, or Sheila Shine on food-contact surfaces or near food prepa-
ration areas.
Do not spray these products near open ames—they are highly ammable in aerosol form.
Rust Removal
Stainless steel may rust if not properly maintained, especially in coastal or high-humidity environ-
ments. Salt accelerates corrosion, so frequent cleaning is essential.
Recommended Rust Removal Methods
Method 1: Instant Rust Out (Exterior Only)
Spray the affected areas and allow the solution to sit for approximately 30 seconds. Wipe clean
with a cloth. Rinse with water, dry thoroughly, then apply WD-40 or Sheila Shine as a protective
coating.
Method 2: WD-40 or Sheila Shine (Exterior Only)
Spray the surface lightly with the cloth and wipe it clean. For heavier rust, a Scotch-Brite pad may
be used carefully.
CAUTION:
Do not use nitric acid (aqua fortis). It is highly corrosive and may cause injury or damage to stain-
less steel surfaces.

20
Cleaning the Interior of the Grill
1. Clean interior surfaces with warm water, mild dish soap, and a soft cloth or sponge.
2. Rinse and dry thoroughly. Do not allow water to collect or puddle. Standing water may cause
corrosion.
3. Cooking racks, ame tamers, and avor bars can be removed for cleaning and are dishwasher
safe.
Burner Maintenance
Spiders and insects may nest in burner tubes, restricting gas ow and causing ashback res.
Important:
Before servicing burners, turn all control knobs to the OFF position, shut off the gas supply, and
disconnect the fuel line.
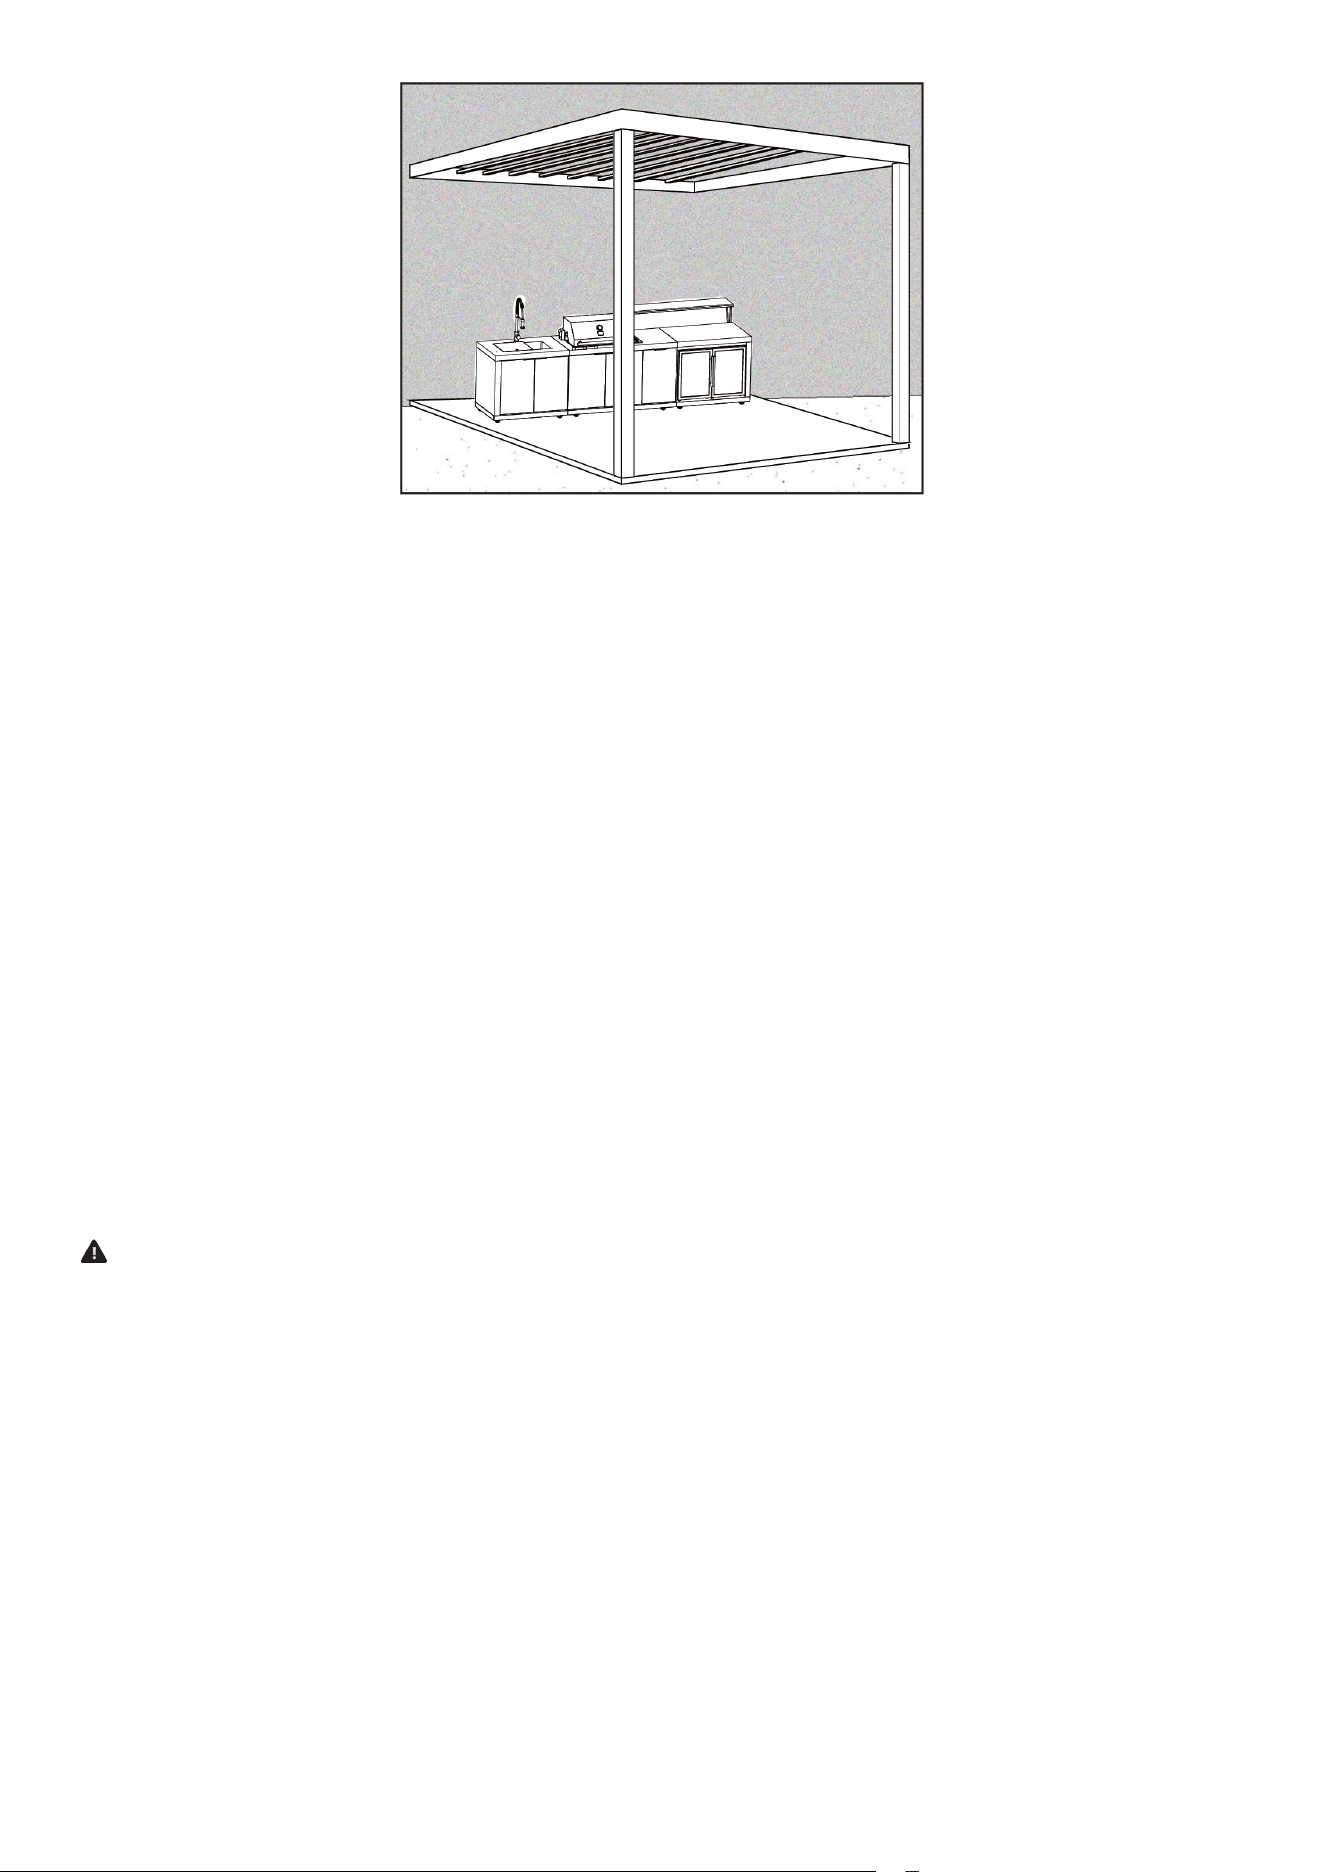
To clean burners:
• Remove locking pins located beneath the grill toward the back.
• Lift burners out carefully, away from the gas valve orices.
• Clean burner exteriors with a wire brush.
• Clear clogged ports using a stiff wire (such as an open paper clip).
• Inspect burners for cracks or damage. Replace damaged burners immediately.
Reinstall burners securely. Locking pins do not need replacement.
Cooking Grates
Clean cooking grates with hot water and detergent. A stiff brush or steel wool may be used only on
cooking grates or griddles, not on other stainless steel surfaces.
Drip Pan
The full-width drip pan collects grease and should be cleaned after each use.
Allow the pan to cool completely before cleaning. Wash with warm, soapy water and rinse thor-
oughly.
Steam Cleaning
Steam cleaning the grill interior is an effective method that does not void the warranty. Portable
steam cleaners may be used on most grill components, including burners.
After steam cleaning, wipe all surfaces dry. If burners become wet, ignite them and allow them to
burn for approximately 10 minutes to remove moisture.
Covering Your Grill
After the grill has completely cooled, cover it with the included full-length, zippered weather cover.
Using the cover helps protect the grill from weather exposure and environmental contaminants.
Never cover the grill while it is hot.

21
Problem: Plugged Orice
Solution: If a burner orice becomes blocked, clear it as follows:
1. Remove the cooking grates, ame tamers, and grease tray.
2. From beneath the burner peg, remove the locking pin using a standard screwdriver or
needle-nose pliers.
3. Carefully lift each burner upward and away from the gas orice.
4. Remove the orice from the control valve.
5. Gently clear any obstruction using a ne wire.
6. Reinstall the orice.
7. Reposition the burners over the orices, ensuring each burner peg is properly seated in
the position hole at the bottom ledge of the rebox.
8. Reinstall the ame tamers, cooking grates, and grease tray.
Note: If you suspect an obstruction inside the control valve, do not attempt to repair it.
Contact your authorized dealer for assistance.
Problem: Igniter Misaligned or Not Sparking
Solution:
Troubleshooting
Perform the following checks:
• Verify that the electrode tip is positioned correctly, pointing forward toward the front
of the burner, and is clean and free of grease.
• Ensure the ignition wire is rmly connected to both the igniter and the electrode. Re-
place the wire if it is frayed or cracked.
• With the gas supply turned OFF and all control knobs in the OFF position, test each
igniter individually:
• Push the control knob entirely inward and rotate it approximately ¼ turn counter-
clockwise until you hear a click.
• A blue spark should be visible at the electrode tip.
• Return the control knob to OFF before testing the next igniter.
Important: If the grill was recently in use, wait at least 5 minutes before attempting to
relight. This allows any accumulated gas to dissipate.
If the igniter still fails to operate after completing these steps, contact your authorized
dealer for service.
Problem: Flashback (Fire Inside Burner Tubes)
Solution: If ames appear inside or around the burner tubes:
1. Immediately turn off the gas supply at its source.
2. Turn all control knobs clockwise to the OFF position.
3. Allow the grill to cool completely.
4. Remove the cooking grates, ame tamers, and grease tray.
5. Clean the burner tubes and burners thoroughly as described in the maintenance sec-
tion of this manual.
22
Fuel Type Conversion
THIS CONVERSION MUST BE PERFORMED BY A QUALIFIED GAS TECHNICIAN ONLY.
Fuel Type Conversion (LP to Natural Gas)
IMPORTANT SAFETY INFORMATION
• This grill is factory-congured for Liquid Propane (LP).
• Natural gas (NG) conversion must be performed by a qualied gas technician only.
• Do NOT attempt to convert this grill yourself. Improper conversion may result in gas leaks, res,
explosions, serious injuries, or deaths.
• If you smell gas, hear unusual noises, or notice abnormal operation after conversion, immedi-
ately shut off the gas supply and discontinue use until the appliance is inspected and repaired
by a qualied technician.
Before You Begin
• Ensure the grill has been properly converted for natural gas before connecting it to an NG sup-
ply.
• When converted to natural gas, replace the LP gas label with the supplied NG gas label.
• For mobile appliances connected to a xed gas supply with a exible hose, a restraining chain
or tether of adequate strength must be installed.
• The tether must be secured to both the appliance and the wall within 2 inches of each con-
nection point.
• The tether length must not exceed 80% of the hose length.
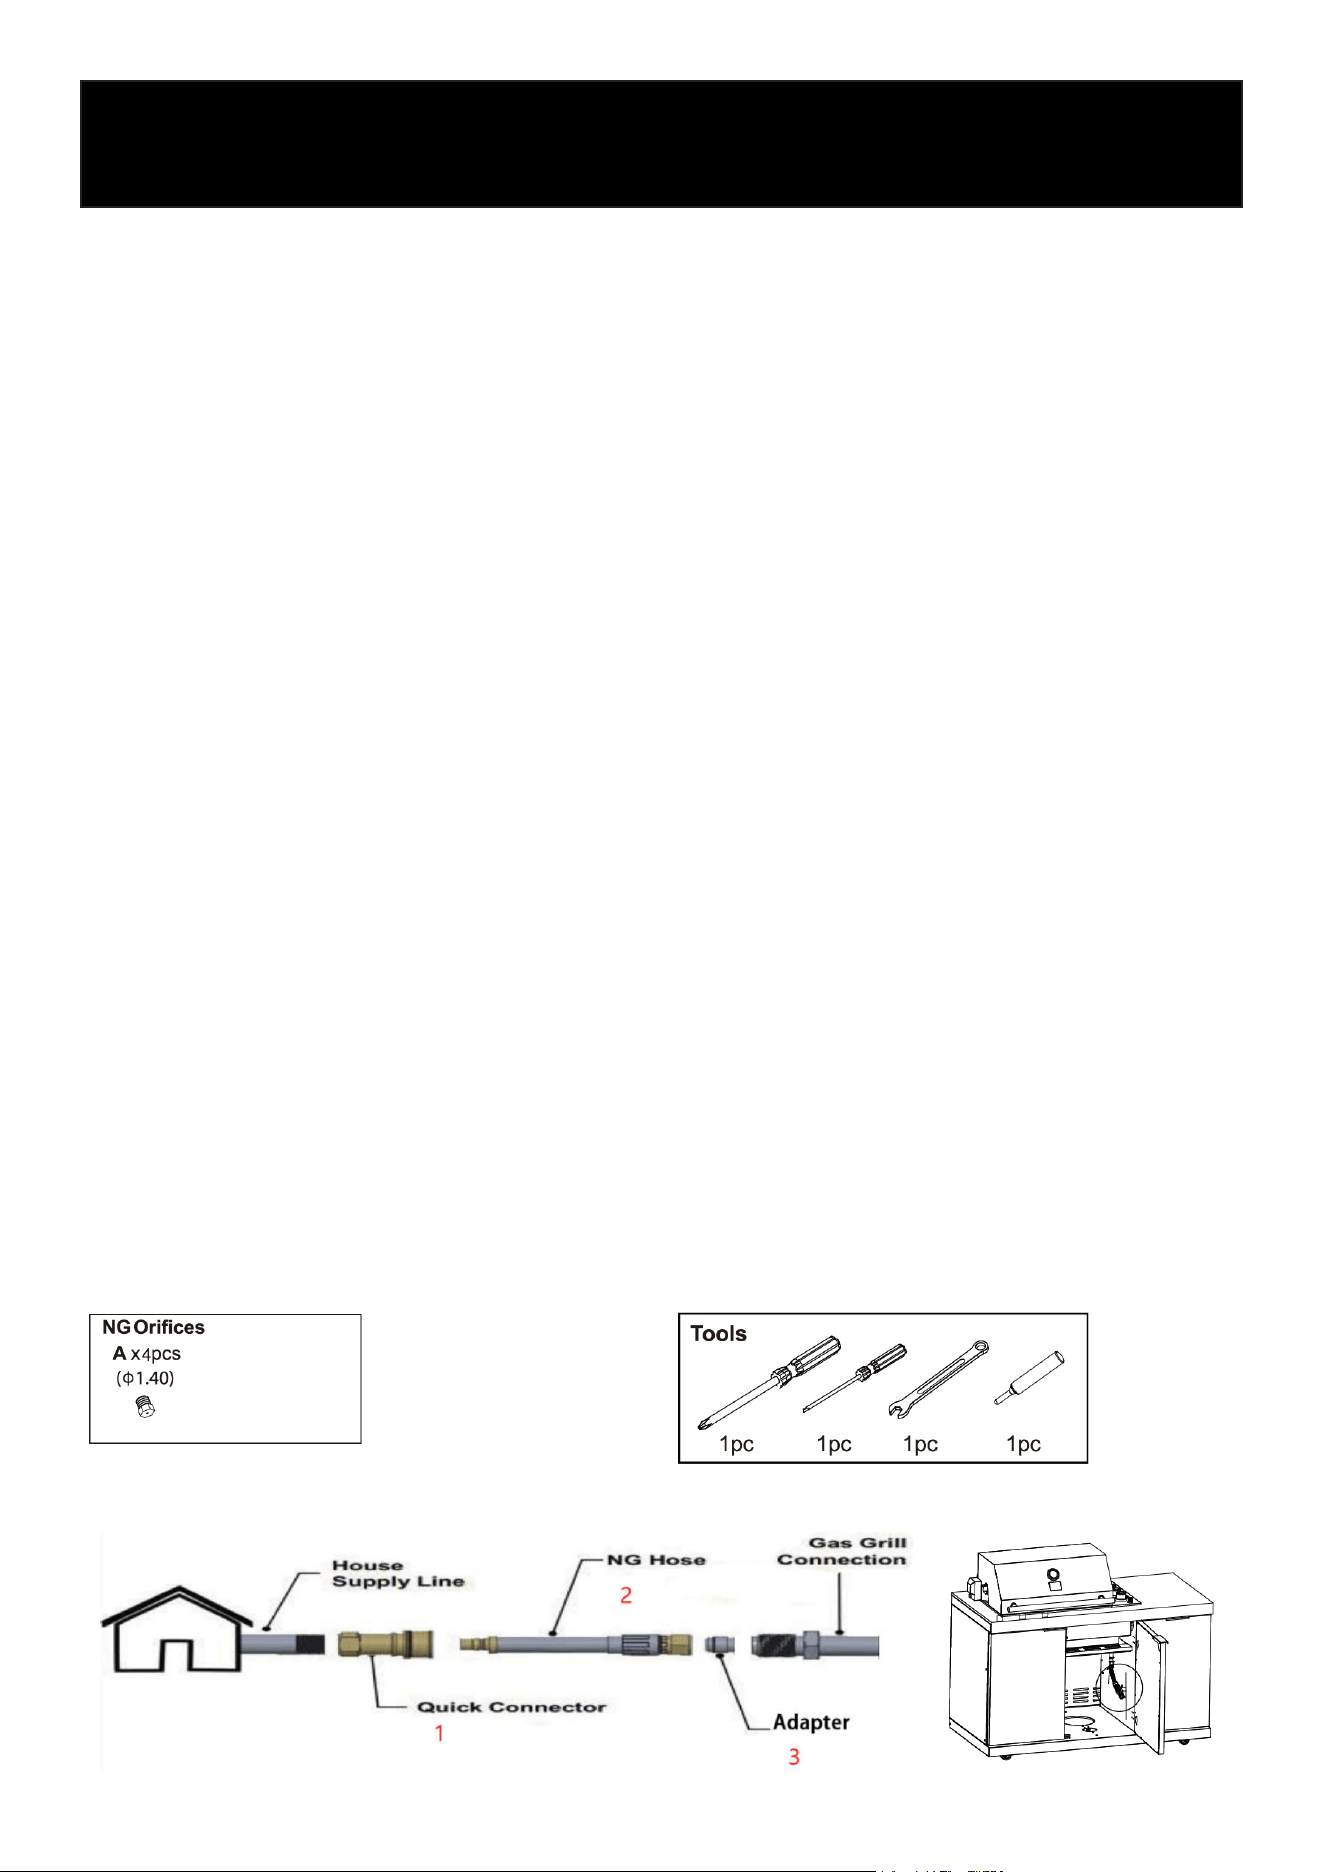
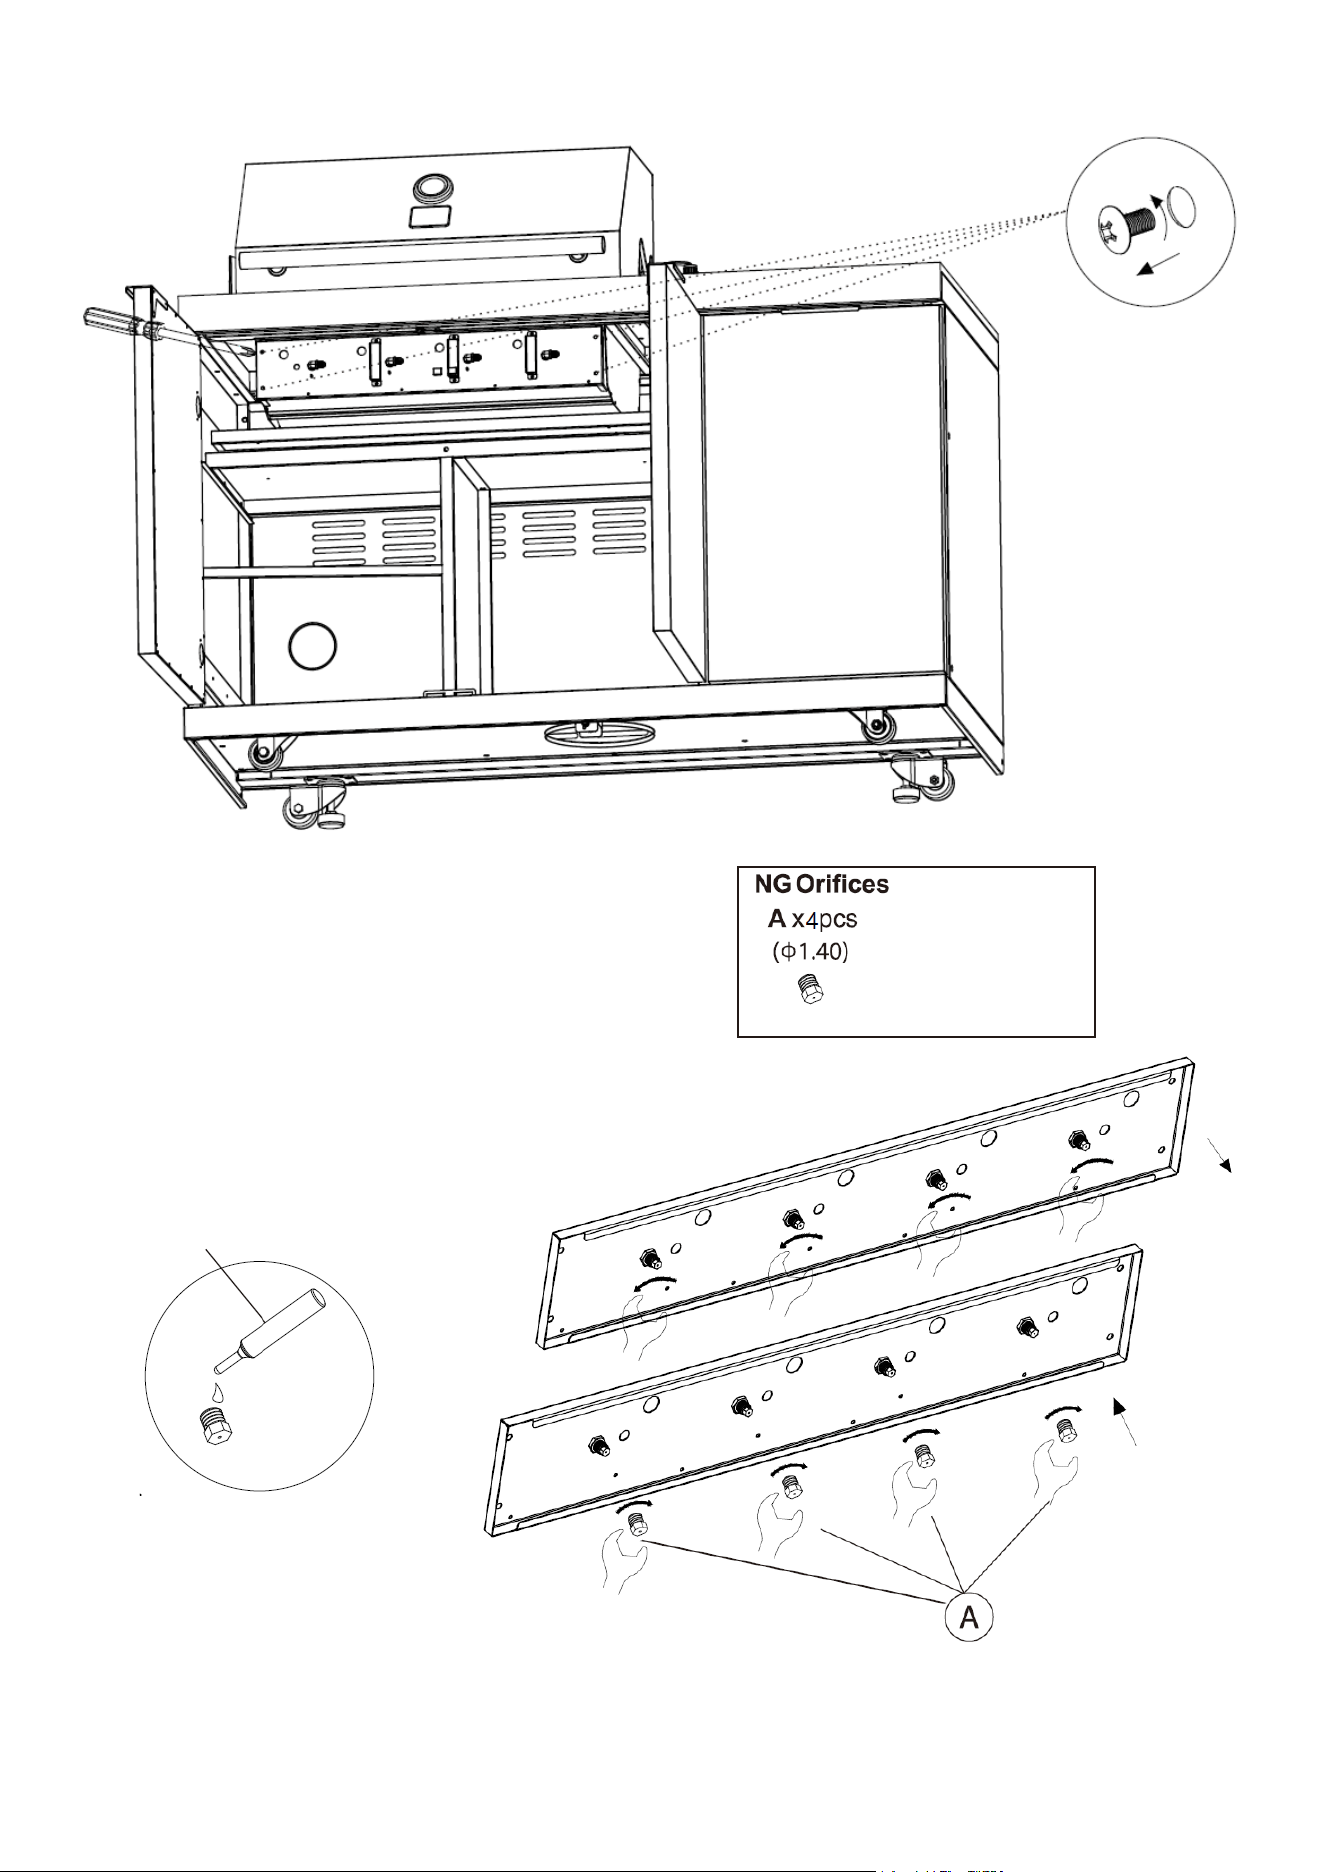
Parts and Tools Required
Included with Conversion Kit
• Natural gas orices (Ø 1.40 mm, 4 pcs – main burners)
• Anaerobic thread sealant
Tools (Included)
• 7 mm nut driver
• Flat-head screwdriver
• Phillips screwdriver
Customer-Supplied Accessories
• 10 ft (3.0 m) natural gas hose
• 4” water column natural gas regulator with
hose
Tools will be needed for gas conversion
23
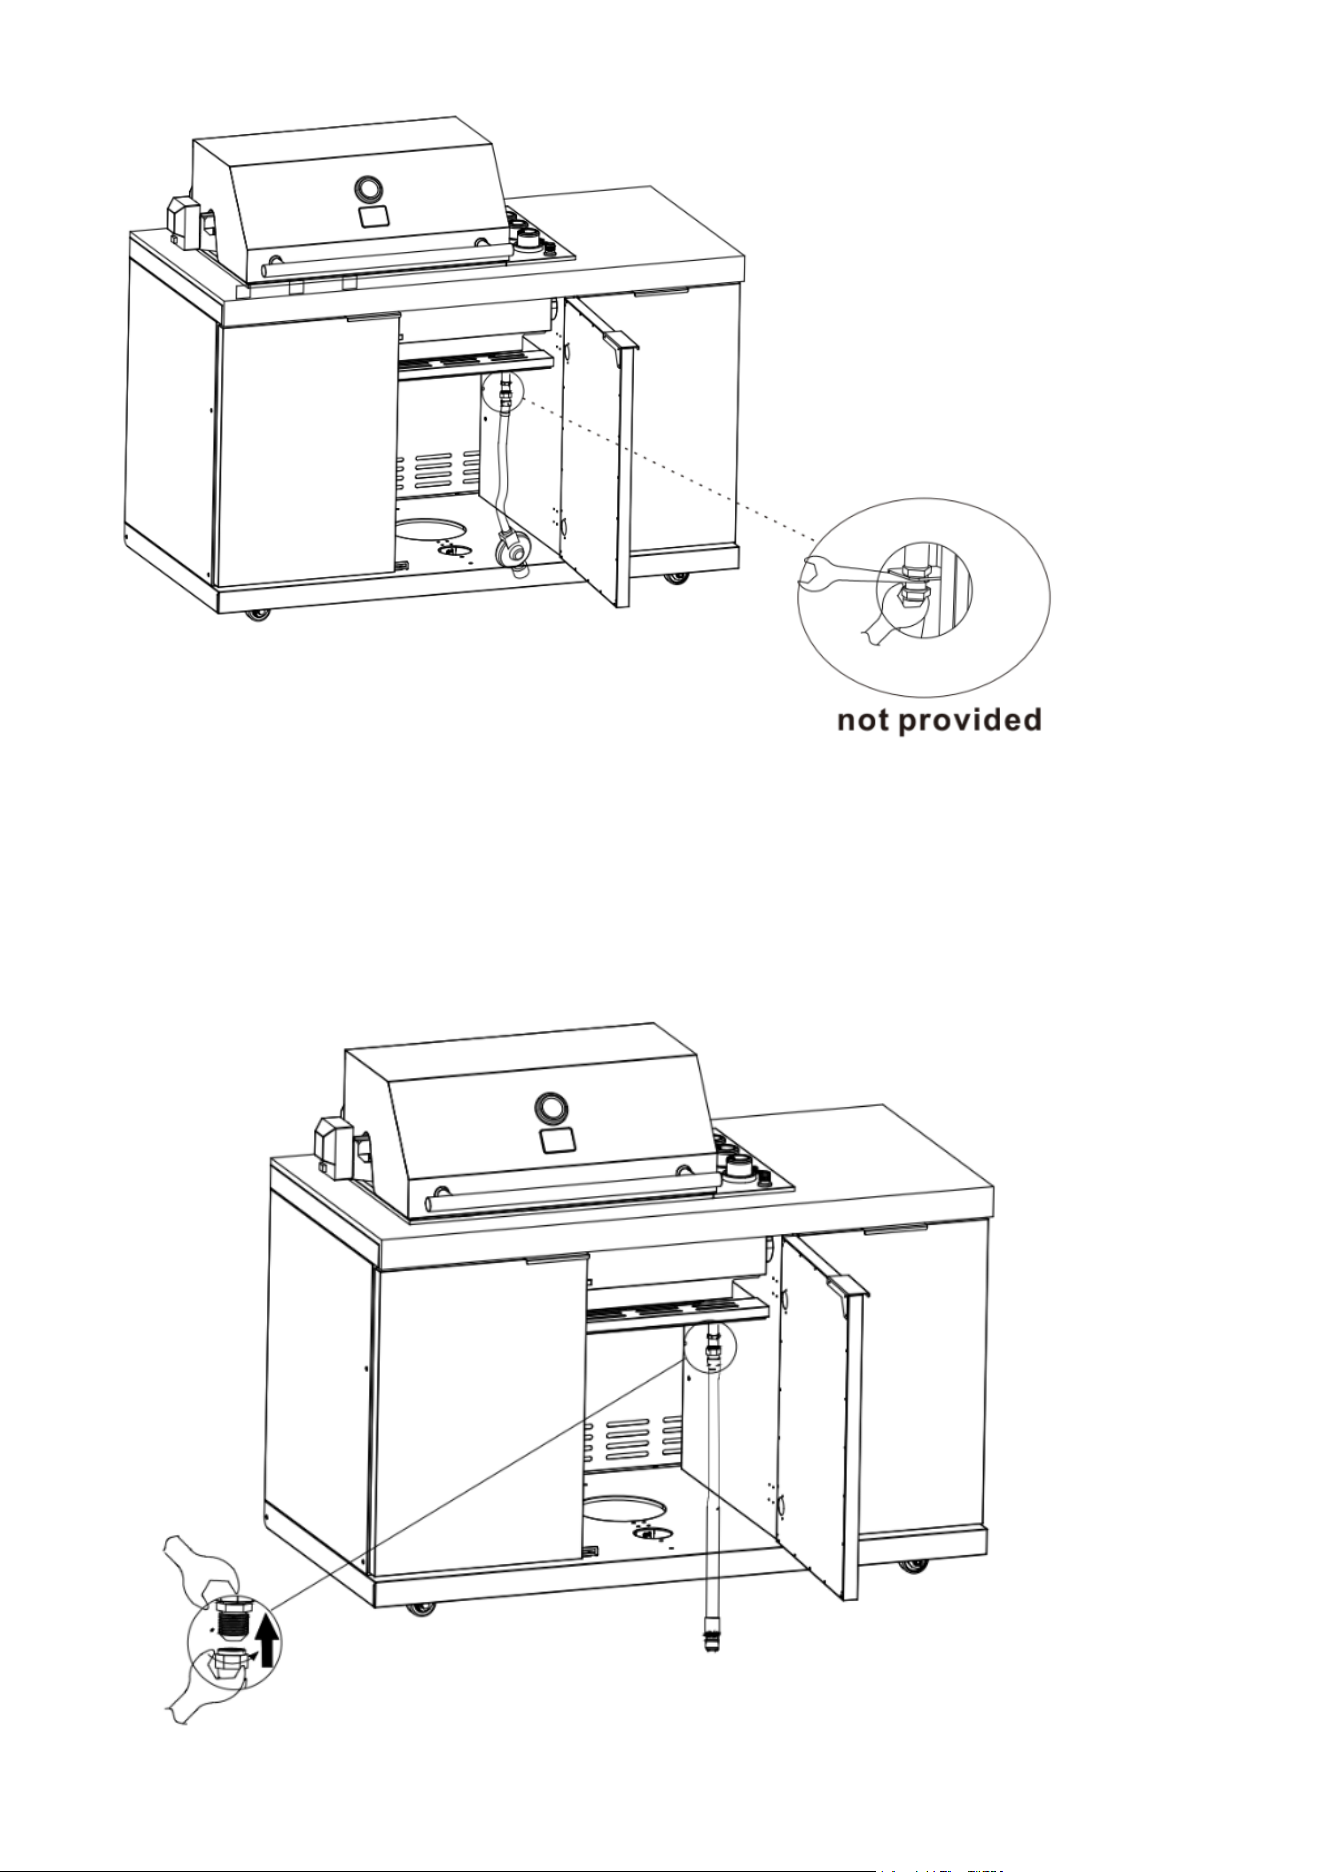
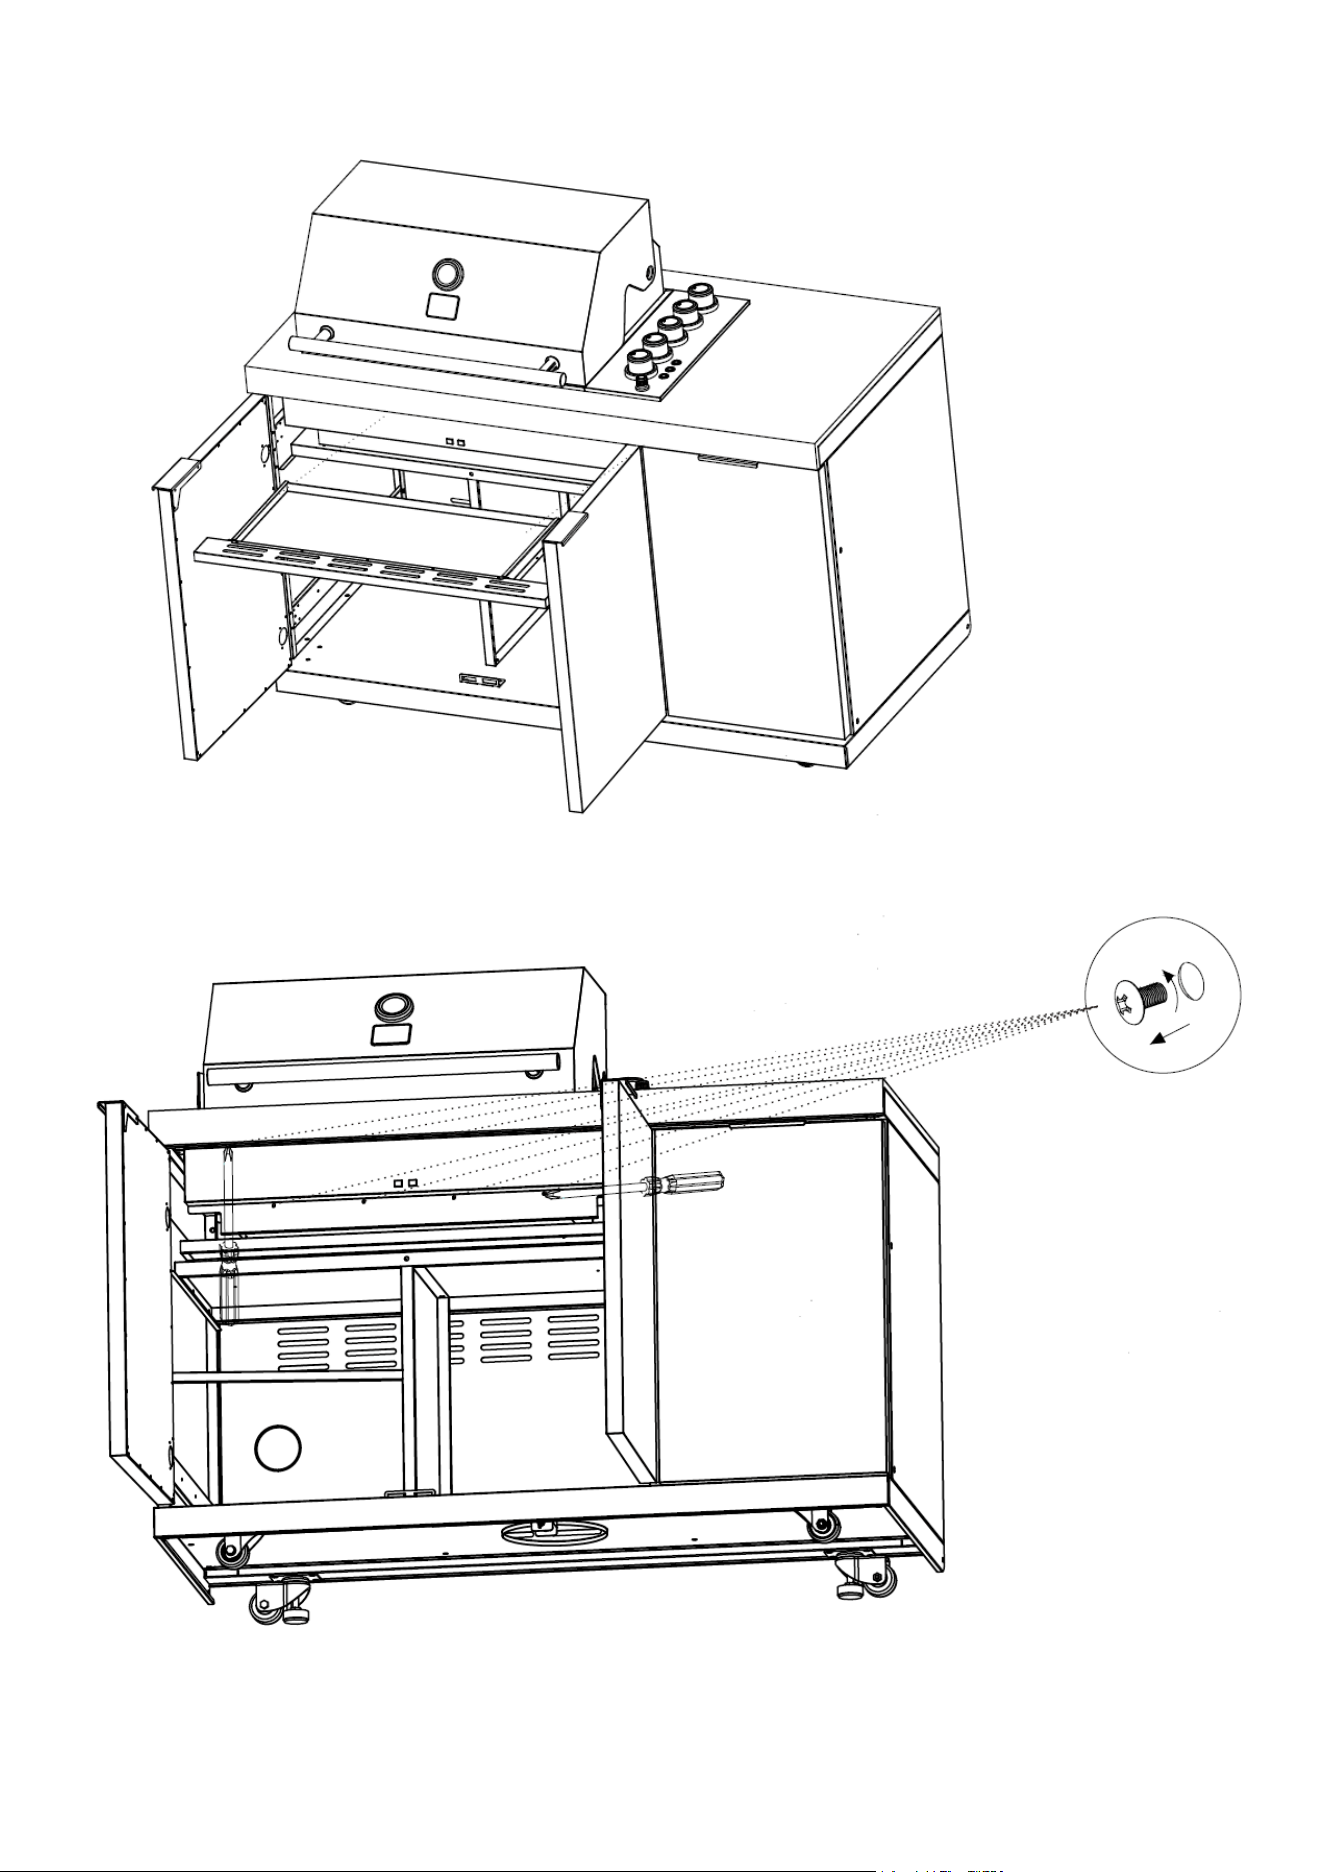
LP to Natural Gas Conversion Procedure
Gas Supply Preparation
1. Turn off the main gas supply valve.
2. Disconnect and remove the LP gas cylinder.
3. Ensure all burner control knobs are in the OFF position.
4. Remove the LP regulator from the manifold using an adjustable wrench.
5. Install the natural gas regulator hose onto the manifold and secure it tightly.
24
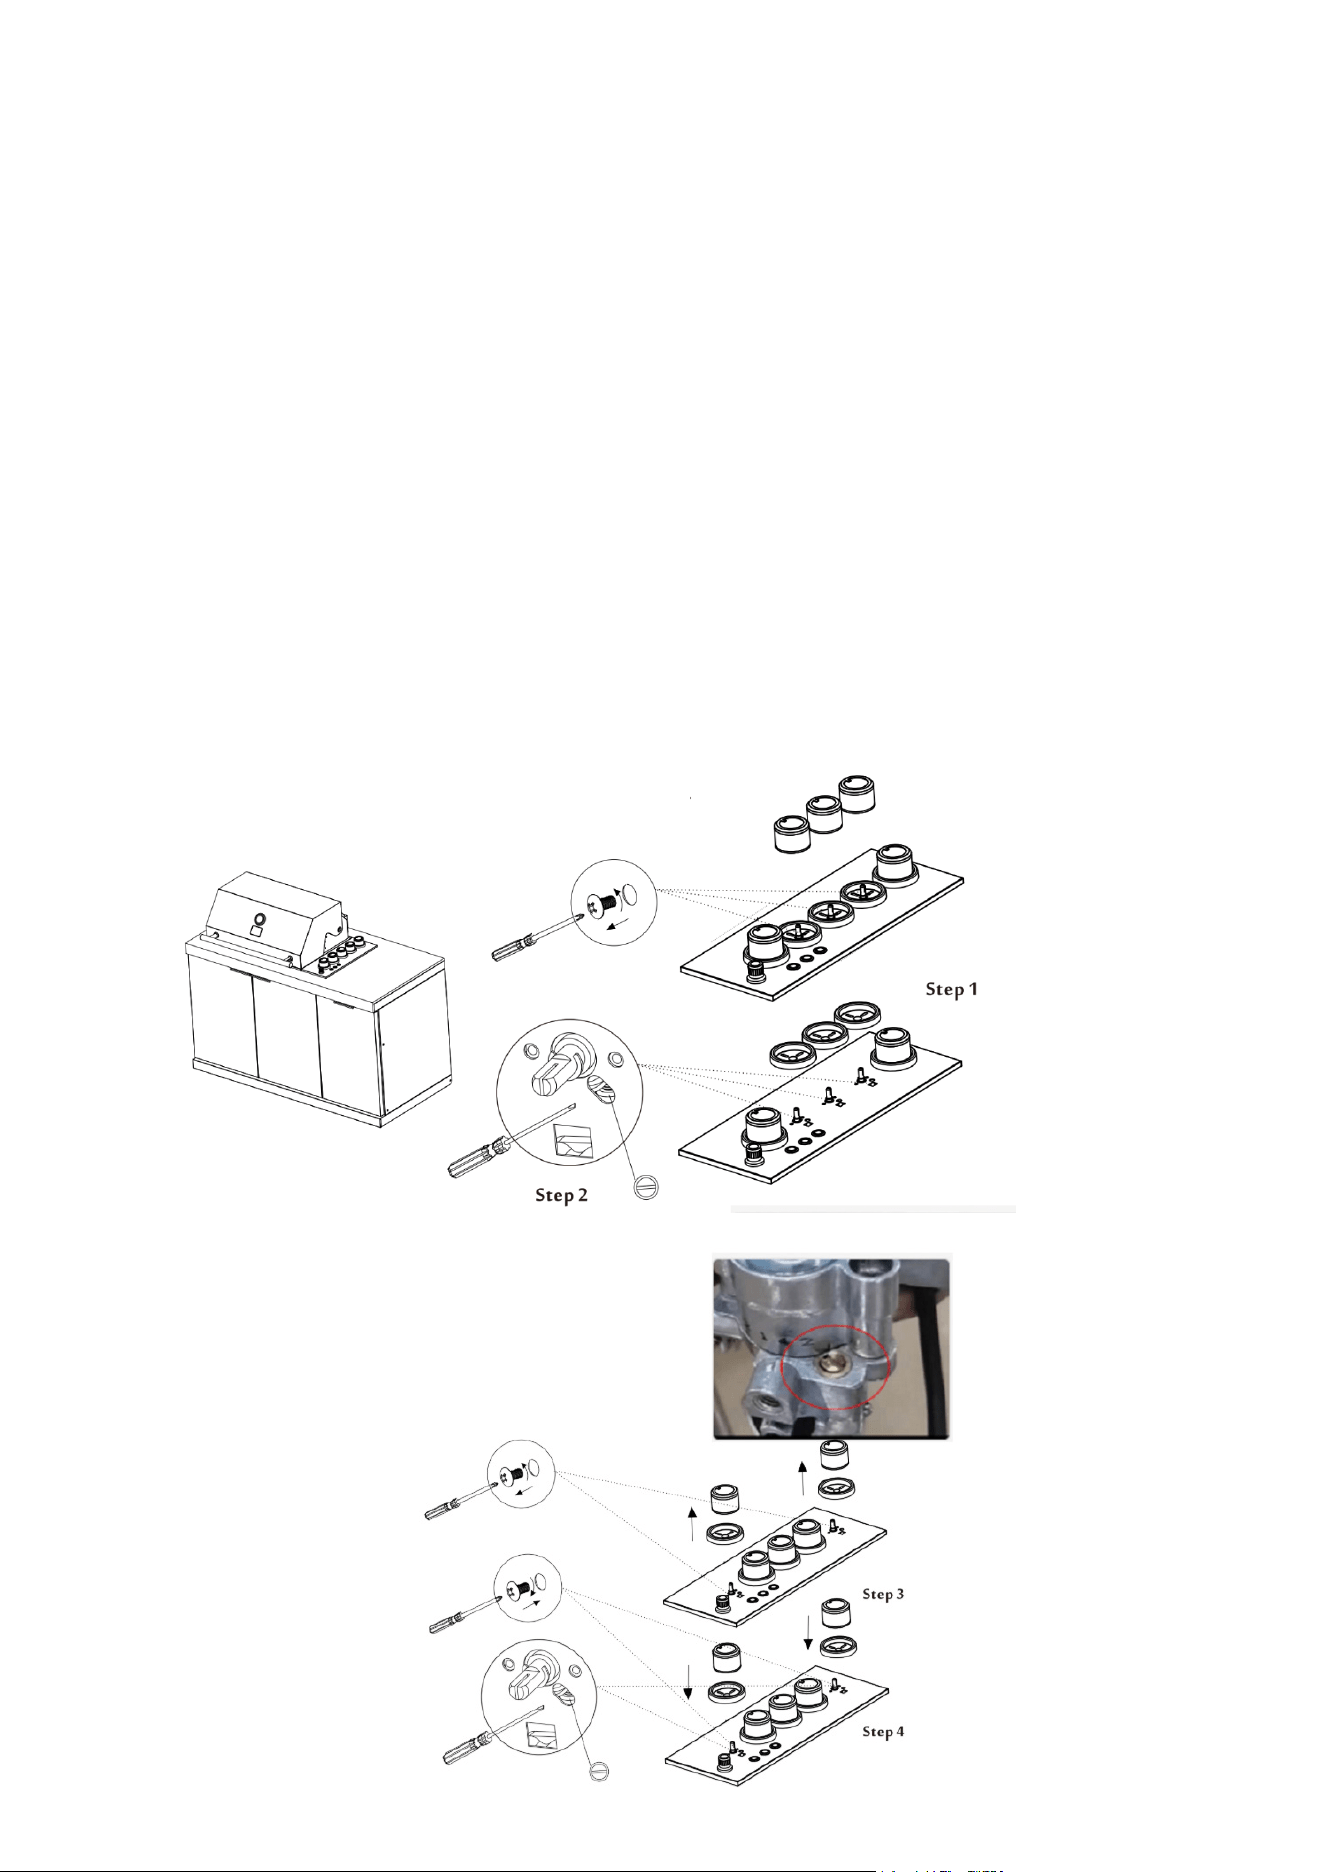
Orice Replacement (Main Burners Only)
1. Remove the drip tray.
2. Remove the control knobs.
3. Loosen the screws securing the control panel (leave two screws loosely attached for support).
4. Remove the valve cover and nozzle bracket.
5. Using a wrench, remove the LP orices from the main burners.
6. Apply anaerobic sealant to the threads of the NG orices.
7. Install the NG orices and tighten securely.
8. Reinstall the nozzle bracket and valve cover.
Valve Adjustment
1. Using a at-head screwdriver, adjust the valve screw:
• Turn the adjustment screw 360° inward from its fully seated position.
• Bottom position = LP
• Top position = NG
(Main burners only)
2. Reinstall the control panel and secure all screws tightly.
3. Reinstall all control knobs.
25
Take out the drip tray
Unscrew the valve cover
26
Unscrew the nozzle bracket
Use a wrench the LP nozzle to NG nozzle, apply
anaerobic adhesive to the threads.
(only for main burner)
Anaerobic Adhesive

27
Reassembly and Leak Testing
1. Reconnect all gas hoses, including the infrared burner hose if applicable.
2. Secure all panels using the original screws.
3. Verify all burners are correctly seated and secured.
4. Perform a soap-and-water leak test on all gas connections.
5. Light the burners to conrm proper operation.
Natural Gas Connection
1. Connect the brass tting on the exible NG hose to the grill.
2. Connect the quick connector on the opposite end to the rigid household natural gas supply.
3. Perform a nal leak test after the connection is complete.
Post-Conversion Safety Requirements
• After conversion to natural gas, the grill must be secured and must not be moved.
• Install a restraining chain or wire of adequate strength between the grill and a xed wall.
• Ensure compliance with all local gas and building codes.
WARNING:
Failure to follow these instructions exactly may result in re, explosion, serious injury, or property
damage.
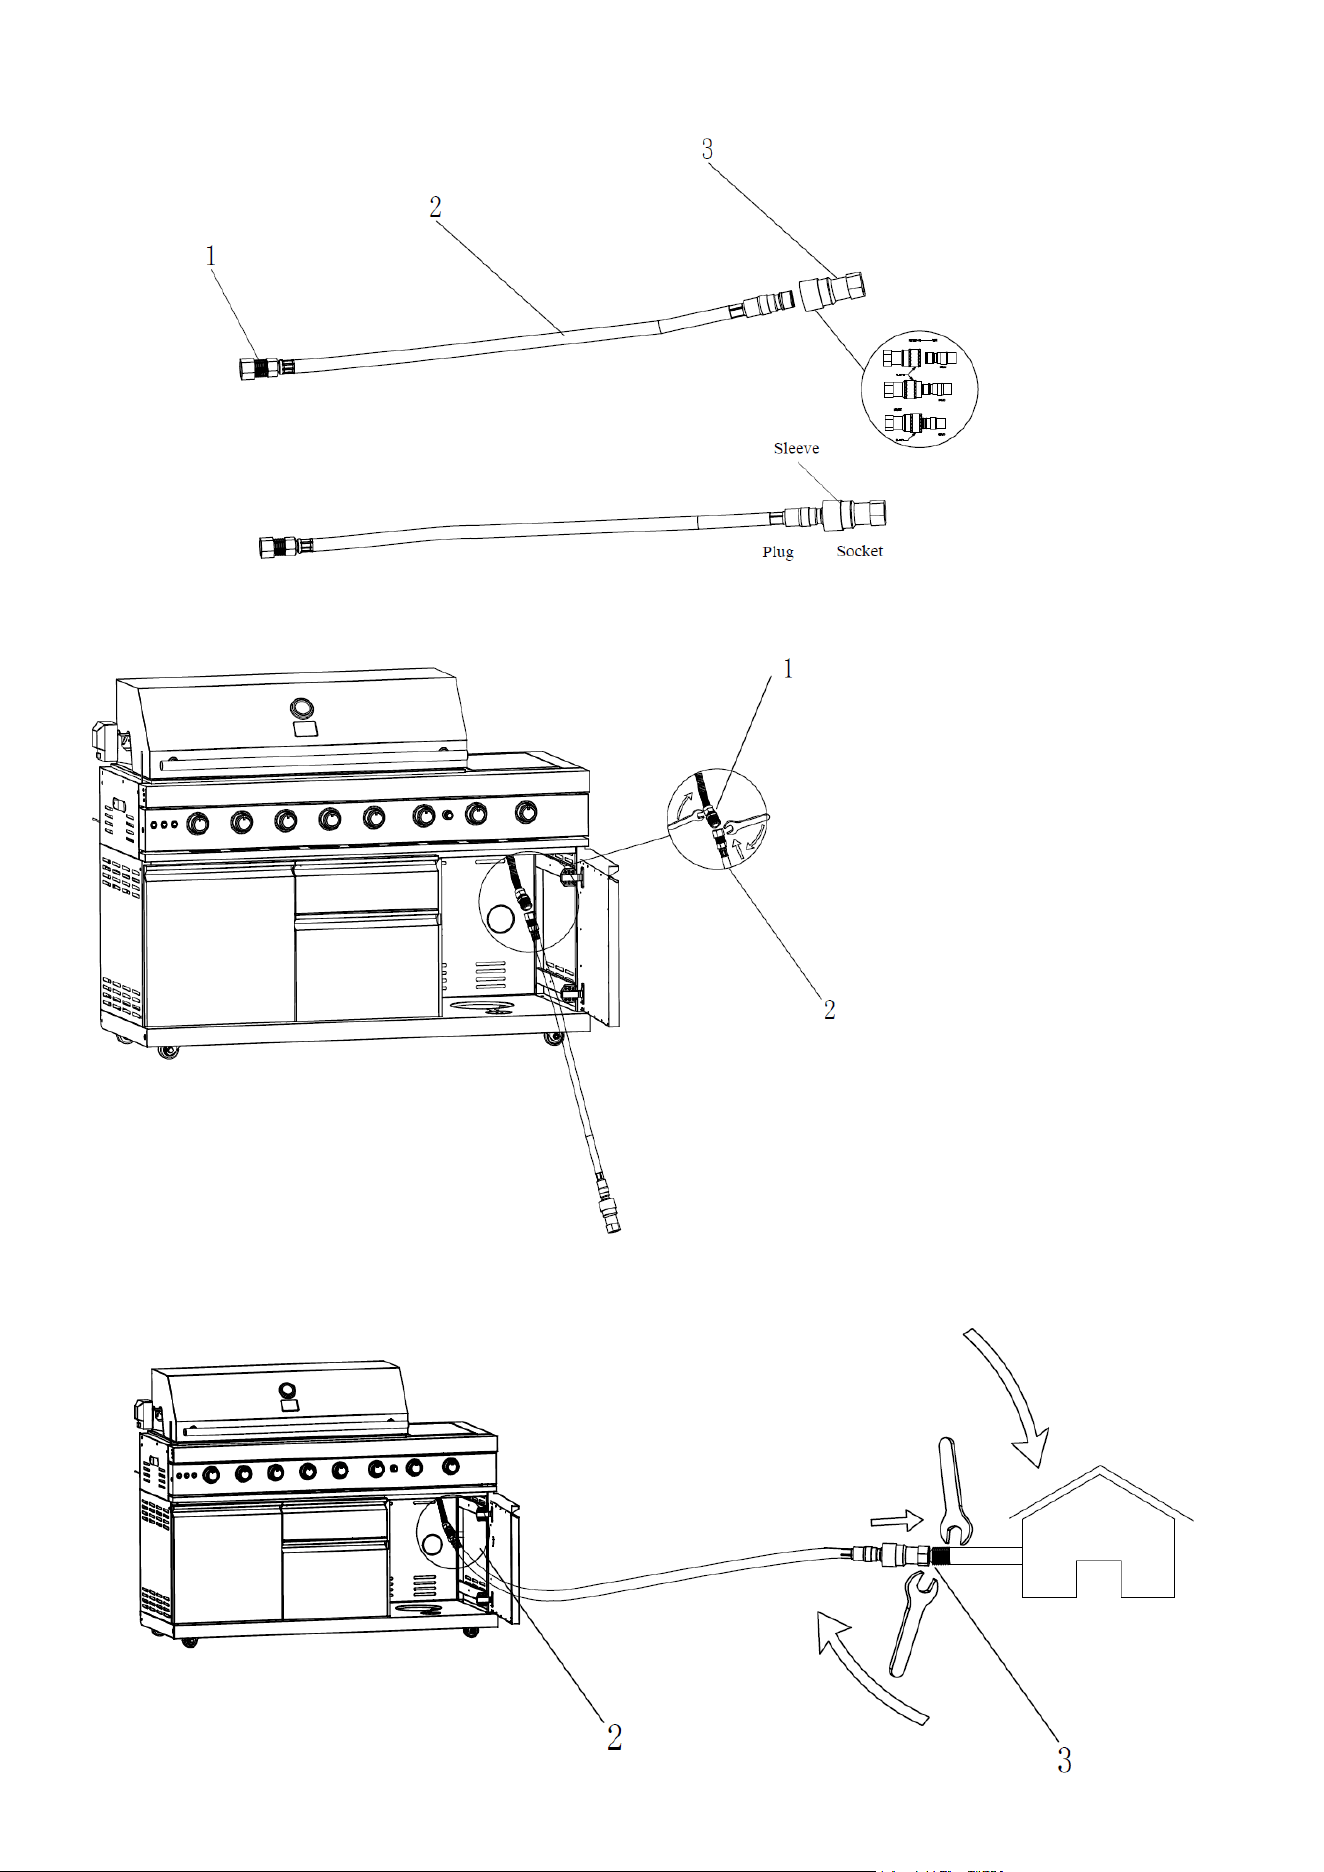
1. Click the Socket into the plug by pulling back the sleeve.
28
2. Fasten the connector into BBQ pipe and connector.
3. Fasten the snap into house NG pipe.
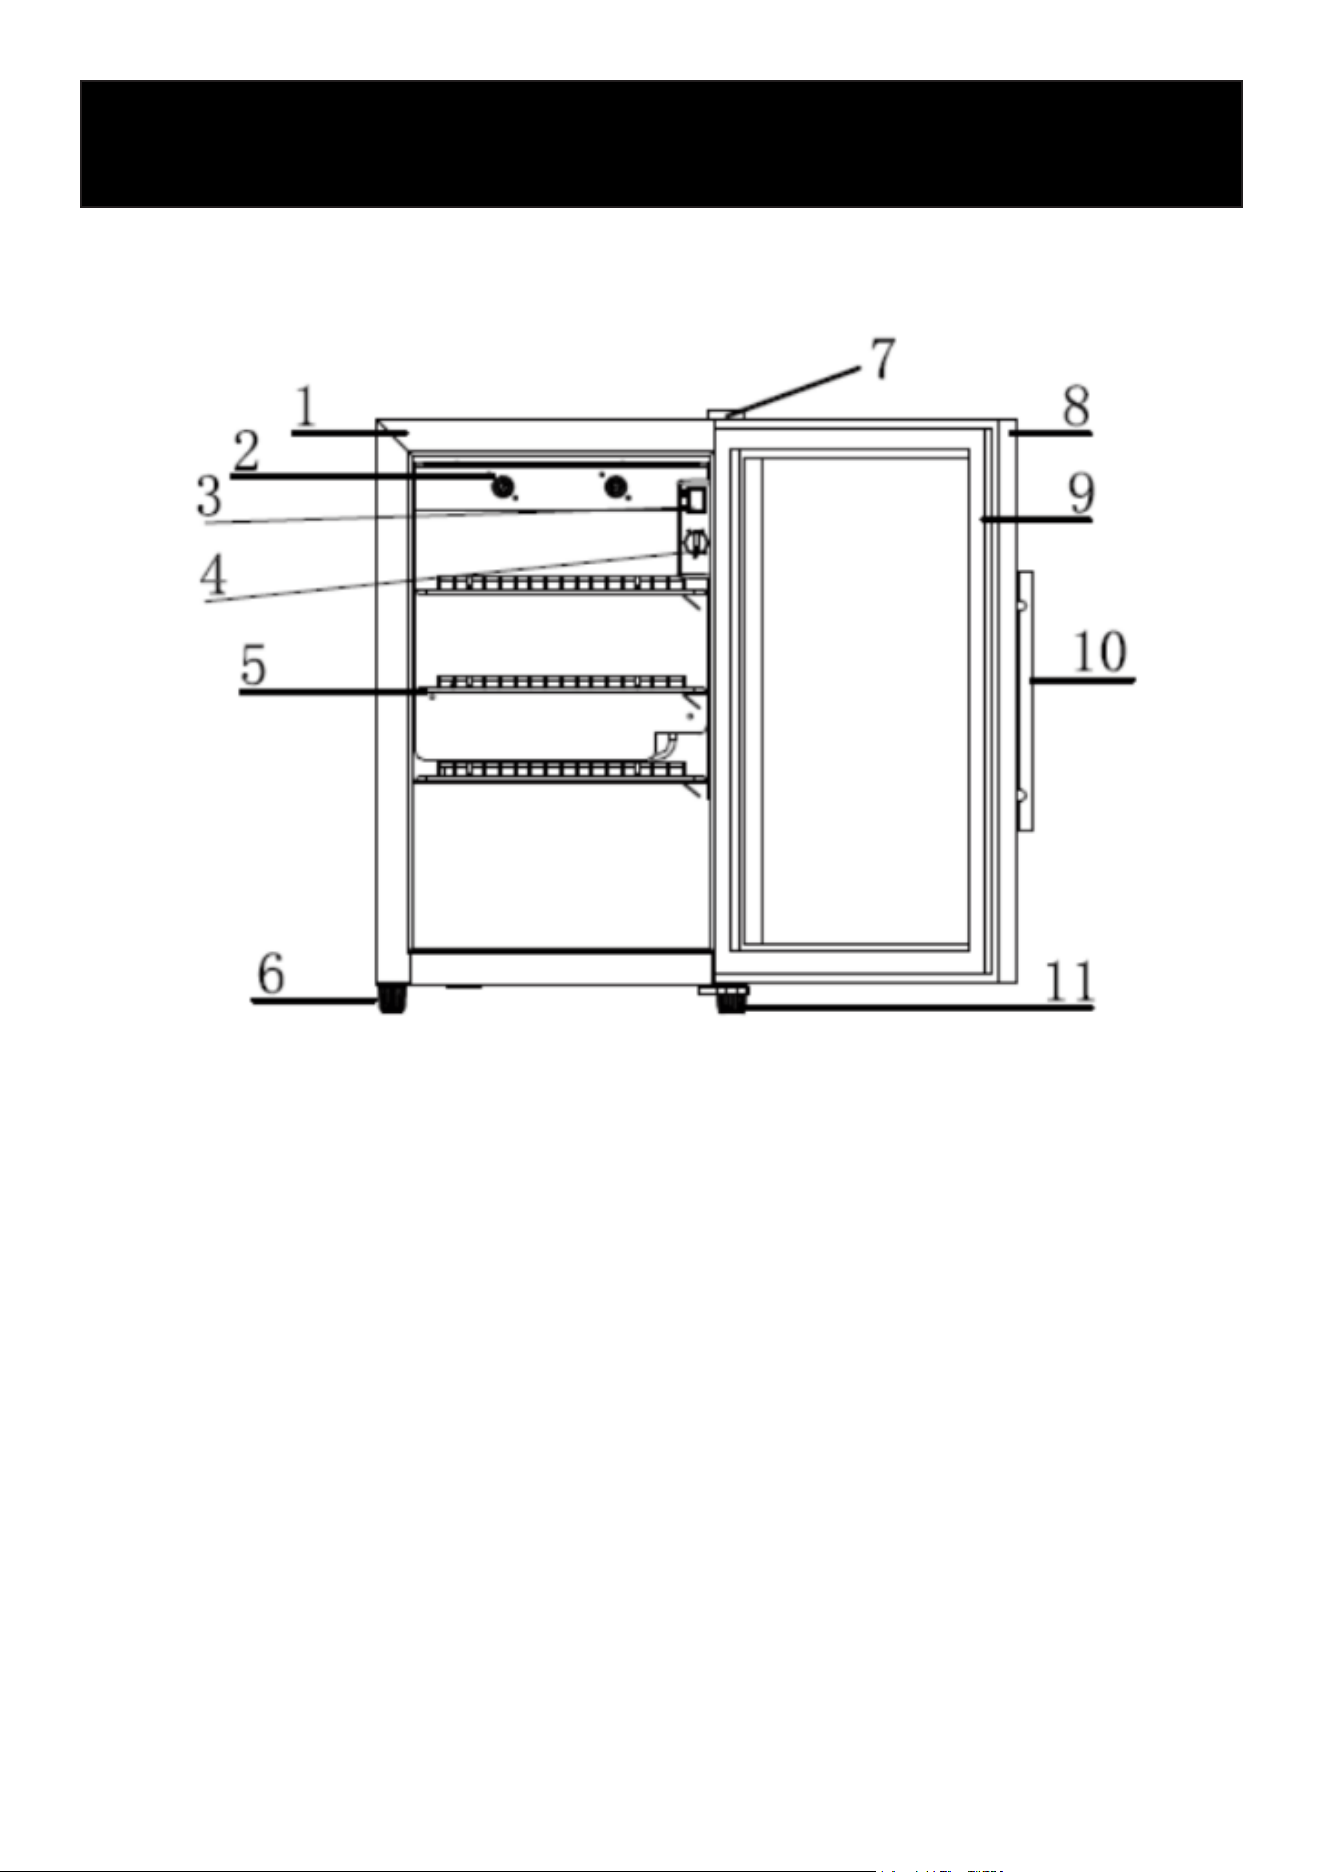
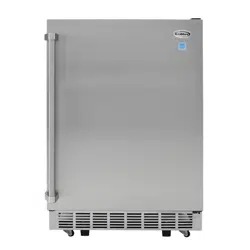
Refrigerator User Manual
1. Casing
2. Fans
3. LED Light Switch
4. Thermostat Switch Knob
5. Rack
6. Foot
7. Upper Hinge
8. Door
9. Door Gasket
10. Door Handle
11. Lower Hinge
Product appearance may vary slightly from this Manual due to ongoing improvements, without
affecting operation or use.
Overview
29

30
General Safety
• This appliance uses ammable refrigerant and insulation materials. Use caution during instal-
lation, maintenance, handling, and disposal.
• Do not damage the refrigerant circuit. Damage may cause re or explosion.
• Do not disassemble the appliance. There are no user-serviceable parts inside.
• If the power cord is damaged, it must be replaced by the manufacturer, an authorized service
agent, or a similarly qualied technician.
• Children should be supervised and must not play with the appliance.
• This appliance is not intended for use by persons with reduced physical, sensory, or mental
capabilities unless properly supervised.
• Do not place the appliance in locations where corrosive or ammable gases may be present.
Electrical Safety
• Use a dedicated, grounded power outlet that matches the voltage listed on the product name-
plate.
• Do not share the power outlet with other appliances.
• Do not extend or modify the power cord.
• Do not damage, crush, pinch, or trap the power cord.
• Do not reconnect power for at least 5 minutes after unplugging or a power outage.
• Ensure the power plug remains accessible at all times after installation.
• Do not connect the grounding wire to gas pipes, water pipes, lightning rods, or telephone lines.
Fire & Explosion Prevention
• Do not store ammable or explosive substances (such as gasoline, alcohol, or aerosol cans
with ammable propellants) in or near the appliance.
• Do not spray ammable substances near the appliance.
• Do not use electrical appliances inside the food storage compartments unless approved by the
manufacturer.
• Keep ventilation openings in the appliance cabinet and surrounding structure clear of obstruc-
tion at all times.
• Do not use mechanical devices or other means to accelerate defrosting unless recommended
by the manufacturer.
Transport & Handling
• Turn off and unplug the appliance before moving it.
• Keep the unit upright during transport; do not tilt more than 45°.
• Do not carry the appliance by the front or rear. Tilt and move it from the sides only.
• Do not lay the appliance at during transport.
• Remove all contents before moving to prevent items from falling.
• Handle with care; the door is made of glass.
Safety

31
Disposal Safety
• Before disposing of the appliance, remove the doors and leave the shelves in place to prevent
children from becoming trapped inside.
• Disposal and recycling must be performed by qualied personnel in accordance with local reg-
ulations.
• Do not damage the refrigeration system during disposal to prevent refrigerant leakage.
32
Location & Placement
• Remove all packaging materials before installation.
• Place the refrigerator on a smooth, solid, level surface.
• Install in a well-ventilated area.
• Maintain at least 2 in. of clearance on the left, right, and back for heat dissipation.
• Do not install in areas where corrosive or ammable gases may be present.
• Ensure the power plug remains accessible after installation.
Before Powering On
• After transportation, leave the unit upright and unplugged for at least 24 hours before connect-
ing power.
• Check that the power cord, thermostat knob, and LED light switch are functioning properly.
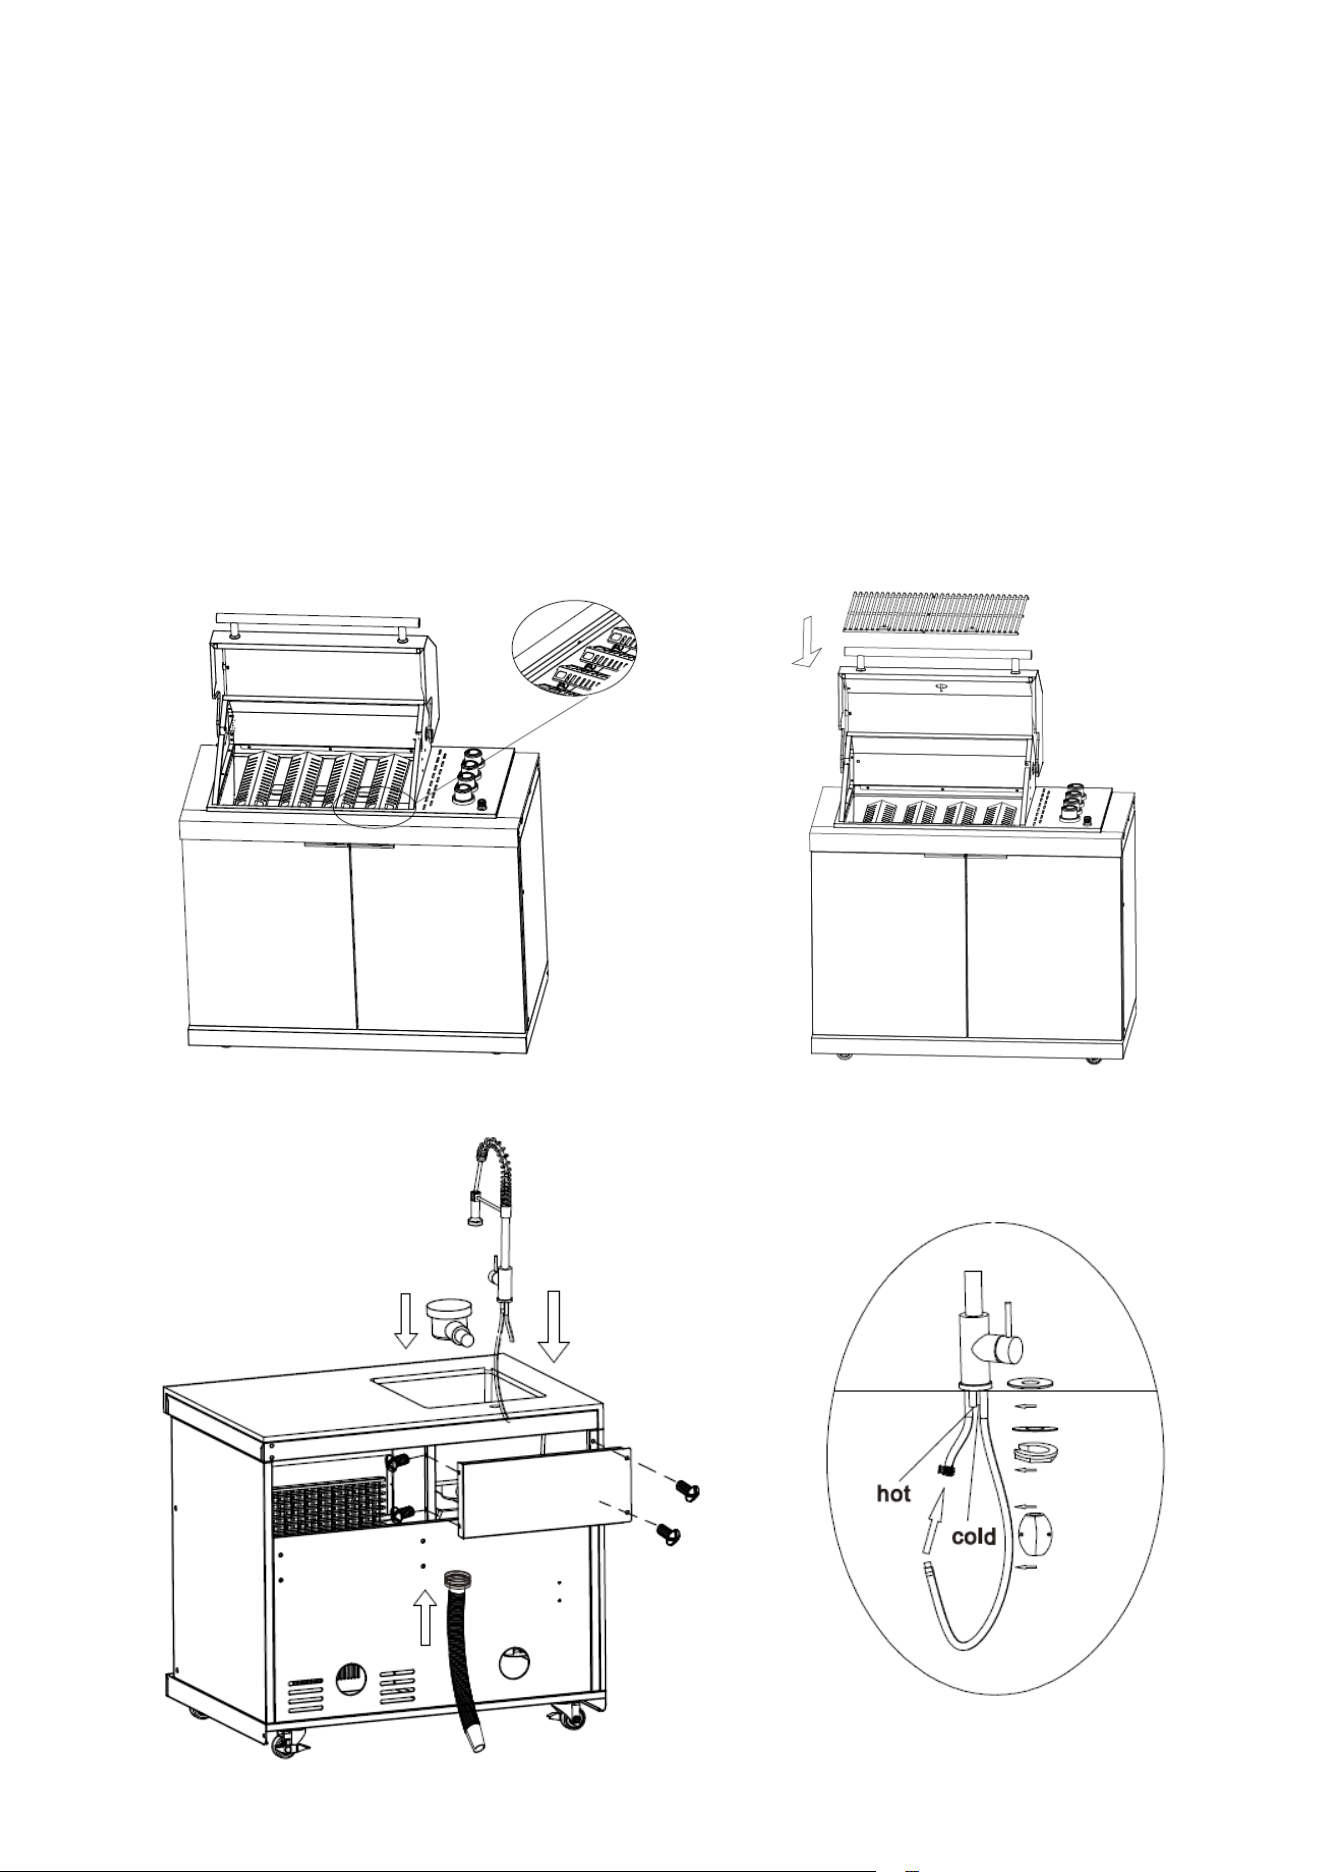
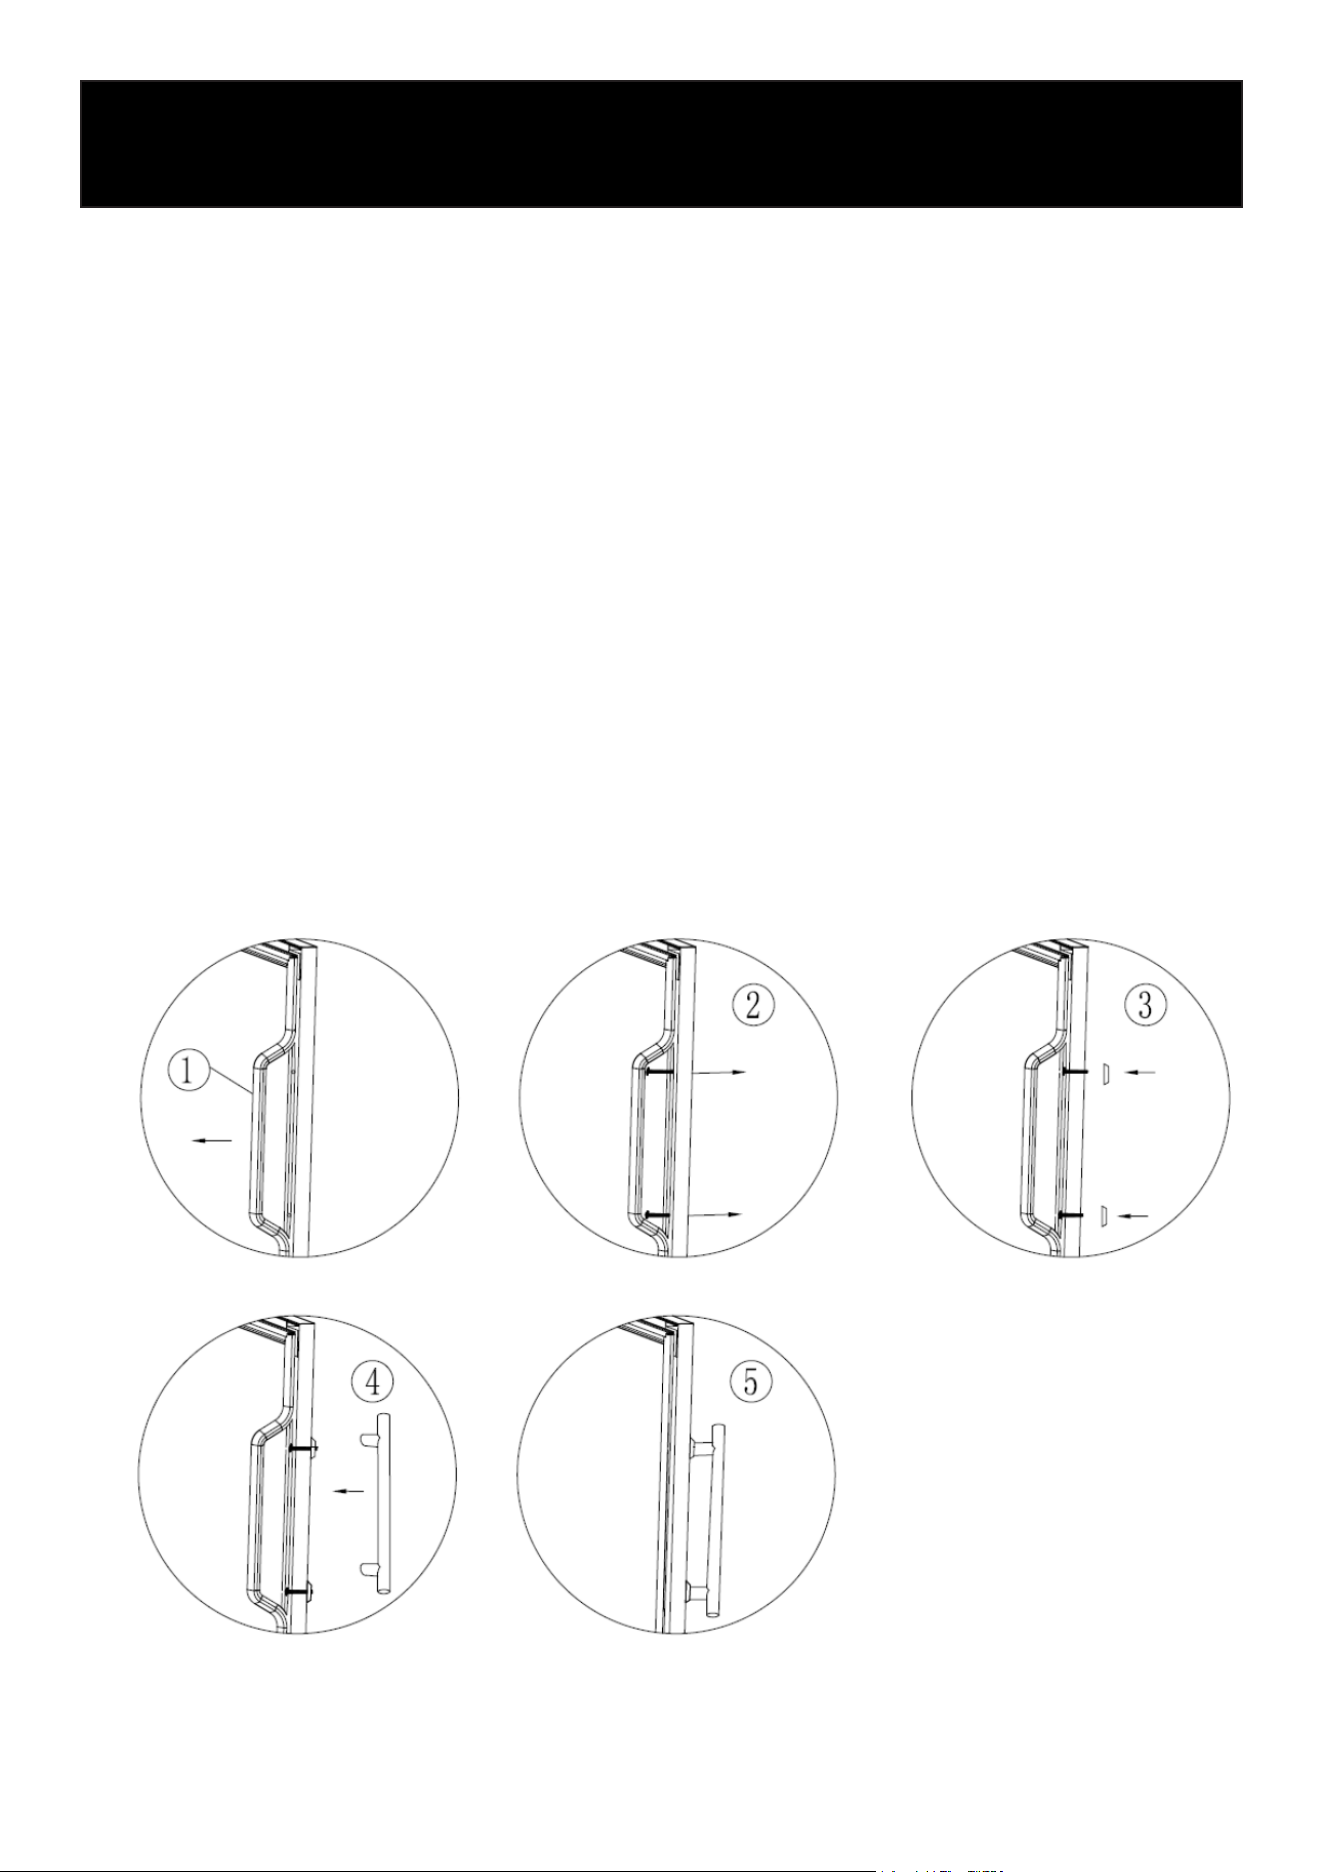
Door Handle Installation
1. Pull back the door gasket located behind the handle.
2. Insert screws into the pre-drilled holes.
3. Reattach the gasket.
4. Attach the handle.
5. Tighten screws and press the door gasket back into place.
Installation
33
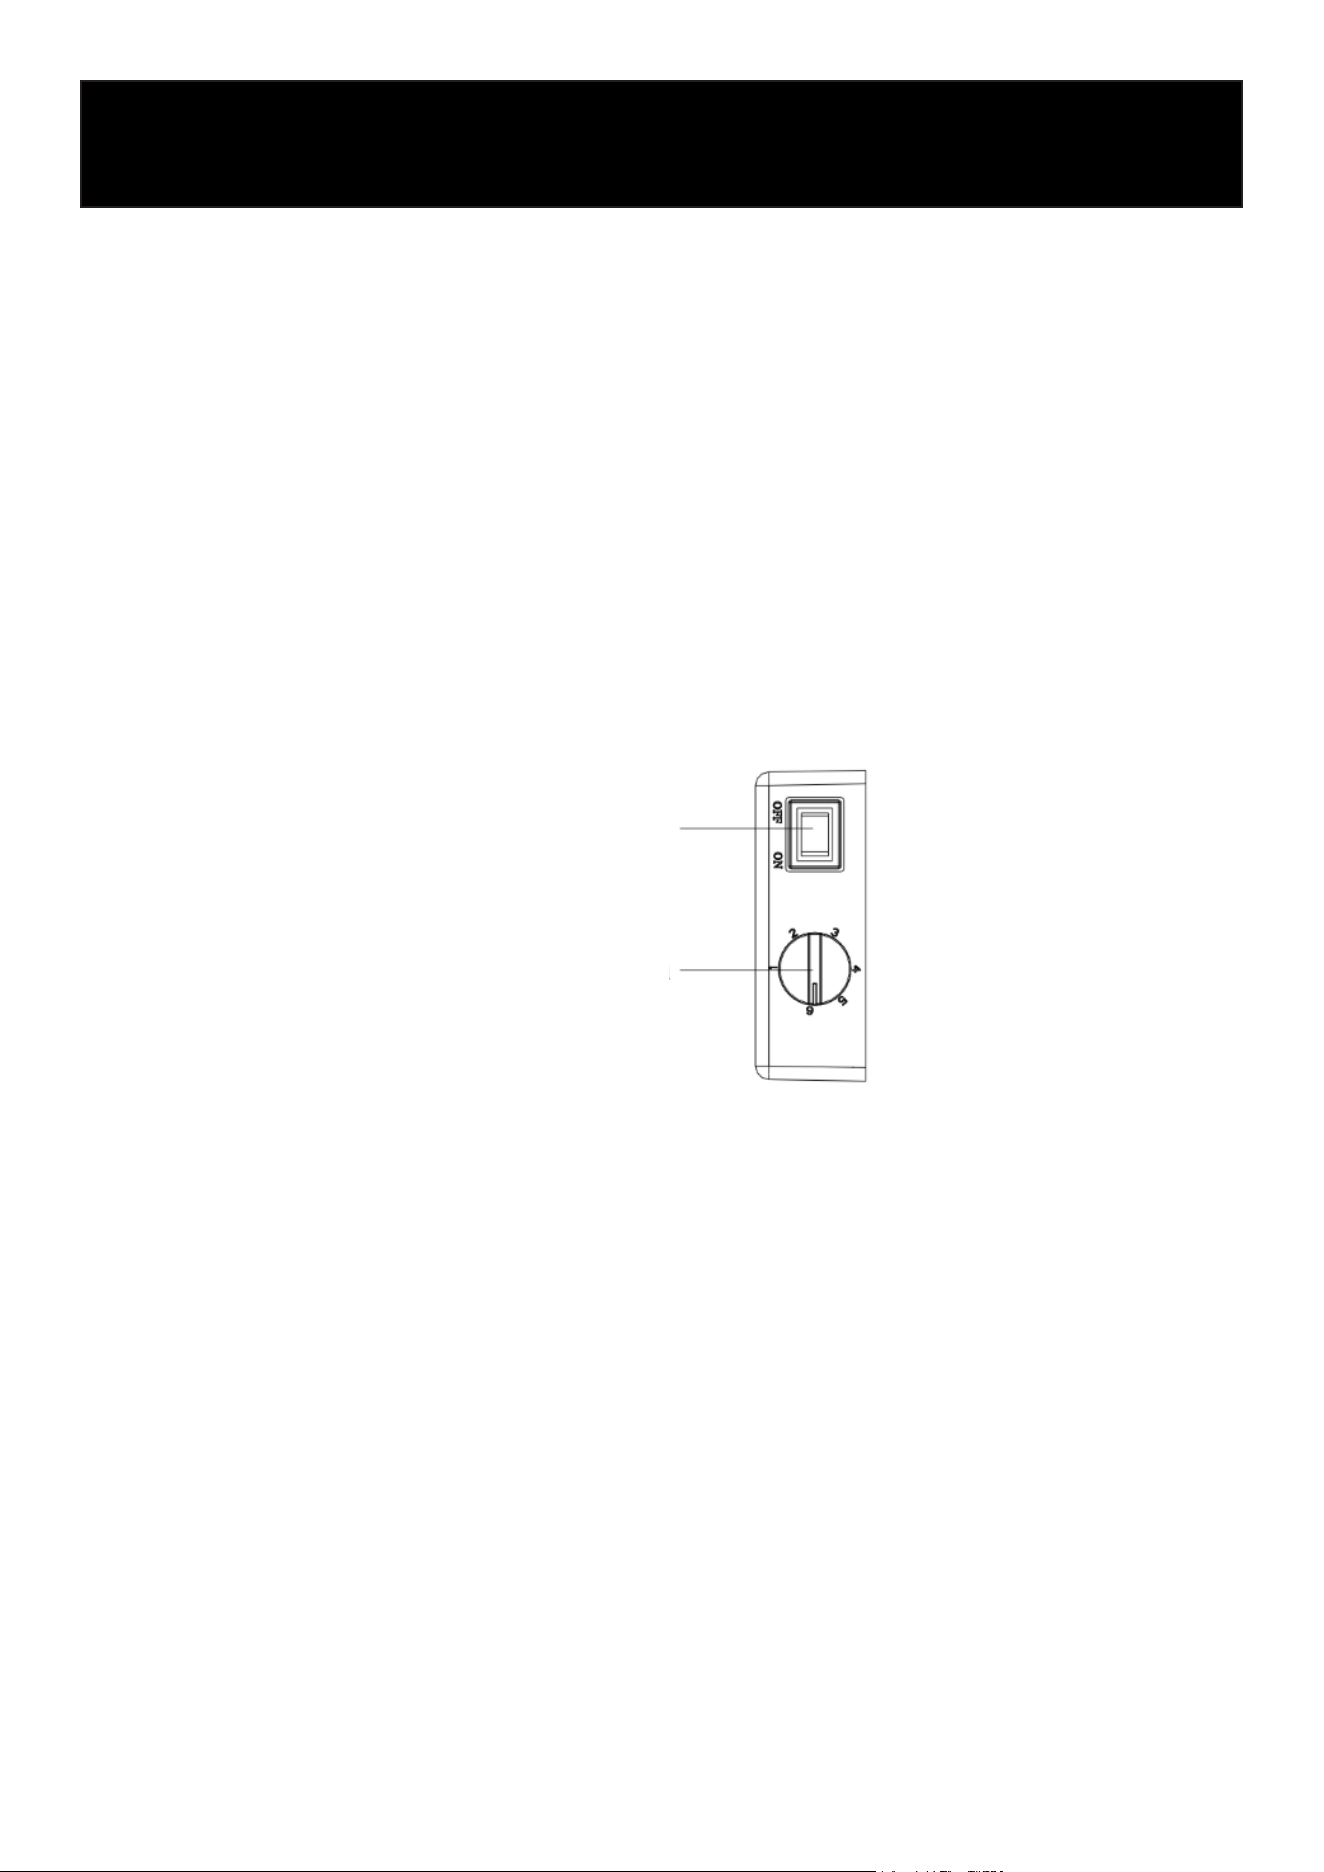
Temperature Control
• The thermostat has 6 levels:
• 1 = highest temperature
• 6 = lowest temperature
• Adjust according to storage needs.
Lighting
• Use the LED light switch to turn the interior light on or off.
Usage Guidelines
• Do not hang items on the door.
• Do not overload shelves or block air inlets/outlets.
• Avoid keeping the door open for extended periods.
• Ensure the door gasket seals properly.
Operation
LED Light Switch
Thermostat switch
knob
34
Maintenance
Cleaning
• Unplug the appliance before cleaning.
• Clean interior and exterior surfaces using a soft cloth and mild neutral detergent.
• Wipe dry with a clean, soft cloth.
• Do not ush the unit with water.
• Clean regularly to maintain optimal performance and extend the product’s life.
Cleaning Warnings
• Do not use abrasive or corrosive cleaners, including:
• Alkaline detergents
• Toilet soap
• Boiling water
• Lacquer thinner, acetone, methylbenzene
• Plastic parts (door gasket, door frame) may degrade if oil fumes accumulate—clean regularly.
Long-Term Storage
If the unit will not be used for an extended period:
• Unplug the power cord.
• Remove all contents.
• Clean and dry the interior and exterior thoroughly.
• Store in a location inaccessible to children.

35
Troubleshooting
Appliance Does Not Work
• Check if the power cord is plugged in.
• Check for power supply or a blown fuse.
Cooling Issues
• Ensure adequate ventilation space.
• Check for nearby heat sources.
• Make sure the door closes properly.
• Inspect the door gasket for damage or deformation.
• Avoid overloading shelves.
• Check thermostat settings.
• Ensure air vents are not blocked.
Noise
• Ensure the unit is level.
• Conrm sucient ventilation space.
• Make sure the appliance is not touching the walls.
• Check for loose or missing parts.
Normal Operating Conditions
• Flowing water–like sounds may occur due to refrigerant circulation.
• Condensation may appear on surfaces in hot or humid environ-
ments; wipe dry with a soft cloth.
If issues cannot be resolved, please contact KoolMore Customer Service.

36
LIMITED WARRANTY
KoolMore Supply Inc. extends a limited warranty to the original purchaser, guaranteeing that this KoolMore product is
free from manufacturing defects in material or workmanship for one year from the date of purchase.
Should you discover any such defect within the warranty period, KoolMore Supply Inc. reserves the right to repair or re-
place the product without charge, or to cover the cost of replacement parts and repair labor needed to correct defects
present at the time of purchase or resulting from regular usage, when the appliance has been installed, operated, and
maintained as per the instructions provided.
At its sole discretion, KoolMore Supply Inc. may decide to replace the product. In such an event, your replacement
appliance will carry the warranty for the remaining term of the original unit’s warranty period.
This warranty is valid exclusively to the original purchaser of the product and only applicable within the United States.
The warranty commences from the date of original consumer purchase. Proof of the original purchase date will be
required to obtain service under this warranty.
Under this limited warranty, your sole and exclusive remedy will be product repair, as outlined above. All services must
be provided by a KoolMore designated service company.
To claim warranty or request repair service:
Email [email protected]. Please include your name, address, phone number, warranty repair request, and a copy
of your proof of purchase receipt. Alternatively, visit koolmore.com and use the Contact Us page. A KoolMore custom-
er service representative will promptly arrange service for your appliance.
We thank you for choosing KoolMore.
WARRANTY EXCLUSIONS
This limited warranty will not cover:
1. Failure of the product to perform during power failures or interruptions,
or due to inadequate electrical service.
2. Damage incurred during transportation or handling.
3. Damage caused by accidents, vermin, lightning, winds, re, oods, or acts of God.
4. Damage resulting from accidents, alterations, misuse, abuse, improper installation, repair, or maintenance. This
includes using any external device that alters or converts the voltage or frequency of electricity.
5. Unauthorized product modications, repairs by unauthorized centers, or use of non-approved replacement parts.
6. Abnormal cleaning and maintenance not aligned with the user’s manual.
7. Use of incompatible accessories or components.
8. Any costs associated with repairs or replacements under these excluded circumstances shall be the responsibility
of the consumer.
WARRANTY