

en Table of contents
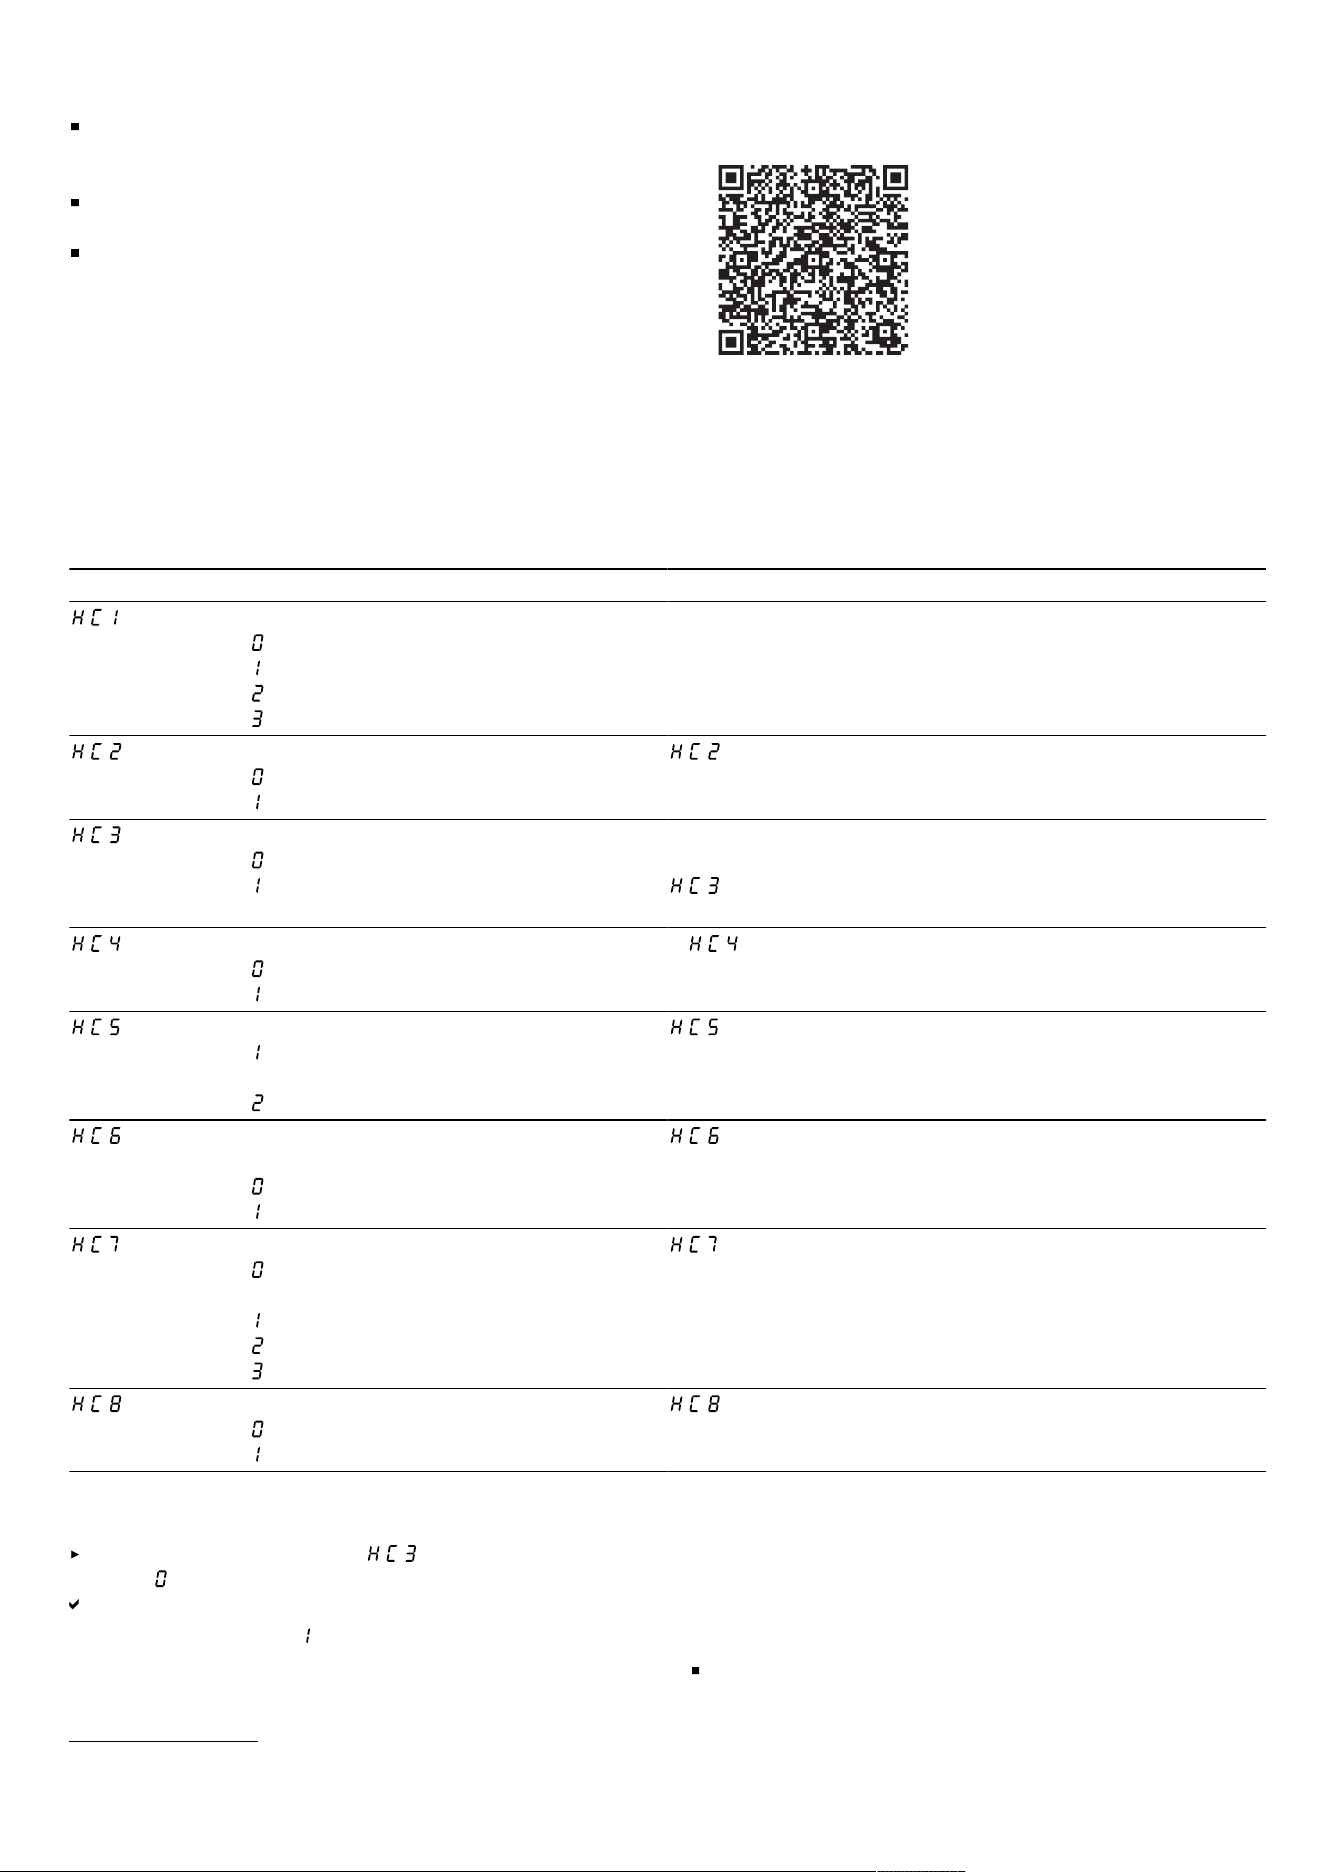
You can find additional information and explanations online.
Scan the QR code on the title page.
Table of contentsTable of contents
1 Safety ........................................................................ 2
2 Avoiding material damage ..................................... 5
3 Environmental protection and saving energy ...... 6
4 Suitable cookware ................................................... 6
5 Familiarising yourself with your appliance .......... 7
6 Operating modes ..................................................... 9
7 Before using for the first time ................................ 9
8 Basic operation ....................................................... 9
9 Ventilation control ................................................. 11
10 flexInduction ........................................................ 12
11 powerMove Plus .................................................. 12
12 Time-setting options ........................................... 13
13 powerBoost .......................................................... 13
14 shortBoost ........................................................... 14
15 Keep-warm function ............................................ 14
16 flexMotion ............................................................ 14
17 Meal assistant ..................................................... 15
18 Wireless cooking sensor ................................... 18
19 Childproof lock ................................................... 20
20 Individual safety switch-off ................................ 21
21 Wipe protection ................................................... 21
22 Basic settings ..................................................... 21
23 Cookware test ..................................................... 23
24 Power limitation .................................................. 23
25 HomeConnect .................................................... 23
26 Cleaning and servicing ...................................... 25
27 Troubleshooting ................................................. 28
28 Disposal ............................................................... 30
29 Declaration of Conformity .................................. 30
30 Customer Service ............................................... 31
31 Test dishes .......................................................... 32
Safety 1 Safety
Observe the following safety instructions.
1.1 Definition of the signal words
This is where you can find explanations for the
safety signal words used in this manual.
WARNING
This indicates that death or serious injuries
may occur as a result of non-observance of
this warning.
ATTENTION
This indicates that damage to the appliance or
other material damage may occur as a result
of non-compliance with this warning.
Note: This alerts you to important information.
1.2 General information
¡ Read this instruction manual carefully.
¡ Keep the instructions, the appliance and the
product information safe for future reference
or for the next owner.
¡ Do not connect the appliance if it has been
damaged in transit.
1.3 Intended use
Only a licensed professional may connect ap-
pliances without plugs. Damage caused by in-
correct connection is not covered under the
warranty.
The appliance can only be used safely if it is
correctly installed according to the safety in-
structions. The installer is responsible for en-
suring that the appliance works perfectly at its
installation location.
Only use this appliance:
¡ To prepare meals and drinks.
¡ Under supervision. Never leave the appli-
ance unattended when cooking for short
periods.
¡ in private households and in enclosed
spaces in a domestic environment.
¡ Up to an altitude of 2000m above sea level.
2
Safety en
Do not use the appliance:
¡ On boats or in vehicles.
¡ With an external timer or a separate remote
control. This does not apply if operation with
appliances included in EN 50615 is
switched off.
¡ To extract hazardous or explosive sub-
stances and vapours.
¡ To extract small parts and liquids.
When using the cooking functions, set the hot-
plate on which you have placed the saucepan
with the temperature sensor.
If you wear an active implantable medical
device (e.g. a pacemaker or defibrillator),
check with your doctor that it complies with
Council Directive 90/385/EEC of 20th June
1990, EN 45502-2-1 and EN 45502-2-2, and
that it has been chosen, implanted and pro-
grammed in accordance with VDE-AR-E
2750-10. If these conditions are satisfied, and
if, in addition, non-metal cooking utensils and
cookware with non-metal handles are used, it
is safe to use this induction hob as intended.
1.4 Restriction on user group
This appliance may be used by children aged
8 or over and by people who have reduced
physical, sensory or mental abilities or inad-
equate experience and/or knowledge,
provided that they are supervised or have
been instructed on how to use the appliance
safely and have understood the resulting
dangers.
Do not let children play with the appliance.
Children must not perform cleaning or user
maintenance unless they are at least 15 years
old and are being supervised.
Keep children under the age of 8 years away
from the appliance and power cable.
1.5 Safe use
WARNING‒Risk of suffocation!
Children may breathe in or swallow small
parts, causing them to suffocate.
Keep small parts away from children.
Do not let children play with small parts.
Children may put packaging material over their
heads or wrap themselves up in it and suffoc-
ate.
Keep packaging material away from chil-
dren.
Do not allow children to play with packaging
material.
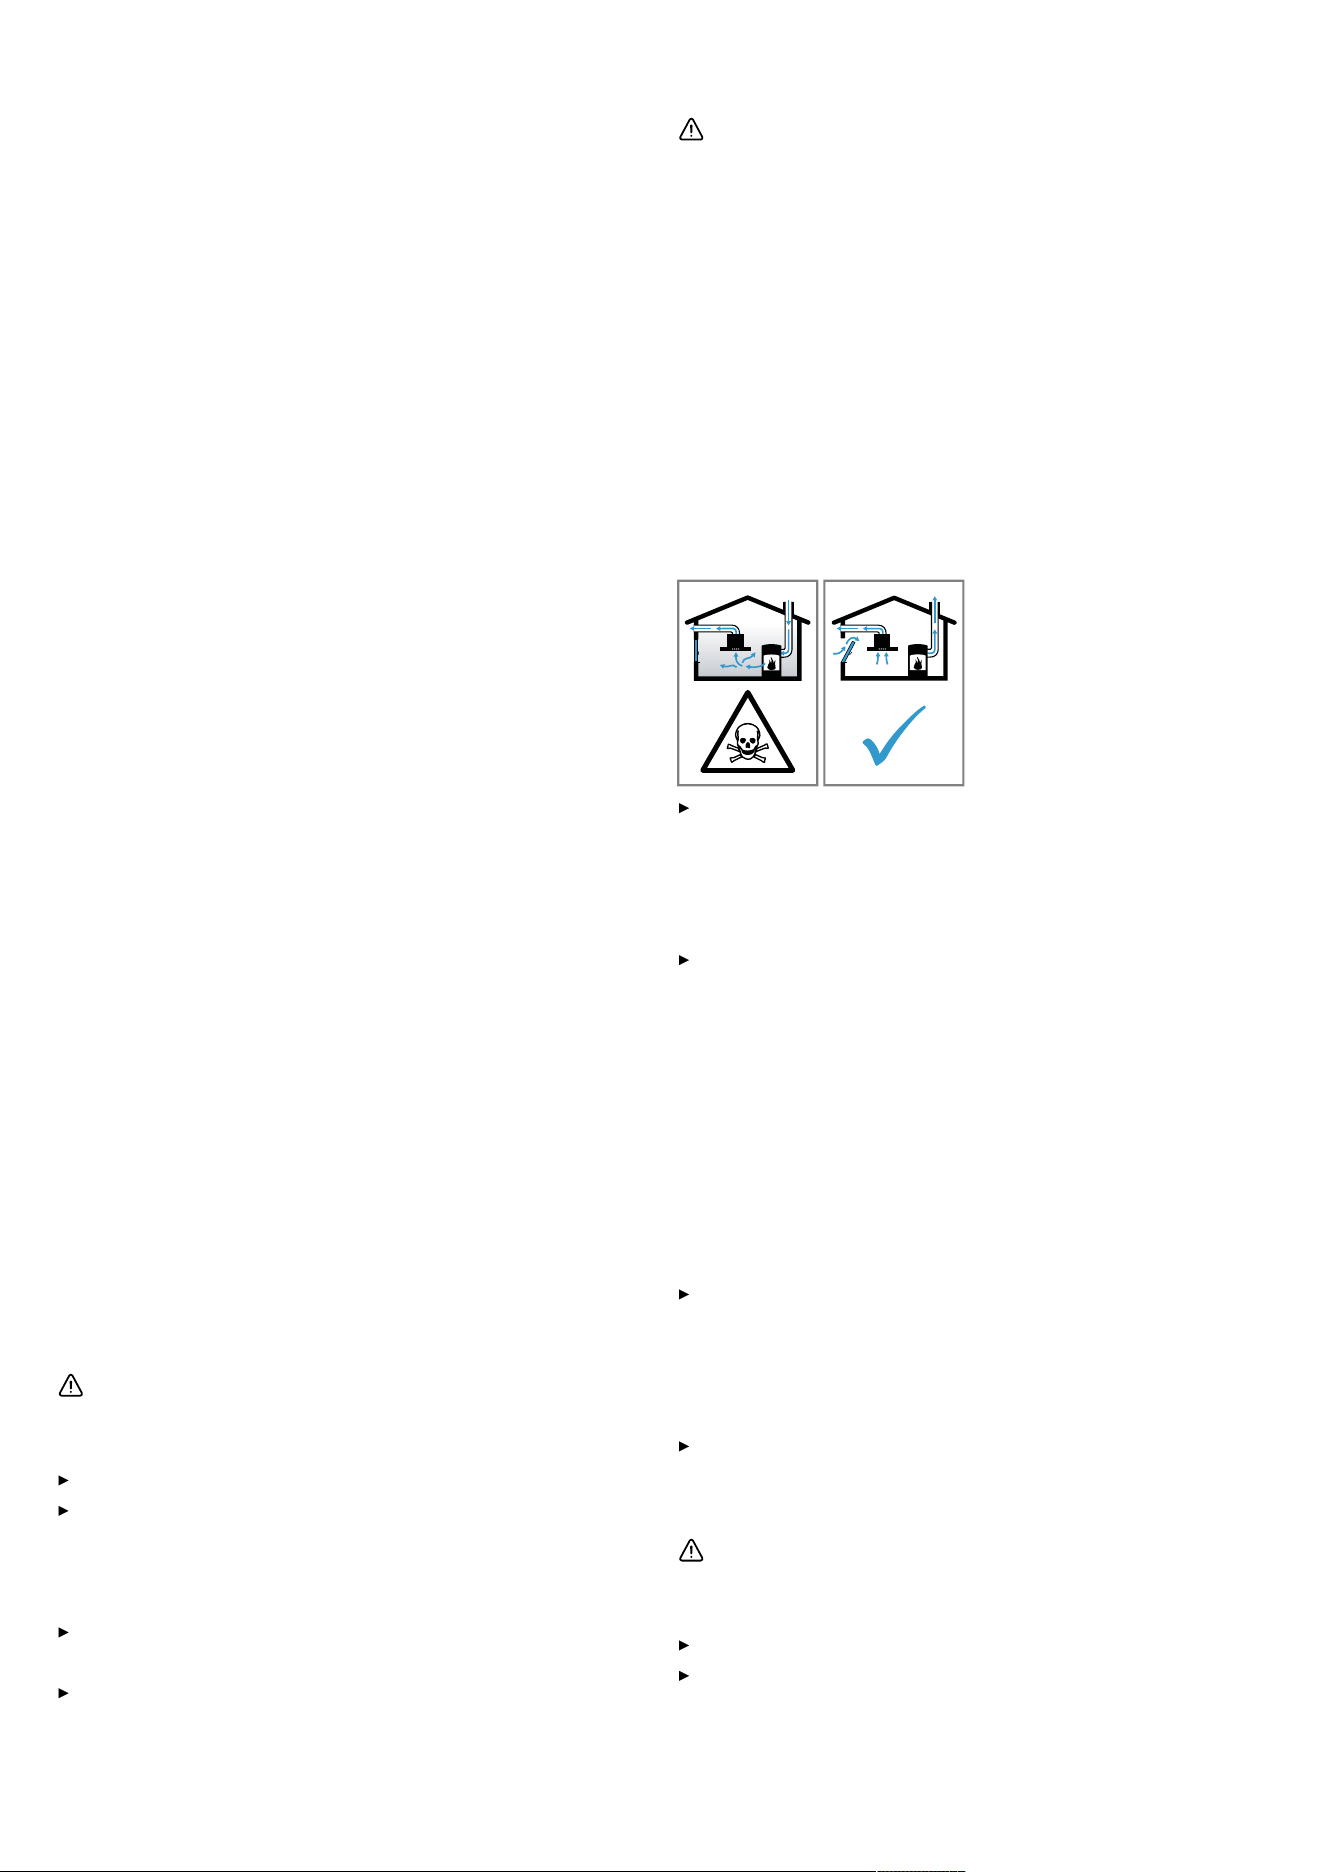
WARNING‒Risk of poisoning!
Risk of poisoning from flue gases being drawn
back in. Room-air-dependent heat-producing
appliances (e.g. gas, oil, wood or coal-oper-
ated heaters, continuous flow heaters or water
heaters) obtain combustion air from the room
in which they are installed and discharge the
exhaust gases into the open through an ex-
haust gas system (e.g. a chimney). With the
extractor hood switched on, air is extracted
from the kitchen and the adjacent rooms.
Without an adequate supply of air, the air pres-
sure falls below atmospheric pressure. Toxic
gases from the chimney or the extraction shaft
are sucked back into the living space.
Always ensure adequate fresh air in the
room if the appliance is being operated in
exhaust air mode at the same time as a
room-air-dependent heat-producing appli-
ance is being operated.
It is only possible to safely operate the appli-
ance if the pressure in the room in which the
heating appliance is installed does not fall
below 4Pa(0.04mbar). This can be
achieved whenever the air needed for com-
bustion is able to enter through openings
that cannot be sealed, for example in doors,
windows, incoming/exhaust air wall boxes or
by other technical means. An incoming/ex-
haust air wall box alone is not sufficient to
ensure compliance with the limit.
In any case, consult a competent person
(e.g. responsible chimney sweep). They are
able to assess the house's entire ventilation
setup and will suggest the suitable ventila-
tion measures to you.
Unrestricted operation is possible if the ap-
pliance is operated exclusively in circulating-
air mode.
WARNING‒Risk of fire!
Leaving fat or oil cooking on an unattended
hob can be dangerous and may lead to fires.
Never leave hot oil or fat unattended.
Never attempt to extinguish a fire using wa-
ter; instead, switch off the appliance and
then cover with a lid or a fire blanket.
3

en Safety
The cooking surface becomes very hot.
Never place flammable objects on the cook-
ing surface or in its immediate vicinity.
Never place objects on the cooking surface.
The appliance will become hot.
Do not keep combustible objects or aerosol
cans in drawers directly underneath the hob.
Hob covers can cause accidents, for example
due to overheating, catching fire or materials
shattering.
Do not use hob covers.
After every use, switch off the hob using the
main switch.
Do not wait until the hob turns off automatic-
ally as there are no longer any pots and
pans on it.
Food may catch fire.
The cooking process must be monitored. A
short process must be monitored continu-
ously.
Fatty deposits in the grease filters may catch
fire.
Never operate the appliance without a
grease filter.
Clean the grease filters regularly.
Never work with naked flames close to the
appliance (e.g. flambéing).
Do not install the appliance near a solid fuel
heating appliance (e.g. wood- or coal-burn-
ing) unless the heating appliance has a
sealed, non-removable cover. There must be
no flying sparks.
WARNING‒Risk of burns!
The appliance and its parts that can be
touched become hot during use, particularly
the hob surround, if fitted.
Caution should be exercised here in order to
avoid touching heating elements.
Young children under 8 years of age must
be kept away from the appliance.
Hob guards may cause accidents.
Never use hob guards.
Metal objects on the hob quickly become very
hot.
Never place metal objects (such as knives,
forks, spoons and lids) on the hob.
The appliance becomes hot during operation.
Allow the appliance to cool down before
cleaning.
If hot liquids penetrate the appliance, only re-
move the grease filter or the overflow con-
tainer once the appliance has cooled down.
WARNING‒Risk of electric shock!
Improper repairs are dangerous.
Repairs to the appliance should only be car-
ried out by trained specialist staff.
Only use genuine spare parts when repairing
the appliance.
If the power cord or the appliance power
cable of this appliance is damaged, it must
be replaced with a special power cord or
special appliance power cable, which is
available from the manufacturer or its Cus-
tomer Service.
If the power cord of this appliance is dam-
aged, it must be replaced by trained special-
ist staff.
If the appliance or the power cord is damaged,
this is dangerous.
Never operate a damaged appliance.
If the surface is cracked, you must switch off
the appliance in order to prevent a possible
electrical shock. To do this, switch off the
appliance via the fuse in the fuse box rather
than at the main switch.
Never operate an appliance with a cracked
or fractured surface.
Never pull on the power cord to unplug the
appliance. Always unplug the appliance at
the mains.
If the appliance or the power cable is dam-
aged, immediately switch off the fuse in the
fuse box.
Call customer service.
Page31
An ingress of moisture can cause an electric
shock.
Do not use steam- or high-pressure cleaners
to clean the appliance.
The insulation on cables of electrical appli-
ances may melt if it touches hot parts of the
appliance.
Never bring electrical appliance cables into
contact with hot parts of the appliance.
WARNING‒Risk of injury!
Saucepans may suddenly jump due to liquid
between the saucepan base and the hotplate.
Always keep hotplates and saucepan bases
dry.
Never use icy-cold cookware that has been
in the freezer.
Batteries can be dangerous for children.
Keep new and used batteries out of the
reach of children.
If you suspect that the battery has been
swallowed or inserted into a body orifice,
seek medical attention immediately.
4
Avoiding material damage en
The wireless temperature sensor is equipped
with a battery, which may become damaged if
it is exposed to high temperatures.
Remove the sensor from the cookware and
store it away from any heat sources.
WARNING‒Risk of serious harm to
health!
This product contains a coin battery.
Swallowing a battery or inserting it into a body
orifice can lead to serious injury or death
within as little as two hours, as it can cause
chemical burns and possibly perforate the oe-
sophagus.
Seek medical attention immediately.
WARNING‒Risk of injury!
The temperature sensor may be very hot when
removing it from the saucepan.
Wear oven gloves or use a tea towel to re-
move it.
When cooking in a bain marie, the hob and
cooking container could shatter due to over-
heating.
The cooking container in the bain marie
must not directly touch the bottom of the wa-
ter-filled pot.
Only use heat-resistant cookware.
An appliance with a cracked or broken surface
can cause cuts.
Do not use the appliance if it has a cracked
or broken surface.
WARNING‒Danger: Magnetism!
The wireless temperature sensor is magnetic
and can damage electronic implants, e.g.
heart pacemakers or insulin pumps.
Persons with electronic implants must stand
at least 10cm away from the magnetic con-
trol element.
Never put the control element in your pock-
ets.
Avoiding material damage2 Avoiding material damage
This is where you can find the most common causes of damage and tips on how to avoid them.
Damage Cause Measure
Stains Unsupervised cooking process. Monitor the cooking process.
Stains, blisters Spilled food, especially food with a high
sugar content.
Remove immediately with a glass scraper.
Stains, blisters or frac-
tures in the glass
Defective cookware, cookware with melted
enamel or cookware with copper or alu-
minium base.
Use suitable cookware that is in a good condi-
tion.
Stains, discolouration Unsuitable cleaning methods. Only use cleaning agents that are suitable for
glass ceramic, and only clean the hob when it
is cold.
Blisters or fractures in
the glass
Knocks or falling cookware, cooking ac-
cessories or other hard or pointed objects.
When cooking, do not hit the glass or let ob-
jects fall onto the hob.
Scratches, discoloura-
tion
Rough cookware bases or moving the cook-
ware on the hob.
Check the cookware. Lift the cookware when
moving it.
Scratches Salt, sugar or sand. Do not use the hob as a work surface or stor-
age space.
Damage to the appli-
ance
Cooking with frozen cookware. Never use frozen cookware.
Damage to the cook-
ware or the appliance
Cooking without contents. Never place or heat empty cookware on a hot
cooking zone.
Glass damage Melted material on the hot cooking zone or
hot pot lid on the glass.
Do not place greaseproof paper or aluminium
foil nor plastic containers or pot lids on the
hob.
Overheating Hot cookware on the control panel or on the
frame.
Never place hot cookware on these areas.
5

en Environmental protection and saving energy
Environmental protection and saving energy3 Environmental protection and saving energy
3.1 Disposing of packaging
The packaging materials are environmentally compatible
and can be recycled.
Sort the individual components by type and dispose
of them separately.
3.2 Saving energy
If you follow these instructions, your appliance will use
less energy.
Select the cooking zone to match the size of your pan.
Centre the cookware on the hob.
Use cookware whose base diameter is the same dia-
meter as the hotplate.
Tip: Cookware manufacturers often give the upper dia-
meter of the saucepan. It is often larger than the base
diameter.
Unsuitable cookware or incompletely covered cook-
ing zones consume a lot of energy.
Cover saucepans with suitable lids.
Cooking without a lid consumes considerably more
energy.
Lift lids as infrequently as possible.
When you lift the lid, a lot of energy escapes.
Using a glass lid
You can see into the pan through a glass lid without
having to lift it.
Use pots and pans with flat bases.
Uneven bases increase energy consumption.
Use cookware that is suitable for the quantity of food.
Large items of cookware containing little food need
more energy to heat up.
Cook with only a little water.
The more water there is in the cookware, the more
energy that is required to heat it up.
Turn down to a lower power level early on. Use a suit-
able ongoing power level.
If you use an ongoing power level that is too high,
you will waste energy.
Adjust the fan speed to the amount of steam produced
during cooking.
The lower the fan speed, the less energy is con-
sumed.
If cooking produces large amounts of steam, select a
higher fan speed in good time.
The odours are distributed around the room less.
Switch the appliance off when you are not using it.
Ensure that there is sufficient ventilation when cooking.
The appliance works more efficiently and with fewer
operating noises.
Clean or replace the filters at regular intervals.
The effectiveness of the filter is retained.
Suitable cookware4 Suitable cookware
Cookware that is suitable for induction cooking must
have a ferromagnetic base, i.e. it must be attracted by a
magnet. The base must also match the size of the cook-
ing zone. If cookware is not detected on a cooking
zone, place this on the cooking zone with the next smal-
lest diameter.
4.1 Size and characteristics of the cookware
To be able correctly detect the cookware, you must take the size and the material of the cookware into consideration.
All cookware bases must be perfectly flat and smooth.
Use Cookware test to check whether the cookware is suitable.
Cookware Materials Properties
Recommended cook-
ware
Stainless steel cookware in a sandwich
design that distributes the heat well.
This cookware distributes the heat evenly,
heats up quickly, and ensures that it can be
detected easily.
Ferromagnetic cookware made of enamelled
steel, cast iron or special induction cookware
made of stainless steel.
This cookware distributes the heat evenly,
heats up quickly, and ensures that it can be
detected.
Suitable The base is not fully ferromagnetic. If the ferromagnetic area is smaller than the
base of the cookware, only the area that is fer-
romagnetic heats up. As a result, the heat is
not distributed evenly.
6
Familiarising yourself with your appliance en
Cookware Materials Properties
Cookware bases that contain aluminium. These cookware bases reduce the ferromag-
netic area, which means that less power is
emitted to the cookware. This cookware may
not be sufficiently detected or may not be de-
tected at all, and therefore does not heat suffi-
ciently.
Not suitable Cookware made from normal thin steel,
glass, clay, copper or aluminium.
Notes
Do not use adapter plates between the hob and the
cookware.
Do not heat up empty cookware and do not use
cookware with a thin base, as this may become very
hot.
Familiarising yourself with your appliance5 Familiarising yourself with your appliance
5.1 Cooking with induction
In comparison to conventional hobs, induction techno-
logy brings with it a series of changes and has a num-
ber of benefits such as time savings when cooking and
frying, energy savings as well as greater ease of clean-
ing and care. It also offers improved heat control as the
heat is generated directly in the cookware.
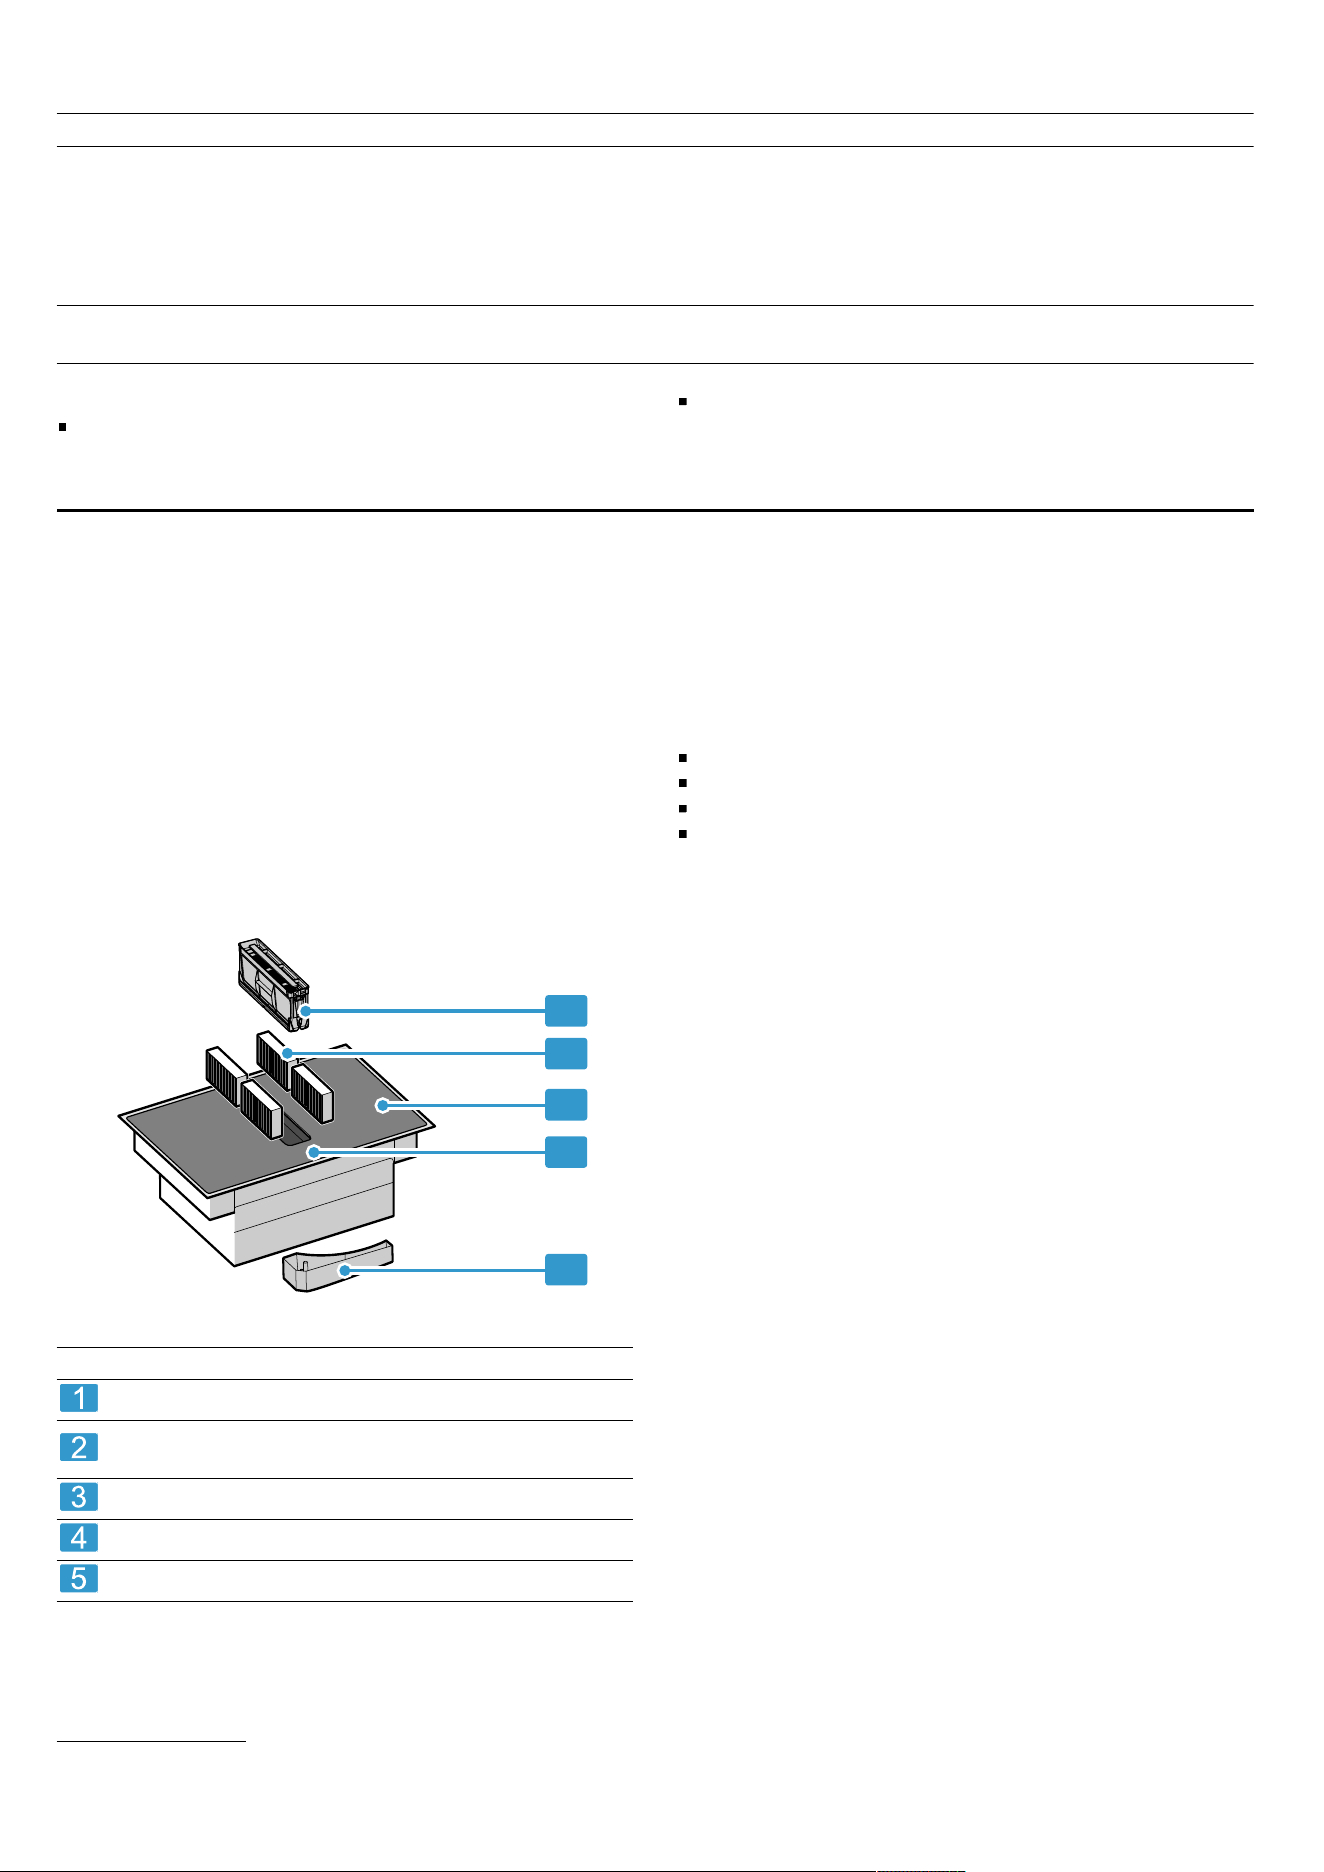
5.2 Your new appliance
Information about your new appliance
2
1
3
4
5
No. Designation
Grease filter
Odour filter for circulating-air mode or acoustics fil-
ter for air extraction mode
1
Hob
Control panel
Overflow container
5.3 Special accessories
Depending on the appliance model, various accessories
are available and you can obtain these from specialist
retailers, from our after-sales service or from our official
website.
Air extraction set
Air recirculation set
Odour filter for recirculating air mode
Acoustics filter for air extraction mode
1
Depending on the appliance specifications.
7
en Familiarising yourself with your appliance
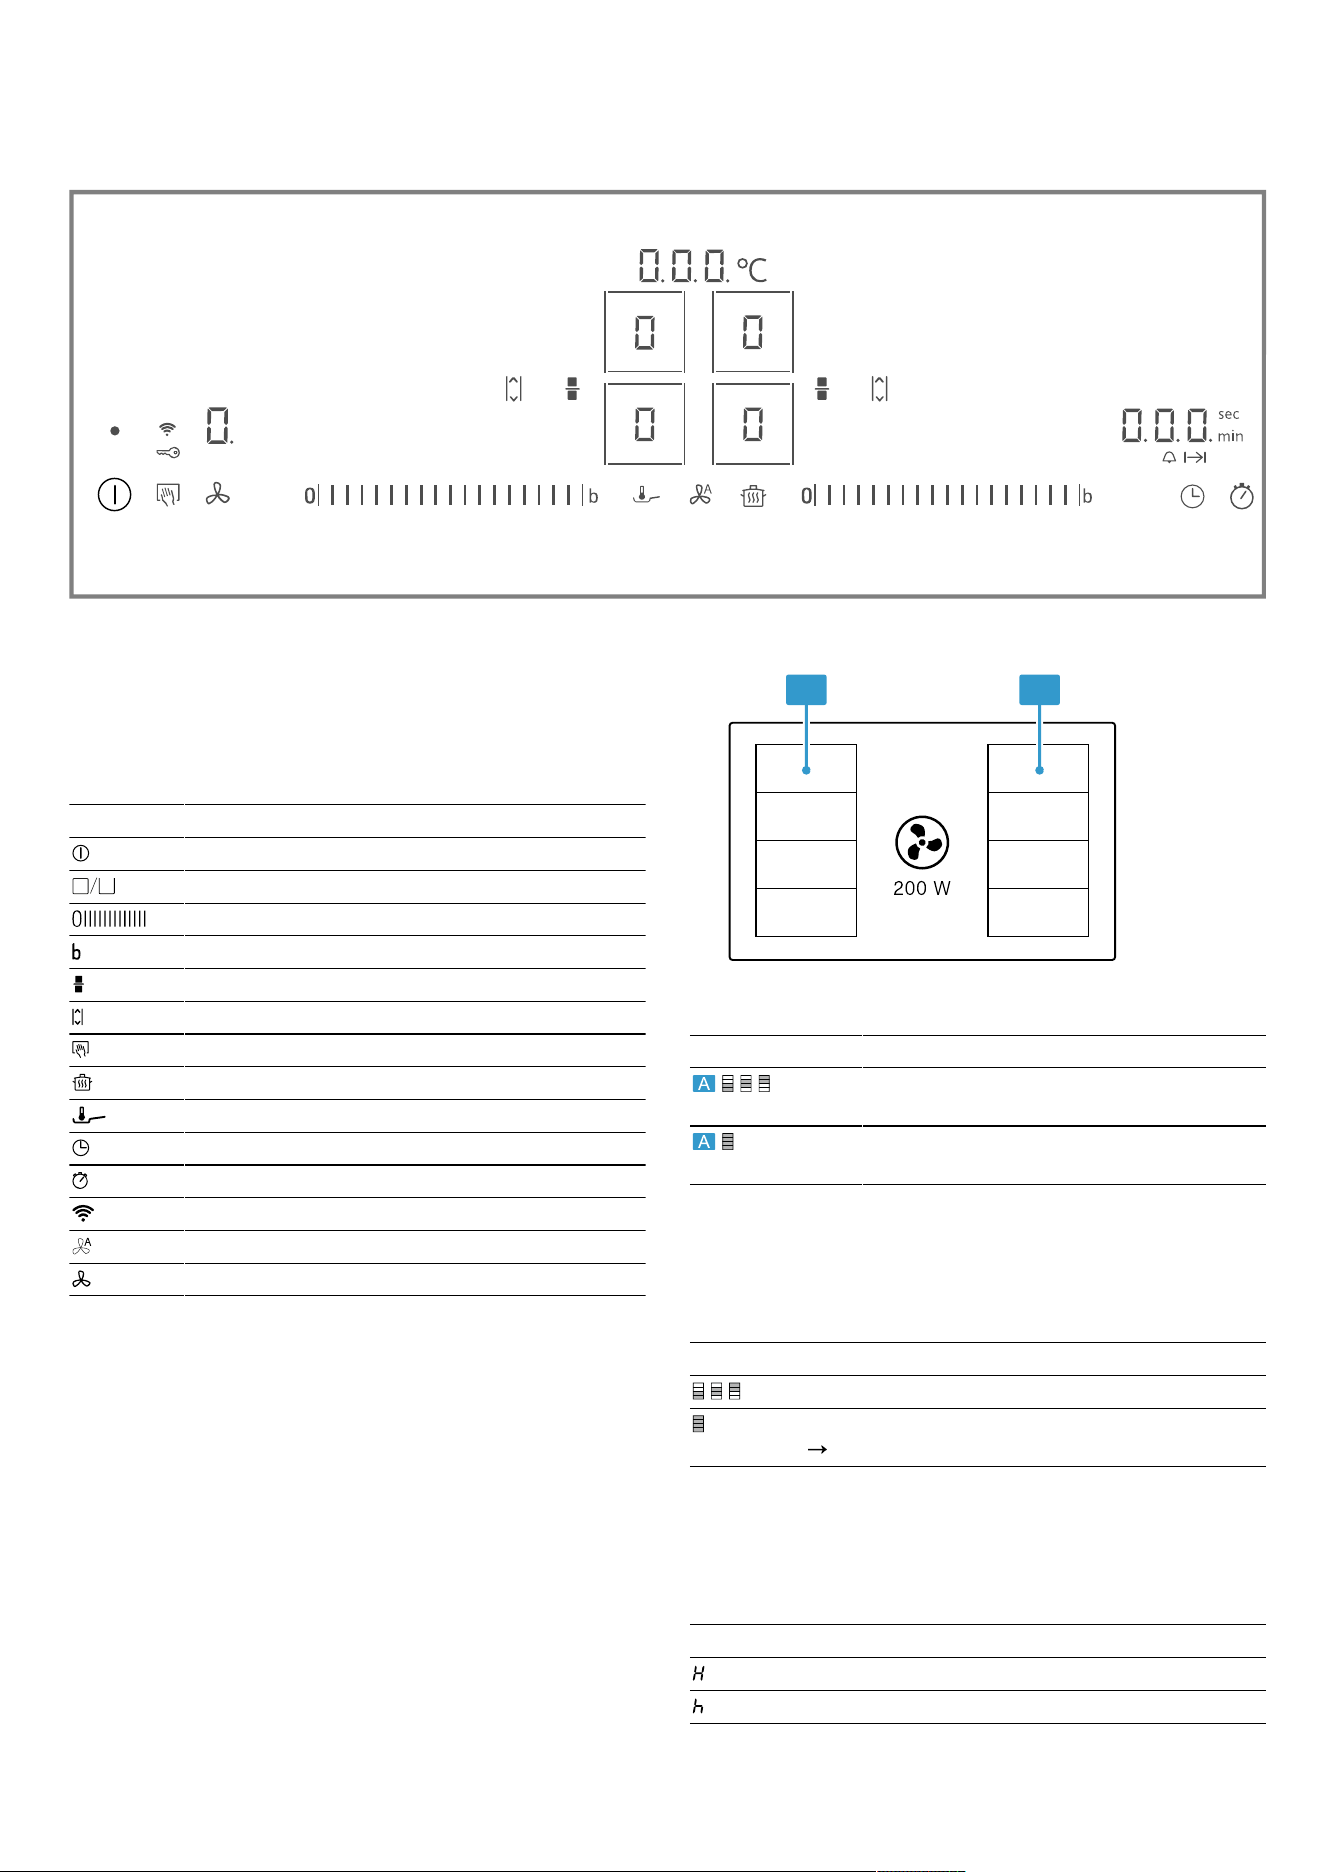
5.4 Control panel
Individual details, such as colour and shape, may differ from the figure.
Tip: Always keep the control panel clean and dry.
Note: Do not place any cookware near the displays or
sensors. The electronics may overheat.
Selection sensors
When you switch on the hob, the symbols for the con-
trols available at this time light up.
Sensor Function
Main switch
Select a cooking zone
Settings range
powerBoost / shortBoost
flexInduction
powerMove Plus
Wipe protection / Childproof lock
Keep-warm function
fryingSensor
Switch-off timer / Timer
countUp function
Wi-Fi
Sensor ventilation control
Ventilation control
Depending on the status of the hob, the displays for the
cooking zones and the various activated and available
functions also light up.
5.5 Distribution of the cooking zones
The specified power has been measured with the stand-
ard pots, which are described in IEC/EN 60335-2-6. The
power may vary depending on the size of the cookware
or cookware material.
A A
Area Highest power level
Power level 9
powerBoost
2200W
3700W
Power level 9
powerBoost
3300W
3700W
5.6 Cooking zone
Before you start cooking, check whether the size of the
cookware fits the cooking zone that you want to use for
cooking:
Area Cooking zone type
Single-circuit cooking zone
Flex Zone
"flexInduction", Page12
5.7 Residual heat indicator
The hob has a residual heat indicator for each cooking
zone. Do not touch the cooking zone if the residual heat
indicator is lit.
Display Meaning
The cooking zone is hot.
The cooking zone is warm.
8
Operating modes en
Operating modes6 Operating modes
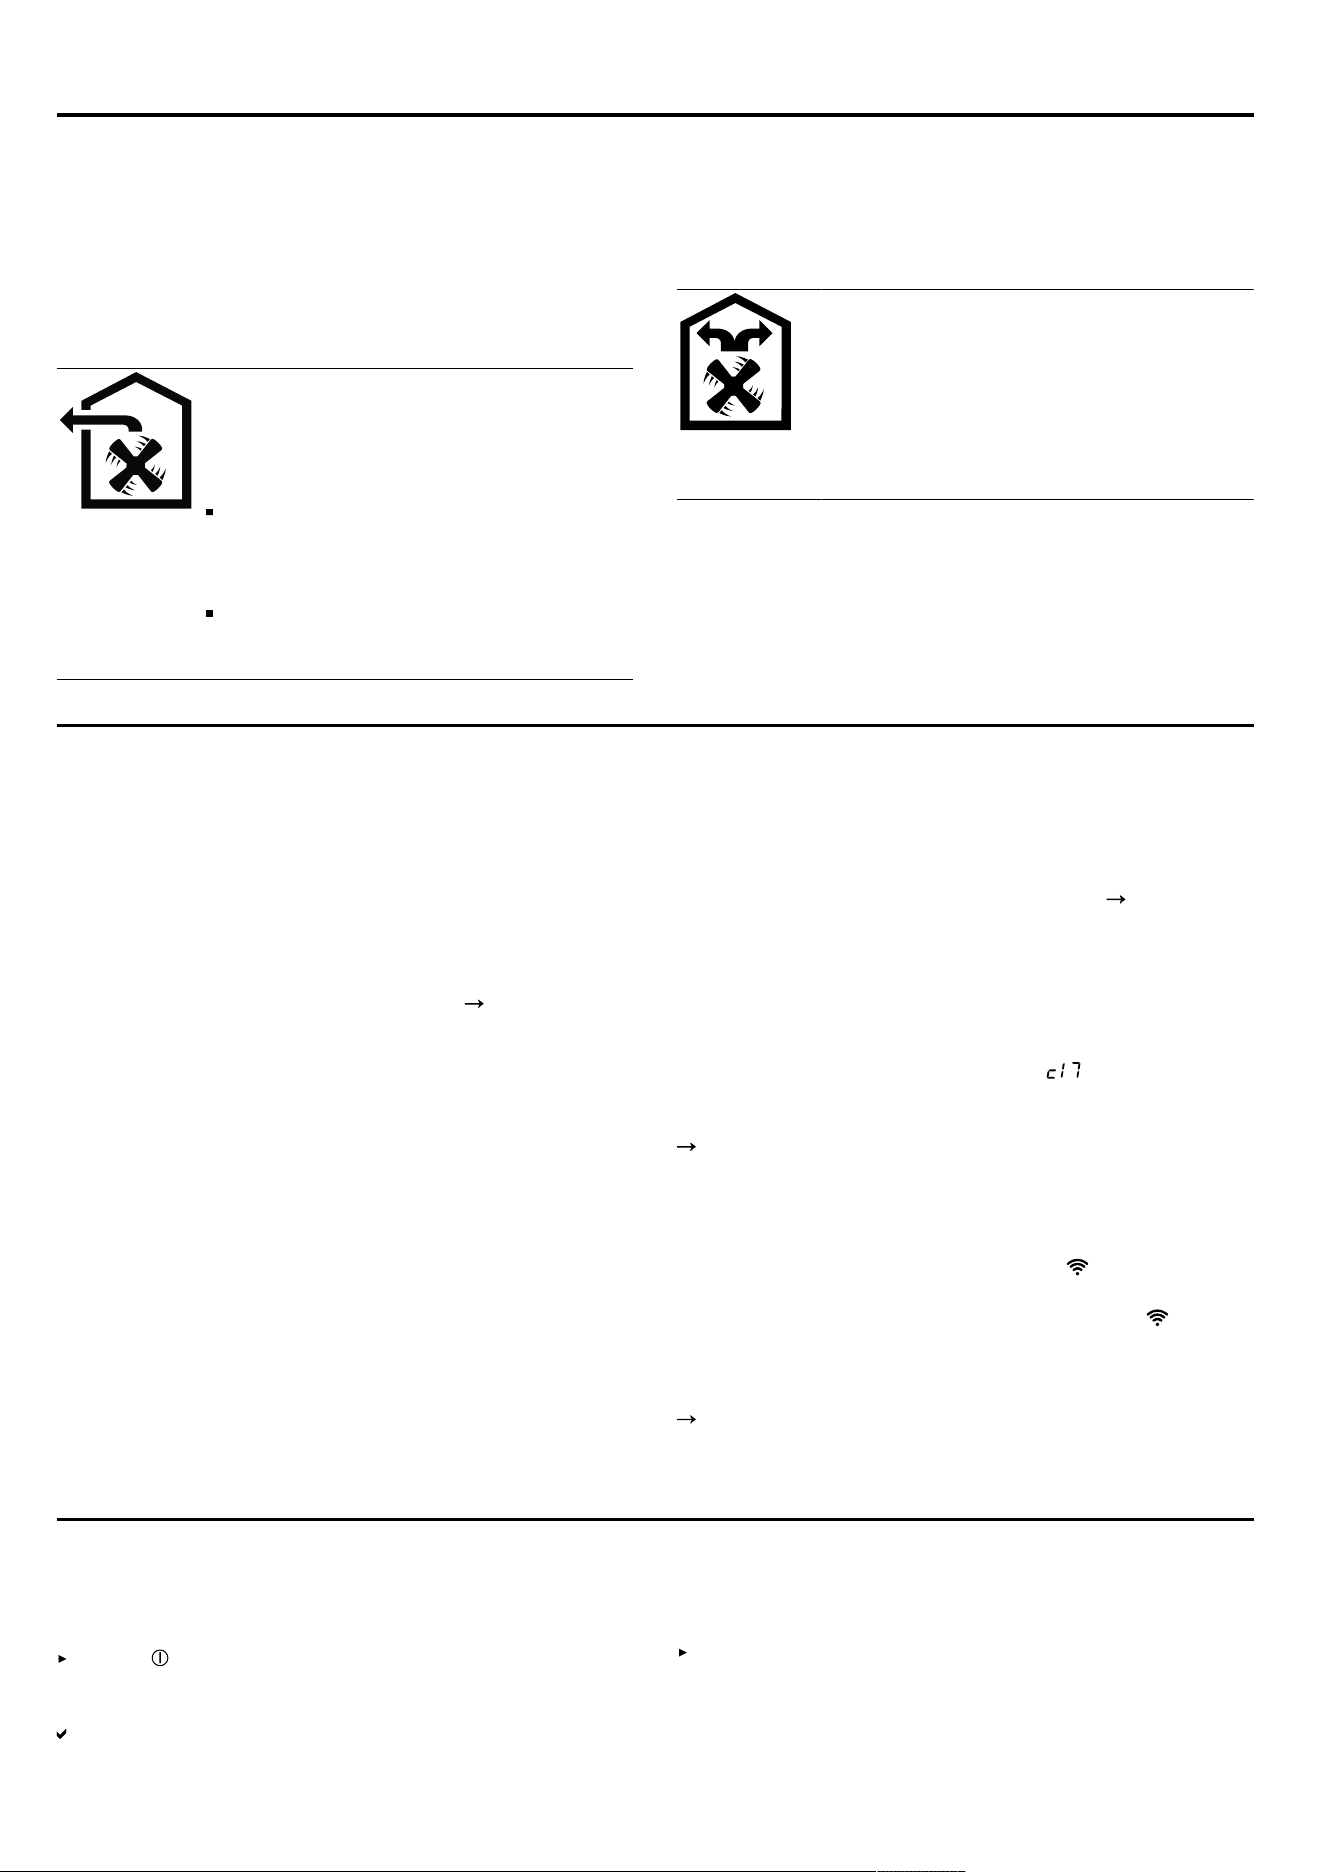
You can use your appliance in air extraction mode or
circulating-air mode.
6.1 Air extraction mode
The air which is drawn in is cleaned by the grease filters
and conveyed to the exterior by a pipe system.
The air must not be discharged into a flue
that is used for exhausting fumes from
appliances burning gas or other fuels (not
applicable to appliances that only dis-
charge the air back into the room).
If the exhaust air is to be conveyed into
a non-functioning smoke or exhaust
gas flue, you must obtain the consent
of the heating engineer responsible.
If the exhaust air is conveyed through
the external wall, a telescopic duct
should be used.
6.2 Air recirculation
The air which is drawn in is cleaned by the grease filters
and an odour filter, and conveyed back into the room.
To bind odours in air recirculation mode,
you must install an odour filter. The differ-
ent options for operating the appliance in
air circulation mode can be found in our
catalogue. Alternatively, ask your dealer.
The required accessories are available
from specialist retailers, from our after-
sales service or from the online shop.
Note: When cooking intensively and for a long time,
moisture is released into the air in the room. When us-
ing the appliance in air recirculation mode, we recom-
mend ventilating the kitchen adequately, e.g. by briefly
opening a window to remove excessive moisture.
Before using for the first time7 Before using for the first time
Observe the following recommendations.
7.1 Initial cleaning
Remove any leftover packaging from the hob surface
and wipe the surface with a damp cloth. You can find a
list of recommended detergents on the official website
siemens-home.bsh-group.com.
More information on care and cleaning.
Page25
7.2 Preparing the appliance
To ensure correct operation, you must arrange the com-
ponents in this order:
1.
Insert the filter.
2.
Insert the metal grease filter.
Note: Never operate the appliance without the metal
grease filter and the overflow container.
7.3 Cooking with induction
In comparison to conventional hobs, induction techno-
logy brings with it a series of changes and has a num-
ber of benefits such as time savings when cooking and
frying, energy savings as well as greater ease of clean-
ing and care. It also offers improved heat control as the
heat is generated directly in the cookware.
7.4 Cookware
You can find a list of recommended cookware on the of-
ficial website siemens-home.bsh-group.com.
Further information on suitable cookware.
Page6
7.5 Setting the operating mode
The appliance is supplied with a preset circulating-air
mode.
When your hob is installed with an air outlet to the out-
side, you must configure the setting to this mode.
You can find additional information about this in the sec-
tion entitled
"Basic settings", Page21
7.6 Setting Home Connect
When you first switch on the appliance, you are promp-
ted to set up your home network. The symbol lights
up for a few seconds on the display panel.
To begin setting up the connection, touch the sensor
and proceed in accordance with the information given in
the section entitled . To exit initial set-up, touch any
sensor.
"HomeConnect", Page23
Basic operation8 Basic operation
8.1 Switching on the hob
Touch .
The symbols for the cooking zones and the currently
available functions light up.
The hob is ready for use.
reStart
If you switch the appliance on within four seconds of
switching it off, the hob operates with the settings that
were previously set.
9
en Basic operation
8.2 Switching the hob off
Touch until the displays go out.
All cooking zones are switched off.
Note: If all of the cooking zones are switched off for
longer than 20seconds, the hob is automatically
switched off.
8.3 Setting the power level in the cooking
zones
The cooking zone has 17 power levels, which are dis-
played from to with intermediate values. Select the
best power level for the food and the planned cooking
process.
1.
Touch for the required cooking zone.
The display lights up brighter.
2.
Select the required power level in the settings area.
The power level has been set.
Note: If no cookware is placed on the cooking zone or
the pot is not suitable, the selected power level flashes.
After a certain period of time, the cooking zone switches
itself off.
quickStart
If you place cookware on the hob before you switch it
on, the cookware is detected when you switch on and
the corresponding cooking zone is selected automat-
ically. Select the power level in the next 20 seconds,
or the hob switches itself off.
Changing the power level and switching off the
cooking zone
1.
Select the cooking zone.
2.
Select the required power level in the settings area or
set it to .
The cooking zone's power level changes or the cook-
ing zone switches itself off and the residual heat indic-
ator appears.
8.4 Cooking recommendations
The table shows which power level ( ) is suitable for
which food. The cooking time ( ) may vary depend-
ing on the type, weight, thickness and quality of the
food. To preheat, set power level 8–9.
Melting
Butter, honey, gelatine 1-2 -
Heating and keeping warm
Boiled sausages
1
3-4 -
Defrosting and heating
Spinach, frozen 3-4 15-25
Poaching, simmering
Potato dumplings
1
4.5-5.5 20-30
Whisked sauces, e.g. Béarnaise
sauce, Hollandaise sauce
3-4 8-12
Boiling, steaming, braising
Rice, with double the volume of
water
2.5-3.5 15-30
Unpeeled potatoes 4.5-5.5 25-35
Pasta
1
6-7 6-10
Soups 3.5-4.5 15-60
Vegetables 2.5-3.5 10-20
Stew in a pressure cooker 4.5-5.5 -
Braising
Pot roast 4-5 60-100
Goulash
2
3-4 50-60
Roasting/frying with a small
amount of fat
1
Escalope, plain or breaded 6-7 6-10
Steak, 3 cm thick 7-8 8-12
Poultry breast, 2cm thick 5-6 10-20
Hamburgers (2 cm thick) 6-7 10-20
Fish and fish fillet, breaded 6-7 8-20
Prawns and scampi 7-8 4-10
Sautéing fresh vegetables and
mushrooms
7-8 10-20
Frozen dishes, e.g. stir-fries 6-7 6-10
Omelette (cooked one after the
other)
3.5-4.5 3-10
Frying (150 to 200g per batch
in 1 to 2l oil, deep-fried in
batches)
1
Frozen products, e.g. chips,
chicken nuggets
8-9 -
Vegetables, mushrooms,
breaded, beer-battered or tem-
pura
6-7 -
Small baked items, e.g. dough-
nuts, battered fruit
4-5 -
1
Without lid
2
Preheat to power level 8 - 8.5
10

Ventilation control en
Ventilation control9 Ventilation control
You can use the hood control to control the highly effi-
cient air extraction system that is integrated in the cook-
ing surface.
9.1 Manual ventilation control
You can control the ventilation setting manually.
Note: When tall items of cookware are used, we cannot
guarantee that the extraction system will work at op-
timum power. Extraction can be improved by placing the
lid on the cookware at an angle.
Activating the manual ventilation control
1.
Touch .
The ventilation system starts at the preset perform-
ance level.
2.
Within the next 10seconds, select the required per-
formance level in the settings area.
The set performance level lights up.
3.
Touch to confirm the setting.
The ventilation system is activated.
Changing or deactivating manual ventilation
control
1.
Touch .
2.
Select the required performance level in the settings
area or set it to .
9.2 Intensive ventilation setting
There are two intensive modes for the ventilation sys-
tem. If you activate the intensive settings, the ventilation
system works at maximum output for a short time.
Activating the intensive ventilation setting
1.
Touch .
2.
Select the required intensive setting:
Intensive setting I: Touch the symbol. The dis-
play lights up. The setting is activated.
Intensive setting II: Touch the symbol twice. The
display lights up. The setting is activated.
Note: After approx. eightminutes, the appliance auto-
matically switches back to performance level .
Changing or deactivating the intensive
ventilation setting
1.
Touch .
2.
Select the required performance level in the settings
area or set it to .
9.3 Automatic start for the ventilation
system
If you select a performance level for a cooking zone, the
automatic start switches on.
As standard, the hob is supplied with sensor-controlled
automatic start. You can find out how to change this set-
ting in section .
"Basic settings", Page21
Automatic start with sensor control
The air quality sensor automatically registers the cook-
ing vapours, selects the optimum performance level,
and the line above the display lights up.
Automatic start via performance levels
The ventilation system switches on at a performance
level in accordance with the respective performance
level for the cooking zone.
9.4 Automatic mode with sensor control
The hob has an air quality sensor that automatically re-
gisters the cooking vapours and switches on the ventila-
tion system.
If the automatic start is switched off or is set in accord-
ance with the power levels, you can manually switch this
on with sensor control at any time.
Activating automatic mode with sensor control
Touch .
The display lights up.
The optimum performance level is set automatically
with the help of the sensor.
The function has been activated.
Deactivating automatic mode with sensor
control
Touch .
The display goes out.
The function has now been deactivated.
Note: You can find out how to set the sensor sensitivity
in section .
"Basic settings", Page21
9.5 Run-on function for the ventilation
system
The run-on function leaves the ventilation system run-
ning for a few minutes after the hob has been switched
off. This allows you to remove any cooking fumes that
remain. The ventilation system then automatically
switches off.
The hob is supplied as standard with the run-on time
with a maximum switch-off time. You can find out how to
change this setting in section .
"Basic settings", Page21
Activating the fan run-on
The run-on time is configured in accordance with the ba-
sic settings:
Via the control for the air quality sensor. The sym-
bol and the display light up.
With a maximum switch-off time. The symbol lights
up.
Note: The run-on function only switches on if at least
one cooking zone has been switched on for at least one
minute.
Deactivating the fan run-on
Manually
To deactivate the function, touch .
11
en flexInduction
Automatically
The appliance deactivates the run-on function when:
The run-on time has elapsed.
You switch the appliance on again.
The sensor ensures that the air quality is in order.
flexInduction10 flexInduction
The flexible cooking zone allows you to position cook-
ware of any shape or size any way you like. It consists
of four inductors that work independently of each other.
When the flexible cooking zone is in use, only the area
that is covered by cookware is activated.
10.1 Positioning the cookware
The flexible cooking zone can be configured in two
ways, depending on which cookware is used. In order to
guarantee good thermal detection and heat distribution,
we recommend positioning the cookware in the centre,
as shown in the figures.
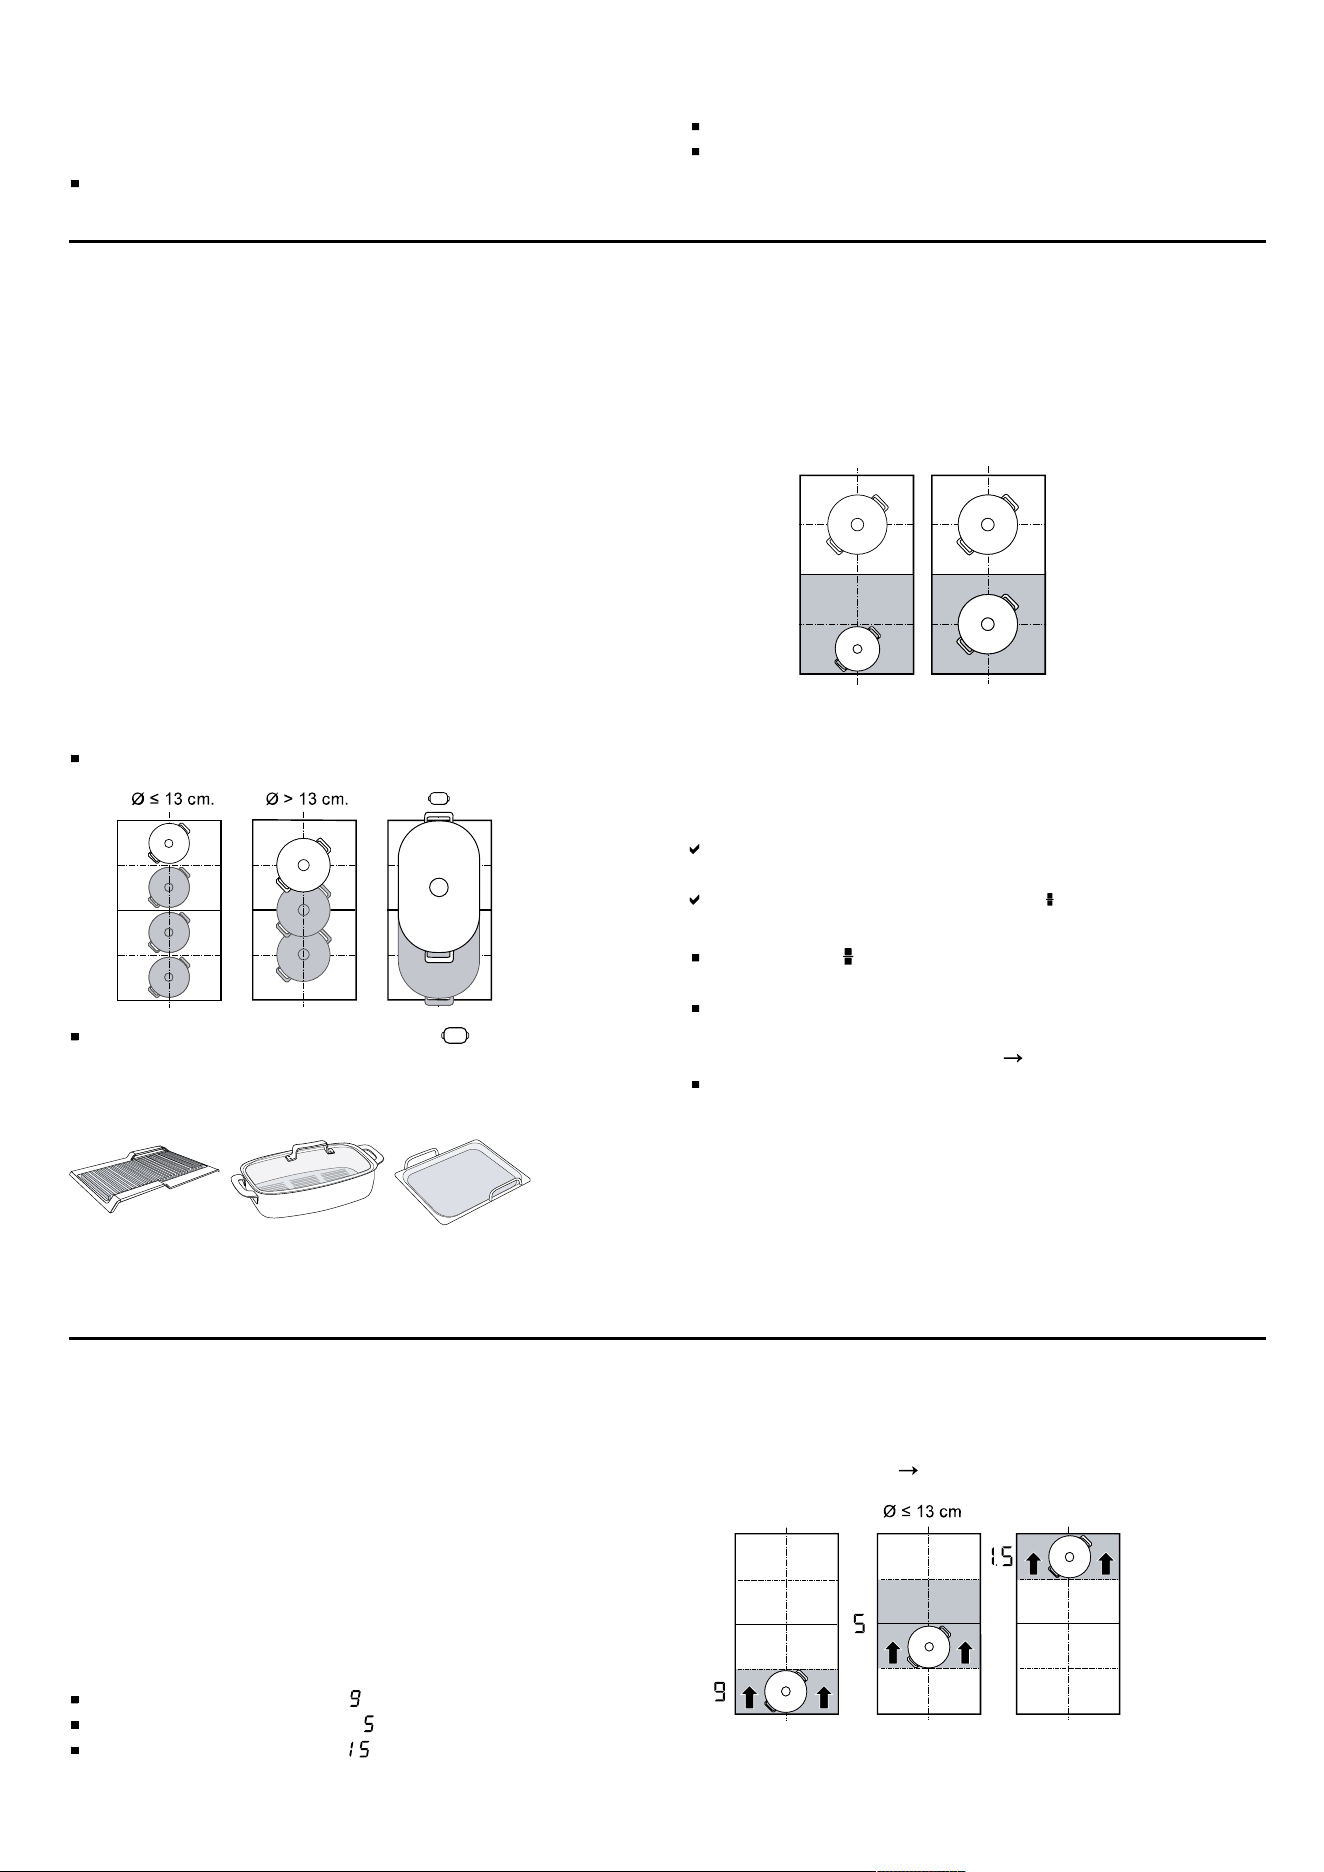
As a connected cooking zone
Recommended for cooking with just one item of cook-
ware.
Position the cookware depending on the size:
Recommended oblong cookware :
As two separate cooking zones
Recommended for cooking with two items of cookware.
You can use the front and rear zone independently of
one another, and set a separate power level for each
zone.
10.2 Switching on flexInduction
1.
Place the cookware on the cooking zone.
2.
The appliance detects the cookware and selects the
cooking zone.
The cooking zones split or connect automatically de-
pending on the size and position of the cookware.
The FlexZone is connected and lights up.
Notes
By touching , you can manually change the settings
for the cooking zone.
You can change the default configuration of the flex-
ible cooking zone. You can find out how to do this in
the "Basic settings" section.
Page21
If you move or lift the cookware from an active con-
nected cooking zone, an automatic search starts.
Each item of cookware that is found within the cook-
ing zone during this search is heated at the previ-
ously selected power level.
powerMove Plus11 powerMove Plus
You can use this function to change the power level of
an item of cookware by simply sliding it forwards or
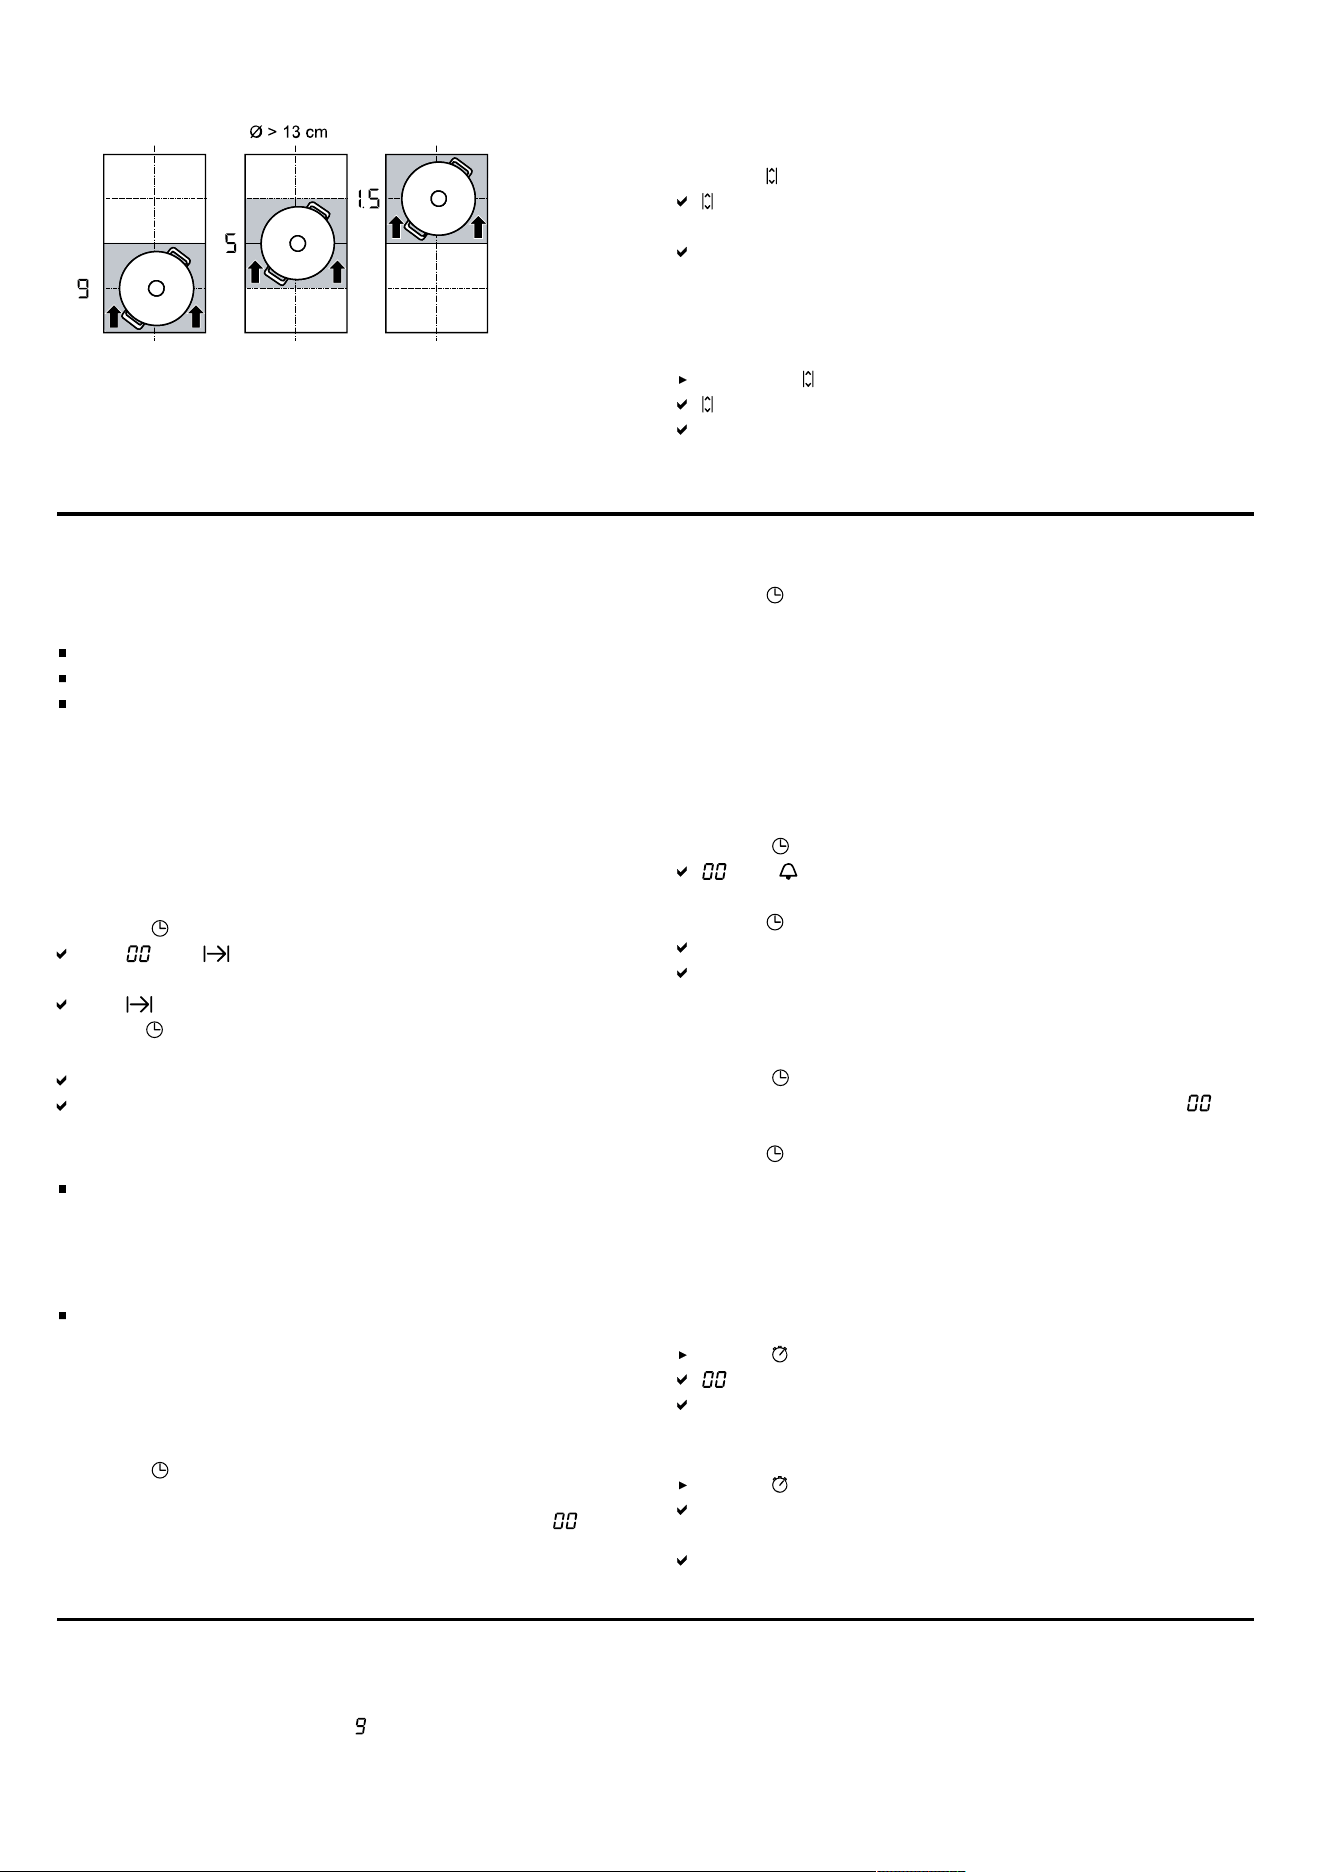
backwards in the flexible cooking zone. The zone is di-
vided into three areas with different power levels.
11.1 Positioning and moving the cookware
Only use one item of cookware. The cooking area de-
pends on the cookware used, as well as its size and po-
sitioning.
Each cooking area has a preset power level:
Front area = power level
Middle area = power level
Rear area = power level .
You can change the standard setting of the preset
power levels. You can find out how to do this in the "Ba-
sic settings" section
Page21
.
12
Time-setting options en
11.2 Activating powerMove Plus
Requirement: Only place one item of cookware on a
flexible zone.
1.
Select one of the two cooking zones in the flexible
zone.
2.
Press .
lights up brighter and the power level for the area in
which the container is located lights up.
The function is switched on.
Note: You can change the power levels during cooking.
11.3 Deactivating powerMove Plus
Touching
lights up dimly.
The function has been deactivated.
Time-setting options12 Time-setting options
Your hob has various functions for setting the cooking
time:
Switch-off timer
Timer
countUp function
12.1 Switch-off timer
Allows you to program a cooking time for one or more
cooking zones. Once the time has elapsed, the cooking
zone is automatically switched off.
Switching on Switch-off timer
1.
Touch twice.
The and displays light up.
2.
Select the required cooking zone and cooking time.
The indicator for the hotplate will light up.
3.
Press to confirm.
4.
Select the required power level.
The cooking time begins to count down.
Once the cooking time has elapsed, the cooking
zone switches itself off and an audible signal sounds.
Notes
If a cooking time has been programmed in a cooking
zone in which the fryingSensor is activated, the pro-
grammed cooking time will start to count down as
soon as the selected temperature level has been
reached.
When you set a cooking time for a cooking zone in
which the cookingSensor is activated, the cooking
time will not start counting down until the selected
temperature level has been reached.
Changing or switching off Switch-off timer
1.
Touch twice.
2.
Select the cooking zone.
3.
In the settings area, change the time or set to to
delete the time.
4.
Press to confirm.
12.2 Timer
Enables the activation of a timer of 0–99 minutes. This
function can be used independently of the cooking
zones and other settings. It does not automatically
switch off the cooking zones.
Switching on Timer
1.
Touch .
and light up.
2.
Set the required time in the settings area.
3.
Press to confirm.
The time begins to count down.
An audible signal sounds and the displays flash once
the time has elapsed.
Changing or switching off the Timer
1.
Touch .
2.
In the settings range, change the time or set to to
delete the time.
3.
Press to confirm.
12.3 countUp function
The stopwatch function displays the time that has
elapsed since activation.
Switching on countUp function
Touch .
light up.
The time begins to count down.
Switching off countUp function
Touch .
The displays for the run time programming function
go out.
The function has been deactivated.
powerBoost13 powerBoost
You can use this function to heat up large volumes of
water more quickly than with .
13
en shortBoost
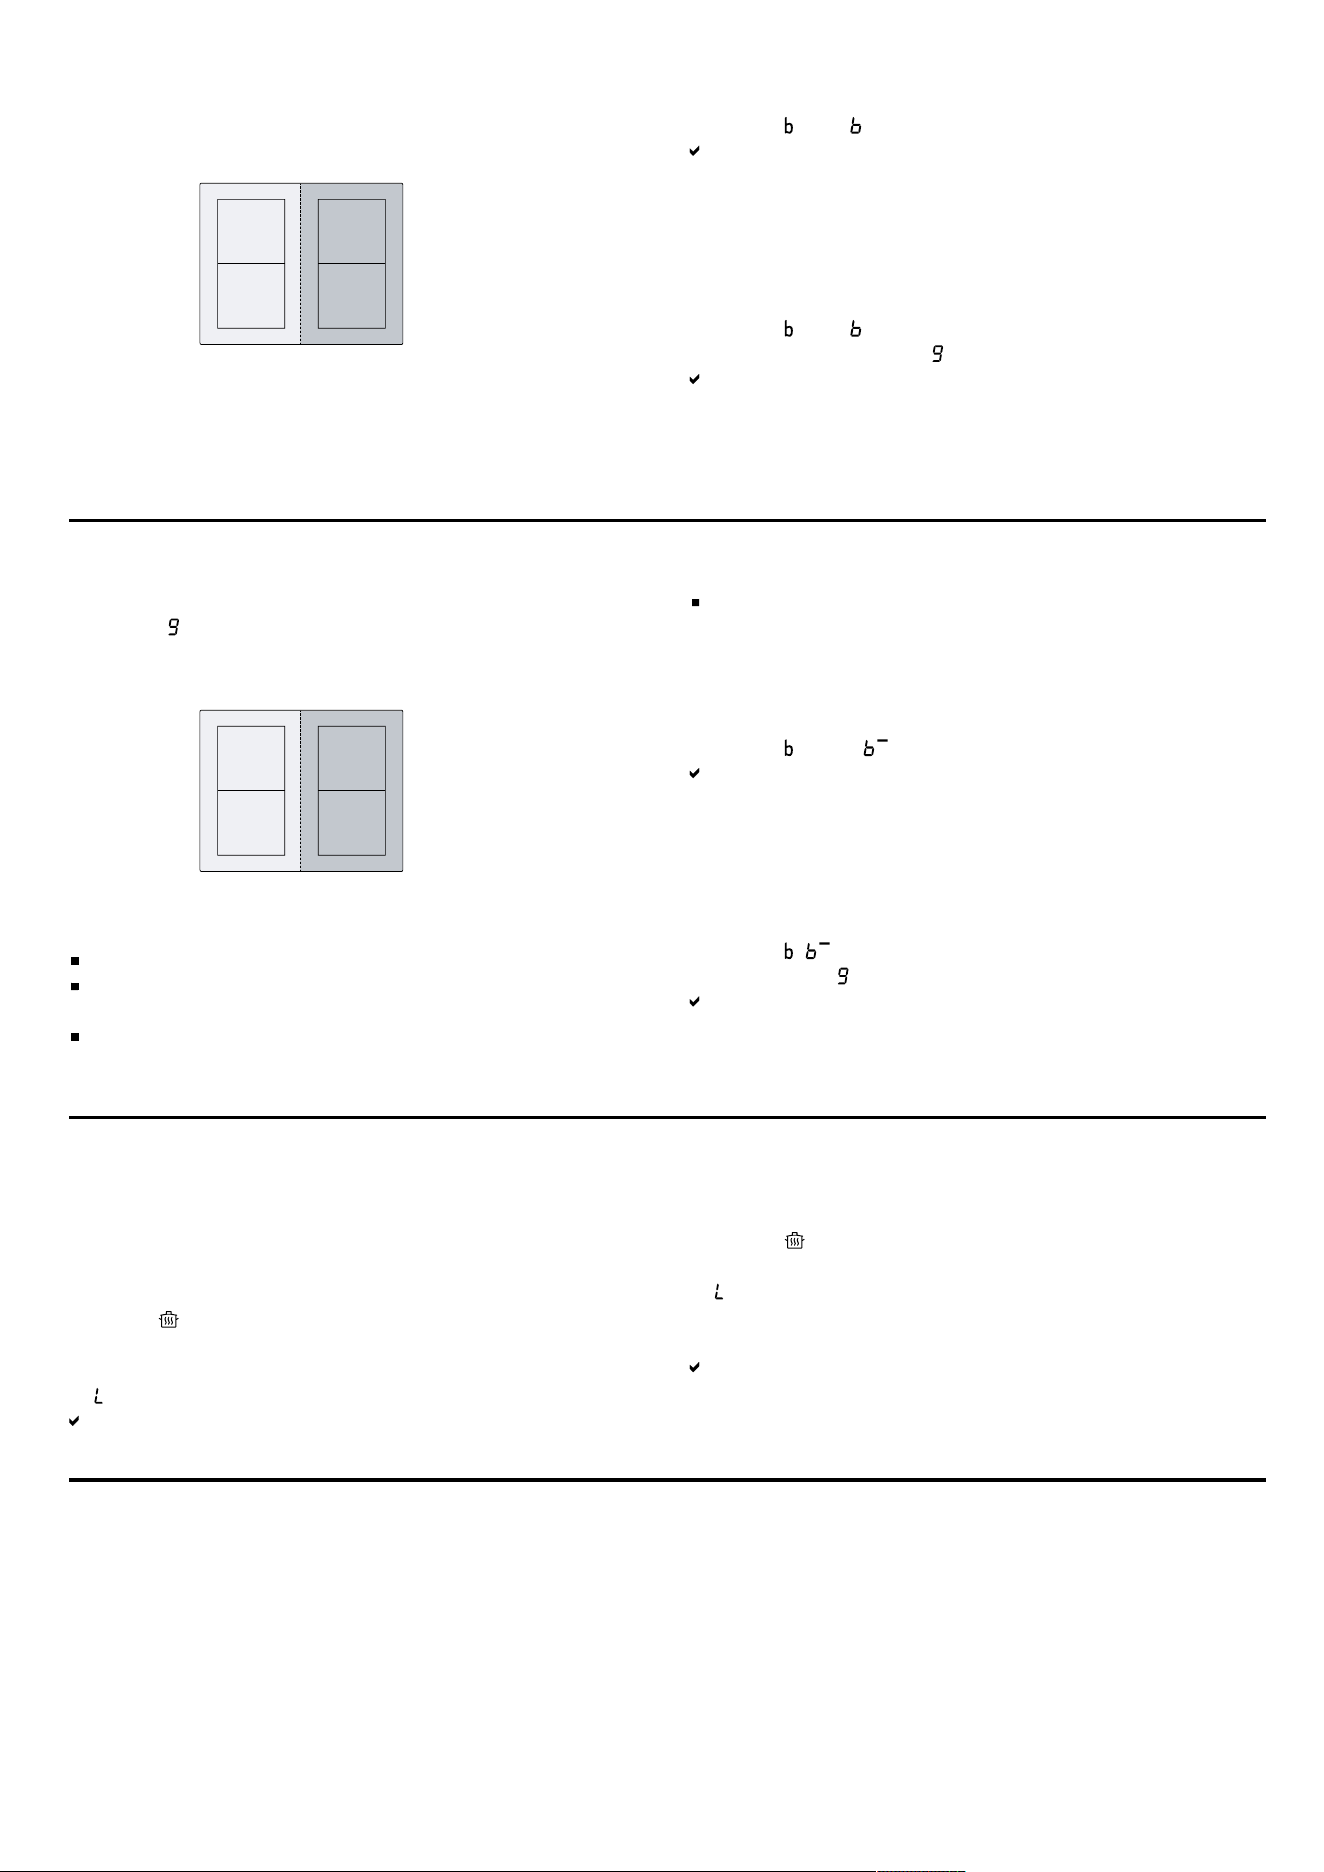
This function is available for all cooking zones, provided
the other cooking zone in the same group is not in use.
13.1 Switching on powerBoost
1.
Select the cooking zone.
2.
Touch . The display lights up.
The function is switched on.
Note: You can also switch on this function when cook-
ing with a connected FlexZone.
13.2 Switching off powerBoost
1.
Select the cooking zone.
2.
Touch . The display goes out and the cooking zone
switches back to the power level.
The function has been deactivated.
Note: In certain circumstances, this function may switch
itself off automatically in order to protect the electronic
elements inside the hob.
shortBoost14 shortBoost
You can use this function to heat up pans more quickly
than with .
This function is available for all cooking zones, provided
the other cooking zone in the same group is not in use.
14.1 Recommended applications
Do not place a lid on the pan.
Never leave pans unattended when they are heating
up.
Only use cold pans.
Use pans with a completely flat base. Do not use
pans with a thin base.
14.2 Switching on shortBoost
1.
Select the cooking zone.
2.
Touch twice. lights up.
The function is switched on.
Note: You can also switch on this function when cook-
ing with a connected FlexZone.
14.3 Switching off shortBoost
1.
Select the cooking zone.
2.
Touch . goes out and the cooking zone switches
back to the power level.
The function has been deactivated.
Note: To avoid high temperatures, this function automat-
ically switches itself off after 30 seconds.
Keep-warm function15 Keep-warm function
You can use this function to melt chocolate or butter
and to keep meals warm.
15.1 Switching on Keep-warm function
1.
Press .
2.
Select the required cooking zone within the next
10seconds.
lights up.
The functions starts.
15.2 Switching off Keep-warm function
1.
Touch .
2.
Select the cooking zone.
goes out.
The cooking zone switches itself off and the residual
heat indicator lights up.
The function has been deactivated.
flexMotion16 flexMotion
You can use this function to transfer the power level, set
cooking time and selected cooking function from one
cooking zone to another.
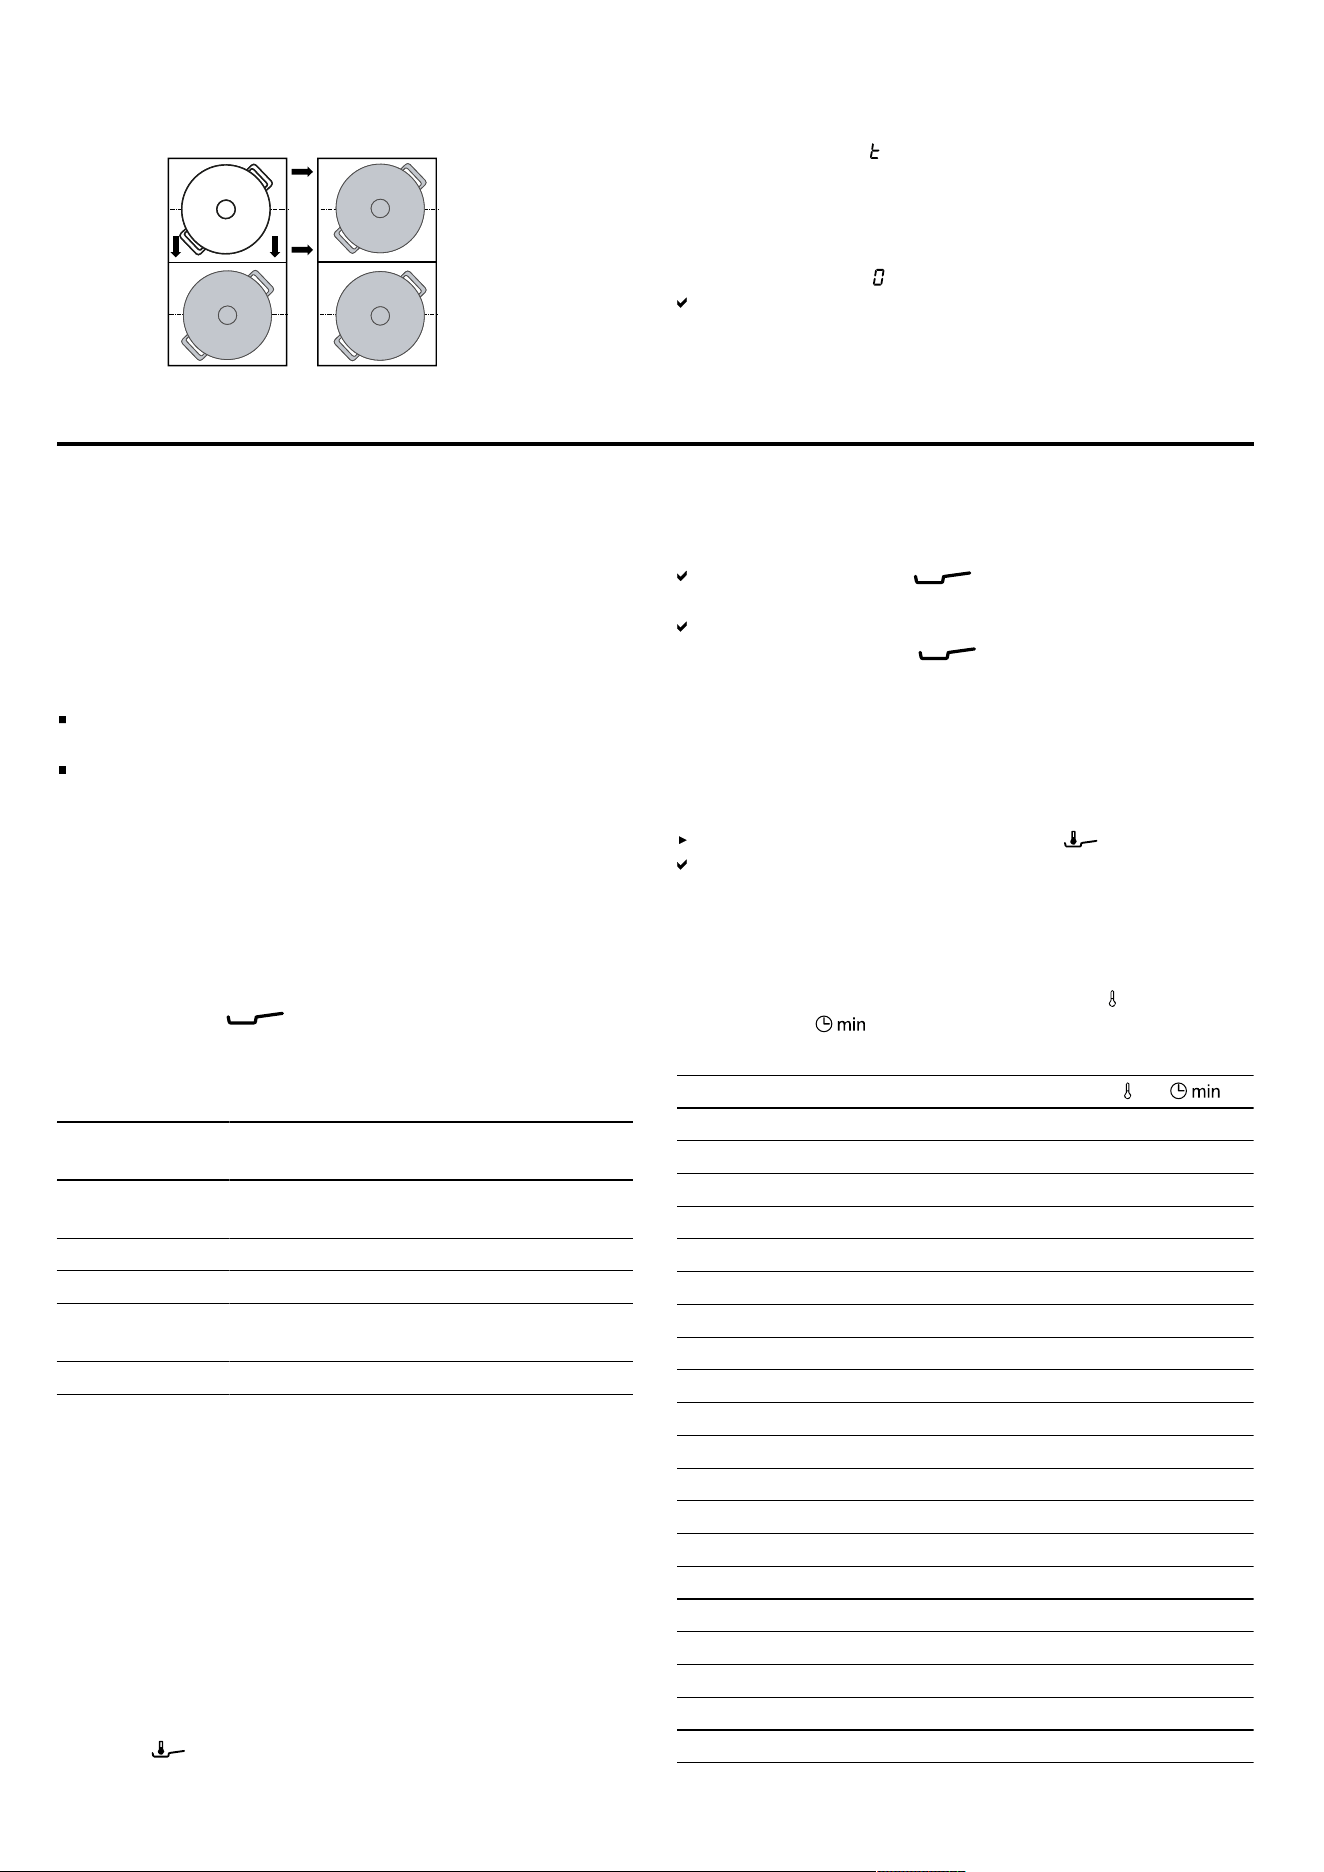
16.1 flexMotion
Requirement: Move the cookware to a cooking zone
which is not switched on, which you have not yet preset
and on which no other cookware has been placed.
14
Meal assistant en
1.
Move the cookware. The cookware is detected and the previously selected
power level and flash alternately on the display for
the new cooking zone.
2.
Select the new cooking zone to implement the set-
tings.
The appliance sets the power level for the original
cooking zone to .
The settings are transferred to the new cooking zone.
Note: If you place a new item of cookware on a different
cooking zone before you have confirmed the settings,
you can use this function for both items of cookware.
Meal assistant17 Meal assistant
The cooking assistant is guaranteed to make cooking
simple and it promises outstanding cooking results.
If you have selected the required temperature, the
sensors continuously measure the temperature of the
cookware and keep it constant during the cooking pro-
cess.
Advantages
Once the selected temperature is reached, it automat-
ically keeps it constant, saving energy.
The oil will not overheat and the food will not boil
over.
17.1 fryingSensor
Suitable for cooking or reducing sauces, pancakes or
frying eggs with butter, for frying vegetables or steaks
up to the required level of boiling, and for keeping the
temperature under control.
This function is available on all cooking zones marked
with this symbol .
Temperature levels
Temperature levels for preparing meals.
Leve
l
Temper-
ature
Functions
1 120ºC Boiling and reducing sauces, fry veget-
ables
2 140ºC Searing in olive oil or butter
3 160ºC Frying fish and coarse foods
4 180ºC Deep-fat frying breaded, frozen and
grilled food
5 215ºC High-temperature grill and griddle plate
Recommended cookware
Special cookware has been developed for this function,
which delivers the best results.
The recommended cookware is available from customer
service, specialist retailers or our online shop siemens-
home.bsh-group.com.
Note: You can also use other cookware. Depending on
the composition of the cookware, the achieved temper-
ature may differ from the selected temperature level.
Switching on the fryingSensor
1.
Place empty cookware on the cooking zone.
2.
Touch and then select the cooking zone.
3.
Within the next 10 seconds, select the required tem-
perature setting on the control panel.
The functions starts. flashes until the set target
temperature is reached.
Once the target temperature has been reached, a sig-
nal tone sounds and stops flashing.
4.
Add the frying fat and then the food to the frying pan.
Note: If you need to cook with more than 250ml oil,
add the oil and wait a few seconds before you add the
food.
Switching off fryingSensor
Select the cooking zone and touch .
The function has been deactivated.
Recommendations for cooking with
fryingSensor
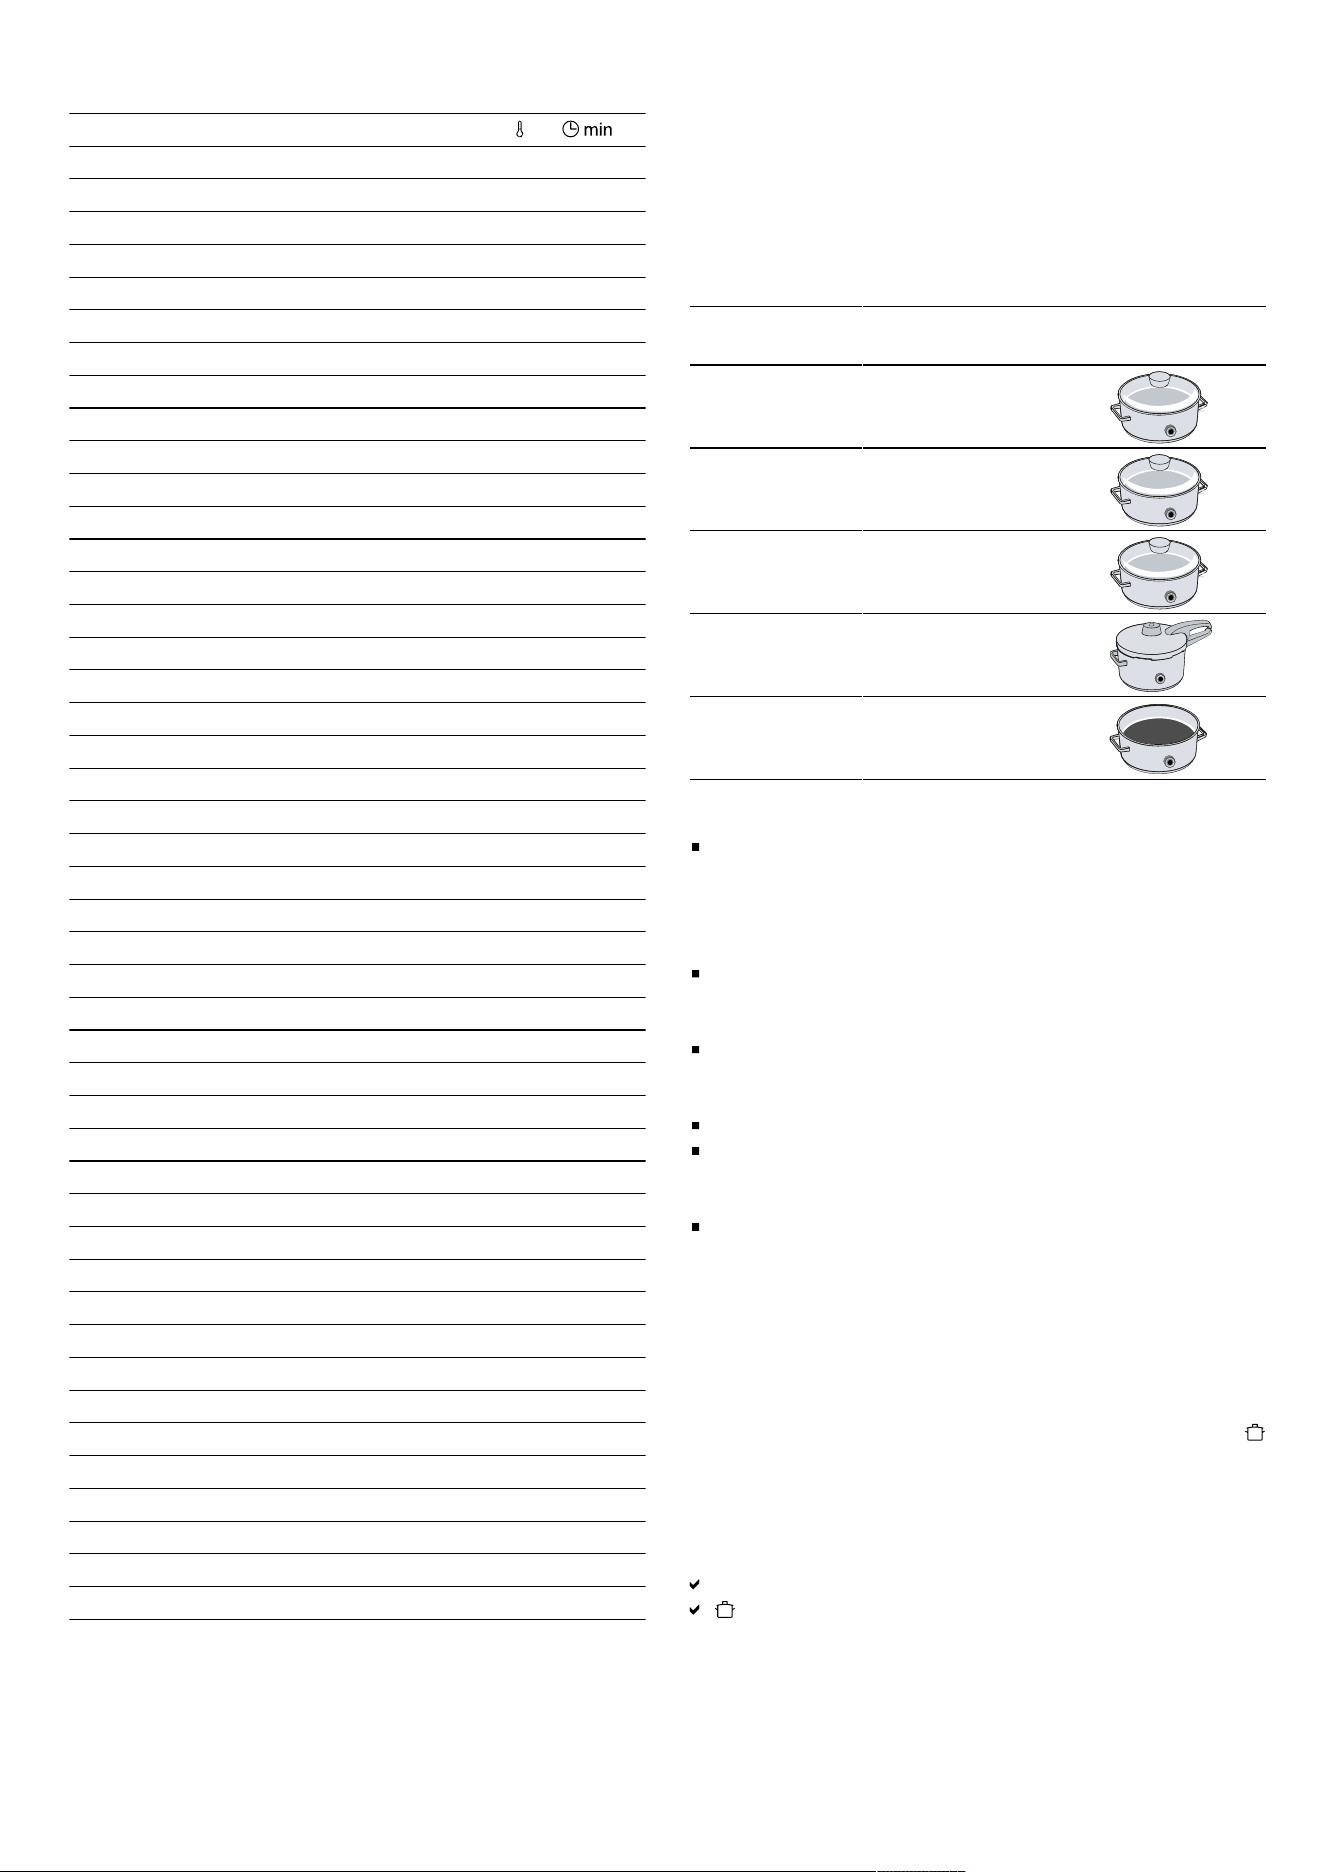
The following table shows the ideal temperature levels
for a selection of dishes. The temperature and the
cooking time depend on the amount, condition
and quality of the food.
Meat
Escalope 4 6-10
Escalope, breaded 4 6-10
Fillet 4 6-10
Chops 3 10-15
Cordon bleu, Wiener Schnitzel 4 10-15
Steak, rare, 3cm thick 5 6-8
Steak, medium, 3cm thick 5 8-12
Steak, well-done, 3cm thick 4 8-12
T-bone steak, rare, 4.5cm thick 5 10-15
T-bone steak, medium, 4.5cm thick 5 20-30
Poultry breast, 2cm thick 3 10-20
Bacon 2 5-8
Minced meat 4 6-10
Hamburgers, 1.5cm thick 3 6-15
Meatballs, 2cm thick 3 10-20
Sausages 3 8-20
Chorizo, fresh sausages 3 10-20
Skewers, kebabs 3 10-20
Gyros 4 7-12
15
en Meal assistant
Fish and seafood
Fish fillet 4 10-20
Fish fillet, breaded 4 10-20
Fish, fried, whole 3 10-20
Sardines 4 6-12
Scampi, prawns 4 4-8
Squid, cuttlefish 4 6-12
Egg dishes
Fried eggs in butter 2 2-6
Fried eggs 4 2-6
Scrambled eggs 2 4-9
Omelette 2 3-6
French toast 3 4-8
Crêpes, blinis, pancakes, tacos 5 1-3
Vegetables
Roast potatoes 5 6-12
Chips 4 15-25
Potato pancakes 5 2-4
Onions, roasted garlic 2 2-10
Onion rings 3 5-10
Courgettes, aubergines, peppers 2 4-12
Green asparagus 3 4-15
Mushrooms 4 10-15
Vegetables, braised in oil 1 10-20
Vegetables in tempura batter 4 5-10
Frozen products
Chicken nuggets 4 10-15
Fish fingers 4 8-12
Chips 5 4-8
Stir-fries 3 6-10
Spring rolls 4 10-30
Pastries, croquettes 5 3-8
Sauces
Tomato sauce 1 25-35
Béchamel sauce 1 10-20
Cheese sauce 1 10-20
Sweet sauces 1 15-25
Sauces, reduced 1 25-35
Other
Fried cheese 3 7-10
Croutons 3 6-10
Toasted bread 4 4-8
Dried ready meals 1 5-10
Almonds, walnuts, pine nuts, roasted 4 3-15
Popcorn 5 3-4
17.2 cookingSensor
You can use this function to heat up, cook or boil foods,
cook with the pressure cooker or fry in a pot with a lot
of oil at a controlled temperature.
In order to use these functions, you need the wireless
cooking sensor for wireless cooking.
This function is available for all cooking zones with the
wireless cooking sensor on the normal cookware.
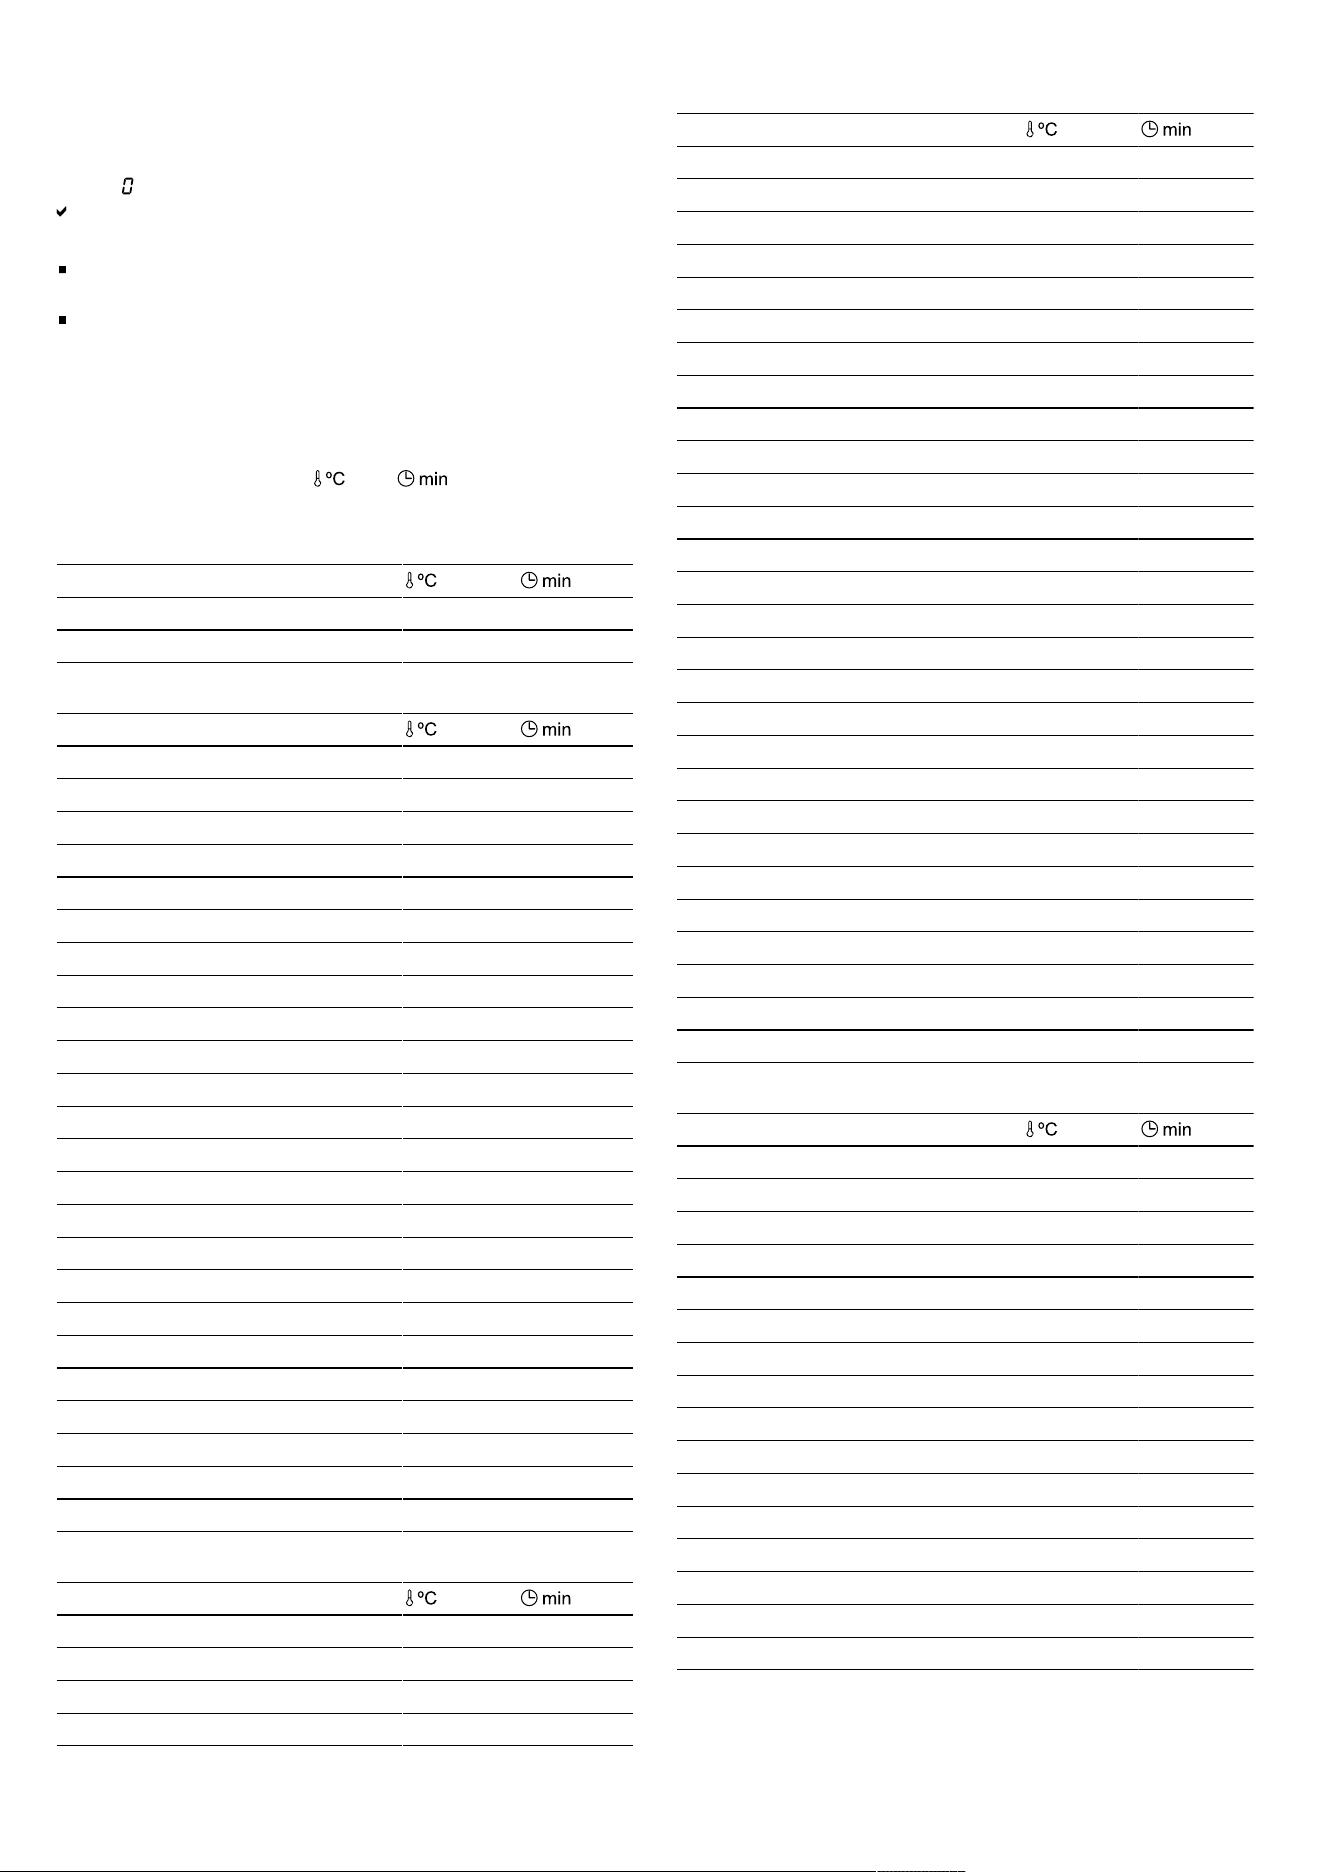
Temperature levels
Temperature levels for preparing meals.
Leve
l
Temper-
ature
Functions Cookware
1 70ºC Heating and keeping
warm
2 90ºC Cooking
3 100ºC Bringing to the boil
4 120ºC Cooking in a pressure
cooker
5 180ºC Deep-fat frying
Notes on the cookingSensor function
The wireless cooking sensor measures the temperat-
ure of the liquid through the silicone base attached to
the container. To ensure correct measurement, the sil-
icone base must be completely covered by the liquid
to be measured.
The frame of the wireless cooking sensor and the sil-
icone base fitted on the cookware must be com-
pletely dry before you can start cooking.
Do not remove the wireless cooking sensor during
cooking. After cooking, remove the sensor carefully
as the sensor may be hot.
To save energy, use a lid.
Position the cookware in such a way that the wireless
cooking sensor is pointing towards the outer side of
the hob.
To prevent overheating, never align the cooking
sensor to any other hot cookware.
Switching on cookingSensor
Requirement: Connect the wireless cooking sensor.
1.
Attach the wireless cooking sensor to the cookware.
2.
Place cookware filled with sufficient liquid on the re-
quired cooking zone and put the lid on.
3.
Press on the centre of the wireless cooking sensor.
lights up on the control panel. Then select the cook-
ing zone on which you have placed the cookware
with the wireless cooking sensor.
4.
Select the appropriate temperature level for the food
that is to be cooked.
The function is switched on.
flashes until the water or oil has reached the ap-
propriate temperature for adding the food. A signal
sounds and the temperature symbol stops flashing.
5.
Once the signal tone has sounded, remove the lid
and add the food. Keep the lid on while cooking.
16
Meal assistant en
Switching off cookingSensor
1.
Select the cooking zone.
2.
Set in the settings area.
The functions are switched off.
Notes
To re-activate the cooking functions, wait for approx-
imately 10 seconds.
The Bluetooth® connection is deactivated if the hob
is disconnected and switches to energy-saving mode.
Recommendations for cooking with
cookingSensor
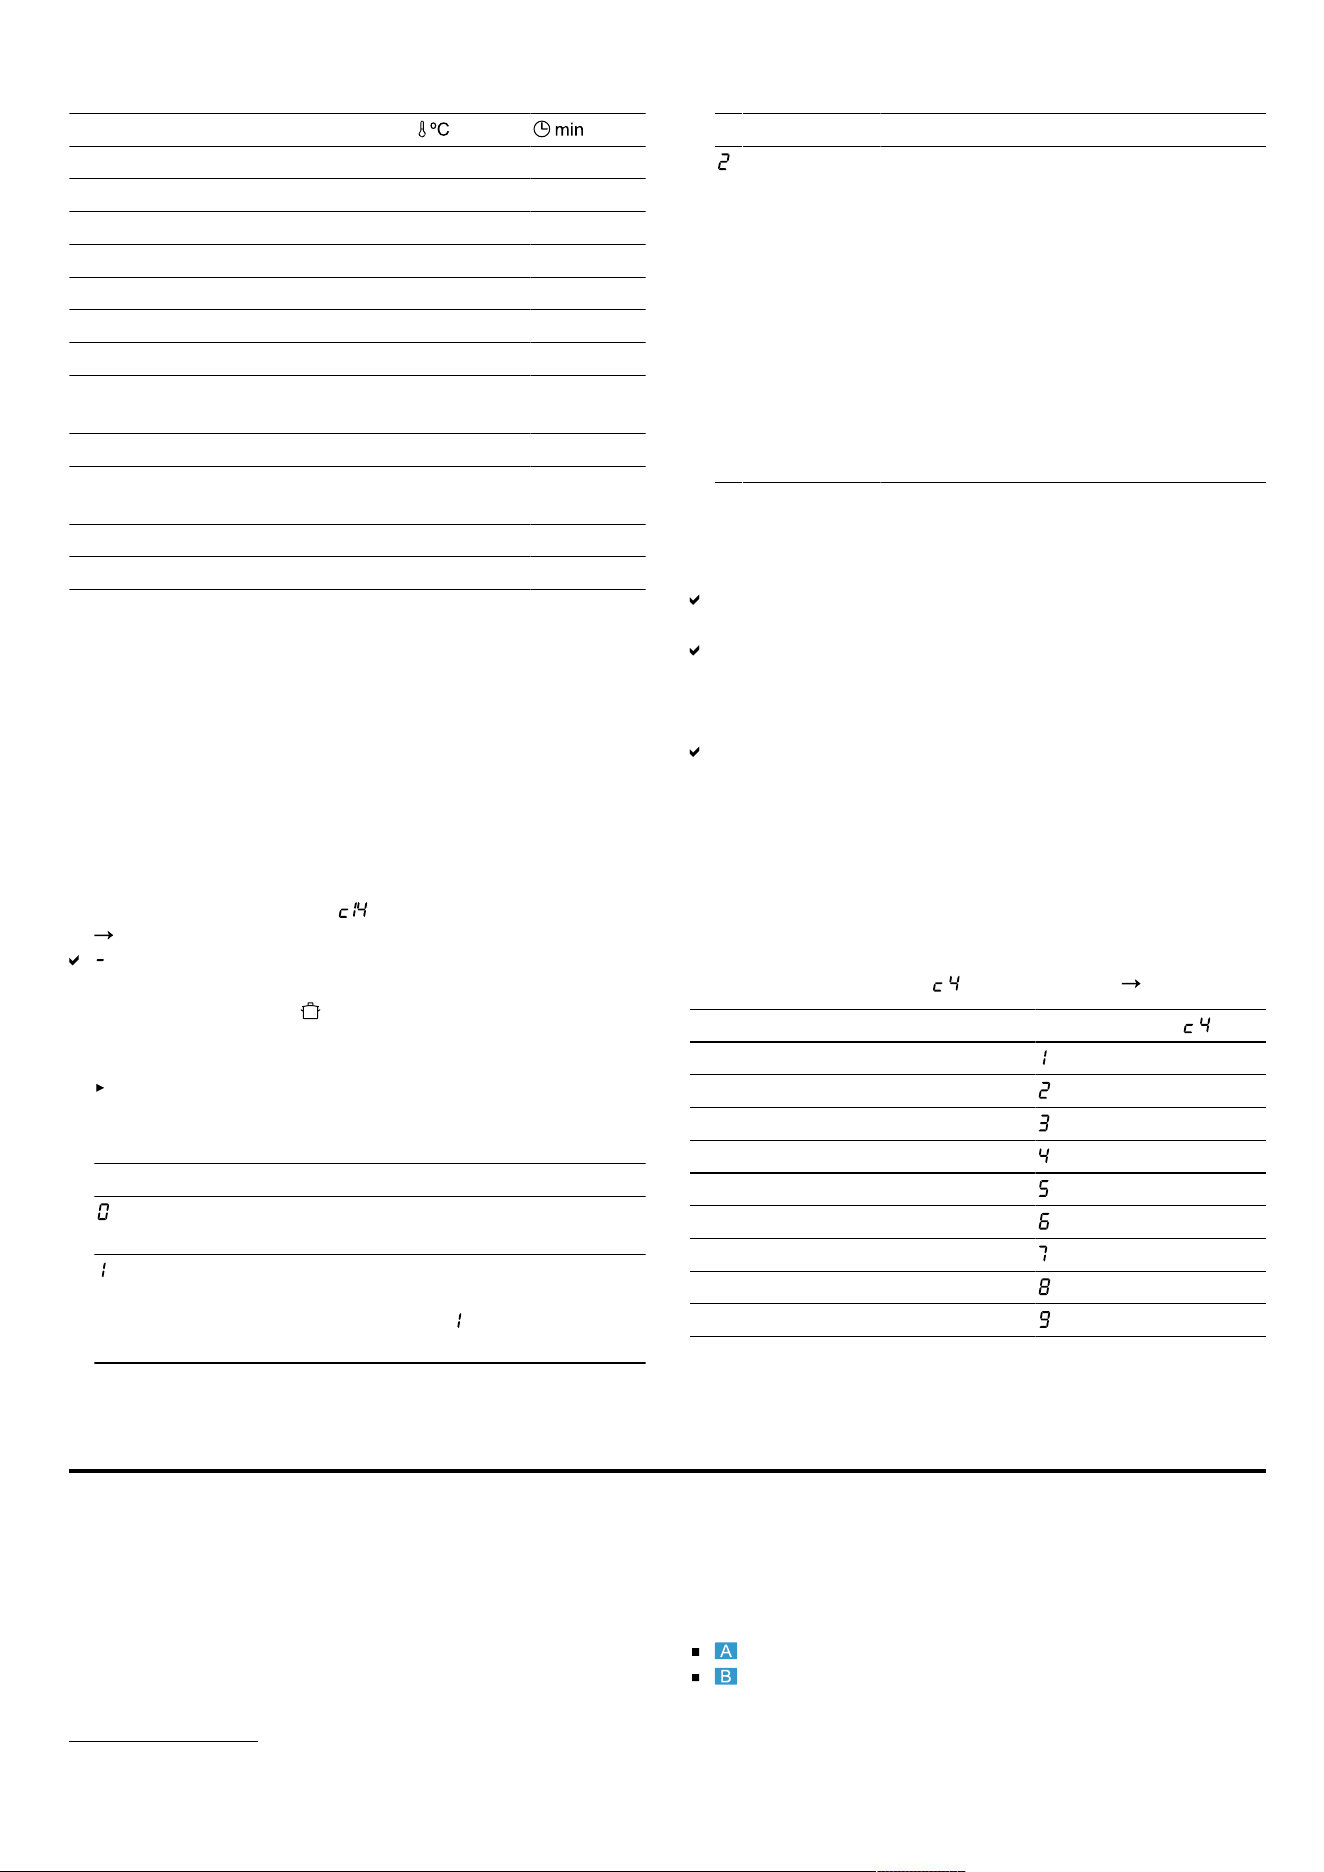
The following table shows the ideal temperature levels
for a selection of dishes. and depend on the
amount, condition and quality of the food.
Heating and keeping warm
Heating goulash 70 10-20
Heating mulled wine 70 5-15
– Poaching
Meat
Sausages 90 10-20
Fish
Braised fish 90 15-20
Egg dishes
Poached eggs 90 2-5
Potatoes
Potato dumplings 90 30-40
Pasta and cereals
Rice 90 25-35
Parboiled rice 90 25-35
Brown rice 90 45-55
Rice, basmati, Thai 90 8-12
Wild rice 90 20-30
Polenta 90 3-8
Semolina pudding 90 5-10
Soups
Instant creams 90 10-15
Desserts
Rice pudding 90 40-50
Porridge 90 10-15
Chocolate pudding 90 3-5
Other
Milk 90 3-10
– Boiling
Meat
Meatballs 100 20-30
Chicken 100 60-90
Veal 100 60-90
Egg dishes
Boiled eggs 100 5-10
Vegetables and legumes
Broccoli 100 10-20
Cauliflower 100 10-20
Brussels sprouts 100 30-40
Green beans 100 15-30
Chickpeas 100 60-90
Peas 100 15-20
Lentils 100 45-60
Potatoes
Gnocchi 100 3-6
Potatoes, boiled 100 30-45
Sweet potatoes 100 30-45
Pasta and cereals
Durum wheat pasta 100 7-10
Fresh pasta 100 3-5
Wholemeal noodles 100 7-10
Durum wheat pasta, stuffed 100 15-20
Fresh pasta, stuffed 100 5-8
Quinoa 100 10-12
Soups
Home-made broths 100 60-90
Instant soups 100 5-10
Desserts
Compote 100 15-25
Frozen products
Green beans 100 15-30
Cooking in a pressure cooker
Meat
Chicken 120 15-25
Veal 120 15-25
Vegetables and legumes
Vegetables 120 3-6
Chickpeas 120 25-35
Lentils 120 10-20
Beans 120 25-35
Potatoes
Potatoes 120 10-20
Sweet potatoes 120 10-20
Pasta and cereals
Rice 120 6-8
Brown rice 120 12-18
Soups
Home-made broths 120 20-30
Frying with a large amount of oil
Use the lid to heat the oil, and remove it to fry the food.
17
en Wireless cooking sensor
Meat
Chicken pieces 180 10-15
Meatballs 180 10-15
Fish
Fish, breaded, battered 180 10-15
Vegetables and legumes
Vegetables, breaded, battered 180 4-8
Mushrooms, breaded or
battered
180 4-8
Desserts
Jam-filled doughnuts and
doughnuts
180 5-10
Frozen products
Chips 180 4-8
17.3 Wireless cooking sensor
To use cookingSensor, you must purchase a wireless
cooking sensor.
You can purchase the wireless cooking sensor from
customer service, in our online shop or in a specialist
shop siemens-home.bsh-group.com.
Connecting the wireless cooking sensor
To connect the wireless cooking sensor to the control
panel, proceed as follows:
1.
Select the basic setting . Basic settings
Page21
lights up.
2.
Select the cooking zone whose display lights up. A
signal tone sounds. flashes.
3.
Briefly press the centre of the wireless cooking
sensor within 30 seconds.
After a few seconds, the status of the connection
between the cooking sensor and the control panel
appears on the cooking zone's visual display.
Result
Connected
correctly
cookingSensor is available.
Not connec-
ted cor-
rectly
Communication error
– Repeat the connection process. If
the result is still , contact cus-
tomer service.
Result
Not connec-
ted cor-
rectly
Communication error
– Bluetooth communication error.
Repeat the connection process.
– You have not pressed the centre
of the wireless cooking sensor
within 30 seconds of selecting the
cooking zone. Repeat the connec-
tion process.
– The battery in the wireless cooking
sensor is flat. Replace the battery,
reset the wireless cooking sensor
and repeat the connection pro-
cess.
Resetting the wireless cooking sensor
1.
Press the centre of the cooking sensor for approx. 8 -
10 seconds.
During this process, the LED display for the wireless
cooking sensor lights up three times.
When the LED lights up for the third time, it will start
to reset the temperature sensor.
2.
Now stop pressing the centre of the wireless cooking
sensor.
As soon as the LED goes out, this means that the
wireless cooking sensor has been reset.
3.
Repeat the connection process from point 2.
Setting the boiling point
The point at which water starts to boil depends on the
height of your home above sea level. If the water is boil-
ing too vigorously or not vigorously enough, you can ad-
just the boiling point. Proceed as follows:
Select the basic setting . Basic settings
Page21
Height Setting value
0m
100-200m
200-400m
1
400-600m
600-800m
800-1000m
1000-1200m
1200-1400m
Over 1400 m
Note: The temperature of 3/100ºC is sufficient to cook
efficiently but, to set more intensive cooking, a lower
level can be selected.
Wireless cooking sensor18 Wireless cooking sensor
To use cookingSensor, you must purchase a wireless
cooking sensor.
You can purchase the wireless cooking sensor from
customer service, in our online shop or in a specialist
shop siemens-home.bsh-group.com.
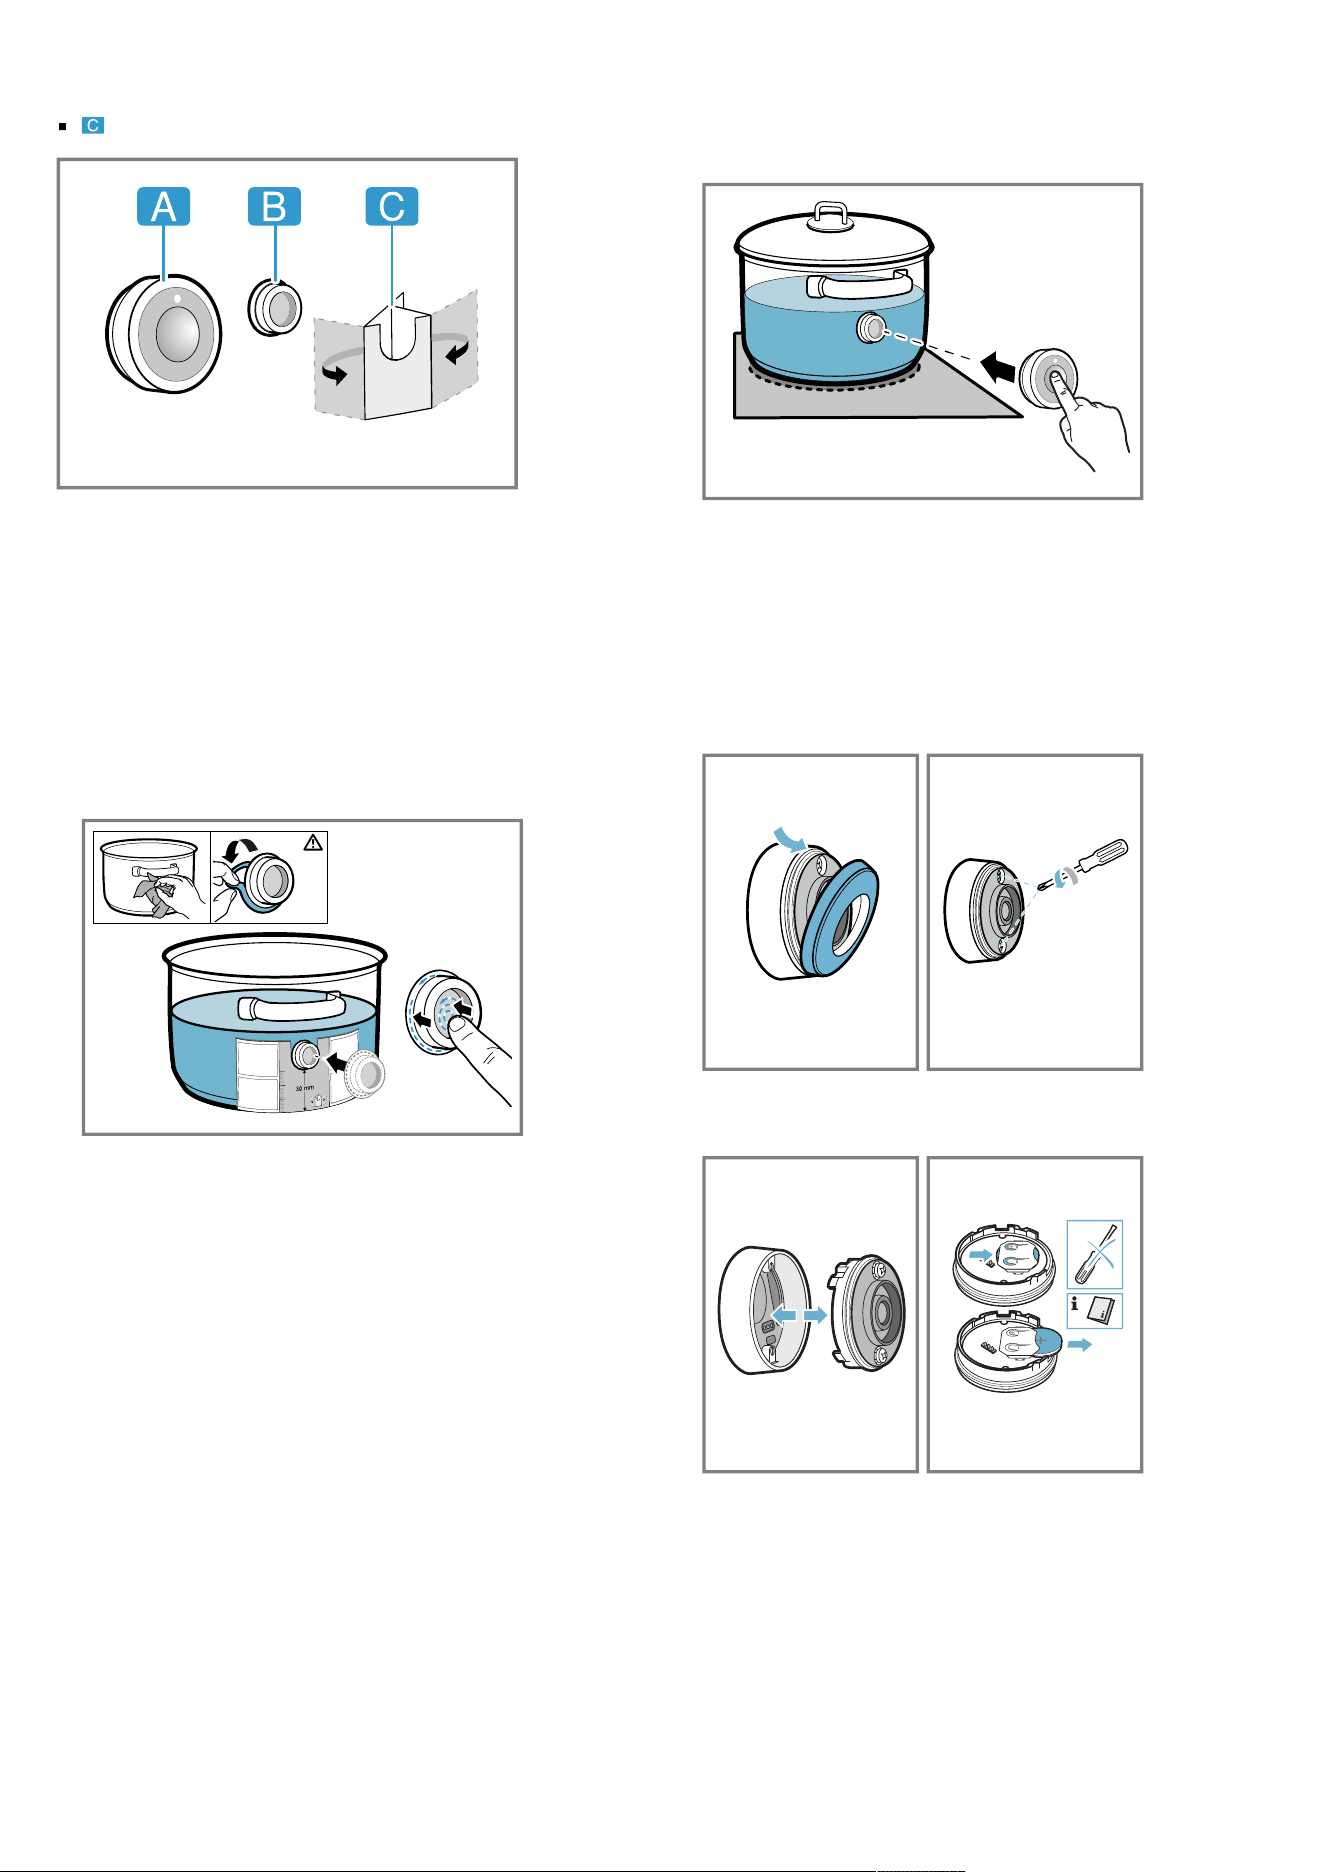
18.1 Scope of delivery
After unpacking all of the parts, check for any transport
damage and for completeness of delivery.
Wireless cooking sensor
Silicone patch
1
Basic setting
18
Wireless cooking sensor en
Template
18.2 Attaching the silicone patch
The silicone patch secures the cooking sensor to the
cookware. For fitting on the cookware:
1.
The adhesive area on the cookware must be free
from grease. Clean and dry the container thoroughly,
and rub the adhesive area using alcohol, for example.
2.
Remove the protective film from the silicone patch.
Adhere the silicone patch to the outside of the cook-
ware in the correct place using the enclosed template
as a guide.
3.
Press down all over the surface of the silicone patch,
including in the centre.
4.
Leave the adhesive to dry for one hour. Do not use or
rinse out the cookware during this time.
Note: If the silicone patch comes loose, use a new one.
If required, you can purchase a set with five silicone
patches from specialist retailers, from our customer ser-
vice or on our official website siemens-home.bsh-
group.com by quoting the article number 17007119.
All adhesives break down over time when they are
stored. To prevent this from happening, place the silic-
one bases on their containers as soon as they are
cleaned.
18.3 Attaching the wireless cooking sensor
1.
Ensure that the silicone patch is completely dry be-
fore attaching the cooking sensor.
2.
Attach the cooking onto the silicone patch so that it
fits perfectly.
18.4 Replacing the battery
If the LED on the wireless cooking sensor does not light
up when pressed, the battery is discharged. Changing
the battery:
1.
Remove the silicone cover from the lower section of
the cooking sensor casing and remove both screws
using a screwdriver.
2.
Open the cooking sensor lid and remove the battery
from the base.
!
19
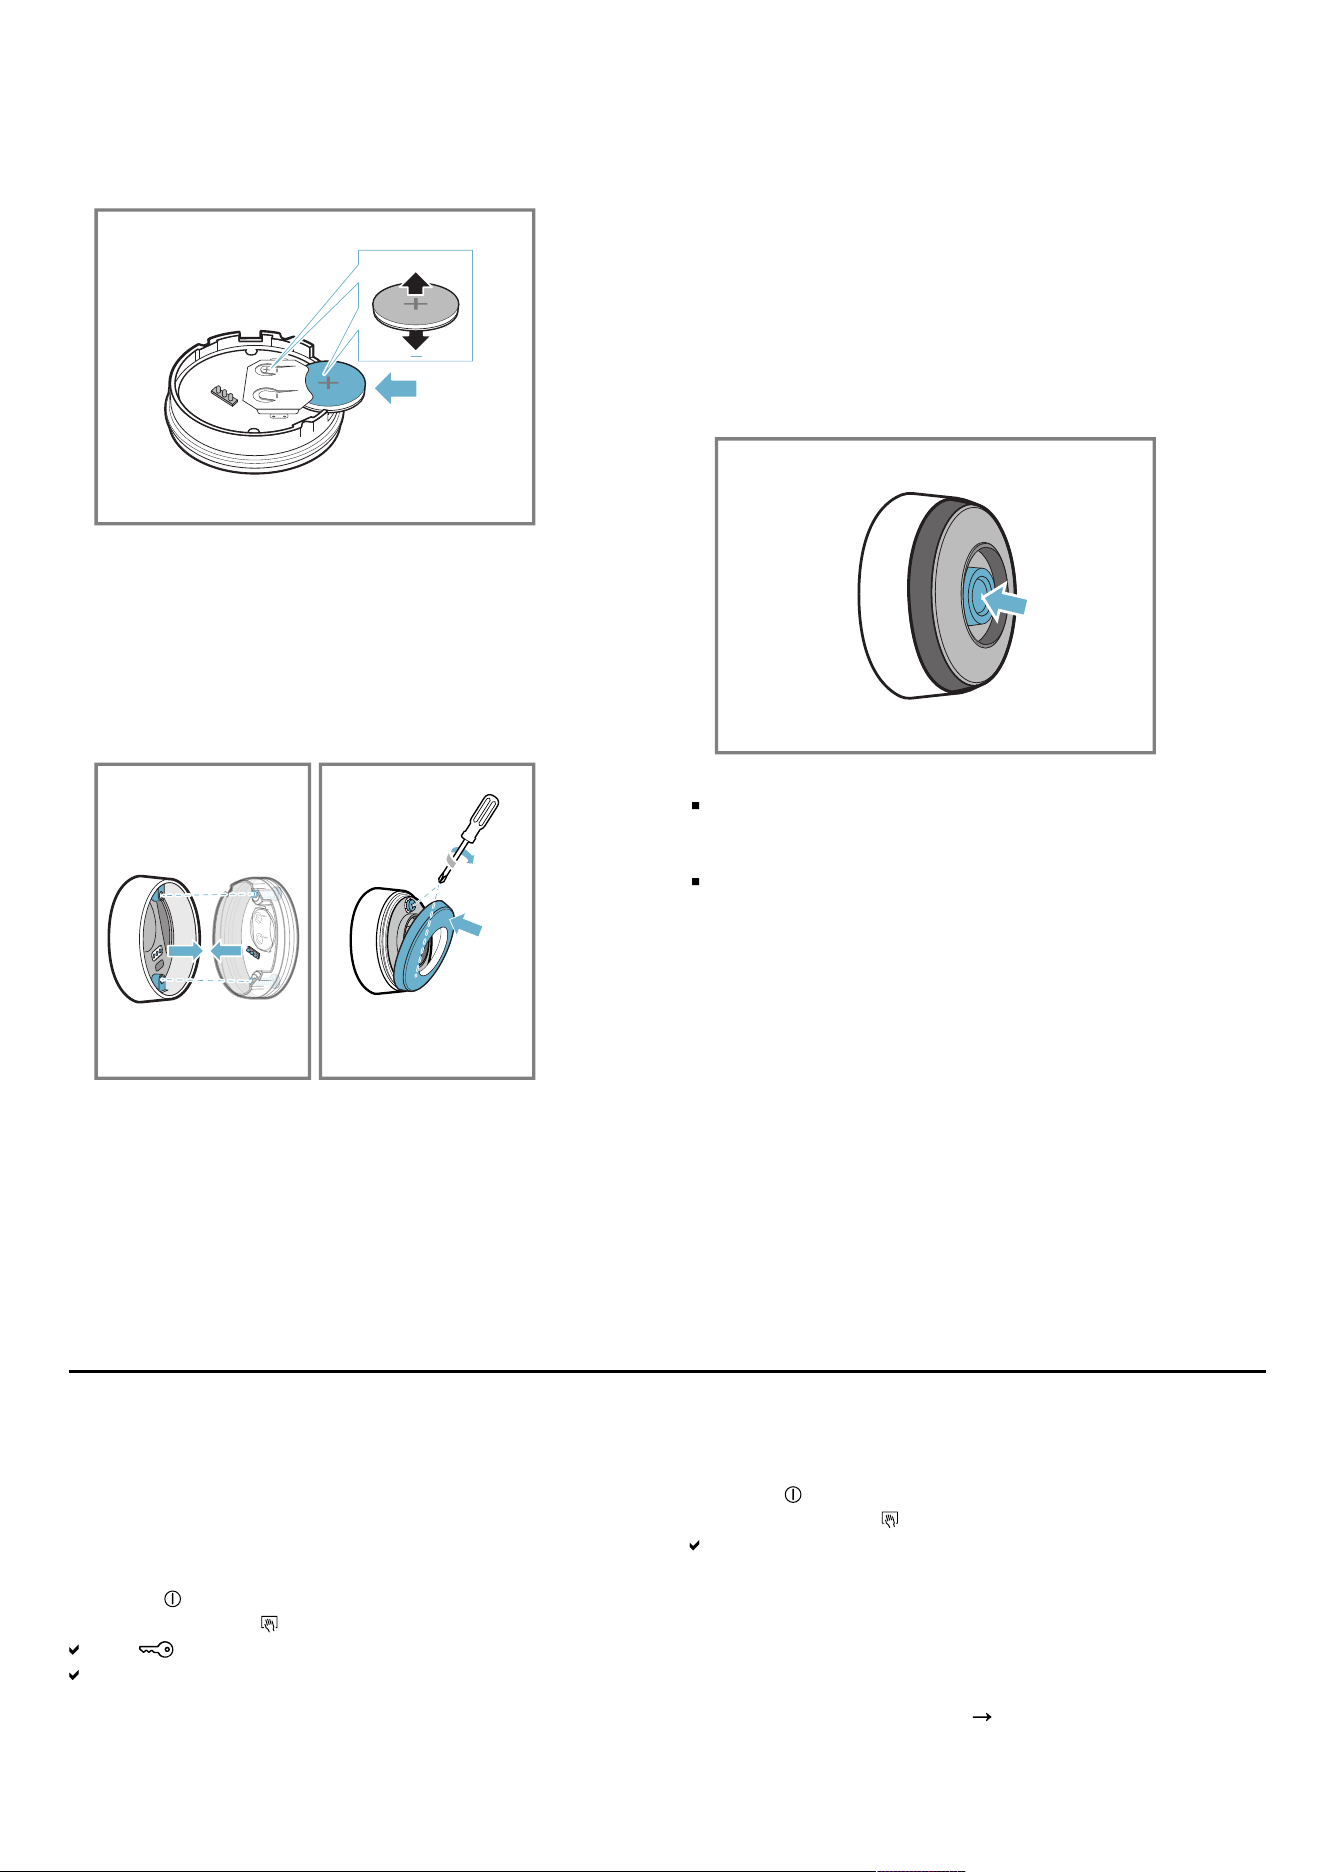
en Childproof lock
3.
Insert a new battery, observing the instructions for the
battery poles. Only use premium-quality CR2032 bat-
teries.
+
Note: Do not use any metal objects to remove the
battery. Do not touch the battery connection points.
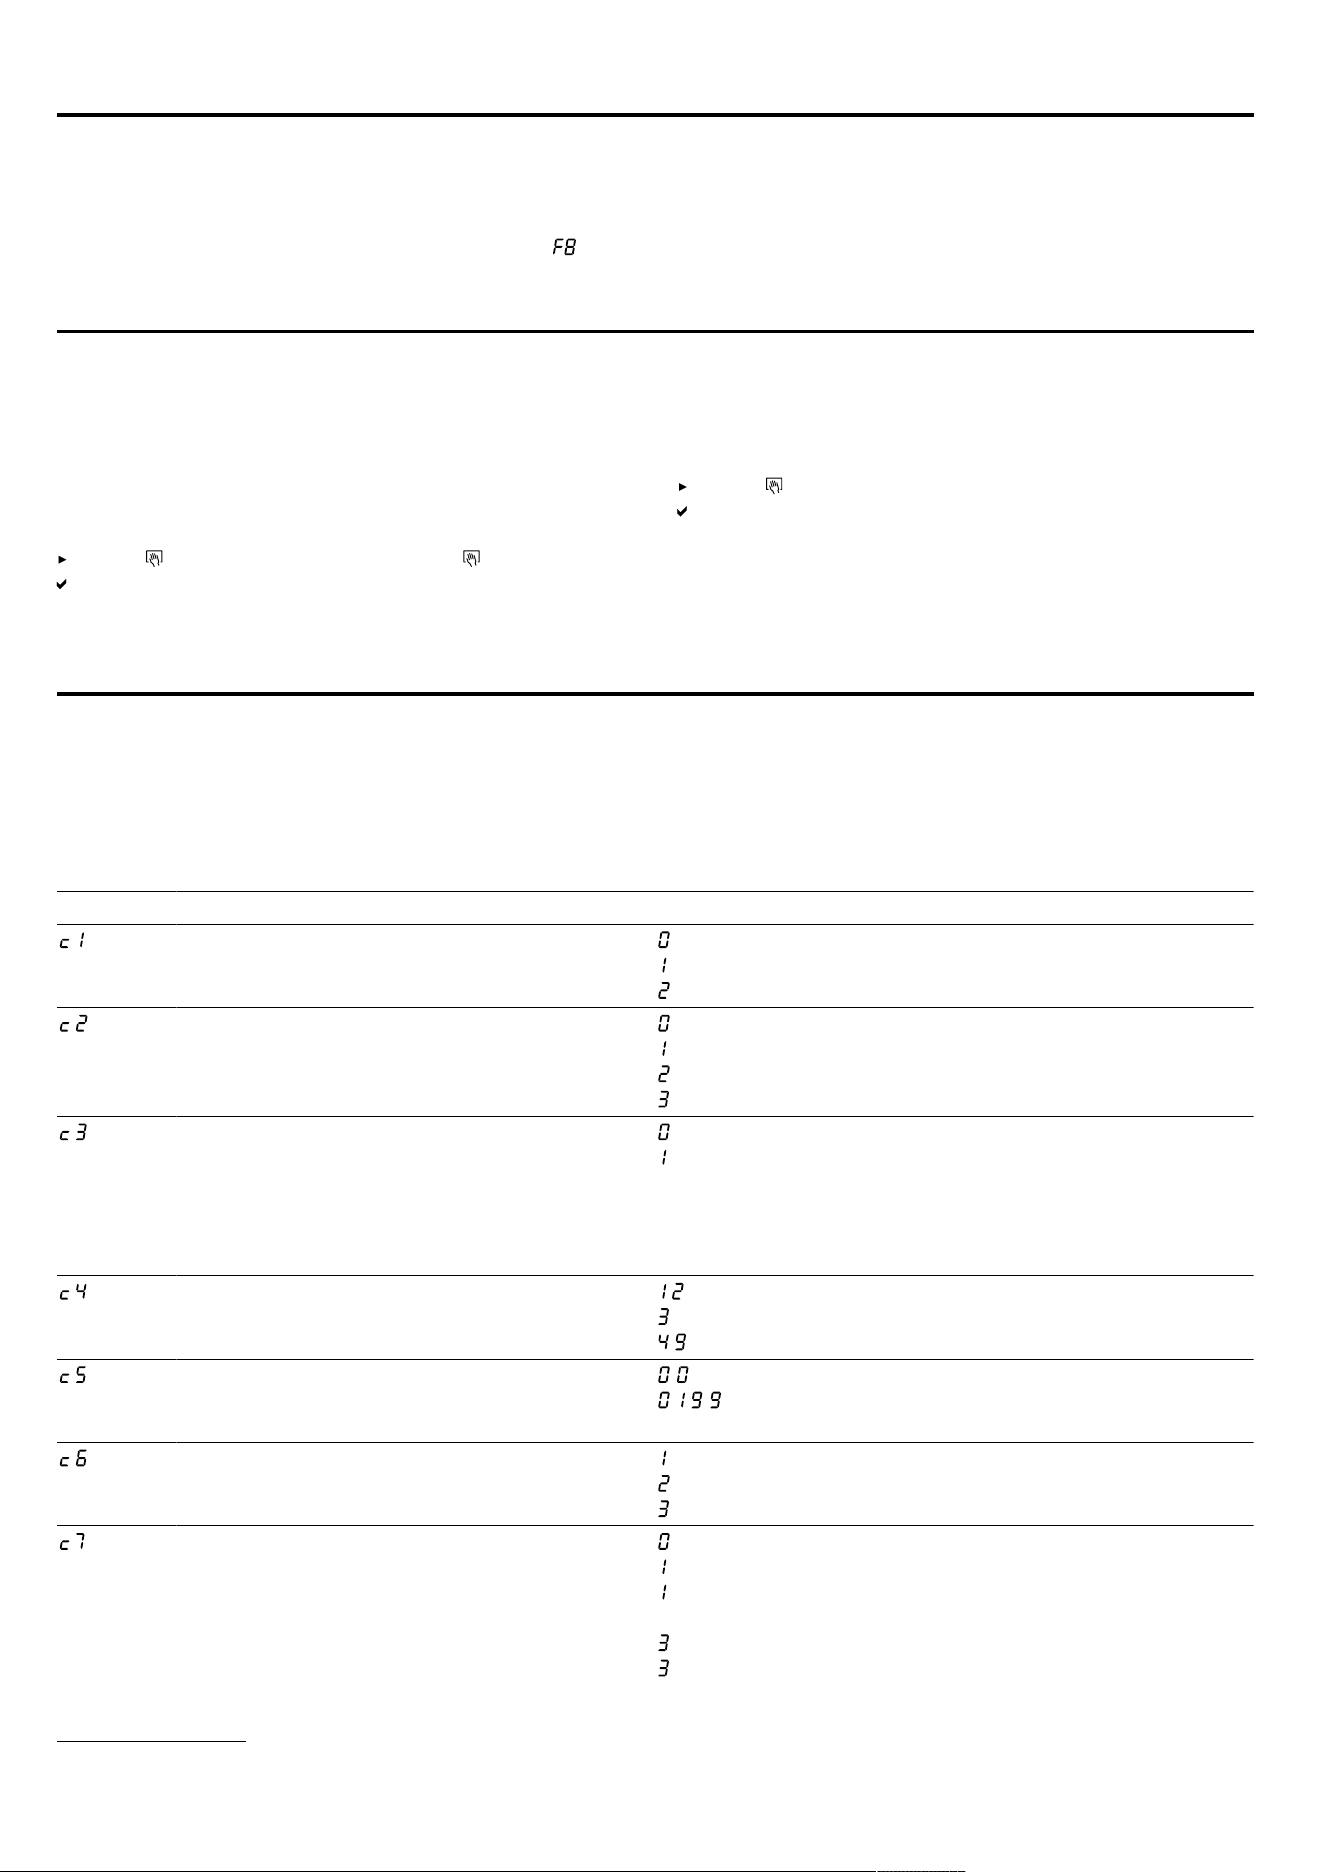
4.
Close the cap on the cooking sensor. The indenta-
tions for the screws on the cap must be aligned with
the indentations on the lower section of the housing.
Use a screwdriver to tighten the screws and secure
the silicone cover on the lower section of the cooking
sensor housing.
18.5 Cleaning
Cooking sensor
Clean with a damp cloth. Do not place in the dish-
washer and do not get it wet.
When you are not using the cooking sensor, remove it
from the cookware and store it in a clean, secure loca-
tion, away from any heat sources.
Silicone patch
Clean and dry before attaching the cooking sensor.
Dishwasher safe.
Note: The cookware with the silicone patch must not be
left to soak for long periods in soapy water.
Window for the wireless cooking sensor
Always keep the window clean and dry. Important:
1.
Remove dirt and oil splatters regularly.
2.
For cleaning, use a cloth or a cotton bud and window-
cleaning solution.
Notes
Do not use hard or rough objects such as bristle
brushes or scouring pads to clean the hob, and do
not use scouring agents.
Do not touch the window for the wireless cooking
sensor with your fingers; this will soil or scratch it.
18.6 Declaration of Conformity
BSH Hausgeräte GmbH hereby declares that the appli-
ance with wireless cooking sensor function meets the
basic requirements and other relevant provisions of the
Directive 2014/53/EU.
A detailed Declaration of Conformity in accordance with
Directive RED can be found at siemens-home.bsh-
group.com on the product page for your appliance un-
der "Additional documents.
The logos and the Bluetooth® brand are registered
trademarks and property of Bluetooth SIG, Inc. These
trademarks are used by BSH Hausgeräte GmbH under
licence. All other trademarks and trade names are
owned by the respective companies.
Childproof lock19 Childproof lock
The hob is equipped with a childproof lock. This pre-
vents children from switching on the hob.
19.1 Switching on Childproof lock
Requirement: The hob must be switched off.
1.
Touch .
2.
Touch and hold for 4 seconds.
The display lights up for 10seconds.
The hob is locked.
19.2 Switching off Childproof lock
1.
Touch .
2.
Touch and hold for 4 seconds.
The lock is released.
19.3 Automatic childproof lock
You can also activate the childproof lock automatically
every time the hob is switched off.
You can find out how to switch the function on and off in
the "Basic settings" section
Page21
.
20
Individual safety switch-off en
Individual safety switch-off20 Individual safety switch-off
The safety function is activated if one cooking zone is in
operation for an extended period and you do not
change any settings. The cooking zone displays and
switches itself off.
The time from 1 to 10 hours depends on the selected
power level.
Press any button to switch on the cooking zone.
Wipe protection21 Wipe protection
Allows the control panel to be locked for cleaning so
that the settings are not inadvertently adjusted.
The lock has no effect on the main switch.
21.1 Switching on Wipe protection
Press . A warning tone sounds and lights up.
The control panel remains locked for 35seconds. A
signal tone sounds 5 seconds before the appliance is
switched off.
21.2 Switching off Wipe protection
To switch off the function early:
touch .
The control panel is unlocked.
Basic settings22 Basic settings
You can configure the basic settings for your appliance
to meet your needs.
22.1 Overview of the basic settings
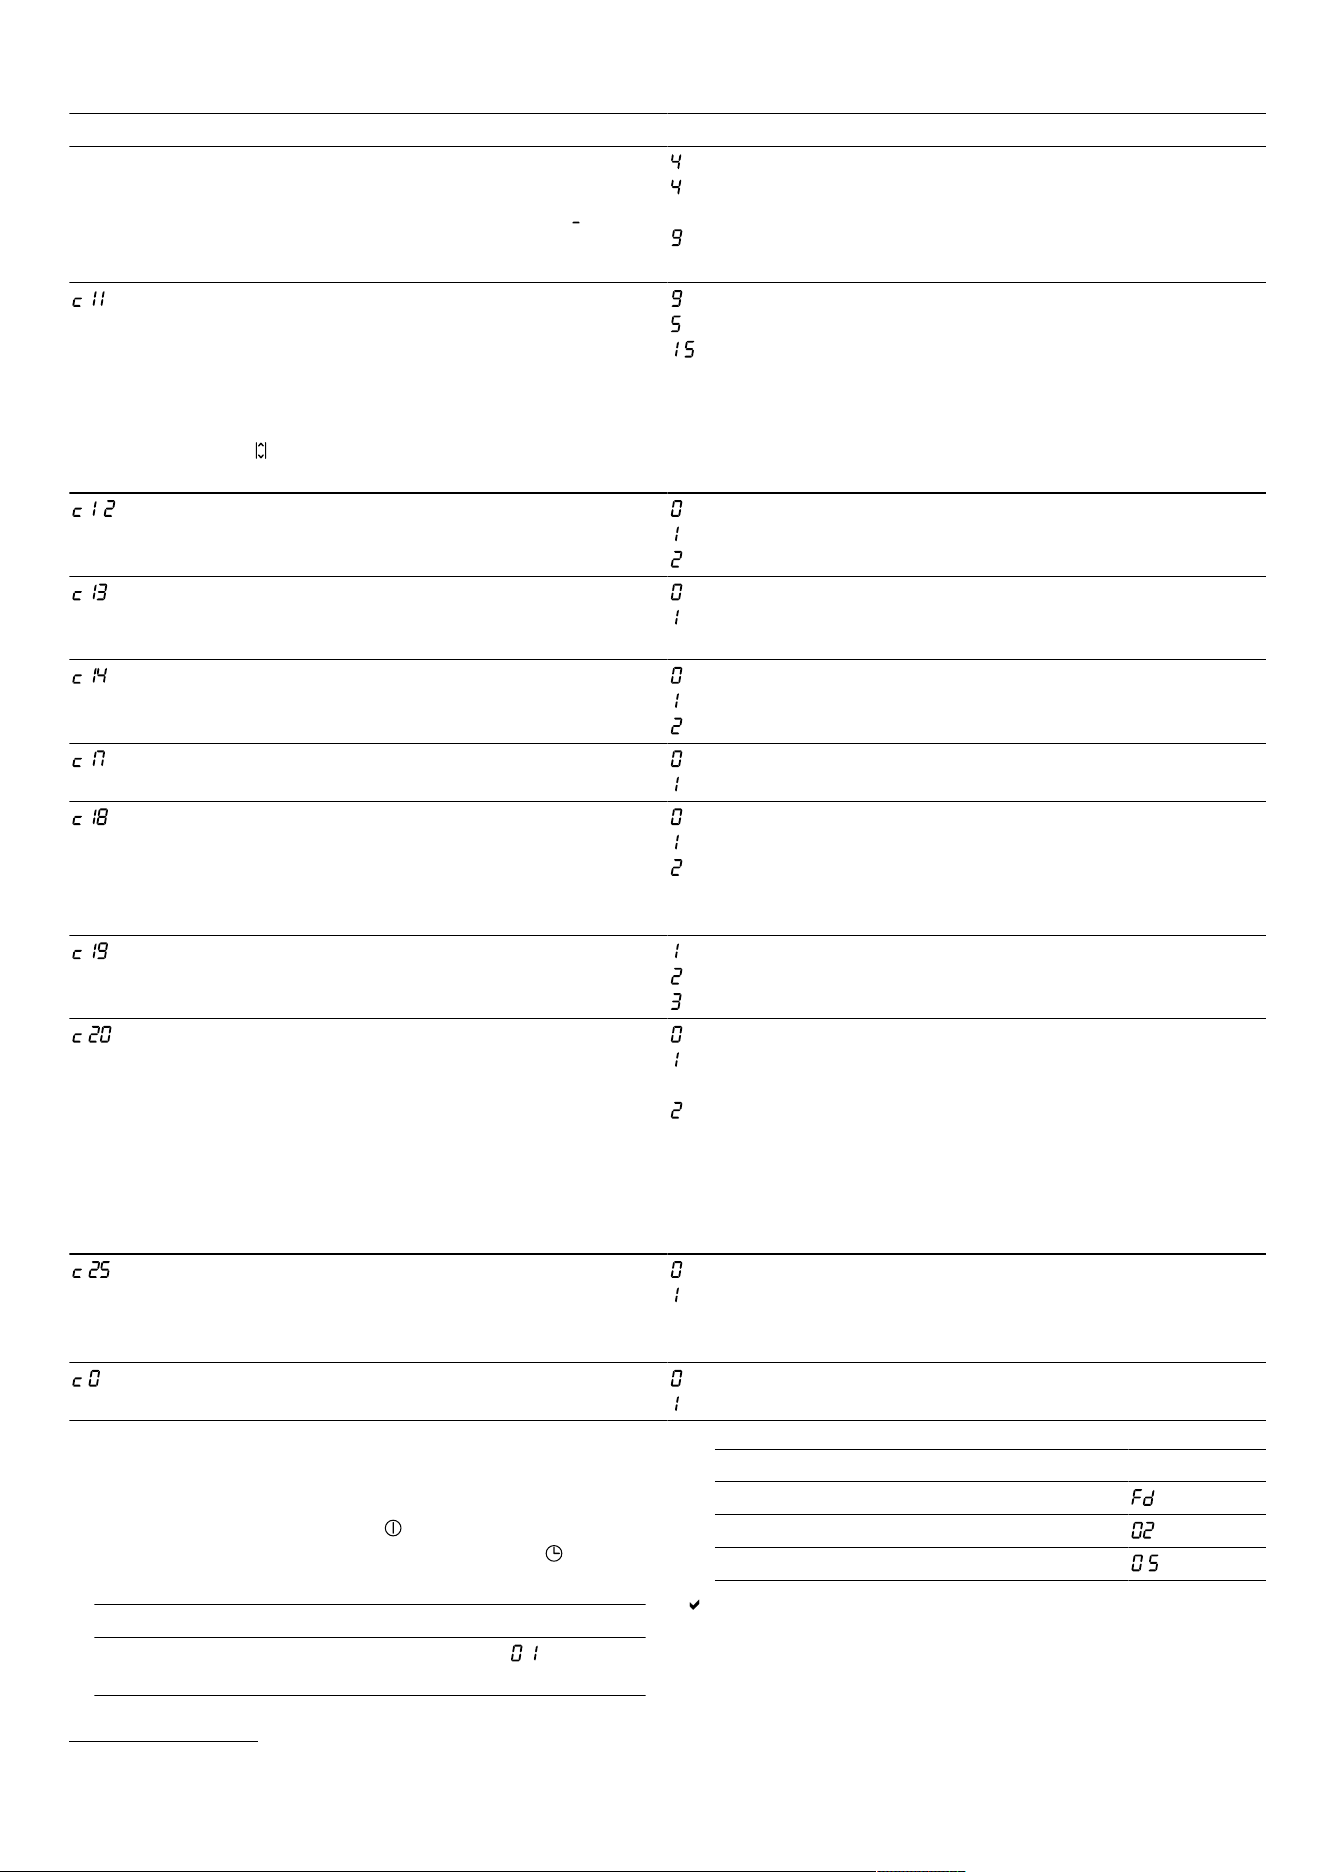
Display Setting Value
Childproof lock - Manual.
1
Automatic.
– Switched off.
Signal tones – Confirmation and fault signals are switched off.
– Only the fault signal is switched on.
– Only the confirmation signal is switched on.
– All signal tones are switched on
1
.
Energy consumption display
Shows the total energy consumption between
switching the hob on and off in kWh.
The accuracy of the display depends on vari-
ous factors such as the voltage quality of the
power supply.
– Switched off.
1
– Switched on.
Select the setting in accordance with the
height about sea level:
- - Decrease.
- Basic setting.
- - Increase.
Automatic switch-off of the cooking zones. – switched off.
1
- - minutes until the appliance switches off automat-
ically.
Duration of the timer end signal tone – 10seconds
1
– 30seconds
- 1 minute
Power limitation
Enables the total power of the hob to be lim-
ited, if necessary, based on the conditions of
your electrical installation. The available set-
tings depend on the maximum power of the
- Switched off. Maximum power of the hob
1
.
- 1000 W. Lowest power setting.
. - 1500 W.
...
- 3000 W. Recommended for 13 A.
. - 3500 W. Recommended for 16 A.
1
Factory setting
21
en Basic settings
Display Setting Value
hob. You can find precise information on the
rating plate. If the function is active and the
hob has reached the set power limit, is dis-
played and you cannot select a higher power
level.
- 4000 W.
. - 4500 W. Recommended for 20 A.
...
- Maximum power of the hob.
powerMove Plus
Allows you to change the preset power levels
for the three cooking areas of the flexible
cooking zone.
Select one of the two cooking zones, set the
required power level in the settings area and
touch to confirm the new power level and
select the next cooking zone.
- Preset power level for the front cooking zone.
- Preset power level for the middle cooking zone.
. - Preset power level for the rear cooking zone.
Cookware test
You can use this function to test the quality of
the cookware.
- Not suitable.
- Not optimal.
- Suitable.
flexInduction
Change the switch-on mode for the Flex
Zone.
- As two independent cooking zones.
- As a connected cooking zone.
1
Connect the wireless cooking sensor to the
hob.
- Connected correctly.
- Not connected correctly due to a transmission error.
- Not connected correctly due to a cooking sensor fault.
Set circulating-air mode or air extraction
mode.
- Configure circulating-air mode.
1
- Configure air extraction mode.
Setting automatic start - Switched off.
- Switched on: Automatic mode with sensor control.
1
- Switched on: The ventilation system starts at a power
level in accordance with the relevant power levels for the
cooking zones.
Setting the sensor sensitivity for the ventila-
tion system.
- Lowest sensor sensitivity setting.
- Medium sensor sensitivity setting.
1
- Highest sensor sensitivity setting.
Setting the run-on
If your hob is working in air extraction mode,
the ventilation system is switched on at the
power level for approx. 6 minutes.
If your hob is working in circulating-air mode,
the ventilation system is switched on at the
power level for approx. 30 minutes.
The run-on function automatically switches off
after this time.
- Switched off.
Switched on: Automatic function with sensor-controlled
run-on.
- Switched on
1
:
Automatic cookware detection - Manually select the required cooking zone.
- The cooking zone detects the size and the position of
the cookware and selects the corresponding cooking
zone(s).
1
Restoring factory settings - Individual settings
1
.
- Factory settings.
22.2 To go to the basic settings
Requirement: The hob must be switched off.
1.
To switch on the hob, touch .
2.
Within the next 10 seconds, press and hold for 4
seconds.
Product information Display
Directory for the technical after-sales
service (TK)
Product information Display
Production number
Production number 1 .
Production number 2 .
The first four displays provide the product information.
To call up the individual displays, touch the control
panel.
1
Factory setting
22
Cookware test en
3.
Touch to access the basic settings.
and light up as a presetting.
4.
Touch repeatedly until the desired setting appears.
5.
Select the required setting in the settings area.
6.
Touch and hold for 4seconds.
The settings are saved.
22.3 Discarding changes to the basic
settings
Touch .
All changes are discarded and not saved.
Cookware test23 Cookware test
The quality of the cookware has a major influence on
the speed and the result of the cooking process.
You can use this function to test the quality of the cook-
ware.
Before the test, ensure that the size of the cookware
base corresponds to the size of the cooking zone being
used.
Access is via the basic settings.
Page21
23.1 Carrying out Cookware test
As a single cooking zone, the flexible cooking zone is
set in such a way that only the individual item of cook-
ware is checked.
1.
At room temperature, place the cookware with ap-
prox.200ml water in the centre of the cooking zone
that best fits the base of the cookware in terms of
size.
2.
Call up the basic settings and select .
3.
Touch the settings area. The display flashes in the
cooking zones.
The test is running.
After 10 seconds, the result appears in the cooking
zone displays.
23.2 Checking the result
You can see what the result means for the quality and
speed of the cooking process in the following table.
Result
The cookware is not suitable for the cooking zone
and therefore does not heat up.
The cookware is taking longer to heat up than ex-
pected and cooking is not progressing as well as it
ought to.
The cookware is heating up correctly and cooking is
progressing well.
To activate this function, touch the settings range.
Power limitation24 Power limitation
You can use this function to set the total power of the
hob.
The hob is set at the factory. You can find the maximum
power of the hob on the rating plate. You can use this
function to adjust the configuration to the requirements
of each electrical installation.
To ensure that this set value is not exceeded, the hob
automatically distributes the available power as needed
between the cooking zones that are switched on.
While this function is activated, the output of each cook-
ing zone may temporarily fall below the nominal value.
In order to not exceed this set value, the hob automatic-
ally distributes the available power as needed between
the cooking zones that are switched on . The appliance
regulates and selects the highest power level automatic-
ally.
You can find out how to do this in the "Basic settings"
section
Page21
HomeConnect25 HomeConnect
This appliance is network-capable. Connecting your ap-
pliance to a mobile device lets you control its functions
via the HomeConnect app, adjust its basic settings and
monitor its operating status.
The HomeConnect services are not available in every
country. The availability of the HomeConnect function
depends on the availability of the HomeConnect ser-
vices in your country. You can find information about
this at:
www.home-connect.com
.
The HomeConnect app guides you through the entire
login process. Follow the instructions, noting the inform-
ation in the HomeConnect app.
Notes
Please note the safety precautions in this instruction
manual and make sure that they are also observed
when operating the appliance via the HomeConnect
app.
"Safety", Page2
Operating the appliance on the appliance itself al-
ways takes priority. During this time it is not possible
to operate the appliance using the HomeConnect
app.
In networked standby mode, the appliance requires a
maximum of2W.
25.1 Setting up HomeConnect
Requirements
The appliance is connected to the power supply and
is switched on.
23
en HomeConnect
You have a mobile device with a current version of
the iOS or Android operating system, e.g. a smart-
phone.
The appliance is receiving signals from the WLAN
home network (Wi-Fi) at its installation location.
The mobile device and the appliance are within range
of your home network's Wi-Fi signal.
1.
Scan the following QR code.
You can install the HomeConnect app and connect
your appliance via the QR code.
2.
Follow the instructions in the HomeConnect app.
25.2 Overview of the HomeConnect settings
You can adjust the settings and network settings for HomeConnect by going to your hob's basic settings.
Setting Selection or display Additional information
Network connection
– Not connected/disconnect network
– Connect automatically
– Connect manually
– Connected
Log on the hob in the Wi-Fi home network (Wi-Fi) or dis-
connect from the network
Connection to app
– Not connected
– Connect
is only displayed if the hob is connected to the
home network.
Connection to the Wi-Fi
– Wireless module switched off
– Wireless module switched on
If Wi-Fi has been activated, you can use the HomeCon-
nect functions.
is only displayed if the hob has been previously con-
nected to a network.
Set using the app
– Switched off
– Switched on
1
If is switched off, only the hob's operating statuses
are displayed in the HomeConnect app.
Software update
– Update available and ready to in-
stall
– Start installation
is only displayed if a software update is available.
Controlling remote access by after-
sales service
– Not authorised
– Authorised
is only displayed if after-sales service is attempting
to connect to the hob. After granting access, you can ter-
minate this at any time.
Display Wi-Fi signal strength
– Not connected to the WLAN home
network (Wi-Fi)
– Signal strength 1 (poor)
– Signal strength 2 (moderate)
– Signal strength 3 (good)
is only displayed if there is a connection to the
WLAN home network (Wi-Fi).
Connection to HomeConnect server
– Not connected
– Connected
is only displayed if there is a connection to the
WLAN home network (Wi-Fi).
25.3 Switching off the network connection
Access the basic settings, and then select the
value .
The connection to the Wi-Fi is deactivated.
Note: Select the value to reactivate the network con-
nection.
25.4 Changing settings via the
HomeConnect app
You can use the HomeConnect app to change the set-
tings for the cooking zones and send them to the hob.
Requirements
The hob is connected to the Wi-Fi and to the
HomeConnect app.
1
Factory setting
24

Cleaning and servicing en
To use the HomeConnect app to set the hob,
must be switched on in the basic settings. is
switched on on delivery. If the option for the transmis-
sion of settings has been deactivated, only the hob's
operating statuses are displayed in the HomeCon-
nect app.
1.
Select the setting in the HomeConnect app and send
it to the hob.
Follow the instructions in the HomeConnect app.
Settings that you send from the HomeConnect app to
the hob must be confirmed on the hob.
As soon as cooking settings are transmitted to a
cooking zone, the display starts to flash, depending
on the setting.
2.
To confirm the setting, press the hotplate display for
the required cooking zone.
3.
To discard the setting, touch any other touch field on
the hob.
25.5 Software update
Your appliance's software can be updated using the
software update function, e.g. for the purposes of optim-
isation, troubleshooting or security updates.
To do this, you must be a registered HomeCon-
nectuser, have installed the app on your mobile device
and be connected to the HomeConnectserver.
As soon as a software update is available, you will be
informed via the HomeConnectapp and will be able to
start the software update via the app. Once the update
has been successfully downloaded, you can start in-
stalling it via the HomeConnectapp if you are in your
home network (Wi-Fi). The HomeConnectapp informs
you once installation is successful.
The current software version can be found in the
HomeConnect app under the appliance information for
the relevant home appliance.
Notes
The software update consists of two steps.
– The first step is the download.
– The second step is the installation on your appli-
ance.
You can continue to use your appliance as normal
while updates are downloading. Depending on your
personal settings in the app, software updates can
also be set to download automatically.
Installation takes a few minutes. You cannot use your
appliance during installation.
We recommend that you install security updates as
soon as possible.
25.6 Remote diagnostics
Customer Service can use Remote Diagnostics to ac-
cess your appliance if you contact them, have your ap-
pliance connected to the HomeConnect server and if
Remote Diagnostics is available in the country in which
you are using the appliance.
Tip: For further information and details about the avail-
ability of Remote Diagnostics in your country, please
visit the service/support section of your local website:
www.home-connect.com
.
25.7 Data protection
Please see the information on data protection.
The first time your appliance is registered on a home
network connected to the Internet, your appliance will
transmit the following types of data to the HomeCon-
nect server (initial registration):
Unique appliance identification (consisting of appli-
ance codes as well as the MAC address of the in-
stalled Wi-Fi communication module).
Security certificate of the Wi-Fi communication
module (to ensure a secure data connection).
The current software and hardware version of your
appliance.
Status of any previous resetting to factory settings.
This initial registration prepares the HomeConnect func-
tions for use and is only required when you want to use
the HomeConnect functions for the first time.
Note: Please note that the HomeConnect functions can
only be utilised with the HomeConnect app. Information
on data protection can be retrieved in the HomeCon-
nect app.
Cleaning and servicing26 Cleaning and servicing
26.1 Hob surface
Preventing damage to the surface
Before you use the appliance for the first time, clean the
surface with a soft cloth and a commercially available
glass ceramic cleaner.
Do not use the hob as a work surface or storage
space.
Prevent food from coming into contact with the hot-
plate since this may lead to permanent discolouration
of the surface.
To prevent stains and damage to the glass, immedi-
ately remove any residues of sugar, plastic, alu-
minium foil, or food that has been spilled. Use a glass
scraper while the cooking zone is still hot.
Immediately remove any coarse dirt, salt and sugar
from the cooking surface to prevent scratches
Do not use cookware with a rough base.
Lift the cookware when moving it.
Do not use a scraper that is in poor condition.
26.2 Cleaning products
You can obtain suitable cleaning products and glass
scrapers from customer service, the online shop or a re-
tailer.
ATTENTION
Unsuitable cleaning products may damage the surfaces
of the appliance.
Never use unsuitable cleaning products.
25
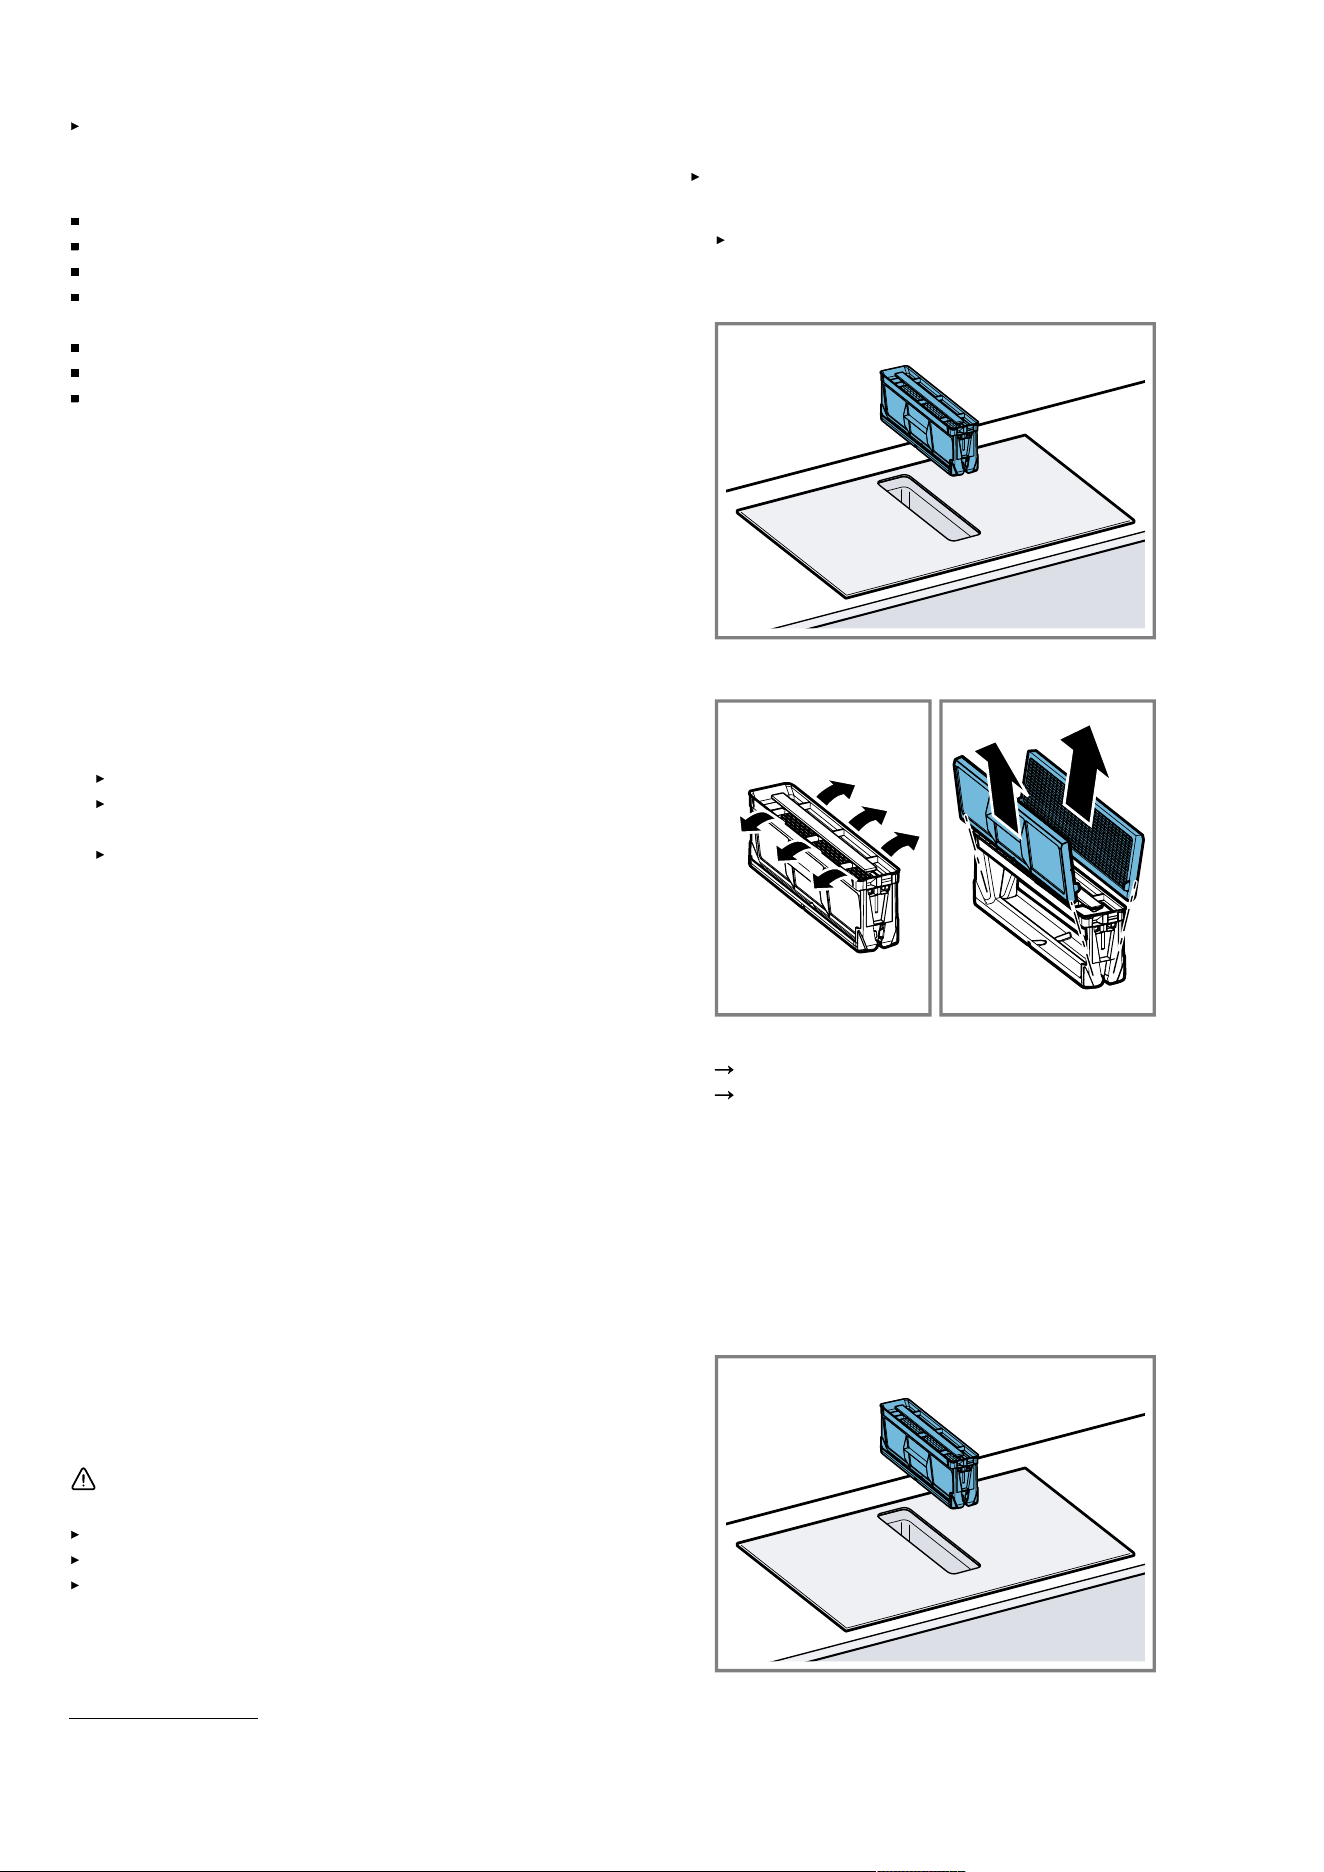
en Cleaning and servicing
Do not use cleaning products while the hob is still
hot. This may cause marks on the surface.
Unsuitable cleaning products
Undiluted detergent
Detergent intended for dishwashers
Abrasive cleaning products
Aggressive cleaning products such as oven spray or
stain remover
Abrasive sponges
High-pressure or steam jet cleaners
Basic products such as degreasing agents
26.3 Cleaning the hob
Clean the hob after every use to prevent cooking
residues from getting burnt on.
Requirement: The hob must be cold. Only in the case
of sugar stains, rice starch, plastic, or aluminium foil, do
not allow the hob to cool down.
1.
Remove heavy soiling using a glass scraper.
2.
Spray the entire surface with soapy water or commer-
cially available detergent. Only use cleaning agents
for glass ceramic cooktops if there is stubborn dirt.
We recommend using a cleaning solution suitable for
glass-ceramic hobs, e.g. Viss®/Cif®
1
.
Apply the cleaning agent evenly and gently.
Follow the cleaning instructions on the packaging
of the cleaning product.
You can achieve good cleaning results using a
special sponge for glass ceramic.
3.
Wipe it with a damp cloth and dry it with a microfibre
cloth.
Tip: If you keep the base of the cookware clean, the
hob surface remains in a good condition.
26.4 Cleaning profiles
Clean the profiles if they are dirty or stained after use.
Note: Do not use a glass scraper.
1.
Clean using warm soapy water and a soft cloth.
Wash new sponge cloths thoroughly before use.
2.
Dry with a soft cloth.
26.5 Grease filter
The grease filter filters the grease out of the kitchen
steam. The filter comprises a container and two remov-
able grease filters. How frequently you clean the module
depends on the quantity and type of grease used when
cooking. To keep them in good working order, you must
clean the grease filters if there are visible grease depos-
its or at least once a month.
WARNING‒Risk of fire!
Fatty deposits in the grease filters may catch fire.
Never operate the appliance without a grease filter.
Clean the grease filters regularly.
Never work with naked flames close to the appliance
(e.g.flambéing).
ATTENTION
Falling grease filters may damage the hob below.
Grip below the grease filter with one hand.
1.
Remove the grease filter.
Grease may accumulate in the bottom of the con-
tainer. Keep the grease filter level to prevent
grease from dripping out.
2.
Remove the components of the grease filter.
3.
Clean the grease filter in the dishwasher or by hand.
"Cleaning the grease filters manually", Page27
"Cleaning the grease filter in the dishwasher",
Page27
4.
If required, remove the odour filters or acoustics fil-
ters and clean the appliance from the inside.
5.
If any objects get into the appliance, remove these
objects and ensure that the supply to the overflow
container is not blocked.
6.
Wipe out the inside of the appliance with soapy water
and a dish cloth.
7.
After cleaning, reinsert the dried grease filter.
1
Viss® and Cif® are registered trademarks of UNILEVER. BSH is an independent company and does not promote UNILEVER
brands.
26
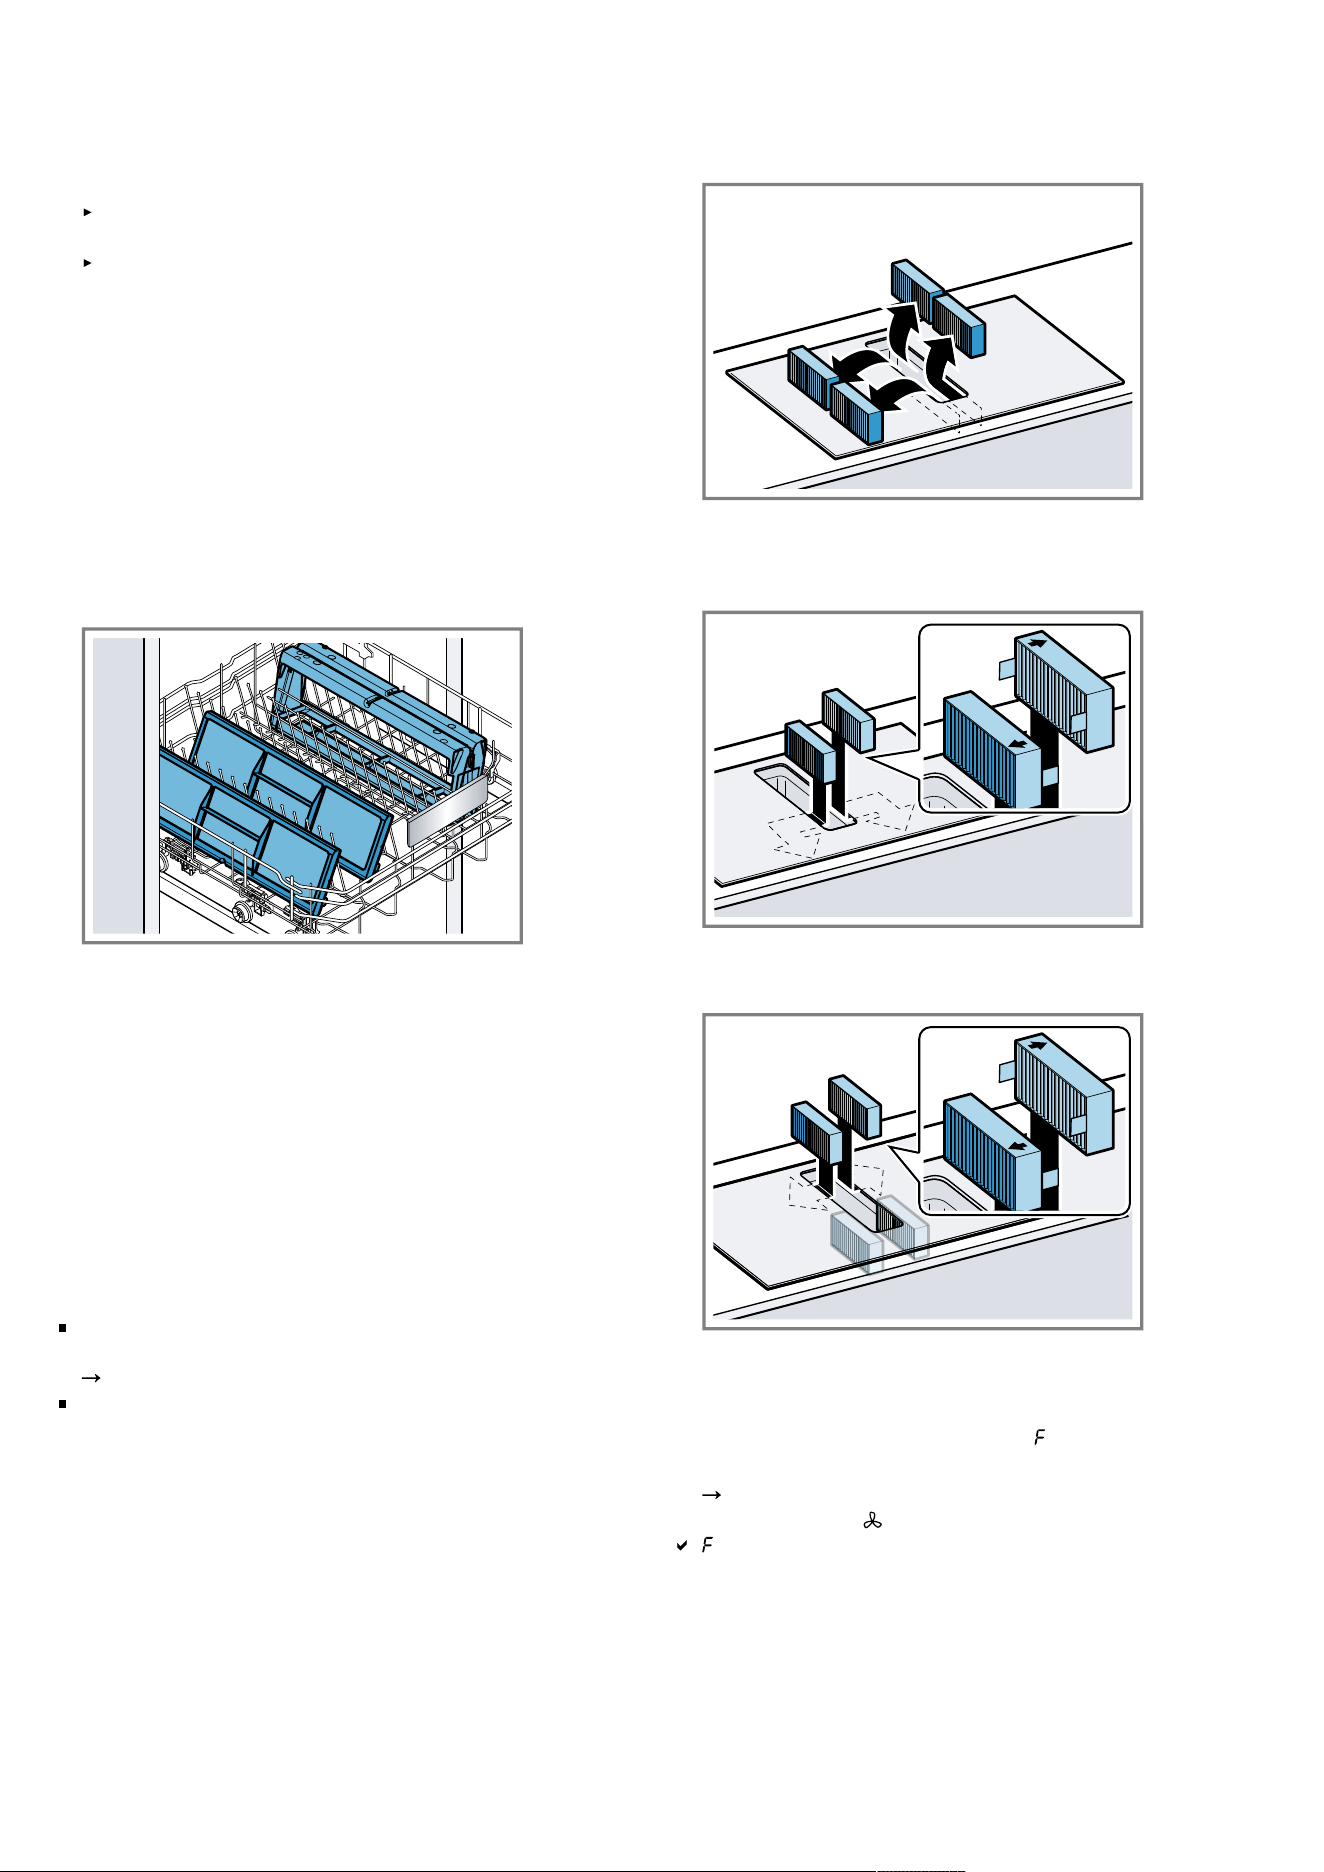
Cleaning and servicing en
Cleaning the grease filters manually
1.
Remove the components of the grease filter.
2.
Soak the grease filter in hot soapy water.
Use a brush to clean the grease filter. Do not use
aggressive, acidic or alkaline cleaning products.
Use special grease solvent for stubborn dirt. You
can purchase the grease solvent from Customer
Service, through our online shop or in a specialist
shop.
3.
Rinse the grease filters thoroughly.
4.
Leave the grease filter to drain.
5.
Fit the components of the grease filter.
6.
After drying, insert the grease filter into the appliance.
Cleaning the grease filter in the dishwasher
1.
Remove the grease filter.
2.
Remove the components of the grease filter.
3.
Place the components of the grease filter loosely in
the dishwasher and do not jam them in.
Do not clean heavily soiled grease filters with table-
ware. Do not use aggressive, acidic or alkaline clean-
ing products.
4.
Start the dishwasher. Select a maximum temperature
setting of 70°C.
5.
Leave the grease filter to drain.
6.
After drying, insert the grease filter into the appliance.
26.6 Odour filter or acoustics filter
You can obtain odour filters or acoustics filters from
specialist retailers, customer service or in the online
shop.
Notes
Replace the odour filters when the warning is dis-
played on the appliance.
"Resetting the saturation indicator", Page27
Change the acoustics filters if they are dirty.
Requirement: To keep them in good working order,
only use genuine replacement filters.
1.
Remove the grease filter.
2.
Remove the four odour filters or acoustics filters, and
dispose of them properly.
3.
Insert two new odour filters or acoustics filters into the
left and right of the appliance and slide them for-
wards.
4.
Insert the other odour filters or acoustics filters into
the left and right of the appliance.
5.
Insert the grease filter into the appliance.
Resetting the saturation indicator
After the appliance is switched off, lights up.
1.
Replace the odour filters.
"Odour filter or acoustics filter", Page27
2.
Press and hold until an audible signal sounds.
stops lighting up. The odour filter display is reset.
26.7 Cleaning the overflow container
The overflow container collects liquids or objects that
come into the appliance from above.
Requirement: The appliance has cooled and the resid-
ual heat indicator has gone out.
27
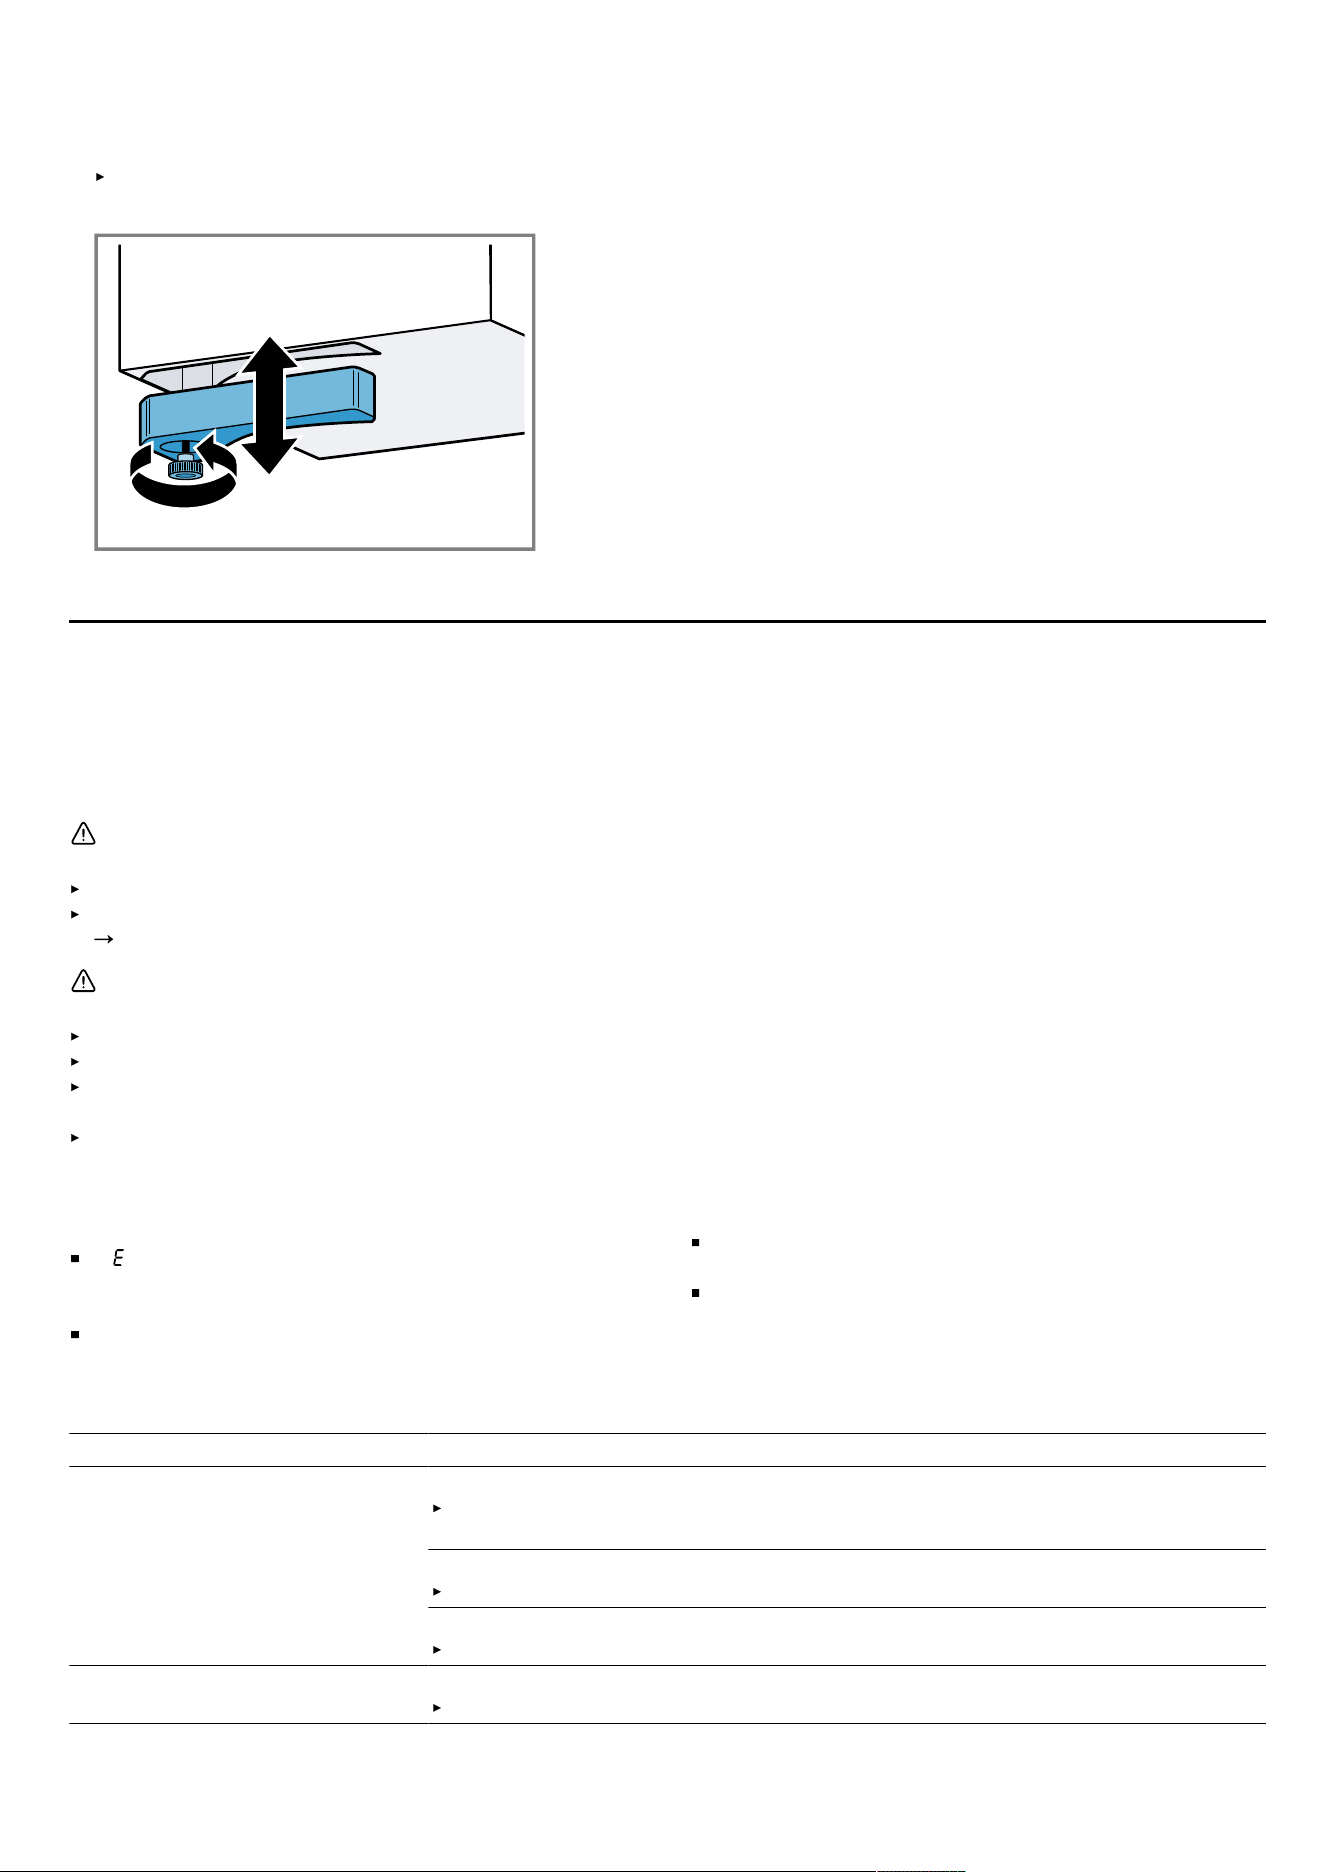
en Troubleshooting
1.
Hold the overflow container with one hand and un-
screw it with the other hand.
Hold the overflow container level to prevent liquid
from leaking out.
2.
Empty the overflow container and rinse it out.
3.
If required, unscrew the screw and clean the overflow
container without the screw in the dishwasher.
4.
Clean the overflow container before screwing it back
into place.
5.
Ensure that the supply to the overflow container is not
blocked.
Remove any objects that have entered the appliance
once it has cooled down. To do this, remove the
grease filter.
Troubleshooting27 Troubleshooting
You can rectify minor faults on your appliance yourself. Read the troubleshooting information before contacting after-
sales service. This will avoid unnecessary costs.
Tip: Permanently connect your appliance to the Home Connect app to automatically receive software updates. This
allows errors to be eliminated, performance to be improved and new functions to be made available.
WARNING‒Risk of injury!
Improper repairs are dangerous.
Repairs to the appliance should only be carried out by trained specialist staff.
If the appliance is defective, call Customer Service.
"Customer Service", Page31
WARNING‒Risk of electric shock!
Improper repairs are dangerous.
Repairs to the appliance should only be carried out by trained specialist staff.
Only use genuine spare parts when repairing the appliance.
If the power cord or the appliance power cable of this appliance is damaged, it must be replaced with a special
power cord or special appliance power cable, which is available from the manufacturer or its Customer Service.
If the power cord of this appliance is damaged, it must be replaced by trained specialist staff.
27.1 Warnings
Notes
If appears in the displays, press and hold the
sensor for the respective cooking zone and read the
fault code.
If the fault code is not listed in the following table, dis-
connect the hob from the power supply and wait
30seconds before reconnecting it. If this display ap-
pears again, contact Customer Service and specify
the exact fault code.
If an error occurs, the appliance does not switch to
low power mode.
In order to protect the appliance's electronic parts
from overheating or surge currents, the hob may tem-
porarily reduce the power level.
27.2 Information on the display panel
Fault Cause and troubleshooting
No displays light up. The power supply has been disconnected.
Use other electrical appliances to check whether there has been a power fail-
ure.
The appliance has not been connected as shown in the circuit diagram.
Connect the appliance in accordance with the circuit diagram.
Electronics fault
If you are unable to rectify the fault, inform the technical after-sales service.
The displays flash. The control panel is wet or an object is covering it.
Dry the control panel or remove the object.
28
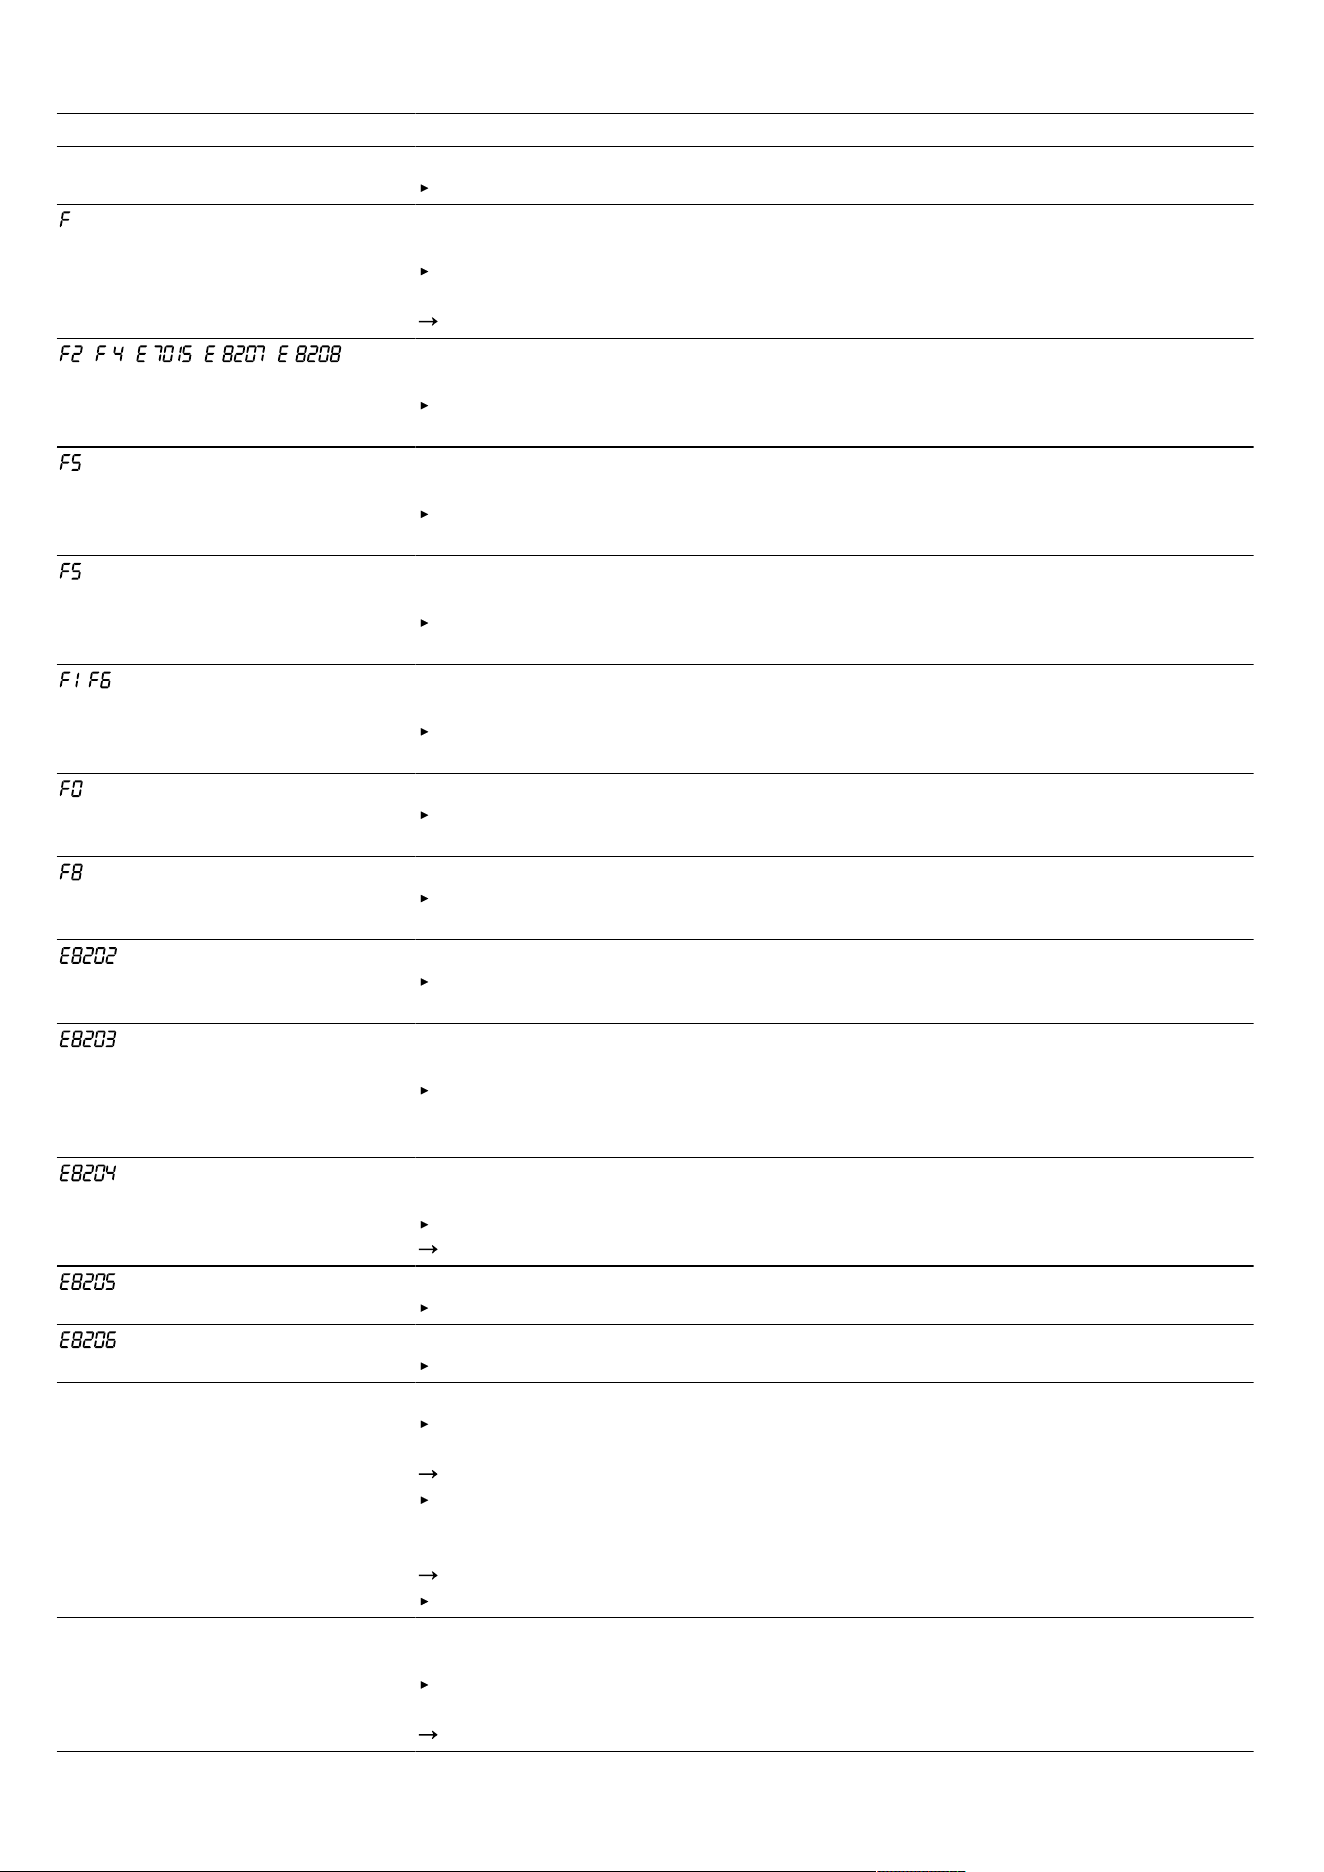
Troubleshooting en
Fault Cause and troubleshooting
Ventilation system not working The appliance has not been connected as shown in the circuit diagram.
Connect the appliance in accordance with the circuit diagram.
The odour filter is saturated or the saturation indicator lights up even though the
filter has been replaced.
Change the filter and reset the filter saturation indicator. You can find additional
information about this in the section entitled .
"Cleaning and servicing", Page25
, , , , The electronics have overheated and one or all of the cooking zones have been
switched off.
Wait until the electronics have cooled down sufficiently. Then touch any button
on the control panel.
+ power level and audible sig-
nal
There is hot cookware in the vicinity of the control panel. This may cause the
electronics to overheat.
Remove the cookware. The fault display goes out shortly afterwards. You can
continue to cook.
and signal tone There is hot cookware in the vicinity of the control panel. The cooking zone has
been switched off to protect the electronics.
Remove the cookware. Wait a few seconds. Touch any button. When the fault
display goes out, you can continue cooking.
/ The cooking zone has overheated and has been switched off to protect the work
surface.
Wait until the electronics have cooled down sufficiently before switching the
cooking zone back on.
flexMotion is not activated.
Touch any button to confirm the fault display. You can continue to cook as nor-
mal without using the flexMotion function. Contact customer service.
The cooking zone has been operating continuously for an extended period.
Individual safety switch-off is switched on. Touch any button to switch off the
display so that you can set the cooking zone.
The cooking sensor has overheated and the cooking zone has been switched off.
Wait until the cooking sensor has cooled down sufficiently before activating the
function again.
The cooking sensor has overheated and all of the cooking zones have been
switched off.
When you are not using the cooking sensor, remove it from the cookware and
keep it away from other cooking zones or heat sources. Switch on the cooking
zones.
There is hot cookware in the vicinity of the control panel. The cooking zone has
been switched off to protect the electronics.
Replace the 3 V CR2032 battery. For more information, see the section entitled
"Replacing the battery", Page19
The connection to the cooking sensor has been broken.
Switch off the function and reactivate it.
The cooking sensor is broken/faulty.
Contact the technical after-sales service.
The wireless cooking sensor dis-
play does not light up.
The wireless cooking sensor is not responding and the display does not light up.
Replace the 3 V CR2032 battery. For more information, see the section en-
titled .
"Replacing the battery", Page19
If this does not solve the problem, press and hold the symbol on the cooking
sensor for 8–10 seconds and then reconnect the cooking sensor to the hob.
For more information, see the section entitled .
"Connecting the wireless cooking sensor", Page18
If the problem persists, contact our technical after-sales service.
The display on the sensor flashes
twice.
The battery in the cooking sensor is almost flat. The next time you cook, you may
be interrupted by the battery running out.
Replace the 3 V CR2032 battery. For more information, see the section en-
titled .
"Replacing the battery", Page19
29
en Disposal
Fault Cause and troubleshooting
The display on the sensor flashes
three times.
The connection to the cooking sensor has been broken.
Press and hold the symbol on the cooking sensor for 8–10 seconds and then
reconnect the cooking sensor to the hob. For more information, see the section
entitled .
"Connecting the wireless cooking sensor", Page18
/ The operating voltage is incorrect and outside of the normal operating range.
Contact your energy supplier.
/ The hob is not connected correctly.
Disconnect the hob from the mains. Connect the hob in accordance with the
circuit diagram.
Demo mode is activated.
Disconnect the hob from the mains. Wait for 30 seconds and connect the hob.
Touch any sensor in the next threeminutes. Demo mode is deactivated.
HomeConnect is not working
properly.
Different causes are possible.
Go to
www.home-connect.com
.
27.3 Normal noises from your appliance
An induction hob may sometimes cause noises or vibra-
tions, such as buzzing, crackling, hissing noises, fan
noises or rhythmic noises.
Disposal28 Disposal
28.1 Disposing of old appliance
Valuable raw materials can be reused by recycling.
1.
Unplug the appliance from the mains.
2.
Cut through the power cord.
3.
Dispose of the appliance in an environmentally
friendly manner.
Information about current disposal methods are avail-
able from your specialist dealer or local authority.
This appliance is labelled in accordance
with European Directive 2012/19/EU
concerning used electrical and elec-
tronic appliances (waste electrical and
electronic equipment - WEEE).
The guideline determines the framework
for the return and recycling of used ap-
pliances as applicable throughout the
EU.
28.2 Disposing of batteries
Batteries should be recycled in an environmentally
friendly manner. Do not dispose of the batteries in the
household rubbish.
Dispose of batteries in an environmentally friendly
manner.
Declaration of Conformity29 Declaration of Conformity
BSH Hausgeräte GmbH hereby declares that the appliance with Home Connect functionality conforms to the essen-
tial requirements and other relevant provisions of Directive 2014/53/EU.
A detailed RED Declaration of Conformity can be found online at siemens-home.bsh-group.com among the additional
documents on the product page for your appliance.
Hereby, BSH Hausgeräte GmbH declares that the appliance with HomeConnect functionality is in compliance with
relevant statutory requirements.
1
A detailed Declaration of Conformity can be found online at siemens-home.bsh-group.com/uk/ among the additional
documents on the product page for your appliance.
1
1
Only applies to Great Britain
30

Customer Service en
2.4 GHz band (2400–2483.5MHz): Max. 100mW
5-GHz band (5150–5350MHz + 5470–5725MHz): max. 50mW
BE BG CZ DK DE EE IE EL ES
FR HR IT CY LI LV LT LU HU
MT NL AT PL PT RO SI SK FI
SE NO CH TR IS UK (NI)
5GHz WLAN (Wi-Fi): For indoor use only.
AL BA MD ME MK RS UK UA
5GHz WLAN (Wi-Fi): For indoor use only.
29.1 Statement of Compliance for Great
Britain
The full Statement of Compliance according to the
Product Security and Telecommunications Infrastructure
(Security Requirements for Relevant Connectable
Products) Regulations 2023 can be found online at
www.siemens-home.bsh-group.com/uk/home among
the additional documents on the product page for your
appliance.
Product type
This statement of compliance covers the products de-
scribed in this information for use whose model identi-
fier group is seen on the title page. The full model identi-
fier is made up of the characters before the slash in the
product number (E no.) which can be found on the rat-
ing plate. Alternatively, you can also find the model iden-
tifier in the first line of the UK Energy Label.
Name and address of manufacturer
BSH Hausgeräte GmbH, Carl-Wery-Strasse 34, 81739
München, Germany
This statement of compliance is prepared by the manu-
facturer.
The manufacturer, BSH Hausgeräte GmbH deems that it
has complied with
provision 5.1-1 of ETSI EN 303 645 v3.1.3 and,
where relevant, provision 5.1-2 of ETSI EN 303 645
v3.1.3;
provision 5.2-1 of ETSI EN 303 645 v3.1.3;
provision 5.3-13 of ETSI EN 303 645 v3.1.3.
Support period
BSH Hausgeräte GmbH will provide security updates
that are necessary to maintain the main functions free of
charge until at least 28/02/2036.
Customer Service30 Customer Service
Function-relevant genuine spare parts according to the
corresponding Ecodesign Directive can be obtained
from Customer Service for a period of at least 10years
from the date on which your appliance was placed on
the market within the European Economic Area.
Furthermore, our Customer Service will continue to
provide you with other function-relevant and storable
genuine spare parts for up to 15years from the date on
which your appliance was placed on the market.
For more information, please contact our Customer Ser-
vice team.
Note: Under the terms of the manufacturer's warranty
the use of Customer Service is free of charge.
Detailed information about the warranty period and the
warranty conditions in your country is available via the
QR code on the enclosed document on service con-
tacts and warranty conditions, from our customer ser-
vice or on our website.
You can find the contact details for our customer ser-
vice via the QR code on the enclosed document on ser-
vice contacts and warranty conditions or on our website.
You can find the information required as per Regula-
tions (EU) 65/2014, (EU) 66/2014 and (EU) 2023/826
online at siemens-home.bsh-group.com on the product
and service pages for your appliance, in the area of
user manuals and additional documents.
30.1 Product number (E-Nr.) and production
number (FD)
If you contact Customer Service, you will require the
product number (E-Nr.) and the production number
(FD), which you can find on the appliance's rating plate.
The rating plate can be found:
On the appliance certificate.
On the underside of the hob, towards the front.
The product number (E no.) can also be found on the
glass ceramic. You can also display the customer ser-
31
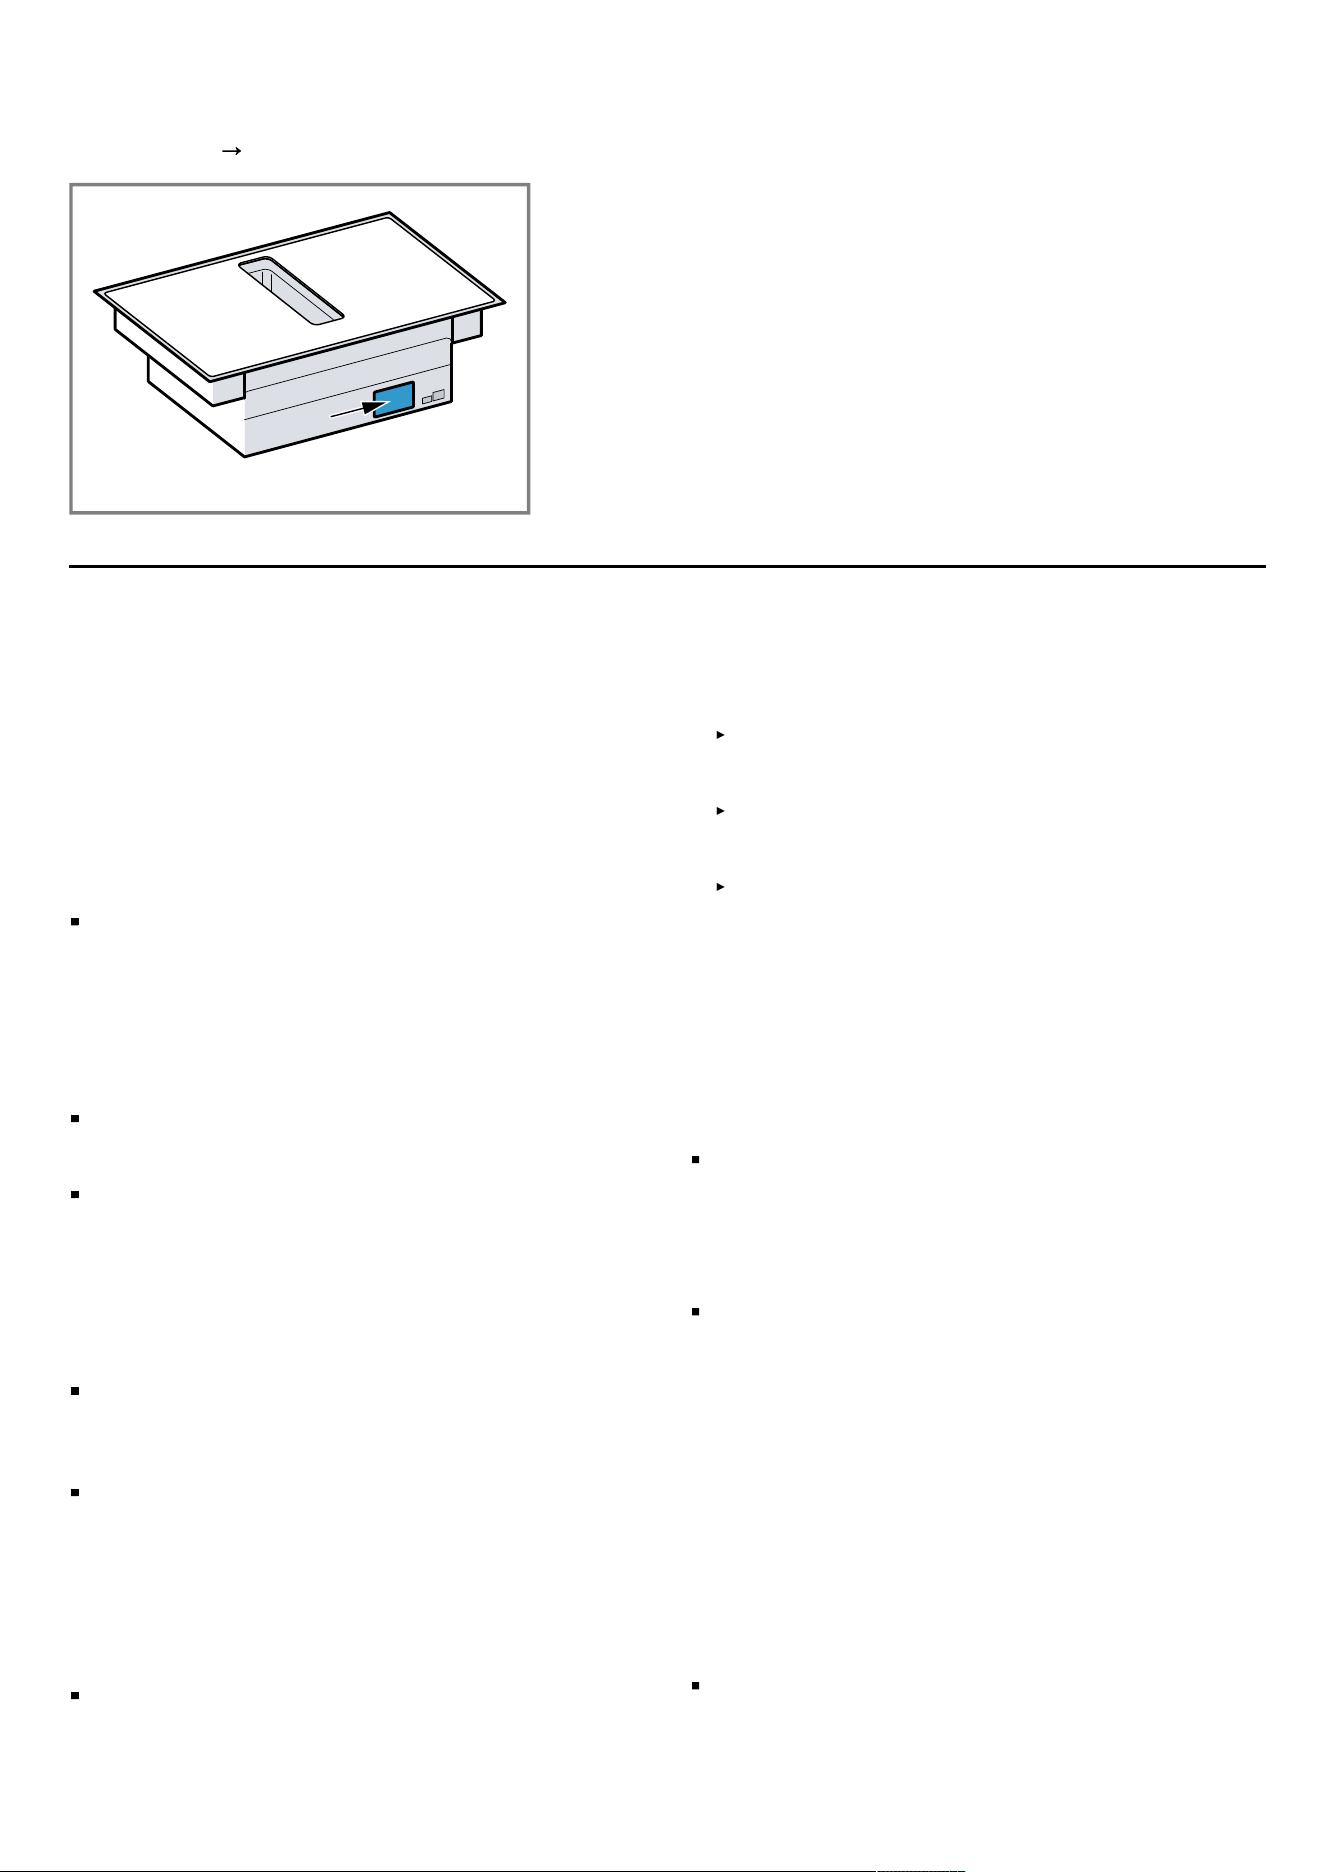
en Test dishes
vice index (KI) and the production number (FD) in the
basic settings.
Page21
Make a note of your appliance's details and the Cus-
tomer Service telephone number to find them again
quickly.
Test dishes31 Test dishes
These recommended settings are intended for test insti-
tutes to facilitate the testing of our appliances. The tests
were carried out using our cookware sets for induction
hobs. If required, these accessory sets can be pur-
chased at a later point from specialist retailers, or
through our technical after-sales service or our online
shop.
31.1 Melting the chocolate coating
Ingredients: 150 g dark chocolate (55% cocoa).
16 cm saucepan without lid
– Boiling: Power level 1.5
31.2 Heating and keeping lentil stew warm
Recipe in accordance with DIN 44550
Initial temperature 20°C
Heating up without stirring
16 cm saucepan with lid, amount: 450g
– Heating up: Duration 1 min. 30 sec., power level 9
– Simmering: Power level 1.5
20 cm saucepan with lid, amount: 800g
– Heating up: Duration 2 min. 30 sec., power level 9
– Simmering: Power level 1.5
31.3 Heating and keeping lentil stew warm
E.g.: Lentil diameter 5–7 mm. Initial temperature 20 °C
Stir after heating for 1 minute
16 cm saucepan with lid, amount: 500g
– Heating up: Duration approx. 1 min. 30 sec., power
level 9
– Simmering: Power level 1.5
20 cm saucepan with lid, amount: 1kg
– Heating up: Duration approx. 2 min. 30 sec., power
level 9
– Simmering: Power level 1.5
31.4 Béchamel sauce
Milk temperature: 7 °C
16 cm saucepan without lid, ingredients: 40 g butter,
40 g flour, 0.5 l milk with 3.5% fat content and a
pinch of salt
Preparing Béchamel sauce
1.
Melt the butter, stir in the flour and salt, and heat up
the mixture.
Heating up: Duration 6 min., power level 2
2.
Add the milk to the roux and bring to the boil, stirring
continuously.
Heating up: Duration 6 min. 30 sec., power level 7
3.
Once the Béchamel sauce comes to the boil, leave it
on the cooking zone for a further two minutes.
Simmering: Power level 2
31.5 Cooking rice pudding with the lid on
Milk temperature: 7 °C
1. Heat the milk until it starts to rise up. Heat up without
a lid. Stir after heating for 10 min.
2. Set the recommended power level and add rice,
sugar and salt to the milk.
The cooking time, including heating up, is approx. 45
minutes.
16 cm saucepan, ingredients: 190g short-grain rice,
90g sugar, 750ml milk with 3.5% fat content and 1 g
salt
– Heating up: Duration approx. 5 min. 30 sec., power
level 8.5
– Simmering: Power level 3
20 cm saucepan, ingredients: 250g short-grain rice,
120g sugar, 1l milk with 3.5% fat content and 1.5 g
salt
– Heating up: Duration approx. 5 min. 30 sec., power
level 8.5
– Simmering: Power level 3, stir after 10 minutes
31.6 Cooking rice pudding without a lid
Milk temperature: 7 °C
1. Add the ingredients to the milk and heat the mixture
up while stirring continuously.
2. Once the milk has reached approx. 90°C, select the
recommended power level and leave it to simmer on a
low heat for approx. 50minutes.
16 cm saucepan without lid, ingredients: 190g short-
grain rice, 90g sugar, 750ml milk with 3.5% fat con-
tent and 1 g salt
32

Test dishes en
– Heating up: Duration approx. 5 min. 30 sec., power
level 8.5
– Simmering: Power level 3
20 cm saucepan without lid, ingredients: 250g short-
grain rice, 120g sugar, 1l milk with 3.5% fat content
and 1.5 g salt
– Heating up: Duration approx. 5 min. 30 sec., power
level 8.5
– Simmering: Power level 2.5
31.7 Cooking rice
Recipe in accordance with DIN 44550
Water temperature: 20°C
16 cm saucepan with lid, ingredients: 125g long-
grain rice, 300 g water and a pinch of salt
– Heating up: Duration approx. 2 min. 30 sec., power
level 9
– Simmering: Power level 2
20 cm saucepan with lid, ingredients: 250g long-grain
rice, 600 g water and a pinch of salt
– Heating up: Duration approx. 2 min. 30 sec., power
level 9
– Simmering: Power level 2.5
31.8 Roasting a pork loin
Initial temperature of the loin: 7°C
24cm pan without lid, ingredients: 3 pork loins, total
weight approx. 300g, 1cm thick, and 15g sunflower
oil
– Heating up: Duration approx. 1 min. 30 sec., power
level 9
– Simmering: Power level 7
31.9 Preparing crêpes
Recipe in accordance with DIN EN 60350-2
24 cm pan without lid, ingredients: 55 ml batter per
crêpe
– Heating up: Duration 1 min. 30 sec., power level 9
– Simmering: Power level 7
31.10 Deep-fat frying frozen chips
Pot dia. 20 cm without lid: ingredients: 2 l sunflower
oil. For each frying time: 200 g frozen chips, 1 cm
thick.
– Heating up: Power level 9, until the oil temperature
reaches 180 °C.
– Simmering: Power level 9
33


Siemens Home Appliances
App
Connect your home appliance today and enjoy the following
benefits:
• Is the hob switched off? Check your hob from anywhere using the
app.
• Choose from our great range of recipes. If a frying sensor is
available, you can send the corresponding settings to your
appliance.
• Do not forget to maintain the filters. When it’s time, you will
receive an app notification.
EN Manufactured by BSH Hausgeräte GmbH under the trademark licence of Siemens AG
Valid within Great Britain:
Imported to Great Britain by
BSH Home Appliances Ltd.
Grand Union House
Old Wolverton Road
Wolverton, Milton Keynes
MK12 5PT
United Kingdom
BSH Hausgeräte GmbH
Carl-Wery-Straße 34
81739 München, GERMANY
siemens-home.bsh-group.com
*9001996516*
9001996516 (060803) REG25
en