Text 1-812-652-2525
(US and Canada only, carrier fees may apply)
Visit www.maxicosi.com
Call 1-800-544-1108
Learn More
Email [email protected]
Sela
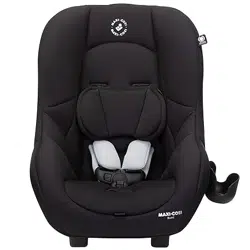
All-in-One Convertible Car Seat
Your model may look different than the one shown.
Read all instructions before using this car seat.
KEEP INSTRUCTIONS FOR FUTURE USE.
Failure to follow the warnings on the labels
and in the instruction manual can result in serious
injury or death to your child. Serious injury may
include paralysis and/or permanent brain injury.
4358-8763A 05.06.26
©2026 Dorel Juvenile Group, Inc. (800) 544-1108 www.maxicosi.com. Styles, colors, and labeling may vary. Made in CHINA. Distributed by
Dorel Juvenile Group, Inc., 2525 State St., Columbus, IN 47201-7494. Dorel Juvenile Canada, 2233 Argentia Road, Suite 110, Mississauga, ON L5N
2X7. Representante exclusivo en Chile: DOREL JUVENILE CHILE S.A. Av. del Parque 4161, oficina 602 A, Huechuraba, Santiago, Chile - Fono: 56 2
24971500 - www.infanti.cl - www.dorel.cl. Importado y distribuido en Perú por: COMEXA COMERCIALIZADORA EXTRANJERA S.A. SUCURSAL DEL
PERÚ - Los Libertadores 455, San Isidro, Lima 27, Lima, Perú RUC 20431062870 – Fono: 4413029 – www.infanti.com.pe. En Centro América, Caribe y
Ecuador por: Best Brands Group S.A. – Av. Balboa, Bay Mall Plaza, Planta Baja, local 9, Panamá. - Fono: (507) 300 2884. En Colombia
por: Baby Universe S.A.S. - Vía 40 No. 77-29, Barranquilla, Colombia - Fono: (575) 353 1110 Importador: DJGM, S.A. DE C.V. Gabriel
Mancera No. 1041 Col. Del Valle, Benito Juárez C.P. 03100 México, Ciudad de México R.F.C. DJG140305GN9 Tel. (55) 67199202

32
Table of Contents
1
Measure
your child.
2
Adjust the car
seat to fit
your child.
3
Install the car
seat into your
vehicle.
4
Secure your
child in the
car seat.
Getting Started
To help you get started using your child’s new car seat (also known as
a child restraint), these are the four main tasks you’ll need to complete.
Getting Started ...................................................................................................3
Parts of the Car Seat .....................................................................................4
Accessory Use ................................................................................................. 8
Choosing a Car Seat Mode .....................................................................13
Adjusting the Headrest/Harness Height
.........................................16
Changing the Buckle Position
...............................................................17
Reclining the Car Seat
..............................................................................20
Rear-Facing Mode ..........................................................................................21
Rear-Facing Child Fit Requirements .................................................24
Rear-Facing Vehicle Installation .......................................................... 27
Installing the Car Seat Rear-Facing with
Rigid LATCH Connectors .........................................................................28
Installing the Car Seat Rear-Facing with
a Vehicle Belt.................................................................................................33
Forward-Facing Mode .................................................................................39
Forward-Facing Child Fit Requirements ......................................... 42
Forward-Facing Vehicle Installation .................................................45
Installing the Car Seat Forward-Facing with
a Vehicle Belt.................................................................................................46
Installing the Car Seat Forward-Facing with
Rigid LATCH Connectors .........................................................................57
Securing Your Child in the Car Seat ....................................................64
Booster Seat Mode ........................................................................................ 70
Storing the Harness System ..................................................................72
Booster Seat Child Fit Requirements ...............................................78
Booster Seat Use in Vehicle .................................................................. 79
Wash and Care .................................................................................................85
Removing the Seat Pad Set ................................................................... 86
Clearning the Seat Pad Set and Parts of the Car Seat .............90
Installing the Seat Pad Set .....................................................................91
Vehicle Belt, LATCH, and Tether Information ...............................97
Vehicle Belts
.................................................................................................. 98
LATCH: Lower Anchor Bars ................................................................102
Tether Strap ................................................................................................104
Safety Information ......................................................................................106
Child Restraint Use .................................................................................107
Vehicle Seating Position .......................................................................108
Installation in Vehicle .............................................................................109
Replacement and Expiration ..............................................................110
Registration and Safety Notices ........................................................111
Aircraft Information..................................................................................113
Warranty ...................................................................................................... 114
Replacement Parts ..................................................................................115
54
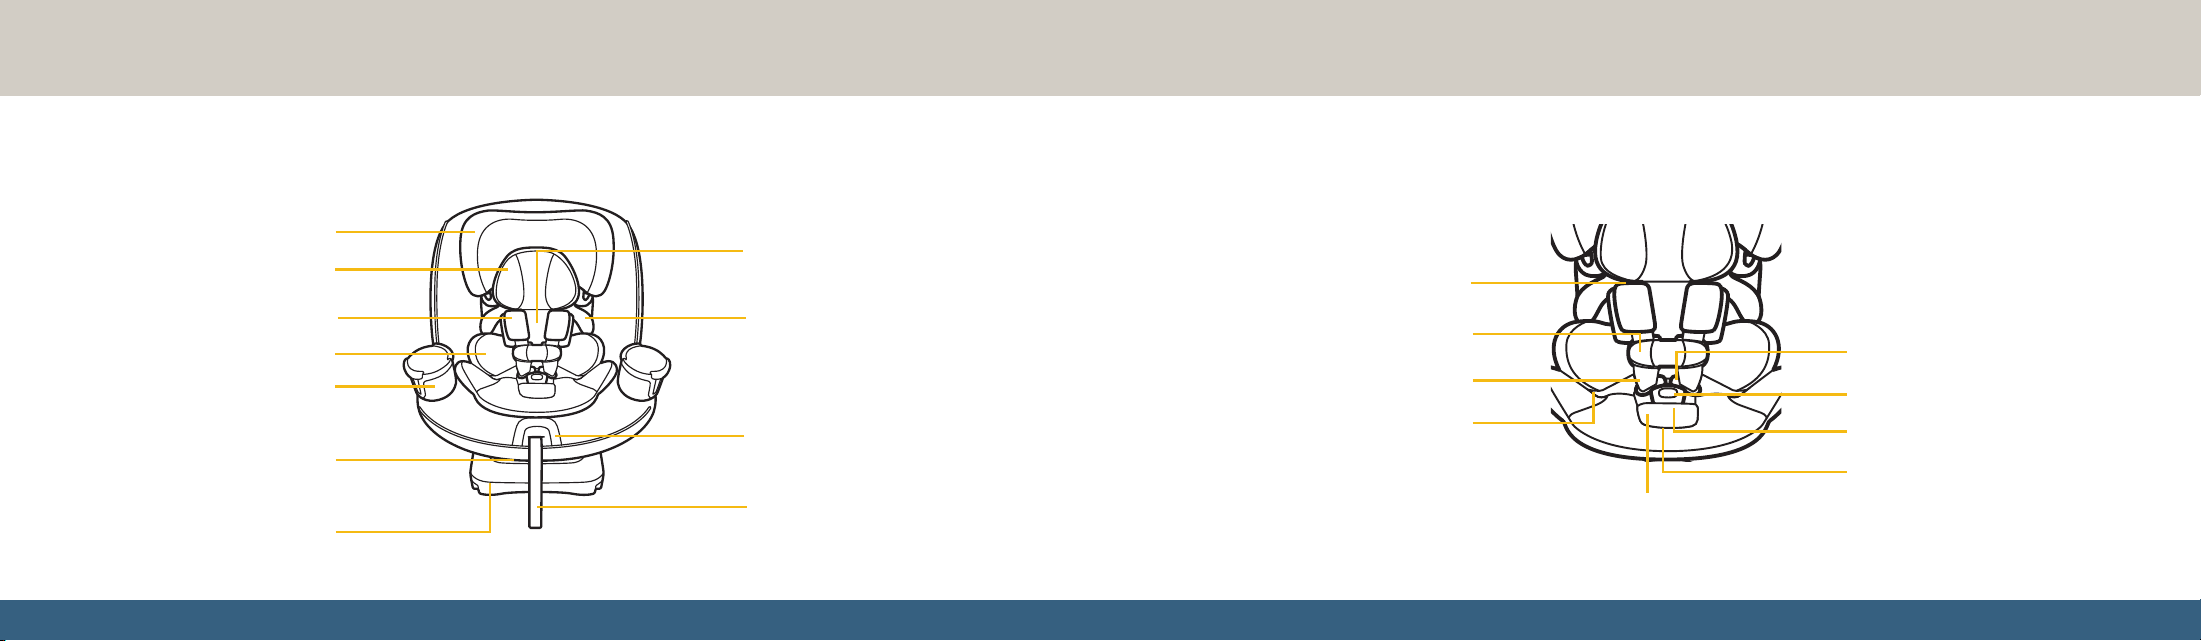
Parts of the Car Seat
4
4
Buckle
Magnetic Chest Clip
Harness Straps
Hip Slots
Buckle Tongues
Buckle Strap
Buckle Slots
Shoulder Harness Slots
*See page 8 for accessory use.
Buckle Cover
Your model may look dierent than the one shown.
Harness System
Recline Handle
(underneath the seat)
Base
Front
4
4
Adjustable Headrest
Head Pillow*
Forward-Facing Lockoff
Arm (behind seat pad)
Body Pillow*
Removable Cup Holders*
Harness Release
Lever (under flap)
Instruction Manual Storage
(in a pocket on the bottom of the
headrest pad))
Harness Covers*
Harness Adjustment Strap
continued on next page
76
4
4
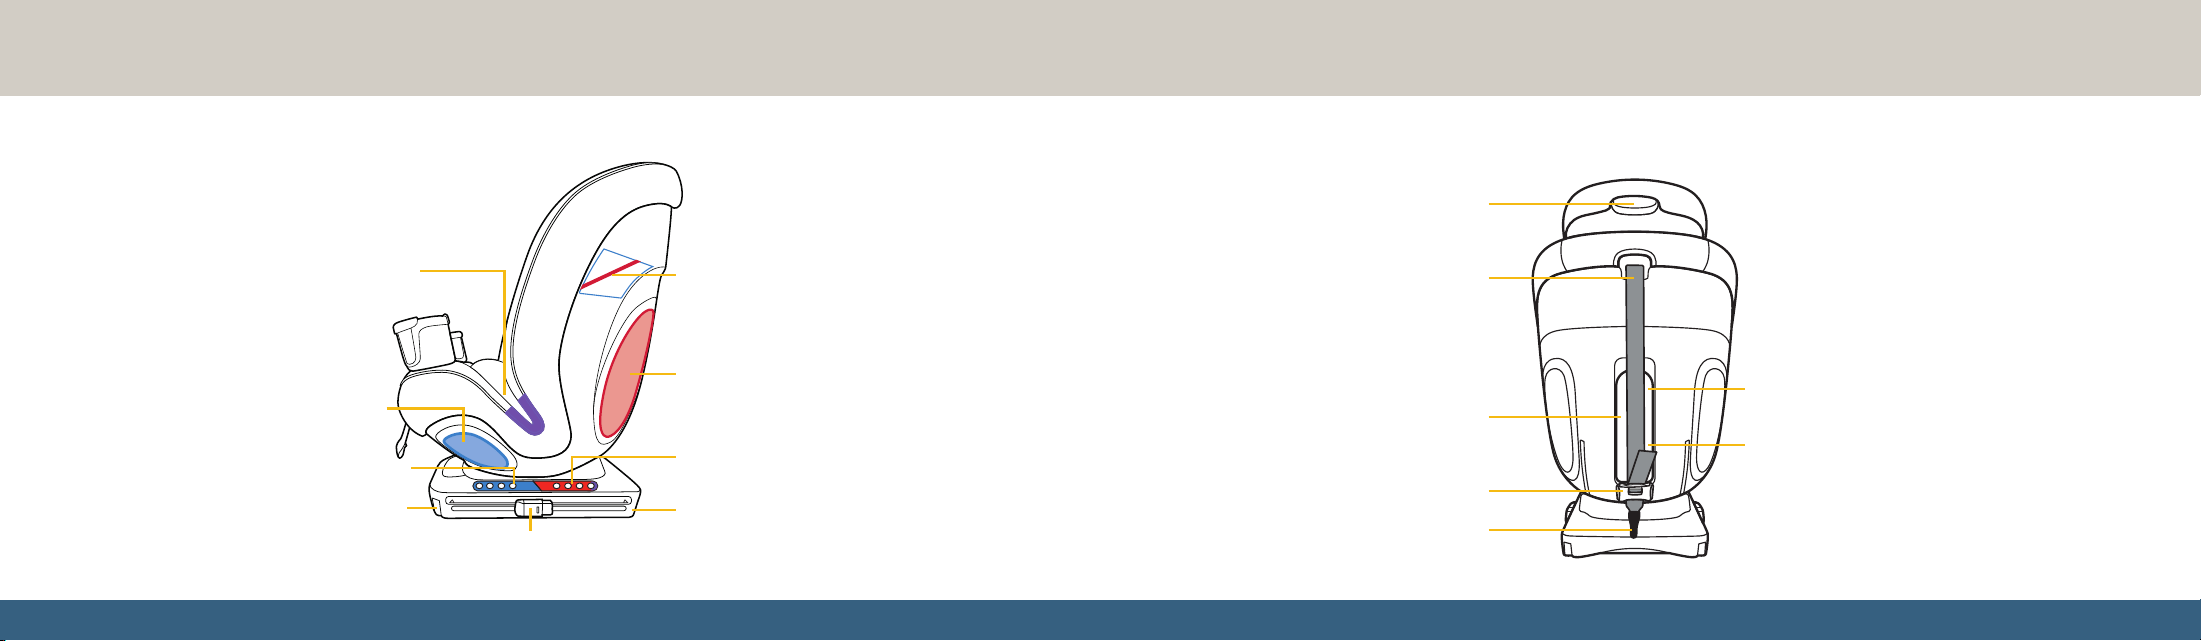
BackSide
Rigid LATCH Connector
Release Lock
Rear-Facing Level Line
Forward-Facing Belt Path
Forward-Facing/Booster Recline
Position Indicators
Forward-Facing/Booster Rigid
LATCH Connectors
Rear-Facing Belt Path
Booster Seat Belt Path
Rear-Facing Recline Position Indicators
Rear-Facing Rigid LATCH
Connectors
4
4
Tether Storage Door
Tether Strap Adjuster
Tether Hook
Tether Strap
Headrest/Harness
Adjustment Handle
Seat Pad Tool
(behind tether storage door)
Tether Strap Storage
(behind tether storage door)
98
For Optional Use in Rear-Facing Mode and Forward-Facing Mode
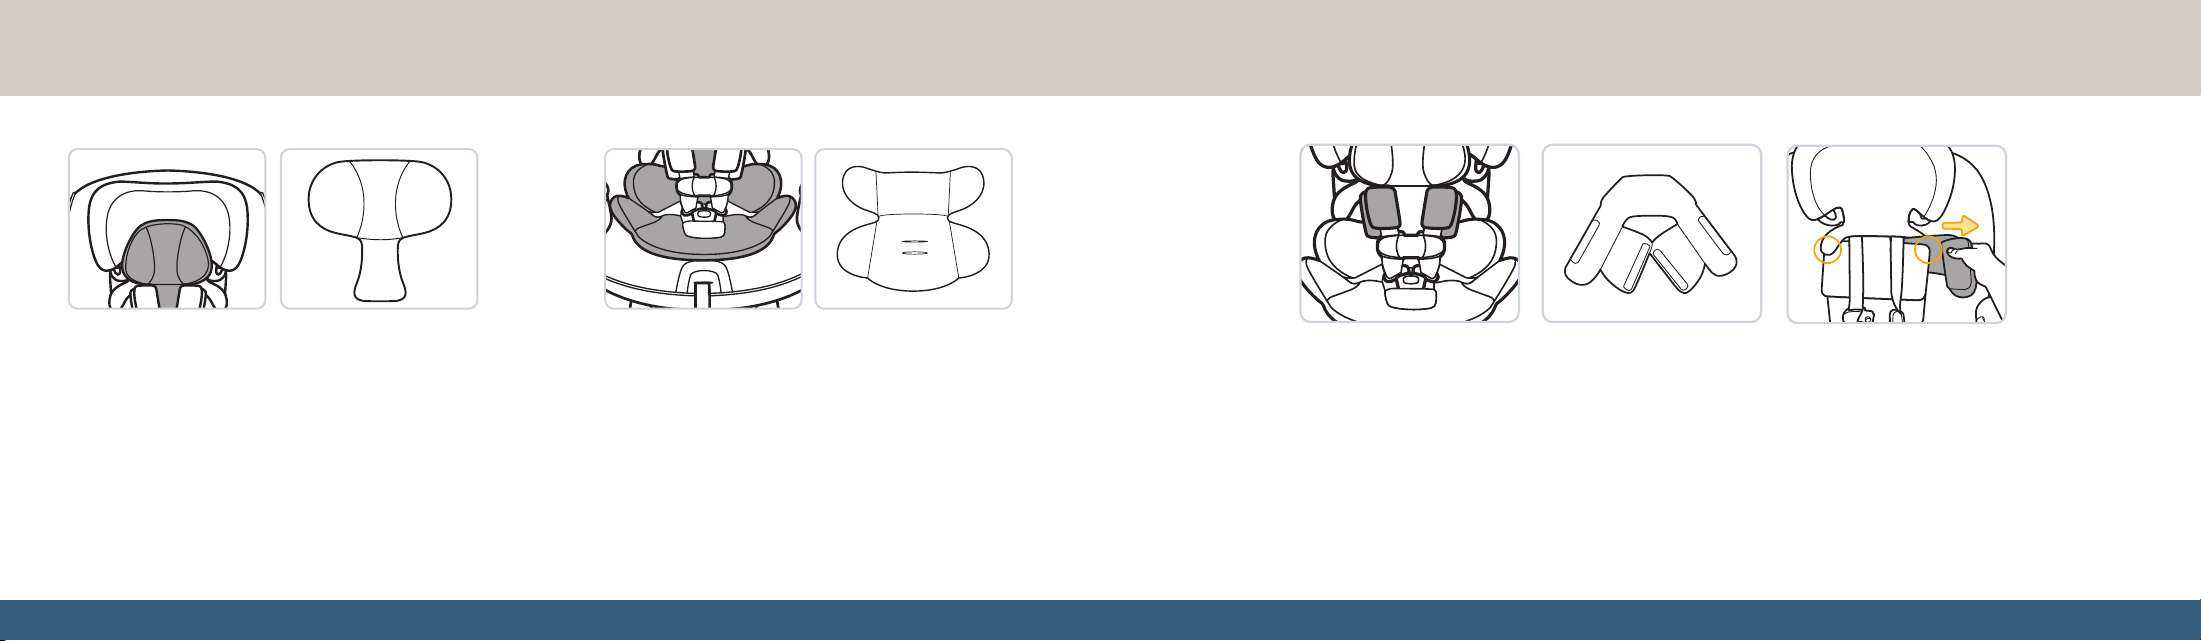
Harness Covers
Accessory Use
The harness covers help provide comfort to
your child’s neck. If the harness covers will
not allow proper positioning of the chest
clip or interfere with getting a tight enough
harness fit for a smaller infant, remove them
and DO NOT use. Store until your child is
large enough to use the harness covers while
maintaining a properly fitting harness.
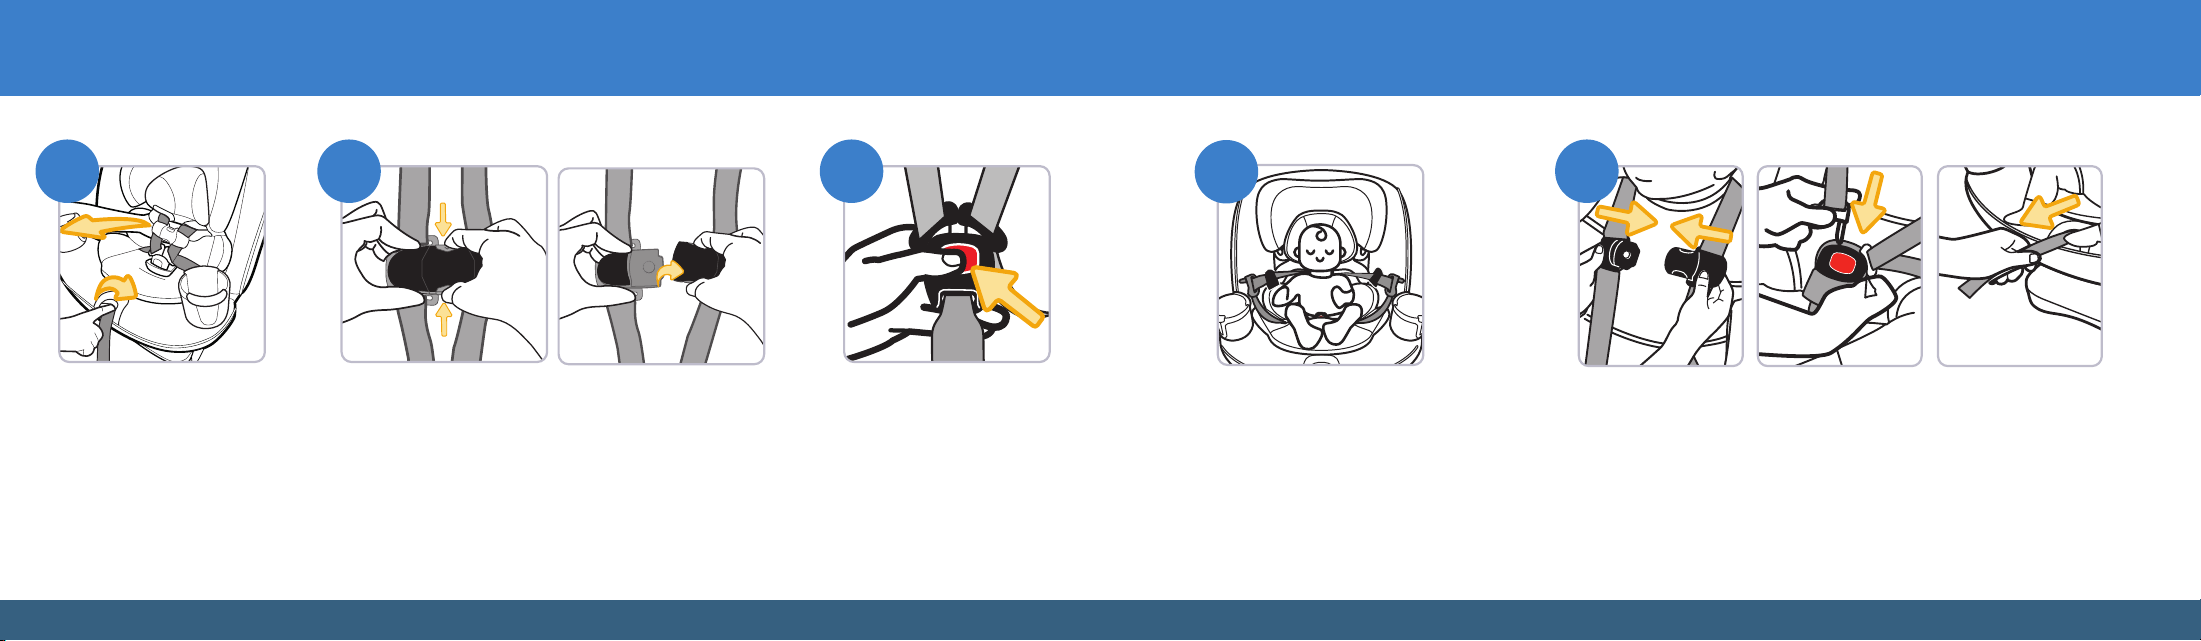
To remove the harness covers:
Pull out the tabs near the shoulder slots on
the headrest pad. Pull apart the fastening
strips on both covers. Slide the harness covers
out from behind the headrest pad. Reinsert
the tabs into the slots on the headrest pad.
continued on next page
When using the head pillow, make sure it does not cover your
infant’s face in any way. The head and body pillows MUST
be used together.
To remove the head and body pillows:
1. Gently pull the head pillow up from behind the body pillow.
2. Unfasten the chest clip and press the red button to unbuckle
the harness. Pull the buckle down through the slot in the
body pillow. Gently slide the body pillow out from behind the
harness straps.
To install the head and body pillows:
1. Unfasten the chest clip and press the red button to unbuckle
the harness. Pull the buckle through the body pillow using
the same buckle slot as the seat pad. Tuck the upper part of
the body pillow beneath the harness straps.
2. Tuck the bottom part of the head pillow behind the upper
part of the body pillow.
Head Pillow
Body Pillow
Head and Body Pillows (For Optional Use in Rear-Facing Mode Only)
1110
For Optional Use in Rear-Facing Mode and Forward-Facing Mode
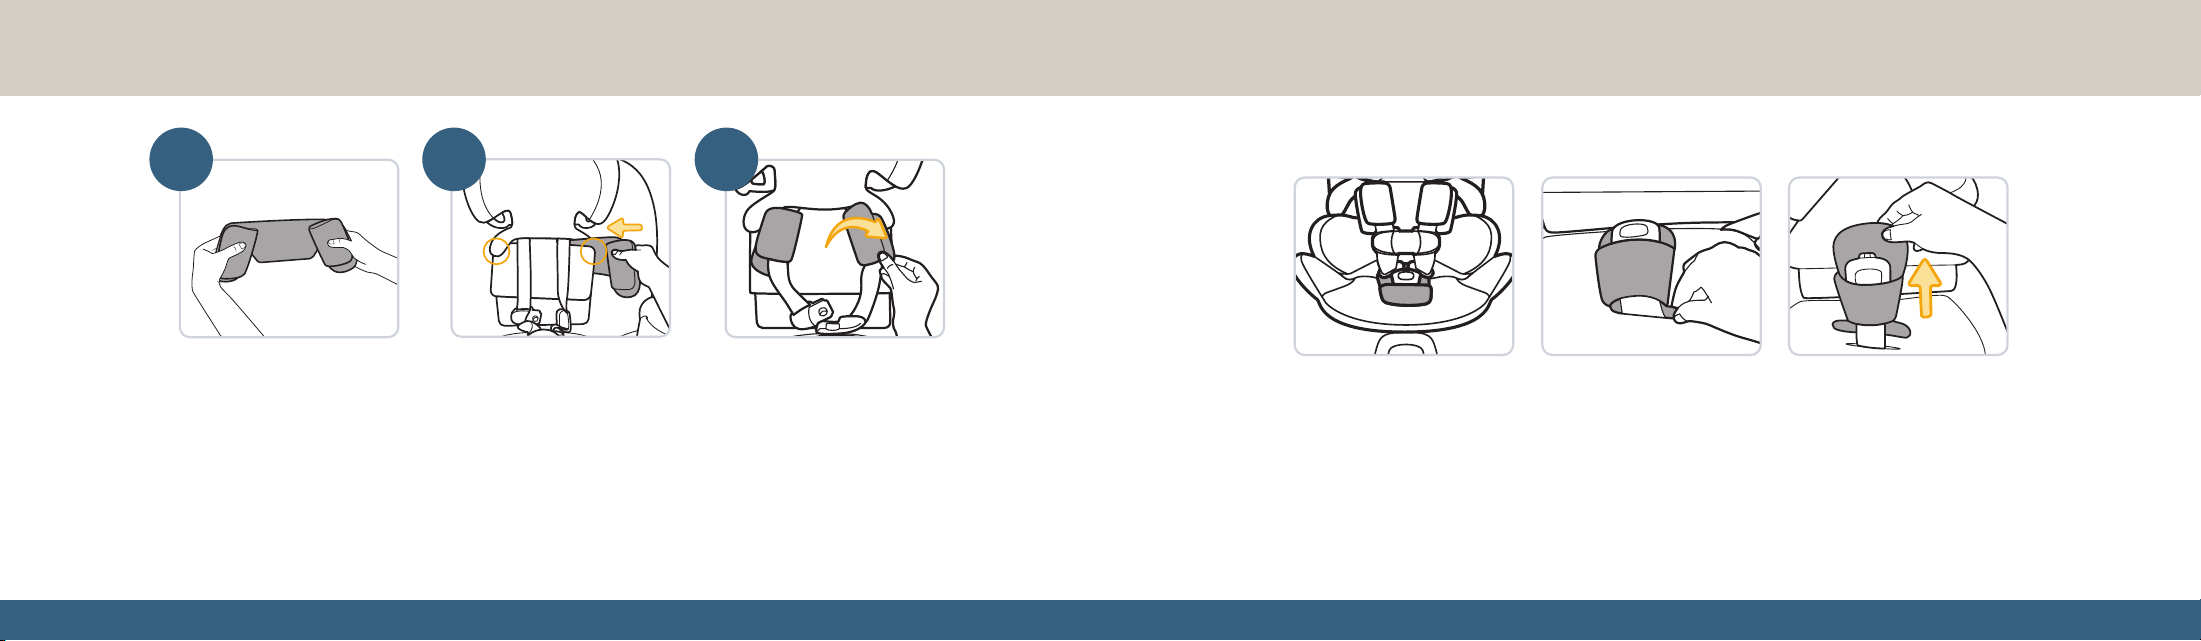
Buckle Cover
To remove the buckle cover: Undo the buckle. Reach into
either the left or right edge of the buckle slot to lift the
bottom part of the buckle cover out of the slot. Repeat on
the opposite side of the buckle slot and then pull the buckle
cover off the buckle.
To install the buckle cover: Undo the buckle. Slide the
cover over the buckle. Tuck either the left or right bottom
part of the cover behind the buckle strap into the body
pillow and seat pad slot. Repeat with the opposite side.
To install the harness covers:
1. Fold the harness covers as shown.
2. Pull out the tabs near the shoulder slots on the headrest pad. Slide the folded harness
covers behind the headrest pad.
3. Place the upper part of the harness strap above the chest clip into both harness covers.
Refasten both sides of the fastening strip on each harness cover. Reinsert the tabs into
the slots on the headrest pad.
1
2 3
1312
For Optional Use in All Modes
Cup Holders
Choosing a Car Seat Mode
Your child’s height, weight, and age determine
how a car seat should be placed in the vehicle.
Children vary widely in body size, shape, and
temperament—please consult your doctor
before switching between any modes within
the limits and fit requirements of the car seat.
Failure to follow these instructions may
result in serious injury or death to your
child. Serious injury can include paralysis
and/or permanent brain injury.
Be certain to measure your child’s weight and
height (do not guess) before using this car seat.
WARNING
Infants and Toddlers
Children must ride rear-facing and remain rear-facing until they reach
the maximum weight or height limits for rear-facing mode. Rear-facing
child restraints installed behind another vehicle seat must be installed
touching the back of the vehicle seat in front of it, or be as close
as possible.
Toddlers and Preschoolers
Children can only use a forward-facing car seat once they outgrow rear-
facing weight or height limits. Once they are forward-facing, children
must use their child restraint in forward-facing mode with a harness
until they reach the maximum weight or height limits for forward-facing
harness mode.
School-Aged Children
Children can only use a belt-positioning booster car seat once they
outgrow forward-facing harness weight or height limits. Children
must use the belt-positioning booster mode until the vehicle’s lap and
shoulder seat belt fit them properly without the belt-positioning booster.
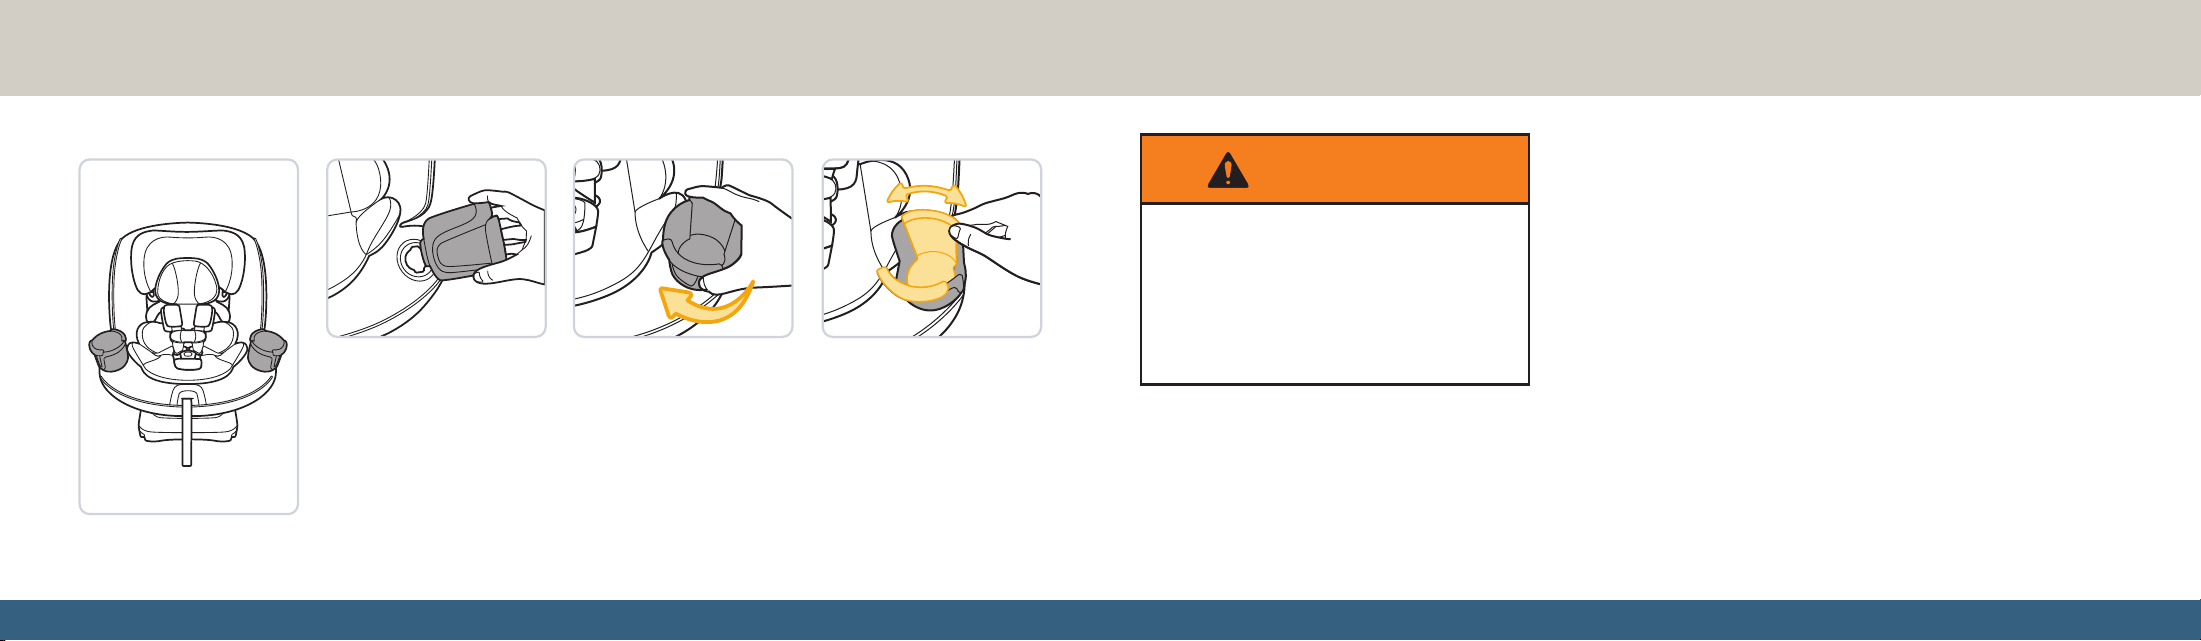
To install the cup holders: Align the bottom of the cup to
the slot on the seat. Twist the cup holder clockwise until it
locks into place. Repeat on the other side.
To remove the cup holders: Twist the cup holder
counterclockwise and pull it out of the slot in the seat.
Repeat on the other side.
continued on next page
To adjust the cup holders:
Holding the outer lip of the
cup holder, rotate the cup
holder to reveal openings
to fit a large cup. Continue
to rotate the cup holder to
close the openings to fit a
small cup.
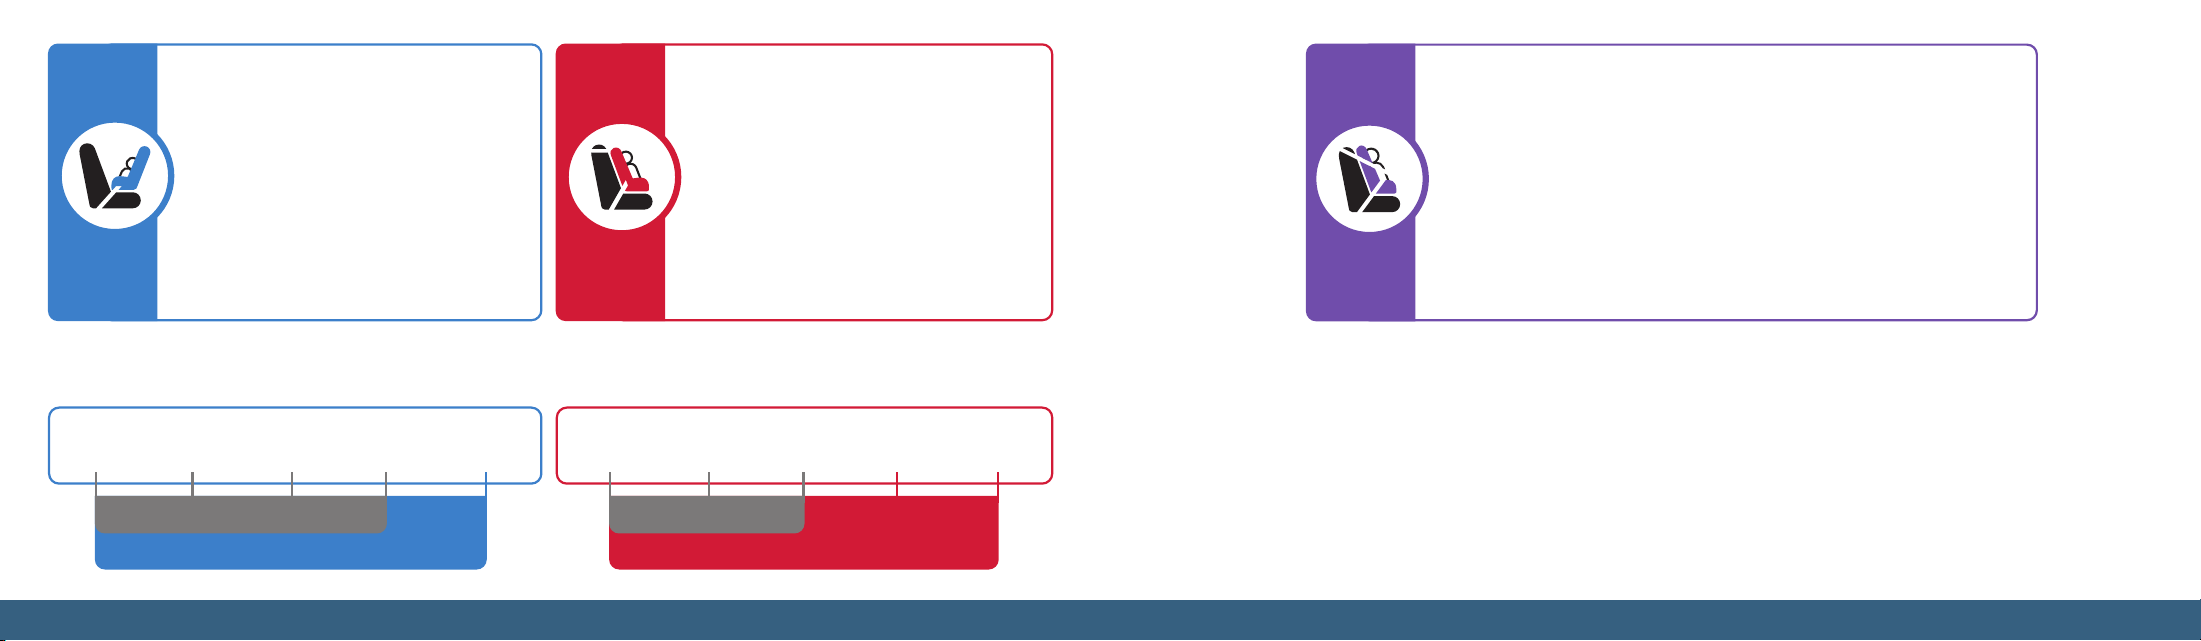
BOOSTER SEAT MODE
40–100 lb (18.1–45.4 kg) and
43.4–52 in. (110.1–132.1 cm)
In this car seat, your child can use the Booster Seat mode until they fit
the vehicle’s lap and shoulder seat belt properly without a Booster Seat
OR outgrow any one of the above.
Storing the Harness System PAGE 72
Booster Seat Child Fit Requirements PAGE 78
Booster Seat Use in Vehicle PAGE 79
REAR-FACING MODE
5–40 lb (2.3–18 kg) and
19–40 in. (48–101.6 cm)
In this car seat, your child MUST ride Rear-
Facing and remain in Rear-Facing mode
until they outgrow any one of the above.
Rear-Facing Child Fit Requirements
PAGE 24
Rear-Facing Vehicle Installation
PAGE 27
FORWARD-FACING MODE
30–65 lb (13.7–29.5 kg) and
34.4–49 in. (87.1–125 cm)
In this car seat, your child can use the
harnessed Forward-Facing mode until they
outgrow any one of the above.
Forward-Facing Child Fit Requirements
PAGE 42
Forward-Facing Vehicle Installation
PAGE 45
5 lb
2.3 kg
15 lb
6.8 kg
25 lb
11.3 kg
35 lb
15.9 kg
40 lb
18 kg
30 lb
13.7 kg
35 lb
15.9 kg
40 lb
18 kg
50 lb
22.7 kg
65 lb
29.5 kg
Rigid LATCH Connectors
Vehicle Belt
Rigid LATCH Connectors
Vehicle Belt
REAR-FACING MODE
Rigid LATCH Connector & Vehicle Belt Usage
FORWARD-FACING MODE
Rigid LATCH Connector & Vehicle Belt Usage
BOOSTER SEAT MODE
Rigid LATCH Connector & Vehicle Usage
You MUST ALWAYS use the vehicle's lap and shoulder belt in Booster Seat mode.
Rigid LATCH connectors are for optional use only in addition to the vehicle's lap and
shoulder belt.
15
14
1716
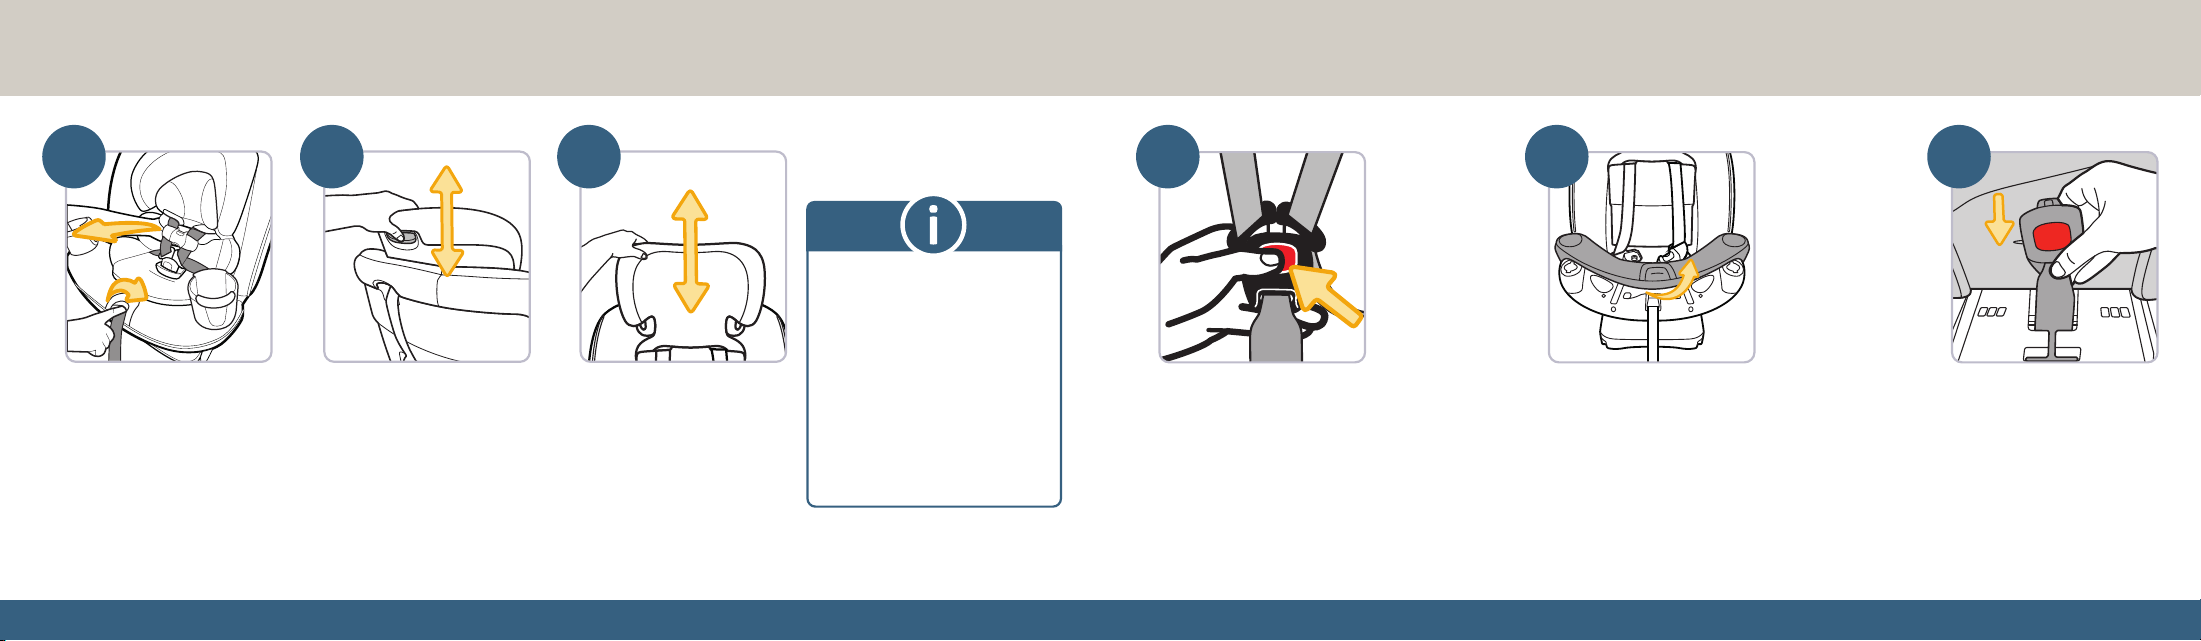
Fully loosen the
harness straps
Push down on the harness
release lever (through the
opening in the seat pad) while
pulling the harness straps
away from the backrest.
2
31
Press the headrest
adjustment handle
Move the headrest up
or down to the proper
height for your child.
Release the handle
to lock the headrest
at the chosen height
Pull up and down on the
headrest to make sure it
is locked in place.
Adjusting the Headrest/Harness Height
For Rear-Facing Child
Requirements, see page 24.
For Forward-Facing Child
Requirements, see page 42.
To secure your child in the seat
and check harness tightness,
see pages 64–68.
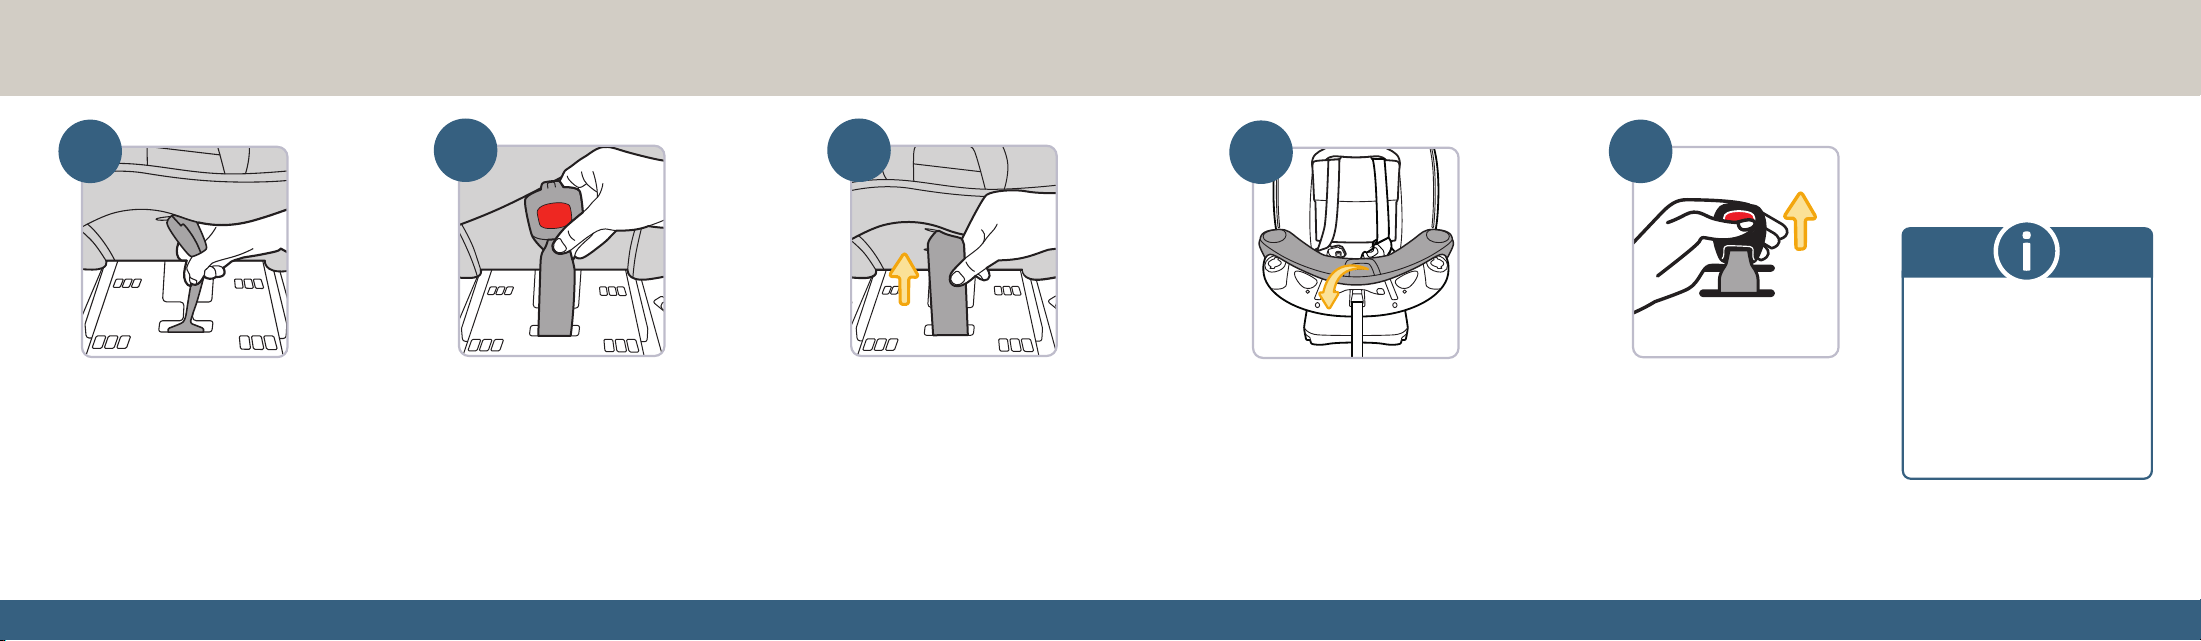
Changing the Buckle Position
Adjusting the Headrest/Harness Height
Unbuckle the harness and
remove the buckle cover
Press the red button to
release the buckle tongues.
See page 11 for how to
remove the buckle cover.
2
1
Remove the cup holders
and lift up the front
of the seat pad
See page 12 for how to
remove the cup holders.
3
Pull the buckle through
the seat pad
If the body pillow is
installed, pull the buckle
through the body pillow
slot first and then the
seat pad.
continued on next page
19
8
Check the buckle
Pull up on the buckle to
make sure the buckle
strap is properly installed
through the same slot in
the car seat and the seat
pad. Make sure the buckle
strap is not twisted.
18
Push the buckle strap into
the new slot
Rotate the buckle strap out
of the channel and into the
new slot, making sure both
the front and back buckle
straps are together in the
same channel.
6
7
5
Pull the buckle through
the seat pad
Pull the buckle through
the same slot in the seat
pad (and body pillow if
applicable) as used for
the buckle.
Pull the seat pad around the bottom of the car seat
Make sure the seat pad is completely tucked in on the
sides and front of the car seat.
Reinstall the cup holders (see page 12).
Reinstall the buckle cover if needed (see page 11).
For Rear-Facing Child
Requirements, see page 24.
For Forward-Facing Child
Requirements, see page 42.
To check harness tightness,
see pages 64–68.
4
Rotate the buckle strap
and move it into the
center channel
Make sure both the front
and back buckle straps
move together into the
center channel.
20
Reclining the Car Seat
5–40 lb (2.3–18 kg) and 19–40 in. (48–101.6 cm)
In this car seat, your child MUST ride Rear-Facing and remain
in Rear-Facing mode until they outgrow any one of the following:
• Weight limit: 40 lb (18 kg); OR
• Height limit: 40 in. (101.6 cm); OR
• Rear-Facing Child Fit Requirements PAGE 24
Rear-Facing Vehicle Installation PAGE 27
1 in. (2.5 cm)
1
2
Rear-Facing Mode
continued on next page
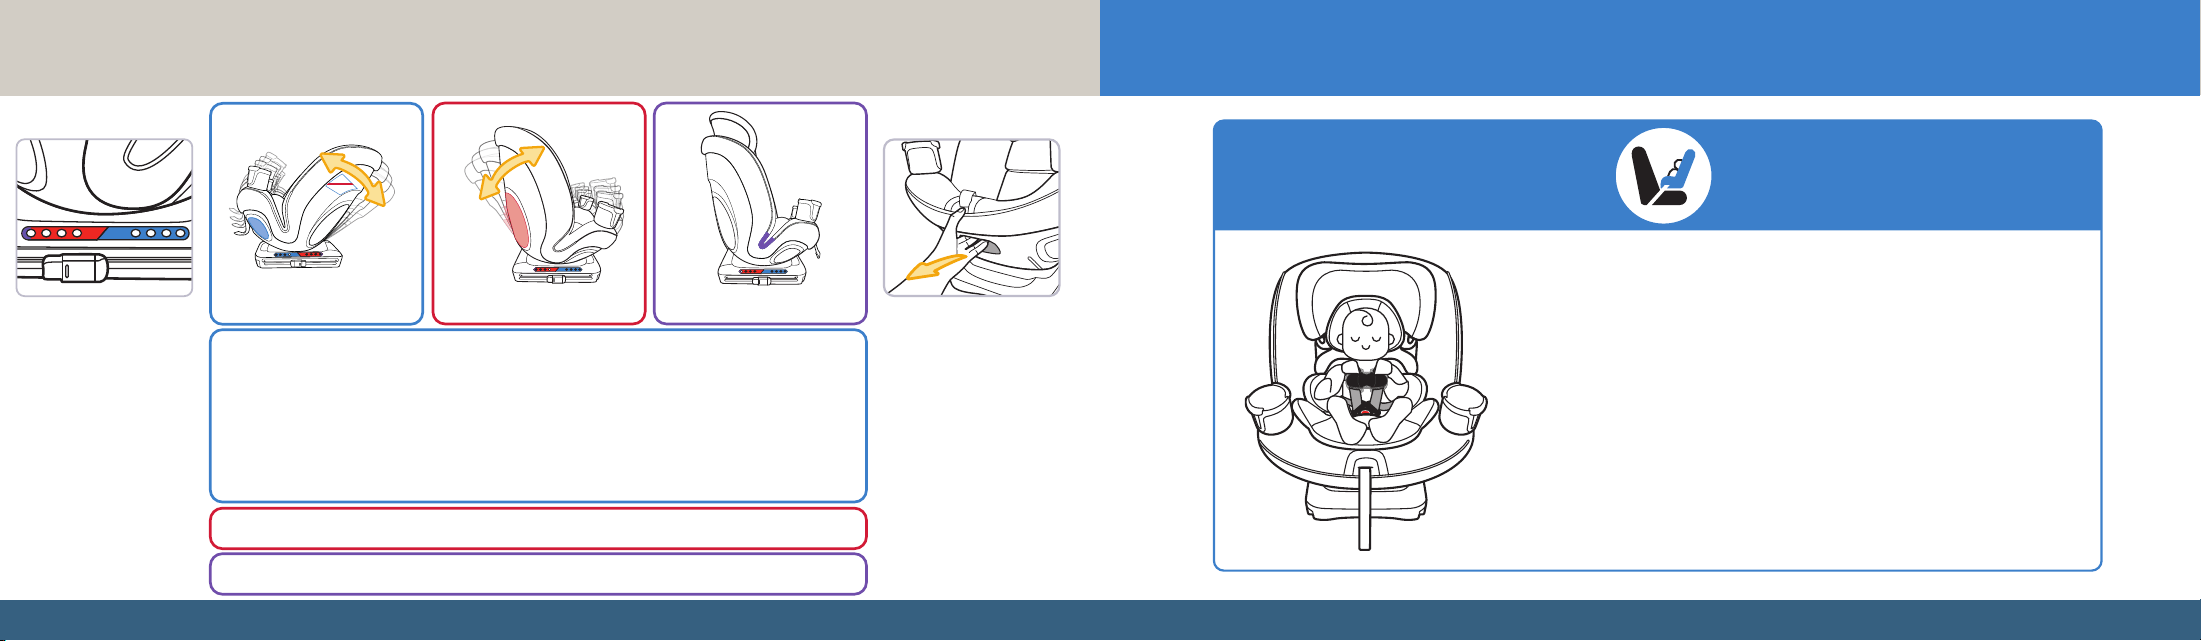
Rear-Facing Mode: Use the Rear-Facing positions 1–4 to recline the car seat as close to the
Rear-Facing Level Line as possible.
For children 5–30 lb (2.3–13.6 kg), you may install the car seat slightly more reclined, but not
more upright than the level line shows.
For children 30–40 lb (13.7–18 kg) AND who can sit up unassisted, install the car seat as
close to the level line as possible.
DO NOT use Forward-Facing positions 5–8 when the car seat is installed Rear-Facing.
Forward-Facing Mode: Use only positions 5–8. DO NOT use Rear-Facing positions 1–4.
Booster Seat Mode: Use position 8 to make the car seat fully upright. DO NOT use positions 1–7.
4
5
4
4
4
3
2
1
8
7
6
5
4
5
8
4
8
3
2
1
4
4
The car seat has
eight positions.
The current recline
position is shown on
both sides on the
base of the car seat.
4
5
4
4
4
3
2
1
8
7
6
5
4
5
8
4
8
3
2
1
4
4
To change the
recline position:
Squeeze the recline
handle to move the
car seat up or down
to one of the eight
positions. Release the
recline handle to lock
the car seat in the
chosen position.
4
5
4
4
4
3
2
1
8
7
6
5
4
5
8
4
8
3
2
1
4
4
Booster Seat Mode
4
5
4
4
4
3
2
1
8
7
6
5
4
5
8
4
8
3
2
1
4
4
Forward-Facing Mode
4
5
4
4
4
3
2
1
8
7
6
5
4
5
8
4
8
3
2
1
4
4
Rear-Facing Mode
21
2322
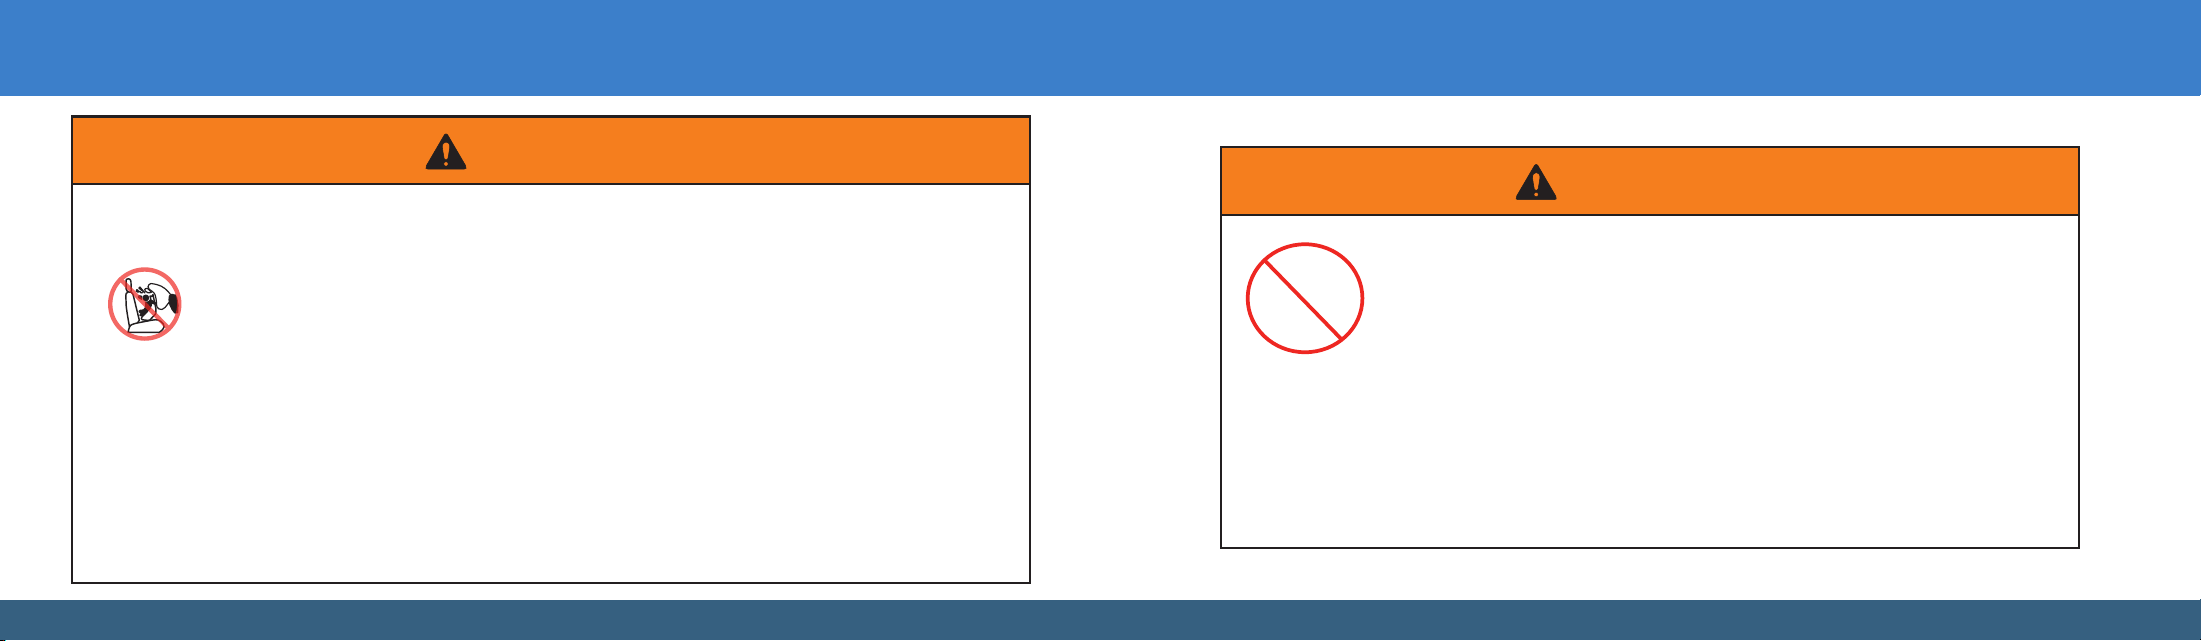
WARNING
Failure to follow these warnings can result in serious
injury or death to your child. Serious injury can include
paralysis and/or permanent brain injury.
NEVER install a Rear-Facing child
restraint in the front seat of a vehicle
equipped with an active frontal airbag.
DO NOT use the lower anchors of the child restraint
anchorage system (LATCH system) to attach this child
restraint Rear-Facing when restraining a child weighing
more than 35 lb (15.9 kg).
The vehicle belt MUST be used for Rear-Facing
installation if your child weighs more than
35 lb (15.9 kg).
DO NOT use the tether for Rear-Facing mode. Secure
the tether strap hook to its storage attachment.
DO NOT use the rigid LATCH connectors along with the
vehicle lap or lap/shoulder belt.
DO NOT fasten multiple lower anchor connectors on
the same lower anchor bar in the vehicle.
Check the vehicle belt or the rigid LATCH connectors
before each use.
Use ONLY if the vehicle belt or rigid LATCH connectors
can be tightened and properly locked securely in place.
Even when unoccupied, this child restraint MUST
be firmly secured to the vehicle with the rigid LATCH
connectors or with the vehicle seat belt.
This child restraint MUST ALWAYS face the rear of the
vehicle until the child has reached the maximum weight
or height limit for Rear-Facing mode.
WARNING
DO NOT use the magnetic chest clip with children who have an implanted
electronic medical device.
A magnet is used to help secure the chest clip locking mechanism
together which may interfere with the proper function of an implanted
electronic medical device.
Parents or caregivers who have an implanted electronic device should keep their device
away from the chest clip and consult their doctor and medical device manufacturer for
specific information before using this chest clip.
If a parent/caregiver or child has an implanted electronic medical device, please contact Dorel
(see back cover).
IMPLANTED
ELECTRONIC
MEDICAL
DEVICES
2524
Rear-Facing Child Fit Requirements
1 in. (2.5 cm)
1
2
1 in. (2.5 cm)
1
2
1 in. (2.5 cm)
1
2
1 in. (2.5 cm)
1
2
1 2 3
Fully loosen the harness straps
Push down on the harness release
lever (through the opening in the
seat pad) while pulling the harness
straps away from the backrest.
Unfasten the chest clip
While holding both sides of the chest clip,
press in on the top and bottom buttons and
pull the chest clip apart.
Unbuckle the harness
Press the red button to release
the buckle tongues.
1 in. (2.5 cm)
1
2
Fasten the chest clip and buckle the harness
Pull the harness adjustment strap straight out to snugly tighten the
harness. Position the chest clip mid-chest (even with the armpits) and
away from your child’s neck.
See Securing Your Child in the Car Seat on page 64 for details on
chest clip position and checking harness tightness.
1 in. (2.5 cm)
1
2
1 in. (2.5 cm)
1
2
1 in. (2.5 cm)
1
2
5
4
Place your child in the car seat
Your child’s bottom and back should
be flat against the car seat.
continued on next page
2726
Vehicle Belt
For a child up to 40 lb (18 kg).
Lap/Shoulder Belt Lap Belt
1 in. (2.5 cm)
1
2
1 in. (2.5 cm)
1
2
1 in. (2.5 cm)
1
2
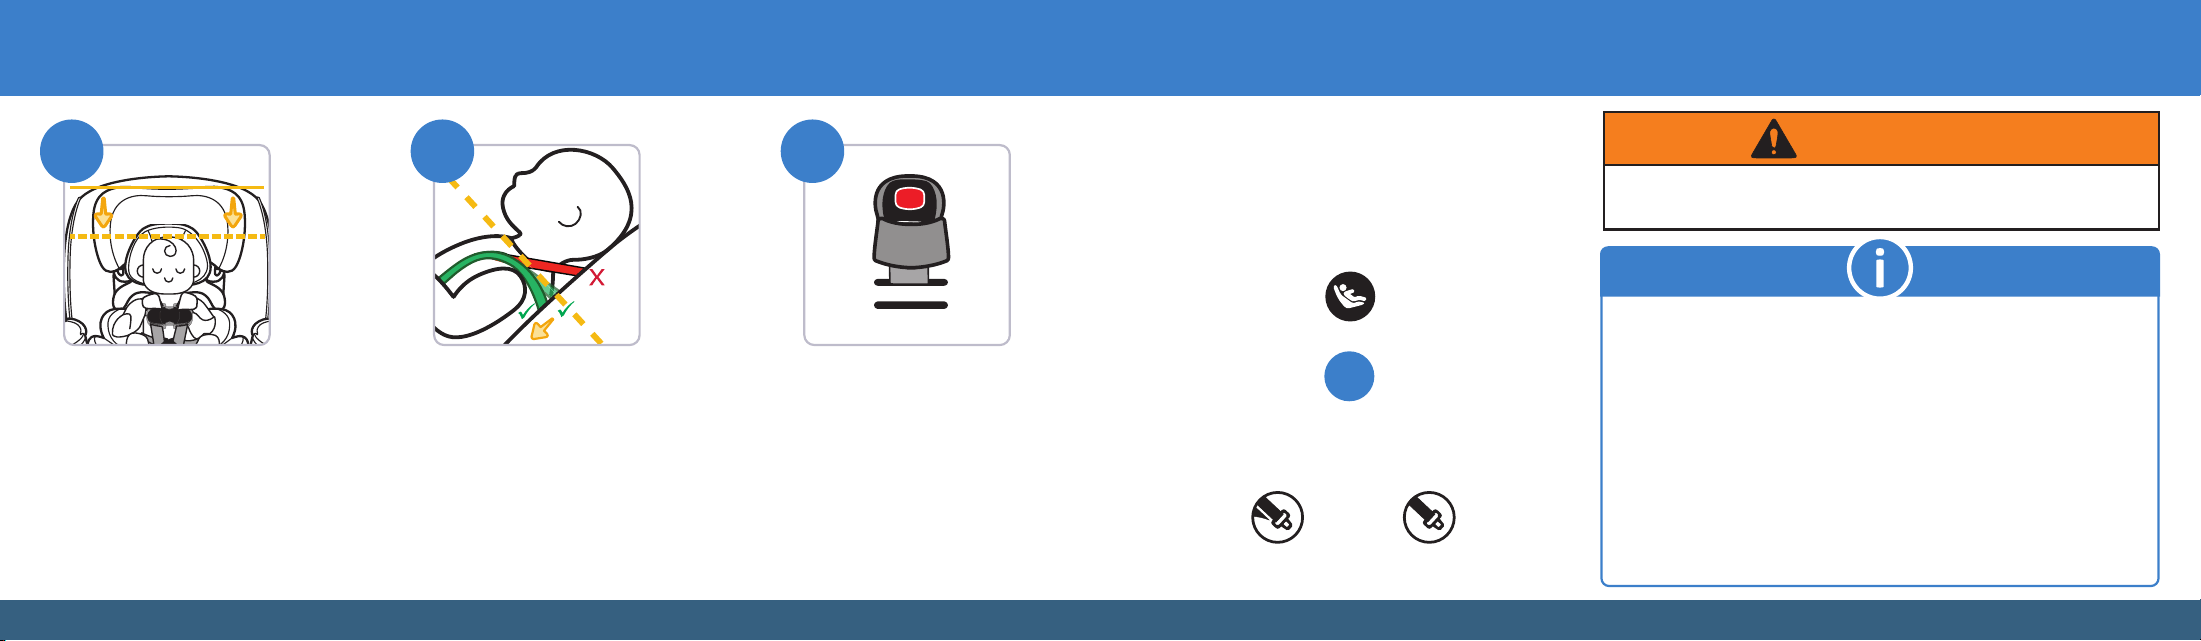
Check the head position
The top of your child’s head MUST
be at least 1 in. (2.5 cm) below
the top of the car seat’s headrest.
To change the headrest position,
see page 16.
Check the harness strap position
When Rear-Facing, the harness
strap MUST be placed at the
shoulder when possible, or slightly
below; NEVER above.
To change the harness strap height,
see page 16.
Check the buckle position
• Use the buckle slot closest to
your child.
• The buckle strap should not
be underneath or behind
your child.
To change the buckle position,
see page 17.
6 7 8
DO NOT use both the rigid LATCH connectors and vehicle belt
at the same time to install the car seat.
WARNING
There are two methods for installing the
car seat in your vehicle. Use only one:
OR
Rigid LATCH Connectors
DO NOT install by this method for a child
weighing more than 35 lb (15.9 kg).
Before installing the car seat:
• Check the child fit requirements on pages 24−26 and
make any necessary adjustments to the harness height
or buckle position.
• Review your vehicle owner’s manual to determine the type of
vehicle belts in your car and how to use them to lock a car seat in
place OR to locate the LATCH: lower anchor seating positions. See
also Vehicle Belts on page 98 and LATCH: Lower Anchor Bars on
page 102.
• Make sure the tether strap is properly stored away (see page 105).
• Ensure the vehicle is on level ground when installing the car seat.
Rear-Facing Vehicle Installation
2928
4
4
4
4
4
4
4
4
4
4
4
4
4
4
4
4
Installing the Car Seat Rear-Facing with Rigid LATCH Connectors
4
4
4
4
4
4
4
4
4
4
4
4
4
4
4
4
4
4
4
4
4
4
4
4
4
4
4
4
4
4
4
4
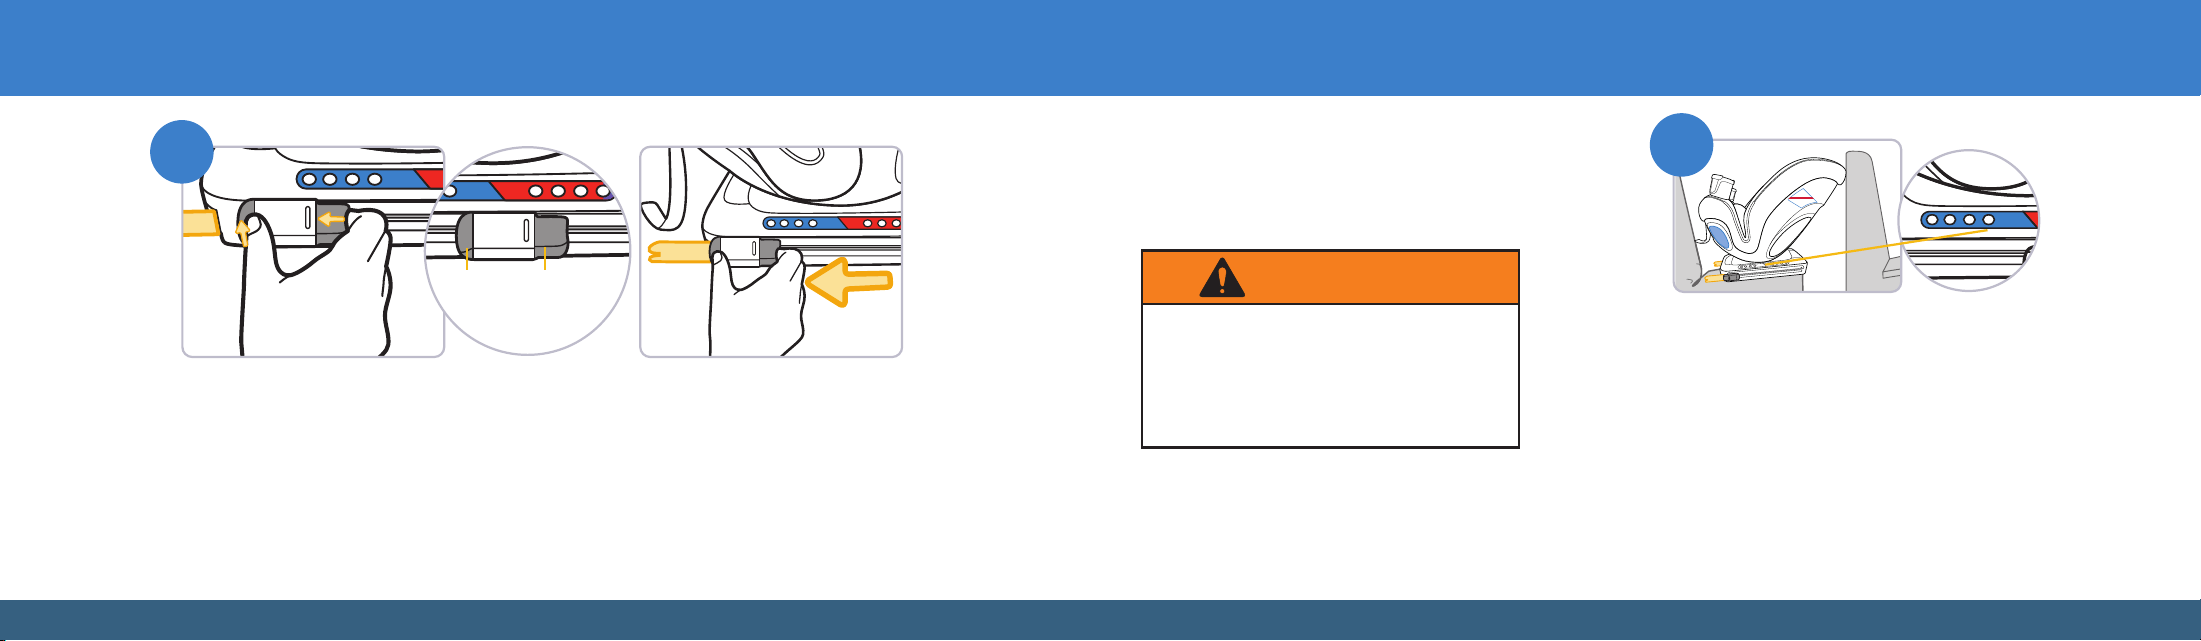
Extend the Rear-Facing rigid LATCH connectors from the base
Push to tilt the release lock tab backwards and then push in the release button on the
other end to slide the release lock to the end of the
Rear-Facing
side of the base until the
connector is fully extended.
Repeat on the other side of the base.
1
Release
Lock Tab
Release
Button
4
4
4
4
4
4
4
4
4
4
4
4
4
4
4
4
2
4
4
4
4
4
4
4
4
4
4
4
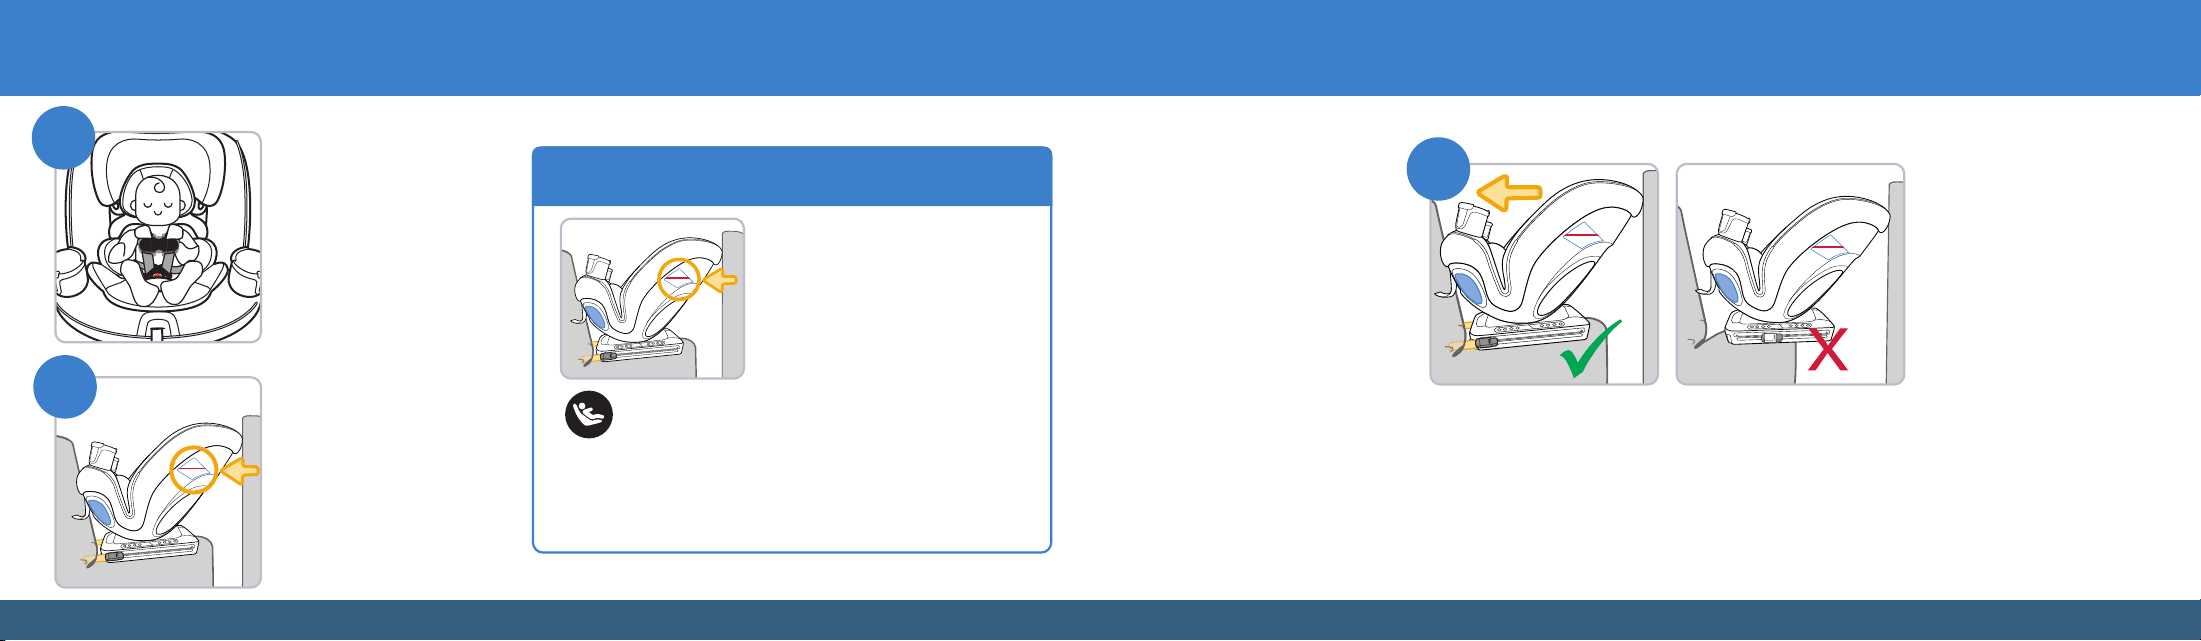
Place the car seat Rear-Facing on the back seat;
recline the car seat and check the Rear-Facing Level Line
Use the Rear-Facing positions 1–4 to recline the car seat as close to the
Rear-Facing Level Line as possible.
For children 5–30 lb (2.3–13.6 kg), you may install the car seat slightly more
reclined, but not more upright than the level line shows.
For children 30–40 lb (13.7–18 kg) AND who can sit up unassisted, install
the car seat as close to the level line as possible.
DO NOT use Forward-Facing positions 5–8 when the car seat is installed
Rear-Facing. See page 20 for how to recline the car seat.
NEVER use a Forward-Facing recline position
when this child restraint is installed Rear-Facing.
Failure to do this can result in serious injury or
death. Serious injury can include paralysis and/or
permanent brain injury.
WARNING
continued on next page
3130
4
4
4
4
4
4
4
4
4
4
4
4
4
4
4
4
4
4
4
4
4
4
4
4
4
4
4
4
4
4
4
4
4
4
4
4
4
4
4
4
4
4
4
4
4
4
4
4
4
4
4
4
4
4
4
4
4
4
4
4
4
4
4
4
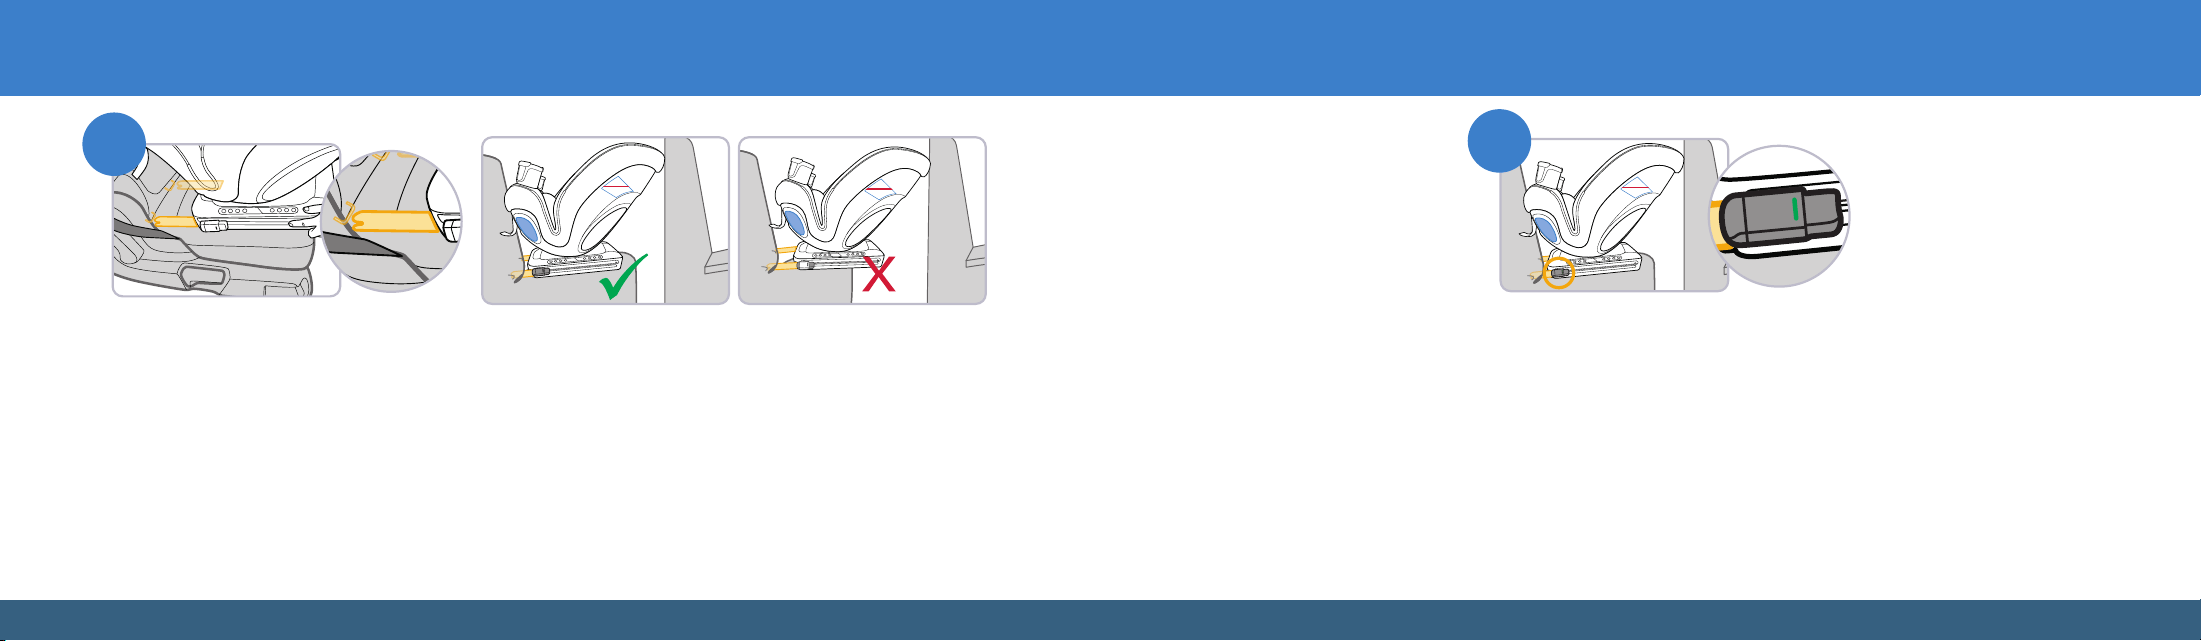
Place the car seat on the vehicle seat so that both
rigid LATCH connectors are aligned with the lower
anchors. Push both sides of the car seat base
EVENLY towards the vehicle seatback. Continue
to push it backwards until both connectors are
attached to the anchors AND the car seat is
touching the vehicle seatback. If the rigid LATCH
connectors are fully retracted and the car seat is still
not touching the vehicle seatback, then adjust the
vehicle seatback so that it creates contact with the
car seat. If the vehicle seatback is not adjustable,
confirm that the connectors are completely
attached to the anchor (see next step).
The car seat base MUST be as flat as possible
on the vehicle seat. The entire base should be
completely on the vehicle seat. When using the
passenger or driver-side locations, the car seat
MUST be touching the back of the vehicle seat in
front of it or be as close as possible.
Attach the rigid LATCH connectors to the lower anchors
3
4
4
4
4
4
4
4
4
4
4
4
4
4
4
4
4
4
4
4
4
4
4
4
4
4
4
4
4
4
4
4
4
4
Check the rigid LATCH connector installation
Verify the car seat is securely attached to the lower anchors by checking the indicator on both rigid
LATCH connector release locks to make sure no red is showing AND pulling the car seat away from
the vehicle seatback.
If the red is showing on either side or the rigid LATCH connectors are not properly connected to the
lower anchors when you pull the car seat away from the vehicle seatback, then repeat steps 1–3.
For help with the installation, please call Consumer Care at 1-800-544-1108 or scan the QR code
on the back cover of this manual.
continued on next page
3332
4
4
4
4
4
4
4
4
4
4
4
4
4
4
4
4
4
4
4
4
4
4
1
Place the car seat Rear-Facing in the back seat
The car seat base MUST be as flat as possible on the vehicle seat. The entire base should be
completely on the vehicle seat. When using the passenger or driver-side locations, the car seat
MUST be touching the back of the vehicle seat in front of it or be as close as possible.
Installing the Car Seat Rear-Facing with a Vehicle Belt
4
4
4
4
4
4
4
4
4
4
4
4
4
4
4
4
4
4
4
4
4
4
4
4
4
4
4
4
4
4
4
4
4
4
4
4
4
4
4
4
4
4
4
4
4
4
4
4
5
6
Secure your child in
the car seat
For complete details on
properly securing your child
in the car seat, including how
to position the chest clip and
check for harness tightness,
see pages 64–68.
Recheck the
Rear-Facing Level Line
Adjust the recline position if
needed (see step 2).
FINISHED!
When using the passenger and
driver side locations, the car seat
MUST be touching the back of the
seat in front of it, or be as close as
possible.
Are the rigid LATCH connectors
securely attached to the vehicle’s
lower anchors? See step 4.
Check your child’s fit often and
make any adjustments to the car
seat as they grow.
Rigid LATCH
Connectors
DO NOT install by this
method for a child
weighing more than
35 lb (15.9 kg).
continued on next page
3534
4
4
4
4
4
4
4
4
4
4
4
4
4
4
4
4
4
4
4
4
4
4
3 4
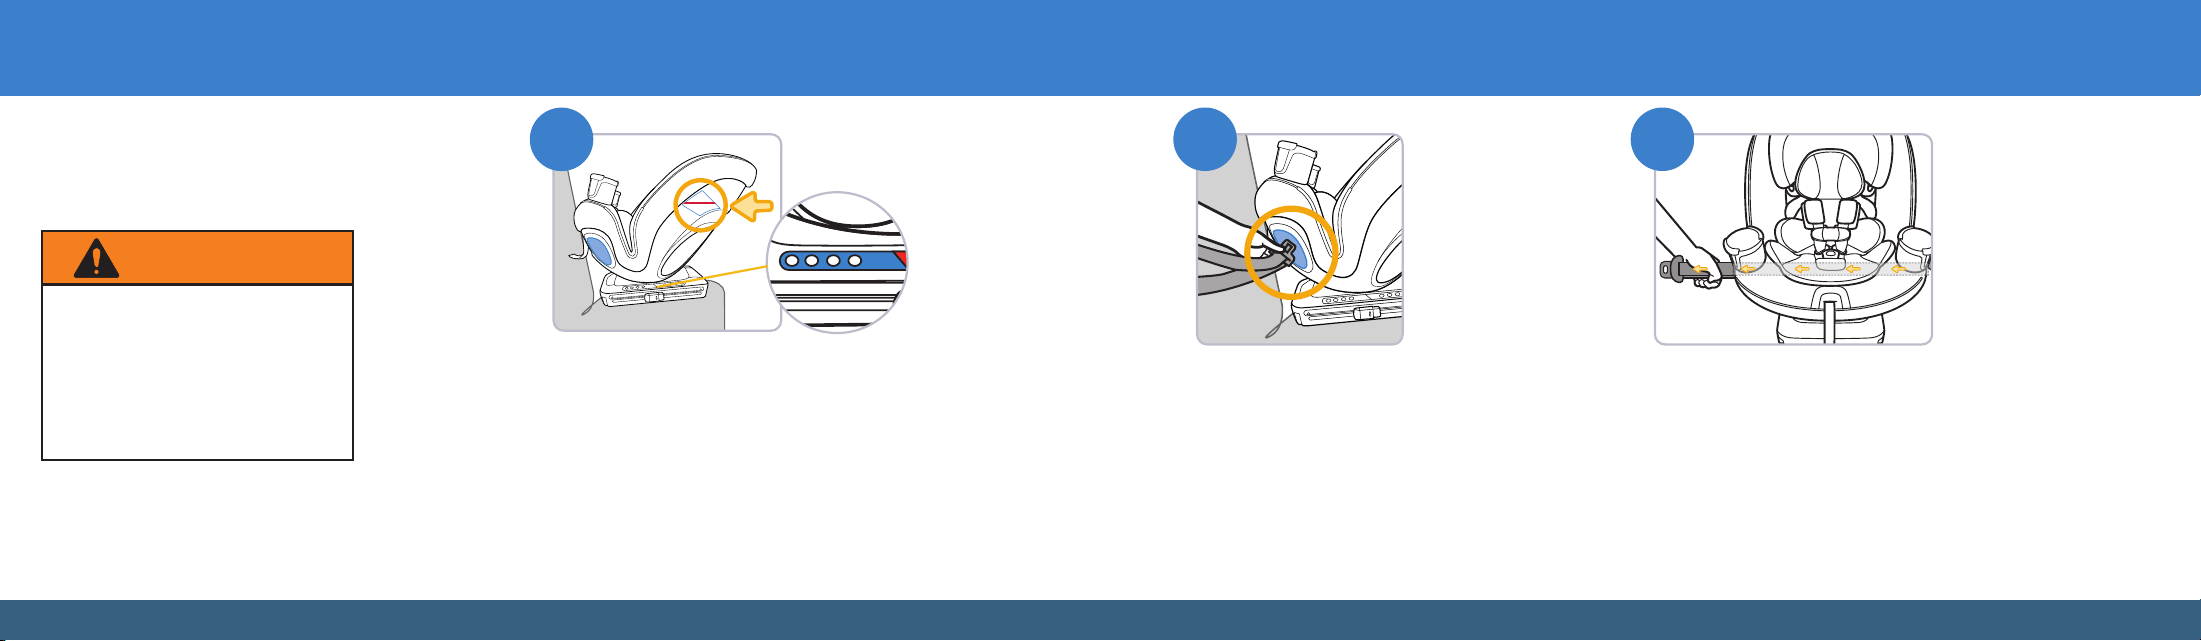
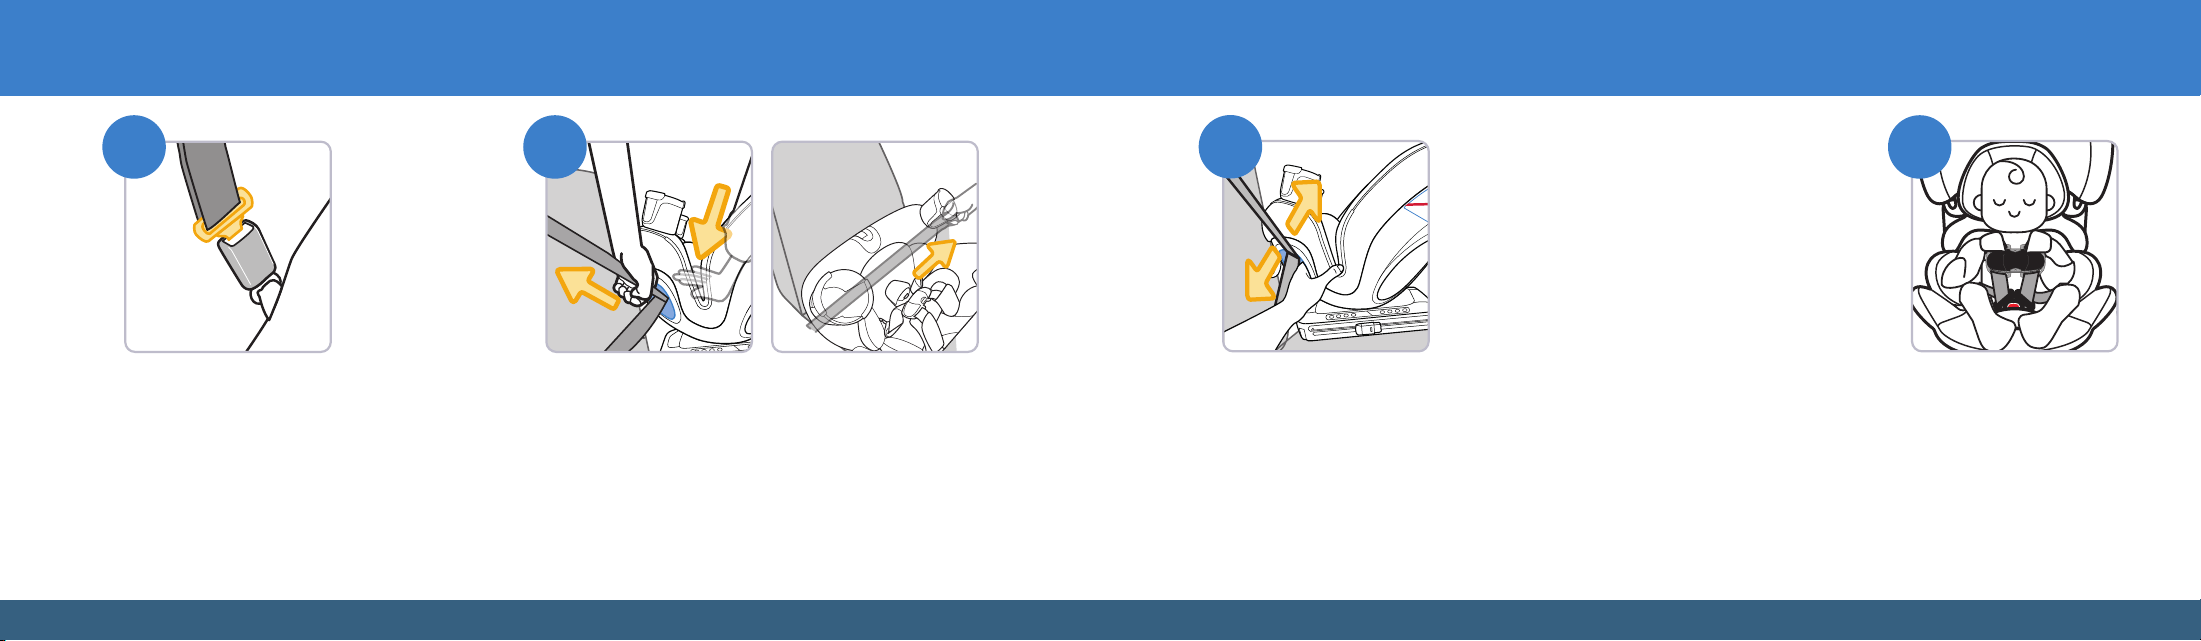
Locate the Rear-Facing Belt
Path opening and begin routing
the belt through the path
Insert the vehicle belt into the
Rear-Facing Belt Path opening.
Reach through the Rear-Facing Belt
Path opening on the other side of the
car seat to pull the belt completely
through the path. Make sure the belt
is positioned properly so that it goes:
• Under the car seat pad; AND
• Across the car seat; AND
• In front of the buckle; AND
• Out the other Rear-Facing
Belt Path opening.
DO NOT twist the belt.
Finish routing the vehicle belt through
the Rear-Facing Belt Path
NEVER use a Forward-Facing recline
position when this child restraint is
installed Rear-Facing. Failure to do this
can result in serious injury or death.
Serious injury can include paralysis
and/or permanent brain injury.
WARNING
Recline the car seat and check the Rear-Facing Level Line
Use the Rear-Facing positions 1–4 to recline the car seat as close to the Rear-Facing
Level Line as possible.
For children 5–30 lb (2.3–13.6 kg), you may install the car seat slightly more reclined,
but not more upright than the level line shows.
For children 30–40 lb (13.7–18 kg) AND who can sit up unassisted, install the car
seat as close to the level line as possible.
DO NOT use Forward-Facing positions 5–8 when the car seat is installed Rear-Facing.
See page 20 for how to recline the car seat.
4
4
4
4
4
4
4
4
4
4
4
2
4
4
4
4
4
4
4
4
4
4
4
continued on next page
3736
4
4
4
4
4
4
4
4
4
4
4
4
4
4
4
4
4
4
4
4
4
4
7
Check the vehicle belt tightness
Hold the car seat at the
Rear-Facing Belt Path with
your non-dominant hand. Push
and pull the car seat from side to
side. The car seat should not move
more than 1 in. (2.5 cm)
at the belt path.
8
Secure your child in the car seat
For complete details on properly securing
your child in the car seat, including how
to position the chest clip and check for
harness tightness, see pages 64−68.
If the car seat moves more than 1 in. (2.5 cm), you can try:
• Pulling the belt tighter; OR
• Reinstalling the car seat; OR
• Changing to a different seating location; OR
• Switching to a different install method (rigid LATCH connectors).
For help with the installation, please call Consumer Care at
1-800-544-1108 or scan the QR code on the back cover of this manual.
4
4
4
4
4
4
4
4
4
4
4
4
4
4
4
4
4
4
4
4
4
4
4
4
4
4
4
4
4
4
4
4
4
5 6
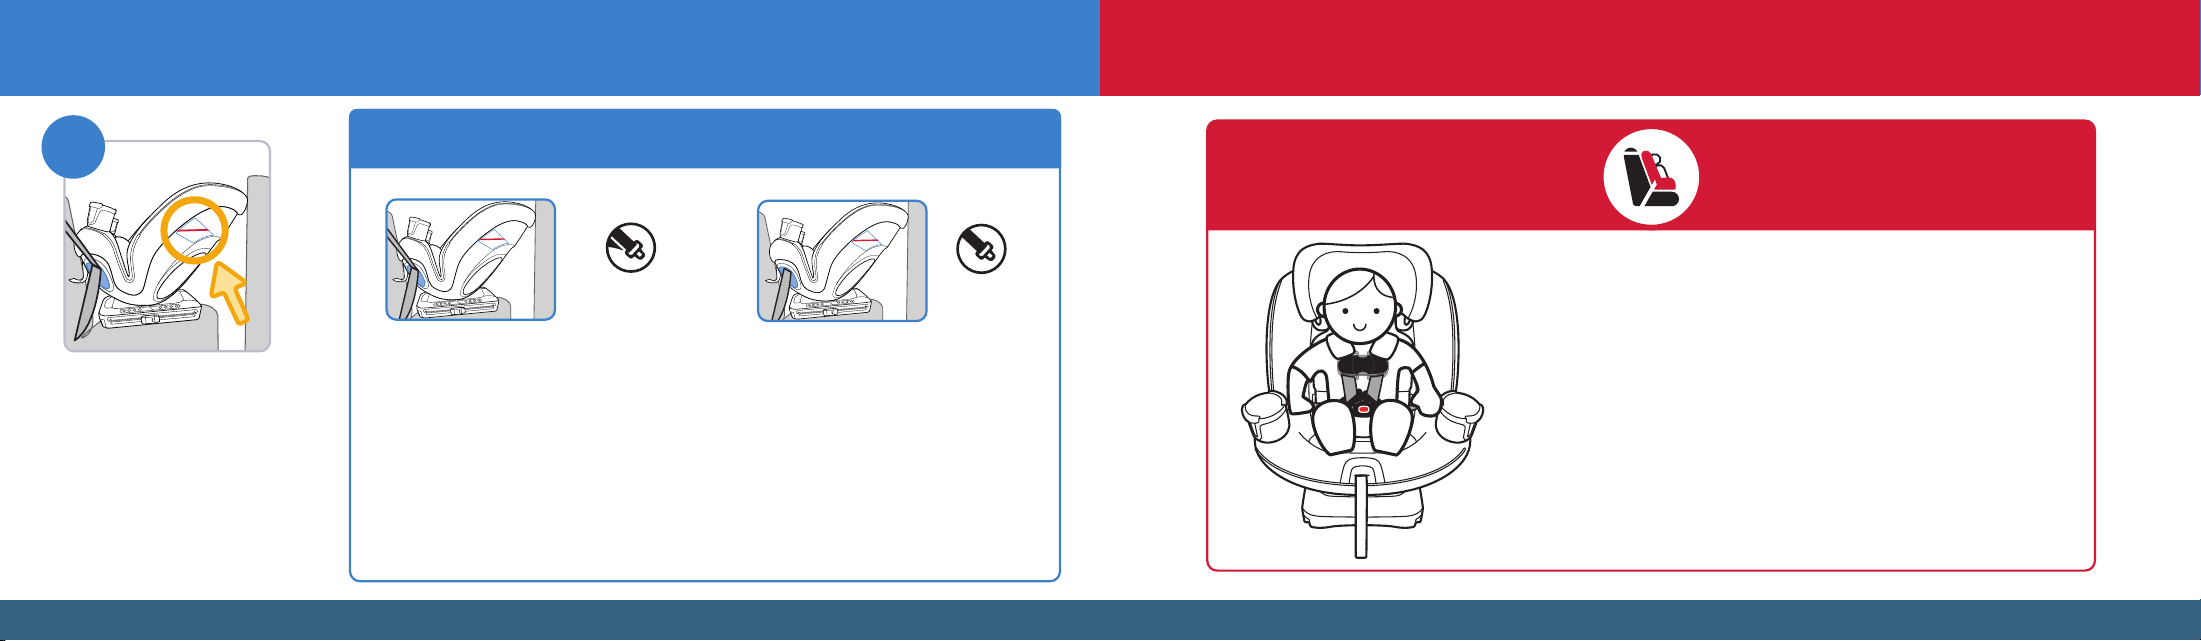
Buckle the vehicle belt
If your vehicle belt has a
switchable retractor, make
sure it is in locking mode.
Refer to page 100 or your
vehicle owner’s manual.
Tighten the vehicle belt
Push firmly down with moderate weight in the center of the car
seat with one hand while using your other hand to pull up on the
shoulder belt to tighten it.
If you are using a lap-only vehicle belt, tighten the belt by
reaching into the belt path opening under the seat pad and
pulling the free end of the belt towards you.
continued on next page
3938
30–65 lb (13.7–29.5 kg) and 34.4–49 in. (87.1–125 cm)
In this car seat, your child MUST remain in Forward-Facing mode
until they outgrow any one of the following:
• Weight limit: 65 lb (29.5 kg); OR
• Height limit: 49 in. (125 cm); OR
• Forward-Facing Child Fit Requirements PAGE 42
Forward-Facing Vehicle Installation PAGE 45
Forward-Facing Mode
continued on next page
4
4
4
4
4
4
4
4
4
4
4
4
4
4
4
4
4
4
4
4
4
4
9
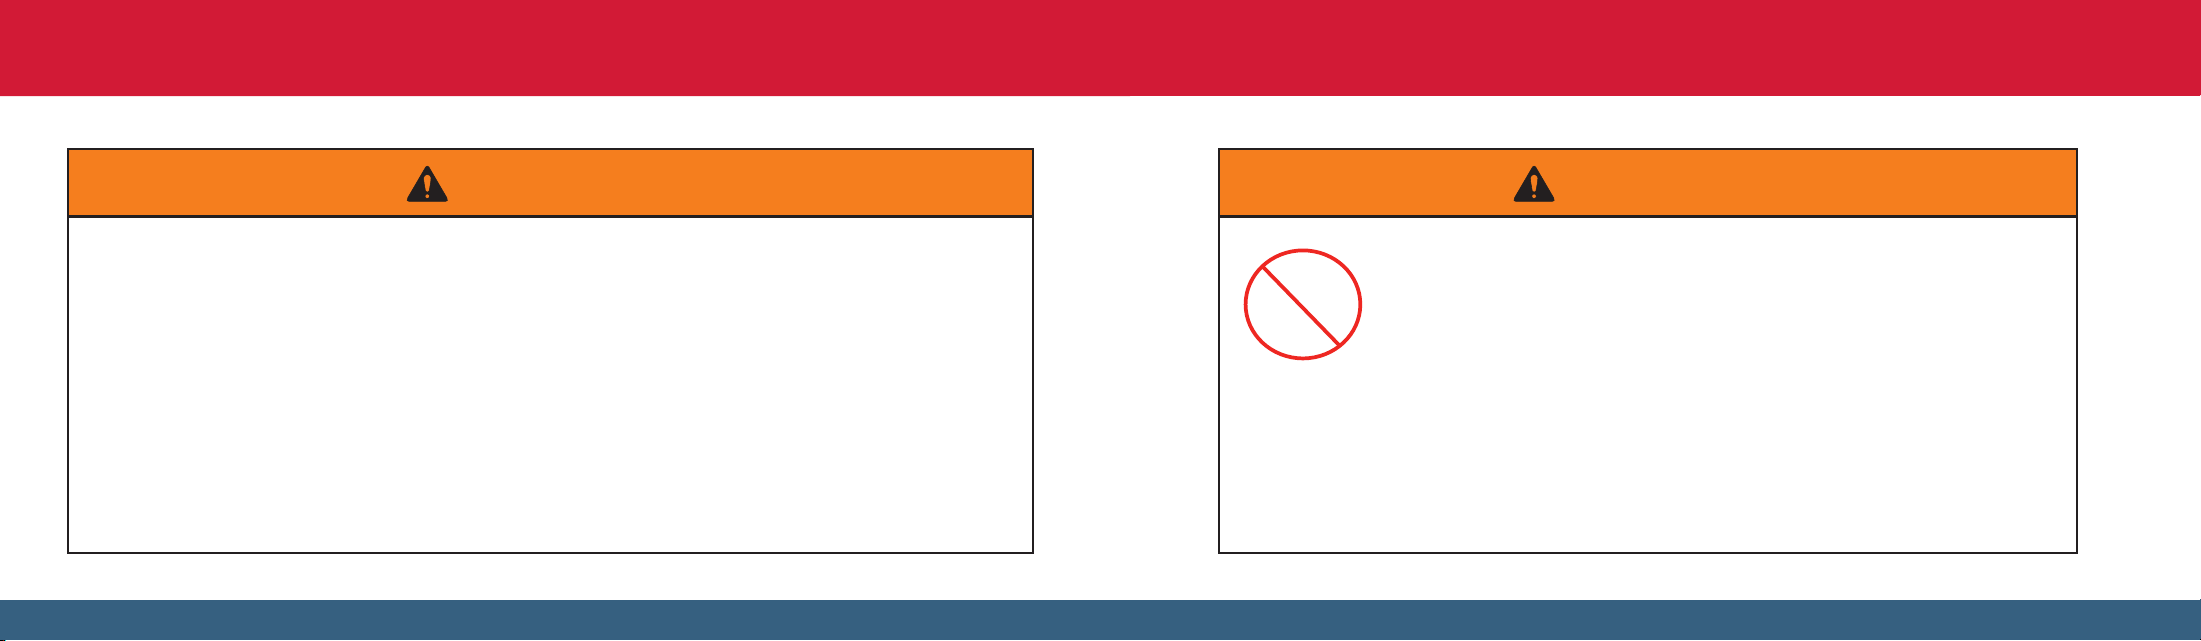
Recheck the Rear-Facing Level Line
Adjust the recline position if needed
(see step 2).
FINISHED!
When using the passenger and driver side locations, the car seat MUST be touching
the back of the seat in front of it, or be as close as possible.
• Is the vehicle belt buckled and the switchable retractor locked? See step 5.
• Is the belt tightened enough so that the car seat does not move more than 1 in.
(2.5 cm) from side to side at the belt path? See steps 6 and 7.
Check your child’s fit often and make any adjustments to the car seat as they grow.
Check the tightness of the installation often to make sure it has not loosened.
4
4
4
4
4
4
4
4
4
4
4
Lap/Shoulder
Belt
Lap Belt
4140
WARNING
Failure to follow these warnings can result in serious injury or
death to your child. Serious injury can include paralysis and/or
permanent brain injury.
DO NOT use the lower anchors of the child restraint
anchorage system (LATCH system) to attach this child
restraint Forward-Facing when restraining a child weighing
more than 40 lb (18 kg).
The vehicle belt MUST be used for Forward-Facing installation
if your child weighs more than 40 lb (18.1 kg).
When anchors are available, you MUST ALWAYS attach, adjust,
and secure the tether (top anchorage) strap when installing the
car seat in the Forward-Facing mode with internal harness.
DO NOT use the rigid LATCH connectors along with the vehicle
lap or lap/shoulder belt.
Check the vehicle belt or the rigid LATCH connectors before
each use.
Use ONLY if the vehicle belt or rigid LATCH connectors can be
tightened and properly locked securely in place.
Even when unoccupied, this child restraint MUST be firmly
secured to the vehicle with the rigid LATCH connectors or with
the vehicle seat belt.
DO NOT fasten multiple lower anchor connectors on the same
lower anchor bar in the vehicle.
Before using this seat in Forward-Facing mode, your child
MUST have outgrown the seat in Rear-Facing mode.
WARNING
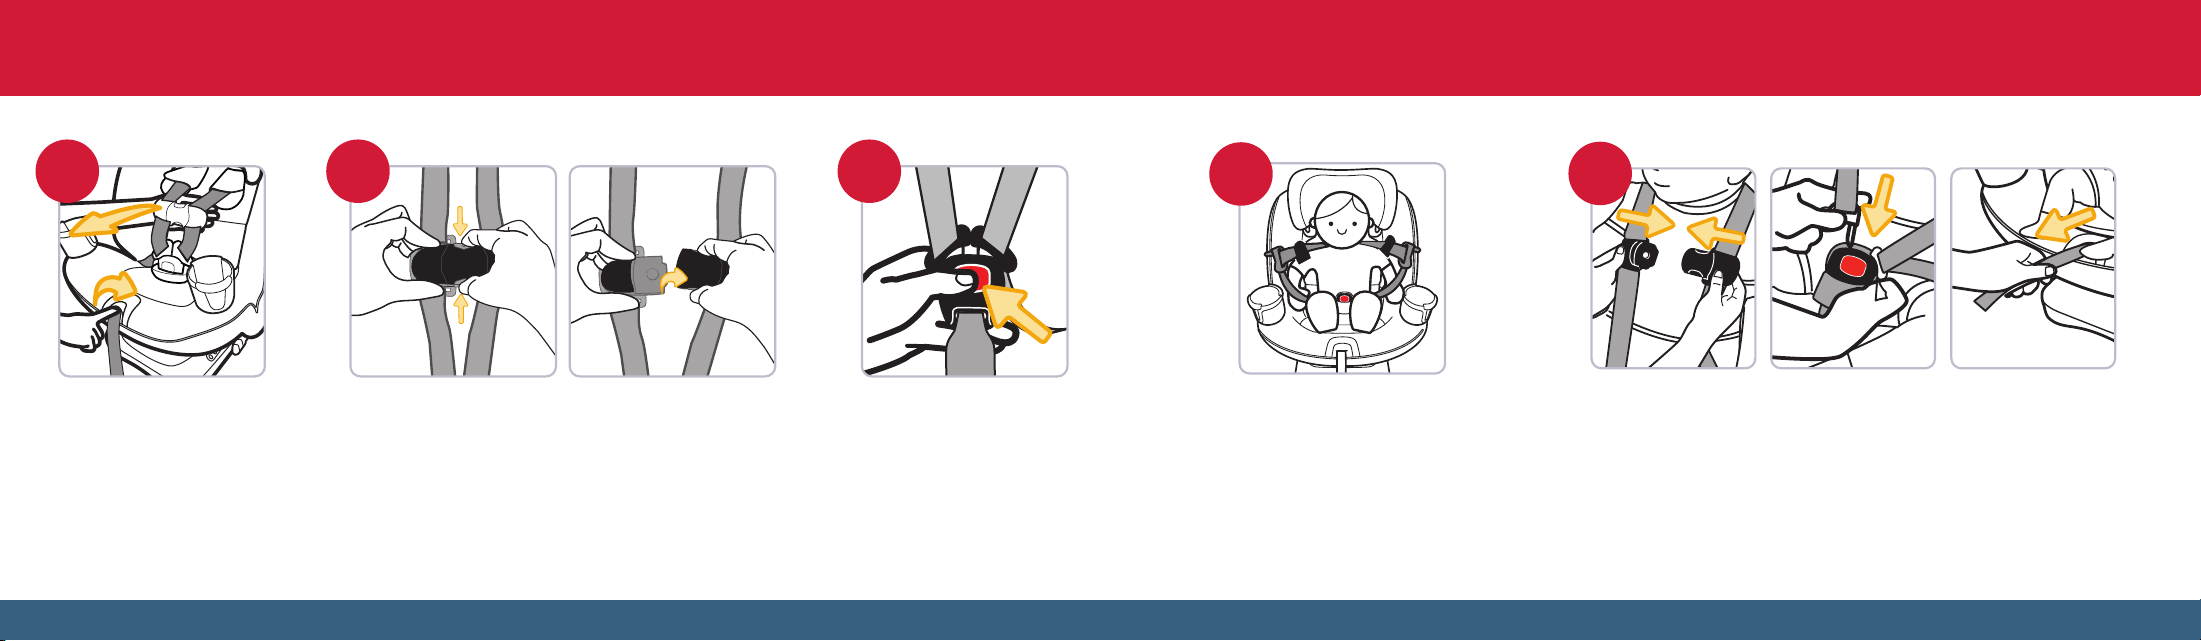
DO NOT use the magnetic chest clip with children who have an implanted
electronic medical device.
A magnet is used to help secure the chest clip locking mechanism
together which may interfere with the proper function of an implanted
electronic medical device.
Parents or caregivers who have an implanted electronic device should keep their device
away from the chest clip and consult their doctor and medical device manufacturer for
specific information before using this chest clip.
If a parent/caregiver or child has an implanted electronic medical device, please contact Dorel
(see back cover) for a replacement (non-magnetic) chest clip free of charge.
IMPLANTED
ELECTRONIC
MEDICAL
DEVICES
4342
1
2
1 in. (2.5 cm)
1
2
1 in. (2.5 cm)
1
2
1 in. (2.5 cm)
1
2
1 2 3
Fully loosen the harness straps
Push down on the harness release
lever (through the opening in the
seat pad) while pulling the harness
straps away from the backrest.
Unfasten the chest clip
While holding both sides of the chest clip, press in on the
top and bottom buttons and pull the chest clip apart.
Unbuckle the harness
Press the red button to
release the buckle tongues.
1
2
Fasten the chest clip and buckle the harness
Pull the harness adjustment strap straight out to snugly tighten the
harness. Position the chest clip mid-chest (even with the armpits) and
away from your child’s neck.
See Securing Your Child in the Car Seat on page 64 for details on chest
clip position and checking harness tightness.
1
2
1 in. (2.5 cm)
1
2
1 in. (2.5 cm)
1
2
5
4
Place your child in the car seat
Your child’s bottom and back
should be flat against the car seat.
Forward-Facing Child Fit Requirements
continued on next page
4544
1
2
1
2
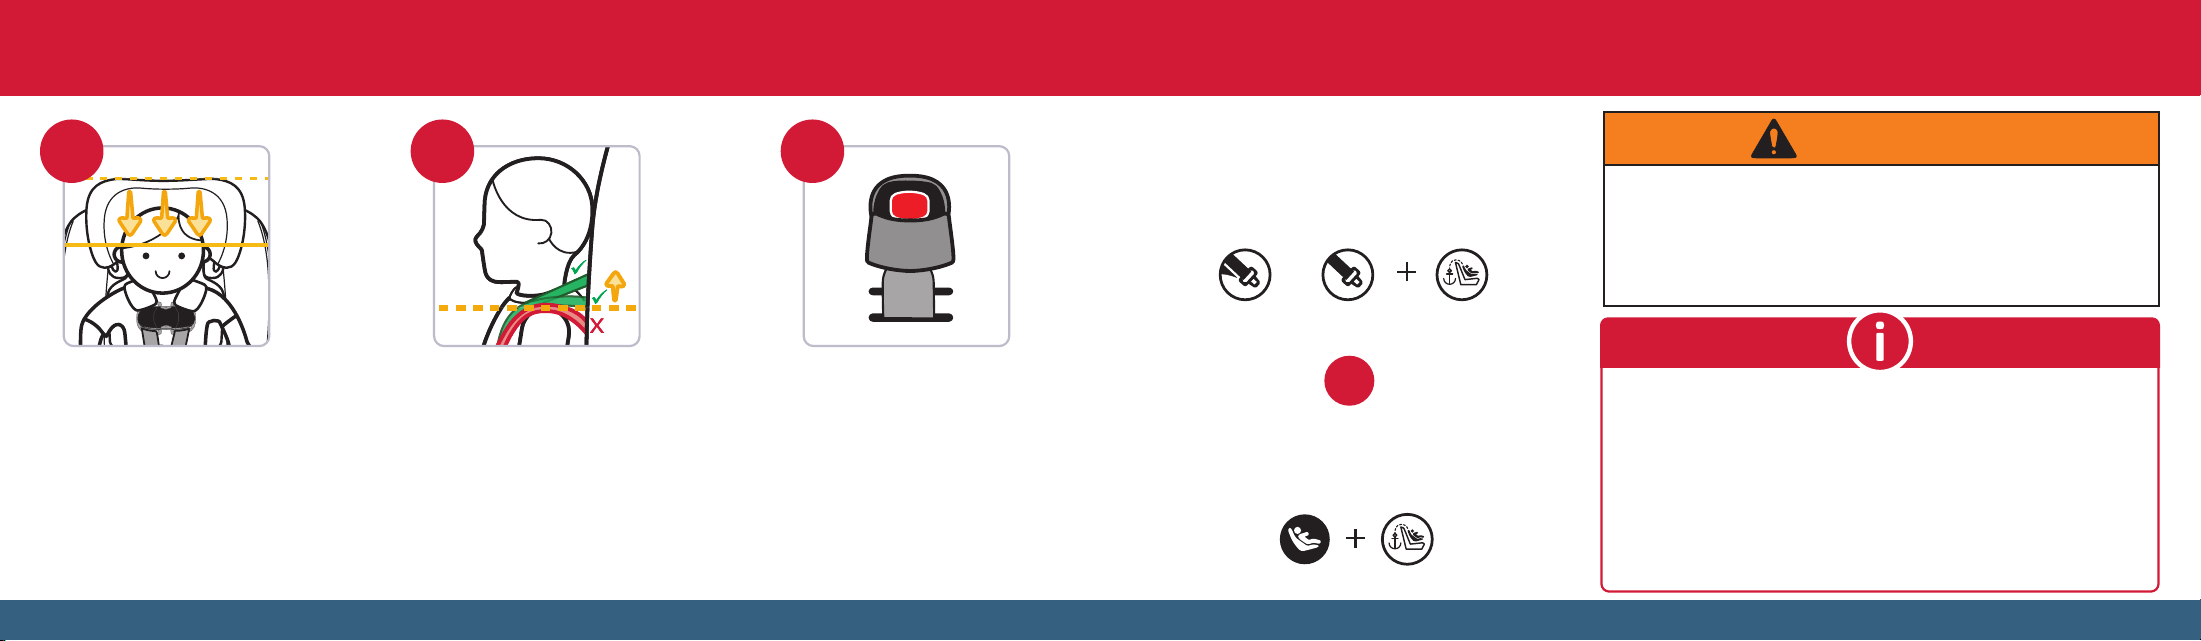
Check the head position
The top of your child’s ears MUST
be below the top of the car
seat’s headrest.
To change the headrest position,
see page 16.
Check the harness strap position
When Forward-Facing, the
harness strap MUST be placed at
the shoulder when possible, or
slightly above; NEVER below.
To change the harness strap height,
see page 16.
Check the buckle position
• Use the buckle slot closest to
your child.
• The buckle strap should not
be underneath or behind
your child.
To change the buckle position,
see page 17.
1
2
6 7 8
There are two methods for installing the
car seat in your vehicle. Use only one:
OR
Vehicle Belt + Tether
For a child between 30–65 lb (13.7–29.5 kg).
Rigid LATCH Connectors + Tether
DO NOT install by this method for a child
weighing more than 40 lb (18 kg).
DO NOT use both the rigid LATCH connectors and vehicle belt at
the same time to install the car seat.
When anchors are available, you MUST ALWAYS attach, adjust,
and secure the tether (top anchorage) strap when installing the
car seat in the Forward-Facing mode with internal harness.
WARNING
Lap/Shoulder
Belt
Lap Belt
Before installing the car seat:
• Check the child fit requirements on pages 42–44 and make any
necessary adjustments to the harness height or buckle position.
• Review your vehicle owner’s manual to determine the type of
vehicle belts in your car and how to use them to lock a car seat
in place OR to locate the LATCH: lower anchor seating positions.
See also Vehicle Belts on page 98 and LATCH: Lower Anchor
Bars on page 102.
Forward-Facing Vehicle Installation
4746
4
5
6
5
5
5
5
5
5
4
5
6
5
5
5
5
5
5
4
5
6
5
5
5
5
5
5
4
5
6
5
5
5
5
5
5
1 2
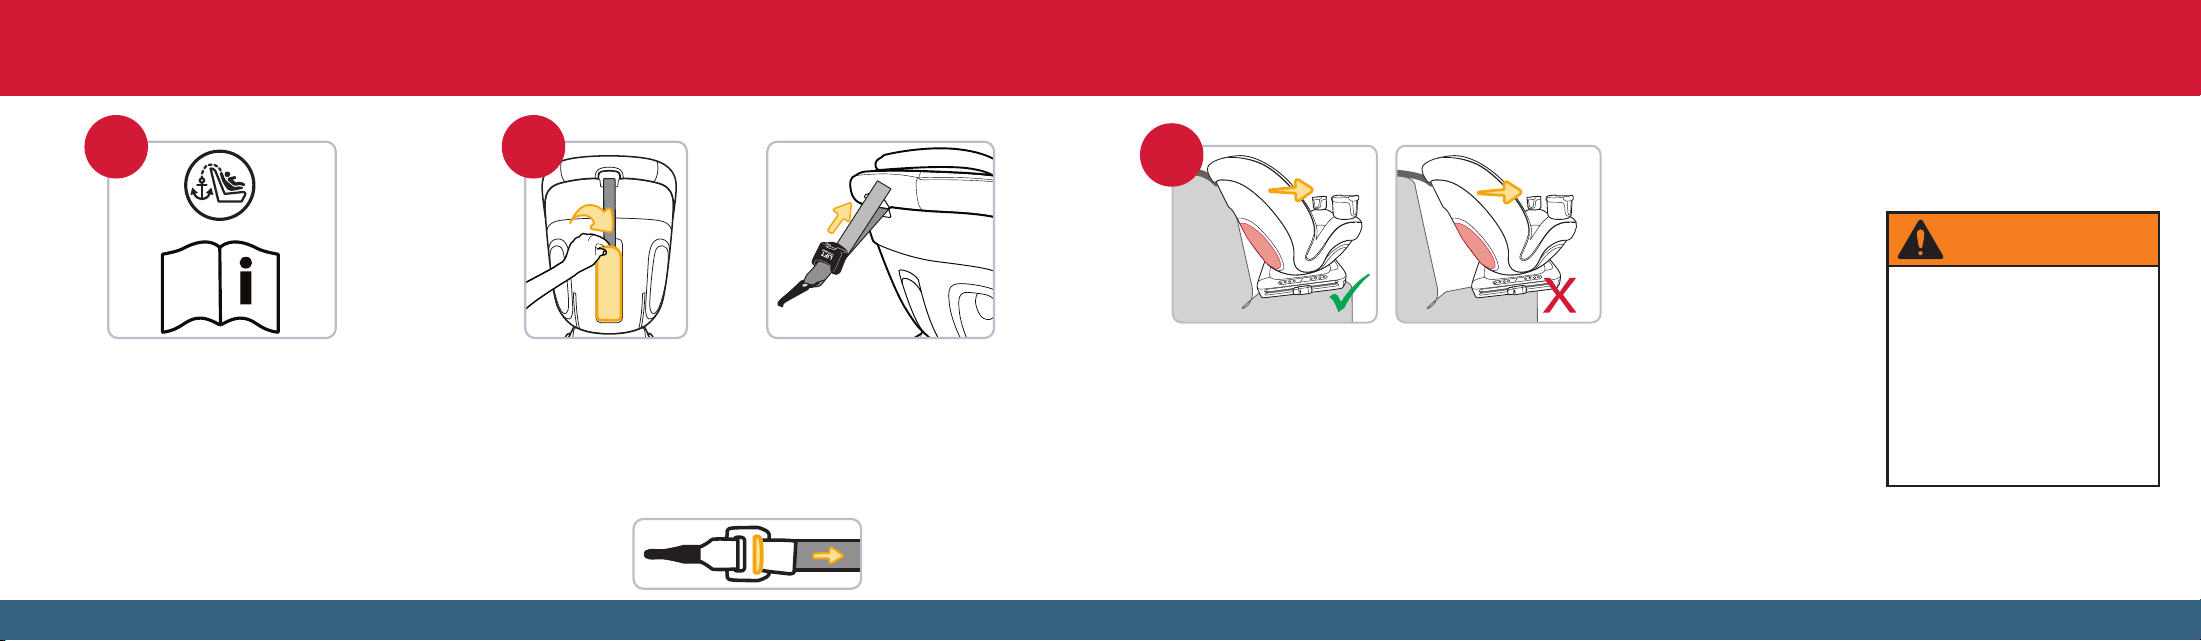
Locate the top tether anchors
in your vehicle
Review your vehicle owner’s manual
for the top tether anchor locations
and how to route the tether strap if
there are vehicle headrests.
Remove the tether strap from storage and loosen it
Open the tether door, loosen the tether strap, and then unhook
the tether strap to remove it from storage (see page 105). To
loosen the strap, lift the tether adjuster up or, if your car seat has
an adjuster with a button, then squeeze the adjuster button and
pull the strap to loosen it as shown.
4
5
6
5
5
5
5
5
5
4
5
6
5
5
5
5
5
5
3
Use the Forward-Facing
positions 5–8 only. Choose
the position that is the most
comfortable for your child.
DO NOT use Rear-Facing positions 1–4 when the car seat is installed Forward-Facing. See
page 20 for how to recline the car seat. Make sure the tether strap is accessible at the top of
the seat. The entire base should be completely on the vehicle seat.
For vehicles with an adjustable seatback: Adjust the angle of the vehicle seatback to match
your chosen Forward-Facing position, making sure that both the car seat is as far back as
possible on the vehicle seat and the car seat base is as flat as possible against the vehicle seat
bottom. Also refer to the vehicle owner’s manual for any additional requirements.
Place the car seat
Forward-Facing in the
back seat and select a
Forward-Facing position
NEVER use a Rear-Facing
recline position when this
child restraint is installed
Forward-Facing. Failure to
do this can result in serious
injury or death. Serious injury
can include paralysis and/or
permanent brain injury.
WARNING
Installing the Car Seat Forward-Facing with a Vehicle Belt
continued on next page
4948
If your vehicle has a headrest that
interferes with a flush car seat fit,
refer to your vehicle owner’s manual
to check whether it can be removed or
adjusted, or if there are other seating
locations to install the car seat.
4
5
6
5
5
5
5
5
5
4
Attach the tether hook to the
vehicle’s top tether anchor
See step 2 if you need to lengthen
the strap to reach the anchor.
4
5
6
5
5
5
5
5
5
4
5
6
5
5
5
5
5
5
7
Adjust the headrest to
the highest position
See page 16 for how
to adjust the headrest.
4
5
6
5
5
5
5
5
5
4
5
6
5
5
5
5
5
5
4
5
6
5
5
5
5
5
5
4
5
6
5
5
5
5
5
5
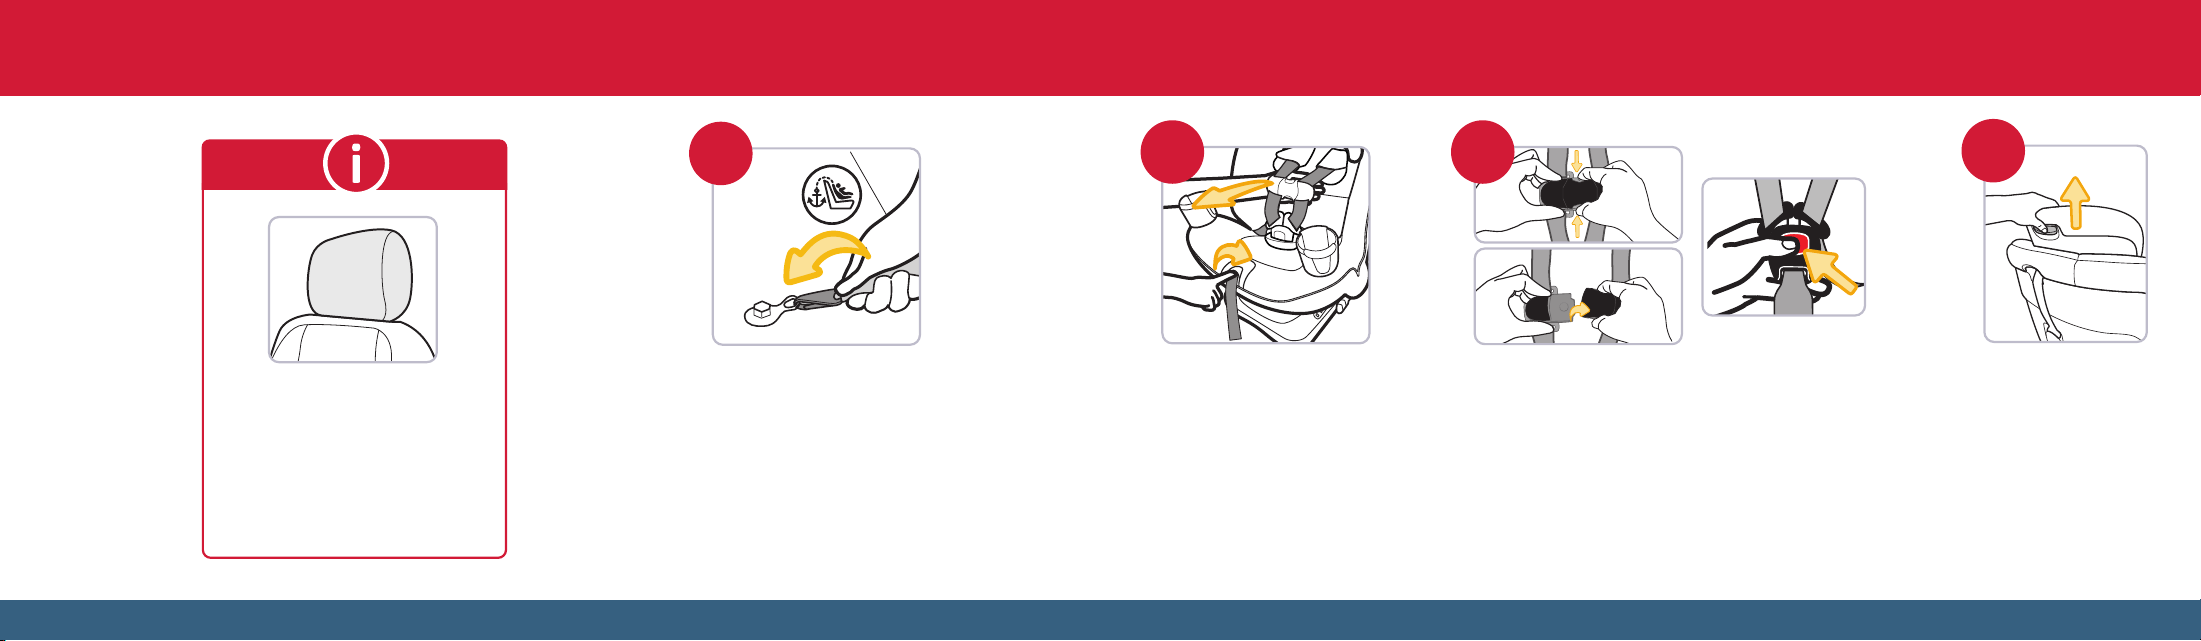
5 6
Fully loosen the
harness straps
Push down on the harness
release lever (through the
opening in the seat pad)
while pulling the harness
straps away from
the backrest.
Unfasten the chest clip and unbuckle the harness
While holding both sides of the chest clip, press in on
the top and bottom buttons and pull the chest clip apart.
Press the red button to release the buckle tongues.
continued on next page
5150
4
5
6
5
5
5
5
5
5
4
5
6
5
5
5
5
5
5
4
5
6
5
5
5
5
5
5
4
5
6
5
5
5
5
5
5
8
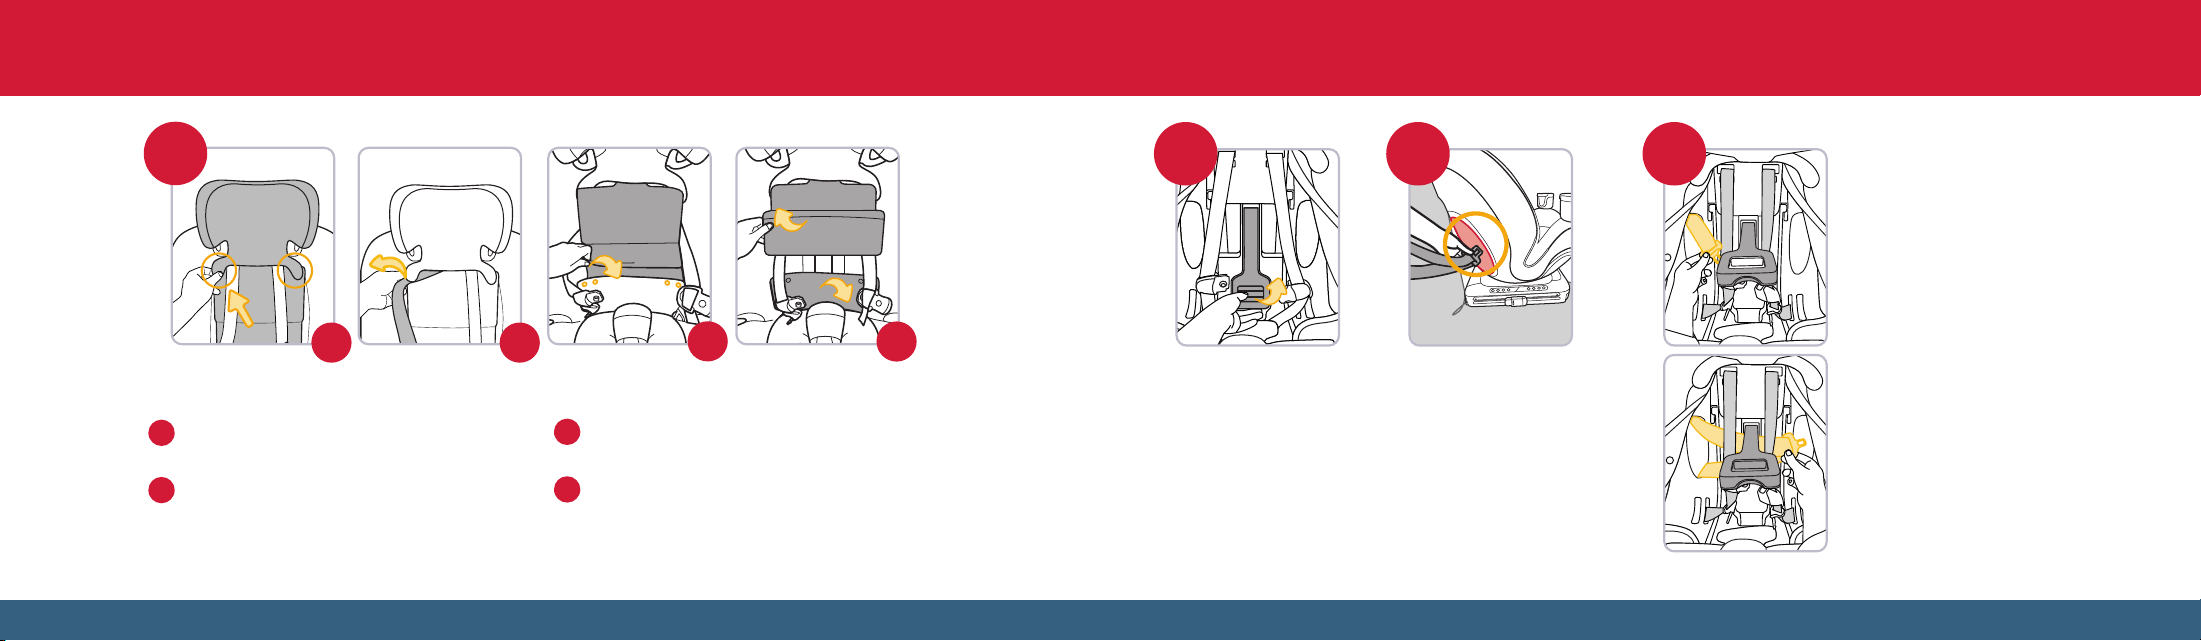
Pull out the tab near the shoulder slot. Repeat
on the other side.
Slide the harness straps out from the headrest
pad. The harness covers can remain installed if
desired (see page 9).
Undo the four snaps toward the bottom of the
backrest pad.
Fold up the bottom of the headrest pad and then
fold down the lower backrest part of the seat pad
to reveal the lockoff arm.
Undo the fasteners and fold up the headrest pad to access the lockoff arm
a
c
b
d
4
5
6
5
5
5
5
5
5
4
5
6
5
5
5
5
5
5
4
5
6
5
5
5
5
5
5
4
5
6
5
5
5
5
5
5
Open the lockoff arm
Squeeze the button toward
the bottom of the lockoff
arm to unlock it and then lift
it all the way up.
10 119
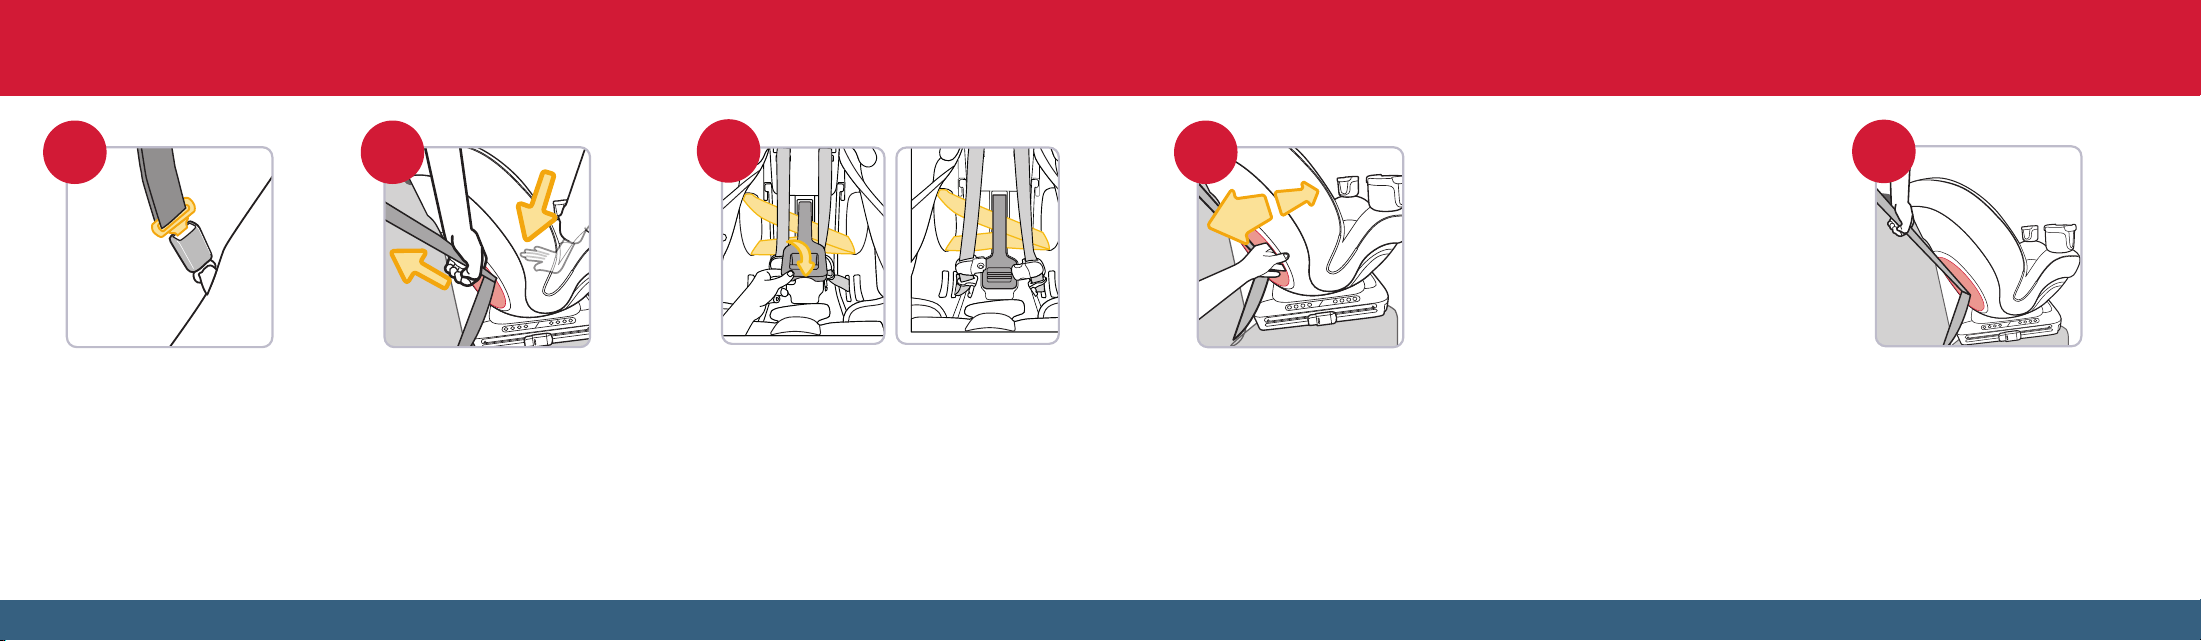
Locate the Forward-Facing
Belt Path opening and begin
routing the vehicle belt
through the path
Insert the vehicle belt into
the Forward-Facing Belt
Path opening.
Reach behind the lockoff arm into the
Forward-Facing Belt Path where the
vehicle belt has been inserted. Route the
vehicle belt under the harness straps and
the narrow section of the lockoff arm and
then out through the other side of the belt
path. Make sure the belt is positioned
properly so that it goes:
• Under the car seat pad; AND
• Across the car seat; AND
• Under the harness straps; AND
• Behind the lockoff arm; AND
• Out the other Forward-Facing Belt
Path opening.
DO NOT twist the belt.
Route the vehicle belt behind
the lockoff arm through the
Forward-Facing Belt Path
continued on next page
b
a
d
c
5352
4
5
6
5
5
5
5
5
5
4
5
6
5
5
5
5
5
5
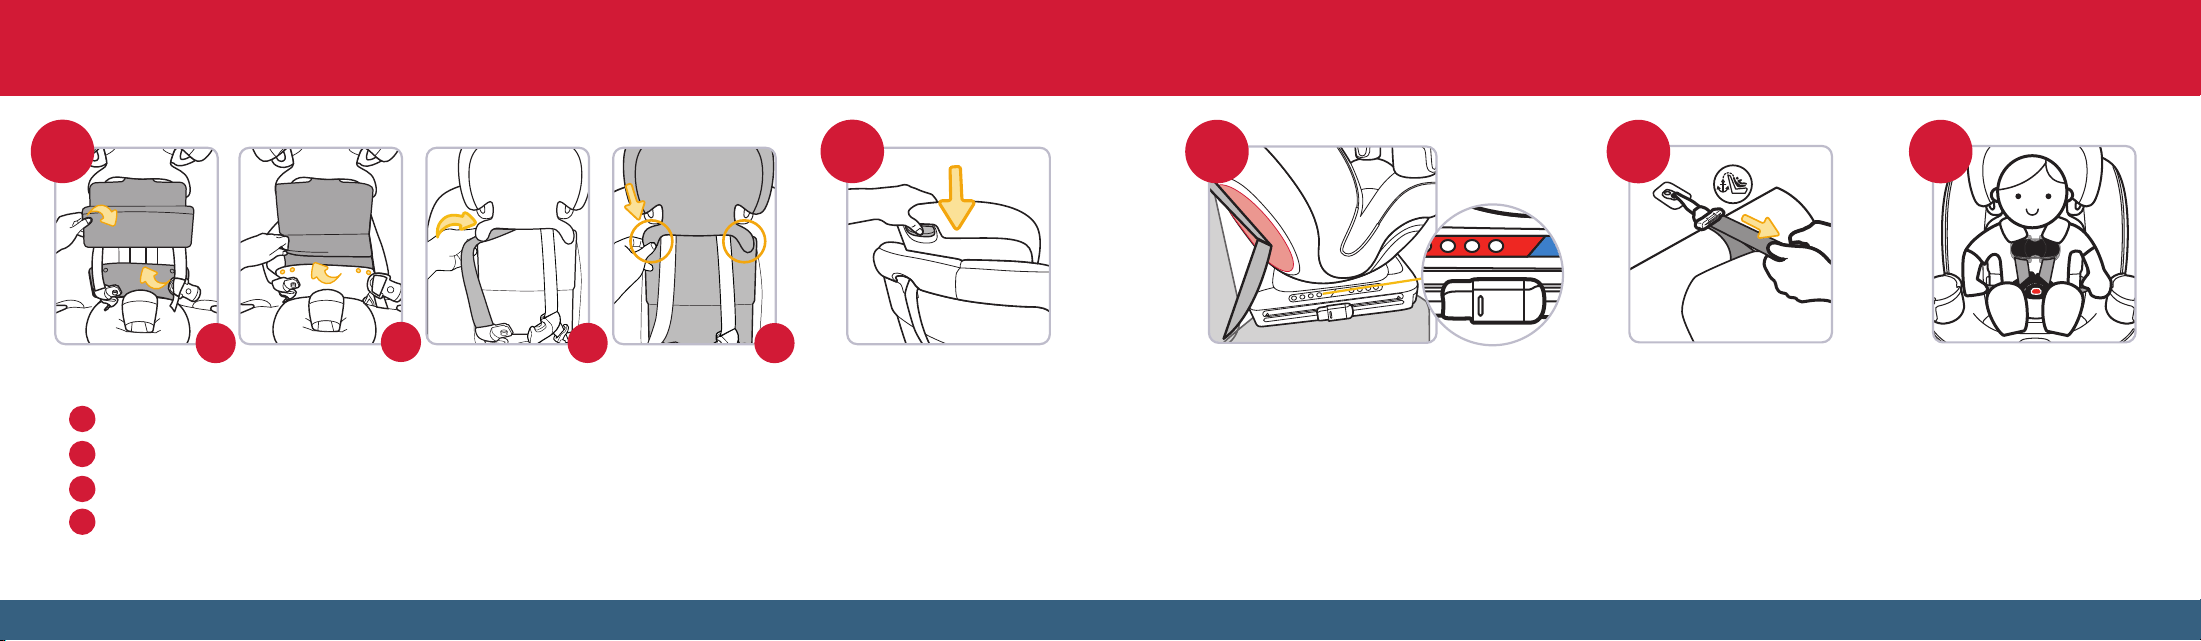
Buckle the vehicle belt
If your vehicle belt has a switchable
retractor, wait to place it in locking
mode until step 16.
Tighten the vehicle belt
Push firmly down with moderate
weight in the center of the car
seat with one hand while using
your other hand to pull up on the
shoulder belt to tighten it.
Close the lockoff arm
Make sure the vehicle belt is completely
under the narrow part of the arm and both
harness straps before closing the arm. Push
the arm down until it clicks into place.
If the lockoff arm requires excessive
force to close it, then loosen the vehicle
belt slightly.
4
5
6
5
5
5
5
5
5
5
5
4
12 13
14
Switch the vehicle belt
to locking mode
If your vehicle belt has a switchable
retractor, then it MUST be in locking
mode. Refer to page 100 or your
vehicle’s owner manual. If your vehicle
belt does not have a switchable
retractor, then go to the next step.
Check the vehicle belt tightness
Hold the car seat at the Forward-Facing
Belt Path with your non-dominant hand.
Push and pull the car seat from side to side.
The car seat should not move more than
1 in. (2.5 cm) at the belt path.
If the car seat moves more than 1 in.
(2.5 cm), you can try:
• Repeating steps 9–14 to remove any slack in the vehicle belt; OR
• Reinstalling the car seat; OR
• Changing to a different seating location; OR
• Switching to a different install method (rigid LATCH connectors).
5
5
4
4
5
6
5
5
5
5
5
5
16
15
continued on next page
5554
4
5
6
5
5
5
5
5
5
Adjust the headrest to the
proper position for your child
See page 42 for Forward-Facing
Child Fit. See page 16 for how to
adjust the headrest.
18
4
5
6
5
5
5
5
5
5
4
5
6
5
5
5
5
5
5
4
5
6
5
5
5
5
5
5
4
5
6
5
5
5
5
5
5
17
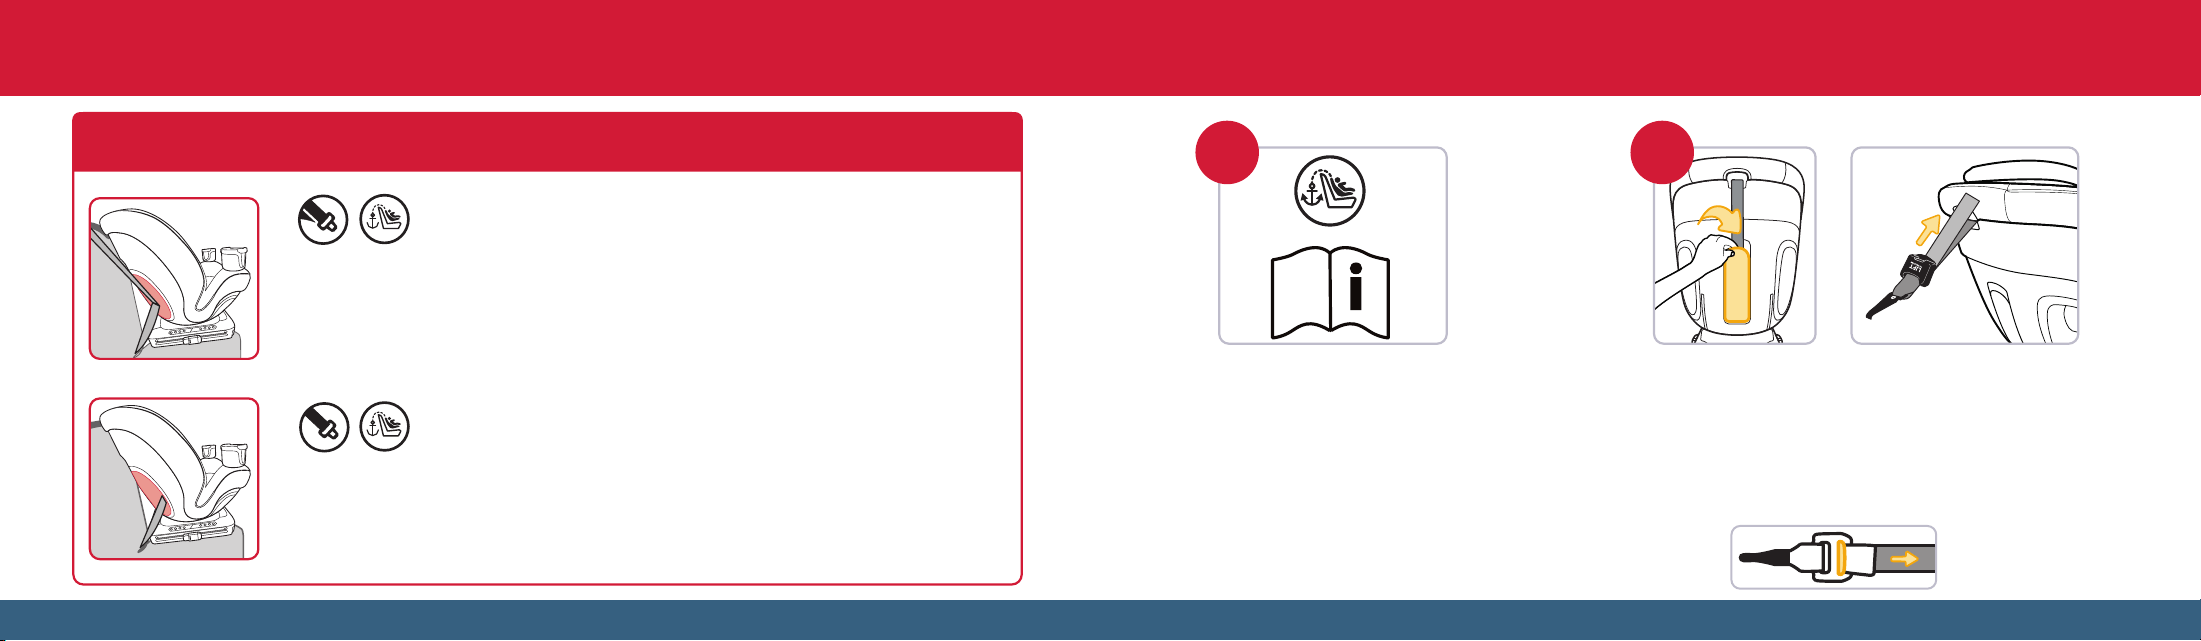
Redo the fasteners on the seat pad and adjust the headrest
Fold up the lower backrest part of the seat pad. Unfold the bottom of the headrest pad.
Snap together the four fasteners on the lower backrest.
Slide the harness straps back in the headrest pad as shown.
Reinsert the tabs into the slots on the headrest pad.
See also the Installing the Seat Pad Set section steps 7 and 8 on page 95 for details on
redoing the fasteners.
c
b
d
4
5
6
5
5
5
5
5
5
4
5
6
5
5
5
5
5
5
Tighten the tether
Push firmly on the back of
the car seat and pull the
free end of the tether strap
to remove all the slack.
2120
Secure your child in the car seat
For complete details on properly
securing your child in the car
seat, including how to position the
chest clip and check for harness
tightness, see pages 64–68.
4
5
6
5
5
5
5
5
5
19
Confirm the car seat recline position
Make sure the car seat is using the Forward-Facing
positions 5–8.
DO NOT use Rear-Facing positions 1–4 when the car
seat is installed Forward-Facing.
4
5
6
5
5
5
5
5
5
continued on next page
a
d
b
c
a
5756
FINISHED!
• Is the vehicle belt buckled and the switchable retractor locked?
See steps 12 and 16.
• Is the lockoff arm closed? See step 14.
• Is the vehicle belt tightened enough so that the car seat does
not move more than 1 in. (2.5 cm) from side to side at the belt
path? See step 15.
• Has the seat pad been fastened? See step 17.
• Has the tether been installed and tightened? See steps 4 and 20.
Check your child’s fit often and make any adjustments to the car
seat as they grow. Check the tightness of the installation often to
make sure it has not loosened.
4
5
6
5
5
5
5
5
5
4
5
6
5
5
5
5
5
5
Lap/Shoulder Belt
+ Tether
For a child between
30–65 lb
(13.7–29.5 kg).
Lap Belt + Tether
For a child between
30–65 lb
(13.7–29.5 kg).
4
5
6
5
5
5
5
5
5
4
5
6
5
5
5
5
5
5
4
5
6
5
5
5
5
5
5
4
5
6
5
5
5
5
5
5
1 2
Locate the top tether anchors
in your vehicle
Review your vehicle owner’s manual
for the top tether anchor locations and
how to route the tether strap if there
are vehicle headrests.
Remove the tether strap from storage and loosen it
Open the tether door, loosen the tether strap, and then unhook the
tether strap to remove it from storage (see page 105). To loosen
the strap, lift the tether adjuster up or, if your car seat has an
adjuster with a button, then squeeze the adjuster button and pull
the strap to loosen it as shown.
Installing the Car Seat Forward-Facing with Rigid LATCH Connectors
continued on next page
5958
4
4
5
4
5
4
4
5
4
5
4
5
5
6
5
5
5
4
4
5
4
5
3
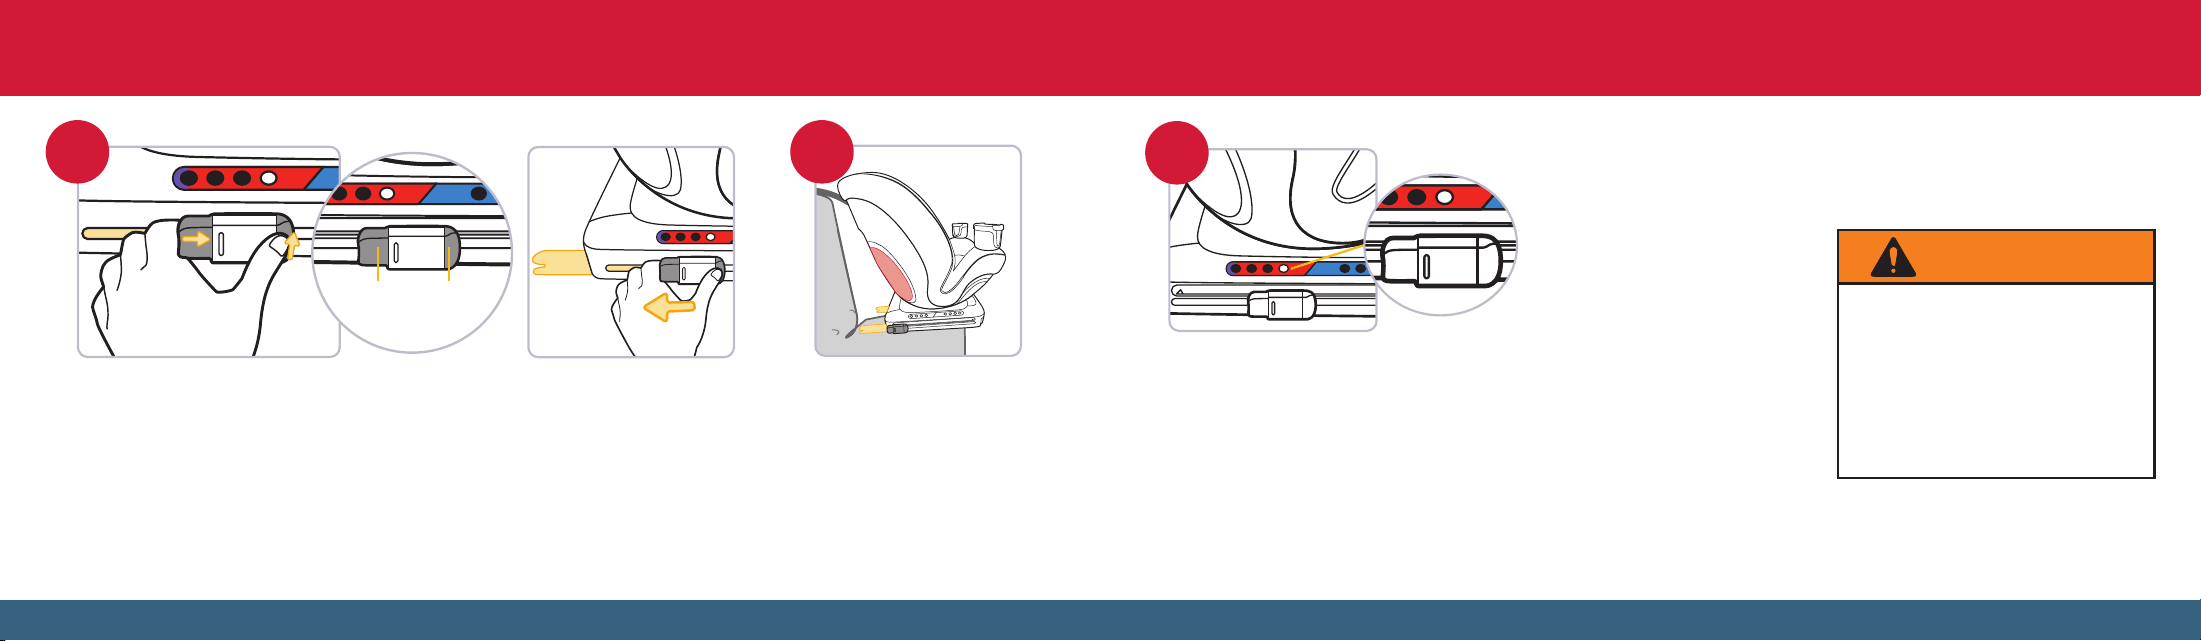
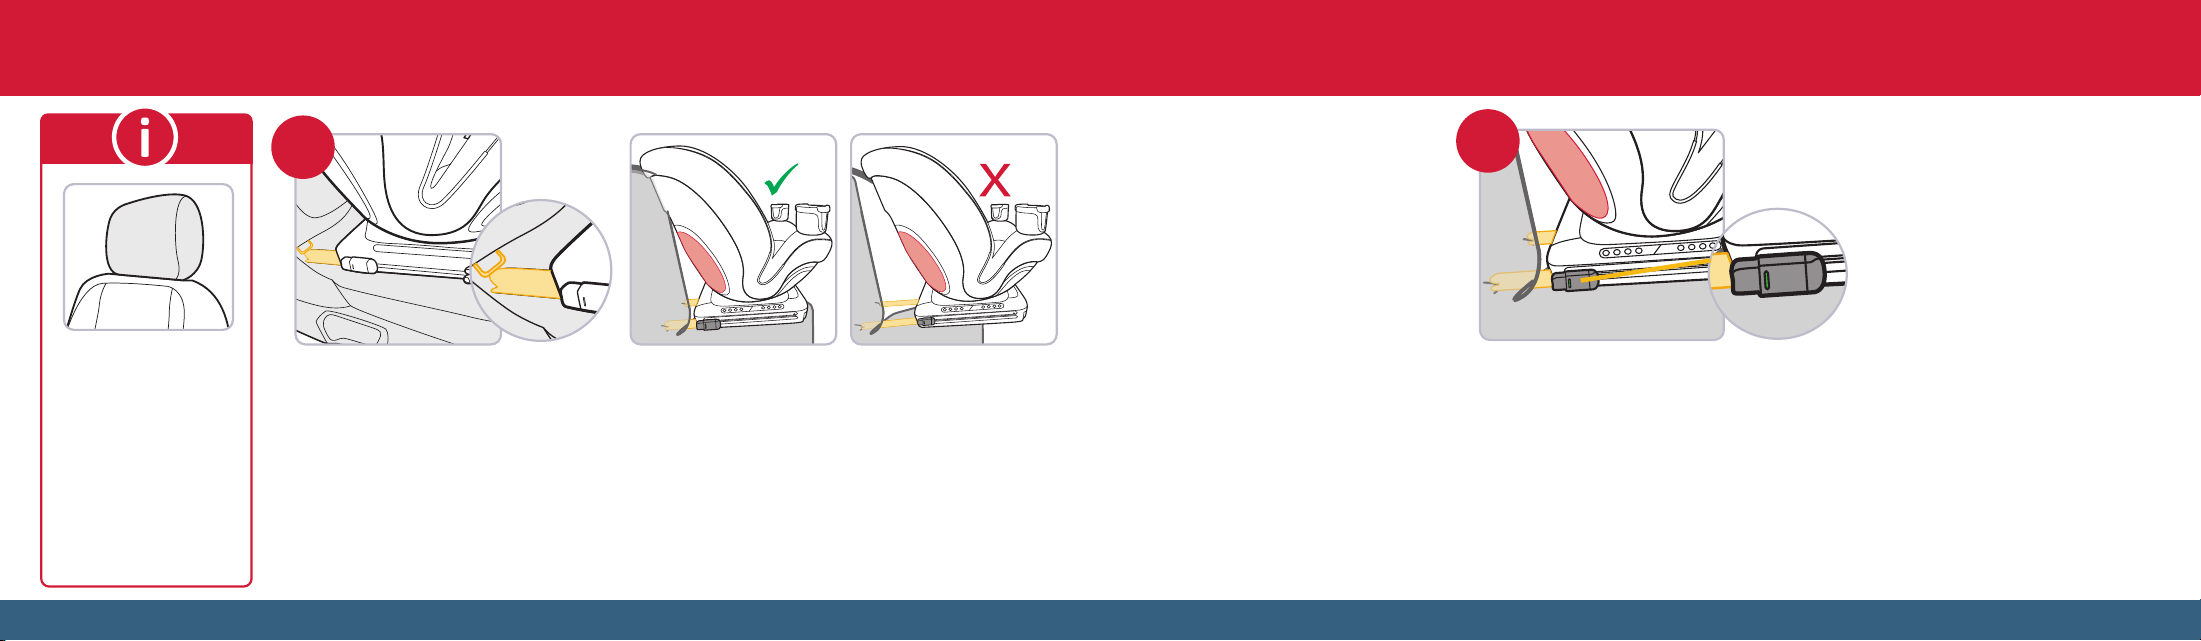
Extend the Forward-Facing rigid LATCH
connectors from the base
Push to tilt the release lock tab backwards and then push in
the release button on the other end to slide the release lock
to the end of the
Forward-Facing
side of the base until
the connector is fully extended.
Repeat on the other side of the base.
4
5
5
6
5
5
5
4
4
5
4
5
4
Put the car seat Forward-Facing
on the back seat
Make sure the tether strap is accessible
at the top of the seat.
4
5
5
6
5
5
5
4
4
5
4
5
Release
Lock Tab
Release
Button
Use the Forward-Facing
positions 5–8 only. Choose
the position that is the most
comfortable for your child.
DO NOT use Rear-Facing
positions 1–4 when the car seat is installed Forward-Facing. See page 20 for how
to recline the car seat. Make sure the tether strap is accessible at the top of the seat.
The entire base should be completely on the vehicle seat.
For vehicles with an adjustable seatback: Adjust the angle of the vehicle seatback
to match your chosen Forward-Facing position, making sure that both the car seat
is as far back as possible on the vehicle seat and the car seat base is as flat as
possible against the vehicle seat bottom. Also refer to the vehicle owner’s manual for
any additional requirements.
4
5
5
6
5
5
5
4
4
5
4
5
5
Select a Forward-Facing position
for the car seat
NEVER use a Rear-Facing recline
position when this child restraint
is installed Forward-Facing.
Failure to do this can result in
serious injury or death. Serious
injury can include paralysis and/or
permanent brain injury.
WARNING
4
5
5
6
5
5
5
4
4
5
4
5
continued on next page
6160
5
5
5
If your vehicle has a
headrest that interferes
with a flush car seat
fit, refer to your vehicle
owner’s manual to
check whether it can be
removed or adjusted, or
if there are other seating
locations to install the
car seat.
4
5
5
6
5
5
5
4
4
5
4
5
4
5
5
6
5
5
5
4
4
5
4
5
5
5
5
6
4
5
5
6
5
5
5
4
4
5
4
5
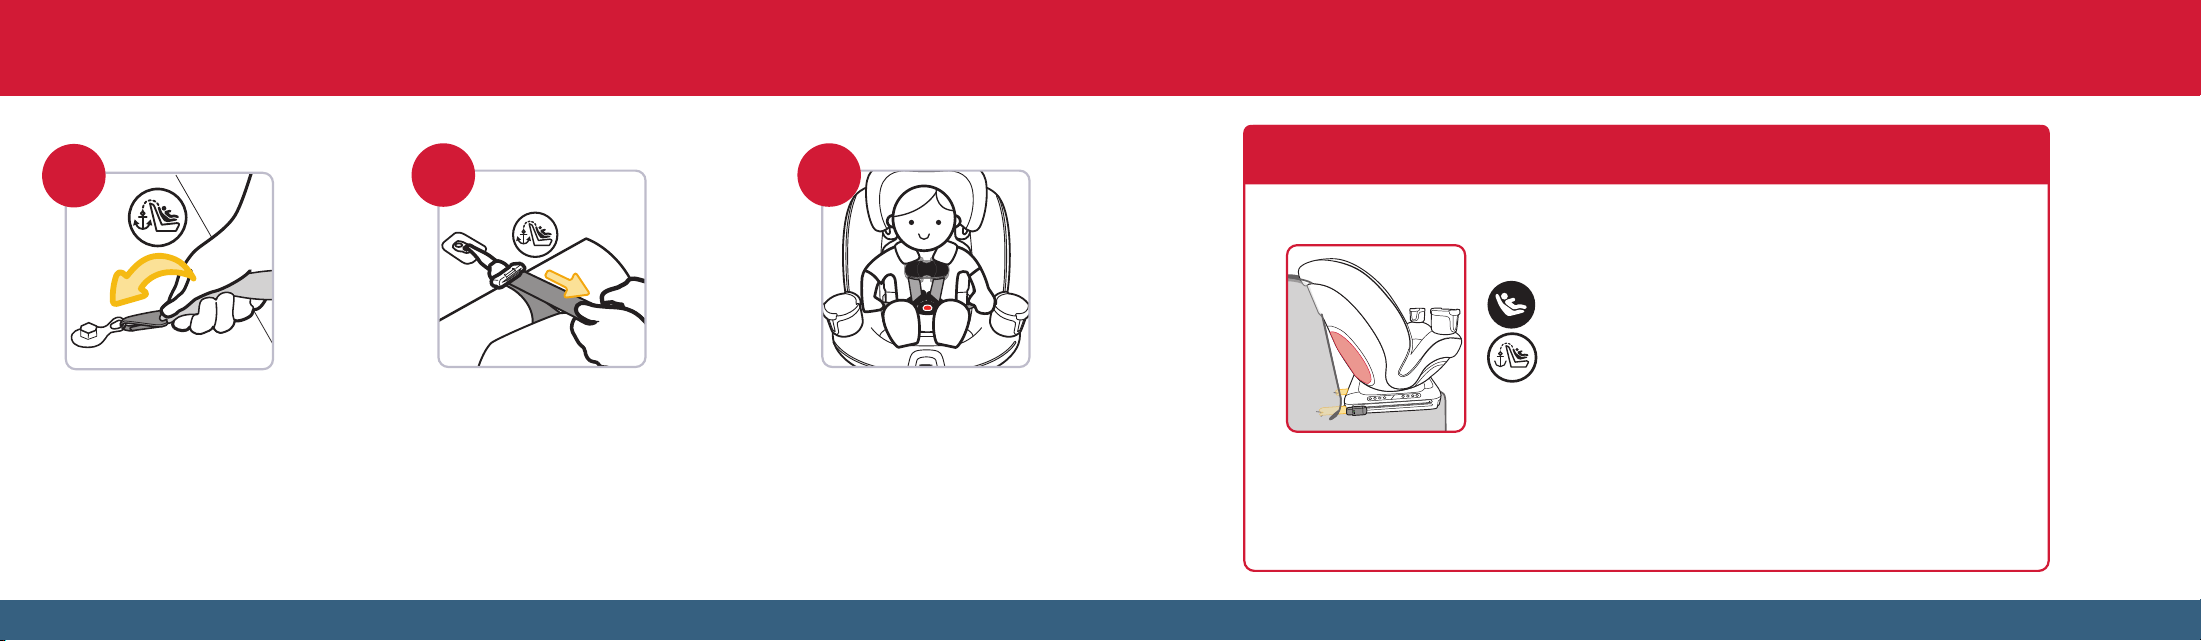
Place the car seat on the vehicle seat so that both connectors are aligned with the lower anchors.
Push both sides of the car seat base EVENLY towards the vehicle seatback. Continue to push it
backwards until both connectors are attached to the anchors AND the car seat is touching the
vehicle seatback. If the rigid LATCH connectors are fully retracted and the car seat is still not
touching the vehicle seatback, then adjust the vehicle seatback so that it creates contact with
the car seat. If the vehicle seatback is not adjustable, confirm that the connectors are completely
attached to the anchor (see next step). The entire base should be completely on the vehicle seat.
Attach the rigid LATCH connectors to the lower anchors
Check the rigid LATCH connector installation
Verify the car seat is securely attached to the lower anchors by checking the indicator on both
rigid LATCH connector release locks to make sure no red is showing AND pulling the car seat
away from the vehicle seatback.
If red is showing on either side or the rigid LATCH connectors are not properly connected to the
lower anchors when you pull the car seat away from the vehicle seatback, repeat steps 3–6.
For help with the installation, please call Consumer Care at 1-800-544-1108 or scan the QR
code on the back cover of this manual.
4
5
5
6
5
5
5
4
4
5
4
5
7
4
5
5
6
5
5
5
4
4
5
4
5
continued on next page
6362
4
5
5
6
5
5
5
4
4
5
4
5
8
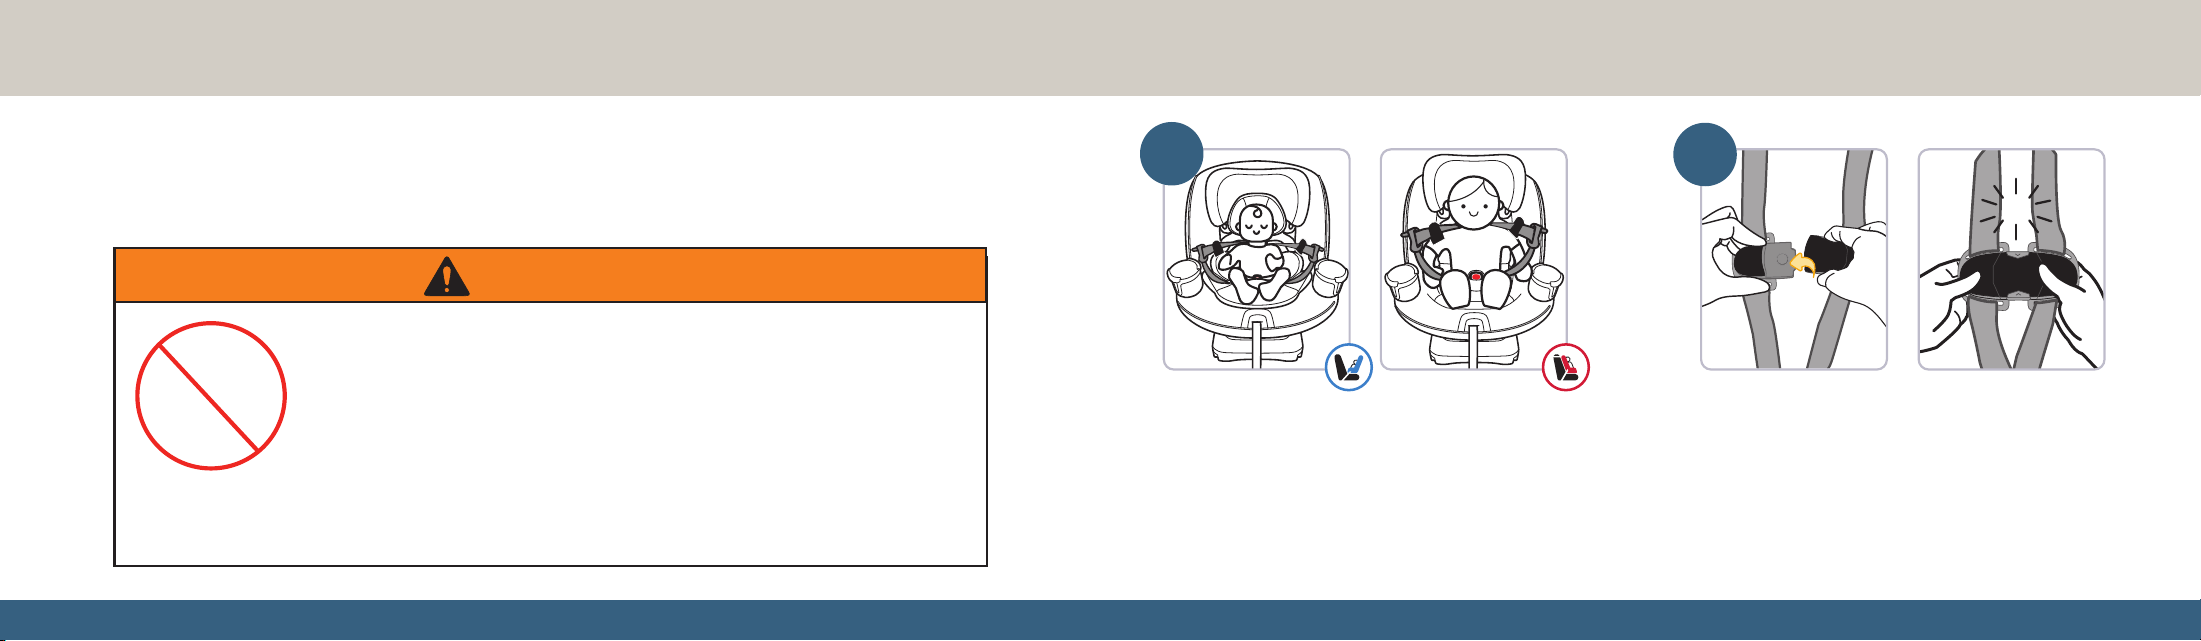
Attach the tether hook to the
vehicle’s top tether anchor
See step 2 if you need to
lengthen the strap to reach
the anchor.
4
5
5
6
5
5
5
4
4
5
4
5
4
5
5
6
5
5
5
4
4
5
4
5
Tighten the tether
Push firmly on the back of
the car seat and pull the
free end of the tether strap
to remove all the slack.
109
Secure your child in the car seat
For complete details on properly
securing your child in the car seat,
including how to position the chest
clip and check for harness tightness,
see pages 64–68.
FINISHED!
• Are the rigid LATCH connectors
securely attached to the vehicle’s
lower anchors? See step 7.
• Has the tether strap been installed
and tightened? See steps 8 and 9.
Check your child’s fit often and make
any adjustments to the car seat as
they grow.
DO NOT install by this method
for a child weighing more than
40 lb (18 kg).
4
5
5
6
5
5
5
4
4
5
4
5
Rigid LATCH
Connectors
+ Tether
6564
Securing Your Child in the Car Seat
DO NOT use the magnetic chest clip with children who have an implanted
electronic medical device.
A magnet is used to help secure the chest clip locking mechanism together
which may interfere with the proper function of an implanted electronic
medical device.
Parents or caregivers who have an implanted electronic device should keep
their device away from the chest clip and consult their doctor and medical
device manufacturer for specific information before using this chest clip. If a parent/caregiver or
child has an implanted electronic medical device, please contact Dorel (see back cover).
IMPLANTED
ELECTRONIC
MEDICAL
DEVICES
WARNING
Follow the steps in this section to secure your child in both Rear-Facing and Forward-Facing modes,
remove your child from the car seat, and troubleshoot any issues.
Refer to Rear-Facing Child Fit Requirements on page 24 and Forward-Facing Child Fit Requirements
on page 42 to make sure child fits the seat properly.
click
click
Place your child in the car seat
Your child’s bottom and back should be flat
against the car seat.
click
click
1
2
Fasten the chest clip
Lay the right (top) half of the chest clip over the left
(bottom) half and it will automatically snap together
and lock.
Pull gently on each half of the chest clip to make
sure it is locked.
continued on next page
6766
click
click
click
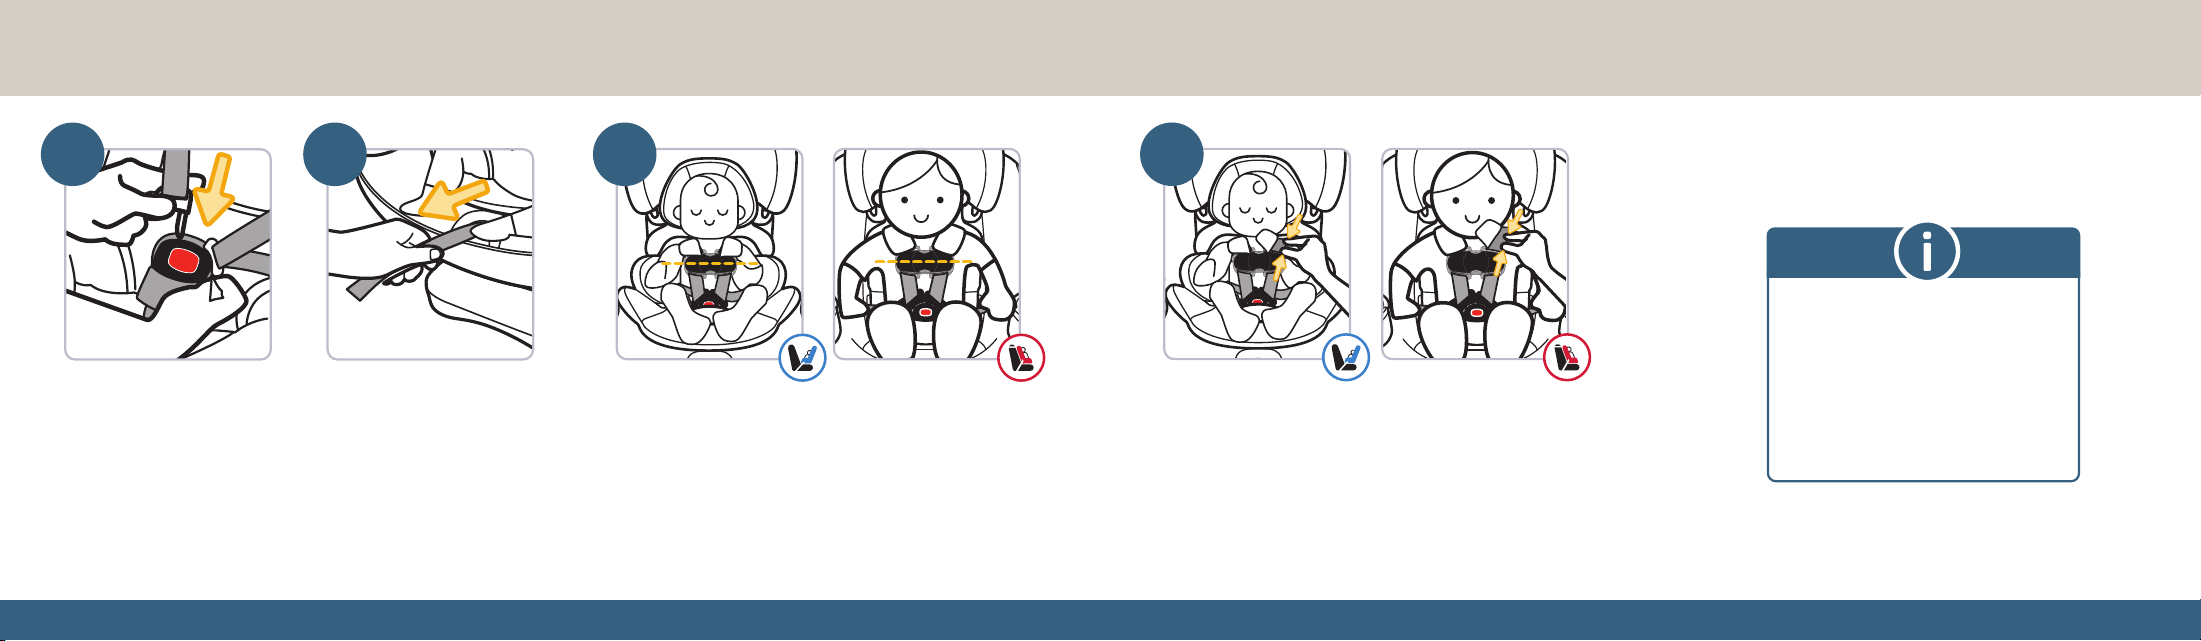
Buckle the harness
Pull the harness straps up
to make sure the buckle
is locked.
4
3
Tighten the harness
Pull the harness adjustment
strap straight out to snugly
tighten the harness.
Position the chest clip
Slide the chest clip up the harness straps and
position it at mid-chest (even with the armpits)
and away from your child’s neck.
click
5
click
click
Try to pinch the harness at the shoulders vertically
between your index finger and thumb as shown.
If your fingers slip off, the harness is tight enough.
If you can pinch the harness strap, tighten it more
(see step 4).
Check the harness tightness
6
A snug strap should not allow any
slack. It lies in a relatively straight line
without sagging. It does not press on
the child’s flesh or push the child’s
flesh or push the child’s body into an
unnatural position.
continued on next page
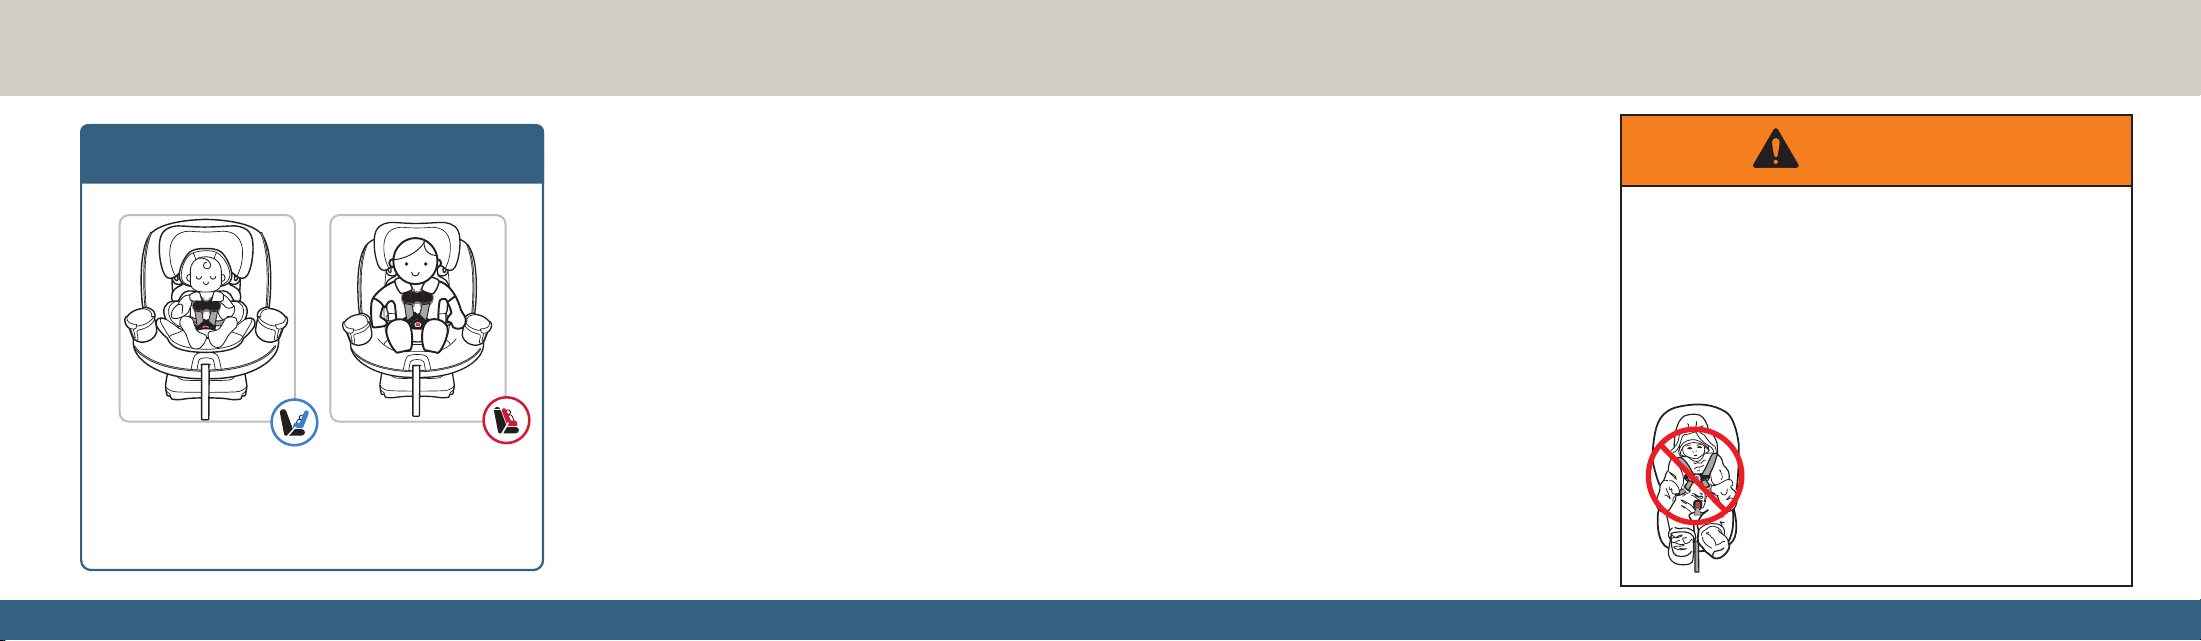
6968
click
FINISHED!
Your child is now secured in the car seat.
Check your child’s fit often and make any needed
adjustments to the car seat as they grow.
To remove your child from the car seat:
1. Loosen the harness straps. Push down on the
harness release lever (through the opening in the
seat pad) while pulling the chest clip away from
your child.
2. Unfasten the chest clip. While holding both
sides of the chest clip, press in on the top and
bottom buttons and pull the chest clip apart.
3. Unbuckle the harness. Press the red button
to release the buckle tongues.
4. Remove your child.
click
Failure to fasten and tighten the harness system
correctly may allow the child to be ejected from the
child restraint in a crash or sudden stop causing serious
injury or death. Serious injury can include paralysis and/
or permanent brain injury.
DO NOT mistake comfort for safety. The harness system
must be snugly adjusted.
DO NOT put snowsuits or bulky garments
on your child when placing them in the
child restraint.
Bulky clothing can prevent the harness
straps from being tightened properly.
WARNING
click
Troubleshooting
If the buckle or harness release lever sticks:
DO NOT LUBRICATE THEM. Check for dropped
food, sticky spilled drinks, dirt, leaves, etc. Clean
the buckle or harness release lever with warm
water and remove any objects with tweezers. If you
cannot adjust the harness to remain tight with the
buckle securely locked, DO NOT use this car seat.
If the harness twists: Straighten the harness each
time you put your child in the car seat. When you
remove your child, lock the buckle and tighten the
harness so it will be ready for the next use.
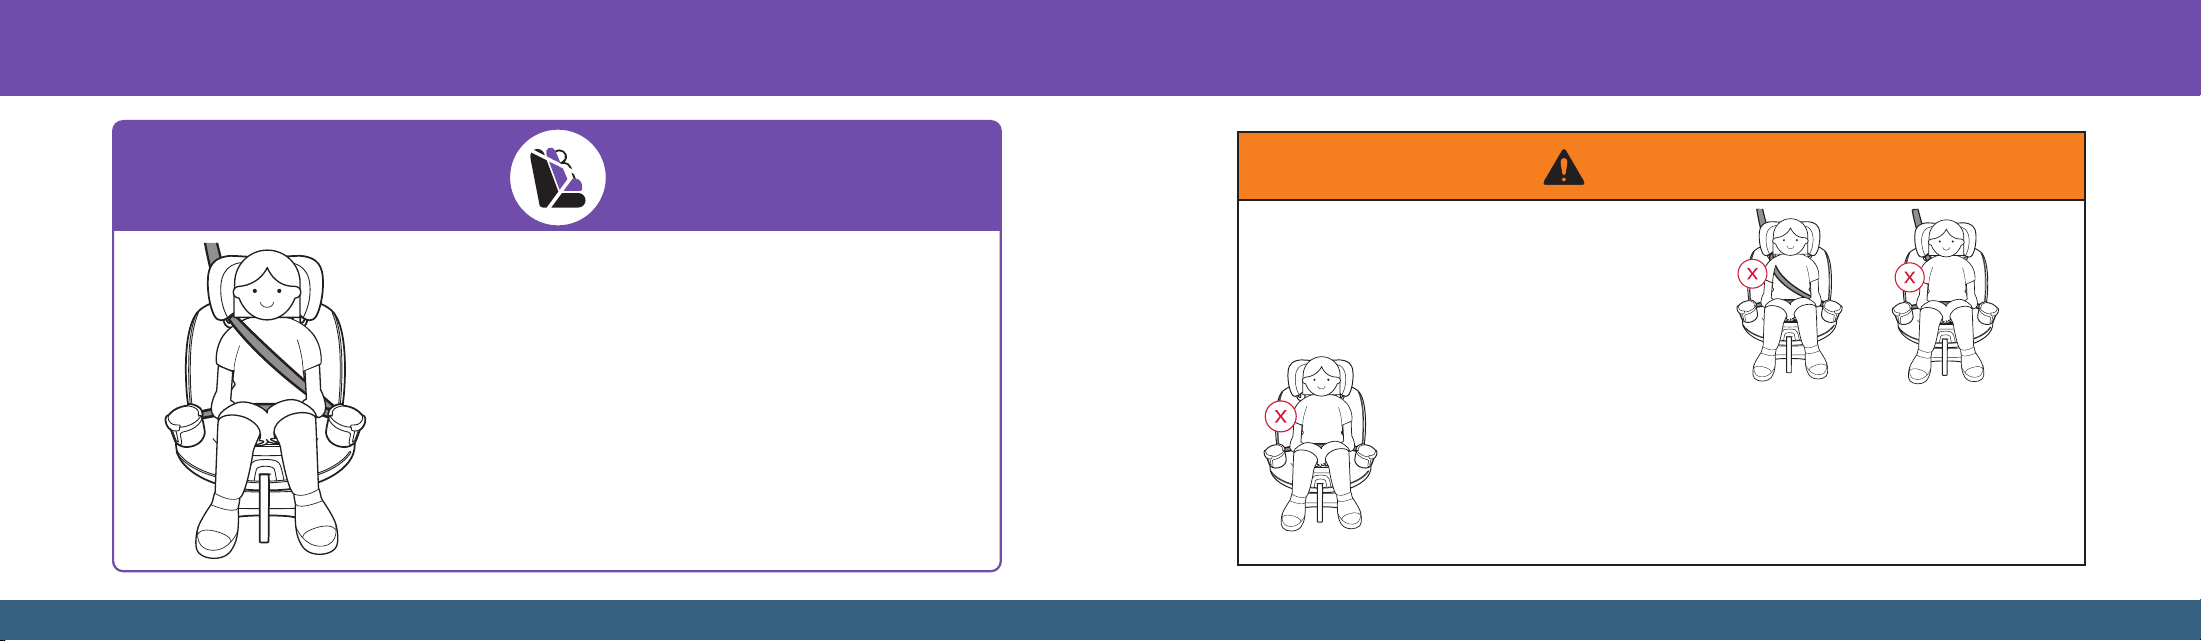
7170
Booster Seat Mode
40–100 lb (18.1–45.4 kg) and 43.4–52 in. (110.1–132.1 cm)
In this car seat, your child can use the Booster Seat mode until they
fit the vehicle’s lap and shoulder belt properly without a Booster Seat
OR outgrow any one of the following:
• Weight limit: 100 lb (45.4 kg); OR
• Height limit: 52 in. (132.1 cm); OR
• Booster Seat Child Fit Requirements PAGE 78
Storing the Harness System PAGE 72
Booster Seat Use in Vehicle PAGE 79
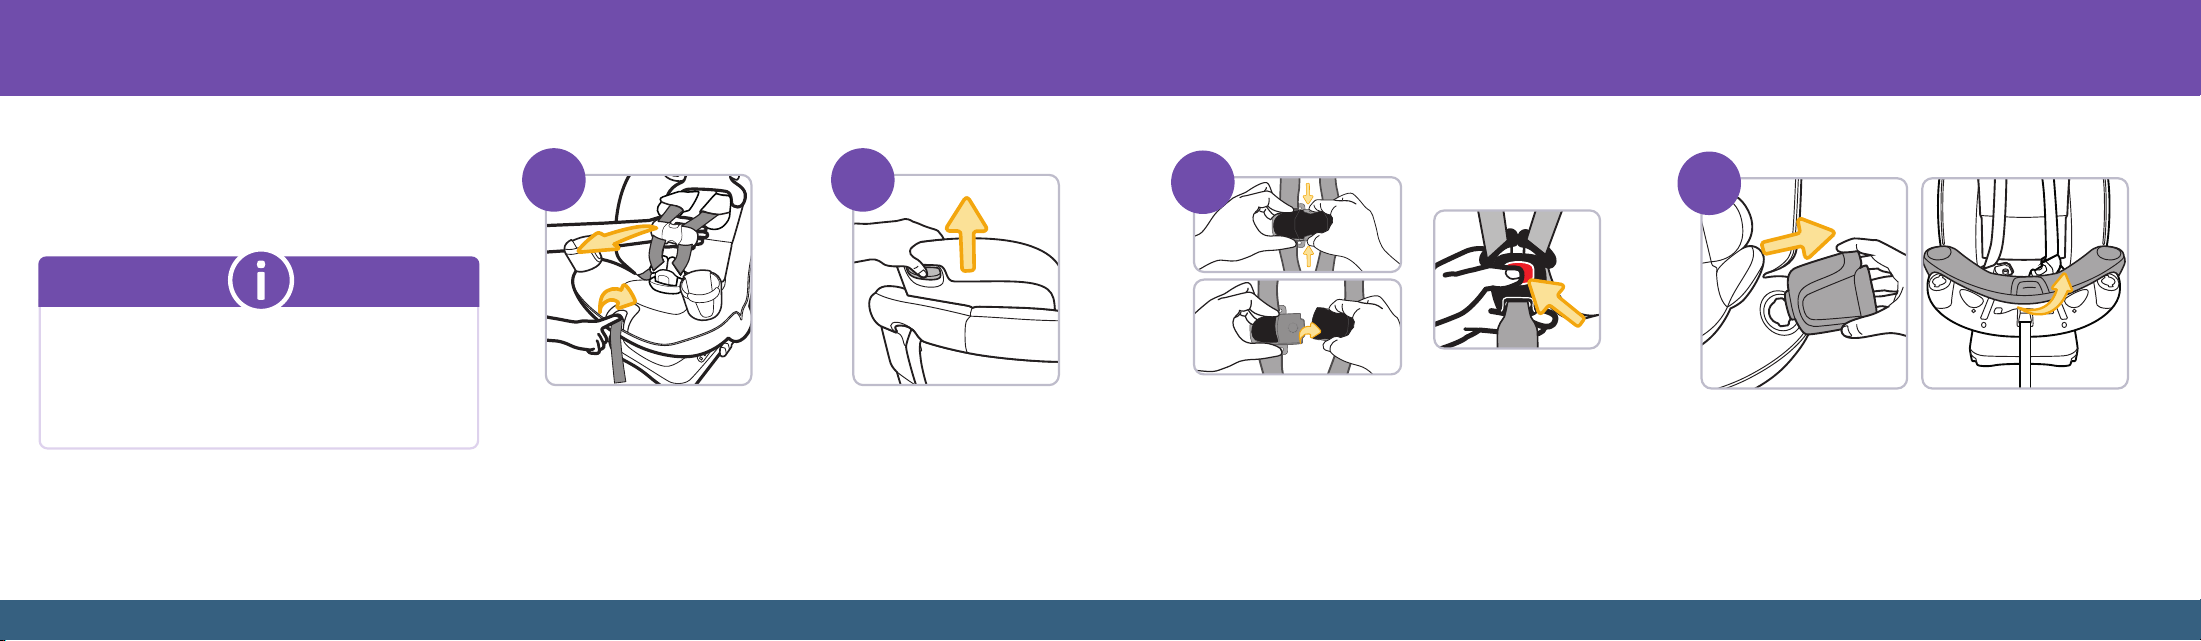
WARNING
DO NOT
use the harness system when using
as a booster seat.
Warning! Use only the vehicle’s lap and
shoulder belt system when restraining the
child in this booster seat.
DO NOT use only the lap
belt when using this seat as
a booster seat. The shoulder
belt MUST always be
adjusted snugly across the
child’s chest.
NEVER place shoulder belt under the child’s
arms or behind their back.
DO NOT use this booster seat if the top of
your child’s ears are above the top of the
booster seat’s headrest.
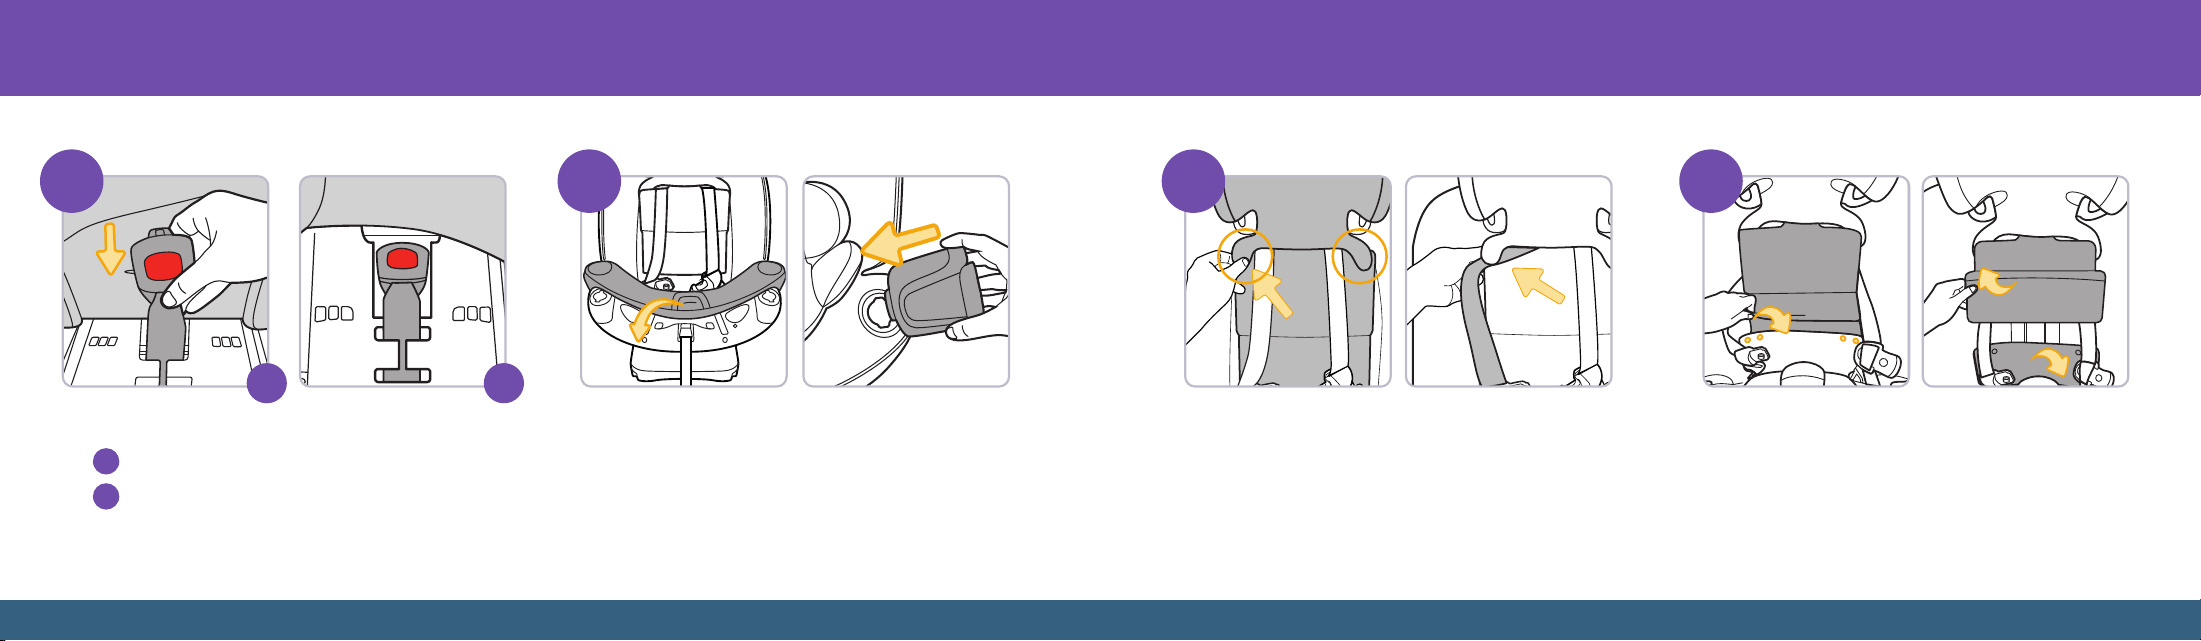
7372
You MUST remove the head and body pillows, harness
covers, and buckle cover before storing the harness
system for Booster Seat Mode. See page 8 to remove
these accessories.
Fully loosen the harness straps
Push down on the harness release
lever (through the opening in the
seat pad) while pulling the harness
straps away from the backrest.
2
1
Adjust the headrest to
the highest position
See page 16 for how to
adjust the headrest.
4
Remove the cup holders and lift up the seat pad
See page 12 for how to remove the cup holders.
1 in. (2.5 cm)
1
2
1 in. (2.5 cm)
1
2
1 in. (2.5 cm)
1
2
3
Unfasten the chest clip and unbuckle the harness
While holding both sides of the chest clip, press in on
the top and bottom buttons and pull the chest clip apart.
Press the red button to release the buckle tongues.
Storing the Harness System
continued on next page
7574
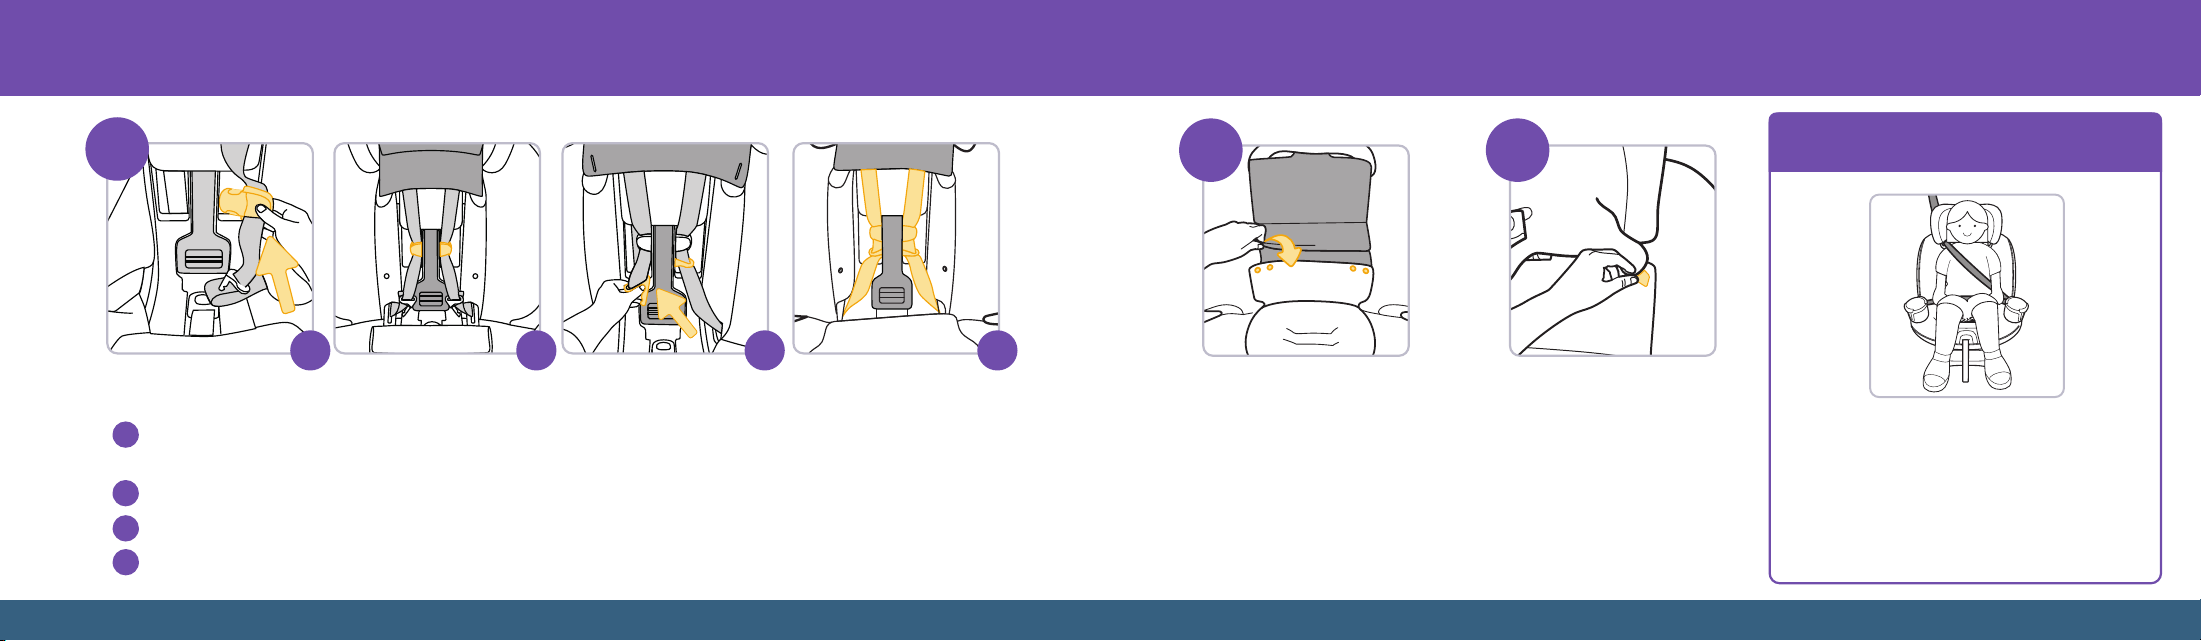
5 6
Store the buckle
Push the buckle down through the seat pad.
Place the buckle in the storage compartment.
Note: The buckle can be in either slot when storing it.
Pull the seat pad around the front of the seat
and install the cup holders
Make sure the seat pad is fully tucked around the front edge of
the seat (see page 92 for using the seat pad tool).
See page 12 for how to install the cup holders.
a
b
7 8
Undo the fasteners near the shoulder slots and
slide out the harness straps
Pull out the tab near the shoulder slot. Slide the harness strap out
and tuck it behind the headrest pad. Repeat on the other side.
Undo the bottom snaps on the seat pad
Undo the four snaps toward the bottom of the backrest
pad. Fold up the lower part of the headrest pad.
continued on next page
b
a
7776
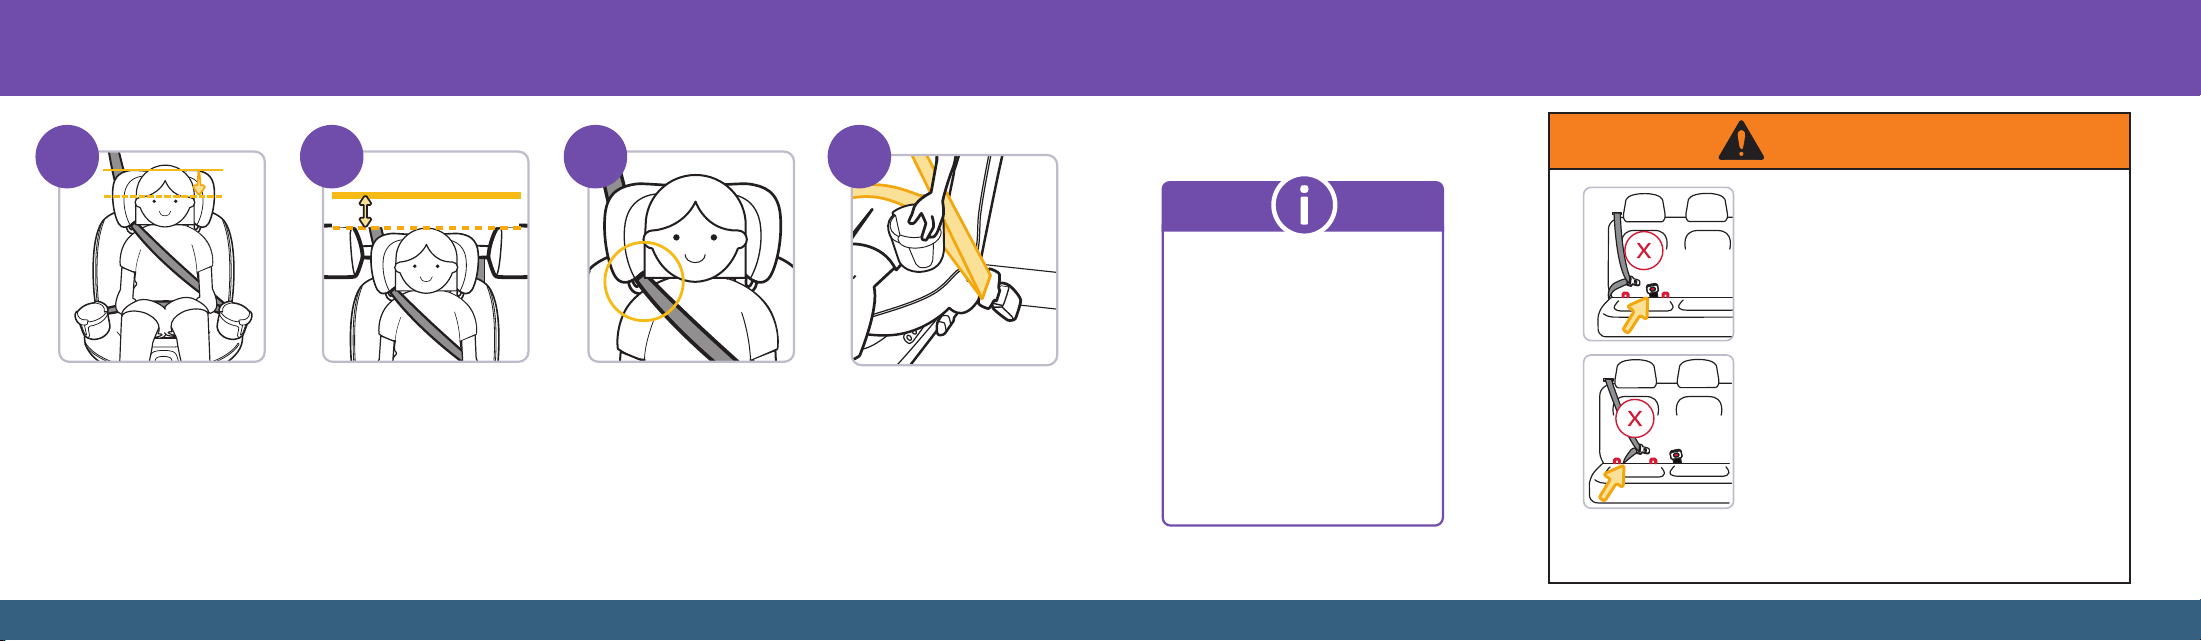
9
Store the harness straps, chest clip, and buckle tongues
Place half of the chest clip in the storage area next to the lockoff arm. Repeat with the other half of the chest clip
on the opposite side of the lockoff arm.
Reach behind the lockoff arm and buckle the chest clip.
Slide the buckle tongues up the harness strap and tuck them below the chest clip.
Make sure the harness straps and buckle tongues are tucked in the storage area with the chest clip buckled.
a c
b d
Unfold the headrest pad and snap
together the fasteners on the seat pad
Fold up the lower backrest part of the
seat pad. Unfold the bottom of the
headrest pad.
Snap together the four fasteners on the
lower backrest part of the seat pad.
1110
Redo the fasteners on the
headrest pad
Reinsert the tab into the slot on
the outer edge of the headrest
pad. Repeat on the other side.
FINISHED!
The car seat has been converted to
Booster Seat mode.
See Booster Seat Child Fit
Requirements on page 78
and Booster Seat Use in Vehicle
on page 79.
d
b
c
a
7978
4
8
4
8
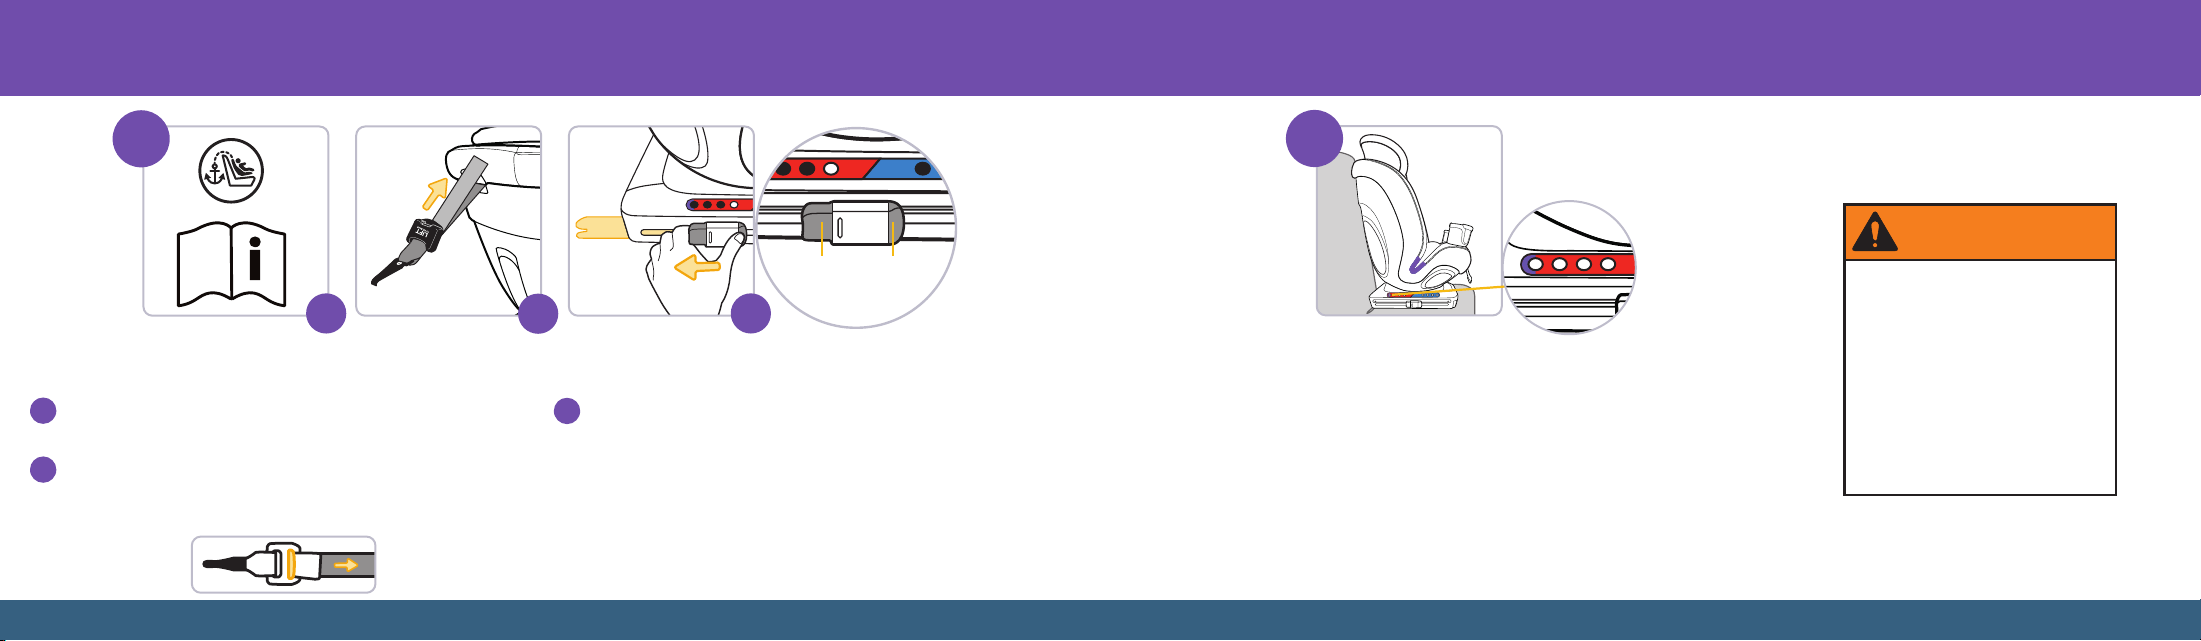
Booster Seat Child Fit Requirements
5 in. (12.7 cm)
5 in. (12.7 cm)
Check the head position
The top of your child’s
ears should NEVER be
above the top of the
booster seat’s headrest.
Adjust the headrest if
needed (see page 16).
5 in. (12.7 cm)
2 3 41
Check the vehicle position
DO NOT use the booster
seat if your child’s head is
less than 5 in. (12.7 cm)
below the roof of the vehicle.
Check the shoulder
belt position
The shoulder belt should lay snugly
across the center of your child’s
shoulder and across their chest. You
may need to adjust the headrest
(see page 16) for the shoulder belt
to be in the proper position.
Check the lap
belt position
The lap belt should lay
snugly across your
child’s hips, NOT ON
THEIR STOMACH.
DO NOT fasten multiple lower anchor connectors on the same lower anchor bar in
the vehicle.
WARNING
DO NOT use the LATCH system if the vehicle
belt or vehicle belt buckle is not easily accessible
with the car seat secured by anchors.
DO NOT fasten multiple lower anchor connectors on the same lower
anchor bar in the vehicle.
Before you begin:
• Review your vehicle owner's
manual to locate the LATCH:
lower anchor seating positions.
• Determine whether you will
be using both the rigid LATCH
connectors and the lap/shoulder
belt or only the lap/shoulder belt
when installing the car seat. See
LATCH: Lower Anchor Bars on
page 102.
Booster Seat Use in Vehicle
continued on next page
DO NOT use the LATCH system if the vehicle
belt or the vehicle belt buckle is between the
LATCH anchors.
8180
4
5
6
4
5
4
5
6
4
5
4
8
4
8
4
5
6
4
5
2
1
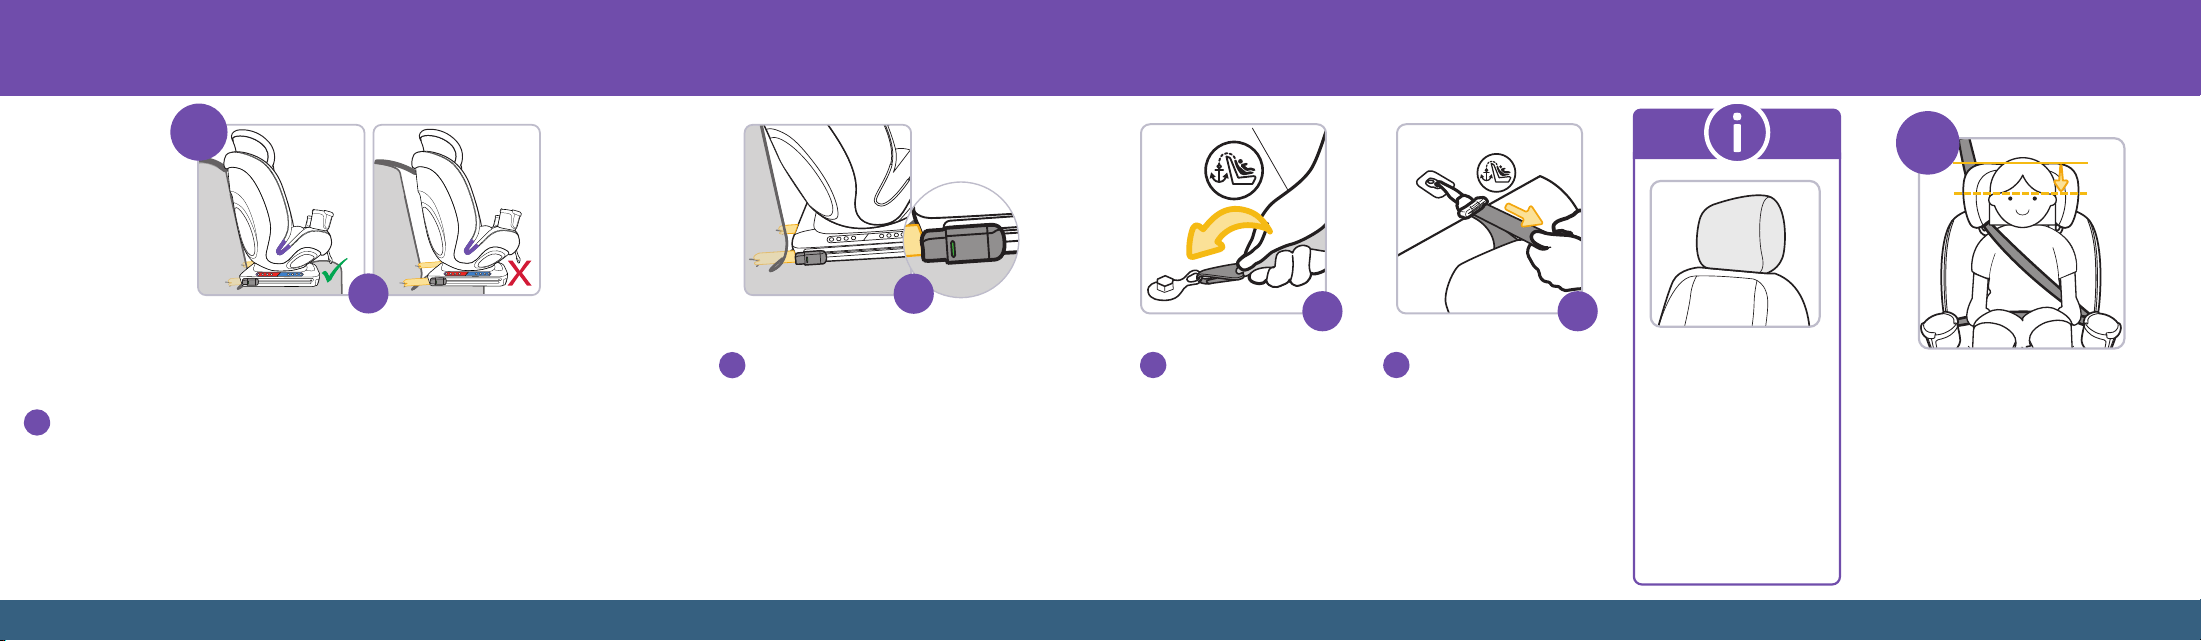
Put the car seat in recline position 8
DO NOT use positions 1–7; see page 20 for how to adjust the booster seat position.
If you are using rigid LATCH connectors: Skip to step 3.
If you are NOT using rigid LATCH connectors: Place the booster seat in the back
seat. The back of the booster seat should be flat against the vehicle seatback. The
vehicle seatback MUST be in the upright position, but you can adjust the angle
slightly to better match the angle of the booster seat. Refer to the vehicle owner’s
manual for how to adjust the vehicle seatback.
Skip to step 2 if you are not using rigid LATCH connectors.
Review your vehicle owner’s manual for the top tether locations
and how to route the tether strap if there are vehicle headrests.
Remove tether from storage location (see page 105) and loosen it.
Or, if your car seat has an adjuster with a button, then squeeze the
adjuster button and pull the strap to loosen it as shown below.
Push to tilt the release lock tab backwards and then push in the
release button on the other end to slide the release lock to the end
of the Booster side of the base until the connector is fully extended.
Repeat on the other side of the base.
4
8
4
8
ONLY use Booster recline
position 8 when using this
child restraint in Booster
mode. Failure to do this can
result in serious injury or
death. Serious injury can
include paralysis and/or
permanent brain injury.
WARNING
4
5
6
5
5
5
5
5
5
a
c
b
4
5
5
6
5
5
5
4
4
5
4
5
Release
Lock Tab
Release
Button
Remove the tether strap from storage and extend rigid LATCH connectors
continued on next page
b
c
a
8382
c
Skip to step 4 if you are not using rigid
LATCH connectors.
Place the booster seat on the vehicle seat
so that both connectors are aligned with
the lower anchors. Push both sides of the
car seat base EVENLY towards the vehicle
seatback. Continue to push it backwards until
both connectors are attached to the anchors
AND the car seat is touching the vehicle
seatback. If the rigid LATCH connectors are
fully retracted and the car seat is still not
touching the vehicle seatback, then adjust
the vehicle seatback so that it creates contact
with the car seat. If the vehicle seatback is
not adjustable, confirm that the connectors
are completely attached to the anchor
(see next step). The entire base should be
completely on the vehicle seat.
Attach the rigid LATCH connectors to the vehicle and then connect and tighten the tether
5
6
4
5
4
5
4
8
4
8
4
8
5
6
4
5
4
5
4
8
4
8
4
8
5
6
4
5
4
5
4
8
4
8
4
8
5
6
4
5
4
5
4
8
4
8
4
8
4
8
4
8
Have your child sit in the booster seat
The top of your child’s ears should
NEVER be above the top of the booster
seat’s headrest.
DO NOT use the booster seat if your
child’s head is less than 5 in. (12.7 cm)
below the roof of the car.
To adjust the headrest, see page 16.
4
4
8
4
8
If your vehicle has a
headrest that interferes
with a flush car seat
fit, refer to your vehicle
owner’s manual to
check whether it
can be removed or
adjusted, or if there are
other seating locations
to install the car seat.
continued on next page
5
6
4
5
4
5
4
8
4
8
4
8
3
a
c
d
5
6
4
5
4
5
4
8
4
8
4
8
Push firmly on the back
of the booster seat and
pull the free end of the
tether strap to tighten it
and remove all the slack.
Attach the tether hook
to the vehicle’s top
tether anchor. See
step 2b if you need to
lengthen the strap to
reach the anchor.
b
d
b
a
Verify the car seat is securely attached to
the lower anchors by checking the indicator
on both rigid LATCH connector release
locks to make sure no red is showing
AND pulling the booster seat away from
the vehicle seatback. If the booster seat is
not securely attached, repeat steps 1–3a.
If this still does not work, retract the rigid
LATCH connectors, store the tether, and
repeat step 2.
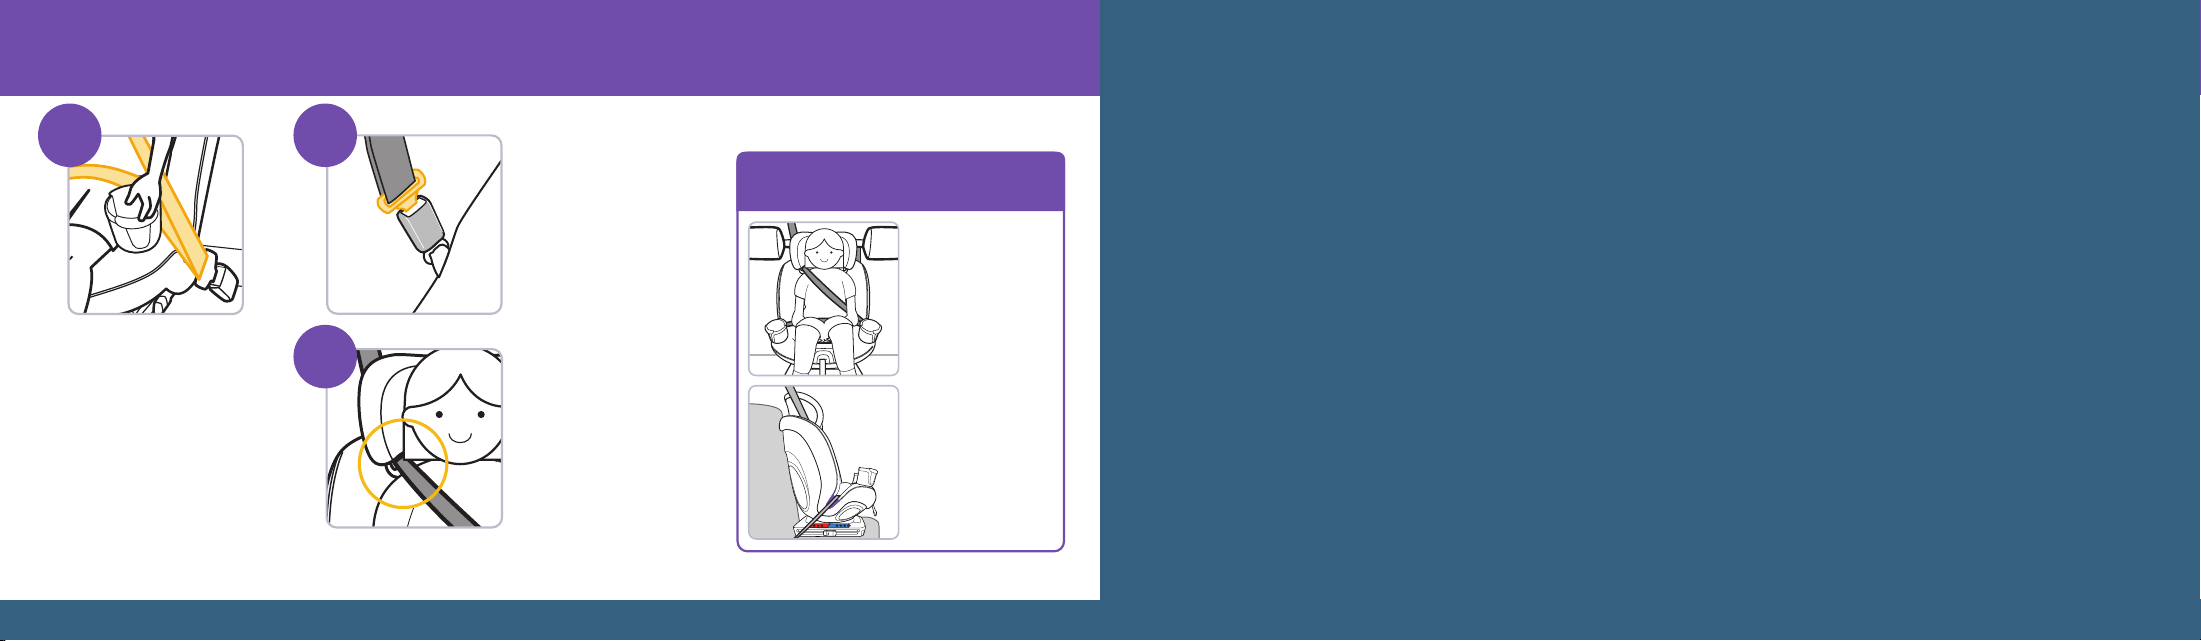
84
Position the shoulder
belt on your child
Thread the shoulder belt
through the belt-positioning
guide in the headrest.
Pull the shoulder belt up
to tighten it so that it lies
snugly across the center of your child’s shoulder and
across their chest, not on their face and neck.
4
8
4
8
4
8
4
8
4
8
4
8
7
FINISHED!
Check periodically
to make sure
your child has
not moved out
of position and
loosened the
shoulder belt.
Keep the booster
seat securely
belted and buckled
even when
unoccupied.
Wash and Care
Removing the Seat Pad Set ......................... 86
Cleaning the Seat Pad Set and
Parts of the Car Seat ...................................... 90
Installing the Seat Pad Set .......................... 91
4
8
4
8
6
Buckle the vehicle belt
Pull the shoulder belt up
to tighten it. Consult your
vehicle owner’s manual for
proper seat belt usage.
4
8
4
8
5
Position the lap belt
on your child
Route the lap belt portion of the
vehicle belt through the Booster
Seat Belt Path as shown.
The lap belt should lay snugly
across your child’s hips, not on
their stomach.
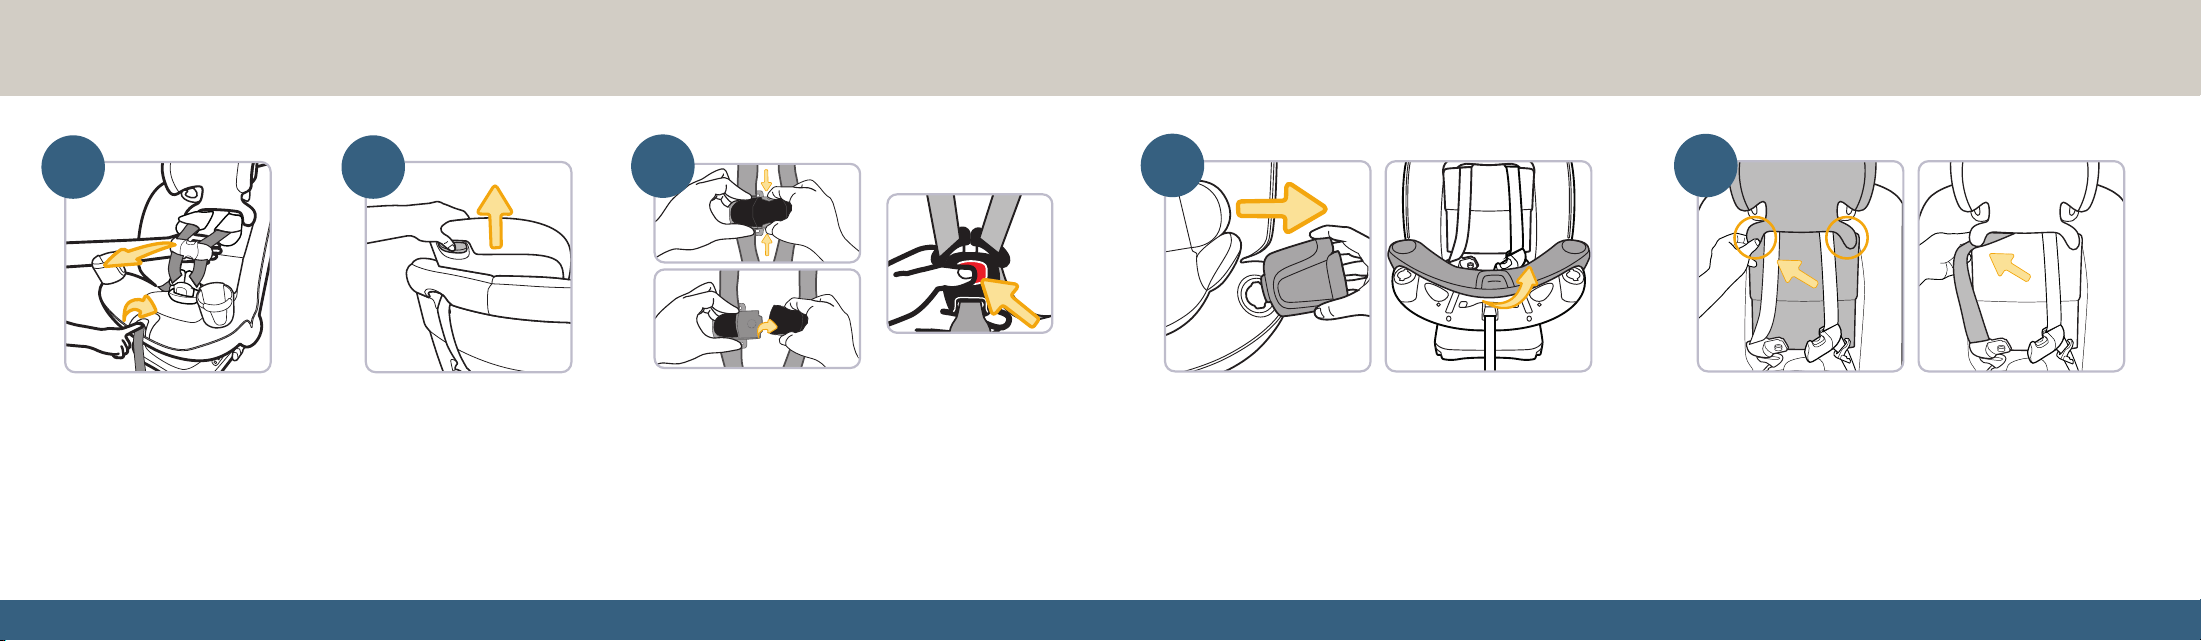
8786
8
8
8
8
8
8
8
8
Fully loosen the harness straps
Push down on the harness release
lever (through the opening in the
seat pad) while pulling the harness
straps away from the backrest.
4
5
6
5
5
5
5
5
5
2
1
Adjust the headrest to
the highest position
See page 16 for how to adjust
the headrest.
3
Unfasten the chest clip and unbuckle the harness
While holding both sides of the chest clip, press in on
the top and bottom buttons and pull the chest clip apart.
Press the red button to release the buckle tongues.
continued on next page
Removing the Seat Pad Set
8
8
8
8
8
8
8
8
4
Remove the cup holders and lift up the seat pad
See page 12 for how to remove the cup holders.
Note: Remove the head and body pillows and harness
covers if installed (see page 8).
5
Undo the fasteners near the shoulder slots and
slide out the harness straps
Pull out the tab near the shoulder slot. Slide the harness
strap out from the headrest pad. Repeat on the other side.
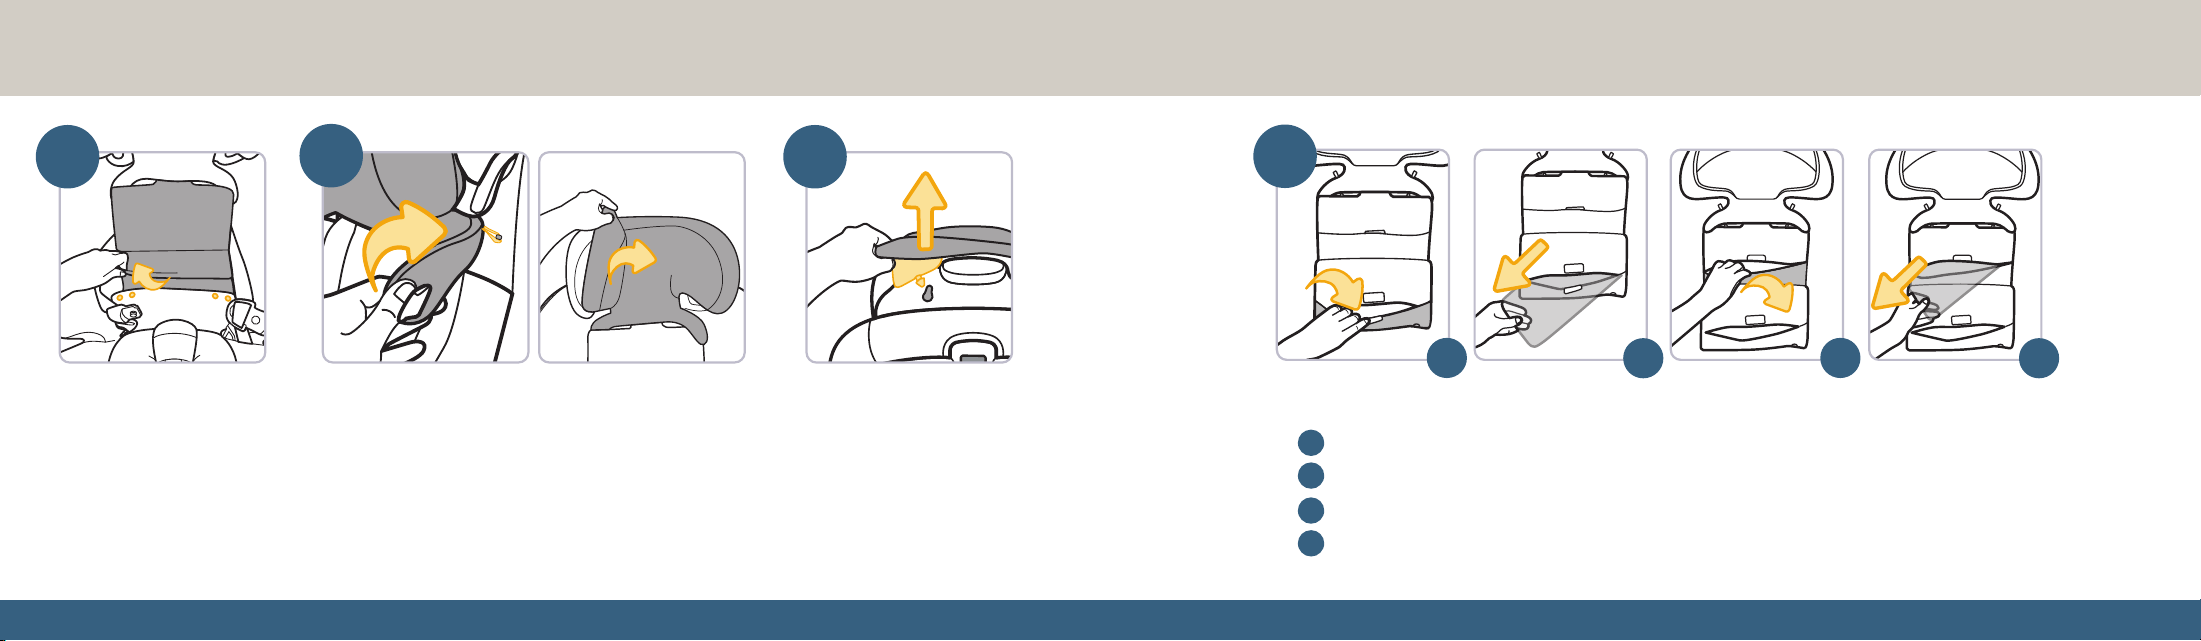
8988
8
8
Unfasten the elastic straps and
begin to remove the headrest pad
Remove the elastic strap on the tab just below the
belt-positioning guide. Repeat with the elastic strap
on the other side and then begin to gently pull the
headrest pad off the headrest.
8
8
7
8
8
6
Undo the bottom snaps
on the seat pad
Undo the four snaps toward
the bottom of the backrest
pad. Fold up the lower part
of the backrest pad.
8
Undo the pegs on the
back of the headrest
Press down on the peg on the back
of the headrest to slide it out of the
slot underneath the headrest pad.
Repeat with the other peg on the
back of the headrest and then lift
off the headrest pad.
continued on next page
On the back of the headrest pad, undo the hook-and-loop fastening strip on the bottom panel.
Remove the plastic insert from the bottom panel.
Undo the hook-and-loop fastening strip on the top panel.
Remove the plastic insert from the top panel.
8
8
8
8
8
8
8
8
9
a
c
b d
d
b
c
a
Remove both inserts from the headrest pad
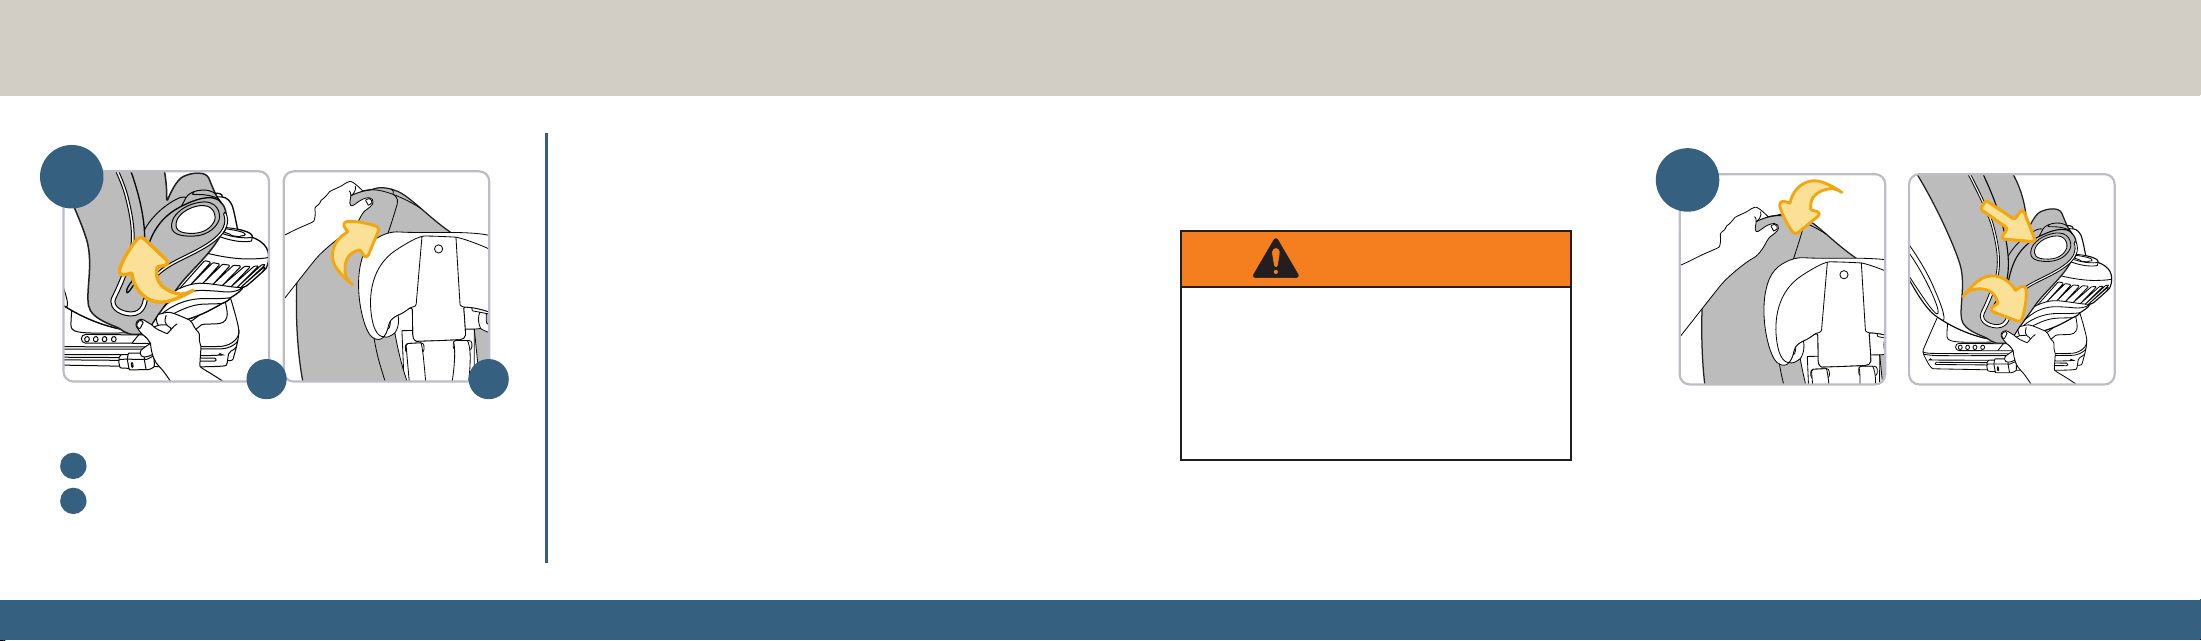
9190
8
8
8
8
10
Gently pull the seat pad off both sides of the car seat.
Gently pull the seat pad around the headrest and
off the car seat.
To clean the seat pad set, head and body
pillows, and buckle cover:
Machine wash separately with cold water on gentle cycle.
DO NOT use bleach. Tumble dry separately for 10–12
minutes on low heat. Remove immediately.
To clean the harness straps:
Check the harness straps often for wear or damage. Spot
clean using warm sudsy water and a damp cloth. Spilled
food and liquids on the car seat may result in mold or
bacterial growth over time. These spills could also attract
insects or rodents.
To clean the harness covers, buckle, and the car seat:
Spot clean using warm sudsy water and a damp cloth.
DO NOT submerge into water.
The cup holders are dishwasher-safe.
Cleaning the Seat Pad Set and
Parts of the Car Seat
a
b
Installing the Seat Pad Set
8
8
8
8
DO NOT use the child restraint without the
seat pad or with damaged harness straps.
Failure to do this can result in serious
injury or death. Serious injury can include
paralysis and/or permanent brain injury.
WARNING
Pull the seat pad over the top and sides of the car seat
DO NOT pull the seat pad around the front of the seat yet.
1
continued on next page
b
a
Remove the seat pad from the car seat
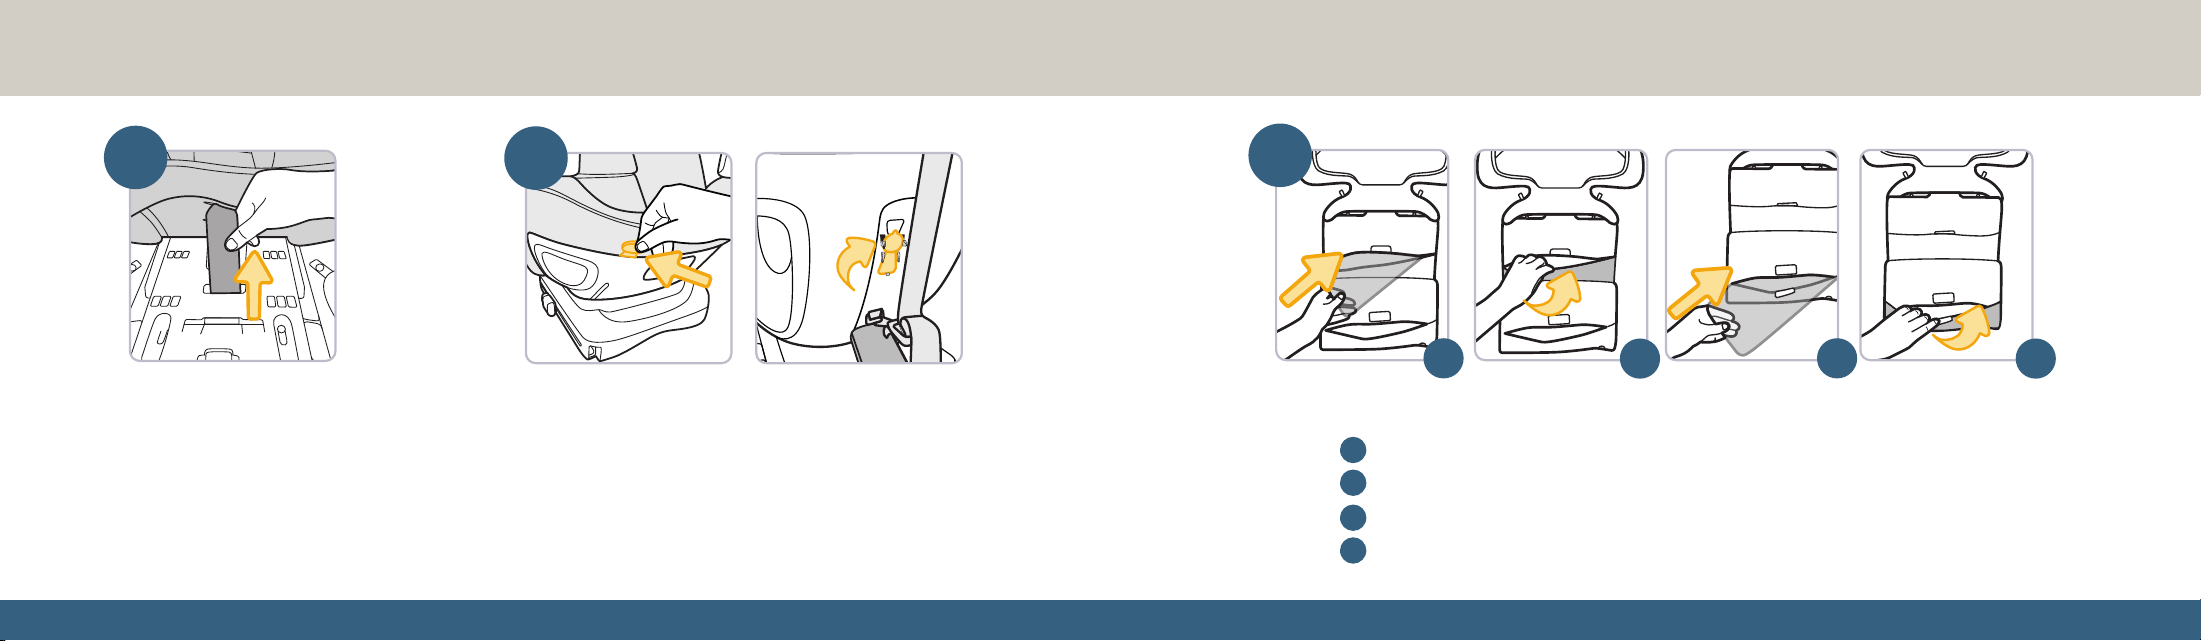
9392
8
8
8
8
8
8
8
8
8
8
8
8
8
8
Tuck the seat pad around the car seat
Use the seat pad tool to help tuck the pad completely into all edges of the
car seat. Hold the tool at the circle and push the seat pad fabric down into
the edges with the other end of the tool.
To access the seat pad tool: Open the tether storage door on the back of
the car seat and lift the seat pad tool out from the clips holding it in place.
Pull the buckle through the seat pad
and then pull the seat pad around
the front of the car seat
Pull the buckle through the same slot
in the seat pad as used for the buckle.
3
2
continued on next page
4
Place the larger of the two inserts into the top panel closest to the shoulder slots.
Reattach the hook-and-loop fastening strip on the top panel.
Place the smaller of the two inserts into the bottom panel.
Reattach the hook-and-loop fastening strip on the bottom panel.
a
c
b d
d
b
c
a
Place both inserts into the headrest pad panels
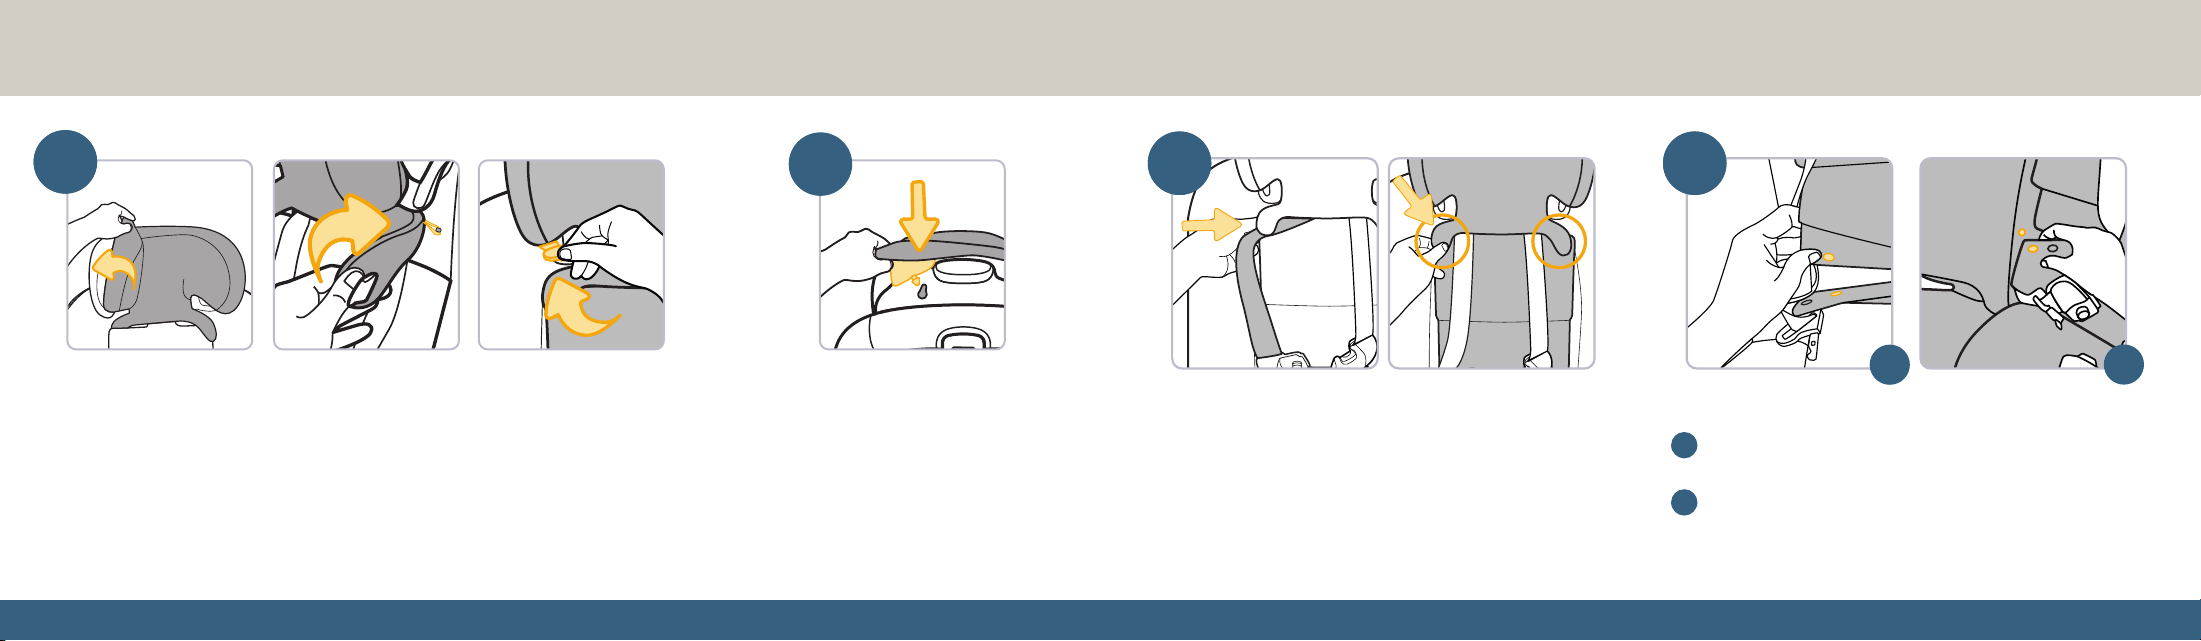
9594
continued on next page
8
8
8
8
8
8
8
8
Reposition the harness straps
and redo the fasteners
Slide the harness straps in the headrest pad as shown.
Reinsert the tabs into the slots on the outer edges of the
headrest pad.
Redo the four snaps at the bottom of the backrest pad
Snap together the two inner fasteners on the bottom panel
of the headrest to the seat pad. Repeat on the other side.
Snap together the two outer fasteners to the sides of the
seat pad. Repeat on the other side.
3 37 8
a
b
8
8
8
8
Pull the headrest pad over the headrest
and fasten the elastic straps
Pull the headrest pad onto the headrest. Fasten the elastic strap onto the tab just
below the belt-positioning guide. Repeat with the elastic strap on the other side of
the headrest. Use the seat pad tool to tuck the sides and bottom of the headrest pad
around the edges of the headrest just above the belt-positioning guides.
35
Secure the pegs on the
back of the headrest
Slide both pegs on the underside of the
headrest pad into the slots on the back of
the headrest. Press down on both pegs to
fasten. Use the seat pad tool to tuck the
headrest pad completely around the front
edges and the booster belt path.
6
b
a
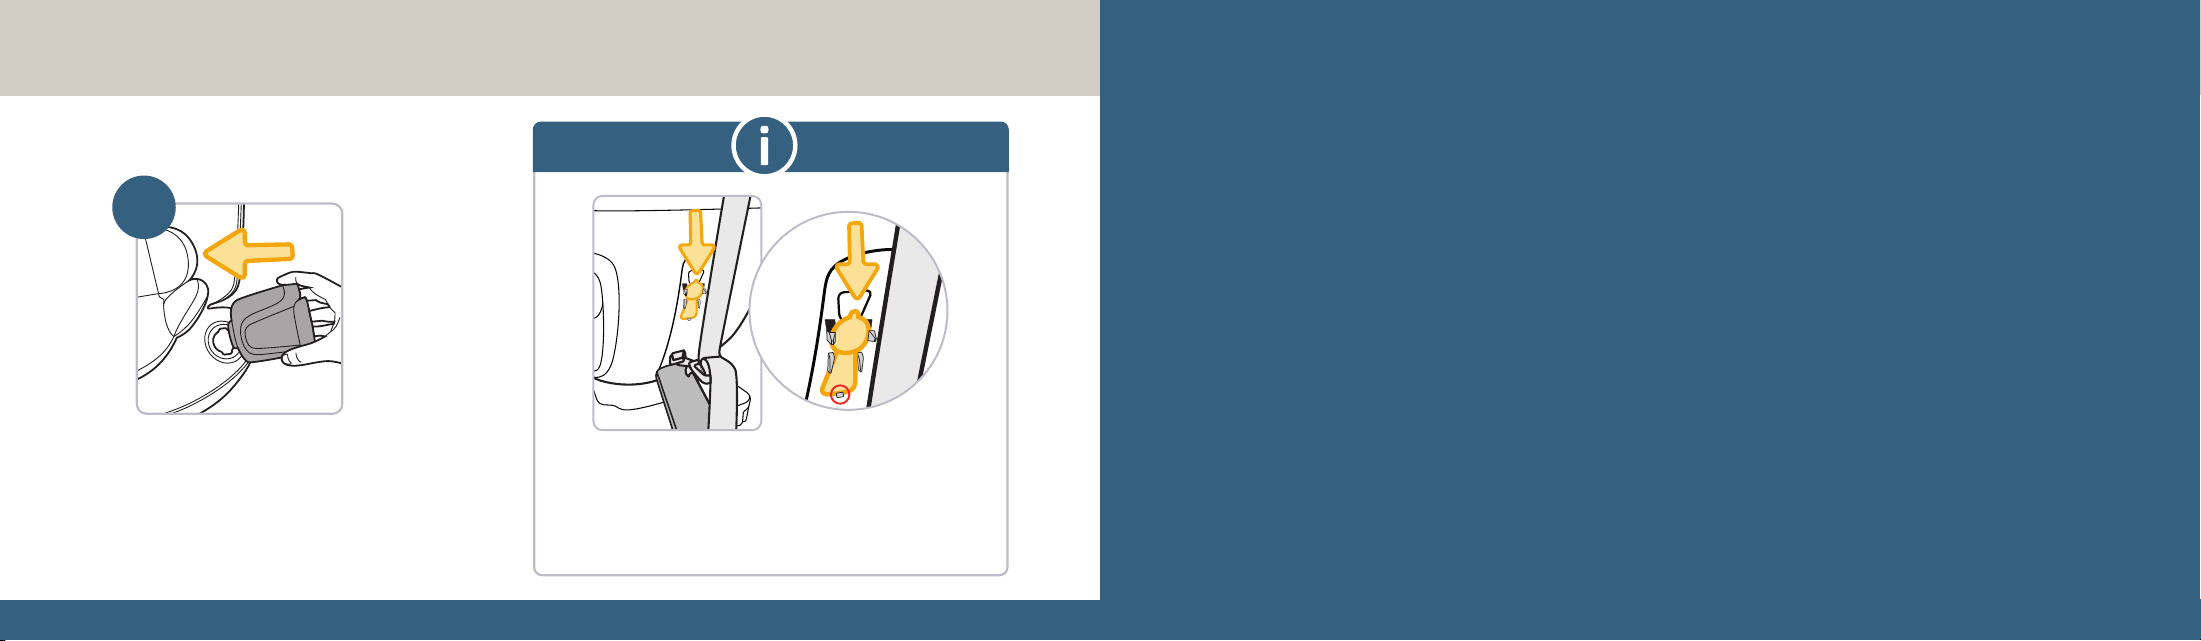
9796
8
8
Install the cup holders
See page 12 for how to
install the cup holders.
9
Vehicle Belt, LATCH, and
Tether Information
Vehicle Belts ..................................................... 98
LATCH: Lower Anchor Bars ......................102
Tether Strap ..................................................... 104
To store the seat pad tool when not in use, open
the tether storage door and slide the tool from the top
down in between the clips. Make sure the bottom edge
of the tool is secured behind the bottom clip to prevent
the tool from falling out.
8
8
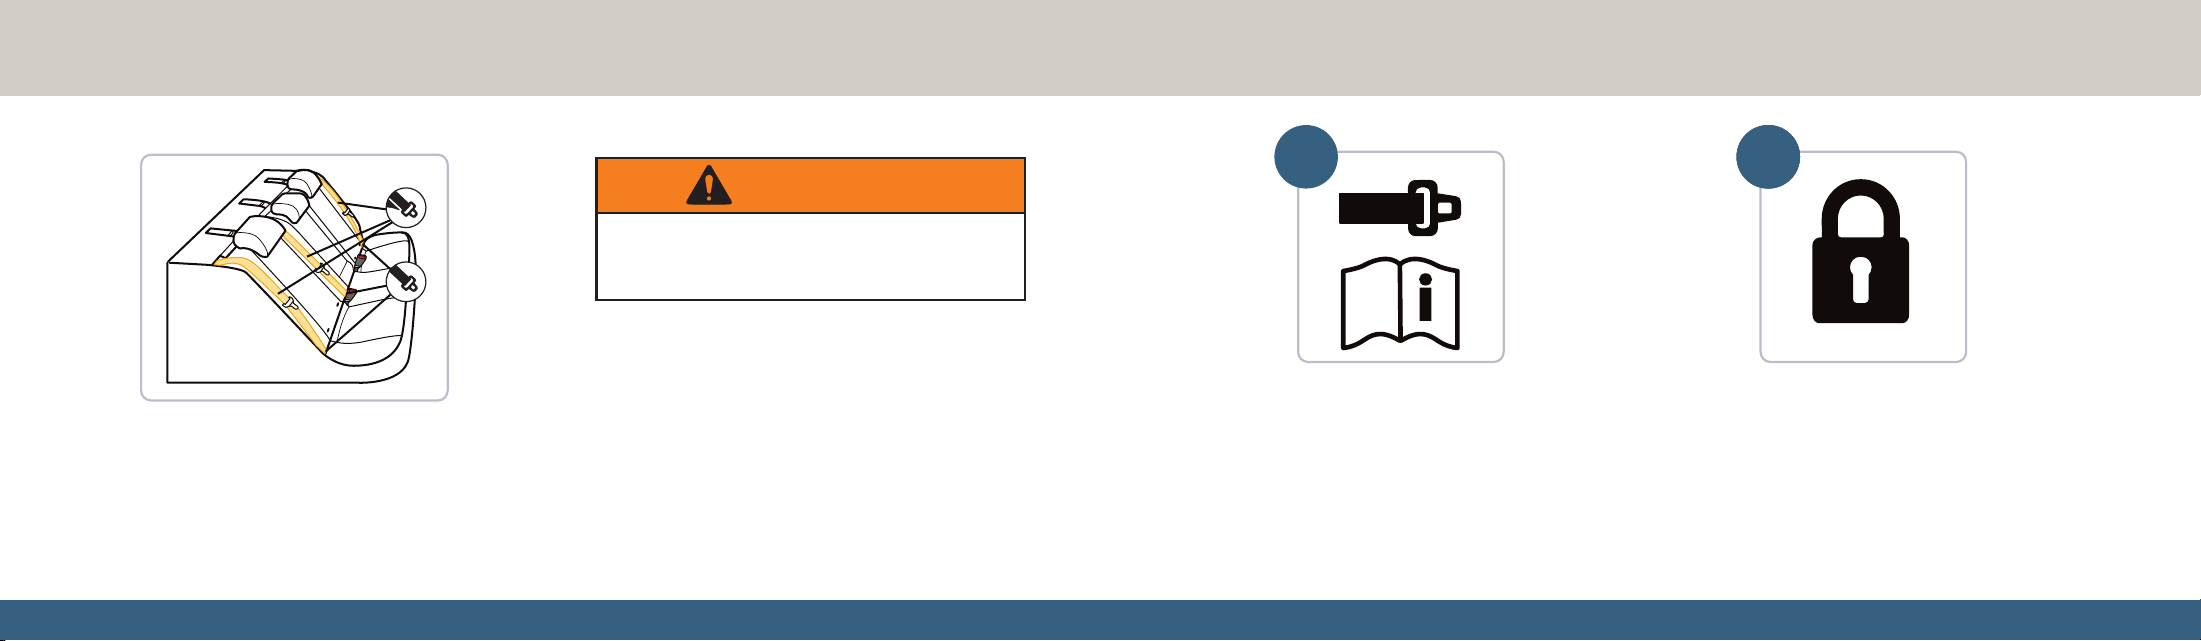
9998
Your vehicle’s features may be considerably
different than those pictured here.
If LATCH: lower anchors are not an option or if your child weighs
more than 35 lb (15.9 kg) in Rear-Facing mode or 40 lb (18 kg)
in Forward-Facing mode, you MUST use the vehicle seat belt
system to install the car seat.
Not all vehicle belts and seating positions will work with car
seats. Follow the steps in this section to learn how to lock a
car seat in Rear-Facing mode or Forward-Facing mode with
a vehicle belt.
WARNING
continued on next page
Vehicle Belts
Check how this car seat can be locked into
place with the vehicle belt
The vehicle belt MUST NOT loosen after tightening
it. This requires locking it by using either:
• The vehicle belt’s retractor (see step 3) OR
• The vehicle belt’s latch plate (see step 4)
You MUST review your
vehicle owner’s manual
Review your vehicle owner’s
manual to determine the type of
vehicle belts in your car and the
seating positions available for
installing a car seat.
1
2
22
DO NOT use both the rigid LATCH connectors
and vehicle belt at the same time in Rear-Facing
or Forward-Facing mode.
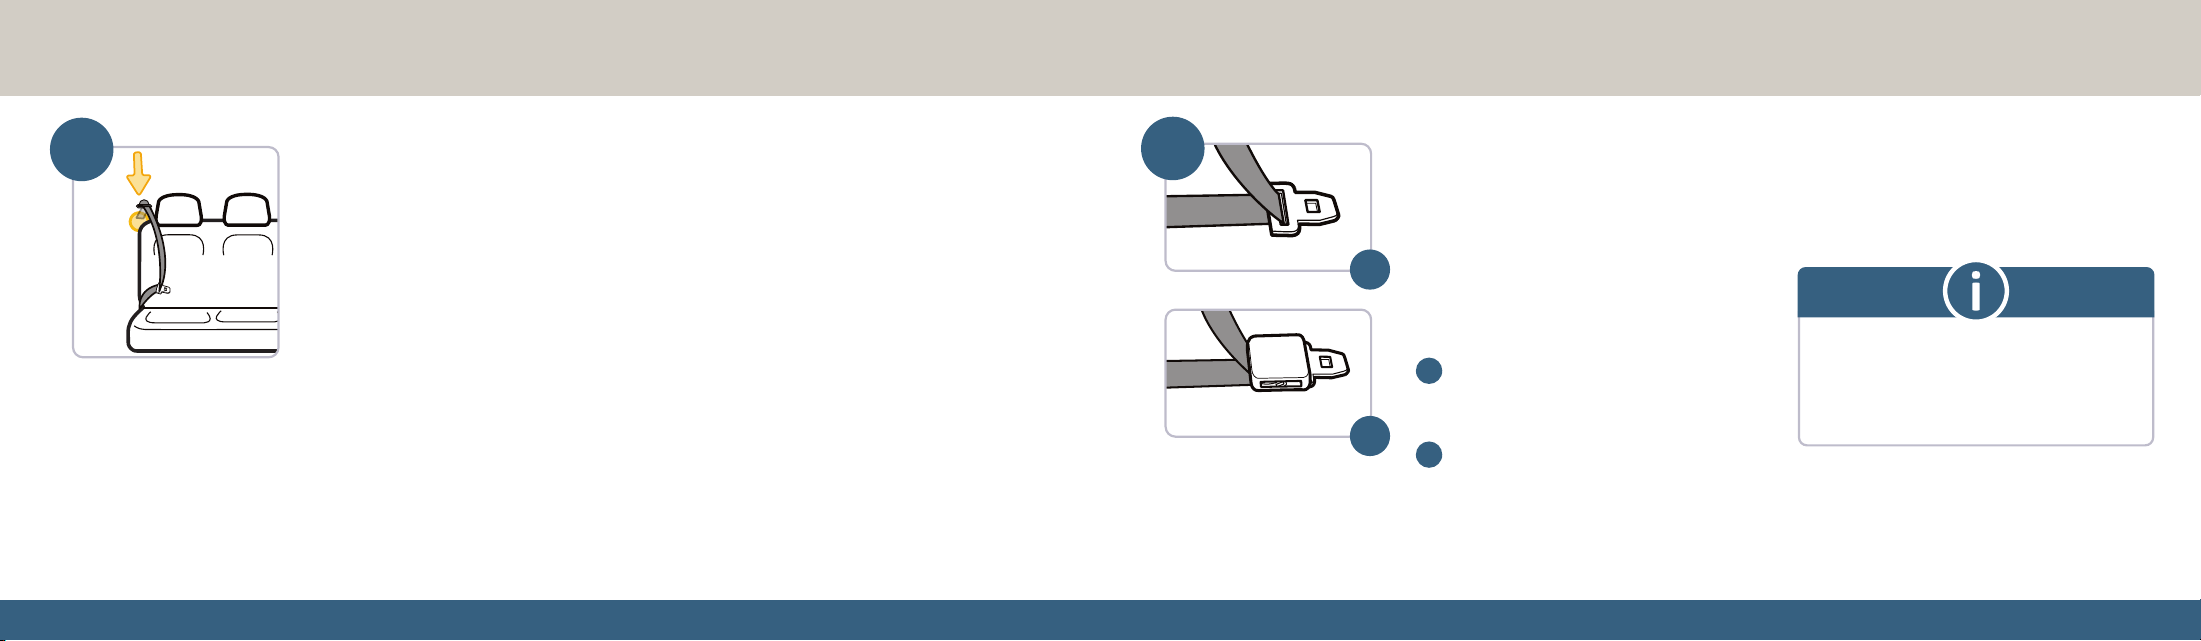
101100
Check the latch plates on your vehicle belts
Latch plates are the part of the vehicle belt that
goes into the buckle.
To check if the latch plate locks:
1. Buckle the vehicle belt.
2. Slowly pull up on the lap portion of the
vehicle belt.
If the vehicle belt does not slide through
the latch plate, it’s locked. You can use
the locking latch plate with this car seat.
If the vehicle belt slides through the
latch plate, it is a sliding latch plate.
Sliding latch plates easily slip between
the lap and shoulder portions of the belt.
Retractors pull vehicle belts into stored positions
and lock the belt to hold passengers in place.
The following retractors will work with this
car seat:
• Switchable retractor (most vehicles have
this type). This retractor can be manually
switched to a locking mode. Your retractor
MUST be in this locking mode to use the
vehicle belt with this car seat.
To switch to locking mode:
1. Slowly pull the shoulder belt all the way out
and then let it go back into the retractor
1–2 in. (2.5–5 cm).
2. As it retracts, you will likely hear a
ratcheting sound.
3. Gently pull the belt to see if it has locked.
You will not be able to pull any more of the
belt out once the lock has engaged.
• Automatic locking retractor. This retractor
always locks. It will automatically lock after
slowly pulling the shoulder belt out at least
halfway and letting it go back into the retractor
1–2 in. (2.5–5 cm).
Emergency locking retractor
If the retractor does not lock, it is likely an
emergency locking retractor. This retractor only
locks during a sudden stop or collision.
Continue to step 4 to determine if your vehicle
belt’s latch plate can lock the belt.
3
Check the retractor on your vehicle belts
4
NEVER use the following with this car seat:
• Emergency locking retractor lap-only belt
• Inflatable seat belts
a
b
Locking Latch Plate
Sliding Latch Plate
b
a
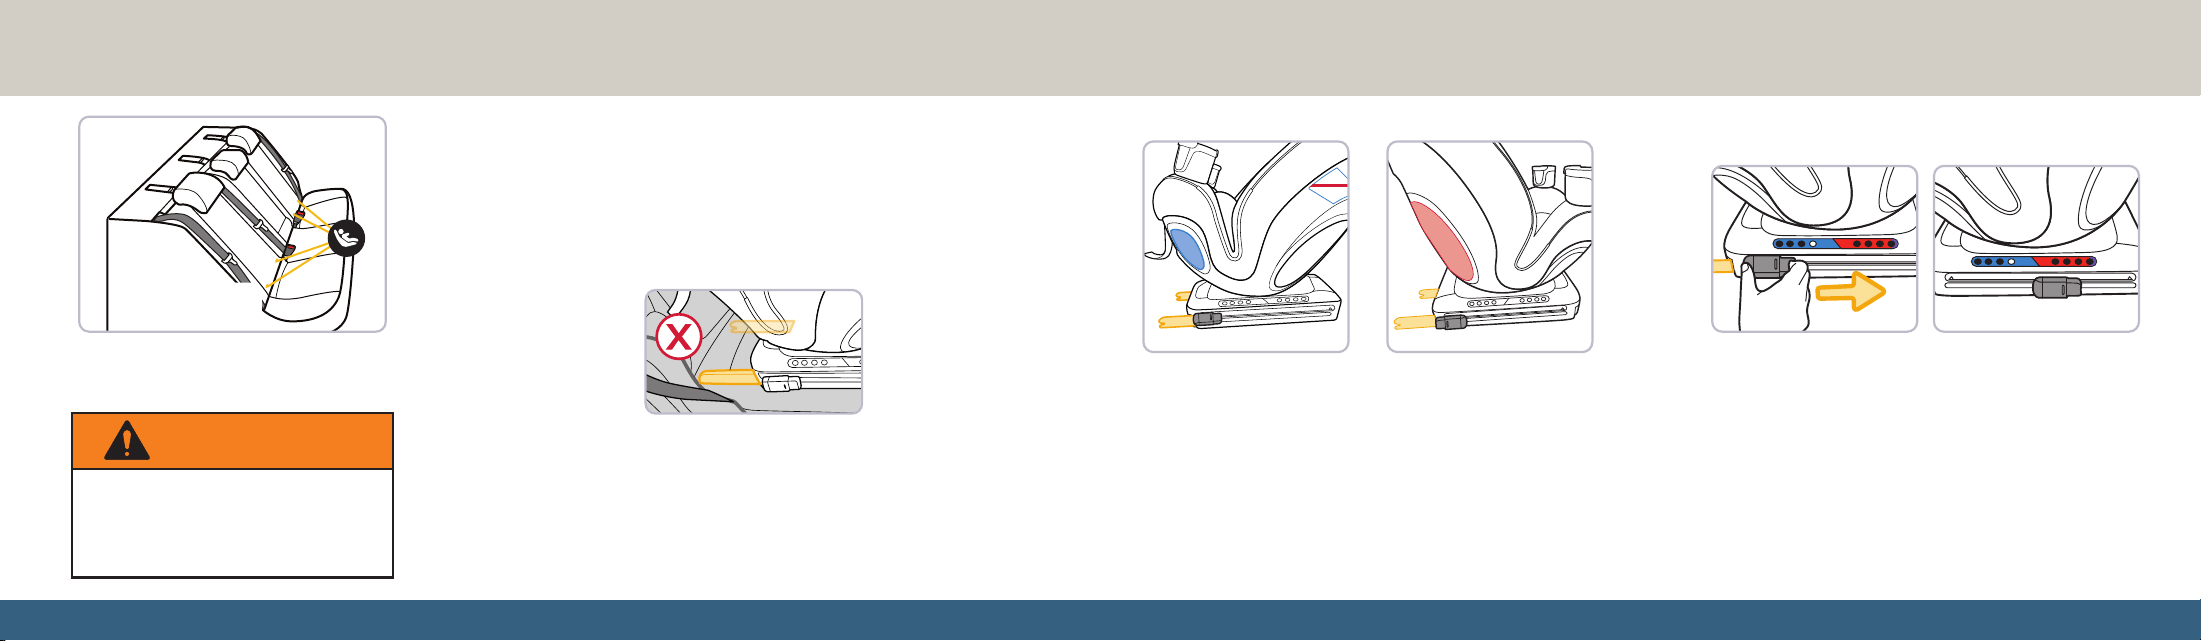
103102
If LATCH: lower anchors are not an option or if your child weighs more than
35 lb (15.9 kg) in Rear-Facing mode or 40 lb (18 kg) in Forward-Facing
mode, you MUST use the vehicle seat belt system to install the car seat.
Not all vehicle belts and seating positions will work with car seats.
Follow the steps in this section to learn how to lock a car seat in
Rear-Facing mode or Forward-Facing mode with a vehicle belt.
DO NOT use both the rigid LATCH
connectors and vehicle belt at the
same time in Rear-Facing or
Forward-Facing mode.
WARNING
5
4
4
4
4
4
4
The lower anchors of LATCH (Lower Anchors and Tethers for CHildren) is
a universal system for installing car seats without using vehicle seat belts.
The rigid LATCH connectors can ONLY be used in vehicles that have the
lower anchor bars installed in designated seating positions. Most vehicles
manufactured after September 2002 are equipped with LATCH: lower anchor
bars. Check your vehicle owner’s manual to see which seating positions may
be equipped with LATCH: lower anchor bars.
5
4
4
4
4
4
4
LATCH: Lower Anchor Bars
5
4
4
4
4
4
4
5
4
4
4
4
4
4
5
4
4
4
4
4
4
5
4
4
4
4
4
4
To install the car seat with rigid LATCH connectors:
• In Rear-Facing mode, see page 28.
• In Forward-Facing mode, see page 57.
In Booster mode, you have the option to install the car
seat with rigid LATCH connectors and the tether strap.
See page 79.
To remove rigid LATCH connectors
from the vehicle anchors:
Push to tilt the release lock tab backwards and then push in the
release button on the other end to slide the release lock to the
middle of the base until the connector is fully retracted. Make
sure the connector does not extend out the opposite side of the
base. Repeat on the other side of the car seat base.
Your vehicle’s features may be considerably
different than those pictured here.
LATCH: Lower
Anchor Bars
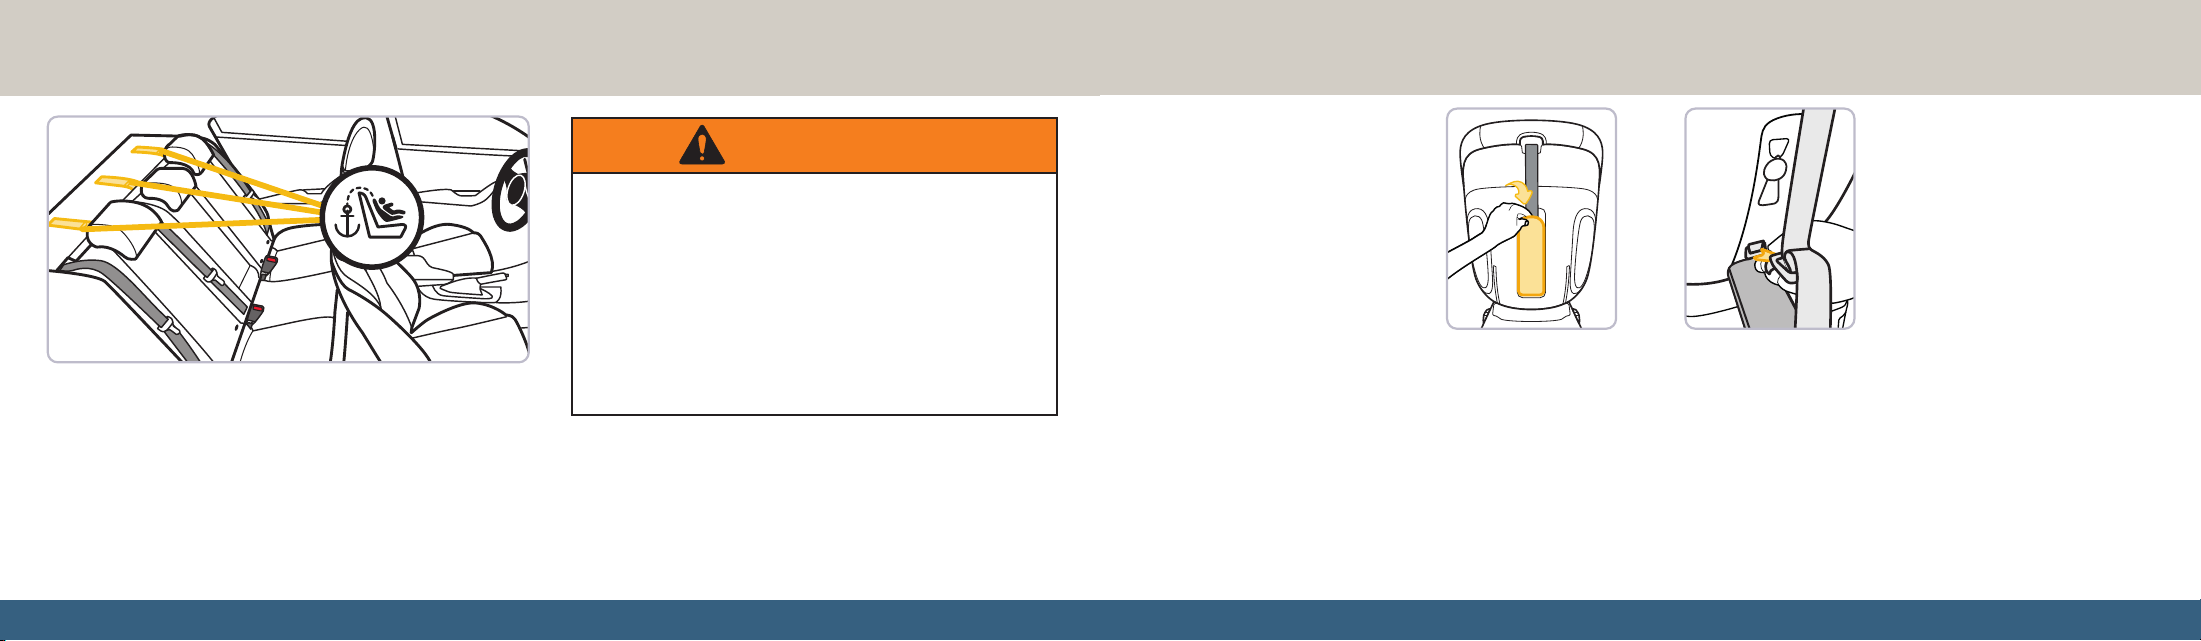
105104
Your vehicle’s features may be considerably different than
those pictured here.
When anchors are available, you MUST ALWAYS attach, adjust,
and secure the tether (top anchorage) strap when installing the car
seat in Forward-Facing mode with the internal harness or when
installing the car seat with rigid LATCH connectors in Booster
mode. Tethers improve the installation and stability of car seats
and reduce the risk of injury. Attach the tether hook to the tether
anchor designated by your vehicle manufacturer for that seating
position. Check your vehicle owner’s manual for more information.
If the seating position does not have a tether anchor, use a different
seating position or see your dealer or a qualified mechanic to have
one installed.
Using this child restraint without the tether strap
anchored as required by the manufacturer would
be a misuse of the child restraint and, in a sudden
stop or crash, could result in serious injury or
death. Serious injury can include paralysis and/or
permanent brain injury.
DO NOT fasten multiple tether hooks on the same
tether anchor in the vehicle.
WARNING
6
Tether Strap
6
6
The tether strap MUST be properly stored in its storage
location when:
• Installing the car seat in Rear-Facing mode; OR
• If you are not using rigid LATCH connectors to install the
car seat in Booster mode; OR
• The car seat is not installed in a vehicle.
Pull down the door on the back of the seat to store the tether
strap. Squeeze the spring lever on the tether hook to open it
and attach it to the storage bar behind the door. Use the tether
strap adjuster to gently tighten the tether strap to remove any
slack. Fold the strap up, tuck it into the compartment, and
close the door.
To remove it for use, open the door and then squeeze the
spring lever on the hook and detach it from the storage tether
hook. Use the tether strap adjuster to slightly loosen the tether
strap to add slack and allow you to detach it from the hook.
Storing the tether strap

107106
Safety Information
Child Restraint Use ....................................... 107
Vehicle Seating Position .............................108
Installation in Vehicle ...................................109
Replacement and Expiration .....................110
Registration and Safety Notices ..............111
Aircraft Information ....................................... 113
Warranty ..........................................................114
Replacement Parts .......................................115
Child Restraint Use
WARNING
NEVER take your child out of the child restraint
while the vehicle is moving.
NEVER leave your child unattended.
Placing your child in a hot child restraint may
result in burns.
DO NOT use a child restraint with damaged or
missing parts.
DO NOT use a child restraint with cut, frayed, or
damaged harnesses.
DO NOT substitute parts or try to modify the child
restraint in any way. DO NOT lubricate buckles
and fasteners.
DO NOT use any child restraint accessory except
those approved by Dorel Juvenile Group.
NEVER allow any child to play with this child
restraint; it is not a toy.
DO NOT remove or cover up any of the warning
labels or other labels on the child restraint.
This child restraint has been certified for use in
passenger vehicles. DO NOT use in a boat, on a
motorcycle, or in a cargo van or bus where there
are no seat belts or tether anchors.
Read all instructions for additional warnings.
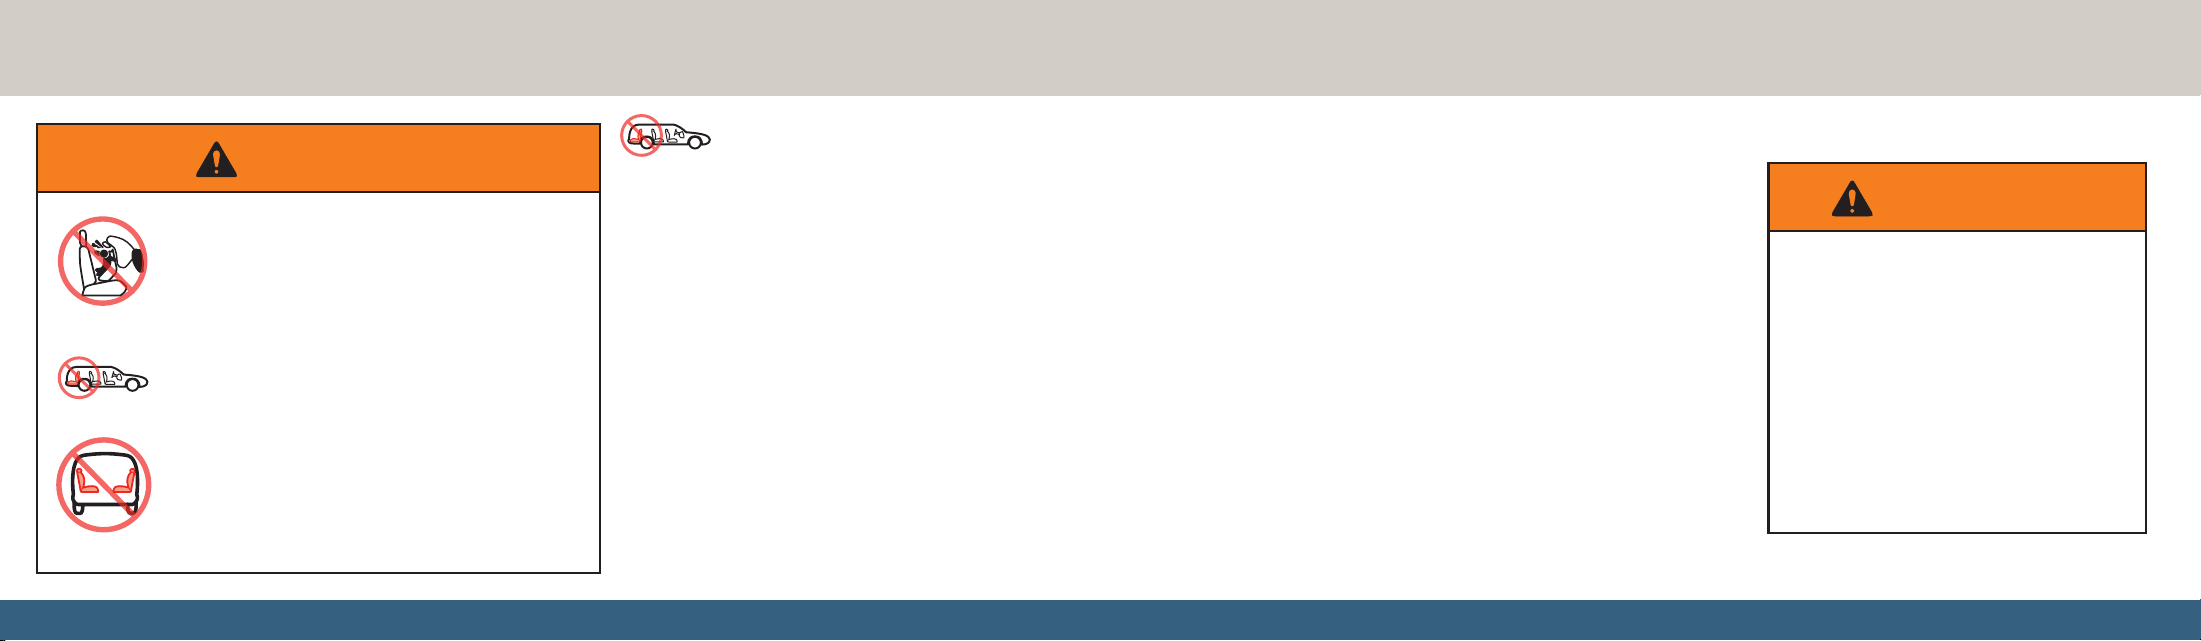
109108
WARNING
According to accident statistics,
children are safer when properly
restrained in the rear seating positions than in
the front seating positions.
Rear seating positions are statistically safer,
whether you have air bags, advanced air bags,
or no air bags at all.
If you are not sure where to place the car seat
in your vehicle:
• Consult your vehicle owner’s manual; OR
• Contact Dorel Juvenile Group Consumer Care
Department; OR
• Visit your local Child Passenger Inspection
Station. Go to www.nhtsa.gov/vehicle-safety/
car-seats-and-booster-seats to find your
closest station.
Vehicle Seating Position
Installation in Vehicle
NEVER place a child rear-facing in a seating position
with an active frontal air bag.
Check the vehicle owner’s manual for more
information about air bag/child restraint use.
Use the child restraint only on vehicle seats that
face forward.
DO NOT use on seats that face the sides or rear of
the vehicle.
For vehicles without a back seat, refer to your vehicle
owner’s manual.
WARNING
Check the vehicle belt or rigid LATCH
before each use. Use only if the belt can
be tightened properly and locked securely
in place.
Even when unoccupied, this child restraint
MUST be firmly secured to the vehicle with
the rigid LATCH connectors or with the
vehicle seat belt.
In a crash or sudden stop, an unsecured
child restraint could injure occupants.
To avoid your child being seriously burned, take the following
precautions:
• Park in the shade or where the sun does not directly hit the car seat.
• Cover the car seat with a sheet or blanket when not in use.
• Check for hot seat and buckles before placing child incar seat.
To help protect your vehicle seat’s upholstery from damage: You
may use an accessory approved by Dorel Juvenile Group or a single
layer towel underneath and behind car seat.
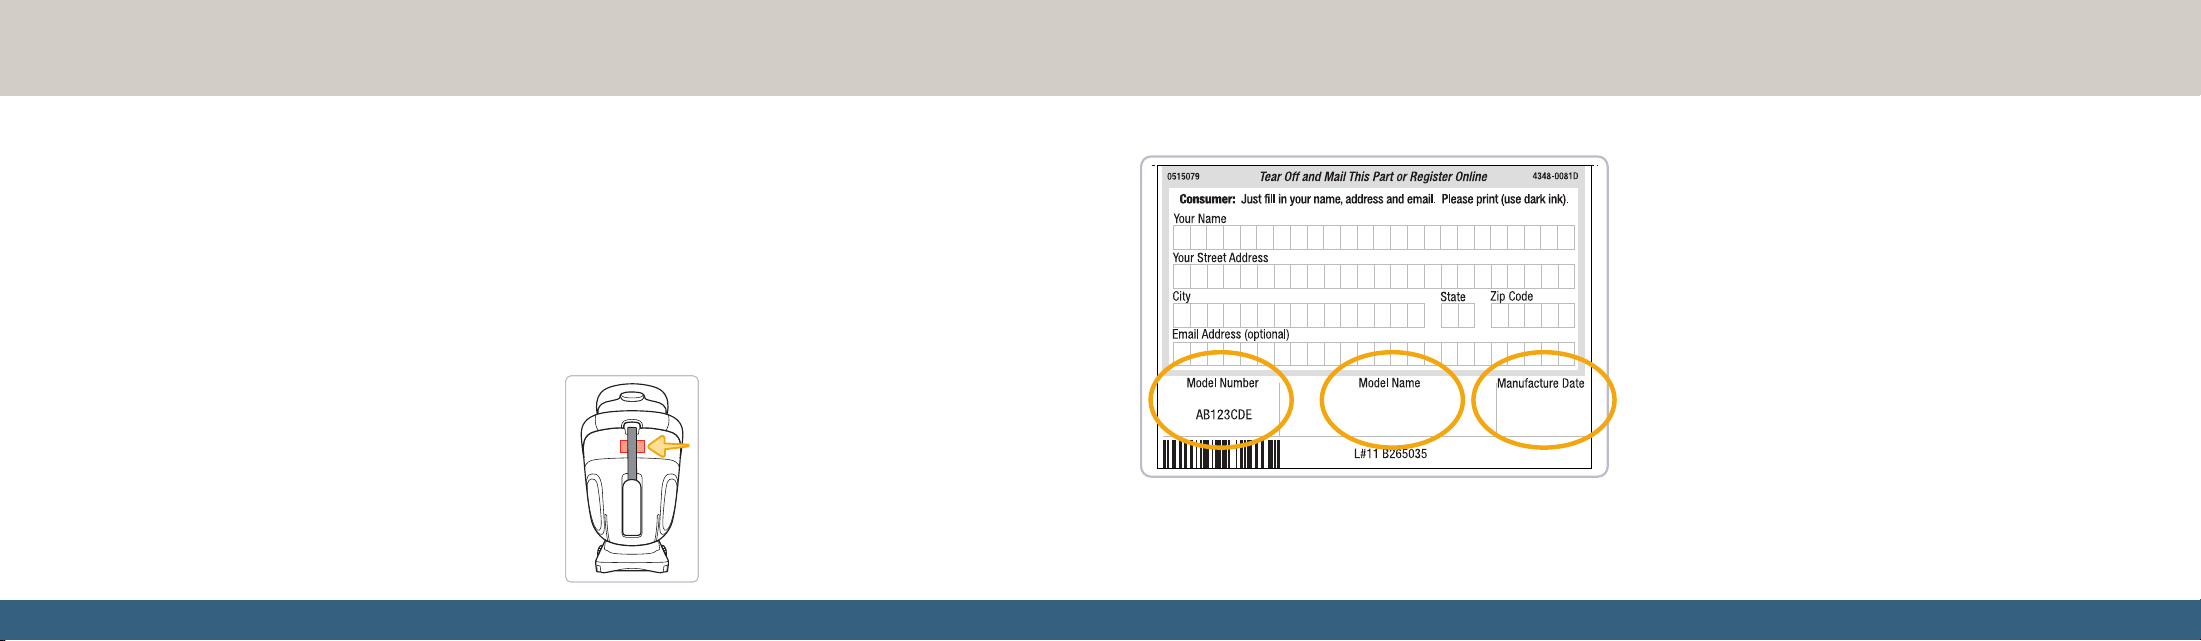
111110
Replacement and Expiration
DO NOT risk your child’s safety.
To keep your child as safe as possible, Dorel Juvenile Group
strongly recommends replacing the car seat even after a minor
crash, even if it was not occupied at the time.
Replacement After a Minor Crash
The National Highway Traffic Safety Administration states
that for a crash to be considered minor ALL of the following
MUST be true:
• Vehicle able to drive away from the crash site; AND
• Vehicle door nearest the car seat was not damaged; AND
• No passengers were injured; AND
• Airbags did not deploy; AND
• There is no visible damage to the car seat.
If the crash your car seat was involved in meets ALL the
criteria, you may not need to replace the car seat.
If one or more of these criteria are not true or if you
are uncertain of any of your answers, replace the car
seat immediately.
Replacement After a Moderate to Severe Crash
You MUST replace this car seat if it has been in a moderate to
severe car crash.
This car seat is intended to protect a child in a single crash.
During a crash, the car seat and all of its parts absorb crash
energy which can deform or weaken it. Damage is not always
visible. A damaged car seat MUST be replaced immediately.
continued on next page
Brand Car Seat
2026/05/01
Expiration
On the back of the car seat there is a date
of manufacture label as shown.
DO NOT use this car seat more than
10 years after the date of manufacture.
Brand Car Seat
2026/05/01
Example of model number,
manufacture date, and line code.
Please complete the postage-paid registration card that
came with your child restraint, and send it to us.
Child restraints could be recalled for safety reasons.
You must register this restraint to be reached in
a recall.
Send your name, address, email address if available, and
the restraint’s model number and manufacturing date to:
Dorel Juvenile Group
P.O. Box 2609
Columbus, IN 47202
or call 1-800-544-1108 or register online at
www.djgusa.com/registration/carseat/us.
For recall information, call the U.S. Government’s Vehicle
Safety Hotline at 1-888-327-4236 (TTY: 1-800-424-9153),
or go to www.NHTSA.gov.
Registration and Safety Notices
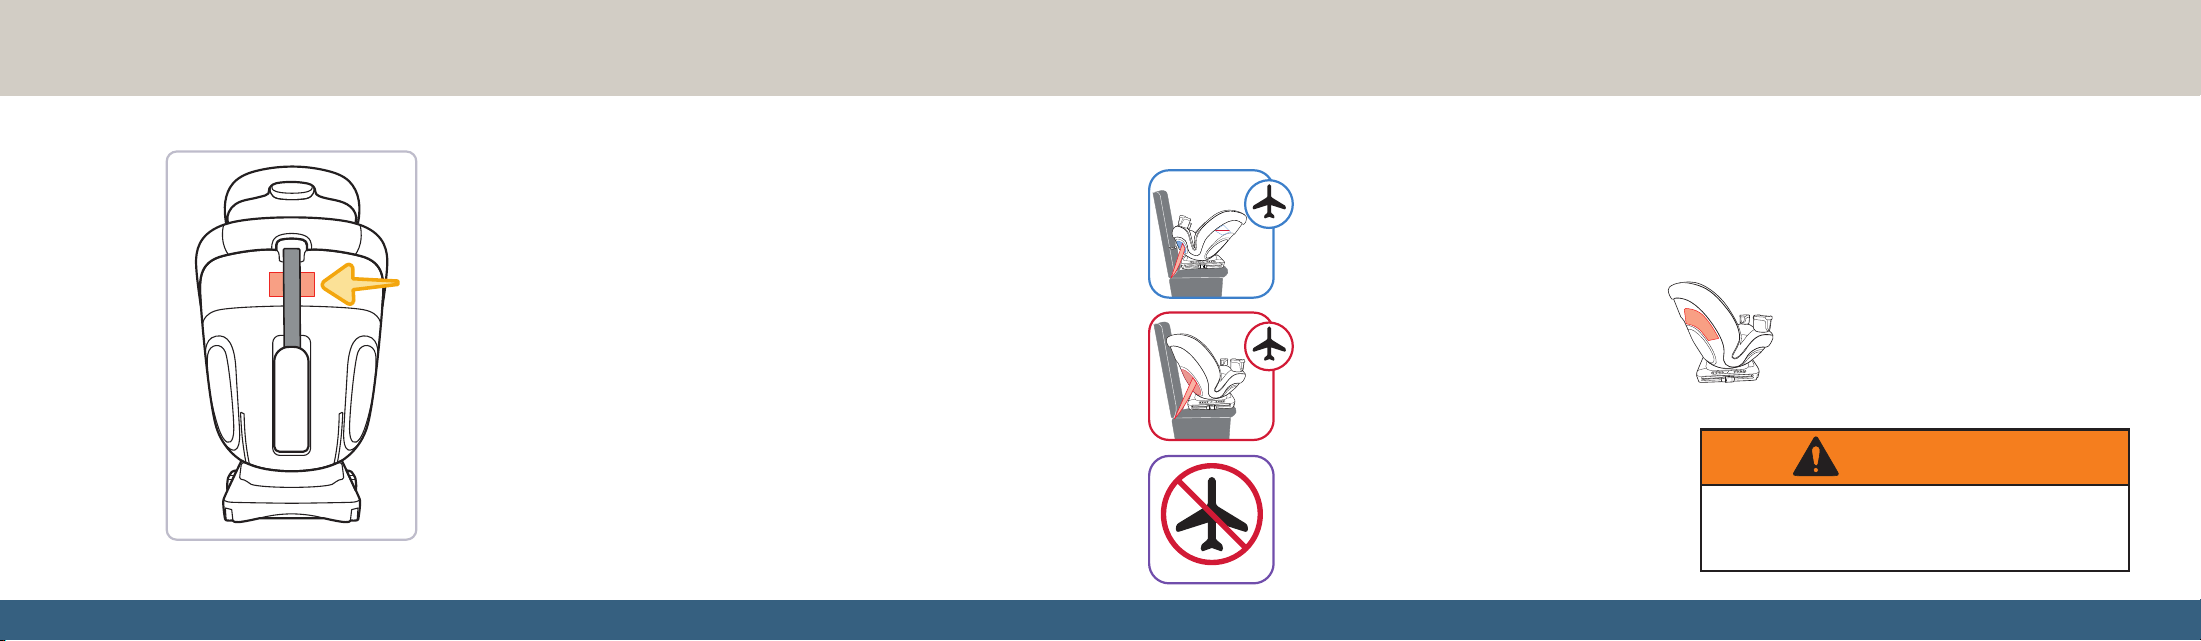
113112
Brand Car Seat
2026/05/01
If you don’t have the card or if your address
changes, you will find the model number,
manufacture date, and line code on the label
located on the back of the car seat.
This restraint is certified for aircraft use when used with the
internal harness.
5
4
5
5
4
5
5
4
5
Rear-Facing Aircraft Installation
Follow the vehicle belt installation
steps on pages 33–37.
Forward-Facing Aircraft
Installation
Follow the vehicle belt installation
steps on pages 46−55, skipping the
tether strap steps.
Booster Seat
This restraint is not certified for aircraft use,
when used as a booster seat, because aircraft
seats do not have shoulder belts.
Install the car seat in a window seat to avoid blocking the aisle.
If the aircraft lap belt is too short, ask the flight attendant for a
belt extender.
Use only on forward-facing aircraft seats. Contact the airline for
their specific policies.
Some airlines may ask to see a label stating
that this car seat is certified for aircraft use.
There is an airplane certification label located
on the side of this car seat as shown.
5
4
5
Aircraft Information
You MUST store the rigid LATCH connectors and
tether strap when installing with aircraft belts.
WARNING

115114
Dorel Juvenile Group, Inc. (DJG) warrants this product to the
original retail purchaser as follows:
This product is warranted against defective materials or
workmanship for one year from the date of original purchase.
An original receipt is required to validate your warranty. DJG will,
at its option, provide replacement parts or replace this product.
DJG reserves the right to substitute if the part or model has been
discontinued.
To make a claim under this warranty, please contact our
Consumer Care Department by phone: 1-800-544-1108 or
text: 1-812-652-2525. Our hours of operation are from 8:00 a.m.
to 6:00 p.m. EST Monday through Thursday and from 8:00 a.m. to
4:30 p.m. on Friday.
Proof of purchase is required and shipping charges are the
responsibility of the consumer.
Warranty Limitations: This warranty does not include damages
which arise from misuse or abuse of this product.
Limitation of Damages: The warranty and remedies as set forth
are exclusive and in lieu of all others, oral or written, expressed or
implied. In no event will DJG or the dealer selling this product be
liable to you for any damages, including incidental or consequential
damages, arising out of the use or inability to use this product.
Limitation of warranties and other warranty terms and state law
rights: Any implied warranties, including implied warranties of
the merchantability and fitness for a particular purpose, shall be
limited to the duration and terms of the express written warranty.
Some states do not allow limitations as to how long an implied
warranty lasts or the exclusion or limitation of incidental or
consequential damages, so the above limitations may not apply
to you.
This warranty gives you specific legal rights, and you may have
other rights, which vary from state to state. Neither DJG nor the
dealer selling this product authorized any person to create for it
any other warranty, obligation, or liability in connection with
this product.
Warranty
For parts availability and questions,
text, chat, call, or email
(see back cover).
If requested color is not available,
a similar color will be substituted.
Applicable tax and shipping &
handling will also be added.
Replacement Parts
Please note: Our product warranty only applies when purchased from
an authorized Maxi-Cosi retailer. The origin of products not purchased
through these authorized retailers is unknown and could be counterfeit.
We cannot support products from an unknown origin as we cannot
verify the handling or condition of such merchandise. We maintain a
strong network of authorized retailers to ensure you are purchasing
safe and complete products.
Fulfillment by a third party does not guarantee you are purchasing
from one of these authorized retailers.
Pricing which is inconsistent with the majority of retailers is a strong
indication that the retailer is not authorized, as we have a consistent
price offering across all authorized retailers.
If you are unsure of the authorization status of a retailer you are
considering purchasing from, or have purchased from, you can check
www.maxicosi.com/us-en/shops.aspx; or call our Consumer Care
Department at 1-800-544-1108; or text us at 1-812-652-2525.
• Chest Clip
• Seat Pad Set
• Cup Holders
• Instructions
• Seat Pad Tool