User Manual
V1.0
Rev0.06
PMN: VistaZ Power, VistaZ Go
HVIN: CVP-0401, CVG-0401
Prepared by: Sandeep Maurya
Release date: 17/03/2026
THE INFORMATION CONTAINED IN THIS DOCUMENT IS PROPRIETARY OF COOLRGROUP AND IS CONFIDENTIAL. ANY PRODUCTION
IN PART OR WHOLE WITHOUT PRIOR WRITTEN AUTHORIZATION OF COOLRGROUP IS PROHIBITED
CoolR Group Inc | www.coolrgroup.com
1 | Page
Contents
1. Pre-requisites 3
2. Steps to use or install VistaZ devices at client/user location: 3
3. FAQ 4
4. How to check CoolR mobile Application version? 5
5. How to login to CoolR mobile Application? 5
6. How to scan VistaZ Device? 5
7. How to check Vista device is connected/not connected? 10
8. How to check Firmware version? 12
9. How to check the battery voltage? 13
10. How to sync the device time? 14
11. How to capture Image manually? 15
12. How to download/view Image on mobile screen? 17
13. How to check events? 18
14. How to reboot the device? 20
15. How to Factory Reset? 21
16. How to upload the image on CoolR server over BLE? 23
17. How to enable Wi-Fi? 26
18. How to upload the image on portal over WIFI? 26
19. How to enable cellular mode? 27
20. How to upload the image on portal over Cellular? 28
21. How to set time slot for image capture? 28
22. How to enable door detection capability? 28
23. Device appearance and use case 29
24. FCC Warning: 30
25. IC Warning: 30
CoolR Group Inc | www.coolrgroup.com
2 | Page
Note: This user manual applies to the following models: PMN: VistaZ Power, VistaZ Go | HVIN:
CVP-0401, CVG-0401
1. Pre-requisites
1.1. VistaZ Power (CVP-0401) or VistaZ Go (CVG-0401).
1.2. Android Phone with internet connectivity*.
1.3. CoolR Mobile Application v3.9
1.4. CoolR App credentials
Notes:
1. * iPhone can also be used for device operation but this manual focuses on Android phone.
2. CoolR Mobile app can be downloaded from
https://drive.google.com/file/d/1N8yHpdhdj5RXXhk328SrgAiKVkVYaMuE/view?usp=sharing
Please contact CoolR team if you are not able to download the apk from the link.
2. Steps to use or install VistaZ devices at client/user location:
1. Scan vistaZ device via CoolR mobile application.
2. Sync the device with mobile app.
3. Scan again.
4. Connect the Device with RN app.
5. As per client / user requirement enable wireless communication interface for Device:
a. Wi-Fi mode. (Wi-Fi ID, password set, Wi-Fi on interval set etc)
Or
b. Cellular mode. (cellular APN, Band etc set)
6. As per client user requirement enable image-capture method.
a. Manual image capture.
b. Time slot-based image capture.
c. Door based image capture.
Note:
1. There are a lot of different features in device, which need to set when we install VistaZ
device but above steps are basic settings which need to done to make device working.

CoolR Group Inc | www.coolrgroup.com
3 | Page
3. FAQ
1. How to check CoolR mobile Application version?
2. How to login to CoolR RN mobile application?
3. How to scan VistaZ Device?
4. How to check VistaZ device is connected/not connected?
5. How to check Firmware version?
6. How to check the battery voltage?
7. How to sync the device time?
8. How to capture Image manually?
9. How to download/view Image on mobile screen?
10. How to check events?
11. How to reboot the device?
12. How to Factory Reset?
13. How to upload the image on portal over BLE?
14. How to enable Wi-Fi?
15. How to upload the image on portal over WIFI?
16. How to enable cellular mode?
17. How to upload the image on portal over Cellular?
18. How to set time slot for image capture?
19. How to enable door detection capability?
20. Other:
a. How to Increase RN app disconnect time duration with the VistaZ device?
b. How to search and connect multiple devices?
c. How to set CoolR Server address in RN app?
d. How to increase BLE ping interval?
e. How to set Tx power of BLE?
f. How to set APN, band, network mode (2G/LTE-CAT-M1/NB-IoT)?
CoolR Group Inc | www.coolrgroup.com
4 | Page
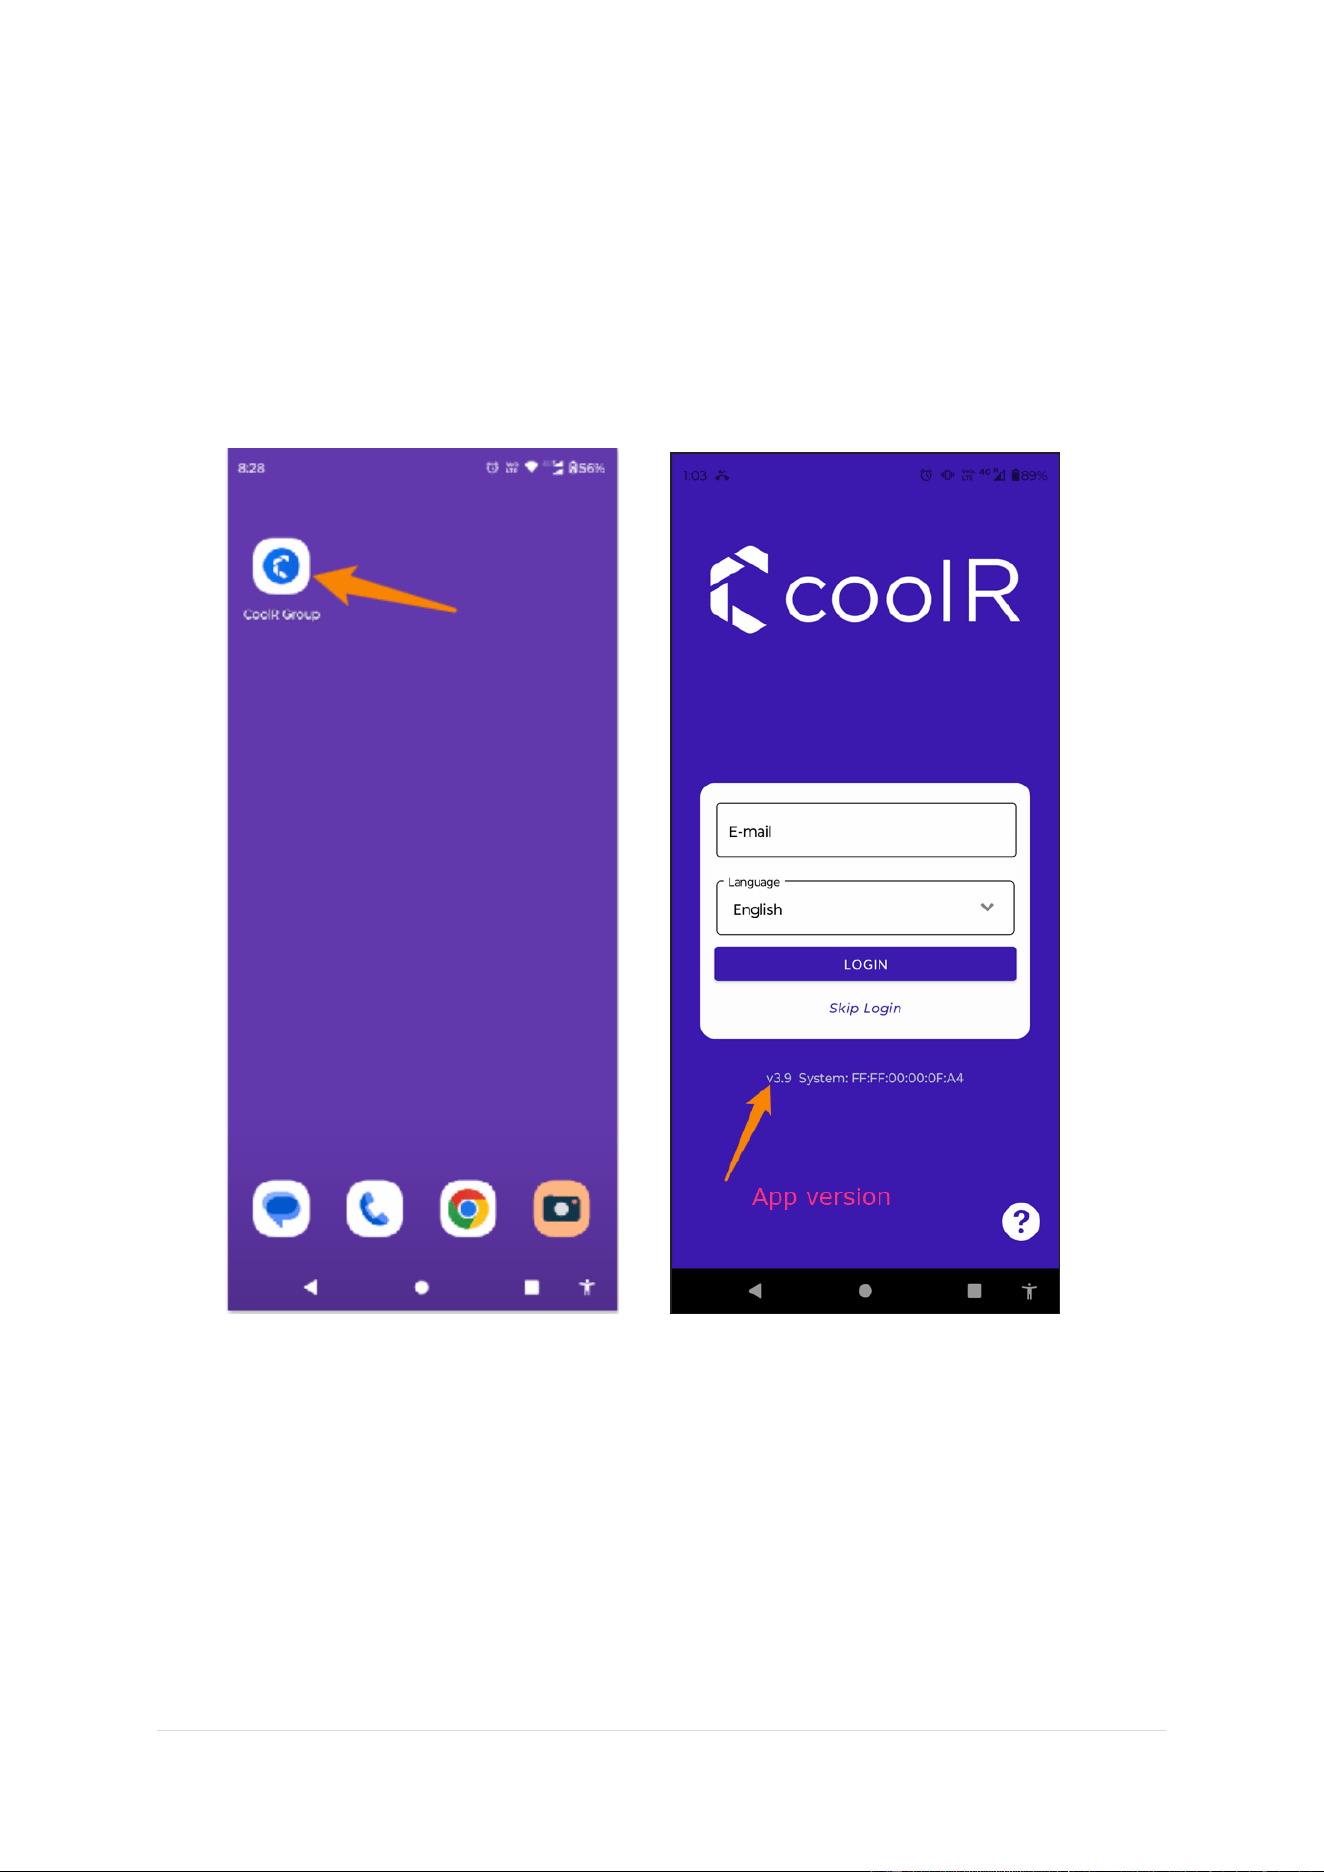
4. How to check CoolR mobile Application version?
5. How to login to CoolR mobile Application?
6. How to scan VistaZ Device?
Steps -
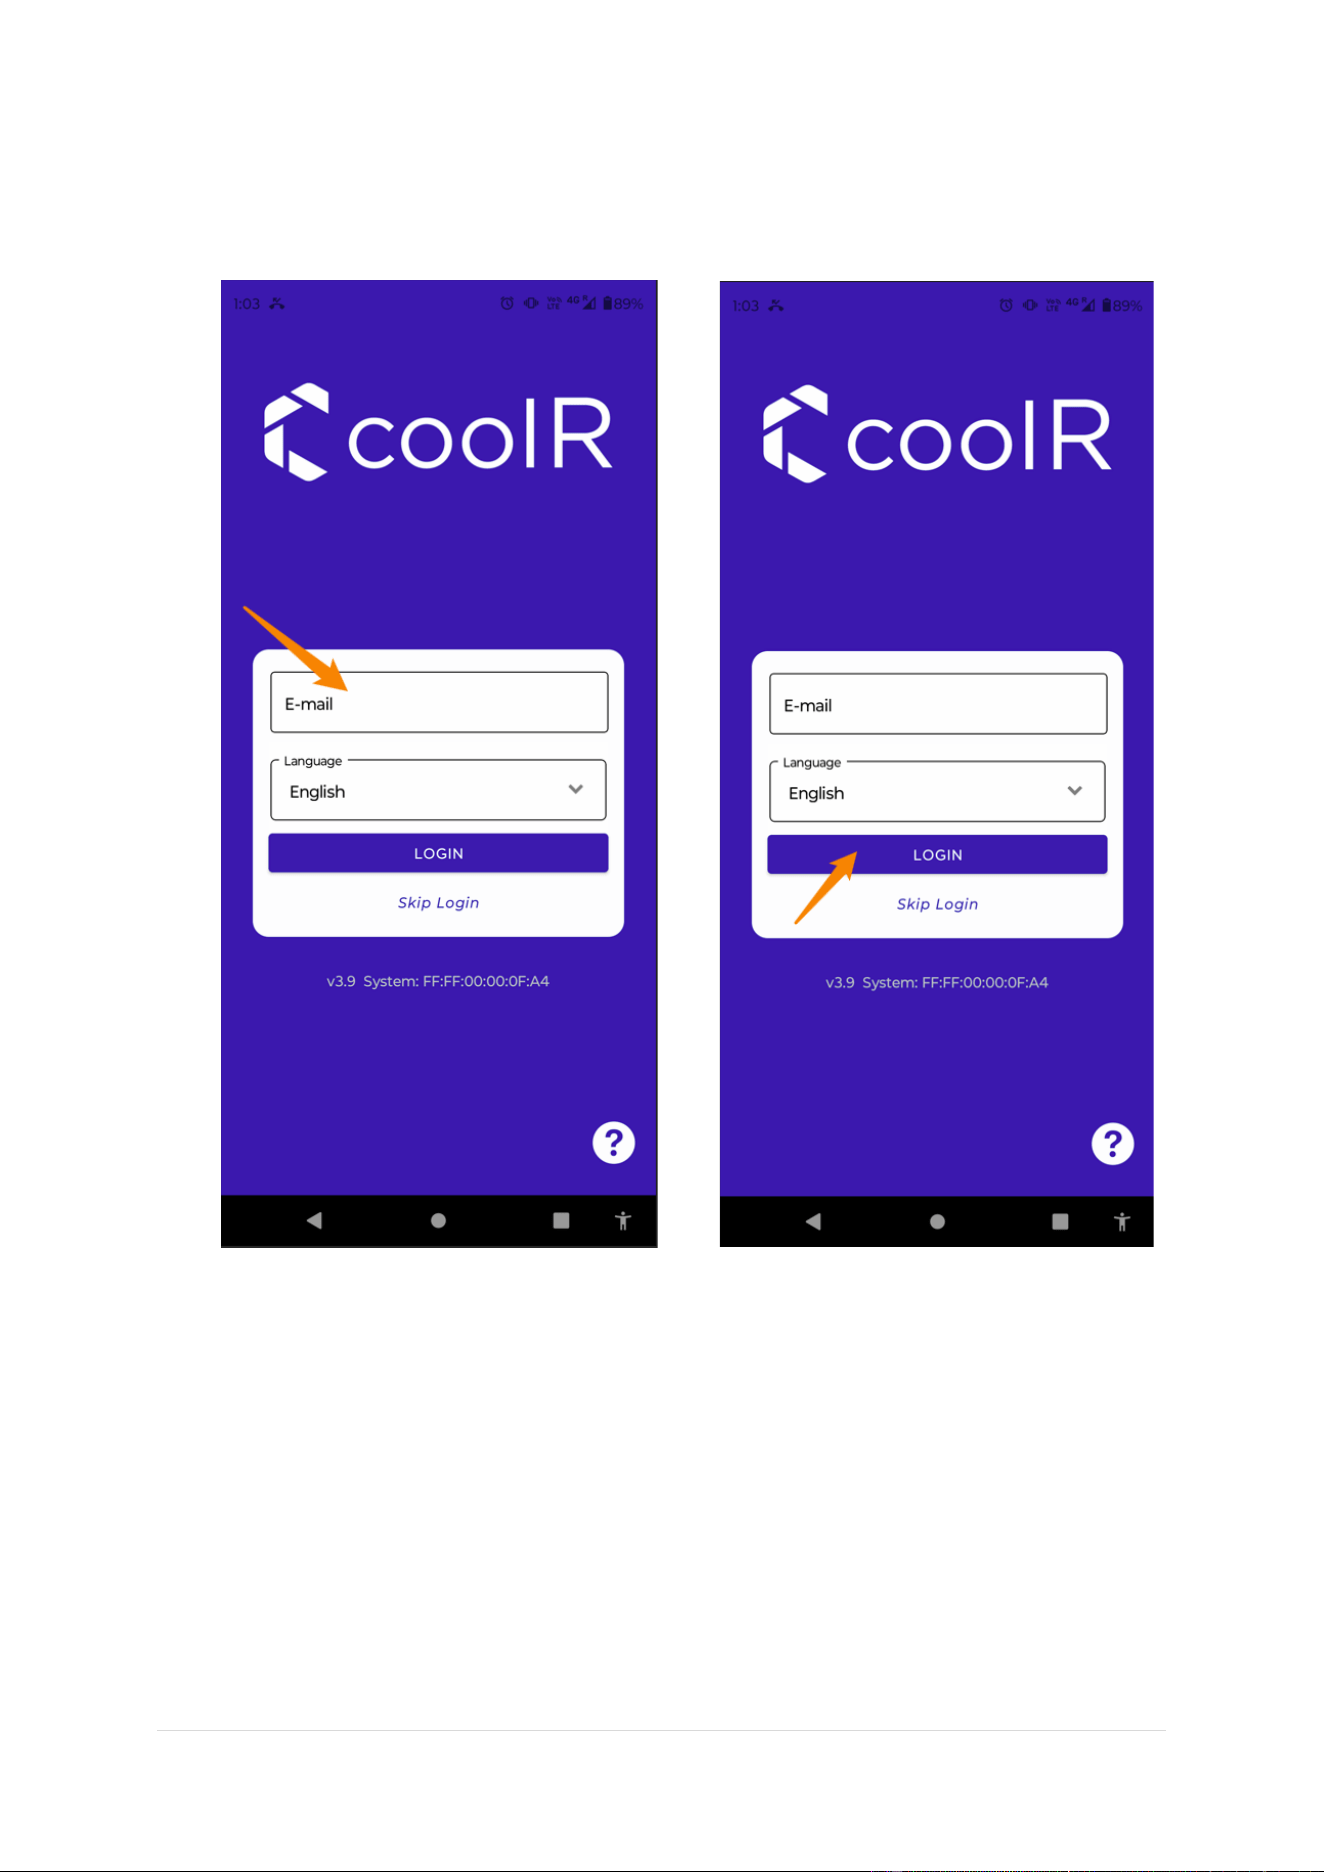
1. Make sure Android phone is connected with internet.
2. Click to open CoolR Mobile Application.
3. You can see the Application version
CoolR Group Inc | www.coolrgroup.com
5 | Page
4. Click on LOGIN
5. Now enter the Login Id and password.
(Note – please connect with CoolR team to get the Login credentials for the particular user)
CoolR Group Inc | www.coolrgroup.com
6 | Page
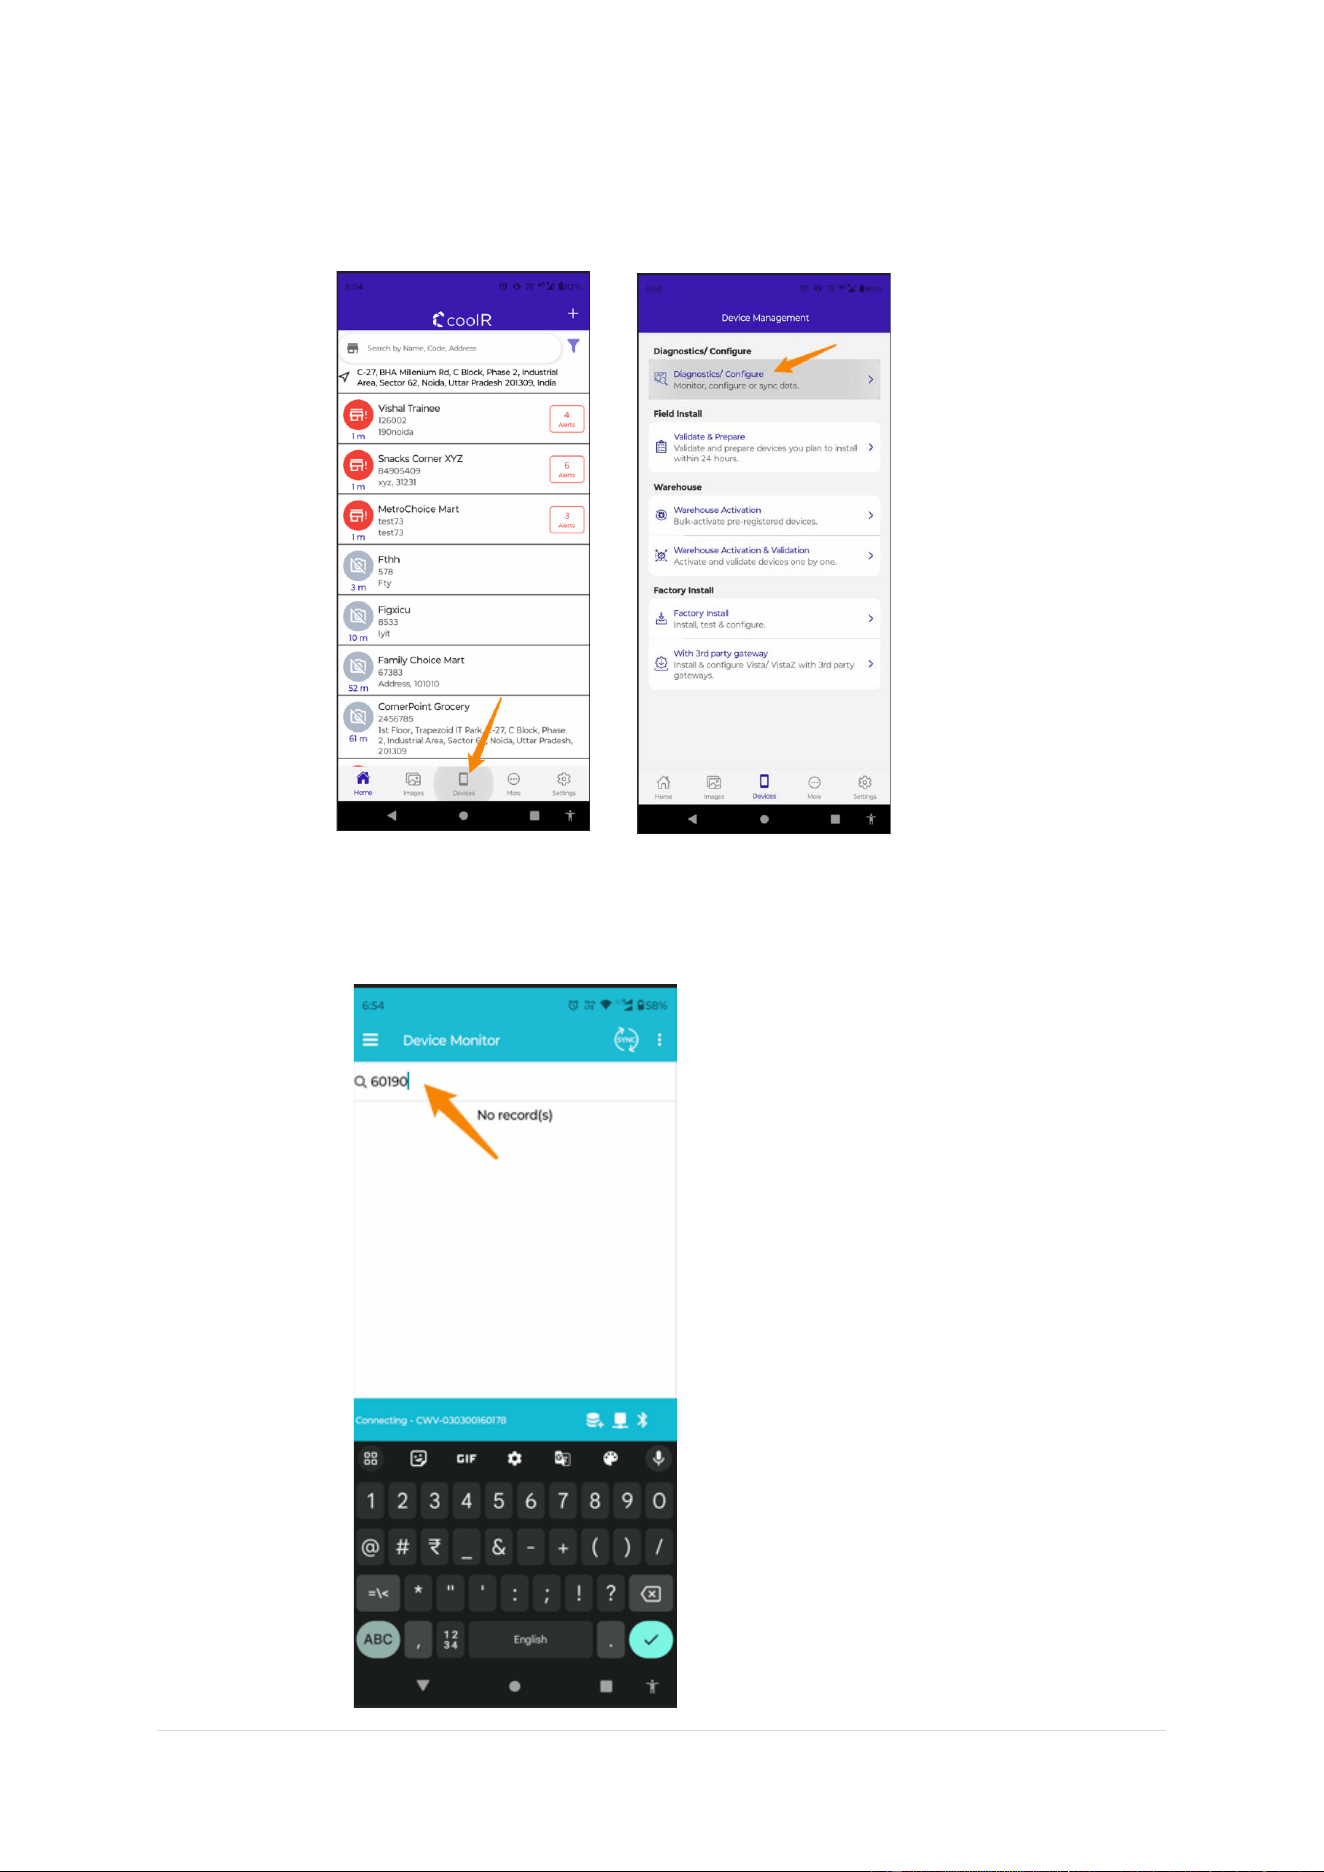
6. After Successfully Login, Home screen will be visible,
7. Click on the Devices option.
8. Click on the Diagnostics/Configure.
9. Now Device Monitor screen will be visible.
10. Enter the last 5 digits of VistaZ seral No. in the search bar. You can get serial number from
device serial number label on the device enclosure.
CoolR Group Inc | www.coolrgroup.com
7 | Page
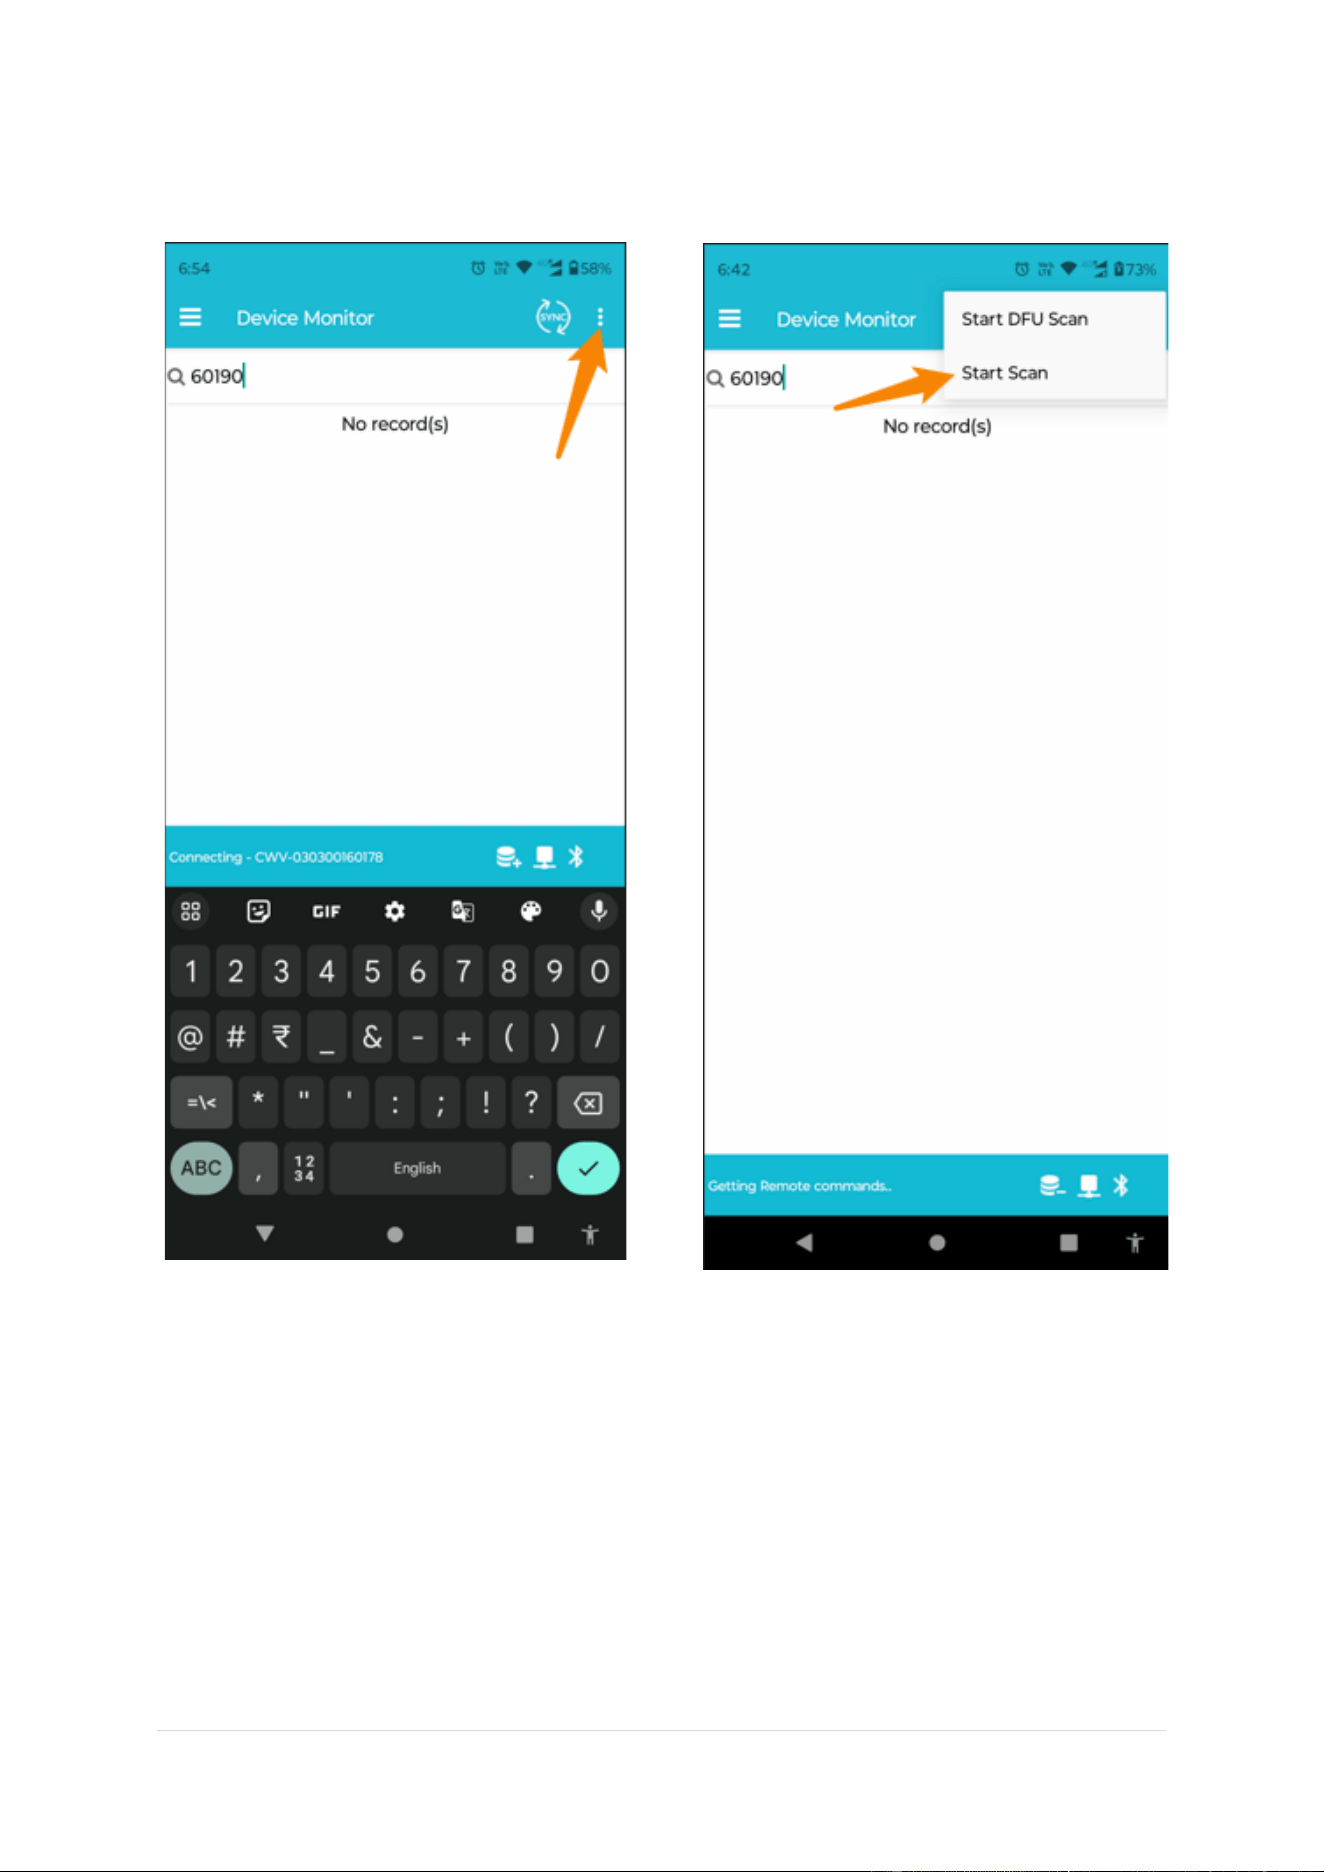
11. Click on 3 dots for start scan
12. Click on start scan.
CoolR Group Inc | www.coolrgroup.com
8 | Page
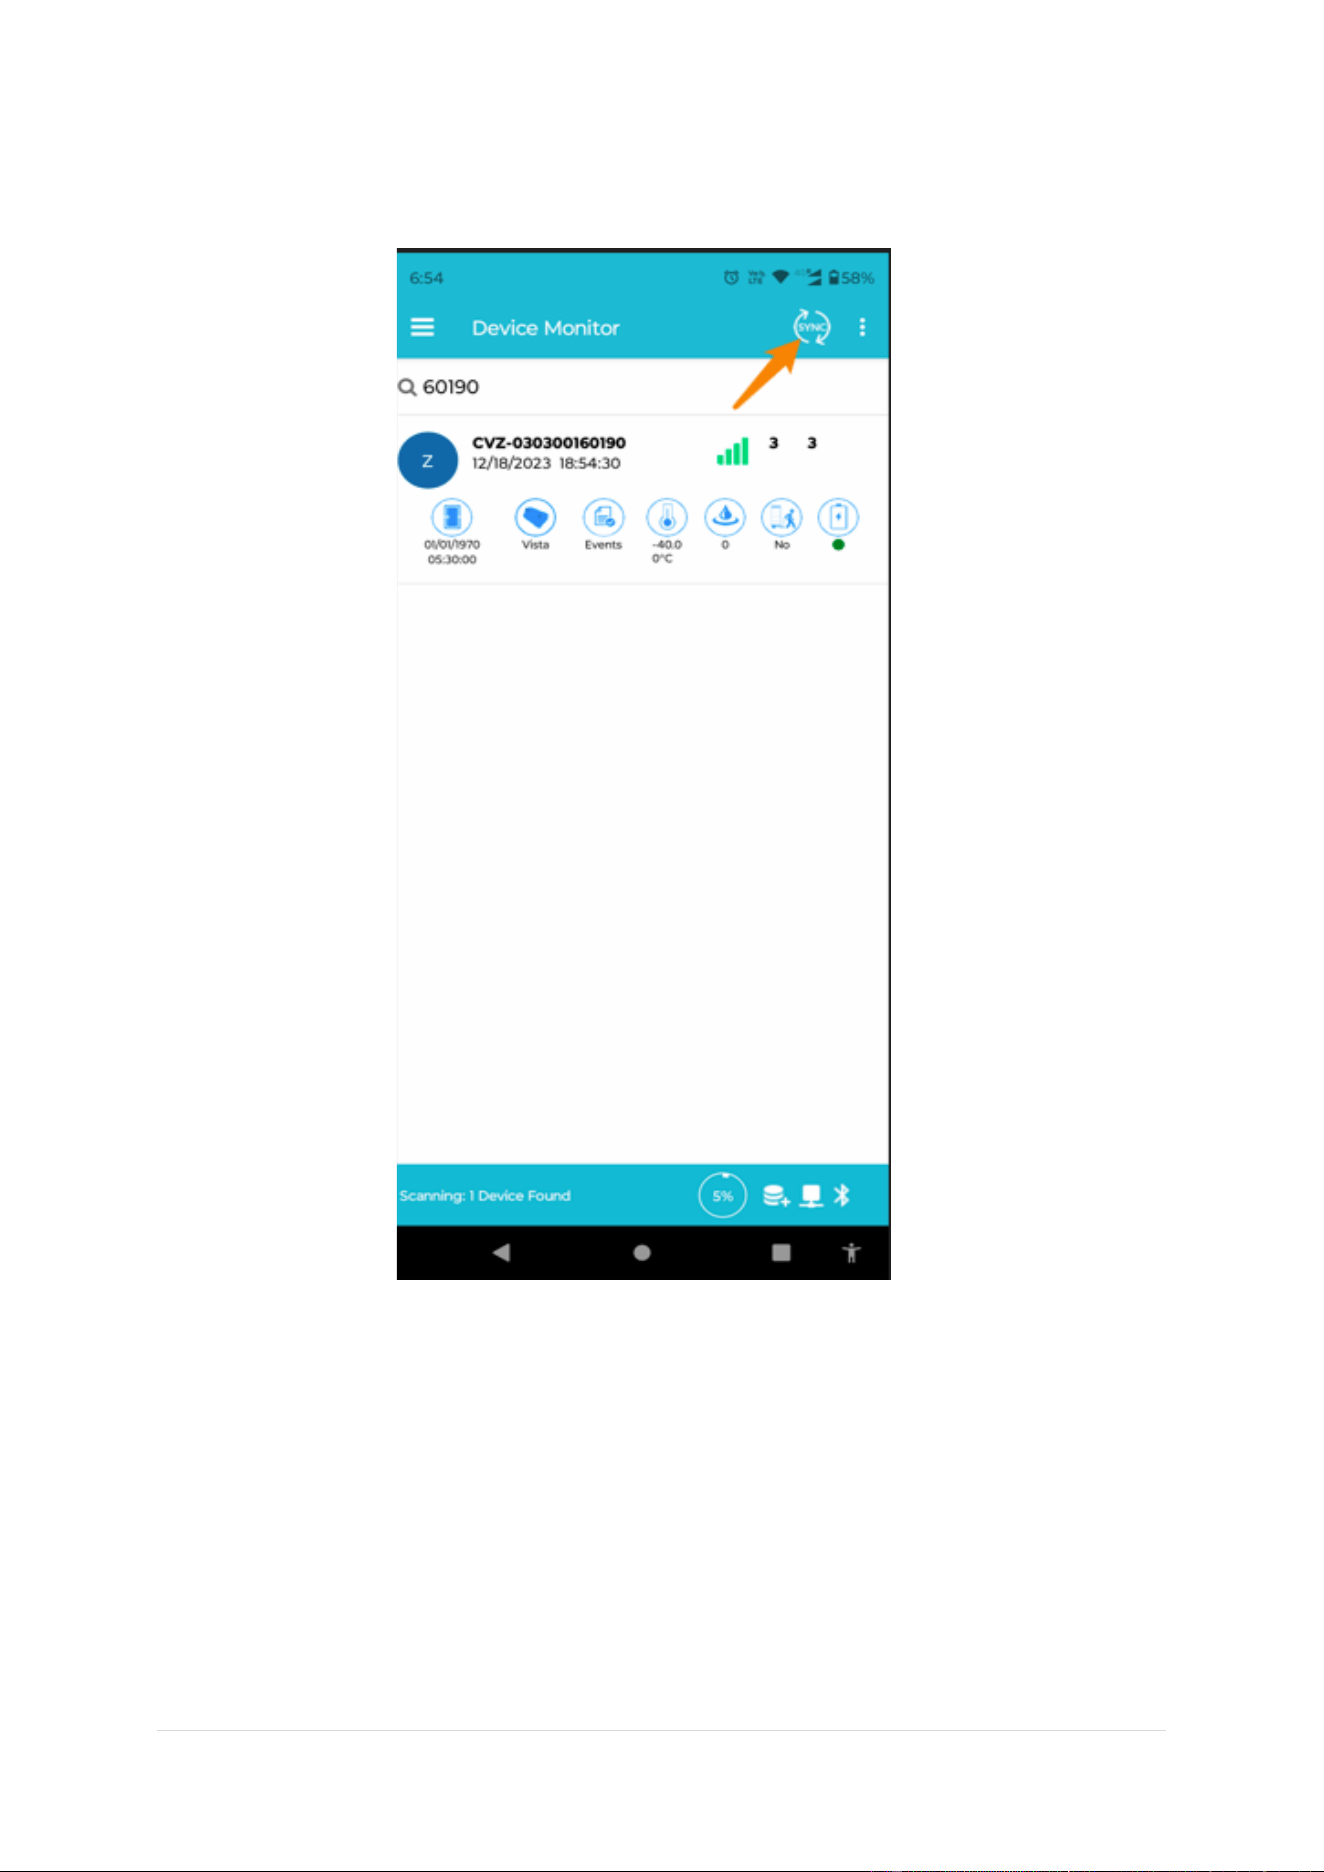
13. Once device serial number is visible, Click on Sync before connection with VistaZ and wait
until device is synced.
CoolR Group Inc | www.coolrgroup.com
9 | Page
7. How to check Vista device is connected/not connected?
Steps -
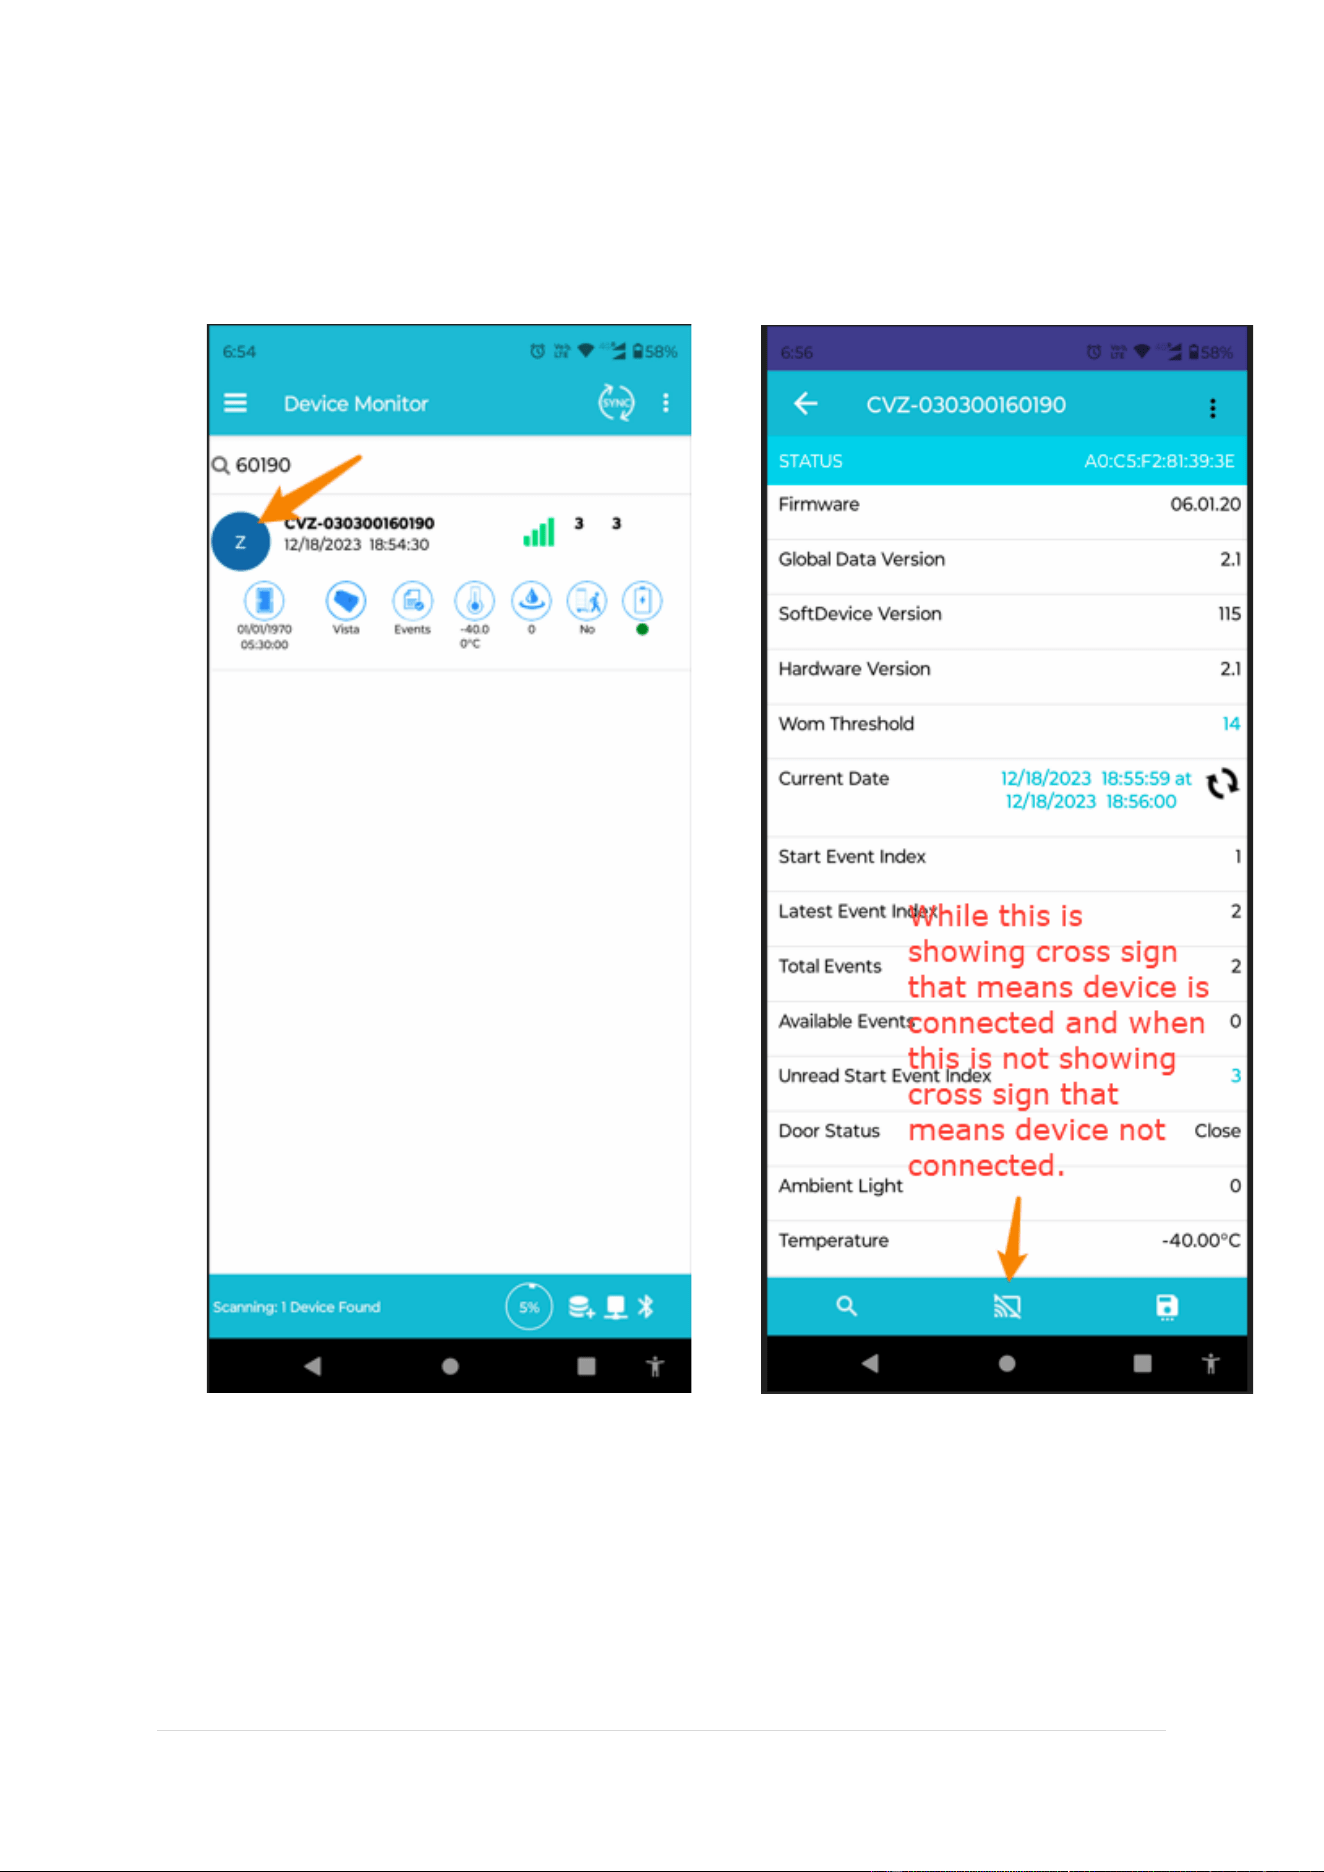
1. Click on Z icon to connect the device.
2. Once device is connected, a cross sign will be visible on the mid bottom of the screen.
CoolR Group Inc | www.coolrgroup.com
10 | Page
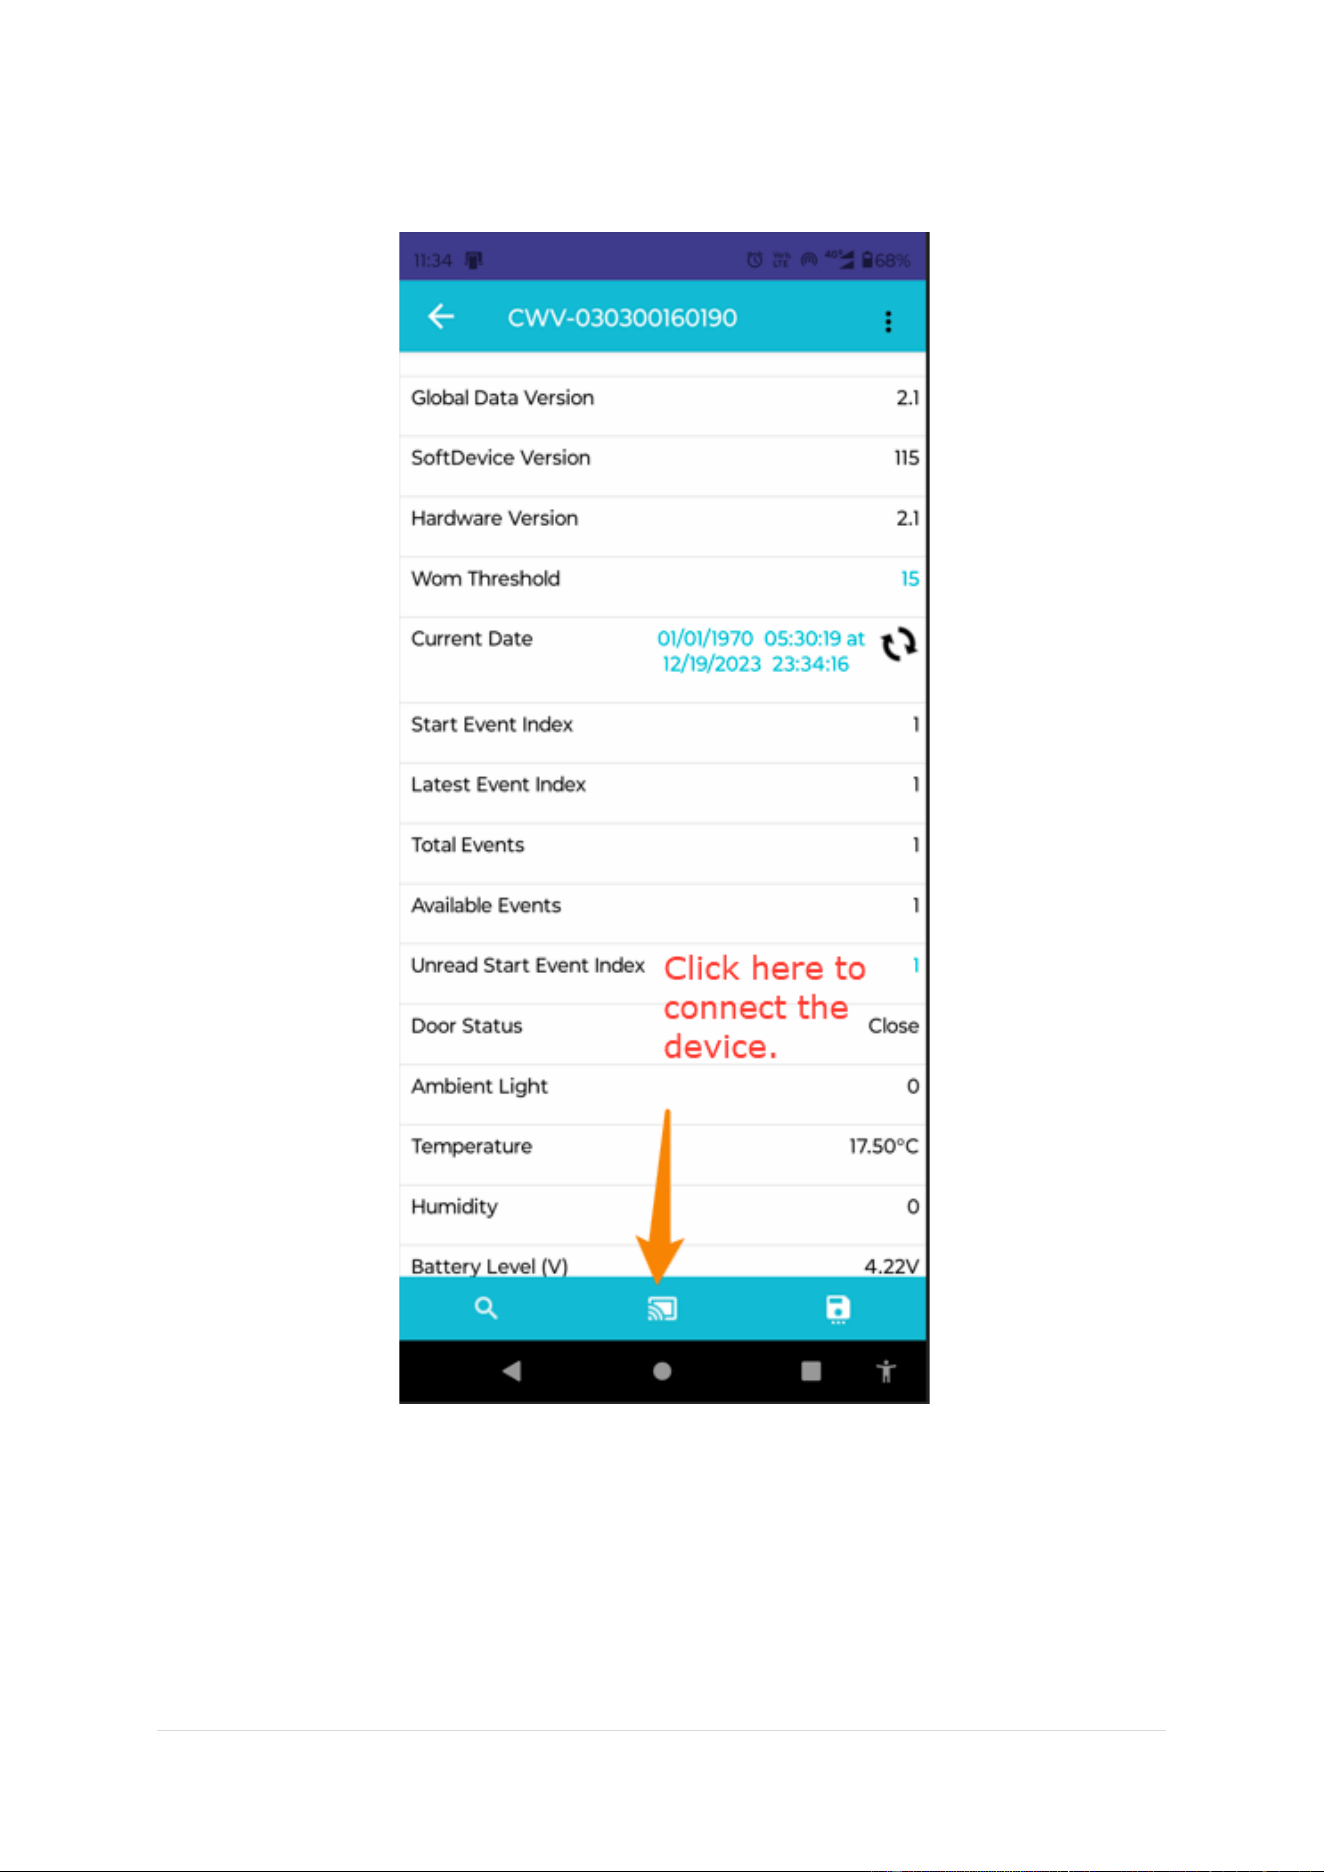
3. Once the status screen is visible, we can connect to the device by clicking on the cross
symbol at the bottom canter of the screen.
CoolR Group Inc | www.coolrgroup.com
11 | Page
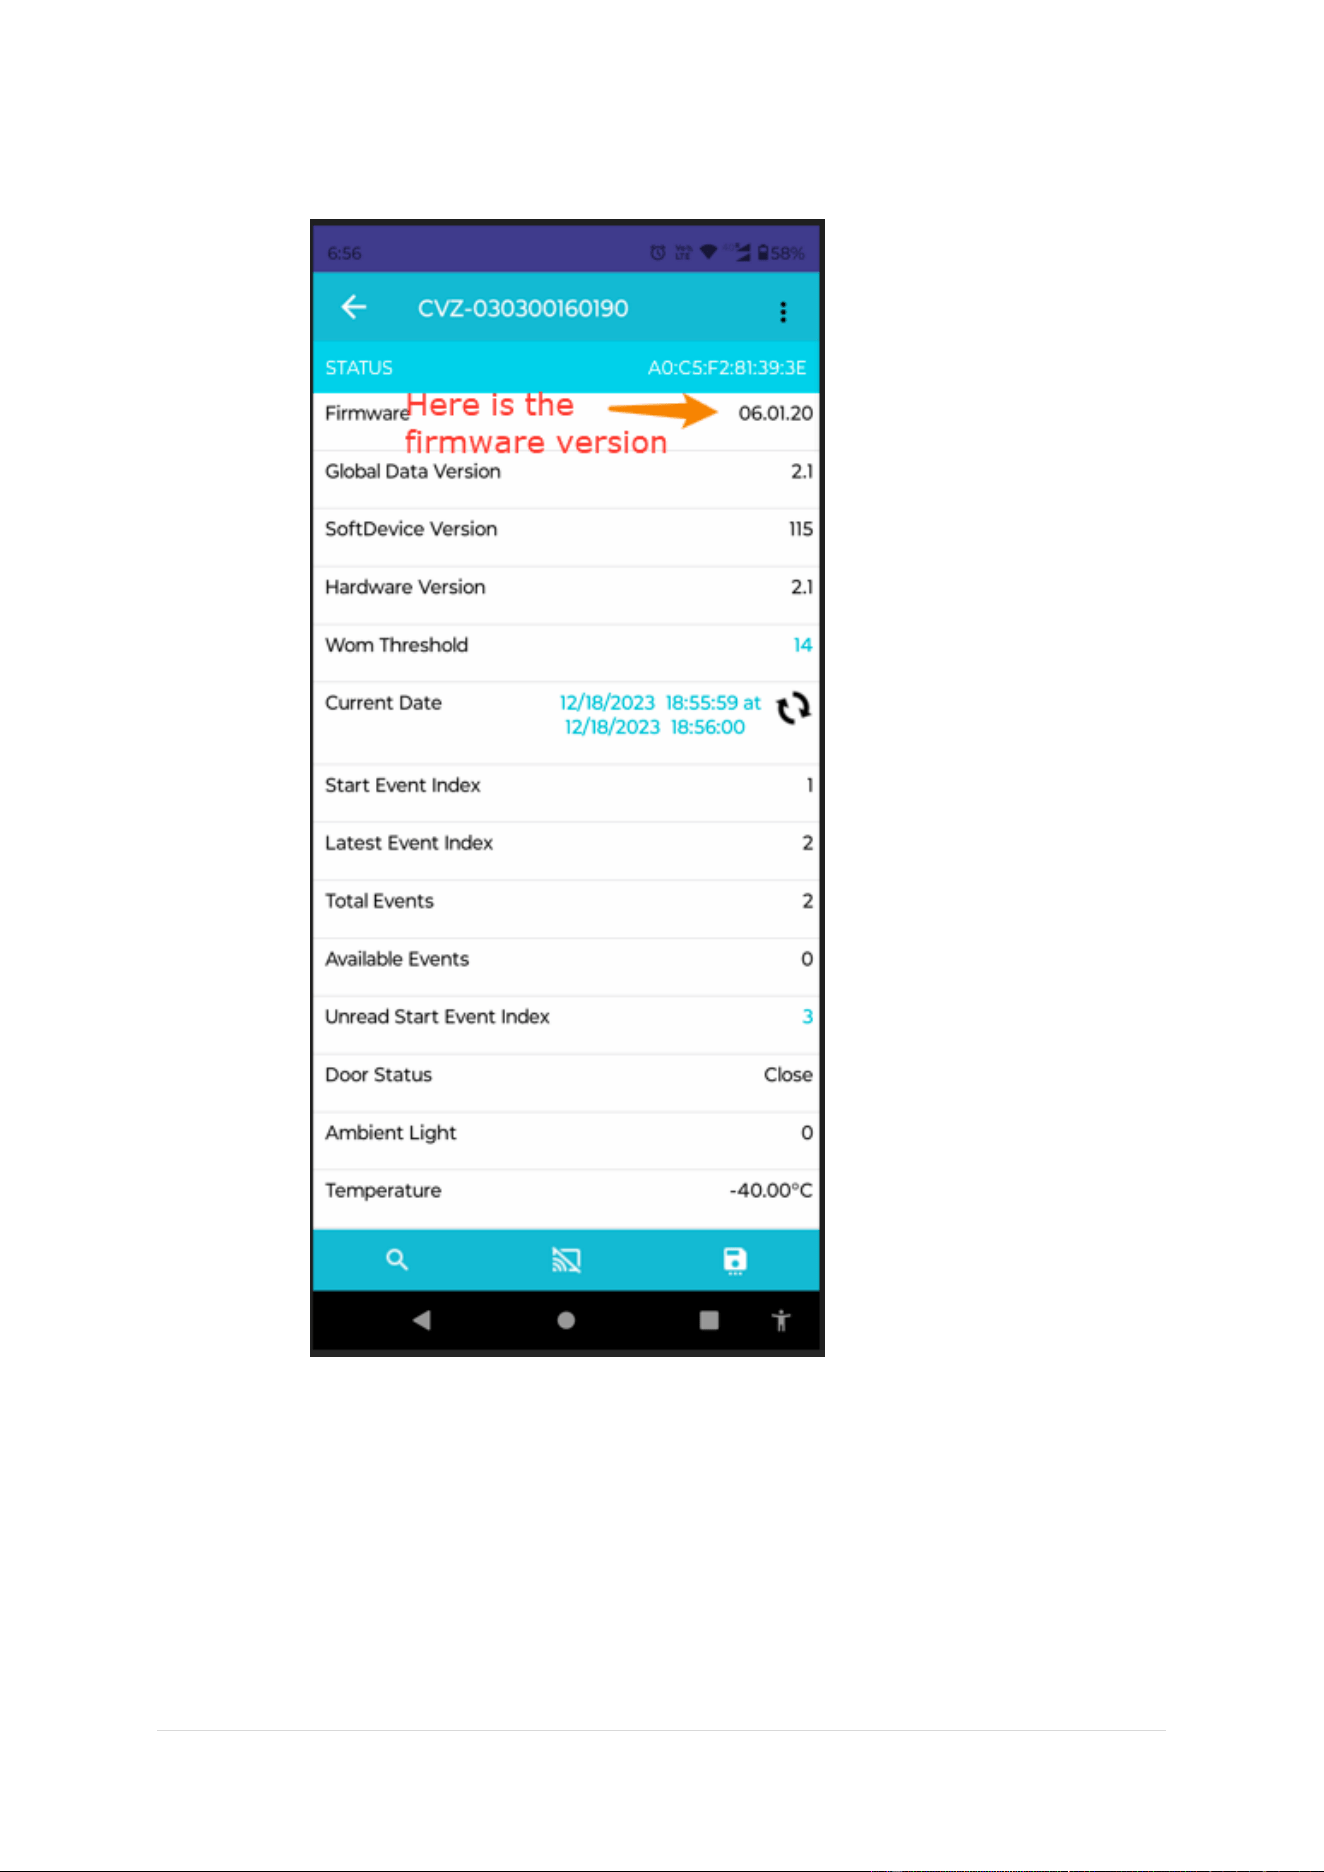
8. How to check Firmware version?
Above is just example, based on actual firmware in your device it will show in the respective
slot.
CoolR Group Inc | www.coolrgroup.com
12 | Page
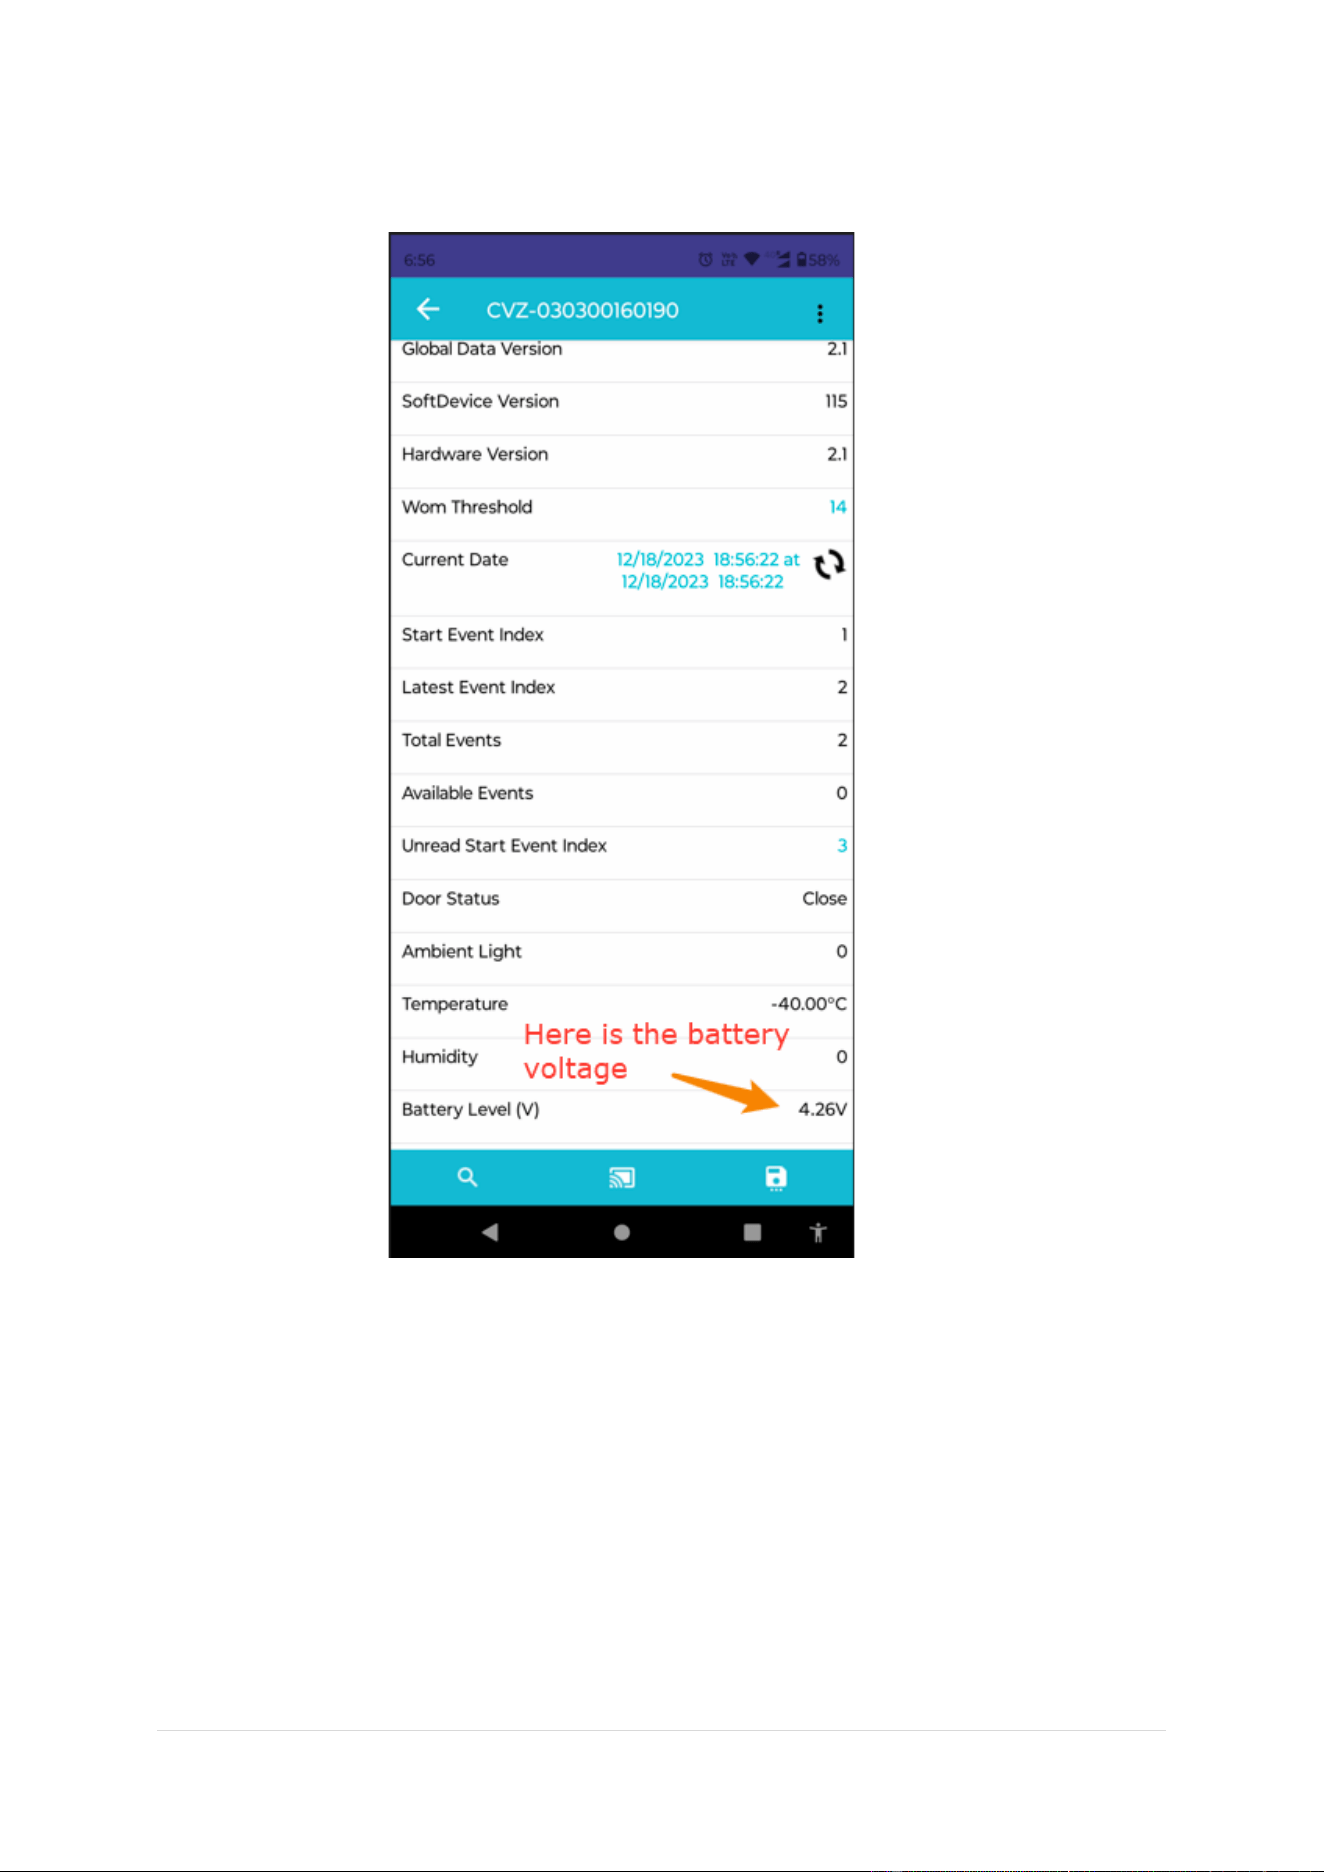
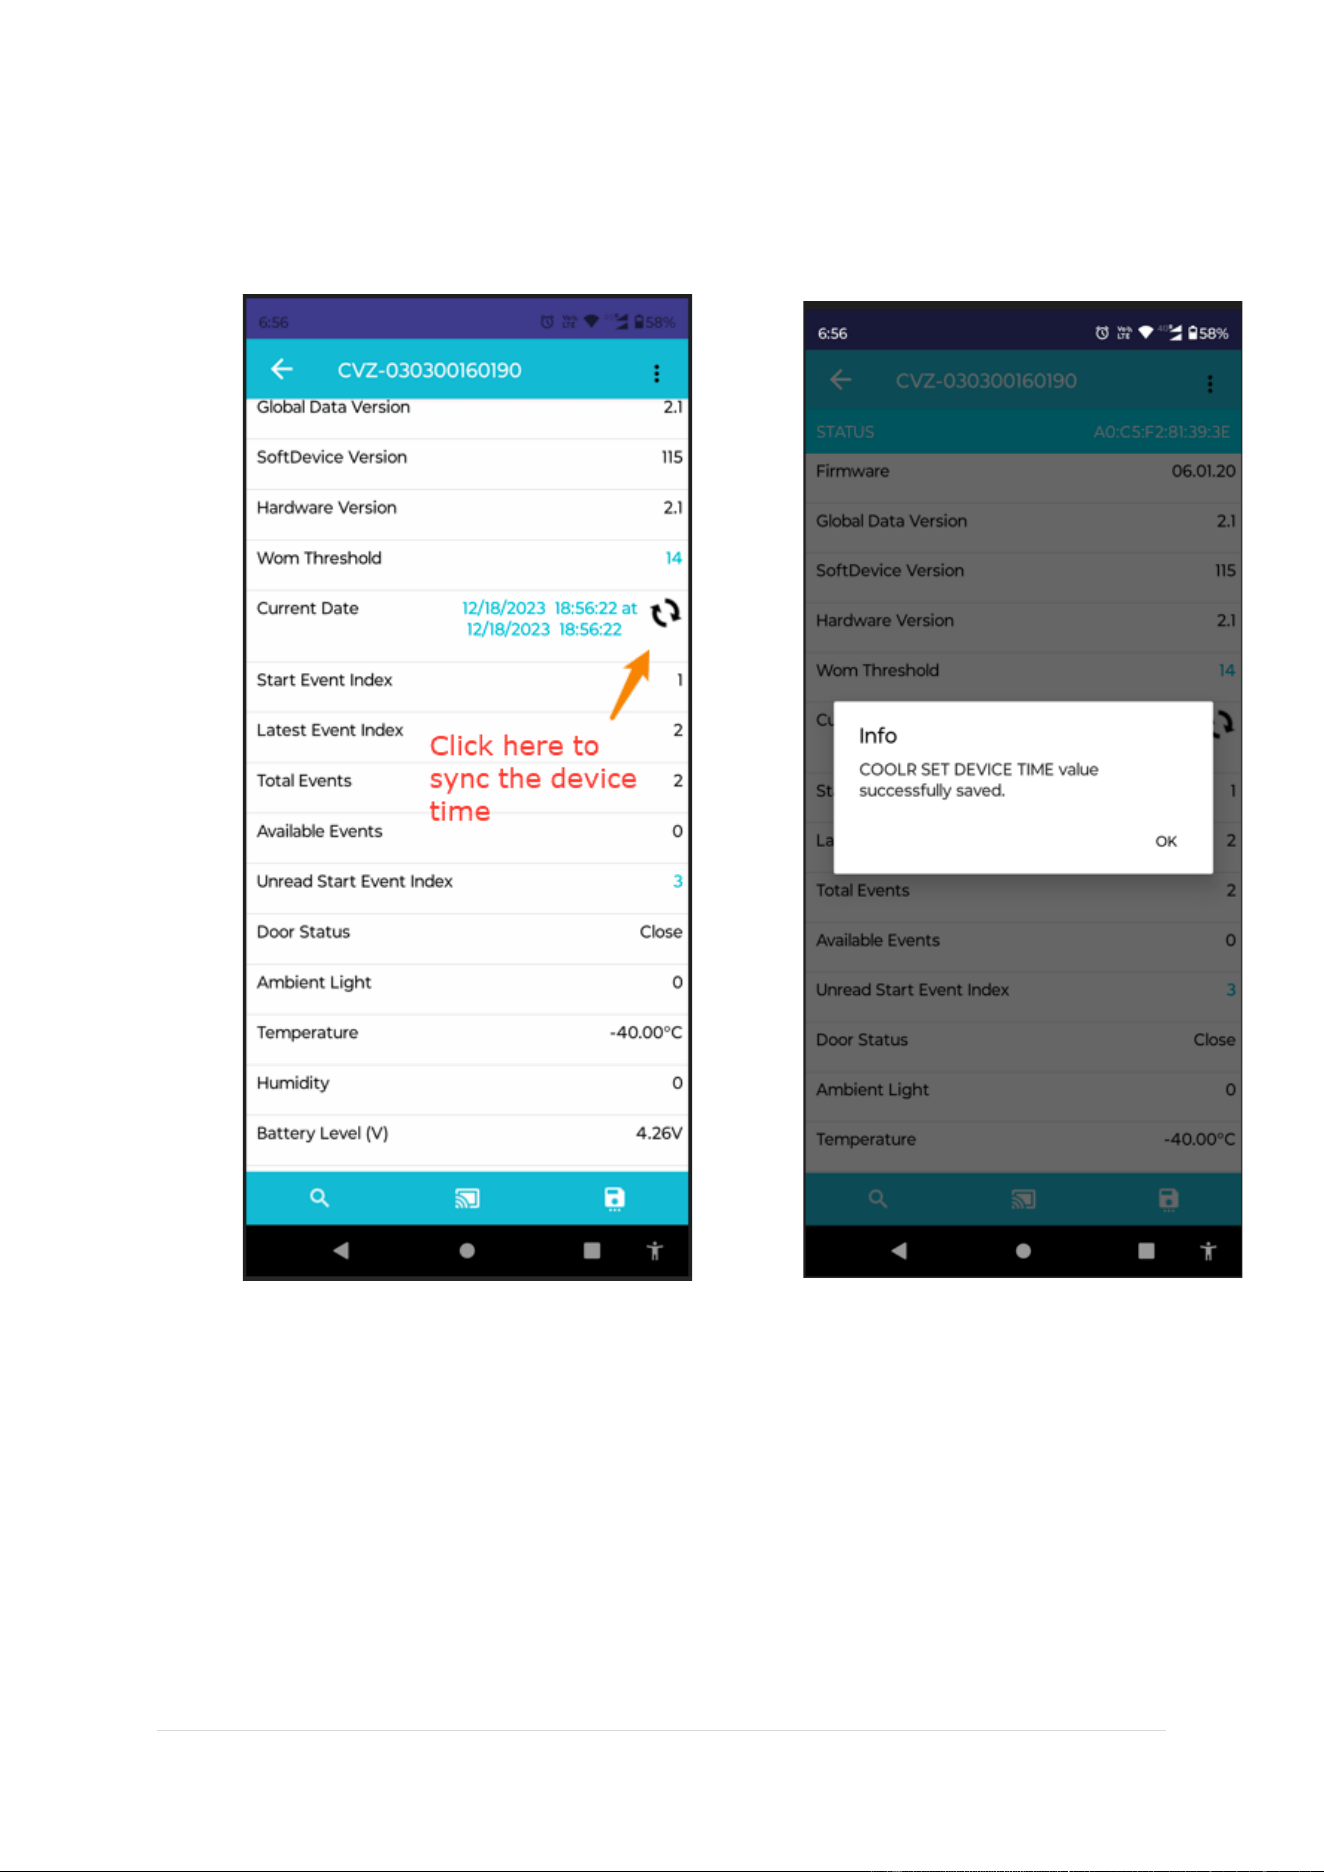
9. How to check the battery voltage?
CoolR Group Inc | www.coolrgroup.com
13 | Page
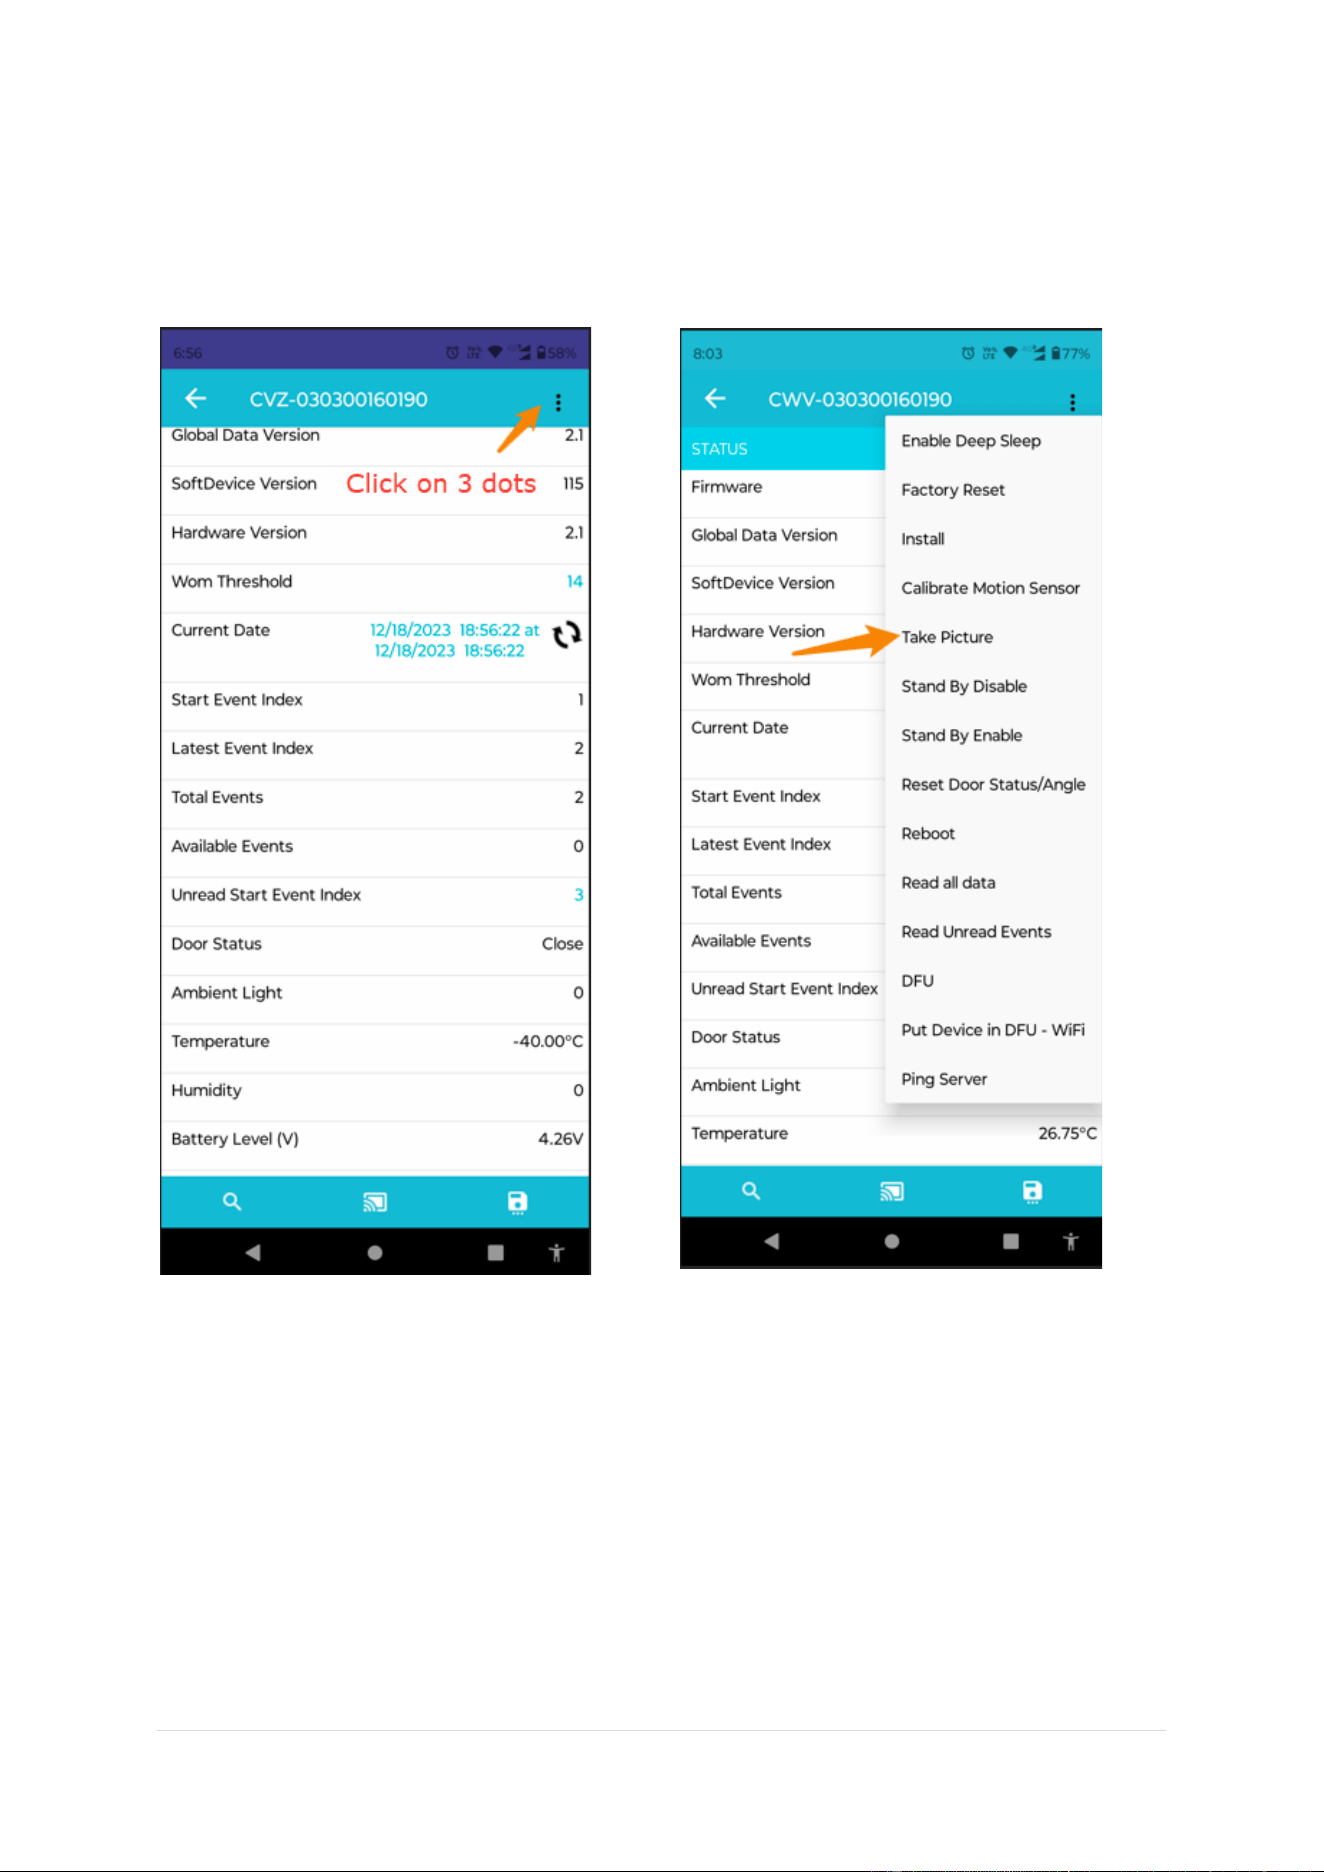
10. How to sync the device time?
Steps
1. Click on the circle pointed in the image,
2. Once time is synced, a pop-up will be visible on the screen to confirm the same.
CoolR Group Inc | www.coolrgroup.com
14 | Page
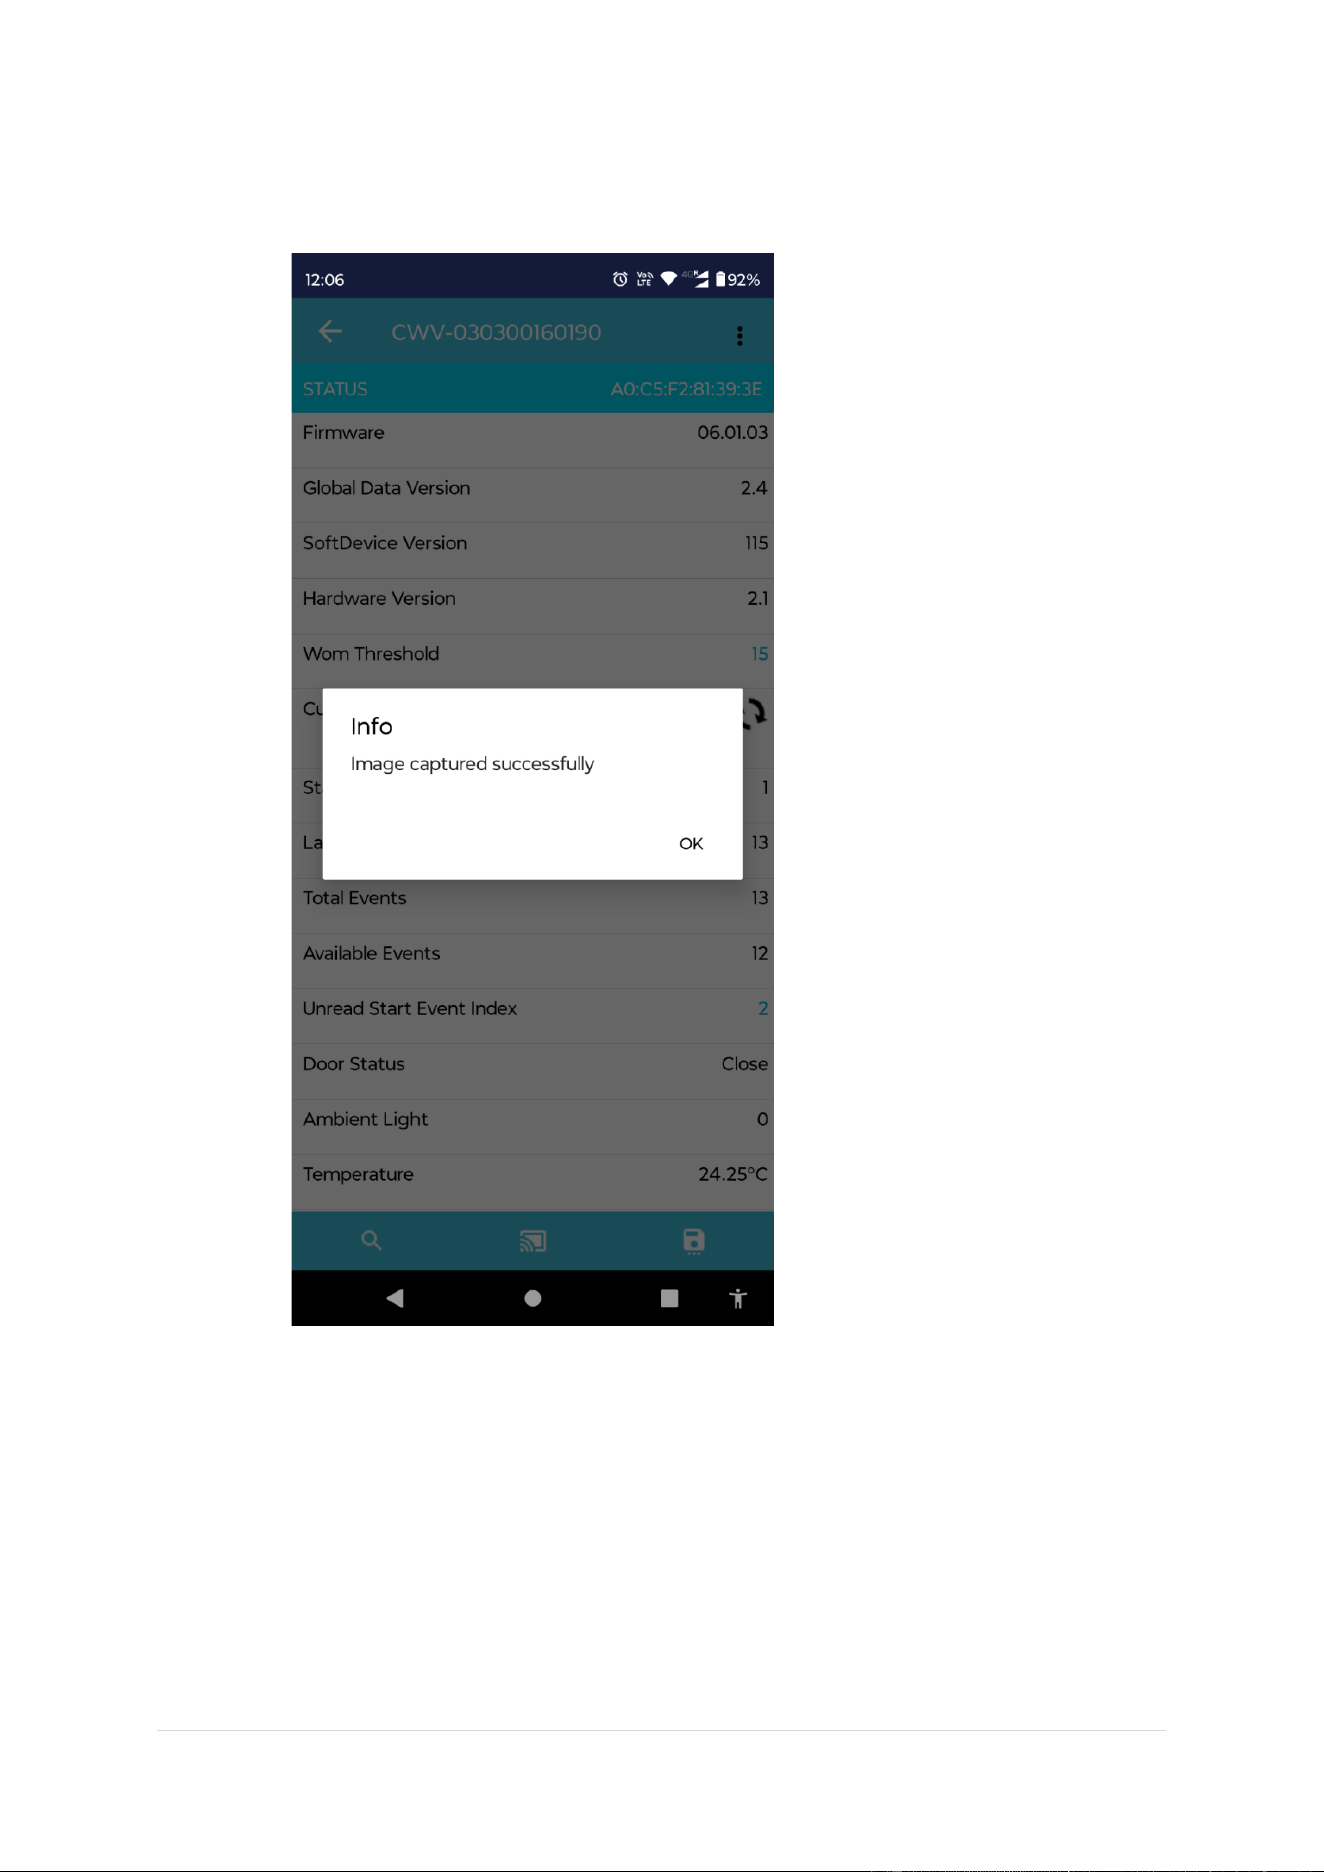
11. How to capture Image manually?
Steps -
1. Click on 3 dots,
2. Now click on Take picture to capture the image,
CoolR Group Inc | www.coolrgroup.com
15 | Page
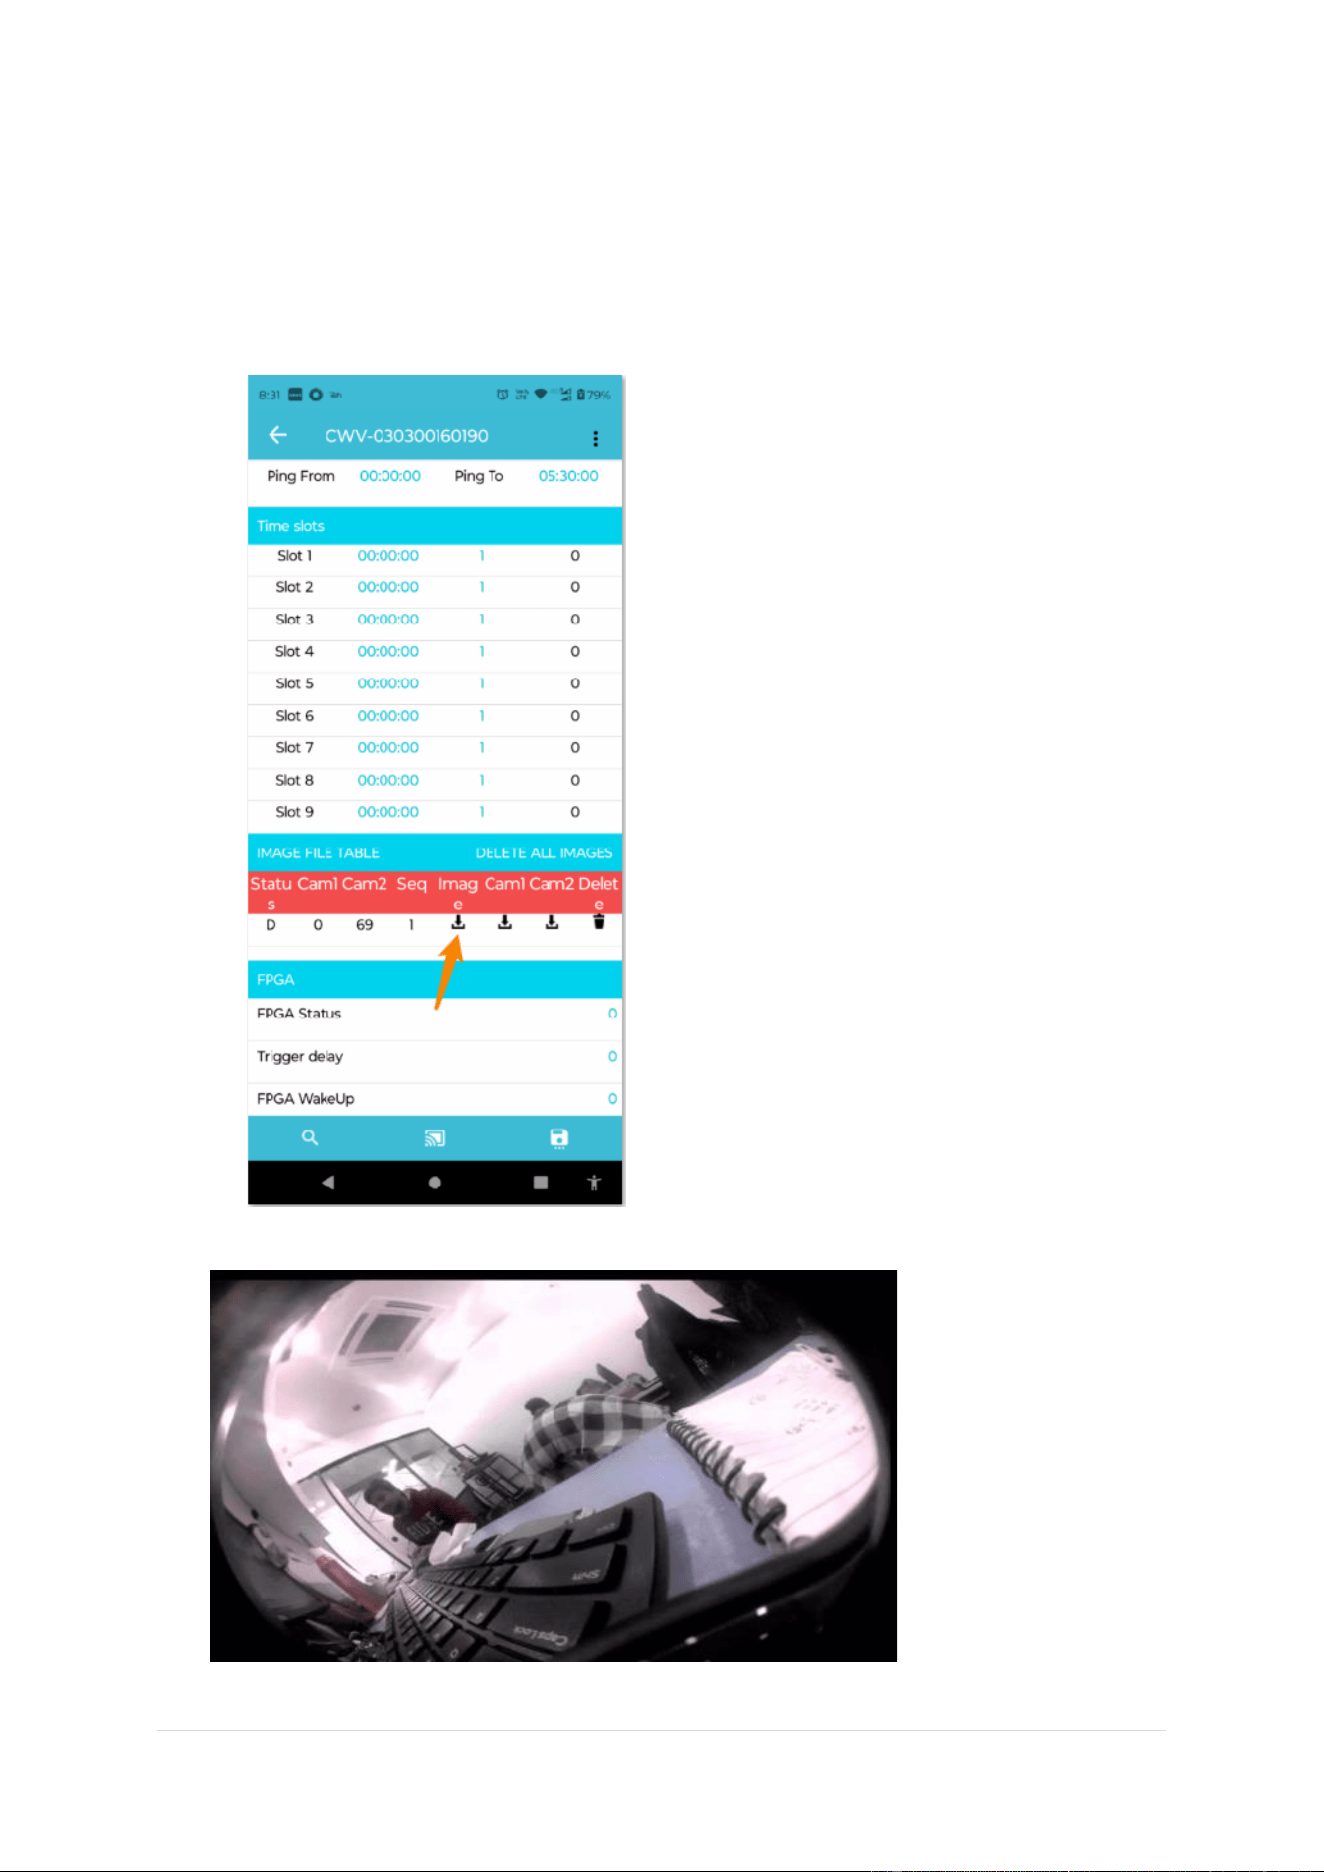
3. A popup will be shown to cofirm that image is captured successfully.
CoolR Group Inc | www.coolrgroup.com
16 | Page
12. How to download/view Image on mobile screen?
Steps-
1. Now connect the device.
2. Scroll down and go to the Image file table,
3. To download the image, click on down arrow pointed in the image.
4. Once image is successfully downloaded, it will be open automatically.
CoolR Group Inc | www.coolrgroup.com
17 | Page
13. How to check events?
Steps –
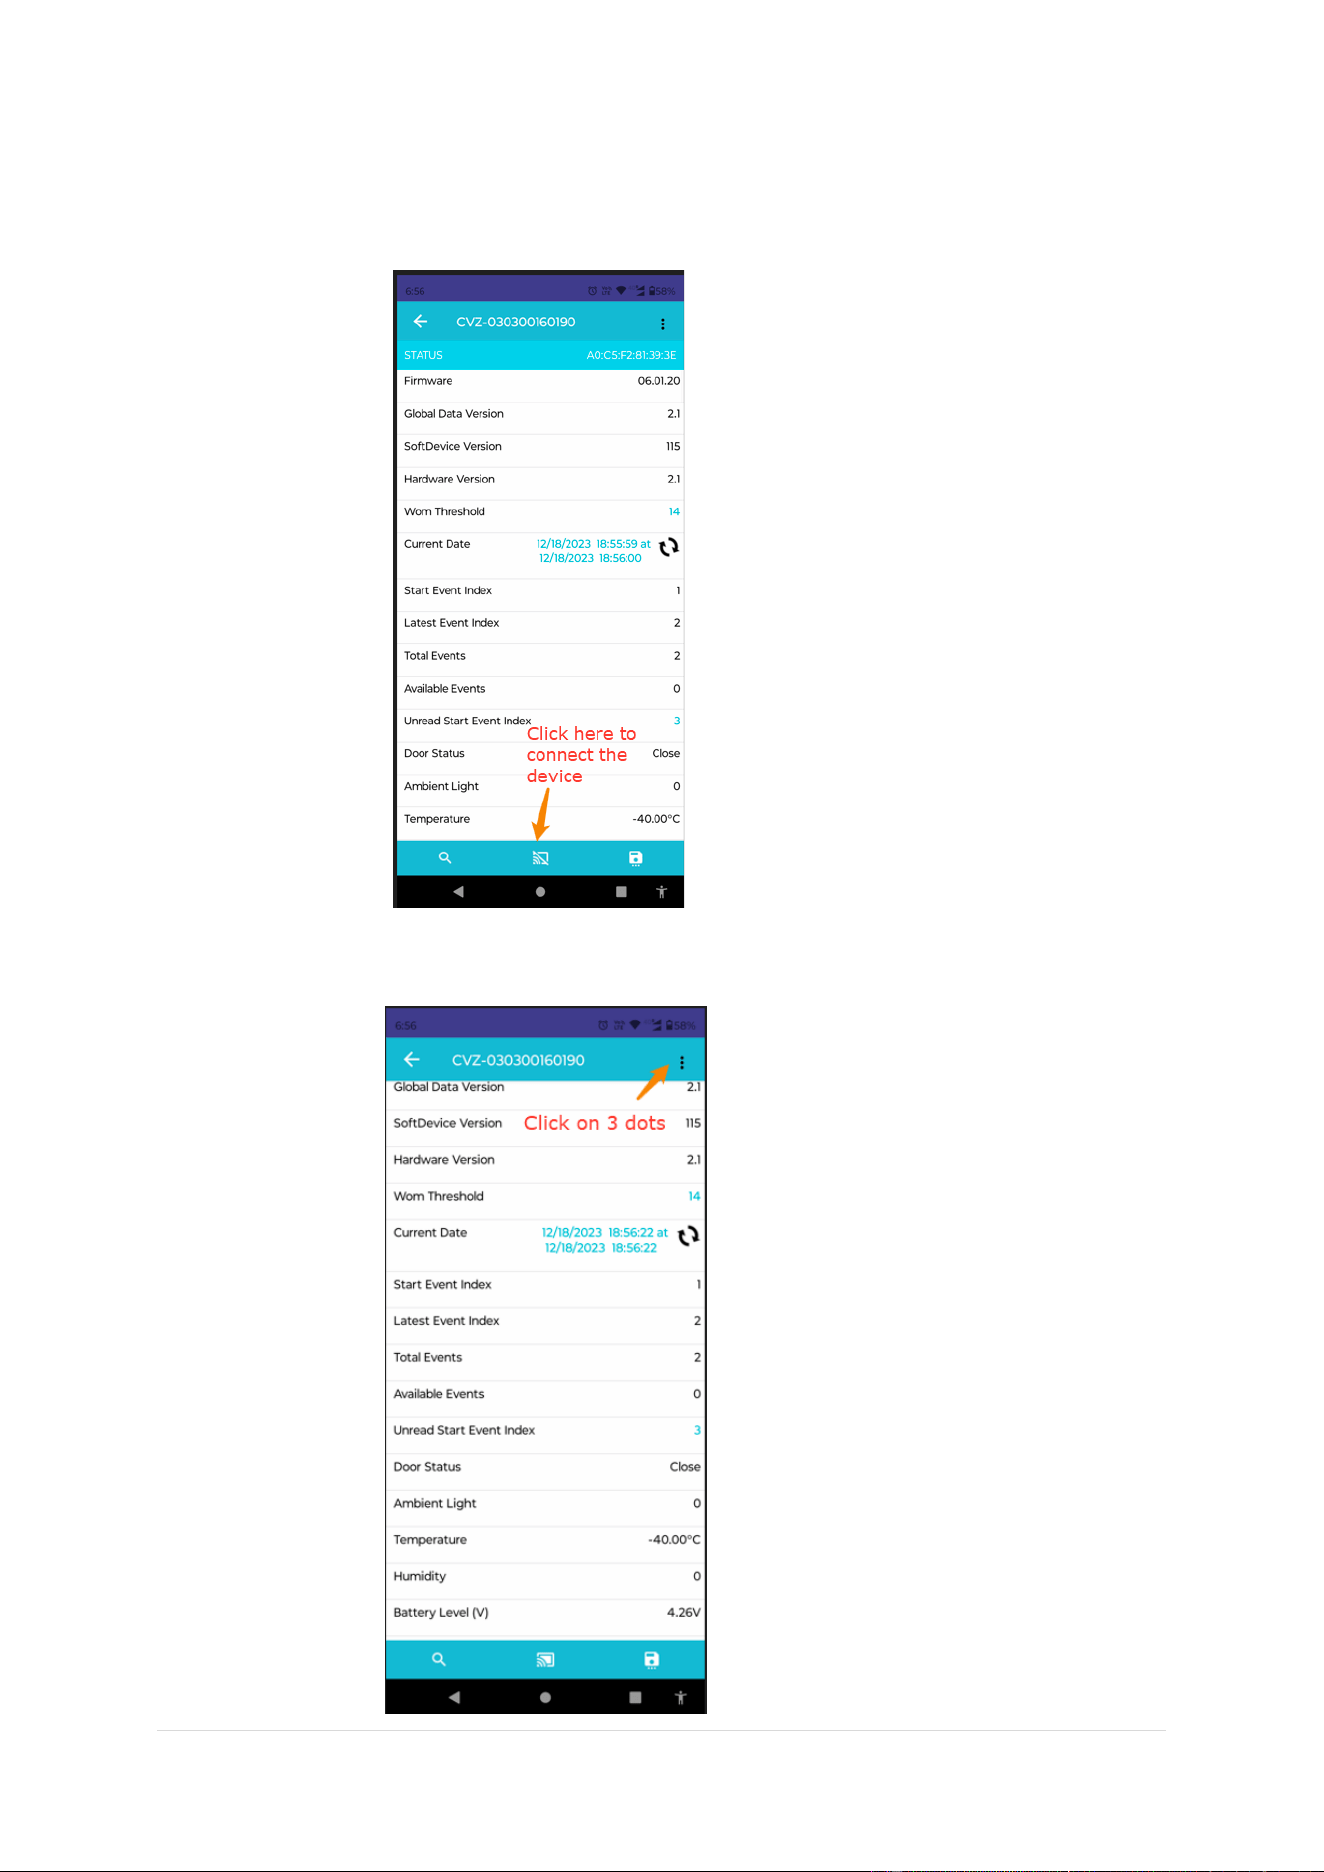
1. Connect the device by clicking on the pointed icon.
2. Now click on 3 dots.
CoolR Group Inc | www.coolrgroup.com
18 | Page
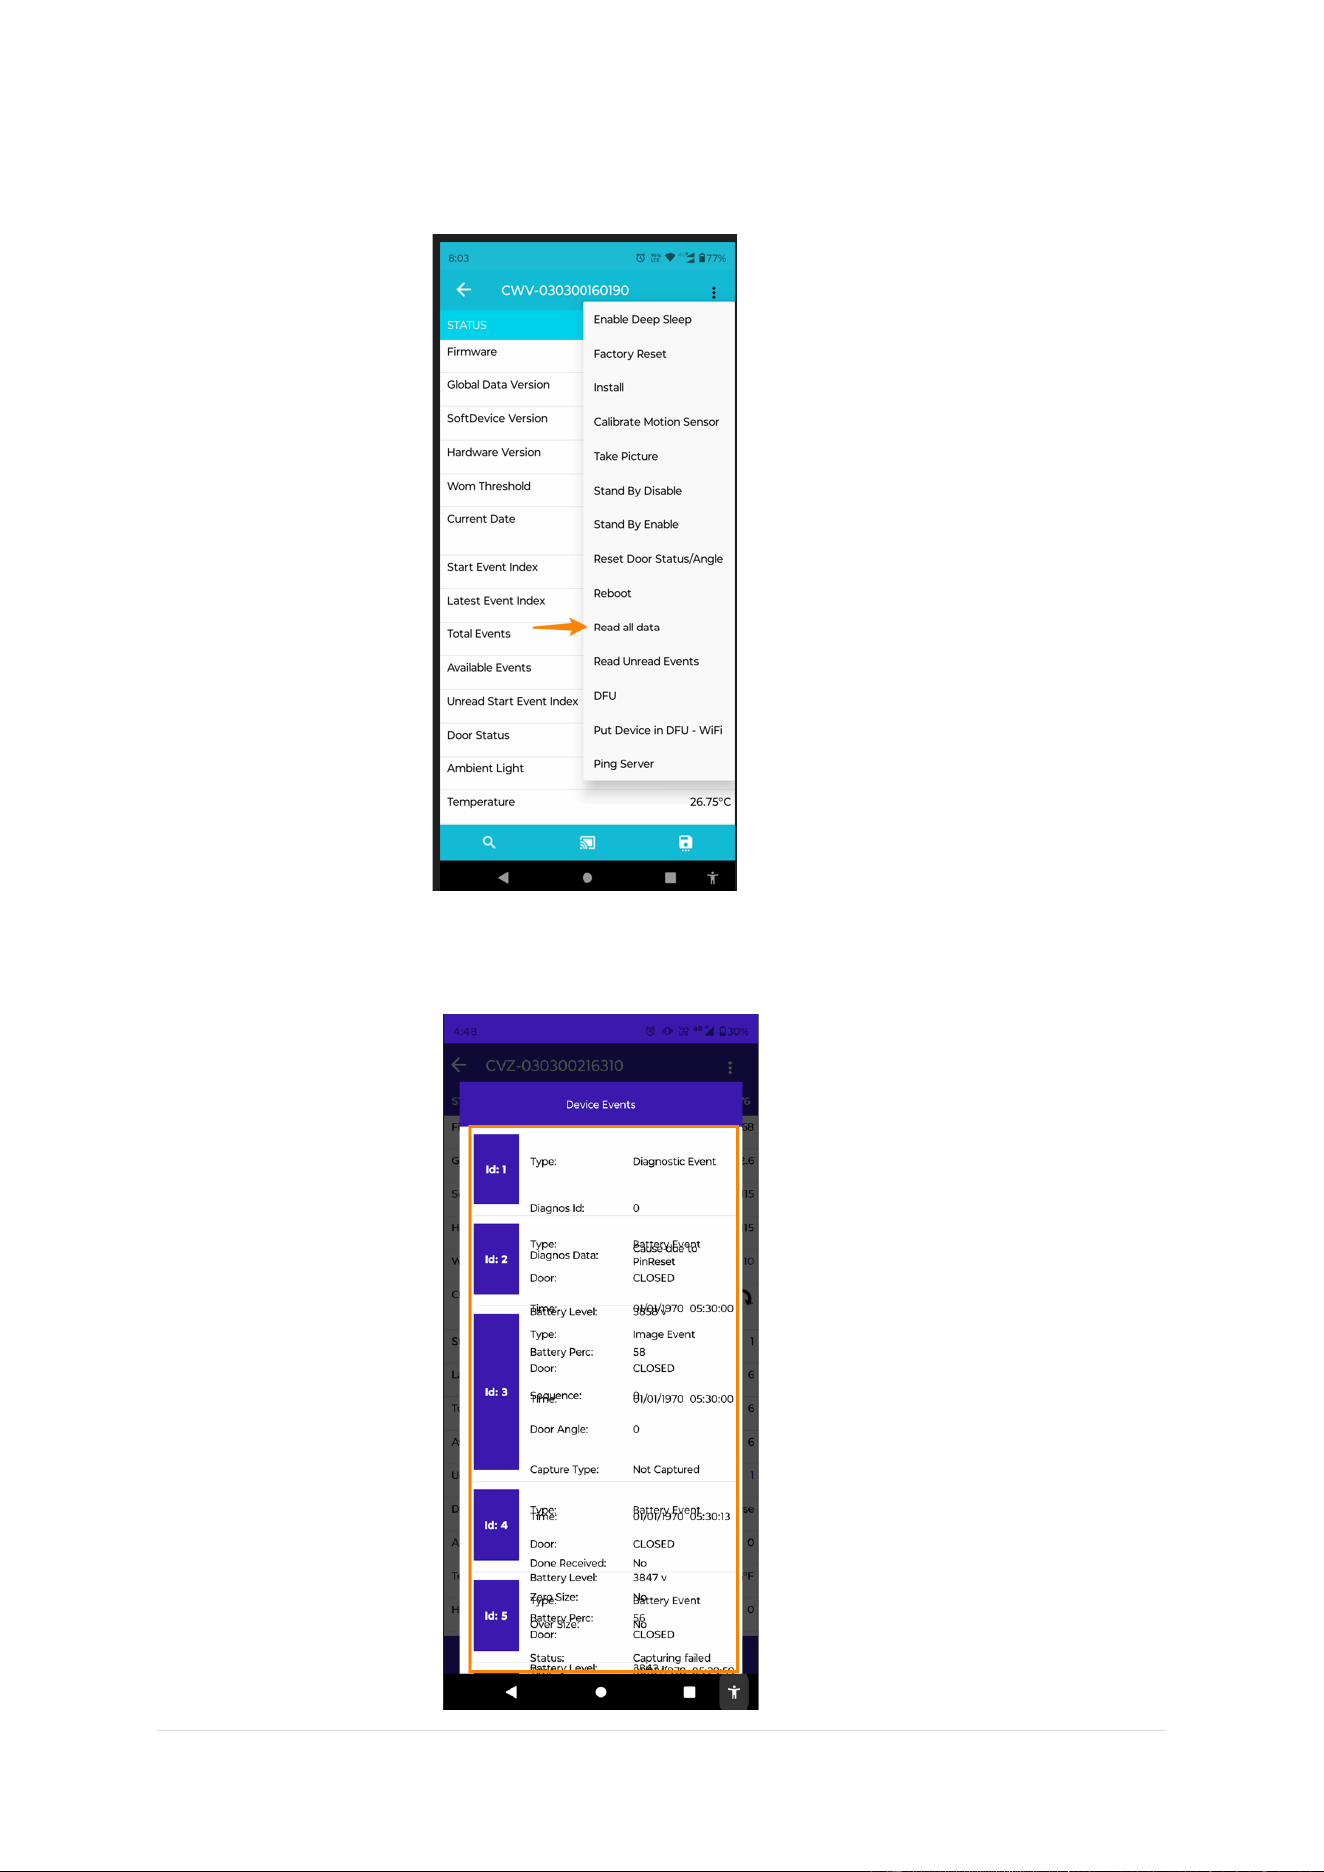
3. Click on Read all data
4. Here all the events can be read.
CoolR Group Inc | www.coolrgroup.com
19 | Page
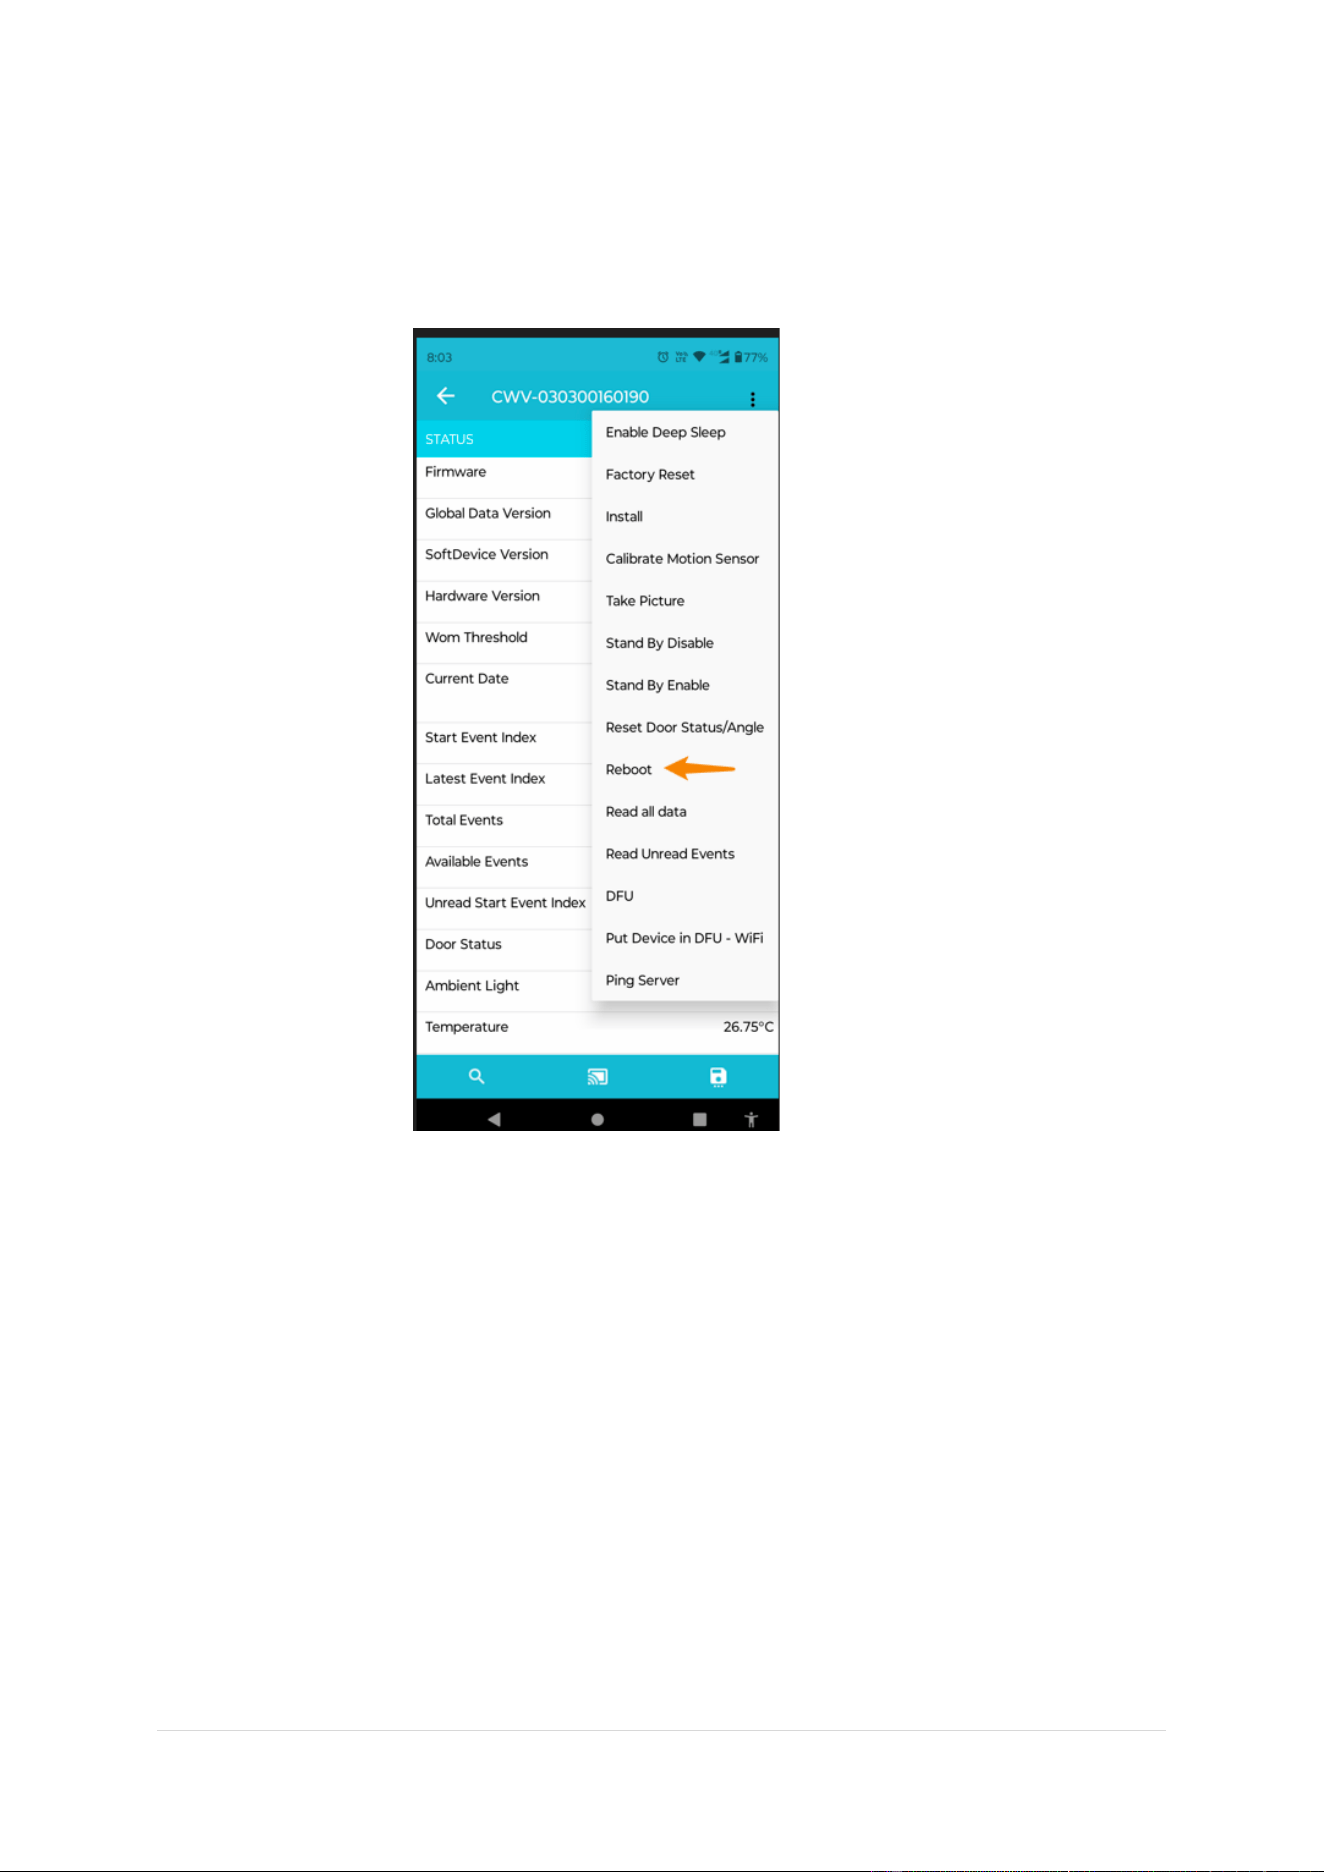
14. How to reboot the device?
Steps-
1. Connect the device first.
2. By clicking on 3 dots go to the Reboot option.
CoolR Group Inc | www.coolrgroup.com
20 | Page
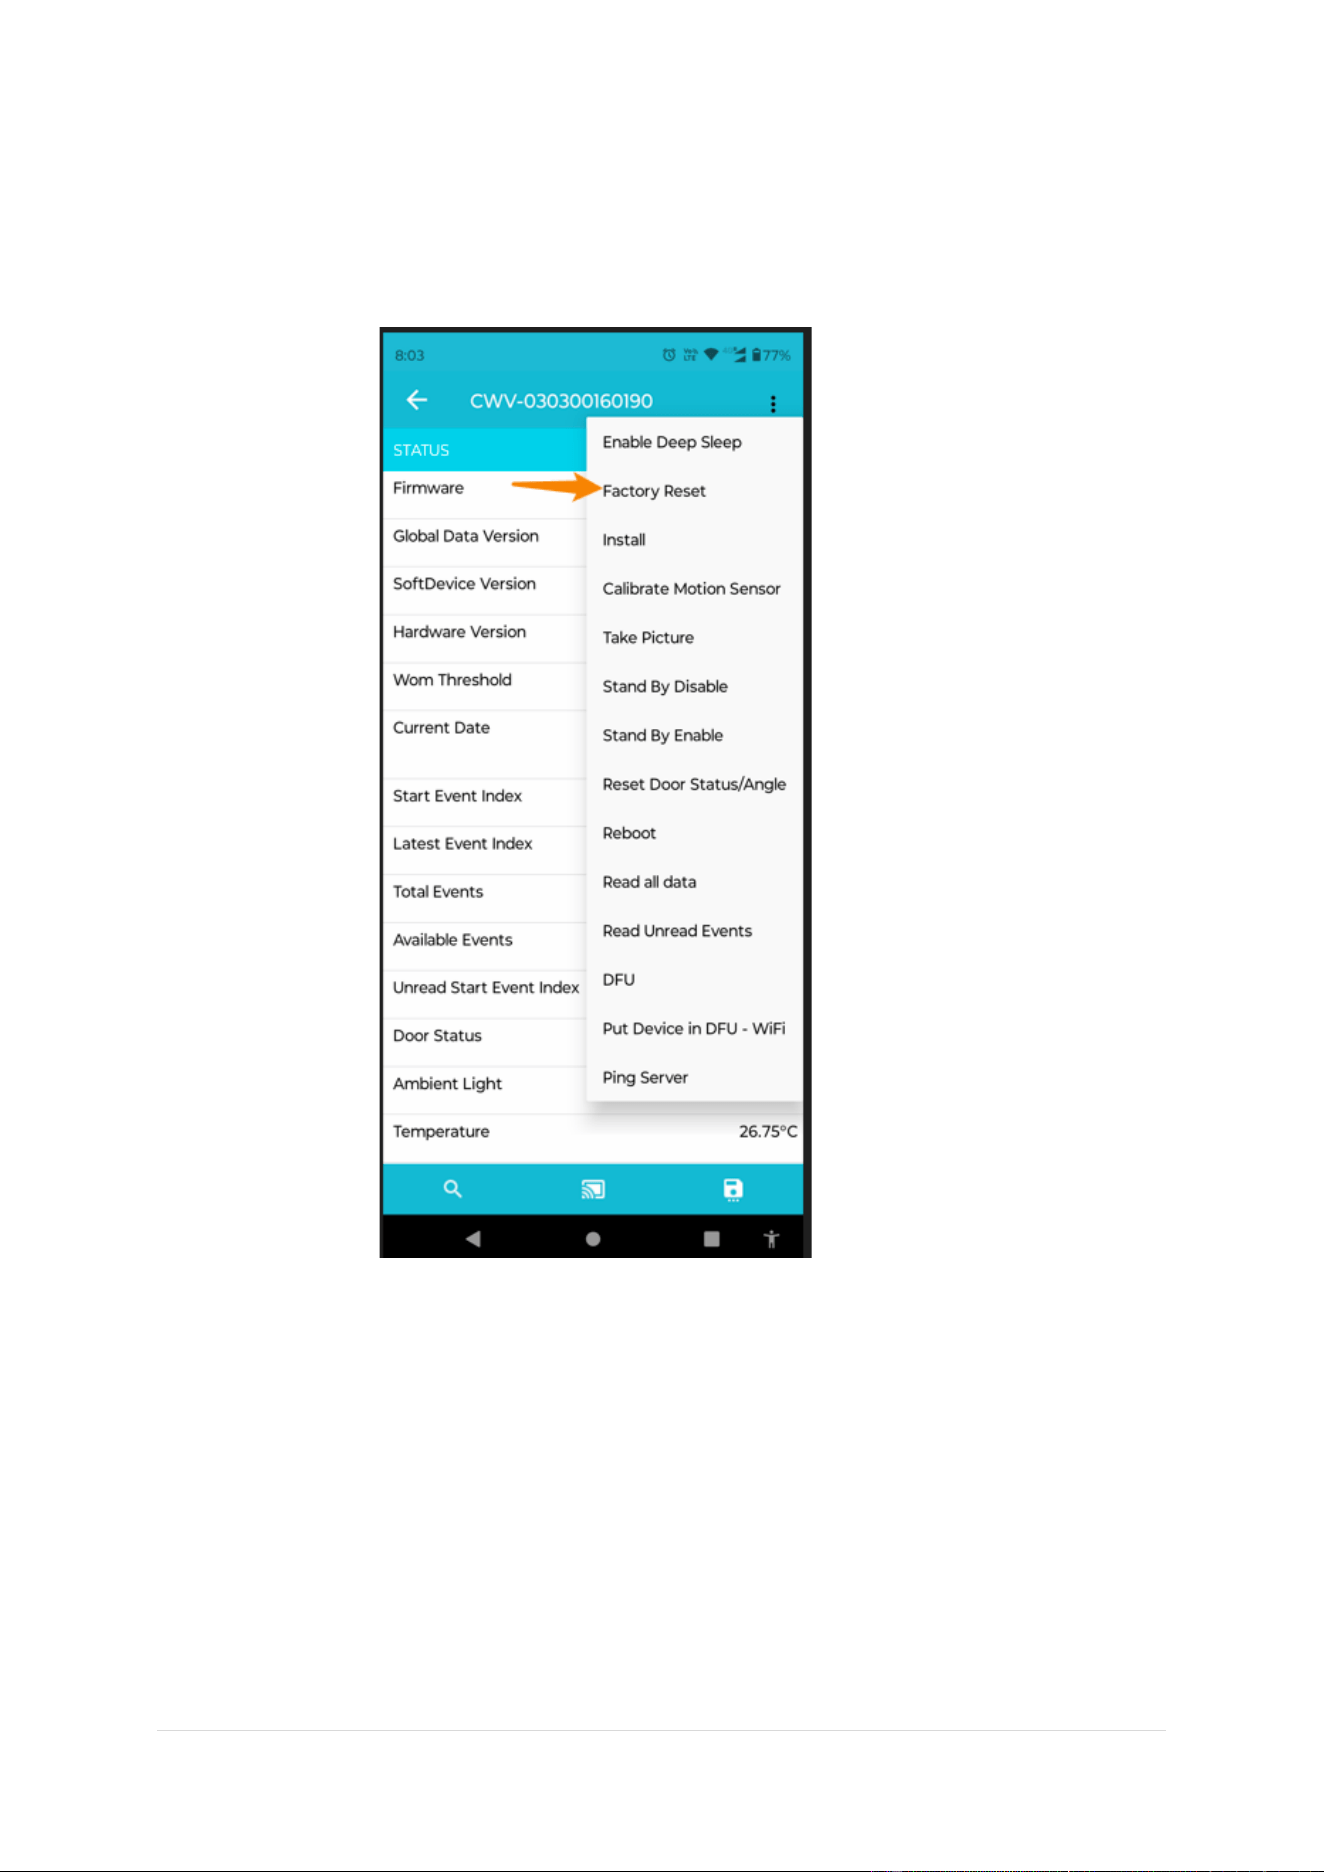
15. How to Factory Reset?
Steps-
1. Connect the device first.
2. By clicking on 3 dots go to the Factory Reset option.
CoolR Group Inc | www.coolrgroup.com
21 | Page
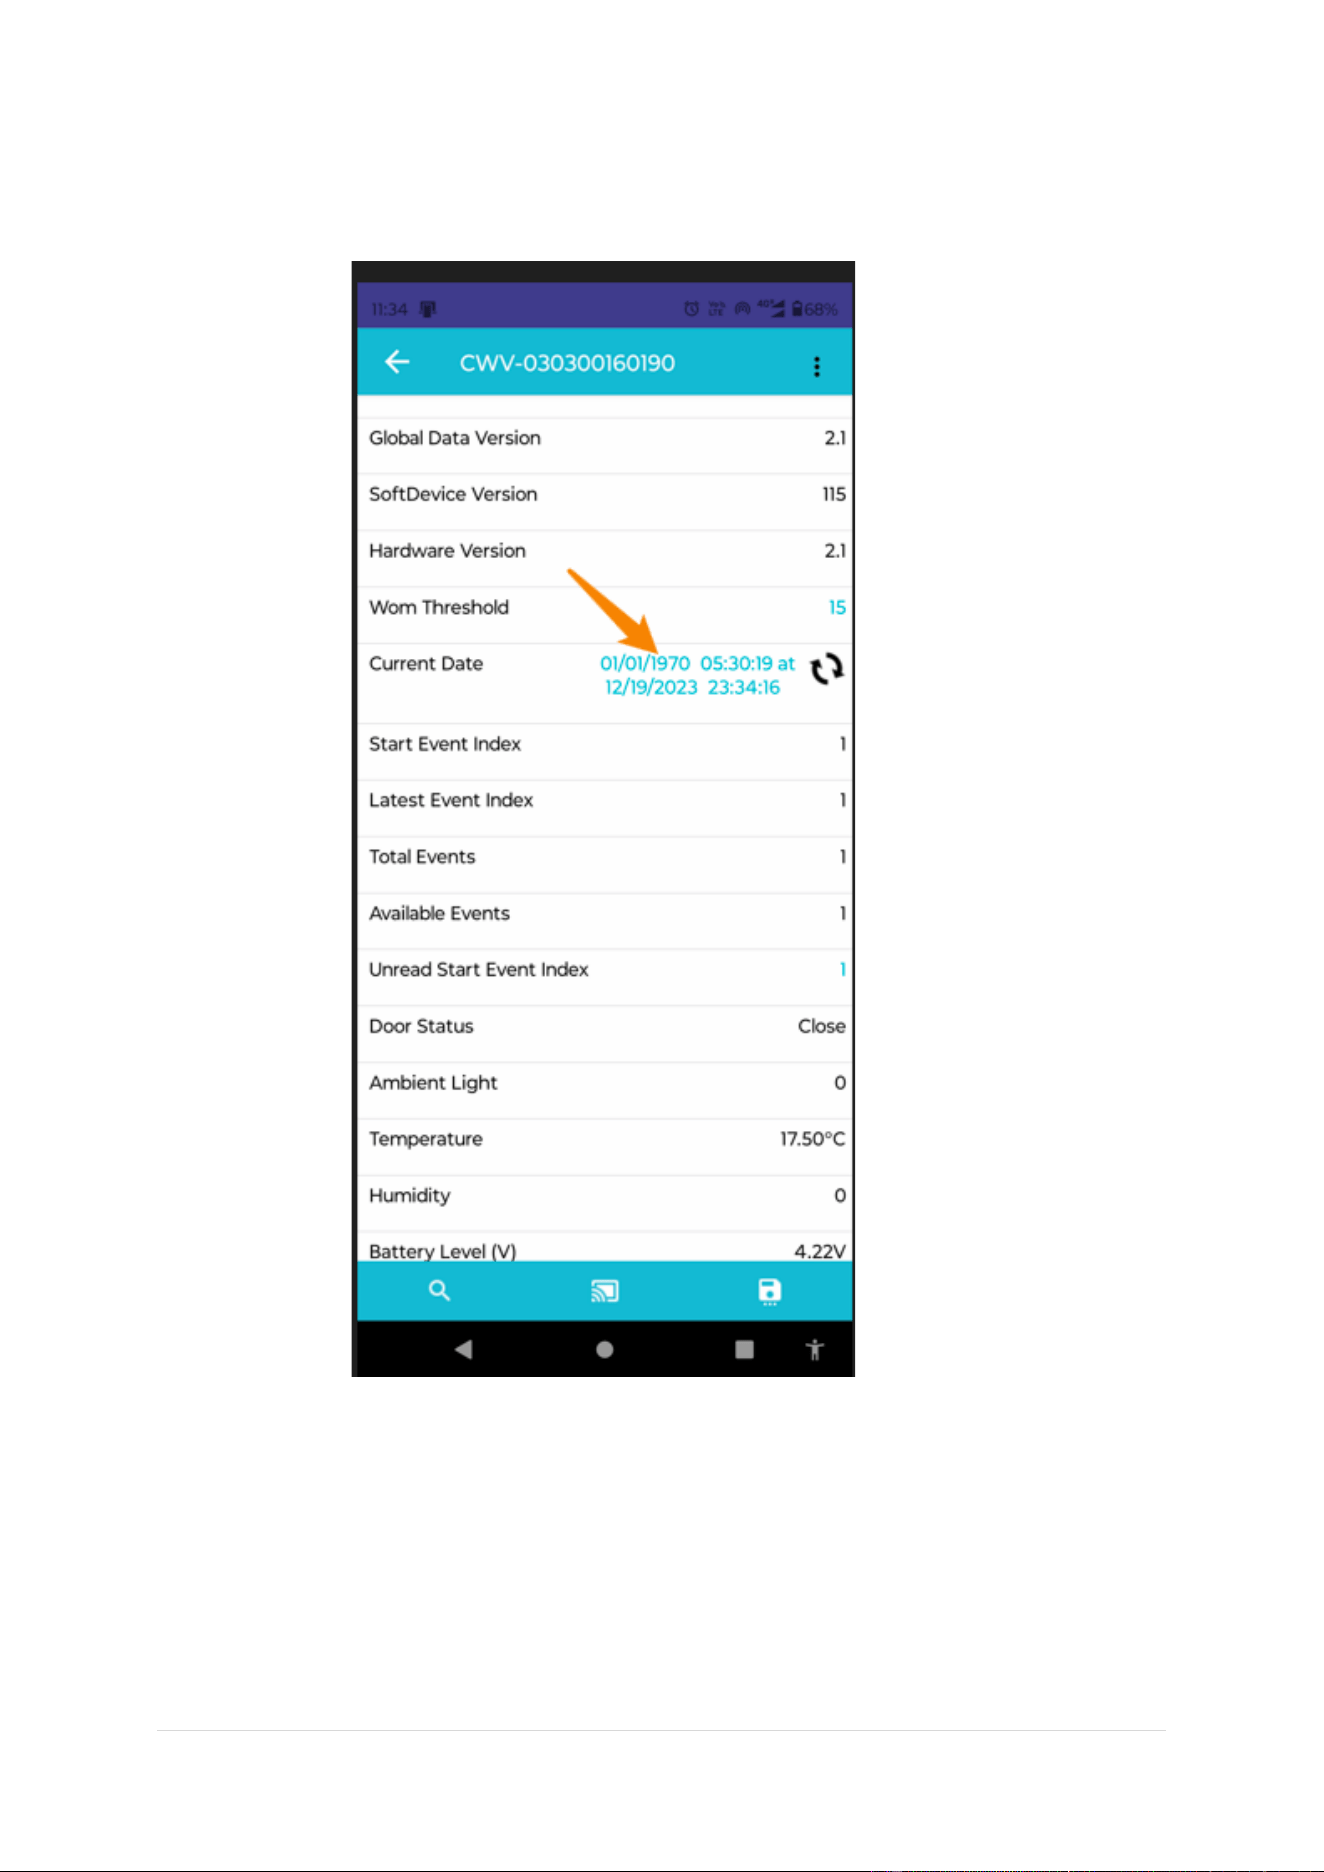
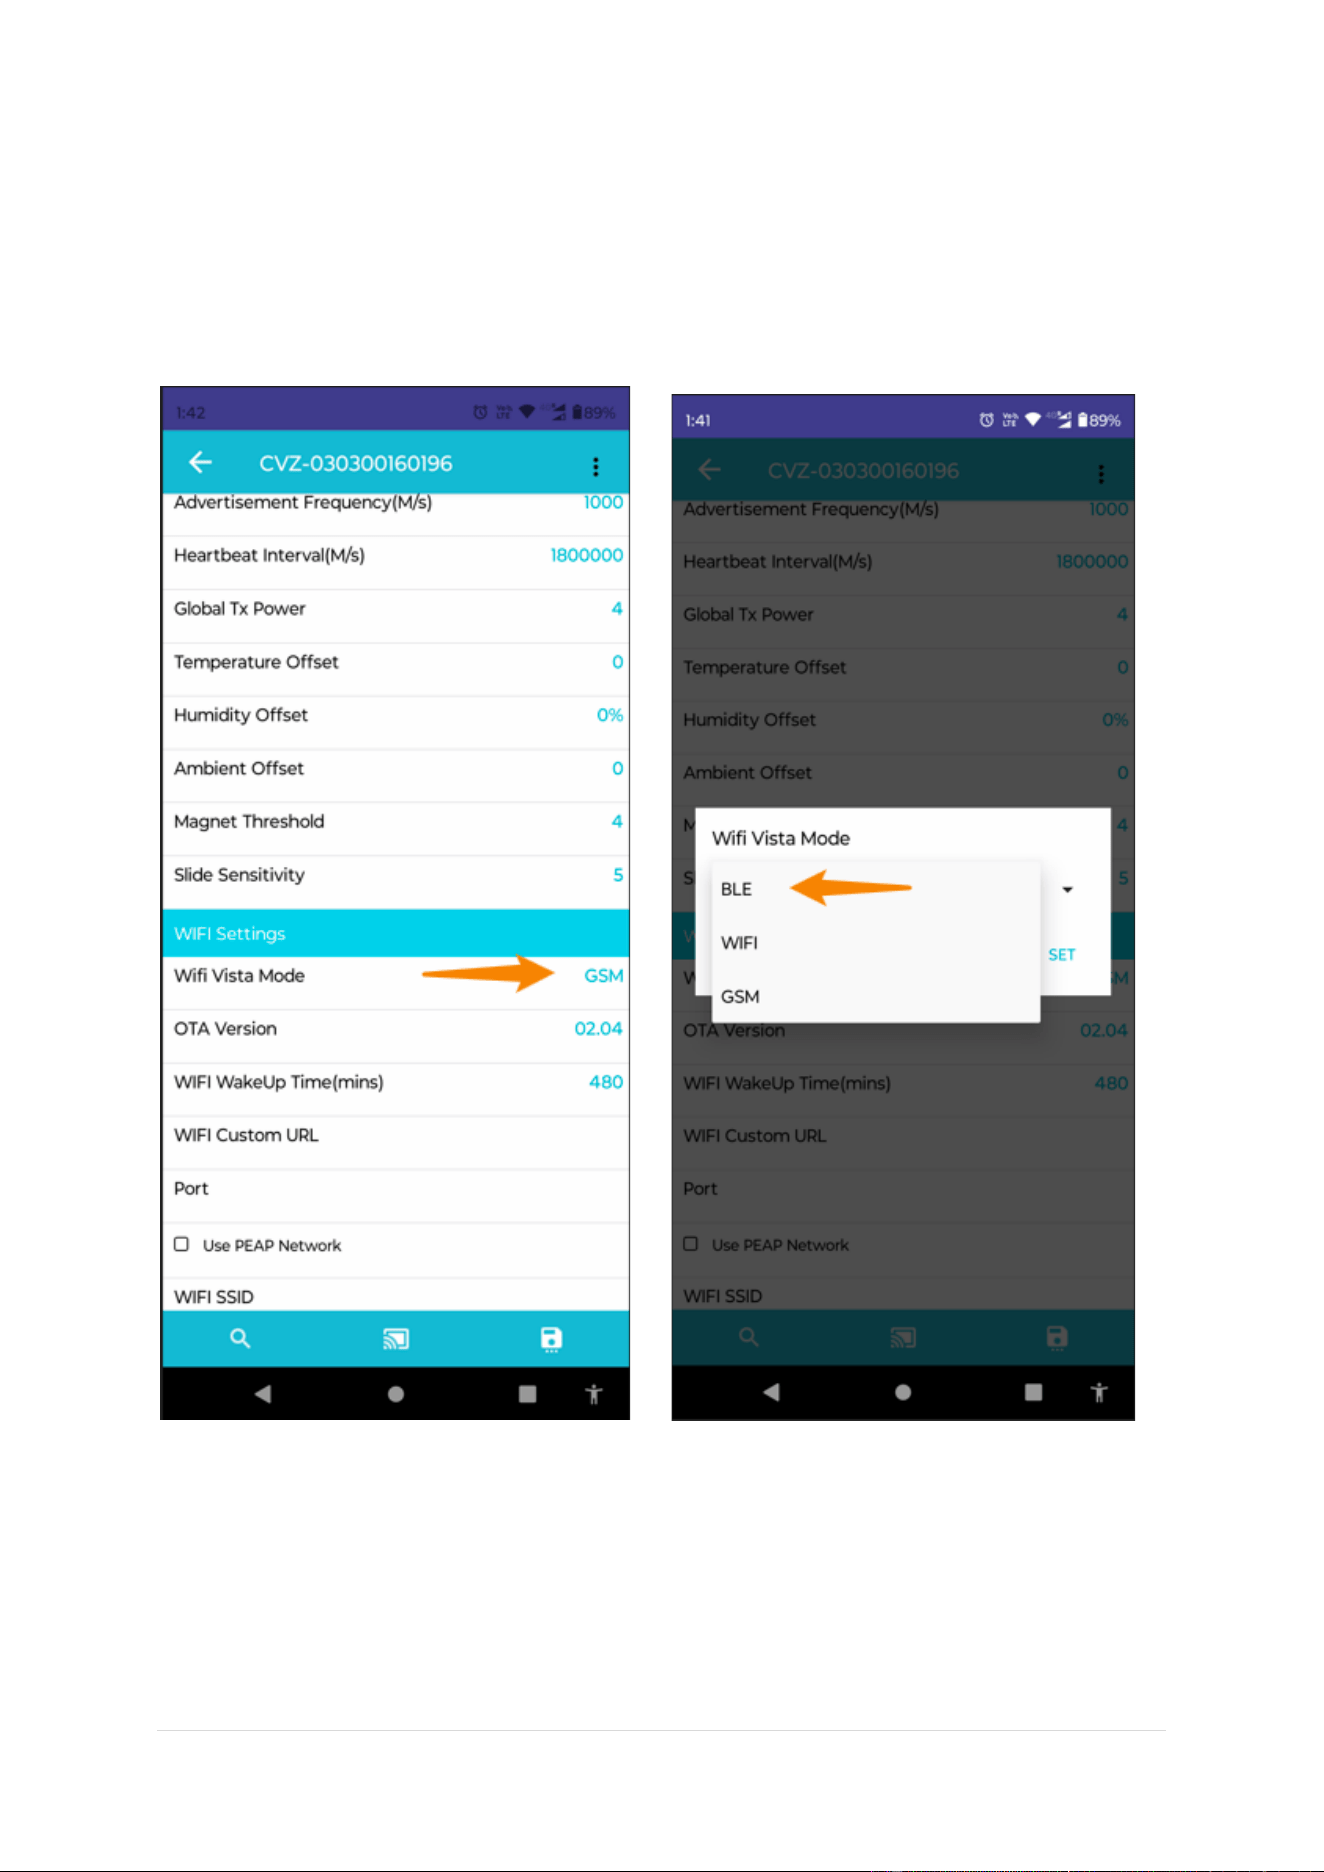
3. To check whether factory reset done or not, connect the device,
4. We can see the device time is reset.
CoolR Group Inc | www.coolrgroup.com
22 | Page
16. How to upload the image on CoolR server over BLE?
Steps –
1. Connect the device.
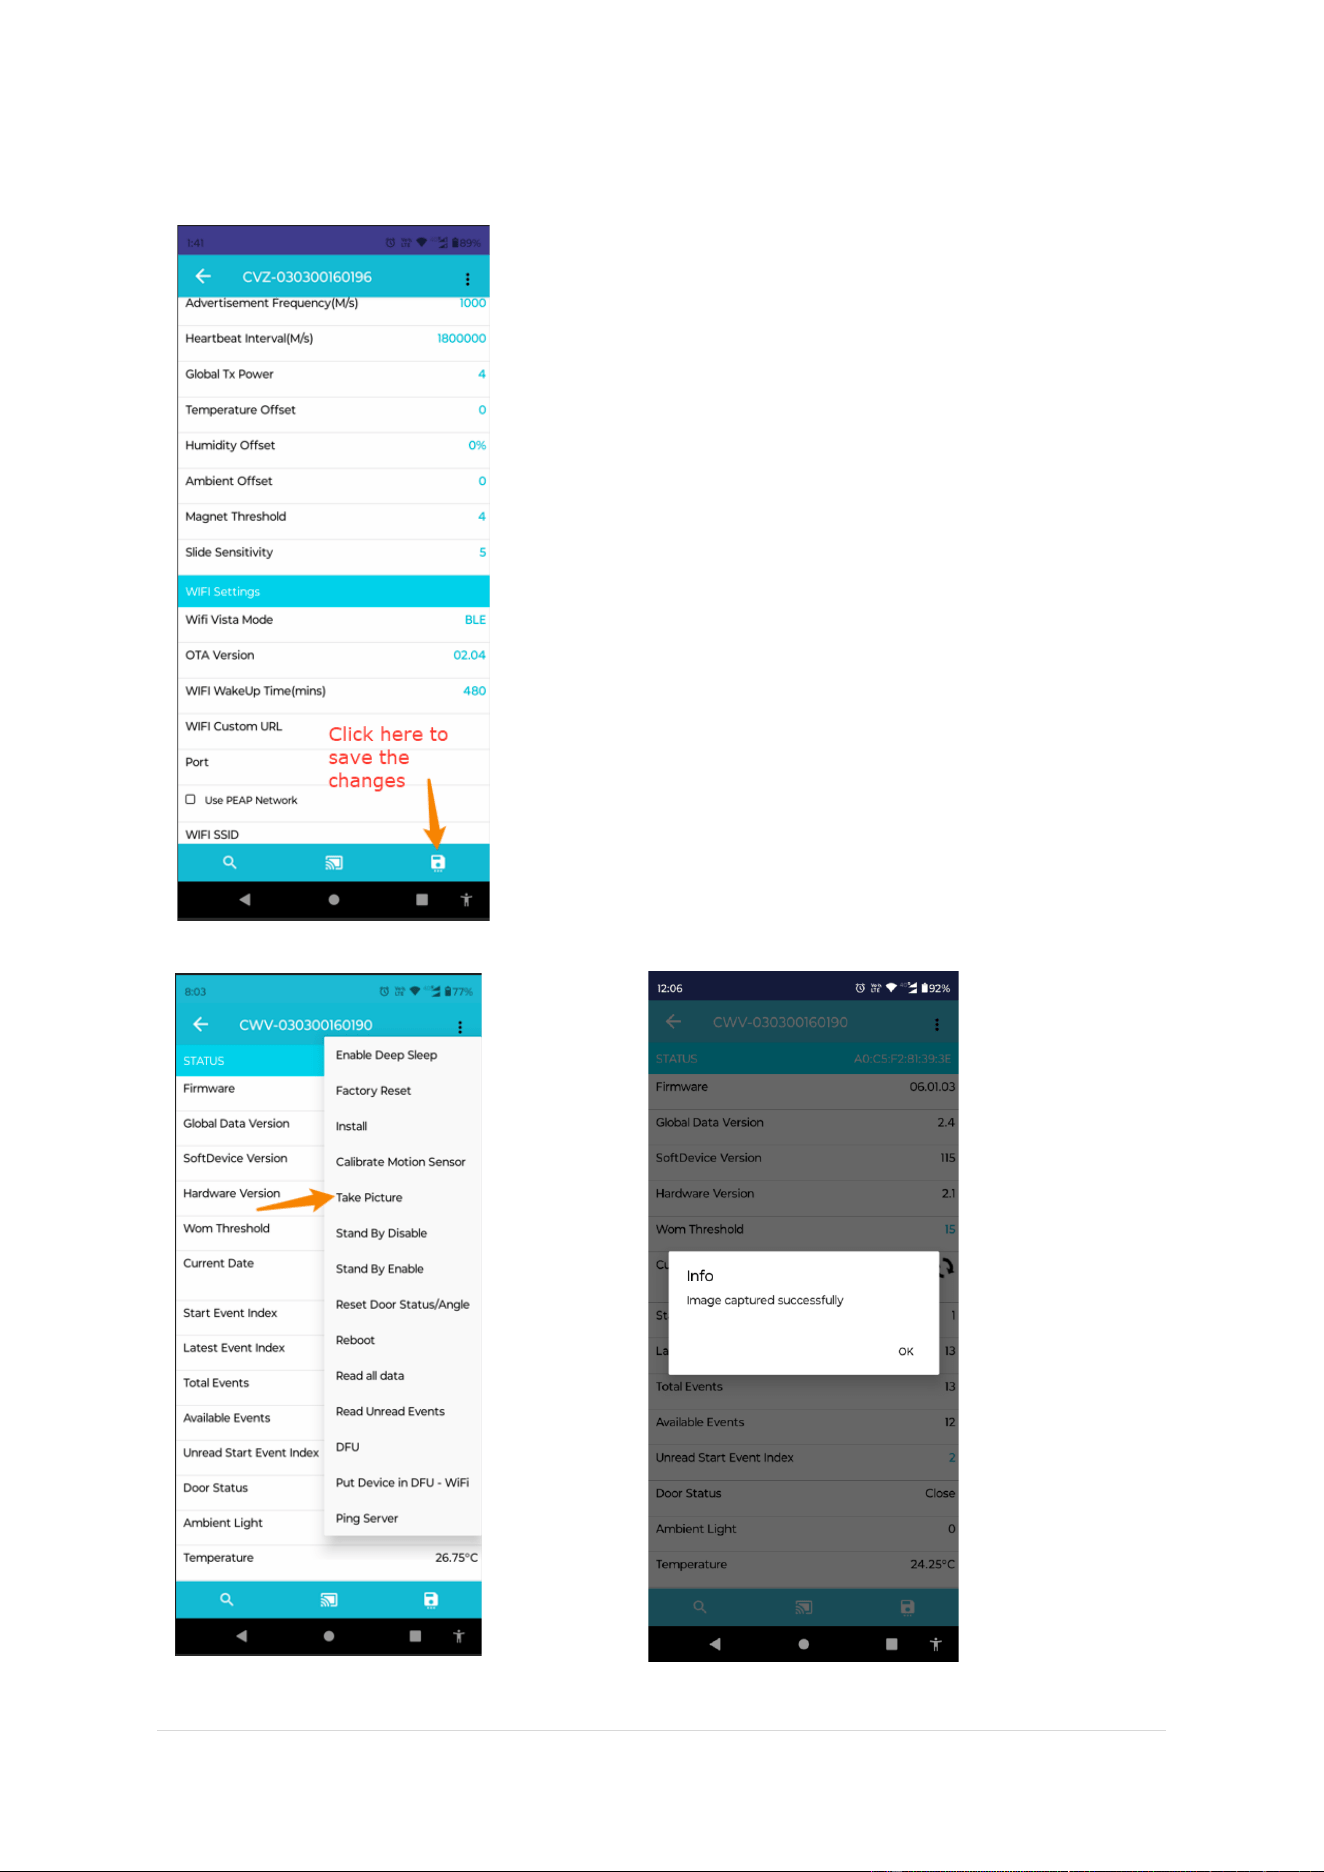
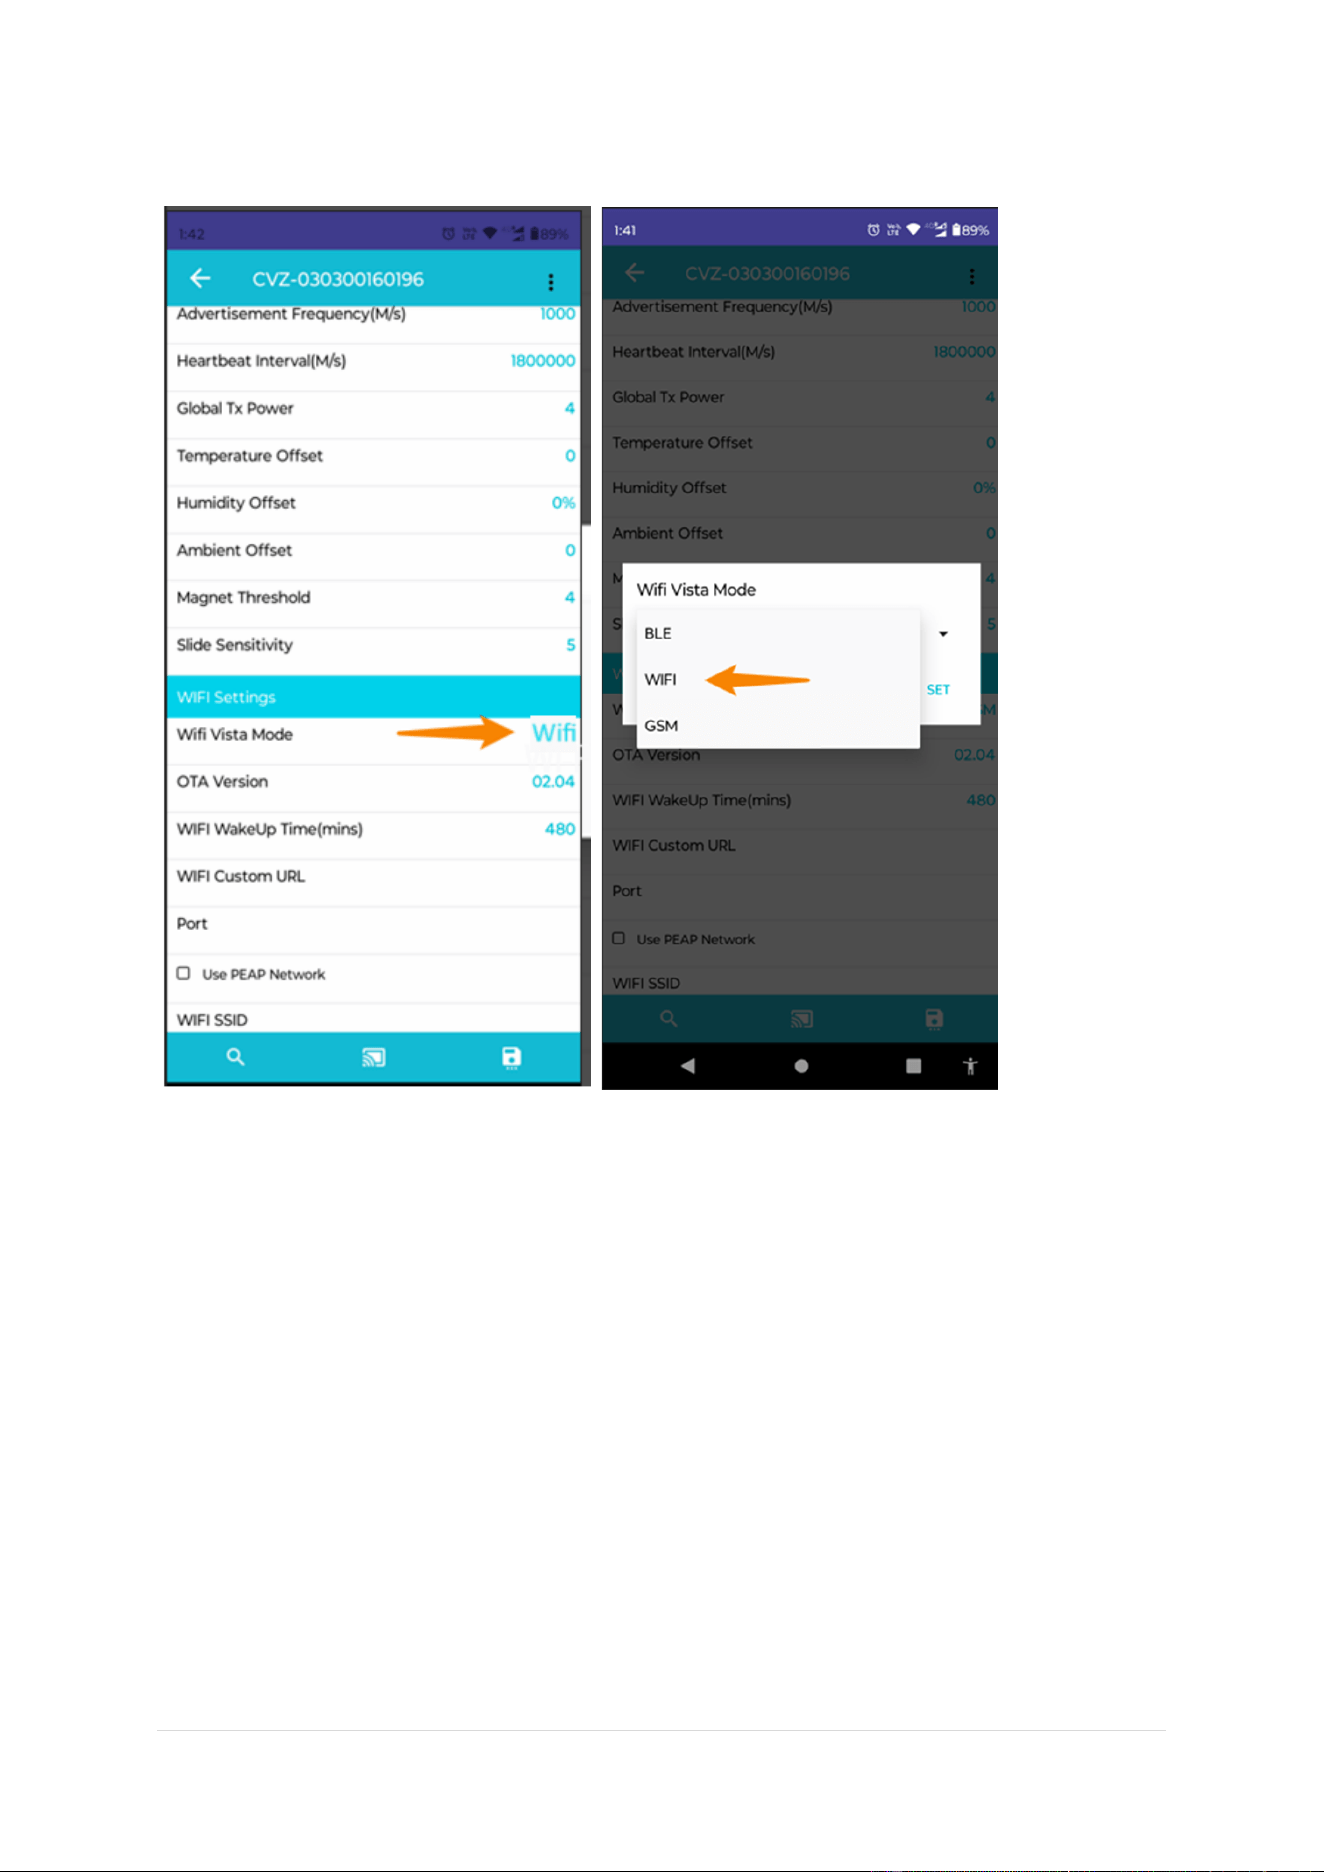
2. Now go the WIFI Settings
3. Click on the GSM (It can be GSM or WiFi or BLE mode, based on last mode you are working)
4. Select BLE. (note by default device remains in BLE mode)
CoolR Group Inc | www.coolrgroup.com
23 | Page
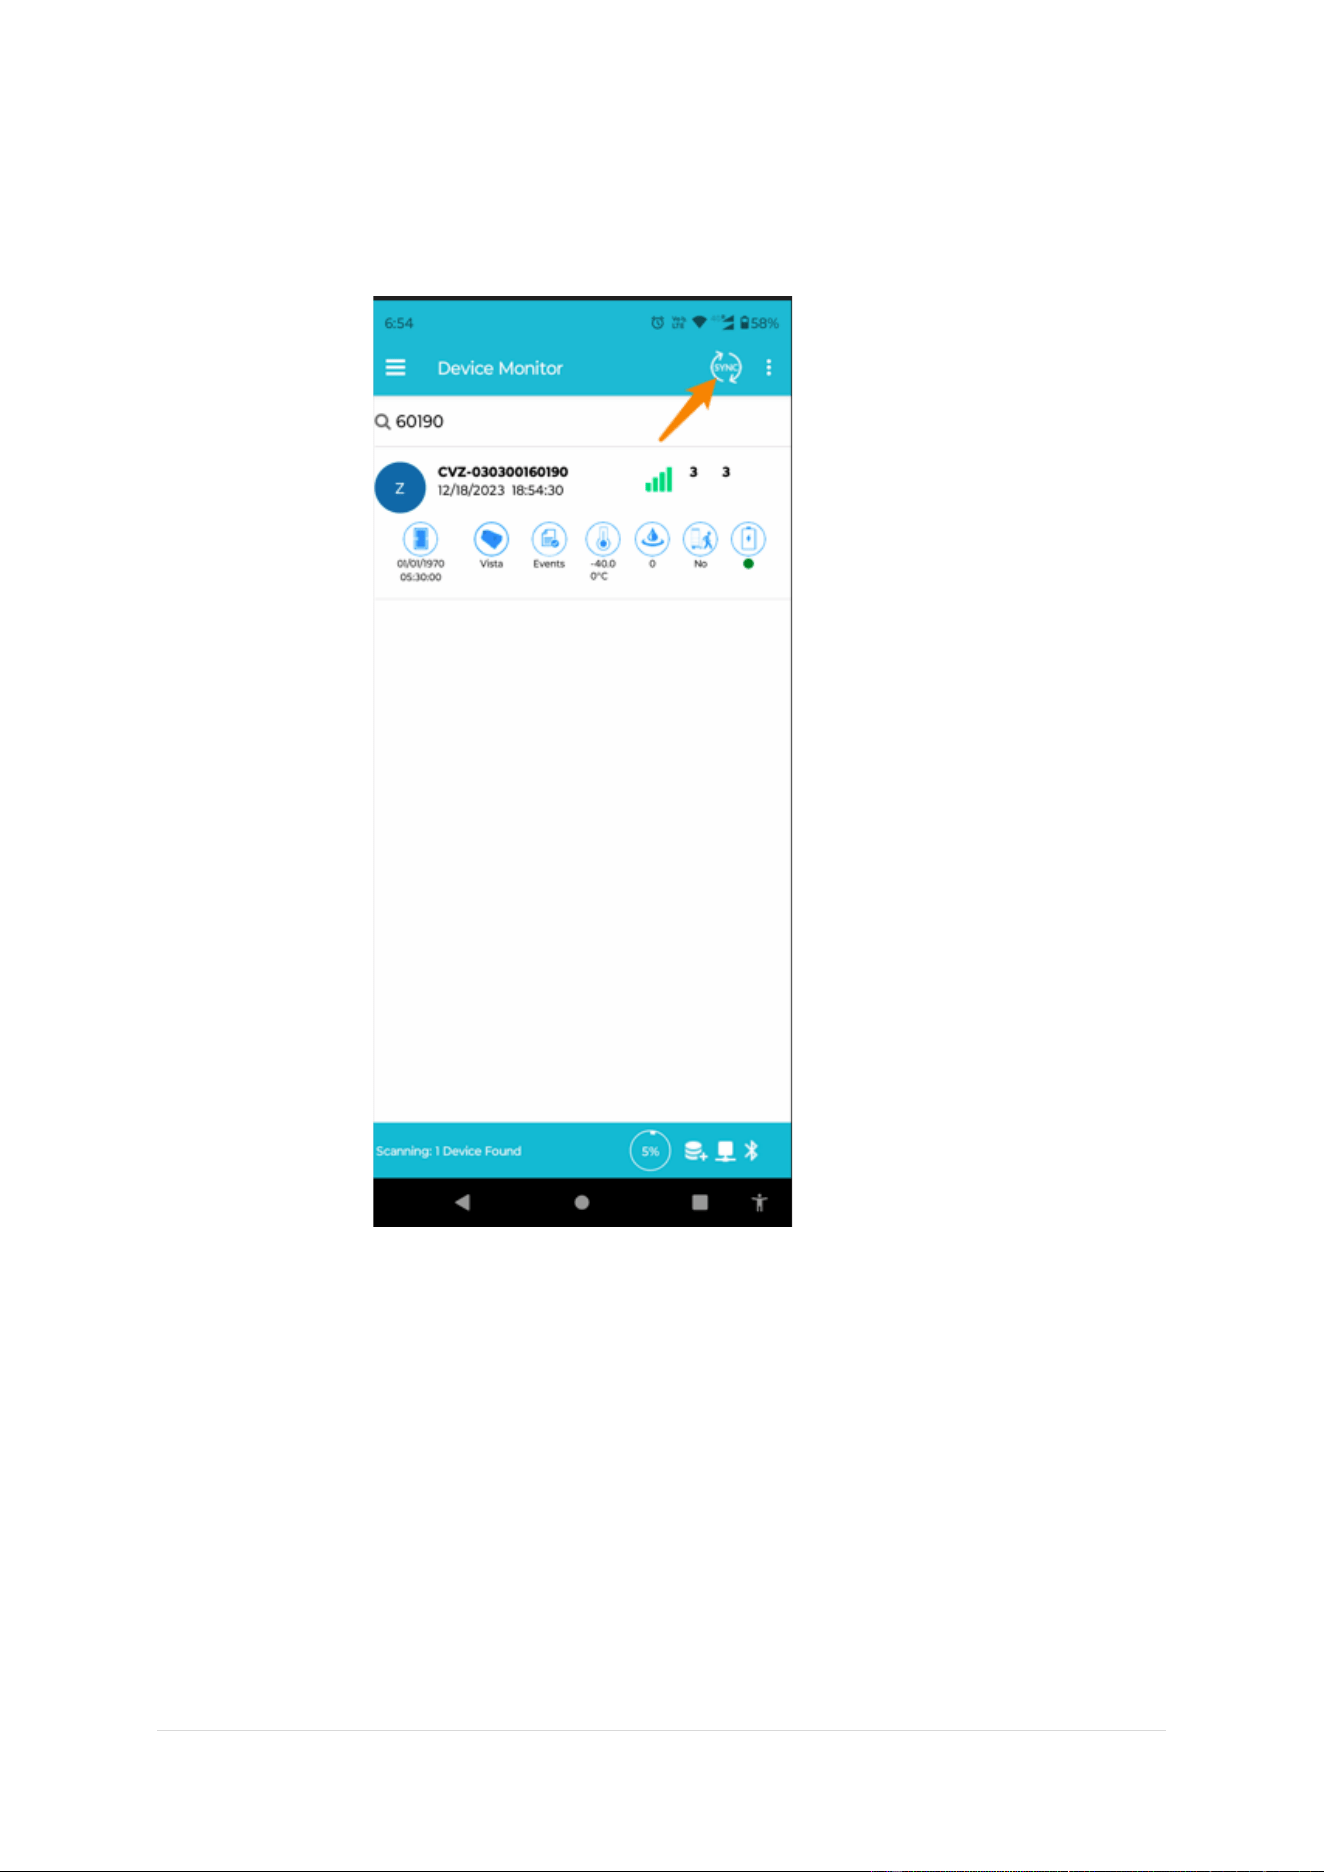
5. To save this setting click on the right bottom icon pointed in the image.
6. Now click on take picture.
CoolR Group Inc | www.coolrgroup.com
24 | Page
7. Once image is captured successfully, then repeat the steps from 1.8 to 1.13 to sync the device,
this process downloads the image from device via BLE and upload over the server.
CoolR Group Inc | www.coolrgroup.com
25 | Page
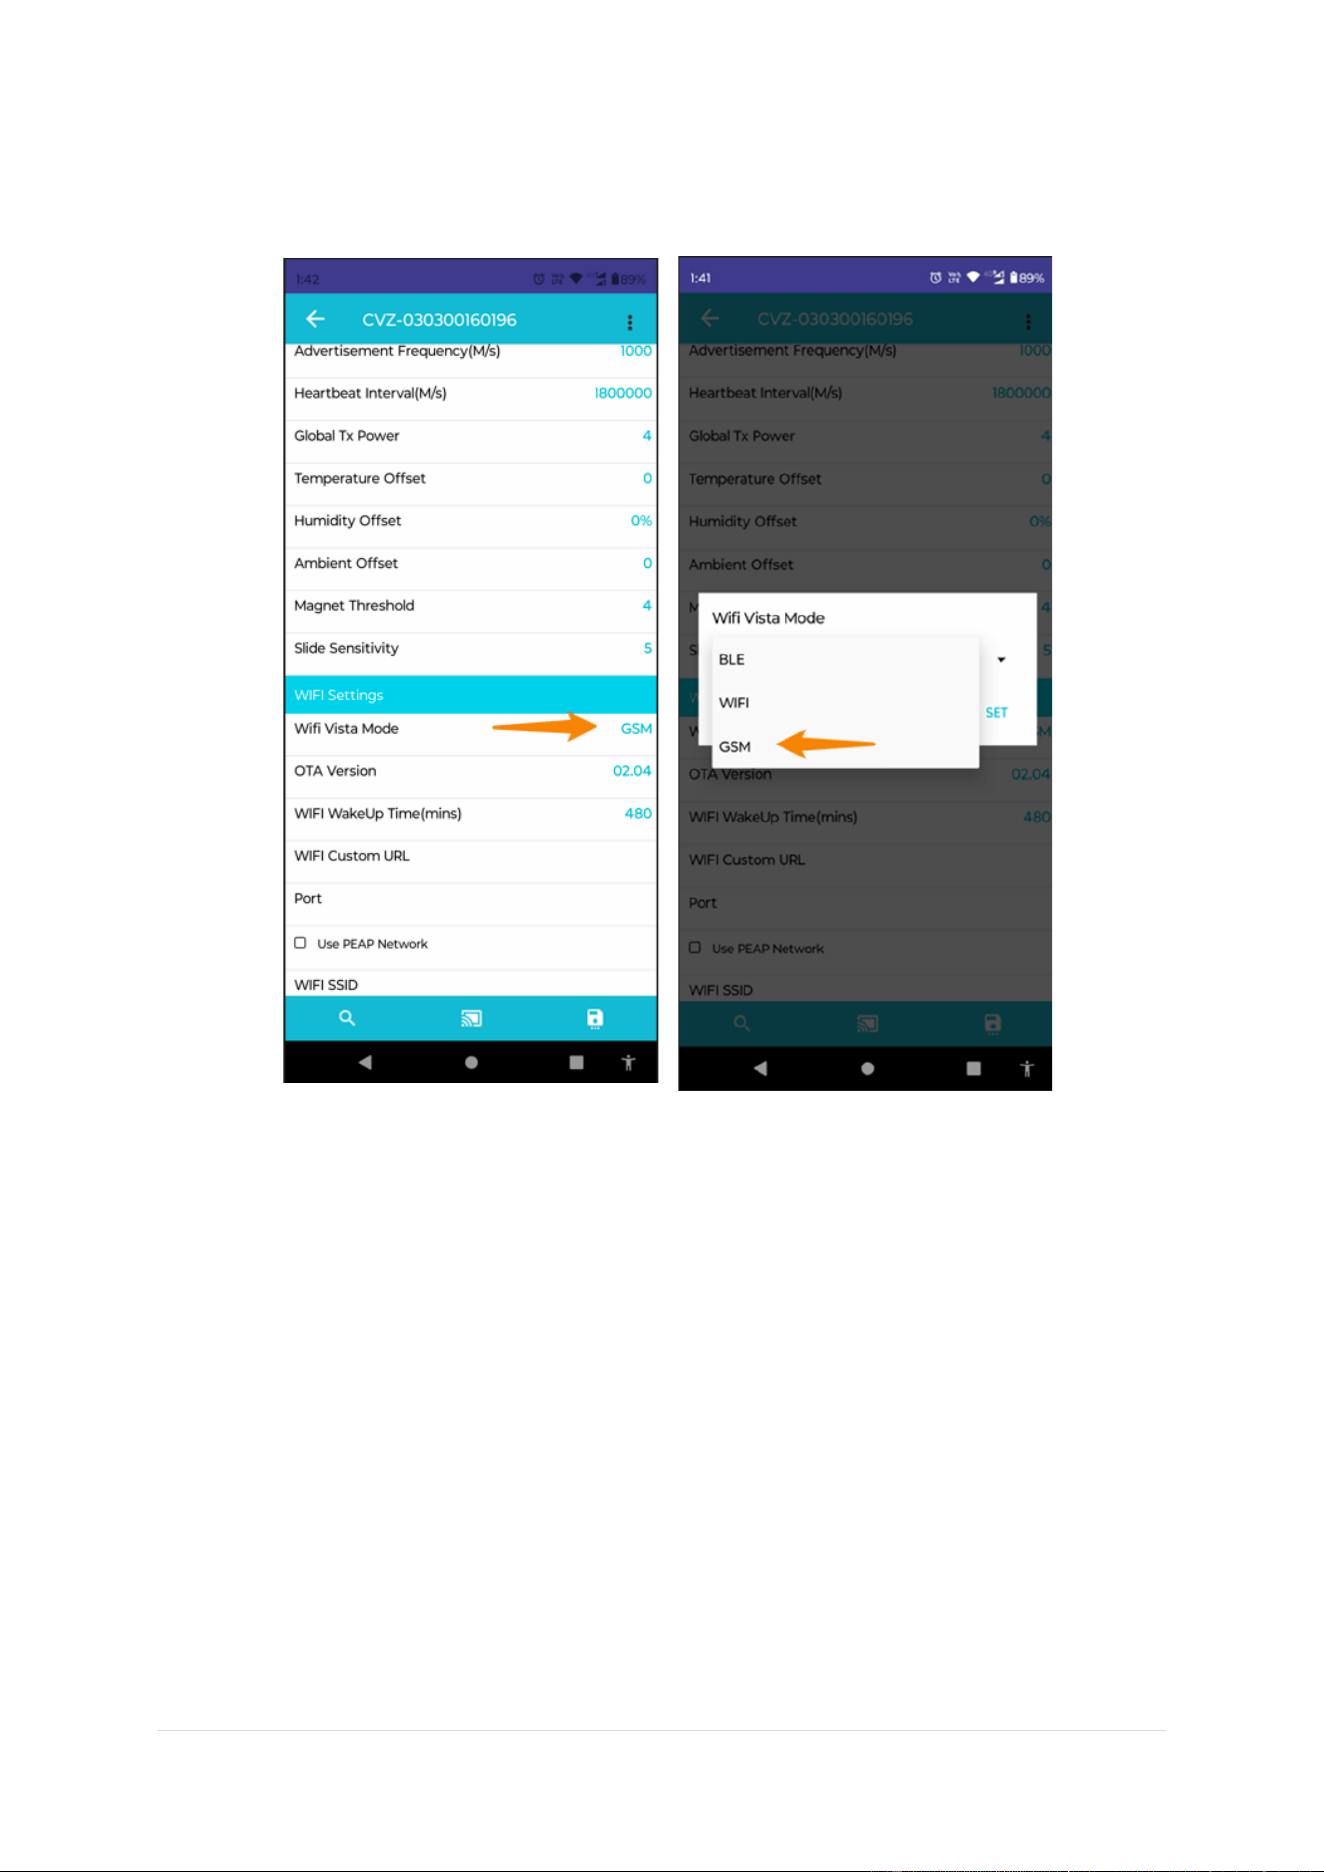
17. How to enable Wi-Fi?
18. How to upload the image on portal over WIFI?
TBD
CoolR Group Inc | www.coolrgroup.com
26 | Page
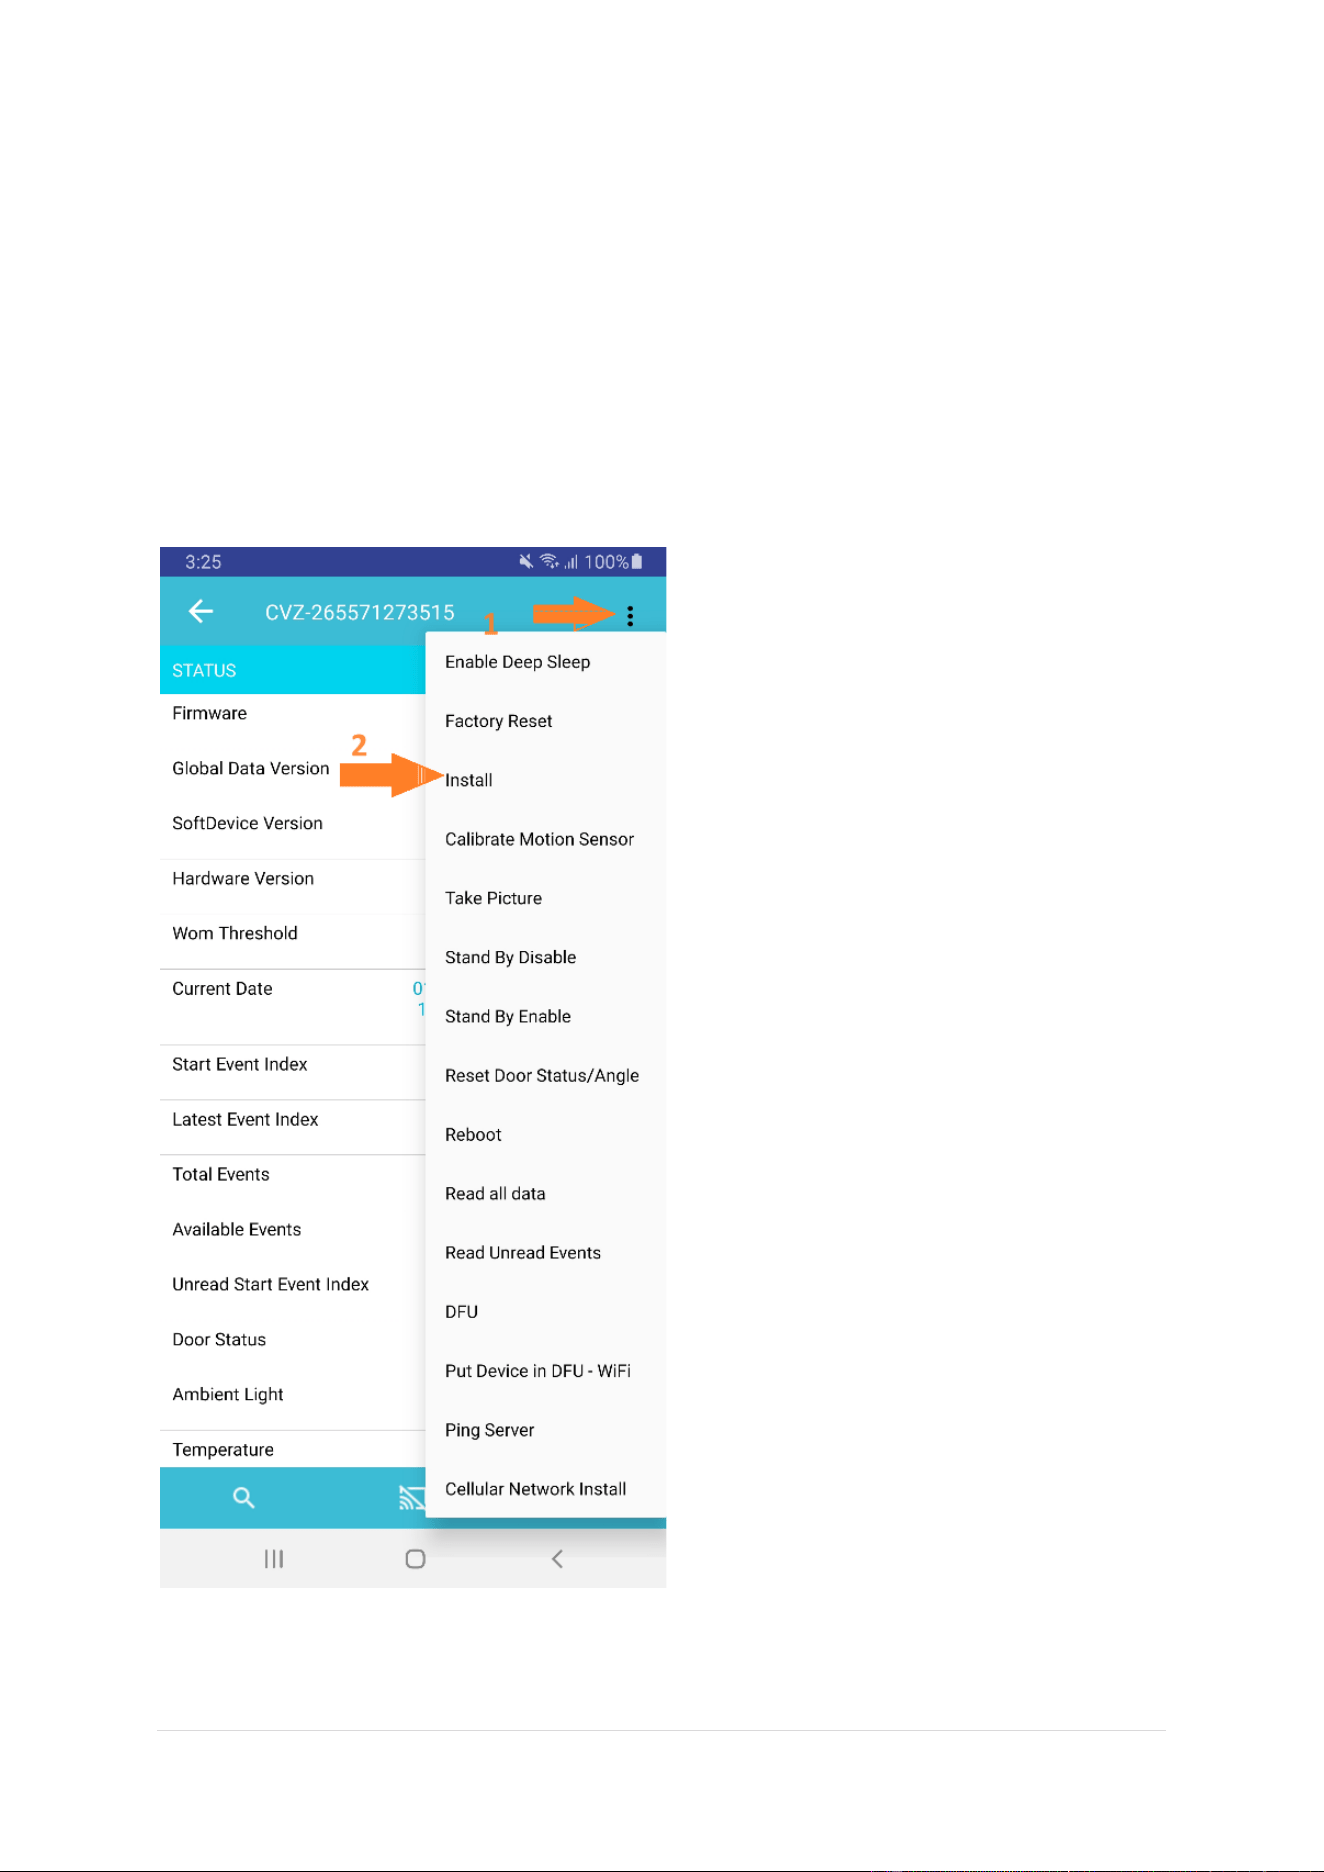
19. How to enable cellular mode?
CoolR Group Inc | www.coolrgroup.com
27 | Page
20. How to upload the image on portal over Cellular?
● Enable gsm mode if not enabled as section 19.
● Capture image as per section 11.
21. How to set time slot for image capture?
TBD
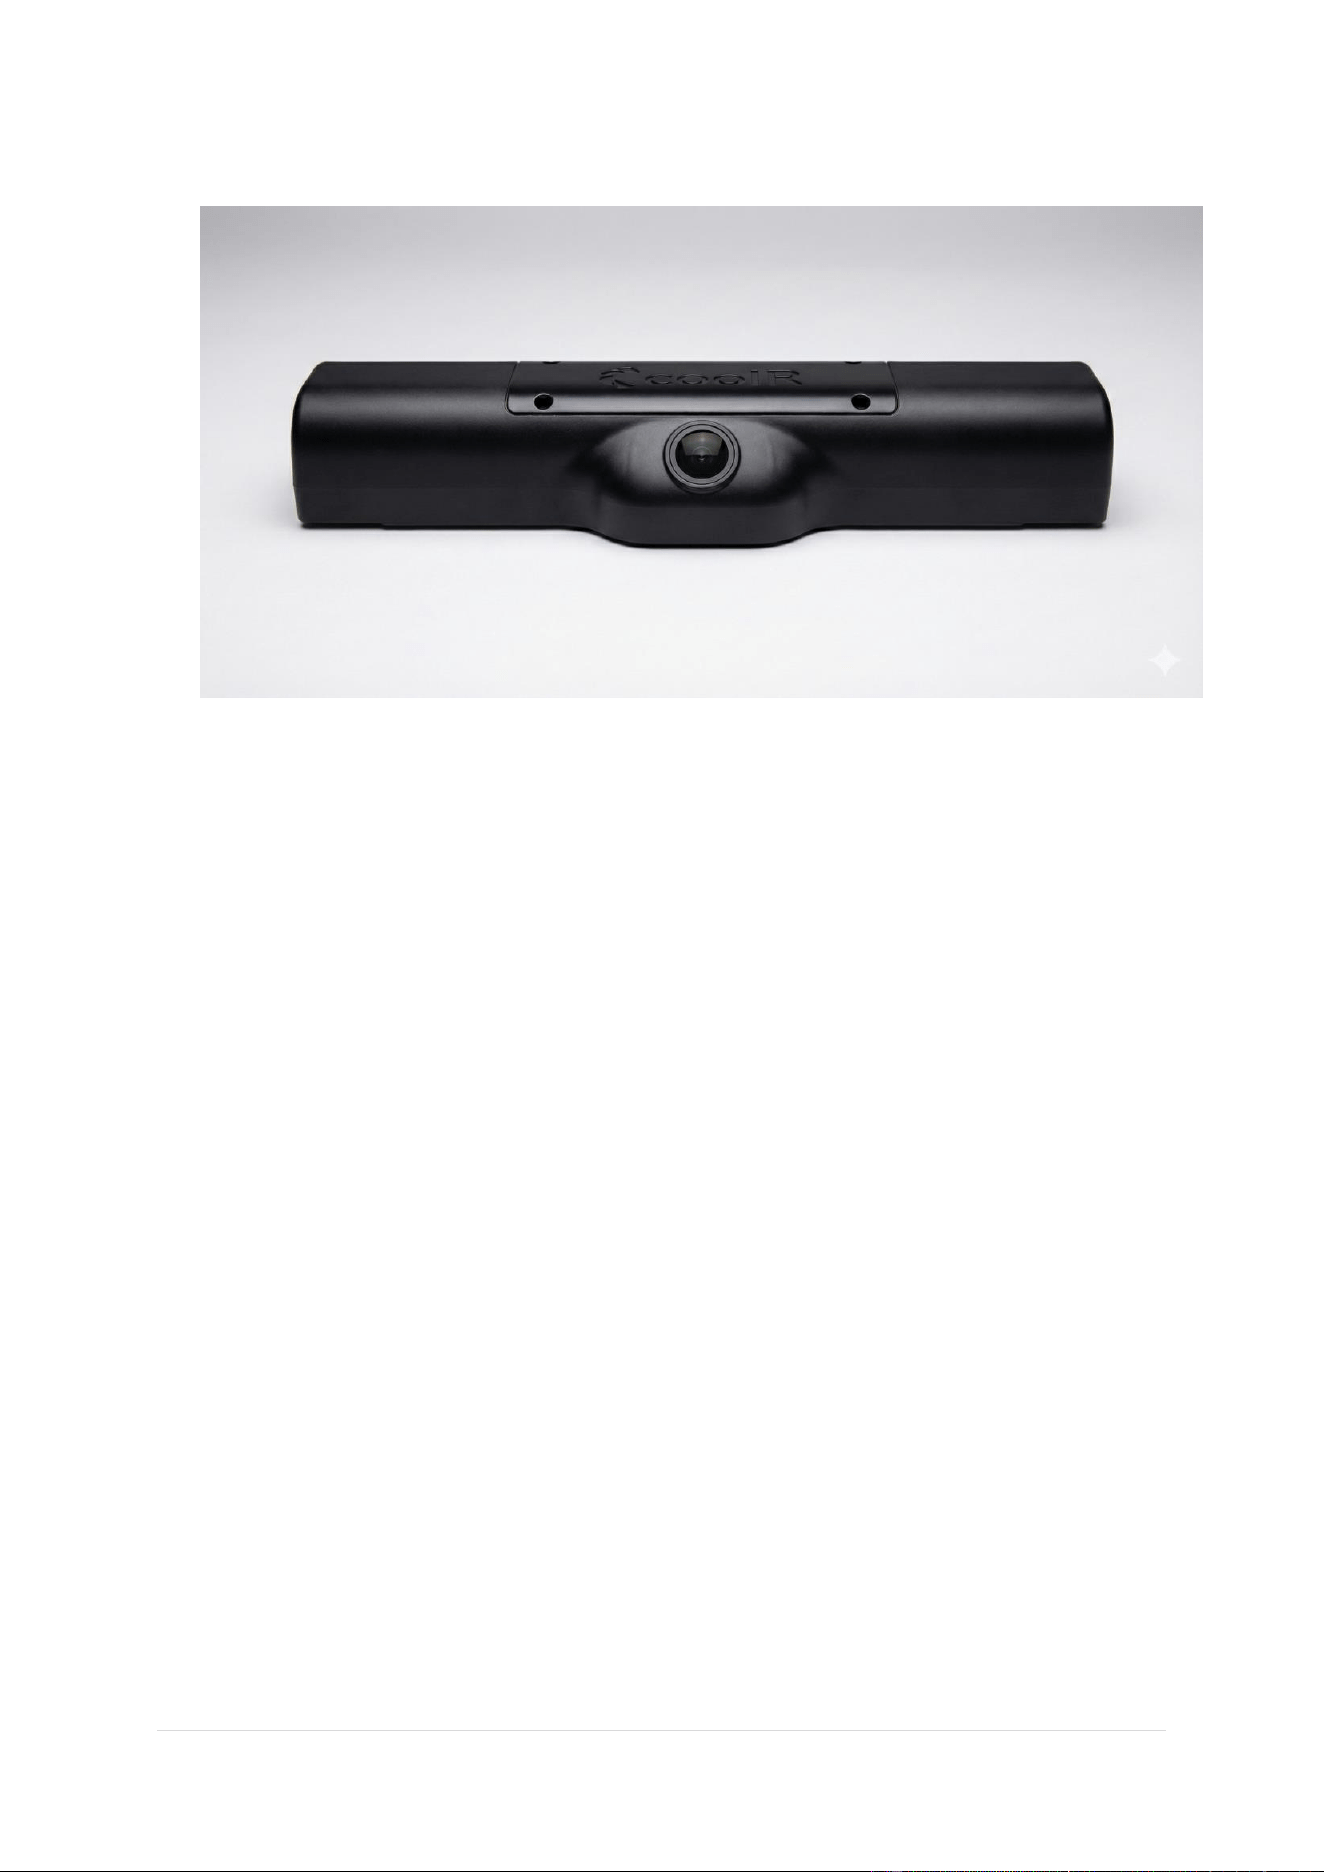
22. How to enable door detection capability?
1. Click on three dots.
2. Click on install.
3. Now door detection capability is ready to use.
CoolR Group Inc | www.coolrgroup.com
28 | Page
23. Device appearance and use case
Use case and mounting location: VistaZ is designed for monitoring product inventory, internal
temperature, and door activity in commercial refrigeration equipment.
The device is installed inside commercial beverage coolers or refrigeration cabinets, including both
horizontal and vertical models.
It is mounted on the interior surface of the cooler glass door, facing the product storage area to
monitor stock levels and cooler operation.

CoolR Group Inc | www.coolrgroup.com
29 | Page
24. FCC Warning:
This device complies with part 15 of the FCC Rules. Operation is subject to the following two conditions:
(1) This device may not cause harmful interference, and
(2) this device must accept any interference received, including interference that may cause undesired
operation.
Note: This equipment has been tested and found to comply with the limits for a Class B digital device, pursuant
to part 15 of the FCC Rules. These limits are designed to provide reasonable protection against harmful
interference in a residential installation. This equipment generates, uses and can radiate radio frequency
energy and, if not installed and used in accordance with the instructions, may cause harmful interference to
radio communications. However, there is no guarantee that interference will not occur in a particular
installation. If this equipment does cause harmful interference to radio or television reception, which can be
determined by turning the equipment off and on, the user is encouraged to try to correct the interference by
one or more of the following measures:
—Reorient or relocate the receiving antenna.
—Increase the separation between the equipment and receiver.
—Connect the equipment into an outlet on a circuit different from that to which the receiver is connected.
—Consult the dealer or an experienced radio/TV technician for help.
Note: The Grantee is not responsible for any changes or modifications not expressly approved by the party
responsible for compliance. such modifications could void the user's authority to operate the equipment.
The device has been evaluated to meet general RF exposure requirement.
To maintain compliance with FCC's RF exposure guidelines, the distance must be at least 20 cm
between the radiator and your body, and fully supported by the operating and installation
25. IC Warning:
This device contains licence-exempt transmitter(s)/receiver(s) that comply with Innovation, Science and
Economic Development Canada’s licence-exempt RSS(s). Operation is subject to the following two conditions:
(1)This device may not cause interference.
(2)This device must accept any interference, including interference that may cause undesired operation of the
device.
Cet appareil contient des émetteurs/récepteurs exempts de licence qui sont conformes aux normes CNR
exemptes de licence d’Innovation, Sciences et Développement économique Canada. Son fonctionnement est
assujetti aux deux conditions suivantes :
(1)Cet appareil ne doit pas causer d’interférences.
(2)Cet appareil doit accepter toute interférence, y compris celles qui peuvent entraîner un fonctionnement
indésirable de l’appareil.
The device has been evaluated to meet general RF exposure requirement. To maintain compliance with RSS-102
-Radio Frequency (RF) Exposure guidelines, this equipment should be installed and operated with a minimum
distance of 20cm between the radiator and your body.
le dispositif de a été évalué à répondre général rf exposition exigence.pour maintenir la conformité avec les
directives d'exposition du RSS-102-Radio Fréquence (RF). ce matériel doit être installé et exploité à une distance
minimale de 20 cm entre le radiateur et votre corps.

