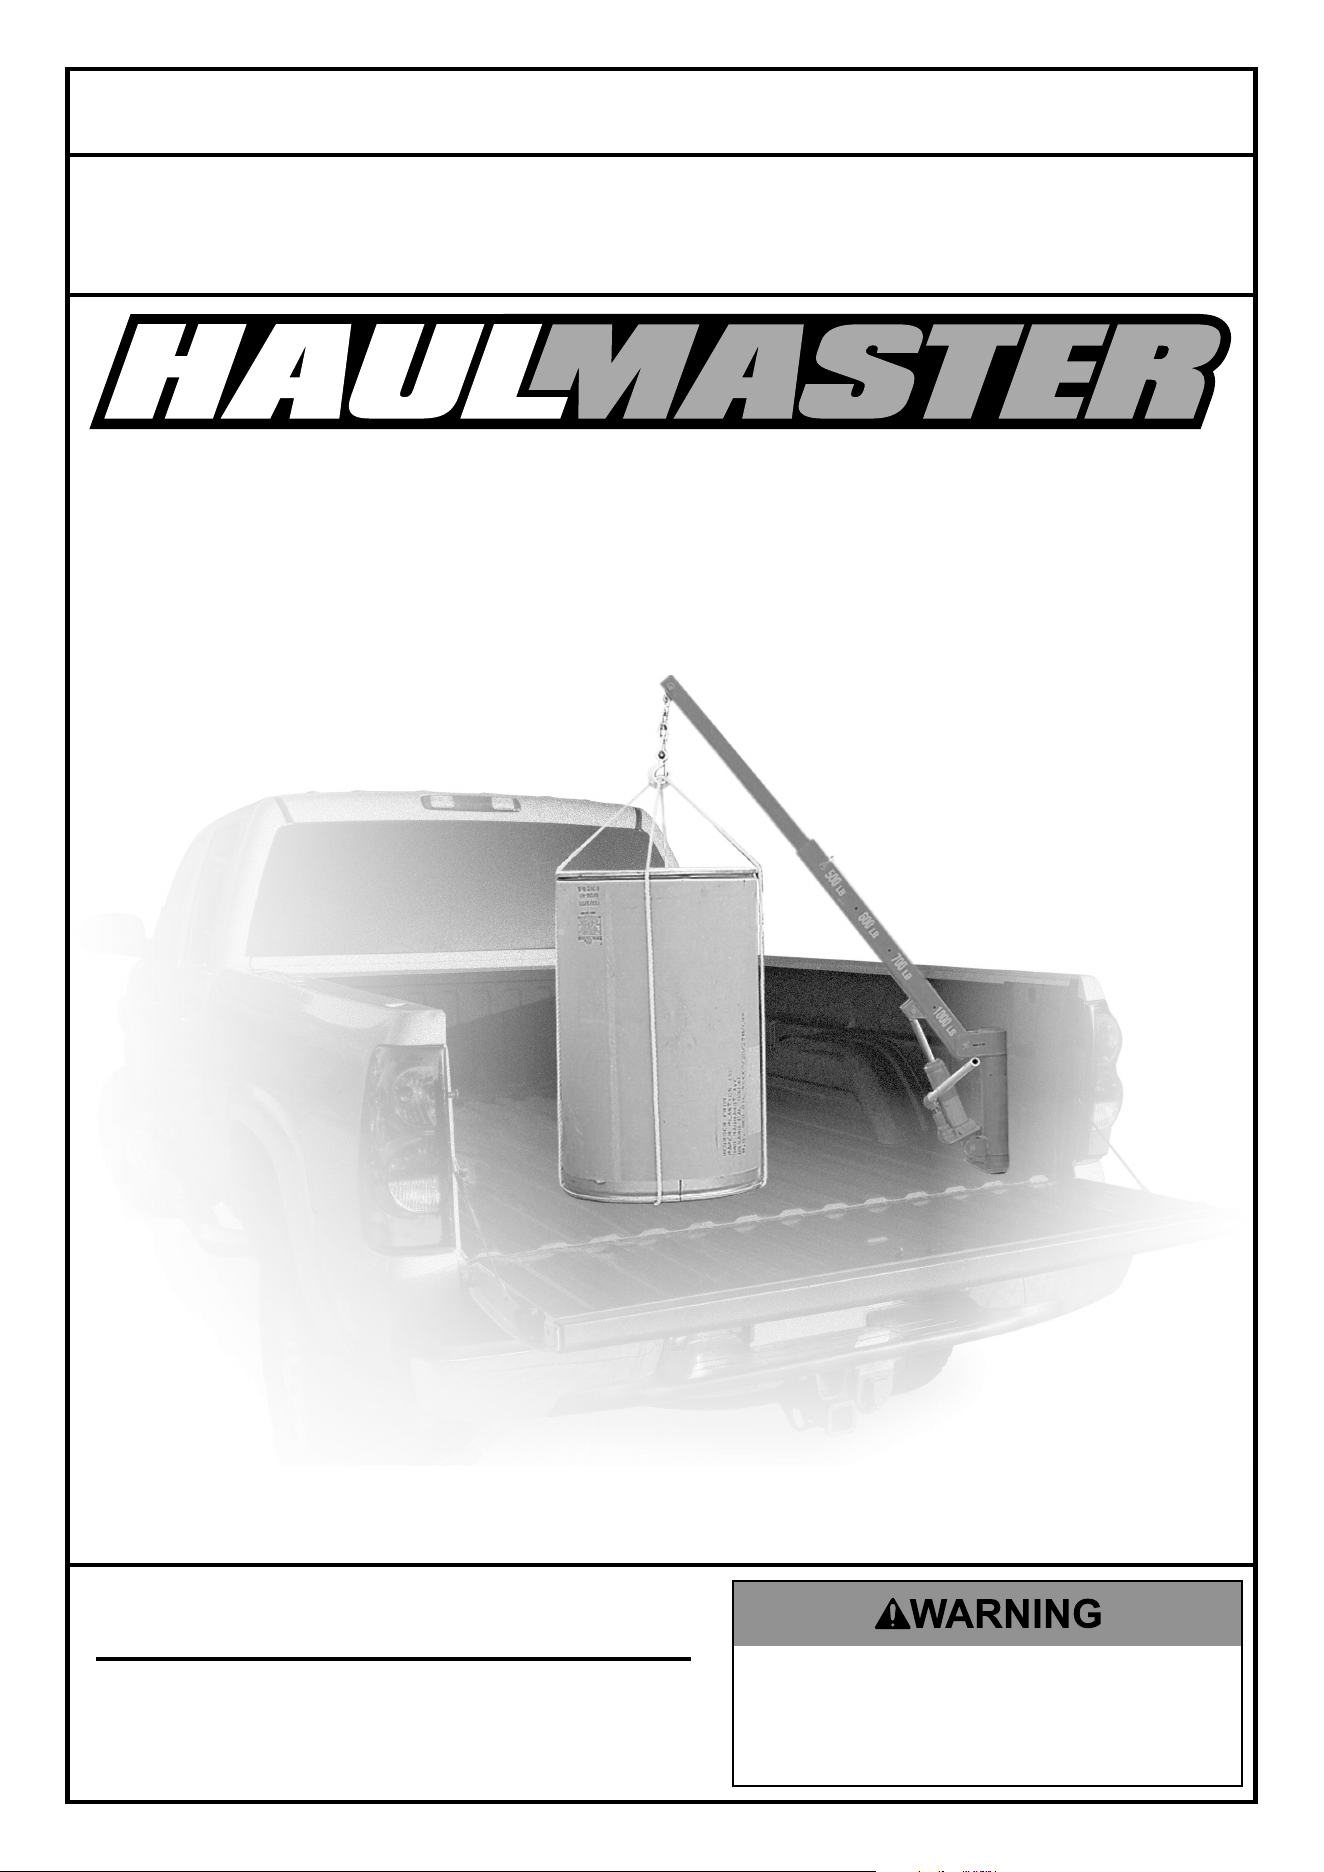
Vehicle Not Included
Visit our website at: http://www.harborfreight.com
Email our technical support at: [email protected]
60732
®
1/2 TON CAPACITY
PICKUP TRUCK
CRANE
Owner’s Manual & Safety Instructions
Save This Manual Keep this manual for the safety warnings and precautions, assembly,
operating, inspection, maintenance and cleaning procedures. Write the product’s serial number in the
back of the manual near the assembly diagram (or month and year of purchase if product has no number).
Keep this manual and the receipt in a safe and dry place for future reference. 24d
When unpacking, make sure that the product is intact
and undamaged. If any parts are missing or broken,
please call 1-888-866-5797 as soon as possible.
Copyright
©
2023 by Harbor Freight Tools
®
. All rights reserved.
No portion of this manual or any artwork contained herein may be reproduced in
any shape or form without the express written consent of Harbor Freight Tools.
Diagrams within this manual may not be drawn proportionally. Due to continuing
improvements, actual product may differ slightly from the product described herein.
Tools required for assembly and service may not be included.
Read this material before using this product.
Failure to do so can result in serious injury.
SAVE THIS MANUAL.
Page 2 For technical questions, please call 1-888-866-5797. 60732
Table of Contents
Safety ......................................................... 2
Specifications ............................................. 3
Assembly .................................................... 4
Operation .................................................... 6
Maintenance ............................................... 8
Parts List and Diagram .............................. 10
Warranty .................................................... 12
®
WARNING SYMBOLS AND DEFINITIONS
This is the safety alert symbol. It is used to alert you to potential personal injury hazards.
Obey all safety messages that follow this symbol to avoid possible injury or death.
Indicates a hazardous situation which, if not avoided,
will result in death or serious injury.
Indicates a hazardous situation which, if not avoided,
could result in death or serious injury.
Indicates a hazardous situation which, if not avoided,
could result in minor or moderate injury.
Addresses practices not related to personal injury.
IMPORTANT SAFETY INFORMATION
Read all safety warnings and instructions.
Failure to follow the warnings and instructions may result in serious injury.
Save all warnings and instructions for future reference.
General Safety Warnings
1. Study, understand, and follow all instructions before
installing or operating this device.
2. Attach to frame of truck bed according to manual
instructions only. Verify that installation surface has
no hidden components or brake lines before drilling
or driving screws.
3. Engage parking brake before use. Do not move
vehicle with load attached to Crane.
4. Do not exceed rated capacity.
5. Use only slings or chains with a rated capacity
greater than the weight of the load being lifted.
6. Do not allow load to swing or drop violently while
lowering or moving.
7. No alterations shall be made to this product. Do not
adjust safety valve.
8. Keep clear from underneath suspended load. Do
not lift people or lift load over people.
9. Capacity decreases as boom lengthens. Follow
capacities marked on boom.
10. Replacement ram must have same rating, mounting
points, and maximum length.
11. Wear ANSI-approved safety goggles, heavy-duty
work gloves, and steel-toed work boots during
installation and use.
12. Do not use for aircraft purposes.
13. Inspect before every use; do not use if parts loose or
damaged.
14. Before driving vehicle, lower boom and position over
truck’s wheel well, then insert Large Lock Pin to
prevent boom from swiveling.
SAFETY OPERATION MAINTENANCESETUP
Page 3For technical questions, please call 1-888-866-5797.60732
15. Attach load to Hook securely by properly rated,
suitable means, such as chains, shackles, hooks,
lifting slings, etc. Load must be attached to prevent
accidental disconnection.
16. Properly seat sling or other device in Hook and fully
close Hook’s safety clasp. Do not allow Hook hitch
to support any part of load. Do not apply load to the
point of the Hook.
17. Stay alert. Watch what you are doing, and use
common sense when operating Crane.
18. Do not use Crane while tired or under the influence
of drugs, alcohol, or medication. A moment of
inattention may result in serious personal injury.
19. Keep children and bystanders away while
operating the Crane. Distractions can cause you to
lose control.
20. Have Crane serviced by a qualified repair person
using only identical replacement parts.
This will ensure that the safety of the Crane is
maintained.
21. Maintain labels and nameplates. These carry
important information. If unreadable or missing,
contact Harbor Freight Tools for a replacement.
22. The warnings, precautions, and instructions
discussed in this manual cannot cover all possible
conditions and situations that may occur. The
operator must understand that common sense and
caution are factors, which cannot be built into this
product, but must be supplied by the operator.
Ram Safety Warnings
1. Attach securely to Crane before use.
2. Do not exceed rated capacity.
3. Do not adjust safety valve.
4. Keep clear of load while lifting and lowering.
5. Lower load slowly.
6. Be aware of dynamic loading! Sudden load
movement may briefly create excess load causing
product failure.
SAVE THESE INSTRUCTIONS.
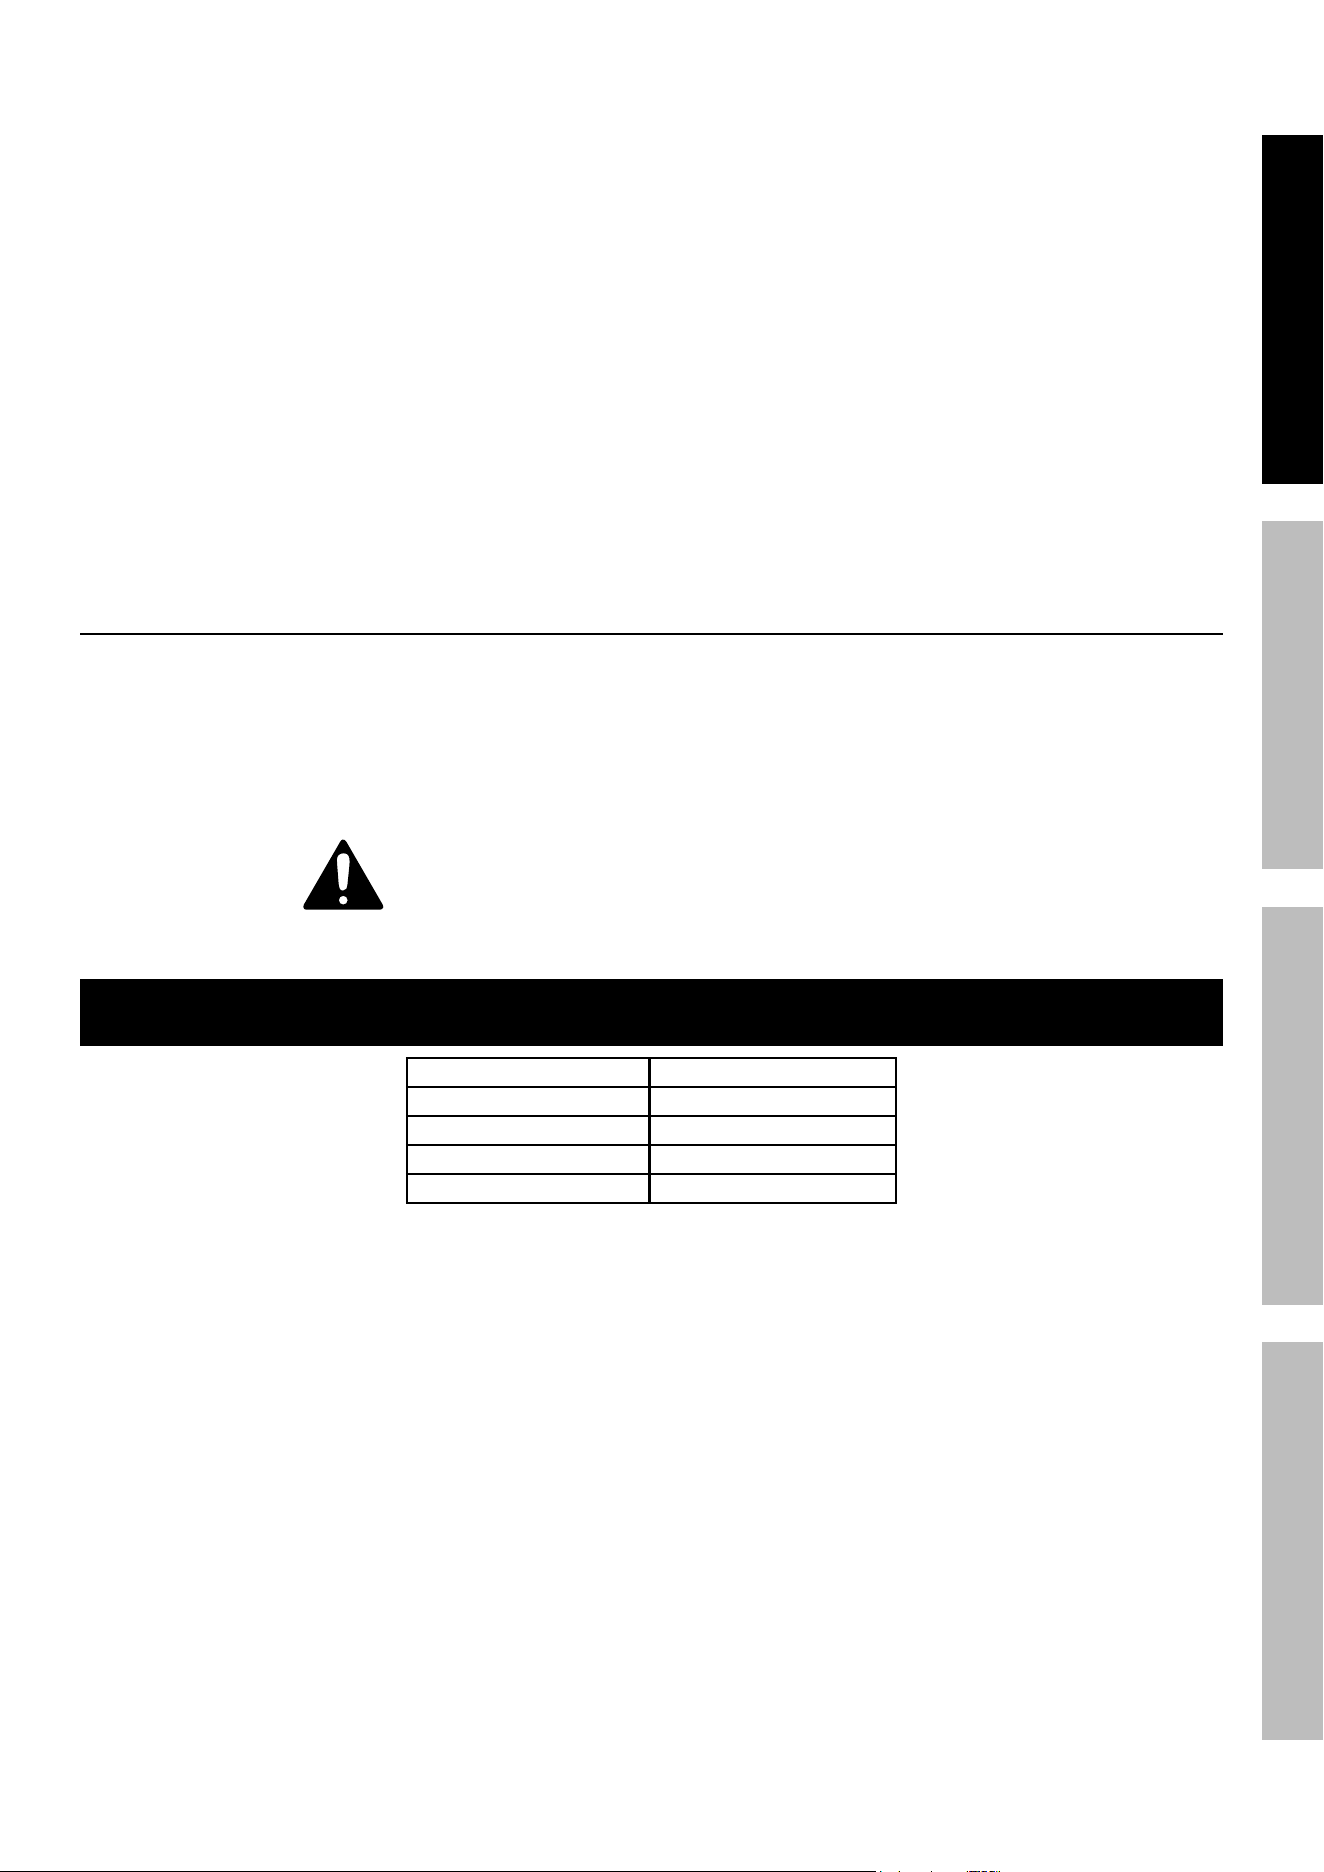
Specifications
Rated Capacity 1,000 lb.
Boom Length, Max. 53-1/2"
Boom Length, Min. 33-3/8"
Chain 7-1/2" L, 3/8" Diameter
Hook Opening 3/4"
SAFETYOPERATIONMAINTENANCE SETUP
Page 4 For technical questions, please call 1-888-866-5797. 60732
Assembly Instructions
Read ENTIRE IMPORTANT SAFETY INFORMATION section at beginning of this manual
including all text under subheadings therein before set up or use of this product.
1. Locate a mounting position so the Crane will be near
end of truck bed and can be attached to frame.
WARNING! The Base must be securely bolted to the
frame of the truck bed. Bolting the Base to the truck
bed will not provide necessary support and could
result in product failure and serious bodily injury.
Note: Verify that installation surface has
no hidden components or brake lines
before drilling or driving screws.
2. Use the Base to mark drilling holes. Drill holes.
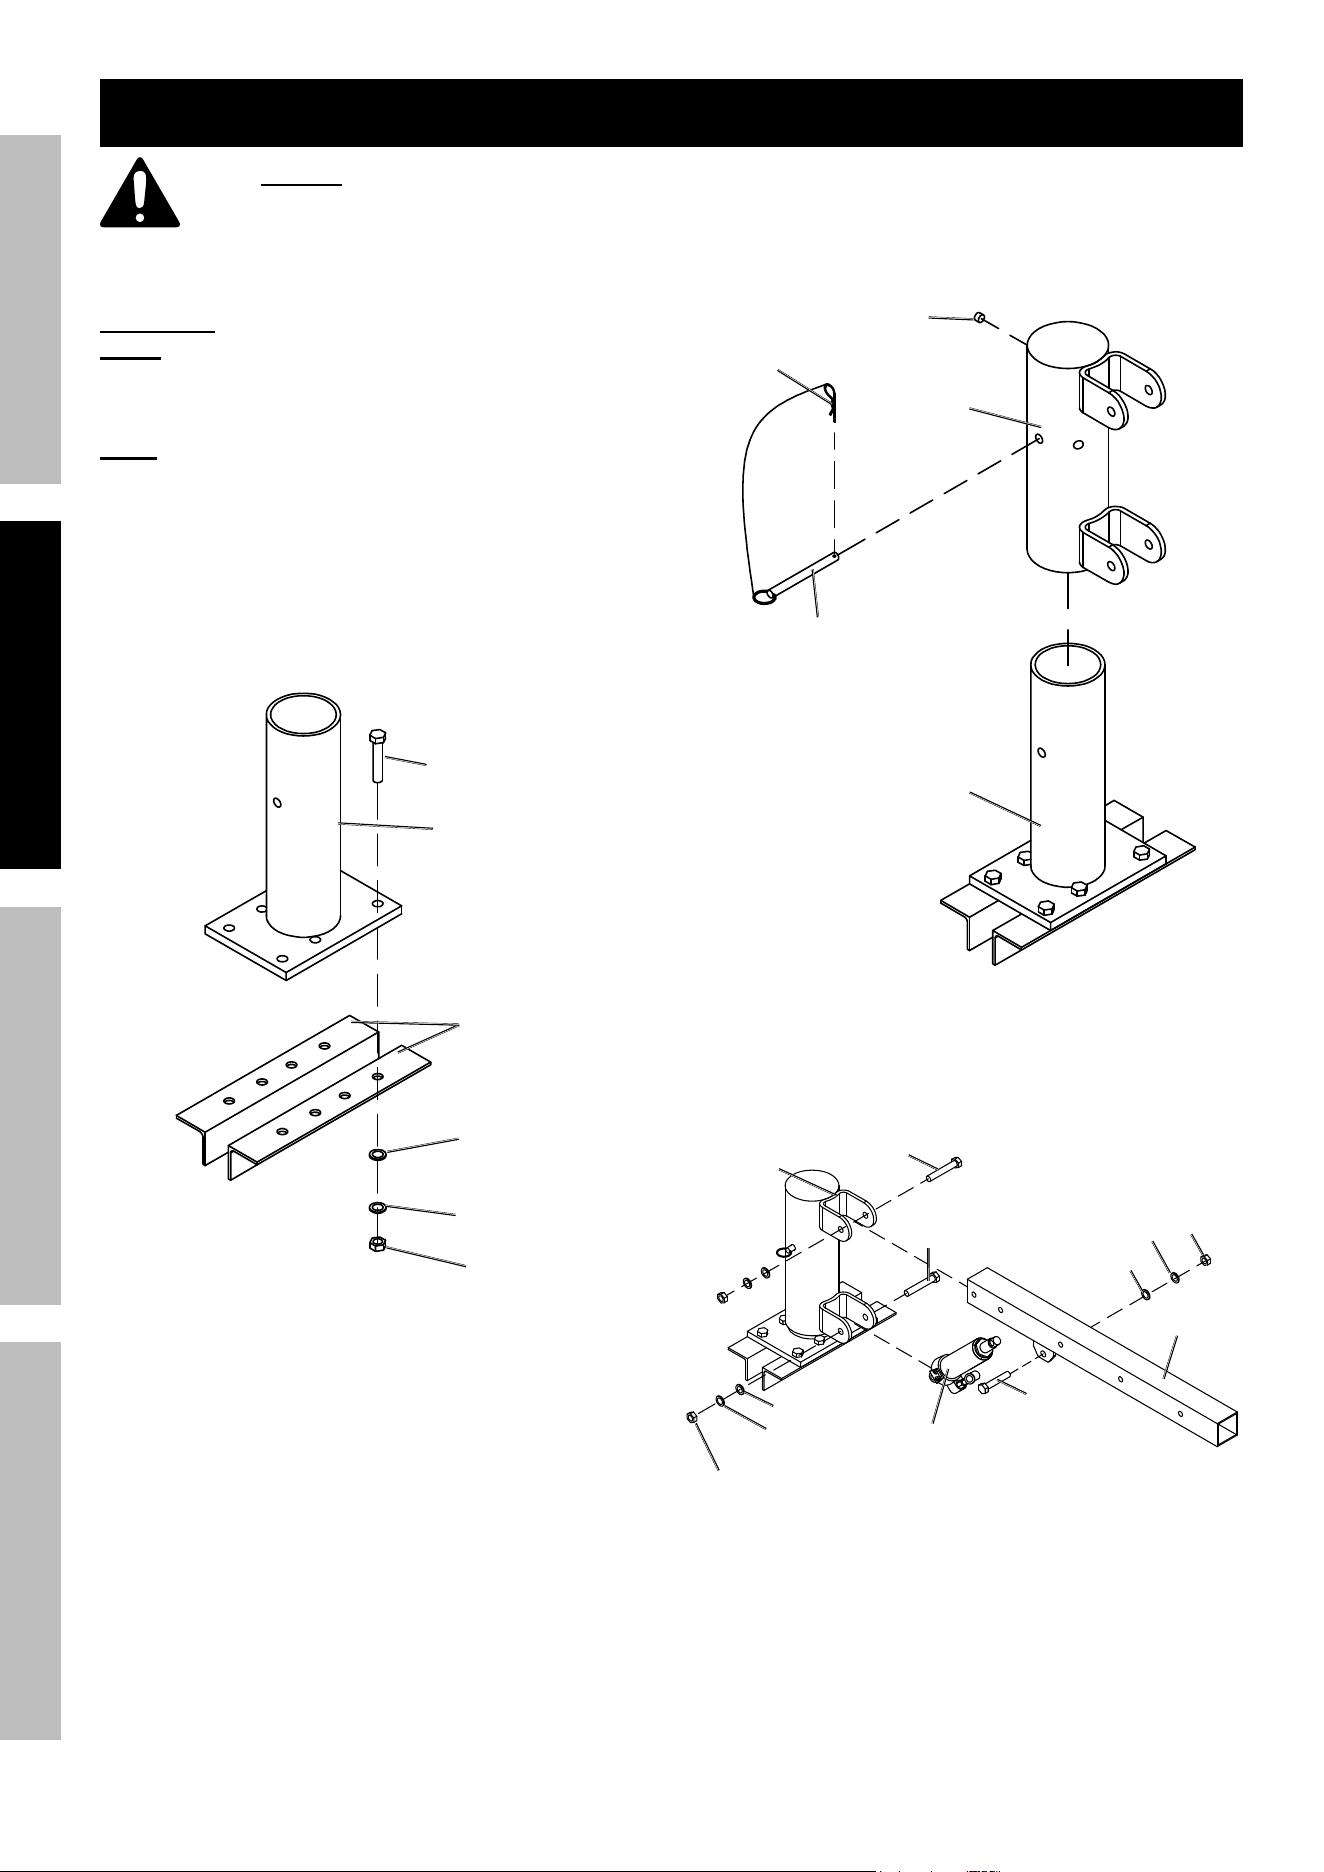
3. Mount Base to frame using Nuts (5), Spring
Washers (12), Washers (10), Mounting Plates
(17) and Bolts (11). (See Figure A.)
Base
(18)
Nut (5)
Spring
Washer (12)
Washer
(10)
Mounting
Plate (17)
Bolt (11)
Figure A
4. Slide Post (13) onto Base (18) and secure
using Large Lock Pin (1). (See Figure B.)
Base
(18)
Post
(13)
Large
Lock
Pin (1)
Grease
Fitting
(3)
R Pin (2)
Figure B
5. Attach Ram (19) to Lower Post Bracket
using Bolt (20), Washer (10), Spring Washer
(12) and Nut (5). (See Figure C.)
Ram (19)
Washer (10)
Spring
Washer (12)
Nut (5)
Bolt (7)
Washer (10)
Spring
Washer (12)
Nut (5)
Boom (14)
Bolt (4)
Bolt (20)
Upper Post
Bracket
Figure C
SAFETY OPERATION MAINTENANCESETUP
Page 5For technical questions, please call 1-888-866-5797.60732
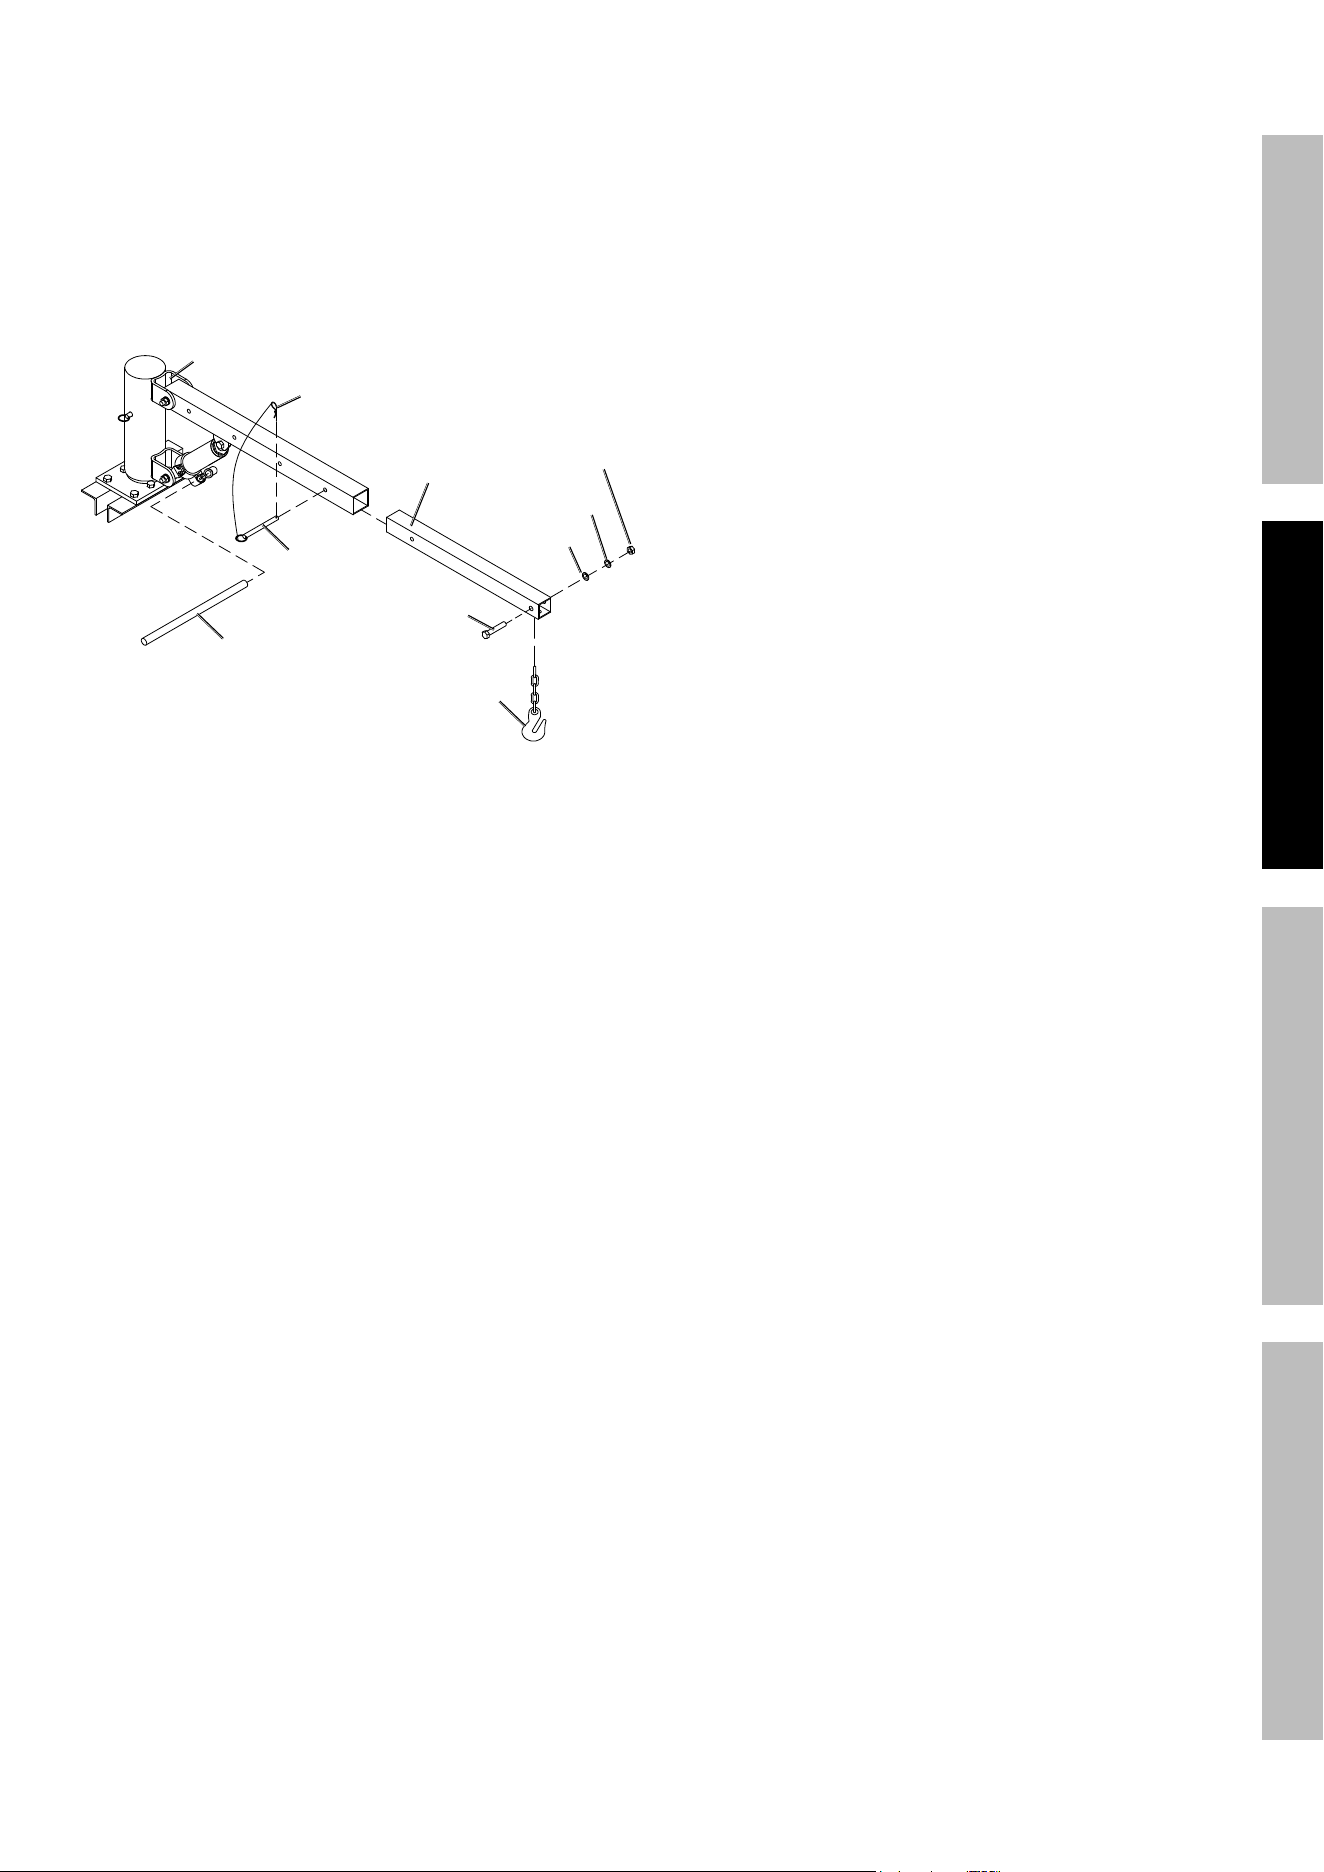
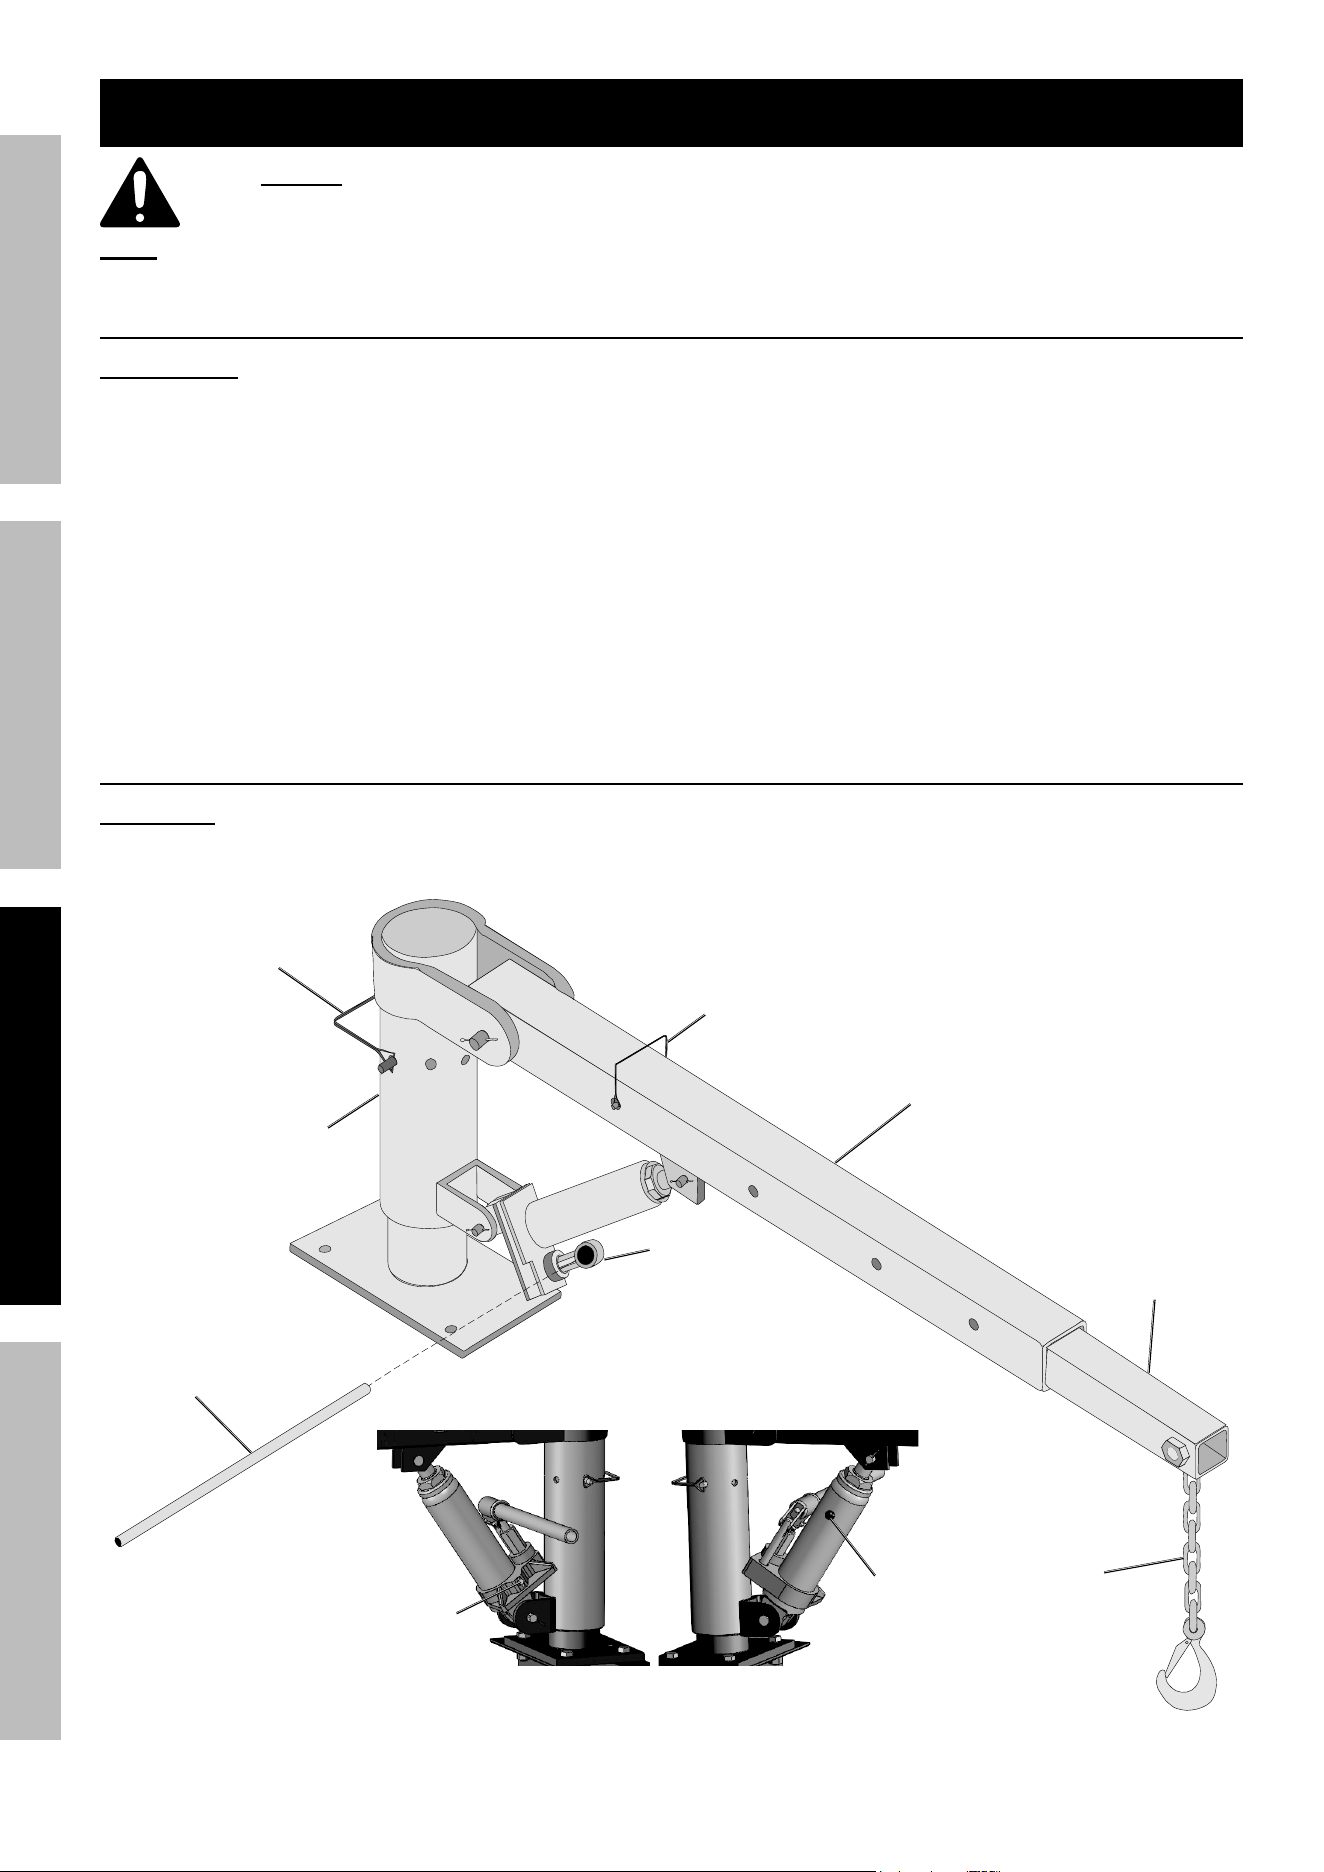
6. Attach Boom (14), Bracket facing down, to
Upper Post Bracket using Bolt (4), Spring
Washer (12) Washer (10) and Nut (5).
7. Connect Boom Bracket to Ram using Bolt (7),
Spring Washer (12), Washer, (10), and Nut (5).
8. Slide Boom Extension (15) into Boom so
that Oval Hole is facing down. Secure with
Small Lock Pin (8). (See Figure D.)
Boom
Extension
(15)
R Pin
(2)
Nut (5)
Washer (10)
Spring
Washer (12)
Bolt (6)
Ram
Handle (16)
Small Lock
Pin (8)
Upper Post
Bracket
Hook &
Chain (9)
Figure D
9. Connect Hook and Chain (9) to Boom
Extension by putting end link through Oval
Hole and securing with Bolt (6), Spring
Washer (12), Washer (10) and Nut (5).
10. Thread Grease Fitting (3) into Post.
SAFETYOPERATIONMAINTENANCE SETUP
Page 6 For technical questions, please call 1-888-866-5797. 60732
Operating Instructions
Read ENTIRE IMPORTANT SAFETY INFORMATION section at beginning of this manual
including all text under subheadings therein before set up or use of this product.
Note: Once Assembly is complete, tighten ALL Bolts before initial operation.
Bleeding Instructions
IMPORTANT! Before first use, check for
proper hydraulic oil level and thoroughly test
the Crane. If it does not work properly, bleed
air from its hydraulic system as follows:
1. Remove Oil Fill Plug. Fill with hydraulic oil
(sold separately) to full level, if necessary.
2. Open Release Valve by turning
counterclockwise with Ram Handle.
3. Insert Ram Handle into Fulcrum, apply
downward pressure to Boom, then pump
Handle quickly several times.
4. Check oil level and, if necessary,
top off with hydraulic oil.
5. Close Release Valve and replace Oil Fill Plug.
6. Test Crane several times for proper
operation before attempting to lift a load.
7. If, after bleeding, the Crane still does not
appear to be working properly, do not use until
repaired by a qualified service technician.
Operating the Crane
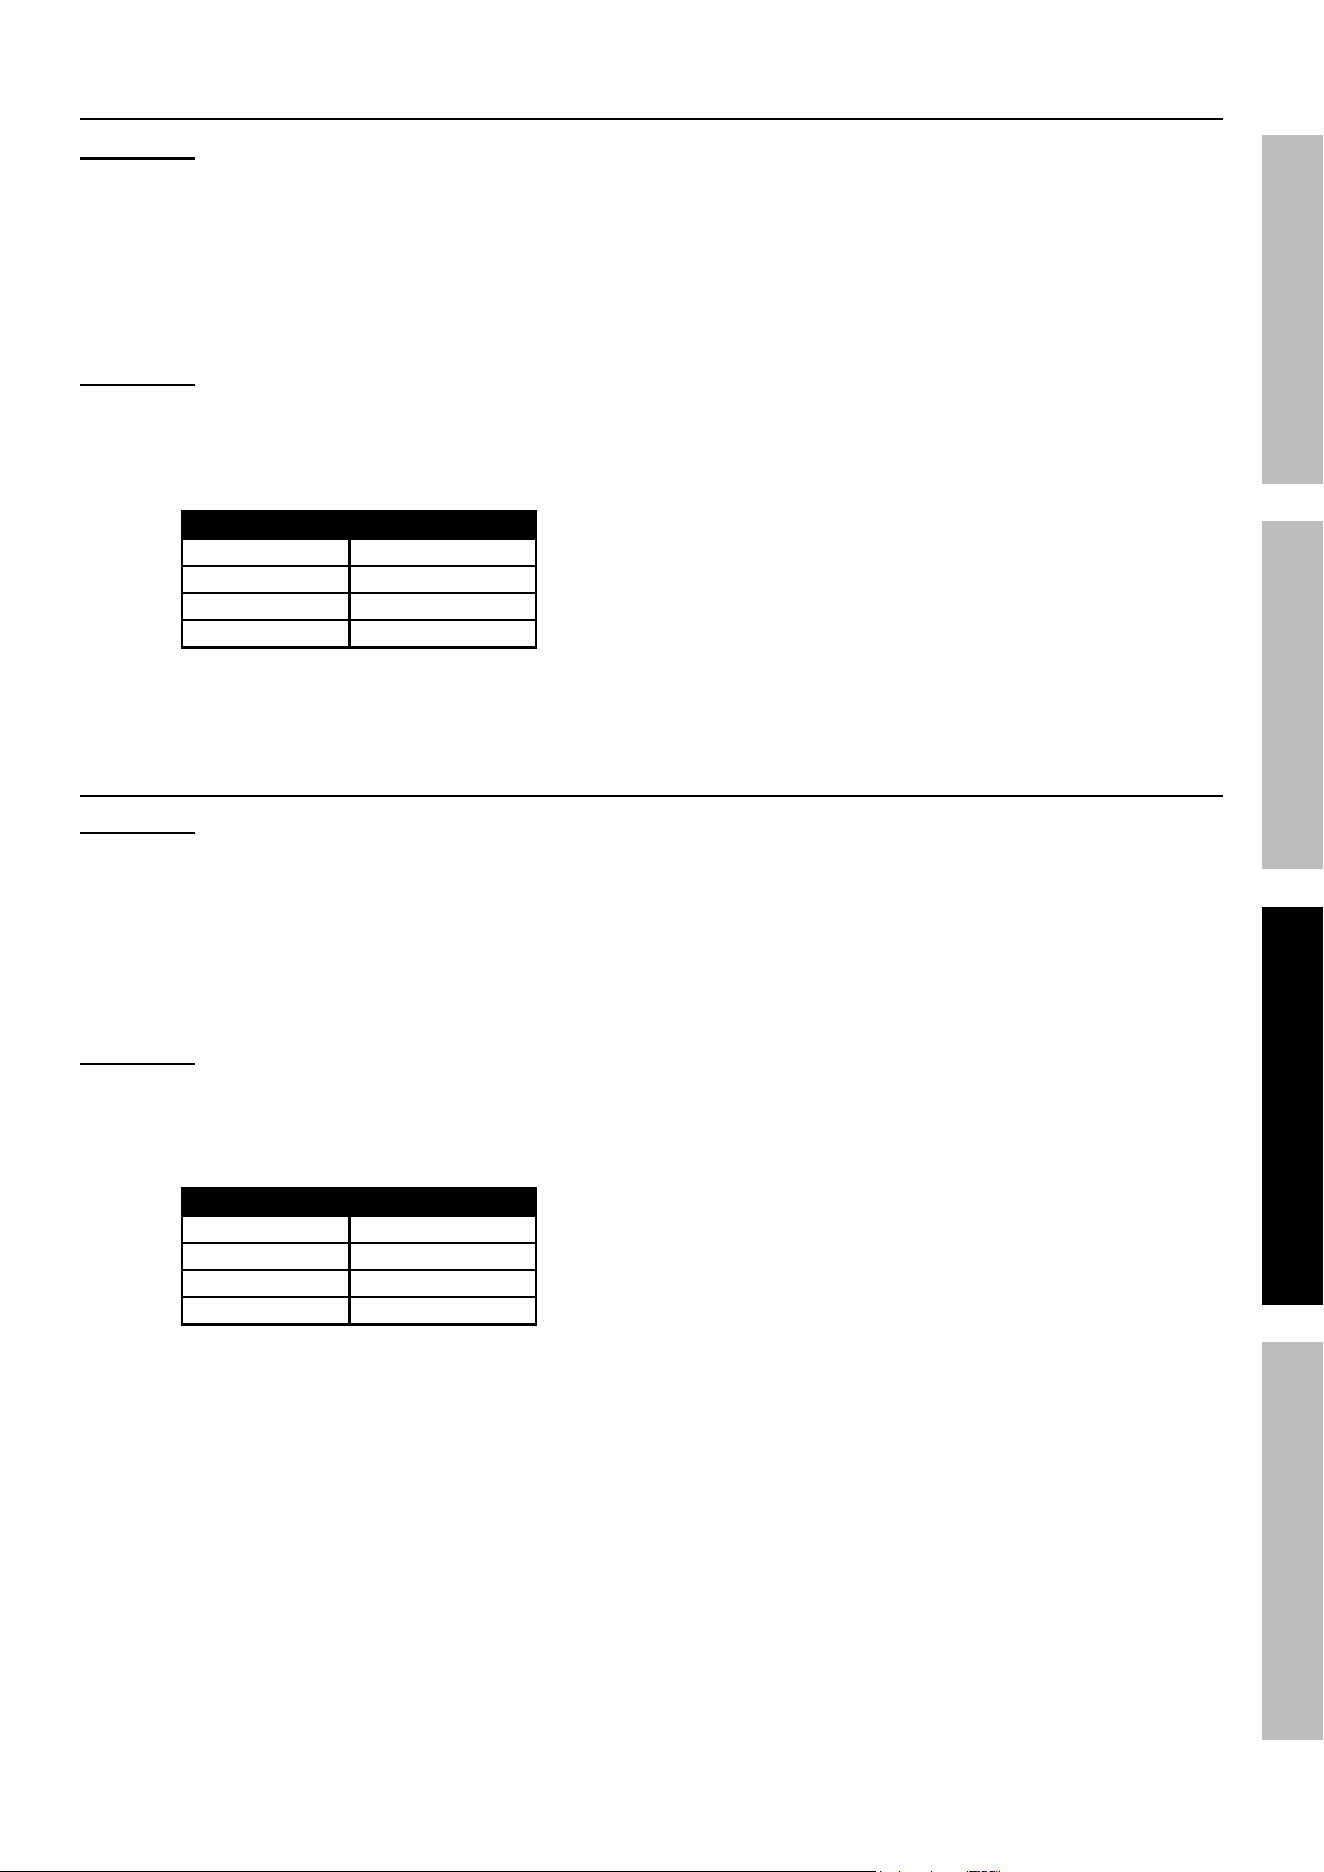
WARNING! The Boom Extension has four positions. Each position has a weight capacity marked
on the Boom. Do not lift more than rated capacity. Be aware of dynamic loading! Sudden load
movement may briefly create excess load causing product failure and serious bodily injury.
Oil Fill
Plug
Release
Valve
Hook and
Chain (9)
Boom
Extension
(15)
Ram
Handle (16)
Post (13)
Large Lock
Pin (1)
Small Lock
Pin (8)
Boom (14)
1000 LB
700 LB
600 LB
500 LB
Fulcrum
Figure E
SAFETY OPERATION MAINTENANCESETUP
Page 7For technical questions, please call 1-888-866-5797.60732
Loading
WARNING! TO PREVENT SERIOUS INJURY:
Engage parking brake before use. Do not
move vehicle with load attached to Crane.
1. Remove Large Lock Pin and swivel Boom
so Hook is over load. If necessary, remove
Small Lock Pin, adjust Boom Extension,
then replace Small Lock Pin.
WARNING! TO PREVENT SERIOUS INJURY: Do not
attempt to extend or retract Boom while load is attached.
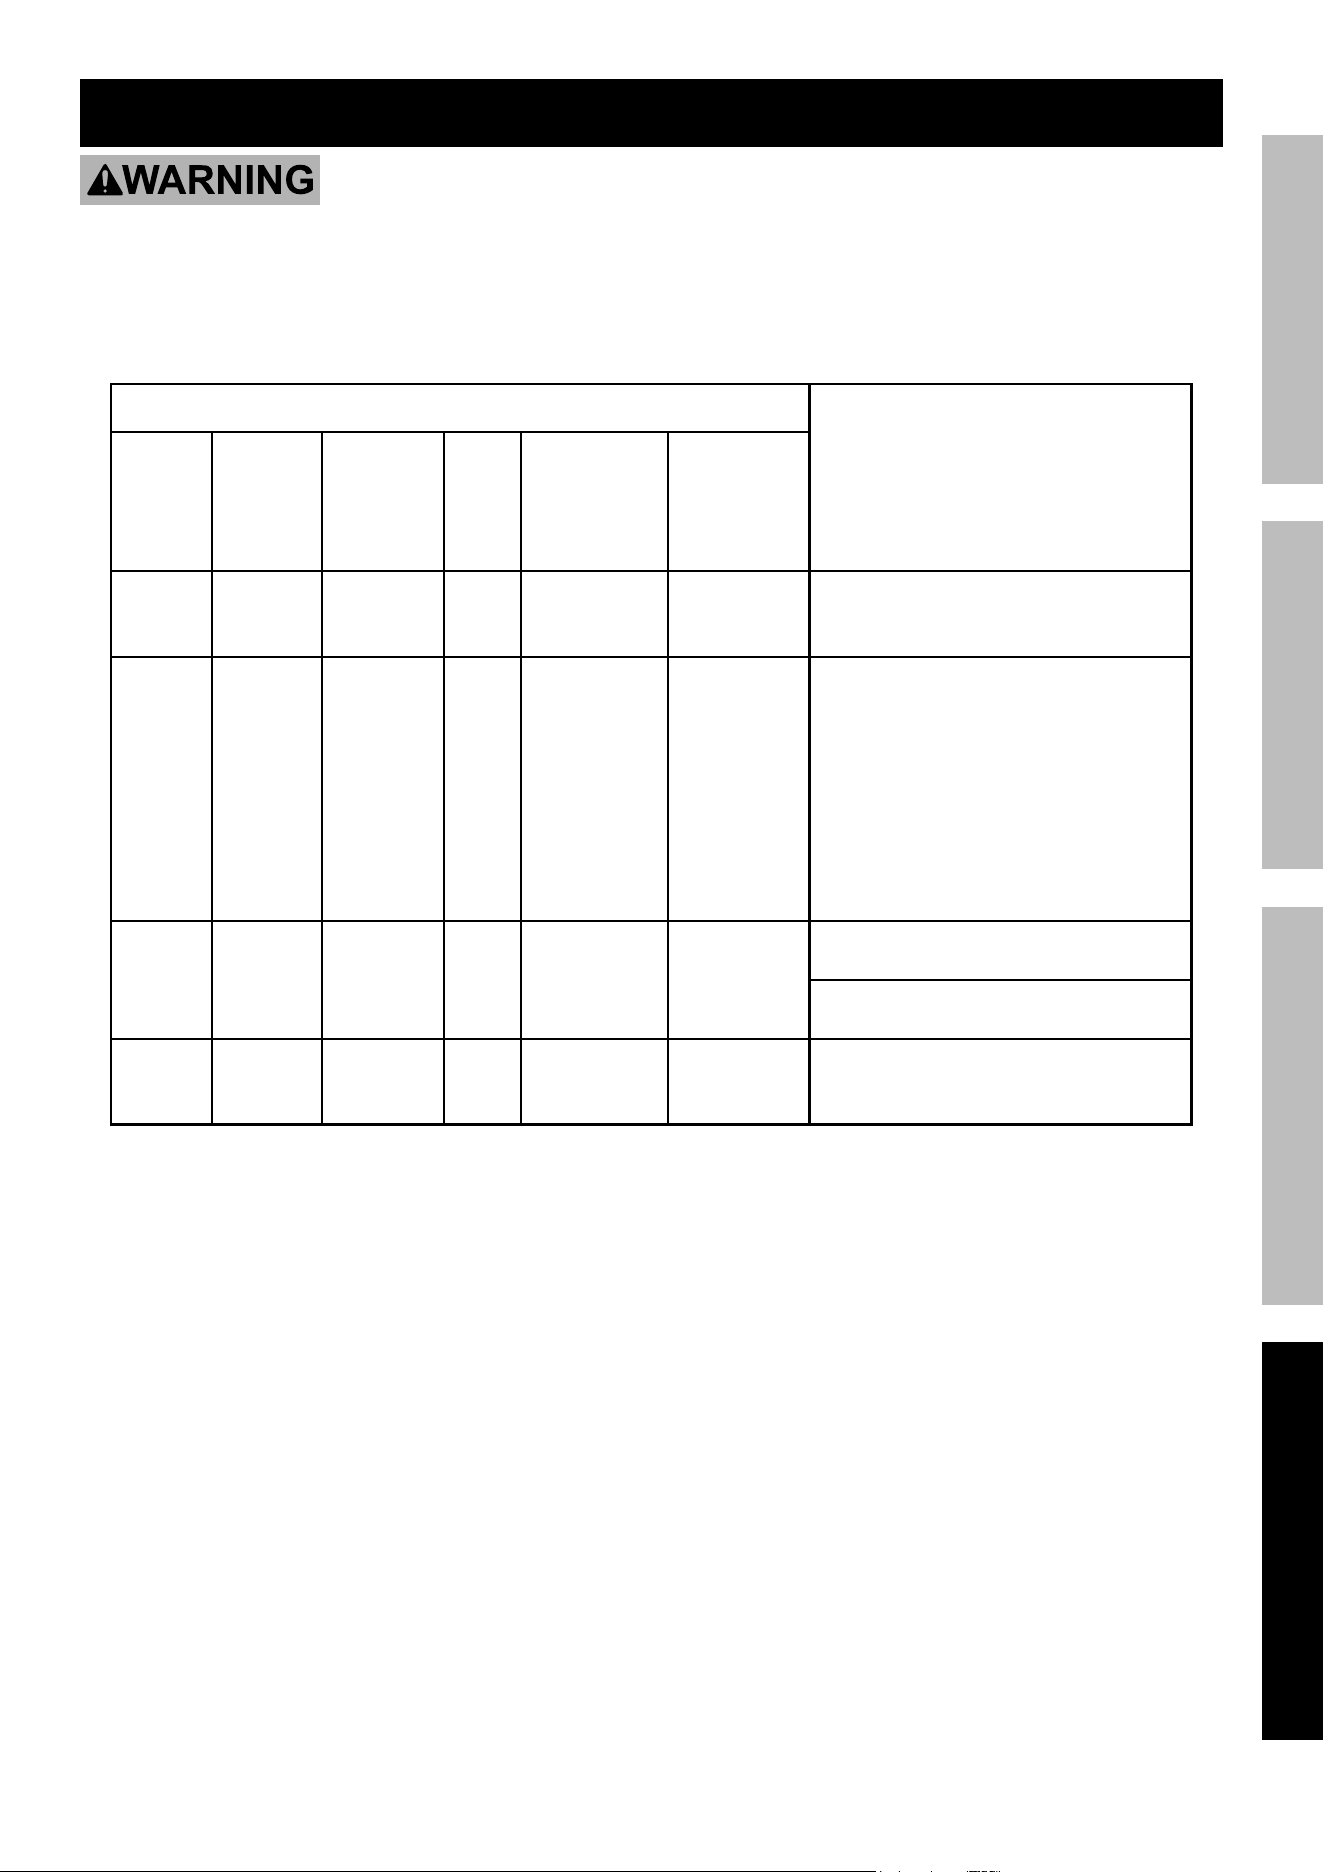
2. Make sure Boom will handle load when
it is extended. (See Figure F.)
Capacity (lb.) Boom Length
500 53-1/2"
600 47-1/2"
700 41-1/2"
1,000 33-3/8"
Figure F
3. Lower Boom until Hook can be attached to load.
4. Attach Hook to properly secured load, giving
specific attention to load balancing.
5. Before lifting load, make sure chain
is not kinked or twisted.
6. To lift load:
a. Make sure Release Valve is closed by
turning clockwise with Ram Handle.
b. Pump Ram Handle until load has been
lifted high enough to clear truck bed.
7. To move load: Swivel Boom until the
load is directly over the truck bed.
8. To lower load: Slowly open Release Valve by
turning counterclockwise with Ram Handle.
9. Remove Hook only after load has
been lowered completely.
10. Before driving vehicle, lower Boom and position
over truck’s wheel well, then insert Large
Lock Pin to prevent Boom from swiveling.
Unloading
WARNING! TO PREVENT SERIOUS INJURY:
Engage parking brake before use. Do not
move vehicle with load attached to Crane.
1. Remove Large Lock Pin.
2. Swivel and lift Boom so Hook is over load. If
necessary, remove Small Lock Pin, adjust Boom
Extension, then replace Small Lock Pin.
WARNING! TO PREVENT SERIOUS INJURY: Do not
attempt to extend or retract Boom while load is attached.
3. Make sure Boom will handle load when
it is extended. (See Figure G.)
Capacity (lb.) Boom Length
500 53-1/2"
600 47-1/2"
700 41-1/2"
1,000 33-3/8"
Figure G
4. Attach Hook to properly secured load, giving
specific attention to load balancing.
5. Before lifting load, make sure chain
is not kinked or twisted.
6. To lift load:
a. Make sure Release Valve is closed by
turning clockwise with Ram Handle.
b. Pump Ram Handle until load has raised
high enough to just clear truck bed.
7. To move load: Swivel Boom until load is safely
away from truck bed and over a level, flat surface.
8. To lower load: Slowly open Release Valve by
turning counterclockwise with Ram Handle.
9. Before driving vehicle, lower Boom and position
over truck’s wheel well, then insert Large
Lock Pin to prevent Boom from swiveling.
SAFETYOPERATIONMAINTENANCE SETUP

Page 8 For technical questions, please call 1-888-866-5797. 60732
Maintenance and Servicing
Procedures not specifically explained in this manual must
be performed only by a qualified technician.
TO PREVENT SERIOUS INJURY FROM ACCIDENTAL OPERATION:
Do not use damaged equipment. If abnormal noise or vibration occurs,
have the problem corrected before further use.
Cleaning, Maintenance, and Lubrication
1. BEFORE EACH USE, inspect the general
condition of the tool. Check for:
• loose hardware,
• misalignment or binding of moving parts,
• cracked or broken parts,
• proper Ram operation, and
• any other condition that may
affect its safe operation.
2. Lubricate the Grease Fitting with a grease
gun once a month, or when the Boom
becomes difficult to swivel on the Post.
Note: If Crane will be exposed to wet
conditions, more frequent lubrication may
be necessary to prevent buildup of rust.
3. Change the hydraulic oil at least once every year:
a. Remove Ram from Crane.
Lower ram completely.
b. Remove Oil Fill Plug.
c. Tip Ram to allow old hydraulic oil
to completely drain out.
d. Dispose of old hydraulic oil in
accordance with local regulations.
e. With the Ram upright, fill with hydraulic
oil (sold separately) to full level.
f. Open Valve Release Screw and pump
the Handle to bleed air from the system
(see Bleeding Instructions on pg. 6).
g. Reinstall Oil Fill Plug.
h. Reinstall Ram to Crane.
4. Top assembly may be removed and stored indoors
in a dry, safe place out of the reach of children.
SAFETY OPERATION MAINTENANCESETUP
Page 9For technical questions, please call 1-888-866-5797.60732
Troubleshooting
TO PREVENT SERIOUS INJURY: Use caution when troubleshooting malfunctioning
Crane. Stay clear of supported load. Completely resolve all problems before use.
If solutions presented in Troubleshooting guide do not solve the problem, have a qualified technician inspect and
repair Crane before use. After Crane is repaired: Test it carefully without a load by raising and lowering it
fully, checking for proper operation, BEFORE RETURNING CRANE TO OPERATION.
DO NOT USE A DAMAGED OR
MALFUNCTIONING CRANE!
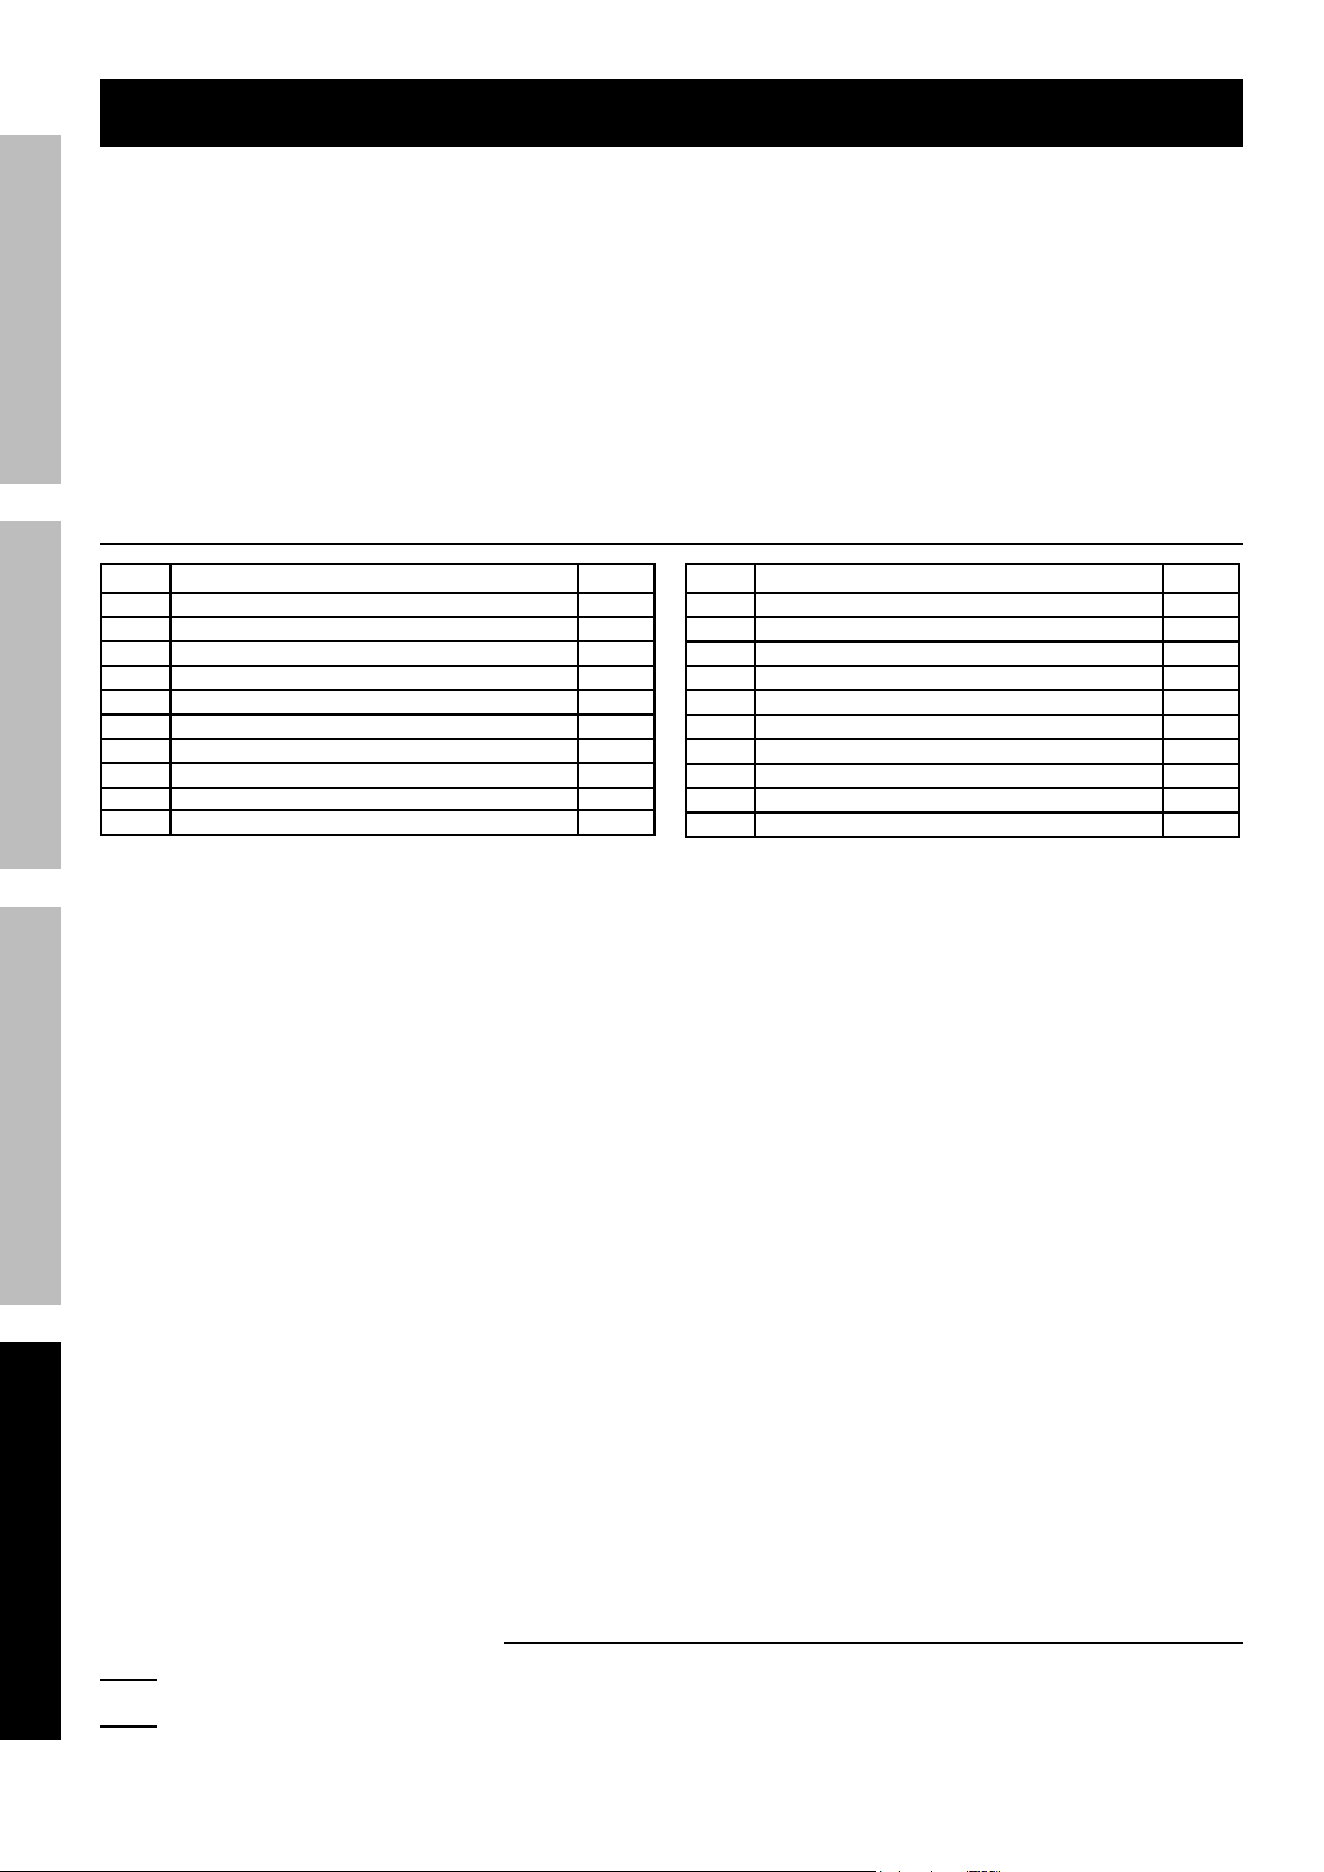
POSSIBLE SYMPTOMS
PROBABLE SOLUTION
(Make certain that the Crane
is not supporting a load while
attempting a solution.)
Ram
will not
lift at its
weight
capacity
Hook
lowers
under
load
Pump
stroke
feels
spongy
Hook
will
not lift
all the
way
Handle
moves up
when Ram is
under load
Oil leaking
from Fill
Plug
X X
Check that Release Valve is closed
fully.
Bleed air from the system.
X X X
Valve may be blocked and may not
close fully. To flush the valve:
1. Lower the Boom and securely
close the Release Valve.
2. Manually lift the Boom
several inches.
3. Open the Release Valve
and force the Boom down
as quickly as possible.
X X X
Ram may be low on oil. Check
the oil level and refill if needed.
Ram may require bleeding - see
Bleeding Instructions on page 6.
X
Unit may have too much
hydraulic oil inside; check fluid
level and adjust if needed.
SAFETYOPERATIONMAINTENANCE SETUP
Page 10 For technical questions, please call 1-888-866-5797. 60732
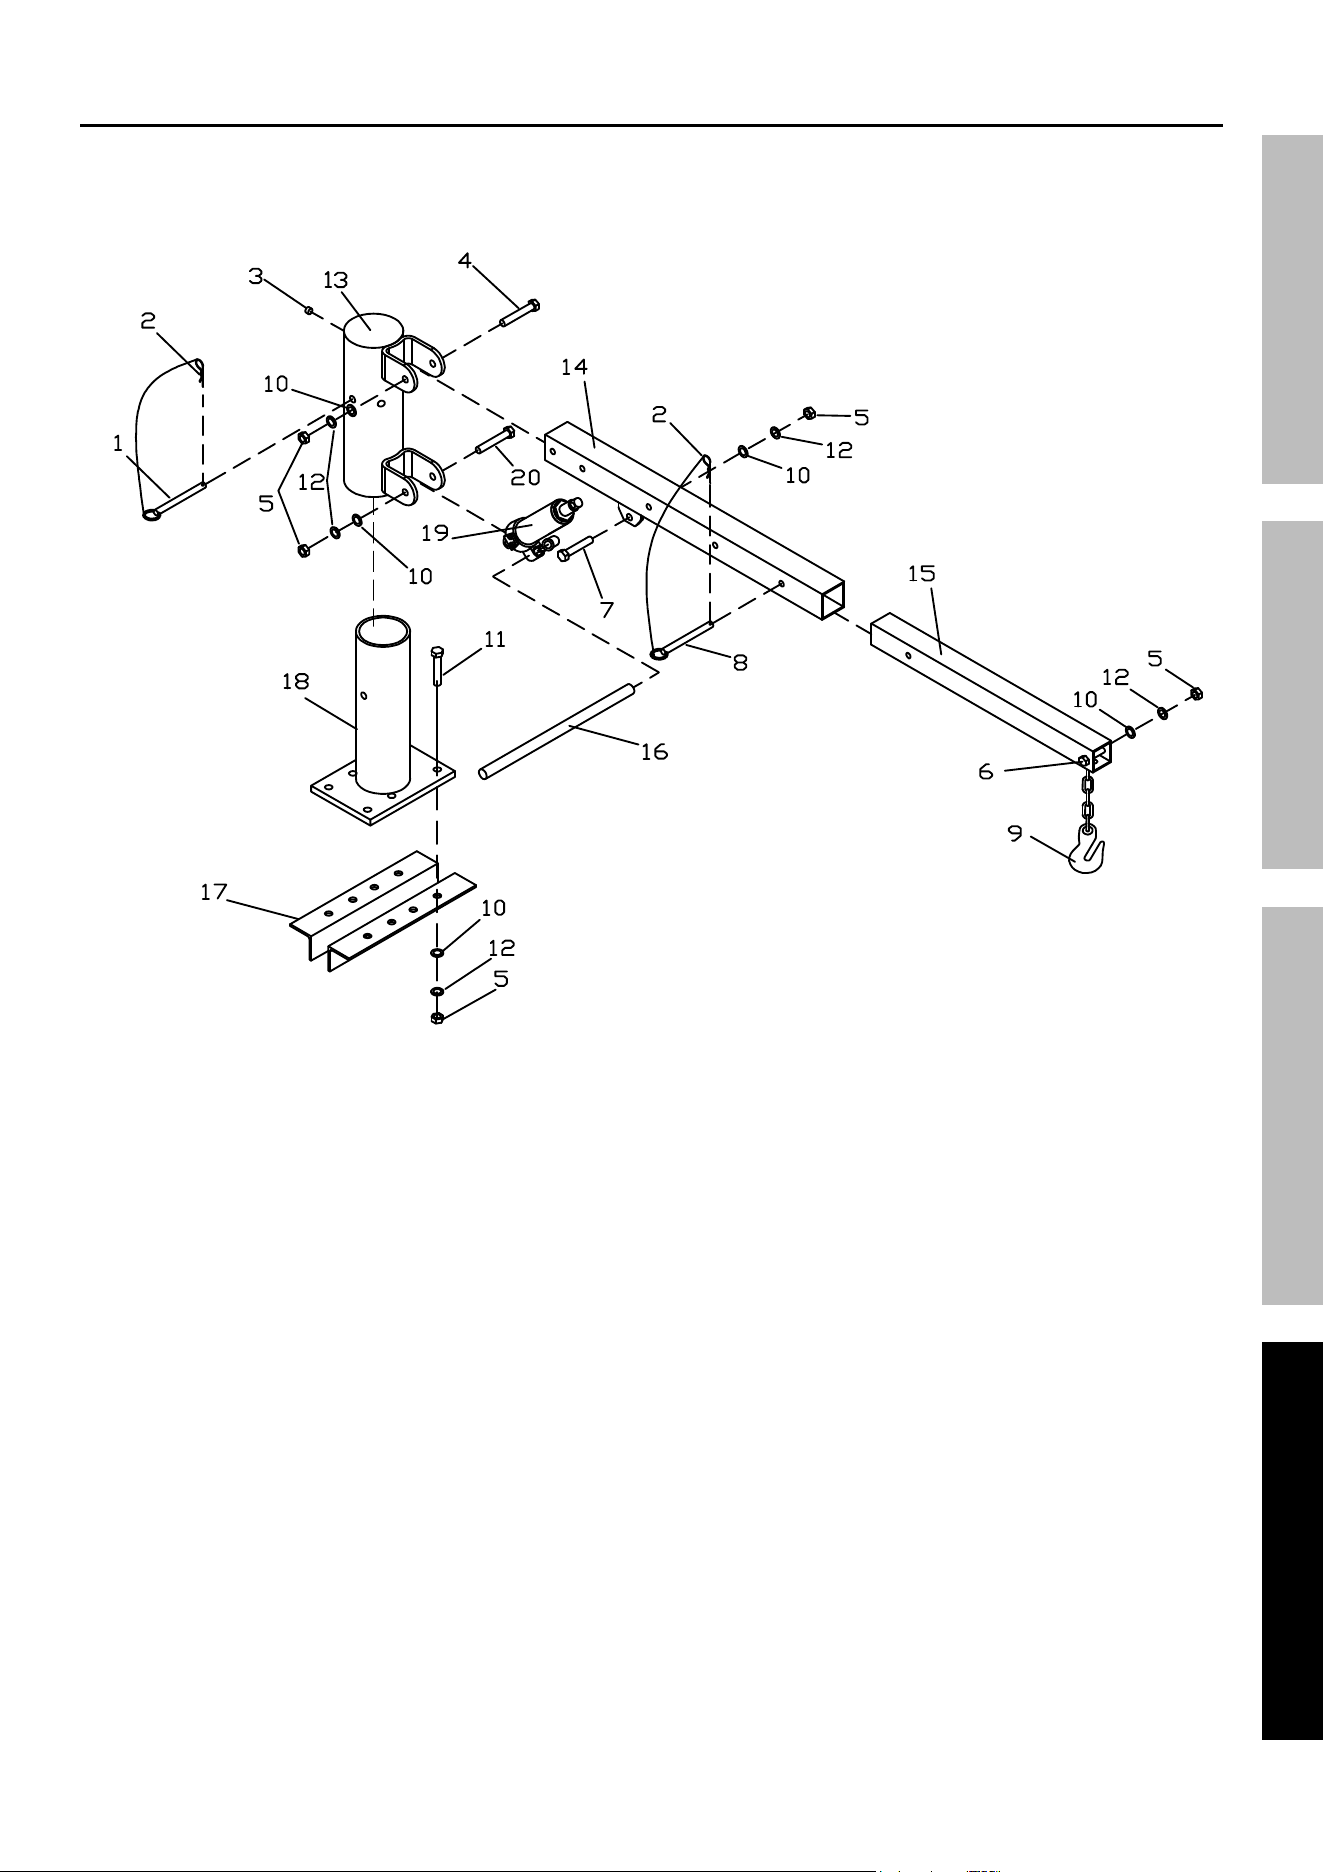
Parts List and Diagram
PLEASE READ THE FOLLOWING CAREFULLY
THE MANUFACTURER AND/OR DISTRIBUTOR HAS PROVIDED THE PARTS LIST AND ASSEMBLY DIAGRAM
IN THIS MANUAL AS A REFERENCE TOOL ONLY. NEITHER THE MANUFACTURER OR DISTRIBUTOR
MAKES ANY REPRESENTATION OR WARRANTY OF ANY KIND TO THE BUYER THAT HE OR SHE IS
QUALIFIED TO MAKE ANY REPAIRS TO THE PRODUCT, OR THAT HE OR SHE IS QUALIFIED TO REPLACE
ANY PARTS OF THE PRODUCT. IN FACT, THE MANUFACTURER AND/OR DISTRIBUTOR EXPRESSLY
STATES THAT ALL REPAIRS AND PARTS REPLACEMENTS SHOULD BE UNDERTAKEN BY CERTIFIED AND
LICENSED TECHNICIANS, AND NOT BY THE BUYER. THE BUYER ASSUMES ALL RISK AND LIABILITY
ARISING OUT OF HIS OR HER REPAIRS TO THE ORIGINAL PRODUCT OR REPLACEMENT PARTS
THERETO, OR ARISING OUT OF HIS OR HER INSTALLATION OF REPLACEMENT PARTS THERETO.
Parts List
Record Product’s Serial Number Here:
Note: If product has no serial number, record month and year of purchase instead.
Note: Some parts are listed and shown for illustration purposes only, and are not available
individually as replacement parts. Specify UPC 193175485632 when ordering parts.
Part Description Qty
1 Large Lock Pin 1
2 R Pin 2
3 Grease Fitting 1
4 Bolt, M12x100 1
5 Nut M12 10
6 Bolt, M12x70 1
7 Bolt, M12x60 1
8 Small Lock Pin 1
9 Hook & Chain 1
10 Washer 12 10
Part Description Qty
11 Bolt, M12x50 6
12 Spring Washer 12 10
13 Post 1
14 Boom 1
15 Boom Extension 1
16 Ram Handle 1
17 Mounting Plate 2
18 Base 1
19 Ram 1
20 Bolt, M12x90 1
SAFETY OPERATION MAINTENANCESETUP
Page 11For technical questions, please call 1-888-866-5797.60732
Assembly Diagram
SAFETYOPERATIONMAINTENANCE SETUP

Limited 90 Day Warranty
Harbor Freight Tools Co. makes every effort to assure that its products meet high quality and durability standards,
and warrants to the original purchaser that this product is free from defects in materials and workmanship for the
period of 90 days from the date of purchase. This warranty does not apply to damage due directly or indirectly,
to misuse, abuse, negligence or accidents, repairs or alterations outside our facilities, criminal activity, improper
installation, normal wear and tear, or to lack of maintenance. We shall in no event be liable for death, injuries
to persons or property, or for incidental, contingent, special or consequential damages arising from the use of
our product. Some states do not allow the exclusion or limitation of incidental or consequential damages, so the
above limitation of exclusion may not apply to you. THIS WARRANTY IS EXPRESSLY IN LIEU OF ALL OTHER
WARRANTIES, EXPRESS OR IMPLIED, INCLUDING THE WARRANTIES OF MERCHANTABILITY AND FITNESS.
To take advantage of this warranty, the product or part must be returned to us with transportation charges
prepaid. Proof of purchase date and an explanation of the complaint must accompany the merchandise.
If our inspection verifies the defect, we will either repair or replace the product at our election or we may
elect to refund the purchase price if we cannot readily and quickly provide you with a replacement. We will
return repaired products at our expense, but if we determine there is no defect, or that the defect resulted
from causes not within the scope of our warranty, then you must bear the cost of returning the product.
This warranty gives you specific legal rights and you may also have other rights which vary from state to state.
®
26677 Agoura Road • Calabasas, CA 91302 • 1-888-866-5797