


GHS 20/20i Installation Instructions EN-3
GHS
™
20/20i Installation
Instructions
These installation instructions are for the
GHS 20 and GHS 20i handsets. The GHS 20
is for use with the Garmin
®
VHF 200 or 300
radio and the GHS 20i is for use with the
Garmin VHF 200i or 300i radio.
For additional information, refer to the
installation instructions provided with your
radio. For operational instructions, refer
to the owner’s manual provided with your
radio.
Compatibility
Your existing VHF 200/200i or
VHF 300/300i radio may need a software
update to work with the GHS 20/GHS 20i.
Consult your Garmin dealer or contact
Garmin for information.
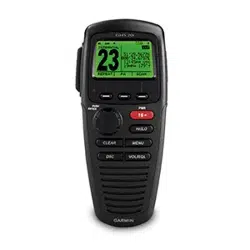
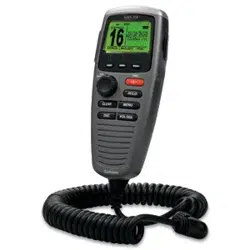
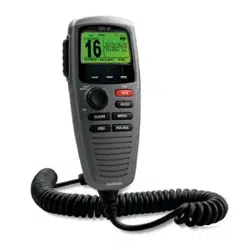
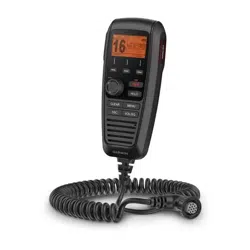
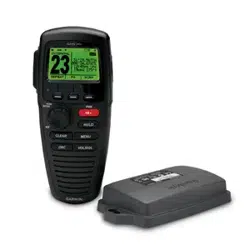
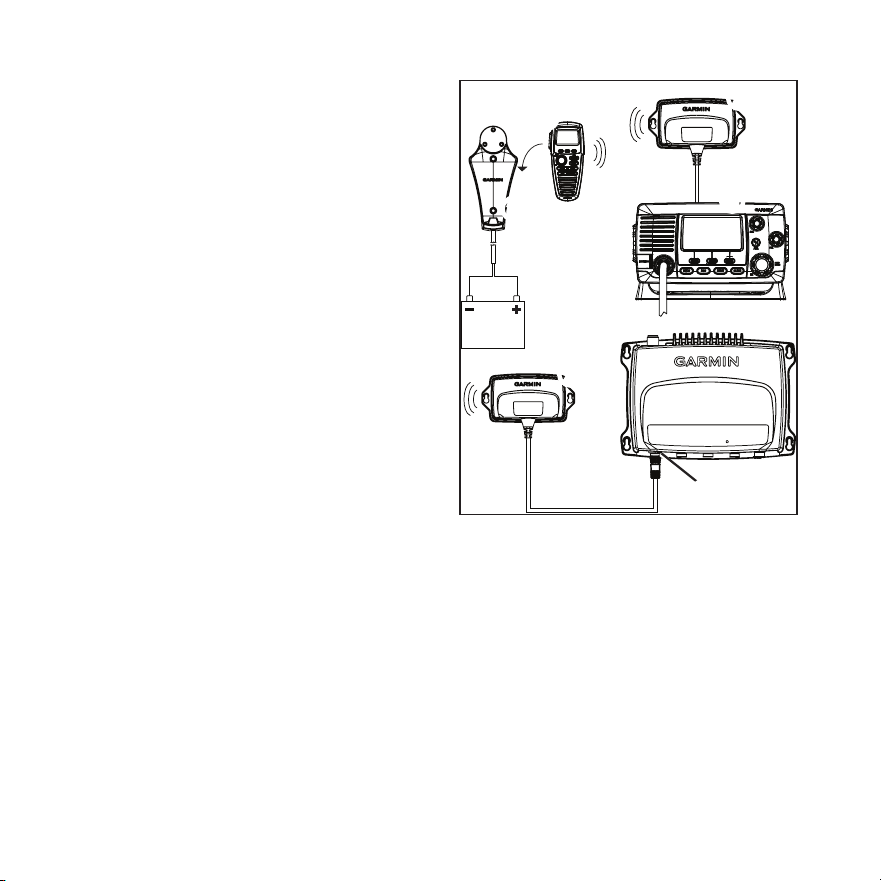
About the GHS 20/20i
The GHS 20/20i handset
➊
comes with a
GWH
™
20 receiver
➋
, a charging cradle
➌
,
a belt clip, and the necessary mounting
hardware.
➍
➎
➊
➌
➋
➋
➏
On a VHF 200/200i
➍
, the GWH 20 will
only function correctly when connected to
the microphone relocation port in the back.
On a VHF 300/300i
➎
, the GWH 20 will
only function correctly when connected to
the STATION3 connector
➏
.
Both the GHS 20/20i handset and the
GWH 20 receiver should be at least
23
5
/
8
in. (60 cm) from any compass to avoid
interference.

EN-4 GHS 20/20i Installation Instructions
About the GHS 20 Battery
The GHS 20 contains a Lithium-ion battery
that charges when the handset is placed in
the properly installed cradle.
An LED above the Channel knob on the
GHS 20/20i indicates the charging status:
• Off—Not charging
• Solid—Charging
• Slow blink (1 blink/second)—The battery
temperature is outside the safe charging
temperature (page 7).
• Fast blink (6 blinks/second)—The battery
cannot charge, and must be replaced.
Installing the GHS 20/20i
Charging Cradle
1. Determine a location to mount the
charging cradle where the cradle can be
connected to the boat battery.
2. Using the cradle as a template, mark the
two screw locations on the surface.
3. Use a ⅛ in. (3 mm) drill bit to drill the
two pilot holes.
4. Use the included 25 mm M4.2 × 1.4
panhead screws to attach the cradle to the
surface.
5. Route the power cable from the cradle to
the boat battery or fuse block.
If it is necessary to extend the wires, use
18 AWG wire.
6. Connect the red wire to the positive
terminal on the battery or fuse block, and
connect the black wire to the negative
terminal.
Installing the GWH 20
NOTE: Metal and other dense materials may
inhibit communication between the GWH 20
and the GHS 20. Test the location to make
sure the GWH 20 reliably communicates
with the GHS 20 everywhere you plan to use
it on the boat.
1. Determine a location to mount the
GWH 20.
If it is necessary to extend the GWH 20
cable, 5 m and 10 m extensions are
available from your Garmin dealer.
2. Using the GWH 20 as a template, mark
the two screw locations on the surface.

GHS 20/20i Installation Instructions EN-5
3. Use a ⅛ in. (3 mm) drill bit to drill the
two pilot holes.
4. Use the included 25 mm M4.2 × 1.4
panhead screws to attach the GWH 20 to
the surface.
5. Route the GWH 20 cable to the
VHF 200/200i or the VHF 300/300i.
6. Perform an action:
• On a VHF 200/200i, connect the
GWH 20 cable to the microphone
relocation port on the rear of the
radio.
• On a VHF 300/300i connect the
GWH 20 to the STATION3 port on
the radio.
The GWH 20 cannot be connected
to any other station on the
VHF 300/300i.
Pairing GHS 20/20i
Up to three GHS 20/20i handsets can be
paired with the GWH 20. You must pair
a GHS 20/20i handset with the GWH 20
only once. The device and the handset
automatically connect after they have been
paired.
1. Turn on all of the GHS 20/20i handsets
you want to pair.
2. Make sure the GWH 20 is connected to
the VHF 200/200i or VHF 300/300i radio
(page 4), and turn it on.
3. On the VHF 200/200i or on a handset
connected to the VHF 300/300i, select
MENU > COMMUNICATIONS >
PAIRING.
4. Select OKto search for the GHS 20
handsets.
A list of IDs for found GHS 20/20i
handsets is shown.
5. Select a handset ID.
6. Select ACCEPT.
A message is shown while the handset
pairs with the GWH 20.

EN-6 GHS 20/20i Installation Instructions
7. When the handset makes a sound, select
OK on the handset to complete the
pairing.
8. Repeat steps 4–7 for each additional
handset.
After a handset has been paired with
the GWH 20, you do not need to pair it
again. It will connect automatically when
the handset and radio are both turned on.
Pairing Troubleshooting
If you are not able to pair a GHS 20/20i
handset with the GWH 20, complete these
steps.
• Make sure all the handsets you want to
pair are turned on.
• Make sure the GWH 20 is connected to
the microphone relocation port of the
VHF 200/200i radio or to STATION3 of
the VHF 300/300i radio.
• When pairing the handsets for the rst
time, make sure the handsets are close
to the GWH 20 (within 3 ft (1 m) if
possible).
• You can connect up to three GHS 20/20i
handsets to the GWH 20. If you have
three handsets paired with the GWH 20,
and you are attempting to replace one
of them, you must rst disconnect the
handset you are replacing (page 6).
Renaming a Paired GHS 20/20i
1. On the VHF 200/200i or on a handset
connected to the VHF 300/300i, select
MENU > COMMUNICATIONS >
CONNECTIONS>[DeviceName]>
NAME.
2. Enter all the letters in the new name
using the Channel knob (up to 12
letters).
3. Select ACCEPT.
Disconnecting a GHS 20/20i From
the GWH 20
If you must replace a GHS 20/20i handset
because one is lost or damaged, for the
best results, disconnect, or unpair, the
handset you are replacing before pairing the
replacement handset to the GWH 20
(page 5).
GHS 20/20i Installation Instructions EN-7
1. On the VHF 200/200i or on the
primary VHF 300/300i (STATION1)
GHS 10/10i handset, select MENU >
COMMUNICATIONS >
CONNECTIONS>[DeviceName]>
DISCONNECT.
2. Select YES to conrm and disconnect the
GHS 20/20i.
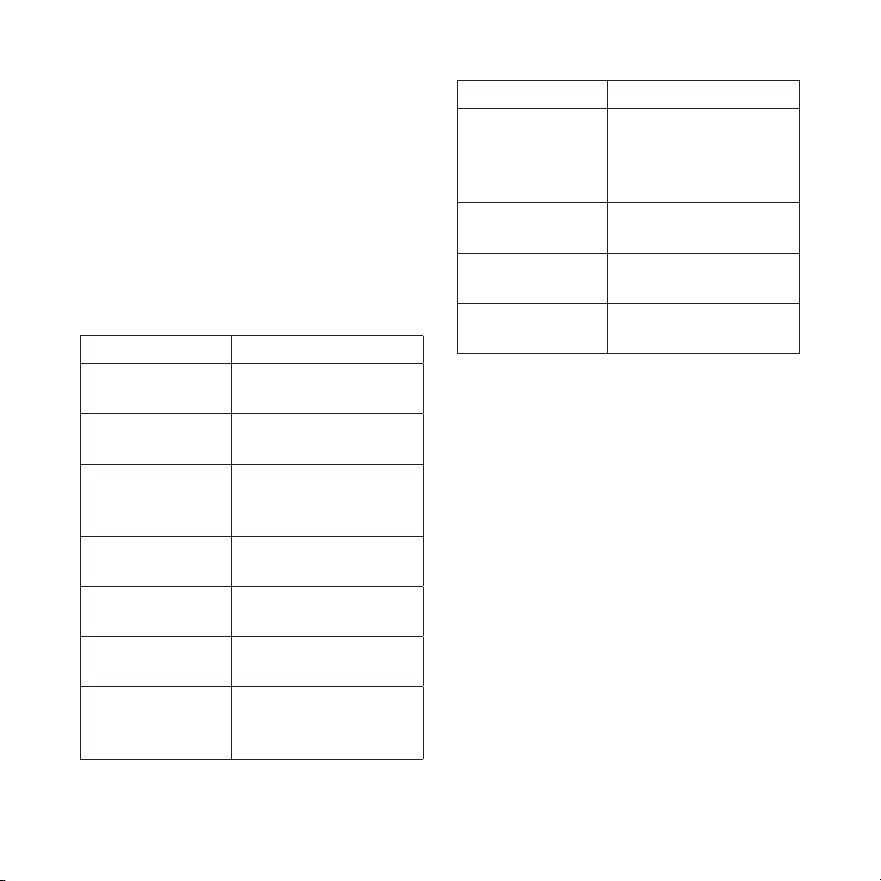
GHS 20/20i Specications
Specication Measurement
Dimensions
GHS 20/20i
6
11
/
32
× 2
53
/
64
× 1
11
/
16
in.
(16.1 × 7.2 × 4.28 cm)
Dimensions
GWH 20
2
51
/
64
× 5
5
/
16
× 1
1
/
32
in.
(7.1 × 13.5 × 2.6 cm)
Weight
GHS 20/20i
GWH 20
8.82 oz (250 g)
6.63 oz (188 g)
Operating
temperature range
from 5ºF to 158ºF
(from -15ºC to 70ºC)
Charging
temperature range
from 32ºF to 113ºF
(from -0ºC to 45ºC)
Compass-safe
distance
23
5
/
8
in. (60 cm)
Waterproof IEC 60529 IPX7
(Immersion in 1 meter
of water for 30 minutes)
Specication Measurement
GHS 20/20i GWH
20 maximum
transmission
distance
328 ft. (100 m),
depending on
installation location
(page 4)
GWH 20 cable
length
59 in. (1.5 m)
Battery type Rechargeable lithium-
ion
Battery life
Charge time
Up to 18 hours
Up to 4 hours

FR-8 Instructions d'installation du GHS 20/20i
Instructions d'installation
du GHS
™
20/20i
Ces instructions d'installation s'appliquent aux
combinés GHS 20 et GHS 20i. Le GHS 20 s'utilise
avec les VHF 200 ou 300 de Garmin
®
. Le GHS 20i
s'utilise avec les VHF 200i ou 300i de Garmin.
Pour plus d'informations, reportez-vous aux
instructions d'installation fournies avec votre radio.
Pour obtenir des instructions de fonctionnement,
reportez-vous au manuel d'utilisation fourni avec
votre radio.
Compatibilité
Il vous faudra peut-être mettre à jour le logiciel de
votre VHF 200/200i ou VHF 300/300i pour qu'elle
fonctionne avec le GHS 20/GHS 20i. Demandez
conseil à votre revendeur Garmin ou contactez
directement Garmin.
A propos du GHS 20/20i
Le combiné GHS 20/20i
➊
est fourni avec un
récepteur GWH
™
20
➋
, un socle de chargement
➌
,
un clip ceinture et le matériel de montage
nécessaire.
➍
➎
➊
➌
➋
➋
➏
Avec une VHF 200/200i
➍
, le récepteur GWH 20
ne fonctionne correctement que lorsqu'il est
connecté au port de déport du micro situé à l'arrière
de la radio.
Avec une VHF 300/300i
➎
, le récepteur GWH 20
ne fonctionne correctement que s'il est branché sur
le connecteur STATION3
➏
.
Le combiné GHS 20/20i ainsi que le récepteur
GWH 20 doivent être utilisés à 60 cm (23
5
/
8
po) de
distance minimum de tout compas pour éviter les
interférences.

Instructions d'installation du GHS 20/20i FR-9
A propos de la batterie du
GHS 20
Le GHS 20 contient une batterie lithium-ion qui se
charge lorsque le combiné est inséré dans le socle
préalablement installé.
Sur le GHS 20/20i, un voyant au-dessus du bouton
Canal indique l'état de charge :
• Eteint : absence de charge
• Fixe : en charge
• Clignotement lent (1 clignotement/seconde) :
la température de la batterie est en dehors de
la plage de températures de sécurité pour le
chargement (page 12).
• Clignotement rapide (6 clignotements/
seconde) : la batterie ne se charge pas et doit
être remplacée.
Installation du socle de
chargement du GHS 20/20i
1. Trouvez un emplacement de montage où il est
possible de connecter le socle de chargement à
la batterie du bateau.
2. En utilisant le socle comme modèle, marquez
l'emplacement des deux vis sur la surface.
3. Utilisez un foret de perceuse de 3 mm (⅛ po)
pour percer les deux trous d'implantation.
4. Utilisez les vis à tête cylindrique M4.2 × 1.4 de
25 mm fournies pour xer le socle à la surface.
5. Acheminez le câble d'alimentation du socle
jusqu'à la batterie ou jusqu'au bloc-fusibles du
bateau.
Si vous avez besoin d'une rallonge pour
l'alimentation, utilisez un câble 18 AWG.
6. Connectez le câble rouge à la borne positive de
la batterie ou du bloc-fusibles, puis connectez
le câble noir à la borne négative.
Installation du GWH 20
REMARQUE : le métal et les autres matériaux
denses peuvent perturber les communications
entre le GWH 20 et le GHS 20. Faites un test
pour conrmer que le GWH 20 communique
correctement avec le GHS 20 à tous les endroits du
bateau où vous comptez l'utiliser.
1. Trouvez un endroit où monter le GWH 20.
Si vous devez rallonger le câble du GWH 20,
des rallonges de 5 m et 10 m sont disponibles
auprès de votre revendeur Garmin.
2. En utilisant le GWH 20 comme modèle,
marquez l'emplacement des deux vis sur la
surface.

FR-10 Instructions d'installation du GHS 20/20i
3. Utilisez un foret de perceuse de 3 mm (⅛ po)
pour percer les deux trous d'implantation.
4. Utilisez les vis à tête cylindrique M4.2 × 1.4
de 25 mm fournies pour xer le GWH 20 à la
surface.
5. Acheminez le câble du GWH 20 jusqu'à la
VHF 200/200i ou VHF 300/300i.
6. Effectuez l'une des actions suivantes :
• Sur une VHF 200/200i, connectez le câble
du GWH 20 au port de déport du micro
situé à l'arrière de la radio.
• Sur une VHF 300/300i, connectez le
GWH 20 au port STATION3 de la radio.
Le GWH 20 ne peut pas être connecté à
une autre station sur la VHF 300/300i.
Couplage du GHS 20/20i
Il est possible de coupler jusqu'à trois combinés
GHS 20/20i avec le GWH 20. Le combiné
GHS 20/20i et le GWH 20 ne doivent être couplé
qu'une seule fois. Ils se connectent ensuite
automatiquement.
1. Allumez tous les combinés GHS 20/20i que
vous voulez coupler.
2. Vériez que le GHS 20 est connecté à la
VHF 200/200i ou VHF 300/300i (page 9), puis
allumez-le.
3. Sur la VHF 200/200i ou sur un combiné
connecté à la VHF 300/300i, sélectionnez
MENU > COMMUNICATIONS >
COUPLAGE.
4. Sélectionnez OK pour rechercher les combinés
GHS 20.
Une liste des identiants des combinés
GHS 20/20i détectés s'afche.
5. Sélectionnez l'identiant d'un combiné.
6. Sélectionnez ACCEPTER.
Un message s'afche et le combiné se couple
avec le GWH 20.

Instructions d'installation du GHS 20/20i FR-11
7. Lorsque le combiné émet un son, sélectionnez
OK sur ce dernier pour terminer la procédure
de couplage.
8. Répétez les étapes 4 à 7 pour chaque combiné
supplémentaire.
Une fois qu'un combiné est couplé avec le
GWH 20, il n'est pas nécessaire de le coupler
de nouveau. Il se connecte automatiquement
lorsque le combiné et la radio sont tous deux
allumés.
Résolution des problèmes de couplage
Si vous n'arrivez pas à coupler un combiné
GHS 20/20i avec le GWH 20, suivez la procédure
ci-dessous.
• Vériez que tous les combinés que vous voulez
coupler sont allumés.
• Vériez que le GWH 20 est connecté au port
de déport du micro de la VHF 200/200i ou au
connecteur STATION3 de la VHF 300/300i.
• Lors du couplage initial des combinés, vériez
que les combinés se situent à proximité du
GWH 20 (1 m [3 pi] maximum si possible).
• Il est possible de coupler jusqu'à trois combinés
GHS 20/20i au GWH 20. Si vous avez déjà
trois combinés couplés avec le GWH 20 et que
vous voulez remplacer l'un d'eux, vous devez
d'abord déconnecter le combiné à remplacer
(page 11).
Changement du nom d'un combiné
GHS 20/20i couplé
1. Sur la VHF 200/200i ou sur un combiné
connecté à la VHF 300/300i, sélectionnez
MENU > COMMUNICATIONS >
CONNEXIONS >[Nomdel'appareil]>
NOM.
2. Saisissez toutes les lettres du nouveau nom à
l'aide du bouton Canal (12 lettres maximum).
3. Sélectionnez ACCEPTER.
Déconnexion d'un combiné GHS 20/20i
du GWH 20
Si vous devez remplacer un combiné GHS 20/20i
en cas de perte ou de casse, pour de meilleures
chances de succès, déconnectez (ou découplez) le
combiné à remplacer avant de coupler le nouveau
combiné avec le GWH 20 (page 10).

FR-12 Instructions d'installation du GHS 20/20i
1. Sur la VHF 200/200i ou sur le combiné
principal GHS 10/10i de la VHF 300/300i
(STATION1), sélectionnez MENU >
COMMUNICATIONS > CONNEXIONS >
[Nomdel'appareil]>DECONNECTER.
2. Sélectionnez OUI pour conrmer et
déconnecter le GHS 20/20i.
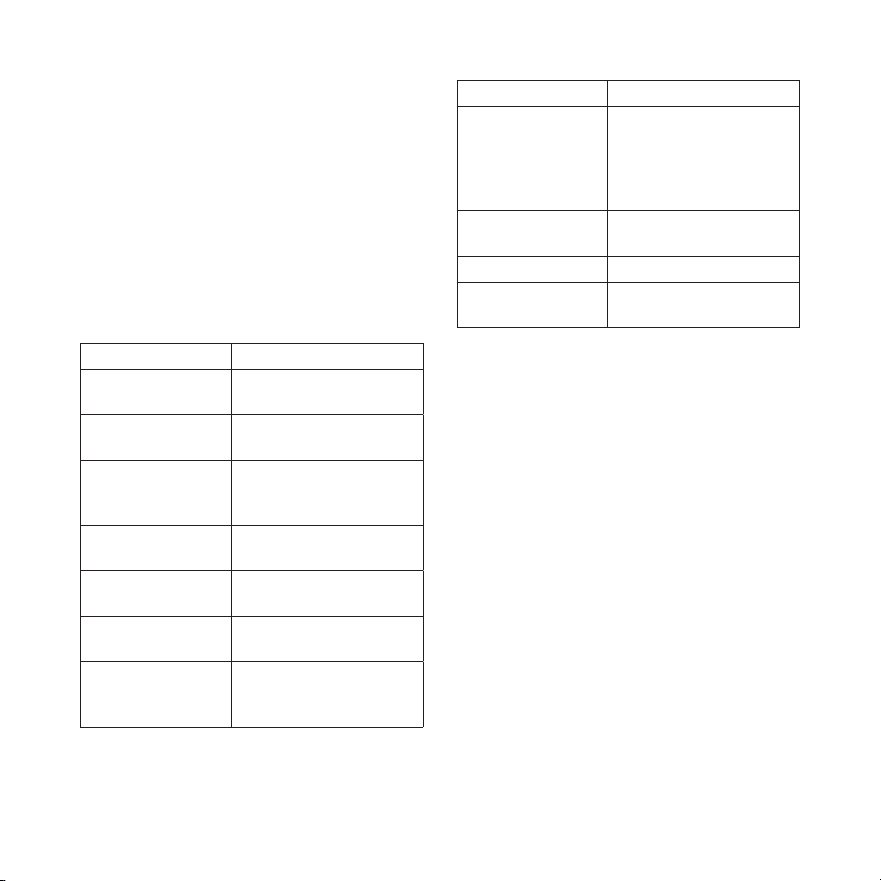
Caractéristiques techniques du
GHS 20/20i
Caractéristique Valeur
Dimensions
GHS 20/20i
16,1 × 7,2 × 4,28 cm
(6
11
/
32
× 2
53
/
64
× 1
11
/
16
po)
Dimensions
GWH 20
7,1 × 13,5 × 2,6 cm
(2
51
/
64
× 5
5
/
16
× 1
1
/
32
po)
Poids
GHS 20/20i
GWH 20
250 g (8,82 onces)
188 g (6,63 onces)
Plage de
températures de
fonctionnement
de -15 °C à 70 °C
(de 5 °F à 158 °F)
Plage de
températures de
chargement
de -0 °C à 45 °C
(de 32 °F à 113 °F)
Distance de sécurité
du compas
60 cm (23
5
/
8
po)
Etanchéité norme IEC 60529 IPX7
(immersion à 1 mètre
de profondeur pendant
30 minutes)
Caractéristique Valeur
Distance de
transmission
maximum entre le
GHS 20/20i et le
GWH 20
100 m (328 pi), en
fonction de l'emplacement
d'installation (page 9)
Longueur du câble
du GWH 20
1,5 m (59 po)
Type de batterie Rechargeable au lithium-ion
Autonomie
Temps de charge
Jusqu'à 18 heures
Jusqu'à 4 heures

Istruzioni di installazione del microtelefono GHS 20/20i IT-13
Istruzioni di installazione
del microtelefono
GHS
™
20/20i
Le seguenti istruzioni di installazione si
riferiscono ai telefoni GHS 20 e GHS 20i. I
microtelefoni GHS 20 e GHS 20i sono compatibili
rispettivamente con le radio VHF 200 o 300 e VHF
200i o 300i di Garmin
®
.
Per ulteriori informazioni, consultare le istruzioni
di installazione fornite con la radio. Per istruzioni
sull'utilizzo, fare riferimento al manuale dell'utente
fornito con la radio.
Compatibilità
Per essere utilizzata con il microtelefono GHS 20/
GHS 20i, la radio VHF 200/200i o VHF 300/300i
potrebbe aver bisogno di un aggiornamento
software. Consultare il proprio rivenditore Garmin
o contattare Garmin per ottenere informazioni.
Informazioni sul microtelefono
GHS 20/20i
Il microtelefono GHS 20/20i
➊
viene fornito con
un ricevitore GWH
™
20
➋
, un caricabatterie
➌
,
un attacco per cintura e gli elementi di montaggio
necessari all'installazione.
➍
➎
➊
➌
➋
➋
➏
In una radio VHF 200/200i
➍
, il ricevitore
GWH 20 funzionerà correttamente solo se
collegato alla porta del microtelefono collocata
sul retro.
In una radio VHF 300/300i
➎
, il ricevitore
GWH 20 funzionerà correttamente solo se
collegato al connettore della STATION3
➏
.
Il microtelefono GHS 20/20i e il ricevitore
GWH 20 non devono essere installati a una
distanza inferiore a 60 cm (23
5
/
8
poll.) dalla
bussola per evitare possibili interferenze.

IT-14 Istruzioni di installazione del microtelefono GHS 20/20i
Informazioni sulla batteria del
microtelefono GHS 20
Il microtelefono GHS 20 contiene una batteria agli
ioni di litio che si ricarica quando il telefono viene
posizionato sul caricabatterie.
Un LED sopra la manopola Canale del telefono
GHS 20/20i indica lo stato di ricarica:
• Disattivato: non in carica
• Fisso: in carica
• Lampeggiante lento (1 /secondo): la
temperatura della batteria è fuori dall'intervallo
della temperatura di ricarica sicura (pagina 17).
• Lampeggiante rapido (6 /secondo): la batteria
non può essere ricaricata e va sostituita.
Installazione del caricabatterie
GHS 20/20i
1. Determinare una posizione per il montaggio
del caricabatterie in cui è possibile fornirgli
l'alimentazione presente sull'imbarcazione.
2. Usando il caricabatterie come modello,
contrassegnare la posizione di due fori sulla
supercie.
3. Utilizzare una punta da trapano da 3 mm
(⅛ poll.) per praticare i fori di riferimento.
4. Utilizzare le viti lettate M4.2 × 1.4 da 25 mm
in dotazione per collegare il caricabatterie alla
supercie.
5. Far passare il cavo di alimentazione dal
caricabatterie alla batteria o al pannello fusibili
dell'imbarcazione.
Se è necessario estendere la lunghezza dei cavi,
utilizzare un cavo 18 AWG.
6. Collegare il cavo rosso al terminale positivo
della batteria o del blocco fusibili e il cavo
nero al terminale negativo.
Installazione del ricevitore
GWH 20
NOTA: è possibile che metallo o altri materiali
densi impediscano la comunicazione tra GWH 20
e GHS 20. Assicurarsi, prima di posizionare il
ricevitore GWH 20 che comunichi perfettamente
con il microtelefono GHS 20 in qualunque punto
dell'imbarcazione.
1. Determinare una posizione per il montaggio
del ricevitore GWH 20.
Se è necessario estendere il cavo del ricevitore
GWH 20, sono disponibili prolunghe di 5 e
10 m presso il proprio rivenditore Garmin.
2. Scegliere il posizionamento del ricevitore
GWH 20 e contrassegnare la posizione di due
fori da effettuare sulla supercie.

Istruzioni di installazione del microtelefono GHS 20/20i IT-15
3. Utilizzare una punta da trapano da 3 mm
(⅛ poll.) per praticare i fori di riferimento.
4. Utilizzare le viti M4.2 × 1.4 da 25 mm in
dotazione per collegare il ricevitore GWH 20
alla supercie.
5. Instradare il cavo del ricevitore GWH 20 verso
la radio VHF 200/200i o VHF 300/300i.
6. Eseguire una delle seguenti operazioni:
• Sulla radio VHF 200/200i, collegare il
cavo del ricevitore GWH 20 alla porta del
microfono di trasferimento sul retro della
radio.
• Sulla radio VHF 300/300i collegare
il ricevitore GWH 20 alla porta della
STATION3 della radio.
Non è possibile collegare il ricevitore
GWH 20 a nessun'altra stazione della radio
VHF 300/300i.
Associazione del microtelefono
GHS 20/20i
È possibile associare no a tre microtelefoni
GHS 20/20i al ricevitore GWH 20. Il micro-
telefono GHS 20/20i deve essere associato al
ricevitore GWH 20 solo una volta. Una volta
associati, il dispositivo e il telefono si connettono
automaticamente.
1. Accendere tutti i microtelefoni GHS 20/20i che
si desidera associare.
2. Assicurarsi che il ricevitore GHS 20
sia collegato ed alimentato alla radio
VHF 200/200i o VHF 300/300i (pagina 14).
3. Sulla radio VHF 200/200i o sul telefono
collegato alla radio VHF 300/300i,
selezionare MENU > COMUNICAZIONI >
ASSOCIAZIONE.
4. Selezionare OKper cercare i telefoni GHS 20.
Viene visualizzato un elenco di ID relativi ai
microtelefoni GHS 20/20i trovati.
5. Selezionare un ID microtelefono.
6. Selezionare ACCETTA.
Viene visualizzato un messaggio durante
l'associazione del microtelefono al ricevitore
GWH 20.

IT-16 Istruzioni di installazione del microtelefono GHS 20/20i
7. Quando il microtelefono emette un segnale
acustico, selezionare OK per completare
l'associazione.
8. Ripetere i passaggi da 4 a 7 per ogni telefono
aggiuntivo.
Una volta associato il microtelefono al
ricevitore GWH 20, non è necessario
riassociarlo. Verrà connesso in automatico
quando il microtelefono e la radio sono accesi.
Risoluzione dei problemi relativi
all'associazione
Se non è possibile associare il telefono GHS 20/20i
al ricevitore GWH 20, effettuare le seguenti
operazioni.
• Assicurarsi che tutti i microtelefoni da
associare siano accesi.
• Accertarsi che il ricevitore GWH 20 sia
collegato alla porta del microfono di
trasferimento della radio VHF 200/200i o alla
STATION3 della radio VHF 300/300i.
• Quando si associano i microtelefoni per la
prima volta, assicurarsi che questi siano vicini
al ricevitore GWH 20 (entro la distanza di 1 m
(3 piedi) se possibile).
• È possibile collegare no a tre microtelefoni
GHS 20/20i al ricevitore GWH 20. Se sono
associati tre microtelefoni al ricevitore
GWH 20 e si tenta di sostituirne uno, è prima
necessario scollegare il microtelefono da
sostituire (pagina 16).
Come rinominare un microtelefono
GHS 20/20i associato
1. Sulla radio VHF 200/200i o sul microtelefono
collegato alla radio VHF 300/300i,
selezionare MENU > COMUNICAZIONI >
CONNESSIONI>[nomedispositivo]>
NOME.
2. Immettere tutte le lettere del nuovo nome
mediante la manopola Canale (no a
12 lettere).
3. Selezionare ACCETTA.
Scollegamento di un microtelefono
GHS 20/20i dal ricevitore GWH 20
Se è necessario sostituire un microtelefono GHS
20/20i poiché è stato smarrito o danneggiato, per
ottenere risultati ottimali, scollegare o annullare
l'associazione del microtelefono da sostituire
prima di associare il microtelefono sostitutivo al
ricevitore GWH 20 (pagina 15).
Istruzioni di installazione del microtelefono GHS 20/20i IT-17
1. Sulla radio VHF 200/200i o sul telefono
GHS 10/10i principale della radio
VHF 300/300i (STATION1), selezionare
MENU > COMUNICAZIONI >
CONNESSIONI>[nomedispositivo]>
SCOLLEGA.
2. Selezionare SÌ per confermare e scollegare
il microtelefono GHS 20/20i.
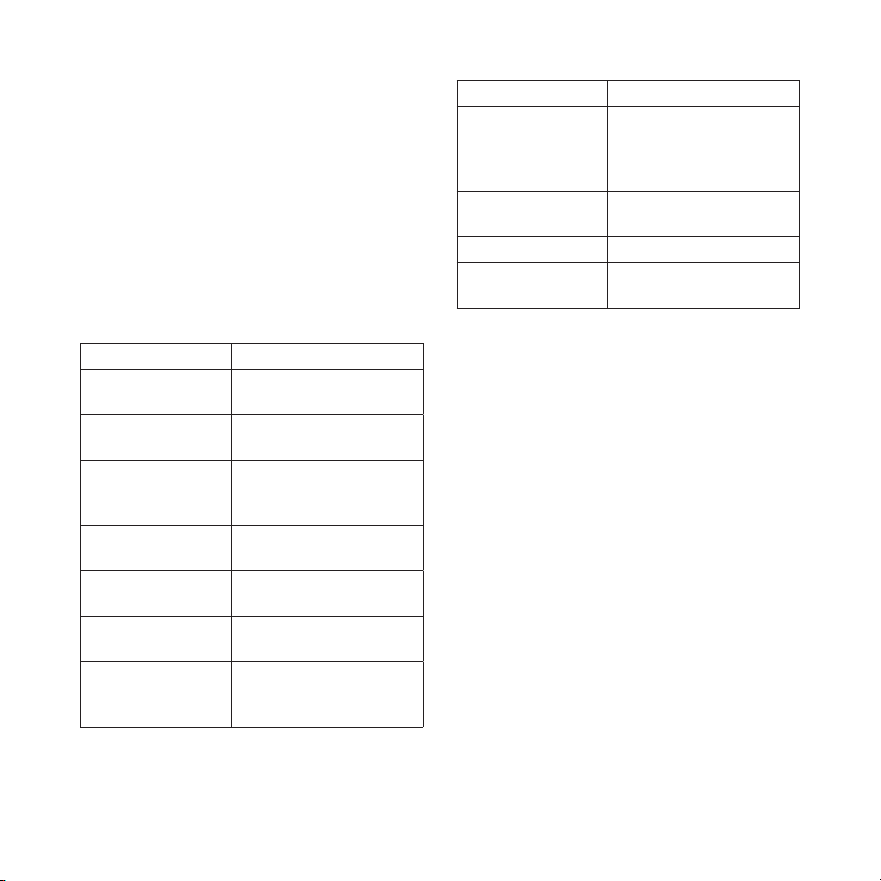
Speciche del microtelefono
GHS 20/20i
Speciche Valore
Dimensioni
GHS 20/20i
16,1 × 7,2 × 4,28 cm
(6
11
/
32
× 2
53
/
64
× 1
11
/
16
poll.)
Dimensioni
GWH 20
7,1 × 13,5 × 2,6 cm
(2
51
/
64
× 5
5
/
16
× 1
1
/
32
poll.)
Peso
GHS 20/20i
GWH 20
250 g (8,82 once)
188 g (6,63 once)
Range temperature
di funzionamento
da -15 ºC a 70 ºC
(da 5 ºF a 158 ºF)
Gamma temperature
di ricarica
da -0 ºC a 45 ºC
(da 32 ºF a 113 ºF)
Distanza di sicurezza
dalla bussola
60 cm (23
5
/
8
poll.)
Impermeabile IEC 60529 IPX7 (può
essere immerso in 1 metro
d'acqua per 30 minuti)
Speciche Valore
Distanza di
trasmissione
massima tra
GHS 20/20i e
GWH 20
100 m (328 piedi), a
seconda della posizione di
installazione (pagina 14)
Lunghezza cavo
GWH 20
1,5 m (59 poll.)
Tipo di batteria Ioni di litio ricaricabile
Durata della batteria
Tempo di ricarica
Fino a 18 ore
Fino a 4 ore

DE-18 GHS 20/20i – Installationsanweisungen
GHS
™
20/20i –
Installationsanweisungen
Diese Installationsanweisungen gelten für die
GHS 20- und GHS 20i-Handsets. Der GHS 20
ist zur Verwendung mit den Garmin
®
VHF 200-
oder VHF 300-Funkgeräten und der GHS 20i
zur Verwendung mit den VHF 200i- oder
VHF 300i-Funkgeräten vorgesehen.
Weitere Informationen nden Sie in den
Installationsanweisungen des Funkgeräts.
Anweisungen zum Betrieb nden Sie im
Benutzerhandbuch des Funkgeräts.
Kompatibilität
Wenn Sie bereits über ein VHF 200/200i- oder
VHF 300/300i-Funkgerät verfügen, muss die
Software möglicherweise aktualisiert werden,
damit es mit dem GHS 20/GHS 20i verwendet
werden kann. Weitere Informationen erhalten Sie
bei Ihrem Garmin-Händler oder bei Garmin.
Informationen zum GHS 20/20i
Im Lieferumfang des GHS 20/20i-Handsets
➊
sind ein GWH
™
20-Empfänger
➋
, eine
Ladehalterung
➌
, ein Gürtelclip und der
erforderliche Montagesatz enthalten.
➍
➎
➊
➌
➋
➋
➏
Der GWH 20 funktioniert mit einem VHF 200/
200i
➍
nur ordnungsgemäß, wenn er an
der Rückseite an den Mikrofonanschluss
angeschlossen ist.
Der GWH 20 funktioniert mit einem VHF 300/300i
➎
nur ordnungsgemäß, wenn er an den Anschluss
STATION3
➏
angeschlossen ist.
Sowohl das GHS 20/20i-Handset als auch der
GWH 20-Empfänger sollten in einem Abstand
von mindestens 60 cm (23
5
/
8
Zoll) zu Kompassen
installiert werden, um Interferenzen zu vermeiden.

GHS 20/20i – Installationsanweisungen DE-19
Informationen zum Akku des
GHS 20
Der GHS 20 verfügt über einen Lithium-Ionen-
Akku, der aufgeladen wird, wenn das Handset
in die ordnungsgemäß installierte Halterung
eingesetzt wird.
Am GHS 20/20i zeigt eine LED über dem Knopf
KANAL den Ladestand an:
• Aus: Nicht aufgeladen.
• Leuchtet: Der Ladevorgang läuft.
• Blinkt langsam (1 Mal pro Sekunde): Die
Akkutemperatur bendet sich außerhalb des
sicheren Ladetemperaturbereichs (Seite 22).
• Blinkt schnell (6 Mal pro Sekunde): Der
Akku kann nicht aufgeladen werden und muss
gewechselt werden.
Installieren der GHS 20/20i-
Ladehalterung
1. Legen Sie einen Montageort für die
Ladehalterung fest, an dem die Halterung mit
der Batterie des Boots verbunden werden kann.
2. Verwenden Sie die Halterung als
Schablone, und markieren Sie die zwei
Schraubenpositionen auf der Oberäche.
3. Verwenden Sie einen Bohrer (3 mm, ⅛ Zoll),
um die zwei Vorbohrungen anzubringen.
4. Befestigen Sie die Halterung mit den im
Lieferumfang enthaltenen Flachkopfschrauben
(25 mm, M4,2 × 1,4) an der Montageäche.
5. Führen Sie das Stromversorgungskabel von
der Halterung zur Batterie des Boots oder zum
Sicherungsblock.
Falls eine Verlängerung der Leitungen
erforderlich ist, verwenden Sie Leitungen nach
AWG 18.
6. Verbinden Sie die rote Leitung mit dem Pluspol
der Batterie oder des Sicherungsblocks, und
verbinden Sie die schwarze Leitung mit dem
Minuspol.
Installieren des GWH 20
HINWEIS: Metalle und andere dichte Materialien
können die Kommunikation zwischen dem
GWH 20 und dem GHS 20 beeinträchtigen. Testen
Sie den Montageort, um sicherzustellen, dass die
Kommunikation zwischen dem GWH 20 und dem
GHS 20 an allen möglichen Verwendungsorten auf
dem Boot ordnungsgemäß funktioniert.
1. Legen Sie einen Montageort für den GWH 20
fest.
Falls eine Verlängerung des GWH 20-Kabels
erforderlich ist, sind bei Garmin-Händlern
Verlängerungen von 5 m und 10 m verfügbar.
2. Verwenden Sie den GWH 20 als
Schablone, und markieren Sie die zwei
Schraubenpositionen auf der Oberäche.

DE-20 GHS 20/20i – Installationsanweisungen
3. Verwenden Sie einen Bohrer (3 mm, ⅛ Zoll),
um die zwei Vorbohrungen anzubringen.
4. Befestigen Sie den GWH 20 mit den im
Lieferumfang enthaltenen Flachkopfschrauben
(25 mm, M4,2 × 1,4) an der Montageäche.
5. Verlegen Sie das GWH 20-Kabel zum
VHF 200/200i oder VHF 300/300i.
6. Führen Sie einen der folgenden Schritte aus:
• Schließen Sie bei einem VHF 200/200i das
GWH 20-Kabel an den Mikrofonanschluss
an der Rückseite des Funkgeräts an.
• Schließen Sie bei einem VHF 300/300i den
GWH 20 an den Anschluss STATION3
am Funkgerät an.
Der GWH 20 kann nicht an andere Stellen
am VHF 300/300i angeschlossen werden.
Koppeln des GHS 20/20i
Sie können bis zu drei GHS 20/20i-Handsets mit
dem GWH 20 koppeln. Ein GHS 20/20i-Handset
muss nur einmal mit dem GWH 20 gekoppelt
werden. Das Gerät und das Handset stellen
automatisch eine Verbindung miteinander her,
nachdem Sie gekoppelt wurden.
1. Schalten Sie alle GHS 20/20i-Handsets ein, die
Sie koppeln möchten.
2. Vergewissern Sie sich, dass der GHS 20 an das
VHF 200/200i- oder VHF 300/300i-Funkgerät
angeschlossen ist (Seite 19), und schalten Sie
ihn ein.
3. Wählen Sie auf dem VHF 200/200i
oder auf einem an das VHF 300/300i
angeschlossenen Handset die Option MENU >
KOMMUNIKATION > KOPPELN.
4. Wählen Sie OK, um nach den
GHS 20-Handsets zu suchen.
Es wird eine Liste von IDs für gefundene
GHS 20/20i-Handsets angezeigt.
5. Wählen Sie eine Handset-ID aus.
6. Wählen Sie AKZEPT.
Während der Kopplung des Handsets mit dem
GWH 20 wird eine Meldung angezeigt.

GHS 20/20i – Installationsanweisungen DE-21
7. Wenn das Handset einen Ton ausgibt, wählen
Sie auf dem Handset die Option OK, um die
Kopplung abzuschließen.
8. Wiederholen Sie die Schritte 4 bis 7 für alle
weiteren Handsets.
Nachdem ein Handset mit dem GWH 20
gekoppelt wurde, muss es nicht erneut
gekoppelt werden. Die Verbindung wird
automatisch hergestellt, wenn sowohl Handset
als auch Funkgerät eingeschaltet sind.
Fehlerbehebung bei
Kopplungsproblemen
Wenn Sie ein GHS 20/20i-Handset nicht mit dem
GWH 20 koppeln können, führen Sie folgende
Schritte aus:
• Vergewissern Sie sich, dass alle Handsets, die
gekoppelt werden sollen, eingeschaltet sind.
• Vergewissern Sie sich, dass der
GWH 20 an den Mikrofonanschluss
des VHF 200/200i-Funkgeräts oder
an den Anschluss STATION3 am
VHF 300/300i-Funkgerät angeschlossen ist.
• Wenn Sie die Handsets zum ersten Mal
koppeln, stellen Sie sicher, dass sie sich in
der Nähe des GWH 20 benden (möglichst in
einem Abstand von maximal 1 m/3 Fuß).
• Sie können bis zu drei GHS 20/20i-Handsets
an den GWH 20 anschließen. Wenn Sie drei
Handsets mit dem GWH 20 gekoppelt haben
und versuchen, eines der Handsets zu ersetzen,
müssen Sie zunächst das Handset trennen, das
Sie ersetzen möchten (Seite 21).
Umbenennen eines gekoppelten
GHS 20/20i
1. Wählen Sie auf dem VHF 200/200i
oder auf einem an das VHF 300/300i
angeschlossenen Handset die Option
MENU > KOMMUNIKATION >
VERBINDUNGEN > [Gerätename] >
NAME.
2. Geben Sie unter Verwendung des Knopfes
KANAL alle Buchstaben des neuen Namens
ein (bis zu 12 Buchstaben).
3. Wählen Sie AKZEPT.
Trennen eines GHS 20/20i vom GWH 20
Wenn Sie ein GHS 20/20i-Handset ersetzen
müssen, da ein Gerät verloren gegangen
ist oder beschädigt wurde, erhalten Sie die
besten Ergebnisse, wenn Sie das zu ersetzende
Handset trennen oder entkoppeln, bevor Sie
das Ersatzhandset mit dem GWH 20 koppeln
(Seite 20).
DE-22 GHS 20/20i – Installationsanweisungen
1. Wählen Sie auf dem VHF 200/200i oder
auf dem primären GHS 10/10i-Handset
des VHF 300/300i (STATION1) die
Option MENU > KOMMUNIKATION >
VERBINDUNGEN > [Gerätename] >
TRENNEN.
2. Wählen Sie JA, um die Auswahl zu bestätigen
und das GHS 20/20i zu trennen.
Technische Daten des
GHS 20/20i
Angabe Werte
Abmessungen
GHS 20/20i
16,1 × 7,2 × 4,28 cm
(6
11
/
32
× 2
53
/
64
× 1
11
/
16
Zoll)
Abmessungen
GWH 20
7,1 × 13,5 × 2,6 cm
(2
51
/
64
× 5
5
/
16
× 1
1
/
32
Zoll)
Gewicht
GHS 20/20i
GWH 20
250 g (8,82 Unzen)
188 g (6,63 Unzen)
Betriebstemperatur-
bereich
-15 ºC bis 70 ºC
(5 °F bis 158 °F)
Ladetemperatur-
bereich
0 °C bis 45 °C
(32 °F bis 113 °F)
Sicherheitsabstand
zum Kompass
60 cm (23
5
/
8
Zoll)
Wasserdicht IEC 60529 IPX7
(Eintauchtiefe 1 m für
30 Minuten)
Angabe Werte
Maximale Übertra-
gungsreichweite
zwischen GHS 20/20i
und GWH 20
100 m (328 Fuß), je nach
Montageort (Seite 19)
Kabellänge des
GWH 20
1,5 m (59 Zoll)
Akkutyp Lithium-Ionen-Akku
Akkulebensdauer
Ladezeit
Bis zu 18 Stunden
Bis zu 4 Stunden
Instrucciones de instalación del GHS 20/20i ES-23
Instrucciones de instalación
del GHS
™
20/20i
Estas instrucciones de instalación pertenecen a los
handsets GHS 20 y GHS 20i. El GHS 20 se puede
utilizar con la radio VHF 200 o 300 de Garmin
®
y el GHS 20i, con la radio VHF 200i o 300i de
Garmin.
Para obtener más información, consulta las
instrucciones de instalación suministradas
con la radio. Para obtener instrucciones de
funcionamiento, consulta el manual del usuario
suministrado con la radio.
Compatibilidad
Es posible que tengas que actualizar el software de
tu radio VHF 200/200i o VHF 300/300i para que
sea compatible con el GHS 20/GHS 20i. Consulta
con tu distribuidor de Garmin o ponte en contacto
con nosotros para obtener información.
Acerca del GHS 20/20i
El handset GHS 20/20i
➊
incluye un receptor
GWH
™
20
➋
, un soporte cargador
➌
, un clip
para cinturón y todos los componentes de montaje
necesarios.
➍
➎
➊
➌
➋
➋
➏
En caso de utilizar una radio VHF 200/200i
➍
, el
GWH 20 sólo funcionará correctamente cuando
esté conectado al puerto de reubicación del
micrófono, en la parte posterior de la radio.
Si se utiliza una radio VHF 300/300i
➎
, el
GWH 20 sólo funcionará correctamente cuando
esté conectado al conector STATION3
➏
.
Tanto el handset GHS 20/20i como el receptor
GWH 20 deben estar a una distancia de, al menos,
23
5
/
8
in (60 cm) de cualquier brújula para evitar
interferencias.

ES-24 Instrucciones de instalación del GHS 20/20i
Acerca de la batería del GHS 20
El GHS 20 contiene una batería de ión-litio que
se carga al colocarlo en el soporte instalado
correctamente.
Un LED situado encima de la rueda Canal del
GHS 20/20i informa acerca del estado de carga:
• Apagado: el dispositivo no está cargándose
• Fijo: el dispositivo está en carga
• Parpadeo lento (1 parpadeo/segundo): la
temperatura de la batería se encuentra fuera del
rango de temperatura segura durante la carga
(página 27).
• Parpadeo rápido (6 parpadeos/segundo): no es
posible cargar la batería y debe sustituirse.
Instalación del soporte cargador
del GHS 20/20i
1. Selecciona una ubicación para montar el
soporte cargador que permita conectar este
último a la batería de la embarcación.
2. Utilizando el soporte a modo de plantilla,
marca la ubicación de los dos tornillos en la
supercie.
3. Utiliza una broca de ⅛ in (3 mm) para perforar
los dos oricios guía.
4. Utiliza los tornillos de cabeza plana M4,2 × 1,4
de 25 mm suministrados para jar el soporte
cargador a la supercie.
5. Dirige el cable de alimentación desde el
soporte hasta la batería de la embarcación o el
bloque de fusibles.
Si es necesario alargar los cables, utiliza cable
de 18 AWG.
6. Conecta el cable rojo al terminal positivo de
la batería o bloque de fusibles y el negro, al
terminal negativo.
Instalación del GWH 20
NOTA: es posible que los materiales densos,
como el metal, impidan la comunicación entre
el GWH 20 y el GHS 20. Prueba la ubicación
para asegurarte de que el GWH 20 se comunica
correctamente con el GHS 20 desde todos los
lugares de la embarcación en los que vas a utilizar
el dispositivo.
1. Selecciona una ubicación para montar el
GWH 20.
Si necesitas alargar el cable del GWH 20,
puedes adquirir cables de extensión de 5 m y
10 m en tu distribuidor de Garmin.
2. Utilizando el GWH 20 a modo de plantilla,
marca la ubicación de los dos tornillos en la
supercie.

Instrucciones de instalación del GHS 20/20i ES-25
3. Utiliza una broca de ⅛ in (3 mm) para perforar
los dos oricios guía.
4. Utiliza los tornillos de cabeza plana M4,2 × 1,4
de 25 mm suministrados para jar el GWH 20
a la supercie.
5. Dirige el cable del GWH 20 a la radio
VHF 200/200i o VHF 300/300i.
6. Lleva a cabo una de las siguientes acciones:
• Si utilizas una radio VHF 200/200i,
conecta el cable del GWH 20 al puerto
de reubicación del micrófono, en la parte
posterior de la radio.
• En caso de utilizar una radio
VHF 300/300i, conecta el GWH 20 al
puerto STATION3 de la misma.
El GWH 20 no puede conectarse a ninguna
otra estación de la radio VHF 300/300i.
Vinculación del GHS 20/20i
Pueden vincularse hasta tres handsets GHS 20/20i
con el GWH 20. El handset GHS 20/20i
debe vincularse con el GWH 20 una sola
vez. El dispositivo y el handset se conectarán
automáticamente una vez que se hayan vinculado.
1. Enciende todos los handsets GHS 20/20i que
desees vincular.
2. Asegúrate de que el GHS 20 está conectado
a la radio VHF 200/200i o VHF 300/300i
(página 24) y enciéndelo.
3. En la radio VHF200/200i o en un handset
conectado a la VHF 300/300i, selecciona
MENU > COMUNICACIONES >
VINCULACIÓN.
4. Selecciona OKpara buscar los handsets
GHS 20.
Se mostrará una lista de ID correspondientes a
los handsets GHS 20/20i encontrados.
5. Selecciona el ID de un handset.
6. Selecciona ACEPTAR.
Se mostrará un mensaje durante el proceso de
vinculación del handset con el GWH 20.

ES-26 Instrucciones de instalación del GHS 20/20i
7. Cuando el handset emita un sonido, selecciona
OK en éste para nalizar el proceso de
vinculación.
8. Repite los pasos 4-7 para cada uno de los
handsets adicionales.
Una vez que hayas vinculado un handset con
el GWH 20, no es necesario que vuelvas a
repetir este proceso. La conexión se establecerá
de forma automática cuando se enciendan el
handset y la radio.
Solución de problemas relacionados con
la vinculación
Si no consigues vincular un handset GHS 20/20i
con el GWH 20, sigue los pasos que se detallan a
continuación.
• Asegúrate de que todos los handsets que deseas
vincular están encendidos.
• Asegúrate de que el GWH 20 está conectado al
puerto de reubicación de micrófono de la radio
VHF 200/200i o al conector STATION3 de la
radio VHF 300/300i.
• Al vincular los handsets por primera vez,
asegúrate de que se encuentran cerca del
GWH 20 (a no más de 3 ft (1 m), si es posible).
• Puedes conectar hasta tres handsets
GHS 20/20i al GWH 20. Si has vinculado
tres handsets al GWH 20 y estás intentando
sustituir uno de ellos, debes desconectar en
primer lugar el handset que vas a sustituir
(página 26).
Cambio de nombre de un GHS 20/20i
vinculado
1. En la radio VHF200/200i o en un handset
conectado a la VHF 300/300i, selecciona
MENU > COMUNICACIONES >
CONEXIONES > [Nombredeldispositivo] >
NOMBRE.
2. Introduce todas las letras del nombre nuevo
mediante la rueda Canal (hasta 12 letras).
3. Selecciona ACEPTAR.
Desconexión de un GHS 20/20i del
GWH 20
Para conseguir unos resultados óptimos en caso de
que debas sustituir un handset GHS 20/20i como
consecuencia de su pérdida o de los daños sufridos
por éste, desconecta o desvincula el handset que
vas a sustituir antes de vincular el handset de
repuesto al GWH 20 (página 25).

Instrucciones de instalación del GHS 20/20i ES-27
1. En la radio VHF 200/200i o en el handset
GHS 10/10i principal de la radio VHF 300/
300i (STATION1), selecciona MENU >
COMUNICACIONES > CONEXIONES>
[Nombredeldispositivo]>
DESCONECTADO.
2. Selecciona SÍ para conrmar y desconectar el
GHS 20/20i.
Especicaciones del GHS 20/20i
Especicación Medida
Dimensiones
GHS 20/20i
6
11
/
32
× 2
53
/
64
× 1
11
/
16
in
(16,1 × 7,2 × 4,28 cm)
Dimensiones
GWH 20
2
51
/
64
× 5
5
/
16
× 1
1
/
32
in
(7,1 × 13,5 × 2,6 cm)
Peso
GHS 20/20i
GWH 20
8,82 oz (250 g)
6,63 oz (188 g)
Rango de
temperaturas de
funcionamiento
De 5 ºF a 158 ºF
(de -15 ºC a 70 ºC)
Rango de
temperaturas de
carga
De 32 ºF a 113 ºF
(de -0 ºC a 45 ºC)
Distancia de
seguridad de
la brújula
23
5
/
8
in (60 cm)
Resistencia
al agua
IEC 60529 IPX7
(inmersión en agua a 1 m
de profundidad durante
30 minutos)
Especicación Medida
Distancia de
transmisión máxima
del GHS 20/20i y
GWH 20
328 ft (100 m), depen-
diendo de la ubicación
de instalación (página 24)
Longitud del cable
del GWH 20
59 in (1,5 m)
Tipo de batería Ión-litio recargable
Autonomía de
la batería
Tiempo de carga
Hasta 18 horas
Hasta 4 horas
© 2011 Garmin Ltd. or its subsidiaries
Garmin International, Inc.
1200 East 151
st
Street, Olathe, Kansas 66062, USA
Garmin (Europe) Ltd.
Liberty House, Hounsdown Business Park, Southampton, Hampshire, SO40 LR UK
Garmin Corporation
No. 68, Zhangshu 2
nd
Rd., Xizhi Dist., New Taipei City 221, Taiwan (R.O.C.)
www.garmin.com
May 2011 Part Number 190-01098-05 Rev. A Printed in China