
6-String Classic Guitar
USER GUIDE

www.PyleUSA.com
2
A B C
A B C
A B C
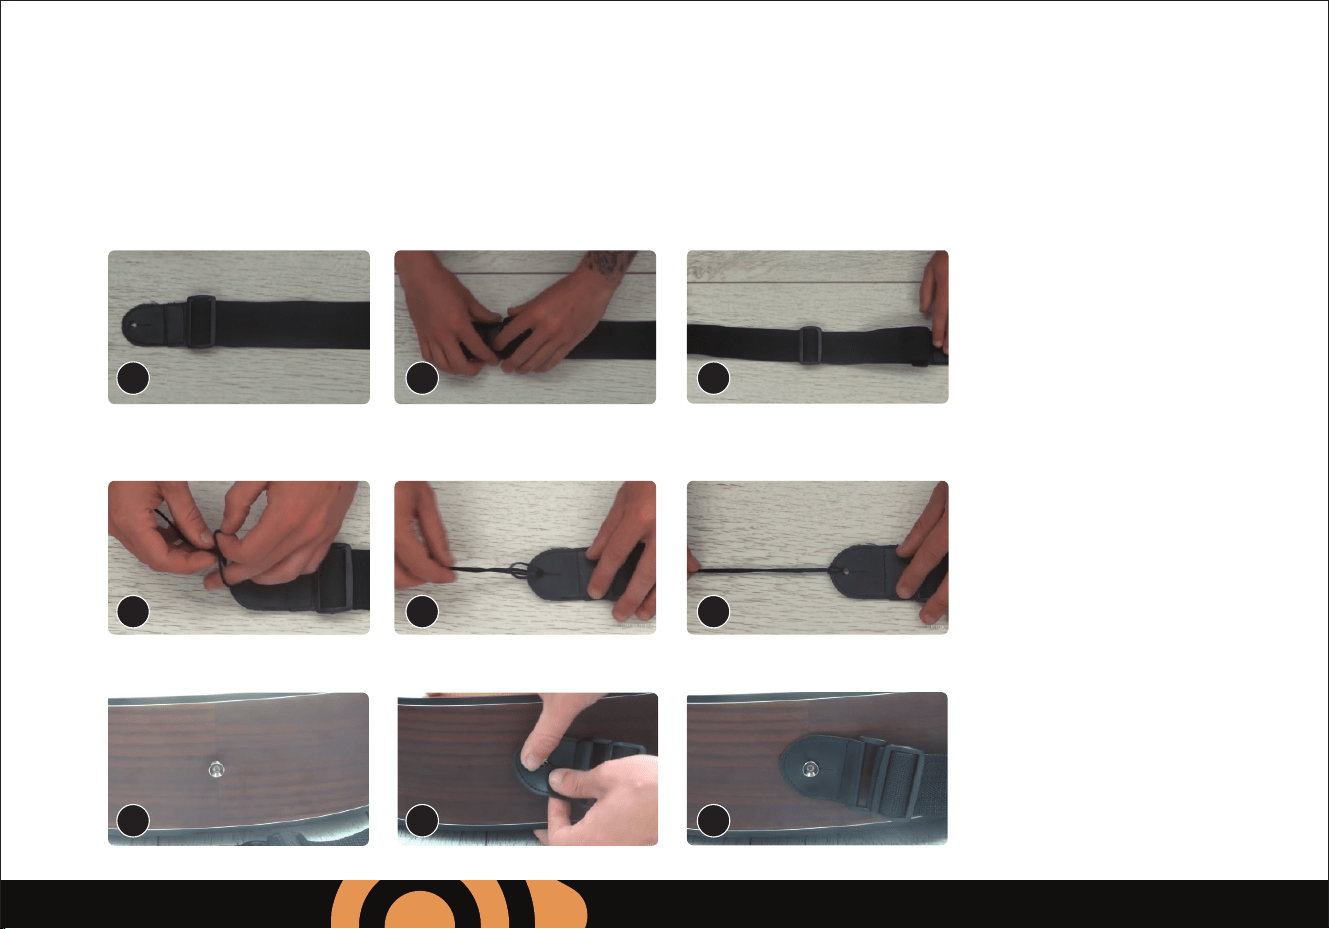
3. Adjust your guitar strap to the correct size.
2. Take the looped end of your string and thread it through the key hole on the front of your strap, tying a knot close
to the hole.
Instructions
A. How to attach a guitar strap?
1. Adjust your guitar strap to the correct size.
Please take a few moments to read through this booklet.
In it you will nd answers to many of your questions and other invaluable information about how to
attach a guitar strap and how to tune a guitar.

1 2
www.PyleUSA.com
3
A B C
A B C
4. Run one side of the string through the headstock and tie a knot on the other side.
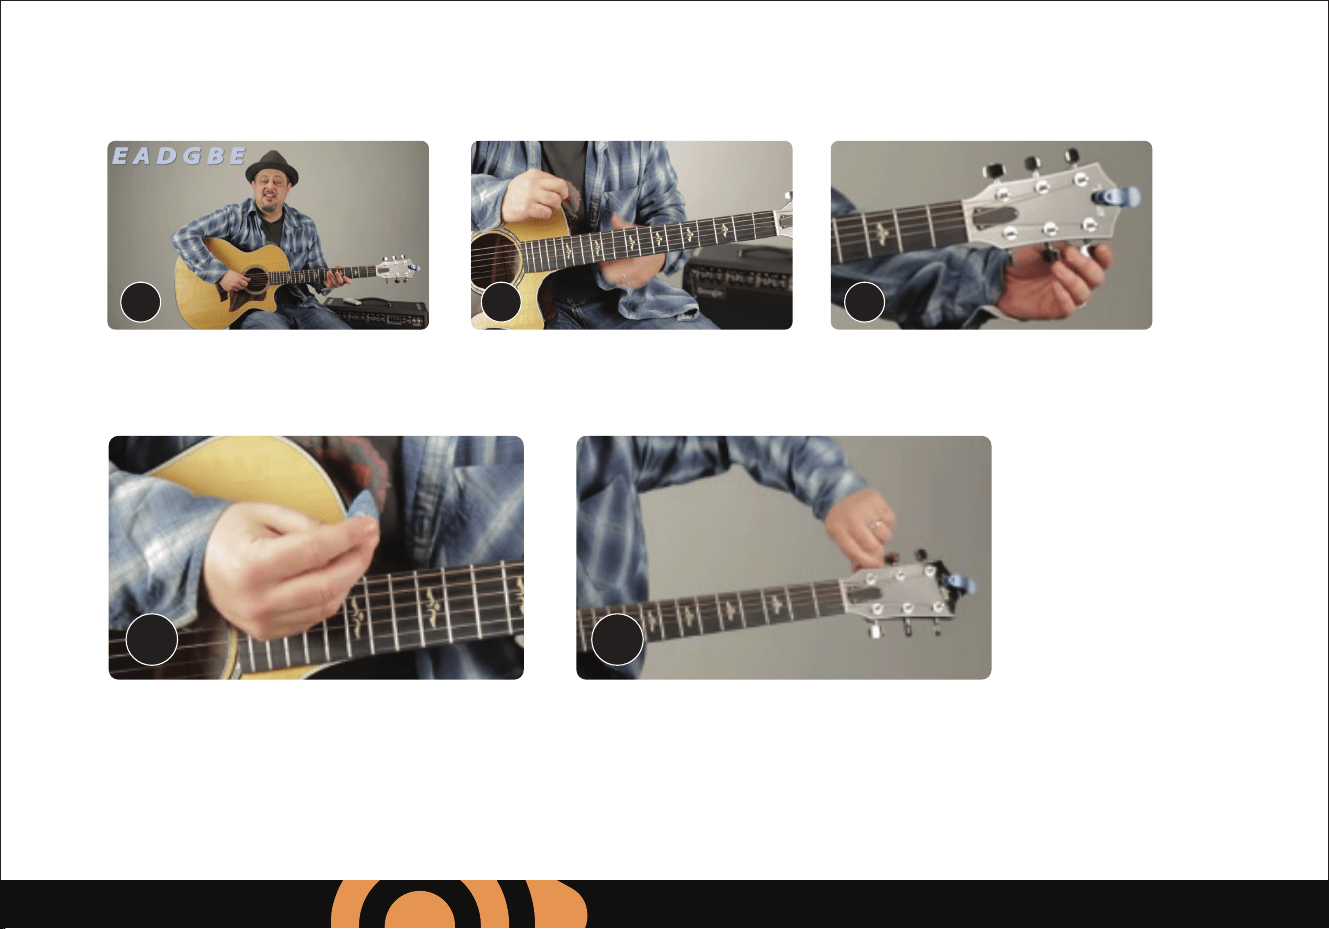
B. How to tune a guitar (for rst time user)
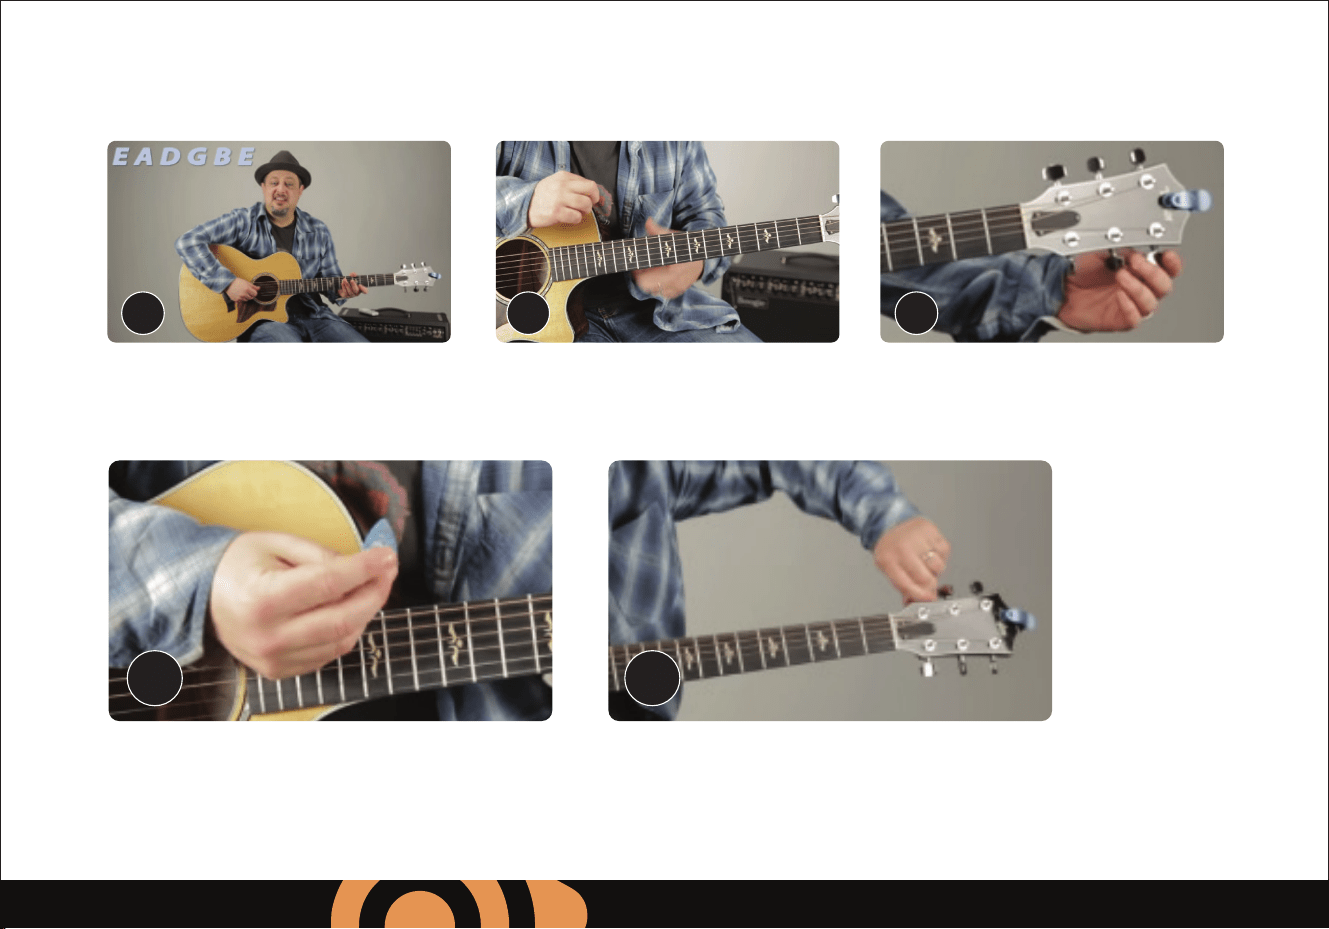
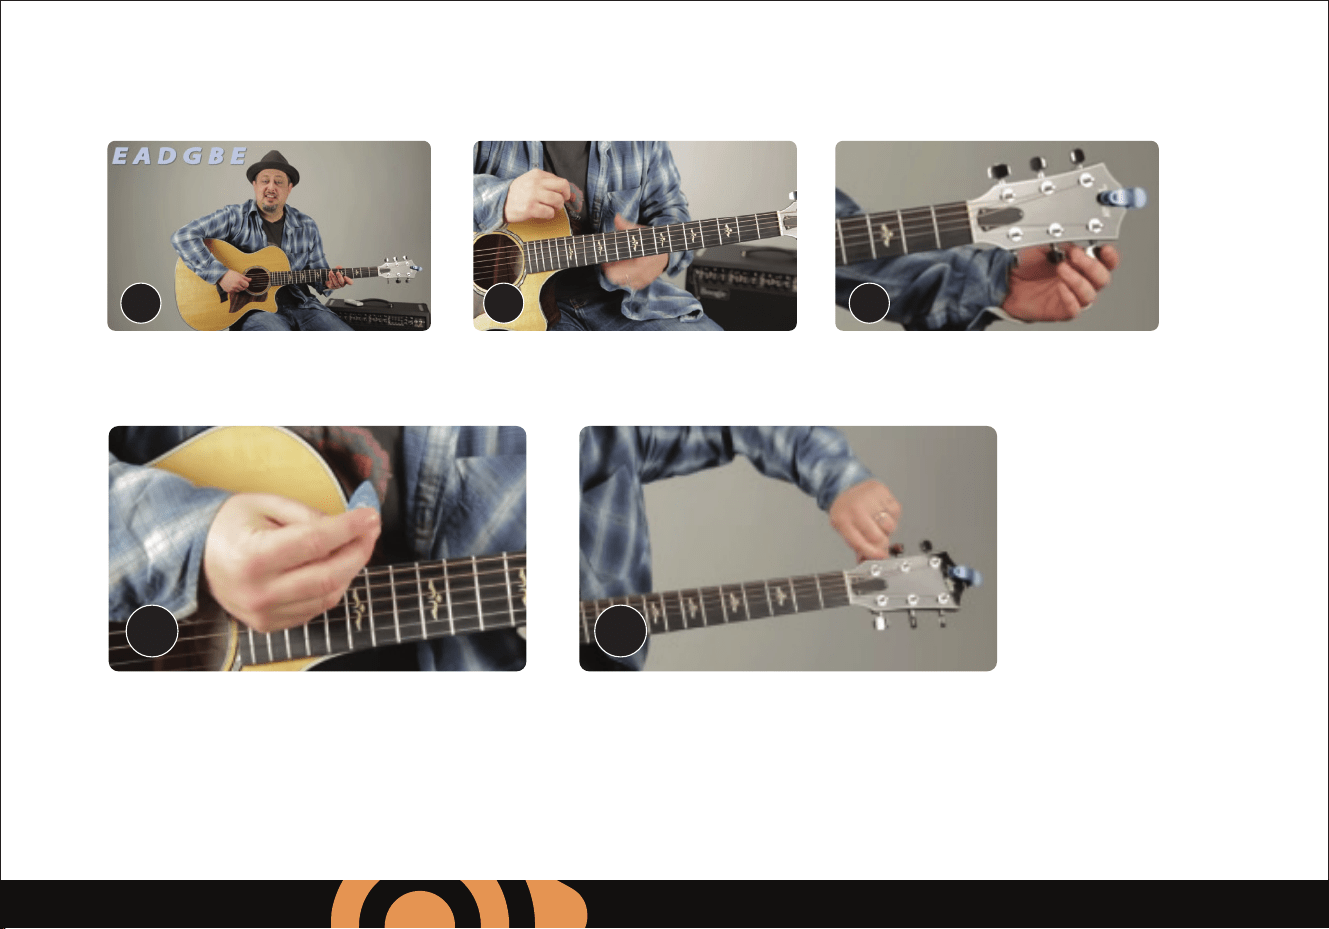
1. Hold the strings down with your left hand while stretch the strings away from the body with your right. (image 1)
2. Use some pressure to wiggle strings back and forth. You don’t need to be gentle but make sure you don’t pull too
hard once you feel the string resisting or it can break. (image 2)
5. Ready to Play now!
www.PyleUSA.com
4
A B
A B C
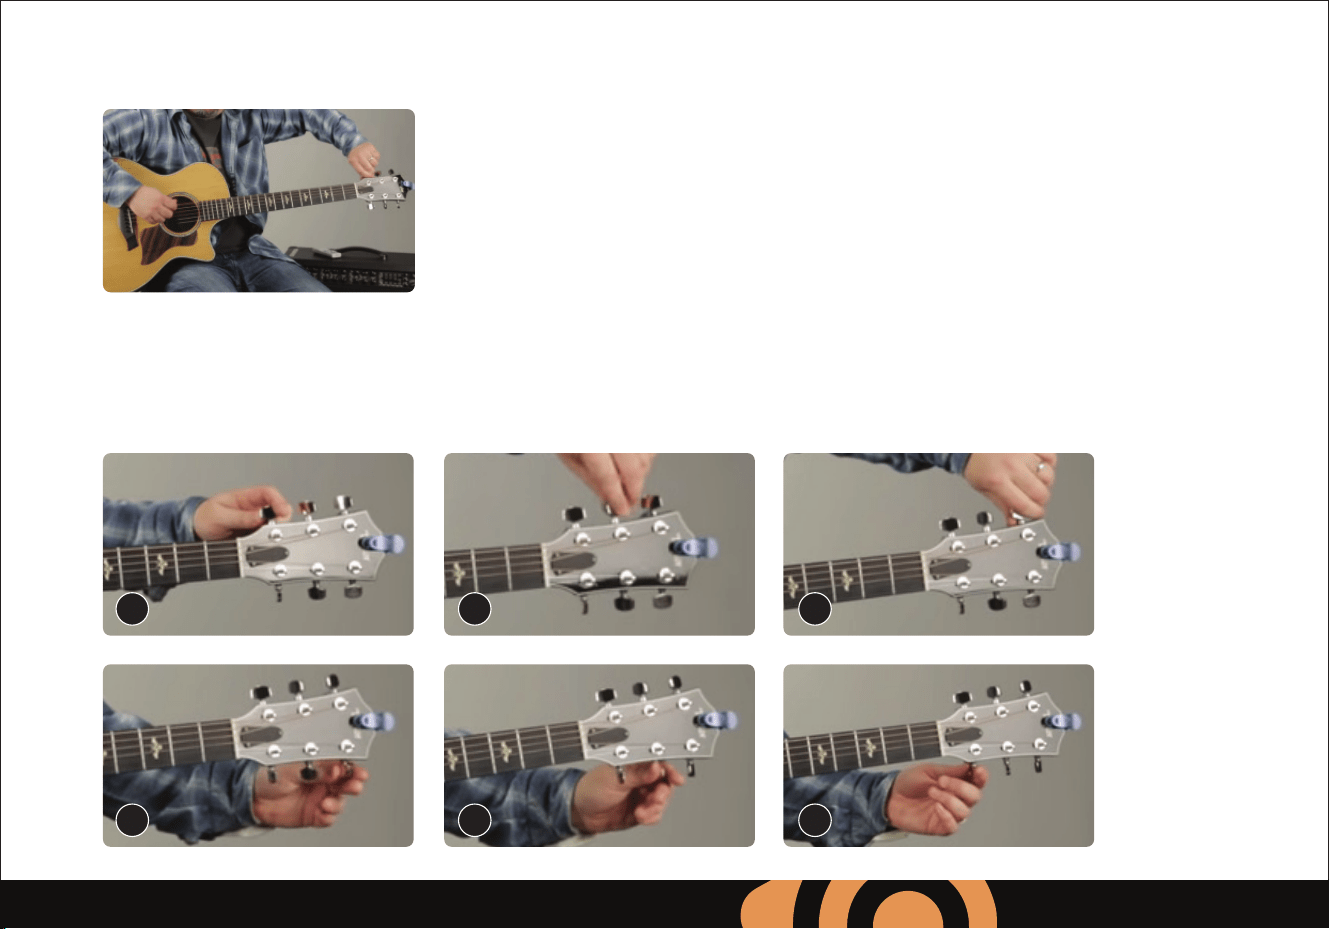
3. Pluck the string with a pick or if not with the pick then with your nger and when you move the tuner around, you
can hear the pitch get lower. You can turn it the other way and tighten it and you hear the pitch get higher.
BASIC RUNDOWN OF TUNING A GUITAR
1. Memorize what the strings are on the guitar. (E – Low version, A, D, G, B, E – High version) (image A, B)
2. Look at the tuners of the guitar. (image C)
www.PyleUSA.com
5
E A D
G B E
5. Once you’ve tuned all the strings, you can gently tug each string at the the middle back and forth to help stretch it.
When stretched the string will drop pitch and go out of tune. After stretching re-tune each string and repeat this
process 6-8 times. This stretching process is only necessary for new strings and the instrument will hold better in
tune after they are broken in.
4. Move the needle of the tuner to get the right tune of the string. If the needle goes too far, bring it back down and
even lower than the notes needs to be and then bring it back up until the needle hits the right tune of the strings.

www.PyleUSA.com
6
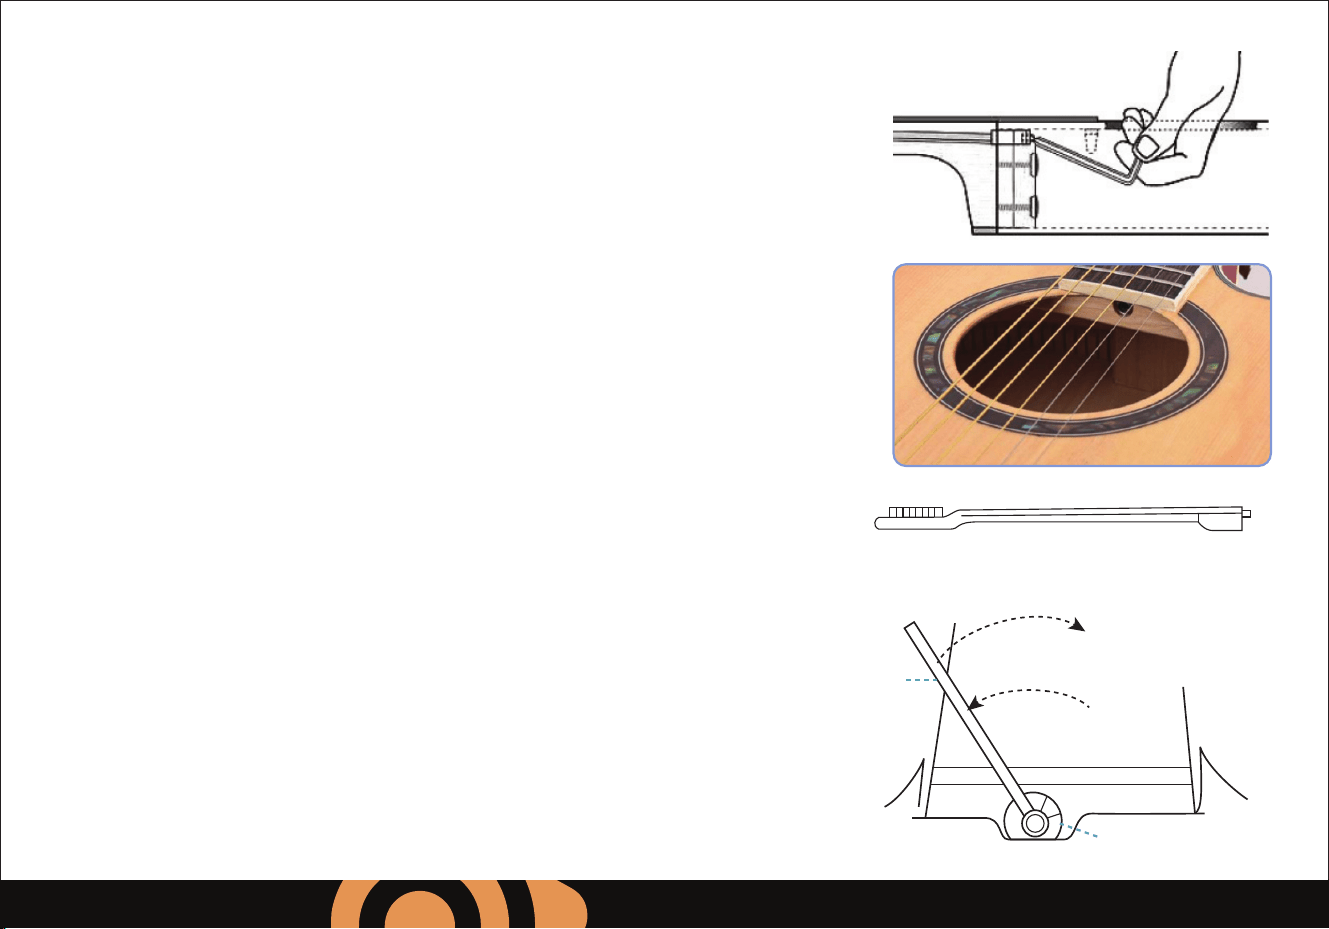
Wrench
Adjustment Nut
Loosen for “hump”
Tighten for “bow”
ADJUSTMENT NUT
How to Adjust an Acoustic Guitar Truss Rod
2. Some strings buzz on the frets between the nut and the fth fret.
This indicates that the neck is either too straight or it is backbowed
from the truss rod’s slow, constant pressure over time.
Two primary signs tell you that your truss rod needs adjusting:
1. There’s a noticeable change in the action; the height of the strings
over the frets has become either too high or too low.
The most common scenario is that the strings get higher as the neck
upbows from the string pull.
However, with a one-way truss rod, if the neck warps away from the
string pull, no amount of loosening the truss rod will pull the neck
straight, because the truss rod only works against the pull of the strings.
Your truss rod needs adjustment when the neck of your guitar has too
much or too little upbow or too much backbow.
Tightening or loosening the adjustment nut adds or lessens pressure on
the rod and neck. As a general rule, tightening the nut moves the neck
away from the string pull and removes upbow; loosening the nut allows
the neck to relax into an upbow again (especially when helped by the
strings’ pull). Controlled upbow is known as relief.

www.PyleUSA.com
7
1 2 3 4
5
6 7
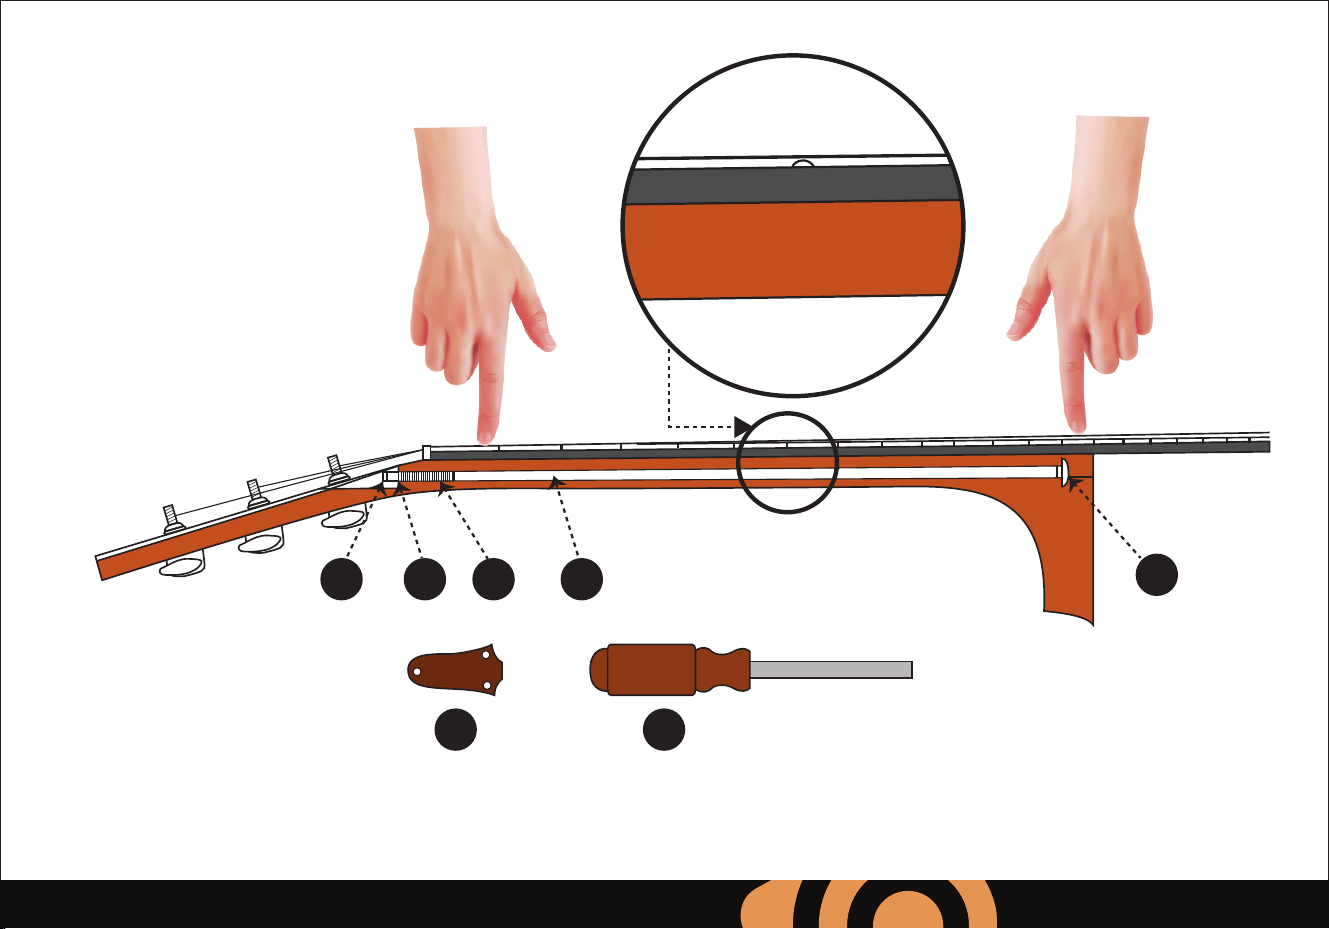
As you press the string down at the 1st and 14th frets, the string should be approximately .010” (0.25 cm) away from the
6th fret - about the thickness of a business card.
1. 1/4” (0.63 cm) nut
2. 3/16” (0.47 cm) washer
3. Threads
4. Main shaft of the truss rod
5. Truss rod anchor
6. Truss rod compartment cover
7. 1/4” nut (0.63 cm) driver


Guitarra clásica de 6 cuerdas
GUÍA DEL USUARIO
SPA

www.PyleUSA.com
2
A B C
A B C
A B C
3. Ajuste la correa de su guitarra al tamaño correcto.
2. Tome el extremo en bucle de la cuerda y páselo por el oricio de la cerradura en la parte delantera de la correa,
haciendo un nudo cerca del oricio .
Instrucciones
A. ¿Cómo se coloca la correa de la guitarra?
1. Ajuste la correa al tamaño correcto.
Por favor, tómese unos minutos para leer este folleto.
En él encontrará respuestas a muchas de sus preguntas y otra información importante sobre cómo
colocar una correa o cómo anar una guitarra.

1 2
www.PyleUSA.com
3
A B C
A B C
4. Pase un lado de la cuerda a través del clavijero y haga un nudo en el otro lado.
B. Cómo anar una guitarra (para usuarios primerizos)
1. Sostenga las cuerdas con la mano izquierda mientras las estira lejos del cuerpo con la derecha. (imagen 1)
2. Use un poco de presión para mover las cuerdas hacia adelante y hacia atrás. No es necesario que sea suave, pero
asegúrese de no tirar demasiado fuerte una vez que sienta que la cuerda se resiste o puede romperse. (imagen 2)
5. Ahora está listo para toca!
www.PyleUSA.com
4
A B
A B C
3. Puntee la cuerda con una púa o, si no es con la púa, con el dedo y cuando mueva el anador, podrá escuchar que
tono baja. Puede girarlo hacia el otro lado y apretarlo y escuchará que el tono se vuelve más alto.
RESUMEN BÁSICO DE LA AFINACIÓN DE UNA GUITARRA
1. Memorice cuáles son las cuerdas de la guitarra. (E – Versión baja, A, D, G, B, E – Versión alta) (imagen A, B)
2. Fíjese en los anadores de la guitarra. (imagen C)

www.PyleUSA.com
5
E A D
G B E
5. Una vez que haya anado todas las cuerdas, puede tirar suavemente de cada cuerda en el medio hacia adelante y
hacia atrás para ayudar a estirarla. Cuando se estira, la cuerda bajará de tono y se desanará. Después de estirar, vuelva
a anar cada cuerda y repita este proceso de 6 a 8 veces. Este proceso de estiramiento solo es necesario para cuerdas
nuevas y el instrumento se mantendrá mejor.
4. Mueva la aguja del anador para obtener la anación correcta de la cuerda. Si la aguja va demasiado lejos, llévela
hacia abajo e incluso más abajo de lo que deben estar las notas y luego vuelva a subirla hasta que la aguja toque la
melodía correcta.
www.PyleUSA.com
6
Llave inglesa
Tuerca de ajuste
Aoje para "joroba"
Apretar para “arco”
TUERCA DE AJUSTE
Cómo ajustar el alma de una guitarra acústica
2. Algunas cuerdas zumban en los trastes entre la cejuela y el quinto
traste. Esto indica que el mástil está demasiado recto o está arqueado
hacia atrás debido a la presión lenta y constante del alma a lo largo del
tiempo.
Dos señales principales le indican que su alma necesita ajustes:
1. Hay un cambio notable en la acción: la altura de las cuerdas sobre los
trastes se ha vuelto demasiado alta o demasiado baja. El escenario más
común es que las cuerdas se vuelven más altas a medida que el mástil se
inclina hacia arriba por el tirón de la cuerda.
Sin embargo, con un alma unidireccional, si el mástil se aleja del tirón de
la cuerda, no ayudará aojar el alma. No tirará del mástil hacia arriba,
porque el alma solo funciona contra el tirón de las cuerdas.
Su alma necesita un ajuste cuando el mástil tiene demasiado o muy poco arco
ascendente o demasiado arco trasero.
Apretar o aojar la tuerca de ajuste agrega o disminuye la presión sobre la
varilla y el cuello. Como regla general, al apretar la cejuela se aleja el mástil del
tirador de la cuerda y se retira el arco hacia arriba; Aojar la cejuela permite que
el mástil se relaje en un arco ascendente nuevamente (especialmente cuando
es ayudado por el tirón de las cuerdas). El arco ascendente controlado se
conoce como alivio.

www.PyleUSA.com
7
1 2 3 4
5
6 7
A medida que presiona la cuerda hacia abajo en los trastes 1 y 14, la cuerda debe estar aproximadamente a .010"
(0.25 centímetro) del 6 traste, aproximadamente el grosor de una tarjeta de presentación.
1. Tuerca de 1/4” (0.63 centímetro)
2. Arandela de 3/16” (0.47 centímetro)
3. Hilos
4. Eje principal del alma
5. Anclaje de alma
6. Tapa del compartimento del alma
7. 1/4” (0.63 centímetro)
destornillador de tuercas


Guitare classique à 6 cordes
GUIDE D'UTILISATION
FRE
www.PyleUSA.com
2
A B C
A B C
A B C
3. Ajustez votre sangle de guitare à la bonne taille.
2. Prenez l'extrémité bouclée de votre corde et passez-la dans le trou de la clef à l'avant de votre sangle, en faisant un
noeud près du trou.
Instructions
A. Comment attacher une sangle de guitare ?
1. Ajustez votre sangle de guitare à la bonne taille.
Veuillez prendre quelques instants pour lire ce guide.
Vous y trouverez les réponses à beaucoup de vos questions et d'autres informations précieuses sur la
manière d'attacher une sangle de guitare et d'accorder une guitare.

1 2
www.PyleUSA.com
3
A B C
A B C
4. Passez un côté de la corde dans la tête de la guitare et faites un nœud de l'autre côté.
B. Comment accorder une guitare (pour les néophytes)
1. Tenez les cordes vers le bas avec votre main gauche tout en étirant les cordes loin du corps avec votre main droite. (Image 1)
2. Exercez une certaine pression pour faire bouger les cordes d'avant en arrière. Il n'est pas nécessaire d'être doux, mais assurez-
vous de ne pas tirer trop fort lorsque vous sentez que la corde résiste ou qu'elle peut se casser. (image 2)
5. Prêt à jouer maintenant!
www.PyleUSA.com
4
A B
A B C
3. Pincez la corde avec un médiator ou, à défaut, avec votre doigt et, lorsque vous déplacez l'accordeur, vous pouvez entendre la
tonalité devenir plus grave. Vous pouvez le tourner dans l'autre sens et le serrer, et vous entendrez la hauteur monter.
APERÇU DE BASE DE L'ACCORDAGE D'UNE GUITARE
1. Mémorisez les cordes de la guitare (mi - version basse, la, ré, sol, si, mi - version haute) (image A, B).
2. Regardez les accordeurs de la guitare (image C).

www.PyleUSA.com
5
E A D
G B E
5. Une fois que vous avez accordé toutes les cordes, vous pouvez tirer doucement sur chaque corde au milieu, d'avant
en arrière, pour l'étirer. Lorsqu'elle est tendue, la corde baisse de ton et se désaccorde. Après l'avoir étirée, accordez à
nouveau chaque corde et répétez ce processus 6 à 8 fois. Ce processus d'étirement n'est nécessaire que pour les cordes
neuves et l'instrument s'accordera mieux une fois qu'elles auront été rodées.
4. Déplacez l'aiguille de l'accordeur pour obtenir la bonne tonalité de la corde. Si l'aiguille va trop loin, ramenez-la vers
le bas et même plus bas que les notes doivent être, puis remontez-la jusqu'à ce que l'aiguille atteigne la bonne tonalité
des cordes.

www.PyleUSA.com
6
Écrou de réglage
Comment ajuster la tige de réglage d'une guitare acoustique
2. Certaines cordes bourdonnent sur les frettes entre le sillet et la
cinquième frette.
Cela indique que le manche est soit trop droit, soit courbé vers l'arrière
en raison de la pression lente et constante exercée par la tige de réglage
au l du temps.
Deux signes principaux vous indiquent que votre tige de réglage a
besoin d'être ajustée:
1. Il y a un changement notable dans l'action ; la hauteur des cordes sur
les frettes est devenue trop haute ou trop basse.
Le scénario le plus courant est que les cordes deviennent plus hautes à
mesure que le manche s'incline sous l'eet de la traction des cordes.
Cependant, avec un tige de réglage à sens unique, si le manche se
déforme par rapport à la traction des cordes, aucun desserrage de la tige
de réglage ne pourra redresser le manche, car la tige de réglage ne
travaille que contre la traction des cordes.
Votre tige de réglage doit être ajustée lorsque le manche de votre guitare a trop
ou pas assez d'archet vers le haut ou trop d'archet vers l'arrière.
Le fait de serrer ou de desserrer l'écrou de réglage ajoute ou réduit la pression
sur la tige et le manche. En règle générale, le fait de serrer l'écrou éloigne le
manche de la traction des cordes et supprime l'archet ; le fait de desserrer
l'écrou permet au manche de se détendre à nouveau vers l'archet (surtout s'il
est aidé par la traction des cordes). L'archet contrôlé est connu sous le nom de
relief.
Clé
Desserrer pour
"bosseler"
Serrer pour "courber"
ÉCROU DE RÉGLAGE
www.PyleUSA.com
7
1 2 3 4
5
6 7
Lorsque vous appuyez sur la corde aux 1ère et 14ème frettes, la corde doit se trouver à environ 0,010 pouces
(.25 centimètre) de la 6ème frette - soit l'épaisseur d'une carte de visite.
1. Ecrou 1/4”de pouce (0.63
centimètre)
2. Rondelle 3/16” de pouce (0.47 centimètre)
3. Filets
4. Arbre principal de la tige de réglage
5. Ancrage de la tige de réglage
6. Couvercle du compartiment de
la tige de réglage
7. Tournevis de 1/4” de pouce
(0.63 centimètre)