
Technical Support and E-Warranty Certificate www.vevor.com/support
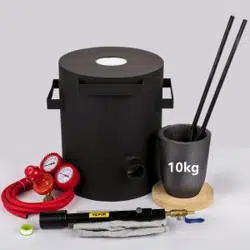
PROPANE MELTING FFURNACE
We continue to be committed to provide you tools with competitive price.
"Save Half", "Half Price" or any other similar expressions used by us only represents an
estimate of savings you might benefit from buying certain tools with us compared to the major top
brands and does not necessarily mean to cover all categories of tools offered by us. You are
kindly reminded to verify carefully when you are placing an order with us if you are actually saving
half in comparison with the top major brands.

- 1 -
MODEL: JH16KGD/JH16KGF/JH16KGA/JH16KGI/JH16KGU
NOTE: The crucible is a loss part and needs to be replaced after 2-3
normal uses.Purchase Website:
https://www.amazon.com/dp/B0DBH419F4
NEED HELP? CONTACT US!
Have product questions? Need technical support? Please feel free to contact us:
Technical Support and E-Warranty Certificate www.vevor.com/support
This is the original instruction, please read all manual instructions carefully before
operating. VEVOR reserves a clear interpretation of our user manual. The
appearance of the product shall be subject to the product you received. Please
forgive us that we won't inform you again if there are any technology or software
updates on our product.
PROPANE MELTING
FURNACE

- 2 -
SAFETY INSTRUCTIONS
WARNING:
1. This product is intended for outside use only.
2. Maintain good ventilation around the equipment to prevent accumulated
smoke and harmful gases from causing damage to the human body.
3. Clean the work area to ensure that there is no debris or flammable
material around.
4. Before each use, check all connections with soapy water for leaks.
5. Propane gas has a strong odor. Never continue to run the unit if the
smell of gas is present. Shut the unit down and check all connections with
soapy water for leaks. NEVER use flame to check for gas leaks. Do not
resume use until proper repairs are made by a qualified gas company or
until you contact the manufacturer for assistance.
6. Be careful when adding raw materials during the smelting process.
7. It is forbidden to melt metals with melting points above 1350°,such as
iron and manganese.
8. During the melting process, you should not observe the melting state
directly, to prevent heat waves from damaging the body. Musttake security
measures.
9. Keep a clear escape route in an emergency.
10. Keep the fire extinguisher at hand.
11. Prohibit overload smelting to prevent liquid metal from flowing out.
12. Wear protective gloves, protective glasses and heat-proof clothing
when using the furnace to avoid burns.
13. Leaking gas can be extremely dangerous.
14. Failure to follow the Cautions and Warnings contained in this assembly
Instruction may result in serious bodily injury or death, or may result in a
fire or an explosion causing damage to property.
15. WARNING-Improper assembly of the melting furnace may be
dangerous. Follow the assembly instructions carefully.
16. WARNING-Do not use the melting furnace unless all parts are in place.
- 3 -
The melting furnace must be properly assembled according to the
assembly instructions by a qualified professional.
17. CAUTION! Never under any circumstances should the exhaust ports
be closed off completely on the doors or open endports. This could cause
serious damage and possible body injury.
18. Avoid standing or moving to the front of openings and exhaust ports.
Extremely high temperatures extend approximately two feet from any
openings while in operation. When retrieving obiects from a hot furnace
approach it from the side.
19. The unit will heat objects to melting temperature, but it will take a little
longer.
20. Never leave the line pressure on when not in use. Always cut the ball
valve and tank valve off for storage.
21. Do not allow the hose to come in contact with hot steel or flames.
22. During operation, the user should always stay in the immediate vicinity
of the furnace. Never leave the fired melting forge unattended!
23. Burn Hazard: When using the furnace, the surface temperature of the
furnace and components will reach up to 600°F. Do not touch any part of
the furnace directly with your hand while the furnace is heating up or hot.
The furnace generates extremely high temperature that can cause severe
burns or afire. Do not place the furnace near a wall or flammable material.
24. Personal protection equipment is required when handling Rigidizer,
Satanite Refractory, and Insulation Blanket during installation.
- 4 -
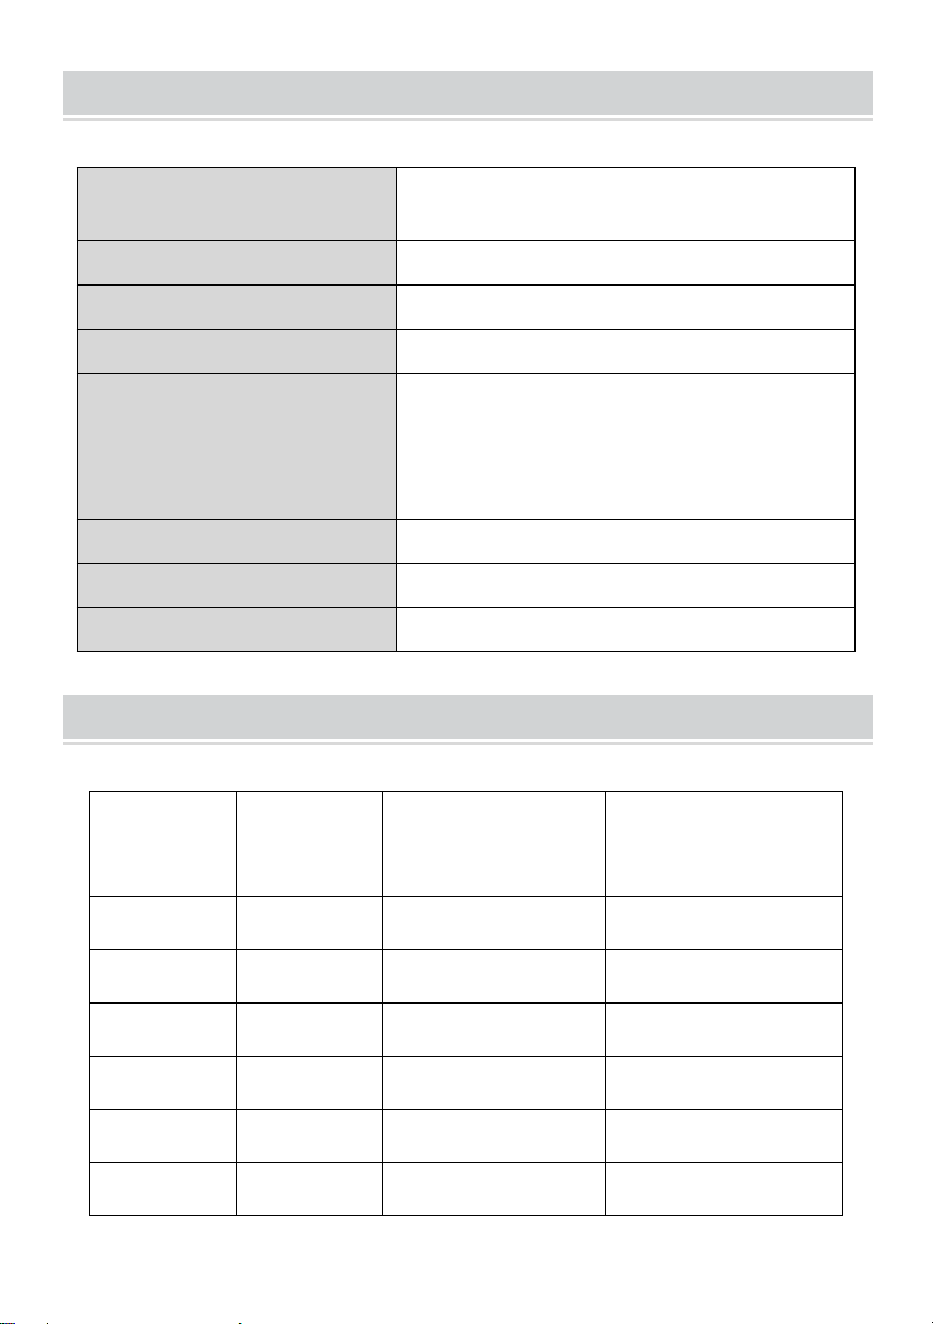
MODEL AND PARAMETERS
Model
JH16KGD / JH16KGF / JH16KGA /
JH16KGI / JH16KGU
Fuel
Propane
Working pressure
14.5~29PSI(0.1~0.2MPa)
Maximum Temperature
2500°F ±3% (1370℃±3%
)
Melted Metal
Gold, Silver, Aluminum, Copper, Brass,
Bronze,Tin K gold and other many metal
(Metal with a melting point below
1350℃)
Shape
Cylindrical
Number of burners
2
Material
Stainless steel
MOLTEN METAL
Metal
Name
Melting
Point(°C)
Primary
Capacity(16kg)
Primary
Capacity(6kg)
Copper
1083.4
16
6
Gold
1064.18
7.2
1.9
Silver
961.78
30.6
13.3
Aluminum
660
18.4
7.2
Zinc
419.53
13.8
4.9
Tin
231.89
14
5
- 5 -
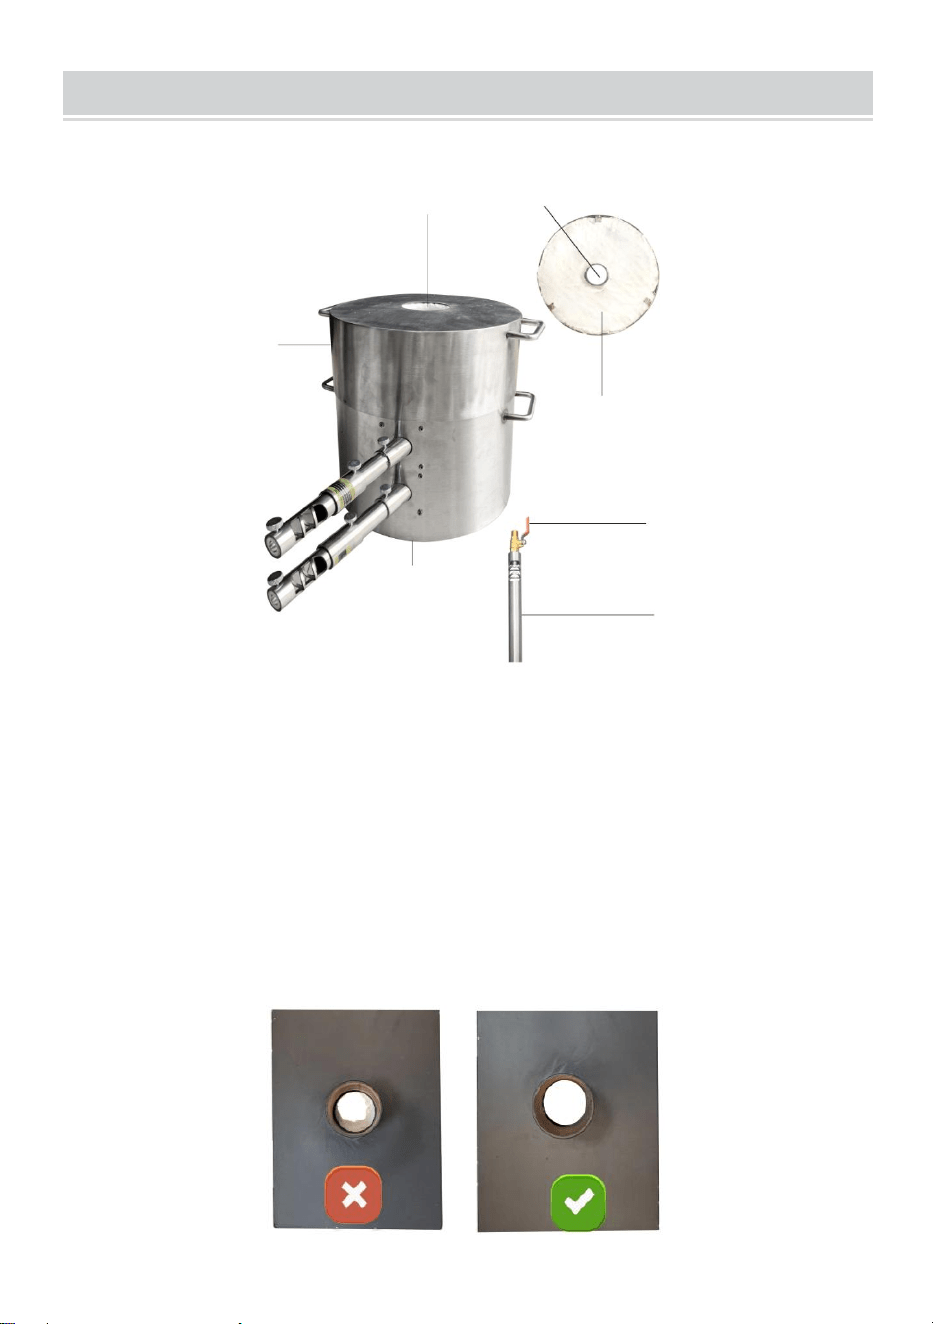
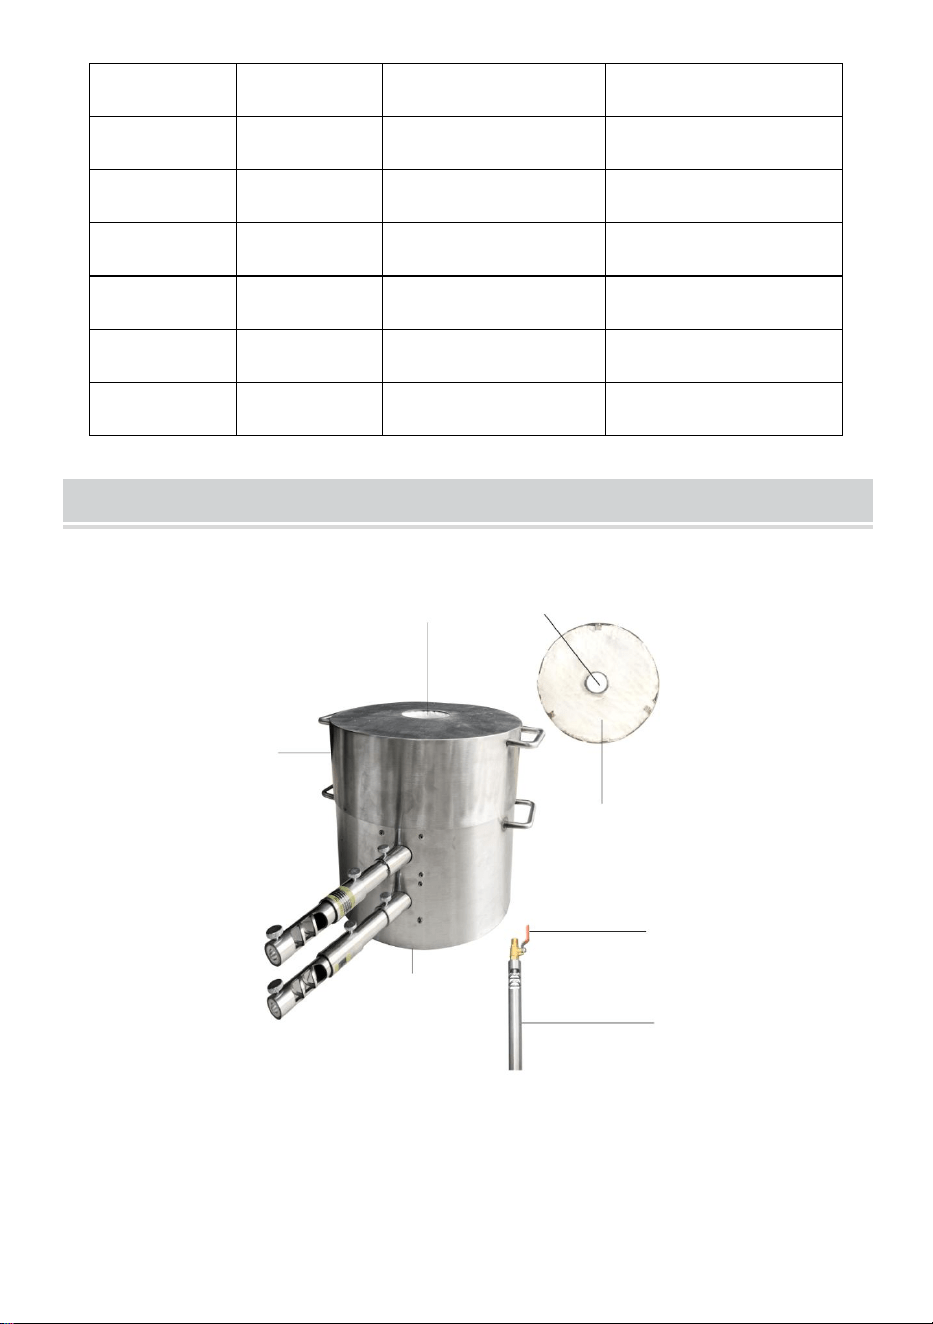
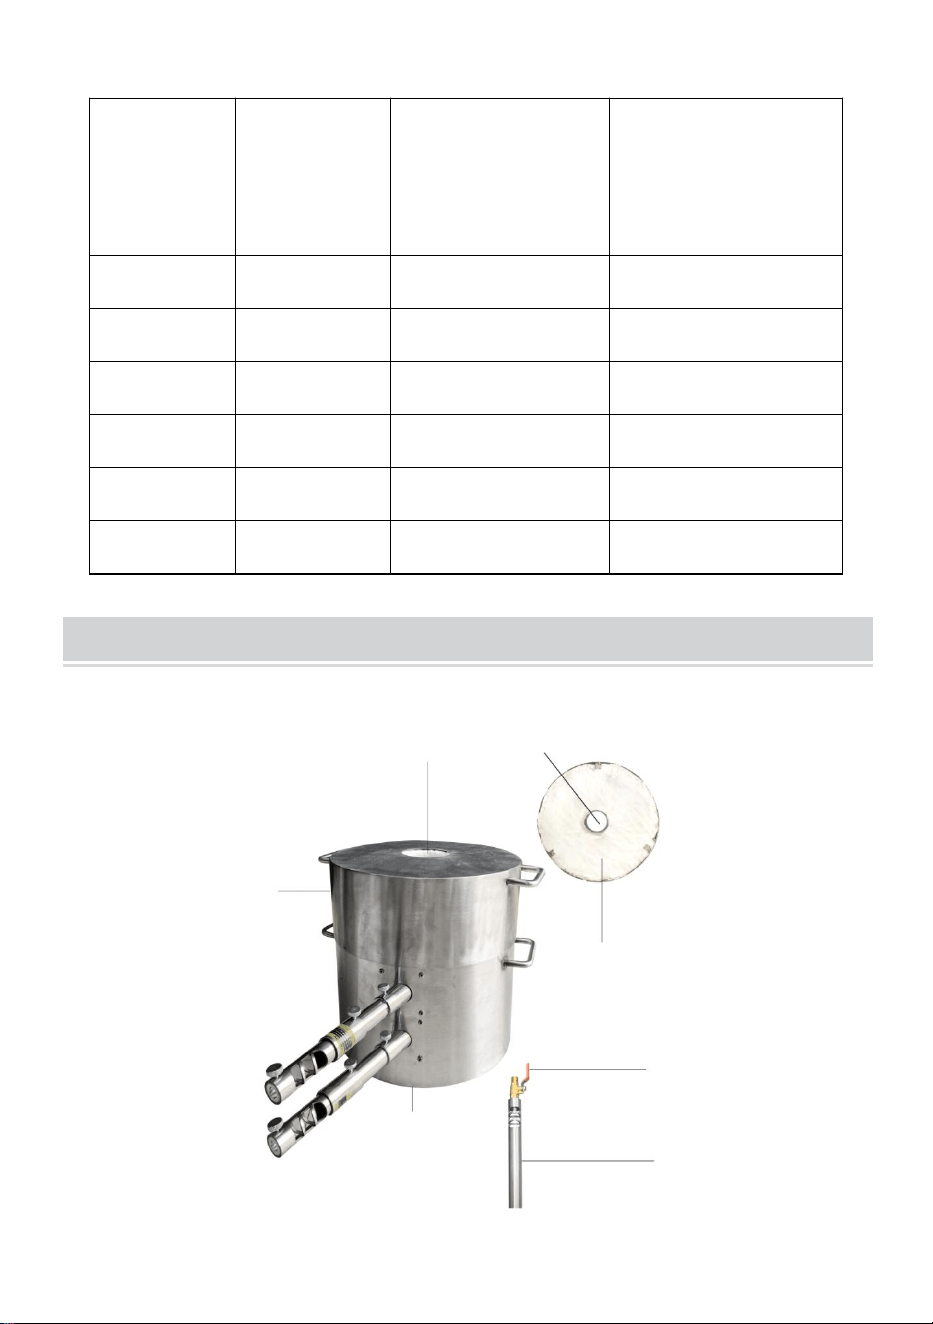
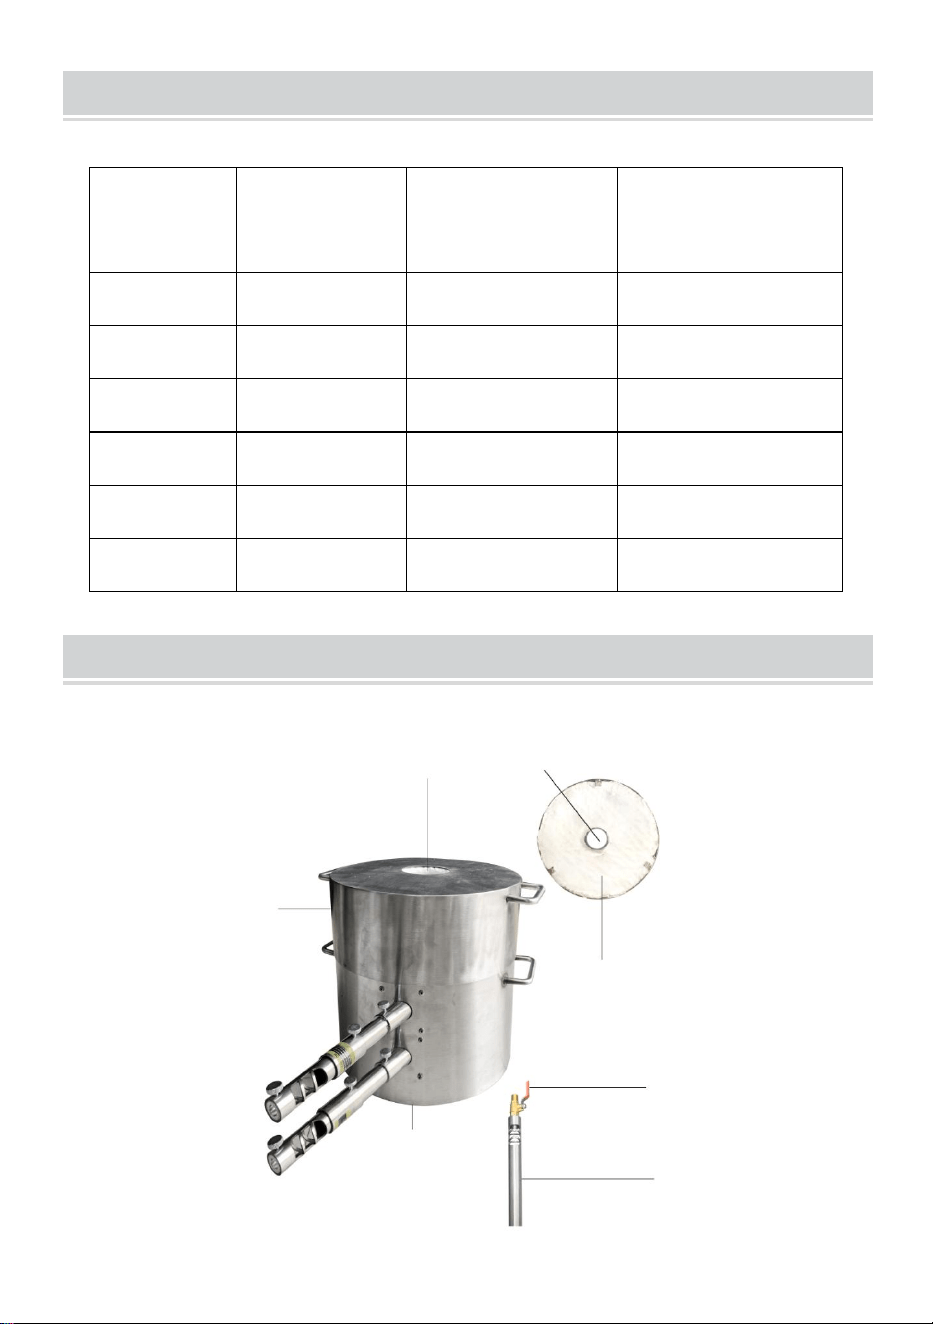
STRUCTURE DIAGRAM
NOTE:
1. It is not necessary to force these fittings to the extreme. However, it is
important to use the proper wrench size when tightening the parts. Once
the unit is assembled, turn the gas pressure on from the tank to the ball
valve and use soapy water to check for leaks on all joints.
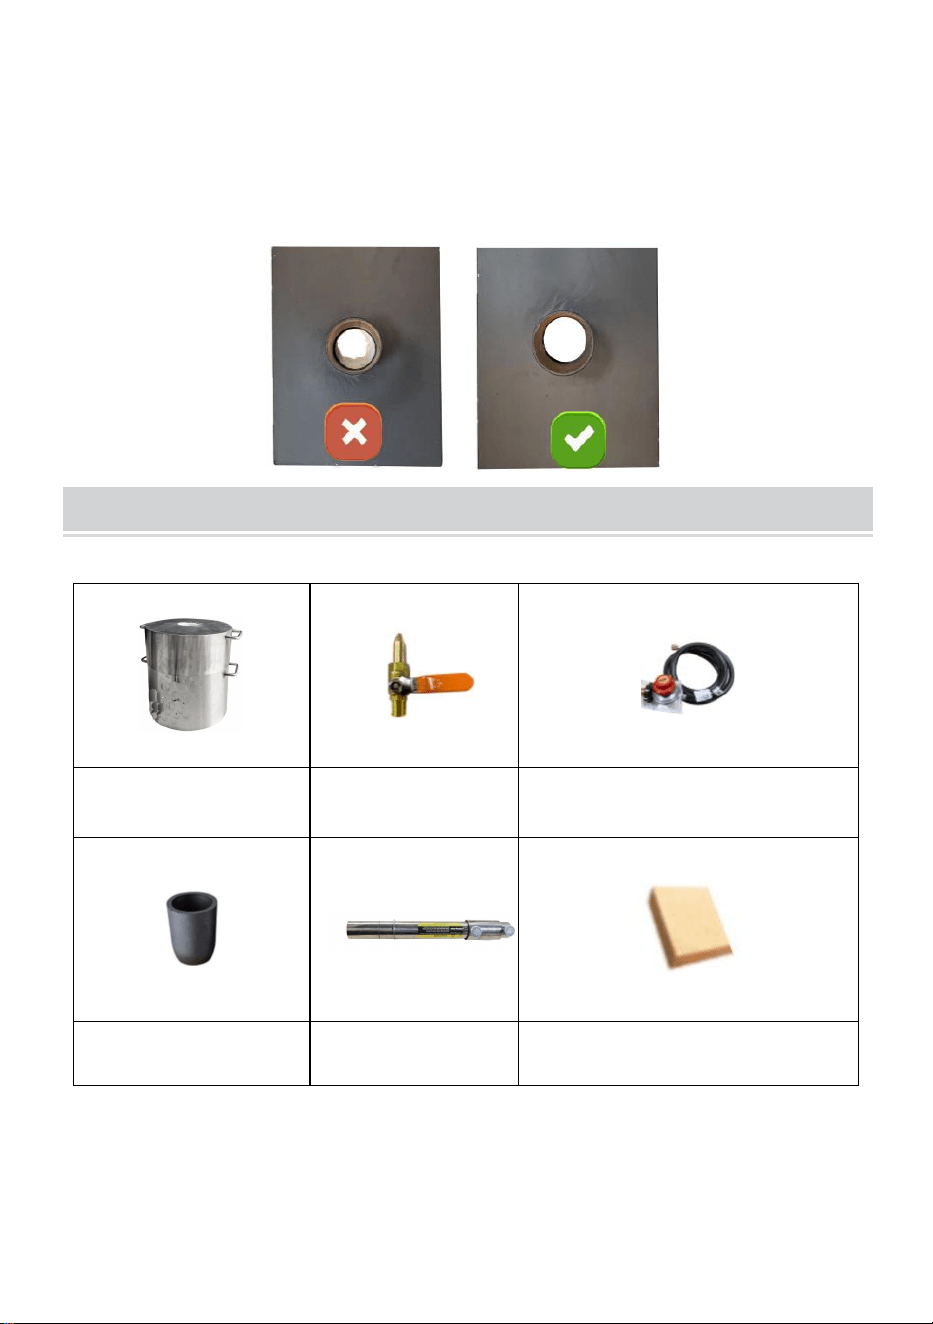
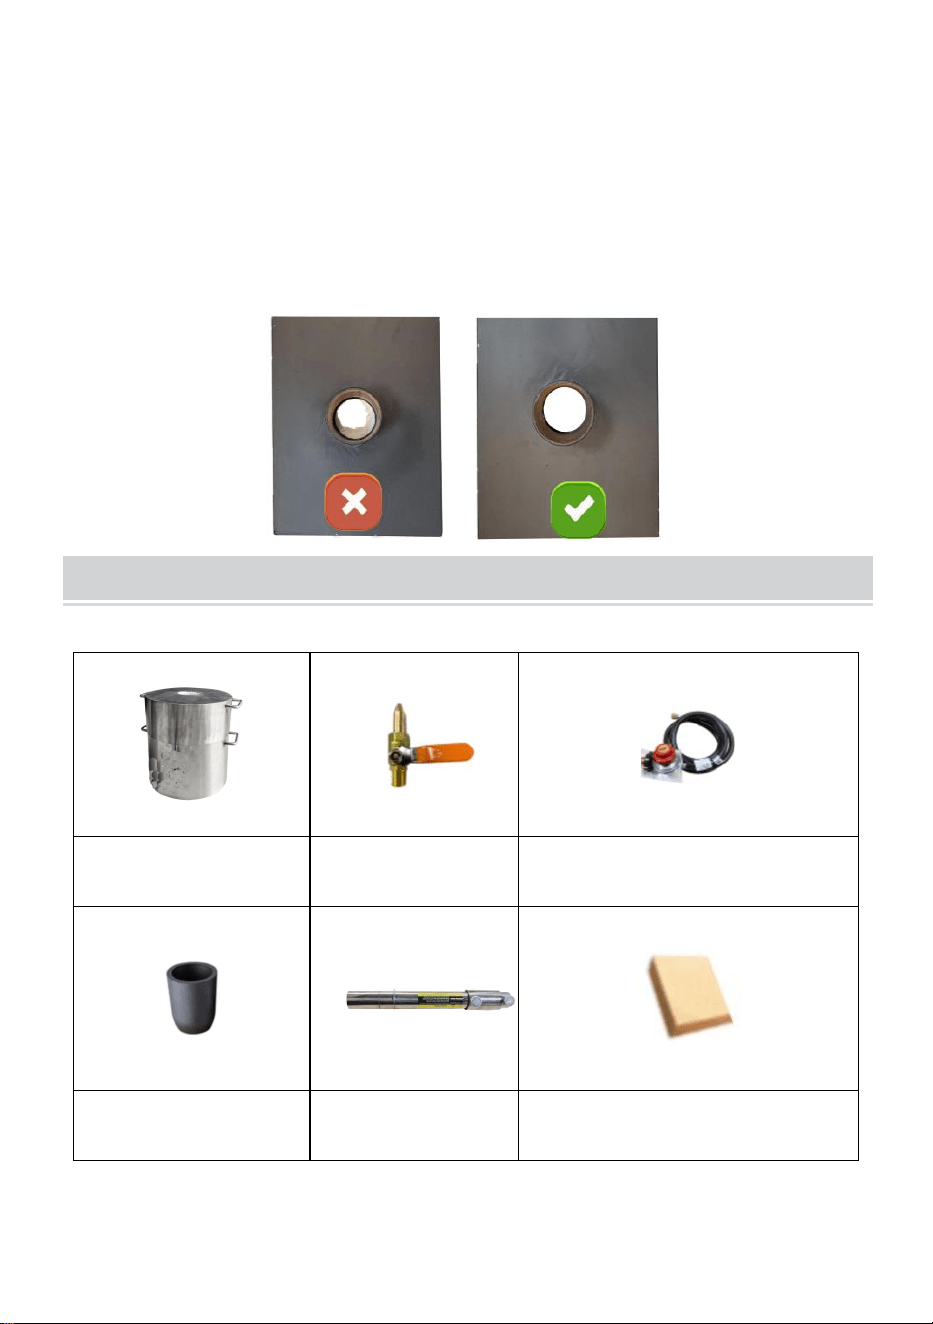
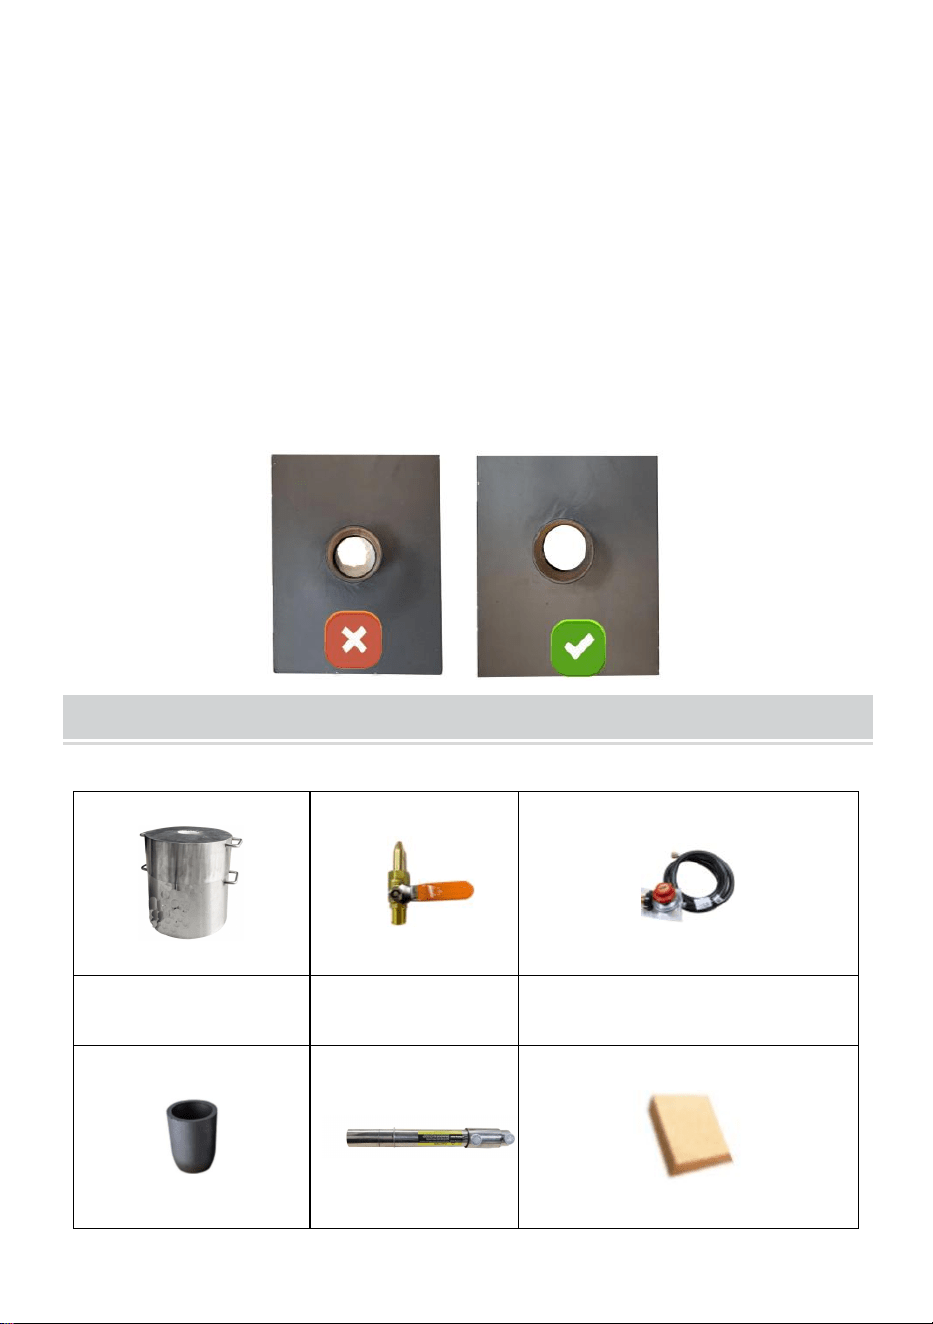
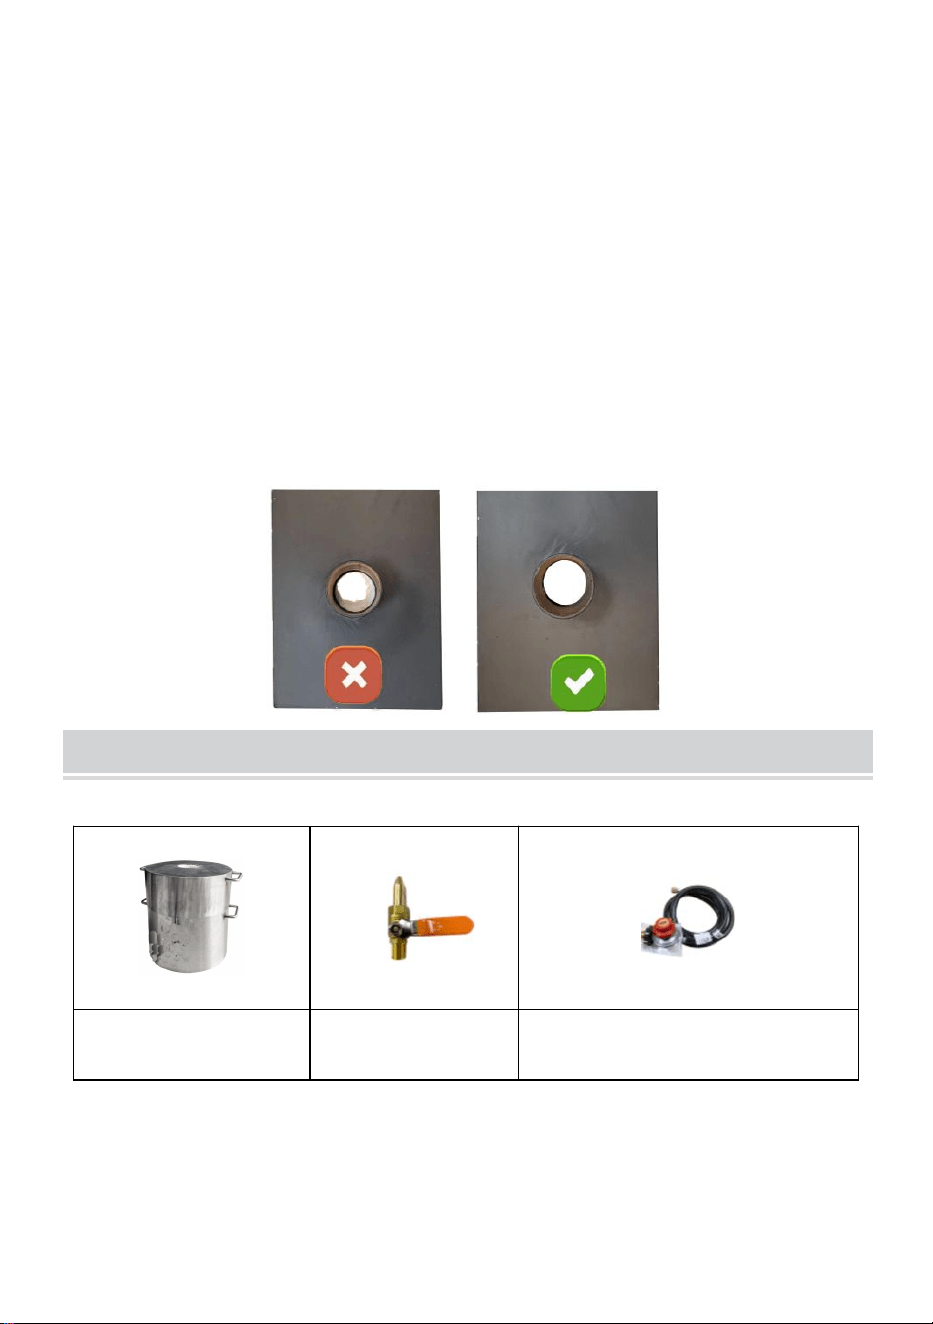
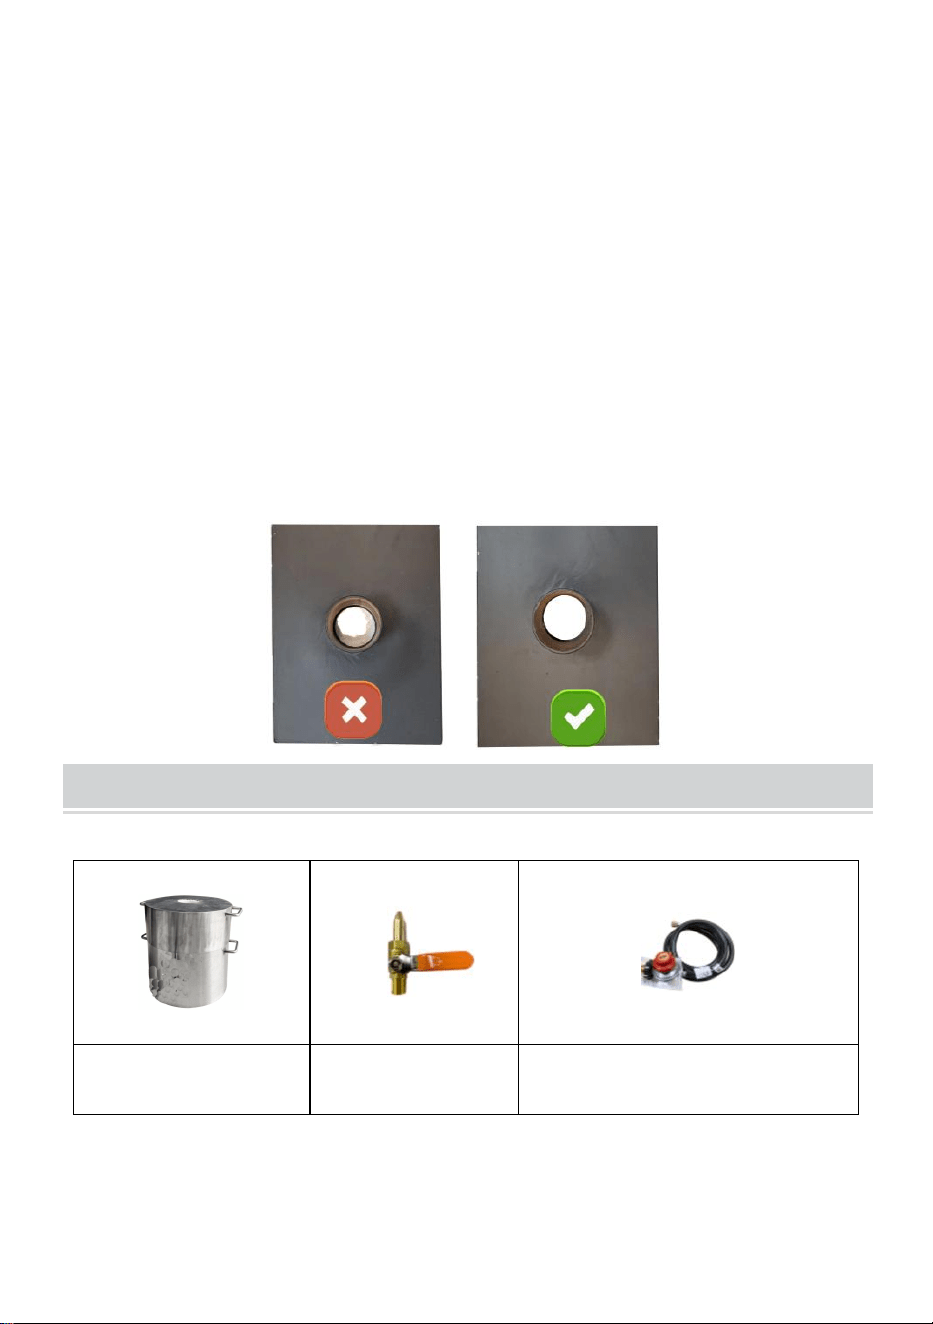
2. Please adjust the insulation blanket at the muzzle of the musket to the
one shown in the picture before using, ensure that the high-temperature
cotton does not block the muzzle of the musket at all. Incorrect operation
may result in damage to the furnace body and danger.
Air Chock Valve
Burner
Furnace Base
Furnace Body
Insulation Interlayer
Furnace Cover
Feeding Port
- 6 -
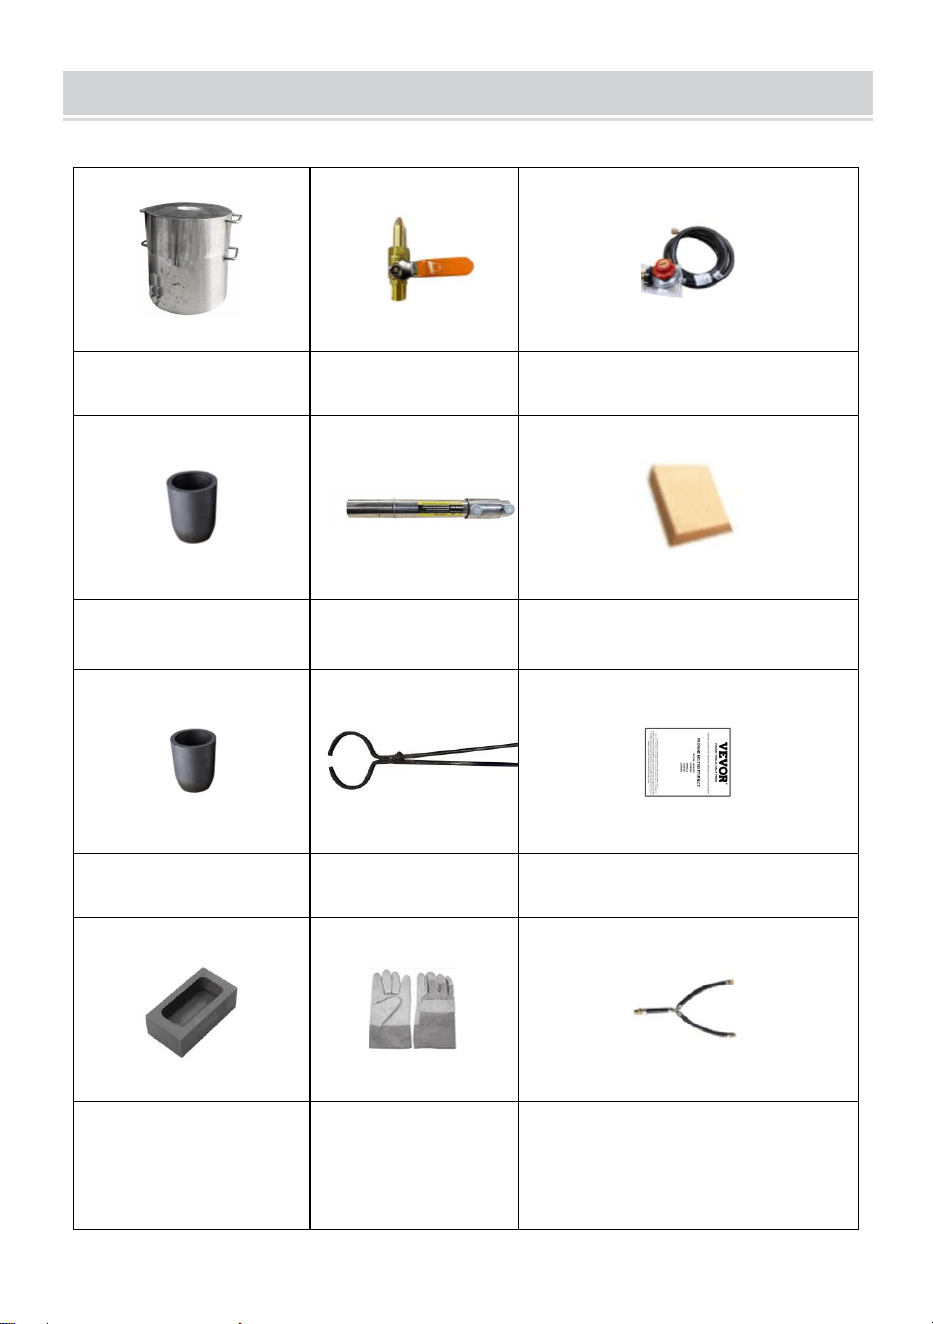
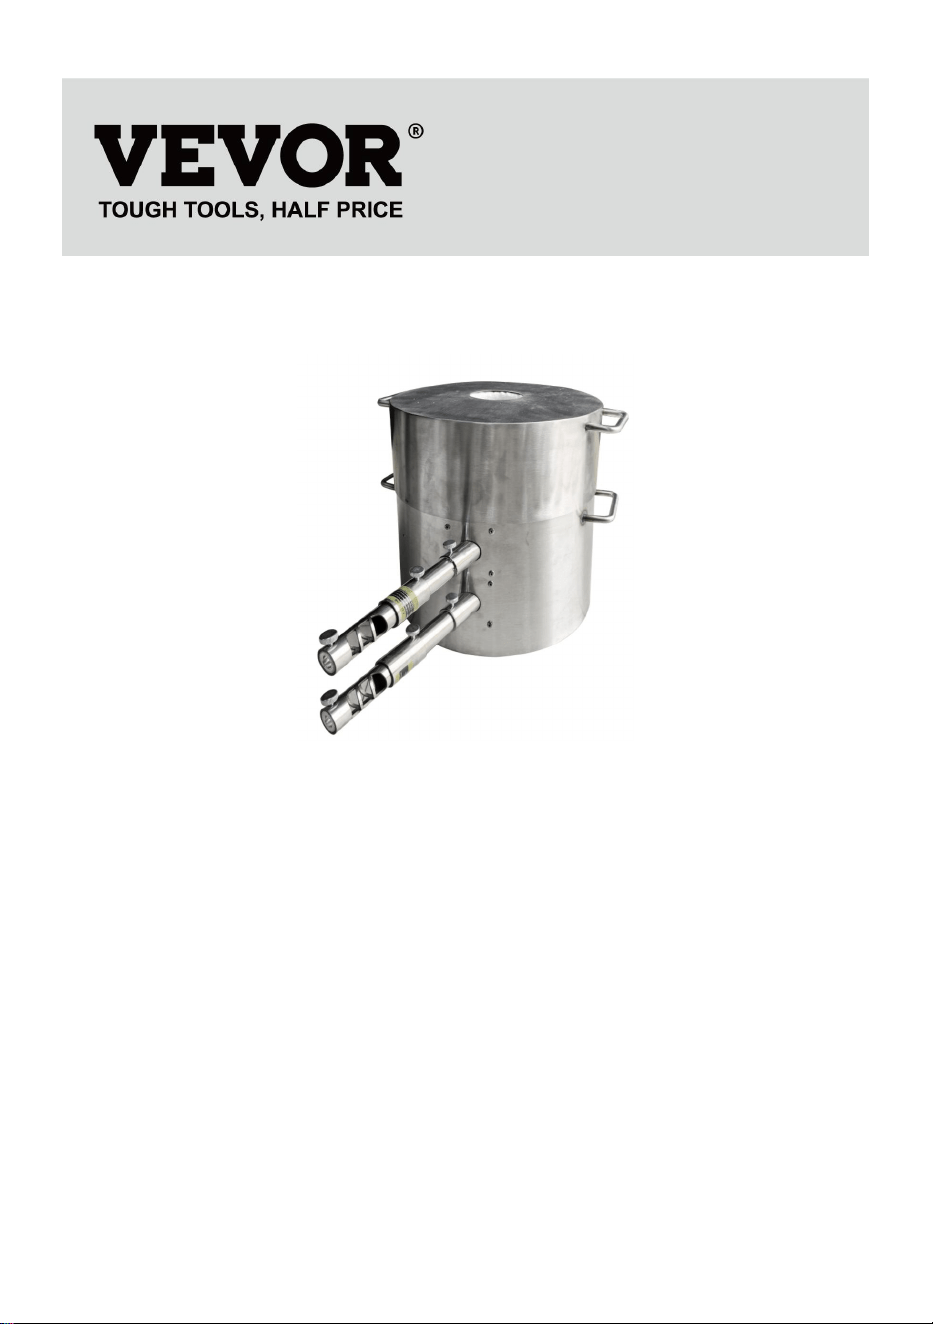
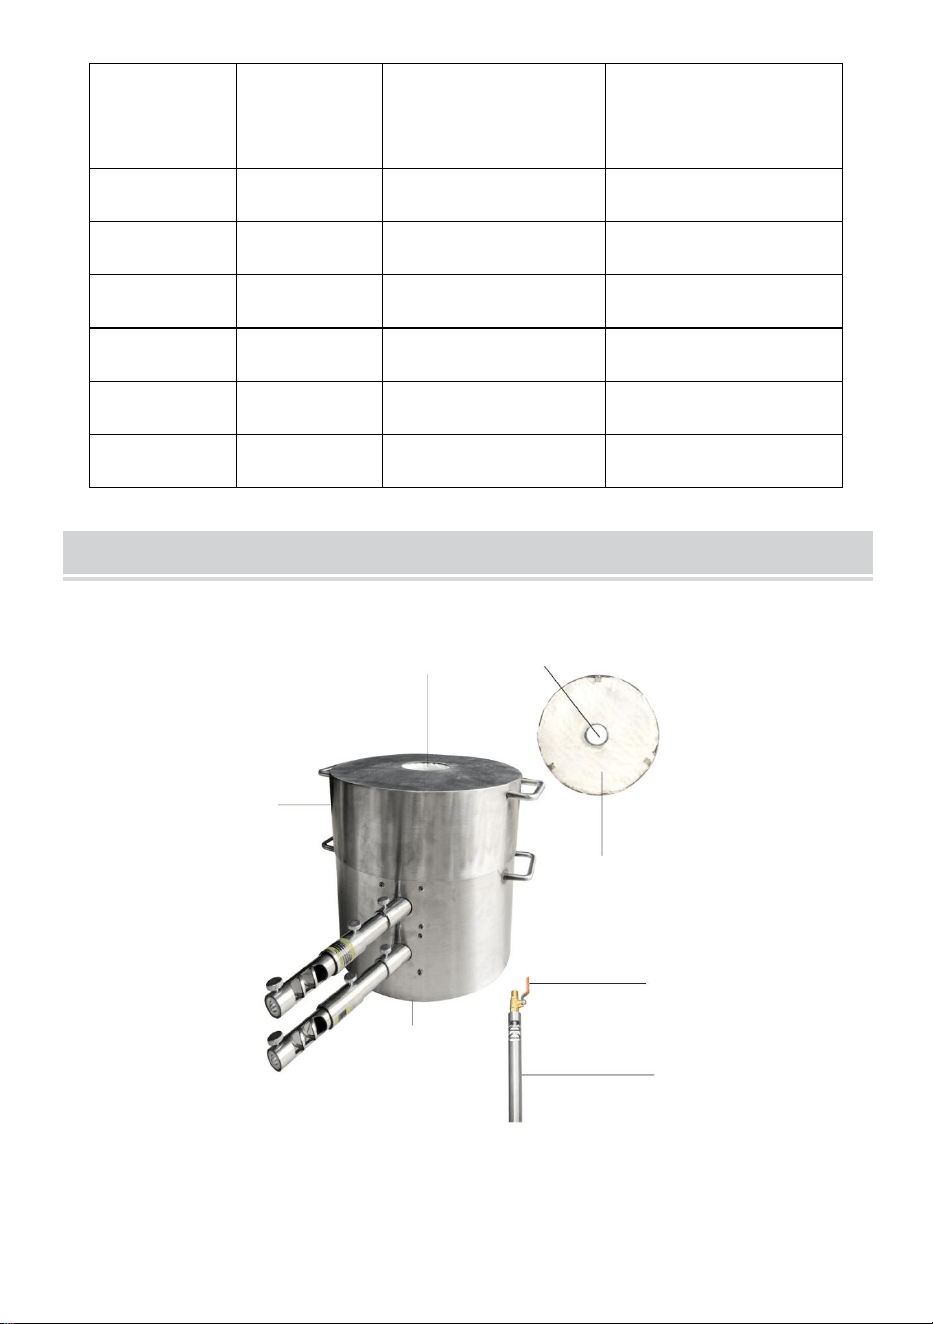
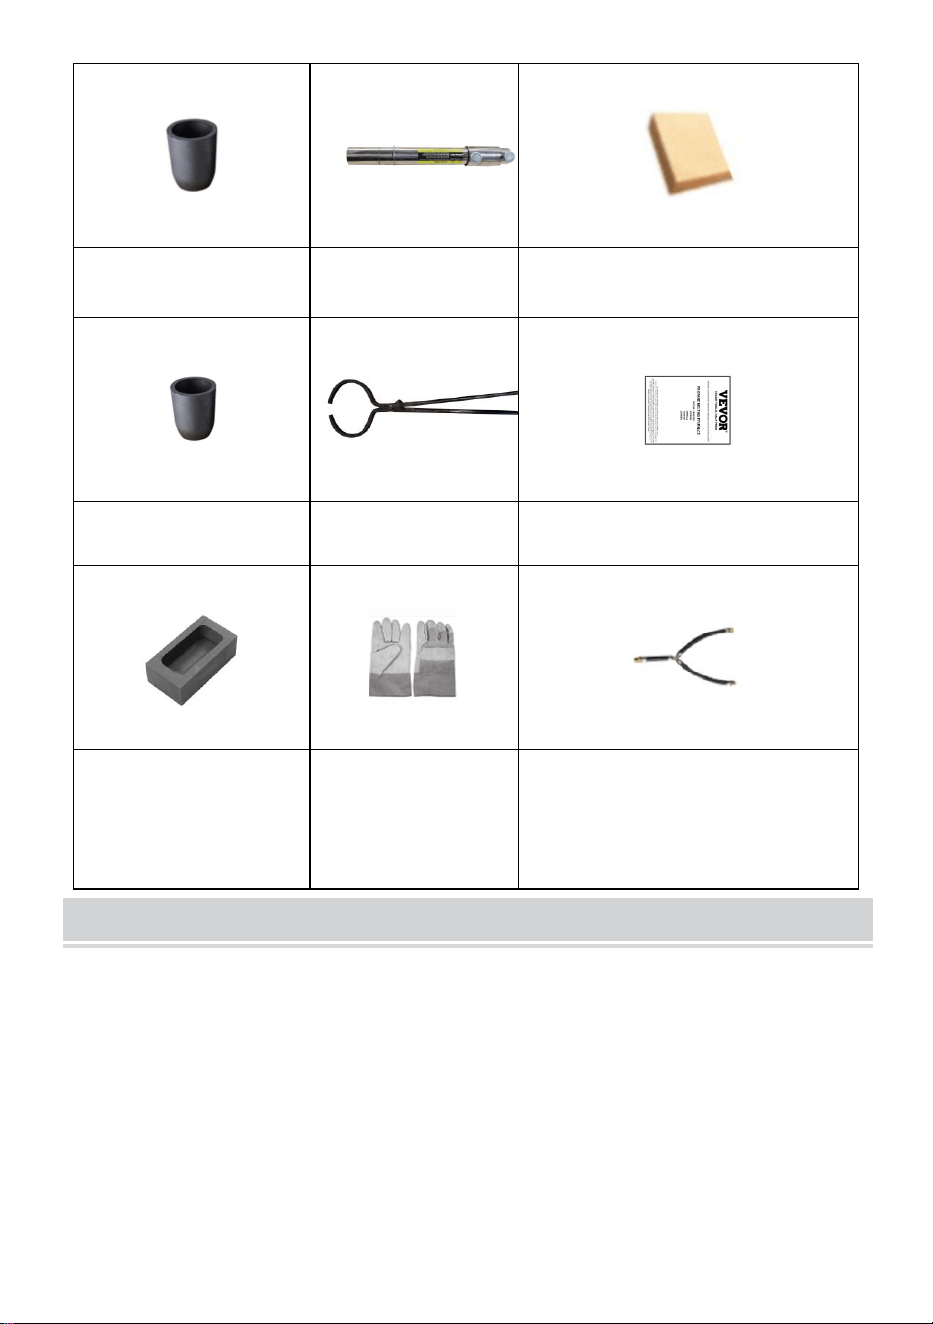
PARTS LIST
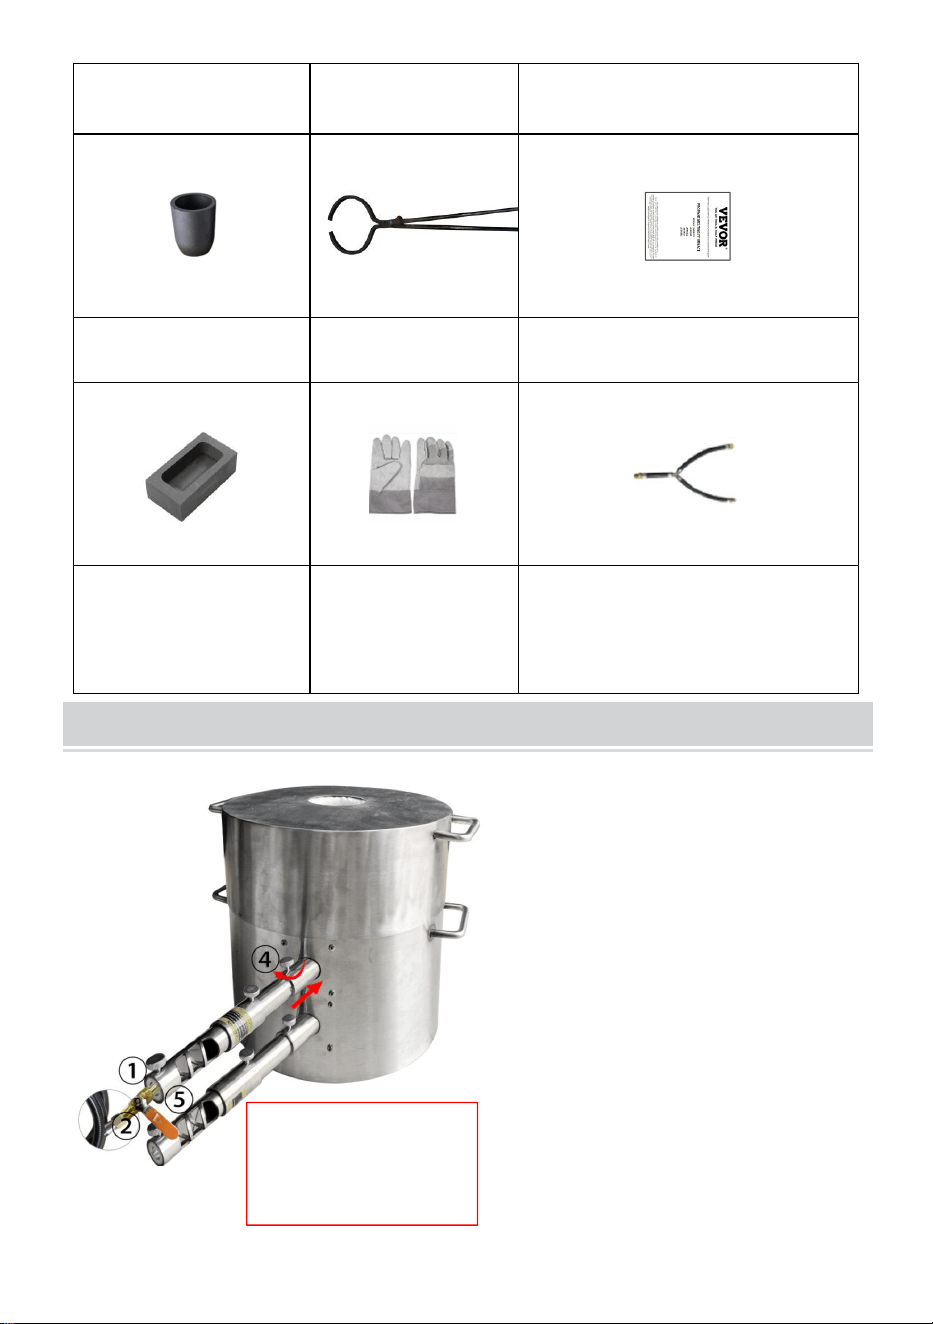
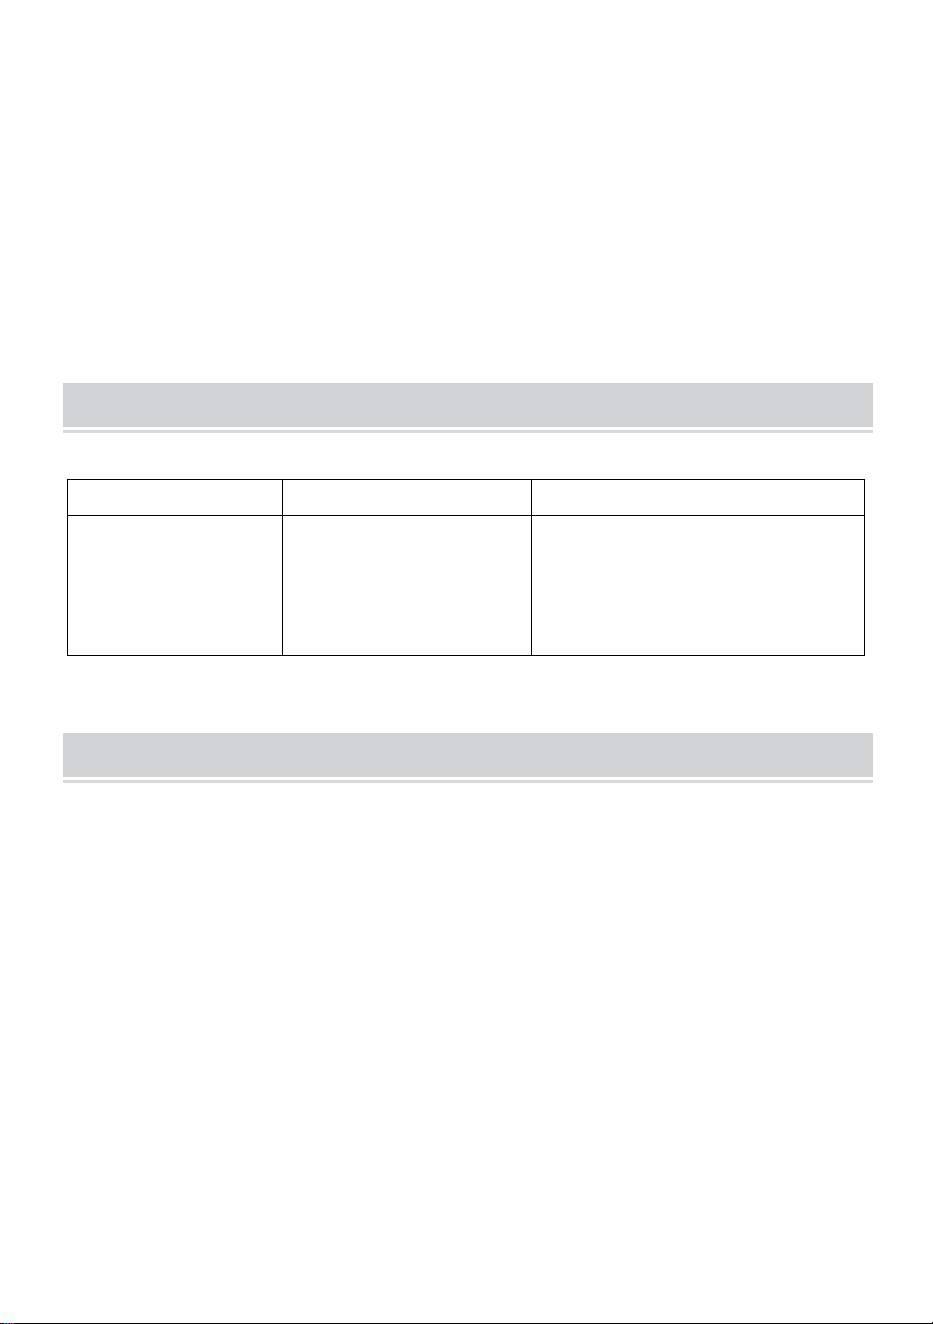
Furnace Body x1
Copper Nozzle x2
Gas Pressure Regulator x1
16#Graphite Crucible x1
Burner x2
Refractory Brick(115*115*20mm)
x1
6#Graphite Crucible x1
Tongs x1
User Manual x1
2kg Graphite oil tank
x1
High temperature
resistant gloves x1
Gas Hose Pipe
x1
- 7 -
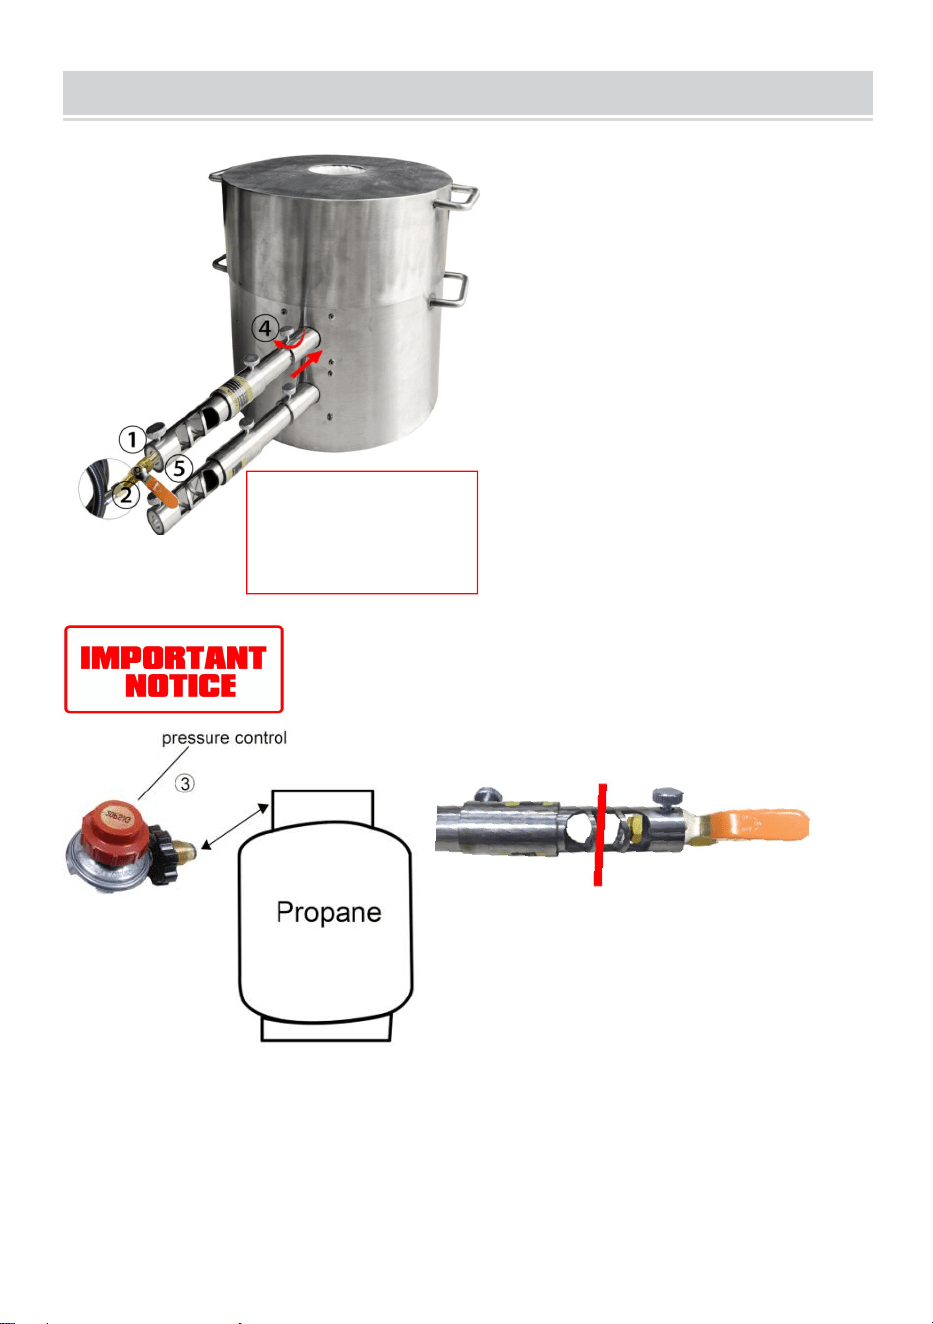
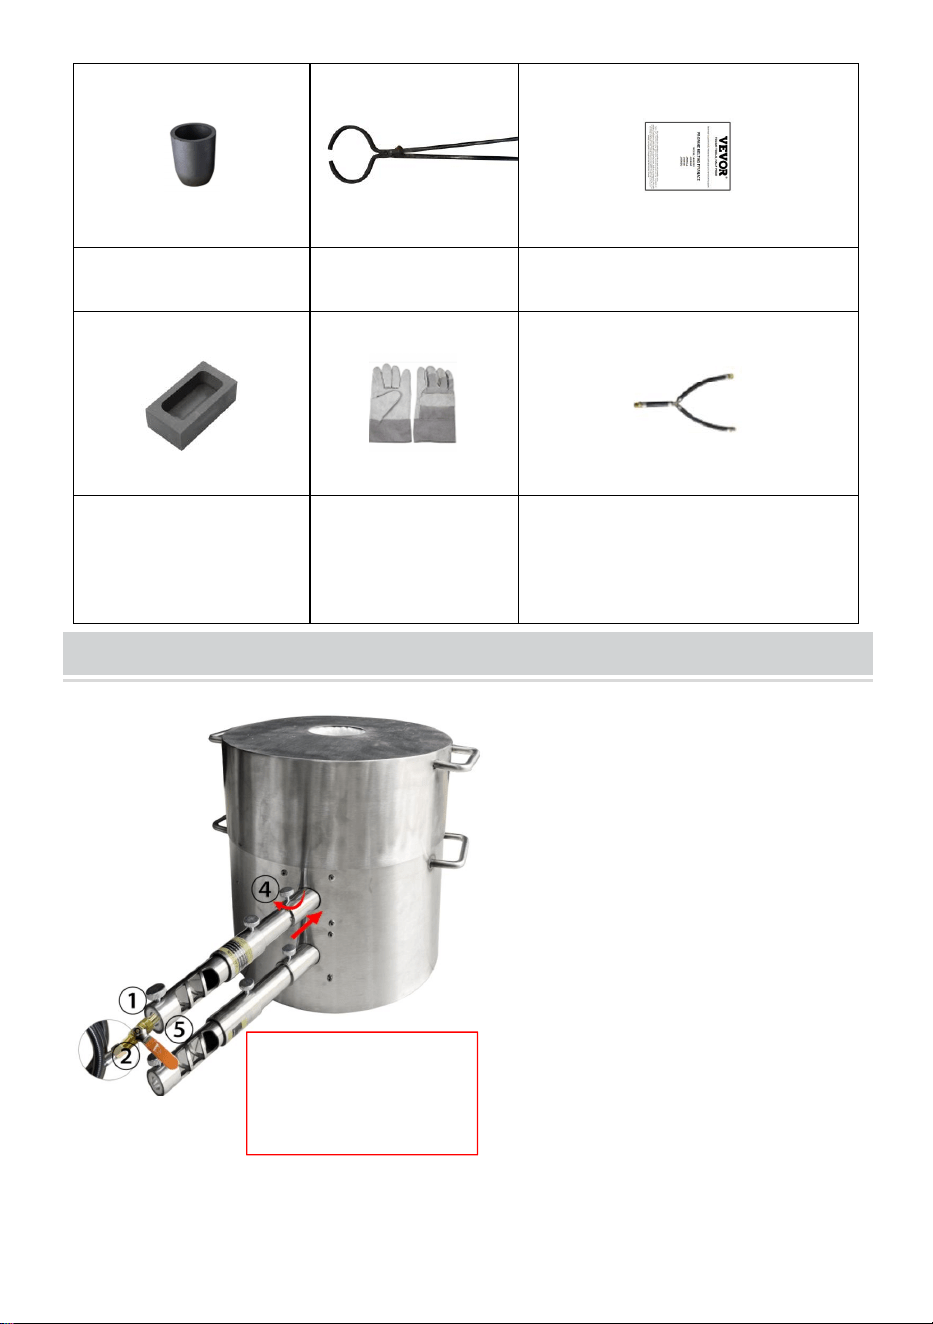
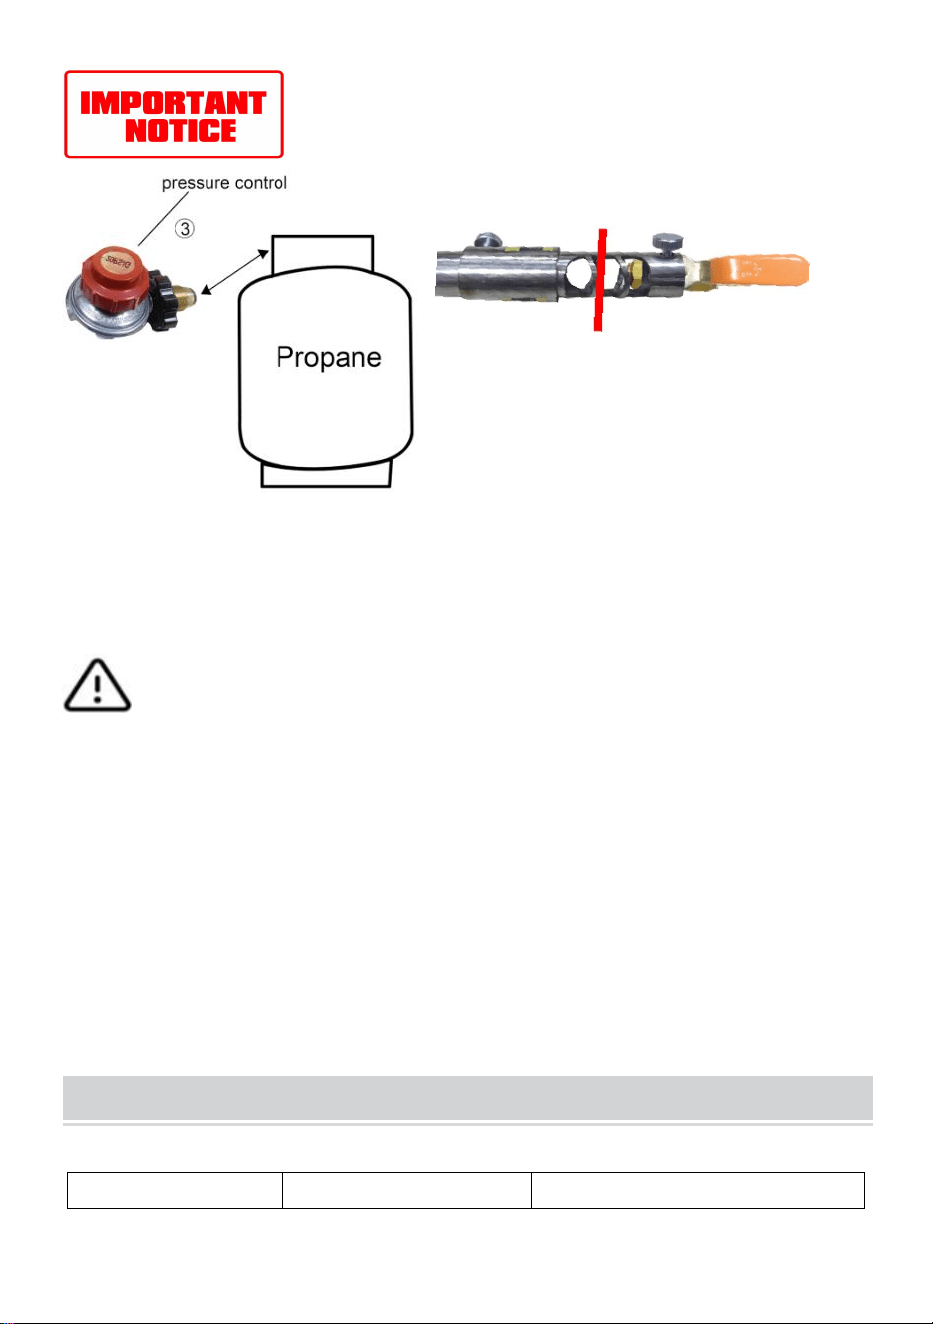
OPERATION STEPS
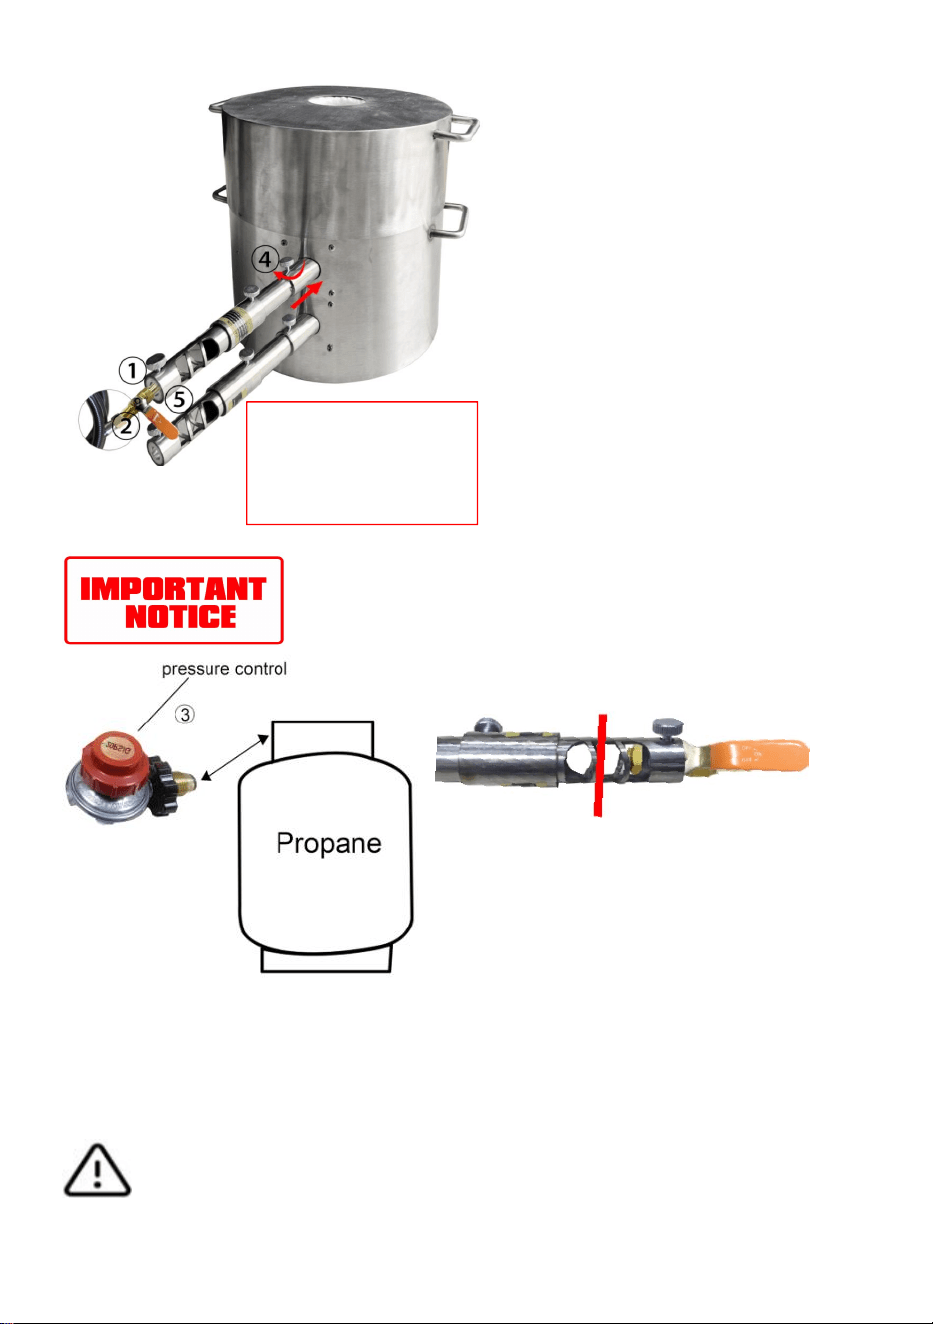
① First, install the gas outlet nozzle to
the burner. Then tighten the screws
above.
② connect the trachea to the brassjoint,
then tighten the screws.
③connect the Regulator to the propane
container.
④ Link and screw the burner into the
furnace.
⑤ open the gas inlet that increases gas
circulation. (Maketheflame stronger)
⑥ putthe crucible into the furnace, open
the Regulator and ignite the gas.
Install the copper nozzle to the burner.
NOTE: Screw the nozzle to the red line.
Then tighten the screws above.
NOTE:
The air pipe needs to be
connected to the pressurevalve
and pressure gauge.
1. Check if the gas regulator is open.
2. Check if the gas cylinder is enough.
Warning: Turn off the
fire in the correct order
before opening the lid!
- 8 -
WARNING
Please note that the closing and opening operations are performed in the
following order:
Opening steps: First, open the ball valve of the gas container, then open
the ball valve of the burner(s).
Closing steps: First, close the ball valve of the burner(s), then close the
ball valve of the gas container.
(Please follow the above operation in order. Failure to do so will result in a
dangerous backfire.)
NOTE
TROUBLE SHOOTING
Problem
Reason
Solution
It can't ignite after
passing gas.
Copper nozzle
blocked.
1.Check that the switch on the
regulator is turned on correctly.
2.Replace the valve.
MAINTENANCE
1. All valves, gauges, regulators, and hoses should be checked weekly for
wear. Replace as needed. Good maintenance is a must with gas
equipment.
2. Place it in a ventilated and dry place.
3. When the ceramic fiber liner becomes thinner, proper insulation is not
achieved. If used for a long time, the material of the inner wall of the
furnace should be replaced. Replacement liners can be purchased from
your local dealer or the manufacturer. You should wear gloves and a dust
mask when handling the used liner. The old liner should be wet down
thoroughly with a spray bottle of water before removal. After removal, it
should be placed in a plastic bag and disposed of immediately.

- 9 -
4. Do not scratch the surface with sharp and hard objects.
5. It shall be stored on wooden, painted steel shelves or rubber pads and
shall be separated from other steel to avoid dust, oil and rust corroding the
stainless steelsurface.
Manufacturer: Shanghaimuxinmuyeyouxiangongsi
Address: Shuangchenglu 803nong11hao1602A-1609shi, baoshanqu,
shanghai 200000 CN.
Imported to AUS: SIHAO PTY LTD, 1 ROKEVA STREETEASTWOOD NSW
2122 Australia
Imported to USA: Sanven Technology Ltd., Suite 250, 9166 Anaheim Place,
Rancho Cucamonga, CA 91730
REP
EC
E-CrossStu GmbH
Mainzer Landstr.69, 60329 Frankfurt am Main.
REP
UK
YH CONSULTING LIMITED.
C/O YH Consulting Limited Office 147, Centurion House,
London Road, Staines-upon-Thames, Surrey, TW18 4AX


Teknisk support och e-garanticertifikat www.vevor.com/support
PROPANSMÄLTNING FFURNAS
Vi fortsätter att vara engagerade i att ge dig verktyg till konkurrenskraftiga priser.
"Spara hälften", "halva priset" eller andra liknande uttryck som används av oss representerar
bara en uppskattning av besparingar du kan dra nytta av att köpa vissa verktyg hos oss jämfört
med de stora toppmärkena och betyder inte nödvändigtvis att täcka alla kategorier av verktyg
som erbjuds av oss. Du påminns vänligen om att noggrant kontrollera när du gör en beställning
hos oss om du faktiskt sparar hälften i jämförelse med de främsta stora varumärkena.

- 1 -
MODELL: JH 16 KG D / JH 16 KG F/ JH 16 KG A/ JH 16 KG I/ JH 16
KGU
OBS: Degeln är en förlustdel och måste bytas ut efter 2-3 normala
användningar. Köpwebbplats:
https://www.amazon.com/dp/B0DBH419F4
BEHÖVS HJÄLP? KONTAKTA OSS!
Har du produktfrågor? Behöver du teknisk support? Kontakta oss gärna:
Teknisk support och e-garanticertifikat www.vevor.com/support
Detta är den ursprungliga instruktionen, läs alla instruktioner noggrant innan du
använder den. VEVOR reserverar sig för en tydlig tolkning av vår användarmanual.
Utseendet på produkten är beroende av den produkt du fått. Ursäkta oss att vi inte
kommer att informera dig igen om det finns någon teknik eller
mjukvaruuppdateringar på vår produkt.
PROPANE MELTING
FURNACE

- 2 -
SAFETY INSTRUCTIONS
VARNING:
25. endast avsedd för utomhusbruk .
26. Upprätthåll god ventilation runt utrustningen för att förhindra ansamlad
rök och skadliga gaser från att orsaka skada på människokroppen.
27. Rengör arbetsområdet för att säkerställa att det inte finns skräp eller
brandfarligt material i närheten.
28. Före varje användning, kontrollera alla anslutningar med tvålvatten för
läckor.
29. Propangas har en stark lukt. Fortsätt aldrig att köra enheten om det
luktar gas. Stäng av enheten och kontrollera alla anslutningar med
tvålvatten för läckor. Använd ALDRIG låga för att kontrollera om det finns
gasläckor. Återuppta inte användningen förrän korrekta reparationer har
utförts av ett kvalificerat gasföretag eller förrän du kontaktar tillverkaren för
hjälp.
30. Var försiktig när du tillsätter råvaror under smältningsprocessen.
31. Det är förbjudet att smälta metaller med smältpunkter över 1350°,
såsom järn och mangan.
32. Under smältningsprocessen bör du inte observera smälttillståndet
direkt, för att förhindra att värmeböljor skadar kroppen. Måste vidta
säkerhetsåtgärder.
33. Håll en utrymningsväg i en nödsituation.
34. Håll brandsläckaren till hands.
35. Förbjud överbelastning smältning för att förhindra att flytande metall
rinner ut.
36. Bär skyddshandskar, skyddsglasögon och värmebeständiga kläder
när du använder ugnen för att undvika brännskador.
37. Läckande gas kan vara extremt farligt .
38. Underlåtenhet att följa de försiktighetsåtgärder och varningar som
finns i denna monteringsinstruktion kan leda till allvarliga kroppsskador

- 3 -
eller dödsfall, eller kan leda till brand eller explosion som orsakar skador på
egendom.
39. VARNING - Felaktig montering av smältugnen kan vara farlig. Följ
monteringsanvisningen noggrant.
40. VARNING - Använd inte smältugnen om inte alla delar är på plats .
Smältugnen måste monteras korrekt enligt monteringsanvisningen av en
kvalificerad fackman .
41. VARNING! Avgasportarna får aldrig under några omständigheter
stängas av helt på dörrar eller öppna ändöppningar. Detta kan orsaka
allvarliga skador och möjliga kroppsskador.
42. Undvik att stå eller flytta dig fram till öppningar och avgasportar.
Extremt höga temperaturer sträcker sig cirka två fot från alla öppningar
under drift. När du hämtar föremål från en varm ugn gå till den från sidan.
43. Enheten kommer att värma föremål till smälttemperatur , men det tar
lite längre tid.
44. Lämna aldrig ledningstrycket på när det inte används. Klipp alltid av
kulventilen och tankventilen för förvaring.
45. Låt inte slangen komma i kontakt med hett stål eller lågor.
46. Under drift ska användaren alltid vistas i omedelbar närhet av ugnen .
Lämna aldrig den brända smältsmedjan utan uppsikt !
47. Risk för brännskador: Vid användning av ugnen kommer ugnen och
komponenternas yttemperatur att nå upp till 600°F. Rör inte någon del av
ugnen direkt med handen medan ugnen är varm eller varm. Ugnen
genererar extremt hög temperatur som kan orsaka allvarliga brännskador
eller brand. Placera inte ugnen nära en vägg eller brännbart material.
48. Personlig skyddsutrustning krävs vid hantering av Rigidizer, Satanite
Refractory och isoleringsfilt under installationen .
- 4 -
MODEL AND PARAMETERS
Modell
JH 16 KGD / JH 16 KG F / JH 16 KG A /
JH 16 KG I / JH 16 KG U
Bränsle
Propan
Arbetstryck
14,5–29 PSI(0,1–0,2 MPa)
Maximal temperatur
2500°F ±3% (1370℃±3%)
Smält metall
Guld, silver, aluminium, koppar,
mässing, brons, tenn K-guld och andra
många metaller
(Metall med en smältpunkt under
1350 ℃)
Form
Cylindrisk
Antal brännare
2
Material
Rostfritt stål
MOLTEN METAL
Metall
Smältpunkt
Primär kapacitet
Primär kapacitet ( 6

- 5 -
namn
(°C)
( 16 kg )
kg )
Koppar
1083,4
16
6
Guld
1064,18
7.2
1.9
Silver
961,78
30.6
13.3
Aluminium
660
18.4
7.2
Zink
419,53
13.8
4.9
Tenn
231,89
14
5
STRUCTURE DIAGRAM
NOTERA:
3. Det är inte nödvändigt att tvinga dessa beslag till det yttersta. Det är
dock viktigt att använda rätt skiftnyckelstorlek när du drar åt delarna. När
enheten är monterad, slå på gastrycket från tanken till kulventilen och
Air Chock Valve
Burner
Furnace Base
Furnace Body
Insulation Interlayer
Furnace Cover
Feeding Port
- 6 -
använd tvålvatten för att kontrollera om det finns läckor på alla leder.
4. Vänligen justera isoleringsfilten vid muskötens nosparti till den som
visas på bilden före användning, se till att högtemperaturbomullen inte
blockerar muskötens nosparti alls. Felaktig användning kan leda till skador
på ugnens kropp och fara.
PARTS LIST
F u r nac e Body x1
C upper N
munstycke x2
Gastryck Regulator x 1
16# Grafitdegel x1
Brännare x2
Eldfast tegel (115 *11 5 *20 mm ) x1

- 7 -
6# Grafit Degel x1
Tång x1
Användarmanual x1
2 kg grafitoljetank
x1
Hög temperatur
resistenta handskar
x1
Gasslangsrör
x1
OPERATION STEPS
① First, install the gas outlet nozzle to
the burner. Then tighten the screws
above.
② connect the trachea to the brassjoint,
then tighten the screws.
③connect the Regulator to the propane
container.
④ Link and screw the burner into the
furnace.
⑤ open the gas inlet that increases gas
circulation. (Maketheflame stronger)
⑥ putthe crucible into the furnace, open
the Regulator and ignite the gas.
Warning: Turn off the
fire in the correct order
before opening the lid!

- 8 -
VARNING
Observera att stängnings- och öppningsoperationerna utförs i följande
ordning :
Öppna steg: Öppna först kulventilen på gasbehållaren, öppna sedan
kulventilen på brännaren/brännarna.
Stängningssteg: Stäng först kulventilen på brännaren/brännarna, stäng
sedan kulventilen på gasbehållaren.
(Vänligen följ ovanstående operation i ordning. Om du inte gör det kommer
det att resultera i en farlig bakslag.)
NOTERA
TROUBLE SHOOTING
Problem
Anledning
Lösning
Install the copper nozzle to the burner.
NOTE: Screw the nozzle to the red line.
Then tighten the screws above.
NOTE:
The air pipe needs to be
connected to the pressurevalve
and pressure gauge.
3. Check if the gas regulator is open.
4. Check if the gas cylinder is enough.

- 9 -
Den kan inte
antändas efter att
ha passerat gas.
Kopparmunstycke
blockerat.
1. Kontrollera att strömbrytaren
på regulatorn är korrekt
påslagen.
2.Sätt tillbaka ventilen .
MAINTENANCE
6. Alla ventiler, mätare, regulatorer och slangar bör kontrolleras varje
vecka för slitage. Byt ut vid behov. Bra underhåll är ett måste med gas
Utrustning.
7. Placera den i ett ventilerat och torrt plats .
8. När det keramiska fiberfodret blir tunnare uppnås inte korrekt isolering.
Om den används under lång tid, materialet i den inre väggen i ugnen bör
bytas ut. Ersättningsfoder kan köpas från din lokala återförsäljare eller
tillverkaren. Du bör bära handskar och en dammmask när du hanterar den
använda linern. Den gamla linern ska blötas ner ordentligt med en
sprayflaska med vatten innan den tas bort. Efter borttagning ska den
placeras i en plastpåse och omedelbart kasseras.
9. Repa inte ytan med vassa och hårda föremål.
10. Den ska förvaras på trä, målade stålhyllor eller gummikuddar och ska
separeras från annat stål för att undvika att damm, olja och rost korroderar
den rostfria ytan.
Tillverkare: Shanghaimuxinmuyeyouxiangongsi
Adress: Shuangchenglu 803nong11hao1602A-1609shi, baoshanqu,
shanghai 200000 CN.
Importerad till AUS: SIHAO PTY LTD, 1 ROKEVA STREETEASTWOOD
NSW 2122 Australien
Importerad till USA: Sanven Technology Ltd., Suite 250, 9166 Anaheim
Place, Rancho Cucamonga, CA 91730

- 10 -
REP
EC
E-CrossStu GmbH
Mainzer Landstr.69, 60329 Frankfurt am Main.
REP
UK
YH CONSULTING LIMITED.
C/O YH Consulting Limited Office 147, Centurion House,
London Road, Staines-upon-Thames, Surrey, TW18 4AX


Soporte técnico y certificado de garantía electrónica www.vevor.com/support
FUSIÓN DE PROPANO HORNO
Seguimos comprometidos a proporcionarle herramientas a precios competitivos.
"Ahorre a mitad de precio", "A mitad de precio" o cualquier otra expresión similar utilizada por
nosotros solo representa una estimación de los ahorros que podría beneficiarse al comprar
ciertas herramientas con nosotros en comparación con las principales marcas principales y no
necesariamente significa cubrir todas las categorías de herramientas ofrecidas. por nosotros. Le
recordamos que, cuando realice un pedido con nosotros, verifique cuidadosamente si realmente
está ahorrando la mitad en comparación con las principales marcas.
- 1 -
MODELO: JH 16 KG D / JH 16 KG F/ JH 16 KG A/ JH 16 KG I/ JH 16
KGU
NOTA: El crisol es una pieza perdida y debe reemplazarse después de 2 o
3 usos normales.Sitio web de compra:
https://www.amazon.com/dp/B0DBH419F4
¿ NECESITAS AYUDA? ¡CONTÁCTENOS!
¿Tiene preguntas sobre el producto? ¿Necesita soporte técnico? Siéntete libre de
contactarnos:
Soporte técnico y certificado de garantía electrónica www.vevor.com/support
Estas son las instrucciones originales; lea atentamente todas las instrucciones del
manual antes de operar. VEVOR se reserva una interpretación clara de nuestro
manual de usuario. La apariencia del producto estará sujeta al producto que
recibió. Perdone que no le informaremos nuevamente si hay actualizaciones de
PROPANE MELTING
FURNACE

- 2 -
tecnología o software en nuestro producto.
SAFETY INSTRUCTIONS
ADVERTENCIA:
49. Este producto está destinado únicamente para uso exterior.
50. Mantenga una buena ventilación alrededor del equipo para evitar que
el humo acumulado y los gases nocivos causen daños al cuerpo humano.
51. Limpie el área de trabajo para asegurarse de que no haya escombros
o material inflamable alrededor.
52. Antes de cada uso, revise todas las conexiones con agua y jabón para
detectar fugas.
53. El gas propano tiene un olor fuerte. Nunca continúe haciendo
funcionar la unidad si hay olor a gas. Apague la unidad y revise todas las
conexiones con agua y jabón para detectar fugas. NUNCA utilice llamas
para comprobar si hay fugas de gas. No reanude el uso hasta que una
compañía de gas calificada realice las reparaciones adecuadas o hasta
que se comunique con el fabricante para obtener ayuda.
54. Tenga cuidado al agregar materias primas durante el proceso de
fundición.
55. Está prohibido fundir metales. Con puntos de fusión superiores a
1350°, como el hierro y manganeso.
56. Durante el proceso de fusión, no se debe observar directamente el
estado de fusión, para evitar que las olas de calor dañen el cuerpo. Debe
tomar medidas de seguridad.
57. Mantenga una ruta de escape despejada en caso de emergencia.
58. Mantenga el extintor a mano.
59. la sobrecarga fundición para evitar que el metal líquido fluya.
60. Use guantes protectores, gafas protectoras y ropa resistente al calor
cuando utilice el horno para evitar quemaduras.
61. Las fugas de gas pueden ser extremadamente peligroso .
62. El incumplimiento de las Precauciones y Advertencias contenidas en

- 3 -
estas Instrucciones de ensamblaje puede provocar lesiones corporales
graves o la muerte, o puede provocar un incendio o una explosión que
cause daños a la propiedad.
63. ADVERTENCIA -El montaje inadecuado del horno de fusión puede
ser peligroso. Siga atentamente las instrucciones de montaje.
64. ADVERTENCIA -No utilice el horno de fusión a menos que todas las
piezas estén en su lugar. El horno fusor debe ser correctamente montado
según las instrucciones de montaje por un profesional cualificado.
65. ¡PRECAUCIÓN! Nunca, bajo ninguna circunstancia, se deben cerrar
completamente los puertos de escape en las puertas ni abrir los puertos
finales. Esto podría causar daños graves y posibles lesiones corporales.
66. Evite pararse o moverse hacia el frente de las aberturas y puertos de
escape. Las temperaturas extremadamente altas se extienden
aproximadamente a dos pies de cualquier abertura mientras está en
funcionamiento. Al recuperar objetos de un horno caliente, acérquese
desde un lado.
67. La unidad calentará los objetos hasta la temperatura de fusión , pero
tardará un poco más.
68. Nunca deje la línea de presión cuando no esté en uso. Siempre corte
la válvula de bola y la válvula del tanque para su almacenamiento.
69. No permita que la manguera entre en contacto con acero caliente o
llamas.
70. el funcionamiento, el usuario siempre debe permanecer en las
inmediaciones del horno . ¡Nunca deje desatendida la fragua cocida !
71. Peligro de quemaduras: Cuando se utiliza el horno , la temperatura de
la superficie del horno y los componentes alcanzará hasta 600 °F. No
toque ninguna parte del horno directamente con la mano. mientras el
horno se está calentando o caliente. El horno genera temperaturas
extremadamente altas que pueden provocar quemaduras graves o
incendios. No coloque el horno cerca de una pared o material inflamable.
72. equipo de protección personal al manipular el rigidizador, el refractario
de satanita y la manta aislante durante la instalación.

- 4 -
MODEL AND PARAMETERS
Modelo
JH 16 KG / JH 16 KG F / JH 16 KG A /
JH 16 KG I / JH 16 KG U
Combustible
Propano
Presión laboral
14,5~29PSI(0,1~0,2MPa)
Temperatura máxima
2500°F ±3% (1370°C±3%
)
metal fundido
Oro, plata, aluminio, cobre, latón,
bronce, oro Tin K y otros muchos
metales.
(Metal con un punto de fusión inferior a
1350 ℃)
Forma
Cilíndrico
Número de quemadores
2
Material
Acero inoxidable
MOLTEN METAL
Nombre del
Punto de
Capacidad
Capacidad primaria
- 5 -
metal
fusión (°C)
primaria ( 16 kg )
( 6 kg )
Cobre
1083.4
dieciséis
6
Oro
1064.18
7.2
1.9
Plata
961,78
30,6
13.3
Aluminio
660
18.4
7.2
Zinc
419.53
13.8
4.9
Estaño
231,89
14
5
STRUCTURE DIAGRAM
NOTA:
5. No es necesario forzar estos accesorios al extremo. Sin embargo, es
importante utilizar el tamaño de llave adecuado al apretar las piezas. Una
vez ensamblada la unidad, abra la presión del gas desde el tanque a la
Air Chock Valve
Burner
Furnace Base
Furnace Body
Insulation Interlayer
Furnace Cover
Feeding Port
- 6 -
válvula de bola y use agua con jabón para verificar si hay fugas en todas
las juntas.
6. Ajuste la manta aislante en la boca del mosquete a la que se muestra
en la imagen antes de usarla, asegúrese de que el algodón de alta
temperatura no bloquee la boca del mosquete en absoluto. El
funcionamiento incorrecto puede provocar daños al cuerpo del horno y
provocar peligro.
PARTS LIST
Cuerpo del horno
x1
Boquilla de cobre
x2
Presion del gas Regulador x1
Crisol de grafito 16# x1
Quemador x2
Ladrillo refractario (115 *11 5 *20
mm ) x1

- 7 -
6# Grafito Crisol x1
Pinzas x1
Manual de usuario x1
Tanque de aceite de
grafito de 2 kg.
x1
Alta temperatura
guantes resistentes
x1
Manguera de gas
x1
OPERATION STEPS
① First, install the gas outlet nozzle to
the burner. Then tighten the screws
above.
② connect the trachea to the brassjoint,
then tighten the screws.
③connect the Regulator to the propane
container.
④ Link and screw the burner into the
furnace.
⑤ open the gas inlet that increases gas
circulation. (Maketheflame stronger)
⑥ putthe crucible into the furnace, open
the Regulator and ignite the gas.
Warning: Turn off the
fire in the correct order
before opening the lid!

- 8 -
ADVERTENCIA
Tenga en cuenta que las operaciones de cierre y apertura se realizan en el
siguiente orden :
Pasos de apertura: Primero, abra la válvula de bola del recipiente de gas,
luego abra la válvula de bola del(los) quemador(es).
Pasos de cierre: Primero, cierre la válvula de bola del(los) quemador(es),
luego cierre la válvula de bola del recipiente de gas.
(Siga la operación anterior en orden. De lo contrario, se producirá un
peligroso efecto contraproducente).
NOTA
TROUBLE SHOOTING
Problema
Razón
Solución
Install the copper nozzle to the burner.
NOTE: Screw the nozzle to the red line.
Then tighten the screws above.
NOTE:
The air pipe needs to be
connected to the pressurevalve
and pressure gauge.
5. Check if the gas regulator is open.
6. Check if the gas cylinder is enough.

- 9 -
No puede
encenderse
después de
expulsar gas.
Boquilla de cobre
bloqueada.
1. Verifique que el interruptor
del regulador esté encendido
correctamente.
2.Reemplace la válvula.
MAINTENANCE
11.Todas las válvulas, medidores, reguladores y mangueras deben
revisarse semanalmente para detectar desgaste. Reemplace según sea
necesario. Un buen mantenimiento es imprescindible con el gas. equipo.
12.Colóquelo en un lugar ventilado y seco . lugar .
13.Cuando el revestimiento de fibra cerámica se vuelve más delgado, no
se logra un aislamiento adecuado. Si se utiliza durante mucho tiempo, el
material del interior Se debe reemplazar la pared del horno. Puede adquirir
revestimientos de repuesto a través de su distribuidor local o del fabricante.
Debe usar guantes y una mascarilla contra el polvo al manipular el
revestimiento usado. El revestimiento viejo debe humedecerse bien con
una botella de agua con atomizador antes de retirarlo. Después de retirarlo,
debe colocarse en una bolsa de plástico y desecharse inmediatamente.
14.No raye la superficie con objetos duros y afilados.
15. Se almacenará en estantes de madera, acero pintado o almohadillas
de goma y se separará de otros aceros para evitar que el polvo, el aceite y
el óxido corroan la superficie de acero inoxidable.
Fabricante: Shanghaimuxinmuyeyouxiangongsi
Dirección: Shuangchenglu 803nong11hao1602A-1609shi, baoshanqu,
shanghai 200000 CN.
Importado a AUS: SIHAO PTY LTD, 1 ROKEVA STREETEASTWOOD NSW
2122 Australia
Importado a EE. UU.: Sanven Technology Ltd., Suite 250, 9166 Anaheim
Place, Rancho Cucamonga, CA 91730

- 10 -
REP
EC
E-CrossStu GmbH
Mainzer Landstr.69, 60329 Frankfurt am Main.
REP
UK
YH CONSULTING LIMITED.
C/O YH Consulting Limited Office 147, Centurion House,
London Road, Staines-upon-Thames, Surrey, TW18 4AX


Supporto tecnico e certificato di garanzia elettronica www.vevor.com/support
FUSIONE DEL PROPANO FFORNACE
Continuiamo a impegnarci per fornirvi strumenti a prezzi competitivi.
"Risparmia la metà", "Metà prezzo" o qualsiasi altra espressione simile da noi utilizzata
rappresenta solo una stima del risparmio che potresti trarre dall'acquistare determinati strumenti
con noi rispetto ai principali marchi più importanti e non significa necessariamente coprire tutte le
categorie di strumenti offerti da noi. Ti ricordiamo di verificare attentamente quando effettui un
ordine con noi se stai effettivamente risparmiando la metà rispetto ai migliori marchi principali.

- 1 -
MODELLO: JH 16 KG D / JH 16 KG F/ JH 16 KG A/ JH 16 KG I/ JH
16 KGU
NOTA: il crogiolo è una parte danneggiata e deve essere sostituito dopo
2-3 utilizzi normali. Sito web di acquisto:
https://www.amazon.com/dp/B0DBH419F4
HO BISOGNO DI AIUTO? CONTATTACI!
Hai domande sul prodotto? Hai bisogno di supporto tecnico? Non esitate a
contattarci:
Supporto tecnico e certificato di garanzia elettronica www.vevor.com/support
Queste sono le istruzioni originali, leggere attentamente tutte le istruzioni del
manuale prima dell'uso. VEVOR si riserva una chiara interpretazione del nostro
manuale d'uso. L'aspetto del prodotto sarà soggetto al prodotto ricevuto. Ti
preghiamo di perdonarci se non ti informeremo più se sono presenti aggiornamenti
PROPANE MELTING
FURNACE

- 2 -
tecnologici o software sul nostro prodotto.
SAFETY INSTRUCTIONS
AVVERTIMENTO:
73. Questo prodotto è destinato esclusivamente all'uso esterno.
74. Mantenere una buona ventilazione intorno all'apparecchiatura per
evitare che il fumo accumulato e i gas nocivi causino danni al corpo
umano.
75. Pulire l'area di lavoro per assicurarsi che non vi siano detriti o
materiale infiammabile nelle vicinanze.
76. Prima di ogni utilizzo, controllare che tutti i collegamenti con acqua
saponata non presentino perdite.
77. Il gas propano ha un forte odore. Non continuare mai a far funzionare
l'unità se è presente odore di gas. Spegnere l'unità e controllare che tutti i
collegamenti con acqua saponata non presentino perdite. Non utilizzare
MAI la fiamma per verificare eventuali perdite di gas. Non riprendere l'uso
finché non vengono eseguite le riparazioni adeguate da parte di
un'azienda del gas qualificata o finché non si contatta il produttore per
ricevere assistenza.
78. Fare attenzione quando si aggiungono materie prime durante il
processo di fusione.
79. È vietato fondere i metalli con punti di fusione superiori a 1350°, come
ferro e manganese.
80. Durante il processo di fusione non bisogna osservare direttamente lo
stato di fusione, per evitare che le ondate di calore danneggino il corpo.
Deve adottare misure di sicurezza.
81. Mantenere chiara la via di fuga in caso di emergenza.
82. Tenere l'estintore a portata di mano.
83. il sovraccarico fusione per impedire la fuoriuscita del metallo liquido.
84. Indossare guanti protettivi, occhiali protettivi e indumenti resistenti al
calore quando si utilizza il forno per evitare ustioni.

- 3 -
85. Le perdite di gas possono essere estremamente gravi pericoloso .
86. La mancata osservanza delle precauzioni e delle avvertenze
contenute nelle presenti istruzioni di montaggio può provocare gravi lesioni
personali o morte, oppure può provocare un incendio o un'esplosione con
conseguenti danni materiali.
87. ATTENZIONE -Un montaggio improprio del forno fusorio può essere
pericoloso. Seguire attentamente le istruzioni di montaggio.
88. ATTENZIONE -Non utilizzare il forno fusorio senza che tutte le parti
siano a posto. Il forno fusorio deve essere assemblato correttamente
secondo le istruzioni di montaggio da un professionista qualificato.
89. ATTENZIONE! In nessun caso le porte di scarico delle porte o delle
porte aperte devono essere completamente chiuse. Ciò potrebbe causare
gravi danni e possibili lesioni personali.
90. Evitare di sostare o di spostarsi davanti alle aperture e alle porte di
scarico. Temperature estremamente elevate si estendono per circa mezzo
metro da qualsiasi apertura durante il funzionamento. Quando si
recuperano oggetti da una fornace calda, avvicinarsi lateralmente.
91. L'unità riscalderà gli oggetti fino alla temperatura di fusione , ma
richiederà un po' più tempo.
92. Non lasciare mai la pressione della linea attiva quando non in uso.
Tagliare sempre la valvola a sfera e la valvola del serbatoio per la
conservazione.
93. Evitare che il tubo entri in contatto con acciaio caldo o fiamme.
94. il funzionamento l'utente deve rimanere sempre nelle immediate
vicinanze del forno . Non lasciare mai incustodita la fucina accesa !
95. Pericolo di ustioni: quando si utilizza il forno , la temperatura
superficiale del forno e dei componenti raggiungerà i 600°F. Non toccare
direttamente con le mani nessuna parte del forno mentre il forno si sta
riscaldando o è caldo. Il forno genera temperature estremamente elevate
che possono causare gravi ustioni o incendi. Non posizionare il forno
vicino a un muro o a materiale infiammabile.
96. un'attrezzatura di protezione personale quando si maneggiano il
Rigidizzatore, il Refrattario Satanite e la Coperta Isolante durante
l'installazione.

- 4 -
MODEL AND PARAMETERS
Modello
JH 16 KG / JH 16 KG F / JH 16 KG A /
JH 16 KG I / JH 16 KG U
Carburante
Propano
Pressione lavorativa
14,5~29PSI(0,1~0,2MPa)
Temperatura massima
2500°F ±3% (1370℃±3%
)
Metallo fuso
Oro, argento, alluminio, rame, ottone,
bronzo, oro Tin K e altri metalli
(Metallo con punto di fusione inferiore a
1350 ℃)
Forma
Cilindrico
Numero di bruciatori
2
Materiale
Acciaio inossidabile
MOLTEN METAL
Nome del
Punto di
Capacità primaria
Capacità primaria
- 5 -
metallo
fusione
(°C)
( 16 kg )
( 6 kg )
Rame
1083.4
16
6
Oro
1064.18
7.2
1.9
Argento
961.78
30.6
13.3
Alluminio
660
18.4
7.2
Zinco
419,53
13.8
4.9
Lattina
231,89
14
5
STRUCTURE DIAGRAM
NOTA:
7. Non è necessario forzare questi raccordi all'estremo. Tuttavia, è
importante utilizzare la chiave della dimensione corretta quando si serrano
Air Chock Valve
Burner
Furnace Base
Furnace Body
Insulation Interlayer
Furnace Cover
Feeding Port

- 6 -
le parti. Una volta assemblata l'unità, accendere la pressione del gas dal
serbatoio alla valvola a sfera e utilizzare acqua saponata per verificare la
presenza di perdite su tutti i giunti.
8. Si prega di regolare la coperta isolante sulla volata del moschetto su
quella mostrata nell'immagine prima dell'uso, assicurarsi che il cotone ad
alta temperatura non blocchi affatto la volata del moschetto. Un
funzionamento errato può causare danni al corpo del forno e pericolo.
PARTS LIST
Corpo della fornace
x1
Ugello in rame x2
Pressione del gas Regolatore x1
16# Crogiolo di grafite x1
Bruciatore x2
Mattone refrattario (115 *11 5
*20mm ) x1
- 7 -
6# Grafite Crogiolo x1
Pinze x1
Manuale d' uso x1
Serbatoio olio in grafite
da 2 kg
x1
Alta temperatura
guanti resistenti x1
Tubo flessibile del gas
x1
OPERATION STEPS
① First, install the gas outlet nozzle to
the burner. Then tighten the screws
above.
② connect the trachea to the brassjoint,
then tighten the screws.
③connect the Regulator to the propane
container.
④ Link and screw the burner into the
furnace.
⑤ open the gas inlet that increases gas
circulation. (Maketheflame stronger)
⑥ putthe crucible into the furnace, open
the Regulator and ignite the gas.
Warning: Turn off the
fire in the correct order
before opening the lid!

- 8 -
AVVERTIMENTO
Si prega di notare che le operazioni di chiusura e apertura vengono
eseguite nel seguente ordine :
Fasi di apertura: aprire innanzitutto la valvola a sfera della bombola del
gas, quindi aprire la valvola a sfera del/dei bruciatore/i.
Fasi di chiusura: chiudere innanzitutto la valvola a sfera del bruciatore/i,
quindi chiudere la valvola a sfera della bombola del gas.
(Si prega di seguire le operazioni di cui sopra in ordine. In caso contrario, si
verificherà un pericoloso ritorno di fiamma.)
NOTA
TROUBLE SHOOTING
Problema
Motivo
Soluzione
Install the copper nozzle to the burner.
NOTE: Screw the nozzle to the red line.
Then tighten the screws above.
NOTE:
The air pipe needs to be
connected to the pressurevalve
and pressure gauge.
7. Check if the gas regulator is open.
8. Check if the gas cylinder is enough.

- 9 -
Non può
accendersi dopo
aver fatto passare
il gas.
Ugello in rame
ostruito.
1. Verificare che l'interruttore
sul regolatore sia acceso
correttamente.
2.Sostituire la valvola.
MAINTENANCE
16.Tutte le valvole, i manometri, i regolatori e i tubi flessibili devono essere
controllati settimanalmente per verificarne l'usura. Sostituire secondo
necessità. Una buona manutenzione è d'obbligo con il gas attrezzatura.
17.Posizionarlo in un luogo ventilato e asciutto posto .
18.Quando il rivestimento in fibra ceramica diventa più sottile, non si
ottiene un isolamento adeguato. Se utilizzato per lungo tempo, il materiale
dell'interno la parete del forno dovrebbe essere sostituita. È possibile
acquistare rivestimenti sostitutivi presso il rivenditore locale o il produttore.
Indossare guanti e una maschera antipolvere quando si maneggia il
rivestimento usato. Il vecchio rivestimento deve essere inumidito
accuratamente con una bottiglia spray piena d'acqua prima della rimozione.
Dopo la rimozione, riporlo in un sacchetto di plastica e smaltirlo
immediatamente.
19.Non graffiare la superficie con oggetti appuntiti e duri.
20. Dovrà essere conservato su ripiani in legno, acciaio verniciato o
cuscinetti in gomma e dovrà essere separato da altro acciaio per evitare
che polvere, olio e ruggine corrodano la superficie in acciaio inossidabile.
Produttore: Shanghaimuxinmuyeyouxiangongsi
Indirizzo: Shuangchenglu 803nong11hao1602A-1609shi, baoshanqu,
shanghai 200000 CN.
Importato in AUS: SIHAO PTY LTD, 1 ROKEVA STREETEASTWOOD NSW
2122 Australia
Importato negli Stati Uniti: Sanven Technology Ltd., Suite 250, 9166
Anaheim Place, Rancho Cucamonga, CA 91730

- 10 -
REP
EC
E-CrossStu GmbH
Mainzer Landstr.69, 60329 Frankfurt am Main.
REP
UK
YH CONSULTING LIMITED.
C/O YH Consulting Limited Office 147, Centurion House,
London Road, Staines-upon-Thames, Surrey, TW18 4AX


Wsparcie techniczne i certyfikat e-gwarancji www.vevor.com/support
TOPIENIE PROPANU PIEC
Nadal dokładamy wszelkich starań, aby zapewnić Państwu narzędzia w konkurencyjnej cenie.
„Zaoszczędź połowę”, „połowa ceny” lub inne podobne wyrażenia używane przez nas
przedstawiają jedynie szacunkową oszczędność, jaką możesz zyskać kupując u nas określone
narzędzia w porównaniu z głównymi najlepszymi markami i niekoniecznie oznaczają
uwzględnienie wszystkich kategorii oferowanych narzędzi przez nas. Przypominamy, aby
podczas składania zamówienia u nas dokładnie sprawdzić, czy faktycznie oszczędzasz połowę
w porównaniu z czołowymi markami.

- 1 -
MODEL: JH 16 KG D / JH 16 KG F/ JH 16 KG A/ JH 16 KG I/ JH 16
KGU
UWAGA: Tygiel jest częścią stratną i należy ją wymienić po 2-3
normalnych użyciach. Strona internetowa zakupu:
https://www.amazon.com/dp/B0DBH419F4
POTRZEBUJĘ POMOCY? SKONTAKTUJ SIĘ Z NAMI!
Masz pytania dotyczące produktu? Potrzebujesz wsparcia technicznego? Śmiało
możesz się z nami skontaktować:
Wsparcie techniczne i certyfikat e-gwarancji www.vevor.com/support
To jest oryginalna instrukcja. Przed przystąpieniem do obsługi prosimy o dokładne
zapoznanie się ze wszystkimi instrukcjami. VEVOR zastrzega sobie jasną
interpretację naszej instrukcji obsługi. Wygląd produktu zależy od produktu, który
otrzymałeś. Proszę wybaczyć nam, że nie będziemy ponownie informować
PROPANE MELTING
FURNACE

- 2 -
Państwa, jeśli pojawią się jakieś aktualizacje technologii lub oprogramowania
naszego produktu.
SAFETY INSTRUCTIONS
OSTRZEŻENIE:
97. Ten produkt jest przeznaczony wyłącznie do użytku na zewnątrz.
98. Utrzymuj dobrą wentylację wokół urządzenia, aby zapobiec
uszkodzeniu ciała ludzkiego przez nagromadzony dym i szkodliwe gazy.
99. Oczyść miejsce pracy, aby upewnić się, że nie ma w nim żadnych
zanieczyszczeń ani materiałów łatwopalnych.
100. Przed każdym użyciem należy sprawdzić wszystkie połączenia wodą
z mydłem pod kątem szczelności.
101. Gaz propanowy ma silny zapach. Nigdy nie uruchamiaj urządzenia,
jeśli wyczuwalny jest zapach gazu. Wyłączyć urządzenie i sprawdzić
wszystkie połączenia wodą z mydłem pod kątem wycieków. NIGDY nie
używaj płomienia do sprawdzania wycieków gazu. Nie wznawiaj
użytkowania do czasu wykonania odpowiednich napraw przez
wykwalifikowaną firmę gazowniczą lub do czasu skontaktowania się z
producentem w celu uzyskania pomocy.
102. Zachowaj ostrożność podczas dodawania surowców w procesie
wytapiania.
103. Zabrania się topienia metali o temperaturze topnienia powyżej 1350°,
takie jak żelazo i mangan.
104. Podczas procesu topienia nie należy bezpośrednio obserwować
stanu topnienia, aby zapobiec uszkodzeniu ciała przez fale upałów. Należy
podjąć środki bezpieczeństwa.
105. W sytuacji awaryjnej zachowaj wolną drogę ewakuacyjną .
106. Trzymaj gaśnicę pod ręką.
107. Zabronić przeciążenia wytapianie, aby zapobiec wypływaniu ciekłego
metalu.
108. pieca należy nosić rękawice ochronne, okulary ochronne i odzież

- 3 -
odporną na ciepło, aby uniknąć oparzeń.
109. Wyciek gazu może być niezwykle poważny niebezpieczny .
110. Niezastosowanie się do przestróg i ostrzeżeń zawartych w niniejszej
Instrukcji montażu może skutkować poważnymi obrażeniami ciała lub
śmiercią, lub może skutkować pożarem lub eksplozją powodującą szkody
materialne.
111. OSTRZEŻENIE - Nieprawidłowy montaż pieca do topienia może być
niebezpieczny. Postępuj dokładnie zgodnie z instrukcją montażu.
112. OSTRZEŻENIE - Nie używaj pieca do topienia , jeśli wszystkie części
nie są na swoim miejscu. Piec do topienia musi zostać prawidłowo
zmontowany zgodnie z instrukcją montażu przez wykwalifikowanego
specjalistę.
113. OSTROŻNOŚĆ! W żadnym wypadku nie należy całkowicie zamykać
otworów wylotowych na drzwiach lub otwartych otworach końcowych.
Może to spowodować poważne uszkodzenia i możliwe obrażenia ciała.
114. Unikaj stania lub przemieszczania się przed otworami i otworami
wylotowymi. Podczas pracy wyjątkowo wysokie temperatury sięgają około
dwóch stóp od wszelkich otworów. Wyciągając przedmioty z gorącego
pieca, podchodź do niego z boku.
115. Urządzenie podgrzeje przedmioty do temperatury topnienia , ale
zajmie to trochę więcej czasu.
116. Nigdy nie pozostawiaj włączonego ciśnienia w linii, gdy nie jest
używane. Zawsze odcinaj zawór kulowy i zawór zbiornika na czas
przechowywania.
117. Nie dopuszczaj do kontaktu węża z gorącą stalą lub płomieniami.
118. Podczas pracy użytkownik powinien zawsze przebywać w
bezpośrednim sąsiedztwie pieca . Nigdy nie zostawiaj wypalonej kuźni bez
nadzoru !
119. Niebezpieczeństwo poparzenia: Podczas używania pieca
temperatura powierzchni pieca i jego komponentów osiągnie nawet 600°F.
Nie dotykaj bezpośrednio ręką żadnej części pieca gdy piec się nagrzewa
lub jest gorący. Piec generuje bardzo wysoką temperaturę , która może
spowodować poważne oparzenia lub pożar. Nie umieszczaj pieca w

- 4 -
pobliżu ściany lub materiału łatwopalnego.
120. Podczas montażu usztywniacza, materiału ogniotrwałego
satanitowego i koca izolacyjnego wymagany jest sprzęt ochrony osobistej .
MODEL AND PARAMETERS
Model
JH 16 KGD / JH 16 KG F / JH 16 KG A /
JH 16 KG I / JH 16 KG U
Paliwo
Propan
Ciśnienie robocze
14,5 ~ 29PSI (0,1 ~ 0,2 MPa)
Maksymalna temperatura
2500°F ±3% (1370℃±3%
)
Roztopiony metal
Złoto, srebro, aluminium, miedź,
mosiądz, brąz, złoto cyny K i wiele
innych metali
(Metal o temperaturze topnienia poniżej
1350℃)
Kształt
Cylindryczny
Liczba palników
2
Materiał
Stal nierdzewna
MOLTEN METAL
- 5 -
Nazwa
metalu
Temperatura
topnienia
(°C)
Pojemność
podstawowa ( 16
kg )
Pojemność
podstawowa ( 6 kg )
Miedź
1083,4
16
6
Złoto
1064.18
7.2
1.9
Srebro
961,78
30.6
13.3
Aluminium
660
18.4
7.2
Cynk
419,53
13.8
4.9
Cyna
231,89
14
5
STRUCTURE DIAGRAM
Air Chock Valve
Burner
Furnace Base
Furnace Body
Insulation Interlayer
Furnace Cover
Feeding Port
- 6 -
NOTATKA:
9. Nie ma potrzeby skrajnego wymuszania tych złączek. Jednakże ważne
jest, aby podczas dokręcania części używać klucza o odpowiednim
rozmiarze. Po zmontowaniu urządzenia włącz ciśnienie gazu ze zbiornika
do zaworu kulowego i za pomocą wody z mydłem sprawdź, czy nie ma
wycieków na wszystkich złączach.
10.Przed użyciem należy dopasować koc izolacyjny na lufie muszkietu do
pokazanego na zdjęciu, upewniając się, że bawełna
wysokotemperaturowa w żaden sposób nie blokuje lufy muszkietu.
Nieprawidłowa obsługa może skutkować uszkodzeniem korpusu pieca i
zagrożeniem.
PARTS LIST
Korpus pieca x1
Miedziana dysza
x2
Ciśnienie gazu Regulator x 1
- 7 -
16 # Tygiel grafitowy x1
Palnik x2
Cegła ogniotrwała (115 *11 5
*20mm ) x1
6# Grafit Tygiel
x1
Szczypce x1
Instrukcja obsługi x1
Zbiornik na olej
grafitowy 2kg
x1
Wysoka temperatura
rękawice odporne x1
Rura węża gazowego
x1
OPERATION STEPS
① First, install the gas outlet nozzle to
the burner. Then tighten the screws
above.
② connect the trachea to the brassjoint,
then tighten the screws.
③connect the Regulator to the propane
container.
④ Link and screw the burner into the
furnace.
⑤ open the gas inlet that increases gas
circulation. (Maketheflame stronger)
⑥ putthe crucible into the furnace, open
the Regulator and ignite the gas.
Warning: Turn off the
fire in the correct order
before opening the lid!
- 8 -
OSTRZEŻENIE
Należy pamiętać, że operacje zamykania i otwierania wykonywane są w
następującej kolejności :
Etapy otwierania: Najpierw otwórz zawór kulowy zbiornika gazu, a
następnie otwórz zawór kulowy palnika(ów).
Etapy zamykania: Najpierw zamknij zawór kulowy palnika(ów), a
następnie zamknij zawór kulowy zbiornika gazu.
(Proszę wykonać powyższą operację w podanej kolejności.
Niezastosowanie się do tego spowoduje niebezpieczny zwrot akcji.)
NOTATKA
TROUBLE SHOOTING
Problem
Powód
Rozwiązanie
Install the copper nozzle to the burner.
NOTE: Screw the nozzle to the red line.
Then tighten the screws above.
NOTE:
The air pipe needs to be
connected to the pressurevalve
and pressure gauge.
9. Check if the gas regulator is open.
10.Check if the gas cylinder is enough.

- 9 -
Nie może się
zapalić po
przejściu gazu.
Zablokowana dysza
miedziana.
1. Sprawdź , czy włącznik
regulatora jest prawidłowo
włączony.
2.Wymień zawór .
MAINTENANCE
21.Wszystkie zawory, manometry, regulatory i węże należy sprawdzać co
tydzień pod kątem zużycia. Wymień w razie potrzeby. W przypadku gazu
konieczna jest dobra konserwacja sprzęt.
22.Umieść go w wentylowanym i suchym miejscu miejsce .
23.Kiedy wyściółka z włókna ceramicznego staje się cieńsza, nie można
uzyskać właściwej izolacji. W przypadku długotrwałego użytkowania
materiał wnętrza należy wymienić ścianę pieca. Wymienne wkładki można
kupić u lokalnego sprzedawcy lub producenta. Podczas pracy ze zużytym
wkładem należy nosić rękawiczki i maskę przeciwpyłową. Przed
usunięciem starą wykładzinę należy dokładnie zwilżyć wodą z butelki z
rozpylaczem. Po wyjęciu należy go umieścić w plastikowej torbie i
natychmiast wyrzucić.
24.Nie rysuj powierzchni ostrymi i twardymi przedmiotami.
25. Należy go przechowywać na drewnianych, malowanych półkach ze
stali lub gumowych podkładkach i należy go oddzielić od innej stali, aby
uniknąć korozji powierzchni stali nierdzewnej przez kurz, olej i rdzę.
Producent: Shanghaimuxinmuyeyouxiangongsi
Adres: Shuangchenglu 803nong11hao1602A-1609shi, baoshanqu, szanghaj
200000 CN.
Import do AUS: SIHAO PTY LTD, 1 ROKEVA STREETEASTWOOD NSW
2122 Australia
Import do USA: Sanven Technology Ltd., Suite 250, 9166 Anaheim Place,
Rancho Cucamonga, CA 91730

- 10 -
REP
EC
E-CrossStu GmbH
Mainzer Landstr.69, 60329 Frankfurt am Main.
REP
UK
YH CONSULTING LIMITED.
C/O YH Consulting Limited Office 147, Centurion House,
London Road, Staines-upon-Thames, Surrey, TW18 4AX


Technischer Support und E-Garantie-Zertifikat www.vevor.com/support
PROPANSCHMELZEN OFEN
Wir sind weiterhin bestrebt, Ihnen Werkzeuge zu wettbewerbsfähigen Preisen anzubieten.
„Sparen Sie die Hälfte“, „Halber Preis“ oder andere ähnliche Ausdrücke, die wir verwenden,
stellen nur eine Schätzung der Ersparnis dar, die Sie beim Kauf bestimmter Werkzeuge bei uns
im Vergleich zu den großen Topmarken erzielen können, und decken nicht unbedingt alle von
uns angebotenen Werkzeugkategorien ab. Wir möchten Sie freundlich daran erinnern, bei Ihrer
Bestellung bei uns sorgfältig zu prüfen, ob Sie im Vergleich zu den großen Topmarken tatsächlich
die Hälfte sparen.

- 1 -
MODELL: JH 16 KG D / JH 16 KG F/ JH 16 KG A/ JH 16 KG I/ JH 16
KGU
HINWEIS: Der Tiegel ist ein Verlustteil und muss nach 2-3 normalen
Anwendungen ersetzt werden.Kauf-Website:
https://www.amazon.com/dp/B0DBH419F4
SIE HILFE? KONTAKTIEREN SIE UNS!
Sie haben Fragen zu unseren Produkten? Sie benötigen technischen Support?
Dann kontaktieren Sie uns gerne:
Technischer Support und E-Garantie-Zertifikat www.vevor.com/support
Dies ist die Originalanleitung. Bitte lesen Sie alle Anweisungen sorgfältig durch,
bevor Sie das Gerät in Betrieb nehmen. VEVOR behält sich eine klare Auslegung
unserer Bedienungsanleitung vor. Das Erscheinungsbild des Produkts richtet sich
nach dem Produkt, das Sie erhalten haben. Bitte verzeihen Sie uns, dass wir Sie
PROPANE MELTING
FURNACE

- 2 -
nicht erneut informieren, wenn es Technologie- oder Software-Updates für unser
Produkt gibt.
SAFETY INSTRUCTIONS
WARNUNG:
121. Dieses Produkt ist nur für den Außenbereich bestimmt .
122. Sorgen Sie für eine gute Belüftung rund um das Gerät, um zu
verhindern, dass angesammelter Rauch und schädliche Gase den
menschlichen Körper schädigen.
123. Reinigen Sie den Arbeitsbereich, um sicherzustellen, dass sich keine
Ablagerungen oder brennbaren Materialien in der Nähe befinden.
124. vor jedem Gebrauch sämtliche Verbindungen mit Seifenlauge auf
Dichtheit.
125. Propangas hat einen starken Geruch. Lassen Sie das Gerät niemals
weiter laufen, wenn Gasgeruch vorhanden ist. Schalten Sie das Gerät aus
und prüfen Sie alle Anschlüsse mit Seifenlauge auf Undichtigkeiten.
Verwenden Sie NIEMALS eine Flamme, um nach Gaslecks zu suchen.
Nehmen Sie die Anlage erst wieder in Betrieb, wenn die Reparaturen von
einem qualifizierten Gasunternehmen ordnungsgemäß durchgeführt
wurden oder Sie sich an den Hersteller gewandt haben.
126. Seien Sie vorsichtig, wenn Sie während des Schmelzprozesses
Rohstoffe hinzufügen.
127. Es ist verboten, Metalle zu schmelzen mit Schmelzpunkten über
1350°, wie Eisen und Mangan.
128. Während des Schmelzvorgangs sollten Sie den Schmelzzustand
nicht direkt beobachten, um zu verhindern, dass Hitzewellen den Körper
schädigen. Es müssen Sicherheitsmaßnahmen getroffen werden.
129. Halten Sie im Notfall einen Fluchtweg frei .
130. Halten Sie den Feuerlöscher griffbereit.
131. Überlastung verhindern Schmelzen, um das Ausfließen von
flüssigem Metall zu verhindern.

- 3 -
132. am Ofen Schutzhandschuhe, Schutzbrille und hitzebeständige
Kleidung, um Verbrennungen zu vermeiden.
133. Austretendes Gas kann extrem gefährlich .
134. Die Nichtbeachtung der in dieser Montageanleitung enthaltenen
Vorsichts- und Warnhinweise kann zu schweren Körperverletzungen oder
zum Tod führen oder einen Brand oder eine Explosion mit Sachschaden
zur Folge haben.
135. WARNUNG - Eine unsachgemäße Montage des Schmelzofens kann
gefährlich sein. Befolgen Sie die Montageanleitung sorgfältig.
136. ACHTUNG - Verwenden Sie den Schmelzofen nicht , wenn nicht alle
Teile vorhanden sind. Der Schmelzofen muss von einem qualifizierten
Fachmann gemäß der Montageanleitung ordnungsgemäß
zusammengebaut werden.
137. ACHTUNG! Unter keinen Umständen dürfen die Abluftöffnungen an
den Türen oder offenen Endöffnungen vollständig verschlossen werden.
Dies kann zu schweren Schäden und möglichen Verletzungen führen.
138. Vermeiden Sie es, vor Öffnungen und Abluftöffnungen zu stehen oder
sich dort aufzuhalten. Extrem hohe Temperaturen erreichen während des
Betriebs etwa 60 cm von allen Öffnungen entfernt. Wenn Sie Gegenstände
aus einem heißen Ofen holen, nähern Sie sich ihm von der Seite.
139. Das Gerät erhitzt Objekte bis zur Schmelztemperatur , es dauert
jedoch etwas länger.
140. Lassen Sie den Leitungsdruck niemals eingeschaltet, wenn er nicht
verwendet wird. Schließen Sie bei der Lagerung immer das Kugelventil
und das Tankventil.
141. Achten Sie darauf, dass der Schlauch nicht mit heißem Stahl oder
Flammen in Berührung kommt.
142. des Betriebes sollte sich der Benutzer stets in unmittelbarer Nähe
des Ofens aufhalten . Lassen Sie den geheizten Schmelzofen nie
unbeaufsichtigt !
143. Verbrennungsgefahr: Bei Verwendung des Ofens erreicht die
Oberflächentemperatur des Ofens und der Komponenten bis zu 600 °F.
Berühren Sie keinen Teil des Ofens direkt mit der Hand . während der Ofen
aufheizt oder heiß ist. Der Ofen erzeugt extrem hohe Temperaturen, die
- 4 -
schwere Verbrennungen oder einen Brand verursachen können. Stellen
Sie den Ofen nicht in die Nähe einer Wand oder eines brennbaren
Materials.
144. mit Rigidizer, Satanite Refractory und Isoliermatten während der
Installation ist persönliche Schutzausrüstung erforderlich .
MODEL AND PARAMETERS
Modell
JH 16 KGD / JH 16 KG F / JH 16 KG A /
JH 16 KG I / JH 16 KG U
Kraftstoff
Propan
Arbeitsdruck
14,5 bis 29 PSI (0,1 bis 0,2 MPa)
Maximale Temperatur
2500 °F ± 3 % (1370 °C ± 3 %)
Geschmolzenes Metall
Gold, Silber, Aluminium, Kupfer,
Messing, Bronze, Zinn K Gold und viele
andere Metalle
(Metall mit einem Schmelzpunkt unter
1350℃)
Form
Zylindrisch
Anzahl Brenner
2
Material
Edelstahl
- 5 -
MOLTEN METAL
Metallname
Schmelzpunkt
(°C)
Primäre Tragkraft
( 16 kg )
Primäre Kapazität
( 6 kg )
Kupfer
1083,4
16
6
Gold
1064,18
7.2
1.9
Silber
961,78
30,6
13.3
Aluminium
660
18.4
7.2
Zink
419,53
13.8
4.9
Zinn
231,89
14
5
STRUCTURE DIAGRAM
Air Chock Valve
Burner
Furnace Base
Furnace Body
Insulation Interlayer
Furnace Cover
Feeding Port
- 6 -
NOTIZ:
11.Es ist nicht notwendig, diese Armaturen bis zum Äußersten zu zwingen.
Es ist jedoch wichtig, beim Festziehen der Teile die richtige
Schraubenschlüsselgröße zu verwenden. Sobald die Einheit
zusammengebaut ist, schalten Sie den Gasdruck vom Tank zum
Kugelhahn ein und überprüfen Sie mit Seifenlauge alle Verbindungen auf
Undichtigkeiten.
12.Passen Sie die Isolierdecke an der Mündung des Gewehrs vor der
Verwendung bitte wie in der Abbildung gezeigt an und stellen Sie sicher,
dass die Hochtemperatur-Baumwolle die Mündung des Gewehrs nicht
blockiert. Eine falsche Bedienung kann zu Schäden am Ofenkörper und zu
Gefahren führen.
PARTS LIST
Ofenkörper
x1
Kupferdüse
x2
Gasdruck Regler x 1
- 7 -
16# Graphittiegel
x1
Brenner x2
Feuerfester Ziegel (115 * 11,5 * 20
mm ) x1
6# Graphit Tiegel x1
Zange x1
Benutzerhandbuch x1
2kg Graphit-Öltank
x1
Hohe Temperatur
beständige
Handsch
uhe x1
Gasschlauch
x1
OPERATION STEPS
① First, install the gas outlet nozzle to
the burner. Then tighten the screws
above.
② connect the trachea to the brassjoint,
then tighten the screws.
③connect the Regulator to the propane
container.
④ Link and screw the burner into the
furnace.
⑤ open the gas inlet that increases gas
circulation. (Maketheflame stronger)

- 8 -
WARNUNG
Bitte beachten Sie, dass die Schließ- und Öffnungsvorgänge in der
Install the copper nozzle to the burner.
NOTE: Screw the nozzle to the red line.
Then tighten the screws above.
NOTE:
The air pipe needs to be
connected to the pressurevalve
and pressure gauge.
11. Check if the gas regulator is open.
12.Check if the gas cylinder is enough.
Warning: Turn off the
fire in the correct order
before opening the lid!

- 9 -
folgenden Reihenfolge durchgeführt werden :
Schritte zum Öffnen: Zuerst den Kugelhahn der Gasflasche öffnen, dann
den Kugelhahn des/der Brenner(s) öffnen.
Schließschritte: Zuerst den Kugelhahn des/der Brenners/Brenner
schließen, dann den Kugelhahn der Gasflasche schließen.
(Bitte befolgen Sie die obigen Schritte der Reihe nach. Andernfalls kann es
zu einer gefährlichen Fehlzündung kommen.)
NOTIZ
TROUBLE SHOOTING
Problem
Grund
Lösung
Es kann sich nach
dem Durchlassen
von Gas nicht
entzünden.
Kupferdüse verstopft.
1. Prüfen Sie , ob der Schalter
am Regler richtig eingeschaltet
ist.
2.Ersetzen Sie das Ventil.
MAINTENANCE
26.Alle Ventile, Messgeräte, Regler und Schläuche sollten wöchentlich auf
Verschleiß überprüft werden. Bei Bedarf ersetzen. Gute Wartung ist bei
Gas ein Muss Ausrüstung.
27.Stellen Sie es an einen belüfteten und trockenen Ort. Ort .
28.Wenn die Keramikfaserauskleidung dünner wird, wird keine
ausreichende Isolierung erreicht. Bei längerem Gebrauch kann das
Material der Innenschicht Die Wand des Ofens sollte ersetzt werden.
Ersatzeinsätze können bei Ihrem Händler vor Ort oder beim Hersteller
erworben werden. Beim Umgang mit dem gebrauchten Einsatz sollten Sie
Handschuhe und eine Staubmaske tragen. Der alte Einsatz sollte vor dem
Entfernen gründlich mit einer Sprühflasche mit Wasser angefeuchtet
werden. Nach dem Entfernen sollte er in eine Plastiktüte gesteckt und
sofort entsorgt werden.

- 10 -
29.Zerkratzen Sie die Oberfläche nicht mit scharfen und harten
Gegenständen.
30. Es muss auf Holz- oder lackierten Stahlregalen oder Gummiunterlagen
gelagert werden und muss von anderem Stahl getrennt werden, um zu
verhindern, dass Staub, Öl und Rost die Edelstahloberfläche korrodieren.
Hersteller: Shanghaimuxinmuyeyouxiangongsi
Adresse: Shuangchenglu 803nong11hao1602A-1609shi, baoshanqu,
Shanghai 200000 CN.
Nach AUS importiert: SIHAO PTY LTD, 1 ROKEVA STREETEASTWOOD
NSW 2122 Australien
Importiert in die USA: Sanven Technology Ltd., Suite 250, 9166 Anaheim
Place, Rancho Cucamonga, CA 91730
REP
EC
E-CrossStu GmbH
Mainzer Landstr.69, 60329 Frankfurt am Main.
REP
UK
YH CONSULTING LIMITED.
C/O YH Consulting Limited Office 147, Centurion House,
London Road, Staines-upon-Thames, Surrey, TW18 4AX

- 11 -


Assistance technique et certificat de garantie électronique www.vevor.com/support
FUSION DU PROPANE FOURNAISE
Nous continuons à nous engager à vous fournir des outils à des prix compétitifs.
"Économisez la moitié", "Moitié prix" ou toute autre expression similaire que nous utilisons ne
représente qu'une estimation des économies dont vous pourriez bénéficier en achetant certains
outils chez nous par rapport aux grandes marques et ne signifie pas nécessairement couvrir
toutes les catégories d'outils proposés. par nous. Nous vous rappelons de bien vouloir vérifier
attentivement lorsque vous passez une commande chez nous si vous économisez réellement la
moitié par rapport aux grandes marques.

- 1 -
MODÈLE : JH 16 KG D / JH 16 KG F/ JH 16 KG A/ JH 16 KG I/ JH
16 KGU
REMARQUE : Le creuset est une pièce perdue et doit être remplacé après
2 à 3 utilisations normales. Site Web d'achat :
https://www.amazon.com/dp/B0DBH419F4
BESOIN D'AIDE? CONTACTEZ-NOUS!
Vous avez des questions sur les produits ? Besoin d'une assistance technique ?
N'hésitez pas à nous contacter:
Assistance technique et certificat de garantie électronique www.vevor.com/support
Il s'agit des instructions originales, veuillez lire attentivement toutes les instructions
du manuel avant de l'utiliser. VEVOR se réserve une interprétation claire de notre
manuel d'utilisation. L'apparence du produit dépend du produit que vous avez reçu.
Veuillez nous pardonner que nous ne vous informerons plus s'il y a des mises à
PROPANE MELTING
FURNACE

- 2 -
jour technologiques ou logicielles sur notre produit.
SAFETY INSTRUCTIONS
AVERTISSEMENT:
145. Ce produit est destiné à un usage extérieur uniquement.
146. Maintenir une bonne ventilation autour de l'équipement pour éviter
que la fumée accumulée et les gaz nocifs ne causent des dommages au
corps humain.
147. Nettoyez la zone de travail pour vous assurer qu’il n’y a pas de débris
ou de matériaux inflammables à proximité.
148. Avant chaque utilisation, vérifiez l'étanchéité de tous les raccords
avec de l'eau savonneuse.
149. Le gaz propane a une forte odeur. Ne continuez jamais à faire
fonctionner l’appareil si une odeur de gaz est présente. Arrêtez l'appareil et
vérifiez toutes les connexions avec de l'eau savonneuse pour déceler les
fuites. N’utilisez JAMAIS de flamme pour vérifier les fuites de gaz. Ne
reprenez pas l'utilisation tant que les réparations appropriées n'ont pas été
effectuées par une compagnie de gaz qualifiée ou jusqu'à ce que vous
ayez contacté le fabricant pour obtenir de l'aide.
150. Soyez prudent lorsque vous ajoutez des matières premières pendant
le processus de fusion.
151. Il est interdit de faire fondre des métaux avec des points de fusion
supérieurs à 1350°, comme le fer et manganèse.
152. Pendant le processus de fusion, vous ne devez pas observer
directement l’état de fusion, afin d’éviter que les vagues de chaleur
n’endommagent le corps. Doit prendre des mesures de sécurité.
153. Gardez une voie d'évacuation dégagée en cas d'urgence.
154. Gardez l'extincteur à portée de main.
155. la surcharge fusion pour empêcher le métal liquide de s'écouler.
156. Portez des gants de protection, des lunettes de protection et des
vêtements résistants à la chaleur lorsque vous utilisez le four pour éviter

- 3 -
les brûlures.
157. Une fuite de gaz peut être extrêmement dangereux .
158. Le non-respect des mises en garde et des avertissements contenus
dans ces instructions de montage peut entraîner des blessures corporelles
graves, voire la mort, ou peut entraîner un incendie ou une explosion
causant des dommages matériels.
159. AVERTISSEMENT -Un montage incorrect du four de fusion peut être
dangereux. Suivez attentivement les instructions de montage.
160. AVERTISSEMENT -N'utilisez pas le four de fusion tant que toutes les
pièces ne sont pas en place. Le four de fusion doit être correctement
assemblé selon les instructions de montage par un professionnel qualifié.
161. PRUDENCE! En aucun cas, les orifices d'échappement ne doivent
être complètement fermés sur les portes ou les orifices d'extrémité ouverts.
Cela pourrait causer des dommages graves, voire des blessures
corporelles.
162. Évitez de vous tenir debout ou de vous déplacer devant les
ouvertures et les orifices d’échappement. Les températures extrêmement
élevées s'étendent à environ deux pieds de toute ouverture pendant le
fonctionnement. Lorsque vous récupérez des objets d'un four chaud ,
approchez-le par le côté.
163. L'appareil chauffera les objets jusqu'à la température de fusion , mais
cela prendra un peu plus de temps.
164. Ne laissez jamais la pression de la conduite allumée lorsqu'elle n'est
pas utilisée. Coupez toujours le robinet à bille et le robinet du réservoir
pour le stockage.
165. Ne laissez pas le tuyau entrer en contact avec de l'acier chaud ou
des flammes.
166. proximité immédiate du four . Ne laissez jamais la forge de fusion
allumée sans surveillance !
167. Risque de brûlure : lors de l'utilisation de la fournaise , la température
de surface de la fournaise et de ses composants atteindra jusqu'à 600 °F.
Ne touchez aucune partie du four directement avec votre main pendant
que le four chauffe ou est chaud. Le four génère une température
extrêmement élevée qui peut provoquer de graves brûlures ou un incendie.
- 4 -
Ne placez pas le four près d'un mur ou d'un matériau inflammable.
168. équipement de protection personnelle est requis lors de la
manipulation du rigidificateur, du réfractaire Satanite et de la couverture
isolante pendant l'installation.
MODEL AND PARAMETERS
Modèle
JH 16 KGD / JH 16 KG F / JH 16 KG A /
JH 16 KG I / JH 16 KG U
Carburant
Propane
Pression de travail
14,5 ~ 29 PSI (0,1 ~ 0,2 MPa)
Température maximale
2 500 °F ± 3 % (1 370 ℃ ± 3 %)
Métal fondu
Or, argent, aluminium, cuivre, laiton,
bronze, étain K et autres métaux.
(Métal avec un point de fusion inférieur
à 1350℃)
Forme
Cylindrique
Nombre de brûleurs
2
Matériel
Acier inoxydable

- 5 -
MOLTEN METAL
Nom du
métal
Point de
fusion (°C)
Capacité primaire
( 16 kg )
Capacité primaire
( 6 kg )
Cuivre
1083.4
16
6
Or
1064.18
7.2
1.9
Argent
961.78
30,6
13.3
Aluminium
660
18.4
7.2
Zinc
419.53
13.8
4.9
Étain
231,89
14
5
STRUCTURE DIAGRAM
Air Chock Valve
Burner
Furnace Base
Furnace Body
Insulation Interlayer
Furnace Cover
Feeding Port
- 6 -
NOTE:
13.Il n’est pas nécessaire de forcer ces raccords à l’extrême. Cependant,
il est important d’utiliser la bonne taille de clé lors du serrage des pièces.
Une fois l'appareil assemblé, ouvrez la pression du gaz du réservoir au
robinet à bille et utilisez de l'eau savonneuse pour vérifier les fuites sur
tous les joints.
14.Veuillez ajuster la couverture isolante au niveau de la bouche du
mousquet à celle montrée sur l'image avant utilisation, assurez-vous que
le coton haute température ne bloque pas du tout la bouche du mousquet.
Un fonctionnement incorrect peut entraîner des dommages au corps du
four et un danger.
PARTS LIST
Corps de fournaise
x1
Buse en cuivre
x2
Pression du gaz Régulateur x1

- 7 -
Creuset en graphite 16#
x1
Brûleur x2
Brique réfractaire (115 *11 5
*20mm ) x1
6# Graphite Creuset x1
Pinces x1
Manuel de l' Utilisateur x1
Réservoir d'huile de
graphite de 2 kg
x1
Haute température
gants résistants x1
Tuyau de gaz
x1
OPERATION STEPS
① First, install the gas outlet nozzle to
the burner. Then tighten the screws
above.
② connect the trachea to the brassjoint,
then tighten the screws.
③connect the Regulator to the propane
container.
④ Link and screw the burner into the
furnace.
⑤ open the gas inlet that increases gas
circulation. (Maketheflame stronger)
⑥ putthe crucible into the furnace, open
- 8 -
AVERTISSEMENT
Veuillez noter que les opérations de fermeture et d'ouverture s'effectuent
Install the copper nozzle to the burner.
NOTE: Screw the nozzle to the red line.
Then tighten the screws above.
NOTE:
The air pipe needs to be
connected to the pressurevalve
and pressure gauge.
13.Check if the gas regulator is open.
14.Check if the gas cylinder is enough.
Warning: Turn off the
fire in the correct order
before opening the lid!
- 9 -
dans l'ordre suivant :
Étapes d'ouverture : Ouvrez d'abord le robinet à bille du réservoir de gaz,
puis ouvrez le robinet à bille du ou des brûleurs.
Étapes de fermeture : Fermez d’abord le robinet à bille du ou des
brûleurs, puis fermez le robinet à bille du réservoir de gaz.
(Veuillez suivre l’opération ci-dessus dans l’ordre. Si vous ne le faites pas,
cela entraînera un retour de flamme dangereux.)
NOTE
TROUBLE SHOOTING
Problème
Raison
Solution
Il ne peut pas
s'enflammer après
avoir laissé passer
du gaz.
Buse en cuivre
bouchée.
1. Vérifiez que l'interrupteur du
régulateur est correctement
allumé.
2. Remplacez la valve.
MAINTENANCE
31.L’usure de toutes les vannes, jauges, régulateurs et tuyaux doit être
vérifiée chaque semaine. Remplacez-le si nécessaire. Un bon entretien est
indispensable avec le gaz équipement.
32.Placez - le dans un endroit aéré et sec lieu .
33.Lorsque le revêtement en fibre céramique devient plus fin, une isolation
adéquate n’est pas obtenue. En cas d'utilisation prolongée, le matériau de
la doublure intérieure la paroi du four doit être remplacée. Des doublures
de remplacement peuvent être achetées auprès de votre revendeur local
ou du fabricant. Vous devez porter des gants et un masque anti-poussière
lorsque vous manipulez le revêtement usagé. L'ancien revêtement doit
être soigneusement mouillé avec un vaporisateur d'eau avant de le retirer.
Après retrait, il doit être placé dans un sac en plastique et jeté
immédiatement.

- 10 -
34.Ne rayez pas la surface avec des objets pointus et durs.
35. Il doit être stocké sur des étagères en bois, en acier peint ou sur des
patins en caoutchouc et doit être séparé des autres aciers pour éviter que
la poussière, l'huile et la rouille ne corrodent la surface en acier inoxydable.
Fabricant : Shanghaimuxinmuyeyouxiangongsi
Adresse : Shuangchenglu 803nong11hao1602A-1609shi, baoshanqu,
Shanghai 200000 CN.
Importé en Australie : SIHAO PTY LTD, 1 ROKEVA STREETASTWOOD
NSW 2122 Australie
Importé aux États-Unis : Sanven Technology Ltd., Suite 250, 9166 Anaheim
Place, Rancho Cucamonga, CA 91730
REP
EC
E-CrossStu GmbH
Mainzer Landstr.69, 60329 Frankfurt am Main.
REP
UK
YH CONSULTING LIMITED.
C/O YH Consulting Limited Office 147, Centurion House,
London Road, Staines-upon-Thames, Surrey, TW18 4AX


Technische ondersteuning en e-garantiecertificaat www.vevor.com/support
PROPAAN SMELT FURNACTIE
Wij blijven ons inzetten om u gereedschap te bieden tegen een concurrerende prijs.
'Bespaar de helft', 'Halve prijs' of andere soortgelijke uitdrukkingen die door ons worden gebruikt
vertegenwoordigen slechts een schatting van de besparingen die u zou kunnen profiteren als u
bepaalde gereedschappen bij ons koopt in vergelijking met de grote topmerken en betekenen
niet noodzakelijkerwijs dat ze alle aangeboden categorieën gereedschappen dekken. door ons.
U wordt er vriendelijk aan herinnerd om bij het plaatsen van een bestelling bij ons zorgvuldig te
verifiëren of u daadwerkelijk de helft bespaart in vergelijking met de grote topmerken.

- 1 -
MODEL: JH 16 KG D / JH 16 KG F/ JH 16 KG A/ JH 16 KG I/ JH 16
KGU
OPMERKING: De smeltkroes is een verliesonderdeel en moet na 2-3
normaal gebruik worden vervangen. Aankoopwebsite:
https://www.amazon.com/dp/B0DBH419F4
NODIG ? NEEM CONTACT MET ONS OP!
Heeft u productvragen? Technische ondersteuning nodig? Neem dan gerust
contact met ons op:
Technische ondersteuning en e-garantiecertificaat www.vevor.com/support
Dit is de originele instructie. Lees alle instructies in de handleiding zorgvuldig door
voordat u ermee aan de slag gaat. VEVOR behoudt zich een duidelijke
interpretatie van onze gebruikershandleiding voor. Het uiterlijk van het product is
afhankelijk van het product dat u heeft ontvangen. Vergeef ons alstublieft dat we u
PROPANE MELTING
FURNACE

- 2 -
niet opnieuw informeren als er technologie- of software-updates zijn voor ons
product.
SAFETY INSTRUCTIONS
WAARSCHUWING:
169. Dit product is uitsluitend bedoeld voor gebruik buitenshuis.
170. Zorg voor een goede ventilatie rond de apparatuur om te voorkomen
dat opgehoopte rook en schadelijke gassen schade aan het menselijk
lichaam veroorzaken.
171. Maak het werkgebied schoon om er zeker van te zijn dat er geen vuil
of brandbaar materiaal in de buurt is.
172. vóór elk gebruik alle aansluitingen met zeepsop op lekkage.
173. Propaangas heeft een sterke geur. Laat het apparaat nooit draaien
als er een gaslucht aanwezig is. Schakel het apparaat uit en controleer alle
aansluitingen met zeepsop op lekkage. Gebruik NOOIT een vlam om te
controleren op gaslekken. Hervat het gebruik niet totdat de juiste
reparaties zijn uitgevoerd door een erkend gasbedrijf of totdat u voor hulp
contact opneemt met de fabrikant.
174. Wees voorzichtig bij het toevoegen van grondstoffen tijdens het
smeltproces.
175. Het is verboden metalen te smelten met smeltpunten boven 1350°,
zoals ijzer en mangaan.
176. Tijdens het smeltproces mag u de smelttoestand niet rechtstreeks
observeren, om te voorkomen dat hittegolven het lichaam beschadigen.
Veiligheidsmaatregelen moeten nemen.
177. Houd in geval van nood een vluchtroute vrij .
178. Houd de brandblusser bij de hand.
179. Verbied overbelasting smelten om te voorkomen dat vloeibaar metaal
naar buiten stroomt.
180. Draag beschermende handschoenen, een veiligheidsbril en
hittebestendige kleding wanneer u de oven gebruikt om brandwonden te

- 3 -
voorkomen.
181. Lekkend gas kan extreem zijn gevaarlijk .
182. Het niet opvolgen van de waarschuwingen in deze
montage-instructie kan leiden tot ernstig lichamelijk letsel of de dood, of
kan leiden tot brand of een explosie met schade aan eigendommen tot
gevolg.
183. WAARSCHUWING - Een onjuiste montage van de smeltoven kan
gevaarlijk zijn. Volg de montage-instructies zorgvuldig.
184. WAARSCHUWING -Gebruik de smeltoven niet tenzij alle
onderdelen op hun plaats zitten. De smeltoven moet correct worden
gemonteerd volgens de montage-instructies door een gekwalificeerde
vakman .
185. VOORZICHTIGHEID! In geen geval mogen de uitlaatpoorten volledig
worden afgesloten op de deuren of open eindpoorten. Dit kan ernstige
schade en mogelijk lichamelijk letsel veroorzaken.
186. Vermijd staan of bewegen naar de voorkant van openingen en
uitlaatpoorten. Extreem hoge temperaturen reiken tijdens bedrijf tot
ongeveer 60 cm uit openingen. Wanneer u voorwerpen uit een hete oven
haalt , benader deze dan vanaf de zijkant.
187. Het apparaat verwarmt voorwerpen tot smelttemperatuur , maar dit
duurt iets langer.
188. Laat de lijndruk nooit ingeschakeld wanneer deze niet in gebruik is.
Sluit bij opslag altijd de kogelkraan en de tankkraan af.
189. Zorg ervoor dat de slang niet in contact komt met heet staal of
vlammen.
190. Tijdens het gebruik moet de gebruiker altijd in de directe omgeving
van de oven blijven . Laat de gebakken smeltsmederij nooit onbeheerd
achter !
191. Verbrandingsgevaar: Bij gebruik van de oven zal de
oppervlaktetemperatuur van de oven en de componenten oplopen tot
600°F. Raak geen enkel onderdeel van de oven rechtstreeks met uw hand
aan terwijl de oven aan het opwarmen of heet is. De oven genereert
extreem hoge temperaturen die ernstige brandwonden of brand kunnen
veroorzaken. Plaats de oven niet in de buurt van een muur of brandbaar
- 4 -
materiaal.
192. Persoonlijke beschermingsmiddelen zijn vereist bij het hanteren van
Rigidizer, Satanite Refractory en Isolatiedeken tijdens de installatie .
MODEL AND PARAMETERS
Model
JH 16 KGD / JH 16 KG F / JH 16 KG A /
JH 16 KG I / JH 16 KG U
Brandstof
Propaan
Werkdruk
14,5~29PSI(0,1~0,2MPa)
Maximale temperatuur
2500°F ±3% (1370℃±3%
)
Gesmolten metaal
Goud, zilver, aluminium, koper,
messing, brons, tin K-goud en ander
veel metaal
(Metaal met een smeltpunt lager dan
1350℃)
Vorm
Cilindrisch
Aantal branders
2
Materiaal
Roestvrij staal
MOLTEN METAL
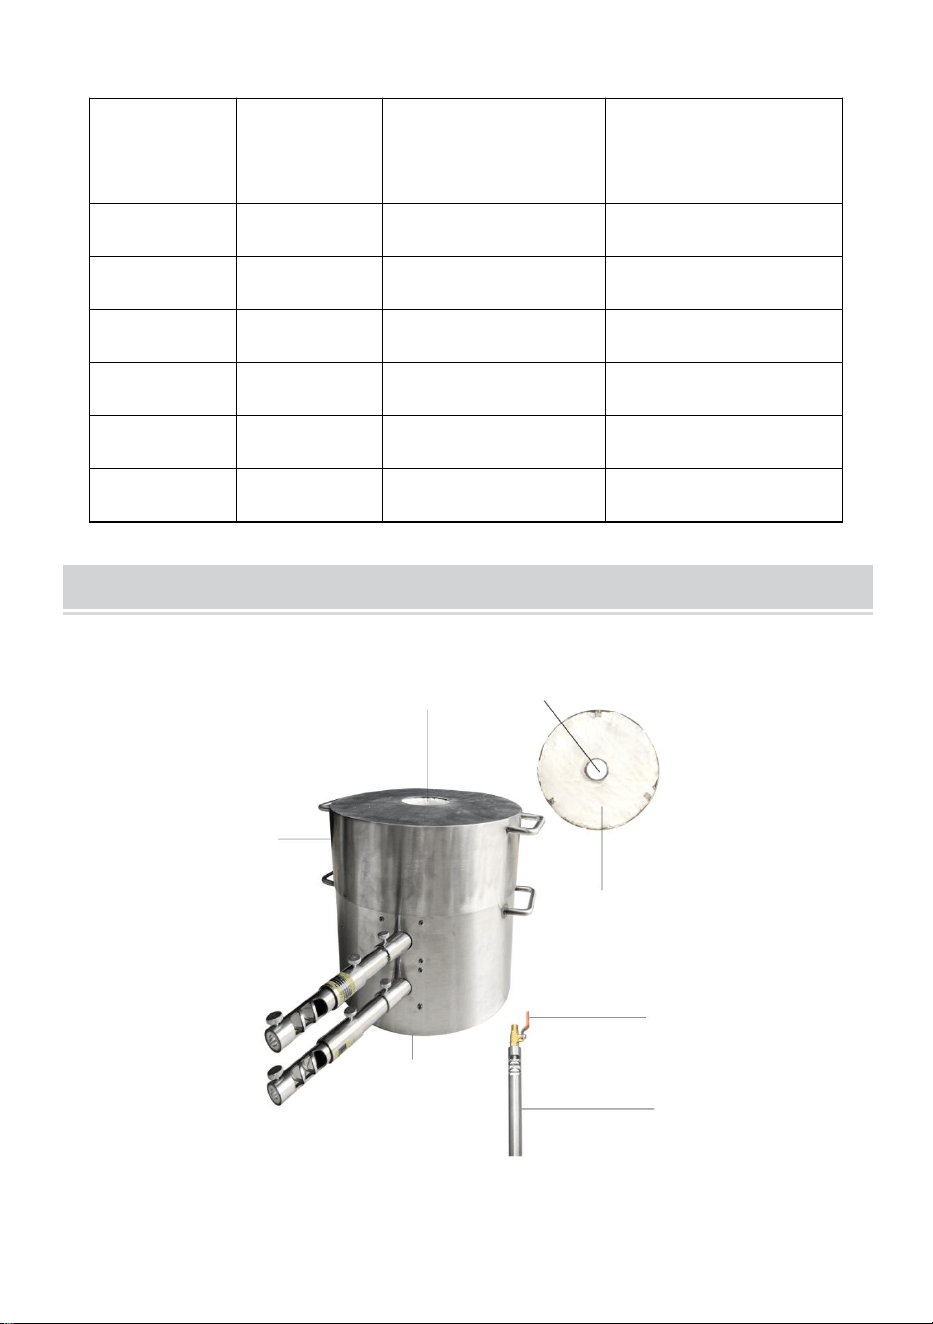
- 5 -
Metalen
naam
Smeltpunt
(°C)
Primaire capaciteit
( 16kg )
Primaire capaciteit
( 6kg )
Koper
1083,4
16
6
Goud
1064.18
7.2
1.9
Zilver
961,78
30.6
13.3
Aluminium
660
18.4
7.2
Zink
419,53
13.8
4.9
Blik
231,89
14
5
STRUCTURE DIAGRAM
OPMERKING:
15.Het is niet nodig om deze fittingen tot het uiterste te forceren. Het is
Air Chock Valve
Burner
Furnace Base
Furnace Body
Insulation Interlayer
Furnace Cover
Feeding Port
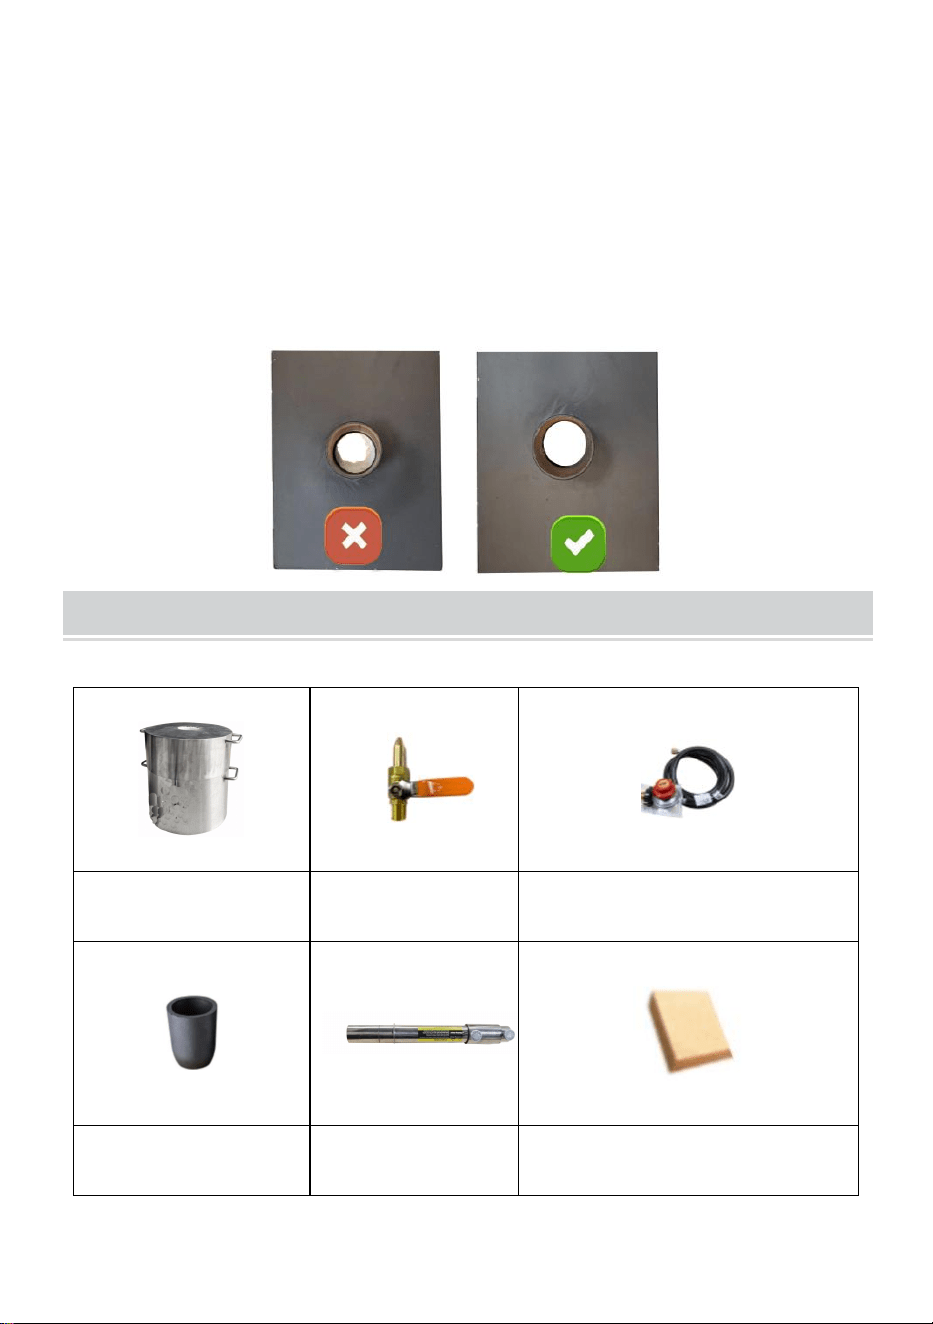
- 6 -
echter belangrijk om de juiste sleutelmaat te gebruiken bij het vastdraaien
van de onderdelen. Zodra de unit is gemonteerd, schakelt u de gasdruk
van de tank naar de kogelkraan in en gebruikt u zeepsop om alle
verbindingen op lekken te controleren.
16.Pas vóór gebruik de isolatiedeken aan de snuit van het musket aan aan
die op de afbeelding, zorg ervoor dat het hoge temperatuurkatoen de snuit
van het musket helemaal niet blokkeert. Onjuiste bediening kan schade
aan het ovenlichaam en gevaar tot gevolg hebben.
PARTS LIST
F u r nac e-lichaam x1
Koperen mondstuk
x2
Gas druk Regelaar x 1
16 # grafietkroes x1
Brander x2
Vuurvaste baksteen (115 * 11 5 * 20
mm ) x1

- 7 -
6# Grafiet Smeltkroes x1
Tang x1
Handleiding x1
Grafietolietank van 2 kg
x1
Hoge temperatuur
resistente
handsch
oenen x1
Gasslangleiding
x1
OPERATION STEPS
① First, install the gas outlet nozzle to
the burner. Then tighten the screws
above.
② connect the trachea to the brassjoint,
then tighten the screws.
③connect the Regulator to the propane
container.
④ Link and screw the burner into the
furnace.
⑤ open the gas inlet that increases gas
circulation. (Maketheflame stronger)
⑥ putthe crucible into the furnace, open
the Regulator and ignite the gas.
Warning: Turn off the
fire in the correct order
before opening the lid!

- 8 -
WAARSCHUWING
Houd er rekening mee dat de sluitings- en openingshandelingen in de
volgende volgorde worden uitgevoerd :
Stappen voor het openen: Open eerst de kogelkraan van de gasfles en
vervolgens de kogelkraan van de brander(s).
Sluitstappen: Sluit eerst de kogelkraan van de brander(s) en sluit
vervolgens de kogelkraan van de gasfles.
(Volg de bovenstaande handelingen in de juiste volgorde. Als u dit niet doet,
kan dit een gevaarlijke averechtse uitwerking tot gevolg hebben.)
OPMERKING
TROUBLE SHOOTING
Probleem
Reden
Oplossing
Install the copper nozzle to the burner.
NOTE: Screw the nozzle to the red line.
Then tighten the screws above.
NOTE:
The air pipe needs to be
connected to the pressurevalve
and pressure gauge.
15.Check if the gas regulator is open.
16.Check if the gas cylinder is enough.

- 9 -
Het kan niet
ontbranden na het
passeren van gas.
Koperen mondstuk
geblokkeerd.
1. Controleer of de schakelaar
op de regelaar correct is
ingeschakeld.
2. Vervang de klep.
MAINTENANCE
36.Alle kleppen, meters, regelaars en slangen moeten wekelijks op slijtage
worden gecontroleerd. Vervang indien nodig. Bij gas is goed onderhoud
een must apparatuur.
37.Plaats het in een geventileerde en droge ruimte plaats .
38.Wanneer de keramische vezelvoering dunner wordt, wordt geen goede
isolatie bereikt. Bij langdurig gebruik verandert het materiaal van de
binnenzijde wand van de oven moet worden vervangen. Vervangende
voeringen kunnen worden gekocht bij uw plaatselijke dealer of de fabrikant.
U dient handschoenen en een stofmasker te dragen bij het hanteren van
de gebruikte liner. De oude voering moet vóór verwijdering grondig worden
bevochtigd met een spuitfles water. Na verwijdering moet het in een plastic
zak worden gedaan en onmiddellijk worden weggegooid.
39.Maak geen krassen op het oppervlak met scherpe en harde
voorwerpen.
40. Het moet worden opgeslagen op houten, geverfde stalen planken of
rubberen kussens en moet worden gescheiden van ander staal om te
voorkomen dat stof, olie en roest het roestvrijstalen oppervlak aantasten.
Fabrikant: Shanghaimuxinmuyeyouxiangongsi
Adres: Shuangchenglu 803nong11hao1602A-1609shi, baoshanqu, shanghai
200000 CN.
Geïmporteerd naar AUS: SIHAO PTY LTD, 1 ROKEVA
STREETEASTWOOD NSW 2122 Australië
Geïmporteerd naar de VS: Sanven Technology Ltd., Suite 250, 9166
Anaheim Place, Rancho Cucamonga, CA 91730

- 10 -
REP
EC
E-CrossStu GmbH
Mainzer Landstr.69, 60329 Frankfurt am Main.
REP
UK
YH CONSULTING LIMITED.
C/O YH Consulting Limited Office 147, Centurion House,
London Road, Staines-upon-Thames, Surrey, TW18 4AX