NS-TPC
BC
A
ZOJIRUSHI CORPORATION
NS-TPC10 / NS-TPC18
CANUSA
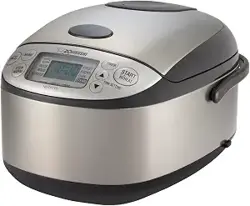
MICOM RICE COOKER & WARMER
OPERATING INSTRUCTIONS
CUISEUR À RIZ ET CHAUFFE-RIZ MICOM
MODE D’EMPLOI
●Thank you for purchasing this product. Always follow basic safety precautions when using electrical appliances.
Read all instructions carefully. Please keep these operating instructions at hand for easy reference.
●
Merci d’avoir acheté ce produit. Veuillez respecter impérativement les consignes de sécurité de base lors de l’emploi
d’appareils électriques. Lisez attentivement toutes les instructions. Veuillez garder ce mode d’emploi à portée de main
pour pouvoir le consulter facilement.
INDEX INDEX
/
IMPORTANT SAFEGUARDS......................................................2
IMPORTANT...............................................................................5
ABOUT THE INNER COOKING PAN........................................5
PART NAMES AND FUNCTIONS................................................6
TIPS FOR DELICIOUS RICE........................................................8
HOW TO SET THE CLOCK..........................................................9
HOW TO CHANGE THE NOTIFICATION SOUNDS....................9
COOKING RICE
BASIC COOKING STEPS........................................................10
TIPS FOR COOKING VARIOUS RICE MENUS.........................12
ESTIMATED COOKING TIME.................................................12
KEEPING RICE WARM
REGULAR KEEP WARM AND EXTENDED KEEP WARM....13
REHEATING RICE......................................................................15
USING THE TIMER TO COOK RICE
USING THE TIMER..................................................................16
HOW TO BAKE CAKE................................................................17
HOW TO STEAM FOOD.............................................................18
RECIPES
AVOCADO AND TUNA BOWL.................................................20
HAND-ROLLED SUSHI............................................................20
CHIRASHI-SUSHI....................................................................21
MIXED RICE.............................................................................21
SWEET RICE COOKED WITH ADZUKI BEANS....................22
MIXED BROWN RICE..............................................................22
SPONGE CAKE........................................................................23
CHEESE CAKE........................................................................23
CLEANING AND MAINTENANCE..............................................24
TROUBLESHOOTING GUIDE....................................................26
ERROR DISPLAYS AND THEIR MEANINGS...........................29
REPLACEMENT PARTS...........................................................30
SPECIFICATIONS.....................................................................30
CONSIGNES DE SÉCURITÉ IMPORTANTES...........................31
IMPORTANT............................................................................34
À PROPOS DE LA CASSEROLE INTÉRIEURE......................34
NOMENCLATURE ET FONCTIONS DES PIÈCES....................35
CONSEILS POUR OBTENIR UN RIZ DÉLICIEUX.....................37
CUISSON DU RIZ
ÉTAPES D’UNE CUISSON ÉLÉMENTAIRE............................38
RÉGLAGE DE L’HORLOGE........................................................40
COMMENT MODIFIER LE SIGNAL SONORE...........................40
CONSEILS POUR LA CUISSON
DE DIVERS PLATS À BASE DE RIZ..........................................41
ESTIMATION DU TEMPS DE CUISSON.................................41
MAINTENIR AU CHAUD LE RIZ AU CHAUD
MAINTIEN AU CHAUD ORDINAIRE ET
MAINTIEN AU CHAUD PROLONGÉ.......................................42
RÉCHAUFFER DU RIZ...............................................................44
UTILISATION DE LA MINUTERIE POUR LA CUISSON DU RIZ
UTILISATION DE LA MINUTERIE..........................................45
COMMENT CUIRE UN GÂTEAU................................................46
COMMENT CUIRE LES ALIMENTS À LA VAPEUR...................47
NETTOYAGE ET ENTRETIEN....................................................49
GUIDE DE DÉPANNAGE............................................................51
AFFICHAGE DES ERREURS ET SIGNIFICATION....................54
PIÈCES DE RECHANGE............................................................55
FICHE TECHNIQUE....................................................................55
This manual is also available for download in the
following languages. Scan the code.
Vous pouvez aussi télécharger ce manuel dans les
langues suivantes. Scannez le code.
en fr es
中文

2
3
Do not modify the Rice Cooker. Only a repair
technician may disassemble or repair this unit.
Attempting to do so may cause fire, electric shock or injury.
Make any repair inquiries to Zojirushi Customer Service.
Do not allow children to use the Rice Cooker
unsupervised. Keep it out of the reach of infants.
Children are at risk of burns, electric shock or injury.
Do not plug or unplug the Power Cord with wet
hands.
Doing so may cause electric shock or injury.
Do not use a power source other than 120V AC.
Use of any other power supply voltage may cause fire or
electric shock.
Do not use the Rice Cooker if the Power Plug or Power
Cord is damaged or if the Power Plug is loosely
inserted into the
electrical outlet.
Doing so may cause
electric shock, short
circuit or fire.
Do not immerse the Rice Cooker in water or
splash it with water. Do not pour water directly
into the Rice Cooker.
Doing so may cause short circuit or electric shock.
Never open the Outer Lid or move the Rice
Cooker during cooking.
Doing so may cause burns.
Keep your hands and face away from the Steam Vent.
Doing so prevents from burns or scalding. Take special precautions
with children and infants.
This Rice Cooker is designed for cooking rice, keeping
rice warm, baking cakes, and steaming only. Do not
use it for anything other than its intended purposes.
Always follow the Operating Instructions and recipes
and never cook the following:
●Foods packaged in plastic bags.
●
Foods wrapped in parchment paper, aluminum foil, plastic wrap, etc.
Doing so may clogthe steam exhaust route.
Do not allow liquid to come in contact with the
Power Plug or Power Cord.
Doing so may cause short circuit or electric shock.
This appliance is not intended for use by persons (including children) with reduced physical, sensory or
mental capabilities, or lack of experience and knowledge, unless they have been given supervision or
instruction concerning use of the appliance by a person responsible for their safety. Children should be
supervised to ensure that they do not play with the appliance.
●
The illustrations used in this Operating Instructions may vary from
the actual product you have purchased.
These WARNINGS and CAUTIONS are intended to prevent property damage or personal injury to you
and others.
Indicates a prohibited operation.
Indicates a requirement or instruction that
must be followed.
The degree of danger or damage by the misuse of this product is indicated as follows:
Prohibited or required actions are indicated as follows:
IMPORTANT SAFEGUARDS
Be sure to follow these instructions.
■
■
Use only an electrical outlet rated at 15 amperes
minimum, and do not plug other devices into
the same outlet.
Plugging other devices into the same outlet may cause the
electrical outlet to overheat, resulting in fire.
If the blades or surface of the Power Plug
become soiled, wipe them clean.
A dirty Power Plug may cause fire.
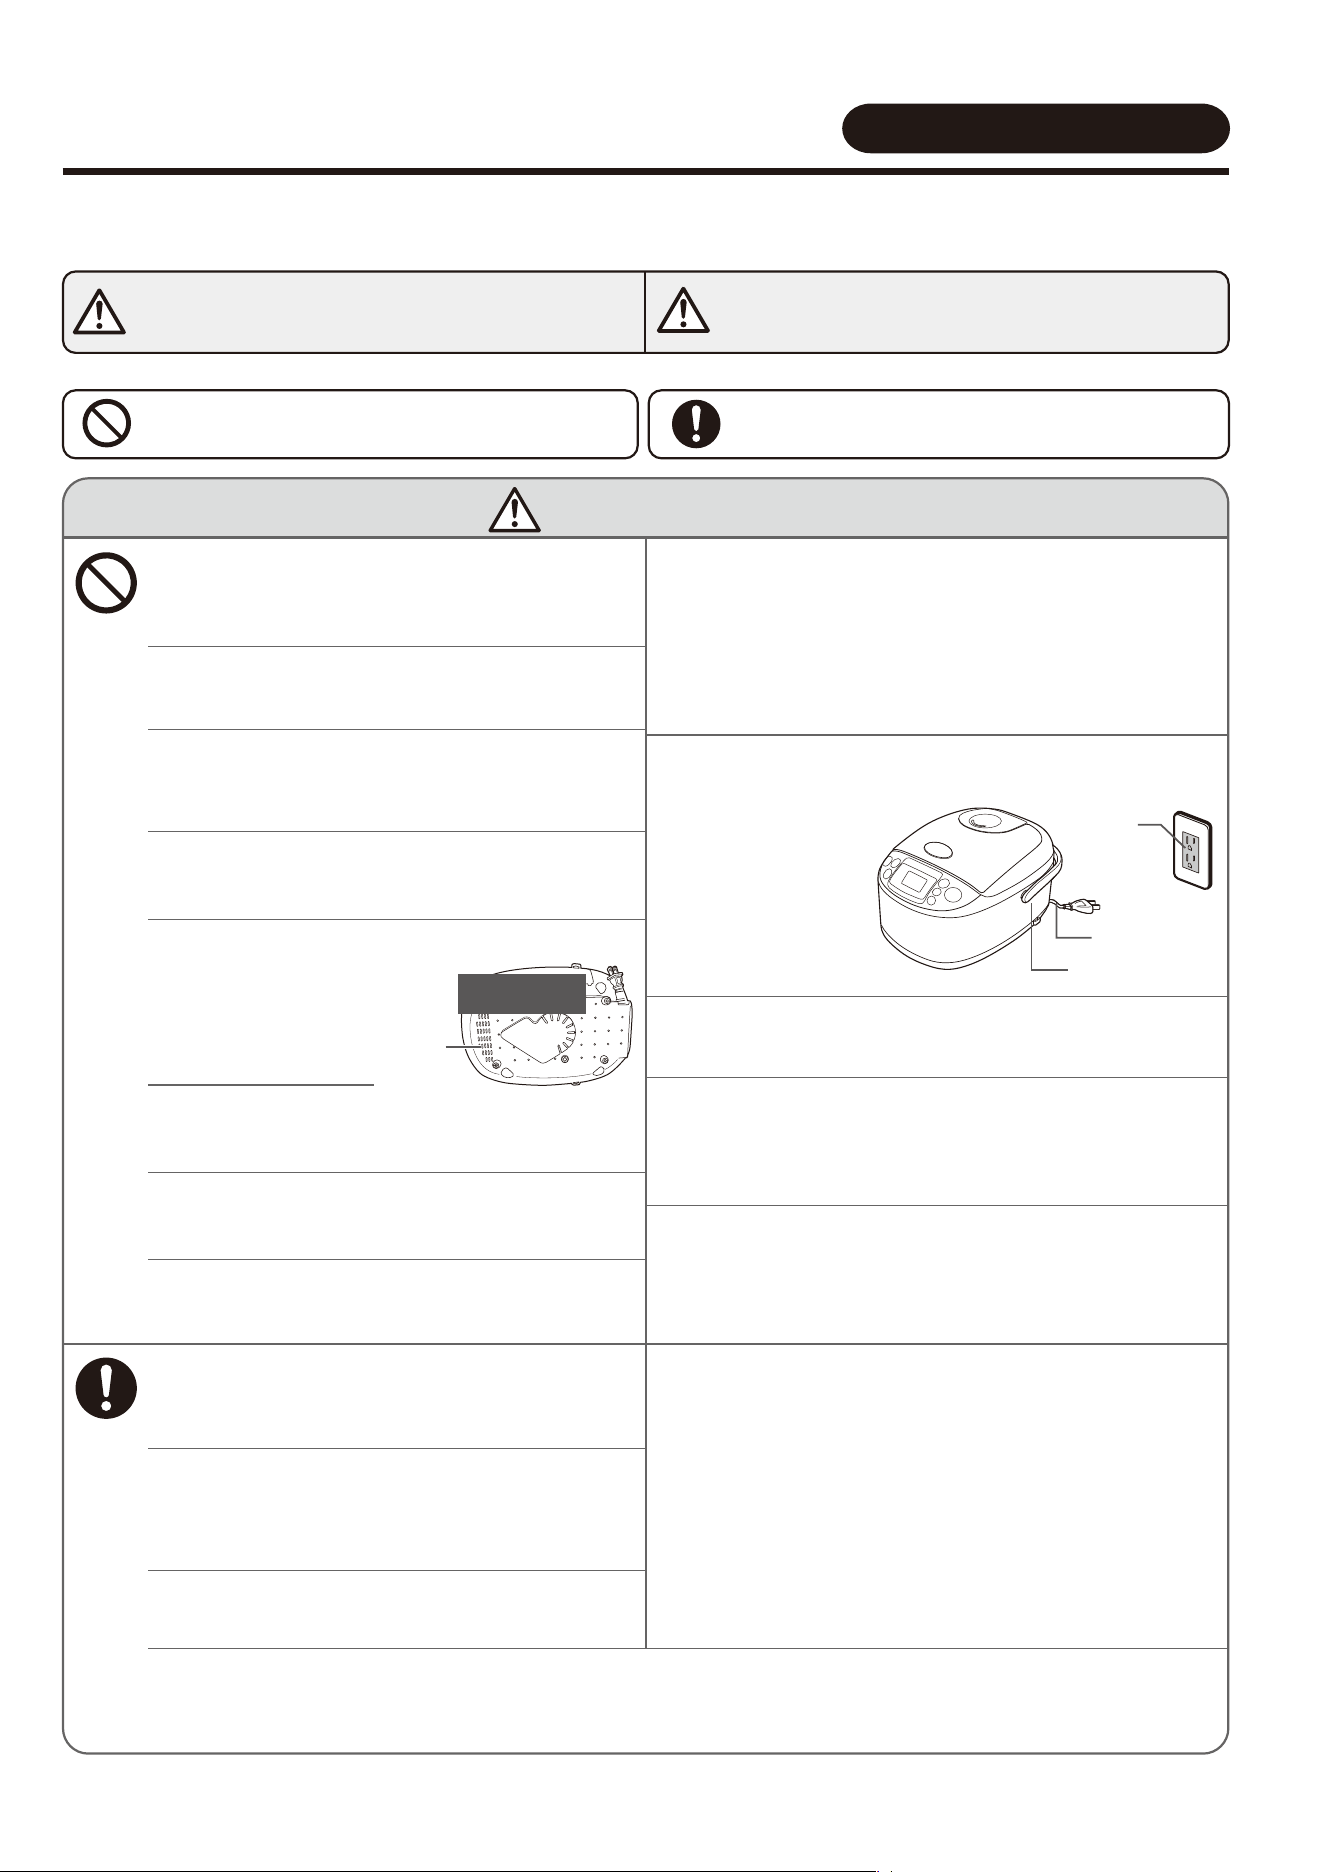
Do not put any metal objects such as pins or
wires into the Air Vent or
crevices located at the
bottom of the Rice Cooker.
Doing so may cause electric
shock or malfunction,
resulting in injury.
WARNINGS
Indicates risk of serious injury
or death.
CAUTIONS
Indicates risk of injury, household
or property damage if mishandled.
WARNINGS
Continued on the next page
Stop using immediately if you notice any of the
following symptoms indicating a malfunction or
breakdown.
Continued use of the Rice Cooker may cause smoke, fire, electric
shock or injury.
If any of the above occurs, unplug the Rice Cooker
immediately and contact the store where you purchased it
or Zojirushi Customer Service for inspection and/or repair.
●The Power Plug or Power Cord has become very hot.
●
The Power Cord is damaged or the electricity turns on and off when
touched.
●
The body of the Rice Cooker is deformed or unusually hot.
●
Smoke is produced from the Rice Cooker or there is a burning smell.
●
Some part of the Rice Cooker is cracked, loose or unstable. etc.
Air Vent
Bottom view of
the product
Insert the Power Plug completely and securely
into the electrical outlet.
A loosely inserted Power Plug may cause electric shock,
short circuit, smoke or fire.
Electrical
Outlet
Do not damage the Power Cord. Do not bend, pull,
twist, bundle or attempt to modify the Power Cord. Do
not place it on or near high temperature surfaces or
appliances, under heavy items or between objects.
A damaged Power Cord can cause fire or electric shock.
Do not allow the Power Plug to come into contact with
steam.
Allowing the Power Plug to come into contact with steam after inserting
it into the electrical outlet may cause short circuit or fire. When using
on a slide-out table or shelf, place the Rice Cooker in a position where
the Power Plug does not come into contact with steam.
IMPORTANT SAFEGUARDS
SAVE THESE INSTRUCTIONS
THIS APPLIANCE IS FOR HOUSEHOLD USE ONLY.
BASIC SAFETY PRECAUTIONS SHOULD ALWAYS BE FOLLOWED WHEN USING
ELECTRICAL APPLIANCES, INCLUDING THE FOLLOWING.
Read all instructions thoroughly.
Avoid touching hot surfaces and do not close or clog the steam vent opening under any
circumstances. The handles and knobs are provided for your safety and protection.
To prevent hazardous operation or electric shock, do not immerse power cord, power plug, or rice
cooker (except inner cooking pan) in water or other liquids.
Close supervision is necessary when the appliance is used by or near children.
Unplug from outlet when not in use and before cleaning. Allow the appliance to cool before adding
or removing parts, and before cleaning the appliance. Make sure appliance is OFF when not in
use, before putting on or taking off parts, and before cleaning.
Do not use or operate the appliance with a damaged cord or plug. If the appliance malfunctions or
has been damaged in any manner, unplug the appliance and return it to the nearest authorized
service facility or dealer for examination, repair or adjustment.
The use of accessories or attachments not recommended by the appliance manufacturer may be
hazardous or may cause malfunction.
Do not use outdoors.
Keep the power cord away from hot surfaces and do not let the cord hang over the edge of tables
or counters.
Do not place the appliance on or near a heated surface such as a gas or electric stove, or in a
heated oven.
Always use extreme caution when moving appliances containing hot contents or liquids.
Plug the cord into a household electrical outlet. To disconnect, turn the power control to OFF, then
remove plug from wall outlet.
Do not use the appliance for other than intended or specified purposes.
To reduce the risk of electric shock, use only the supplied inner cooking pan.
The heating element surface is subject to residual heat after use.
1
2
3
4
5
6
7
8
This appliance is supplied with a short power cord to reduce the risk of becoming entangled in or
tripping over it. Extension cords may be used if care is exercised in their use. If an extension cord is
used, the marked electrical rating of the cord should be at least as great as the electrical rating of the
appliance, and a longer cord should be arranged so that it will not drape over the countertop or
tabletop where it can be pulled on by children or tripped over unintentionally.
This appliance has a polarized plug (one blade is wider than the other). To reduce the risk of electric
shock, this plug was designed to fit into a polarized outlet in only one direction. If the plug does not fit
fully into the outlet, do not attempt to force it or modify it in any way. Simply reverse the plug and
insert. If it still does not fit, contact a qualified electrician.
9
10
11
12
13
14
15
Power Plug
Power Cord
2
3
Do not modify the Rice Cooker. Only a repair
technician may disassemble or repair this unit.
Attempting to do so may cause fire, electric shock or injury.
Make any repair inquiries to Zojirushi Customer Service.
Do not allow children to use the Rice Cooker
unsupervised. Keep it out of the reach of infants.
Children are at risk of burns, electric shock or injury.
Do not plug or unplug the Power Cord with wet
hands.
Doing so may cause electric shock or injury.
Do not use a power source other than 120V AC.
Use of any other power supply voltage may cause fire or
electric shock.
Do not use the Rice Cooker if the Power Plug or Power
Cord is damaged or if the Power Plug is loosely
inserted into the
electrical outlet.
Doing so may cause
electric shock, short
circuit or fire.
Do not immerse the Rice Cooker in water or
splash it with water. Do not pour water directly
into the Rice Cooker.
Doing so may cause short circuit or electric shock.
Never open the Outer Lid or move the Rice
Cooker during cooking.
Doing so may cause burns.
Keep your hands and face away from the Steam Vent.
Doing so prevents from burns or scalding. Take special precautions
with children and infants.
This Rice Cooker is designed for cooking rice, keeping
rice warm, baking cakes, and steaming only. Do not
use it for anything other than its intended purposes.
Always follow the Operating Instructions and recipes
and never cook the following:
●Foods packaged in plastic bags.
●
Foods wrapped in parchment paper, aluminum foil, plastic wrap, etc.
Doing so may clogthe steam exhaust route.
Do not allow liquid to come in contact with the
Power Plug or Power Cord.
Doing so may cause short circuit or electric shock.
This appliance is not intended for use by persons (including children) with reduced physical, sensory or
mental capabilities, or lack of experience and knowledge, unless they have been given supervision or
instruction concerning use of the appliance by a person responsible for their safety. Children should be
supervised to ensure that they do not play with the appliance.
●
The illustrations used in this Operating Instructions may vary from
the actual product you have purchased.
These WARNINGS and CAUTIONS are intended to prevent property damage or personal injury to you
and others.
Indicates a prohibited operation.
Indicates a requirement or instruction that
must be followed.
The degree of danger or damage by the misuse of this product is indicated as follows:
Prohibited or required actions are indicated as follows:
IMPORTANT SAFEGUARDS
Be sure to follow these instructions.
■
■
Use only an electrical outlet rated at 15 amperes
minimum, and do not plug other devices into
the same outlet.
Plugging other devices into the same outlet may cause the
electrical outlet to overheat, resulting in fire.
If the blades or surface of the Power Plug
become soiled, wipe them clean.
A dirty Power Plug may cause fire.
Do not put any metal objects such as pins or
wires into the Air Vent or
crevices located at the
bottom of the Rice Cooker.
Doing so may cause electric
shock or malfunction,
resulting in injury.
WARNINGS
Indicates risk of serious injury
or death.
CAUTIONS
Indicates risk of injury, household
or property damage if mishandled.
WARNINGS
Continued on the next page
Stop using immediately if you notice any of the
following symptoms indicating a malfunction or
breakdown.
Continued use of the Rice Cooker may cause smoke, fire, electric
shock or injury.
If any of the above occurs, unplug the Rice Cooker
immediately and contact the store where you purchased it
or Zojirushi Customer Service for inspection and/or repair.
●The Power Plug or Power Cord has become very hot.
●
The Power Cord is damaged or the electricity turns on and off when
touched.
●
The body of the Rice Cooker is deformed or unusually hot.
●
Smoke is produced from the Rice Cooker or there is a burning smell.
●
Some part of the Rice Cooker is cracked, loose or unstable. etc.
Air Vent
Bottom view of
the product
Insert the Power Plug completely and securely
into the electrical outlet.
A loosely inserted Power Plug may cause electric shock,
short circuit, smoke or fire.
Electrical
Outlet
Do not damage the Power Cord. Do not bend, pull,
twist, bundle or attempt to modify the Power Cord. Do
not place it on or near high temperature surfaces or
appliances, under heavy items or between objects.
A damaged Power Cord can cause fire or electric shock.
Do not allow the Power Plug to come into contact with
steam.
Allowing the Power Plug to come into contact with steam after inserting
it into the electrical outlet may cause short circuit or fire. When using
on a slide-out table or shelf, place the Rice Cooker in a position where
the Power Plug does not come into contact with steam.
IMPORTANT SAFEGUARDS
SAVE THESE INSTRUCTIONS
THIS APPLIANCE IS FOR HOUSEHOLD USE ONLY.
BASIC SAFETY PRECAUTIONS SHOULD ALWAYS BE FOLLOWED WHEN USING
ELECTRICAL APPLIANCES, INCLUDING THE FOLLOWING.
Read all instructions thoroughly.
Avoid touching hot surfaces and do not close or clog the steam vent opening under any
circumstances. The handles and knobs are provided for your safety and protection.
To prevent hazardous operation or electric shock, do not immerse power cord, power plug, or rice
cooker (except inner cooking pan) in water or other liquids.
Close supervision is necessary when the appliance is used by or near children.
Unplug from outlet when not in use and before cleaning. Allow the appliance to cool before adding
or removing parts, and before cleaning the appliance. Make sure appliance is OFF when not in
use, before putting on or taking off parts, and before cleaning.
Do not use or operate the appliance with a damaged cord or plug. If the appliance malfunctions or
has been damaged in any manner, unplug the appliance and return it to the nearest authorized
service facility or dealer for examination, repair or adjustment.
The use of accessories or attachments not recommended by the appliance manufacturer may be
hazardous or may cause malfunction.
Do not use outdoors.
Keep the power cord away from hot surfaces and do not let the cord hang over the edge of tables
or counters.
Do not place the appliance on or near a heated surface such as a gas or electric stove, or in a
heated oven.
Always use extreme caution when moving appliances containing hot contents or liquids.
Plug the cord into a household electrical outlet. To disconnect, turn the power control to OFF, then
remove plug from wall outlet.
Do not use the appliance for other than intended or specified purposes.
To reduce the risk of electric shock, use only the supplied inner cooking pan.
The heating element surface is subject to residual heat after use.
1
2
3
4
5
6
7
8
This appliance is supplied with a short power cord to reduce the risk of becoming entangled in or
tripping over it. Extension cords may be used if care is exercised in their use. If an extension cord is
used, the marked electrical rating of the cord should be at least as great as the electrical rating of the
appliance, and a longer cord should be arranged so that it will not drape over the countertop or
tabletop where it can be pulled on by children or tripped over unintentionally.
This appliance has a polarized plug (one blade is wider than the other). To reduce the risk of electric
shock, this plug was designed to fit into a polarized outlet in only one direction. If the plug does not fit
fully into the outlet, do not attempt to force it or modify it in any way. Simply reverse the plug and
insert. If it still does not fit, contact a qualified electrician.
9
10
11
12
13
14
15
Power Plug
Power Cord
4 5
IMPORTANT
Open
Button
ABOUT THE INNER COOKING PAN
IMPORTANT SAFEGUARDS
(
cont.
)
WARNING
•
INGESTION HAZARD
: This product contains a button cell or coin battery.
•
DEATH
or serious injury can occur if ingested.
• A swallowed button cell or coin battery can cause
Internal Chemical Burns
in as little
as
2 hours
.
•
KEEP
new and used batteries
OUT OF REACH of CHILDREN.
•
Seek immediate medical attention
if a battery is suspected to be swallowed or
inserted inside any part of the body.
• Remove and immediately recycle or dispose of used batteries according to local regulations and keep away from
children. Do NOT dispose of batteries in household trash or incinerate.
• Even used batteries may cause severe injury or death.
• Call a local poison control center for treatment information.
• Compatible battery type CR2450.
• Nominal battery voltage 3V.
• Non-rechargeable batteries are not to be recharged.
• Do not force discharge, recharge, disassemble, heat above 158°F (70°C) or incinerate. Doing so may result in injury
due to venting, leakage or explosion resulting in chemical burns.
• This product contains a non-replaceable battery.
Do not touch hot surfaces during or immediately
after use.
Be careful of steam
when opening the
Outer Lid and do not
touch the Inner
Cooking Pan when
loosening rice.
Touching hot surfaces may
cause burns.
Do not place or use the Rice Cooker on unstable
surfaces or on surfaces that are vulnerable to heat.
Doing so may cause fire or injury.
Please allow the Rice Cooker to cool down
before cleaning.
Handling hot parts such as the Inner Lid, Inner Cooking Pan
and heating element may cause burns.
Always unplug the Rice Cooker by holding the Power
Plug, not by pulling the Power Cord.
Pulling the Power Cord to unplug the Rice Cooker may cause electric
shock, short circuit or fire.
Always retract the Power Cord holding the
Power Plug.
The plug may hit you and cause injury.
If the Power Plug or Power Cord is damaged, it must
be replaced by the manufacturer, its service agent,
or similarly qualified persons to avoid hazards.
Do not use the Rice Cooker on a slide-out table or
shelf with insufficient load capacity.
Doing so may damage the slide-out table or shelf, causing the Rice
Cooker to fall, resulting in injury or burns. The slide-out table or shelf
should have a load capacity of 33 lbs./15 kg or more for the 1.0 L
model, and 44 lbs./20 kg or more for the 1.8 L model.
Do not use the Rice Cooker on a surface where the Air
Vent located at the bottom of the Rice Cooker can
become blocked or covered (such as on paper, cloth,
carpet, plastic bag or aluminum sheet).
Doing so may cause breakdown of the Rice Cooker.
Do not use the Rice Cooker where it may come
into contact with water or near heat sources.
Doing so may cause electric shock, short circuit, or can
damage the Rice Cooker.
Do not use cookware other than the provided
Inner Cooking Pan or Steaming Basket.
Doing so may cause the cookware or Steaming Basket to
overheat or the Rice Cooker to malfunction.
Unplug the Power Plug from the outlet when
the Rice Cooker is not in use.
Leaving the Power Plug connected to an outlet may cause
the insulation to become damaged, resulting in burns, injury,
electric shock, short circuit or fire.
Do not cover the Main Body, especially the
Steam Vent, with a cloth or other object.
Doing so may cause breakdown.
When you are finished, be sure to press the
CANCEL button.
Removing the Inner Cooking Pan only will not turn off
the power.
Do not damage, drop or deform the Inner Cooking Pan.
A damaged Inner Cooking Pan may not cook properly.
Do not cook when the Inner
Cooking Pan is empty.
Doing so may cause breakdown of the Rice Cooker or melting of the
Steaming Basket.
Do not operate the Rice Cooker
if rice or other foreign matter is
stuck on the inside of the Main
Body, the outside surface of the
Inner Cooking Pan, the Center
Sensor, or the Heating Plate.
Doing so may burn or otherwise
discolor the rice.
Do not use the Rice Cooker where its steam may
come into contact with other electrical appliances.
The steam may cause fire, malfunction, discoloration or deformation
of other electrical appliances.
Do not splash the Rice Cooker with water or place it
on top of something wet.
Doing so may cause electric shock or breakdown.
Do not use the Rice Cooker in direct sunlight.
Doing so may cause discoloration of the Rice Cooker.
Do not use the Rice Cooker on top of an induction
heating cooker.
Doing so may cause breakdown.
Always hold the Rice Cooker by the Handle when
carrying it. Do not tilt the Main Body.
Doing so may cause the contents to spill.
Clean the Rice Cooker and the surrounding area
before using it.
This Rice Cooker is equipped with an Air Vent to improve function
and performance, but if dust or insects enter the Air Vent, the Rice
Cooker may malfunction. If the Rice Cooker malfunctions due to
insects, etc. entering the Air Vent, there will be a charge for repairs.
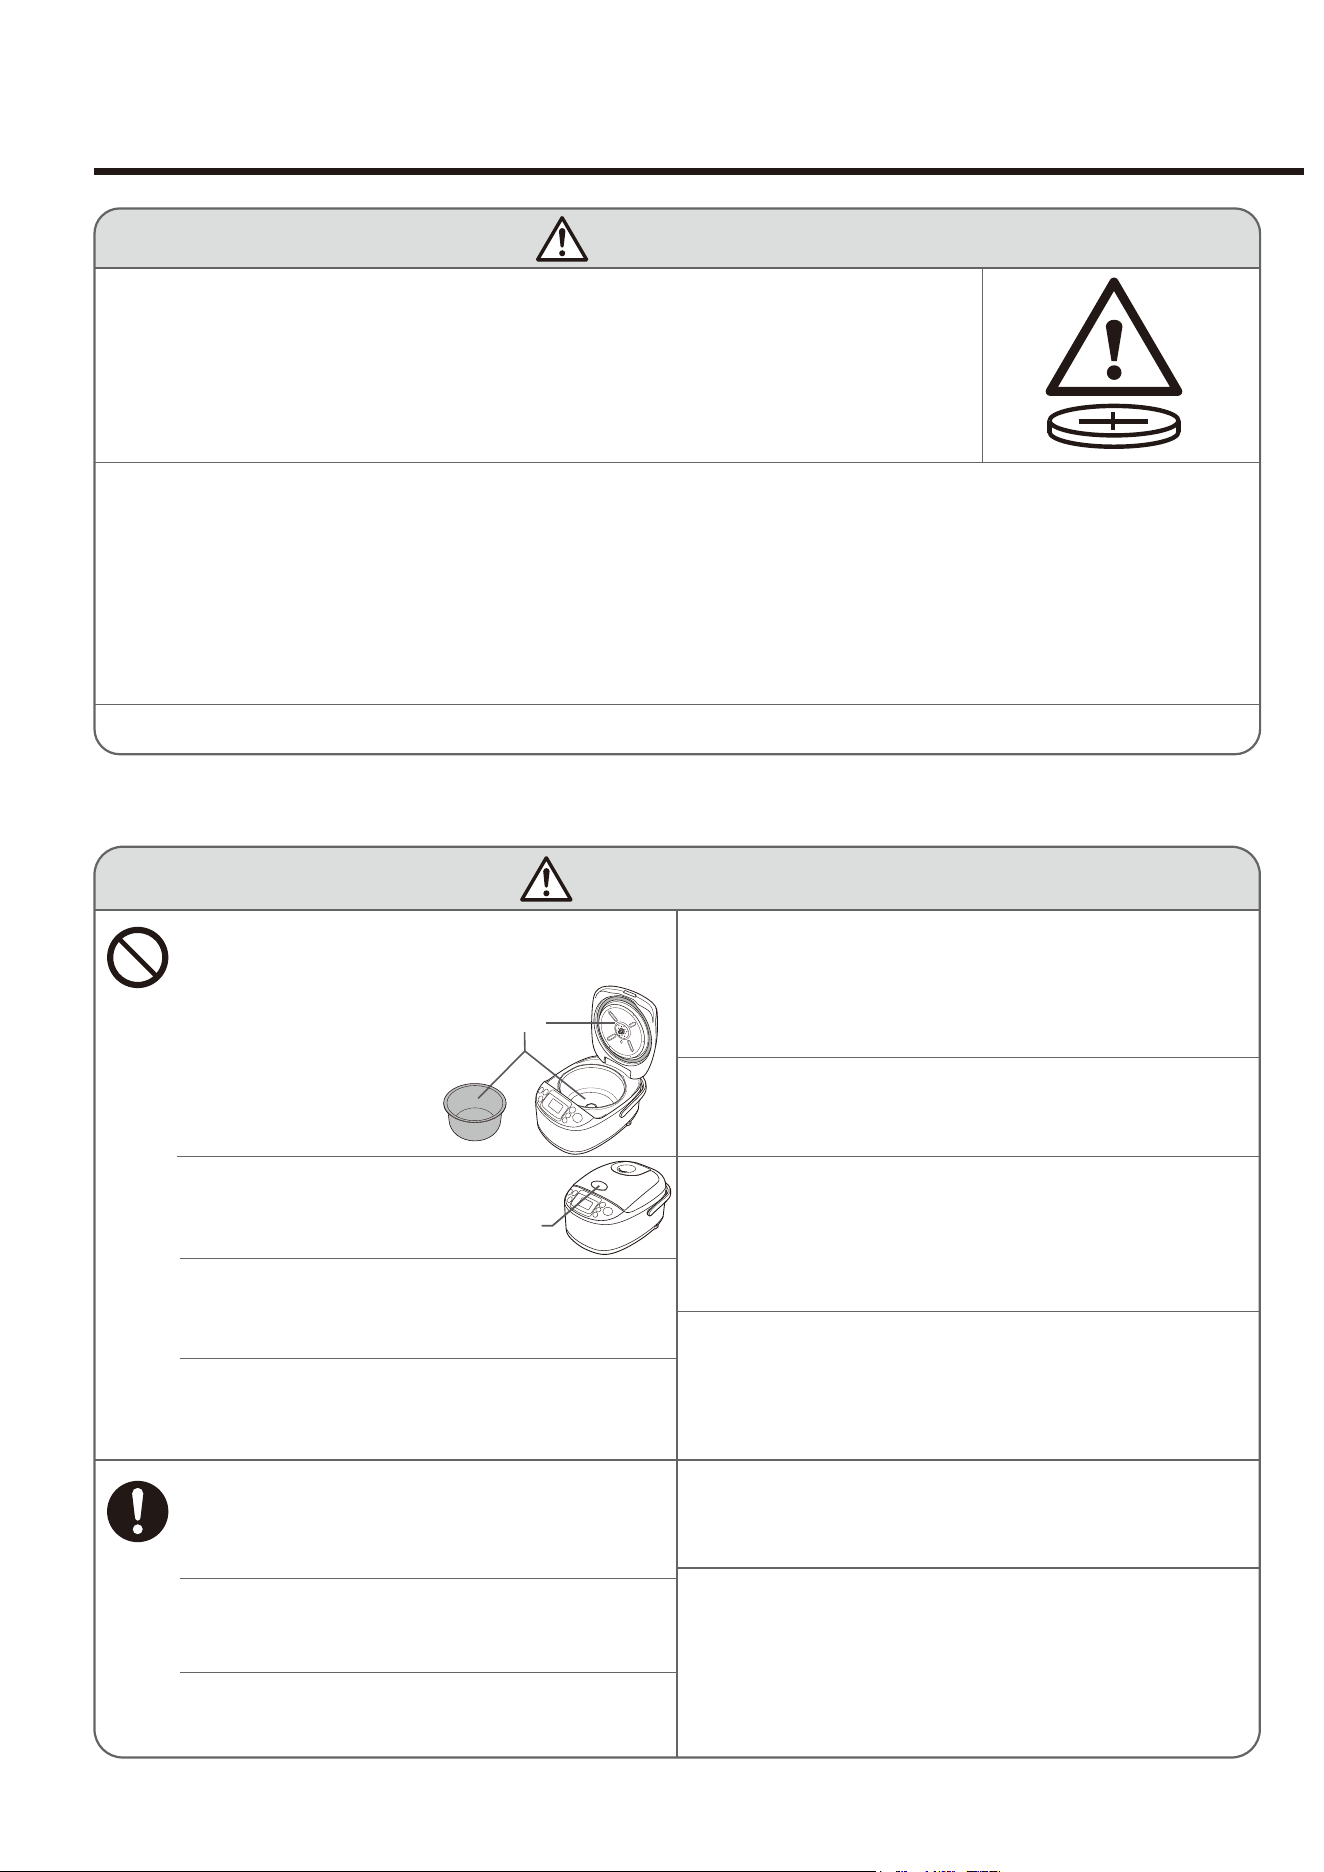
Do not touch the Open Button
when moving the Rice Cooker.
Doing so may cause the Outer Lid to
open, resulting in injury or burns.
This appliance is intended for household use and
similar applications listed below.
●
Staff (employee) kitchen area in shops, offices and other working environments.
●Farmhouses
*This appliance is not intended for use by many unspecified people
for a long period of time.
This appliance must not be used in the following areas:
·
By clients in hotels, motels and other residential type environments
· Bed and breakfast type environments
Be especially careful with
metal parts such as the
Inner Lid Set, Inner
Cooking Pan, and
Heating Plate.
Remove the
foreign matter.
CAUTIONS
Do not use the Rice Cooker near walls or furniture.
Allow enough room for steam to escape if using
beneath shelving.
Failing to allow enough room may cause breakdown. Steam or heat
may also damage, discolor or deform walls, furniture or shelving.
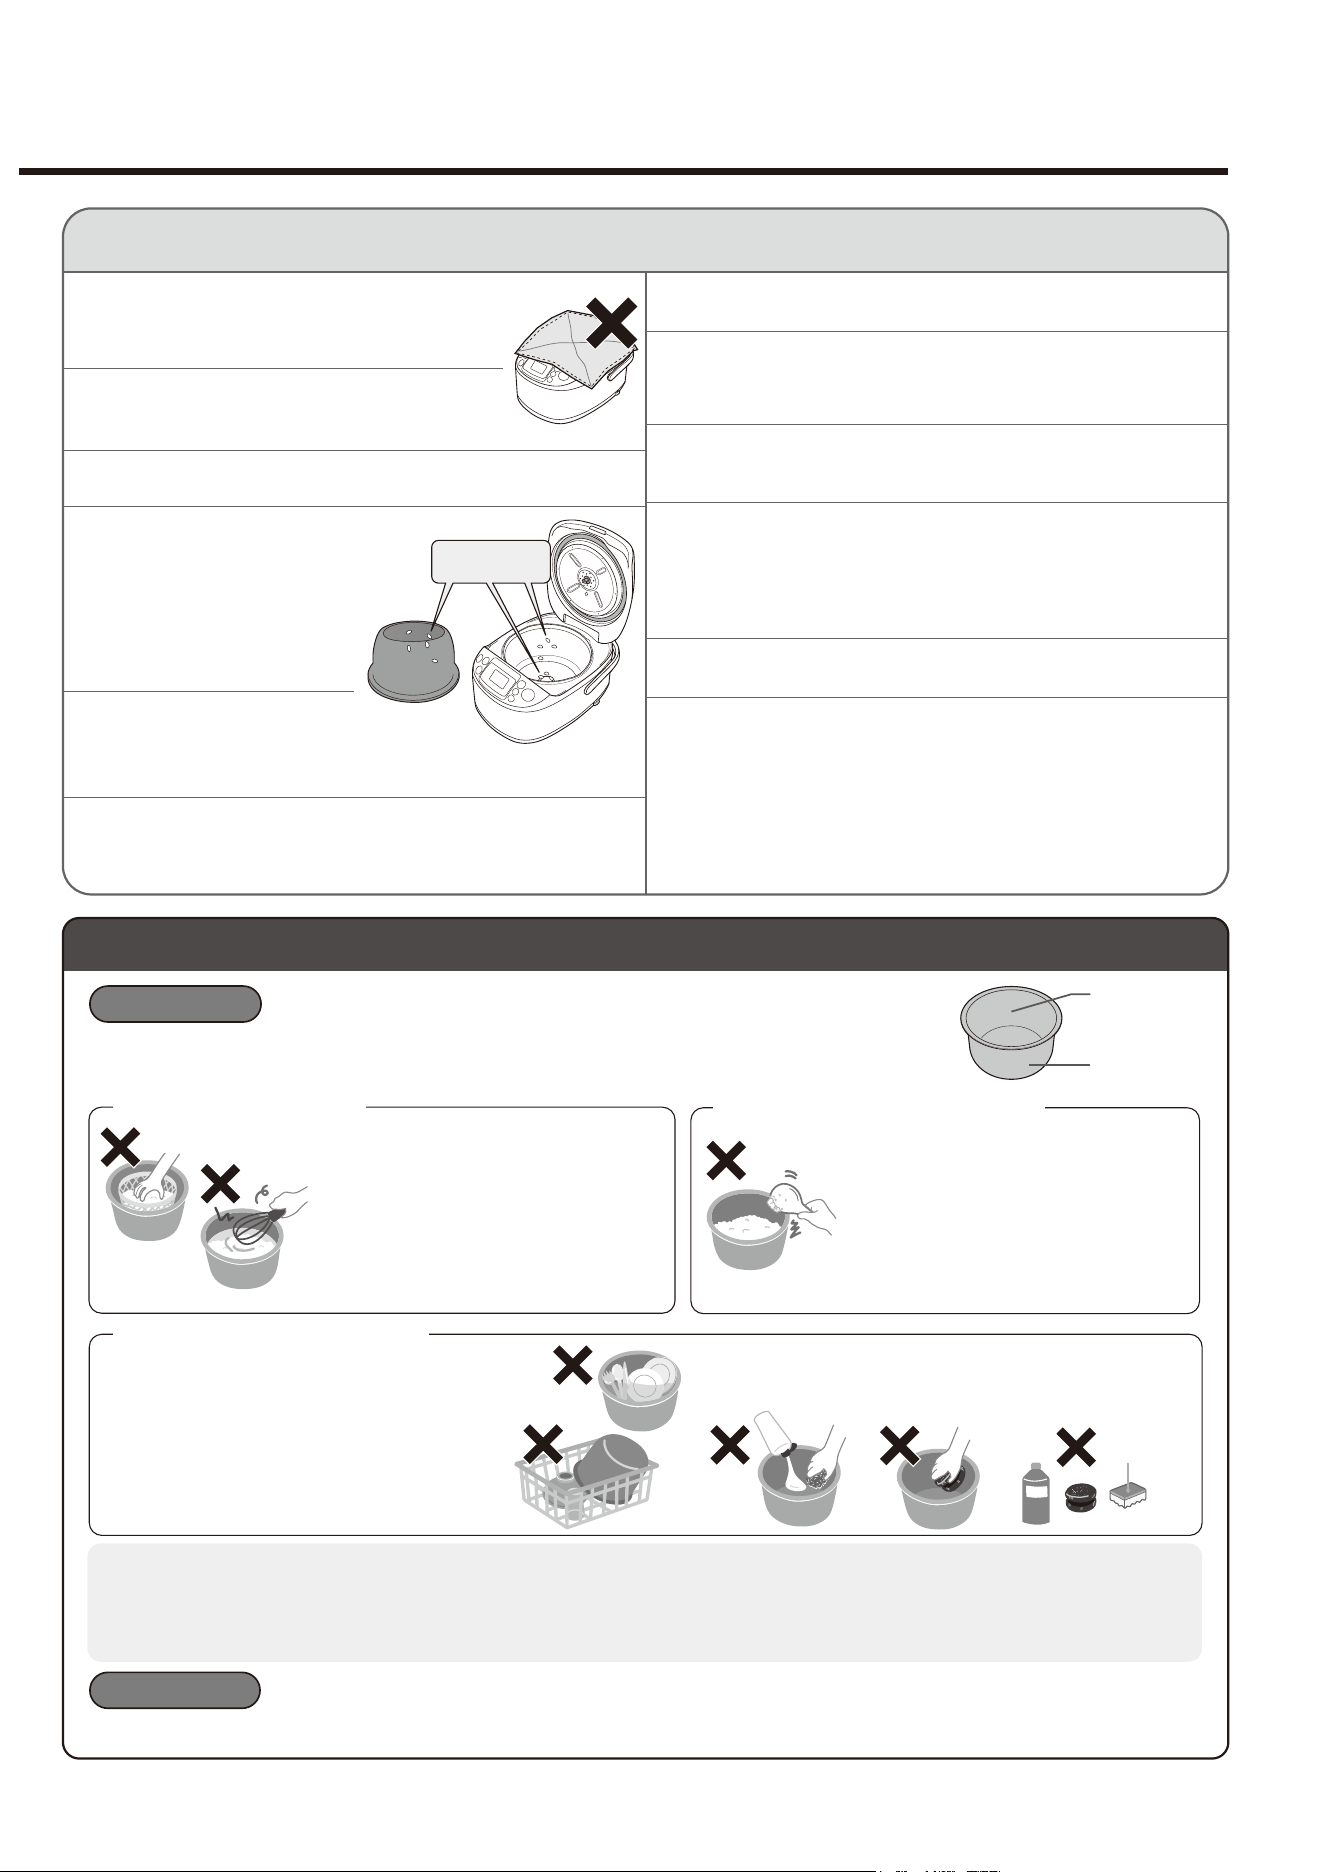
Inner Surface
Outer Surface
●
Do not place utensils or dishes inside the
Inner Cooking Pan.
●
Do not place in a dishwasher or dish dryer.
●
Clean the Inner Cooking Pan immediately
after using any seasonings.
●
Only use soft cleaning implements such as
a sponge when cleaning.
●
Remove foreign matter (such as
stones) from the rice before cleaning.
●
Do not use utensils such as whisks to
clean rice.
●
Do not place a metal strainer in the
Inner Cooking Pan when cleaning rice.
●
Use the Inner Cooking Pan only for
this Rice Cooker.
●
Do not use such items as thinner, abrasive cleaners,
bleach, scrubbing brushes (nylon, metal, etc.),
melamine sponges or sponges with a nylon surface.
●
Heat may cause some discoloration, but this does not affect the cooking results.
●
The outer surface touches important sensitive sensors. Be careful not to allow it to get dirty or damaged.
●
Note that firmly pushing the bottom surface of the Inner Cooking Pan against a sink, table, or similar
items may damage or discolor such items.
The Coating on the inner surface of the Inner Cooking Pan can peel off if damaged.
Please take special care to prevent damage and follow these precautions.
Nylon
Surface
Inner Surface
Outer Surface
●
Do not pour vinegar into the Inner
Cooking Pan (when making sushi rice).
●
Do not use a metal ladle (when serving
porridge, etc.).
●
Do not hit with the Spatula or other
utensils (when serving, etc.).
In order to use the Inner Cooking Pan for many years to
come, please observe the following.
<During Preparation>
<When Cleaning> →pg. 24
<When Cooking Completes>
The Coating on the inner surface of the Inner Cooking Pan may wear out with use.
●
The Coating may eventually discolor or peel off. This will not affect the cooking / Keep Warm performances or its sanitary
properties, and is harmless to your health.
●
If concerned with the peeling of the Coating or if the Inner Cooking Pan deforms, please replace it by purchasing a new one.
→pg. 30
4
5
IMPORTANT
Open
Button
ABOUT THE INNER COOKING PAN
IMPORTANT SAFEGUARDS
(
cont.
)
WARNING
•
INGESTION HAZARD
: This product contains a button cell or coin battery.
•
DEATH
or serious injury can occur if ingested.
• A swallowed button cell or coin battery can cause
Internal Chemical Burns
in as little
as
2 hours
.
•
KEEP
new and used batteries
OUT OF REACH of CHILDREN.
•
Seek immediate medical attention
if a battery is suspected to be swallowed or
inserted inside any part of the body.
• Remove and immediately recycle or dispose of used batteries according to local regulations and keep away from
children. Do NOT dispose of batteries in household trash or incinerate.
• Even used batteries may cause severe injury or death.
• Call a local poison control center for treatment information.
• Compatible battery type CR2450.
• Nominal battery voltage 3V.
• Non-rechargeable batteries are not to be recharged.
• Do not force discharge, recharge, disassemble, heat above 158°F (70°C) or incinerate. Doing so may result in injury
due to venting, leakage or explosion resulting in chemical burns.
• This product contains a non-replaceable battery.
Do not touch hot surfaces during or immediately
after use.
Be careful of steam
when opening the
Outer Lid and do not
touch the Inner
Cooking Pan when
loosening rice.
Touching hot surfaces may
cause burns.
Do not place or use the Rice Cooker on unstable
surfaces or on surfaces that are vulnerable to heat.
Doing so may cause fire or injury.
Please allow the Rice Cooker to cool down
before cleaning.
Handling hot parts such as the Inner Lid, Inner Cooking Pan
and heating element may cause burns.
Always unplug the Rice Cooker by holding the Power
Plug, not by pulling the Power Cord.
Pulling the Power Cord to unplug the Rice Cooker may cause electric
shock, short circuit or fire.
Always retract the Power Cord holding the
Power Plug.
The plug may hit you and cause injury.
If the Power Plug or Power Cord is damaged, it must
be replaced by the manufacturer, its service agent,
or similarly qualified persons to avoid hazards.
Do not use the Rice Cooker on a slide-out table or
shelf with insufficient load capacity.
Doing so may damage the slide-out table or shelf, causing the Rice
Cooker to fall, resulting in injury or burns. The slide-out table or shelf
should have a load capacity of 33 lbs./15 kg or more for the 1.0 L
model, and 44 lbs./20 kg or more for the 1.8 L model.
Do not use the Rice Cooker on a surface where the Air
Vent located at the bottom of the Rice Cooker can
become blocked or covered (such as on paper, cloth,
carpet, plastic bag or aluminum sheet).
Doing so may cause breakdown of the Rice Cooker.
Do not use the Rice Cooker where it may come
into contact with water or near heat sources.
Doing so may cause electric shock, short circuit, or can
damage the Rice Cooker.
Do not use cookware other than the provided
Inner Cooking Pan or Steaming Basket.
Doing so may cause the cookware or Steaming Basket to
overheat or the Rice Cooker to malfunction.
Unplug the Power Plug from the outlet when
the Rice Cooker is not in use.
Leaving the Power Plug connected to an outlet may cause
the insulation to become damaged, resulting in burns, injury,
electric shock, short circuit or fire.
Do not cover the Main Body, especially the
Steam Vent, with a cloth or other object.
Doing so may cause breakdown.
When you are finished, be sure to press the
CANCEL button.
Removing the Inner Cooking Pan only will not turn off
the power.
Do not damage, drop or deform the Inner Cooking Pan.
A damaged Inner Cooking Pan may not cook properly.
Do not cook when the Inner
Cooking Pan is empty.
Doing so may cause breakdown of the Rice Cooker or melting of the
Steaming Basket.
Do not operate the Rice Cooker
if rice or other foreign matter is
stuck on the inside of the Main
Body, the outside surface of the
Inner Cooking Pan, the Center
Sensor, or the Heating Plate.
Doing so may burn or otherwise
discolor the rice.
Do not use the Rice Cooker where its steam may
come into contact with other electrical appliances.
The steam may cause fire, malfunction, discoloration or deformation
of other electrical appliances.
Do not splash the Rice Cooker with water or place it
on top of something wet.
Doing so may cause electric shock or breakdown.
Do not use the Rice Cooker in direct sunlight.
Doing so may cause discoloration of the Rice Cooker.
Do not use the Rice Cooker on top of an induction
heating cooker.
Doing so may cause breakdown.
Always hold the Rice Cooker by the Handle when
carrying it. Do not tilt the Main Body.
Doing so may cause the contents to spill.
Clean the Rice Cooker and the surrounding area
before using it.
This Rice Cooker is equipped with an Air Vent to improve function
and performance, but if dust or insects enter the Air Vent, the Rice
Cooker may malfunction. If the Rice Cooker malfunctions due to
insects, etc. entering the Air Vent, there will be a charge for repairs.
Do not touch the Open Button
when moving the Rice Cooker.
Doing so may cause the Outer Lid to
open, resulting in injury or burns.
This appliance is intended for household use and
similar applications listed below.
●
Staff (employee) kitchen area in shops, offices and other working environments.
●Farmhouses
*This appliance is not intended for use by many unspecified people
for a long period of time.
This appliance must not be used in the following areas:
·
By clients in hotels, motels and other residential type environments
· Bed and breakfast type environments
Be especially careful with
metal parts such as the
Inner Lid Set, Inner
Cooking Pan, and
Heating Plate.
Remove the
foreign matter.
CAUTIONS
Do not use the Rice Cooker near walls or furniture.
Allow enough room for steam to escape if using
beneath shelving.
Failing to allow enough room may cause breakdown. Steam or heat
may also damage, discolor or deform walls, furniture or shelving.
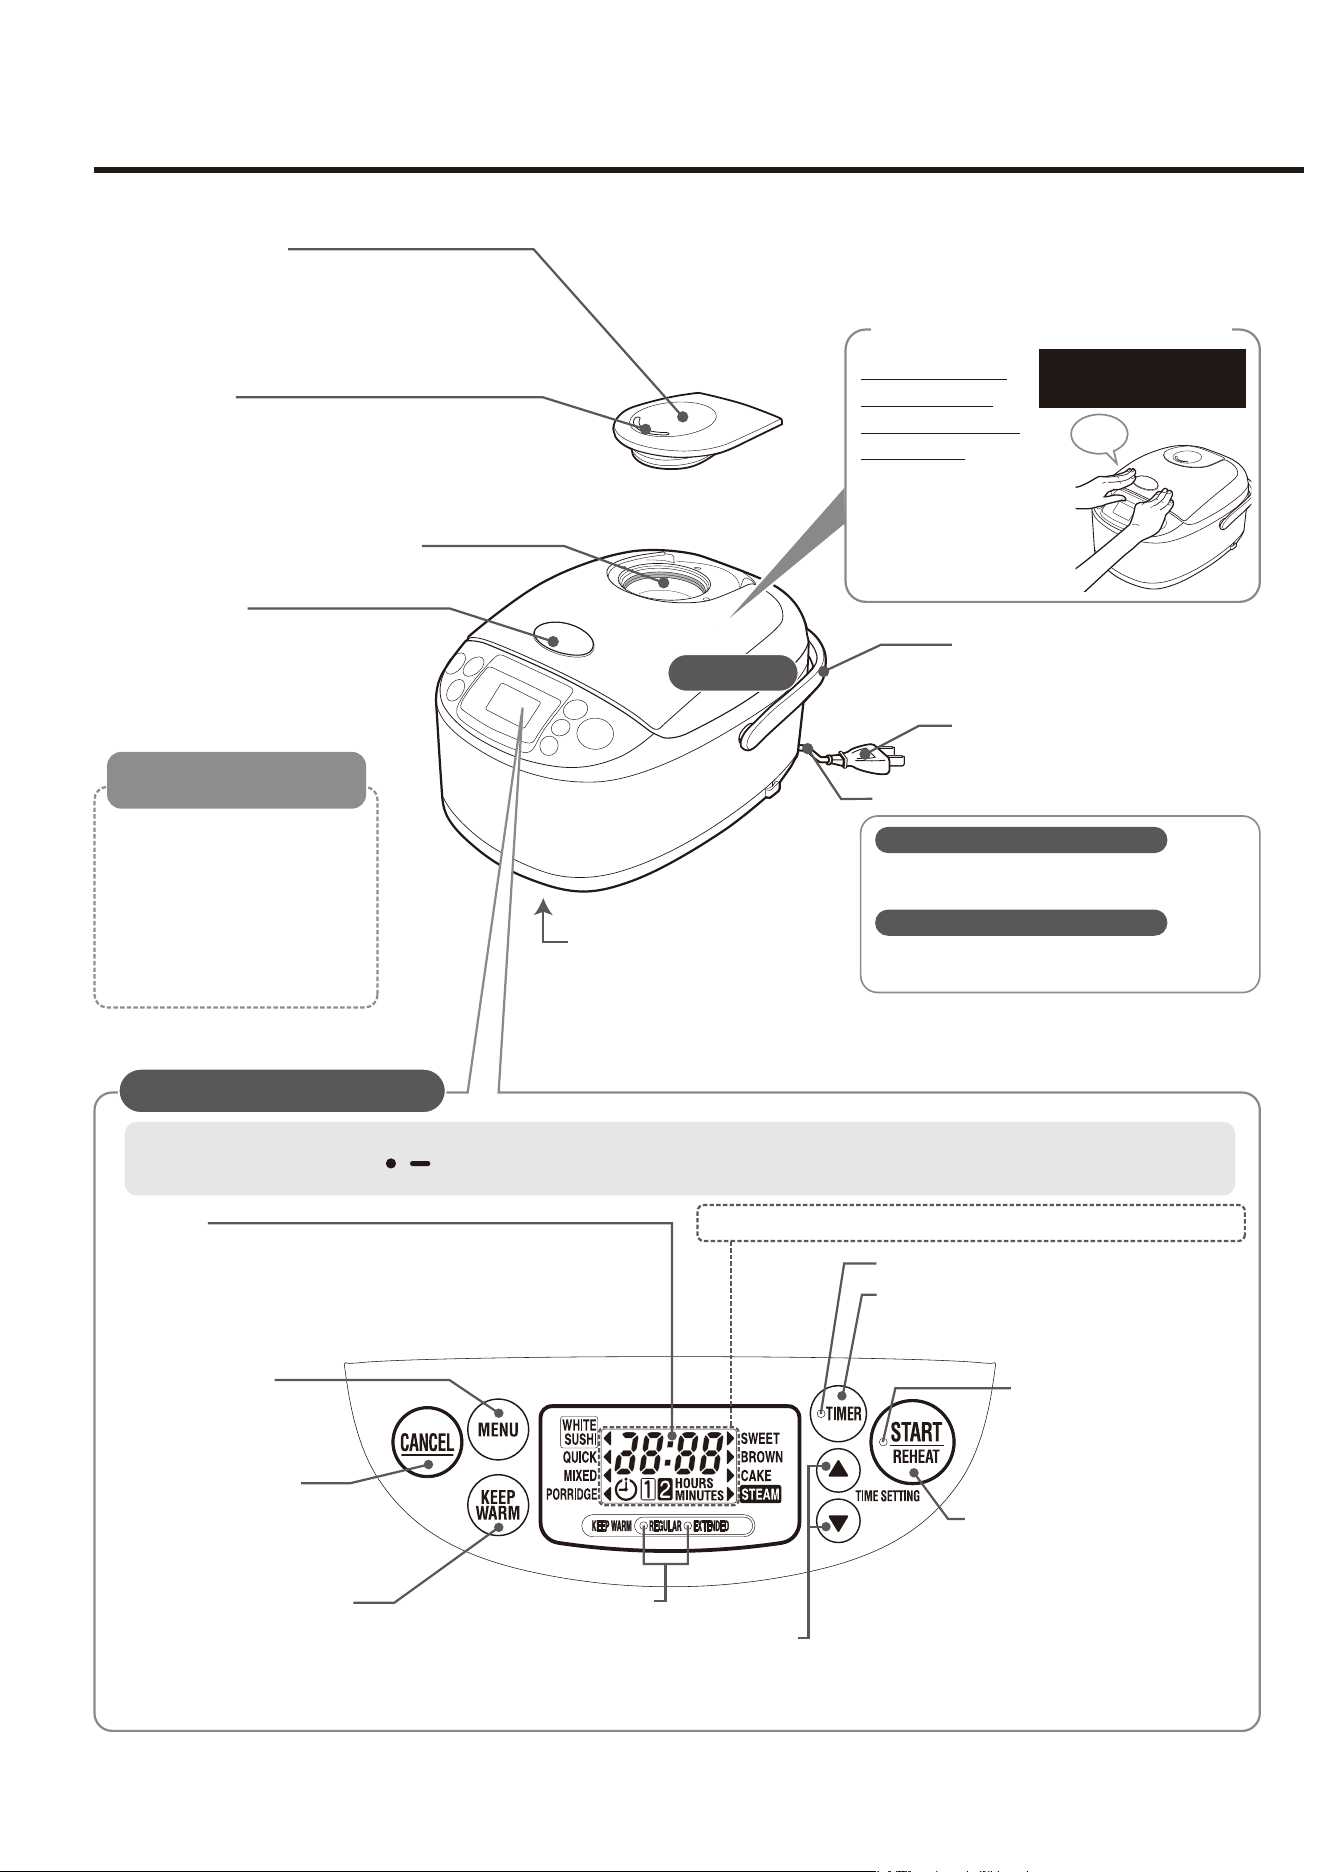
Inner Surface
Outer Surface
●
Do not place utensils or dishes inside the
Inner Cooking Pan.
●
Do not place in a dishwasher or dish dryer.
●
Clean the Inner Cooking Pan immediately
after using any seasonings.
●
Only use soft cleaning implements such as
a sponge when cleaning.
●
Remove foreign matter (such as
stones) from the rice before cleaning.
●
Do not use utensils such as whisks to
clean rice.
●
Do not place a metal strainer in the
Inner Cooking Pan when cleaning rice.
●
Use the Inner Cooking Pan only for
this Rice Cooker.
●
Do not use such items as thinner, abrasive cleaners,
bleach, scrubbing brushes (nylon, metal, etc.),
melamine sponges or sponges with a nylon surface.
●
Heat may cause some discoloration, but this does not affect the cooking results.
●
The outer surface touches important sensitive sensors. Be careful not to allow it to get dirty or damaged.
●
Note that firmly pushing the bottom surface of the Inner Cooking Pan against a sink, table, or similar
items may damage or discolor such items.
The Coating on the inner surface of the Inner Cooking Pan can peel off if damaged.
Please take special care to prevent damage and follow these precautions.
Nylon
Surface
Inner Surface
Outer Surface
●
Do not pour vinegar into the Inner
Cooking Pan (when making sushi rice).
●
Do not use a metal ladle (when serving
porridge, etc.).
●
Do not hit with the Spatula or other
utensils (when serving, etc.).
In order to use the Inner Cooking Pan for many years to
come, please observe the following.
<During Preparation>
<When Cleaning> →pg. 24
<When Cooking Completes>
The Coating on the inner surface of the Inner Cooking Pan may wear out with use.
●
The Coating may eventually discolor or peel off. This will not affect the cooking / Keep Warm performances or its sanitary
properties, and is harmless to your health.
●
If concerned with the peeling of the Coating or if the Inner Cooking Pan deforms, please replace it by purchasing a new one.
→pg. 30
6 7
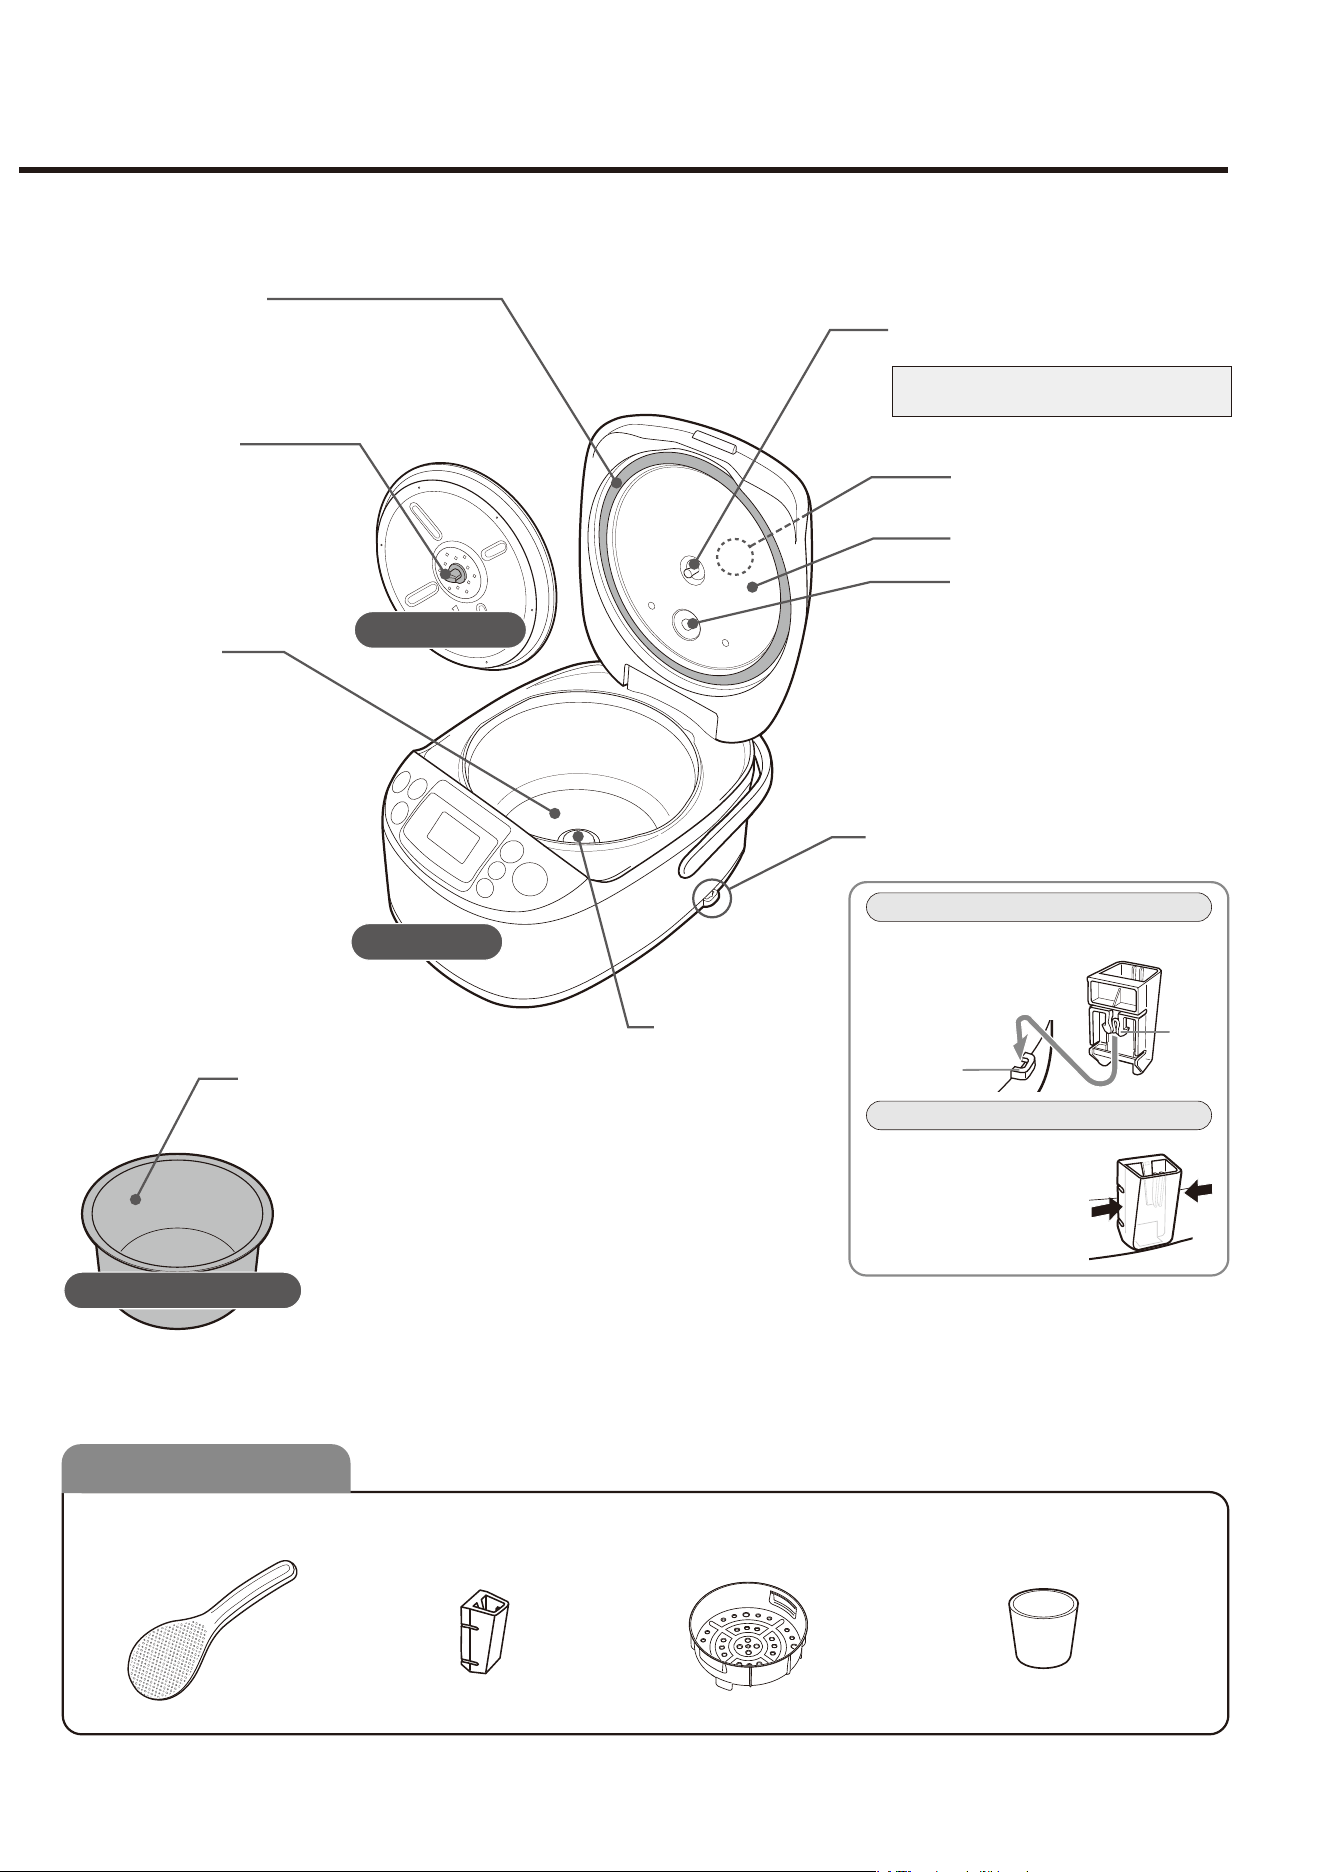
PART NAMES AND FUNCTIONS
Handle
Power Plug
Power Cord
Open Button
Press the Open Button to open
the Outer Lid.
Use the Handle for carrying.
Steam Vent Cap Receptacle
Air Vent
(bottom front of the Main Body)
●
Be sure to firmly insert the Steam Vent Cap.
●
The Steam Vent Cap will be very hot while cooking
and immediately afterward. Be very careful.
Steam Vent Cap
●
Steam arising from the vent is very hot while rice is
cooking. Please exercise care.
Steam Vent
Display
CANCEL button
START/REHEAT button
START/REHEAT light
KEEP WARM button
TIME SETTING buttons
a
TIMER button
TIMER light
Use this button to initiate cooking
or reheating.
Use this button to cancel
the selected setting or
function in operation.
●
Use when cooking rice using the Timer
function. →pg. 16
●
During Keep Warm, use this button to
select the Regular Keep Warm or
Extended Keep Warm mode.
→pg. 13
●
Use this button to restart the Keep Warm
mode. → pg. 14
●
Black lines that may appear on the LCD when wiped with a
cloth are caused by static electricity and do not indicate a
malfunction. Such lines disappear shortly.
●
While the Power Plug is pulled out, only the time display turns
on.
This Display is an example only, and will not appear in actual use.
●
Use this button when adjusting the current time. →pg. 9
●
Use this button when setting the scheduled time for TIMER cooking. →pg. 16
●
Use this button to set the time for cake baking and steaming. →pg. 17, pg. 18
KEEP WARM lights
MENU button
Use this button for setting
the menu you will be
using.
→pg. 10
A lithium battery is installed
internally so that even if the
Power Cord is unplugged,
information such as the
current time and menu
settings are saved. The
lithium battery will wear out
with use. →pg. 29
Spatula Spatula Holder Steaming Basket
Measuring Cup
ACCESSORIES
How to Extend the Power Cord:
CONTROL PANEL
●
Press buttons down firmly.
●
The raised dot and dash ( , ) in the center of the START/REHEAT and CANCEL buttons and the Notification Sounds
are provided for individuals with visual impairment.
Press down on the center
front edge of the Outer Lid.
●
The Outer Lid may
open during
cooking or the Keep
Warm mode if it is
not closed securely.
HOW TO CLOSE THE OUTER LID
Click
Push down on
the Outer Lid
until you hear it
click shut.
Hold the Power Plug and pull out. (Do not
pull out beyond the red mark on the cord.)
How to Retract the Power Cord:
Hold the Power Plug and pull out the Power
Cord about an inch then allow it to retract.
Outer Lid
Water Level Lines
Lid Sensor
(Located at 2 positions inside
the Inner Cooking Pan)
Center Sensor
Radiator Plate
Steam Vent
Spatula Holder Attachment
Inner Lid Set Mounting Axis
Attach the Inner Lid Set here.
●
Be sure to reattach the Inner Lid
Set after every cleaning.
→pg. 25
(Located at 2 positions: right & left edges)
Heating Plate
●
Please remove the
protective sheet placed
between the Heating
Plate and the Inner
Cooking Pan before
initial use.
Inner Cooking Pan
Main Body
Inner Lid Set
Spatula Holder
Attachment
Hook
How to attach the Spatula Holder:
Inner Lid Knob
Outer Lid Gasket
Use this knob for detaching and
attaching the Inner Lid Set.
●
Push the hook of the Spatula Holder
into the Spatula Holder
Attachment.
How to detach the Spatula Holder:
●
Press the center part
on each side of the
Spatula Holder in the
directions of the
arrows to detach the
Spatula Holder.
(approx. 6.1 fl. oz./approx. 180 mL)
About the Lithium Battery
(button cell or coin battery)
6 7
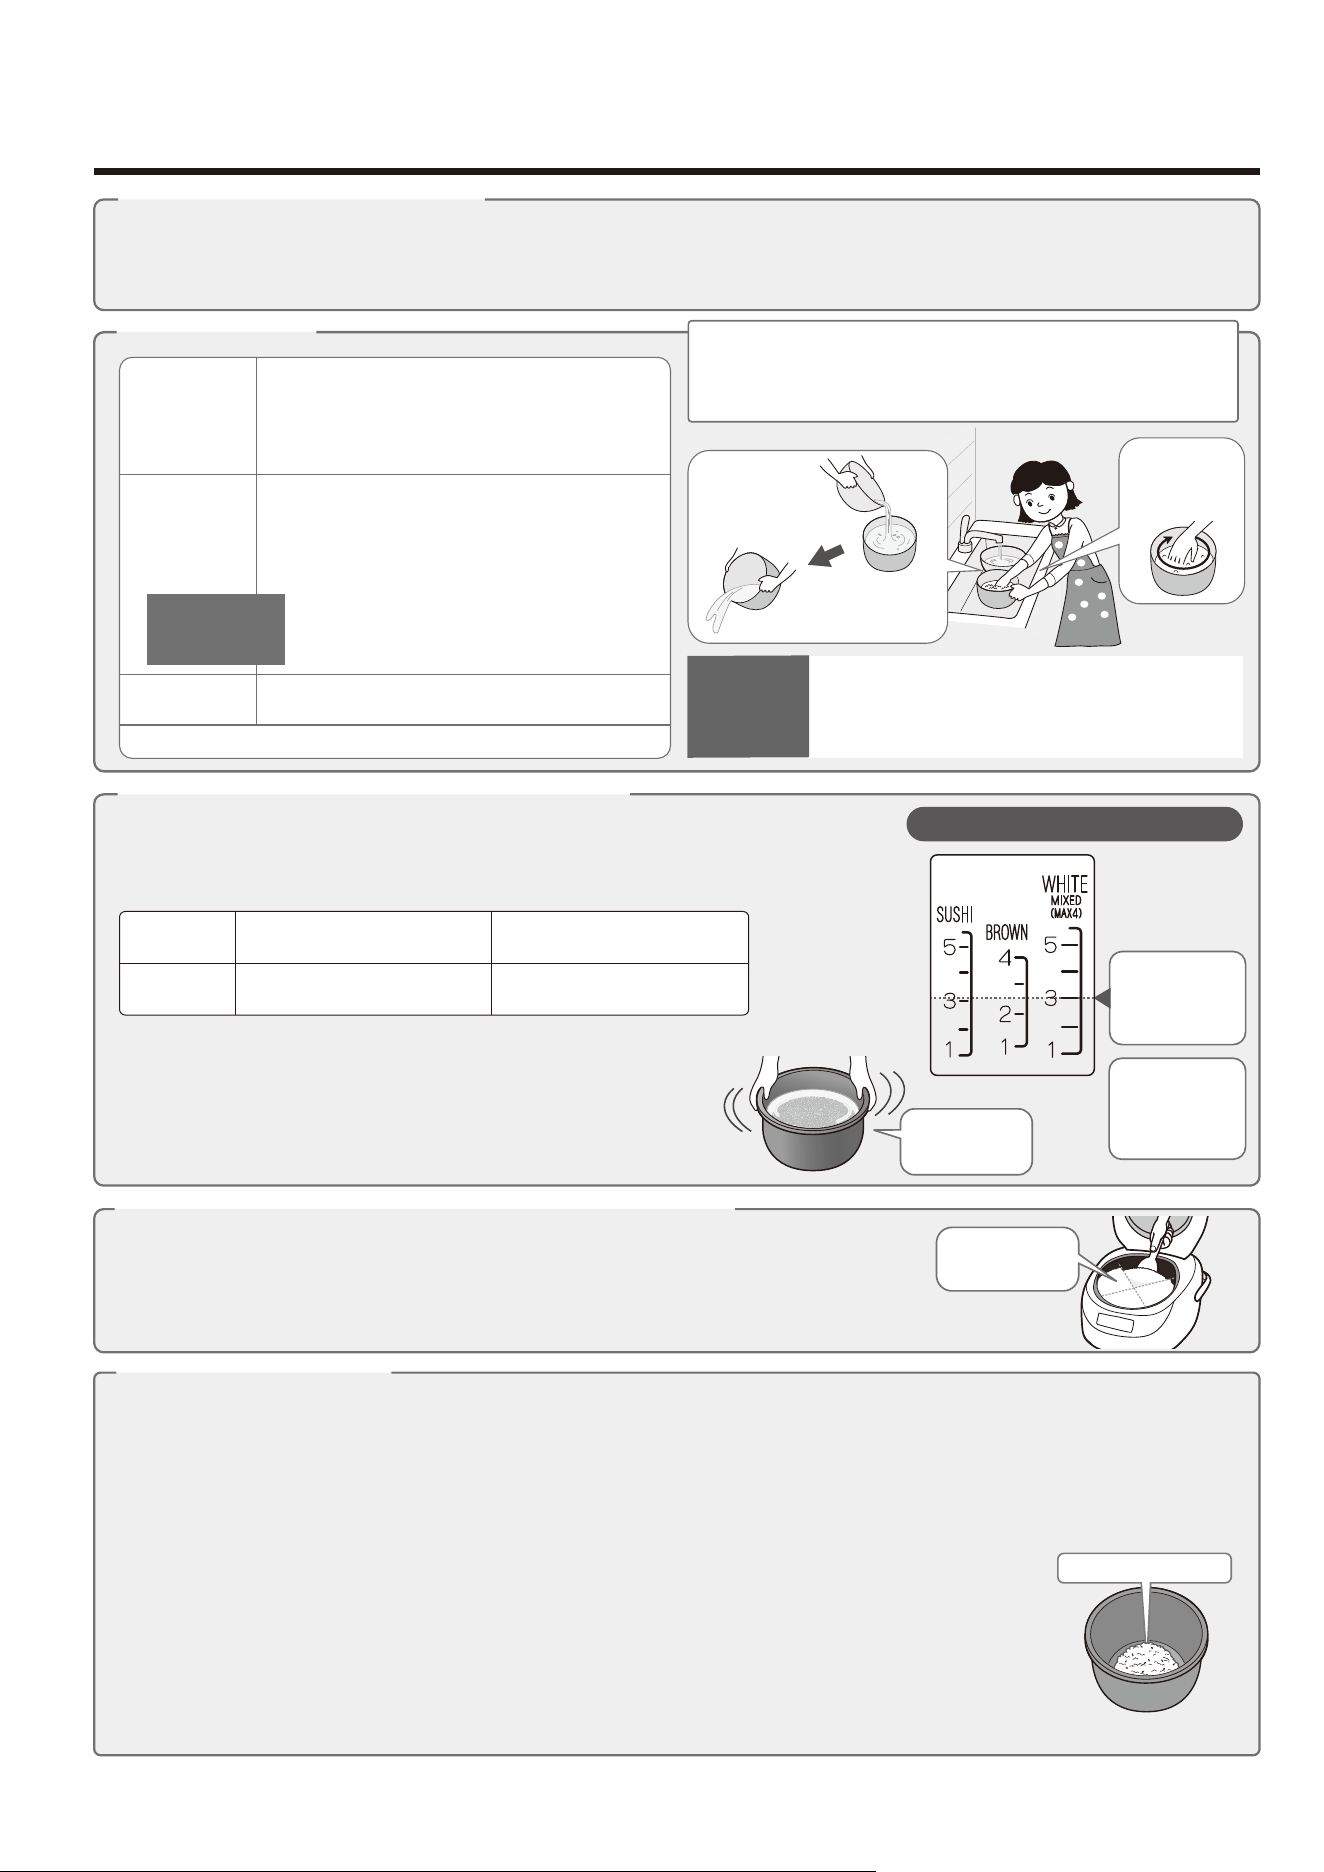
PART NAMES AND FUNCTIONS
Handle
Power Plug
Power Cord
Open Button
Press the Open Button to open
the Outer Lid.
Use the Handle for carrying.
Steam Vent Cap Receptacle
Air Vent
(bottom front of the Main Body)
●
Be sure to firmly insert the Steam Vent Cap.
●
The Steam Vent Cap will be very hot while cooking
and immediately afterward. Be very careful.
Steam Vent Cap
●
Steam arising from the vent is very hot while rice is
cooking. Please exercise care.
Steam Vent
Display
CANCEL button
START/REHEAT button
START/REHEAT light
KEEP WARM button
TIME SETTING buttons
a
TIMER button
TIMER light
Use this button to initiate cooking
or reheating.
Use this button to cancel
the selected setting or
function in operation.
●
Use when cooking rice using the Timer
function. →pg. 16
●
During Keep Warm, use this button to
select the Regular Keep Warm or
Extended Keep Warm mode.
→pg. 13
●
Use this button to restart the Keep Warm
mode. → pg. 14
●
Black lines that may appear on the LCD when wiped with a
cloth are caused by static electricity and do not indicate a
malfunction. Such lines disappear shortly.
●
While the Power Plug is pulled out, only the time display turns
on.
This Display is an example only, and will not appear in actual use.
●
Use this button when adjusting the current time. →pg. 9
●
Use this button when setting the scheduled time for TIMER cooking. →pg. 16
●
Use this button to set the time for cake baking and steaming. →pg. 17, pg. 18
KEEP WARM lights
MENU button
Use this button for setting
the menu you will be
using.
→pg. 10
A lithium battery is installed
internally so that even if the
Power Cord is unplugged,
information such as the
current time and menu
settings are saved. The
lithium battery will wear out
with use. →pg. 29
Spatula Spatula Holder Steaming Basket
Measuring Cup
ACCESSORIES
How to Extend the Power Cord:
CONTROL PANEL
●
Press buttons down firmly.
●
The raised dot and dash ( , ) in the center of the START/REHEAT and CANCEL buttons and the Notification Sounds
are provided for individuals with visual impairment.
Press down on the center
front edge of the Outer Lid.
●
The Outer Lid may
open during
cooking or the Keep
Warm mode if it is
not closed securely.
HOW TO CLOSE THE OUTER LID
Click
Push down on
the Outer Lid
until you hear it
click shut.
Hold the Power Plug and pull out. (Do not
pull out beyond the red mark on the cord.)
How to Retract the Power Cord:
Hold the Power Plug and pull out the Power
Cord about an inch then allow it to retract.
Outer Lid
Water Level Lines
Lid Sensor
(Located at 2 positions inside
the Inner Cooking Pan)
Center Sensor
Radiator Plate
Steam Vent
Spatula Holder Attachment
Inner Lid Set Mounting Axis
Attach the Inner Lid Set here.
●
Be sure to reattach the Inner Lid
Set after every cleaning.
→pg. 25
(Located at 2 positions: right & left edges)
Heating Plate
●
Please remove the
protective sheet placed
between the Heating
Plate and the Inner
Cooking Pan before
initial use.
Inner Cooking Pan
Main Body
Inner Lid Set
Spatula Holder
Attachment
Hook
How to attach the Spatula Holder:
Inner Lid Knob
Outer Lid Gasket
Use this knob for detaching and
attaching the Inner Lid Set.
●
Push the hook of the Spatula Holder
into the Spatula Holder
Attachment.
How to detach the Spatula Holder:
●
Press the center part
on each side of the
Spatula Holder in the
directions of the
arrows to detach the
Spatula Holder.
(approx. 6.1 fl. oz./approx. 180 mL)
About the Lithium Battery
(button cell or coin battery)
98
HOW TO SET THE CLOCK
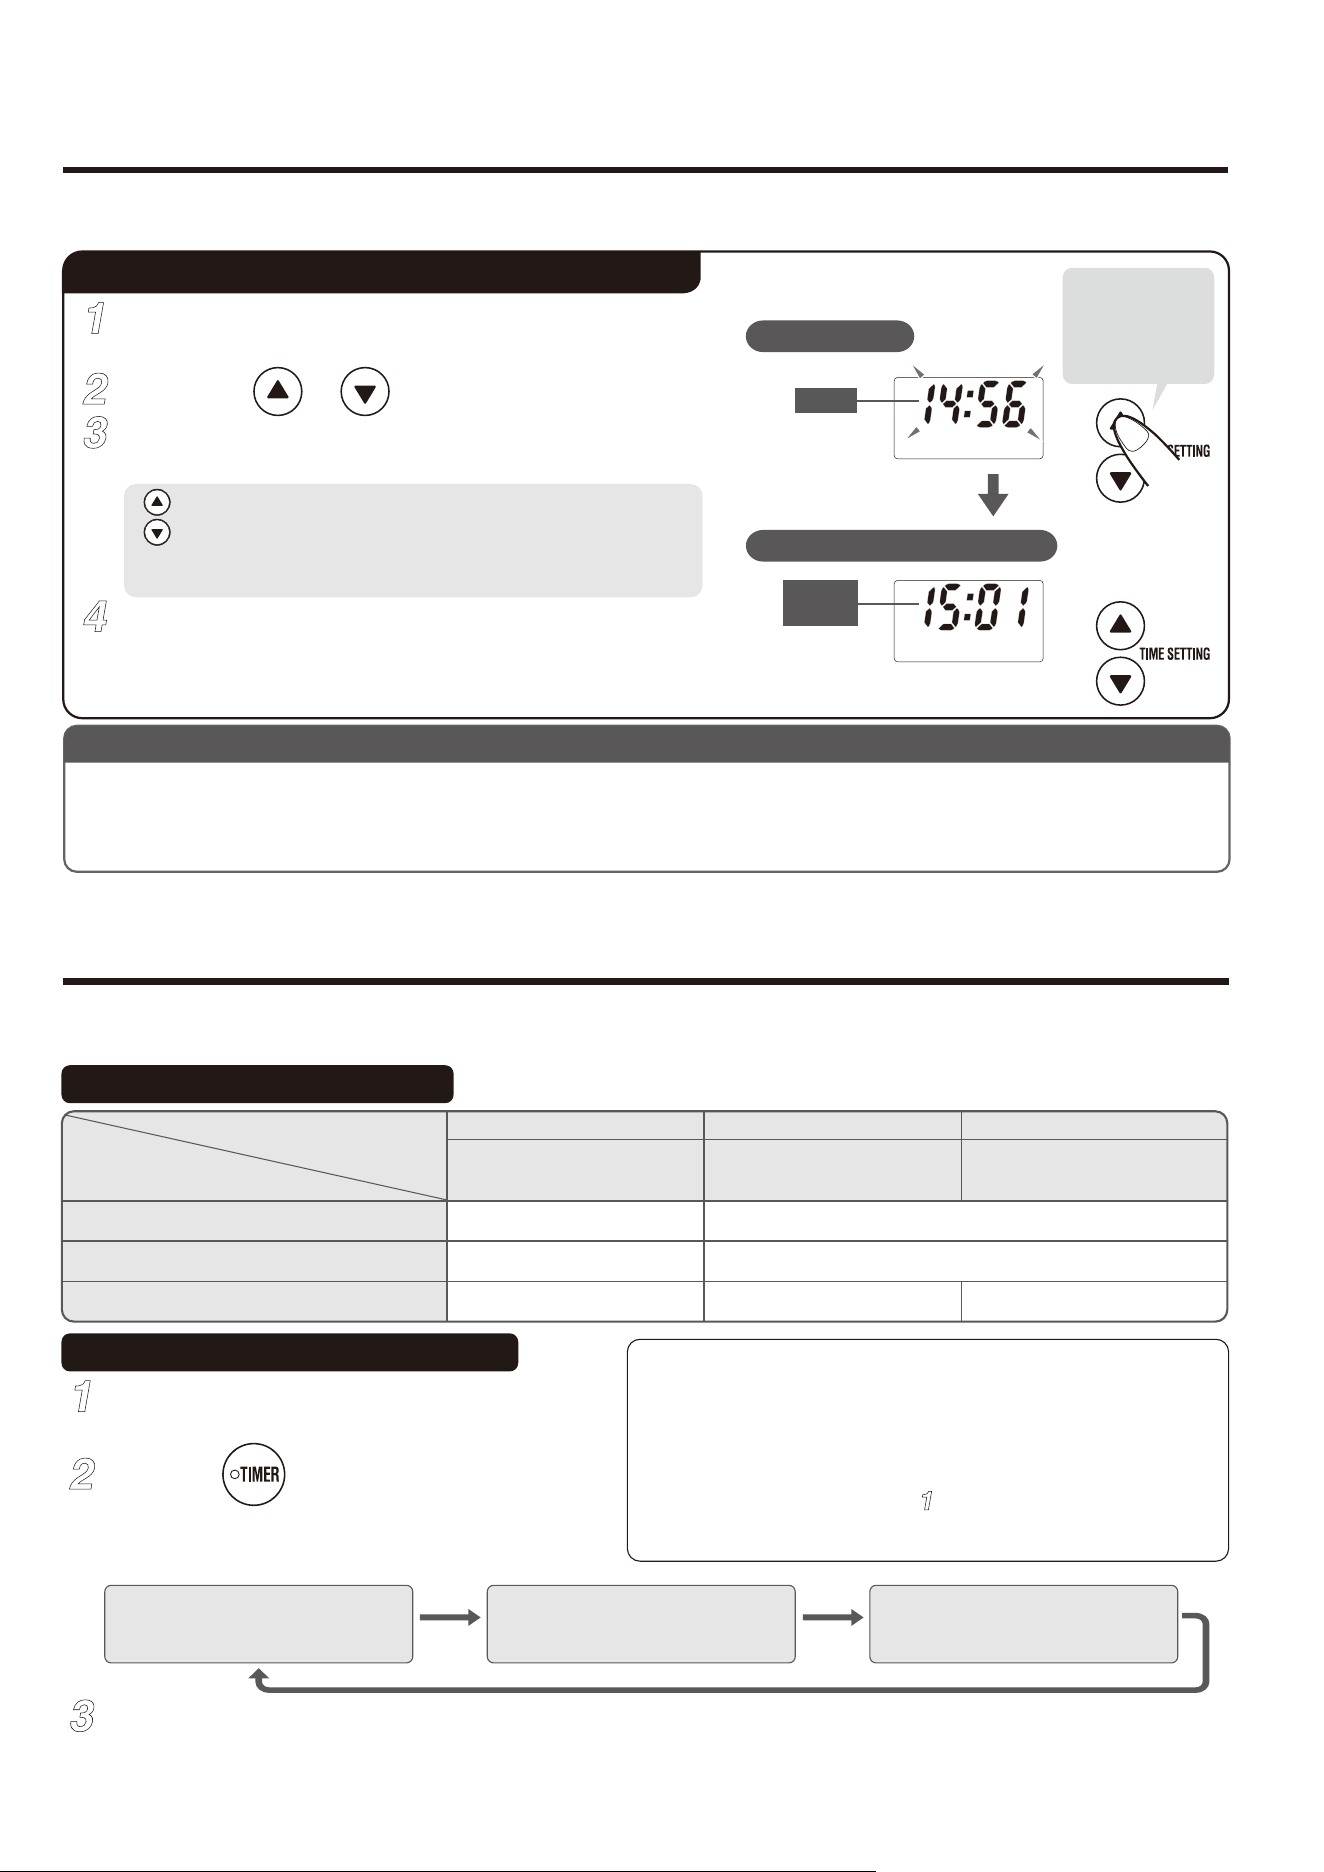
●Although the clock is set before shipment from the factory, certain conditions such as room temperature may
cause it to display an inaccurate time.
●If the clock is inaccurate, cooking will not be completed at the time you set for the Timer.
●
The clock cannot be changed during cooking, reheating, Regular Keep Warm, Extended Keep Warm, or timer cooking.
If the clock is inaccurate, set the correct time as shown below.
HOW TO CHANGE THE NOTIFICATION SOUNDS
●
The clock is displayed in 24-hour (military) time.
e.g. If the current time is 15:01 but displays 14:56.
2
1
3
●
The selected Notification Sound is stored even if the Power Plug is disconnected from the electrical outlet.
Each time the TIMER button is held for more
than 3 seconds, the Notification Sounds will change.
●
You cannot change the Melody Signal for the initiation of
reheating.
●
You cannot change the Notification Sounds during cooking,
reheating, Regular Keep Warm, Extended Keep Warm or
timer cooking.
●
If you find it difficult to change/select the Notification Sounds,
please start over from Step .
●
Regardless of the setting, the buzzer indicating an error will
sound.
Hold the button for more than
3 seconds.
The setting is completed when the desired Notification Sound is heard.
This product is equipped with a Notification Sound function, which will inform you when the Rice Cooker begins cooking,
when the Timer is set, or when cooking has completed. You can choose the sound type from Melody, Beep or Silent.
Types of Notification Sounds
How to Change the Notification Sounds
1
1
2
4
Press the or button.
Set the Inner Cooking Pan and insert the Power
Plug into an electrical outlet.
The time display will stop blinking after 3 seconds,
indicating the Time Setting is completed.
3
Once the time display starts blinking, immediately
adjust the clock to the current time.
If the time display still does not show the current time, repeat Step
2
to
readjust the time.
●
Press and hold either button to quickly adjust in 10-minute
increments.
: Each press advances the time in 1-minute increments.
: Each press reverses the time in 1-minute increments.
Set the Inner Cooking Pan and insert
the Power Plug into an electrical outlet.
Adjusting time
Time correction is completed
Blinks
Stops
blinking
Press
immediately
once the time
display starts
blinking.
①
Melody
It will play “Amaryllis” when the
sound setting is completed.
②
Beep
It will beep 3 times when the sound
setting is completed.
③
Silent
It will beep 1 time when the sound
setting is completed.
Melody Beep Silent
Default setting at the time of
shipment from the factory.
Choose this setting to
change from a Melody.
Choose this setting to
disable the Notification Sound.
Cooking has begun
Timer is set
“Twinkle, Twinkle, Little Star”
“Twinkle, Twinkle, Little Star”
“Amaryllis”
beeps 5 times
no sound
When
Types of Notification Sounds
and their meanings
a beep
a beep
Cooking or reheating has completed
TIPS FOR DELICIOUS RICE
①
Rinse rice
②
Wash rice
③
Rinse rice
Attention!
Do not clean the rice or adjust the amount of
water using hot water (95°F/35°C or above).
Doing so will cause the rice to be cooked
improperly.
Adjusting to Correct Amount of Water
Selecting and Storing Rice
Washing Rice
Loosening Rice After Cooking Has Completed
Keeping Rice Warm
Gather rice in center
●
Complete steps ①–③ within 10 minutes.
Add water to
Water Level
Line
3 for
WHITE
.
This illustration
shows the
Inner Cooking
Pan of the
1.0 L model.
When Cooking 3 Cups of White Rice
First, pour plenty of water into the Inner
Cooking Pan from the bowl and stir the rice
loosely by hand 2 or 3 times (for 10 seconds
or less). Drain the water immediately
afterwards. Repeat twice.
Wash by stirring the rice by hand 30 times,
pour plenty of water from the bowl and stir the
rice loosely again. Drain the water
immediately afterwards. Repeat this washing
process 2-4 times.
Lastly, pour plenty of water from the bowl and
rinse the rice. Repeat twice.
New Crop
●
If you add too much water, it may boil over through the Steam Vent.
●
Do not use alkalized ionic water that is over pH 9. Rice cooked with strongly
alkalized ionic water may appear yellow or become too glutinous.
●
Before placing the Inner Cooking Pan in the Rice Cooker, turn the
Inner Cooking Pan lightly to level out the surface of the rice.
●
Wipe the Inner Cooking Pan clean. Moisture or dirt on the Inner
Cooking Pan will prevent the sensor from operating correctly, and
the Rice Cooker will not be able to cook delicious rice.
●
Loosen the rice one quarter at a time by sliding the spatula along the edge of the Inner Cooking Pan
and lifting up a large part of rice, standing up the spatula, and then cutting through clumps in the rice.
Type of
Rice
Add a little water to the
normal level
Reduce water slightly
from the normal level
Water
Adjustment
Be sure to adjust the amount of water on a flat surface. The Water
Level Lines are guidelines. Adjust the amount of water according to
preference, rice type, and crop age.
For each brand of rice, select rice that has been polished as recently as possible.
The quality of rice deteriorates over time after it has been polished. We recommend that you purchase rice in small quantities,
refrigerate it in airtight containers, or take similar measures.
As a guideline, polished rice expires within two weeks in the summer and within two months in the winter.
Doing so releases excess moisture, resulting in rice that is perfectly cooked with a fluffy
texture. Loosen the rice within 10 minutes after cooking completes. Not loosening the rice
may cause it to clump, become too glutinous or burn.
Old Crop
●
When keeping rice in the Inner Cooking Pan for later consumption, use the Keep Warm mode.
●
To prevent the rice from becoming dry, wet,
developing an odor or turning yellow, do not use the
Keep Warm mode for the following:
●
Keeping a small amount of rice warm for a long period.
●
Keeping rice warm for more than 12 hours.
●
Adding additional rice while keeping rice warm.
●
Reheating cold rice. ●
Keeping porridge warm.
●
Keeping rice warm when it contains additional ingredients and
seasonings (mixed rice or sweet rice, etc.).
●
Keeping foods other than rice warm.
●
Keeping rice warm with the Spatula left inside the Rice Cooker.
●
Keeping food cooked with the STEAM menu item warm.
●
If rice is left in the Inner Cooking Pan with the Power Plug unplugged or with the Keep Warm mode canceled, the rice
may develop a foul odor or condensed moisture may fall on the rice, making it soggy.
●
When keeping a small amount of rice warm,
gather the rice toward the center of the Inner
Cooking Pan.
●
As the amount of rice kept
warm decreases, the rice
may dry or become wet.
To minimize this, gather the
rice toward the center of the
Inner Cooking Pan while
keeping warm.
Guidelines for
the number of
repetitions
・
Less than 4 cups of rice .... 2 sets
・
4 - 7 cups of rice ... 3 sets
・
8 cups of rice or more ... 4 sets
Prepare a bowl to pool water.
If you pour water into the Inner Cooking Pan directly
from the faucet, the rice will absorb water that smells
like rice bran as water is pooling.
Rinse the rice
with plenty of
water quickly.
Drain the water
immediately
afterwards.
Wash by
stirring the rice
with large
motions.
Ensure that the
surface of the
rice is level.
Loosen the rice
one quarter at a
time.
NOTE
98
HOW TO SET THE CLOCK
●Although the clock is set before shipment from the factory, certain conditions such as room temperature may
cause it to display an inaccurate time.
●If the clock is inaccurate, cooking will not be completed at the time you set for the Timer.
●
The clock cannot be changed during cooking, reheating, Regular Keep Warm, Extended Keep Warm, or timer cooking.
If the clock is inaccurate, set the correct time as shown below.
HOW TO CHANGE THE NOTIFICATION SOUNDS
●
The clock is displayed in 24-hour (military) time.
e.g. If the current time is 15:01 but displays 14:56.
2
1
3
●
The selected Notification Sound is stored even if the Power Plug is disconnected from the electrical outlet.
Each time the TIMER button is held for more
than 3 seconds, the Notification Sounds will change.
●
You cannot change the Melody Signal for the initiation of
reheating.
●
You cannot change the Notification Sounds during cooking,
reheating, Regular Keep Warm, Extended Keep Warm or
timer cooking.
●
If you find it difficult to change/select the Notification Sounds,
please start over from Step .
●
Regardless of the setting, the buzzer indicating an error will
sound.
Hold the button for more than
3 seconds.
The setting is completed when the desired Notification Sound is heard.
This product is equipped with a Notification Sound function, which will inform you when the Rice Cooker begins cooking,
when the Timer is set, or when cooking has completed. You can choose the sound type from Melody, Beep or Silent.
Types of Notification Sounds
How to Change the Notification Sounds
1
1
2
4
Press the or button.
Set the Inner Cooking Pan and insert the Power
Plug into an electrical outlet.
The time display will stop blinking after 3 seconds,
indicating the Time Setting is completed.
3
Once the time display starts blinking, immediately
adjust the clock to the current time.
If the time display still does not show the current time, repeat Step
2
to
readjust the time.
●
Press and hold either button to quickly adjust in 10-minute
increments.
: Each press advances the time in 1-minute increments.
: Each press reverses the time in 1-minute increments.
Set the Inner Cooking Pan and insert
the Power Plug into an electrical outlet.
Adjusting time
Time correction is completed
Blinks
Stops
blinking
Press
immediately
once the time
display starts
blinking.
①
Melody
It will play “Amaryllis” when the
sound setting is completed.
②
Beep
It will beep 3 times when the sound
setting is completed.
③
Silent
It will beep 1 time when the sound
setting is completed.
Melody Beep Silent
Default setting at the time of
shipment from the factory.
Choose this setting to
change from a Melody.
Choose this setting to
disable the Notification Sound.
Cooking has begun
Timer is set
“Twinkle, Twinkle, Little Star”
“Twinkle, Twinkle, Little Star”
“Amaryllis”
beeps 5 times
no sound
When
Types of Notification Sounds
and their meanings
a beep
a beep
Cooking or reheating has completed
TIPS FOR DELICIOUS RICE
①
Rinse rice
②
Wash rice
③
Rinse rice
Attention!
Do not clean the rice or adjust the amount of
water using hot water (95°F/35°C or above).
Doing so will cause the rice to be cooked
improperly.
Adjusting to Correct Amount of Water
Selecting and Storing Rice
Washing Rice
Loosening Rice After Cooking Has Completed
Keeping Rice Warm
Gather rice in center
●
Complete steps ①–③ within 10 minutes.
Add water to
Water Level
Line
3 for
WHITE
.
This illustration
shows the
Inner Cooking
Pan of the
1.0 L model.
When Cooking 3 Cups of White Rice
First, pour plenty of water into the Inner
Cooking Pan from the bowl and stir the rice
loosely by hand 2 or 3 times (for 10 seconds
or less). Drain the water immediately
afterwards. Repeat twice.
Wash by stirring the rice by hand 30 times,
pour plenty of water from the bowl and stir the
rice loosely again. Drain the water
immediately afterwards. Repeat this washing
process 2-4 times.
Lastly, pour plenty of water from the bowl and
rinse the rice. Repeat twice.
New Crop
●
If you add too much water, it may boil over through the Steam Vent.
●
Do not use alkalized ionic water that is over pH 9. Rice cooked with strongly
alkalized ionic water may appear yellow or become too glutinous.
●
Before placing the Inner Cooking Pan in the Rice Cooker, turn the
Inner Cooking Pan lightly to level out the surface of the rice.
●
Wipe the Inner Cooking Pan clean. Moisture or dirt on the Inner
Cooking Pan will prevent the sensor from operating correctly, and
the Rice Cooker will not be able to cook delicious rice.
●
Loosen the rice one quarter at a time by sliding the spatula along the edge of the Inner Cooking Pan
and lifting up a large part of rice, standing up the spatula, and then cutting through clumps in the rice.
Type of
Rice
Add a little water to the
normal level
Reduce water slightly
from the normal level
Water
Adjustment
Be sure to adjust the amount of water on a flat surface. The Water
Level Lines are guidelines. Adjust the amount of water according to
preference, rice type, and crop age.
For each brand of rice, select rice that has been polished as recently as possible.
The quality of rice deteriorates over time after it has been polished. We recommend that you purchase rice in small quantities,
refrigerate it in airtight containers, or take similar measures.
As a guideline, polished rice expires within two weeks in the summer and within two months in the winter.
Doing so releases excess moisture, resulting in rice that is perfectly cooked with a fluffy
texture. Loosen the rice within 10 minutes after cooking completes. Not loosening the rice
may cause it to clump, become too glutinous or burn.
Old Crop
●
When keeping rice in the Inner Cooking Pan for later consumption, use the Keep Warm mode.
●
To prevent the rice from becoming dry, wet,
developing an odor or turning yellow, do not use the
Keep Warm mode for the following:
●
Keeping a small amount of rice warm for a long period.
●
Keeping rice warm for more than 12 hours.
●
Adding additional rice while keeping rice warm.
●
Reheating cold rice. ●
Keeping porridge warm.
●
Keeping rice warm when it contains additional ingredients and
seasonings (mixed rice or sweet rice, etc.).
●
Keeping foods other than rice warm.
●
Keeping rice warm with the Spatula left inside the Rice Cooker.
●
Keeping food cooked with the STEAM menu item warm.
●
If rice is left in the Inner Cooking Pan with the Power Plug unplugged or with the Keep Warm mode canceled, the rice
may develop a foul odor or condensed moisture may fall on the rice, making it soggy.
●
When keeping a small amount of rice warm,
gather the rice toward the center of the Inner
Cooking Pan.
●
As the amount of rice kept
warm decreases, the rice
may dry or become wet.
To minimize this, gather the
rice toward the center of the
Inner Cooking Pan while
keeping warm.
Guidelines for
the number of
repetitions
・
Less than 4 cups of rice .... 2 sets
・
4 - 7 cups of rice ... 3 sets
・
8 cups of rice or more ... 4 sets
Prepare a bowl to pool water.
If you pour water into the Inner Cooking Pan directly
from the faucet, the rice will absorb water that smells
like rice bran as water is pooling.
Rinse the rice
with plenty of
water quickly.
Drain the water
immediately
afterwards.
Wash by
stirring the rice
with large
motions.
Ensure that the
surface of the
rice is level.
Loosen the rice
one quarter at a
time.
NOTE
11
10
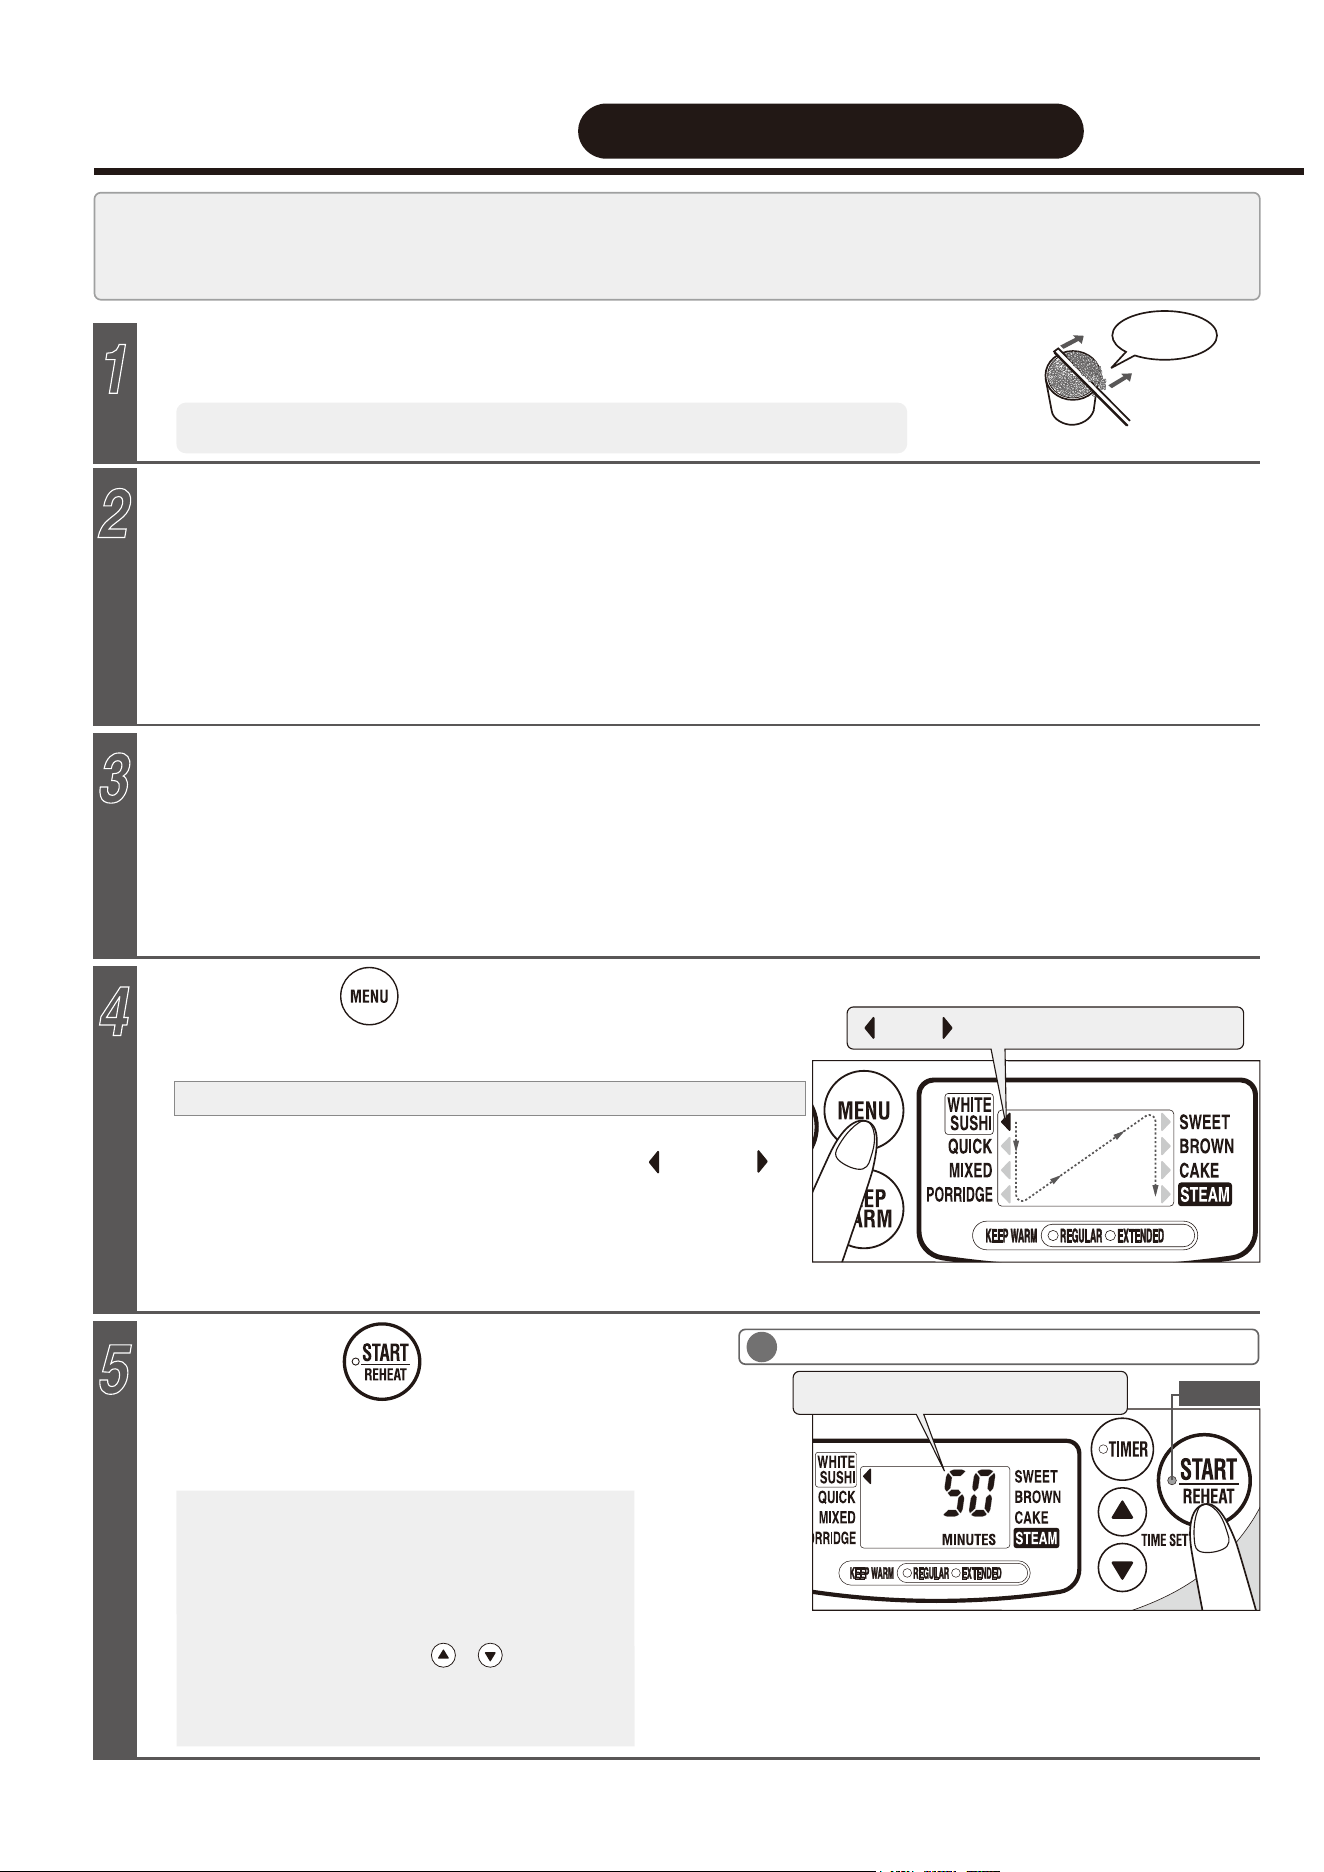
Each time you press the button, the illuminated display
item will switch between those shown with “ ”, and “ ” in
the order of ①, ②.
COOKING RICE
Clean the rice and adjust the amount of water.
Overfill the Measuring Cup with rice, then level off.
Measure the rice with the supplied Measuring Cup.
1
3
4
5
2
① Clean the rice. → See “TIPS FOR DELICIOUS RICE” on pg. 8
② On a flat leveled surface, pour water over the rice in the Inner Cooking Pan, filling to the Water Level Line
that matches the number of cups of rice you are cooking and the menu setting. → pg. 12
③ For an accurate measurement, level the surface of the rice.
●
The rice may be cooked immediately after cleaned, as soaking is not required. Soaking the rice will soften
the texture of the rice.
●
The Water Level Lines serve as standard guidelines and the amount of water should be adjusted according
to preference. (Adjust 1-2 mm above or below the indicated Water Level Line.)
Place the Inner Cooking Pan into the Main Body, attach the Inner
Lid Set and Steam Vent Cap, close the Outer Lid, and insert the
Power Plug into an electrical outlet.
(approx. 6.1 fl. oz./approx. 180 mL)
Press the button.
●
The Inner Cooking Pan may spin when loosening the rice. Holding the Inner Cooking Pan (which is very hot
immediately after use) with an oven-mitt or a soft cloth will keep it from spinning while reducing damage to the
outside bottom of the pan.
●
Depending on cooking conditions, the bottom portion of the rice may become slightly browned.
●
Depending on the heat convection while cooking, the surface of the finished rice may look uneven.
6
7
After use, remove all the rice from the Inner Cooking Pan, press the
button, unplug the Power Plug from the electrical outlet, and then
clean the Rice Cooker.
Do not close the Outer Lid with the Spatula inside the Rice Cooker. Doing so may make the Outer
Lid difficult to open.
②①
●
Wash the Inner Cooking Pan, Inner Lid Set, Steam Vent Cap, Spatula, Spatula Holder, Measuring Cup, and Steaming Basket
before initial use. → pg.24 - pg.25
●
When you use this Rice Cooker for the first time, there will be a resinous smell, such as that of plastic, but the odor will
lessen as you use the Rice Cooker. If you are concerned about the odor, please see pg. 24 “IF THERE IS AN ODOR”.
Be sure to use the Measuring Cup supplied, as other measuring cups may differ.
Level the rice off at the top of the cup to maintain accuracy.
BASIC COOKING STEPS
Level off!
Be sure to wipe moisture and foreign matter off the outer surface of the Inner Cooking Pan, the inside of the
Main Body, the Inner Lid Set, and the Steam Vent Cap.
●
Make sure that the Inner Cooking Pan is inserted all the way in.
●
Close the Outer Lid slowly and firmly until you hear a clicking sound.
Press the button and select
the menu setting.
●
The estimated time until cooking completion may differ from the actual time required.
The actual time of cooking completion may vary depending on factors such as the
room or water temperature, the voltage, the water measurement, or the type of rice.
●
The Rice Cooker will make adjustments to the estimated time until cooking
completion when it reaches the steaming process. The estimated time until
cooking completion may increase or decrease suddenly during this process.
●Press and hold the button to quickly cycle through the selections.
It will stop when it reaches WHITE/SUSHI menu setting.
●
The menu settings such as WHITE/SUSHI and BROWN will
remain selected until you change the setting.
●
The menu setting at the time of shipment from the factory is WHITE/SUSHI.
Ex.
Display when cooking with the WHITE/SUSHI menu setting
“ ”, and “ ” light up while the item is switched.
Displays the estimated time (in minutes)
until cooking completion.
The Melody (Beep) sounds, and cooking begins.
The START/REHEAT light turns on, and the Display shows
the estimated time (in minutes) until cooking completes.
Turns on
IMPORTANT
●
When cooking more than one pot of rice consecutively, or cooking
right after cancelling the Keep Warm mode, allow the Rice Cooker to
cool for 45 minutes or longer. If the Main Body and the Outer Lid are
hot, the rice may not cook well.
When adjusting the amount of water to the
PORRIDGE Water Level Line, do not cook using
menu settings other than PORRIDGE. Using any
other menu setting may cause the contents to
boil over.
●
The PORRIDGE menu setting will not be
saved. When cooking porridge, select the
PORRIDGE menu setting each time.
Be careful that the contents do not boil over.
● Do not begin cleaning the Rice Cooker until the Main Body has cooled. → pg.24 - pg.25
●
Please do not handle the Power Plug while your hands are wet. (Doing so may cause short circuit or electric
shock.)
●
Removing the Inner Cooking Pan only will not turn off the power. Make sure to press the CANCEL button.
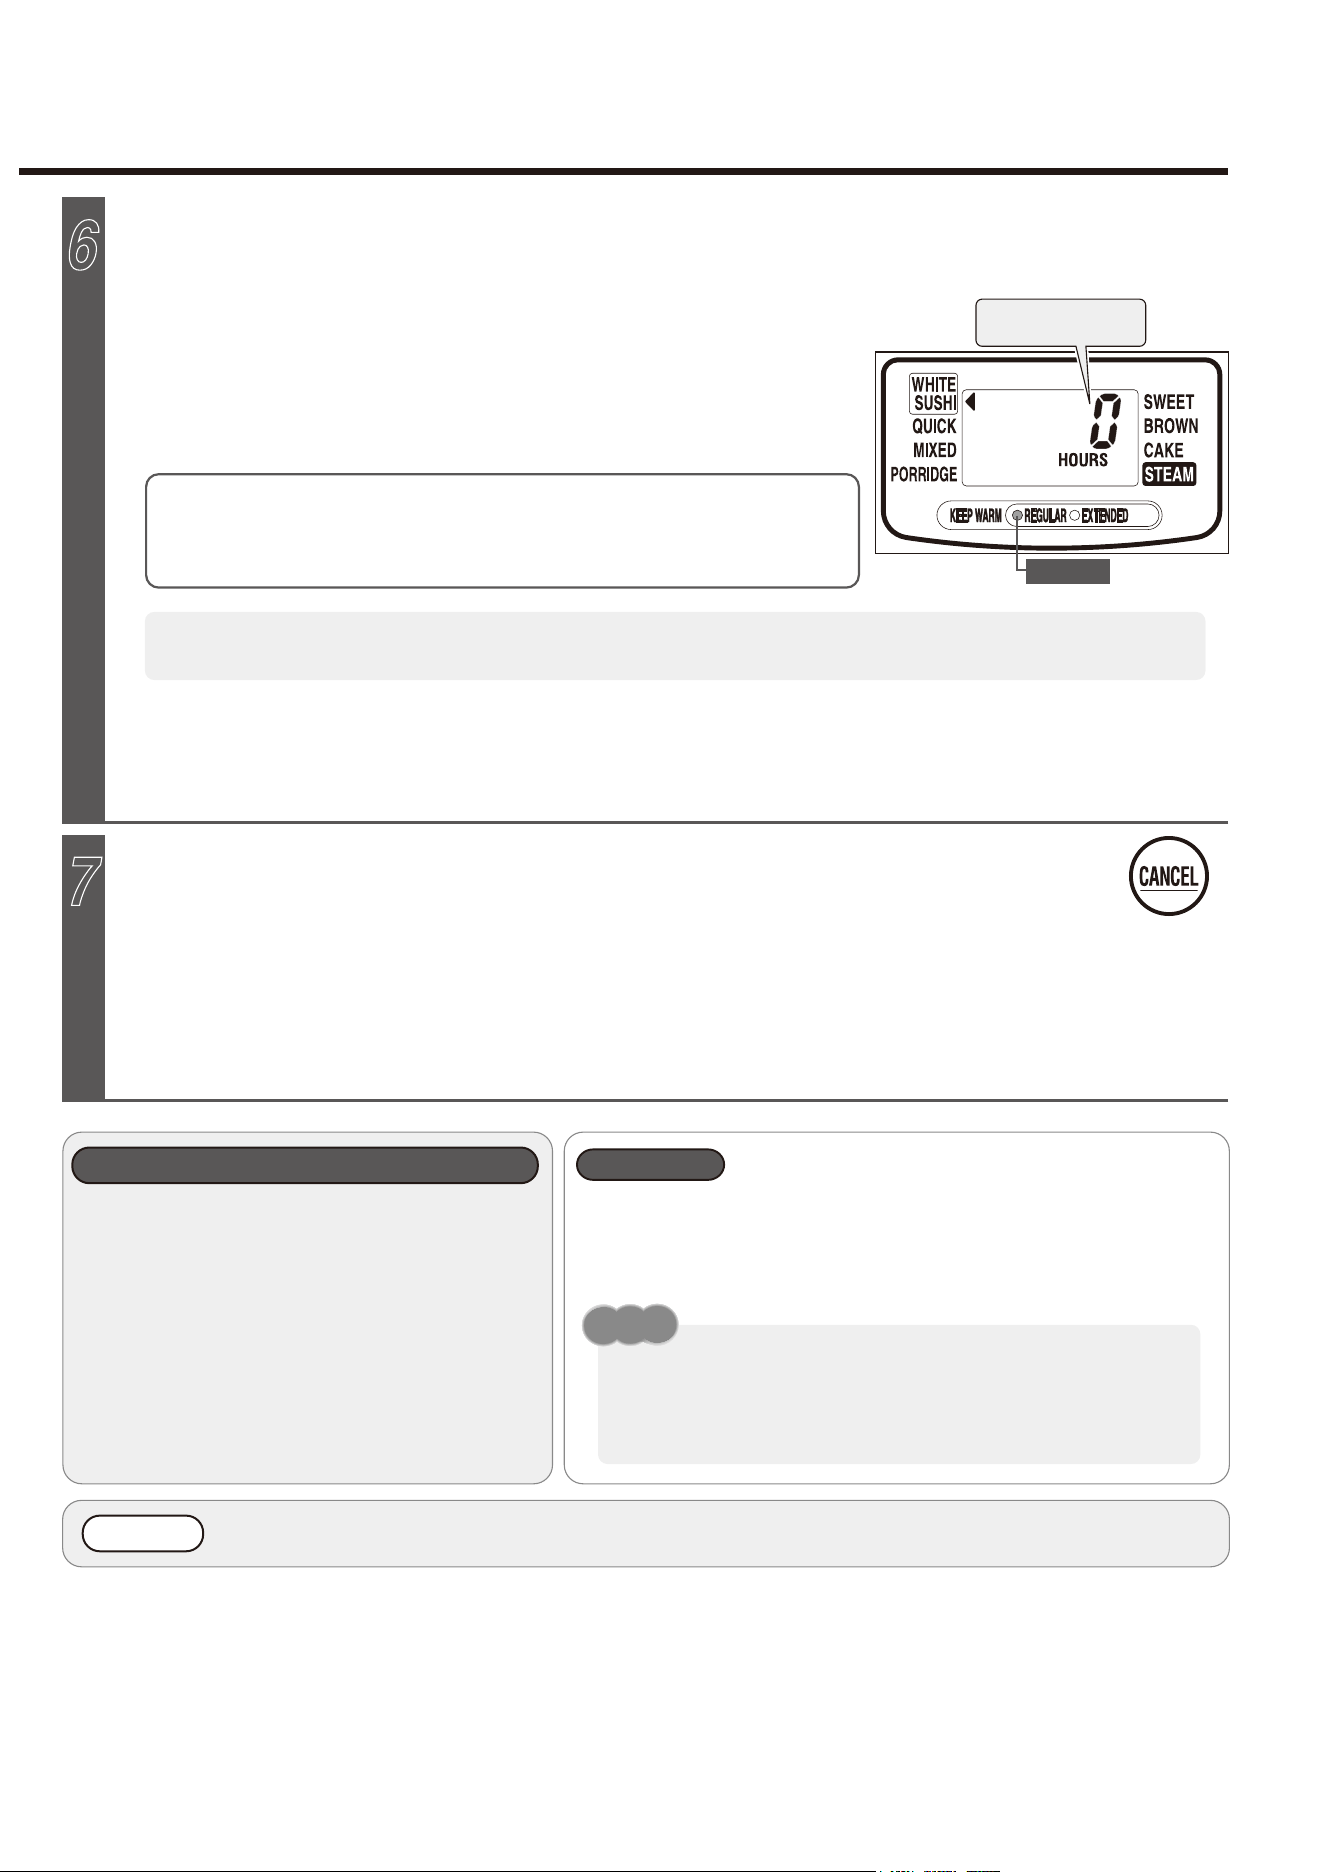
When it switches to the Keep Warm mode, immediately loosen the rice.
By loosening the rice and removing excess moisture, you prevent the
rice from hardening, becoming soggy, or becoming burnt
.
●Be careful not to burn yourself when loosening rice.
To cool the Main Body and Outer Lid quickly, please try the following:
•
Fill the Inner Cooking Pan with cold water and place it in the Main
Body.
•
Open the Outer Lid, remove the Inner Lid Set and allow the Radiator
Plate to cool.
NOTE
●You can switch the Notification Sounds (Melody, Beep, Silent) that alert you when certain actions occur.
→ See “HOW TO CHANGE THE NOTIFICATION SOUNDS” on pg. 9
Elapsed time of the
Keep Warm mode.
TIPS
When the Melody (Beep) to indicate cooking completion sounds
and the Rice Cooker switches to the Keep Warm mode, loosen the
rice immediately.
Turns on
●
Make sure the Rice Cooker is not in the Keep
Warm (Regular Keep Warm or Extended Keep
Warm) mode, then press the START/REHEAT
button. If the Keep Warm light is on, the reheating
process will start.
→ pg. 15
●
If you want to know the current time during the
cooking process, press the or button and the
Display will switch only while the button is pressed.
●
Do not put the Steaming Basket in the Rice Cooker
while cooking rice if not also steaming other foods.
When cooking completes, it will automatically switch to the Keep Warm mode.
→See “KEEPING RICE WARM” on pg. 13
The REGULAR KEEP WARM light turns on and the START/REHEAT light
turns off. The length of time that the rice has been kept warm is shown on
the Display in hours (HOURS).
11
10
Each time you press the button, the illuminated display
item will switch between those shown with “ ”, and “ ” in
the order of ①, ②.
COOKING RICE
Clean the rice and adjust the amount of water.
Overfill the Measuring Cup with rice, then level off.
Measure the rice with the supplied Measuring Cup.
1
3
4
5
2
① Clean the rice. → See “TIPS FOR DELICIOUS RICE” on pg. 8
② On a flat leveled surface, pour water over the rice in the Inner Cooking Pan, filling to the Water Level Line
that matches the number of cups of rice you are cooking and the menu setting. → pg. 12
③ For an accurate measurement, level the surface of the rice.
●
The rice may be cooked immediately after cleaned, as soaking is not required. Soaking the rice will soften
the texture of the rice.
●
The Water Level Lines serve as standard guidelines and the amount of water should be adjusted according
to preference. (Adjust 1-2 mm above or below the indicated Water Level Line.)
Place the Inner Cooking Pan into the Main Body, attach the Inner
Lid Set and Steam Vent Cap, close the Outer Lid, and insert the
Power Plug into an electrical outlet.
(approx. 6.1 fl. oz./approx. 180 mL)
Press the button.
●
The Inner Cooking Pan may spin when loosening the rice. Holding the Inner Cooking Pan (which is very hot
immediately after use) with an oven-mitt or a soft cloth will keep it from spinning while reducing damage to the
outside bottom of the pan.
●
Depending on cooking conditions, the bottom portion of the rice may become slightly browned.
●
Depending on the heat convection while cooking, the surface of the finished rice may look uneven.
6
7
After use, remove all the rice from the Inner Cooking Pan, press the
button, unplug the Power Plug from the electrical outlet, and then
clean the Rice Cooker.
Do not close the Outer Lid with the Spatula inside the Rice Cooker. Doing so may make the Outer
Lid difficult to open.
②①
●
Wash the Inner Cooking Pan, Inner Lid Set, Steam Vent Cap, Spatula, Spatula Holder, Measuring Cup, and Steaming Basket
before initial use. → pg.24 - pg.25
●
When you use this Rice Cooker for the first time, there will be a resinous smell, such as that of plastic, but the odor will
lessen as you use the Rice Cooker. If you are concerned about the odor, please see pg. 24 “IF THERE IS AN ODOR”.
Be sure to use the Measuring Cup supplied, as other measuring cups may differ.
Level the rice off at the top of the cup to maintain accuracy.
BASIC COOKING STEPS
Level off!
Be sure to wipe moisture and foreign matter off the outer surface of the Inner Cooking Pan, the inside of the
Main Body, the Inner Lid Set, and the Steam Vent Cap.
●
Make sure that the Inner Cooking Pan is inserted all the way in.
●
Close the Outer Lid slowly and firmly until you hear a clicking sound.
Press the button and select
the menu setting.
●
The estimated time until cooking completion may differ from the actual time required.
The actual time of cooking completion may vary depending on factors such as the
room or water temperature, the voltage, the water measurement, or the type of rice.
●
The Rice Cooker will make adjustments to the estimated time until cooking
completion when it reaches the steaming process. The estimated time until
cooking completion may increase or decrease suddenly during this process.
●Press and hold the button to quickly cycle through the selections.
It will stop when it reaches WHITE/SUSHI menu setting.
●
The menu settings such as WHITE/SUSHI and BROWN will
remain selected until you change the setting.
●
The menu setting at the time of shipment from the factory is WHITE/SUSHI.
Ex.
Display when cooking with the WHITE/SUSHI menu setting
“ ”, and “ ” light up while the item is switched.
Displays the estimated time (in minutes)
until cooking completion.
The Melody (Beep) sounds, and cooking begins.
The START/REHEAT light turns on, and the Display shows
the estimated time (in minutes) until cooking completes.
Turns on
IMPORTANT
●
When cooking more than one pot of rice consecutively, or cooking
right after cancelling the Keep Warm mode, allow the Rice Cooker to
cool for 45 minutes or longer. If the Main Body and the Outer Lid are
hot, the rice may not cook well.
When adjusting the amount of water to the
PORRIDGE Water Level Line, do not cook using
menu settings other than PORRIDGE. Using any
other menu setting may cause the contents to
boil over.
●
The PORRIDGE menu setting will not be
saved. When cooking porridge, select the
PORRIDGE menu setting each time.
Be careful that the contents do not boil over.
● Do not begin cleaning the Rice Cooker until the Main Body has cooled. → pg.24 - pg.25
●
Please do not handle the Power Plug while your hands are wet. (Doing so may cause short circuit or electric
shock.)
●
Removing the Inner Cooking Pan only will not turn off the power. Make sure to press the CANCEL button.
When it switches to the Keep Warm mode, immediately loosen the rice.
By loosening the rice and removing excess moisture, you prevent the
rice from hardening, becoming soggy, or becoming burnt
.
●Be careful not to burn yourself when loosening rice.
To cool the Main Body and Outer Lid quickly, please try the following:
•
Fill the Inner Cooking Pan with cold water and place it in the Main
Body.
•
Open the Outer Lid, remove the Inner Lid Set and allow the Radiator
Plate to cool.
NOTE
●You can switch the Notification Sounds (Melody, Beep, Silent) that alert you when certain actions occur.
→ See “HOW TO CHANGE THE NOTIFICATION SOUNDS” on pg. 9
Elapsed time of the
Keep Warm mode.
TIPS
When the Melody (Beep) to indicate cooking completion sounds
and the Rice Cooker switches to the Keep Warm mode, loosen the
rice immediately.
Turns on
●
Make sure the Rice Cooker is not in the Keep
Warm (Regular Keep Warm or Extended Keep
Warm) mode, then press the START/REHEAT
button. If the Keep Warm light is on, the reheating
process will start.
→ pg. 15
●
If you want to know the current time during the
cooking process, press the or button and the
Display will switch only while the button is pressed.
●
Do not put the Steaming Basket in the Rice Cooker
while cooking rice if not also steaming other foods.
When cooking completes, it will automatically switch to the Keep Warm mode.
→See “KEEPING RICE WARM” on pg. 13
The REGULAR KEEP WARM light turns on and the START/REHEAT light
turns off. The length of time that the rice has been kept warm is shown on
the Display in hours (HOURS).
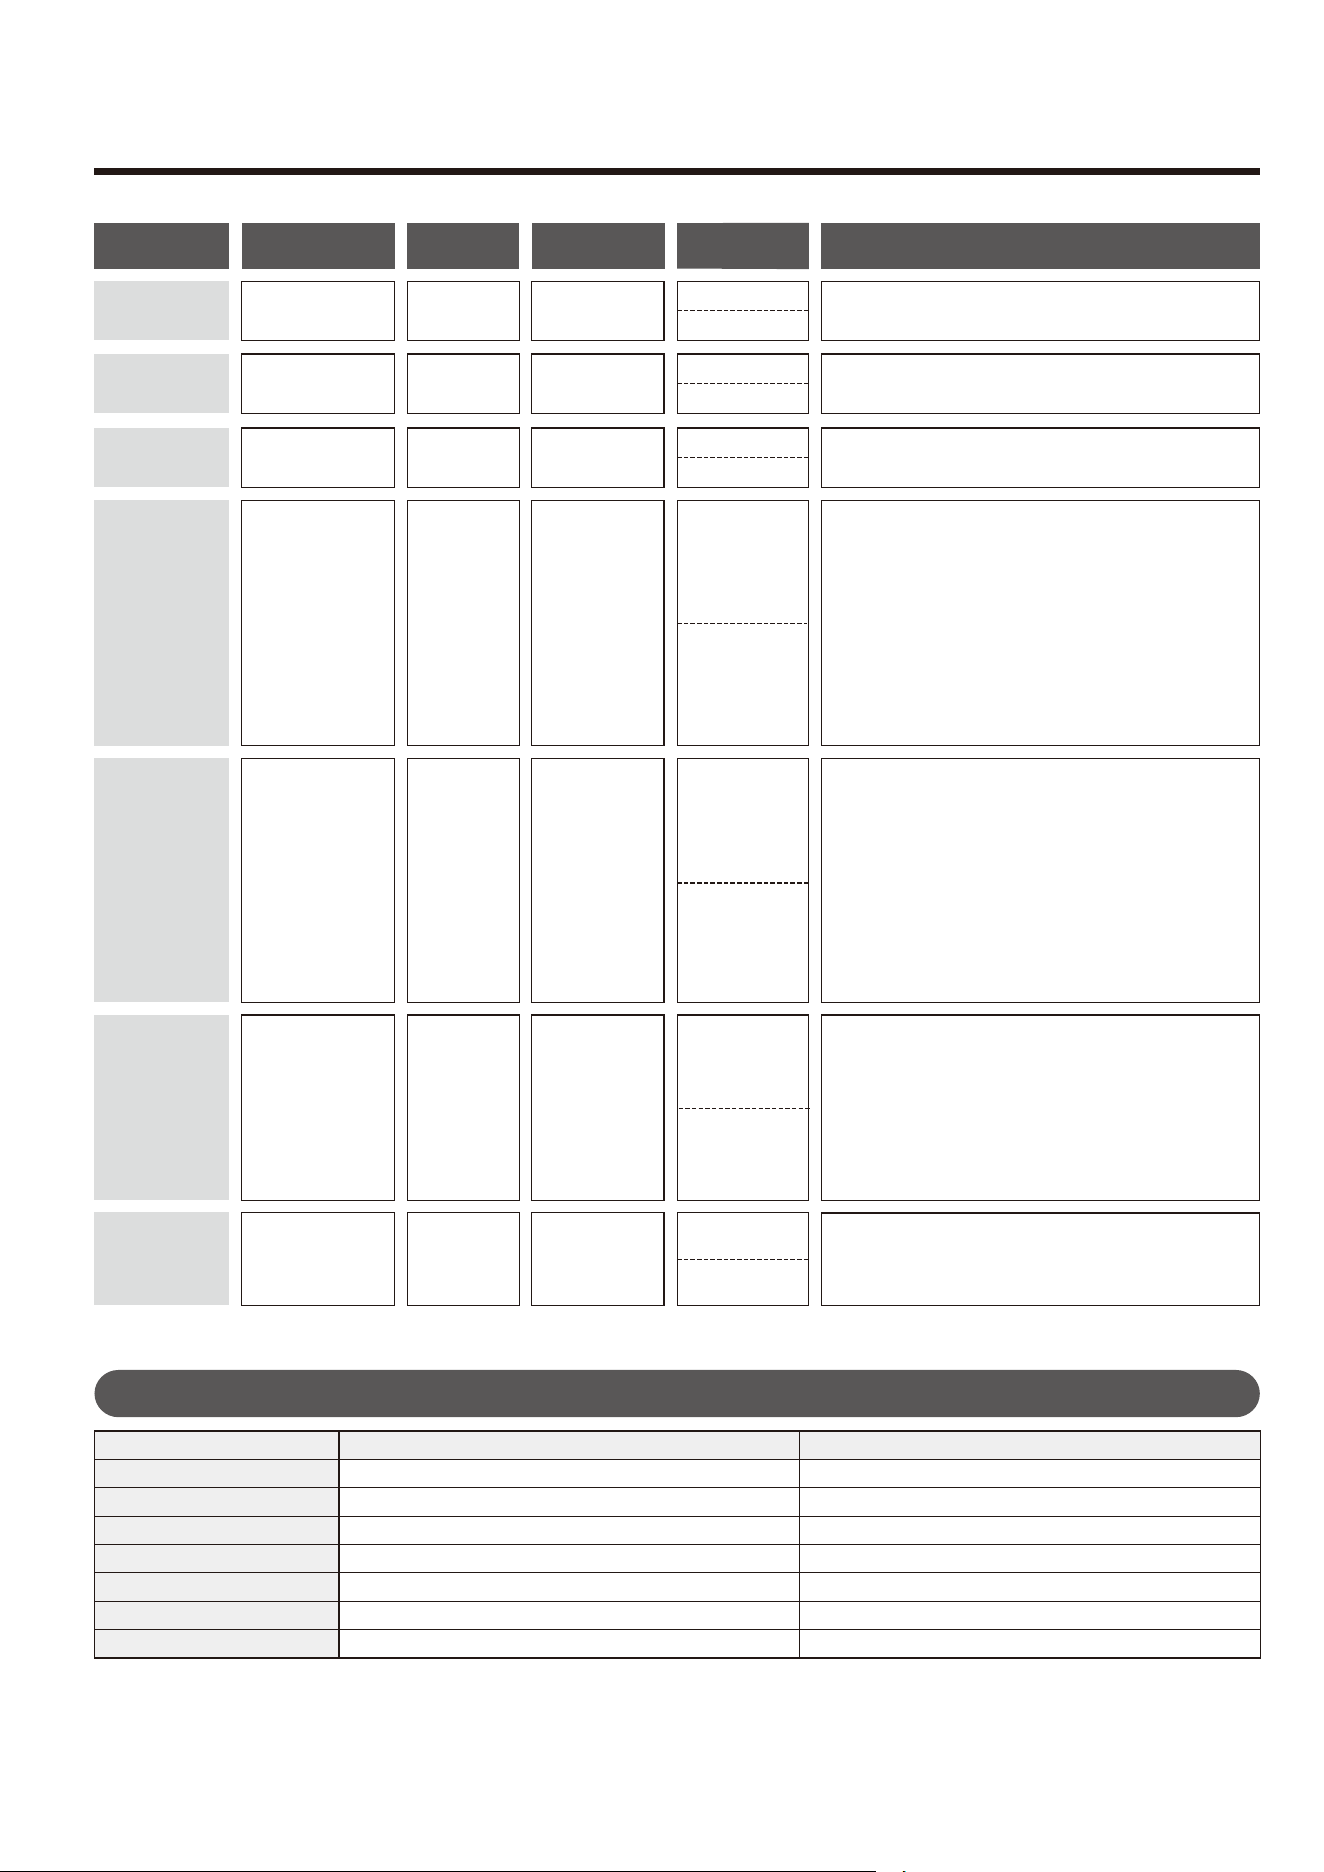
13
12
TIPS FOR COOKING VARIOUS RICE MENUS
KEEPING RICE WARM
SUSHI
●
Cooks brown rice.
●
If white rice is mixed with brown rice, it may boil
over or imperfect cooking may occur. Therefore, a
mixture like this is not recommended.
You can choose the Regular Keep Warm mode or Extended Keep Warm mode.
This mode can be activated during the Regular Keep Warm mode.
Check to make sure the REGULAR KEEP WARM light is on.
Press the button.
1
2
CANCEL button
●
To end the Keep Warm mode, press the CANCEL button.
Press the button.
BROWN BROWN
Brown Rice
●
Cooks mixed rice.
●
Seasonings should be mixed with soup stock or
water and then added to the rice. After adjusting
the amount of water, stir thoroughly. If the
seasonings are added directly to the rice or if
not mixed properly, scorching or imperfect
cooking may occur.
●
The recommended amount of ingredients
should be 30-50% of the rice weight.
●
Chop ingredients into small pieces and place on
top of rice without mixing them into the rice.
●
Cooks porridge.
●
The recommended amount of ingredients
should be 30-50% of the rice weight.
●
Chop ingredients into small pieces and place on
top of rice without mixing them into the rice.
●
Ingredients that do not cook easily should not
be used in large amounts.
●
Boil green leafy vegetables separately and add
them after the porridge has finished cooking.
●
Brown rice and partially polished rice cannot be
used to make porridge.
WHITEMIXED
Mixed Rice
1.0L: 1–5.5
1.8L: 2–10
Short/Medium
Grain White Rice
Short/Medium
Grain White Rice
Short/Medium
Grain White Rice
Short/Medium
Grain White Rice
Short/Medium
Grain White Rice
Short/Medium
Grain Brown
Rice
WHITE/
SUSHI
WHITE/
SUSHI
WHITE
White Rice
1.0L: 1–5.5
1.8L: 2–10
QUICK
WHITE
Quick
Cooking
1.0L: 1–5.5
1.8L: 2–10
1.0L: 1–4
1.8L: 2–6
1.0L: 1–4
1.8L: 2–6
1.0L: 1–4
1.8L: 2–8
1.0L: 0.5–1.5
1.8L: 0.5–2.5
Sushi Rice
PORRIDGE
PORRIDGE
Porridge
*Capacity is measured in the supplied rice measuring cup, using uncooked rice.
Sweet Rice
●
Cooks white rice to a regular consistency (texture).
●
Cooks sweet rice.
●
Wash rice and drain it in a strainer for
approximately 30 minutes.
●
Seasonings should be mixed with soup stock or
water and then added to the rice. After adjusting
the amount of water, stir thoroughly.
●
Place ingredients on top of the rice after adjusting
the water.
SWEET
(When cooking
sweet rice mixed
with white rice,
use slightly
above the water
level for SWEET)
Sweet Rice Only
or
Sweet Rice +
Short/Medium
Grain White Rice
SWEET
Type of rice
to use
Notes and Tips
Water Level
Menu Setting
Type of rice you
want to cook
Cooking Capacity
[cups]
*
●
Cooks white rice faster. Please note that the
rice texture may be slightly harder.
●
Cooks rice for use with sushi. Please note that
the rice texture may be slightly harder.
●
The above table is based on the testing conditions of 120 volts, a room temperature of 68°F (20℃), and water at a starting temperature of 64.4°F (18℃).
●
The above lengths of time are measured from Cooking until the Keep Warm process. Actual times may vary depending on the
voltage, room temperature, season, the amount of water used, and the type of rice.
●
The MIXED menu setting requires a longer cooking time to allow the rice to absorb seasonings.
WHITE
SUSHI
QUICK
MIXED
PORRIDGE
SWEET
BROWN
Approx. 45 minutes – 60 minutes
Approx. 45 minutes – 60 minutes
Approx. 29 minutes – 40 minutes
Approx. 55 minutes – 65 minutes
Approx. 55 minutes – 65 minutes
Approx. 45 minutes – 50 minutes
Approx. 85 minutes – 110 minutes
Approx. 45 minutes – 60 minutes
Approx. 45 minutes – 60 minutes
Approx. 30 minutes – 45 minutes
Approx. 55 minutes – 65 minutes
Approx. 50 minutes – 65 minutes
Approx. 45 minutes – 50 minutes
Approx. 85 minutes – 110 minutes
1.0 L model
Menu
1.8 L model
ESTIMATED COOKING TIME
REGULAR KEEP WARM AND EXTENDED KEEP WARM
Continued on the next page
Up to 12 hours
Up to 12 hours
KEEP WARM button
KEEP WARM
lights
How to change from the Extended Keep Warm mode to the Regular Keep Warm mode
●
The Extended Keep Warm mode is not available in the following cases.
The Rice Cooker will beep and automatically start the Regular Keep Warm mode.
●
If 12 hours of Regular Keep Warm has already elapsed
●
After 4 hours of Extended Keep Warm has already elapsed, then it is switched to Regular Keep Warm
●
If the temperature of the Inner Cooking Pan is low because the Keep Warm mode has been cancelled, or
power failure
●
After 8 hours of the Extended Keep Warm mode, the Rice Cooker automatically switches to the Regular Keep
Warm mode.
The setting will return to the Regular Keep Warm
mode and the REGULAR KEEP WARM light will
turn on.
ABOUT LENGTH OF KEEP WARM TIME
●
Be sure to observe the length of time for which rice can be kept warm as shown in the table below.
●
You cannot select EXTENDED KEEP WARM for the menus marked with a “”. REGULAR KEEP WARM is automatically selected.
●
After cooking, all menus default to the Keep Warm mode. However, do not use the Keep Warm mode for the menus with an “ ”
below. Doing so can cause spoilage and foul odors.
* With the PORRIDGE menu setting, the cooked grains will become thick as time passes, so turn off the Keep Warm mode after
cooking is finished and consume the food as soon as possible.
Menu
KEEP WARM
REGULAR
KEEP WARM
EXTENDED
KEEP WARM
BROWN
MIXED・PORRIDGE*・SWEETWHITE・SUSHI・QUICK
When cooking completes, the Rice Cooker
automatically switches to the Regular Keep
Warm mode and the REGULAR KEEP
WARM light turns on.
EXTENDED KEEP WARM
Use this mode when keeping rice warm for a longer period of time. Drying and
yellowing of rice will be reduced by maintaining the temperature slightly lower.
●
The Keep Warm mode is not available for the CAKE and STEAM menu settings.
REGULAR KEEP WARM
This mode keeps the rice warm
at a higher temperature, so the
rice develops odors less easily.
Turns on
The EXTENDED KEEP WARM light will turn on.
Turns on
Turns on
Turns on
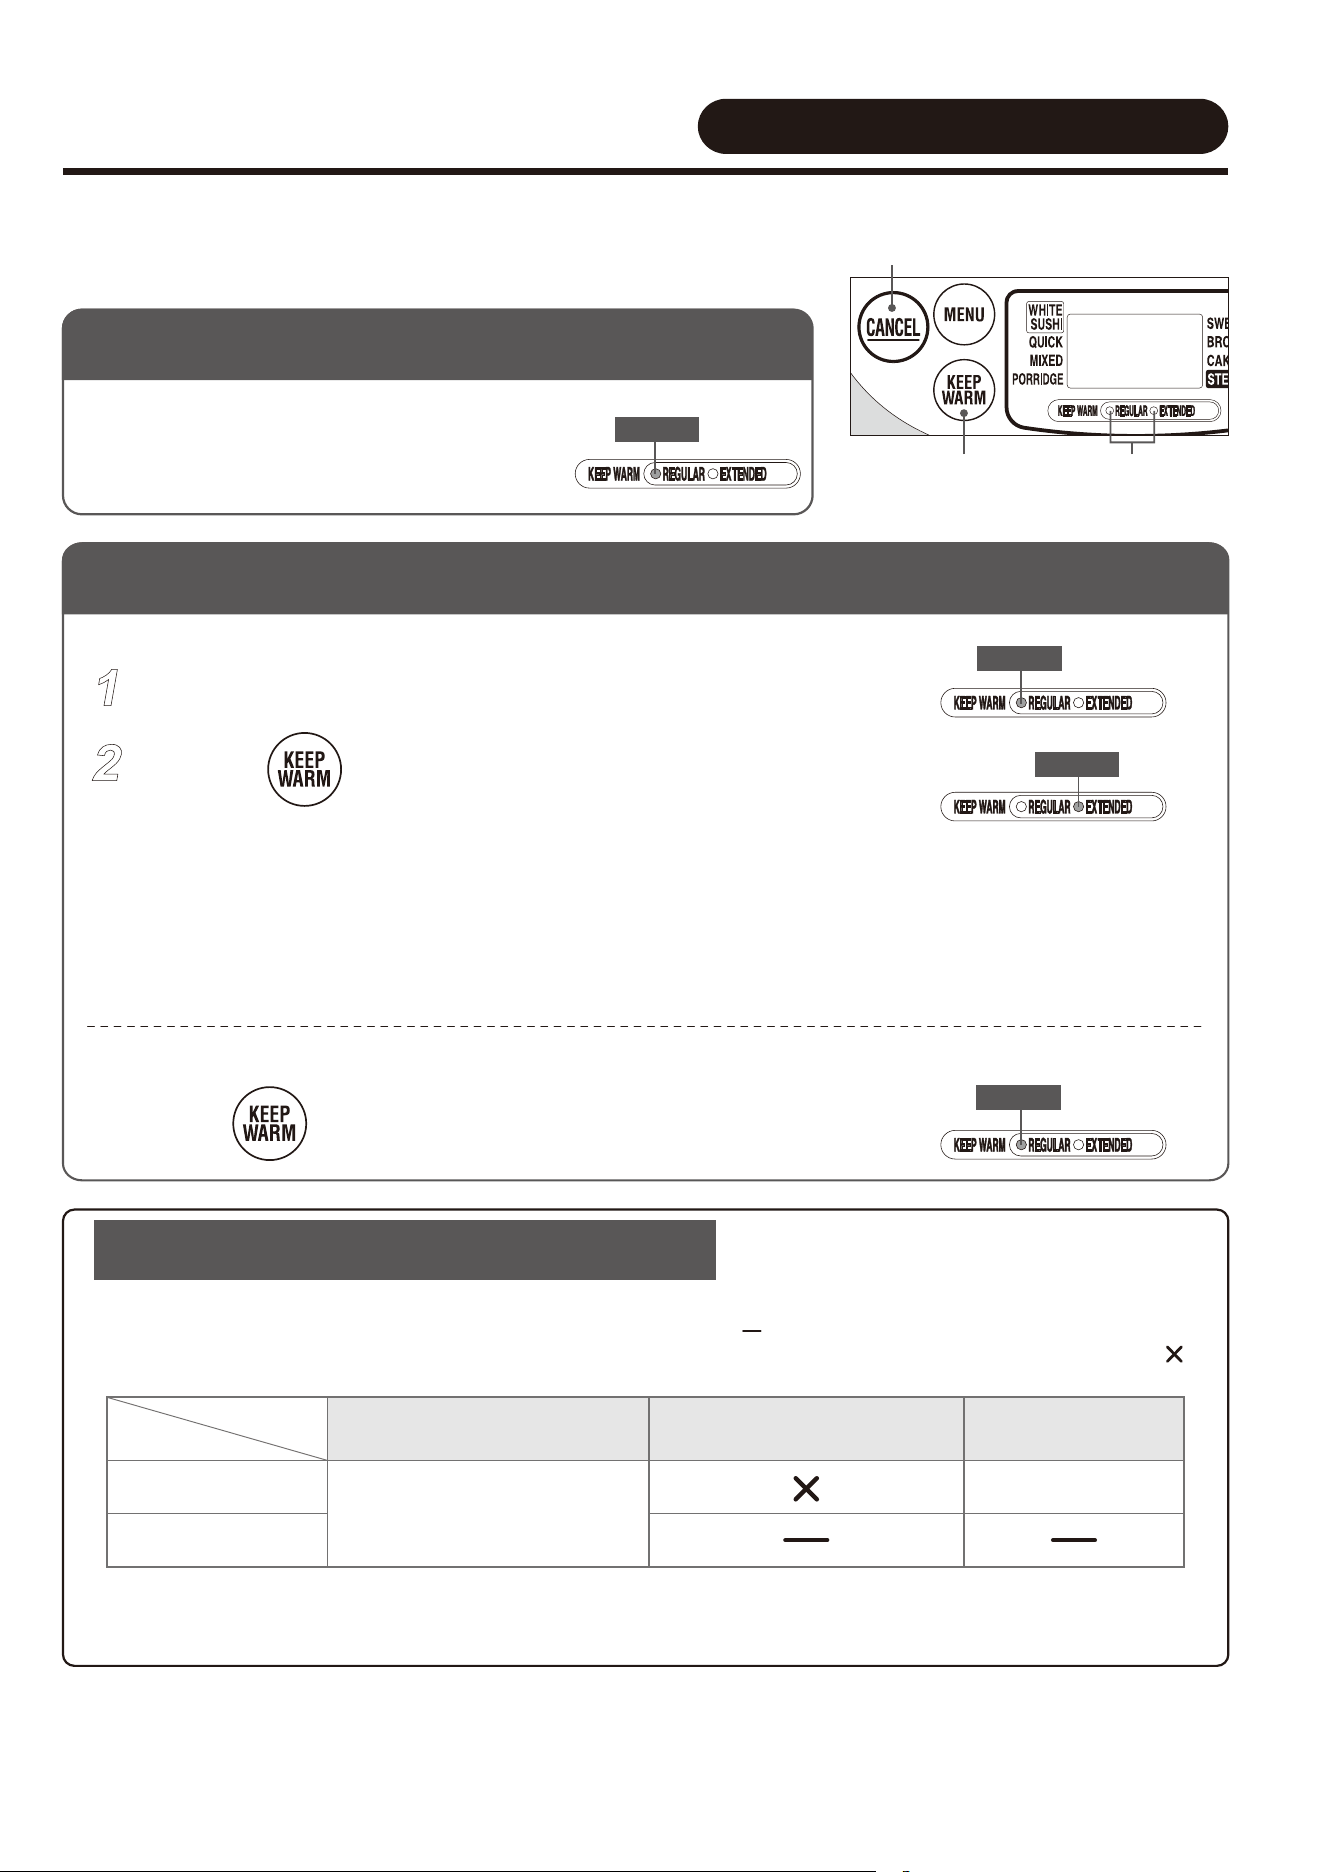
13
12
TIPS FOR COOKING VARIOUS RICE MENUS
KEEPING RICE WARM
SUSHI
●
Cooks brown rice.
●
If white rice is mixed with brown rice, it may boil
over or imperfect cooking may occur. Therefore, a
mixture like this is not recommended.
You can choose the Regular Keep Warm mode or Extended Keep Warm mode.
This mode can be activated during the Regular Keep Warm mode.
Check to make sure the REGULAR KEEP WARM light is on.
Press the button.
1
2
CANCEL button
●
To end the Keep Warm mode, press the CANCEL button.
Press the button.
BROWN BROWN
Brown Rice
●
Cooks mixed rice.
●
Seasonings should be mixed with soup stock or
water and then added to the rice. After adjusting
the amount of water, stir thoroughly. If the
seasonings are added directly to the rice or if
not mixed properly, scorching or imperfect
cooking may occur.
●
The recommended amount of ingredients
should be 30-50% of the rice weight.
●
Chop ingredients into small pieces and place on
top of rice without mixing them into the rice.
●
Cooks porridge.
●
The recommended amount of ingredients
should be 30-50% of the rice weight.
●
Chop ingredients into small pieces and place on
top of rice without mixing them into the rice.
●
Ingredients that do not cook easily should not
be used in large amounts.
●
Boil green leafy vegetables separately and add
them after the porridge has finished cooking.
●
Brown rice and partially polished rice cannot be
used to make porridge.
WHITEMIXED
Mixed Rice
1.0L: 1–5.5
1.8L: 2–10
Short/Medium
Grain White Rice
Short/Medium
Grain White Rice
Short/Medium
Grain White Rice
Short/Medium
Grain White Rice
Short/Medium
Grain White Rice
Short/Medium
Grain Brown
Rice
WHITE/
SUSHI
WHITE/
SUSHI
WHITE
White Rice
1.0L: 1–5.5
1.8L: 2–10
QUICK
WHITE
Quick
Cooking
1.0L: 1–5.5
1.8L: 2–10
1.0L: 1–4
1.8L: 2–6
1.0L: 1–4
1.8L: 2–6
1.0L: 1–4
1.8L: 2–8
1.0L: 0.5–1.5
1.8L: 0.5–2.5
Sushi Rice
PORRIDGE
PORRIDGE
Porridge
*Capacity is measured in the supplied rice measuring cup, using uncooked rice.
Sweet Rice
●
Cooks white rice to a regular consistency (texture).
●
Cooks sweet rice.
●
Wash rice and drain it in a strainer for
approximately 30 minutes.
●
Seasonings should be mixed with soup stock or
water and then added to the rice. After adjusting
the amount of water, stir thoroughly.
●
Place ingredients on top of the rice after adjusting
the water.
SWEET
(When cooking
sweet rice mixed
with white rice,
use slightly
above the water
level for SWEET)
Sweet Rice Only
or
Sweet Rice +
Short/Medium
Grain White Rice
SWEET
Type of rice
to use
Notes and Tips
Water Level
Menu Setting
Type of rice you
want to cook
Cooking Capacity
[cups]
*
●
Cooks white rice faster. Please note that the
rice texture may be slightly harder.
●
Cooks rice for use with sushi. Please note that
the rice texture may be slightly harder.
●
The above table is based on the testing conditions of 120 volts, a room temperature of 68°F (20℃), and water at a starting temperature of 64.4°F (18℃).
●
The above lengths of time are measured from Cooking until the Keep Warm process. Actual times may vary depending on the
voltage, room temperature, season, the amount of water used, and the type of rice.
●
The MIXED menu setting requires a longer cooking time to allow the rice to absorb seasonings.
WHITE
SUSHI
QUICK
MIXED
PORRIDGE
SWEET
BROWN
Approx. 45 minutes – 60 minutes
Approx. 45 minutes – 60 minutes
Approx. 29 minutes – 40 minutes
Approx. 55 minutes – 65 minutes
Approx. 55 minutes – 65 minutes
Approx. 45 minutes – 50 minutes
Approx. 85 minutes – 110 minutes
Approx. 45 minutes – 60 minutes
Approx. 45 minutes – 60 minutes
Approx. 30 minutes – 45 minutes
Approx. 55 minutes – 65 minutes
Approx. 50 minutes – 65 minutes
Approx. 45 minutes – 50 minutes
Approx. 85 minutes – 110 minutes
1.0 L model
Menu
1.8 L model
ESTIMATED COOKING TIME
REGULAR KEEP WARM AND EXTENDED KEEP WARM
Continued on the next page
Up to 12 hours
Up to 12 hours
KEEP WARM button
KEEP WARM
lights
How to change from the Extended Keep Warm mode to the Regular Keep Warm mode
●
The Extended Keep Warm mode is not available in the following cases.
The Rice Cooker will beep and automatically start the Regular Keep Warm mode.
●
If 12 hours of Regular Keep Warm has already elapsed
●
After 4 hours of Extended Keep Warm has already elapsed, then it is switched to Regular Keep Warm
●
If the temperature of the Inner Cooking Pan is low because the Keep Warm mode has been cancelled, or
power failure
●
After 8 hours of the Extended Keep Warm mode, the Rice Cooker automatically switches to the Regular Keep
Warm mode.
The setting will return to the Regular Keep Warm
mode and the REGULAR KEEP WARM light will
turn on.
ABOUT LENGTH OF KEEP WARM TIME
●
Be sure to observe the length of time for which rice can be kept warm as shown in the table below.
●
You cannot select EXTENDED KEEP WARM for the menus marked with a “”. REGULAR KEEP WARM is automatically selected.
●
After cooking, all menus default to the Keep Warm mode. However, do not use the Keep Warm mode for the menus with an “ ”
below. Doing so can cause spoilage and foul odors.
* With the PORRIDGE menu setting, the cooked grains will become thick as time passes, so turn off the Keep Warm mode after
cooking is finished and consume the food as soon as possible.
Menu
KEEP WARM
REGULAR
KEEP WARM
EXTENDED
KEEP WARM
BROWN
MIXED・PORRIDGE*・SWEETWHITE・SUSHI・QUICK
When cooking completes, the Rice Cooker
automatically switches to the Regular Keep
Warm mode and the REGULAR KEEP
WARM light turns on.
EXTENDED KEEP WARM
Use this mode when keeping rice warm for a longer period of time. Drying and
yellowing of rice will be reduced by maintaining the temperature slightly lower.
●
The Keep Warm mode is not available for the CAKE and STEAM menu settings.
REGULAR KEEP WARM
This mode keeps the rice warm
at a higher temperature, so the
rice develops odors less easily.
Turns on
The EXTENDED KEEP WARM light will turn on.
Turns on
Turns on
Turns on
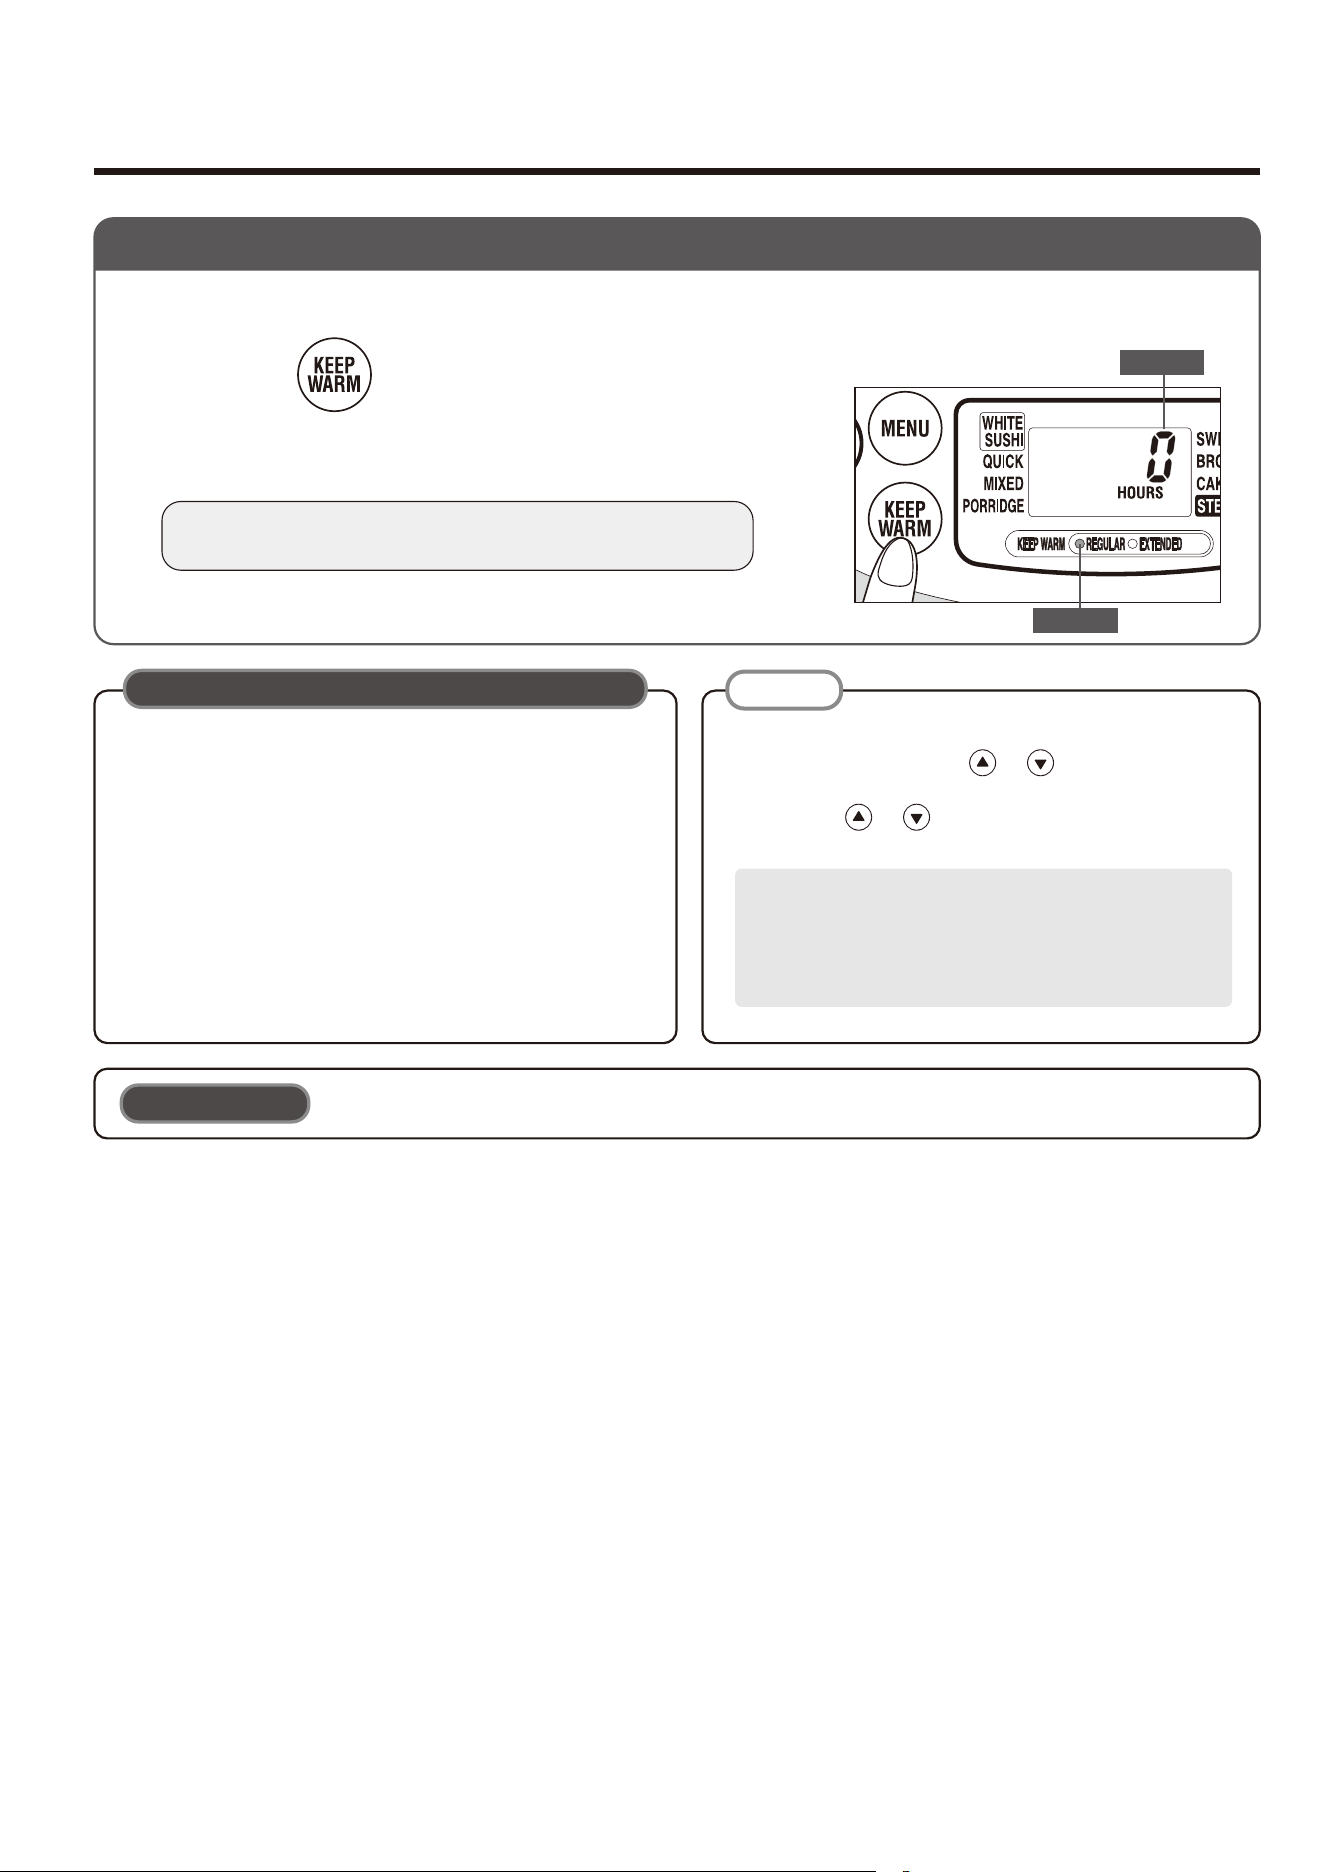
14 15
KEEPING RICE WARM
(
cont.
)
REHEATING RICE
Loosen the rice.
Loosen and level the surface of the
rice that is being kept warm.
1
3
2
Make sure that the KEEP WARM light is on, and
press the button.
START/REHEAT light
START/REHEAT button
KEEP WARM lights
Either light
Press the button.
The REGULAR KEEP WARM light turns on, and the time
elapsed display returns to “0HOURS”.
●
If you want to know the current time during the Keep
Warm mode, press the or button and the
Display will switch.
Press the or button again to return to the
display for the Keep Warm time elapsed.
If you do not return the display to the Keep Warm
time elapsed, the next time you cook rice, the
Keep Warm time elapsed will not be displayed.
This change can only be made during the Keep
Warm mode.
●
Foul odors or the growth of bacteria may occur
depending on how well the unit is cleaned, the room
temperature based on the season or the usage
environment, frequent opening and closing of the Outer
Lid, the type of rice used, or the way the rice was
cleaned. If you are concerned about odors, cleaning
the Rice Cooker according to “THE INTERIOR” on pg.
25 and “IF THERE IS AN ODOR” on pg. 24 and then
using REGULAR KEEP WARM should be effective.
●
When keeping rice in the Inner Cooking Pan for later consumption, you must use the Keep
Warm mode.
■
When you want to keep rice warm after canceling the Keep Warm mode.
When you are concerned about the odor
IMPORTANT
NOTE
HOW TO KEEP RICE WARM AGAIN
●
If the temperatures of the rice and the Inner Cooking Pan
are low, do not keep warm again.
Turns on
Turns on
If you press the START/REHEAT button
when the KEEP WARM (REGULAR
KEEP WARM or EXTENDED KEEP
WARM) light is off, the cooking process
will start.
●
Be sure to loosen the rice to prevent it from becoming hard or scorching.
●
To reheat a small amount of rice, add 1 tablespoon of water for each bowl of rice
(approx. 5.5 oz./approx. 160 g), mix well, and gather the rice toward the center of the
Inner Cooking Pan. Doing so will minimize dryness.
●
Be careful not to burn yourself when loosening the rice.
●
The Inner Cooking Pan may spin when loosening the rice. Holding the Inner Cooking
Pan (which is very hot immediately after reheating) with an oven-mitt or a soft cloth
will keep it from spinning while reducing damage to the outside bottom of the pan.
●
Loosen and level the surface of the rice, as the rice at the bottom may be harder.
●
Be careful not to burn yourself when loosening the rice.
●
The Inner Cooking Pan may spin when loosening the rice. Holding the Inner Cooking Pan (which is very hot
immediately after reheating) with an oven-mitt or a soft cloth will keep it from spinning while reducing damage to
the outside bottom of the pan.
Estimated reheat time
Approx. 7 min. – 9 min.
You can use this function during the Regular Keep Warm
mode or Extended Keep Warm mode.
●
This Reheat function is for reheating the rice during the Keep Warm
mode to make the rice warmer. Particularly, when the rice is kept
warm at a lower temperature by the Extended Keep Warm mode, the
Reheat function will reheat the rice to the best serving temperature.
●
You can reheat the rice only when the KEEP WARM (REGULAR
KEEP WARM or EXTENDED KEEP WARM) light is on.
●
Do not use the Reheat function to reheat food other than
white rice, as reheating other types of rice may cause
scorching or discoloring.
●
Do not repeat the Reheat function as doing so may cause
scorching or dryness.
●
Do not use the Reheat function if the amount of rice left over is
above Water Level Line 3 (for 1.0 L model) or 6 (for 1.8 L
model) for WHITE as the rice may not be warmed adequately.
●
Do not use the Reheat function if the rice is cold or the
temperature of the Inner Cooking Pan is too low as doing
so may cause scorching, foul odors or the rice may
become hard.
The Melody (Beep) sounds,
and reheating is finished.
The START/REHEAT light
turns off, the REGULAR
KEEP WARM light turns on,
and the Rice Cooker
switches to the Regular Keep
Warm mode.
Press
the button.
The START/REHEAT light turns off, the
REGULAR KEEP WARM light turns on,
and the Rice Cooker switches to the
Regular Keep Warm mode.
To cancel the Reheat mode and return to the Keep Warm mode
The KEEP WARM light turns off, the START/REHEAT light blinks.
Blinks
Turns off
A Melody sounds, and reheating starts.
Do not reheat for the following cases
Press
the button.
The START/REHEAT light turns off,
and the current time display returns.
To cancel the Reheat mode and the Keep Warm mode
Turns on
Approx.
7 min. – 9 min.
later
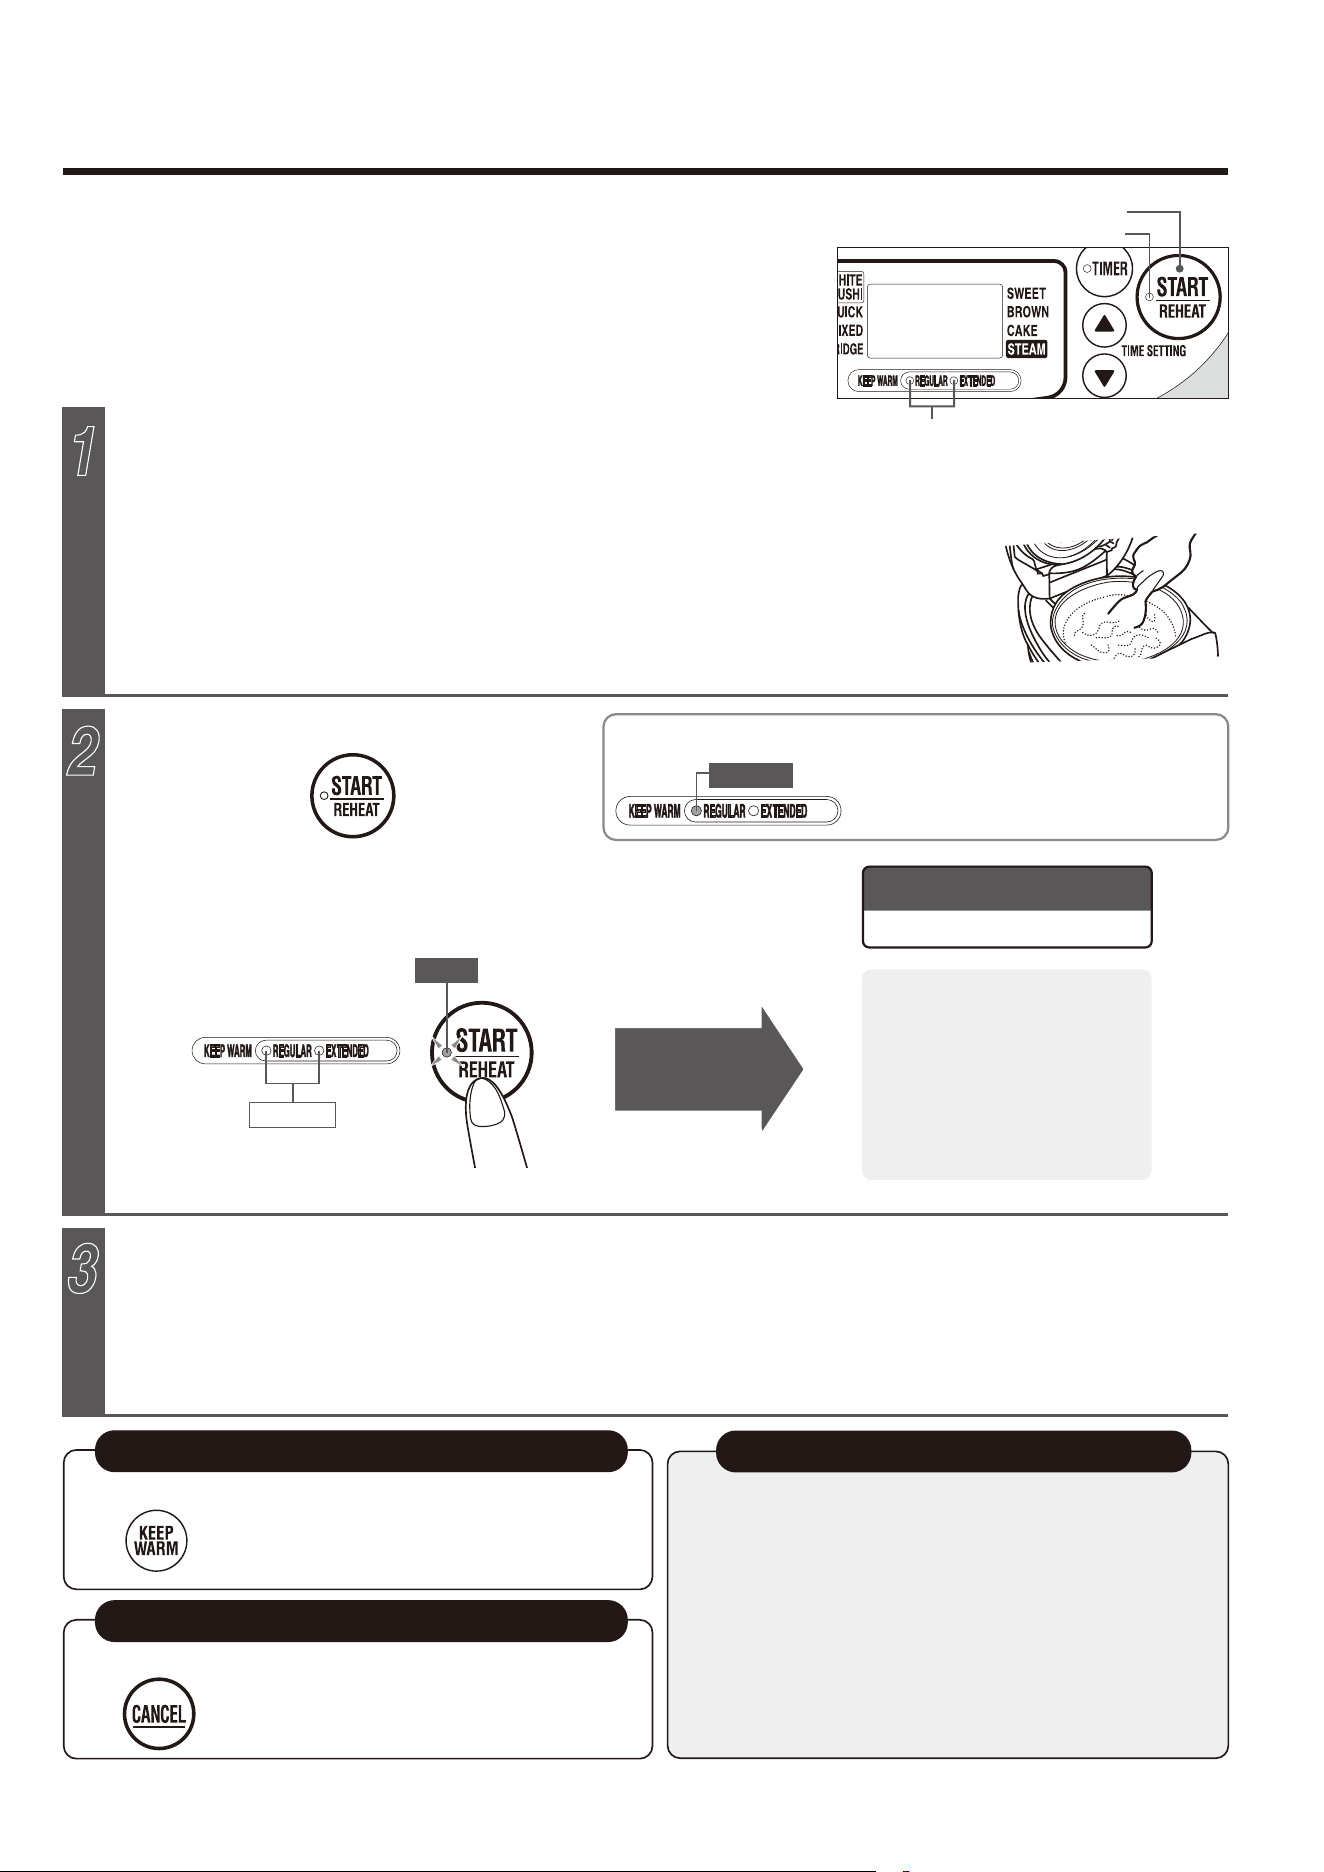
14 15
KEEPING RICE WARM
(
cont.
)
REHEATING RICE
Loosen the rice.
Loosen and level the surface of the
rice that is being kept warm.
1
3
2
Make sure that the KEEP WARM light is on, and
press the button.
START/REHEAT light
START/REHEAT button
KEEP WARM lights
Either light
Press the button.
The REGULAR KEEP WARM light turns on, and the time
elapsed display returns to “0HOURS”.
●
If you want to know the current time during the Keep
Warm mode, press the or button and the
Display will switch.
Press the or button again to return to the
display for the Keep Warm time elapsed.
If you do not return the display to the Keep Warm
time elapsed, the next time you cook rice, the
Keep Warm time elapsed will not be displayed.
This change can only be made during the Keep
Warm mode.
●
Foul odors or the growth of bacteria may occur
depending on how well the unit is cleaned, the room
temperature based on the season or the usage
environment, frequent opening and closing of the Outer
Lid, the type of rice used, or the way the rice was
cleaned. If you are concerned about odors, cleaning
the Rice Cooker according to “THE INTERIOR” on pg.
25 and “IF THERE IS AN ODOR” on pg. 24 and then
using REGULAR KEEP WARM should be effective.
●
When keeping rice in the Inner Cooking Pan for later consumption, you must use the Keep
Warm mode.
■
When you want to keep rice warm after canceling the Keep Warm mode.
When you are concerned about the odor
IMPORTANT
NOTE
HOW TO KEEP RICE WARM AGAIN
●
If the temperatures of the rice and the Inner Cooking Pan
are low, do not keep warm again.
Turns on
Turns on
If you press the START/REHEAT button
when the KEEP WARM (REGULAR
KEEP WARM or EXTENDED KEEP
WARM) light is off, the cooking process
will start.
●
Be sure to loosen the rice to prevent it from becoming hard or scorching.
●
To reheat a small amount of rice, add 1 tablespoon of water for each bowl of rice
(approx. 5.5 oz./approx. 160 g), mix well, and gather the rice toward the center of the
Inner Cooking Pan. Doing so will minimize dryness.
●
Be careful not to burn yourself when loosening the rice.
●
The Inner Cooking Pan may spin when loosening the rice. Holding the Inner Cooking
Pan (which is very hot immediately after reheating) with an oven-mitt or a soft cloth
will keep it from spinning while reducing damage to the outside bottom of the pan.
●
Loosen and level the surface of the rice, as the rice at the bottom may be harder.
●
Be careful not to burn yourself when loosening the rice.
●
The Inner Cooking Pan may spin when loosening the rice. Holding the Inner Cooking Pan (which is very hot
immediately after reheating) with an oven-mitt or a soft cloth will keep it from spinning while reducing damage to
the outside bottom of the pan.
Estimated reheat time
Approx. 7 min. – 9 min.
You can use this function during the Regular Keep Warm
mode or Extended Keep Warm mode.
●
This Reheat function is for reheating the rice during the Keep Warm
mode to make the rice warmer. Particularly, when the rice is kept
warm at a lower temperature by the Extended Keep Warm mode, the
Reheat function will reheat the rice to the best serving temperature.
●
You can reheat the rice only when the KEEP WARM (REGULAR
KEEP WARM or EXTENDED KEEP WARM) light is on.
●
Do not use the Reheat function to reheat food other than
white rice, as reheating other types of rice may cause
scorching or discoloring.
●
Do not repeat the Reheat function as doing so may cause
scorching or dryness.
●
Do not use the Reheat function if the amount of rice left over is
above Water Level Line 3 (for 1.0 L model) or 6 (for 1.8 L
model) for WHITE as the rice may not be warmed adequately.
●
Do not use the Reheat function if the rice is cold or the
temperature of the Inner Cooking Pan is too low as doing
so may cause scorching, foul odors or the rice may
become hard.
The Melody (Beep) sounds,
and reheating is finished.
The START/REHEAT light
turns off, the REGULAR
KEEP WARM light turns on,
and the Rice Cooker
switches to the Regular Keep
Warm mode.
Press
the button.
The START/REHEAT light turns off, the
REGULAR KEEP WARM light turns on,
and the Rice Cooker switches to the
Regular Keep Warm mode.
To cancel the Reheat mode and return to the Keep Warm mode
The KEEP WARM light turns off, the START/REHEAT light blinks.
Blinks
Turns off
A Melody sounds, and reheating starts.
Do not reheat for the following cases
Press
the button.
The START/REHEAT light turns off,
and the current time display returns.
To cancel the Reheat mode and the Keep Warm mode
Turns on
Approx.
7 min. – 9 min.
later
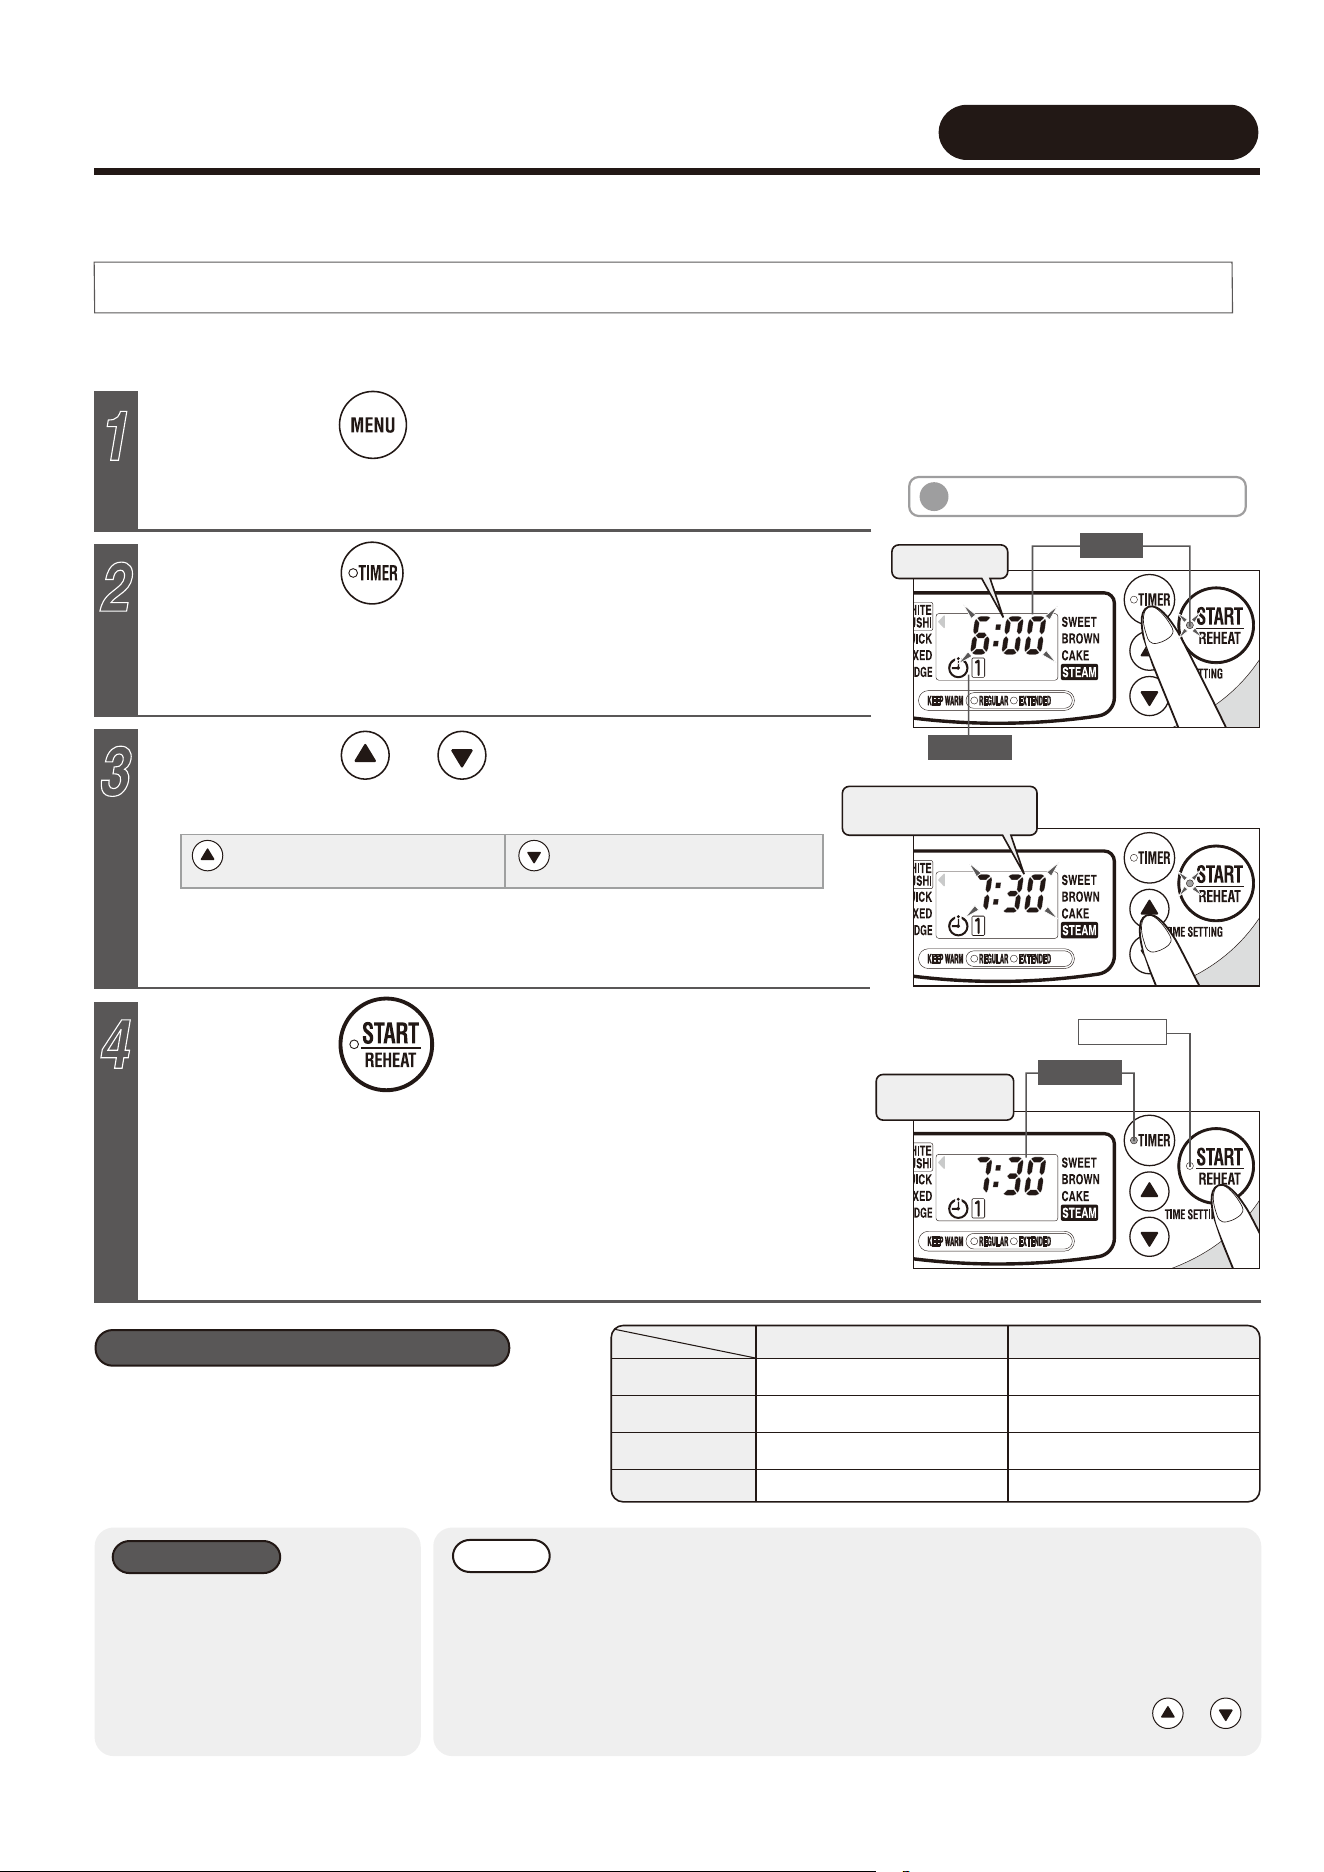
16 17
●
When the CAKE menu setting is selected,
the default cooking time for the CAKE menu
setting will begin blinking. Press the or
button to change the cooking time.
→ Refer to the RECIPES (pg. 23) for the
cooking time.
●Press and hold the button to quickly adjust
the time in 5-minute increments.
Press the or button to set a
specific time to finish cooking.
WHITE
SUSHI
PORRIDGE
BROWN
1.0 L model
1 hour 5 min. –
1 hour 5 min. –
1 hour 10 min. –
1 hour 55 min. –
1 hour 10 min. –
1 hour 10 min. –
1 hour 15 min. –
2 hours –
1.8 L model
HOW TO BAKE CAKE
●
Display for a 1.0 L model
1
Grease the inside of the Inner Cooking Pan lightly and evenly with butter.
2
Prepare the batter for cake.
●
The cake may be difficult to remove if the Inner Cooking Pan is not greased evenly.
3
4
5
Press the button.
6
1
USING THE TIMER TO COOK RICE
USING THE TIMER
●
This function sets the Rice Cooker to automatically finish cooking by a specific time. Once set, the timer settings are stored in “Timer 1”
or “Timer 2”.
●
The initial settings are 6:00 for “Timer 1”, 18:00 for “Timer 2”.
●
Set the clock to the current time before setting the Timer function. If the clock is inaccurate, the cooking will not be completed at the
time you set for the Timer. → pg. 9
When setting Timer 1 to “7:30”.
Ex.
: Each press advances the time
in 10-minute increments.
: Each press reverses the time
in 10-minute increments.
●
The Timer function is not available for QUICK, MIXED, SWEET, CAKE
and STEAM menu settings.
Press the button to select the desired menu setting.
Press the button.
The preset time for “Timer 1” and the START/REHEAT light will blink.
●
Press the button again and the preset time for “Timer 2” will appear.
●
If you set the Timer shorter than the Length Needed for the Timer Settings, a beep will sound, the Rice Cooker will start cooking
immediately, and the estimated time until cooking completion will be displayed.
●
For pre-cooking preparations, see steps 1 through 3 under “BASIC COOKING STEPS” on pg. 10.
Press the button to select “Timer 1”
(or “Timer 2”).
●
Press and hold the button to quickly adjust the time in 10-minute
increments.
●
You do not need to set the time again when using the same settings.
●
The START/REHEAT button must be pressed to set the TIMER.
●
Cooking will be completed at the specified time. →See step 6 under
“BASIC COOKING STEPS” on pg. 11
●
To cancel the Timer setting while using the Timer function, press the
CANCEL button.
The START/REHEAT light turns off, and the time you wish to finish
cooking and the TIMER light turn on.
The Melody (Beep) sounds,
and the Timer setting is
completed.
●
The estimated time until cooking completion will not be displayed when the Timer is set.
●
Cooking may not complete at the set time if the temperature of the room or water is too
low. In addition, the cooking time may be affected by the amount of water or voltage.
●
When cooking using the Timer function, the rice absorbs extra moisture, which can
make the rice softer or cause the bran to collect at the bottom and burn.
●
If you want to know the current time while using the Timer function, press the or
button and the Display will switch only while the button is pressed.
●
Do not use the Timer function
if you are adding ingredients
and/or seasonings to the rice.
Ingredients may spoil or
seasonings may settle to the
bottom of the Inner Cooking
Pan and your results may not
be satisfactory.
●Do not set the Timer for 13 hours or more.
Furthermore, do not set the Timer for 8 hours or
more when the water temperature is high, such as
during summer. (This will prevent spoilage caused
by rice being soaked for longer than required.)
1
2
3
4
Length Needed for the Timer Settings
IMPORTANT
NOTE
Blinks
Preset time
Turns on
The time you wish to
complete cooking.
Turns off
TIMER setting
complete.
Turns on
Pour the cake batter into the Inner Cooking Pan from Step ,
level the surface and release excess air.
●
Hit the bottom of the Inner Cooking Pan with the palm of your hand several times to release the air bubbles in
the batter.
Do not hit the Inner Cooking Pan with hard objects or drop it onto the kitchen counter, as this may deform the
Inner Cooking Pan and cause uneven baking.
*Do not add baking powder or baking soda as it may cause the cake
to rise too high and cause malfunction.
*The maximum capacity of all-purpose flour is 4.2 oz./120 g (1.0 L
model) or 6.3 oz./180 g (1.8 L model).
Refer to the RECIPES (pg. 23) for how to prepare the batter and the amounts of its ingredients.
4
●
Remove the cake from the Inner Cooking Pan immediately
after cooking completion. Otherwise the cake may become
difficult to remove.
●
Be careful when removing the cake as the interior of the
Rice Cooker and the Inner Cooking Pan are hot upon
cooking completion.
●
If the cake needs more baking, restart the process from
Step to bake a little longer.
●
Wait for the Main Body to cool before cleaning.
●
If there is smell of cake left inside the Inner Cooking Pan,
see pg. 24 “IF THERE IS AN ODOR” to remove the smell.
●
Always press the CANCEL button when cooking
completes. The Rice Cooker will beep every 30 minutes
and the display will blink as a reminder to remove the
cake if the CANCEL button is not pressed.
45 minutes
65 minutes
1 minute –
60 minutes
1 minute –
80 minutes
1.0 L model
1.8 L model
Model
Default
Cooking
Time
Cooking Time
Range
IMPORTANT
●
If you want to know the current time while baking is in progress, press the
or button and the Display will switch only while the button is pressed.
The START/REHEAT light turns on, and the remaining time (in minutes)
until baking completion appears on the Display.
The Melody (Beep) sounds and baking begins.
Close the Outer Lid and press the button to choose the
CAKE menu setting.
Blinks
When the Melody (Beep) to indicate cooking completion sounds, press
the button and remove the cake from the Inner Cooking Pan.
Turns on
Blinks
Blinks
Within 30 minutes
of cooking completion
After 30 minutes of
cooking completion
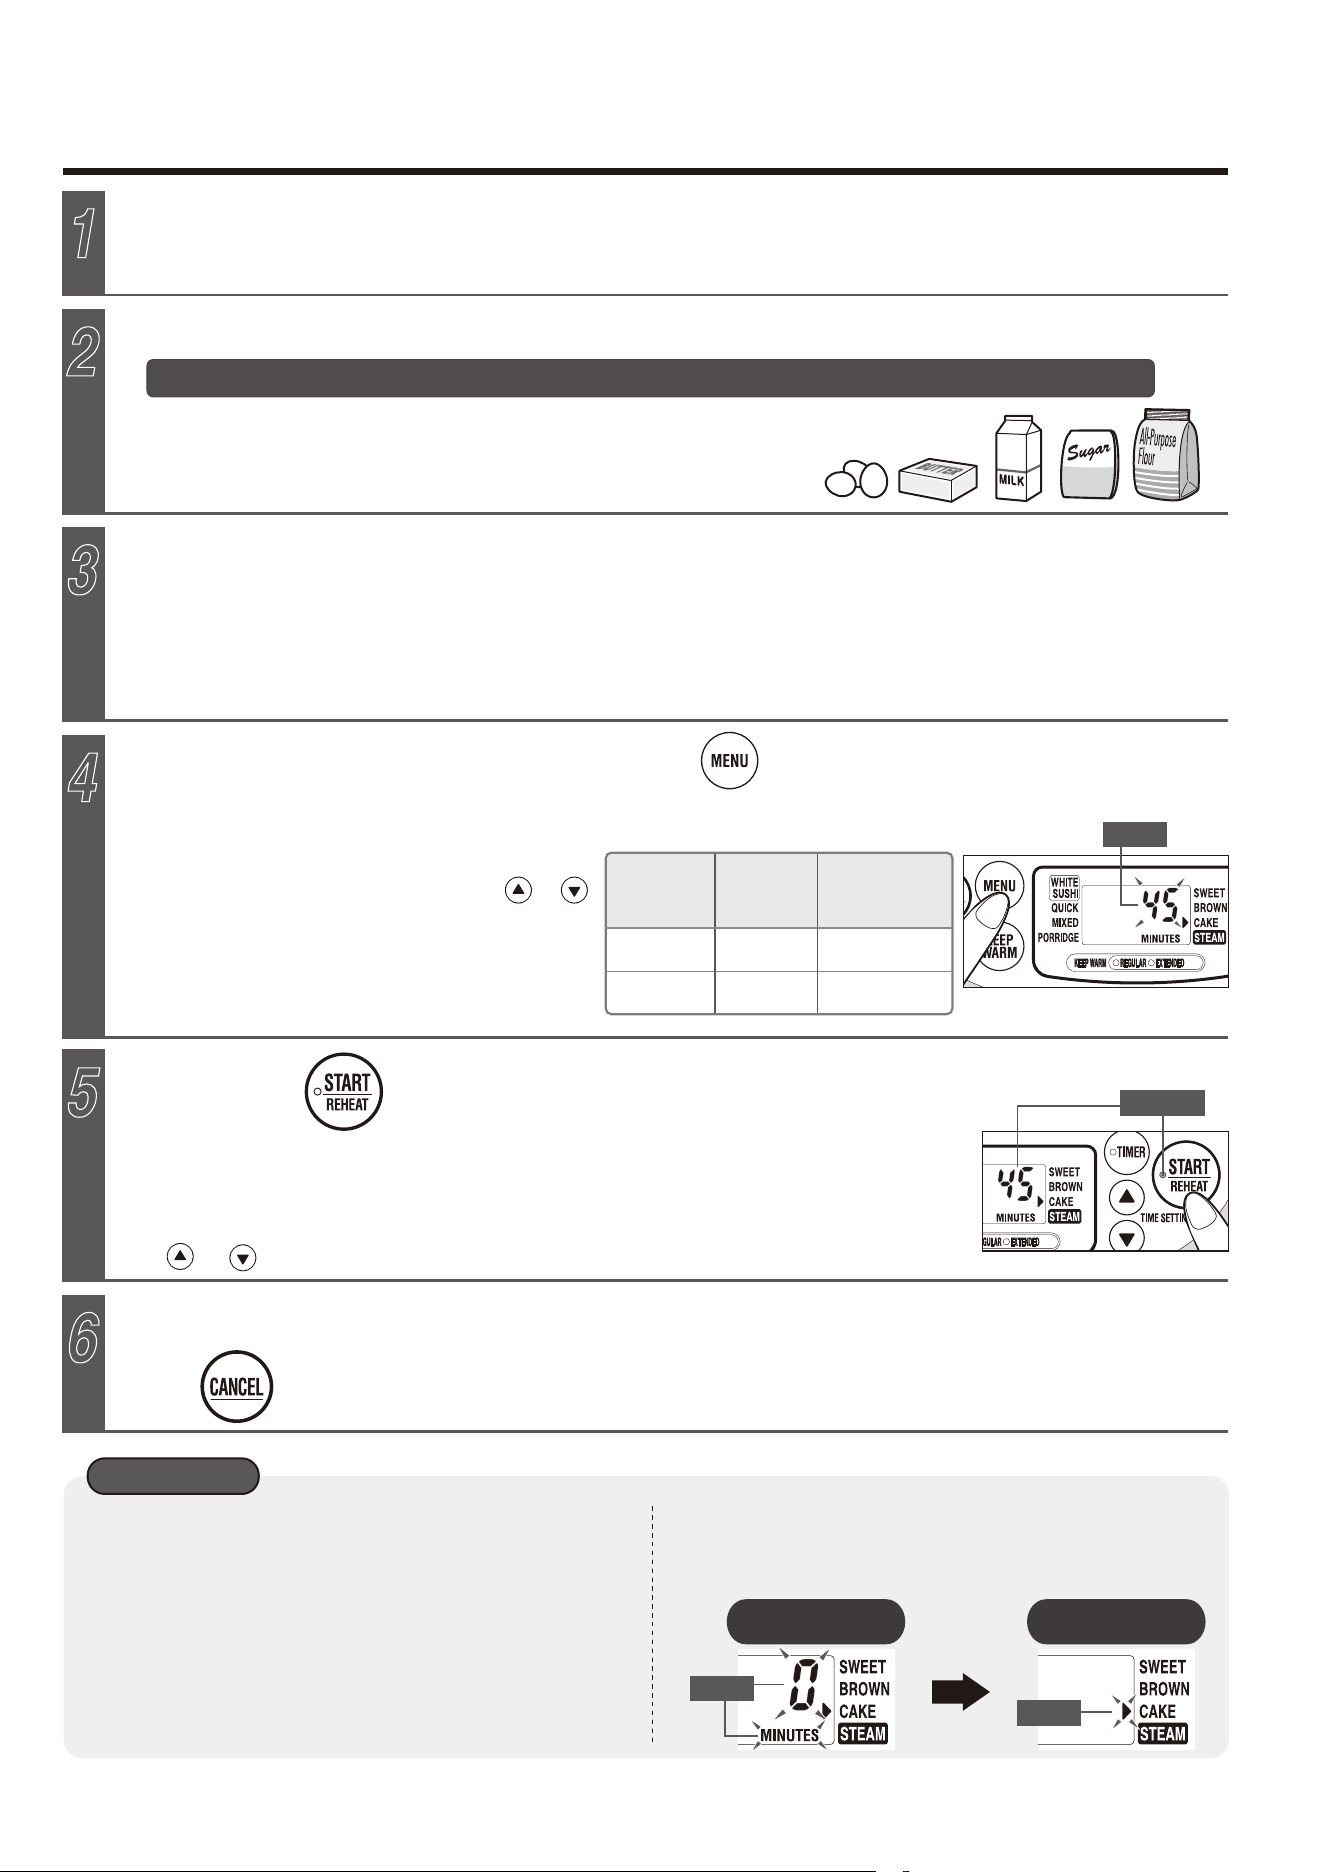
16 17
●
When the CAKE menu setting is selected,
the default cooking time for the CAKE menu
setting will begin blinking. Press the or
button to change the cooking time.
→ Refer to the RECIPES (pg. 23) for the
cooking time.
●Press and hold the button to quickly adjust
the time in 5-minute increments.
Press the or button to set a
specific time to finish cooking.
WHITE
SUSHI
PORRIDGE
BROWN
1.0 L model
1 hour 5 min. –
1 hour 5 min. –
1 hour 10 min. –
1 hour 55 min. –
1 hour 10 min. –
1 hour 10 min. –
1 hour 15 min. –
2 hours –
1.8 L model
HOW TO BAKE CAKE
●
Display for a 1.0 L model
1
Grease the inside of the Inner Cooking Pan lightly and evenly with butter.
2
Prepare the batter for cake.
●
The cake may be difficult to remove if the Inner Cooking Pan is not greased evenly.
3
4
5
Press the button.
6
1
USING THE TIMER TO COOK RICE
USING THE TIMER
●
This function sets the Rice Cooker to automatically finish cooking by a specific time. Once set, the timer settings are stored in “Timer 1”
or “Timer 2”.
●
The initial settings are 6:00 for “Timer 1”, 18:00 for “Timer 2”.
●
Set the clock to the current time before setting the Timer function. If the clock is inaccurate, the cooking will not be completed at the
time you set for the Timer. → pg. 9
When setting Timer 1 to “7:30”.
Ex.
: Each press advances the time
in 10-minute increments.
: Each press reverses the time
in 10-minute increments.
●
The Timer function is not available for QUICK, MIXED, SWEET, CAKE
and STEAM menu settings.
Press the button to select the desired menu setting.
Press the button.
The preset time for “Timer 1” and the START/REHEAT light will blink.
●
Press the button again and the preset time for “Timer 2” will appear.
●
If you set the Timer shorter than the Length Needed for the Timer Settings, a beep will sound, the Rice Cooker will start cooking
immediately, and the estimated time until cooking completion will be displayed.
●
For pre-cooking preparations, see steps 1 through 3 under “BASIC COOKING STEPS” on pg. 10.
Press the button to select “Timer 1”
(or “Timer 2”).
●
Press and hold the button to quickly adjust the time in 10-minute
increments.
●
You do not need to set the time again when using the same settings.
●
The START/REHEAT button must be pressed to set the TIMER.
●
Cooking will be completed at the specified time. →See step 6 under
“BASIC COOKING STEPS” on pg. 11
●
To cancel the Timer setting while using the Timer function, press the
CANCEL button.
The START/REHEAT light turns off, and the time you wish to finish
cooking and the TIMER light turn on.
The Melody (Beep) sounds,
and the Timer setting is
completed.
●
The estimated time until cooking completion will not be displayed when the Timer is set.
●
Cooking may not complete at the set time if the temperature of the room or water is too
low. In addition, the cooking time may be affected by the amount of water or voltage.
●
When cooking using the Timer function, the rice absorbs extra moisture, which can
make the rice softer or cause the bran to collect at the bottom and burn.
●
If you want to know the current time while using the Timer function, press the or
button and the Display will switch only while the button is pressed.
●
Do not use the Timer function
if you are adding ingredients
and/or seasonings to the rice.
Ingredients may spoil or
seasonings may settle to the
bottom of the Inner Cooking
Pan and your results may not
be satisfactory.
●Do not set the Timer for 13 hours or more.
Furthermore, do not set the Timer for 8 hours or
more when the water temperature is high, such as
during summer. (This will prevent spoilage caused
by rice being soaked for longer than required.)
1
2
3
4
Length Needed for the Timer Settings
IMPORTANT
NOTE
Blinks
Preset time
Turns on
The time you wish to
complete cooking.
Turns off
TIMER setting
complete.
Turns on
Pour the cake batter into the Inner Cooking Pan from Step ,
level the surface and release excess air.
●
Hit the bottom of the Inner Cooking Pan with the palm of your hand several times to release the air bubbles in
the batter.
Do not hit the Inner Cooking Pan with hard objects or drop it onto the kitchen counter, as this may deform the
Inner Cooking Pan and cause uneven baking.
*Do not add baking powder or baking soda as it may cause the cake
to rise too high and cause malfunction.
*The maximum capacity of all-purpose flour is 4.2 oz./120 g (1.0 L
model) or 6.3 oz./180 g (1.8 L model).
Refer to the RECIPES (pg. 23) for how to prepare the batter and the amounts of its ingredients.
4
●
Remove the cake from the Inner Cooking Pan immediately
after cooking completion. Otherwise the cake may become
difficult to remove.
●
Be careful when removing the cake as the interior of the
Rice Cooker and the Inner Cooking Pan are hot upon
cooking completion.
●
If the cake needs more baking, restart the process from
Step to bake a little longer.
●
Wait for the Main Body to cool before cleaning.
●
If there is smell of cake left inside the Inner Cooking Pan,
see pg. 24 “IF THERE IS AN ODOR” to remove the smell.
●
Always press the CANCEL button when cooking
completes. The Rice Cooker will beep every 30 minutes
and the display will blink as a reminder to remove the
cake if the CANCEL button is not pressed.
45 minutes
65 minutes
1 minute –
60 minutes
1 minute –
80 minutes
1.0 L model
1.8 L model
Model
Default
Cooking
Time
Cooking Time
Range
IMPORTANT
●
If you want to know the current time while baking is in progress, press the
or button and the Display will switch only while the button is pressed.
The START/REHEAT light turns on, and the remaining time (in minutes)
until baking completion appears on the Display.
The Melody (Beep) sounds and baking begins.
Close the Outer Lid and press the button to choose the
CAKE menu setting.
Blinks
When the Melody (Beep) to indicate cooking completion sounds, press
the button and remove the cake from the Inner Cooking Pan.
Turns on
Blinks
Blinks
Within 30 minutes
of cooking completion
After 30 minutes of
cooking completion
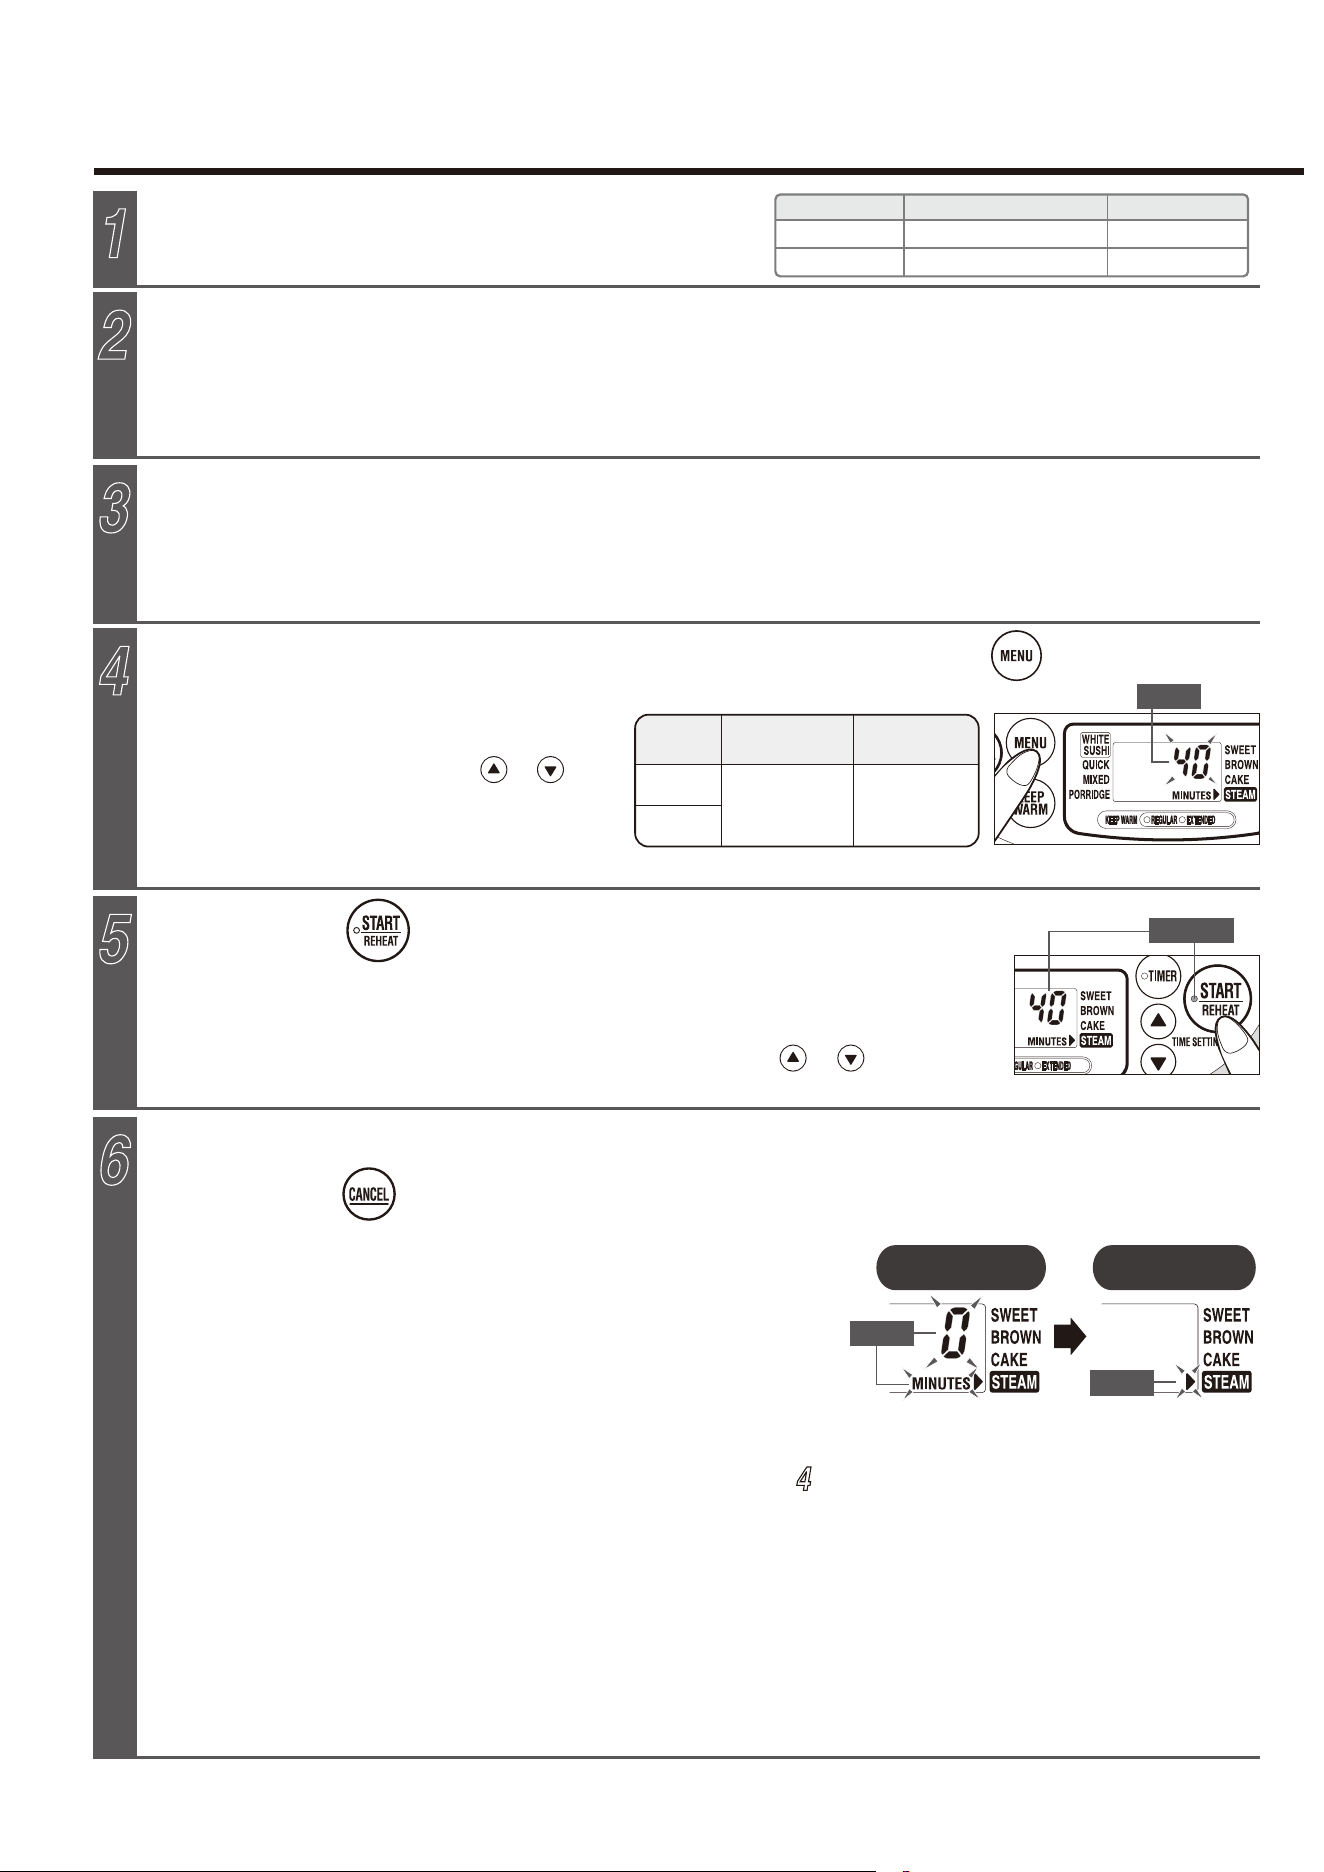
18 19
HOW TO STEAM FOOD
Add water to the Inner Cooking Pan.
Place the Inner Cooking Pan into the Main Body and place the
Steaming Basket.
Place food in the Steaming Basket from step 2, attach the Inner Lid Set
and the Steam Vent Cap, close the Outer Lid, and then insert the Power
Plug into an electrical outlet.
●
Place food in the Steaming Basket evenly. The Steaming Basket may become slant if the food is heavier on one side.
When the Melody (Beep) to indicate cooking completion sounds,
press the button and open the Outer Lid to remove the food
from the Steaming Basket.
Press the button.
1
2
3
5
6
4cups
3cups
18fl.oz.(540mL)
24fl.oz.(720mL)
Capacity
Measuring Cup
Model
1.0 L model
1.8 L model
Select the STEAM menu setting by pressing the button.
*The cooking time includes the time it takes to boil the water.
4
Wipe the outer surface of the Inner Cooking Pan, the inside of the Main Body, the Inner Lid Set, and the Steam
Vent Cap clean of moisture and foreign matter.
●
Please make sure to place the Steaming Basket straight, or steam may escape from the gap.
●
When the STEAM menu setting is selected,
the default cooking time will appear in the
Display. You can make the cooking time
longer or shorter by using the or
buttons.
See pg. 19 “Suggested Steaming Time.”
●
Press and hold the button to quickly adjust
the time in 5-minute increments.
●
Clean food scum from ingredients such as chicken or fish after cooking.
●
Place steamed vegetables in ice water immediately after cooking and then drain them to preserve their bright colors.
NOTE
40 minutes
1.0 L model
1.8 L model
1 minute –
60 minutes
Default Cooking
Time
Cooking Time
Range
Model
Within 30 minutes
of cooking completion
After 30 minutes of
cooking completion
NOTE
20 min.
15 min.
15 min.
20 min.
40 min.
35 min.
30 min.
30 min.
25 min.
20 min.
20 min.
15 min.
20 min.
Cut into bite-size pieces
Cut into bite-size pieces
Cut into bite-size pieces
Cut into bite-size pieces
Cut into bite-size pieces
Cut into bite-size pieces
Cut into bite-size pieces
Cut slits on the bottom side (that comes into contact with the Steaming Basket)
Slice into less than 1 inch/2 cm thickness and wrap in aluminum foil
Steam without removing shells
Leave appropriate space between food items
Leave appropriate space between food items
Remove from shell (It is recommended to line the Steaming Basket with
Chinese cabbage or cabbage to prevent the scallops from sticking)
Do not cook the following types of foods in the Rice Cooker:
●
Thick foods such as curry and stews
●
Foods that may bubble over such as those using baking soda
●
Foods that expand after cooking such as processed seafood products and beans
●
Foods with large amounts of oil
●
Foods packaged in plastic bags
When cooking…
●
Do not use paper towels or other lids to cover the food.
●
Remove any foreign matter from the outer surface of the Inner Cooking Pan, Heating Plate or Center Sensor.
→ pg.24 - pg.25
●
When using aluminum foil or cooking sheet, do not completely cover the holes on the Steaming Basket, or allow it to extend
outside the Steaming Basket. Doing so may cause breakdown, boiling over, or steam may leak.
●
Steaming time will vary based on the room and water temperature, voltage, water measurement, size, amount and
temperature of the food or other factors.
●
When steaming consecutively, check to make sure there is enough water in the Inner Cooking Pan, and add water
accordingly to prevent it from boiling dry.
●
Steaming fish and meat for an extended time makes them tough. If they do not cook through, try slicing them thinly before
steaming. Adding herbs, garlic or flavoring with salt and pepper may reduce odors.
When cooking other foods together with rice...
●
Cook the rice using the WHITE/SUSHI menu setting.
●
Cook 1 cup of rice if the model has a cooking capacity of 1.0 L and 2 to 4 cups of rice if the model has a cooking capacity of
1.8 L. Cooking too much rice may cause the Outer Lid to open during cooking, preventing the rice from cooking properly and
the other ingredients from steaming properly.
●
Level the surface of the rice before cooking. → Failure to do so may cause the cooked rice to touch the Steaming Basket.
●
Ingredients that require a comparatively long steaming time, such as potatoes, sweet potatoes, corn, pumpkin, and fish
(wrapped in aluminum foil) can be cooked together. If they do not cook through properly, reduce the amount of ingredients or
cut them into small pieces.
●
Ingredients that require a comparatively short steaming time, such as spinach, will not steam properly.
●
Do not add ingredients while the rice is cooking.
●
The rice may burn more easily or take on the color and odor of the other ingredients.
Suggested Steaming Time
Ingredients Tips for SteamingTimeAmount
Carrot
Broccoli
Spinach
Pumpkin
Potato
Sweet potato
Corn
Chicken
Fish
(white fish, salmon, etc.)
Prawn
Scallop
1, about 7 oz./200 g
½, about 7 oz./200 g
About 3-½ oz./100 g
¼, about 9 oz./250 g
3, about 16 oz./450 g
1, about 10-½ oz./300 g
1, about 7 oz./200 g
1 fillet, about 10-½ oz./300 g
Cut into fillets, about 5 oz./150 g
15, about 5 oz./150 g
About 5 oz./150 g
About 7 oz./200 g
About 7 oz./200 g
Refrigerated meat dumplings,
pot stickers (jiaozi), meat
buns (xiaolongbao)
Frozen meat dumplings, pot
stickers (jiaozi), meat buns
(xiaolongbao)
Ensure that the height does not exceed 1-½”/3.5 cm when the food is
added. If this height is exceeded, the food may hit the Inner Lid Set,
causing a breakdown.
Turns on
Blinks
The Melody (Beep) sounds and steaming will start.
The START/REHEAT light turns on and the
Display shows the remaining time (in
minutes) until steaming completion.
●
If you want to know the current time during cooking, press the or button
and the Display will switch only while the button is pressed.
●
Remove the food from the Steaming Basket immediately after
cooking completion because the Rice Cooker does not switch to the
Keep Warm mode, or the food may become wet or soggy.
●
Be careful when opening the Outer Lid and removing the steamed
dish and Steaming Basket, as the steam and the inside of the Main
Body are very hot upon cooking completion (which may cause burns).
●
Always press the CANCEL button when cooking is complete. The Rice Cooker will beep every 30 minutes and
the display will blink as a reminder to remove the food if the CANCEL button is not pressed.
●
If the food needs more steaming, restart the process from Step to steam a little longer.
●
If smells of food remain inside the Inner Cooking Pan, see pg. 24 “CLEANING AND MAINTENANCE: IF THERE
IS AN ODOR” to remove the smell.
●
The Steaming Basket may become colored from the ingredients (especially carrots and leafy vegetables), but it
will not affect cooking performance. Although stains on the Steaming Basket may not be completely removed
even with cleaning, wash the basket immediately after every use, as stains will become even more difficult to
remove if they dry out.
●
Oil and scum may soil the Inner Lid Set and the inside of the Outer Lid, especially when steaming meats. Always wash
the Inner Lid Set, Inner Cooking Pan and Steaming Basket after each use, and wipe the Outer Lid Gasket and the
inside of the Outer Lid after each use to prevent odors or spoiling.
●
Hot condensation may fall from the Inner Lid Set when the Outer Lid is opened upon cooking completion and cause burns.
Please exercise caution.
4
Blinks
Blinks
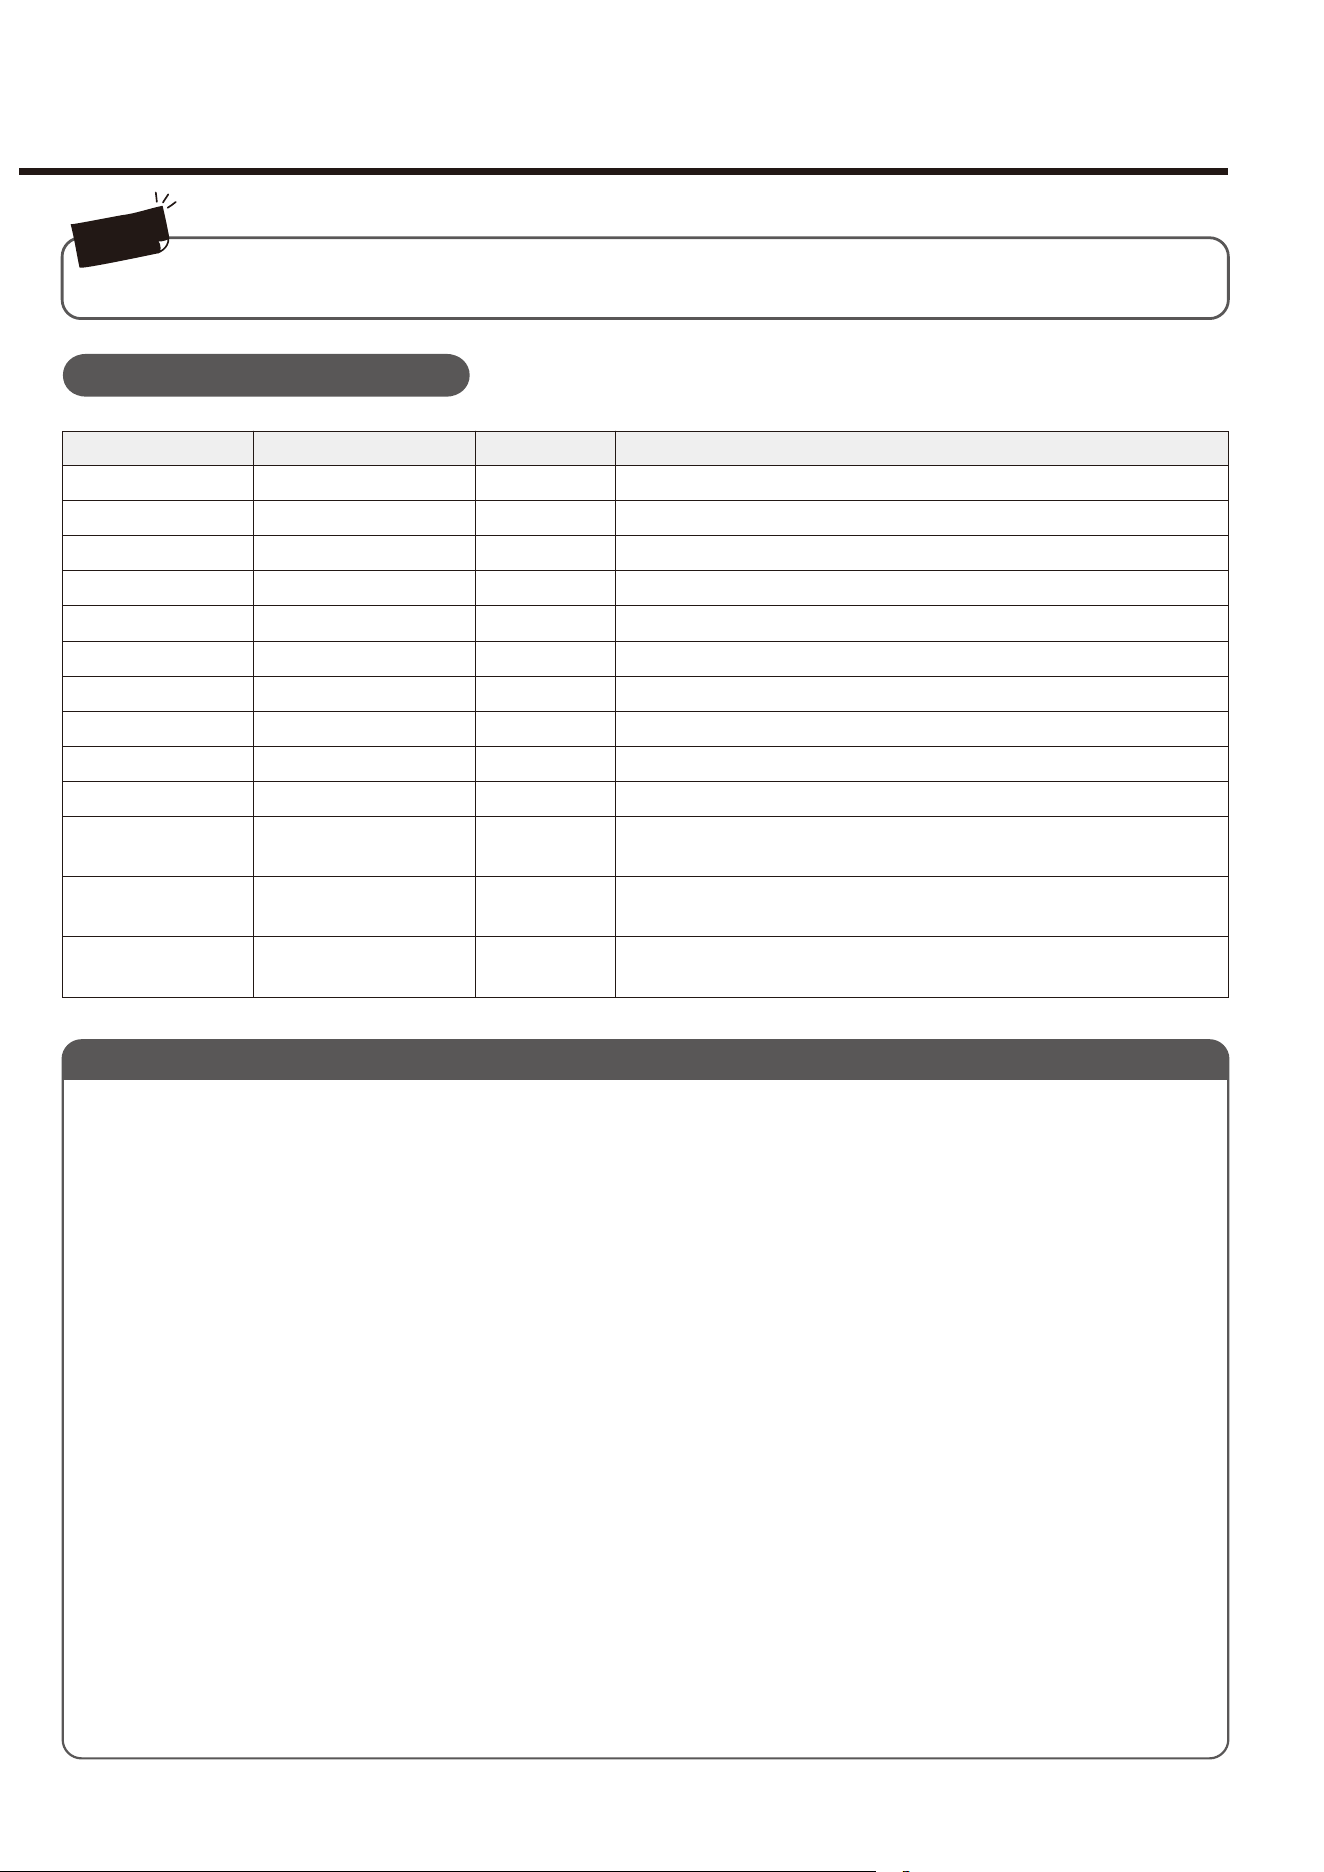
18 19
HOW TO STEAM FOOD
Add water to the Inner Cooking Pan.
Place the Inner Cooking Pan into the Main Body and place the
Steaming Basket.
Place food in the Steaming Basket from step 2, attach the Inner Lid Set
and the Steam Vent Cap, close the Outer Lid, and then insert the Power
Plug into an electrical outlet.
●
Place food in the Steaming Basket evenly. The Steaming Basket may become slant if the food is heavier on one side.
When the Melody (Beep) to indicate cooking completion sounds,
press the button and open the Outer Lid to remove the food
from the Steaming Basket.
Press the button.
1
2
3
5
6
4cups
3cups
18fl.oz.(540mL)
24fl.oz.(720mL)
Capacity
Measuring Cup
Model
1.0 L model
1.8 L model
Select the STEAM menu setting by pressing the button.
*The cooking time includes the time it takes to boil the water.
4
Wipe the outer surface of the Inner Cooking Pan, the inside of the Main Body, the Inner Lid Set, and the Steam
Vent Cap clean of moisture and foreign matter.
●
Please make sure to place the Steaming Basket straight, or steam may escape from the gap.
●
When the STEAM menu setting is selected,
the default cooking time will appear in the
Display. You can make the cooking time
longer or shorter by using the or
buttons.
See pg. 19 “Suggested Steaming Time.”
●
Press and hold the button to quickly adjust
the time in 5-minute increments.
●
Clean food scum from ingredients such as chicken or fish after cooking.
●
Place steamed vegetables in ice water immediately after cooking and then drain them to preserve their bright colors.
NOTE
40 minutes
1.0 L model
1.8 L model
1 minute –
60 minutes
Default Cooking
Time
Cooking Time
Range
Model
Within 30 minutes
of cooking completion
After 30 minutes of
cooking completion
NOTE
20 min.
15 min.
15 min.
20 min.
40 min.
35 min.
30 min.
30 min.
25 min.
20 min.
20 min.
15 min.
20 min.
Cut into bite-size pieces
Cut into bite-size pieces
Cut into bite-size pieces
Cut into bite-size pieces
Cut into bite-size pieces
Cut into bite-size pieces
Cut into bite-size pieces
Cut slits on the bottom side (that comes into contact with the Steaming Basket)
Slice into less than 1 inch/2 cm thickness and wrap in aluminum foil
Steam without removing shells
Leave appropriate space between food items
Leave appropriate space between food items
Remove from shell (It is recommended to line the Steaming Basket with
Chinese cabbage or cabbage to prevent the scallops from sticking)
Do not cook the following types of foods in the Rice Cooker:
●
Thick foods such as curry and stews
●
Foods that may bubble over such as those using baking soda
●
Foods that expand after cooking such as processed seafood products and beans
●
Foods with large amounts of oil
●
Foods packaged in plastic bags
When cooking…
●
Do not use paper towels or other lids to cover the food.
●
Remove any foreign matter from the outer surface of the Inner Cooking Pan, Heating Plate or Center Sensor.
→ pg.24 - pg.25
●
When using aluminum foil or cooking sheet, do not completely cover the holes on the Steaming Basket, or allow it to extend
outside the Steaming Basket. Doing so may cause breakdown, boiling over, or steam may leak.
●
Steaming time will vary based on the room and water temperature, voltage, water measurement, size, amount and
temperature of the food or other factors.
●
When steaming consecutively, check to make sure there is enough water in the Inner Cooking Pan, and add water
accordingly to prevent it from boiling dry.
●
Steaming fish and meat for an extended time makes them tough. If they do not cook through, try slicing them thinly before
steaming. Adding herbs, garlic or flavoring with salt and pepper may reduce odors.
When cooking other foods together with rice...
●
Cook the rice using the WHITE/SUSHI menu setting.
●
Cook 1 cup of rice if the model has a cooking capacity of 1.0 L and 2 to 4 cups of rice if the model has a cooking capacity of
1.8 L. Cooking too much rice may cause the Outer Lid to open during cooking, preventing the rice from cooking properly and
the other ingredients from steaming properly.
●
Level the surface of the rice before cooking. → Failure to do so may cause the cooked rice to touch the Steaming Basket.
●
Ingredients that require a comparatively long steaming time, such as potatoes, sweet potatoes, corn, pumpkin, and fish
(wrapped in aluminum foil) can be cooked together. If they do not cook through properly, reduce the amount of ingredients or
cut them into small pieces.
●
Ingredients that require a comparatively short steaming time, such as spinach, will not steam properly.
●
Do not add ingredients while the rice is cooking.
●
The rice may burn more easily or take on the color and odor of the other ingredients.
Suggested Steaming Time
Ingredients Tips for SteamingTimeAmount
Carrot
Broccoli
Spinach
Pumpkin
Potato
Sweet potato
Corn
Chicken
Fish
(white fish, salmon, etc.)
Prawn
Scallop
1, about 7 oz./200 g
½, about 7 oz./200 g
About 3-½ oz./100 g
¼, about 9 oz./250 g
3, about 16 oz./450 g
1, about 10-½ oz./300 g
1, about 7 oz./200 g
1 fillet, about 10-½ oz./300 g
Cut into fillets, about 5 oz./150 g
15, about 5 oz./150 g
About 5 oz./150 g
About 7 oz./200 g
About 7 oz./200 g
Refrigerated meat dumplings,
pot stickers (jiaozi), meat
buns (xiaolongbao)
Frozen meat dumplings, pot
stickers (jiaozi), meat buns
(xiaolongbao)
Ensure that the height does not exceed 1-½”/3.5 cm when the food is
added. If this height is exceeded, the food may hit the Inner Lid Set,
causing a breakdown.
Turns on
Blinks
The Melody (Beep) sounds and steaming will start.
The START/REHEAT light turns on and the
Display shows the remaining time (in
minutes) until steaming completion.
●
If you want to know the current time during cooking, press the or button
and the Display will switch only while the button is pressed.
●
Remove the food from the Steaming Basket immediately after
cooking completion because the Rice Cooker does not switch to the
Keep Warm mode, or the food may become wet or soggy.
●
Be careful when opening the Outer Lid and removing the steamed
dish and Steaming Basket, as the steam and the inside of the Main
Body are very hot upon cooking completion (which may cause burns).
●
Always press the CANCEL button when cooking is complete. The Rice Cooker will beep every 30 minutes and
the display will blink as a reminder to remove the food if the CANCEL button is not pressed.
●
If the food needs more steaming, restart the process from Step to steam a little longer.
●
If smells of food remain inside the Inner Cooking Pan, see pg. 24 “CLEANING AND MAINTENANCE: IF THERE
IS AN ODOR” to remove the smell.
●
The Steaming Basket may become colored from the ingredients (especially carrots and leafy vegetables), but it
will not affect cooking performance. Although stains on the Steaming Basket may not be completely removed
even with cleaning, wash the basket immediately after every use, as stains will become even more difficult to
remove if they dry out.
●
Oil and scum may soil the Inner Lid Set and the inside of the Outer Lid, especially when steaming meats. Always wash
the Inner Lid Set, Inner Cooking Pan and Steaming Basket after each use, and wipe the Outer Lid Gasket and the
inside of the Outer Lid after each use to prevent odors or spoiling.
●
Hot condensation may fall from the Inner Lid Set when the Outer Lid is opened upon cooking completion and cause burns.
Please exercise caution.
4
Blinks
Blinks
20 21
Continued on the next page
RECIPES
Ingredients (4-5 servings)
3 cups White rice
* Use the supplied Measuring Cup.
1 lb. (454 g) Raw tuna (sashimi grade)
2 (300 g) Medium Avocados
A)
4 Tbsp. Soy sauce
1 tsp.
wasabi,
grated
Grated
wasabi
to taste
Soy sauce to taste
1
Clean white rice well and fill the Inner Cooking Pan with
water to Water Level Line
3
for WHITE.
2
Press the MENU button, select WHITE/SUSHI and press the
START/REHEAT button to start cooking.
3
Slice the avocado in 1/4 inch (0.5 cm) thickness, and the raw
tuna in 1/2 inch (1 cm) thickness, marinate in “
A
”.
4
When cooking is completed, place the rice in a bowl and top
with the marinated tuna and avocado.
5
Serve with additional
wasabi
and soy sauce to taste.
How to cook
AVOCADO AND TUNA BOWL
Menu Setting: WHITE /SUSHI
Ingredients (4-5 servings)
Seaweed,
wasabi
(horse radish), soy sauce and
pickled red ginger to taste
3 cups White rice
* Use the supplied Measuring Cup.
Mixed vinegar
4 Tbsp. Rice vinegar
1 Tbsp. Sugar
1 1/2 tsp. Salt
Suggested Toppings
Sashimi (tuna, squid, prawns, etc.)
Japanese pickles (e.g. pickled radish)
Avocado and ham
Natto
(fermented soybean) and green onions
Bacon and asparagus
Salmon roe, sea eel and rolled egg
Carrots, cucumbers and celery
1
Clean white rice well and fill the Inner Cooking Pan with
water to Water Level Line
3
for SUSHI.
2
Press the MENU button, select WHITE/SUSHI and press the
START/REHEAT button to start cooking.
3
When cooking is completed, place the rice into a wooden
container (wiped with a clean wet cloth). Pour the mixed
vinegar over the rice and mix thoroughly while cooling it with
a fan.
●
Hand-rolled sushi is simple and quick, wrapping your
favorite sashimi, ingredients and sushi rice with
Nori
(seaweed). You can also use a lettuce leaf to wrap your
hand-rolled sushi.
How to cook
HAND-ROLLED SUSHI
Ingredients (4-5 servings)
3 cups White rice
* Use the supplied Measuring Cup.
Mixed vinegar
4 Tbsp. Vinegar
3 Tbsp. Sugar
1 tsp. Salt
1 oz. (28 g) Carrot
1 oz. (28 g) Gobo
1 oz. (28 g) Bamboo shoot
2 pieces (38 g) Shiitake mushroom
1 (30 g) Chikuwa (fish paste)
4 fl oz. (118 mL) Soup stock
2 Tbsp. Sugar
1 Tbsp. Soy sauce
1 Tbsp. Mirin (sweet sake)
2 eggs
1 tsp. Mirin
A pinch Salt
Pickled lotus root, Nori (seaweed), Pickled red ginger to taste
Shrimp, Squid, Boiled snow peas to garnish
1
Clean rice well and fill the Inner Cooking Pan with water to
Water Level Line
3
for SUSHI.
2
Press the MENU button, select WHITE/SUSHI and press the
START/REHEAT button to start cooking.
3
When cooking is completed, place the rice into a wooden
container (wiped with clean wet cloth). Pour mixed vinegar
over the rice and mix thoroughly while cooling it with a fan.
4
Cut the carrot into fine pieces, shred Gobo, cut the
bamboo shoot in small strips, cut shiitake mushrooms
in thin strips, and cut the chikuwa in lengthwise then
cut into small pieces. Boil these ingredients in the soup
stock “
A
” until the soup is gone.
5
Mix the ingredients of “
B
” and fry in a thin crepe, and
slice into a small thin strips.
6
Mix the ingredients from Step
4
with the Sushi rice
from Step
3
, sprincle sliced fried eggs from Step
5
,
pickled lotus root and Nori (seaweed). Decorate with
shrimps, squid and snow peas and top with pickled red
ginger.
How to cook
CHIRASHI-SUSHI
Menu Setting: WHITE /SUSHI
A
B
Ingredients (4-5 servings)
1
Slice chicken thigh into 1/2 inch (1 cm) cubes. Place Age in a
strainer and pour hot water over it; gently squeeze to drain excess
oil, then slice into small strips. Soak chicken thigh and Age in soup
stock “
A
” for 5 minutes (do not discard this soup stock).
2
Slice carrots and Konnyaku into small strips, soak Konnyaku
in hot water and drain. Shred Gobo, soak in water until soft,
then drain. Cut Shiitake into small strips.
3
Add the soup stock from Step
1
to the water used to soak
the dried Shiitake, and mix them well.
4
Clean white rice and add the mixture from Step
3
. Fill the Inner
Cooking Pan with water to Water Level Line
3
for WHITE, and
then mix well from the bottom of the Inner Cooking Pan.
5
Place the ingredients from Steps
1
and
2
on top of the rice
from Step
4
and spread evenly across the top.
Do not mix the ingredients with the rice. Changing the
amounts of rice and ingredients may cause imperfect
cooking.
6
Press the MENU button, select MIXED and press the
START/REHEAT button to start cooking.
7
When cooking is completed, mix the rice to loosen it.
8
Serve rice in a bowl and sprinkle stone parsley on top.
How to cook
MIXED RICE
Menu Setting: MIXED
A
3 cups White rice
* Use the supplied
Measuring Cup.
2 oz. (57 g) Chicken thigh
1/2 slice (7 g) Age (fried tofu)
1 oz. (28 g) Carrots
1 oz. (28 g) Konnyaku
1 oz. (28 g) Gobo
2–3 (7-11 g) Dried shiitake
mushrooms (soaked in
water to constitute)
1 1/2 Tbsp. Light soy
sauce
1 1/2 Tbsp. Mirin (sweet
sake)
1/2 tsp. Salt
1/2 tsp. Dashinomoto
Soup taken from soaking
dried Shiitake to taste
Stone parsley to taste
The measurements used in
these Recipes
1 Tablespoon = 0.5 fl. oz. (15 mL) 1 teaspoon = 0.17 fl. oz. (5 mL)
Measure the rice with the supplied Measuring Cup. (1 Cup = approx. 6.1 fl. oz./approx. 180 mL)
Menu Setting: WHITE /SUSHI
20 21
Continued on the next page
RECIPES
Ingredients (4-5 servings)
3 cups White rice
* Use the supplied Measuring Cup.
1 lb. (454 g) Raw tuna (sashimi grade)
2 (300 g) Medium Avocados
A)
4 Tbsp. Soy sauce
1 tsp.
wasabi,
grated
Grated
wasabi
to taste
Soy sauce to taste
1
Clean white rice well and fill the Inner Cooking Pan with
water to Water Level Line
3
for WHITE.
2
Press the MENU button, select WHITE/SUSHI and press the
START/REHEAT button to start cooking.
3
Slice the avocado in 1/4 inch (0.5 cm) thickness, and the raw
tuna in 1/2 inch (1 cm) thickness, marinate in “
A
”.
4
When cooking is completed, place the rice in a bowl and top
with the marinated tuna and avocado.
5
Serve with additional
wasabi
and soy sauce to taste.
How to cook
AVOCADO AND TUNA BOWL
Menu Setting: WHITE /SUSHI
Ingredients (4-5 servings)
Seaweed,
wasabi
(horse radish), soy sauce and
pickled red ginger to taste
3 cups White rice
* Use the supplied Measuring Cup.
Mixed vinegar
4 Tbsp. Rice vinegar
1 Tbsp. Sugar
1 1/2 tsp. Salt
Suggested Toppings
Sashimi (tuna, squid, prawns, etc.)
Japanese pickles (e.g. pickled radish)
Avocado and ham
Natto
(fermented soybean) and green onions
Bacon and asparagus
Salmon roe, sea eel and rolled egg
Carrots, cucumbers and celery
1
Clean white rice well and fill the Inner Cooking Pan with
water to Water Level Line
3
for SUSHI.
2
Press the MENU button, select WHITE/SUSHI and press the
START/REHEAT button to start cooking.
3
When cooking is completed, place the rice into a wooden
container (wiped with a clean wet cloth). Pour the mixed
vinegar over the rice and mix thoroughly while cooling it with
a fan.
●
Hand-rolled sushi is simple and quick, wrapping your
favorite sashimi, ingredients and sushi rice with
Nori
(seaweed). You can also use a lettuce leaf to wrap your
hand-rolled sushi.
How to cook
HAND-ROLLED SUSHI
Ingredients (4-5 servings)
3 cups White rice
* Use the supplied Measuring Cup.
Mixed vinegar
4 Tbsp. Vinegar
3 Tbsp. Sugar
1 tsp. Salt
1 oz. (28 g) Carrot
1 oz. (28 g) Gobo
1 oz. (28 g) Bamboo shoot
2 pieces (38 g) Shiitake mushroom
1 (30 g) Chikuwa (fish paste)
4 fl oz. (118 mL) Soup stock
2 Tbsp. Sugar
1 Tbsp. Soy sauce
1 Tbsp. Mirin (sweet sake)
2 eggs
1 tsp. Mirin
A pinch Salt
Pickled lotus root, Nori (seaweed), Pickled red ginger to taste
Shrimp, Squid, Boiled snow peas to garnish
1
Clean rice well and fill the Inner Cooking Pan with water to
Water Level Line
3
for SUSHI.
2
Press the MENU button, select WHITE/SUSHI and press the
START/REHEAT button to start cooking.
3
When cooking is completed, place the rice into a wooden
container (wiped with clean wet cloth). Pour mixed vinegar
over the rice and mix thoroughly while cooling it with a fan.
4
Cut the carrot into fine pieces, shred Gobo, cut the
bamboo shoot in small strips, cut shiitake mushrooms
in thin strips, and cut the chikuwa in lengthwise then
cut into small pieces. Boil these ingredients in the soup
stock “
A
” until the soup is gone.
5
Mix the ingredients of “
B
” and fry in a thin crepe, and
slice into a small thin strips.
6
Mix the ingredients from Step
4
with the Sushi rice
from Step
3
, sprincle sliced fried eggs from Step
5
,
pickled lotus root and Nori (seaweed). Decorate with
shrimps, squid and snow peas and top with pickled red
ginger.
How to cook
CHIRASHI-SUSHI
Menu Setting: WHITE /SUSHI
A
B
Ingredients (4-5 servings)
1
Slice chicken thigh into 1/2 inch (1 cm) cubes. Place Age in a
strainer and pour hot water over it; gently squeeze to drain excess
oil, then slice into small strips. Soak chicken thigh and Age in soup
stock “
A
” for 5 minutes (do not discard this soup stock).
2
Slice carrots and Konnyaku into small strips, soak Konnyaku
in hot water and drain. Shred Gobo, soak in water until soft,
then drain. Cut Shiitake into small strips.
3
Add the soup stock from Step
1
to the water used to soak
the dried Shiitake, and mix them well.
4
Clean white rice and add the mixture from Step
3
. Fill the Inner
Cooking Pan with water to Water Level Line
3
for WHITE, and
then mix well from the bottom of the Inner Cooking Pan.
5
Place the ingredients from Steps
1
and
2
on top of the rice
from Step
4
and spread evenly across the top.
Do not mix the ingredients with the rice. Changing the
amounts of rice and ingredients may cause imperfect
cooking.
6
Press the MENU button, select MIXED and press the
START/REHEAT button to start cooking.
7
When cooking is completed, mix the rice to loosen it.
8
Serve rice in a bowl and sprinkle stone parsley on top.
How to cook
MIXED RICE
Menu Setting: MIXED
A
3 cups White rice
* Use the supplied
Measuring Cup.
2 oz. (57 g) Chicken thigh
1/2 slice (7 g) Age (fried tofu)
1 oz. (28 g) Carrots
1 oz. (28 g) Konnyaku
1 oz. (28 g) Gobo
2–3 (7-11 g) Dried shiitake
mushrooms (soaked in
water to constitute)
1 1/2 Tbsp. Light soy
sauce
1 1/2 Tbsp. Mirin (sweet
sake)
1/2 tsp. Salt
1/2 tsp. Dashinomoto
Soup taken from soaking
dried Shiitake to taste
Stone parsley to taste
The measurements used in
these Recipes
1 Tablespoon = 0.5 fl. oz. (15 mL) 1 teaspoon = 0.17 fl. oz. (5 mL)
Measure the rice with the supplied Measuring Cup. (1 Cup = approx. 6.1 fl. oz./approx. 180 mL)
Menu Setting: WHITE /SUSHI
22
23
RECIPES
(
cont.
)
Ingredients (4-5 servings)
3 cups Sweet rice
* Use the supplied Measuring Cup.
2 oz. (57 g) Adzuki beans
Salt with parched sesame to taste
1
Clean sweet rice and drain in a strainer for about 30
minutes.
2
Rinse the adzuki beans, put them into a saucepan with 2 cups
of water, bring to a boil, and boil for 2 minutes. Then, drain the
boiled water. Then add 3 cups of water and boil for 20 minutes
until the beans become soft enough to break by pressing with
your fingertip. Drain the beans but keep the soup stock.
3
Put the rice from Step
1
into the Inner Cooking Pan, add the
soup stock from Step
2
, and pour water to Water Level Line
3
for SWEET. Stir from the bottom of the pan and place the
adzuki beans from Step
2
on top and level the surface.
Do not mix the ingredients with the rice. Changing the
amounts of rice and ingredients may cause imperfect
cooking.
How to cook
SWEET RICE COOKED WITH ADZUKI BEANS
Menu Setting: SWEET
Boil the adzuki beans,
separate them into beans and
stock, and then cool them at room temperature before use.
When adjusting the amount of water, add the stock as a
substitute for water.
Ingredients (4-5 servings)
1
Slice chicken thigh into 1/2 inch (1 cm) cubes. Place Age in
a strainer and pour hot water over it; gently squeeze to drain
excess oil, then slice into small strips.
2
Slice carrots and Konnyaku into small strips, soak Konnyaku
in hot water and drain. Shred Gobo, soak in water until soft,
then drain.
3
Clean brown rice and put
“
A
”
in the Inner Cooking Pan, add
water to Water Level Line
3
for BROWN, and then
mix well
from the bottom of the Inner Cooking Pan.
4
Place ingredients from Steps
1
and
2
on top of rice from
Step
3
.
Do not mix the ingredients with the rice. Changing the
amounts of rice and ingredients may cause imperfect
cooking.
5
Press the MENU button, select BROWN and press the
START/REHEAT button to start cooking.
6
When cooking is completed, mix the rice to loosen it.
Clean brown rice lightly to remove husks.
When cooking rice with additional ingredients, limit the
amount of rice to 1-4 cups for the 1.0 L model and 2-6
cups for 1.8 L model.
How to cook
MIXED BROWN RICE
Menu Setting: BROWN
3 cups Brown rice
* Use the supplied Measuring Cup.
3 oz. (85 g) Chicken thigh
1 slice (13 g) Age (fried tofu)
1 oz. (28 g) each Carrots, Konnyaku and Gobo
3 Tbsp. Light soy sauce
1/2 Tbsp. Mirin (sweet sake)
A
Menu Setting: CAKE
1
Grease the inside of the Inner Cooking Pan lightly and
evenly with butter.
2
Add “
A
” in a small bowl and float the small bowl in a larger
bowl containing hot water to melt the butter.
3
Place the egg whites in a bowl and beat until foamy. Add the
sugar in 2 to 3 portions, beating well after each addition,
until the whites hold stiff peaks.
4
Add yolks and vanilla extract to Step
3
and beat until thick.
5
Add sifted all-purpose flour to Step
4
. Mix with rubber
spatula until smooth and well blended. Gently fold in “
A
”
from Step
2
without over-mixing.
6
Pour the batter from Step
5
into the Inner Cooking Pan and hit
the bottom of the Inner Cooking Pan with the palm of your hand
several times to release the air bubbles in the batter. Place the
Inner Cooking Pan into the Main Body and close the Outer Lid.
7
Press the MENU button and select the CAKE menu
setting. Set the cooking time to 45 minutes for the 1.0 L
model and 65 minutes for the 1.8 L model and press the
START/REHEAT button.
8
When baking completes, remove the cake from the Inner
Cooking Pan and allow to cool.
9
Frost the cake with whipped cream and garnish with
desired fruit.
●
Flavor variations: Sift cocoa powder with all-purpose
flour to make a chocolate cake, or green tea powder to
make green tea cake. (Add 1 1/2Tbsp. for the 1.0L
model and 2Tbsp. for the 1.8L model.)
How to cook
SPONGE CAKE
(Cooking time: 45 minutes for the 1.0L model and 65 minutes for the 1.8L model)
All-purpose flour (sifted).....................
Egg (separate egg yolk from white)...
Sugar..................................................
Vanilla extract.....................................
Milk...............................................
Butter............................................
Fresh cream, fruits (for decoration)....
Butter (for greasing the Inner Cooking Pan)
...
4.2 oz. (120 g)
4 pcs.
3.5 oz. (100 g)
To taste
1 Tbsp.
0.7 oz. (20 g)
as you like
As needed
1.0 L model
6.3 oz. (180 g)
6 pcs.
5.3 oz. (150 g)
To taste
1 1/2 Tbsp.
1.1 oz. (30 g)
as you like
As needed
1.8 L model
A
Ingredients
●The ingredients specified below are the maximum amounts with which the sponge cake can be appropriately made. If more than
the amounts specified for the ingredients is used, the cake may cook insufficiently or the cake batter may become attached to the
Inner Lid Set.
CHEESE CAKE
Grease the inside of the Inner Cooking Pan lightly and evenly
with butter.
Soften cream cheese at room temperature or put in microwave
oven for 30 seconds at 500 W.
Place cream cheese from Step
2
in a bowl and mix with
wooden spatula until it becomes smooth. Add sugar and blend.
Add yolks one at a time to Step 3, mixing well after each addition.
Then, add sifted all-purpose flour, fresh cream, lemon juice, vanilla
extract, and melted butter in order, mixing well after each addition.
Place the egg whites in a separate bowl and beat until foamy.
Add the sugar in 2 to 3 portions, beating well after each
addition, until stiff peaks form.
Gently fold in meringue from Step
5
to Step
4
with a rubber
spatula without over-mixing.
Pour the batter from Step
6
into the Inner Cooking Pan and hit the
bottom of the Inner Cooking Pan with the palm of your hand
several times to release the air bubbles in the batter. Place the
Inner Cooking Pan into the Main Body and close the Outer Lid.
Press the MENU button and select the CAKE menu setting. Set
the cooking time to 60 minutes for the 1.0 L model and 80 minutes
for the 1.8 L model and press the START / REHEAT button.
When baking completes,
immediately invert the Inner Cooking
Pan onto a plate to remove the cake, and let it cool slightly to
release the initial heat. (Be careful handling the cake as freshly
baked cakes are fragile and can easily break.)
Chill cake in refrigerator. Decorate with whipped cream and
garnish with fruits.
●
Flavor variations: Soak raisins in rum to soften, lightly coat with
flour and add after Step
6
. (Add 1.1 oz.(30 g) of raisins for 1.0 L
model and 1.8 oz. (50 g) for 1.8 L model.)
1
2
3
4
5
6
7
8
9
10
How to cook
Ingredients
1.0L model 1.8L model
7.1 oz.(200 g)
1.8 oz.(50 g)
1.1 oz.(30 g)
3 pcs.
1.1 oz.(30 g)
1.7 oz.(50 mL)
4 tsp.
To taste
0.7 oz.(20 g)
as you like
As needed
10.6 oz.(300 g)
2.5 oz.(70 g)
1.8 oz.(50 g)
5 pcs.
1.8 oz.(50 g)
2.0 oz.(60 mL)
2 Tbsp.
To taste
1.1 oz.(30 g)
as you like
As needed
Cream cheese ………………………
Sugar…………………………………
Sugar
(for beating egg whites)
…………
Egg
(separate egg yolk from white)
………
All-purpose flour (sifted)……………
Fresh cream …………………………
Lemon juice …………………………
Vanilla extract ………………………
Butter, melted ………………………
Fresh cream, fruits (for decoration)
………
Butter
(for greasing the Inner Cooking Pan)
…
Menu Setting: CAKE
4
Press the MENU button, select SWEET and press the
START/REHEAT button to start cooking.
5
When cooking is completed, loosen the rice. Serve in a
bowl and sprinkle the salt with parched sesame on top.
When adding regular white rice or rinse-free rice, add
water to slightly above the Water Level Line for SWEET.
(Cooking time: 60 minutes for the 1.0 L model and 80 minutes for the 1.8 L model)

22
23
RECIPES
(
cont.
)
Ingredients (4-5 servings)
3 cups Sweet rice
* Use the supplied Measuring Cup.
2 oz. (57 g) Adzuki beans
Salt with parched sesame to taste
1
Clean sweet rice and drain in a strainer for about 30
minutes.
2
Rinse the adzuki beans, put them into a saucepan with 2 cups
of water, bring to a boil, and boil for 2 minutes. Then, drain the
boiled water. Then add 3 cups of water and boil for 20 minutes
until the beans become soft enough to break by pressing with
your fingertip. Drain the beans but keep the soup stock.
3
Put the rice from Step
1
into the Inner Cooking Pan, add the
soup stock from Step
2
, and pour water to Water Level Line
3
for SWEET. Stir from the bottom of the pan and place the
adzuki beans from Step
2
on top and level the surface.
Do not mix the ingredients with the rice. Changing the
amounts of rice and ingredients may cause imperfect
cooking.
How to cook
SWEET RICE COOKED WITH ADZUKI BEANS
Menu Setting: SWEET
Boil the adzuki beans,
separate them into beans and
stock, and then cool them at room temperature before use.
When adjusting the amount of water, add the stock as a
substitute for water.
Ingredients (4-5 servings)
1
Slice chicken thigh into 1/2 inch (1 cm) cubes. Place Age in
a strainer and pour hot water over it; gently squeeze to drain
excess oil, then slice into small strips.
2
Slice carrots and Konnyaku into small strips, soak Konnyaku
in hot water and drain. Shred Gobo, soak in water until soft,
then drain.
3
Clean brown rice and put
“
A
”
in the Inner Cooking Pan, add
water to Water Level Line
3
for BROWN, and then
mix well
from the bottom of the Inner Cooking Pan.
4
Place ingredients from Steps
1
and
2
on top of rice from
Step
3
.
Do not mix the ingredients with the rice. Changing the
amounts of rice and ingredients may cause imperfect
cooking.
5
Press the MENU button, select BROWN and press the
START/REHEAT button to start cooking.
6
When cooking is completed, mix the rice to loosen it.
Clean brown rice lightly to remove husks.
When cooking rice with additional ingredients, limit the
amount of rice to 1-4 cups for the 1.0 L model and 2-6
cups for 1.8 L model.
How to cook
MIXED BROWN RICE
Menu Setting: BROWN
3 cups Brown rice
* Use the supplied Measuring Cup.
3 oz. (85 g) Chicken thigh
1 slice (13 g) Age (fried tofu)
1 oz. (28 g) each Carrots, Konnyaku and Gobo
3 Tbsp. Light soy sauce
1/2 Tbsp. Mirin (sweet sake)
A
Menu Setting: CAKE
1
Grease the inside of the Inner Cooking Pan lightly and
evenly with butter.
2
Add “
A
” in a small bowl and float the small bowl in a larger
bowl containing hot water to melt the butter.
3
Place the egg whites in a bowl and beat until foamy. Add the
sugar in 2 to 3 portions, beating well after each addition,
until the whites hold stiff peaks.
4
Add yolks and vanilla extract to Step
3
and beat until thick.
5
Add sifted all-purpose flour to Step
4
. Mix with rubber
spatula until smooth and well blended. Gently fold in “
A
”
from Step
2
without over-mixing.
6
Pour the batter from Step
5
into the Inner Cooking Pan and hit
the bottom of the Inner Cooking Pan with the palm of your hand
several times to release the air bubbles in the batter. Place the
Inner Cooking Pan into the Main Body and close the Outer Lid.
7
Press the MENU button and select the CAKE menu
setting. Set the cooking time to 45 minutes for the 1.0 L
model and 65 minutes for the 1.8 L model and press the
START/REHEAT button.
8
When baking completes, remove the cake from the Inner
Cooking Pan and allow to cool.
9
Frost the cake with whipped cream and garnish with
desired fruit.
●
Flavor variations: Sift cocoa powder with all-purpose
flour to make a chocolate cake, or green tea powder to
make green tea cake. (Add 1 1/2Tbsp. for the 1.0L
model and 2Tbsp. for the 1.8L model.)
How to cook
SPONGE CAKE
(Cooking time: 45 minutes for the 1.0L model and 65 minutes for the 1.8L model)
All-purpose flour (sifted).....................
Egg (separate egg yolk from white)...
Sugar..................................................
Vanilla extract.....................................
Milk...............................................
Butter............................................
Fresh cream, fruits (for decoration)....
Butter (for greasing the Inner Cooking Pan)
...
4.2 oz. (120 g)
4 pcs.
3.5 oz. (100 g)
To taste
1 Tbsp.
0.7 oz. (20 g)
as you like
As needed
1.0 L model
6.3 oz. (180 g)
6 pcs.
5.3 oz. (150 g)
To taste
1 1/2 Tbsp.
1.1 oz. (30 g)
as you like
As needed
1.8 L model
A
Ingredients
●The ingredients specified below are the maximum amounts with which the sponge cake can be appropriately made. If more than
the amounts specified for the ingredients is used, the cake may cook insufficiently or the cake batter may become attached to the
Inner Lid Set.
CHEESE CAKE
Grease the inside of the Inner Cooking Pan lightly and evenly
with butter.
Soften cream cheese at room temperature or put in microwave
oven for 30 seconds at 500 W.
Place cream cheese from Step
2
in a bowl and mix with
wooden spatula until it becomes smooth. Add sugar and blend.
Add yolks one at a time to Step 3, mixing well after each addition.
Then, add sifted all-purpose flour, fresh cream, lemon juice, vanilla
extract, and melted butter in order, mixing well after each addition.
Place the egg whites in a separate bowl and beat until foamy.
Add the sugar in 2 to 3 portions, beating well after each
addition, until stiff peaks form.
Gently fold in meringue from Step
5
to Step
4
with a rubber
spatula without over-mixing.
Pour the batter from Step
6
into the Inner Cooking Pan and hit the
bottom of the Inner Cooking Pan with the palm of your hand
several times to release the air bubbles in the batter. Place the
Inner Cooking Pan into the Main Body and close the Outer Lid.
Press the MENU button and select the CAKE menu setting. Set
the cooking time to 60 minutes for the 1.0 L model and 80 minutes
for the 1.8 L model and press the START / REHEAT button.
When baking completes,
immediately invert the Inner Cooking
Pan onto a plate to remove the cake, and let it cool slightly to
release the initial heat. (Be careful handling the cake as freshly
baked cakes are fragile and can easily break.)
Chill cake in refrigerator. Decorate with whipped cream and
garnish with fruits.
●
Flavor variations: Soak raisins in rum to soften, lightly coat with
flour and add after Step
6
. (Add 1.1 oz.(30 g) of raisins for 1.0 L
model and 1.8 oz. (50 g) for 1.8 L model.)
1
2
3
4
5
6
7
8
9
10
How to cook
Ingredients
1.0L model 1.8L model
7.1 oz.(200 g)
1.8 oz.(50 g)
1.1 oz.(30 g)
3 pcs.
1.1 oz.(30 g)
1.7 oz.(50 mL)
4 tsp.
To taste
0.7 oz.(20 g)
as you like
As needed
10.6 oz.(300 g)
2.5 oz.(70 g)
1.8 oz.(50 g)
5 pcs.
1.8 oz.(50 g)
2.0 oz.(60 mL)
2 Tbsp.
To taste
1.1 oz.(30 g)
as you like
As needed
Cream cheese ………………………
Sugar…………………………………
Sugar
(for beating egg whites)
…………
Egg
(separate egg yolk from white)
………
All-purpose flour (sifted)……………
Fresh cream …………………………
Lemon juice …………………………
Vanilla extract ………………………
Butter, melted ………………………
Fresh cream, fruits (for decoration)
………
Butter
(for greasing the Inner Cooking Pan)
…
Menu Setting: CAKE
4
Press the MENU button, select SWEET and press the
START/REHEAT button to start cooking.
5
When cooking is completed, loosen the rice. Serve in a
bowl and sprinkle the salt with parched sesame on top.
When adding regular white rice or rinse-free rice, add
water to slightly above the Water Level Line for SWEET.
(Cooking time: 60 minutes for the 1.0 L model and 80 minutes for the 1.8 L model)
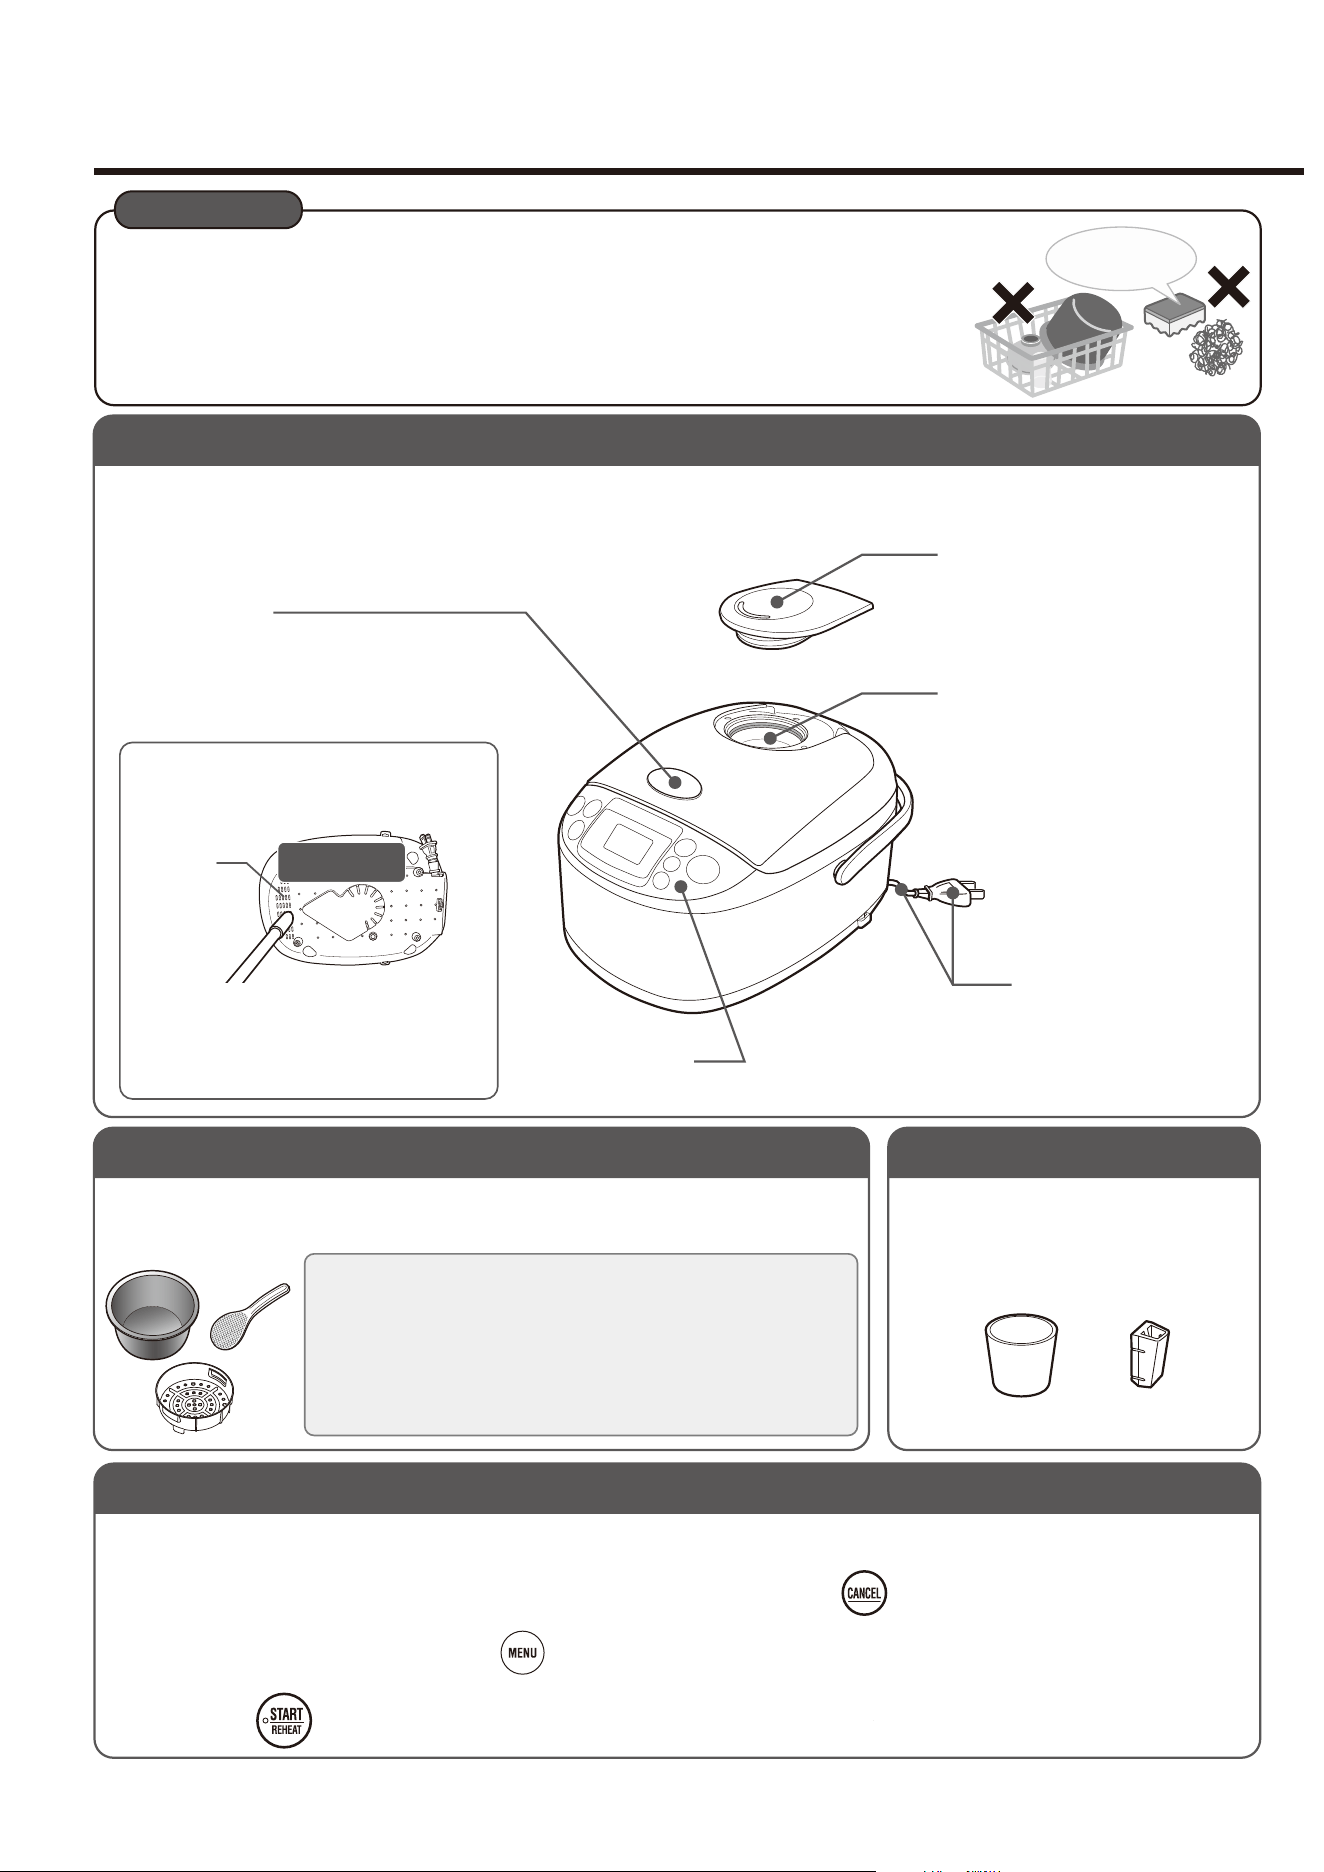
24 25
CLEANING AND MAINTENANCE
●Clean the Rice Cooker
thoroughly after every use.
IMPORTANT
Fill the Inner Cooking Pan with water up to Water
Level Line 1 for WHITE for 1.0 L model, and Water
Level Line 2 for 1.8 L model.
●
Do not put other matter such as kitchen detergents in the
Inner Cooking Pan.
Close the Outer Lid and press the button to
select the QUICK menu setting.
Press the button.
When a Melody (Beep) sounds and the Rice
Cooker switches to the Keep Warm mode,
press the button.
Wait until the Main Body cools down, discard the
water and clean accordingly.
●
Open the Outer Lid and dry the Rice Cooker in a well
ventilated place.
Wipe clean with a well-wrung soft cloth.
●
When using a chemically treated cloth, do not scrub forcefully or leave it in
contact for an extended period.
(Doing so may damage the surface, causing discoloration, scratches,
degradation in quality, or corrosion.)
Wash using a neutral kitchen detergent and a soft sponge. Wash using a soft sponge.
●
To wash thoroughly, use a neutral
kitchen detergent.
Wipe with a dry soft
cloth.
Power Plug/
Power Cord
Wash under running water
and dry thoroughly.
Steam Vent Cap
Remove the Steam Vent Cap,
and wipe the Outer Lid with a
well-wrung soft cloth.
Steam Vent Cap
Receptacle
THE EXTERIOR
Inner Cooking Pan (→ pg. 5) / Spatula / Steaming Basket
Measuring Cup / Spatula Holder
1
2
3
4
5
IF THERE IS AN ODOR
●
Be sure to unplug the Power Cord and allow the Main Body and the Inner Cooking Pan to
cool down before cleaning.
●
Do not use such items as thinner, abrasive cleaners, bleach, alcohol disinfectant, scrubbing
brushes (nylon, metal, etc.), melamine sponges or sponges with a nylon surface. (Doing so may
damage the surface, causing discoloration, scratches, degradation in quality, or corrosion.)
●
Do not use a dishwasher or dish-dryer. Doing so may cause scratches, deformation or discoloration.
●
Be sure to reattach the Inner Lid Set, Steam Vent Cap, and Spatula Holder correctly.
Do not wash
using sponges with
hard surfaces.
Wipe with a dry soft cloth.
Control Panel
If the Open Button becomes clogged
with rice or other matter, remove with
a bamboo skewer.
●
Otherwise the Outer Lid may not open.
Open Button
●
Do not use polishing powder, metal or nylon scrubbing brushes.
●
Handle gently. Do not strike it or rub it too hard.
●
When dry rice or other food has stuck to the Inner Cooking Pan
or Spatula, soak it in water until the food softens, and then
wash this item off with a soft sponge or something similar.
The Coating on the inner surface of the Inner Cooking Pan can
peel off if damaged, so follow the precautions listed below.
Air Vent
Air Vent
Clean using a vacuum cleaner
(once a month).
●
If you use the Rice Cooker while there
is dust or other matter stuck to the Air
Vent, the internal temperature may
become abnormally high, resulting in
breakdown.
●
If the Inner Cooking Pan is dirty, add lukewarm water and a neutral kitchen detergent
and clean it.
Bottom view of
the product
THE INTERIOR
HOW TO DETACH AND ATTACH THE INNER LID SET
Outer Lid / Steam Vent
Hold the Outer Lid securely and
wipe with a well-wrung soft cloth.
Remove any rice or residue on the
inside of the Outer Lid.
Heating Plate
Wipe the surface with a soft cloth
dampened with lukewarm water
and wrung out thoroughly.
If rice or other matter becomes
stuck to the Heating Plate, lightly
polish it off with a sandpaper of
about No. 320 after dipping in
water.
If it becomes clogged with rice or
other matter, remove with a
bamboo stick.
●
Leaving rice, other matter or
moisture on the surface may cause
the Outer Lid to rust or discolor.
Inner Lid Set
Rinse in hot or cold water,
wash using a neutral kitchen
detergent and a soft sponge,
and dry thoroughly.
●
Do not remove the Inner Lid
Knob.
●
Be sure to clean the Inner Lid Set
after every use. If left dirty or wet,
the color may change to brown or
rust may form.
Outer Lid Gasket
Wipe with a well-wrung soft cloth.
Remove any rice or residue.
●
The Outer Lid Gasket cannot be
removed.
Center Sensor
Wipe with a well-wrung soft cloth.
If it becomes clogged with rice or
other matter, remove with a
bamboo stick.
Hold the Outer Lid with one hand and
pull the Inner Lid Knob toward you with
the other hand.
HOW TO DETACH
Affix the hollow part of the
Inner Lid Set (rear of the
Inner Lid Knob) to the Inner
Lid Set Mounting Axis to
attach the Inner Lid Set.
HOW TO ATTACH
Inner Lid Knob
Inner Lid Set
Mounting Axis
Rear of the Inner
Lid Knob
Affix this
hollow part to
the Inner Lid
Set Mounting Axis.
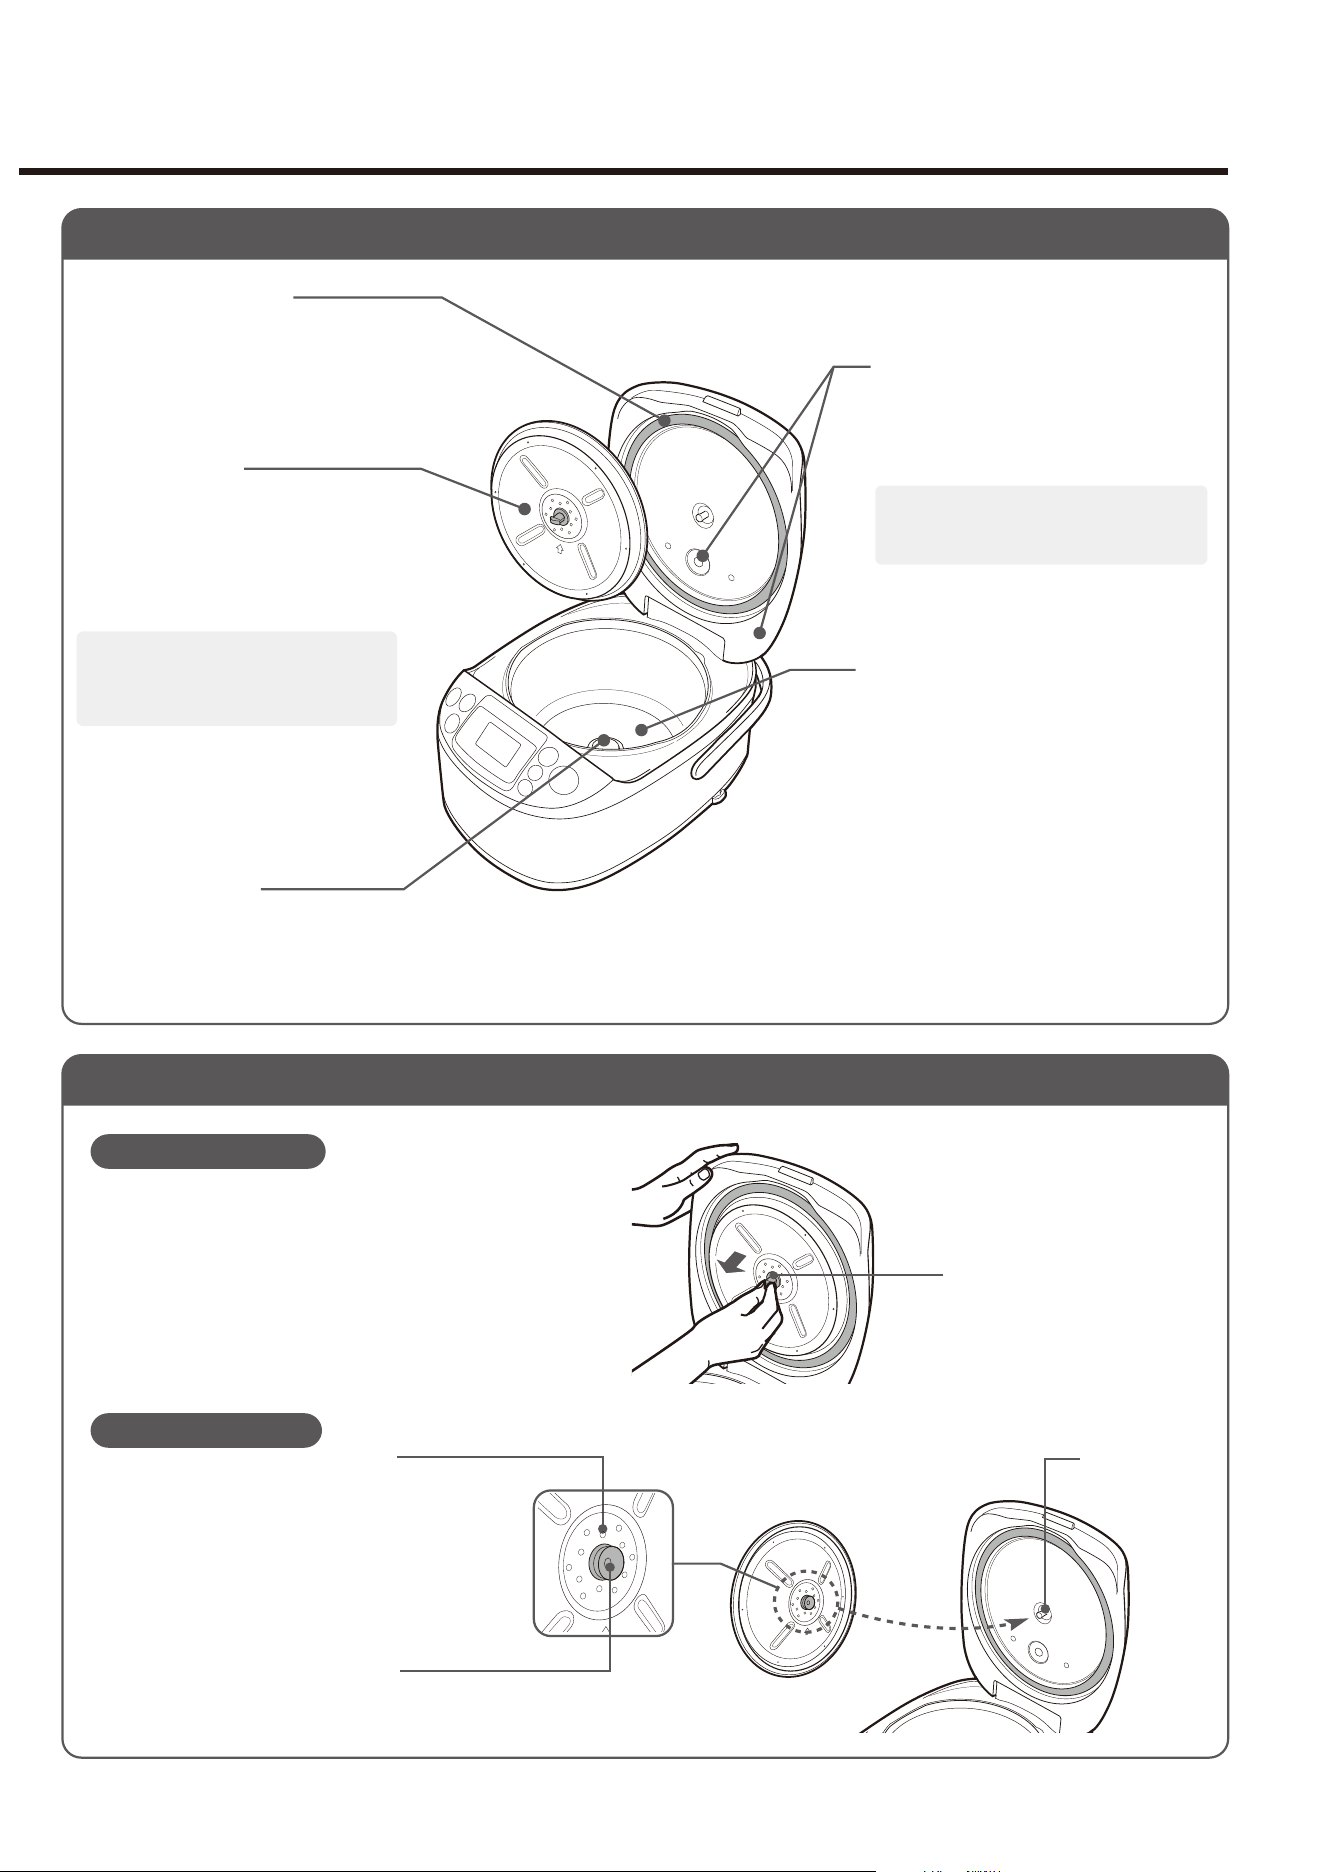
24 25
CLEANING AND MAINTENANCE
●Clean the Rice Cooker
thoroughly after every use.
IMPORTANT
Fill the Inner Cooking Pan with water up to Water
Level Line 1 for WHITE for 1.0 L model, and Water
Level Line 2 for 1.8 L model.
●
Do not put other matter such as kitchen detergents in the
Inner Cooking Pan.
Close the Outer Lid and press the button to
select the QUICK menu setting.
Press the button.
When a Melody (Beep) sounds and the Rice
Cooker switches to the Keep Warm mode,
press the button.
Wait until the Main Body cools down, discard the
water and clean accordingly.
●
Open the Outer Lid and dry the Rice Cooker in a well
ventilated place.
Wipe clean with a well-wrung soft cloth.
●
When using a chemically treated cloth, do not scrub forcefully or leave it in
contact for an extended period.
(Doing so may damage the surface, causing discoloration, scratches,
degradation in quality, or corrosion.)
Wash using a neutral kitchen detergent and a soft sponge. Wash using a soft sponge.
●
To wash thoroughly, use a neutral
kitchen detergent.
Wipe with a dry soft
cloth.
Power Plug/
Power Cord
Wash under running water
and dry thoroughly.
Steam Vent Cap
Remove the Steam Vent Cap,
and wipe the Outer Lid with a
well-wrung soft cloth.
Steam Vent Cap
Receptacle
THE EXTERIOR
Inner Cooking Pan (→ pg. 5) / Spatula / Steaming Basket
Measuring Cup / Spatula Holder
1
2
3
4
5
IF THERE IS AN ODOR
●
Be sure to unplug the Power Cord and allow the Main Body and the Inner Cooking Pan to
cool down before cleaning.
●
Do not use such items as thinner, abrasive cleaners, bleach, alcohol disinfectant, scrubbing
brushes (nylon, metal, etc.), melamine sponges or sponges with a nylon surface. (Doing so may
damage the surface, causing discoloration, scratches, degradation in quality, or corrosion.)
●
Do not use a dishwasher or dish-dryer. Doing so may cause scratches, deformation or discoloration.
●
Be sure to reattach the Inner Lid Set, Steam Vent Cap, and Spatula Holder correctly.
Do not wash
using sponges with
hard surfaces.
Wipe with a dry soft cloth.
Control Panel
If the Open Button becomes clogged
with rice or other matter, remove with
a bamboo skewer.
●
Otherwise the Outer Lid may not open.
Open Button
●
Do not use polishing powder, metal or nylon scrubbing brushes.
●
Handle gently. Do not strike it or rub it too hard.
●
When dry rice or other food has stuck to the Inner Cooking Pan
or Spatula, soak it in water until the food softens, and then
wash this item off with a soft sponge or something similar.
The Coating on the inner surface of the Inner Cooking Pan can
peel off if damaged, so follow the precautions listed below.
Air Vent
Air Vent
Clean using a vacuum cleaner
(once a month).
●
If you use the Rice Cooker while there
is dust or other matter stuck to the Air
Vent, the internal temperature may
become abnormally high, resulting in
breakdown.
●
If the Inner Cooking Pan is dirty, add lukewarm water and a neutral kitchen detergent
and clean it.
Bottom view of
the product
THE INTERIOR
HOW TO DETACH AND ATTACH THE INNER LID SET
Outer Lid / Steam Vent
Hold the Outer Lid securely and
wipe with a well-wrung soft cloth.
Remove any rice or residue on the
inside of the Outer Lid.
Heating Plate
Wipe the surface with a soft cloth
dampened with lukewarm water
and wrung out thoroughly.
If rice or other matter becomes
stuck to the Heating Plate, lightly
polish it off with a sandpaper of
about No. 320 after dipping in
water.
If it becomes clogged with rice or
other matter, remove with a
bamboo stick.
●
Leaving rice, other matter or
moisture on the surface may cause
the Outer Lid to rust or discolor.
Inner Lid Set
Rinse in hot or cold water,
wash using a neutral kitchen
detergent and a soft sponge,
and dry thoroughly.
●
Do not remove the Inner Lid
Knob.
●
Be sure to clean the Inner Lid Set
after every use. If left dirty or wet,
the color may change to brown or
rust may form.
Outer Lid Gasket
Wipe with a well-wrung soft cloth.
Remove any rice or residue.
●
The Outer Lid Gasket cannot be
removed.
Center Sensor
Wipe with a well-wrung soft cloth.
If it becomes clogged with rice or
other matter, remove with a
bamboo stick.
Hold the Outer Lid with one hand and
pull the Inner Lid Knob toward you with
the other hand.
HOW TO DETACH
Affix the hollow part of the
Inner Lid Set (rear of the
Inner Lid Knob) to the Inner
Lid Set Mounting Axis to
attach the Inner Lid Set.
HOW TO ATTACH
Inner Lid Knob
Inner Lid Set
Mounting Axis
Rear of the Inner
Lid Knob
Affix this
hollow part to
the Inner Lid
Set Mounting Axis.

26 27
TROUBLESHOOTING GUIDE
Continued on the next page
A noise is heard
during Cooking, or
Keep Warm
The Reheat function
does not work
●
Please check the following
points before calling for service.
Problems Possible Causes / Solutions
Rice cooks too
hard or too soft
Rice is scorched
Boils over while
cooking
Unable to start
cooking or the
buttons do not
respond
●
Increase or decrease water slightly (by 1-2 mm) from the Water Level Line according to your preference.
●
If the amount of water is adjusted with the Rice Cooker on a tilted surface, it may be too high or
too low, which will lead to changes in the hardness of the cooked rice.
●
The texture of rice varies depending on the brand of the rice, where it was harvested, and how
long it was stored (new crop or old crop).
●
The texture of rice varies depending on the room and water temperatures.
●
Using the Timer may result in softer rice.
●
Using the QUICK menu setting may result in harder or wet rice.
→
Please try using the WHITE/SUSHI menu setting.
●
Make sure the Inner Cooking Pan is not deformed.
●
Did you use the supplied Measuring Cup to measure the rice before cooking?
●
Rice may not have been cleaned sufficiently, leaving too much bran on the rice.
●
Did you level the surface of the rice before cooking?
●
Did you loosen the rice after cooking was completed?
→
Loosen the rice immediately after cooking is completed.
●
Is there moisture or foreign matter such as (cooked or uncooked) rice on the outer surface of the
Inner Cooking Pan, the Center Sensor, or the Heating Plate?
→
Wipe them off.
●
Is there moisture or foreign matter on the inside of the Main Body, the Inner Lid Set, or the Steam Vent Cap?
→ Wipe them off.
●
Is there moisture or foreign matter such as (cooked or uncooked) rice on the outer surface of the
Inner Cooking Pan, the Center Sensor, or the Heating Plate?
→ Wipe them off.
●
If you soak the rice for a long time or cook rice using the Timer, the bran may collect at the bottom,
and the rice will be more easily scorched.
●
Rice may not have been cleaned sufficiently, leaving too much bran on the rice.
●
Make sure the Inner Cooking Pan is not deformed.
The surface of the
cooked rice is
uneven
●
Depending on the heat convection while cooking, the surface of the cooked rice may look uneven.
●
Did you level the surface of the rice before cooking?
●
Make sure the Inner Lid Set and the Inner Cooking Pan are not deformed.
●
Did you use the wrong menu setting or amount of water?
→
pg. 12
When cooking using the PORRIDGE menu setting, the contents are particularly likely to boil over,
so be sure not to use the wrong amount of water or menu setting.
→ See “Be careful that the contents do not boil over.” on pg. 11
●
Make sure the Steam Vent Cap is attached.
●
Rice may not have been cleaned sufficiently, leaving too much bran on the rice.
●
Make sure the Inner Cooking Pan is not deformed.
●
Make sure the Power Plug is plugged in securely.
●
Does the Display show
“E01”
or
“E02”
?
→
pg. 29
●
Is the KEEP WARM (REGULAR KEEP WARM or EXTENDED KEEP WARM) light on?
→
Press the CANCEL button and press the START/REHEAT button.
●
Did you press the START/REHEAT button after selecting a menu setting on the display panel?
→
The START/REHEAT button must be pressed to start cooking the rice.
Steam comes out
from the gap
between the Outer
Lid and the Main Body
●
Make sure that the Inner Lid Set has not been dropped or deformed, and that the Outer Lid
Gasket is not torn.
●
Has the Outer Lid Gasket become soiled?
→
Clean the Outer Lid Gasket.
●
Make sure the Inner Cooking Pan is not deformed.
●
Make sure the KEEP WARM (REGULAR KEEP WARM or EXTENDED KEEP WARM) light is on.
→
pg. 15
●
The microprocessor (MICOM) makes a sound while adjusting the heat power of the Rice Cooker.
This does not indicate a problem.
●
There is a spark-like noise when there is water left on the outside of the Inner Cooking Pan.
→
Always take precautions to wipe the outer surface of the Inner Cooking Pan and the
inside of the Main Body clean, especially of moisture and foreign matters, before placing
the Inner Cooking Pan into the Main Body.
COOKING
RICE
COOKING
RICE /
KEEP
WARM
Condensation
forms on the Inner
Lid Set
●
Did you loosen the rice immediately after it was finished cooking (to allow excess moisture to
escape)?
●
Did you turn off the Keep Warm mode or unplug the Power Plug?
●
Condensation may form depending on the type of rice cooked and the room temperature.
→
Such buildup does not indicate a malfunction. Simply wipe it away.
Problems Possible Causes / Solutions
During Keep
Warm, rice has an
odor, or rice
becomes watery
●
Was the rice kept warm with the Spatula left in the Inner Cooking Pan?
●
Was cold rice reheated?
●
Did you loosen the rice after cooking was completed?
→
Loosen the rice immediately after cooking is completed.
●
Rice may not have been cleaned sufficiently, leaving too much bran on the rice.
●
Some odor may remain after cooking mixed rice or after using the STEAM menu.
→
Clean the Inner Cooking Pan thoroughly and perform “IF THERE IS AN ODOR” on pg. 24.
●
The Keep Warm mode may not have been used for keeping rice warm.
→
Leaving rice in the Inner Cooking Pan without using the Keep Warm mode may cause
unwanted odor.
→
pg. 8
●
Did you clean the Rice Cooker thoroughly after every use?
→
Foul odors due to the growth of bacteria may occur depending on how well the unit is
cleaned, the room temperature based on the season or usage environment, frequent
opening and closing of the Outer Lid, the type of rice used, or the way the rice was
cleaned. If you are concerned about odors, cleaning the Rice Cooker according to “THE
INTERIOR” on pg. 25 and "IF THERE IS AN ODOR" on pg. 24 and then using REGULAR
KEEP WARM on pg. 13 should be effective.
KEEP
WARM
During Keep
Warm, rice
becomes yellow
or dry
Extended Keep
Warm is not
accepted
●
Is there moisture or foreign matter such as (cooked or uncooked) rice on the outer surface of the
Inner Cooking Pan, the Center Sensor, or the Heating Plate?
→
Wipe them off.
●
Are you keeping warm a small amount of rice in the Inner Cooking Pan?
●
Was the Keep Warm mode used for more than 12 hours?
→
pg. 13
●
Certain types of rice and water used may make the rice appear yellow.
●
Did you select a menu setting for which the Extended Keep Warm mode is not available?
→
pg. 13
●
Was the Keep Warm mode used for more than 12 hours?
→
If the Keep Warm mode is used for more than 12 hours, the Extended Keep Warm mode
will not be accepted.
●
Is the rice in the Inner Cooking Pan cold?
→
If the temperature of the Inner Cooking Pan is low, the Extended Keep Warm mode will
not be accepted.
The Display does
not
show the elapsed
Keep Warm time
●
Does the Display show the current time?
→
Press the Time Setting buttons to change the display.
→
pg. 14 “NOTE” .
TIMER
COOKING
The Rice Cooker
starts cooking
immediately after
the Timer is set
Rice is not ready
at the set time
The Timer cannot
be set
●
Is the current time set correctly?
→
The clock is displayed in 24-hour (military) time. Please check and set it again.
●
If the Timer is set to a time that is less than the timer cooking time, the Rice Cooker will begin
cooking immediately.
●
Did you press the START/REHEAT button after setting the time?
→
The START/REHEAT button must be pressed to complete setting the Timer.
●
Is
“7:00”
blinking on the Display?
→
Unless the current time is set, the Timer function will not be accepted.
→
pg. 9
●
Have you selected a menu setting that doesn’t work with the Timer function?
→
The Timer function is not available for QUICK, MIXED, SWEET, CAKE and STEAM menu
settings.
●
Is the current time set correctly?
→
The clock is displayed in 24-hour (military) time. Please check and set it again.
●
Cooking may not complete at the set time if the temperature of the room or water is too low.
In addition, the cooking time may be affected by the amount of water or voltage.
Cake rises too
much
●
Did you add baking powder or baking soda?
→
Do not add baking powder or baking soda as it may cause the cake to rise too high and
cause malfunction.
Cake is difficult to
remove from the
Inner Cooking Pan
●
Be sure to grease the inside of the Inner Cooking Pan well.
→
Otherwise, the cake may be difficult to remove. (Pouring the cake batter after greasing the
inside of the Inner Cooking Pan will make cake removal easier when baking is finished.)
●
Make sure the Inner Cooking Pan is not deformed.
→
If the Inner Cooking Pan is deformed, the cake may turn out darker or bake insufficiently.
Cake is scorched
●
Make sure the Inner Cooking Pan is not deformed.
→
If the Inner Cooking Pan is deformed, the cake may turn out darker or bake insufficiently.
●
The cooking time may have been too long.
→
Be sure to follow the cooking times suggested in the RECIPES on pg. 23. If the cooking
result is not satisfactory, reduce the cooking time by using the Time Setting buttons.
→
pg. 17
Cake easily crumbles
●
Freshly baked cake is fragile and easily crumbles. Carefully remove the cake from the Inner
Cooking Pan directly after baking.
CAKE

26 27
TROUBLESHOOTING GUIDE
Continued on the next page
A noise is heard
during Cooking, or
Keep Warm
The Reheat function
does not work
●
Please check the following
points before calling for service.
Problems Possible Causes / Solutions
Rice cooks too
hard or too soft
Rice is scorched
Boils over while
cooking
Unable to start
cooking or the
buttons do not
respond
●
Increase or decrease water slightly (by 1-2 mm) from the Water Level Line according to your preference.
●
If the amount of water is adjusted with the Rice Cooker on a tilted surface, it may be too high or
too low, which will lead to changes in the hardness of the cooked rice.
●
The texture of rice varies depending on the brand of the rice, where it was harvested, and how
long it was stored (new crop or old crop).
●
The texture of rice varies depending on the room and water temperatures.
●
Using the Timer may result in softer rice.
●
Using the QUICK menu setting may result in harder or wet rice.
→
Please try using the WHITE/SUSHI menu setting.
●
Make sure the Inner Cooking Pan is not deformed.
●
Did you use the supplied Measuring Cup to measure the rice before cooking?
●
Rice may not have been cleaned sufficiently, leaving too much bran on the rice.
●
Did you level the surface of the rice before cooking?
●
Did you loosen the rice after cooking was completed?
→
Loosen the rice immediately after cooking is completed.
●
Is there moisture or foreign matter such as (cooked or uncooked) rice on the outer surface of the
Inner Cooking Pan, the Center Sensor, or the Heating Plate?
→
Wipe them off.
●
Is there moisture or foreign matter on the inside of the Main Body, the Inner Lid Set, or the Steam Vent Cap?
→ Wipe them off.
●
Is there moisture or foreign matter such as (cooked or uncooked) rice on the outer surface of the
Inner Cooking Pan, the Center Sensor, or the Heating Plate?
→ Wipe them off.
●
If you soak the rice for a long time or cook rice using the Timer, the bran may collect at the bottom,
and the rice will be more easily scorched.
●
Rice may not have been cleaned sufficiently, leaving too much bran on the rice.
●
Make sure the Inner Cooking Pan is not deformed.
The surface of the
cooked rice is
uneven
●
Depending on the heat convection while cooking, the surface of the cooked rice may look uneven.
●
Did you level the surface of the rice before cooking?
●
Make sure the Inner Lid Set and the Inner Cooking Pan are not deformed.
●
Did you use the wrong menu setting or amount of water?
→
pg. 12
When cooking using the PORRIDGE menu setting, the contents are particularly likely to boil over,
so be sure not to use the wrong amount of water or menu setting.
→ See “Be careful that the contents do not boil over.” on pg. 11
●
Make sure the Steam Vent Cap is attached.
●
Rice may not have been cleaned sufficiently, leaving too much bran on the rice.
●
Make sure the Inner Cooking Pan is not deformed.
●
Make sure the Power Plug is plugged in securely.
●
Does the Display show
“E01”
or
“E02”
?
→
pg. 29
●
Is the KEEP WARM (REGULAR KEEP WARM or EXTENDED KEEP WARM) light on?
→
Press the CANCEL button and press the START/REHEAT button.
●
Did you press the START/REHEAT button after selecting a menu setting on the display panel?
→
The START/REHEAT button must be pressed to start cooking the rice.
Steam comes out
from the gap
between the Outer
Lid and the Main Body
●
Make sure that the Inner Lid Set has not been dropped or deformed, and that the Outer Lid
Gasket is not torn.
●
Has the Outer Lid Gasket become soiled?
→
Clean the Outer Lid Gasket.
●
Make sure the Inner Cooking Pan is not deformed.
●
Make sure the KEEP WARM (REGULAR KEEP WARM or EXTENDED KEEP WARM) light is on.
→
pg. 15
●
The microprocessor (MICOM) makes a sound while adjusting the heat power of the Rice Cooker.
This does not indicate a problem.
●
There is a spark-like noise when there is water left on the outside of the Inner Cooking Pan.
→
Always take precautions to wipe the outer surface of the Inner Cooking Pan and the
inside of the Main Body clean, especially of moisture and foreign matters, before placing
the Inner Cooking Pan into the Main Body.
COOKING
RICE
COOKING
RICE /
KEEP
WARM
Condensation
forms on the Inner
Lid Set
●
Did you loosen the rice immediately after it was finished cooking (to allow excess moisture to
escape)?
●
Did you turn off the Keep Warm mode or unplug the Power Plug?
●
Condensation may form depending on the type of rice cooked and the room temperature.
→
Such buildup does not indicate a malfunction. Simply wipe it away.
Problems Possible Causes / Solutions
During Keep
Warm, rice has an
odor, or rice
becomes watery
●
Was the rice kept warm with the Spatula left in the Inner Cooking Pan?
●
Was cold rice reheated?
●
Did you loosen the rice after cooking was completed?
→
Loosen the rice immediately after cooking is completed.
●
Rice may not have been cleaned sufficiently, leaving too much bran on the rice.
●
Some odor may remain after cooking mixed rice or after using the STEAM menu.
→
Clean the Inner Cooking Pan thoroughly and perform “IF THERE IS AN ODOR” on pg. 24.
●
The Keep Warm mode may not have been used for keeping rice warm.
→
Leaving rice in the Inner Cooking Pan without using the Keep Warm mode may cause
unwanted odor.
→
pg. 8
●
Did you clean the Rice Cooker thoroughly after every use?
→
Foul odors due to the growth of bacteria may occur depending on how well the unit is
cleaned, the room temperature based on the season or usage environment, frequent
opening and closing of the Outer Lid, the type of rice used, or the way the rice was
cleaned. If you are concerned about odors, cleaning the Rice Cooker according to “THE
INTERIOR” on pg. 25 and "IF THERE IS AN ODOR" on pg. 24 and then using REGULAR
KEEP WARM on pg. 13 should be effective.
KEEP
WARM
During Keep
Warm, rice
becomes yellow
or dry
Extended Keep
Warm is not
accepted
●
Is there moisture or foreign matter such as (cooked or uncooked) rice on the outer surface of the
Inner Cooking Pan, the Center Sensor, or the Heating Plate?
→
Wipe them off.
●
Are you keeping warm a small amount of rice in the Inner Cooking Pan?
●
Was the Keep Warm mode used for more than 12 hours?
→
pg. 13
●
Certain types of rice and water used may make the rice appear yellow.
●
Did you select a menu setting for which the Extended Keep Warm mode is not available?
→
pg. 13
●
Was the Keep Warm mode used for more than 12 hours?
→
If the Keep Warm mode is used for more than 12 hours, the Extended Keep Warm mode
will not be accepted.
●
Is the rice in the Inner Cooking Pan cold?
→
If the temperature of the Inner Cooking Pan is low, the Extended Keep Warm mode will
not be accepted.
The Display does
not
show the elapsed
Keep Warm time
●
Does the Display show the current time?
→
Press the Time Setting buttons to change the display.
→
pg. 14 “NOTE” .
TIMER
COOKING
The Rice Cooker
starts cooking
immediately after
the Timer is set
Rice is not ready
at the set time
The Timer cannot
be set
●
Is the current time set correctly?
→
The clock is displayed in 24-hour (military) time. Please check and set it again.
●
If the Timer is set to a time that is less than the timer cooking time, the Rice Cooker will begin
cooking immediately.
●
Did you press the START/REHEAT button after setting the time?
→
The START/REHEAT button must be pressed to complete setting the Timer.
●
Is
“7:00”
blinking on the Display?
→
Unless the current time is set, the Timer function will not be accepted.
→
pg. 9
●
Have you selected a menu setting that doesn’t work with the Timer function?
→
The Timer function is not available for QUICK, MIXED, SWEET, CAKE and STEAM menu
settings.
●
Is the current time set correctly?
→
The clock is displayed in 24-hour (military) time. Please check and set it again.
●
Cooking may not complete at the set time if the temperature of the room or water is too low.
In addition, the cooking time may be affected by the amount of water or voltage.
Cake rises too
much
●
Did you add baking powder or baking soda?
→
Do not add baking powder or baking soda as it may cause the cake to rise too high and
cause malfunction.
Cake is difficult to
remove from the
Inner Cooking Pan
●
Be sure to grease the inside of the Inner Cooking Pan well.
→
Otherwise, the cake may be difficult to remove. (Pouring the cake batter after greasing the
inside of the Inner Cooking Pan will make cake removal easier when baking is finished.)
●
Make sure the Inner Cooking Pan is not deformed.
→
If the Inner Cooking Pan is deformed, the cake may turn out darker or bake insufficiently.
Cake is scorched
●
Make sure the Inner Cooking Pan is not deformed.
→
If the Inner Cooking Pan is deformed, the cake may turn out darker or bake insufficiently.
●
The cooking time may have been too long.
→
Be sure to follow the cooking times suggested in the RECIPES on pg. 23. If the cooking
result is not satisfactory, reduce the cooking time by using the Time Setting buttons.
→
pg. 17
Cake easily crumbles
●
Freshly baked cake is fragile and easily crumbles. Carefully remove the cake from the Inner
Cooking Pan directly after baking.
CAKE

29
28
TROUBLESHOOTING GUIDE
(
cont.
)
Problems Possible Causes / Solutions
Cake is not
cooked through
or does not rise
●
The cooking time may have been too short.
→
Be sure to follow the cooking times suggested in the RECIPES on pg. 23. If it still
requires more baking, use the Time Setting buttons to adjust the time.
→
pg. 17
●
The egg whites may not have been whipped sufficiently.
→
When the egg whites are not whipped sufficiently, the cake may not be cooked through
or may not rise. Whip the egg whites until they peak.
●
The egg whites may have been whipped excessively, causing them to separate.
→
When the egg whites separate, the cake may not be cooked through or may not rise. It is
sufficient to whip the egg whites just until they peak.
●
The ingredients may not have been measured correctly.
→
When the ingredients are not measured correctly, the cake may not be cooked through or may not rise.
●
When mixing in the all-purpose flour, the mixture may have been mixed (kneaded) too much.
→
When mixed too much, the cake may not be cooked through or may not rise.
●
When making a cake that contains nuts or other solid filling, too much filling may have been added.
→
Adding too much filling may prevent the cake from baking properly.
●
Too much cake batter may have been added.
→
Be sure to bake using only the amounts listed in the RECIPES on pg. 23. Too much
batter may prevent the cake from being cooked through.
●
Too much time may have passed after preparing the batter.
→
If too much time passes after the batter was prepared, the bubbles may disappear and
the cake may not rise. Bake the cake promptly after making the batter.
●
Tapping the bottom of the Inner Cooking Pan too many times after adding the batter may prevent
the cake from rising properly. Tap gently only a few times.
●
Make sure the Inner Cooking Pan is not deformed.
→
If the Inner Cooking Pan is deformed, the cake may not bake properly.
●
Do not put anything into the Inner Cooking Pan other than the batter. Do not use a cake mold, cooking paper, or
similar material.
→
Doing so may deform the Inner Cooking Pan, cause peeling of the Coating, or prevent the cake from baking
properly.
CAKE
The Outer Lid
cannot be opened
●
If you press the edge of the Open Button, the Outer Lid may be difficult to open. Be sure to press
the center of the Open Button.
The Outer Lid
opens during
cooking
●
Did you close the Outer Lid completely?
→
Be sure to close the Outer Lid until you hear it click shut.
The Outer Lid
won’t close
●
Is the Inner Lid Set attached correctly?
●
If rice residue is stuck on the Outer Lid or the Inner Lid Set and has discolored, clean it.
→
pg. 25
There’s a resinous
odor, such as that
of plastic
●
When you use this Rice Cooker for the first time, there will be a resinous smell, such as that of
plastic, but the odor will lessen as you use the Rice Cooker. If you are concerned about the odor,
please see
pg. 24
“IF THERE IS AN ODOR” .
You mistakenly
put rice and water
directly into the
Main Body
When power
failure occurs
There is rust colored dirt
on the inside of the Outer
Lid or the Inner Lid Set
●
Putting rice and water directly into the Main Body may cause a malfunction. Contact the store
where you purchased the Rice Cooker or Zojirushi Customer Service.
●
If too many appliances are used simultaneously while cooking is in progress, an overload may
occur and the breaker will cut off the electricity.
→
If another appliance is plugged into the same outlet as the Rice Cooker, unplug it before
resetting the breaker. If the electricity is restored in less than 10 minutes, the Rice Cooker
will resume cooking automatically.
OTHER
●
Is there sufficient water for steaming?
→
pg. 18
●
Are there too many ingredients?
→
Reduce the amount of ingredients, or increase cooking time.
●
Are the ingredients too large?
→
Cut ingredients into smaller sizes, or increase cooking time.
→
pg. 19
“Suggested
Steaming Time”
●
Has too much time elapsed since cooking was completed?
→
The Rice Cooker does not switch to Keep Warm mode. Take out the ingredients
immediately after cooking.
●
Vegetables: Steaming time is too short. Add more water and continue steaming.
●
Fish and meat: Steaming time is too long. Reduce the steaming time.
STEAM
COOKING
Food does not
steam
Steamed food is
hard
Steamed food is
cold
ERROR DISPLAYS AND THEIR MEANINGS
Panel Display Cause
(Points to Check)
●
Unplug the Power Cord and plug it in again.
●
The temperature of the Lid Sensor or the Center Sensor is too high.
→
Press the CANCEL button and open the Outer Lid for more than 45 minutes and allow the
interior to cool down. (Be careful not to burn yourself.) To cool faster, see “TIPS” on pg. 11.
●
Indicates malfunction.
→
Please contact the store where you purchased the Rice Cooker or Zojirushi Customer Service.
●
The built-in lithium battery is dead.
When the lithium battery is dead, stored memories (current time, menu selection, and Keep Warm
settings) will be erased if the Power Plug is unplugged from the electrical outlet. However, if the
Power Plug is plugged back into the electrical outlet and the clock is set, the Rice Cooker will
function normally. Contact Zojirushi Customer Service to have the lithium battery replaced (a fee will
be charged for the replacement).
●
If the Display shows a blinking , reset the time.
→
pg. 9
Once the clock is set, the Rice Cooker will function normally. If rice is cooked while the Display
shows a blinking (when the clock has not been set), the current time will not be shown during
the cooking process or during Keep Warm.
Error
Display
Odd Display
The Display turns off
when the Power Plug
is unplugged from the
electrical outlet
is blinking
If the countermeasures listed below do not solve the problem, contact the store where you purchased the Rice Cooker or Zojirushi Customer Service.
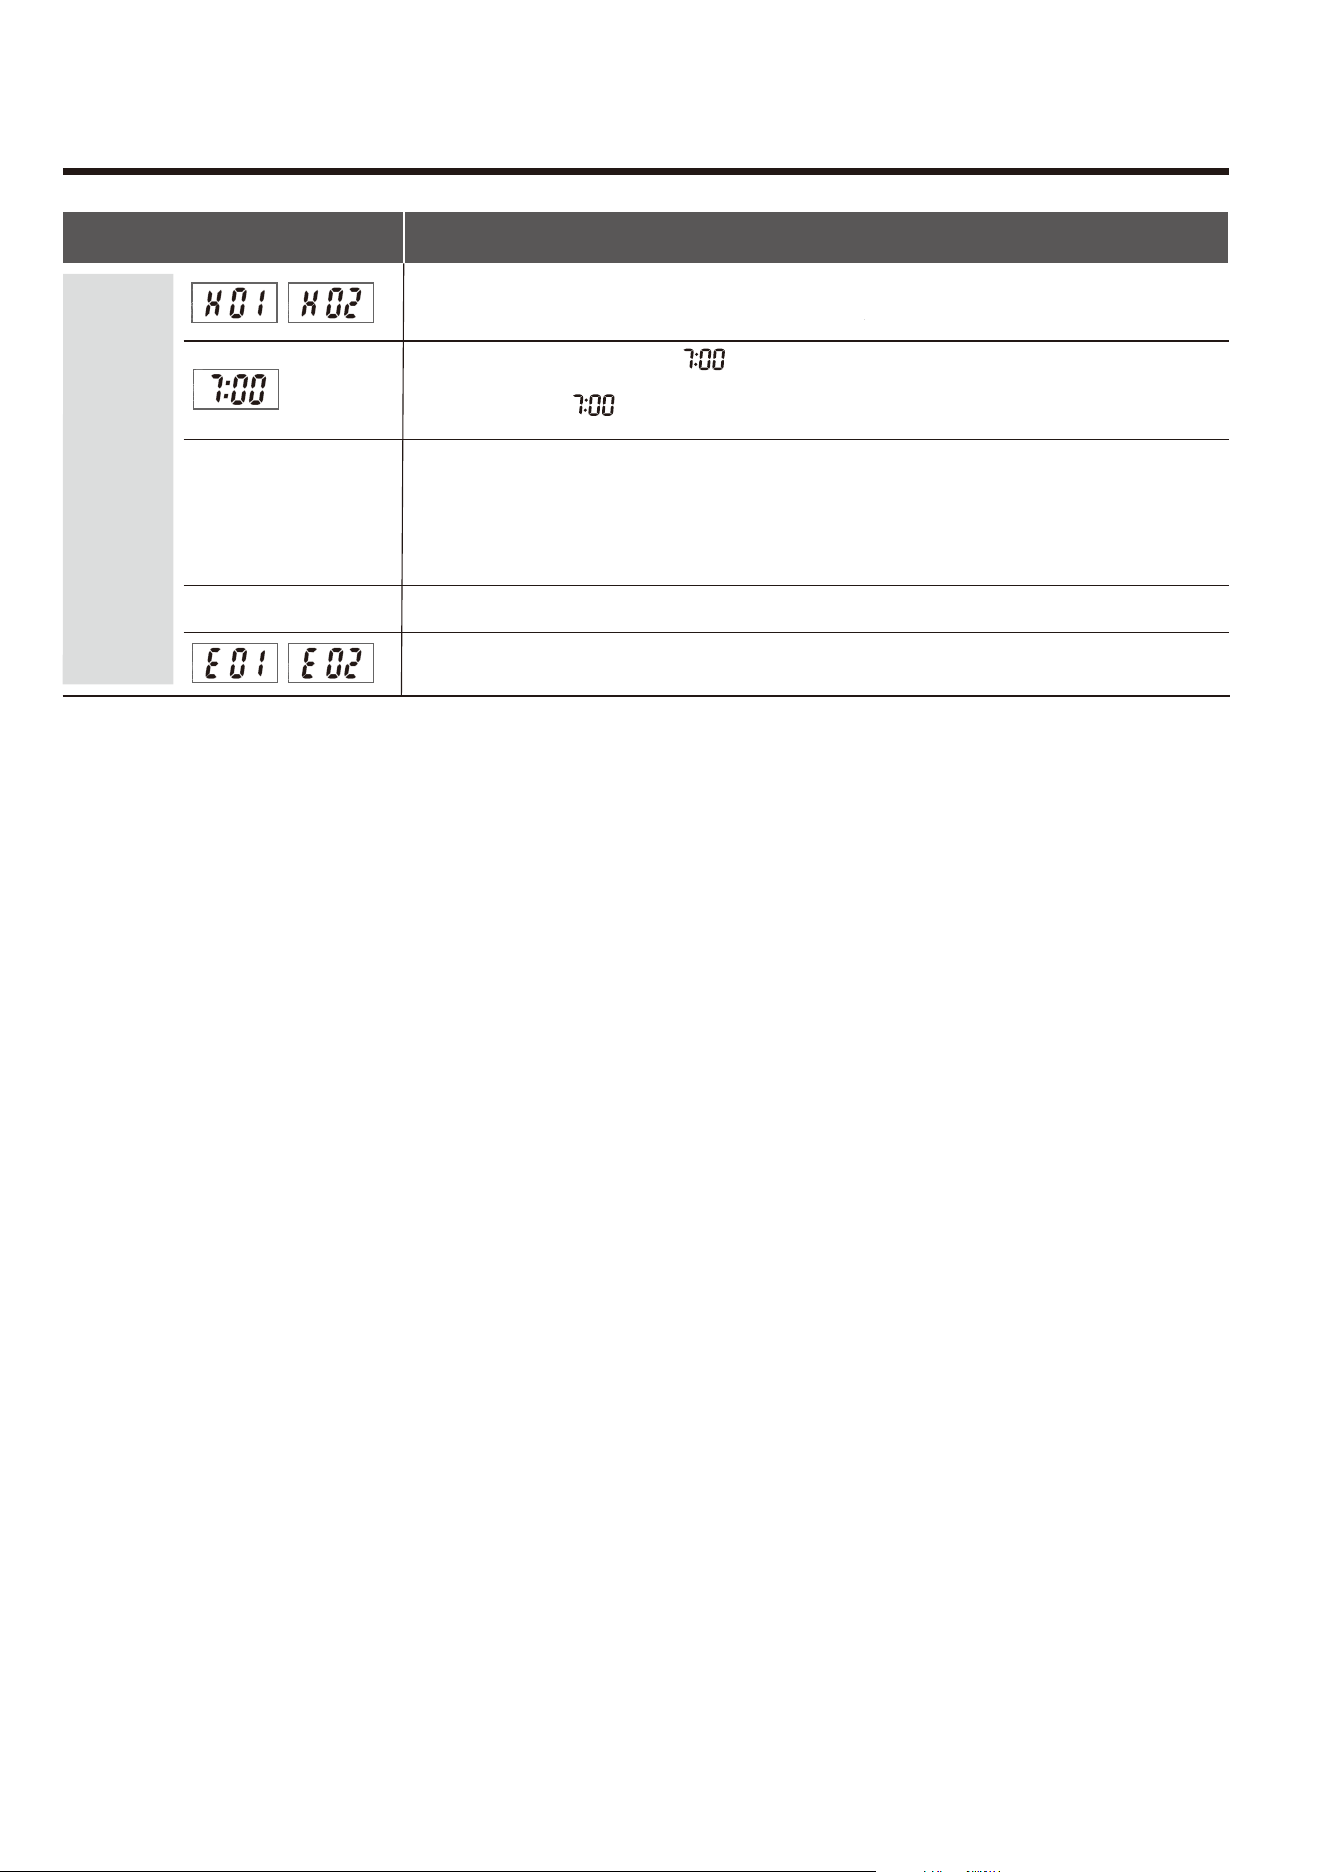
29
28
TROUBLESHOOTING GUIDE
(
cont.
)
Problems Possible Causes / Solutions
Cake is not
cooked through
or does not rise
●
The cooking time may have been too short.
→
Be sure to follow the cooking times suggested in the RECIPES on pg. 23. If it still
requires more baking, use the Time Setting buttons to adjust the time.
→
pg. 17
●
The egg whites may not have been whipped sufficiently.
→
When the egg whites are not whipped sufficiently, the cake may not be cooked through
or may not rise. Whip the egg whites until they peak.
●
The egg whites may have been whipped excessively, causing them to separate.
→
When the egg whites separate, the cake may not be cooked through or may not rise. It is
sufficient to whip the egg whites just until they peak.
●
The ingredients may not have been measured correctly.
→
When the ingredients are not measured correctly, the cake may not be cooked through or may not rise.
●
When mixing in the all-purpose flour, the mixture may have been mixed (kneaded) too much.
→
When mixed too much, the cake may not be cooked through or may not rise.
●
When making a cake that contains nuts or other solid filling, too much filling may have been added.
→
Adding too much filling may prevent the cake from baking properly.
●
Too much cake batter may have been added.
→
Be sure to bake using only the amounts listed in the RECIPES on pg. 23. Too much
batter may prevent the cake from being cooked through.
●
Too much time may have passed after preparing the batter.
→
If too much time passes after the batter was prepared, the bubbles may disappear and
the cake may not rise. Bake the cake promptly after making the batter.
●
Tapping the bottom of the Inner Cooking Pan too many times after adding the batter may prevent
the cake from rising properly. Tap gently only a few times.
●
Make sure the Inner Cooking Pan is not deformed.
→
If the Inner Cooking Pan is deformed, the cake may not bake properly.
●
Do not put anything into the Inner Cooking Pan other than the batter. Do not use a cake mold, cooking paper, or
similar material.
→
Doing so may deform the Inner Cooking Pan, cause peeling of the Coating, or prevent the cake from baking
properly.
CAKE
The Outer Lid
cannot be opened
●
If you press the edge of the Open Button, the Outer Lid may be difficult to open. Be sure to press
the center of the Open Button.
The Outer Lid
opens during
cooking
●
Did you close the Outer Lid completely?
→
Be sure to close the Outer Lid until you hear it click shut.
The Outer Lid
won’t close
●
Is the Inner Lid Set attached correctly?
●
If rice residue is stuck on the Outer Lid or the Inner Lid Set and has discolored, clean it.
→
pg. 25
There’s a resinous
odor, such as that
of plastic
●
When you use this Rice Cooker for the first time, there will be a resinous smell, such as that of
plastic, but the odor will lessen as you use the Rice Cooker. If you are concerned about the odor,
please see
pg. 24
“IF THERE IS AN ODOR” .
You mistakenly
put rice and water
directly into the
Main Body
When power
failure occurs
There is rust colored dirt
on the inside of the Outer
Lid or the Inner Lid Set
●
Putting rice and water directly into the Main Body may cause a malfunction. Contact the store
where you purchased the Rice Cooker or Zojirushi Customer Service.
●
If too many appliances are used simultaneously while cooking is in progress, an overload may
occur and the breaker will cut off the electricity.
→
If another appliance is plugged into the same outlet as the Rice Cooker, unplug it before
resetting the breaker. If the electricity is restored in less than 10 minutes, the Rice Cooker
will resume cooking automatically.
OTHER
●
Is there sufficient water for steaming?
→
pg. 18
●
Are there too many ingredients?
→
Reduce the amount of ingredients, or increase cooking time.
●
Are the ingredients too large?
→
Cut ingredients into smaller sizes, or increase cooking time.
→
pg. 19
“Suggested
Steaming Time”
●
Has too much time elapsed since cooking was completed?
→
The Rice Cooker does not switch to Keep Warm mode. Take out the ingredients
immediately after cooking.
●
Vegetables: Steaming time is too short. Add more water and continue steaming.
●
Fish and meat: Steaming time is too long. Reduce the steaming time.
STEAM
COOKING
Food does not
steam
Steamed food is
hard
Steamed food is
cold
ERROR DISPLAYS AND THEIR MEANINGS
Panel Display Cause
(Points to Check)
●
Unplug the Power Cord and plug it in again.
●
The temperature of the Lid Sensor or the Center Sensor is too high.
→
Press the CANCEL button and open the Outer Lid for more than 45 minutes and allow the
interior to cool down. (Be careful not to burn yourself.) To cool faster, see “TIPS” on pg. 11.
●
Indicates malfunction.
→
Please contact the store where you purchased the Rice Cooker or Zojirushi Customer Service.
●
The built-in lithium battery is dead.
When the lithium battery is dead, stored memories (current time, menu selection, and Keep Warm
settings) will be erased if the Power Plug is unplugged from the electrical outlet. However, if the
Power Plug is plugged back into the electrical outlet and the clock is set, the Rice Cooker will
function normally. Contact Zojirushi Customer Service to have the lithium battery replaced (a fee will
be charged for the replacement).
●
If the Display shows a blinking , reset the time.
→
pg. 9
Once the clock is set, the Rice Cooker will function normally. If rice is cooked while the Display
shows a blinking (when the clock has not been set), the current time will not be shown during
the cooking process or during Keep Warm.
Error
Display
Odd Display
The Display turns off
when the Power Plug
is unplugged from the
electrical outlet
is blinking
If the countermeasures listed below do not solve the problem, contact the store where you purchased the Rice Cooker or Zojirushi Customer Service.
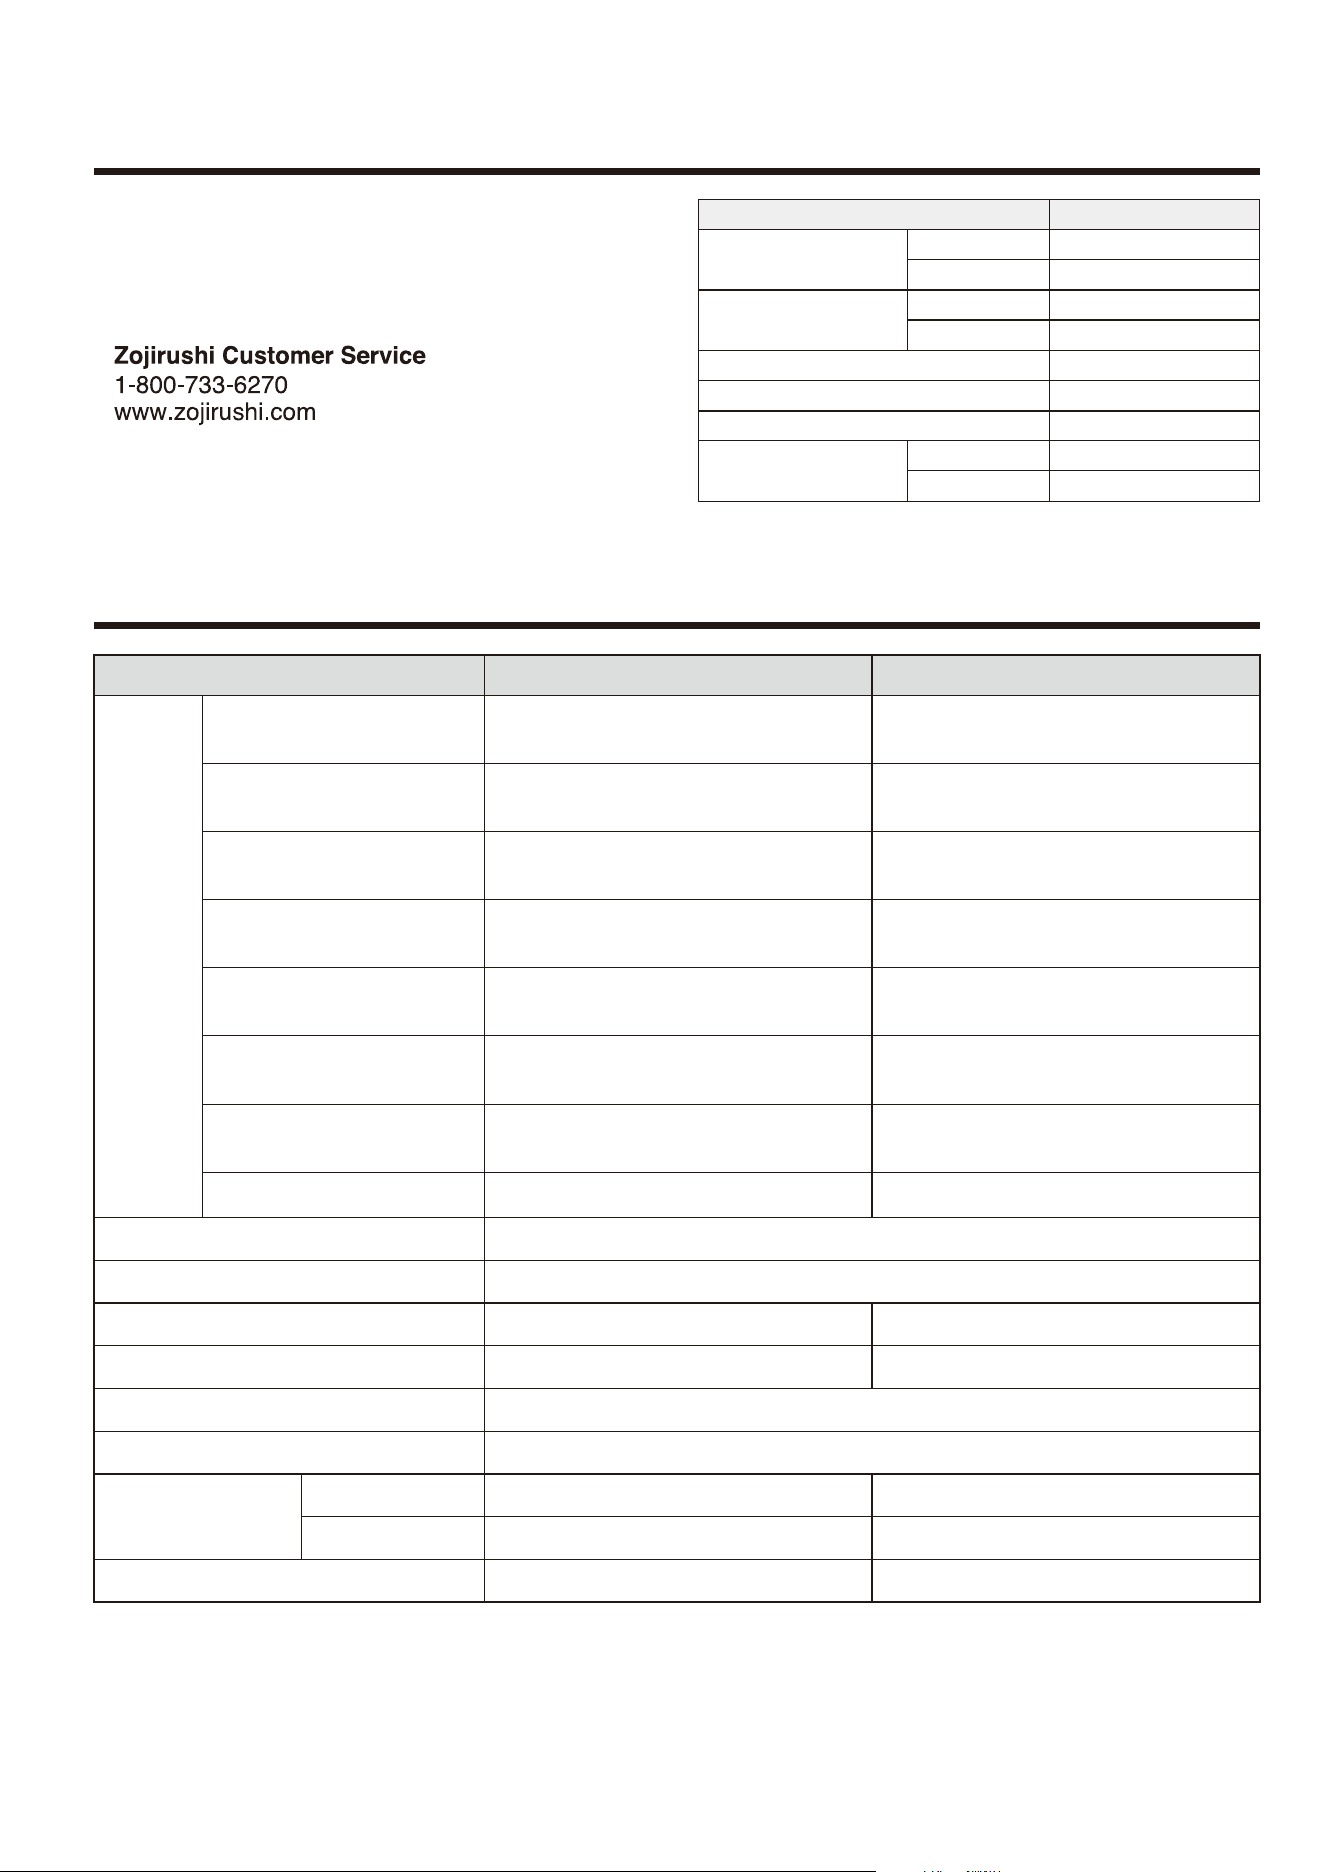
30
SPECIFICATIONS
REPLACEMENT PARTS
●
If damaged, replace with new parts (for a fee).
●
When replacing parts, please check the model number
and the parts name beforehand, then contact the store
where you purchased the Rice Cooker or Zojirushi
Customer Service.
C194-6B
C243-6B
B688-6B
B689-6B
SHAKN-6B
616864-00
615784-00
BU195031L-00
BU195032L-00
Part Name Part Number
1.0 L model
1.8 L model
1.0 L model
1.8 L model
1.0 L model
1.8 L model
Inner Lid Set
Inner Cooking Pan
Spatula
Spatula Holder
Measuring Cup
Steaming Basket
●
The average power consumption during Keep Warm is calculated with the Rice Cooker at maximum capacity and at a room
temperature of 68°F (20℃).
●
This product may not operate properly in certain environments or places with high altitudes or extreme weather conditions.
Please avoid using this product in such areas.
●
This product cannot be used in areas where power supply voltage or power supply frequency is different.
●
(*1) Capacity is measured in the supplied rice measuring cup, using uncooked rice. Other grains may vary.
●
(*2) Height with the Outer Lid open.
0.18–1.0
0.18–1.0
0.18–1.0
0.18–0.72
0.09–0.27
0.18–0.72
0.18–0.72
[1–5.5]
[1–5.5]
[1–5.5]
[1–4]
[0.5–1.5]
[1–4]
[1–4]
0.36–1.8
0.36–1.8
0.36–1.8
0.36–1.08
0.09–0.45
0.36–1.08
0.36–1.44
[2–10]
[2–10]
[2–10]
[2–6]
[0.5–2.5]
[2–6]
[2–8]
Height Limit for Steamed Foods
Rating
Electric Consumption
Average Power Consumption during Keep Warm
Rice Cooking System
Power Cord Length
Weight
Direct Heating
3' 7" (1.1 m)
AC 120 V 60 Hz
1-½ inch/3.5 cm
29 W
820 W610 W
35 W
approx. 8 lbs. (approx. 3.5 kg) approx. 11 lbs. (approx. 4.6 kg)
Cooking
Capacity
(approx. L)
[cups]
10-
1
/
8
(W) × 14
(D) × 8-
5
/
8
(H)
(16-
1
/
4
*2
)
11-
1
/
8
(W) × 15 (D) × 10
(H)
(18-
5
/
8
*2
)
25.5 (W) × 35.5 (D) × 21.5 (H)
(41
*2
) 28 (W) × 38 (D) × 25 (H)
(47
*2
)
External
Dimensions
<approx. inch>
<approx. cm>
*1
WHITE
SUSHI
QUICK
MIXED
PORRIDGE
SWEET
BROWN
CAKE
(Short/Medium Grain White Rice)
(Short/Medium Grain White Rice)
(Short/Medium Grain White Rice)
(Short/Medium Grain White Rice)
(Short/Medium Grain White Rice)
(Short/Medium Grain Brown Rice)
Model No. NS-TPC10 NS-TPC18
All-Purpose Flour 4.2 oz./120 g
All-Purpose Flour 6.3 oz./180 g
(Sweet Rice Only or Sweet Rice
+ Short/Medium Grain White Rice)

30
SPECIFICATIONS
REPLACEMENT PARTS
●
If damaged, replace with new parts (for a fee).
●
When replacing parts, please check the model number
and the parts name beforehand, then contact the store
where you purchased the Rice Cooker or Zojirushi
Customer Service.
C194-6B
C243-6B
B688-6B
B689-6B
SHAKN-6B
616864-00
615784-00
BU195031L-00
BU195032L-00
Part Name Part Number
1.0 L model
1.8 L model
1.0 L model
1.8 L model
1.0 L model
1.8 L model
Inner Lid Set
Inner Cooking Pan
Spatula
Spatula Holder
Measuring Cup
Steaming Basket
●
The average power consumption during Keep Warm is calculated with the Rice Cooker at maximum capacity and at a room
temperature of 68°F (20℃).
●
This product may not operate properly in certain environments or places with high altitudes or extreme weather conditions.
Please avoid using this product in such areas.
●
This product cannot be used in areas where power supply voltage or power supply frequency is different.
●
(*1) Capacity is measured in the supplied rice measuring cup, using uncooked rice. Other grains may vary.
●
(*2) Height with the Outer Lid open.
0.18–1.0
0.18–1.0
0.18–1.0
0.18–0.72
0.09–0.27
0.18–0.72
0.18–0.72
[1–5.5]
[1–5.5]
[1–5.5]
[1–4]
[0.5–1.5]
[1–4]
[1–4]
0.36–1.8
0.36–1.8
0.36–1.8
0.36–1.08
0.09–0.45
0.36–1.08
0.36–1.44
[2–10]
[2–10]
[2–10]
[2–6]
[0.5–2.5]
[2–6]
[2–8]
Height Limit for Steamed Foods
Rating
Electric Consumption
Average Power Consumption during Keep Warm
Rice Cooking System
Power Cord Length
Weight
Direct Heating
3' 7" (1.1 m)
AC 120 V 60 Hz
1-½ inch/3.5 cm
29 W
820 W610 W
35 W
approx. 8 lbs. (approx. 3.5 kg) approx. 11 lbs. (approx. 4.6 kg)
Cooking
Capacity
(approx. L)
[cups]
10-
1
/
8
(W) × 14
(D) × 8-
5
/
8
(H)
(16-
1
/
4
*2
)
11-
1
/
8
(W) × 15 (D) × 10
(H)
(18-
5
/
8
*2
)
25.5 (W) × 35.5 (D) × 21.5 (H)
(41
*2
) 28 (W) × 38 (D) × 25 (H)
(47
*2
)
External
Dimensions
<approx. inch>
<approx. cm>
*1
WHITE
SUSHI
QUICK
MIXED
PORRIDGE
SWEET
BROWN
CAKE
(Short/Medium Grain White Rice)
(Short/Medium Grain White Rice)
(Short/Medium Grain White Rice)
(Short/Medium Grain White Rice)
(Short/Medium Grain White Rice)
(Short/Medium Grain Brown Rice)
Model No. NS-TPC10 NS-TPC18
All-Purpose Flour 4.2 oz./120 g
All-Purpose Flour 6.3 oz./180 g
(Sweet Rice Only or Sweet Rice
+ Short/Medium Grain White Rice)
NS-TPC
BC
A
ZOJIRUSHI CORPORATION
NS-TPC10 / NS-TPC18
CANUSA
MICOM RICE COOKER & WARMER
OPERATING INSTRUCTIONS
CUISEUR À RIZ ET CHAUFFE-RIZ MICOM
MODE D’EMPLOI
●Thank you for purchasing this product. Always follow basic safety precautions when using electrical appliances.
Read all instructions carefully. Please keep these operating instructions at hand for easy reference.
●
Merci d’avoir acheté ce produit. Veuillez respecter impérativement les consignes de sécurité de base lors de l’emploi
d’appareils électriques. Lisez attentivement toutes les instructions. Veuillez garder ce mode d’emploi à portée de main
pour pouvoir le consulter facilement.
INDEX INDEX
/
IMPORTANT SAFEGUARDS......................................................2
IMPORTANT...............................................................................5
ABOUT THE INNER COOKING PAN........................................5
PART NAMES AND FUNCTIONS................................................6
TIPS FOR DELICIOUS RICE........................................................8
HOW TO SET THE CLOCK..........................................................9
HOW TO CHANGE THE NOTIFICATION SOUNDS....................9
COOKING RICE
BASIC COOKING STEPS........................................................10
TIPS FOR COOKING VARIOUS RICE MENUS.........................12
ESTIMATED COOKING TIME.................................................12
KEEPING RICE WARM
REGULAR KEEP WARM AND EXTENDED KEEP WARM....13
REHEATING RICE......................................................................15
USING THE TIMER TO COOK RICE
USING THE TIMER..................................................................16
HOW TO BAKE CAKE................................................................17
HOW TO STEAM FOOD.............................................................18
RECIPES
AVOCADO AND TUNA BOWL.................................................20
HAND-ROLLED SUSHI............................................................20
CHIRASHI-SUSHI....................................................................21
MIXED RICE.............................................................................21
SWEET RICE COOKED WITH ADZUKI BEANS....................22
MIXED BROWN RICE..............................................................22
SPONGE CAKE........................................................................23
CHEESE CAKE........................................................................23
CLEANING AND MAINTENANCE..............................................24
TROUBLESHOOTING GUIDE....................................................26
ERROR DISPLAYS AND THEIR MEANINGS...........................29
REPLACEMENT PARTS...........................................................30
SPECIFICATIONS.....................................................................30
CONSIGNES DE SÉCURITÉ IMPORTANTES...........................31
IMPORTANT............................................................................34
À PROPOS DE LA CASSEROLE INTÉRIEURE......................34
NOMENCLATURE ET FONCTIONS DES PIÈCES....................35
CONSEILS POUR OBTENIR UN RIZ DÉLICIEUX.....................37
CUISSON DU RIZ
ÉTAPES D’UNE CUISSON ÉLÉMENTAIRE............................38
RÉGLAGE DE L’HORLOGE........................................................40
COMMENT MODIFIER LE SIGNAL SONORE...........................40
CONSEILS POUR LA CUISSON
DE DIVERS PLATS À BASE DE RIZ..........................................41
ESTIMATION DU TEMPS DE CUISSON.................................41
MAINTENIR AU CHAUD LE RIZ AU CHAUD
MAINTIEN AU CHAUD ORDINAIRE ET
MAINTIEN AU CHAUD PROLONGÉ.......................................42
RÉCHAUFFER DU RIZ...............................................................44
UTILISATION DE LA MINUTERIE POUR LA CUISSON DU RIZ
UTILISATION DE LA MINUTERIE..........................................45
COMMENT CUIRE UN GÂTEAU................................................46
COMMENT CUIRE LES ALIMENTS À LA VAPEUR...................47
NETTOYAGE ET ENTRETIEN....................................................49
GUIDE DE DÉPANNAGE............................................................51
AFFICHAGE DES ERREURS ET SIGNIFICATION....................54
PIÈCES DE RECHANGE............................................................55
FICHE TECHNIQUE....................................................................55
This manual is also available for download in the
following languages. Scan the code.
Vous pouvez aussi télécharger ce manuel dans les
langues suivantes. Scannez le code.
en fr es
中文



