Instruction book
Mode d’emploi
Manual de insctrucciones
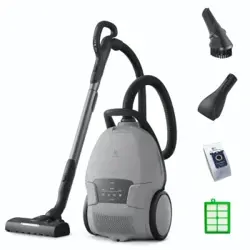
800 Bagged Cleaner
EHVS80W5AG


IMPORTANT SAFEGUARDS
When using an electrical appliance, basic precautions should always be followed, including the following:
READ ALL INSTRUCTIONS BEFORE USING THIS VACUUM CLEANER.
Failure to follow the warnings and instructions may result in electric shock, fire and/or serious injury.
• Use only as described in this manual. Use only manufacturer’s recommended attachments.
• Do not use outdoors or on wet surfaces.
• Do not leave appliance when plugged in. Unplug from outlet when not in use and before servicing.
• Do not allow to be used as a toy, Close attention is necessary when used by or near children.
• Do not use with damaged cord or plug. If appliance is not working as it should, has been dropped, damaged, left out
-
doors, or dropped into water, return it to a service center.
• Do not pull or carry by cord, use cord as a handle, close a door on cord, or pull cord around sharp edges or corners. Do
not run appliance over cord. Keep cord away from heated surfaces.
• Do not unplug by pulling on cord. To unplug, grasp the plug, not the cord.
• Do not handle plug or appliance with wet hands.
• Do not put any object into openings. Do not use with any opening blocked; keep free of dust, lint, hair, and anything that
may reduce air flow.
• Keep hair, loose clothing, fingers, and all parts of body away from openings and moving parts.
• Turn off all controls before unplugging.
• Use extra care when cleaning on stairs.
• Do not use to pick up flammable or combustible liquids, such as gasoline, or use in areas where they may be present.
• Always turn off this appliance before connecting or disconnecting motorized nozzle
• Hold plug when rewinding onto cord reel. Do not allow plug to whip when rewinding.
• Do not pick up anything that is burning or smoking, such as cigarettes, matches, or hot ashes.
• Do not use without dust bag and/or filters in place.
• Instructions for cleaning and user•maintenance operations recommended by the manufacturer, such as lubrication or
nonlubrication, and a statement to the user that any other servicing should be performed by an authorized service rep
-
resentative or that the appliance has no user serviceable parts.
• Specific instructions for the proper method of storage of the cord, the total appliance, and the like, when the appliance is
not in use, and for care of the cord while in use.
• To reduce the risk of electric shock, this appliance has a polarized plug (one blade is wider than the other). This plug
will fit in a polarized outlet only one way. If the plug does not fit fully in the outlet, reverse the plug. If it still does not fit,
contact a qualified electrician to install the proper outlet. Do not change the plug in any way.
•
Unplug before connecting Mini Turbo nozzle.
This equipment has been tested and found to comply with the limits for a Class B digital device, pursuant to part 15 of
the FCC Rules. These limits are designed to provide reasonable protection against harmful interference in a residential
installation. This equipment generates, uses and can radiate radio frequency energy and, if not installed and used
in accordance with the instructions, may cause harmful interference to radio communications. However, there is no
guarantee that interference will not occur in a particular installation. If this equipment does cause harmful interference to
radio or television reception, which can be determined by turning the equipment off and on, the user is encouraged to try
to correct the interference by one or more of the following measures:
- Reorient or relocate the receiving antenna.
- Increase the separation between the equipment and receiver.
- Connect the equipment into an outlet on a circuit different from that to which the receiver is connected.
- Consult the dealer or an experienced radio/TV technician for help.
WARNING
SAVE THESE INSTRUCTIONS
Household use only !
To reduce the risk of fire, electric shock, or injury:
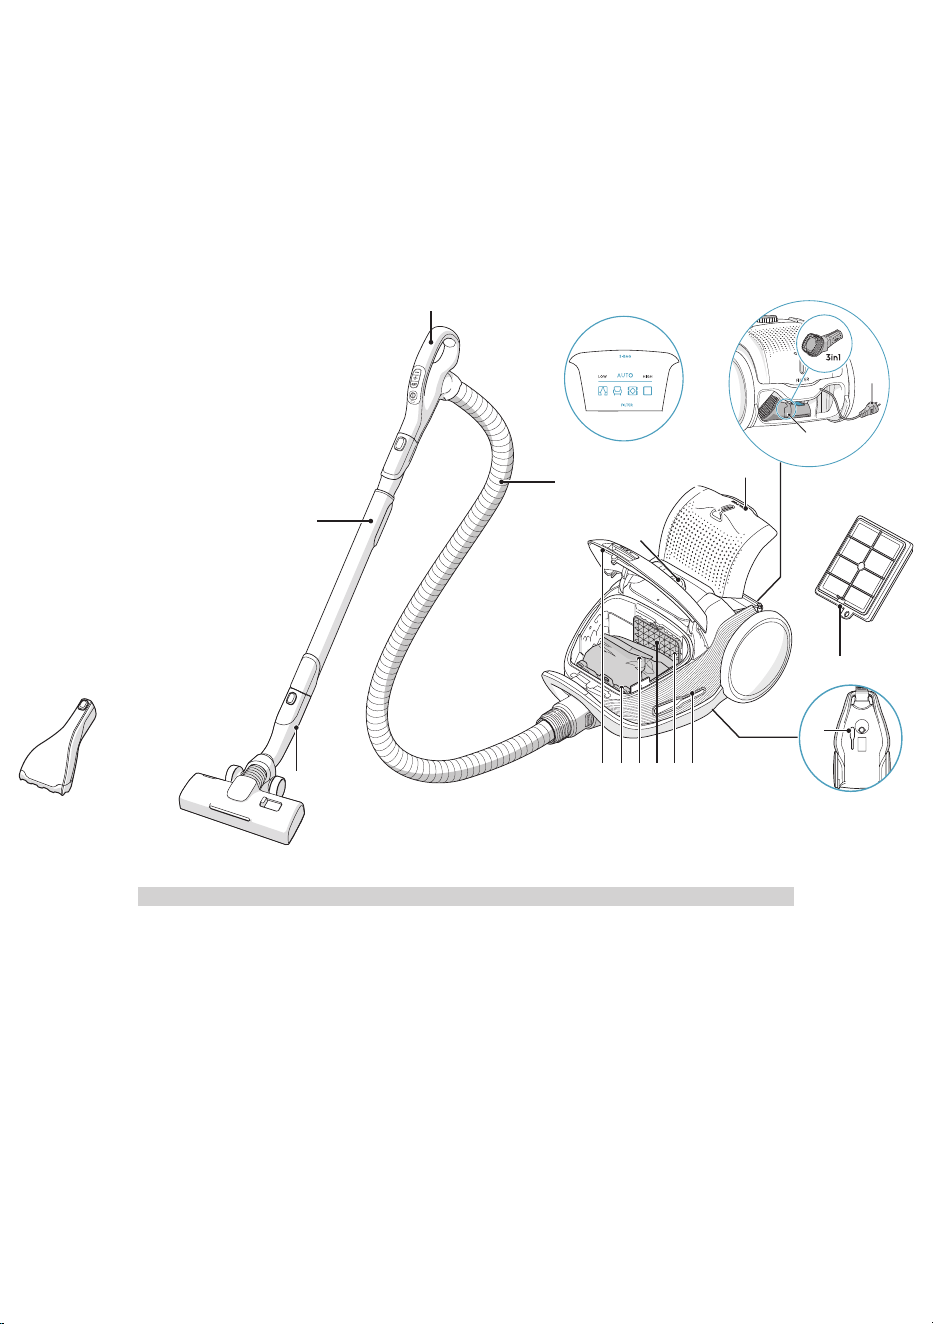
1
12
13
14
15
2
4678910
4
3
5
11
1
16
1. Display
2. Exhaust filter lid
3. Exhaust filter
4. Parking slots
5. Power cord
6. Motor filter
7. Motor filter holder
8. S-bag®
9. S-bag® holder
10. Dust compartment cover
11. 3in1 tool
12. AeroPro hose 1
13. AeroPro handle
14. AeroPro telescopic tube
15. AllFloor Auto LED nozzle
16. Mini Turbo nozzle
DESCRIPTION OF 800 VACUUM CLEANER
Thank you for choosing Electrolux 800 bagged vacuum cleaner. Always use original accessories and spare
parts to get the best results. This product is designed with the environment in mind. All plastic parts are
marked for recycling purposes.
Before starting
• Read this manual carefully.
• Check that all parts described are included.
• Pay special attention to the safety precautions!
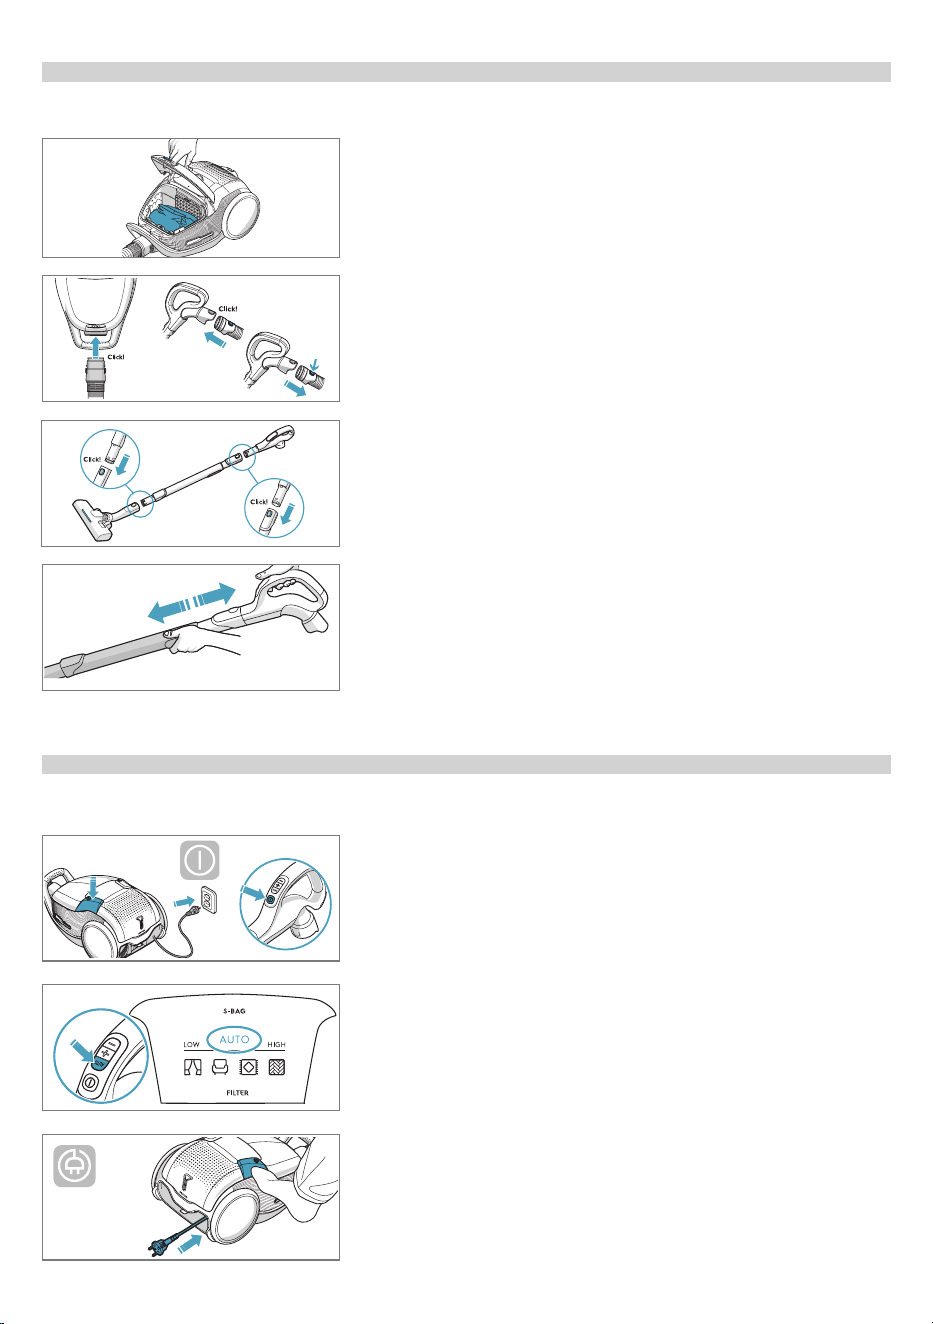
HOW TO USE THE VACUUM CLEANER
Open the dust compartment cover by pulling the S-BAG
button. Check that the dust bag (s-bag) is in place.
Insert the hose into the cleaner (to remove it, press the lock
buttons and pull). Insert the hose into the hose handle until
the lock button clicks (to release it, press the lock button
and pull).
Attach the telescopic tube to the nozzle. Attach the
telescopic tube to the hose handle (to remove it, press the
lock button and pull).
Adjust the telescopic tube by holding the lock with one
hand and pulling the handle with the other hand.
START/STOP THE VACUUM CLEANER AND ADJUST SUCTION POWER
Pull out the power cord and plug it into the mains. Press
the ON/OFF button to turn the cleaner on/off. Indicators
light up, LOW/HIGH indicator lights up from left to right and
back. Press the ON/OFF button on the remote control to
turn the cleaner on/off.
Adjust suction power: The cleaner starts in AUTO mode
(automatic power regulation). AUTO indicator is illuminated
on the display and LOW/HIGH indicator pulses. To regulate
power manually press +/- button on handle. Press AUTO
button to return to auto-function.
After cleaning, push the REWIND button to rewind the
cable.
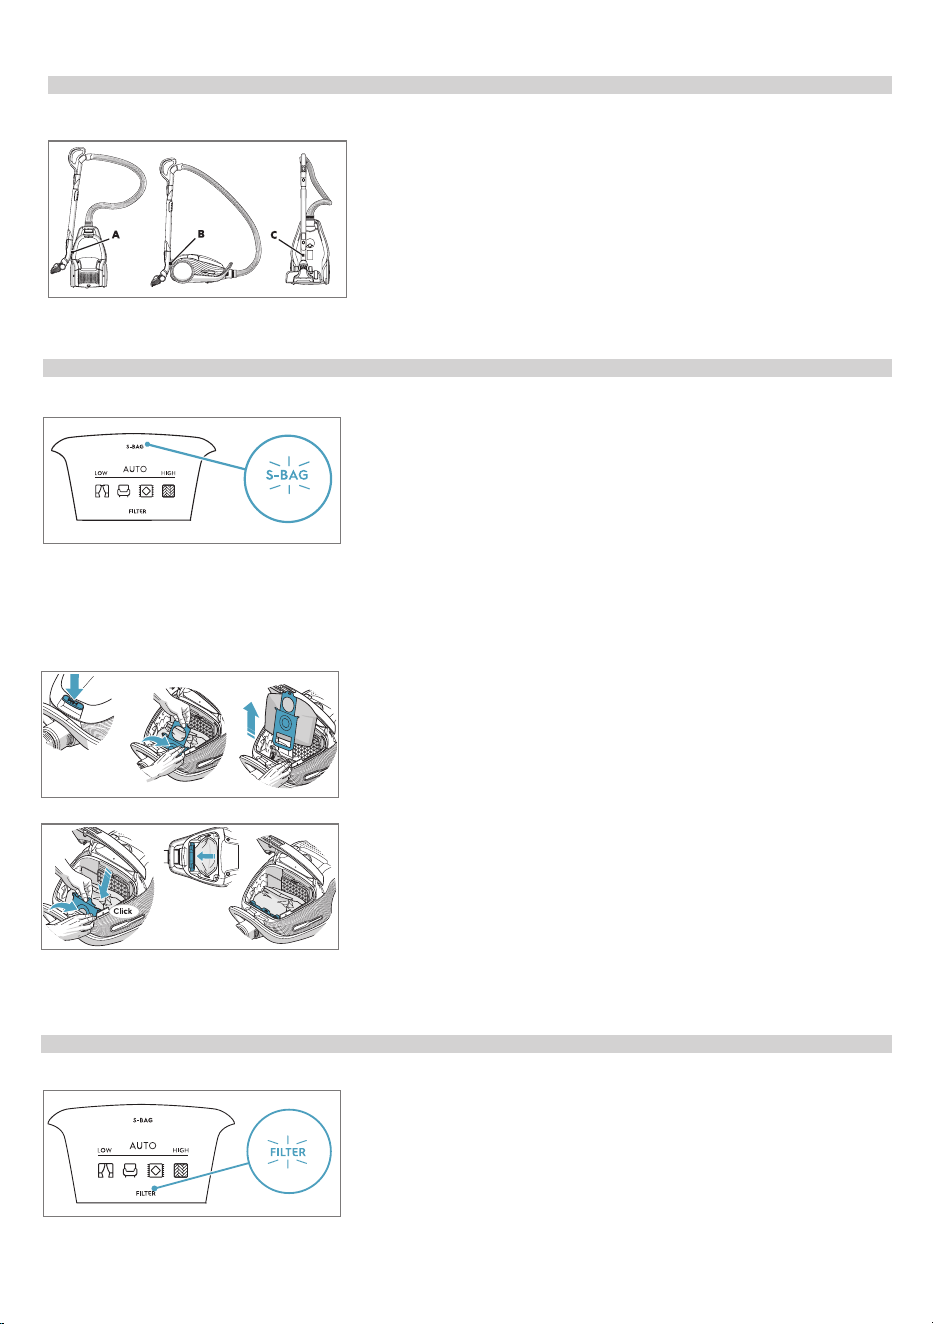
PARKING POSITIONS
Replace the s-bag when S-BAG indicator lights up in red
(green light: bag is OK, yellow light: soon time to replace
bag).
NB: Always change the s-bag when S-BAG indicator is illuminated or has red light even if the s-bag is not full (it
may be blocked) and after using carpet cleaning powder. For best possible performance, use the Ultra Long
Performance bag which is especially developed for your cleaner. Other synthetic s-bags can also be used. Do not
use paper dust bags! www.s-bag.com
Use parking position on the side (A) or underneath (C)
to carry and store the cleaner. At the back (B) when you
pause (save your back).
REPLACING THE DUSTBAG, S-BAG®
Open the dust compartment cover by pulling the S-BAG
button.
Pull the cardboard handle to close and remove the s-bag®
Insert a new s-bag® by pushing the cardboard straight
down in its tracks. Close the lid. If the s-bag® is not properly
placed or is missing, the lid will not close.
When you start the cleaner after s-bag replacement, It takes 10 seconds
before the S-BAG indicator turns off or turns green.
Replace/clean the filter when filter indicator lights up in red.
Green light indicates that the filter is ok. It lights up briefly
when you start the vacuum cleaner.
REPLACING THE FILTERS
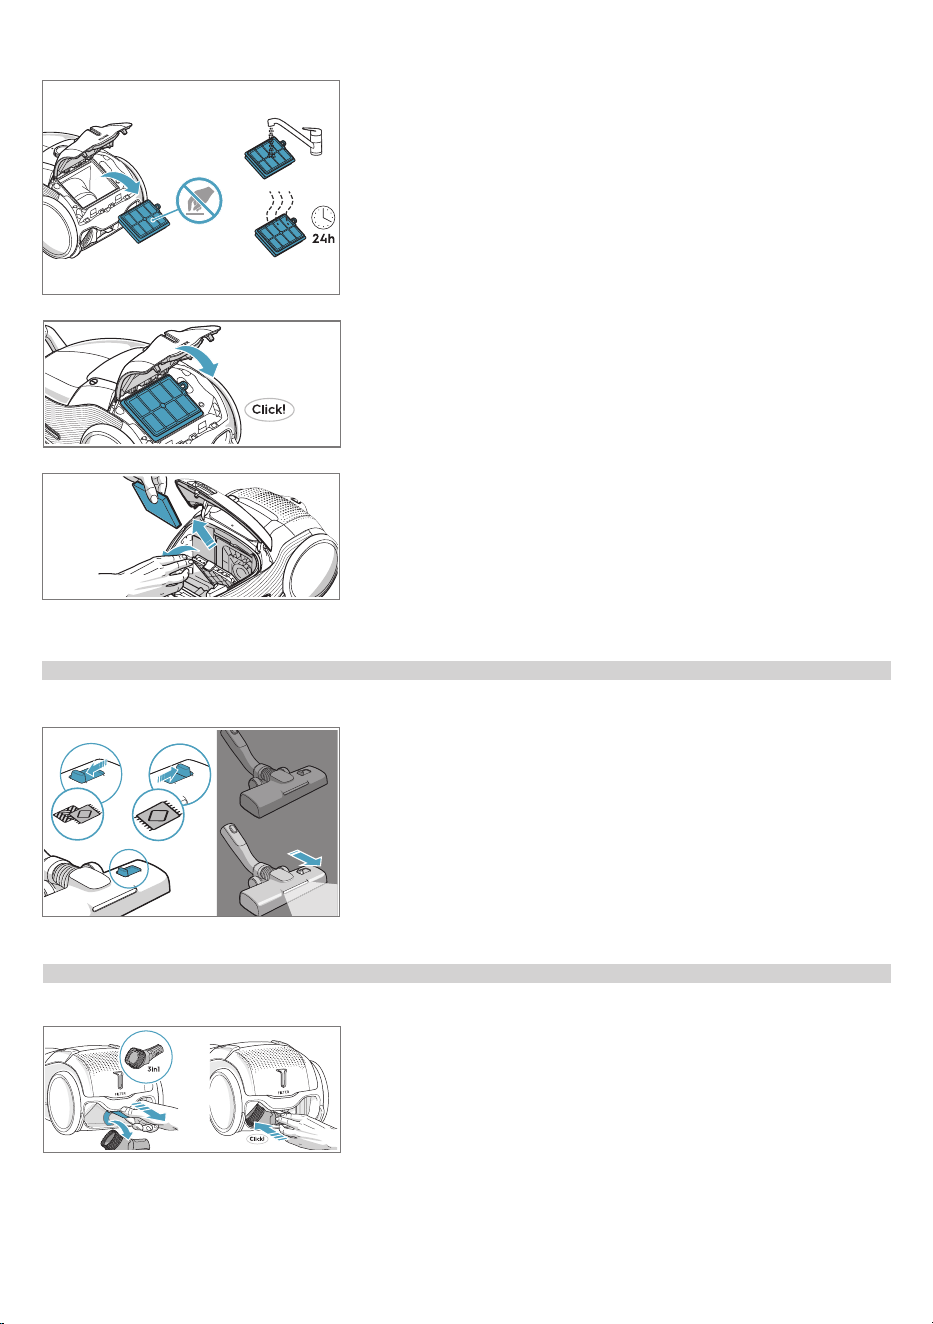
Pull the FILTER button to open the filter lid. Use original
s-filters. Remove the filter and check the reference on the
frame to define type. Replace with a new filter or clean it.
Rinse the inside (dirty side) in lukewarm tap water. Tap the
filter frame to remove the water. Repeat the process four
times.
NB: Do not use cleaning agents. Avoid touching the filter surface. Let
the filter dry completely (min. 24 h in room temperature) before putting
back ! Change the washable filter at least once a year or when it is
very dirty or damaged. Do not remove the L-shaped foam under the
filter.
After replacing the filter, close the filter lid until it is clicked
back into place. If the filter lid comes off, position the hinges
at the bottom and push the filter lid until it is clicked back
into place.
NB: When you start the cleaner after filter replacement, It takes 10
seconds before the FILTER indicator turns green or turns off.
Replace the motor filter when dirty or after every 5th s-bag.
Push the filter holder down and pull it out. Exchange the
filter and close the lid.
For deep cleaning on carpet, change the nozzle setting with the
slider to Carpet mode. Icon illustrates recommended floor
type. Move the nozzle forward. The front light turns on
automatically after a few seconds. When the nozzle is not
used, the light turns off automatically after a few seconds.
VACUUMING WITH THE UNIVERSAL NOZZLE
Pull the textile tab to take out 3in1 tool. The tool has
3 functions, see pictures on next page.
After usage, put it back in its place.
3IN1 ACCESSORY TOOL
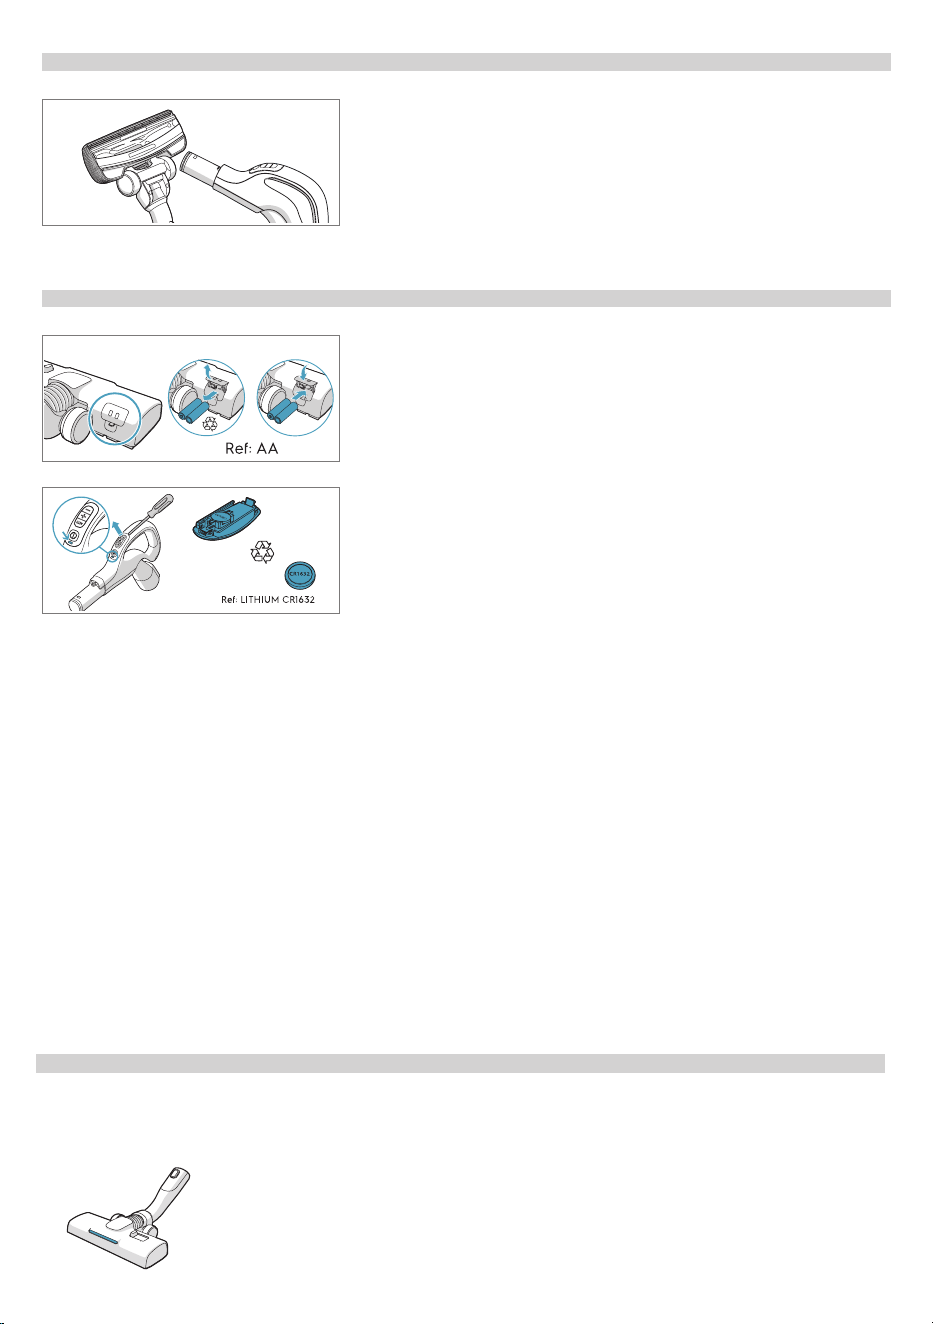
Disconnect the nozzle from the tube. Clean with the hose
handle.
CLEANING THE UNIVERSAL NOZZLE
Change batteries when front lights start blinking fast. Use 2
AA batteries.
CHANGING THE BATTERIES
TIPS ON HOW TO GET BEST RESULTS
AllFloor Auto LED nozzle
(with front lights)
Change battery when light indicator turns red or is not
responding when pressing any button. Use only batteries
type LITHIUM CR1632
- For all floor types, secures excellent dust pick up both on
carpets and hard floors.
- Recommended to use Allfloor mode, which enables going
from hard floor to carpet without adjusting the setting.
- For deep cleaning on carpet, change the nozzle setting with
the slider to Carpet mode.
- Front light helps to detect dust and dirt in dark spaces (under
furniture etc).
• Remove and immediately recycle or dispose of used batteries according to local regulations and keep away from
children. Do NOT dispose of batteries in household trash or incinerate.
• Even used batteries may cause severe injury or death.
• Call a local poison control center for treatment information.
• Battery in Handle: “CR1632” ; Battery in Main Nozzle: 2x “AA LR6”
• Nominal battery voltage in Handle: 3 V ; in Main Nozzle: 1.5 V
• Non-rechargeable batteries are not to be recharged.
• Do not force discharge, recharge, disassemble, heat above (manufacturer’s specified temperature rating) or
incinerate. Doing so may result in injury due to venting, leakage or explosion resulting in chemical burns.
• Ensure the batteries are installed correctly according to polarity (+ and -).
• Do not mix old and new batteries, different brands or types of batteries, such as alkaline, carbon-zinc, or
rechargeable batteries.
• Remove and immediately recycle or dispose of batteries from equipment not used for an extended period of time
according to local regulations.
• Always completely secure the battery compartment. If the battery compartment does not close securely, stop using
the product, remove the batteries, and keep them away from children.
• Remove the batteries from the product before scrapping. Follow your country’s rules for collection of batteries and
electrical products.
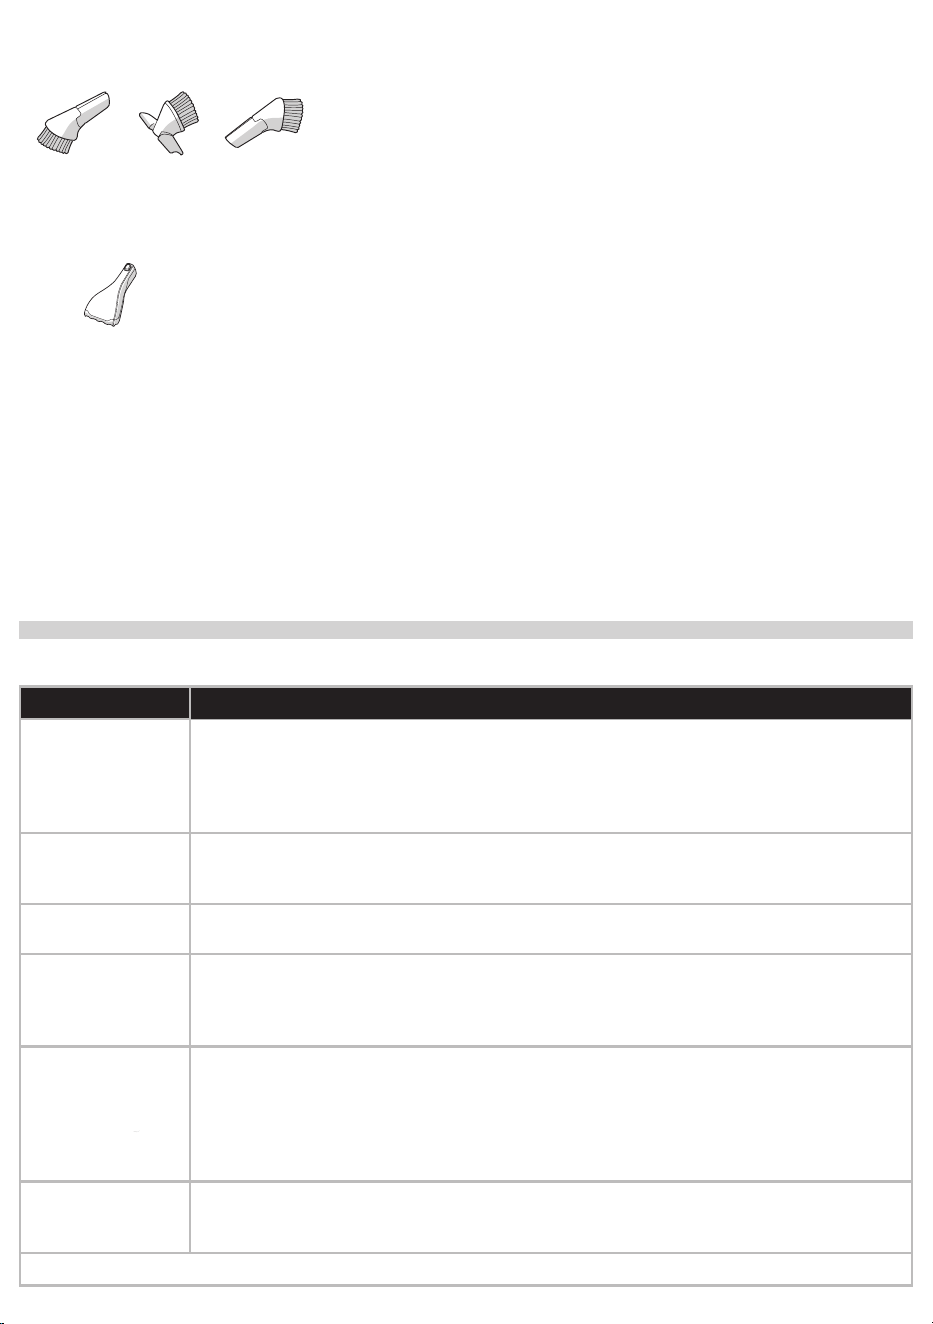
Mini Turbo nozzle
3in1 accessory tool
- Brushes and vacuums at the same time (best pick up of hair,
fibres etc).
- For textile furniture, car seats, mattresses etc.
- Brush roller is driven by the airflow of the vacuum cleaner.
- Not suitable for carpets with very deep pile and long fringes
as it can get stuck in the rotating brush roll.
1. Dusting tool for hard surfaces (bookshelves, skirting boards etc).
2. Upholstery tool for textiles (curtains, upholstery etc).
3. Crevice tool for narrow spaces (behind radiators etc).
PROBLEM SOLUTION
The vacuum clean-
er does not start
• Check that the cable is connected to the mains.
• Check that the plug and cable are not damaged.
• Check for a blown fuse.
• Check if the battery indicator lamp in the remote control handle responds (certain models
only).
The s-bag®
indicator light is
illuminated
• Check if the s-bag® is full or blocked.
• If you have already changed the s-bag®, change the motor lter.
The lter indicator
light is illuminated
Change, or wash (if washable), the exhaust lter.
The cleaner stops
The cleaner might be overheated: disconnect it from the mains; check if the nozzle, tube,
hose or lters are blocked. Let the cleaner cool down for 30 minutes before plugging it in
again.
If the cleaner still does not work, contact an authorized Electrolux service centre.
Reduction of
suction capacity
versus normal
• Check if the s-bag is full or blocked.
• Check if the motor lter is clogged and needs changing.
• Check if nozzle is blocked and needs to be cleared.
• Check if hose is blocked by squeezing it gently. However, be careful in case the obstruction
has been caused by glass or needles caught inside the hose.
Note: The warranty does not cover any damage to the hose caused by cleaning it.
Water has been
sucked into the
vacuum cleaner
It will be necessary to replace the motor at an authorized Electrolux service centre.
Damage to the motor caused by the penetration of water is not covered by the warranty.
For any further problems, contact an authorized Electrolux service centre.
TROUBLESHOOTING

Your appliance is covered by a two year limited warranty. For two years from your original date of delivery, Electrolux will pay
all costs for repairing or replacing any parts of this appliance that prove to be defective in materials or workmanship when
such appliance is installed, used and maintained in accordance with the provided instructions.
CUSTOMER’S SOLE AND EXCLUSIVE REMEDY UNDER THIS LIMITED WARRANTY SHALL BE REPAIR OR REPLACEMENT
AS PROVIDED HEREIN. CLAIMS BASED ON IMPLIED WARRANTIES, INCLUDING WARRANTIES OF MERCHANTABILITY
OR FITNESS FOR A PARTICULAR PURPOSE, ARE LIMITED TO ONE YEAR OR THE SHORTEST PERIOD ALLOWED BY LAW,
BUT NOT LESS THAN ONE YEAR. ELECTROLUX SHALL NOT BE LIABLE FOR CONSEQUENTIAL OR INCIDENTAL DAMAGES
SUCH AS PROPERTY DAMAGE AND INCIDENTAL EXPENSES RESULTING FROM ANY BREACH OF THIS WRITTEN
LIMITED WARRANTY OR ANY IMPLIED WARRANTY. SOME STATES AND PROVINCES DO NOT ALLOW THE EXCLUSION
OR LIMITATION OF INCIDENTAL OR CONSEQUENTIAL DAMAGES, OR LIMITATIONS ON THE DURATION OF IMPLIED
WARRANTIES, SO THESE LIMITATIONS OR EXCLUSIONS MAY NOT APPLY TO YOU. THIS WRITTEN WARRANTY GIVES YOU
SPECIFIC LEGAL RIGHTS. YOU MAY ALSO HAVE OTHER RIGHTS THAT VARY FROM STATE TO STATE.
Keep your receipt, delivery slip, or some other appropriate payment record to establish the warranty period should service be
required. If service is performed, it is in your best interest to obtain and keep all receipts. Service under this warranty must be
obtained by contacting Electrolux at the addresses or phone numbers below.
This warranty only applies in the USA, Puerto Rico and Canada. In the USA and Puerto Rico, your appliance is warranted
by Electrolux Consumer Products, Inc. In Canada, your appliance is warranted by Electrolux Canada Corp. Electrolux
authorizes no person to change or add to any obligations under this warranty. Obligations for service and parts under
this warranty must be performed by Electrolux or an authorized service company. Product features or specifications as
described or illustrated are subject to change without notice.
Limited Warranty
Exclusions
This warranty does not cover the following:
If you need service
1. Products with original serial numbers that have been removed, altered or cannot be readily determined.
2. Product that has been transferred from its original owner to another party or removed outside the USA or Canada.
3. Rust on the interior or exterior of the unit.
4. Products purchased “as-is” are not covered by this warranty.
5. Products used in a commercial setting.
6. Service calls which do not involve malfunction or defects in materials or workmanship, or for appliances not in ordinary
household use or used other than in accordance with the provided instructions.
7. Service calls to correct the installation of your appliance or to instruct you how to use your appliance.
8. Expenses for making the appliance accessible for servicing, such as removal of trim, cupboards, shelves, etc., which are
not a part of the appliance when it is shipped from the factory.
9. Service calls to repair or replace appliance light bulbs, air filters, other consumables, or knobs, handles, or other
cosmetic parts.
10. Pickup and delivery costs; your appliance is designed to be repaired in the home.
11. Surcharges including, but not limited to, any after hour, weekend, or holiday service calls, tolls, ferry trip charges, or
mileage expense for service calls to remote areas, including the state of Alaska.
12. Damages to the finish of appliance or home incurred during transportation or installation, including but not limited to
floors, cabinets, walls, etc.
13. Damages caused by: services performed by unauthorized service companies; use of parts other than genuine Electrolux
parts or parts obtained from persons other than authorized service companies; or external causes such as abuse,
misuse, inadequate power supply, accidents, fires, or acts of God.
DISCLAIMER OF IMPLIED WARRANTIES; LIMITATION OF REMEDIES