
SAFETY INFORMATION .........3
USING THE REFRIGERATOR
Temperature Control ...................5
Garage Operation ......................5
Sabbath Mode .........................5
Fresh Food Compartment Shelves .......6
Freezer Compartment Shelves ..........6
Storage Drawers .......................7
Automatic Ice Maker ...................8
CARE AND CLEANING ...........9
INSTALLATION INSTRUCTIONS
Preparing to Install the Refrigerator .....10
Water Line Installation ................ 11
Installing the Door Handle .............14
Reversing the Door Swing .............15
TROUBLESHOOTING
Normal Operating Sounds ............ 20
LIMITED WARRANTY .............21
CONSUMER SUPPORT ..........22
ENGLISH/FRANÇAIS/
ESPAÑOL
Write the model and serial
numbers here:
Model # _________________
Serial # _________________
Find these numbers on a label
on the left side, near the middle
of the refrigerator compartment.
49-1000478 Rev. 6 07-23 GEA
Models 16, 17, 18, 19, 22
OWNER’S MANUAL &
INSTALLATION
INSTRUCTIONS
REFRIGERATORS
Top-Freezer
GE is a trademark of the General Electric Company. Manufactured under trademark license.

2 49-1000478 Rev. 6
THANK YOU FOR MAKING GE APPLIANCES A PART OF YOUR HOME.
Whether you grew up with GE Appliances, or this is your first, we’re happy to have you in the family.
We take pride in the craftsmanship, innovation and design that goes into every GE Appliances
product, and we think you will too. Among other things, registration of your appliance ensures that we
can deliver important product information and warranty details when you need them.
Register your GE appliance now online. Helpful websites and phone numbers are available in the
Consumer Support section of this Owner’s Manual. You may also mail in the pre-printed registration
card included in the packing material.
49-1000478 Rev. 6 3
CAUTION
To reduce the risk of injury when using your refrigerator, follow these basic safety precautions.
Ŷ 'RQRWFOHDQJODVVVKHOYHVRUFRYHUVZLWKZDUP
water when they are cold. Glass shelves and
covers may break if exposed to sudden temperature
changes or impact, such as bumping or dropping.
Tempered glass is designed to shatter into many
small pieces if it breaks.
Ŷ .HHSILQJHUVRXWRIWKH³SLQFKSRLQW´DUHDV
clearances between the doors and between the
doors and cabinet are necessarily small. Be careful
closing doors when children are in the area.
Ŷ 'RQRWWRXFKWKHFROGVXUIDFHVLQWKHIUHH]HU
compartment when hands are damp or wet, skin
may stick to these extremely cold surfaces.
Ŷ 'RQRWUHIUHH]HIUR]HQIRRGVZKLFKKDYHWKDZHG
completely.
Ŷ ,QUHIULJHUDWRUVZLWKDXWRPDWLFLFHPDNHUVDYRLG
contact with the moving parts of the ejector
mechanism, or with the heating element that
UHOHDVHVWKHFXEHV'RQRWSODFHILQJHUVRUKDQGV
on the automatic ice making mechanism while the
refrigerator is plugged in.
SAFETY INFORMATION
READ AND SAVE THESE INSTRUCTIONS
WARNING
To reduce the risk of fire, explosion, electric shock, or injury when using your refrigerator, follow
these basic safety precautions:
Ŷ 7KLVUHIULJHUDWRUPXVWEHSURSHUO\LQVWDOOHG
DQGORFDWHGLQDFFRUGDQFHZLWKWKH,QVWDOODWLRQ
,QVWUXFWLRQVEHIRUHLWLVXVHG
Ŷ 8QSOXJWKHUHIULJHUDWRUEHIRUHPDNLQJUHSDLUVRU
cleaning.
NOTE: Power to the refrigerator cannot be
disconnected by any setting on the control panel.
NOTE: Repairs must be performed by a qualified
Service Professional.
Ŷ 5HSODFHDOOSDUWVDQGSDQHOVEHIRUHRSHUDWLQJ
Ŷ 'RQRWXVHDQH[WHQVLRQFRUG
Ŷ .HHSIODPPDEOHPDWHULDOVDQGYDSRUVDZD\IURPWKH
refrigerator.
Ŷ 'RQRWVWRUHH[SORVLYHVXEVWDQFHVVXFKDVDHURVRO
cans with a flammable propellant in this appliance.
Ŷ 7RSUHYHQWVXIIRFDWLRQDQGHQWUDSPHQWKD]DUGV
WRFKLOGUHQUHPRYHWKHIUHVKIRRGDQGIUHH]HU
doors from any refrigerator before disposing of it or
discontinuing its use.
Ŷ 7RDYRLGVHULRXVLQMXU\RUGHDWKFKLOGUHQVKRXOGQRW
stand on, or play in or with the appliance.
Ŷ &KLOGUHQDQGSHUVRQVZLWKUHGXFHGSK\VLFDOVHQVRU\
or mental capabilities or lack of experience and
knowledge can use this appliance only if they are
supervised or have been given instructions on safe
XVHDQGXQGHUVWDQGWKHKD]DUGVLQYROYHG
Ŷ 7KLVDSSOLDQFHLVLQWHQGHGWREHXVHGLQKRXVHKROG
and similar applications such as: staff kitchen areas
LQVKRSVRIILFHVDQGRWKHUZRUNLQJHQYLURQPHQWV
IDUPKRXVHVE\FOLHQWVLQKRWHOVPRWHOVEHG
EUHDNIDVWDQGRWKHUUHVLGHQWLDOHQYLURQPHQWV
catering and similar non-retail applications.
Ŷ Connect to potable water supply only. A cold water
supply is required for automatic icemaker operation.
The water pressure must be between 40 and 120 psi
(275-827 kilopascals).
Ŷ'RQRWDSSO\KDUVKFOHDQHUVWRWKHUHIULJHUDWRU
Certain cleaners will damage plastic which may
cause parts such as the door or door handles to
detach unexpectedly. See the Care and Cleaning
section for detailed instructions.
IMPORTANT SAFETY INFORMATION
READ ALL INSTRUCTIONS BEFORE USING THE APPLIANCE
WARNING
FIRE OR EXPLOSION HAZARD Flammable Refrigerant
This appliance contains isobutane refrigerant,
also known as R600a, a natural gas with high
environmental compatibility. However, it is also
combustible. Adhere to the warnings below to
reduce the risk of injury or property damage.
1. When handling, installing and operating the
appliance, care should be taken to avoid damage to
the refrigerant tubing.
2. 6HUYLFHVKDOORQO\EHSHUIRUPHGE\DXWKRUL]HG
VHUYLFHSHUVRQQHO8VHRQO\PDQXIDFWXUHUDXWKRUL]HG
service parts.
3. 'LVSRVHRIUHIULJHUDWRULQDFFRUGDQFHZLWKWKH
Federal and Local Regulations. The flammable
refrigerant and insulation material used in this
product require special disposal procedures. Contact
your local authorities for the environmentally safe
disposal of your refrigerator.
4. .HHSYHQWLODWLRQRSHQLQJVLQWKHDSSOLDQFH
enclosures or in the built-in structure clear of
obstruction.
5. To remove frost, scrape with a plastic or wood
VSDWXODRUVFUDSHU'RQRWXVHDQLFHSLFNRUDPHWDO
or sharp-edged instrument as it may puncture the
IUHH]HUOLQHUDQGWKHQWKHIODPPDEOHUHIULJHUDQW
tubing behind it.
6. 'RQRWXVHHOHFWULFDODSSOLDQFHVLQVLGHWKHIRRG
storage compartment of the appliance.
7. 'RQRWXVHDQ\HOHFWULFDOGHYLFHWRGHIURVW\RXU
IUHH]HU
4 49-1000478 Rev. 6
PROPER DISPOSAL OF YOUR OLD REFRIGERATOR
Do not, under any circumstances, cut or remove the third (ground) prong from the power cord. For
personal safety, this appliance must be properly grounded.
The power cord of this appliance is equipped with a
3-prong (grounding) plug which mates with a standard
SURQJJURXQGLQJZDOORXWOHWWRPLQLPL]HWKH
SRVVLELOLW\RIHOHFWULFVKRFNKD]DUGIURPWKLVDSSOLDQFH
Have the wall outlet and circuit checked by a qualified
electrician to make sure the outlet is properly
grounded.
Where a standard 2-prong wall outlet is encountered, it
is your personal responsibility and obligation to have it
replaced with a properly grounded 3-prong wall outlet.
'RQRWXVHDQDGDSWHU
The refrigerator should always be plugged into its own
individual electrical outlet which has a voltage rating
that matches the rating plate.
$9ROW$&+]RUDPSIXVHGJURXQGHG
electrical supply is required. This provides the best
performance and also prevents overloading house
ZLULQJFLUFXLWVZKLFKFRXOGFDXVHDILUHKD]DUGIURP
overheated wires.
Never unplug your refrigerator by pulling on the power
cord. Always grip plug firmly and pull straight out from
the outlet.
,PPHGLDWHO\GLVFRQWLQXHXVHRIDGDPDJHGVXSSO\
FRUG,IWKHVXSSO\FRUGLVGDPDJHGLWPXVWEH
replaced by a qualified service professional with an
DXWKRUL]HGVHUYLFHSDUWIURPWKHPDQXIDFWXUHU
When moving the refrigerator away from the wall, be
careful not to roll over or damage the power cord.
CONNECTING ELECTRICITY
WARNING
ELECTRICAL SHOCK HAZARD
Plug into a grounded 3-prong outlet
'RQRWUHPRYHWKHJURXQGSURQJ
'RQRWXVHDQDGDSWHU
'RQRWXVHDQH[WHQVLRQFRUG
Failure to follow these instructions can result in death, fire, or electrical shock.
SAFETY INFORMATION
IMPORTANT SAFETY INFORMATION
READ ALL INSTRUCTIONS BEFORE USING THE APPLIANCE
READ AND SAVE THESE INSTRUCTIONS
WARNING
SUFFOCATION AND ENTRAPMENT HAZARD
Failure to follow these disposal instructions can result in death or serious injury
IMPORTANT: Child entrapment and suffocation
are not problems of the past. Junked or abandoned
refrigerators are still dangerous even if they will sit
IRU³MXVWDIHZGD\V´,I\RXDUHJHWWLQJULGRI\RXUROG
refrigerator, please follow the instructions below to help
prevent accidents.
Before You Throw Away Your Old Appliance
Ŷ7DNHRIIWKHIUHVKIRRGDQGIUHH]HUGRRUV
Ŷ Leave the shelves in place so that children may not
easily climb inside.
INSTALLATION
WARNING
FIRE OR EXPLOSION HAZARD
.HHSIODPPDEOHPDWHULDOVDQGYDSRUVDZD\IURPUHIULJHUDWRU)DLOXUHWRGRVRFDQUHVXOWLQILUHH[SORVLRQRUGHDWK
Refrigerant and Foam Disposal:
'LVSRVHRIDSSOLDQFHLQDFFRUGDQFHZLWK)HGHUDODQG/RFDO5HJXODWLRQV)ODPPDEOHUHIULJHUDQWDQGLQVXODWLRQ
material used requires special disposal procedures. Contact your local authorities for the environmentally safe
disposal of your appliance.
49-1000478 Rev. 6 5
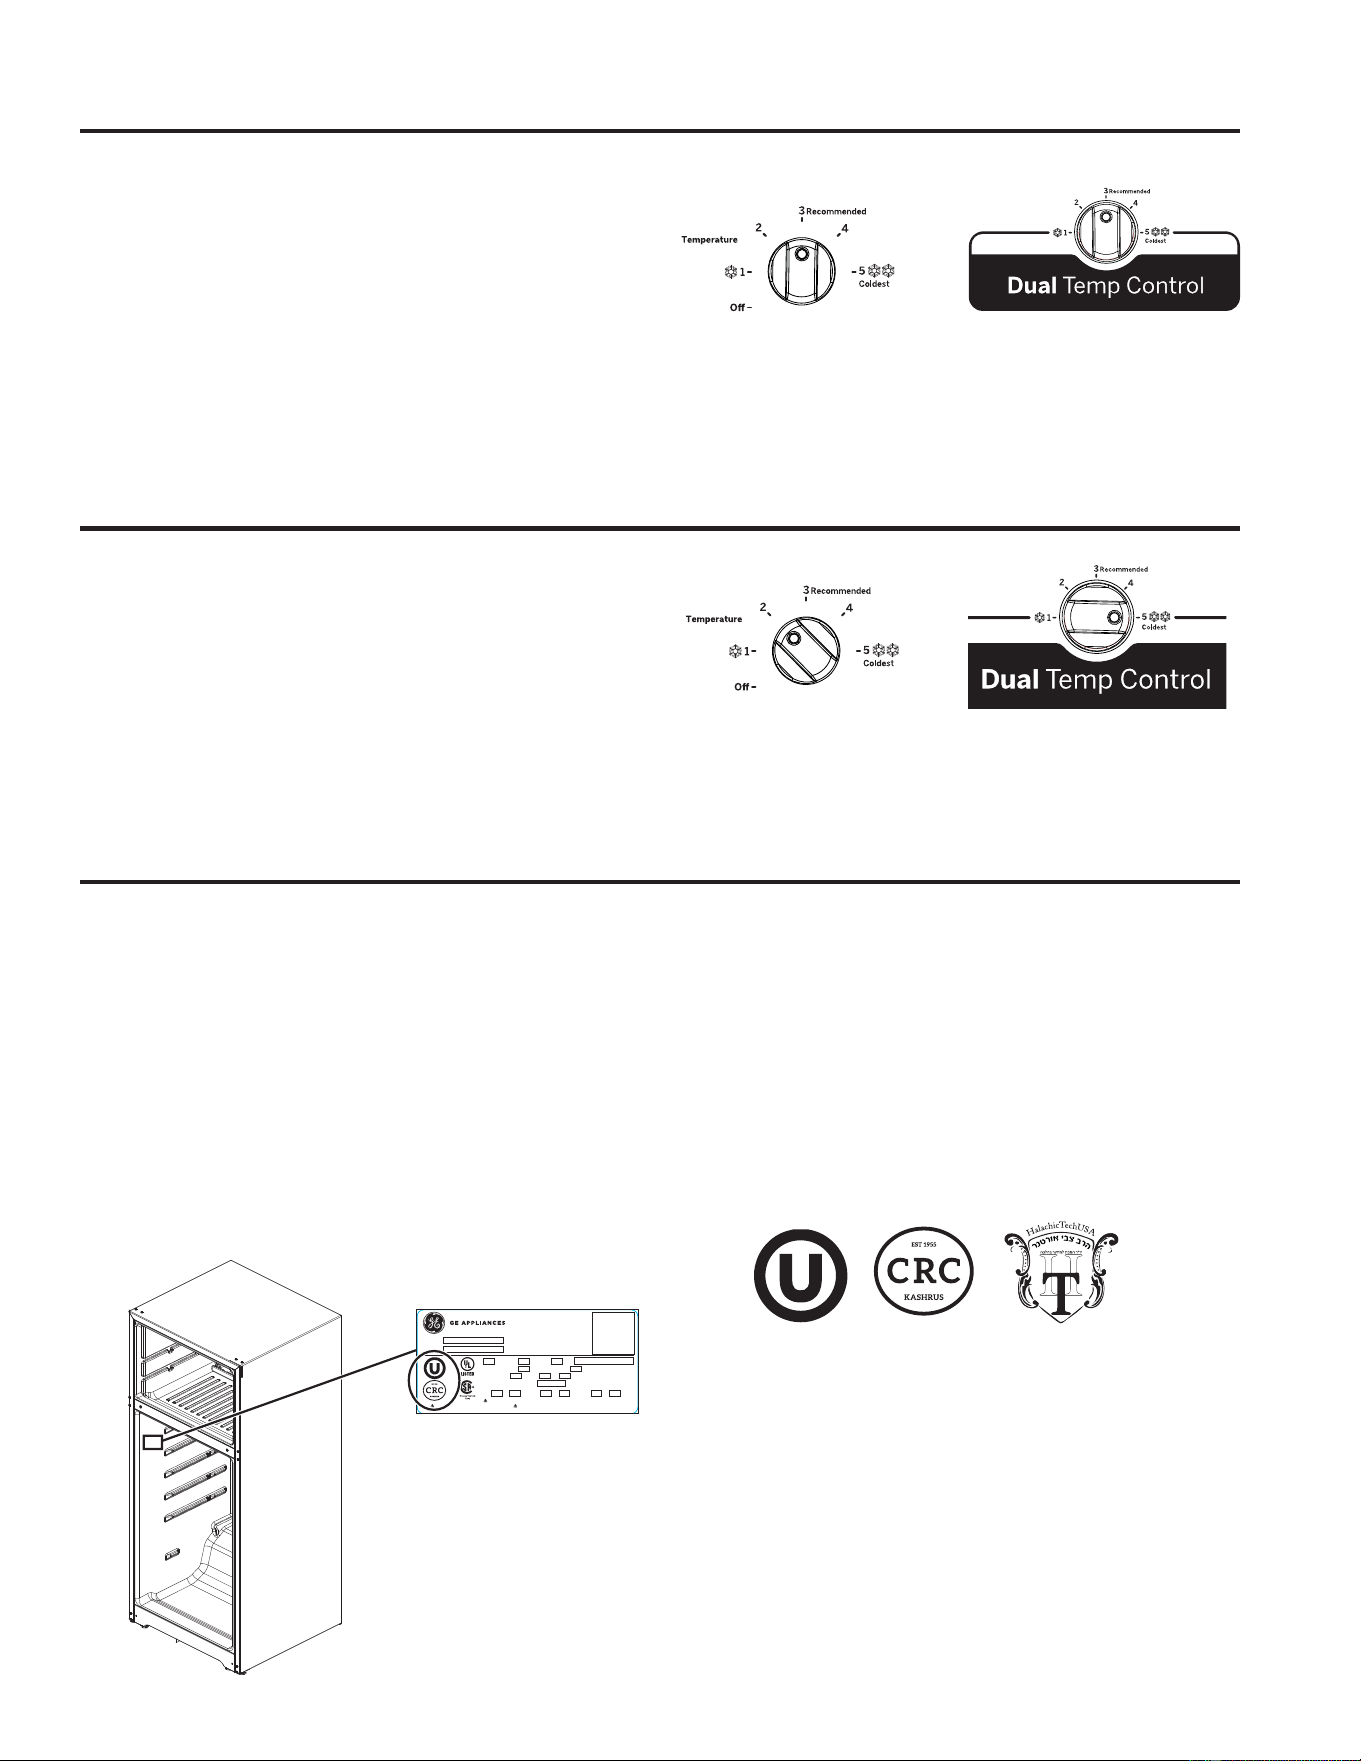
The temperature control adjusts the refrigerator from its
warmest to coldest settings.
Your refrigerator will come with the recommended
IDFWRU\VHWWLQJRQ³´)RUFROGHUWHPSHUDWXUHWXUQ
WKHNQREFORFNZLVHWRHLWKHUVHWWLQJ³´RU³´)RU
warmer temperature, turn the dial counter-clockwise
WRHLWKHUVHWWLQJ³´RU³´7RWXUQRIIWKHFRROLQJLQ
both compartments, turn the knob counter-clockwise to
VHWWLQJ³2II´1RWHWKDWWKLVGRHVQRWVKXWRIISRZHUWRWKH
refrigerator.
7KLVUHIULJHUDWRURIIHUVDQ28DQG&5&6DEEDWKPRGH
that complies with standards set forth by Orthodox
8QLRQWKH&HQWUDO5DEELQLFDO&RQJUHVVDQG+DODFKD
Tech, and is 100% certified to the highest halacha
standards. Sabbath mode requires that the control knob
and light switch are operated at the same time. The light
switch is located just to the left of the control knob.
To enter Sabbath Mode, turn the control knob to position
5, then hold down the light switch. While the light switch
is held down, turn the control knob to position 3. Once
the control knob is in position 3, release the light switch.
When you release the light switch, the light will dim and
product is in Sabbath mode.
To exit Sabbath mode, turn the control knob to OFF.
After 5 secs, then turn the knob to the setting (1 through
XVHGSULRUWRHQWHULQJ6DEEDWKPRGH,I6DEEDWK
mode is not exited manually, it will end automatically
DIWHUKRXUV,ISRZHULVGLVFRQQHFWHGIURPWKHSURGXFW
while it is in Sabbath mode, it will remain in Sabbath
mode after power is reconnected. Sabbath mode does
not deactivate the icemaker, if present. The icemaker
must be turned off manually by moving the icemaker
switch to the off position. The icemaker switch is located
RQWKHLFHPDNHULQWKHIUHH]HUFRPSDUWPHQW
Models with dual temperature control have an adjustable
IUHH]HUFRQWURODQGFDQEHRSHUDWHGLQORFDWLRQVZLWK
ambient temperatures between 38-110°F (3.3-43.3°C).
For cold ambient conditions 38-54°F (3.3-12.2°C) the
fresh food should be set to setting 2 to prevent food from
IUHH]LQJLQWKHIUHVKIRRGFRPSDUWPHQWDQGWKHIUHH]HU
setting should be adjusted to position 5 to prevent food
IURPWKDZLQJLQWKHIUHH]HUFRPSDUWPHQW
Temperature Control for locations between 55°F-110°F
Sabbath Mode OU (Orthodox Union) and CRC (Central Rabbinical Congress)
Garage Operation for locations between 38°F-54°F
USING THE REFRIGERATOR: Temperature Control / Garage Operaion / Sabbath Mode
Freezer Control
Freezer Control
Cold Ambient Setting
Models with dual
temperature control only.
Fresh Food Control
Fresh Food Control
Please check your rating label to
FRQ¿UPZKHWKHU\RXUXQLWRႇHUVWKH28
and CRC Sabbath mode. Only units with
WKH28DQG&5&ORJRRQWKHUDWLQJODEHO
comply with the standards set forth by
2UWKRGR[8QLRQWKH&HQWUDO5DEELQLFDO
Congress, and Halacha Tech.
Scan for Service or
Registration
Model No.
Serial No.
MINIMUM INSTALLATION CLEARANCES
VAC
DEFROST HEATER
HZ
WATTS ICEMAKER
WATTS
REFRIGERANT
CHARGE ( GRAMS)OZ.
AMPS
INTOP BACK IN INSIDES
CASE/DOOR INSULATION GAS
mm)(
mm)(
mm)(
WARNING: Cancer and Reproductive Harm - www.P65Warnings.ca.gov
Appliance Park, Louisville, KY 40225
GEAppliances.com 800-GE CARES
AVERTISSEMENT: Cancer et Troubles de l’appareil reproducteur
ADVERTENCIA: Cancer y Dano Reproductivo
HOUSEHOLD
REFRIGERATOR
182A
183848
6 49-1000478 Rev. 6
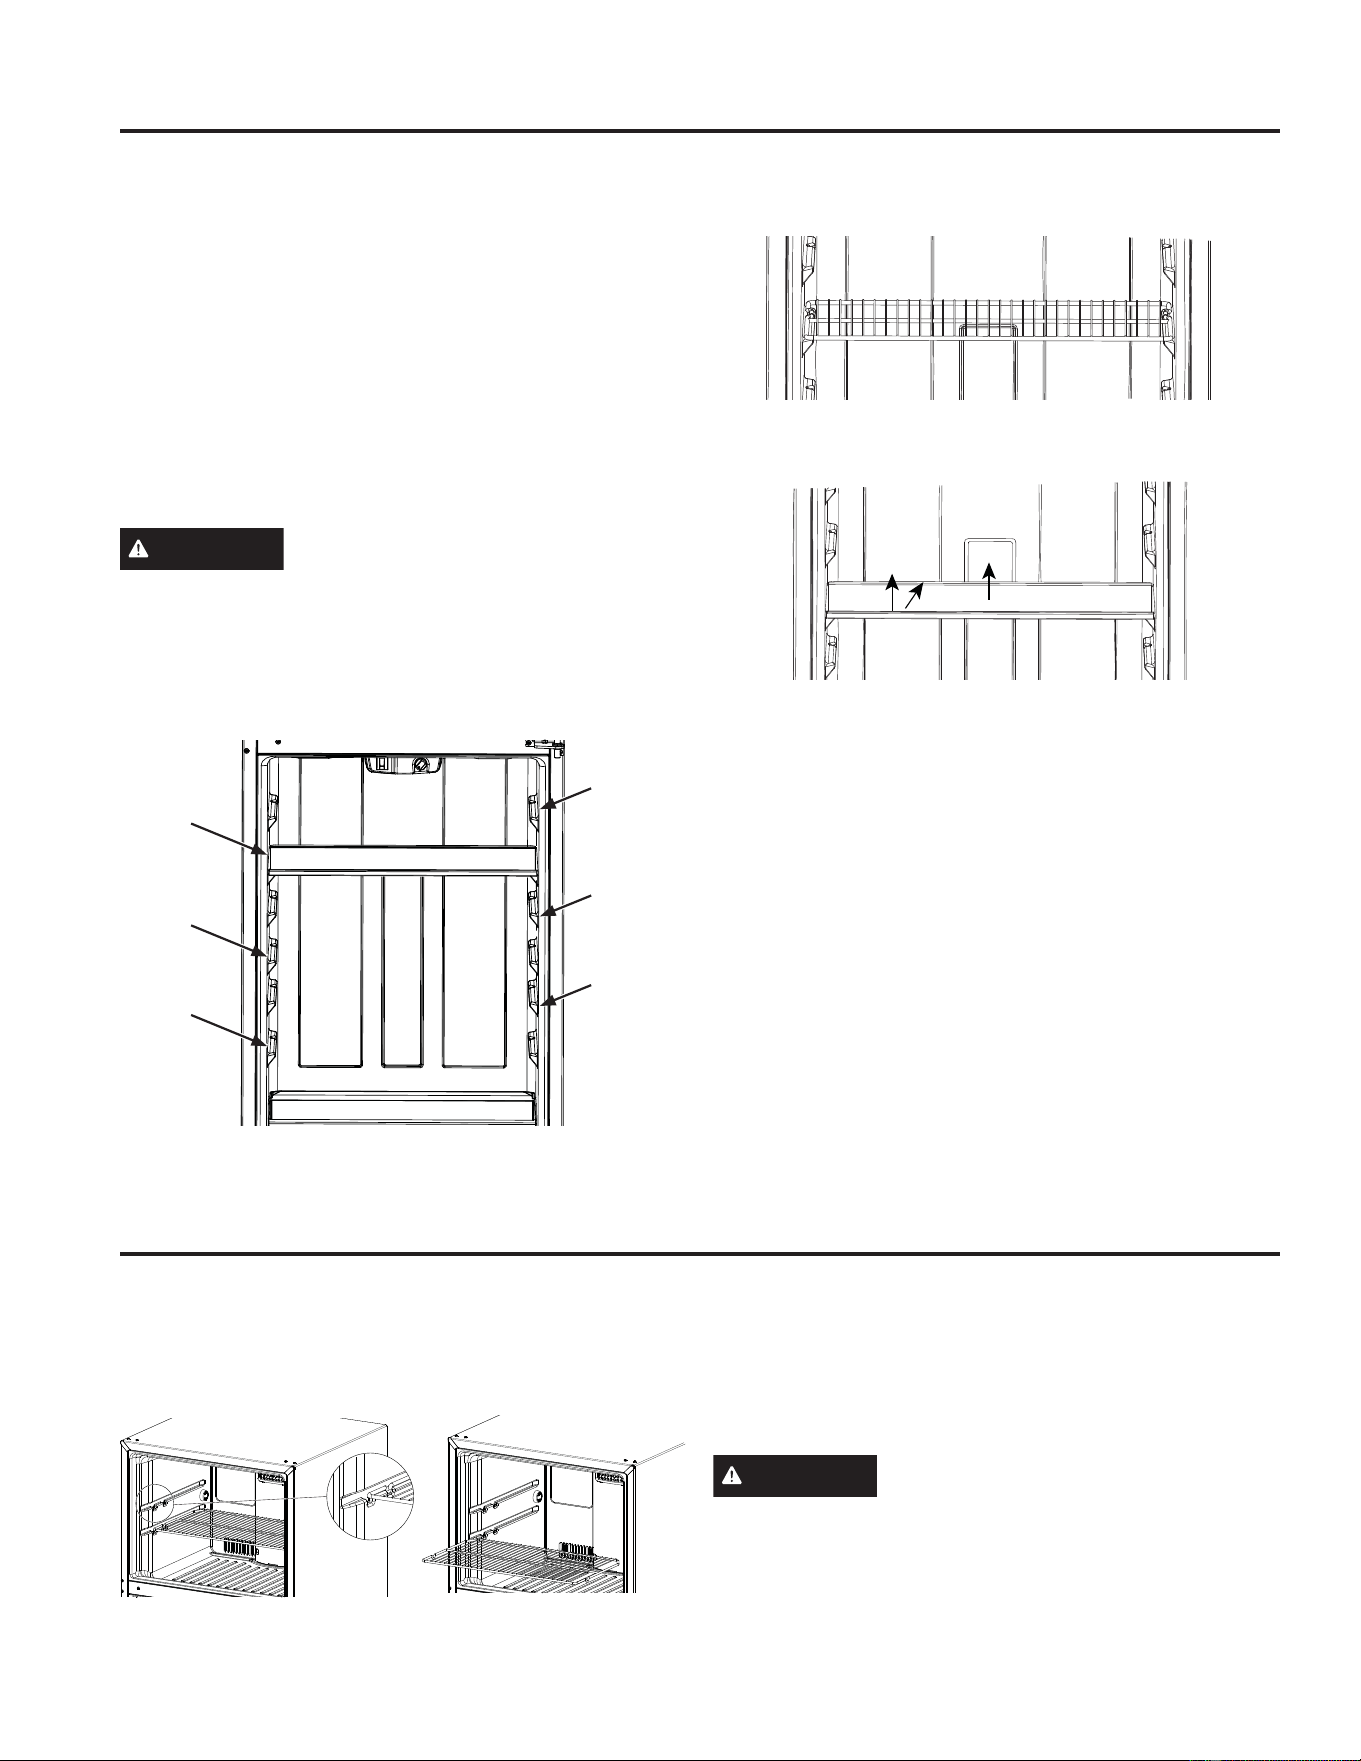
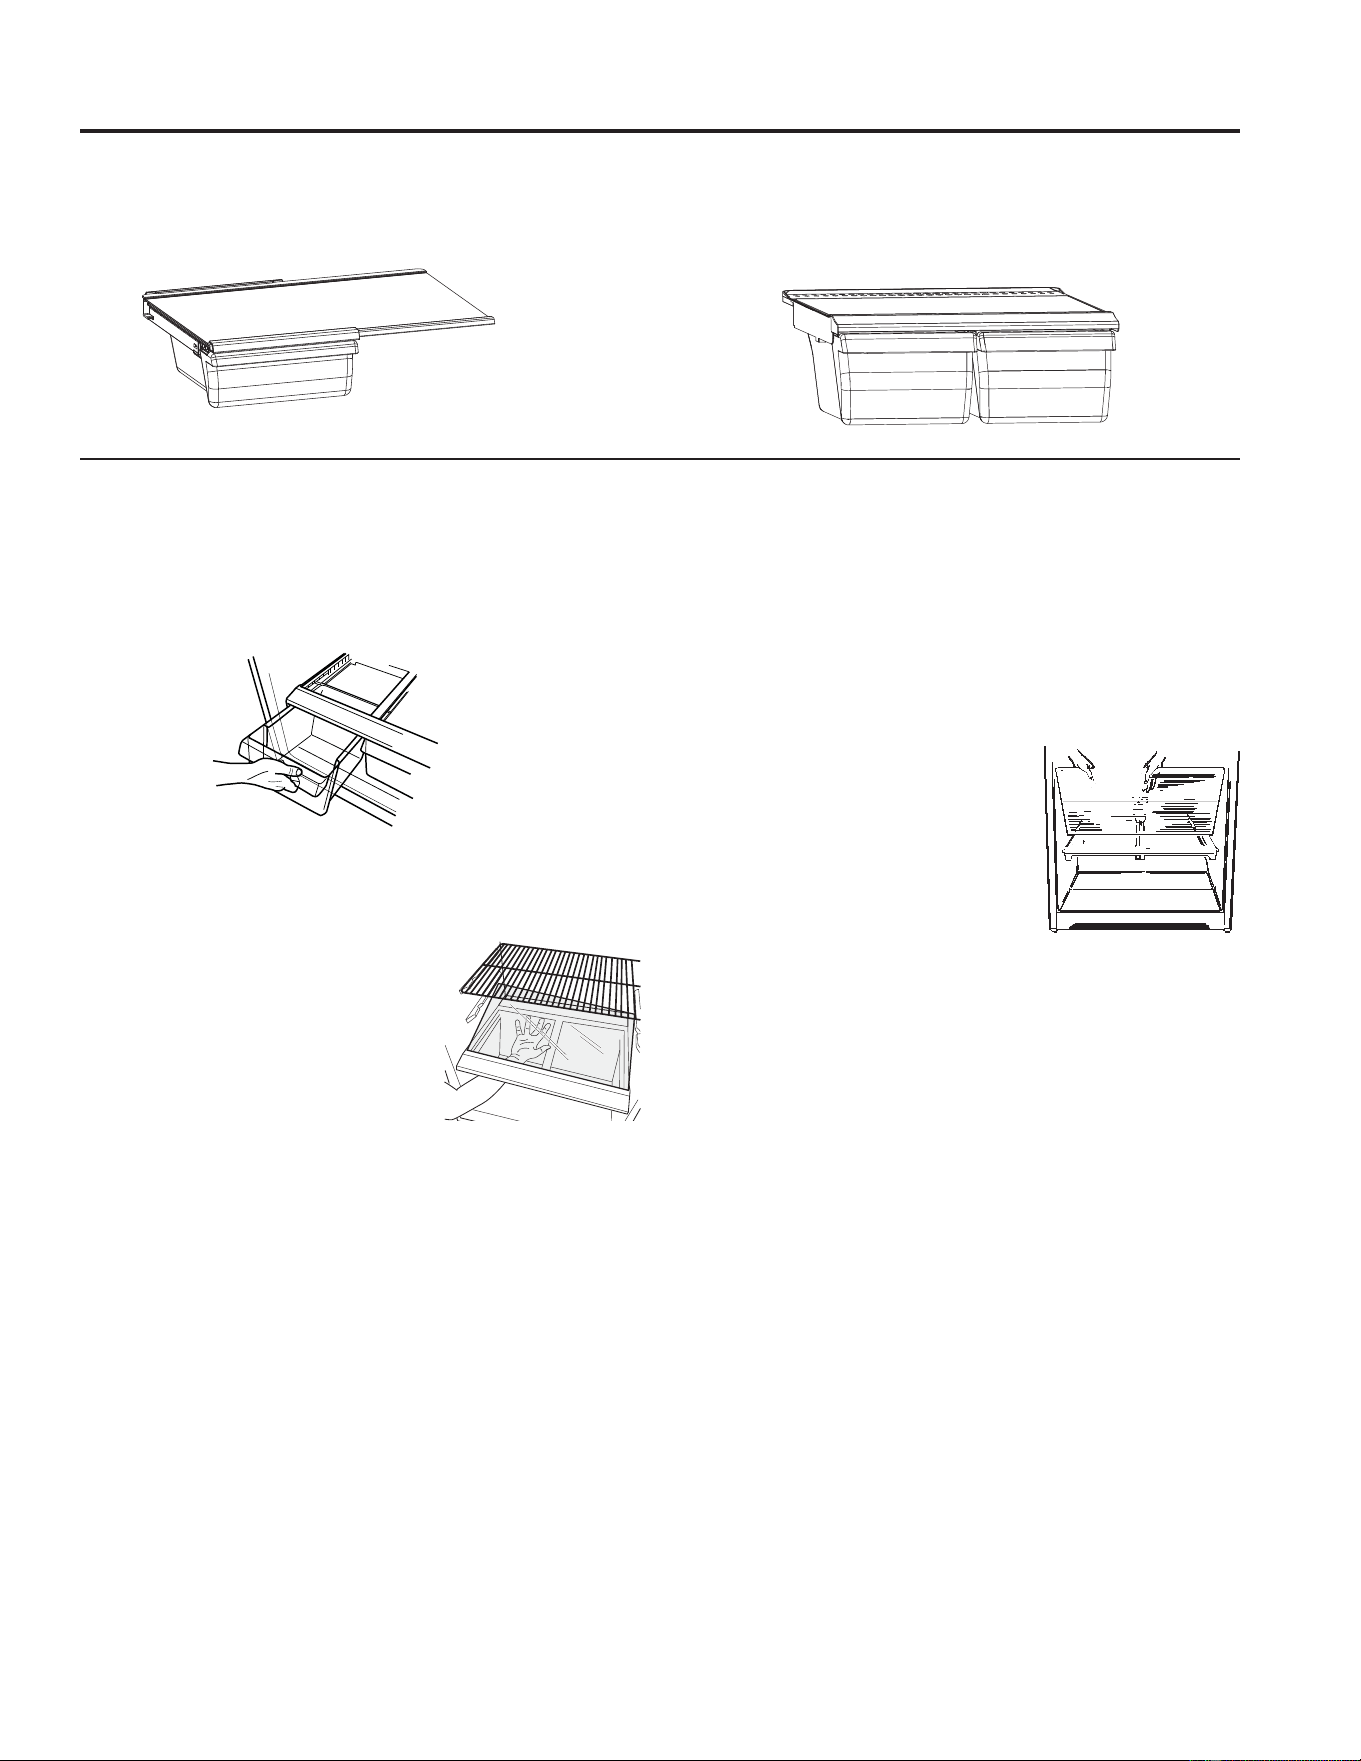
USING THE REFRIGERATOR: Shelves
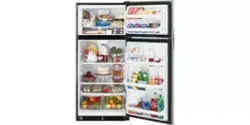
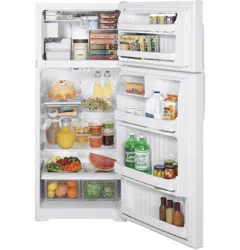
Fresh Food Compartment Shelves
Freezer Compartment Shelves
When placed correctly on the shelf supports, the
steel wire stationary shelves will stop before coming
FRPSOHWHO\RXWRIWKHIUHH]HUDQGZLOOQRWWLOWZKHQ\RX
place food on it or remove food from it.
Some models have glass shelves.
To ensure shelf functions as intended, slide shelf to the
furthest back retention point:
• Glass Shelf - front slot 1
• Steel Wire Shelf - rear slot 2
CAUTION
'RQRWFOHDQJODVVVKHOYHVRUFRYHUV
with warm water when they are cold. Glass shelves and
covers may break if exposed to sudden temperature
changes or impact such as bumping or dropping.
Tempered glass is designed to shatter into many small
pieces if it breaks.
Shelf supports at various levels allow you to custom-space your shelves. Not all features are on all models.
Full-Width Shelves
Some models have a stationary tempered glass shelf or
two steel wire stationary shelves. These shelves can be
moved to another place in the fresh food compartment.
When placed correctly on the shelf supports, the shelf
will stop before coming completely out of the refrigerator
and will not tilt when you place food on it or remove food
from it.
Pull glass shelves forward so the glass rests evenly on
side rails. For units with glass shelves, rail positions 2
and 4/5 are recommended.
CAUTION
'RQRWFOHDQJODVVVKHOYHVRUFRYHUV
with warm water when they are cold. Glass shelves and
covers may break if exposed to sudden temperature
changes or impact such as bumping or dropping.
Tempered glass is designed to shatter into many small
pieces if it breaks.
Wire shelf - lift back end and pull forward to remove
Glass shelf - lift the front edge (1), push shelf back (2),
lift shelf up and pull forward (3) to remove.
Rail Position 2
Rail Position 1
Rail Position 4
Rail Position 3
Rail Position 6
Rail Position 5
1
2
3
1
2
49-1000478 Rev. 6 7
Drawer and Cover
Drawer Removal
'UDZHUVFDQEHUHPRYHGHDVLO\E\JUDVSLQJWKHVLGHV
and lifting up slightly while pulling drawers past the stop
location.
Cover Removal
1. Remove the drawers.
2. Reach in, push the back of glass
cover up, and at the same time,
pull it backward as far as it will
come.
Tilt it and take it out. Avoid
cleaning the cold glass cover with
hot water because the extreme
temperature difference may
cause it to break.
3. Remove the drawer frame. (Always remove the glass
cover before you take out the drawer frame.)
Lift the frame off the supports at each side and back,
pull it forward, tilt it and take it out.
To replace:
1. Lower the frame until it rests on the supports at each
side and back.
2. Replace the glass cover, pushing
its front edge firmly into the
front frame channel and gently
lowering the back into place.
3. Replace the drawers.
Storage Drawers
Not all features are on all models.
Snack Drawer
The snack drawer can be moved to the most useful
location for your family’s needs.
Fruit and Vegetable Drawers
Excess water that may accumulate in the bottom of the
drawers should be emptied and the drawers wiped dry.
USING THE REFRIGERATOR: 6WRUDJH'UDZHUV
8 49-1000478 Rev. 6
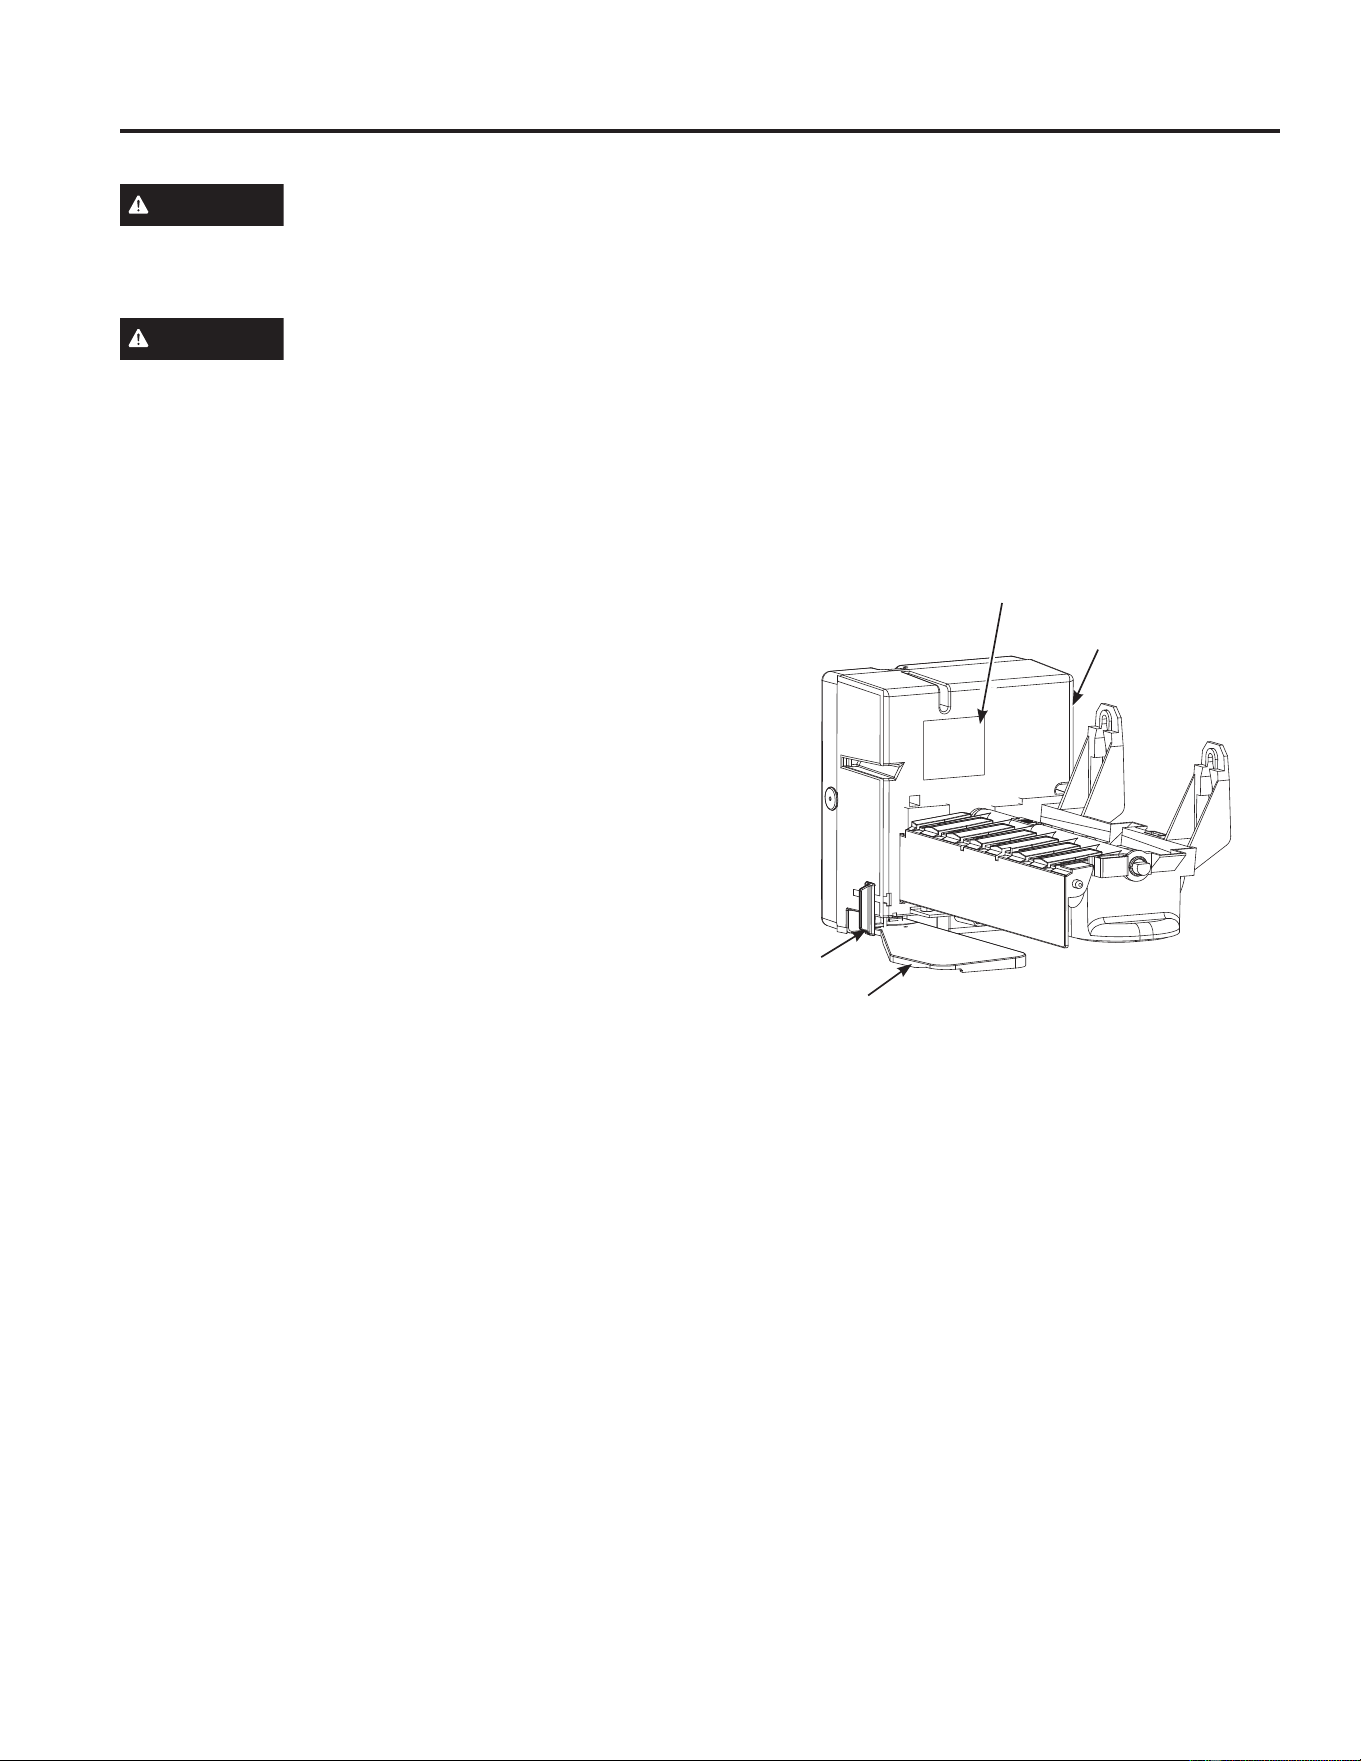
Automatic Icemaker (on some models)
WARNING
Connect to potable water supply only.
A cold water supply is required for automatic icemaker
operation. The water pressure must be between 40 and
120 psi (275-827 kilopascals).
CAUTION
Avoid contact with the moving parts
of the ejector mechanism, or with the heating element
(located on the bottom of the ice maker) that releases
WKHFXEHV'RQRWSODFHILQJHUVRUKDQGVRQWKH
automatic ice making mechanism while the refrigerator is
plugged in.
A newly-installed refrigerator may take 12–24 hours to
begin making ice.
The ice maker will produce approximately 70-100
FXEHVLQDKRXUSHULRGGHSHQGLQJRQWKHIUHH]HU
compartment temperature, room temperature, number of
door openings and other use conditions.
,IWKHUHIULJHUDWRULVRSHUDWHGEHIRUHWKHZDWHUFRQQHFWLRQ
is made to the ice maker, set the switch OFF.
When the refrigerator has been connected to the water
supply, set the switch ON position.
The ice maker will fill with water when it cools to 15°F
(-9°C). A newly-installed refrigerator may take 12 to 24
hours to begin making ice cubes.
Once the ice maker starts to make ice, it may take up
to 48 hours to fill the bin, depending on the temperature
settings and number of door openings.
<RXZLOOKHDUDEX]]LQJVRXQGHDFKWLPHWKHLFHPDNHU
fills with water.
NOTICE: Throw away the first few batches of ice to
allow the water line to clear.
Be sure nothing interferes with the sweep of the feeler
arm.
When the bin fills to the level of the feeler arm, the ice
maker will stop producing ice.
,WLVQRUPDOIRUVHYHUDOFXEHVWREHMRLQHGWRJHWKHU
,ILFHLVQRWXVHGIUHTXHQWO\ROGLFHFXEHVZLOOEHFRPH
cloudy, taste stale, shrink or fuse together.
,FHPDNHUDFFHVVRU\NLW
,I\RXUUHIULJHUDWRUGLGQRWDOUHDG\FRPHHTXLSSHGZLWK
an automatic ice maker, an ice maker accessory kit is
available at extra cost.
This refrigerator will accept accessory icemaker kit
,0'RU,0'8VHLQVWUXFWLRQV;VXSSOLHGLQWKHNLWIRU
assembly.
IMPORTANT: This refrigerator requires a red label
icemaker. See above for the location of the label on the
LFHPDNHU,IWKHLFHPDNHUWKDWFDPHZLWK\RXUNLWGRHV
QRWKDYHDUHGODEHOLWZLOOQRWIXQFWLRQ,QWKLVFDVH
please call 800.GE.CARES (in Canada 800.561.3344)
for the correct icemaker.
,FHPDNHU
,FHPDNHU/DEHO
Feeler Arm
Power Switch
Not all features are on all models.
USING THE REFRIGERATOR: $XWRPDWLF,FHPDNHU
49-1000478 Rev. 6 9
Cleaning the Inside
To help prevent odors, leave an open box of baking soda in the
IUHVKIRRGDQGIUHH]HUFRPSDUWPHQWV
8QSOXJWKHUHIULJHUDWRUEHIRUHFOHDQLQJ,IWKLVLVQRWSUDFWLFDO
wring excess moisture out of sponge or cloth when cleaning
around switches, lights or controls.
8VHZDUPZDWHUDQGEDNLQJVRGDVROXWLRQ²DERXWDWDEOHVSRRQ
(15 ml) of baking soda to a quart (1 liter) of water. This both
FOHDQVDQGQHXWUDOL]HVRGRUV5LQVHDQGZLSHGU\
After cleaning the door gaskets, apply a thin layer of petroleum
jelly to the door gaskets at the hinge side. This helps keep the
gaskets from sticking and bending out of shape.
CAUTION
'RQRWFOHDQJODVVVKHOYHVRUFRYHUVZLWK
warm water when they are cold. Glass shelves and covers may
break if exposed to sudden temperature changes or impact
such as bumping or dropping. Tempered glass is designed to
VKDWWHULQWRPDQ\VPDOOSLHFHVLILWEUHDNV'RQRWZDVKDQ\
plastic refrigerator parts in the dishwasher.
Moving the Refrigerator
Be careful when moving the refrigerator away from the wall.
All types of floor coverings can be damaged, particularly
cushioned coverings and those with embossed surfaces.
Turn the leveling legs at each front corner of the refrigerator
counterclockwise until the rollers support the refrigerator. Pull
the refrigerator straight out and return it to position by pushing
it straight in. Moving the refrigerator in a side direction may
result in damage to the floor covering or refrigerator.
When pushing the refrigerator back, make sure you don’t roll
over the power cord or ice maker supply line (on some models).
After rolling the refrigerator back into place, turn the legs
clockwise until the legs again bear the weight of the refrigerator.
Replacing the Lights
/('OLJKWLQJLVORFDWHGDWWKHWRSFHQWHURIWKHIUHVKIRRG
compartment.
$QDXWKRUL]HGWHFKQLFLDQZLOOQHHGWRUHSODFHWKH/('OLJKW
,IWKLVDVVHPEO\QHHGVWREHUHSODFHGFDOO*($SSOLDQFHV
6HUYLFHDWLQWKH8QLWHG6WDWHVRU
1.800.561.3344 in Canada.
Preparing for Vacation
For long vacations or absences, remove food and unplug the
refrigerator. Move the temperature control dial to the OFF
position, and clean the interior with a baking soda solution of
one tablespoon (15 ml) of baking soda to one quart (1 liter) of
water. Leave the doors open.
Move the switch to the OFF position on the power switch
model, and shut off the water supply to the refrigerator.
,IWKHWHPSHUDWXUHFDQGURSEHORZIUHH]LQJKDYHDTXDOLILHG
servicer drain the water supply system (on some models) to
prevent serious property damage due to flooding.
Preparing to Move
Secure all loose items such as grille, shelves and drawers by taping
them securely in place to prevent damage. To prevent the doors
from opening while moving, secure them to the case with tape. Be
sure the refrigerator stays in an upright position during moving.
Care And Cleaning
Cleaning the Outside
NOTE: DO NOT allow stainless steel cleaner to come in contact with any plastic parts such as trim pieces, handle hardware and
OLQHUV,IXQLQWHQWLRQDOFRQWDFWRIFOHDQHUVZLWKSODVWLFSDUWVGRHVRFFXUFOHDQSODVWLFSDUWZLWKDVSRQJHDQGPLOGGHWHUJHQWPL[HG
with warm water.
CARE AND CLEANING
DO USE DO NOT USE
On all models:
Soft, clean cloth or sponge
Abrasive cloths, scrubbing sponges, scouring or steel wool pads
On fingerprint resistant* and painted
models:
Mild detergent mixed with warm water
Abrasive powders, liquids, or sprays
Window sprays, ammonia, or bleach
Citrus or plant oil based cleaners
Acidic or vinegar based cleaners
Oven cleaners
Alkaline cleaners
Stainless steel cleaners
On stainless steel models:
Mild detergent mixed with warm water
$SSURYHGVWDLQOHVVVWHHOFOHDQHUV
Visit the GE Appliances parts store
for approved stainless steel cleaners:
GEAppliancesparts.com or call
877.959.8688
Cleaners with oxalic acid such as Bar
.HHSHUV)ULHQG6RIW&OHDQVHUFDQ
be used to remove surface rust, tarnish
and small blemishes on stainless steel
surfaces only.
Abrasive powders or sprays
Window Sprays or Ammonia
Citrus or plant oil-based cleaners
Acidic or vinegar-based cleaners
Oven cleaners
Cleaners containing acetone (propanone)
$Q\FOHDQHUZLWK:$51,1*DERXWSODVWLFFRQWDFW
DO NOT use Stainless Steel cleaners on the door surfaces.
IMPORTANT: The use of incorrect products may damage the outer finish of Fingerprint Resistant Stainless models.
Please follow these instructions and use only the appropriate items below to clean your appliance surfaces.
FINGERPRINT RESISTANT STAINLESS STEEL*, BLACK STAINLESS, SLATE, DARK
SLATE, PAINTED - Outside surfaces, door handles, and trim
*Easily wipe away smudges and fingerprints.