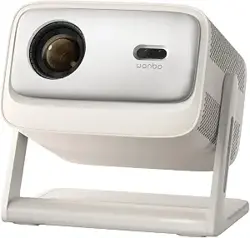
Projektor Wanbo
Vali 1 Pro
Vali 1 Pro
Thank you for purchasing our products.
For your safety and benefit, please read this product manual carefully before using. If you fail to
follow the product instructions or precautions, and cause any personal injury, property or other
losses, the company will not bear any responsibility.
Introduction Manual

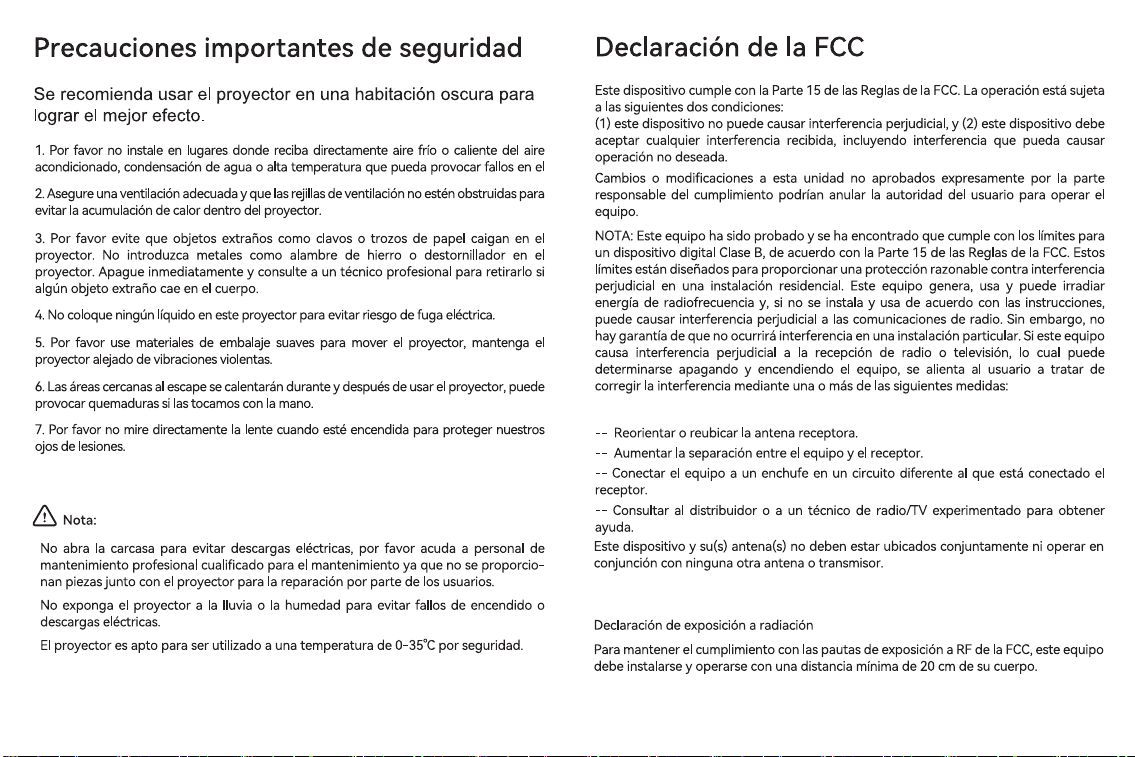
Impoant Safety Precautions
You are recommended to use the projector in a dark room to achieve
the best effect.
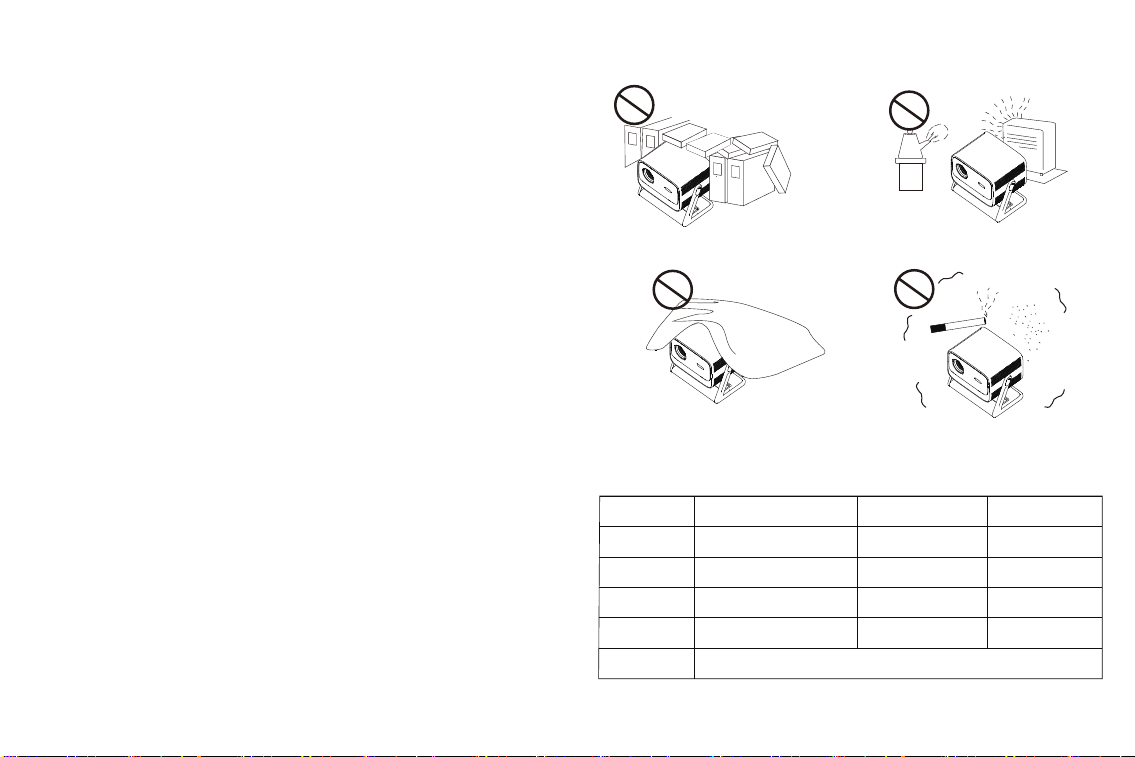
1. Please don’t install in places that directly blown by cold and warm air of air-conditioning,
water condensation or high temperature may lead to projector failure.
2. Ensure adequate ventilation and vent are not blocked to prevent heat accumulation
inside the projector.
3. Please prevent foreign matters such as nails or paper scraps from falling into the
projector. Do not insert any metals such as iron wire or screwdriver into the projector.
Please turn off the power immediately and turn to professional technician to remove
it if any foreign matters fall into the body.
4. Do not place any liquid on this projector to avoid risk of electric leakage.
5. Please use soft packaging materials to move the projector, keep the projector from
violent vibration.
6. Areas near the exhaust will become hot during and after we use the projector, it may
lead to scald if we touch with hand.
7. Please don’t watch lens directly when it’s on so as to protect our eyes from injury.
Note:
· Don’t open the sh
ell to prevent electric shock, Please turn to qualified professional
maintenance personnel for the maintenance as there are no parts in the projector
projector
projector
that
users can repair themselves.
· Don’t expose the to rain or moisture so as to prevent misfire or electric shock.
· The is applicable to be used under a temperature of 0-35℃ for a safe side.
Table of Contents
English………………………………………………………………1
Español……………………………………………………………8
1
2
This device complies with Part 15 of the FCC Rules. Operation is subject to the following two
conditions: (1) this device may not cause harmful interference, and (2) this device must accept
any interference received, including interference that may cause undesired operation.
Changes or modifications to this unit not expressly approved by the party responsible for
compliance could void the user’s authority to operate the equipment.
NOTE: This equipment has been tested and found to comply with the limits for a Class B
digital device, pursuant to Part 15 of the FCC Rules. These limits are designed to provide
reasonable protection against harmful interference in a residential installation. This equipment
generates, uses and can radiate radio frequency energy and, if not installed and used in
accordance with the instructions, may cause harmful interference to
radio communications.
However, there is no guarantee that interference will not occur in a particular installation.
If this equipment does cause harmful interference to radio or television reception, which can
be determined by turning the equipment off and on, the user is encouraged to try to correct the
interference by one or more of the following measures:
-- Reorient or relocate the receiving antenna.
-- Increase the separation betwe
en the equipment and receiver.
-- Connect the equipment into an outlet on a circuit different from that to which the receiver
is connected.
-- Consult the dealer or an experienced radio / TV
technician
for help.
This device and its antenna(s) must not be co-located or operation in conjunction with any
other antenna or transmitter.
Radiation Exposure Statement
To maintain compliance with FCC’s RF Exposure guidelines, This equipment should be
in
stalled and operated with minimum distance of 20cm from your body.
FCC Statement
Basic Parameters
Product Name
Light Source
Operation Mode
Output Po
Net Weight
Accesso
Wanbo Projector
LED
Remote Control
Headphone Audio Output
2.8kg
User Manual / Remote Control / Power Cord
*Use at altitudes below 5000m.
Display Principle
Working Environment
Input Po
Machine Size
LCD
-5~40°C
HDMI/USB
254×188.8×227.6mm
Power Supply
AC 100~240V
50/60Hz 2.5A(MAX)
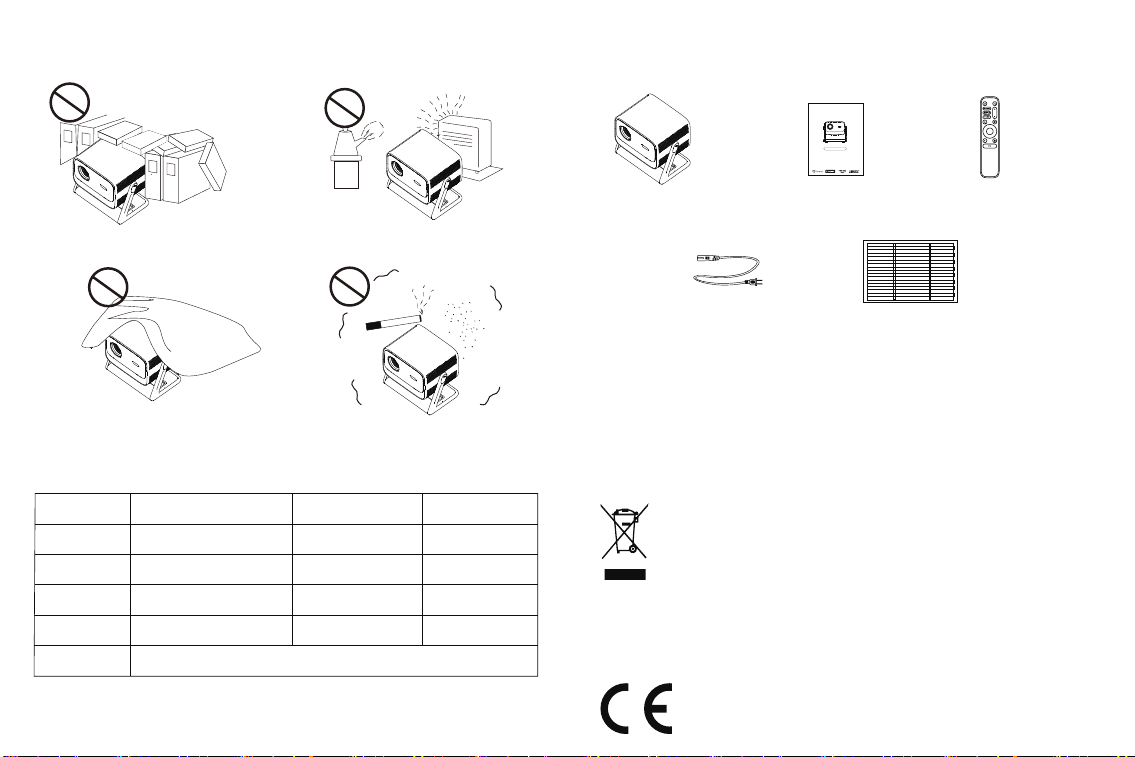
Impoant Safety Precautions
Don’t install in places with poor ventilation Don’t install in places that hot and humid
Don’t block the vent (Inlet or Outlet) Don’t install in dusty and smoky areas
3
List of Items
Projector Instruction Manual Remote Control
Note: Thank you ve much for purchasing Wanbo projector. Please check whether
the physical product and accessories you received are consistent with those of the list.
If not, please contact the customer seice of Wanbo in time.
Power Cord
Dustproof Cotton
Replacement core
Wanbo Projector
Vali 1 Pro Instruction Manual
Before using this projector, please read this Instruction Manual carefully.
Thank you for purchasing our products. For your safety and benefit, please read this Instruction
Manual carefully before using. If you fail to follow the Instuction Manual or precautions, and
cause any personal injury, property or other losses, the company will not bear any responsibility.
WEEE Disposal and Recycling Information:
All products bearing this symbol are waste electrical and electronic equipment
(WEEE as in directive 2012/19/EU) which should not be mixed with unsorted
household waste. Instead, you should protect human health and the environment
by handing over your waste equipment to a designated collection point for the
recycling of waste electrical and electronic equipment, appointed by the
government or local authorities.Correct disposal and recycling will help prevent potential
negative consequences to the environment and humanhealth. Please contact the installer
or local authorities for more information about the loc
ation as well as terms and conditions
of such collection points.
EU Declaration of Conformity
Hereby, Shenzhen Wanbo Technology Co., Ltd declares that the radio
equipment is in compliance with Directive 2014/53/EU.
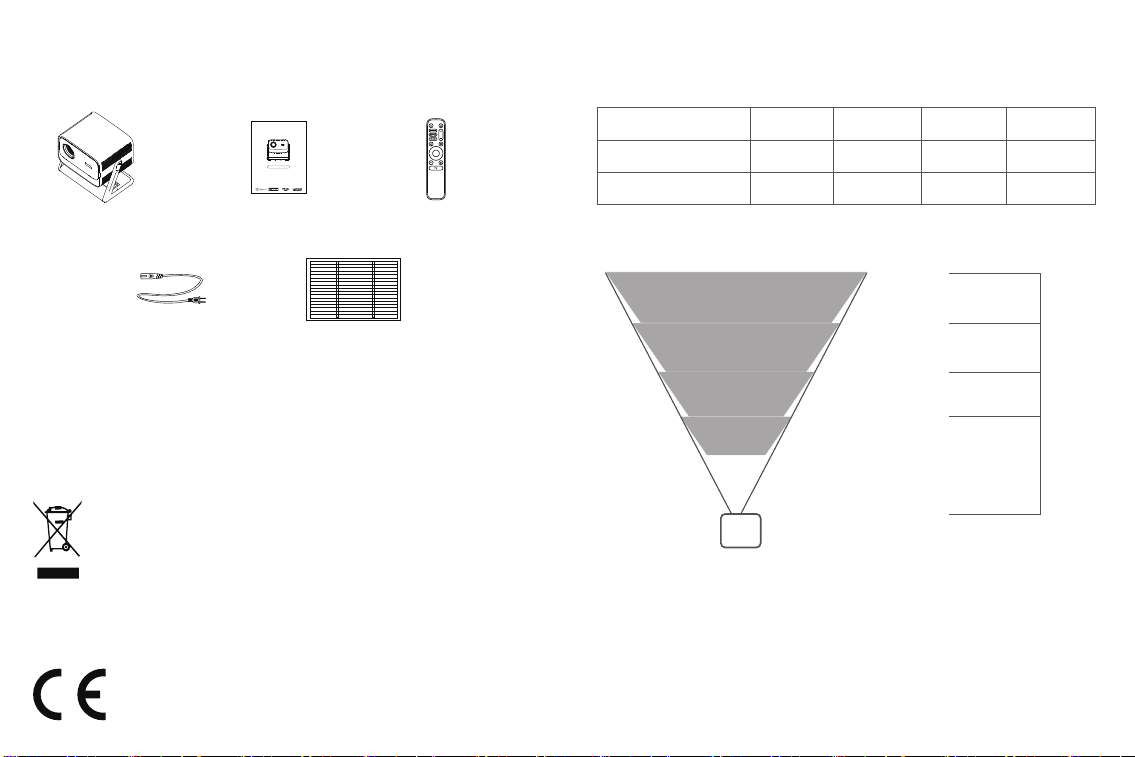
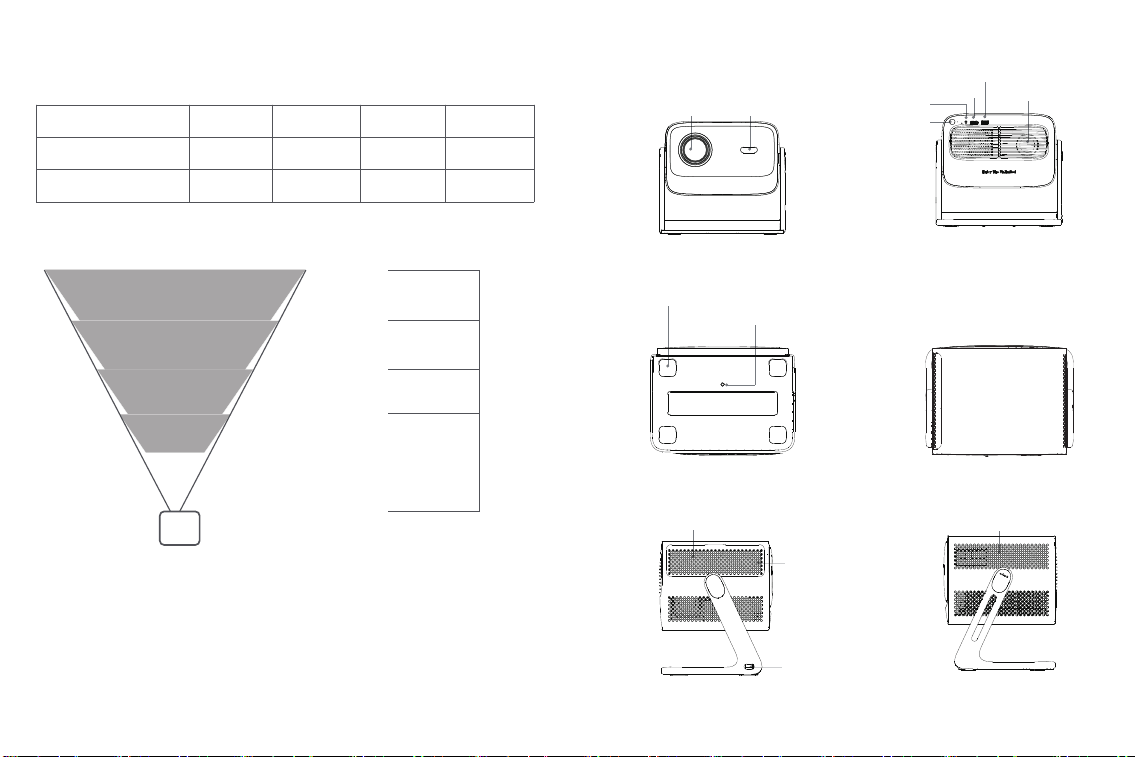
Projection Distance Reference
Projection size ( 40
89*50
1.2
1.2m
2.1m
3.0m
3.9m
Inch)
Screen length * width (cm)
Lens ~ screen (m)
70
155*87
2.1
100
221*125
3.0
130
288*162
3.9
Note: The best projection distance for this projector is about 1.2m~3.9m. If the distance
is too far, the brightness and clarity will decrease, aecting the viewing experience.
130 Inch
Recommended size
100 Inch
40 Inch
70 Inch
Sound outlet
Air outlet
(Do not block)
Air inlet
(with dust-proof cotton inside)
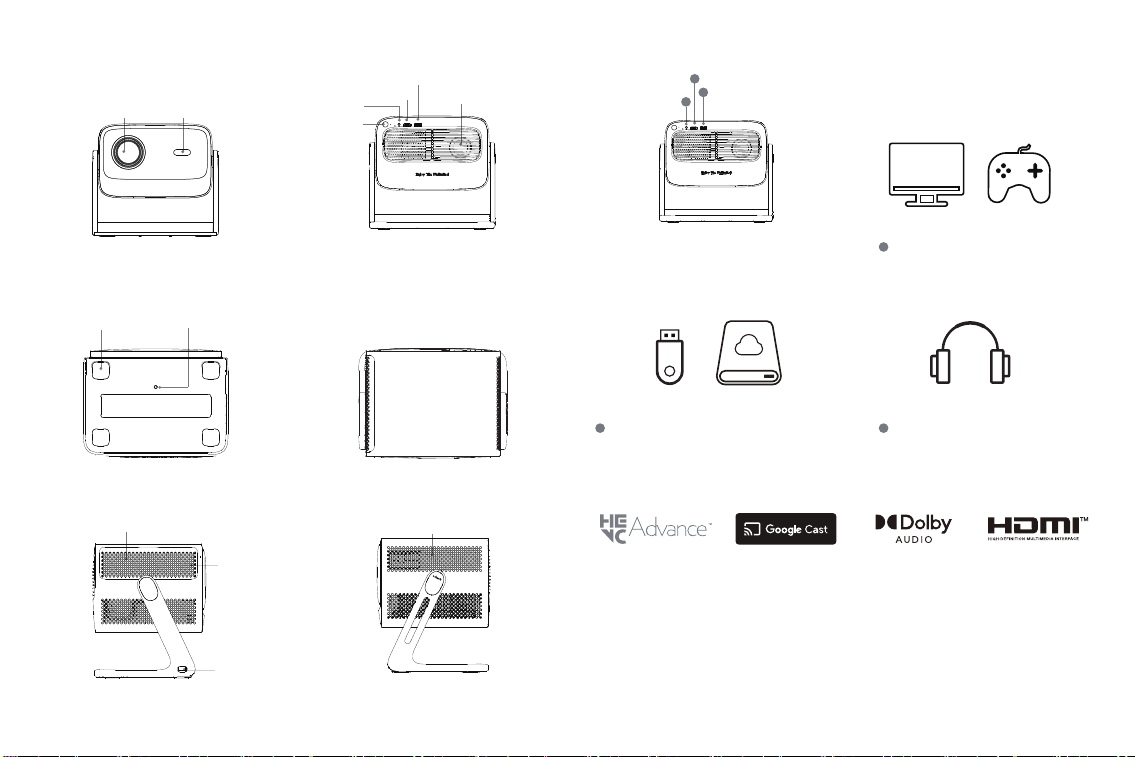
Introduction to Projector Appearance
Lens
Camera
ON/OFF
Power Supply Input
Foot pads
Gimbal/bracket inteace
Sound outlet
AUX JACK
*
Power button indicator light description
Standby: Red light is always on
Power on: Green light is always on
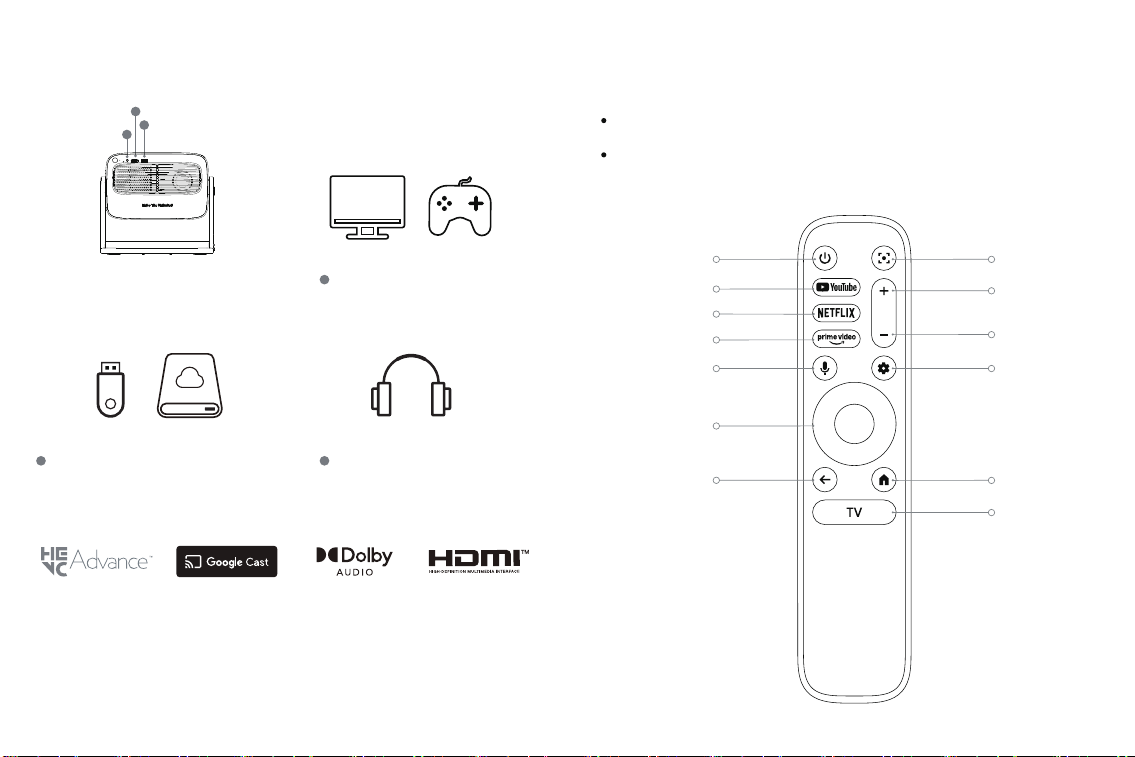
USB
HDMI
External Device Connection
1
3
2
1 HD:Computers, game consoles
2 AUX JACK:Headphone
3
USB-A: USB flash drive, external hard drive
Google TV is the name of this device's software experience and a trademark of Google LLC. Google,
YouTube and Google Cast are trademarks of Google LLC.
Manufactured under license from Dolby Laboratories. Dolby, Dolby Audio and the double-D symbol are
trademarks of Dolby Laboratories Licensing Corporation.
The terms HDMI, HDMI High-Denition Multimedia Inteace, HDMI Trade dress and the HDMI Logos
are trademarks or registered trademarks of HDMI Licensing Administrator, Inc.
Netix is a trademark of Netix, Inc.
All brands contained herein are trademarks of their respective owners.
4
Remote Control
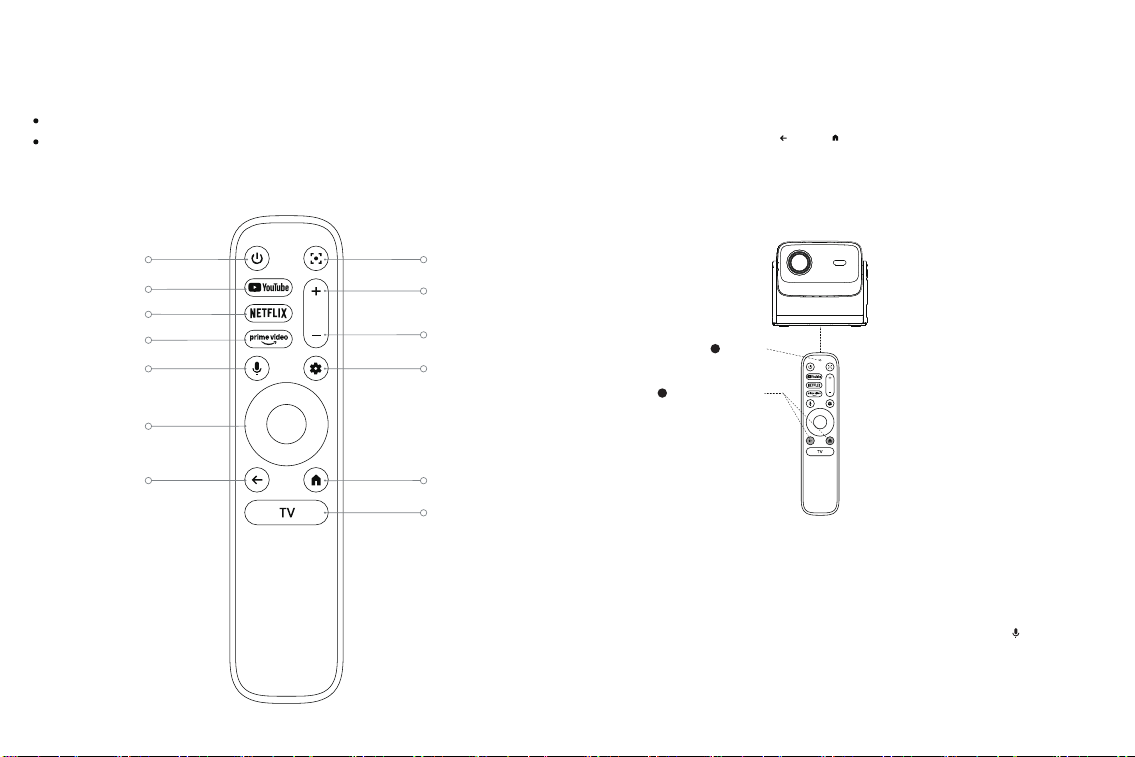
Power-on status:
Note:
Long press the POWER key to turn o, sho press the POWER key to standby.
Power-o status:
Long press the POWER key to turn on.
Focu
VOL +
VOL -
Settings
Home
Free TV/Live TV
Navigation key
Google Assistant
Prime Video
Netix
Youtube
ON/OFF
Back
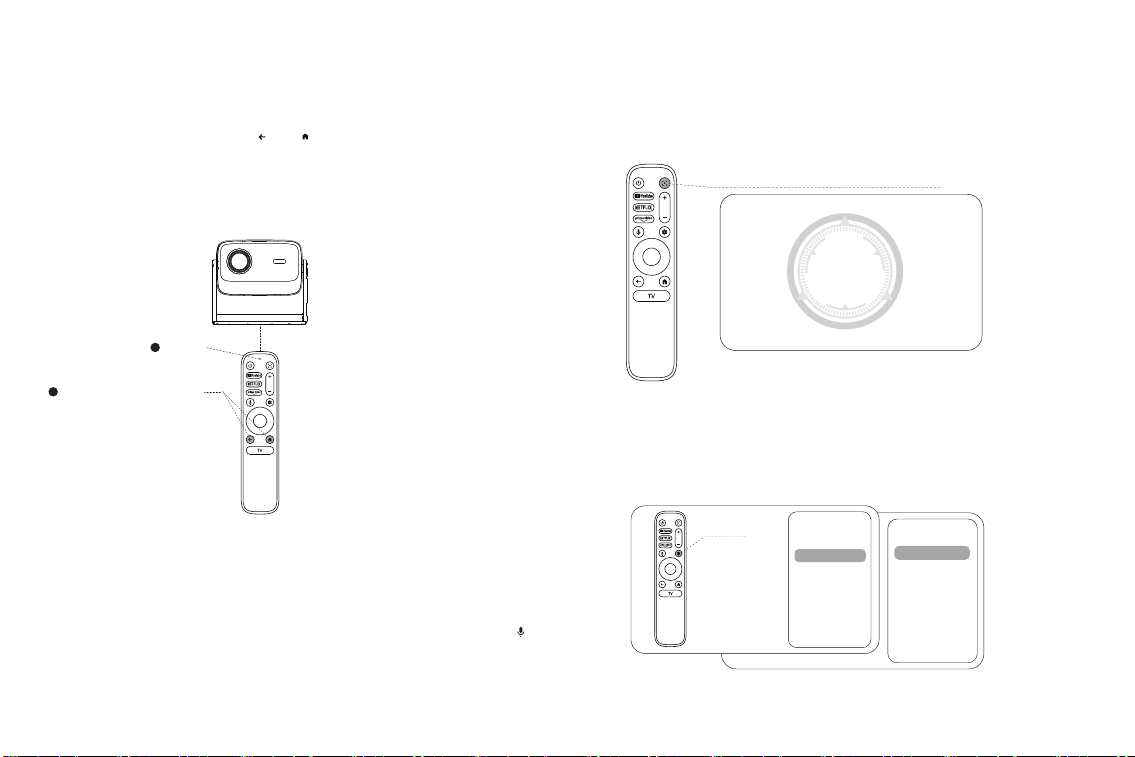
1. Press and hold the buttons and at the same time.
“ ”
Remote Control Pairing
Turn on the remote control and place it within 10cm of the device.
If pairing still fails, you need to disconnect the device from the power source, then resta
it following the above steps again.
Voice control of Remote Control: Press and hold the language button of remote
control, move close to the remote control and give a voice command, then release
the voice button to complete voice control.
Voice Control
2. Release the buttons after the indicator light flashes.
3. The pairing page appears and prompts "Pairing successful". The remote control
is paired successfully.
“ ”
≈10cm
Long press for pairing
Indicator
“ ”
5
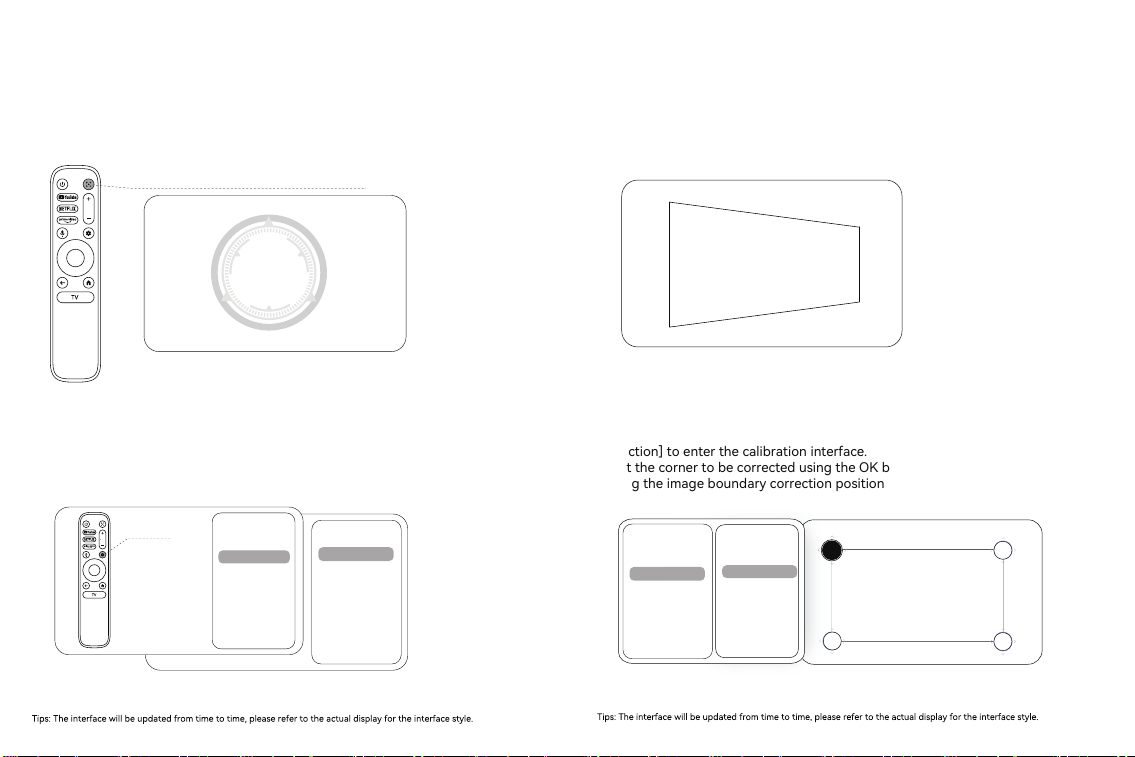
Focus Setting
Method 1: Manual focus
Press the Focus button on the remote control and use the Up and Down focus
buttons to adjust manually.
Method 2: Auto focus
1. Press the projector setting button on the remote control
2. Enter [Setting] and select [Projector]-[Focus] to focus
A sho press activates autofocus; once autofocus is complete,
manual focus options will be displayed. A long press activates manual focus.
Focus
Keystone Correction
Advanced Settings
Energy & Peormance
Bluetooth Speaker Mode
Projector
Channels and inputs
Projector
Display and sound
Network and lnternet
Accounts and proles
Privacy
Settings
Press Setting button on
projector's remote control
Focus
Method 1: Manually trigger automatic correction
Moving the projector can trigger real-time autofocus
and keystone correction to complete image calibration in one step.
Calibration Settings
Method 2: Manual correction
When the image needs fuher ne-tuning,
enter [Setting] and select [Projector]-[Keystone Correction]-[Manual Keystone
Correction] to enter the calibration inteace.
Select the corner to be corrected using the OK button on the remote controller, and
moving the image bounda correction position using the arrow keys.
Auto Keystone Correction
Manual Keystone Correction
Keystone Correction Settings
Image Adaptation
Reset to Default Image
Keystone Correction
Manual Keystone Correction
Focus
Keystone Correction
Advanced Settings
Energy & Peormance
Bluetooth Speaker Mode
Projector
6
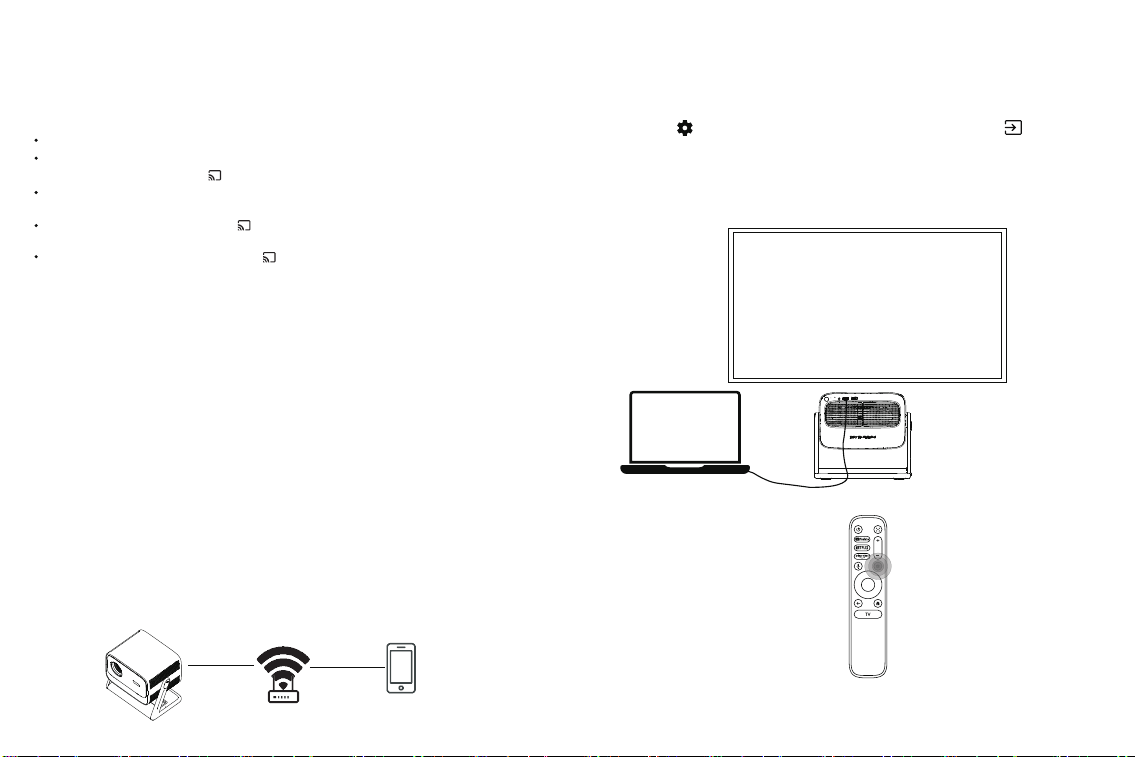
When the color of the Cast icon changes, it means you have successfully
connected.
To stop casting, click the "Cast" icon on the device Phone / Tablet / PC and select
"Disconnect".
Open the APP you want to cast from. In the APP, click the video you want to
cast and click the Cast icon .
Wireless Screen Casting
Method 1: Google Cast™
Method 2: Airplay
To cast from your Phone / Tablet / PC to the projector:
Connect the Phone / Tablet / PC and the projector to the same Wi-Fi.
a. Make sure the IOS device and the projector are connected to the same WiFi.
b. Search the keyword "Airplay" or "Cast" in the app store and download the relevant
app to the projector.
c. Open the downloaded app on the projector and follow the application prompts
d. Open the mobile phone control center, click "Screen Mirroring" to search and
connect the device. Find the projection name corresponding to the
projector in the app, and click Connect to complete the screen mirroring.
On Phone / Tablet / PC, click and select the name of the projector you want
to cast to
2.Press the " " button on the remote control, then select the " " icon
and then select the HDMI channel to complete the connection and display.
Wired Connection for Screen Casting
1. Connect the projector and the input device using an HDMI cable.
*The signal input devices of different systems may vary, and you need to operate
according to the requirements of the signal input device.
7
Cleaning Method
Please make sure the power plug is unplugged before cleaning.
Do not use pesticides or other volatile chemicals on the projector or lens. Do not let
rubber or vinyl products contacts the projector for a long time, which will damage the
coating and make it peeled off.
· Projector cleaning
1. Wipe with a soft, dry cotton cloth. If it’s dirtied seriously, we can wipe with soft cloth
that stuck with diluted neutral detergent, then d with a clean and d cloth. Please
pay more attention if used with chemical fiber cloth.
2. Don’t use thinner, benzene or any other solvents to avoid quality reduction or coating
peeling off etc.
3. A brush can be inserted into the front of the vacuum cleaner to remove dirt inside the
vents. Please don’t use vacuum cleaner
with no connector, or clean with vents directly.
4. Please don’t scrape the projector with nails or any other hard objects so as to avoid
scratches.
· Projector cleaning
1. Clean lens with the same method for camera lens: please use professional blow dryer
or cleaning paper for glasses, ensure lens are not scratched.
· Inlet and Outlet Dust Cleaning
1. Dust in the inlet and outlet will prevent ventilation and increase the internal
temperature, which will cause defect.
2. Disconnect power line after turn off the projector.
3. Clean the exterior with an electric vacuum cleaner, please install brush head adapter
on the vacuum cleaner first. Kindly take note: don’t use vacuum cleaner with no
connector or brush.
4. Replace the dust-proof cotton core regularly.
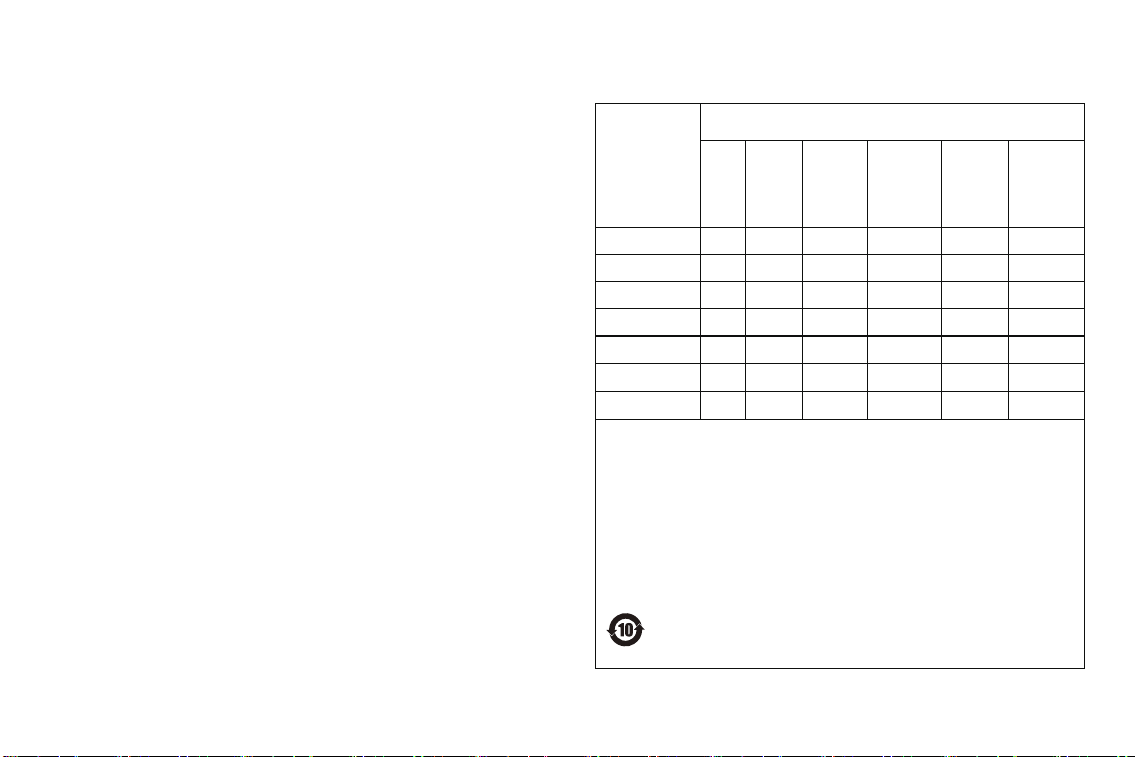
Poisonous and Harmful Substance, Element Name
and Content
Part name
Shell
Optical Machine
Circuit Board
Fan
Other Wires
Remote Control
Power Supply
Hazardous substances
Lead
(Pb)
Mercury
(Hg)
Cadmium
(Cd)
Hexavalent
chromium
(Cr(VI))
Polybro
minated
Biphenyls
(PBB)
Polybro
minated
Diphenyl
Ethers
(PBDE)
O
O
O
O
X
O
O
O
O
O
O
O
O
O
O
O
O
O
O
O
O
O
O
O
O
O
O
O
O
O
O
O
O
O
O
O
O
O
O
O
O
O
O: Content of the hazardous substance in all homogeneous materials of the
component is under the limits of SJ / T11363-2006.
X: Content of the hazardous substance exceeds the limit requirements
specified by SJ
/
T11363-2006 in at least one homogeneous material of the
component. The components labeled "X" " have no substitutive due to
global technology development limits. Circuit board assembly *: including
printed circuit board and its components, electronic components, etc.
The number in the icon represents the projector’s service life under
normal environment (without battery).
8
9
Directiva RAEE de información de
eliminación y reciclaje:
Todos los productos que llevan este símbolo son residuos de aparatos
eléctricos y electrónicos (RAEE según la directiva 2012/19/UE) que no
deben mezclarse con residuos domésticos sin clasificar. En su lugar,
debe proteger la salud humana y el medio ambiente entregando sus
equipos de desecho a un punto de recogida para el reciclaje de residuos
de equipos eléctricos y electrónicos, designado por el gobierno o las autoridades
locales. La eliminación y el reciclado correctos ayudarán a evitar posibles
consecuencias negativas para el medio ambiente y la salud humana. Póngase en
contacto con el instalador o con las autoridades l ocales paraobtener más
información sobre la ubicación y las condiciones de dichos puntos de recogida.
Declaración de conformidad de la UE
Por medio de la presente, Shenzhen Wanbo Technology Co., Ltd
declara que el equipo de radio cumple con la Directiva 2014/53/UE.
Parámetros básicos
Nombre del
producto
Fuente de luz
Modo de
operación
Pueo de salida
Peso neto
Accesorio
Proyector Wanbo
LED
Control remoto
Salida de audio para auriculares
2.8kg
Manual del usuario/Control remoto/Cable de alimentación
*Utilizar a altitudes inferiores a 5000 m.
Principio de visualización
Entorno de trabajo
Pueo de entrada
Tamaño de la máquina
LCD
-5~40°C
HDMI/USB
254×188.8×227.6mm
Lista de aículos
Fuente de alimentación
AC 100~240V
50/60Hz 2.5A(MAX)
Precauciones impoantes de seguridad
No instale en lugares con mala ventilación. No instale en lugares calurosos y húmedos.
No bloquee la ventilación (entrada o salida). No instale en lugares polvorientos y
con humo.
Proyector Manual de instrucciones Control remoto
Nota: Muchas gracias por comprar Wanbo proyector. Por favor, verique si el
producto físico y los accesorios que ha recibido son consistentes con los de la lista.
Si no es así, por favor contacte con el seicio de atención al cliente de
Wanbo a tiempo.
Cable de alimentación
Núcleo de repuesto de algodón
a prueba de polvo
Wanbo Projector
Vali 1 Pro Instruction Manual
Before using this projector, please read this Instruction Manual carefully.
Thank you for purchasing our products. For your safety and benefit, please read this Instruction
Manual carefully before using. If you fail to follow the Instuction Manual or precautions, and
cause any personal injury, property or other losses, the company will not bear any responsibility.
10
Referencia de distancia de proyección
Salida de sonido
Salida de aire
(No bloquear)
Entrada de aire
(con algodón antipolvo en el interior)
Introducción a la apariencia del proyector
Lente
Cámara
Tamaño de proyección
(pulgadas)
40
89*50
1.2
1.2m
2.1m
3.0m
3.9m
Longitud de pantalla * ancho
(cm)
Lente ~ pantalla (m)
70
155*87
2.1
100
221*125
3.0
130
288*162
3.9
ENCENDIDO/APAGADO
Entrada de alimentación
Almohadillas para pies
Inteaz de cardán/patente
Salida de sonido
Entrada AUX
Nota: La mejor distancia de proyección para este proyector es de aproximadamente
1,2 m a 3,9 m. Si la distancia es demasiado grande, el brillo y la claridad disminuirán,
afectando la experiencia visual.
130 Inch
Tamaño recomendado
100 Inch
40 Inch
70 Inch
*
Descripción del indicador de luz del botón
de encendido
En espera: La luz roja está siempre encendida
Encendido: La luz verde está siempre encendida
USB
HDMI
11
Control remotoConexión de dispositivos externos
Estado de encendido:
Nota:
Mantenga presionada la tecla POWER para apagar, presione brevemente la
tecla POWER para entrar en espera
Estado apagado:
Mantenga presionada la tecla POWER para encender.
1
3
2
1 HD:Computadoras, consolas de juegos
2 Entrada AUX: Auriculares
3
Enfoque
VOL +
VOL -
Conguración
Inicio
Televisión gratuita
/TV en vivo
Tecla de navegación
Asistente de Google
Prime Video
Netix
Youtube
ENCENDIDO/
APAGADO
Atrás
USB-A: Memoria USB, disco duro externo
Google TV es el nombre de la experiencia de software de este dispositivo y una marca comercial de
Google LLC. Google, YouTube y Google Cast son marcas comerciales de Google LLC.
Fabricado bajo licencia de Dolby Laboratories. Dolby, Dolby Audio y el símbolo de la doble D son marcas
comerciales de Dolby Laboratories Licensing Corporation.
Los términos HDMl, HDMl High-Denition Multimedia Inteace, HDMl Trade dress y los logotipos HDMl
son marcas comerciales o marcas registradas de HDMl Licensing Administrator, Inc.
Netix es una marca comercial de Netix, inc.
Todas las marcas aquí contenidas son marcas comerciales de sus respectivos propietarios.
12
1. Mantenga pulsados los botones " " y " " al mismo tiempo.
Emparejamiento del mando a distancia
Encienda el mando a distancia y colóquelo a menos de 10 cm del dispositivo.
Si el emparejamiento sigue fallando, desconecte el dispositivo de la fuente de
alimentación y reinícielo siguiendo los pasos anteriores.
Control por voz del mando a distancia: Mantenga pulsado el botón de idioma " "
del mando a distancia, acérquese al mando y dé una orden de voz, luego suelte el
botón de voz para completar el control por voz.
Control por voz
2. Suelte los botones después de que el indicador parpadee.
3. Aparece la página de emparejamiento y se muestra el mensaje "Emparejamiento
exitoso". El mando a distancia está emparejado correctamente.
Ajuste de enfoque
Método 1: Enfoque manual
Presione el botón de enfoque en el mando a distancia y use los botones de
enfoque Arriba y Abajo para ajustar manualmente.
Método 2: Enfoque automático
1. Presione el botón de conguración del proyector en el mando a distancia
Consejo: La inteaz se actualizará de vez en cuando, consulte la pantalla real para conocer el estilo de la inteaz.
2. Ingrese en [Conguración] y seleccione [Corrección de imagen]-[Enfoque
de imagen] para enfocar
Una pulsación coa activa el enfoque automático; una vez completado
el enfoque automático, se mostrarán las opciones de enfoque manual.
Una pulsación larga activa el enfoque manual.
≈10cm
Mantenga pulsado para emparejar
Indicador
Focus
Keystone Correction
Advanced Settings
Energy & Peormance
Bluetooth Speaker Mode
Projector
Channels and inputs
Projector
Pantalla y sonido
Red e Internet
Accounts and proles
Privacy
Conguración
Presione el botón de
conguración en el mando
a distancia del proyector
Focus
13
Consejo: La inteaz se actualizará de vez en cuando, consulte la pantalla real para conocer el estilo de la inteaz.
Cuando el color del icono Cast cambia, signica que la conexión se ha realizado
correctamente.
Para detener la transmisión, haga clic en el icono "Cast " s] en el dispositivo Teléfono
/ Tableta / PC y seleccione "Disconnect"
Abra la APLICACIÓN desde la que desea transmitir. En la aplicación, haga clic en
el video que desea transmitir y haga clic en el icono Cast .
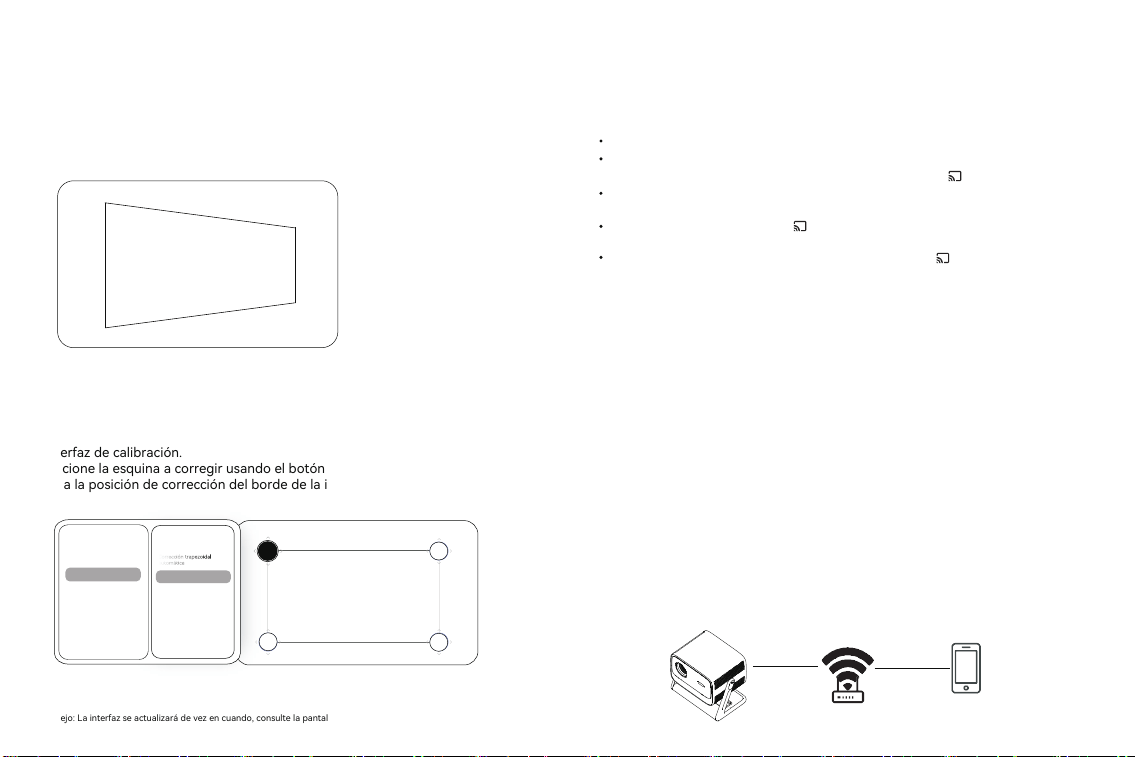
Método 1: Activar manualmente la corrección automática
Mover el proyector puede activar el enfoque automático en tiempo real y la
corrección trapezoidal para completar la calibración de la imagen en un solo paso.
Ajustes de calibración
Método 2: Corrección manual
Cuando la imagen necesita un ajuste adicional, entre en [Setting] y seleccione
[Projector]-[Keystone Correction]-[Manual KeystoneCorrection] para entrar en
la inteaz de calibración.
Seleccione la esquina a corregir usando el botón OK del mando a distancia y
mueva la posición de corrección del borde de la imagen con las teclas de echa.
Proyección inalámbrica
Método 1: Google Castrm
Método 2: Airplay
Corrección trapezoidal
automática
Corrección trapezoidal manual
Ajustes de corrección
trapezoidal
Adaptación de imagen
Restablecer imagen
predeterminada
Corrección trapezoidal
Para transmitir desde su Teléfono / Tableta / PC al proyector:
Conecte el Teléfono / Tableta / PC y el proyector a la misma red Wi-Fi.
a. Asegúrese de que el dispositivo iOS y el proyector estén conectados a la misma
red WiFi.
b. Busque la palabra clave "Airplay" o "Cast" en la tienda de aplicaciones y descargue
la aplicación correspondiente en el proyector.
c. Abra la aplicación descargada en el proyector y siga las instrucciones de la aplicación
d. Abra el centro de control del teléfono móvil, haga clic en "Screen Mirroring" para
buscar y conectar el dispositivo. Busque el nombre de proyección correspondiente
al proyector en la aplicación y haga clic en Connect para completar la duplicación
de pantalla.
Corrección trapezoidal manual
No Teléfono / Tableta / PC, haga clic y seleccione el nombre del proyector al que
desea transmitir
Enfoque
Corrección trapezoidal
Ajustes avanzados
Energía y rendimiento
Modo altavoz Bluetooth
Proyector
14
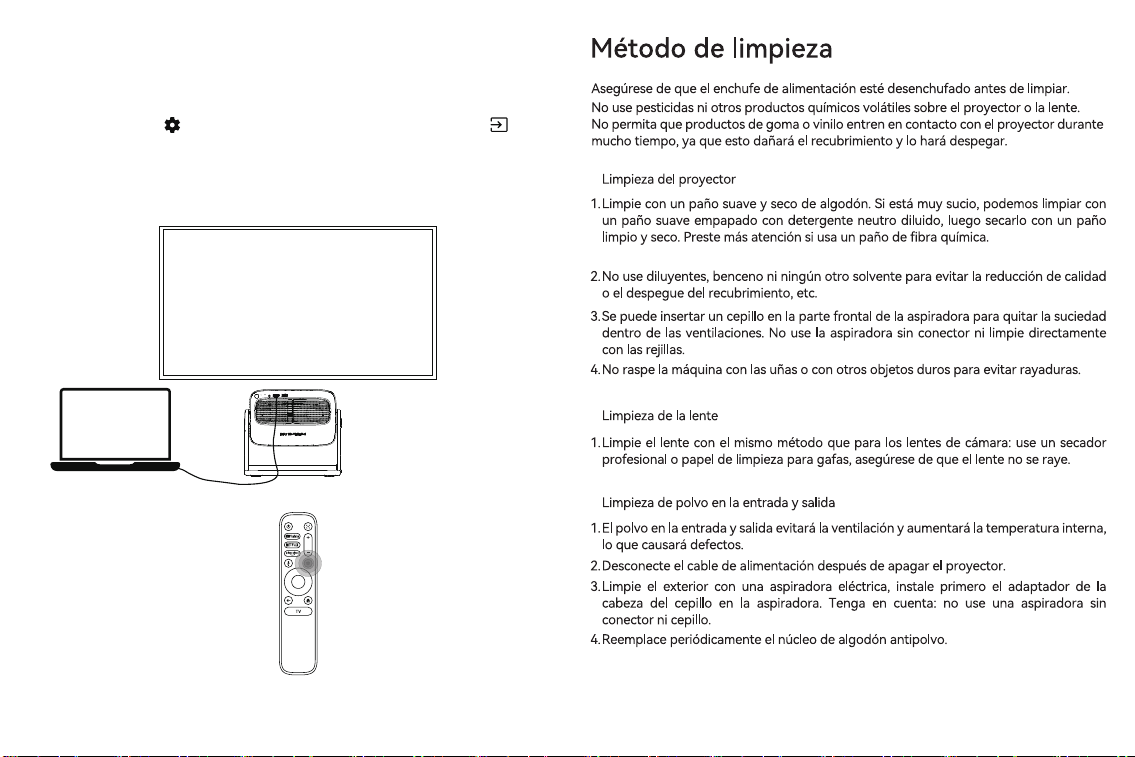
2. Presione el botón " " del control remoto, luego seleccione el icono " " y
después seleccione el canal HDMl para completar la conexión y la
visualización.
Conexión por cable para la
proyección de pantalla
1. Conecta el proyector y el dispositivo de entrada utilizando un cable HDMI.
* Los dispositivos de entrada de señal de diferentes sistemas pueden variar, y
debes operar según los requisitos del dispositivo de entrada de señal.
15
16