12/2024
Read these instructions carefully before using your appliance, and keep it carefully.
If you follow the instructions, your appliance will provide you with many years of good service.
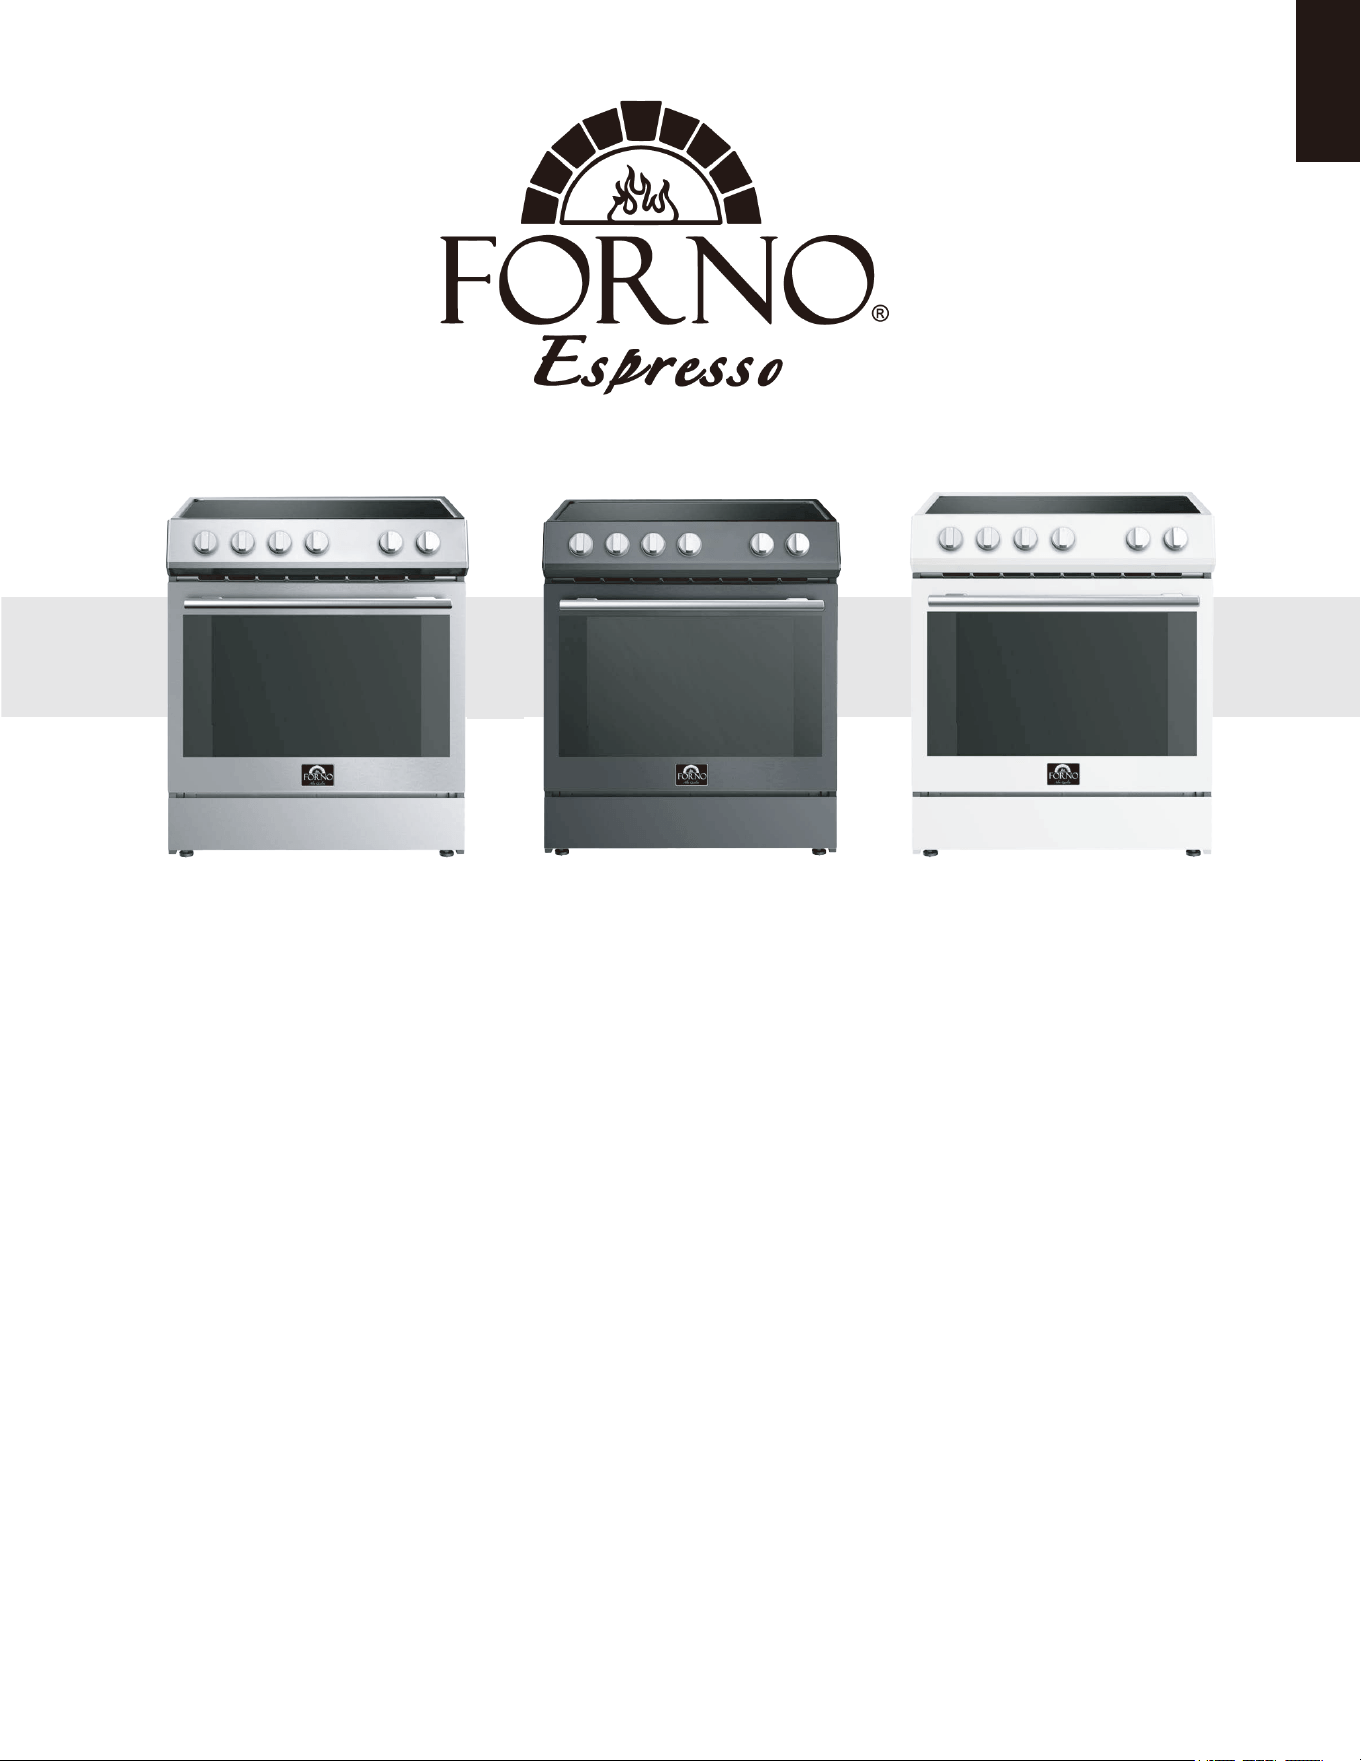
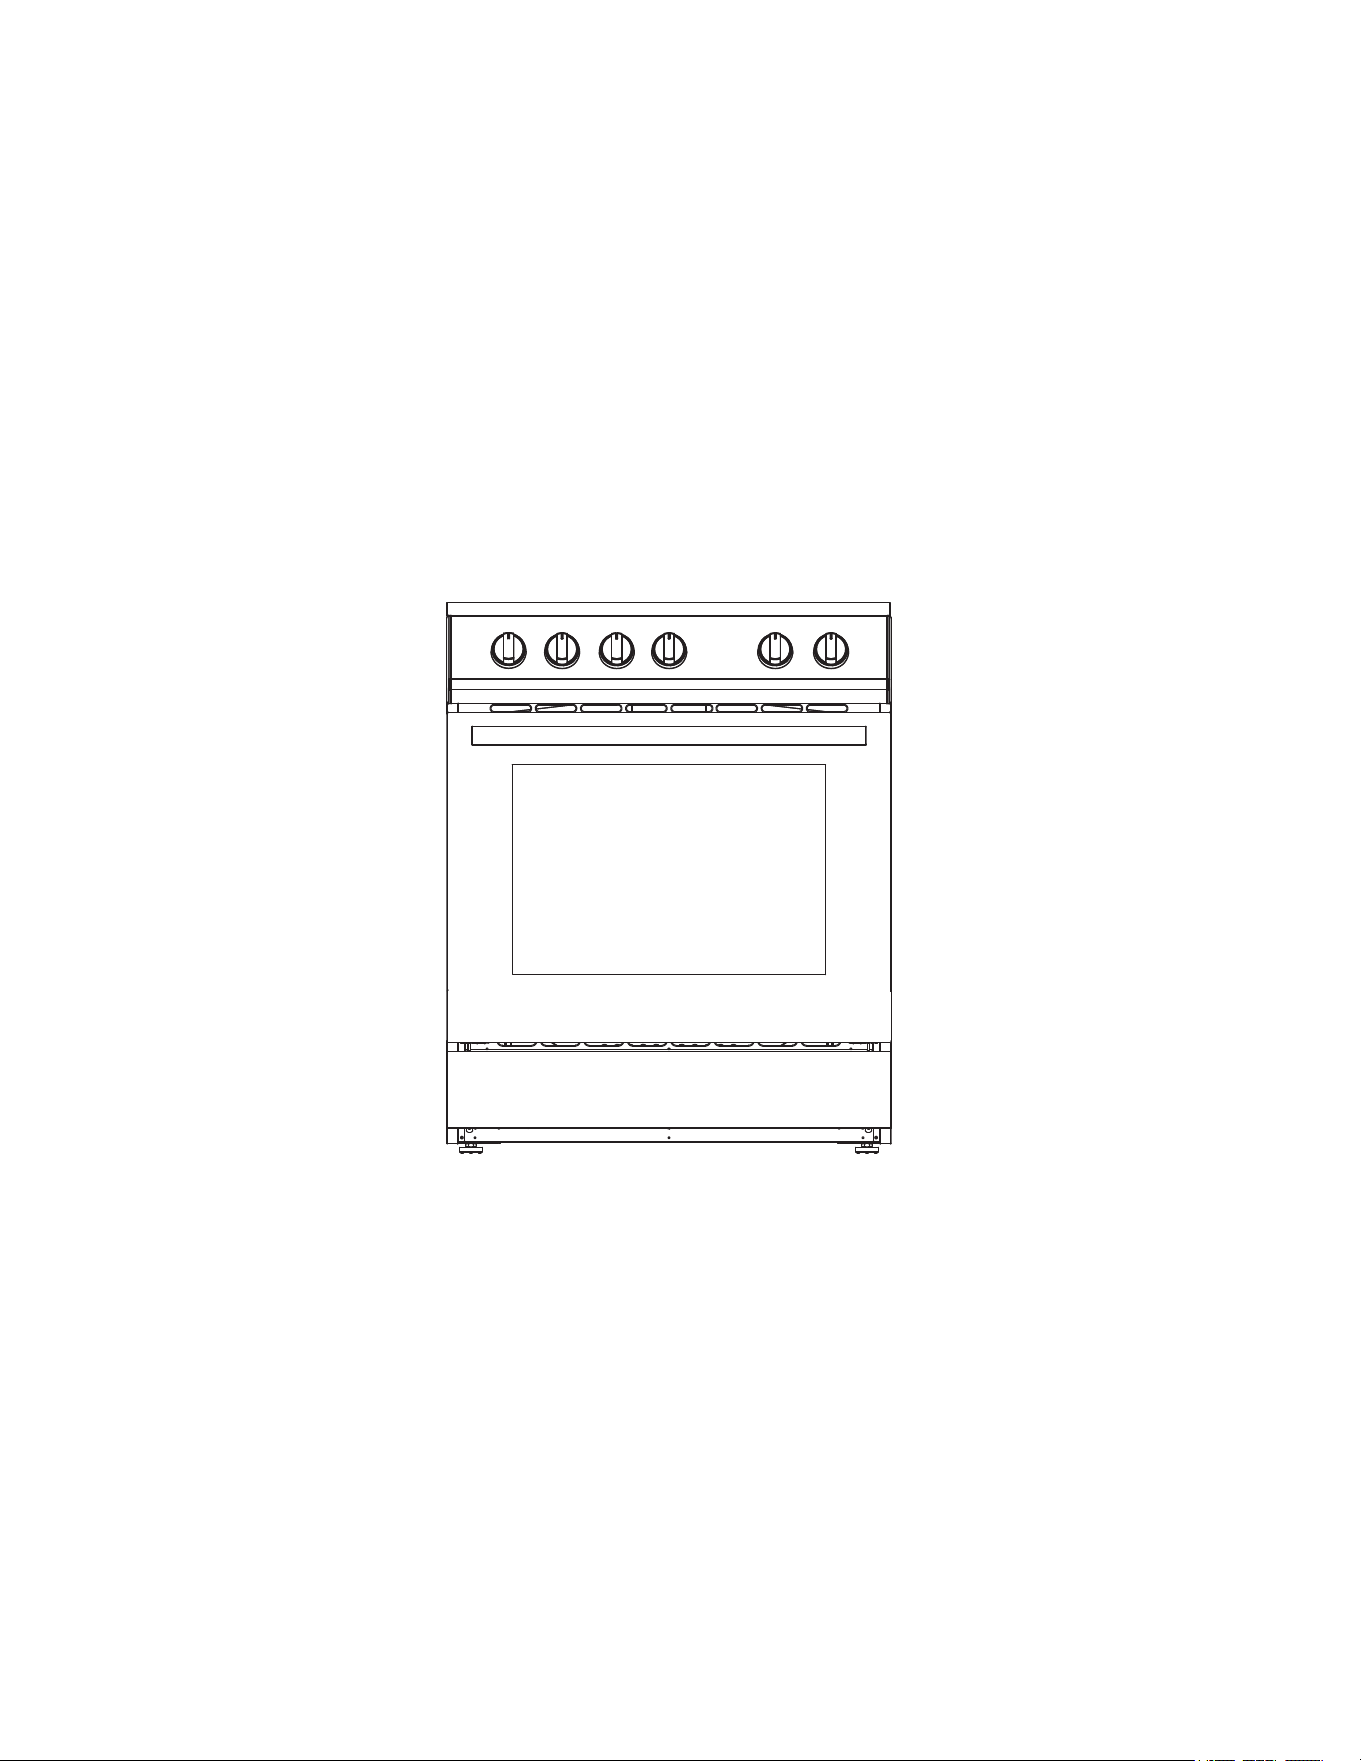
INDUCTION RANGE
MODEL NUMBER SERIES
FFSIN0982-30| FFSIN0982-30BLK | FFSIN0982-30WHT
INSTRUCTION MANUAL
ENGLISH
TABLE OF CONTENTS
Customer Care 4
Warning 5
Important Safety 7
Name Of Parts 8
Control Panel 9
2
Operating Instruction
•
Cooktop Use ....................................................................
•
Oven Use ..........................................................................
• Preheating .......................................................................
Oven Modes:
• Bake .........................................................................
• Broil ..........................................................................
Convection Modes:
• Conv. Bake ...............................................................
• Conv. Broil ...............................................................
• Conv. Roast .............................................................
9
11
11
12
13
14
15
15
Range Care
• Cleaning ...........................................................................
• Oven Door Removal .........................................................
• Oven Light Replacement ..................................................
17
18
19
Troubleshooting 20
Warranty 23
INDUCTION RANGE
MODEL NUMBER SERIES
FFSIN0982-30| FFSIN0982-30BLK | FFSIN0982-30WHT
3
Product Information Servince Information
Model Number:
Use these numbers in any
correspondence or services calls
concerning your product.
If you received a damaged product,
immediately contact Forno.
To save time and money, before
you call for serviced, check the
troubleshooting guide. It listed the
causes of minor operation problems
that you can correct yourself.
Serial Number:
Date of Purchase:
Purchase Address And Phone:
Thank you for purchasing a Frono product. Please read the entire instruction manual before operating your new appliance
practices, features, operation and care recommendations of your appliance.
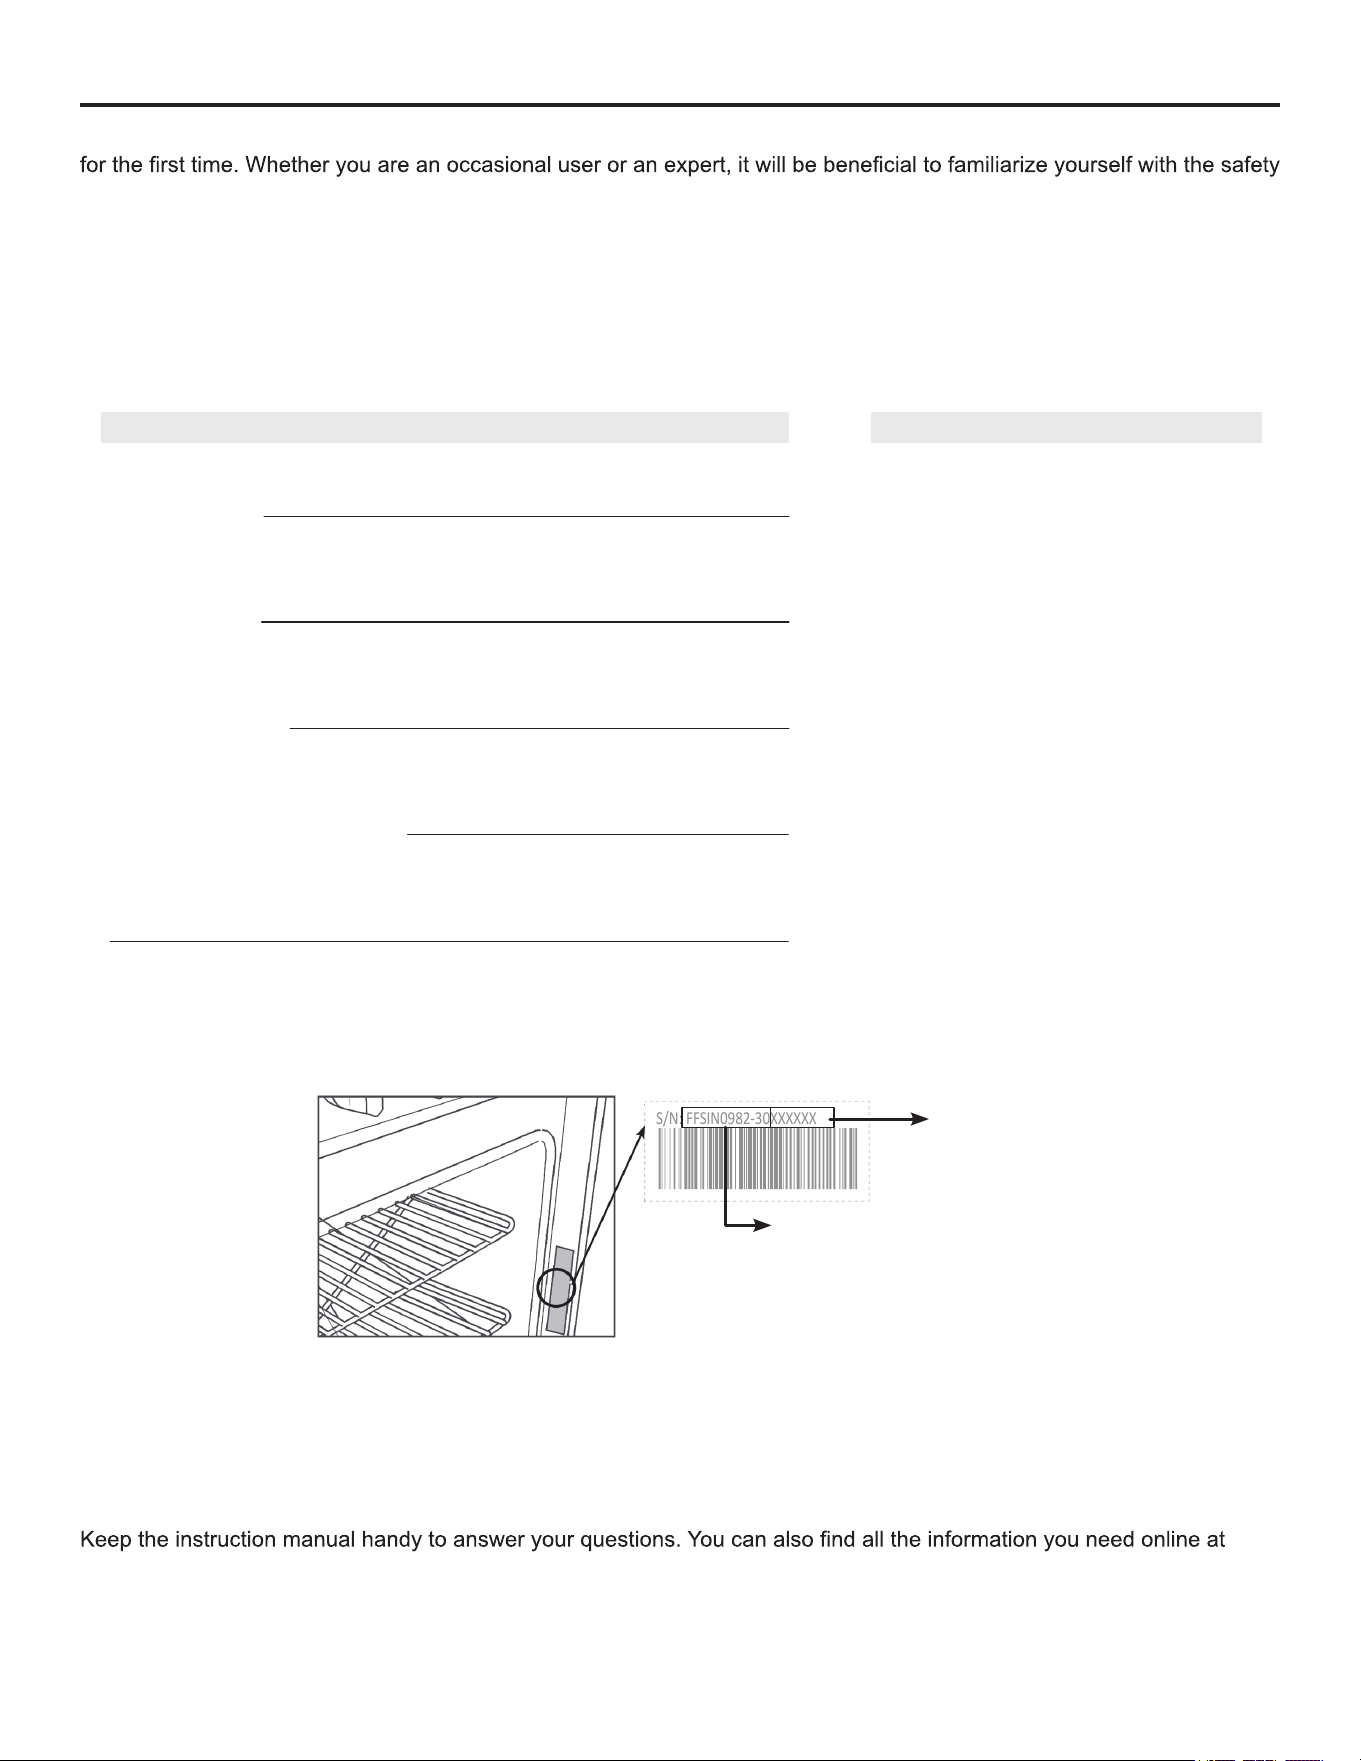
Both the model and serial number are listed inside the product. For warranty purposes, you will also need the date of
purchase .
Record this information below for future reference.
Customer Care
Services in Canada and Untied States
www.forno.ca.
If you don’t understand something or need more assistance, please visit our website or email: [email protected]
If there is a problem, please contact FORNO customer service. Please note that troubleshooting with a customer service
representative will be needed before being able to send a service provider. All warranty work needs to be authorized by
FORNO customer service. All our authorized service providers are carefully selected and rigorously trained by us.
S/N
: FF
SIN0982-30X
XXXXX
Model Number
Serial Number
Model And Serial Number Location
4
WARNING
FOR YOUR SAFETY
Your safety and the safety of others are very important.
We have provided many important safety messages in this manual and on your appliance. Always read and obey all
safety messages.
This is the safety alert symbol. This symbol alerts you to potential hazards that can kill or hurt you
and others. Al l safety messages will follow the safety alert symbol and either the word “DANGER,”
“WARNING” or “CAUTION.” These words mean:
• You can be killed or seriously injured if you don’t immediately follow instructions.
• You can be killed or seriously injured if you don’t follow instructions.
• A potentially hazardous situation which, if not avoided, could result in minor or
moderate injury.
All safety messages will tell you what the potential hazard is, tell you how to reduce the chance of injury, and tell you
what can happen if the instructions are not followed.
DANGER
WARNING
CAUTION
WARNING : This product can expose you to chemicals including [Lead, lead
and lead compound, which is [are] known to the state of California to cause
cancer and birth defects or other reproductive harm. For more information go
to www.P65Warning.ca.gov.
5
WARNING
FOR YOUR SAFETY
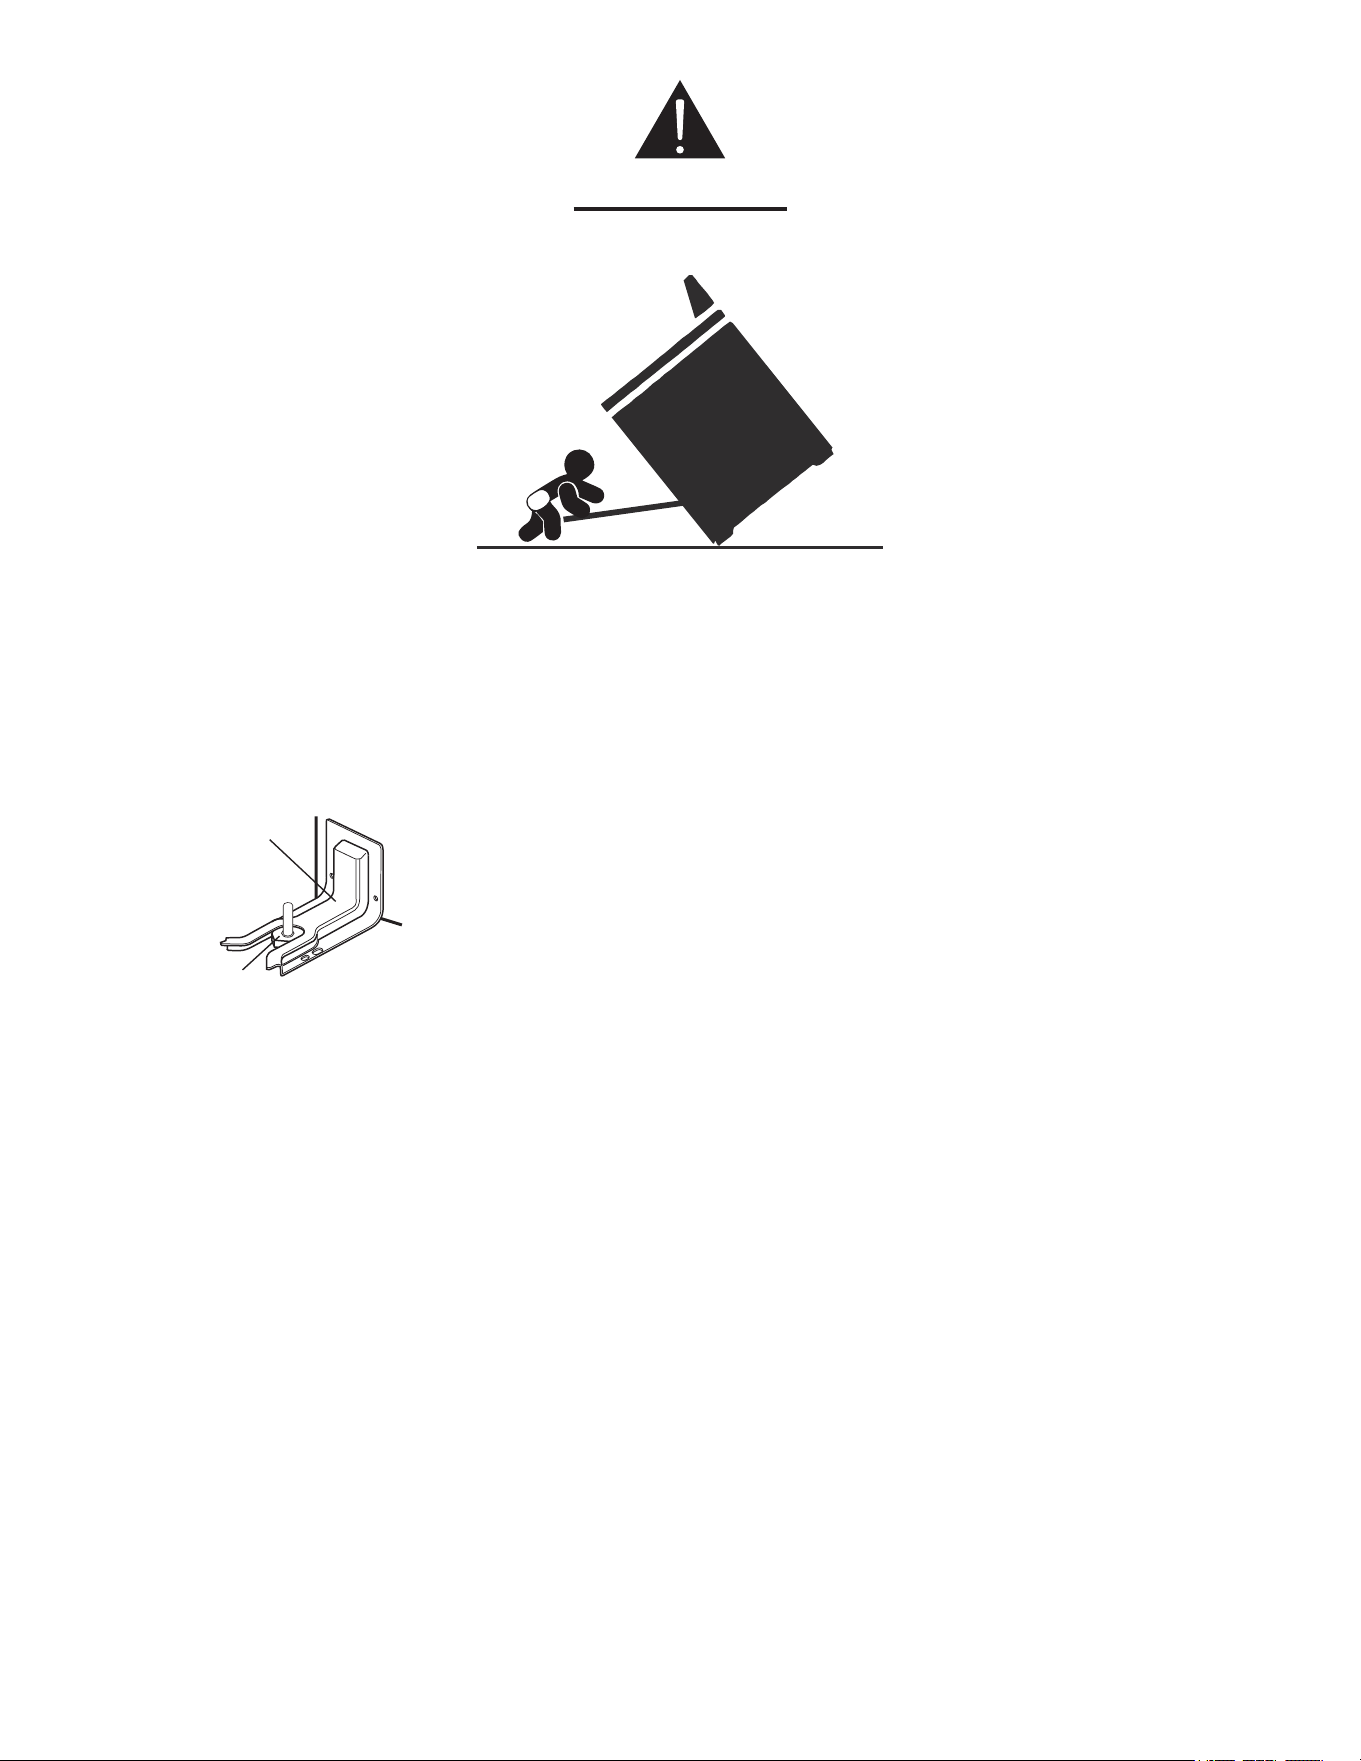
Tip Over Hazard
• A child or adult can tip the range and be killed.
• Install anti-tip bracket to floor or wall per installation instructions
• Slide range back so rear range foot is engaged in the slow of the anti-tip bracket.
• Re-engage the anti-tip bracket if range is moved.
• Do not operate the range without anti-tip bracket installed and engaged.
• Failure to follow these instructions can result in death or serious burns to children and adults.
Making sure the anti-tip bracket is installed:
• Slide range forward.
• Look for the anti-tip bracket securely attached to floor and wall
• Slide range back so rear range foot is under anti-tip bracket.
Anti-Tip
Bracket
Range
Foot
6

WARNING: To reduce the risk of fire, electrical shock,
injury to persons, or damage when using the range, follow
basic precautions, including the following:
• WARNING: TO REDUCE THE RISK OF TIPPING OF
THE RANGE, THE RANGE MUST BE SECURED BY
PROPERLY INSTALLED ANTI-TIP DEVICES. TO CHECK IF
THE DEVICES ARE INST
ALLED PROPERLY, SLIDE THE
RANGE COMPLETELY FORWARD, LOOK FOR THE ANTI-
TIP BRACKET SECURELY ATTACHED T
O THE FLOOR
BEHIND THE RANGE, AND SLIDE RANGE COMPLETELY
BACK UNTIL THE REAR RANGE FOOT IS UNDER ANTI-
TIP BRACKET.
• WARNING: NEVER use this appliance as a space heater
to heat or warm the room. Doing so may result in carbon
monoxide poisoning and overheating of the oven.
• WARNING: NEVER cover any slots, holes, or passages
in the oven bottom or cover an entire rack with materials
such as aluminum foil. Doing so blocks airflow throug
the oven and may cause carbon monoxide poisoning.
Aluminum foil linings may also trap heat, causing a fir
hazard.
• CAUTION: Do not store items of interest to children in
cabinets above a range or on the back guard of a range
–children climbing onto the range to reach items could be
seriously injured.
• DO NOT LEAVE Children Alone –Children should not
be left alone or unattended in areas where the range is in
use. They should never be allowed to sit or stand on any
part of the range.
• Wear Proper Apparel – Loose-fitting or hanging garment
should never be worn while using the range.
• User Servicing – Do not repair or replace any part of the
range unless specifically recommended in the manual
All other servicing should be referred to a qualifie
technician.
• Flammable materials should not be stored in an oven or
near surface units.
• DO NOT USE WATER on Grease Fires – Smother fir
or flame, use a dry chemical or foam-type extinguishe .
• Make sure your pot holders is dry. – Moist or damp pot
holders on hot surfaces may result in burns from steam.
Do not let pot holder touch hot heating elements. Do not
use a towel or other bulky cloth.
• DO NOT TOUCH SURFACE UNITS OR AREAS NEAR
UNITS – Surface units may be hot even though they
are dark in color. Areas near surface units may become
hot enough to cause burns. During and after use, do not
touch, or let clothing or other flammable materials contac
surface units or areas near units until they have had
sufficient time to cool Among those areas are the cook
top and surfaces facing the cook top.
• Never Leave Surface Units Unattended at High Heat
Settings – Boil over causes smoking and greasy
spillovers that may ignite.
• Glazed Cooking Utensils – Only certain types of glass,
glass/ceramic, ceramic, earthenware, or other glazed
utensils are suitable for range-top service without
breaking due to sudden temperature changes.
• Utensil Handles Should Be Turned Inward and Not
Important Safety Instructions
Extend Over Adjacent Surface Units – To reduce the risk
of burns, ignition of flammable materials, and spill ge
due to unintentional contact with the utensil, the handle
of a utensil should be positioned so that it is turned
inward, and does not extend over adjacent surface units.
• Clean Cook top with Caution – If a wet sponge or cloth
is used to wipe spills on a hot cooking area, be careful to
avoid steam burn. Some cleaners can produce noxious
fumes if applied to a hot surface.
• CAUTION: When Opening Door, stand on the side of
the range and let the hot air or steam escape before
removing or replacing food.
• Do Not Heat Unopened Food Containers. - Build-up of
pressure may cause the container to burst and result in
injury.
• Keep Oven Vent Ducts free from obstructions.
• Oven Racks Placement – Always place oven racks in the
desired location while the oven is cool. If the rack must
be moved while the oven is hot, do not let the pot holder
in contact with the heated rack.
• DO NOT TOUCH HEATING ELEMENTS OR INTERIOR
SURFACES OF OVEN – Heating elements may be hot
even though they are dark in color. The interior surfaces
of an oven become hot enough to cause burns. During
and after use, do not touch, or let clothing or other
flammable materials in contact with heating element
or interior surfaces of the oven until they have had
sufficient time to cool. Other surfaces of the applian
may become hot enough to cause burns – among these
surfaces are oven vent openings and surfaces near
these openings, oven doors, and windows of oven doors.
• Proper Installation – The range, when installed, must be
electrically grounded by local codes or, in the absence
of local codes, with the National Electrical Code, ANSI/
NFPA 70. In Canada, the range must be electrically
grounded by Canadian Electrical Code. Be sure the
range is properly installed and grounded by a qualifie
technician.
• Disconnect the electrical supply before servicing the
appliance.
• Injuries may result from the misuse of appliance doors or
drawers such as stepping, leaning, or sitting on the doors
or drawers.
• Maintenance – Keep the range area clear and free from
combustible materials, gasoline, and other flammabl
vapors and liquids.
• For units with ventilating hood
• Clean Ventilating Hoods Frequently – Grease should not
be allowed to accumulate on the hood or filte .
• When flambé cooking under the vent hood, turn the fa
on.
READ AND SAVE THESE INSTRUCTIONS
State of California Proposition 65 Warnings: WARNING:
This product contains one or more chemicals known to the
State of California to cause cancer. WARNING: This product
contains one or more chemicals known to the State of
California to cause birth defects or other reproductive harm.
7
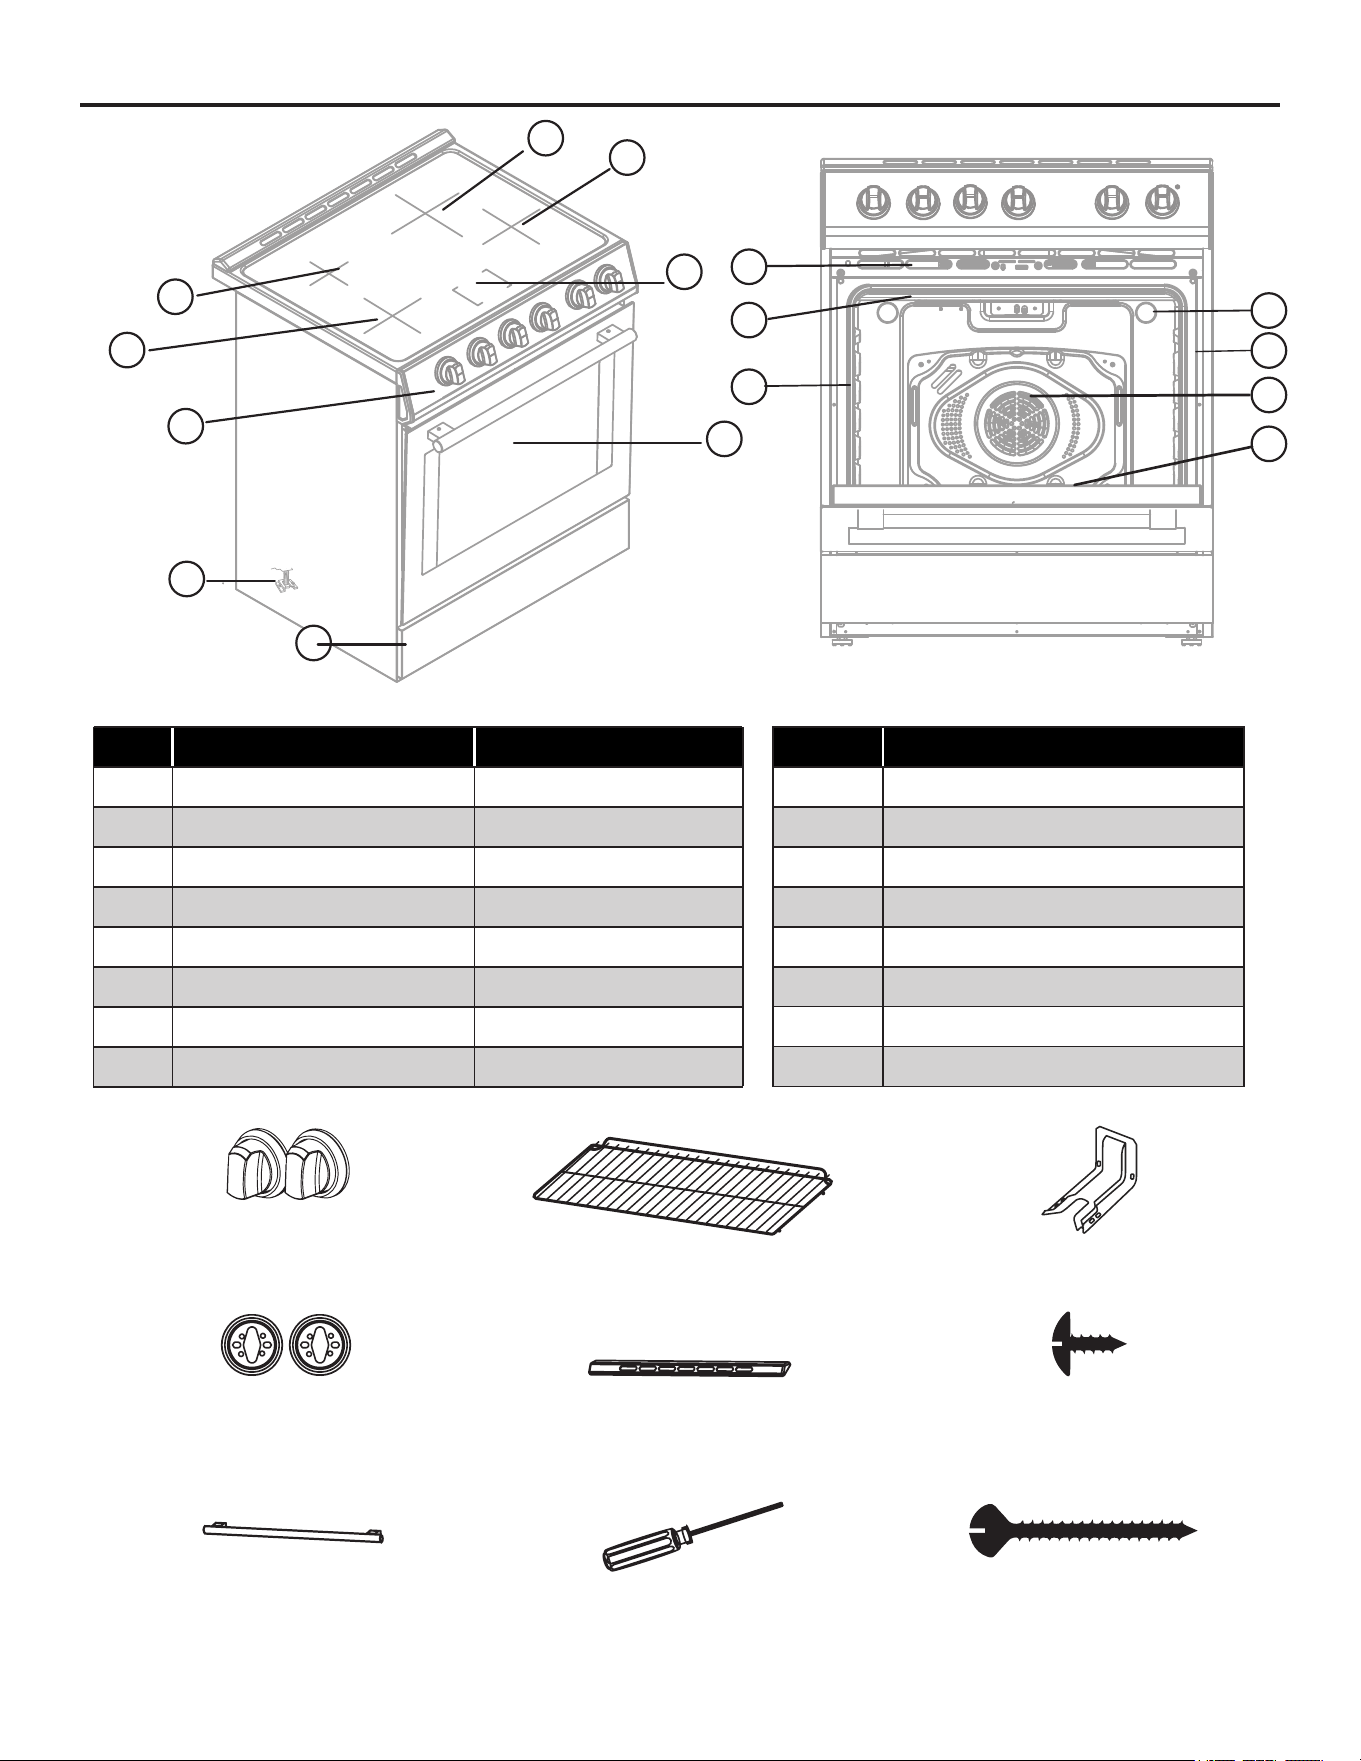
Names of Parts and Accessories
1
2
3
4
5
6
7
8
9
10
11
12
14
15
16
13
2x Forno Door Handle
(Stainless Steel 1x & Antique Brass 1x)
12x Bezel
(Stainless Steel 6x & Antique Brass 6x)
1x Backsplash
1x Hand tool
1x Anti-Tip Bracket
12x Forno Knobs
(Stainless Steel 6x & Antique Brass 6x)
5x Screws (M4*8)
(For blacksplash Installation)
2x Screws (M5*45)
(For Anti-tip bracket)
2x Racks
8
NOTE: Antique brass Handle/Antique brass Knobs only for the White And Black Units.
Numbers
Parts Remark
1
Left Rear Burner: 1200 / 1500W(boost)
Heating area size: 140mm
Most suitable pan size: 140-160mm
Heating area size: 140mm
Most suitable pan size: 140-160mm
Heating area size: 185mm
NA
NA
NA
NA
Most suitable pan size: 180-200mm
Heating area size: 185mm
Most suitable pan size: 180-200mm
2 Left Front Burner: 1800 / 2100W(boost)
3 Control Panel
4
Anti-tip Bracket
5
Kick Plate
6
Right Rear Burner: 2300 / 3000W(boost)
7
Right Front Burner: 1200 / 1500W(boost)
8
Hot Surface Indicator Lights
Numbers Parts
9
Oven Door Window
10
Oven Vent
11 Broil Element
12 Door Gasket
13 Bottom Element (not visible)
14 Oven Light
15 Model and Serial Number Plate
16 Convection Fan
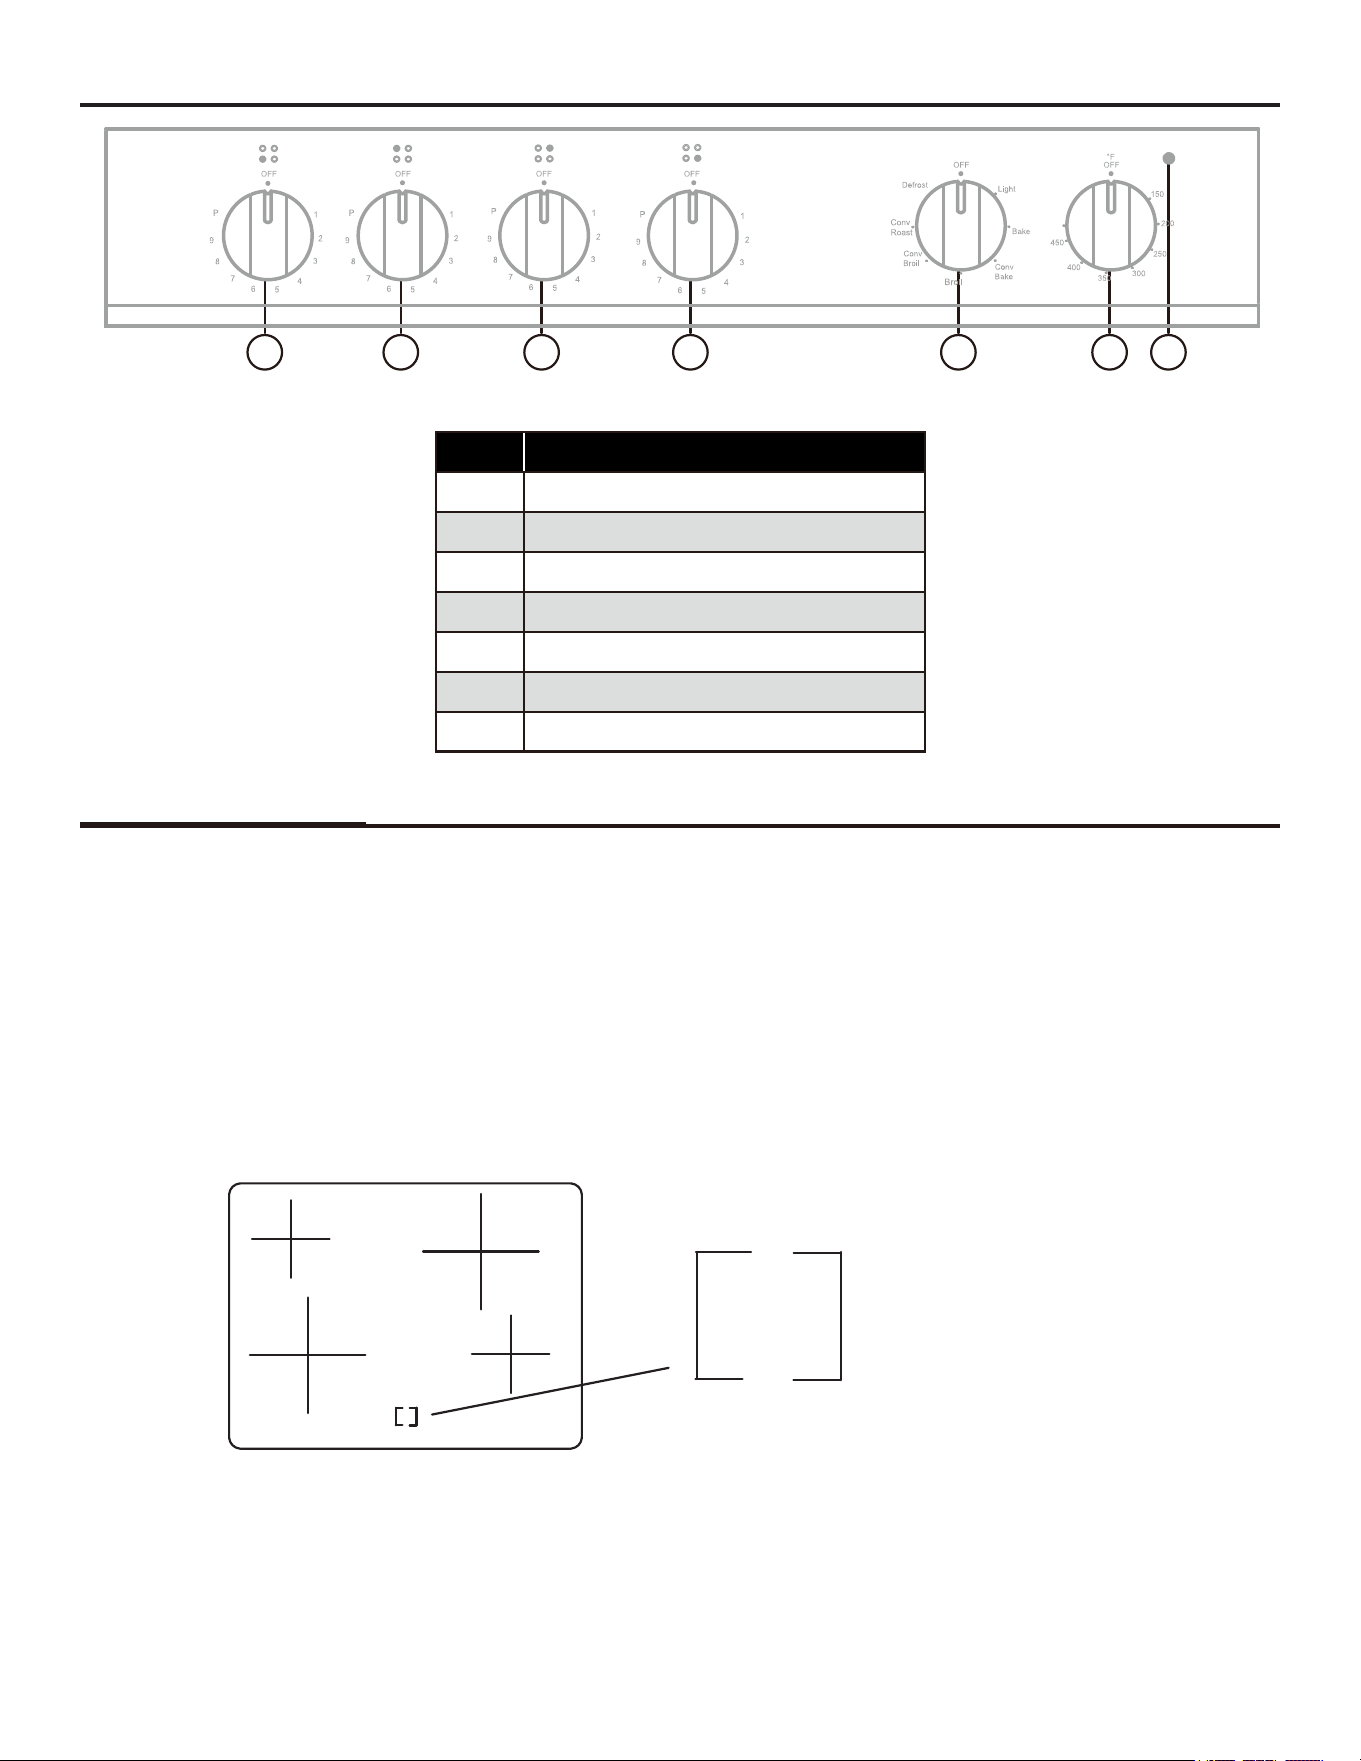
Control Panel
D E F G
Numbers Parts
A
Front left burner
B
Rear left burner
C Rear right burner
D Front right burner
E Oven settings
F Temperature
G Light indicator
A B C
Operating Instructions
9
1. Place a suitable pan on the cooking zone you wish to use. How to tell if your existing pan can be used for induction
range. Place a magnet at the bottom of the pan and pay attention if the magnet sticks to the pan. If so, then the pan is
suitable for induction. If the magnet does not stick to the pan, then the pan is NOT suitable for the induction. Note: A
non induction pan, will not work on the induction range.
2. Select the heating zone you wish to use. Make sure the bottom of the pan and the surface of the cooking zone are
clean and dry. Turn the control knob clockwise.
-
-
2
-
The relevant indicator on the
hob for that zone will show
the power level selected.
COOKTOP USE
Max
Operating Instructions (continued)
10
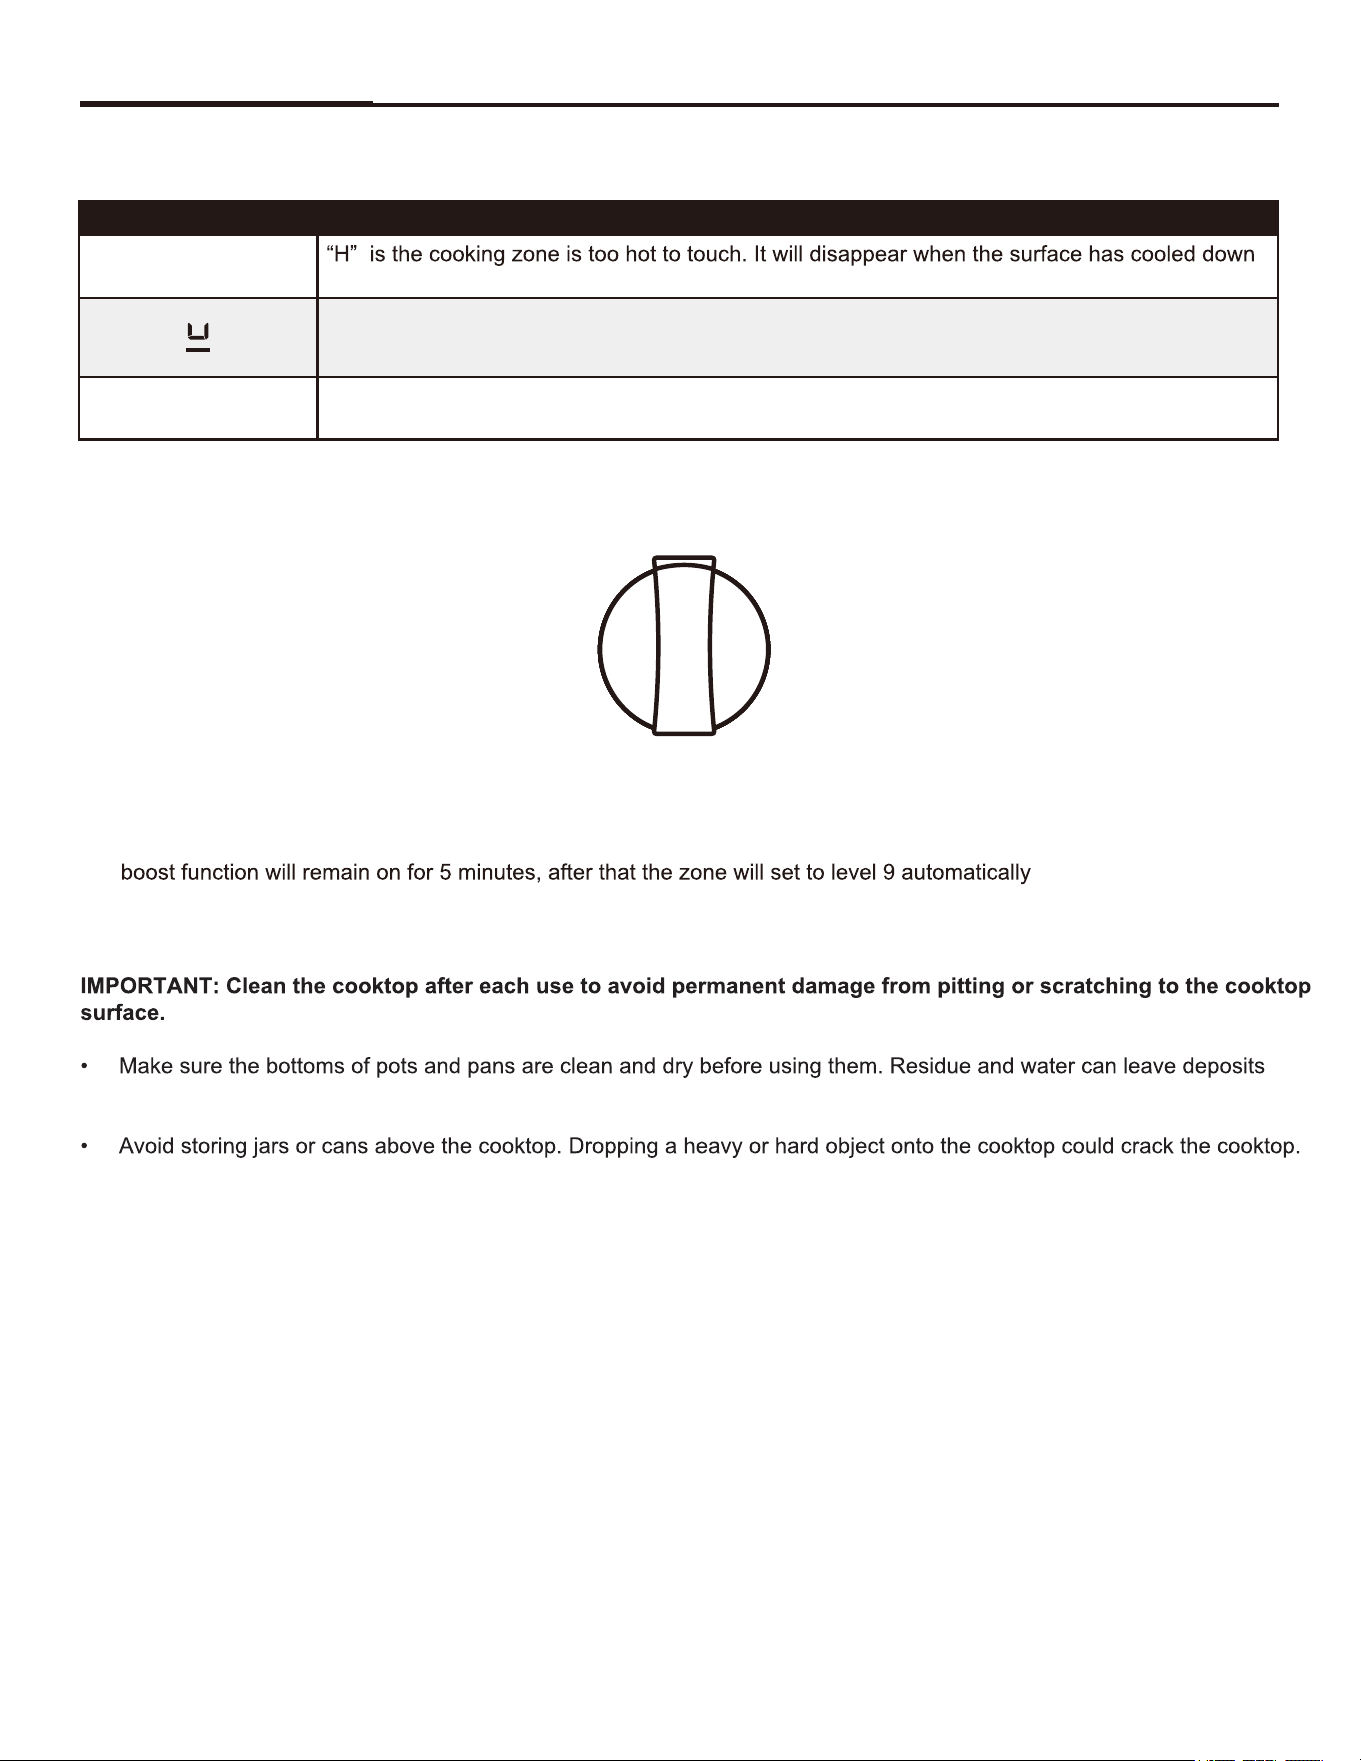
Indicator Icons & Symbols:
Icons & Symbols: Function
H
to a safe temperature.
The burner is activated but not in use
P
Boost is activated
3. Adjust the power level up /down by turning the control knob clockwise/anti-clockwise. The power levels range from 1-9
as well as Boost (P) settings. You can modify the power level at any time..
OFF
6
P
9
8
7 5
4
3
1
Activating the Boost Function:
1. Turn the control knob clockwise all the way to “
P”. The “P” will be activated and it will display on the indicator. The
.
2. To cancel the boost function, turn the knob anticlockwise to “
9”.
Note: you can activate two boost functions at same time,except for the Right Rear Burner (3000W).
when heated.
• To avoid damage to the cooktop, do not leave a hot lid on the cooktop. As the cooktop cools, air can become trapped
between the lid and the cooktop and ceramic glass could break when the lid is removed.
OVEN USE
This multi-function oven combines the functions of traditional oven modes with the functions of modern, fan-assisted
convection modes in a single oven. Use the Cooking feature control knob, located on the control panel, to select the oven
mode.
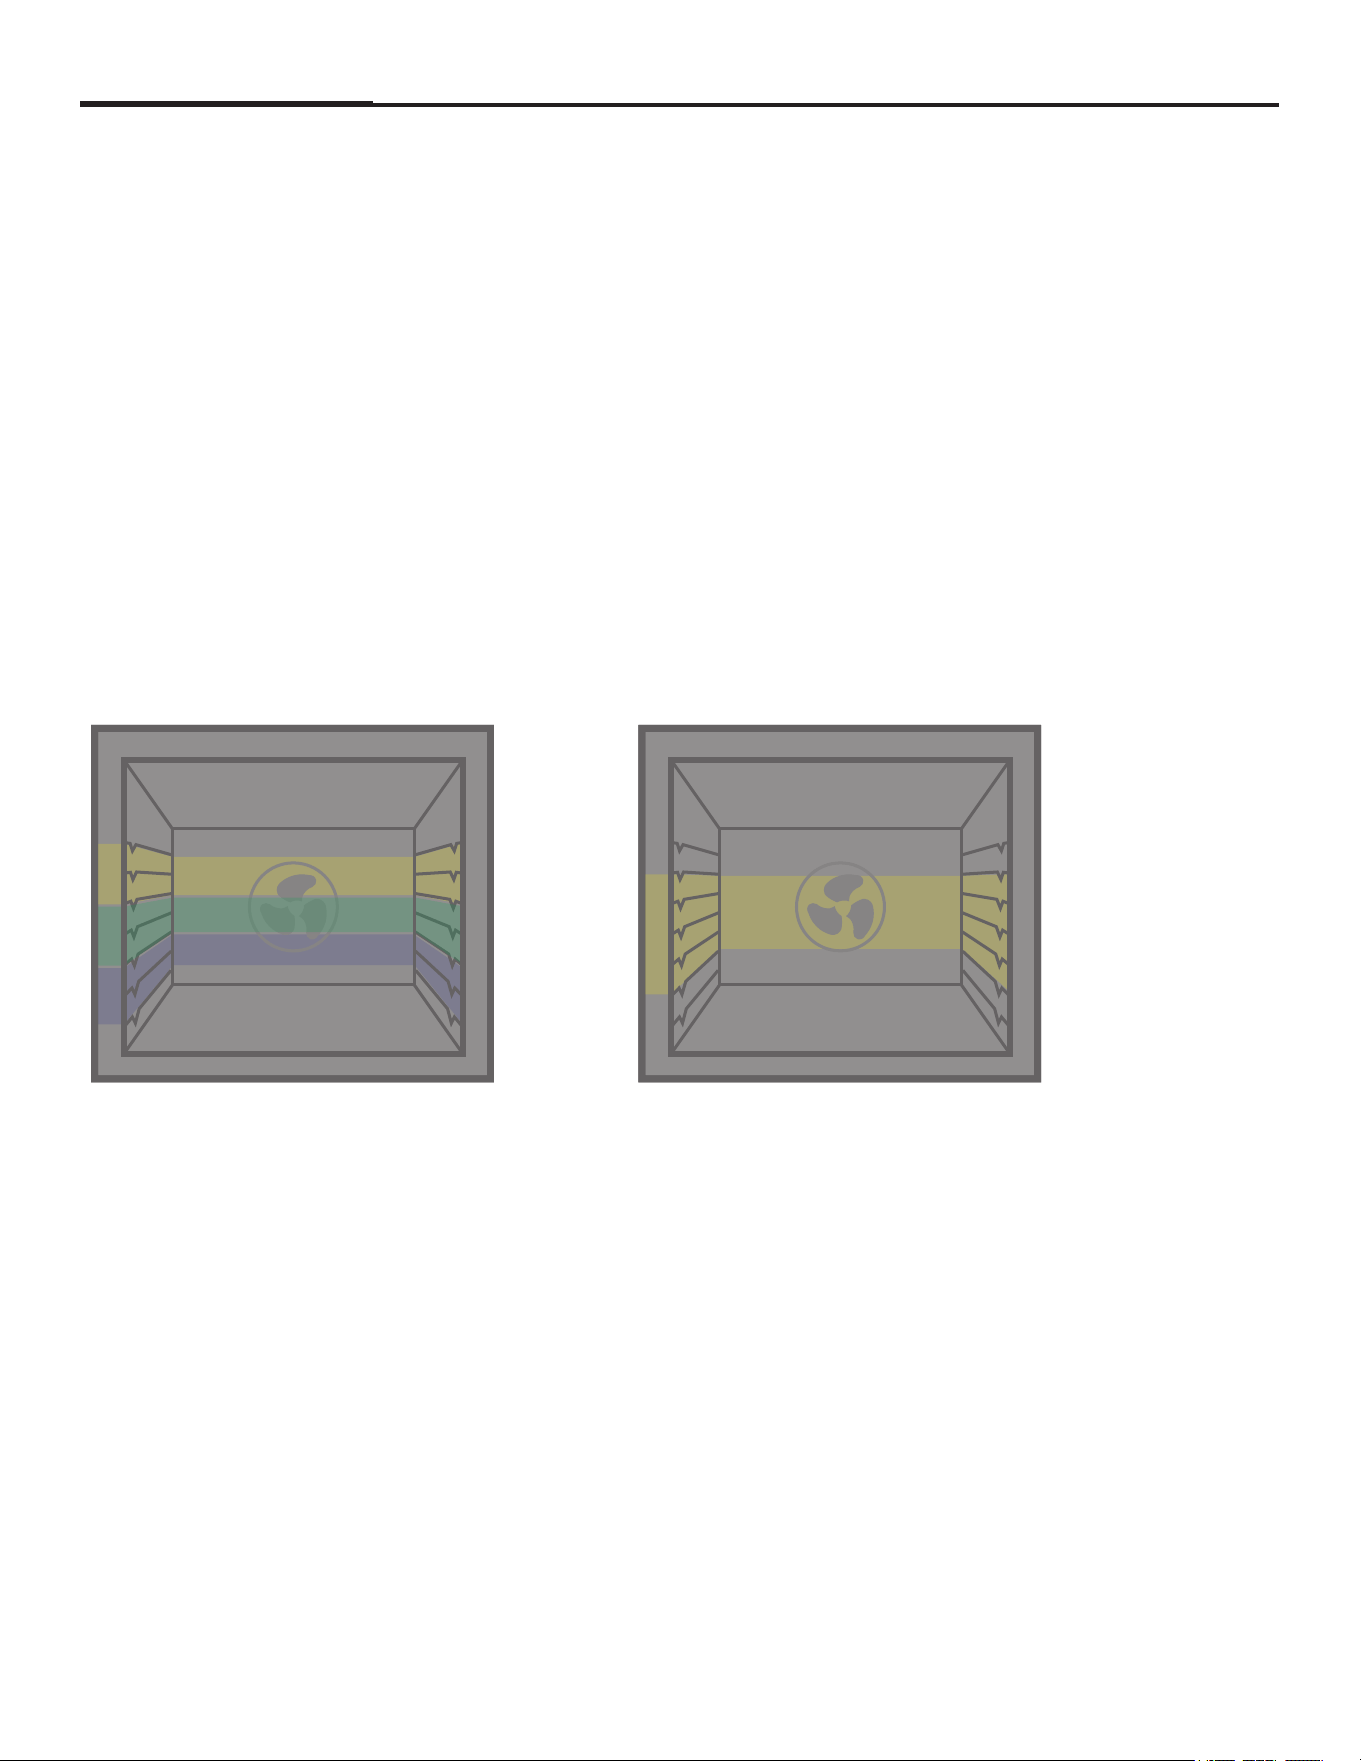
Rack Placement in your oven
5
2
1
6
Most baked goods (4&3)
Roasting (2&1)
Toasting or Broiling (6&5)
4
3
5
2
1
6
4
3
Multiple Rack (5-2)
Operating Instructions (continued)
11
• For foods containing sugar in any form, clean up all spills as soon as possible. If sugary spills are allowed to cool down,
they can adhere to the cooktop and can cause pitting and permanent marks
• Do not slide cookware or bakeware across the cooktop. Aluminum or copper bottoms and rough inishes on cookware
or bakeware could leave scratches or marks on the cooktop.
• Do not cook popcorn in prepackaged aluminum containers on the cooktop. They could leave aluminum marks that
cannot be removed completely.
• Do not allow objects that could melt, such as plastic or aluminum foil, to touch any part of the entire cooktop.
• Do not use the cooktop as a cutting board.
• Do not cook foods directly on the cooktop.
BEFORE USE
1.
Make sure the oven is close.
2. Rotate the cooking feature knob to Bake.
3. Rotate the temperature feature knob to 500°F (260°C).
4. Let it operate for 30 minutes NOTE: Allow the oven to operate for 30 minutes with no food in the cavity. Once it did its
30 minutes, open the oven door to allow the oven to cool. Any odor that may be detected during this initial use is due
to the evaporation of substances used to protect the oven during storage.
5. IMPORTANT:
Do not place anything, including dishes, foil, and oven trays, on the bottom of the oven when it is in operation to avoid
damaging the enamel.
PREHEATING
1. Turn the cooking functions knob to the desired function you wish to use.
2. Rotate the dial to the temperature you wish to use.
Note: The higher the temperature is, the longer it will take to preheat. The actual oven temperature will go higher than
your set temperature to offset the heat lost when you open the oven door to place the food on the rack. This ensures
that cooking will begin at the proper temperature. Do not open the door while the oven is preheating. When the oven had
reached the set temperature, the indicator light on the control panel will turn on. You can then open the door and place
food in the oven.
OVEN SETTINGS
1. Bake
• Use one rack when selecting the bake mode.
• On occasion, check the oven to see if your food is done.
• Use metal bakeware (with or without a non-stick finish), heatproof glass, glass ceramic, potter , or other utensils suitable
for the oven.
•For best results, bake food on a single rack with at least 1” - 1½” (2.5 - 4 cm) space between bakeware and oven walls.
• When using heatproof glass, reduce temperature by 25°F (15°C) from recommended temperature. Use baking sheets
with or without sides or jelly roll pans.
• Dark metal pans or nonstick coatings will cook faster with more browning. Insulated bakeware will slightly lengthen the
cooking time for most foods.
• Do not use aluminum foil or disposable aluminum trays to line any part of the oven. Foil is an excellent heat insulator and
heat will be trapped beneath it. This will alter the cooking performance and can damage the finish of the oven. You can
line a baking tray with foil and use this on the bottom shelf.
• Avoid using the opened door as a shelf to place pans.
• See Troubleshooting for tips on solving baking and roasting problems.
Oven (continued)
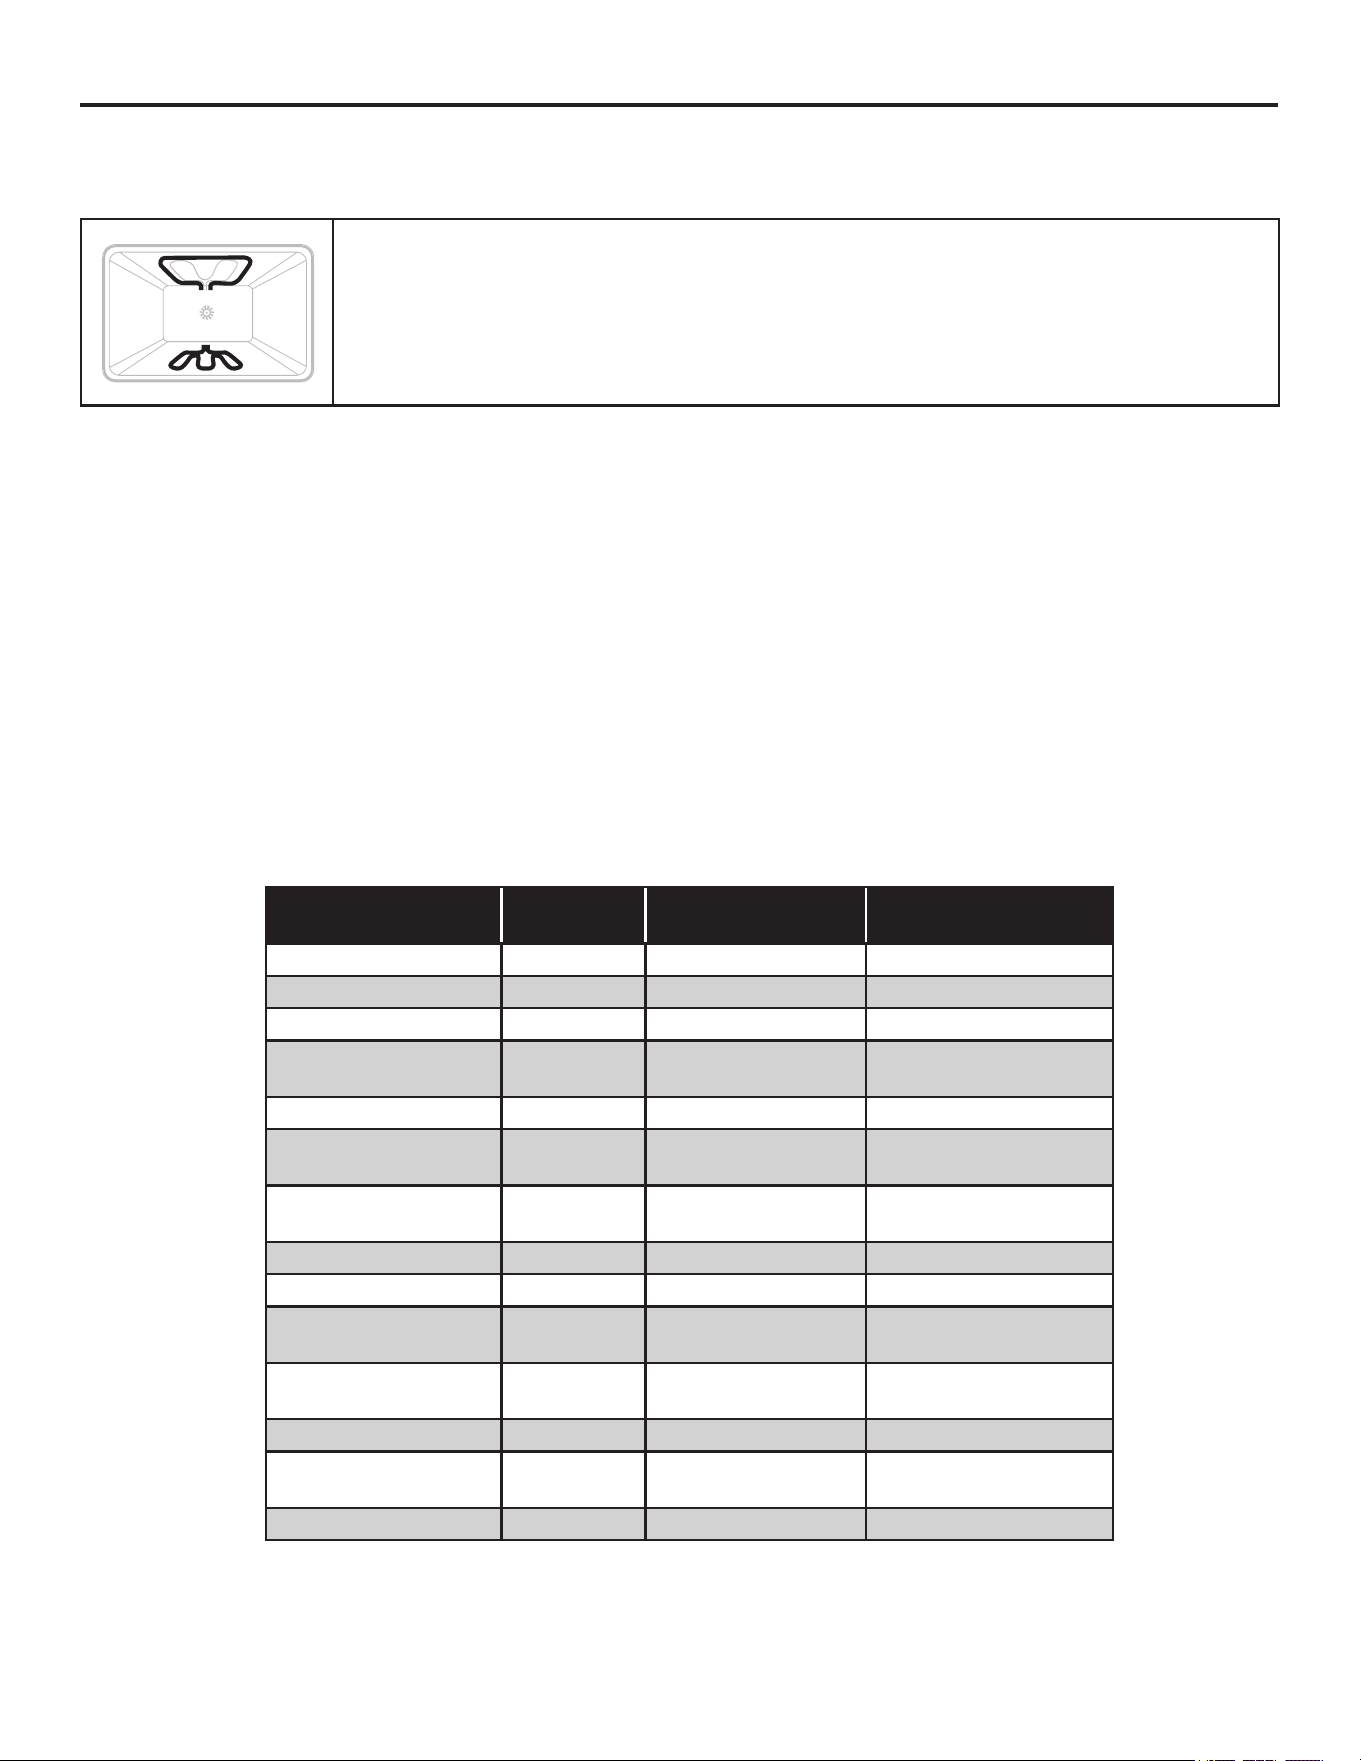
Baking is cooking with heated air. Both upper and lower elements in the oven are used, but
the fan is used only during preheating. Follow the recipe or convenience food directions for
baking temperature, time, and rack position. Baking time will vary with the temperature of
ingredients and the size, shape, and finish of the baking utensil.. The temperature can be set
from 170°F (77°C) to 500°F (260°C).
Food Item Rack Position
Temp. °F (°C)
(Preheated Oven)
Time (Min)
Cupcakes 2 350(175) 19-22
Bunt Cake 1 350(175) 40-45
Angel Food 1 350(175) 35-39
Pie 2 crust, fresh, 9” 2
375-400
(190-205)
45-50
2 crust, frozen fruit, 9” 2 375(190) 68-78
Cookies Sugar 2
350-375
(175-190)
8-10
Chocolate Chip cookies 2
350-375
(175-190)
8-13
Brownies 2 350(175) 29-36
Yeast bread loaf 9 x 5 2 375(190) 18-22
Yeast rolls 2
375-400
(190-205)
12-15
Biscuits 2
375-400
(190-205)
7-9
Muffi 2 425 (220) 15-19
Frozen Pizza 2
400-450
(205-235)
23-26
Fresh Pizza 2 425 (246) 15-18
Bake chart Oven Function:
12
2. Broil
NOTES: Before broiling, position the rack to your needs
• For best results, use a two-piece broiler pan with a grid (not provided). It is designed to drain juices which helps to
avoid spills and splatters.
• For proper draining, do not cover the grid with foil. The bottom of the pan may be lined with aluminum foil for easier
cleaning.
• Trim excess fat to reduce spattering. Slit the remaining fat on the edges to avoid curling.
• Pull out the oven rack to stop position before turning or removing food. Use tongs to turn food to avoid the loss of
juices. Very thin cuts of fish, poultr , or meat may not need to be turned.
• After broiling, remove the pan from the oven when removing the food. Drippings will bake on the pan if left in the
heated oven, making cleaning more difficul
• Position food on the grid in the broiler pan, then place it in the center of the oven rack. Close the oven door and set
the control.
Oven (continued) Oven (continued)
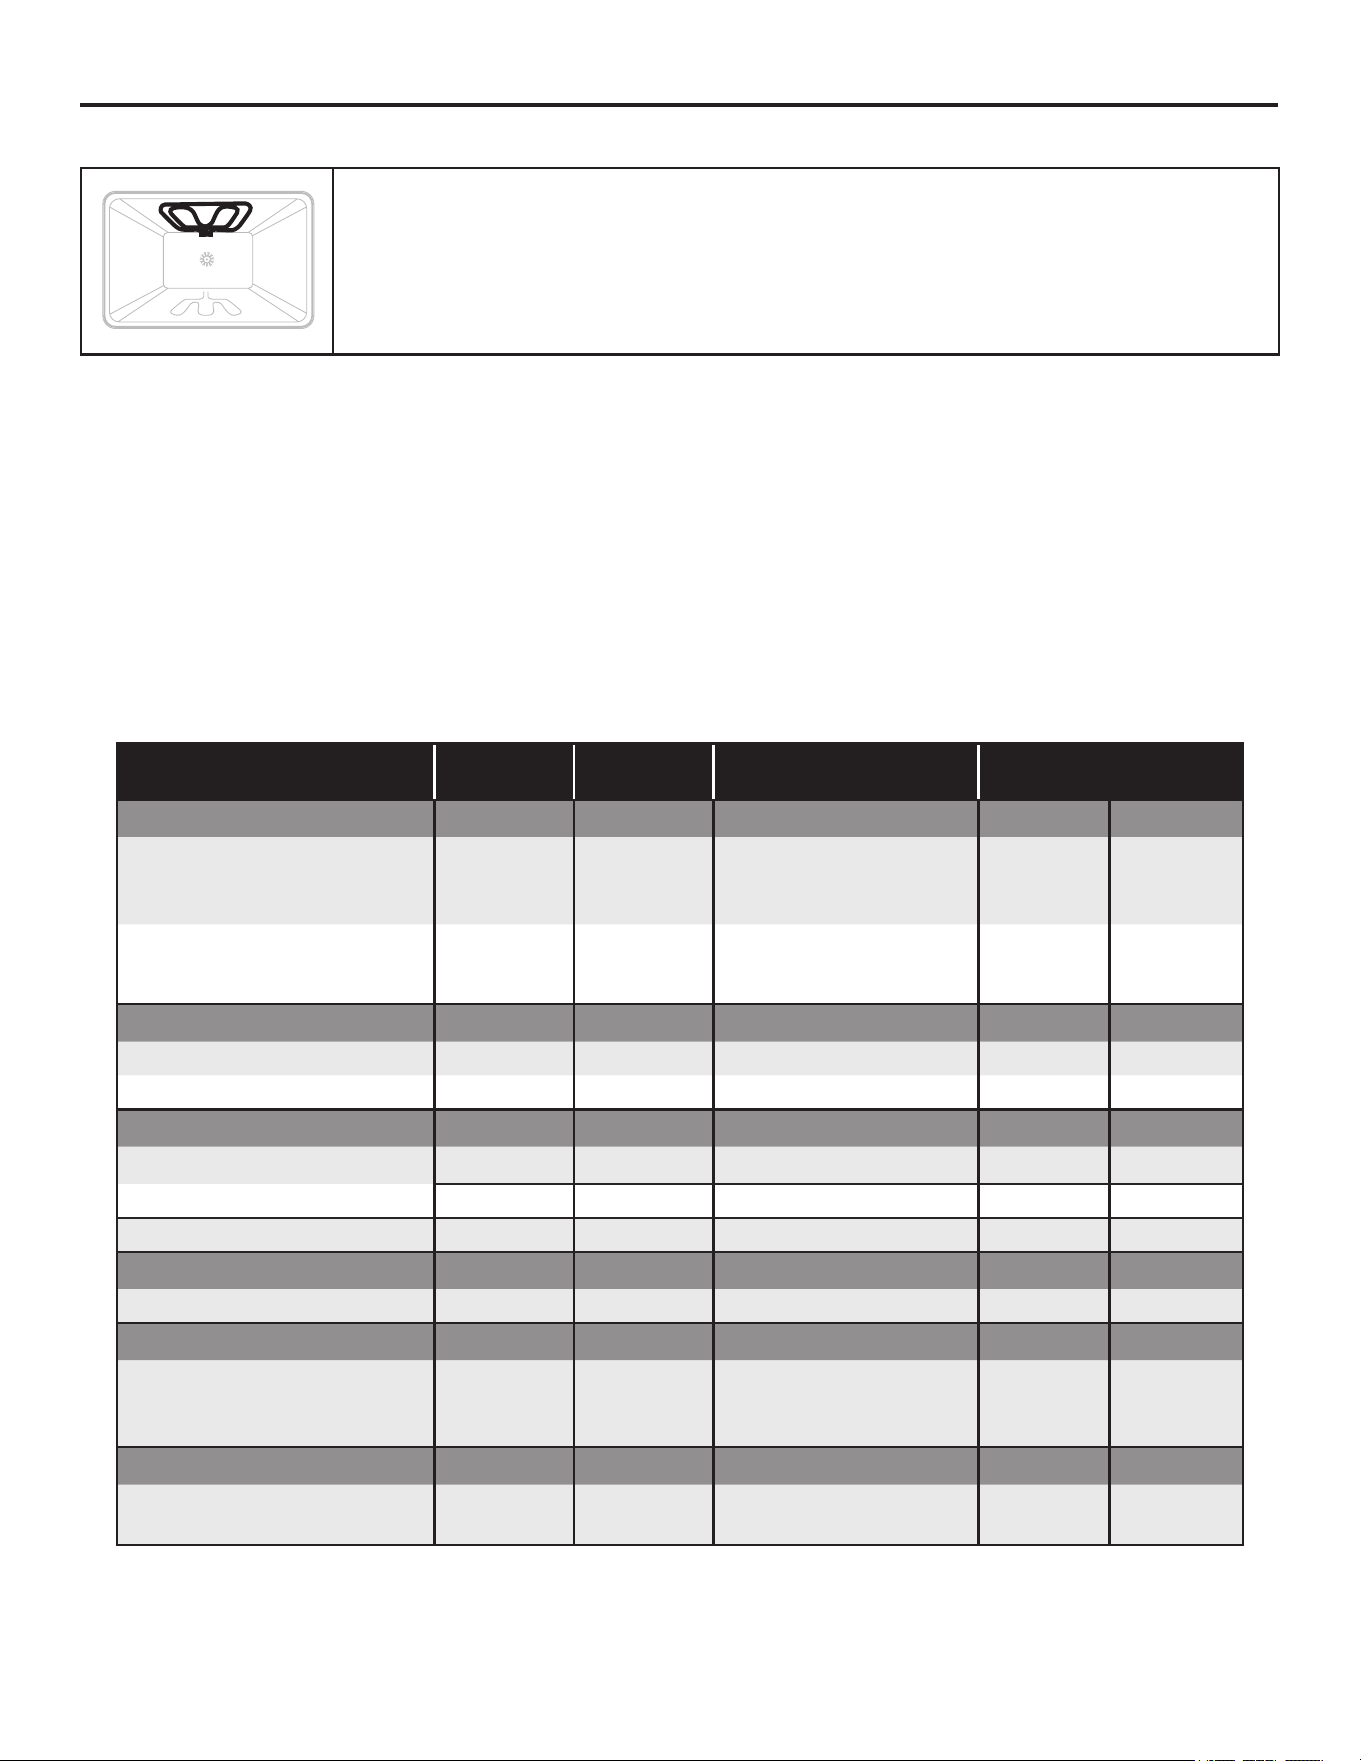
Broiling uses direct radiant heat to cook food. Thicker cuts and unevenly shaped of meat, fish,
and poultry may cook better at lower broiling temperatures. Tips: The oven door remains closed during
broil. When inspecting the food, open the oven door no more than two inches.).
Food And Thickness
Rack
Position
Broil Setting.
°F (°C)
Level of
Doneness
SIDE 1
Time (Min)
SIDE 2
Time (Min)
BEEF
Steak (3/4"-1) 5 550 (290)
-Medium Rare
-Medium
-Well Done
- (5 - 7)
- (6 - 8)
- (8 - 10)
- (4 - 6)
- (5 - 7)
- (7 - 0)
Hamburgers (3/4"-1") 4 550 (290)
-Medium
-Well Done
- (8 - 11)
- (10-13)
- (6 - 9)
- (8 - 10)
POULTRY
Breast (bone-in) 4 450 (235) Well Done (10 - 12) (8 - 10)
Thigh (very well done) 4 550 (290) Well Done (28 - 30) (13 - 15)
PORK
Pork Chops (1") 5 550 (290) Well Done (7- 9) (5 - 7)
Sausage - fresh 5 550 (290) Well Done (5 - 7) (3 - 5)
Ham Slice (½") 5 550 (290) Well Done (4 - 6) (3 - 5)
SEAFOOD
Fish Filets, 1" Buttered 4 450 (235) Well Done (10 - 14) Do not turn
LAMB
Chops (1") 5 550 (290)
-Medium Rare
-Medium
-Well Done
- (5 - 7)
- (6 - 8)
- (7 - 9)
- (4 - 6)
- (4 - 6)
- (5 - 7)
BREAD
Garlic Bread, 1" slices
4
3
550 (290)
- (2 - 2:30)
- (4 - 6)
13
Oven (continued)
CONVECTION SETTINGS
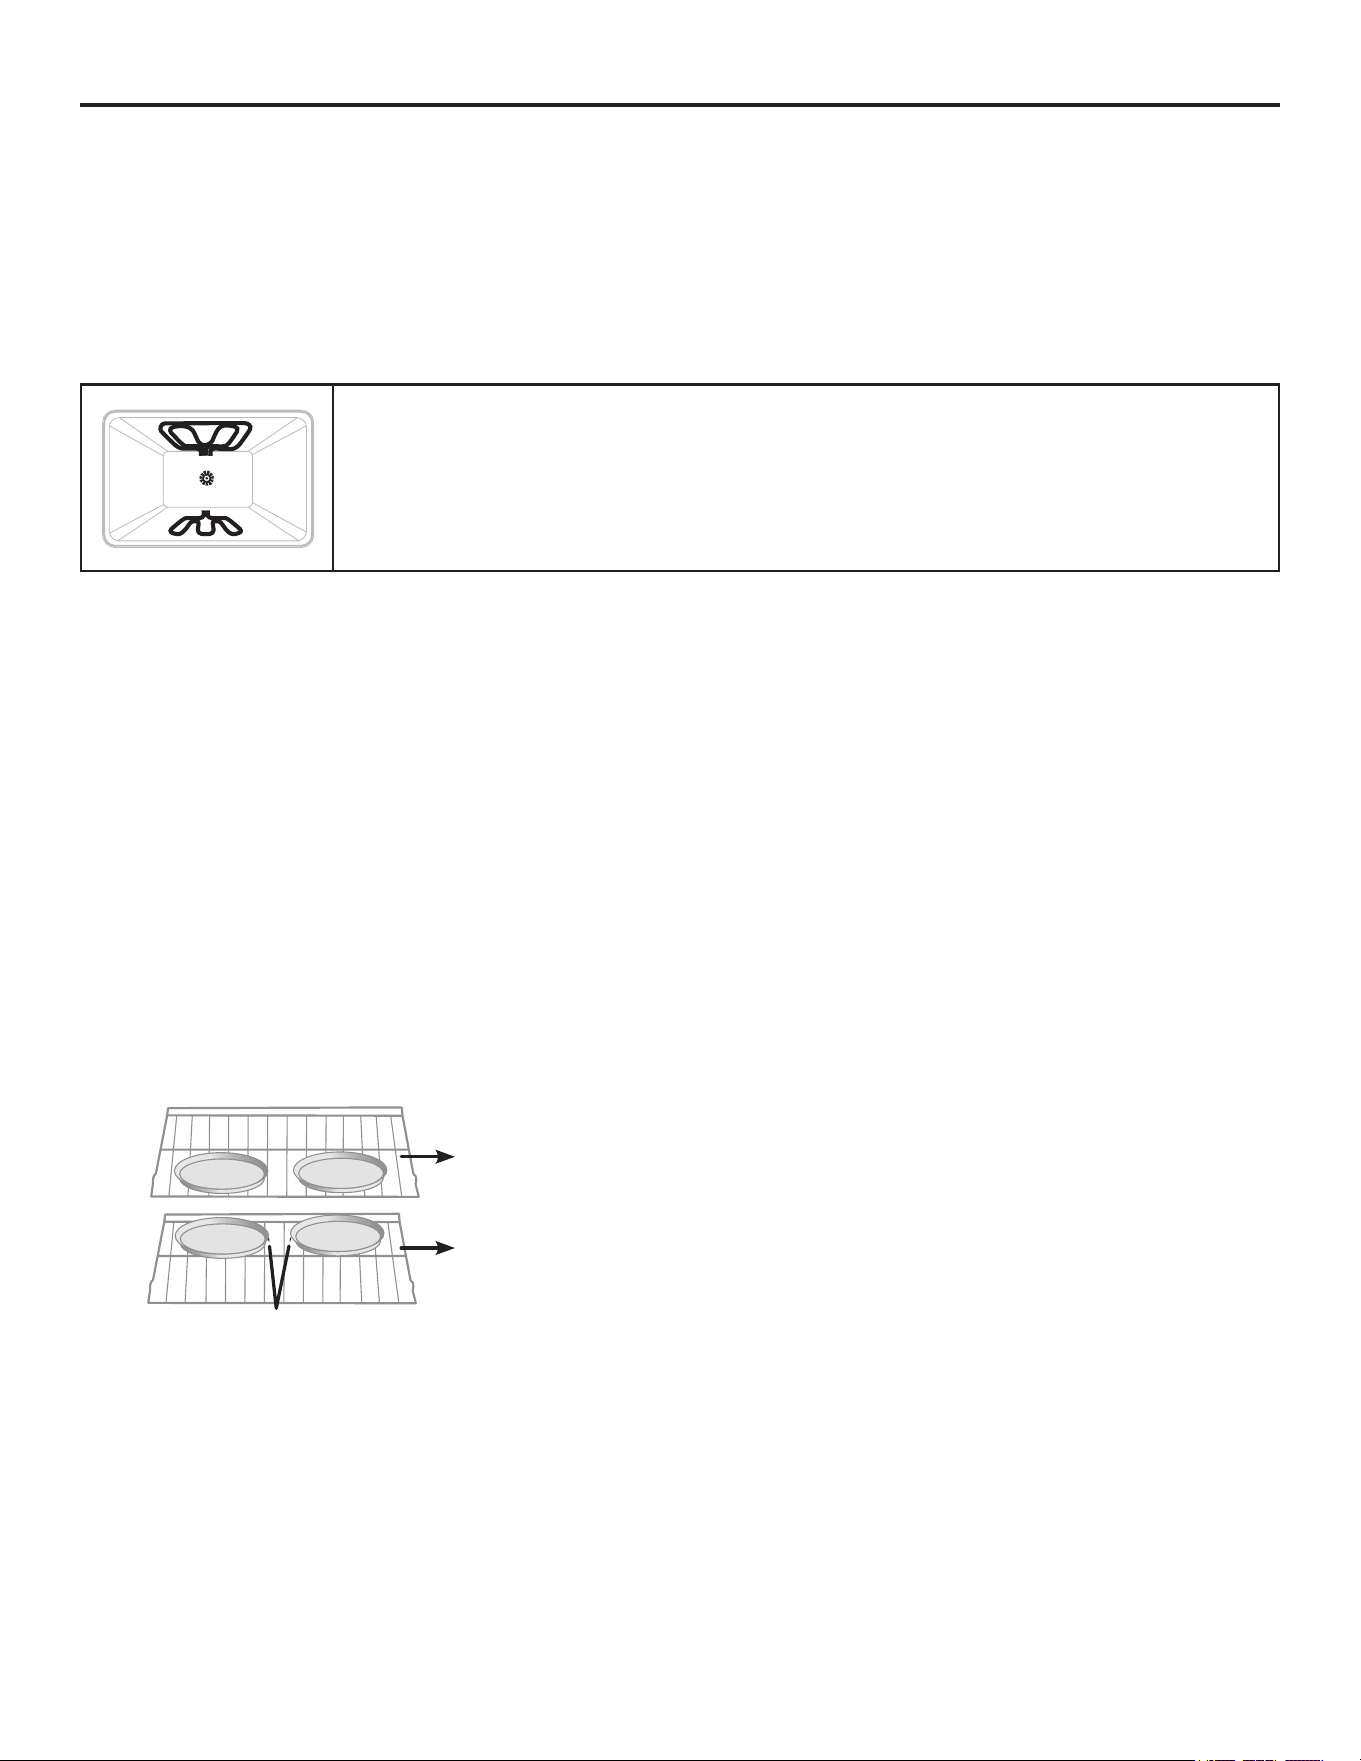
During convection cooking, the fan provides hot air circulation throughout the oven. The movement of heated air around
the food can help to speed up cooking by penetrating the cooler outer surfaces. The food cooks more evenly, browning
and crisping outer surfaces while sealing moisture inside. When the oven is set to the Convection function, the bake and
broil elements, and the fan operate to heat the oven cavity. *The convection fan operates during any convection function.
1. Convection Bake:
• Use Convection Bake for single or multiple-rack baking. Reduce standard recipe baking temperature by 25°F (15°C).
• For best results, foods should be cooked uncovered, in low-sided pans to take advantage of the forced air circulation.
Use shiny aluminum pans for best results unless otherwise specified
• Heatproof glass or ceramic can be used. Reduce the temperature by another 25°F (15°C) when using heatproof glass
dishes for a total reduction of 50°F (30°C).
• Dark metal pans may be used. Note that food may brown faster when using dark metal bakeware.
• The number of racks used is determined by the height of the food to be cooked.
• Baked items, for the most part, cook extremely well in convection. Don’t try to convert recipes such as custards,
quiches, pumpkin pie, or cheesecakes, which do not benefit from the convection-heating process. Use the regula
Bake mode for these foods.
• When baking four cake layers at the same time, stagger pans so that one pan is not directly above another. For best
results, place cakes on front of upper rack and back of lower rack. Allow 1” - 1½” (2.5 - 4 cm) air space around pans.
1. Turn the cooking functions knob to the convection bake.
2. Rotate the dial to the temperature you wish to use.
3. You can open the door and place food in the oven.
2 at the front
2 at the rear
1¹⁄2”
Compared to BAKE setting, Convection Bake adds the use of convection fan(s) to circulate
heated air. So both the temperature and the cooking time may be slightly reduced.
Tips: When convection baking, reduce your recipe baking temperature by 25°F.
14
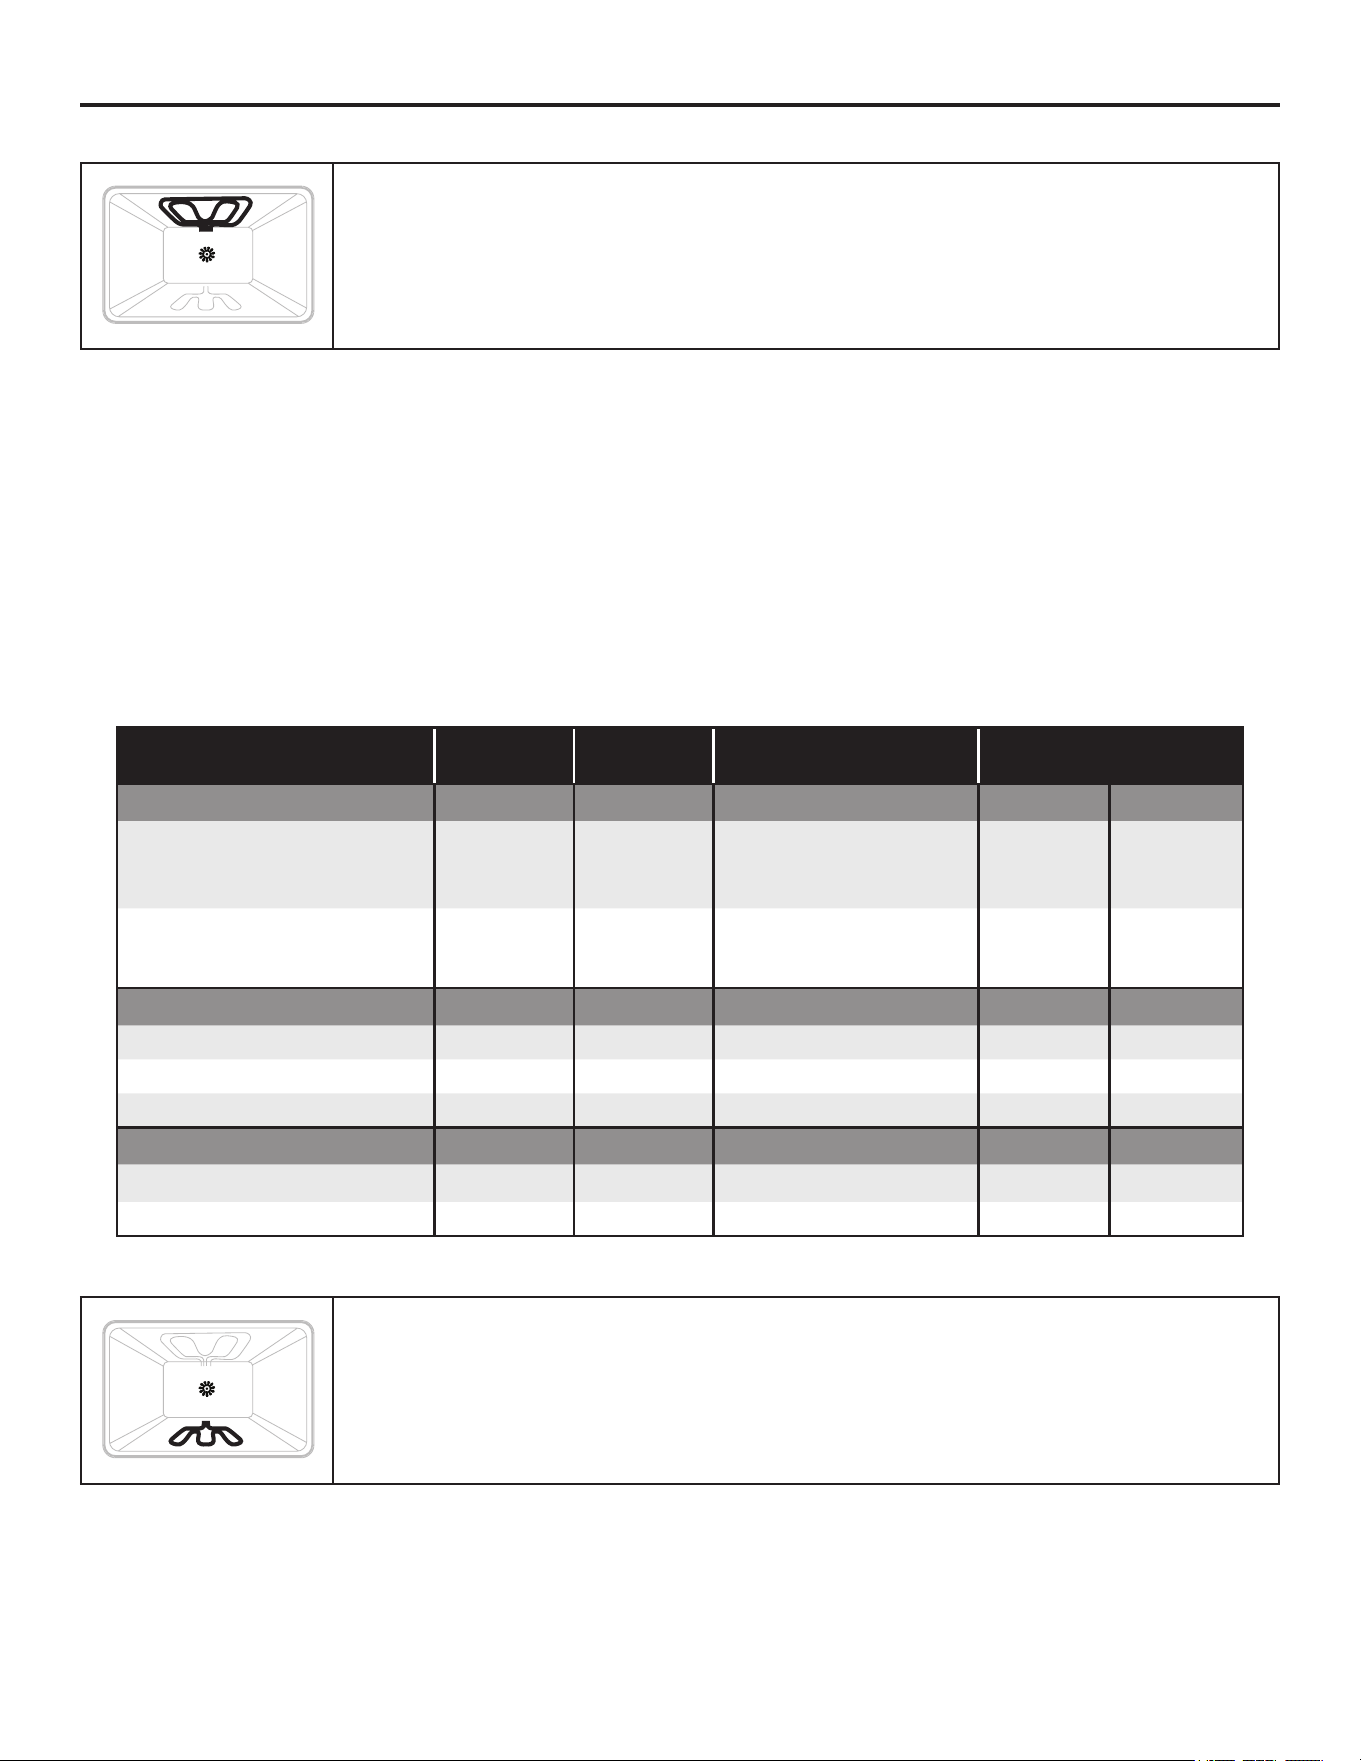
2. Convection Broil
1. Turn the cooking functions knob to the convection BROIL.
2. Rotate the dial to the temperature you wish to use.
3. The oven will begin preheating. Do not open the door while the oven is preheating. When the oven had reached the
set temperature, the indicator light on the control panel will turn off.
4. You can open the door and place food in the oven.
Guidelines:
•Place rack in the required position needed before turning on the oven.
•Use Convection Broil mode with the oven door closed. •When convection broiling, enter your normal broiling temperature.
•Do not preheat oven.
•Use the 2-piece broil pan.
•Turn meats once halfway through the cooking time. See the Convection Broil chart.
•Thicker cuts and unevenly shaped pieces of meat, fish and poultry may cook better at lower broiling temperatures
Oven (continued)
3. Convection Roast:
1. Turn the cooking functions knob to the convection roast.
2. Rotate the dial to the temperature you wish to use.
3. You can open the door and place food in the oven.
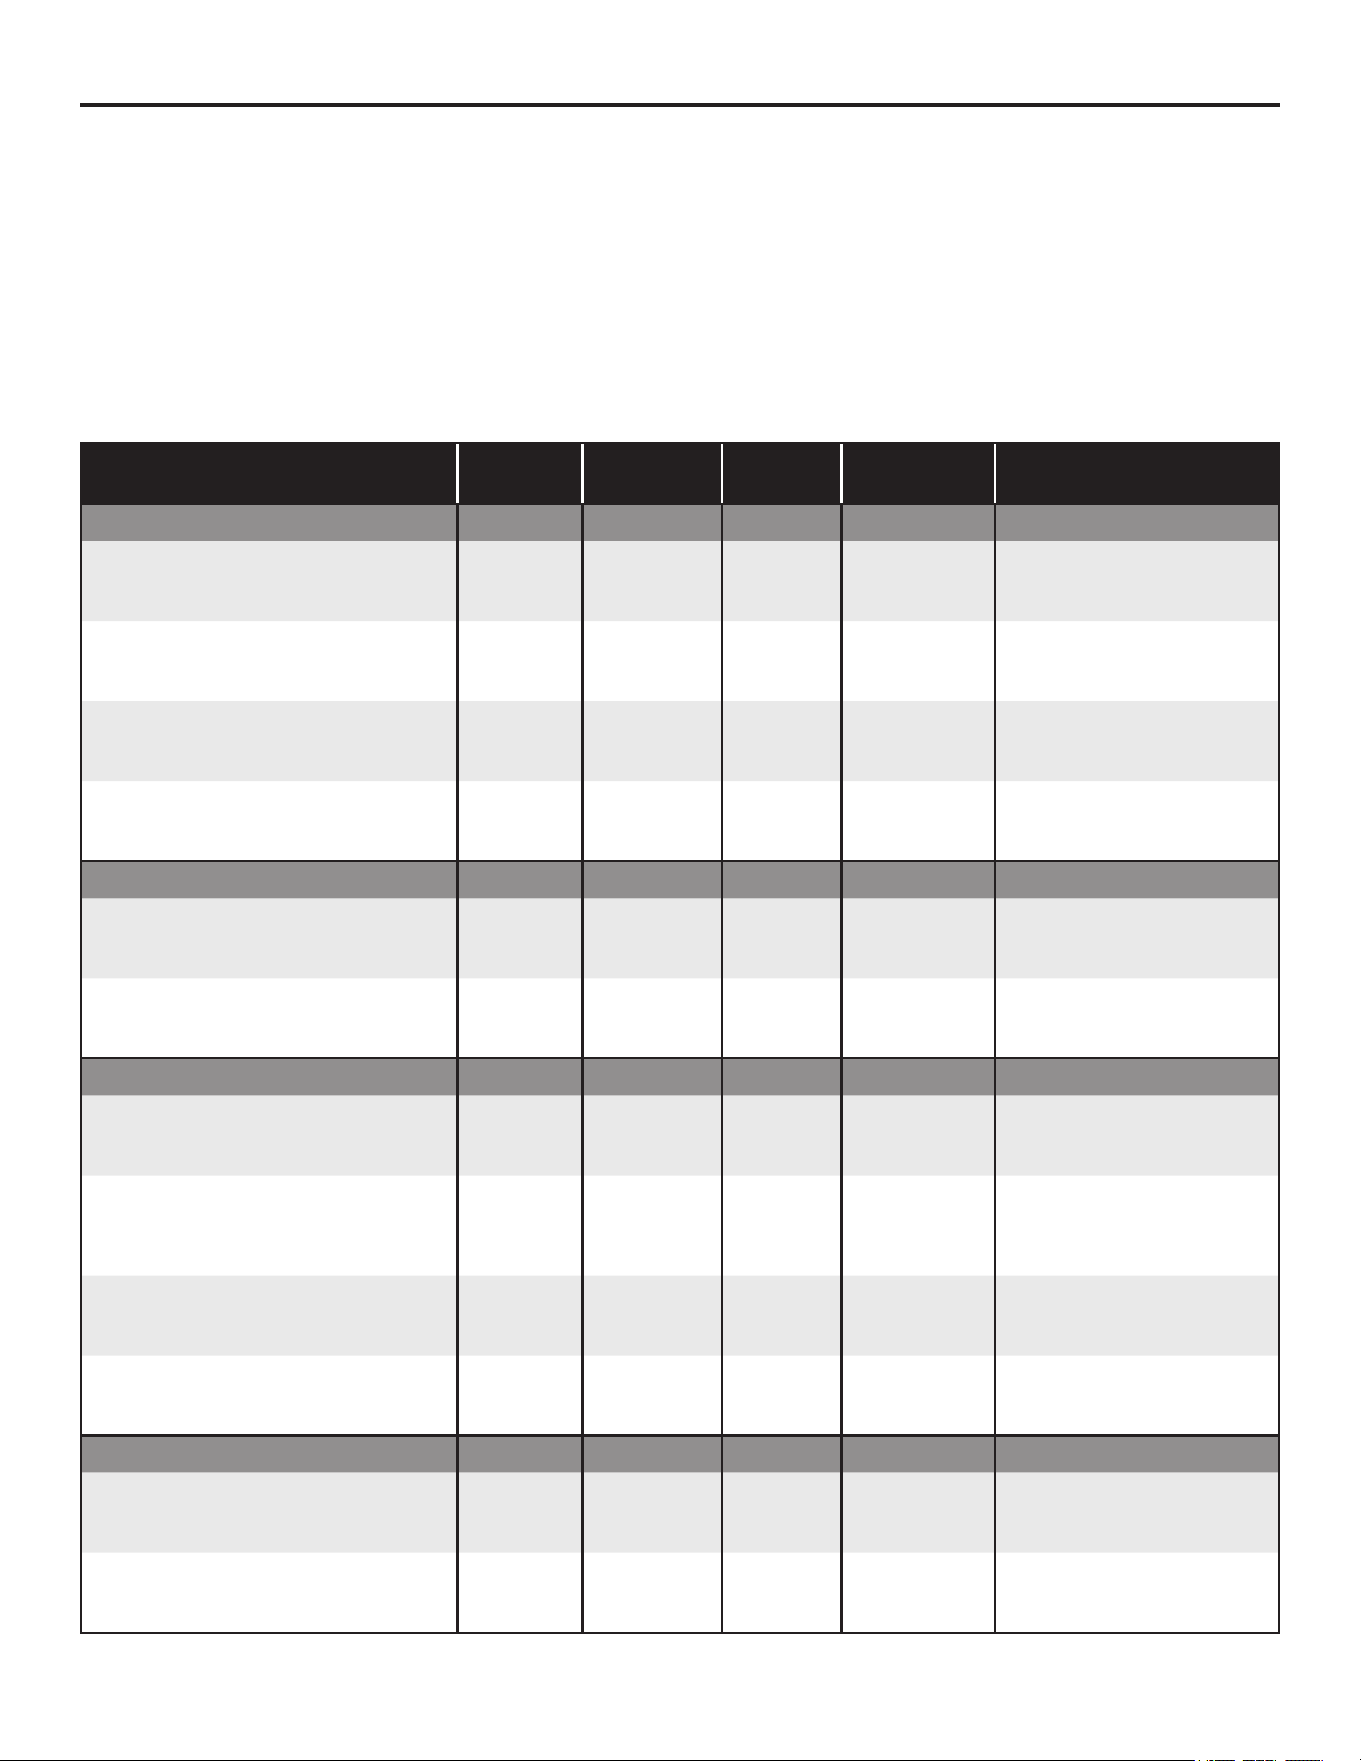
Convection Broil adds the use of convection fan(s) to circulate heated air. Bring the rack to the
middle of the cavity to provide evening cooking.
Food And Thickness
Rack
Position
Broil Setting.
°F (°C)
Level of
Doneness
SIDE 1
Time (Min)
SIDE 2
Time (Min)
BEEF
Steak (1½” or more) 4 450 (235)
-Medium Rare
-Medium
-Well Done
- (9 - 12)
- (11 - 13)
- (18 - 20)
- (8 - 10)
- (10 - 12)
- (16 - 17)
Hamburgers (more than 1") 4 550 (290)
-Medium
-Well Done
- (8 - 11)
- (11-13)
- (5 - 7)
- (8 - 10)
POULTRY
Chicken Quarters 4 450 (235) Well Done (16 - 18) (10 - 13)
Chicken Halves 3 450 (235) Well Done (25 - 27) (15 - 18)
Chicken Breasts 4 450 (235) Well Done (13 - 15) (9 - 13)
PORK
Pork Chops (1¼" or more) 4 450 (235) Well Done (12 - 14) (11 - 13)
Sausage - fresh 4 450 (235) Well Done (4 - 6) (3 - 5)
When convection roasting, turn to your normal roasting temperature. The roasting time should
be 15-30% less than in conventional cooking. It is not necessary to preheat the oven for
Convection Roast.
15
Oven (continued)
Food And Thickness
Weight
(Lb)
Oven Temp.
°F (°C)
Rack
Position
Time
(Min. Per Lb)
Internal
Temp. °F (°C)
BEEF
Rib Roast - 4 - 6 325 (160) 2
16-20
18-22
-145 (63) Medium Rare
-160 (71) medium
Rib Eye Roast (boneless) - 4 - 6 325 (160) 2
16-20
18-22
-145 (63) Medium Rare
-160 (71) medium
Rump, Eye, Tip, Sirloin (boneless) - 3 - 6 325 (160) 2
16-20
18-22
-145 (63) Medium Rare
-160 (71) medium
Tenderloin Roast - 2 - 3 400 (205) 2 15-20 145 (63) Medium Rare
PORK
Loin Roast (boneless or bone-in) - 5 - 8 350 (205) 2 16-20 160 (71) medium
Shoulder - 3 - 6 400 (205) 2 20-25 160 (71) medium
POULTRY
Chicken whole- 3 - 4 375 (190) 2 18-21 180 (82)
Turkey, not stuffed
12 - 15
16 - 20
21 - 25
325 (160)
325 (160)
325 (160)
1
1
1
10-14
9-11
6 - 11
-180 (82)
-180 (82)
-180 (82)
Turkey Breast - 3 - 8 325 (160) 1 15-20 170 (77)
Comish Hen - 1 - 1 ¹⁄2 350 (205) 2
45-75
total
180 (82)
LAMB
Half Leg - 3 - 4 325 (160) 2
22 - 27
28 - 33
-160 (71) medium
-170 (77) well
Whole Leg - 6 - 8 325 (160) 1
22 - 27
28 - 33
-160 (71) medium
-170 (77) well
Guidelines:
• Do not preheat for Convection Roast.
• Roast in a low-sided, uncovered pan.
• When roasting whole chickens or turkey, tuck wings behind back and loosely tie legs with kitchen string.
• Use the 2-piece broil pan for roasting uncovered.
• Double-check the internal temperature of meat or poultry by inserting meat thermometer into another position.
• Large poultry may need to be covered with foil (and pan roasted) during a portion of the roasting time to prevent over-
browning.
• The minimum safe temperature for stuffing in poultry is 165ºF (75ºC
• After removing the food from the oven, cover loosely with foil for 10 to 15 minutes before carving if necessary to
increase the final foodstuff temperature by 5° to 10°F (3° to 6° C
16

CLEANING
IMPORTANT: Before cleaning, make sure all controls are turned off, and the oven and cooktop are cool. Always follow
label instructions on cleaning products. It is recommended that you first use soap, water and a soft cloth or sponge unless
otherwise noted. Do not use abrasive cleaning products.
EXTERIOR PORCELAIN ENAMEL SURFACES
Food spills containing acids, such as vinegar and tomato, should be cleaned as soon as the entire appliance is cool.
These spills may affect the finis
Cleaning Method:
Glass cleaner, mild liquid cleaner or nonabrasive scrubbing pad: Gently clean around the model and serial number
plate because scrubbing may remove numbers.
EXTERIOR STAINLESS STEEL
NOTE: Do not use soap-filled scouring pads, abrasive cleaners, cooktop polishing cream, steel-wool pads, gritty washcloths or some paper towels.
Damage may occur, even with one-time or limited use. Rub in direction of grain to avoid damaging.
Cleaning Methods:
Liquid detergent or all-purpose cleaner: Rinse well with clean water and dry with soft, lint-free cloth.
Stainless Steel Cleaner and Polish
Vinegar for hard water spots
OVEN DOOR EXTERIOR
Cleaning Method:
Glass cleaner and paper towels or nonabrasive plastic scrubbing pad: Apply glass cleaner to soft cloth or sponge,
not directly on panel.
CERAMIC GLASS COOKTOP
IMPORTANT: To avoid damaging the cooktop, do not use steel wool, abrasive powder cleansers, chlorine bleach, rust
remover or ammonia. Ceramic cooktop cleaning materials: cooktop cleaner, cooktop scraper and cooktop cleaning pads
are available at most grocery stores.
1. Remove food/residue with a cooktop scraper. For best results, use the cooktop scraper while the cooktop is still
warm, but not hot to the touch. It is recommended to wear an oven mitt while scraping the warm cooktop.
• Hold the cooktop scraper at approximately a 45° angle
against the glass surface and scrape the residue. It will be necessary to apply pressure in order to remove the
residue.
• Allow the cooktop to cool down completely before proceeding to Step 2.
2. Apply a few dime-sized drops of cooktop cleaner to the affected areas
• Rub cooktop cleaner onto the cooktop surface with a nylon or similar cooktop cleaning pad. Some pressure is
needed to remove stubborn stains.
• Allow the cleaner to dry to a white haze before proceeding to Step 3.
3. Polish with a clean, dry cloth or a clean, dry paper towel.
SMUDGES FROM ALUMINUM BOTTOMED PANS
Cleaning Method:
A cloth dampened in vinegar.
COOKTOP CONTROL KNOBS
• Pull knobs straight out from the control panel to remove.
• When replacing knobs, make sure knobs are turned to the Off position
Cleaning Method:
Soap and water or dishwasher:
NOTE: Do not use steel wool, abrasive cleansers or oven cleaner. Do not soak knobs.
Range Care
17
CONTROL PANEL
Cleaning Method:
Glass cleaner and soft cloth or sponge: Apply glass cleaner to soft cloth or sponge, not directly on panel.
NOTE: Do not use abrasive cleaners, steel-wool pads, gritty washcloths or some paper towels. Damage may occur.
OVEN CAVITY
Food spills should be cleaned when oven cools. At high temperatures, foods react with porcelain, so staining, etching,
pitting or faint white spots can result.
Cleaning Method:
Mild detergent and warm water.
NOTE: Do not use oven cleaners.
OVEN RACKS
Cleaning Method:
Steel-wool pad
OVEN DOOR REMOVAL
For normal oven use, there is no need to remove the oven door. However, should it become necessary to remove the
door, follow the instructions in this section.
IMPORTANT:
› When you are planning to clean the oven doors, it is recommended to do this step several hours after the unit has been
used. Make sure the unit is off and fully cool down
› Keep in mind the oven door is heavy, fragile, and the front door has glass. To avoid the glass from breaking, use both
hands and grasp only the sides of the oven door to remove it.
› Be sure that both levers are securely in place before removing the door.
›Do not force doors open or closed.
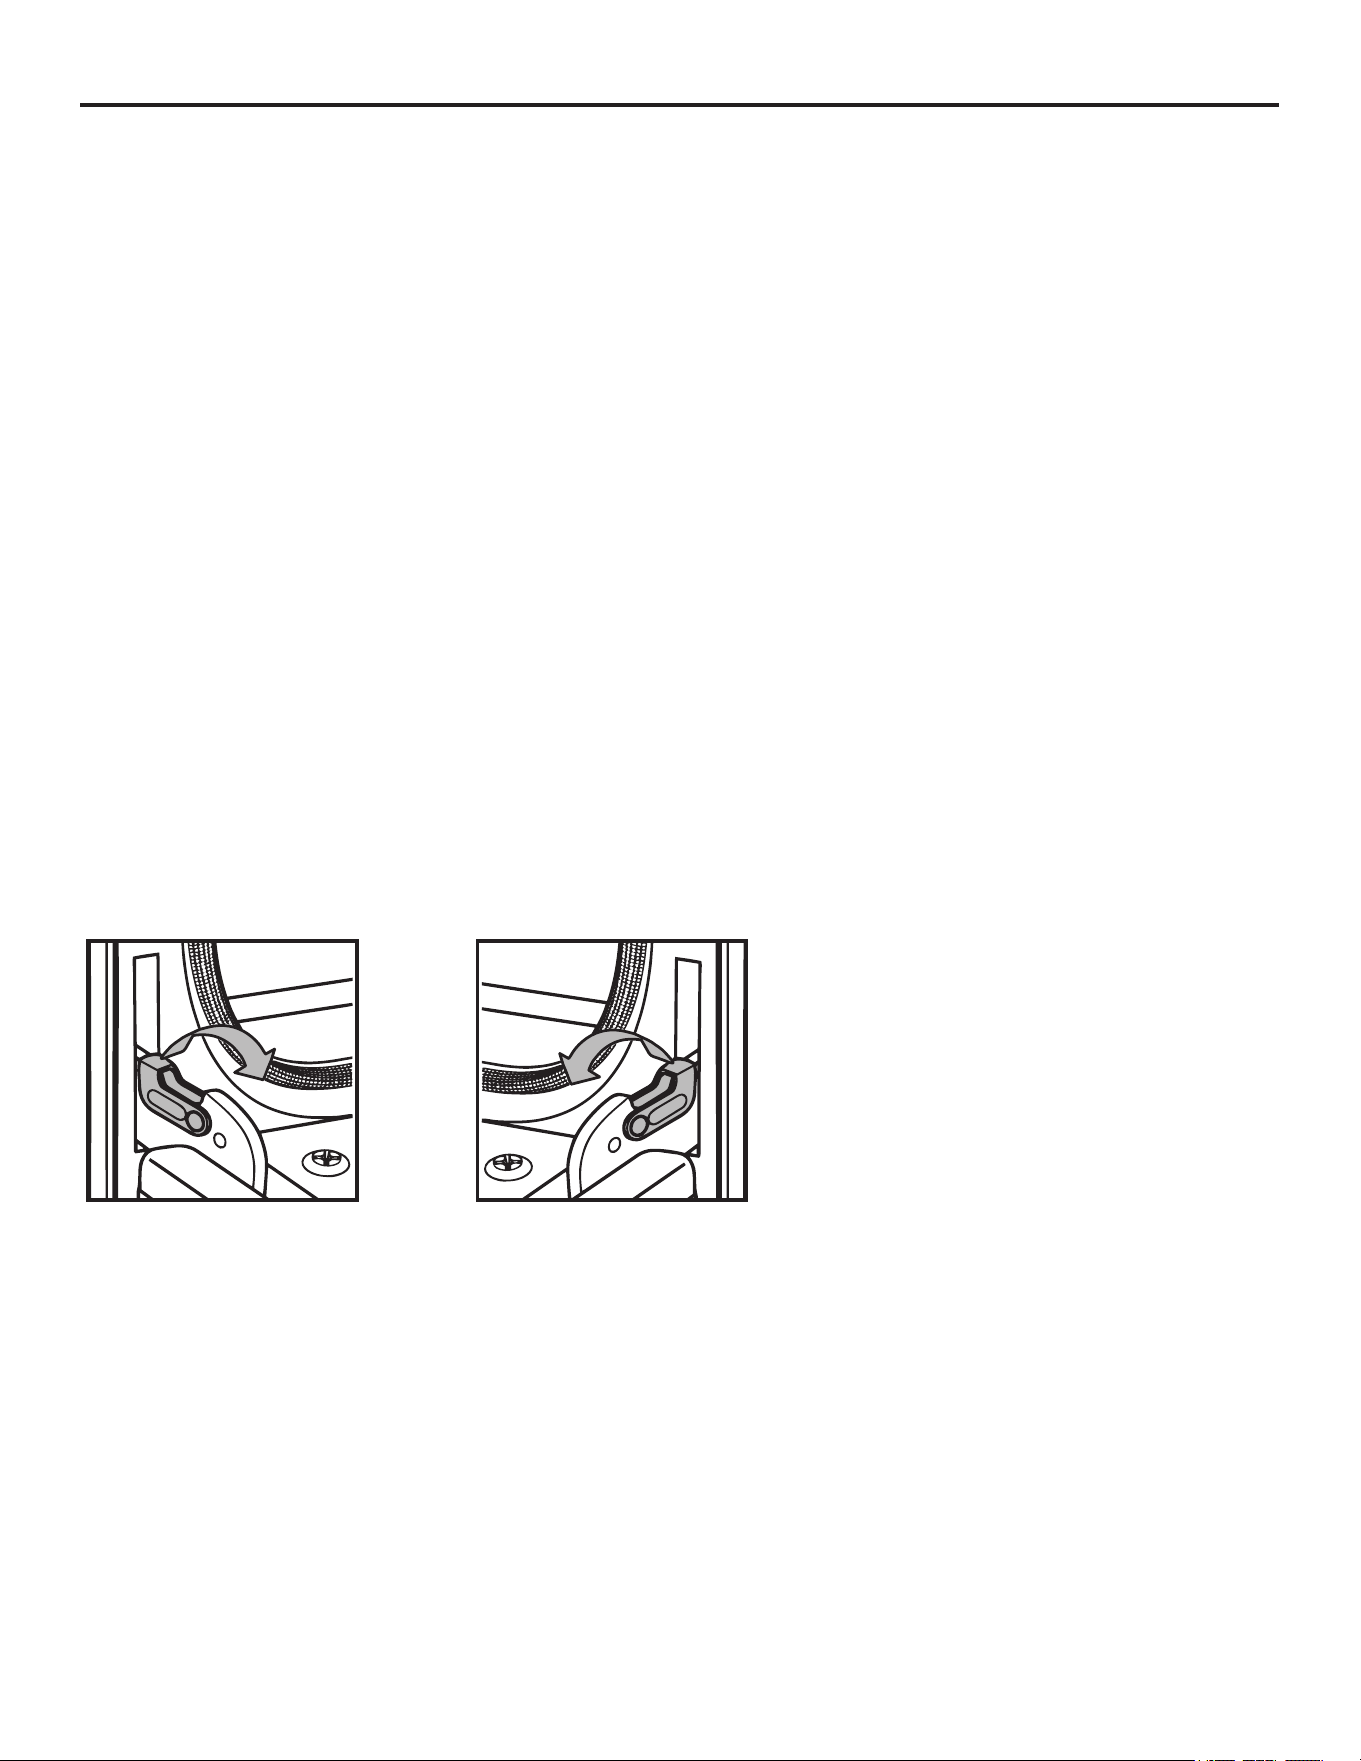
To remove the oven door:
1. Open the oven door completely.
2. Lift up the hinge latch on each side.
3. Close the oven door as far as it will shut.
4. While grasping both outside edges of the oven door, lift up on the door.
5. Continue to push the top of the door closed while pulling the bottom of the door out of the hinge receivers in the door
frame.
Range Care (continued)
Left hinge Right hinge
18
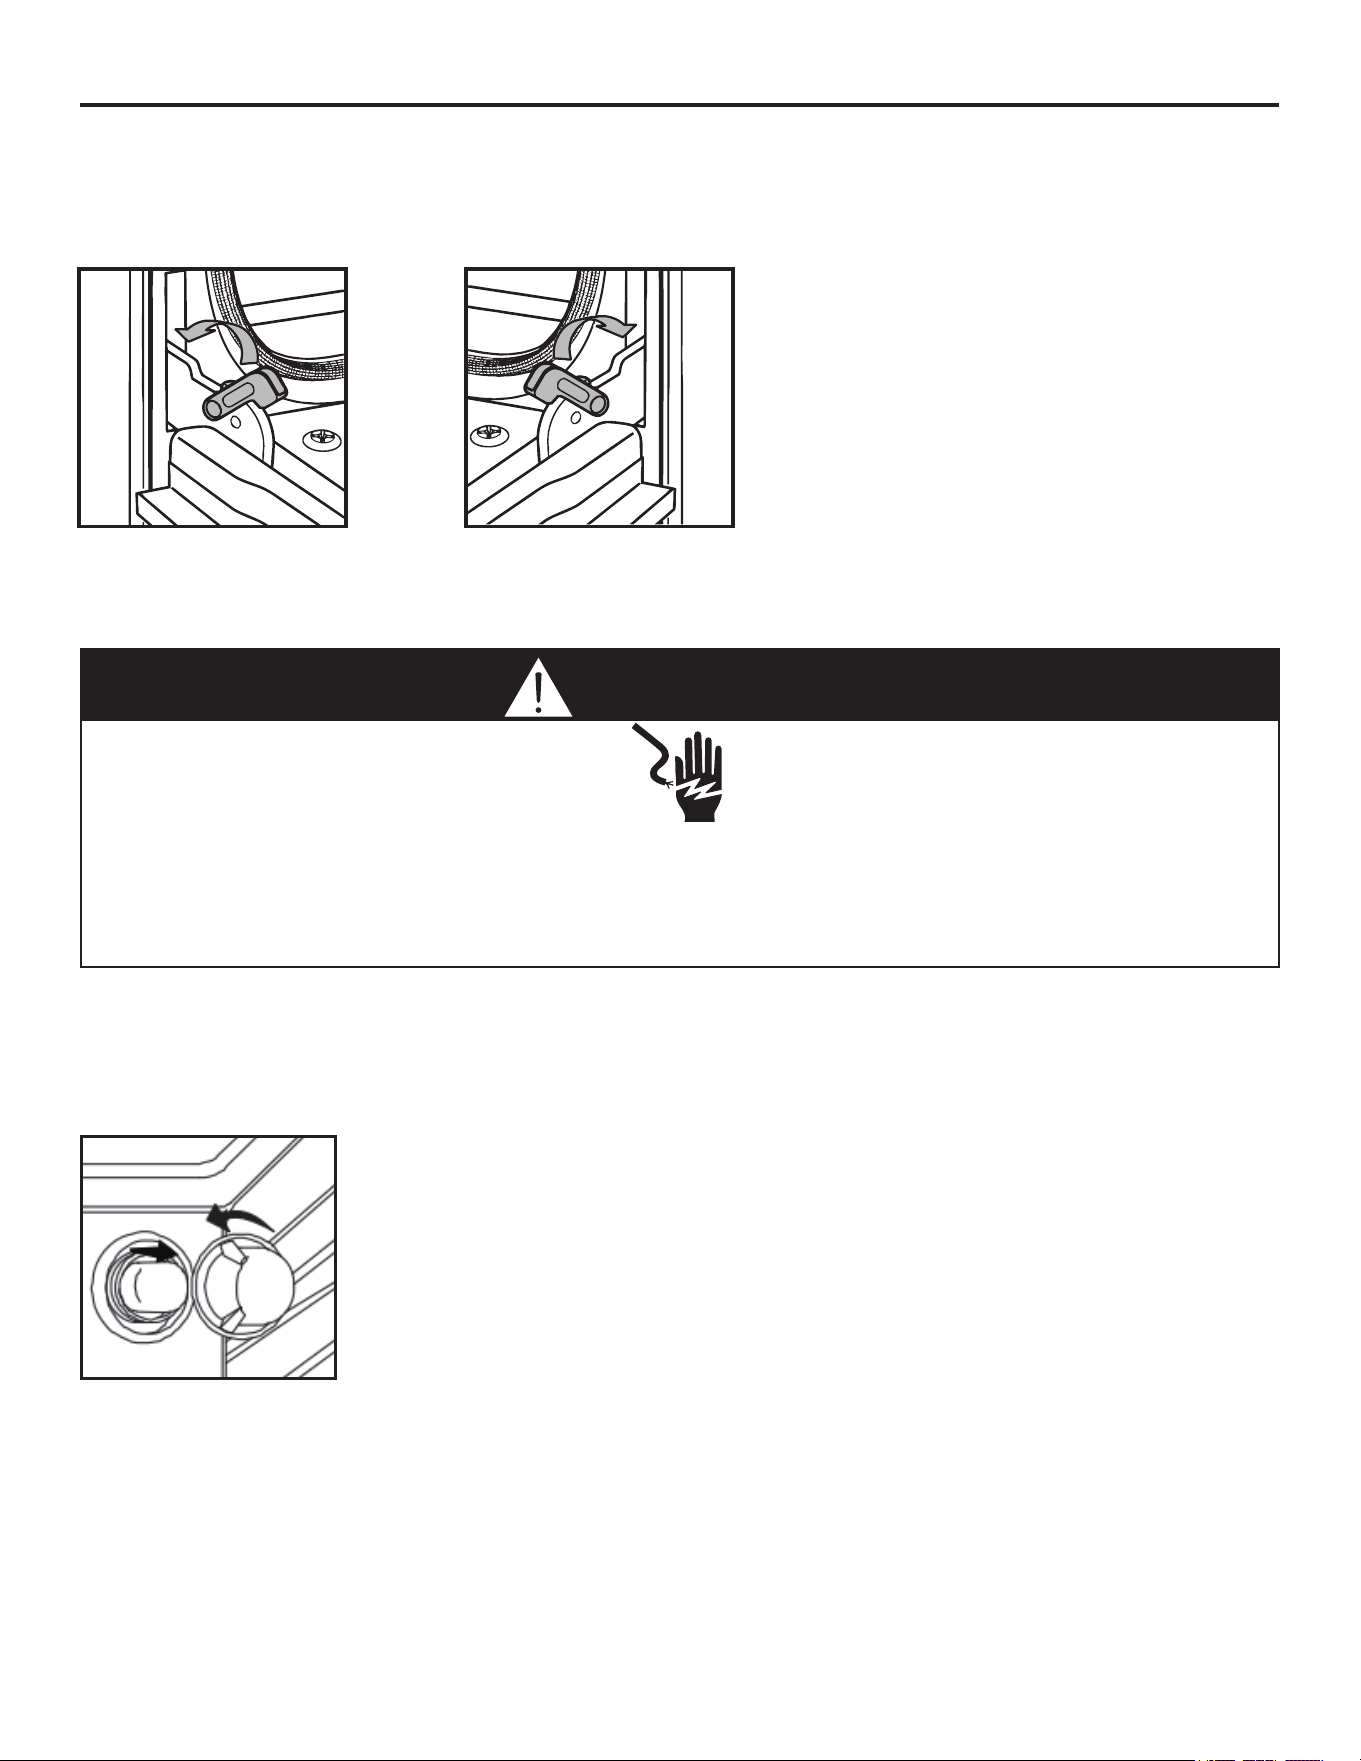
REPLACING AN OVEN LIGHT
The oven light is a standard 25-watt (G9) appliance bulb.
IMPORTANT: Before replacing the bulb, make sure the oven is cool and the controls are turned off
1. Disconnect the power.
2. Remove the bulb cover by turning it anti-clockwise.
3. Remove the burned-out bulb from the socket.
NOTE: To avoid damage or decreasing the life of the new bulb, do not touch the bulb with bare fingers. ear gloves or
use a tissue when replacing the light bulb.
4. Replace the bulb, and then replace the bulb cover.
5. Reconnect the power.
To place back the oven door:
1. Insert both hanger arms into the hinge receivers in the door frame.
2. Slowly open the oven door, and you will feel the door set into place.
3. Move the hinge latches back into the locked position.
4. Check that the door opens and closes freely. If it does not, repeat the door removal and placing the oven door back.
Range Care (continued)
Left hinge Right hinge
WARNING
Electrical Shock Hazard
• Make sure the oven and lights are cool and power to the oven has been turned off before replacing the light bulb(s)
• The lenses must be in place when using the oven. The lenses serve to protect the light bulb from breaking.
• The lenses are made of glass. Handle carefully to avoid breakage.
• Failure to do so could result in death, electric shock, cuts or burns.
19
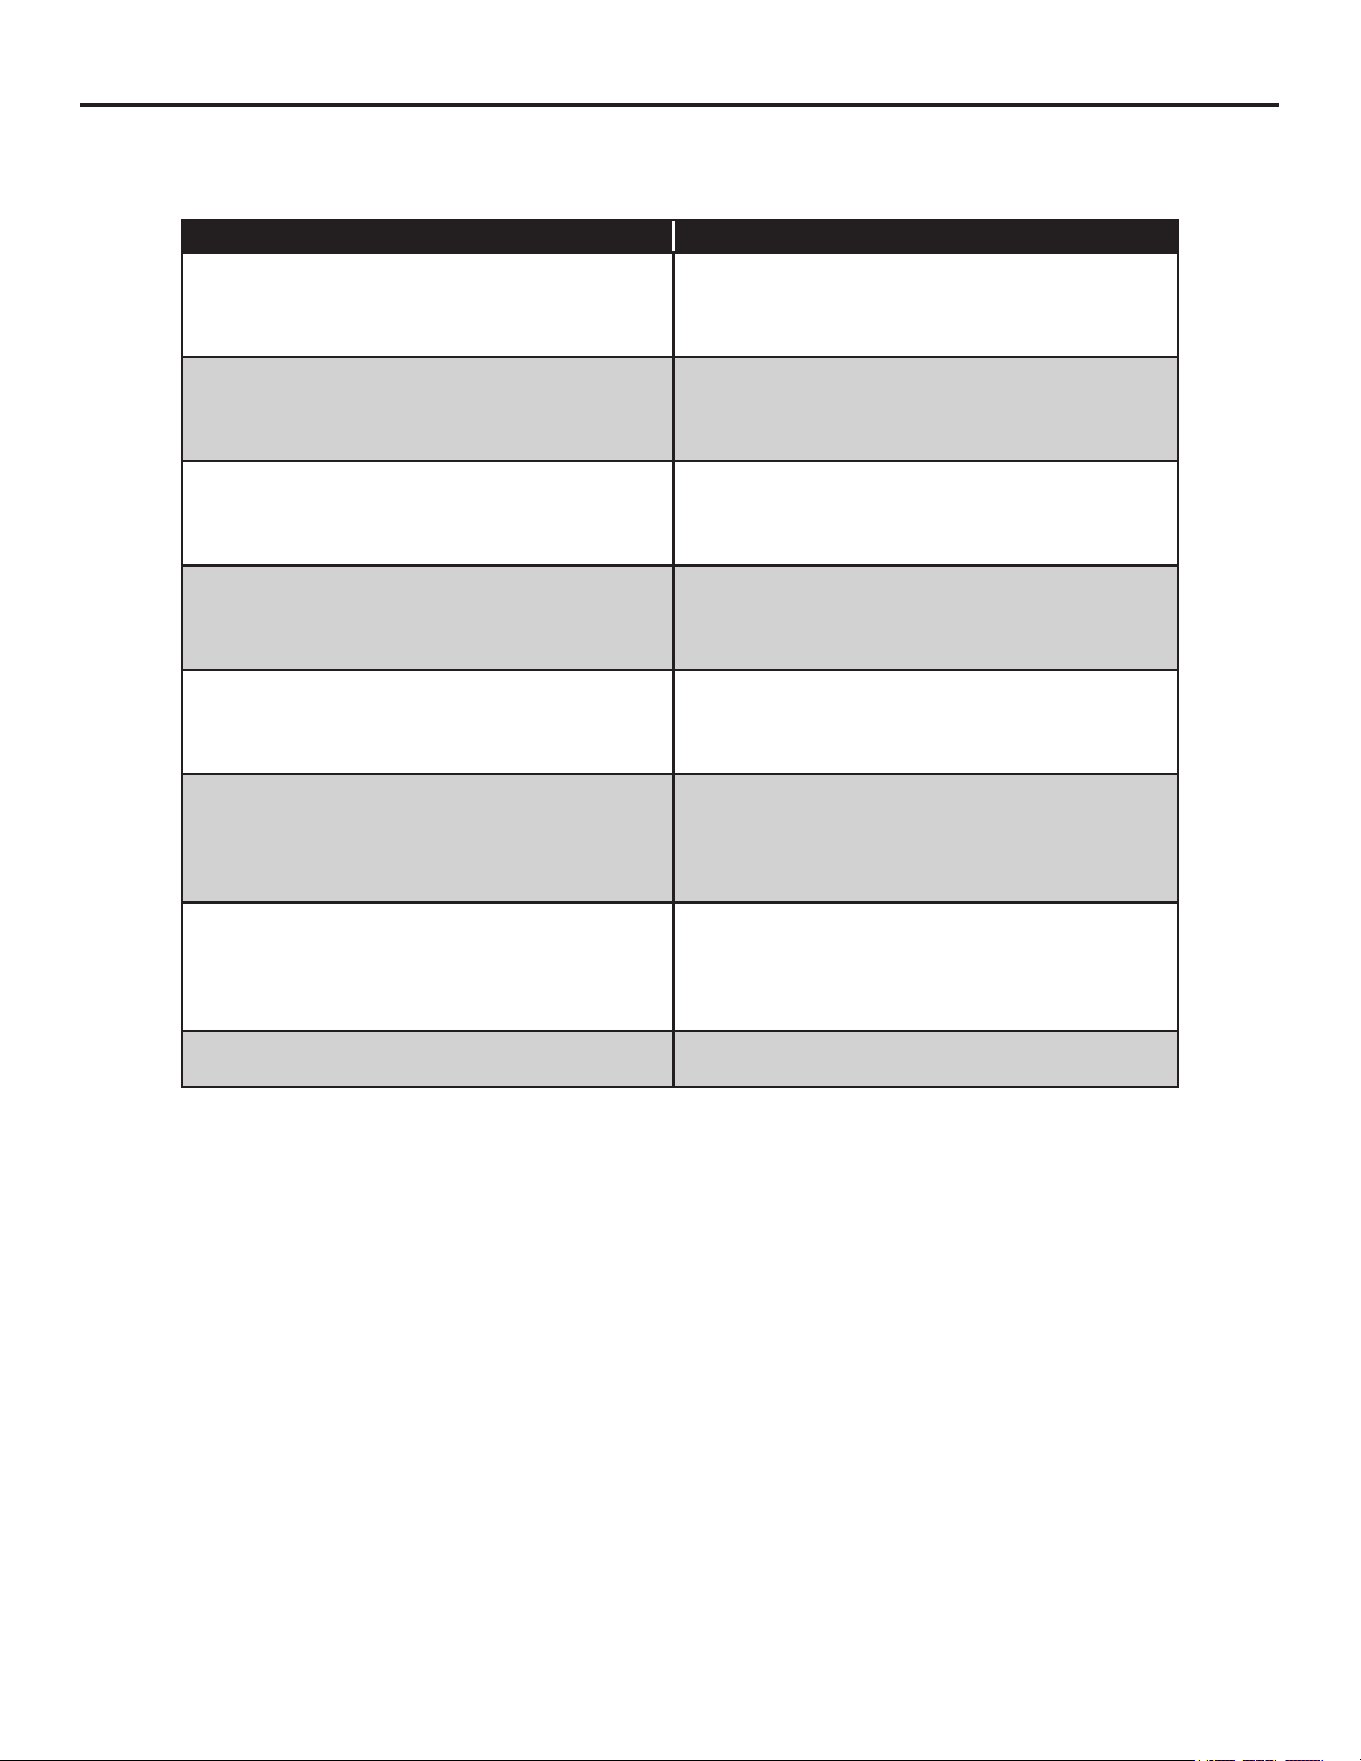
Troubleshooting
• BAKING AND ROASTING PROBLEMS
Before contacting Forno customer service, please check the chart below for cases that may apply to you. It can be simple
misuse of material, shapes, and sizes of bakeware that causes poor results.
Baking Issues Causes
Food browns unevenly • Oven not preheated
• Aluminum foil on oven rack or oven bottom
• Baking utensil too large for recipe
• Pans touching each other or oven walls
Food too brown on bottom • Oven not preheated
• Using glass, dull or darkened metal pans
• Incorrect rack position
• Pans touching each other or oven walls
Food is dry or has shrunk excessively • Oven not preheated
• Using glass, dull or darkened metal pans
• Incorrect rack position
• Pans touching each other or oven walls
Food is baking or roasting too slowly • Oven temperature too high
• Baking time too long
• Oven door opened frequently
• Pan size too large
Piecrusts do not brown on bottom or crust is soggy • Baking time not long enough
• Using shiny steel pans
• Incorrect rack position
• Oven temperature is too low
Cakes pale, flat and may not be done insid • Oven temperature too low
• Incorrect baking time
• Cake tested too soon
• Oven door opened too often
• Pan size may be too large
Cakes high in middle with crack on top • Oven temperature too high
• Baking time too long
• Pans touching each other or oven walls
• Incorrect rack position
• Pan size too small
Piecrust edges too brown • Oven temperature too high
• Edges of crust too thin
20
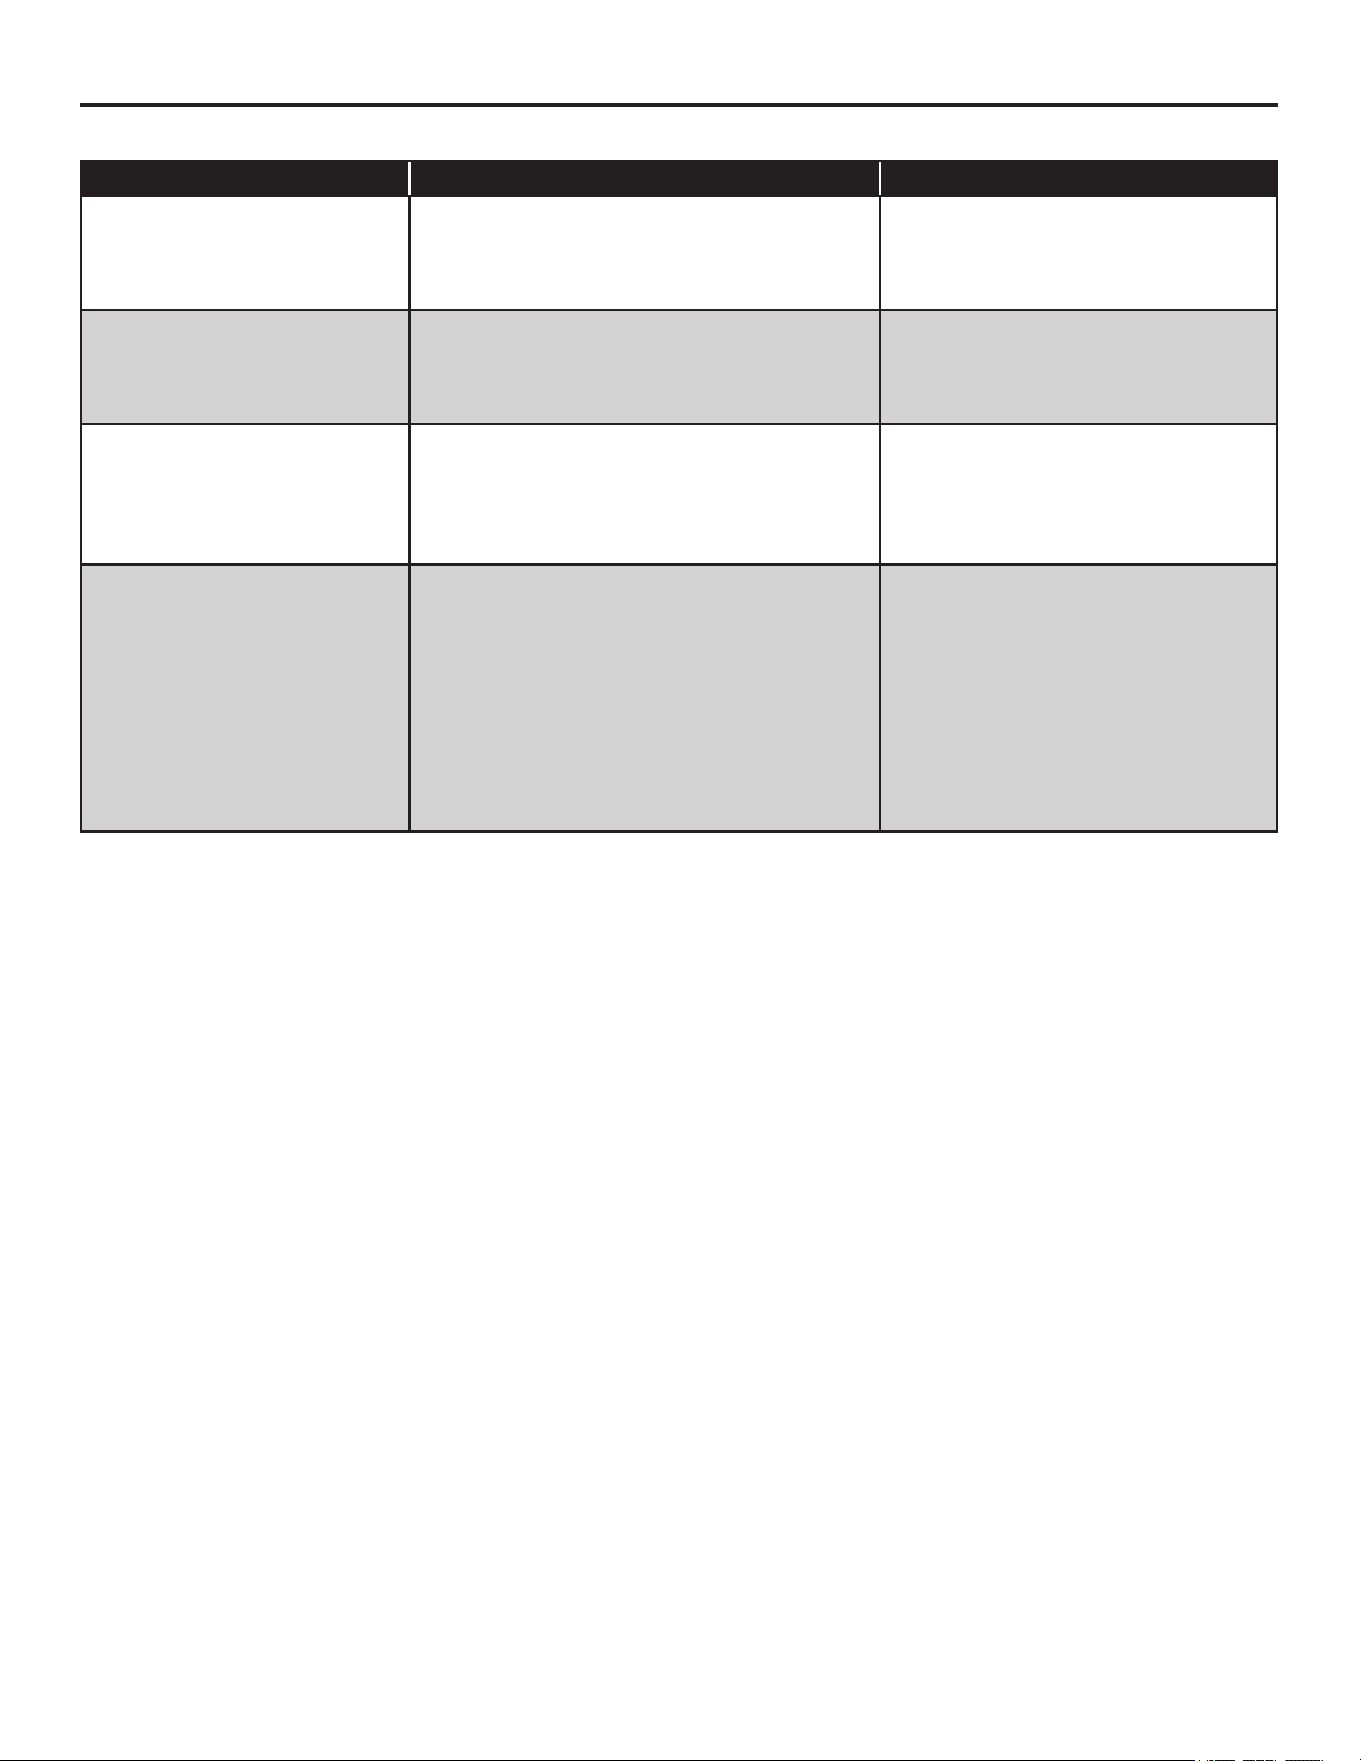
Troubleshooting (continued)
• COOKTOP
Baking Issues Possible Causes Solutions
Heating elements and controls
do not work.
Fuse is blown or circuit breaker is tripped.
No electricity to the cooktop.
Replace the fuse or reset the
circuit breaker. If the problem
continues, call an electrician. Have
electrician check your power supply.
Heating elements do not heat
properly.
Improper cookware is being used. Select proper cookware. See
“Cookware.”
If the problem continues, call for
service.
Heating elements cycle off
even when elements are turned
to their highest settings.
Heating element temperature limiters are
temporarily shutting off the elements due
to exceeding the maximum allowable
temperature
This is a normal operating condition,
especially during rapid heat-up
operations. The element will cycle
back on automatically after it has
cooled sufficient .
Glass ceramic surface is see
through or appears to be red in
color.
Under direct or bright lighting, you will
sometimes be able to see through the glass
and into the chassis due to its transparent
quality. You may also notice a red tint under
these conditions
These are normal properties of black
ceramic glass panels.
21
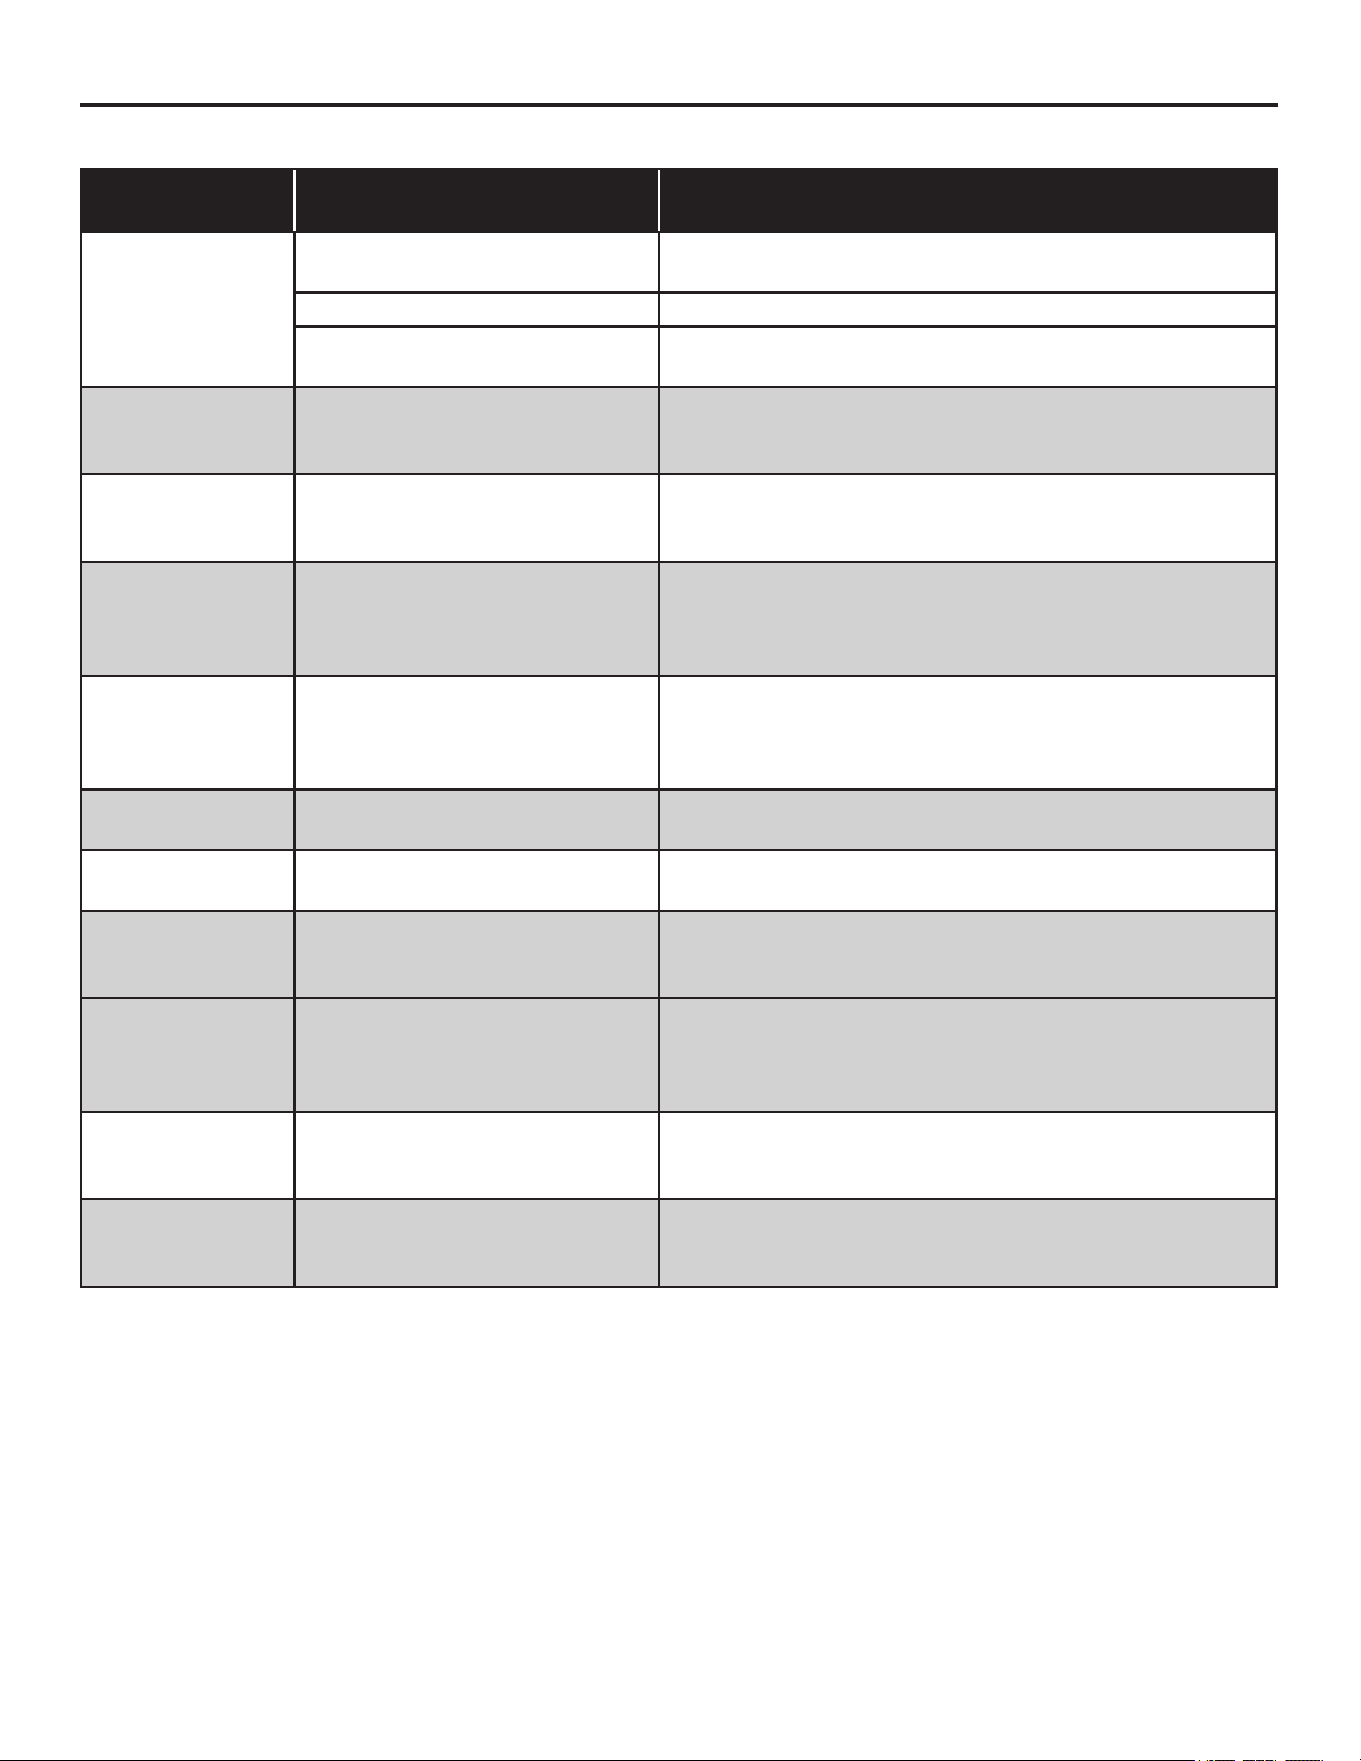
Troubleshooting (continued)
• OVEN
Baking Issues Possible Causes Solutions
Oven is not heating No power to the oven Replace the fuse or reset the circuit breaker. If the problem
continues, call an electrician.
Oven control not turned on Make sure the oven temperature
Oven door is not closed Close the oven door. The heating elements turn off when the
door is opened and remain off until the oven door is closed
Oven is not cooking
evenly
Not using the correct bake ware or
oven rack position
Refer to cook charts for recommended rack position. Always
reduce recipe temperature by 25 °F (15 °C) when baking
with Convention Bake mode.
Oven display stays
Off
Power interruption Turn off power at the main power supply (fuse or breaker
box). Turn breaker back on. If condition persists, call for
service.
Oven mode and
temperature
controls cannot be
set.
The oven door is open. Close the oven door. The oven mode and temperature
controls cannot be set if the oven door is open.
Cooling fan
continues to run
after oven is turned
o
The electronic components have
not yet cooled sufficient
The fan will turn off automatically when the electronic
components have cooled sufficient
Oven light is not
working properly
Light bulb loose or burned-out. Reinsert or replace the light bulb. Touching the bulb with
fingers may cause the bulb to burn out
Oven light stays on Door is not closing completely Check for obstruction in oven door. Check to see if hinge is
bent or door switch broken.
Cannot remove
lens cover
Soil build-up around the lens cover. Wipe lens cover area with a clean, dry towel prior to
attempting to remove the lens cover.
Clock and timer
are not working
properly
No power to the oven Check the circuit breaker or fuse box to your house. Make
sure there is proper electrical power to the oven.
Excessive Moisture When using bake mode, preheat the oven first. Convection
Bake and Convection Roast will eliminate any moisture in
the oven.
Porcelain Chips Porcelain interior is bumped by
oven racks
When removing and replacing oven racks, always tilt
racks upward and do not force them to avoid chipping the
porcelain.
22

Warranty
What this limited warranty covers:
The Warranty coverage provided by Forno Appliances in this
statement applies exclusively to the original Forno appliance
(“Product”) sold to the consumer (“Purchaser”) by an authorized
Forno dealer/distributor/retailer, purchased and installed in the
United States or Canada, and which has always remained within
the original country of purchase (the United States or Canada).
Warranty coverage is activated on the date of the Product’s
original retail purchase and has a duration of two (2) years.
Warranty coverage is non-transferable. In the event of
replacement of parts or of the entire product, the replacement
Product (or parts) shall assume the remaining original Warranty
activated with the original retail purchase document. This
Warranty shall not be extended with respect to such replacement.
Forno Appliances will repair or replace any component/part which
fails or proves defective due to materials and/or workmanship
within 2 years of the date of the original retail purchase and
under conditions of ordinary residential, non-commercial use.
Repair or replacement will be free of charge, including labor at
standard rates and shipping expenses. Purchaser is responsible
for making the Product reasonably accessible for service. Repair
service must be performed by a Forno Authorized Service
company during normal working hours.
Important
Retain proof of original purchase to establish warranty period.
Forno’s liability on any claim of any kind, with respect to the
goods and/or services provided, shall in no event exceed the
value of the goods or service or part there of which has given rise
to the claim.
30-Day Cosmetic Warranty
The Purchaser must inspect the product at the time of delivery.
Forno warrants that the Product is free from manufacturing
defects in materials and workmanship for a period of thirty (30)
days from date of the original retail purchase of the Product.
This coverage includes:
• Paint blemishes
• Chips
• Macroscopic finish defect
Cosmetic warranty does NOT cover:
• Issues resulting from incorrect transport, handling and/
or installation (e.g.: dents, broken, warped or deformed
structures or components, cracked or otherwise damaged
glass components);
• Slight color variations on painted/enameled components;
• Differences caused by natural or artificial lighting, locati
or other analogous factors; > stains/corrosion/discoloration
caused by external substances and/or environmental factors;
> labor costs, display, floo , B-stock, out- of-box,“as is”
appliances and demo units.
How to receive service
To receive warranty services, the Purchaser must contact the
Forno Support department in order to determine the problem
and the required service procedures. Troubleshooting with a
customer service representative will be necessary before moving
forward with the service. Model number, serial number and date
of original retail purchase will be requested.
Warranty Exclusions: What Is Not Covered.
• Use of the Product in any non-residential, commercial
application.
• Use of the Product for anything other than its intended
purpose.
• Repair services provided by anyone other than a Forno
Authorized Service agency.
• Damages or repair services to correct services provided by
unauthorized parties or the use of unauthorized parts.
• Installation not in accordance with local/state/city/county fir
codes, electrical codes, gas codes, plumbing codes, building
codes, laws or regulations.
• Defects or damage due to improper storage of the Product.
• Defects, damage or missing parts on products sold out of the
original factory packaging or from displays. > Service calls or
repairs to correct an incorrect installation of the Product and/
or related accessories.
• Replacement of parts/service calls to connect, convert or
otherwise repair the electrical wiring and/or gas line in order
to properly use the product.
• Replacement of parts/service calls to provide instructions
and information on the use of the Product.
• Replacement of parts/service calls to correct issues arising
from the product being used in a manner other than what is
normal and customary for residential use.
• Replacement of parts/service calls due to wear and tear of
components such as seals, knobs, pan supports, shelving,
cutlery baskets, buttons, touch displays, scratched or broken
ceramic-glass tops.
• Replacement of parts/service calls for lack of/improper
maintenance, including but not limited to: build up of
residues, stains, scratches, discoloration, corrosion.
• Defects and damages arising from accidents, alteration,
misuse, abuse or improper installation.
• Defects and damages arising from Product transport,
logistics and handling. Inspection of the product must be
made at time of delivery. Following receipt and inspection,
the selling dealer/delivery company must be notified of an
issues arising from handling, transport and logistics.
• Defects and damages arising from external forces beyond
the control of Forno Appliances, including but not limited
to wind, rain, sand, fires, floods, mudslides, freezi
temperatures, excessive moisture or extended exposure
to humidity, power surges, lightning, structural failures
surrounding the appliance and other acts of God.
• Products whose serial number has been altered/damaged/
tampered with. In no case shall Forno be held liable
or responsible for damage to surrounding property,
including furniture, cabinetry, flooring, panels, and othe
structures surrounding the Product. Forno is neither
liable nor responsible for the Product if it is located in a
remote area or an area where certified trained technician
are not reasonably available. Purchaser must bear any
transportation and delivery costs of the Product to the
nearest Authorized Service Center or the additional travel
expenses of a certified trained technicia
23

Warranty (Continued)
THERE ARE NO EXPRESS WARRANTIES OTHER THAN THOSE LISTED AND DESCRIBED ABOVE, AND NO WARRANTIES, EITHER EXPRESS OR IMPLIED,
INCLUDING, BUT NOT LIMITED TO, ANY IMPLIED WARRANTIES OF MERCHANTABILITY OR FITNESS FOR A PARTICULAR PURPOSE THAT SHALL APPLY
AFTER THE EXPRESS WARRANTY PERIODS STATED ABOVE, AND NO OTHER EXPRESS WARRANTY OR GUARANTEE GIVEN BY ANY PERSON, FIRM
OR CORPORATION WITH RESPECT TO THIS PRODUCT SHALL BE BINDING ON FORNO. FORNO SHALL NOT BE LIABLE FOR LOSS OF REVENUE OR
PROFITS, FAILURE TO REALIZE SAVINGS OR OTHER BENEFITS, TIME AWAY FROM WORK, MEALS, LOSS OF FOOD OR BEVERAGES, TRAVELING OR
HOTEL EXPENSES, EXPENSES TO RENT OR PURCHASE APPLIANCES, REMODELING/CONSTRUCTION EXPENSES IN EXCESS OF DIRECT DAMAGES
WHICH ARE UNDENIABLY CAUSED EXCLUSIVELY BY FORNO OR ANY OTHER SPECIAL, INCIDENTAL OR CONSEQUENTIAL DAMAGES CAUSED BY THE
USE, MISUSE OR INABILITY TO USE THIS PRODUCT, REGARDLESS OF THE LEGAL THEORY ON WHICH THE CLAIM IS BASED, AND EVEN IF FORNO
HAS BEEN ADVISED OF THE POSSIBILITY OF SUCH DAMAGES. NOR SHALL RECOVERY OF ANY KIND AGAINST FORNO BE GREATER IN AMOUNT
THAN THE PURCHASE PRICE OF THE PRODUCT SOLD BY FORNO AND CAUSING THE ALLEGED DAMAGE. WITHOUT PREJUDICE TO THE FOREGOING,
PURCHASER ASSUMES ALL RISK AND LIABILITY FOR LOSS, DAMAGE OR INJURY TO PURCHASER AND PURCHASER’S PROPERTY AND TO OTHERS
AND THEIR PROPERTY ARISING FROM THE USE, MISUSE, OR INABILITY TO USE THIS PRODUCT SOLD BY FORNO THAT IS NOT A DIRECT RESULT OF
NEGLIGENCE ON THE PART OF FORNO THIS LIMITED WARRANTY SHALL NOT EXTEND TO ANYONE OTHER THAN THE ORIGINAL PURCHASER OF THIS
PRODUCT, IS NON-TRANSFERABLE, AND STATES YOUR EXCLUSIVE REMEDY.
24