

Technical Support and E-Warranty Certificate www.vevor.com/support
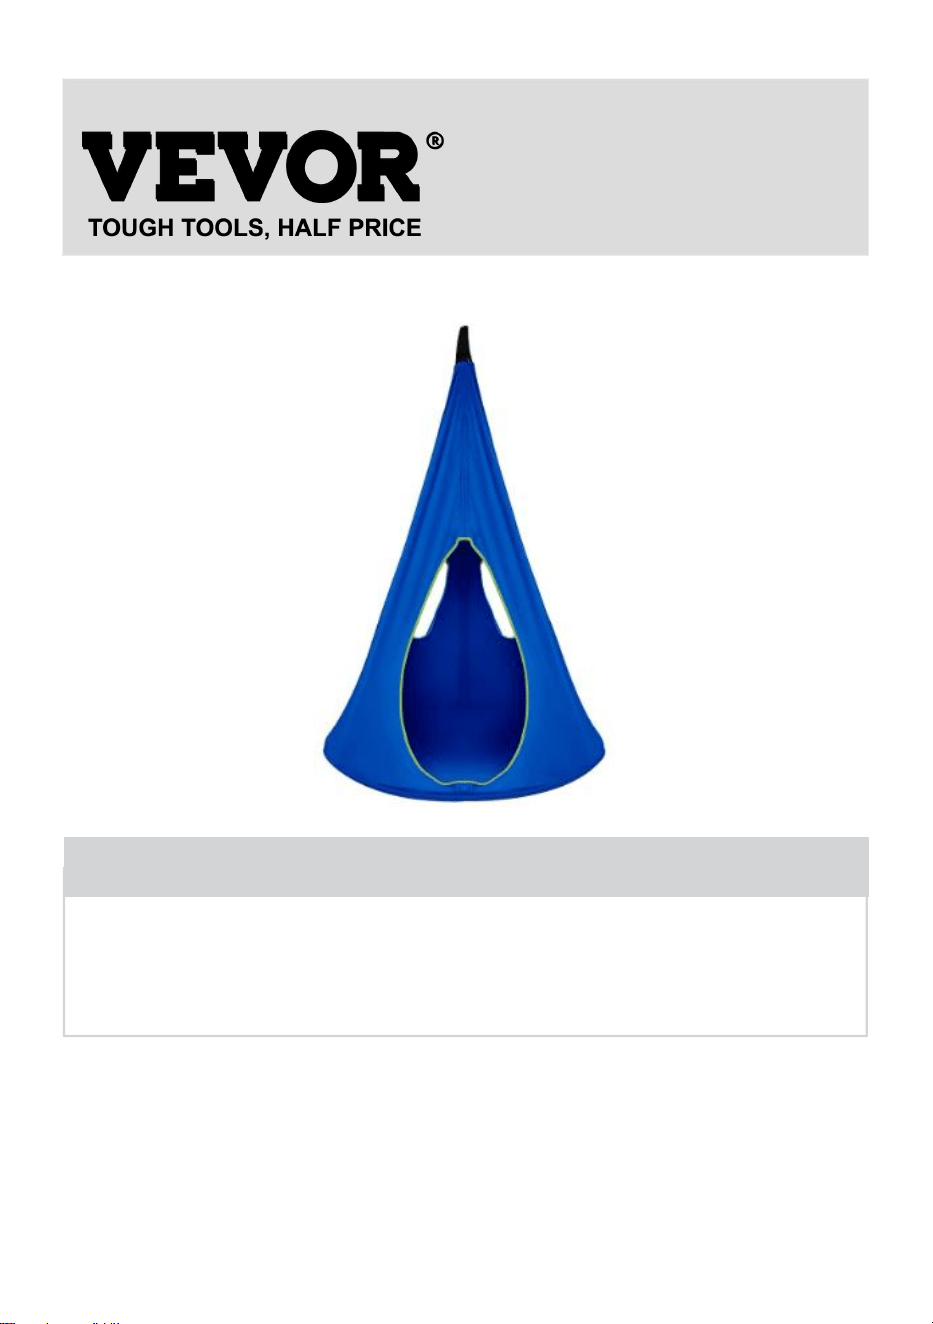
HAMMOCK CHAIR
USER MANUAL
We continue to be committed to provide you tools with competitive price.
"Save Half","Half Price" or any other similar expressions used by us only represents an
estimate of savings you might benefit from buying certain tools with us compared to the major
top brands and does not necessarily mean to cover all categories of tools offered by us. You
are kindly reminded to verify carefully when you are placing an order with us if you are
actually saving half in comparison with the top major brands.
1
LYY006 /LYY007 /LYY008
Have product questions? Need technical support? Please feel free to
contact us:
Technical Support and E-Warranty Certificate
www.vevor.com/support
NEED HELP? CONTACT US!
This is the original instruction,please read all manual instructions carefully
before operating. VEVOR reserves a clear interpretation of our user
manual. The appearance of the product shall be subject to the product
you received. Please forgive us that we won't inform you again if there
are any technology or software updates on our product.
HAMMOCK CHAIR

2
Safety precautions
WARNING:
Read this instructions before using this product. Failure to do so can result in
serious injury. the basic precautions should always be followed,including the
following:
•Reconfirm that all nuts,bolts,and screws are tight and secure.
•Grease hardware and hanging points regularly.
•Check hardware and hanging points for rust which could affect their strength.
Replace if necessary.
•Check seat,air cushion,and tent for excessive wear and tear.
•Check ropes for fraying,wear,or breakage.Replace if necessary.
•Do not leave the tent swing outdoors for an extended period of time.
•In winter season,it is recommended that the tent swing is stored indoors.
•To clean,wipe down with a damp cloth.
•Store in a dry place away from direct sunlight.
•Cover or store in a bag if unused for an extended period of time.
SAVE THESE INSTRUCTIONS
4
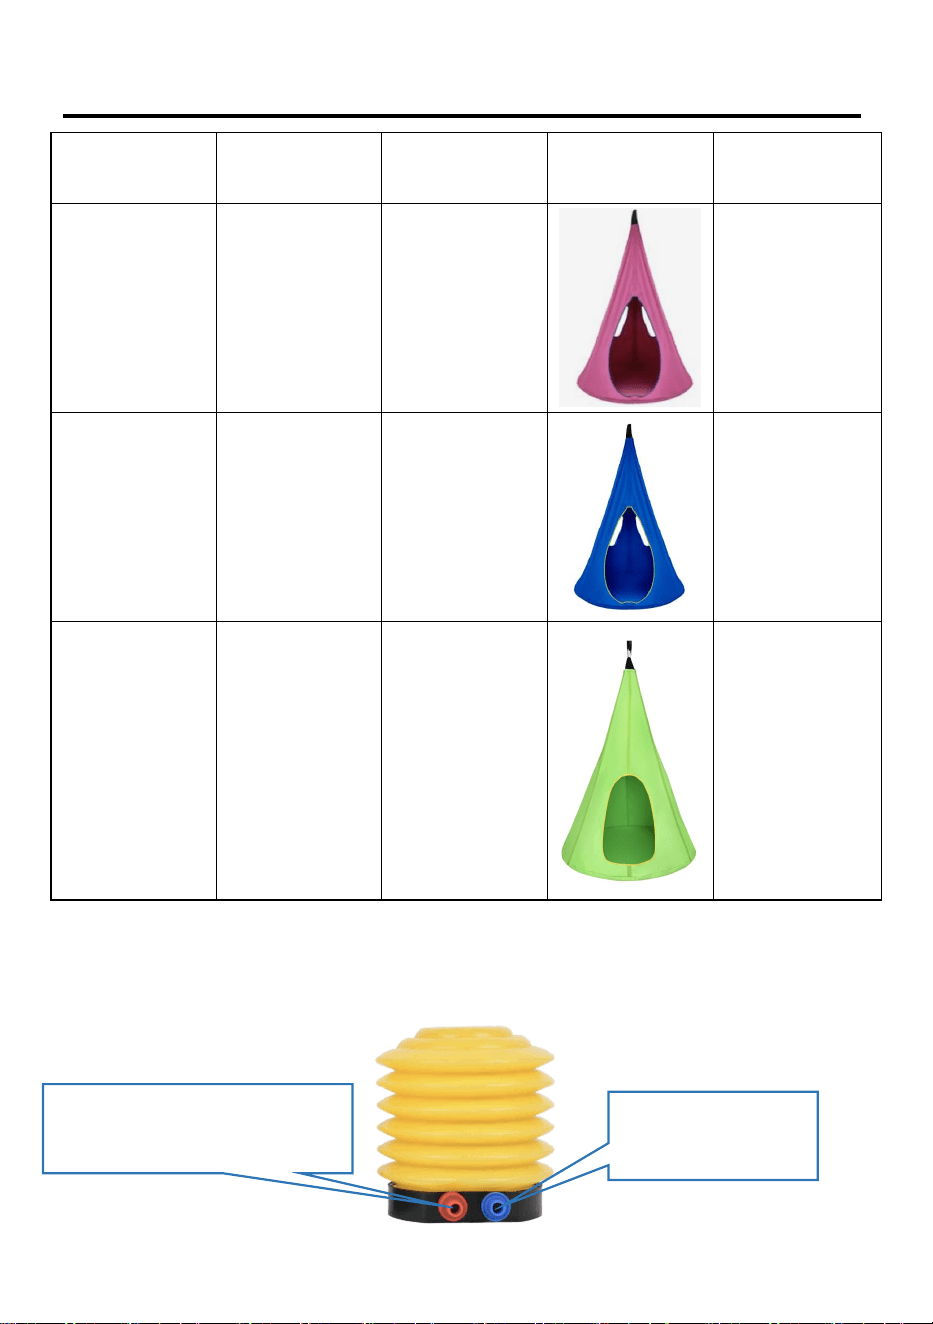
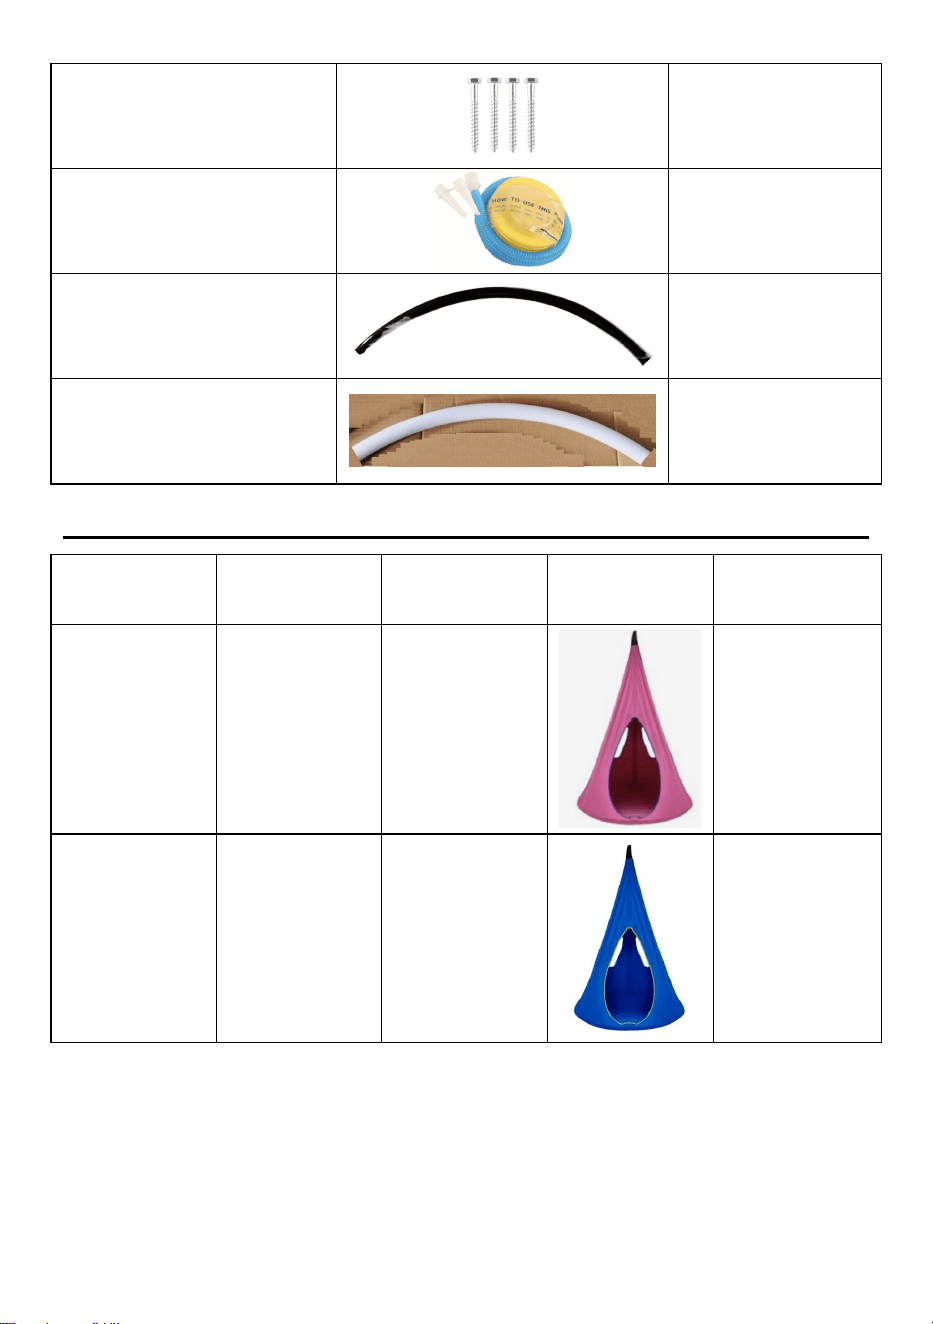
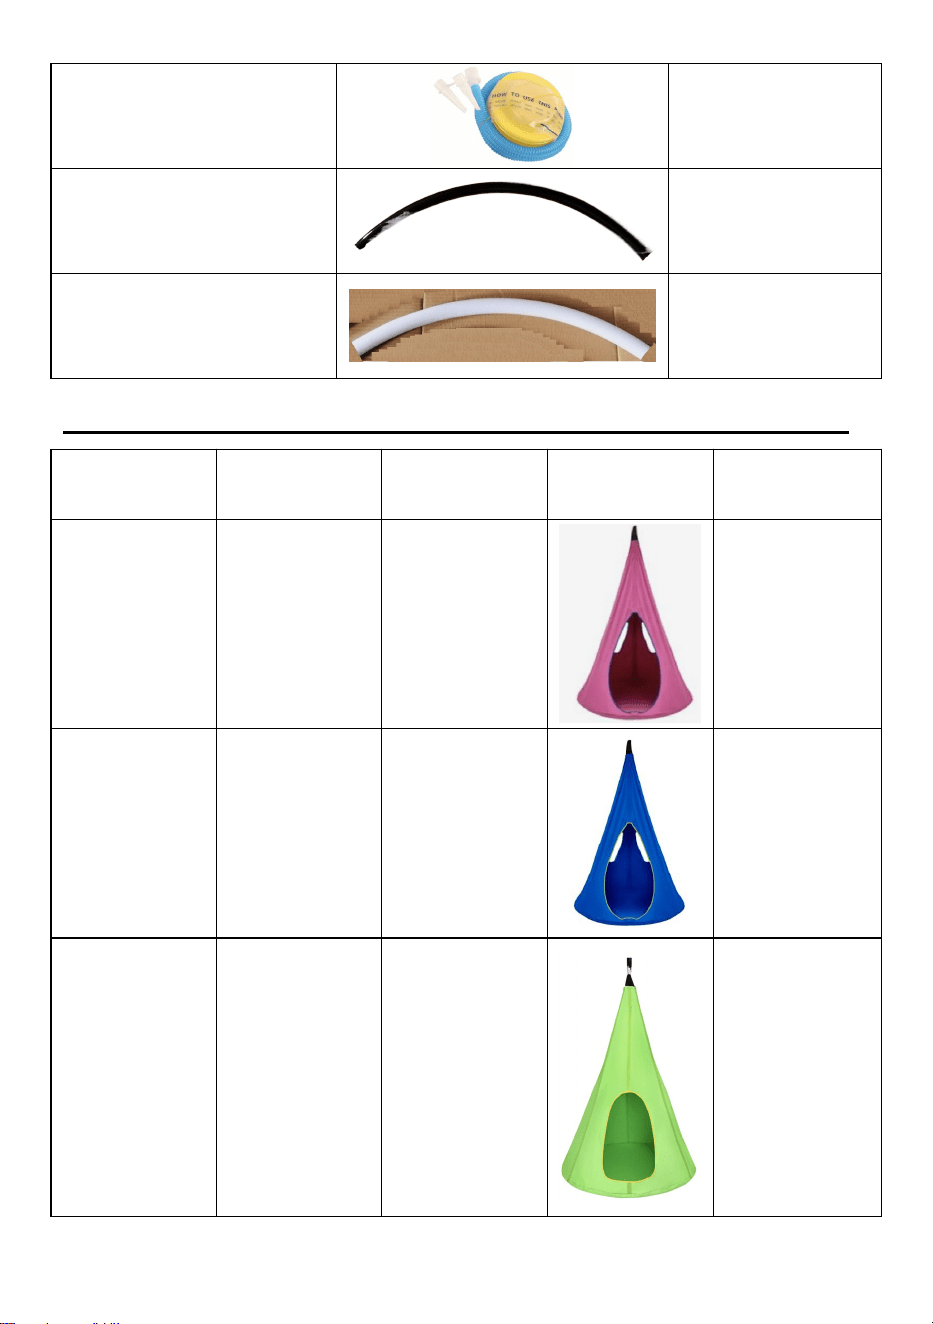
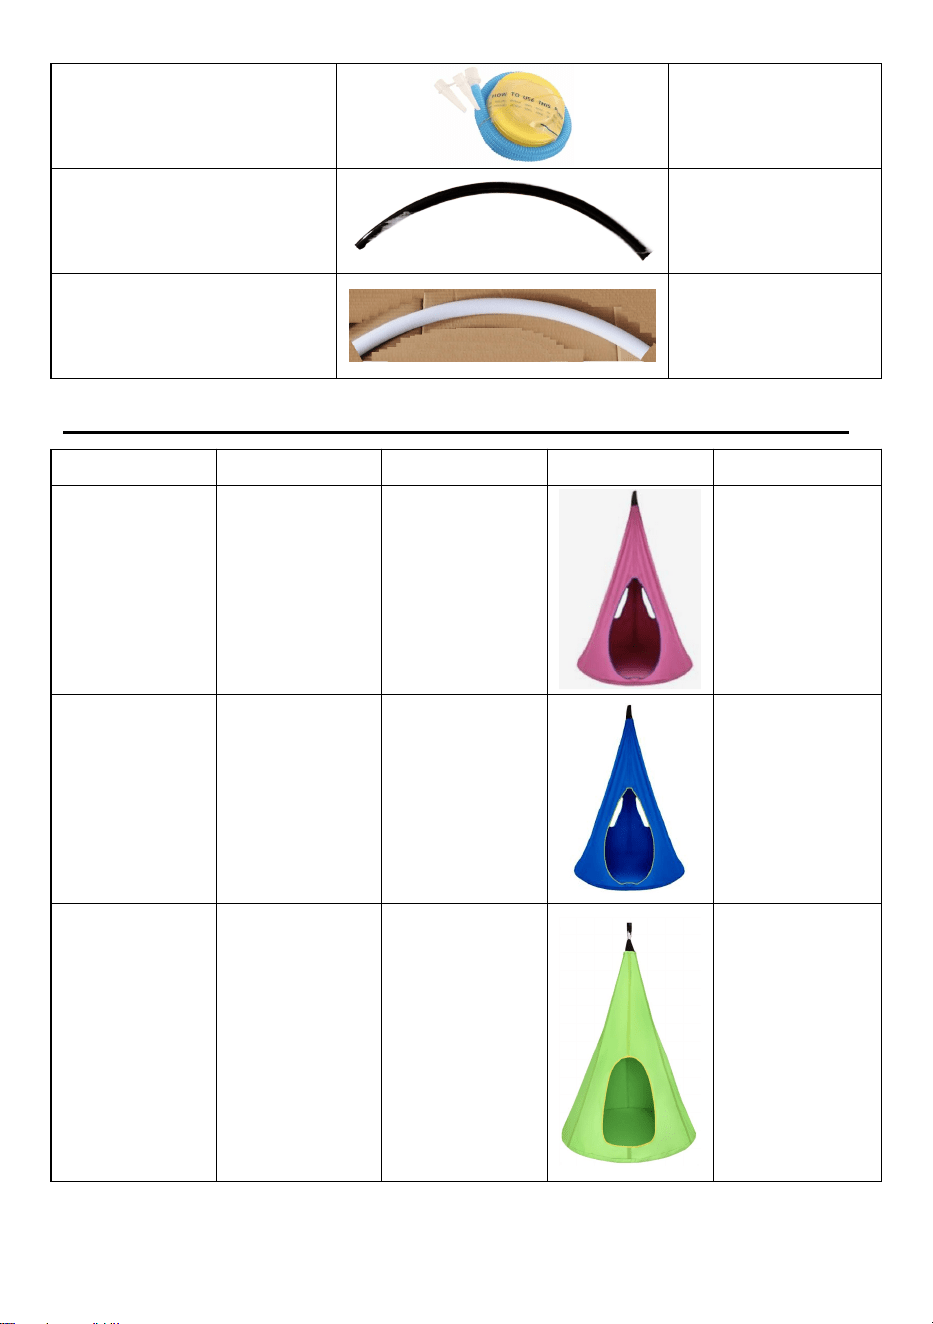
Product Parameter
Model
Body color
Hemming
color
Picture
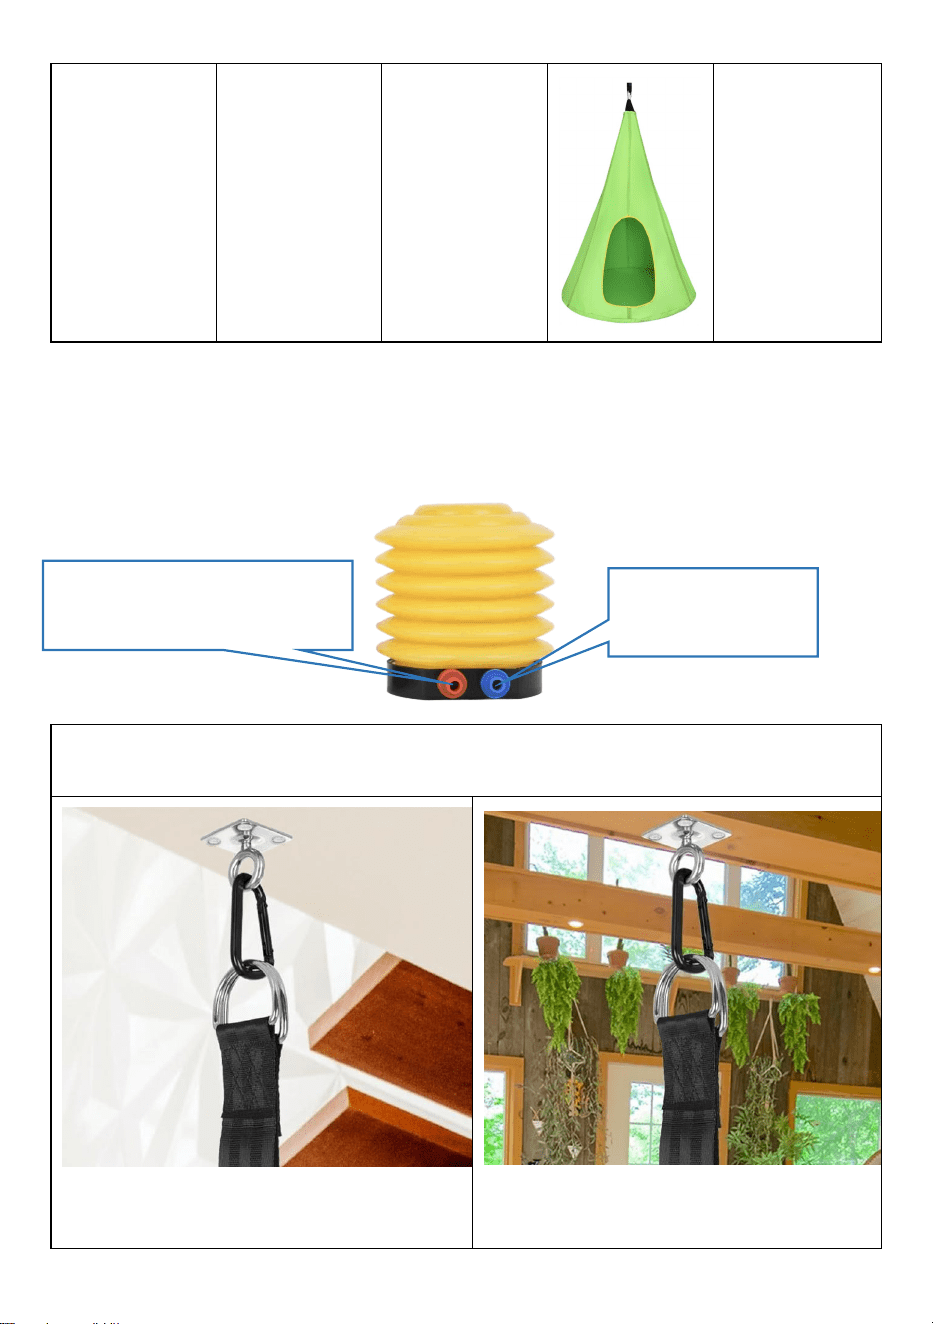
Load-bearing
LYY009
Purple
powder
Blue
120lb/54kg
LYY010
Blue
Fruit green
120lb/54kg
LYY011
Fruit green
Grass green
120lb/54kg
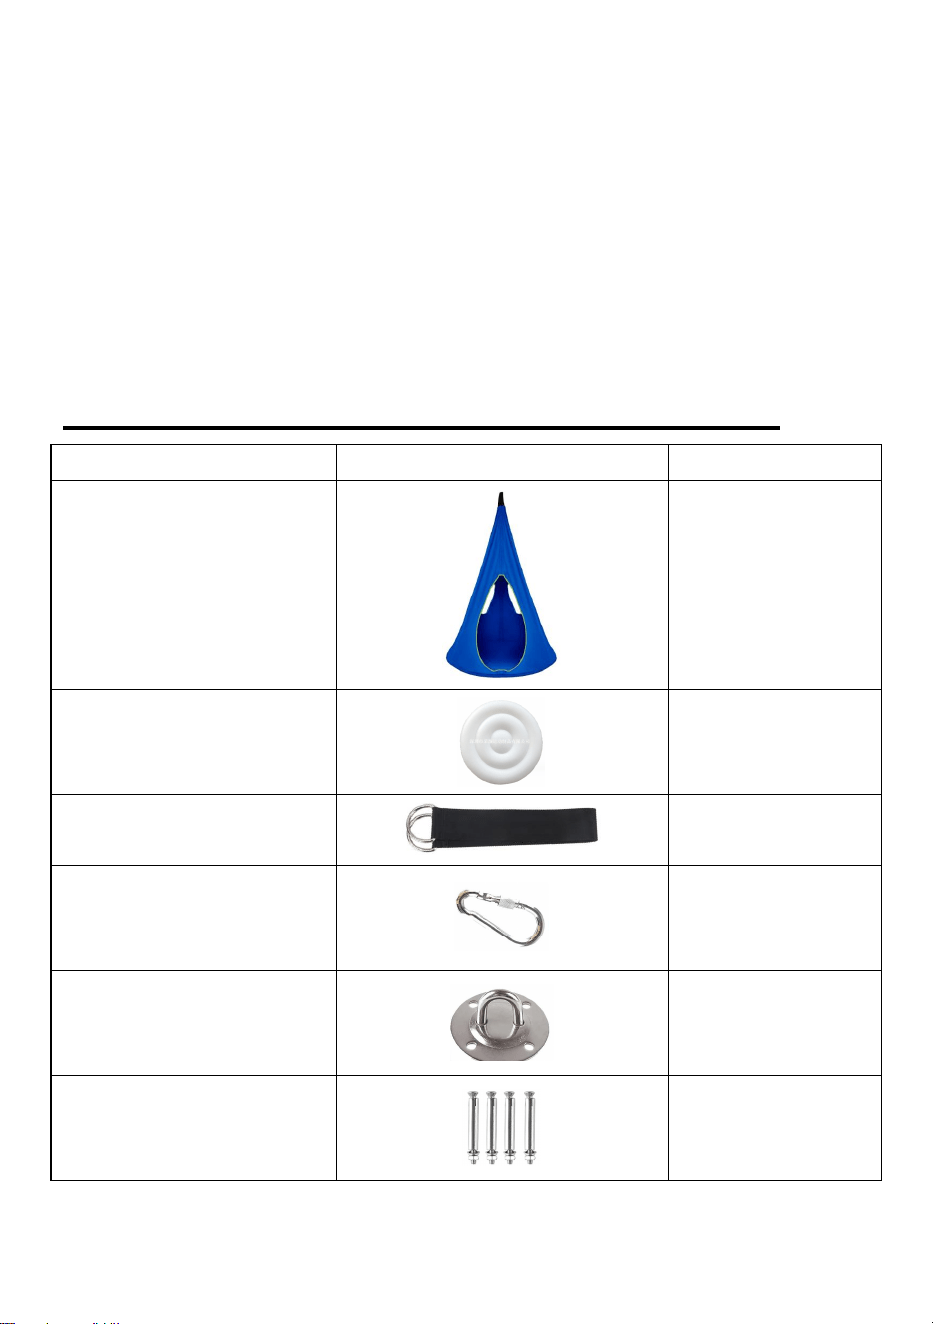
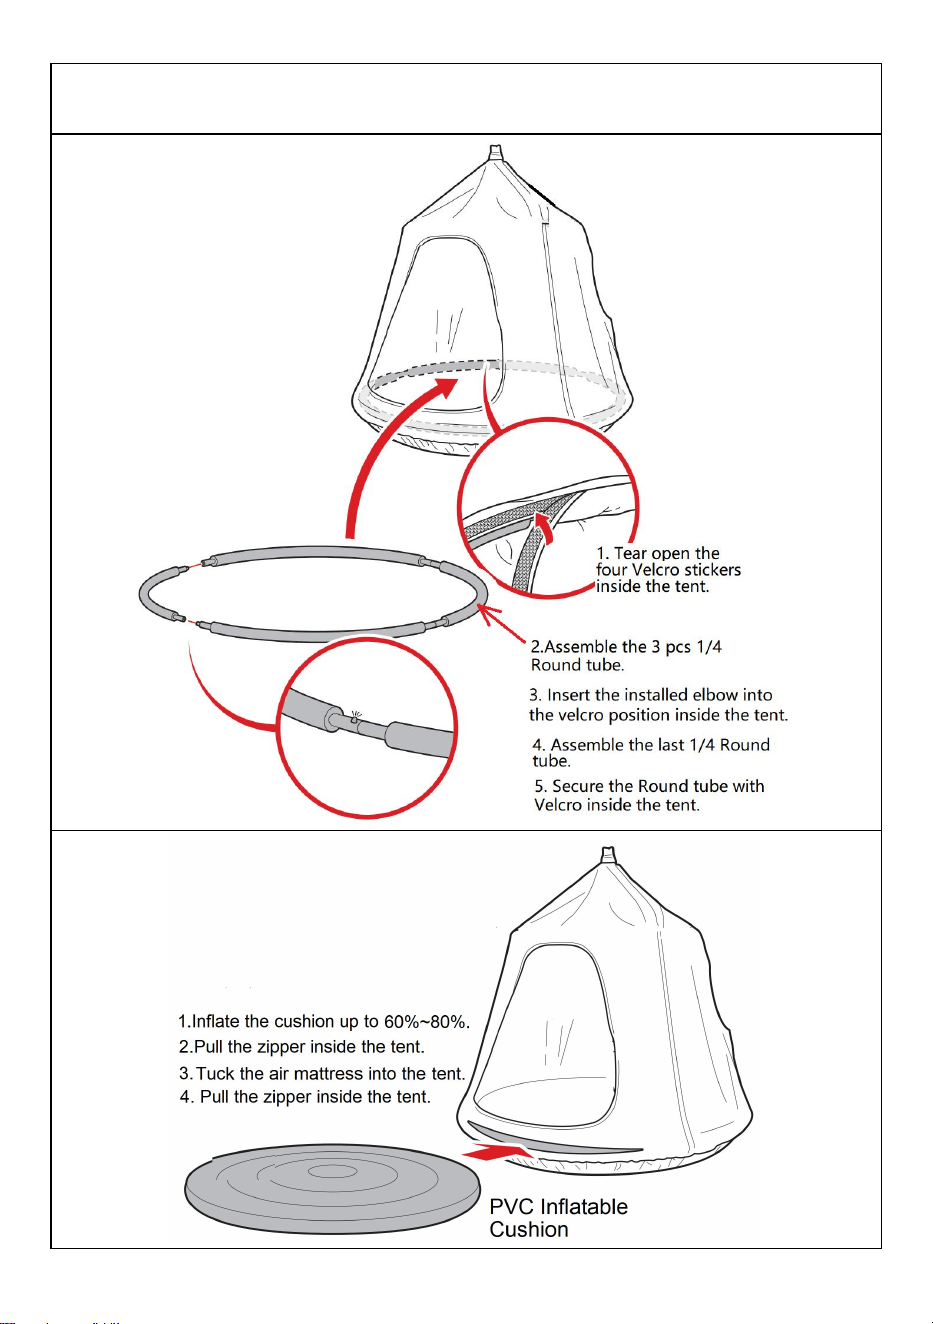
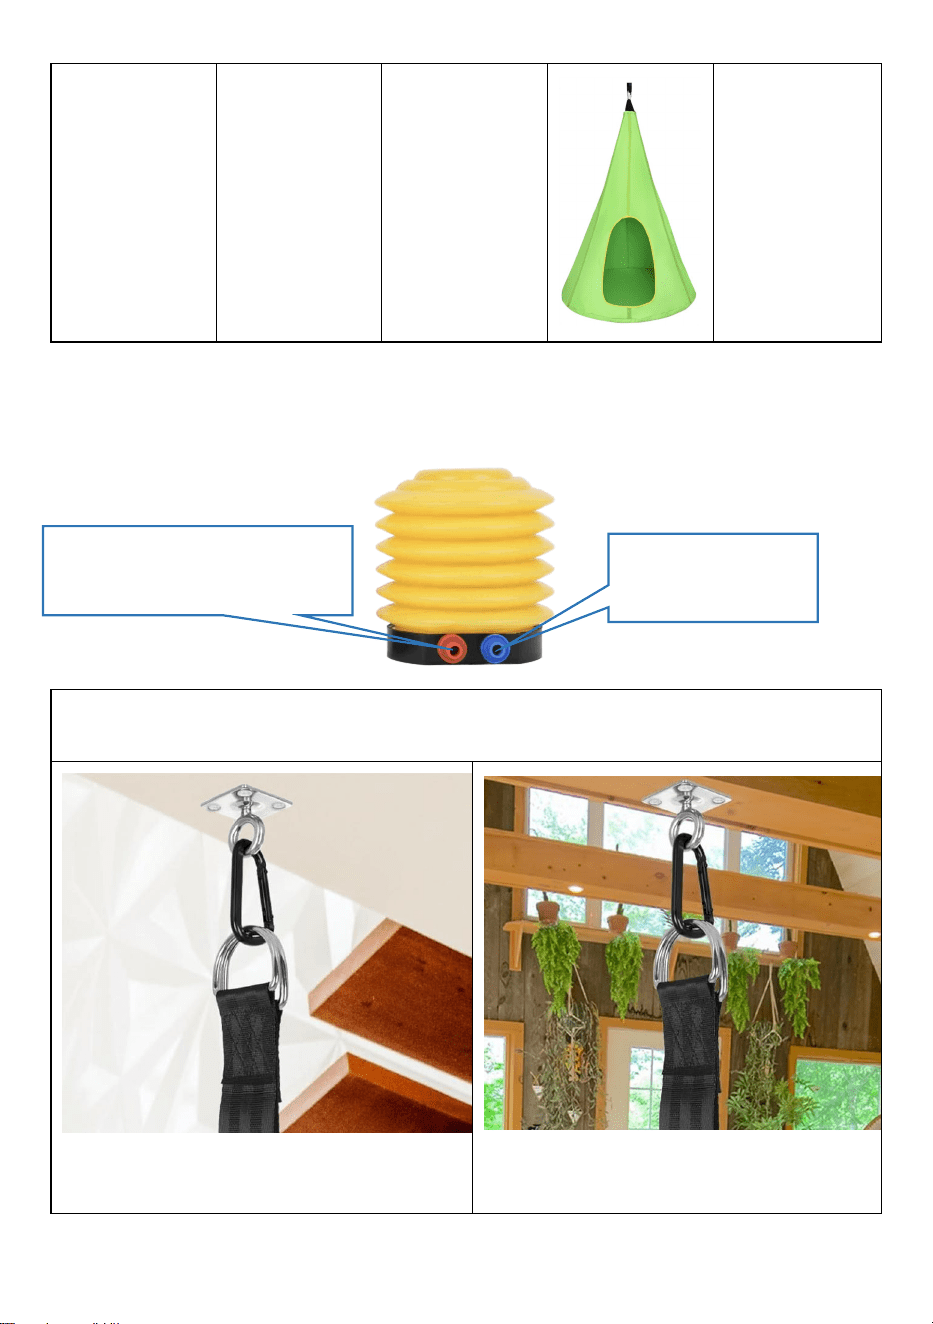
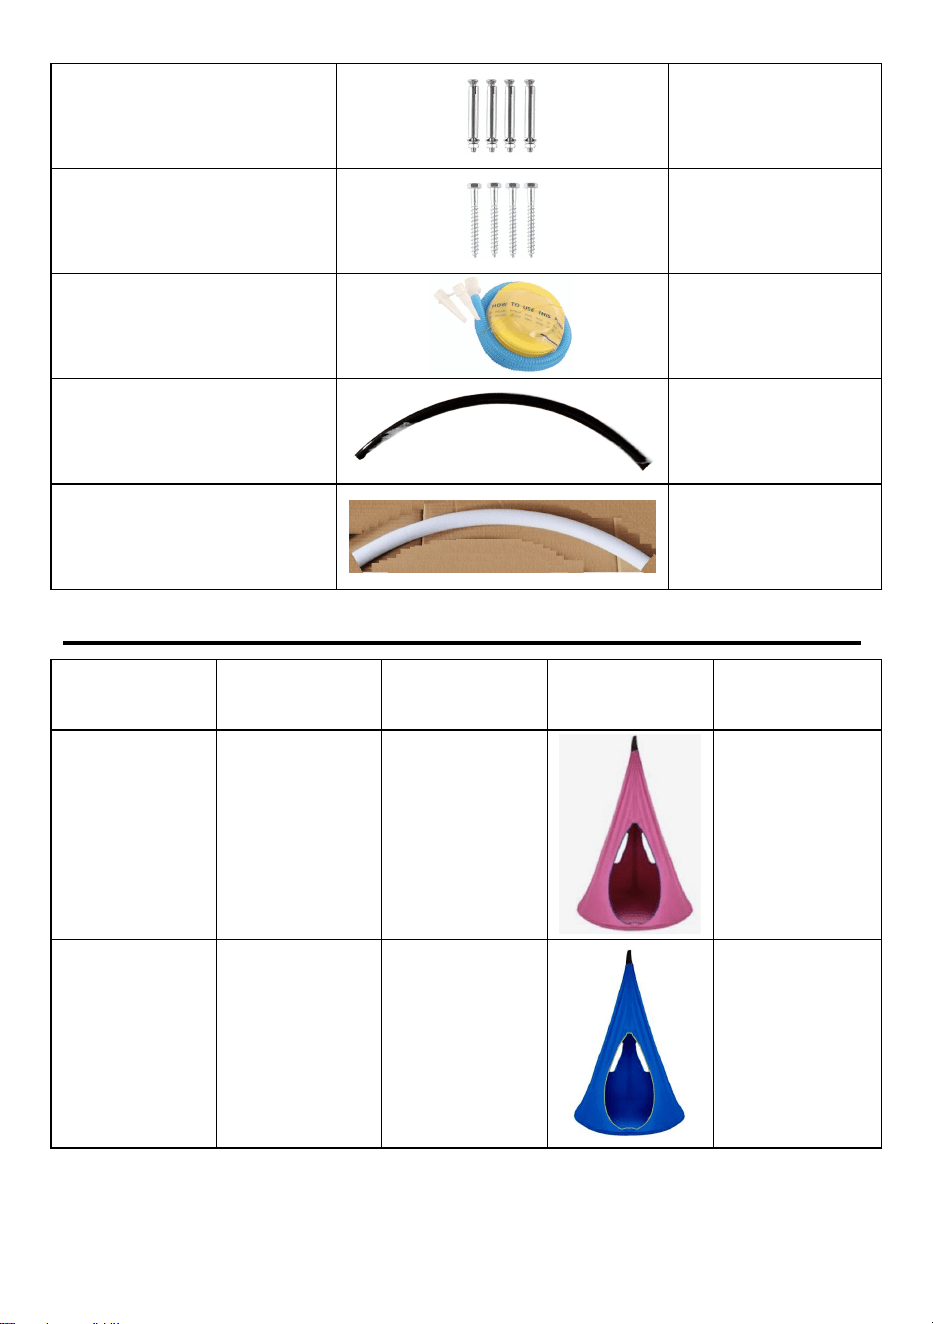
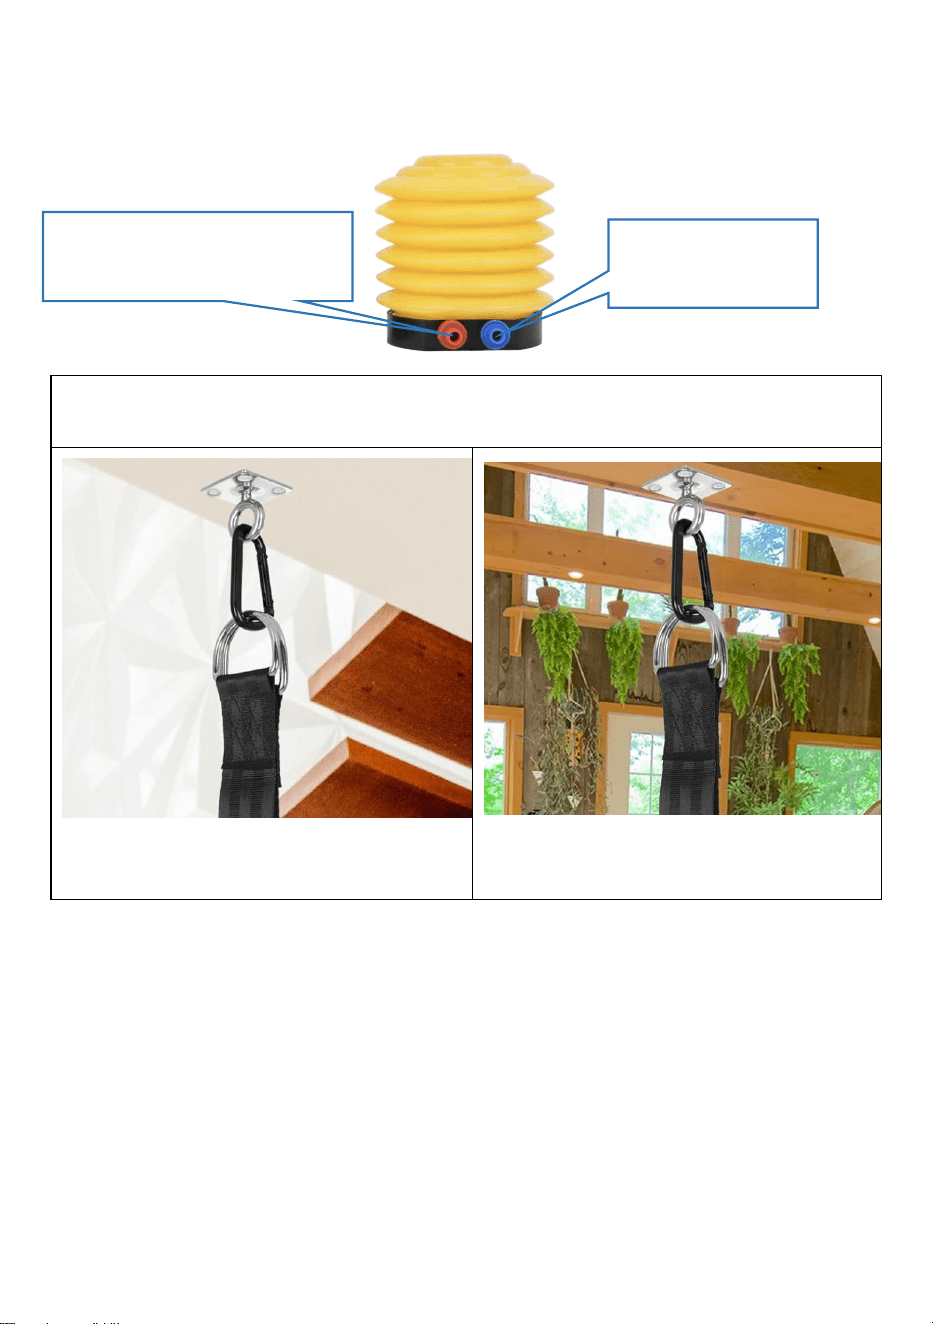
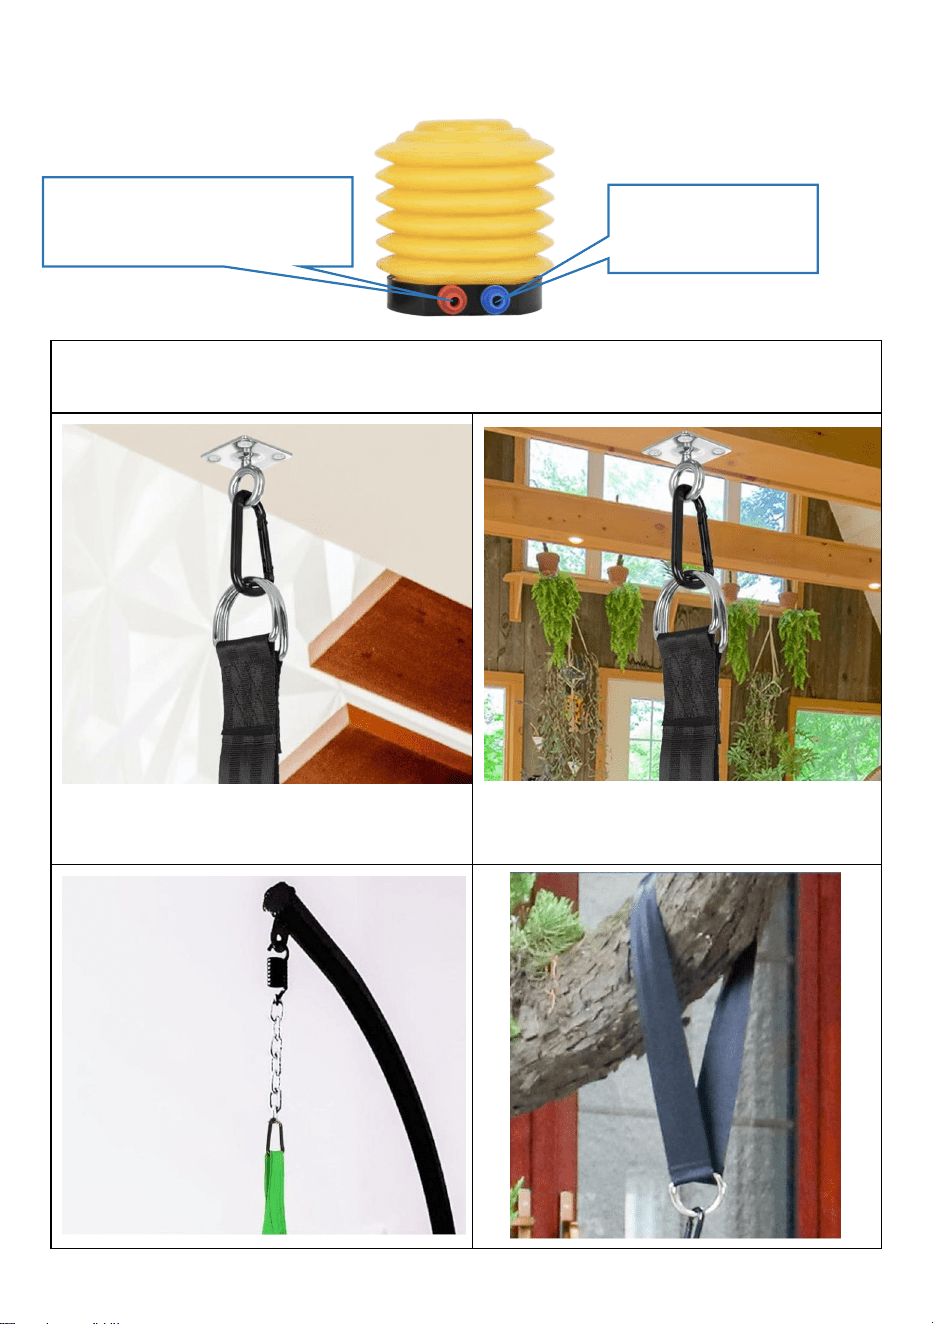
Please keep the air cushion inflated once every half a month.
Blue air hole out,
connect the hose.
The red air hole is vented,
and the hose is connected.
6
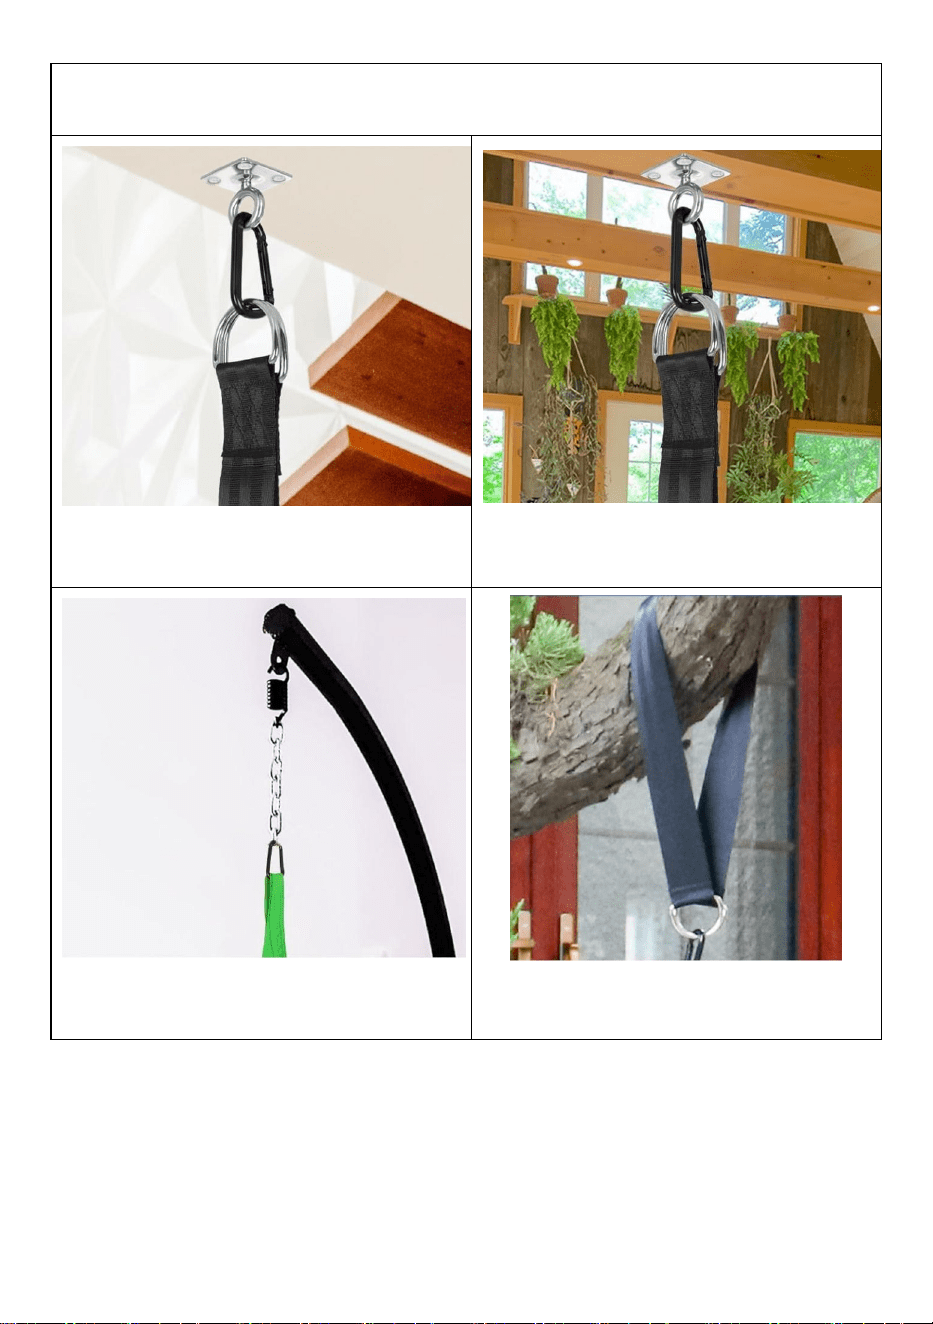
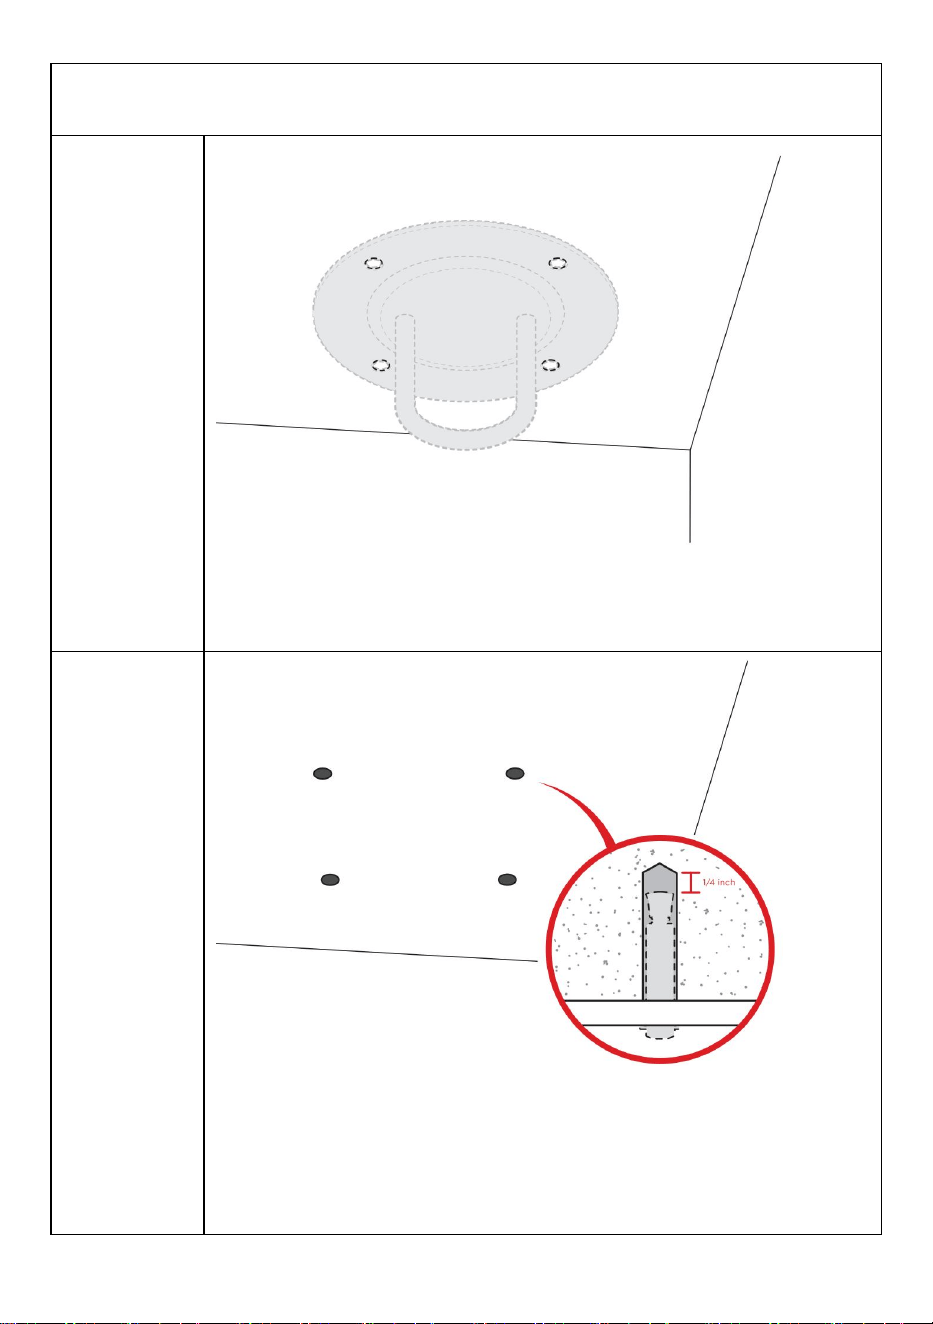
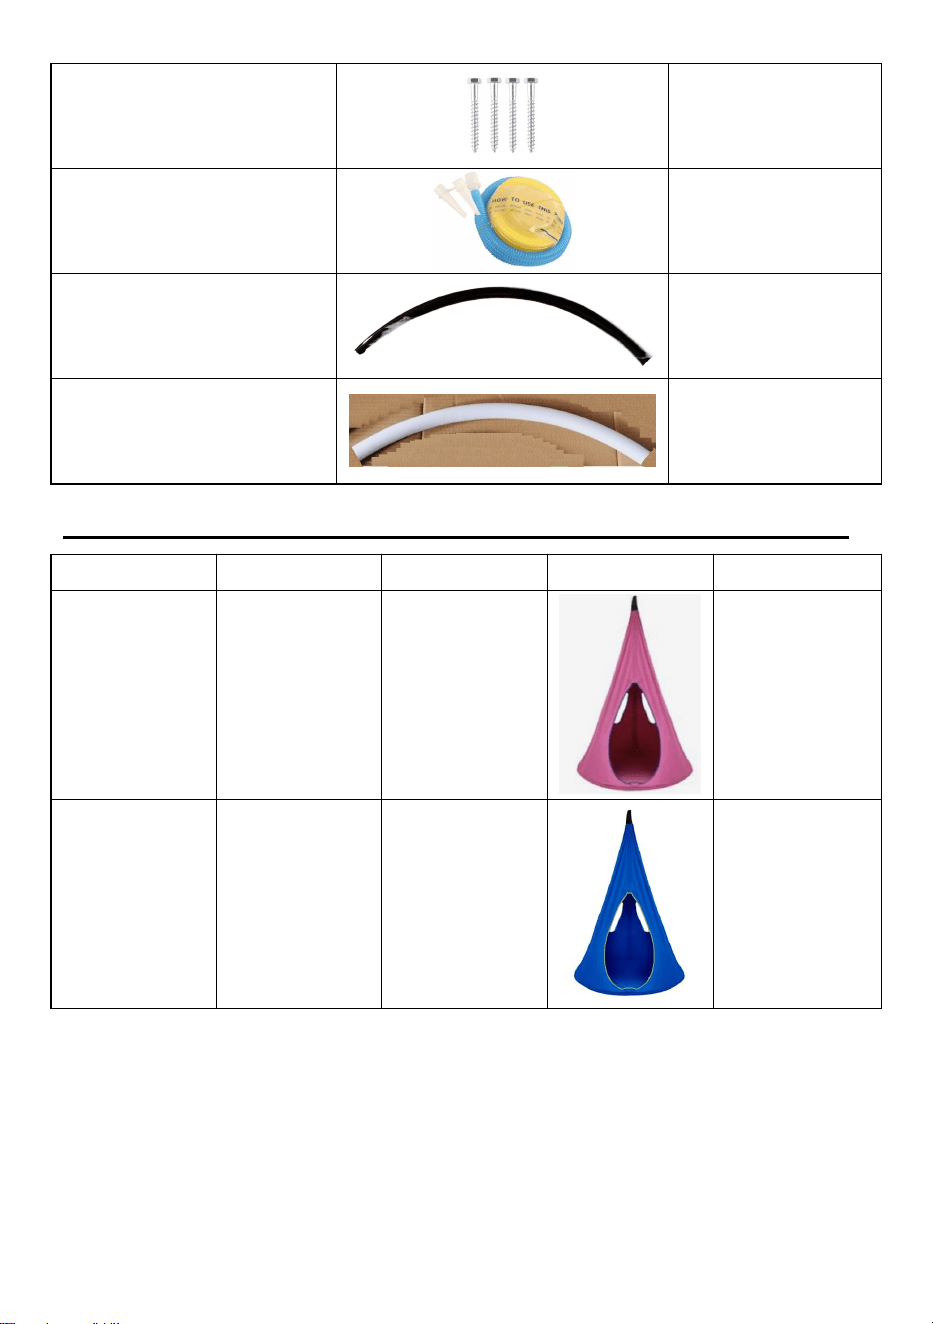
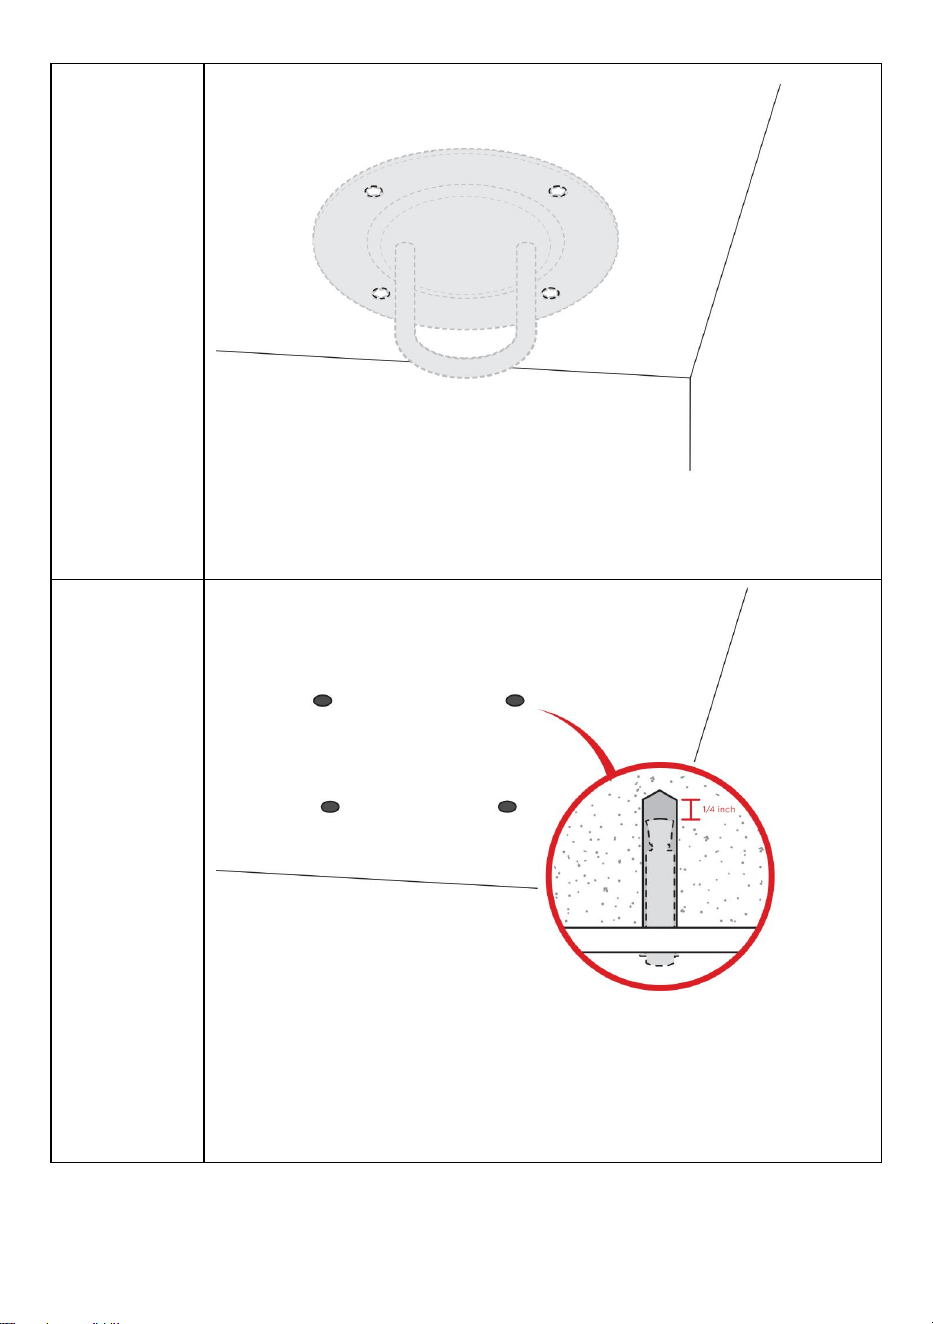
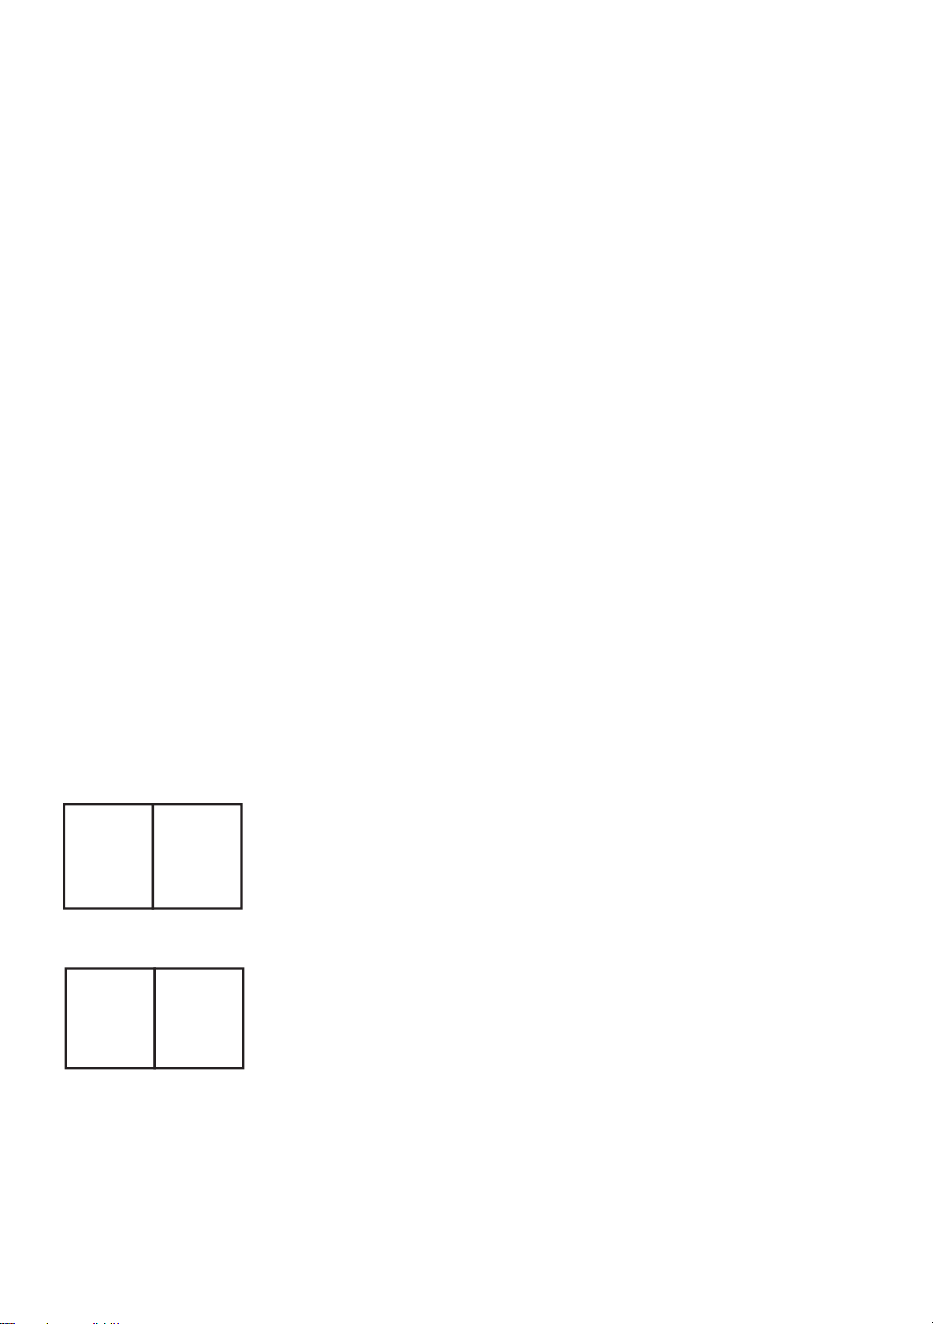
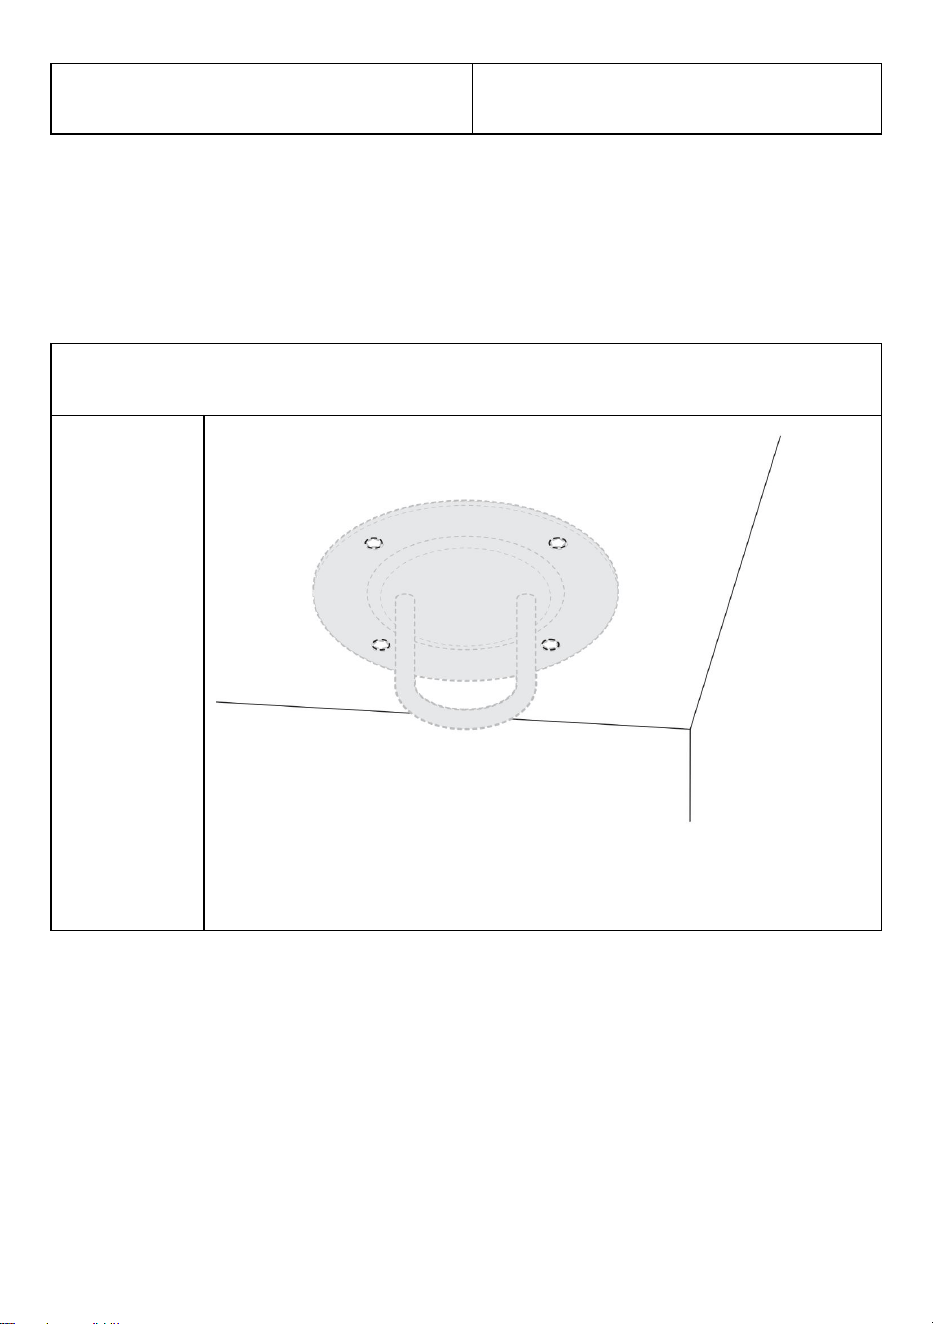
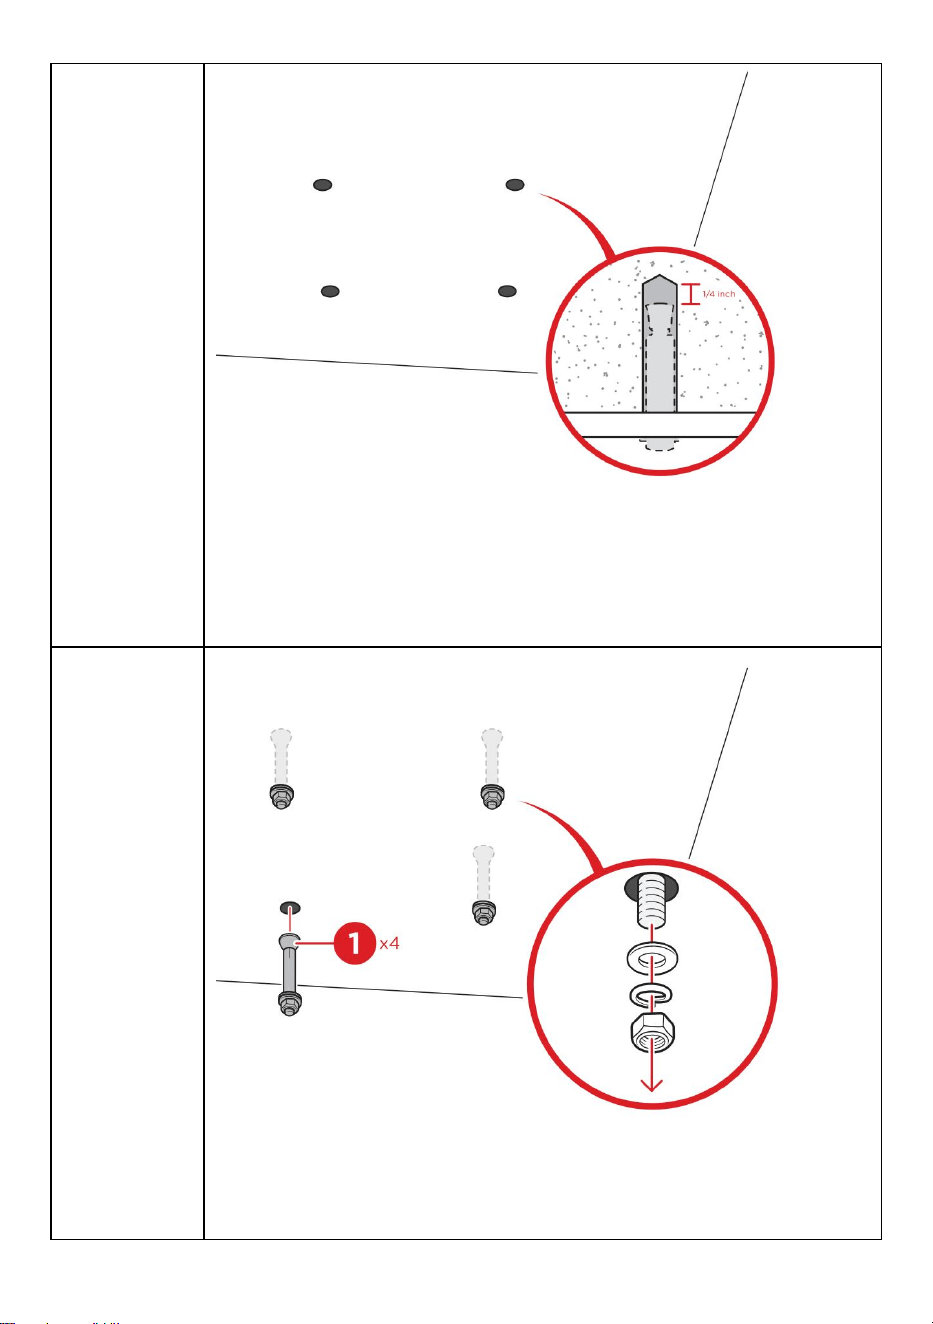
Concrete Ceiling Installation procedure
A
Line up the ceiling mount and use a pencil to mark the desired
mounting location.
B
Drill four holes at the mounting location.
NOTE:Drill approximately a 1/4" deeper than the length of the
sleeve anchor.
7
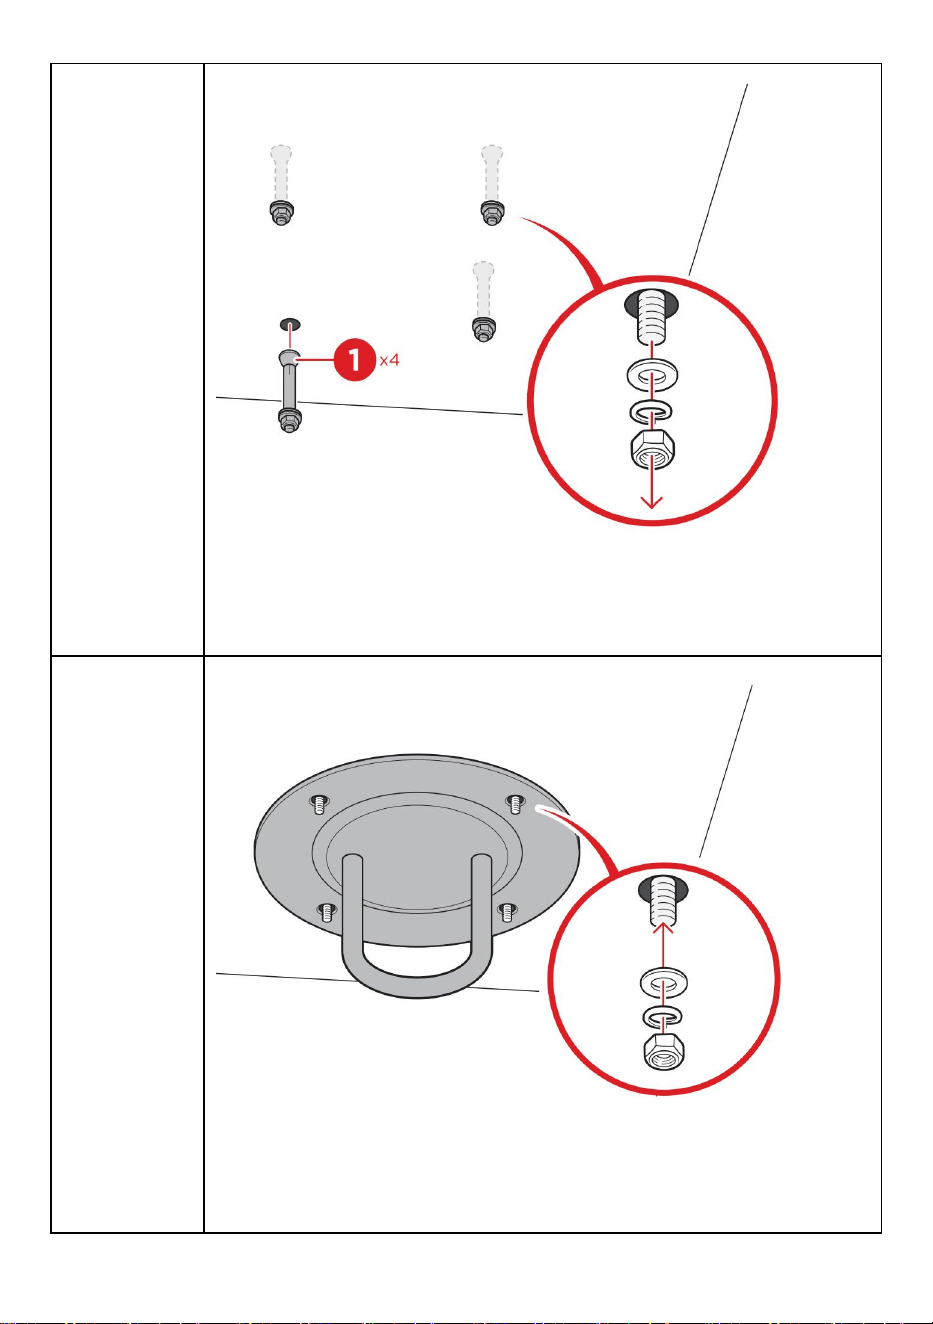
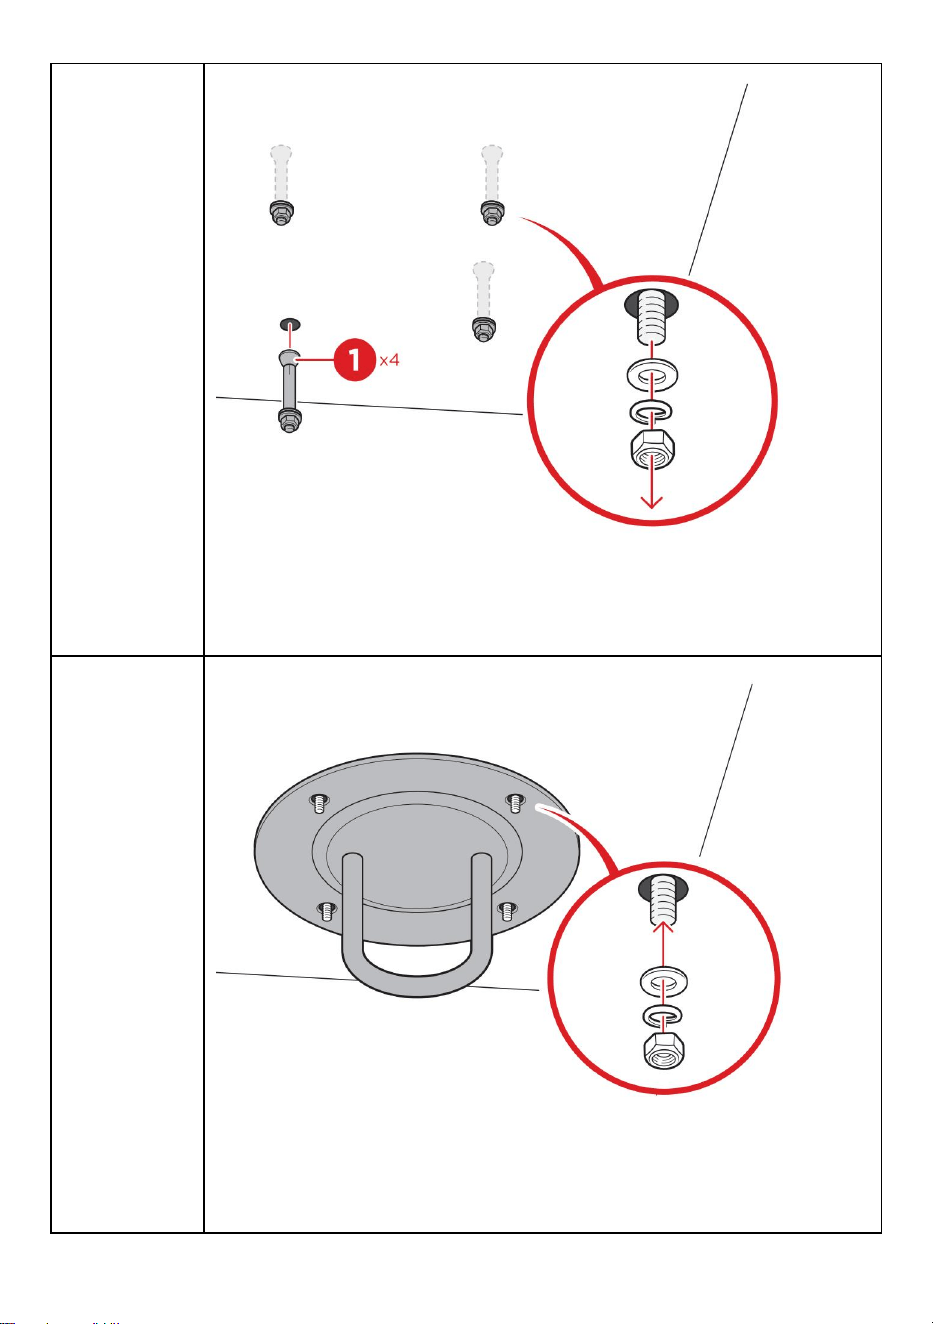
C
Insert four part 1 sleeve anchors into the holes. Use a hammer if
necessary. Remove the nuts/washers from the sleeve anchors.
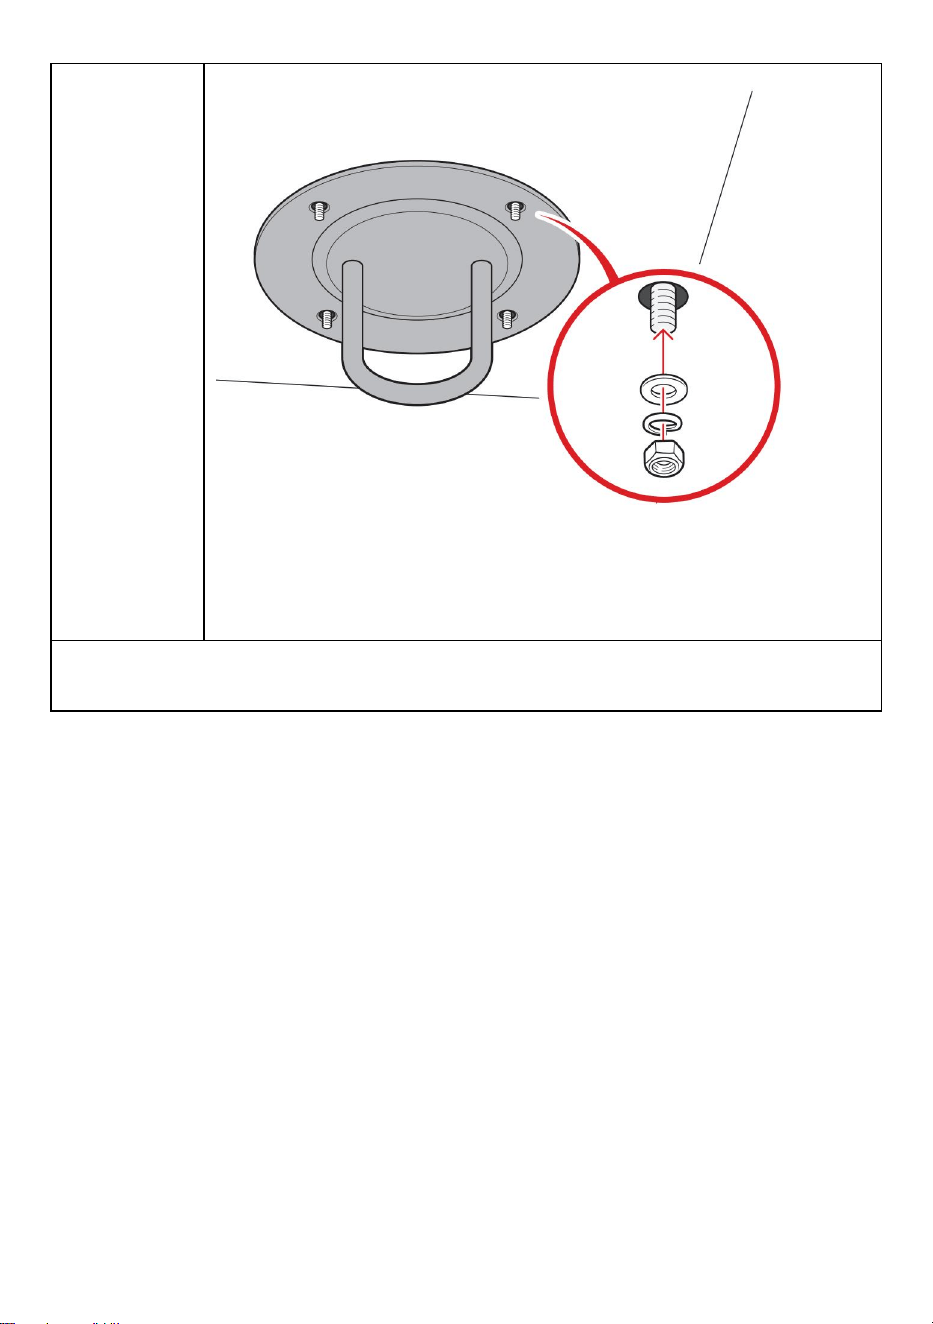
D
Place the mount, then tighten the nuts to secure the mount.

8
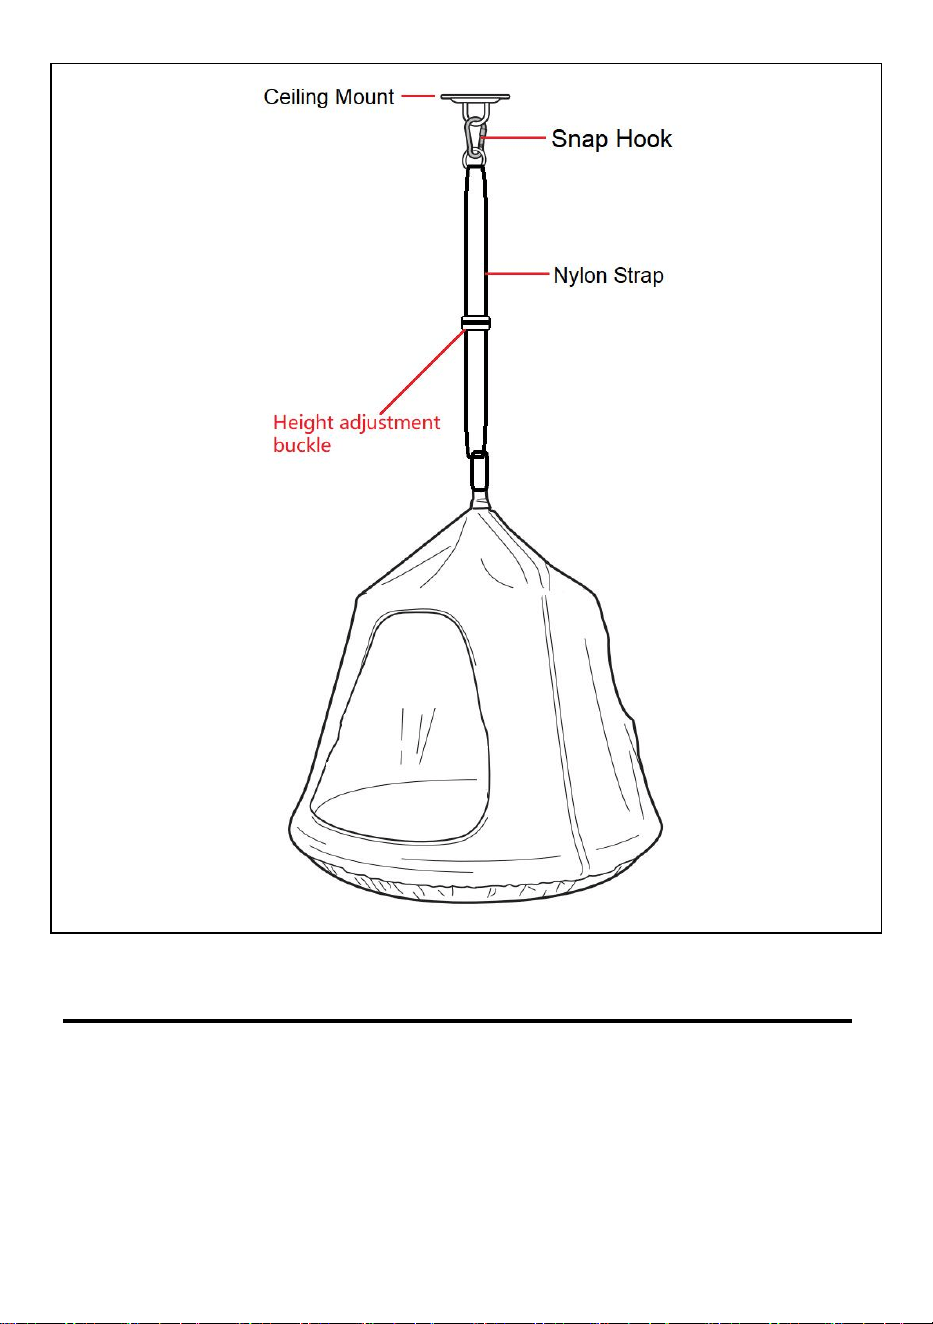
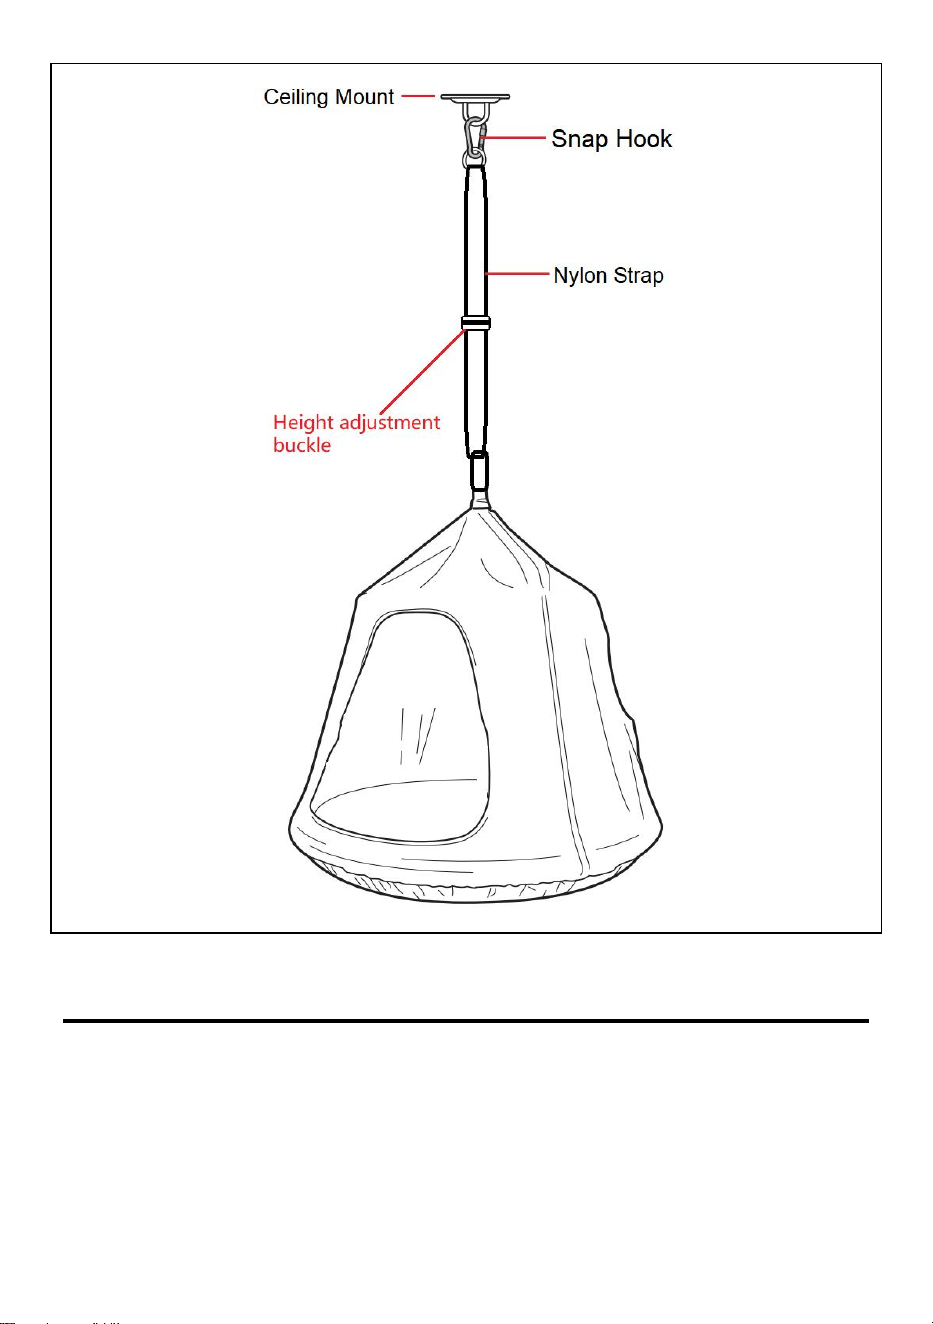
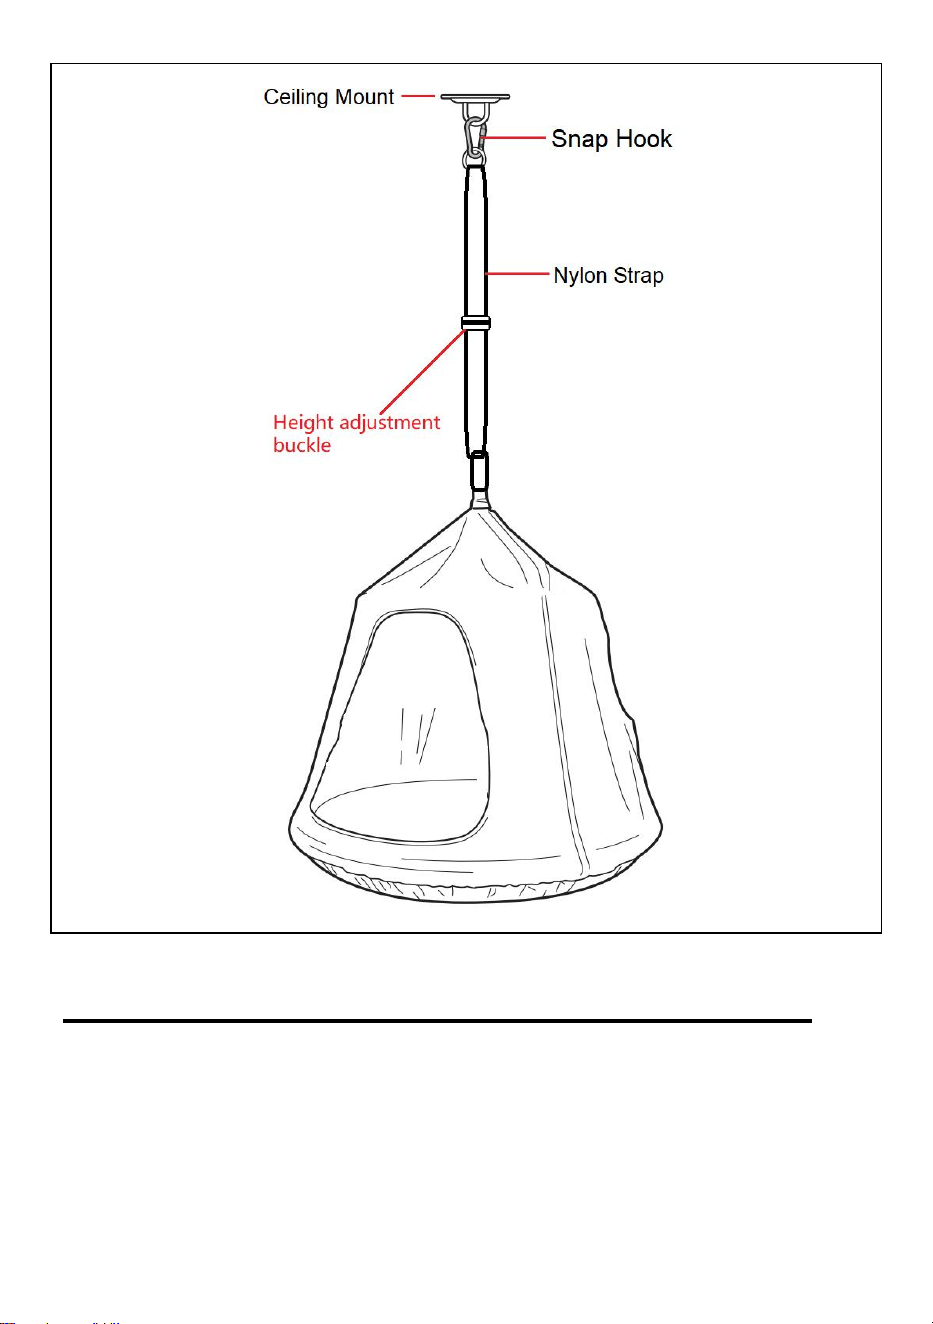
Installation procedure
9
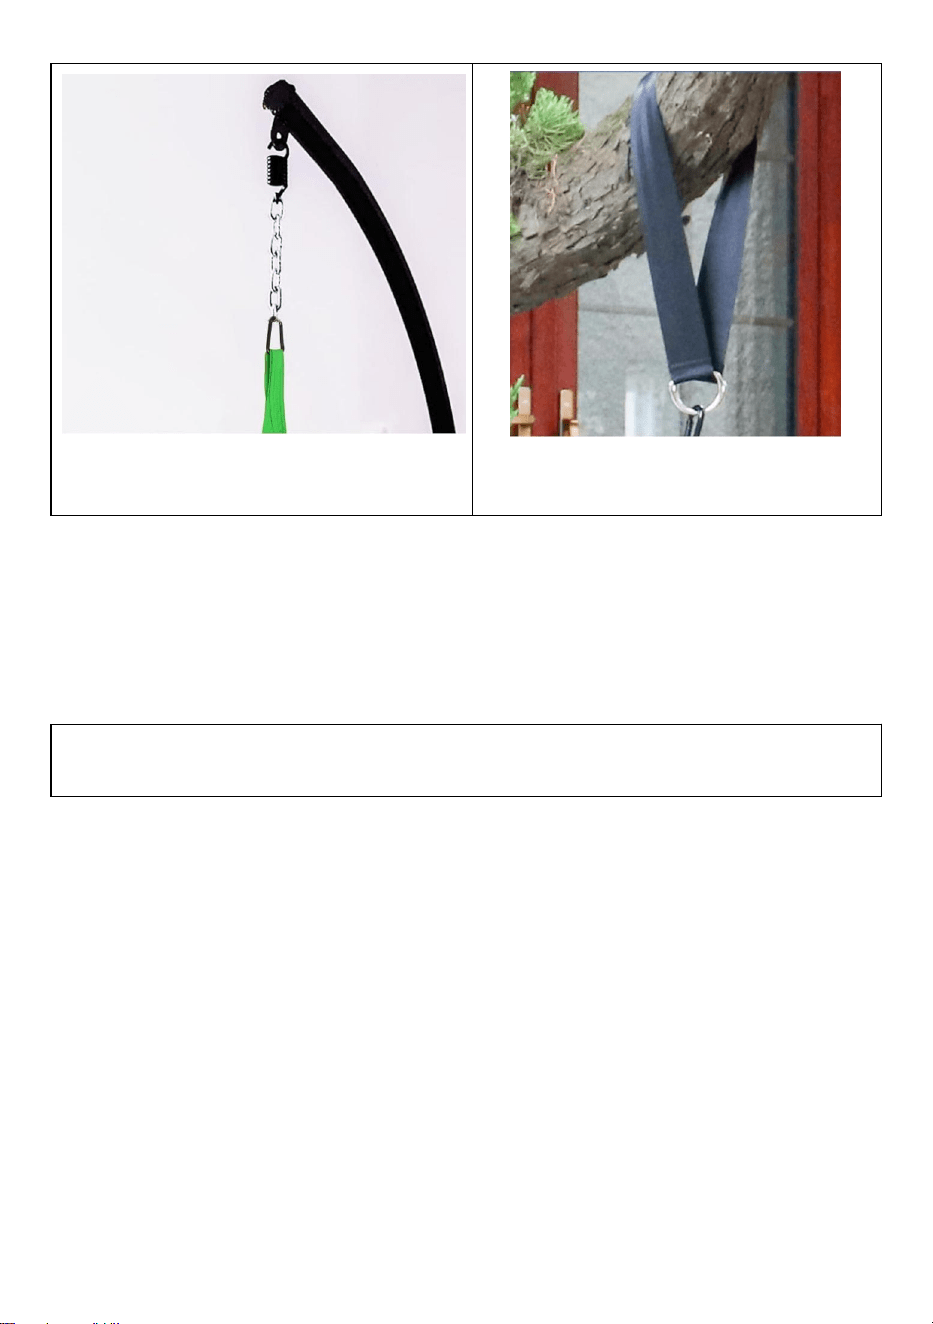
INSTALLATION TIPS
•Make sure overhead structure can support a minimum of 250lbs. If hanging from
a tree,diameter of tree limb should be 10 inches.
•Have adults test the overhead structure by pulling down or sitting in the swing.
•Do not install over concrete,asphalt,or hard ground.
•Swing should have a fall zone surrounding of the swing.
-Fall zone should extend a minimum of 18 inches on each side and twice the swing
10
height on the front/back.
•Place soft padding around the swing if ground is too hard.
•Do not use in a place with excessive sunlight.In warm weather, make sure that the
tent swing surface is not too hot. Swing height should be12 to 18 inches above the
ground.
•Swing must have at least 6.5 feet of overhead and side clearance from any
structure or obstruction such as a fence,garage,house,branches,wires,etc.
•Install in an area clear of wires,walls,structures,furniture,etc.
Address:Baoshanqu Shuangchenglu 803long 11hao 1602A-1609shi
Shanghai
Imported to AUS: SIHAO PTY LTD, 1 ROKEVA STREETEASTWOOD
NSW 2122 Australia
Imported to USA: Sanven Technology Ltd., Suite 250, 9166 Anaheim
Place, Rancho Cucamonga, CA 91730
REP
UK
Pooledas Group Ltd
Unit 5 Albert Edward House, The Pavilions
Preston, United Kingdom
REP
EC
SHUNSHUN GmbH
Römeräcker 9 Z2021, 76351
Linkenheim-Hochstetten, Germany
Made In China


2
Technique Assistance et certificat de garantie électronique
www.vevor.com/support
CHAISE HAMAC
MANUEL DE L'UTILISATEUR
We continue to be committed to provide you tools with competitive price.
"Save Half","Half Price" or any other similar expressions used by us only represents an
estimate of savings you might benefit from buying certain tools with us compared to the major
top brands and does not necessarily mean to cover all categories of tools offered by us. You
are kindly reminded to verify carefully when you are placing an order with us if you are
actually saving half in comparison with the top major brands.

1
LYY006 /LYY007 /LYY008
Have product questions? Need technical support? Please feel free to
contact us:
Technical Support and E-Warranty Certificate
www.vevor.com/support
NEED HELP? CONTACT US!
HAMMOCK CHAIR

2
This is the original instruction,please read all manual instructions carefully
before operating. VEVOR reserves a clear interpretation of our user
manual. The appearance of the product shall be subject to the product
you received. Please forgive us that we won't inform you again if there
are any technology or software updates on our product.
Précautions de sécurité
AVERTISSEMENT:
Lisez ces instructions avant d'utiliser ce produit. Ne pas le faire peut entraîner
des blessures graves. les précautions de base doivent toujours être suivies ,
notamment les suivantes :
• Confirmez à nouveau que tous les écrous , boulons et vis sont serrés et
sécurisés.
• Graissez régulièrement la quincaillerie et les points de suspension.
• Vérifiez la quincaillerie et les points de suspension pour déceler de la rouille qui
pourrait affecter leur force. Remplacez si nécessaire.
• Vérifiez le siège , le coussin d'air et la tente pour déceler toute usure excessive.
• Vérifiez que les cordes ne sont pas effilochées , usées ou cassées.
Remplacez-les si nécessaire.
• Ne laissez pas la balançoire de la tente à l'extérieur pendant une période
prolongée.
• En hiver , il est recommandé de ranger la balançoire de la tente à l'intérieur.
• Pour nettoyer , essuyez avec un chiffon humide.

3
• Conserver dans un endroit sec, à l'abri de la lumière directe du soleil.
• Couvrir ou conserver dans un sac en cas d'inutilisation pendant une période
prolongée.
CONSERVEZ CES INSTRUCTIONS
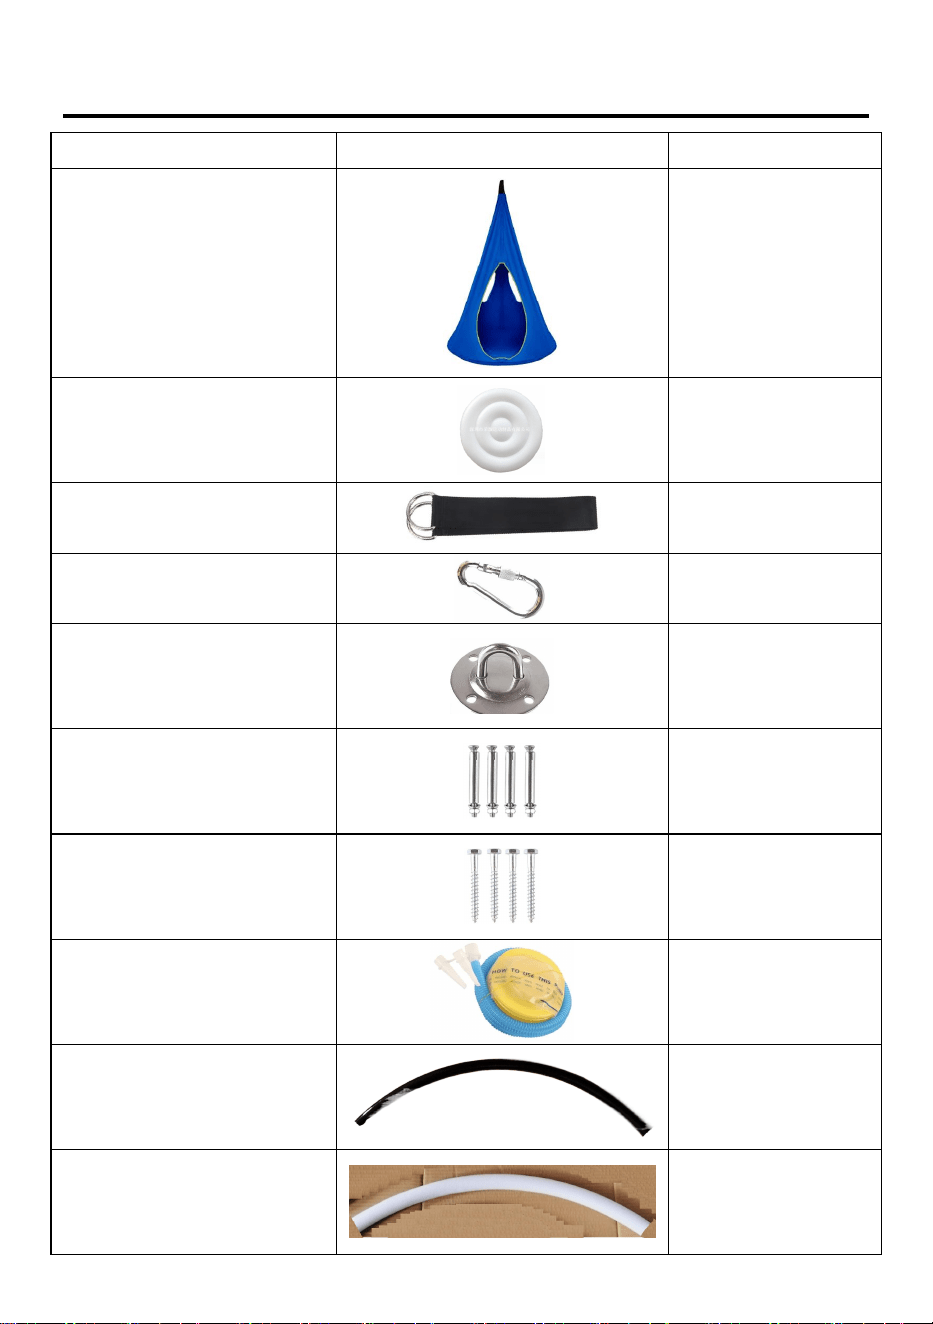
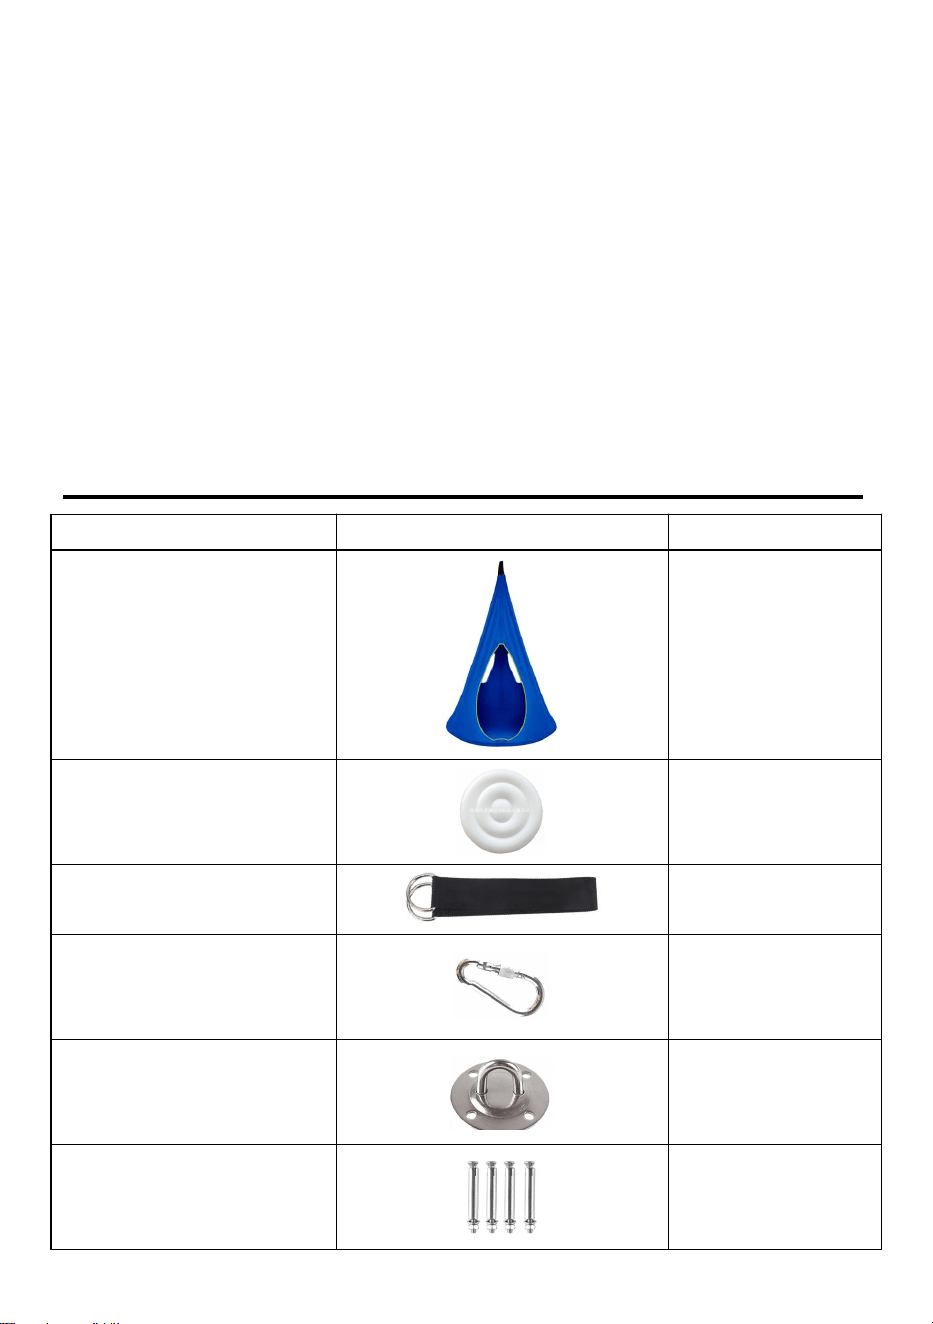
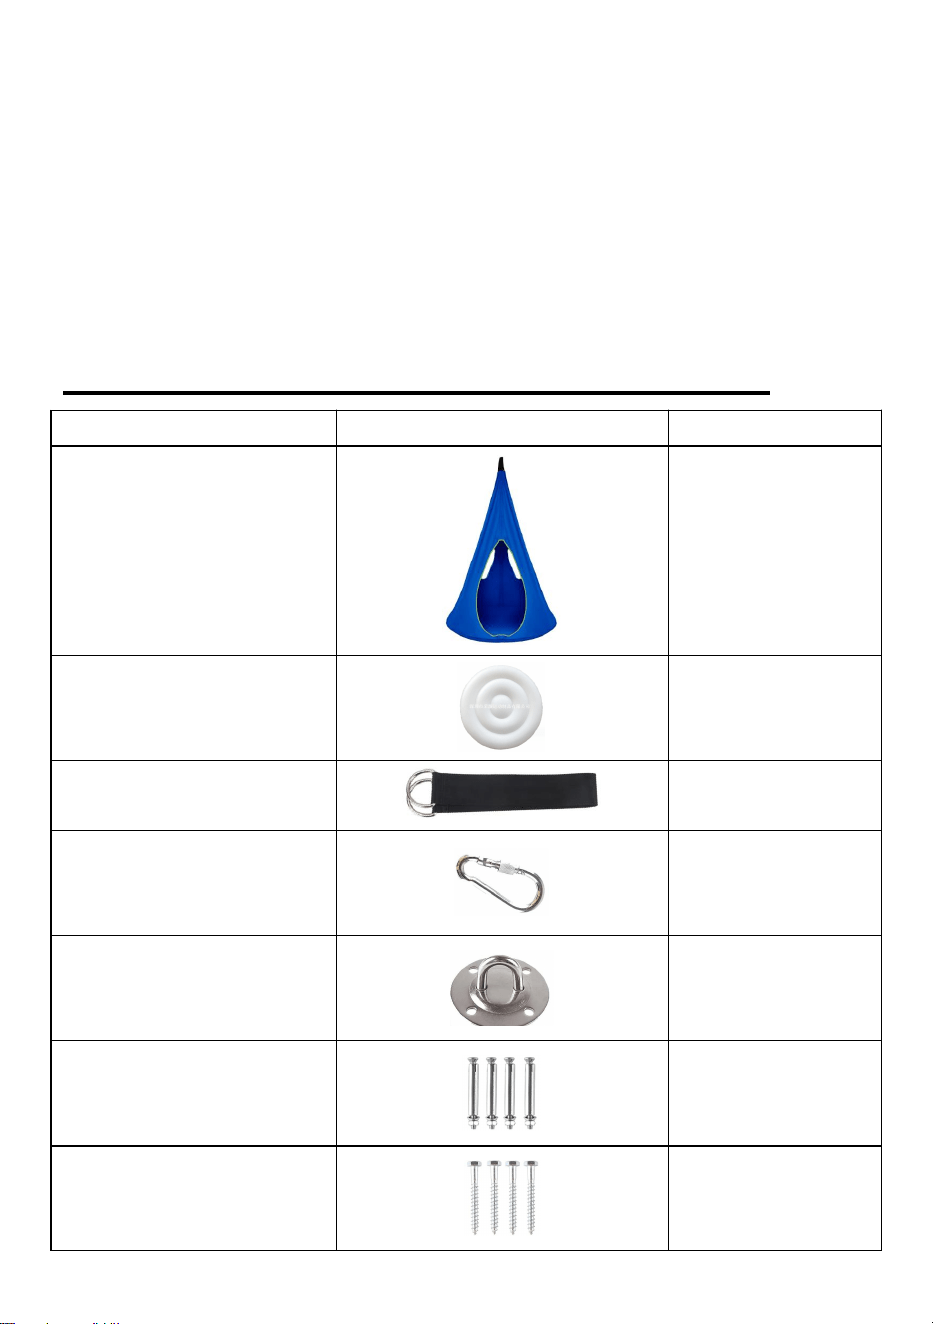
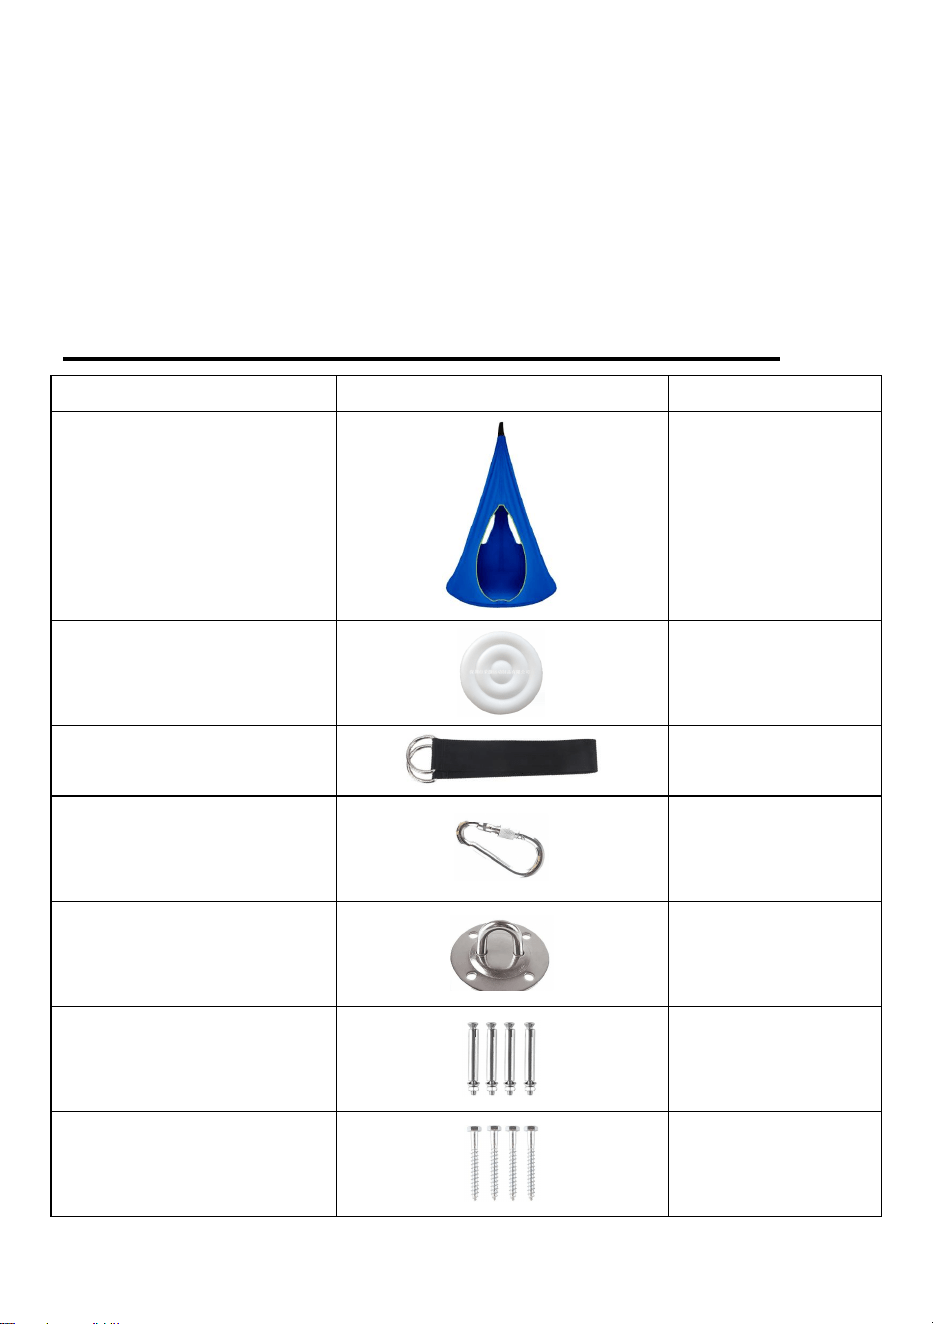
Liste de produits
Nom
les pièces
Q uantité
Balançoire du module
1
Coussin gonflable en PVC
1
Sangle en nylon
1
Mousqueton
1
Montage au plafond
1
Des vis
( Pour plafond en
béton )
4


6
Supports pour hamacs
Arbre
Procédure d'installation du plafond en béton

7
UN
Alignez le support de plafond et utilisez un crayon pour marquer
l'emplacement de montage souhaité.
B
Percez quatre trous à l'emplacement de montage.
REMARQUE : Percez environ 1/4" plus profond que la longueur
du manchon d'ancrage.

8
C
Insérez quatre ancrages à manchon en partie 1 dans les trous.
Utilisez un marteau si nécessaire. Retirez les écrous/rondelles des
ancrages du manchon.
D
Placez le support, puis serrez les écrous pour fixer le support.

9
Procédure d'installation

10
CONSEILS D'INSTALLATION
• Assurez-vous que la structure aérienne peut supporter un minimum de 25 0 lb.
S'il est suspendu à un arbre , le diamètre de la branche de l'arbre doit être de 10
pouces.
• Demandez aux adultes de tester la structure supérieure en tirant vers le bas ou
en s'asseyant sur la balançoire.
• Ne pas installer sur du béton , de l'asphalte ou un sol dur.

11
• La balançoire doit être entourée d'une zone de chute.
-La zone de chute doit s'étendre sur un minimum de 18 pouces sur chaque côté et
deux fois la hauteur de balancement à l'avant/à l'arrière.
• Placez un rembourrage doux autour de la balançoire si le sol est trop dur.
• Ne pas utiliser dans un endroit trop ensoleillé. Par temps chaud , assurez-vous
que la surface de balancement de la tente n'est pas trop chaude. La hauteur de
balançoire doit être de 12 à 18 pouces au-dessus du sol.
• Le swing doit avoir au au moins 6,5 pieds de dégagement aérien et latéral à
partir de toute structure ou obstacle tel qu'une clôture , un garage , une maison ,
des branches , des fils , etc.
• Installer dans une zone exempte de fils , murs , structures , meubles , etc .
Adresse : Baoshanqu Shuangchenglu 803long 11hao 1602A-1609shi
Shanghai
Importé en Australie : SIHAO PTY LTD, 1 ROKEVA STREETASTWOOD
NSW 2122 Australie
Importé aux États-Unis : Sanven Technology Ltd., Suite 250, 9166
Anaheim Place, Rancho Cucamonga, CA 91730
REP
UK
Pooledas Group Ltd
Unit 5 Albert Edward House, The Pavilions
Preston, United Kingdom
REP
EC
SHUNSHUN GmbH
Römeräcker 9 Z2021, 76351
Linkenheim-Hochstetten, Germany
Fabriqué en Chine


2
Technisch Support- und E-Garantie-Zertifikat www.vevor.com/support
HÄNGEMATTENSTUHL
BENUTZERHANDBUCH
We continue to be committed to provide you tools with competitive price.
"Save Half","Half Price" or any other similar expressions used by us only represents an
estimate of savings you might benefit from buying certain tools with us compared to the major
top brands and does not necessarily mean to cover all categories of tools offered by us. You
are kindly reminded to verify carefully when you are placing an order with us if you are
actually saving half in comparison with the top major brands.

1
LYY006 /LYY007 /LYY008
Have product questions? Need technical support? Please feel free to
contact us:
Technical Support and E-Warranty Certificate
www.vevor.com/support
NEED HELP? CONTACT US!
HAMMOCK CHAIR

2
This is the original instruction,please read all manual instructions carefully
before operating. VEVOR reserves a clear interpretation of our user
manual. The appearance of the product shall be subject to the product
you received. Please forgive us that we won't inform you again if there
are any technology or software updates on our product.
Sicherheitsvorkehrungen
WARNUNG:
Lesen Sie diese Anweisungen, bevor Sie dieses Produkt verwenden.
Andernfalls kann es zu schweren Verletzungen kommen. Die grundlegenden
Vorsichtsmaßnahmen sollten immer befolgt werden , einschließlich der folgenden:
• Stellen Sie sicher, dass alle Muttern , Bolzen und Schrauben fest angezogen
und sicher sind.
• Beschläge und Aufhängepunkte regelmäßig einfetten.
• Überprüfen Sie die Hardware und die Aufhängepunkte auf Rost, der sie
beeinträchtigen könnte Stärke. Bei Bedarf austauschen.
• Überprüfen Sie Sitz , Luftkissen und Zelt auf übermäßige Abnutzung.
• Überprüfen Sie die Seile auf Ausfransungen , Abnutzung oder Brüche und
ersetzen Sie sie bei Bedarf.
• Lassen Sie die Zeltschaukel nicht für längere Zeit im Freien stehen.
• Im Winter wird empfohlen , die Zeltschaukel drinnen aufzubewahren.
• Zum Reinigen mit einem feuchten Tuch abwischen.

6
Hängemattenständer
Baum
Vorgehensweise bei der Installation einer Betondecke

7
A
Richten Sie die Deckenhalterung aus und markieren Sie mit einem
Bleistift den gewünschten Montageort.
B
Bohren Sie am Montageort vier Löcher.
HINWEIS: Bohren Sie etwa 1/4 Zoll tiefer als die Länge des
Hülsenankers.

8
C
Setzen Sie vier Hülsenanker Teil 1 in die Löcher ein. Benutzen Sie
bei Bedarf einen Hammer. Entfernen Sie die
Muttern/Unterlegscheiben von den Hülsenankern.
D
Platzieren Sie die Halterung und ziehen Sie dann die Muttern fest,
um die Halterung zu befestigen.
9
Installationsvorgang

10
INSTALLATIONSTIPPS
• Stellen Sie sicher, dass die Deckenkonstruktion mindestens 250 Pfund tragen
kann. Wenn es an einem Baum hängt , sollte der Durchmesser des Asts 10 Zoll
betragen.
• Lassen Sie Erwachsene die Überkopfkonstruktion testen, indem sie die
Schaukel herunterziehen oder sich darauf setzen.
• Nicht auf Beton , Asphalt oder hartem Boden installieren.

11
• Die Schaukel sollte eine Absturzzone rund um die Schaukel haben.
-Die Fallzone sollte mindestens 18 betragen Zoll An jede seitlich und doppelte
Schwunghöhe vorne/hinten.
• Wenn der Boden zu hart ist, legen Sie eine weiche Polsterung um die Schaukel.
• Nicht an Orten mit übermäßiger Sonneneinstrahlung verwenden. Achten Sie bei
warmem Wetter darauf , dass die Schaukelfläche des Zeltes nicht zu heiß ist. Die
Schaukelhöhe sollte 12 bis 18 Zoll über dem Boden liegen.
• Schaukel muss vorhanden sein mindestens 6,5 Fuß von Überkopf- und
Seitenfreiheit von Alle Strukturen oder Hindernisse wie Zäune , Garagen , Häuser ,
Äste , Drähte usw.
• Installieren Sie das Gerät an einem Ort, der frei von Kabeln , Wänden ,
Strukturen , Möbeln usw. ist .
Adresse: Baoshanqu Shuangchenglu 803long 11hao 1602A-1609shi
Shanghai
Importiert nach AUS: SIHAO PTY LTD, 1 ROKEVA STREETEASTWOOD
NSW 2122 Australien
In die USA importiert: Sanven Technology Ltd., Suite 250, 9166 Anaheim
Place, Rancho Cucamonga, CA 91730
REP
UK
Pooledas Group Ltd
Unit 5 Albert Edward House, The Pavilions
Preston, United Kingdom
REP
EC
SHUNSHUN GmbH
Römeräcker 9 Z2021, 76351
Linkenheim-Hochstetten, Germany
In China hergestellt


2
Tecnico Supporto e certificato di garanzia elettronica www.vevor.com/support
SEDIA AMACA
MANUALE D'USO
We continue to be committed to provide you tools with competitive price.
"Save Half","Half Price" or any other similar expressions used by us only represents an
estimate of savings you might benefit from buying certain tools with us compared to the major
top brands and does not necessarily mean to cover all categories of tools offered by us. You
are kindly reminded to verify carefully when you are placing an order with us if you are
actually saving half in comparison with the top major brands.

1
LYY006 /LYY007 /LYY008
Have product questions? Need technical support? Please feel free to
contact us:
Technical Support and E-Warranty Certificate
www.vevor.com/support
NEED HELP? CONTACT US!
HAMMOCK CHAIR

2
This is the original instruction,please read all manual instructions carefully
before operating. VEVOR reserves a clear interpretation of our user
manual. The appearance of the product shall be subject to the product
you received. Please forgive us that we won't inform you again if there
are any technology or software updates on our product.
Misure di sicurezza
AVVERTIMENTO:
Leggere queste istruzioni prima di utilizzare questo prodotto. In caso contrario,
si potrebbero verificare lesioni gravi. È necessario seguire sempre le precauzioni
di base , incluse le seguenti:
• Riconfermare che tutti i dadi , i bulloni e le viti siano serrati e fissati.
• Lubrificare regolarmente la ferramenta e i punti di sospensione.
• Controllare l'eventuale presenza di ruggine sull'hardware e sui punti di
sospensione che potrebbero comprometterli forza. Sostituire se necessario.
• Controllare che il sedile , il cuscino d'aria e la tenda non siano eccessivamente
usurati.
• Controllare che le corde non siano sfilacciate , usurate o rotte. Sostituirle se
necessario.
• Non lasciare l'altalena all'aperto per un lungo periodo di tempo.
• Nella stagione invernale , si consiglia di riporre l'altalena della tenda al chiuso.
• Per pulire , strofinare con un panno umido.

3
• Conservare in un luogo asciutto, lontano dalla luce solare diretta.
• Coprire o conservare in una borsa se non utilizzato per un lungo periodo di
tempo.
CONSERVA QUESTE ISTRUZIONI
Elenco prodotti
Nome
Parti
Quantità _
Altalena del baccello
1
Cuscino gonfiabile in PVC
1
Cinturino in nylon
1
Moschettone
1
Montaggio a soffitto
1
Viti
( Per soffitto in
cemento )
4


6
Supporti per amache
Albero
Procedura di installazione del soffitto in cemento
7
UN
Allineare il supporto a soffitto e utilizzare una matita per
contrassegnare la posizione di montaggio desiderata.
B
Praticare quattro fori nella posizione di montaggio.
NOTA: forare circa 1/4" più in profondità della lunghezza del
manicotto di ancoraggio.

8
C
Inserire quattro tasselli a manicotto della parte 1 nei fori. Se
necessario, utilizzare un martello. Rimuovere i dadi/rondelle dagli
ancoraggi del manicotto.
D
Posizionare il supporto, quindi serrare i dadi per fissare il supporto.

9
Procedura d'installazione
10
CONSIGLI PER L'INSTALLAZIONE
• Assicurarsi che la struttura sopraelevata possa supportare un minimo di 25 0
libbre. Se appeso a un albero , il diametro del ramo dell'albero dovrebbe essere di
10 pollici.
• Chiedere agli adulti di testare la struttura sopraelevata abbassandola o
sedendosi sull'altalena.
• Non installare su cemento , asfalto o terreno duro.

11
• L'altalena dovrebbe avere una zona di caduta attorno all'altalena.
-La zona di caduta dovrebbe estendersi come minimo di 18 pollici SU ogni lato e il
doppio dell'altezza di oscillazione nella parte anteriore/posteriore.
• Posizionare un'imbottitura morbida attorno all'altalena se il terreno è troppo
duro.
• Non utilizzare in luoghi esposti alla luce solare eccessiva. Nella stagione calda ,
assicurarsi che la superficie dell'altalena della tenda non sia troppo calda.
L'altezza dell'oscillazione dovrebbe essere compresa tra 12 e 18 pollici dal suolo.
• L'altalena deve avere a almeno 6,5 piedi di spazio sopraelevato e laterale da
qualsiasi struttura o ostacolo come recinzione , garage , casa , rami , cavi , ecc.
• Installare in un'area priva di cavi , pareti , strutture , mobili , ecc.
Indirizzo: Baoshanqu Shuangchenglu 803long 11hao 1602A-1609shi
Shanghai
Importato in AUS: SIHAO PTY LTD, 1 ROKEVA STREETEASTWOOD
NSW 2122 Australia
Importato negli Stati Uniti: Sanven Technology Ltd., Suite 250, 9166
Anaheim Place, Rancho Cucamonga, CA 91730
REP
UK
Pooledas Group Ltd
Unit 5 Albert Edward House, The Pavilions
Preston, United Kingdom
REP
EC
SHUNSHUN GmbH
Römeräcker 9 Z2021, 76351
Linkenheim-Hochstetten, Germany
Made in China


2
Técnico Soporte y certificado de garantía electrónica www.vevor.com/support
SILLA HAMACA
MANUAL DE USUARIO
We continue to be committed to provide you tools with competitive price.
"Save Half","Half Price" or any other similar expressions used by us only represents an
estimate of savings you might benefit from buying certain tools with us compared to the major
top brands and does not necessarily mean to cover all categories of tools offered by us. You
are kindly reminded to verify carefully when you are placing an order with us if you are
actually saving half in comparison with the top major brands.

1
LYY006 /LYY007 /LYY008
Have product questions? Need technical support? Please feel free to
contact us:
Technical Support and E-Warranty Certificate
www.vevor.com/support
NEED HELP? CONTACT US!
HAMMOCK CHAIR

2
This is the original instruction,please read all manual instructions carefully
before operating. VEVOR reserves a clear interpretation of our user
manual. The appearance of the product shall be subject to the product
you received. Please forgive us that we won't inform you again if there
are any technology or software updates on our product.
Precauciones de seguridad
ADVERTENCIA:
Lea estas instrucciones antes de usar este producto. De lo contrario, se pueden
producir lesiones graves. Siempre se deben seguir las precauciones básicas ,
incluidas las siguientes:
• Vuelva a confirmar que todas las tuercas , pernos y tornillos estén apretados y
seguros.
• Engrase los herrajes y los puntos para colgar con regularidad.
• Revise los herrajes y los puntos para colgar en busca de óxido que pueda
afectar su fortaleza. Reemplace si es necesario.
• Revise el asiento , el cojín de aire y la tienda para detectar desgaste excesivo.
• Revise las cuerdas para ver si están deshilachadas , desgastadas o rotas.
Reemplácelas si es necesario.
• No deje la tienda de campaña al aire libre durante un período prolongado de
tiempo.
• En la temporada de invierno , se recomienda guardar el columpio de la tienda
en el interior.
3
• Para limpiar , limpie con un paño húmedo.
• Almacenar en un lugar seco y alejado de la luz solar directa.
• Cubra o guárdelo en una bolsa si no se utiliza durante un período prolongado.
GUARDA ESTAS INSTRUCCIONES
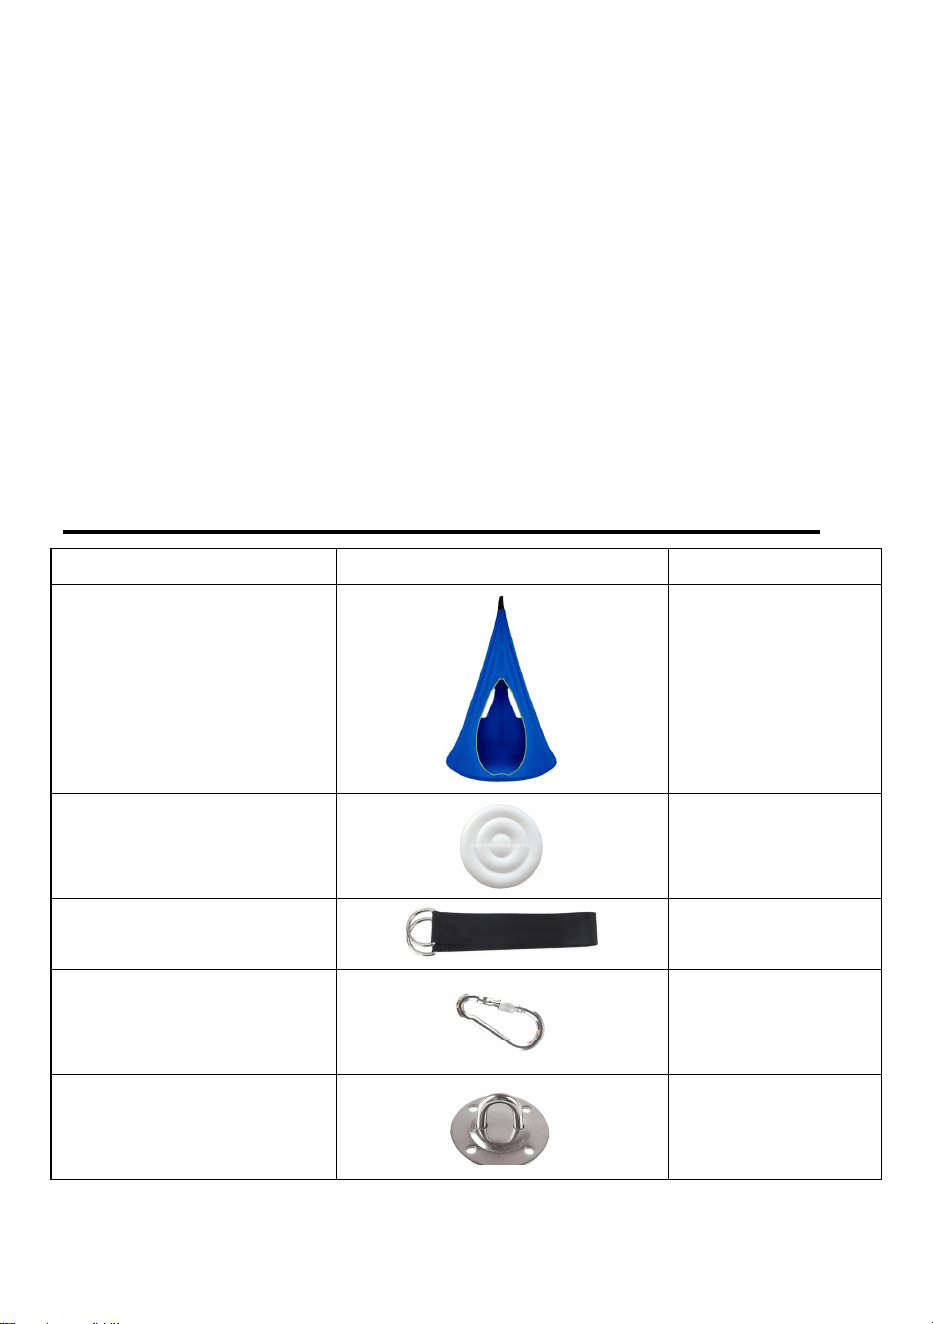
Lista de productos
Nombre
Partes
Cantidad _
Columpio de vaina
1
Cojín inflable de PVC
1
Correa de nailon
1
Mosquetón
1
Montaje en techo
1
Tornillos
( Para techo de hormigón )
4


6
Soportes para hamacas
Árbol
Procedimiento de instalación de techo de hormigón

7
A
Alinee el soporte de techo y use un lápiz para marcar la ubicación
de montaje deseada.
B
Taladre cuatro agujeros en la ubicación de montaje.
NOTA: Perfore aproximadamente 1/4" más profundo que la
longitud del anclaje de la manga.

8
C
Inserte cuatro anclajes de manga de la parte 1 en los orificios.
Utilice un martillo si es necesario. Retire las tuercas/arandelas de
los anclajes de la manga.
D
Coloque el soporte y luego apriete las tuercas para asegurar el
soporte.

9
Procedimiento de instalación

10
CONSEJOS DE INSTALACIÓN
• Asegúrese de que la estructura superior pueda soportar un mínimo de 25 0
libras. Si cuelga de un árbol , el diámetro de la rama del árbol debe ser de 10
pulgadas.
• Haga que los adultos prueben la estructura superior tirando hacia abajo o
sentándose en el columpio.
• No lo instale sobre concreto , asfalto o suelo duro.
11
• El columpio debe tener una zona de caída alrededor del columpio.
-La zona de caída debe extenderse un mínimo de 18 pulgadas en cada lado y el
doble de la altura de giro en la parte delantera/trasera.
• Coloque un acolchado suave alrededor del columpio si el suelo es demasiado
duro.
• No lo utilice en un lugar con luz solar excesiva. En climas cálidos , asegúrese de
que la superficie del columpio de la tienda no esté demasiado caliente. La altura
del columpio debe estar entre 12 y 18 pulgadas del suelo.
• El swing debe tener en menos 6,5 pies de espacio libre superior y lateral desde
cualquier estructura u obstrucción como una cerca , garaje , casa , ramas ,
alambres , etc.
• Instalar en un área libre de cables , paredes , estructuras , muebles , etc.
Dirección: Baoshanqu Shuangchenglu 803long 11hao 1602A-1609shi
Shanghai
Importado a AUS: SIHAO PTY LTD, 1 ROKEVA STREETEASTWOOD
NSW 2122 Australia
Importado a EE. UU.: Sanven Technology Ltd., Suite 250, 9166 Anaheim
Place, Rancho Cucamonga, CA 91730
REP
UK
Pooledas Group Ltd
Unit 5 Albert Edward House, The Pavilions
Preston, United Kingdom
REP
EC
SHUNSHUN GmbH
Römeräcker 9 Z2021, 76351
Linkenheim-Hochstetten, Germany
Hecho en china


2
Techniczny Certyfikat wsparcia i e-gwarancji www.vevor.com/support
LEŻAK
INSTRUKCJA OBSŁUGI
We continue to be committed to provide you tools with competitive price.
"Save Half","Half Price" or any other similar expressions used by us only represents an
estimate of savings you might benefit from buying certain tools with us compared to the major
top brands and does not necessarily mean to cover all categories of tools offered by us. You
are kindly reminded to verify carefully when you are placing an order with us if you are
actually saving half in comparison with the top major brands.

1
LYY006 /LYY007 /LYY008
Have product questions? Need technical support? Please feel free to
contact us:
Technical Support and E-Warranty Certificate
www.vevor.com/support
NEED HELP? CONTACT US!
HAMMOCK CHAIR

2
This is the original instruction,please read all manual instructions carefully
before operating. VEVOR reserves a clear interpretation of our user
manual. The appearance of the product shall be subject to the product
you received. Please forgive us that we won't inform you again if there
are any technology or software updates on our product.
Środki ostrożności
OSTRZEŻENIE:
Przeczytaj tę instrukcję przed użyciem tego produktu. Niezastosowanie się do
tego może spowodować poważne obrażenia. należy zawsze przestrzegać
podstawowych środków ostrożności , w tym:
• Sprawdź ponownie, czy wszystkie nakrętki , śruby i wkręty są dokręcone i
bezpieczne.
• Regularnie smaruj okucia i punkty zawieszenia.
• Sprawdź okucia i punkty zawieszenia pod kątem rdzy, która może mieć wpływ
na ich działanie wytrzymałość. W razie potrzeby wymienić.
• Sprawdź siedzisko , poduszkę powietrzną i namiot pod kątem nadmiernego
zużycia.
• Sprawdź liny pod kątem postrzępienia , zużycia lub złamania. W razie potrzeby
wymień .
• Nie pozostawiaj huśtawki namiotowej na zewnątrz przez dłuższy czas.
• W sezonie zimowym zaleca się przechowywanie huśtawki namiotowej w
pomieszczeniu zamkniętym.
3
• Aby wyczyścić , przetrzyj wilgotną szmatką.
• Przechowywać w suchym miejscu, z dala od bezpośredniego światła
słonecznego.
• Przykryj lub przechowuj w torbie, jeśli nie jest używany przez dłuższy czas.
ZACHOWAJ TE INSTRUKCJE
Lista produktów
Nazwa
Części
Ilość _
Pod huśtawką
1
Nadmuchiwana poduszka
z PCV
1
Nylonowy pasek
1
Karabińczyk
1
Montaż sufitowy
1


6
Stojaki do hamaków
Drzewo
Procedura montażu sufitu betonowego

7
A
Wyrównaj uchwyt sufitowy i za pomocą ołówka zaznacz żądane
miejsce montażu.
B
Wywierć cztery otwory w miejscu montażu.
UWAGA: Wywierć otwór o około 1/4 cala głębiej niż długość kotwy
tulejowej.

8
C
Włóż cztery kotwy tulejowe części 1 do otworów. W razie potrzeby
użyj młotka. Zdejmij nakrętki/podkładki z kotew tulejowych.
D
Umieść uchwyt, a następnie dokręć nakrętki, aby zabezpieczyć
uchwyt.

9
Procedura instalacji

10
WSKAZÓWKI MONTAŻOWE
• Upewnij się, że konstrukcja napowietrzna wytrzyma co najmniej 25 0 funtów.
Jeśli zwisasz z drzewa , średnica gałęzi powinna wynosić 10 cali.
• Poproś dorosłych, aby przetestowali konstrukcję górną, pociągając ją lub
siedząc na huśtawce.
• Nie instaluj na betonie , asfalcie lub twardym podłożu.
• Huśtawka powinna mieć wokół niej strefę upadku.
11
-Strefa upadku powinna rozciągać się na minimum 18 cale NA każdy boku i
dwukrotność wysokości obrotu z przodu/tyłu.
• Jeśli podłoże jest zbyt twarde, umieść wokół huśtawki miękką wyściółkę.
• Nie używaj w miejscu o dużym nasłonecznieniu. Podczas ciepłej pogody
upewnij się, że powierzchnia huśtawki namiotu nie jest zbyt gorąca. Wysokość
huśtawki powinna wynosić od 12 do 18 cali nad ziemią.
• Huśtawka musi mieć godz co najmniej 6,5 stopy prześwitu nad głową i z boku
dowolną konstrukcję lub przeszkodę, taką jak płot , garaż , dom , gałęzie ,
przewody itp .
• Zainstaluj w miejscu wolnym od przewodów , ścian , konstrukcji , mebli itp .
Adres: Baoshanqu Shuangchenglu 803long 11hao 1602A-1609shi
Szanghaj
Import do AUS: SIHAO PTY LTD, 1 ROKEVA STREETEASTWOOD NSW
2122 Australia
Import do USA: Sanven Technology Ltd., Suite 250, 9166 Anaheim Place,
Rancho Cucamonga, CA 91730
REP
UK
Pooledas Group Ltd
Unit 5 Albert Edward House, The Pavilions
Preston, United Kingdom
REP
EC
SHUNSHUN GmbH
Römeräcker 9 Z2021, 76351
Linkenheim-Hochstetten, Germany
Wyprodukowano w Chinach


2
Technisch Ondersteuning en e-garantiecertificaat www.vevor.com/support
HANGSTOEL
HANDLEIDING
We continue to be committed to provide you tools with competitive price.
"Save Half","Half Price" or any other similar expressions used by us only represents an
estimate of savings you might benefit from buying certain tools with us compared to the major
top brands and does not necessarily mean to cover all categories of tools offered by us. You
are kindly reminded to verify carefully when you are placing an order with us if you are
actually saving half in comparison with the top major brands.

1
LYY006 /LYY007 /LYY008
Have product questions? Need technical support? Please feel free to
contact us:
Technical Support and E-Warranty Certificate
www.vevor.com/support
NEED HELP? CONTACT US!
HAMMOCK CHAIR

2
This is the original instruction,please read all manual instructions carefully
before operating. VEVOR reserves a clear interpretation of our user
manual. The appearance of the product shall be subject to the product
you received. Please forgive us that we won't inform you again if there
are any technology or software updates on our product.
Veiligheidsmaatregelen
WAARSCHUWING:
Lees deze instructies voordat u dit product gebruikt. Als u dit niet doet, kan dit
leiden tot ernstig letsel. de basisvoorzorgsmaatregelen moeten altijd worden
gevolgd , waaronder de volgende:
• Controleer nogmaals of alle moeren , bouten en schroeven goed vastzitten.
• Smeer beslag en ophangpunten regelmatig.
• Controleer het beslag en de ophangpunten op roest die hun onderdelen kan
aantasten kracht. Vervang indien nodig.
• Controleer stoel , luchtkussen en tent op overmatige slijtage.
• Controleer de touwen op rafels , slijtage of breuk . Vervang ze indien nodig.
• Laat de tentschommel niet gedurende langere tijd buiten staan.
• In het winterseizoen wordt aanbevolen de tentschommel binnen op te bergen.
• Om schoon te maken , veegt u af met een vochtige doek.
• Bewaar op een droge plaats, uit de buurt van direct zonlicht.
3
• Dek het apparaat af of bewaar het in een zak als het gedurende langere tijd niet
wordt gebruikt.
BEWAAR DEZE INSTRUCTIES
Productlijst _
Naam
Onderdelen
Hoeveelheid _
Pod-schommel
1
PVC opblaasbaar kussen
1
Nylon riem
1
Karabijnhaak
1
Plafondmontage
1
Schroeven
( Voor betonnen plafond )
4
Schroeven
( Voor houten plafond )
4

6
Hangmatstandaards
Boom
Installatieprocedure voor betonnen plafonds

7
A
Lijn de plafondmontage uit en gebruik een potlood om de
gewenste montagelocatie te markeren.
B
Boor vier gaten op de montageplaats.
OPMERKING: Boor ongeveer 1/4 inch dieper dan de lengte van
het hulsanker.
8
C
Steek vier deel 1-hulsankers in de gaten. Gebruik indien nodig een
hamer. Verwijder de moeren/ringen van de hulsankers.
D
Plaats de houder en draai vervolgens de moeren vast om de
houder vast te zetten.

9
Installatieprocedure
10
INSTALLATIETIPS
• Zorg ervoor dat de bovenconstructie minimaal 25 kg kan dragen. Als u aan een
boom hangt , moet de diameter van de boomtak 25 cm zijn.
• Laat volwassenen de bovenconstructie testen door deze naar beneden te
trekken of in de schommel te gaan zitten.
• Niet installeren op beton , asfalt of harde grond.
• Schommel moet een valzone rondom de schommel hebben.

11
-De valzone moet minimaal 18 zijn inches op elk zijkant en tweemaal de
schommelhoogte aan de voor-/achterkant.
• Plaats zachte vulling rond de schommel als de grond te hard is.
• Niet gebruiken op een plek met veel zonlicht. Zorg er bij warm weer voor dat het
schommeloppervlak van de tent niet te warm is. De schommelhoogte moet 12 tot
18 inch boven de grond zijn.
• Swing moet hebben minimaal 6,5 meter boven het hoofd en een vrije ruimte aan
de zijkant elke constructie of obstakel zoals een hek , garage , huis , takken ,
draden , enz.
• Installeer het apparaat op een plek vrij van draden , muren , constructies ,
meubels , enz.
Adres: Baoshanqu Shuangchenglu 803long 11hao 1602A-1609shi
Shanghai
Geïmporteerd naar AUS: SIHAO PTY LTD, 1 ROKEVA
STREETEASTWOOD NSW 2122 Australië
Geïmporteerd naar de VS: Sanven Technology Ltd., Suite 250, 9166
Anaheim Place, Rancho Cucamonga, CA 91730
REP
UK
Pooledas Group Ltd
Unit 5 Albert Edward House, The Pavilions
Preston, United Kingdom
REP
EC
SHUNSHUN GmbH
Römeräcker 9 Z2021, 76351
Linkenheim-Hochstetten, Germany
Gemaakt in China


2
Teknisk Support och e-garanticertifikat www.vevor.com/support
HÄNGMATTA STOL
ANVÄNDARMANUAL
We continue to be committed to provide you tools with competitive price.
"Save Half","Half Price" or any other similar expressions used by us only represents an
estimate of savings you might benefit from buying certain tools with us compared to the major
top brands and does not necessarily mean to cover all categories of tools offered by us. You
are kindly reminded to verify carefully when you are placing an order with us if you are
actually saving half in comparison with the top major brands.
1
LYY006 /LYY007 /LYY008
Have product questions? Need technical support? Please feel free to
contact us:
Technical Support and E-Warranty Certificate
www.vevor.com/support
NEED HELP? CONTACT US!
HAMMOCK CHAIR

2
This is the original instruction,please read all manual instructions carefully
before operating. VEVOR reserves a clear interpretation of our user
manual. The appearance of the product shall be subject to the product
you received. Please forgive us that we won't inform you again if there
are any technology or software updates on our product.
Säkerhetsåtgärder
VARNING:
Läs dessa instruktioner innan du använder denna produkt. Underlåtenhet att
göra det kan resultera i allvarliga skador. de grundläggande
försiktighetsåtgärderna bör alltid följas, inklusive följande:
• Bekräfta igen att alla muttrar , bultar och skruvar är åtdragna och säkra.
• Smörj hårdvara och upphängningspunkter regelbundet.
• Kontrollera hårdvara och hängpunkter för rost som kan påverka deras styrka.
Byt ut vid behov.
• Kontrollera sätet , luftkudden och tältet för överdrivet slitage .
• Kontrollera att repen inte är slitna , slitna eller går sönder . Byt ut dem vid behov.
• Lämna inte tältgungan utomhus under en längre tid.
• Under vintersäsongen rekommenderas att tältgungan förvaras inomhus .
• För att rengöra , torka av med en fuktig trasa.
• Förvara på en torr plats borta från direkt solljus.
6
Hängmatta stativ
Träd
Procedur för installation av betongtak
A
Rikta upp takfästet och använd en penna för att markera önskad
monteringsplats.
7
B
Borra fyra hål vid monteringsplatsen.
OBS: Borra ungefär 1/4" djupare än längden på hylsankaret.
C
Sätt in fyra del 1-hylsankare i hålen. Använd en hammare om det
behövs. Ta bort muttrarna/brickorna från hylsankare.
8
D
Placera fästet och dra sedan åt muttrarna för att säkra fästet.
Installationsprocedur
9
10
INSTALLATIONSTIPS
• Se till att överliggande struktur kan bära minst 25 0lbs. Om den hänger i ett träd
bör diametern på trädets gren vara 10 tum .
• Låt vuxna testa överliggande struktur genom att dra ner eller sitta i gungan.
• Installera inte över betong , asfalt eller hård mark .
• Gungan bör ha en fallzon som omger gungan.
- Fallzonen bör vara minst 18 tum på varje sida och dubbla gunghöjden fram/bak.
11
• Placera mjuk stoppning runt gungan om underlaget är för hårt.
• Använd inte på en plats med starkt solljus. Vid varmt väder, se till att tältets
gungyta inte är för varm. Svänghöjden bör vara 12 till 18 tum över marken.
• Gunga måste ha kl minst 6,5 fot av overhead och sidoavstånd från någon
struktur eller hinder som ett staket , garage , hus , grenar , ledningar , etc.
• Installera i ett område fritt från ledningar , väggar , strukturer , möbler etc.
Adress: Baoshanqu Shuangchenglu 803long 11hao 1602A-1609shi
Shanghai
Importerad till AUS: SIHAO PTY LTD, 1 ROKEVA STREETEASTWOOD
NSW 2122 Australien
Importerad till USA: Sanven Technology Ltd., Suite 250, 9166 Anaheim
Place, Rancho Cucamonga, CA 91730
REP
UK
Pooledas Group Ltd
Unit 5 Albert Edward House, The Pavilions
Preston, United Kingdom
REP
EC
SHUNSHUN GmbH
Römeräcker 9 Z2021, 76351
Linkenheim-Hochstetten, Germany
Tillverkad i Kina

