www.zlinekitchen.com
User Manual
MICROWAVE DRAWERS
MWD MODELS

ZLINE Kitchen and Bath provides Attainable Luxury, where the kitchen and bath of your dreams
is never out of reach. Through our unique designs and unparalleled quality, we’re dedicated to
providing you an elevated experience in the heart of your home. With an endless selection of
features and finishes, our inspiration is your reality.

ZLINE is fueled by a passion for innovation; A relentless pursuit of bringing the
highest end luxury designs and professional features into everyone’s homes.
Because we continually strive to improve our products, we may change
specifications and designs without prior notice.
Scan the QR code to view the most up-to-date version of the Installation
Manual and User Manual.
WARNING: This product can expose you to chemicals including nickel, which is known to the
State of California to cause cancer. For more information, go to www.P65Warnings.ca.gov.

TABLE OF CONTENTS
IMPORTANT SAFETY INSTRUCTIONS . . . . . . . . . . . . . . . . . . . 1
OPERATION . . . . . . . . . . . . . . . . . . . . . . . . . . . . . . . . . . . . . . . . 5
Radio Interference . . . . . . . . . . . . . . . . . . . . . . . . . . . . . . . . . 5
Material Usage . . . . . . . . . . . . . . . . . . . . . . . . . . . . . . . . . . 6
MWD-1 Series Controls . . . . . . . . . . . . . . . . . . . . . . . . . . . . . . 7
MWD-30 Series Controls . . . . . . . . . . . . . . . . . . . . . . . . . . . . 13
MAINTENANCE AND CLEANING . . . . . . . . . . . . . . . . . . . . 19
TROUBLESHOOTING . . . . . . . . . . . . . . . . . . . . . . . . . . . . . . . . 22
WARRANTY . . . . . . . . . . . . . . . . . . . . . . . . . . . . . . . . . . . . . . . . 24

1
General Safety
WARNING
• Before installation and operation, please read and follow
these important instructions for the safety of your home
and the people living in it.
• Installation and service must be performed by a qualified
installer. The oven should not be adjusted or repaired by
anyone except properly qualified service personnel.
• IMPORTANT: Save this installation manual for
local electrical inspector’s use and for your own
future reference.
• This device complies with part 18 of the FCC Rules.
• Do not attempt to operate this oven with the door open
since open-door operation can result in harmful exposure
to microwave energy. It is important not to destroy or
tamper with the safety interlocks.
• Do not place any object between the oven front face and
the door or allow soil or cleaner residue to accumulate
on sealing surfaces.
• Do not operate the oven if it is damaged. It is particularly
important that the oven door closes properly and that
there is no damage to the:
• Door (bent or broken)
• Hinges and latches (broken or loosened)
• Door seals and sealing surfaces (dirty or eroding)
• When using electrical appliances, basic safety
precautions should be followed.
• To reduce the risk of burns, electric shock, fire, personal
injury, or exposure to excessive microwave energy, read
all instructions before using the appliance.
IMPORTANT SAFETY INSTRUCTIONS

2
General Safety
• This appliance must be grounded or connected to a
properly grounded outlet.
• Install this appliance only in accordance with the
provided installation instructions.
• Some products such as whole eggs and sealed
containers (i.e. closed glass jars) should not be heated
in this oven.
• Use this appliance only for its intended use as described
in the manual. Do not use corrosive chemicals or
vapors in this appliance. This type of oven is specifically
designed to heat, cook, or defrost food. It is not designed
for industrial or laboratory use.
• As with any appliance, close supervision is necessary
when used by children.
• Cleaning and user maintenance shall not be made by
children without supervision. Keep the appliance and its
cord out of reach of children.
• Do not operate this appliance if it has a damaged
electrical cord or plug, if it is not working properly, or if
the entire unit has been damaged.
• Do not cover or block any openings on the appliance.
• Do not immerse cord or plug in water.
• Keep cord away from heated surfaces.
• Do not let cord hang over edge of table or counter.
• Do not use paper products when appliance is operated in
the convection or baking mode.
• Do not store this appliance outdoors. Do not use this
product near water — for example, near a kitchen
sink, in a wet basement, near a swimming pool, or
similar locations.
IMPORTANT SAFETY INSTRUCTIONS

3
General Safety
• When cleaning surfaces of the door and oven that
come together when closing the door, use only mild,
nonabrasive soaps or kitchen-safe cleaners applied with
a sponge or soft cloth. Do not clean with metal scouring
pads. Pieces can burn off the pad and touch electrical
parts, increasing risk of electric shock.
• To reduce the risk of fire inside the oven:
• Do not overcook food. Carefully oversee appliance
when paper, plastic, or other combustible materials
are placed inside the oven to facilitate cooking.
• Remove wire twist-ties from paper or plastic bags
before placing bag in oven.
• If material inside of the oven ignites, keep oven door
closed, turn oven off, and disconnect the power cord,
or shut off power at the fuse or circuit breaker panel.
• Do not use the microwave for storage purposes. Do
not leave paper products, cooking utensils, or food
inside when not in use.
• Do not store any materials, other than manufacturer’s
recommended accessories, in this oven
when not in use.
• HOT CONTENTS CAN CAUSE SEVERE BURNS. DO
NOT ALLOW CHILDREN TO USE THE MICROWAVE.
Use caution when removing hot items.
IMPORTANT SAFETY INSTRUCTIONS

4
General Safety
• Liquids such as water, coffee, or tea may be heated
beyond the boiling point without appearing to be boiling.
• Visible bubbling or boiling when the container is
removed from the microwave oven is not always
present. THIS COULD RESULT IN VERY HOT LIQUID
SUDDENLY BOILING OVER WHEN THE CONTAINER
IS DISTURBED.
• To reduce the risk of injury:
• Do not overheat liquid.
• Stir the liquid before and halfway through heating it.
• Do not use straight sided containers with
narrow necks.
• After heating, allow the container to stand in the
microwave oven for a short time before removing
the container.
• Use extreme care when inserting a spoon or other
utensils into the container.
• Oversized food or oversized metal utensils should not be
inserted in a microwave oven as they may create a fire or
risk of electric shock.
• Do not cover racks or any other part of the oven with
metal foil. This will cause over-heating of the oven.
• Do not use the microwave if the oven is empty.
IMPORTANT SAFETY INSTRUCTIONS

5
Interference
OPERATION
RADIO INTERFERENCE
• Operation of the microwave oven may cause interference to your radio, TV, or
similar equipment.
• When there is interference, it may be reduced or eliminated by taking the
following measures:
• Clean the door and sealing surface of the oven.
• Reorient the receiving antenna of the radio or TV.
• Move the microwave oven away from the receiver.
• Plug the microwave oven into a different outlet so the appliance and receiver are on
different branch circuits.
CAUTION
UTENSILS
• Tightly-closed utensils could explode. Closed containers should be opened and plastic
pouches should be pierced before cooking.
• Carefully review the instructions on the next page regarding what materials to use in
the microwave.
• Please note there may be certain non-metallic utensils that are not safe to use
for microwaving. If in doubt, you can test the utensil in question by following the
procedure below:
• Fill a microwave-safe container with 1 cup of cold water, along with the utensil
in question.
• Cook on maximum power for 1 minute.
• Carefully feel the utensil. If the empty utensil is warm, do not use it for microwave cooking.
• Do not exceed 1 minute cooking time.
6
Material Usage
OPERATION
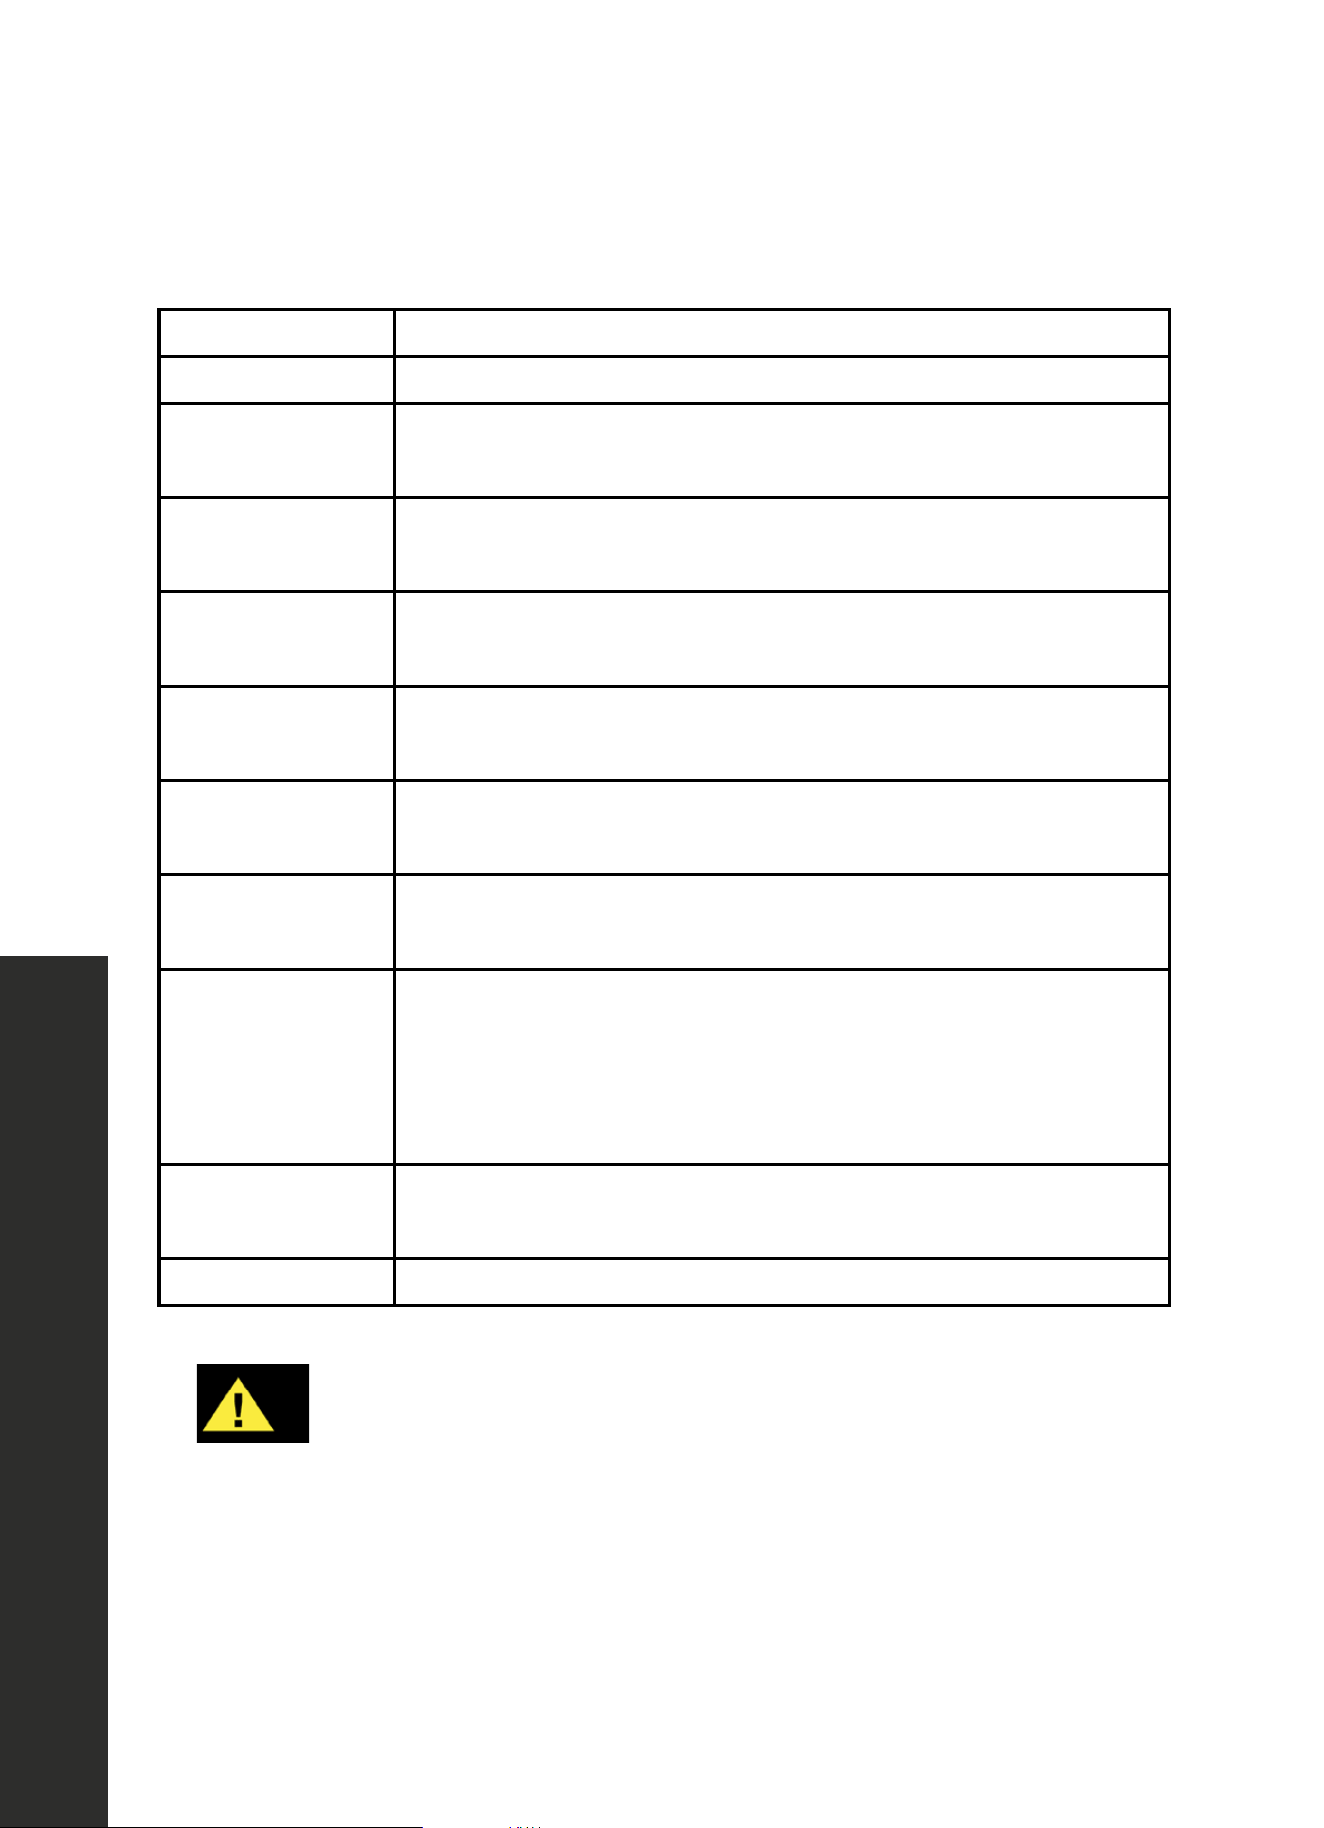
MATERIAL USAGE
MATERIAL USAGE
Browning dish Follow manufacturer instructions.
Dinnerware
Microwave-safe only. Follow manufacturer’s instructions. Do not
use cracked or chipped dishes.
Glass jars
Always remove lid. Use only to heat food until just warm. Most
glass jars are not heat resistant and may break.
Oven
cooking bags
Follow manufacturer instructions. Do not close with metal tie. Make
slits to allow steam to escape.
Paper
plates and cups
Use for short term cooking/warming only. Do not leave oven
unattended while cooking.
Paper towels
Use to cover food for reheating and absorbing fat. Use with
supervision for a short-term cooking only.
Parchment and
wax paper
Use as a cover to prevent splattering or a wrap for steaming.
Plastic
Microwave-safe only. Follow the manufacturer’s instructions. Some
plastic containers soften as the food inside gets hot. “Boiling bags”
and tightly closed plastic bags should be slit, pierced, or vented as
directed by package.
Plastic wrap
Microwave-safe only. Use to cover food during cooking to retain
moisture. Do not allow plastic wrap to touch food.
Thermometers Microwave-safe only (meat and candy thermometers.)
WARNING
Do not use aluminum, metal or metal trimmed utensils, metal twist
ties, paper bags, plastic foam, wood, or stainless steel mugs.

7
Controls
OPERATION MWD-1 Series Microwaves
MWD-1 SERIES CONTROLS
1. Open
2. Setup
3. Auto Menu
4. Defrost Weight
5. Close
6. Clock/Kitchen Timer
7. Defrost Time
8. Number Keys
9. Power
10. Start/+30 sec
11 . Time Cook
12. Stop/Cancel
POWER ON
• When the microwave oven is plugged into an outlet, buzzer sounds once. Screen displays
“WELCOME.” Then the oven turns into waiting state. The screen displays “00:00.”
• In waiting state, the screen will display the current time if the clock has been set. Otherwise,
“00:00” will display.
• Press “OPEN” button to open the drawer, and screen displays “OPEN.” The
screen will display “PLEASE CLOSE” when the drawer is fully opened.
• Press “CLOSE” button to close the drawer, and the screen displays “CLOSE.” The screen
will display the current time or “00:00” when the drawer is fully closed. If there are errors
opening or closing the drawer, buzzer will sound 5 times, and the screen will display
“CLOSE OR OPEN.”
CLOCK SETTING
• Press “CLOCK/KITCHEN TIMER” button once. The first hour figure will flash and other
“0” will light. A clock symbol will light up.
• Press the number buttons to enter the correct time. The input should be between
01:00-12:59.
• Press “CLOCK/KITCHEN TIMER” to finish the setting. “:” will flash.
• NOTE: In the process of setting the clock, if the “STOP/CANCEL” button is pressed or if
there is no operation within 1 minute, the oven will revert to former setting.

8
OPERATION MWD-1 Series Microwaves
Cooking Functions
KITCHEN TIMER
• Press “CLOCK/KITCHEN TIMER” button twice. Screen will display 00:00.
“FUNCTION” will light.
• Press the number buttons to enter the time. The maximum time is 99 minutes 99 seconds.
• Press “START/+30SEC.” to confirm the setting. The timer will count down.
• When the timer expires, buzzer will ring 5 times. The oven turns into waiting state.
Screen will display the current time if the clock has been set. Otherwise, screen will
display “00:00.”
• When the timer is in operation, cooking programs cannot be operated. “STOP/CANCEL”
can be pressed to cancel the timer.
MICROWAVE COOKING FUNCTION
• 11 power levels are available.
• Press “TIME COOK” button. Screen will display “00:00.” “FUNCTION” will light.
Press number buttons to input the cooking time. The maximum cooking time is 99
minutes 99 seconds.
• Press “POWER” button to set the power. The default power level is “PL100.”
• Press number buttons to select different power levels.
• Press “START/+30SEC.” to start cooking. Buzzer sounds once. The cooking time begins
to count down. When cooking finished, buzzer sounds 5 times and “FINISH” displays.
LEVEL 10 9 8 7 6 5 4 3 2 1 0
POWER 100% 90% 80% 70% 60% 50% 40% 30% 20% 10% 0%
DISPLAY PL100 PL90 PL80 PL70 PL60 PL50 PL40 PL30 PL20 PL10 PL00
NOTE: In the process of setting power levels, if the “STOP/CANCEL” button is pressed or if
there is no operation within 1 minute, the oven will revert to former setting.

9
OPERATION MWD-1 Series Microwaves
Cooking Functions
MICROWAVE COOKING FUNCTION
• In waiting state, instant cooking at 100% power level with 30 seconds cooking time can be
started by pressing “START/+30SEC.” Each press on the same button will increase cooking
time by 30 seconds.
• During microwave and Defrost Time mode, “START/+30SEC.” can be pressed to increase
cooking or defrosting time. Each press will increase 30 seconds.
• Note: “START/+30SEC.” cannot be pressed to increase cooking time for Defrost Weight
and Auto Menu cooking modes.
WEIGHT DEFROST FUNCTION
• Press “DEFROST WEIGHT” button. Screen displays “WEIGHT DEFROST” and
“FUNCTION” will light.
• Press number buttons to input the weight to be defrosted.
• The input weight should be between 0.1–6.0 lb (0.05– 2.7 kg).
• Press “START/+30SEC.” to start defrosting. Buzzer sounds once. The defrosting time begins
to count down. When defrosting is finished, buzzer sounds 5 times and “FINISH” displays.
• NOTE: Buzzer will sound to remind you to turn the food over during defrosting. The oven will
continue working if you don’t stop the oven to turn food over.
TIME DEFROST FUNCTION
• Press “DEFROST TIME” button. Screen displays “TIME DEFROST” and “FUNCTION”
will light.
• Press number buttons to enter the defrosting time between 00:01-99:99.
• Press “START/+30SEC.” to start defrosting. Buzzer sounds once. The defrosting time begins
to count down. When defrosting is finished, buzzer sounds 5 times and “FINISH” displays.
• NOTE: The defrosting power level is PL30.
AUTO MENU: BEVERAGE
• Press “BEVERAGE” button. Screen displays “1.” “AUTO MENU” and “
“ indicators will
light. Continue to press “BEVERAGE” button, “1” or “2” will display in order.
• Press “START/+30SEC.” to start cooking. Buzzer sounds once. The cooking time begins to
count down. When cooking is finished, buzzer sounds 5 times and “FINISH” displays.

10
Auto Menu
OPERATION MWD-1 Series Microwaves
AUTO MENU: POPCORN
• Press “POPCORN” button. Screen displays “1.75.” “AUTO MENU” and “OZ” indicators
will light.
• Continue to press “POPCORN” button, “1.75,” “3.0,” or “3.5” will display in order.
• Press “START/+30SEC.” to start cooking. Buzzer sounds once. “OZ” will go out. The
cooking time begins to count down. When cooking is finished, buzzer sounds 5 times
and “FINISH” displays.
AUTO MENU: MELT
• Press “MELT” button. Screen displays “BUTTER.” “AUTO MENU” indicator will light.
• Continue to press “MELT” button, “BUTTER,” “CHOCOLA,” “CHEESE,” or “MARSHMA”
will display in order.
• Press “START/+30SEC.” to confirm the selection.
• Press “MELT” button to select the weight. “OZ” will light.
• Press “START/+30SEC.” to start cooking. Buzzer sounds once. “OZ” will go out. The
cooking time begins to count down. When cooking is finished, buzzer sounds 5 times
and “FINISH” displays.
MENU DISPLAY WEIGHT
Butter/Margarine BUTTER
1
2
3
Chocolate CHOCOLA
4
8
Cheese CHEESE
8
16
Marshmallows MARSHMA
5
10

11
Auto Menu
OPERATION MWD-1 Series Microwaves
AUTO MENU: SOFTEN
Press “SOFTEN” button. Screen displays “BUTTER.” “AUTO MENU” indicator will light.
• Continue to press “SOFTEN” button, “BUTTER,” “ICE-CRE,” or “CHEESE” will
display in order.
• Press “START/+30SEC.” to confirm the selection.
• Press “SOFTEN” button to select the weight. “OZ” will light except butter menu.
• Press “START/+30SEC.” to start cooking. Buzzer sounds once. “OZ” will go out. The
cooking time begins to count down. When cooking is finished, buzzer sounds 5 times
and “FINISH” displays.
MENU DISPLAY WEIGHT
Butter BUTTER
1
2
3
Ice cream/Frozen juice ICE-CRE
8
16
32
Cream cheese CHEESE
3
8
BUZZER ON/OFF (MUTE):
• Press “SETUP” button. Screen displays “BUZ OFF.”
• Press “START/+30SEC.” button. The oven will turn to waiting state. Buzzer is turned off.
No buzzer will sound.
• Press “SETUP” button. Screen displays “BUZ ON.”
• Press “START/+30SEC.” button. The oven will turn to waiting state. Buzzer is turned on.
Buzzer will sound normally.

12
Other Specifications
OPERATION MWD-1 Series Microwaves
PANEL LOCK
• Lock: In waiting state, press “STOP/CANCEL” for 3 seconds; the oven will enter into the
panel lock state. Screen will display the current time if the clock has been set. Otherwise,
“00:00” will display.
• Lock release: In locked state, press “STOP/CANCEL” for 3 seconds to release the lock.
INQUIRING FUNCTION
• In cooking state, press “CLOCK/KITCHEN TIMER ” button to check the clock. The current
time will display for 3 seconds before changing back to cooking time.
• In cooking state, press “POWER” button to check the microwave power. The current
microwave power will display for 3 seconds before changing back to cooking time.
• NOTE: In defrosting state and auto menu, power level cannot be inquired.
OTHER SPECIFICATIONS
• In cooking state, “OPEN” cannot be pressed to open the drawer unless “STOP/
CANCEL” button is pressed to pause the cooking. Press “CLOSE” button to close the
drawer. Then “START/+30SEC.” button must be pressed to continue cooking.
• If the cooking program has been set and “START/+30SEC.” is not pressed in 1 minute,
the current time will be displayed. The setting will be canceled.
• If the oven door is open, the lamp will light until the oven is powered off.

13
Controls
MWD-30 SERIES CONTROLS
1. Open
2. Mute
3. Auto Menu
4. Defrost Weight
5. Close
6. Timer/Clock
7. Defrost Time
8. Number Keys
9. Time Cook
10. Start/+30 sec
11 . Power Level
12. Stop/Cancel
POWER ON
• When the microwave oven is plugged into an outlet, the buzzer sounds once. Then the
oven turns into waiting state. The screen displays “00:00.”
• In waiting state, the screen will display the current time if the clock has been set. Otherwise,
“00:00” will display.
CLOCK SETTING
• Press “TIMER/CLOCK” button twice. “12:00” will flash.
• Press the number buttons to enter the correct time. The input should be between 1:00-12:59.
• Press “START+30SEC.” or “TIMER/CLOCK” to finish the setting.
• NOTE: In the process of setting the clock, if the “STOP/CANCEL” button is pressed or if
there is no operation within 1 minute, the oven will revert to former setting.
OPERATION MWD-30 Series Microwaves

14
Cooking Functions
KITCHEN TIMER
• Press “TIMER/CLOCK” button once. “00:00” will display.
• Press number keys to set the clock; it should be within 00:01-99:99.
• Press “START+30SEC.” to begin the timer.
• When the timer expires, buzzer will ring 4 times. The oven turns into waiting state. Screen will
display the current time if the clock has been set. Otherwise, screen will display “00:00”.
MICROWAVE TIME COOK
• 10 power levels are available.
• Press “TIME COOK” button; screen will display “00:00.”
• Press number keys to set the cook time; it should be within 00:01-99:99.
COOK POWER
• Press “POWER LEVEL” once to confirm and then press “POWER LEVEL” repeatedly or
press number key to set the power level.
• Press “START+30SEC.” to start cooking.
• If no power level is set, the default power level is “L10.”
LEVEL 10 9 8 7 6 5 4 3 2 1
POWER 100% 90% 80% 70% 60% 50% 40% 30% 20% 10%
DISPLAY L10 L09 L08 L07 L06 L05 L04 L03 L02 L01
ADD 30 SECONDS
• In waiting state, instant cooking at 100% power level with 30 seconds cooking time can
be started by pressing “START/+30SEC.” Each press on the same button will increase
cooking time by 30 seconds.
• During microwave and defrost time, “START/+30SEC.” can be pressed to increase time.
Each press will increase 30 seconds.
OPERATION MWD-30 Series Microwaves

15
DEFROST WEIGHT FUNCTION
• Press “DEFROST WEIGHT” button. Screen displays the defrost icon, and “0.0 lbs” will light.
• Press number buttons to input the weight to be defrosted. The input weight should be
between 0.1–6.0 lb (0.05– 2.7 kg).
• Press “START/+30SEC.” to start defrosting. Buzzer sounds once.
NOTE: The buzzer will sound twice to remind you of turning over the food during defrosting.
DEFROST TIME FUNCTION
• Press “DEFROST TIME” button. Screen displays defrost icon and “00:00” will light.
• Press number buttons to enter the defrosting time between 00:01-99:99.
• Press “START/+30SEC.” to start defrosting.
NOTE: The defrosting power level is L03. It cannot be changed. The buzzer will sound twice
to remind you of turning over the food during defrosting.
AUTO MENU: POPCORN
Press “POPCORN” button to start cooking directly, when the oven door is closed.
AUTO MENU: SENSOR REHEAT
• In waiting state, press “Sensor Reheat” once, and “Sr-1” will display.
• Press “Sensor Reheat” repeatedly or press “1-4” to choose the menu.
• Press “START+30SEC.” to start cooking.
Cooking Functions
OPERATION MWD-30 Series Microwaves
16
Cooking Functions
OPERATION MWD-30 Series Microwaves
AUTO MENU: SENSOR COOK
• In waiting state, press “Sensor Cook” once, and “Sc-1” will display.
• Press “Sensor Cook” repeatedly or press “1-7” to choose the menu.
• Press “START+30SEC.” to start cooking.
Potato Sc-1
Chicken Sc-2
Fish Sc-3
Ground meat Sc-4
Fresh veggies Sc-5
Frozen veggies Sc-6
Canned veggies Sc-7
AUTO MENU: BEVERAGE
• In waiting state, press “Beverage” once,”1”,”01:30” will display.
• Press “Beverage” repeatedly or press “1”or “2” to choose the menu.
• Press “START+30SEC.” to start cooking.
AUTO MENU: MELT
• In waiting state, press “MELT” once, and “1buTT” will display.
• Press “MELT” repeatedly to choose the menu.
• Press “1”or “2” to choose the correspond weight.
• Press “START+30SEC.” to start cooking.
MENU DISPLAY WEIGHT
Butter/Margarine
1 buTT 1 (stick)
2 buTT 2 (stick)
3 buTT 3 (stick)
Chocolate
4 oz Choc 4 oz
8 oz Choc 8 oz
Cheese
8 oz CHEE 8 oz
16 oz CHEE 16 oz

17
Cooking Functions
AUTO MENU: SOFTEN
• In waiting state, press “SOFTEN” once, and “1buTT” will display.
• Press “SOFTEN” repeatedly to choose the menu.
• Press “1”or “2” to choose the correspond weight.
• Press “START+30SEC.” to start cooking.
MENU DISPLAY WEIGHT
Butter/Margarine
1 buTT 1 (stick)
2 buTT 2 (stick)
3 buTT 3 (stick)
Ice cream/Frozen juice
8 oz ICE 8 oz
16 oz ICE 16 oz
32 oz ICE 32 oz
Cream cheese
3 oz CHEE 3 oz
8 oz CHEE 8 oz
MULTIPLE COOK
• In waiting state, press “DEFROST WEIGHT” once, and “0.0 lbs” will display.
• Press number buttons to input the weight to be defrosted. The input weight should be
between 0.1–6.0 lb (0.05– 2.7 kg).
• Press “TIME COOK” button once. “00:00” will display.
• Then, press number keys to set the cook time; it should be within 00:01-99:99.
• Press “POWER LEVEL” once to confirm and then press “POWER LEVEL” repeatedly or
press number key to set the power level.
• Press “START+30SEC.” to start cooking.
NOTE: The defrost function can only be one stage of a multiple cook. Two stage cooking
can be set at most levels.
OPERATION MWD-30 Series Microwaves

18
Cooking Functions
OPERATION MWD-30 Series Microwaves
BUZZER ON/OFF
To enter silent mode
• Press “MUTE” button. Screen displays silent icon.
To cancel silent mode
• In silent mode, press “MUTE” button. The buzzer will sound twice.
PANEL LOCK
• Lock: In waiting state, press “STOP/CANCEL” for 3 seconds, then oven will enter into
the panel lock state. Screen will display “Loc.”
• Unlock: In locked state, press “STOP/CANCEL” for 3 seconds to release the lock. Screen
will display “UnLo.”
ECO MODE
To enter eco mode:
• The microwave will enter eco mode when the oven door is closed and the unit sits in
waiting state for longer than 1 minute.
• When in eco-mode, the stand-by power will be 0.9W.
To cancel eco mode:
• In eco mode, open the door or press any key to cancel it.
INQUIRING FUNCTION
In cooking state, press “TIMER/CLOCK” button to check the clock. The current time will
display for 3 seconds before changing back to cooking time.

19
CARE AND CLEANING
• Microwave energy may escape if the cooking compartment drawer, side rails, or
drawer guide rollers are damaged, which can be a serious health risk. Never use the
appliance if any portion of the drawer is damaged. If you see damage, contact ZLINE
at 1-614-777-5004.
WARNING
NEVER use high-pressure cleaners or steam cleaners. This increases the chance
of moisture penetrating inside the unit’s mechanical and electrical systems,
which may cause an electric shock.
• Slight differences in color on the front of the appliance are caused by the use of different
materials, such as glass, plastic, and metal. Shadows on the door panel that look like
streaks are caused by reflections made by the oven light.
• Unpleasant odors, e.g. after fish has been prepared, can be removed easily. Add a
few drops of lemon juice to a cup of water. Place a wooden spoon into the container to
prevent superheating. Heat the water for 1 to 2 minutes at maximum microwave power.
CLEANING AGENTS
• To ensure that the different surfaces are not damaged by using the wrong cleaning agent,
observe the information in the table on page 20. Do not use:
• Sharp or abrasive cleaning agents
• Metal or glass scrapers to clean the glass in the drawer
• Metal or glass scrapers to clean the area where the microwave drawer and frame
touch when closed
• Hard scouring pads and sponges
• Cleaning agents with high concentrations of alcohol
• Wash new sponge cloths thoroughly before use.
• Allow all surfaces to dry thoroughly before using the appliance again.
MAINTENANCE AND CLEANING
Care and Cleaning
20
CLEANING GUIDE
Appliance front
and exterior
Hot soapy water: Clean with a dish cloth and dry with a soft
cloth. Do not use glass cleaners or metal or glass scrapers.
Appliance front with
stainless steel
Hot soapy water: Clean with a dish cloth and dry with a soft
cloth. Remove flecks of limescale, grease, starch, and albumin
(e.g. egg white) immediately. Corrosion can form under such
residues. Special stainless steel cleaning agents can be obtained
at appliance stores and other vendors. Do not use glass cleaners
or metal or glass scrapers for cleaning.
Cooking
compartment and
microwave interior
Hot soapy water: Clean with a dish cloth and dry with a soft
cloth. Remove flecks of limescale, grease, starch and albumin
(e.g. egg white) immediately. Corrosion can form under such
residues. Do not use glass cleaners or metal or glass scrapers.
Control panel
Damp cloth: Ensure that no water seeps into the appliance
interior. Dry with a soft cloth.
Drawer glass
Kitchen-safe glass cleaner: Clean with a dish cloth and dry with
a soft cloth. Do not use a glass scraper.
Drawer guides,
rails and rollers
Soft dry cloth: Remove crumbs and food debris and wipe with
a soft dry cloth so the door may open and close smoothly.
Pay special attention to the white rollers that help guide the
microwave drawer. Open the drawer fully to thoroughly clean
these rollers to avoid sparking (arcing).
WARNING
NEVER clean the appliance immediately after switching off, as you risk
being burned. Let the appliance cool down before cleaning. Disconnect
power before cleaning or leave the door open to inactivate the microwave
during cleaning.
MAINTENANCE AND CLEANING
Cleaning Guide
21
Cleaning Guide
MAINTENANCE AND CLEANING
CLEANING GUIDE
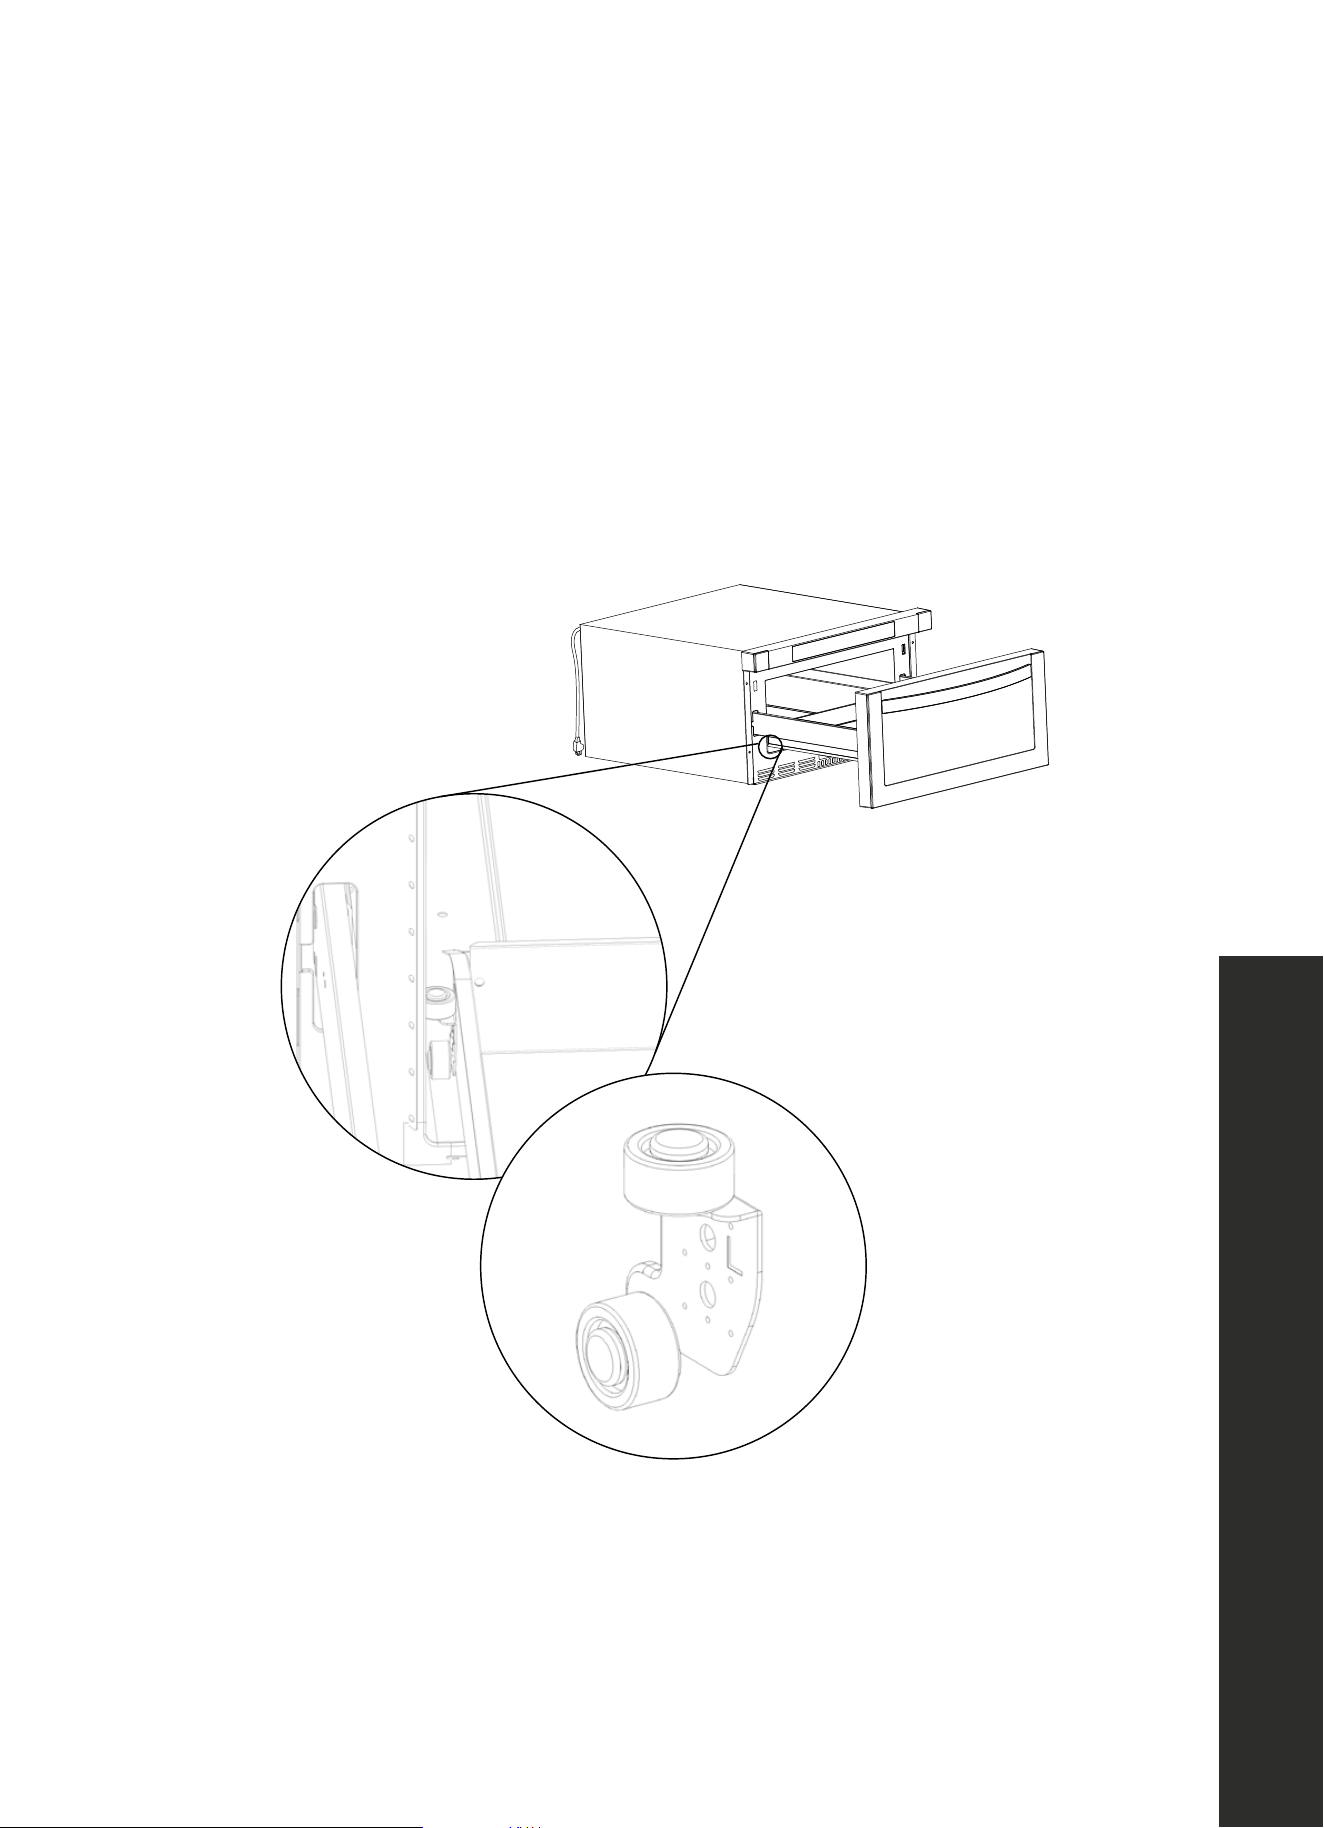
IMPORTANT:
It’s recommended to thoroughly clean the interior of your microwave drawer at least once
a week. If the appliance is not cleaned often, food and grease can build up on the ceramic
base plate and in hard-to-reach locations along the white drawer guide rollers and the
sliding side rails — as outlined in the images below — which may cause sparking (arcing).

22
Troubleshooting
TROUBLESHOOTING
ISSUE POSSIBLE CAUSE TROUBLESHOOTING
Oven won’t start.
Electrical cord is unplugged. Plug into the outlet.
Door is open. Close the door and retry.
Wrong operation is set. Check instructions
Arcing or sparking.
Materials to be avoided
in the microwave
oven were used.
Use microwave-safe
cookware only.
The oven is
operated when empty.
Do not operate with oven empty.
Spilled food is in the oven. Clean inside the oven frequently.
Certain foods high in iron can
cause a spark.
Example: Broccoli, potatoes,
butter, etc.
Improper defrosting.
Materials to be avoided in
microwave oven were used.
Use microwave-safe
cookware only.
Cooking time and/or power
is not suitable.
Use correct cooking time
and/or power.
Food is not turned or stirred. Turn or stir food.
Unevenly
cooked food.
Materials to be avoided in
microwave oven were used.
Use microwave-safe
cookware only.
Food is not defrosted
completely.
Completely defrost food.
Cooking time and/or power
level is not suitable.
Use correct cooking time and/
or power level.
Food is not turned or stirred. Turn or stir food.
Overcooked food.
Cooking time and/or power
level is not suitable.
Use correct cooking time and/
or power level.

23
Troubleshooting
TROUBLESHOOTING
ISSUE POSSIBLE CAUSE TROUBLESHOOTING
Undercooked food.
Materials to be avoided in
microwave were used.
Use microwave-safe
cookware only.
Oven ventilation ports
are restricted.
Check to see that oven
ventilation ports are
not restricted.
Cooking time and/or power
level is not suitable.
Use correct cooking time and/
or power level.
Food is not turned or stirred. Turn or stir food.

WARRANTY
COVERAGE
ZLINE Kitchen and Bath (“ZLINE”) microwave parts will be warrantied for two years from the
original date of product delivery for the original purchaser of the product.
ZLINE warranty periods begin from the original date of product delivery and solely cover
the original purchaser of the product, delivered new and in its original carton. ZLINE will
provide free-of-charge, non-consumable replacement parts for the components that failed
due to manufacturing defects.
It is the responsibility of the customer to install all replacement parts, as ZLINE does not perform
service repairs on its microwave products.
ZLINE’s liability is limited to the original purchase price of the product. Additional injuries,
losses, damages, or other inconveniences caused by product malfunction or defects in
materials are not covered under the terms of this warranty.
TERMS
ZLINE warranties apply only to the original purchaser of a ZLINE product installed for normal
residential use. This is defined as a single-family, residential dwelling in a non-commercial
setting. Any warranty claim stemming from installation, operation, or any other use within a
commercial setting is not covered under this limited warranty.
Commercial settings include, but are not limited to: schools, churches, hotels, restaurants,
vacation rentals such as Airbnb, daycare centers, private clubs, fire stations, common areas
in multi-family dwellings, nursing homes, food service locations, and institutional food service
locations such as hospitals or correctional facilities.
This warranty is non-transferable and will not under any circumstance be extended based on
the date of installation — the warranty period takes effect from the date of product delivery
and only covers the original purchaser. The warranty applies only to products installed in the
contiguous United States and the District of Columbia.

WARRANTY
Out-of-pocket payments will not be reimbursed for replacement parts unless prior approval is
received from ZLINE. Unapproved out-of-pocket payments for parts will not be reimbursed.
Out-of-pockets for any type of service will not be reimbursed, as ZLINE does not perform
service repairs on its microwave products. All warranty procedures must be followed to
maintain warranty coverage.
If ZLINE is unable to replace the defective part after a reasonable number of attempts, ZLINE
reserves the right to offer to replace the product or provide the original purchaser a full refund
of the purchase price of the product (not including installation, removal, or other charges that
were not included in the original purchase price).
The original purchaser of the product must provide the original proof of purchase, including
the purchase date, when filing a claim to obtain replacement parts or refunds. Additionally,
the original purchaser of the product must provide the serial number of the product when filing
a claim to obtain replacement parts or refunds.
This warranty shall not apply to any ZLINE product in which the original factory serial
number has been removed, altered, or cannot be readily determined for any reason. Further,
ZLINE is not responsible for damage resulting from, but not limited to: shipment, delivery, or
improper installation; negligence or improper maintenance, misuse, or abuse of the product;
unauthorized alteration, modification, or tampering with the product; accident, fire, floods,
pest infestations, pandemics, natural disasters, or any other unpreventable or unexplained
acts of nature, commonly referred to as “acts of God”; flare-up fires or damages caused
by improper electric supply, electrical line current, voltage, or power surges; and service
to correct installation not in accordance with the instructions contained in ZLINE’s product
manuals and/or with local government codes.
Additionally, this microwave warranty does not apply to aesthetic damage, scratches, or natural
wear caused by normal use; second-hand, open box products, or products purchased from
an unauthorized retailer; consumable parts including, but not limited to, metal and charcoal
filters; and damages, problems, or any type of performance-related issues stemming from
alteration or tampering with the microwave, including, but not limited to, painting stainless
steel, black stainless, or DuraSnow
®
finishes or any portion of the product’s interior or exterior,
and cutting the 3-prong plug to manually hardwire the product.

WARRANTY
Information contained within ZLINE’s installation and user manuals, in addition to product
information included on ZLINE’s website and all related digital listings, do not cover every
possible condition and situation that may occur during the installation or operation of
ZLINE products.
ZLINE reserves the right to make changes at any time to its products when considered safe,
necessary, and useful. Always check the ZLINE website for the most up-to-date version of its
product manuals: www.zlinekitchen.com/pages/manuals.
Do not install or operate any ZLINE product if it has missing or broken parts or if it arrives
damaged due to shipping. If ZLINE products arrive damaged, contact ZLINE Customer
Experience at 1-614-777-5004 for help. Failure to report a damaged appliance prior to
installation or operation may void the warranty. ZLINE does not perform service repairs on its
microwave products.
ZLINE disclaims responsibility for damage or injury caused by improper installation or use of
any of its products. ZLINE is under no obligation, by law or otherwise, to provide concessions,
including repairs, prorates, rebates, discounts, or replacements, once the warranty has expired.
SERIAL NUMBER LOCATION
The rating tag shows the model and serial number of
your appliance. Please write down the model number
and serial number of your appliance. The serial number
is located below the control pad on the microwave. The
tag is visible when the microwave door is open. Both
are needed to obtain warranty assistance. Do not
remove permanently affixed labels, warnings, or plates
from the product. This will void the warranty. You may
also consider attaching your receipt or proof of
purchase to this manual.

WARRANTY
CUSTOMER SERVICE AND PARTS INFORMATION
Please contact ZLINE Customer Service for questions and
troubleshooting help at 1-614-777-5004 or visit
www.zlinekitchen.com/contact to utilize our online Customer
Experience Portal.
Scan the QR code to view the most up-to-date version of our Installation
Manual and User Manual.
Need to purchase a part or accessory for your ZLINE product?
Visit www.zlineparts.com, ZLINE’s official parts distribution partner.