EMAC9KW
Portable Local Air
Conditioner
User Manual

2
Contents
Important Safety Precautions ....................................................................................... 3
General Description ........................................................................................................ 8
Inside the Package ......................................................................................................... 8
Panel Function ................................................................................................................ 9
Remote Control ............................................................................................................... 9
Before First Use ........................................................................................................... 10
Installation Explanations ............................................................................................ 10
Using the Appliance ..................................................................................................... 13
Cleaning and Maintenance ........................................................................................... 15
Trouble Shooting .......................................................................................................... 16
Information to identify the model(s) to which the information relates to Air
Conditioner ................................................................................................................... 17
Technical Data ............................................................................................................. 18
Disposal......................................................................................................................... 18
Help Line ....................................................................................................................... 18

3
Important Safety Precautions
VERY IMPORTANT!
Please do not install or use your mobile air
conditioner before you have carefully read this
manual. Please keep this instruction manual
for an eventual product warranty and for future
reference.
WARNING
1. Do not use means to accelerate the defrosting process
or to clean, other than those recommended by the
manufacturer.
2. The appliance shall be stored in a room without
continuously operating ignition sources (for example:
open flames, an operating gas appliance or an
operating electric heater.
3. Do not pierce or burn.
4. Be aware the refrigerants may not contain an odour.
5. Appliance shall be installed, operated and stored in a
room with a floor area larger than 8.7m
2
.
WARNING
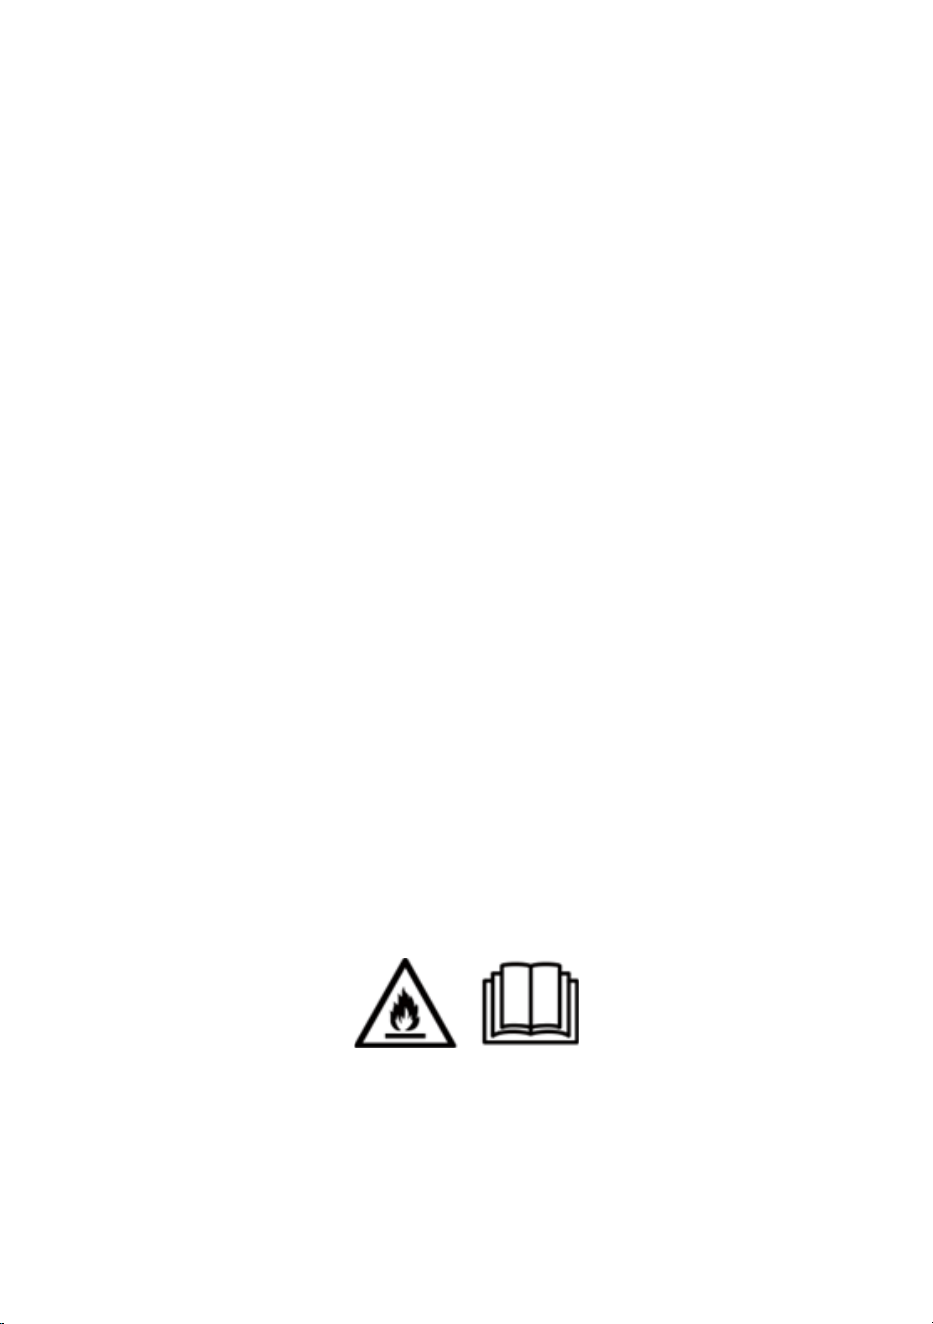
• Specific information regarding appliances with R 290
refrigerant gas.
• Thoroughly read all of the warnings.

4
• When defrosting and cleaning the appliance, do not
use any tools other than those recommended by the
manufacturing company.
• The appliance must be placed in an area without any
continuously sources of ignition (for example: open
flames, gas or electrical appliances in operation).
• Do not puncture and do not burn.
• This appliance contains 180g of R290 refrigerant gas.
• R290 is a refrigerant gas that complies with the European
directives on the environment. Do not puncture any part
of the refrigerant circuit.
• If the appliance is installed, operated or stored in a non-
ventilated area, the room must be designed to prevent to
the accumulation of refrigerant leaks resulting in a risk of
fire or explosion due to ignition of the refrigerant caused
by electric heaters, stoves, or other sources of ignition.
• The appliance must be stored in such a way as to prevent
mechanical failure.
• Individuals who operate or work on the refrigerant
circuit must have the appropriate certification issued by
an accredited organization that ensures competence in
handling refrigerants according to a specific evaluation
recognized by associations in the industry.
• Repairs must be performed based on the recommendation
from the manufacturing company. Maintenance and
repairs that require the assistance of other qualified
personnel must be performed under the supervision of an
individual specified in the use of flammable refrigerants.

5
1. The appliance is for indoor use only.
2. Do not use the unit on a socket under repairs or not
installed properly.
3. Do not use the unit, follow these precautions:
A: Near to source of fire.
B: An area where oil is likely to splash.
C: An area exposed to direct sunlight.
D: An area where water is likely to splash.
E: Near a bath, a laundry, a shower or a swimming
pool.
4. Never insert your fingers, rods into the air outlet.
Take special care to warn children of these dangers.
5. Keep the unit upward while transport and storage, for
the compressor locates properly.
6. Before cleaning the air-conditioner, always turn o or
disconnect the power supply.
7. When moving the air-conditioner, always turn o and
disconnect the power supply, and move it slowly.
8. To avoid the possibility of fire disaster, the air-
conditioner shall not be covered.
9. All the air-conditioner sockets must comply with the
local electric safety requirements. If necessary, please
check it for the requirements.
10. Children should be supervised to ensure that they do
not play with the appliance.
11. If the supply cord is damaged, it must be replaced
by the manufacturer, its service agent or similarly
qualified persons in order to avoid a hazard.
12. This appliance can be used by children aged from 8

6
years and above and persons with reduced physical,
sensory or mental capabilities or lack of experience
and knowledge if they have been given supervision or
instruction concerning use of the appliance in a safe
way and understand the hazards involved. Children
shall not play with the appliance. Cleaning and user
maintenance shall not be made by children without
supervision.
13. The appliance shall be installed in accordance with
national wiring regulations.
14. Recycling
This marking indicates that this product should
not be disposed with other household wastes
throughout the EU. To prevent possible harm to the
environment or human health from uncontrolled
waste disposal, recycle it responsibly to promote
the sustainable reuse of material resources. To
return your used device, please use the return and
collection systems or contact the retailer where the
product was purchased. They can take this product for
environmentally safe recycling.
15. GWP: R290: 3
16. Contact authorized service technician for repair or
maintenance of this unit.
17. Do not pull, deform or modify the power supply cord
or immerse it in water . Pulling or misuse of the
power supply cord can result in damage to the unit
7
and cause electrical shock.
18. Compliance with national gas regulations shall be
observed.
19. Keep ventilation openings clear of obstruction.
20. Any person who is involved with working on or
breaking into a refrigerant circuit should hold
a current valid certificate from an industry-
accredited assessment authority, which authorizes
their competence to handle refrigerants safely in
accordance with an industry recognized assessment
specification.
21. Servicing shall only be performed as recommended
by the equipment manufacturer. Maintenance and
repair requiring the assistance of other skilled
personnel shall be carried out under the supervision
of the person competent in the use of flammable
refrigerants.
22. Do not operate or stop the unit by inserting or pulling
out Die power plug, it may cause electric shock or fire
due to heat generation.
23. Unplug the unit if strange sounds, smell, or smoke
comes from it.
Notes:
• If any parts damage, please contact the dealer or a
designated repair shop.
8
• In case of any damage, please turn o the power switch,
disconnect the power supply, and contact the dealer or a
designated repair shop.
• In any case, the power cord shall be firmly grounded.
• To avoid the possibility of danger, if power cord
is damaged, please turn o the power switch and
disconnect the power supply. It must be replaced from
the dealer or a designated repair shop.
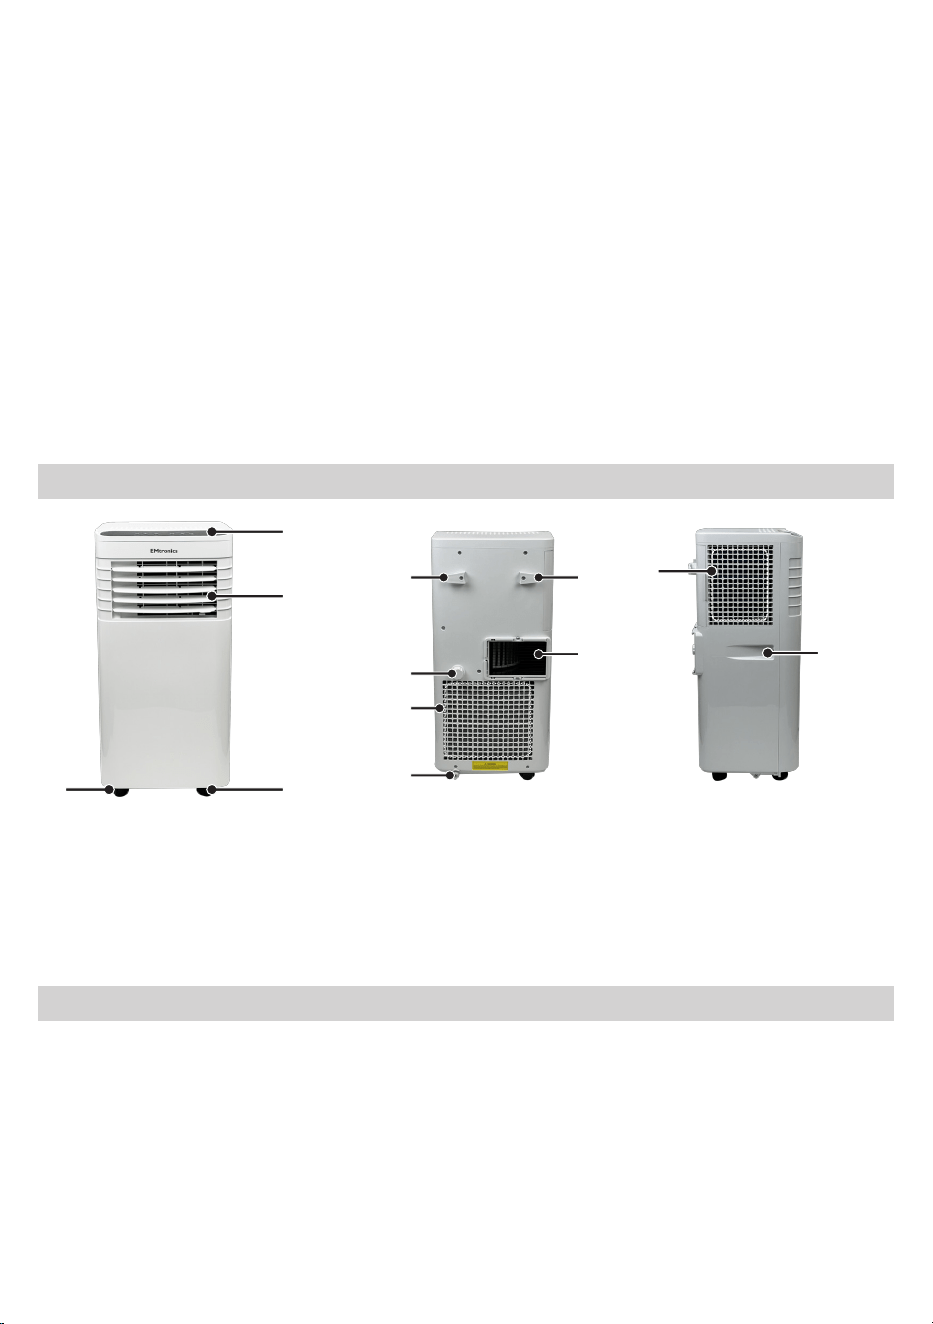
General Description
A
B
CC
D D
E
F
G
H
I
J
A. Control Panel
B. Air outlet
C. Castor Wheels
D. Cable Management
E. Exhaust Air Outlet Connection
F. Drainage Cap
G. Hot Air Inlet
H. Outfall
I. Dust Filter Gauze
J. Handle
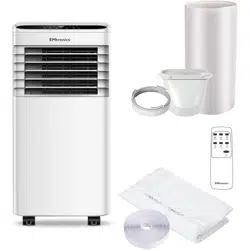
Inside the Package
1 x Main Air Conditioner Unit
1 x Hot-Air Exhaust Hose
1 x Hose Connector (Window End)
1 x Square Vent Hose Connector (Air
Conditioner End)
1 x Drawstring Cloth
1 x Remote Controller
1 x 2xAAA batteries
1 x Drainage Nozzle
1 x Drainage pipe
9
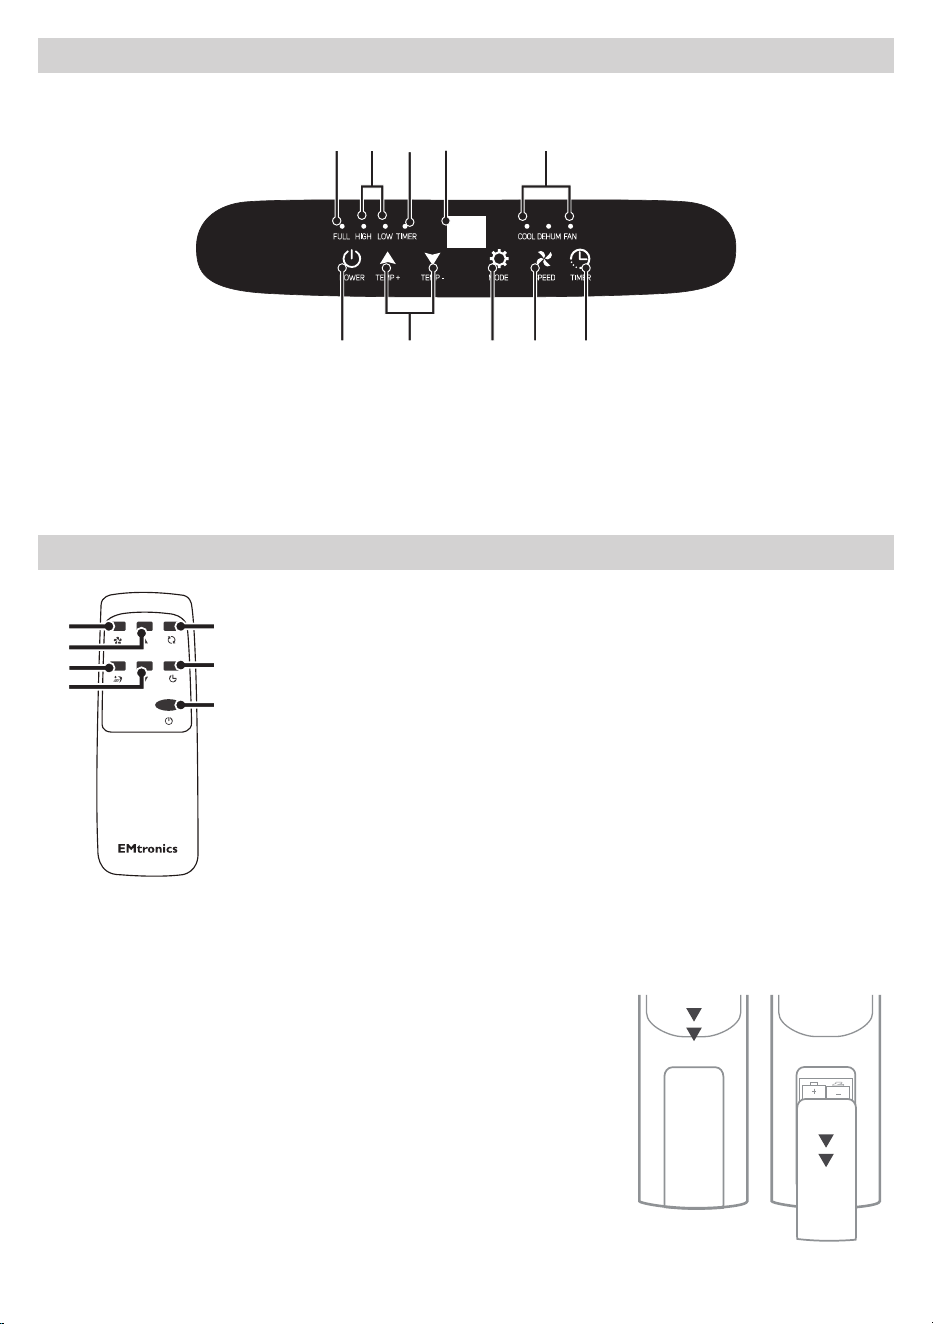
Panel Function
1 2 4 5
6 7
8 9 10
3
1. Water Tank Full LED Indicator
2. Fan Speed LED Indicator
3. Timer Indicator
4. LED Display
5. Mode LED Indicator
6. Power : On / O
7. Temperature : Up / Down
8. Mode : Cool / Dehumidifier / Fan
9. Fan Speed : High / Low
10. Timer Control
Remote Control
Speed
Temp Up
Mode
Timer
Temp Down
Sleep
7
9
11
7
8
10
6
6. Power : On / O
7. Temperature Up / Down
8. Mode : Cool / Dehumidifier / Fan
9. Fan Speed : High / Low
10. Timer
11. Sleep Mode : On / O
Fitting The Remote Control Batteries
Before use, the remote control batteries will need fitting.
Remove batteries from their packaging before fitting them
in to the remote control.
1. Slide the tab downwards and lift the ‘battery lid’
upwards to open the compartment.
2. Fit 2 x AAA batteries as displayed in the diagram. Make
sure the polarities of the battery match the remote e.g.
The ‘+’ symbol within the compartment should match
with the ‘+’ symbol on the battery.
3. Replace the compartment lid and proceed to use.
10
Before First Use
Before operating the device :
1. Find a place where there is a power supply nearby.
2. Install the exhaust hose, and adjust the window position.
3. Insert the power cord into a grounded AC230V/50Hz mains power wall socket.
4. Please open front air outlet slats (B) first, then press the power button to turn
on the machine.
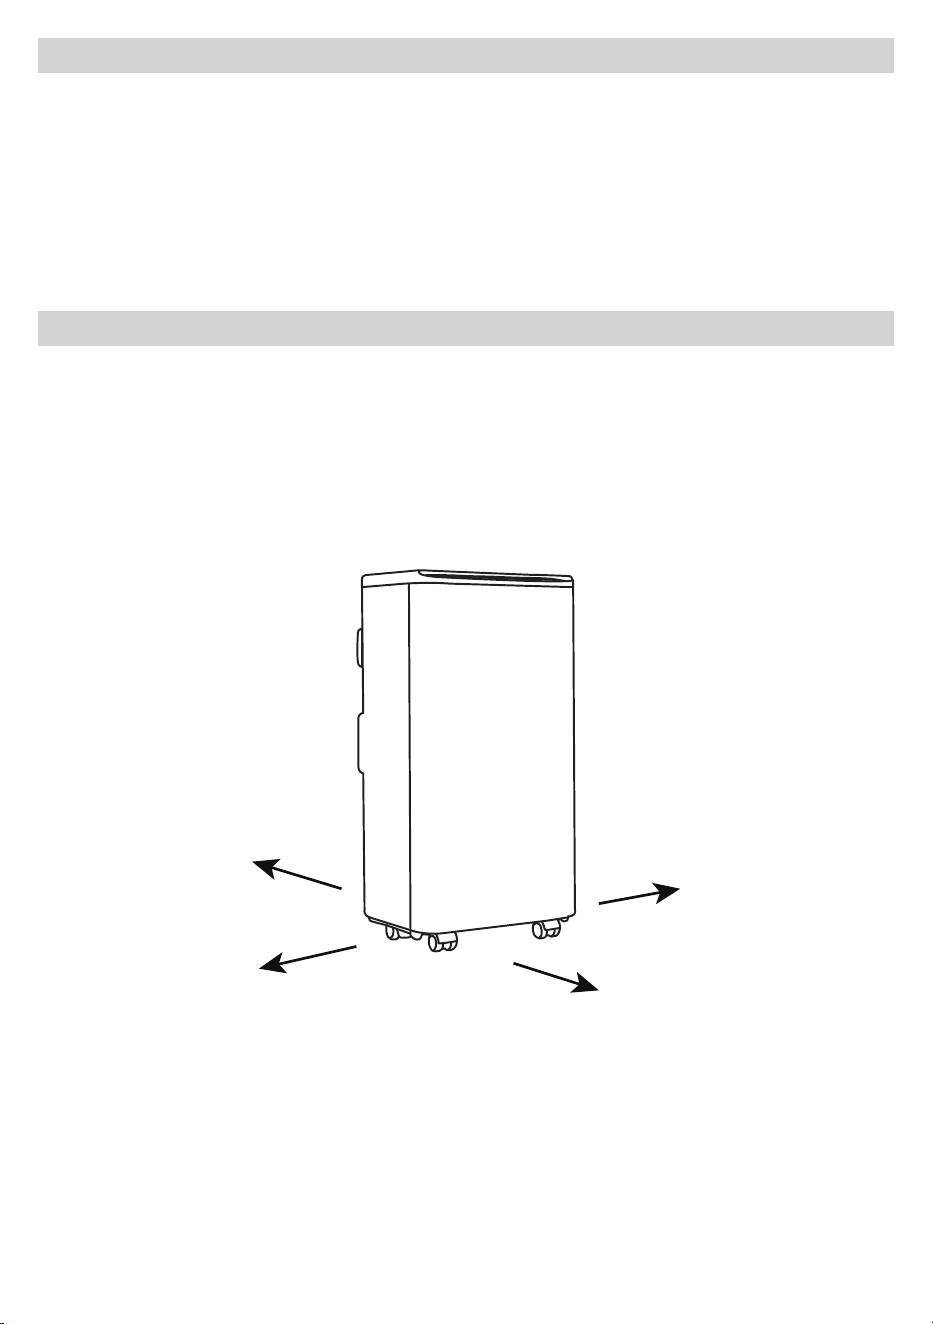
Installation Explanations
1. Ideal location
• The air conditioner should be positioned in a flat and empty place with 30cm
of clear ventilation space around it position. Don’t block the air outlet (B) at
the front of the appliance.
• Socket wiring should be in accordance with the local electric safety
requirements.
30CM
30CM
30CM
30CM
11
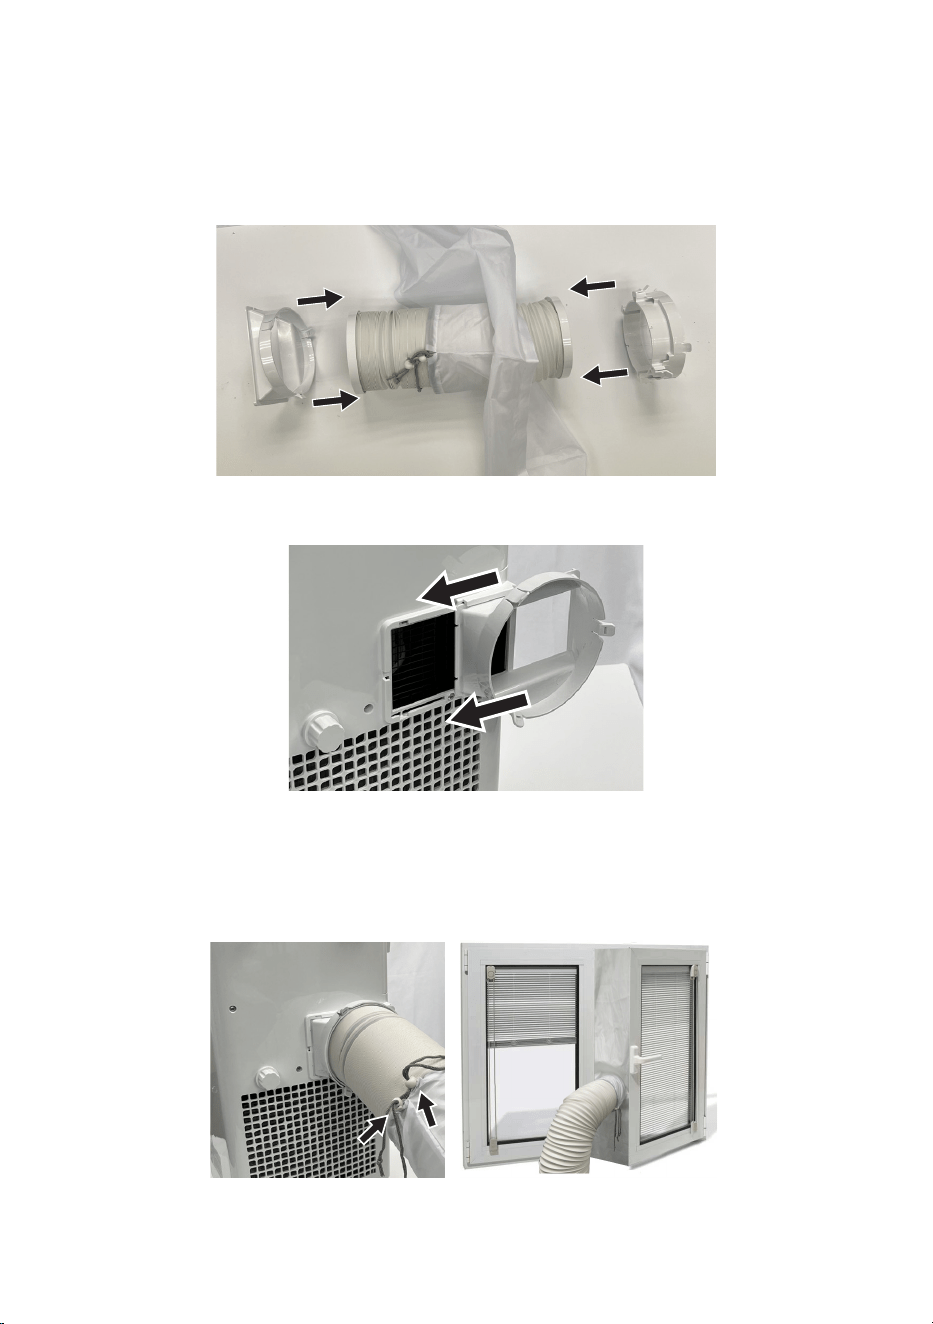
2. Exhaust Hose Installation
Temporary installation:
• Slide the drawstring cloth on to the exhaust vent hose.
• Twist one end of the exhaust vent hose into the square hose connector and
twist the other end of the hose into the round hose connector.
• Now slide the square connector end over the opening at back of the air
conditioner.
• Stick the self adhesive Velcro strips supplied to the edges of the window and
window frame which is planned to be used. Then open the window and attach
the drawstring cloth (The drawstring cloth has its own Velcro strips stitched
to the edges which will lock together with the Velcro strips now attached
around the window)
• Put the other round connector end of the exhaust hose through the round
hole in the drawstring cloth, now attached to the window opening, and
tighten up the drawstrings.
12
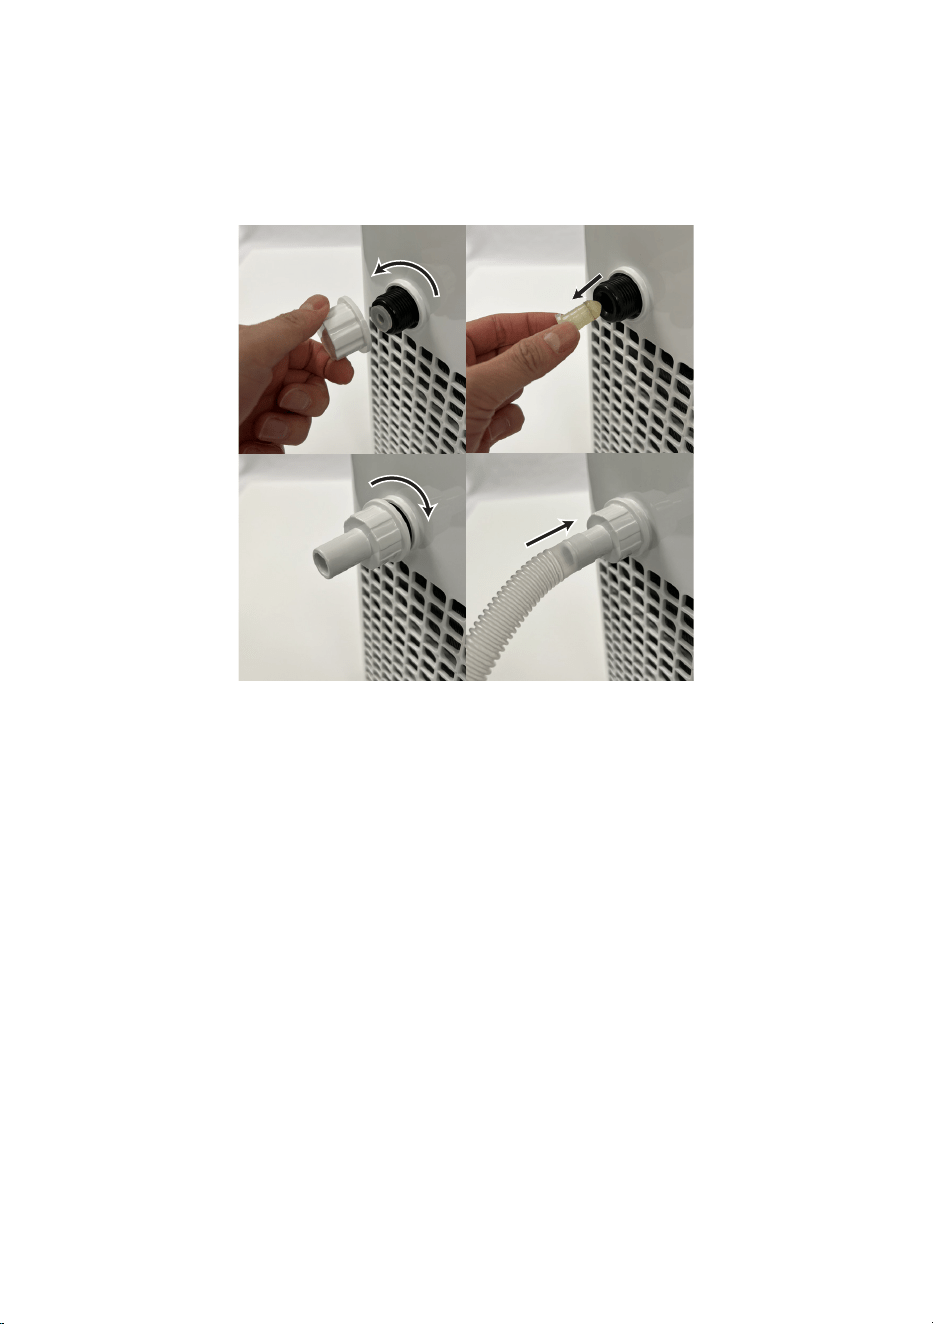
3. Continuous drainage pipe installation
1. Remove the drainage cap (F) at the back of the machine
2. Pull out the rubber water plug from inside.
3. Install the drainage nozzle by tightening it clockwise on to the drainage
socket.
4. Finally, install the drainage pipe by pushing it firmly on to the nozzle end.
STEP 1 STEP 2
STEP 3 STEP 4
4. Internal Tank water tank drainage with ‘FULL’ Alarm Function
The inner water tank inside the air-conditioner has a water level safety cut-
out switch. When the water level reaches the maximum capacity, the water full
indicator lamp lights up, “FL” will be displayed in the control panel (D), a buzzer
will sound 5 times and the compressor will automatically stop running. (When
the water tank is full, get an empty bucket ready to drain the water in to, then
remove the cap (F) at the back of the unit, remove the rubber stopper inside and
then allow the water to drain out before disposing of it into a sink or drain. Refit
the rubber plug and cap securely and allow the device to continue its operation.

13
Using the Appliance
1. Preliminary checks
Check whether the exhaust vent hose has been mounted properly.
Follow these precautions before using the device for cooling and dehumidifying:
• Always allow an interval of at least 3 minutes when switching between the
Cooling and Dehumidifying function modes.
• Do not share one socket with other appliances.
• Be sure you have opened up the front air vent slats fully before plugging in
and using the device.
• After plugging in the unit to a mains supply the power light will flash to
indicate standby mode, push the power on/o button to activate.
2. Cooling operation
• Press the “Mode” button until the LED Indicator (5) “Cool” blinks blue.
• Press the “UP” or “DOWN” button to select a desired room temperature. (16°C
- 31°C)
• Press the “Fan Speed” button to select the desired fan speed, shown by the
fan speed indicator (2).
3. Dehumidifying operation
Press the “Mode” button until the ”DEHUM”(idify) LED indicator blinks Blue.
• The system will automatically switch to LOW fan speed.
4. Fan operation
• Press the “Mode” button (8) until the “Fan” LED indicator blinks Blue.
• Press the Fan Speed button (9) to select an air fan speed of High or Low
indicated by indicator LED (2).

14
5. Timer operation
Set the timer to switch on the device up to 24 hours later:
With mains power supplied and the unit in standby mode (the power on/o
button will be flashing), press the TIMER button (10) once and select a desired
‘ON time’ by pressing the “UP” or “DOWN” buttons (7) up/down. Each press of
these buttons will increment or decrement the timer setting by 1 hour.
Press MODE Button (8) to Select COOL / DEHUM / FAN mode.
Press SPEED button (9) to select desired fan speed.
Notes: During DEHUM mode, only the LOW and MID fan speeds are selectable.
Once you have selected the timer settings, press the “Timer” button again to
finish the setting.
• The display will now stop flashing while showing the time in hours until the
unit will be activate.
• Remember, the selectable timer range is between 1- 24 hours.
• Once the Timer is set, the “Timer” indicator LED light (3) will on.
Set the Timer to turn o the unit later:
When the air-conditioner is in the “ON” status, press the “Timer” button once
and select a desired “OFF time” by pressing the “UP” or “DOWN” buttons (7).
Each press of the buttons will increment or decrement the timer setting by 1
hour. Once you have selected the time setting, press the “Timer” buttons again
to finish the setting.
• The display will now stop flashing while showing the time in hours until the
unit will be automatically turn o.
• Remember, the selectable timer range is between 1- 24 hours.
• Once the Timer is set, the “Timer” indicator LED light (3) will on.
6. Sleep function (only accessible via Remote Control)
1. When in cooling mode, press the “SLEEP” button to enter sleep mode. During
sleep mode, the preset temperature will automatically increase 1 °C every
hour, with a maximum preset temperature increase of 2 degrees c in total.
2. Press the sleep button again to exit the sleep function.
Note: in sleep mode, the air wind speed will be locked in LOW and the
temperature cannot be adjusted.

15
7. Drainage
1. Condensate automatic evaporation drainage
The machine can automatically evaporate condensed water and discharge it
through the exhaust air vent hose in the refrigeration and dehumidification
modes, so you do not need to connect the drainage pipe for drainage, but
please ensure that the water plug and water drainage cap (F) have been
installed.
2. Continuous drainage
Refer to the installation guide above “Installation Section - Point 3”.
3. Water FULL alarm
When the water tank is full, the indicator light (1) will be on, the buzzer will
sound 5 times, the display screen (4) will display “FL”, the compressor will
automatically stop running. Get an empty bucket ready to drain the water in
to, then remove cap (F) at the back of the unit, remove the rubber stopper
inside and then allow the water to drain out into the bucket before disposing
of it into a sink or drain. Refit the rubber stopper and cap securely and allow
the device to continue its operation.
8. Temperature display conversion
Long press the mode key (8) on the unit for about 5 seconds to switch the
display between Fahrenheit and Celsius.
Cleaning and Maintenance
1. Before cleaning, be sure to disconnect the unit from any electric supply outlet.
2. Do not use gasoline or other chemicals to clean the unit.
3. If the air conditioner is damaged, please contact the dealer or repair shop. Do not
attempt to repair it on your own.
1. Air Filter
• If the air filter becomes clogged with dust/dirt, then it should be cleaned. It is
good practice to clean the air filter once every two weeks.
• Dismounting the filter: Slide out the air filter from the main unit.
• Cleaning: Clean the air filter with neural detergent in lukewarm water and dry
it out in the shade.
• Re-mounting: Slide in the air filter back to the main unit.
2. Clean the Air-conditioner Surface
First clean the surface with a neutral detergent and wet cloth, and then wipe it
with a dry cloth.
16
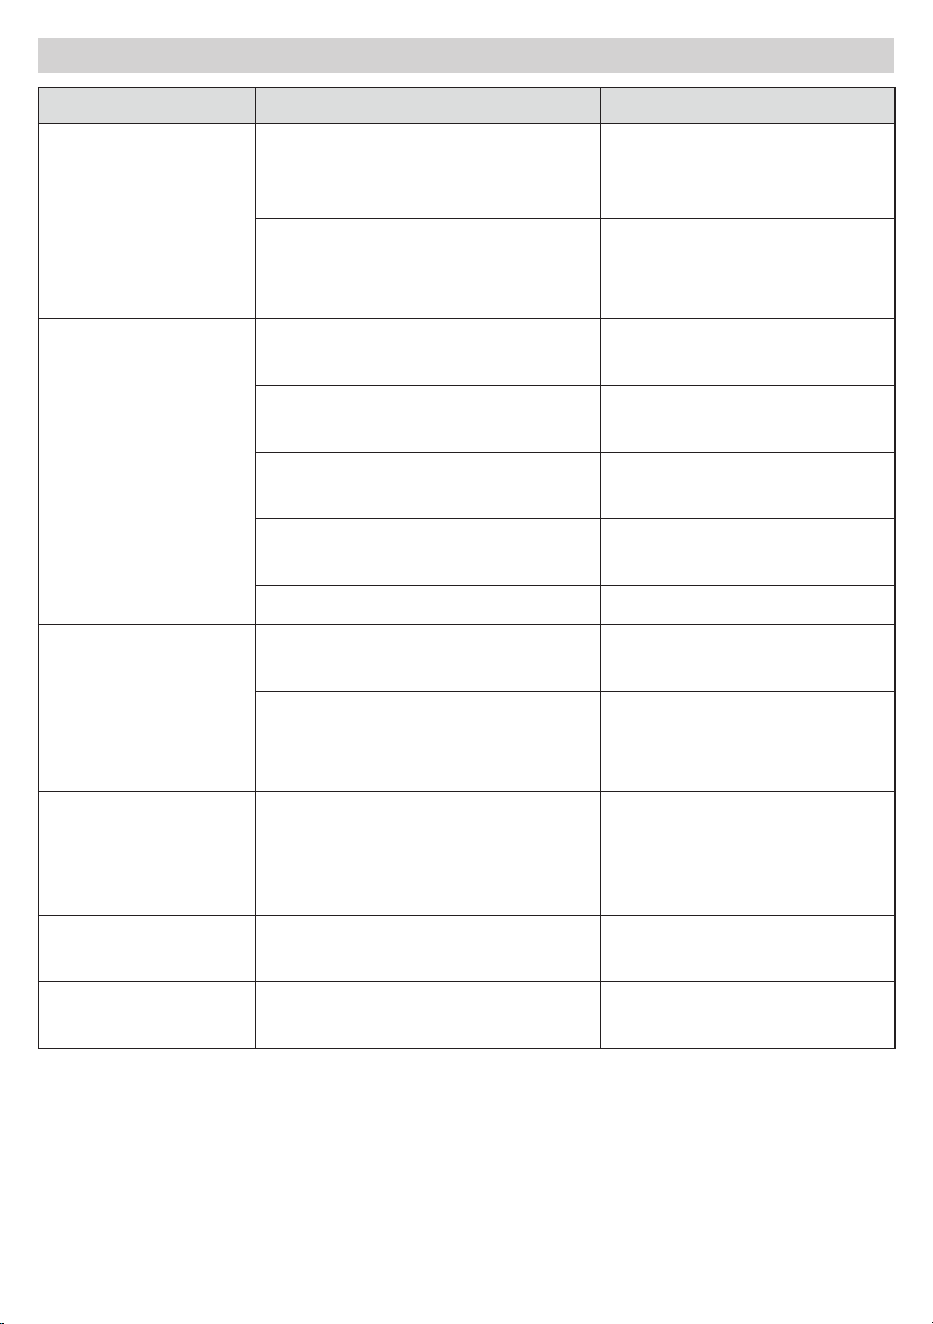
Trouble Shooting
Problems Possible Causes Solution
Unit does not start
when pressing
Power button
Water full indicator lamp
blinks, FL is lit in the display
area and water tank is full
Drain the water out of the
water tank.
Room temperature is lower
than the setting temperature.
(Cooling mode)
Reset the temperature
Not cool enough
The doors or windows are not
closed.
Make sure all the windows
and doors are closed.
There are heat sources inside
the room.
Remove the heat sources
if possible
Exhaust air hose is not
connected or blocked.
Connect or clean the
exhaust air hose.
Temperature setting is too
high.
Reset the temperature
Air inlet is blocked. Clean the air inlet.
Noise come out
from the unit
Noise come out
from the unit
The ground is not level or not
flat enough.
Place the unit on a flat,
level ground if possible
The sound comes from the
flowing of the refrigerant
inside the air conditioner.
It is normal.
E1 Code on the
display
Room temperature sensor
failed
Replace room temperature
sensor (the unit can
also work without
replacement.)
E2 Code on the
display
Evaporator coil sensor failed
Replace evaporator coil
sensor.
FL Code on the
display
Water tank full
Please empty the water
tank.
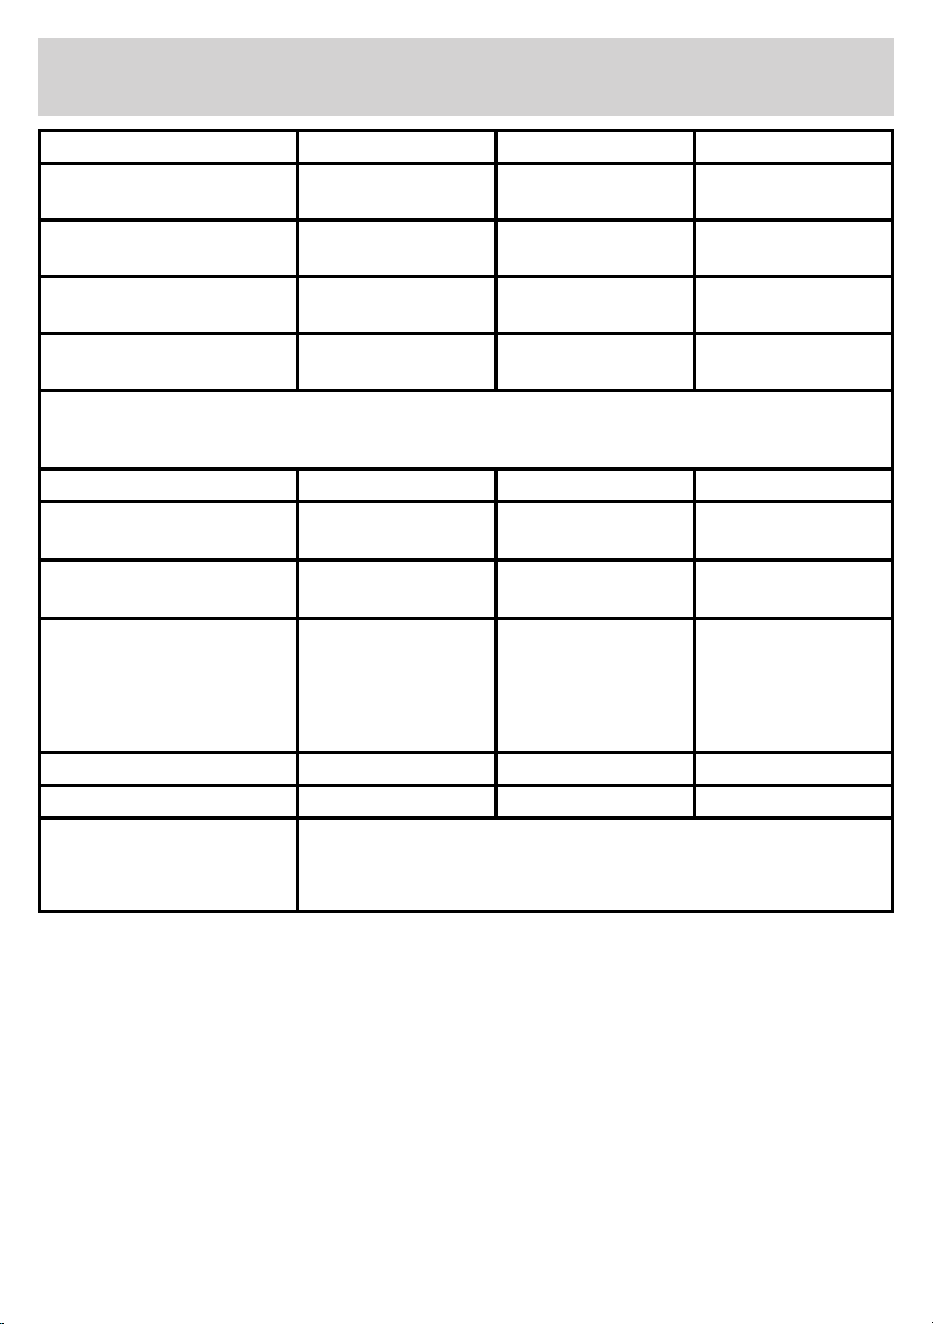
17
Information to identify the model(s) to which the
information relates to Air Conditioner
Descripon Symbol Value Unit
Rated capacity for cooling P
rated
for cooling 2.600 kW
Rated power input for cooling P
EER
0.970 kW
Rated Energy eciency rao EER
d
2.74 -
Rated Coecient of
performance
COP
d
2.64 -
Informaon to idenfy the model(s) to which the informaon relates to Air Condioner:
Descripon Symbol Value Unit
Power consumpon in
thermostat-o mode
P
TO
- W
Power consumpon in standby
mode
P
SB
0.5 W
Electricity consumpon of
single/double duct appliances
(indicate for cooling and
heang separately)
O
SD
SD:0.970(cooling) kWh/h
Sound power level L
WA
65 dB(A)
Global warming potenal GWP 3 kgCO
2
eq.
Contact details for obtaining
more informaon
ELECTRIC MANIA LTD.
Unit 16, Anglo Industrial Park, Fishponds Road, Wokingham
RG41 2AN

18
Technical Data
Voltage : AC220-240V 50Hz
Power Consumption : 970 W
Protection class : 1 (This appliance must be earthed)
Model : EMAC9KW
Disposal
• Disposal of your old product. Your product is designed and manufactured
with high quality materials and components, which can be recycled and
reused
• Please make yourself aware of the local collection system for electrical
and electronic products.
• Please act according to your local rules and do not dispose of your old products with
your normal household waste.
• The correct disposal of your old product will help prevent potential negative
consequences for the environment and human health.
Help Line
If you have any question, please feel free to call our supporting hotline 01189 775506
or email us [email protected]
Produced for ELECTRIC MANIA LTD.
Unit 16, Anglo Industrial Park
Fishponds Road, Wokingham
RG41 2AN Made in China

