Instructions for use
ECAM630.35
ECAM630.55
ECAM630.75

2
Primadonna Aromatic
Contents
1 DESCRIPTION OF PRODUCTS 6
1.1 Description of the machine 6
1.2 Description of panel and homepage 8
1.3 Description of accessories* 9
1.4 Description of milk carafe 10
2 USING THE MACHINE FIRST TIME 11
2.1 Procedure for rst power-up 11
2.2 Check the water hardness 12
2.3 Setting water hardness 13
2.4 Installing the water lter 13
2.5 Introduction to the features of the machine 14
3 HOW TO USE YOUR MACHINE 15
3.1 Turning on and turning o 15
3.1.1 Turning on 15
3.1.2 Turning o 15
3.1.3 Switching o for extended periods 16
3.2 Homepage and external buttons 17
3.2.1 Introduction to homepage 17
3.2.1.1 Navigating the drinks display 17
3.2.1.2 Upper tabs (Drinks, Bean Adapt e Coee Routines) 17
3.2.1.3 Settings, notications and indicators 18
3.2.1.4 Time 18
3.2.1.5 Prole and background icon 18
3.2.2 External buttons 20
3.2.2.1 On/O 20
3.2.2.2 Hot 20
3.2.2.3 Cold 20
3.2.2.4 Proles 21
3.3 Connectivity 22
3.3.1 Activating the Wi-Fi connection 22
3.3.2 Resetting the Wi-Fi connection 22
3.3.3 Deactivating the Wi-Fi connection 22
4 DRINKS 23
4.1 Hot coee drinks 24
4.1.1 Direct selection of hot coee drinks 24

3
4.1.2 Customization of hot coee drinks 24
4.1.3 Using pre-ground coee for hot coee drinks 26
4.1.4 Coee pot 27
4.2 Cold Brew and Over Ice coee drinks 29
4.2.1 Direct selection of Cold Brew and Over Ice coee drinks 29
4.2.2 Customization of cold coee drinks (Cold Brew and Over Ice) 30
4.2.3 Use of pre-ground coee in cold coee drinks (Over Ice only) 32
4.2.4 Cold Brew carafe 33
4.3 Drinks with hot milk 35
4.3.1 What milk to use in the “LatteCrema Hot” carafe? 35
4.3.2 Preparation and attachment of the “LatteCrema Hot” carafe 36
4.3.3 Milk frothing with the “LatteCrema Hot” carafe 36
4.3.4 Direct selection of drinks with hot milk 37
4.3.5 Customization of drinks with hot milk 38
4.3.6 Using pre-ground coee for drinks with hot milk 40
4.4 Drinks with cold milk 42
4.4.1 What milk to use in the “LatteCrema Cool” carafe? 42
4.4.2 Preparation and attachment of the “LatteCrema Cool” carafe 43
4.4.3 Milk frothing with the “LatteCrema Cool” carafe 44
4.4.4 Direct selection of drinks with cold milk 44
4.4.5 Customization of drinks with cold milk 45
4.4.6 Using pre-ground coee for drinks with cold milk 47
4.5 Delivering hot water 48
4.6 Tea function 49
4.7 Tips for a Perfect coee 50
4.8 Additional features 51
4.8.1 Extra shot 51
4.8.2 To Go 52
4.8.3 Bean adapt technology 55
4.8.4 “My” function 56
4.8.5 Coee Routines 58
5 SETTINGS 59
5.1 How to navigate the settings 59
5.2 Descaling 59
5.3 Water lter 59
5.4 Cleaning the machine 60
5.5 Rinsing 60

4
5.6 Cleaning the carafe 60
5.7 Drain the circuit 61
5.8 Auto-o 61
5.9 Beep 62
5.10 Energy saving 62
5.11 Languages 62
5.12 Coee temperature 63
5.13 Grinder settings 63
5.14 Water hardness 64
5.15 Default values 65
5.16 Support (QR code) 65
5.17 Carafe tips 65
5.18 Creative recipes 65
5.19 Statistics 66
5.20 More information 66
6 CLEANING AND MAINTENANCE 67
6.1 Cleaning removable parts 67
6.1.1 Cleaning methods 67
6.2 Dishwasher safe components 68
6.2.1 Cleaning the grounds container: 68
6.2.2 Cleaning the drip tray and the drip tray grille 68
6.2.3 Cleaning the milk carafes 70
6.2.3.1 Cleaning the milk carafe after use 70
6.2.3.2 Thorough cleaning of milk carafe 71
6.2.4 Cleaning the coee funnel 72
6.2.5 Cleaning the nozzles of the drinks spout 73
6.3 Components that should be soaked 74
6.3.1 Cleaning the cup tray 74
6.3.2 Cleaning the grounds container support 74
6.3.3 Cleaning the service water spout 75
6.3.4 Cleaning the De’Longhi travel mug (sold separately) every time after use 75
6.4 Components washed with running water 76
6.4.1 Cleaning the water tank and lid 76
6.5 Cleaning the body of the machine 77
6.5.1 Cleaning the inside of the machine 77
6.5.2 Cleaning the control panel 77

5
6.6 Deep cleaning of the machine 78
6.6.1 Deep cleaning of the machine 78
6.6.2 Cleaning the removable brewing unit 80
6.6.3 Descaling 82
6.6.4 Management of water lter 84
6.6.4.1 Installing the water lter 84
6.6.4.2 Replacing the water lter 85
7 FREQUENT PROMPTS AND ALARM MESSAGES 87
7.1 Messages regarding the water tank and the coee grounds container 87
7.2 Messages regarding the water lter 89
7.3 Messages regarding coee beans and pre-ground coee 89
7.4 Messages regarding the carafes 91
7.5 Messages regarding cleaning and descaling 97
7.6 Messages of a general nature or temperature-related 99
8 FAQ 100
9 TECHNICAL DATA 104
6
Primadonna Aromatic
1 DESCRIPTION OF PRODUCTS
1.1 Description of the machine
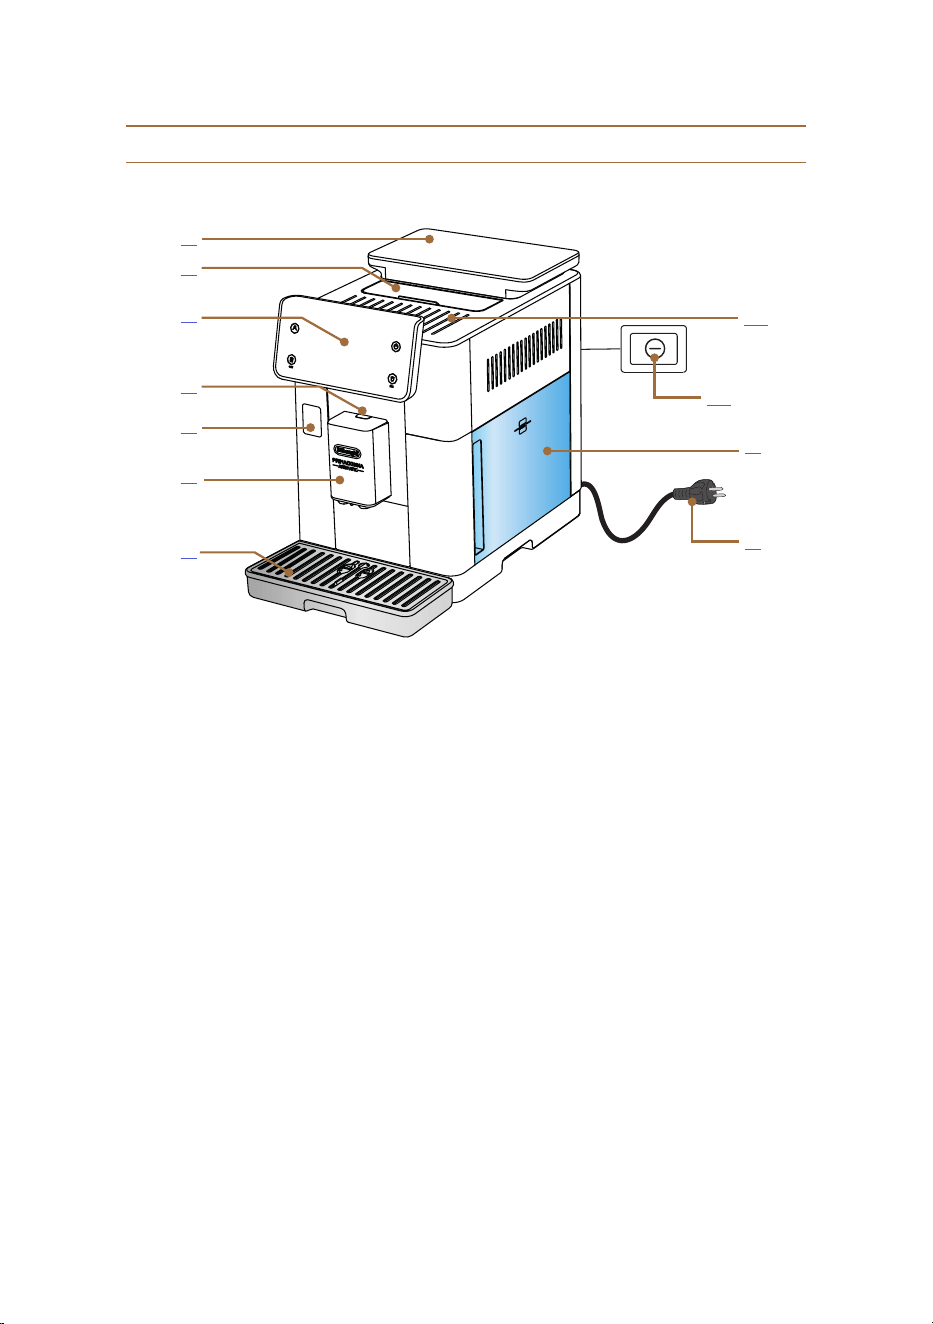
A1. Bean hopper with lid and seal
A2. Lid covering accessories/pre-ground coee compartment
A3. Drinks spout (height-adjustable)
A4. Spout cover release button
A5. Flap covering milk carafe connector/service water spout
A6. Drip tray
A7. Power cord
A8. Water tank with lid
A9. Control panel
A10. Cup shelf
A11. Main switch
A2
A1
A3
A5
A6
A7
A11
A8
A9
A4
A10
7
A12
A14
A20
A15
A13
A16
A19
A18
A6
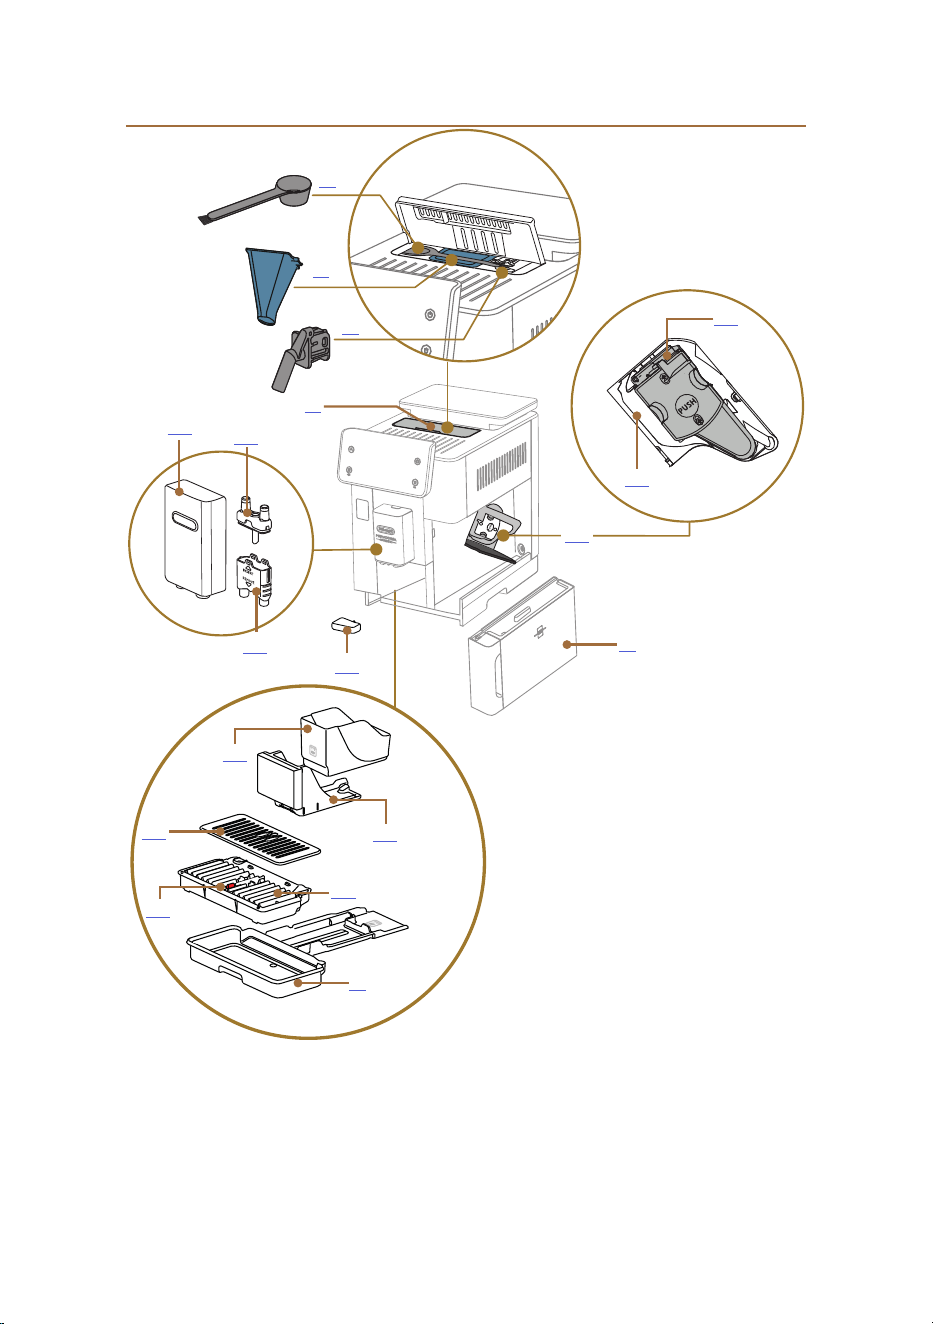
A12. Grounds container
A13. Grounds container support
A14. Cup tray
A15. Drip tray grille
A16. Drip tray water level indicator
A17. Brewing unit access ap
(accessible when water tank is
removed)
A18. Brewing unit housing
A19. Removable brewing unit
A20. Condensate tray
A21. Drinks spout cover
A22. Top coee spout nozzle
A23. Bottom coee spout nozzle
A17
A2
A21
A23
A22
D1
D2
D3
A8
8
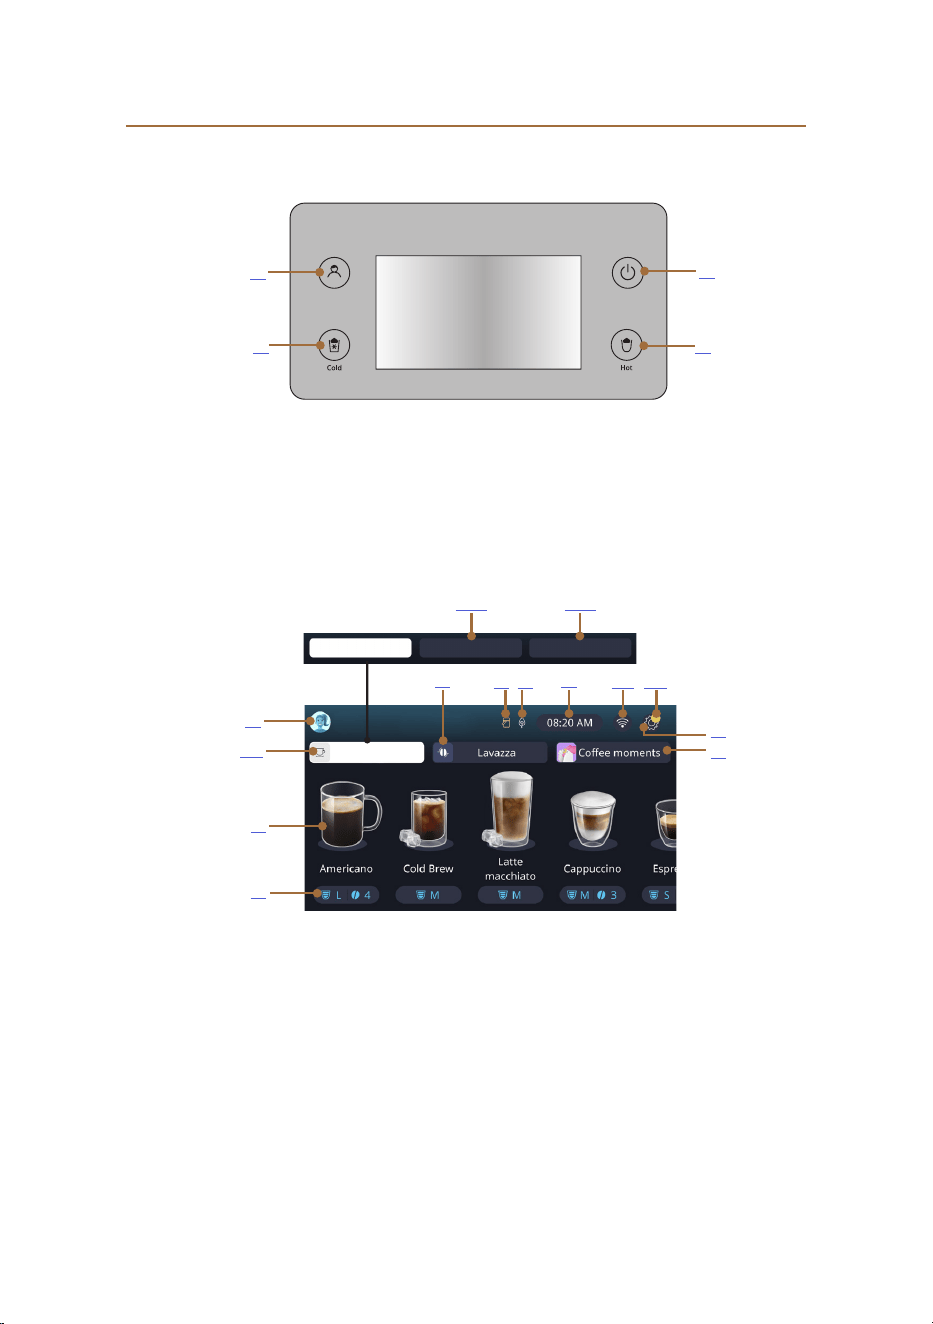
B1. ON/Standby button
B2. Hot drinks selection button
B3. Cold drinks selection button
B4. Prole selection button
B1
B4
B2
B3
C1
C11
C7
C8
C1. Prole selected (proles menu access
button)
C2. Coee Routines
C3. Bean Adapt Technology
C4. Milk carafe Clean indicator
C5. Energy saving indicator
C6. Settings menu
C7. Direct drink selection
C8. Drink customization bar
C9. Day/time setting button
C10. Connectivity access button
C11. Drink select button
C11A Coee button
C11B Milk button
C12. Machine maintenance alarms indicator
C2
C6
C12
C10
C9
C5C4
C11A C11B
C3
1.2 Description of panel and homepage
§All§ Coee Milk
§All§
9
* Accessories: number and type dier according to model
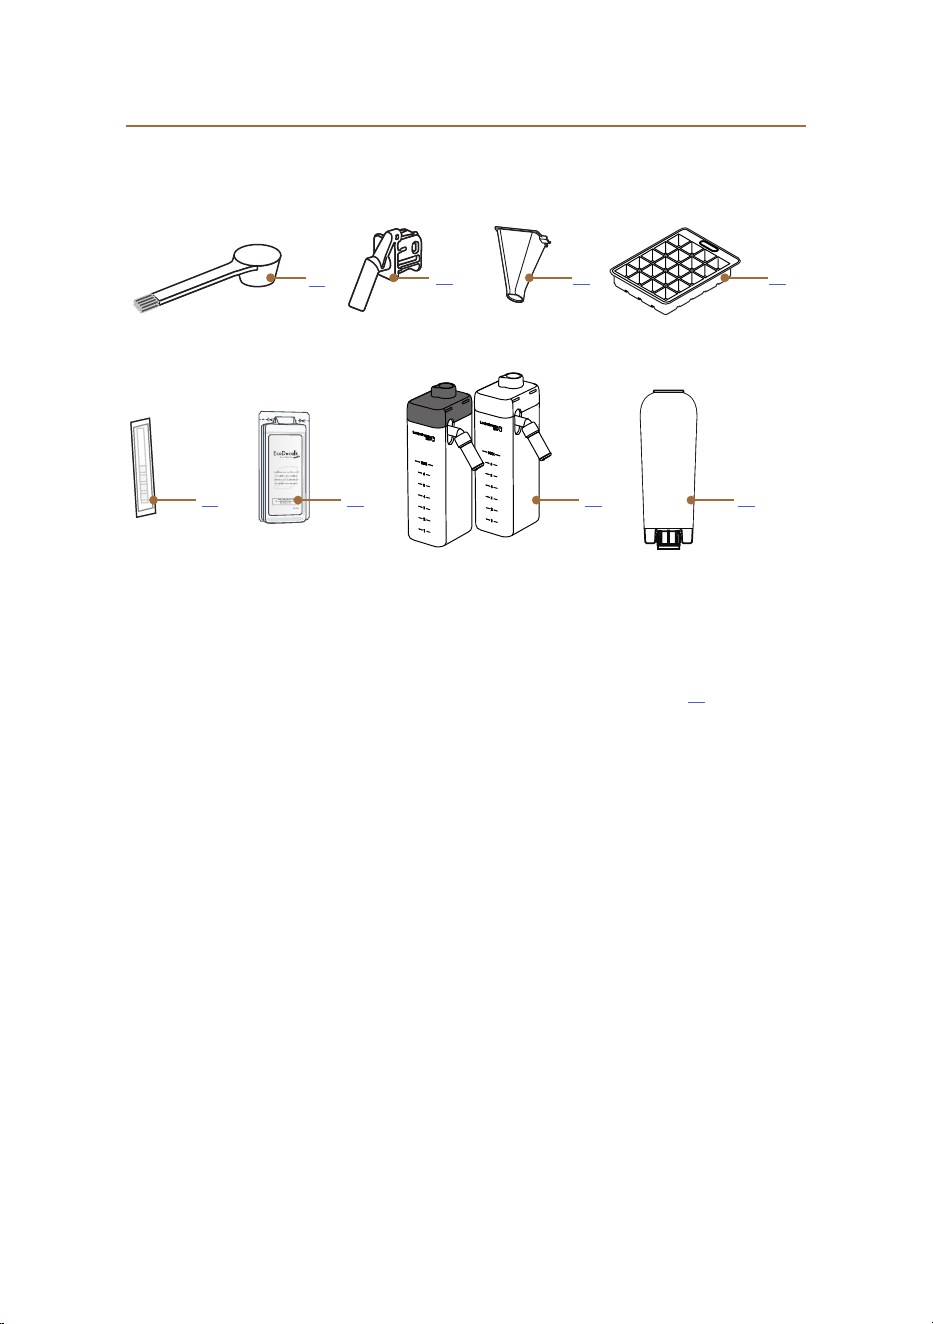
INSIDE THE MACHINE ACCESSORIES COMPARTMENT A2
D1. Pre-ground coee scoop/brush
D2. Service/cleaning water spout (keep the spout in a safe
place after each use)
D3. Removable pre-ground coee funnel
IN THE ACCESSORIES PACK
D4. Ice tray
D5. "Water Hardness Test" strip
D6. Descaler
D7. Milk containers
D8. Water softener lter
D1
D2 D3 D4
D7D6 D8D5
1.3 Description of accessories*
11
Primadonna Aromatic
2 USING THE MACHINE FIRST TIME
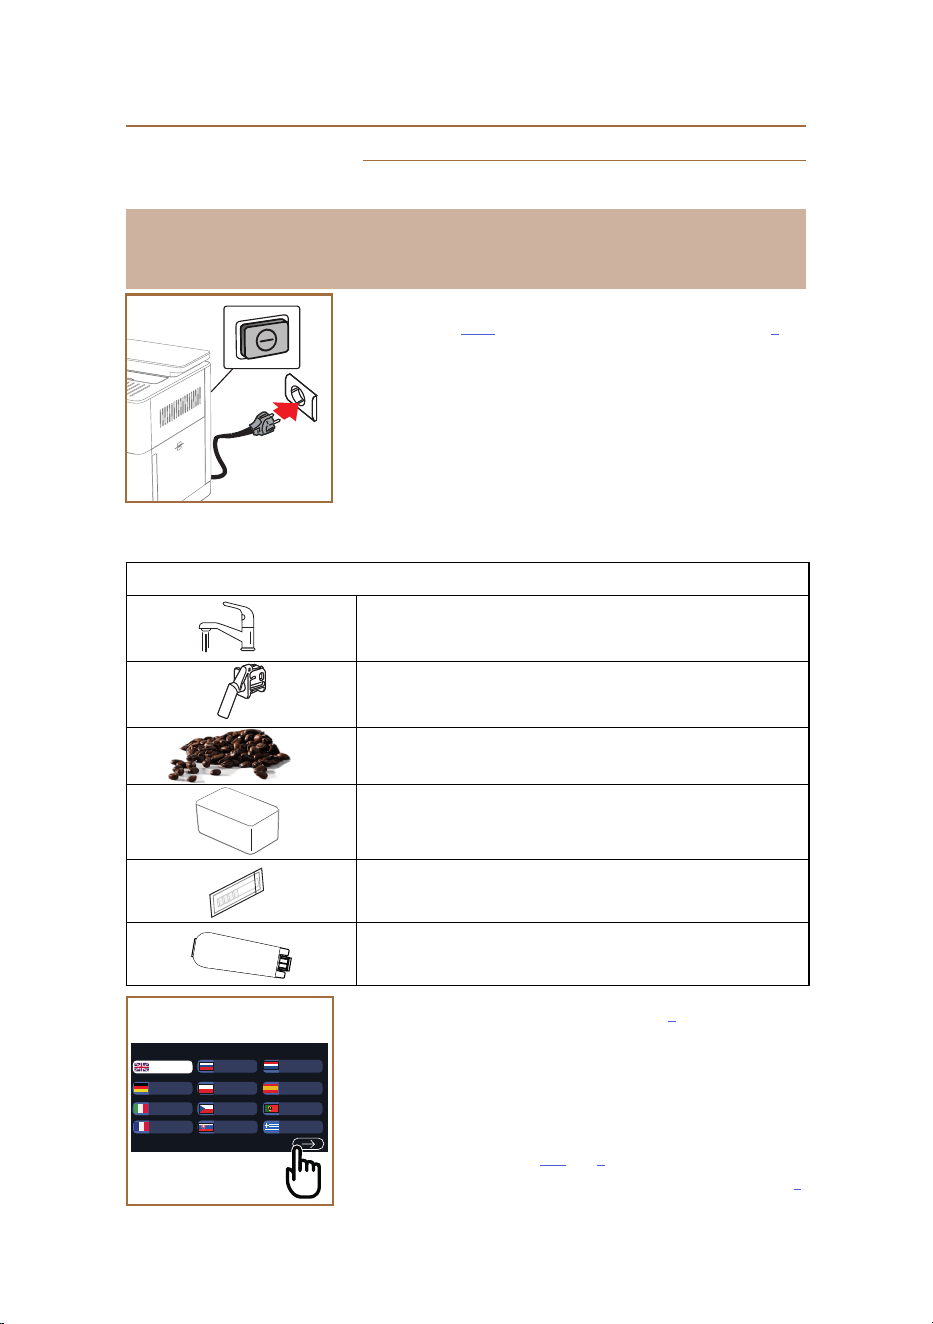
2.1 Procedure for rst power-up
1
1. Plug the power cord into the mains electricity supply and check that
the switch (A11) on the back of the machine is pushed in (g. 1).
The machine switches on and will show you how to set it up the way you prefer: follow the instructions displayed
and the Primadonna Aromatic will be ready for use!
Here are the essentials:
Fresh drinking water
Service/cleaning water spout
Your favourite coee beans
A container
(make sure the capacity is at least 0.4 litres)
Water hardness test strip
(you’ll nd it in the accessories pack)
Water softener lter
2. Scroll through the pages of the display (g. 2) until your language
appears, then select the corresponding ag;
3. Press “→” to go to the next step.
4. Select the appropriate time zone for your location and press “→” .
5. Set the day, hours and minutes and the display format, scrolling up
or down: a.m., p.m. or 24h. Press “→”.
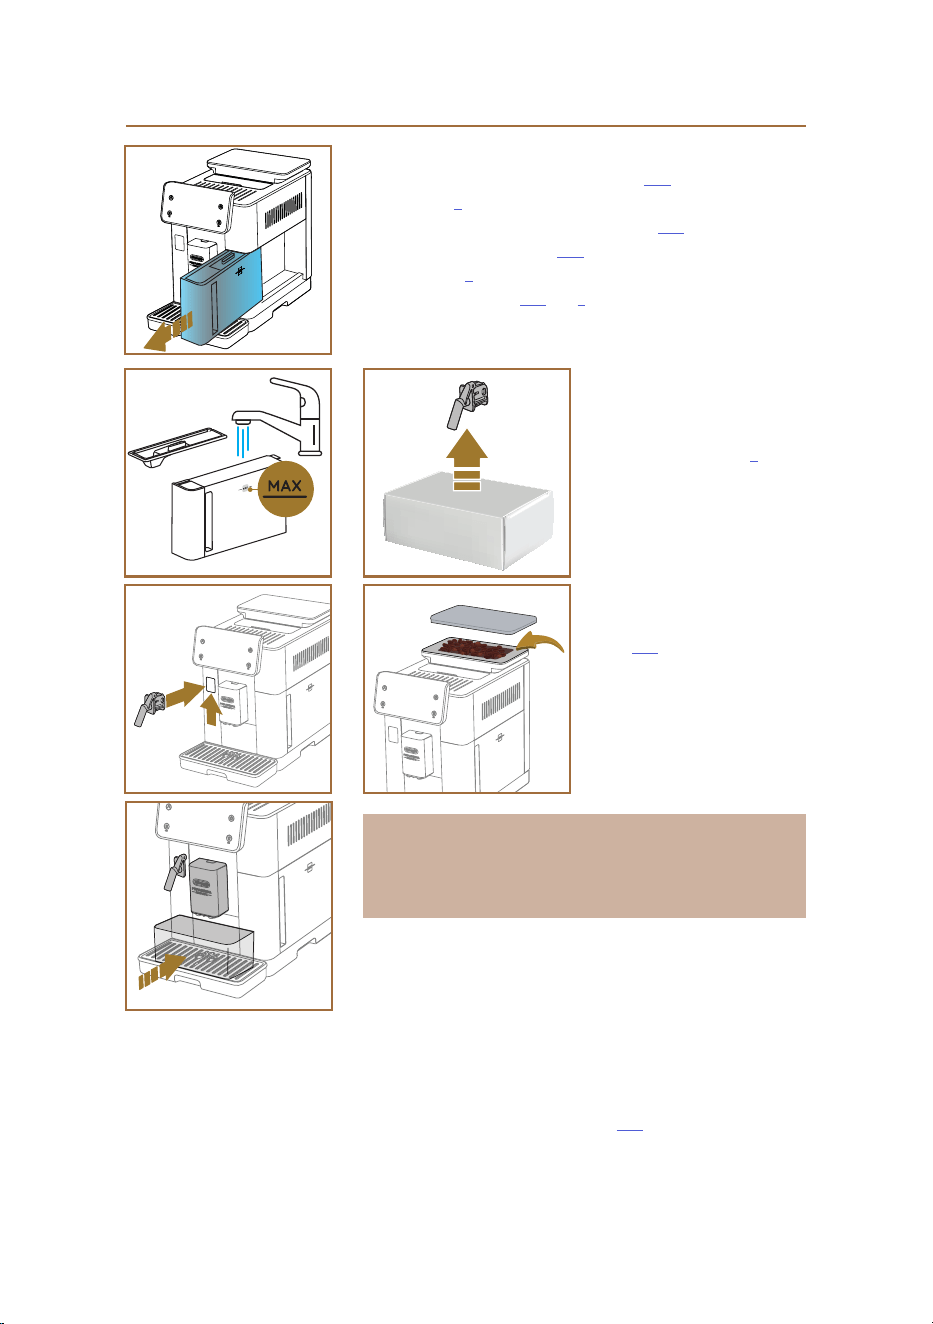
6. Remove the water tank (A8) (g. 3).
7. Fill the tank with fresh drinking water up to the MAX level (g. 4)
What language should we speak in?
Deutsch
English
Italiano
Français
Polski
Čeština
Slovenský
Русский
Español
Português
Ελληνικά
Nederlands
Please note:
When used for the rst time, all removable accessories that make contact with water or milk (milk carafe,
water tank, etc...) should be rinsed with hot water. For best results, wash the milk carafe in a dishwasher.
2
12
and reposition it in the machine.
8. Take the service/cleaning water spout (D2) from the accessories
pack (g. 5).
9. Push upwards on the connector cover ap (A5) and attach the ser-
vice/cleaning water spout (D2) to the milk carafe/water spout con-
nector (g. 6).
10. Fill the bean hopper (A1) (g. 7), then conrm by pressing “→”.
3
4
7
5
6
8
11. Position a container of at
least 0.4 litres capacity un-
der the spouts (g. 8).
12. Press "Yes" to start the rinse
function. Delivery will stop
automatically.
13. The machine now starts
heating up and continues
until hot water is delivered
from the drinks spout (g.
(A3)).
14. Press “→” to move on to the
next step.
Please note:
• The rst time the machine is used, the water circuit will be empty
and operation could be very noisy. The noise becomes less as the
circuit lls.
2.2 Check the water hardness
The machine will prompt for descaling to be carried out after a predeter-
mined period of time, depending on the water hardness. The machine
can also be programmed according to the actual hardness of the local
water supply, by setting the appropriate frequency. Accordingly, it is ad-
visable to set the correct value without delay, following the machine’s
step by step guide. Proceed as follows:
15. Take the "Total hardness test" strip (D5) from the accessories pack
and remove it from its wrapper. Press “→”.
16. Immerse the strip completely in a glass of water for about one second.
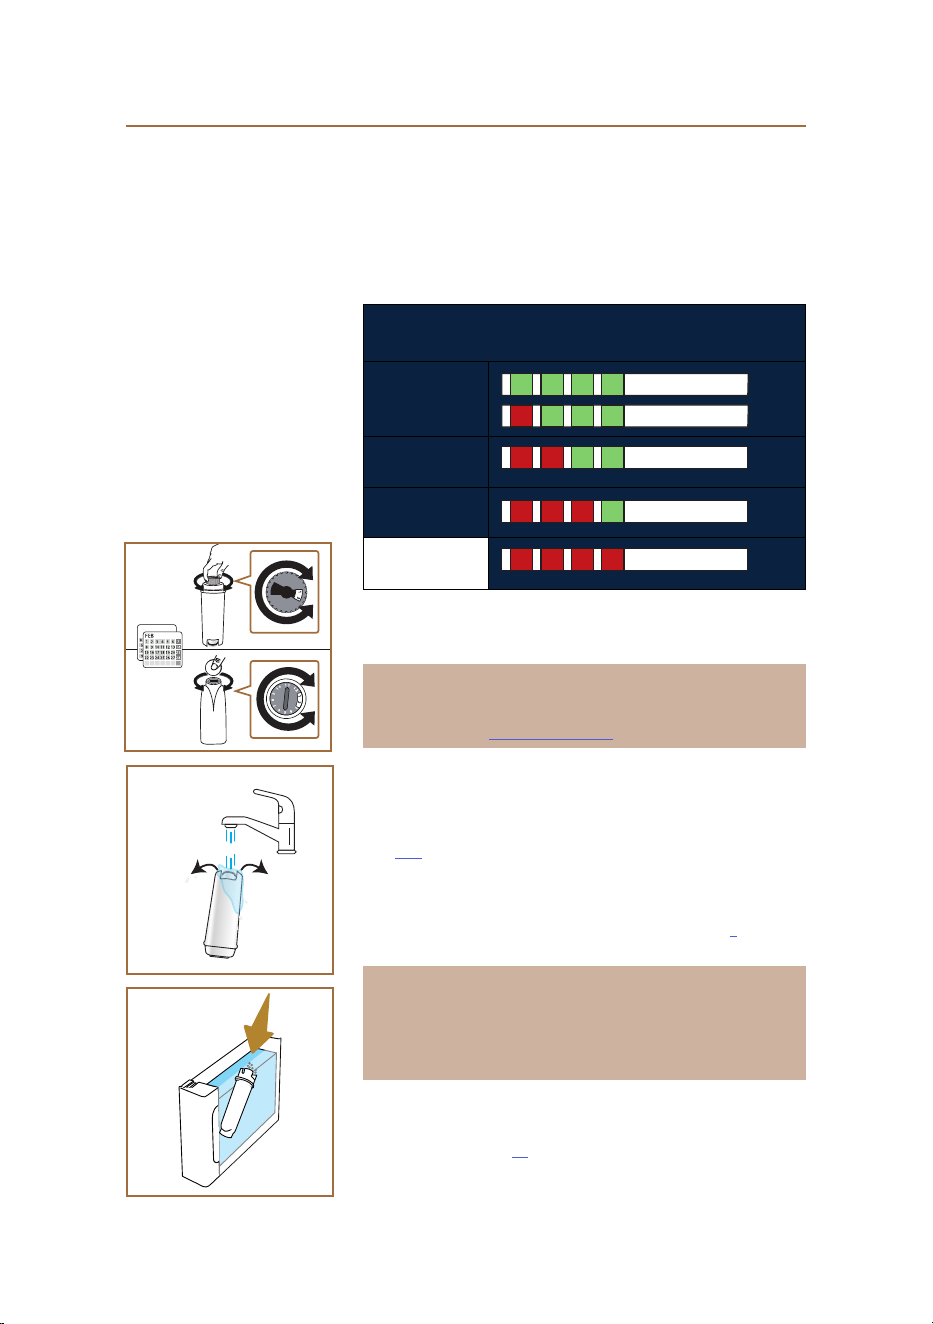
13
17. Remove the strip from the water and shake lightly. Press “→”. After
about a minute, 1, 2, 3, or 4 red squares will appear, depending on
the hardness of the water. Each square corresponds to 1 level;
2.3 Setting water hardness
18. Press on the level corresponding to the water hardness measured
previously, as indicated in the following table:
Select the water hardness level according to the number of red squares
that appear on the strip
Level 1
Level 2
Level 3
Level 4
19. Press “→” twice to move on to the next step.
20. The machine is now reprogrammed with the new water hardness
setting.
Please note:
The water hardness can be changed at any time by way of the settings
menu (see section “5.14 Water hardness”).
2.4 Installing the water lter
To ensure the performance of the machine remains constant over time, a
message will recommend the installation of a De’Longhi water softener
lter (D8). Proceed as follows to install the lter straight away, or alterna-
tively, press “Later” to postpone installation:
21. Take the lter out of the pack and press “Ok” .
22. Turn the date indicator to show the next 2 months (g. 9): press “→”
to pass on to the next step.
Please note:
The lter lasts about two months, provided that the machine is regularly
in use; if the machine is left unused with the lter installed, it will last no
longer than 3 weeks.
23. To activate the lter, run tap water through the hole in the centre of
the lter until water comes out of the openings at the side for more
than a minute (g. 11). Press “→” to pass on to the next step.
0,5 L
10
11
2
9
14
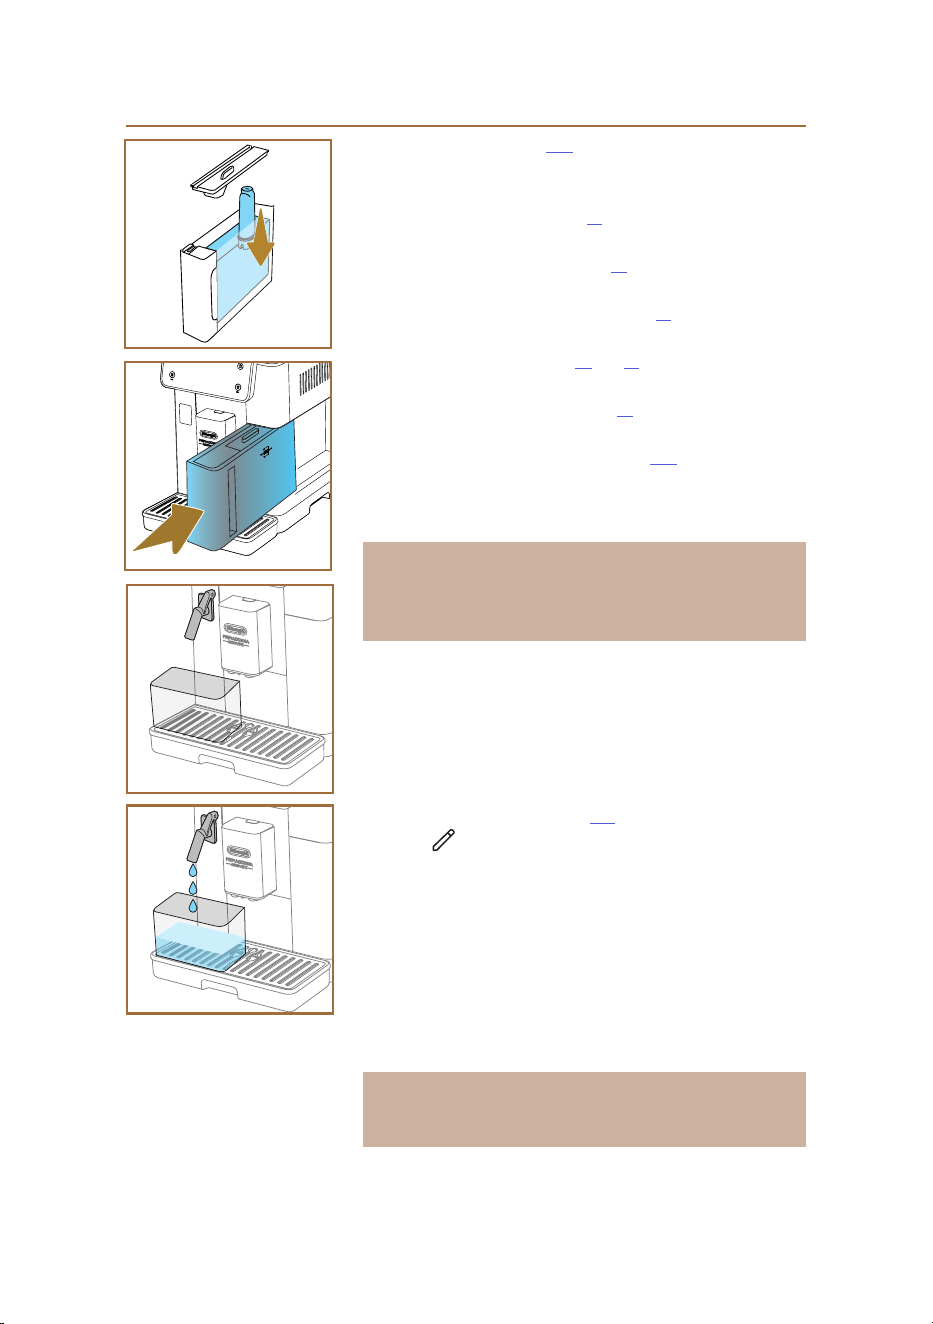
24. Remove the water tank (A8) from the machine and ll with fresh
drinking water; remove the lid of the tank and immerse the lter in
the water, while squeezing the middle section 2 or 3 times so that
the air bubbles can escape (g. 11). Press “→” to pass on to the next
step.
25. Insert the lter in its housing (g. 12) and press fully home. Close
the water tank with the lid. Press “→” to pass on to the next step.
26. Return the water tank to the machine (g. 13).
27. Position an empty container of at least 0.5 litres capacity under the
service/cleaning water spout D2 (g. 14) and press "Ok" to activate
the lter.
28. The machine delivers hot water (g. 15) and stops automatically.
29. The lter is now operational. Press “→” to access the next step.
30. Remove the service/cleaning water spout (D2) and position it in the
holder (if provided) or keep in a safe place. It will be useful when
carrying out certain maintenance operations on the machine.
31. Press “Ok” to move on to the next step.
Please note:
If the lter was not installed when the machine was rst started up,
access the settings menu, select “maintenance”, then “lter”, and follow
the procedure.
2.5 Introduction to the features of the machine
Now that the technical part of the rst start-up has been completed, the
PrimaDonna Aromatic will show you how to create user proles and get
familiar with the main features it provides:
32. Press “Start” and watch the display;
33. Tap the preferred prole, if so desired, to customize the icon and the
name, using the relative button (C1) ;
34. Press to customize the icon;
35. Tap the “Prole1” eld to customize the name.
36. Press “Done” to store the changes.
37. Press “→” : the proles have been created.
38. Press “→”: the machine is ready to show a short introductory video.
39. Press “Start” and watch the display.
40. The machine illustrates the main functions.
When the introduction has nished, press “Ok” to see other informational
videos, scrolling the titles with the arrow “→”. This done, press “Start”: the
machine is ready for use.
Please note:
The rst time the machine is used,a few coees will need to be made
before the drink in the cup tastes as it should.
14
15
13
12
15
Primadonna Aromatic
0,5 s
16
3 HOW TO USE YOUR MACHINE
3.1 Turning on and turning o
3.1.1 Turning on
Please note:
Each time the machine is turned on, to ensure drinks will be made at
just the right temperature, it carries out an automatic preheat and rinse
cycle that cannot be interrupted. The machine is not ready for use until
the cycle has been completed.
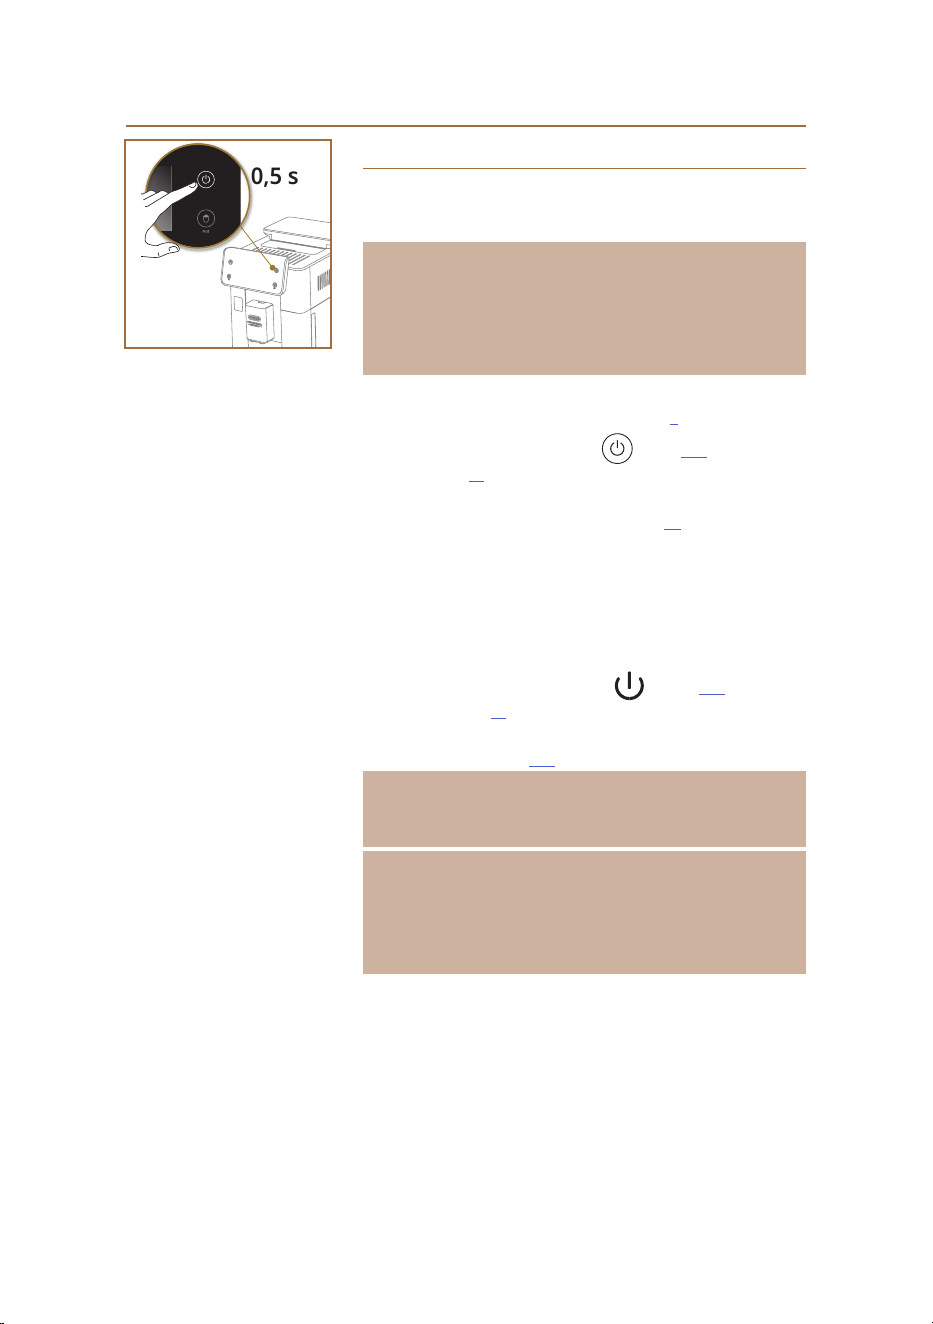
Check that the machine is connected to the electrical power supply and
that the main switch is in the correct position (g. 1).
1. To turn the machine on, press the button (B1) and hold for 0.5
second (g. 16): the machine switches on.
2. Once the machine has heated up, a rinse cycle begins, during which
hot water is delivered from the drinks spout A3; in addition to heat-
ing up the boiler, this has the eect of heating up the internal cir-
cuits as hot water is circulated through them.
3.1.2 Turning o
Whenever the machine is turned o after being used to make coee, it
will run a rinse cycle automatically.
1. To turn the machine on, press the button (B1) and hold for
0.5 second (g. 16).
2. If envisaged, the machine runs a rinse cycle, delivering hot water
from the drinks spout (A3), then switches o (stand-by).
Important!
• Never unplug the machine while it is switched on.
• Never press the main switch while the machine is on.
Please note:
• Whenever the machine is turned o after being used to make cof-
fee, it performs an automatic rinse cycle.
• If the machine is not going to be used for any length of time, un-
plug it from the mains socket.
16
3.1.3 Switching o for extended periods
If the machine is not going to be used for any length of time (e.g. holi-
days, periods of absence), follow the directions under the heading “ 5.7
Drain the circuit”. If the machine will not be used for a few days, proceed
as follows:
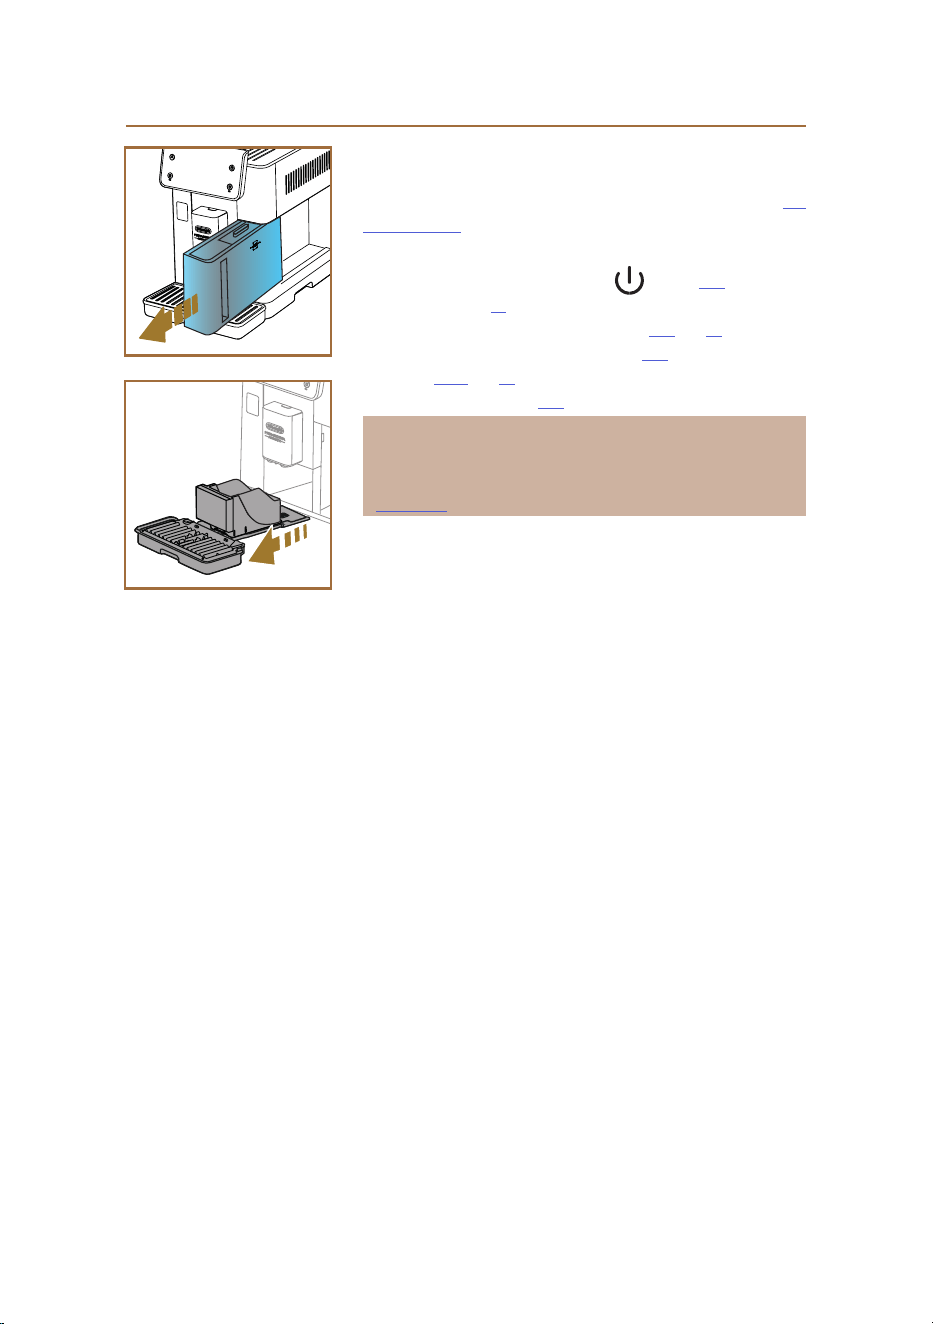
1. To turn the machine o, press the button (B1) and hold for
0.5 second (g. 16).
2. Remove, empty and clean the water tank (A8) (g. 17).
3. Remove, empty and clean the drip tray (A6) and the grounds con-
tainer (A11) (g. 18).
4. Unplug the power cord (A7) from the socket.
Please note:
When turning the machine on again, ll the water tank and, before
making any kind of drink, run 3 rinse cycles as indicated under heading
“ 5.5 Rinsing”.
18
17
17
3.2 Homepage and external buttons
3.2.1 Introduction to homepage
This display is designed to give you all the information you need at any
given moment of your day.
Navigating with ease through this generous oering of drinks and infor-
mation is crucial, which is why we have included certain features that will
be of great help to you.
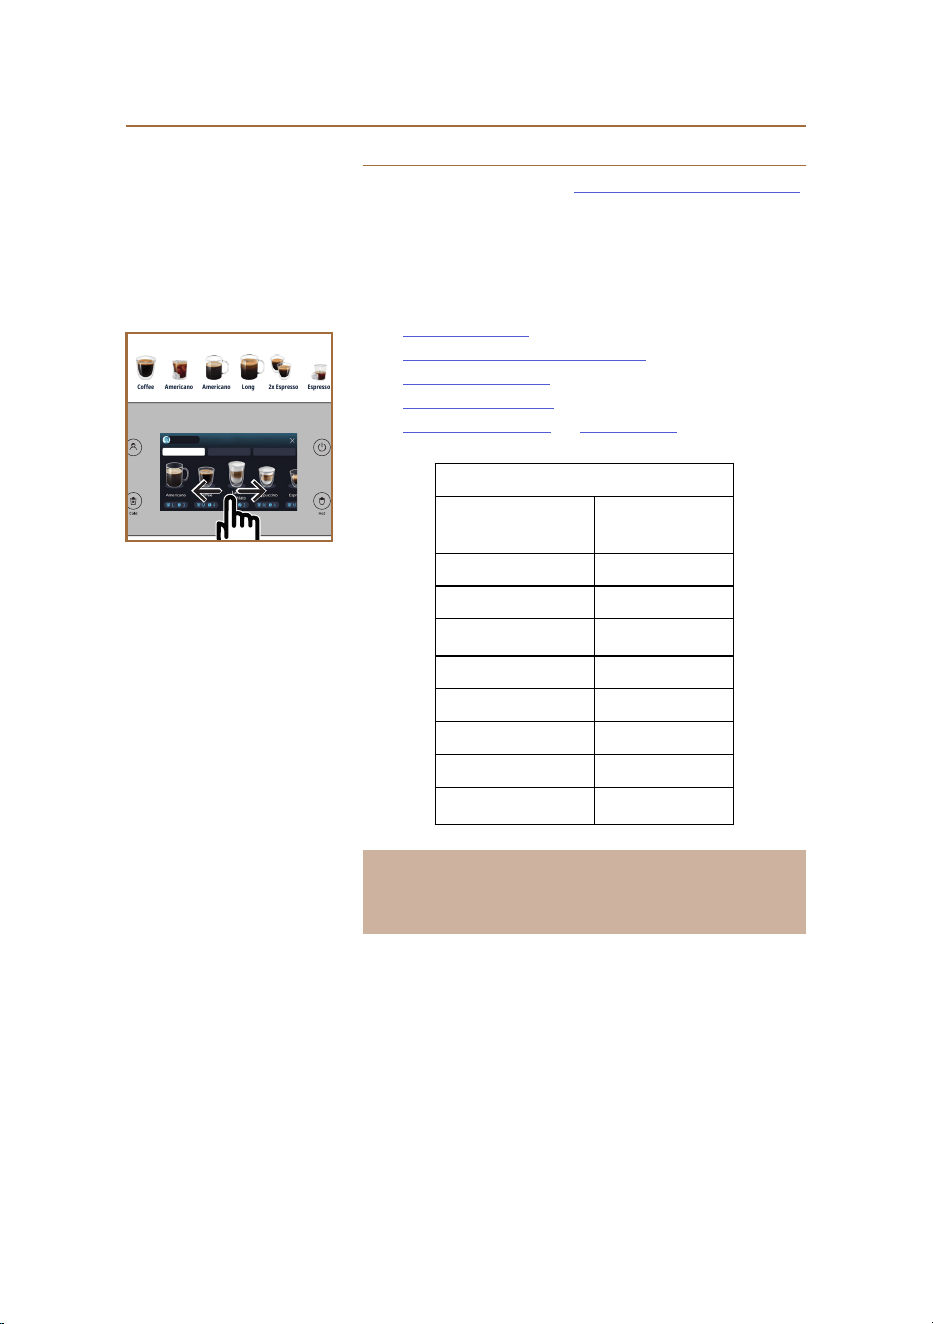
3.2.1.1 Navigating the drinks display
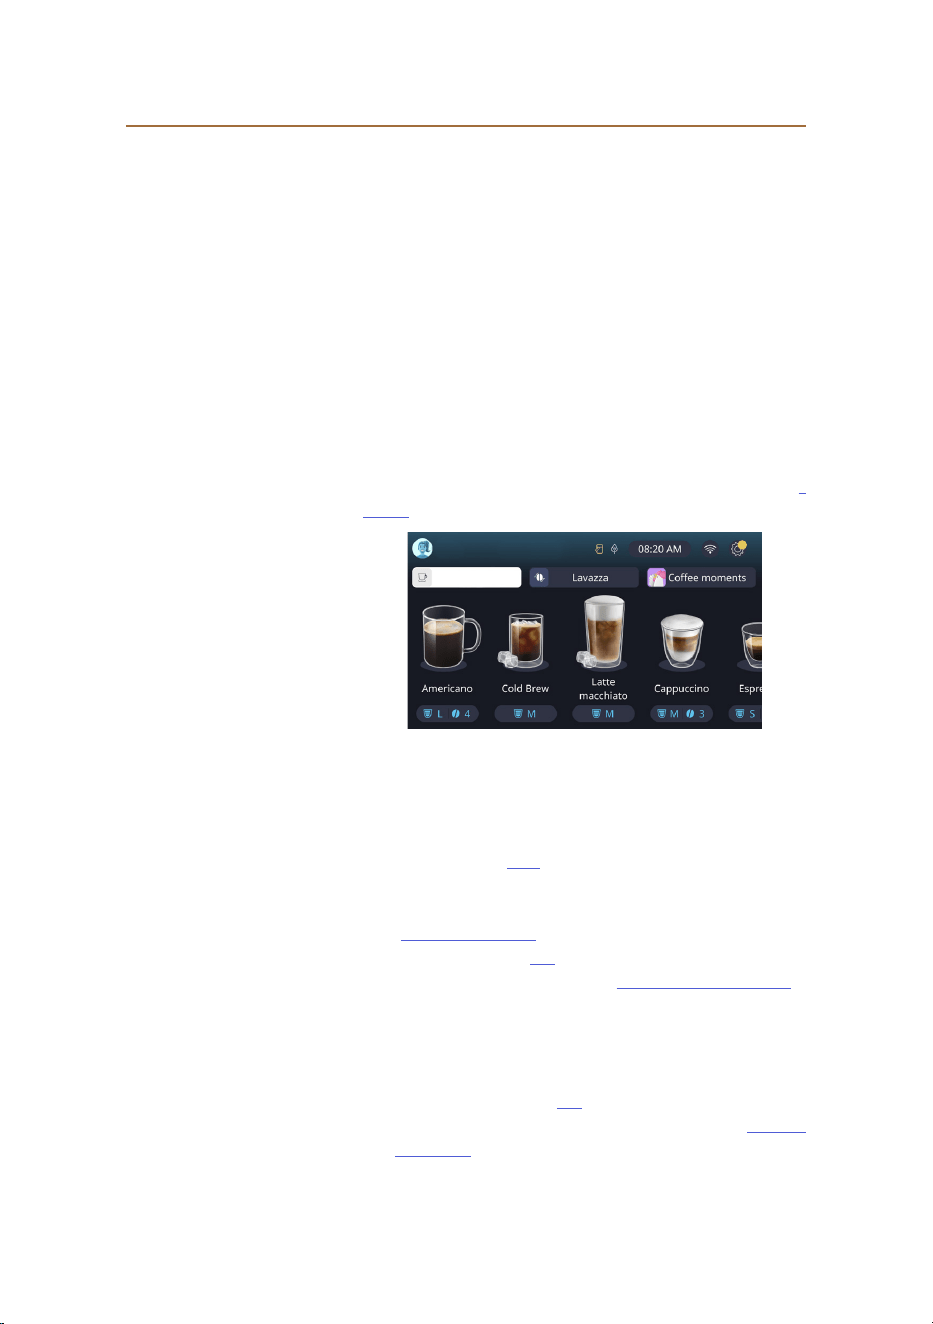
When you switch on your machine, you will see a number of drinks icons
in the middle of the homepage: scrolling horizontally, you can explore the
entire selection the machine has to oer.
Displayed below each of the drink icons is a customization bar (grey,
with rounded ends) in which the delivery settings for the relative drink
are indicated. These are explained in greater detail under the heading "4
DRINKS".
Drinks
3.2.1.2 Upper tabs (Drinks, Bean Adapt e Coee Routines)
Located above the drink icons are 3 tabs, which give quick access to cer-
tain functionalities of the machine or provide important information
regarding the drinks you want to make.
• Selecting “Drinks” (C11) the display will show all the various drinks
that can be made with your machine. This is useful when a ltered
view has been selected; details can be found under the heading
"3.2.2 External buttons".
• The “Bean Adapt” tab (C3) gives access to the Bean Adapt function:
when this is activated (see heading "4.8.3 Bean adapt technology"),
the machine self-adjusts its settings to suit the type of coee bean
being used. When Bean Adapt is active, it shows the name of the
selected bean: tapping on the name, it becomes possible to select a
dierent coee bean or create new avour proles.
• The “Coee Routines” tab (C2) can be used to show which "Coee
Moment" is active at any given time. Find out about the "4.8.5 Cof-
fee Routines" feature in the dedicated section.

18
3.2.1.3 Settings, notications and indicators
The area at the top right of the display shows certain useful information
regarding the daily use of your machine, as well as the time, and the icon
that accesses the settings menu (C6):
• A symbol (C4) at the top centre warns that the tubes inside the
milk container need cleaning (see heading "6.2.3.2 Thorough clean-
ing of milk carafe after each use").
• When the symbol (C5) appears on the display, it indicates that
the energy saving function is active (see heading "5.10 Energy sav-
ing").
• The symbol (C10) is the connectivity icon, which indicates the
connection status of the machine (for further details see heading
"3.3 Connectivity"). Tapping on the icon gives direct access to the
Connectivity menu, from which you can enable/disable Wi-Fi,
download the App or select other operations explained under the
heading Connectivity .
• The "l" symbol (C12) indicates an alarm relating to maintenance of
the machine (descaling, replacement/removal of water lter, clean-
ing operations).
3.2.1.4 Time
The clock shows the current time (C9), and when tapped, can be used to
change the time zone, the day, the hours and minutes in the preferred
format, and to enable their synchronization via Wi-Fi (the various possi-
bilities aorded by Wi-Fi are explained under the Connectivity heading ).
To make a change, press (C9) to select and adjust the parameter of inter-
est, then press “←” to return to the previous screen and "X" to go back to
the homepage.
3.2.1.5 Prole and background icon
At the top left of the display is a circle showing a coloured avatar (C1) that
represents one of the proles created on your machine.
You can create up to 4 proles on this machine, each with its own av-
atar and distinctive colour. The colour is applied not only to the avatar
but also to the background of the display and the external button (B4)
so that you can always be sure which prole you are using. Proles and
Coee Routines (see heading "4.8.5 Coee Routines") are important tools
that ensure you enjoy a truly tailor made experience with your machine.
In eect, the machine will save the preferences of each user on that us-
er’s prole and — if coee routines are active — link them to dierent
moments of the day. This means that the machine can predict what you
might want and oer it on the display as a rst choice. Tapping on the
avatar, you can view all the proles created, and from there:
• tap on another avatar to go onto its homepage;

19
• add a new prole;
• edit an existing prole;
• delete an existing prole;
To add add a new prole (possible as long as there are still less than 4
displayed):
• tap the avatar circle at the top left of the homepage;
• press +;
• tap on the pencil under the prompted avatar;
• select a colour from those available, then scroll through the avatars
below, tap the one preferred and press “←”;
• tap the name;
• use the keyboard that pops up on the display to enter the name that
will be used, then press 'Done' repeatedly, and nally 'X' to go back
to the homepage.
To edit an existing prole:
• tap the avatar circle at the top left of the homepage;
• tap on the pencil under the prompted avatar;
• select a colour from those available, then scroll through the avatars
below, tap the one preferred and press “←”;
• tap the name;
• use the keyboard that pops up on the display to enter the name that
will be used, then press 'Done' repeatedly, and nally 'X' to go back
to the homepage.
To delete an existing prole:
• tap the avatar circle at the top left of the homepage;
• tap on the pencil under the avatar to be removed;
• press "Delete" at the top right, then "Yes" at the bottom right;
• press "X" repeatedly at the top right until the homepage reappears.

20
3.2.2 External buttons
3.2.2.1 On/O
The On/O button is used to turn the electrical system of the machine on
and o. For more information, see sections under heading "3.1 Turning on
and turning o" regarding the machine.
Having plugged the power cord into the mains socket and checked that
the switch (A11) (g. 1) on the back of the machine is pushed in, press the
on/o button (B1). The machine now switches on.
To switch the machine o, press the same button again.
3.2.2.2 Hot
To ensure you can nd your favourite drink without diculty, the ma-
chine is equipped with buttons that operate like lters, showing a selec-
tion of the drinks available.
This way, it will be easier to pick out a Long Black or a Cappuccino for
your breakfast.
More exactly, button (B2) will show you all the hot drinks your machine
is able to make. In this new ltered view that appears, there will be two
new tabs ("Coee" C11A and "Milk" C11B) at the top of the screen; if se-
lected, these lter the list of drinks further, distinguishing between black
coee drinks, and drinks that make use of milk.
To go back to the full list, simply select button (B2) a second time, or press
"X" at the top right. For more information, see heading "4 DRINKS".
3.2.2.3 Cold
To ensure you can nd your favourite drink without diculty, the ma-
chine is equipped with buttons that operate like lters, showing a selec-
tion of the drinks available.
This way, it will be easier to pick out a Cold Brew To Mix for your evening
drink, or a Cold Cappuccino for your breakfast.
More exactly, button (B3) will show you all the cold drinks (cold brew or
over ice) your machine is able to make.
In this new ltered view that appears, there will be two new tabs ("Cof-
fee" (C11A) and "Milk" (C11B)) at the top of the screen; if selected, these
lter the list of drinks further, distinguishing between black coee drinks,
and drinks that make use of milk.
Please note:
For models of the machine that do not come with the LatteCrema Cool
Carafe (with white lid) in the accessories pack, the coee and milk tabs
will not appear, and the cold drinks available will include only coee
drinks without milk.
To go back to the full list, simply select button (B3) a second time, or press
"X" at the top right.
For more information, see heading "4 DRINKS".

21
3.2.2.4 Proles
As mentioned under the heading "3.2.1.5 Prole and background icon"
up to 4 proles can be created and managed in such a way as to access a
customized view of every user's favourite drinks.
Button (B4) is used to switch quickly from one prole to another: sim-
ply tap the button as many times as is necessary to bring up the desired
prole.
Alternatively, the user can switch from one prole to another as illustrat-
ed in heading "3.2.1.5 Prole and background icon".
22
3.3 Connectivity
3.3.1 Activating the Wi-Fi connection
Use this function to enable or disable connectivity. Proceed as follows:
1. Tap the symbol (C10) on the display;
2. Tap the eld next to the relative item to activate the Wi-Fi
connection, along with remote control (by way of the “My Coee
Lounge” App — connect via Wi-Fi to complete the conguration)
and automatic updates;
3. The machine PIN needed to connect to the App is displayed on the
screen;
4. Press "X" to save the new selection and go back to the homepage.
Please note:
If remote connection is o, certain of the functions on the App will not be
available (e.g. delivery of drinks).
3.3.2 Resetting the Wi-Fi connection
If the name or password of the Wi-Fi network are changed or if the ma-
chine is connected to a new Wi-Fi network, a reset procedure becomes
necessary, as described below:
5. Tap the symbol (C10) on the display;
6. Press “Reset” ;
7. Press 'Ok' to conrm deletion of the network settings and deactiva-
tion of the Wi-Fi connection;
8. Press "X" and reconnect with the App, selecting the new credentials
and following the indications given above (previous heading "3.3.1
Activating the Wi-Fi connection".
3.3.3 Deactivating the Wi-Fi connection
To deactivate the Wi-Fi connection and remote control, pressthe
symbol (C10) on the display, then tap the eld next to the relative
item.
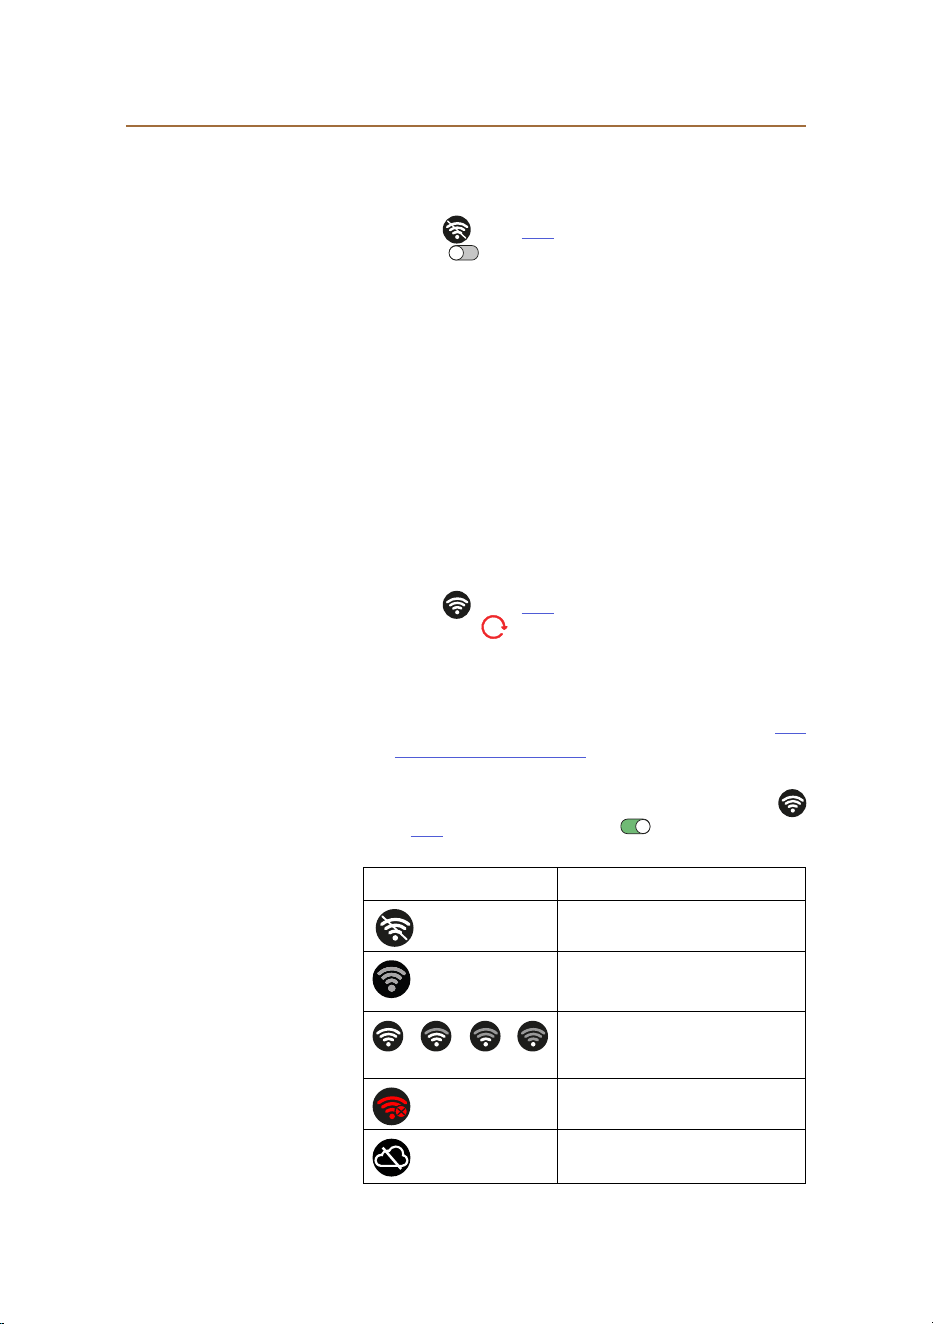
Symbols on the homepage Meaning
Wi-Fi disabled
Wi-Fi enabled but machine not paired
and connected
Status of Wi-Fi connection
Wi-Fi connection error
Cannot reach cloud
23
Primadonna Aromatic
4 DRINKS
As explained under the heading "3.2 Homepage and external buttons"
above, this machine oers a great variety of dierent drinks.
The following sections of the manual will provide you with all the infor-
mation you need to prepare your drink, to customize it, and, in the case of
milk-based drinks, to ensure you use the milk carafes correctly.
The drinks are divided into 5 groups:
• 4.1 Hot coee drinks
• 4.2 Cold Brew and Over Ice coee drinks
• 4.3 Drinks with hot milk
• 4.4 Drinks with cold milk
• 4.5 Delivering hot water and 4.6 Tea function
Quantities table
Drink Programmable
quantity
Espresso 20-80 ml
2X Espresso 2x20-2x80 ml
Espresso lungo 60-180 ml
Doppio+ 80-180 ml
Filter style 115-250 ml
Coee 100-270 ml
Americano 20-180 ml
Long Black 20-180 ml
Important!
Do not use green, caramelized or candied coee beans as they could
stick to the grinder and render it unusable.
Americano
Coffee
AmericanoEspresso
Long 2x Espresso Espresso Coffee
19
§All§
Coee
Hot drinks
Milk
24
4.1 Hot coee drinks
You can use your machine to prepare a wide variety of hot coee drinks:
rst select Hot (B2), then select the "Coee" tab in the top part of the dis-
play, as described previously under the heading "3.2.2 External buttons".
These are the hot coee drinks that will appear in the display of your
machine (g. 19).
4.1.1 Direct selection of hot coee drinks
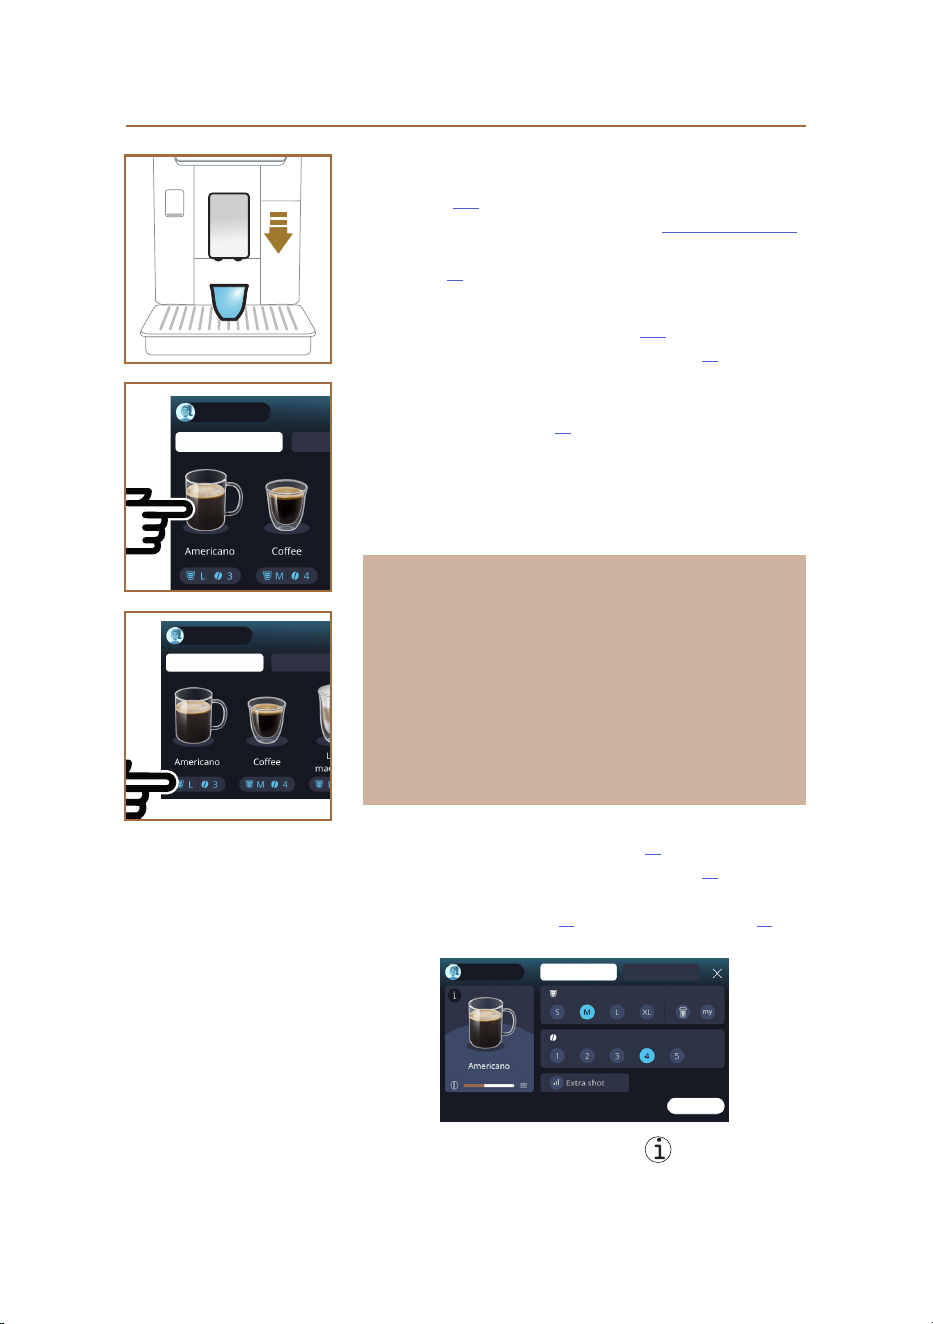
1. Place 1 or 2 cups under the drinks spout (A3).
2. Lower the spout as near as possible to the cup (g. 20): this will give
a creamier top.
3. Tap the image on the homepage that illustrates the desired coee
drink (e.g. Americano, g. 21).
4. The machine proceeds with the preparation.
5. A description of each single step (grinding, preparation, delivery of
coee) appears on the display.
Once the preparation has been completed, the machine is ready for use
again.
Please note
• "Cancel": press to interrupt preparation completely and go back
to the homepage.
• "Stop": when preparing drinks with multiple ingredients (e.g.
Americano = coee + hot water), press this button to terminate
the delivery of the current ingredient and pass on to delivery of
the next ingredient.
• At the end of delivery, to increase the quantity of coee in
the drink, simply press +Extra. When the required quantity is
reached, press Stop.
4.1.2 Customization of hot coee drinks
1. Place 1 or 2 cups under the drinks spout (A3);
2. Lower the spout as near as possible to the cup (g. 20): this will give
a creamier top;
3. Tap the customization bar C8 below the desired drink (g. 22). The
display will bring up a screen similar to the one indicated here:
Coee beans
Deliver
Pre-ground
Quantity ~80ml
The drink icon on the left is also a button that you can tap to
bring up a short description of the selected drink and, if the drink com-
20
§All§
21
§All§
22

25
prises multiple ingredients (e.g. coee and water), a bar indicating the
proportions.
The dashboard on the right displays the various controls for customizing
the drink. If the selected drink uses beans ground at the moment of brew-
ing, a “Coee beans” tab appears at the top of the screen.
Please note
Should you want to use pre-ground coee, details can be found under
the heading "4.1.3 Using pre-ground coee for hot coee drinks".
A rst box relating to the size/quantity of the drink presents a choice of
dierent sizes (S, M, L, XL), and two functions: My (see heading "4.8.4
“My” function") and To Go (see heading "4.8.2 To Go"). On selecting the
preferred quantity, an updated estimate of the actual uid amount will
be shown at the top of the box.
The second box allows selection of the desired intensity for the drink (se-
lecting an Espresso, Bean Adapt intensity will also be available if a Bean
Adapt prole has been created and the Bean adapt technology function
has been activated; see heading "4.8.3 Bean adapt technology").
Finally there is the "ExtraShot" option, which sets the machine to deliver
an added ristretto for a bit of extra energy.
4. Once all the desired settings have been selected, tap “Deliver” and
the machine proceeds with preparation.
5. A description of each single step (grinding, preparation, delivery of
coee) appears on the display.
When the preparation has been completed, the machine asks if you want
to save the new setting and, if the Coee Routines function is active, to
conrm whether or not you want to save this particular drink for all times
of the day or only for the current time (in which case, tap the time of
day currently displayed and conrm with 'Yes'). All the information you
need on Coee routines can be found under the heading "4.8.5 Coee
Routines".
26
Please note
• "Cancel": press to interrupt preparation completely and go back
to the homepage, without saving the customization.
• "Stop": when preparing drinks with multiple ingredients (e.g.
Americano = coee + hot water), press this button to terminate
the delivery of the current ingredient and pass on to delivery of
the next ingredient.
• At the end of delivery, to increase the quantity of coee in
the drink, simply press +Extra. When the required quantity is
reached, press Stop.
• To ensure that the features typical of certain drinks are pre-
served, customization of the To Go option and the intensity set-
ting may be inhibited.
4.1.3 Using pre-ground coee for hot coee drinks
Many drinks can be prepared using pre-ground coee. You will know if
this function is available for your favourite drink, as the “pre-ground” tab
is displayed on the customization page. The steps for preparing your hot
coee drink with pre-ground coee are described below.
Important!
• Never add pre-ground coee when the machine is o, or it could
spread through and soil the inside of the machine. In this situation
the machine could be damaged.
• Never use more than one level scoop as it could dirty the inside of
the machine or clog the funnel.
• When using pre-ground coee, you can make only one cup at a
time and it will not be possible to select the intensity of the drink
via the display, since the intensity depends on the amount of cof-
fee you pour into the funnel, which can never be more than one
level scoop.
• Certain drinks cannot be prepared using pre-ground coee: Dop-
pio+, 2xEspresso and Coee Pot.
• Making Filter style coee: halfway through preparation, when
prompted by the machine, add one level measure of pre-ground
coee and press "Deliver".
1. Place 1 cup under the drinks spout (A3);
2. Tap the customization bar C8 below the desired drink (g. 22). A
page appears on the display, showing the parameters that can be
customized according to preference;
3. Select the “Pre-ground” tab at the top right;
23
24

27
Important!
Selecting Pre-ground, the screen changes and the option of altering
the intensity setting is removed, since the intensity depends on the
amount of pre-ground coee introduced (which in any event must be
no more than 1 level scoop).
4. Choose the preferred quantity: an updated estimate of the actual
uid amount will be shown at the top of the page. Press “Deliver”;
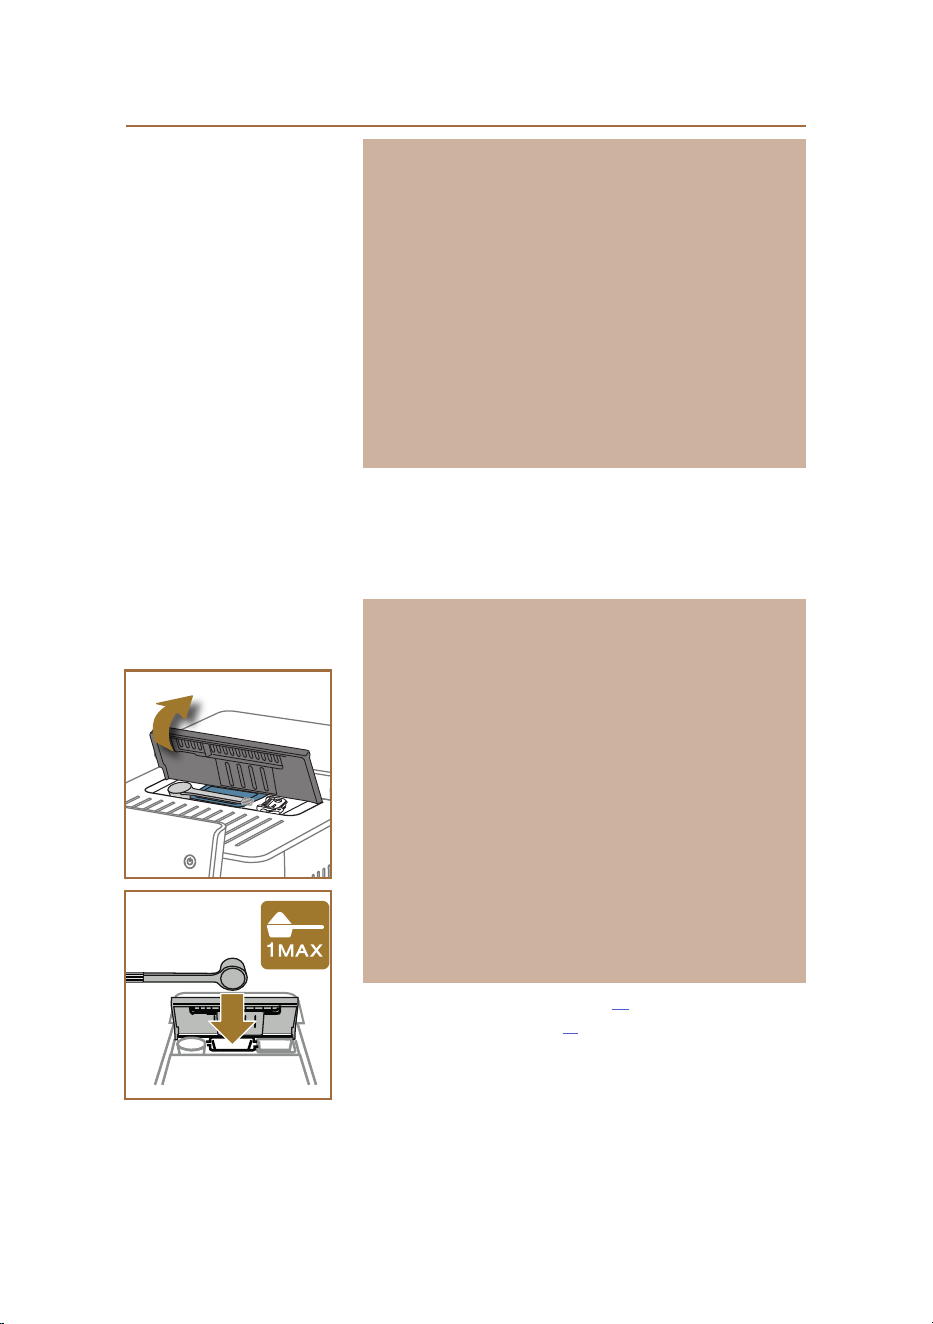
5. Lift the lid A2 of the accessories compartment (g. 23);
6. Check that the pre-ground coee funnel (D3) is in place and make
sure it is not blocked; add one level scoop (D1) of pre-ground coee
(g. 24). Press "Ok";
7. The machine proceeds with preparation and a description of each
single step (water heating, delivery of coee) appears on the display.
Once the preparation has been completed, the machine is ready for use
again. In contrast to other customizations, the use of pre-ground coffee
cannot be saved but must be selected at each preparation.
Please note
• "Cancel": press to interrupt preparation completely and go back
to the homepage, without saving the customization.
• "Stop": when preparing drinks with multiple ingredients (e.g.
Americano = coee + hot water), press this button to terminate
the delivery of the current ingredient and pass on to delivery of
the next ingredient.
• At the end of delivery, to increase the quantity of coee in
the drink, simply press +Extra. When the required quantity is
reached, press Stop.
4.1.4 Coee pot
Coffee pot is a drink to be enjoyed in company, and more exactly, a light
and balanced “Coffee-based” drink, with a thin covering of cream.
Given the convivial nature of the drink, the quantity will not be expressed
in sizes (s, m, l, xl) but in terms of cups, and the estimated uid amount
can always be seen on the display in the cup box.
To make the drink, proceed as follows:
1. On the homepage (C), select and tap the image of the desired drink
(C7), or alternatively, if the intention is to select the number of cups
to prepare and/or the desired intensity, tap the drink customization
bar (C8) and make the selection; now press “Start” to move on to
the next step;
2. Fill the water tank (A8) up to the MAX level, and ll the bean hopper
(A1).

28
3. Having made sure there is sucient water and coee for prepara-
tion of the drink, press "→";
4. Procure a container of the appropriate capacity, no more than
14cm in height, and position it under the drinks spout (A3). Press
“Deliver”;
5. The machine proceeds with preparation, carrying out a number of
grinding steps appropriate for the number of cups selected, and a
description of each single step (grinding, delivery of coee) appears
on the display.
6. With delivery ended, in the event that during step 1 the number of
cups and/or the intensity of the drink were changed, conrm with
“Yes” to store the new settings, or press “No” to retain the previous
parameters. You can also save them in your Coee Routine by ticking
the relative box.
All the information you need on Coee routines can be found under the
heading "4.8.5 Coee Routines".
The machine is ready to be used again.
Caution!
After making a pot of coee, leave the machine to cool for 5 minutes
before making another drink. Risk of overheating.
Please note
"Cancel "or Stop": press to stop preparation completely and go back to
the homepage.
Please note
Ideally, wash the coee pot after each use with hot water and mild
washing up liquid. Then rinse thoroughly with warm water to remove
any trace of detergent. The coee pot is dishwasher-safe.
29
4.2 Cold Brew and Over Ice coee drinks
You can use your machine to prepare a wide variety of cold coee drinks
(Over Ice and Cold Brew): rst select Cold (B3), then, if featured on your
model of the machine, select the "Coee" tab at the top of the display as
described previously under the heading "3.2.2 External buttons".
Please note
• For models of the machine that do not come with the LatteCrema
Cool Carafe (with white lid) in the accessories pack, the “Coee”
and “Milk” tabs will not appear, and the cold drinks available will
include only coee drinks without milk.
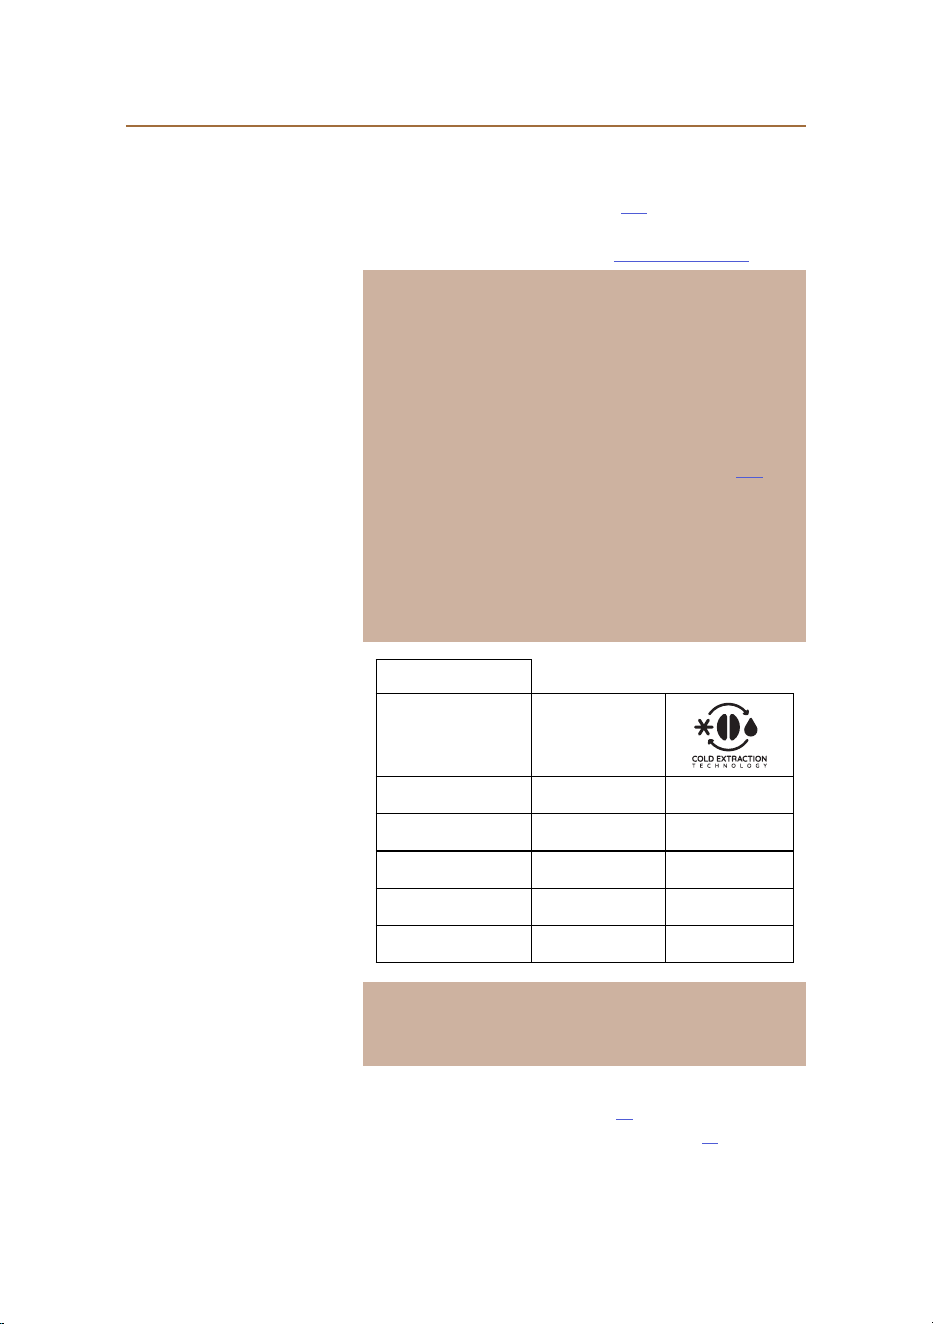
• Cold Brew drinks use Cold Extraction Technology, which is a brew-
ing method that takes a few minutes to complete.
•
For best results with Cold Brew, empty the water tank (A8), rinse
out and ll with fresh drinking water.
• When a Cold Brew drink is selected immediately after making a
hot drink, the machine prompts to carry out a cold rinse so that
the new drink will be delivered at the right temperature. In this
situation, respond by selecting the cold rinse or press “Skip” to
proceed with preparation.
Drink
Over ice
Espresso
✓
✕
Coee
✓
✕
Americano
✓
✕
Cold Brew carafe
✕
✓
Cold Brew to Mix
✕
✓
Important!
Do not use green, caramelized or candied coee beans as they could
stick to the grinder and render it unusable.
4.2.1 Direct selection of Cold Brew and Over Ice coee drinks
1. Place 1 glass under the drinks spout A3.
2. Lower the spout as near as possible to the cup (g. 20): this will give
a creamier top.
30
3. Tap the image C7 on the homepage that illustrates the desired cof-
fee drink (e.g. Coee).
4. Make the selection between “Ice” or “Extra ice”, in the case of "Over
Ice" drinks, or between "Original" or "Intense" in the case of "Cold
Brew” drinks: press “→”;
5. Depending on the selection, the machine will adjust the extraction
parameters and suggest the correct amount of ice to use for opti-
mum results.
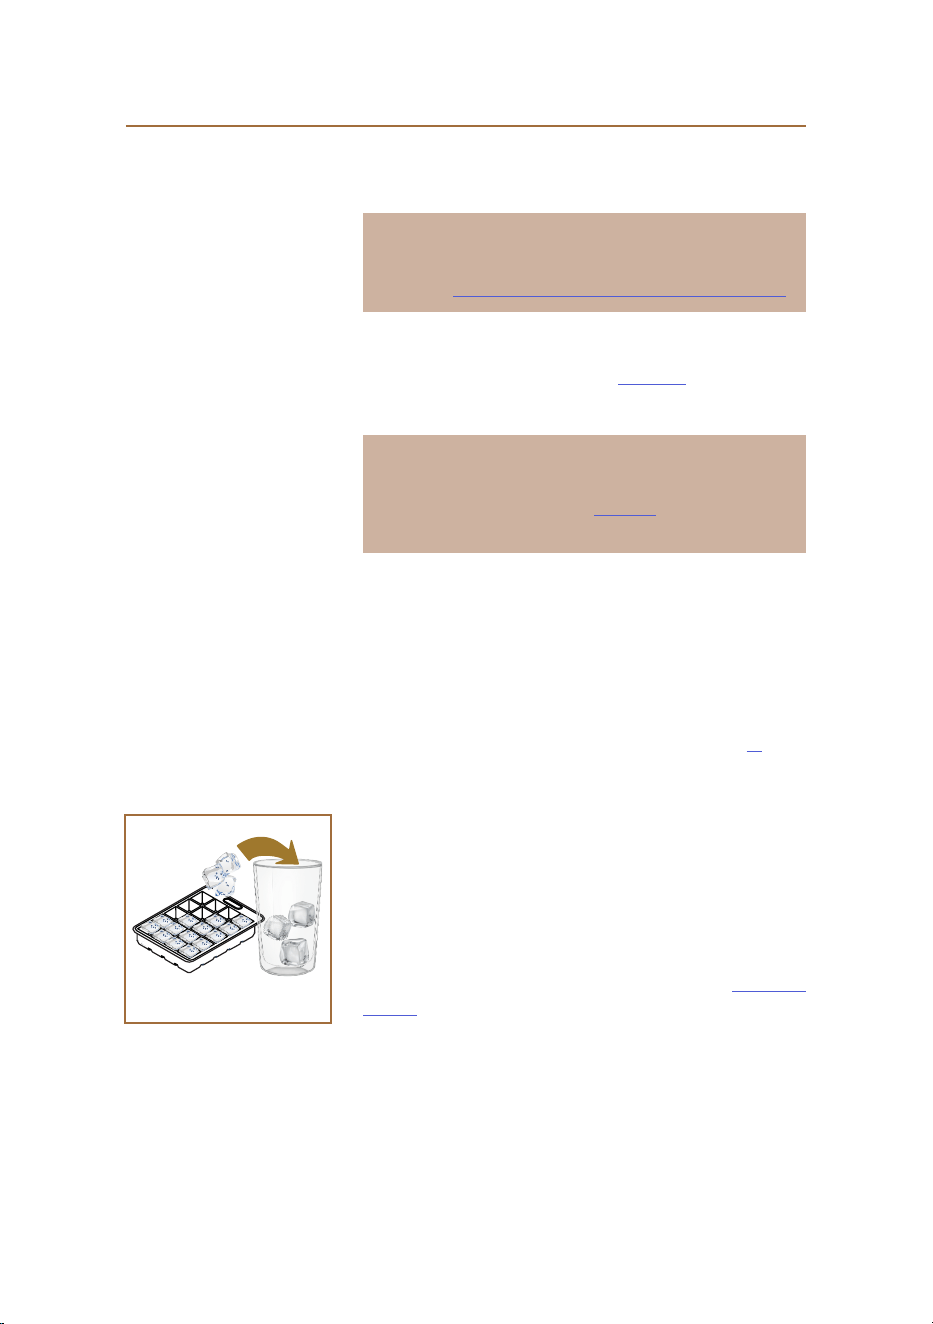
6. Place the number of ice cubes indicated in the glass (g. 25) and
press “Deliver”.
7. The machine proceeds with the preparation. A description of each
single step (grinding, preparation, delivery of coee) appears on the
display.
Once the preparation has been completed, the machine is ready for use
again.
Please note
• "Cancel": press to interrupt preparation completely and go back
to the homepage, without saving the customization.
• "Stop": when preparing drinks with multiple ingredients (e.g.
Americano = coee + hot water), press this button to terminate
the delivery of the current ingredient and pass on to delivery of
the next ingredient.
4.2.2 Customization of cold coee drinks (Cold Brew and Over
Ice)
1. Place 1 cup/glass under the drinks spout (A3);
2. Lower the spout as near as possible to the cup (g. 20): this will give
a creamier top;
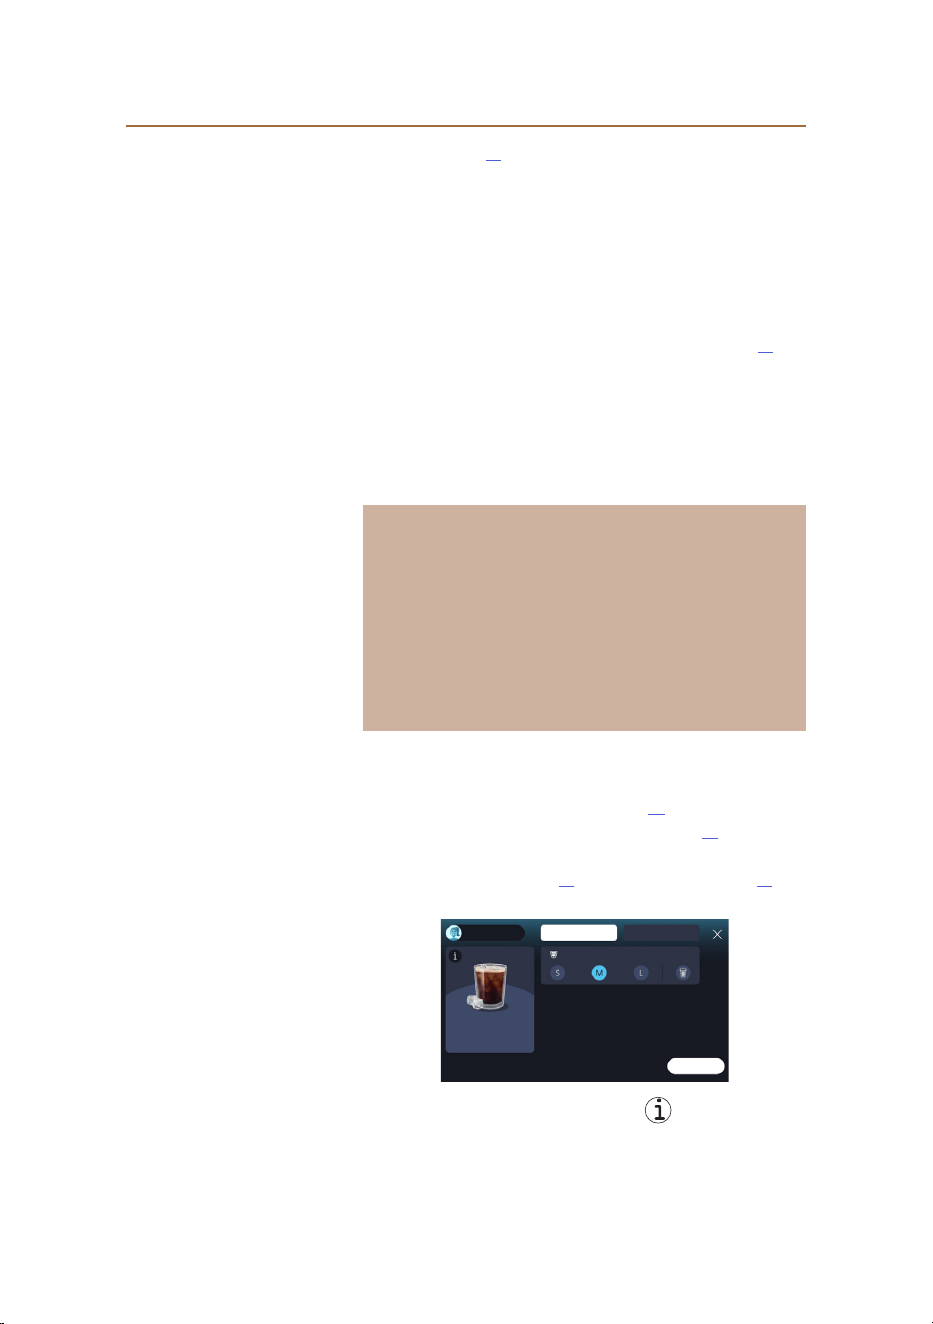
3. Tap the customization bar C8 below the desired drink (g. 22). The
display will bring up a screen similar to the one indicated here:
Coee
Coee beans
Start
Pre-ground
Quantity ~195ml
The drink icon on the left is also a button that you can tap to
bring up a short description of the selected drink and, if the drink com-
prises multiple ingredients (e.g. coee and water), a bar indicating the
proportions.
31
The dashboard on the right displays the various controls for customizing
the drink. If the selected drink uses beans ground at the moment of brew-
ing, a “Coee beans” tab appears at the top of the screen.
Please note
Should you want to use pre-ground coee, details can be found under
the heading "4.4.6 Using pre-ground coee for drinks with cold milk".
Also displayed is a single box indicating the size/quantity of the drink,
which enables selection between the sizes (S, M and, where envisaged,
L), and the To Go function (see heading "4.8.2 To Go"). On selecting the
preferred quantity, an updated estimate of the actual uid amount will
be shown at the top of the box.
Please note
To ensure a correct balance between ice and coee, the intensity
cannot be changed; neither can the Extra shot option be used, as this
would spoil the drink.
4. After setting the parameters, press “Start” and proceed as follows:
• Make the selection between “Ice” or “Extra ice”, in the case of "Over
Ice" drinks, or between "Original" or "Intense" in the case of "Cold
Brew” drinks: press “→”;
• Depending on the selection, the machine will adjust the extraction
parameters and suggest the correct amount of ice to use for opti-
mum results.
• Place the number of ice cubes indicated in the glass (g. 25): press
“Deliver”.
5. The machine proceeds with the preparation. A description of each
single step (grinding, preparation, delivery of coee) appears on the
display.
When the preparation has been completed, the machine asks if you want
to save the new setting and, if the Coee Routines function is active, to
conrm whether or not you want to save this particular drink for all times
of the day or only for the current time (in which case, tap the time of
day currently displayed and conrm with 'Yes'). All the information you
need on Coee routines can be found under the heading "4.8.5 Coee
Routines".
25

32
Please note
• "Cancel": press to interrupt preparation completely and go back
to the homepage, without saving the customization.
• "Stop": when preparing drinks with multiple ingredients (e.g.
Americano = coee + hot water), press this button to terminate
the delivery of the current ingredient and pass on to delivery of
the next ingredient.
• To ensure that the features typical of certain drinks are pre-
served, customization of the To Go option and the intensity set-
ting may be inhibited.
4.2.3 Use of pre-ground coee in cold coee drinks (Over Ice
only)
Many drinks can be prepared using pre-ground coee. You will know if
this function is available for your favourite drink, as the “pre-ground” tab
is displayed on the customization page.
The steps for preparing your drink with pre-ground coee are described
below.
Important!
• Never add pre-ground coee when the machine is o, or it could
spread through and soil the inside of the machine. In this situation
the machine could be damaged.
• Never use more than one level scoop as it could dirty the inside of
the machine or clog the funnel.
• When using pre-ground coee, you can make only one cup at a
time.
• A Cold Brew drink cannot be prepared using pre-ground coee.
1. Place 1 cup/glass under the drinks spout (A3);
2. Tap the customization bar C8 below the desired drink (g. 22). A
page appears on the display, showing the parameters that can be
customized according to preference;
3. Select the “Pre-ground” tab at the top right;
4. Choose the preferred quantity: an updated estimate of the actual
uid amount will be shown at the top of the page.
5. Press “Start”;
6. Make the selection between an “Ice” or an “Extra ice” drink, and press
“→”;
7. Depending on the selection, the machine will adjust the extraction
parameters and suggest the correct amount of ice to use for opti-
mum results: place the number of ice cubes indicated in the glass
(g. 25) and press “Deliver”;

33
8. Lift the lid (A2) of the accessories compartment (g. 23);
9. Check that the pre-ground coee funnel (D3) is in place and make
sure it is not blocked; add one level scoop (D1) of pre-ground coee
(g. 24) and press “Ok”;
10. The machine proceeds with preparation and a description of each
single step (water heating, delivery of coee) appears on the display.
Once the preparation has been completed, the machine is ready for use
again. In contrast to other customizations, the use of pre-ground coee
cannot be saved but must be selected at each preparation.
Please note
• "Cancel": press to interrupt preparation completely and go back
to the homepage, without saving the customization.
• "Stop": when preparing drinks with multiple ingredients (e.g.
Americano = coee + hot water), press this button to terminate
the delivery of the current ingredient and pass on to delivery of
the next ingredient.
4.2.4 Cold Brew carafe
Cold Brew carafe is a refreshing Cold Brew type drink ideal for serving and
enjoying in company. Given the convivial nature of the drink, the quantity
will not be expressed in sizes (s, m, l, xl) but in terms of cups, and the
estimated uid amount can always be seen on the display in the cup box.
Please note
When using the Cold Brew Carafe, it is best not to put ice in the carafe
during delivery, but to place 3-4 ice cubes in each individual glass at the
moment of serving the drink.
To make the drink, proceed as follows:
1. To get the best results, the machine suggests placing the ice (3-4
cubes) in the glasses before serving the drink;
2. Press “→”;
3. Empty the water tank (A8), rinse, and ll with fresh drinking water
up to the MAX level. Fill the bean hopper (A1) ;
4. Select the desired intensity: “Original” or “Intense”, then press “→”;
5. Having made sure there is sucient water and coee for prepara-
tion of the drink, press “→”;
6. Procure a container of the appropriate capacity, no more than
14cm in height, and position it under the drinks spout (A3). Press
“Deliver”;
7. The machine proceeds with preparation, carrying out a number of
grinding steps appropriate for the number of cups selected, and a
description of each single step (grinding, delivery of coee) appears
on the display.

34
8. With delivery ended, in the event that during step 1 the number of
cups was changed, conrm with “Yes” to store the new settings, or
press “No” to retain the previous parameters. You can also save them
in your Coee Routine by ticking the relative box.
All the information you need on Coee routines can be found under the
heading "4.8.5 Coee Routines". The machine is ready to be used again.
Please note
• "Cancel "or Stop": press to stop preparation completely and go
back to the homepage.
• To ensure a correct balance between ice and coee, the Extra shot
option cannot be used, as this would spoil the drink.
35
4.3 Drinks with hot milk
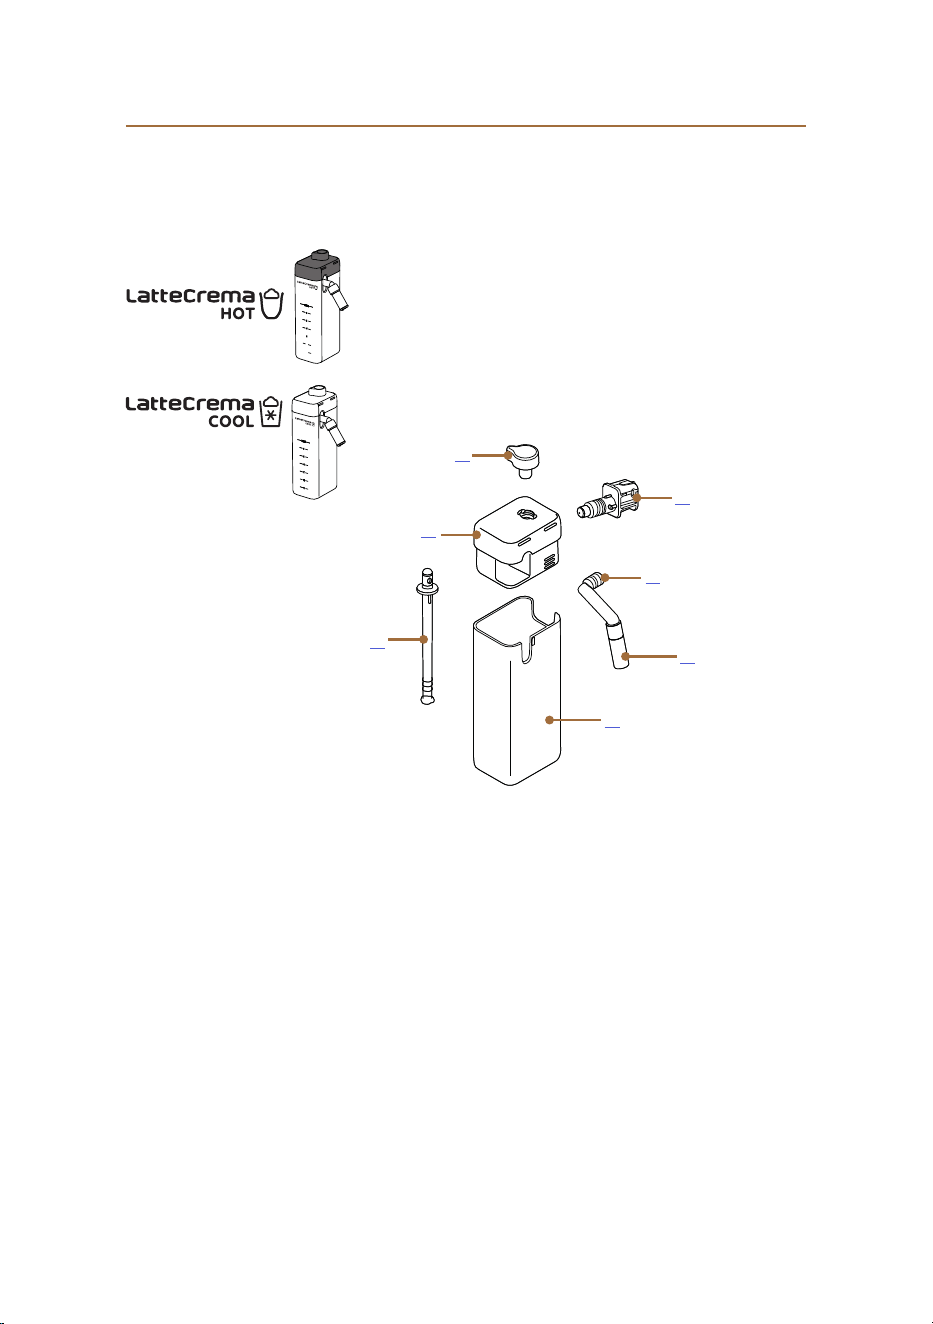
When preparing hot drinks with milk you need to use the LatteCrema Hot
carafe, identied by the black coloured carafe lid (E2).
The next few headings give indications on the types of milk to use, on
how to utilize and clean the carafe and, as in the case of coee drinks,
how to deliver and customize your hot milk-based drinks. You can use
your machine to prepare a wide variety of hot milk drinks: rst select
Hot (B2), then the "Milk" tab in the top part of the display, as described
previously under heading "3.2.2 External buttons".
These are the hot drinks with milk that will appear in the display of your
machine.
Drinks
Caelatte Galão
Hot milk (not frothed) Cappuccino
Café au lait Cappuccino Mix
Café con leche Espresso Macchiato
Latte Macchiato Cappuccino+
Flat White Hot milk (frothed)
Cortado
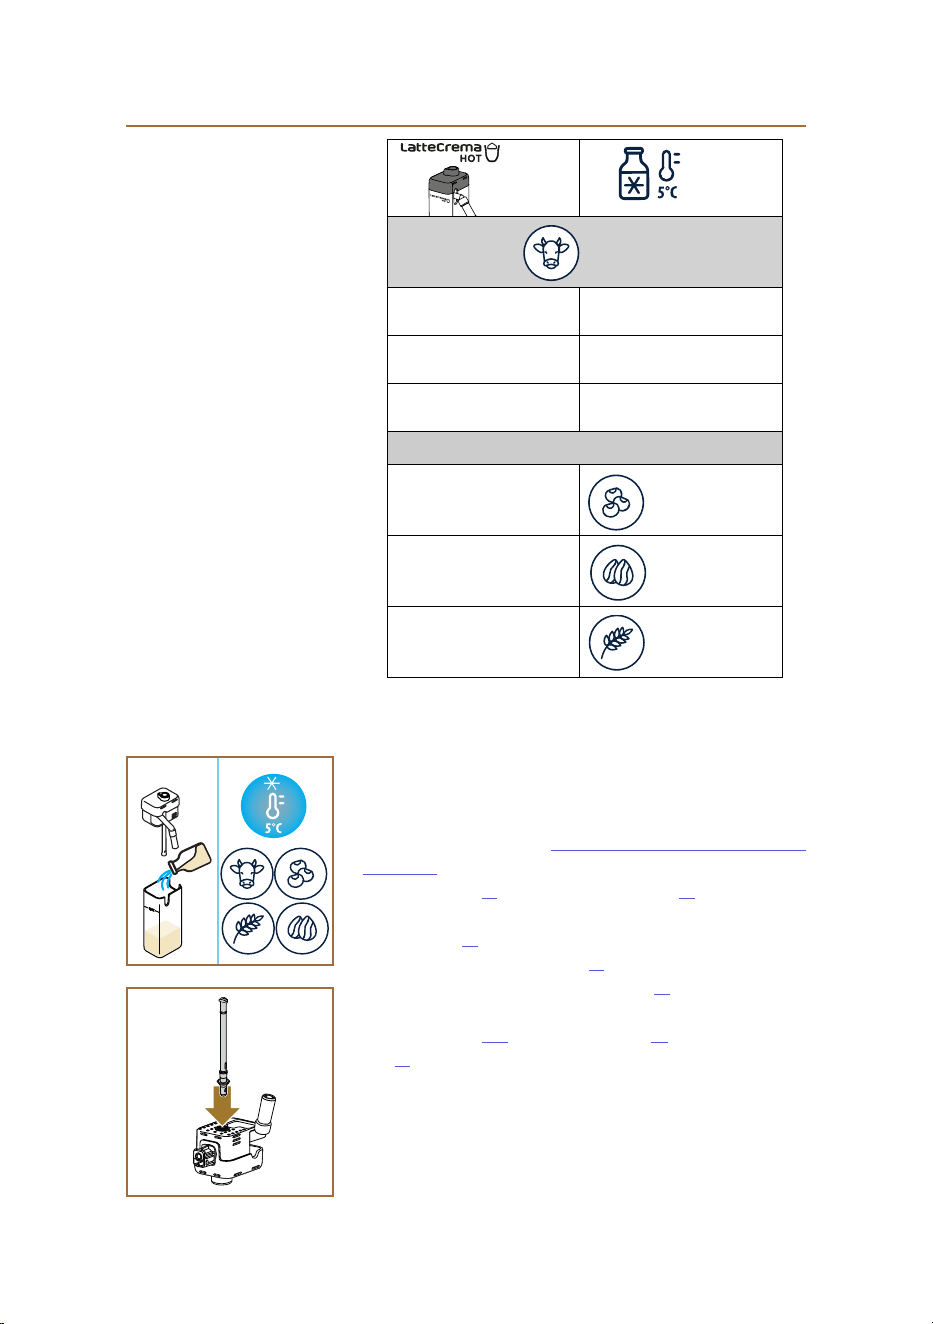
4.3.1 What milk to use in the “LatteCrema Hot” carafe?
With the LatteCrema Hot carafe, milk can be heated and frothed to
dierent levels, so that any drink made with hot milk will be prepared to
perfection. Steam, air and milk are blended together in the proportions
guaranteed to produce a perfect froth, delivered directly from carafe to
cup. In addition, the LatteCrema Hot carafe features a dedicated cleaning
cycle with steam and water, which also means that leftover milk can be
kept in the fridge and used later.
The quality of the froth can vary depending on:
• the temperature of the milk or vegetable drink used (for best re-
sults, always use straight from the fridge, 5 °C);
• type of milk or vegetable drink;
• the brand used;
• ingredients and nutritional values.
36
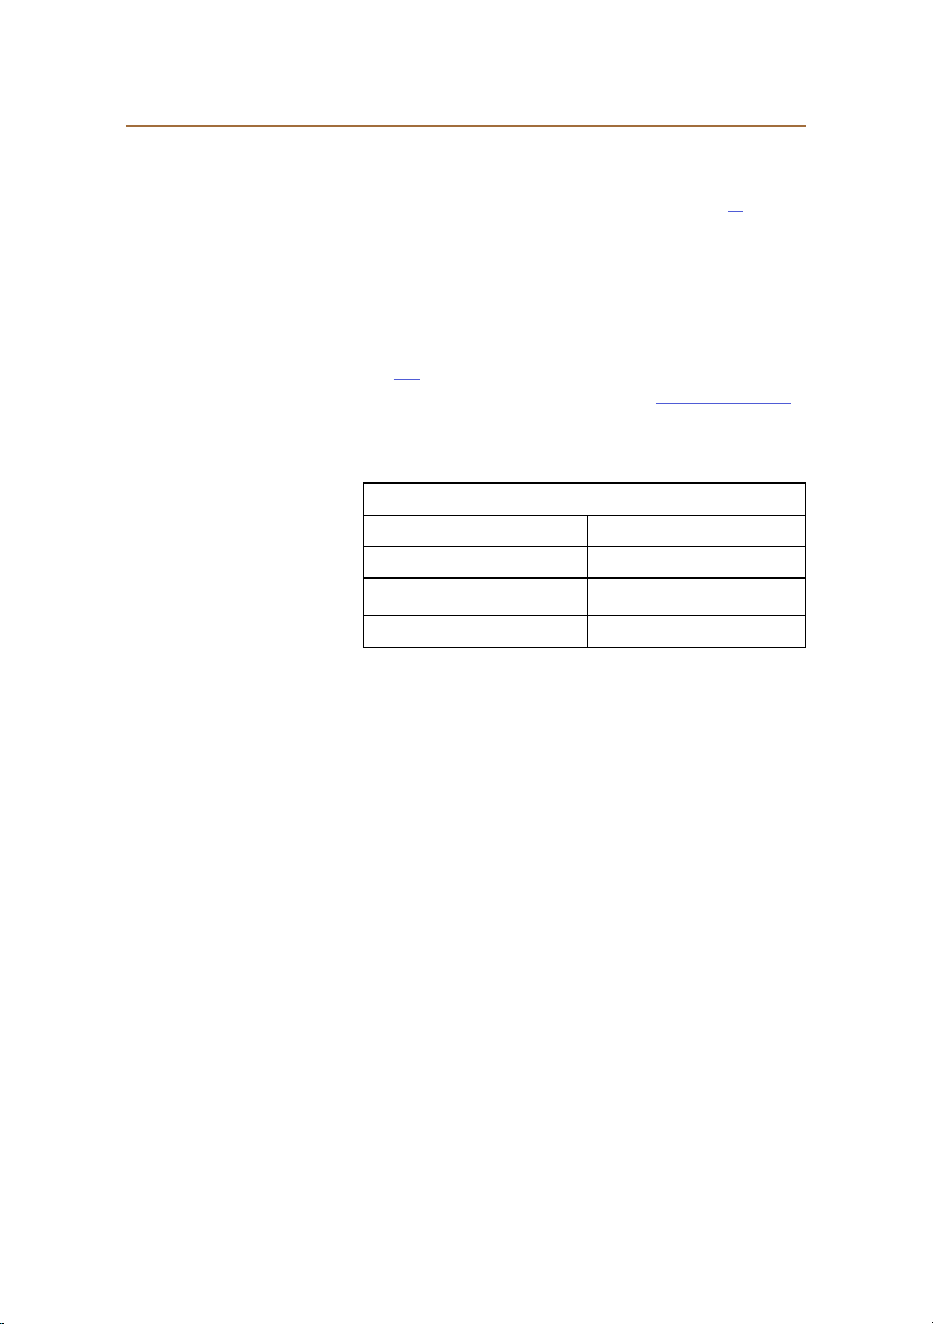
Cow's milk
✓
Whole
(fat >3,5%)
✓
Semi-skimmed
(fat between 1.5 and 1.8%)
✓
Skimmed
(fat <0.5%)
Vegetable drinks
✓
Soya
✓
Almond
✓
Oatmeal
4.3.2 Preparation and attachment of the “LatteCrema Hot” ca-
rafe
This heading explains how to prepare the LatteCrema Hot carafe for use.
Remember to ensure that the milk is left out of the fridge for a short a
time as possible so that it always stays at a temperature close to 5 °C, as
explained under the heading "4.3.1 What milk to use in the “LatteCrema
Hot” carafe?".
1. Raise the lid (E2) and ll the milk container (D7) with a sucient
quantity of milk, not exceeding the MAX level marked on the con-
tainer (g. 26);
2. Make sure the milk intake tube (E6) is secured correctly to the socket
on the underside of the milk carafe lid (g. 27); Reposition the lid on
the milk container;
3. Raise the ap (A5) and attach the carafe (D7) to the connector (g.
28), pushing it fully home. The machine emits a beep (if the beep
function is enabled).
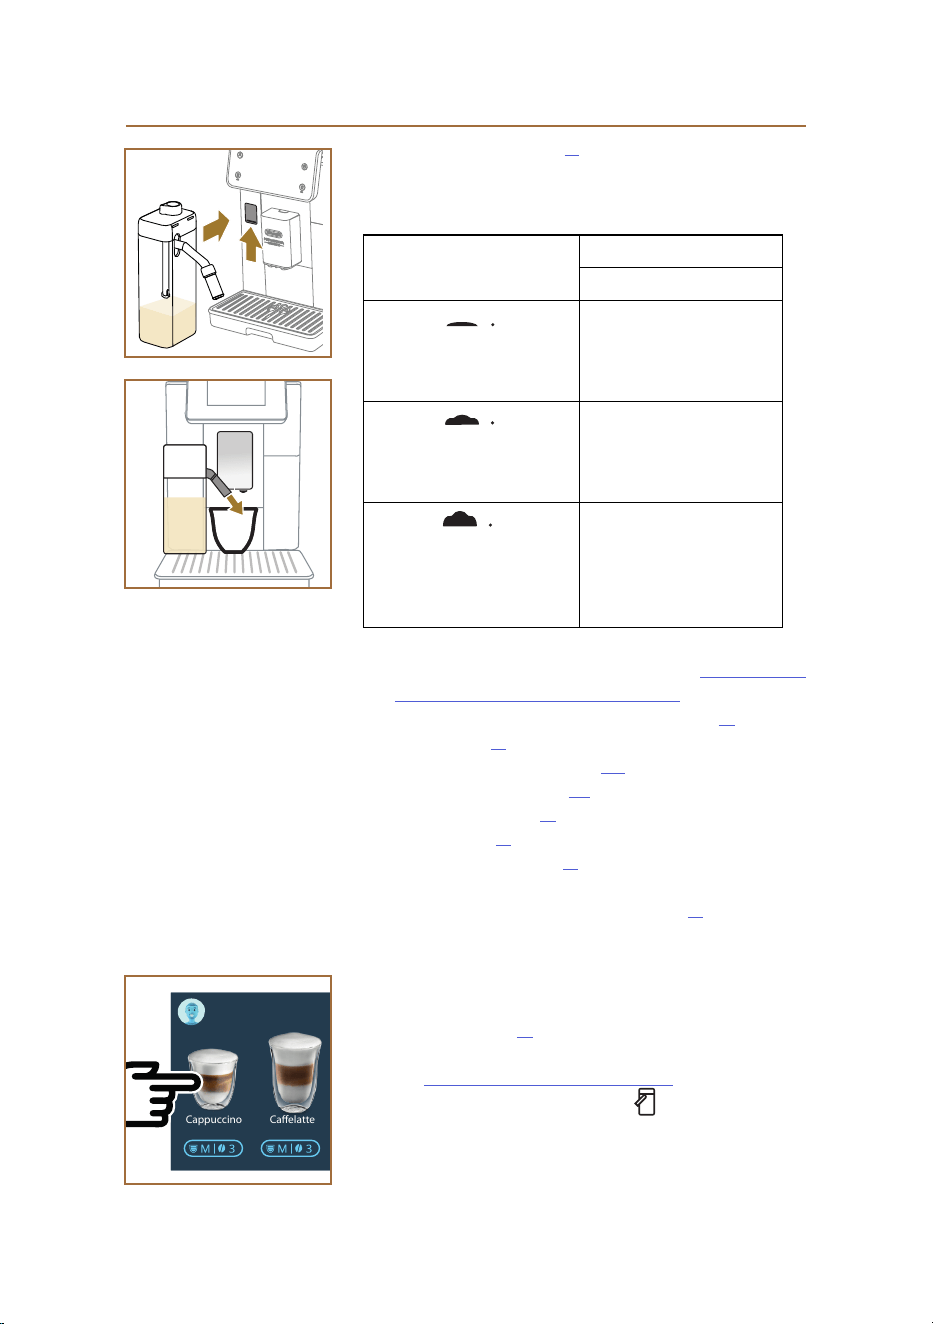
4.3.3 Milk frothing with the “LatteCrema Hot” carafe
The LatteCrema Hot carafe is designed to give 3 levels of froth, adapting
perfectly to any drink you may have in mind.
26
27
37
Turn the froth adjustment dial (E1) to select the amount of milk froth
that will be delivered when making milk based drinks. When selecting
a drink, the display will suggest the appropriate position for setting the
froth adjustment dial.
Dial position Recommended for…
Hot
MIN
Light froth
• Caelatte
• Hot milk (not frothed)
• Café au lait
• Café con leche
MED
Creamy froth
• Latte Macchiato
• Flat White
• Cortado
• Galão
MAX
Thick froth
• Cappuccino
• Cappuccino Mix
• Espresso Macchiato
• Cappuccino+
• Hot milk (frothed)
4.3.4 Direct selection of drinks with hot milk
1. Follow the instructions given under the heading "4.3.2 Preparation
and attachment of the “LatteCrema Hot” carafe";
2. Place a suciently large cup under the drinks spout (A3) and under
the milk spout (E3);
3. Adjust the milk spout extension (E4) to suit the height of your cup
and lower the drinks spout (A3) so as to bring it down as near as
possible to the cup (g. 29): this will give a creamier top.
4. Tap the image (C7) on the homepage that illustrates the desired
drink (e.g.. Cappuccino, g. 30).
5. As the machine heats up and proceeds with preparation, set the
level of froth by turning the adjustment dial (E1) to the position
recommended on the display.
6. A description of each single step (grinding, preparation, delivery of
coee, delivery of milk) appears on the display.
7. Once the preparation has ended, the machine will prompt the user
to clean the carafe (D7) (Clean function) to ensure the lid is not left
unwashed. Follow the instructions given under the dedicated head-
ing "6.2.3.1 Cleaning the milk carafe after use"
8. If the milk carafe is not cleaned, the symbol appears on the
homepage as a reminder that cleaning is required.
28
29
Cappuccino Coee
Americano
Caelatte
30
38
Please note
• Once all the hot milk drinks you wanted to prepare have been
delivered, remember that the milk carafe needs cleaning as
described under the heading "6.2.3.1 Cleaning the milk carafe
after use". If there is still some milk left in the carafe, return it to
the refrigerator; if not, clean the carafe thoroughly as indicated
under the heading "6.2.3.2 Thorough cleaning of milk carafe".
• "Cancel": press to interrupt preparation completely and go back
to the homepage, without saving the customization.
• "Stop": when preparing drinks with multiple ingredients (e.g.
Cappuccino = milk + coee), press this button to terminate the
delivery of the current ingredient and pass on to delivery of the
next ingredient.
• At the end of delivery, to increase the quantity of coee in
the drink, simply press +Extra. When the required quantity is
reached, press Stop.
4.3.5 Customization of drinks with hot milk
1. Follow the instructions given under the heading "4.3.2 Preparation
and attachment of the “LatteCrema Hot” carafe";
2. Place a suciently large cup under the drinks spout (A3) and under
the milk spout (E3);
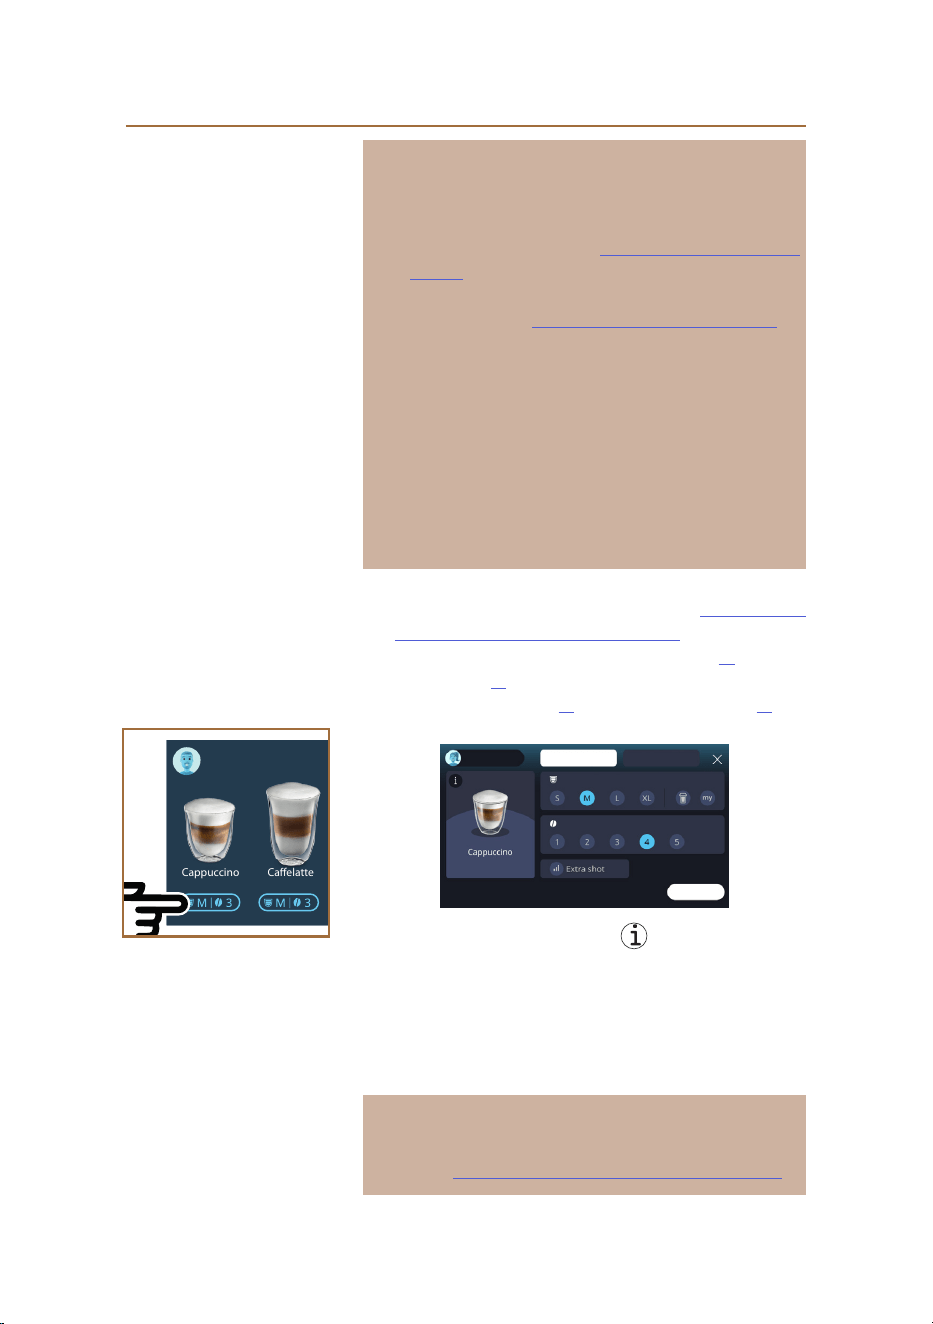
3. Tap the customization bar C8 below the desired drink (g. 31). The
display will bring up a screen similar to the one indicated here:
Coee beans
Deliver
Pre-ground
Quantity ~60ml
The drink icon on the left is also a button that you can tap to bring
up a short description of the selected drink and, if the drink comprises
multiple ingredients (e.g. coee, water and milk), a bar indicating the
proportions.
The dashboard on the right displays the various controls for customizing
the drink. If the selected drink uses beans ground at the moment of brew-
ing, a “Coee beans” tab appears at the top of the screen.
Please note
Should you want to use pre-ground coee, details can be found under
the heading "4.3.6 Using pre-ground coee for drinks with hot milk".
Cappuccino Coee
Americano
Caelatte
31

39
A rst box relating to the size/quantity of the drink presents a choice of
dierent sizes (S, M, L, XL), and two functions: My (see heading “4.8.4
“My” function") and To Go (see heading To Go). On selecting the preferred
quantity, an updated estimate of the actual uid amount will be shown
at the top of the box.
The second box is used to select the desired level of intensity.
Finally there is the "ExtraShot" option, which sets the machine to deliver
an added ristretto for a bit of extra energy.
4. Adjust the milk spout extension (E4) to suit the height of your cup,
and lower the drinks spout so as to bring it down as near as possible
to the cup (g. 29): this will give a creamier top;
5. Once all the desired settings have been selected, tap “Deliver”;
6. As the machine heats up and proceeds with preparation, set the
level of froth by turning the adjustment dial (E1) to the position
recommended on the display;
7. A description of each single step (grinding, preparation, delivery of
coee, delivery of milk) appears on the display;
8. When the preparation has been completed, the machine asks if you
want to save the new setting and, if the Coee Routines function is
active, to conrm whether or not you want to save this particular
drink for all times of the day or only for the current time (in which
case, tap the time of day currently displayed and conrm with 'Yes').
All the information you need on Coee routines can be found under
the heading "4.8.5 Coee Routines".
Please note
• Once all the hot milk drinks you wanted to prepare have been
delivered, remember that the milk carafe needs cleaning as de-
scribed under the heading "6.2.3.1 Cleaning the milk carafe after
use". If there is still some milk left in the carafe, return it to the
refrigerator; if not, clean the carafe thoroughly as indicated under
the heading "6.2.3.2 Thorough cleaning of milk carafe".

40
Please note
• "Cancel": press to interrupt preparation completely and go back to
the homepage, without saving the customization.
• "Stop": when preparing drinks with multiple ingredients (e.g.
Cappuccino = milk + coee), press this button to terminate the
delivery of the current ingredient and pass on to delivery of the
next ingredient.
• At the end of delivery, to increase the quantity of coee in
the drink, simply press +Extra. When the required quantity is
reached, press Stop.
• To ensure that the features typical of certain drinks are preserved,
customization of the To Go option and the intensity setting may
be inhibited.
4.3.6 Using pre-ground coee for drinks with hot milk
Many drinks can be prepared using pre-ground coee. You will know if
this function is available for your favourite drink, as the “pre-ground” tab
is displayed on the customization page. The steps for preparing your hot
milk drink with pre-ground coee are described below.
Important!
• Never add pre-ground coee when the machine is o, or it could
spread through and soil the inside of the machine. In this situation
the machine could be damaged.
• Never use more than one level scoop as it could dirty the inside of
the machine or clog the funnel.
• When using pre-ground coee, you can make only one cup at a
time.
• A Cappuccino+ drink cannot be prepared using pre-ground coee.
1. Follow the instructions given under the heading "4.3.2 Preparation
and attachment of the “LatteCrema Hot” carafe";
2. Place a suciently large cup under the drinks spout (A3) and under
the milk spout (E3);
1. Tap the customization bar C8 below the desired drink (g. 30). A
page appears on the display, showing the parameters that can be
customized according to preference;
2. Select the “Pre-ground” tab at the top right;
3. Lift the lid of the accessories compartment (g. 23).
4. Check that the pre-ground coee funnel is inserted and make sure
it is not blocked; add one level scoop of pre-ground coee (g. 24) .
Choose the quantity and press “Deliver”.

41
5. As the machine heats up and proceeds with preparation, set the
level of froth by turning the adjustment dial (E1) to the position
recommended on the display;
6. The machine proceeds with preparation and a description of each
single step (water heating, delivery of coee) appears on the display.
Once the preparation has been completed, the machine is ready for use
again. In contrast to other customizations, the use of pre-ground coee
cannot be saved but must be selected at each preparation.
Please note
• "Cancel": press to interrupt preparation completely and go back to
the homepage, without saving the customization.
• "Stop": when preparing drinks with multiple ingredients (e.g.
Cappuccino = milk + coee), press this button to terminate the
delivery of the current ingredient and pass on to delivery of the
next ingredient.
• At the end of delivery, to increase the quantity of coee in
the drink, simply press +Extra. When the required quantity is
reached, press Stop.
42
4.4 Drinks with cold milk
When preparing drinks with cold milk you need to use the LatteCrema
Cool carafe, identied by the white coloured carafe lid (E2). If your
model does not have this accessory, you can purchase it on the
delonghi.com website.
The next few headings give indications on the types of milk to use, on
how to utilize and clean the carafe and, as in the case of coee drinks,
how to deliver and customize your cold milk-based drinks. You can use
your machine to prepare a wide variety of hot milk drinks: rst press
Cold (B3) to select cold drinks, then the "Milk" tab in the top part of the
display, as described previously under heading "3.2.2 External buttons".
These are the drinks with cold milk that will appear in the display of your
machine.
Drinks
Caelatte Cold milk (frothed)
Latte Macchiato Flat White
Cappuccino
Cold brew Latte
Cappuccino Mix
Cold brew Cappuccino
4.4.1 What milk to use in the “LatteCrema Cool” carafe?
With the LatteCrema Cool carafe, milk can be frothed to dierent levels,
so that any drink made with cold milk will be prepared to perfection.
Steam, air and milk are blended together in the proportions guaranteed
to produce a perfect froth, delivered directly from carafe to cup. In
addition, the LatteCrema Cool carafe features a dedicated cleaning cycle
with steam and water, which also means that leftover milk can be kept
in the fridge and used later. If you do not have the LatteCrema Cool
carafe, you can purchase it on the delonghi.com website.
The quality of the froth can vary depending on:
• the temperature of the milk or vegetable drink used (for best re-
sults, use straight from the fridge, 5 °C);
• type of milk or vegetable drink;
• the brand used;
• ingredients and nutritional values.
43
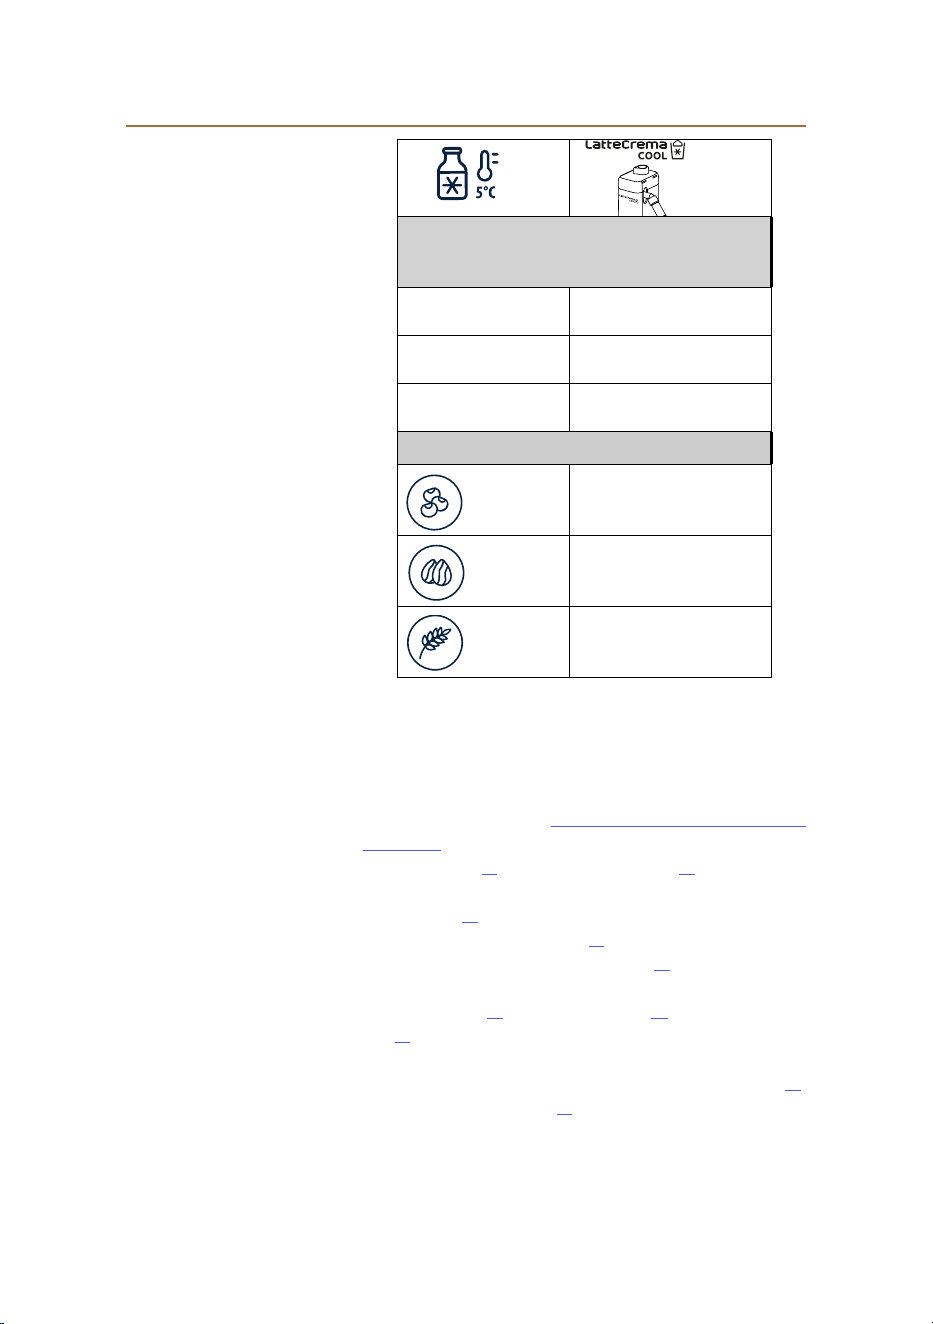
Whole
(fat >3,5%)
l
Semi-skimmed
(fat between 1.5 and 1.8%)
l
Skimmed
(fat <0.5%)
✓
Soya
✓
Almond
✓
Oatmeal
✓
4.4.2 Preparation and attachment of the “LatteCrema Cool” ca-
rafe
This heading explains how to prepare the LatteCrema Cool carafe for use.
Remember to ensure that the milk is left out of the fridge for a short a
time as possible so that it always stays at a temperature close to 5 °C, as
explained under the heading "4.4.1 What milk to use in the “LatteCrema
Cool” carafe?".
1. Raise the lid (E2) and ll the milk container (D7) with a sucient
quantity of milk, not exceeding the MAX level marked on the con-
tainer (g. 26);
2. Make sure the milk intake tube (E6) is secured correctly to the socket
on the underside of the milk carafe lid (g. 27); Reposition the lid on
the milk container;
3. Raise the ap (A5) and attach the carafe (D7) to the connector (g.
28), pushing it fully home. The machine emits a beep (if the beep
function is enabled);
4. Place a suciently large cup under outlets of the drinks spout (A3)
and under the milk spout (E3);
5. Select the required drink.
44
Please note
If "Energy Saving" mode is enabled (see relative heading), there may be
a few seconds delay before the drink is delivered.
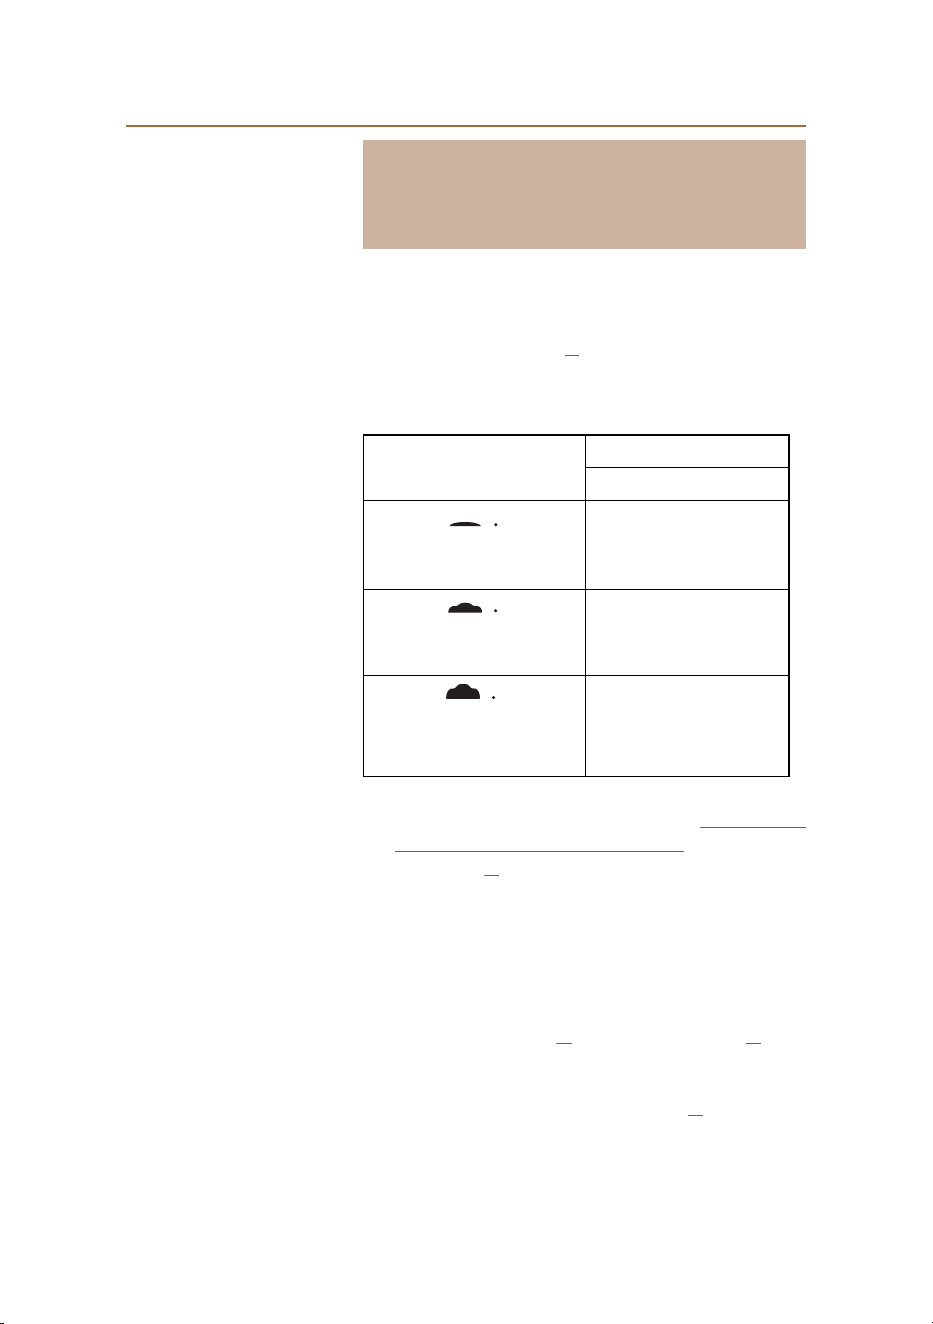
4.4.3 Milk frothing with the “LatteCrema Cool” carafe
The LatteCrema Cool carafe is designed to give 3 levels of froth, adapting
perfectly to any drink you may have in mind.
Turn the froth adjustment dial (E1) to select the amount of milk froth
that will be delivered when making milk based drinks. When selecting
a drink, the display will suggest the appropriate position for setting the
froth adjustment dial.
Dial position Recommended for…
Cold
MIN
Light froth
• Caelatte
MED
creamy froth
• Latte Macchiato
• Flat White
• Cold brew latte
MAX
thick froth
• Cappuccino
• Cappuccino Mix
• Cold milk (frothed)
• Cold brew cappuccino
4.4.4 Direct selection of drinks with cold milk
1. Follow the instructions given under the heading “4.4.2 Preparation
and attachment of the “LatteCrema Cool” carafe";
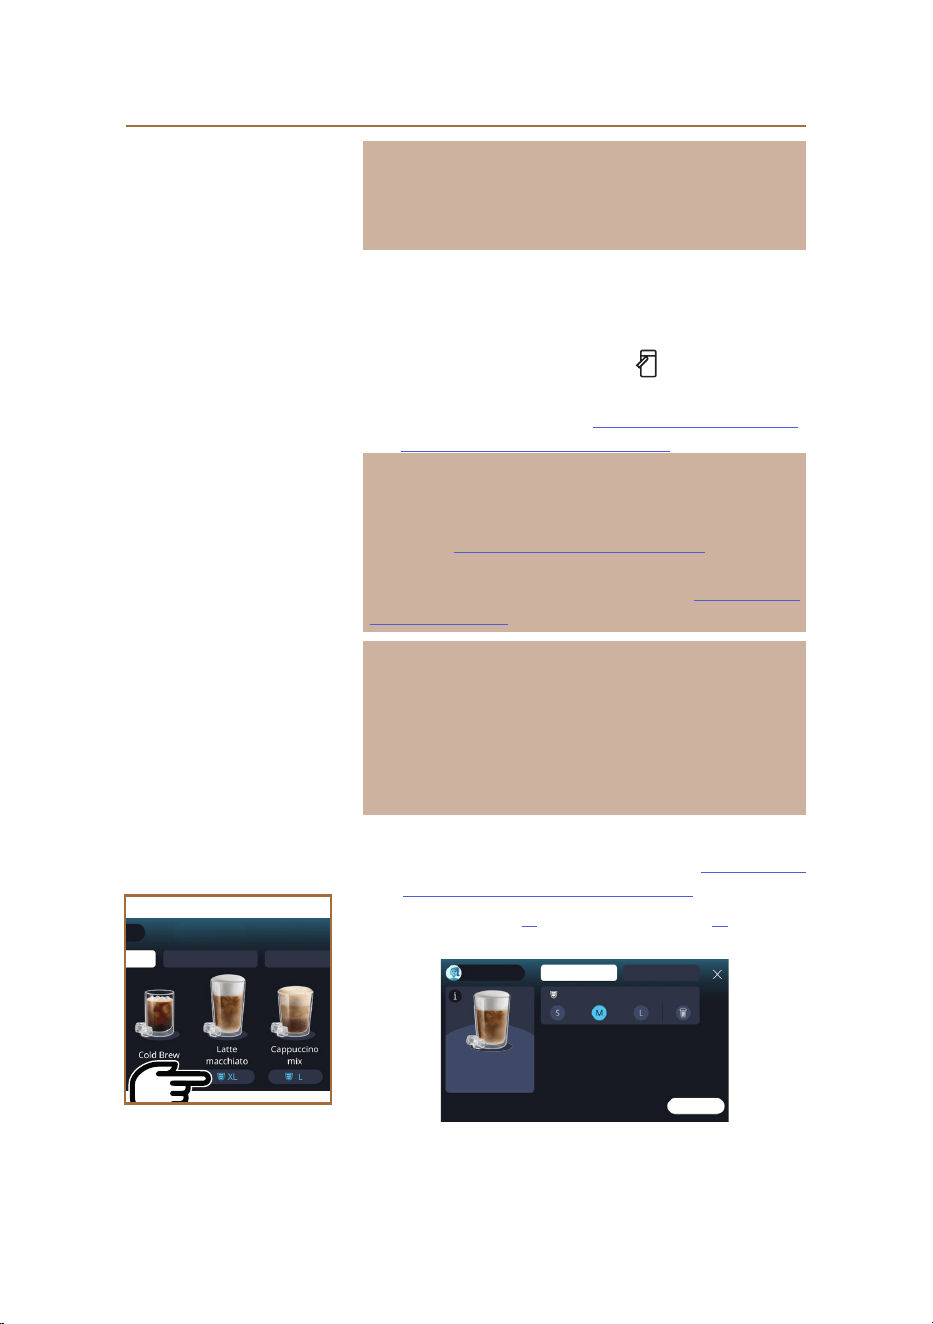
2. Tap the image C7 on the homepage that illustrates the desired drink
(e.g.. Cold Cappuccino, g. );
3. Select how cold you want your drink to be — “Ice” or “Extra ice” —
and press “→”;
4. On the basis of the selection, the machine will suggest how many
ice cubes you should put in the glass;
5. Having placed the suggested quantity of ice in the glass, position
it under the drinks spout (A3) and under the milk spout (E3) of the
LatteCrema Cool carafe, then press “Deliver”;
6. As the machine heats up and proceeds with preparation, set the
level of froth by turning the adjustment dial (E1) to the position
recommended on the display;
45
Please note
If "Energy Saving" mode is enabled (see relative heading), there may be
a few seconds delay before the drink is delivered.
7. A description of each single step (grinding, preparation, delivery of
coee, delivery of milk) appears on the display;
8. Once the preparation has been completed, the machine is ready for
use again.
9. If the milk carafe is not cleaned, the symbol appears on the
homepage as a reminder that cleaning is required. Further details
are given under the heading "3.2.1 Introduction to homepage",
"3.2.1.3 Settings, notications and indicators".
Please note
Once all the cold milk drinks you wanted to prepare have been deliv-
ered, remember that the milk carafe needs cleaning as described under
the heading "6.2.3.1 Cleaning the milk carafe after use". If there is still
some milk left in the carafe, return it to the refrigerator; if not, clean the
carafe thoroughly as indicated under the heading "6.2.3.2 Thorough
cleaning of milk carafe".
Please note
• "Cancel": press to interrupt preparation completely and go back
to the homepage.
• "Stop": when preparing drinks with multiple ingredients (e.g.
Cappuccino = milk + coee), press this button to terminate the
delivery of the current ingredient and pass on to delivery of the
next ingredient.
4.4.5 Customization of drinks with cold milk
1. Follow the instructions given under the heading “4.4.2 Preparation
and attachment of the “LatteCrema Cool” carafe".
Tap the customization bar C8 below the desired drink (g. 32). The display
will bring up a screen similar to the one indicated here:
Latte
macchiato
Coee beans
Start
Pre-ground
Quantity ~410ml
Coee
Cold drinks
Milk
32

46
The drink icon on the left is also a button that you can tap to bring up
a short description of the selected drink and, if the drink comprises mul-
tiple ingredients (e.g. coee and milk), a bar indicating the proportions.
The dashboard on the right displays the various controls for customizing
the drink. If the selected drink uses beans ground at the moment of brew-
ing, a “Coee beans” tab appears at the top of the screen.
Please note
Should you want to use pre-ground coee, details can be found under
the heading "4.4.6 Using pre-ground coee for drinks with cold milk".
A rst box relating to the size/quantity of the drink presents a choice of
dierent sizes (S, M, L), and the To Go function (see heading "4.8.2 To
Go"). On selecting the preferred quantity, an updated estimate of the
actual uid amount will be shown at the top of the box.
Please note
To ensure a correct balance between ice and coee, the intensity can-
not be changed; neither can the “4.8.1 Extra shot” option be used, as
this would spoil the drink.
2. Once all the desired settings have been selected, press “Start”;
3. Select how cold you want your drink to be — “Ice” or “Extra ice” —
or, in the case of Cold Brew drinks, if you want the intensity to be
"Original" or "Intense", and press “→”;
4. On the basis of the selection, the machine will suggest how many
ice cubes you should put in the glass;
5. Having placed the suggested quantity of ice in the glass, position it
under the outlets of the drinks spout A3 and under the milk spout
(E3) of the LatteCrema Cool carafe, then press “Deliver”;
6. As the machine heats up and proceeds with preparation, set the
level of froth by turning the adjustment dial (E1) to the position
recommended on the display;
7. A description of each single step (grinding, preparation, delivery of
coee, delivery of milk) appears on the display;
8. When the preparation has been completed, the machine asks
if you want to save the new setting and, if the Coee Routines
function is active, to conrm whether or not you want to save this
particular drink for all times of the day or only for the current time
(in which case, tap the time of day currently displayed and conrm
with 'Yes'). All the information you need on Coee routines can be
found under the heading “4.8.5 Coee Routines".
47
Please note
Depending on your selection of "Ice" or "Extra Ice", and "Original" or
"Intense", the machine will adjust the extraction parameters and sug-
gest the correct amount of ice to use for optimum results..
Please note
Once all the cold milk drinks you wanted to prepare have been deliv-
ered, remember that the milk carafe needs cleaning as described under
the heading "6.2.3.1 Cleaning the milk carafe after use". If there is still
some milk left in the carafe, return it to the refrigerator; if not, clean the
carafe thoroughly as indicated under the heading "6.2.3.2 Thorough
cleaning of milk carafe".
Please note
• "Cancel": press to interrupt preparation completely and go back to
the homepage, without saving the customization.
• "Stop": when preparing drinks with multiple ingredients (e.g.
Cappuccino = milk + coee), press this button to terminate the
delivery of the current ingredient and pass on to delivery of the
next ingredient.
4.4.6 Using pre-ground coee for drinks with cold milk
Many drinks can be prepared using pre-ground coee. You will know if
this function is available for your favourite drink, as the “pre-ground” tab
is displayed on the customization page. The steps for preparing your cold
milk drink with pre-ground coee are described below.
Important!
• Never add pre-ground coee when the machine is o, or it could
spread through and soil the inside of the machine. In this situation
the machine could be damaged.
• Never use more than one level scoop as it could dirty the inside of
the machine or clog the funnel.
• When using pre-ground coee, you can make only one cup at a
time.
• Cold Brew Latte and Cold Brew Cappuccino drinks cannot be pre-
pared using pre-ground coee.
1. Follow the instructions given under the heading “4.4.2 Preparation
and attachment of the “LatteCrema Cool” carafe".
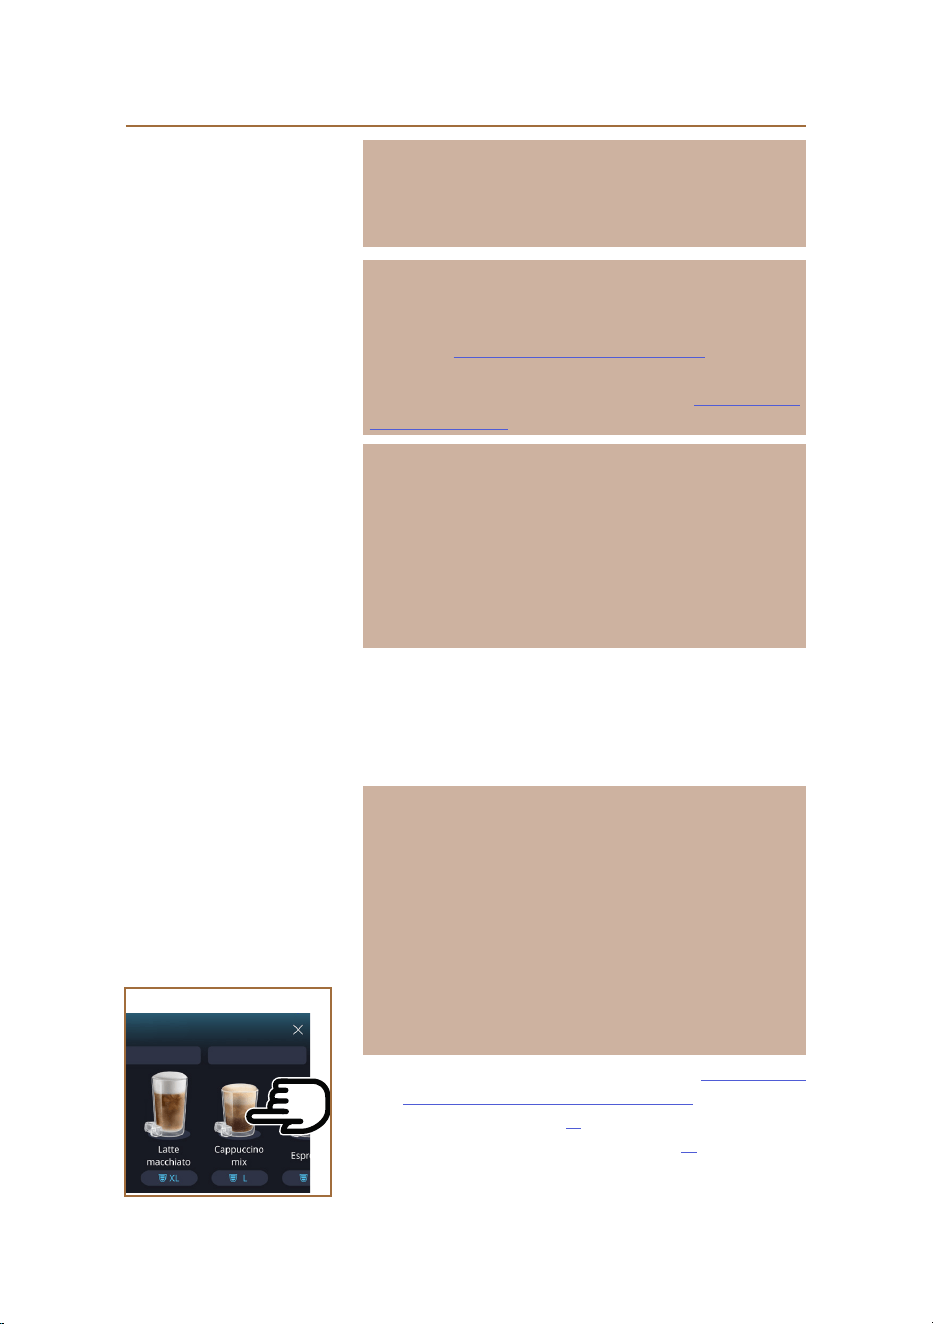
2. Press the customization bar C8 at the bottom of the image illustrat-
ing the desired drink (e.g. Capuccino mix, g. 33). A page appears
33
Coee
Cold drinks
Milk

48
on the display, showing the parameters that can be customized
according to preference;
3. Select the “Pre-ground” tab at the top right;
4. Choose the preferred quantity: an updated estimate of the actual
uid amount will be shown at the top of the page. Press “Start”;
5. Make the selection between an “Ice” or an “Extra ice” drink, and press
“→”;
6. On the basis of the selection, the machine will adjust the brewing
parameters and suggest how many ice cubes should be used to en-
sure best results: place the suggested quantity of ice in the glass and
position it under the outlets of the drinks spout (A3) and under the
milk spout (E3) of the LatteCrema Cool carafe, then press “Deliver”;
7. Lift the lid (A2) of the accessories compartment (g. 23);
8. Check that the pre-ground coee funnel (D3) is in place and make
sure it is not blocked; add one level scoop (D1) of pre-ground coee
(g. 24) and press “Ok”;
9. The machine proceeds with preparation and a description of each
single step (water heating, delivery of coee and delivery of milk)
appears on the display.
Once the preparation has been completed, the machine is ready for use
again. In contrast to other customizations, the use of pre-ground coee
cannot be saved but must be selected at each preparation.
Please note
• "Cancel": press to interrupt preparation completely and go back to
the homepage, without saving the customization.
• "Stop": when preparing drinks with multiple ingredients (e.g.
Cappuccino = milk + coee), press this button to terminate the
delivery of the current ingredient and pass on to delivery of the
next ingredient.
4.5 Delivering hot water
1. Place a cup under the drinks spout A3 (g. 20).
2. On the homepage (C):
• tap directly on the image C7 illustrating hot water: delivery begins;
• tap the customization bar C8 at the bottom of the image and select
the quantity to be delivered, then “Deliver”: delivery begins;
3. Delivery will stop automatically.
49
Please note
• To stop delivery manually, press "Stop" or "Cancel".
• At the end of delivery, to increase the quantity of coee in the
drink, simply press +Extra. When the required quantity has been
reached, press "Stop” or “Cancel”.
• The hot water function can also be used to warm the cup so that a
drink can be enjoyed even hotter: simply ll your cup with a little
hot water, then empty it just before your hot drink is delivered by
the machine.
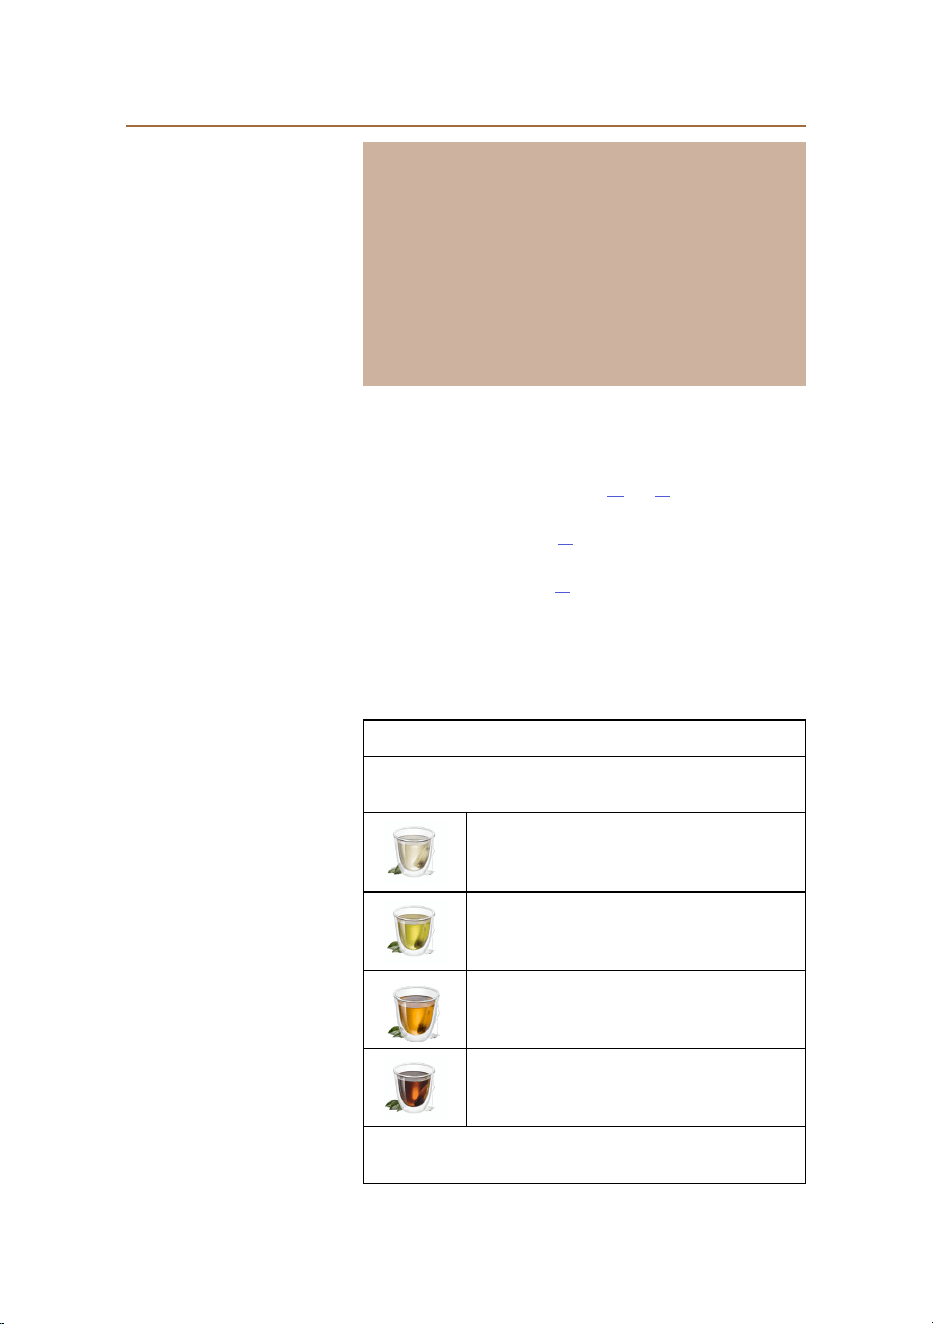
4.6 Tea function
With the hot tea function, you can select 4 temperatures according to the
type of tea or tisana being prepared.
1. Place a cup under the drinks spout A3 (g. 20).
2. On the homepage (C):
• tap directly on the image C7 illustrating the tea function: delivery
begins;
• tap the customization bar C8 at the bottom of the image, select the
quantity to be delivered and the type of tea (the machine will now
select the appropriate temperature as indicated in the following
table), then press “Deliver”: delivery begins;
• Delivery will stop automatically.
The machine is ready to be used again.
Tea and tisana drinks
Selecting the type of tea you want to prepare, the machine sets the
right temperature. This table shows the recommended brewing times.
White tea
1-3 minutes brewing time
Green tea
1-2 minutes brewing time
Oolong tea
30 seconds to 1 minute brewing time
Black tea
1-5 minutes brewing time
Our Tea function will prepare a cup of teat at just the right tempera-
ture, delivering the amount of water you prefer.

50
Please note:
• To stop delivery manually, press "Stop" or "Cancel".
• At the end of delivery, to increase the quantity of liquid in the cup,
press "+Extra" When the required quantity has been reached,
press "Stop” or “Cancel”.
4.7 Tips for a Perfect coee
1. If the coee emerges drop-by-drop, too weak and not creamy
enough, refer to the tutorial on adjusting the coee grinder (see
heading “5.13 Grinder settings”) and consult the FAQs section;
2. If the coee is too hot or cold, adjust the coee temperature setting
(see heading "5.12 Coee temperature", in the settings menu) and
consult the FAQs section;
3. To make a hotter coee, proceed as follows:
• run a rinse cycle before preparing and delivering the coee (see
heading "5.5 Rinsing" in the settings menu );
• warm the cups with hot water (using the hot water function, see
heading 4.5 Delivering hot water“);
• select a higher temperature setting for the coee (see heading "5.12
Coee temperature" in the settings menu ).
4. To make a cooler coee:
• empty the water tank and ll with fresh water;
• cool the cup/glass with cold water or with ice, to be removed be-
fore the coee is delivered;
• if the cup or glass is able to withstand sharp changes in temper-
ature, place in the fridge for a few minutes before delivering the
hot drink.

51
4.8 Additional features
4.8.1 Extra shot
Give a boost to the following drinks by adding an Espresso ristretto (30
ml):
Hot
Espresso Cappuccino Mix
Espresso lungo Cortado
Filter style Flat White
Coee Doppio+
Americano Long Black
Cappuccino Verlängerter
Cappuccino+ Café con leche
Latte Macchiato Café au lait
Espresso Macchiato Galão
Caelatte
Proceed as follows:
1. Tap the customization bar C8 under the image of the desired drink
(e.g. Americano, g. 21). The parameters that can be customized
according to personal preference appear on the display:
2. Press “Extra Shot”, then “Ok”.
3. Select the desired quantity and intensity. To conrm that the feature
is activated, the message EXTRA SHOT will be displayed, along with
an estimate of the increased quantity. Press “Deliver”.
4. Conrm by pressing "Ok". (Ticking the box, the message will not be
shown again).
5. The machine proceeds with preparation and a description of each
single step appears on the display.
6. When delivery has ended, press “Yes” to store the new settings or
“No” to retain the previous parameters. You can also save them in
your Coee Routine by ticking the relative box. In this instance, the
Extra Shot is indicated by the symbol in the customization bar
of the drink.
The machine is ready to be used again.
Please note
• If saved, the new settings will be stored ONLY in the selected
prole.
• This function is not available with pre-ground coee.
• Customizations can be saved as applicable to all times of the day,
or if Coee Routines are activated, only for the current time. See
heading "4.8.5 Coee Routines".
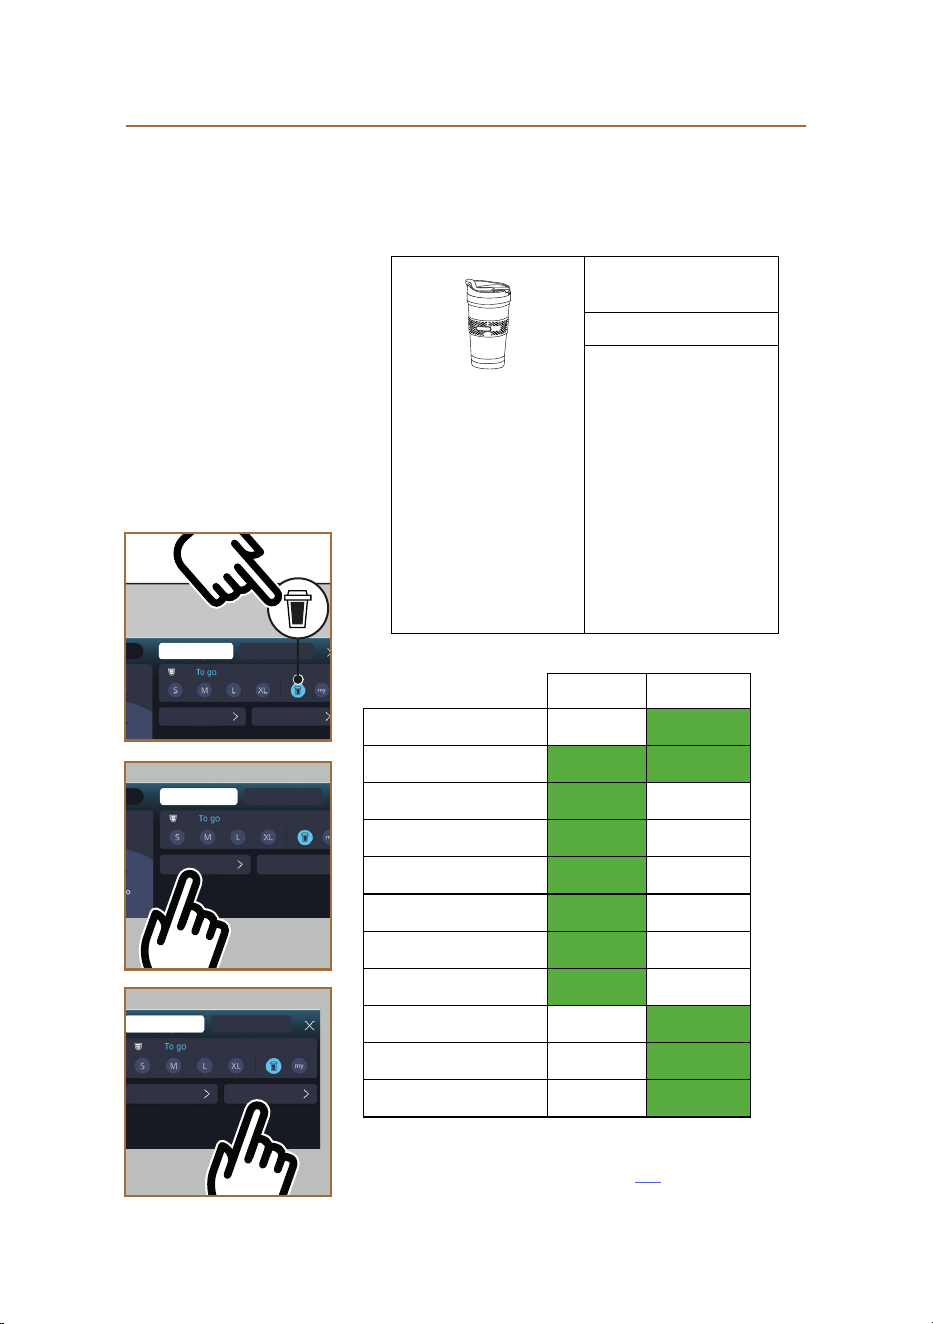
52
4.8.2 To Go
The “To Go” function is ideal for anyone who may want to create a cus-
tomized take-away drink . Search the delonghi.com website to nd the
recommended travel mug for your machine:
Travel mug (not included)
(capacity 235ml)
Type: DLSC074
EAN: 8004399024465
The “To Go” function can be used for preparation of the following drinks:
Hot Cold
Coee
✕
✓
Americano
✓ ✓
Cappuccino
✓ --
Latte Macchiato
✓ --
Caelatte
✓ --
Cappuccino Mix
✓ --
Flat White
✓ --
Milk
✓ --
Cold Brew
-- ✓
Cold Brew Cappuccino
-- ✓
Cold Brew Latte
-- ✓
Proceed as follows:
1. Place the mug under the drinks spout (A3);
34
Coee beans
Adjustment Guide
Pre-ground
35
Coee beans
Adjustment Guide
Pre-ground
36
Coee beans
Adjustment Guide
Pre-ground

53
2. If the intention is to prepare a drink with milk, follow the instruc-
tions given under headings “4.3.2 Preparation and attachment
of the “LatteCrema Hot” carafe” and “4.4.2 Preparation and
attachment of the “LatteCrema Cool” carafe”;
3. Tap the customization bar at the bottom of the image illustrating
the desired drink (e.g. Americano, g. 21). The display shows the
parameters that are customizable according to preference, and
the functions that can be selected;
4. In the top box , select the “To Go” quantity (g. 34): the
display shows two further boxes “Adjustment” and “To Go guide”;
5. Tapping the “Adjustment” box (g. 35), the display will show a
screen on which the quantity of the drink can be corrected as
appropriate for the travel mug being used (±12% for each level),
before the drink is delivered. If the quantity is changed on this
screen, then selecting “Save”, the new quantity of the “To Go”
drink will be stored and applied automatically when the next To
Go is prepared;
6. Tapping the “To Go guide” box (g. 36), the display shows the
information relative to the quantity, and therefore to the correct
size of travel mug being used;
• 7a. For hot drinks: press “Deliver”;
• 7b. For cold drinks: press “Start” and follow the instructions on
the display;
7. The machine proceeds with the preparation, stopping automati-
cally when done.
8. The rst time any To Go drink is prepared, and similarly the rst
time for each prole in use, the “adjustment” function appears
at the end of the preparation to allow correction of the quantity,
depending on the Mug being used;
9. If the quantity of the drink is satisfactory, simply conrm with
“Ok”, otherwise indicate whether the amount of liquid for future
deliveries needs to be more (moving the indicator toward +) or
less (moving the indicator toward -) and press “Adjustment” to
save;
Important
Using the “Adjustment” function, the quantity indicated in the top box of
the customization screen may not be correct.
10. To exit the “Adjustment” function, press “X”.

54
Please note:
• If saved, the new settings will be stored ONLY in the selected
prole.
• Each time a dierent mug is used, it is advisable to stay close to
the machine to check the amount of liquid eectively dispensed.
• A good way to ensure that hot drinks stay warm is to preheat the
travel mug with hot water.
• If the intention is to use a travel mug other than the one supplied,
bear in mind that it must be no taller than 14 cm.
Important
• The contents of the travel mug should be used within 2 hours max-
imum: once this time has elapsed, empty and clean the mug as de-
scribed in the following section.
• Before screwing on the lid of the travel mug, open the locking cap
to release the pressure;
• Whenever drinks have been prepared with milk, clean the carafe as
indicated in
“Following preparation of milk-based drinks — gen-
eral notes"
.
• For more information, refer to the leaet accompanying the travel
mug.
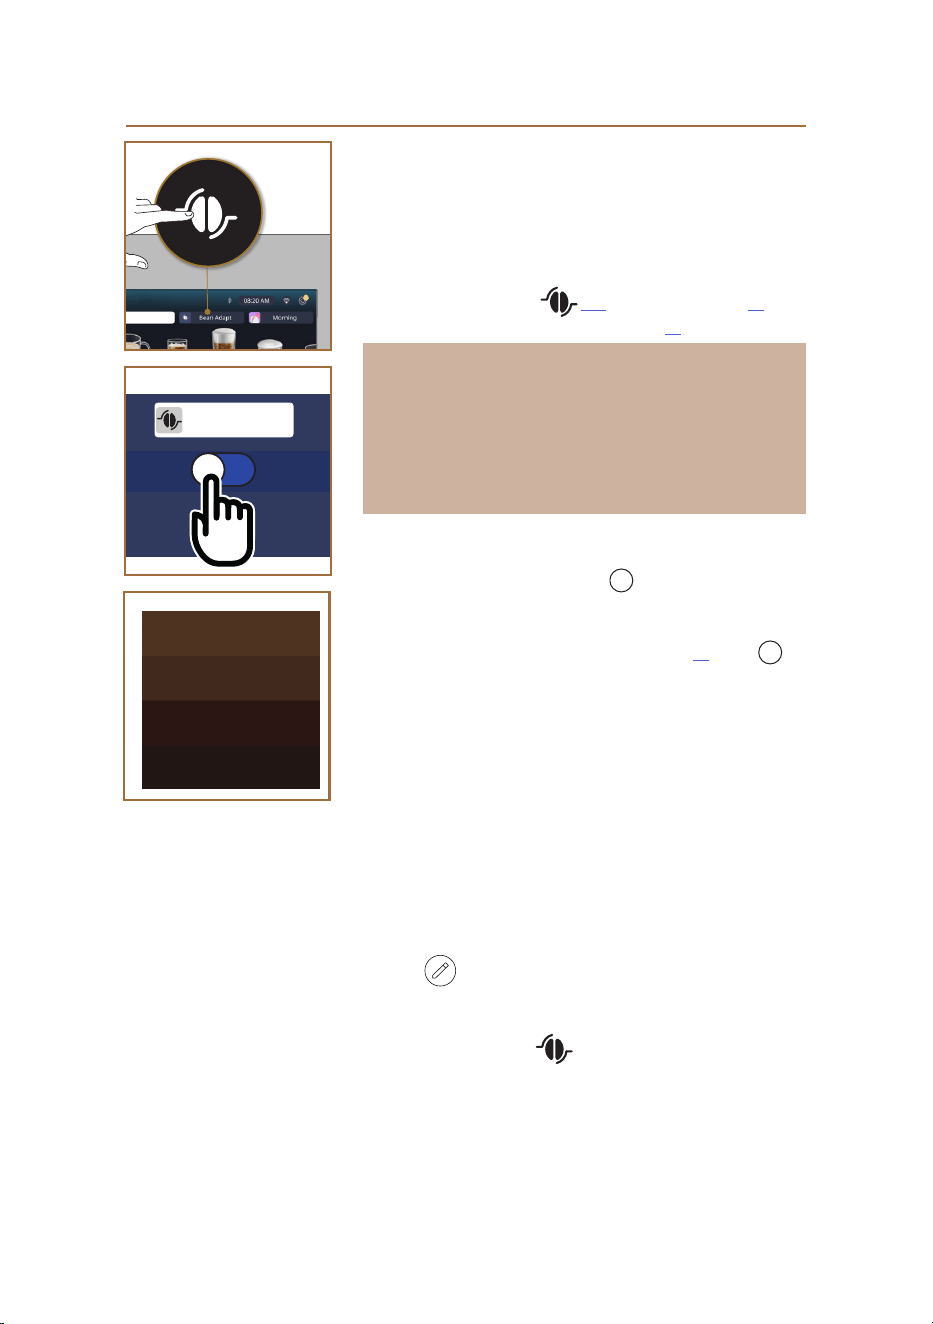
55
37
Bean Adapt
O On
38
39
Light
Dark
Medium
Extra-Dark
4.8.3 Bean adapt technology
A coee expert at your ngertips that helps you, in a few short steps,
to optimize the brewing of your coee and the way it tastes in the cup.
Smart technology guides you through adjustment and operation of the
machine, according to the selected coee beans: from grinding to brew-
ing, each step will be controlled to get the best from any coee bean.
1. Tap the Bean Adapt tab (C3) on the homepage (g. 37);
2. To enable Bean Adapt, press the button (g. 38);
Please note
A message on the display warns that in order to proceed, the machine
needs to have prepared at least 3 cups of coee with the same variety
of bean and with the grinder at the same setting. If these preparatory
steps have not yet been completed, press "Ok"; then “X” and nally
“Yes” to exit without saving, and proceed with preparation of the 3 cups
of coee as required.
3. Select the variety of coee bean being used: 100% Arabica or a
blend of Arabica and Robusta (this information will be found on the
pack containing the beans). Press
i
for additional information.
Press “→”;
4. Select the type of roast, tapping the colour depth description that
appears closest to the colour of the beans (g. 39). Press
i
for
additional information. Press “→”;
The machine will now check how the settings can be adjusted to give the
best possible outcome, based on the information it has:
5. Press “Deliver” to prepare an Espresso. Following delivery, press “→”;
6. The machine now has all the information it needs to be able to
dene the optimum parameters (in some cases it may also ask for
an opinion on the coee just made), which will rst be displayed
and then adopted in the machine settings. With each screen that
appears, press “→” to go to the next parameter:
- Coee temperature;
- Intensity;
- Grinder setting.
7. Tap on the name of the beans and the keyboard pops up to
customize the name. Press “Done” to conrm the name;
8. Press “→”: the machine stores the settings and the name of the bean
appears in place of the logo.

56
Please note
• Bean Adapt Technology will be visible as an intensity setting for
espresso coee only, but will improve the brewing results for all
other coee based drinks as well.
• Up to 6 dierent bean proles can be stored: every time you
change the type of beans used in the machine, simply tap the
Bean Adapt tab (C3) on the homepage and select the new bean
from the list.
4.8.4 “My” function
With the “My” function, you can select the quantity of each single ingredi-
ent used for preparation of the hot drink you want to make. The My func-
tion is dierent from the selection of the quantity described in headings
on the customization of drinks, as it allows you to adapt a drink precisely
to your particular cup.
The way it works is simple and intuitive: once you have started preparing
your drink, you need only stop the delivery whenever you choose, and
that quantity will be saved as a 'My' quantity on the active prole.
Given below are the step-by-step instructions on how to save the “My”
setting for a drink with two ingredients (e.g. Cappuccino = milk +
coee). The same procedure can be followed for a drink with just one
ingredient.
1. Check that the selected prole is the one for which you want to
customize the drink;
2. Tap the customization bar C8 at the bottom of the image illustrating
the desired drink (e.g. Capuccino g. 31);
3. Press ;
4. Press “Start”,
5. If preparing coee based drinks, select the intensity, or if using the
tea function, select the temperature: press “→”.
6. Place the preferred cup under the drinks spout (A3) and press
“Deliver”;
7. The machine starts delivering the rst ingredient. A bar appears on
the display, representing the range from 1 up to the maximum value
programmable for this particular ingredient of the selected drink.
8. After a few seconds of delivering the ingredient, the bottom part of
the display will show the “Stop” button, which you can press at any
time to terminate the delivery. If the selected drink has only one
ingredient, the quantity released into the cup up to the moment of
pressing Stop will be stored, and you can retrieve it at any time as
a “My” quantity.
57
9. If the drink comprises another ingredient, a new progress bar will
appear on the screen, similar to the rst described above, and all
you have to do is repeat the same procedure for this second ingre-
dient. At the conclusion of this second cycle, the “My” quantity will
be saved likewise.
10. If Coee Routines are active, as explained under the “Coee Rou-
tines” heading, the machine will ask if you want to save the setting
for all times of the day or only for one particular time.
Please note
• If saved, the new settings will be stored ONLY in the selected
prole.
• In the case of Espresso coee, when a single drink is custom-
ized, the respective double version of the drink is automatically
customized as well.
• It is possible to exit programming mode at any given moment
by pressing “X”: the values will not be saved.
• In practice, “My“ is one of the amounts or quantities you can
select for your drink, which means you can choose at any
given moment to select one of the other quantities or go back
to the “My“ setting, certain that it will be the one saved with
the process described above. If you want to reprogramme the
"My“ quantity, simply tap the “Reset” tab, which appears
whenever My is selected. Once the reset is done, you can set the
quantity again via the process illustrated above.
• To reprogramme the My drink, the parameters must be reset to
the factory default values: tap the customization bar C8 of the
drink and check that the function is enabled. Press “Reset”
to restore the factory default values for the drink. The drink can
now be reprogrammed.
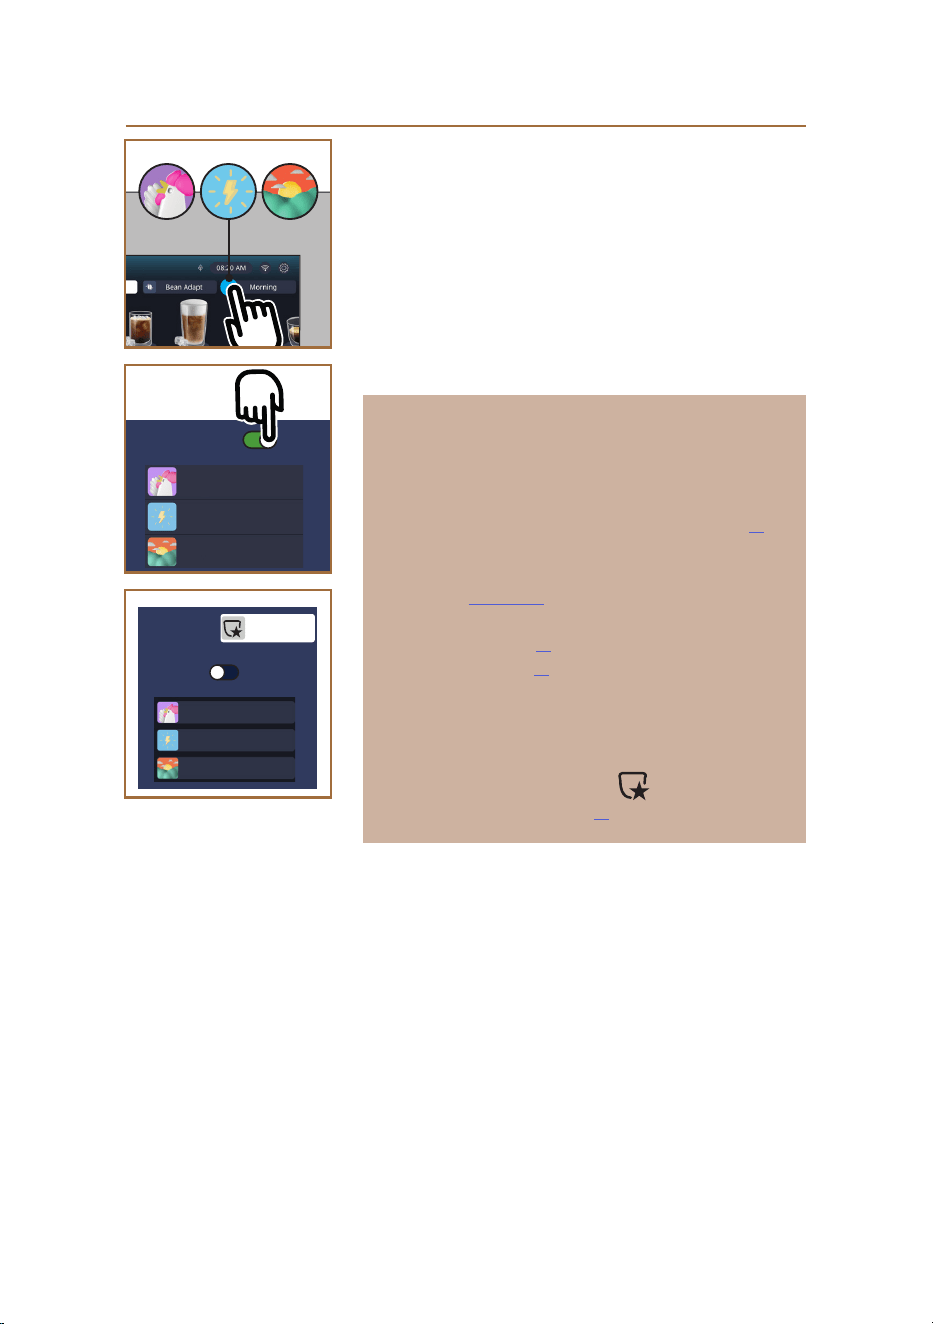
58
O On
O On
40
41
42
4.8.5 Coee Routines
With this function the machine will remember how you like your coee
at dierent times through the day and update the list of drinks to match
your preferences.
As long as the function is active, whenever the settings (quantity, inten-
sity, etc.) for any given drink are changed, the machine will give you the
option of saving the new settings, for that particular period during the
day, by ticking the dedicated box and then conrming with 'Yes'. On the
other hand, should you want to save the new settings for all times of the
day, simply select “Yes” on the dedicated screen.
Please note
You can check on the homepage if the feature is active: if the tab on
the right shows the words “Coee Routines”, this means the feature is
disabled, in which case a tap on the tab will enable it.
If however the tab on the right shows one of 3 symbols (g. 40), this
means that coee routines are active. Make certain that the time on the
clock is correct, or adjust as necessary, following the instructions given
under heading "3.2.1.4 Time". To disable this function:
• on the homepage, tap on the symbol corresponding to the current
period of the day (g. 40);
• tap on the cursor (g. 41) and conrm with “Yes” that the function
is being disabled;
• tap on the list you want to keep as the dened list, and conrm
with “Ok”.
On the homepage, the symbol of the coee routine currently in pro-
gress will be replaced by another symbol indicating that the func-
tion has been disabled correctly (g. 42).
Morning
Lunch
Later
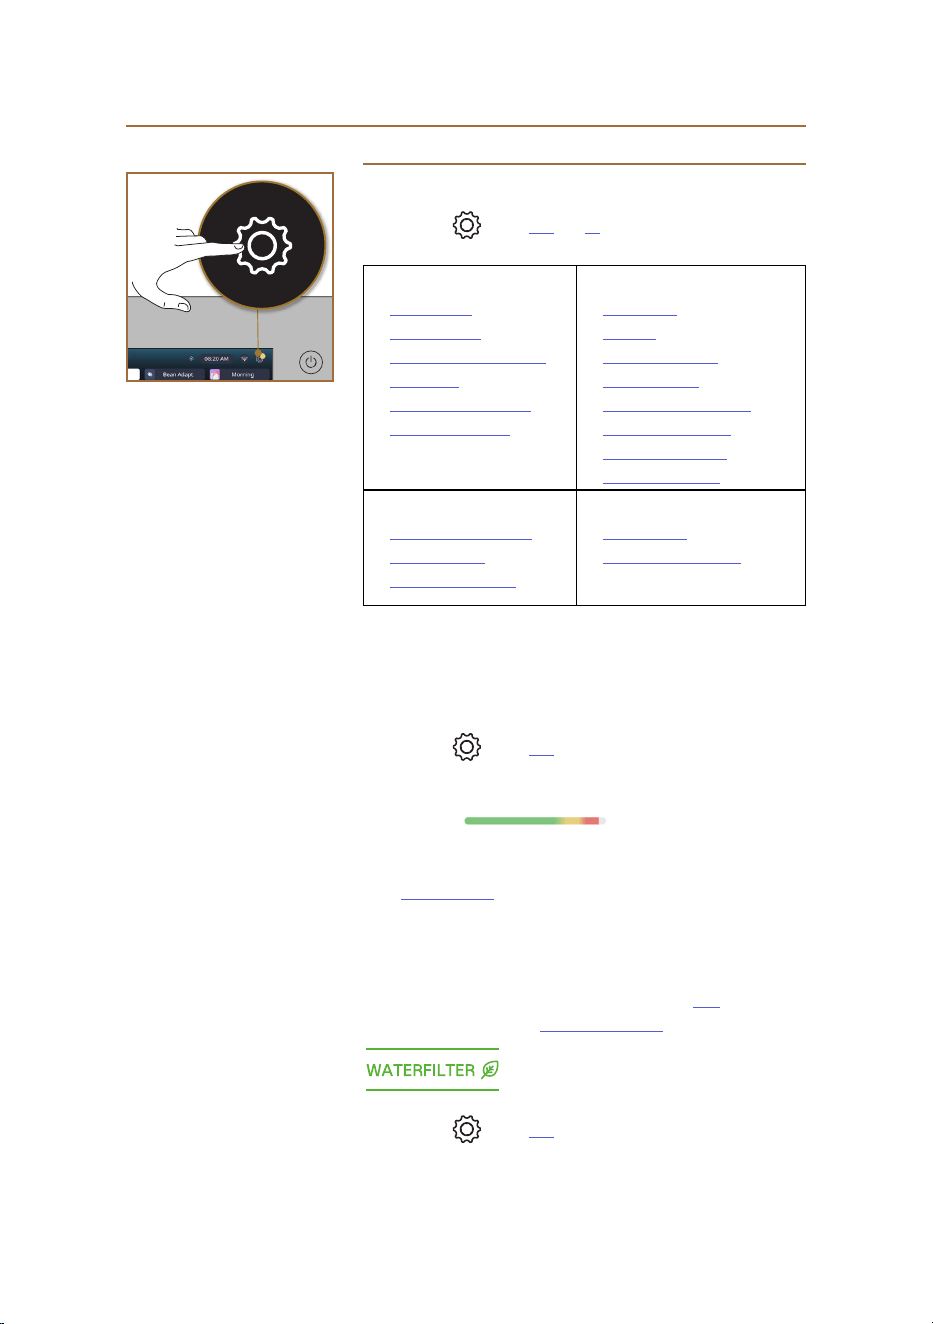
59
Primadonna Aromatic
5 SETTINGS
5.1 How to navigate the settings
1. Press the button (C6) (g. 43).
The settings are divided into four topics:
• Maintenance
5.2 Descaling
5.3 Water lter
5.4 Cleaning the machine
5.5 Rinsing
5.6 Cleaning the carafe
5.7 Drain the circuit
• General settings
5.8 Auto-o
5.9 Beep
5.10 Energy saving
5.11 Languages
5.12 Coee temperature
5.13 Grinder settings
5.14 Water hardness
5.15 Default values
• Tips and guides
5.16 Support (QR code)
5.17 Carafe tips
5.18 Creative recipes
• Information on the machine
5.19 Statistics
5.20 More information
2. Select a topic, then scroll through the relative sub-menus on the
screen and select the one of interest.
3. Press “X” to go back and to return to the homepage.
5.2 Descaling
1.
Press the button (C6).
2. Press “Descale”.
The display shows a progress bar that indicates when the next descale
will be required .
3. To descale immediately, press “Read more”, “Yes” and follow the
guided procedure. The instructions are also given under the heading
"6.6.3 Descaling".
4. Otherwise, press “X” to go back and to return to the homepage.
5.3 Water lter
To ensure the performance of the machine remains constant over time, it
is advisable to install a De’Longhi water softener lter (D8).
For further information, visit www.delonghi.com.
EAN: 8004399327252
1.
Press the button (C6).
2. Press “Water Filter”. The display shows a progress bar that indicates
when the water lter will need to be replaced/removed.
43

60
3. Press "Start" and follow the guided procedure; The instructions are
also given under the heading "2.4 Installing the water lter".
4. Otherwise, press “X” to go back and to return to the homepage.
5.4 Cleaning the machine
To give the nozzles of the drinks spout (A22 and A23) and the removable
brewing unit (A19) a thorough clean before being prompted automati-
cally by the machine, proceed as follows:
1.
Press the button (C6).
2. Press “Clean machine” .
3. Press “Start” and wait for the machine to complete a series of pre-
paratory steps, then follow the guided procedure. The instructions
are also given under the heading “6.6 Deep cleaning of the machine”.
4. Otherwise, press “X” to go back and to return to the homepage.
5.5 Rinsing
Using this function, hot water can be delivered from the drinks spout (A3)
to clean and heat the internal circuit of the machine. In the event that the
machine has been idle for more than 3-4 days, it is advisable to carry out
2-3 rinse cycles before using it again.
To start the rinse function, proceed as follows:
1.
Press the button (C6).
2. Press “Rinse”.
To proceed with the rinse:
3. Place a container of at least 0.2 litres capacity under the drinks spout
(A3) (g. 8).
4. Press “Yes”: after a few seconds, hot water is delivered from the
drinks spout (A3) to clean and heat the internal circuit of the
machine.
5. To stop rinsing, press “Stop” or wait for the rinse cycle to end
automatically.
6. The machine is ready for use.
Please note:
• If the machine is not used for more than 3-4 days, it is highly ad-
visable, when turning it on again, to run 2-3 rinses before use;
• After cleaning, there may be water in the grounds container (A12).
This is quite normal.
5.6 Cleaning the carafe
This section has all the information you need to guarantee long-term
reliability of the milk carafe (the full procedure is described under the
heading "6.2.3.2 Thorough cleaning of milk carafe").

61
1.
Press the button (C6).
2. Press “Clean carafe”.
3. Press "Start" and follow the guided procedure using the scroll ar-
rows “←” or “→”. At the end of the procedure, press “Done” to conrm
that cleaning is nished and go back to the homepage.
4. Press “X” at any time to quit the procedure and go back to the
homepage.
5.7 Drain the circuit
To avoid the water in the circuit freezing if the machine is to be left idle for
an extended period, or before taking it to a service centre, it is advisable
to drain the water circuit.
1.
Press the button (C6).
2. Press “Drain circuit”.
3. Press “Yes”.
4. Remove the drip tray (A6) (g. 18); empty and clean both the tray
and the grounds container (A11). Return the parts to the machine.
5. Press
“→”. Position a container of at least 0.2 litres capacity under
the drinks spout (A3) and the service/cleaning water spout (D2) (g.
8).
6. Press “Yes” and the machine will run a rinse cycle, releasing hot
water from the drinks spout (A3).
7. Once rinsing is complete, remove the water tank (A8) and empty
it. Press “→”.
8. If there is a lter (D8) installed in the water tank,
remove it and press
the scroll arrow
“→”.
9. Reposition the tank (empty) and press
“→”.
10. Press “Yes” and wait for the machine to begin emptying the circuit;
(Caution: beware of hot water coming from the spouts). As the water
circuit gradually empties, the machine could become noisier: this is a
normal aspect of operation.
11. Once the circuit has emptied, remove, empty and reposition the
drip tray, then press
“→” and
“Ok” and the machine will switch o
(standby).
12. Unplug the machine from the mains power supply.
13. The
next time the machine is turned on, follow the instructions under
heading
"2 USING THE MACHINE FIRST TIME".
5.8 Auto-o
Auto-o can be set so that if the machine is not being used, it will switch
o after a given interval of time has elapsed.
1. Press the button (C6).
2. Select “General settings” on the screen.
3. Press “Auto-o ”
62
4. The display will show the auto-o time currently selected and the
other options that are available.
5. Select the desired auto-o time and press “Ok”
to save.
6. Press “X” to go back to the homepage.
Please note:
The auto-o time used by the machine is factory-set to a low value,
so as to minimize energy consumption. Selecting a higher value for a
longer auto-o time will have the eect of increasing the energy con-
sumption of the machine.
5.9 Beep
If enabled, the machine emits a beep whenever an operation is per-
formed. Selecting this item, you can activate or deactivate the beep.
1.
Press the button (C6).
2. Select “General settings” on the screen.
3. Press “Beep”.
4. Press “O” to deactivate or “On” to activate.
5. Press “X” to save and go back to the homepage.
5.10 Energy saving
When activated, the function reduces energy consumption in compliance
with European regulations. Selecting this item, you can activate or deac-
tivate energy saving.
1.
Press the button (C6).
2. Select “General settings” on the screen.
3. Press “Energy saving”.
4. Press “O” to deactivate or “On” to activate.
5. Press “X” to save and go back to the homepage.
Please note:
If “Energy Saving” mode is activated, there may be a few seconds delay
before the rst coee is delivered.
Please note:
When the symbol appears on the display, this indicates that the
function is active.
5.11 Languages
To change the language setting, proceed as follows:
1.
Press the button (C6).
2. Select “General settings” on the screen.
3. Press “languages”.
4. Select “Set” and choose the preferred language, which will be se-
lected automatically.
5. Press “X” to store the new language and go back to the homepage.
63
5.12 Coee temperature
Temperature is one of the main factors in determining a good coee
brew. The lighter the roast, the higher the temperature the coee can
withstand, and vice versa. Which is why we recommend using the Bean
Adapt function to ensure the ideal temperature setting for the
bean being used.
Important: if what you are looking for is simply a hotter drink, then the
best way to achieve this is to warm the cup beforehand with a little hot
water, which can be poured away before your coee drink is dispensed
by the machine. If on the other hand your preference is for a cooler drink,
use cold water or ice to lower the temperature of the cup, before placing
it empty under the spout of the coee machine.
1.
Press the button (C6).
2. Select “General settings” on the screen.
3. Press "Coee temperature";
4. Set the desired temperature
5. Press “X” to store the new temperature and go back to the homepage.
5.13 Grinder settings
The adjustment of the coee grinder, hence the coarseness or neness of
the ground coee, is one of the crucial factors in achieving a good brew.
Accordingly, we recommend using the Bean Adapt function, which will
adjust the grinder to the optimum setting for any bean you wish to use.
Should you prefer not to activate Bean Adapt , we will show you in
this heading how to change the grinder setting and oer a few sugges-
tions on how to adjust it correctly.
1. Press
the button (C6).
2. Select “General settings” on the screen.
3. Scroll through the topics and select “Grinder settings”.
4. Press “Set” to access the screen for adjustment of the grinding level.
5. Press “More info on adjusting the grinder” if you need a more de-
tailed explanation on how to adjust the grinding level: use the scroll
arrows to go from one screen to the next, then press “X” to go back
to the main grinder adjustment screen.
6. Select one of the grinding levels available (identied with grey
background). Grinding levels can be set one at a time.
7. If the bean adapt function is active, the display shows the relative
symbol next to the level set for the bean prole currently in
use.
8. To restore the factory settings, press reset .
9. Press “X” to go back to the “Grinder settings” menu;
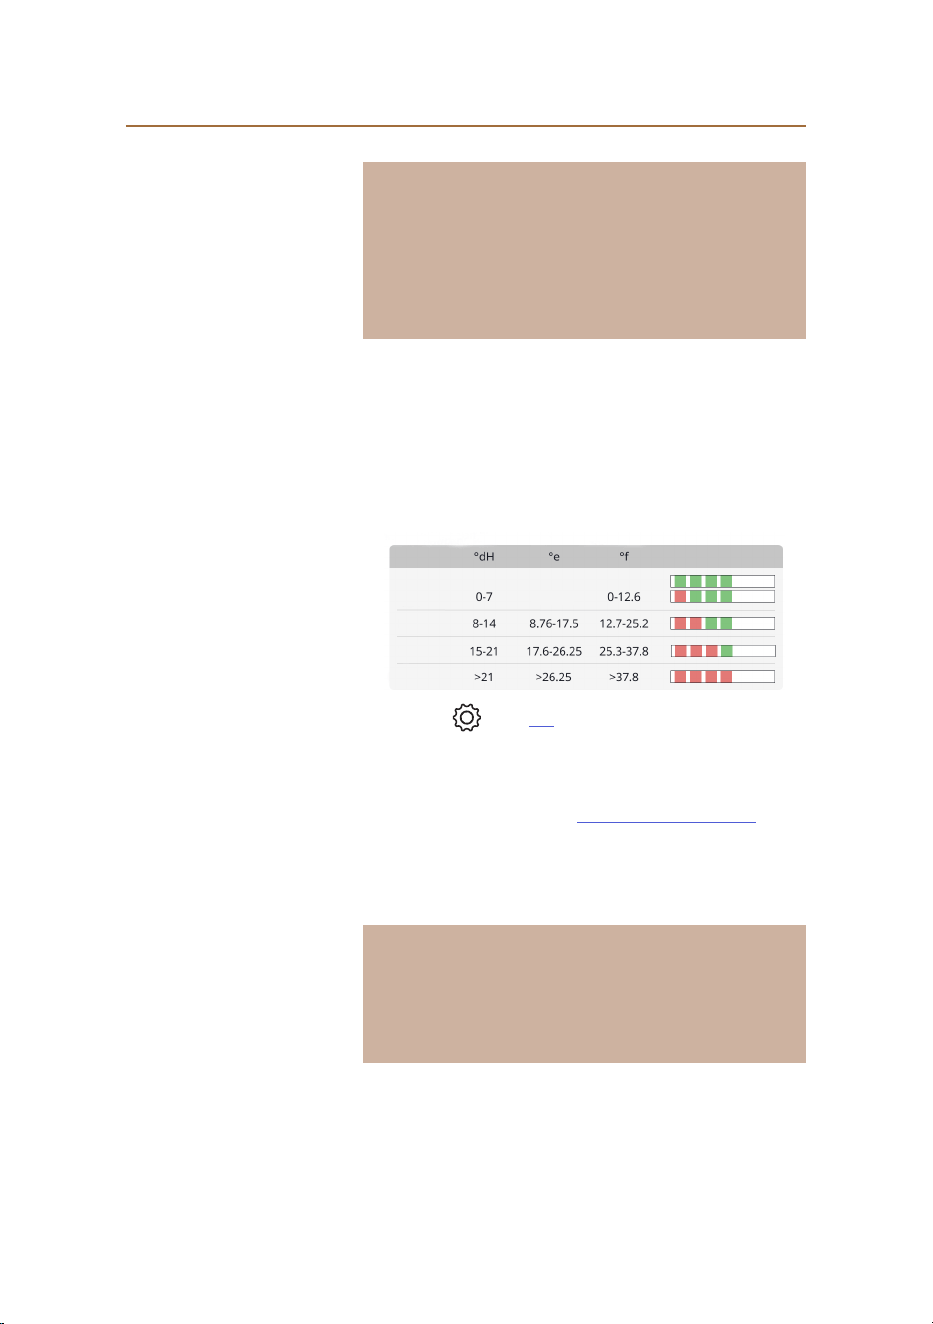
64
10. Press “X” to go back to the homepage.
Please note:
• After completing the above procedure, at least 5 coees should be
prepared and delivered before making any further adjustment to
the coee grinder. If the coee is still not being delivered correctly
by the machine, repeat the procedure.
• If the Bean Adapt function is active, changing the grinding level
will have the eect of deactivating the function.
5.14 Water hardness
The machine will prompt for descaling to be carried out after a predeter-
mined period of time, depending on the water hardness. The machine
can also be programmed according to the actual hardness of the local
water supply, by setting the appropriate frequency.
Guide to water hardness
For information on levels of hardness in water, consult the table below
0-8.75
Level 1
Level 2
Level 3
Level 4
1. Press the button (C6).
2. Select “General settings” on the screen.
3. Scroll through the topics and select “Water hardness”
4. Press "Set" and then proceed to test the hardness of the water, as
indicated under the heading "2.2 Check the water hardness".
5. Press
on the level (1,2,3 or 4, depending on the value revealed by
the hardness test and the table above)
to select the new setting.
6. Press “X” repeatedly, rst to save the new level, and thereafter to go
back to the homepage.
Please note:
You can carry out the water hardness test using any commercially avail-
able strip of similar type. Having measured the hardness of your water,
consult the table (see above) and select the button “Find out more
about water hardness”.
65
5.15 Default values
This function resets all menu settings and all user customizations, restor-
ing the factory default values (with the exception of the language, which
remains as set, and the statistics).
1.
Press the button (C6).
2. Select “General settings” on the screen.
3. Scroll through the topics and select “Default values”
4. Select what it is you want to reset: “Machine” or “Prole”.
• Machine: Press “Start” and “Yes”
and wait for the machine to carry
out the reset. Press “X” repeatedly to go back to the homepage.
Please note:
Whenever the machine (not the individual prole) is reset to the
factory default values, the system will suggest running the rst time
start-up operations from heading "2.5 Introduction to the features of
the machine".
• Prole: Press “Start”
and select the prole to be reset.
Press “Yes”
and wait for the machine to reset the prole. Press “X” repeatedly to
go back to the homepage.
5.16 Support (QR code)
Associated with this item, there will always be a QR code that leads to
this instruction manual and to other content of importance for you and
your machine.
1.
Press the button (C6).
2. Select “Tips and guides” on the screen.
3. Press “Support” and scan the QR code with your smartphone.
4. Press “X” to go back to the homepage.
5.17 Carafe tips
This item takes you to a number of tips regarding types of milk to use for
the creation of a perfect froth, hot and cold alike.
1.
Press the button (C6).
2. Select “Tips and guides” on the screen.
3. Press “Froth tips”.
4. Select “Tips for hot or cold carafe” (see heading “What milk to use”).
5. Press “X” repeatedly to go back to the homepage.
5.18 Creative recipes
Scan the QR code to see all the creative recipes. Creative recipes are rec-
ipes that allow you, step by step, to create beverages or cocktails that
blend ingredients such as syrups, liqueurs and fruit with the drinks your
machine is designed to make.

66
With the My Coee Lounge App, you have access at any given moment
to more than 150 creative recipes using espresso, cold brew, cappuccino,
latte macchiato, etc...
In this section, you will always nd the QR code that allows you to down-
load the App and nd out about all the recipes we have put together,
just for you.
1.
Press the button (C6).
2. Select “Tips and guides” on the screen.
3. Press “Creative recipes” and scan the QR code with your smartphone.
4. Press “X” to go back to the homepage.
5.19 Statistics
Selecting this item, you can see what types of drinks have been made,
and how many, also how often you have carried out maintenance tasks
and how much water has been used.
1.
Press the button (C6).
2. Select “Machine information” on the screen.
3. Press “Statistics”.
4. Press “Read more” and swipe from right to left across the display
screen to view all the statistics of your machine.
5. Press “X” repeatedly to go back to the homepage.
5.20 More information
In this section you can view the serial number and the build of your
machine. These items of information could be useful should you need to
contact customer service.
1.
Press the button (C6).
2. Select “Machine information” on the screen.
3. Press “More information” to see the serial number and build.
4. Press “X” to go back to the homepage.
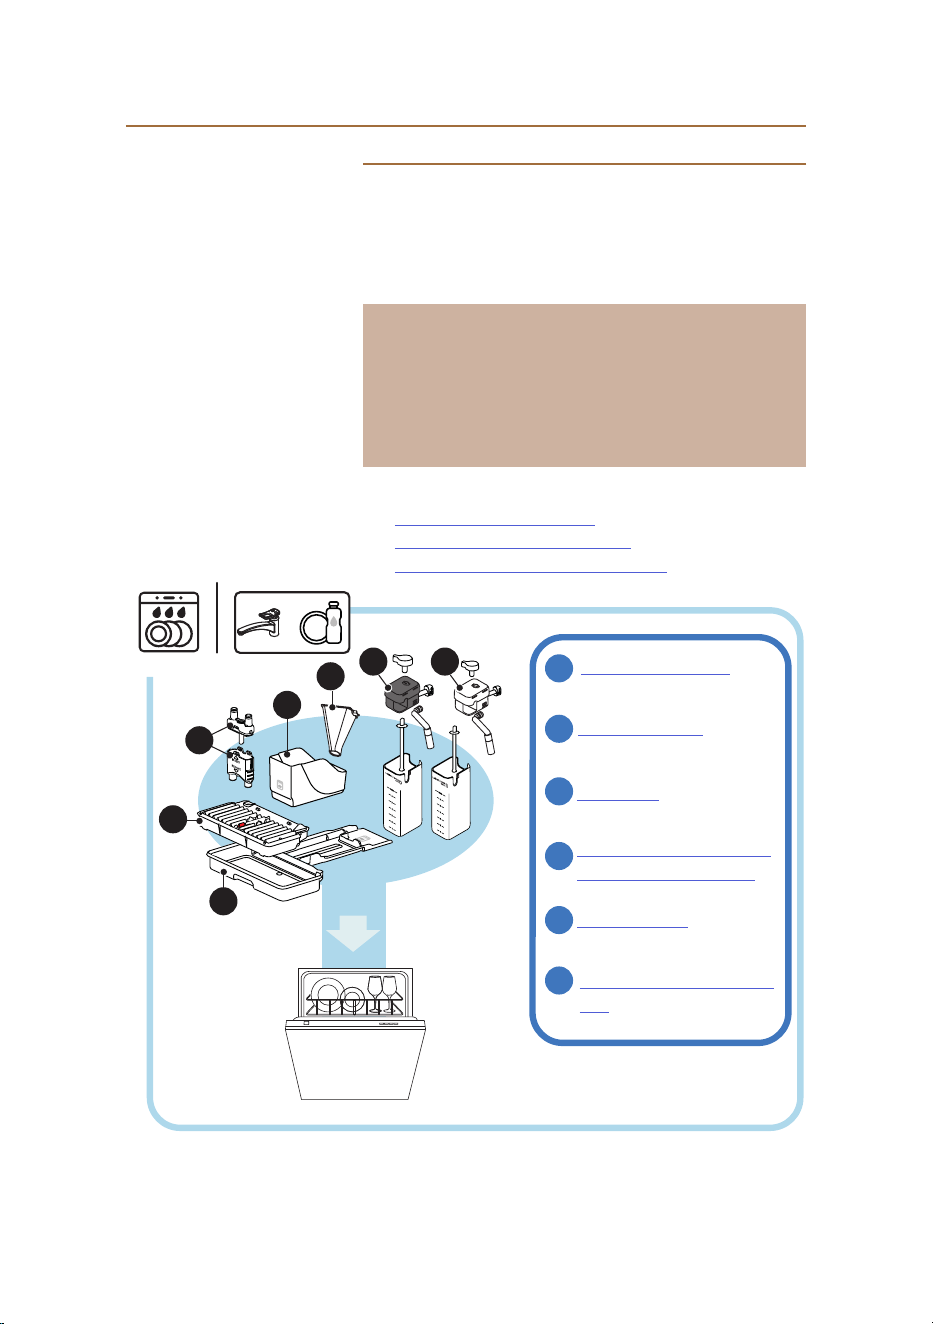
67
Primadonna Aromatic
1
2
3
4
5
6
1
2
3
4
5
6
4
+
Grounds container (A12)
Drip tray grille (A15)
Coee funnel (D3)
Drinks spout nozzles (A22 and
A23)
Drip tray (A6)
LatteCrema carafe (all compo-
nents must be disassembled)
6 CLEANING AND MAINTENANCE
6.1 Cleaning removable parts
Under the heading that follows, you will nd instructions on the various
cleaning and servicing operations recommended by De’Longhi.
To facilitate proper cleaning of the machine, many of the components are
designed so that they can be removed and washed with ease.
Please note:
• Do not use solvents, abrasive detergents or alcohol to clean the
machine. With De’Longhi superautomatic coee machines, no
chemical additives are required for cleaning purposes.
• Do not use metal objects to remove encrustations or coee depos-
its as they could scratch metal or plastic surfaces.
6.1.1 Cleaning methods
• 6.2 Dishwasher safe components
• 6.3 Components that should be soaked
• 6.4 Components washed with running water
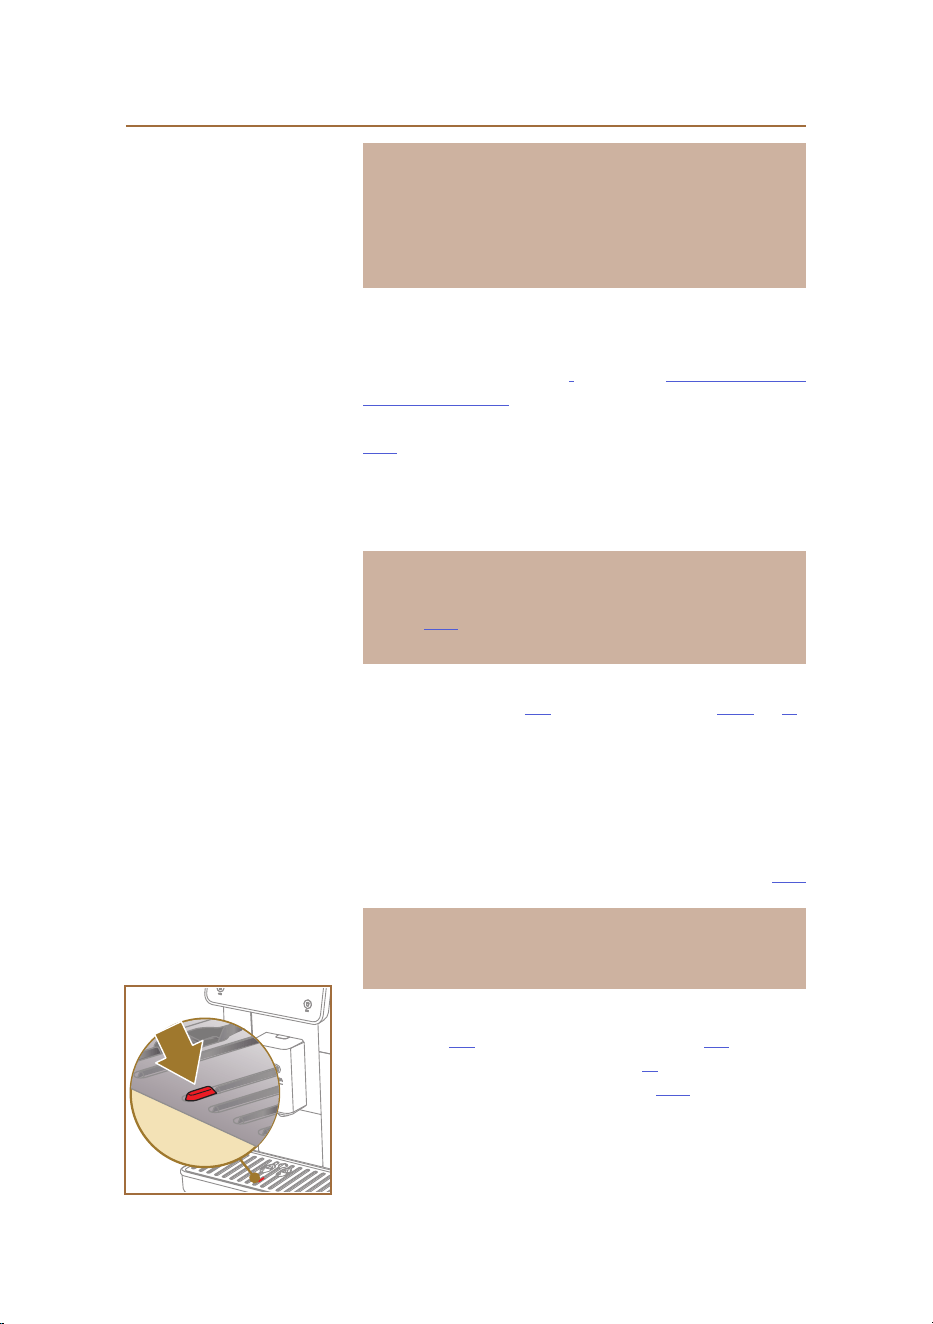
68
Please note:
If there is no dishwasher available, it is recommended that components
be left to soak in warm water (40 °C approx) and washing-up liquid for
around 30 minutes. Rinse thoroughly under running water, and nally,
dry with a clean cloth.
44
6.2 Dishwasher safe components
6.2.1 Cleaning the grounds container:
When prompted by the machine (see heading "7 FREQUENT PROMPTS
AND ALARM MESSAGES"), this must be emptied and cleaned. The ma-
chine cannot be used to make coee again until the grounds container
(A12) has been cleaned. To prevent mould from forming, the machine will
display the message indicating the need to empty the grounds container
72 hours after the rst coee has been prepared, even though the con-
tainer may not be full (for the 72 hours to be calculated correctly, the
machine must never be disconnected from the mains power supply).
Important! Danger of scalding
If several milk-based drinks are prepared one after the other, the metal
cup tray (A14) becomes hot. Wait for it to cool down before touching it,
and handle from the front only.
To clean (with the machine on):
1. Remove the drip tray (A6) and the grounds container (A12) (g. 45);
2. Empty the drip tray and the grounds container and clean them, taking
care to remove all residues that may have collected on the bottom.
3. Wash the grounds container in the dishwasher
or leave it to soak in
warm water (40 °C approx) and washing-up liquid for around 30
minutes. Rinse thoroughly under running water, and nally, dry
with a clean cloth.
4. Reposition the drip tray in the machine, complete with grille (A15)
and grounds container.
Important!
To get the best possible results from cleaning operations: when emp-
tying the coee grounds container, always empty the drip tray as well.
6.2.2 Cleaning the drip tray and the drip tray grille
The drip tray (A6) is tted with a oat level indicator A16 (colour red)
showing the amount of water it contains (g. 44).
Before the indicator protrudes from the cup tray (A14), the drip tray must
be emptied and cleaned, otherwise the water may overow the edge and
damage the machine, the surface it rests on or the surrounding area. To
remove the drip tray, proceed as follows:
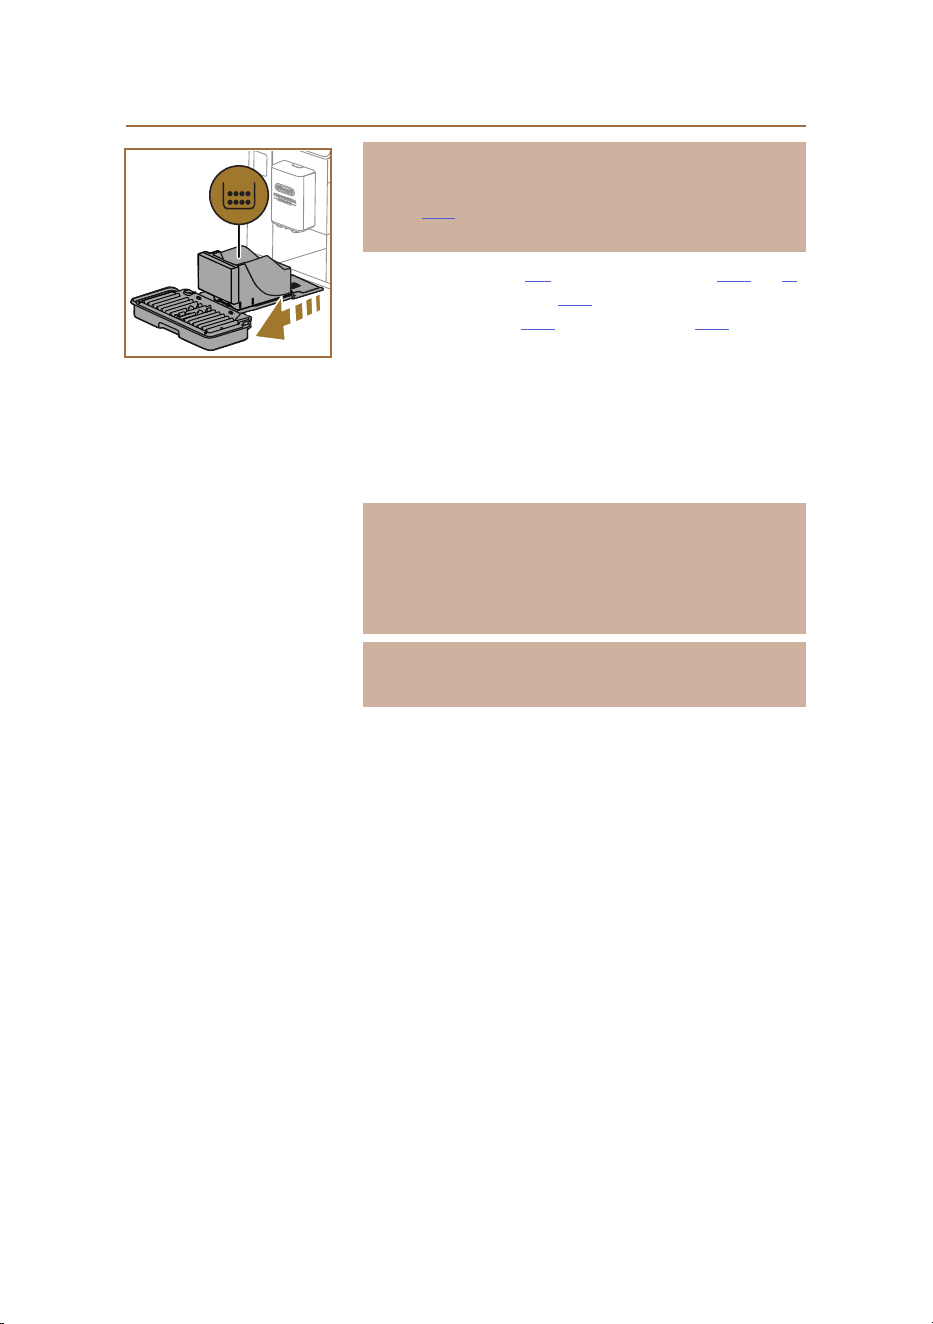
69
Important! Danger of scalding!
If several milk-based drinks are prepared one after the other, the metal
cup tray (A14) becomes hot. Wait for it to cool down before touching it,
and handle from the front only.
1. Remove the drip tray (A6) and the grounds container (A12) (g. 45);
2. Check the condensate tray (A20) and empty if necessary;
3. Remove the cup tray (A14) and the drip tray grille (A15), then empty
the drip tray and the grounds container;
4. Wash the grounds container in the dishwasher
or leave it to soak in
warm water (40 °C approx) and washing-up liquid for around 30
minutes. Rinse thoroughly under running water, and nally, dry
with a clean cloth.
5. Reposition the drip tray in the machine, complete with grille and
coee grounds container.
Important!
When removing the drip tray, the coee grounds container must always
be emptied, even if it has not lled up noticeably. If this is not done, it
can happen that when further coees are prepared, the grounds con-
tainer will ll up more than expected and clog the machine.
Important!
The cup grille is not dishwasher-safe.
45
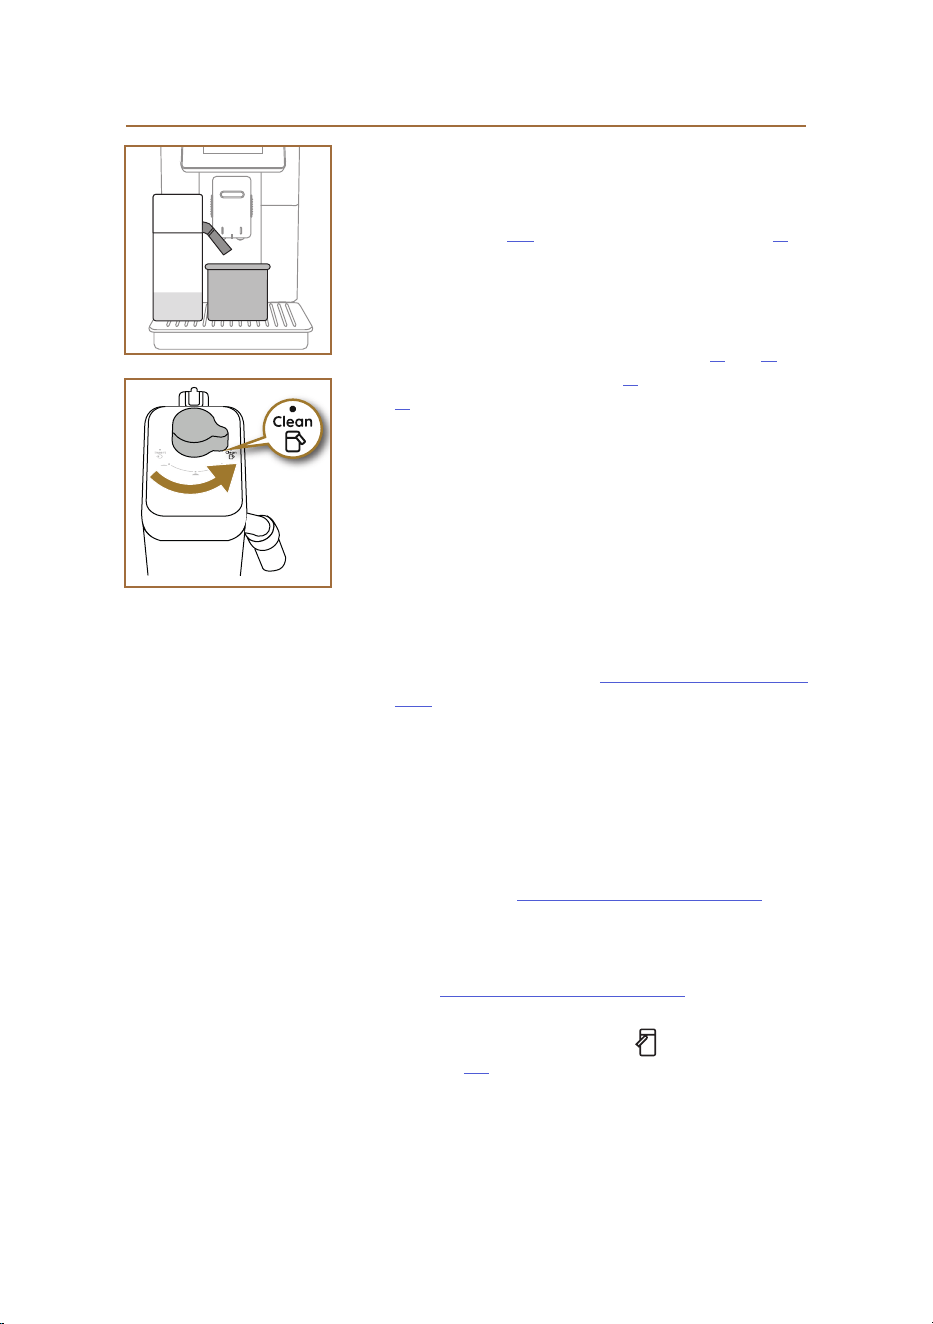
70
47
46
6.2.3 Cleaning the milk carafes
6.2.3.1 Cleaning the milk carafe after use
Every time a milk-based drink is delivered, the machine will prompt the
user to clean the carafe (D7) (Clean function) to ensure that the lid (E2) of
the carafe is not left unwashed. To start the cleaning operation, proceed
as follows:
1. Leave the milk carafe in the machine (there is no need to empty the
container);
2. Place a cup or other recipient under the milk spout (E3) (g. 46);
3. Turn the froth adjustment/clean dial (E1) to the “Clean” position (g.
47): hot water and steam are delivered from the milk spout. Clean-
ing stops automatically;
4. Turn the dial back to one of the froth selections;
Preparing several drinks in succession:
• To proceed with further preparations, when the message to clean
the carafe appears (Clean function), press “Later”. Proceed with
cleaning of the carafe after the nal preparation.
After multiple preparations, the milk container is empty or the
milk that remains is not enough to make further drinks
• Having carried out the cleaning step (with the “Clean” function),
disassemble the milk carafe and clean all components, proceeding
as described under the heading "6.2.3.2 Thorough cleaning of milk
carafe".
After multiple preparations, there is enough milk left in the con-
tainer to make further drinks
• Having carried out the cleaning step with the “Clean” function, re-
move the milk carafe and put it straight in the refrigerator. The Lat-
teCrema Hot carafe can be kept in the refrigerator no longer than 2
days, and the LatteCrema Cool no longer than one day: proceed with
the cleaning of all the components, following the steps described
under the heading ”6.2.3.2 Thorough cleaning of milk carafe"..
Important:
If the milk carafe is left out of the refrigerator for more than 30 minutes,
disassemble and clean all components, proceeding as described under
the heading 6.2.3.2 Thorough cleaning of milk carafe.
Following preparation of milk-based drinks — general notes
• If the milk carafe is not cleaned, the symbol appears on the
homepage (C4) as a reminder that cleaning is required.
• In certain cases, the machine will need to heat up before cleaning
can take place (Clean function).
• To ensure correct cleaning, wait for the CLEAN function to end. The
function is automatic. It must not be stopped while in progress.
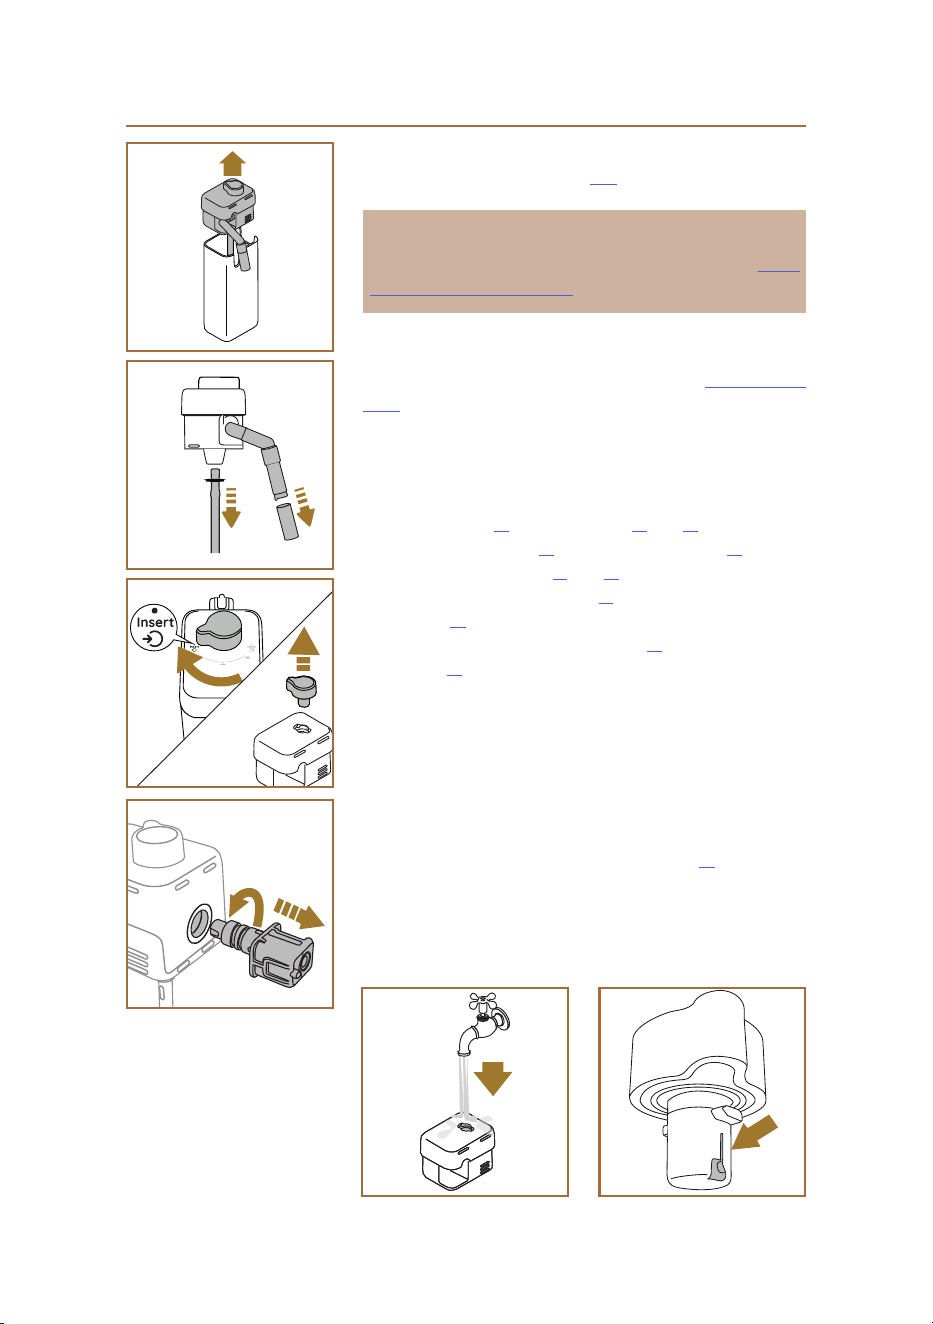
71
48
49
50
51
5352
6.2.3.2 Thorough cleaning of milk carafe
Thorough cleaning of the milk carafe (D7) is a key factor in securing opti-
mum and consistent results from the machine over time.
Please note
For cleaning after each preparation of a milk drink, see heading "6.2.3.1
Cleaning the milk carafe after use".
Your machine will remind you when the carafe needs cleaning, and if in
doubt, you can always consult the cleaning instructions directly on the
machine by accessing the settings menu, see heading "5.6 Cleaning the
carafe".
It is recommended that you carry out a thorough clean of the carafe: in
the case of the LatteCrema Cool, after 1 day if it has not been used, or
in the case of the LatteCrema Hot, after 2 days if not used. Proceed as
follows:
1. Remove the lid (E2) of the milk carafe (E7) (g. 48);
2. Detach the milk spout (E3), the milk spout extension (E4) (if tted)
and the milk intake tube (E6) (g. 49);
3. Turn the froth adjustment knob (E1) clockwise to the “Insert” posi-
tion (g. 50) and pull upwards to detach;
4. Turn the milk carafe connector-coupling (E5) anticlockwise and pull
out (g. 51).
5. Wash in a dishwasher (recommended) or by hand, as indicated
below:
• In a dishwasher: rinse all components under warm drinking water
(at least 40 °C), then place them in the top basket of the dishwasher
and run a programme at 50 °C, e.g. Eco standard.
• By hand: rinse all components carefully with warm drinking water
(at least 40 °C) to ensure that all visible residues are removed: make
sure the water passes through the holes (g. 52). Immerse all
components (including the milk container) in a solution of warm
drinking water (at least 40° C) and washing-up liquid for at least
30 minutes. Rinse all components thoroughly with warm drinking
water, rubbing them individually between ngers and thumbs.

72
6. Make sure there are no milk residues left in the cavity and the chan-
nel on the underside of the dial (g. 53). If necessary, scrape with
a toothpick.
7. Check that the intake tube (E6) and the outlet tube (E3) are not
clogged with milk residues.
8. Dry the components with a clean dry cloth;
9. Reassemble all components of the milk carafe.
Please note:
The machine will give a reminder periodically of the need for thorough
cleaning of the milk carafe, and indicate the full sequence of steps.
6.2.4 Cleaning the coee funnel
Clean the removable pre-ground coee funnel (D3) at regular intervals
(about once a month). Proceed as follows:
1. Switch o the machine (see heading "3.1.2 Turning o");
2. Lift the lid of the accessories compartment (g. 23).
3. Remove the scoop/brush (D1);
4. Take out the removable funnel (D3);
5. Wash the funnel under warm running water (40 °C approx) and dry
with a clean cloth. The funnel can also be washed in a dishwasher, in
which case 50 °C is suitable.
6. Return the funnel to its housing and put away the brush;
7. Close the lid.
Important!
After cleaning, check that no accessories have been left in the funnel.
The presence of foreign matter in the funnel during operation could
cause damage to the machine.
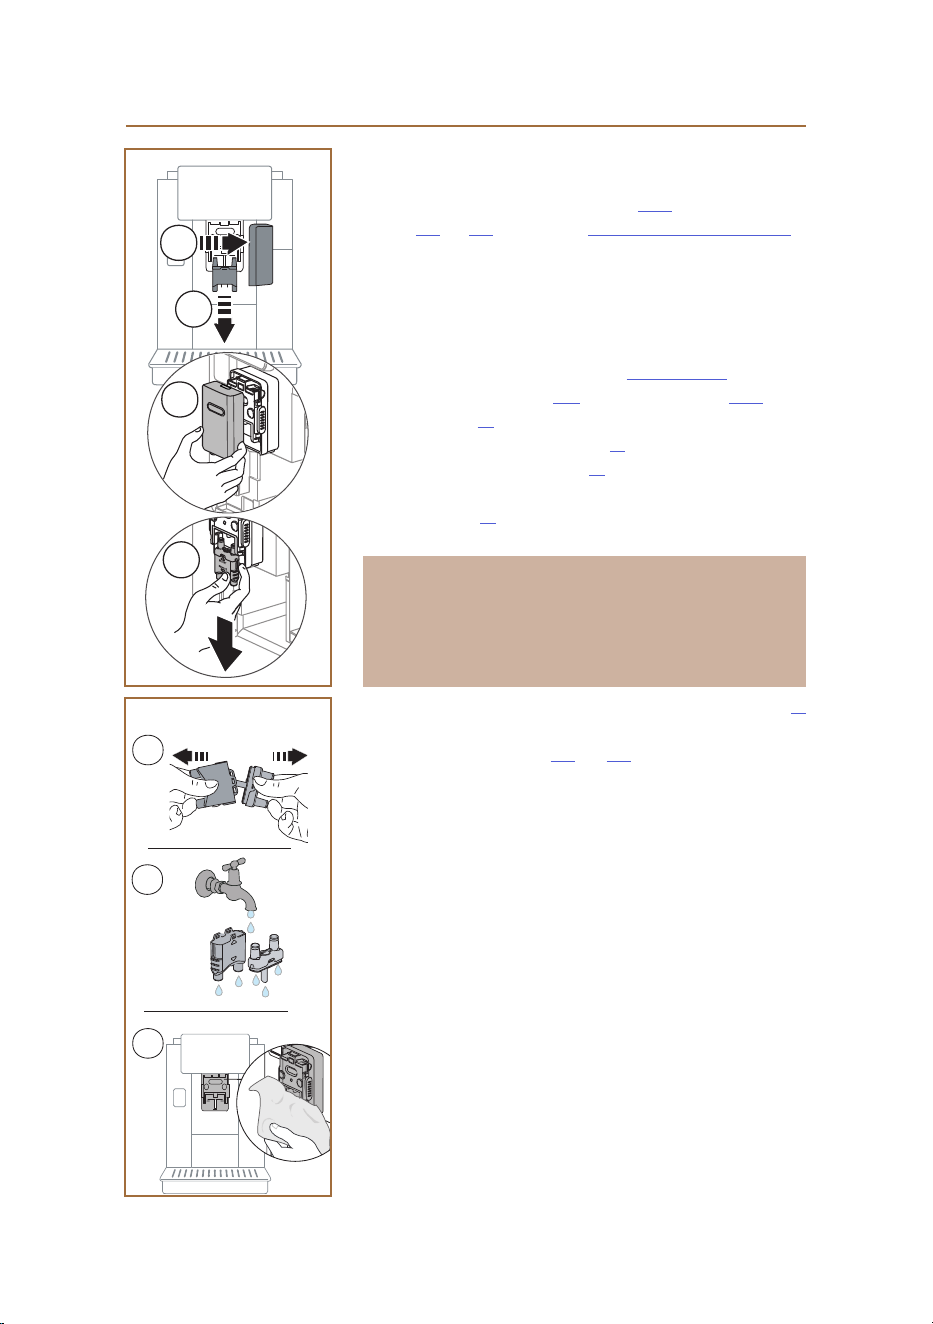
73
1
2
1
2
54
3
4
5
55
6.2.5 Cleaning the nozzles of the drinks spout
This model has been designed to give a prompt that will remind you
when to clean the removable brewing unit (A19) and the coee spout
nozzles (A22 and A23) (see heading “6.6 Deep cleaning of the machine”).
This is a quick and simple operation, but if carried out regularly, it will
ensure the taste and aroma of your coee never disappoints, as well as
prolonging the life of your machine.
To clean the coee spout nozzles whenever you please, even without the
reminder, proceed as follows:
1. Switch o the machine (see heading "3.1.2 Turning o");
2. Press the release button (A4) and remove the cover (A21) of the
drinks spout (A3) by pulling it away from the front, then remove the
nozzles by pulling downwards (g. 54 details 1 and 2);
3. Separate the two nozzles (g. 55 detail 3) and rinse them under
warm running drinking water (at least 40 °C) to remove all visible
residues (g. 55 detail 4). For maximum cleansing, a cycle in the
dishwasher is recommended.
Please note:
If there is no dishwasher available, it is recommended that components
be left to soak in warm water (40 °C approx) and washing-up liquid for
around 30 minutes. Rinse thoroughly under running water, and nally,
dry with a clean cloth.
4. Clean the socket of the removable nozzles with a sponge (g. 55
detail 5);
5. Reassemble the nozzles (A22 and A23), then reattach them to the
spout: make sure the “INSERT” marking is at the top and can be seen
when the nozzles have been retted;
6. Reposition the cover on the spout and ensure it snaps into place.
7. The nozzles of the drinks spout are now clean and the machine is
ready for use.
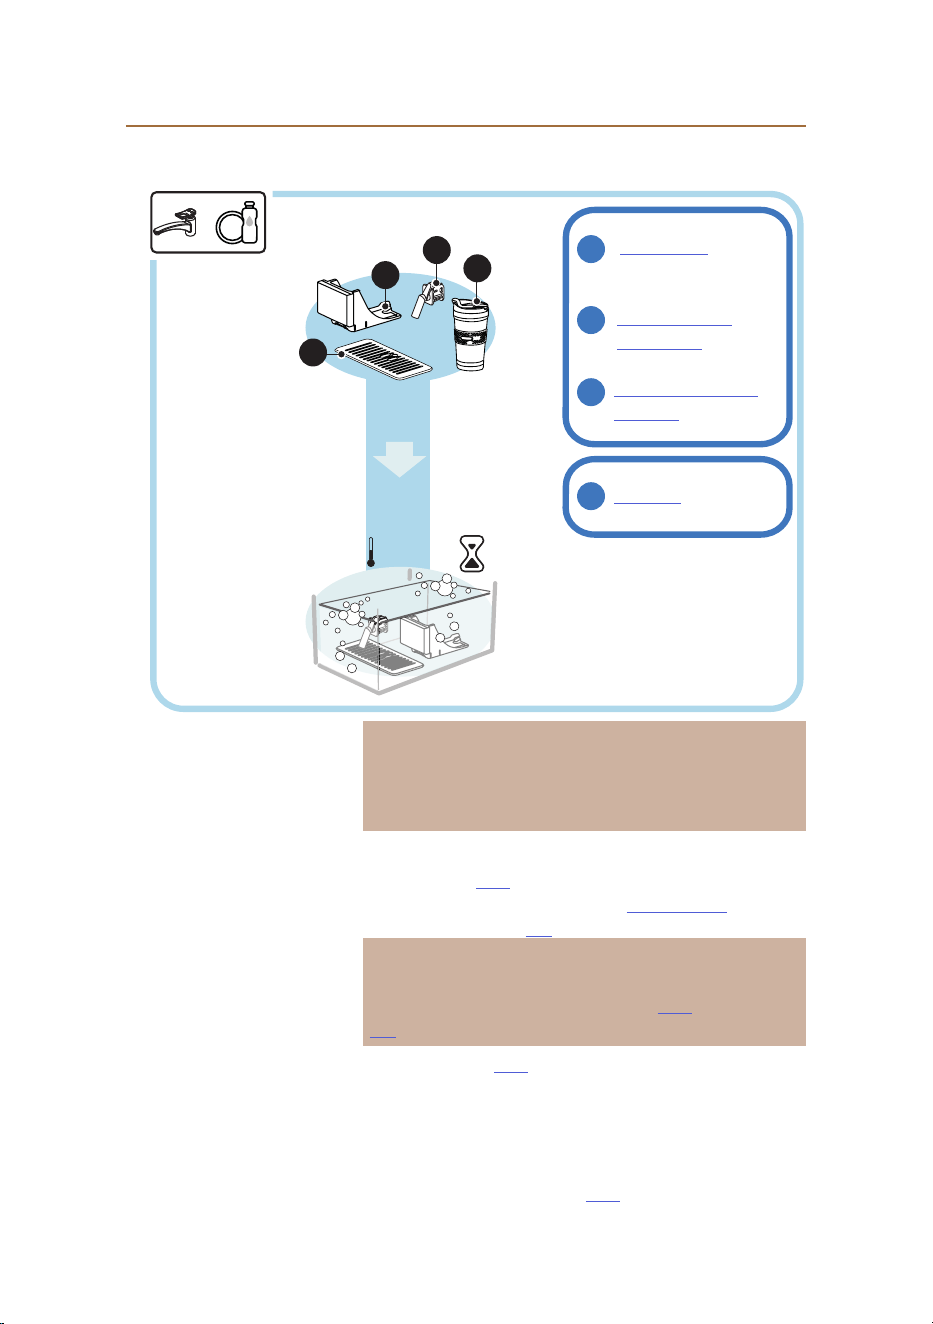
74
>40
°C
> 30 min
+
1
2
3
1
2
3
4
4
Cup tray (A14)
Service/cleaning water
spout (D2)
Travel mug
Grounds container
support (A13)
6.3 Components that should be soaked
6.3.1 Cleaning the cup tray
Clean the cup tray (A14) at regular intervals, as follows:
1. Switch o the machine (see heading "3.1.2 Turning o");
2. Remove the drip tray (A6);
Important!
To get the best possible results from cleaning operations, remember
always to empty the coee grounds container (A12) and the drip tray
(A6).
3. Lift the cup tray (A14);
4. Leave it to soak in warm water (40 °C approx) and washing-up liquid
for around 30 minutes. Rinse thoroughly under running water, and
nally, dry with a clean cloth.
6.3.2 Cleaning the grounds container support
Clean the grounds container support (A13) at regular intervals, as follows:
Please note:
Leave components to soak in warm water (40 °C approx) and washing-
up liquid for around 30 minutes. Rinse thoroughly under running
water, and nally, dry with a clean cloth.

75
1. Switch o the machine (see heading "3.1.2 Turning o");
2. Remove the drip tray (A6);
Important!
To get the best possible results from cleaning operations, remember
always to empty the coee grounds container (A12) and the drip tray
(A6).
3. Lift out the grounds container (A12) so as to get to the support;
4. Leave it to soak in warm water (40 °C approx) and washing-up liquid
for around 30 minutes. Rinse thoroughly under running water, and
nally, dry with a clean cloth.
6.3.3 Cleaning the service water spout
Clean the water spout (D2) at regular intervals, as follows:
5. Open the lid of the accessories compartment A2 and remove the
spout from its socket (if present on your model) (g. 23);
6. Leave it to soak in warm water (40 °C approx) and washing-up liquid
for around 30 minutes. Rinse thoroughly under running water, and
nally, dry with a clean cloth.
6.3.4 Cleaning the De’Longhi travel mug (sold separately) every
time after use
In the interests of hygiene, the travel mug should always be cleaned after
use. Do not use abrasive materials that could damage the surface of the
container. Proceed as follows:
1. Unscrew the lid and rinse the container and lid with warm drinking
water (40°C).
2. Soak the components in warm water (40°C) and washing up liquid
for at least 30 minutes. Do not use scented detergents.
3. Clean the inside of the container and the lid with a clean sponge and
washing up liquid, removing any visible dirt.
4. Rinse all components with warm drinking water (40°C).
5. Dry all components with a clean, dry cloth or paper towels, then
reassemble.
6. Wash the lid in the dishwasher once a week. The metal container is
not dishwasher safe.
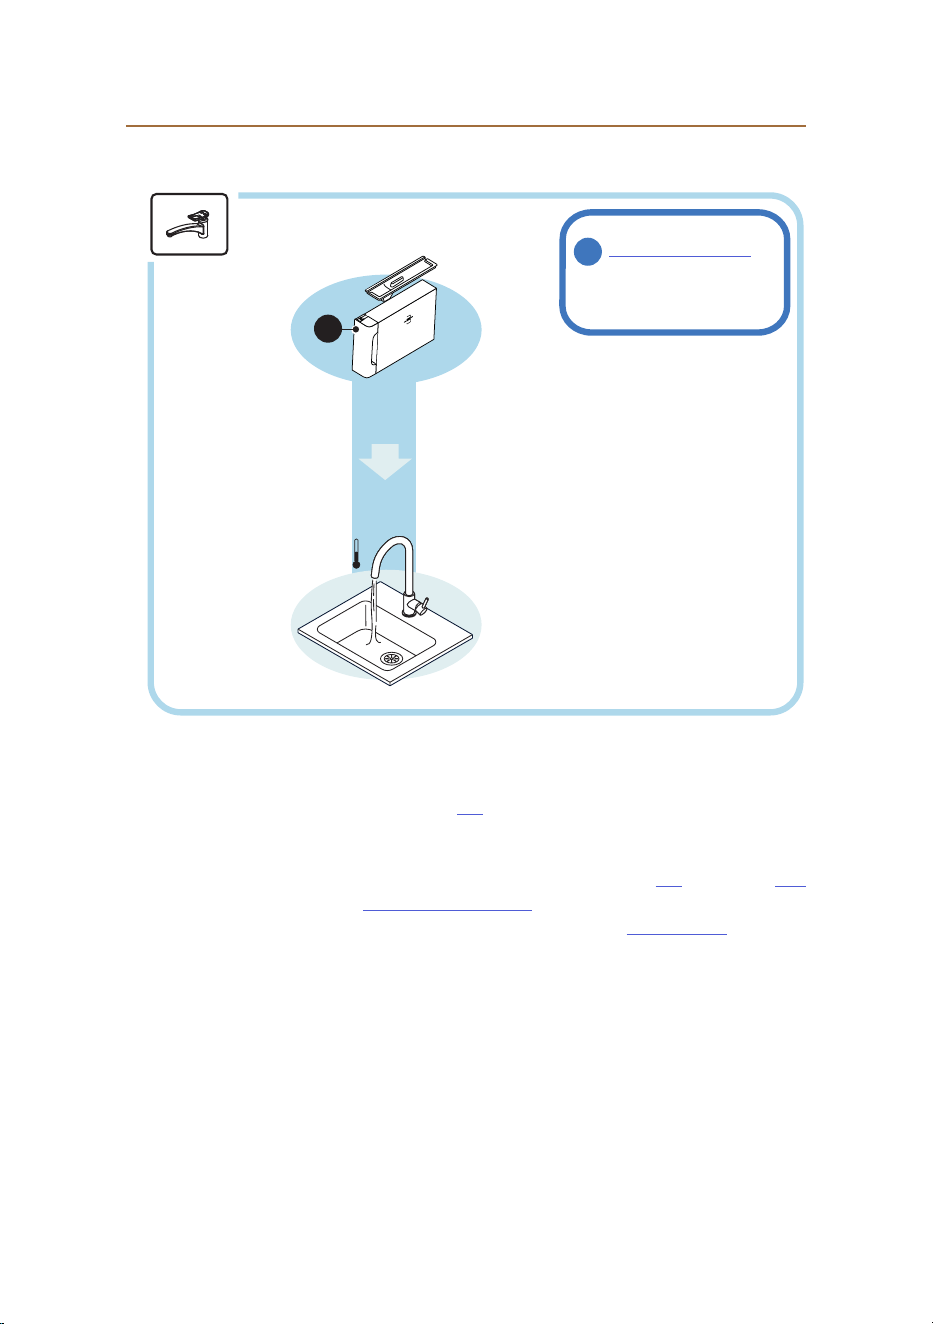
76
6.4.1 Cleaning the water tank and lid
The water tank (A8) should be cleaned periodically (about once a month)
or at all events, if the machine is not used for more than 3 days.
Cleaning the water tank is also one of the required steps in the proce-
dure for replacement of the water softener lter (D8) (see heading "6.6.4
Management of water lter").
1. Switch o the machine (see heading "3.1.2 Turning o");
2. Take out the water tank, remove the water softener lter (if in-
stalled) and rinse with drinking water;
3. Empty the water tank and wash out with warm water (40 °C ap-
prox), wiping if necessary with a non-abrasive cloth. Rinse thor-
oughly under running water;
4. Reinstate the lter, if removed previously, then ll the water tank
with fresh drinking water up to the MAX level and return it to the
machine.
5. (Only if a water softener lter is installed) release 100ml of hot
water to reactivate the lter.
>40
°C
1
1
6.4 Components washed with running water
Water tank and lid (A8)

77
6.5 Cleaning the body of the machine
6.5.1 Cleaning the inside of the machine
Danger of electric shock!
Before carrying out cleaning operations on internal parts, the machine
must be turned o (see heading "3.1.2 Turning o") and unplugged
from the mains power supply. Never immerse the machine in water
1. Check periodically (about once a month) that the inside of the
machine (accessible once the drip tray (A6) has been removed) is
not dirty.
2. If necessary, remove coee deposits using the brush (D1) supplied
with the machine, and a sponge.
3. Remove all residues with a vacuum cleaner
6.5.2 Cleaning the control panel
Remember that this is a touch screen, and therefore a very delicate com-
ponent. With this in mind, be sure to apply a similarly delicate touch, and
follow the steps described below:
4. Switch o the machine (see heading "3.1.2 Turning o"); this way,
you will also be able to see the dirt more easily;
5. You need to use a microbre cloth, which cleans surfaces without
scratching or damaging them;
6. Do not use solvents, abrasive detergents or alcohol.
7. Pass the microbre cloth over the touch screen (the cloth can be
moistened with a little water if need be);
8. After cleaning the surface with a proprietary product or with a
moist part of the microbre cloth, wipe dry using the dry part of
the cloth.

78
6.6 Deep cleaning of the machine
6.6.1 Deep cleaning of the machine
The machine needs a major clean periodically, in order to remove residual
deposits of coee that can sometimes form in and around certain parts.
Your machine will let you know when this kind of cleaning is required,
and you can decide whether to do it immediately, or wait until a later
time (see heading "7 FREQUENT PROMPTS AND ALARM MESSAGES"). If
the decision is to proceed straight away, then once the prompt message
appears, simply press “Yes” and follow the instructions step by step on
the display, from step 4. To postpone cleaning until later, press “No”:
the homepage will now show a reminder alongside the settings menu
symbol (C6), in the form of a yellow dot "l" (C12), to indicate that the
machine needs cleaning (the message will reappear every time the ma-
chine is turned on).
To access the deep cleaning procedure from the settings menu, proceed
as follows:
1. Tap the settings symbol (C6);
2. Select “Maintenance”, then “Machine cleaning”;
3. Press “Start” to begin the guided cleaning procedure: the machine
sets itself for cleaning;
4. Remove the water tank (A8) (g. 3);
5. Open the ap of the brewing unit (A17) (g. 56) on the right hand
side of the machine;
6. Press the two coloured release buttons inwards (g. 57) while at
the same time pulling the brewing unit (A19) outwards;
7. Press “→”;
8. Rinse the brewing unit under running water, without detergents.
If the dirt is stubborn, leave the brewing unit to soak in drinking
water for 5 minutes, then use the brush on the handle of the pre-
ground coee scoop (D1) to remove the remaining traces;
Important!
RINSE WITH WATER ONLY
NO DETERGENTS - NO DISHWASHER
9. Use the brush likewise to remove any coee residues left in the
housing (18) of the brewing unit, which is visible behind the ap
(A17);
10. Press “→”;
11. Reposition the brewing unit by sliding it into its housing, applying
pressure so it clicks into place;

79
Please note:
If the brewing unit is dicult to t, adapt it to the right size (before
insertion) by applying pressure to the two levers (g. 58).
12. Once inserted, make sure the two coloured buttons have snapped
out;
13. Close the brewing unit ap, ensuring it is rmly in position, and
reposition the water tank;
14. Press “→”;
15. Press the release button (A4) and remove the cover (A21) (A3),
pulling it outwards; press “→”;
16. 16. Remove the nozzles by pulling downwards (g. 54 details 1
and 2) and separate them (g. 55 detail 3), then press “→”;
17. Rinse the nozzles under warm running drinking water (at least 40
°C) to remove all visible residues (g. 55 detail 4). For maximum
cleansing, a cycle in the dishwasher is recommended. Press “→”;
Please note:
If there is no dishwasher available, it is recommended that components
be left to soak in warm water (40 °C approx) and washing-up liquid for
around 30 minutes. Rinse thoroughly under running water, and nally,
dry with a clean cloth.
18. Clean the socket of the removable nozzles with a sponge (g. 55
detail 5);
19. Reassemble the nozzles (A22 and A23), then reattach them to the
spout: make sure the “INSERT” marking is at the top and can be
seen when the nozzles have been retted;
20. Reposition the cover on the spout, ensuring it snaps into place;
press “→”;
21. To complete the process of cleaning the machine, run a series of
rinse cycles with hot water: position a container of at least 0.2 li-
tres capacity under the drinks spout and press “Yes”. The machine
will heat up and carry out the rinses; when done, the homepage
reappears.
The machine is now ready for use.
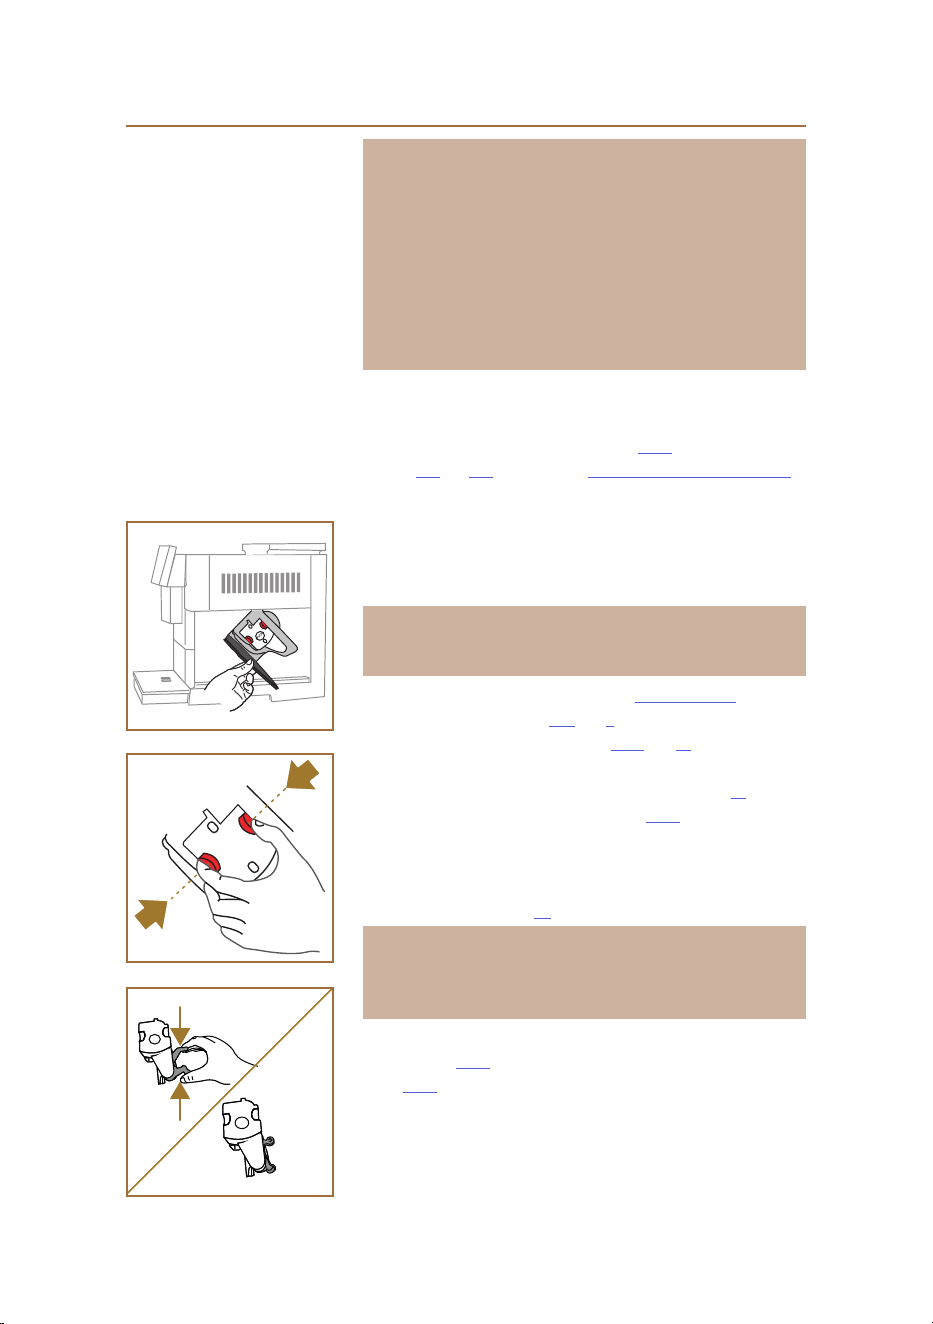
80
✔
58
56
57
Please note:
• The second time that the machine displays the cleaning prompt,
the guided procedure will appear only if “Show me all steps” is
selected following step 3; otherwise, once all the steps described
above for cleaning the removable brewing unit and the coee
nozzles have been completed correctly, simply press “Done”.
• Check regularly (about once a month) that the inside of the ma-
chine (accessible after removing the drip tray) is not dirty.
• Remove all residues with a vacuum cleaner.
6.6.2 Cleaning the removable brewing unit
This model has been designed to give a prompt that will remind you
when to clean the removable brewing unit (A19) and the coee spout
nozzles (A22 and A23) (see heading “6.6 Deep cleaning of the machine”).
This is a quick and simple operation, but if carried out regularly, it will
ensure the taste and aroma of your coee never disappoints, as well as
prolonging the life of your machine.
To clean the removable brewing unit whenever you please, even without
the reminder, proceed as follows:
Important!
The brewing unit cannot be removed while the machine is on.
1. Switch o the machine (see heading "3.1.2 Turning o");
2. Remove the water tank (A8) (g. 3);
3. Open the ap of the brewing unit (A17) (g. 56) on the right hand
side of the machine;
4. Press the two coloured release buttons inwards (g. 57) while at
the same time pulling the brewing unit (A19) outwards;
5. Rinse the brewing unit under running water, without detergents.
If the dirt is stubborn, leave the brewing unit to soak in drinking
water for 5 minutes, then use the brush on the handle of the pre-
ground coee scoop (D1) to remove the remaining traces;
Important!
RINSE WITH WATER ONLY
NO DETERGENTS - NO DISHWASHER
6. Use the brush likewise to remove any coee residues left in the
housing (A18) of the brewing unit, which is visible behind the ap
(A17);
7. After cleaning, replace the brewing unit by sliding it into its hous-
ing, then apply pressure to the component until it clicks into place;

81
Please note:
If the brewing unit is dicult to t, adapt it to the right size (before
insertion) by applying pressure to the two levers (g. 58).
8. Once inserted, make sure the two coloured buttons have snapped
out;
9. Close the brewing unit ap and ensure it is rmly in place;
10. Reposition the water tank in the machine.
11. The removable brewing unit is now clean and the machine is ready
for use.
82
6.6.3 Descaling
Descaling is a deep-cleaning function of your machine that serves to
eliminate the limescale residues which can form gradually along the cir-
cuit that conveys water from the tank to your cup.
Not only does descaling prolong the life of your machine, it also makes a
considerable dierence to the quality of the drinks you prepare.
As explained under the heading "5.14 Water hardness", the machine tells
you when will be the best time to run a descaling cycle, based on the
number and type of the drinks prepared and the hardness of the water
you are using. If the water hardness setting has been entered correctly,
the machine will prompt for descaling to be carried at the appropriate
intervals.
You can check at any time how long it will be until the next descale by
going to the settings menu → maintenance → 5.2 Descaling.
Important!
• Before use, read the instructions and the labelling on the descaler
pack.
• Use only descaler supplied by De’Longhi. If unsuitable descaler is
used, or descaling is not carried out properly and when required,
the machine may develop faults not covered by the manufactur-
er’s guarantee.
• Descaler can cause damage to delicate surfaces. If the product is
accidentally spilt, dry immediately.
To descale
EAN: 8004399327252
Descaler De’Longhi descaler
Container Recommended capacity: 2.0 litres
Time ~25min
Descale the machine when the corresponding message appears on the
homepage (see heading "7 FREQUENT PROMPTS AND ALARM MESSAG-
ES"): to proceed with descaling straight away, press “Yes” and follow the
instructions step by step as indicated on the display.
To postpone cleaning until later, press “No”: the homepage will now
show a reminder in the form of a yellow dot, alongside the settings menu
symbol (C6), to indicate that the machine needs descaling. (The
message reappears every time the machine is turned on).
To access the descaling menu:
1. Tap the
symbol (C6)
on the homepage;
2. Select “Maintenance”, then “Descaling”;
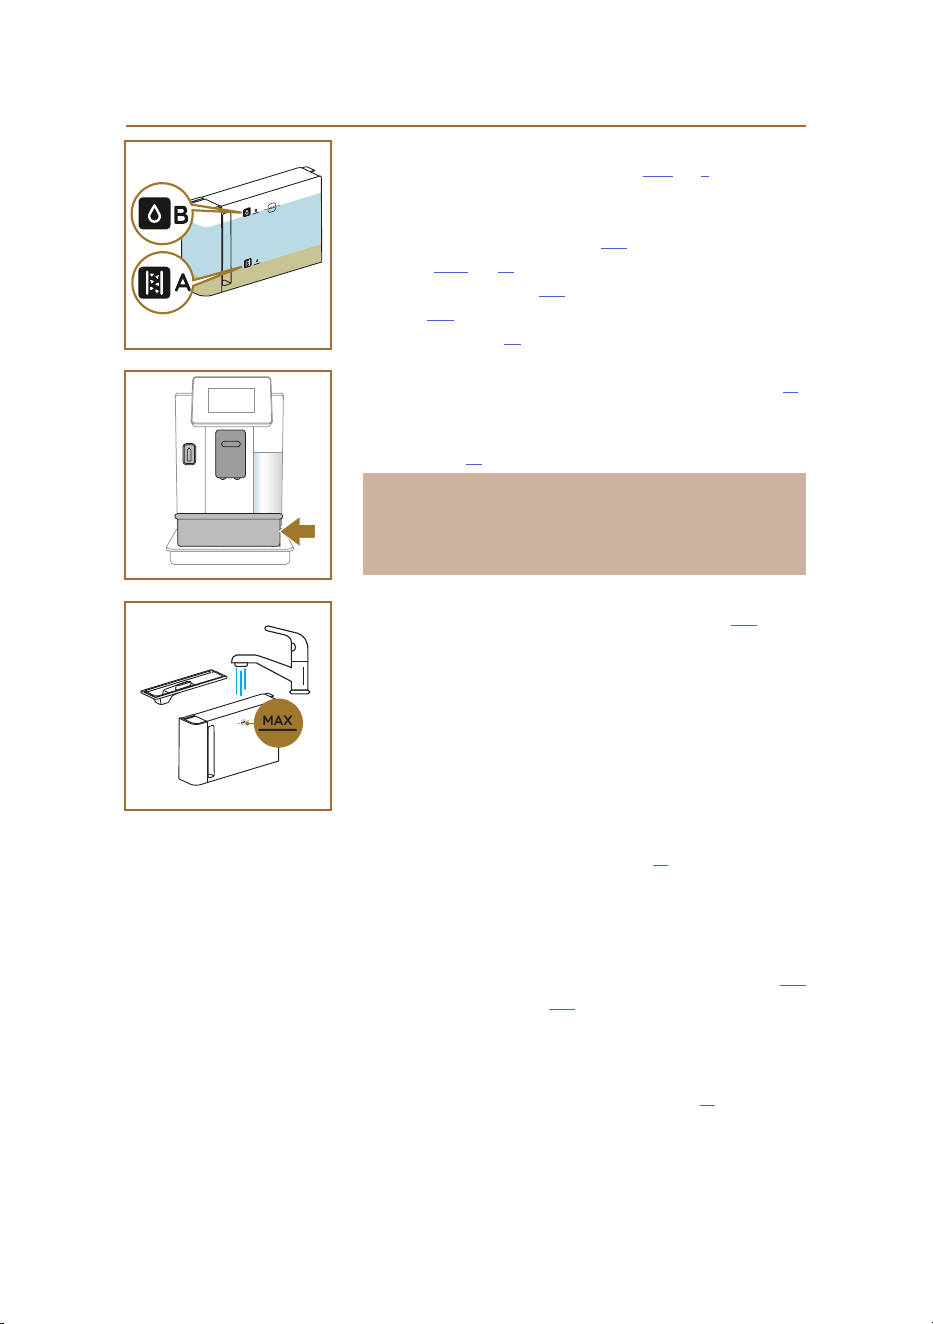
83
3. Press "Start" to view the guided descale procedure;
4. Attach the service/cleaning water spout (D2) (g. 7) (located in the
accessories compartment, if specied for the particular model of
machine);
5. Remove and empty the drip tray (A6) and the coee grounds con-
tainer (A12) (g. 18): reposition both in the machine and press
“→” ;
6. Remove the water tank (A8), lift the lid and (if installed) remove the
lter (D8). Empty the tank completely and press
“→” ;
7. Pour the descaler (
D6
) into the water tank, lling up to level A marked
on the inside of the tank (which is equivalent to one 100ml single-use
pack), then add drinking water (one litre), lling up to level B (g. 59).
Reposition the water tank (with lid) in the machine and press “Start”
;
8. Position an empty container of at least 2.0 litres capacity under the
spouts (g. 60). Press "Yes” to start the procedure;
Important! Danger of scalding
Hot water containing acid ows out of the spouts. Accordingly, take
care to avoid contact with this solution.
9. The descale cycle starts and descaling solution ows both from the
service/cleaning water spout and from the drinks spout (A3) and hot
water spout; a succession of rinses will be performed automatically
at set intervals to remove the scale residues from inside the coee
machine;
After a number of minutes, the machine completes the rst step of the
descaling cycle, which is followed by a rinse step. Proceed as follows:
10. Empty the container used to collect the descaler solution;
11. Remove the water tank, empty it and rinse well under running
drinking water, and reinstate the water softener lter, if removed
earlier.
12. Fill the tank up to the MAX level (g. 61) with fresh water and
return it to the machine. Press “→” ;
13. Having emptied the container used previously to collect the descaler
solution, reposition it under the spouts and press "Yes" to start the
rinse;
14. Hot water will ow both from the
service/cleaning water spout (D2)
and from the drinks spout
(A3)
;
15. When the water in the tank has run out, empty the container used to
collect the rinsing water, then remove the drip tray and the grounds
container, empty them and return them to the machine;
16. Detach the water tank and ll to the MAX level
(g. 61),
then return it
to the machine and press "Next";
17. The descaling procedure is now complete: press "X";
61
59
2,0L
60

84
18. The machine runs a rapid heating cycle, following which the homepage
reappears.
Please note:
• During the descale procedure, water may nd its way into the
grounds container (A12). This is quite normal.
• If the descaling cycle is not completed successfully (e.g., due to a
power outage), when the machine is powered up again, it will re-
sume the cycle from the point at which it was interrupted.
• If the water tank has not been relled to the MAX level, the display
will prompt for a second rinse to ensure that the descaling solution
has been completely eliminated from the internal circuits of the ma-
chine. Before starting the rinse, remember to empty the drip tray.
6.6.4 Management of water lter
To ensure the performance of the machine remains constant over time, the
use of a De’Longhi water softener lter (D8) is recommended.
For more information, visit www.delonghi.com.
WATERFILTER EAN: 8004399327252
6.6.4.1 Installing the water lter
De’Longhi water softener lter (D8)
If when using the machine for the rst time you chose to postpone installa-
tion of the water lter (see
heading
"2.4 Installing the water lter"), or if it
was installed and then removed, and you now want to reinstall it, proceed
as follows:
1. Tap the
symbol (C6)
on the homepage;
2. Select “Maintenance”, then “Water lter”;
3. Press "Yes" to view the guided procedure;
4. Attach the hot water spout (D2) (on models for which the part is spec-
ied, it will be found in the accessories compartment on top of the
machine when the lid is opened, see
g. 23);
5. Remove the lter
(D8)
from the packaging and turn the date indicator
to view the next 2 months (g. 9): press
“→”
to pass on to the next
step;
Please note:
The lter lasts about two months assuming normal use of the machine; if
on the other hand the machine remains idle with the lter installed, it will
not last more than three weeks, at most.
6. To activate the lter, run tap water through the hole in the centre of the
lter until water comes out of the openings at the side for more than a
minute (g. 10). Press
“→
” to pass on to the next step.

85
7. Remove
the water tank (A8)
from the machine and ll with fresh
drinking water; remove the lid of the tank and immerse the lter in
the water, while squeezing the middle section 2 or 3 times so that the
air bubbles can escape (g. 11).
Press
“→
” to pass on to the next step.
8. Locate the lter in the special hous
ing
(g. 12) and push fully home.
Close the water tank with the lid. Press
“→”
to pass on to the next step.
9. Return the water tank to the machine (g. 13).
10. Position an empty container of at least 0.5 litres capacity under the
service/cleaning water spout (D2) (g. 14) and press “Yes” to activate
the lter.
11. The machine delivers hot water (g. 15) and stops automatically.
12. The lter is now operational. Press
“
X
” to go back to the homepage.
Please note:
Remove the service/cleaning water spout
(D2)
and position it in the
holder (if provided) or keep in a safe place. It will be useful when carry-
ing out certain maintenance operations on the machine.
6.6.4.2 Replacing the water lter
The use of a water softener lter (see
heading
"2.4 Installing the water
lter") can be regarded as an item of preventive maintenance that has a
dual purpose:
• to improve the quality of the water that ows through the circuit of
the machine and into your cup;
• to reduce the frequency with which the machine requires descaling.
You can check at any time how long it will be until the lter needs to
be replaced/removed by going to the settings menu → maintenance →
water lter (see heading "5.3 Water lter").
Replace the lter when the
corresponding message appears on the homepage
(see heading "7 FRE-
QUENT PROMPTS AND ALARM MESSAGES")
: to replace the lter immedi-
ately, press “Yes” and follow the instructions on the display from point 4
onwards. To postpone replacement until later, press “No”: the homepage
will now show a reminder alongside the settings menu symbol
(C6)
, in the
form of a yellow dot
"l" (C12)
, to indicate that the lter needs attention
(the message will reappear every time the machine is turned on).
To remove and replace the lter, proceed as follows:
1. Tap
(C6)
on the homepage;
2. Select “Maintenance”, then “Water lter”;
3. Press "Yes" to view the guided procedure;
4. Remove the water tank (A8) and the spent lter: press
“→” to conrm
that the spent water lter has been removed
;

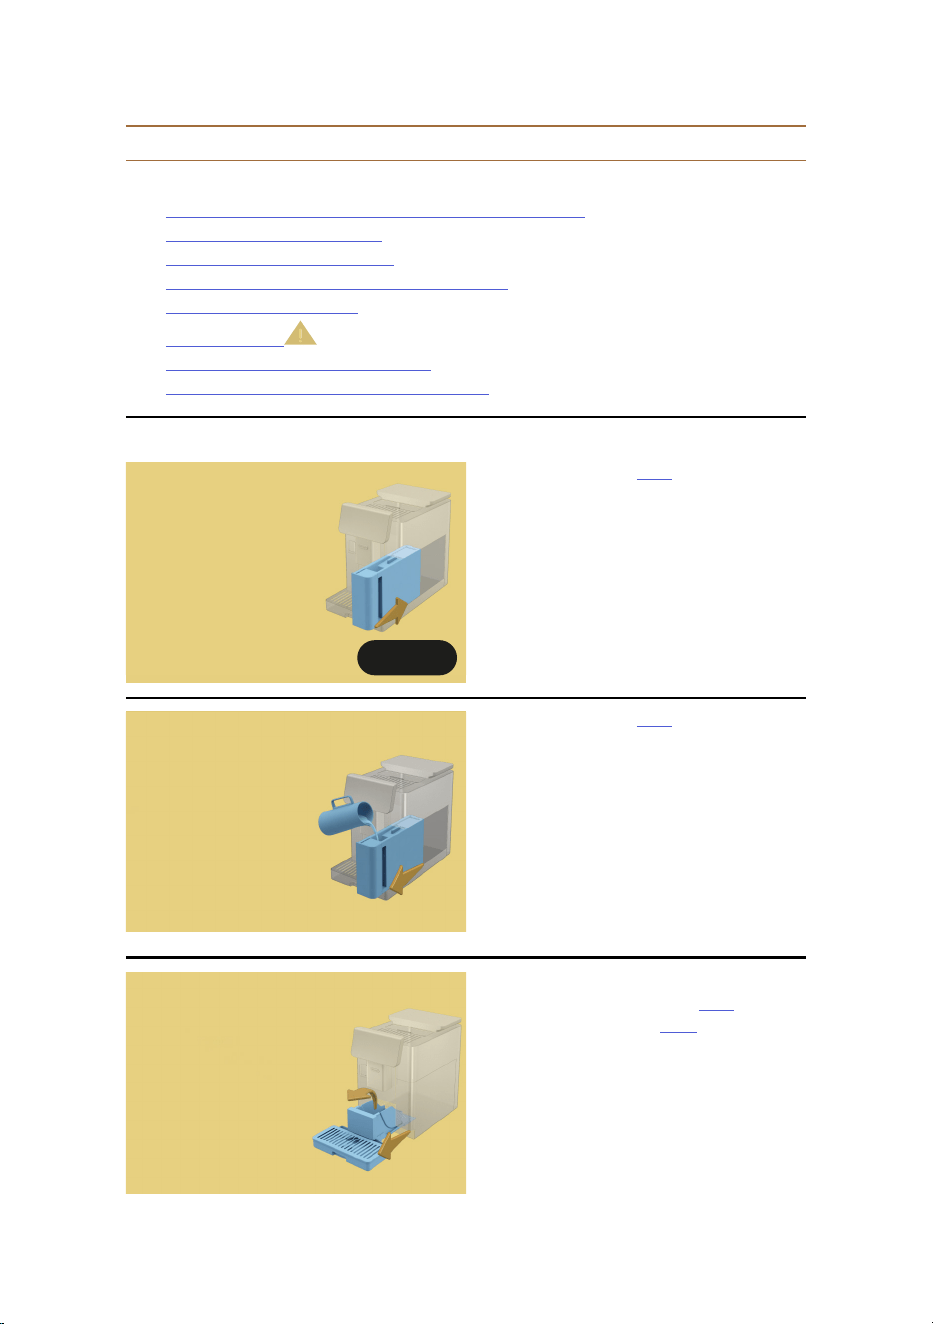
87
Primadonna Aromatic
7 FREQUENT PROMPTS AND ALARM MESSAGES
In this section, you will nd a list of possible prompts and alarm messages, organized as follows.
• Messages regarding the water tank and the coee grounds container
• Messages regarding the water lter
• Messages regarding the brewing unit
• Messages regarding coee beans and pre-ground coee
• Messages regarding the carafes
• Warning messages
• Messages regarding cleaning and descaling
• Messages of a general nature or temperature-related
7.1 Messages regarding the water tank and the coee grounds container
Insert the water tank
• The water tank (A8) is not in place.
• Check that the tank is correctly
in place. Try removing and
repositioning the tank, pushing it
fully home.
Ok
• The water tank (A8) is empty.
• Fill the water tank up to the MAX
level.
It’s time to ll the water
tank with fresh water.
• Too much coee has been used.
• Remove the drip tray (A6) and the
grounds container (A11), empty them
both, then return all parts to the
machine and repeat the preparation.
I am unable to complete
your drink. Please empty
the grounds container and
drip tray and try again.
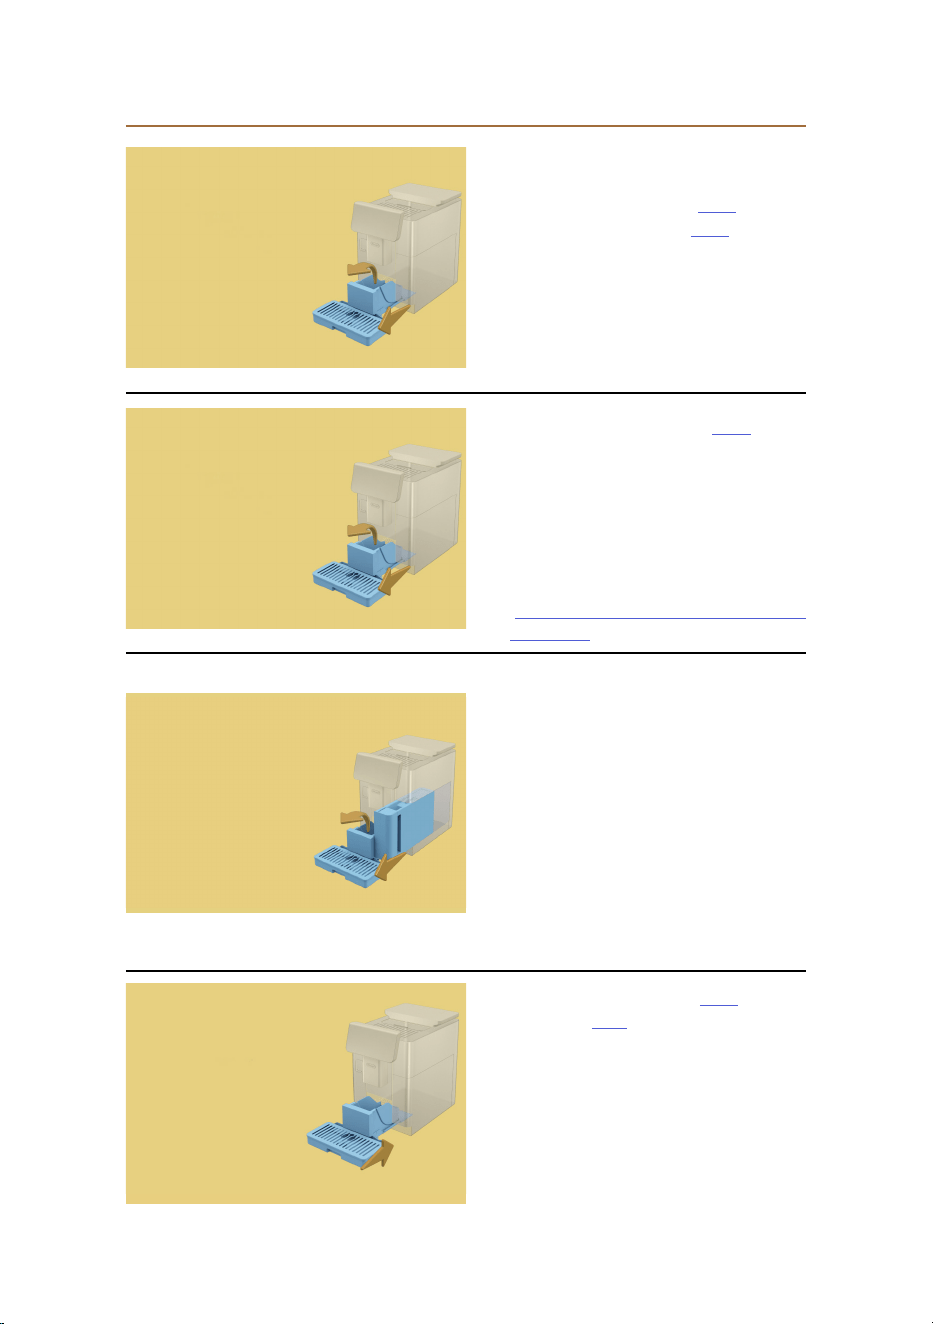
88
Time to empty the grounds
container and the drip
tray. Even if not full, it is
important to clear them
out regularly
• The grounds container (A12) is full
and was emptied more than 72h
ago. (Remember that the grounds
container should be emptied every
72h even if it is not full, to ensure
that unpleasant smells and mould do
not develop).
Clean as described under heading
"6.2.1 Cleaning the grounds
container:".
• If the level of water is low and the
grounds container is almost due
to be emptied, it is advisable to
carry out both these operations at
once. Remember that the grounds
container should be emptied every
72h even if it is not full, to ensure
that smells and mould do not
develop.
The machine asks for both operations
to be done straight away so that
multiple drinks can be prepared
without interruption
Can you empty the drip tray
and the grounds container?
Fill the water tank with
fresh water
• Too much pre-ground coee has
been used
Remove the drip tray (A6) and the
grounds container (A11), empty
them both then return all parts
to the machine and repeat the
preparation, reducing the amount
of pre-ground coee (max 1
scoop).
I am unable to complete
your drink. Please empty
the grounds container and
drip tray and try again.
Reduce the quantity of
pre-ground coffee and try
again. Remember, one
scoop only!
• The grounds container (A12) and the
drip tray (A6) have been removed
from the machine.
Position the grounds container and
the drip tray
Please insert the
grounds container and
the drip tray
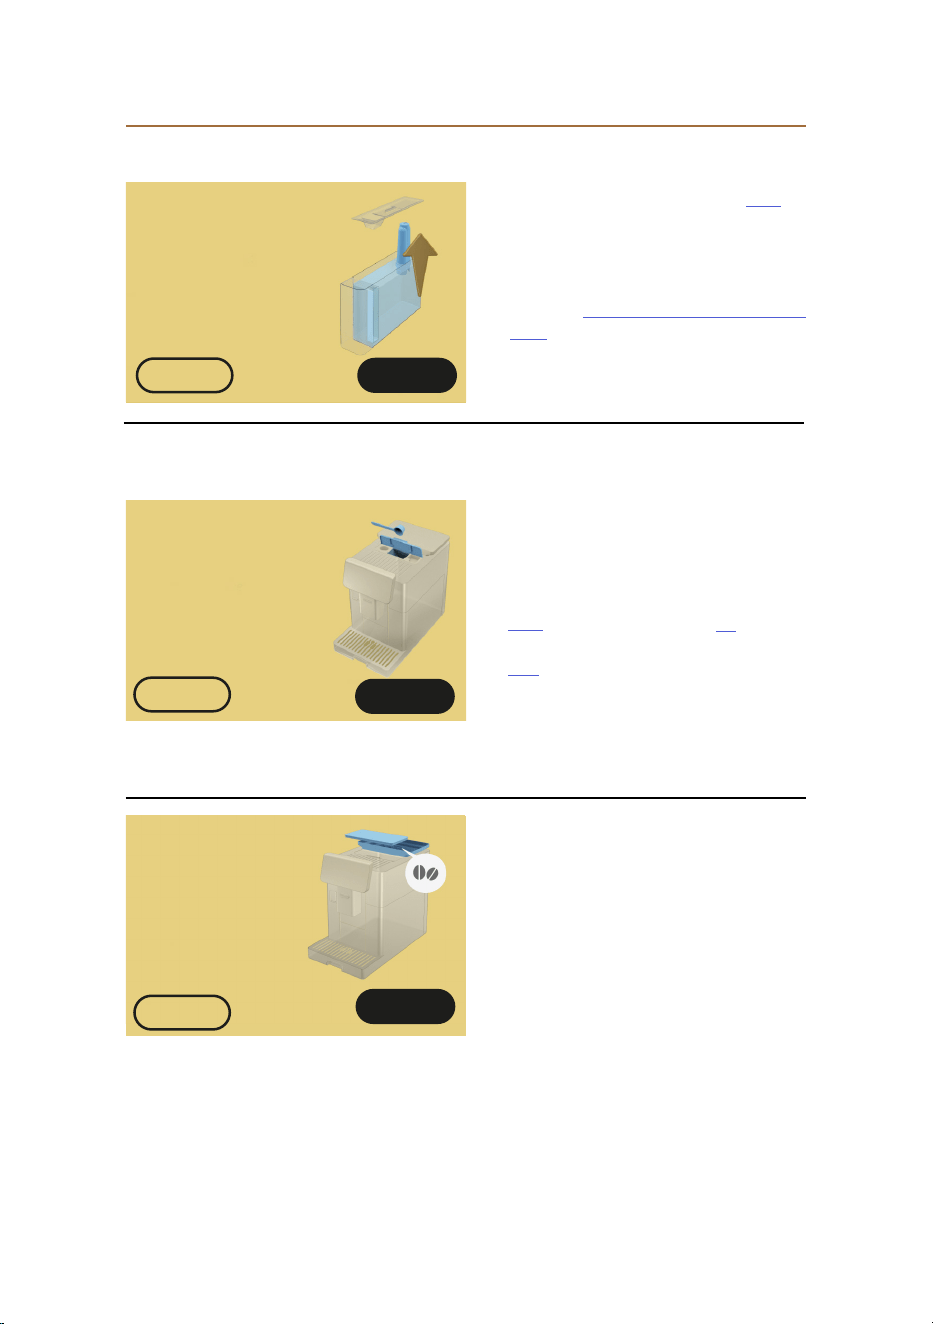
89
• The water softener filter (D8) is
spent.
• Press “Ok” to remove/replace the
filter, or “No” if the intention is to do
it later. Follow the instructions under
heading "6.6.4 Management of water
filter".
YesNo
It's time to replace
your water lter.
Ready?
7.2 Messages regarding the water lter
• Preparation of a drink using pre-
ground coee has been selected,
but the amount of pre-ground coee
inserted is not sucient.
• Make sure, when opening the flap
(A2), that the funnel (D3) is not
blocked, then put in one level scoop
(D1) of pre-ground coee and press
“Ok” to resume preparation.
Are you sure you have
added the pre-ground
coffee?
Add it now One scoop
only!
Ok
• The coee beans have run out.
• Fill the bean hopper and press
“Done” to resume preparation.
Oops! it looks like
you’re out of coffee
beans. Time to add
some more.
Done
7.3 Messages regarding coee beans and pre-ground coee
Cancel
Cancel
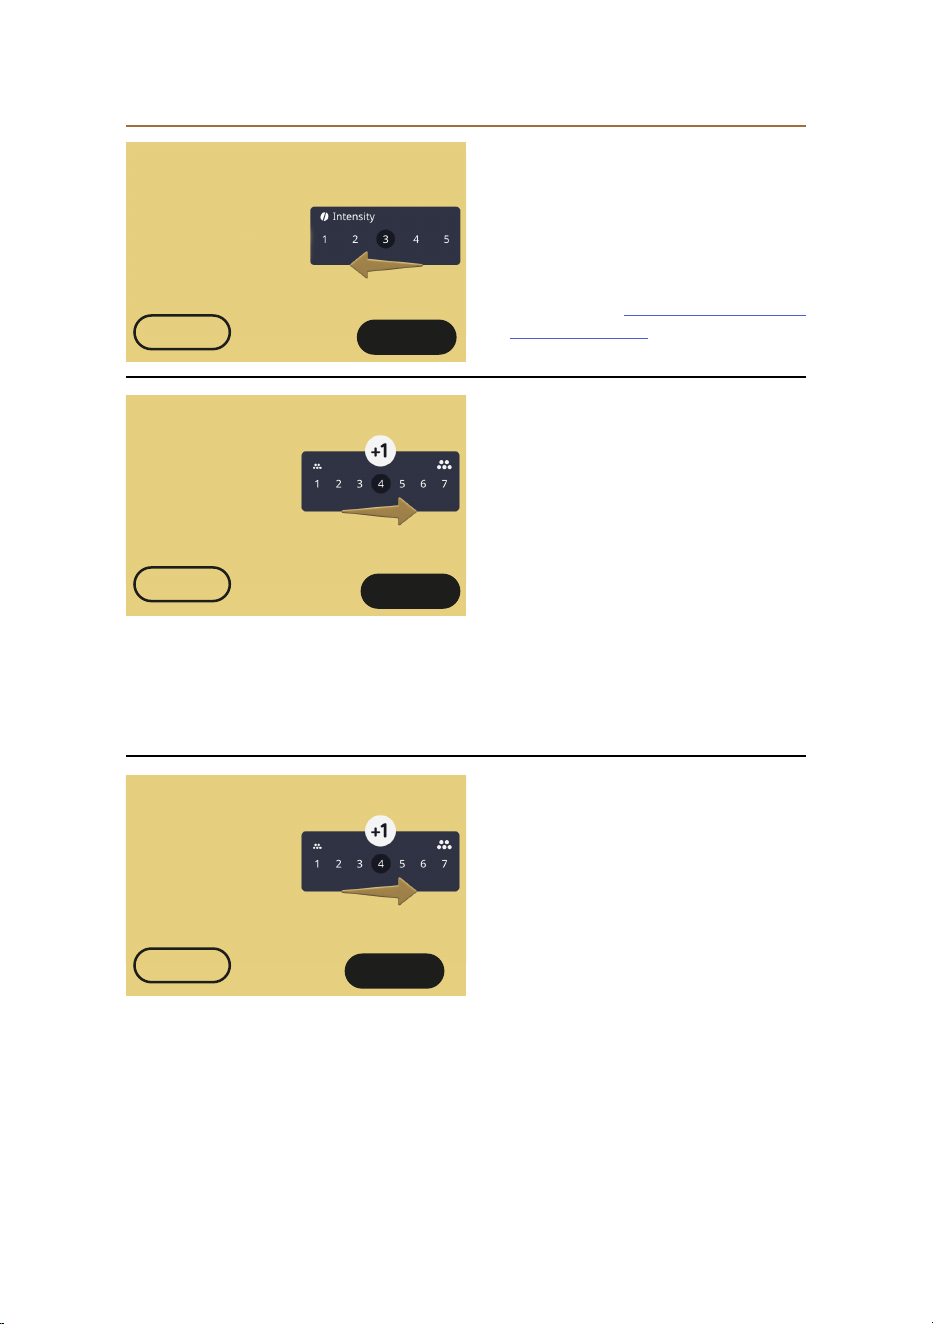
90
I am unable to complete
your drink. I’ll disable
the Bean Adapt function
temporarily and increase
the grinder setting by 1
(+1). You can reactivate
it after the drink has been
delivered Ready?
• The beans are too finely ground,
so that the coee is delivered too
slowly or not at all.
• Press “Yes” to go back to the
homepage: Bean Adapt is disabled
temporarily and the grinder setting
will be increased automatically the
next time that a drink with coee
is prepared (using beans). If the
intention is to reactivate Bean Adapt,
it is advisable to do so only after at
least one drink with coee has been
prepared (using beans) with the new
grinder setting. Press “No” to go
back to the homepage: the grinder
setting will remain as it is currently,
in which case there is a chance that
the alarm could reoccur.
Yes
• The beans are too finely ground,
so that the coee is delivered too
slowly or not at all.
• Press “Yes” to go back to the
homepage: the grinder setting will
be increased automatically the
next time that a drink with coee
is prepared (using beans). Press
“No” to go back to the homepage:
the grinder setting will remain as it
is currently, in which case there is a
chance that the alarm could reoccur.
I am unable to
complete your drink.
I’ll increase the
grinder setting by 1
(+1). Ready?
Yes
• The beans are too finely ground,
so that the coee is delivered too
slowly or not at all.
• Press “Ok” to go back to the
homepage. Repeat the preparation,
selecting a lower intensity setting
from the drink customizations menu
(see heading "4.1.2 Customization of
hot coee drinks").
Sorry, I am unable to
complete your drink.
Go to the settings and
reduce the intensity,
then try again
Ok
No
No
No
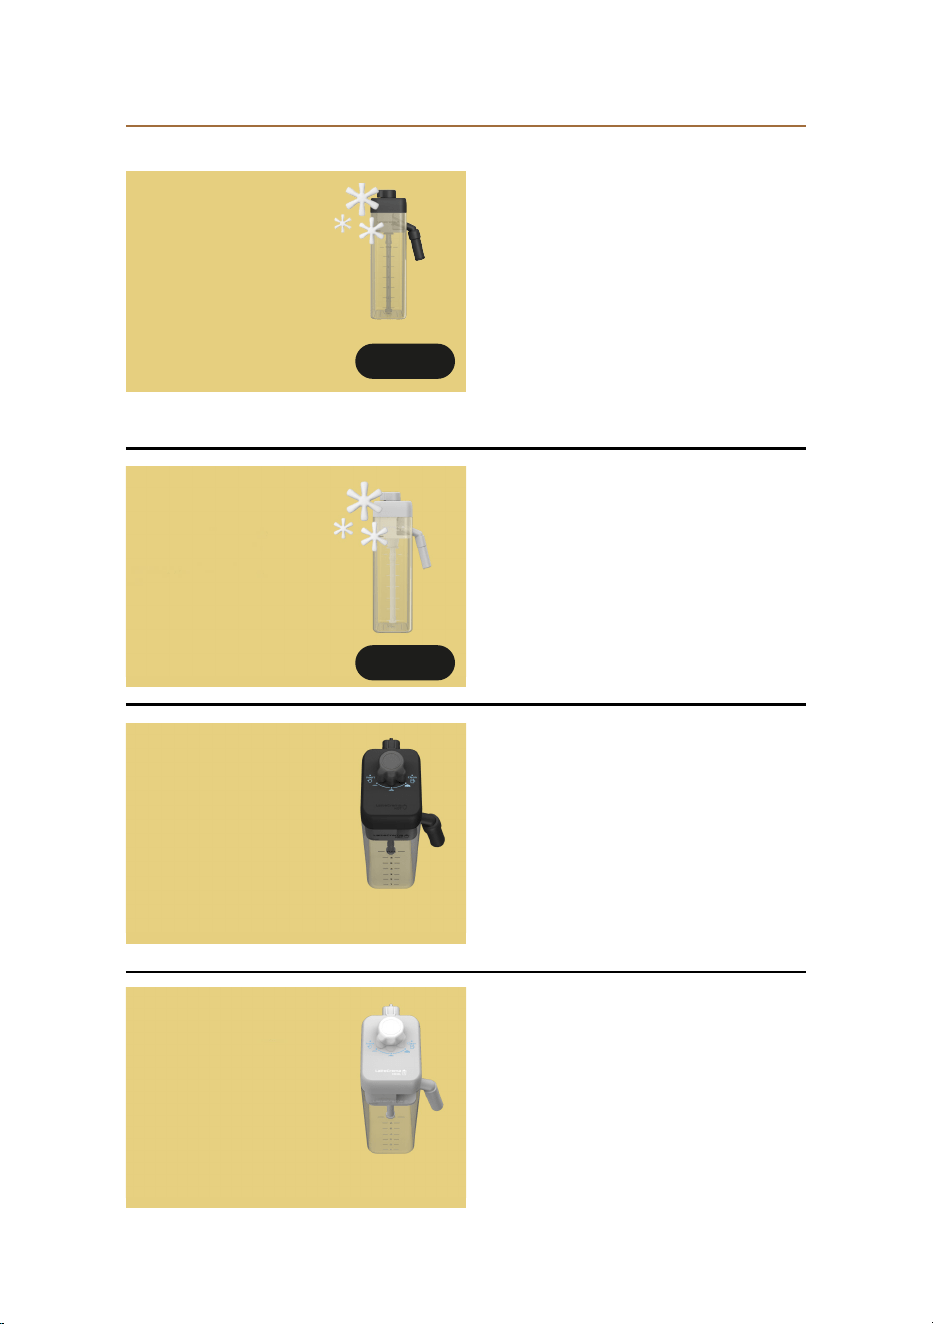
91
• The LatteCrema Hot carafe is still on
the machine.
• Press "Ok" and proceed with other
preparations, or remove the carafe
and place it in the fridge.
Remember to store the
milk carafe in the fridge
Ok
• The LatteCrema Cool carafe is still
on the machine.
• Press "Ok" and proceed with other
preparations, or remove the carafe
and place it in the fridge.
Remember to store the
milk carafe in the fridge
Ok
• The machine has been asked to
make a hot milk-based drink with the
froth adjustment dial in the “Clean”
position.
• Turn the dial to the correct position
and repeat the selection to start
preparing the drink.
• The machine has been asked to
make a cold milk-based drink with
the froth adjustment dial in the
“Clean” position.
• Turn the dial to the correct position
and repeat the selection to start
preparing the drink.
Please turn the carafe
dial to your preferred
milk froth setting
Please turn the carafe
dial to your preferred
milk froth setting
7.4 Messages regarding the carafes
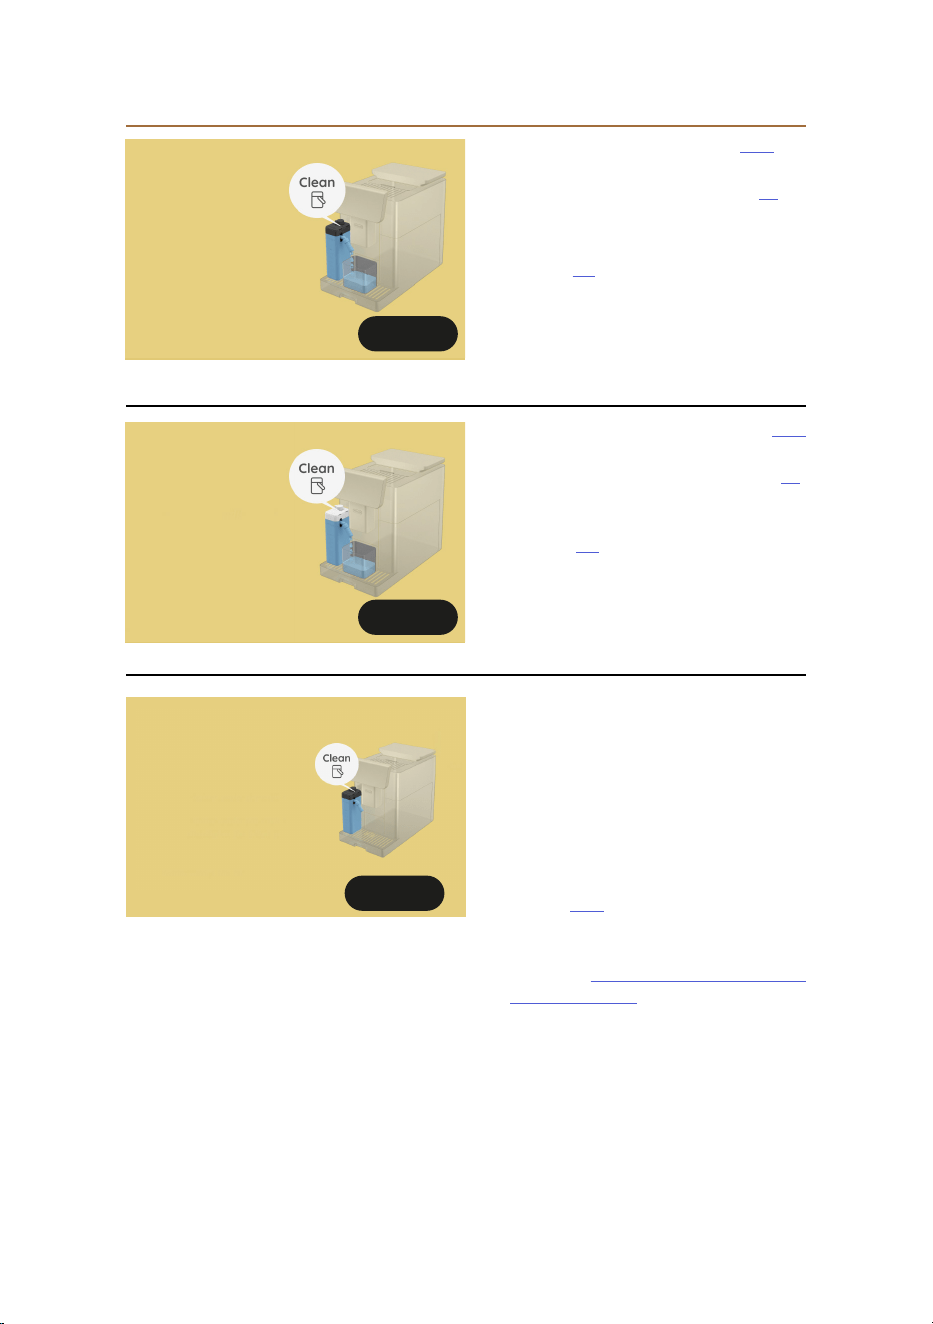
92
• The LatteCrema Hot carafe (D7) has
been placed in the machine with the
froth adjustment/clean dial (E1) in
the “Clean” position.
Position a container under the milk
spout (E3) and press "Yes" to start
the procedure for cleaning the milk
carafe, or turn the dial to a froth
adjustment position and select a
drink
• The LatteCrema Cool carafe (D7)
has been placed in the machine with
the froth adjustment/clean dial (E1)
in the “Clean” position.
• Position a container under the milk
spout (E3) and press "Yes" to start
the procedure for cleaning the milk
carafe, or turn the dial to a froth
adjustment position and select a
drink.
Ready to start the
cleaning process?
Alternatively, you can
turn the dial to one of
the milk froth settings
Ready to start the
cleaning process?
Alternatively, you can
turn the dial to one of
the milk froth settings
Yes
Yes
• If you want to prepare another
drink straight away, press “later”
and proceed to make the drink, but
remember to carry out the cleaning
procedure by turning the dial to
Clean, before removing the carafe
and placing it in the fridge. Every
time a hot milk-based drink has been
prepared, the machine asks for the
carafe (D7) to be cleaned (Clean
function).
• Proceed as indicated under the
heading "6.2.3.1 Cleaning the milk
carafe after use" (Clean function).
Position a container
under the milk spout.
Turn the dial to Clean
Later
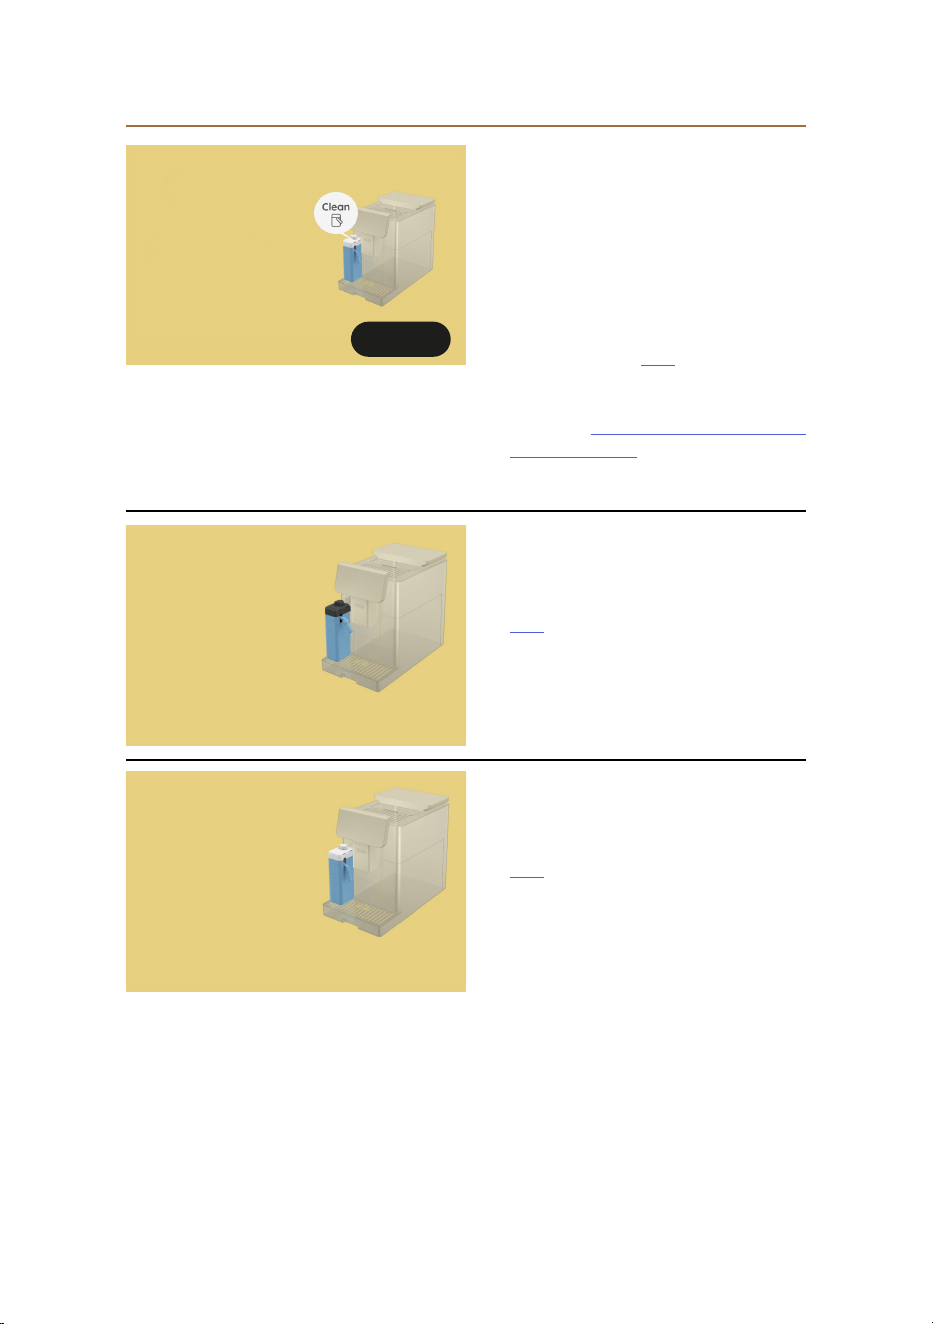
93
• If you want to prepare another
drink straight away, press “later”
and proceed to make the drink, but
remember to carry out the cleaning
procedure by turning the dial to
Clean, before removing the carafe
and placing it in the fridge. Every
time a cold milk-based drink has
been prepared, the machine asks
for the carafe (D7) to be cleaned
(Clean function).
• Proceed as indicated under the
heading "6.2.3.1 Cleaning the milk
carafe after use" (Clean function).
Position a container
under the milk spout.
Turn the dial to Clean
Later
• The machine has been asked to
make a drink with hot milk, but the
carafe is not in position.
• Position the LatteCrema Hot carafe
(D7)
• The machine has been asked to
make a drink with cold milk, but the
carafe is not in position.
• Position the LatteCrema Cool carafe
(D7)
Can you insert the
LatteCrema Hot carafe?
Can you insert the
LatteCrema Cool
carafe?
94
• The machine has been asked to
make a drink with hot milk, but using
the wrong milk carafe (LatteCrema
Cool carafe).
• Remove the carafe intended
for cold milk drinks and use the
carafe designed for hot milk drinks
(LatteCrema Hot carafe).
• The machine has been asked to make
a drink with cold milk, but using the
wrong milk carafe (LatteCrema Hot
carafe).
• Remove the carafe intended for
hot milk drinks and use the carafe
designed for cold milk drinks
(LatteCrema Cool carafe).
You are using the
LatteCrema Hot carafe
Please change the
carafe or your choice
of drink
You are using the
LatteCrema Cool carafe
Please change the
carafe or your choice
of drink
• An error occurred during the
preparation of an Espresso with
Intensity set on Bean Adapt and with
the Refine function not enabled for
the bean profile in use.
• Press “Ok” to go back to the
homepage, tap on the customization
bar C8 under Espresso, select a
lower intensity and try delivering
the drink again. If the alarm appears
during the process of creating a
new Bean Adapt bean profile, press
“Ok”and go back to the Espresso
delivery screen. Now press the
“Deliver” button to try again.
Oops, something went
wrong.
Try again.
Ok
1.1 Warning messages
95
• Indicates that the machine needs
descaling.
• If the intention is to proceed with
descaling, press “Yes” and follow the
guided procedure, otherwise press
“No”: in this case, a yellow dot "l”
(C12) will appear on the homepage
next to the settings menu symbol
(C6) as a reminder that descaling
is required (see heading "6.6.3
Descaling").
Yes
It's time to descale. Ready to
start?
(~ 25 min)
Oops, the process has
been interrupted. Ready to
continue?
• Installation/replacement of filter
interrupted or not completed
correctly.
• Press “Yes” to continue (see heading
"6.6.4 Management of water filter").
Yes
• The water circuit is empty.
• Press "Yes" to fill the circuit: the flow
of water will stop automatically. If
the problem persists, make sure
the water tank (A8) is pushed fully
home.
• A new water softener filter (D8) has
been installed.
• Make sure that the instructions for
installing the new filter (see heading
“6.6.4 Management of water filter”)
have been followed correctly. If the
problem persists, remove the water
filter.
The water circuit is out
of water. Ready to rell?
Yes
No
96
• Request to set the day and time
again.
• Press “→” to go to the next screen
and set the day and time, then press
"Ok" to confirm and go back to the
homepage.
Oops! I forgot what
time and what day it
is. Please, set them
again to continue using
Coffee Routines
→
• An error occurred during the
preparation of an Espresso with
Intensity set on Bean Adapt and with
the Refine function enabled for the
bean profile in use.
• Press "Ok" to go back to the
homepage, select Bean Adapt
Technology by tapping the relative
symbol (C3), then the "..." button for
the profile of the bean in use; now
tap on the box at the bottom right to
access the Refine process for your
bean profile and follow the guided
procedure on the display, step by
step.
Oops, something went
wrong. Use the “Rene”
option in the Bean
Adapt prole for the
beans being used and
try again
Ok
Oops, the descaling process
has been interrupted. Ready
to continue?
• Descaling interrupted or not
completed correctly
• Press “Yes” to continue (see heading
"6.6.3 Descaling").
Yes
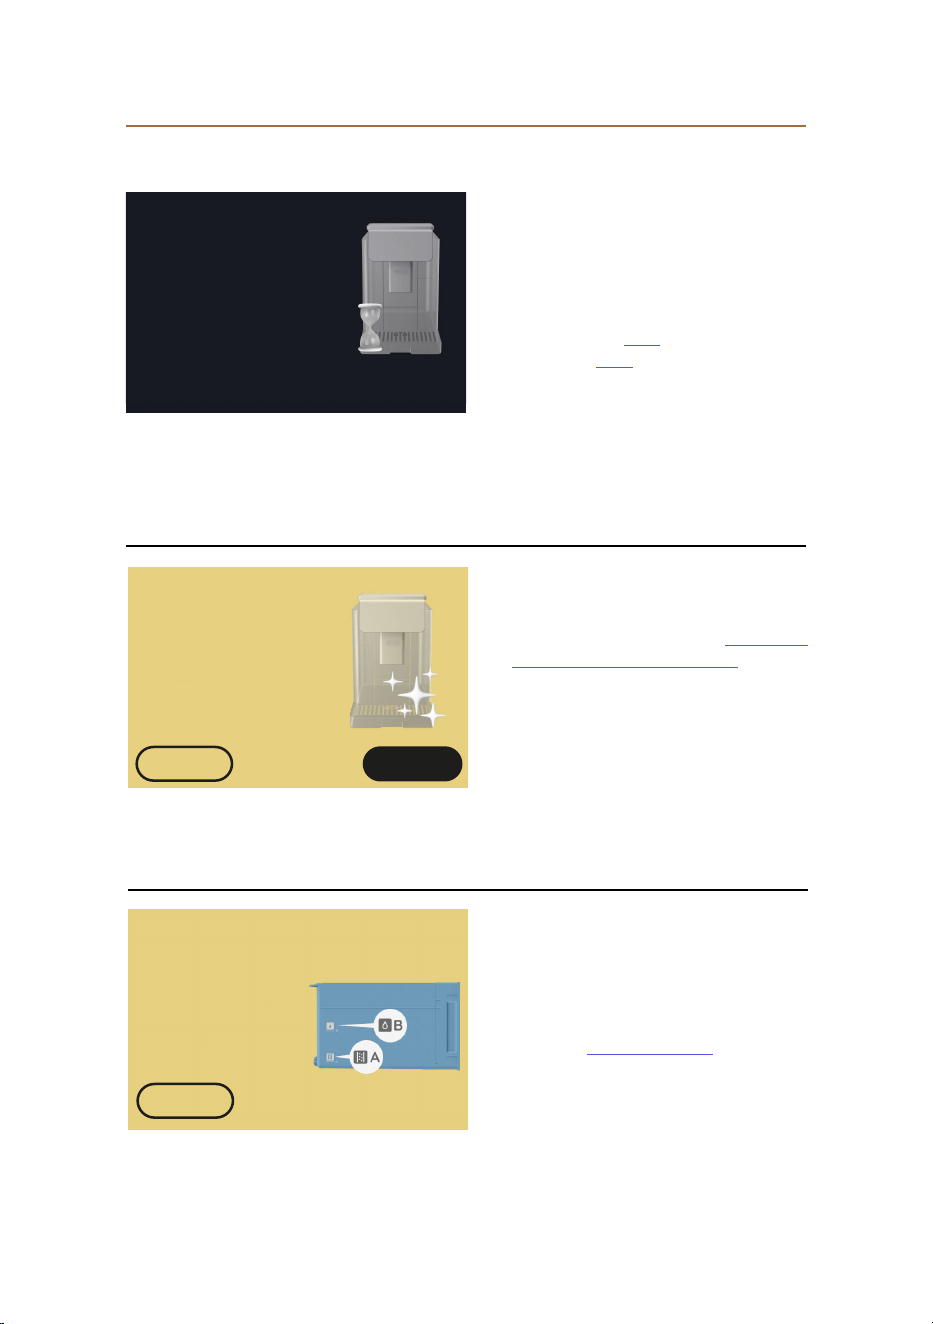
97
• The machine has detected impurities
in its internal circuits.
• Wait until the machine completes
the cleaning cycle and displays
the message to empty the coee
grounds and the drip tray: remove
the drip tray (A6) and the grounds
container (A11), empty them both,
then return them to the machine
and repeat the preparation. Contact
an Authorized Service Centre if the
problem persists.
Just doing a little
cleaning. Back in a
moment.
• Deep cleaning of the machine when
prompted: “Yes” button: first step
in the process of deep cleaning the
machine (see heading "6.6 Deep
cleaning of the machine"). “No”
button: The alarm will appear every
time the machine is switched on,
until the deep cleaning process
has been carried out (see relative
heading).
• Start and completion of the deep
cleaning process
Time to clean your
machine. Ready to
start?
(~ 10 min)
Yes
←
• During the guided procedure for
preparation to start the descale
cycle, the quantity of descaling
solution put into the water tank was
not sucient
• Prepare the solution as described in
heading "6.6.3 Descaling".
Add De'Longhi descaler
(up to Level A), top up
with water (to level B),
then reinsert the tank
7.5 Messages regarding cleaning and descaling
No
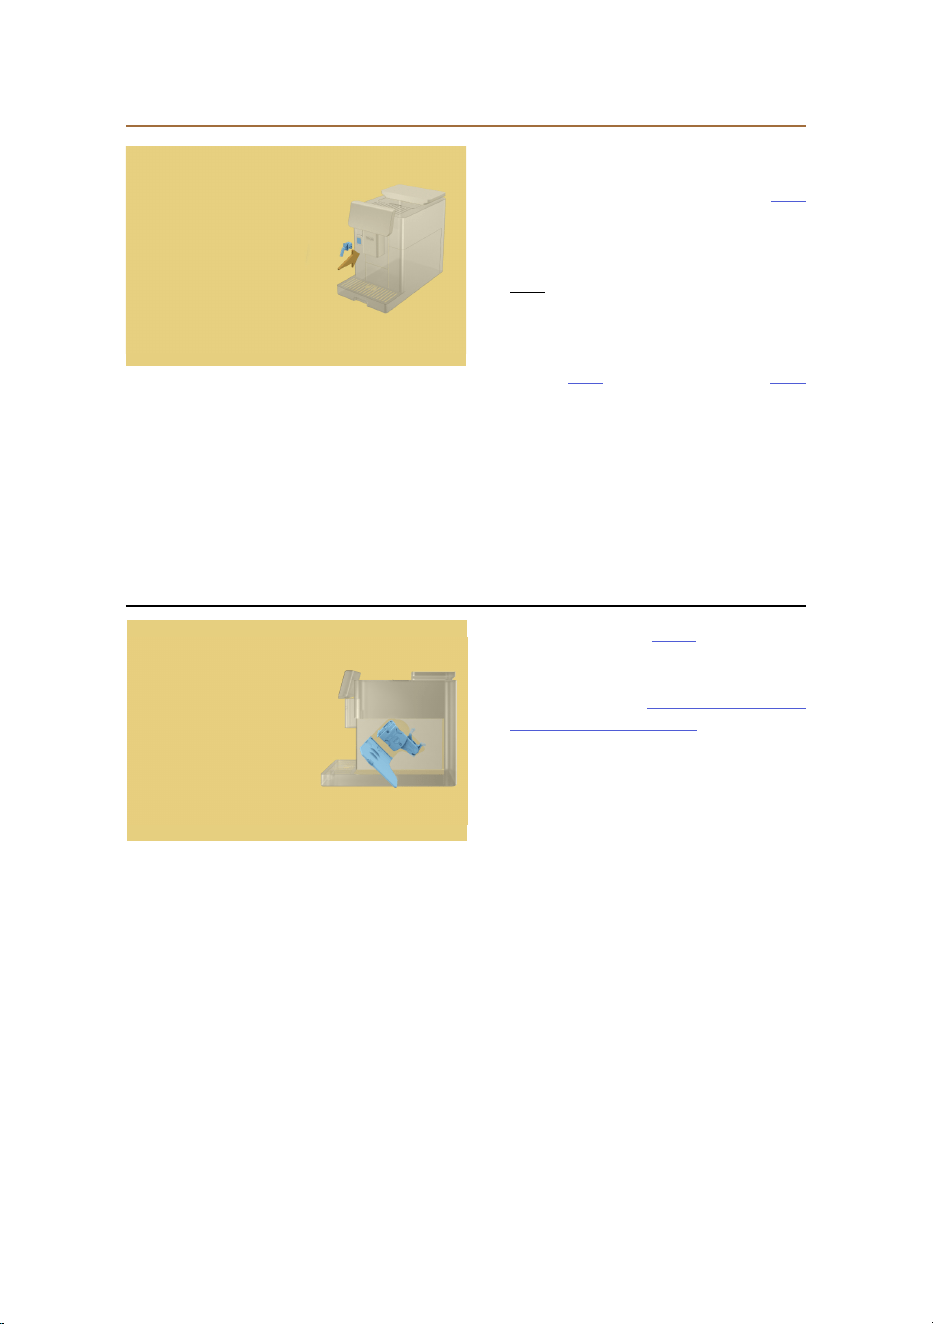
98
• A prompt has been given to start
a function requiring the use of the
service/cleaning water spout (D2)
but the accessory has not been
fitted to the machine.
• The service/cleaning water spout
(D2) was detached during the
process of descaling the machine or
emptying the water circuit.
• Attach the service/cleaning water
spout (D2) to its connector (A5)
and push fully home, to the point of
hearing the beep (if activated), and
repeat the operation.
Insert descaling spout
• The brewing unit (A19) has not been
reinserted after cleaning.
• Refit the brewing unit as described
under heading "6.6.2 Cleaning the
removable brewing unit".
Can you insert the brewing
unit?
99
• General alarm
• Contact customer services and/or
an authorized Service Centre.
Something's not right:
Can you refer to the
user manual please?
Ok
• Malfunction of internal cooling fan.
• Contact customer services and/or
an authorized Service Centre.
Machine cooling system
failure. Can you refer
to the user manual
please?
Ok
• Everything OK. Every time hot milk
is delivered, the machine cools
the boiler down to a temperature
suitable for delivering coee.
• Wait until the process is completed.
I need to cool down
now. It won’t take long.
7.6 Messages of a general nature or temperature-related

100
Primadonna Aromatic
• Machine does not switch on
The cord (A7) is not plugged firmly into the mains socket
The main switch (A11) is not pushed in (see heading "3.1.1 Turning on").
• Coee not hot (1)
It has been 2-3 minutes since the last preparation and the internal
circuit of the machine has cooled down: in this situation, a hot rinse is
advisable.
Tap on the homepage to go the settings menu
(see heading "5.5 Rinsing").
• Coee not hot (2)
The cups have not been preheated.
Warm the cups by rinsing them with hot water.
(Please note: the function described under heading “4.5 Delivering hot
water” can be used).
• Coee not hot (3)
The temperature set for preparation of the coee is too low. Select a
higher temperature as indicated below:
Tap on the homepage to go to the settings menu (see heading "4.7
Tips for a Perfect coee").
• Coee not hot (4)
Descaling is required: proceed as described under heading "6.6.3
Descaling".
This done, check that the water hardness setting is right for the water
provided by your local supplier (see heading “2.2 Check the water
hardness” and “2.3 Setting water hardness”).
• Coee weak or not creamy enough (1)
The coee beans are ground too coarsely. Activate Bean Adapt (C3) or
adjust the grinder setting directly:
tap on the homepage to go to the general settings menu (see
heading "5.13 Grinder settings").
8 FAQ
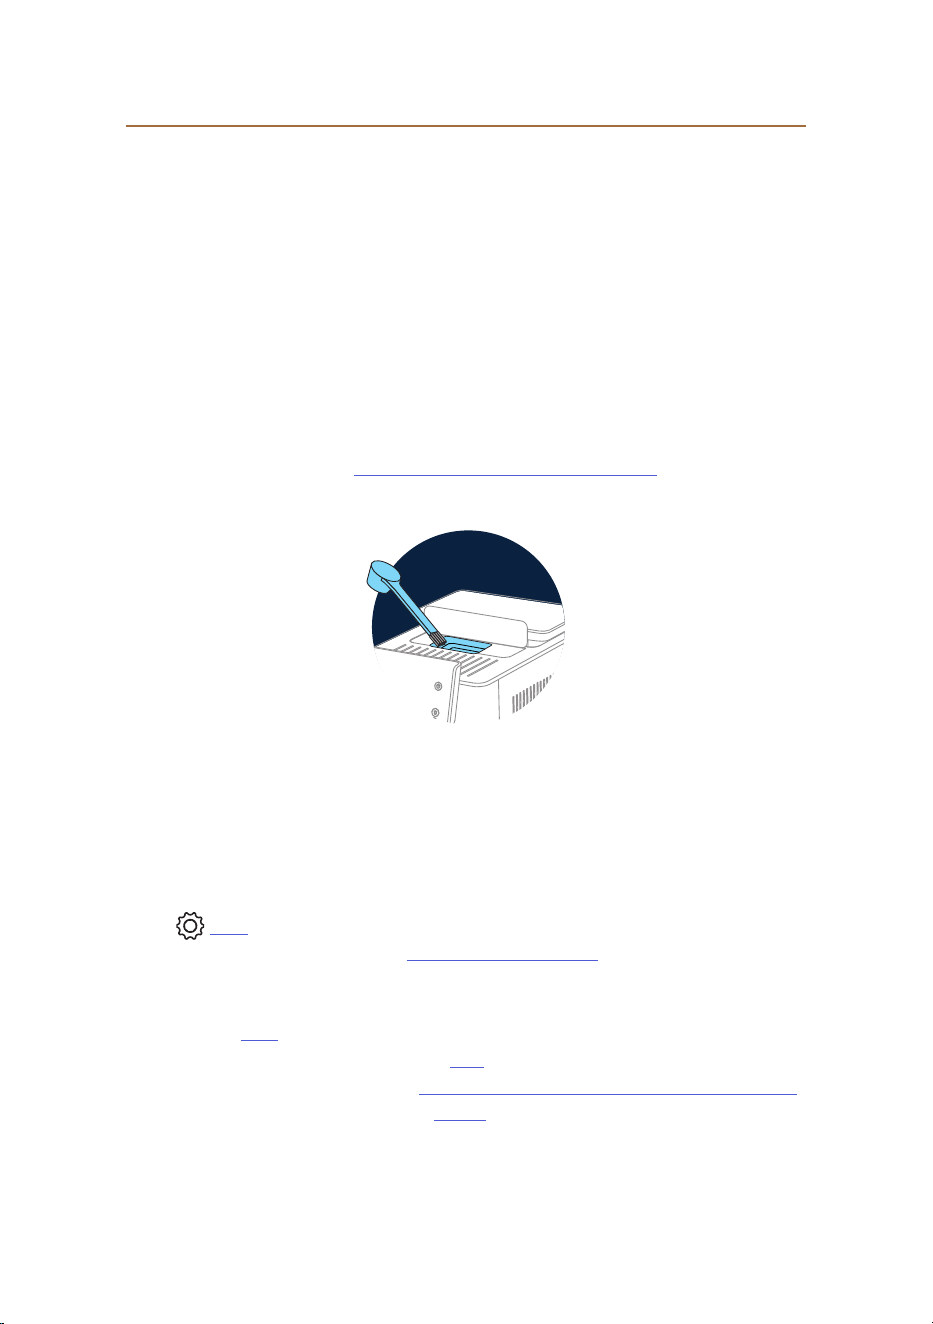
101
• Coee weak or not creamy enough (2)
The coee is unsuitable.
Use coee for espresso machines.
• Coee weak or not creamy enough (3)
The coee is not fresh: the pack has been open too long and it has lost
its flavour.
• Coee delivered from the spout is watery
If the Bean Adapt function is active, check the settings, or change the
aroma of the drink.
The funnel is clogged and needs to be cleaned as indicated under
heading "6.2.4 Cleaning the coee funnel".
• Coee delivered too slowly or drop-by-drop
If the Bean Adapt function is active, check the settings.
The coee is ground too finely. Adjust the grinder setting directly:
tap (C6) on the homepage to go to the general settings menu (see
heading "5.13 Grinder settings").
• Coee does not come out of one or both nozzles of the drinks
spout. (A3)
The nozzles of the drinks spout (A3) are clogged. Clean the nozzles
as described under heading "6.2.5 Cleaning the nozzles of the drinks
spout".
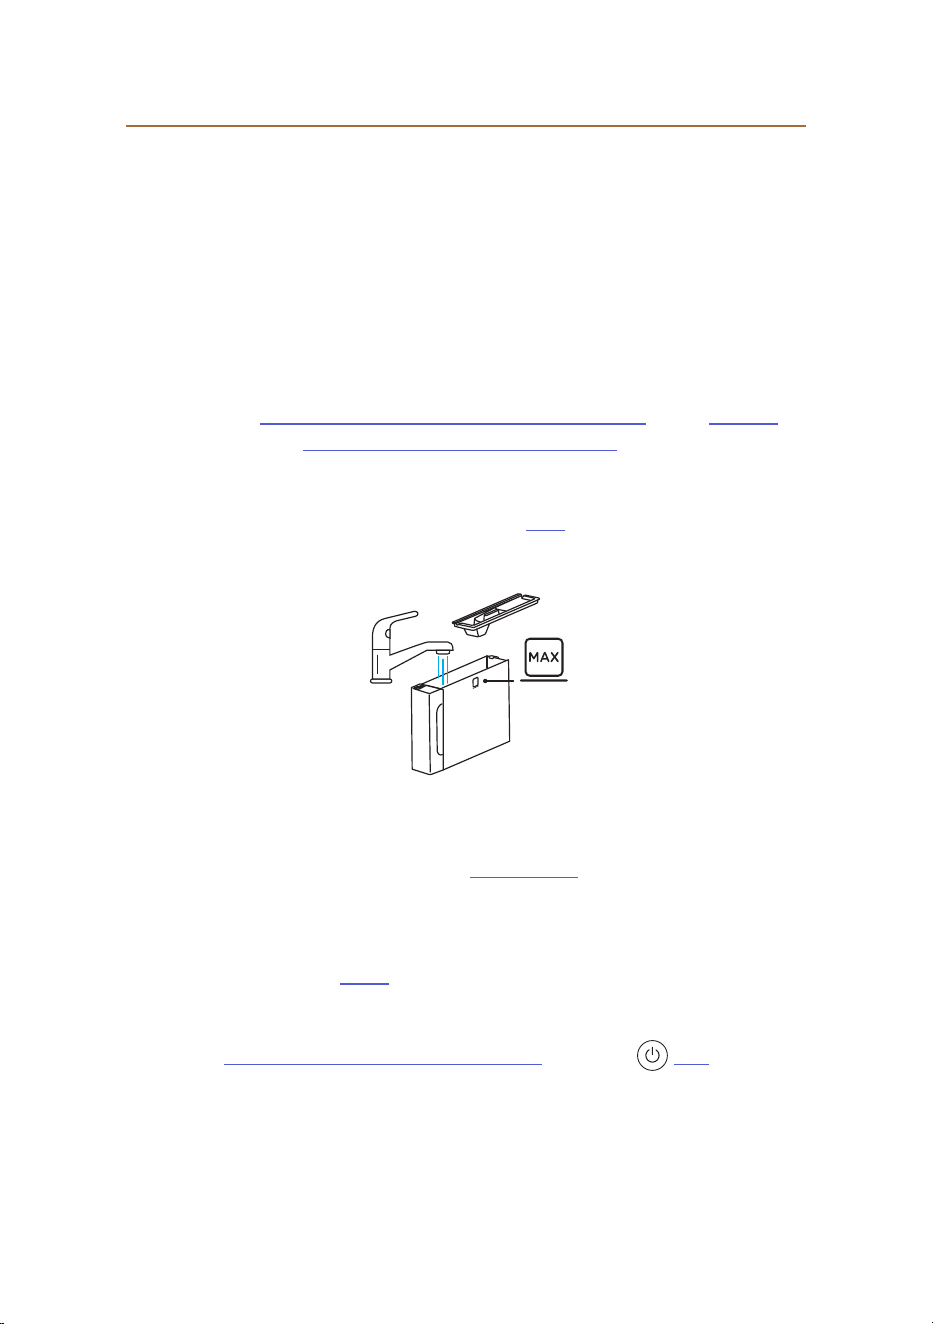
102
• Milk presents large bubbles, or splashes from the milk spout, or is
under-frothed (1).
Use cow’s milk or vegetable drinks at refrigerator temperature (about
5° C).
If the result is still not as expected, try changing the brand of milk.
In the case of vegetable drinks, use “Barista” versions for best results.
• Milk presents large bubbles, or splashes from the milk spout, or is
under-frothed (2).
Clean the lid of the milk carafe thoroughly, as described under
headings "6.2.3.1 Cleaning the milk carafe after use" and "6.2.3.2
Thorough cleaning of milk carafe".
• Drink delivered short of measure
The amount of water in the tank (A8) is not sucient.
Always fill the tank at least to the MAX level.
• “To go” drink too long or spilling from the travel mug
The quantity selected does not match the size of drink (To go= 236 ml)
(see heading "4.8.2 To Go").
• The brewing unit (A19) cannot be removed.
The brewing unit can be removed only when the deep cleaning
procedure is selected or with the machine switched o. Refer to the
heading "6.6 Deep cleaning of the machine" or press
(B1) to switch
the machine o.
MAX

103
• Cup shelf (A10) very hot.
Several drinks have been prepared in rapid succession.
If the cup shelf needs to be removed, use the handle designed for the
purpose or wait a few minutes for the metal parts to cool.
• Following descale cycle, machine calls for a second rinse.
During the rinse cycle, the tank (A8) was not filled to the MAX level
Follow the procedure indicated by the machine, but first empty the drip
tray (A6) to avoid water overflowing.
Refer to heading "6.6.3 Descaling".
• Machine emits pus of steam from the drip tray (A6) and/or
there is water on the surface where the machine is positioned.
The drip tray grille (A15) was not returned to its position after cleaning.
Reposition the grille in the drip tray.
• App not working
The App has a malfunction Close the App, then run it again.

104
Primadonna Aromatic
Voltage: 220-240 V~ 50-60 Hz max. 10 A
Power: 1450 W
Pressure: 1.9 MPa (19 bar)
Water tank capacity:
2.2l
Size LxDxH: 262x485x390 mm
Cord length:
1250 mm
Weight (varies according to model): 12/13 kg
Max bean hopper capacity: 500 g
De'Longhi reserves the right to modify the technical specication and styl-
ing of its products at any moment, without compromising their functional-
ity and quality.
Tips for Energy Saving
• To reduce energy consumption, after delivering one or more drinks,
remove milk carafes or accessories.
• Select the lowest time setting for the auto-o function (see heading
"5.8 Auto-o"
);
• Activate Energy Saving (see heading "5.10 Energy saving"
);
• Always carry out the descaling cycle when prompted by the machine.
9 TECHNICAL DATA

57132C9075_01
_0125