PROPANE
PIZZA OVEN
MODEL NUMBER: UNQ-PZ12CTH LP, UNQ-PZ16CTH LP
OWNER’S GUIDE
serial number:
JULY25V1

2
TABLE OF CONTENTS
Congratulations! You have purchased one of the most efcient cooking products available on the market to-
day. We are proud of our quality products and we believe in the dependable service we provide.
Before using the appliance, read through this manual carefully including all the information on safety, instal-
lation, operation, and cleaning. These guidelines do not cover every possible condition or situation that may
occur. Be safe using common sense and caution when installing, operating and cleaning this appliance. If you
are unsure about any of these instructions or warnings, contact your local product dealer or Unique Appliances
for assistance.
Before you call for service, here are a few things you can do to help us serve you better.
Read this owner’s manual carefully before installing and using your appliance: It contains instructions to
help you use and maintain your appliance properly. We are not responsible for the damage occurred due to
misuse.
Follow all instructions on your appliance and instruction manual, and keep this manual in a safe place to
resolve any problems that may occur in the future.
Visit our website: Our website www.UniqueAppliances.com will give you access to self service tools, FAQs
and much more.
If you receive a damaged appliance: Immediately contact the retailer that sold you the appliance.
Save time and money: Check the troubleshooting section at the end of this manual before calling. This
section will help you solve common problems that may occur.
WELCOME
NEED HELP?
CALIFORNIA PROP 65 WARNING
WARNING
This product can expose you to chemicals including Diisononyl Phthalate (DINP)
which is known to the State of California to cause cancer.
For more information go to www.P65Warnings.ca.gov
Important safety information .............................3
Best practices for safety ....................................6
Parts included .....................................................7
Assembly .............................................................8
Connecting the gas cylinder ...............................9
Disconnecting the gas cylinder ....................... 10
Converting to xed fuel systems .................... 11
Operation .......................................................... 13
Care and maintenance ..................................... 14
Troubleshooting ............................................... 16
Rating plate ...................................................... 17
Warranty ........................................................... 18
Appliance information ..................................... 19
Product registration ......................................... 19
Contact us ........................................................ 19
3
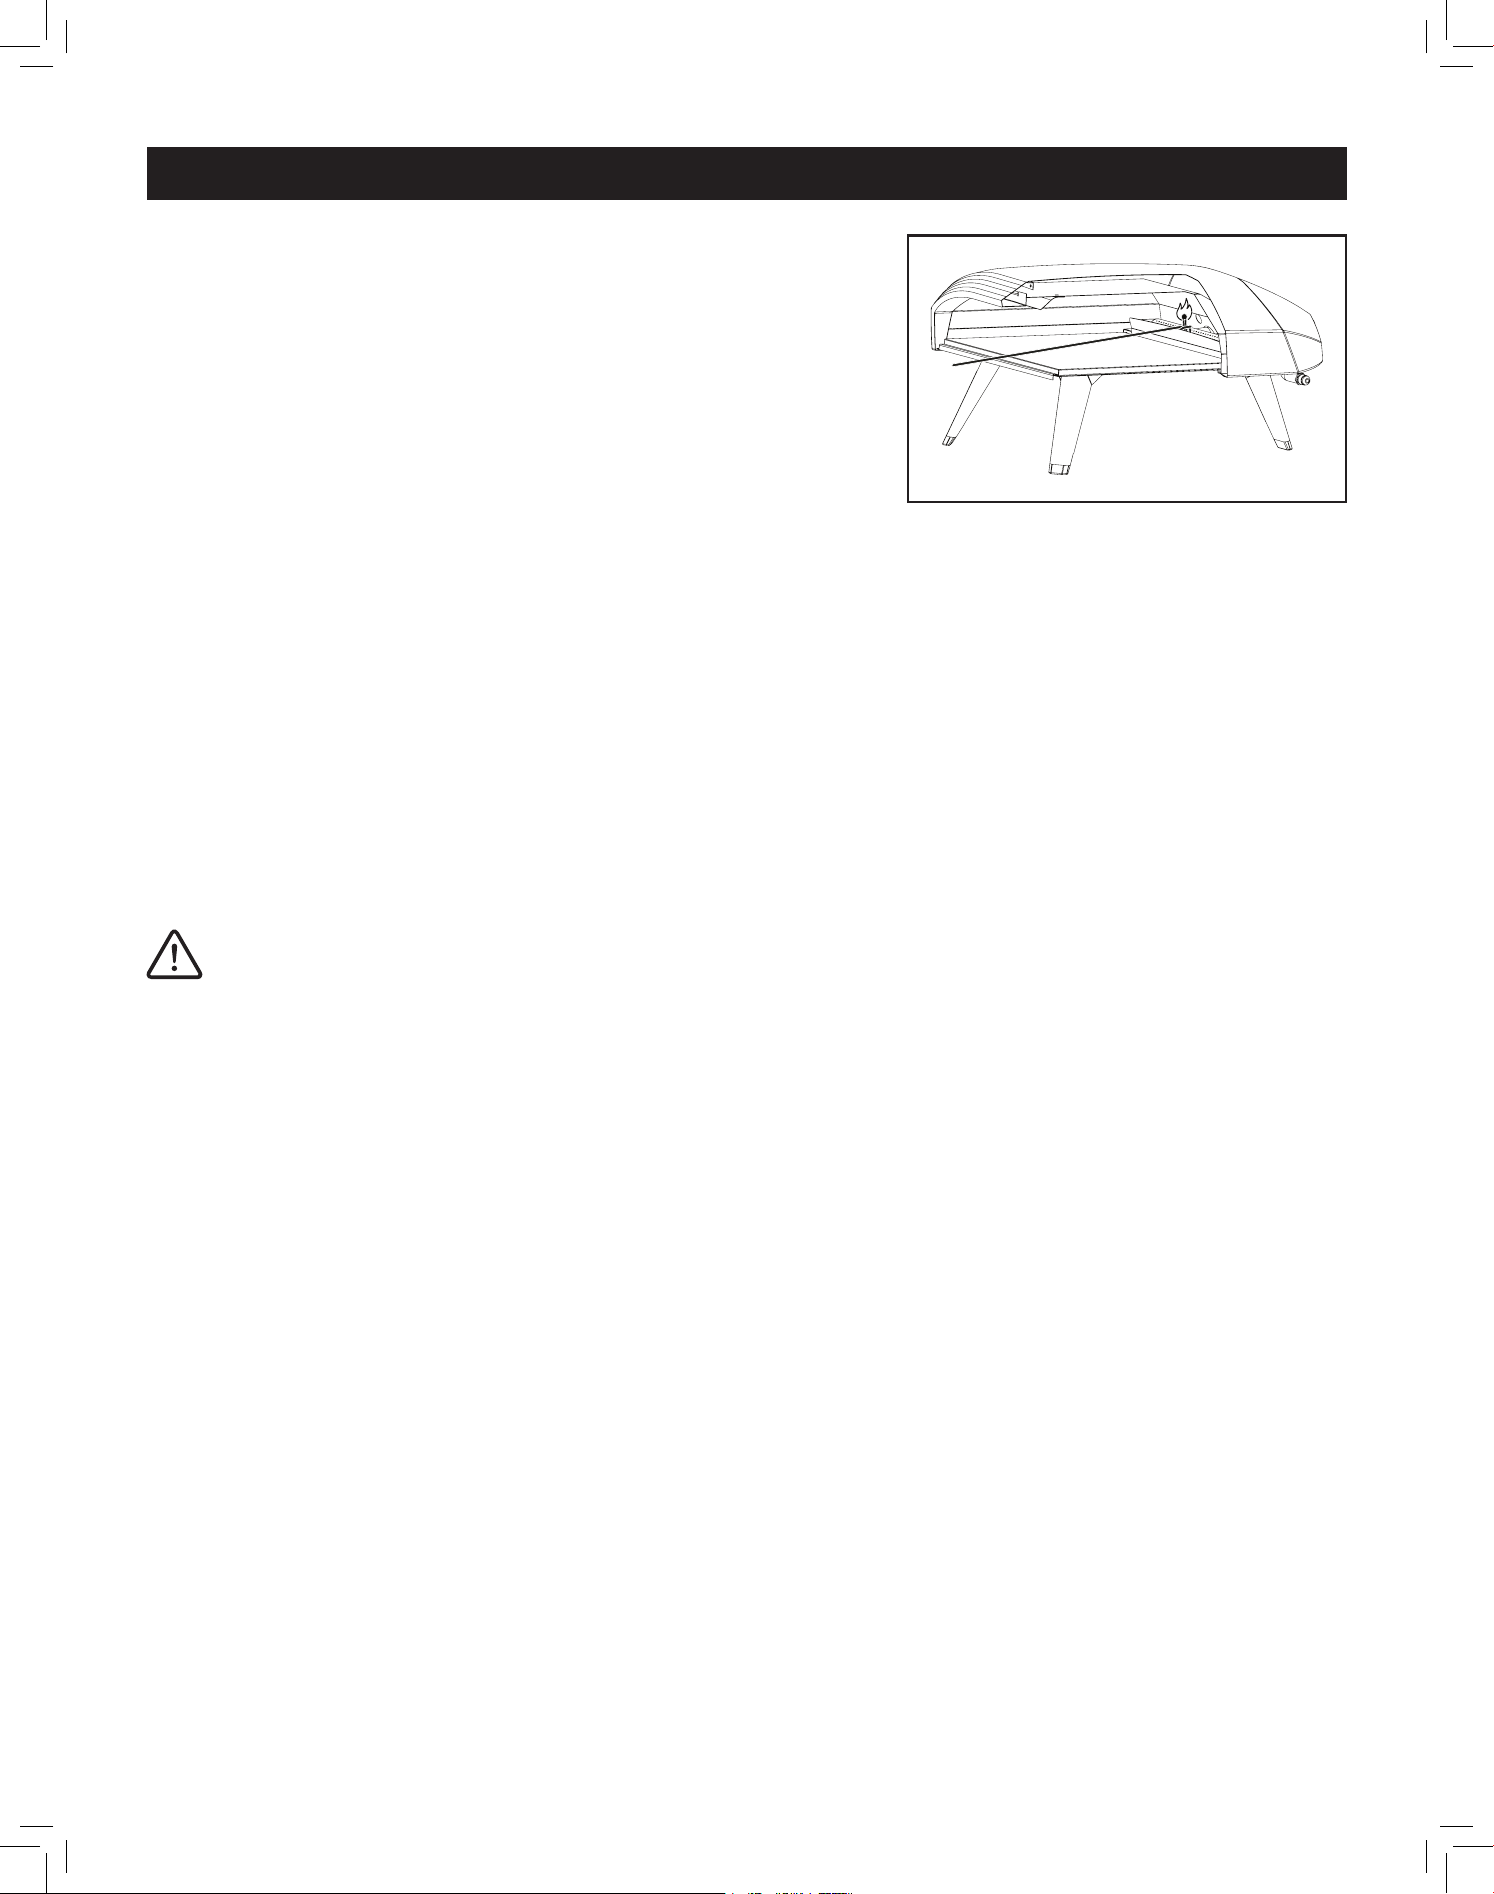
IMPORTANT SAFETY INFORMATION
These warnings are provided in the interest of your safety. Please ensure that you understand them before
installing or using this pizza oven. Your safety is of paramount importance. To reduce the risk of re, burn
hazard or other injury, read this safety manual carefully and completely before using this appliance. If you
are unsure about any of these meanings or warnings, contact your local product dealer or Unique Appliances
for assistance.
This instruction manual contains important information necessary for the proper assembly and safe use of the
appliance. Read and follow all warnings and instructions before assembling and using the appliance. Follow all
warnings and instructions when using the appliance.
This manual includes a list of required parts necessary for the safe operation of the appliance, directions for
proper assembly and for assembly of installed parts and accessories supplied with the appliance, and proper
procedures for gas leak testing. Keep this manual for future reference.
DANGER
• Never operate this appliance unattended.
• If a re should occur, keep away from the appliance and immediately call your re department. Do not at-
tempt to extinguish an oil or a grease re with water.
• Failure to follow these instructions could result in re, explosion or burn hazard which could cause property
damage, personal injury or death.
If you smell gas:
• Shut off gas to the appliance.
• Extinguish any open ame.
• If odor continues, keep away from the appliance and immediately call your gas supplier or re department.
Failure to follow these instructions could result in re, explosion or burn hazard which could cause property
damage, personal injury or death.
WARNING
FOR OUTDOOR USE ONLY
• The appliance is a portable pizza oven for outdoor use. It is not intended for commercial use. Any other use
or modication of this appliance is considered improper use and may pose considerable danger.
• This appliance is set to supply butane/propane mixture gas using a 50 millibar regulator.
• Keep the fuel supply hose away from any heated surface(s).
• Do not use this oven on or under any apartment or condominium balcony or deck.
• This appliance is not intended to be installed in or on a boat or in/on a recreational vehicle.
• This appliance is intended only for outdoor use, and should not be used in a building, garage, or any other
enclosed area.
• Minimum clearance from sides of unit to combustible construction is 610mm (24 inches).
• Minimum clearance from back of unit to combustible construction is 915mm (36 inches).
• The appliance should not be located or used under overhead unprotected combustible construction materials
or surfaces. For a grill, fryer or broiler, the minimum clearance shall be at least 10ft (3m) from any structure
or combustible material.
• The appliance must not extend beyond the surface on which it sits.
4
IMPORTANT SAFETY INFORMATION (continued)
.WARNING
• No ammable materials should be within 3 meters around the appliance (e.g., awnings, wooden terraces, or
furniture).
• Keep the cooking area (3-meter radius around the appliance) free of re sources, such as ignition devices on
water heaters, electrical appliances, and ammable vapors/liquids like gasoline and alcohol.
• Do not place ammable items on or in the appliance.
• Do not move the appliance when in use.
• The use of alcohol, prescription or non-prescription drugs may impair the consumer’s ability to properly
assemble or safely operate the appliance.
• This device should never be used by children. This device is not intended for use by people with (including
children) sensory or intellectual impairment, lack of experience and knowledge. They must receive guidance
on the risks associated with the device and be supervised by a person responsible for its safety.
• Keep out of reach of children. Keep children and pets away from the appliance at all times.
• Have a re extinguisher and rst aid kit at hand.
• This appliance gets very hot. Use included pizza peel to manipulate pizzas. Wear protective gloves when
handling hot parts.
• Do not use the appliance while wearing loose, draping or wide-sleeved clothes.
• Never let clothing or other ammables come close to or in contact with any burner or hot surface until it has
cooled. The fabric could ignite, causing serious injury.
• This appliance is not intended for and should never be used as a heater.
• Do not store gas cylinders in a building, garage or any other enclosed area and keep them out of reach of
children at all times.
• Do not store or use gasoline or other ammable liquids/gases in the vicinity of this appliance.
• Do not store full or empty gas cylinders near this appliance.
• Check all gas supply ttings for leaks before each use. Do not use the appliance until all connections have
been checked and do not leak.
• Do not smoke while leak testing. Never leak test with an open ame.
• Clean and inspect the hose before each use of the appliance. If there is evidence of abrasion, wear, cuts, or
leaks, the hose must be replaced prior to the appliance being put into operation. The replacement hose as-
sembly shall be that specied by the manufacturer.
• When lighting, keep your face and hands as far away from the appliance as possible.
• When using a match to light the appliance, make sure to use the included matchstick holder.
• Spiders and insects can nest inside the burner of the appliance and disrupt gas ow. Inspect the burner at
least once a year. A clogged tube can lead to a re beneath the appliance.
• Do not connect the device to a natural gas network. These valves and nozzles are designed specically for
liqueed gas.
• Liquid gas is not natural gas. Using natural gas in a liquid gas installation, or using liquid gas in a natural gas
installation, is a dangerous act that nulls the warranty. Check for gas leaks and obstacles in the burner before
use.
• After a period of storage or non-use, check for gas leaks and clogged burners before use. Be sure to turn off
the gas source switch on the cylinder and disconnect the pressure regulator before moving the cylinder.
Never remove a gas cylinder from its designated operating position for use.
• Do not operate the equipment when the gas cylinder is not in the specied correct position.
• No electrical power lines, gas and fuel supply hoses should be placed near or on any heated surfaces.
5
IMPORTANT SAFETY INFORMATION (continued)
.WARNING
• Do not modify the appliance. Any sort of modication strictly prohibited. Sealed parts are not to be manipulat-
ed by the user. Do not disassemble injectors.
• Never close the oven with aluminium foil or any other material, as this will impede the ventilation of the burn-
er, creating a potentially dangerous situation that may result in property damage and/or personal injury.
• The burner tube openings must be positioned properly over the valve orices.
• Check screws and tighten if necessary before use to ensure stability.
• Do not use charcoal, ceramic briquets or lava rocks in the appliance.
• Keep ventilation openings free and clear of debris.
• Flammable liquids may cause ash ames or deagrations. Never use ignition liquids (e.g. lighter uids, pet-
rol or spirits).
• If a gas leak occurs, turn off the gas supply.
• Turn off the gas supply at the gas cylinder after use.
• This appliance must be kept away from ammable materials during use.
• The appliance will be hot during and after use. Use insulated oven mitts or gloves for protection from hot
surfaces.
• Do not store objects or materials in the storage area under the appliance. Do not block the ow of combus-
tion air to the underside of the control panel and the rebox.
• Never attempt to perform repairs on gas components. For repairs, please contact your dealer for more infor-
mation. Failure to follow this warning may cause a re or explosion which can cause serious injury, death or
damage to property.
• Some parts of this appliance have sharp edges. Wear protective gloves during setup and use.
LP GAS CYLINDER WARNING
• Do not store spare liquid propane gas cylinder under or near this appliance.
• Never ll the cylinder beyond 80 percent capacity.
• Liquid propane cylinder must be tted with an OVERFILL PROTECTION DEVICE (OPD).
• The cylinder supply system must be arranged for vapour withdrawal.
• Changing the gas cylinder shall be carried out away from any source of ignition.
• Only use the pressure regulator and hose assembly that is supplied with the appliance or compatible regula-
tors. You can obtain it after consulting the store where you made the purchase.
• The hose of the gas hose assembly must not be bent and must not be longer than 1.5 meters. The hose
should not be twisted or kinked when attached to the gas cylinder.
• Only gas cylinders with a diameter not exceeding 310 millimeters, a maximum height of 600 millimeters and
containing 5 to 13 kilograms (standard 20 lb tank) of liqueed gas are permitted.
• Do not attempt to disconnect the pressure regulator and hose assembly or any gas tting while the appliance
is in operation or still hot.
• Do not use a damaged gas cylinder. A dented or rusty gas cylinder or a gas cylinder with a damaged valve
may be hazardous and should be replaced with a new one immediately.
• Although the gas cylinder may appear to be empty, gas may still be present and the cylinder should be trans-
ported and stored accordingly.

6
BEST PRACTICES FOR SAFETY
When properly cared for, your oven will provide safe, reliable service for many years. However, extreme care
must be used as the oven produces intense heat that can increase the risk of accidents.
When using this oven basic practices must be followed, including but not limited to following:
• Do not repair or replace any part of the oven unless specically recommended in this manual. All other ser-
vice should be referred to a qualied technician.
• Do not heat unopened food containers as a build-up of pressure may cause the containers to burst.
• When lighting the burner, always pay close attention to what you are doing.
• When using the oven, do not touch the outer shell, stone baking board or immediate surroundings as these
areas become extremely hot and could cause burns.
• Do not use the oven to cook extremely fatty meats or other products which could are up.
• Keep the area surrounding the oven free from combustible material including uids, trash and vapours such
as gasoline or charcoal lighter uid.
• Do not obstruct the ow of combustion and ventilation air.
• Never use the oven in extremely windy conditions.
• Never use the oven indoors - risk of carbon monoxide poisoning.
• The temperature under the oven is high. Do not place the oven on a table with ammable tablecloths, plastic
or any other inammable materials.
• If the burner goes out during operation, turn off all gas valves. Wait for ve minutes before attempting to reig-
nite. Follow the ignition Instructions on page 13.
• If the information above is not followed exactly, a re resulting in death or serious injury may occur.
• This manual states that the installation must conform with local codes or, in the absence of local codes, with
the National Fuel Gas Code, ANSI Z223.1/NFPA 54, Storage and Handling of Liqueed Petroleum Gases,
ANSI/NFPA 58; or Natural Gas and Propane Installation Code, CSA B149.1; Propane Storage and Handling,
CSA B149.2
• The cylinder to be used must be constructed and marked in accordance with the specications for LP gas
cylinders, U.S. Department of Transportation (DOT) or the Standards for cylinders, Spheres and Tubes for the
Transportation of Dangerous Goods, CAN/CSA-B339.
7
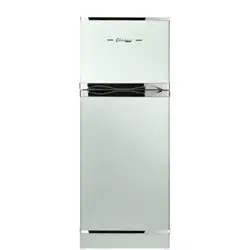
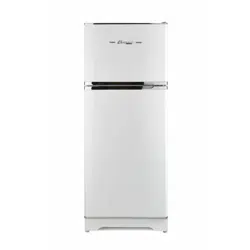
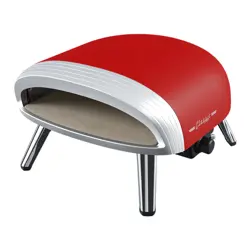
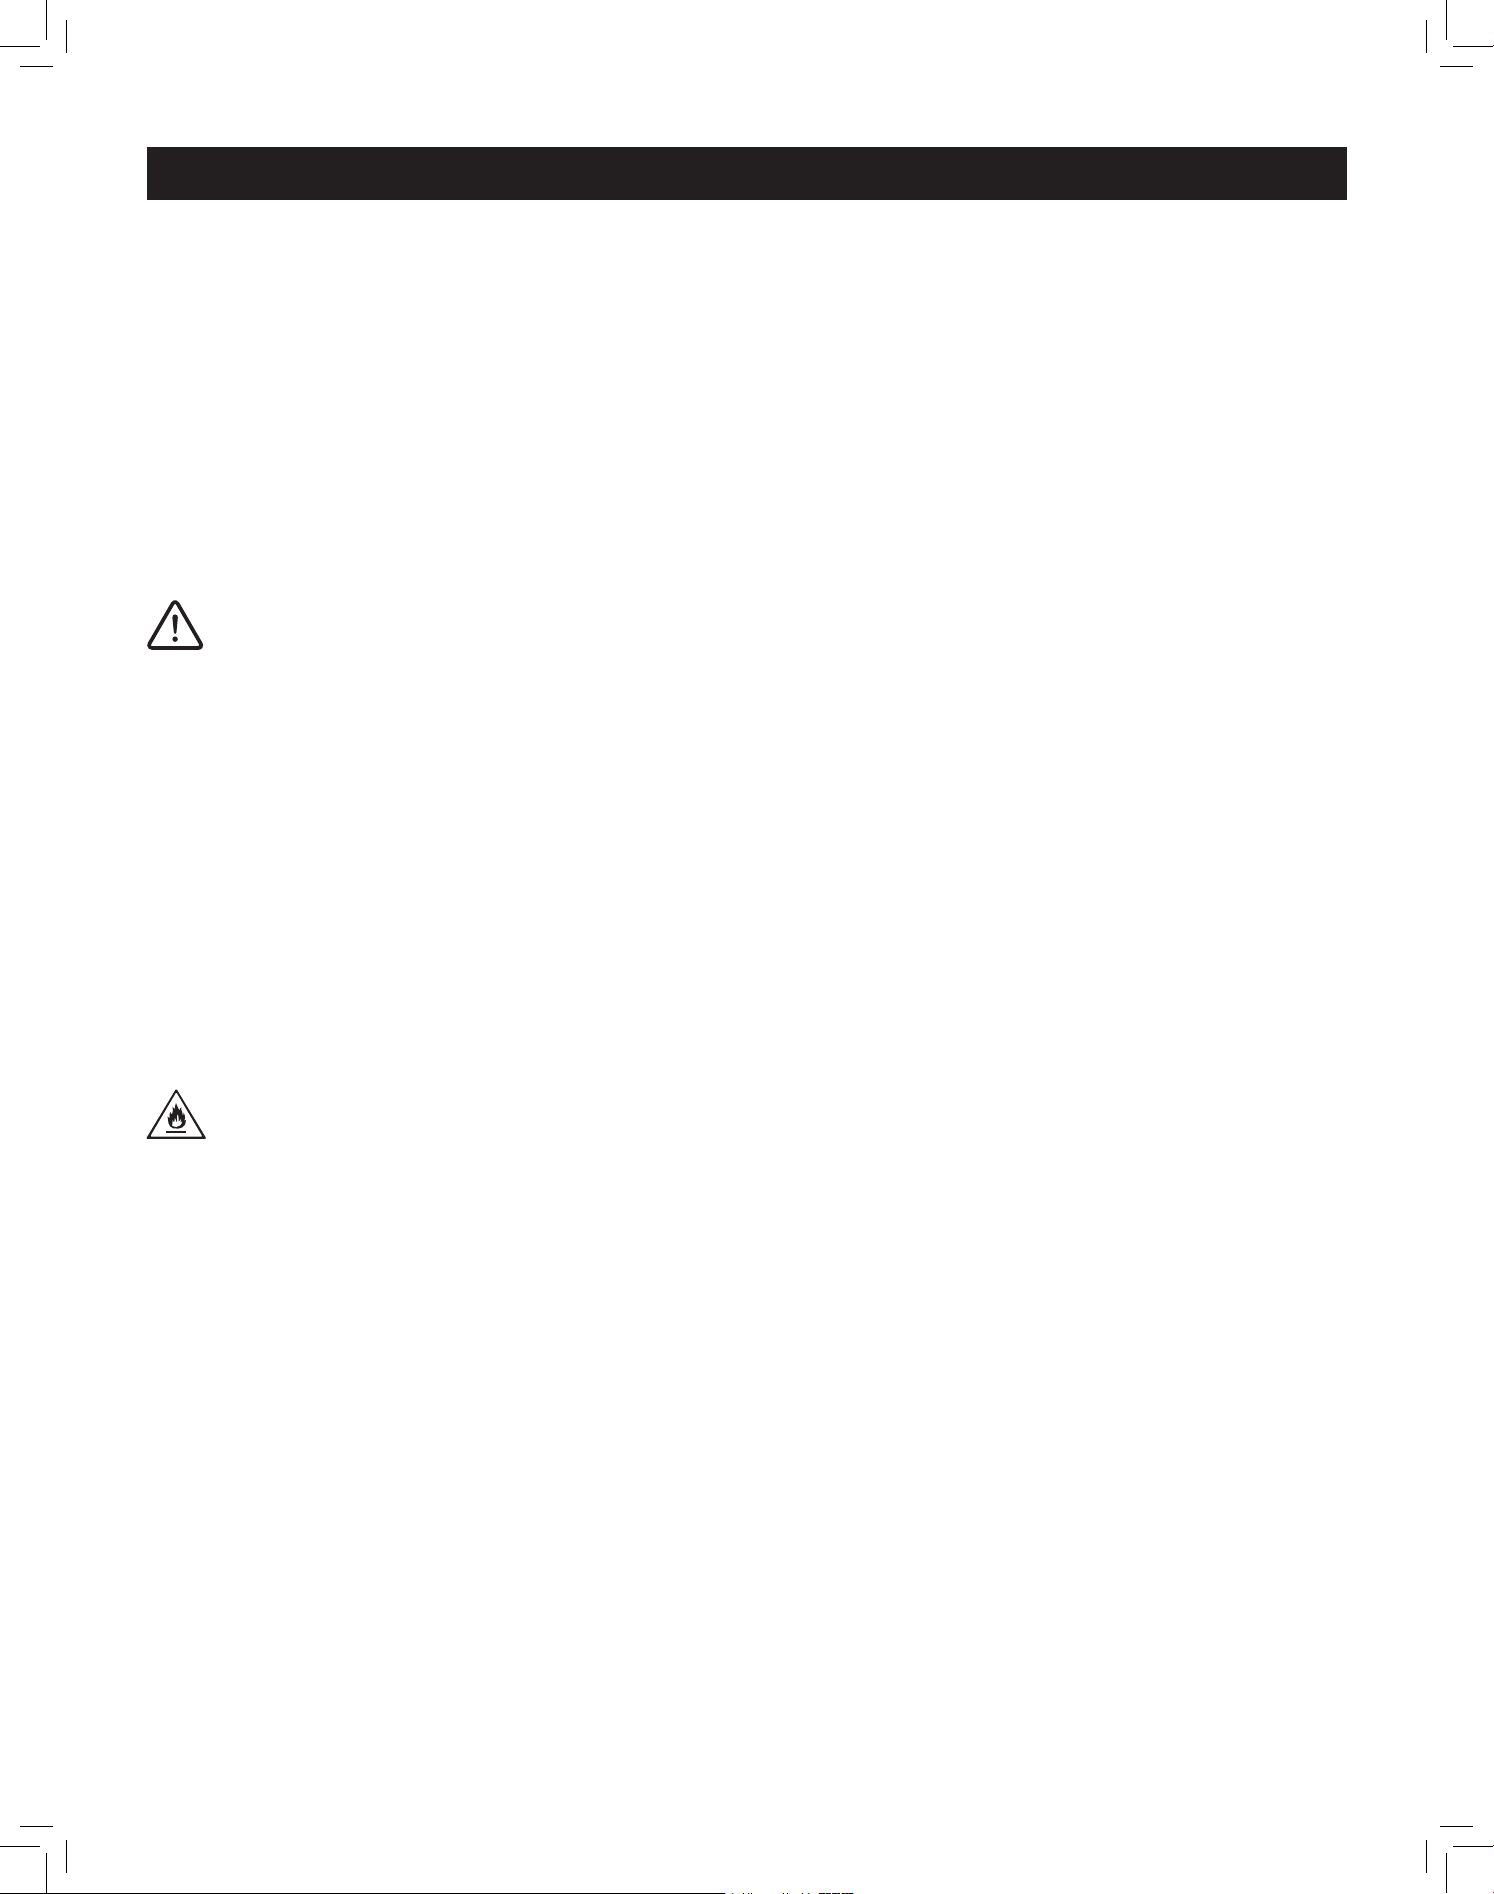
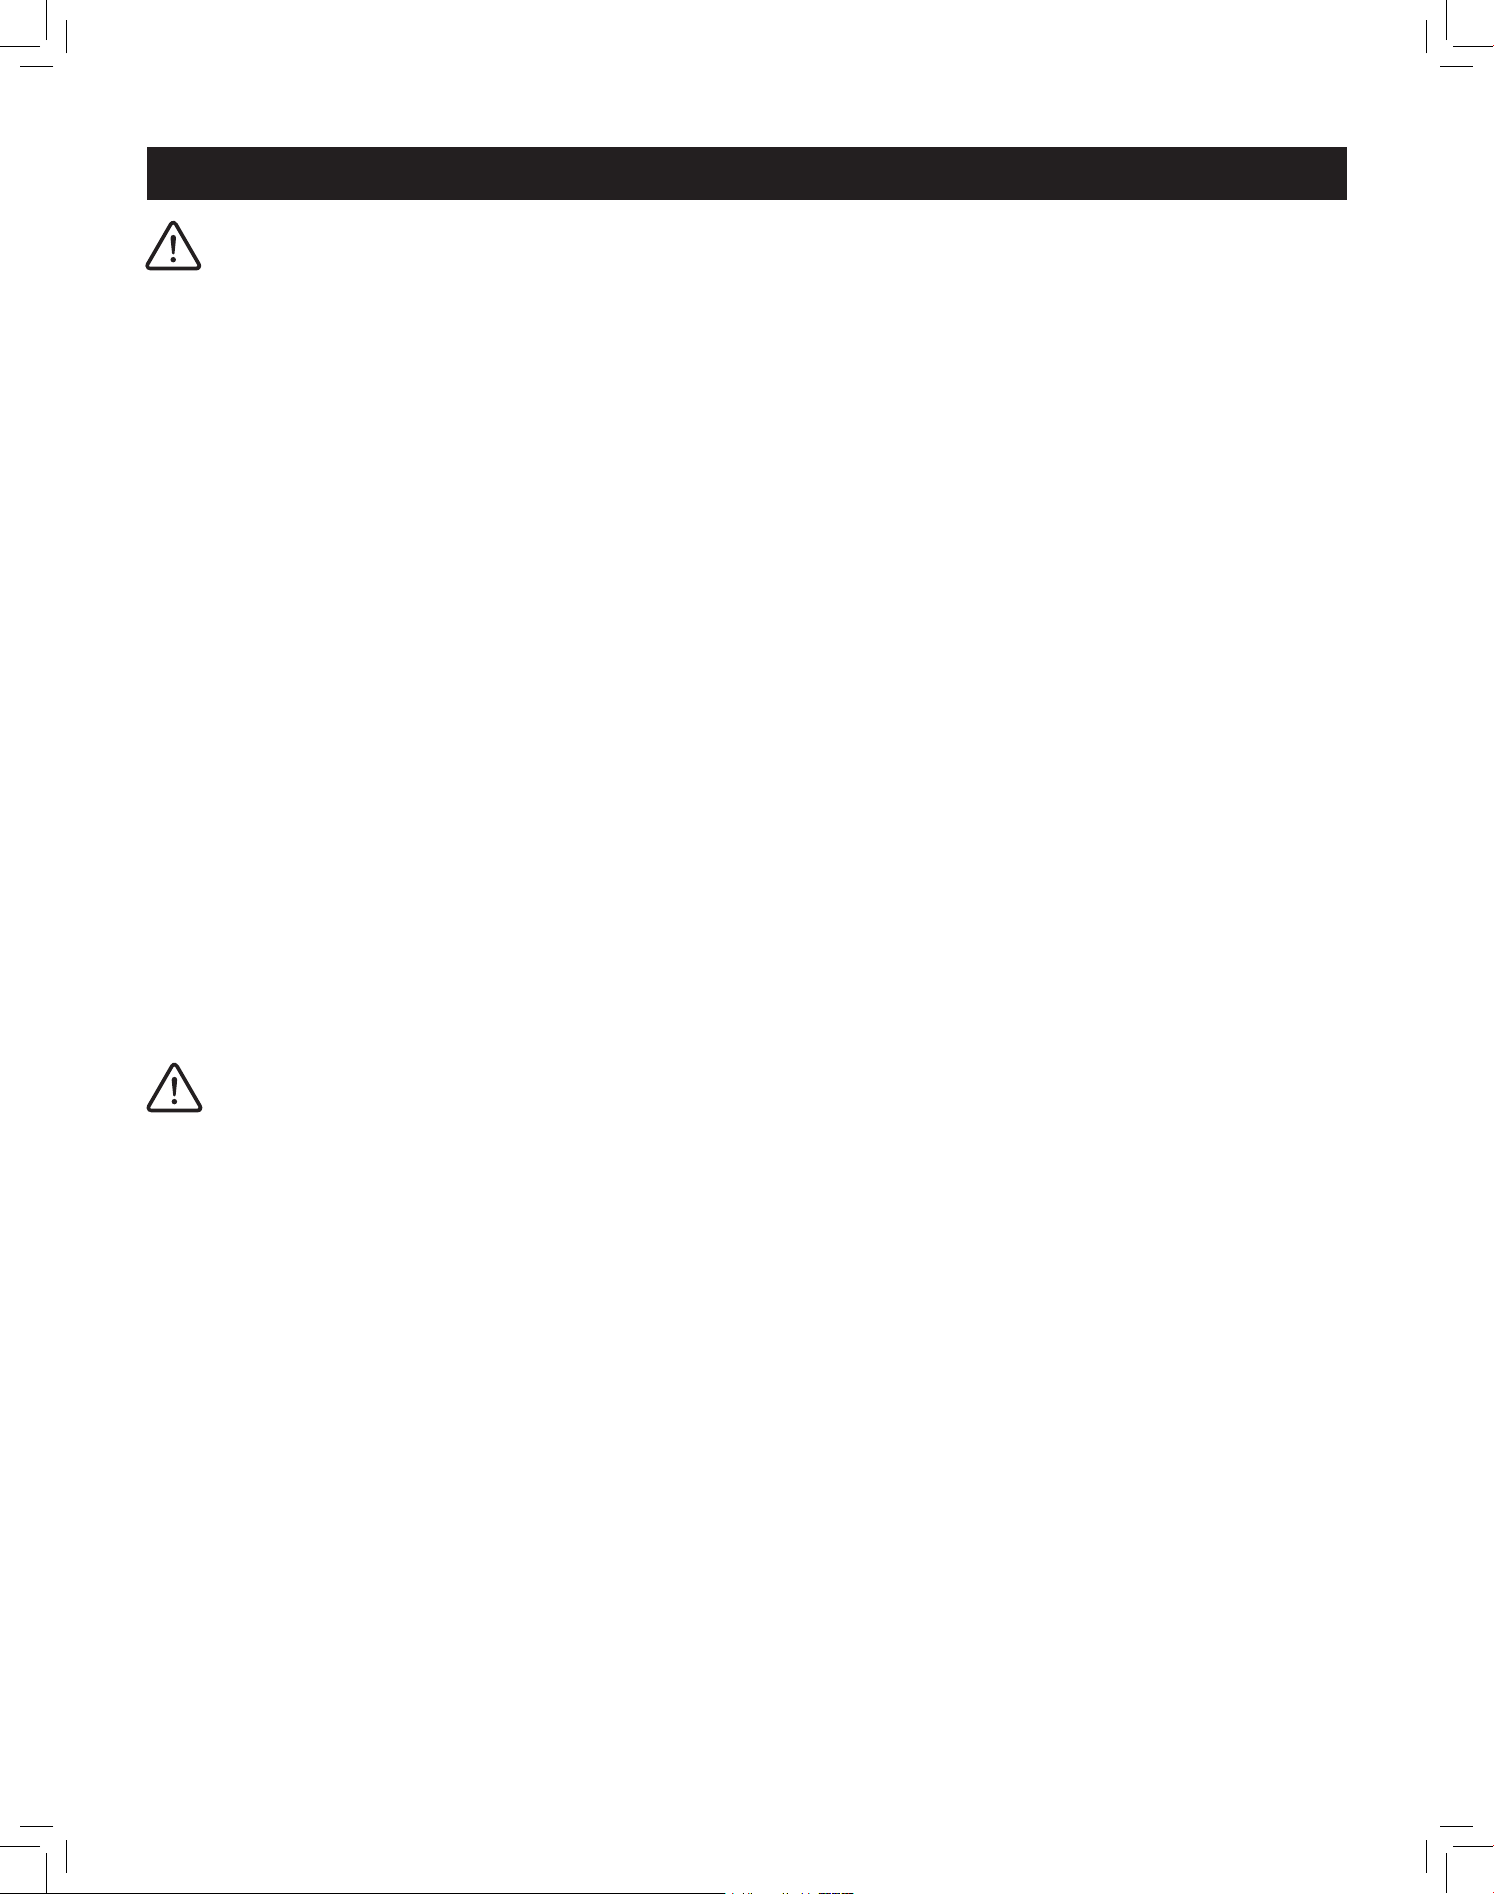
Unique Classic Retro Propane Pizza Oven
12” or 16”
Gas hose and regulator kit
High Temperature Baking Stone
Folding Pizza Peel
(pizza spatula)
Ignition Rod
PARTS INCLUDED
Accessories sold seperately:
• Heavy duty carrying bag
• Oven scraper brush
• Quick connectors for xed fuel system installation
To order:
• Visit www.uniqueappliances.com
or
• Contact Unique customer service:
Toll-free: 1-877-427-2266 or 1-905-827-6154
Email: [email protected]
8
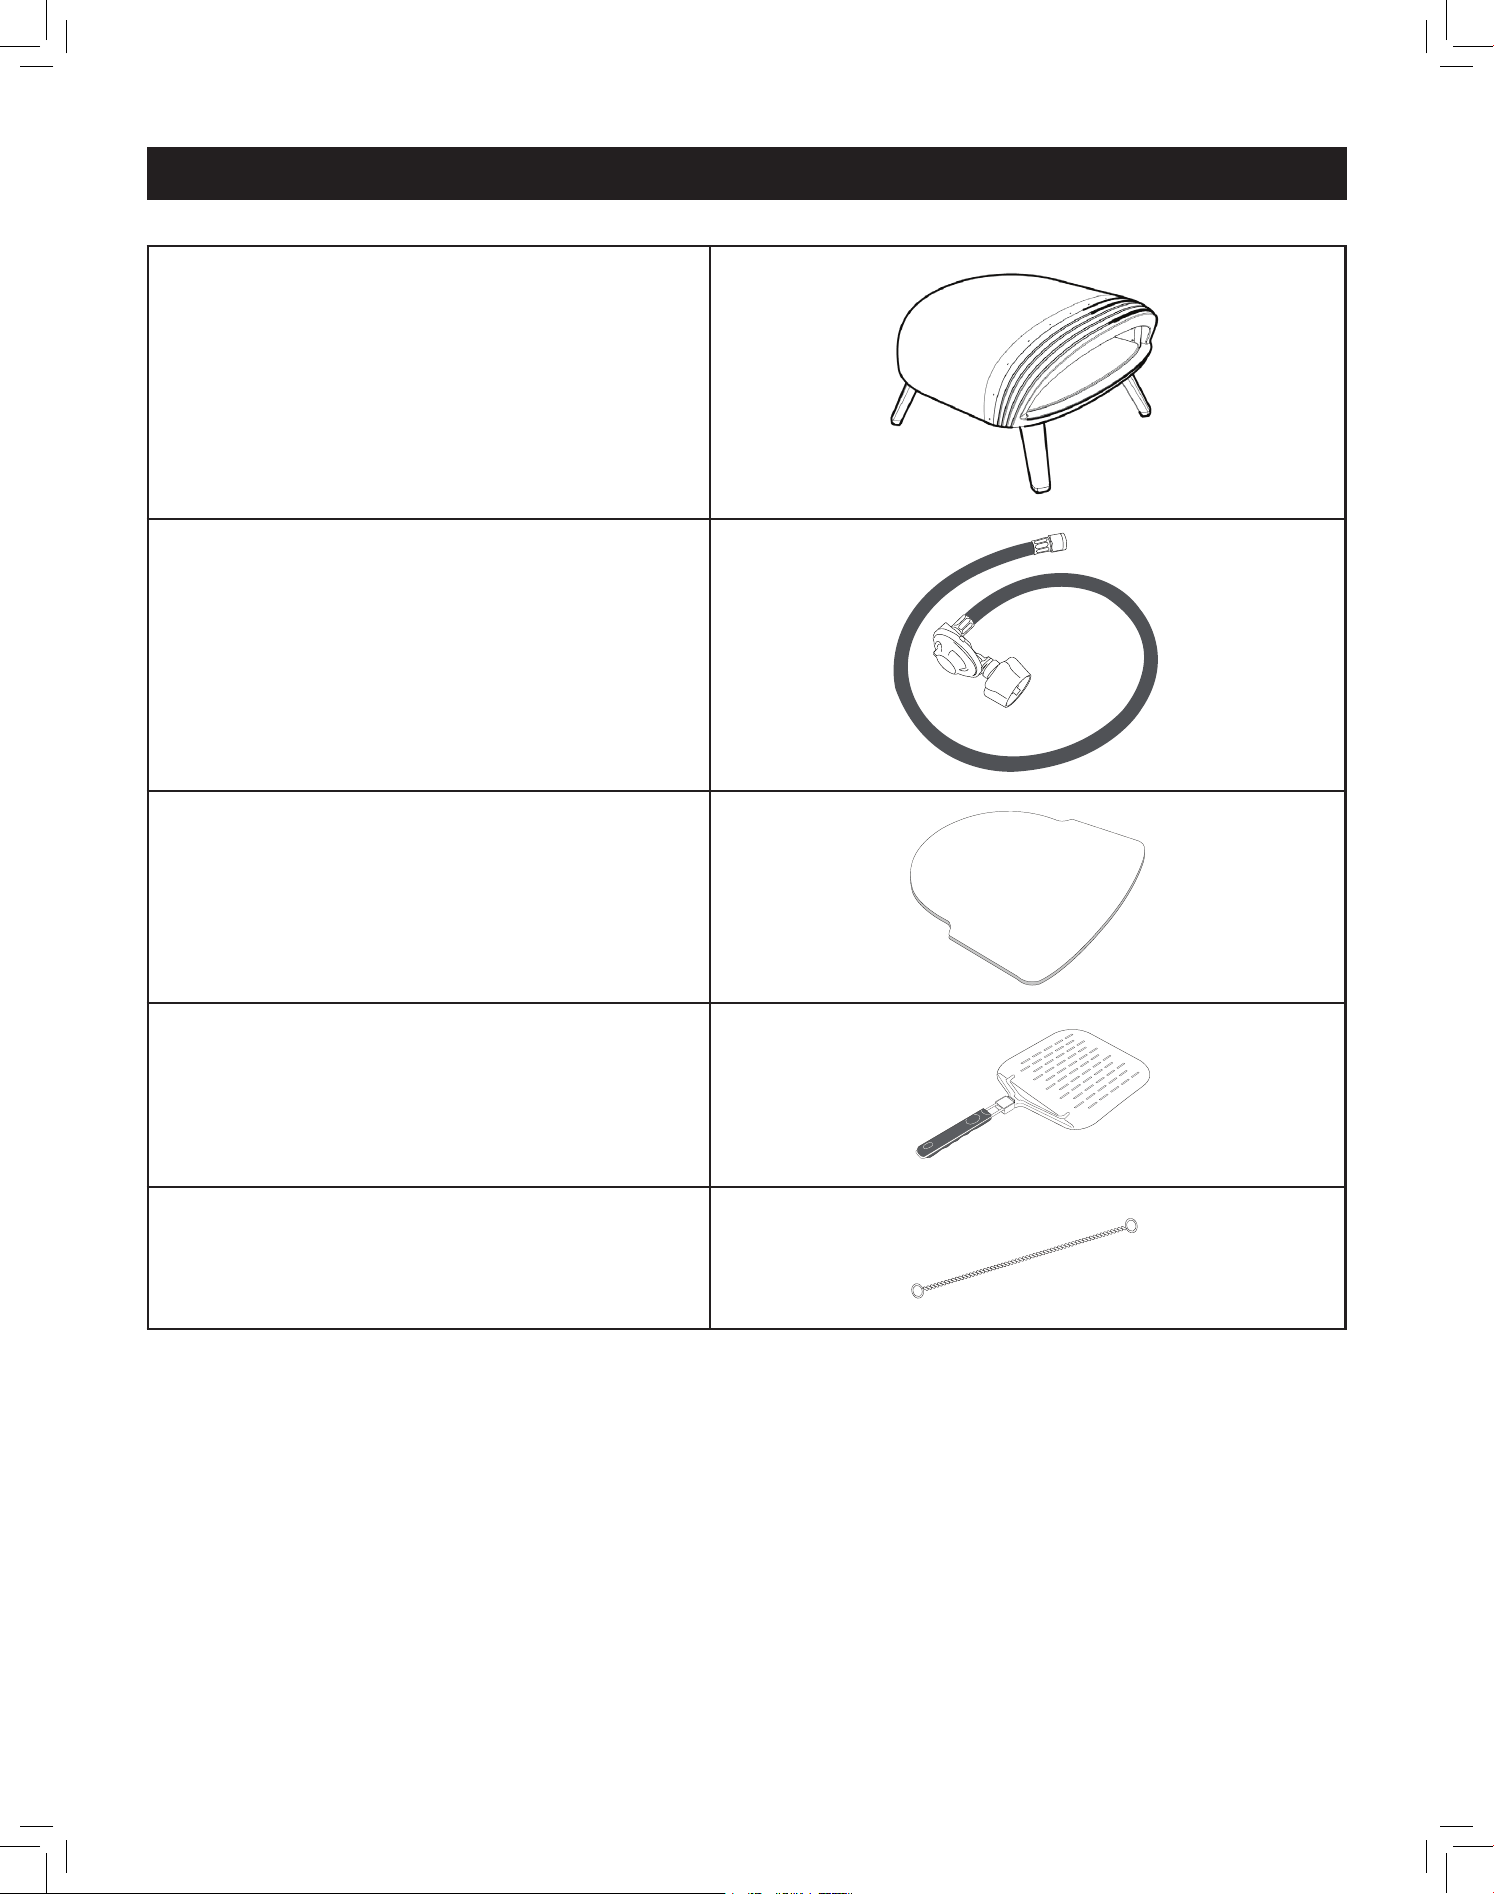
ASSEMBLY
IMPORTANT
• Fold out the legs completely. NOTE: the 12” oven has 3 legs (shown above), the 16” oven has 4 legs.
• Never operate the oven upside down.
• Set up the oven on a level, stable and non-ammable surface. Make sure that the oven is placed higher than
the valve of the upright gas cylinder (eg: the oven on a stable tabletop, with the gas cylinder set upright on
the ground below.)
• Insert the dry baking stone fully into the oven. Caution: do not use a wet stone in the oven as it may crack. If
wet, the baking stone can be dried in a conventional oven at 60˚C/140˚F for 2 hours before use.
WARNING
Improper assembly can be dangerous. Be sure to follow the assembly instructions carefully. Before assembly,
make sure all parts are present. If any part is missing or damaged, do not attempt to assemble the appliance.
Contact customer service for replacement parts.
1 2
Unfold the legs
• 12” oven = 3 legs (shown)
• 16” oven = 4 legs
Insert the dry baking stone fully into the oven.
NOTE: Ensure that the baking stone is fully in-
serted so that there is no overhang outside of the
oven. Make sure the baking stone is level.
9
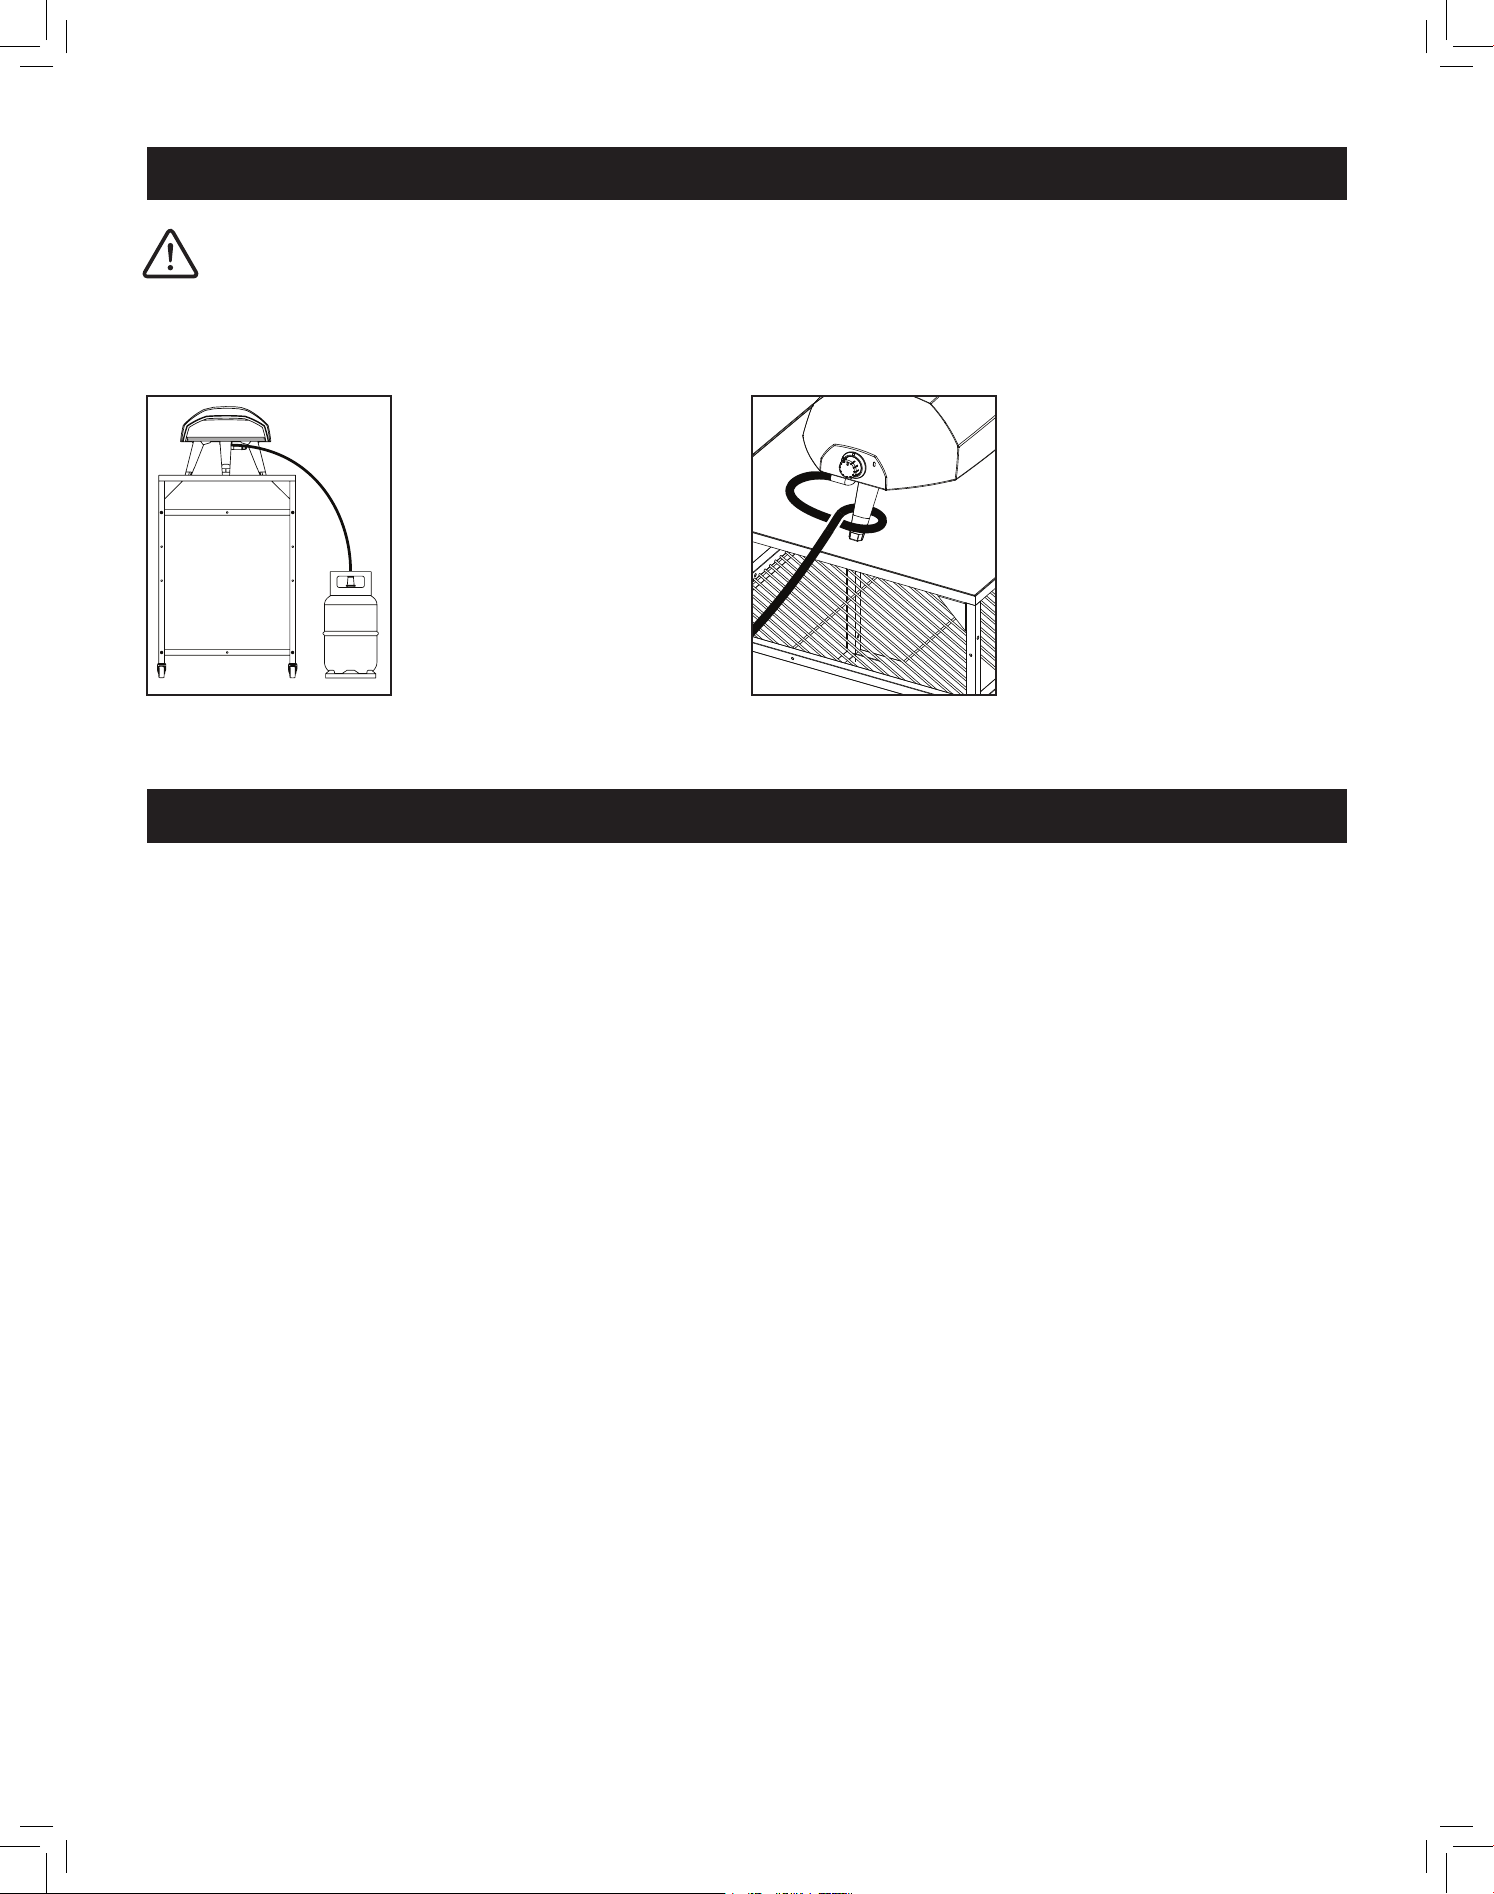
CONNECTING THE GAS CYLINDER
NOTE: Regulators will vary depending on region.
• Please always keep the gas bottle in upright position.
• The size for 20 lbs LP gas cylinder is 12.2 inches in diameter and 17.9 inches tall.
• If the appliance is not in use, the gas must be turned off at the supply cylinder.
• The cylinder used must include a collar to protect the cylinder valve.
• The minimum distance for the appliance and the 20 lbs gas tank is 25 inches apart.
Connecting the liquid propane gas cylinder
1. Set control knob on the cylinder valve to the OFF position (triangle pointing upwards).
2. Make sure the burner valve is in OFF position.
3. Inspect the valve connections, port and regulator assembly. Remove any debris and inspect the hose for damage.
4. Make sure the the rubber seal within the gas cylinder valve is in a good condition. If it is showing wear or
damage, it must be replaced. Contact Unique Appliances for a replacement seal.
6. Screw the pressure regulator counter-clockwise tightly on to the gas cylinder by hand.
7. Open the gas valve on the pressure regulator by one full turn.If you see, smell or hear the hiss of escaping
gas, close the valve immediately again. Otherwise, close the valve after the gas hose is lled and the pointer
of the pressure gauge has come to a complete standstill within the green area.
8. When connecting the regulator assembly to the valve, hand tighten the nut clockwise until it stops. Using a
wrench could damage the quick coupling nut and result in a hazardous situation.
9. Open the cylinder valve fully by turning the valve counter-clockwise.
10. Before lighting the oven, spray leak detector or use a soap and water solution at all the joints of the gas
system.
11. If active bubbles appear, there is a leaking joint. Close the valve immediately again and check the connec-
tion of the joint. Repeat the previous steps from step 3 on. If the leak can not be eliminated, do not try to
perform any repair work - contact the point of purchase or your local liquid propane dealer for repairs.
12. If no bubbles form, the gas system is ready for use. Wipe away any remaining leak testing liquid. Make sure
that the valve is closed after every use or leakage test.
WARNING
Only use gas cylinder approved according to DIN EN 417 with a gas mixture of 80% Butane/20% Propane.
Do not use a damaged gas cylinder. A dented or rusty gas cylinder or a gas cylinder with a damaged valve
may be hazardous and should be replaced with a new one immediately. Be sure the pressure regulator is
mounted with the small vent hole pointed downward so that it will not collect water. This vent should be free
of dirt, grease, bugs, etc.
The joint where the hose connects to the gas cylinder must be leak-tested every time the gas cylinder is
changed or reconnected.
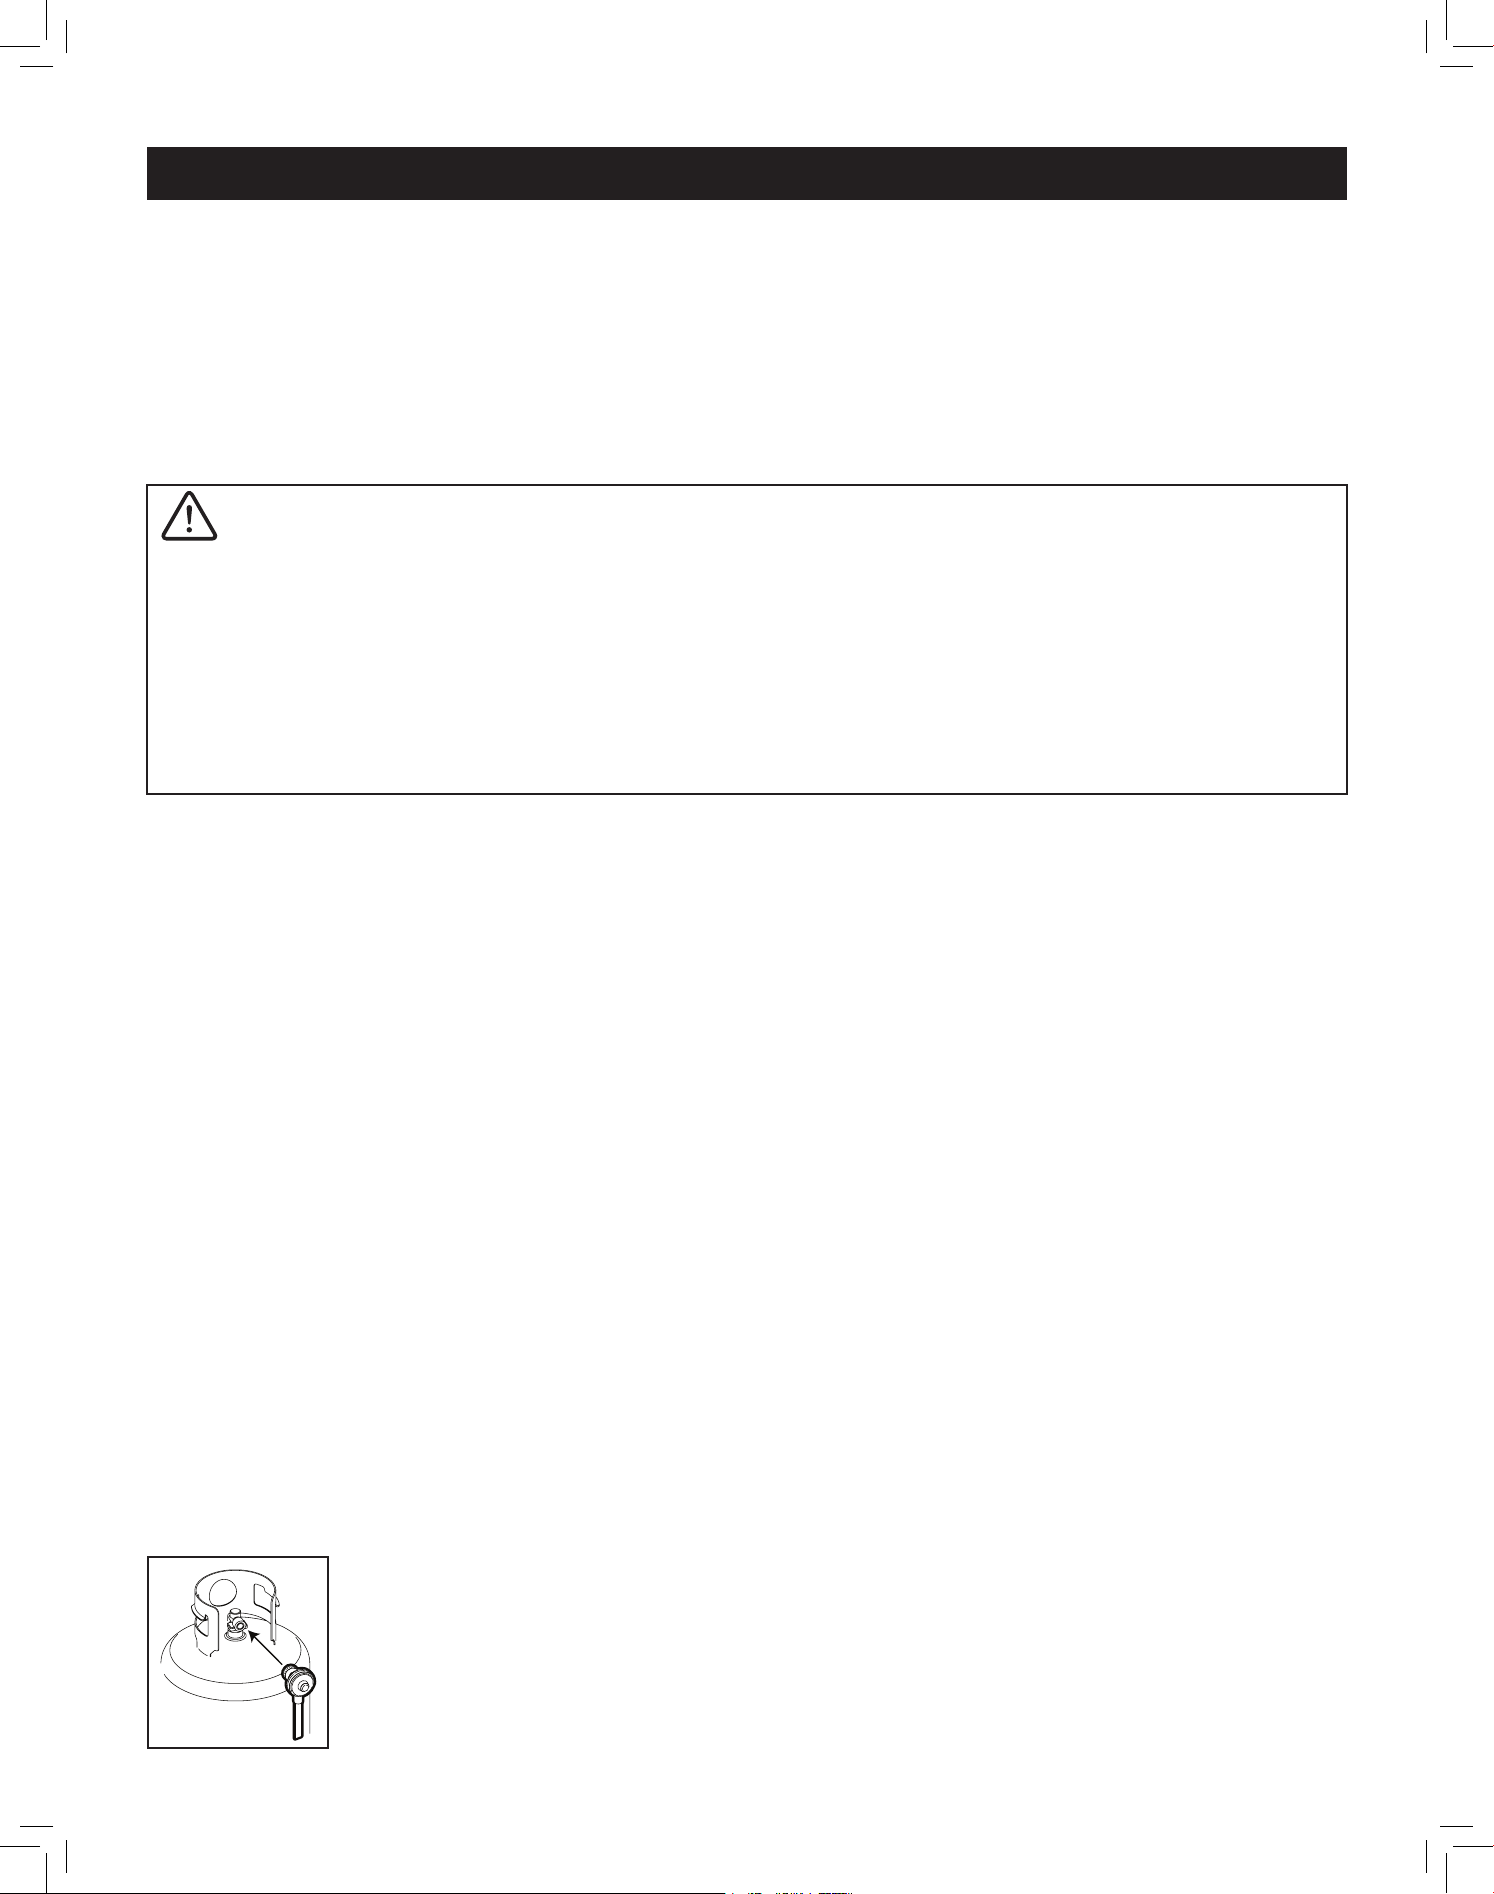
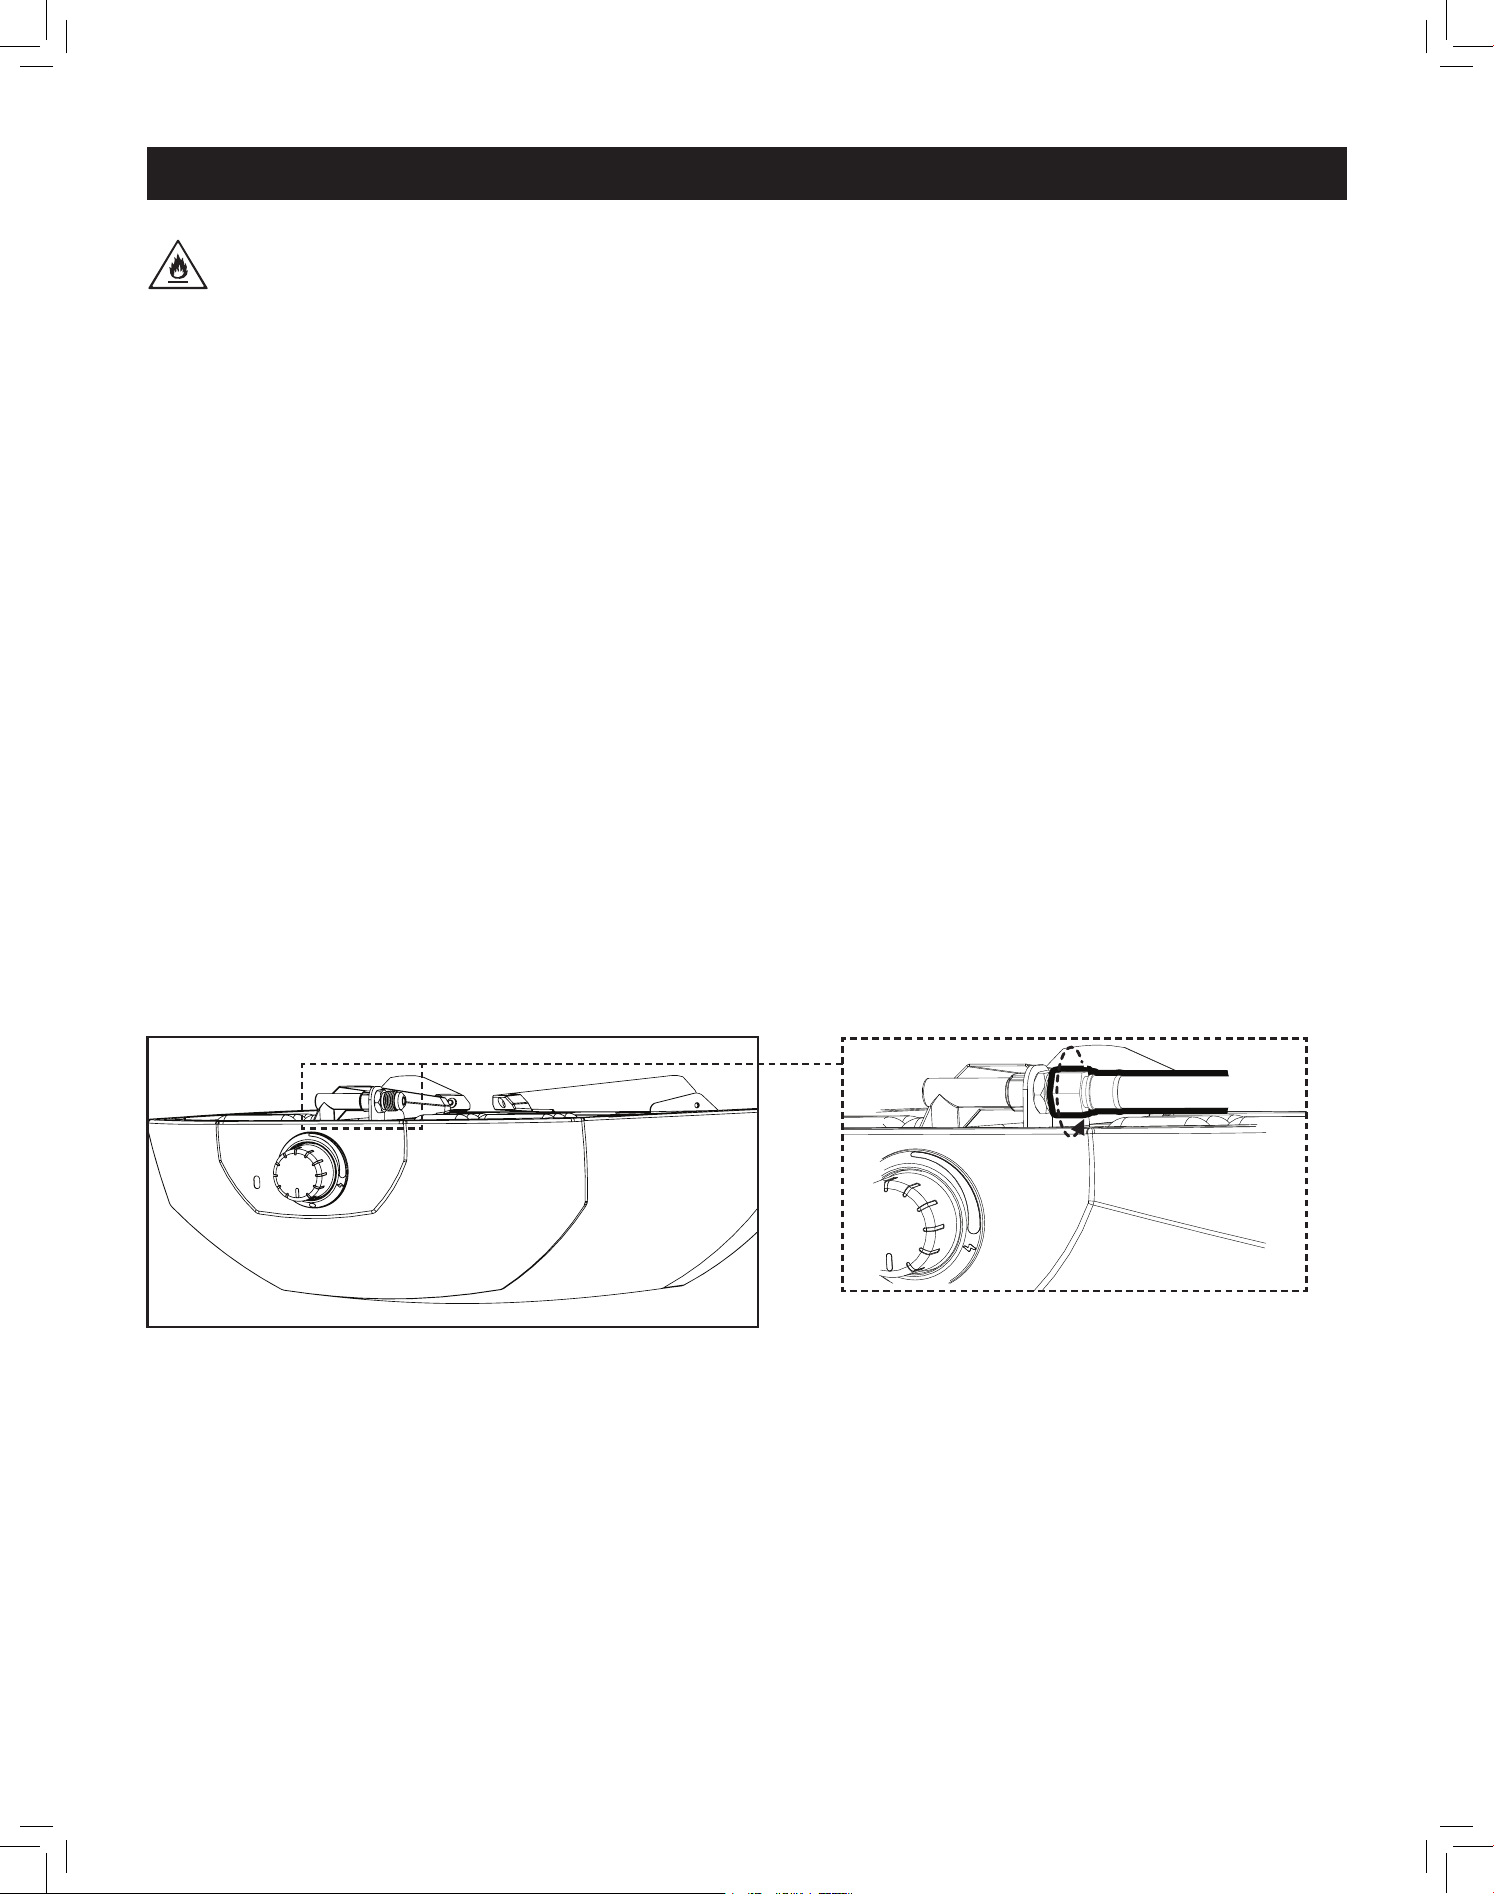
QCC1 gas regulator
This gas tting is clockwise. Make sure that the tank is completely switched off and screw
the regulator as far as possible into the gas tank valve.
10
Disconnecting the liquid propane gas cylinder
1. Turn the oven burner valve OFF and make sure the oven is cool.
2. Turn the liquid propane cylinder valve OFF by turning clockwise until it stops.
3. Detach the regulator assembly from the cylinder valve by turning the quick coupling nut counter-clockwise.
4. Cover the cylinder valve outlet with a dust cap whenever the cylinder is not in use. Only install the type of
dust cap on the cylinder valve outlet that is provided with the cylinder valve. Other types of caps or plugs
may result in leakage of propane.
DISCONNECTING THE GAS CYLINDER
Correct hose position
Route the gas hose away
from the oven, with no kinks
or tight curves.
Incorrect hose position
Ensure the hose does not
have any kinks or tight curves,
and do not loop the hose
around legs.
CONNECTING THE GAS CYLINDER (continued)
Positioning the gas hose
WARNING:
The hose pipe can be a tripping hazard. Always route the gas hose away from the oven. The
hose must not touch the oven body. Do not wrap or route gas hose around the legs of the oven.
11
CONVERTING TO FIXED FUEL SYSTEMS (LARGE PROPANE TANK)
WARNING
FIRE, EXPLOSION, AND CARBON-MONOXIDE HAZARD
If the information in these instructions is not followed precisely, a re, explosion, or production of carbon mon-
oxide may result, causing property damage, personal injury, or loss of life.
This conversion kit should be installed by a qualied agency in accordance with the appliance manufacture’s
instructions and all applicable codes and requirements of the local authority. The qualied agency is responsi-
ble for the proper installation of this kit. The Installation is naot proper and complete until the operation of the
converted appliance is veried according to the manufacturer’s instructions supplied with the kit.
• This kit is only applicable with Unique Classic Retro 12 and Unique Classic Retro 16 pizza ovens.
• NOT INCLUDED: DH22 model hose and quick connectors to Fixed Fuel System
• The appliance and its individual shutoff valve must be disconnected from the gas supply piping system
during any pressure testing of that system at test pressures in excess of 1/2 psi (3.5kPa).
• The appliance must be isolated from the gas supply piping system by closing its individual manual shutoff
valve during any pressure testing of the gas supply piping system at test pressures equal to or less than 1/2
psi (3.5kPa).
Instructions
1. Caution: Before proceeding with the conversion; shut off the gas supply and ensure the oven is cool to the
touch. Remove the baking stone and turn the oven upside down.
2. Remove the gas hose using a 19mm/ 3/4” wrench.
1 2
12
CONVERTING TO FIXED FUEL SYSTEMS (continued)
3a
3b
4
3. Attach DH22 gas hose using a 19mm/ 3/4” wrench.
4. Attach quick connectors at the end of the gas hose and connect to the xed fuel system.
5 Perform Leak Test
Ensure the hose connection is safe and
secure.
Note
Although the gas connections of the appliance are leak tested prior packing and shipment, a complete leak
test must be performed at the installation site.
Before each use, check all the gas connections for leak testing using the procedure listed below. If the smell of
gas is detected at any time, immediately stop using the oven and check the entire system for leaks.
Before testing
Make sure all packing material has been removed from the appliance.
Use a commercially prepared, water-based leak dectector, or make a solution of one part liquid detergent and
one part water. You will need a spray bottle, brush or rag to apply the solution to the ttings.
To test
1. Turn the burner valve OFF.
2. Turn the liquid propane cylinder valve on counter-clockwise to open the valve.
3. Apply water-based leak detector or a soap and water solution to all gas ttings. Soap bubbles will appear
where a leak is present.
4. If a leak is present, immediately turn the gas supply OFF and tighten leaky ttings.
5. Turn the gas back ON and recheck.
6. Should the gas continue to leak from any of the ttings, turn the gas supply OFF and contact customer ser-
vice.
13
Using the baking stone
CAUTION
• The baking stone is fragile and can crack or break if bumped or dropped.
• Do not use the pizza stone over an open ame.
• Extreme and/or sudden temperature changes can cause the baking stone to crack.
• Do not place frozen food on a hot baking stone.
• Do not cool down the pizza stone with water.
• After cleaning the stone with water, please dry the stone before use. This can be done in a conventional oven
at 60°C (140°F) for 2 hours.
• Burnt-on food can be cleaned by ipping the stone - high oven temperatures will reduce food residues to
ashes that can be easily wiped away once the stone/oven have completely cooled.
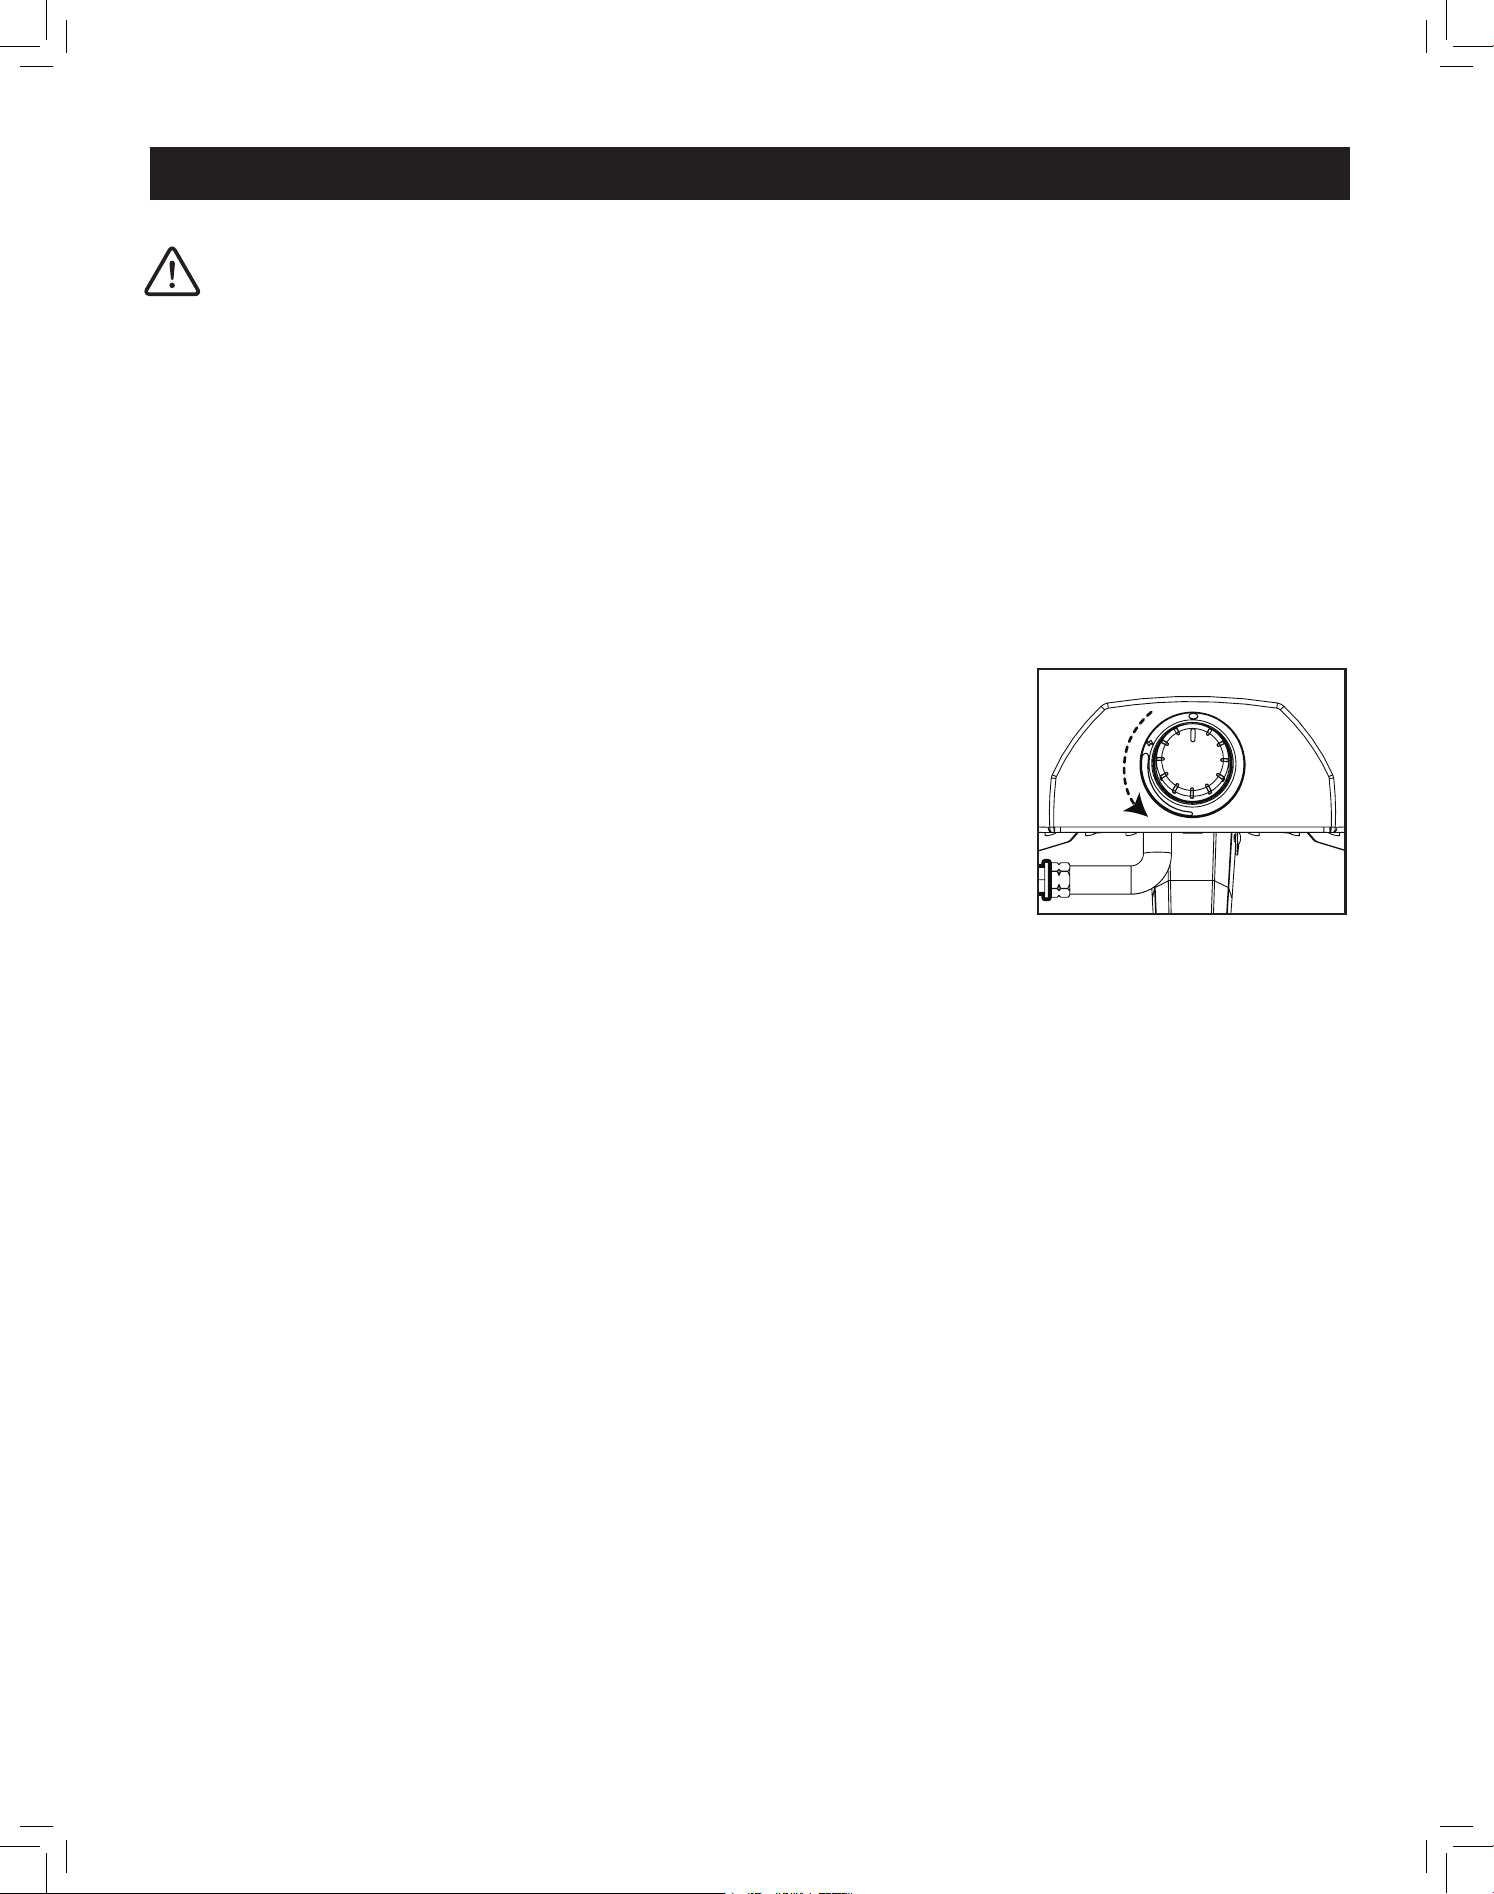
Control Knob
The Burner is controlled by a control knob. Once the burner is lit, the temperature
can be set as required by setting the control knob between MAX (high tempera-
ture) and MIN (low temperature).
Using the oven
• The 12” pizza oven is rated at 15,354 BTU
• The 16” pizza oven is rated at 27,300 BTU
Pre-heat the pizza oven on maximum level for about 15 minutes before using it for the rst time. This burns
away any possible residues and may emit an unpleasant smell - this is normal and will dissipate quickly.
To begin:
1. Make sure the oven has been leak tested and properly placed.
2. Remove any remaining packing material.
3. Light the burner using the lighting instructions below
How to light the oven
To light the oven using the ignitor:
Read all instructions before lighting.
1. Make sure the control knob is in OFF position, and then turn the liquid propane cylinder valve ON by slowly
turning counter-clockwise.
2. Push in and slowly turn the control knob counter-clockwise until you hear a click and the burner ignites.
3. Continue to push in the control knob for 5 seconds after ignition and then release. Turn the control knob
further to the lower left.
4. If the burner doesn’t light within 5 seconds, turn the knob OFF, wait 5 minutes and repeat the lighting steps.
5. Once lit, allow the pizza oven to pre-heat for 15 to 20 minutes before cooking.
OPERATION
14
CARE AND MAINTENANCE
Cleaning and care
WARNING
Always set the control knobs to the OFF position and close the gas cylinder when the appliance is not in use.
Make sure the appliance has cooled down before cleaning, moving or storing. Only use detergents that are
food safe (e.g. no paint solvents or thinner.)
Burner Care
• Use a narrow bottle brush with a exible handle (do not use a wire brush) and brush the entire outer surface
of the tube burner to remove food residue and dirt.
• Clean any blocked port carefully with a wire (like a straight pin or bent paper clip.)
• Check the burner for damage, corrosion or enlarged holes. If any damage is found, the burner must be re-
placed.
Interior and exterior care
• Clean the appliance often, preferably after each cookout.
• The appliance should be cleaned at least once as year to inhibit rust formation.
• Do not mistake brown or black accumulation of grease and smoke for paint. Interiors of gas grills are not
painted by the factory and should never be painted. Apply a strong solution of detergent and water or use an
appliance cleaner with a scrub brush on the insides of the oven lid and the boom. Rinse by wiping with water
and a clean cloth or sponge and allow to completely air dry. Do not apply caustic appliance/oven cleaner to
painted surfaces.
• The outer shell of the appliance may fade with time and use. This will not affect performance.
• Store your Unique Classic Retro 12 oven out of direct sunlight and indoors where possible and when storing
for extended periods of time. It should not be exposed to harsh weather conditions such as snow, heavy rain
and strong winds.
To light with a match:
1. If burner will not light after several attempts using the control
knob, the burner may be lit with a match.
2. If you have already attempted to light the burner using the control
knob, wait 5 minutes for any gas to dissipate.
3. Insert a match into the matchstick holder, ignite the match and
insert through the oven opening to the burner.
4. Push and turn the control knob to HI slowly, the burner should
ignite immediately.
5. Continue to push in the control knob for 5 seconds after ignition and then release.
6. If the burner does not light within seconds, turn the control knob OFF and wait 5 minutes and try again.
7. Once lit, allow the pizza oven to pre-heat for 15 to 20 minutes before cooking.
To turn the oven off:
• After removing the last pizza being prepared, allow the oven to operate at maximum temperature for 5 min-
utes longer to burn off any remaining food residues.
1. Push in the control knob and turn to the right until the triangle points upwards.
2. Close the gas valve after the burner is off.
15
CARE AND MAINTENANCE (continued)
Stainless Steel surfaces
To maintain your appliance’s retro look, carefully wash the exterior and stainless steel surfaces with mild deter-
gent and warm water and wipe dry with a soft cloth after each use. Wipe in the direction of brushed nishes to
avoid leaving streaks or damaging the nish.
Gas hose and regulator
Before each use check hoses for any wear or damage. Replace any damaged hoses immediately. Make sure
the hose assembly is not bent or kinked and does not contact any warm surface while the appliance is in use.
Always keep the pressure regulator clean and ensure that the vent hole on the lower side of the pressure regu-
lator is not blocked.
WARNING
It is recommended to replace the pressure regulator and hose assembly every 5 years, however, some
countries mandate that pressure regulator and hose assembies should be replaced after a shorter period of
use, which should be followed. Contact Unique Appliances for a replacement pressure regulator and hose
assembly.
• Toll-free: 1-877-427-2266 or 1-905-827-6154
• Email: [email protected]
Please use this equipment only with CE-certied hose assemblies and pressure regulators.
Storing your oven
1. Close the valve on the gas cylinder.
2. Set the control knob to off (triangle pointing upwards).
3. Wait for the pizza oven to cool completely.
4. Remove the gas cylinder from the oven by unscrewing the gas hose clockwise.
5. Thoroughly clean the oven.
6. Store in a dry, indoor location (e.g. garage or cellar).
7. Store the gas cylinder outdoors in a dry, well ventilated location, out of reach of children.
• Do not expose the oven to direct sunlight or harsh weather conditions for an extended period of time.
• When removing the appliance from storage, check for tube burner obstructions before use.
Disposal
This appliance must not be disposed of as household garbage or unsorted municipal waste. To help conserve
resources and protect the environment, it must be returned to a designated regional collection point for waste
management and/or recycling. Contact your local authorities for more information.
Do no allow children to play with plastic bags and packaging material - risk of injury and suffocation. Store
packing materials out of the reach of children, or dispose of them in an environmentally responsible manner.
16
TROUBLESHOOTING
PROBLEM POSSIBLE CAUSE SOLUTION
Burner will not
light
• No gas ow
• Coupling nut and regulator
not fully connected
• Obstruction of gas ow
• Disengagement of burner
to valve
• Incorrect assembly
1. Check to see if propane tank is empty
2. Turn the coupling nut about one-half to three quarters
additional turn until solid stop.
3. Tighten by hand only - do not use tools
4. Clear burner tube
5. Re-engage burner and valve
6. Check steps in assembly instructions
• The electrodes are covered
with cooking residue
1. Clean the burner as described in Cleaning and Care
(page 14). Degrease the electrode tips by gently wiping
with rubbing alcohol.
• The electrodes are bent
and/or are too far from the
burner
1. Gently bend the electrodes back towards the burner.
Yellow/
orange ames,
noticeable smell
of gas
• The burner is clogged by
spiders/insects or other
obstructions
1. Clean the burner as described in Cleaning and Care (pg. 14)
Sudden drop in
gas ow or low
ame
• Out of gas
• The gas hose is bent or
kinked.
1. Check for gas in propane tank
2. Turn off gas control knob, wait 30 seconds and light
oven. If ames are still low, turn off gas control knob
and propane tank valve. Disconnect regulator. Recon-
nect regulator and leak test. Turn on propane tank valve,
wait 30 seconds and then light oven.
3. Ensure the gas hose is straight and unkinked.
Flames blow out
1. High or gusting winds
2. Low on propane gas
1. Turn front of oven away from wind
2. Rell propane tank
3. Refer to instructions “sudden drop in gas ow” (above)
Flare-up
1. Grease build up
2. Excessive fat in meat
3. Excessive cooking tem-
perature
4. Excess our on the cook-
ing surface
1. Clean oven
2. Trim fats from meat before cooking
3. Adjust (lower) temperature accordingly
4. Brush remnant our from cooking surface
5. Flip stone
Flashback (re
in burner tube,
roaring sound
from burner)
1. Burner and/or burner
tubes are blocked
2. Pressure drop during
ignition
1. Turn gas control knob off. Clean burner and/or burner
tubes.
2. Turn off oven, ensure the tank valve is fully open (if
applicable) and relight.
17
RATING PLATE
Product name
Model
Version
Power 15354 BTU
Propane Propane
27300 BTU
CSA certified CSA certified
UNQ-PZ12CTH O LP
UNQ-PZ12CTH R LP
UNQ-PZ12CTH T LP
UNQ-PZ12CTH MB LP
UNQ-PZ16CTH O LP
UNQ-PZ16CTH R LP
UNQ-PZ16CTH T LP
UNQ-PZ16CTH MB LP
Gas pizza oven
Gas type
Gas pressure
Injector size
Product size
Net weight
0 ≤ 12inch diameterPizza size suitable for
USE OUTDOOR ONLY.
READ THE INSTRUCTIONS BEFORE
USING THE APPLIANCE.
WARNING: ACCESSIBLE PARTS.
MAY BE VERY HOT. PLEASE KEEP YOUNG CHILDREN AWAY.
0 ≤ 16inch diameter
22.4 lbs 40.9 lbs
22.72 × 16.20 × 11.89 in 23.78 × 25.98 × 14.96 in
Propane 1.02 Propane 1.02
11” W.C. 11” W.C.
120mm
70mm

18
WARRANTY
STANDARD WARRANTY
This appliance has been designed for domestic or residential use only. If properly installed, adjusted, and operated under
normal conditions in accordance with printed instructions, it will satisfactorily perform the functions expected of this
type of appliance. If the appliance fails due to a defect in material or workmanship within one year (standard warranty
period) from the original date of purchase:
Unique will, at our option, repair, exchange, or otherwise correct any part(s) found to be defective—excluding surface nish.
EXTENDED WARRANTY
Subject to the terms outlined below, Unique will extend the standard warranty period for select pizza oven models when customers
register their product within 60 days of purchase at uniqueappliances.com/product-registration. Products eligible for extended cov-
erage will be clearly identied on our website. Extended warranty period on eligible model is 5 years.
Terms of Extended Warranty:
• Applies only to Qualifying Products as listed on the warranty registration page.
• The Extended Warranty Period will begin on the product’s original purchase date.
• Proof of purchase is required for all claims.
• The warranty is transferable, provided the new owner has the original proof of purchase.
• Any replacement parts issued under warranty are covered by the remaining time on the original or extended warranty period.
• Altering the product in any way will void the warranty.
• Warranty support is subject to the product being used in accordance with the owner’s manual.
WHAT IS COVERED
During the applicable warranty period (standard or extended), Unique guarantees the product will be free from material defects in
materials and workmanship.
Specically:
• Faulty components will be repaired or replaced.
• If the defect renders the product unusable, the full unit may be replaced.
• Unique may request the return of the product for diagnostic purposes before issuing a replacement.
WHAT IS NOT COVERED
The following are excluded from both standard and extended coverage:
• Normal wear and tear
• Discoloration or heat tarnishing
• Surface rust, water damage, or corrosion from salt air/humidity
• Severe weather or natural disasters
• User error, including misuse or incorrect fuels
• Use outside the country of purchase
• Any alteration of the product
• Minor warping from heat that does not impair functionality
• Installation not compliant with instruction manual
• Use for commercial or industrial purposes
• Power failures, re, theft, or acts of God
• Service calls due to installation errors or customer education
• Freight or transit damage
• Any use outside of intended design or environment (e.g., outdoor use where not approved)
OWNER RESPONSIBILITIES
• Register the product (for extended warranty eligibility) within 60 days of purchase.
• Provide model and serial number when requesting service.
• Retain your proof of purchase—required for all claims.
• Make the appliance accessible for service and cover additional charges for remote locations.
• Any service calls requested to demonstrate use or correct non-warranty issues are the responsibility of the owner.
CLAIMS PROCESS
To initiate a warranty claim, customers must:
1. Visit uniqueappliances.com/technical-support or contact Customer Service at 1-877-427-2266.
2. Submit proof of purchase, serial number, and photographs/videos of the issue.
3. Cooperate with troubleshooting steps as requested by support.
If the issue qualies under warranty, Unique will, at our discretion, repair or replace the product. If no fault is found under warranty
terms, the product may be returned at the customer’s expense.
LIMITATION OF LIABILITY
This warranty is a voluntary manufacturer’s warranty and does not affect your statutory rights. In no event shall recovery under this
warranty exceed the original purchase price of the appliance.
Design updates made by Unique do not imply prior models are defective. Warranty service does not include design upgrades.
19
For questions related to the operation, safety or the purchase of your oven, please contact your dealer for more
information. For general information, contact our customer service department:
(manual copy - keep with your records)
To make the care and servicing of your appliance easy and efcient, please record the following information
for future reference:
Model:
Serial Number:
Purchased From:
Date Purchased:
APPLIANCE INFORMATION
CONTACT US
Toll-free
1-877-427-2266 or 1-905-827-6154
available during regular business hours,
8:30 am to 4:30 pm, EST.
Website
www.uniqueappliances.com
Email
Please visit our website at https://uniqueappliances.com/pages/product-registration
to register your product.
PRODUCT REGISTRATION
NOTES

© 2025 Unique Appliances Ltd., 2245 Wyecroft Road,
Oakville, Ontario, Canada, L6L 5L7
www.uniqueappliances.com