INSTRUCTIONS
& PRECAUTIONS
IMPORTANT NOTES:
*
Be sure to read this instruction sheet, along with any other instructions provided with
this particular product before making any attempt to remove the current strut from the
vehicle under repair.
* The piston rod (polished metal portion of strut unit) must not be grasped with any type
of tool. Any minor imperfection in the piston rod will reduce the overall life of the part.
* Gas pressurized struts such as this one, are not to be heated or opened, under any
circumstances.
* Eye, hand, foot and head protective apparel are a constant necessity.
*
Safety rated "jack-stands" are to be used at all times when a procedure requires one to
be beneath a motor vehicle.
*
The existing (used) modular assembly must be discarded in a manner considered safe
by official working standards. Be sure to keep out of reach and area of children. And
keep a safe distance from all personnel. Do not attempt any form of disassembly. To
avoid injury, or potentially a fatality, please follow this sheet of instructions, along
with any other instructions provided with this particular product, (see figures E, F& G)
* The replacement of the old coil springs will cause a vehicle to appear higher than
normal. This is most apparent on older vehicles whose springs have sagged to a
virtually unusable level, prior to install of new struts. Allow time for the vehicles
weight to adjust the springs to their final resting height.
* Do not remove piston Rod Lock Nut. The spring can cause serious injury.
[For additional information and torque specification, please consult a professional vehicle
repair manual.]
Removal Instructions:
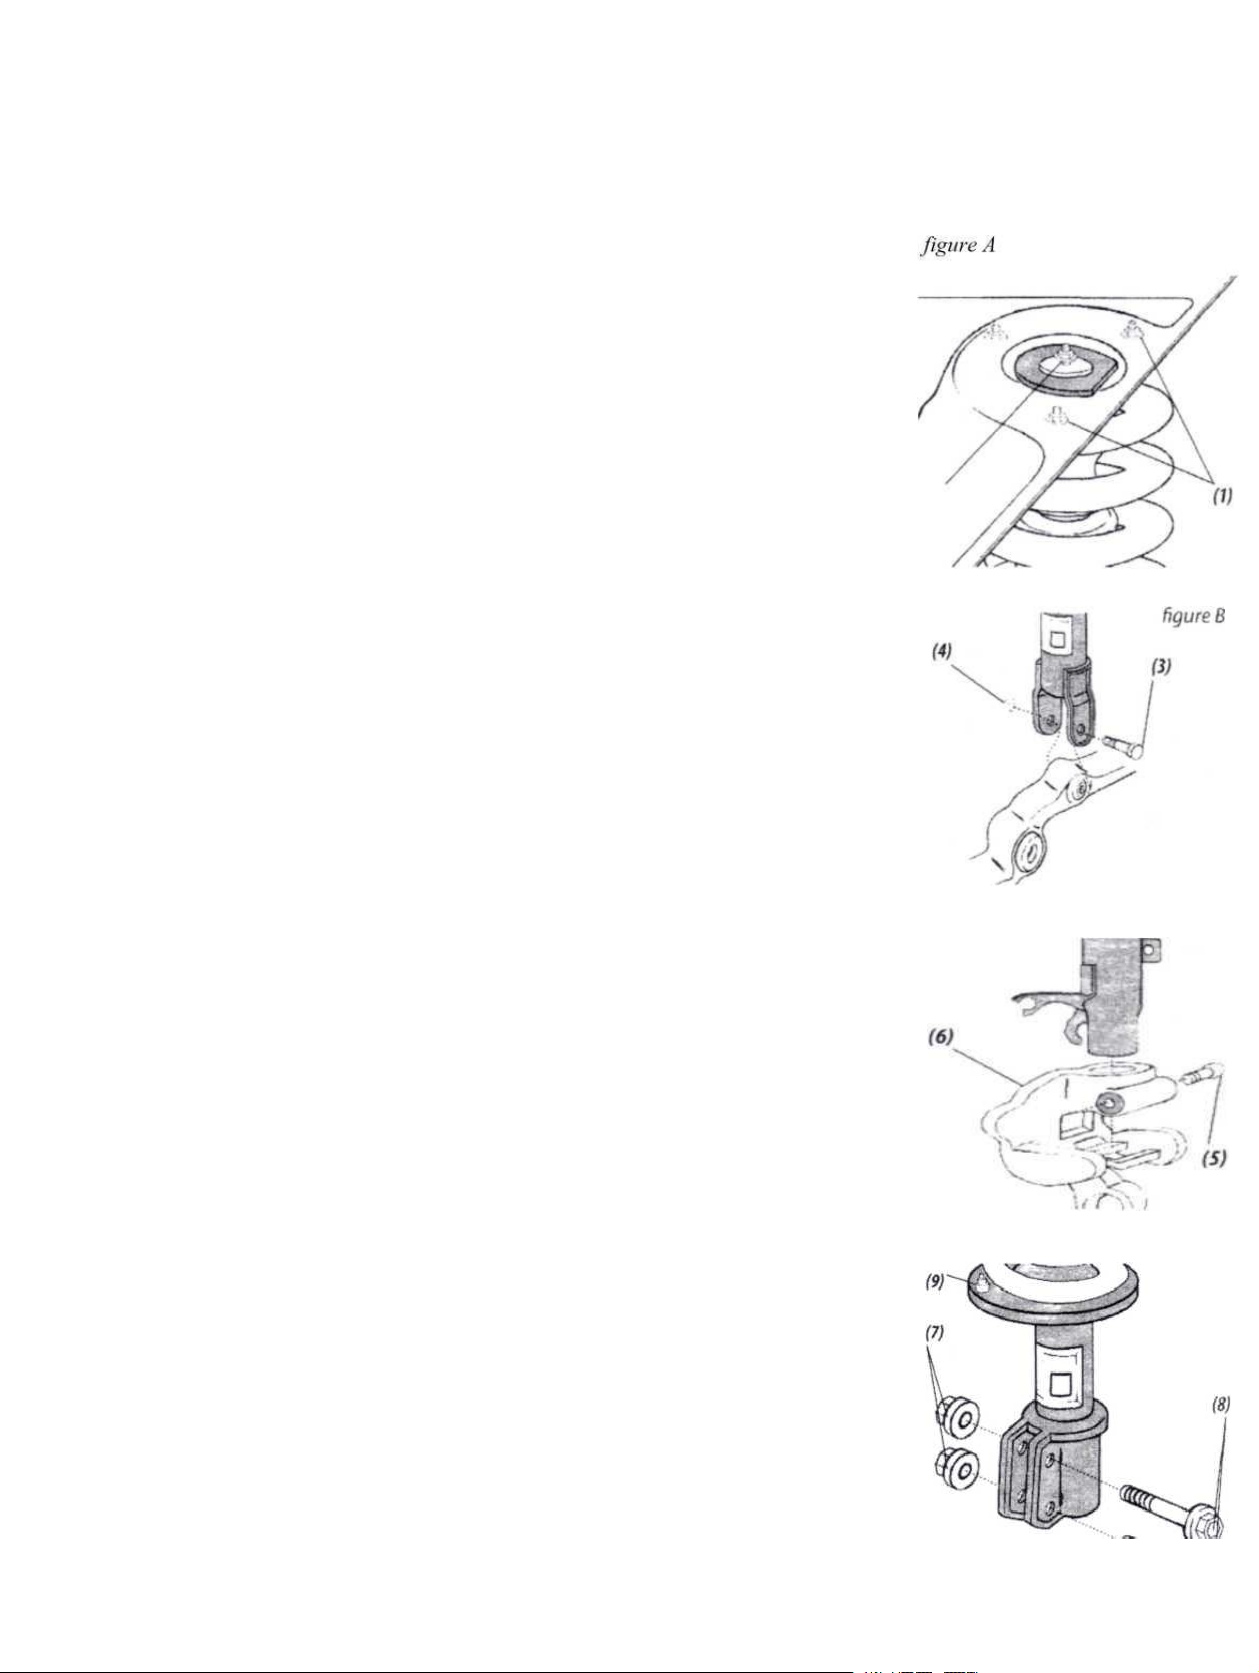
(la) Locate the upper mounting nuts of the bearing plate. (1) But be sure not to remove these,
simply loosen them for the time being. Make a mark on any one of the mounting studs as a
reference point. Now locate the same stud on the CRS Pro strut and make the same mark
accordingly. This will allow proper orientation during reinstall, (see figure A)
(lb) Raise the vehicle. Make certain that the frame is supported properly to avoid sagging and
damage to the vehicle. This is also a very important safety measure.
(1 c) Remove the appropriate wheels for the struts, which you are installing.
WARNING: IFYOU HAVE NOT PROPERLY FOLLOWED THESTEPS OFfib), YOU ARE IN
SERIOUS DANGER OF PHYSICAL INJURYAND/OR FATALITY.
SERIOUS DAMAGE TO THE VEHICLE UNDER REPAIR MAYALSO RESULT.
(ld) Continue by removing all items attached to the strut.These may include (but are not limited
to): Brake hoses, stabilizers and ABS (anti-lock braking system) connections. Retain any
hardware for potential re-use. If these items are beyond repair, be sure to apply the correct
fasteners when re-installing.
(le) Using a boot protector can allow minimizing damage to the drive shaft if anything is to go
wrong. It is strongly recommended that you perform this task.
(lf) Remove the holding nut from the outer tie-rod end. (9) Be sure to keep it for further use.
(see (1 d) for unusable hardware & fasteners)
Complete Strut Assembly
VARIOUS STRUT CONFIGURATIONS:
Single Bolted Strut-
(2a) For a single-lower-bolt style strut, unfasten and retain the pinch-bolt (3 & 4) for later
use. (see figure B)
(2b) First step in dismantling the spindle-to-strut assembly is the pinch-bolt. (5) Using a large
flat-headed screwdriver to separate the spindle-to-strut pinch-points can make this easier.
Force the spindle (6) o"of the strut assembly with a rubber mallet, (see figure C)
Double Bolted Strut-
(2c) Unfasten the lower mounting nuts. (7) Slide the bolts past their connecting components.
(8) Keep the removed hardware, if possible. Loosen the old strut from the steering
knuckle connector, (see figure D)
(2d) Going back to (1 a) remove the upper mounting nuts. New nuts are included
with the CRS Pro Strut complete strut assembly, (see figure A)
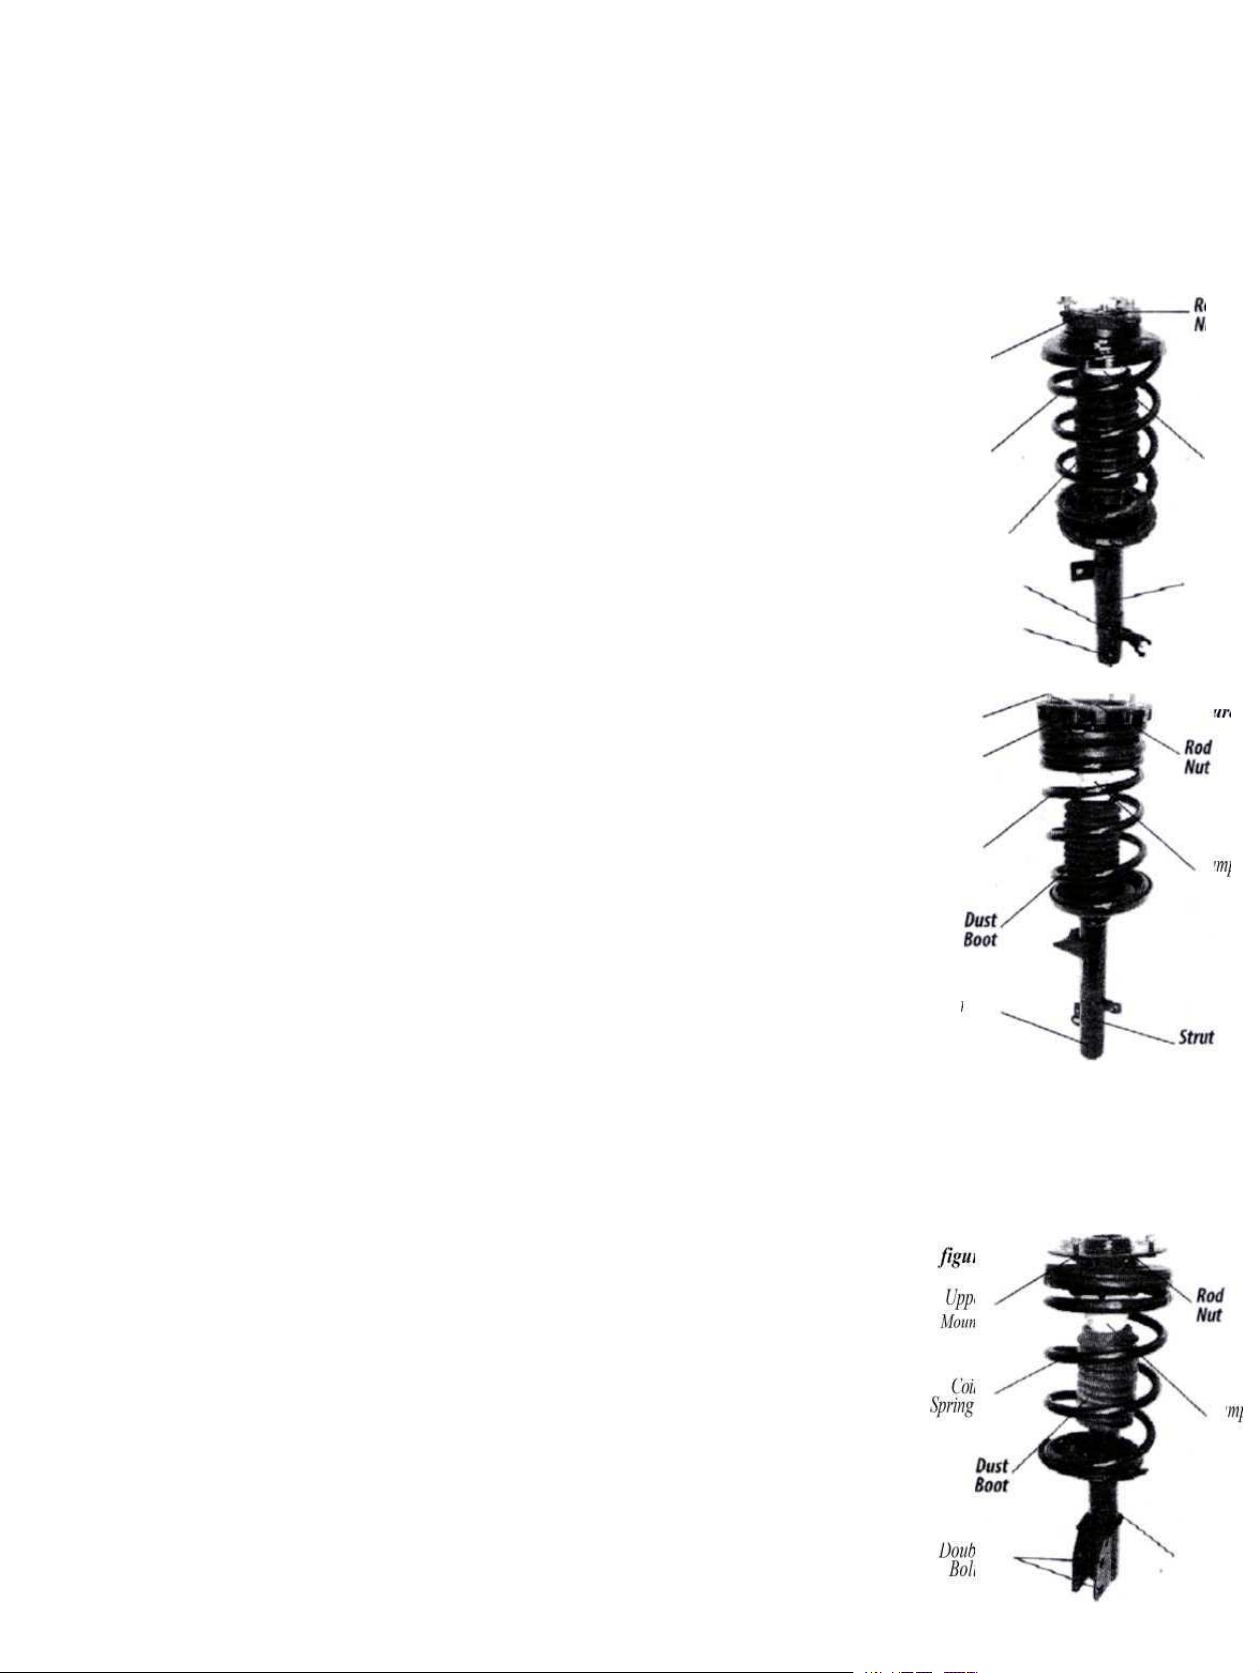
(2e) Remove the old strut assembly from the wheel well, (see figure E,F&G)
Warning: Serious Injury and/Or Fatality Can Occur From Removal Of The Rod Nut.
Under No Circumstances Should This Be attempted. During Installation The Coil Spring Is
Under High Pressure. Failure To Properly Restrain This Force When Removing
The Strut From Its Housing Can Result In Injury.
INSTALLATION INSTRUCTION:
(3a) Realign the new strut assembly in the strut tower housing and hand-tighten the mounting
nuts. (1)
(see figure A) Keep in mind that some rotation of the upper bearing plate might be needed.
Some Strut units are fixed and non-rotational.
VARIOUS STRUT CONFIGURATIONS:
Single Bolted Strut ■
(4a) Loosely install the pinch-bolt. (3) (see figure B) Lift the vehicle slightly using a jack until the
vehicle is slightly above the safety stands. Securely fasten the pinch-bolt. Torque Bolts to
Manufacturer's specification: found in repair manual
(4b) Line up the strut to the spindle pinch joint. Now in reverse, separate the pinch joint with the
Screwdriver and use the rubber mallet to tap the spindle assembly onto the strut. (see figure Q
Properly torque the nut (5) to the values found in the vehicle repair manual.
Double Bolted Strut ■
(4c) Connect the lower mounting nuts (7) and bolts (8) onto one another, (see figure D) Properly
torque the nuts down to the values found in the vehicle repair manual.
GENERAL INSTALLATION GUIDE:
(5a) Connect the tie rod end to strut, (see figure D) Properly torque the nut (9) down to the values
found in the vehicle repair manual.
(5b) If so equipped, place stabilizer link with strut then properly torque the nut down to the values
found in the vehicle repair manual.
(5c) Install all items to strut that were removed in the removal process. (1d)These may include (but
are not limited to): Brake hoses, stabilizers and ABS (anti-lock braking system) connections.
Torque bolts to specifications found in vehicle repair manual.
INSTRUCTIONS
& PRECAUTIONS
figure
1
Upper
Mount
Coil
Spring
Dust Boot
Upper
Mount
Coil
Spring
Rod
Nut

(5d) Remove wire retainer and boot protector, from drive shaft if used.
(5e) Replace wheels and torque lug nuts to the manufacturer's specifications. This is found in the owner's manual or in the official
vehicle repair manual.
(5f) For determining the intervals within which to tighten the bearing plates and upper mounting nuts, refer to the vehicle repair
manual. Torque values are also found here.
(5g) Performing a proper two, or four-wheel alignment must be done with the correct tools. Perform this task with great care and
caution.
(5h) Refer to your manufacturer's recommended values and settings for the rear wheel toe specifications. Align and reset these, if
needed.
Warning: It is Most Important, Not To Over Tighten Any Of The Nuts Or Bolts On Your Vehicle.
Excessive Torque Will Cause Damage To Threads Or The Bolt/Nut itself. Each Bolt/ Nut must be
Torqued To Exact Manufacturer's Specifications In Order To Avoid Voiding Warranties
FAQ:
What is the difference between shock absorbers and struts?
Struts and shocks are very similar in function, but very different in design. The job of both is to control
excessive spring motion; however, struts are also a structural component of the suspension. Struts can
take the place of two or three conventional suspension components and are often used as a pivot point
for steering and to adjust the position of the wheels for alignment purposes.
Why did I only receive a part of the accessories when I purchased a whole set?
Since the shock absorber assembly you purchased is an oversized product, it will be relatively difficult
to transport. In order for you to receive your product normally, we will usually split the package and
send it for you. If you receive part of the package, please wait patiently
How do I know when my shocks or struts need to be replaced?
struts are safety-critical components that are highly susceptible to everyday wear and tear. the vehicle
exhibits excessive bounce, sway, or dive during braking. If the shock or strut has lost a large amount of
fluid, if it is bent or broken, or if it has damaged brackets or worn bushings, it should be repaired or
replaced.