
ENAR
USER MANUAL
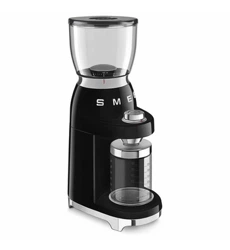
COFFEE GRINDER
مادختسا بيتك
ةوهقلا ةنحطم

We advise you to read this manual carefully, as it contains all the instructions for managing the appliance’s aesthetic and
functional qualities.
For further information on the product: www.smeg.com
.هئا
ر
ب تمق يذلا جتنملل ةيفيظولاو ةيلامجلا صئاصخلا ع ظافحلا نمضت
ي
�
لا تاميلعتلا عيمج مضي ثيح ةيانعب بيتكلا اذه ةءارقب حصنن
www.smeg.com ةرايز ءاجرب ج
َ
تن
ُ
ملا نع تامولعملا نم ديزملل
START
STOP
1
2
3
4
5
6
7
8
M
2
3
1
8
6
7
9
4
1
3
2
6
11
12
“A”
10
“B” “C”
5
5A
SUPERFINE
FINE
MEDIUM
START
STOP
1
2
3
4
5
6
7
8
M
9
8
7
15
16
10A
13
12
4
“D”
“F”
“G”
“H”
“I”
“ L”
12A
12
12
12A
10A
10B
“E”
5
1
5
6
Important information for the user / معلومات هامة للمستخدم
Instructions / تاريذحت
General information on this user manual, on safety and nal disposal /
ي
�
اهن لكشب زاهجلا نع صلختلا ةيفيكو همادختسا ةمسو زاهجلا اذه مادختسا ليلد نع ةماع تامولعم
Description /
فصولا
Appliance description / زاهجلا فصو
Use /
لامعتس
إ
ا
Information on using your appliance / زاهجلا مداختسا نع تامولعم
Cleaning and care / التنظيف و الصيانة
Information for proper cleaning and maintenance of the appliance/ حيحص لكشب زاهجلا ةنايصو فيظنتل تامولعم
Safety instructions / تحذير للسلامة
Information / تامولعم
Advice / تاحا
ر
قا

NOTES
Scan the QR code for a quick access to the portal My Smeg Assistant
My Smeg Assistant ةباوب إ عيلا لوصولل ا
ً
ئوض ةعيلا ةباجتسا زمر حسما

ةيحيضوتلا موسرلا ربتعت ،كلذلو .قبسم راذنإ نود اهتاجتنم نيسحتل ةبسانم اهارت يتلا تيدعتلا عيمجب مايقلا يف قحلاب اهسفنل عينصتلا ةهج ظفتحت“
”طقف ةيداشرإ ةميق تاذ امنإو ةمزل
ُ
م ليلدلا اذه يف ةدراولا فاصواو
The manufacturer reserves the right to make any changes deemed useful for the improvement of its products without
priornotice. The illustrations and descriptions contained in this manual are therefore not binding and are merely indicative.
EN - 1
EN
1 SAFETY
1.1 Essential safety-related
warnings
Since the machine is powered by electricity,
the following safety warnings must be
complied with:
• Do not touch the plug with wet hands.
• Make sure that the power outlet used is
always freely accessible, because only
in this way can it be unplugged when
necessary.
• If the plug is to be removed from the
socket, grasp the plug directly. Never
pull the cable as damage may b
caused.
• If the machine should suffer a malfunction,
do not attempt to repair it.
Switch the appliance off, remove the
plug from the power outlet and contact
the Smeg Technical After-sales centre.
• If the plug or power supply cable
are damaged, have them replaced
exclusively by the Technical After-sales
centre, so as to prevent all risks.
• Do not immerse the appliance, in water.
• Attention: disconnect the plug before
cleaning.
• Do not allow the power cable to hang
over the edge of the table or any other
surface, or to come into contact with hot
surfaces.
• Do not use the appliance for more than
90 seconds consecutively. Allow the
appliance to cool down foe approx.
15 minutes before re-use.
Keep the packaging material (plastic bags,
expanded polystyrene) out of the reach of
children.
• Cleaning and maintenance are the user’s
responsibility and must not be performed
by unsupervised children.
• Do not position the appliance on or in
proximity of electric or gas cookers, or
in a heated oven.
• Make sure that there are no foreign
objects inside the coffee grinder.
• Switch the appliance off and disconnect
it from the electric power supply
before changing the accessories or
approaching the parts that move during
use.
1.2 Connect the appliance
Caution! Make sure that the mains
voltage and the frequency correspond
with that indicated on the data plate on
the bottom of the appliance.
Only connect the appliance to a current
outlet installed perfectly with minimum
capacity of 10A and with efcient earth.
If the appliance power outlet and plug
are incompatible, have the power outlet
replaced with a suitable type by qualied
staff.
• This appliance must not be used by
children.
• Keep the appliance and its cable out of
the reach of children.
• Children must not play with the machine.
• The appliance can be used by persons
with reduced physical and sensory
conditions or lack of experience and
Warnings
EN - 2
knowledge, if supervised or instructed
concerning safe use of the appliance by
a person responsible for their safety and
they understand the risks connected.
• Disconnect the appliance from the
power outlet before all assembly,
disassembly and cleaning operations.
1.3 Use compliant with
destination
• The appliance is intended for household
and similar use, such as:
- in the kitchen area for the staff of shops,
ofces and other work environments;
- in bed and breakfast and agritourism
accommodation;
- by guests at hotels and motels, and in
residential environments.
• Other uses, in restaurants, bars and cafés
for example, are improper.
1.4 Manufacturer’s liability
The manufacturer declines all liability for
injury/damage undergone by persons and
objects due to:
• use of the appliance different from that
envisioned;
• the user manual not being read;
• tampering even with individual parts of
the appliance;
• use of non-original spare parts;
• failure to comply with safety
recommendations.
Keep these instructions carefully.
Whenever the appliance is
transferred to other persons, it
must be accompanied by these
user instructions.
1.5 Disposal
Electrical appliances must not be disposed
of with household waste.
The appliances bearing this symbol
are subject to European Directive
2012/19/EU.
• All discarded electric and electronic
appliances must be disposed of
separately from household waste,
by taking them to relevant centres
envisioned by the Country. By disposing
of the discarded device correctly,
damage to the environment and risks to
human health will be avoided. For further
information regarding the disposal of the
discarded device, contact the Municipal
Administration, the Disposal dept., or the
shop where the device was purchased.
Warnings
EN - 3
EN
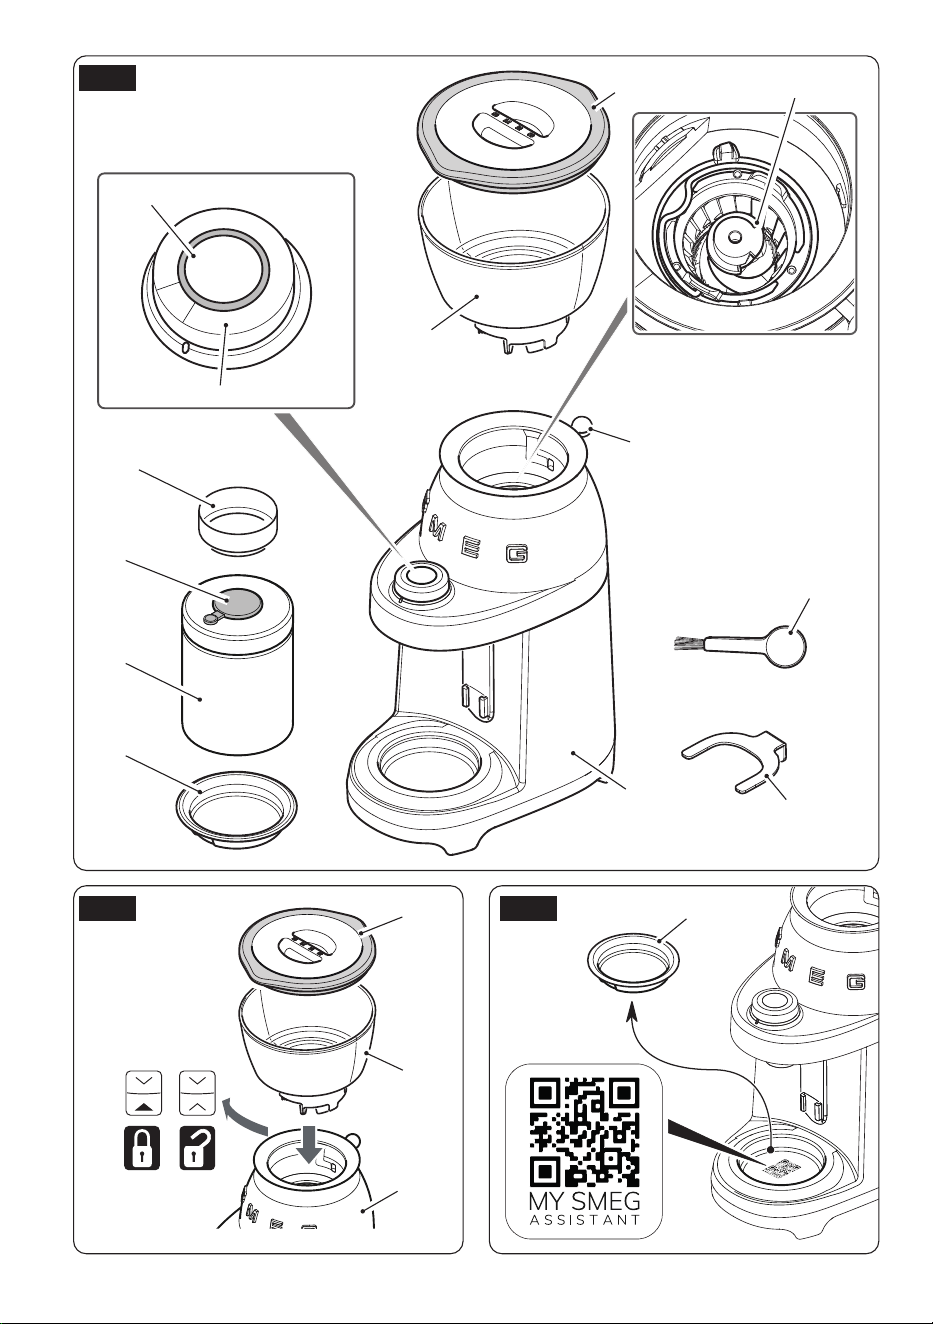
2 Appliance description
(Fig. A)
1 Motor base
2 Coffee bean container (240 g)
3 Coffee bean container lid
4 Versatile 51-58 mm diameter dosing ring
5 Ground coffee container with lid
6 Dust collector tray
7 START/STOP button
8 Grinding functions selection knob
9 Grinding level adjustment lever
10 Grinder
11 Cleaning brush
12 Filter-holder support fork
Identication plate
The identication plate states the technical
data, serial number, and marking. The
identication plate must never be removed.
3 Before commissioning
(Fig. A)
• Unpack the appliance carefully and remove
all packaging materials and promotional
labels.
• Wash all components, except for the motor
base (1) and the grinder (10), with hot
water and normal washing-up liquid. Rinse
all components thoroughly and dry them
before use.
The grinder must never be washed
and must always be kept dry.
Clean the grinder with the cleaning
brush provided or with a hard-
bristle brush.
Before use, check that all the
components are integral and do
not have any cracks.
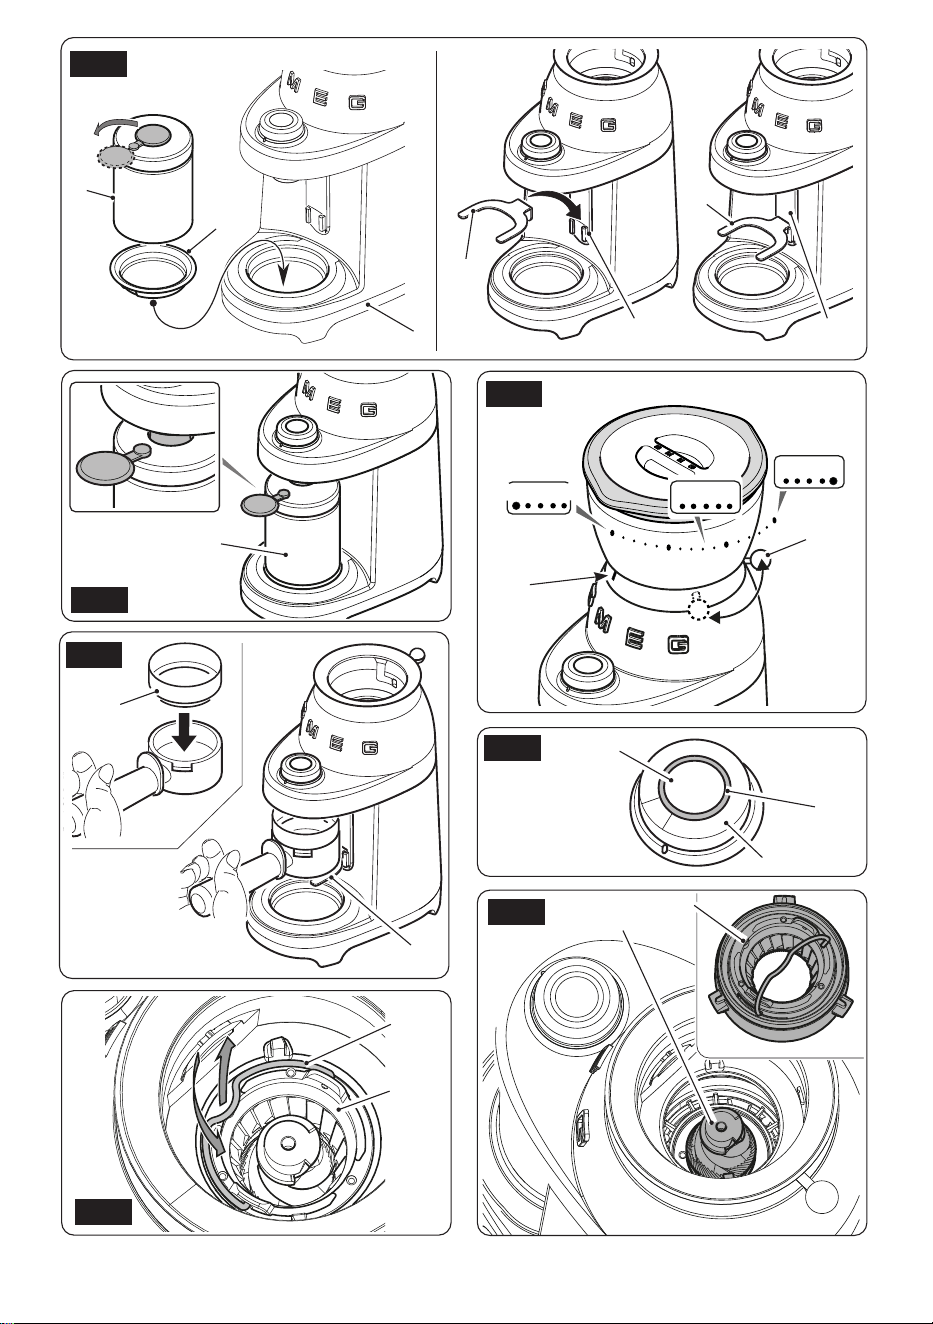
4 Assembly of
components
(Fig. B-D)
• Position the container (2) on the motor base
(1) matching up the two reference notches
“ ” “ ” on the left side of the motor
body (1).
Now, rotate the container (2) clockwise until
the two indications “ ” “ ” match.
• Place the lid (3) on the container (2).
• Position the plate (6) on the motor base (1)
in a way to secure it.
Description / Assembly
EN - 4
5 Description of controls
(Fig. F-G)
Grinding adjustment lever (9)
The appliance has a lever (9), which allows the
level of grinding to be adjusted appropriately
to your use:
SUPERFINE Superne grinding
FINE Fine grinding
MEDIUM Medium grinding
When using the device with a
Smeg ECF03 coffee machine to
prepare espresso coffee, proceed
as indicated, depending on the
type of lter selected, otherwise,
when preparing COLD BREW
drinks, we recommend setting
the coffee grinder to MEDIUM,
typically between level 10 and 12.
Move the lever to make the indicator (13)
correspond with the desired grinding level.
When using non-pressurised lters,
we recommend setting the coffee
grinder to “SUPERFINE”, whereas
when using pressurised lters, we
recommend selecting the “FINE”
setting.
Controls
EN - 5
EN
Controls
Quantity of grinding selection knob
(8)
The appliance has 8 pre-set functions and a
manual function, which can be selected using
the knob (8).
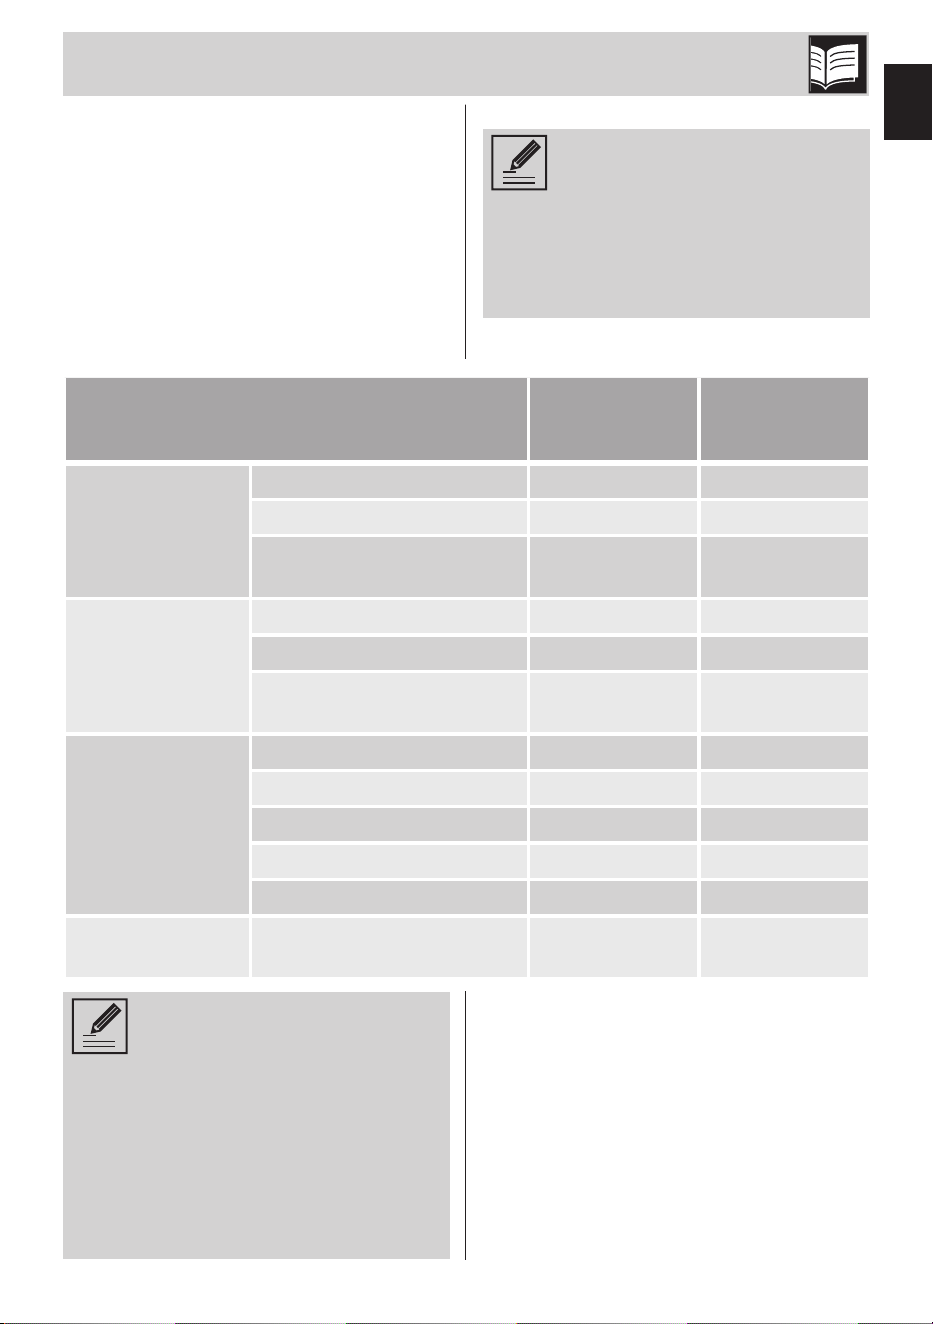
Each function corresponds to a pre-dened
grinding time, which increases gradually
step-by-step.
Choose the appropriate settings
from the table below, depending
on the type of machine and the
selected function.
It may be necessary to modify the
quantity of coffee, depending on
the type being used.
Function
Grinder
setting
Function
selector
setting
Single espresso
51 mm diameter pressurised lter
FINE 1
58 mm diameter pressurised lter
FINE 1
58 mm diameter non-
pressurised lter
SUPERFINE 3
Double espresso
51 mm diameter pressurised lter
FINE 2
58 mm diameter pressurised lter
FINE 4
58 mm diameter non-
pressurised lter
SUPERFINE 5
Filter coffee
2 cups MEDIUM 3
4 cups MEDIUM 5
6 cups MEDIUM 6
8 cups MEDIUM 8
10 cups MEDIUM 8
Cold Brew
(With Smeg ECF03)
MEDIUM 3
The user may decide to operate the
machine in “M - Manual” mode,
irrespective of the selected function.
Set the selector to “M” and press
START/STOP.
Do not leave the coffee grinder
unattended when operating in
manual mode as it is necessary to
press the start/stop button again
when it has nished grinding.
EN - 6
Make sure to stop grinding before
that coffee powder exceeds the
ground coffee container maximum
level mark.
Coffee may lose avour quickly
once ground. For optimal results,
use coffee powder immediately
after grinding. Store the ground
coffee container in a dark, fresh
and dry environment. Make sure
the coffee powder level is lower
than the container maximum level
mark and that the container lid is
rmly closed and screwed.
Grinding the coffee in to the espresso
coffee lter-holder (Fig. A-D-F-G-H)
• If the dosing ring (4) is to be used, position
it on the compatible lter holder (ø51 o ø58
mm).
• Position the lter-holder support fork (12) in
the relative attachment (12A).
• Position the lter-holder under the dispensing
cone.
• Select the grinding level.
• Select the program depending on the
desired function. For more information about
the various functions, consult the paragraph
“DESCRIPTION OF COMMANDS”.
• Press the START/STOP button (7) to start
grinding. For all pre-set programs, grinding
will end automatically.
• When grinding has been completed,
remove the lter-holder.
6 Use (Fig. D-F-G-I)
Make sure the upper grinder
(10A) is inserted and secured in
its housing.
• Insert the plug into the power outlet.
• Lift the lid (3) and introduce the coffee beans
into the container (2).
If the LED located on the knob
flashes, it means that the
appliance is in error condition:
beans container not present or not
inserted correctly.
Grinding the coffee into the container
(5)
• Position the powder container (5) on the
plate (6) being careful to open the silicon
cap.
• Select the desired level of grinding by
positioning the indicator (13) on the
gradation desired.
• Select the desired quantity by rotating the
knob (8) and making the red indicator of
the ring match with the desired program:
from “2” to “12”.
• Press the START/STOP button (7) to start
grinding. For all pre-set programs, grinding
will end automatically, excluding the
manual function (M).
• When grinding has been completed,
remove the container (5) from the appliance.
• To withdraw the ground coffee from the
container (5), open it by turning the lid (5A)
anti-clockwise and remove it.
Grind coffee in proper quantity,
make sure that coffee powder
is lower than the ground coffee
container maximum level mark.
Use
EN - 7
EN
The dosing ring (4) prevents the
coffee powder from falling, thus
helping to reduce dirtying and
waste. Compatible with Smeg 58
mm lter-holders.
Filter-holder not supplied.
If the manual grinding operating
time exceeds the safety time set
(90 seconds), the motor stops
automatically.
During the grinding phase, do not
turn the knob (8) from one program
to another and do not move the
grain selection lever (9).
If a ner level of grinding than
that currently used is to be set,
it is highly recommended to
remove the grinder and clean it to
remove any residual beans, before
proceeding with a new grinding
operation. See the CLEANING
AND MAINTENANCE section to
remove the grinder.
A beans locking system allows the
container (2) to be raised safely
from the motor base (1), in a way
to prevent the beans escaping.
The coffee grinder has an auto-off
function (stand-by), in the event it
is not used after 90 seconds.
Press the START/STOP button (7)
to re-activate the product.
Grinding times (Fig. I-L)
The functions envision pre-set ground coffee
supply settings. However, depending on
personal taste, the pre-set amount of ground
coffee can be increased or decreased, thus
customising the different functions.
Customise the amount of grinding
for espresso coffee
• Make sure that the grinding indicator (13)
is set to a suitable level for espresso coffee
(SUPERFINE or FINE, depending of the type
of lter in use, as indicated in the paragraph
“DESCRIPTION OF COMMANDS”).
• Turn the knob (8) to “1”.
• Press the START/STOP button (7) to start
grinding and hold it down for the desired
time; the ring (15) flashes during the
programming phase.
• On releasing the button, grinding stops, the
ring stops ashing and the new setting is
memorised.
It is possible to customise all the
other functions by repeating
procedure to modify the grinding
quantity.
Restoring factory values
To reset the factory values:
• Turn the knob (8) to program “M”.
• Press the START/STOP button (7) and hold
it down for 5 seconds. The ring (15) ashes
5 times indicating that all factory-set values
have been reset.
Use
EN - 8
7 Cleaning and
maintenance
(Fig. A-I-L)
• Make sure the coffee bean container (2)
is empty and then activate manual mode
(M) to remove any coffee residues from the
grinder.
Before carrying out any cleaning
operation, ALWAYS disconnect the
plug from the power outlet.
Never immerse the motor base (1)
in water or other liquids.
• Remove the container (2) by turning it
anticlockwise.
• Remove any coffee beans present in the
grinder using the cleaning brush (11)
supplied.
• Lift the handle (16) and turn the upper
grinder (10A) anti-clockwise to release and
remove it.
• Clean the upper grinder (10A) and the
lower grinder (10B) and the coffee outlet
cavity using a brush with hard bristles or the
cleaning brush (11) supplied.
• Re-mount the upper grinder (10A) making
the two notches “ ” “ ” match and
rotating clockwise to x it “ ” “ ”.
• The coffee bean container (2), the lid (3)
and the plate (6) can be washed using
warm water and neutral detergent.
• The motor base (1) can be cleaned using a
damp cloth, avoiding the use of detergents
or abrasive materials.
Cleaning and maintenance
EN - 9
EN
Problem Possible causes Solution
The appliance does not
work.
Unplugged. Plug in.
The coffee bean container
is not inserted correctly.
Check that the coffee bean
container is correctly inserted
in the motor base.
The motor thermal
protection has activated
automatically.
Wait (approx. 30 minutes)
for the thermal protection to
reset.
The Led on the knob
ashes.
The coffee bean container
is not inserted correctly.
Check that the coffee bean
container is correctly inserted
in the motor base.
See the Assembly of
Components paragraph to
assemble the container.
The appliance stops
during operation.
The motor thermal
protection has activated
automatically.
Wait (approx. 30 minutes)
for the thermal protection to
reset.
The appliance works
but does not dispense
ground coffee.
No coffee beans in the
relative container.
Load the coffee beans.
Grinder blocked. Remove the grinder and
check there are no objects
blocking rotation.
The grinding level set is
incorrect or difcult.
The top of the grinder
(10A) is missing.
Insert and secure the upper
grinder (10A) in its housing.
Grinders worn. Replace the grinders by
taking the appliance to an
authorised after-sales centre.
Contact local technical support if the problem is not solved or in case of other types
of faults.
Troubleshooting

EN - 10