tM
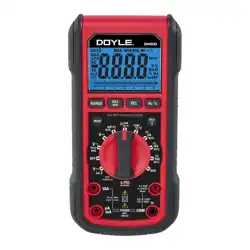
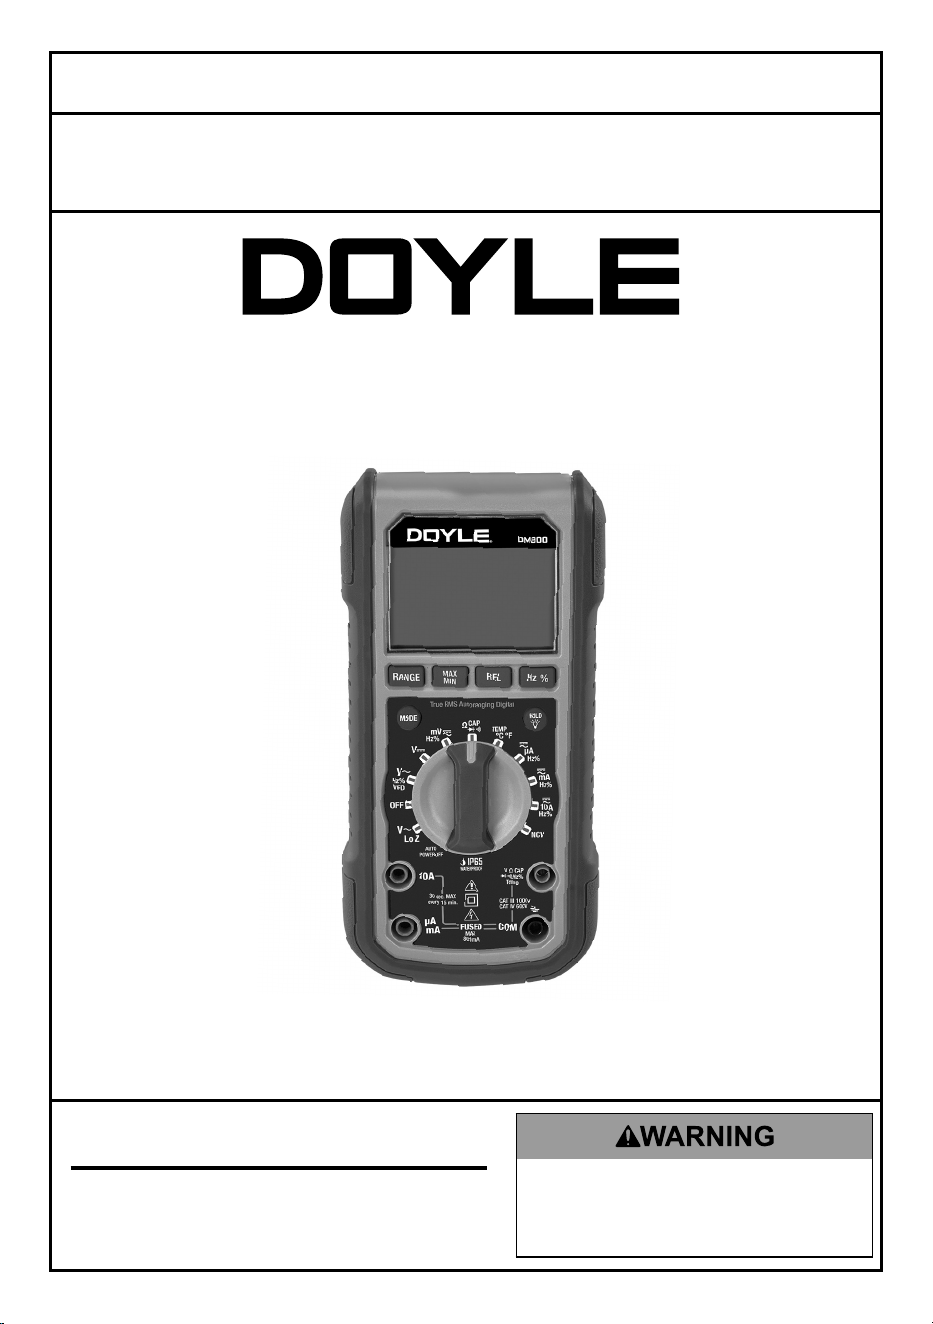
DIGITAL MULTIMETER
Visit our website at: https://www.harborfreight.com
email our technical support at: [email protected]
59442
Owner’s Manual & Safety Instructions
Save This Manual Keep this manual for the safety warnings and precautions, assembly,
operating, inspection, maintenance and cleaning procedures. Write the product’s date code in the back
of the manual near the assembly diagram (or month and year of purchase if product has no number).
Keep this manual and the receipt in a safe and dry place for future reference. 25i
When unpacking, make sure that the product is intact
and undamaged. If any parts are missing or broken,
please call 1-800-444-3353 as soon as possible.
Copyright
©
2025 by Harbor Freight Tools
®
. All rights reserved.
No portion of this manual or any artwork contained herein may be reproduced in
any shape or form without the express written consent of Harbor Freight Tools.
Diagrams within this manual may not be drawn proportionally. Due to continuing
improvements, actual product may differ slightly from the product described herein.
Tools required for assembly and service may not be included.
Read this material before using this product.
Failure to do so can result in serious injury.
SAVE THIS MANUAL.
Page 2 For technical questions, please call 1-800-444-3353. Item 59442
SaFety OperatiOn MaintenanceSetup
table of contents
Safety ..........................................2
Specifications ..............................5
Setup ...........................................6
Operation ..................................... 8
Maintenance ...............................15
Warranty .....................................16
tM
WarninG SyMBOLS anD DeFinitiOnS
This is the safety alert symbol. It is used to alert you to
potential personal injury hazards. Obey all safety messages
that follow this symbol to avoid possible injury or death.
Indicates a hazardous situation which, if not avoided,
will result in death or serious injury.
Indicates a hazardous situation which, if not avoided,
could result in death or serious injury.
Indicates a hazardous situation which, if not avoided,
could result in minor or moderate injury.
Addresses practices not related to personal injury.

Page 3For technical questions, please call 1-800-444-3353.Item 59442
SaFetyOperatiOnMaintenance Setup
iMpOrtant SaFety inFOrMatiOn
Safety Warnings and precautions
read all safety warnings and all instructions.
Failure to follow the warnings and instructions may result
in electric shock, fire and/or serious injury.
Save all warnings and instructions for future reference.
1. Electrical shock can cause death
or injury! NEVER TOUCH exposed
conductors of electricity.
2. test cable voltages with care.
3. Inspect the Multimeter before
use. In addition to a general
inspection, look specifically for:
a. Pay special attention to the
insulation protecting the connectors.
b. Check the leads for exposed metal,
damaged insulation, and continuity.
c. Replace damaged test lead
immediately, before use.
4. Do not use the Multimeter if:
a. Either of the test leads are
damaged in any way.
b. Test leads are dirty or
have residue on them.
c. The battery is low.
d. Near any explosive
gasses or fumes.
e. Any abnormal operation is
detected.
(If in doubt about the
condition of the Meter, have
it serviced before use.)
f. The battery cover is open.
5. Power this Meter using only
the battery(ies) referenced in
the Specifications Chart.
6. Use caution when working near
voltages above 30 VAC rms, 42 VAC
peak, or 60 VDC. Voltages this high
present a risk of electric shock.
7. Disconnect the circuit’s power
before connecting the Meter in
series, when measuring current.
8. Connect the common (COM) test
lead first and disconnect it last.
9. Hold the probes with fingers
behind guards.
10. Avoid electrical shock. Use extreme
caution when working near uninsulated
conductors or bus bars. Prevent body
contact with grounded surfaces such
as pipes, radiators, ranges, and cabinet
enclosures when testing voltages.
11. Observe work area conditions. Do
not test voltages in damp or wet
locations. Don’t expose to rain.
Keep work area clean and well lit.
12. Keep children away. Children must
never be allowed in the work area.
13. Stay alert. Watch what you are doing,
use common sense. Do not operate
any meter when you are tired.
14. Do not operate meter if under the
influence of alcohol or drugs. Read
warning labels on prescriptions to
determine if your judgment or reflexes
are impaired while taking drugs. If there
is any doubt, do not operate the meter.

Page 4 For technical questions, please call 1-800-444-3353. Item 59442
SaFety OperatiOn MaintenanceSetup
15. People with pacemakers should
consult their physician(s) before use.
Electromagnetic fields in close
proximity to heart pacemaker could
cause pacemaker interference
or pacemaker failure.
16. Do not test voltage on circuits
higher than 1000 volts.
17. Do not test current on circuits
higher than 10 amps.
18. Dress properly. Protective,
electrically nonconductive
clothes and nonskid footwear are
recommended when working.
19. Wear ANSI-approved safety
goggles during use.
20. Only use accessories intended
for use with this meter.
21. Avoid damaging meter. Use only
as specified in this manual.
22. Prior to testing resistance, diodes,
or continuity; disconnect all power
to the circuit and discharge all
high-voltage capacitors.
23. Performance of this meter may vary
depending on battery condition.
24. Use the proper settings, terminals,
techniques, and range for the
tests performed. Start with the
range stated in the instructions.
25. Do not apply voltage to the
Test Leads when the Multimeter
is in the Ohms testing setting.
Damage can occur to the Meter.
26. Do not switch between testing
modes with the multimeter
connected to a circuit.
27. Have the Multimeter calibrated by
a qualified technician every year
to maintain accurate results.
28. The warnings, cautions, and
instructions discussed in this
instruction manual cannot cover all
possible conditions and situations
that may occur. It must be understood
by the operator that common sense
and caution are factors which cannot
be built into this product, but must
be supplied by the operator.
SaVe tHeSe inStructiOnS.
Page 5For technical questions, please call 1-800-444-3353.Item 59442
SaFetyOperatiOnMaintenance Setup
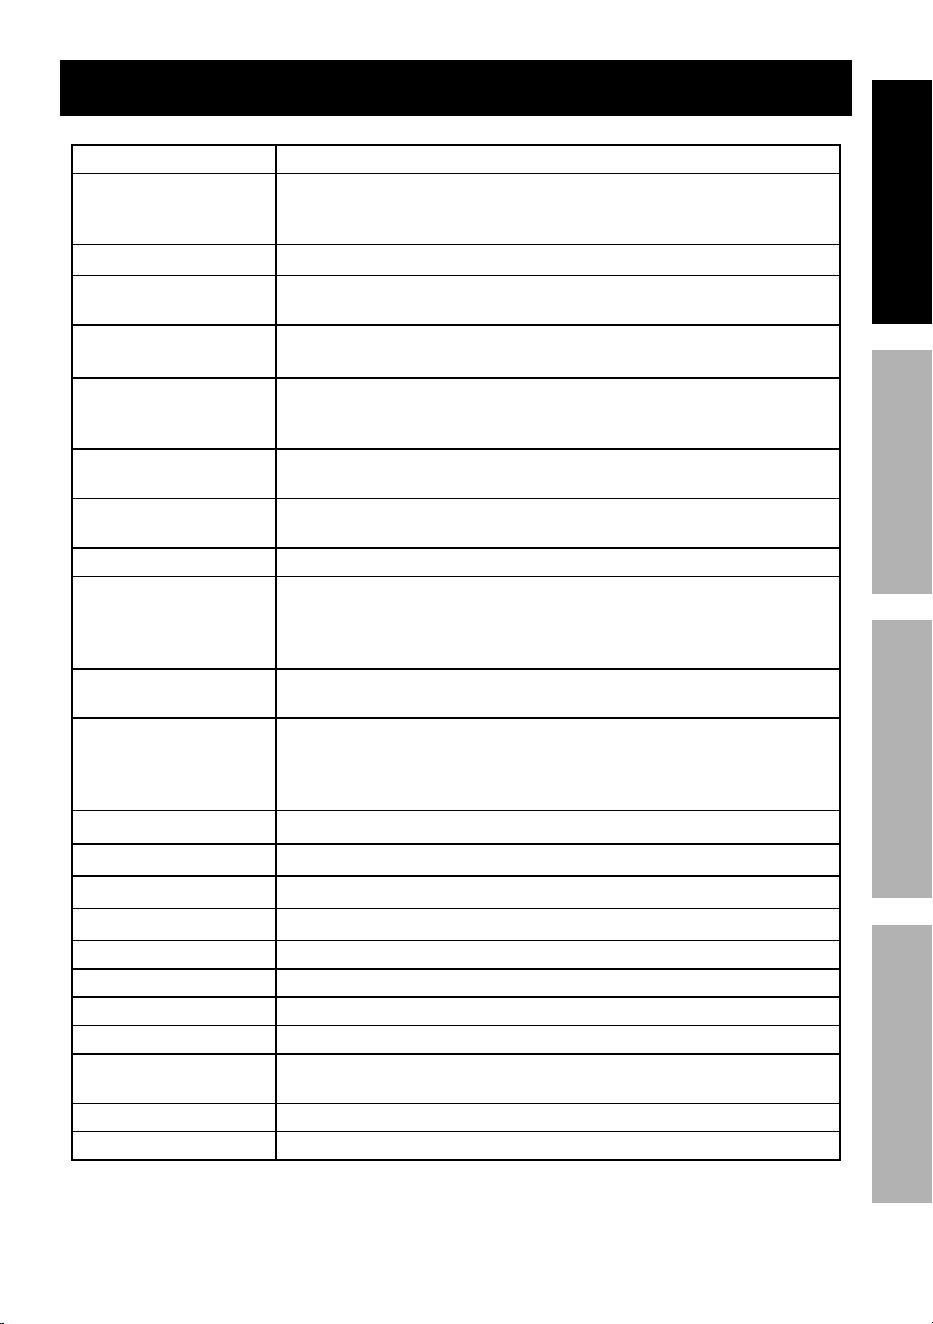
Specifications
DC Voltage Ranges: 60mV / 600mV / 6V / 60V / 600V / 1000V
DC Voltage Accuracy (@60mV - 600mV) ± (0.9% of rdg + 9D)
(@6V - 600V) ± (0.5 of rdg + 5D)
(@1000V) ± (0.6% of rdg + 6D)
DC Current
Ranges: 600μA / 6000μA / 60mA / 600mA / 6A / 10A
DC Current Accuracy (@600μA - 600mA) ± (1.0% of rdg + 3D)
(@6A - 10A) ± (1.5% of rdg + 3D)
AC Voltage Ranges: 60mV / 600mV / 6V / 60V / 600V / 1000V
Frequency Range: 45Hz ~ 1kHz (Sine); 50/60Hz (All Waves)
AC Voltage Accuracy (@60mV - 600mV) ± (0.9% of rdg + 9D)*
(@6V - 600V) ± (0.8% of rdg + 4D)*
(@1000V) ± (0.8% of rdg + 8D)*
AC Current Ranges: 600μA / 6000μA / 60mA / 600mA / 6A / 10A
Frequency Range: 45Hz ~ 1kHz (Sine); 50/60Hz (All Waves)
AC Current Accuracy (@600μA - 600mA) ± (1.5% of rdg + 3D)*
(@6A - 10A) ± (2.0% of rdg + 3D)*
Resistance Ranges: 600Ω / 6kΩ / 60kΩ / 600kΩ / 6MΩ / 60MΩ
Resistance Accuracy (@600Ω) ± (1.0% of rdg + 2D)
(@6kΩ - 600kΩ) ± (0.8% of rdg + 2D)
(@6MΩ) ± (1.2% of rdg + 2D)
(@60MΩ) ± (1.0% of rdg + 5D)
Capacitance Ranges: 9.999nF / 99.99nF / 999.9nF / 9.999µF
/ 99.99µF / 999.9µF / 9.999mF / 99.99mF
Capacitance Accuracy (@9.999nF) ± (5.0% of rdg + 25D)
(@99.99nF) ± (5.0% of rdg + 20D)
(@999.9nF-999.9µF) ± (4.0% of rdg + 5D)
(@9.999mF -99.99mF) ± (10% of rdg)
Diode Open circuit voltage ~3.2V
Continuity Meter beeps at < 50Ω
Frequency Range: 10Hz - 1MHz @ >100mV
Frequency Accuracy (@10Hz - 1MHz) ± (1.5% of rdg)
Temperature Range: -328°F - 2372°F (-200°C - 1300°C)
Temperature Accuracy (@-328°F - 2372°F) ± (3.0% of rdg + 9D)
Duty Cycle 0.1% - 99.9%
Operating Temperature Range: 32°F - 122°F
Overload Protection (mAμA Jack) 800mA/1000V Ø6.35×31.8mm fuse (F1)
(10A Jack) 10A/1000V Ø10.3×38mm fuse (F2)
Display LCD
Battery 3 AAA (included)
* Reading between 5-100% of Range.
Page 6 For technical questions, please call 1-800-444-3353. Item 59442
SaFety OperatiOn MaintenanceSetup
Setup - Before use:
read the entire iMpOrtant SaFety inFOrMatiOn section
at the beginning of this manual including all text under
subheadings therein before set up or use of this product.
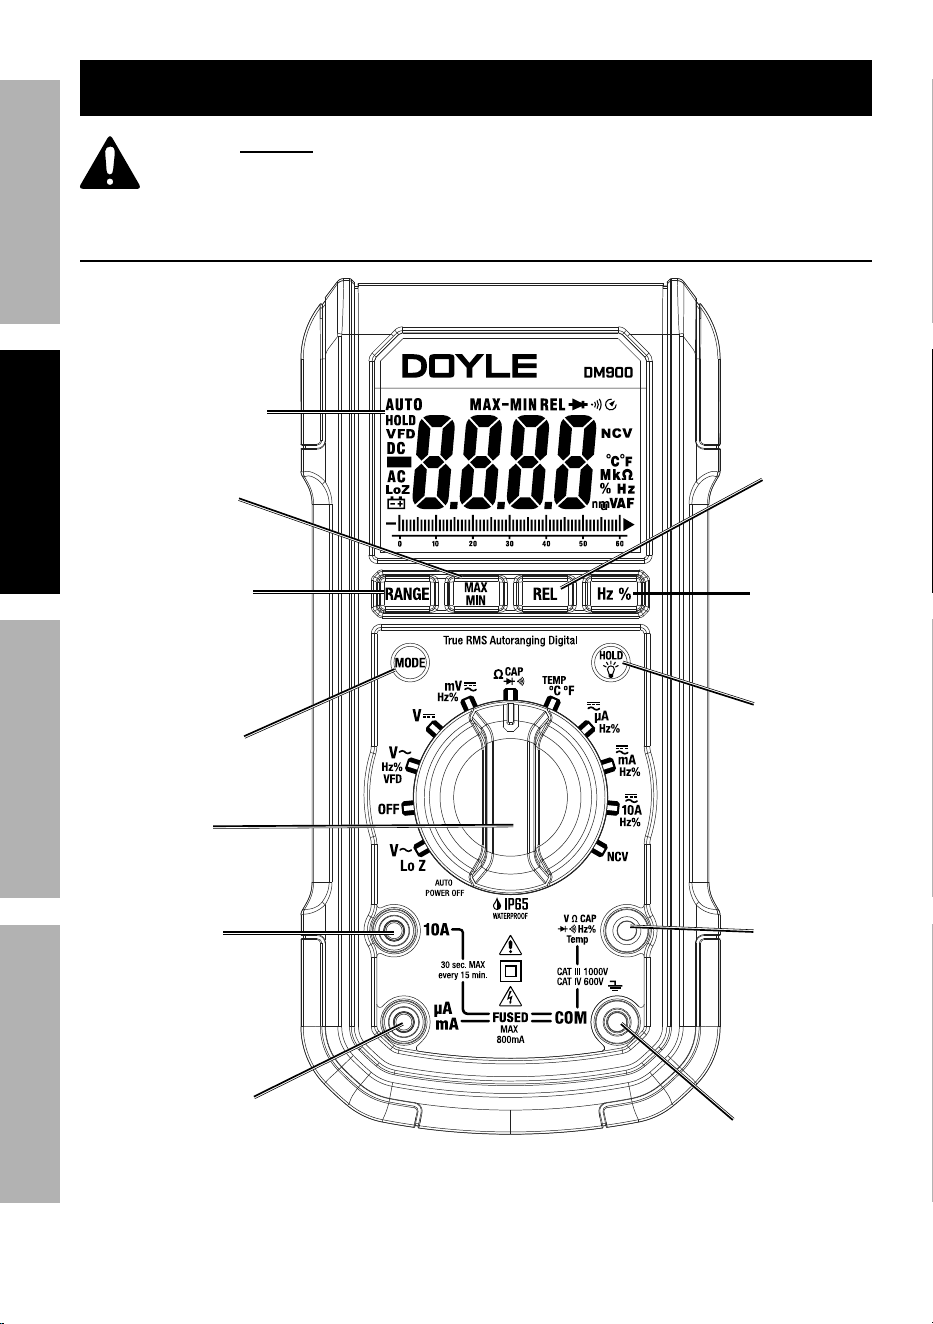
Functions
TM
Display
range Button
Maximum/
Minimum
Button
relative
Button
Hz/Duty cycle
Button
Hold/
Backlight
Button
MODe
Button
rotary
Switch
10a input Jack
Milli/Micro amp
input Jack
cOM input Jack
positive
input
Jack
Page 7For technical questions, please call 1-800-444-3353.Item 59442
SaFetyOperatiOnMaintenance Setup
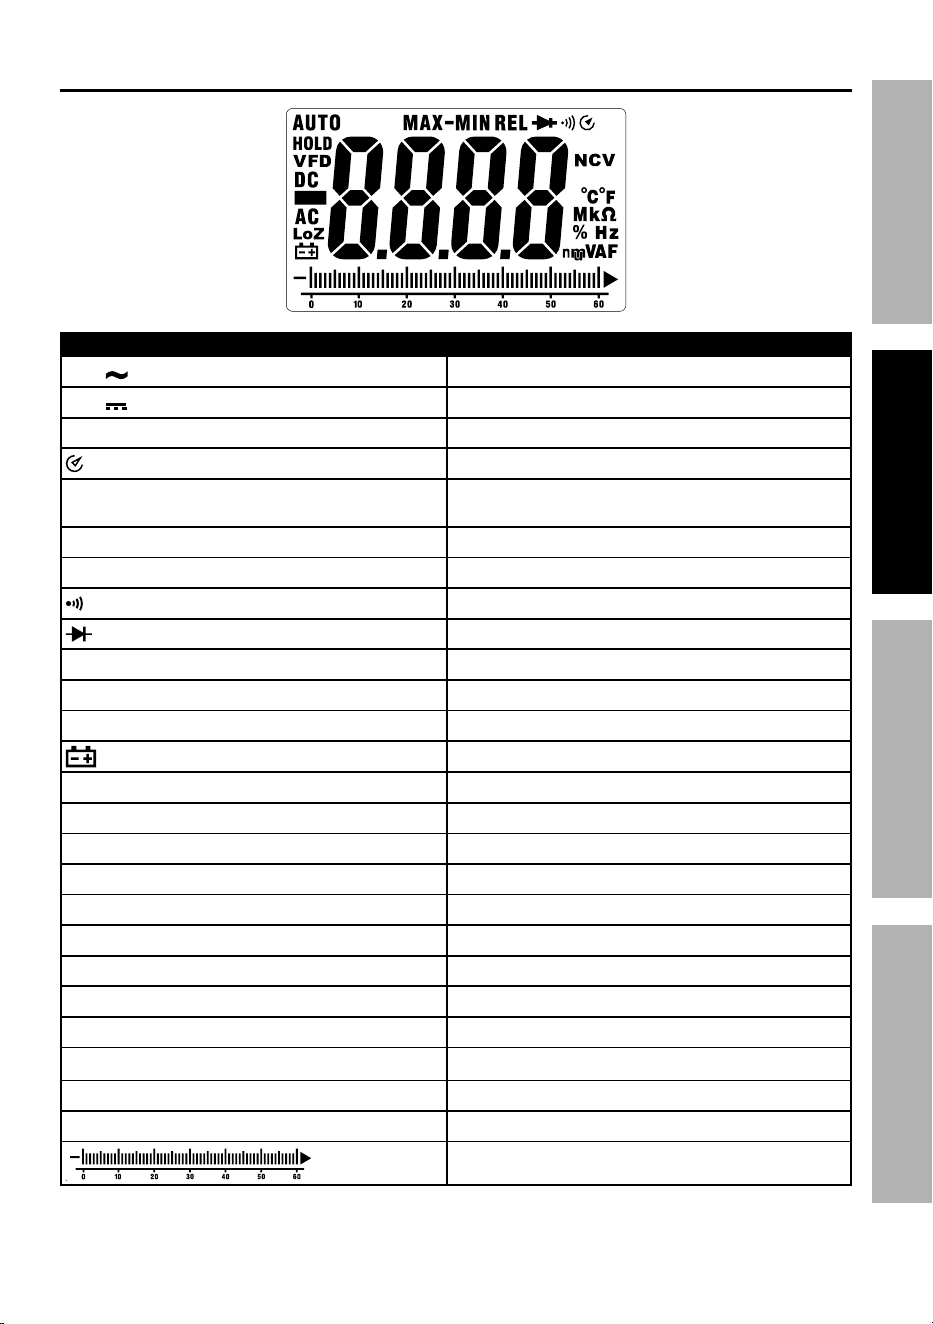
Display
Symbol Description
ac, Alternating current
Dc, Direct current
HOLD Indicates that display data is being held
Auto Power-Off
autorange, autO
Auto range mode (Meter selects the
range with the best resolution)
VFD Variable frequency drive mode
ncV Non-contact AC voltage measurement
Continuity
Diode test
reL Relative measurement mode
MaX The maximum value is being measured
Min The minimum value is being measured
Battery low
% Percent (Duty cycle)
°c, °F Celsius / Fahrenheit (Temperature)
kΩ, Ω Kilohms, Ohms (Resistance)
mF, F, Millifarads, Farads (Capacitance)
mV, V Millivolts, Volts (Voltage)
ma, a Milliamperes, Amperes (Current)
kHz, Hz Kilohertz, Hertz (Frequency)
n, μ, m Unit of measurement: Nano, Micro, Milli
k, M Unit of measurement: Kilo, Mega
LoZ Low input impedance
OL Value too large for the selected range
-
Negative reading
Bar graph

Page 8 For technical questions, please call 1-800-444-3353. Item 59442
SaFety OperatiOn MaintenanceSetup
Operating instructions
read the entire iMpOrtant SaFety inFOrMatiOn section
at the beginning of this manual including all text under
subheadings therein before set up or use of this product.
electrical shock can cause death or injury! neVer tOucH
exposed conductors of electricity.
General Operation
ranGe Button
The ranGe Button enables manual selection of available ranges for the selected
function. The Meter’s default is autorange (autO) where the Meter selects for you.
1. To select manual ranging mode,
press the ranGe Button, the autO
display indicator will turn off.
2. Each press of the ranGe Button
steps through the ranges available
for the selected function.
3. To return to Autorange, hold down the
ranGe Button for about 2 seconds
or until autO is seen on the Display.
MaX Min Button
The MaX Min Button allows you to record, temporarily store and view signal
events as you monitor them. You may record while in any range or mode
except Hz% (frequency/duty cycle), continuity, diode, and capacitance.
1. Press the MaX Min (maximum/
minimum) Button to begin recording.
note: Meter will exit Autorange and
automatically select range that Meter was
in when MaX Min Button was pressed.
2. When finished recording, press the
MaX Min Button to scroll through the
high (maximum), low (minimum), and
Max-Min (difference between maximum
and minimum) recorded readings. The
readings will be seen on the Display.
3. To return to normal operating
mode, hold down the MaX Min
Button for about 2 seconds.
reL Button
The reL (relative mode) Button can be used when measuring voltage, current,
capacitance, and temperature. Relative mode subtracts a stored value from subsequent
measurements and displays the difference. For example, if the stored value is
20.0V and the present measurement is 22.0V then the Meter will display 2.0V.
1. To enter relative mode, press the
reL Button. The present
measurement will lock and
the Meter will display “0”.
2. Take a new measurement and the
Meter will display the relative value.
3. Press the reL Button again to reset
the stored value and exit relative mode.
Page 9For technical questions, please call 1-800-444-3353.Item 59442
SaFetyOperatiOnMaintenance Setup
Hz% Button
The Hz% (frequency/duty cycle) Button allows you to measure the frequency
and duty cycle (the ratio of time a load or circuit is on verses off) of a signal.
1. To measure the frequency/duty cycle,
press the Hz% Button. Frequency (Hz)
is the default measurement mode.
2. To measure Duty cycle, press the Hz%
Button again to select % measurement.
3. To exit the frequency/duty
cycle measuring mode,
press the Hz% Button.
HOLD / LiGHt Button
The HOLD/LiGHt Button has two functions: To hold the present
reading on the Display and to turn on the Display’s backlight.
1. To activate HOLD, press and hold
the HOLD/LiGHt Button for less
than 2 seconds. Meter will beep and
HOLD appears on the Display.
2. When in HOLD mode, the present
reading will be held on the Display.
3. To exit HOLD, press and hold the
HOLD/LiGHt Button for less than 2
seconds. Meter will beep and HOLD
disappears from the Display.
note: The Hold mode will not capture
unstable or noisy readings.
4. To turn on the Display’s backlight,
hold down the HOLD/LiGHt
Button for about 2 seconds.
5. The backlight will automatically
turn off after about 5 minutes.
note: Frequent use of the backlight
shortens the life of the battery(ies). Only
use the backlight when necessary.
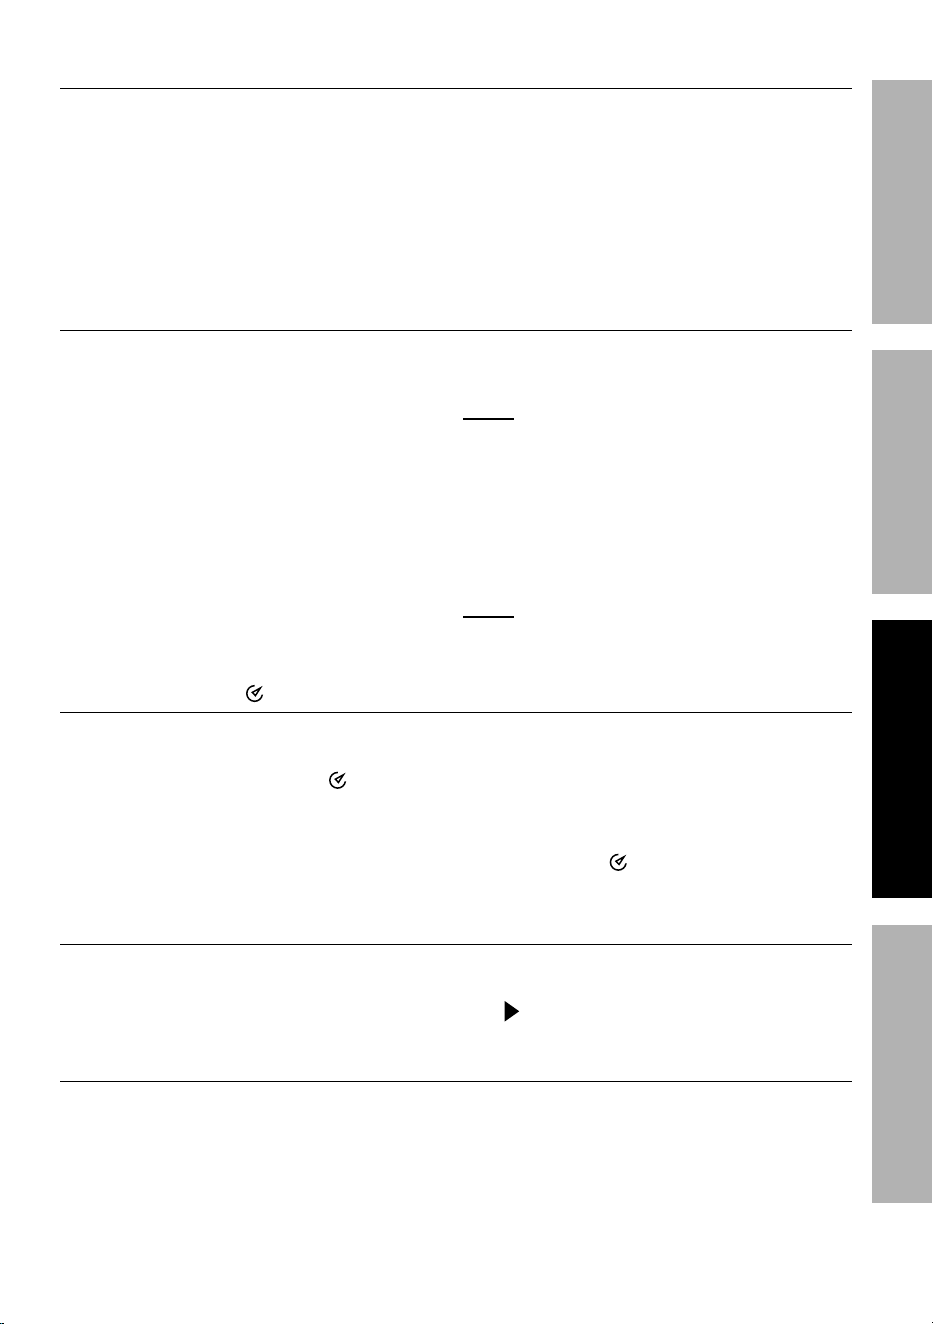
auto power-Off
If the Meter is not used for approximately 15 minutes, it automatically
turns itself off to conserve battery power. auto power-Off is enabled
by default, and is indicated by appearing on the Display.
1. To turn the Meter back on after
auto power-off, press any Button
or turn the Rotary Switch to OFF
and then to desired position.
2. To disable auto power-Off, hold down
the MODe Button while turning on the
Meter. The symbol will not display
when Auto Power-Off is disabled.
Bar Graph
The bar graph updates faster than the digital display. This can be used
for monitoring changes in measurements at a higher sampling rate.
The bar graph indicates polarity (-) and overload (
OL
).
Lead alert
Meter has Lead Alert function to help prevent damage to Meter and prevent
accidentally blowing fuses. If test leads are not inserted into the proper jacks
corresponding to the Rotary Switch position, Meter will flash LeaD on Display and
beep. For example, if the dial is set to measure AC voltage, and the red test lead
is plugged into the 10A jack, the Meter will activate the Lead Alert function. This
will let you know you will blow the fuse if you attempt to measure a voltage

Page 10 For technical questions, please call 1-800-444-3353. Item 59442
SaFety OperatiOn MaintenanceSetup
Measurement Operation
Remove plugs from ends of test leads
(included) before connecting to Meter.
note: test lead probes have removable
covers for overvoltage protection. With
covers in place, test leads are rated for use
with CAT III and CAT IV circuits. Exposed
probes are rated for use with CAT II circuits.
ac/Dc Voltage Measurement
Measure AC conductors carrying up to 1000 VAC, 45Hz ~ 1kHz.
Measure DC conductors carrying up to 1000 VDC.
WarninG! tO preVent SeriOuS
inJury: use caution when working
near voltages above 30 Vac rms,
42 Vac peak, or 60 VDc. Voltages this
high present a risk of electric shock.
1. Plug black test lead into cOM
Jack. Plug red test lead into
VΩcap (positive) input Jack.
2. Turn Rotary Switch to
V or V~/Hz%/ VFD as appropriate.
3. Carefully touch exposed
conductors with tips of probes.
4. Read measured voltage on the Display.
5. Press Hz% to obtain frequency
and duty cycle value.
6. If in V~ mode, press and hold MODe
Button for 2 seconds to turn on
Variable Frequency Drive (VFD) mode.
To exit VFD mode, press and hold
the MODe Button for 2 seconds.
mV Voltage Measurement
1. Plug black test lead into cOM Jack.
Plug red test lead into
VΩcap (positive) input Jack.
2. Turn Rotary Switch to
the mV
/ Hz%/ VFD position.
3. Press the MODe Button to indicate
AC or DC measurement.
4. Carefully touch exposed
conductors with tips of probes.
5. Read measured voltage on the Display.
6. Press Hz% to obtain frequency
and duty cycle value.
7. When testing is complete, turn
Rotary Switch to OFF, remove
test leads and store with Meter.
Low impedance (LoZ) Measurement
Used to eliminate ghost voltage. Changes the Meter’s input impedance from 10M
Ohms to 3K Ohms. This will attempt to draw power from the circuit, and will eliminate
ghost voltage. Do not use if drawing power will damage the circuit you are testing.
1. Plug black test lead into cOM Jack.
Plug red test lead into
VΩcap (positive) input Jack.
2. Turn Rotary Switch to
the V~ / LoZ position.
3. Carefully touch exposed
conductors with tips of probes.
4. Read measured voltage on the Display.
5. When testing is complete, turn
Rotary Switch to OFF, remove
test leads and store with Meter.

Page 11For technical questions, please call 1-800-444-3353.Item 59442
SaFetyOperatiOnMaintenance Setup
temperature Measurement
Measure temperature from -328°F to 2372°F (-200°C to 1300°C).
1. Connect positive end of
Thermocouple (included) to the
VΩcap (positive) input Jack and
negative end to the mAμA input Jack.
2. Turn Rotary Switch to the
teMp °c°F position. The Display will
show the current ambient temperature.
3. Press MODe Button to switch
between Celsius and Fahrenheit.
4. Touch the tip of the Thermocouple
to the object being tested.
5. After a few seconds the measured
temperature will display.
6. When testing is complete, turn
Rotary Switch to OFF, remove
Thermocouple and store with Meter.
note: To avoid measurement errors at
very low temperatures, the operating
temperature must not exceed 10~28°F.
WarninG! tO preVent eLectric
SHOcK, remove thermocouple before
switching between testing modes.
resistance Measurement
Measure resistance up to 60M Ohms.
WarninG! tO preVent
eLectric SHOcK, turn off all power
and fully discharge capacitors in the
circuit under test before measuring.
note: When measuring Ohms,
start with the lowest range if the
resistance is unknown.
1. Plug black test lead into cOM
Jack. Plug red test lead into
VΩcap (positive) input Jack.
2. Turn the Rotary Switch to
the Ωcap position.
3. Press MODe Button until the Display
indicates Ohms Ω is being measured.
4. Carefully touch exposed
conductors with tips of probes.
5. Read measured resistance
on the Display.
6. When testing is complete, turn
Rotary Switch to OFF, remove
test leads and store with Meter.
note: Sometimes the resistor value and
measured resistance differ. This is due
to the Meter’s output test current going
through all possible paths between leads.
• Keep test leads as
short as possible.
• Resistors should be
measured out of circuit.
note: For resistance measurements
above 1MΩ, allow a few seconds
to get a steady reading.
note: When leads are disconnected
or measurement is out of
range, OL is displayed.
Page 12 For technical questions, please call 1-800-444-3353. Item 59442
SaFety OperatiOn MaintenanceSetup
continuity Measurement
Test continuity between two points in a circuit.
WarninG! tO preVent
eLectric SHOcK, turn off all power
and fully discharge capacitors in the
circuit under test before measuring.
1. Plug black test lead into cOM Jack.
Plug red test lead into
VΩcap (positive) input Jack.
2. Turn the Rotary Switch to
the Ωcap position.
3. Press MODe Button until
is displayed.
4. Connect the test leads across
the circuit to be measured.
5. Read measured resistance on the
Display. If the measured resistance
is less than 50Ω, Meter will beep.
6. When testing is complete, turn
Rotary Switch to OFF, remove
test leads and store with Meter.
note: If test leads are open or the
resistance is out of range, OL is displayed.
Diode Measurement
Test voltage drop in diodes.
WarninG! tO preVent
eLectric SHOcK, turn off all power
and fully discharge capacitors in the
circuit under test before measuring.
1. Plug black test lead into cOM Jack.
Plug red test lead into
VΩcap (positive) input Jack.
2. Turn the Rotary Switch to
the Ωcap position.
3. Press MODe Button until
V is displayed.
4. Connect red probe to diode’s anode
and black probe to the cathode.
5. Read measured forward-biased
voltage drop on the Display.
note: In a circuit, a good diode will produce
a forward voltage drop of 0.4V to 0.7V.
note: OL is displayed if the test leads
are reversed, the diode is open, or
the measurement is out of range.
6. When testing is complete, turn
Rotary Switch to OFF, remove
test leads and store with Meter.

Page 13For technical questions, please call 1-800-444-3353.Item 59442
SaFetyOperatiOnMaintenance Setup
capacitance Measurements
Measure capacitors up to 60mF.
WarninG! tO preVent
eLectric SHOcK, turn off all power
and fully discharge capacitors in the
circuit under test before measuring.
1. Plug black test lead into cOM Jack.
Plug red test lead into
VΩcap (positive) input Jack.
2. Turn the Rotary Switch to
the Ωcap position.
3. Press MODe Button until
nF is displayed.
4. Carefully touch capacitor
leads with tips of probes.
5. Read measured capacitance
on the Display.
note: Large capacitors can take up
to 10 seconds to display a value.
note: If the measurement is out
of range, OL is displayed.
6. When testing is complete, turn
Rotary Switch to OFF, remove
and store capacitor and Meter.
current Measurement
Measure AC and DC circuits and conductors carrying up to 10 amperes.
note: Amperage is always tested
in series with circuit under test.
note: When using manual range mode,
always start with highest range if amperage
is unknown.
nOtice: to prevent damage to the
meter, use the correct input jacks.
1. Turn Rotary Switch to appropriate
position, depending on amperage
of circuit under test.
•
μA
Hz %
microamperes (μA),
•
ma
Hz %
milliamperes (mA),
•
10a
Hz %
Amperes (A).
2. Always start with highest range
if amperage is unknown.
3. turn off power to circuit and
allow capacitors to discharge.
4. Press MODe Button to select
AC or DC current.
5. Break circuit and connect test leads
in series with circuit being measured.
Connect black lead on lower voltage side.
• Plug black test lead into cOM Jack.
• If amperage is < 600mA, plug
red test lead into μAmA Jack.
• If amperage is > 600mA, plug
red test lead into 10a Jack.
6. Power on the circuit and
read measurement.
• Switch to lower ranges,
as necessary, to get the
most accurate reading.
• If “OL” is displayed the
measurement exceeds the current
range. Switch to a higher range.
7. Press Hz% to obtain frequency
and duty cycle value.
WarninG! tO preVent SeriOuS
inJury: Measure for a maximum
of 30 seconds and allow 15 minutes
to pass between measurements.
8. When testing is complete, reconnect
the circuit, turn Rotary Switch to OFF,
remove test leads and store with Meter.

Page 14 For technical questions, please call 1-800-444-3353. Item 59442
SaFety OperatiOn MaintenanceSetup
non-contact ac Voltage Measurement
1. Turn Rotary Switch to NCV Position.
NCV will appear on the Display.
2. Hold the Multimeter close to the
AC voltage being tested.
3. If no signal is detected, eF
will show on the display.
4. If signal is detected, NCV indicator
will flash and meter will beep.
5. Display will show horizontal lines
according to strength, one being the
weakest and four being the strongest.
6. When testing is complete, turn
Rotary Switch to OFF and store Meter.
Page 15For technical questions, please call 1-800-444-3353.Item 59442
SaFetyOperatiOnMaintenance Setup
Maintenance and Servicing
procedures not specifically explained in this manual
must be performed only by a qualified technician.
cleaning, Maintenance, and Lubrication
1. Wipe unit with a dry, lint-free cloth.
Do not use solvents or abrasives.
2. Remove battery if not in
use for long periods.
3. Store unit in a dry location.
4. Other than the battery and fuses,
there are no replaceable parts
in this unit. repairs should be
done by a qualified technician.
Battery/Fuse replacement
If the sign appears on the Display,
the battery should be replaced.
1. Remove test leads from the Meter.
2. Power off Meter and turn it over.
3. Remove screw(s). Remove tilt
stand and battery cover.
4. Replace Battery.
a. Remove battery from the
battery compartment.
b. Replace battery with the
same type and rating.
note: Do not reverse the
polarity of the battery.
5. Replace Fuse(s).
a. Remove screw(s) from case bottom
and separate case top from bottom.
b. Carefully remove fuses one at a
time. Gently pry one end loose
and remove from its bracket.
Make note of its rating.
c. Replace with new fuse of the
same type and rating.
note: Meter will display FuSe if
fuse needs to be replaced.
6. Rejoin the tilt stand, battery
cover and case bottom.
Reinstall and tighten screw(s).
calibration
Have the Meter calibrated by a qualified technician every year.
record Date code Here:
note: if product has no date code, record month and year of purchase instead.
note: Reference UPC 193175471031.

LiMiteD 3-year Warranty
This DOYLE product is warranted to the original purchaser to be free from defects in materials
and workmanship for a period of three (3) years beginning on the date of purchase. To obtain
warranty service, visit your local Harbor Freight retail store. Warranty registration is not required.
The product or part must be returned with proof of purchase (e.g. in-store receipt or packing slip/
invoice) and may require shipment by purchaser to a service center at purchaser’s expense. If
our inspection verifies a covered defect in materials or workmanship during the warranty period,
we will, at our option, repair or replace the defective product. We will return repaired products
within a reasonable time at our expense, but if we determine that there is no defect, or that
the defect resulted from causes not within the scope of our warranty, then we will return the
product to you if you pay return shipping costs. Fraudulent returns or claims will be denied. The
repair or replacement described in this warranty shall be your sole and exclusive remedy.
This warranty does not cover any failure or damage that we determine is due directly or indirectly to:
• normal wear and tear, including, without limitation to, batteries, fuses, test leads, thermocouples, and
other wear items
• accident, misuse, abuse, rental, use not for the intended purpose, or use not in accordance with the
product manual
• modification, alteration, unauthorized repair, use of equipment or components we did not supply,
improper installation
• any other failure not arising from defective materials or workmanship
THIS WARRANTY IS EXCLUSIVE AND IN LIEU OF ALL OTHER EXPRESS WARRANTIES,
WRITTEN OR ORAL, AND ANY IMPLIED WARRANTIES ARE DISCLAIMED TO THE EXTENT
PERMITTED BY LAW AND OTHERWISE LIMITED TO THE DURATION OF THE EXPRESS
WARRANTY HEREIN. HARBOR FREIGHT SHALL NOT BE LIABLE UNDER ANY CIRCUMSTANCES
FOR ANY INCIDENTAL, INDIRECT, SPECIAL, CONSEQUENTIAL, OR PUNITIVE DAMAGES OR
COSTS ARISING FROM THIS WARRANTY OR THE USE OF THIS PRODUCT. SOME STATES
DO NOT ALLOW LIMITATIONS ON HOW LONG AN IMPLIED WARRANTY LASTS OR THE
EXCLUSION OR LIMITATION OF INCIDENTAL OR CONSEQUENTIAL DAMAGES, SO THESE
LIMITATIONS MAY NOT APPLY TO YOU. THIS WARRANTY GIVES YOU SPECIFIC LEGAL
RIGHTS, AND YOU MAY ALSO HAVE OTHER RIGHTS WHICH VARY FROM STATE TO STATE.
26677 agoura road • calabasas, ca 91302 • 1-800-444-3353
tM