TouchBoard acts as a wireless controller to the
StarryHub.You can operate StarryHub with the TouchBoard
easily.Before using the TouchBoard, please turn the power
button(on the back of the TouchBoard) to ON status.
offPut the TouchBoard back to charging dock (on the top
ofStarryHub) after each use.
入门指南
尺寸:7cmx13.5cm
Side
Above
Conference
Microphone Array
Touchpad
Placement Area
Regarding this product manual (hereinaf-
ter referred to as the "manual")
Rear
Front
Focusing Camera
TOF Module
Opto-Mechanical Lens
Host
3
How to Use the TouchBoard
Host Power On TouchBoard power on
❶
Power on StarryHub and the TouchBoard.
❷
Long press on the upper left corner for 3 seconds
until the LED indicator blinks in blue color.
on
Off
TouchBoard acts as a wireless controller to the StarryHub.
You can operate StarryHub with the TouchBoard easily.
Before using the TouchBoard, please turn the power button
(on the back of the TouchBoard) to ON status.
Put the TouchBoard back to charging dock (on the top of
StarryHub) after each use.
2
Device Function
on
off
· Pair the TouchBoard with the StarryHub
* TouchBoard and the StarryHub are paired by factory default.
If you need pair them again, please do as follow steps:
· Touch Panel / Keyboard
Tap on Touch/Board to switch input method
(touch panel or keyboard).
· Volume adjustment
Tap on V- V+ to adjust volume of the StarryHub.
❸
Put the TouchBoard back to the charging dock, wait for 10 seconds
until the icons on the first row of the TouchBoard light up.
Pairing is completed.
Paired!
Click the icon to perform autofocus, and long press the
icon to enter manual focus/manual keystone correction.
· Focus
· MIC on/off
Tap to mute on/off.
· Home
Tap on and back to home page, long press for APP
selector.
· Back
· Finger touch
Tap to get back to previous page or previous operation.
In Touch mode , regular operations such as “Slide”,
“Click/Touch with 1 finger”, “Slide with 2 fingers” and “Zoom
in & out with 2 fingers” are supported.
Slide with ONE finger or Double click with ONE finger and
slide :To move object.
Tab with two fingers Call out more options = right-click on
computer mouse.
Slide vertically with three fingers: To switch between APPs.
Slide left/right with three fingers Switch applications.
Click
One finger slide Slide with two fingers Tab/Press with one finger
· Keyboard
In Board mode , keyboard will light up so you can
use the TouchBoard as an input method.
· Low Battery Status
"Low Battery" alert appears with the upper left indicator
light keeps flashing red when Touchboard battery under
20%. Please put the TouchBoard back to the charging
dock (the 3 pins on the top of StarryHub) to recharge.
2
Two fingers
open/close
Slide with ONE finger or Double
click with ONE finger and slide
Tab with four fingers to
capture current screen
Tab with
two fingers
Slide left/right
with three fingers
Slide vertically
with three fingers
* Check the label on the back side of the TouchBoard to see
more finger touch operations
*Tab shift to switch kepboard input language.
4
5
Reminder
6
After-sale Service And Warranty
1. All warranty terms and after-sales service are following
the local laws and regulations in the territories of the
CZUR authorized sellers.
If there's no specified laws or regulations in this territory,
standard warranty is 12-month from the date of purchase
for all hardware, excluding nature expiration, artificial
damage, unusual breaks and terms listed below in
non-warranty coverage.
2. Non-warranty coverage:
1) Standard working environment temperature should be
within the range of 0~40 degrees Celsius,
2) Failure or damage caused by incorrect installation or
use in non-specified working conditions (excessive
temperature, excessive humidity, etc.),
3) Damage caused by non-official parts or parts replaced
by users without instruction or confirmation from CZUR
support te
am,
4) Damage caused by disasters, accidents or human factors,
5) Failure or damage caused by unauthorized disassem-bly,
repair, modification, or abuse,
6) Damage caused by repairs performed by any none CZUR
authorized parties.
Thank you for choosing StarryHub and supporting CZUR.
Please go over below so you can understand how after-sales
service works and what the warranty terms are.
7
Contact Information
Reach CZUR team via one of the following ways for support or
share your comments.
Company Name:
Shenzhen Chengzhe Chuangxiang Technology Co., Ltd
Website:
www.czur.com
Sales Office:
RM722, Block B, Podium of Building No. 12, Shenzhen Bay
Eco-Technology Park, No. 10 Gaoxin South RD., Nanshan District,
Shenzhen, 518063, China.
Office line:
0086-755-23974826
E-mail address:
support@czur.com
Software Center:
Room1001,10th Floor, Block A, No.32A Huoju Road, High-tech
Industrial Zone, Dalian City, Liaoning Province, China
Factory Address:
6th Floor, Building E, Huihong Industrial Park,No. 170
Jinxiaotanghuancun Road, Fenggang Town, Dongguang city,
Guangdong province, 523690, China.
·
System Upgrade
• CZUR Share
• Scan QR code to download CZUR Share
APP
Thank you for choosing our product. As an industry-first new
product, StarryHub requires you to read the instruction manual
before use to quickly get started.
Thank you for purchasing products from Shenzhen Chengzhe Creative
FCC Warning
This device complies with Part 15 of the FCC Rules. Operation is subject
to the following two conditions:
(1) This device may not cause harmful interference, and
(2) this device must accept any interference received, including
interference that may cause undesired operation.
NOTE 1: This equipment has been tested and found to comply with the
limits for a Class B digital device, pursuant to part 15 of the FCC Rules.
These limits are designed to provide reasonable protection against harmful
interference in a residential installation.
This equipment generates, uses and can radiate radio frequency energy
and, if not installed and used in accordance with the instructions, may
cause harmful interference to radio communications. However, there is no
guarantee that interference will not occur in a particular installation.
If this equipment does cause harmful interference to radio or television
reception, which can be determined by turning the equipment off and on,
the user is encouraged to try to correct the interference by one or more of
the following
measures:
- Reorient or relocate the receiving antenna.
- Increase the separation between the equipment and receiver.
-Connect the equipment into an outlet on a circuit different from that to
which the receiver is connected.
-Consult the dealer or an experienced radio/TV technician for help.
NOTE 2: Any changes or modifications to this unit not expressly approved
by the party responsible for compliance could void the user's authority to
operate the equipment.
RF Exposure Statement
To maintain compliance with FCC'S RF Exposure guidelines, This equipment
should be installed and operated with minimum 20cm between the radiator
and your body.
This device and its antenna(s) must not be co-located or operation in
conjunction with any other antenna or transmitter.
Technology Co., Ltd. (hereinafter referred to as "Chengzhe Company" or
"Chengzhe"). For your safety and interests, please carefully read the
instruction manual before use. Chengzhe Company shall not be liable for
any losses or damages caused by your failure to operate in accordance
with the instruction manual or precautions.
The copyright of the instruction manual belongs to Chengzhe Company; if
the content of the instruction manual is inconsistent with the actual
product, the actual product shall prevail. If you have any objections to the
content or terms of the instruction manual, please submit a written
objection to Chengzhe Company within seven days after purchase.
Otherwise, you will be deemed to have agreed to and understood all the
content of the instruction manual.
Chengzhe Company reserves the right to interpret and modify the
instruction manual
The model and parameters of this product shall be subject to the label on
the device body
Wide-angle Video
Conferencing Camera
Wide Angle
Two-position elevation bracket,
adjustable at 4°/8° angles
1/4 Screw Thread
Camera Indicator
Long-focal-length Video
Conferencing Camera
Telephoto
Headphone
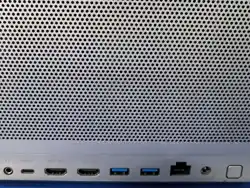
Jack
Type-C
Port
HDMI-OUTHDMI-IN USB3.0*2 Power Switch
Power
Indicator
LAN DC
Touchpad
Front
Back
Touch Panel
/ Keyboard
LED Indicator
V- V+ Focus
MIC on/off
Home
Touch Panel / Key Board
Back
Charging pin
TouchBoard Power on/off
Buzzer
on
Off
1
Power On
·
Power on
Connect the power supply, press the power switch for 2 seconds,
and the device will turn on.
·
Shutdown
When the device is powered on, press and hold the power switch
for 2 seconds to pop up the shutdown/restart selection. Or press
and hold for 8 seconds to directly shut down the device.
This product is mainly used in meeting rooms, including local
meetings, recording, file storage, meeting writing, wireless
screen projection, etc., and can also be used for large-screen
audio and video playback and other scenarios.
·
Standby
When the device is powered on, click the power switch to put the
device on standby; or place the touchpad (remote control) back in
the storage area on top of the projector to put the device on
standby.
·
Wake up
In standby mode, click the power switch to wake up the device;
or remove the touchpad (remote control) from the storage area
to wake up the device.
*If the device is not used for a long time, it is recommended to
turn it off and disconnect the power supply.
Note: Different versions of the software may vary, please refer to
the actual functions of the version
.
· Wireless Screen Mirroring / File Transfer
Smartphones and computers can download the [Chengzhe
Instant Transfer] software for screen mirroring and file transfer;
Apple devices come with AirPlay, while Android or Windows
(shortcut: Win+K) devices can use the built-in screen mirroring
function of the system for wireless screen projection, or they
can also perform wireless screen projection through a wireless
peripheral module.
Online Upgrade
Perform an online upgrade according to the system upgrade
prompt in the settings.
· Peripheral Mode
USB Peripheral Mode: Connect the computer and the device via
a dedicated USB data cable, and the computer can then call
the device's microphone, speaker, and camera;
Wireless Peripheral Mode: After successfully pairing with the
device via the wireless peripheral module, insert it into a
computer, and you can then use the device's microphone,
speaker, and camera in the computer's conferencing software.
An App designed to allow you to share
screens of your smart devices to
StarryHub
·
·
·
·
·
·
·
·
·
Do not remove the power supply when StarryHub is still on.
Always power off StarryHub before removing power supply.
Do not look directly at the camera lens or point the lens
towards human eye when the lens is powered on, to avoid
damage to the eyes caused by strong light.
Do not obstruct or block the air inlet or outlet of the
StarryHub, to avoid affecting the cooling process, which
may cause damage to the electronic components.
Do not use cloth or paper to wipe all the lenses to avoid
damage to the lenses.
You can use an air blower to remove dust on the lens
surface. Do not touch the lenses regularly.
Do not use detergent to clean the equipment to avoid
corrosion.
Keep the StarryHub and its accessories out of the reach of
children.
Please make sure to use the StarryHub in a dry and
ventilated environment.
Do not store the StarryHub and its accessories under
extreme temperature because extreme temperature will
shorten the life of electronic parts.
Do not put the StarryHub or its accessories into any drying
machines or heating devices.