Instruction Manual
UHF Wireless Microphone
TW620
TW630
TW621
TW632


01
Thank you for purchasing TONOR wireless
microphone. This manual is intended to help
you understand all about this microphone and
how to use it. TONOR always strives for the
ultimate user experience. All our knowledge
and passion for audio technology are incorpo-
rated into building microphones with high
performance for you. The TONOR microphone
is high quality and easy to use to achieve the
best user experience.
Enjoy your microphone!
TONOR Team
ABOUT THIS MANUAL
02
CATALOGUE
English
Package Including
Deutsch
Español
03-03
04~10
11~17
18~24
25~31
32~38
Français
Italiano
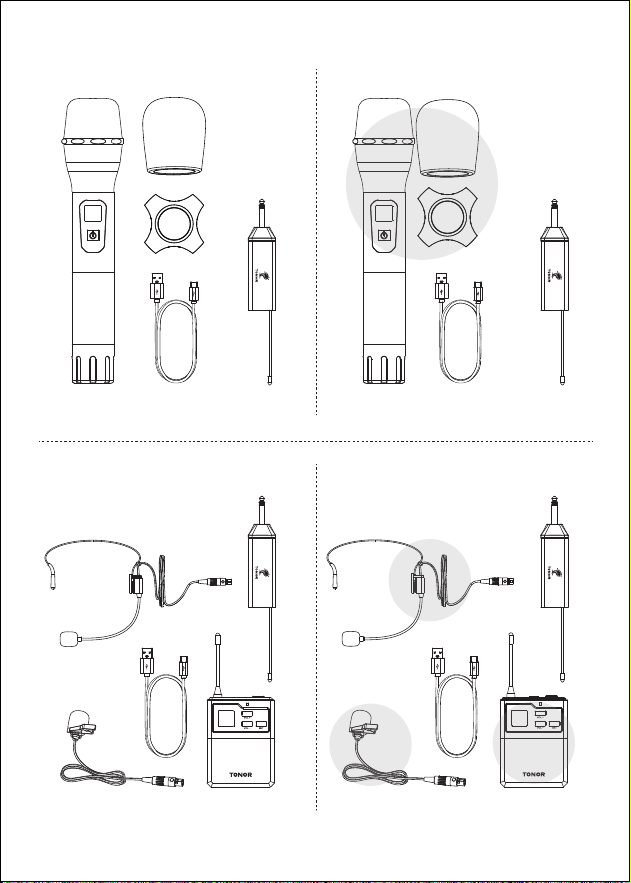
03
TW620
Package Including
TW630
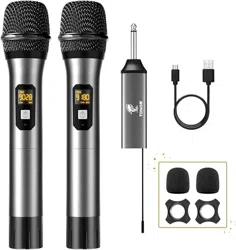
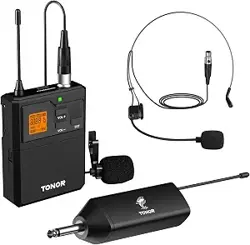
TW621 TW632
x2
x2
x2
x2
04
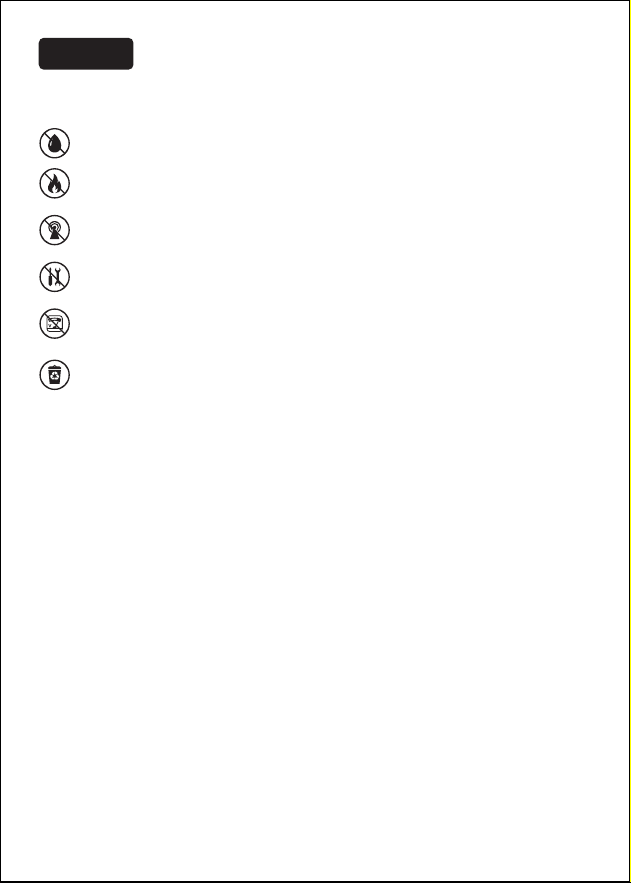
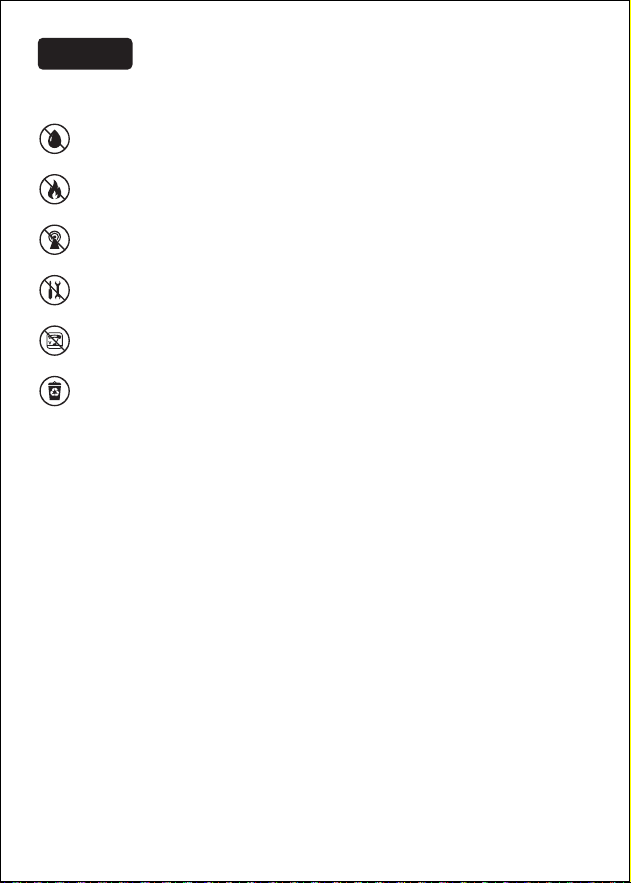
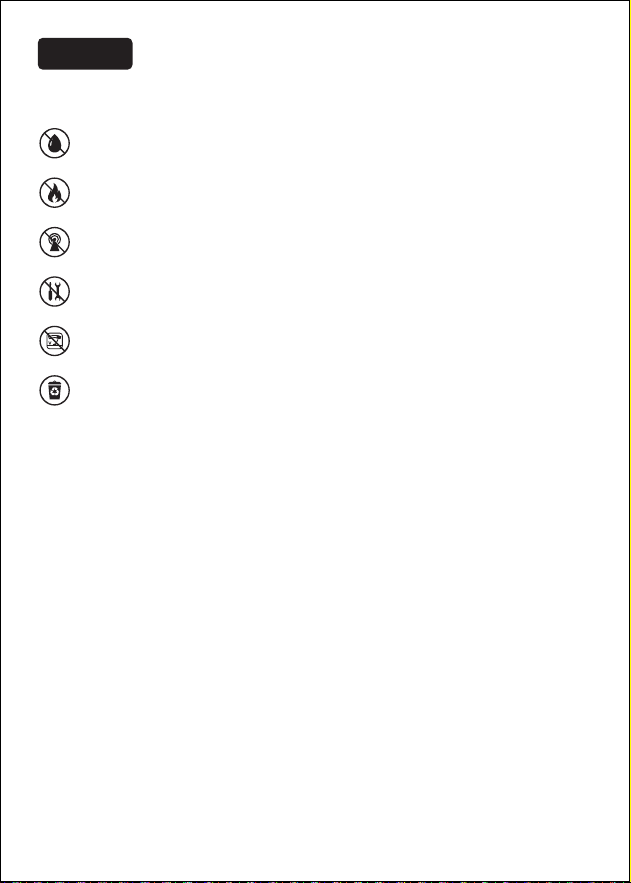
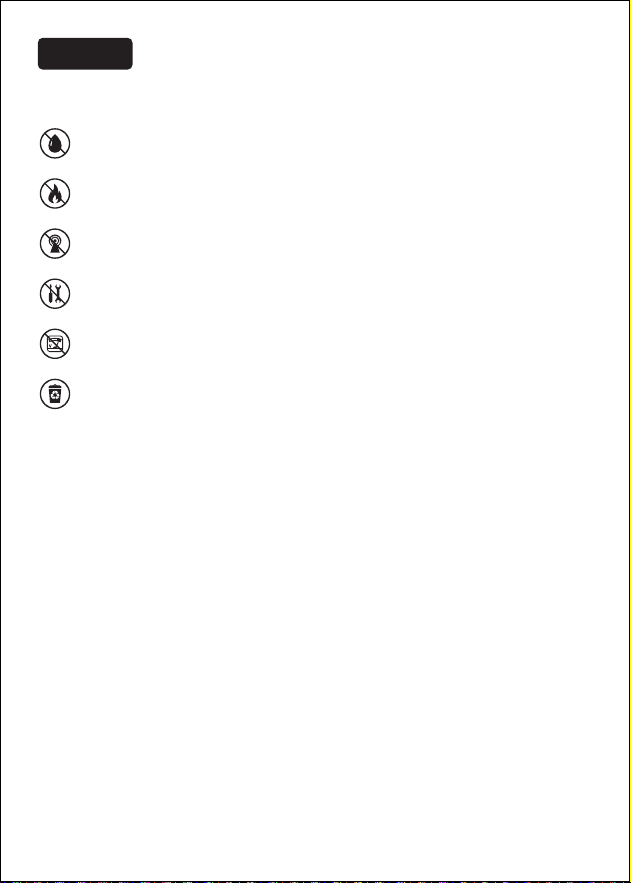
When using this device, keep it away from water.
Use the device in ventilated environment, keep it away from fire.
Since it's a wireless device, please keep it away from other
interfering sources.
Don't take apart the device.
Please use the standard power supply, high voltage may damage
the device.
Please place the used batteries into the recycle bin, don't litter
them.
Frequency Response: 40hz-18khz
Maximum Radio-frequency Power Transmitted: 8.5 dBm
Operating Frequency (US): A MIC: 902.8-914MHz, B MIC: 915.6-926.8MHz
Operating Frequency (UK/EU): A MIC: 823-826.2MHz, B MIC: 827.8-831MHz
Operating Range: Up to 60m
Frequency Stability: ±0.0005 MHz
SNR: 96dB
Sound Distortion: ≤0.5%
Mic Input Sensitivity: -51dBV
RF Sensitivity: -95dBm
Operating Temperature: 0˚C to +55˚C
OPERATING ENVIRONMENTS & NOTES
SPECIFICATIONS
English
05
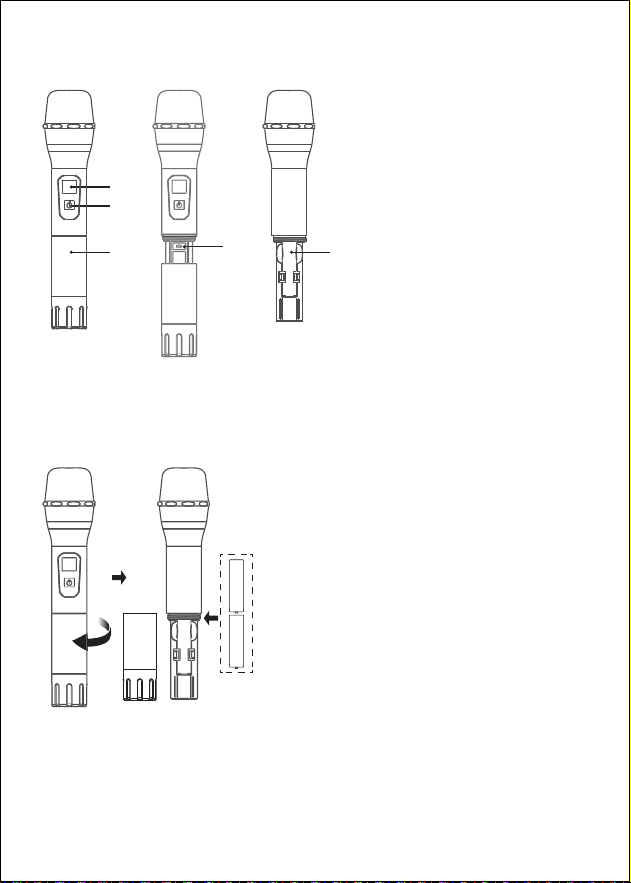
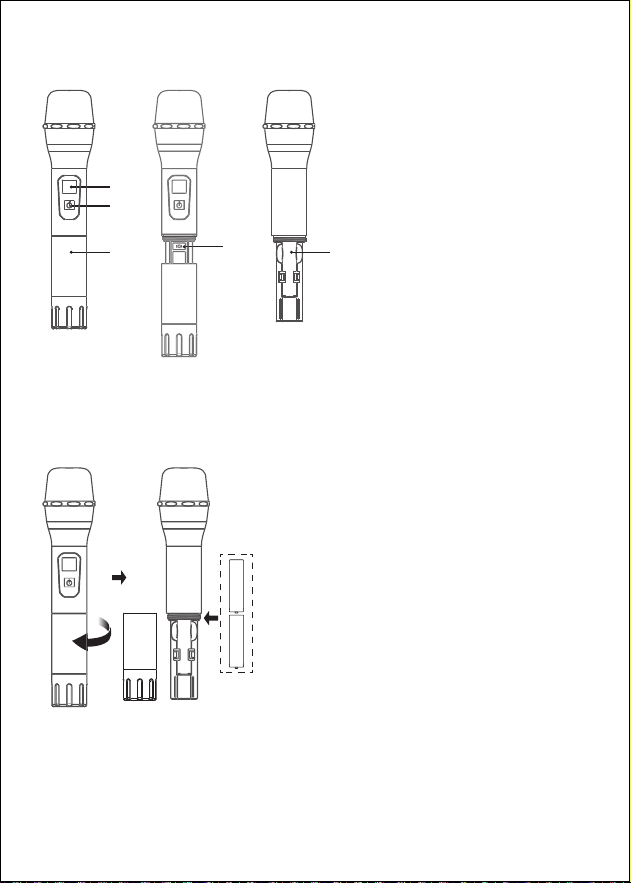
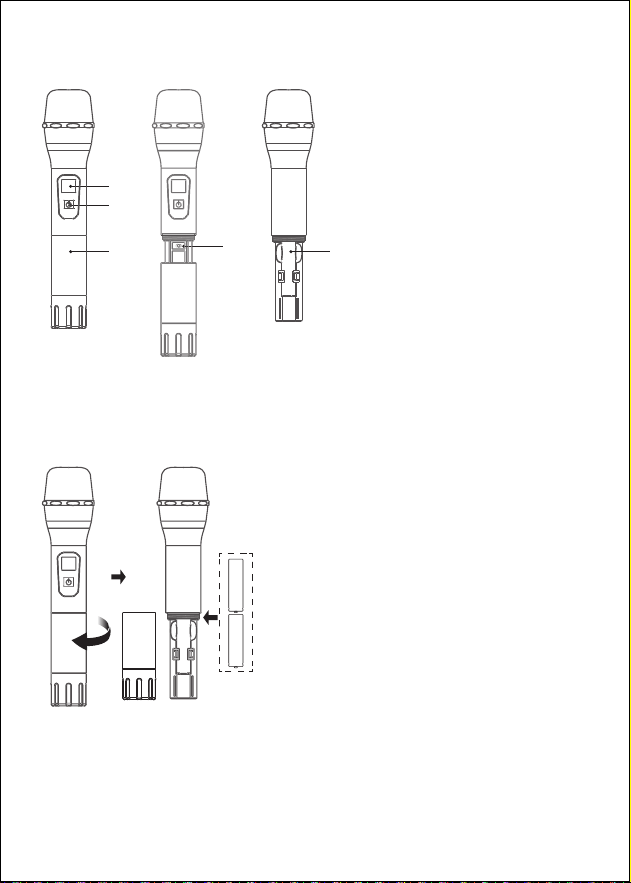
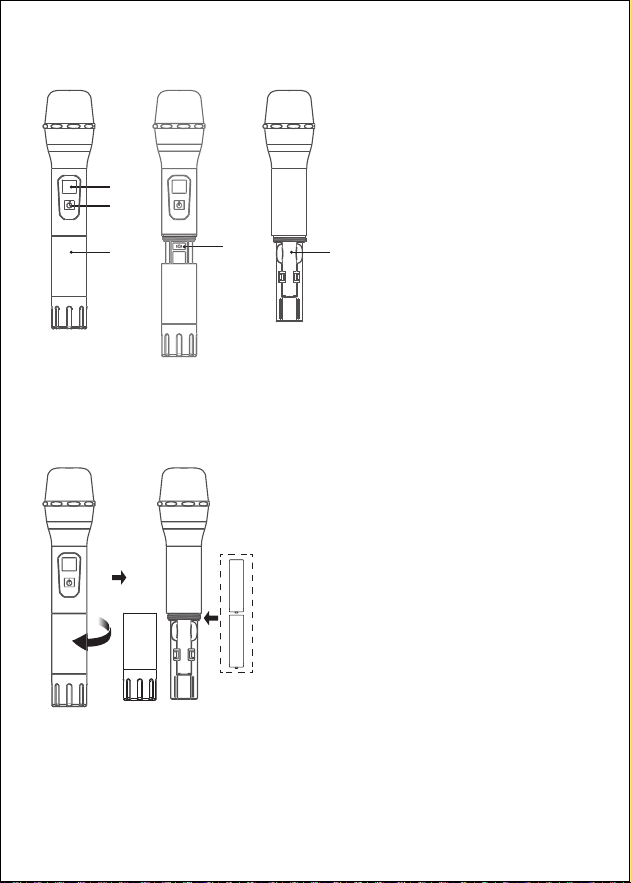
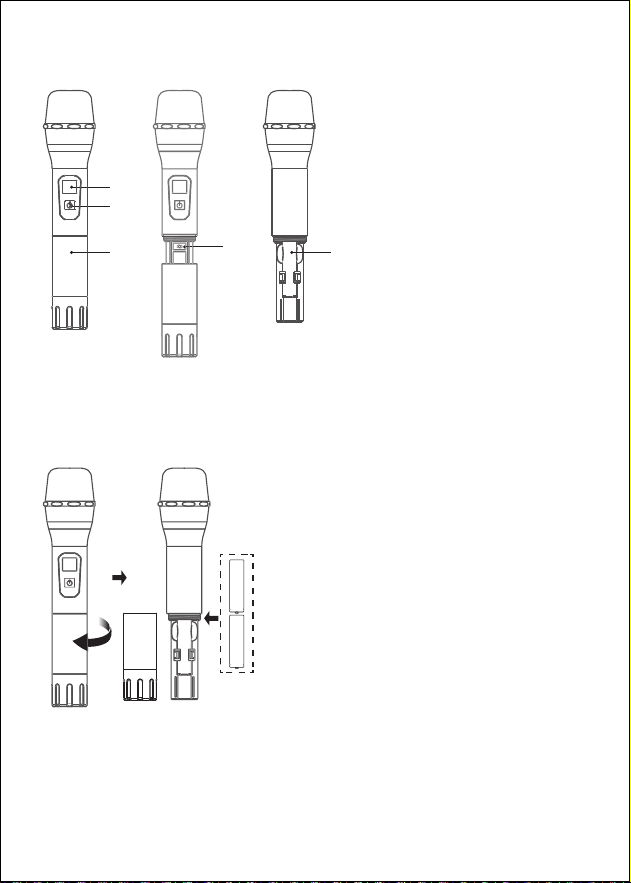
Install 2*AA batteries before using the
wireless microphone and installing
instruction is as follows:
1. Take down the tail tube of mic.
2. Install the batteries and tighten tail
tube of mic.
Note: The positive and negative polarity
of battery cannot be reversed.
As shown in above pictures:
1. Display Screen
2. On/Off Switch
3. Tail Tube
4. HI-LO Button
5. Battery Compartment
MICROPHONE OPERATION INSTRUCTION
1
2
3
4
5
+
-
+
-
06
1
2
4
CH0 1
CHA
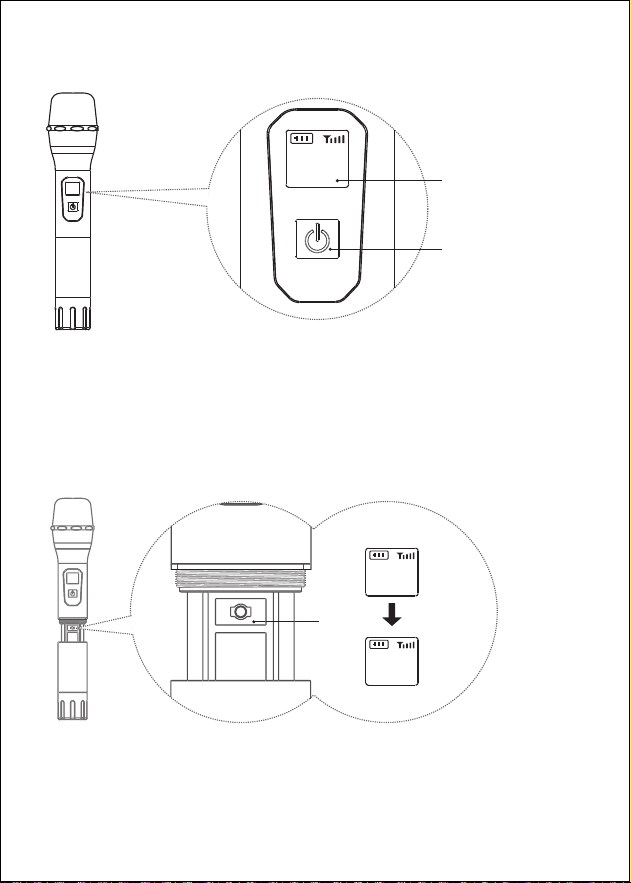
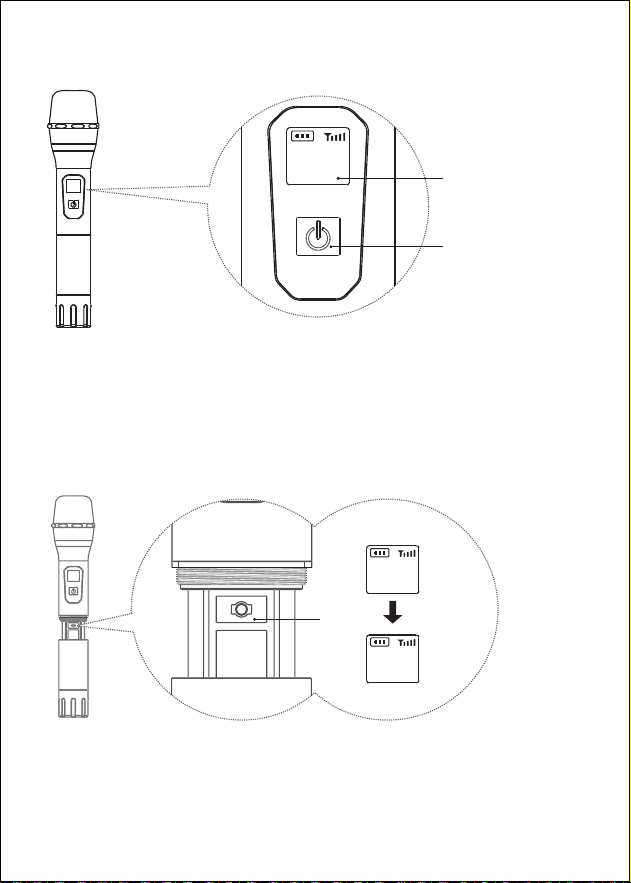
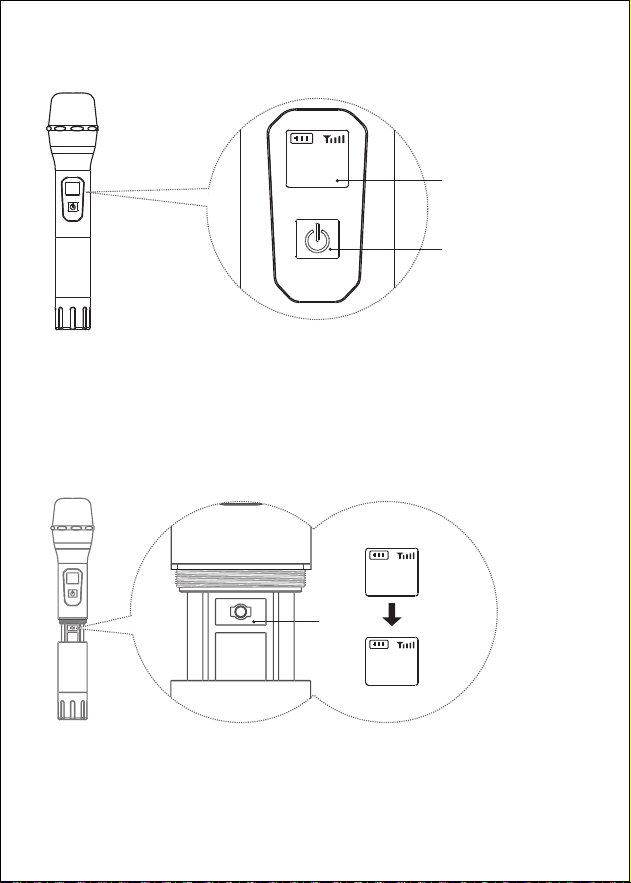
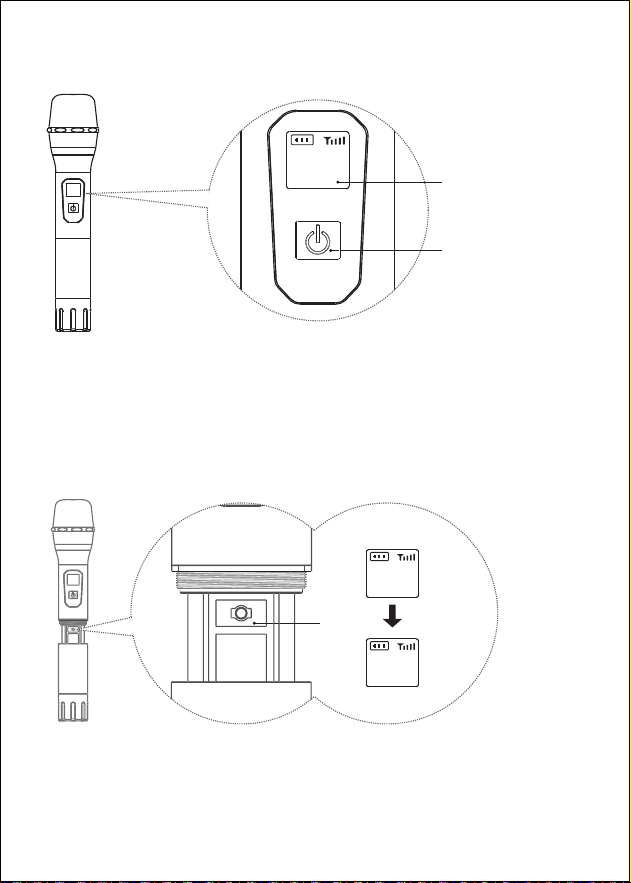
Instruction:
1. Press button 2 for 2s to turn it on/off.
2. Press the HI-LO button 4, then the frequency on the screen wilI be changed.
CH0 1
CHA
CH0 2
CHA
HI
LO
07
or
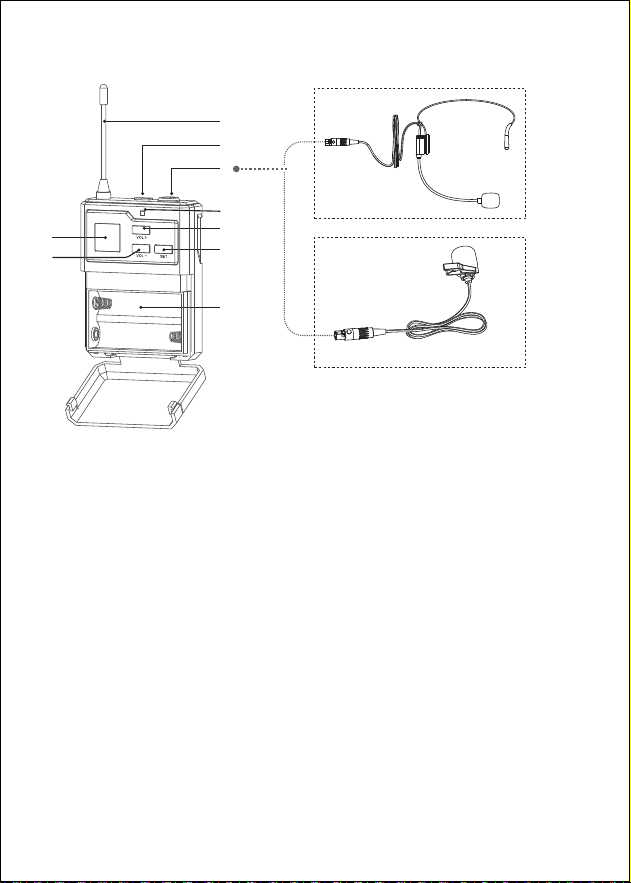
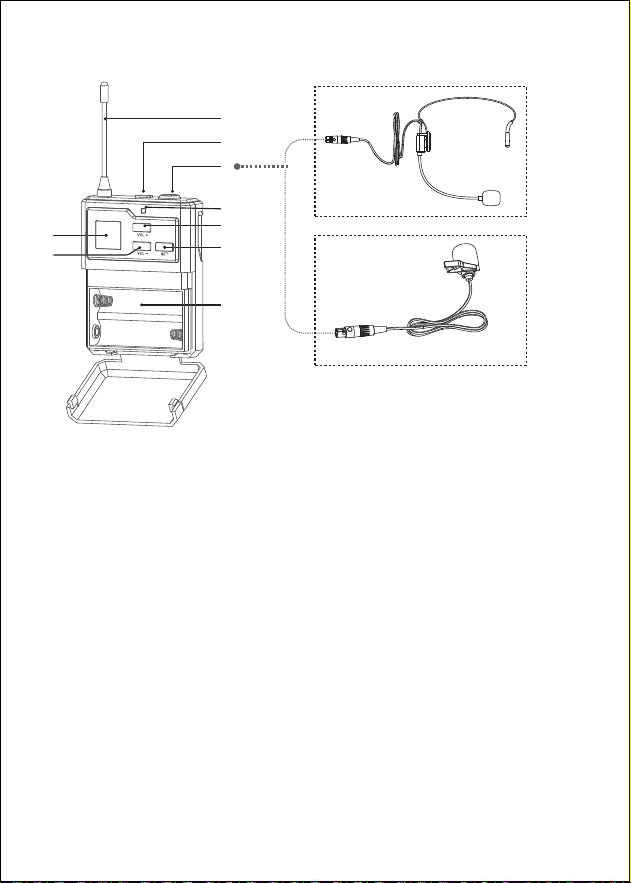
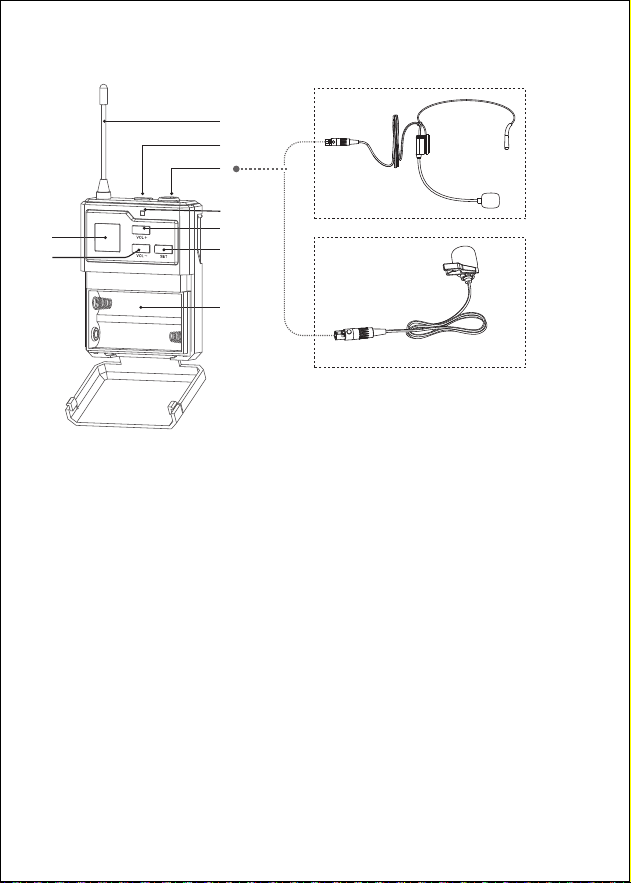
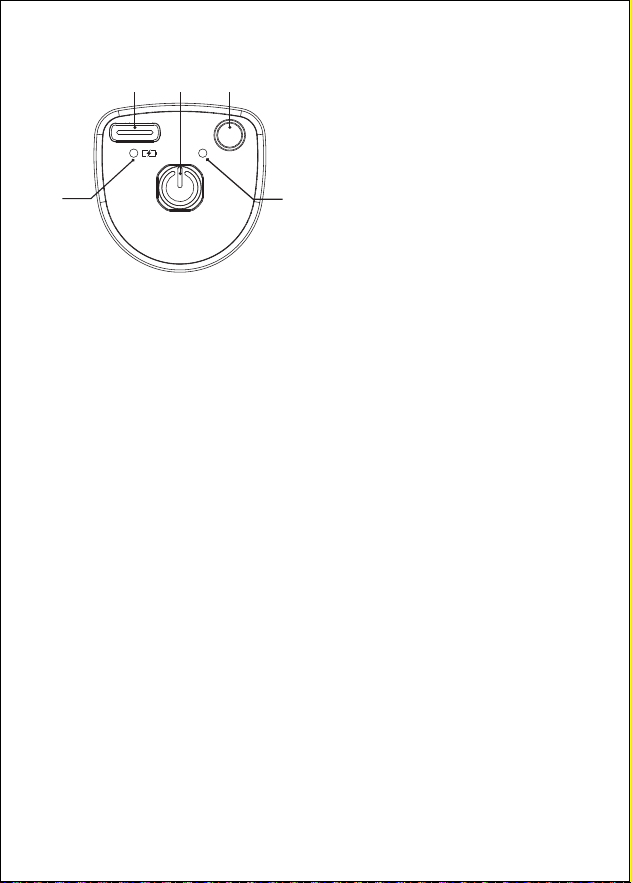
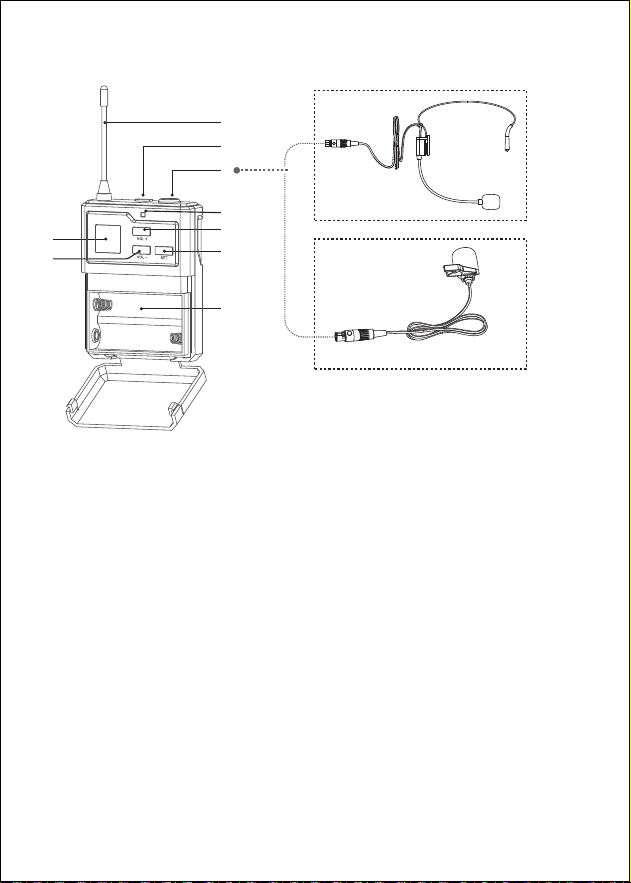
1. Antenna
2. Power Button: Click to turn on the mic. Click to mute when it is on, and
click again to exit mute. Long press for 2 seconds to turn off.
3. XLR Jack
4. LCD Display
5. LED Light: Green for power on. Red for Mute.
6. VOL+: Click to increase the volume by one level. Long press to increase
the volume automatically, up to 40 levels.
7. VOL-: Click to decrease the volume by one level. Long press to decrease
the volume automatically, down to 0 level.
8. SET Button: Short press to change the frequency.
9. Battery Compartment
BODYPACK OPERATION INSTRUCTION
1
2
3
6
8
9
5
4
7
08
PO WE R
RF
AN T
US B 5V
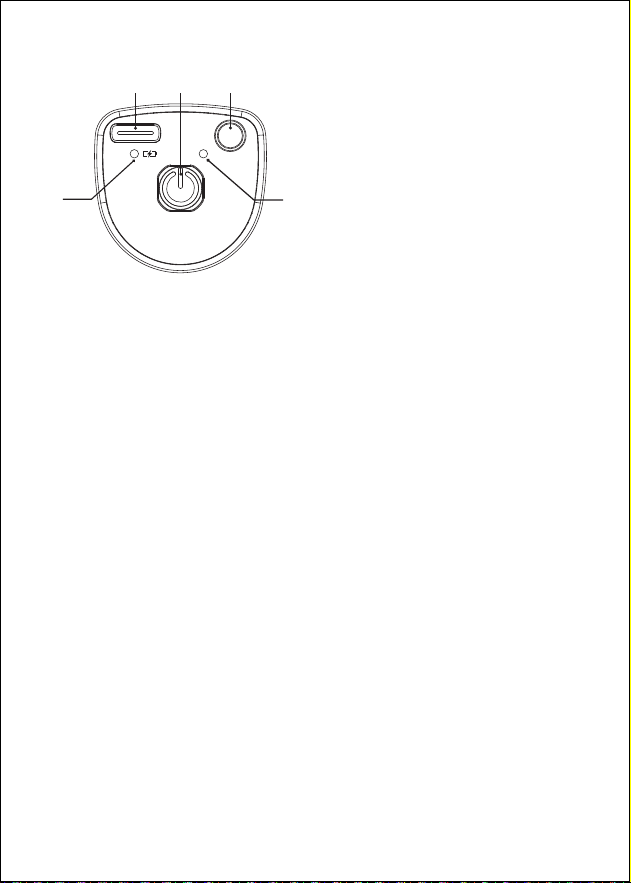
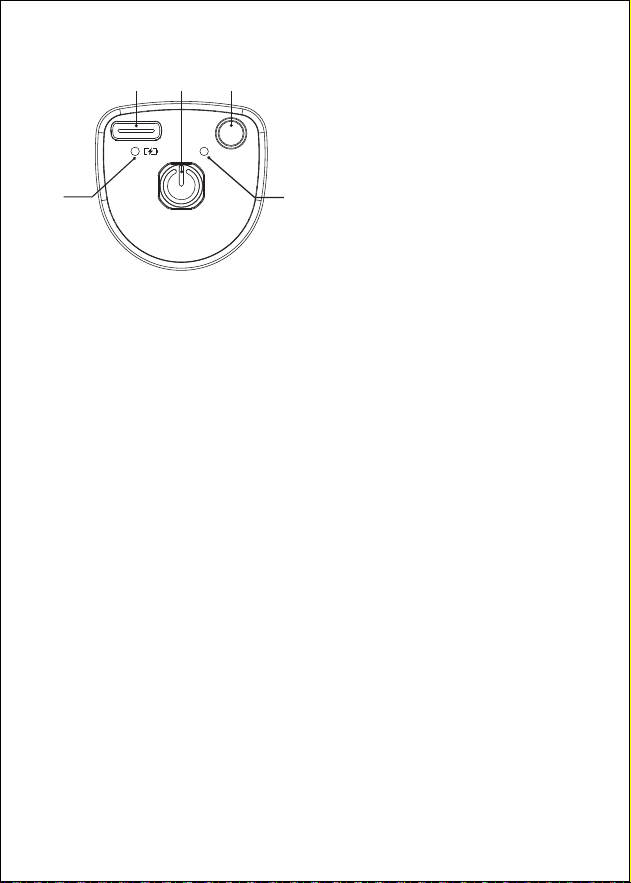
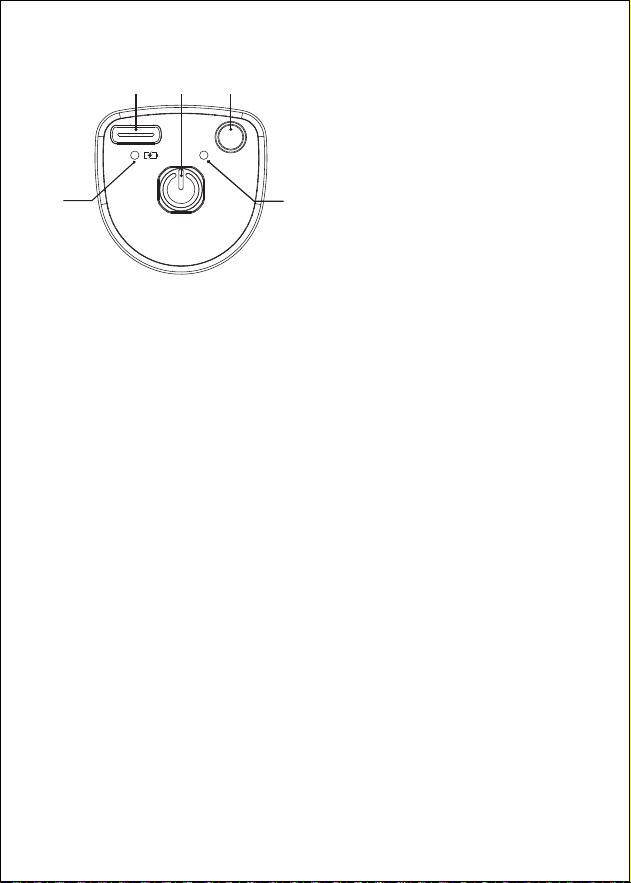
1. USB-C CHARGING PORT
2. POWER BUTTON (Long press for 2 seconds to tum it on/off.)
3. SIGNAL ANTENNA
4. BATTERY INDICATOR
5. RF LIGHT
LIGHT INSTRUCTION
Battery indicator 4
Red light when shutdown charging: The receiver is in charging model.
Light off when shutdown charging: The receiver is fully charged.
Green light: The receiver is turn on.
Yellow light when turn on charging: The receiver is in charging model. The
light turns green when the receiver is fully charged
RF light 5
Turns off: The receiver is not connected to the microphone.
Stays on: The receiver and microphone are successfully connected.
Flashes quickly: The receiver and microphone are successfully connected,
and the microphone is transmitting audio signals.
Flashes slowly: The power of the receiver is in a low battery status.
RECEIVER INSTRUCTION
2
1
3
4
5

09
No sound (The batteries of microphone have already been installed, but
one of the microphone has on sound.)
Please turn off the handheld microphone or bodypack microphone
which can work normally, and you will find that the RF light on the receiver
will disappear. Then follow the steps below to pair the no sound one with
the receiver.
1. Make sure that the receiver and HANDHELD microphone are turned
OFF. Or Make sure that the receiver is OFF and the BODYPACK
microphone is on.
2. Open the battery case of handheld mic or bodypack mic and install the
batteries.
3. Make sure that the handheld microphone is OFF, press and hold the
HI/LO button and the power button simultaneously, do not release them,
until the handheld microphone screen flashes quickly, then release two
buttons simultaneously. Or make sure the bodypack mic is on, long press
the SET button until the bodypack screen flashes quickly, then release the
SET button.
4. Turn on the receiver's power button, wait for 5 seconds or so, then press
the HI/LO button on the handheld microphone or SET button on the
bodypack once, until the handheld microphone screen or bodypack screen
becomes steady and no longer flashes, the RF light on the receiver turns
steady, indicating that the pairing is successful.
5. Tum off the handheld microphone, then tighten the microphone tail
tube. Pairing is now completed.
Received signal with noise or interference
Change to other channels;
Check if receiving distance exceeds the maximum range.
Microphone cannot be tumed on
Check if batteries are installed reversely;
Change to new batteries.
TROUBLESHOOTING

10
EU Declaration of conformity
• RoHS Directive (2011/65/EU)
Hereby, Fujian EastWest Lifewit Technology Co.,LTD declares that the radio
equipment type TW620/TW621/TW630/TW632 is in compliance with
Directive 2014/53/EU.
The full text of the EU declaration of conformity is available at the
following internet address:
https: //www.tonormic.com/pages/eu-declaration-of-conformity
Conditions and restrictions for using frequencies
WARRANTY
There may be special conditions and restrictions for using frequencies in
your country.
Before putting the product into operation, find the information for your
country at the following address:
https://www.tonormic.com/pages/permitted-frequency-bands
TONOR provides 2 ears of after-sales service, free replacement to products
that are NOT damaged resulting from accident, alteration, misuse,
negligence, or abuse. If exceeding 30 days of Amazon return policy, you
can still contact us through our Shopify TONORMIC. We will serve you with
full sincerity!
11
Deutsch
Halten Sie das Gerät von Wasser fern, wenn Sie es benutzen.
Verwenden Sie das Gerät in einer gut belüfteten Umgebung und
halten Sie es von Feuer fern.
Halten Sie das Gerät bitte von anderen Störquellen fern, da es sich
um ein drahtloses Gerät handelt.
Bauen Sie das Gerät nicht auseinander.
Verwenden Sie ein Standard-Netzteil, eine hohe Spannung kann
das Gerät beschädigen.
Bitte werfen Sie die verbrauchten Batterien nicht in den Müll,
sondern in den Recycling-Behälter.
Frequenzbereich: 40hz-18khz
Maximale übertragene Hochfrequenzleistung: 8.5 dBm
Betriebsfrequenz: A MIC: 823-826.2MHz, B MIC: 827.8-831MHz
Betriebsreichweite: Bis zu 60 m
Frequenzstabilität: ±0.0005 MHz
SNR: 96 dB
Klangverzerrung: ≤0,5 %
Empfindlichkeit des Mikrofoneingangs: -51 dBV
RF-Empfindlichkeit: -95 dBm
Betriebstemperatur: 0˚C zu +55˚C
BETRIEBSUMGEBUNG & HINWEISE
TECHNISCHE DATEN
12
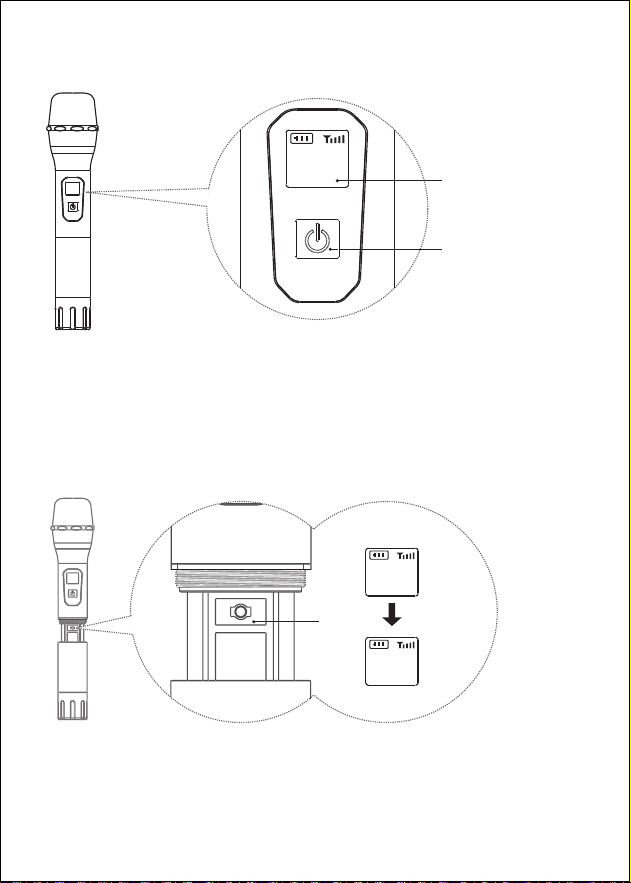
Legen Sie vor Gebrauch des drahtlosen
Mikrofos 2x AA-Batterien ein und gehen
Sie wie folgt vor:
1. Nehmen Sie das Endstück des
Mikrofons ab.
2. Legen Sie die Batterien ein und
schrauben Sie das Endstück des
Mikrofons fest.
Hinweis: Verwechseln Sie nicht die
positive und negative Polarität der
Batterie.
Wie in den obigen Bildern
gezeigt:
1. Display
2. Ein/Aus Taste
3. Endstück
4. +/- Taste
5. Batteriefach
MICROPHONE OPERATION INSTRUCTION
1
2
3
4
5
+
-
+
-
13
1
2
4
CH0 1
CHA
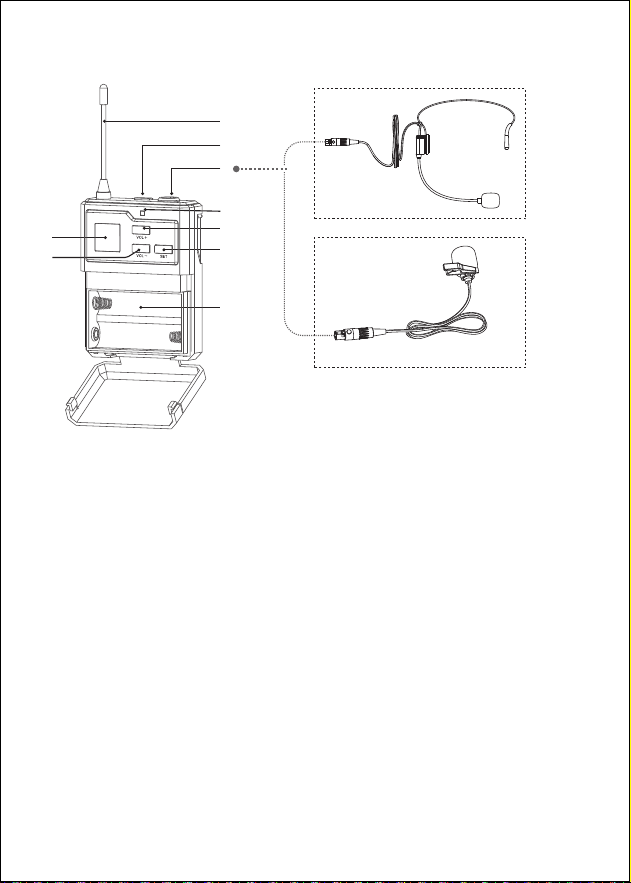
Anleitung:
1. Drücken Sie die Taste 2 für 2 Sekunden, um das Gerät ein-/auszuschalten.
2. Drücken Sie die Taste +/- 4, um die Frequenz auf dem Bildschirm zu ändern.
CH0 1
CHA
CH0 2
CHA
HI
LO
14
or
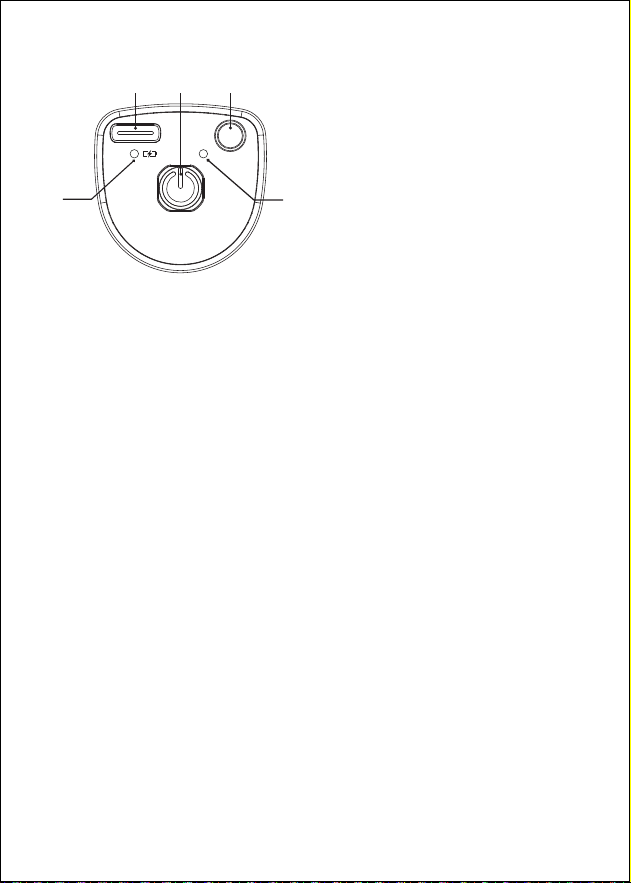
1. Antenne
2. Ein-/Aus-Taste: Klicken Sie hier, um das Mikrofon einzuschalten. Klicken
Sie, um die Stummschaltung zu aktivieren, wenn sie aktiviert ist, und
klicken Sie erneut, um die Stummschaltung zu beenden. Zum Ausschalten
2 Sekunden lang drücken.
3. XLR-Buchse
4. LCD-Display
5. LED-Leuchte: Grün zum Einschalten. Rot für Stummschaltung.
6. VOL+: Klicken Sie, um die Lautstärke um eine Stufe zu erhöhen. Durch
langes Drücken wird die Lautstärke automatisch um bis zu 40 Stufen
erhöht.
7. VOL-: Klicken Sie, um die Lautstärke um eine Stufe zu verringern. Durch
langes Drücken wird die Lautstärke automatisch bis auf den Wert 0
verringert.
8. SET-Taste: Kurz drücken, um die Frequenz zu ändern. Lange drücken, um
in den Kopplungsmodus zu gelangen.
9. Batteriefach
BEDIENUNGSANLEITUNG FÜR DEN BODYPACK
1
2
3
6
8
9
5
4
7
15
PO WE R
RF
AN T
US B 5V
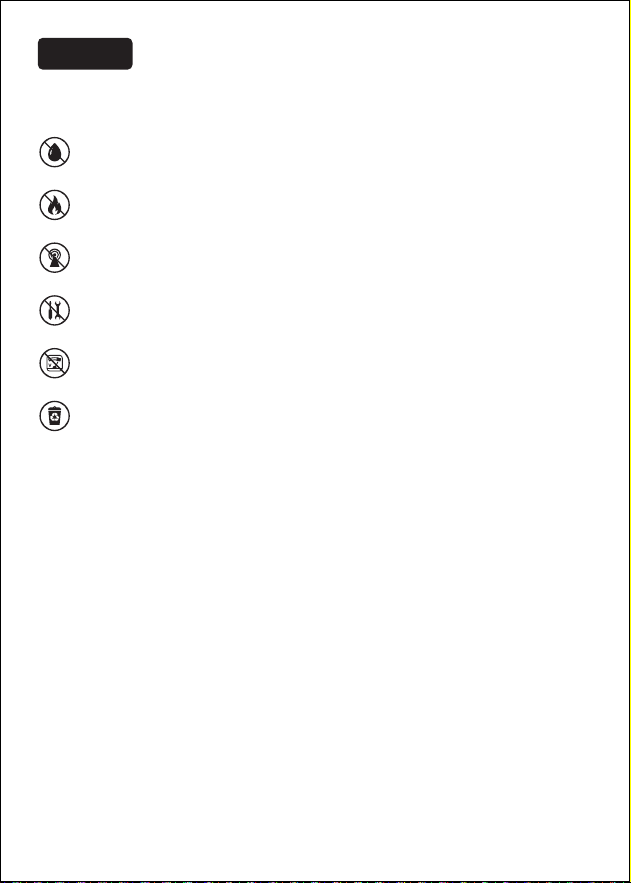
1. USB-CLADEANSCHLUSS
2. EIN-/AUS TASTE (2 Sekunden lang gedrückt halten, um es ein-/auszus-
chalten.)
3. SIGNALANTENNE
4. BATTERIEANZEIGE
5. RF-LICHTT
LICHTANZEIGE
Batterieanzeige 4
Rotes Licht beim Herunterfahren de Ladevorgangs: Der Empfänger
befindet sich m Lademodell.
Licht aus beim Herunterfahren des Ladevorgangs: Der Empfänger stun"s
tanni? our echoranger ist eingeschalket.
Gelbes Licht beim Einschalten des Ladevorgangs: Der Empfänger befindet
sich im Lademodus. Das Licht leuchtet grün, wen der
Empfänger vollständig aufgeladen ist.
RF-Licht 5
Schaltet aus: Der Empfänger ist nicht mit dem Mikrofon verbunden.
Lichtanzeige an: Der Empfänger und das Mikrofon sind erfolgreich
verbunden.
Blinkt schnell: Der Empfänger und das Mikrofon sind erfolgreich verbunden
und das Mikrofon überträgt Audiosignale.
Blinkt langsam: Die Stromversorgung des Empfängers ist in einem
niedrigen Batteriestatus.
EMPFÄNGER-ANLEITUNG
2
1
3
4
5

16
Kein Ton (Die Batterien des Mikrofons sind bereits eingelegt, aber eines
der Mikrofone hat einen Ton.)
Bitte schalten Sie das Handmikrofon oder Taschenmikrofon aus, das
normal funktionieren kann, und Sie werden feststellen, dass das RF-Licht
am Empfänger verschwindet. Führen Sie dann die folgenden Schritte aus,
um den No-Sound-Empfänger mit dem Receiver zu koppeln.
1. Stellen Sie sicher, dass der Empfänger und das Handmikrofon ausges-
chaltet sind. Oder Stellen Sie sicher, dass der Empfänger ausgeschaltet
und das BODYPACK-Mikrofon eingeschaltet ist.
2. Öffnen Sie das Batteriefach des Handmikrofons oder Taschenmikrofons
und legen Sie die Batterien ein.
3. Stellen Sie sicher, dass das Handmikrofon ausgeschaltet ist. Halten Sie
die HI/LO-Taste und die Ein/Aus-Taste gleichzeitig gedrückt. Lassen Sie sie
nicht los, bis der Bildschirm des Handmikrofons schnell blinkt. Lassen Sie
dann zwei Tasten gleichzeitig los. Oder stellen Sie sicher, dass das
Taschenmikrofon eingeschaltet ist, drücken Sie lange die SET-Taste, bis der
Bildschirm des Taschensenders schnell blinkt, und lassen Sie dann die
SET-Taste los.
4. Schalten Sie den Netzschalter des Empfängers ein, warten Sie etwa 5
Sekunden und drücken Sie dann einmal die HI/LO-Taste am Handmikrofon
oder die SET-Taste am Taschensender, bis der Bildschirm des Handmikro-
fons oder Taschensenders stabil leuchtet und nicht mehr blinkt. Das
RF-Licht am Empfänger leuchtet konstant und zeigt damit an, dass die
Kopplung erfolgreich war.
5. Drehen Sie das Handmikrofon ab und ziehen Sie dann das Mikrofonen-
drohr fest. Das Pairing ist nun abgeschlossen.
Empfangenes Signal mit Rauschen oder Störungen
Wechseln Sie zu anderen Kanälen;
Prüfen Sie, ob der Empfangsbereich die maximale Reichweite
überschreitet.
Mikrofon lässt sich nicht einschalten
Prüfen Sie, ob die Batterien falsch herum eingelegt sind;
Wechseln Sie die Batterien aus.
FEHLERBEHEBUNG

17
EU-Konformitätserklärung
• RoHS-Richtlinie (2011/65/EU)
Hiermit erklärt Fujian EastWest Lifewit Technology Co.,LTD, dass der
Funkgerätetyp TW620/TW621/TW630/TW632 der Richtlinie 2014/53/EU
entspricht.
Der vollständige Text der EU-Konformitätserklärung ist unter folgender
Internetadresse verfügbar:
https://www.tonormic.com/pages/eu-declaration-of-conformity
Bedingungen und Einschränkungen für die Nutzung von Frequenzen
GARANTIE
Möglicherweise gelten in Ihrem Land besondere Bedingungen und
Einschränkungen für die Nutzung von Frequenzen.
Bevor Sie das Produkt in Betrieb nehmen, finden Sie die Informationen für
Ihr Land unter folgender Adresse:
https://www.tonormic.com/pages/permitted-frequenzbands
TONOR bietet eine 2-jährige Garantie und kostenlosen Ersatz für Produkte,
die NICHT durch Unfall, Veränderung, Missbrauch, Nachlässigkeit oder
unsachgemäßen Gebrauch beschädigt wurden. Wenn Sie das 30-tägige
Rückgaberecht von Amazon überschreiten, können Sie uns weiterhin über
unseren Shopify TONORMIC kontaktieren.dv Wir werden Ihnen gerne
behilflich sein!
18
Français
Lorsque vous utilisez cet appareil, tenez-le éloigné de toute source
d’eau.
Utilisez l'appareil dans un environnement ventilé, tenez-le éloigné
du feu.
Comme il s'agit d'un appareil sans fil, tenez-le éloigné de toute
autre source d'interférence.
Ne démontez pas l'appareil.
Veuillez utiliser une alimentation électrique standard, la haute
tension peut endommager l'appareil.
Veuillez placer les piles usagées dans la poubelle de recyclage, ne
les jetez pas dans la nature.
Réponse en fréquence: 40hz-18khz
Puissance radiofréquence maximale transmise: 8,5 dBm
Fréquence de fonctionnement: A MIC: 823-826.2MHz, B MIC:
827.8-831MHz
Portée de fonctionnement: Jusqu'à 60m
Stabilité de fréquence: ±0.0005 MHz
SNR: 96dB
Distorsion du son: ≤0.5%
Sensibilité de l'entrée micro: -51dBV
Sensibilité RF: -95dBm
Température de fonctionnement: 0˚C à +55˚C
ENVIRONNEMENTS D'UTILISATION ET NOTES
SPÉCIFICATIONS
19
Installez 2*piles AA avant d'utiliser le
microphone sans fil. Voici les instruc-
tions d'installation:
1. Descendez le tube arrière du micro.
2. Installez les piles et serrez le tube
arrière du micro.
Remarque: La polarité positive et
négative des piles ne peut pas être
inversée.
Comme indiqué sur les
images ci-dessus:
1. Écran d'affichage
2. Interrupteur marche/arrêt
3. Tube arrière
4. Bouton HI-LO
5. Compartiment des piles
INSTRUCTION D'UTILISATION DU MICROPHONE
1
2
3
4
5
+
-
+
-
20
1
2
4
CH0 1
CHA
Instruction:
1. Appuyez sur le bouton 2 pendant 2s pour l'allumer ou l'éteindre.
2. Appuyez sur le bouton HI-LO 4, puis la fréquence sur l'écran sera changée.
CH0 1
CHA
CH0 2
CHA
HI
LO
21
or
1. Antenne
2. Bouton d'alimentation: cliquez pour allumer le micro. Cliquez pour
désactiver le son lorsqu'il est activé, puis cliquez à nouveau pour quitter le
mode muet. Appuyez longuement pendant 2 secondes pour éteindre.
3. Prise XLR
4. Écran LCD
5. Lumière LED: verte pour la mise sous tension. Rouge pour Muet.
6. VOL+: Cliquez pour augmenter le volume d'un niveau. Appuyez
longuement pour augmenter le volume automatiquement, jusqu'à 40
niveaux.
7. VOL-: Cliquez pour diminuer le volume d'un niveau. Appuyez longue-
ment pour diminuer le volume automatiquement jusqu'au niveau 0.
8. Bouton SET: appuyez brièvement pour changer la fréquence. Appuyez
longuement pour accéder au mode d'appairage.
9. Compartiment des piles
INSTRUCTIONS D'UTILISATION DU BODYPACK
1
2
3
6
8
9
5
4
7
22
PO WE R
RF
AN T
US B 5V
1. PORT DE CHARGE USB-C
2. BOUTON D'ALIMENTATION (Appuyez longuement pendant 2 secondes
pour l'allumer/l'éteindre.)
3. ANTENNE DE SIGNAL
4. INDICATEUR DE BATTERIE
5. LUMIÈRE RF
INSTUCTIONS POUR LA LUMIÈRE:
Indicateur de batterie 4
Voyant rouge lors de l'arrêt de la charge: Le récepteur est en charge.
Éteint lors de l'arrêt de la charge: Le récepteur est entièrement chargé.
Lumière verte: Le récepteur est allumé.
Voyant jaune lors de la mise en charge: Le récepteur est en charge.
Le voyant devient vert lorsque le récepteur est complètement chargé.
Voyant RF 5
Éteint: Le récepteur n'est pas connecté au microphone.
Reste allumé: Le récepteur et le microphone sont connectés avec succès.
Cliqnote rapidement: Le récepteur et le microphone sont connectés avec
succès, et le microphone transmet des signaux audio
Cliqnote lentement: L'alimentation du récepteur est dans un état de
batterie faible.
INSTRUCTION DE RÉCEPTION
2
1
3
4
5

23
Pas de son (Les piles du microphone sont déjà installées, mais l'un des
microphones a du son.)
Veuillez éteindre le microphone à main ou le microphone de poche qui
peut fonctionner normalement, et vous constaterez que le voyant RF du
récepteur disparaîtra. Suivez ensuite les étapes ci-dessous pour associer
celui sans son au récepteur.
1. Assurez-vous que le récepteur et le microphone portatif sont éteints. Ou
Assurez-vous que le récepteur est éteint et que le microphone BODYPACK
est allumé.
2. Ouvrez le boîtier des piles du micro portable ou du micro de poche et
installez les piles.
3. Assurez-vous que le microphone à main est éteint, appuyez et
maintenez simultanément le bouton HI/LO et le bouton d'alimentation, ne
les relâchez pas jusqu'à ce que l'écran du microphone à main clignote
rapidement, puis relâchez deux boutons simultanément. Ou assurez-vous
que le micro du bodypack est allumé, appuyez longuement sur le bouton
SET jusqu'à ce que l'écran du bodypack clignote rapidement, puis relâchez
le bouton SET.
4. Allumez le bouton d'alimentation du récepteur, attendez environ 5
secondes, puis appuyez une fois sur le bouton HI/LO du microphone à
main ou sur le bouton SET du bodypack, jusqu'à ce que l'écran du
microphone à main ou l'écran du bodypack devienne stable et ne clignote
plus, le voyant RF du récepteur devient fixe, indiquant que l'appairage est
réussi.
5. Éteignez le microphone à main, puis serrez le tube arrière du
microphone. L'appairage est maintenant terminé.
Signal reçu avec du bruit ou des interférences
Passez à d'autres canaux;
Vérifiez si la distance de réception dépasse la portée maximale.
Impossible de mettre le microphone en marche
Vérifiez si les piles sont installées à l'envers;
Changez les piles et mettez-en des neuves.
DÉPANNAGE

24
Déclaration de conformité UE
• Directive RoHS (2011/65/UE)
Par la présente, Fujian EastWest Lifewit Technology Co., LTD déclare que
l'équipement radio de type TW620/TW621/TW630/TW632 est conforme à
la directive 2014/53/UE.
Le texte complet de la déclaration UE de conformité est disponible à
l’adresse Internet suivante:
https://www.tonormic.com/pages/eu-declaration-of-conformity
Conditions et restrictions d'utilisation des fréquences
GARANTIE
Il peut y avoir des conditions et restrictions particulières pour l'utilisation
des fréquences dans votre pays.
Avant de mettre le produit en service, recherchez les informations relatives
à votre pays à l'adresse suivante:
https://www.tonormic.com/pages/permis-fréquence-bands
TONOR fournit 2 modes de contact pour le service après-vente, ainsi qu’un
remplacement gratuit pour les produits qui ne sont PAS endommagés
suite à un accident, une altération, une mauvaise utilisation, une
négligence ou un abus. Si vous dépassez les 30 jours de la politique de
retour d'Amazon, vous pouvez toujours nous contacter par le biais de
notre Shopify TONORMIC. Nous vous servirons avec sincérité !
25
Italiano
Tenere il dispositivo lontano dall'acqua.
Utilizzare il dispositivo in un ambiente ventilato e tenerlo lontano
dal fuoco.
Poiché si tratta di un dispositivo wireless, tenerlo lontano da altre
fonti di interferenza.
Non smontare il dispositivo.
Utilizzare l'alimentazione standard, l'alta tensione potrebbe
danneggiare il dispositivo.
Le batterie usate vanno smaltite negli appositi contenitori.
Risposta in frequenza: 40hz-18khz
Potenza massima in radiofrequenza trasmessa: 8,5 dBm
Frequenza operativa: A MIC: 823-826,2MHz, B MIC: 827,8-831MHz
Portata operativa: Fino a 60m
Stabilità di frequenza: ±0,0005 MHz
SNR: 96dB
Distorsione del suono: ≤0,5%
Sensibilità ingresso microfono: -51dBV
Sensibilità RF: -95dBm
Temperatura di funzionamento: da 0˚C a +55℃˚C
AMBIENTI OPERATIVI E AVVERTENZE
SPECIFICHE TECNICHE
26
Prima di utilizzare il microfono wireless
inserire 2 batterie AA secondo le
seguenti istruzioni:
1. Svitare e rimuovere il tubo di coda
del microfono.
2. Inserire le batterie e riposizionare il
tubo di coda del microfono.
Nota: non inverire la polarità positiva e
negativa delle batterie.
Come mostrato nelle
immagini precedenti:
1. Schermo del display
2. Interruttore di
accensione/spegnimento
3. Tubo di coda
4. Tasto HI-LO
5. Scomparto batterie
ISTRUZIONI PER IL FUNZIONAMENTO DEL MICROFONO
1
2
3
4
5
+
-
+
-
27
1
2
4
CH0 1
CHA
Istruzioni:
1. Premere il pulsante 2 per 2s per accendere/spegnere il microfono.
2. Premere il pulsante HI-LO 4 per modificare la frequenza sullo schermo.
CH0 1
CHA
CH0 2
CHA
HI
LO
28
or
1. Antenna
2. Pulsante di accensione: fare clic per accendere il microfono. Fare clic per
disattivare l'audio quando è attivo e fare nuovamente clic per uscire
dall'audio. Premere a lungo per 2 secondi per spegnere.
3. Presa XLR
4. Display LCD
5. Luce LED: verde per accensione. Rosso per Muto.
6. VOL+: fare clic per aumentare il volume di un livello. Premere a lungo
per aumentare automaticamente il volume, fino a 40 livelli.
7. VOL-: fare clic per diminuire il volume di un livello. Premere a lungo per
diminuire automaticamente il volume, fino al livello 0.
8. Pulsante SET: premere brevemente per modificare la frequenza.
Premere a lungo per accedere alla modalità di accoppiamento.
9. Scomparto batteria
ISTRUZIONI PER L'USO DEL BODYPACK
1
2
3
6
8
9
5
4
7
29
PO WE R
RF
AN T
US B 5V
1. PORTA DI RICARICA USB-C
2. PULSANTE DI ACCENSIONE (Premere a lungo per 2 secondi per
accenderlo/spegnerlo.)
3. ANTENNA DI SEGNALE
4. INDICATORE DELLA BATTERIA
5. SPIA RF
ISTUZIONE INDICATOR LUMINOSI
Indicatore luminoso della batteria 4
Luce rossa quando si spegne la ricarica: Il ricevitore è in fase di ricarica.
Luce spenta quando si spegne la ricarica: Il ricevitore è completa-mente
carico.
Luce verde: Il ricevitore è acceso.
Luce gialla quando si accede la ricarica: Il ricevitore è in fase di ricarica. La
luce diventa verde quando il ricevitore è completa-mente carico.
Spia RF 5
Spegne: Il ricevitore non è collegato al microfono.
Rimane accesa: Il ricevitore e il microfono sono collegati corretta-mente.
Lampeggia rapidamente: Il ricevitore e il microfono sono collegati
correttamente e il microfono sta trasmettendo segnali audio.
Lampeggia lentamente: La batteria del ricevitore è scarica.
ISTRUZIONI PER IL RICEVITORE
2
1
3
4
5

30
Nessun suono (le batterie del microfono sono già state installate, ma
uno dei microfoni funziona.)
Spegni il microfono portatile o il microfono da cintura che può
funzionare normalmente e scoprirai che la luce RF sul ricevitore scompar-
irà. Quindi seguire i passaggi seguenti per associare quello senza audio al
ricevitore.
1. Assicurarsi che il ricevitore e il microfono PALMARE siano spenti. Oppure
assicurati che il ricevitore sia spento e il microfono BODYPACK sia acceso.
2. Aprire la custodia delle batterie del microfono portatile o del microfono
da cintura e installare le batterie.
3. Assicurarsi che il microfono portatile sia spento, tenere premuti
contemporaneamente il pulsante HI/LO e il pulsante di accensione, non
rilasciarli finché lo schermo del microfono portatile non lampeggia
rapidamente, quindi rilasciare i due pulsanti contemporaneamente.
Oppure assicurati che il microfono del body-pack sia acceso, premi a lungo
il pulsante SET finché lo schermo del body-pack non lampeggia rapida-
mente, quindi rilascia il pulsante SET.
4. Accendere il pulsante di accensione del ricevitore, attendere circa 5
secondi, quindi premere una volta il pulsante HI/LO sul microfono portatile
o il pulsante SET sul body-pack, fino a quando lo schermo del microfono
portatile o lo schermo del body-pack diventa stabile e non lampeggia più,
la luce RF sul ricevitore diventa fissa, indicando che l'accoppiamento è
riuscito.
5. Spegnere il microfono portatile, quindi serrare il tubo di coda del
microfono. L'accoppiamento è ora completato.
Segnale con disturbi o interferenze
Passare ad altri canali;
Controllare se la distanza di ricezione è superiore alla portata massima.
Il microfono non si accende
Controllare se le batterie sono installate al contrario;
Cambiare le batterie.
RISOLUZIONE DEI PROBLEMI

31
Dichiarazione di conformità UE
• Direttiva RoHS (2011/65/UE)
Con la presente, Fujian EastWest Lifewit Technology Co.,LTD dichiara che il
tipo di apparecchiatura radio TW620/TW621/TW630/TW632 è conforme
alla Direttiva 2014/53/UE.
Il testo completo della dichiarazione di conformità UE è disponibile al
seguente indirizzo internet:
https://www.tonormic.com/pages/eu-declaration-of-conformity
Condizioni e restrizioni per l'utilizzo delle frequenze
GARANZIA
Potrebbero esserci condizioni e restrizioni speciali per l'utilizzo delle
frequenze nel tuo Paese.
Prima di mettere in funzione il prodotto, reperite le informazioni per il
vostro Paese al seguente indirizzo:
https://www.tonormic.com/pages/pertched-frequency-bands
TONOR fornisce 2 anni di servizio post-vendita e sostituzione gratuita per i
prodotti che NON sono danneggiati a causa di incidenti, alterazioni, uso
improprio, negligenza o abuso. Se sono stati superati i 30 giorni di politica
di reso Amazon, puoi ancora contattarci attraverso il nostro Shopify
TONORMIC. Saremo lieti di servirti
32
Español
Mantenga siempre este aparato alejado del agua.
Utilice el dispositivo en un entorno ventilado, evite exponerlo al
fuego.
Dado que se trata de un dispositivo inalámbrico, procure
mantenerlo alejado de cualquier fuente de interferencias.
No desmonte el dispositivo.
Por favor, emplee la fuente de alimentación estándar, un voltaje
alto podría dañar el aparato.
Le rogamos que deposite las pilas usadas en un contenedor de
reciclaje apropiado, no las tire a la basura.
Respuesta en frecuencia: 40Hz-18Khz
Potencia máxima de radiofrecuencia transmitida: 8,5 dBm
Frecuencia de funcionamiento: A MIC: 823-826,2MHz, B MIC:
827,8-831MHz
Alcance operativo: Hasta 60 m
Estabilidad de frecuencia: ±0,0005 MHz
Relación señal-ruido: 96 dB
Distorsión acústica: ≤0,5%
Sensibilidad de entrada del micrófono: -51dBV
Sensibilidad RF: -95dBm
Temperatura de funcionamiento: 0˚C a +55˚C
CONDICIONES DE FUNCIONAMIENTO Y OBSERVACIONES
ESPECIFICACIONES
33
Antes de utilizar el micrófono
inalámbrico, inserte 2* pilas AA
siguiendo las instrucciones de
instalación que se indican a continu-
ación:
1. Retire la carcasa inferior del
micrófono.
2. Instale las pilas y vuelva a colocar la
carcasa inferior en su lugar.
Nota: Tenga cuidado de no invertir la
polaridad positiva y negativa de las
pilas.
Como se muestra en las
imágenes anteriores:
1. Pantalla de visualización
2. Interruptor de encendi-
do/apagado
3. Carcasa inferior
4. Botón HI-LO
5. Compartimento de las
pilas
GUÍA DE FUNCIONAMIENTO DEL MICRÓFONO
1
2
3
4
5
+
-
+
-
34
1
2
4
CH0 1
CHA
Instrucciones:
1. Pulse el botón 2 durante 2 segundos para encender o apagar el aparato.
2. Pulse el botón HI-LO 4 para cambiar la frecuencia en pantalla.
CH0 1
CHA
CH0 2
CHA
HI
LO
35
or
1. Antena
2. Botón de encendido: haga clic para encender el micrófono. Haga clic
para silenciar cuando esté activado y haga clic nuevamente para salir del
silencio. Mantenga presionado durante 2 segundos para apagar.
3. Conector XLR
4. Pantalla LCD
5. Luz LED: Verde para encendido. Rojo para silencio.
6. VOL+: Haga clic para aumentar el volumen en un nivel. Mantenga
presionado para aumentar el volumen automáticamente, hasta 40 niveles.
7. VOL-: Haga clic para disminuir el volumen en un nivel. Mantenga
presionado para disminuir el volumen automáticamente, hasta el nivel 0.
8. Botón SET: Presione brevemente para cambiar la frecuencia. Mantenga
presionado para ingresar al modo de emparejamiento.
9. Compartimento de las pilas
INSTRUCCIONES DE FUNCIONAMIENTO DEL BODYPACK
1
2
3
6
8
9
5
4
7
36
PO WE R
RF
AN T
US B 5V
1. PUERTO DE CARGA USB-C
2. BOTÓN DE ENCENDIDO (Pulsación larga durante 2 segundos para
encenderlo/apagarlo.)
3. ANTENA
4. INDICADOR DE BATERÍA
5. INDICADOR RF
LDESCRIPCIÓN DE LOS INDICADORES LUMINOSOS
4 Indicador de batería
Luz roja cuando se apaga la carga: El receptor está en modo de carga.
Luz apagada cuando se apaga la carga: El receptor está totalmente
cargado.
Luz verde: El receptor está encendido.
Luz amarilla cuando enciende la carga: El receptor está en modo de
carga. La luz se vuelve verde cuando el receptor está completa-mente
cargado.
5 Indicador RF
Apaga: El receptor no está conectado al micrófono.
Permanece encendido: El receptor y el micrófono están conectados
correctamente.
Parpadea rápidamente: El receptor y el micrófono están conecta-dos
correctamente y el micrófono está transmitiendo señales de audio.
Parpadea lentamente: La batería del receptor se está agotando.
INSTRUCCIONES DEL RECEPTOR
2
1
3
4
5

37
No hay sonido (las baterías del micrófono ya están instaladas, pero uno
de los micrófonos tiene sonido).
Apague el micrófono de mano o el micrófono de bolsillo, que puede
funcionar normalmente, y verá que la luz de RF del receptor desaparecerá.
Luego siga los pasos a continuación para emparejar el que no tiene
sonido con el receptor.
1. Asegúrese de que el receptor y el micrófono MANO estén apagados. O
asegúrese de que el receptor esté apagado y el micrófono BODYPACK esté
encendido.
2. Abra la caja de las baterías del micrófono de mano o del micrófono
bodypack e instale las baterías.
3. Asegúrese de que el micrófono de mano esté APAGADO, presione y
mantenga presionado el botón HI/LO y el botón de encendido simultánea-
mente, no los suelte hasta que la pantalla del micrófono de mano
parpadee rápidamente, luego suelte dos botones simultáneamente. O
asegúrese de que el micrófono del bodypack esté encendido, mantenga
presionado el botón SET hasta que la pantalla del bodypack parpadee
rápidamente, luego suelte el botón SET.
4. Encienda el botón de encendido del receptor, espere aproximadamente
5 segundos, luego presione el botón HI/LO en el micrófono de mano o el
botón SET en el bodypack una vez, hasta que la pantalla del micrófono de
mano o del bodypack se quede estable y ya no parpadee. La luz RF del
receptor se vuelve fija, lo que indica que el emparejamiento se realizó
correctamente.
5. Apague el micrófono de mano y luego apriete el tubo trasero del
micrófono. El emparejamiento ya está completo.
La recepción de la señal presenta ruidos o interferencias
Cambie a otros canales.
Compruebe si la distancia de recepción supera el alcance máximo.
No se puede encender el micrófono
Compruebe si se han instalado las pilas al revés.
Sustituya las pilas por otras nuevas.
SOLUCIÓN DE PROBLEMAS

38
Declaración UE de conformidad
• Directiva RoHS (2011/65/UE)
Por la presente, Fujian EastWest Lifewit Technology Co., LTD declara que el
equipo de radio tipo TW620/TW621/TW630/TW632 cumple con la
Directiva 2014/53/UE.
El texto completo de la declaración UE de conformidad está disponible en
la siguiente dirección de Internet:
https://www.tonormic.com/pages/eu-declaration-of-conformity
Condiciones y restricciones de uso de frecuencias
GARANTÍA
Puede haber condiciones y restricciones especiales para el uso de
frecuencias en su país.
Antes de poner en funcionamiento el producto, busque la información de
su país en la siguiente dirección:
https://www.tonormic.com/pages/permitted-frequency-bands
TONOR proporciona 2 años de asistencia posventa, incluyendo el
reemplazo gratuito de aquellos productos que NO estén dañados como
resultado de un accidente, alteración, mal uso, negligencia o abuso. Si
supera los 30 días establecidos en la política de devoluciones de Amazon,
puede ponerse en contacto con nosotros a través de nuestra tienda
Shopify TONORMIC. ¡Le atenderemos encantados!

39
FCC Statement
This device complies with part 15 of the FCC Rules. Operation is subject to
the following two conditions:
(1)This device may not cause harmful interference.
(2)This device must accept any interference received, including interfer-
ence that may cause undesired operation.
ISED Statement
This device contains licence-exempt transmitter(s)/receiver(s) that comply
with Innovation, Science and Economic Development Canada’s licence-ex-
empt RSS(s). Operation is subject to the following two conditions:
(1) This device may not cause interference.
(2) This device must accept any interference, including interference that
may cause undesired operation of the device.
L’émetteur/récepteur exempt de licence contenu dans le présent appareil
est conforme aux CNR d’Innovation, Sciences et Développement
économique Canada applicables aux appareils radio exempts de licence.
L’exploitation est autorisée aux deux conditions suivantes:
(1) L' appareil ne doit pas produire de brouillage;
(2) L' appareil doit accepter tout brouillage radioélectrique subi, même si
le brouillage est susceptible d' en compromettre le fonctionnement.
CA
FR
US
MX
40
Frequency Range (US)
A MIC
902.8-914MHz
(902.8MHz, 903.6MHz, 904.4MHz, 905.2MHz, 906.0MHz,
906.8MHz, 907.6MHz, 908.4MHz, 909.2MHz, 910.0MHz,
910.8MHz, 911.6MHz, 912.4MHz, 913.2MHz, 914MHz)
B MIC
915.6-926.8MHz
(915.6MHz, 916.4MHz, 917.2MHz, 918.0MHz, 918.8MHz,
919.6MHz, 920.4MHz, 921.2MHz, 922.0MHz, 922.8MHz,
923.6MHz, 924.4MHz, 925.2MHz, 926.0MHz, 926.8MHz)
Frequency Range (UK/EU)
A MIC
823-826.2MHz
(823MHz, 823.8MHz, 824.6MHz, 825.4MHz, 826.2MHz)
B MIC
AT
DK
HR
LV
SE
BE
EE
HU
MT
SI
BG
EL
IE
NL
SK
CY
ES
IT
PL
UK(NI)
CZ
FI
LT
PT
DE
FR
LU
RO
827.8-831MHz
(827.8MHz, 828.6MHz, 829.4MHz, 830.2MHz, 831MHz)
!

FUJIAN EASTWEST LIFEWIT TECHNOLOGY
CO.,LTD | RM 1201-1205, BLD 18, 2ND PHASE
OF INNOVATION PARK, FUZHOU 350108,
CHINA
EASTWEST ELECTRONIC COMMERCE CO US
LIMITED | 3500 SOUTH DUPONT HIGHWAY,
SUITE G106 DOVER, DE 19901 UNITED STATES
LIFEWIT LIMITED | UNIT 2, VINCENT HOUSE,
FIRCROFT WAY, EDENBRIDGE UNITED
KINGDOM
Lifewit GmbH | Friedenstraße 5 97072
Wuerzburg Germany
MADE IN CHINA
WEEE ID: DE 57064210
https://www.tonormic.com