Operator’s Manual

This page is empty

CUBEScan
TM
BioCon-V Operator’s Manual
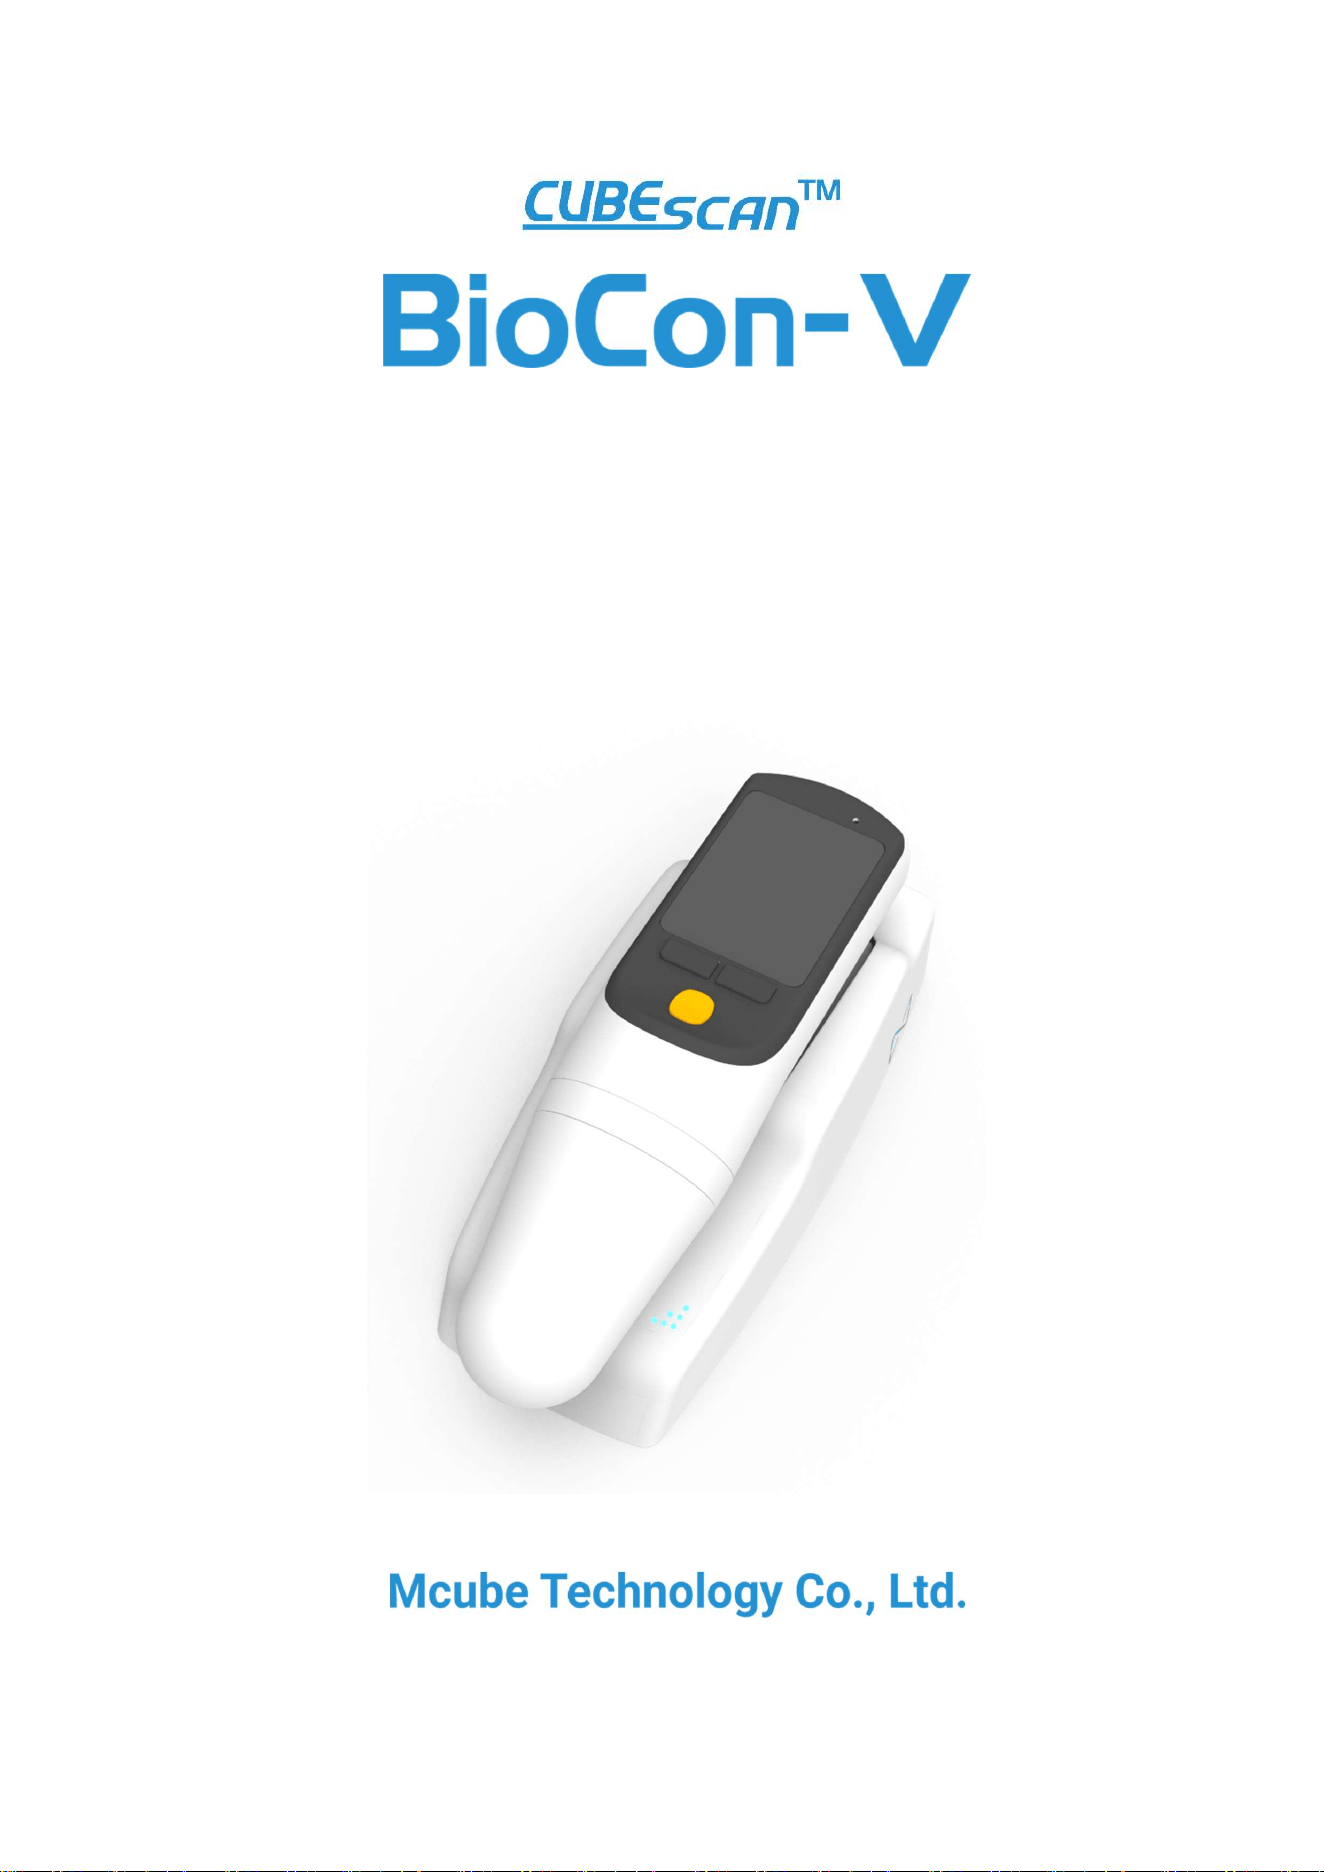
BioCon-V
Bladder Volume Measurement System
Operator’s Manual
This product is a medical device. Please read the precautions
and instructions carefully before use.
Please note that the information in this manual is subject to change without prior notice.
No part of this manual may be reproduced in any form or by any means, electronic or
mechanical, without the permission of Mcube Technology Co., Ltd.
This manual may not be reproduced or translated into other formats, including digital or printed
media.
The figures and examples in this document are not based on actual patient data. For the latest
user information, please contact your sales representative or Mcube Technology Co., Ltd.
The appearance, specifications, features, application screens, and image content of the product
in this guide are subject to change without prior notice to improve the product’s performance.
Mcube Technology Co., Ltd.
39 Magokjungang 12-ro, Gangseo-gu, Seoul 07789, Republic of Korea
Tel: +82 02-3421-7780
Fax: +82 02-3421-7076
Email: [email protected]
Website: www.mcubetech.co.kr
Copyright ⓒ2026 by Mcube Technology Co., Ltd. All rights reserved.

CUBEScan
TM
BioCon-V Operator’s Manual
CONTENTS
1. GENERAL INFORMATION ........................................................................................ 1
1.1. PRODUCT DESCRIPTION .............................................................................................................. 1
1.2. INTENDED PURPOSE .................................................................................................................... 1
1.3. PATIENT/USER CHARACTERISTICS .............................................................................................. 1
1.4. UNDESIRABLE SIDE EFFECTS ....................................................................................................... 2
1.5. SERVICES ........................................................................................................................................ 2
1.6. INCIDENT REPORTING (VIGILANCE SYSTEM) ........................................................................... 2
2. SAFETY INFORMATION ............................................................................................ 3
2.1. NOTICE TO ALL USERS ................................................................................................................. 3
2.2. CONTRAINDICATIONS .................................................................................................................. 3
2.3. ELECTRICAL SAFETY ...................................................................................................................... 3
2.4. BATTERY SAFETY ........................................................................................................................... 6
2.5. DEVICE SAFETY.............................................................................................................................. 8
2.6. SAFE HANDLING PROCEDURES FOR TRANSPORT ................................................................... 9
3.1. PRODUCT FEATURES .................................................................................................................. 10
3.2. SYSTEM COMPONENTS.............................................................................................................. 10
3.3. OUTER APPEARANCE – PROBE ................................................................................................. 11
3.4. OUTER APPEARANCE – CHARGING CRADLE ........................................................................... 12
3.5. INFORMATION SCREEN DISPLAY .............................................................................................. 13
4. PREPARATION BEFORE USE ................................................................................... 14
4.1. CHARGING CRADLE INSTALLATION .......................................................................................... 14
4.2. BATTERY CHARGING .................................................................................................................. 14
5. HOW TO USE .......................................................................................................... 17
5.1. MEASUREMENT ACCURACY ...................................................................................................... 17
5.2. CHECK BEFORE USE .................................................................................................................... 17
5.3. TURN THE DEVICE ON/OFF ....................................................................................................... 18
5.4. BUTTON OPERATIONS GUIDE ................................................................................................... 18
5.5. INITIAL SETUP ............................................................................................................................. 19
5.6. HOME SCREEN ............................................................................................................................ 21
5.7. SCAN PREPARATION .................................................................................................................. 22
5.8. LOCATING THE BLADDER (PRE-SCAN) ..................................................................................... 23
5.9. CHECK SCAN RESULTS ............................................................................................................... 26
5.10. LAST SCAN RESULT .................................................................................................................... 27
5.11. PASSWORD RESET PROCEDURE ................................................................................................ 29
5.12. AUTO SLEEP MODE ..................................................................................................................... 32

CUBEScan
TM
BioCon-V Operator’s Manual
6. DEVICE SETTING ..................................................................................................... 33
6.1. ACCESSING THE DEVICE SETTING MENU ................................................................................ 33
6.2. SETTING DATA FORMAT ............................................................................................................ 34
6.3. SETTING THE DATE ..................................................................................................................... 34
6.4. SETTING THE TIME ..................................................................................................................... 34
6.5. ADJUSTING SCREEN BRIGHTNESS............................................................................................ 34
6.6. SETTING THE SLEEP MODE TIMEOUT ...................................................................................... 35
6.7. ADJUSTING THE VOLUME ......................................................................................................... 35
6.8. SELECTING THE BARCODE FORMAT ......................................................................................... 35
6.9. ACCESSING THE WI-FI SETUP SCREEN ..................................................................................... 36
6.10. CHANGING THE PASSWORD ..................................................................................................... 37
7.1. GENERAL INFORMATION ........................................................................................................... 39
7.2. PURPOSE OF SOFTWARE ........................................................................................................... 40
7.3. MAIN FUNCTIONS ...................................................................................................................... 40
7.4. INSTALL CUBELITE ...................................................................................................................... 40
7.5. REMOVE CUBELITE ...................................................................................................................... 41
7.6. ADMINISTRATOR SETTING ........................................................................................................ 42
7.7. SELECTING A DEVICE .................................................................................................................. 44
7.8. REGISTERING THE DEVICE ......................................................................................................... 45
7.9. DATA MANAGEMENT ................................................................................................................. 47
7.10. SETTINGS ..................................................................................................................................... 49
8. TABLET PC APPLICATION - BIOCON-V MANAGER ............................................. 57
8.1. INFORMATION ............................................................................................................................ 57
8.2. INSTALLING ON A SMART DEVICE ........................................................................................... 58
8.3. LOG IN .......................................................................................................................................... 60
8.4. RESETTING THE PASSWORD ..................................................................................................... 61
8.5. HOME SCREEN ............................................................................................................................ 62
8.6. CONNECTING THE DEVICE ........................................................................................................ 63
8.7. QUICK TAB ................................................................................................................................... 68
8.8. DEVICE SCREEN ........................................................................................................................... 69
8.9. PATIENT LIST SCREEN ................................................................................................................ 77
8.10. SCAN MIRRORING ...................................................................................................................... 79
8.11. WI-FI SETTING ............................................................................................................................. 82
8.12. SETTINGS (TABLET SETTING) .................................................................................................... 83
9. NOTIFICATION MESSAGES .................................................................................... 86
9.1. PROBE POP-UP MESSAGES ........................................................................................................ 86
9.2. PROBE NOTIFICATION MESSAGES ............................................................................................ 87
9.3. PROBE SELECTION MESSAGE (ACCEPT/DECLINE OPTION) ................................................... 89
9.4. REMOTE CONNECTION MESSAGES (TABLET/PC) .................................................................... 90

CUBEScan
TM
BioCon-V Operator’s Manual
10. MAINTENANCES ..................................................................................................... 91
10.1. DEVICE ERRORS .......................................................................................................................... 91
10.2. DEVICE & SCAN ERROR MESSAGE ........................................................................................... 92
10.3. CALIBRATION AND SELF-TEST ERROR MESSAGES ................................................................. 92
10.4. SERVICE AND TECHNICAL SUPPORT ........................................................................................ 94
11. CLEANING AND DISINFECTION ............................................................................ 95
11.1. COMPATIBILITY ........................................................................................................................... 96
11.2. CLEANING .................................................................................................................................... 96
11.3. DISINFECT THE PROBE ............................................................................................................... 97
12. BATTERY .................................................................................................................. 98
13. REGULAR INSPECTION .......................................................................................... 98
14. DISPOSAL OF THE DEVICE..................................................................................... 98
15. REPAIRS OF THE DEVICE ....................................................................................... 99
16. SELF-SCAN TEST AND CALIBRATION ................................................................... 99
16.1. SELF-DEVICE TEST ....................................................................................................................... 99
16.2. CALIBRATION ............................................................................................................................ 100
16.3. FIRMWARE UPGRADE .............................................................................................................. 103
17. SPECIFICATIONS ................................................................................................... 105
17.1. ACOUSTIC OUTPUT TABLE ....................................................................................................... 105
17.2. COMPONENT SPECIFICATIONS ............................................................................................... 108
17.3. ELECTROMAGNETIC COMPATIBILITY ...................................................................................... 110
17.4. FCC/ISED COMPLIANCE INFORMATION ................................................................................. 114
17.5. ENVIRONMENTAL CONDITIONS ............................................................................................. 115
18. GLOSSARY ............................................................................................................. 117
19. SYMBOL DIRECTORY ............................................................................................ 118
20. REFERENCES .......................................................................................................... 118

CUBEScan
TM
BioCon-V Operator’s Manual
1
1. GENERAL INFORMATION
1.1. PRODUCT DESCRIPTION
CUBEScan BioCon-V (Ultrasound Bladder Volume Measuring Device) is a safe, easy-to-use, non-invasive
device capable of measuring bladder volume (residual urine volume). This device consists of a probe
and a cradle.
BioCon-V is a B-mode ultrasound device powered by a battery built into portable probe. The probe's
battery can be recharged using the charging cradle.
The internally mounted 3D-mechanical sector transducer captures the bladder in 12 cross-sectional
views and calculates bladder volume based on these images. The captured 12 cross-sectional images
are displayed to the user via the probe's LCD screen. Additionally, the Pre-Scan feature allows the user
to confirm the bladder's position before scanning, enabling more accurate and easier measurement.
Measurement results can be transmitted to a computer or tablet via Wi-Fi, and data management and
device settings can be performed using CubeLite (PC software) and BioCon-V Manager (tablet app).
1.2. INTENDED PURPOSE
CUBEScan BioCon-V is a B-mode pulsed-echo ultrasound device. BioCon-V projects ultrasonic energy
through the lower abdomen of a patient to non-invasively obtain images of the bladder to calculate
the urine volume. The BioCon-V is intended to be used by a qualified medical professional in hospitals
and other healthcare facilities to non-invasively measure the urine volume in the bladder.
1.3. PATIENT/USER CHARACTERISTICS
1.3.1. PATIENT POPULATION AND MEDICAL CONDITIONS
Patients whose bladder volume needs to be measured.
1.3.2. INTENDED USER
Physicians and medical professionals.
1.3.3. ENVIRONMENTS OF INTENDED USE
The CUBEScan BioCon-V is intended for use in professional healthcare environments including
hospitals, doctor’s office, clinics, and examination rooms.

CUBEScan
TM
BioCon-V Operator’s Manual
2
1.4. UNDESIRABLE SIDE EFFECTS
No Undesirable side-effects were observed during the clinical evaluation and post-market surveillance
conducted by Mcube Technology Co., Ltd.
1.5. SERVICES
If you have difficulties in using the system due to failure or lack of education, please contact your local
dealer or Mcube Technology at mcube@mcubetech.co.kr.
1.6. INCIDENT REPORTING (VIGILANCE SYSTEM)
Any serious incident that has occurred in relation to the BioCon-V should be reported to the
manufacturer and the competent authority of the Member State in which the user and/or patient is
established. Please contact your local distributors or Mcube Technology Co., Ltd.
CUBEScan
TM
BioCon-V Operator’s Manual
3
2. SAFETY INFORMATION
2.1. NOTICE TO ALL USERS
This operator’s manual contains essential information required for the use of BioCon-V, including its
components, functions, maintenance, environmental conditions, and cautions. All users must read and
understand the contents of this manual before operating the BioCon-V.
Safety Information includes critical safety guidance that must be followed when using the BioCon-V.
2.2. CONTRAINDICATIONS
WARNING
AVERTISSEMENT
DO NOT use the Biocon-V in the following cases.
NE PAS utiliser Biocon-V dans les cas suivants.
- For fetal use or on pregnant patients
Pour une utilisation fœtale ou sur des patientes enceintes
- Patients with ascites
Patients atteints d'ascite
- Patients with open skin or wounds in the suprapubic region
Patients présentant des lésions cutanées ouvertes ou des plaies dans la région sus-pubienne
2.2.1. BIOLOGICAL SAFETY
According to the latest data, there are no known adverse effects from using ultrasound devices that
emit pulsed ultrasound signals. The BioCon-V is intended to be used by medical professionals or under
their guidance. The ultrasound acoustic energy emitted by the BioCon-V is limited to a minimal level
sufficient to accurately measure bladder volume. For details on the acoustic output levels, refer to the
relevant section.
2.3. ELECTRICAL SAFETY
This device is designed in accordance with IEC 60601-1 as a Class I, Type BF device.
It also complies with the essential safety requirements for medical electrical equipment set by CSA
(Canadian Standards Association), UL (Underwriters Laboratories), and European harmonized standards.
To prevent electrical or mechanical shock or injury, follow all warnings and precautions provided with
the device.
WARNING
AVERTISSEMENT
To avoid the risk of electrical shock, the device must be connected to a properly grounded
power supply. Ground reliability can be ensured only when using a Hospital Grade (UL Green
Dot) power cord or a Medical Grade power supply compliant with IEC 60601-1.
Pour éviter tout risque de choc électrique, l’appareil doit être raccordé à une source

CUBEScan
TM
BioCon-V Operator’s Manual
4
d’alimentation correctement mise à la terre. La fiabilité de la mise à la terre n’est garantie
que si un cordon d’alimentation de qualité hospitalière (UL Green Dot) ou une alimentation
de qualité médicale conforme à la norme IEC 60601-1 est utilisé.
Do not operate the device in an environment where flammable gases or flammable
anesthetic mixtures are present.
N'utilisez pas l'appareil dans un environnement où sont présents des gaz inflammables ou
des mélanges anesthésiques inflammables.
Do not use the device simultaneously with a defibrillator or high
-
frequency (HF) surgical
equipment.
N'utilisez pas l'appareil en même temps qu'un défibrillateur ou un équipement chirurgical à
haute fréquence (HF).
All service and maintenance must be performed only by service engineers authorized by
Mcube Technology Co., Ltd.
Tout entretien et toute maintenance doivent être effectués uniquement par des techniciens
agréés par Mcube Technology Co., Ltd. Electrostatic discharge (ESD) is a natural phenomenon
that occurs frequently in low-humidity environments caused by heating or air conditioning.
Co.,Ltd.
Before use, inspect the device exterior, power cord, and adapter for any visible damage. If
any damage is found, do not use the device.
Avant utilisation, inspectez l'extérieur de l'appareil, le cordon d'alimentation et l'adaptateur
afin de détecter tout dommage visible.
Do not use the device if the probe is fully submerged in liquid.
N'utilisez pas l'appareil si la sonde est entièrement immergée dans un liquide.
Connect only to an adapter rated for AC 100–240 V, 50/60 Hz as specified by the
manufacturer.
Connectez uniquement à un adaptateur conçu pour une tension alternative de 100 à 240 V,
50/60 Hz, conformément aux spécifications du fabricant.
Do not disassemble or modify the device. Doing so may result in serious injury to the patient
or operator.
Ne démontez pas et ne modifiez pas l'appareil. Cela pourrait entraîner des blessures graves
pour le patient ou l'opérateur.
Using cables or accessories other than those specified or provided by the manufacturer may
increase electromagnetic emissions or reduce the device’s electromagnetic immunity, which
could result in improper operation.
L’utilisation de câbles ou d’accessoires autres que ceux spécifiés ou fournis par le fabricant
peut augmenter les émissions électromagnétiques ou réduire l’immunité électromagnétique
de l’appareil, ce qui peut entraîner un fonctionnement inapproprié.
Portable RF communication devices should not be used within 30 cm (12 inches) of any part
of BioCon-V, including cables specified or provided by Mcube Technology Co., Ltd.
Les appareils de communication RF portables ne doivent pas être utilisés à moins de 30 cm
(12 pouces) de toute partie du BioCon
-
V, y compris les câbles spécifiés ou fournis par Mcube

CUBEScan
TM
BioCon-V Operator’s Manual
5
Technology Co., Ltd.
CAUTION
MISE EN GARDE
BioCon-V is designed to comply with IEC 60601-1-2, the general standard for electromagnetic safety.
It is equipped with appropriate and reasonable protection against electromagnetic interference that
may occur under typical installation and operating conditions. The device must be installed and
operated as instructed in this operator’s manual.
Le BioCon-V est conçu conformément à la norme IEC 60601-1-2, la norme générale relative à la
sécurité électromagnétique. Il est équipé de protections appropriées et raisonnables contre les
interférences électromagnétiques susceptibles de se produire dans des conditions normales
d’installation et de fonctionnement. L’appareil doit être installé et utilisé conformément aux
instructions de ce manuel d’utilisation.
This device is intended for use in professional healthcare environments only.
Cet appareil est destiné à être utilisé uniquement dans des environnements de soins de santé
professionnels.
Medical electrical equipment may be affected by electromagnetic interference from portable and
mobile RF communication devices. Ensure that such devices are turned off before use.
Les équipements électromédicaux peuvent être affectés par des interférences électromagnétiques
provenant de dispositifs de communication RF portables ou mobiles. Assurez-vous que ces
dispositifs sont éteints avant utilisation.
Electrostatic discharge (ESD) is a natural phenomenon that occurs frequently in low-humidity
environments caused by heating or air conditioning.
La décharge électrostatique (ESD) est un phénomène naturel qui se produit fréquemment dans des
environnements à faible humidité, en particulier lorsque le chauffage ou la climatisation est en
fonctionnement.
Even low levels of ESD can damage the device. To prevent ESD, use antistatic sprays, antistatic
linoleum, or antistatic mats.
De faibles niveaux de décharges électrostatiques (ESD) peuvent endommager l’appareil. Pour éviter
les ESD, utilisez des sprays antistatiques, du linoléum antistatique ou des tapis antistatiques.
Due to its emission characteristics, BioCon-V is suitable for use in industrial areas and hospitals
(CISPR 11 Class A). If used in a residential environment (where CISPR 11 Class B is generally
required), the device may not provide adequate protection against radio frequency communication
services. The user may need to take mitigation measures such as relocating or reorienting the
device.
En raison de ses caractéristiques d’émission, le BioCon-V est adapté à une utilisation dans les
environnements industriels et hospitaliers (CISPR 11 Classe A).
S’il est utilisé dans un environnement résidentiel (où la Classe B est généralement requise), il peut
ne pas offrir une protection suffisante contre les services de communication radiofréquence.
L’utilisateur peut être amené à prendre des mesures d’atténuation telles que le déplacement ou la
réorientation de l’appareil.
If an error message is displayed on the device, note the error code and contact Mcube Technology
CUBEScan
TM
BioCon-V Operator’s Manual
6
Co., Ltd. for assistance.
Si un message d’erreur apparaît sur l’appareil, notez le code d’erreur et contactez Mcube Technology
Co., Ltd. pour obtenir de l’aide.
To use the PC software (CubeLite) for data management, the computer must comply with IEC 62368-
1 or IEC 60601-1 standards. In the operating environment, the complete system must also comply
with the applicable requirements of IEC 60601-1, including Clause 16 for ME systems.
If additional signal input/output terminals are to be added, the resulting system must also comply
with the applicable requirements of IEC 60601-1, including Clause 16 for ME systems. For assistance,
contact the biomedical engineering department of your hospital, your distributor, or Mcube
Technology Co., Ltd.
Pour utiliser le logiciel PC CubeLite destiné à la gestion des données, l’ordinateur doit être conforme
aux normes IEC 62368-1 ou IEC 60601-1. Dans l’environnement d’utilisation, le système complet doit
également être conforme aux exigences applicables de la norme IEC 60601-1, y compris la clause 16
relative aux systèmes EM. Si des bornes d’entrée/sortie de signal supplémentaires doivent être
ajoutées, le système résultant doit également être conforme aux exigences applicables de la norme
IEC 60601-1, y compris la clause 16 relative aux systèmes EM. Pour obtenir de l’aide, contactez le
service biomédical de votre hôpital, votre distributeur ou Mcube Technology Co., Ltd.
2.4. BATTERY SAFETY
BioCon-V must be operated using a lithium-ion battery.
If you experience any issues related to the battery, stop using the device immediately and contact your
distributor or Mcube Technology Co., Ltd. (Contact Email: mcube@mcubetech.co.kr
To ensure safe use of the battery, follow all warnings and precautions below.
WARNING
AVERTISSEMENT
The battery must be replaced only by service engineers authorized by Mcube Technology Co.,
Ltd.
La batterie doit être remplacée uniquement par des techniciens agréés par Mcube Technology
Co., Ltd.
Charge the battery only using charging equipment provided by Mcube Technology Co., Ltd.
(USB PD adapter, USB C to C cable, and wireless charging cradle).
Rechargez la batterie uniquement à l’aide des équipements de charge fournis par Mcube
Technology Co., Ltd. (adaptateur USB PD, câble USB C-C et socle de charge sans fil).
Do not charge the battery in environments or under conditions not specified by the
manufacturer, as this may cause overheating, explosion, or electrolyte leakage.
Ne rechargez pas la batterie dans des environnements ou des conditions non spécifiés par le
fabricant, car cela pourrait provoquer une surchauffe, une explosion ou une fuite
d’électrolyte.
If electrolyte leakage occurs, do not touch the liquid. If the liquid contacts your skin or eyes,
seek medical attention immediately.

CUBEScan
TM
BioCon-V Operator’s Manual
7
En cas de fuite d’électrolyte, ne touchez pas le liquide. Si le liquide entre en contact avec
votre peau ou vos yeux, consultez immédiatement un médecin.
CAUTION
MISE EN GARDE
If you detect any unusual signs from the battery such as strange odors or overheating, immediately
stop using the device and contact your distributor or Mcube Technology Co., Ltd.
Si vous remarquez des signes inhabituels provenant de la batterie, tels qu’une odeur étrange ou une
surchauffe, arrêtez immédiatement d’utiliser l’appareil et contactez votre distributeur ou Mcube
Technology Co., Ltd.
Do not charge the battery in environments with open flames or direct sunlight.
Ne rechargez pas la batterie dans des environnements exposés à des flammes nues ou à la lumière
directe du solei.
If the device does not operate for more than 10 minutes after being fully charged, contact your
distributor or Mcube Technology Co., Ltd.
Si l’appareil reste inopérant pendant plus de 10 minutes après une charge complète, veuillez
contacter votre distributeur ou Mcube Technology Co., Ltd.
The battery will gradually discharge when not in use. Fully charged the battery 1-2 days before us.
Turning off the device when not in use will help extend battery life.
La batterie se déchargera progressivement lorsqu’elle n’est pas utilisée. Rechargez complètement la
batterie un à deux jours avant l’utilisation. Éteindre l’appareil lorsqu’il n’est pas utilisé contribue à
prolonger la durée de vie de la batterie.
Long-term Storage: If the BioCon-V is not used for more than three months, store the device under
appropriate environmental conditions to prevent battery depletion. It is recommended to recharge
the battery every six months. For detailed storage conditions, refer to 17.5. ENVIRONMENTAL
CONDITIONS.
Stockage à long terme: Si le BioCon-V n’est pas utilisé pendant plus de trois mois, conservez-le dans
des conditions environnementales appropriées pour éviter la décharge de la batterie. Il est
recommandé de recharger la batterie tous les six mois. Pour des conditions de stockage détaillées,
reportez-vous à la section « 17.5. CONDITIONS ENVIRONNEMENTALES».
To extend the battery lifespan, it is recommended to charge up to approximately 75% and discharge
down to around 20% during normal use.
Pour prolonger la durée de vie de la batterie, il est recommandé de la recharger jusqu’à environ
75 % et de la décharger jusqu’à environ 20 % lors d’une utilisation normale.

CUBEScan
TM
BioCon-V Operator’s Manual
8
2.5. DEVICE SAFETY
To ensure the safe use of BioCon-V and its components, you must follow the warnings and precautions
below.
WARNING
AVERTISSEMENT
Do not modify or the device without the manufacturer's approval.
Ne modifiez pas et ne démontez pas l’appareil sans l’autorisation du fabricant.
Do not use the device if the probe is damaged.
N’utilisez pas l’appareil si la sonde est endommagée.
Use the device in a well-ventilated area to prevent overheating or damage.
Utilisez l’appareil dans un endroit bien ventilé afin d’éviter toute surchauffe ou tout
dommage.
Do not use the USB cable while it is bent or twisted, as this may cause malfunction or
charging failure.
N’utilisez pas le câble USB lorsqu’il est plié ou tordu, car cela pourrait provoquer un
dysfonctionnement ou un échec de charge.
If the LCD screen is broken, avoid direct contact with the liquid crystal. If the liquid leaks and
contacts your body, follow the instructions below.
Si l’écran LCD est brisé, évitez tout contact direct avec le cristal liquide. Si le liquide fuit et
entre en contact avec votre corps, suivez les instructions ci-dessous.
- If the liquid contacts your skin, wipe it off with a clean cloth and wash the area with soap and
running water.
Si le liquide entre en contact avec votre peau, essuyez-le avec un chiffon propre, puis lavez la
zone avec de l’eau et du savon.
- If the liquid gets into your eyes, rinse your eyes with running water for at least 15 minutes and
seek medical attention.
Si le liquide entre dans vos yeux, rincez-les à l’eau courante pendant au moins 15 minutes et
consultez un médecin.
- If the liquid is swallowed, rinse your mouth thoroughly with water, drink plenty of water, and
induce vomiting. Then, visit a hospital and consult a physician immediately.
Si le liquide est avalé, rincez-vous soigneusement la bouche, buvez beaucoup d’eau et
provoquez le vomissement. Rendez-vous ensuite immédiatement à l’hôpital pour consulter un
médecin.

CUBEScan
TM
BioCon-V Operator’s Manual
9
CAUTION
MISE EN GARDE
If the device will not be used for an extended period, unplug the cradle adapter and power off the
device.
Si l’appareil n’est pas utilisé pendant une longue période, débranchez l’adaptateur du socle de
charge et éteignez l’appareil.
Use the device indoors only.
Utilisez l’appareil uniquement à l’intérieur.
If the system behaves abnormally or operates inconsistently, stop using it. Power down the system
and contact Mcube Technology or your distributor.
Si le système fonctionne de manière anormale ou incohérente, cessez immédiatement de l’utiliser.
Éteignez le système et contactez Mcube Technology ou votre distributeur.
Do not pour or spill any liquids (e.g., water) on the device.
Ne versez ni ne renversez aucun liquide (par exemple de l’eau) sur l’appareil.
Changes or modifications not expressly approved by the party responsible for compliance could
void the user’s authority to operate the equipment.
Les modifications ou changements non expressément approuvés par la partie responsable de la
conformité réglementaire peuvent annuler l’autorisation de l’utilisateur d’exploiter l’équipement.
2.6. SAFE HANDLING PROCEDURES FOR TRANSPORT
Packaging Damage: If the package has caused battery leakage or electrolyte discharge, safely isolate
the affected part, seal it in a plastic bag, and contact the consignor for further instructions. Contact the
consignor (sender) for instructions. The consignor will provide disposal or handling guidance.
Until the product is inspected and, if necessary, repackaged, keep the damaged package separately in
a designed area.
Product Damage: If the Package has resulted in battery leakage or electrolyte discharge, safely isolate
the damage part, seal it in a plastic bag, and contact consignor for further instructions.
CUBEScan
TM
BioCon-V Operator’s Manual
10
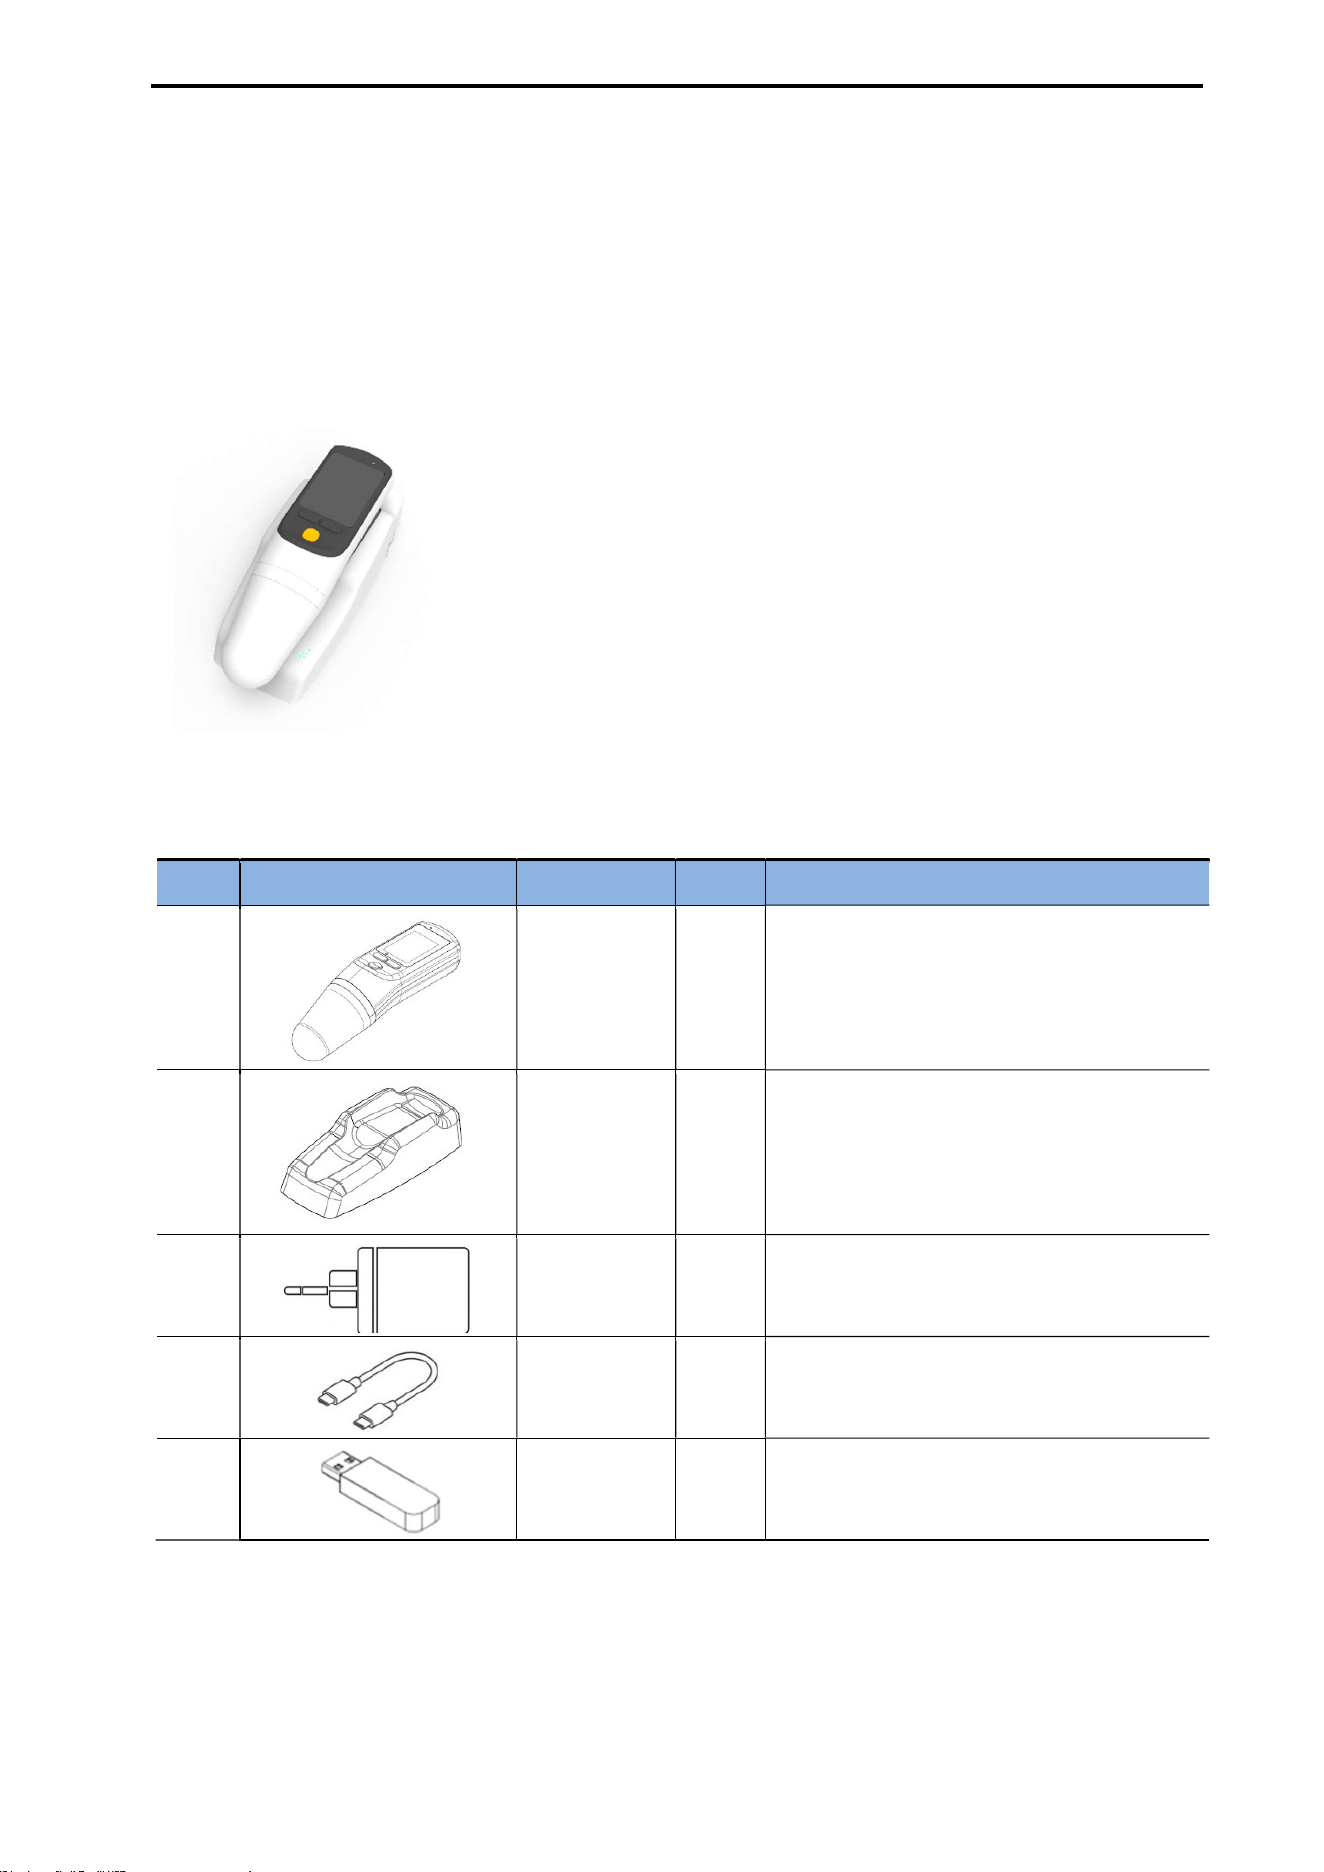
3. INTRODUCTION
3.1. PRODUCT FEATURES
3.2. SYSTEM COMPONENTS
No. Figure Part Qty Description
1
Probe 1
Ultrasound Bladder Volume Scanner
Lightweight resin body with a built-in
battery and wireless charging
Three-button interface
2
Charging
Cradle
1 Used for wireless charging of the probe.
3
Power
Adapter
1
ATN045A3-W200U
100-240VAC, 50/60Hz, 1-0.5A
4
USB
Cable
1
C to C
1.5m
5
External
Memory
1 PC Software (CubeLite)
NOTE: For replacement parts, contact your distributor or Mcube Technology Co., Ltd.
CUBEScan
TM
BioCon-V Consists of two main components: BioCon-V Probe, Charging Cradle
Key Features
The Probe is made of lightweight resin, and the Charging cradle is
designed for portability.
Measures bladder volume (residual urine) using ultrasound.
Provides real-time bladder imaging through the Pre-Scan function.
Enables quick and efficient measurements within a short time.
Allows device management, measurement review, and configuration
via a dedicated tablet application (BioCon-V Manager).
The LED indicators on both the probe and the cradle clearly show
charging status.
CUBEScan
TM
BioCon-V Operator’s Manual
11
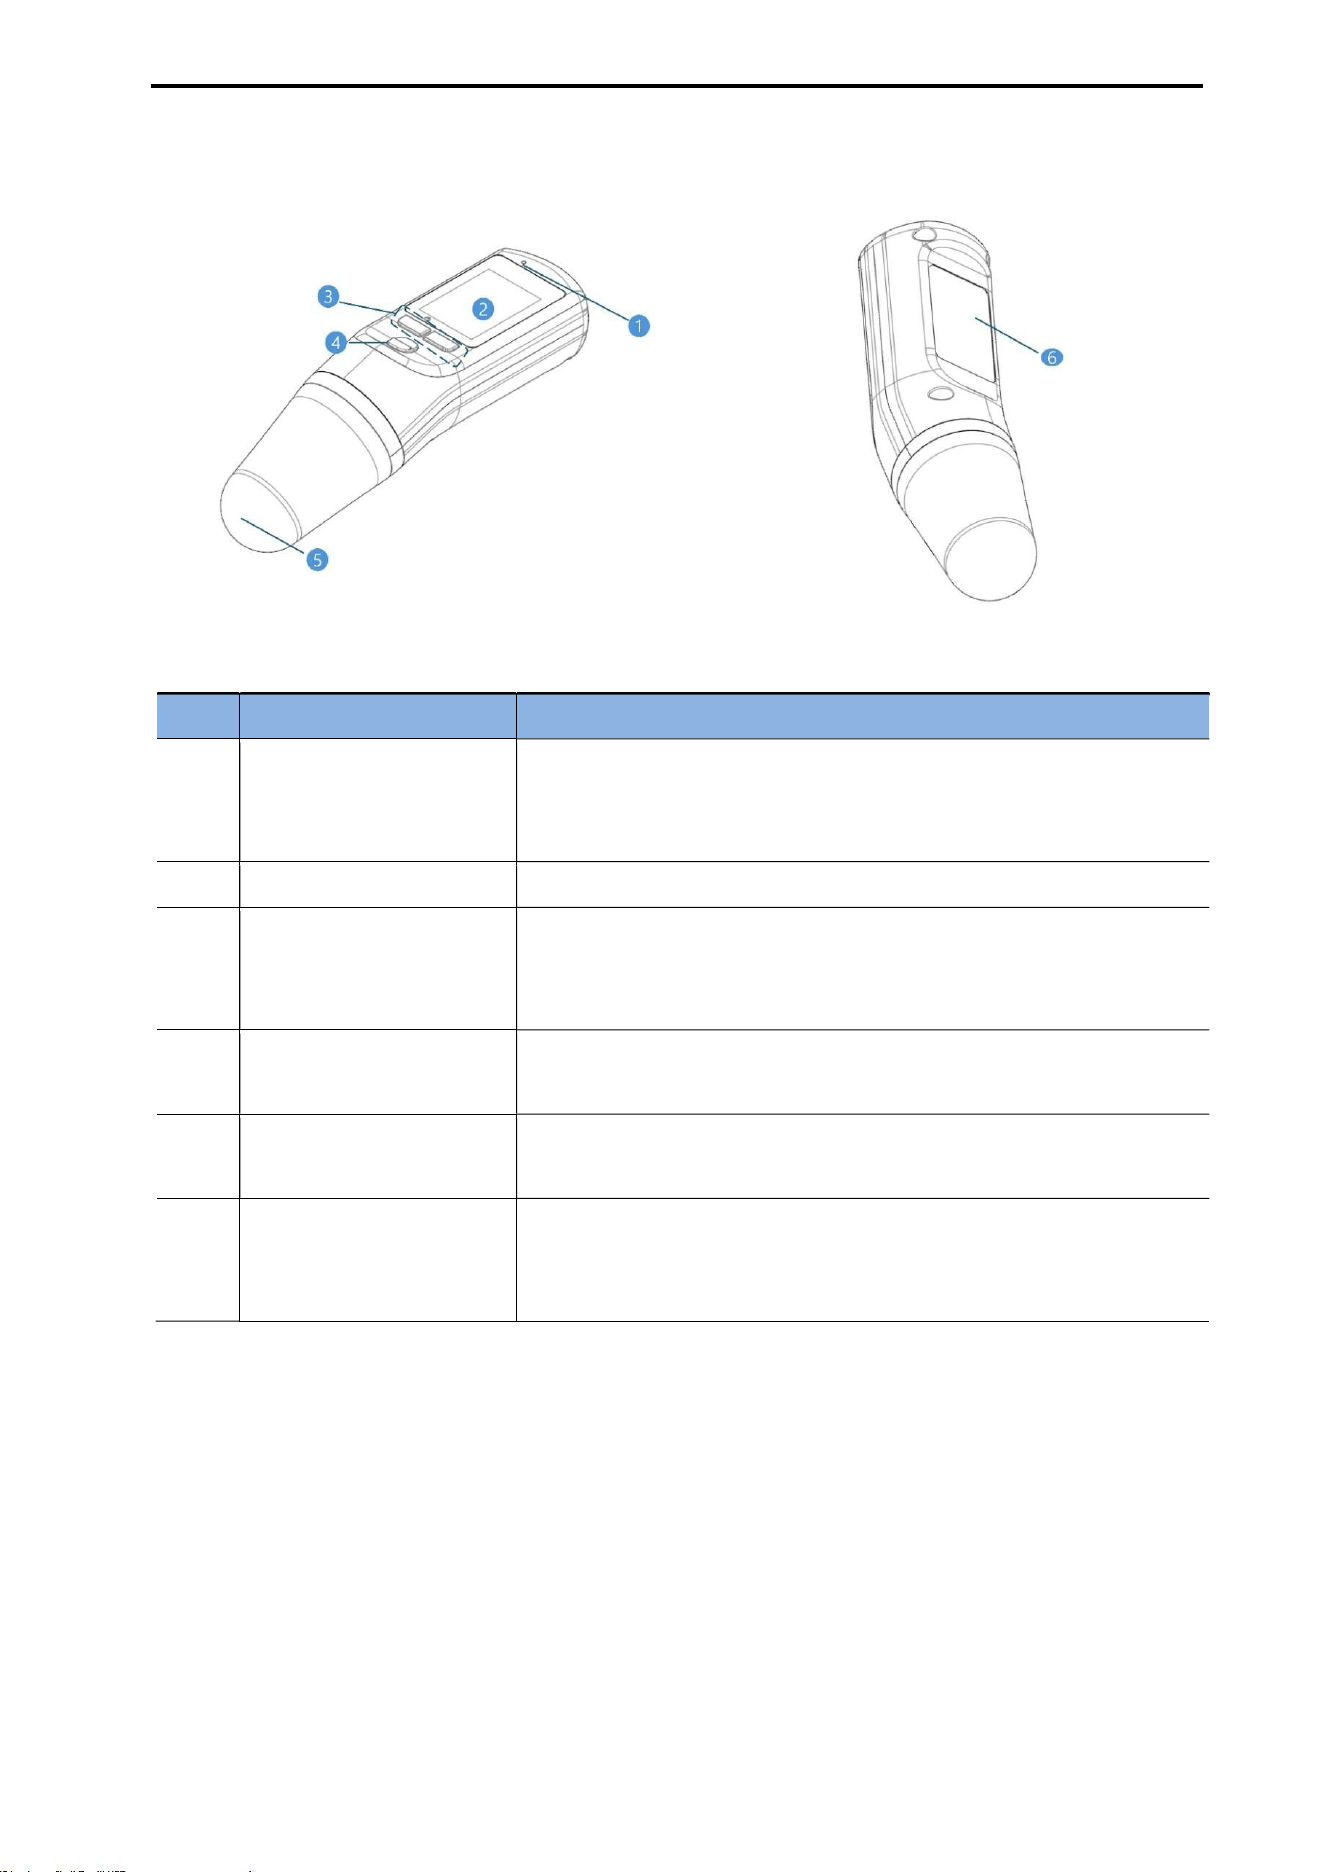
3.3. OUTER APPEARANCE – PROBE
[Probe Appearance]
No. Part Purpose
1
Charging Status
Indicator
(LED)
Displays the charging status LED.
Charging: Orange LED ON
Charging error: Blinking Orange LED
2 LCD Displays bladder volume, menu options, and information.
3 Menu Button
Used to switch to sleep mode, navigate through options, make
changes, and save settings.
※ Power on/off is operated together with the Scan button.
4 Scan Button
Performs Pre-Scan and Normal Scan functions.
※ Power on/off is operated together with this button.
5 Probe Head
Contacts the patient’s abdomen to transmit and receive ultrasound
signals.
6 Back Label
Displays probe-related information.
NOTE: Label contents are subject to change without prior notice.
CUBEScan
TM
BioCon-V Operator’s Manual
12
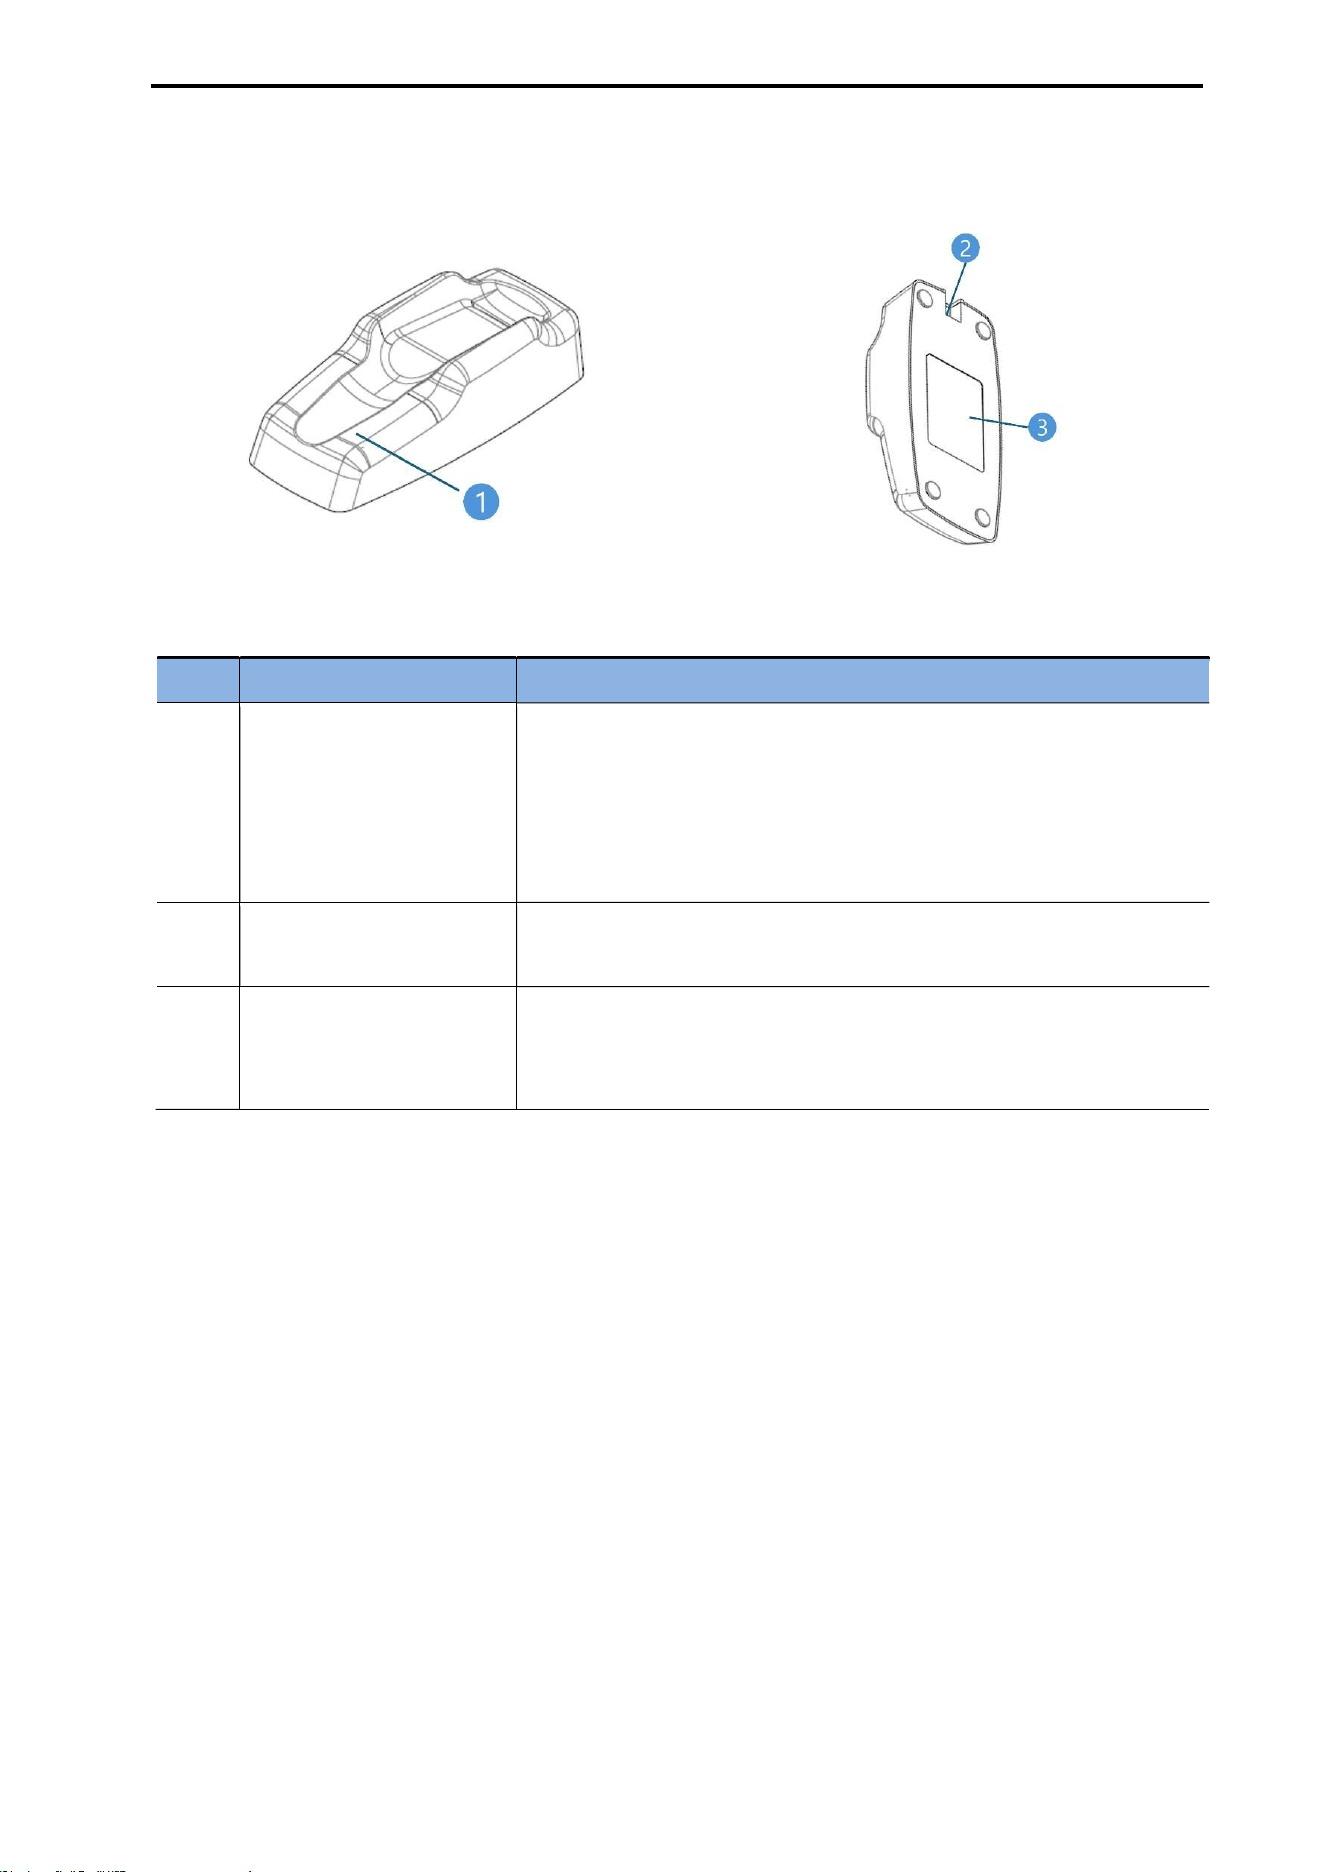
3.4. OUTER APPEARANCE – CHARGING CRADLE
[Front View of the Charging Cradle] [Rear View of Charging Cradle]
No. Part Purpose
1
Battery Charging
Indicator
Shows the charging status.
Charging: Orange LED ON
Standby: Green LED ON
Charging error: Blinking Green & Orange LED
Charging fault: Red LED ON
2 USB Adapter Port
Connect the USB cable and power adapter to provide power to
the cradle.
3 Label
Displays cradle-related information.
NOTE: Label contents are subject to change without prior notice.
CUBEScan
TM
BioCon-V Operator’s Manual
13
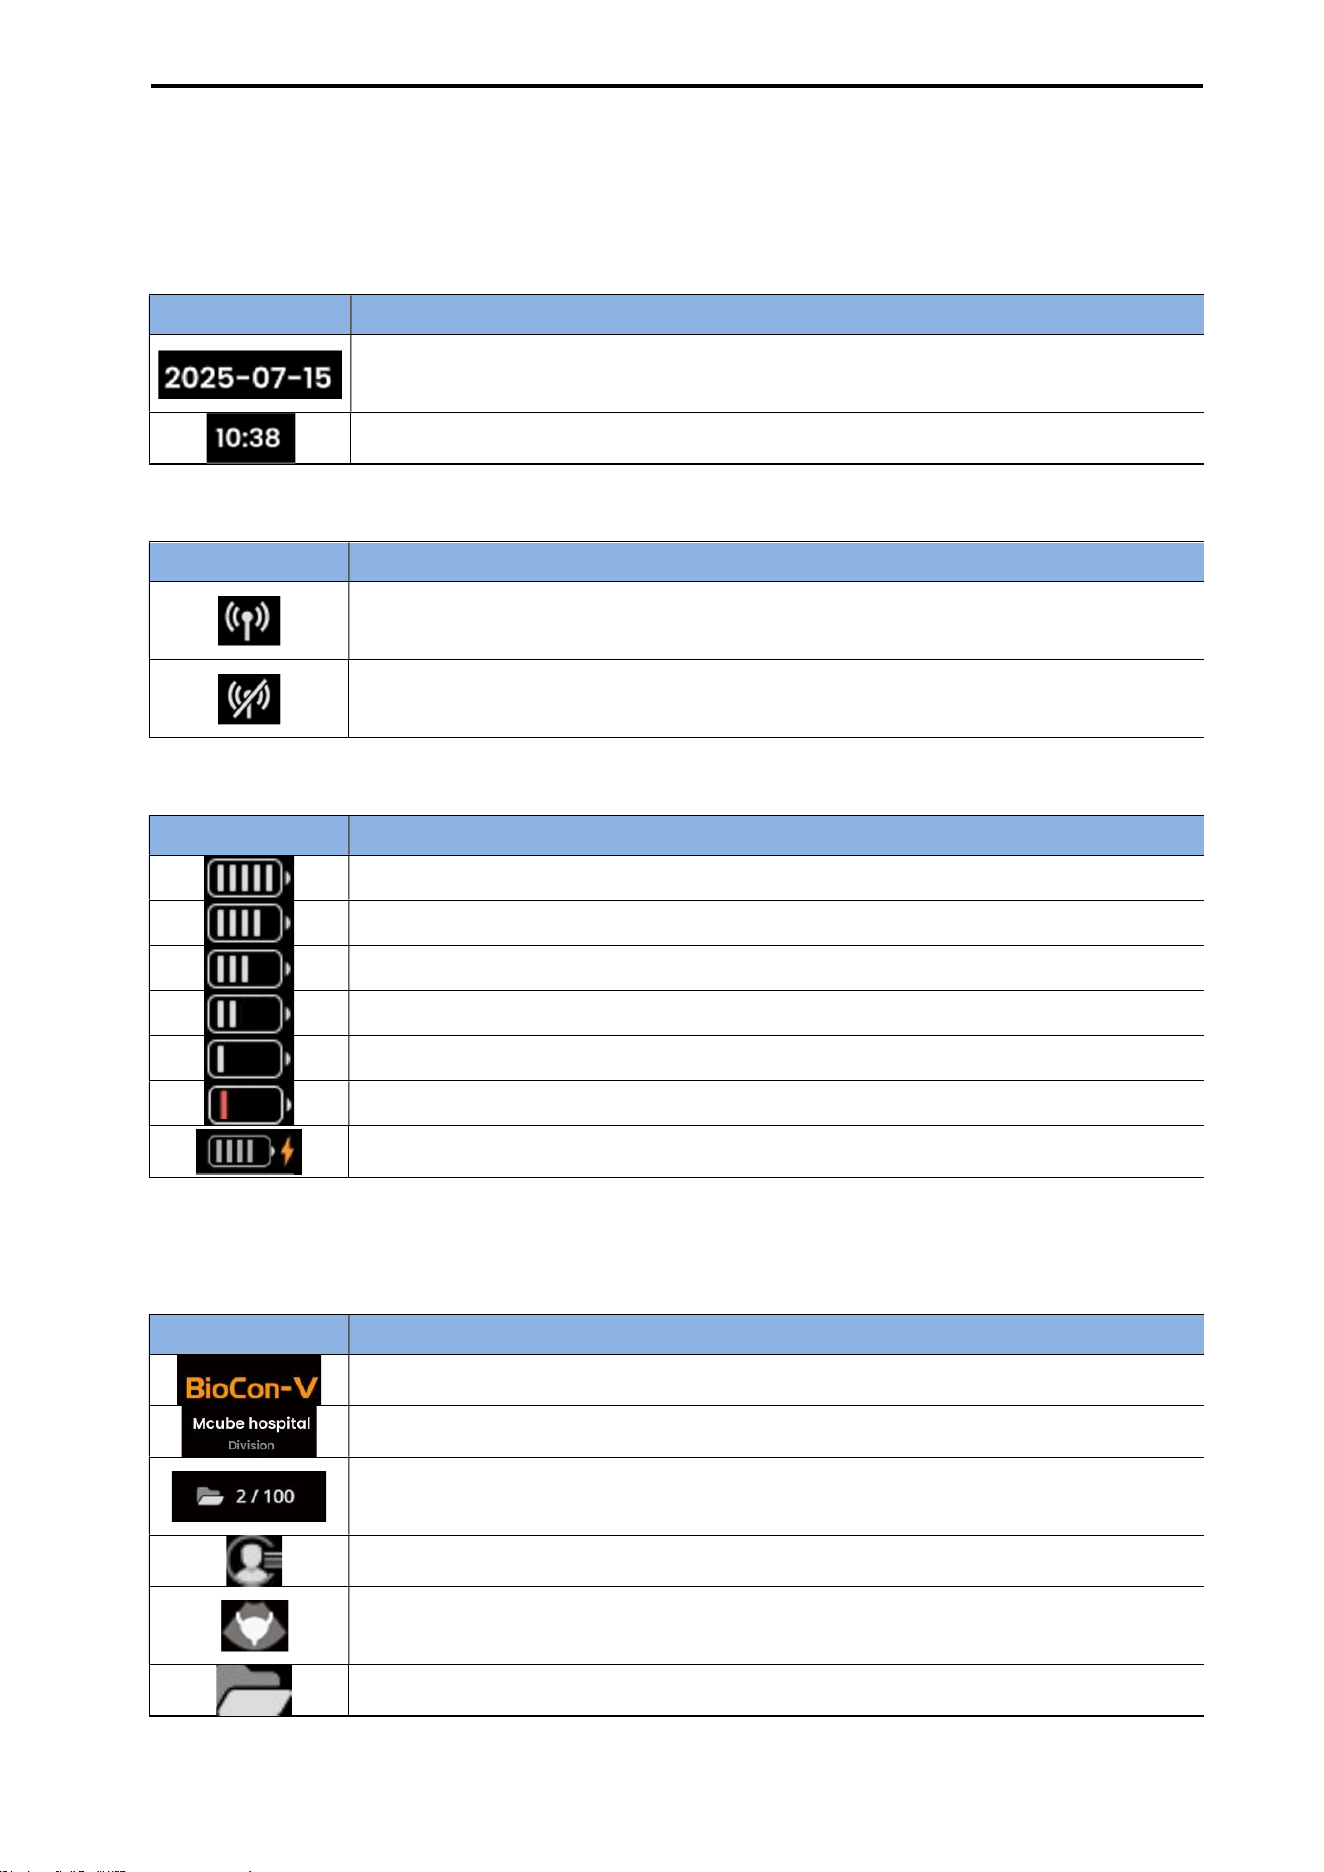
3.5. INFORMATION SCREEN DISPLAY
3.5.1. STATUS BAR
(1) Date & Time Display
(2) Wireless Status
(3) Battery Status (Level, Charging)
3.5.2. Main Screen
(1) Home Screen
Icon Description
Displays the date. The date format follows the option selected in the Settings
menu (e.g., YYYY-MM-DD, MM-DD-YYYY, DD-MM-YYYY).
Displays the time in 24-hour format.
Icon Description
The wireless AP feature is enabled and connected to CubeLite or BioCon-
V Manager
app.
The wireless AP feature is enabled but not connected to the CubeLite or BioCon-
V
Manager app.
Icon Description
Battery fully charged
Battery level: 80%
Battery level: 60%
Battery level: 40%
Battery low
Charging required immediately
Indicates that the battery is currently charging.
Icon Description
Displays the device name (BioCon-V).
Displays the hospital name and department entered in the Settings menu.
Shows the number of stored measurements and the maximum number of storable
measurements.
Opens the registered patient list screen.
When the center button is pressed on the Home screen, a Pre-
Scan is executed
immediately.
Opens the review list screen to view stored measurement results.
CUBEScan
TM
BioCon-V Operator’s Manual
14
4. PREPARATION BEFORE USE
Before using the device, be sure to read 5.1. MEASUREMENT ACCURACY.
Check the battery icon on the status bar to ensure that the probe has sufficient power. If the battery
level is low, fully charge the probe before use.
Clean the probe before use. Moisten a soft cloth with a cleaning/disinfection solution and gently
wipe the probe head. For detailed instructions, refer to 11. CLEANING AND DISINFECTION.
4.1. CHARGING CRADLE INSTALLATION
Install the charging cradle on a stable, level indoor surface before use.
Use only the charging cradle, USB cable, and power adapter provided or specified by Mcube
Technology Co., Ltd.
Connect the USB cable to the USB adapter port on the charging cradle.
Connect the other end of the USB cable to the power adapter, then plug the power cord into a wall
outlet.
After power is applied, confirm that the cradle starts up properly. The cradle LED blinks green and
orange four times, then changes to standby mode with the green LED on.
Place the probe on the cradle and verify that the probe is seated correctly. During charging, the
probe LED turns orange, the cradle LED turns orange, and the battery charging icon appears on the
LCD screen.
When charging is complete, the probe LED turns off and the cradle LED remains green.
The charging cradle does not come into contact with the patient. Maintain a minimum distance of 2
meters from the patient during use.
Do not use the charging cradle to charge any device other than the BioCon-V.
4.2. BATTERY CHARGING
WARNING
AVERTISSEMENT
The battery must be replaced by service authorized by Mcube Technology Co., Ltd.
La batterie doit être remplacée uniquement par un service agréé par Mcube Technology Co.,
Ltd.
Charge the battery only using the charging cradle, USB cable, and adapter provided by
Mcube Technology Co., Ltd.
Rechargez la batterie uniquement à l’aide du socle de charge, du câble USB et de
l’adaptateur fournis par Mcube Technology Co., Ltd.
Do not disassemble, heat, or incinerate the battery.
Ne démontez pas, ne chauffez pas et n’incinérez pas la batterie.
Handle the battery with care to prevent the risk of explosion or fire.
Manipulez la batterie avec précaution afin d’éviter tout risque d’explosion ou d’incendie.
The BioCon
-
V uses a lithium
-
ion battery as its power source. Follow the instructions below to
reduce potential hazards when handling the battery:
CUBEScan
TM
BioCon-V Operator’s Manual
15
Le BioCon-V utilise une batterie lithium-ion comme source d’alimentation. Suivez les
instructions ci-dessous afin de réduire les risques potentiels lors de la manipulation de la
batterie:
- Do not short-circuit the battery terminals or allow them to come into contact with conductive
materials such as metal. Short-circuiting may cause fire, injury, or device damage.
Ne mettez pas en court-circuit les bornes de la batterie et ne les laissez pas entrer en contact
avec des matériaux conducteurs tels que le métal. Un court-circuit peut provoquer un incendie,
des blessures ou des dommages à l’appareil.
- Do not subject the battery to impact, vibration, or excessive pressure. Internal damage may
result in overheating, sparks, leakage, explosion, or fire.
Ne soumettez pas la batterie à des chocs, des vibrations ou une pression excessive. Des
dommages internes peuvent entraîner une surchauffe, des étincelles, des fuites, une explosion
ou un incendie.
Do not charge the device near open flames or under direct sunlight.
Ne rechargez pas l’appareil à proximité de flammes nues ou sous la lumière directe du soleil.
Do not use the charging cradle to charge any device other than the BioCon
-
V.
N’utilisez pas le socle de charge pour recharger un autre appareil que le BioCon-V.
CAUTION
MISE EN GARDE
The charging cradle does not come into contact with the patient. Maintain a minimum distance of 2
meters from the patient during use.
Le socle de charge n’entre pas en contact avec le patient. Maintenez une distance minimale de 2
mètres du patient pendant l’utilisation.
If you notice any unusual smell, heat, discoloration, or deformation from the battery, stop using the
device immediately and contact the distributor or Mcube Technology Co., Ltd.
Si vous remarquez une odeur inhabituelle, une chaleur excessive, une décoloration ou une
déformation de la batterie, cessez immédiatement d’utiliser l’appareil et contactez le distributeur ou
Mcube Technology Co., Ltd.
CUBEScan
TM
BioCon-V Operator’s Manual
16
Battery Charging Procedure:
No. Procedure Description
1
Fully charge
before first use
When using the device for the first time, fully charge the probe
battery before operation.
2 Connect the adapter
Connect the AC/DC adapter cable to the charging cradle.
Plug the power cord into a wall outlet.
3 Check cradle startup
The cradle LED blinks green and orange four times to indicate
that startup is complete.
After startup, the cradle switches to standby mode (Green LED
ON).
4
Place the probe on the
cradle and check the
charging status
During charging: Probe (Orange LED ON), Cradle (Orange LED
ON)
BioCon-V LCD screen: Battery charging icon displayed on the
status bar (e.g., )
5
Charging complete
status
When charging is complete: Probe (LED OFF), Cradle (Green
LED ON)
6 Recharge status
Wireless charging is automatically disabled when the probe
battery reaches 100% while mounted in the cradle.
Wireless charging is automatically re-enabled either when the
battery level falls to 98% or below while the probe is in Sleep
Mode, or when the probe wakes from Sleep Mode.
NOTE:
A full charge of the usable capacity takes approximately 4 hours.
The device automatically turns on when the power-off probe is placed on the charging cradle.
CUBEScan
TM
BioCon-V Operator’s Manual
17
5. HOW TO USE
5.1. MEASUREMENT ACCURACY
The following cases may affect ultrasound transmission and measurement accuracy.
Patients who have undergone suprapubic or pelvic surgery
Patients with scars, sutures, staples or incisions in the suprapubic region
Patients with bladder catheter
Air gaps between the patient’s skin and probe head
Morbidly obese patients
Contaminated probe head
Inadequate patient posture
In patients with myoma and cystic lesions, there is a possibility of overestimating bladder volume.
5.2. CHECK BEFORE USE
CUBEScan BioCon-V supports Pre-Scan function to help locate the patient's bladder.
It is recommended to perform measurements when the residual urine volume is at least 100 mL.
WARNING
AVERTISSEMENT
DO NOT use the Biocon-V in the presence of flammable anesthetics. Explosion hazards
exist.
NE PAS utiliser le BioCon-V en présence d’anesthésiques inflammables. Il existe un risque
d’explosion.
DO NOT use the Biocon-V in the following cases.
NE PAS utiliser le BioCon-V dans les cas suivants.
- For fetal use or on pregnant patients
-
Pour un usage fœtal ou sur des patientes enceintes
- Patients with ascites
-
Chez les patients présentant une ascite
- Patients with open skin or wounds in the suprapubic region.
-
Chez les patients ayant une peau ouverte ou des plaies dans la région sus-pubienne
CUBEScan
TM
BioCon-V Operator’s Manual
18
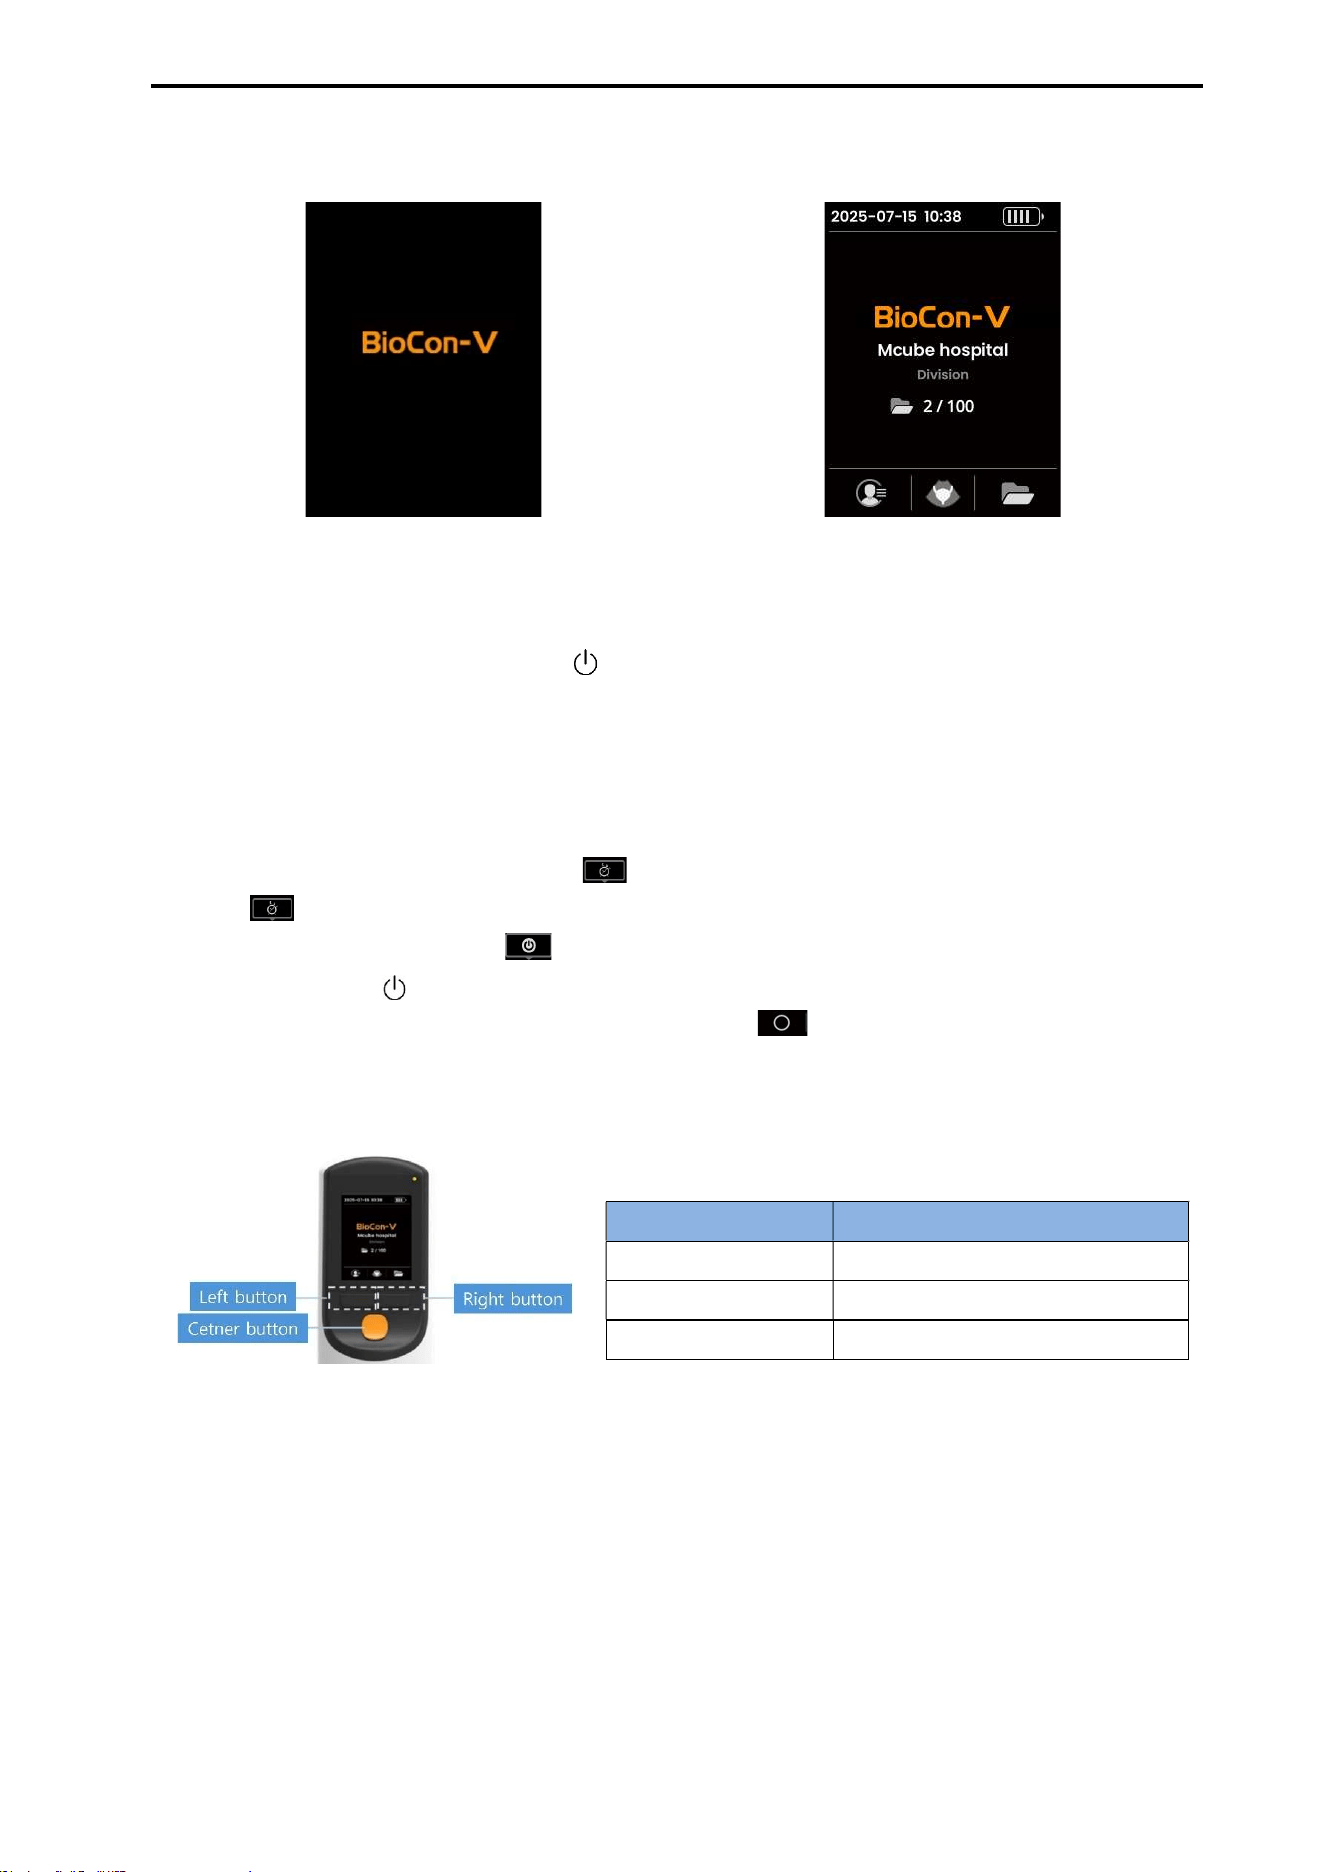
5.3. TURN THE DEVICE ON/OFF
[BioCon-V Boot Screen] [BioCon-V Home Screen]
5.3.1. POWER ON
Press and hold the left button (Power, ) to turn on the device or exit Sleep Mode.
When the device powers on, the BioCon-V boot screen appears.
Once the boot process is complete, the home screen is displayed.
5.3.2. POWER OFF
Press and hold the left button (Power, ) for more than 3 seconds to put the device into Sleep
Mode ( ).
Press and hold the left button ( ) and the center button together for more than 3 seconds; the
Power-off message ( ) will be displayed.
On the message window, press the left button (Confirm, ) to turn off the device.
5.4. BUTTON OPERATIONS GUIDE
[BioCon-V Physical Buttons]
BioCon-V is operated using three physical buttons.
Button Position Main Function
Left Button Power ON/OFF, Menu navigation
Center Button Start Scan, Confirm
Right Button Menu Navigation
Button operations for each function are described separately in the corresponding section.
CUBEScan
TM
BioCon-V Operator’s Manual
19
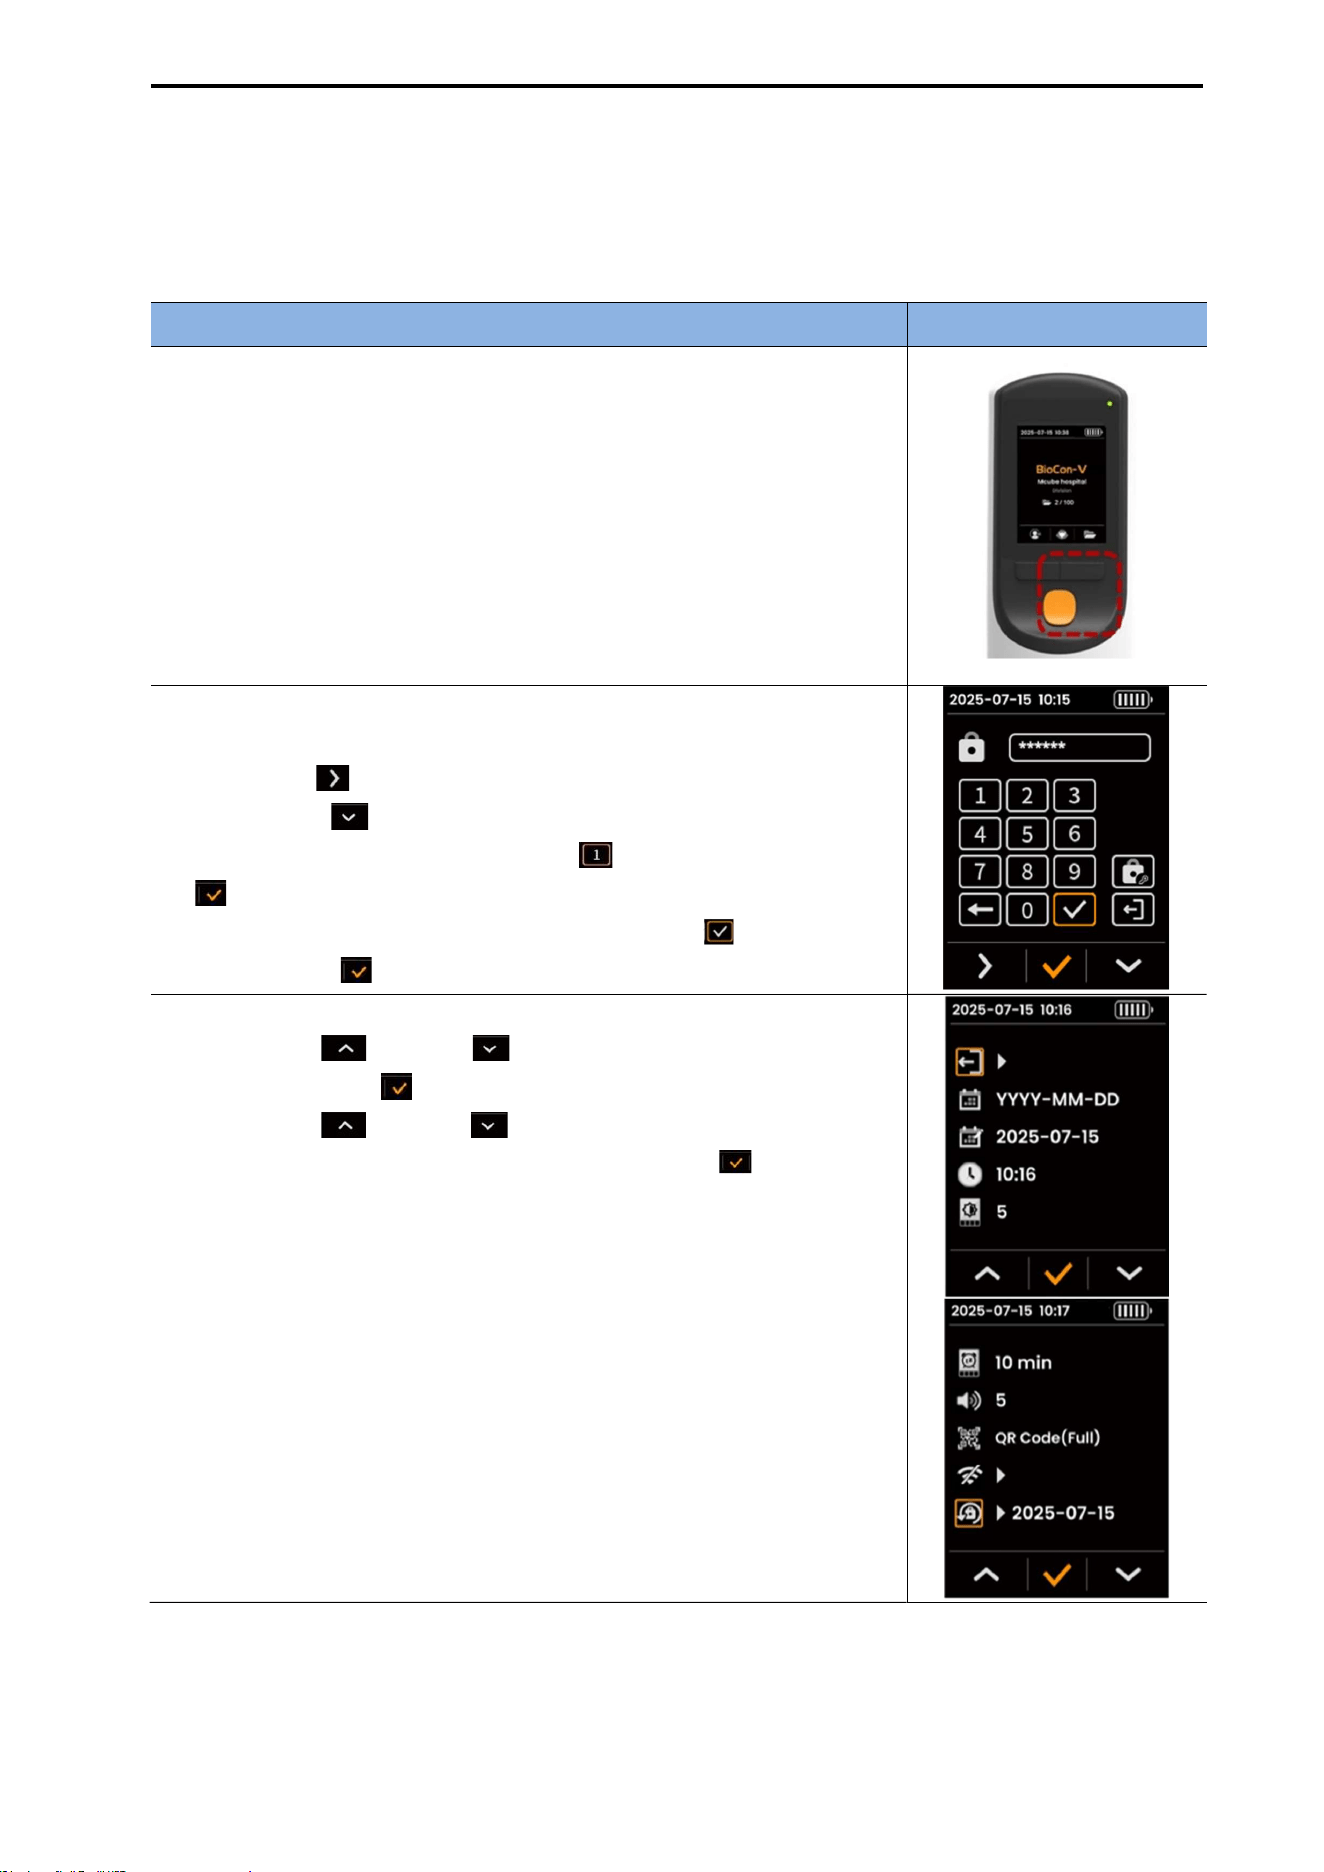
5.5. INITIAL SETUP
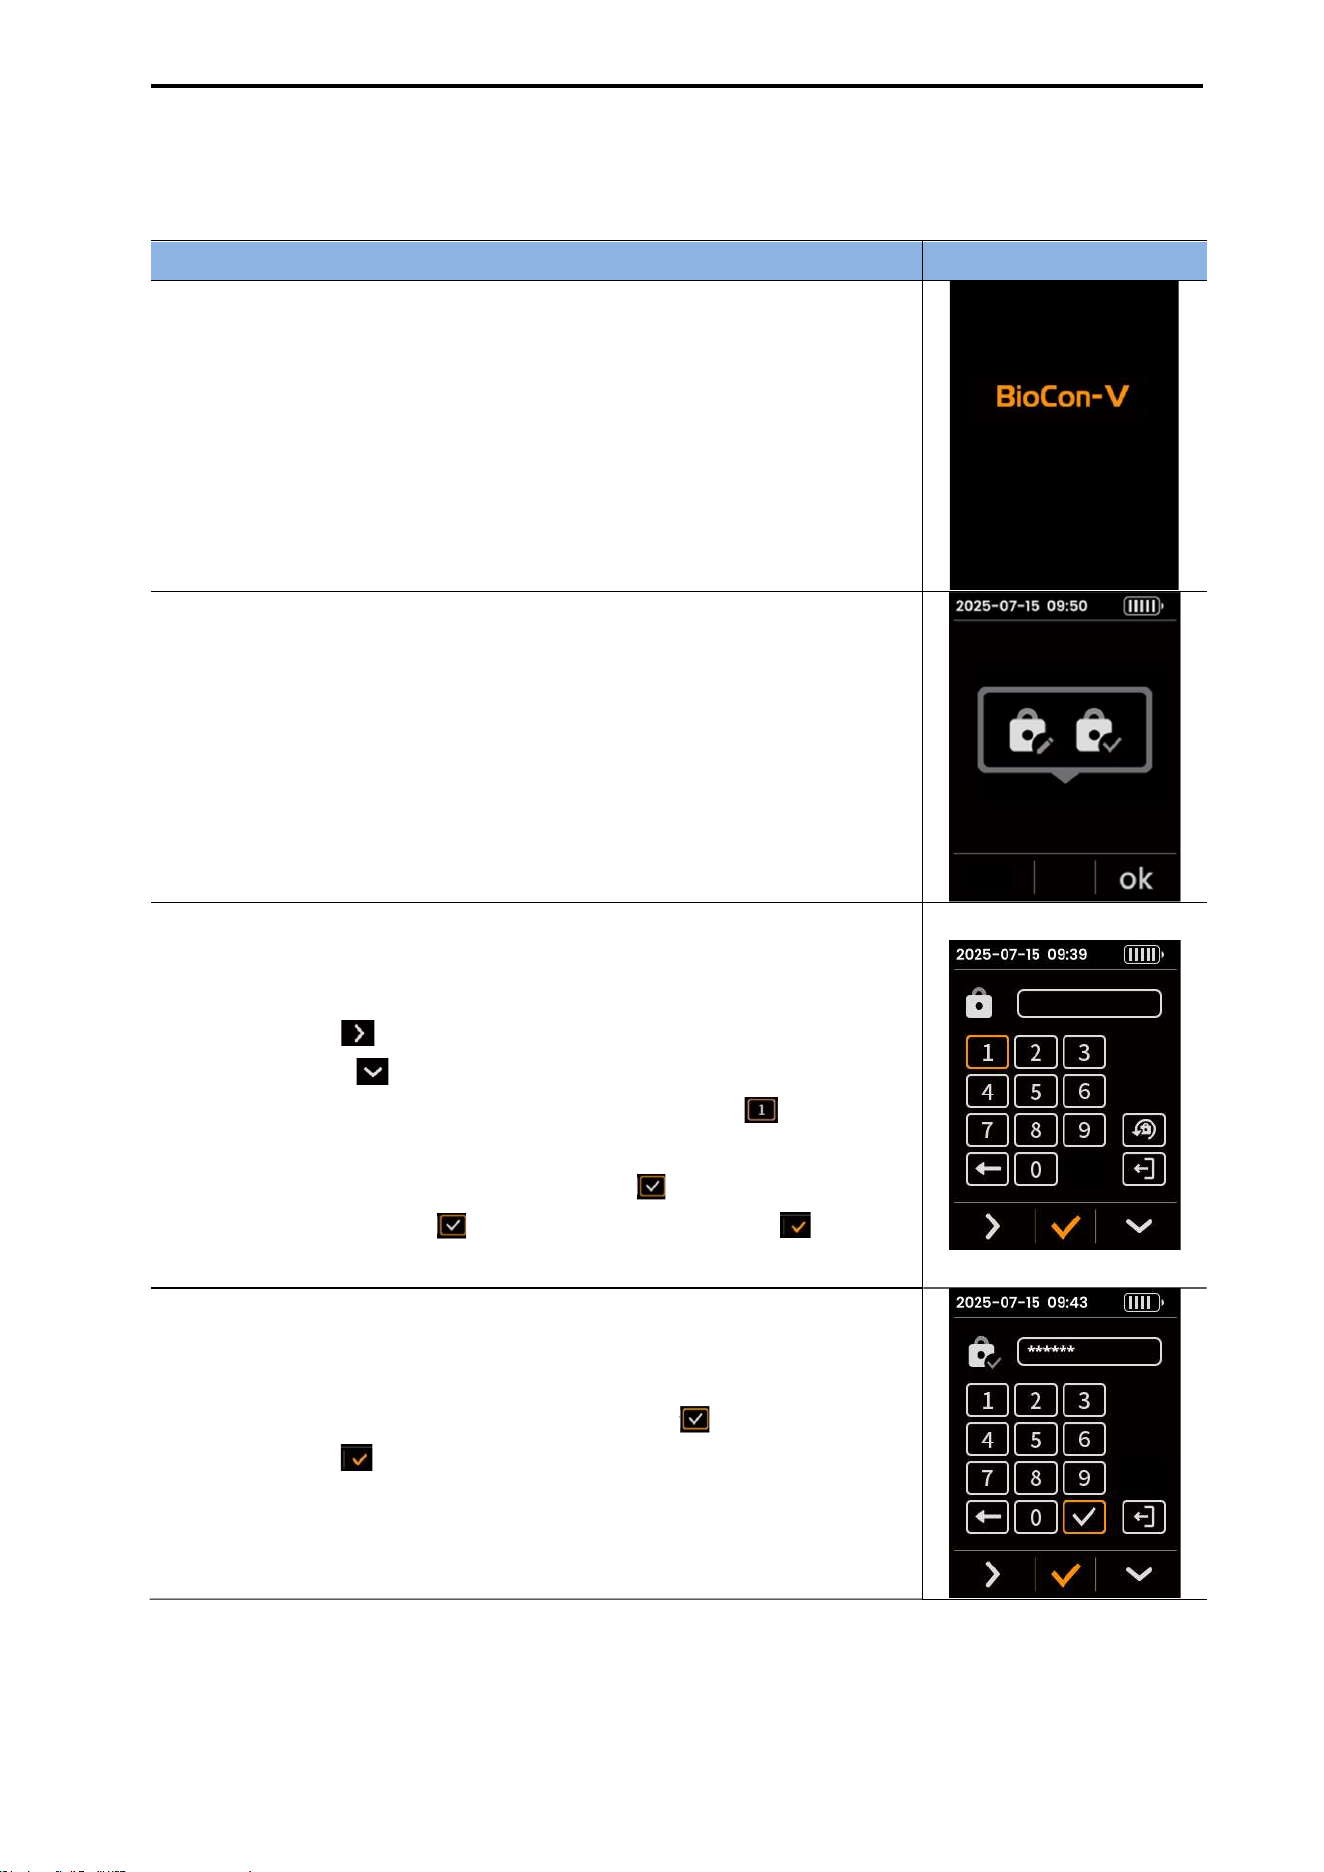
If you are using the Biocon-V for the first time, please follow the steps below to set your initial password.
Initial Setup Procedure Screen
(1) Power On
Press the left (power) button on the probe to turn on the device.
(2) Initial Password Change Notice
When the device powers on, a message recommending that you
change the initial password will appear.
When the device powers on, a message recommending that you
change the initial password will appear.
(3) Open the Settings Screen and Enter the Initial Password
On the Settings screen, enter the default 6-digit initial password.
(4) Enter the Current Password
Enter the initial 6-digit password.
Keypad Operation.
- Left button ( ): Move the cursor to the right.
- Right button ( ): Move the cursor downward.
- When the desired number is highlighted in orange ( ), press the
center button to select it.
- After entering all 6 digits, the Enter icon ( ) becomes active.
- Select the Enter icon ( ) and press the center button ( ) to
confirm.
(5) Enter the New Password
Enter a new 6-digit password.
The input method is the same as entering the current password.
After completing entry, select the Confirm icon ( ) and press the
center button ( ) to save.

CUBEScan
TM
BioCon-V Operator’s Manual
20
(6) Confirm the New Password (Re-enter)
Re-enter the same 6-digit password.
After completing entry, select the Confirm icon ( ) and press the
center button ( ) to save.
(7) Password Setup Complete
When the password is successfully saved, a “Password Setup Complete”
message appears for approximately 3 seconds.
(6) Enter the Home Screen
After the message disappears, the device automatically moves to the
home screen, completing the initial password setup.
CUBEScan
TM
BioCon-V Operator’s Manual
21
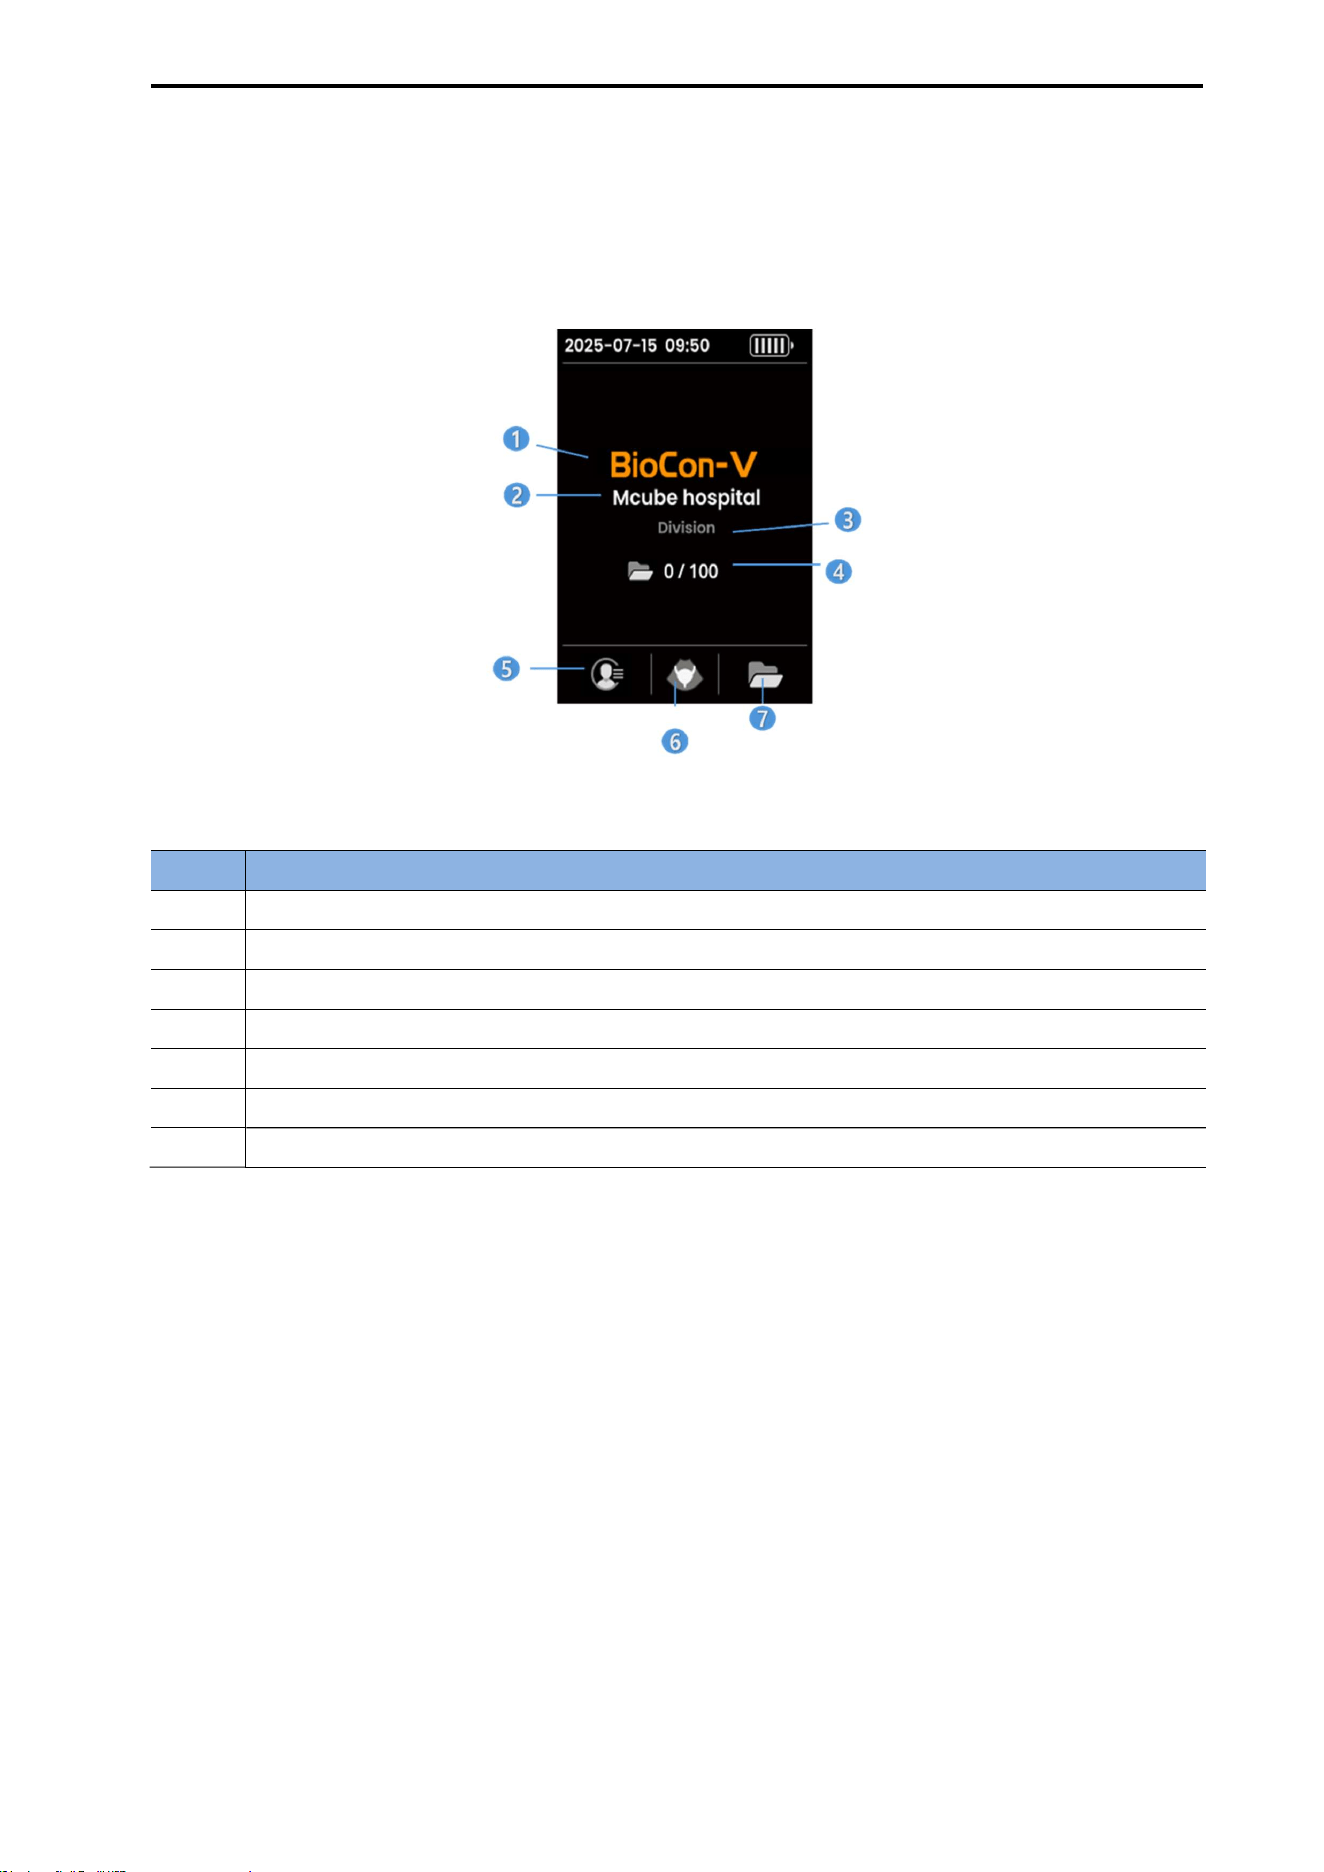
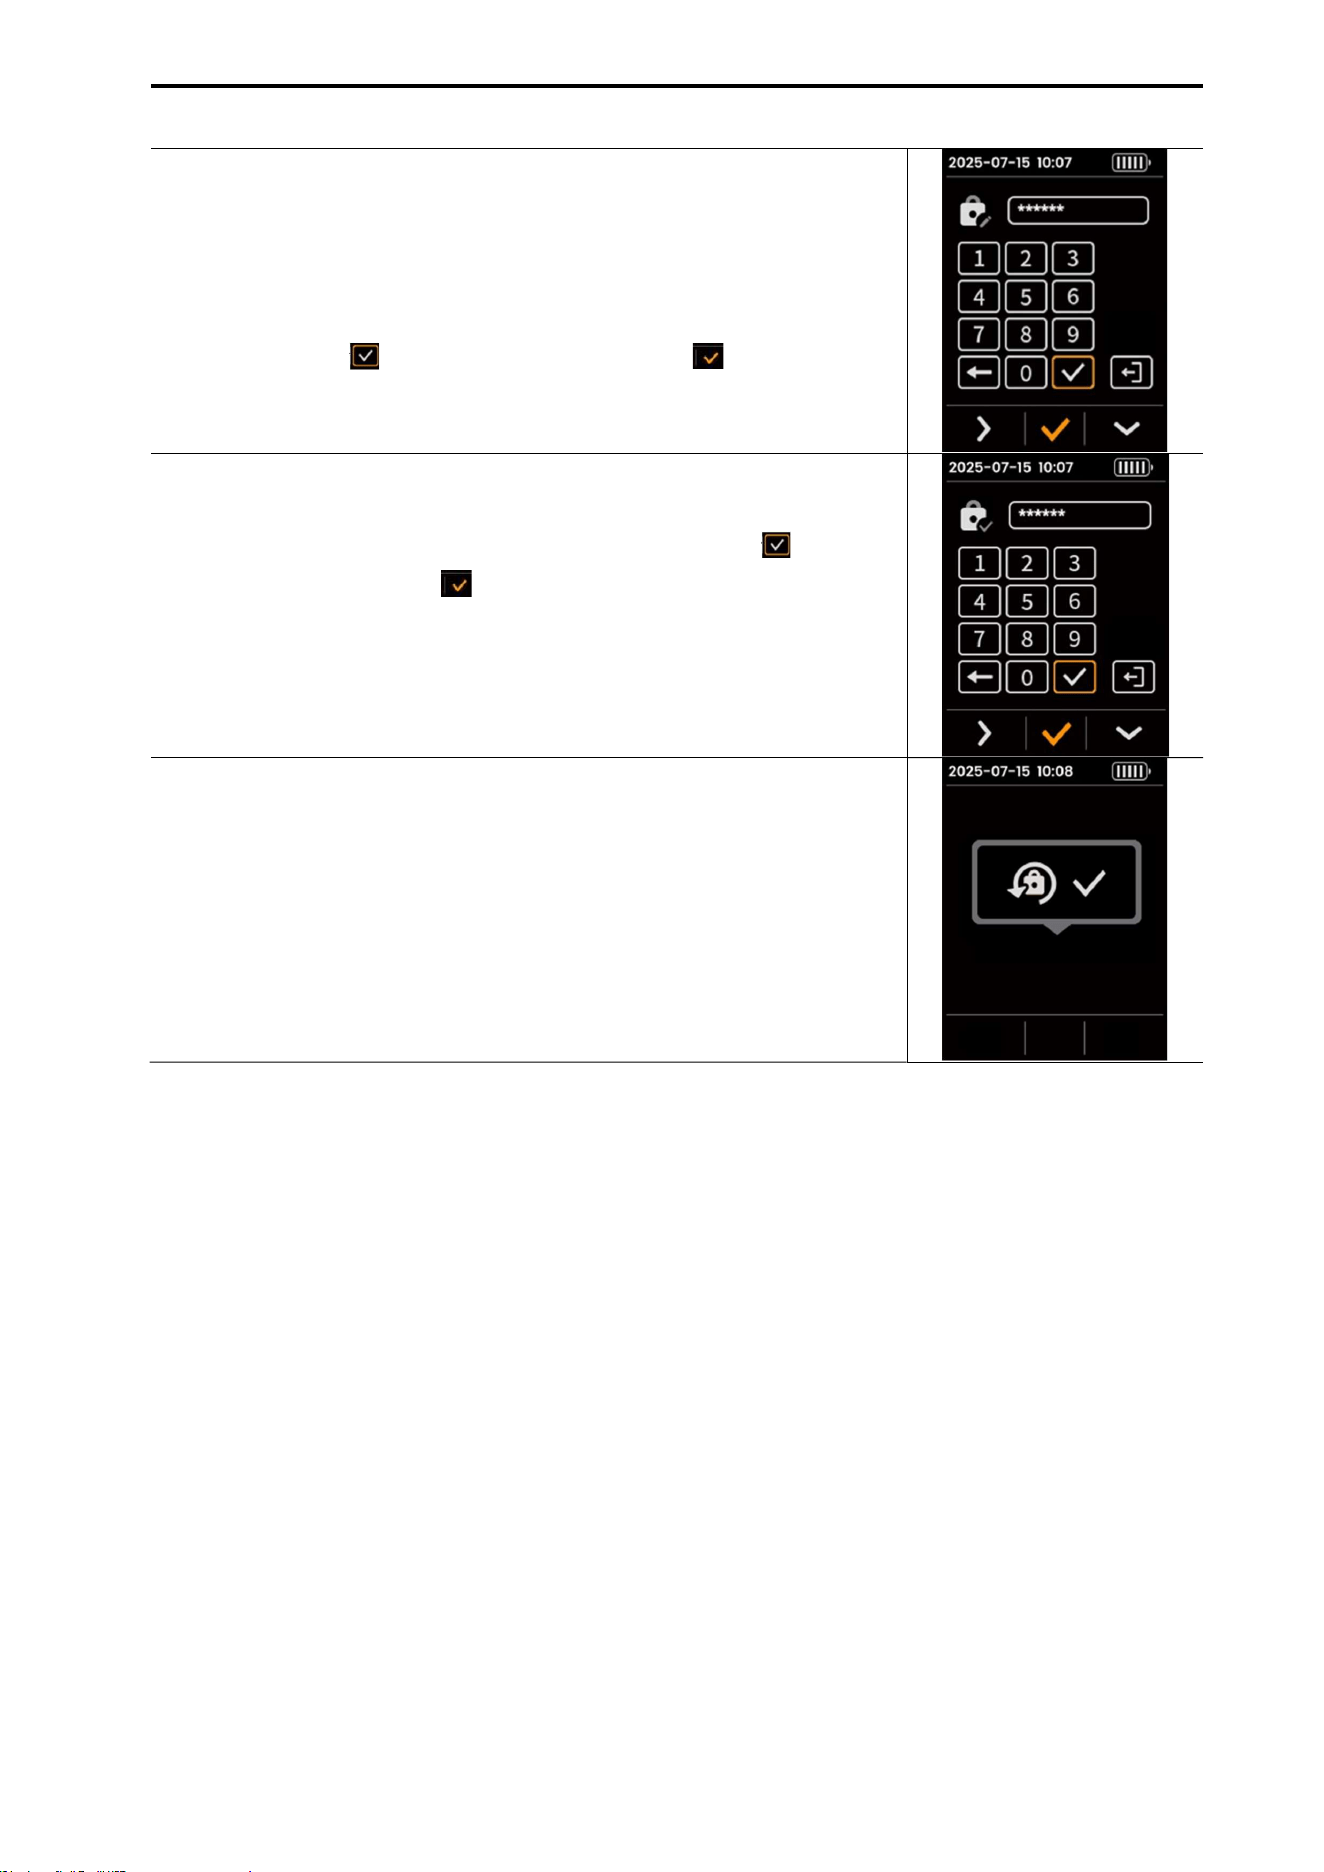
5.6. HOME SCREEN
When the BioCon-V is powered on, the home screen appears, allowing you to check key
information and access main functions.
[BioCon-V Home Screen]
No. Item and Description
1 Device Model: BioCon-V
2 Hospital or Clinical Name
3 Department name
4 Number of stored scans / Maximum number of storable scans
5 Displays the registered patient list
6 Scan: Executes Pre-Scan and Normal Scan
7 Opens the list of stored scan results and the review screen
NOTE:
Up to 100 review items can be stored. When the limit is exceeded, the oldest data is automatically
deleted.
Data is displayed in the order of most recent measurements first.
After password entry, access to patient information remains enabled until the device enters sleep
mode or is powered off.
CUBEScan
TM
BioCon-V Operator’s Manual
22
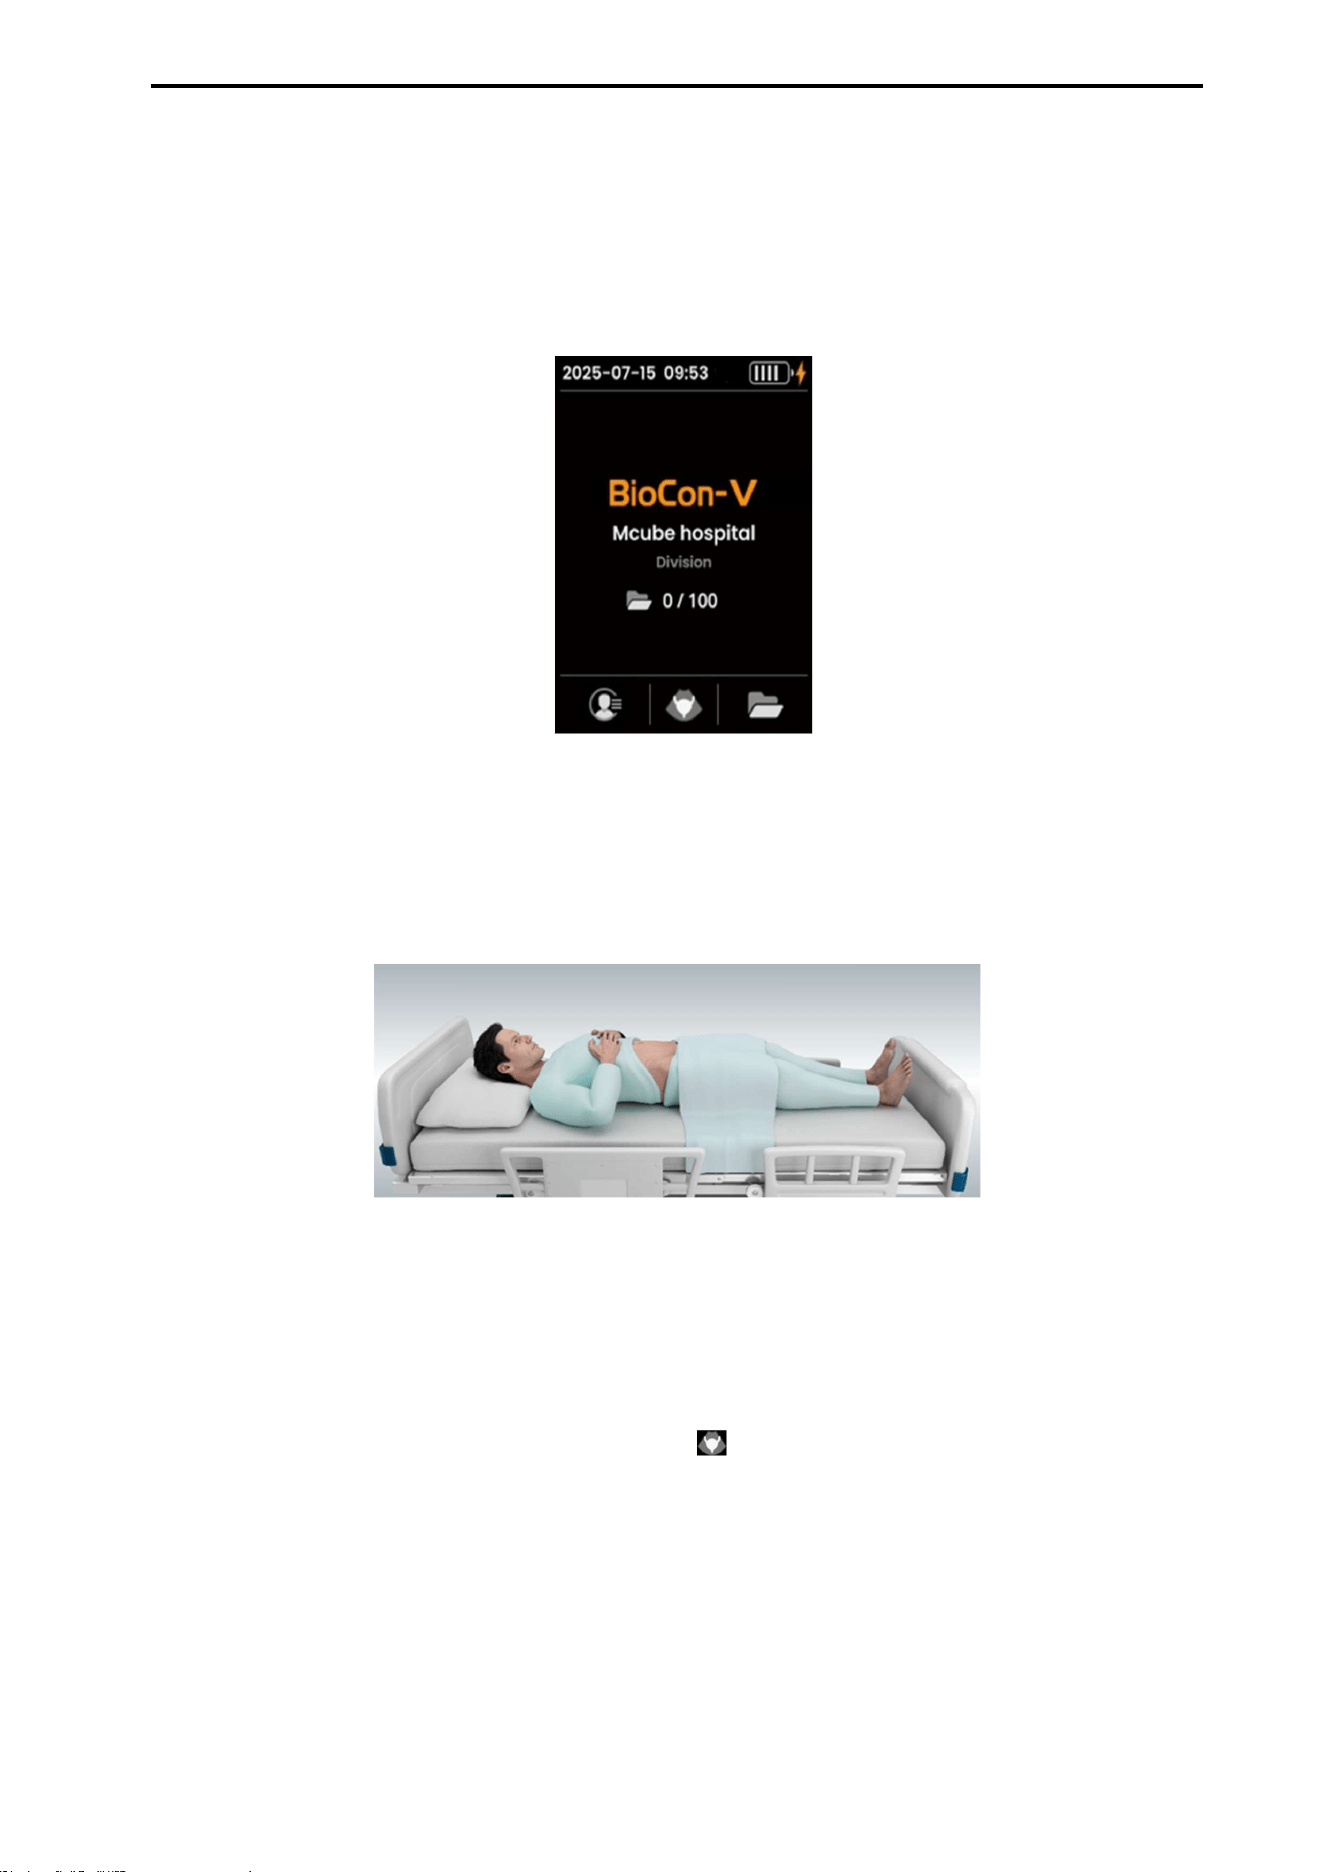
5.7. SCAN PREPARATION
(1) Power on
Press the left button on the probe to turn on the device.
When the boot process is complete, the home screen appears.
[Home Screen]
(2) Prepare the Patient
Position the patient in a comfortable supine position.
Lift the clothing to fully expose the area from the pubic bone to the navel.
(3) Apply Ultrasound Gel
Apply ultrasound gel evenly to the probe head.
Ensure that no air bubbles remain inside the gel, as they may reduce measurement accuracy.
(4) how to Hold the Probe
On the Home Screen, press the Center button (Scan, ) and hold the probe so that you can face the
probe display screen directly.
(5) Position the Probe
Place the probe head firmly against the skin at a point approximately 3 cm above the patient’s pubic
bone.
Adjust the position left and right along the straight line connecting the pubic bone and the navel to
find the optimal scanning position.
CUBEScan
TM
BioCon-V Operator’s Manual
23
5.8. LOCATING THE BLADDER (PRE-SCAN)
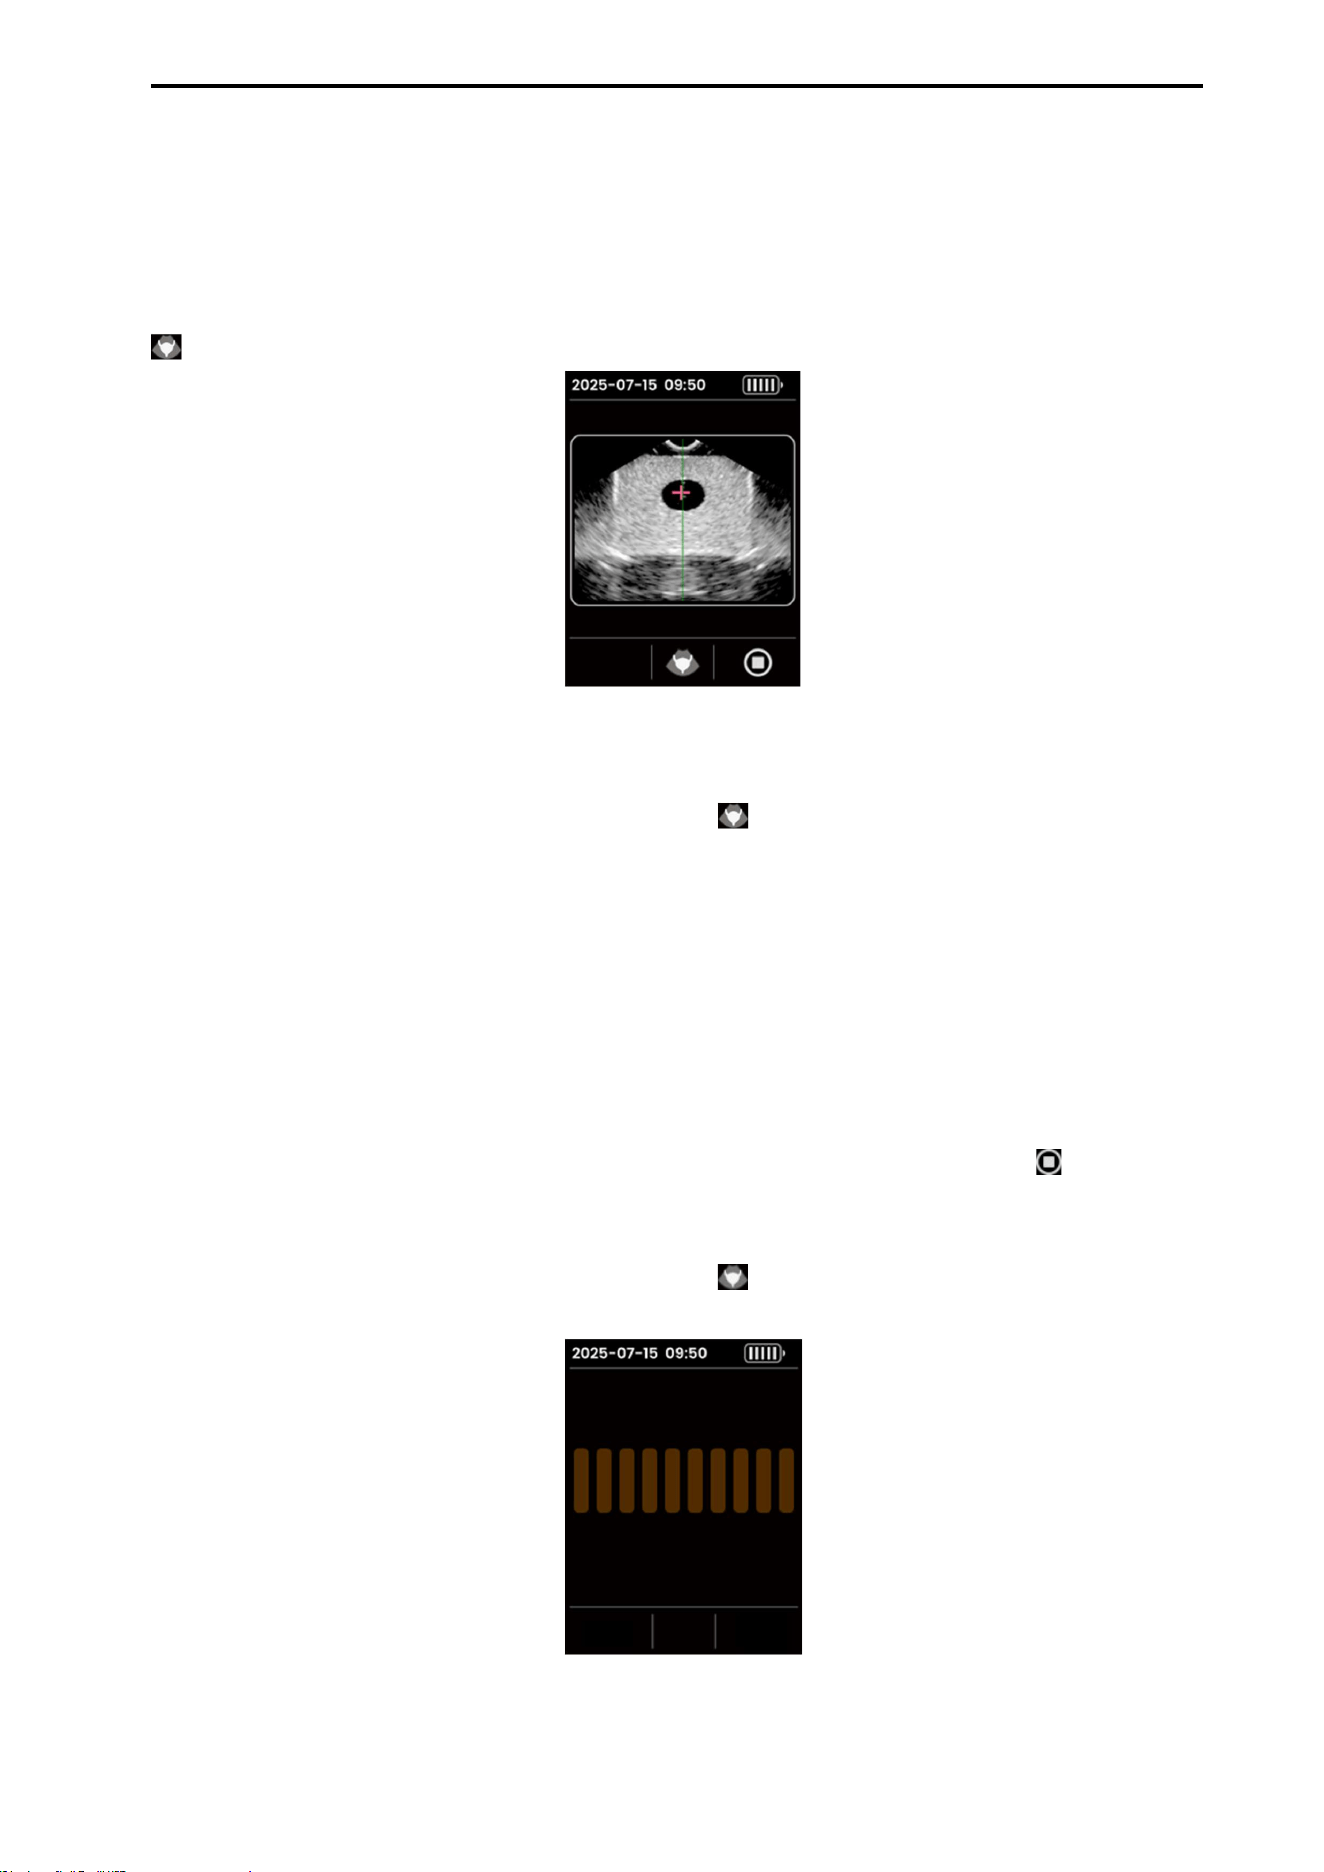
5.8.1. PRE-SCAN PROCEDURE
(1) Start Pre-Scan
When the bladder appears within the measurement area on the screen, press the center button (Scan,
) to start the Pre-Scan.
[Pre Scan Screen]
(2) Execute the Scan
On the Pre-Scan screen, press the center button (Scan, ) again to proceed with scanning.
(3) Find the Optimal Angle
Slowly tilt the probe left and right to find the angle at which the bladder appears the largest.
NOTE: The optimal scanning position is when the bladder image appears largest, and its center is
positioned close to the midline.
(4) Stop the Pre-Scan
To stop the Pre-Scan or return to the information screen, press the right button (Stop, ).
(5) Start Normal Scan
On the Pre-Scan screen, press the center button (Scan, ) to start a Normal Scan.
[Normal Scan Screen]
CUBEScan
TM
BioCon-V Operator’s Manual
24
(6) Precautions During Scanning
Hold the probe steady to prevent any movement during scanning.
Any movement may affect the measurement accuracy.
(7) Scan Complete
When the Scan is finished, the Scan Result Screen will automatically appear.
On the result screen, press the right button (Home, ) to return to the Home screen, the
maximum value of the measurement session is saved automatically.
For detail on viewing and using scan results, refer to 5.9. CHECK SCAN RESULTS.
[scan Result Screen]
5.8.2. MEASURING A REGISTERED PATIENT
To measure a registered patient, follow the procedure below.
Measurement Method Display
(1) Home screen
From the Home screen, press the left button (Patient List, ) to
move to the Patient List screen.
(2) Enter Password
When the password input window appears, enter the 6-digit
password.
Keypad operation
Button Icon Function Description
(Left Button)
Move cursor right
Move the cursor one
space to the right.
CUBEScan
TM
BioCon-V Operator’s Manual
25
(Right Button)
Move Down
Move the cursor down one
space.
(Center Button)
Select/Enter
Confirms and enters the
selected number (highlighted
in orange)
(Orange Highlight)
Selected State
Indicates the currently selected
keypad item
(Enter Icon)
Confirm
Password
After entering six digits, select
this icon to confirm the
password
Input Procedure
- Use the left button to move the cursor right, and the right button
to move the cursor down.
- When the desired number is highlighted in orange ( ), press the
center button to enter it.
- Enter all six digits.
- Select the Input Complete icon ( ) and press the center button
( ) to finish password entry.
(3) Select the Patient
Select the patient you wish to measure from the patient list to move
to the Pre-Scan screen.
For Pre-Scan instructions, refer to 5.8.1. PRE-SCAN PROCEDURE.
NOTE: After entering the password, access to patient information
remains available until the device enters sleep mode or is powered off.
(4) After Completing the Scan
When the scan is complete, the result screen appears.
Left button ( ): Moves to the maximum scan barcode screen.
Right button ( ): Saves the maximum scan value for the current
session, then returns to the home screen.
CUBEScan
TM
BioCon-V Operator’s Manual
26
(5) Using the Barcode
The maximum scan barcode screen is displayed along with the
maximum measurement value (Max) of the session.
You can scan the barcode using a barcode reader or a mobile device
to input patient data
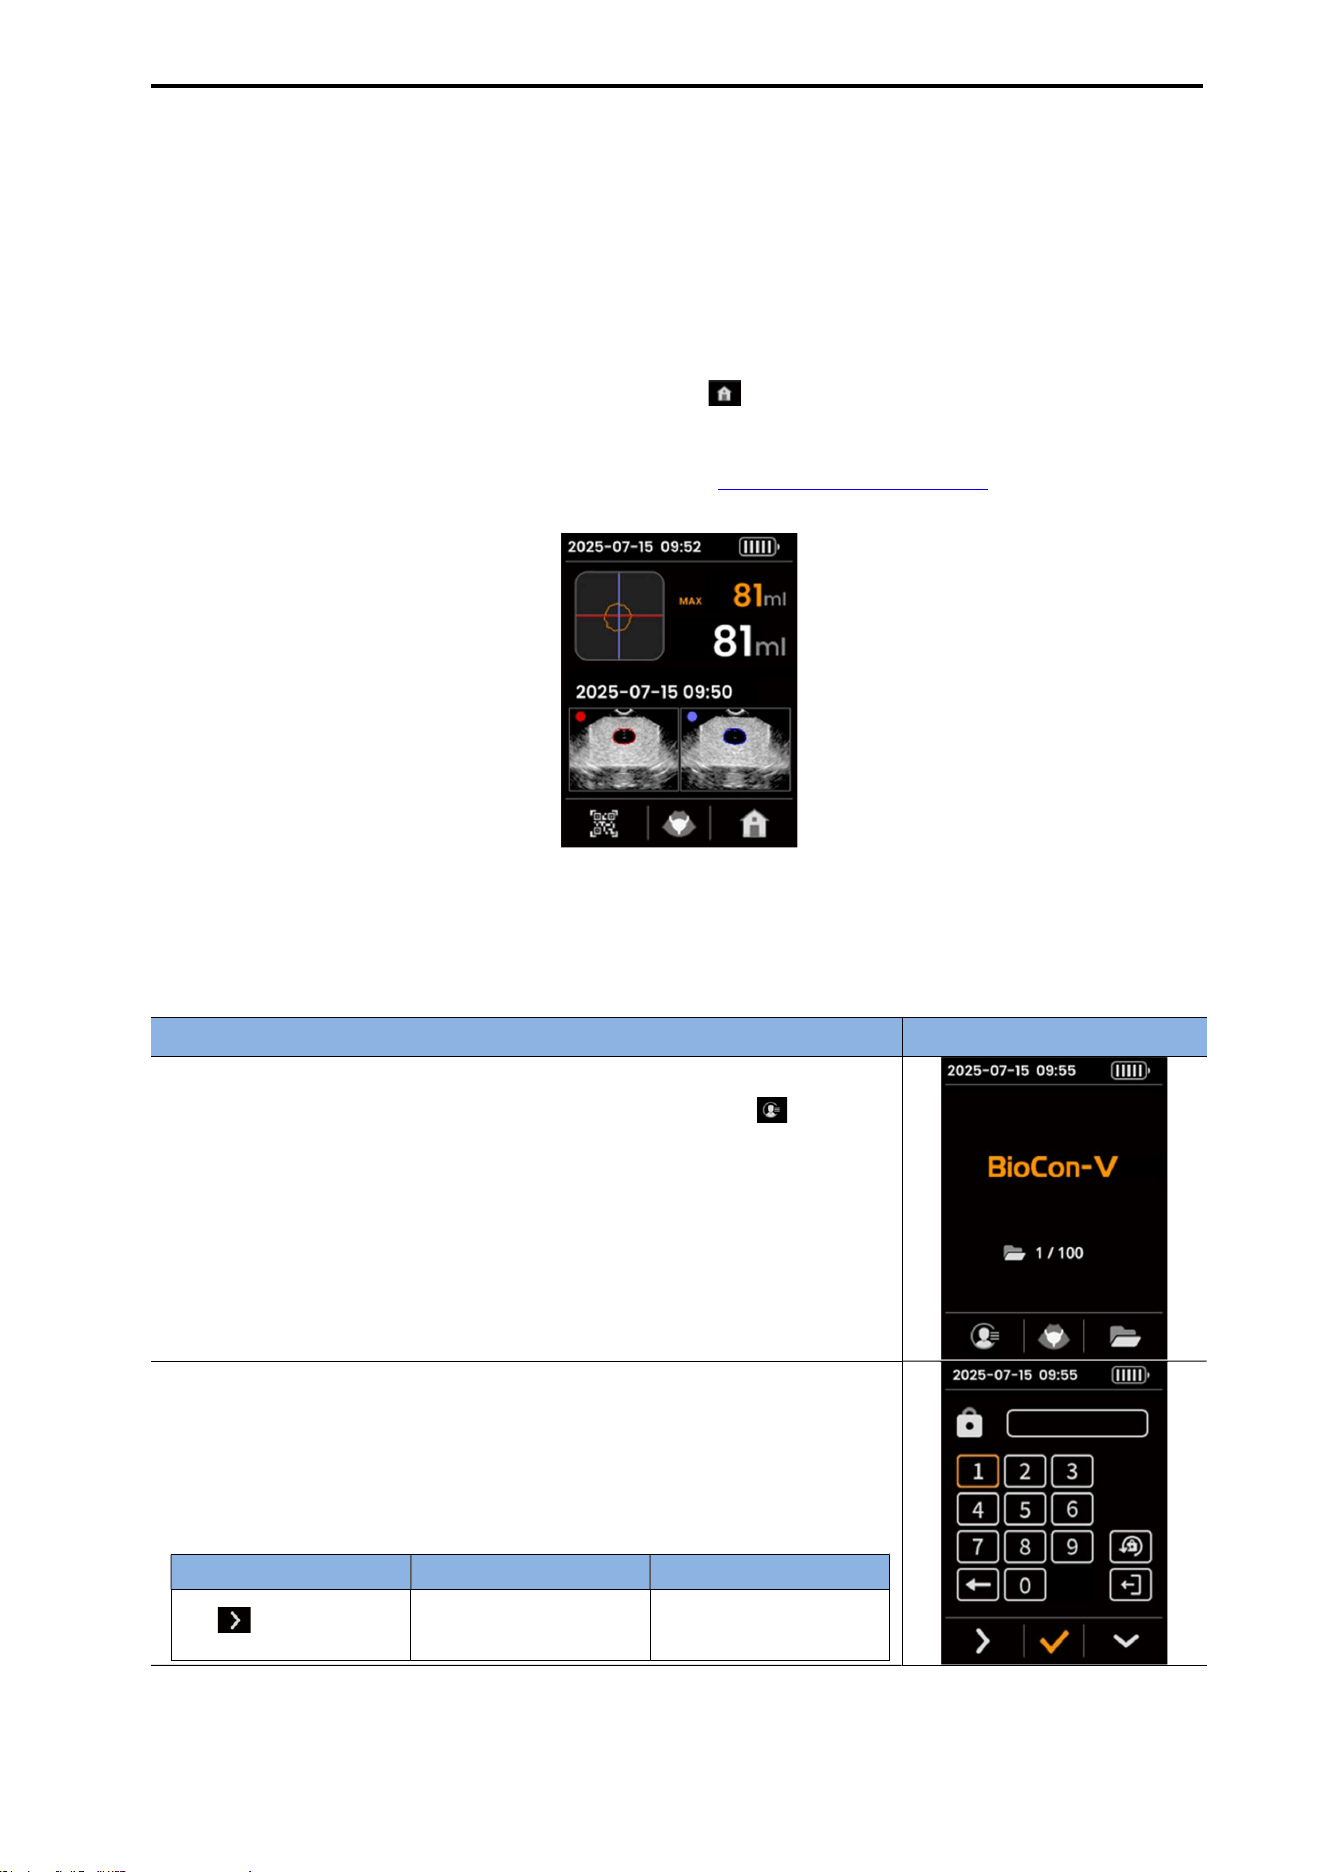
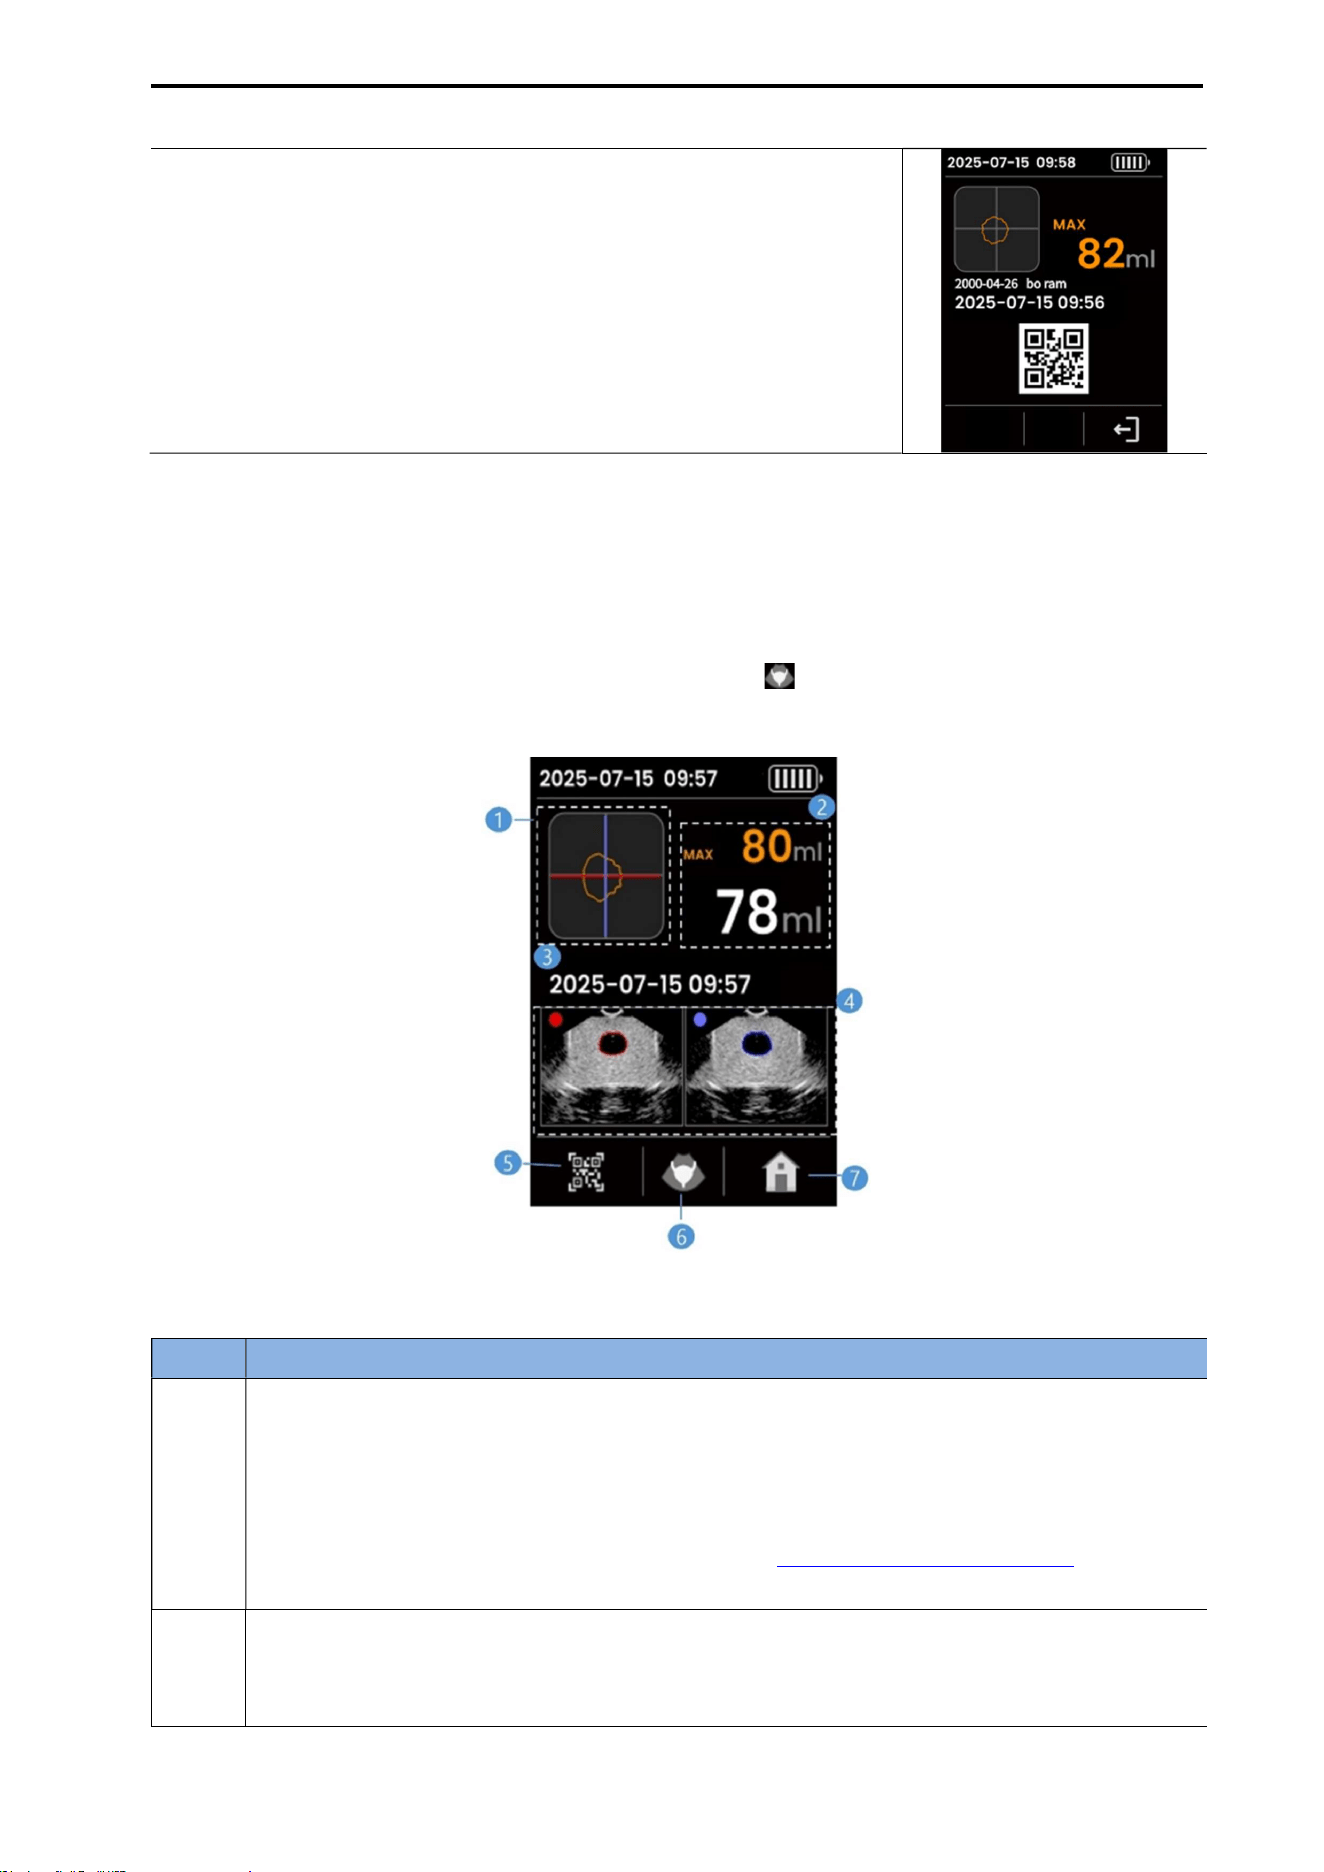
5.9. CHECK SCAN RESULTS
When the scan is complete, the scan result screen is displayed automatically.
On this screen, you can check the current residual volume, the maximum residual volume (Max), the
patient’s name, and the measurement date/time.
To measure the patient again, press the center button (Scan, ) on the scan result screen.
[Scan Result Screen]
No. Description
1
Bladder Position/Orientation Indicator
Displays the bladder location and scan direction along with the crosshair.
NOTE: Measurement accuracy is highest when the bladder center is positioned at the center
of the crosshair. If the center is misaligned, refer to 5.8.1. PRE-SCAN PROCEDURE. and
perform the scan again.
2
Measurement Value Display Area
Max (orange): The maximum residual volume recorded during the session
Current Value (white): The actual residual volume obtained from the most recent scan
CUBEScan
TM
BioCon-V Operator’s Manual
27
5.10. LAST SCAN RESULT
To review stored scan data, follow the steps below.
Procedure Screen
(1) Move to the Password Input Screen
From the Home screen, press the right button ( ) to move to the
current password input screen.
(2) Enter the Current Password
When the password input window appears, enter the 6-digit
password.
Keypad operation
Button Icon Function Description
(Left Button)
Move
Cursor right
Moves the cursor one
position to the right
(Right Button)
Move
Cursor down
Moves the cursor one
position down
(Center Button)
Select/Input
Enter the selected
number
(highlighted in orange)
3
Measurement Information Display
Shows the measurement date/time and patient information (when measuring a registered
patient).
4
Cross-Section Image Display
Displays the bladder ultrasound image for each cross-section and shows whether the
bladder contour is aligned.
The circular icon at the upper-left corner of each cross-section image indicates its
orientation (R-L, H-F).
5
Barcode Icon
When selected, the maximum scan barcode screen is displayed, allowing data transfer using
a barcode reader.
6
Scan Button (Center Button)
Returns to the Pre-Scan screen and starts a re-scan.
7
Home Icon (Right Button)
Saves the maximum scan value for the current session and returns to the home screen.
CUBEScan
TM
BioCon-V Operator’s Manual
28
(Orange Highlight)
Selected State
Indicates the currently
selected
keypad item
(Input Complete
Icon)
Completed
Password
entry
After entering all six
digits, select to confirm
the password
Password Input Procedure
- Press the left button to move the cursor right and the right
button to move the cursor down.
- When the desired number is highlighted in orange ( ), press
the center button to enter it.
- Enter all six digits.
- Select the Input Complete icon ( ), then press the center button
( ) to finish password entry.
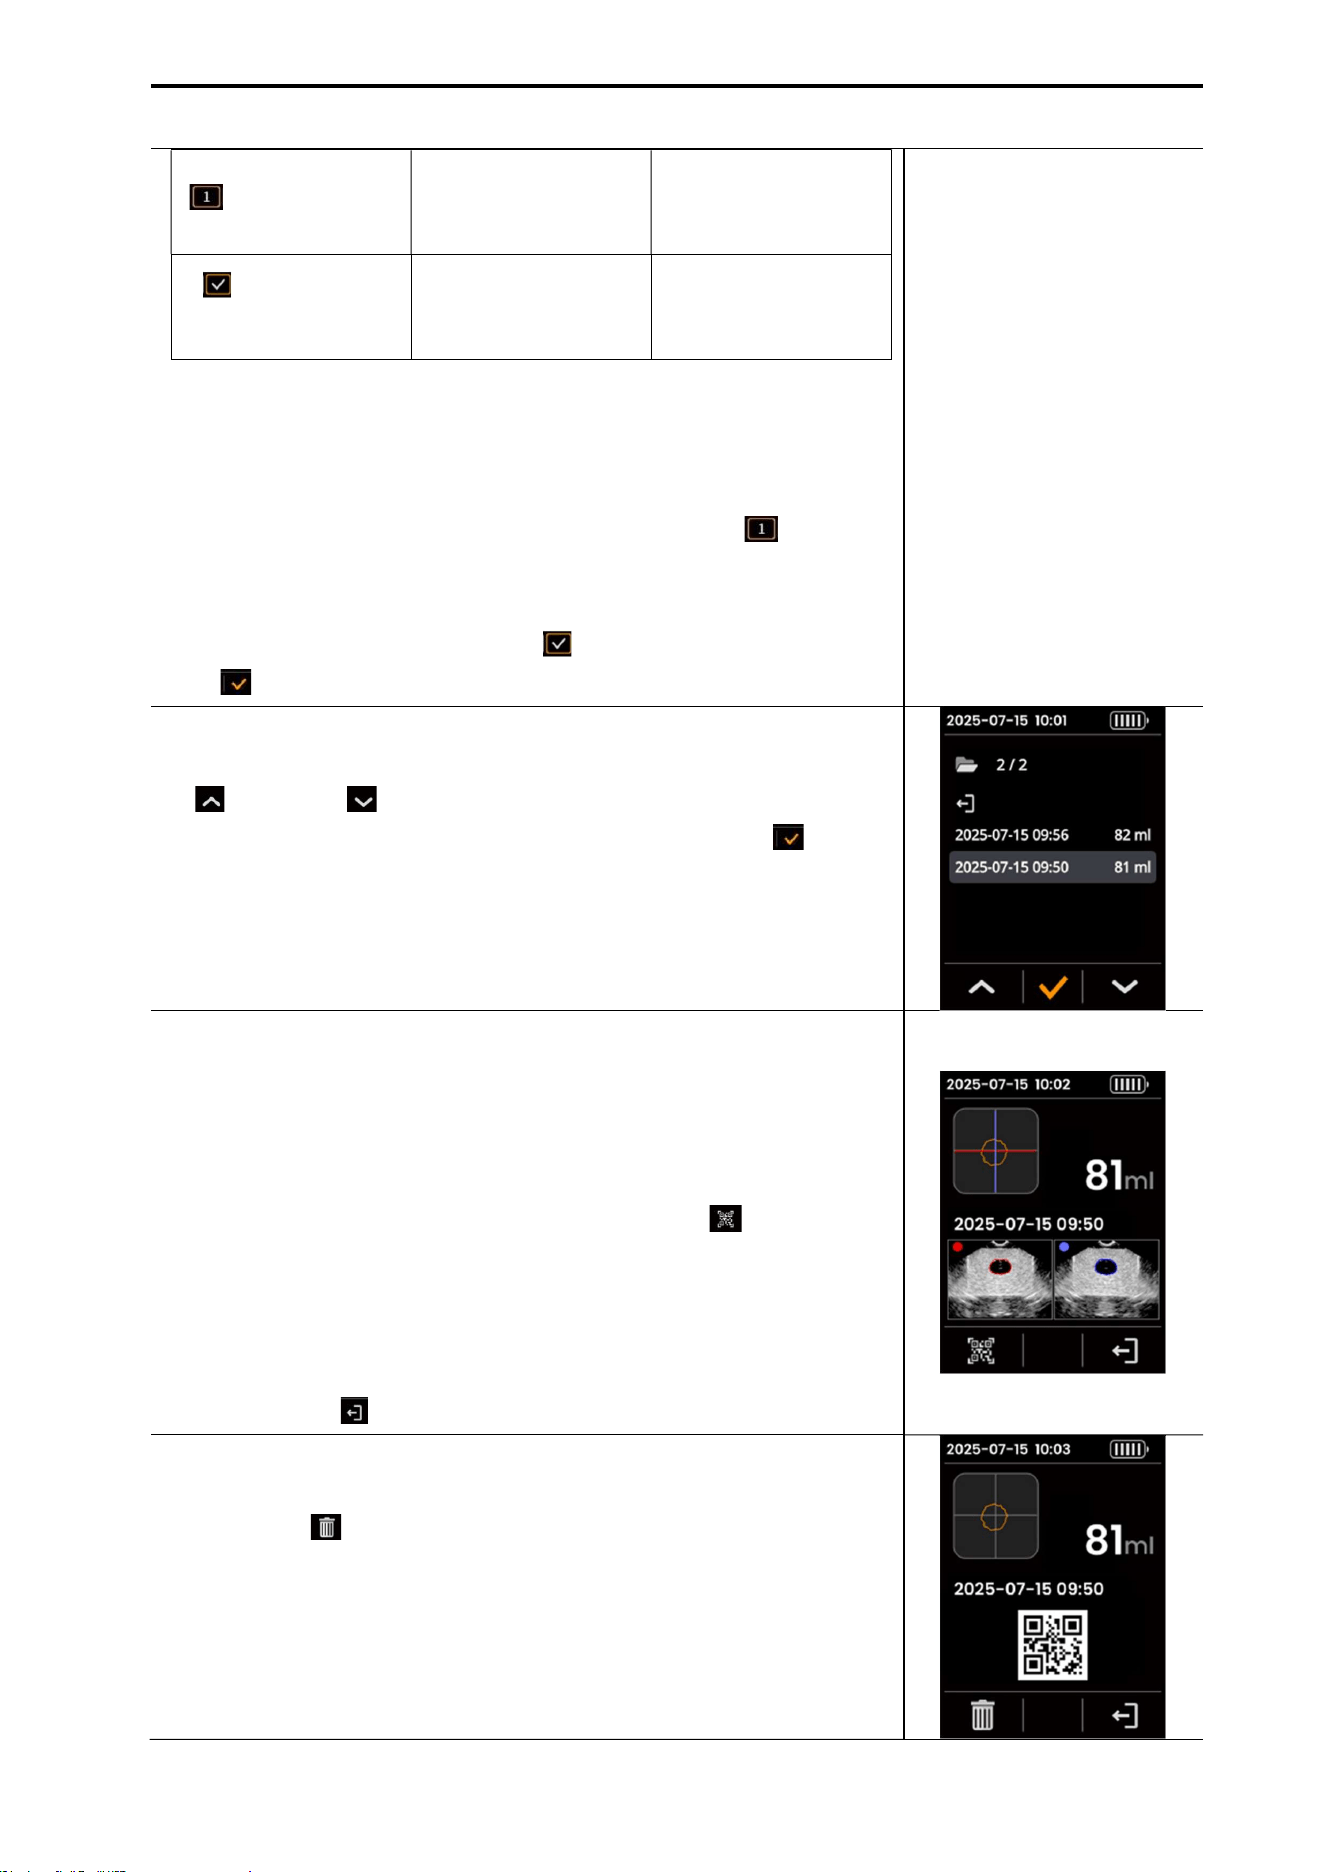
(3) Select Data from the Review List
On the Review List screen, select the data to review using the left
( ) and right ( ) buttons.
After selecting the desired item, press the center button ( ) to
open the Image Review screen.
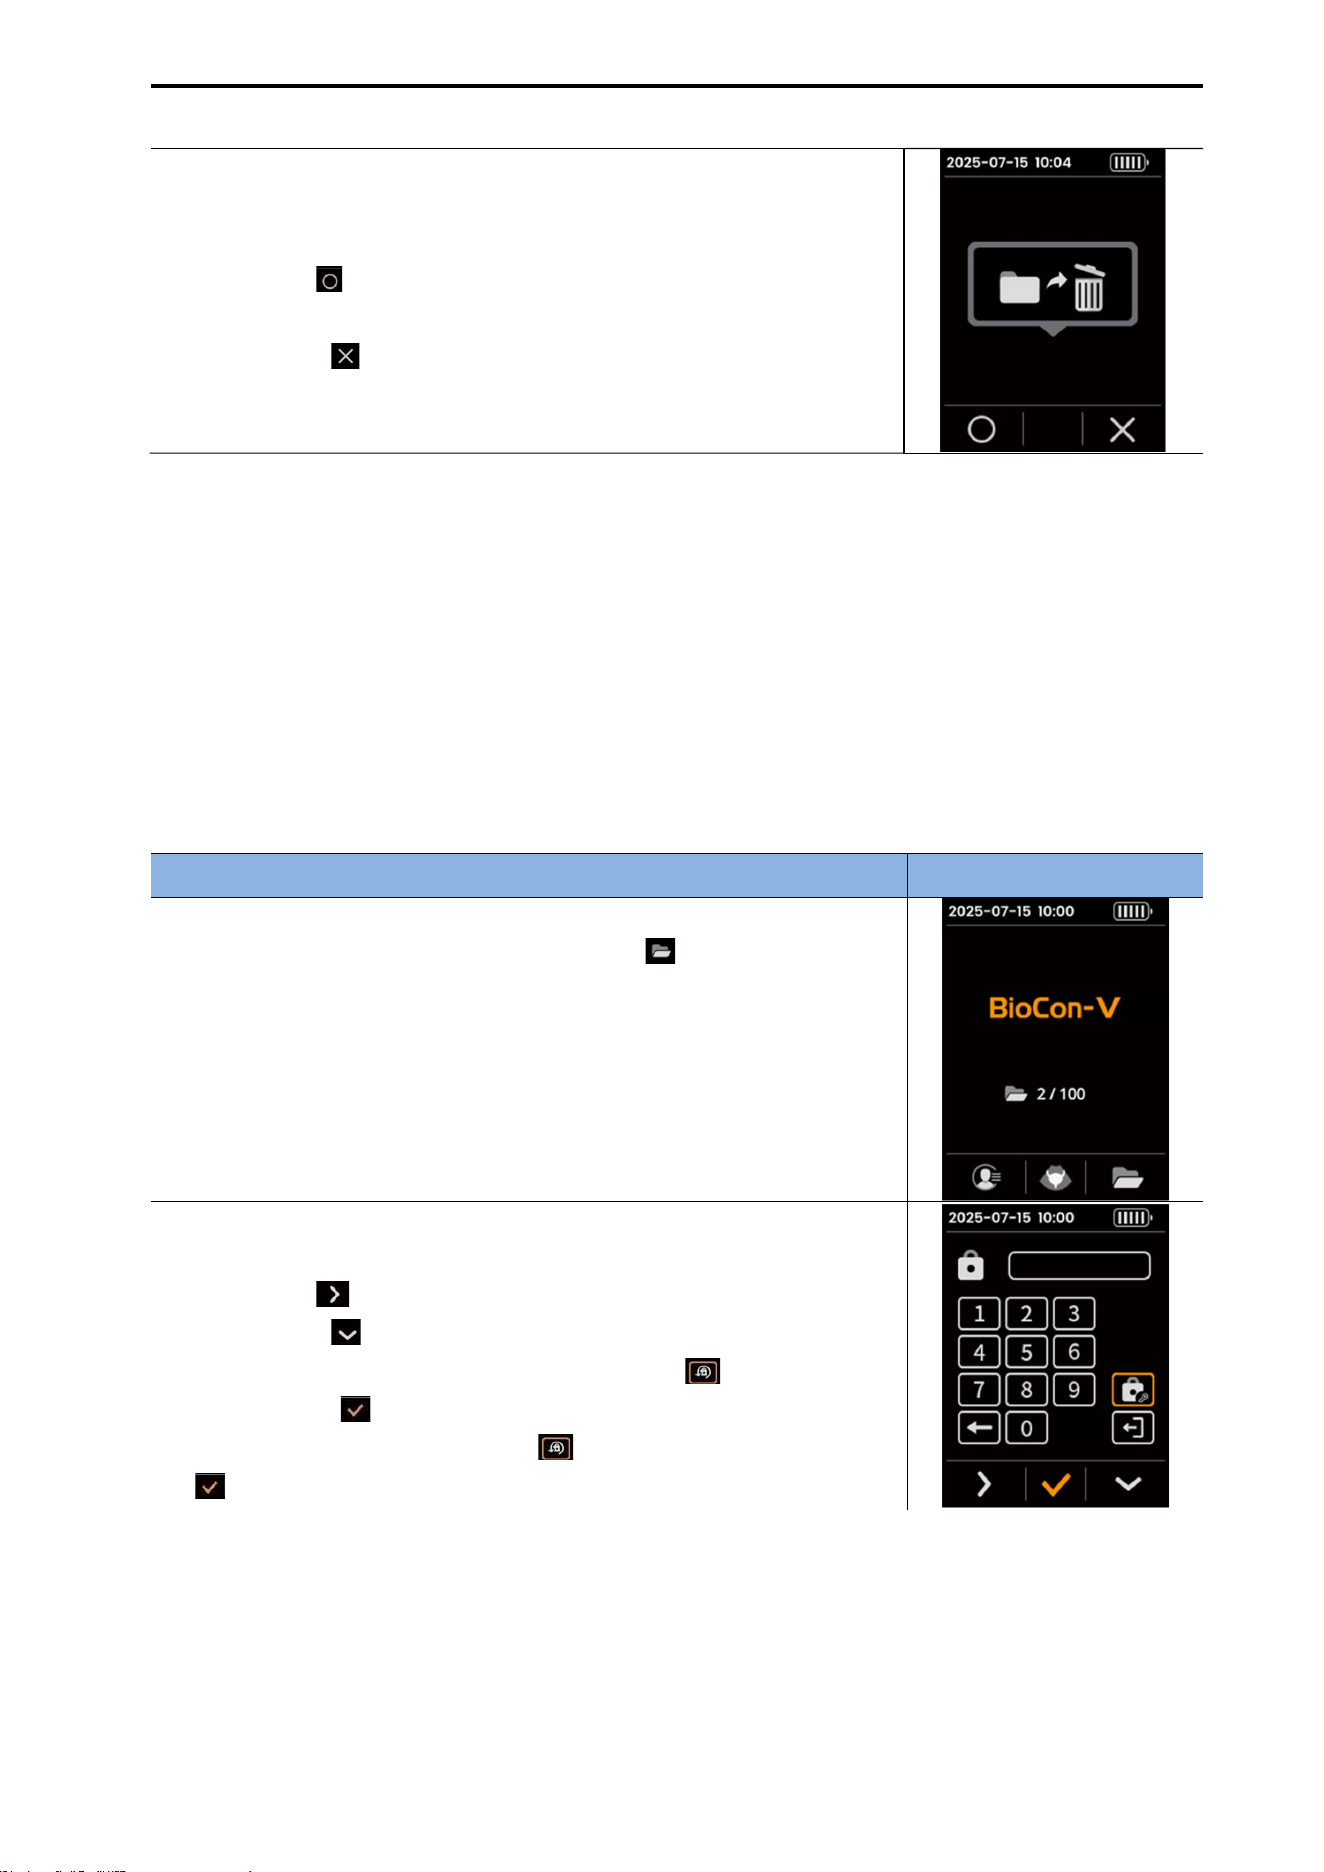
(4) Check the Image Review Screen
The Image Review screen displays the selected data, including cross-
sectional scan images and measurement information.
(5) Move to the Maximum Scan Barcode Screen
From the Image Review screen, press the left button ( ) to move to
the Maximum Scan Barcode Screen.
(6) Return to the Review List
On the Maximum Scan Barcode Screen or Image Review screen, press
the right button ( ) to return to the Review List screen.
(7) Deleted Stored Data
In the Review List, select the data you wish to delete, then press the
left button ( ).
A deleted confirmation message will appear.
CUBEScan
TM
BioCon-V Operator’s Manual
29
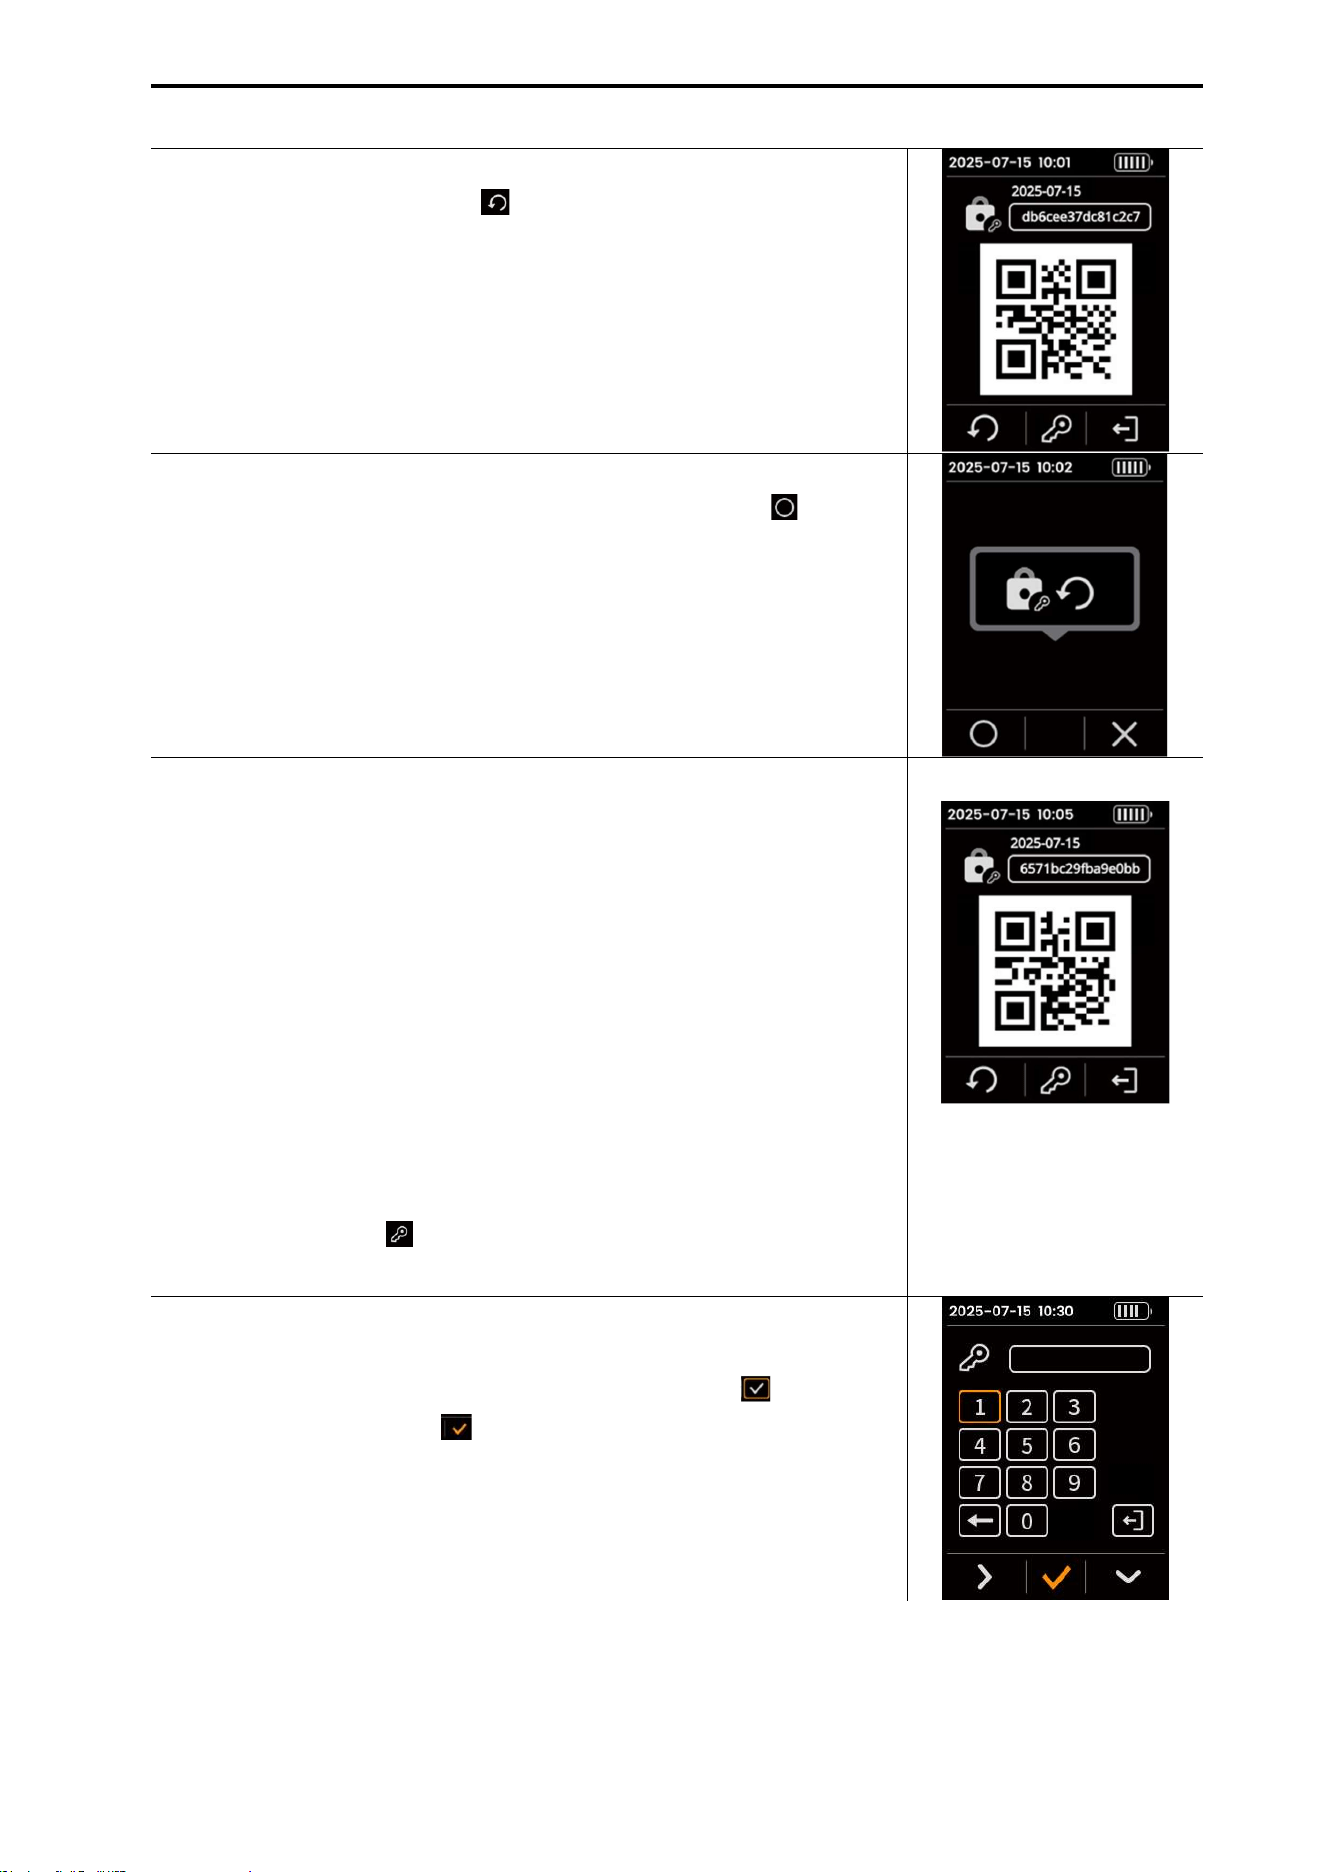
(8) Select Whether to Delete
When the deleted confirmation message appears, choose one of the
following.
Left button ( ): Proceed with deletion → The data is deleted and
the Screen returns to the Review List
Right button ( ): Cancel deletion
NOTE:
Up to 100 items can be stored in the review list; when the limit is exceeded, the oldest data is
automatically deleted.
Data is sorted in the order of most recent measurements first.
Once the password is entered, access to patient information remains active until the device enters
sleep mode or is powered off.
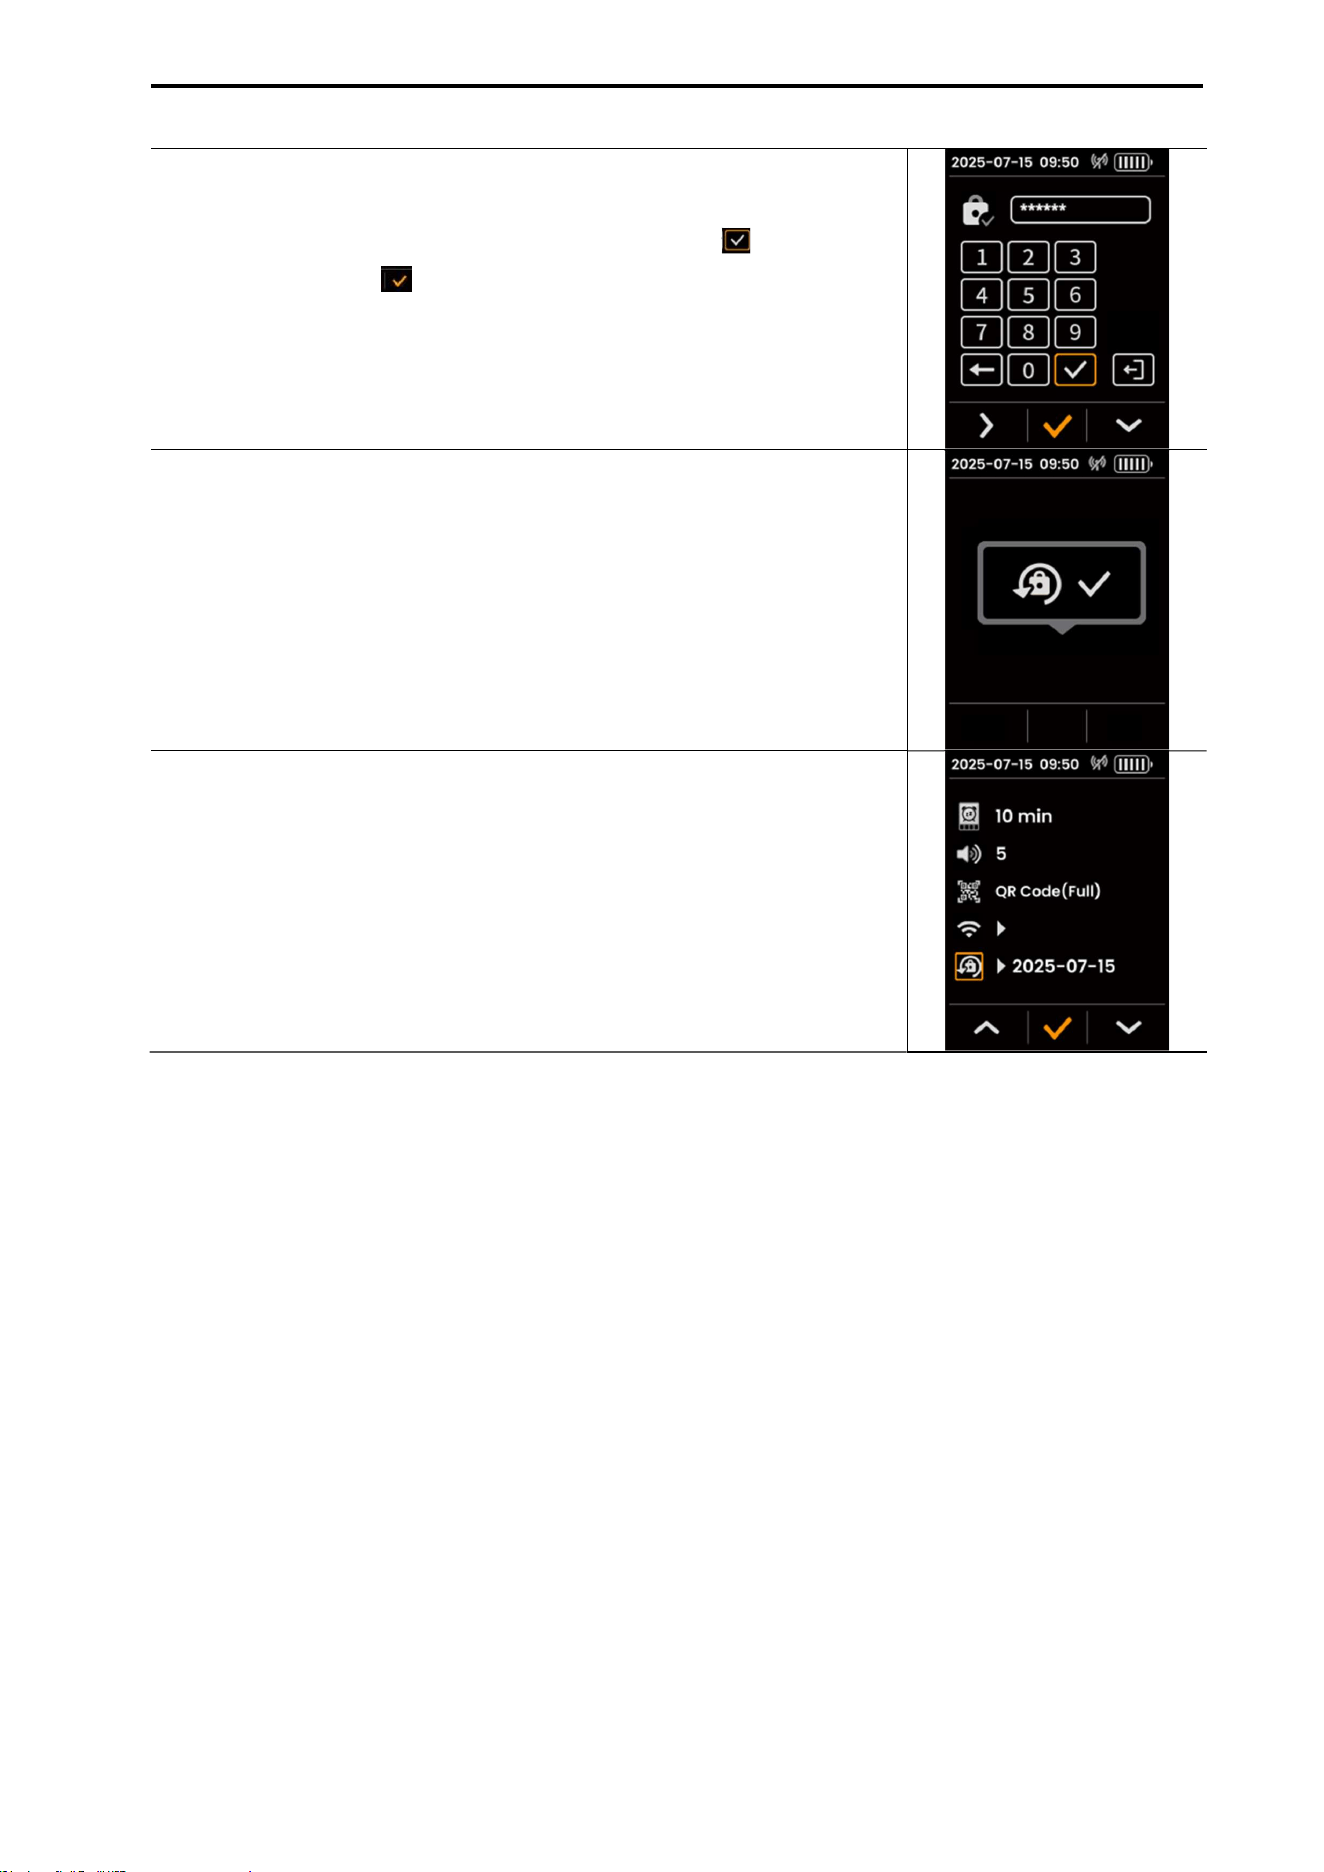
5.11. PASSWORD RESET PROCEDURE
If you forget your password, follow the steps below.
Procedure Screen
(1) Enter the Password Input Screen
From the Home screen, press the right button ( ) to move to the
password input screen.
(2) Select the Password Change Menu
Keypad Operation
Left button ( ): Moves the cursor to the right.
Right button ( ): Moves the cursor downward.
When the desired item is highlighted in orange ( ), press the
center button ( ) to select it.
Select the Password Change icon ( ), then press the center button
( ) to move to the Lock Code screen.
CUBEScan
TM
BioCon-V Operator’s Manual
30
(3) Move to the Lock Code Menu
Press the left button (Generate, ) to display the Lock Code generation
confirmation screen.
(4) Lock Code Generation Confirmation Screen
On the Lock Code generation screen, press the left button ( ) to
display the Lock Code generation screen.
(5) Generate the Lock Code
Write down the generated lock code on paper or save it as a photo
for safekeeping.
The lock code remains valid until a new lock code is generated.
NOTE: The generated lock code must be provided to the manufacturer
to receive a Key Code.
(6) Provide the Lock Code to the Manufacturer
Send the lock code displayed on the screen to the manufacturer.
The manufacturer will issue the Key Code corresponding to the lock
code.
Press the key icon ( , center button) to move to the Key Code input
screen.
(7) Enter and Confirm the Key Code
Enter the Key Code provided by the manufacturer using the keypad.
After the input is complete, select the Complete icon ( ), then
press the center button ( ).
CUBEScan
TM
BioCon-V Operator’s Manual
31
(8) Enter a New Password
When the Key Code is verified successfully, the new password (6
digits) input screen appears.
Enter the 6-digit password using the numeric keypad, select the
Input.
Complete icon ( ) and press the center button ( ).
(9) Re-enter the New Password
Re-enter the same 6-digit password to confirm it.
After input is complete, select the Input Complete icon ( ), then
press the center button ( ) to save it.
(10) Password Setup Complete
When the password setup is complete, a completion message
appears for approximately 3 seconds.
After confirmation, the previous lock code is automatically deleted,
and the screen returns to the Home screen.
CUBEScan
TM
BioCon-V Operator’s Manual
32
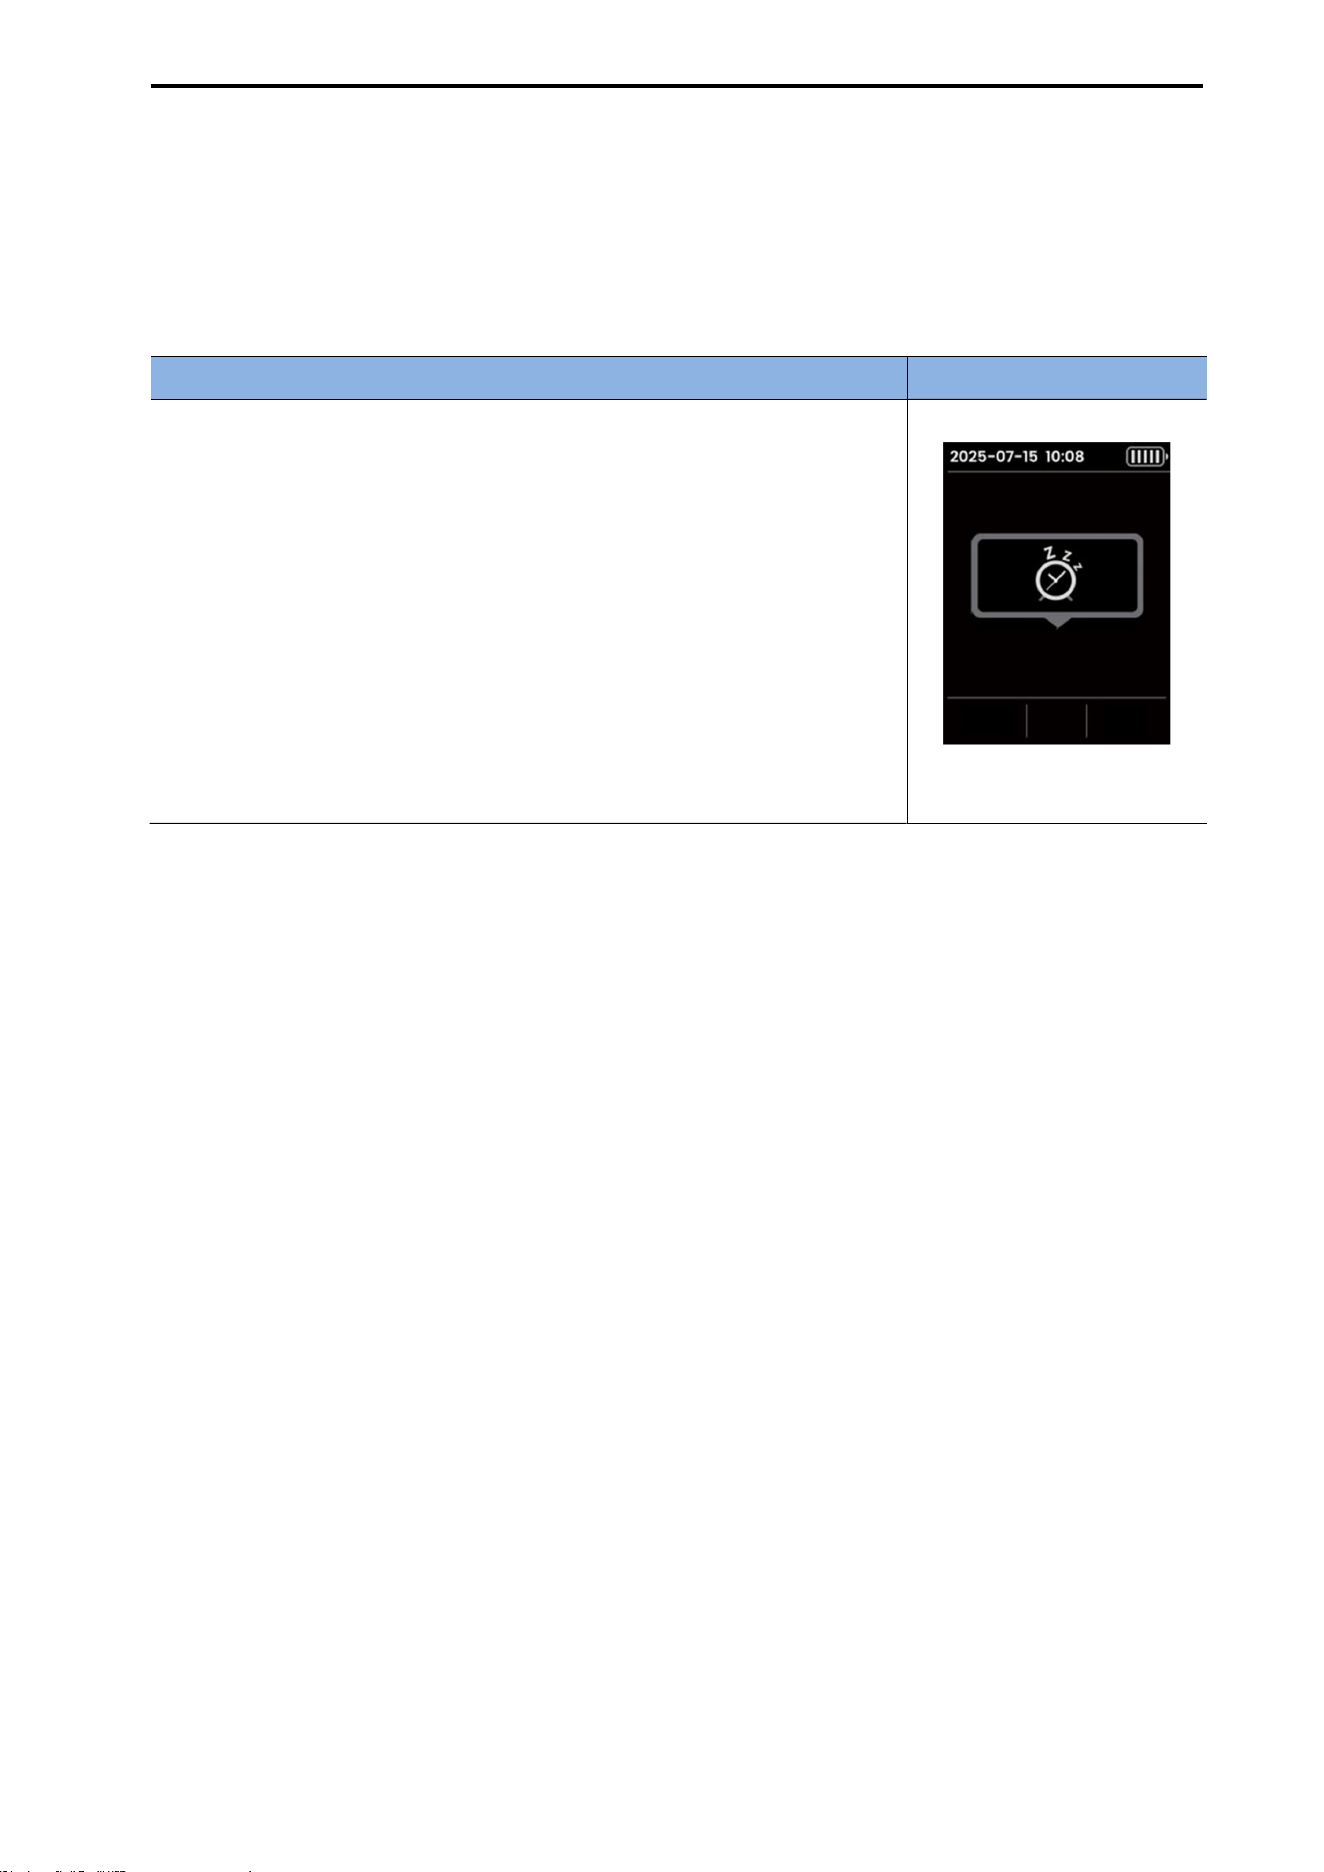
5.12. AUTO SLEEP MODE
To conserve the device’s battery power, Auto Sleep Mode is activated automatically under the
conditions shown below.
When Auto Sleep Mode starts, a message appears for approximately 3 seconds, and the screen turns
off automatically.
Description
Screen
Auto Sleep Activation Conditions
When there is no activity on the probe for the set duration
(2//5/10 minutes)
- No scanning
- No data transmission
- No user input
When there is no user input for approximately 10 seconds during
wireless charging
Exiting Auto Sleep Mode: Press the left button to exit Auto Sleep Mode
and turn the screen back on.
[Auto Sleep Mode Screen]
CUBEScan
TM
BioCon-V Operator’s Manual
33
6. DEVICE SETTING
6.1. ACCESSING THE DEVICE SETTING MENU
Procedure Screen
(1) Entering the Setting Menu
From the Home screen, press and hold the center button and right
button simultaneously for 3 seconds.
(2) Entering the Password (6 digits)
Keypad operation
Left button ( ): Move cursor to the right.
Right button ( ): Move cursor downward.
Selected key is highlighted in orange ( ) → Press the center button
( ) to enter.
After entering all 6 digits, select the Confirm icon ( ) → Press the
center button ( ).
(3) Selecting and Changing Settings
Use the left ( ) or right ( ) button to select an item → Press
the center button ( ) to activate it.
Use the left ( ) or right ( ) button to adjust the setting.
After adjusting the setting, press the center button ( )
to apply the change.
NOTE: Once the password is entered and access is granted, the
authorization remains valid until the device enters sleep mode or is
powered off.
CUBEScan
TM
BioCon-V Operator’s Manual
34
6.2. SETTING DATA FORMAT
You can select one of the following date formats: YYYY-MM-DD / MM-DD-YYYY / DD-MM-YYYY.
[Procedure]
Select the Date Format icon ( ), then press the center button ( ). (Activation example:
)
Use the left button ( ) or right button ( ) to choose the desired date format.
Press the center button ( ) to apply the selected format.
Once applied, the date displayed at the top of the screen is immediately updated to the new format.
6.3. SETTING THE DATE
The configured date will also be recorded in the scan results.
[Procedure]
Select the Date icon ( ), then press the center button ( ).
The fields are activated sequentially in the order of Year → Month → Day.
Use the left button ( ) and right button ( ) to change the numbers in the active field
After adjusting the number, press the center button ( ) to move to the next field.
6.4. SETTING THE TIME
The time is set in the 24-hour format (HH:MM) and is also recorded in the scan results.
[Procedure]
Select the Time icon ( ), then press the center button ( ).
When the Hour field becomes active, press the left button ( ) or right button ( ) to adjust the
value, then press the center button ( ).
When the Minute field becomes active, set it in the same manner, then press the center button ( )
to save.
6.5. ADJUSTING SCREEN BRIGHTNESS
The screen brightness can be adjusted from Level 1 to Level 5, with higher numbers indicating a
brighter display.
[Procedure]
Select the Screen Brightness icon ( ), then press the center button ( ).
Press the left button ( ) or right button ( ) to choose the desired brightness level (1–5).
Press the center button ( ) to save the setting.
CUBEScan
TM
BioCon-V Operator’s Manual
35
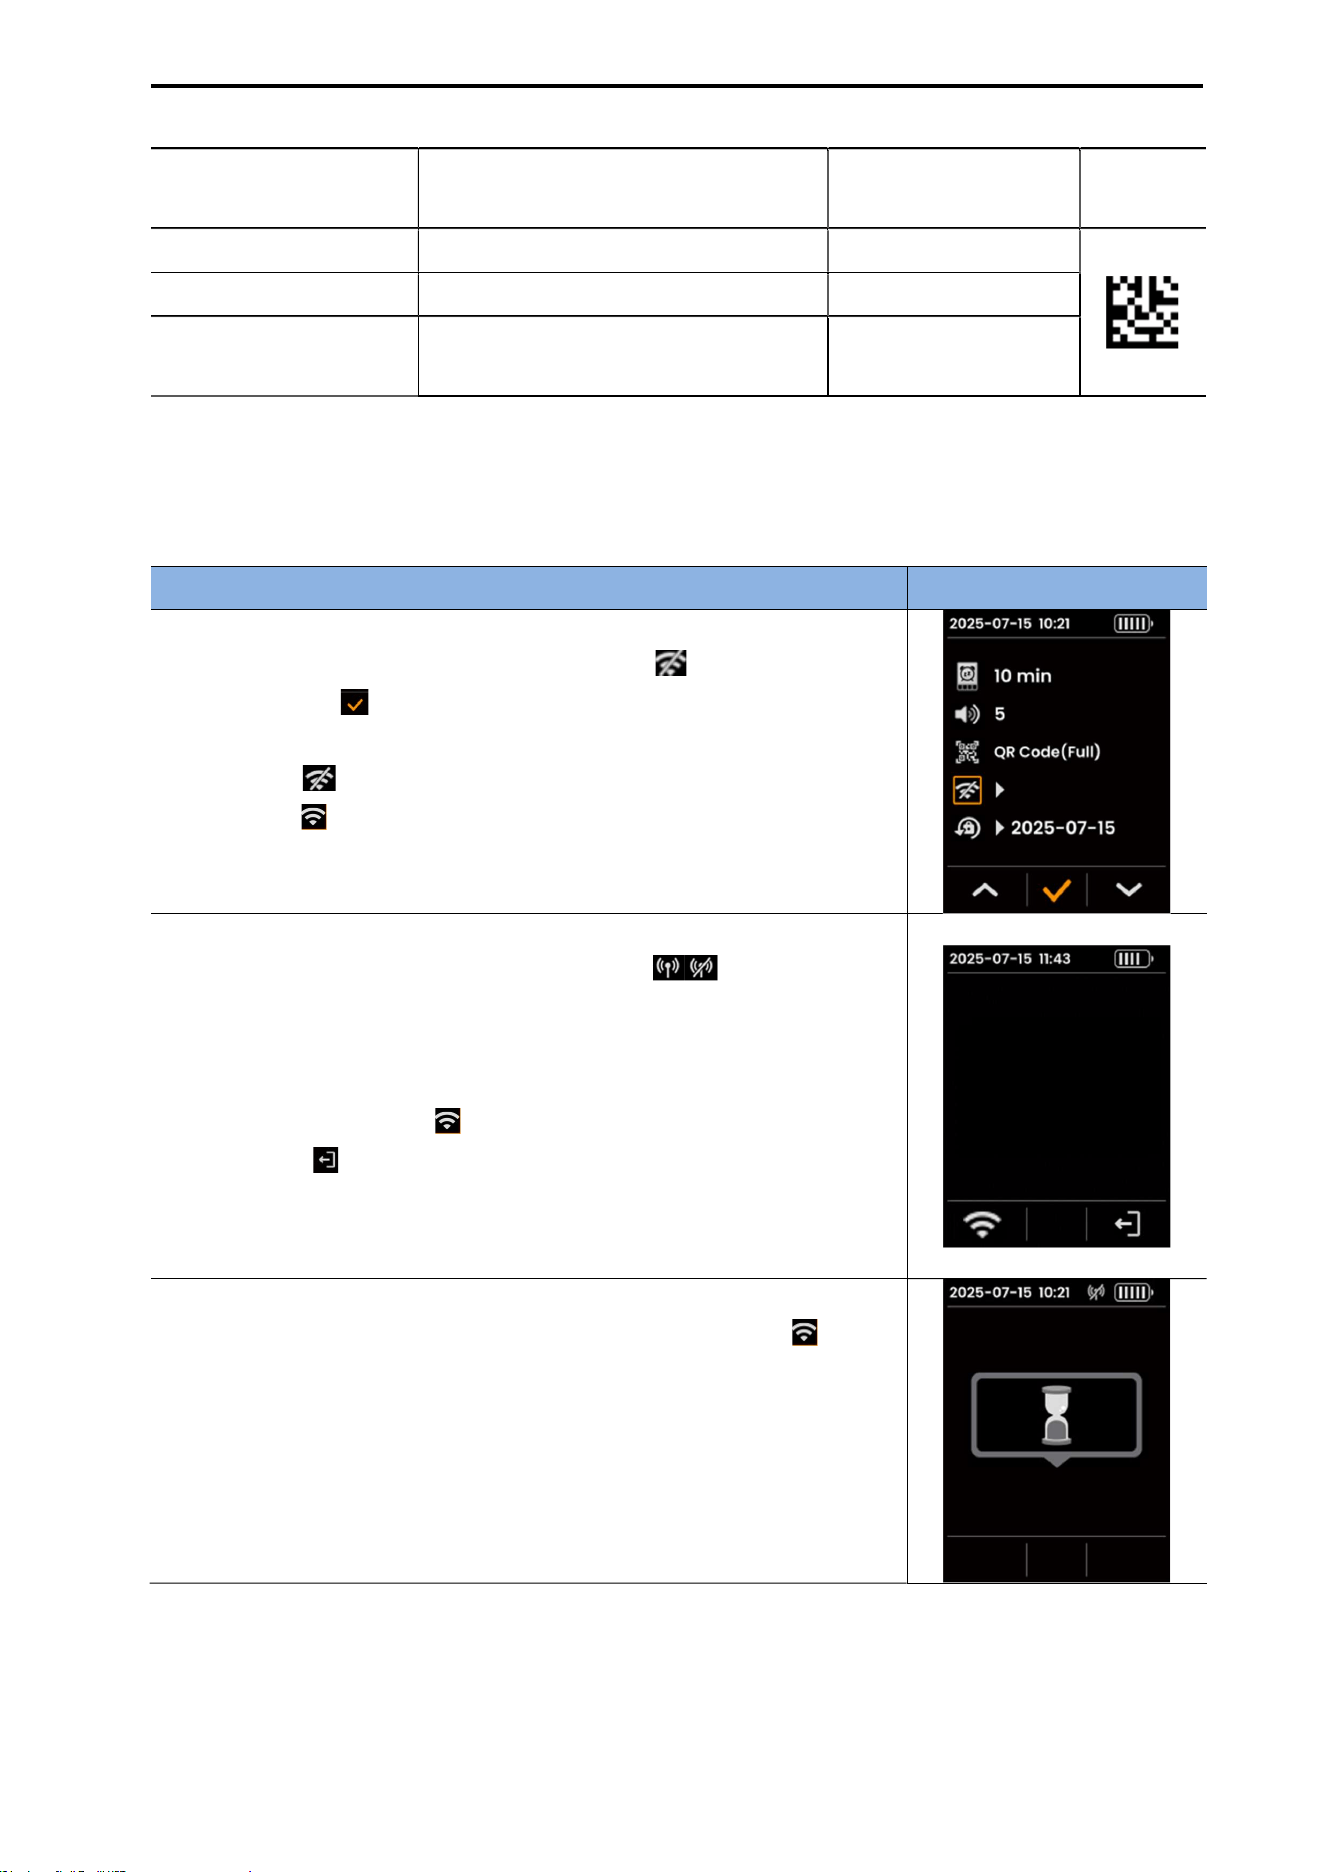
6.6. SETTING THE SLEEP MODE TIMEOUT
The device allows you to choose the duration before Sleep Mode activates.
The available options are 2 minutes, 5 minutes, and 10 minutes.
[Procedure]
Select the Sleep Mode icon ( ), then press the center button ( ).
Press the left button ( ) or right button ( ) to select the desired timeout (2 minutes, 5 minutes,
or 10 minutes).
Press the center button ( ) to save the setting.
6.7. ADJUSTING THE VOLUME
The volume level can be adjusted from 0 to 5, and the selected level is applied to the beep sound
generated when a scan is completed.
[Procedure]
Select the Volume icon ( ), then press the center button ( ).
Press the left button ( ) or right button ( ) to select the desired volume level (0–5).
Press the center button ( ) to save the setting.
6.8. SELECTING THE BARCODE FORMAT
The selected barcode format is applied to measurement data and can also be used when transferring
data to a PC.
[Procedure]
Select the Barcode Format icon ( ).
Press the left button ( ) or right button ( ) to choose the desired option.
Press the center button ( ) to save the selected format.
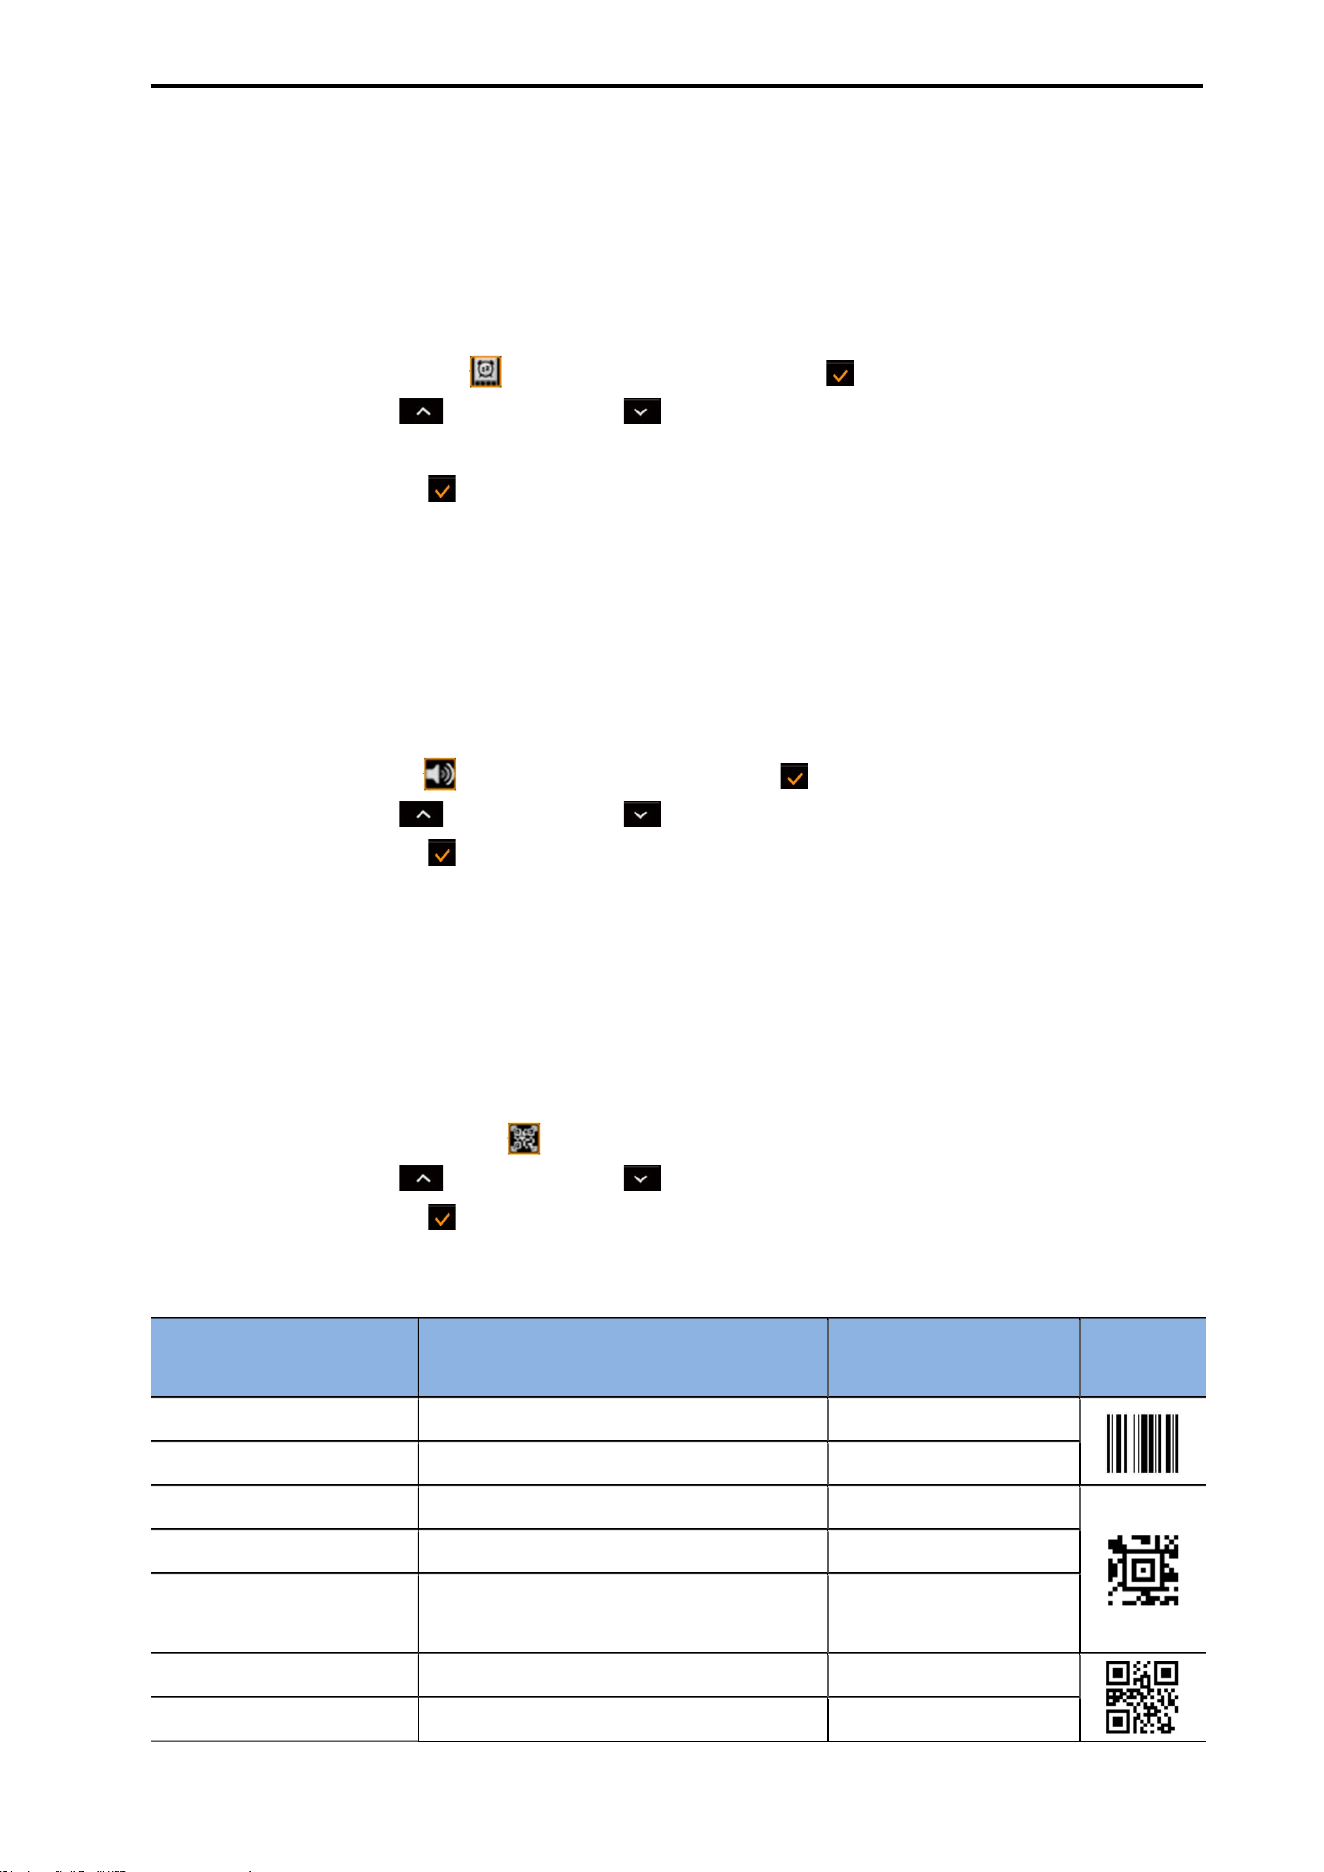
[Barcode Format Options Table]
Option Description Output Data
Barcode
Format
Code-128 (Number) Measures numeric amount only 80
Code-128 (Volume) Measures numeric amount + unit 80 ml
Aztec Code (Number) Measures numeric amount only 80
Aztec Code (Volume) Measures numeric amount + unit 80 ml
Aztec Code (Full) Measures date-time + amount
20250715-095703 80
ml
QR Code (Number) Measures numeric amount only 80
QR Code (Volume) Measures numeric amount + unit 80 ml
CUBEScan
TM
BioCon-V Operator’s Manual
36
QR Code (Full) Measures date-time + amount
20250715-095703 80
ml
Data Matrix (Number) Measures numeric amount only 80
Data Matrix (Volume) Measures numeric amount + unit 80 ml
Data Matrix (Full) Measures date-time + amount
20250715-095703 80
ml
6.9. ACCESSING THE WI-FI SETUP SCREEN
You can check the SSID and PW (Password) information required for registering the device in CubeLite
(PC software) or BioCon-V Manager (tablet app).
Procedure Screen
(1) Opening the Wi-Fi Menu
From the Home screen, select the Wi-Fi icon ( ), then press the
center button ( ) to enter the Wi-Fi menu.
Wi-Fi status indications
- WiFi Off( ): Wireless connection disabled
- WiFi On( ): Wireless connection enabled
(2) Wireless Setting Disabled
When Wi-Fi is turned off, the Wi-Fi indicator ( ) in the status
bar disappears.
The SSID & PW screen also switches to the disabled state.
You can perform the following actions.
- Wireless Enable icon ( , left button): Turn Wi-Fi back on
- Exit icon ( , right button): Return to the Setting menu
(3) Disabling the Wireless Setting
On the SSID & PW screen, select the Wireless Enable icon ( ).
An activation screen appears as shown on the right.
CUBEScan
TM
BioCon-V Operator’s Manual
37
(4) Checking SSID and PW Information
When you enter the Wi-Fi menu, the device’s SSID and PW
information are displayed on the screen.
Icon Functions
Button Icon Function Description
Wireless icon(left)
Enable/disable wireless
function
Barcode icon (center)
Opens the wireless
information barcode
screen
Exit icon (right)
Returns to the settings
screen.
(5) Viewing the Wireless Information Barcode
Press the Barcode icon ( ) to display the wireless information
barcode, which contains the SSID and PW.
You can scan this barcode using a tablet camera or a PC barcode
reader to automatically enter the SSID and PW.
Press the Exit icon ( , right button) to return to the SSID & PW
screen.
6.10. CHANGING THE PASSWORD
The Password Change menu allows you to set a new 6- to 10-digit lock password for the device.
Procedure Screen
(1) Opening the Password Change Menu
From the Setting screen, select the Password Change icon ( ), then
press the center button ( ).
(2) Entering a New Password
When the password keypad appears, enter a 6- to 10-digit password.
Keypad Operation
Left button( ): Move the cursor to the right.
Right button ( ): Move the cursor downward.
Selected item is highlighted in orange ( ) → Press the center
button ( ) to enter.
After entering all 6–10 digits, select the Confirm icon ( ) → Press
the center button ( ) to confirm.
CUBEScan
TM
BioCon-V Operator’s Manual
38
(3) Re-entering the New Password (Confirmation)
Enter the same 6- to 10-digit password again to confirm.
After completing the input, select the Confirm icon ( ), then press
the center button ( ) to finalize the password change.
(4) Password Change Complete Message
A message confirming that the password change is complete is
displayed for approximately 3 seconds.
(5) Return to the Setting Screen
After the message disappears, the device automatically returns to the
setting screen.
The password change date is updated and displayed on the screen.

CUBEScan
TM
BioCon-V Operator’s Manual
39
7. SOFTWARE (CUBELITE)
If you are not using CubeLite (PC software), you may skip this section.
7.1. GENERAL INFORMATION
This section provides detailed instructions on how to use CubeLite.
Before using CubeLite, be sure to read and fully understand the contents of this manual.
Mcube Technology Co., Ltd. shall not be held responsible for any problems that occur under the
following circumstances.
When the software is not used in accordance with the instructions in the operator’s manual
When the PC software is modified by a non-professional or by the user without authorization
When using assembled PCs or tablets that are not covered by the manufacturer's warranty
CAUTION
MISE EN GARDE
It is strongly recommended to install security software on all computers where CubeLite is installed
and executed.
Il est fortement recommandé d’installer un logiciel de sécurité sur tous les ordinateurs où CubeLite
est installé et utilisé.
To protect personal information, avoid using easily guessable passwords and change your password
regularly.
Pour protéger les informations personnelles, évitez d’utiliser des mots de passe faciles à deviner et
changez-les régulièrement.
To prevent loss of patient data, perform regular backups.
Pour éviter la perte de données patients, effectuez des sauvegardes régulières.
Precautions When Connecting to a Computer:
The computer used with this device must comply with IEC 62368-1 or IEC 60601-1 and must be
installed and operated in accordance with the manufacturer’s instructions.
L’ordinateur utilisé avec cet appareil doit être conforme aux normes IEC 62368-1 ou IEC 60601-1 et
doit être installé et utilisé conformément aux instructions du fabricant.
If a cybersecurity threat is detected while using the software, immediately disconnect the internet
and power off the device.
Then, contact Mcube Technology Co., Ltd. for assistance:
Phone: +82-2-3421-7780
Email: mcube@mcubetech.co.kr
Si une menace de cybersécurité est détectée lors de l’utilisation du logiciel, déconnectez
immédiatement Internet et éteignez l’appareil.
Contactez ensuite Mcube Technology Co., Ltd. pour obtenir de l’assistance.

CUBEScan
TM
BioCon-V Operator’s Manual
40
Security Measures Required Before Using the Software
Mesures de sécurité requises avant d’utiliser le logiciel
User access control
Contrôle d’accès utilisateur
Antivirus and anti-malware software
Logiciel antivirus et anti-malware
Firewall configuration
Configuration du pare-feu
Session management procedures
Procédures de gestion de session
7.2. PURPOSE OF SOFTWARE
CubeLite allows users to transfer PDF or JPG files generated by the BioCon-V device to a computer.
7.3. MAIN FUNCTIONS
The CubeLite Software provides the following main functions: Export scan results in PDF or JPG format
via Wi-Fi (wireless connection).
7.4. INSTALL CUBELITE
7.4.1. INITIAL INSTALLATION OF CUBELITE
Connect the installation USB to the computer.
Run the CubeLite Install Manager file.
When the Administrator Password window appears, enter the password and click the [Update]
button.
On the initial installation screen, click the [Next >] button.
On the Select Installation Folder screen, install to the default folder or click [Browse...] to specify a
folder, then click [Next >] to continue.
On the Confirm Installation screen, click the [Next >] button to start the installation ((The Installing
CubeLite window will appear and show the installation progress).
When the Installation Complete screen appears, click the [Close] button to finish the installation.
7.4.2. UPGRADE INSTALLATION OF CUBELITE
The upgrade procedure is identical to the initial installation process described in 7.4.1. INITIAL
INSTALLATION OF CUBELITE.
During the upgrade process, an administrator password prompt may appear.
If the password has been forgotten, it must be reset before performing the upgrade.

CUBEScan
TM
BioCon-V Operator’s Manual
41
7.5. REMOVE CUBELITE
7.5.1. REMOVE USING THE CONTROL PANEL
Open the Control Panel.
Select Uninstall a program.
From the list, select CubeLite and click [Uninstall].
7.5.2. REMOVE USING THE SOFTWARE
Run the CubeLite Installer Manager.
In the Administrator Password window, enter the password and click [Update].
On the “Welcome to the CubeLite Installer Setup Wizard” screen, select Remove CubeLite, then click
[Finish].
The Removing CubeLite progress window will appear, and the uninstallation will begin.
When “CubeLite was successfully removed” appears, click [Close] to finish.
[Password Reset Procedure]
If you forget your password, follow the steps below.
Click the [Forgot] button to Open the Reset Password window.
Click the [Generator] button to create a Lock Code (e.g., fab51).
Send the generated Lock Code to the manufacturer via email mcube@mcubetech.co.kr
Enter the issued Key Code, then click the [Reset] button to complete the process.
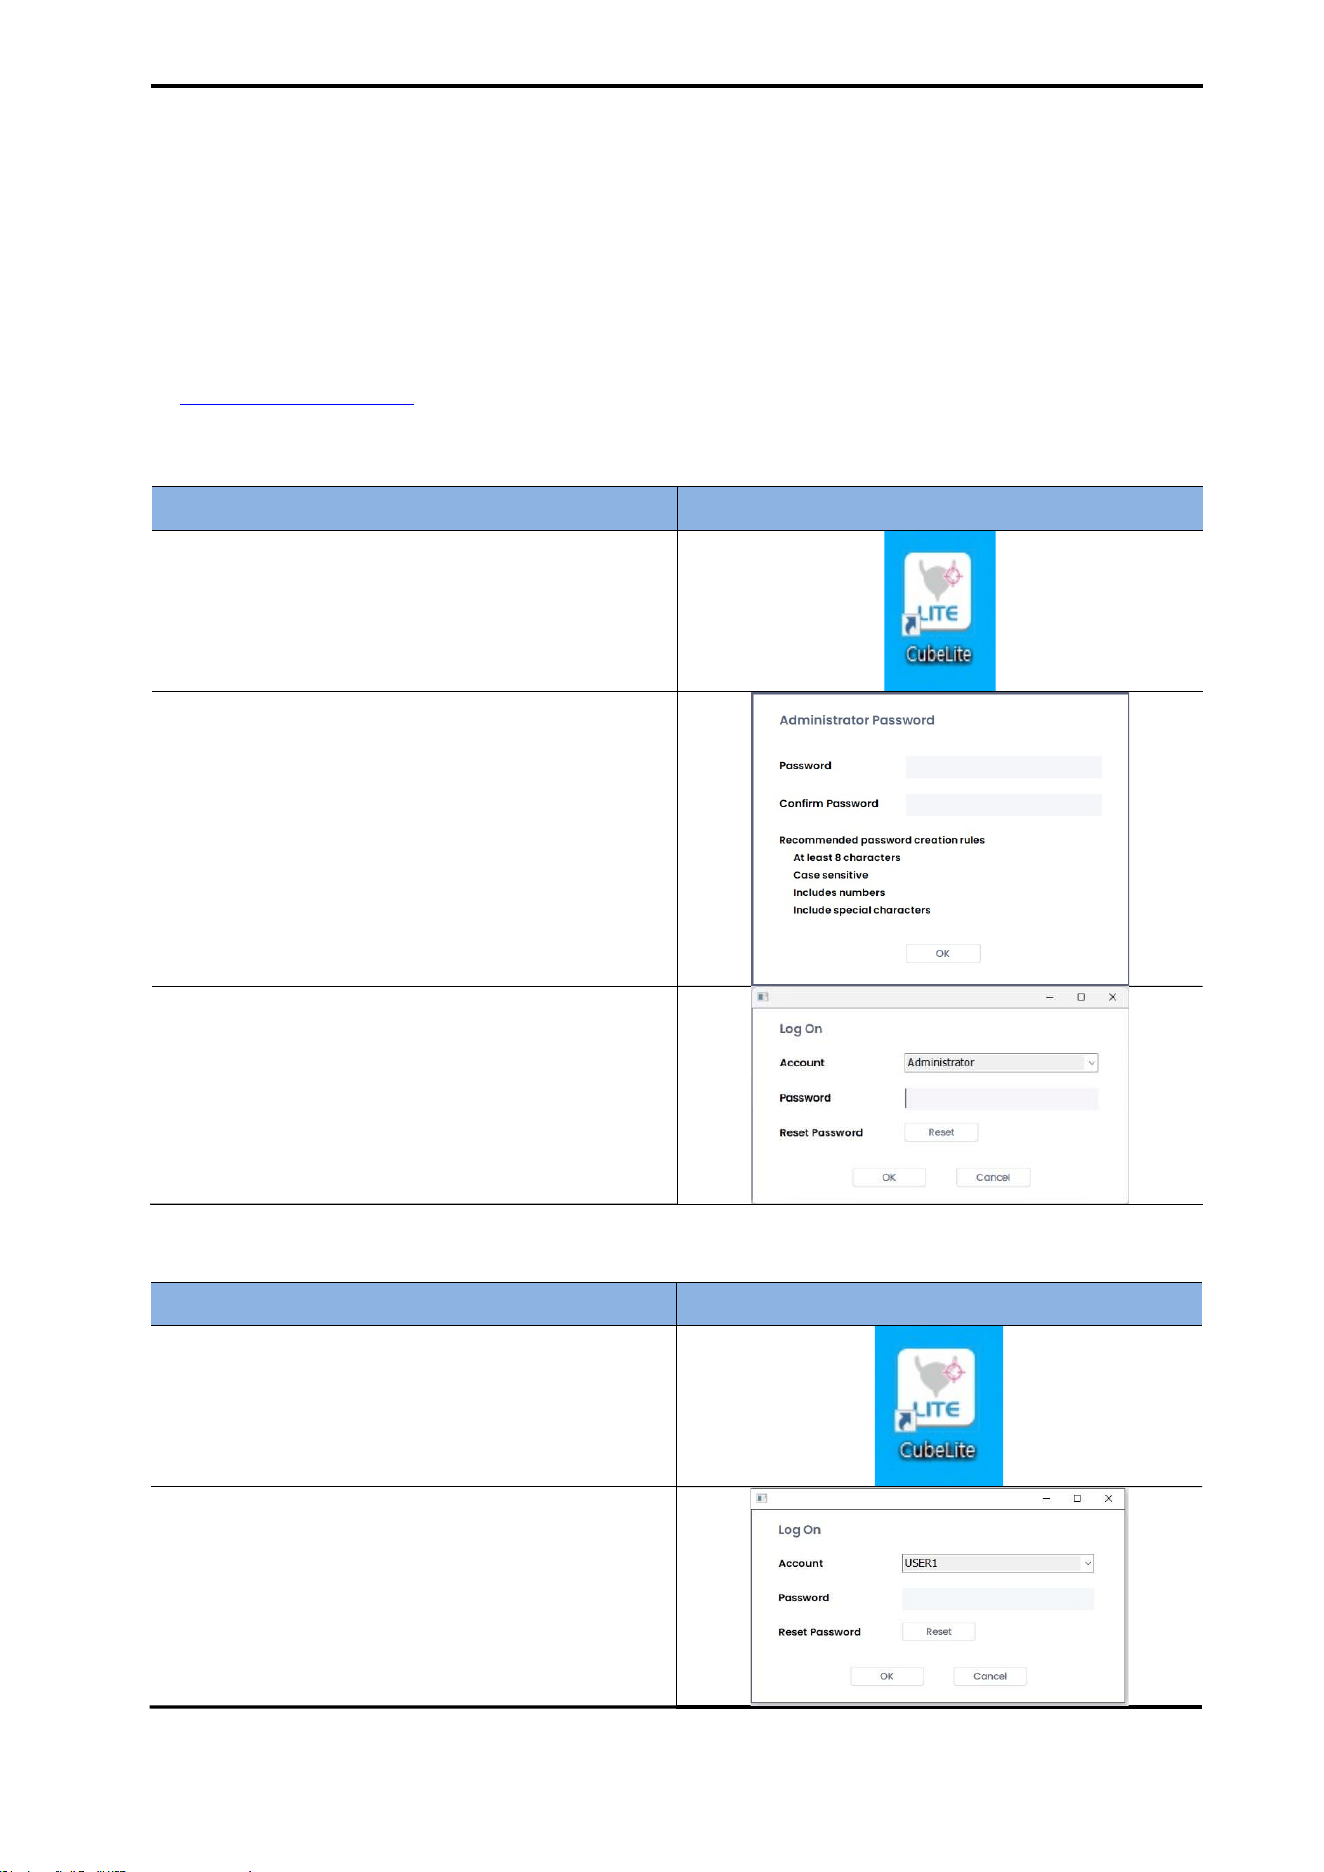
CUBEScan
TM
BioCon-V Operator’s Manual
42
7.6. ADMINISTRATOR SETTING
7.6.1. ADMINISTRATOR PASSWORD SETTING
To prevent unauthorized access to CubeLite, you must register an administrator password when using
the program for the first time.
For details on changing the password, adding user accounts, and other security-related settings, refer
to 7.10.3 Security Settings.
(1) First-Time Login
Procedure Screen
(1) Run CubeLite
Double-click the CubeLite icon on the PC desktop
to launch the program.
(2) Register Administrator Password
When the password registration window appears,
enter your desired password.
Click [OK] after entering the password.
(3) Setup Complete
Once the password is registered, CubeLite will be
available in Administrator Mode.
(2) User Login
Procedure Screen
(1) Run CubeLite
Double-click the CubeLite icon on the PC
desktop to launch the program.
(2) Select Account
In the login window, select USER.
(3) Enter Password
Enter your user password and click [OK].
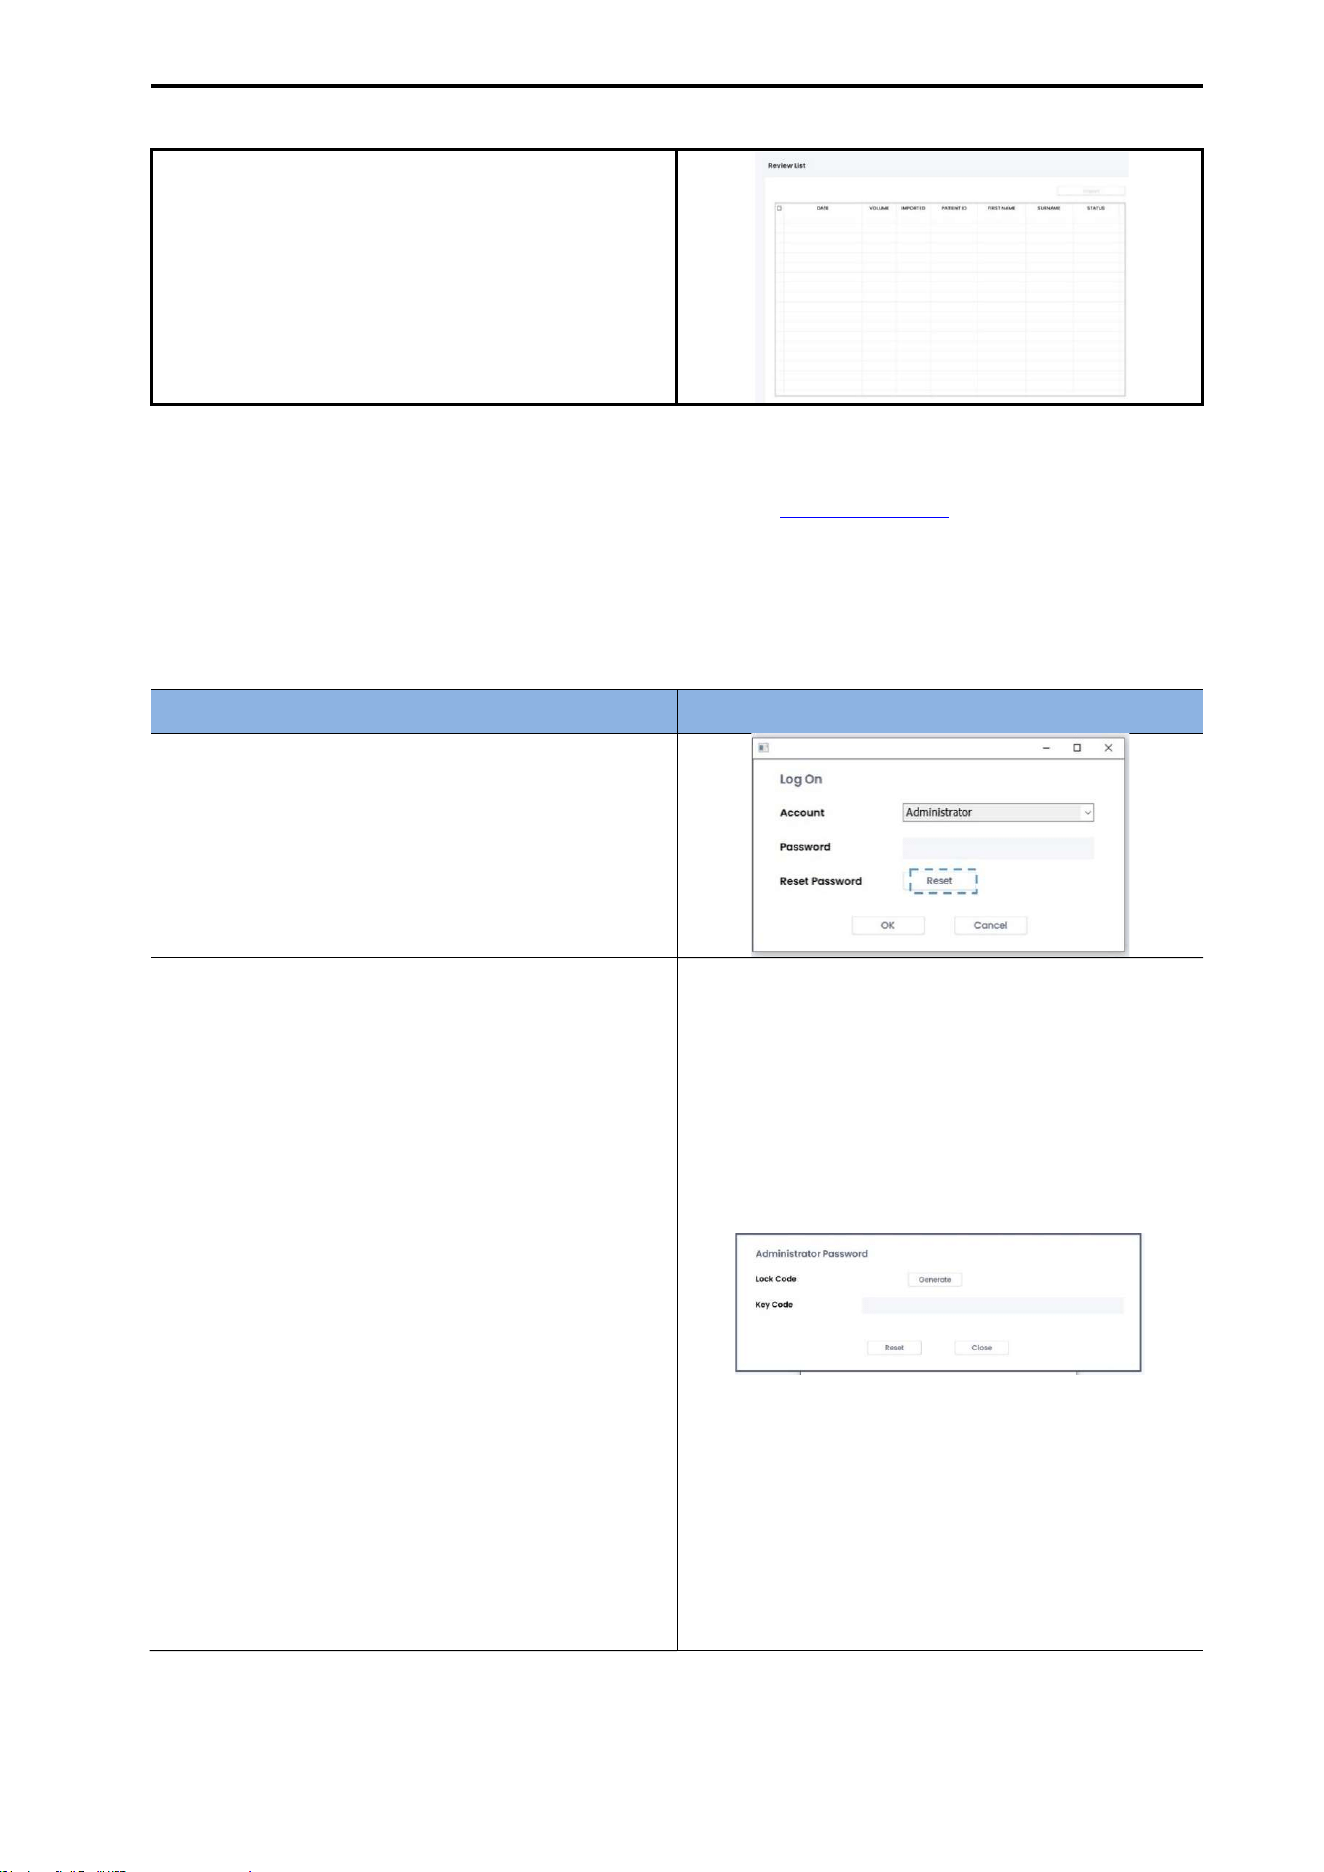
CUBEScan
TM
BioCon-V Operator’s Manual
43
(4) Login Complete
After login, CubeLite will run in User Mode.
NOTE:
For instructions on how to register a user account, refer to 7.10.3. SECURITY.
In User Mode, the settings menu is disabled and cannot be accessed.
7.6.2. Administrator Password Reset
If the administrator or user password is lost, it can be reset by following the procedure below.
Procedure Screen
(1) Click the Reset Button
In the password input window, click the [Reset]
button.
(2) Generate a Lock Code
Click the [Generate] button to create a new lock
code.
(3) Provide the Lock Code
Send the generated lock code to the distributor
or manufacturer.
(4) Enter the Key Code
Enter the key code issued by the distributor or
manufacturer.
(5) Password Reset Complete
The password will be reset, and you can register
a new password. The new password must meet
at least three of the following requirements.
At least 8 characters
Includes both uppercase and lowercase letters
Includes numbers
Includes special characters
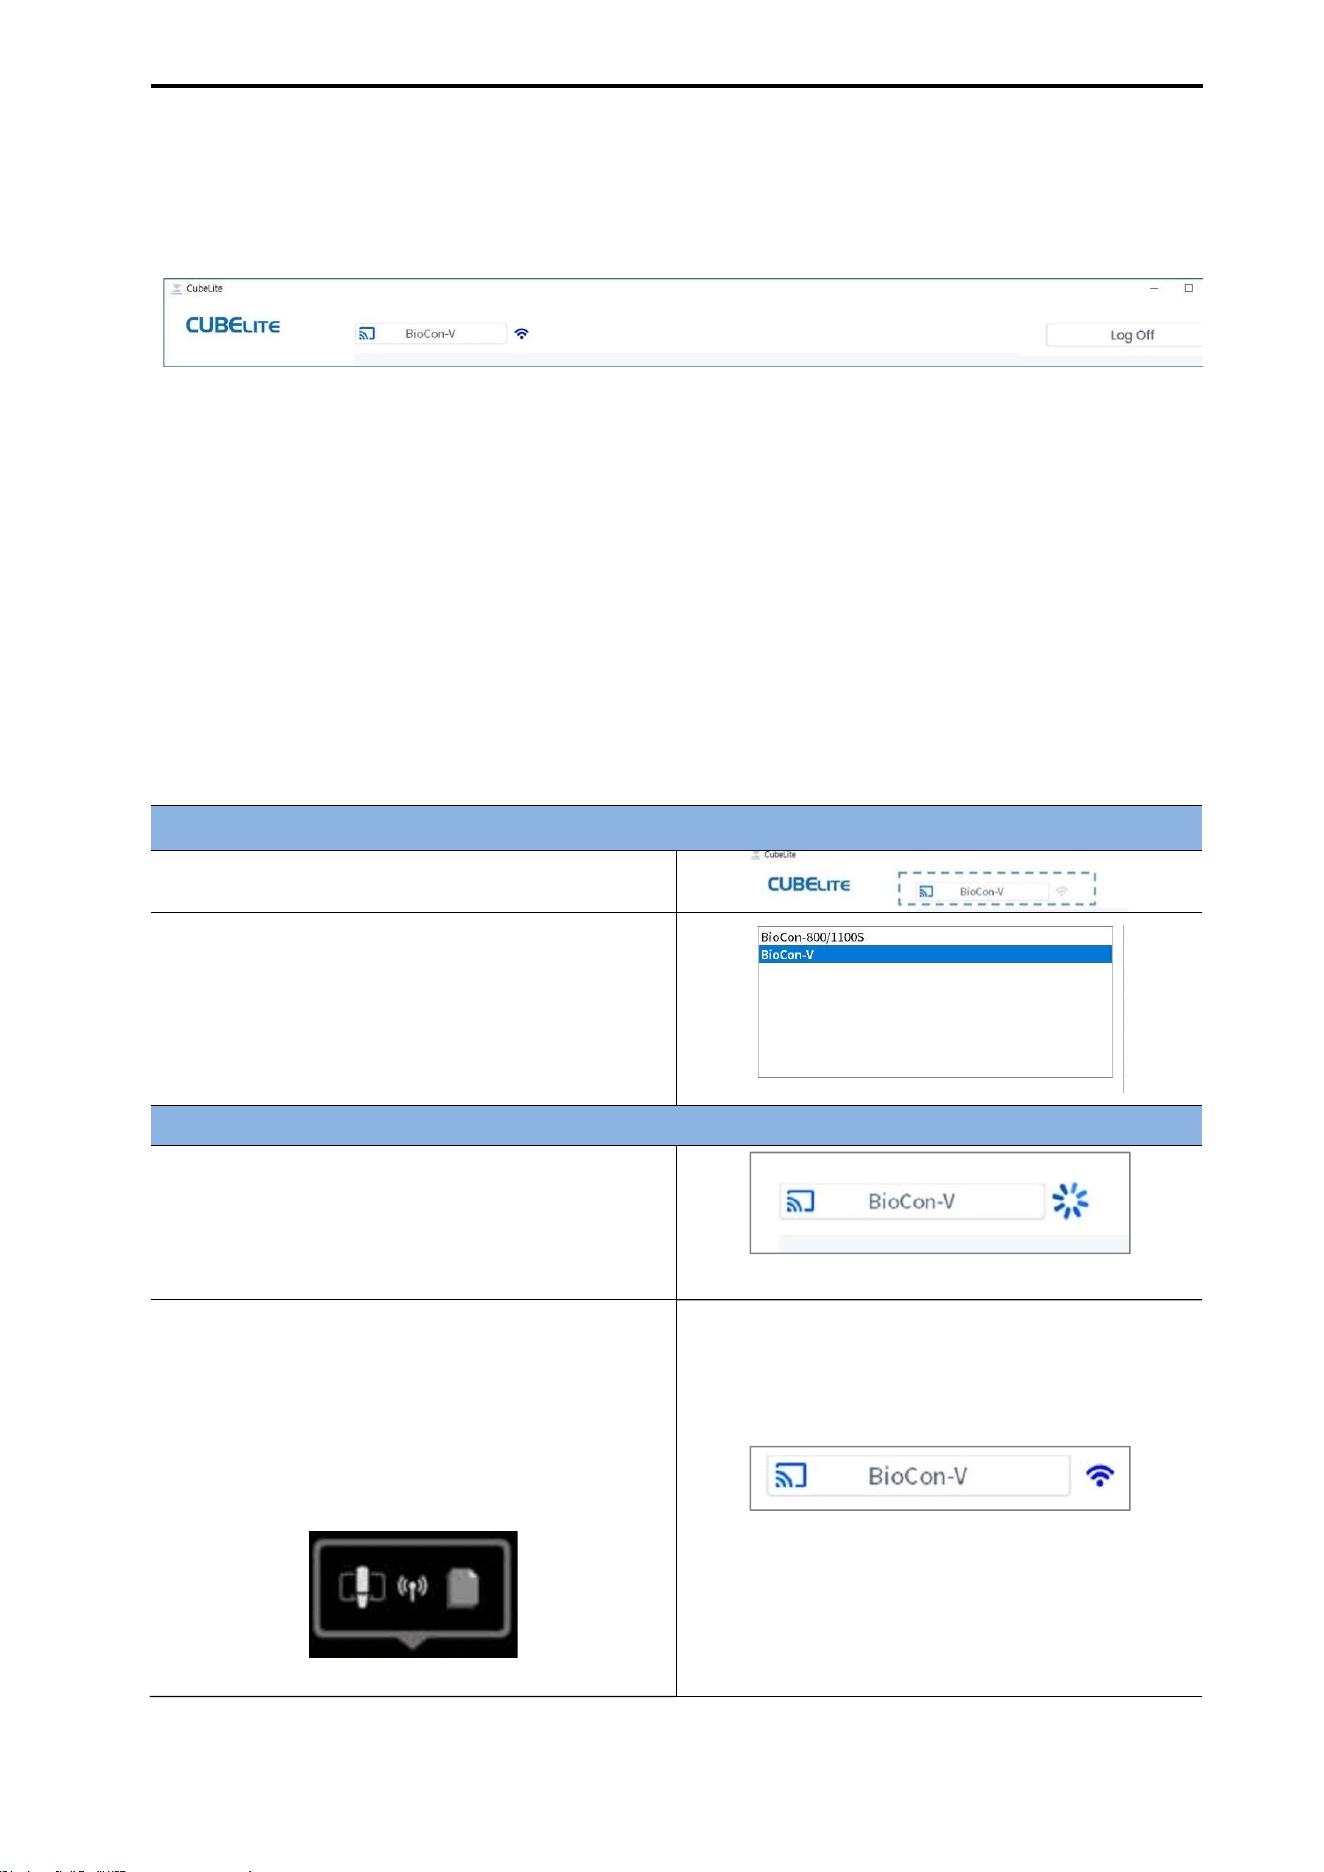
CUBEScan
TM
BioCon-V Operator’s Manual
44
7.6.3. LOG OFF
When you log off from CubeLite, the log-on window appears, allowing you to select an account
(Administrator or User) and re-enter the password to log in again.
(1) How to Log Off
Click the [Log Off] button at the top right of the screen.
The system will log off, and the log-on window will automatically appear.
(2) Logging In Again
In the log-on window, select an account (Administrator or User).
Enter the password and click the [OK] button to access CubeLite.
③ If you click the [Cancel] button or enter an incorrect password, login will not be possible.
7.7. SELECTING A DEVICE
Selecting the Device
(1) Click the Device Selection field.
(2) When the message “Please select the device
you want to use” appears, the device
selection window will open.
(3) Select BioCon-V, then click the [OK] button.
Checking BioCon-V Status
(1) Connecting Automatically
A circular loading icon appears on the screen,
indicating that the device is automatically
connecting to Wi-Fi.
[Connecting Status Screen]
(2) Wi-Fi Connection (Icon turns blue)
When the Wi-Fi indicator turns blue, the
connection has been successfully established.
The same connection status is also shown on
the BioCon-V LCD screen.
[Connection Screen on BioCon-V]
[Connection Complete Screen]
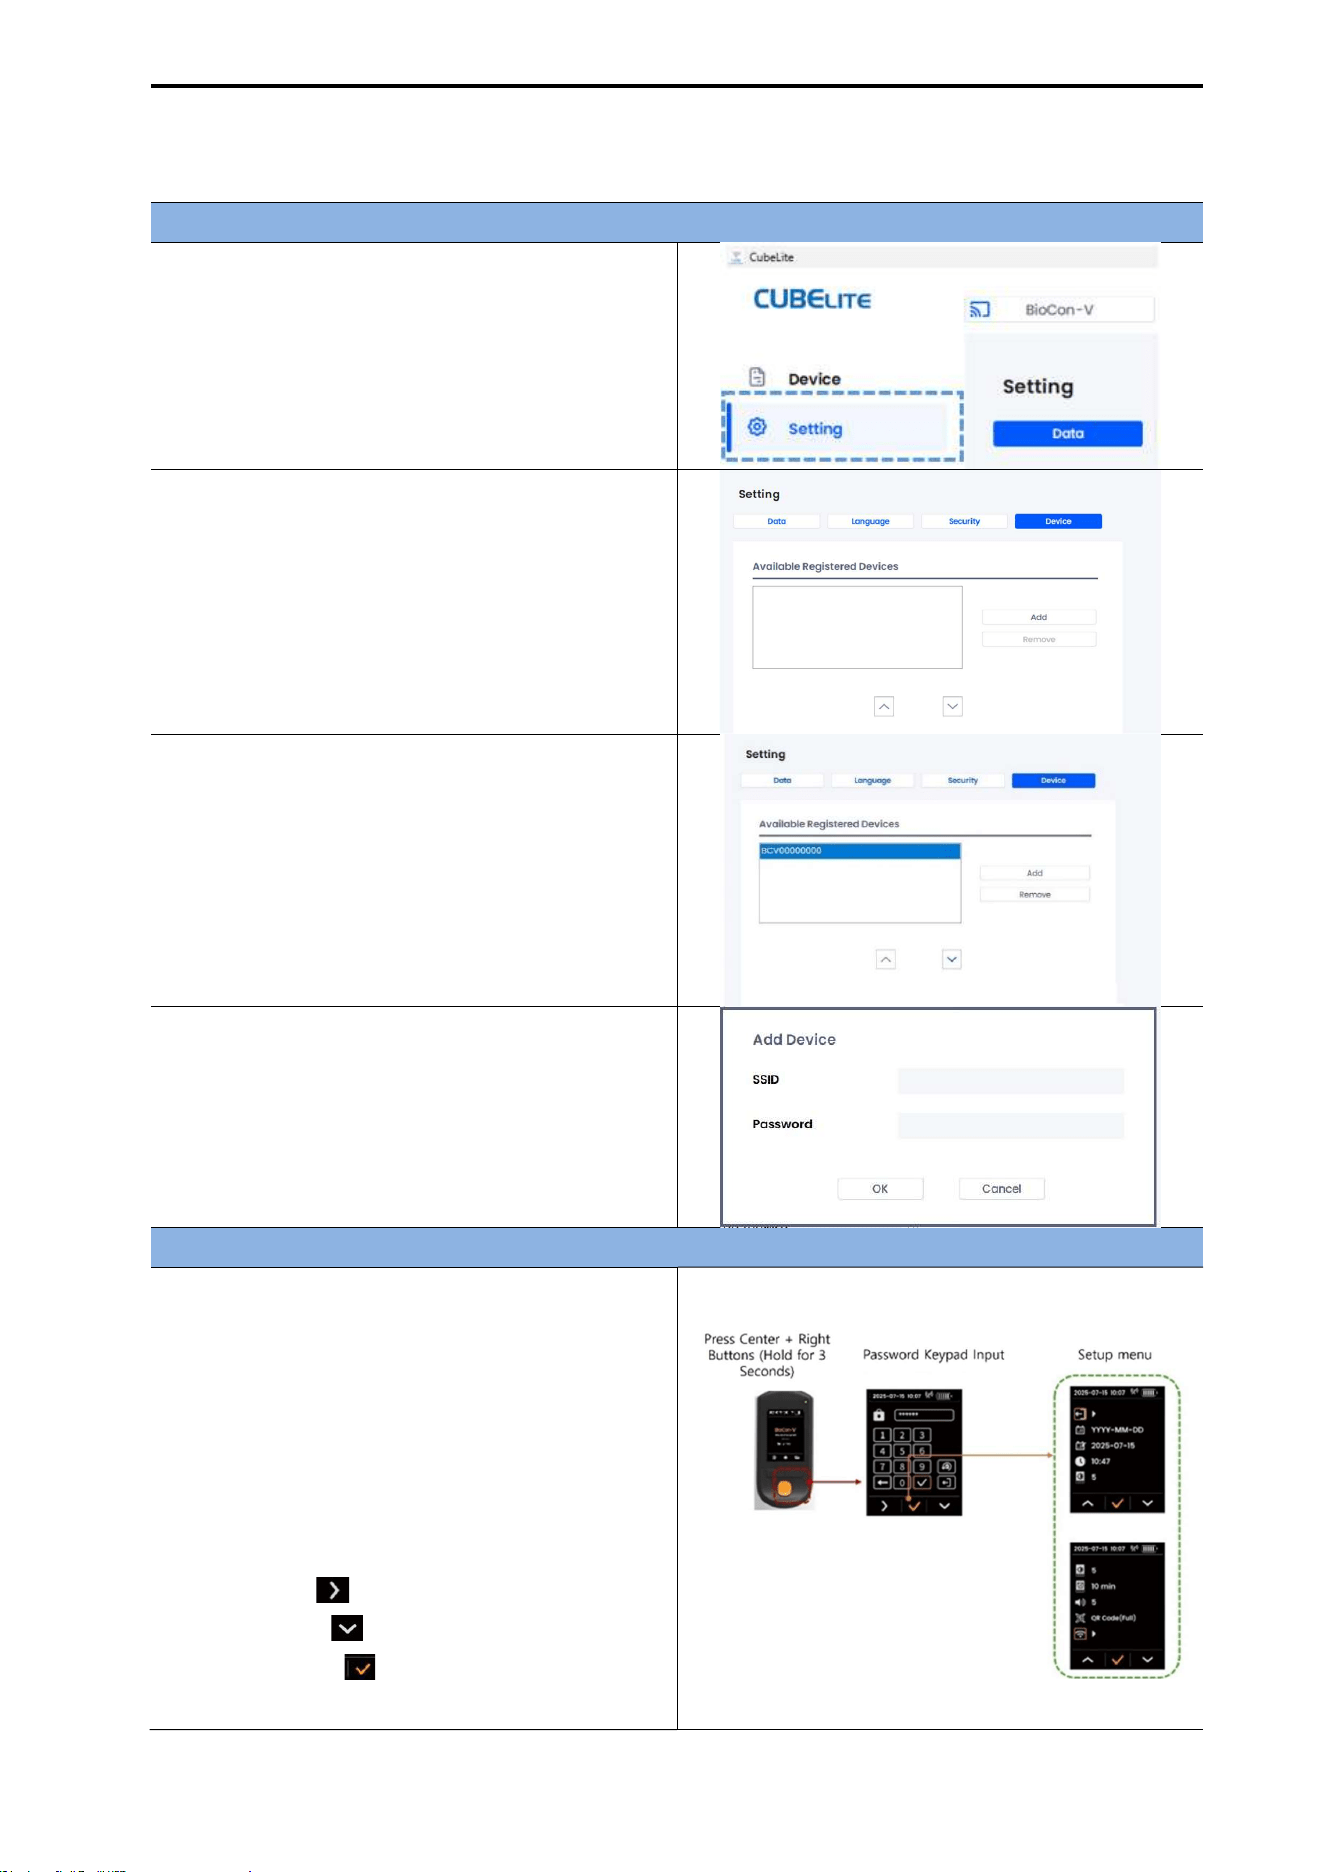
CUBEScan
TM
BioCon-V Operator’s Manual
45
7.8. REGISTERING THE DEVICE
Configuring the Device in CubeLite
(1) Press the Settings button to open the
Settings menu.
(2) In the Settings menu, select the Device tab.
(3) In the Available Registered Devices field, click
the [Add] button.
(4) The SSID and Password input window will
appear.
Checking Device Connection Information on BioCon-V
(1) On the BioCon-V device, go to the Settings
screen.
From the Home screen, press and hold the
center and right buttons simultaneously for 3
seconds.
(2) When the password entry window appears,
enter your password.
Left button ( ): Move right
Right button ( ): Move down
Center button ( ): Select/Enter
The selected item is highlighted in orange
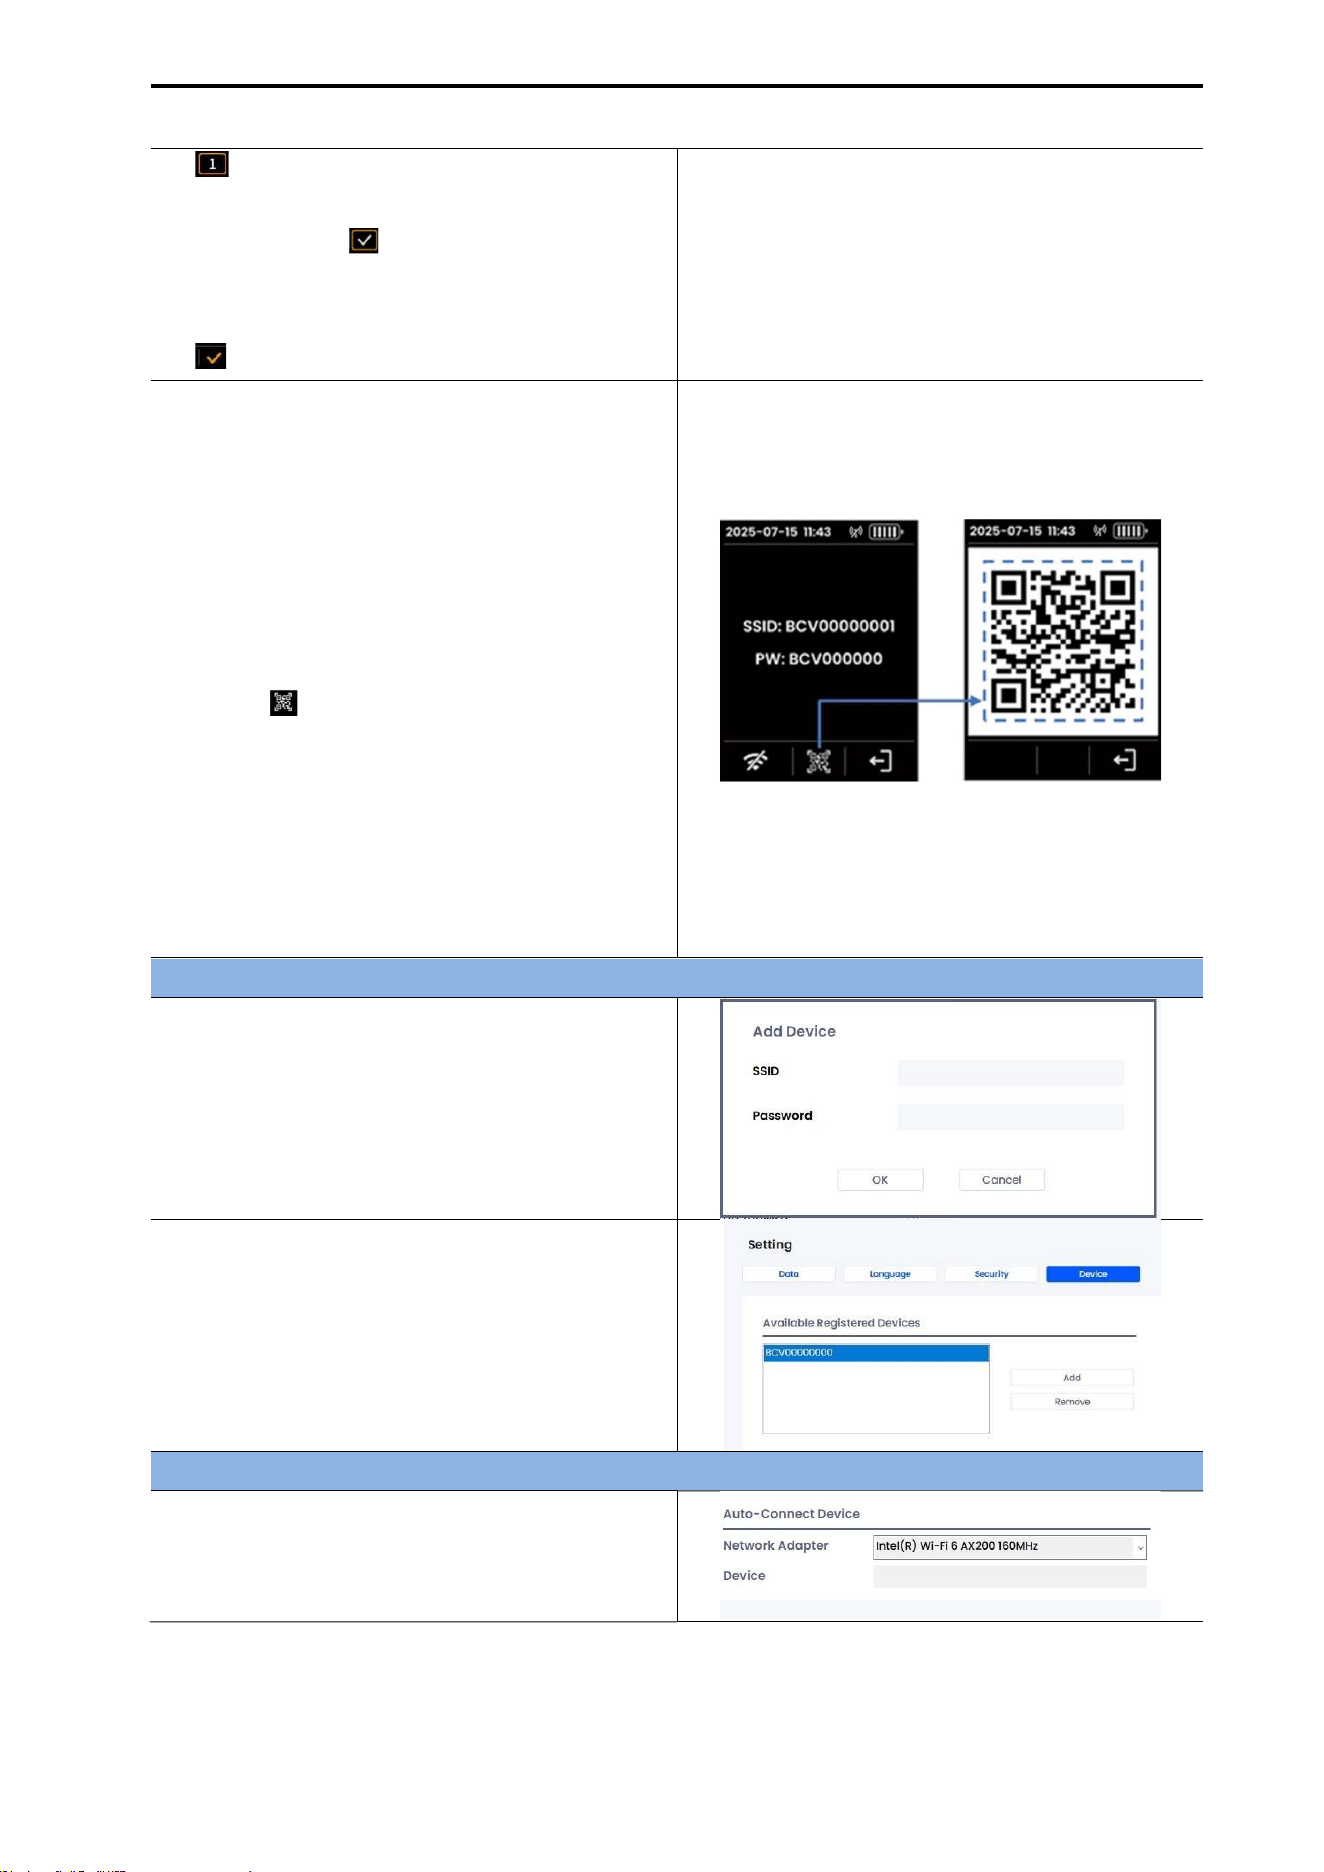
CUBEScan
TM
BioCon-V Operator’s Manual
46
( ).
(3) The Enter icon( ) becomes active once six
or more digits are entered.
Select the icon and press the Center button
( ) to confirm.
(4) Entering SSID and Password
Choose one of the following two methods.
[Manual Input]
Manually enter the SSID and PW displayed on
the device screen into the tablet.
[Using the Barcode Reader]
On the SSID & PW screen, press the center
button ( ) to display a barcode containing
the SSID and password.
Scan the barcode with the barcode reader to
automatically enter the SSID and password.
NOTE: You can register multiple BioCon-V
devices using the same method.
[SSID & PW Barcode Screen]
Completing Device Registration in CubeLite
(1) After entering the SSID and password, click
the [OK] button.
(2) Confirm that the device has been added to
the Available Registered Devices list.
Registering the Device for Automatic Connection
(1) In the Network Adapter field, select the
network card currently in use.

CUBEScan
TM
BioCon-V Operator’s Manual
47
(2) Select the device name (e.g., BCV0000000),
then click the down arrow button ( ).
(3) Once the automatic connection is complete,
the device name will be automatically
displayed in the Device field.
(4) Select the Device menu.
(4) Once BioCon-V and CubeLite are properly
connected, the measured data automatically
appears in the Review List.
NOTE: When you run CubeLite afterward, it
will automatically connect to the
BioCon-V device.
7.9. DATA MANAGEMENT
7.9.1. IMPORTING DATA
Imported data is saved to the designated folder.
Saved contents: Scan date/time, aiming information, measured volume, and all captured cross-
sectional images.
Saved data can be printed as needed.
[Import Procedure]
(1) Connect BioCon-V to CubeLite
Once BioCon-V and CubeLite are properly connected, the measured data will automatically appear in
the Review List.
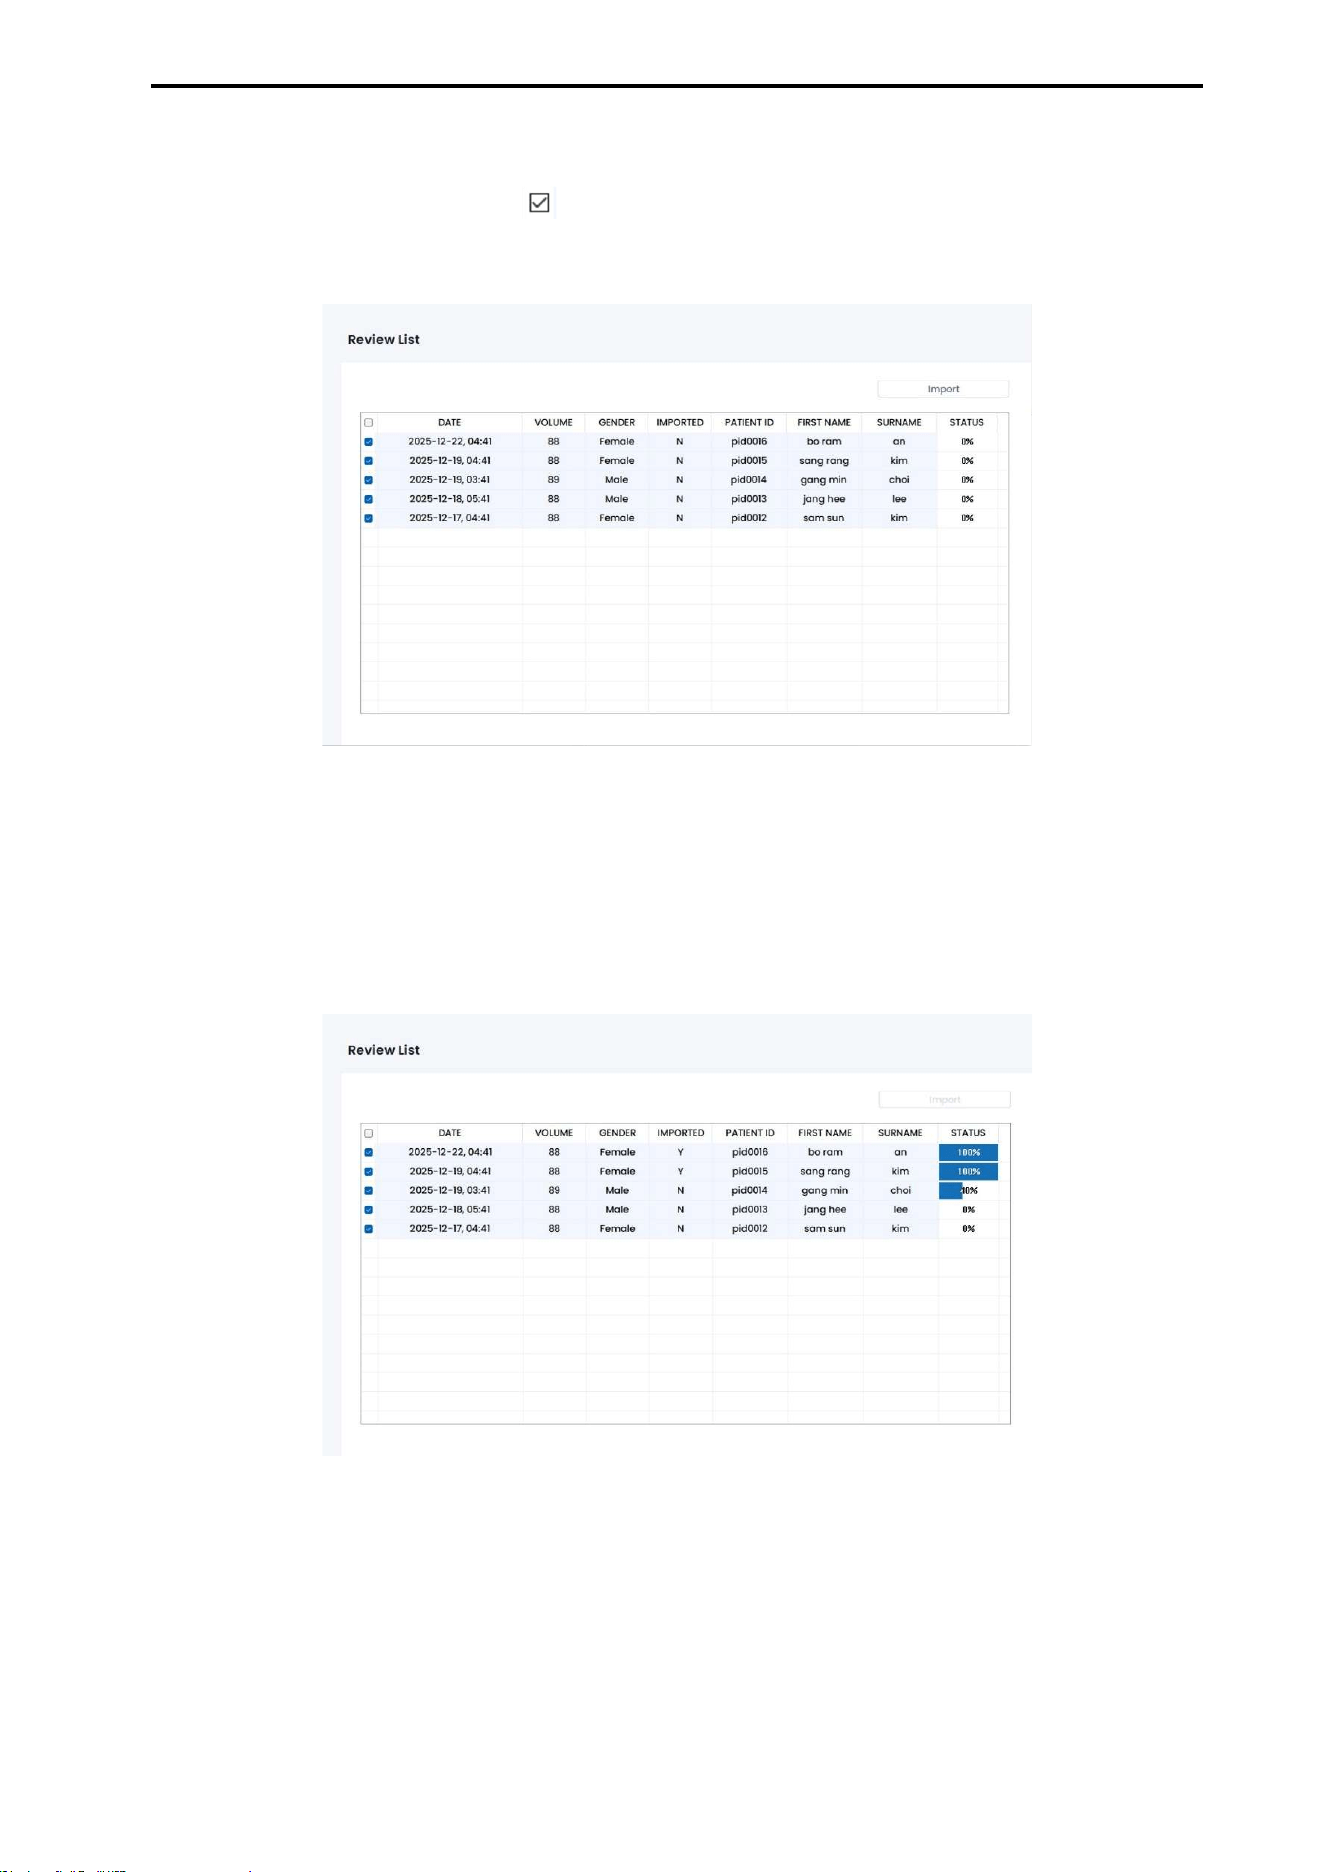
CUBEScan
TM
BioCon-V Operator’s Manual
48
(2) Select the data to import
In the Review List, check the box ( ) next to the patient data you want to import.
When selected, the progress status will display “0%”.
(3) Start Importing
Click the [Import] button.
(4) Check Progress
The progress window displays the import status for each data item.
(5) Import Complete
When all data has been transferred, a message will appear stating “Import completed successfully”.
(6) Close the Window
Click [OK] to close the window.
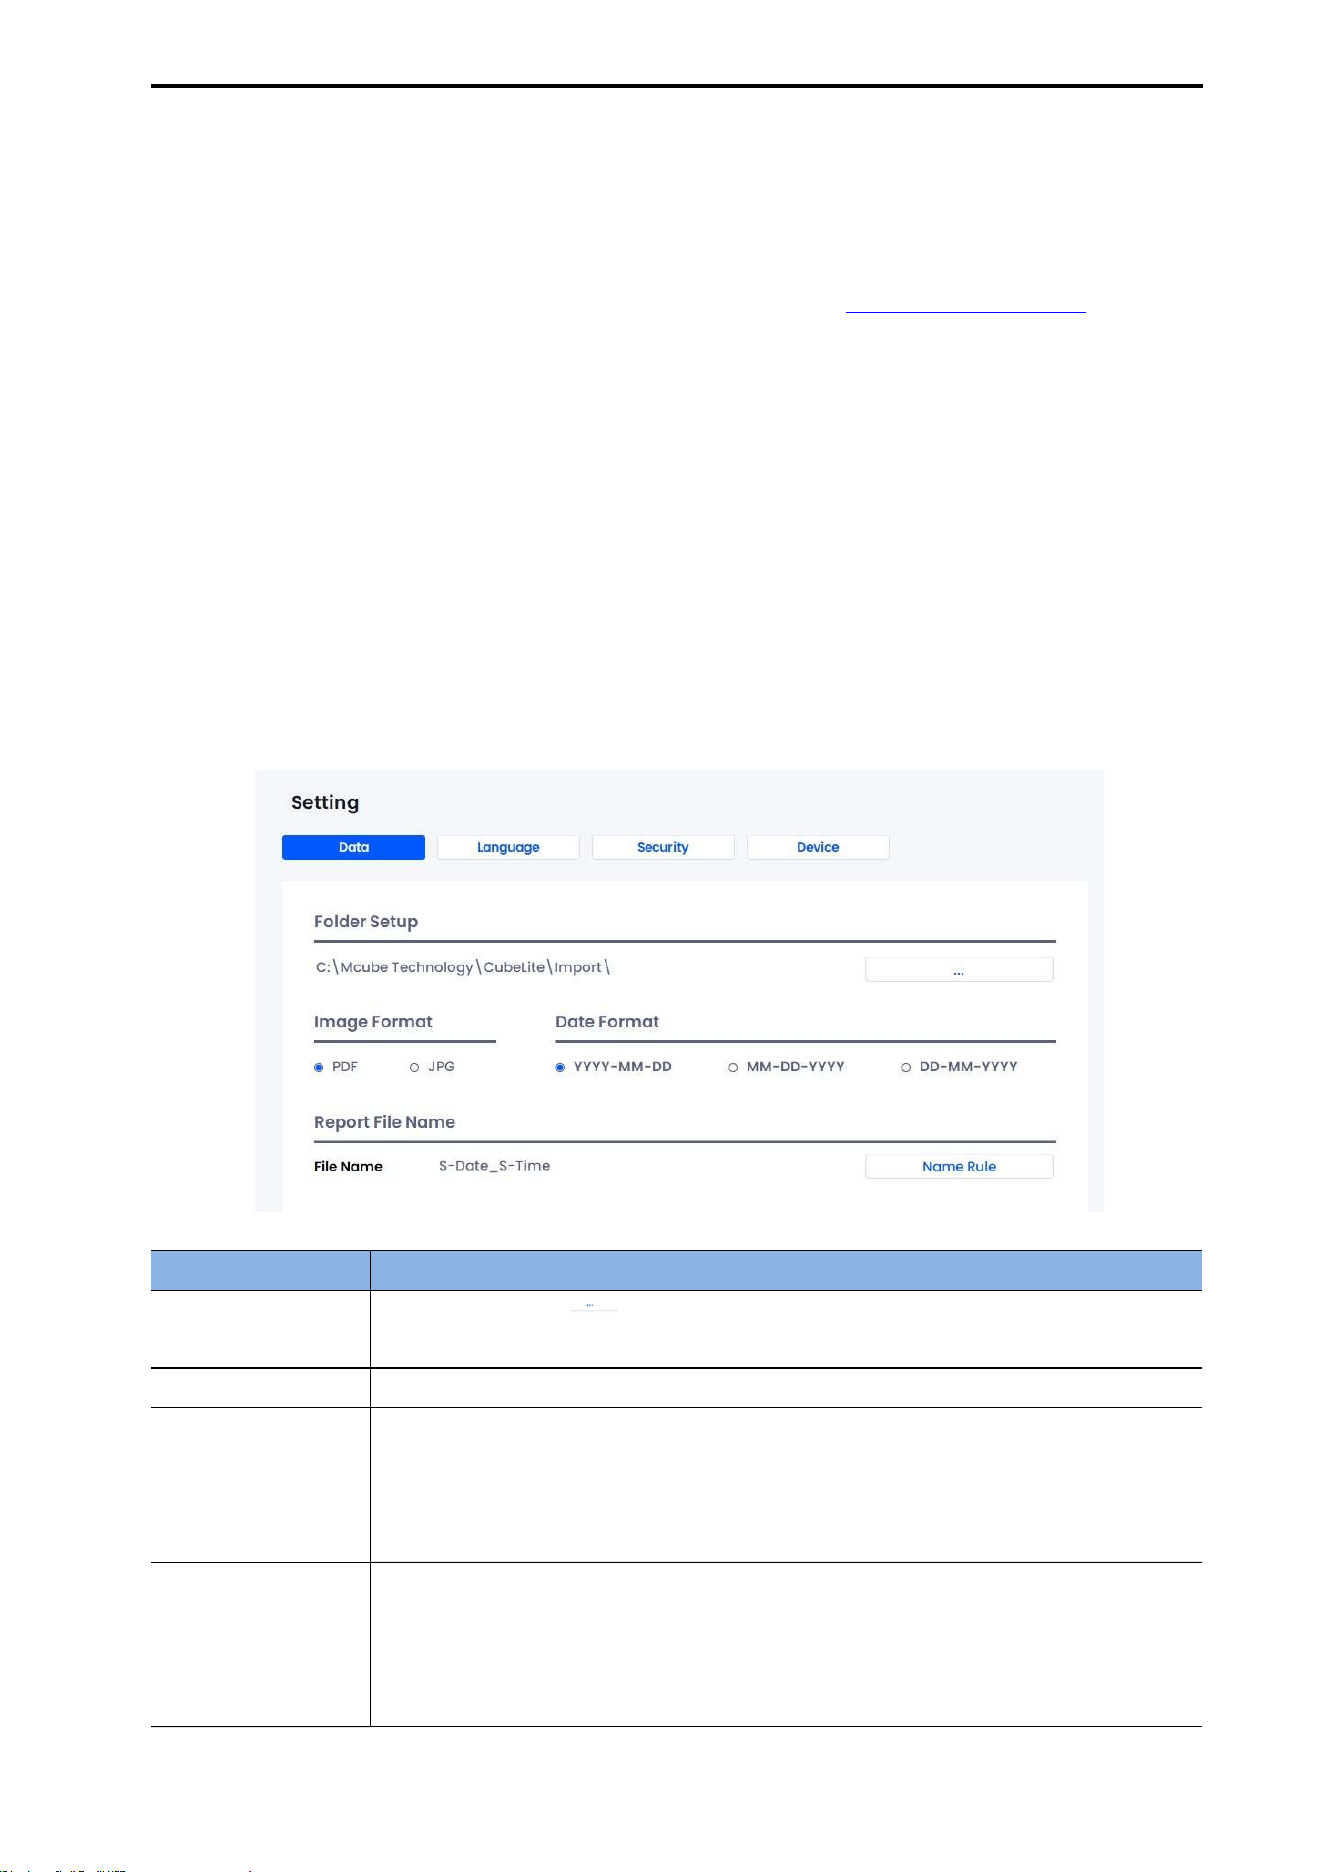
CUBEScan
TM
BioCon-V Operator’s Manual
49
7.9.2. EXPORTING DATA
Saved data can be exported in either PDF or JPG format.
To change the output format: go to CubeLite Settings → Data → Image Format.
For detailed instructions on how to configure the format, refer to 7.9.1. IMPORTING DATA.
Data Included in Exported Files:
Patient ID, First Name, Sur Name, Gender, Date of birth, Age, Operator ID, Scan Aim
7.10. SETTINGS
The Settings menu of CubeLite is available only when logged in with an administrator account.
7.10.1. DATA SETTINGS
In the [Data] tab, you can configure the storage location of measurement data, image format, date
format, and file-naming format.
Item Description
Folder Setup
Click the [Browse ( )] button to select the folder where data will be saved.
Default path: C:\Mcube Technology\CubeLite\Import
Image Format Select the file format for exported data: PDF or JPG.
Date Format
Select your preferred date display format.
YYYY-MM-DD (Year-Month-Day)
MM-DD-YYYY (Month-Day-Year)
DD-MM-YYYY (Day-Month-Year)
Report Format
Name
Click the Name Rule icon to configure the naming rule for report files.

CUBEScan
TM
BioCon-V Operator’s Manual
50
[Name Rule Setting Screen]
[Report File Name Configuration]
You can configure the report file name using combinations of the following
items: Patient ID (PID), First Name, Surname, Gender, User Date, Scan Date (S-
Date), Scan Time (S-Time), etc.
No. & Item Description
①
Use the ( ) Add icon to move the selected format item to section
②.
②
Format Items Included in the Report File Name
Use the ( ) Remove icon to remove items from the file name.
Use the ( , ) arrow icons to change the order in which the
items appear in the file name.
User Defined
You may define your own custom format.
After entering the format, use the ( ) Add icon to add it to
section ②.
Delimiter
You can select a delimiter to separate each format item.
(None, /, comma (,), underscore (_), hyphen (-)).
Space Around
Delimiter
You can choose whether to include spaces before or after the
delimiter.
(None, Before, After, Both)
File Name
Preview
Displays a real-time preview of the file name according to the
selected format.
(e.g., S-Date-S-Time)
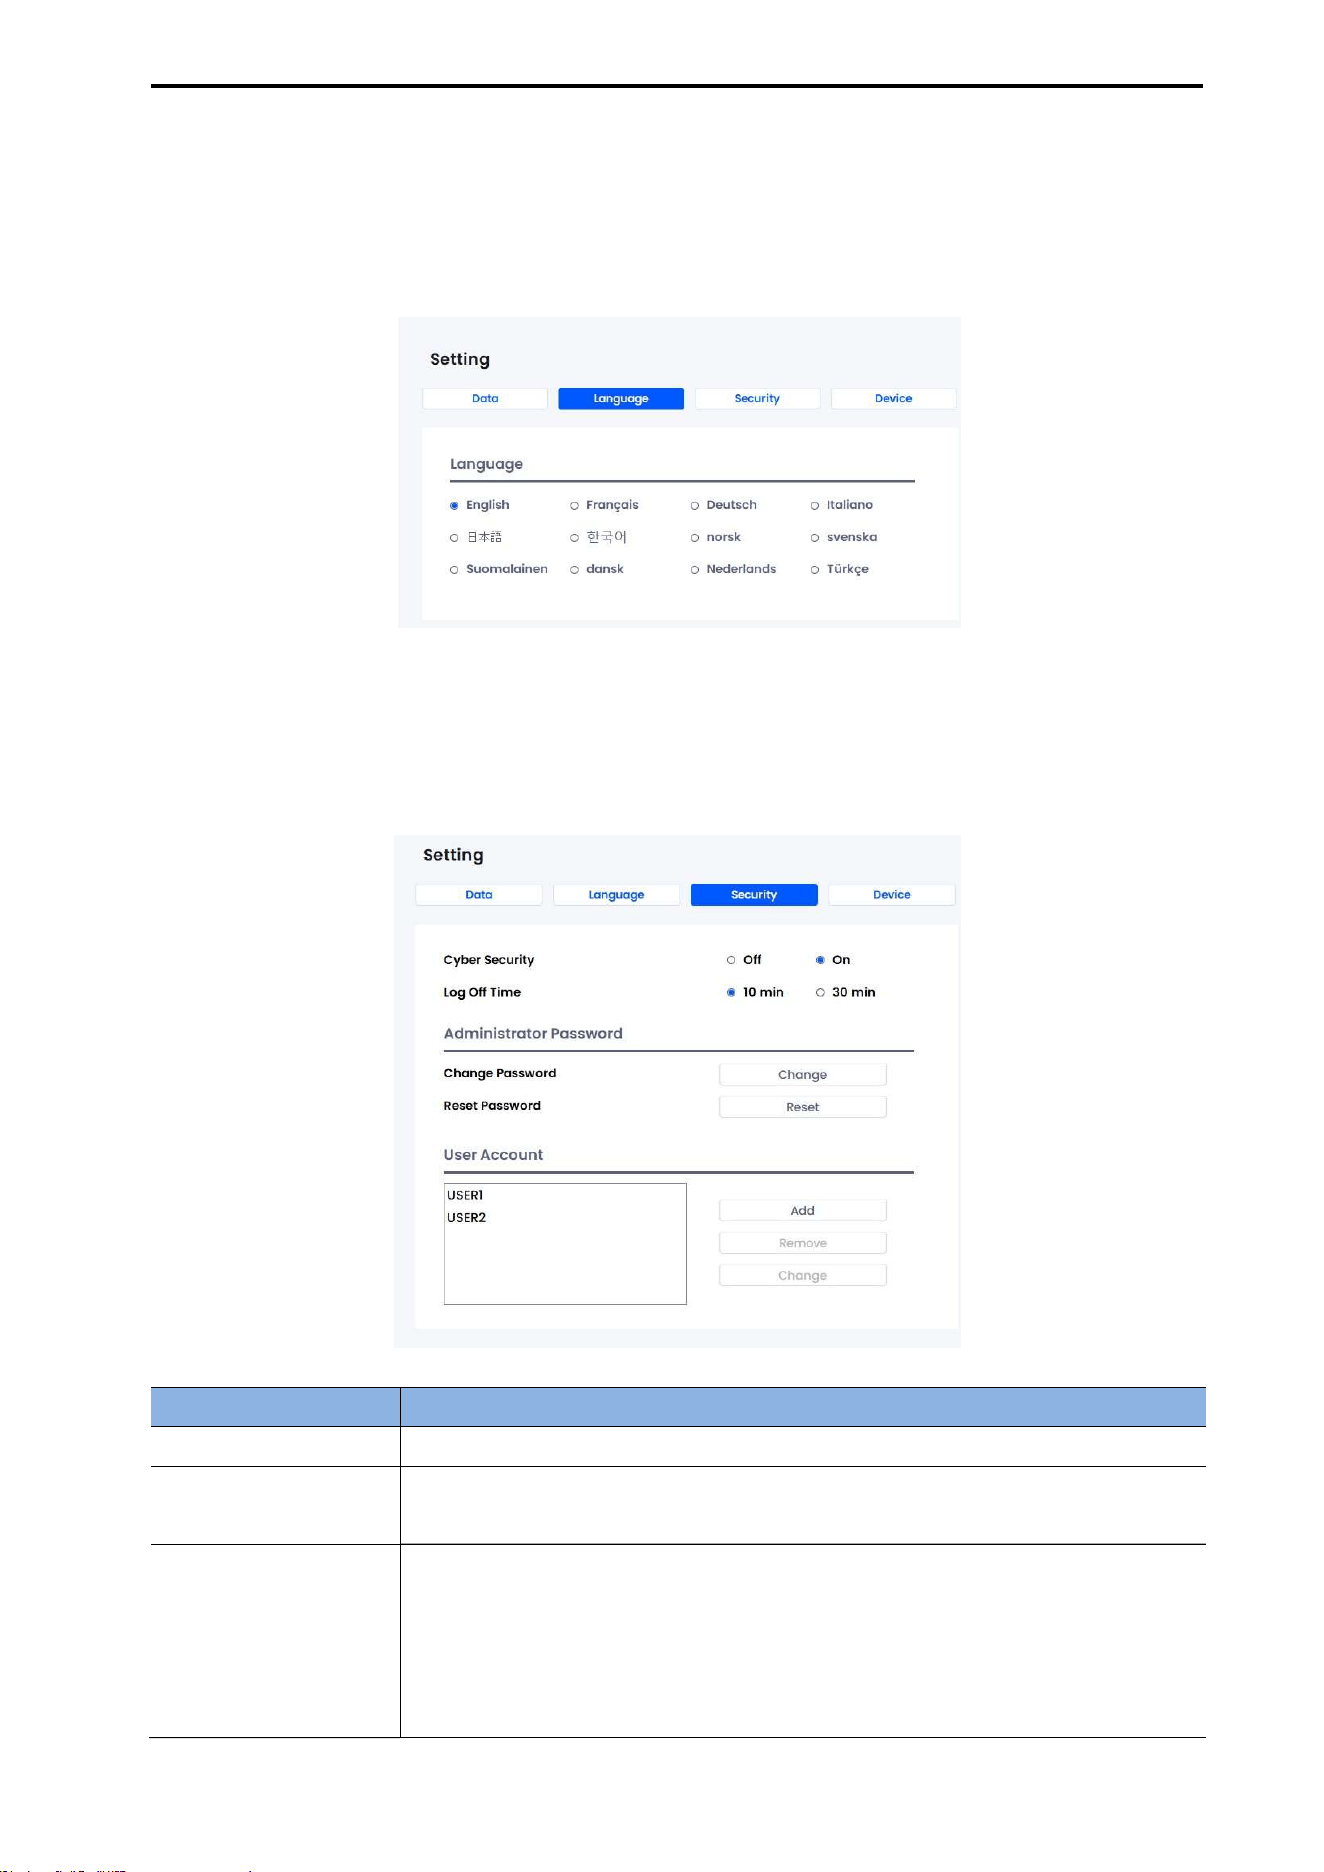
CUBEScan
TM
BioCon-V Operator’s Manual
51
7.10.2. LANGUAGE SETTINGS
In the [Language] tab, you can select the display language for the program.
The program interface will switch to the selected language immediately.
7.10.3. SECURITY
In the [Security] tab, you can configure security-related features such as passwords, automatic logoff,
and user accounts.
Item Description
Cybersecurity Enables or disables the program’s security features.
Log Off Time
Automatically logs off the program after the specified period of inactivity.
Re-entering the password is required when logging back in.
Change Administrator
Password
The administrator password can be changed by following the steps below.
Click the [Change] button.
When the administrator password window appears, enter the current
password.
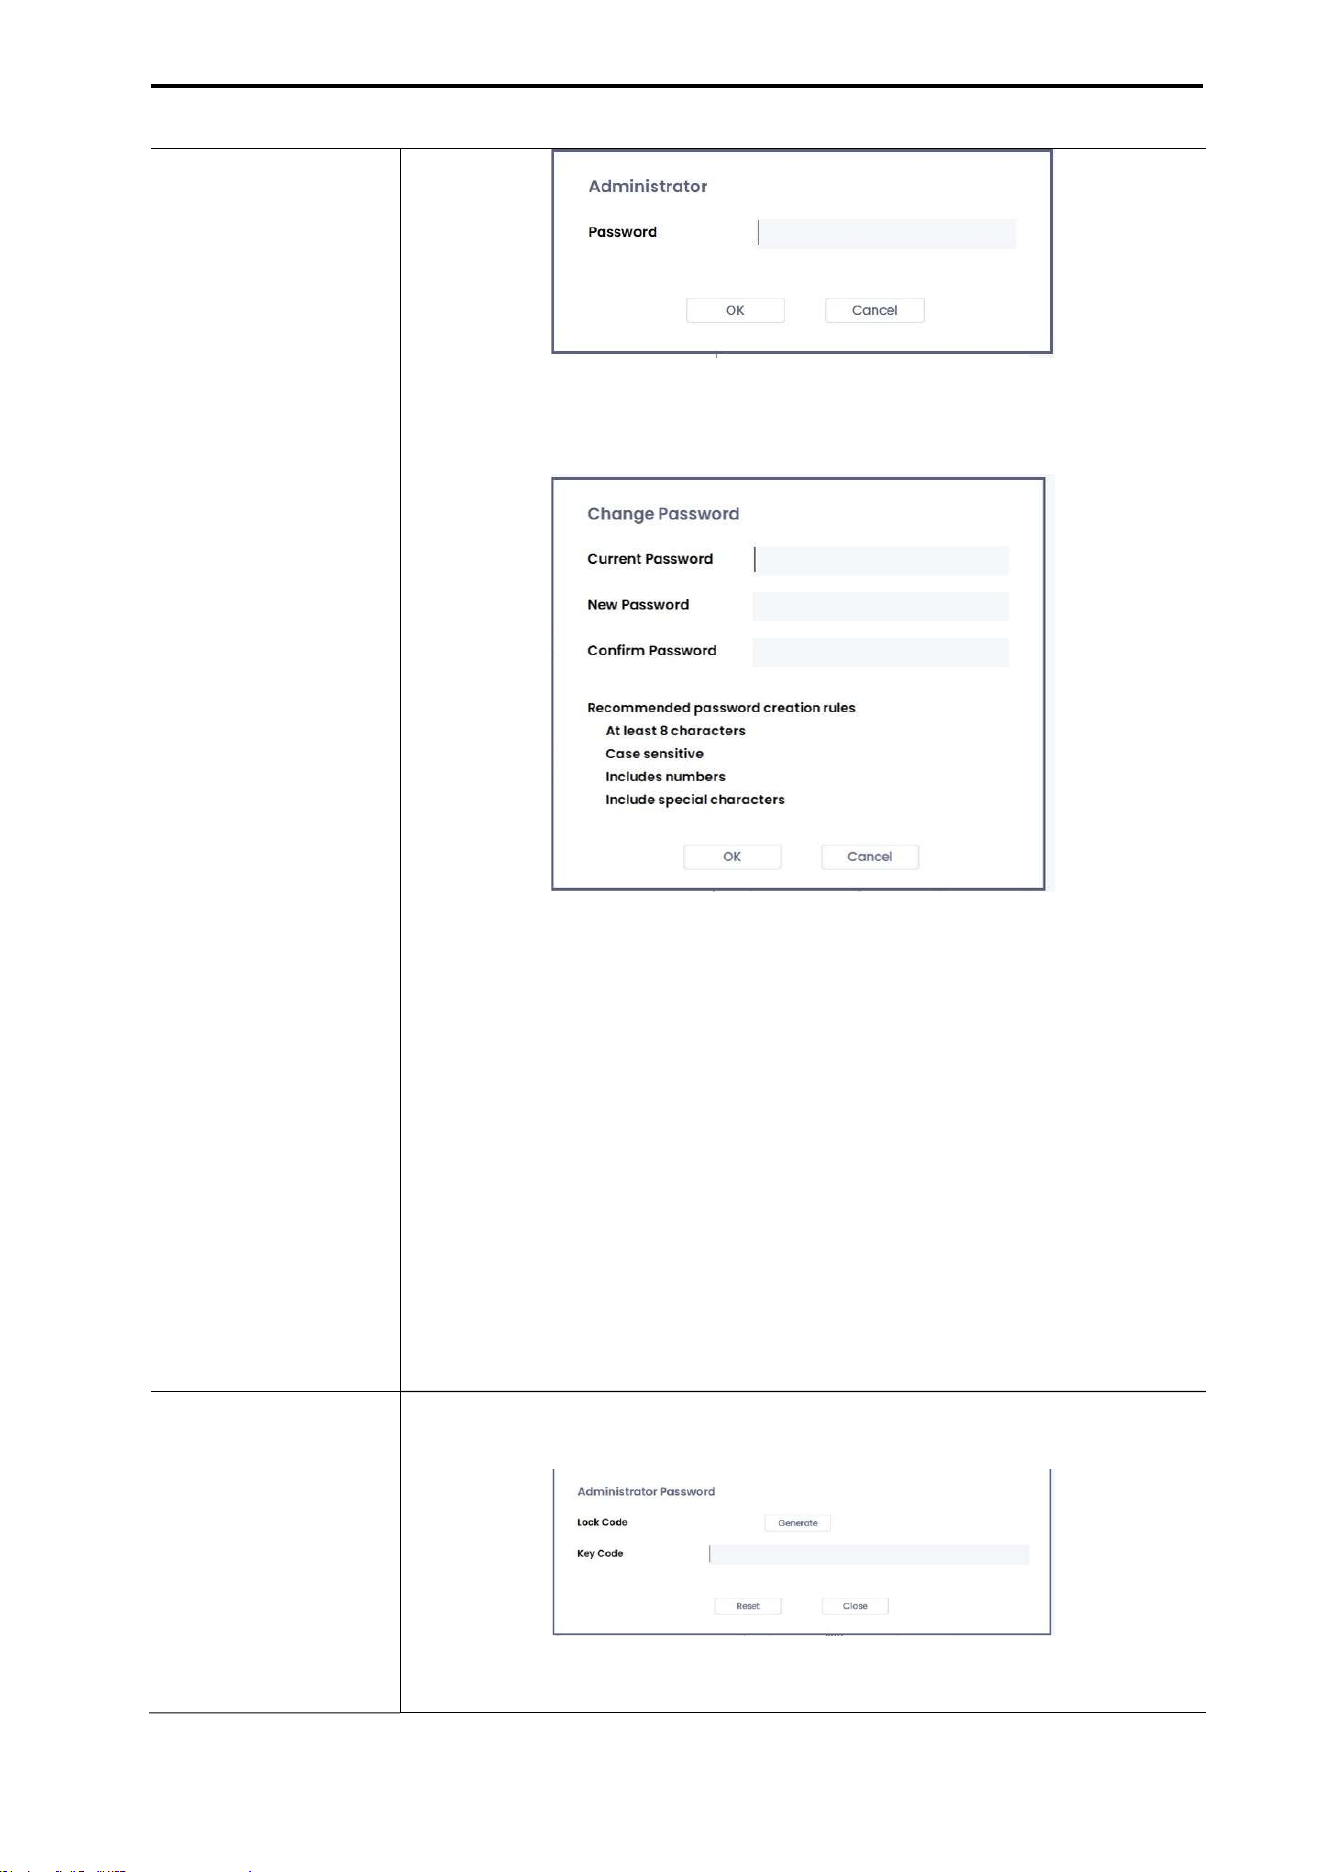
CUBEScan
TM
BioCon-V Operator’s Manual
52
The password change window will open.
In the Current Password field, enter the existing password.
In the New Password field, enter the new password you want to set.
In the Confirm Password field, re-enter the same password entered in
Step 5.
Click [OK] to complete the password change.
NOTE:
The new password must meet all of the following conditions.
∙ It must be at least 8 characters long.
∙ It must include a combination of uppercase letters, lowercase
letters, numbers, and special characters.
∙ Passwords are case-sensitive.
Reset Password
If you forget the existing password, you can reset it as follows.
Click the [Reset] button to open the administrator password window.
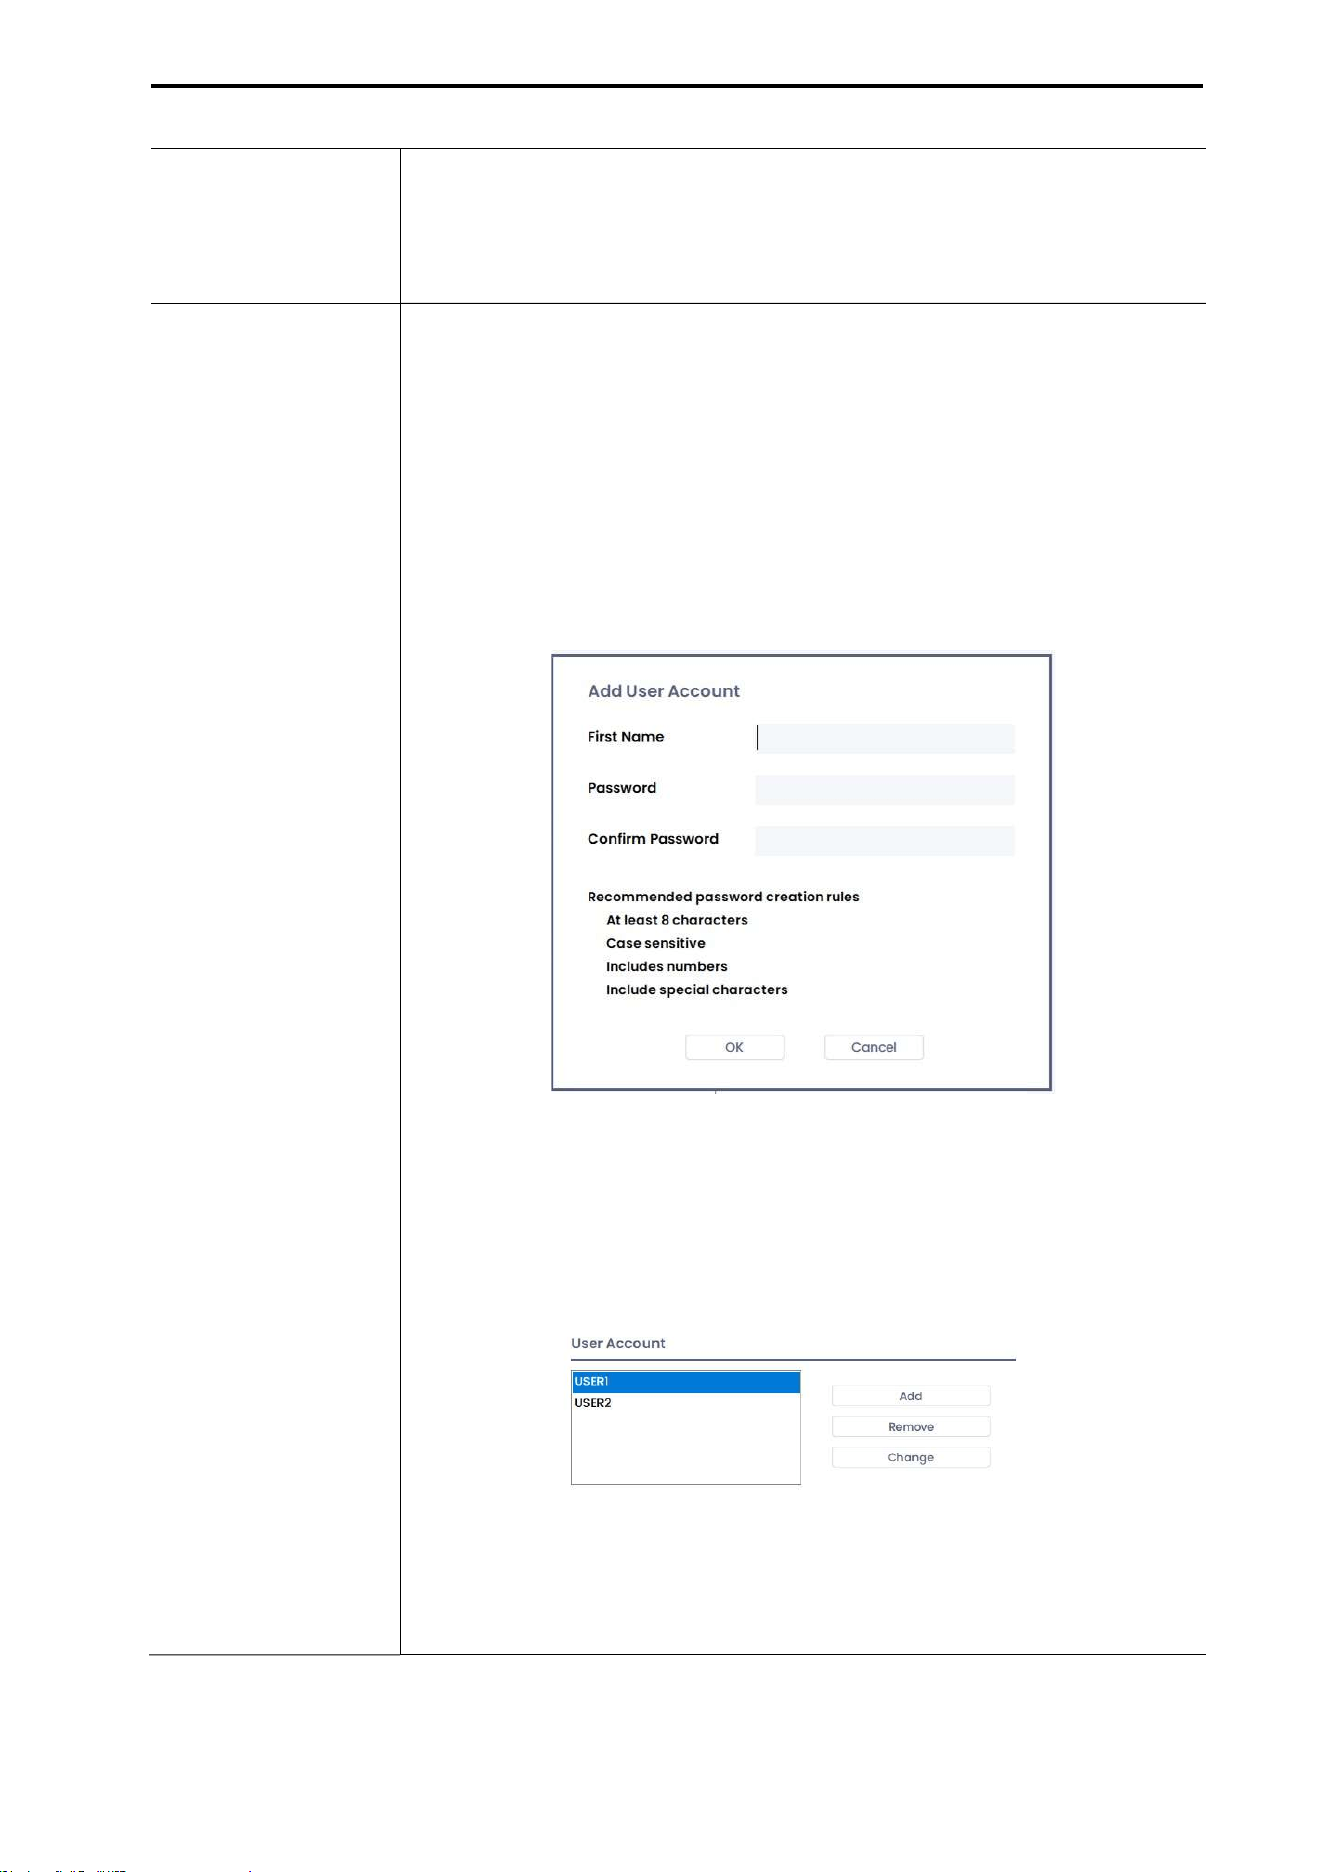
CUBEScan
TM
BioCon-V Operator’s Manual
53
Click the [Generate] button to create a new lock code.
Provide the generated lock code to the distributor or manufacturer.
Enter the key code issued by the distributor or manufacturer.
5) Click [Reset] to complete the password reset.
User Account
You can add, remove, or modify user accounts.
[Add User Account]
Click the [Add] button.
In the Add User window, enter the Name, Password, and Confirm
Password fields. The password must satisfy at least three of the following
conditions (8 characters or more, uppercase/lowercase rule, numbers,
special characters).
Click [OK] to create the new user account.
[Remove User Account]
Select the user account you want to delete from the list.
Click [Remove].
When the message “Are you sure want to delete?” appears, click [Yes].
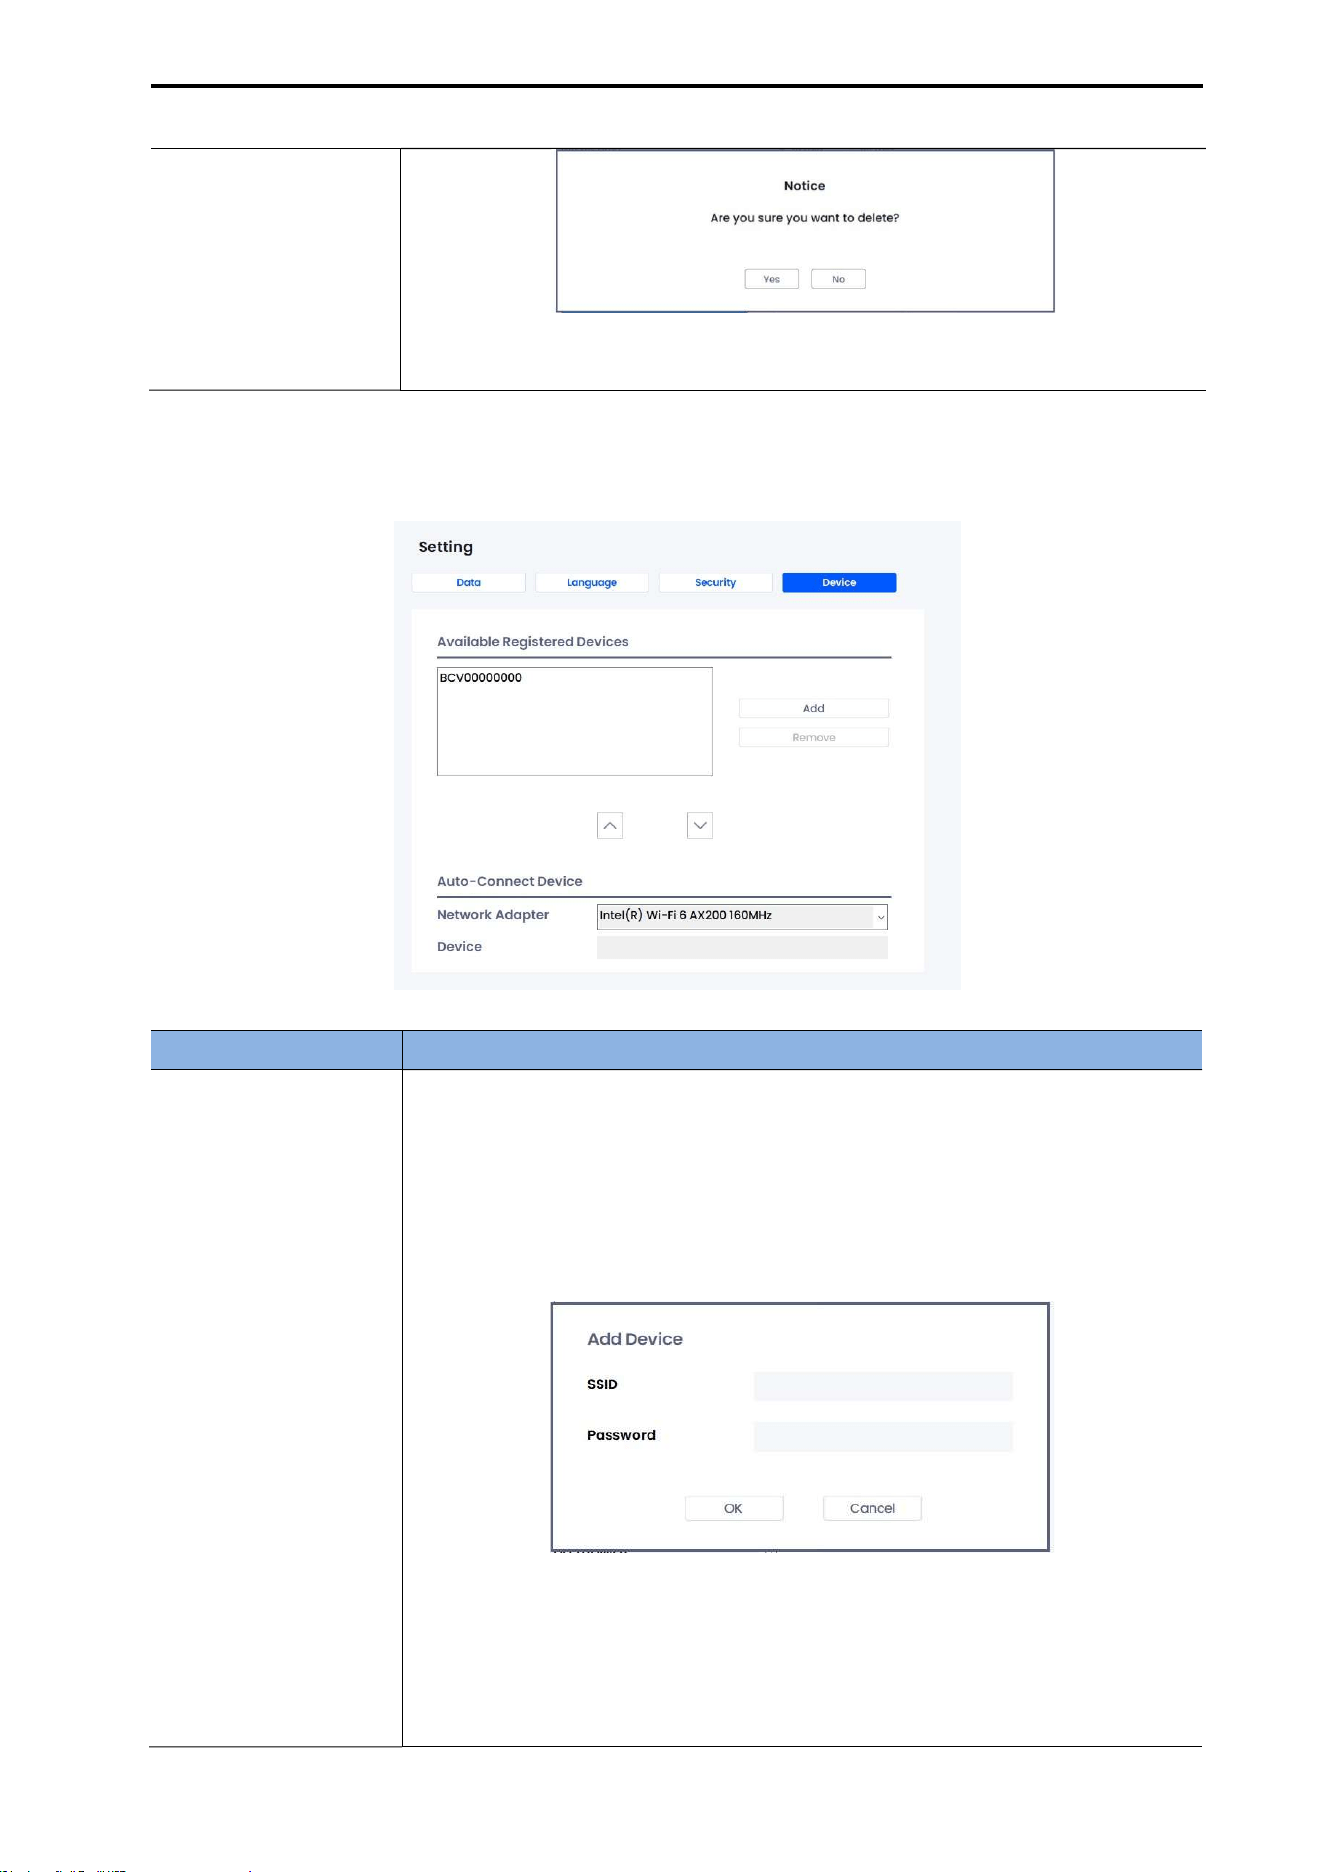
CUBEScan
TM
BioCon-V Operator’s Manual
54
The selected user account will be removed from the list.
7.10.4. DEVICE
Item Description
Available Registered
Device
(1) Click [Add]
In the Available Registered Devices field, click the [Add] button.
(2) Device Add Window Appears
The SSID and Password input fields will be displayed.
(3) Enter Information and Connect
Enter the SSID and password, then click [OK].
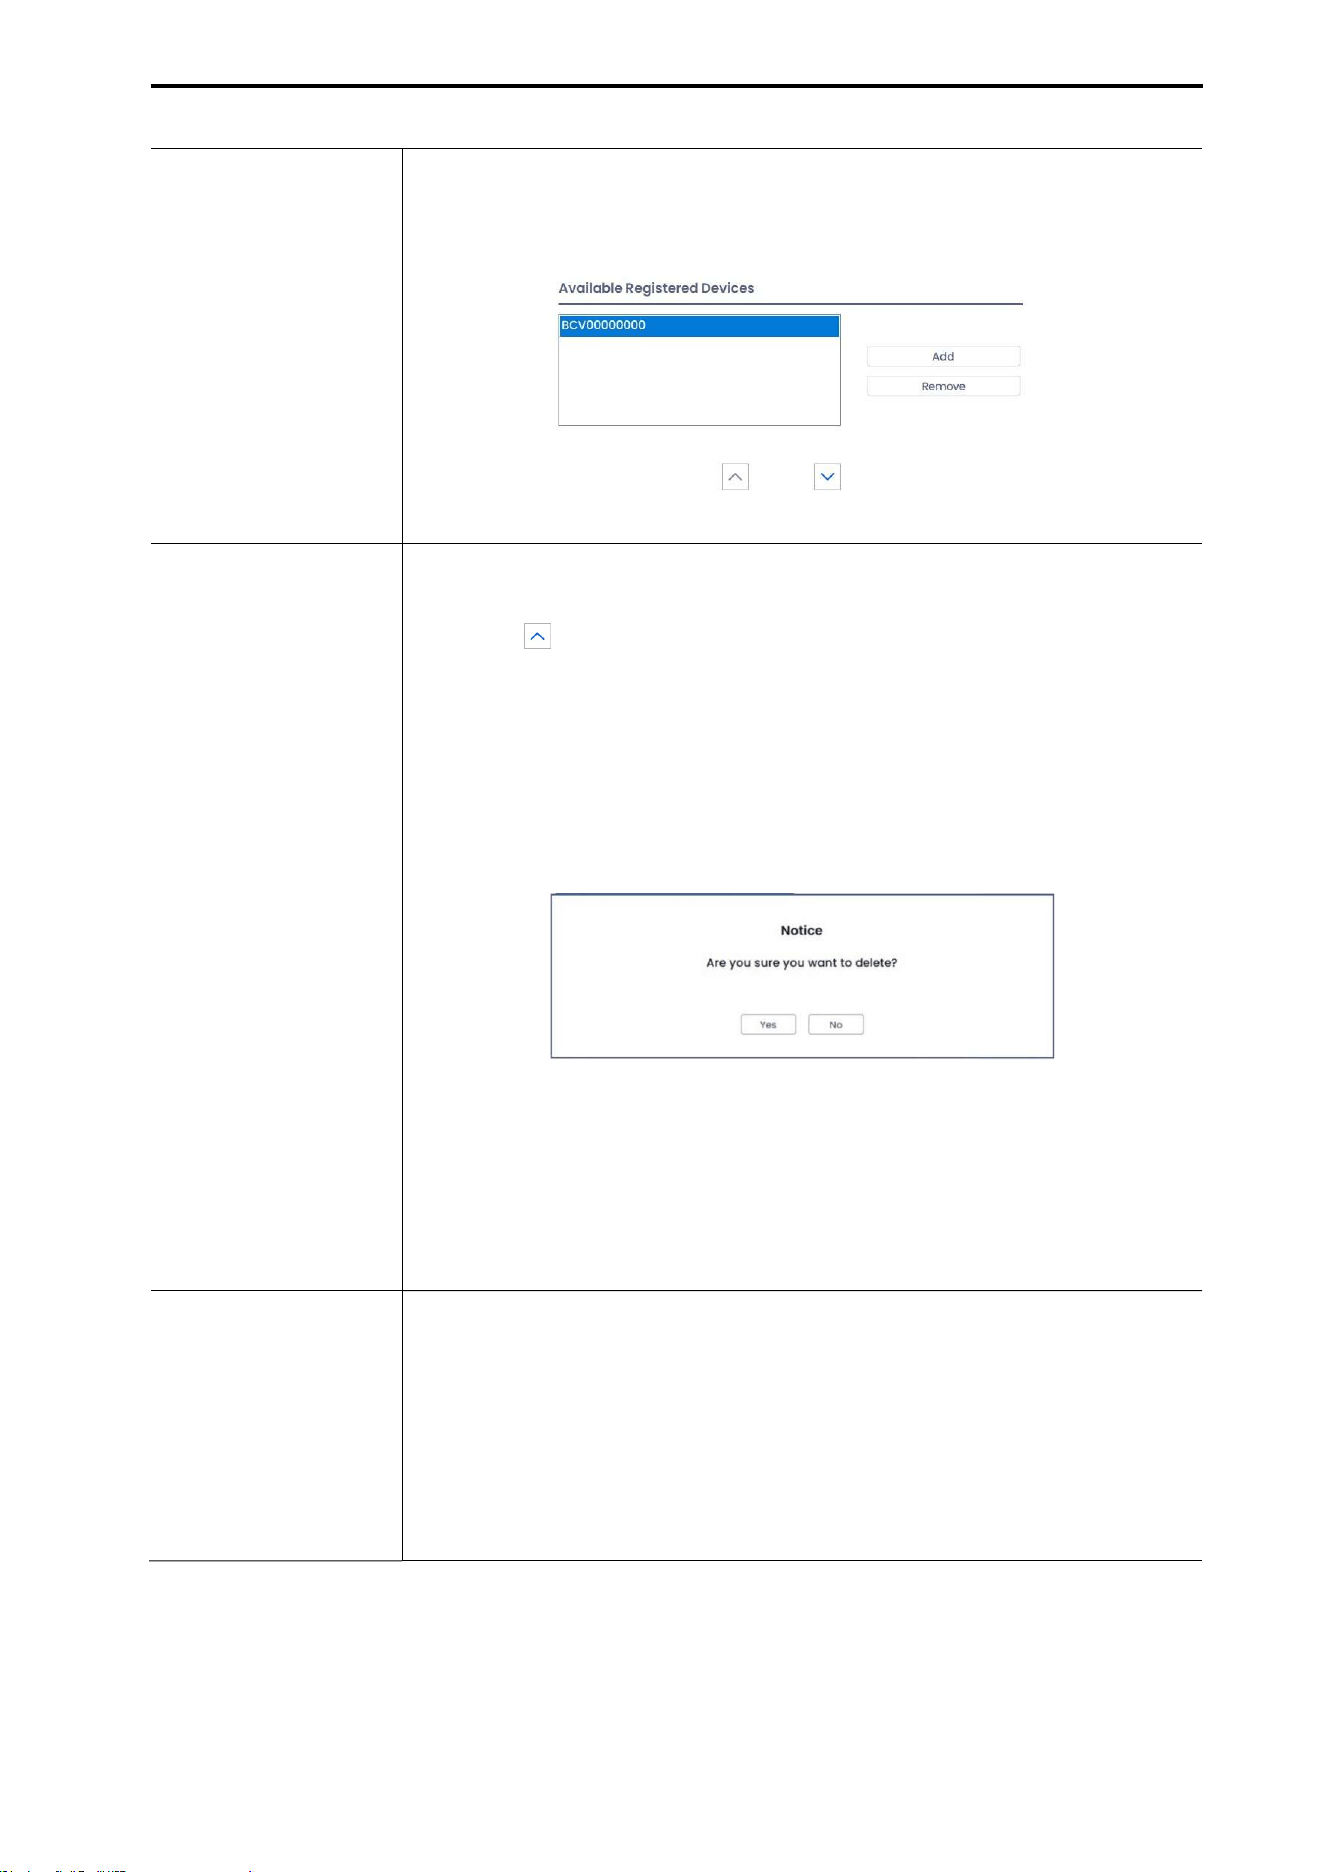
CUBEScan
TM
BioCon-V Operator’s Manual
55
(4) Confirm Addition
The newly added device will appear in the Available Registered Devices list.
Remove Device
(1) Disable Auto-Connect (if enabled)
If the device to be removed is set as “Auto Connect,” click the [Disable]
button ( ) on the right side to turn off auto-connection.
Once Auto-Connect is disabled, the [Remove] button becomes active in
the Available Registered Devices list.
(2) Execute Removal
Select the device to remove and click the [Remove] button.
(3) Confirm Removal
When the message “Are you sure you want to delete?” appears, click [Yes].
(4) Completion
The selected device will be deleted from the list.
Auto Connect Device
CubeLite can automatically connect to the selected device when the
program starts.
(1) Select Device
In the Available Registered Devices list, select the device you want to set for
Auto Connect.
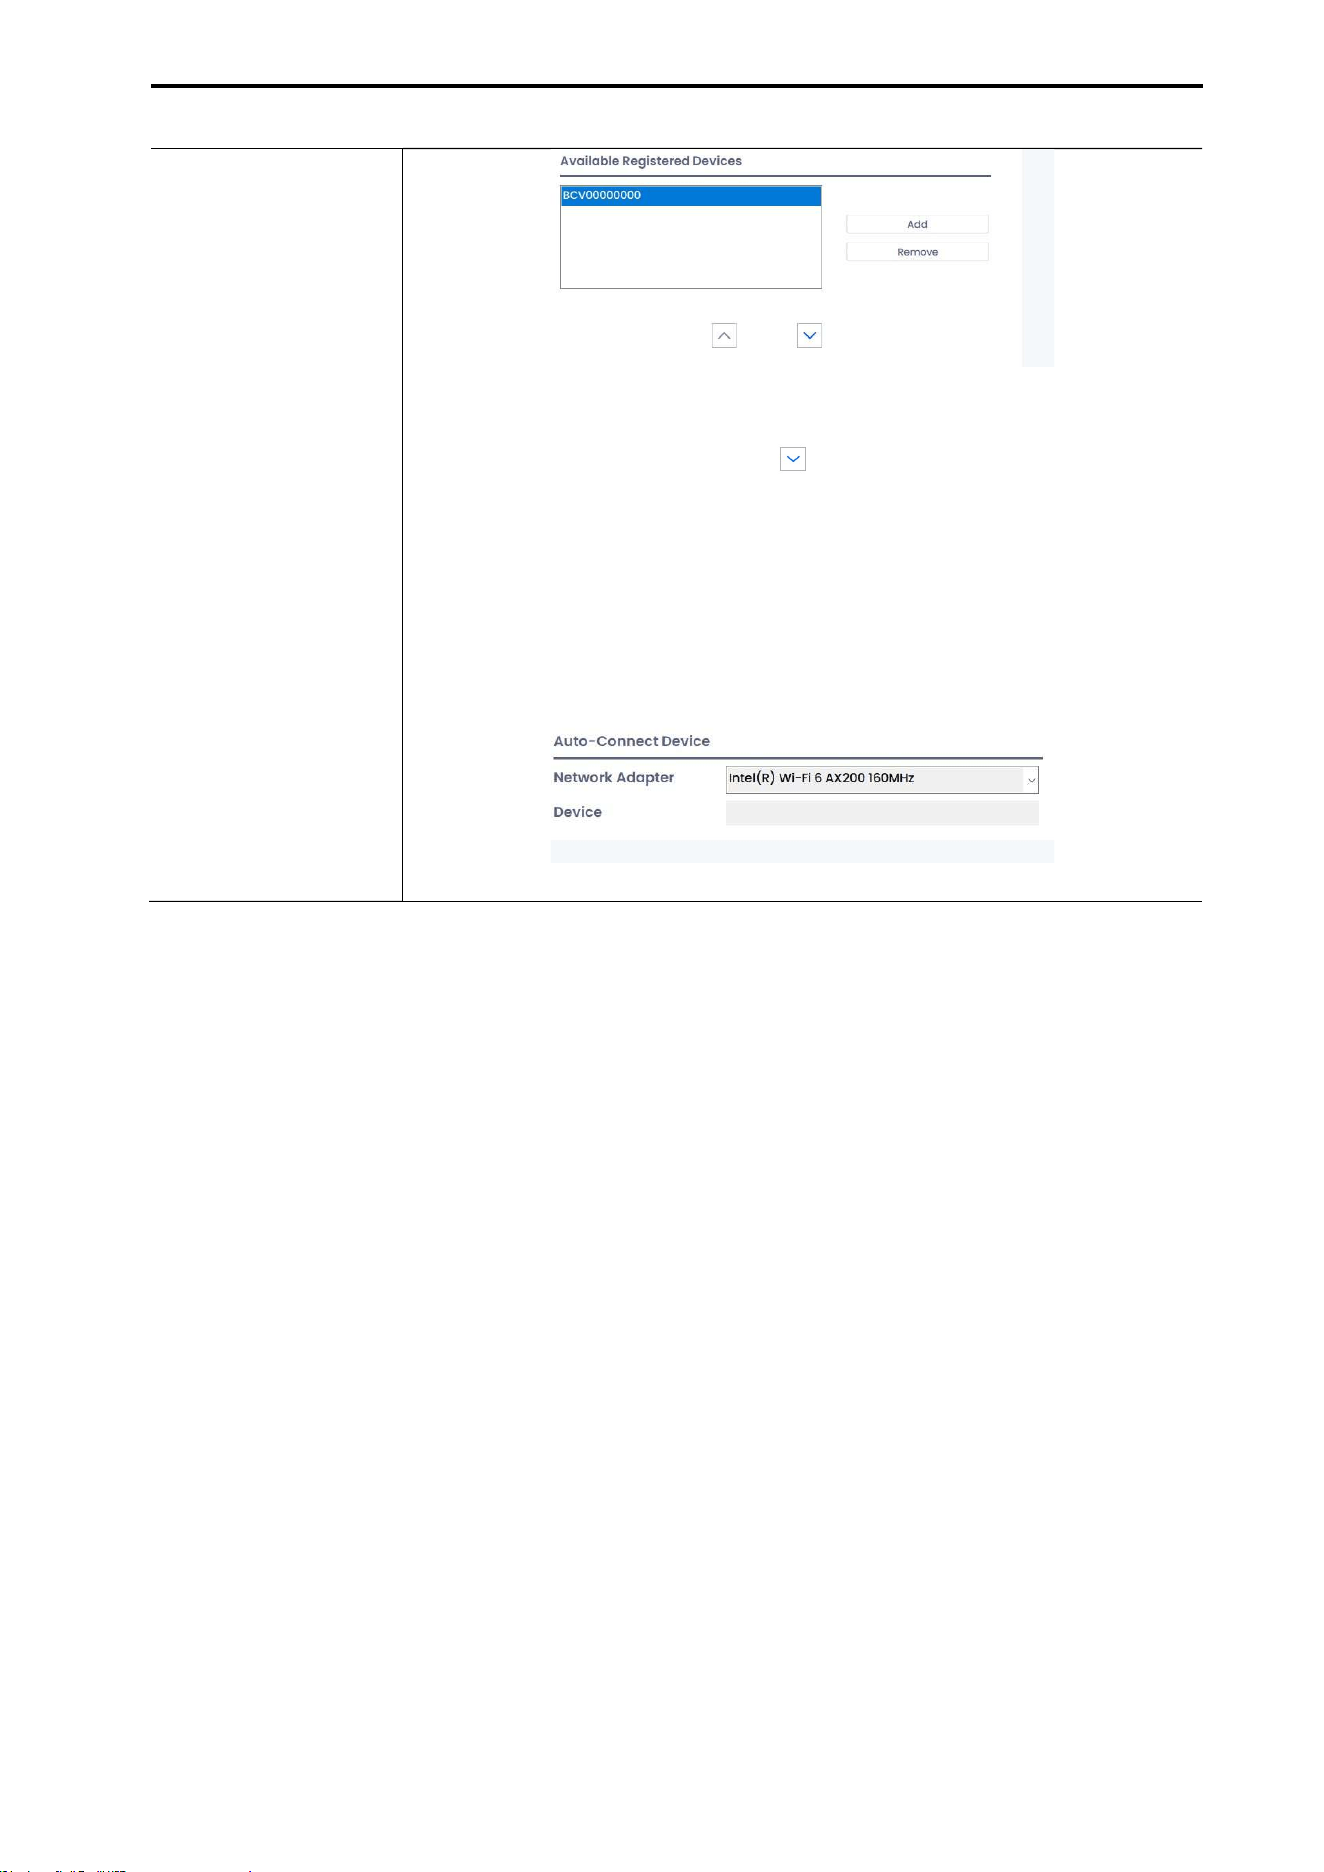
CUBEScan
TM
BioCon-V Operator’s Manual
56
(2) Enable Auto-Connect
Click the [Auto Connect] button ( ) next to the selected device.
A status window will appear showing “Connecting to device…”
(3) Registration Complete
After setup, CubeLite will automatically connect to the device (e.g.,
BCV00000000) each time it is launched.

CUBEScan
TM
BioCon-V Operator’s Manual
57
8. TABLET PC APPLICATION - BIOCON-V MANAGER
8.1. INFORMATION
8.1.1. GENERAL INFORMATION
This section explains how to use the BioCon-V Manager application.
Product specifications or the contents of this operator’s manual are subject to change without prior
notice for the purpose of product performance improvement.
Before using the application, please read and fully understand the contents of this manual.
Mcube Technology Co., Ltd. shall not be held responsible for any problems that occur under the
following circumstances.
When the software is installed and used on a smart device other than a tablet (only tablets are
supported).
When the software is not used in accordance with the instructions provided in this operator’s
manual.
When the software is modified arbitrarily by non-professionals or users.
When the tablet used does not meet the minimum supported specifications.
When the tablet has been altered or modified in a way that voids the manufacturer’s warranty.
CAUTION
MISE EN GARDE
It is recommended that all devices on which BioCon-V Manager is installed and operated have
appropriate security software installed.
Il est recommandé d’installer un logiciel de sécurité sur tous les appareils où BioCon- V Manager est
installé et utilisé.
To protect personal information, avoid using weak passwords and change your password regularly.
Pour protéger les informations personnelles, évitez d’utiliser des mots de passe faibles et changez-
les régulièrement.
To prevent data loss, back up patient data periodically.
Pour éviter toute perte de données, sauvegardez régulièrement les données des patients.
8.1.2. Purpose of Software
BioCon-V Manager is a dedicated application designed for managing the configuration of the BioCon-
V device and handling patient information.
8.1.3. Main Function
Change and manage BioCon-V settings.
Perform BioCon-V maintenance.
Manage patient data such as transferring or deleting patient information.

CUBEScan
TM
BioCon-V Operator’s Manual
58
8.2. INSTALLING ON A SMART DEVICE
This section explains how to install BioCon-V Manager on a supported smart device.
[Supported Device Specifications]
Only Android OS is supported.
Device CPU RAM
Operating
System
Resolution
Tablet
Exynos 1280 or
higher
4 GB or more
Android 11
or higher
2000x1200 px
or higher
NOTE:
Smart devices other than tablets are not supported.
Only Android operating systems are supported.
Before installing the app, make sure your tablet meets the minimum system requirements.
Updating the tablet’s OS after installation may cause the app to malfunction.
Do not install the app on tablets that have been modified or tampered with (e.g., through
hacking). The app may not operate properly.
8.2.1. INSTALLING ON AN ANDROID SMART DEVICE
(1) Open the Play Store
On your Android smart device, tap the Play Store icon ( ).
(2) Searching for the App
In the Play Store search bar, type “BioCon-V Manager” and tap the Search icon ( ).
(3) Selecting and Install the App
From the search results, select BioCon-V Manager and tap Install.
(4) Opening the App After Installation
Once the installation is complete, tap Open.
(5) Running the App
The BioCon-V Manager app will launch automatically.
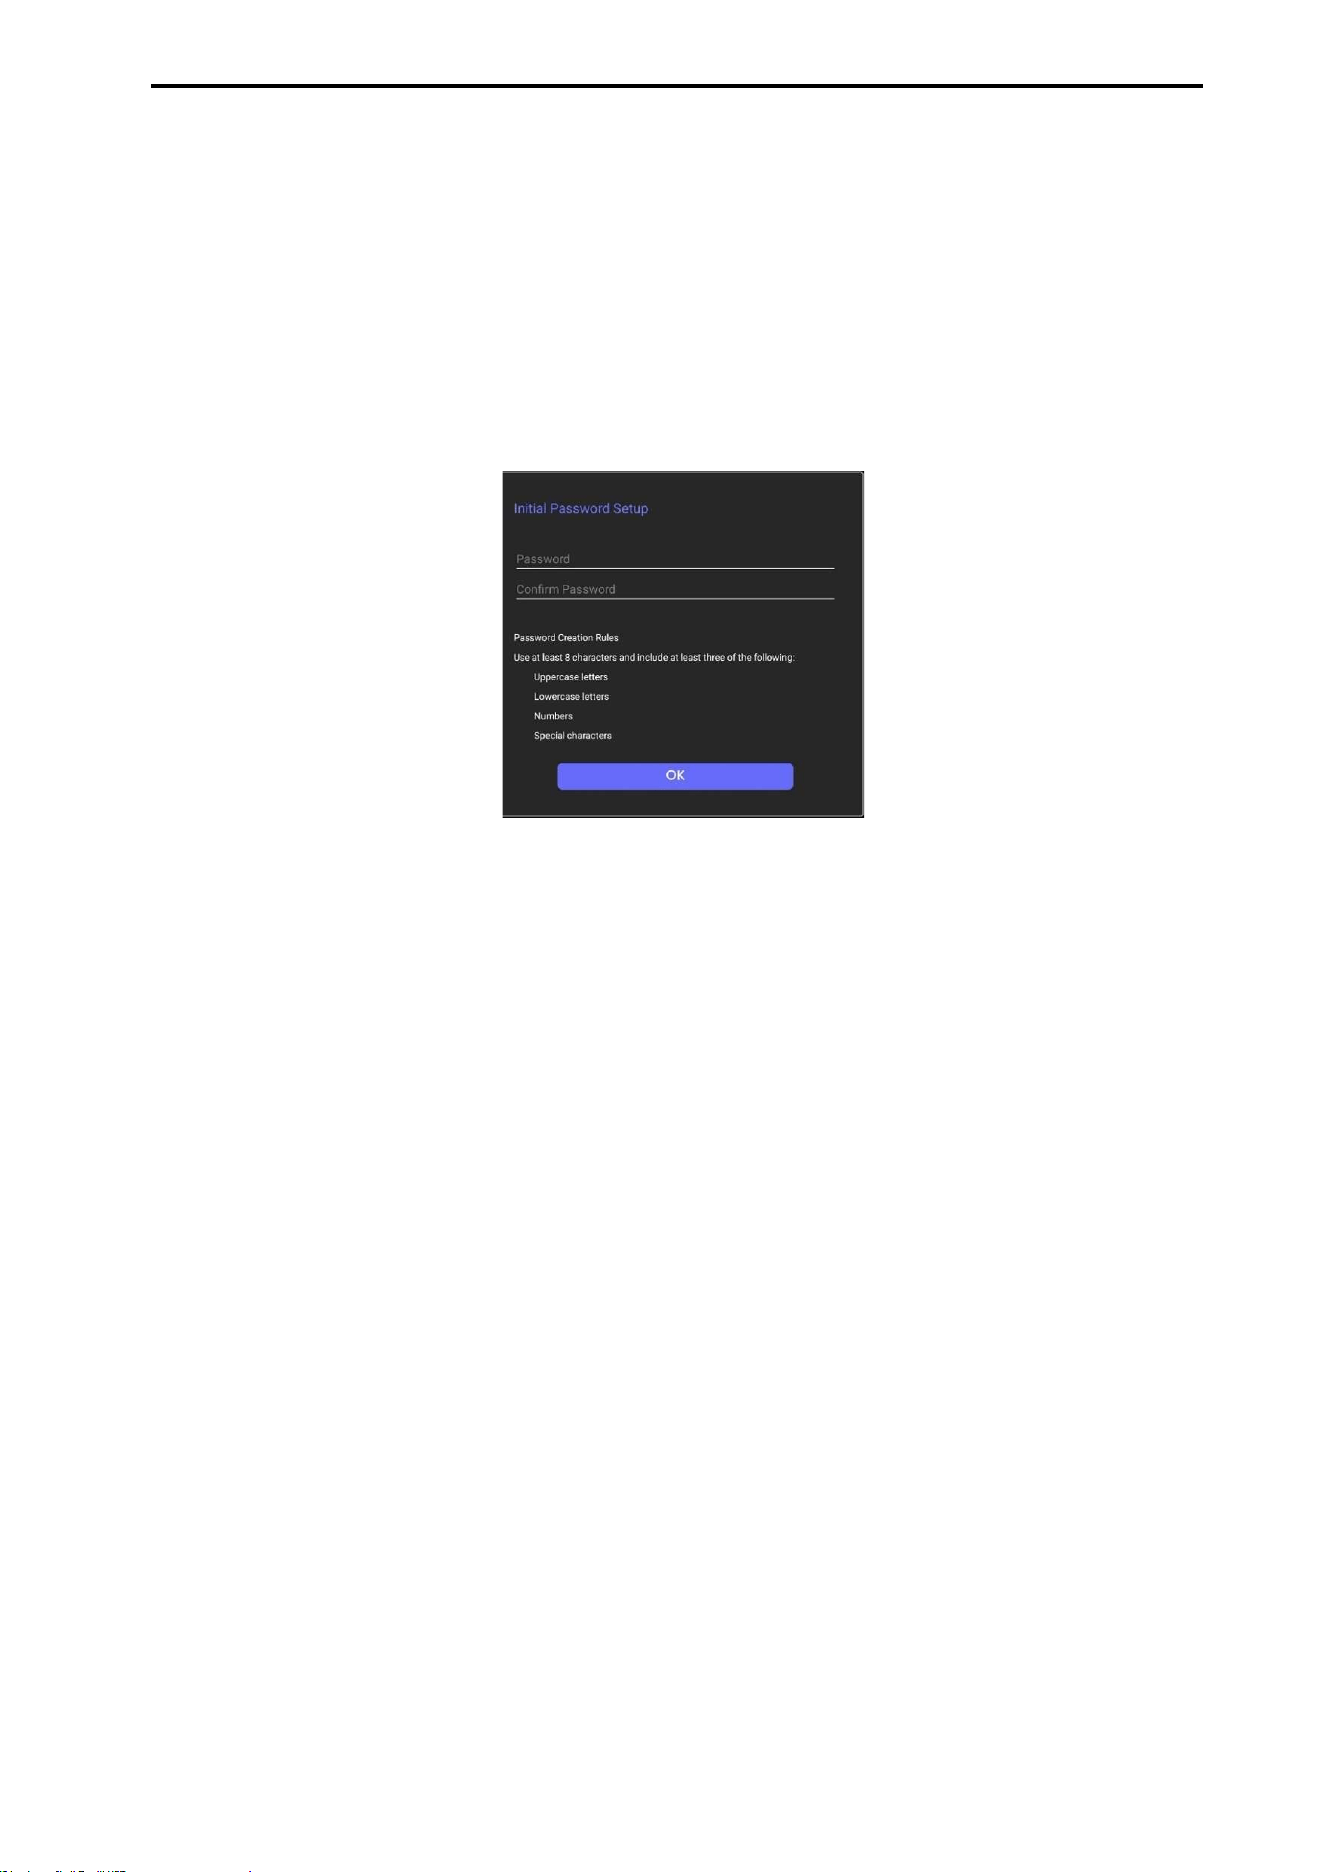
CUBEScan
TM
BioCon-V Operator’s Manual
59
8.2.2. FIRST-TIME LAUNCH
(1) Launching the App
On your tablet, open the BioCon-V Manager app.
(2) Password Setup Screen
When launching the app for the first time, the Password Setup screen appears.
This screen is displayed only once during initial setup.
[First Login Screen]
NOTE: Required App Permissions
Location Permission: Required for Wi-Fi scanning and connection functions. Location information is
not stored.
Camera Permission: Used for QR code scanning. Captured images are not saved.
Network Permission: Required for communication with the device and connection to the server.
Wi-Fi Permission: Required to connect to and disconnect from Wi-Fi networks.
(3) Creating a Password:
The password must be at least 8 characters long and include a combination of three of the following.
uppercase letters, lowercase letters, numbers, and special characters.
(4) Entering the Password
Enter the new password in the New Password field, then re-enter the same password in the Confirm
Password field.
(5) Completing the Password Setup
Tap the [OK] button to complete the password setup.
After confirming the password on the Password Settings screen, the Login screen will appear.
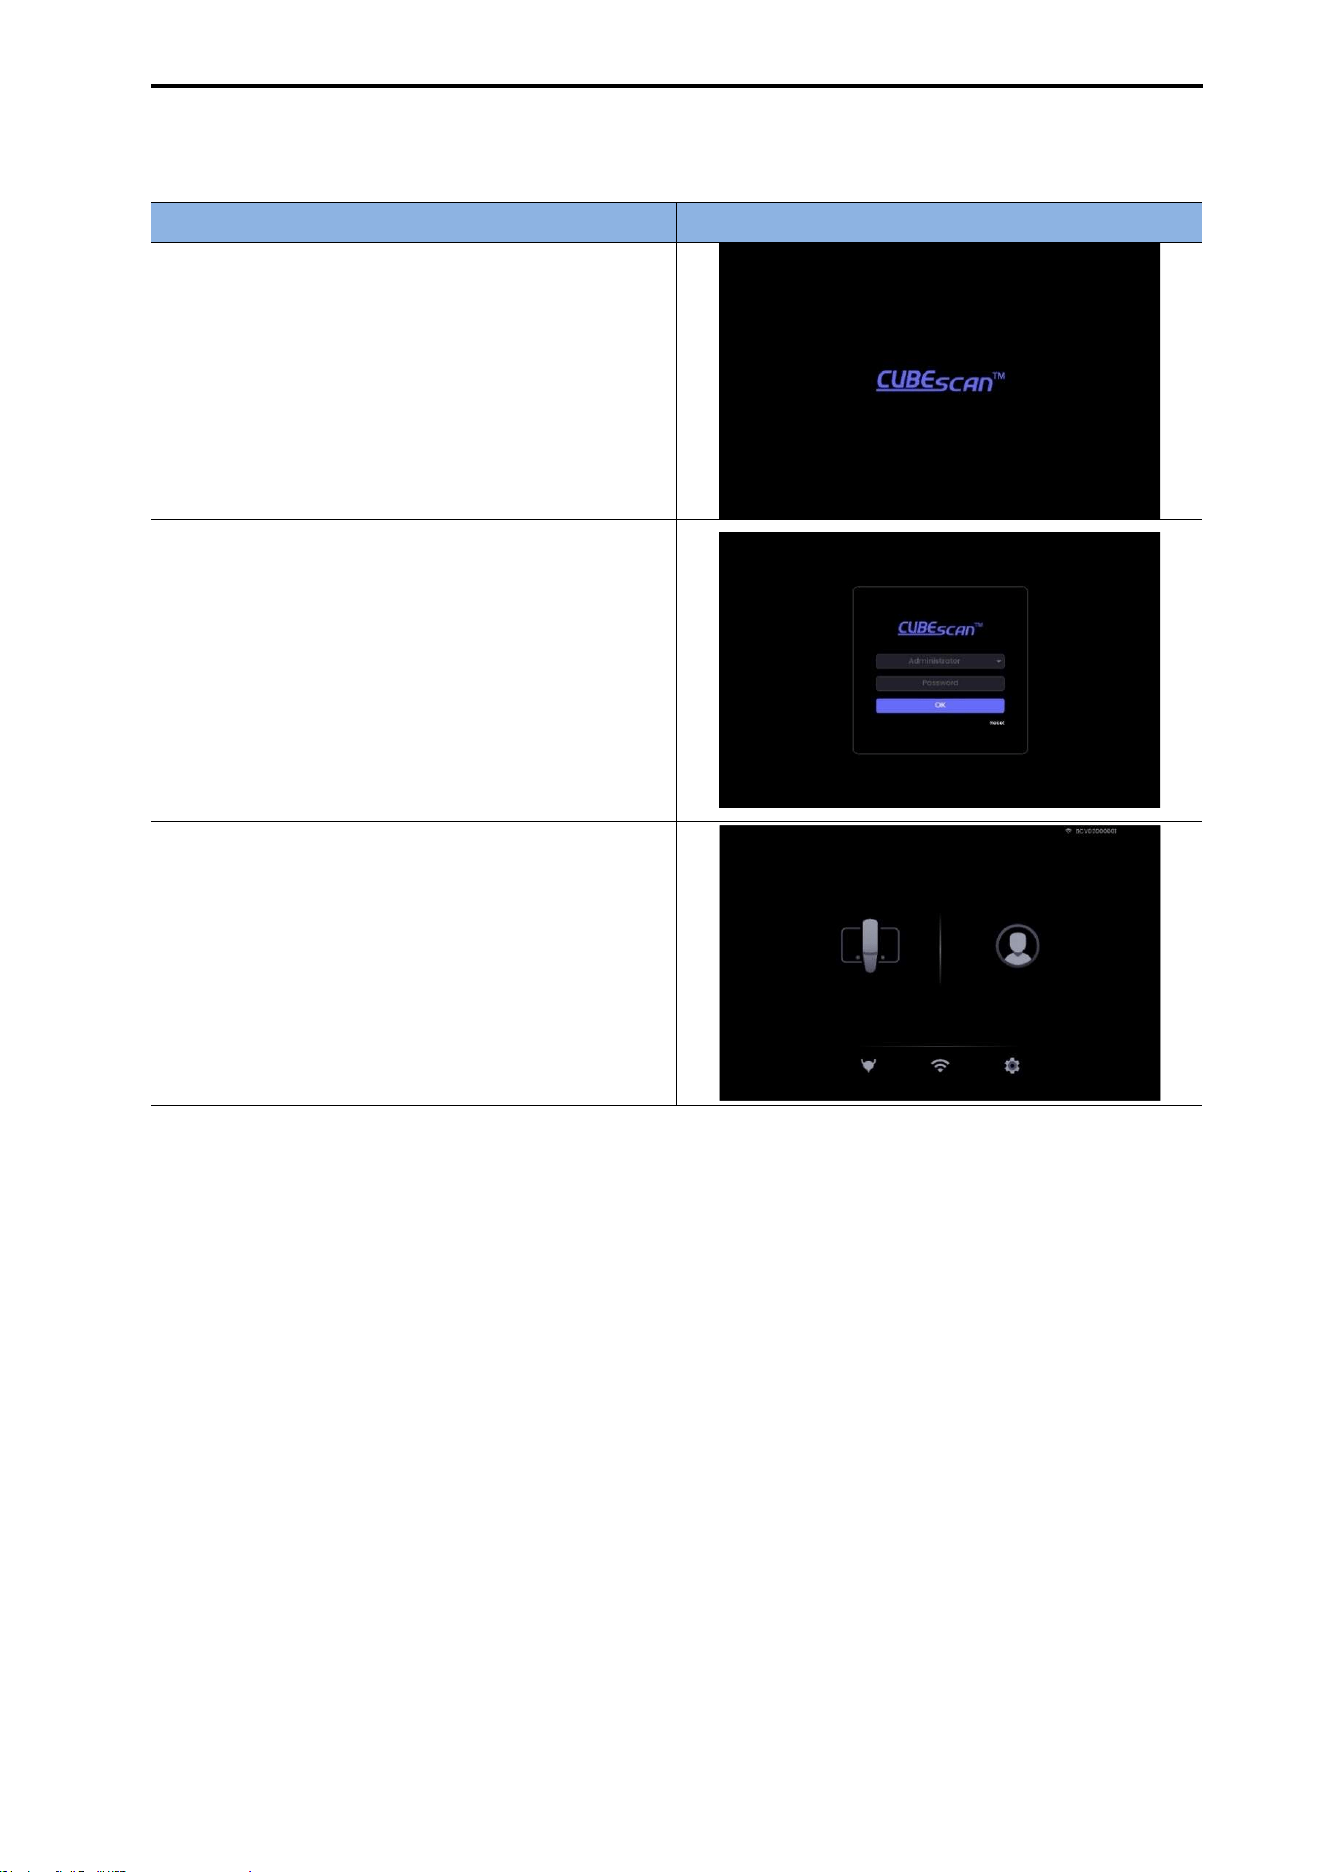
CUBEScan
TM
BioCon-V Operator’s Manual
60
8.3. LOG IN
Procedure Screen
(1) Launch the App
When you open the BioCon-V Manager app on
your tablet, the startup screen appears.
(2) Login Screen and Password Entry
After about 2 seconds, the Login screen is
displayed.
Enter your password and tap the [OK] button.
(3) Home Screen
If the password is entered correctly, the BioCon-
V Home Screen appears.
NOTE:
You cannot proceed to the Home screen if the password is entered incorrectly.
The password is case-sensitive, so be sure to enter it exactly as it was set.
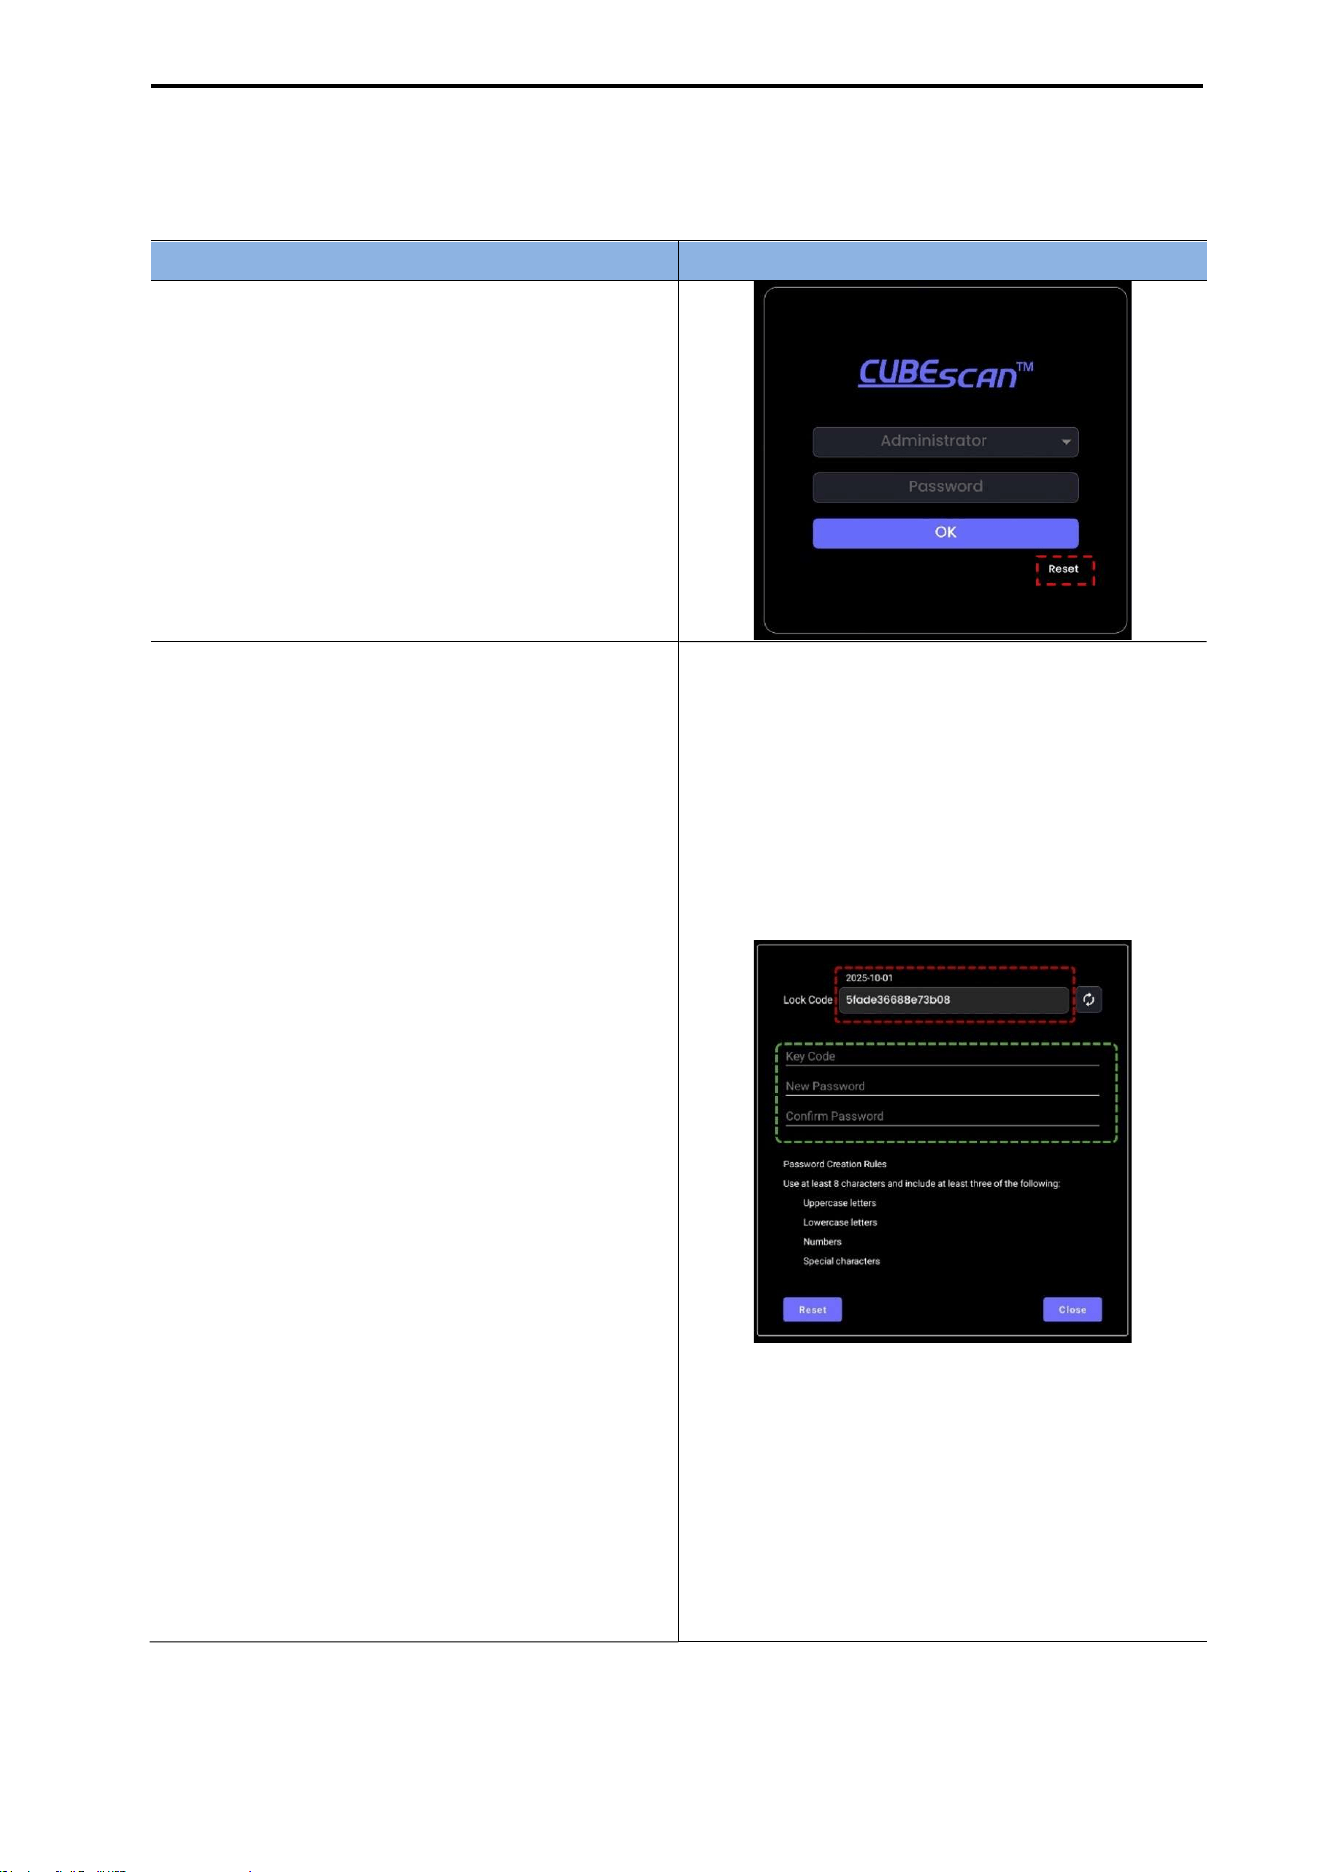
CUBEScan
TM
BioCon-V Operator’s Manual
61
8.4. RESETTING THE PASSWORD
If you forget your password, follow the steps below to reset it.
Procedure Screen
(1) Select the Reset Button
Launch the BioCon-V Manager app.
On the startup screen, tap the [Reset] button.
(2) Check and Send the Lock Code
A Lock Code is generated on the Password
Reset screen.
Send the generated lock code to the
distributor or manufacturer.
(3) Enter the Key Code
Enter the key code issued by the distributor or
manufacturer.
(4) Set a New Password
Enter the new password in the New Password
field.
Re-enter the same password in the Confirm
Password field.
Tap the [Reset] button to complete the
password reset.
NOTE:
The password must contain at least 8
characters and include three or more of the
following: uppercase letters, lowercase letters,
numbers, and special characters.
After resetting the password, the app will
move to the Login screen, where you can log
in using the new password.

CUBEScan
TM
BioCon-V Operator’s Manual
62
8.5. HOME SCREEN
On the Home screen, tap any icon to access its corresponding function.
No. Item Description
① Device Settings
Check the device status and change settings.
If the auto-connect device is not registered, the message "No auto-
connect device is registered. Please register an auto-connect device
from the Wi-Fi screen first." appears.
For details, refer to 8.6 Connecting the Device.
②
Patient DB
Management
View and manage the list of patients registered on both the device and
the tablet.
③ Scan
Performs Pre-Scan and Normal Scan.
If the auto-connect device is not registered, the message "No auto-
connect device is registered. Please register an auto-connect device
from the Wi-Fi screen first." appears.
For details, refer to 8.10 Scan Mirroring.
④ Wi-Fi Settings
Connect the tablet and the device via Wi-Fi.
For details, refer to 8.11 Wi-Fi Settings.
⑤ Tablet Settings
You can configure the following features.
Data Format
Change Password
Log-off Time
Language
Activity Log
For details, refer to 8.12 Settings (Tablet Settings).
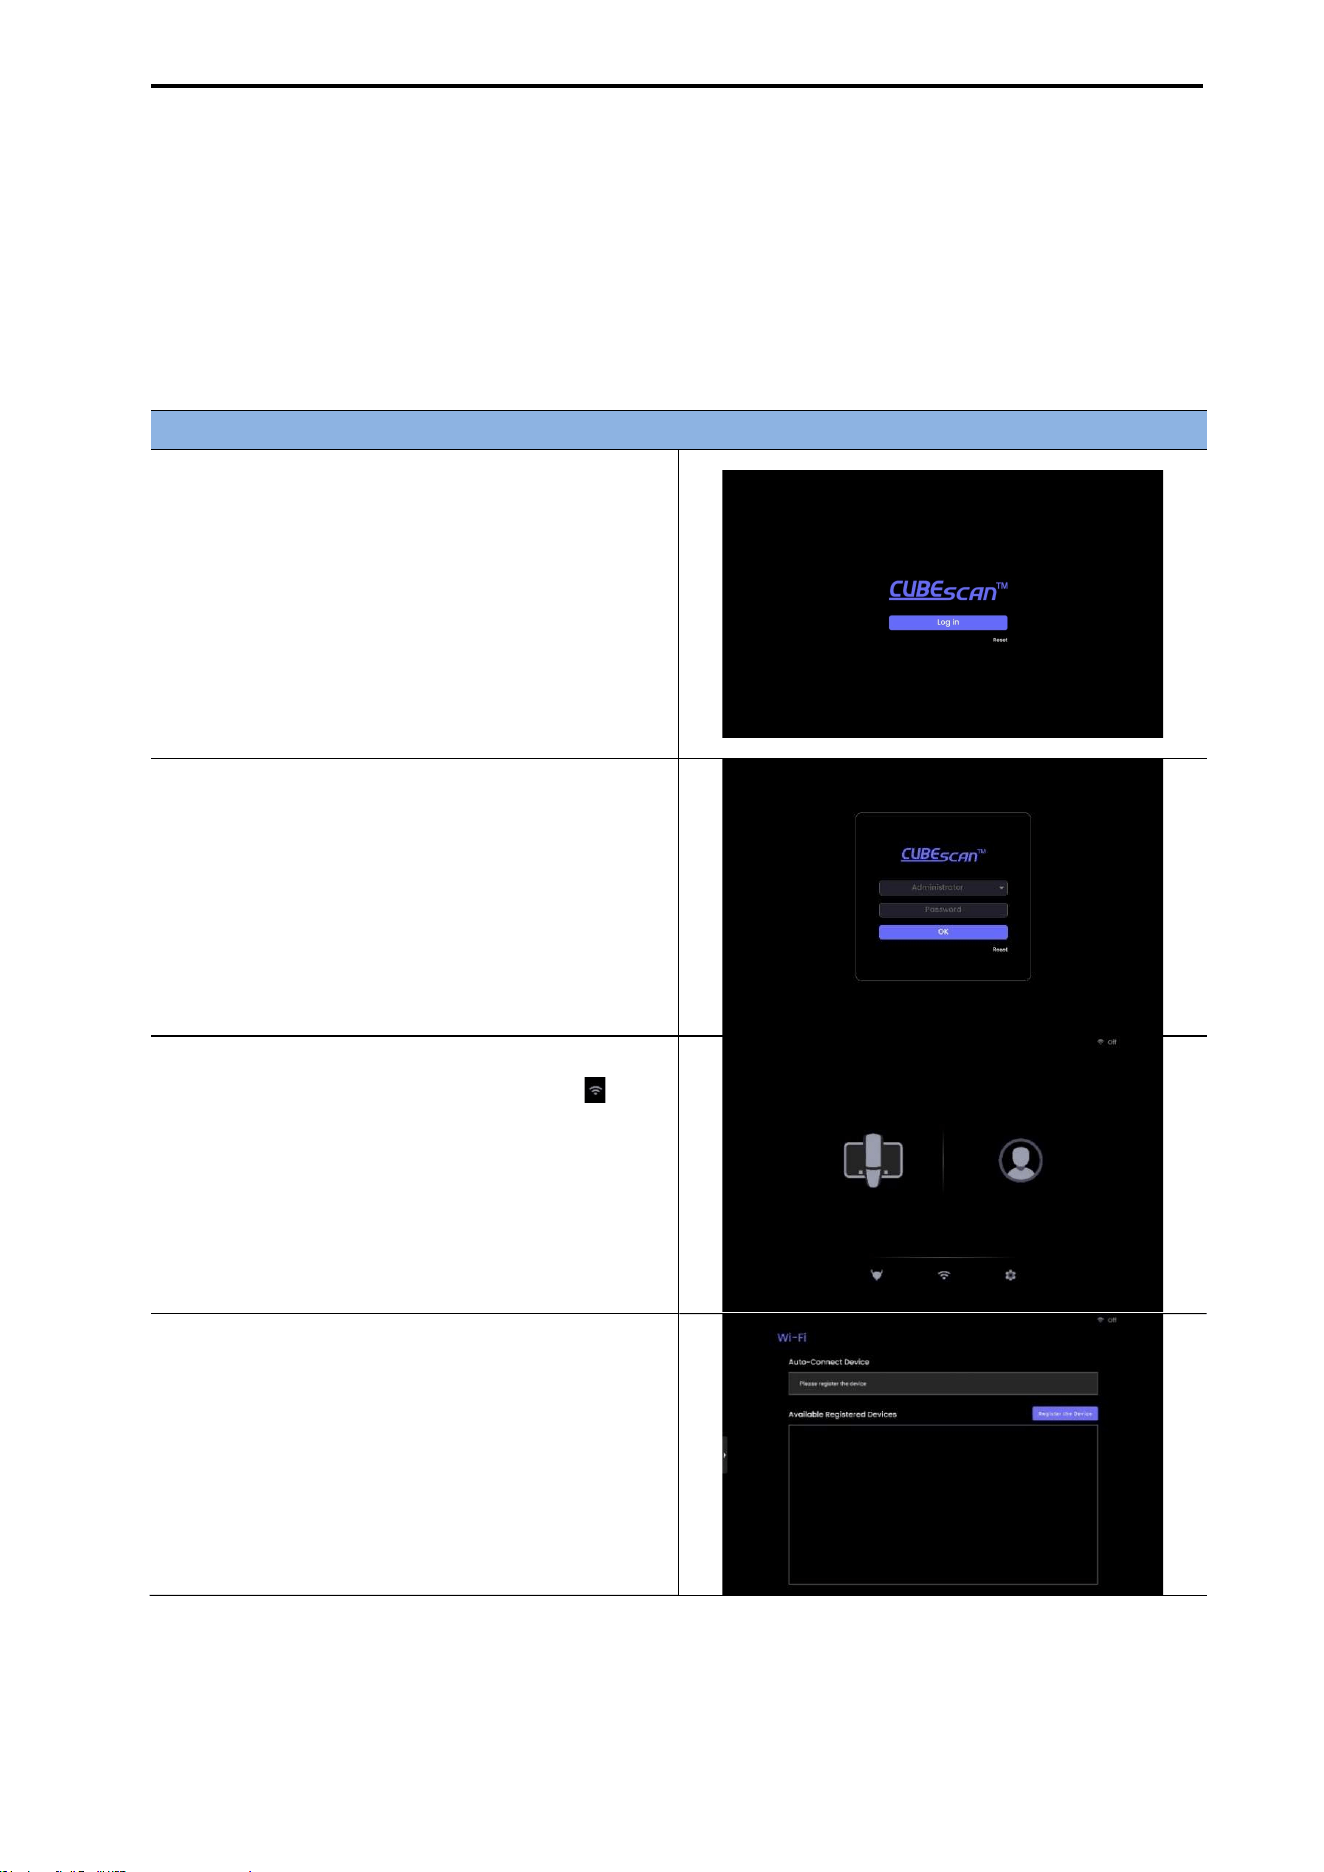
CUBEScan
TM
BioCon-V Operator’s Manual
63
8.6. CONNECTING THE DEVICE
The BioCon-V Manager app connects to the BioCon-V device via Wi-Fi.
During use, the tablet and the device must remain connected to the same Wi-Fi network.
8.6.1. CONNECTING THE ANDROID APP TO THE DEVICE
To connect the BioCon-V Manager app to the device, follow the steps below.
Preparing the Tablet for Connection
(1) Turn on Wi-Fi on the Tablet & Launch the
App
Turn on the tablet’s Wi-Fi.
Launch the BioCon-V Manager app.
The startup screen appears.
(2) Select the [Log in] Button
On the startup screen, tap the [Log in] button.
(3) Log In
When the Login screen appears, enter the
currently set password.
(4) Go to the Wi-Fi Menu
On the Home screen, tap the Wi-Fi icon ( ).
(5) Open the Device Registration Menu
When the Wi-Fi settings window appears, tap
[Register the Device].
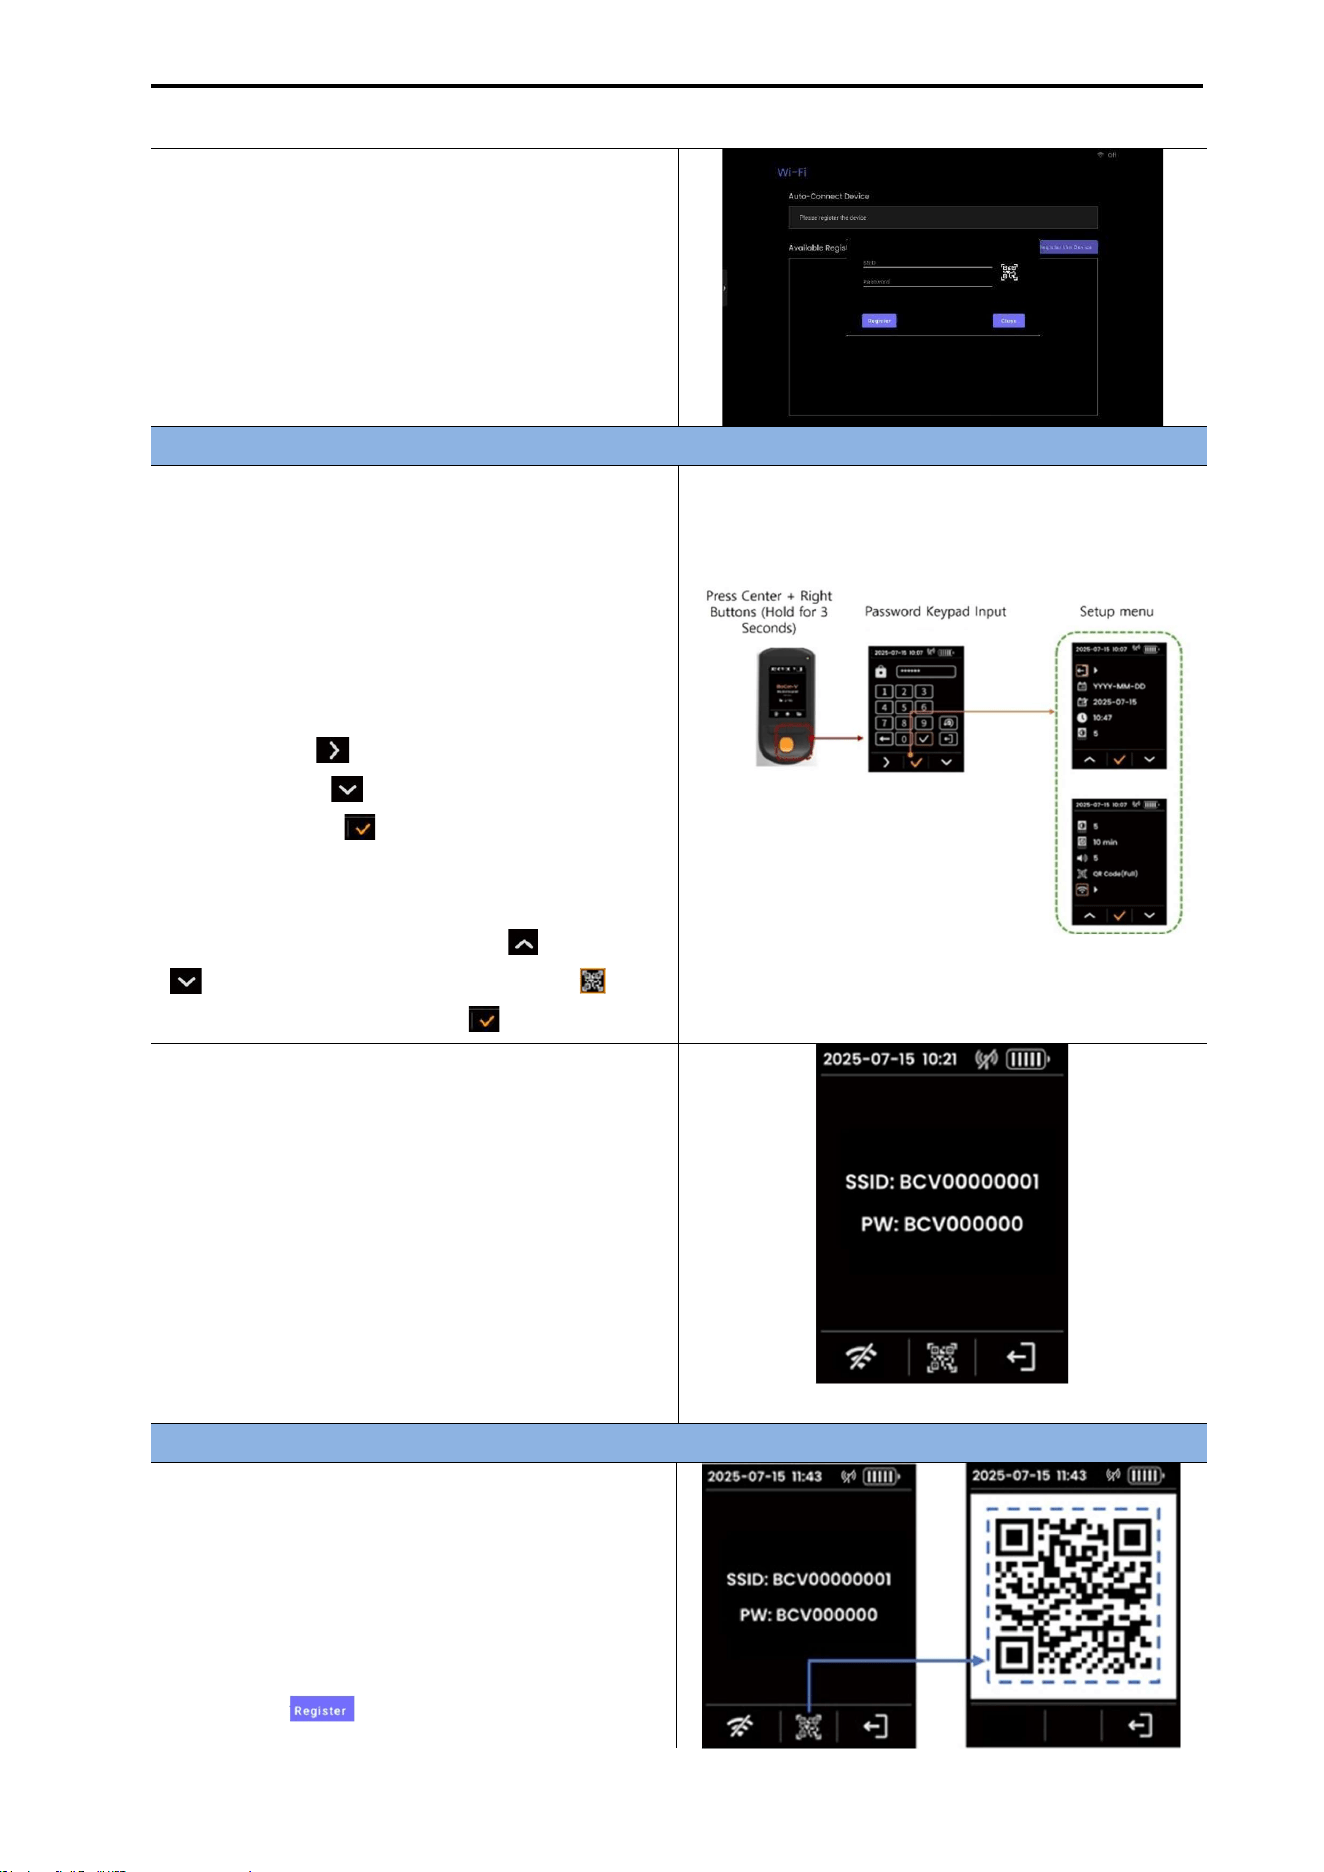
CUBEScan
TM
BioCon-V Operator’s Manual
64
(6) SSID and Password Input Fields
The input fields for SSID and Password appear.
To obtain this information, check the SSID/PW
on the BioCon-V device
Checking Connection Information on the BioCon-V Device
(1) Enter the Setting Screen
On the BioCon-V device, press and hold the
center button and right button for 3 seconds.
(2) Enter the Password
When the password entry window appears,
enter the password.
Left button ( ): Move cursor to the right
Right button ( ): Move cursor downward
Center button ( ): Select/Confirm
(3) Open the Barcode Menu
In the Setting menu, use the left ( ) and right
( ) buttons to select the Barcode icon ( ),
then press the center button ( ).
(4) Display the SSID and PW Information
The SSID & PW Information screen is displayed
first (You can check the device-generated Wi-Fi
name (SSID) and password (PW).).
[SSID & PW Screen]
Entering the SSID & PW to Connect the Device
Choose one of the following two methods.
(1) Manual Input
Manually enter the SSID and PW displayed on
the device screen into the tablet.
After entering the information, tap the
[Register ( )] button on the tablet to
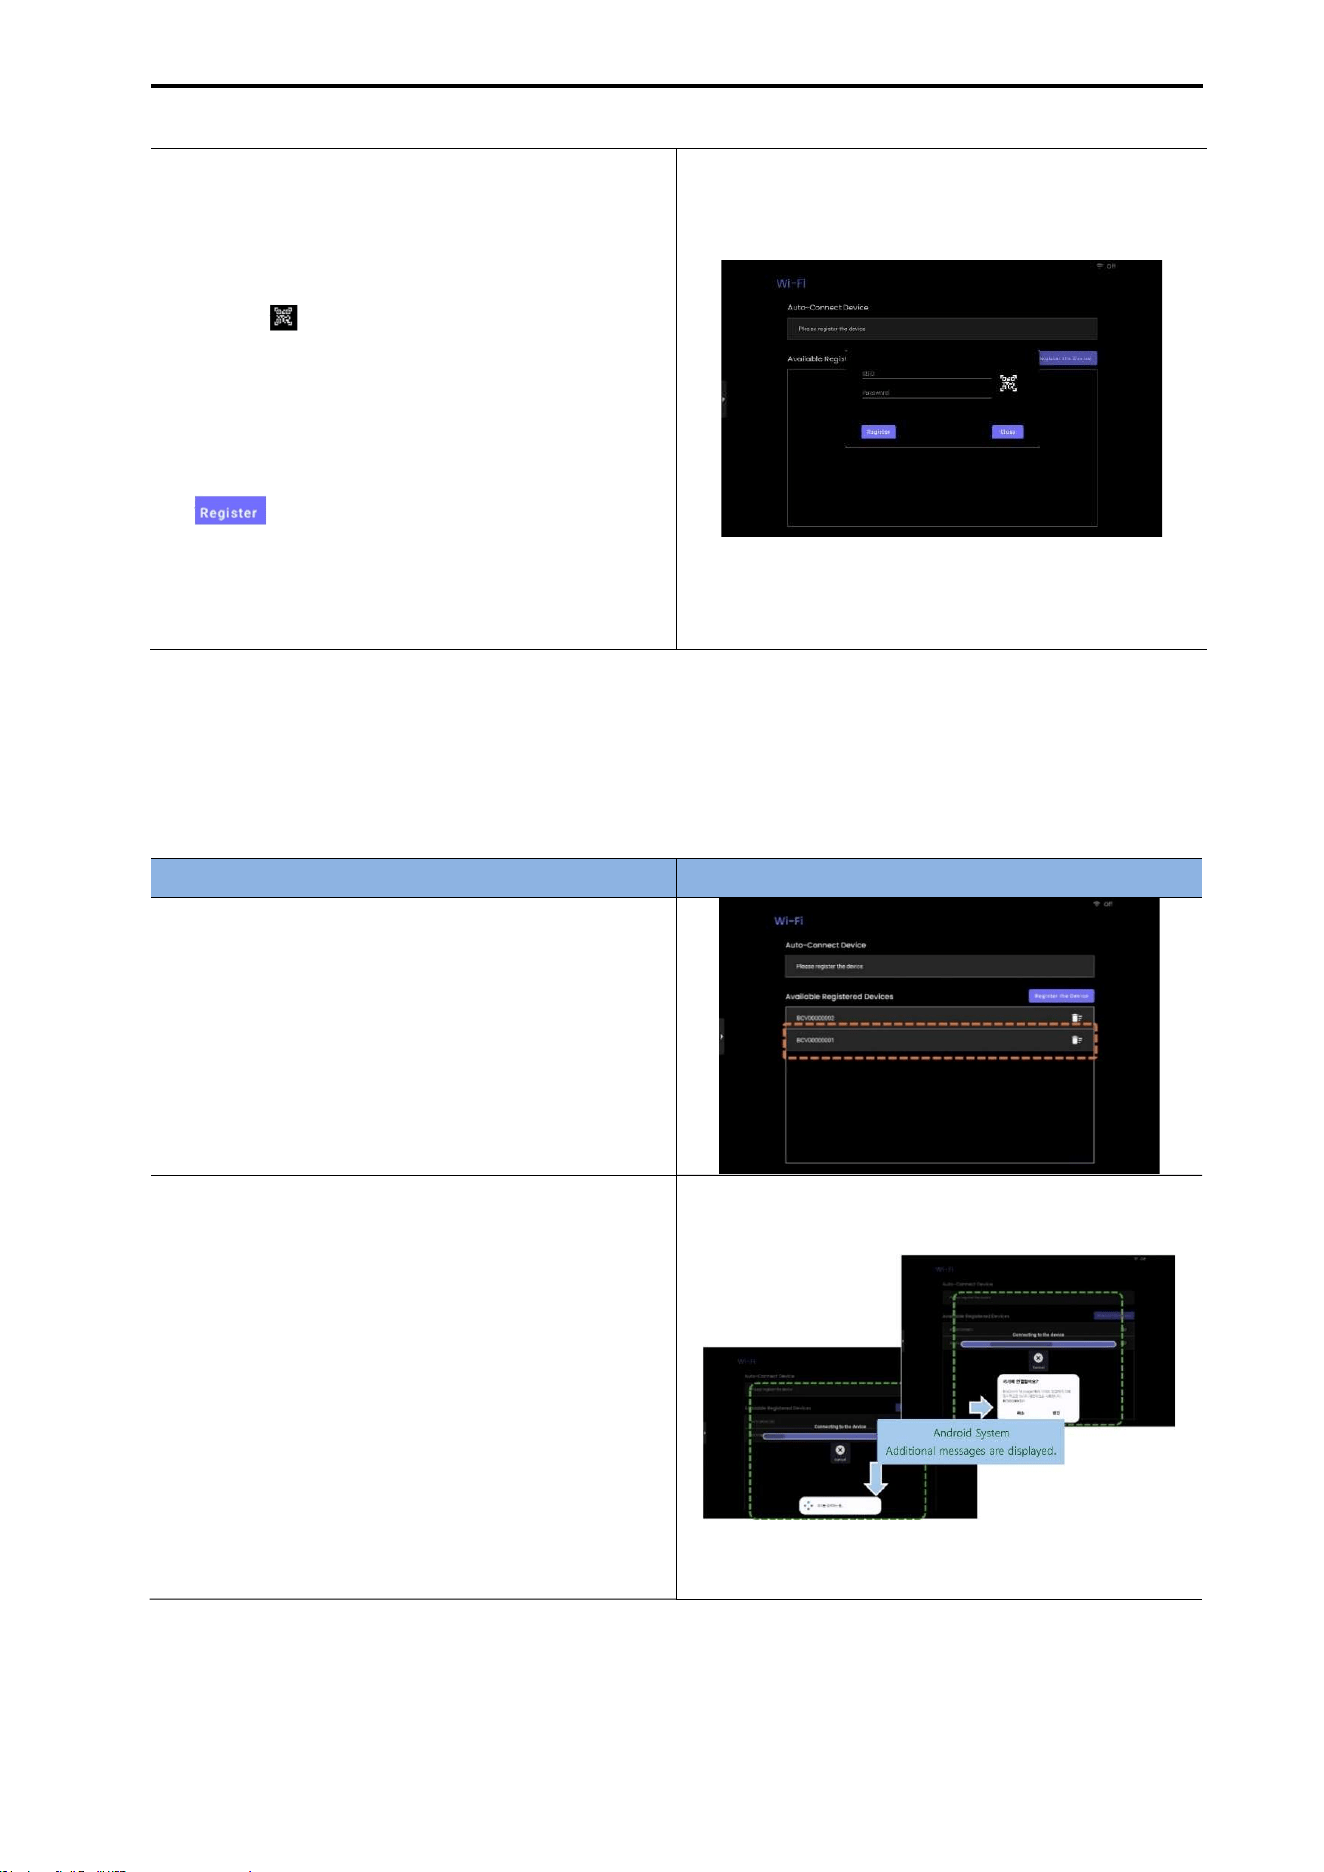
CUBEScan
TM
BioCon-V Operator’s Manual
65
complete the registration. [SSID & PW Barcode Screen]
(2) Automatic Input
On the SSID & PW screen, press the center
button ( ) to display a barcode containing
the SSID and password.
Scan the barcode using the tablet’s camera.
The SSID and PW are entered automatically.
After automatic input, tap the [Register
( )] button to complete registration.
NOTE: You can register multiple BioCon-V
devices consecutively using the same procedure
[Tablet SSID/PW Input Screen]
8.6.2. REGISTERING A DEVICE FOR AUTOMATIC CONNECTION
(1) First-Time Connection
To use the automatic connection feature, the device must first be registered on the tablet.
Follow the steps below to complete the initial registration.
Procedure Screen
(1) Select the Device
In the [Available Registered Device] list, tap the
BioCon-V device you want to register.
(2) Confirm the Connection Approval
Message
An Android system popup appears displaying
the message: “Do you want to connect to this
device?”
Tap [Connect] to approve the connection.
(3) Automatic Registration Process
The automatic registration progress screen
appears, and the registration proceeds
automatically.
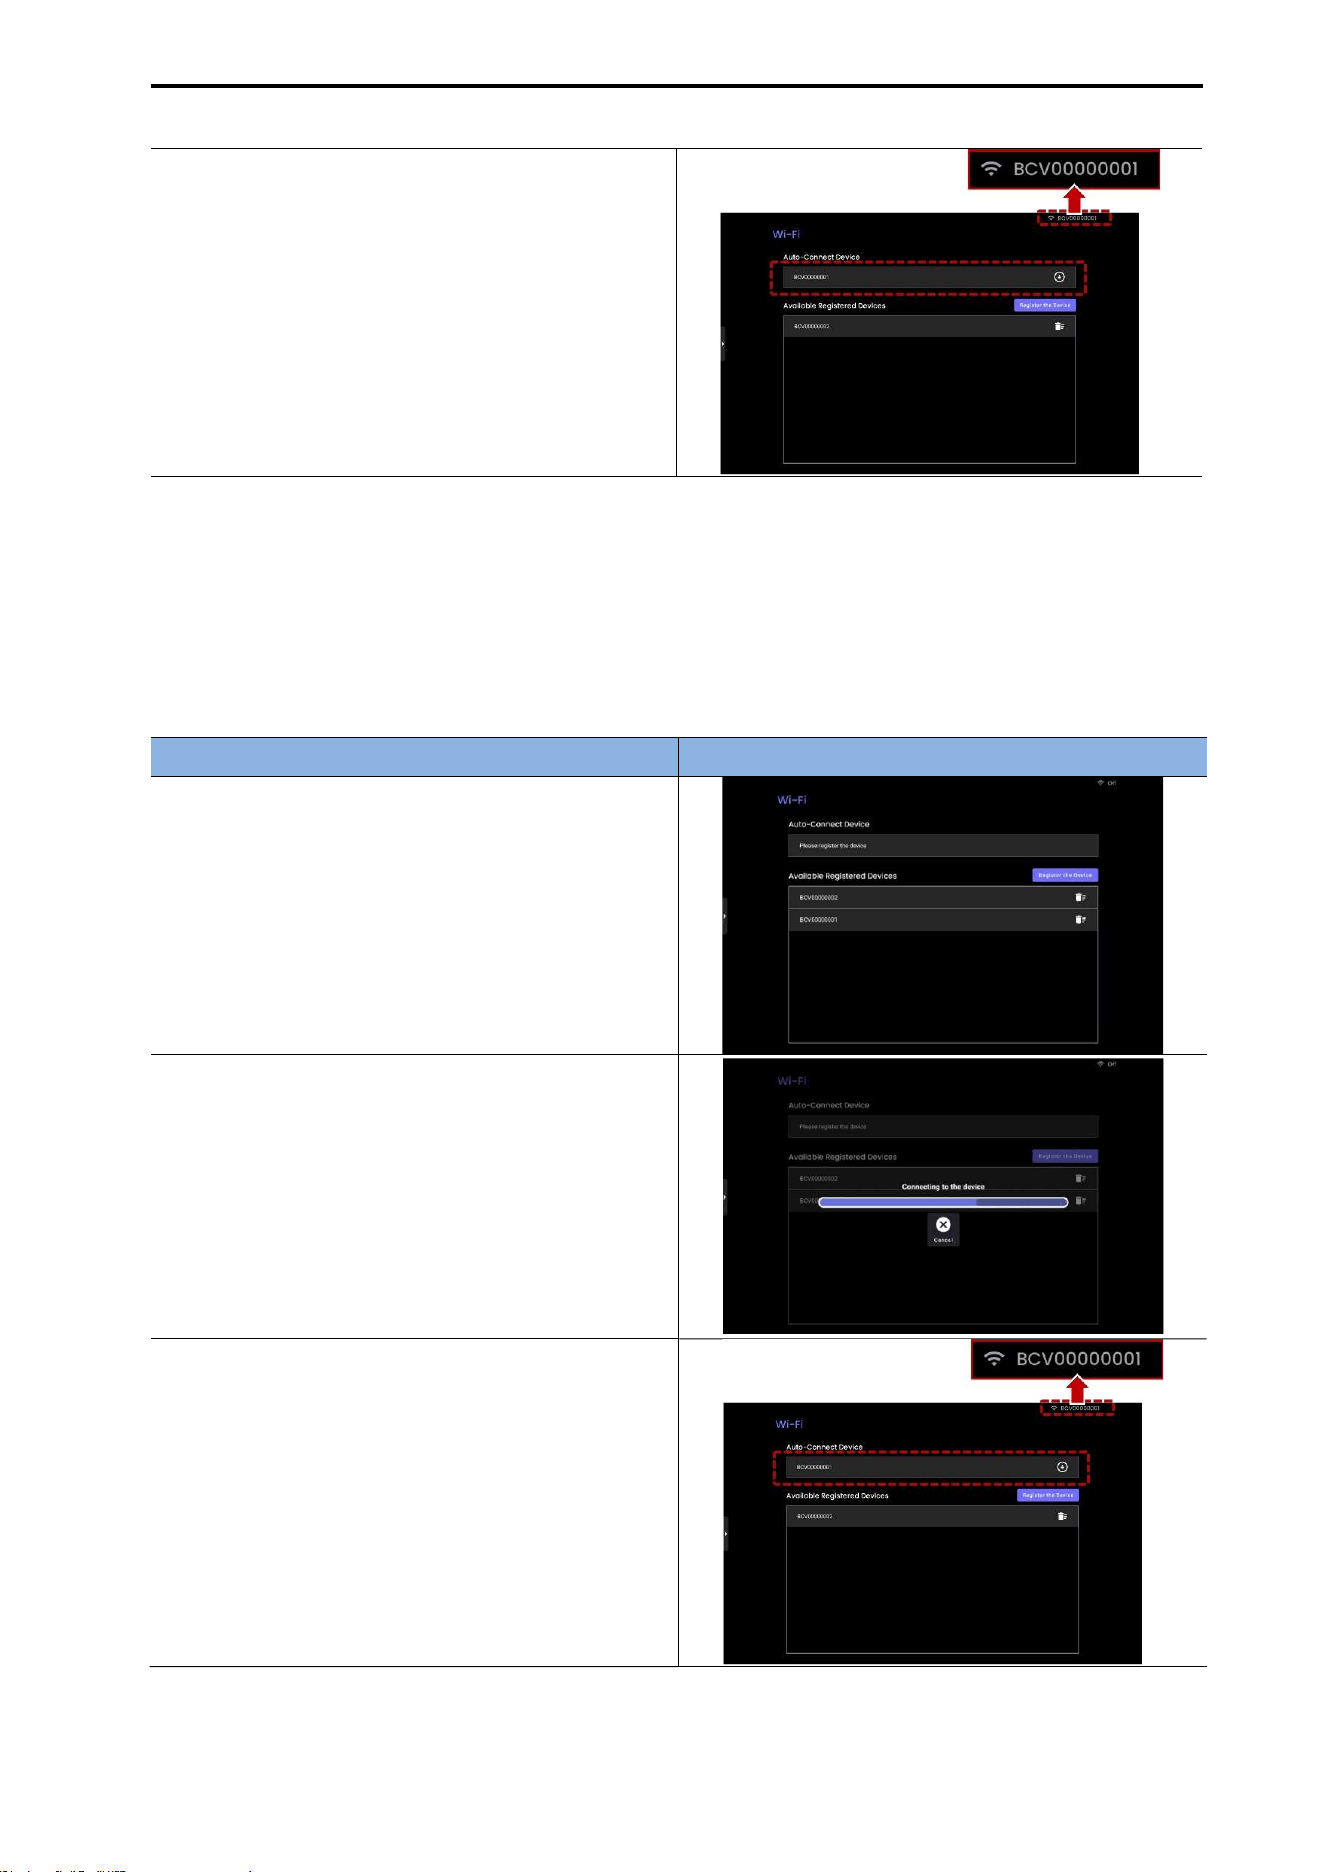
CUBEScan
TM
BioCon-V Operator’s Manual
66
(4) Confirm Registration Completion
When registration is complete, the device
appears as an auto-connect target on the
[Auto-Connect Device] screen.
You can also check the connection status from
the tablet’s Status Bar.
NOTE: If the tablet or the device enters Auto Sleep Mode, the following message may appear:
“Unable to connect the device. Would you like to try connecting again?” Tap [Yes] to attempt
reconnection.
(2) Setting Automatic Connection for an Already Registered Device
To set a previously registered BioCon-V device for automatic connection, follow the steps below.
Procedure Screen
(1) Select the Device
In the [Available Registered Device] list, tap
the device you want to set for automatic
connection
(2) Registration in Progress
A progress screen for automatic connection
registration appears.
(3) Confirm Completion
On the [Auto-Connect Device] screen, confirm
that the device has been successfully
registered for automatic connection.
You can also check the connection status from
the tablet’s Status Bar.
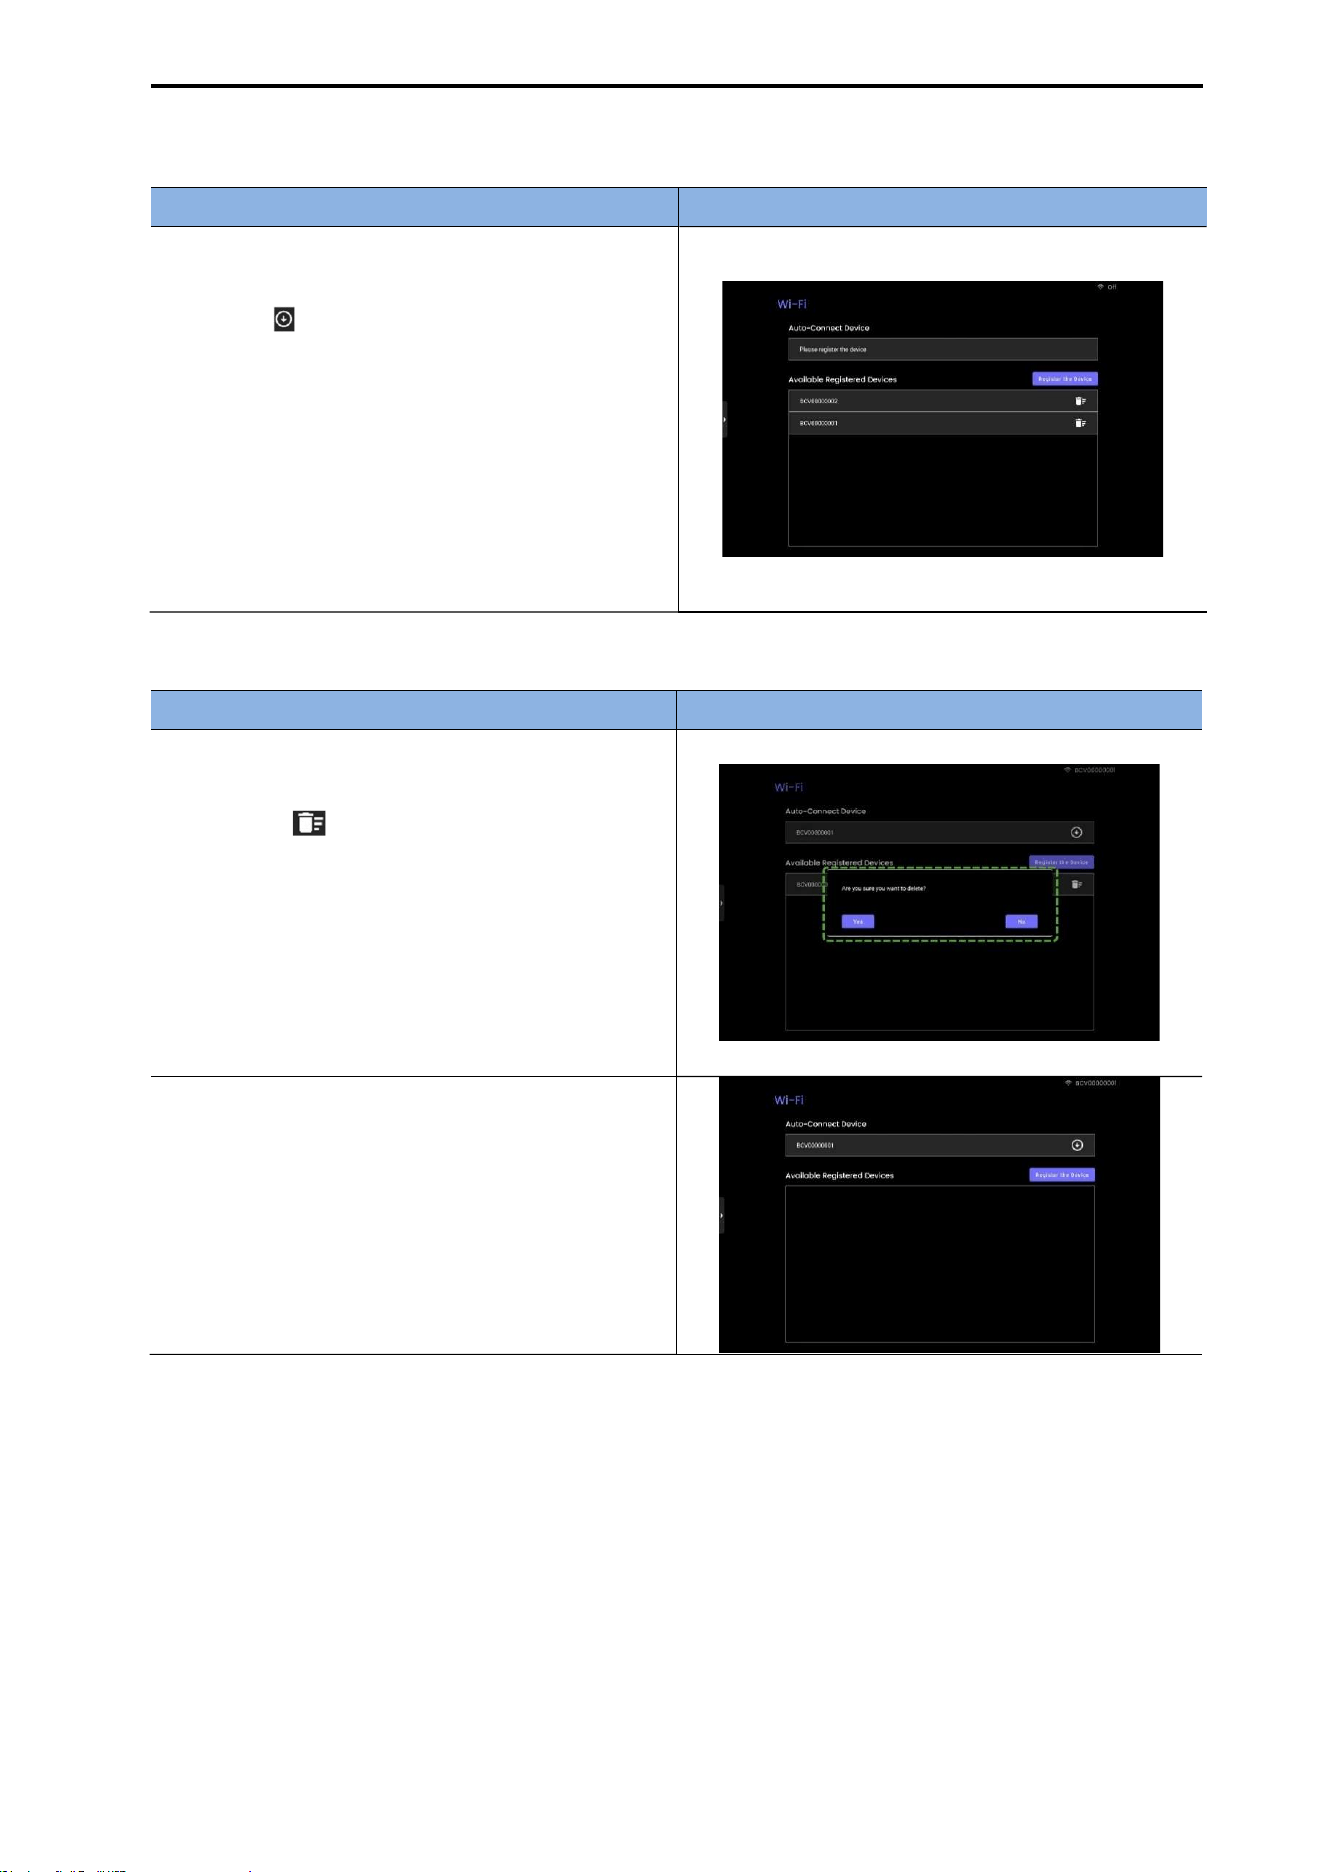
CUBEScan
TM
BioCon-V Operator’s Manual
67
(3) Cancel Auto-Connect Registration
Procedure Screen
(1) Select the Delete Button
- In the [Auto-Connect Device] list, tap the
[Cancel ( )] button.
(2) Completion of Cancellation
The selected device is removed from the Auto-
Connect list.
The removed device will no longer connect
automatically, and it can be re-registered again
if needed.
(4) Deleting a Registered Device from the List
Procedure Screen
(1) Select the Delete Icon
In the [Available Registered Devices] list, tap the
Delete icon ( ) next to the device you want to
remove.
(2) Confirm Deletion
When the message “Are you sure you want to
delete?” appears, tap [Yes] to proceed with
deletion.
(3) Confirm Removal from the List
Once deletion is complete, the device will be
removed from the [Available Registered
Devices] list.
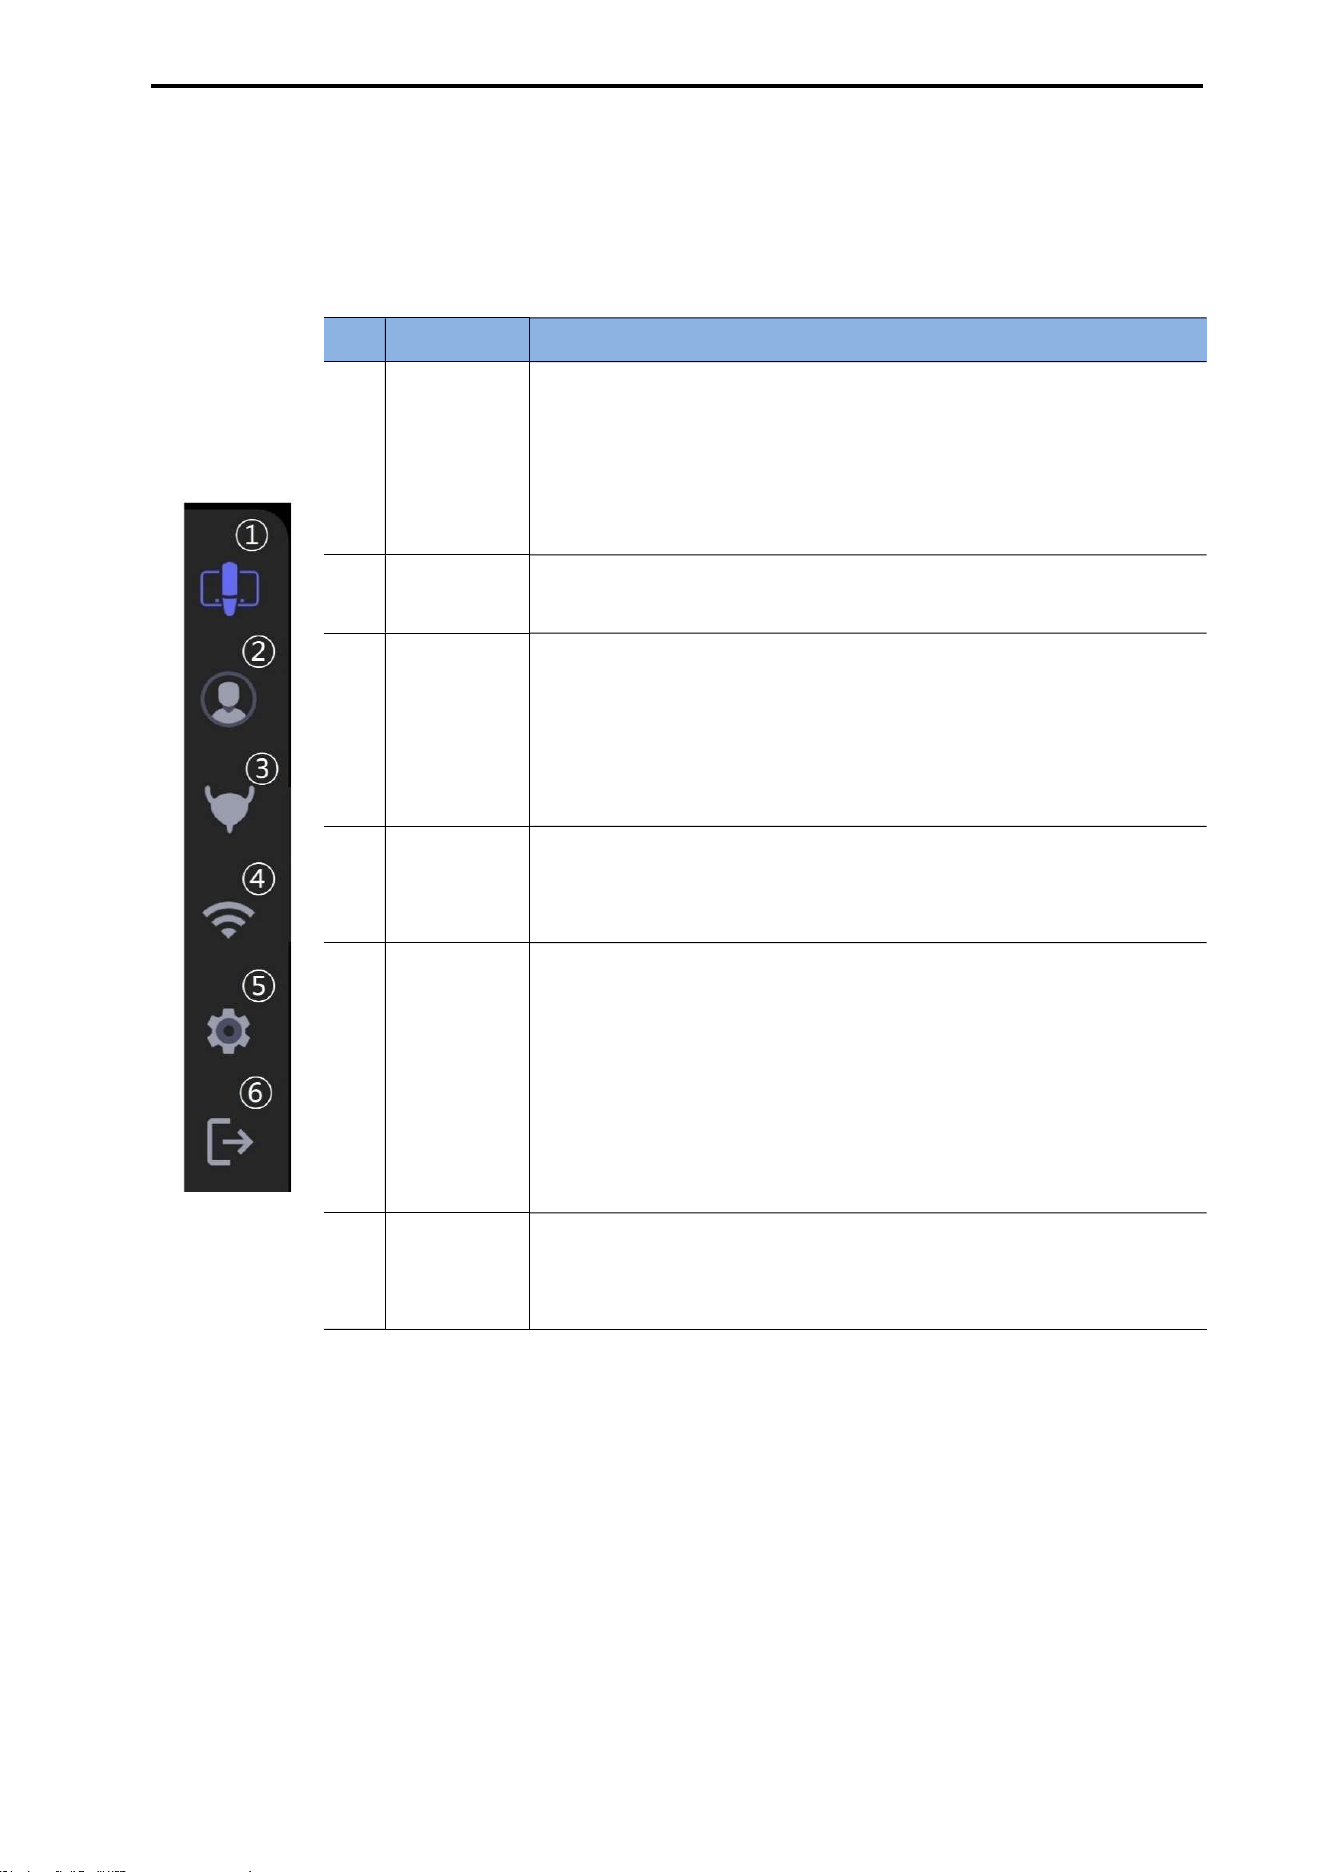
CUBEScan
TM
BioCon-V Operator’s Manual
68
8.7. QUICK TAB
The Quick Tab is a fast-access menu displayed when you tap the Tablet Settings icon on the tablet
screen. It allows you to immediately launch key functions.
The functions of each icon are as follows.
No.
Item
Description
①
Device
Settings
Check the device status and change settings.
If the auto-connect device is not registered, the message "No
auto-connect device is registered. Please register an auto-
connect device from the Wi-Fi screen first." appears.
For details, refer to 8.6 Connecting the Device.
②
Patient List
View the list of registered patients, register new patients, and
modify existing patient information.
③
Scan
Performs Pre-Scan and Normal Scan.
If the auto-connect device is not registered, the message "No
auto-connect device is registered. Please register an auto-
connect device from the Wi-Fi screen first." appears.
For details, refer to 8.10 Scan Mirroring.
④
Wi-Fi
Settings
Menu for connecting the tablet to the BioCon-V device via
Wi-Fi.
For details, refer to 8.12 Wi-Fi Settings.
⑤
Settings
Configure the following features.
Data Format
Change Password
Log-off Time
Language
Activity Log
For details, refer to 8.12 Settings (Tablet Settings).
⑥
Log out
Performs logout.
A confirmation message appears; selecting [Yes] completes
the logout and returns to the Login screen.
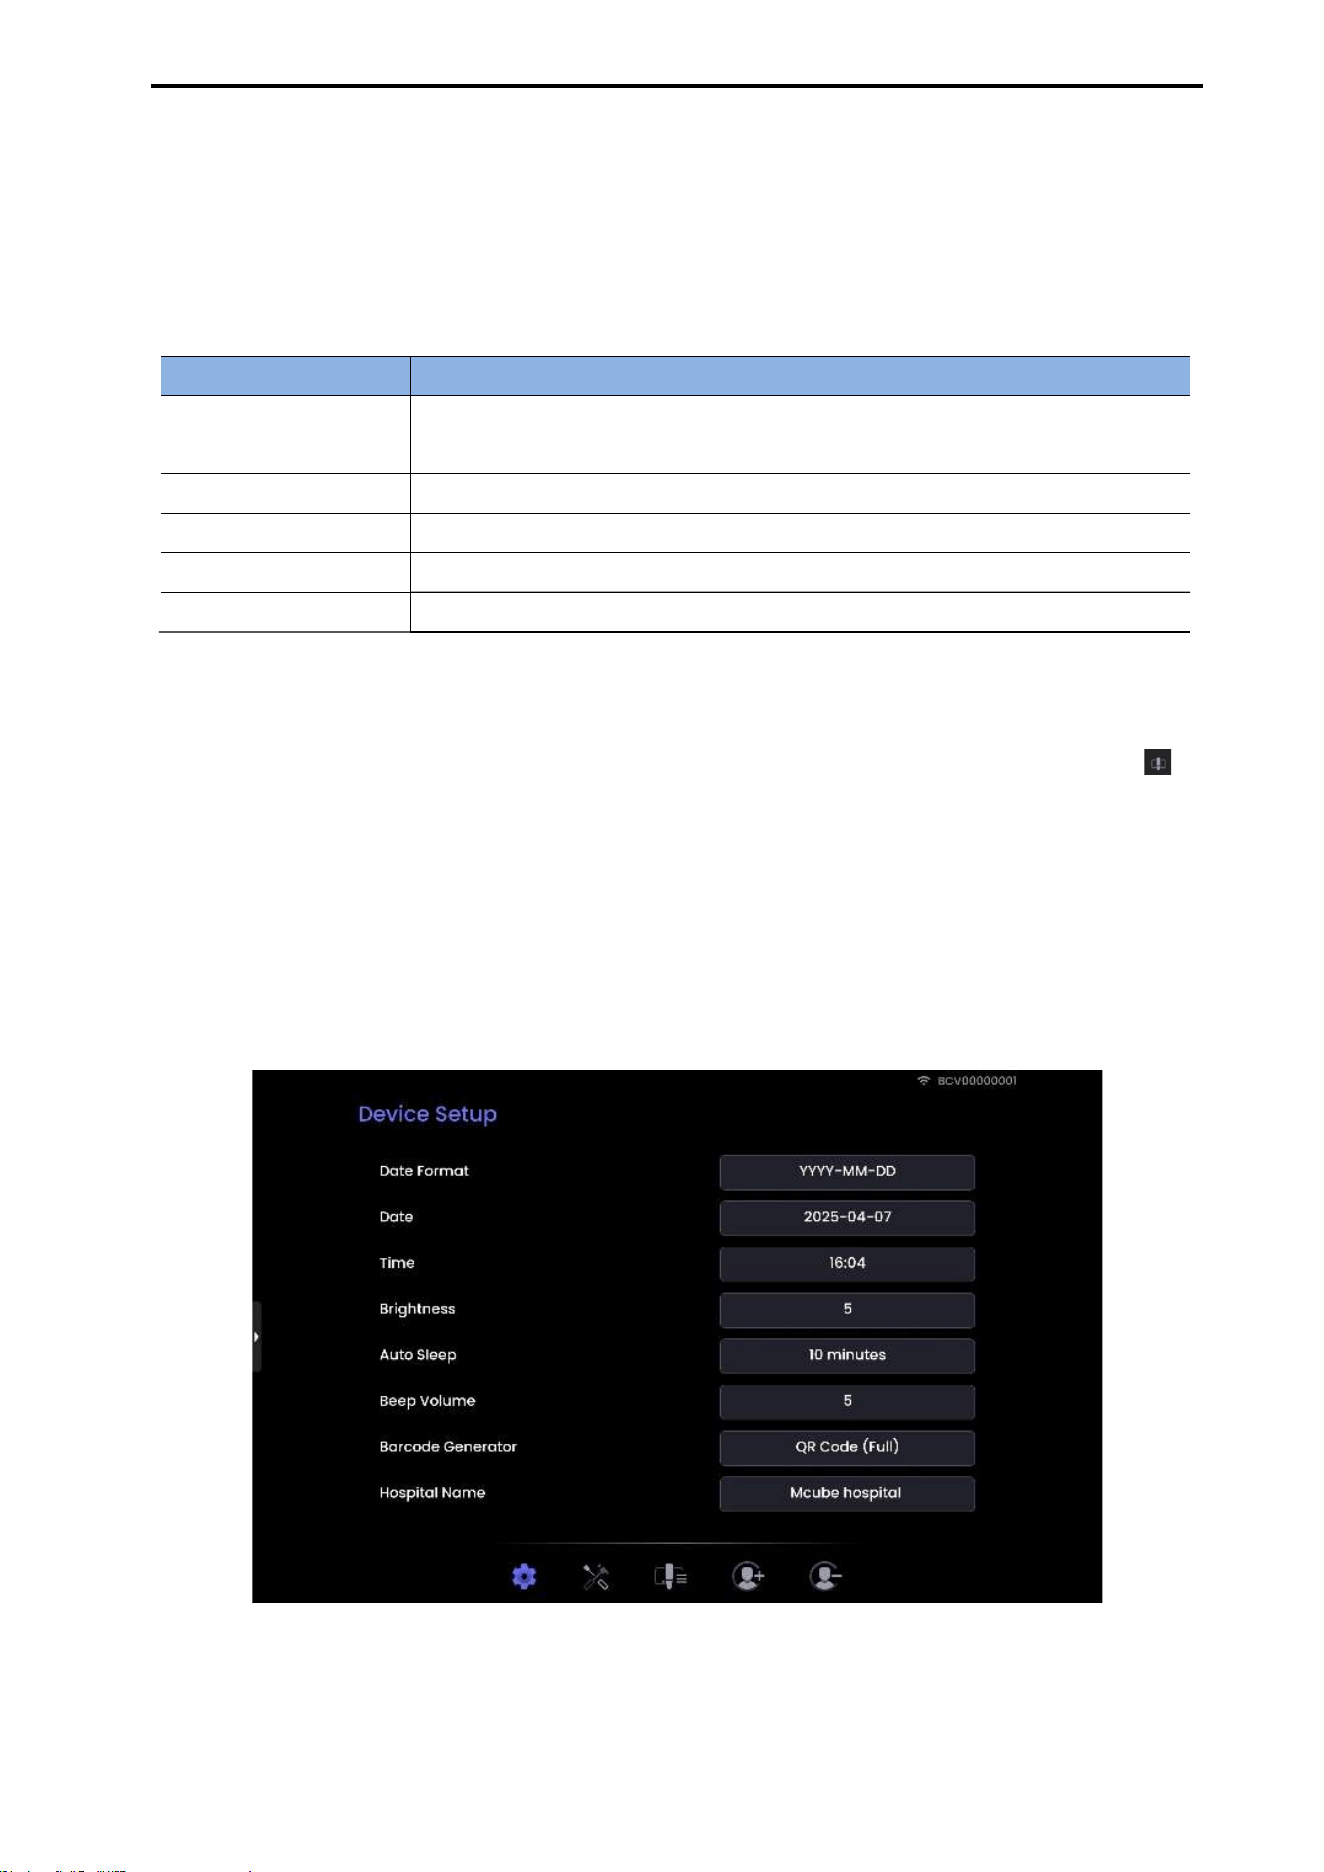
CUBEScan
TM
BioCon-V Operator’s Manual
69
8.8. DEVICE SCREEN
[Function Overview]
The Device screen provides an integrated view of the key functions linked to the BioCon-V device.
These functions are available only when the BioCon-V device and the tablet are properly connected.
The Device screen consists of the following five main functions.
Function Description
Device Setup
Changes the device’s date format/time, screen brightness, auto sleep,
volume, and other settings.
Device Maintenance Executes device inspection and maintenance functions.
Device Data List Displays the measurement data stored in the device.
Device Patient Add Registers a new patient directly on the device.
Device Patient Delete
Deletes stored patient information from the device.
[How to Access the Device Screen]
Launch the BioCon-V Manager app and log in.
On the Home screen or at the bottom of the Quick Tab menu, locate and tap the Device icon ( ).
The Device Setup screen appears first. You can navigate to Device Setup / Device Maintenance /
Device Data List / Device Patient Add / Device Patient Delete using the top tabs or the screen
switching menu.
8.8.1. DEVICE SETUP SCREEN
The Device Setup screen allows you to change the primary BioCon-V settings directly from the tablet.
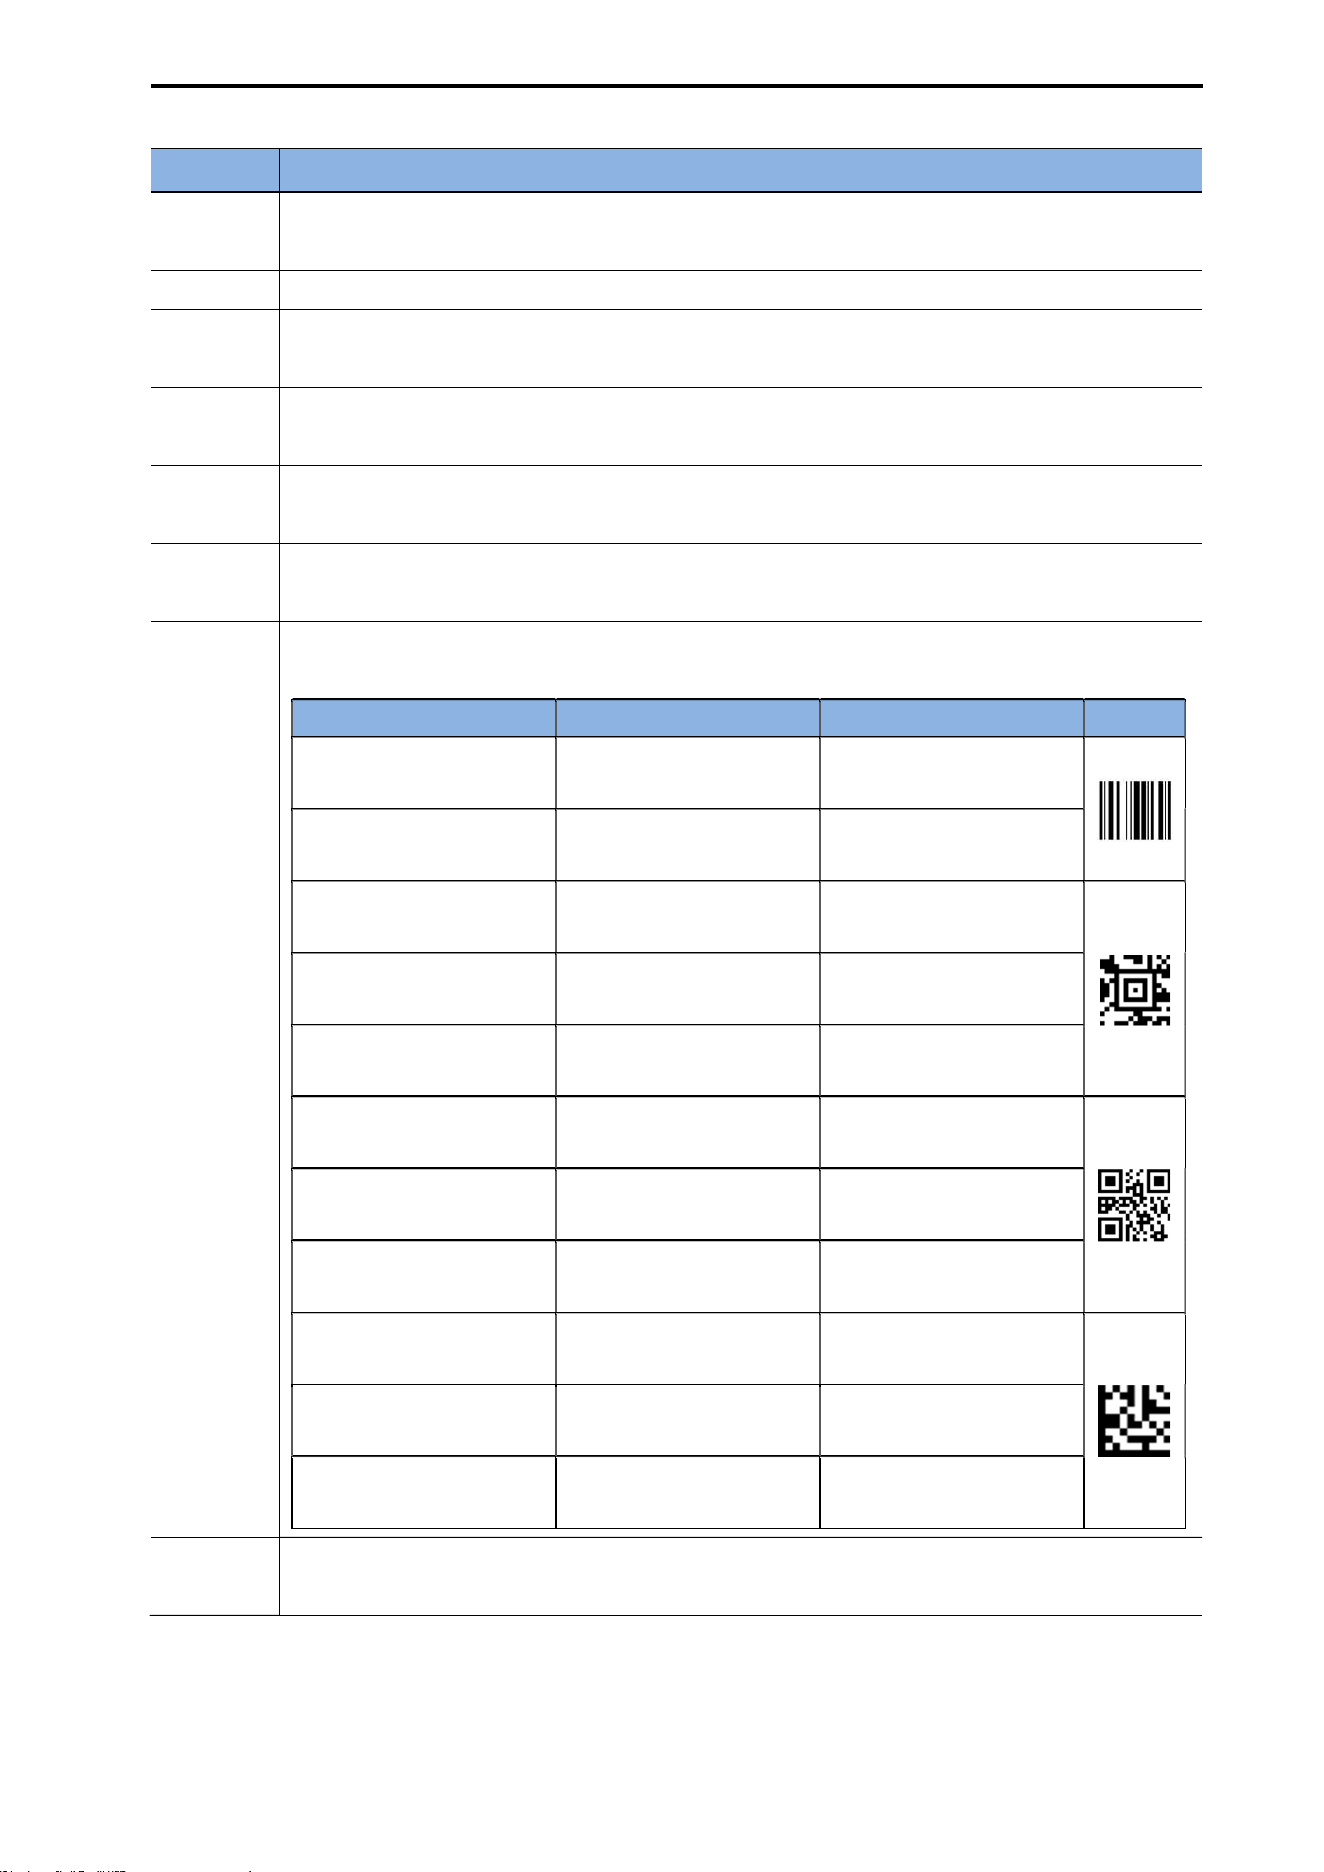
CUBEScan
TM
BioCon-V Operator’s Manual
70
Item
Description
Data
Format
Sets the date format. (e.g., DD-MM-YYYY, YYYY-MM-DD, MM-DD-YYYY)
The selected format is applied immediately across both the device and the app.
Date In the pop-up window, select Year → Month → Day, then tap [OK].
Time
In the pop-up window, select the hour and minute and tap [OK], or tap the
keyboard input field to enter the time directly.
Brightness
Adjusts the screen brightness from Level 1 to Level 5.
Higher numbers indicate a brighter screen.
Auto
Sleep
Selects the automatic sleep (auto screen-off) time. (Options: 2 minutes / 5 minutes /
10 minutes)
Beep
Volume
Sets the beep volume (heard when a scan is completed) from Level 1 to Level 5.
Higher numbers indicate a louder beep.
Barcode
Generator
Select the barcode format to be used when generating barcodes for measurement data.
Option Description Output Data Barcode
Code-128 (Number)
Measures numeric
amount only
80
Code-128 (Volume)
Measures numeric
amount + unit
80 ml
Aztec Code (Number)
Measures numeric
amount only
80
Aztec Code (Volume)
Measures numeric
amount + unit
80 ml
Aztec Code (Full)
Measures date-time +
amount
20250715-095703 80 ml
QR Code (Number)
Measures numeric
amount only
80
QR Code (Volume)
Measures numeric
amount + unit
80 ml
QR Code (Full)
Measures date-time +
amount
20250715-095703 80 ml
Data Matrix (Number)
Measures numeric
amount only
80
Data Matrix (Volume)
Measures numeric
amount + unit
80 ml
Data Matrix (Full)
Measures date-time +
amount
20250715-095703 80 ml
Hospital
Name
Enter the name of the hospital or clinic.
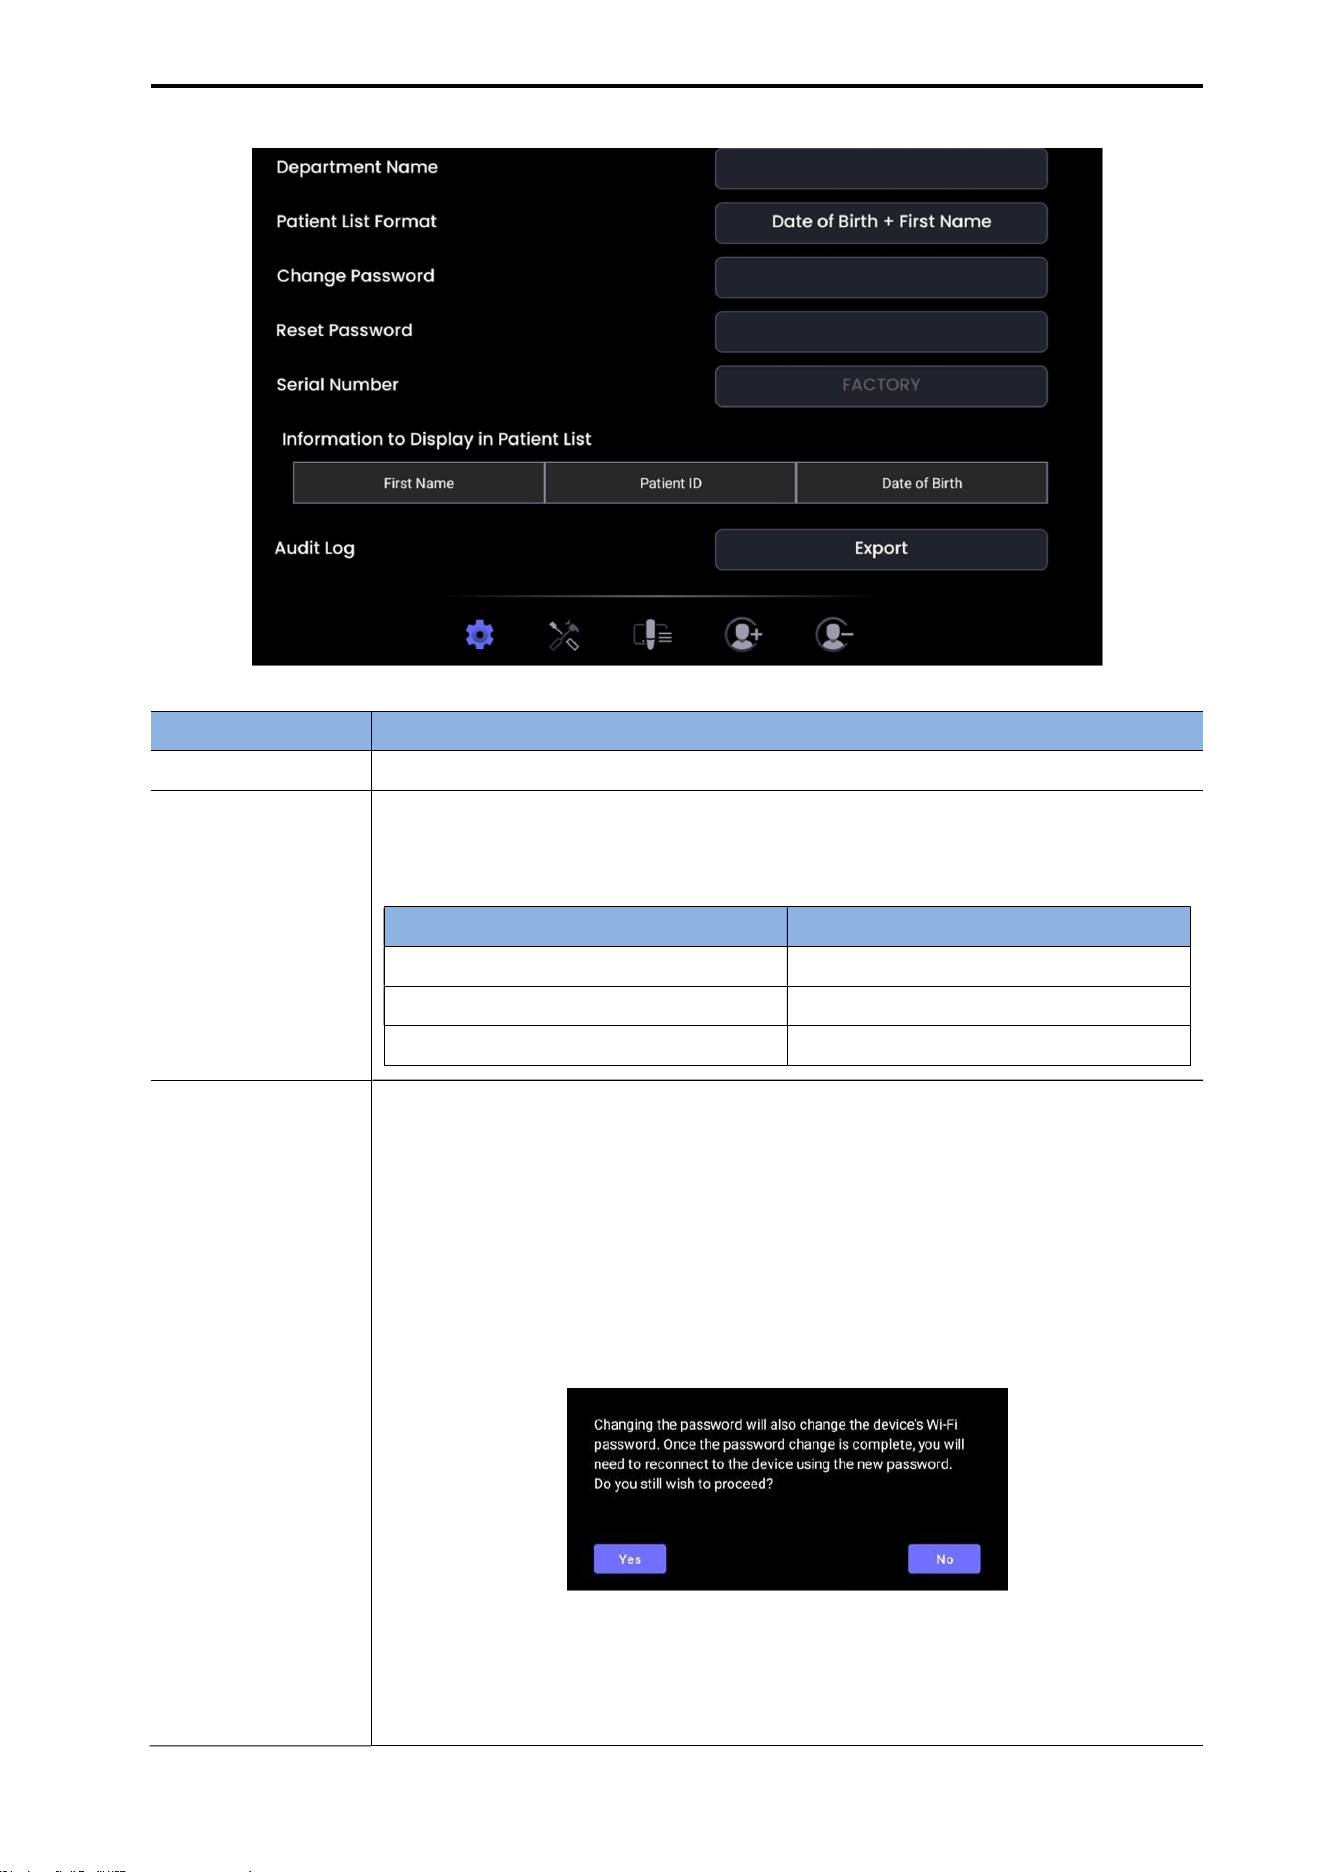
CUBEScan
TM
BioCon-V Operator’s Manual
71
Item Description
Depart Name Enter the name of the department.
Patient List Format
Select how patient information is displayed in the patient list (up to 3 items).
The selected format is applied immediately.
Option Display Format
Date of Birth + First Name Displays Date of Birth + First Name
Date of Birth + Surname Displays Date of Birth + Surname
Date of Birth + Patent ID Displays Date of Birth + Patient ID
Change Password
[Procedure]
Changes the Wi-Fi password of the device.
(1) Tap the button next to Change Password.
(2) Review the confirmation message and tap [Yes].
Message: Changing the password will also change the device’s Wi-Fi
assword. After the password is changed, you must reconnect to the device
sing the new password.
(3) The password input window appears:
Current Password: Enter the current password.
New Password: Enter a new password.
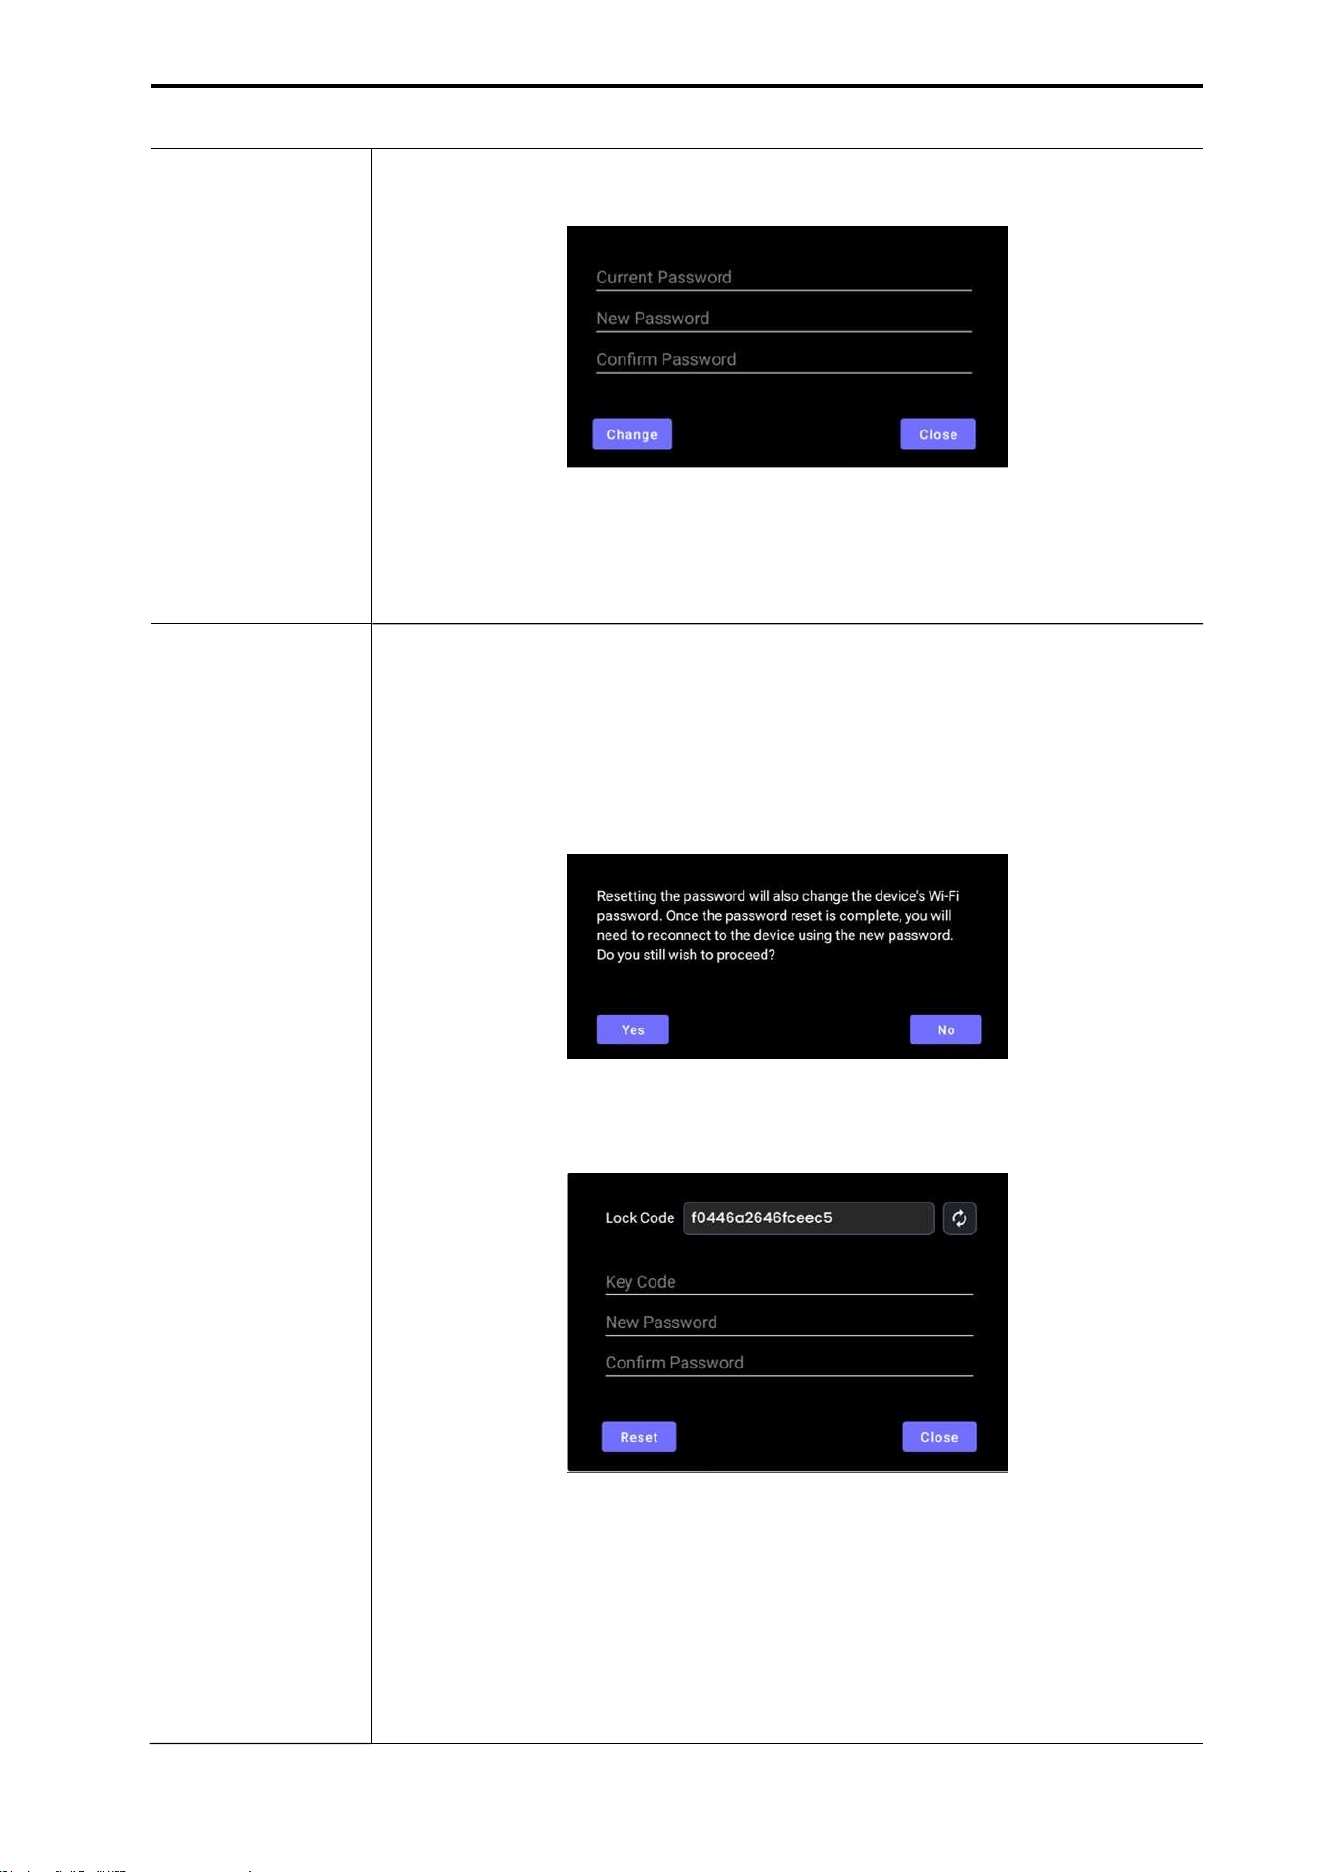
CUBEScan
TM
BioCon-V Operator’s Manual
72
Confirm Password: Re-enter the new password.
(4) Tap [Change] to complete the password change.
※ After the password is changed, the updated change date is displayed in the
tab.
Reset Password
Resets the device’s Wi-Fi password to the default value.
(1) Tap Reset Password.
(2) When the confirmation message appears, tap [Yes].
Message: Resetting the password will also change the device’s Wi-Fi
password. After the reset, you must reconnect using the new password. Do
you want to continue?
(3) A Lock Code will be generated. Provide this code to the manufacturer.
(4) After receiving a Key Code from the manufacturer, enter:
Key code:
New Password
Confirm Password
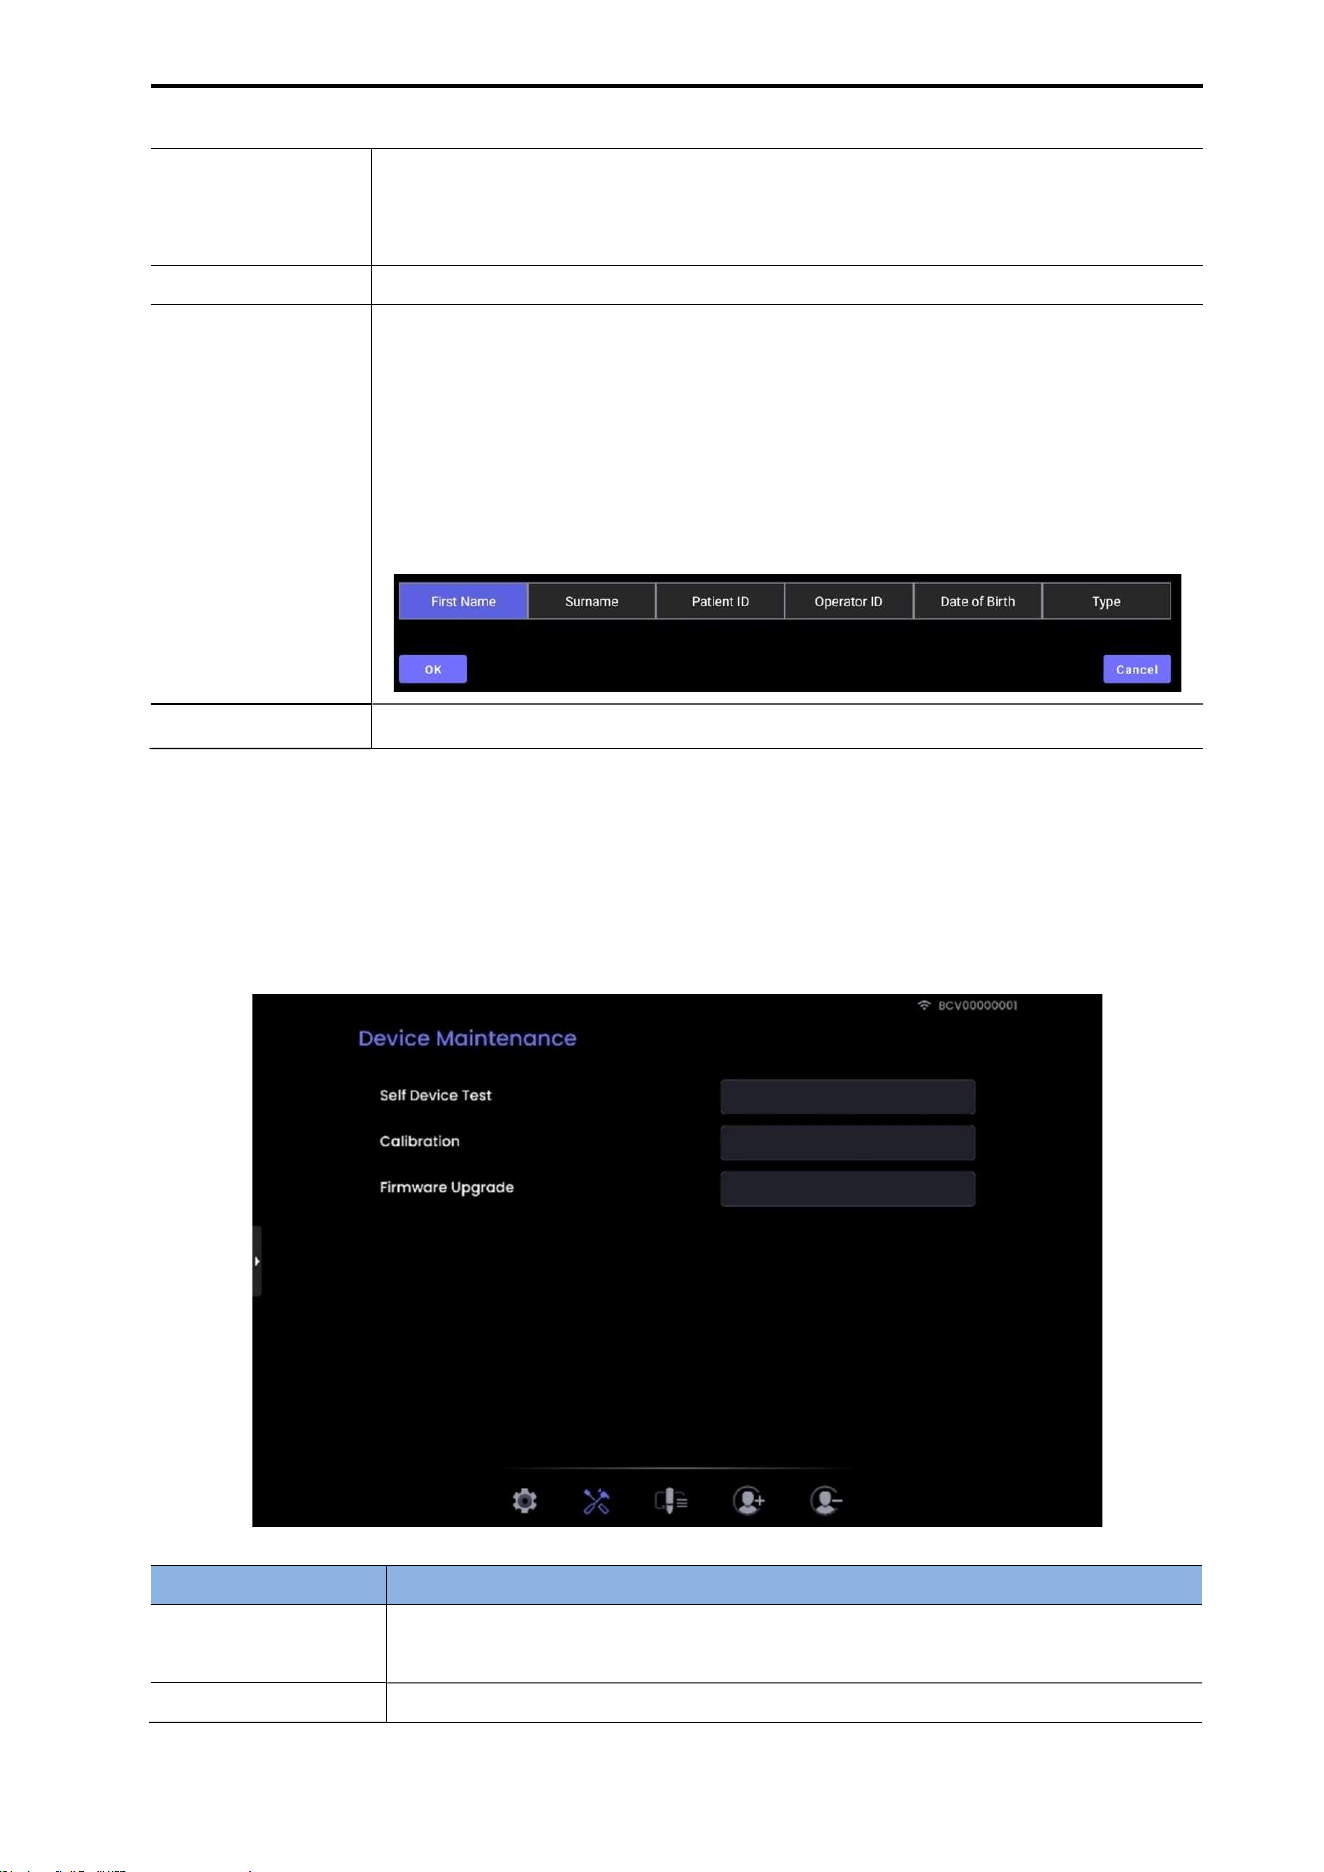
CUBEScan
TM
BioCon-V Operator’s Manual
73
(5) Tap [Reset] to complete the password reset.
※ After the reset is complete, the updated change date is displayed on the
screen.
Serial Number Displays the serial number of the BioCon-V device.
Information to
Display
In Patient List
Select up to 3 types of information to display in the patient list.
Options: First Name, Surname, Patient ID, Operator ID, Date of Birth, Type
[Setting Method]
(1) Tap the item you want to modify (e.g., First Name).
(2) In the selection window, choose the desired information type and tap [OK].
Audit Log
Press the Export button to export the audit log.
8.8.2. DEVICE MAINTENANCE SCREEN
The Device Maintenance screen allows you to perform inspection and maintenance functions for the
BioCon-V device. Each function is used to check device status, detect errors, and maintain
performance.
Item Description
Self-Device Test
Performs a self-diagnostic test on the device.
※ For details, refer to 16.2 Self-Device Test.
Calibration Performs device calibration.
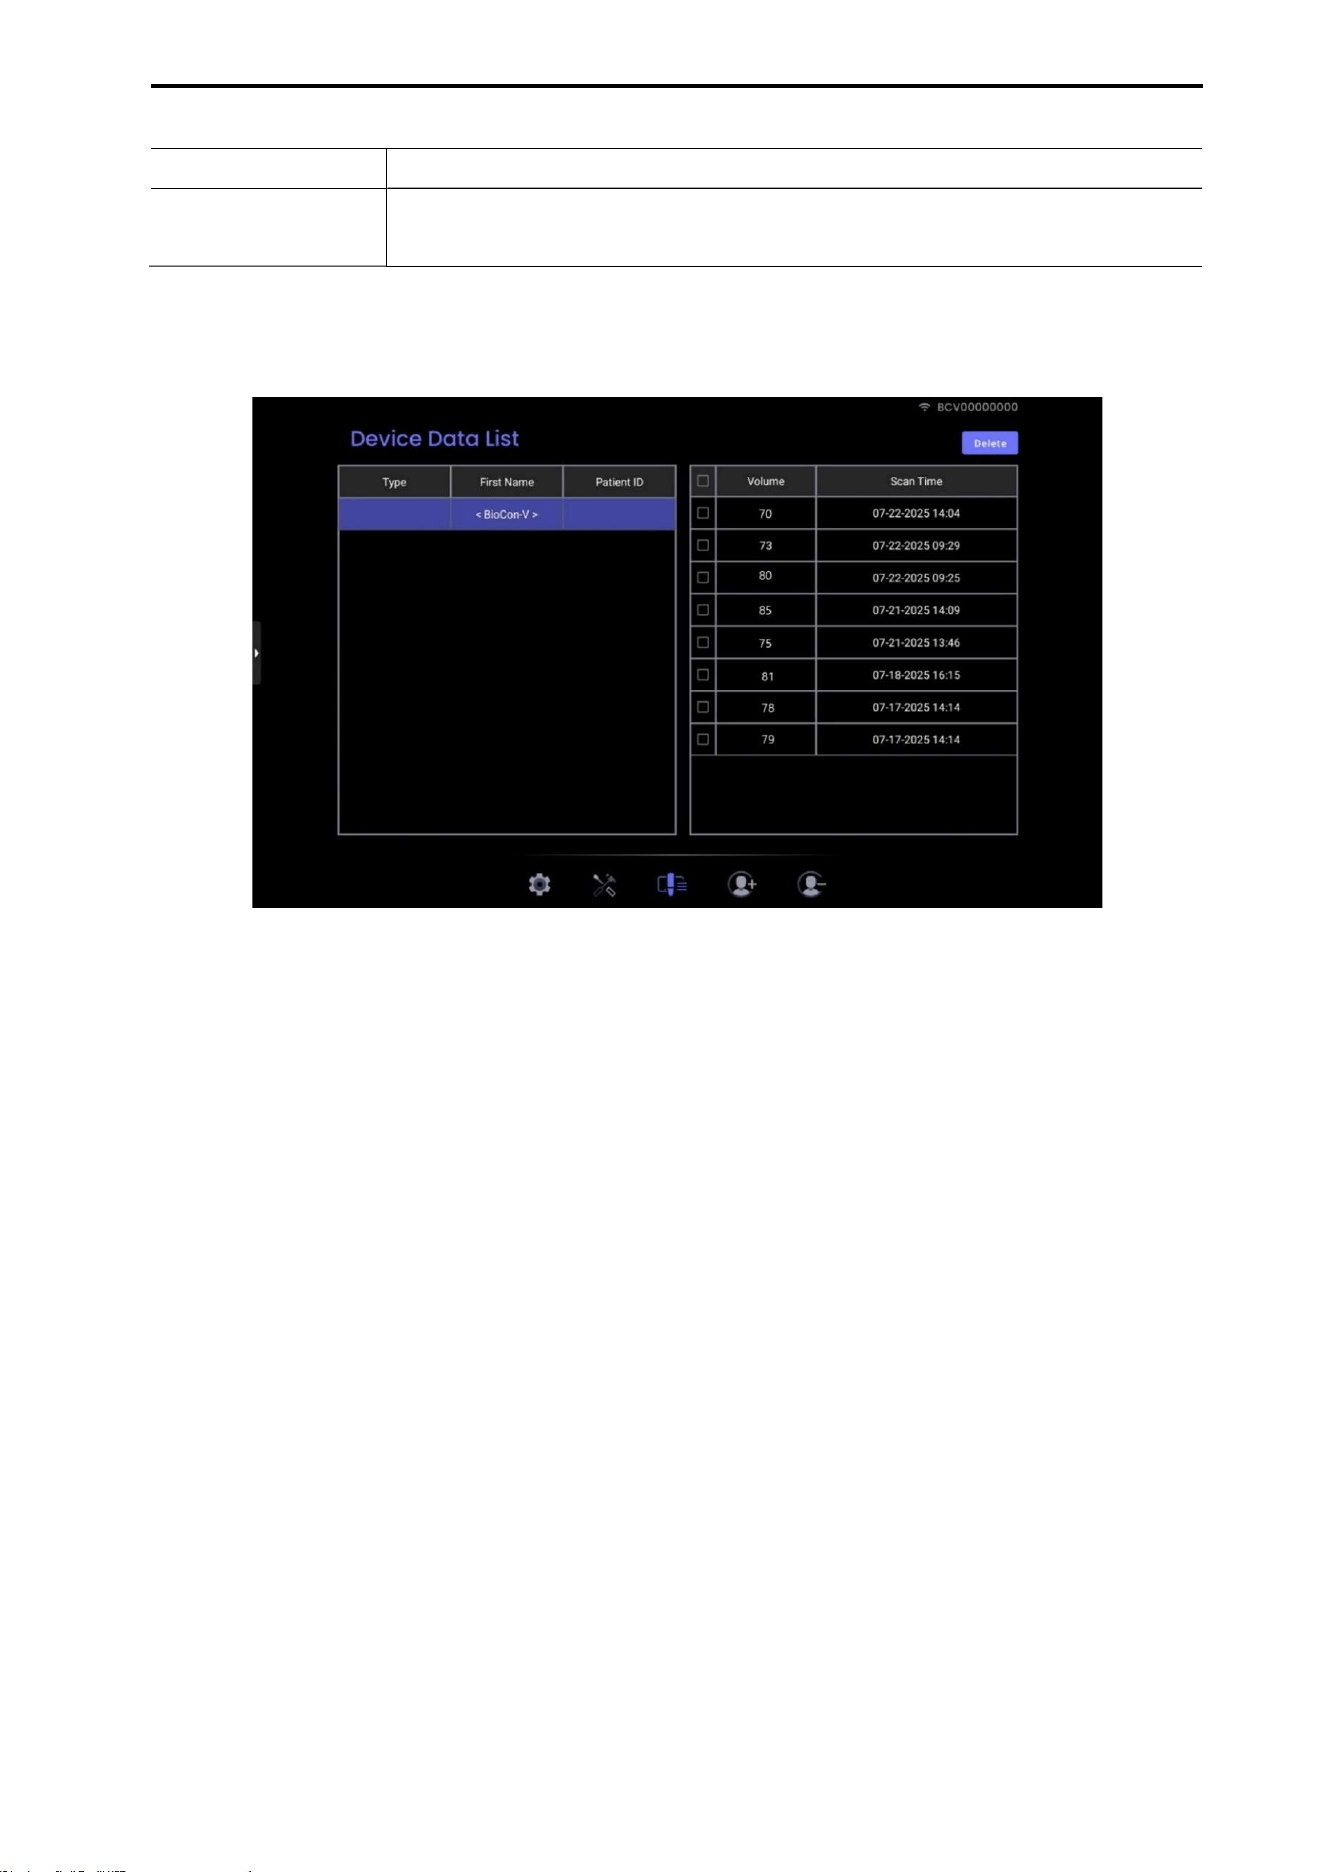
CUBEScan
TM
BioCon-V Operator’s Manual
74
※ For details, refer to 16.3 Calibration.
Firmware Upgrade
Updates the device firmware to the latest version.
※ For details, refer to 16.4 Firmware Upgrade.
8.8.3. DEVICE DATA LIST SCREEN
Displays the name of the registered BioCon-V device.
Select the data you want to delete, then tap the [Delete] button to remove it.
Displays the list of measurement data stored on the BioCon-V device.
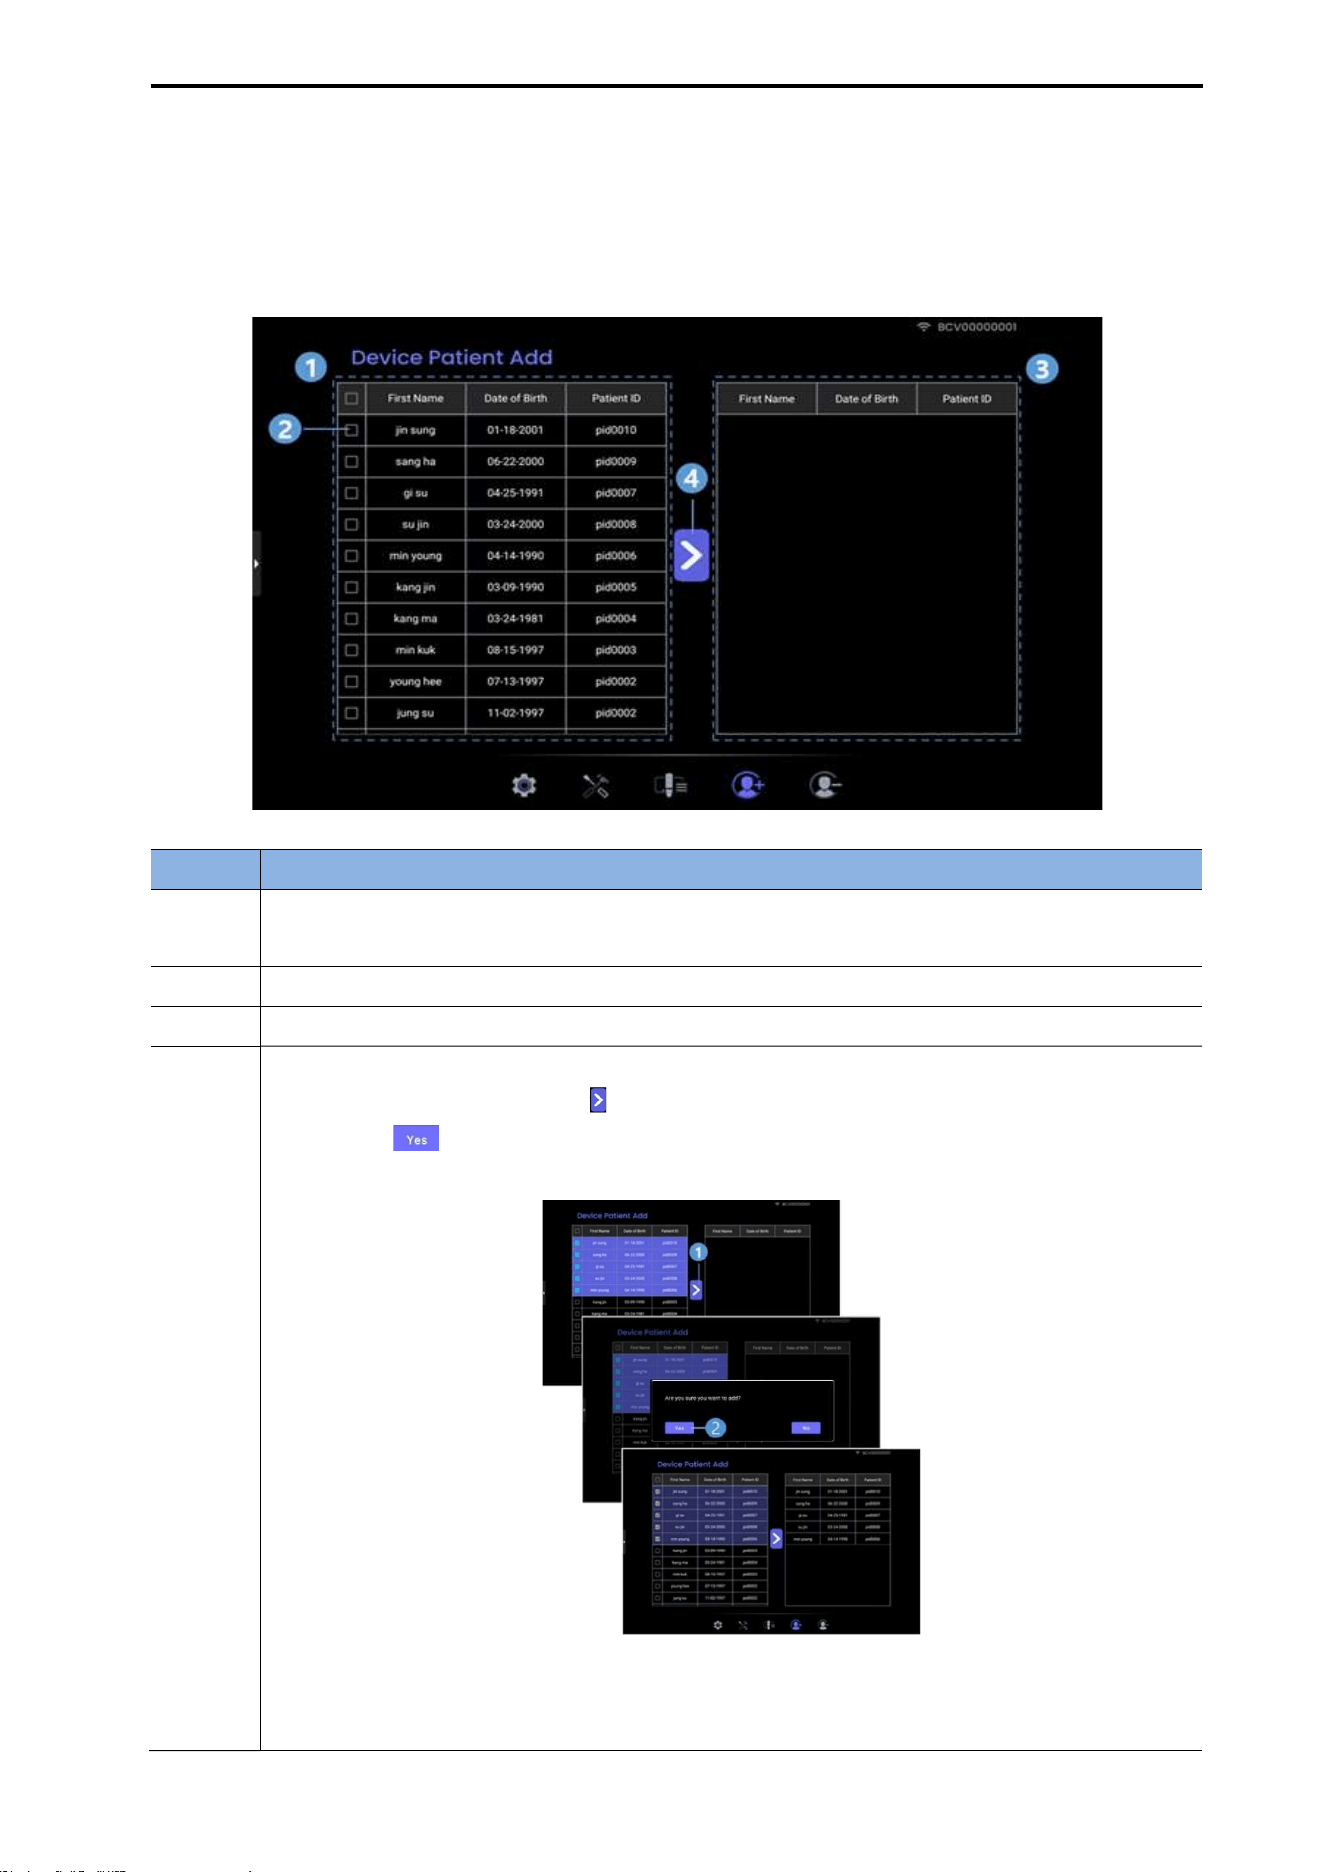
CUBEScan
TM
BioCon-V Operator’s Manual
75
8.8.4. DEVICE PATIENT ADD SCREEN
On the Device Patient Add screen, you can transfer patient information stored on the tablet to the
BioCon-V device.
No. Description
① Displays the list of patient information stored on the tablet.
※ For details on how to enter patient information, refer to 8.9.1 Patient Edit.
② Select the patient information you want to transfer to the BioCon-V.
③ Displays the list of patient information currently stored on the BioCon-V device.
④ Transfers the selected patient information to the BioCon-V device.
When you tap the [Transfer ( )] button, a confirmation message appears.
Tap [Yes ( )] to complete the transfer to the BioCon-V.
※ For instructions on how to perform a measurement using transferred patient
information, refer to 5.8.2 Measuring Using Registered Patient Information.
CUBEScan
TM
BioCon-V Operator’s Manual
76
8.8.5. DEVICE PATIENT DELETE SCREEN
On the Device Patient Delete screen, you can delete patient information stored on the BioCon-V
device.
No. Description
① Select the checkbox for the patient information you want to delete.
② The Data List view displays the measurement data stored for the selected patient.
③ After selecting the data to delete, tap the [Delete] button.
When the message ‘Are you sure you want to delete?’ appears, tap [Yes] to delete the
selected data.
CUBEScan
TM
BioCon-V Operator’s Manual
77
8.9. PATIENT LIST SCREEN
On the Patient List screen, you can view, register, edit, and delete patient information.
(1) Launch the BioCon-V Manager app and log
in.
(2) Select the Patient DB Management tab from
the Home screen, or tap the Patient icon ( )
in the Quick Tab.
(3) To register a new patient, tap the Add button
( ). For details, refer to 8.9.1 Patient Edit.
8.9.1. PATIENT REGISTRATION
On the Patient List screen, you can view, register, and delete patient information.
Item Description
First Name Tap the input field and enter the information using the on-screen keyboard.
Surname Tap the surname field and enter the information using the on-screen keyboard.
Patient ID Tap the Patient ID field and enter the ID using the on-screen keyboard.
Operator ID
Tap the Operator ID field and enter the information using the on-screen keyboard.
Patient ID Tap the Patient ID field and enter the ID using the on-screen keyboard.
Date of Birth
Use the '<' and '>' buttons to navigate through the year and month, then select the
date. Tap [OK] to confirm.
CUBEScan
TM
BioCon-V Operator’s Manual
78
Type Select one of the following options: Male, Female, Child.
Registration Completion Notice:
Tap the [Add] button to finalize the registration. When the registration is successfully completed, the
message "Patient information has been saved successfully" appears and disappears after 2 seconds.
8.9.2. Patient Delete
Procedure Screen
(1) Select the patient you want to delete by
checking the box next to the patient’s name.
(2) Tap the [Delete] button.
(3) When the confirmation message “Are you
sure you want to delete?” appears, tap [Yes].
(4) The selected patient information will be
deleted.
CUBEScan
TM
BioCon-V Operator’s Manual
79
8.10. SCAN MIRRORING
When BioCon-V and the tablet are properly connected via Wi-Fi, you can monitor and perform scan
measurements in real time through the tablet screen.
8.10.1. SCAN MEASUREMENT
Unregistered Patient Measurement (Anonymous Measurement)
(1) Start Scan While Connected to the Device
When the tablet is connected to the device, tap
the Scan icon ( ) in the Quick Tab.
(2) Scan Preparation Screen
The scan preparation screen appears on the
tablet.
If no patient information is entered, tap the
[Scan] button immediately.
Alternatively, press the center button on the
BioCon-V device to start.
(3) Perform Pre-Scan
The Pre-Scan screen appears.
For proper Pre-Scan instructions, refer to 5.8.
LOCATING THE BLADDER (PRE-SCAN).
(4) Perform Normal Scan
Tap the [Scan] button on the tablet or press the
device’s center button to start the Normal Scan.
(5) Scan Result Screen
The scan result screen appears.
To re-scan the same patient: tap [Scan].
To scan a new patient: tap [New Patient].
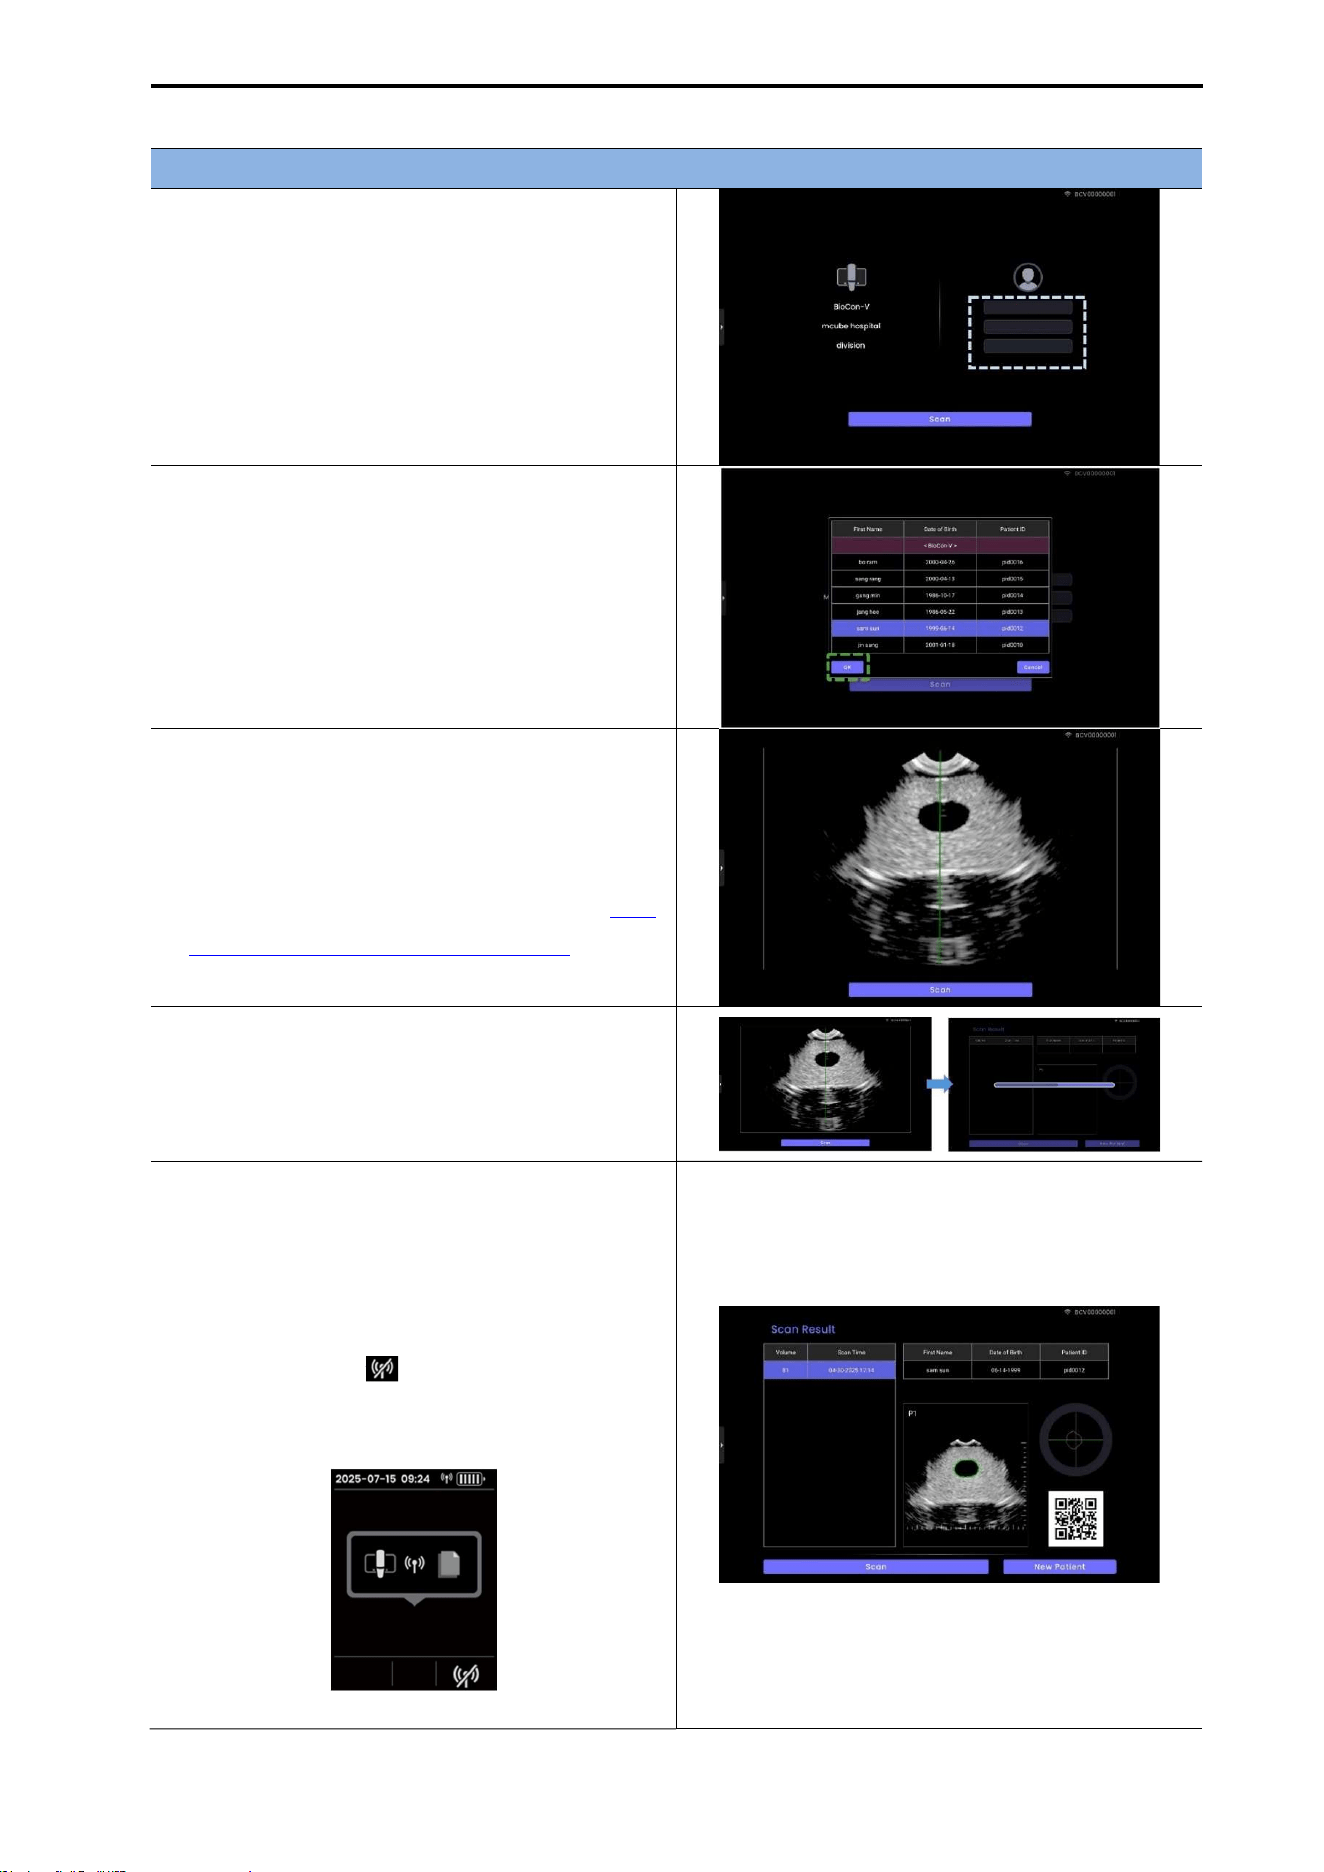
CUBEScan
TM
BioCon-V Operator’s Manual
80
Registered Patient Measurement
(1) Select Patient
Tap the list area on the right side of the screen
and select the patient to be measured.
(2) Confirm Patient Selection
After selecting the patient from the list, tap [OK].
NOTE: The displayed patient list is from the
BioCon-V device database,
not
the tablet
database.
(3) Start Pre-Scan
Tap the [Scan] button on the tablet, or press
the center button (Scan) on the device to
begin Pre-Scan.
For proper Pre-Scan instructions, refer to 5.8.
LOCATING THE BLADDER (PRE-SCAN).
(4) Start Normal Scan
Tap the [Scan] button on the tablet, or press the
device’s center button to start the Normal
Scan.
(5) Check Scan Results
The scan result screen appears.
Re-scan the same patient: tap [Scan]
Scan a new patient: tap [New Patient]
How to disconnect from the BioCon-V: Press
the right button ( ) on BioCon-V to
disconnect from the tablet.
[BioCon-V Device Screen]
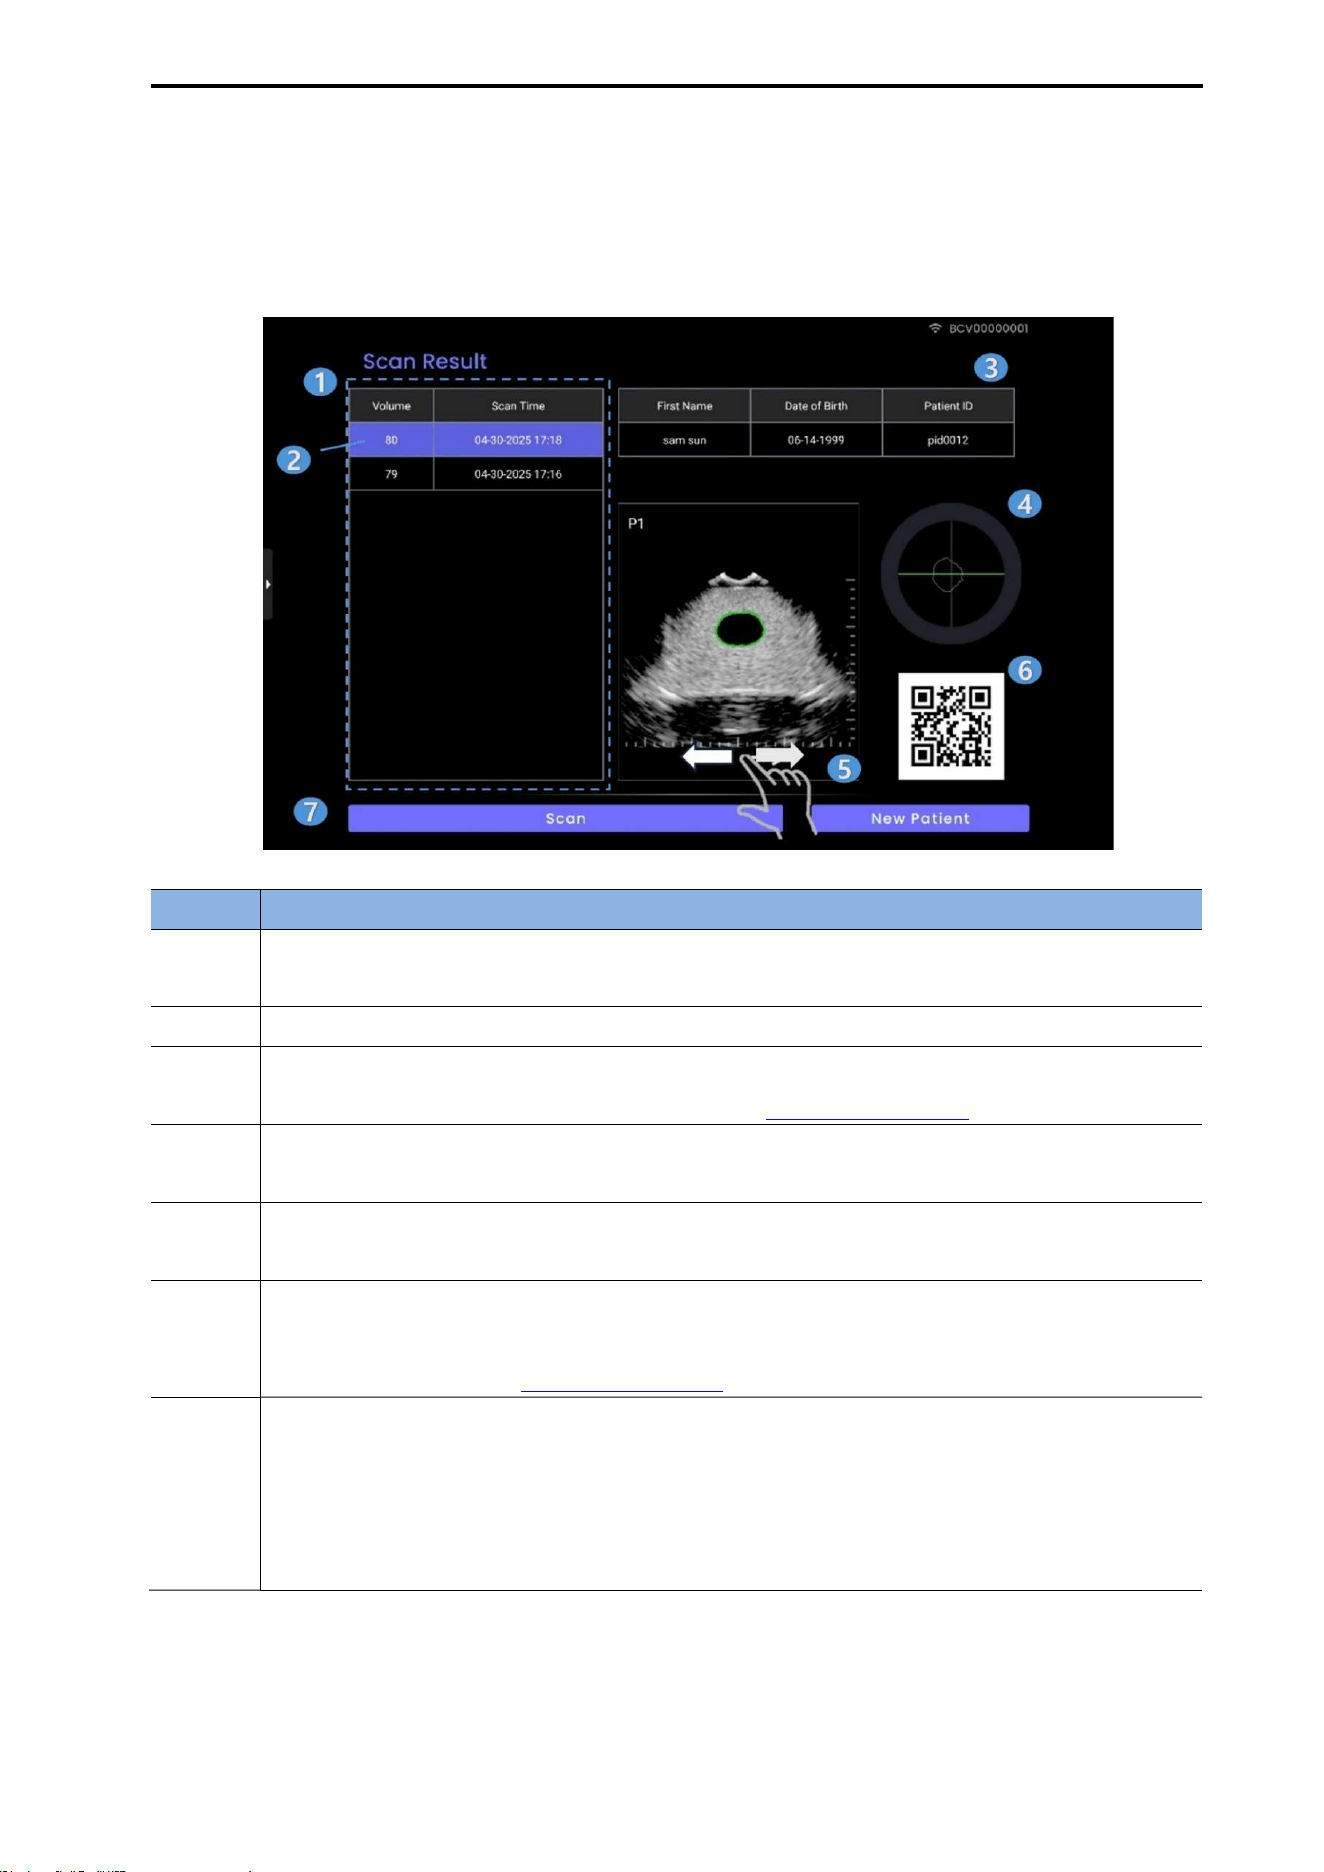
CUBEScan
TM
BioCon-V Operator’s Manual
81
8.10.2. SCAN RESULT SCREEN
When the scan is completed, the Scan Result screen appears on the tablet.
Each item on the screen functions as follows.
No. Description
①
A new scan result is added to the list. Up to 10 results can be stored; when the limit is
exceeded, the oldest data is automatically deleted.
② Tap any item on the left-side list to view the previous scan result for that selection.
③
Displays the registered patient information (First Name, Date of Birth, Patient ID). For
changing displayed patient information, refer to 8.8. DEVICE SCREEN.
④
Shows the bladder scan position and orientation. Each swipe of the cross-section image
rotates the plane by 15°.
⑤
Swipe left or right on the plane-image area to browse through other plan images (P1–
P12).
⑥
Outputs the current scan result as a barcode. The barcode can be scanned using a
barcode reader or mobile device camera to retrieve the measurement value. For barcode
format settings, refer to 8.8. DEVICE SCREEN.
⑦
Repeat Measurement and New Measurement Options
Re-scan the same patient: Tap [Scan] to perform another measurement on the same
patient.
Measure a new patient: Tap [New Patient] to return to the home screen and begin a
new measurement.
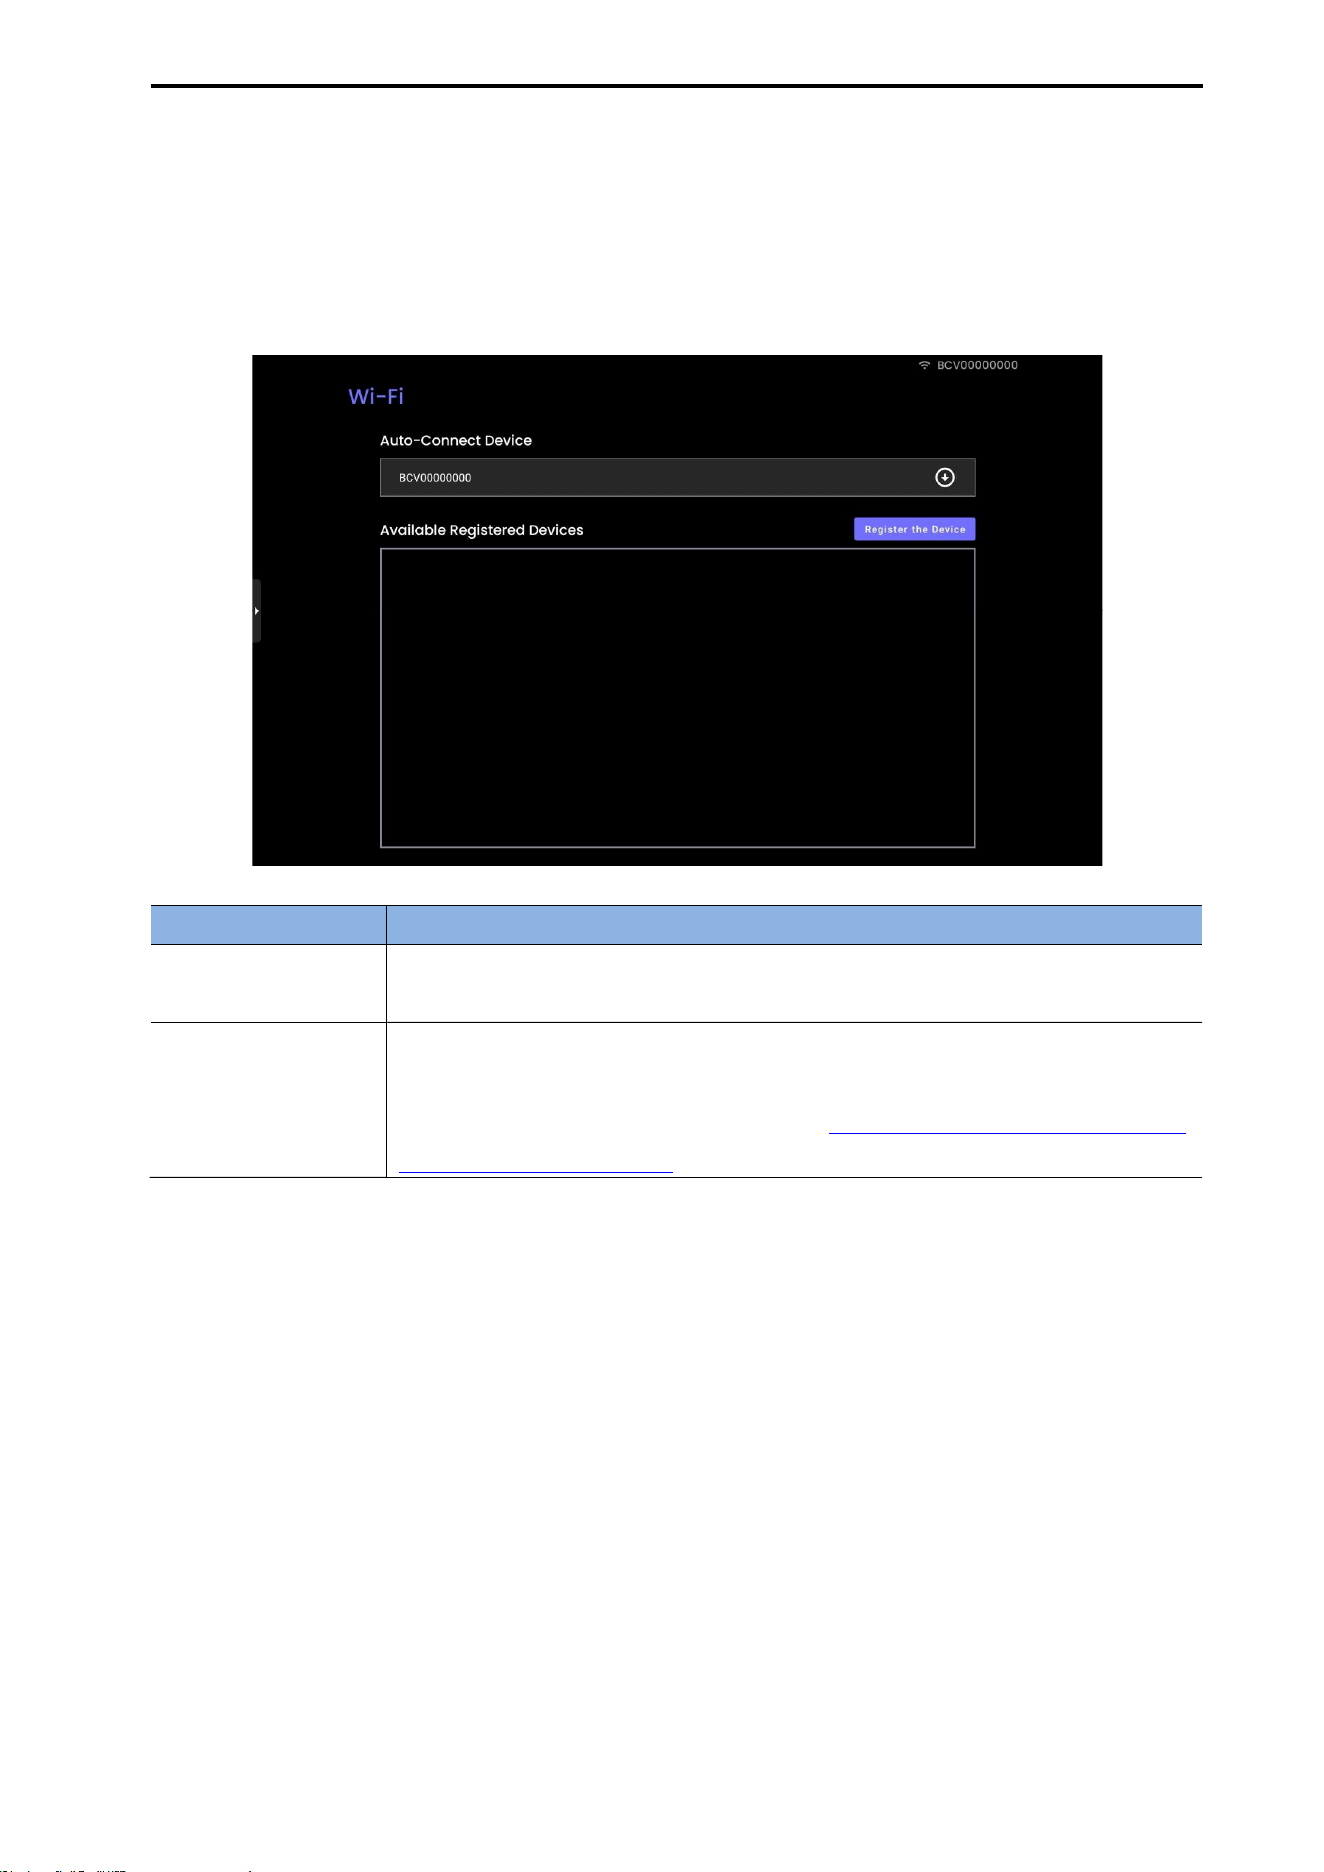
CUBEScan
TM
BioCon-V Operator’s Manual
82
8.11. WI-FI SETTING
In the Wi-Fi Settings menu of the BioCon-V Manager app, you can manage functions such as
automatic connection setup, device registration, viewing the list of registered devices, and deleting or
re-registering devices.
Item Description
Auto-Connect
Device
Displays a list of BioCon-V devices that are set to automatically connect to
the tablet. Automatic connection can also be disabled from this menu.
Available Registered
Device
Displays the list of BioCon-V devices registered on the tablet.
※ To register a new device, tap the [Register the Device] button.
→ For detailed registration steps, refer to 8.6.2. REGISTERING A DEVICE FOR
AUTOMATIC CONNECTION.
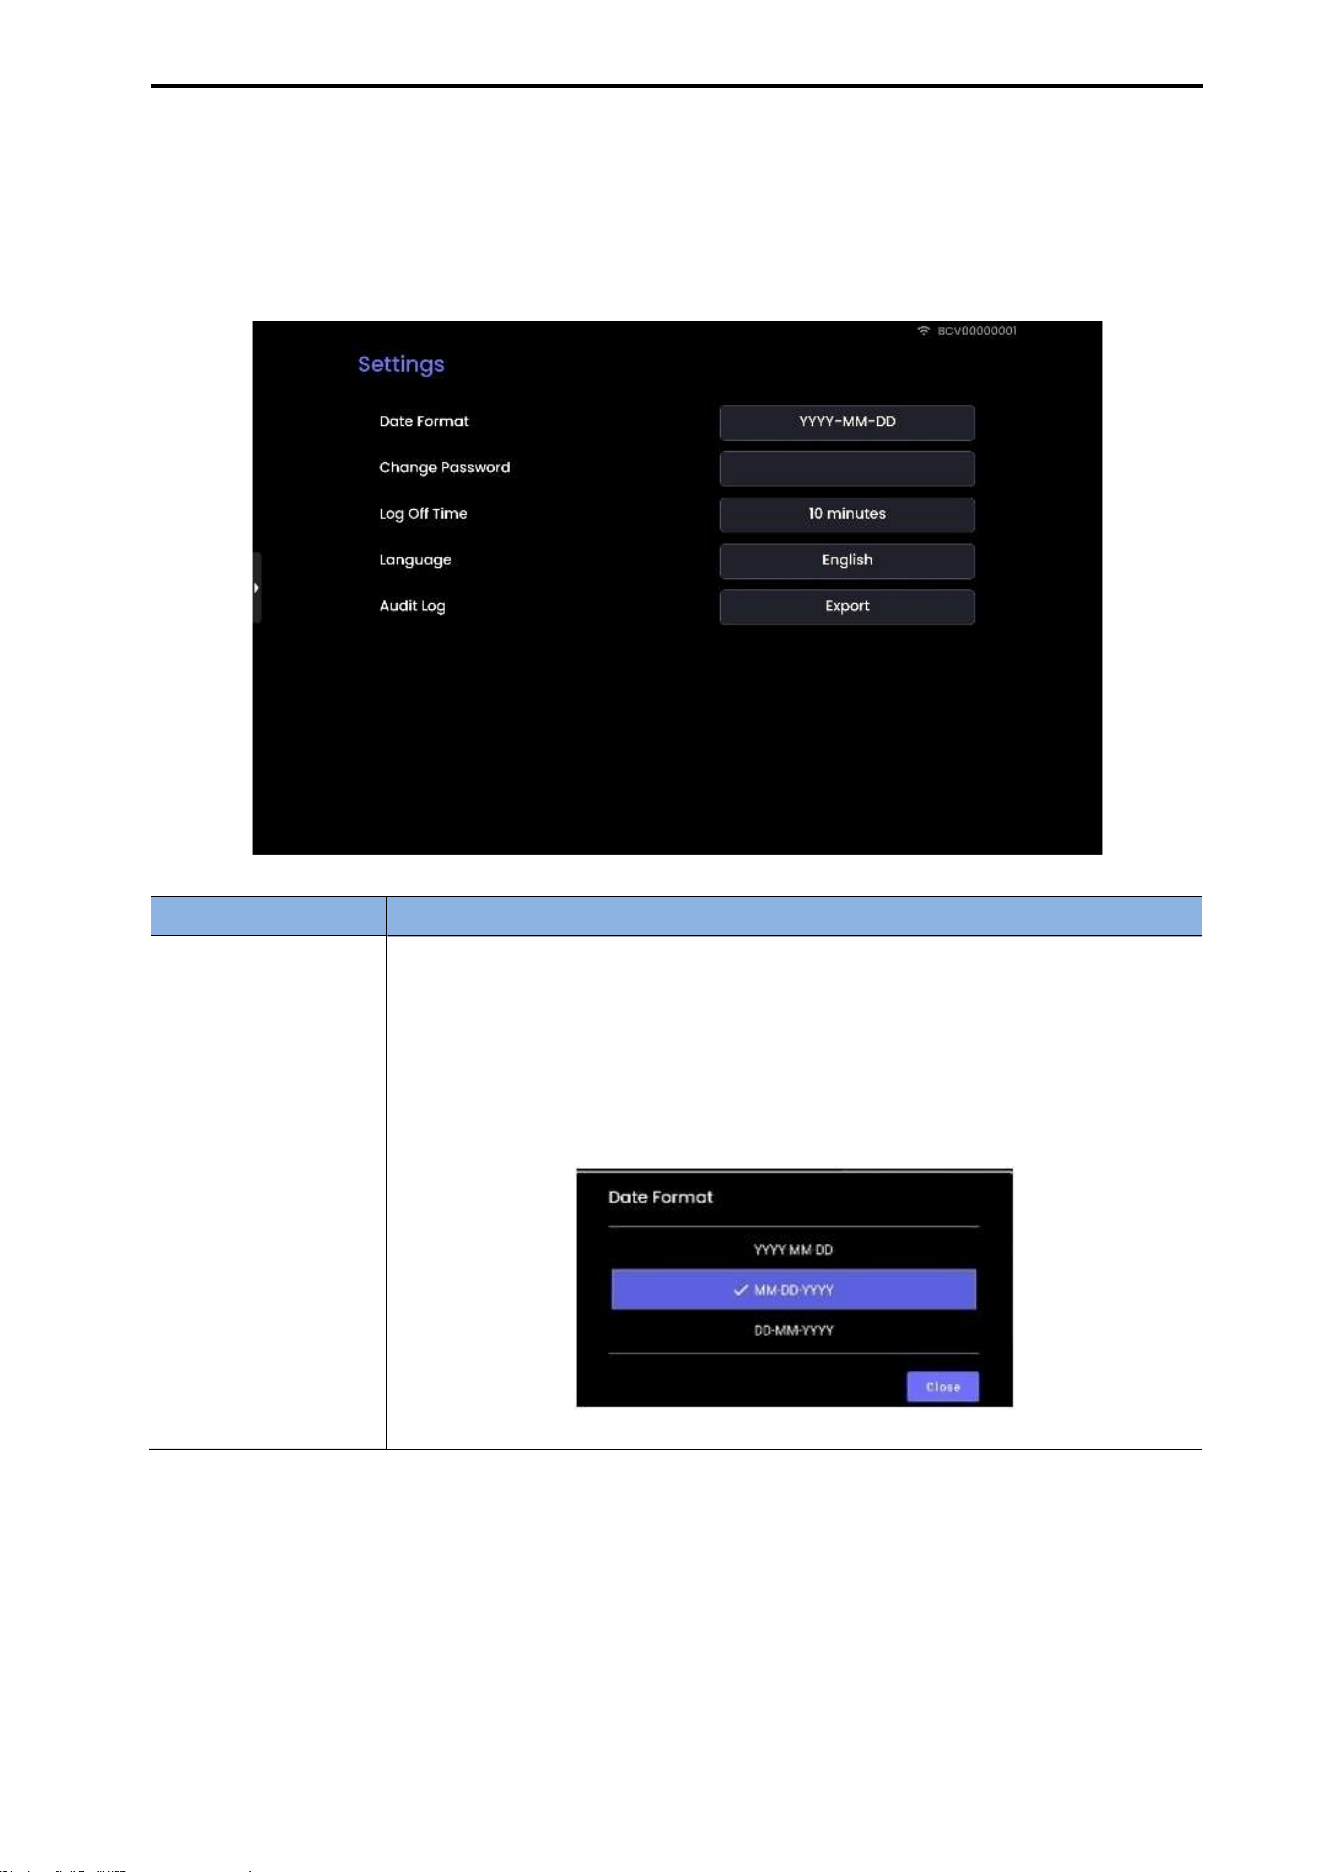
CUBEScan
TM
BioCon-V Operator’s Manual
83
8.12. SETTINGS (TABLET SETTING)
The Settings screen allows you to change key tablet environment settings such as date format,
password, auto log-off time, and language.
Item Description
Date
Format
Tap the format displayed on the right side of Date Format (e.g., YYYY-MM-
DD).
In the pop-up window, select one of the date formats (YYYY-MM-DD, MM-
DD-YYYY, DD-MM-YYYY).
After selecting the format, tap [Close] to apply the setting.
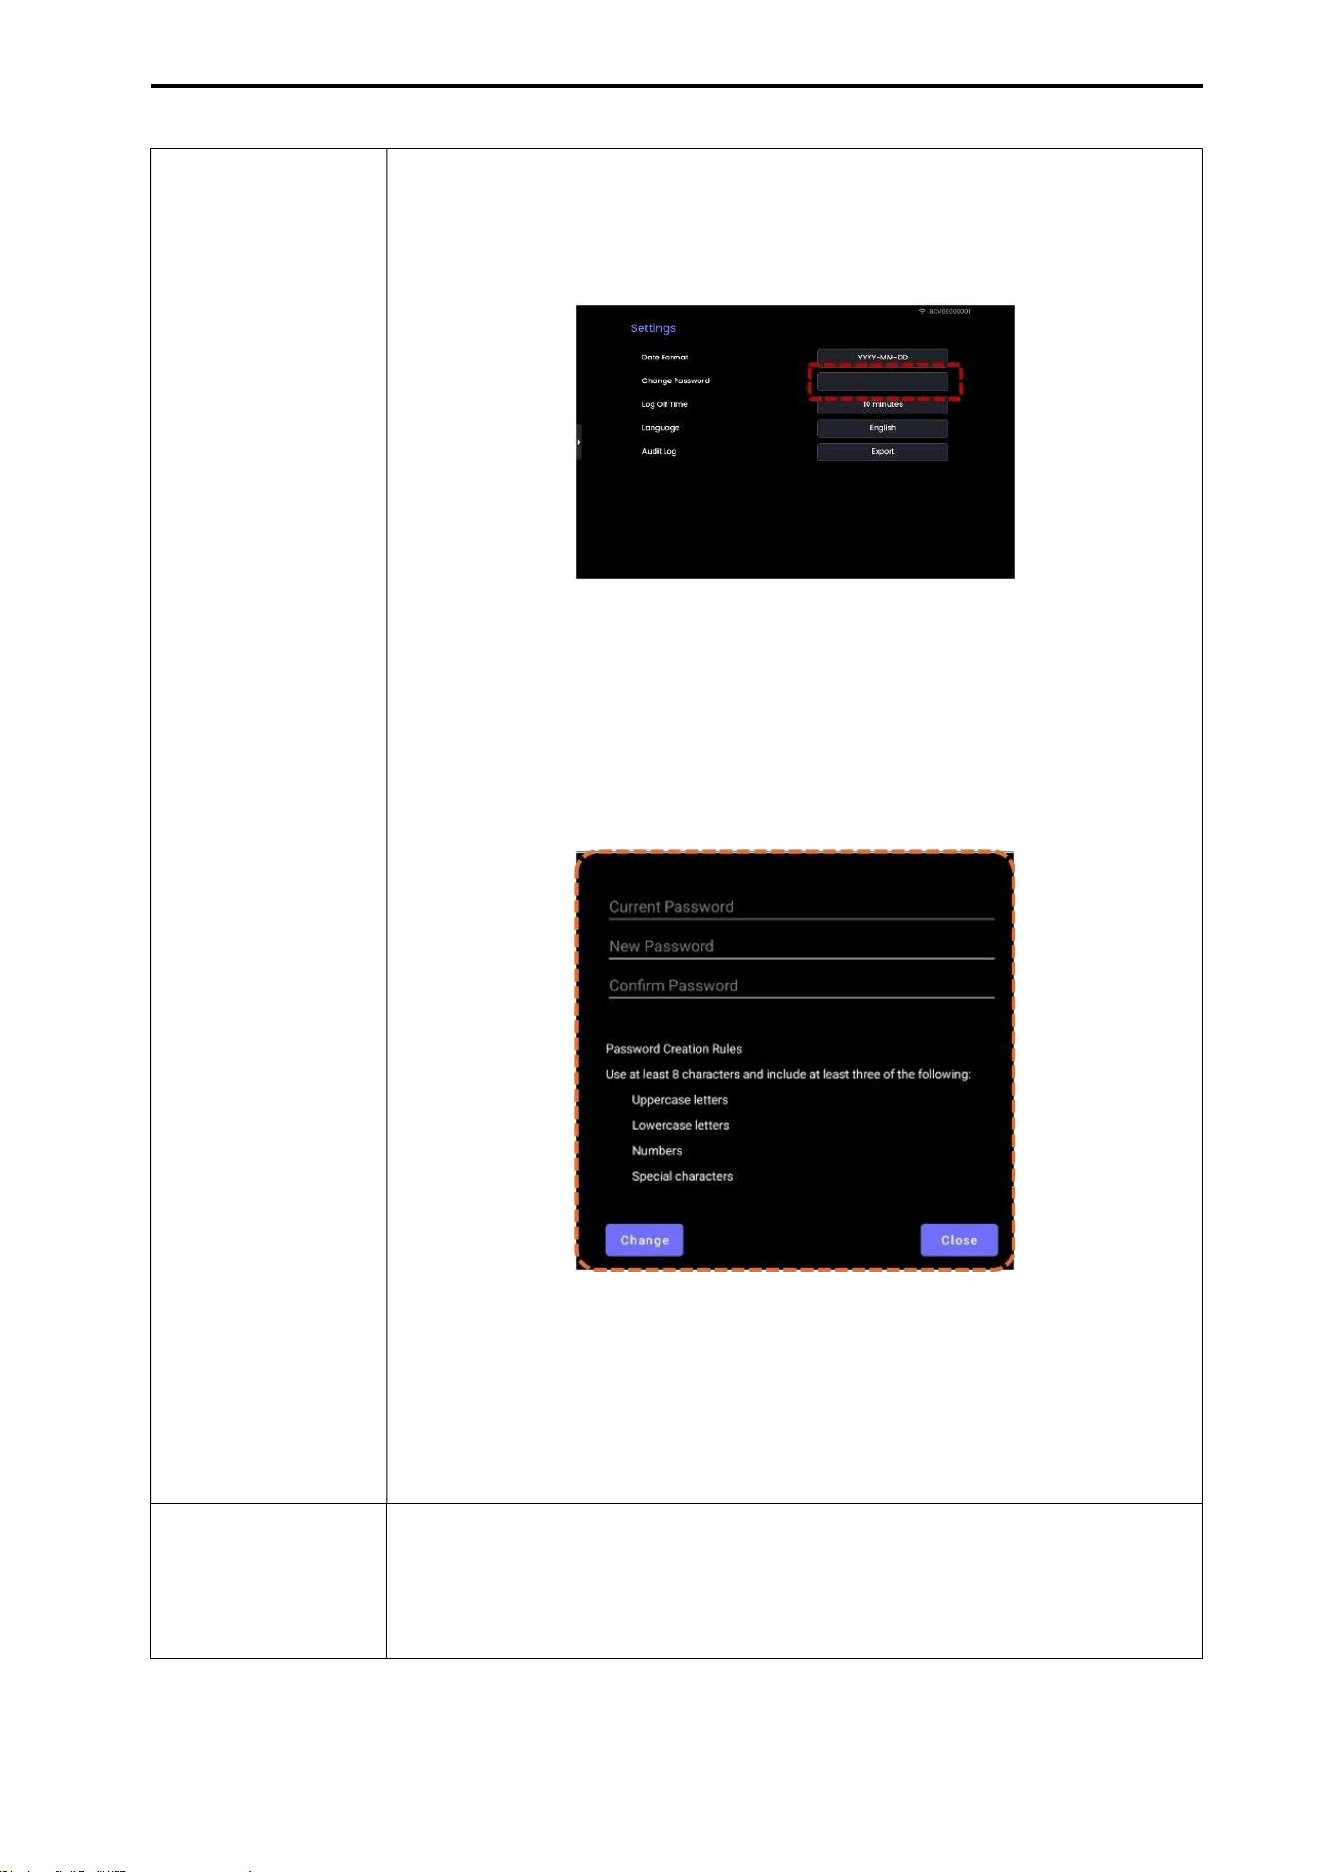
CUBEScan
TM
BioCon-V Operator’s Manual
84
Change
Password
Follow the steps below to change the password.
(1) Tap the Change Password field.
A password input pop-up window appears.
(2) Current Password: Enter the current password.
(3) New Password: Enter the new password.
(4) Confirm Password: Re-enter the same new password.
(5) Tap [Change]: Once completed, the password change date is updated and
displayed in the Settings screen.
NOTE:
The password must contain at least 8 characters and include a
combination of three or more of the following
- Uppercase letters, lowercase letters, numbers, or special characters
The new password must be different from the current password.
Log
Off Time
Sets the automatic log-off time.
(1) Select the desired time option (10 minutes or 30 minutes).
(2) Tap [Close] to save the setting.
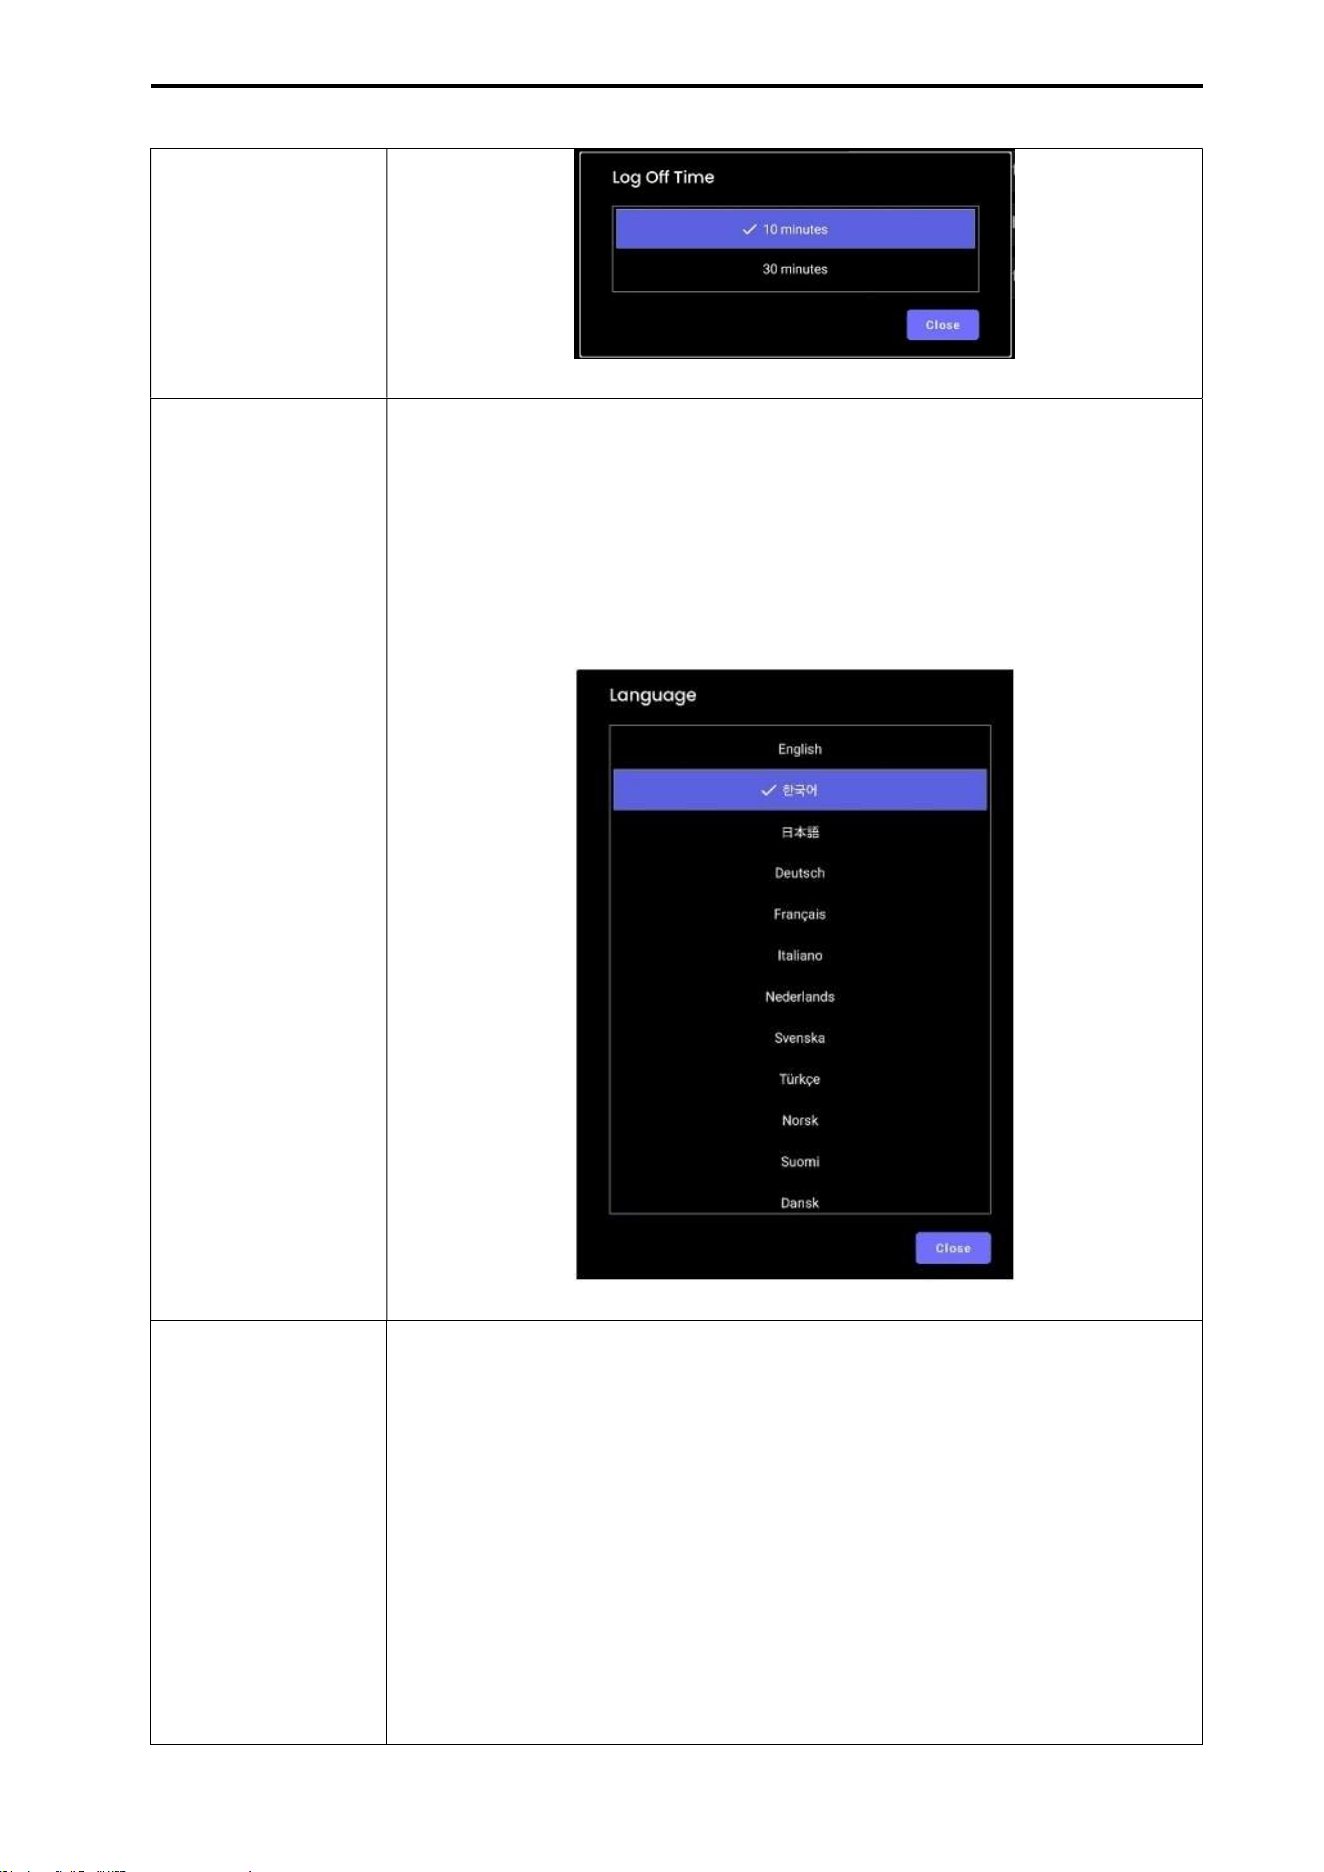
CUBEScan
TM
BioCon-V Operator’s Manual
85
Language (1) Tap the currently selected language (e.g., English) to open the language
selection window.
(2) When the list of supported languages appears, select the desired
language.
(3) Tap [Close] to apply the setting.
*The selected language is applied immediately after tapping [Close].
Audit
Log
The Audit Log records the following information.
User activity history
Timestamp of performed actions
System responses and event logs
Only anonymized information unrelated to personal patient data is stored.
[How to Export Logs]
Tap [Export].
Select the desired file save location.
The audit log file will be saved to the designated location.

CUBEScan
TM
BioCon-V Operator’s Manual
86
9. NOTIFICATION MESSAGES
9.1. PROBE POP-UP MESSAGES
Popup Message Description
Condition
Power Sleep
When there is no measurement, data transmission, or
user input during the Auto Sleep time set in the probe
settings.
When there is no user input for approximately 10
seconds while wireless charging.
When the sleep command is triggered by pressing the
left button for more than 3 seconds.
Low Battery
Displayed when the battery level is below 5%.
Displayed when essential functions are restricted due to
low battery.
Password
Change
Complete
Displayed when the changed password has been set and
saved.
Power Off
Restricted
Displayed when attempting to power off while wireless
charging.
Power-off is restricted to ensure stable wireless charging.
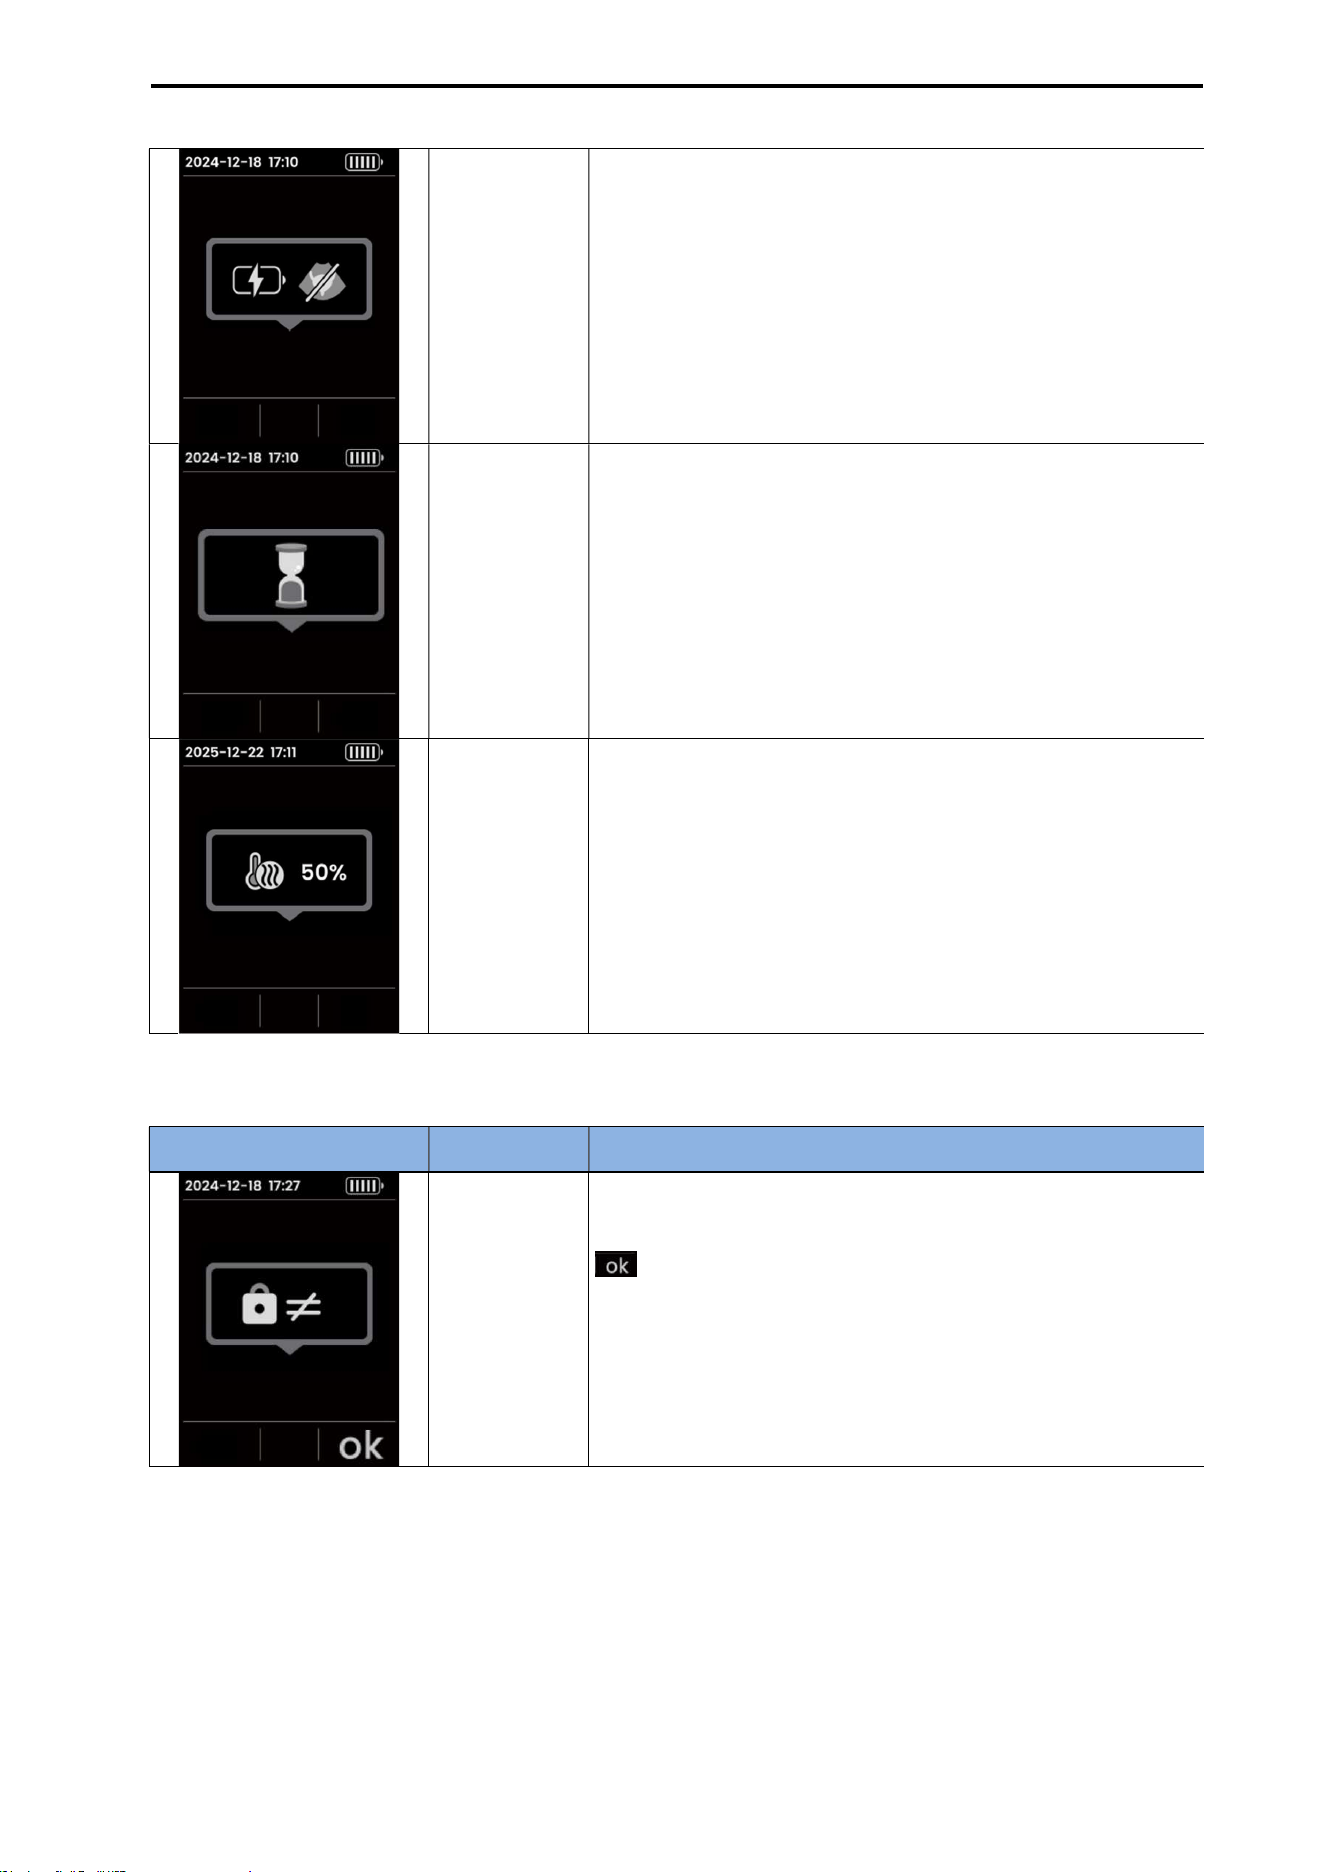
CUBEScan
TM
BioCon-V Operator’s Manual
87
9.2. PROBE NOTIFICATION MESSAGES
Scan
Restricted
During
Charging
Displayed when a scan is attempted during wireless
charging.
In Progress
Displayed when the system requires waiting for the current
operation to complete.
Oil Heating
Displayed when the system requires waiting for oil
heating to complete.
The displayed number indicates the progress.
Popup Message Description
Condition
Current
Password
Mismatch
The value entered on the keypad does not match the
stored current password.
: Confirm icon
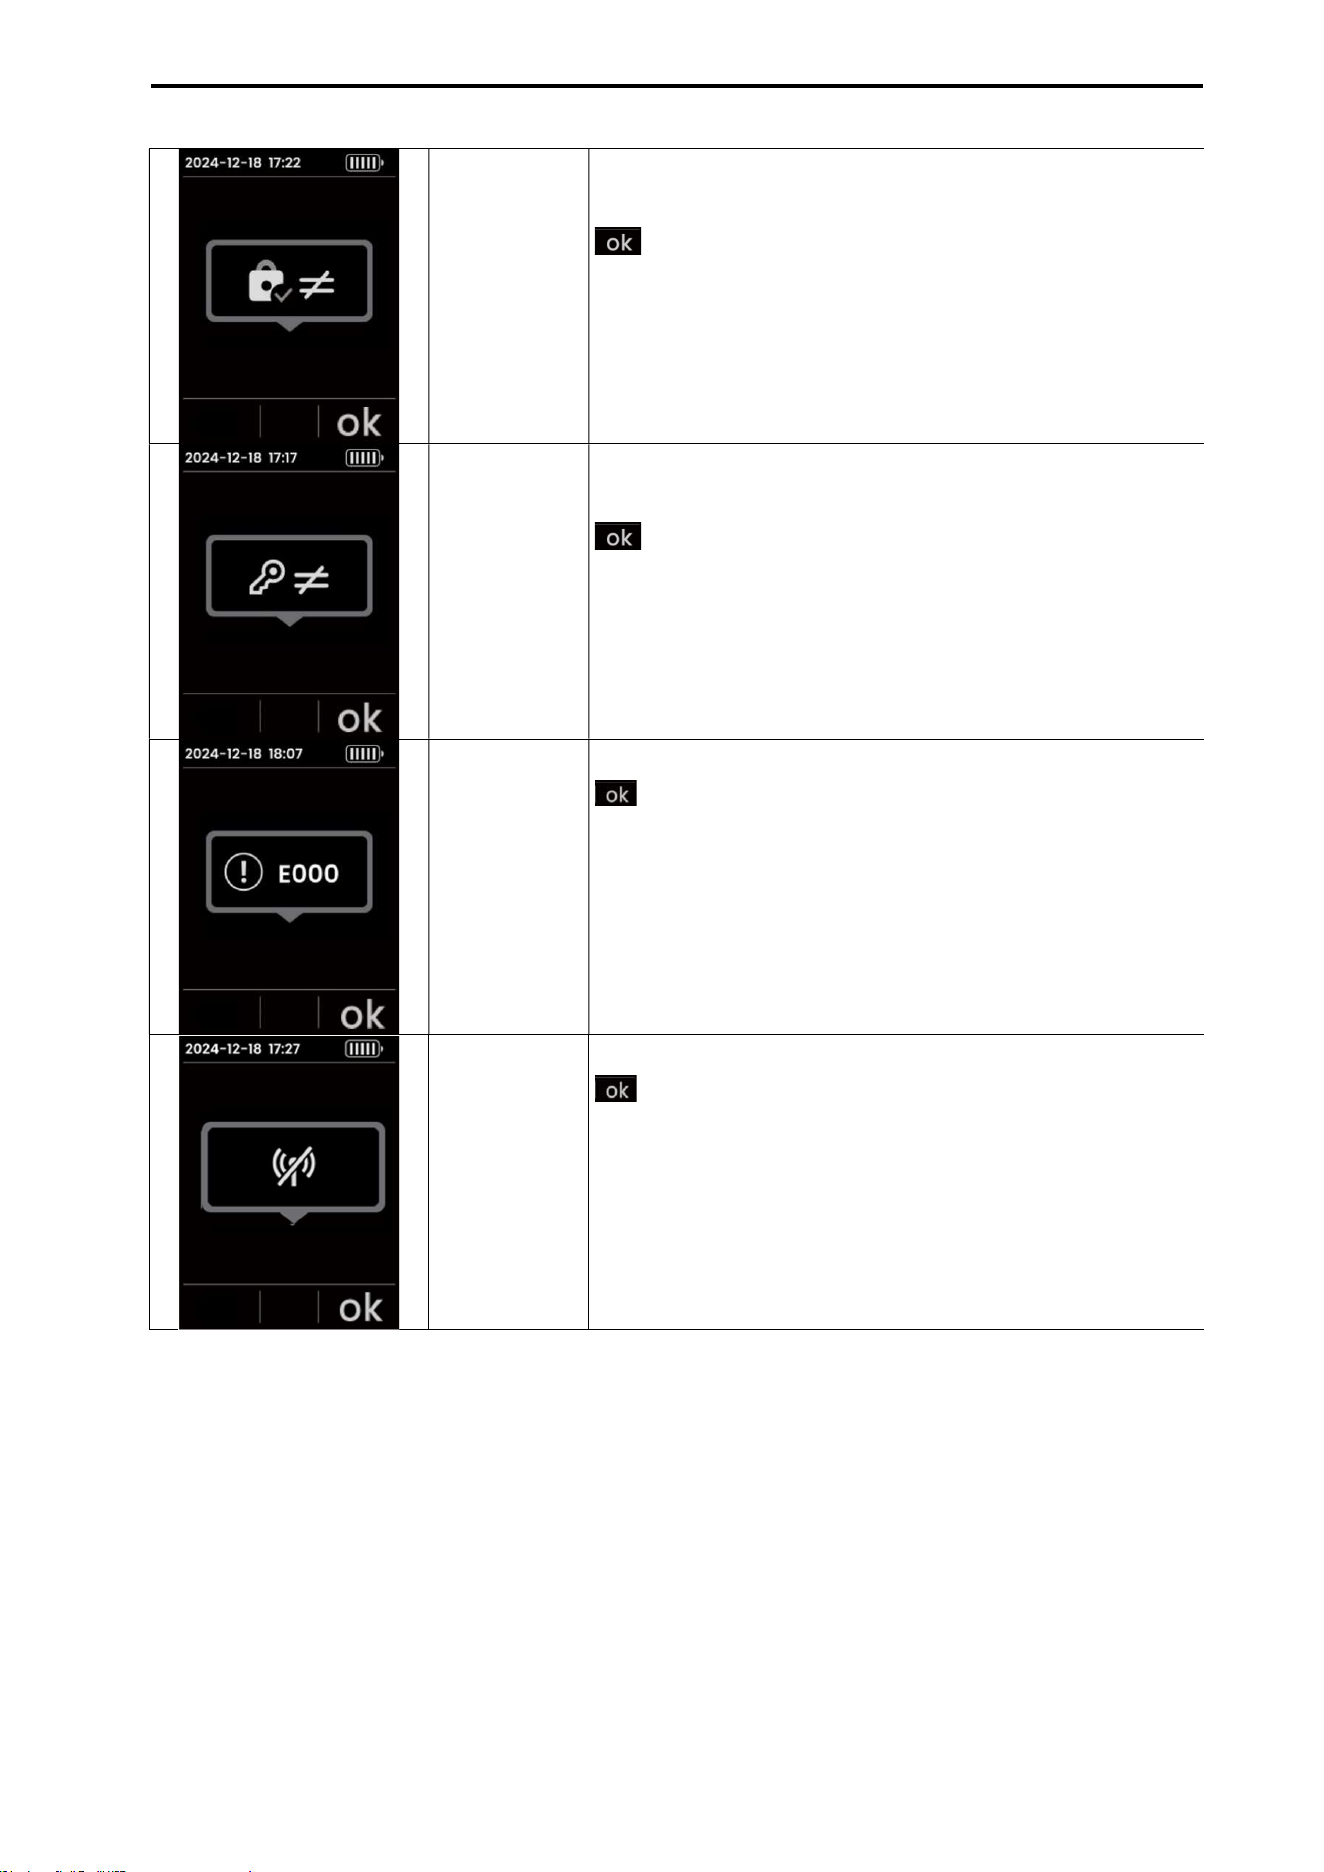
CUBEScan
TM
BioCon-V Operator’s Manual
88
New Password
Mismatch
The new password and the confirmation password do
not match.
: Confirm icon
Key Code
Mismatch
The entered key code does not match the generated key
code based on the stored lock code.
: Confirm icon
Error Code
Displays an error code.
: Confirm icon
Remote
Connection
Lost
Display when a remote connection is disconnected.
: Confirm icon
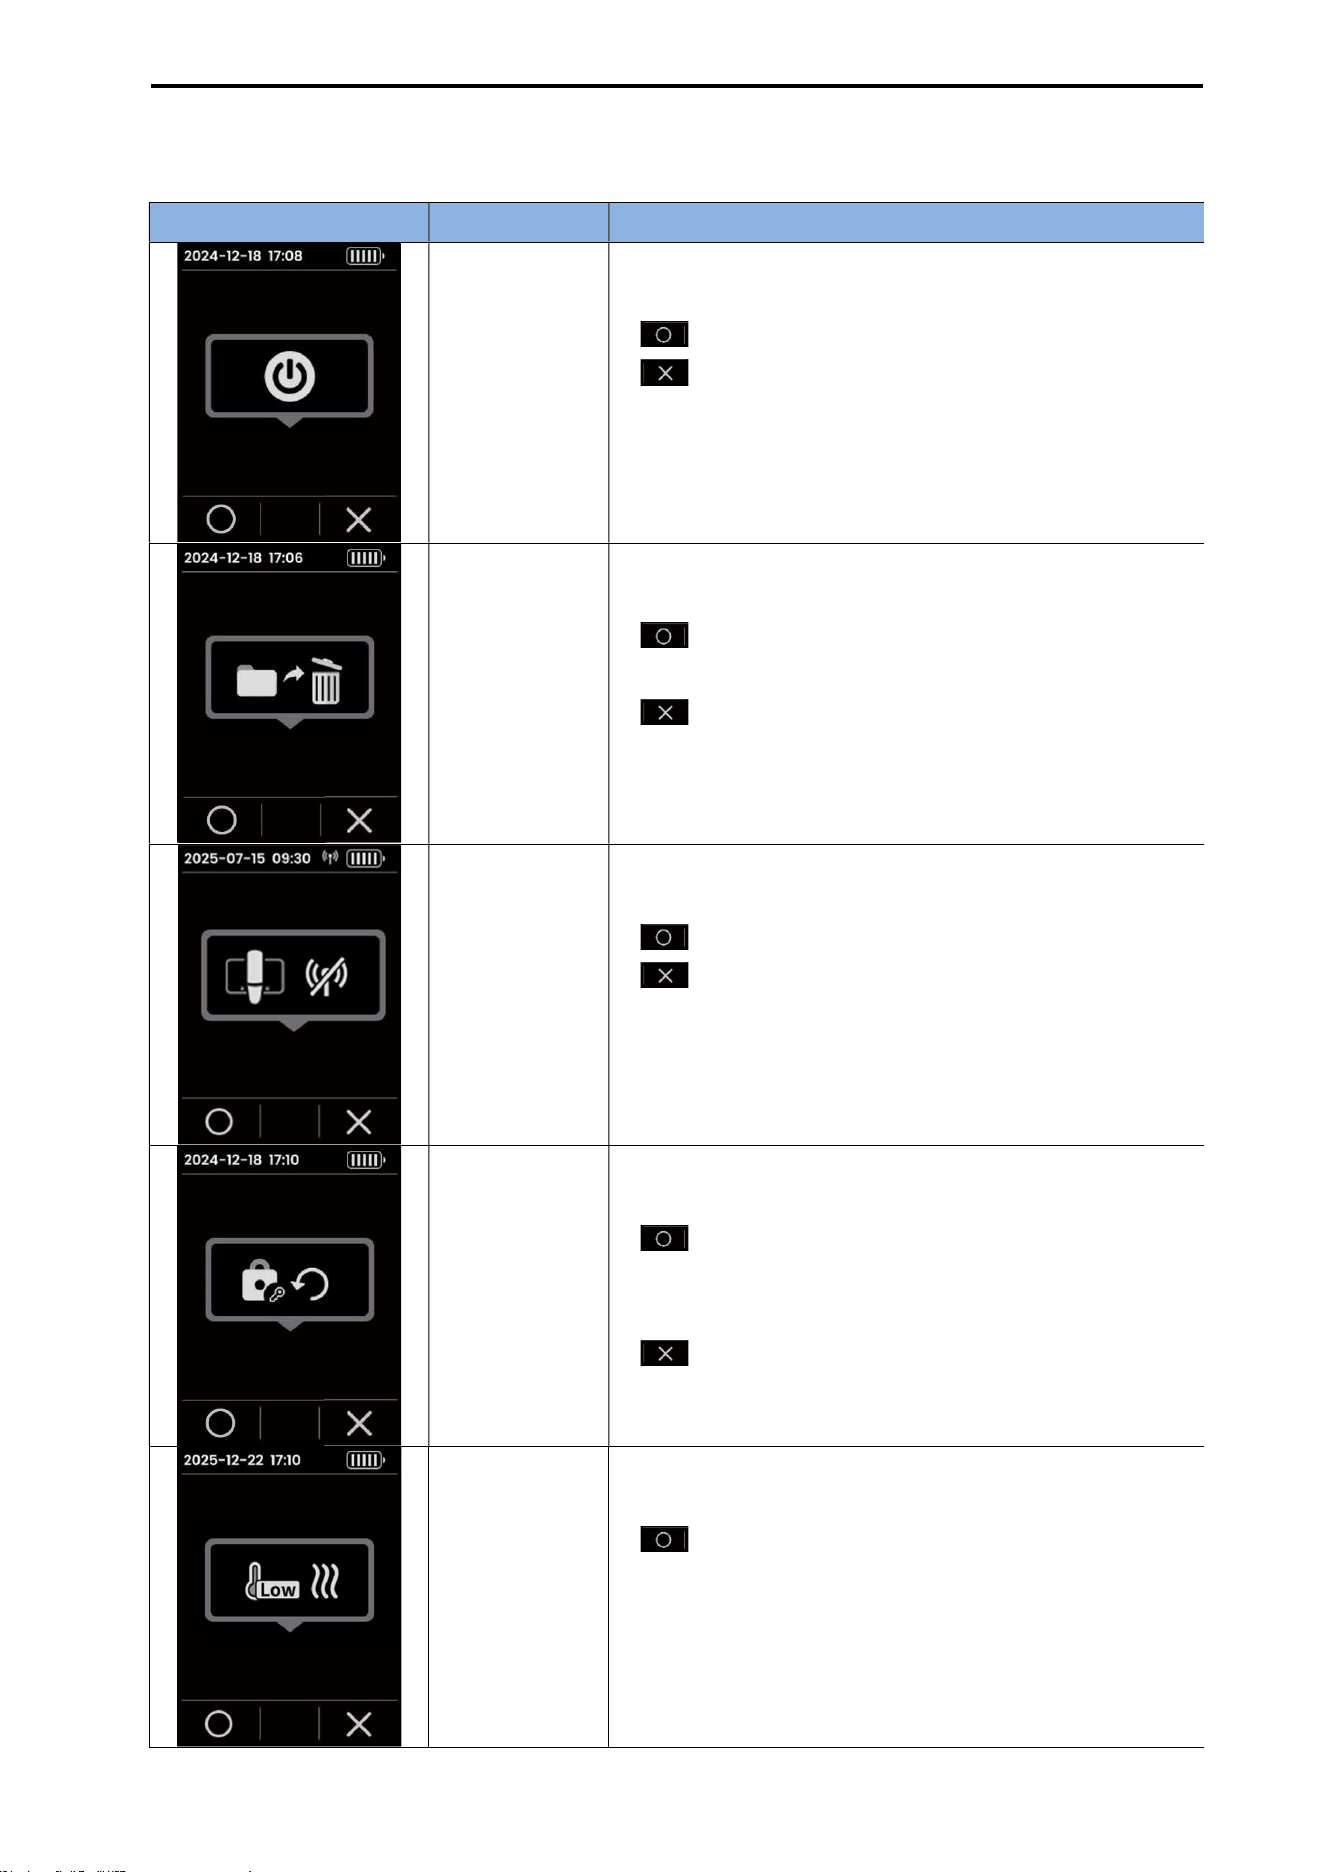
CUBEScan
TM
BioCon-V Operator’s Manual
89
9.3. PROBE SELECTION MESSAGE (ACCEPT/DECLINE OPTION)
Popup Message Description Condition
Power Off
When the left + center buttons are pressed and held for
more than 3 seconds:
(Left button): Execute power off
(Right button): Cancel power off and return to
the previous screen
Delete Stored
Data
When the delete icon is selected on the Barcode Review
screen:
(Left button): Delete the selected data and
return to the Review List screen
(Right button): Stay on the Barcode Review
screen
Disconnect
Remote
Connection
When the disconnect icon is selected during a remote
connection session:
(Left button): Disconnect
(Right button): Cancel
Generate Lock
Code
When the generate icon is selected on the Lock Code
screen:
(Left button): Delete the existing lock code,
generate a new lock code, and move to the Lock
Code screen
(Right button): Stay on the Lock Code screen
Low
Temperature
Displayed when a scan is attempted while the system’s
internal temperature is 10 °C or lower:
(Left button):
Performs an operation to heat the
oil inside the system to increase the temperature. While
oil
heating is in progress, the message below appears
and automatically disappears when it reaches 100%.
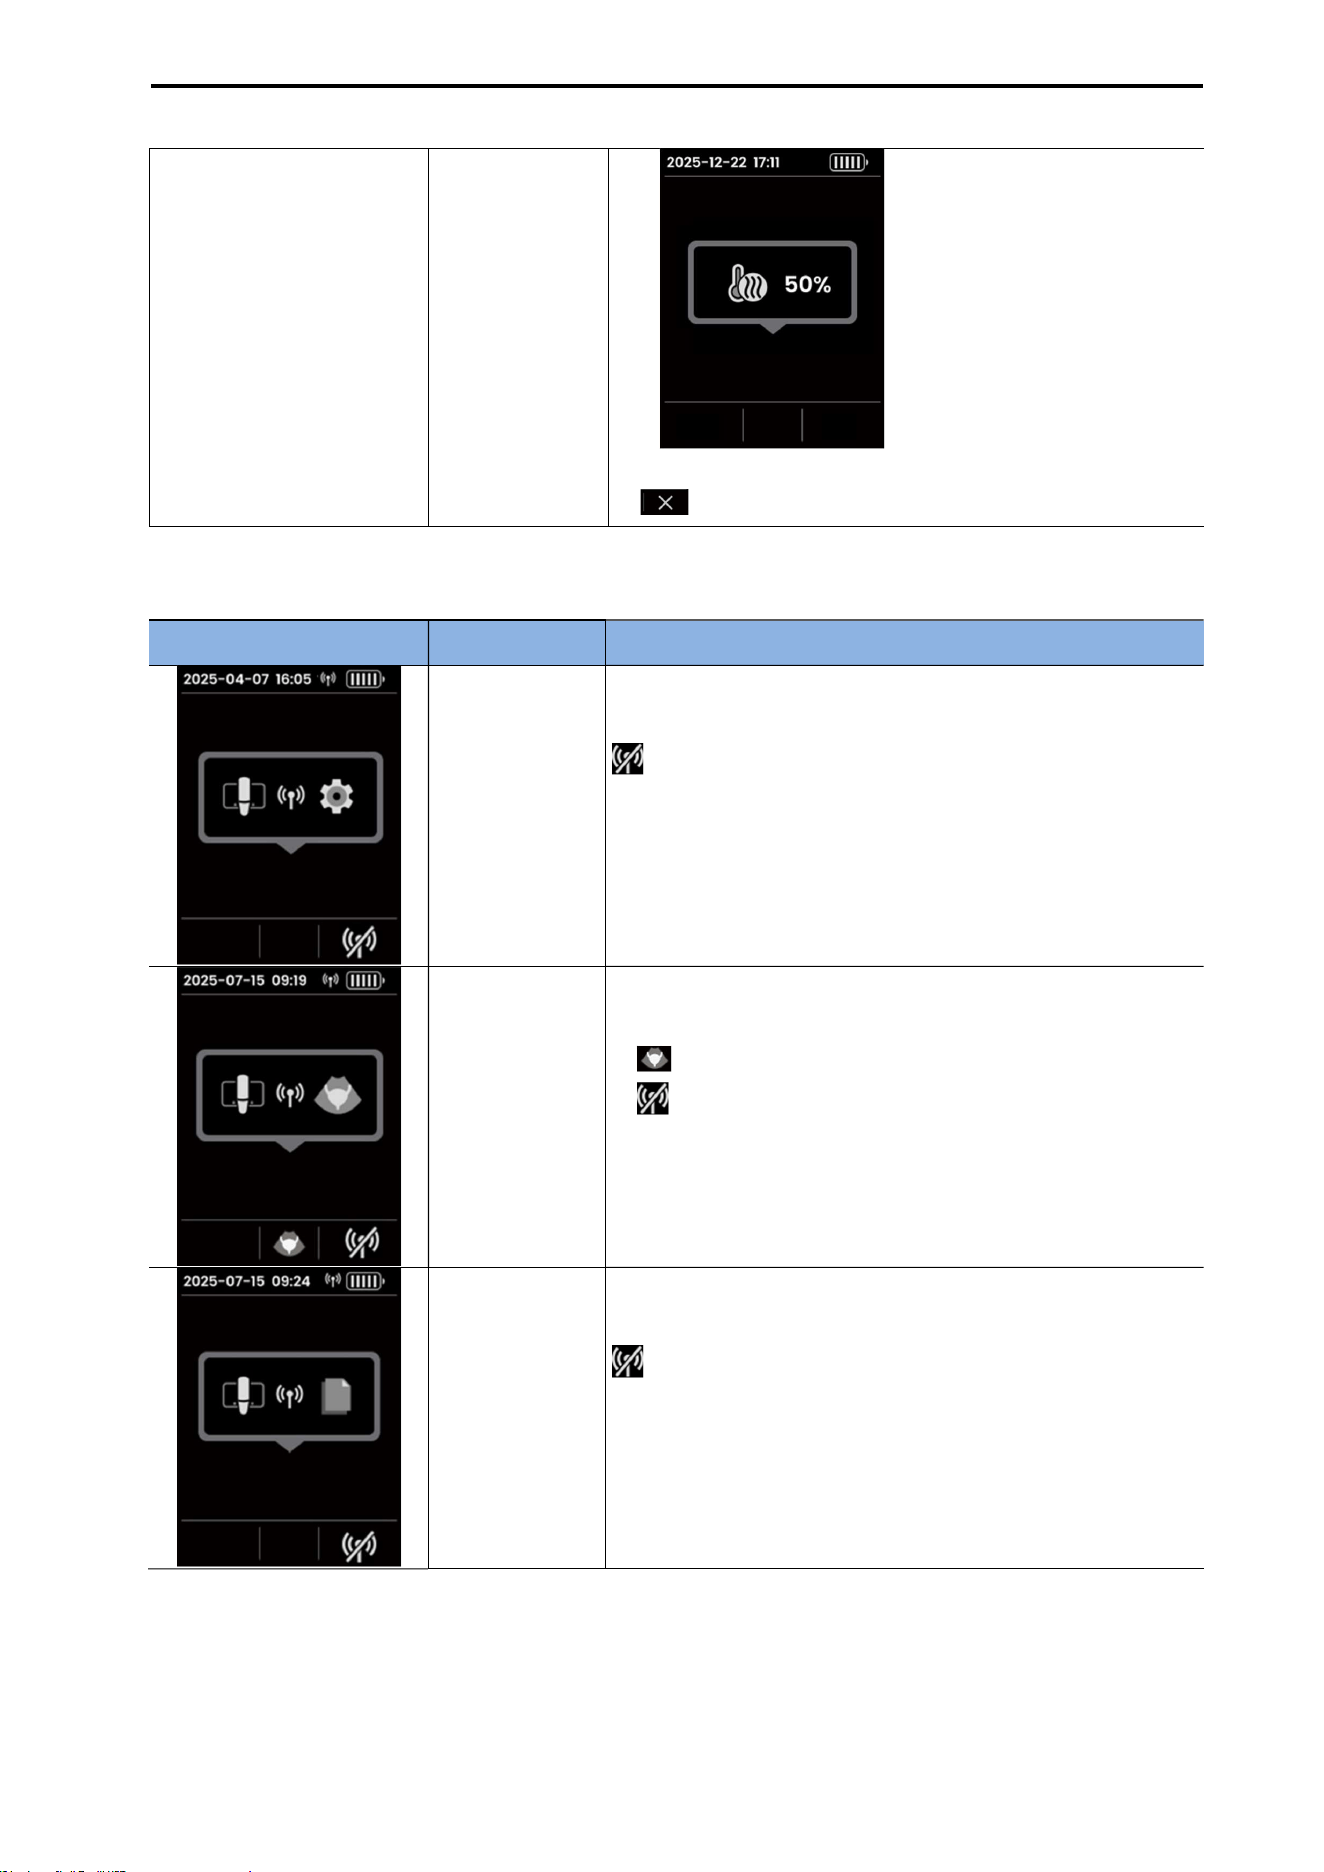
CUBEScan
TM
BioCon-V Operator’s Manual
90
9.4. REMOTE CONNECTION MESSAGES (TABLET/PC)
(Right button): Cancel
Popup Message Description
Condition
Remote Setup
Indicates that the tablet and the probe
are connected for
configuration changes.
: Disconnect
Remote Scan
Indicates that the tablet and the probe
are connected for
scan mirroring.
: Scan Settings
: Disconnect
Remote Transfer
Indicates that the CubeLite and the probe are connected
for transmitting scan results (PDF/JPG)
: Disconnect
CUBEScan
TM
BioCon-V Operator’s Manual
91
10. MAINTENANCES
10.1. DEVICE ERRORS
Error Message
Description
Action
Displayed when attempting to power
off the device during wireless
charging.
Stop wireless charging and try again.
Displayed when attempting to start a
scan during wireless charging.
Stop wireless charging and try again.
Displayed when the battery level is
low.
Charge the device before use.
Displayed when the wireless
connection is lost.
Attempting to reconnect to the
wireless connection near the probe.
Displayed when a password change is
required (initial password status or
more than 6 months have passed
since the last change).
Change the password in the
Settings menu.
Displayed when the password entered
via keypad does not match the current
password.
Check the password and try again.
Displayed when the new password and
the confirmation password do not
match during the password change
process.
Enter the same password in both the
New Password and Confirm Password
fields.
Displayed when the entered Key Code
does not match the Key Code
generated from the stored Lock Code.
To reset your password, contact the
distributor or manufacturer.
Displayed when an error occurs (xxx =
error number).
Refer to 10.2. DEVICE & SCAN ERROR
MESSAGE and 10.3. CALIBRATION
AND SELF-TEST ERROR MESSAGES for
actions related to each error code.

CUBEScan
TM
BioCon-V Operator’s Manual
92
10.2. DEVICE & SCAN ERROR MESSAGE
Operation Error Code Action
Pre-Scan and
Normal Scan
1 Please perform the scan operation again.
Turn the power off and on, then perform the scan again.
If the error persists, please contact our Customer Support
Department for assistance.
2
3
4
5
6
7
8
Allow the device to cool down sufficiently, then perform the scan
again.
Turn the power off and on, then perform the scan again.
If the error persists, please contact our Customer Support
Department for assistance.
10.3. CALIBRATION AND SELF-TEST ERROR MESSAGES
Operation Error Code Action
Calibration
step 1
(with Calkit)
0 This error code appears when the stop button is pressed.
101 Perform Calibration Step 1 (Calkit) again.
If the error persists, please contact our Customer Support
Department.
102
103
104
105
106
107
Allow the device to cool down sufficiently, then perform Calibration
Step 1 (Calkit) again.
If the error persists, please contact our Customer Support
Department.
201 Perform Calibration Step 1 (Calkit) again.
If the error persists, please contact our Customer Support
Department.
202
203
204
205
Check that the Calkit is filled with enough water up to the water
level mark. If not, fill it with water to the indicated level.
Ensure that the probe is correctly mounted on the Calkit.
206
Perform Calibration Step 1 (Calkit) again.
If the error persists, please contact our Customer Support
Department.

CUBEScan
TM
BioCon-V Operator’s Manual
93
207
Ensure that the probe is correctly mounted on the Calkit.
Check for any air bubbles inside the outer wall or target area of
the Calkit. The Calkit must be free of air bubbles.
Confirm that the water temperature inside the Calkit is between
20°C and 24°C.
Perform Calibration Step 1 (Calkit) again.
If the error persists, please contact our Customer Support
Department.
208
Calibration
step 2
(with
Phantom)
0 This error code appears when the stop button is pressed.
301 Perform Calibration Step 2 (Phantom) again.
If the error persists, please contact our Customer Support
Department.
302
303
304
305
Ensure that the probe is correctly mounted on the Phantom.
Check that the surface of the Phantom has sufficient water.
Confirm that the water temperature of the Phantom is between
20°C and 24°C.
Perform Calibration Step 2 (Phantom) again.
Replace the Phantom with a new one and perform Calibration Step
2 again.
If the error persists, please contact our Customer Support
Department.
306 Perform Calibration Step 2 (Phantom) again.
If the error persists, please contact our Customer Support
Department.
307
308
309
Allow the device to cool down sufficiently, then perform Calibration
Step 2 (Phantom) again.
If the error persists, please contact our Customer Support
Department.
401 Perform Calibration Step 2 (Phantom) again.
If the error persists, please contact our Customer Support
Department.
402
403
404
405
406
407
Self-Scan
Test
0 This error code appears when the stop button is pressed.
601 Perform the Self-Scan again.
If the error persists, please contact our Customer Support
Department.
602
603
604

CUBEScan
TM
BioCon-V Operator’s Manual
94
605
606
607
608
609
610
611
612
Allow the device to cool down sufficiently, then perform the Self-
Scan again.
If the error persists, please contact our Customer Support
Department.
10.4. SERVICE AND TECHNICAL SUPPORT
If you need technical support, or if you experience any malfunction or other unexpected issue with the
device, please contact your distributor or the manufacturer.
You can reach us by e-mail at mcube@mcubetech.co.kr or visit our website at www.mcube.co.kr for
inquiries.

CUBEScan
TM
BioCon-V Operator’s Manual
95
11. CLEANING AND DISINFECTION
WARNING
AVERTISSEMENT
Cleaning must always be performed before disinfection. If cleaning is not done properly,
contamination may remain even after disinfection.
Le nettoyage doit toujours être effectué avant la désinfection. Si le nettoyage n’est pas
correctement réalisé, une contamination peut subsister même après la désinfection.
Improper cleaning or disinfection may cause permanent damage to the device.
Un nettoyage ou une désinfection inapproprié(e) peut endommager définitivement l’appareil.
Do not use solvents such as thinner or benzene, or any abrasive materials.
N’utilisez pas de solvants tels que le diluant ou le benzène, ni de matériaux abrasifs.
This device is not designed for sterilization.
Cet appareil n’est pas conçu pour être stérilisé
Do not immerse the device (except for the probe head) in any solution.
Ne plongez pas l’appareil (sauf la tête de la sonde) dans une solution.
When cleaning or disfenfecting the probe or charging or cradle, do not submerge them in liquid.
Lors du nettoyage ou de la désinfection de la sonde ou du socle de charge, ne les immergez pas
dans un liquide.
Do not use metal brushes or abrasive pads, as they may scratch the surface.
N’utilisez pas de brosses métalliques ni de tampons abrasifs, car ils peuvent rayer la surface.
Always wear protective gloves when cleaning and disinfecting the device.
Portez toujours des gants de protection lors du nettoyage et de la désinfection de l’appareil.
Compatibility may vary depending on the type of cleaning or disinfectant solution. Since it is
impossible to verify all products for safety, contact the manufacturer before use.
La compatibilité peut varier selon le type de solution de nettoyage ou de désinfectant. Étant
donné qu’il est impossible de vérifier la sécurité de tous les produits, contactez le fabricant avant
utilisation.
Do not spray disinfectant directly onto the BioCon-V, charging cradle, outer surfaces, or into gaps
and openings.
Ne vaporisez pas de désinfectant directement sur le BioCon-V, le socle de charge, les surfaces
extérieures ou dans les interstices et ouvertures.
CAUATION
MISE EN GARDE
The device must be cleaned and disinfected according to the approved procedures described in this
operator’s manual.
L’appareil doit être nettoyé et désinfecté conformément aux procédures approuvées décrites dans ce
manuel d’utilisation.
This procedure has been prepared with consideration for material compatibility; the manufacturer
recommends strict compliance with it.
Cette procédure a été élaborée en tenant compte de la compatibilité des matériaux ; le fabricant
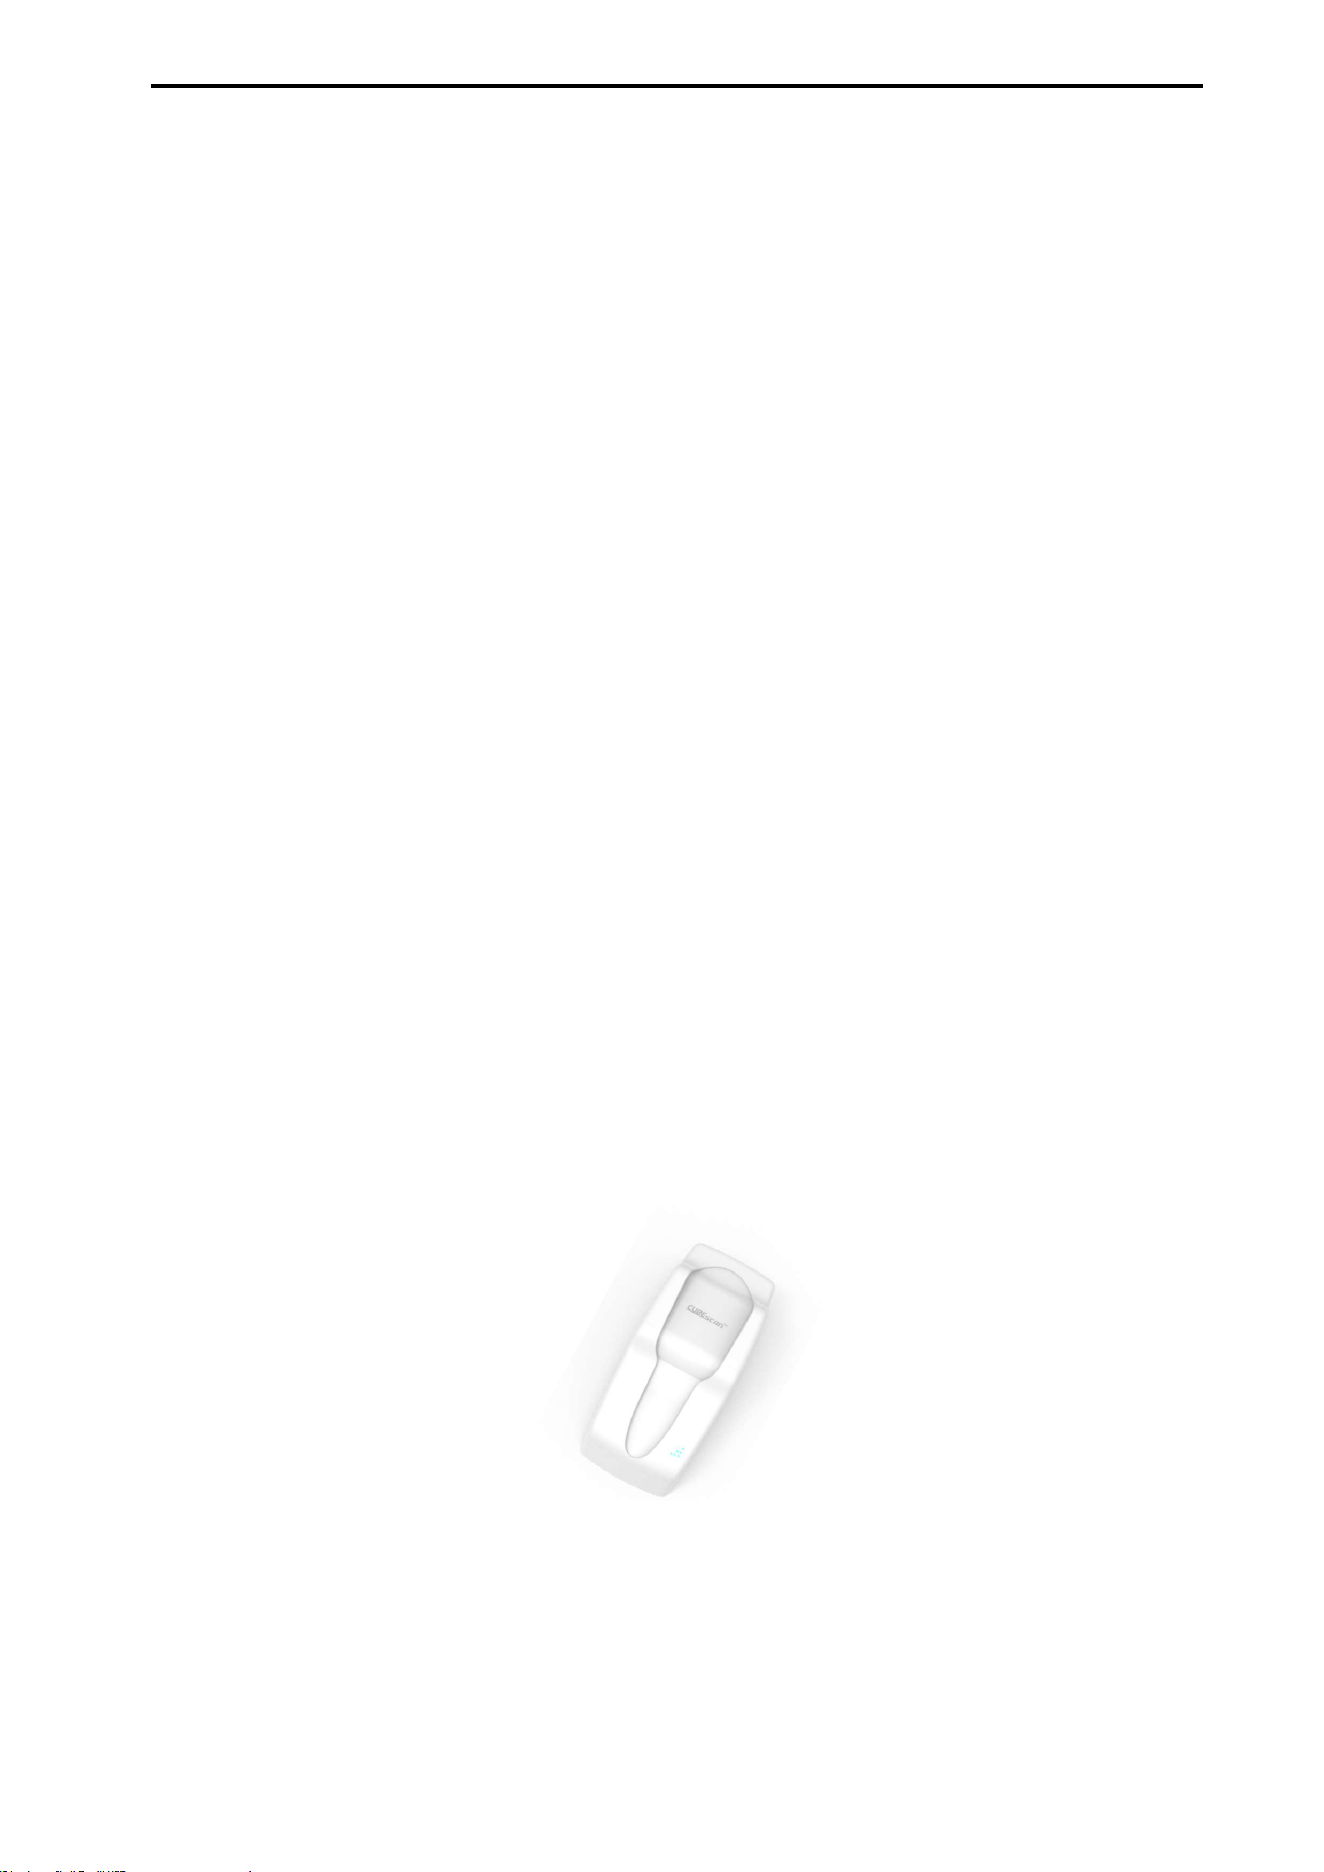
CUBEScan
TM
BioCon-V Operator’s Manual
96
recommande de s’y conformer strictement.
Handle and dispose of disinfectants in accordance with the instructions provided in this manual.
Manipulez et éliminez les désinfectants conformément aux instructions fournies dans ce manuel.
11.1. COMPATIBILITY
The following products have been verified to be effective and compatible for cleaning and disinfection.
Metrex® CaviWipes
TM
Metrex® CaviCide
TM
Spray
11.2. CLEANING
11.2.1. PREPARATION
Unplug the charging cradle’s power cord from the wall outlet and disconnect the USB cable.
Wipe off ultrasound gel, dust, or dirt using a paper towel or a soft, lint-free cloth.
11.2.2. CLEANING-CHARGING CRADLE
Put on a new pair of gloves.
Spray Metrex® CaviCide™ onto a soft brush until it is thoroughly moistened. Using the dampened
brush, clean the cradle’s surface, recessed areas, and hard-to-reach spaces until no visible
contaminants remain.
Wipe the surface thoroughly using a Metrex® CaviWipe™ towel.
Using a new Metrex® CaviWipe™ towel, wipe the surface of the charging cradle again and leave it
for approximately 2 minutes.
If additional Metrex® CaviWipe™ towels are used, ensure a minimum contact time of 2 minutes.
Visually inspect the surface of the charging cradle to ensure there are no remaining contaminants.
Allow the charging cradle to air dry completely.
[Charging Cradle]
NOTE: Ensure that water, isopropyl alcohol, or ethanol does not enter the USB power port. If any liquid
has entered, make sure to dry it completely before use.

CUBEScan
TM
BioCon-V Operator’s Manual
97
11.2.3. CLEANING THE PROBE
Put on a new pair of gloves.
Spray Metrex® CaviCide™ generously onto a soft brush until it is well moistened.
Using the brush, clean the probe surface, grooves, and crevices until no visible contamination
remains.
Wipe the surface thoroughly with a Metrex® CaviWipe™ towel.
Wipe again using a new Metrex® CaviWipe™ towel and leave it for approximately 2 minutes.
If additional Metrex® CaviWipe™ towels are used, maintain a contact time of at least 2 minutes.
Visually inspect the probe for any remaining contaminants, then allow it to air dry completely.
11.3. DISINFECT THE PROBE
Although this procedure provides low-level disinfection, it must be performed before scanning a new
patient.
Put on a new pair of gloves.
Spray the probe head thoroughly with Metrex® CaviCide™ Spray until it is visibly wet.
Allow the probe head to remain wet for at least 3 minutes.
If additional spraying is needed, ensure the total contact time remains at least 3 minutes.
Allow the probe head to air dry completely.
Using a new Metrex® CaviWipe™ towel, thoroughly wipe the probe head.
After wiping, ensure the surface remains wet for at least 3 minutes.
Allow the probe to air-dry. Then, using a sterile, lint-free cloth moistened with RO/DI (reverse
osmosis/deionized) water, wipe the probe head thoroughly for at least 1 minute.
Using a new sterile lint-free cloth, wipe again for 1 minute.
To completely remove any residual disinfectant, wipe once more using a sterile cloth moistened with
RO/DI water.
Allow the probe to air-dry completely before using it on a new patient.

CUBEScan
TM
BioCon-V Operator’s Manual
98
12. BATTERY
The user cannot remove the probe battery. If you do not plan to use the probe for an extended
period, switch the probe to shutdown mode to prevent the battery from becoming fully discharged.
Store the device under appropriate environmental conditions, and it is recommended to charge the
device at least once every 6 months. Refer to 17.5. ENVIRONMENTAL CONDITIONS.
13. REGULAR INSPECTION
Once a week, you should inspect the BioCon-V as below.
Check the probe head for abnormal sound during scanning.
Check the probe for cracks and oil-leakage.
Check the exterior surface of the device for physical damage or deformation.
Cracks that allow the fluid ingress into the device may affect the performance of the BioCon-V.
If oil leakage or damage to the probe head is observed, stop using the device immediately and
contact the service center.
If oil leakage or physical damage is observed, stop using the device immediately and contact the
manufacturer
Handle the device carefully during use, storage, and transportation to prevent any damage that may
lead to oil leakage.
14. DISPOSAL OF THE DEVICE
The device and its components contain environmentally hazardous substances such as mineral oil and
lead. When the device or its components reach the end of their service life, please dispose of them in
accordance with your local regulations for medical device disposal, or return them to Mcube
Technology Co., Ltd.
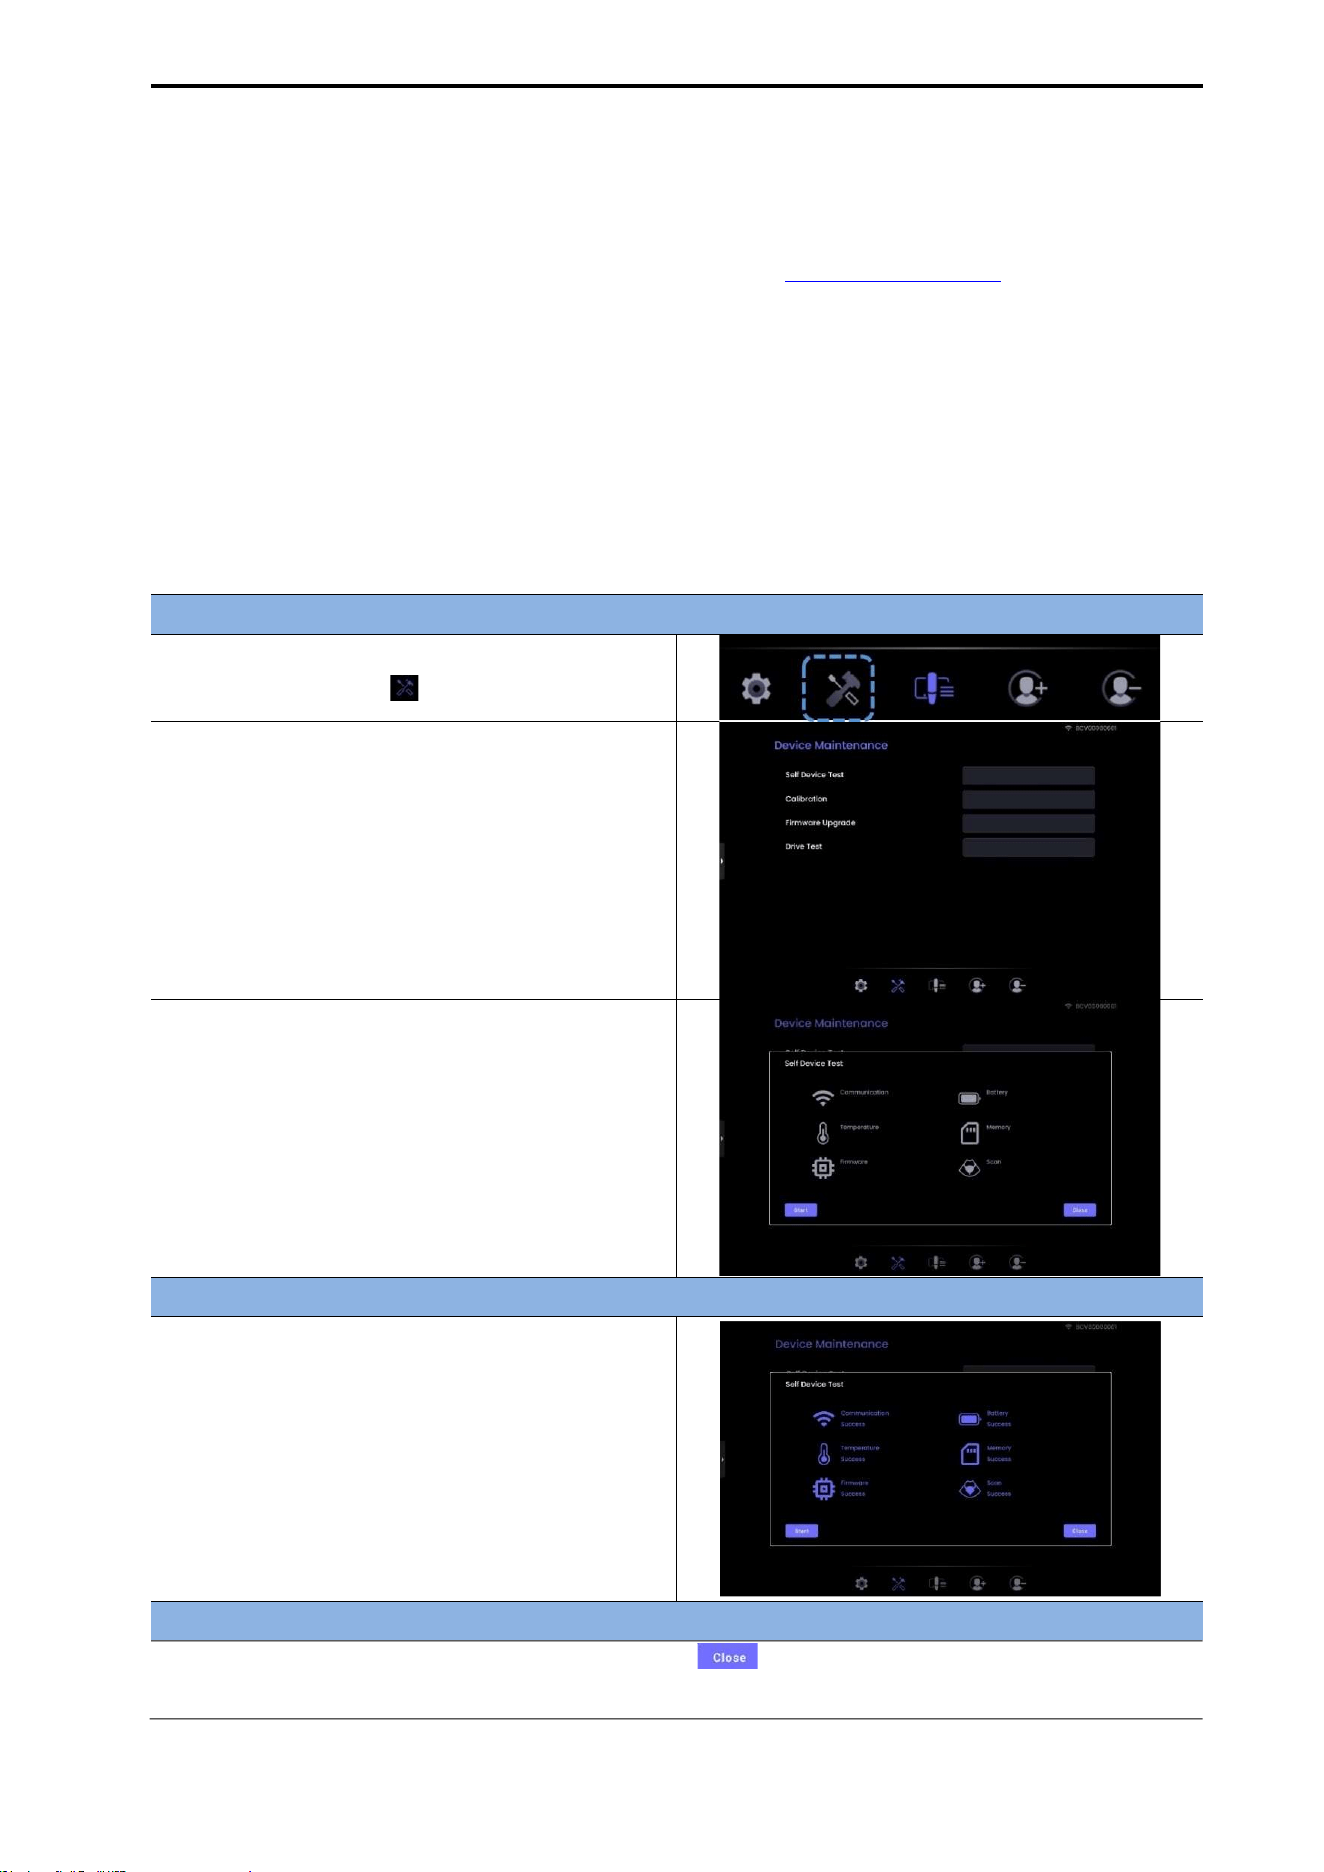
CUBEScan
TM
BioCon-V Operator’s Manual
99
15. REPAIRS OF THE DEVICE
Only authorized service technicians designated by our company are permitted to disassemble and
repair this device. If a problem occurs that is not described in 10.1. DEVICE ERRORS. Trobe shooting,
please contact your distributor or Mcube Technology Co., Ltd.
16. SELF-SCAN TEST AND CALIBRATION
16.1. SELF-DEVICE TEST
The Self-Device Test function automatically checks the device’s major operating components.
Each diagnostic step runs sequentially, and the final results are displayed upon completion.
ACCESSING THE SELF-DEVICE TEST
(1) On the bottom menu, select the Device
Maintenance icon ( ).
(2) On the Device Maintenance screen, tap Self-
Device Test.
(3) Tap the [Start] button to begin the test.
The device will automatically run the diagnostic
steps in the order shown below.
RESULT SCREEN
When all tests are completed successfully,
each item will display “Success”.
If an issue is detected during testing, the
corresponding error code will be displayed.
EXIT AND ADDITIONAL FUNCTIONS
After the test is completed, tap the Close button ( ) to return to the Device Maintenance
screen.
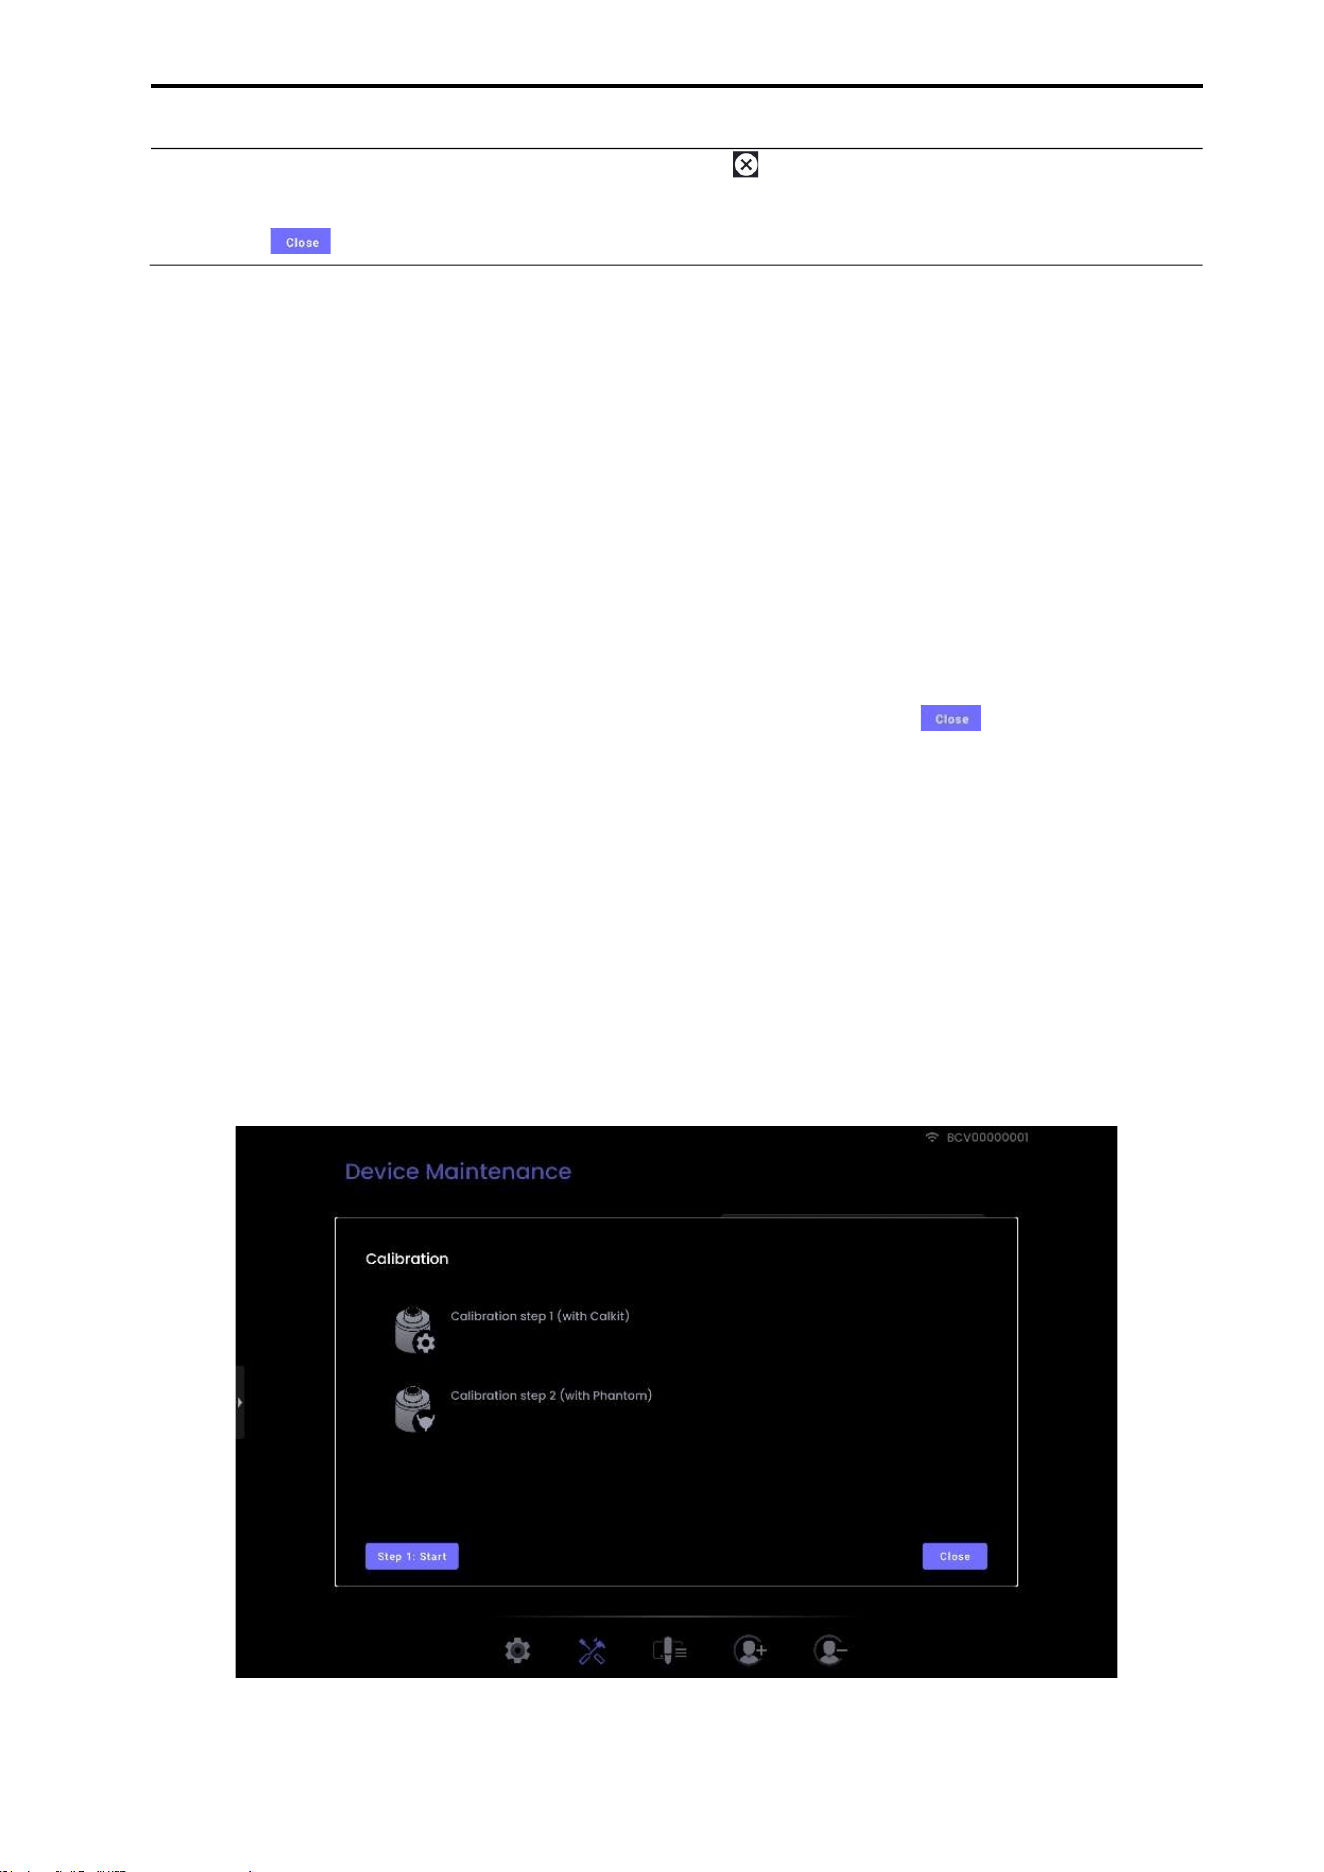
CUBEScan
TM
BioCon-V Operator’s Manual
100
To stop the test during operation, tap the Stop icon ( ) to end the test
If the Self-Device Test is activated unintentionally, you may exit at any time by pressing the Close
button ( ).
16.2. CALIBRATION
BioCon-V does not require regular calibration during normal operation.
However, calibration may be performed as a preventive measure when required by institutional policies
or regional regulations, or when the probe has been dropped, subjected to impact, or unused for an
extended period.
NOTE:
Perform calibration only when the battery level is at 60% or higher.
If a low-battery error occurs, charge the device before performing calibration.
Only use the Calibration Phantom and Calkit provided by Mcube Technology Co., Ltd.
If the Calibration screen is opened unintentionally, tap the Close button ( ) to return to the
Device Maintenance screen.
[Calibration Structure]
Calibration consists of two steps.
Step 1 – Calibration using the Calkit
Step 2 – Calibration using the Phantom
NOTE: If calibration is interrupted during the process, the entire procedure must be restarted from
Step 1.
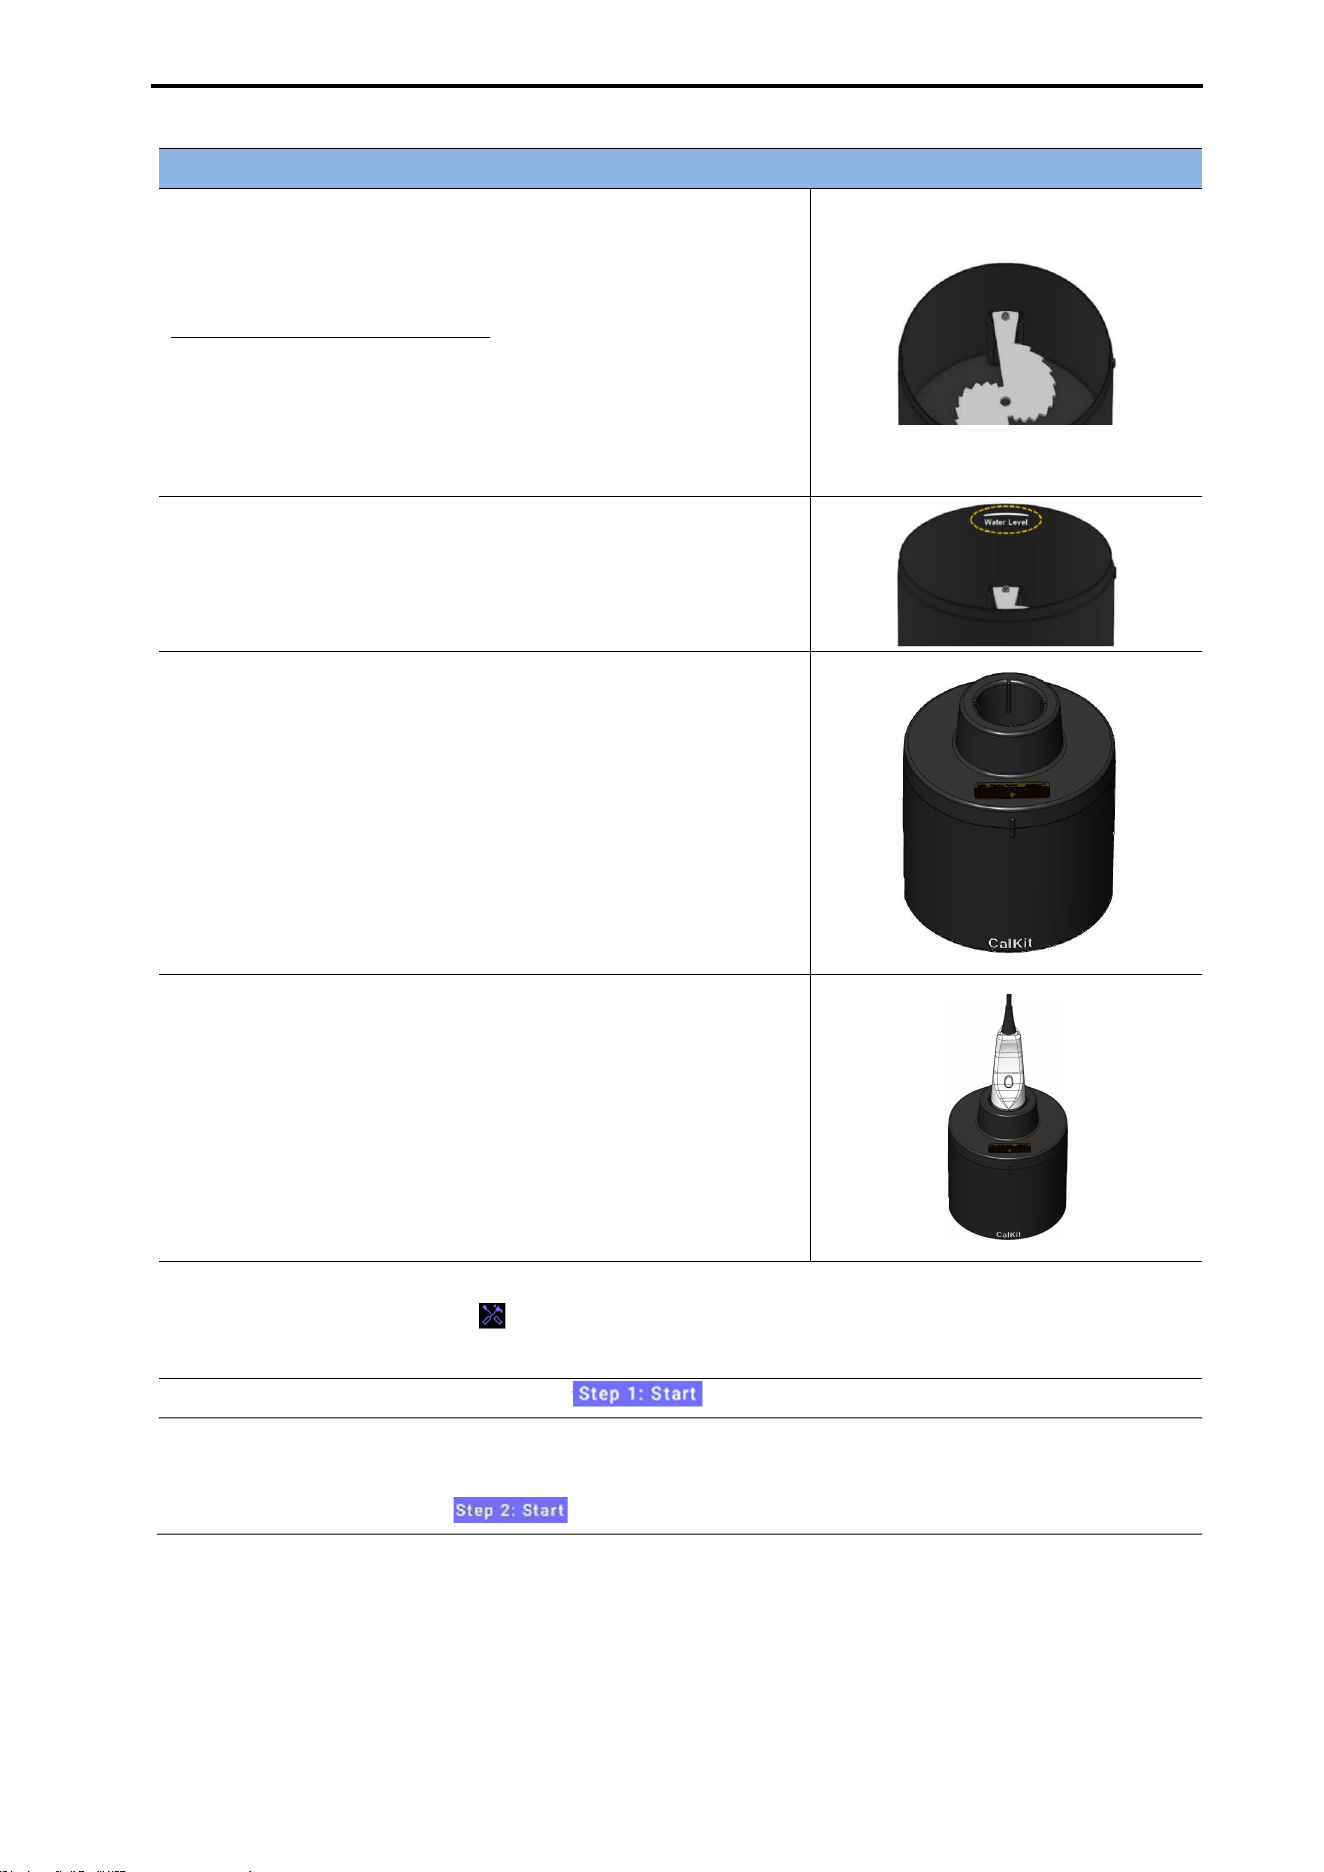
CUBEScan
TM
BioCon-V Operator’s Manual
101
Step 1: Calkit Calibration
(1) Prepare the Calkit
Open the lid of the calibration Calkit and fill it with water.
*Optimal calibration conditions: You may use distilled water
instead of saline. Before starting calibration, make sure there
are no air bubbles inside the Calkit.
Begin calibration only after confirming that all bubbles have
disappeared.
(2) Fill to the Water Level mark
Inside the Calkit, a water Level marking is provided.
Fill the Calkit with water up to this mark.
The marking is located one step below the top edge.
(3) Close the Calkit lid
Close the lid so that the arrow on the lid aligns with the
nipple on the body.
(4) Mount the probe
Align the direction of the probe’s scan button with the arrow
on the lid, then securely place the probe head into the probe
holder.
(5) Enter the Calibration menu
Go to Device Maintenance ( ).
Tap the [Calibration] button.
(6) To begin, tap the Step 1: Start icon ( ).
(7) After completing Step 1 (Calkit Calibration)
proceed to Step 2: Phantom Calibration.
The Step 2: Start button ( ) will appear on the screen.
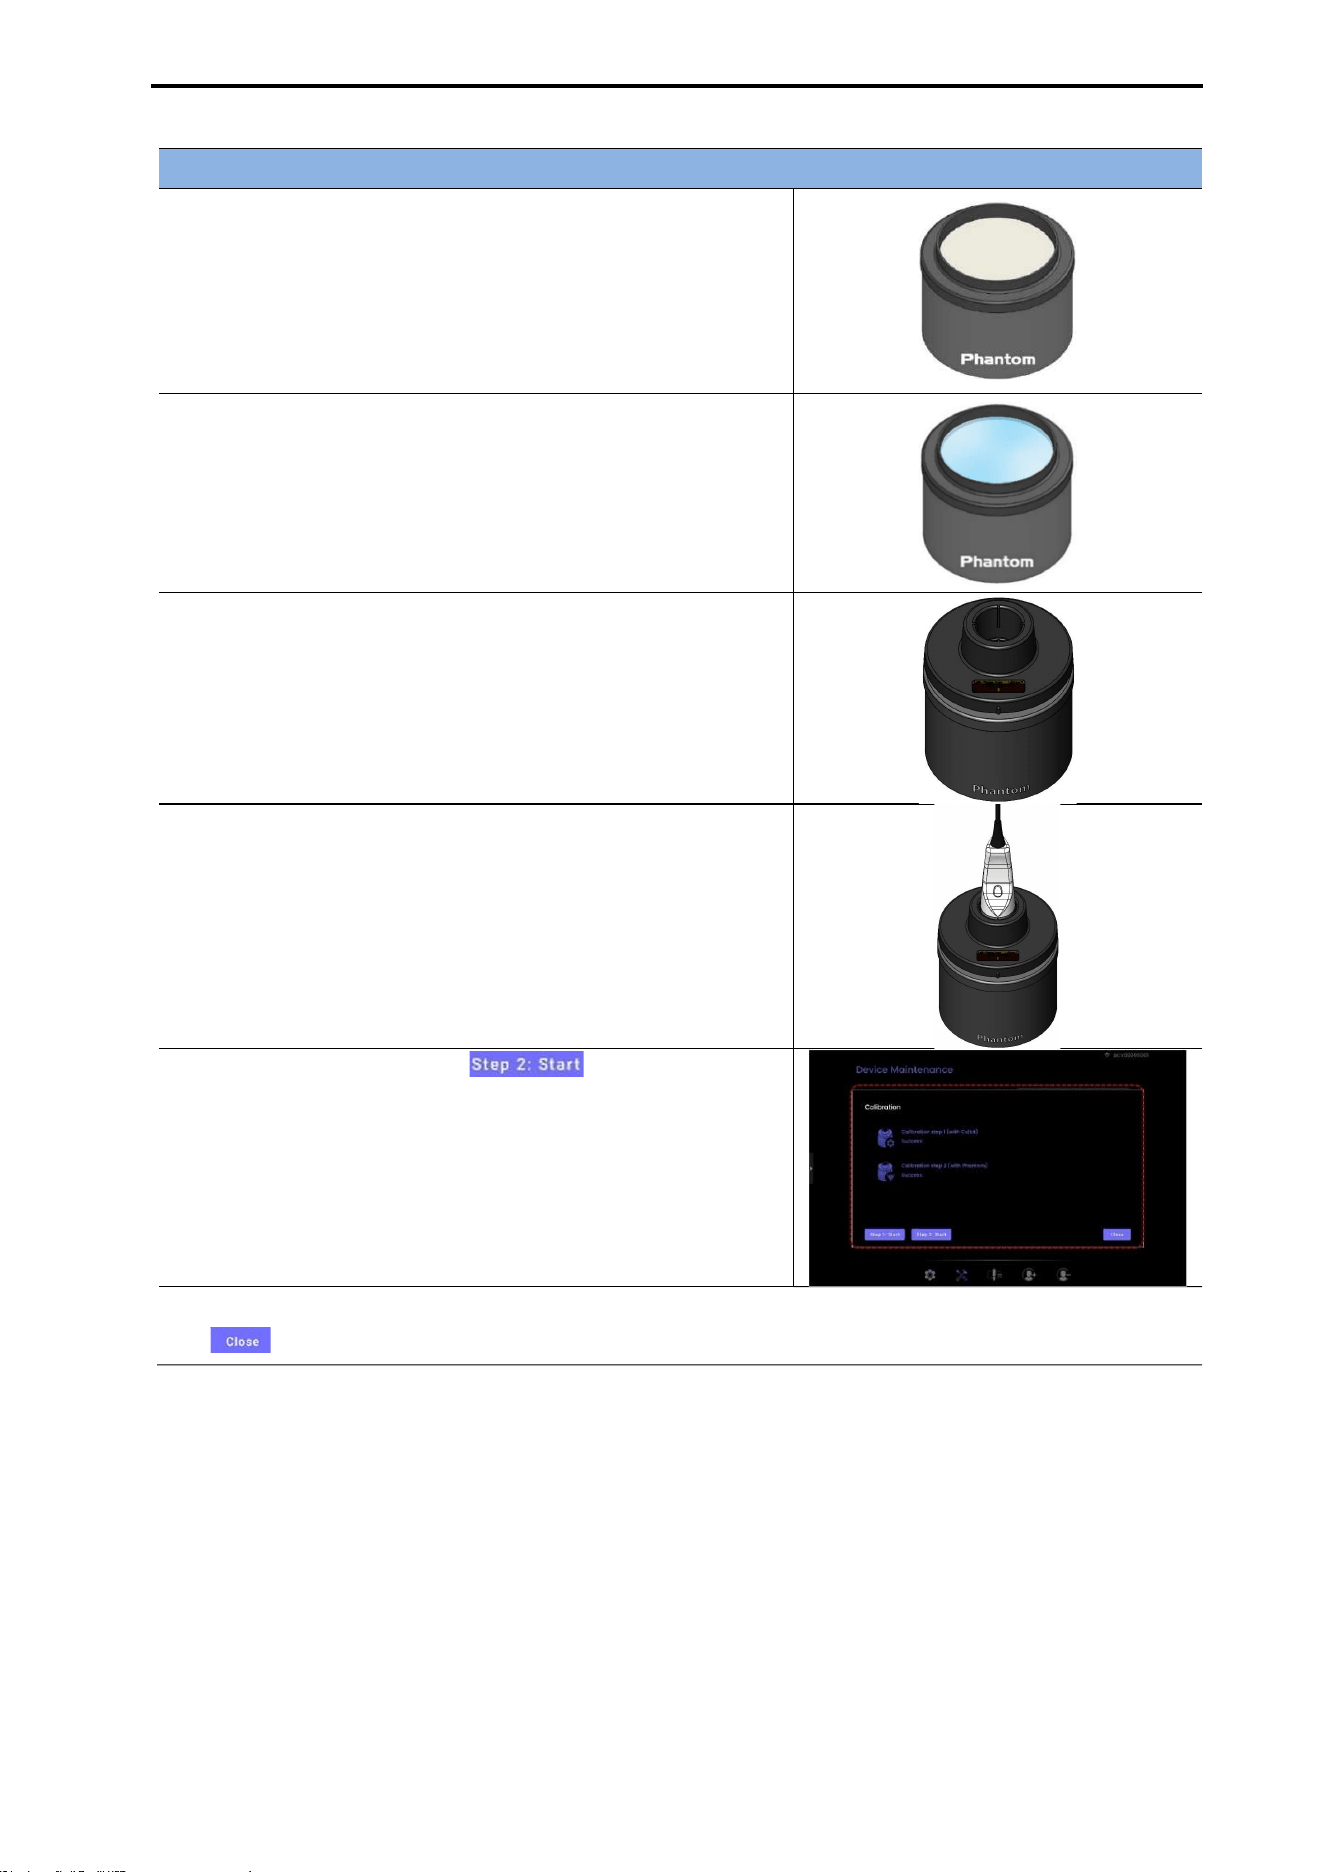
CUBEScan
TM
BioCon-V Operator’s Manual
102
Step 2: Phantom Calibration
(1) Place the calibration phantom on a flat, stable surface
and open the lid.
(2) Pour approximately 140–160 mL of water onto the top
surface of the phantom.
(3) Place the lid holder on top of the phantom.
Ensure that the lid holder is stable and positioned evenly.
(4) Securely place the probe head into the probe holder.
(5) Before starting Phantom Calibration (Step 2)
confirm that Calkit Calibration (Step 1) has been
successfully completed.
(6) Tap the Step 2 Start icon ( ) to begin
Phantom Calibration.
Once calibration is successfully completed, each step will be
marked as “Success” on the result screen.
(7) After completing both Step 1 (Calkit Calibration) and Step 2 (Phantom Calibration), tap the [Close
( )] button to return to the Device Maintenance screen.
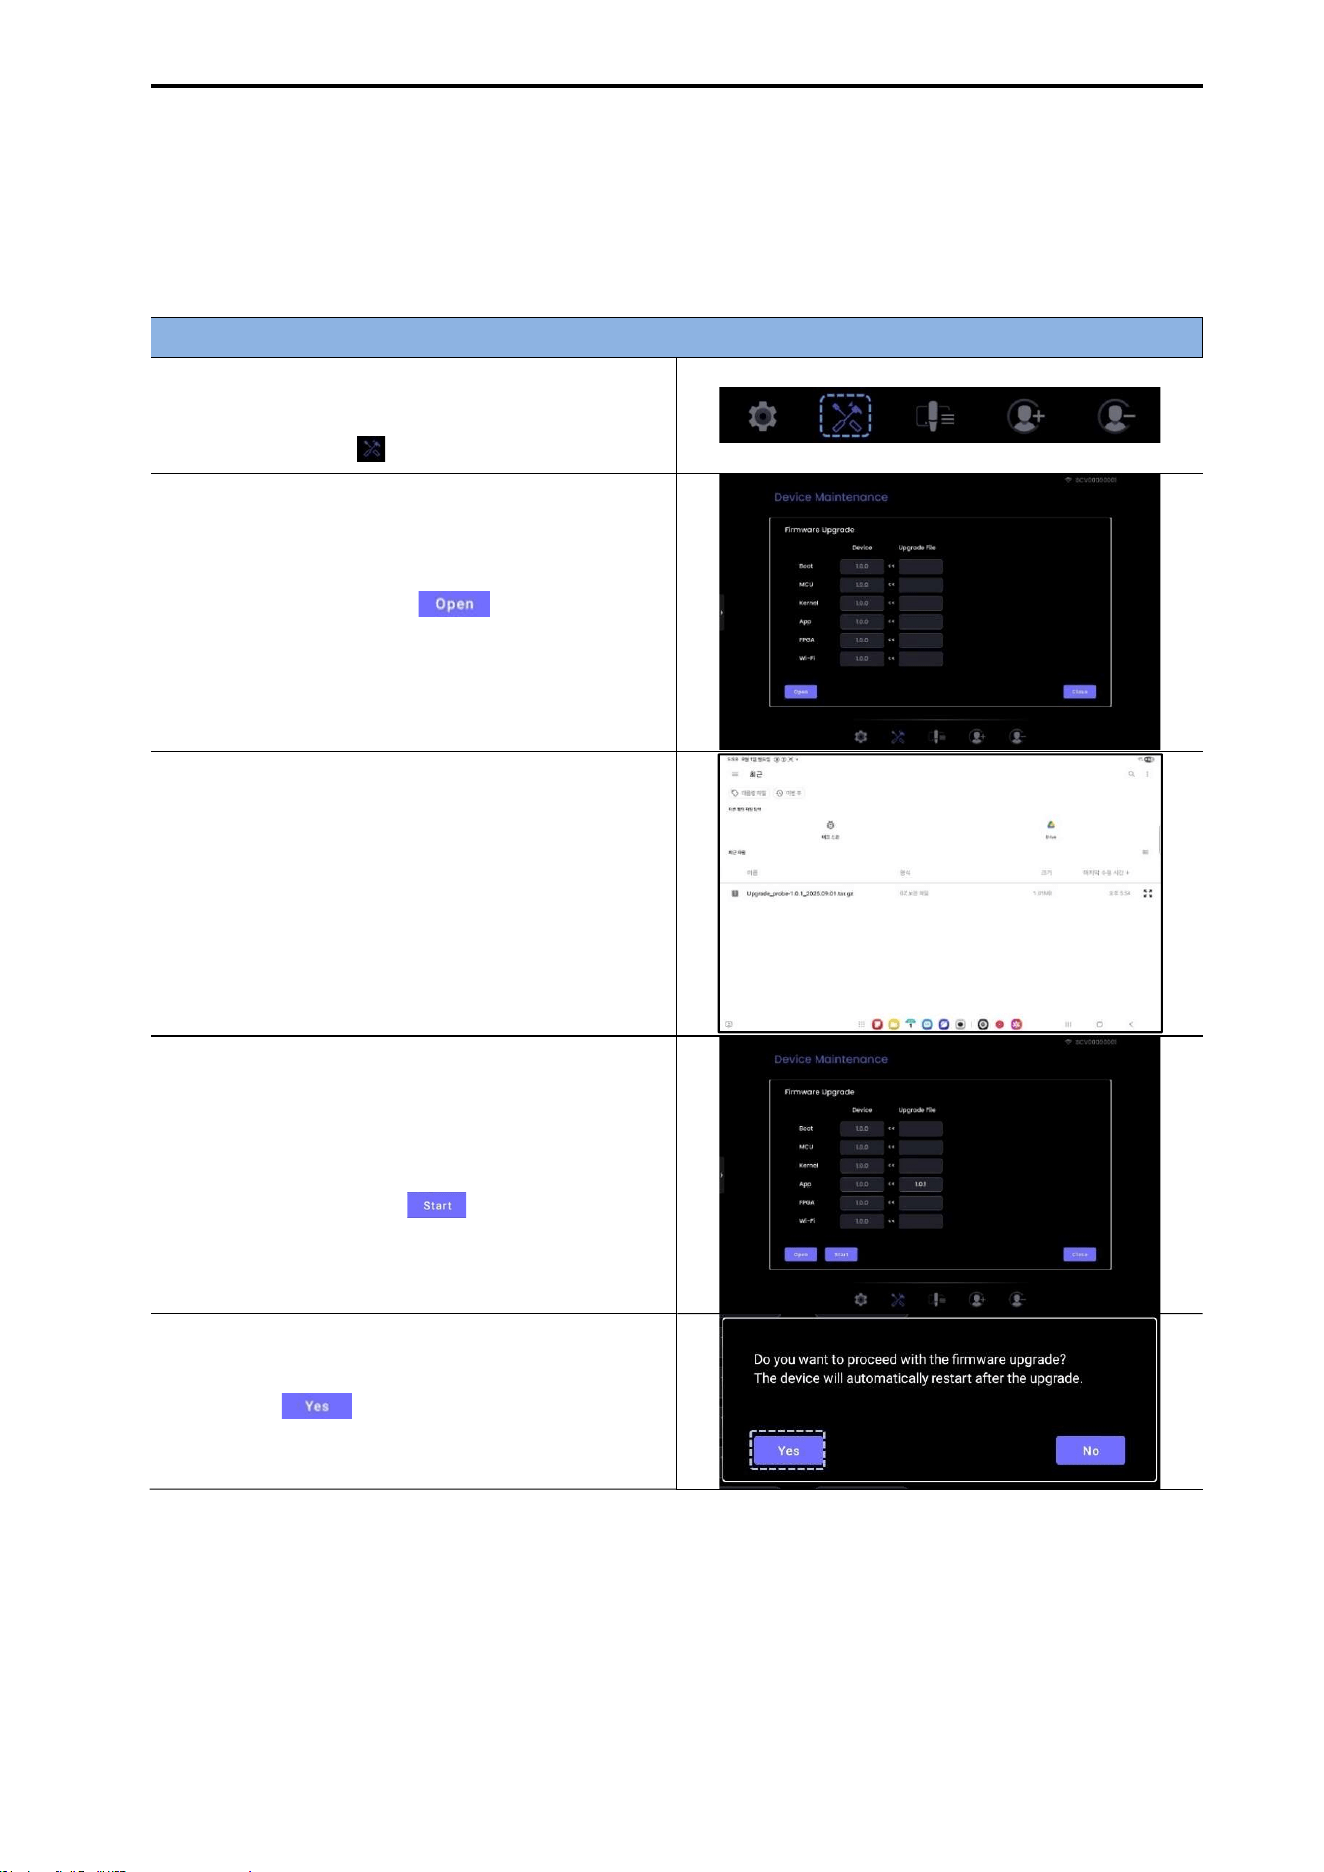
CUBEScan
TM
BioCon-V Operator’s Manual
103
16.3. FIRMWARE UPGRADE
You can update the BioCon-V device firmware to the latest version.
The upgrade process is performed through the tablet, and the device will automatically reboot once the
update is complete.
Firmware Upgrade Procedure
(1) Open the Device Maintenance screen
From the bottom menu, tap the Device
Maintenance icon ( ).
(2) Run the Firmware Upgrade function
In the Device Maintenance screen, tap
Firmware Upgrade.
Tap the Open button ( ) to browse and
select the upgrade file.
(3) Select the upgrade file
Navigate to the folder where the firmware
upgrade file is stored and select the file.
(4) Check the selected version and start the
upgrade
The selected firmware version information will
be displayed on the screen.
Tap the Start button ( ) to begin the
upgrade.
(5) Confirm the upgrade
A confirmation message will appear.
Tap Yes ( ) to proceed with the
upgrade.
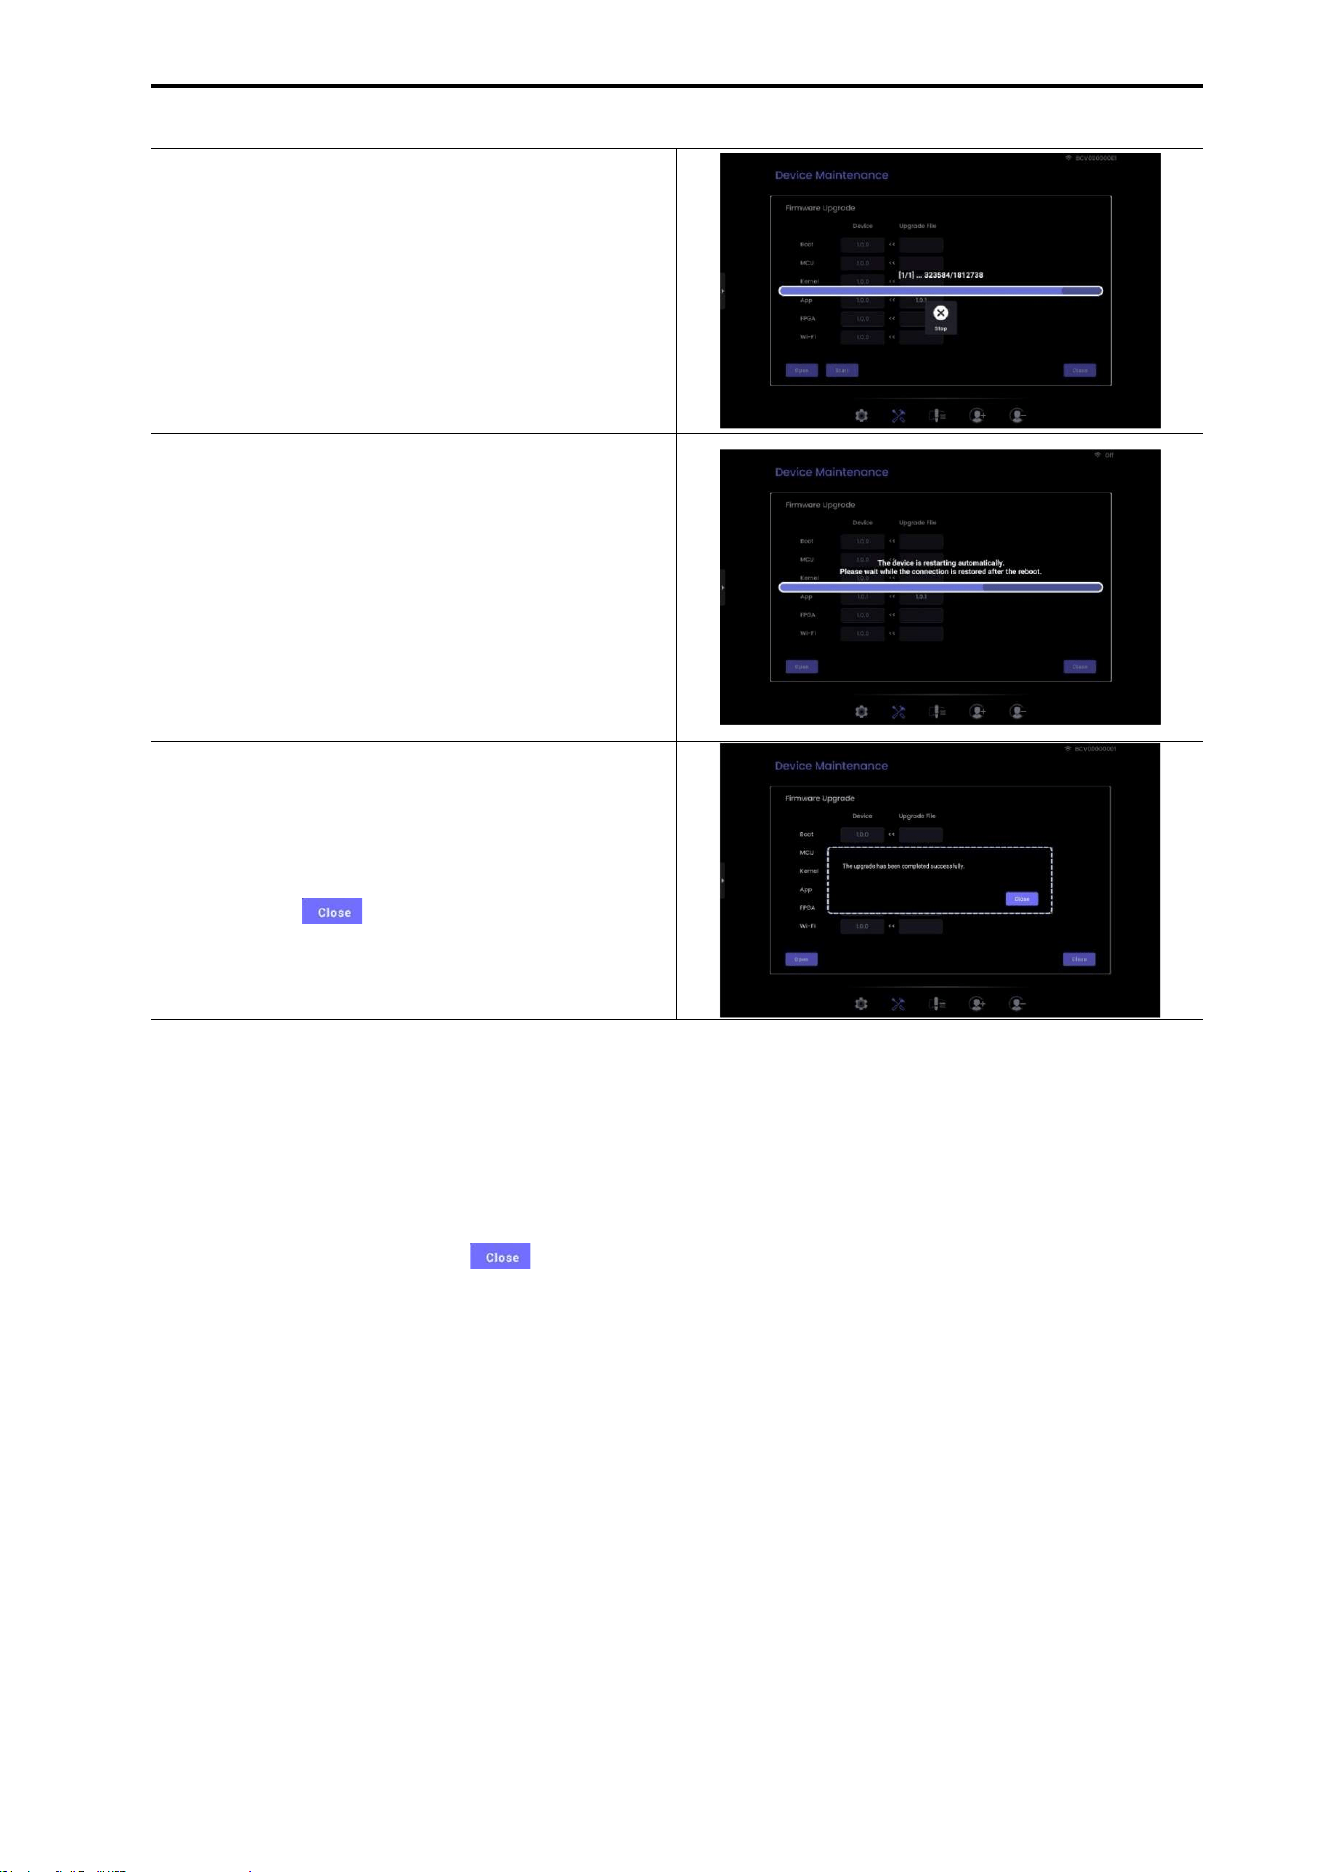
CUBEScan
TM
BioCon-V Operator’s Manual
104
(6) Transfer the upgrade file
The upgrade progress will be shown on the
status bar.
Please wait while the file is transmitted to the
BioCon-V device.
(7) Automatic device reboot
After file transmission, the BioCon-V device
will verify the upgrade file and automatically
reboot.
During this time, the tablet displays: “The
device is restarting automatically. Please wait
while the connection is restored after the
reboot.”
(8) Confirm upgrade completion
Once the device restarts and the connection is
restored, a success message appears: “The
upgrade has been completed successfully.”
Tap Close ( ) to return to the Device
Maintenance screen.
NOTE:
Ensure that the battery level is at least 60% before starting the upgrade.
If a low-battery warning appears during the upgrade, fully charge the device before
retrying.
If you do not wish to proceed with the upgrade or if you accessed the menu
unintentionally, tap Close ( ) to return to the Device Maintenance screen.

CUBEScan
TM
BioCon-V Operator’s Manual
105
17. SPECIFICATIONS
17.1. ACOUSTIC OUTPUT TABLE
WARNING
AVERTISSEMENT
The ALARA principle (As Low As Reasonably Achievable) should be used for all medical
ultrasound exposures.
Le principe ALARA (Niveau le plus bas qu’il soit raisonnablement possible d’atteindre)
devrait être utilisé pour toutes les expositions à l’échographie médicale.
The user cannot adjust the acoustic output energy of the BioCon-V. The output level is lower
than the levels mentioned in AIUM (Medical Ultrasound Safety, American Institute of
Ultrasound in Medicine, 2014) and there are no reported biological effects below this level.
However, to minimize exposure, measurements should be as short as possible.
L’utilisateur ne peut pas ajuster l’énergie de sortie acoustique du BioCon-V. Le niveau de sortie
est inférieur aux niveaux mentionnés dans AIUM (Medical Ultrasound Safety, American
Institute of Ultrasound in Medicine, 2014) et il n’y a aucun effet biologique signalé sous ce
niveau. Toutefois, pour minimiser l’exposition, les mesures doivent être aussi courtes que
possible.
CUBEScan
TM
BioCon-V Operator’s Manual
106
ACOUSTIC OUTPUT TABLE Track 3 - IEC 60601-2-37:2024
Transducer: BioCon-V
MODE: B-MODE
MI TIS TIB TIC
Index Label
At
Surface
Below
Surface
At
Surface
Below
Surface
Maximum index value 0.4302 0.01032 0.0136 n/a
Index component value 0.4302 0.01032
n/a 0.0136 n/a ---
Acoustic
Parameters
p
r,α
at
z
MI
(MPa) 0.7258 --- --- --- --- ---
P
(mW) --- 0.7617 0.7617 n/a
P
1x1
(mW) --- 0.7617 0.7617 ---
z
s
(cm) --- --- n/a --- --- ---
z
b
(cm) --- --- --- --- n/a ---
z
pii,α
(cm) 3.38 --- n/a --- n/a ---
z
MI
(cm) 3.2 --- --- --- --- ---
f
awf
(MHz) 2.846 2.846 2.846 n/a
Other
Information
t
d
(µsec) 1.035 --- --- --- --- ---
prr
(Hz) 325 --- --- --- --- ---
srr
(Hz) 5.5 --- --- --- --- ---
p
r
at
z
pii
(MPa) 1.027 --- --- --- --- ---
I
pa,α
at z
pii,α
(W/cm²) 24.25 --- --- --- --- ---
Operating
control
conditions
Not user adjustable; fixed B-mode output
NOTE 1 Only one operating condition per index.
NOTE 2 Data for "at surface" and "below surface" are entered in both the columns related to
TIS
or
TIB
.
NOTE 3 Information need not be provided regarding
TIC
for any TRANSDUCER ASSEMBLY not intended for transcranial or
neonatal cephalic uses.
NOTE 4 If the requirements of 201.12.4.2a) or b) are met, it is not required to enter any data in the columns related to
TIS, TIB
or
TIC
.
NOTE 5 If the requirements of 201.12.4.2c) are met, it is not required to enter any data in the column related to
MI
.
NOTE 6 The depths
z
pii and
z
pii,
α
apply to NON-SCANNING MODES, while the depths
z
sii and
z
sii,
α
apply to SCANNING MODES.
*Since the intended use of BioCon-V does not involve transcranial applications
, TIC
is not calculated.
NOTE:
It is not necessary to provide information on the TIS formula when the maximum TIS value is not
calculated for the applicable mode.
For transducer assemblies that are not used for transcranial or neonatal head applications, TIC-
related information does not need to be provided.
If the equipment meets all exemption conditions specified in 51.2 aa) and 51.2 dd), information

CUBEScan
TM
BioCon-V Operator’s Manual
107
regarding MI and TI does not need to be provided
Symbols used in Acoustic Output Table are described below.
Symbol Definition
MI
Mechanical index
TIS
Soft-tissue thermal index
TIB
Bone thermal index
TIC
Cranial-bone thermal index
p
r,α
at z
MI
Attenuated peak-rarefactional acoustic pressure at depth for mechanical index
P
Output power
P
1x1
Bounded-square output power
z
s
Depth for
TIS
z
b
Depth for bone thermal index
z
pii,α
Depth for peak pulse-intensity integral
z
MI
Depth for mechanical index
f
awf
Acoustic working frequency
t
d
Pulse duration
prr
Pulse repetition rate
srr
Scan repetition rate
p
r
at
z
pii
Peak-rarefactional acoustic pressure at depth for peak pulse-intensity integral
I
pa,α
at
z
pii,α
Attenuated pulse-average intensity at depth for peak attenuated pulse intensity
integral

CUBEScan
TM
BioCon-V Operator’s Manual
108
17.2. COMPONENT SPECIFICATIONS
17.2.1. PORBE
Item Specification
Model Name BioCon-V
Bladder Volume Range 0-999ml
Accuracy
0-99ml±7.5ml, 100 - 999ml±7.5%
When measured using the bladder phantom of Mcube Technology Co.,
Ltd. in accordance with this user manual.
Scan Time Approx. 2 Seconds (Normal scan)
Input Power
Internal Powered
RRC-1120 (Rechargeable lithium- ion battery)
- Voltage: 3.6V (Nominal)
- Capacity: 2350 mAh
Wireless charging current: 0.56 A
Sleep mode current consumption: ≤ 2 mA
(automatically powers off after 8 hours in sleep
mode)
Usage per Charge: Approx: 100 scans
- Based on a fully charged new Battery
- Under Mcube Technology’s test conditions
Charging
< 5.4 W (9 V, 0.6 A)
- Charging time: Appex.5 hours from fully
discharged to fully Charged.
- When using the BioCon-V Charging cradle
Expected Lifetime 7 years
Display
TFT-LCD 2.0 inch
240 X RGB X 320
User Interface
LCD Icon
3 Physical buttons
Water Resistance IPX3
Probe Head
14mm Transducer diameter: 14mm
Sector scanning method
Ultrasound frequency: 2.8MHz
B-mode scan image
Scan angle: 120
Applied Part: Probe head
Penetration depth; (generation patient): 23cm
Type BF applied part
Operation Mode Continuous operation
Weight 313 g
Compatible Devices Tablets and laptops with built-in Wi-Fi

CUBEScan
TM
BioCon-V Operator’s Manual
109
Desktops with a Wi-Fi module on the mainboard or a USB Wi-Fi
dongle
Others
Battery charging temperature range: 0–55
°C
Operating ambient temperature: 10–35
°C
Sleep mode current consumption: ≤ 2 mA (automatically powers off
after 8 hours in sleep mode)
Wireless
WLAN
IEEE 802.11a/n/ac (20/40/80 MHz)
Operating Frequency band: 5725-5850 MHz
Encryption: WPA2
Modulation: OFDM
Output power (e.i.r.p): 13 dBm (Average power)
Wireless transmitting power (Receiving only)
17.2.2. CHARGING CRADLE
Item Specification
Model Name BioCon-V Charger
Usage Wireless charging (Indoor use only)
Main Chipset Infineon (WLC1115)
Coil Type 1 Coil (A11)
Input Power Charging cradle 5 Vdc, 3.0 A (Stand-by)/9 Vdc, 3.0 A (Charging)
Output Power 15 W Max.
Charging Efficiency 70%
Modulation Method Frequency Modulation
Temperature Sensor NTCG164KF104FT1
Operating Frequency 128 kHz
Insulation Class Class II equipment
Water Resistance IPX 3
LED Indicator Multi-Color LED (Red:1, Green:1, Orange:1)
Weight 204 g (Power adapter not included)
17.2.3. POWER ADAPTER
Item Specification
Model Name ATN045A3-W200V
Input Power 100-240 V~, 50/60 Hz, 1.0-0.5 A
Output Power
5.0 Vdc, 3.0 A, 15W/9.0 Vdc, 3.0 A, 27 W/12.0 Vdc, 3.0 A, 36 W/15.0 Vdc,
3.0 A, 45 W/20.0 Vdc, 2.25 A, 45 W (MAX)
Weight 142 g (USB cable not included)
CUBEScan
TM
BioCon-V Operator’s Manual
110
17.2.4. PC
Contents Specification
Operating System (OS) Windows 7, Windows 8.1, Windows 10, Windows 11
CPU Pentium 500 MHz or higher (minimum requirement)
Main Memory 256MB
Hard Disk Capacity 100MB
Others
Display: Monitor with a minimum resolution of 1024 × 768
Printer: Local printer or network printer
User Input: Keyboard and mouse
17.2.5. TABLET
Contents Specification
OS Android 11 or higher
CPU Exynos 1280 or higher
RAM 4 GB or higher
Resolution 2000 × 1200 pixels or higher
17.3. ELECTROMAGNETIC COMPATIBILITY
17.3.1. ELECTROMAGNETIC EMSSIONS
Guidance and Manufacturer’S Declaration – Electromagnetic Emissions
BioCon-V is designed for use in the electromagnetic environment specified below.
Customers or users of BioCon-V must ensure that it is used in such an environment.
EMISSIONS TEST Compliance Limit
Electromagnetic Environment
– Guidance
Mains terminal
disturbance voltage
CISPR 11
Group 1 Class A
The EMISSIONS characteristics of BioCon-
V make it suitable for use in industrial
areas and hospitals (CISPR 11 class A). If it
is used in a residential environment (for
which CISPR 11 class B is normally
required) this equipment might not offer
adequate protection to radio-frequency
communication services. The user might
need to take mitigation measures, such as
relocating or re-orienting the equipment.
Radiated disturbance
CISPR 11
Group1, Class A
Harmonics
IEC 61000-3-2
Class A
The BioCon-V is suitable for use in all
establishments other than domestic, and
may be used in domestic establishments
and those directly connected to the public

CUBEScan
TM
BioCon-V Operator’s Manual
111
Voltage fluctuations/Flicker
IEC 61000-3-3
Complies
low-voltage power supply network that
supplies buildings used for domestic
purposes, provided the following warning
is heeded:
Warning: This equipment/system is
intended for use by healthcare
professionals only.
This equipment/system may cause radio
interference or may disrupt the operation
of nearby equipment. It may be necessary
to take mitigation measures, such as
re-orienting or relocating the BioCon-V or
shielding the location
17.3.2. ELECTROMAGNETIC IMMUNITY
Guidance and Manufacturer’S Declaration – Electromagnetic Immunity
BioCon-V is designed for use in the electromagnetic environment specified below.
Customers or users of BioCon-V must ensure that it is used in such an environment.
Immunity Test
IEC 60601
Test Level
IEC 60601
Compliance Level
Electromagnetic Environment
– Guidance
Electrostatic
Discharge (ESD)
IEC 61000-4-2
± 8 kV/Contact
± 2, ± 4, ± 8, ±
15 kV
/Air
±8 kV/Contact
±2, ±4, ±8, ±15
kV
/Air
Floors should be wood, concrete or ceramic
tile.
If floors are covered with synthetic material,
the relative humidity should be at least
30 %.
Radiated RF
Electromagnetic
Field
IEC 61000-4-3
3 V/m
80 MHz - 2.7 GHz
80% AM at 1 kHz
3 V/m
80 MHz - 2.7 GHz
80% AM at 1 kHz
BioCon-V is suitable to use in professional
healthcare environment.
RF communication equipment is used no
closer than 30 cm to any part of the
BioCon-V, including cables specified by
Mcube Technology Co., Ltd.
Immunity to
Proximity Fields
from RF wireless
Communications
Equipment
IEC 61000-4-3
28 V/m Max.
385-5785 MHz in
according to table
9
in IEC 60601-1-2
28 V/m Max.
385-5785 MHz in
according to table
9
in IEC 60601-1-2
Electrical Fast
Transient /Burst
IEC 61000-4-4
100 kHz
repetition
frequency
± 2 kV for power
supply lines
±100 kHz
repetition
frequency
± 2 kV for power
supply lines
The quality of supplied power should be
suitable for general business site or
hospital environment.

CUBEScan
TM
BioCon-V Operator’s Manual
112
Surge
IEC 61000-4-5
Line to Line
±0.5 kV, ±1 kV
Line to Ground
±0.5 kV, ±1 kV,
±2 kV
Line to Line
±0.5 kV, ±1 kV
Line to Ground
±0.5 kV, ±1 kV,
±2 kV
The quality of supplied power should be
suitable for general business site or hospital
environment.
Conducted
Disturbances
Induced by
RF fields
IEC 61000-4-6
3 V
0.15 MHz - 80
MHz
6 V in ISM bands
between
0.15 MHz and 80
MHz
80% AM at 1 kHz
3 V
0.15 MHz - 80
MHz
6 V in ISM bands
between 0.15
MHz and 80 MHz
80% AM at 1 kHz
The strength of RF field in the frequency
range higher than 150 kHz -
80 MHz, the strength of the RF field is
smaller than 3 V.
Power Frequency
(50/60 Hz)
Magnetic Field
IEC 61000-4-8
30 A/m
50 & 60 Hz
30 A/m
50 & 60 Hz
Power frequency magnetic fields should be
at levels characteristic of a typical location
in a typical domestic, residential or Home
Health Care environment.
Voltage dips,
short
interruptions and
voltage
variations on
power supply
input lines
IEC 61000-4-11*
0 % U
T
: 0.5 cycle
At 0°, 45°, 90°,
135°, 180°, 225°,
270° and 315°
0 % U
T
; 1 cycle
and
70 % U
T
; 30 cycles
Single phase: at
0º
0 % U
T
; 250/300
cycles
0 % U
T
: 0.5 cycle
At 0°, 45°, 90°,
135°, 180°, 225°,
270° and 315°
0 % U
T
; 1 cycle
and
70 % U
T
; 25/30
cycles
Single phase: at
0º
0 % U
T
; 250/300
cycles
Mains power quality should be that of a
typical residental or hospital environment.
If the user of the BioCon-V
requires continued operation during power
mains interruptions, it is recommended
that the BioCon-V be powered from an
uninterruptible power supply or a battery
be used with the system power source.
Radiated fields in
close proximity
IEC 61000-4-39
65 A/m Max
30 kHz - 13.56
MHz in according
to table 11 in IEC
60601-1-2
65 A/m Max
30 kHz - 13.56
MHz in according
to table 11 in IEC
60601-1-2
BioCon-V is suitable to use in professional
healthcare environment.
Portable radio frequency (RF, RFID)
communication devices can interfere with
the medical electrical device. Therefore, do
not use your mobile phone in a medical

CUBEScan
TM
BioCon-V Operator’s Manual
113
office or hospital environment.
NOTE: U
T
is the AC voltage of the power before using test level
17.3.3. RECOMMENDED SEPARATION DISTANCE
Recommended separation distances between
portable and mobile RF communications equipment and the BioCon-V
Portable RF communications equipment (including peripherals such as antenna cables and external
antennas) should be used no closer than 30 cm (12 inches) to any part of the BioCon-V including
cables specified by the manufacturer. If the distance is closer than 30 cm (12 inches), performance of
the BioCon-V may decrease.
Immunity
Test
Band
a)
Service
a)
Modulation
IEC 60601
Test Level
IEC 60601
Compliance
Level
Proximity
fields from RF
wireless
communicatio
ns equipment
380-390 MHz
TETRA 400
Pulse
modulation
18 Hz
27 V/m 27 V/m
430–470 MHz
GMRS 460,
FRS 460
FM
± 5 kHz
deviation
1 kHz sine
28 V/m 28 V/m
704-787 MHz
LTE Band 13,
17
Pulse
modulation
217 Hz
9 V/m 9 V/m
800-960 MHz
GSM 800/900,
TETRA 800,
iDEN 820,
CDMA 850,
LTE Band 5
Pulse
modulation
18 Hz
28 V/m 28 V/m
1700-1990
MHz
GSM 1800;
CDMA 1900;
GSM 1900;
DECT;
LTE Band 1, 3,
4, 25; UMTS
Pulse
modulation
217 Hz
28 V/m 28 V/m
2400-2570
MHz
Bluetooth,
WLAN,
802.11 b/g/n,
RFID 2450,
LTE Band 7
Pulse
modulation
217 Hz
28 V/m 28 V/m

CUBEScan
TM
BioCon-V Operator’s Manual
114
5100-5800
MHz
WLAN 802.11
a/n
Pulse
modulation
217 Hz
9 V/m 9 V/m
NOTE: These guidelines may not apply in all situations. Electromagnetic propagation is affected by
absorption and reflection from structures, objects and people.
a) For some services, only the uplink frequencies are included.
17.4. FCC/ISED COMPLIANCE INFORMATION
BioCon-V complies with Part 15 of the FCC Rules.
Operation is subject to the following two conditions.
This device may not cause harmful interference.
This device must accept any interference received, including interference that may cause undesired
operation.
BioCon-V has been tested and found to comply with the limits for a Class B digital device, pursuant to
part 15 of the FCC Rules. These limits are designed to provide reasonable protection against harmful
interference in a residential installation. This equipment generates, uses and can radiate radio
frequency energy and, if not installed and used in accordance with the instructions, may cause harmful
interference to radio communications. However, there is no guarantee that interference will not occur
in a particular installation. If this equipment does cause harmful interference to radio or television
reception, which can be determined by turning the equipment off and on, the user is encouraged to
try to correct the interference by one or more of the following measures.
Reorient or relocate the receiving antenna.
Increase the separation between the equipment and receiver.
Connect the equipment into an outlet on a circuit different from that to which the receiver is
connected.
Consult the dealer or an experienced radio/TV technician for help
Any changes or modifications to this device not expressly approved by Mcube Technology Co., Ltd.
responsible for compliance could void your authority to operate the equipment.
[Industry Canada Statement]
This device complies with RSS-247 of the Industry Canada Rules. Operation is subject to the following
two conditions.
This device may not cause harmful interference.
This device must accept any interference received, including interference that may cause undesired
operation.
Ce dispositif est conforme à la norme CNR-247 d’Industrie Canada applicable aux appareils radio
exempts de licence. Son fonctionnement est sujet aux deux conditions suivantes.
Le dispositif ne doit pas produire de brouillage préjudiciable.
CUBEScan
TM
BioCon-V Operator’s Manual
115
CE dispositif doit accepter tout brouillage reçu, y compris un brouillage susceptible de provoquer un
fonctionnement indésirable.
17.5. ENVIRONMENTAL CONDITIONS
WARNING
AVERTISSEMENT
Do not store the device in a sealed vehicle or under direct sunlight. This may cause a fire
hazard.
Ne stockez pas l’appareil dans un véhicule fermé ni sous la lumière directe du soleil. Cela
pourrait présenter un risque d’incendie.
Do not place the device on unstable surfaces. The device may fall, resulting in damage or
potential injury.
Ne placez pas l’appareil sur une surface instable. L’appareil pourrait tomber, provoquant des
dommages ou des blessures potentielles
CAUTION
MISE EN GARDE
Do not place heavy objects on the device. It may cause damage.
Ne placez pas d’objets lourds sur l’appareil. Cela pourrait l’endommager.
Do not store the device in humid or dusty environments.
Ne stockez pas l’appareil dans un environnement humide ou poussiéreux.
This device is intended for indoor use only and must be operated under the environmental
conditions specified in the table below.
Cet appareil est destiné uniquement à une utilisation en intérieur et doit être utilisé dans les
conditions environnementales spécifiées dans le tableau ci-dessous.
Unplug the device from the wall outlet during thunderstorms or when it will be unused for an
extended period to prevent damage.
Débranchez l’appareil de la prise murale pendant les orages ou lorsqu’il ne sera pas utilisé pendant
une longue période afin d’éviter tout dommage.
If the BioCon-V has been stored at temperatures below 10℃, do not use it immediately in a warmer
environment. This may cause malfunction. Wait until the device reaches a temperature above 10℃
before use.
Si le BioCon-V a été stocké à une température inférieure à 10 °C, ne l’utilisez pas immédiatement
dans un environnement plus chaud. Cela pourrait provoquer un dysfonctionnement. Attendez que
l’appareil atteigne une température supérieure à 10 °C avant utilisation.
If the BioCon-V is not used for more than 3 months, store it under the recommended conditions
and charge the battery at least once every 6 months.
Si le BioCon-V n’est pas utilisé pendant plus de 3 mois, conservez-le dans les conditions
recommandées et rechargez la batterie au moins une fois tous les 6 mois.
If the battery needs to be removed or replaced, please contact the distributor or Mcube Technology
Co., Ltd.
Si la batterie doit être retirée ou remplacée, veuillez contacter le distributeur ou Mcube Technology

CUBEScan
TM
BioCon-V Operator’s Manual
116
Co., Ltd.
Environmental Specifications
Use Indoor
Operating temperature +10 ~ 35℃ (+50 ~ 95°F)
Relative humidity 30 ~ 75% non-condensing
Atmospheric pressure 700 ~1060 hPa
Storage and Transportation Conditions
Storage and transportation temperature
0 ~ +23℃ (+32 ~ 73.4°F) ≤ 1 year
0 ~ +45℃ (+32 ~ 113°F) ≤ 3 months
0 ~ +55℃ (+32 ~ 131°F) ≤ 1 month
Relative humidity 20 ~ 80% non-condensing
Atmospheric pressure 600 ~1060 hPa

CUBEScan
TM
BioCon-V Operator’s Manual
117
18. GLOSSARY
Probe Main device with an LCD display.
Charging Cradle Wirelessly charges the built-in battery of the probe.
Transducer
A device that converts one form of energy into another. An ultrasound
transducer converts electrical energy into sound waves, or vice versa. In
this manual, the term transducer refers specifically to an ultrasound
transducer.
B-mode
A type of ultrasound imaging mode that displays the strength of the
echo signal as brightness on the screen.
Pre-Scan
A general 2D real-time ultrasound scanning mode. The 2D images are
displayed continuously in real-time. This helps the user locate the
bladder and estimate the residual urine area.
Normal Scan
Captures 12-plane ultrasound images and calculates the residual urine in
the bladder using 3D scanning.
Self-Test Performs a self-diagnostic test and displays the result.
Phantom Performs phantom-based calibration and displays the result.
Calkit
Performs calibration using a calibration kit (CalKit) and displays the
result.
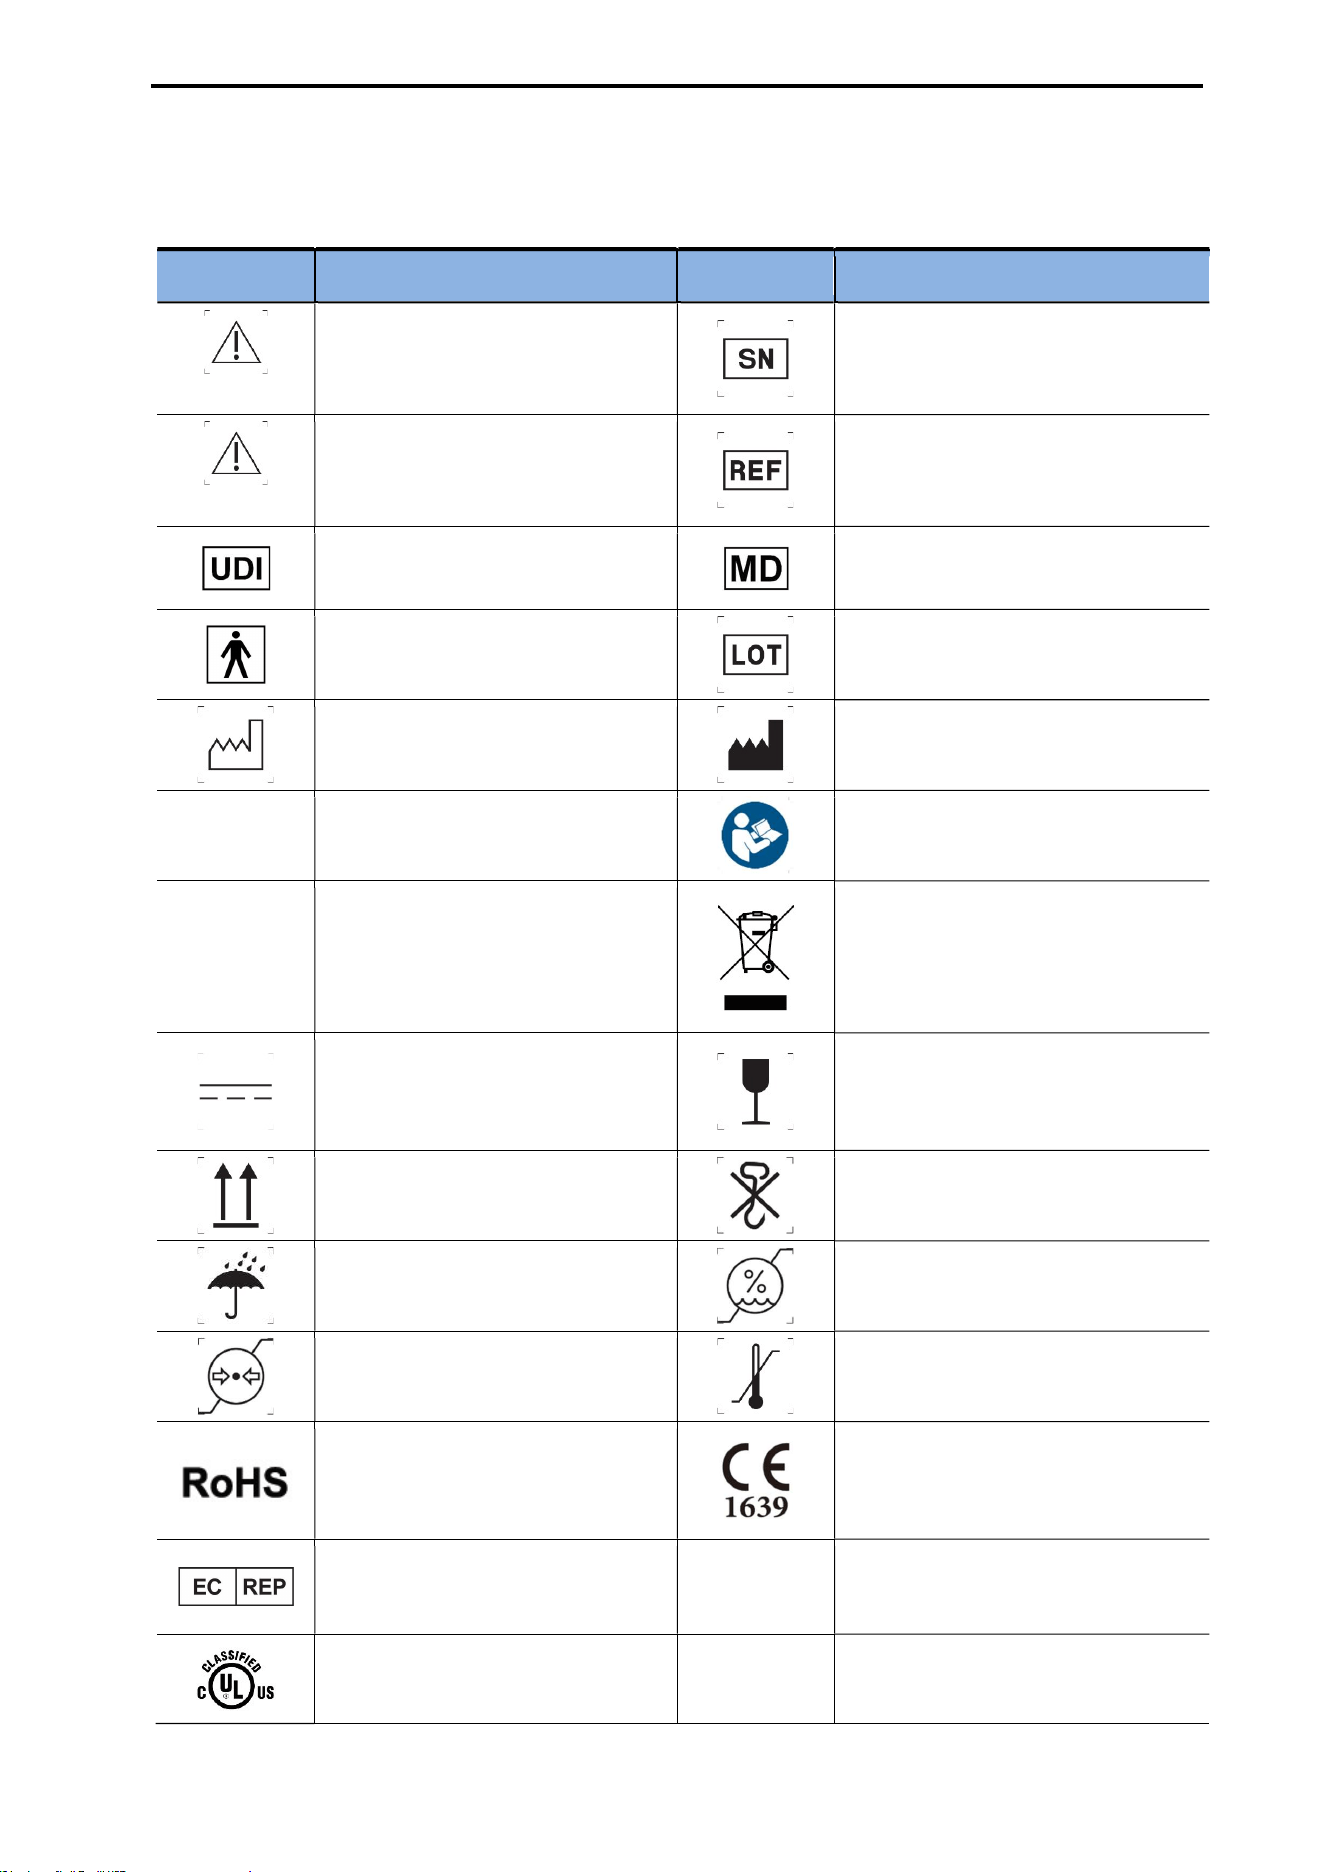
CUBEScan
TM
BioCon-V Operator’s Manual
118
19. SYMBOL DIRECTORY
Symbol Description Symbol Description
WARNING
Risk of personal injury or serious
system damage
Indicates the manufacturer’s serial
number
CAUTION
Risk of system damage or failure
Indicates the manufacturer’s catalog
(part) number
Unique Device Identifier for the
product
Indicates the item is a medical device
Indicates a Type BF applied part
complying with IEC 60601-1
Indicates the manufacturer’s batch
code
Indicates the date of manufacture
Indicates the medical device
manufacturer
NOTE
Useful information for efficient
device use
Consult the Instructions for Use
IPX 3 Protection against spraying water
WEEE
Indicates that separate collection for
waste electrical and electronic
equipment is required
Indicates on the rating plate that the
equipment is suitable for direct
current only
Handle with care; contents are fragile
Indicates correct upright position
Do not use hooks for handling
Keep the device away from
rain/moisture
Permissible humidity range for
storage/use
Permissible atmospheric pressure
range
Temperature limit
EU’s restriction of hazardous
substances
European conformity (CE) mark with
Notified Body identification number
for Class IIa, IIb, III medical devices
European Authorized Representative
RX Only
Prescription use only (U.S. Federal
Law)
Certified to U.S. and Canadian safety
standards

CUBEScan
TM
BioCon-V Operator’s Manual
119
20. REFERENCES
AIUM. Medical Ultrasound Safety. Laurel, MD: American Institute of Ultrasound in Medicine; 2014.
AIUM. Acoustic Output Labeling Standard for Diagnostic Ultrasound Equipment: A Standard for How
Manufacturers Should Specify Acoustic Output Data. Revision 1. Laurel, MD: American Institute of
Ultrasound in Medicine; 2008.
Health Canada. Guidelines for the Safe Use of Diagnostic Ultrasound. Ottawa, ON: Health Canada;
2002. Cat. H46-2/01-255E.
Health Canada. Medical Devices Regulations, SOR/98-282.
Regulation (EU) 2017/745 of the European Parliament and of the Council on medical devices.
IEC 60601-1:2005+AMD1:2012+AMD2:2020. Medical electrical equipment – Part 1: General
requirements for basic safety and essential performance. Geneva: International Electrotechnical
Commission.
ANSI/AAMI ES 60601-1:2005/A2:2021, Medical electrical equipment – Part 1: General requirements
for basic safety and essential performance.
CAN/CSA-C22.2 No. 60601-1:2022. Medical electrical equipment – Part 1: General requirements for
basic safety and essential performance.
IEC 60601-2-37:2024. Medical electrical equipment – Part 2-37: Particular requirements for the basic
safety and essential performance of ultrasonic medical diagnostic and monitoring equipment.
Geneva: International Electrotechnical Commission.
ISO 10993-1:2018. Biological evaluation of medical devices – Part 1: Evaluation and testing within a
risk management process. Geneva: International Organization for Standardization.
U.S. Food and Drug Administration. Marketing Clearance of Diagnostic Ultrasound Systems and
Transducers; Guidance for Industry and Food and Drug Administration Staff. 2019.
U.S. Food and Drug Administration. General Principles of Software Validation; Final Guidance for
Industry and FDA Staff. 2002.
Hong WS, Ham SY, Kim TW, Seo JS, Yang SK. Usefulness of a Sonographic Bladder Scan for
Uroflowmetry and the Evaluation of the Anxiety Level Associated with Uroflowmetry. Korean Journal
of Urology. 2007;48(6):633-637.
Chung B, Lee T, Yang JH. The Diagnostic Value of Portable Bladder Volume Measurement (BVMS)
with Real Bladder Image in the Measurement of Bladder Volume According to the Different Angling
of Transducer. Korean Journal of Urology. 2006;47(6):1320-1326.
Bodker B, Lose G. Postoperative urinary retention in gynecologic patients. International
Urogynecology Journal and Pelvic Floor Dysfunction. 2003;14:94-97.
McNaughton-Collins M, Barry MJ. Managing patients with lower urinary tract symptoms suggestive
of benign prostatic hyperplasia. American Journal of Medicine. 2005;118:1331-1339.
Mcube Technology Co., Ltd.
39 Magokjungang 12-ro, Gangseo-gu, Seoul 07789, Republic of Korea
Manufacturing License Number: No. 1117
Tel: 02-3421-7780
Fax: 02-3421-7076
Email: mcube@mcubetech.co.kr
Website: www.mcubetech.co.kr
Issue date: March 13, 2026
MUM-BioCon-V-EN_FR (Rev.1.0)