User Manual
Dishwasher
CIP 3D9E0B-80

Thank you for purchasing a Candy product
Please read these instructions carefully before using this appliance. The instructions
contain important information which will help you get the best out of the appliance and
ensure safe and proper installation, use and maintenance.
Keep this manual in a convenient place so you can always refer to it for the safe and
proper use of the appliance.
If you sell the appliance, give it away, or leave it behind when you move house,make
sure you also pass on this manual so that the new owner can become familiar with the
appliance and safety warnings.
Safety and warnings ..................................................................................................
Installation instructions ...............................................................................................
Product Description ....................................................................................................
Overview of programmes............................................................................................
1
4
20
22
Water softening system..............................................................................................
24
Using rinse aid............................................................................................................
26
Utensils...........................................................................................................................
27
Loading utensils..........................................................................................................
28
Adding detergent........................................................................................................
Before first Use...........................................................................................................
30
31
Daily Use.....................................................................................................................
Care and cleaning.......................................................................................................
Troubleshooting...........................................................................................................
Technical Data............................................................................................................
33
35
39
44
Recommended loading...............................................................................................
43
1
Read all instructions before using the dishwashe
r
.
The information in this manual must be followed to minimise the risk of fire or explosion
or to prevent property damage, personal injury or loss of life.
Use the dishwasher only for its intended function as described in this user guide.
This
appliance
is
intended
to
be
used
in
household
and
similar
applications
such as:
– sta
f
f kitchen areas in shops, offi
ces and other working environments;
– farm houses;
– by clients in hotels, motels and other residential type environments;
– bed and breakfast type environments.
Electrical shock hazard
Cut Hazard
When using your dishwasher, follow basic
precautions, including the following:
WARNING
WARNING
WARNING
Take care - panel edges are sharp.
Failure to use caution could result in injury or cuts.
Before installing the dishwasher, remove the house fuse or open the circuit breaker.
T
his appliance must be earthed. In the event of a malfunction or breakdown, earthing
will
reduce the risk of electric shock by providing a path of least resistance for electric
curren
t. This appliance is equipped with a cord having an equipmentearthing conductor
and
an earthing plug. The plug must be plugged into an appropriate outlet that is installed
and
earthed in accordance with all local codes and ordinances.
WA
RNING - Improper connection of the equipment-earthing conductor can result in a
risk
of electric shock. Check with a qualified electrician or service representative if you
are
in doubt as to whether the appliance is properly earthed.
Do
not modify the power supply plug provided with the appliance - if it will not fit the
ou
tlet, have a proper outlet installed by a qualified electrician. Do not use an extension
cord
, adapter plug or multiple outlet box.
Failure to follow this advice may result in electrical shock or death.
Safety and warnings
2
Use only detergents or rinse aid recommended for use in a domestic dishwasher and
keep them out of reach of children.
Check that the detergent dispenser is empty after the completion of each wash
program.
When loading items to be washed, locate sharp items so that they are not likely to
damage
the dishwasher and load sharp knives with the handle up to reduce the risk
of cut-type injuries.
Do not touch the filter plate (the metal disc in the dishwasher base) during or
immediately after use, as it may be hot from the heater plate underneath.
Do not tamper with the controls.
Do not abuse, sit in, stand on the door or dish rack of the dishwasher.
Do not lean on the adjustable racks or us
e
them to support your body weight.
T
o reduce the risk of injur
y
, do not allow children to play in or on the dishwashe
r
.
Under certain conditions, hydrogen gas may be produced in a hot water heater system
t
hat has not been used for two weeks or more. Hydrogen gas is explosive. If the hot
wa
ter system has not been used for such a period, before using thedishwasher, turn
on
all hot water taps and let the water flow from each for several minutes. This will
relea
se any accumulated hydrogen gas. As the gas is flammable, do not smoke or use
an open flame during this time.
Remove the door to the washing compartment when removing an old dishwasher
from service or discarding it.
Some dishwasher detergents are strongly alkaline. They can be extremely dangerous
if swallowed. Avoid contact with the skin and eyes and keep children away from the
dishwasher when the door is open. Check that the detergent receptacle is empty after
completion of the wash cycle.
Certified residential dishwashers are not intended for licensed food establishments.
Maintenance safety instructions
Disconnect the appliance from the power supply before any cleaning or maintenance.
When disconnecting the appliance,pull the plug rather than the power supply cord or
junction of cord to avoid damage.
Do not repair or replace any part of the appliance or attempt any servicing unless
specifically recommended in this user guide.
Keep the floor around your appliance clean and dry to reduce the possibility of slipping.
Keep the area around/underneath your appliance free from the accumulation of
combustible materials, such as lint, paper, rags and chemicals.
Safety and warnings
3
Operational safety instructions
Open the door very carefully if the dishwasher is in operation. There is a risk of being
sprayed with hot water. Do not open the door fully until the spray arms have stopped
rotating.
The door should not be left in the open position as this could present a tripping
hazard.
The water inside the dishwasher is not suitable for drinking.
The dishwasher must be used with the filter plate, drain filter and spray arm(s) in place.
T
o identify what these parts are, see drawings in section ‘‘Care and Cleaning’’of this
user guide.
Do not operate this dishwasher if it is damaged, malfunctioning, partially disassembled
or has missing or broken parts, including a damaged power supply cord or plug.
Household appliances are not intended to be played with by children. Children of less
t
han 8 years old must be kept away from the appliance unless continuously supervised.
T
his appliance can be used by children aged from 8 years and above, and persons
wi
th reduced physical, sensory or mental capabilities or lack of experience and
k
nowledge, if they have been given supervision or instruction concerning the use of
the appliance in a safe way and they understand the hazards involved.
Cleaning and user maintenance shall not be done by children without supervision.
Do not allow children to play inside, on or with this appliance or any discarded
appliance.
If a dishwasher cleaner is used, we would strongly recommend a wash program with
detergent should be run immediately afterward, to prevent any damage to the dishwasher.
The dishwasher is designed for washing normal household utensils. Items that are
con
taminated by petrol, paint, steel or iron debris, corrosive, acidic or alkaline chemicals
are not to be washed in the dishwasher.
If the dishwasher is not being used for long periods of time, turn the electricity and
water supply to the dishwasher off.
Safety and warnings
4
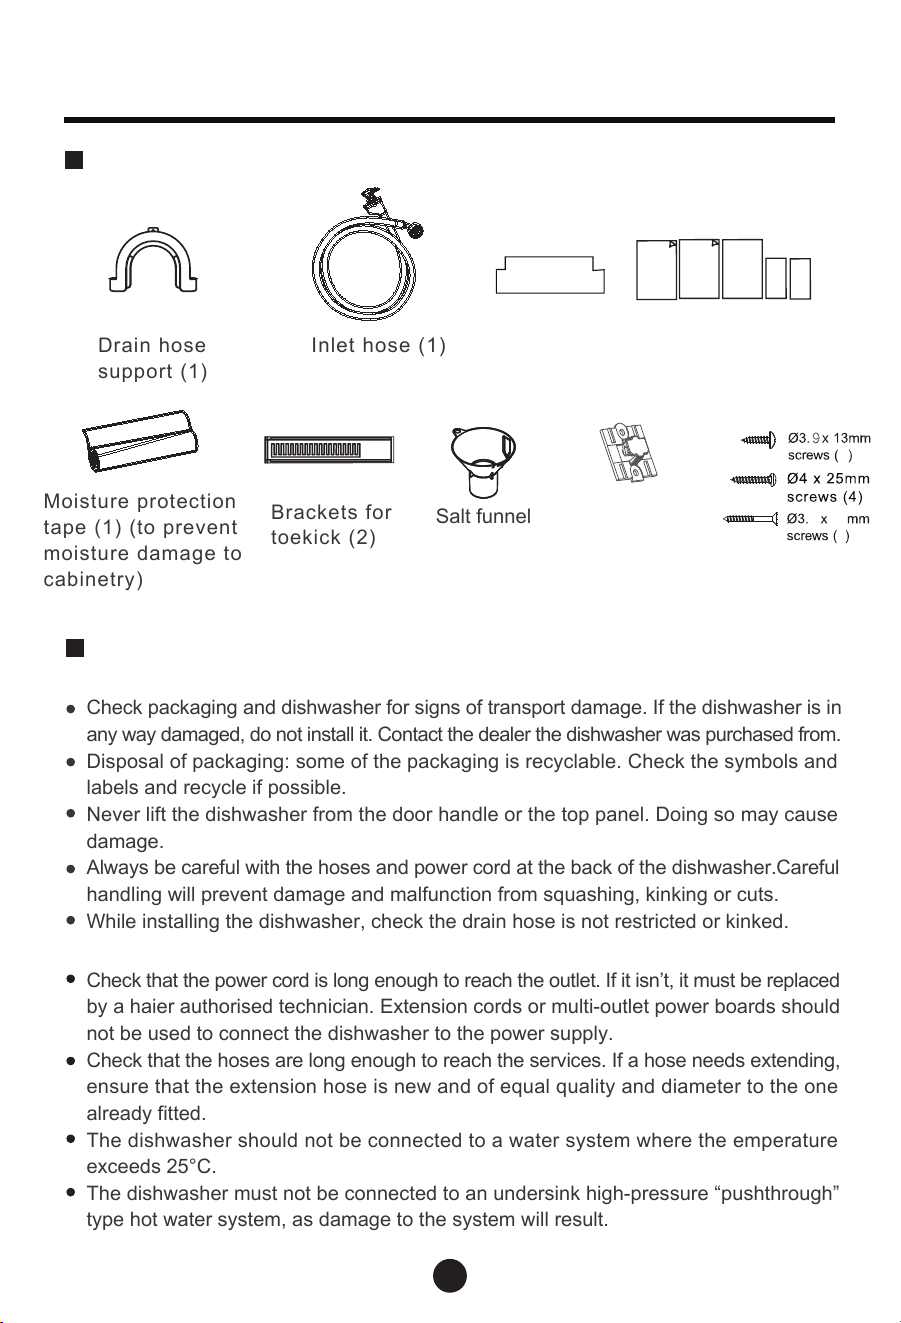
Parts supplied
Prior to installation
Unpacking and handling
Connections and services
Check packaging and dishwasher for signs of transport damage. If the dishwasher is in
any
way damaged, do not install it. Contact the dealer the dishwasher was purchased from.
Di
sposal of packaging: some of the packaging is recyclable. Check the symbols and
labels and recycle if possible.
Never
lift the dishwasher from the door handle or the top panel. Doing so may cause
damage.
A
lways be careful with the hoses and power cord at the back of the dishwasher.Careful
handling will prevent damage and malfunction from squashing, kinking or cuts.
While installing the dishwasher, check the drain hose is not restricted or kinked.
D
r
a
i
n
h
o
s
e
s
u
p
p
o
r
t
(
1
)
I
n
l
e
t
h
o
s
e
(
1
)
B
r
a
c
k
e
t
s
f
o
r
t
o
e
k
i
c
k
(
2
)
M
o
i
s
t
u
r
e
p
r
o
t
e
c
t
i
o
n
t
a
p
e
(
1
)
(
t
o
p
r
e
v
e
n
t
m
o
i
s
t
u
r
e
da
m
a
g
e
t
o
c
a
b
i
n
e
t
r
y
)
Salt funnel
Cotton felt
(1)
Energy labelling
(1)
User Manual
(1)
Warranty card
(1)
Installation instruction
(2)
Check that the power cord is long enough to reach the outlet. If it isn’t, it must be replaced
by a haier authorised technician. Extension cords or multi-outlet power boards should
not be used to connect the dishwasher to the power supply.
Check that the hoses are long enough to reach the services. If a hose needs extending,
ensure that the extension hose is new and of equal quality and diameter to the one
already fitted.
The dishwasher should not be connected to a water system where the emperature
exceeds 25°C.
The dishwasher must not be connected to an undersink high-pressure “pushthrough”
type hot water system, as damage to the system will result.
Installation instructions
9
8
5 44
6
Fastener
(1)
(1)
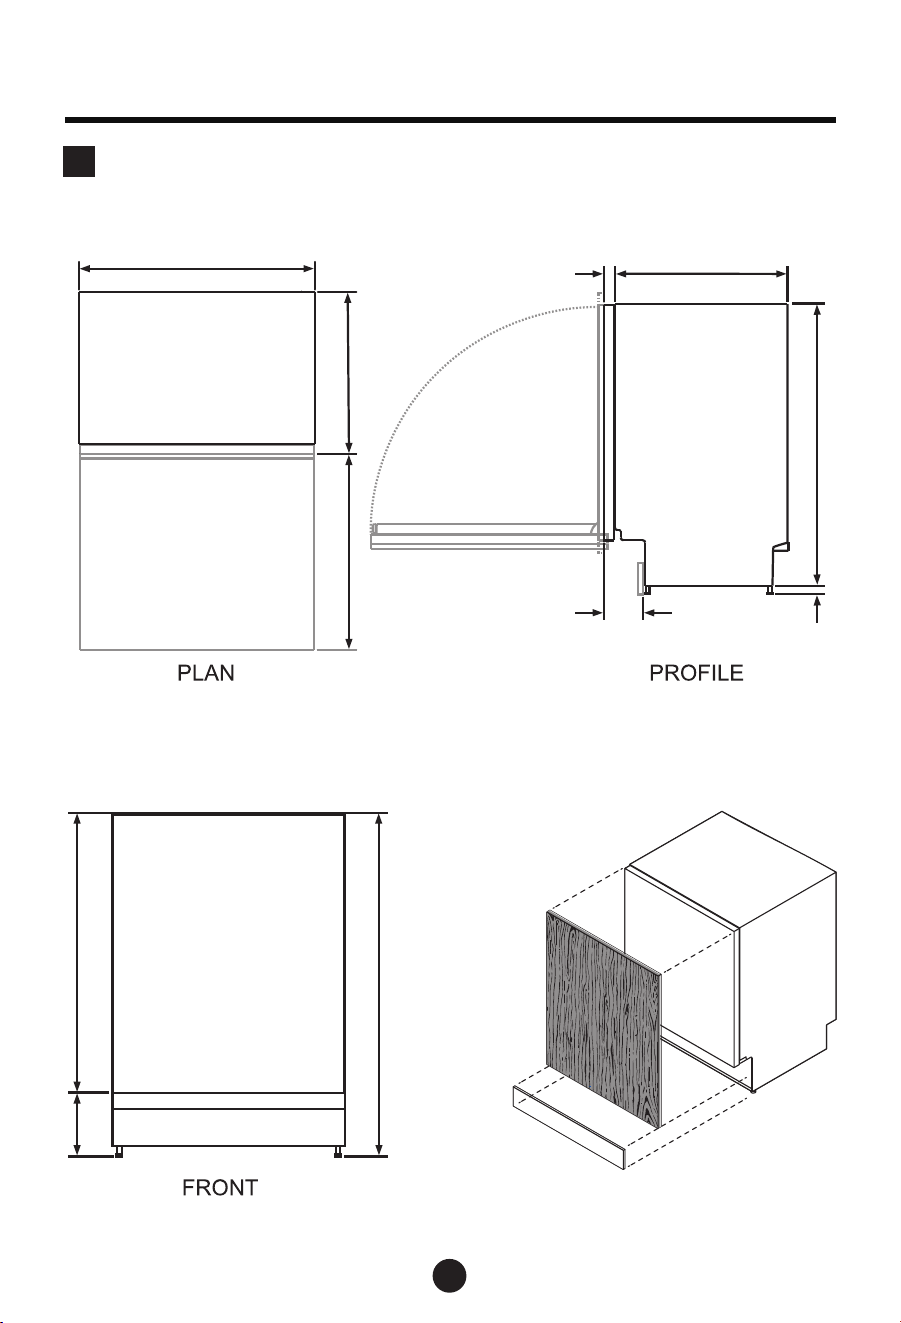
5
C
K
B
1
Product dimensions
A
I
D
F
G
E
H
J
Installation instructions
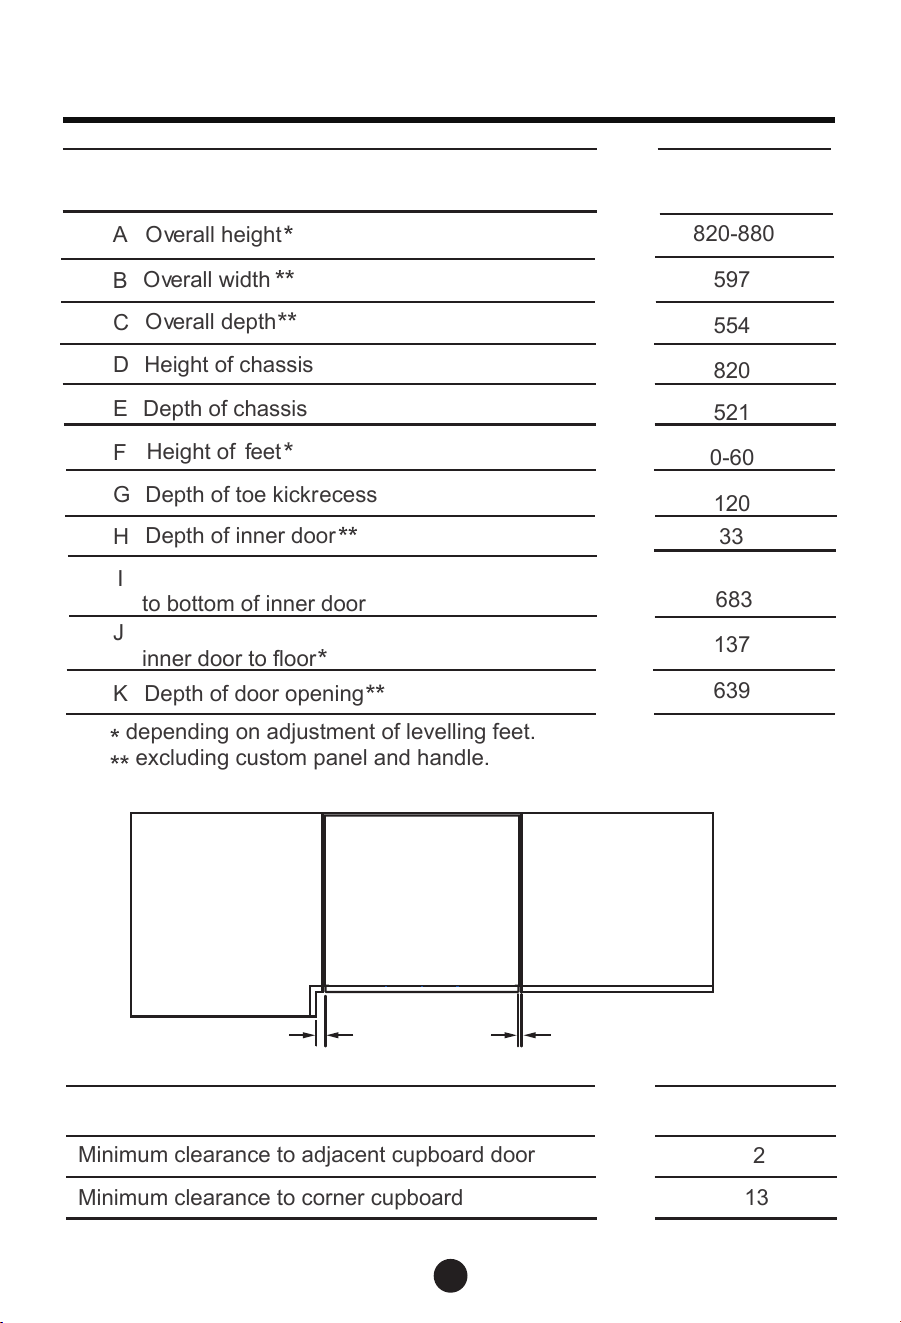
A
B
C
D
E
F
G
H
I
J
K
Product dimensions
820-880
597
554
820
521
0-60
120
33
683
137
639
unit:mm
Depth of door opening
inner door to floor
to bottom of inner door
Depth of inner door
Depth of toe kick
r
ecess
Height of
f
eet
Depth of chassis
Height of chassis
O
v
erall depth
O
v
erall width
O
v
erall height
depending on adjustment of levelling feet.
excluding custom panel and handle.
Std tub product
B A
Plan
2
13
unit :mm
Cabinetry dimensions
Minimum clearance to adjacent cupboard door
Minimum clearance to corner cupboard
6
Installation instructions
Height from top of chassis
Height from bottom of
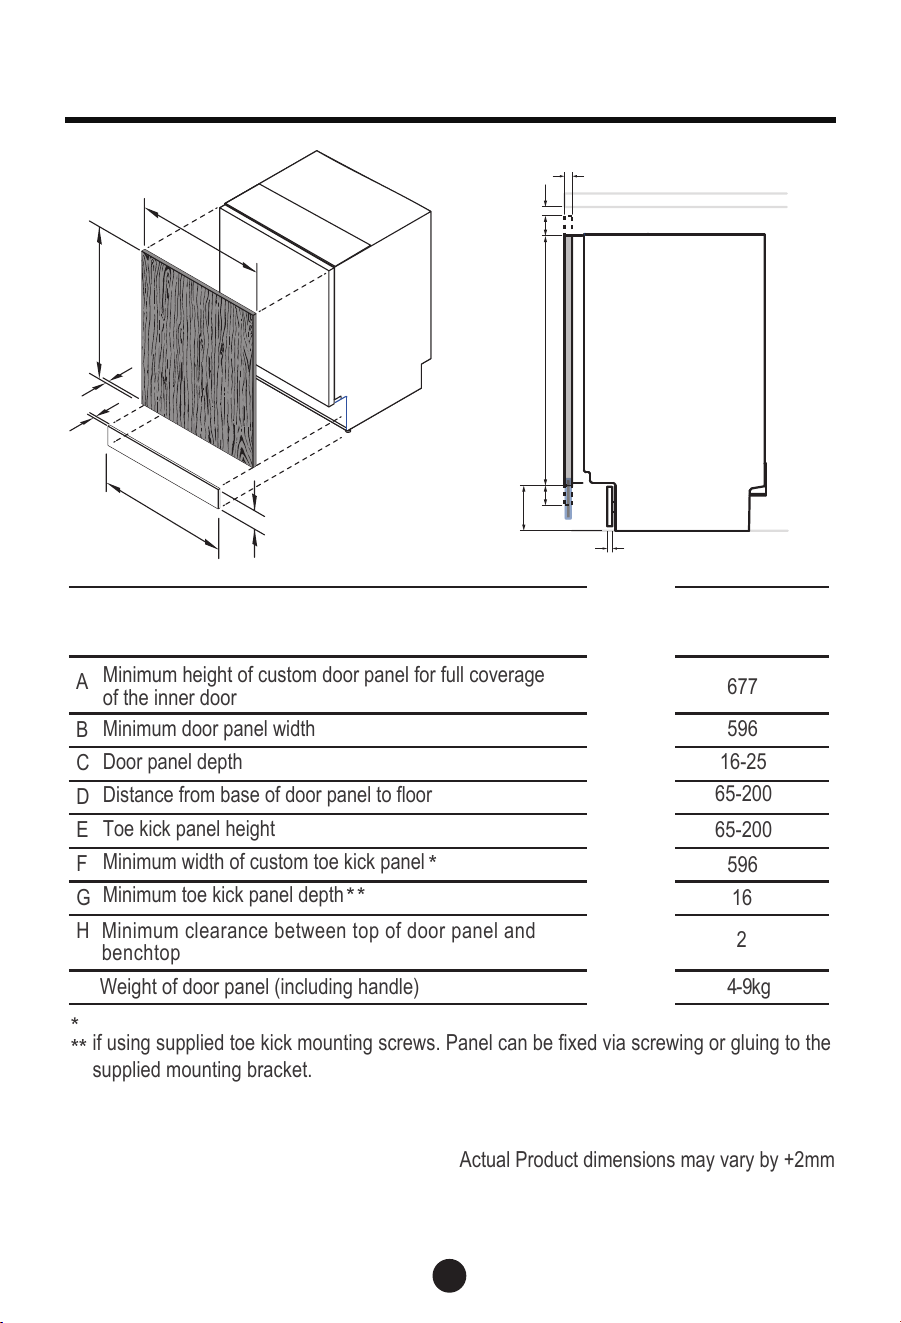
Std tub
product
unit:mm
Actual Product dimensions may vary by +2mm
A
B
C
D
E
F
G
H
Iso Profile
A
D
H
C
E
G
C
A
B
F
G
Minimum height of custom door panel for full coverage
of the inner door
Minimum door panel width
Door panel depth
Distance from base of door panel to floor
Toe kick panel height
Minimum width of custom toe kick panel
Minimum toe kick panel depth
Weight of door panel (including handle)
if using supplied toe kick mounting screws. Panel can be fixed via screwing or gluing to the
supplied mounting bracket.
677
596
16-25
65-200
65-200
596
16
2
4
-
9
kg
Custom panel considerations
7
Minimum clearance between top of door panel and
benchtop
Installation instructions
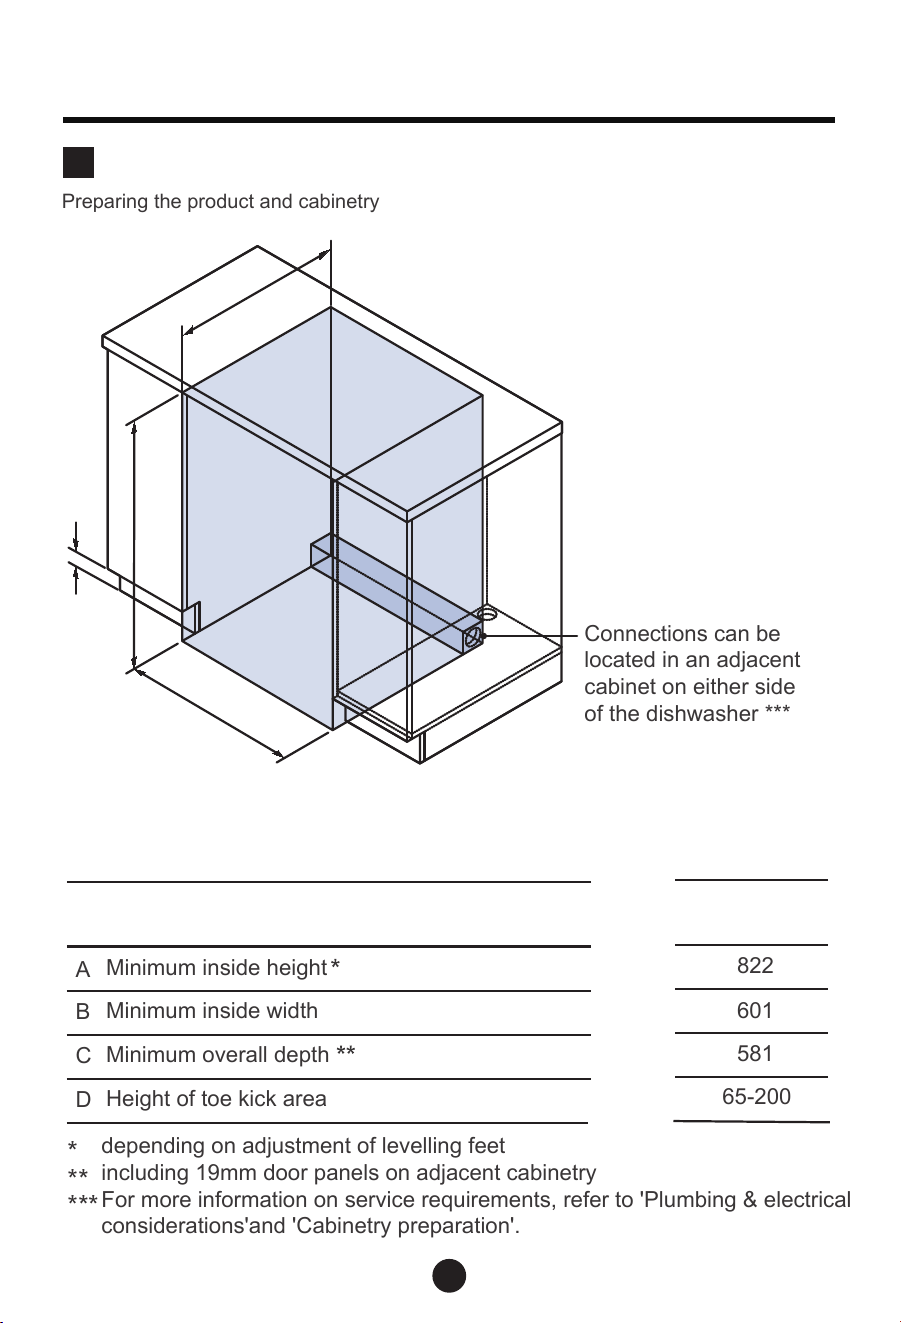
Preparing the product and cabinetry
Cavity preparation
2
Isometric
A
d
B
C
Connections can be
located in an adjacent
cabinet on either side
of the dishwasher ***
A
B
C
D
822
601
581
unit:mm
65-200
Cabinetry dimensions
Minimum inside height
Minimum inside width
Minimum overall depth
Height of toe kick area
depending on adjustment of levelling feet
including 19mm door panels on adjacent cabinetry
For more information on service requirements, refer to 'Plumbing & electrical
considerations'and 'Cabinetry preparation'.
8
Installation instructions
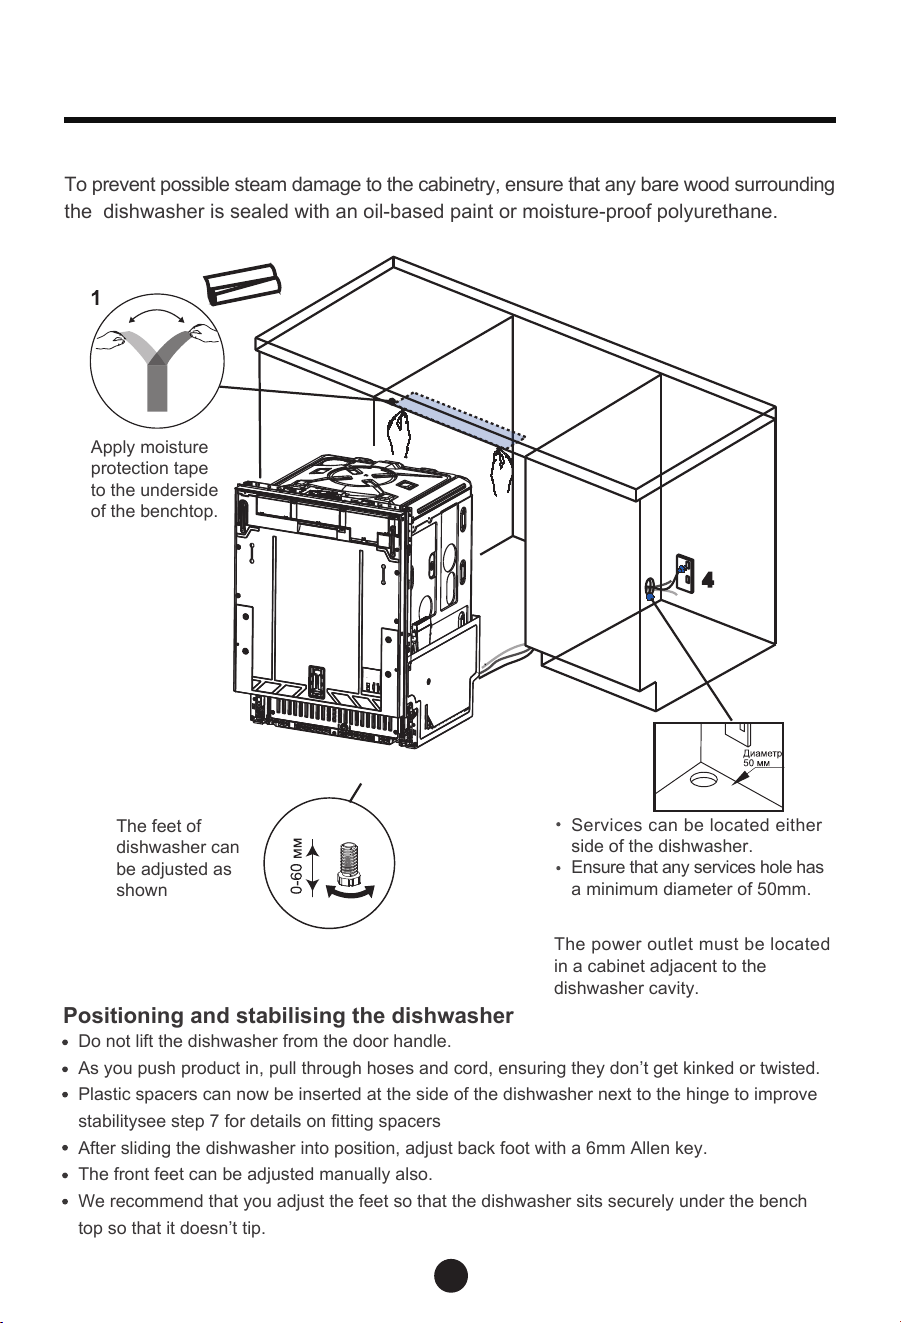
IMPORTANT!
The power outlet must be located
in a cabinet adjacent to the
dishwasher cavity.
Services can be located either
side of the dishwasher.
E
nsure that any services hole ha
s
a minimum diameter of 50mm.
Positioning and stabilising the dishwasher
Do not lift the dishwasher from the door handle.
As you push product in, pull through hoses and cord, ensuring they don’t get kinked or twisted.
Plastic spacers can now be inserted at the side of the dishwasher next to the hinge to improve
stabilitysee step 7 for details on fitting spacers
After sliding the dishwasher into position, adjust back foot with a 6mm Allen key.
The front feet can be adjusted manually also.
We recommend that you adjust the feet so that the dishwasher sits securely under the bench
top so that it doesn’t tip.
Apply moisture
protection tape
to the underside
of the benchtop.
IMPORTANT!
To prevent possible steam damage to the cabinetry, ensure that any bare wood surrounding
the dishwasher is sealed with an oil-based paint or moisture-proof polyurethane.
3
4
The feet of
dishwasher can
be adjusted as
shown
9
Installation instructions
4
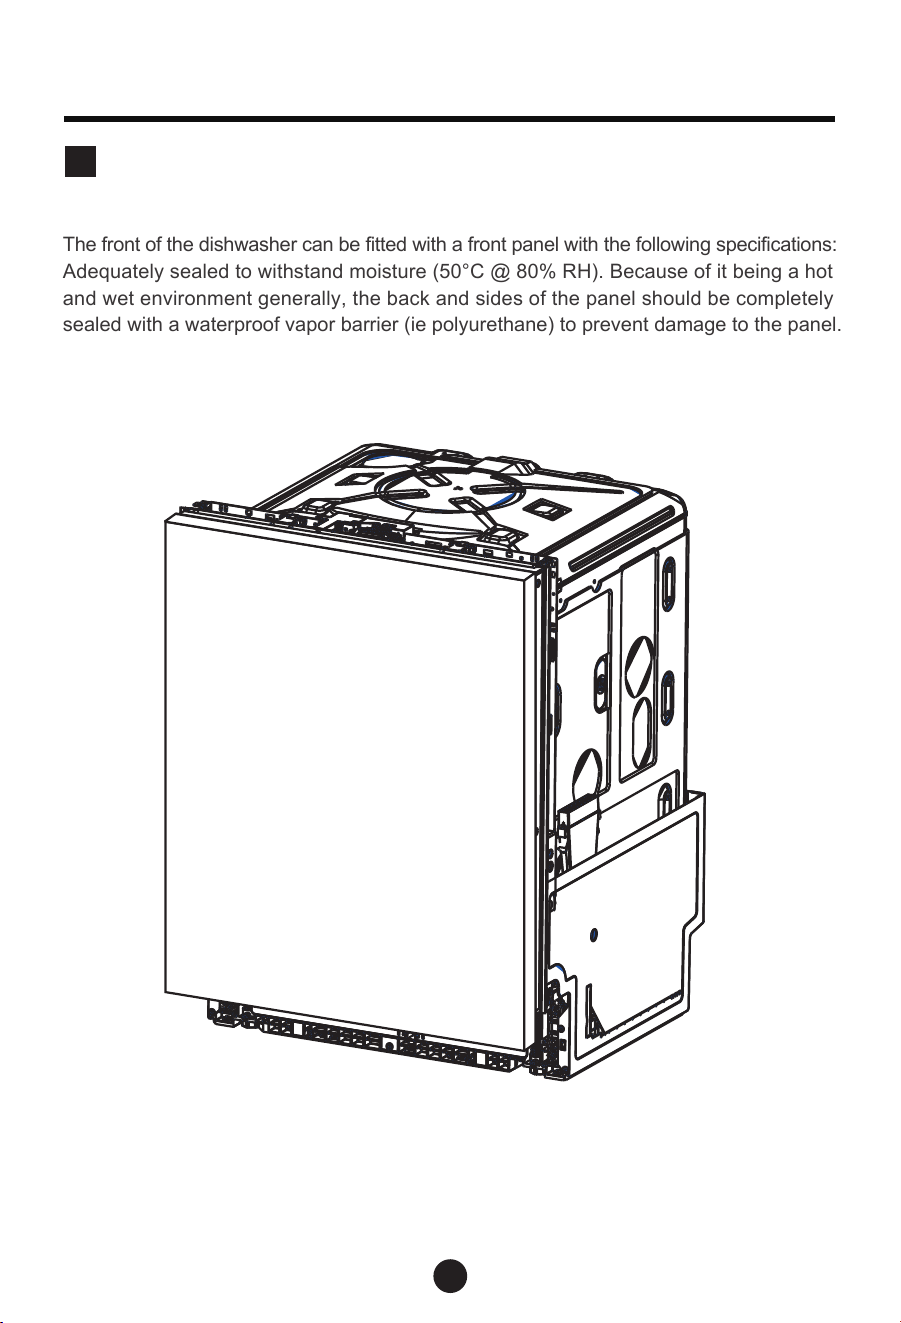
Front panel material specifications
The front of the dishwasher can be fitted with a front panel with the following specifications:
A
dequately sealed to withstand moisture (50°C @ 80% RH). Because of it being a hot
and
wet environment generally, the back and sides of the panel should be completely
sealed with a waterproof vapor barrier (ie polyurethane) to prevent damage to the panel.
Custom door panel preparation
10
Installation instructions
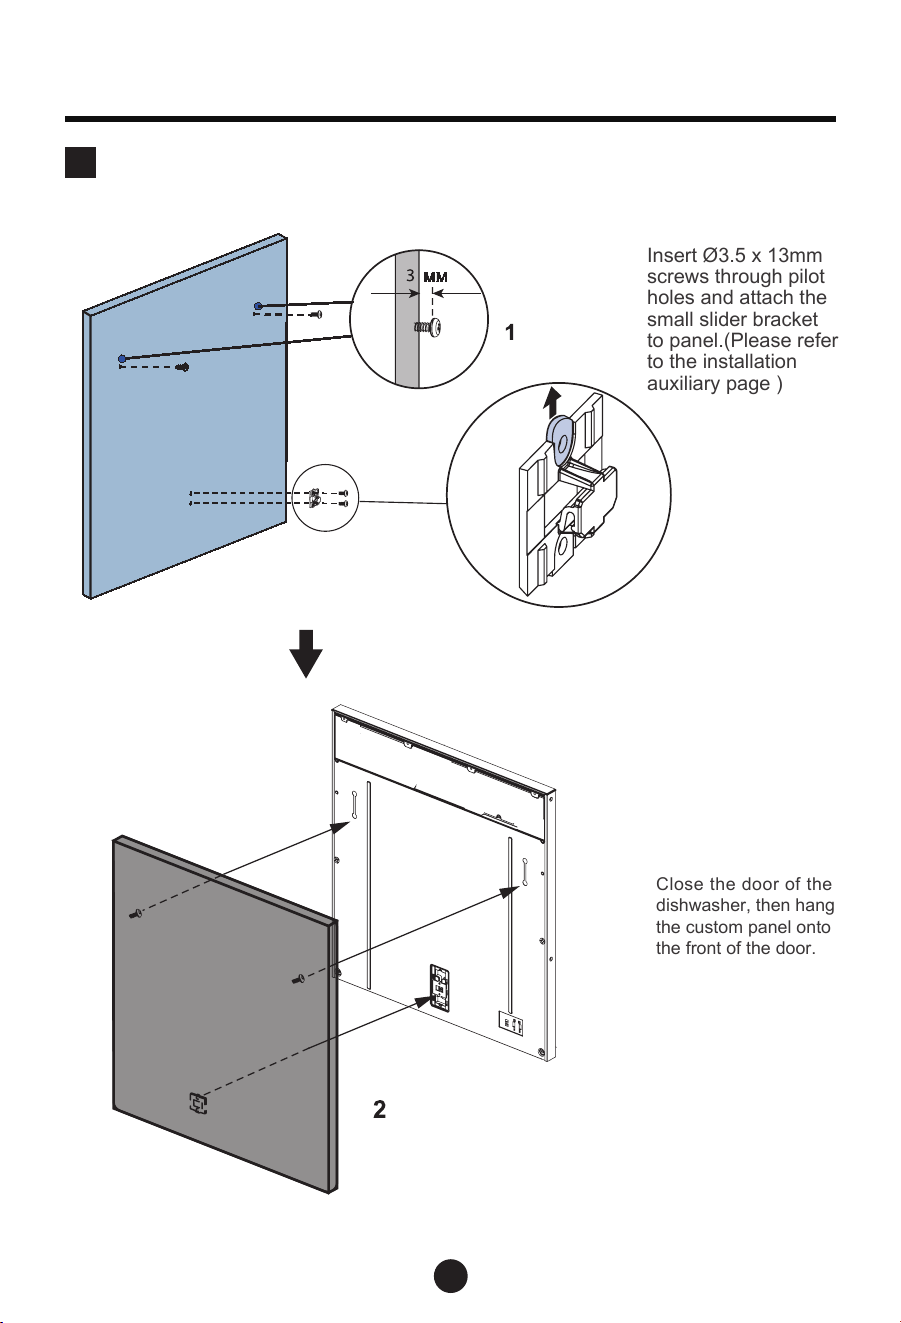
5
Attaching custom door panel
Insert Ø3.5 x 13mm
screws through pilot
holes and attach the
small slider bracket
to panel.(Please refer
to the installation
auxiliary page )
`
Close the door of the
dishwasher, then hang
the custom panel onto
the front of the door.
1
2
11
Installation instructions
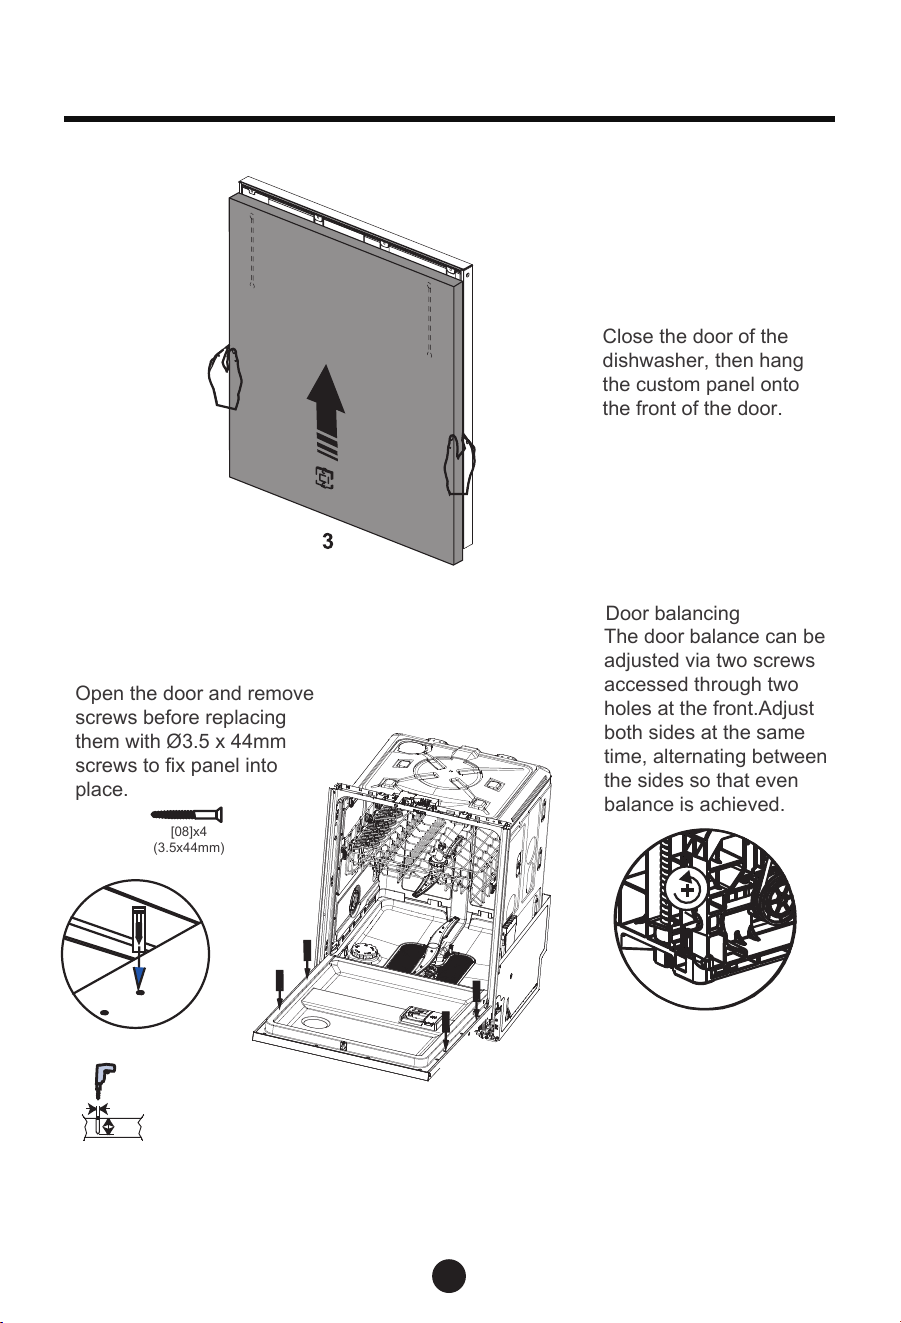
Door balancing
IMPORTANT!
5
4
The door balance can be
adjusted via two screws
accessed through two
holes at the front.Adjust
both sides at the same
time, alternating between
the sides so that even
balance is achieved.
Open the door and remove
screws before replacing
them with Ø3.5 x 44mm
screws to fix panel into
place.
Close the door of the
dishwasher, then hang
the custom panel onto
the front of the door.
Clockwise rotation: Spring tension
Counterclockwise rotation: Spring relaxation
Rotate the screws to
adjust until the door
is just open under its
own weight.
12
[08]x4
(3.5x44mm)
12mm
2mm
Installation instructions
13
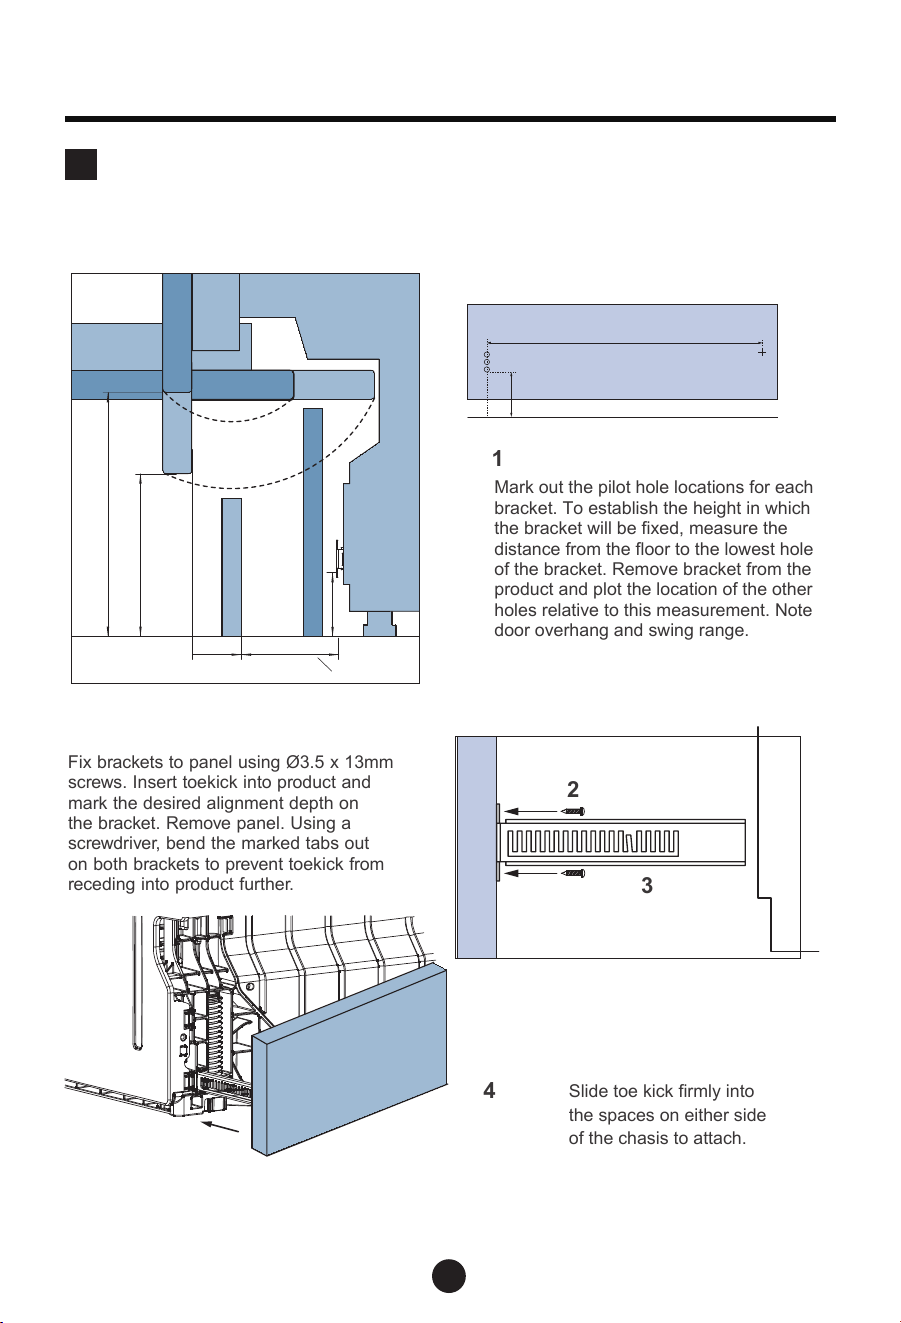
Slide toe kick firmly into
the spaces on either side
of the chasis to attach.
Fix
b
r
ac
k
ets
t
o
panel
using
Ø3.5
x
13mm
sc
r
e
w
s.
Insert
t
oekick
in
t
o
p
r
oduct
and
mark
the
desi
r
ed
alignment
depth
on
the
b
r
ac
k
et.
R
em
o
v
e
panel.
Using
a
sc
r
e
w
dri
v
e
r
,
bend
the
mar
k
ed
tabs
out
on
both
b
r
ac
k
ets
t
o
p
r
e
v
ent
t
oekick
f
r
om
r
e
c
eding
in
t
o
p
r
oduct
furthe
r
.
toekick depth range
4
Mark out the pilot hole locations for each
bracket. To establish the height in which
the bracket will be fixed, measure the
distance from the floor to the lowest hole
of the bracket. Remove bracket from the
product and plot the location of the other
holes relative to this measurement. Note
door overhang and swing range.
1
Toe kick installation
255.5 Centre
6
Separate panel
153
65
30
100
A
2
A
3
Installation instructions
14
F
i
t
c
o
n
t
inuo
u
s
pan
e
l
t
o
s
urroundi
n
g
c
abi
n
e
t
r
y
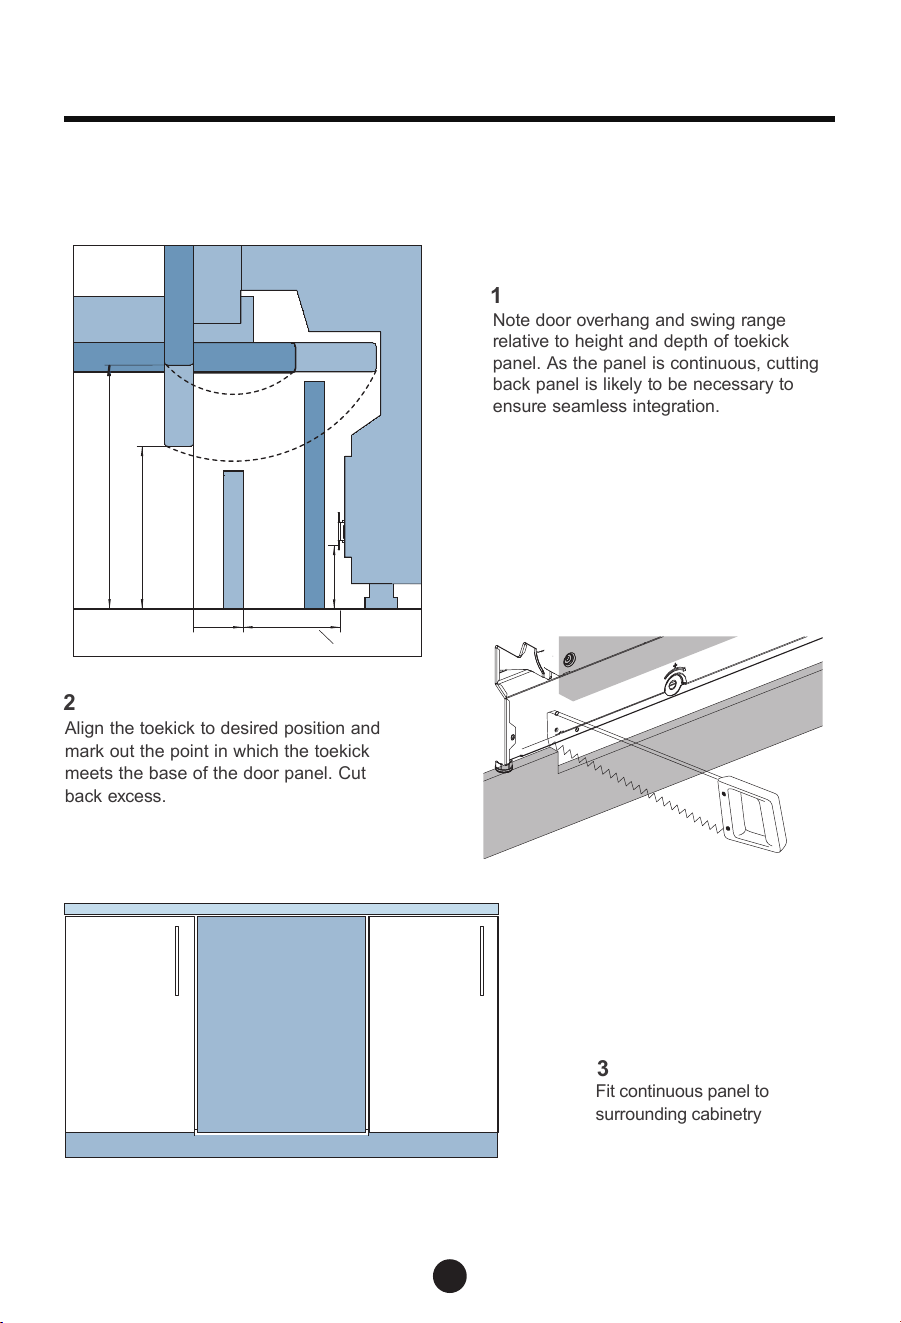
Align
the
t
oekick
t
o
desi
r
ed
position
and
mark
out
the
point
in
which
the
t
oekick
meets
the
base
of
the
door
panel.
Cut
back
e
x
c
e
s
s.
3
No
t
e
door
o
v
erhang
and
s
wing
r
ange
r
elati
v
e
t
o
height
and
depth
of
t
oekick
panel.
As
the
panel
is
c
ontinuous,
cutting
back
panel
is
li
k
ely
t
o
be
ne
c
e
s
sary
t
o
ensu
r
e
seamle
s
s
in
t
eg
r
ation.
1
Continuous panel
2
toekick depth range
153
65
30
100
A
Installation instructions
A
B
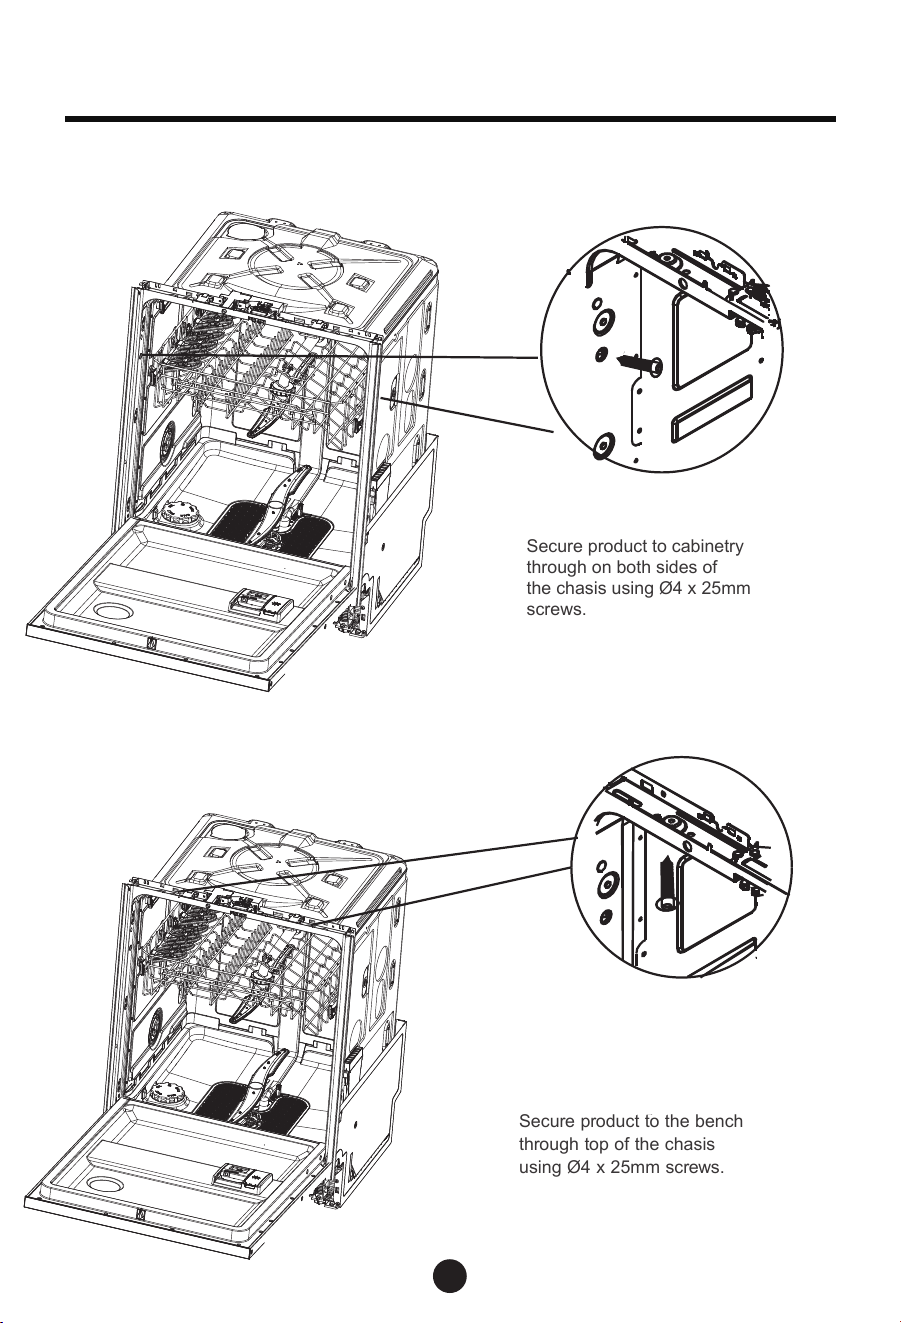
Secure to the cabinetry on the sides
Secure product to cabinetry
through on both sides of
the chasis using Ø4 x 25mm
screws.
Optionally secure to the cabinetry above
Secu
r
e
p
r
oduct
t
o
the
bench
th
r
ough
t
op
of
the
chasis
using
Ø4
x
25mm
sc
r
e
w
s.
15
Installation instructions
3
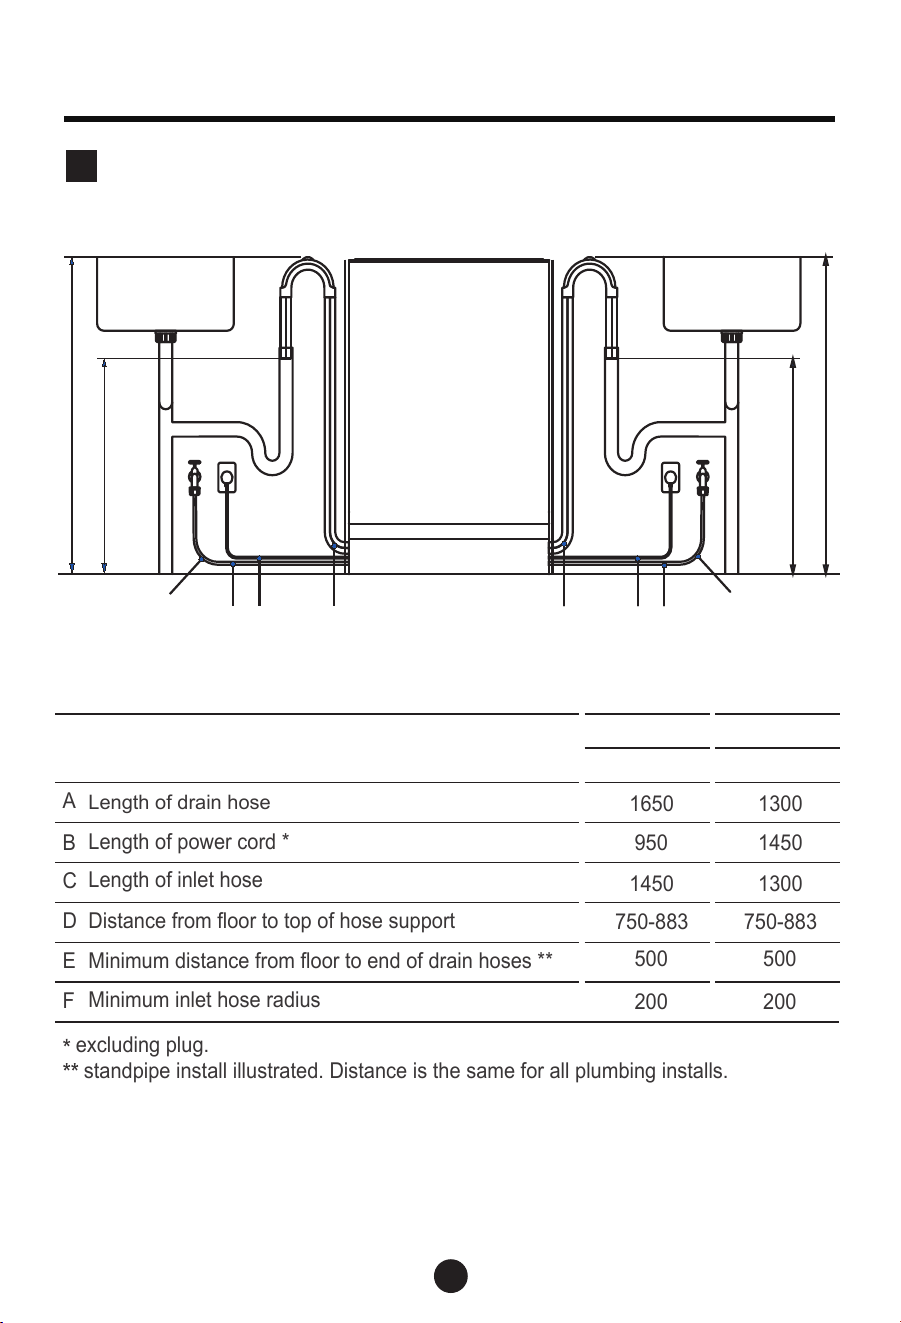
Plumbing and drainage options. Determine which is more
suitable
A
B
C
D
E
F
ABC A B C
F
F
E E
DD
uni t : m m uni t : m m
Length of drain hose
Length of power cord *
Length of inlet hose
Distance from floor to top of hose support
Minimum distance from floor to end of drain hoses **
Minimum inlet hose radius
excluding plug.
standpipe install illustrated. Distance is the same for all plumbing installs.
Left side
Right side
1650
1450
750-883
950
500
200
1300
1300
750-883
1450
500
200
Service dimensions
16
Installation instructions
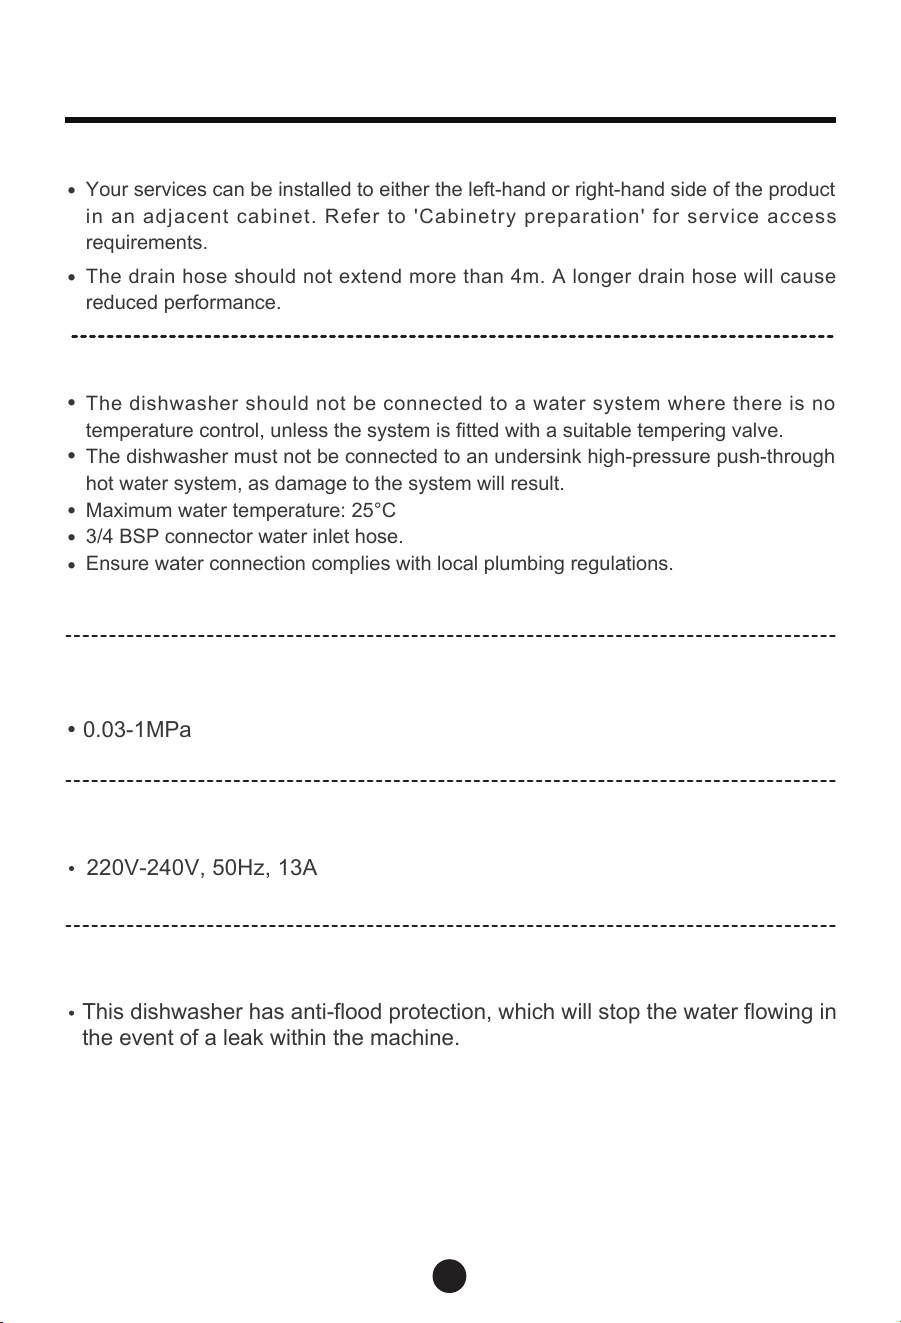
Hose and cord lengths
Your services can be installed to either the left-hand or right-hand side of the product
in
an adjacent cabinet. Refer to 'Cabinetry preparation' for service access
requirements.
The drain hose should not extend more than 4m. A longer drain hose will cause
reduced performance.
The dishwasher should not be connected to a water system where there is no
temperature control, unless the system is fitted with a suitable tempering valve.
T
he dishwasher must not be connected to an undersink high-pressure push-through
hot water system, as damage to the system will result.
Maximum water temperature: 25°C
3/4 BSP connector water inlet hose.
Ensure water connection complies with local plumbing regulations.
Water connection
Water pressure
0.03-1MPa
Electrical requirements
220V-240V, 50Hz, 13A
This dishwasher has anti-flood protection, which will stop the water flowing in
the event of a leak within the machine.
Anti-flood protection
•
•
•
•
•
•
•
•
17
Installation instructions
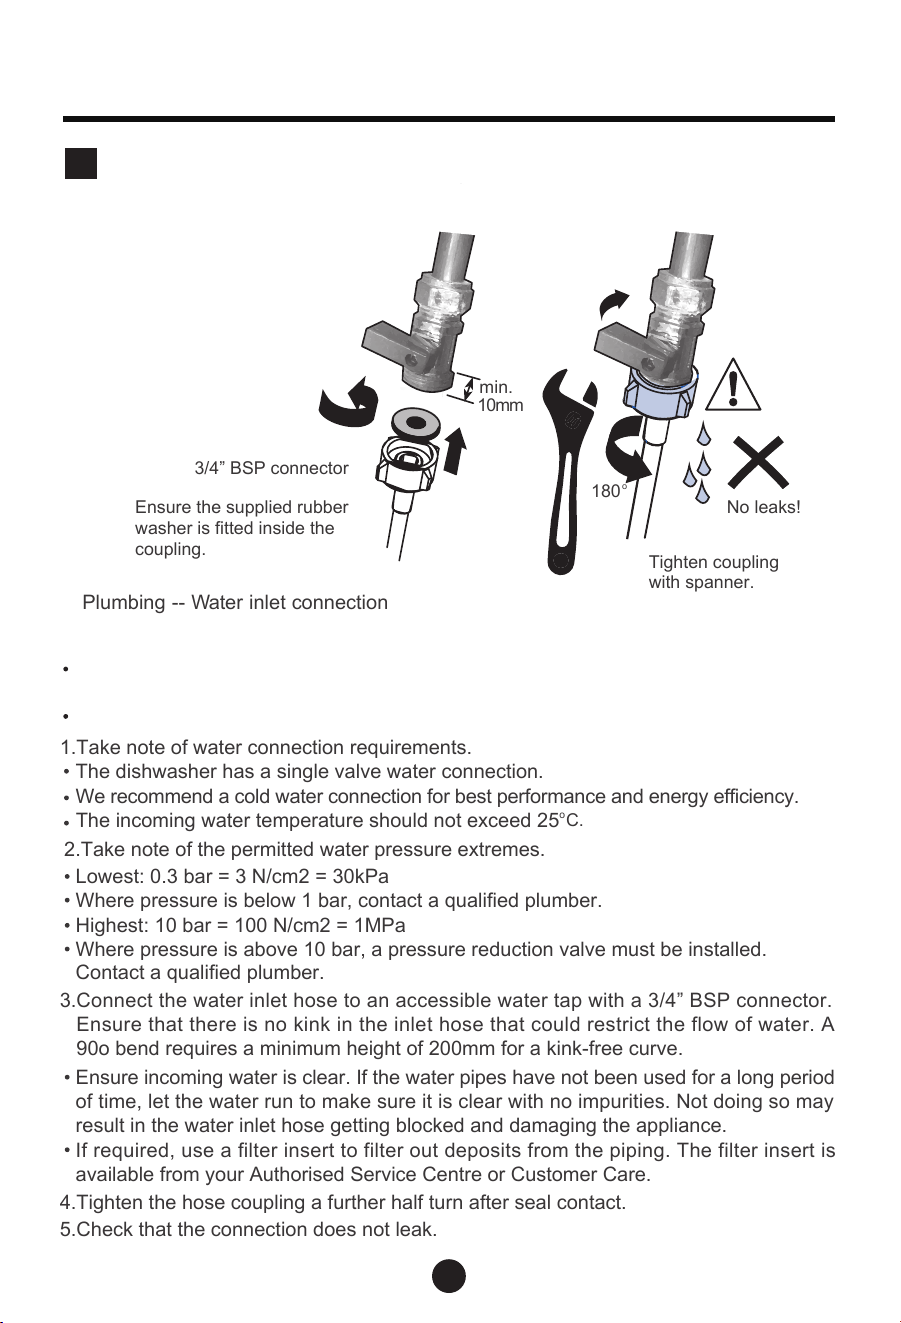
18
Ensure the supplied rubber
washer is fitted inside the
coupling.
Tighten coupling
with spanner.
180
o
No leaks!
1
2
Plumbing
--
W
a
t
er
inlet
c
onnection
IMPORTANT!
The appliance should be connected to the water main using the new water
inlet hose supplied.Old hoses should not be used.
Do not shorten the inlet hose.
1.Take note of water connection requireme
n
ts.
The dishwasher has a single valve water
connection.
W
e
recommen
d
a
col
d
w
a
t
e
r
c
onne
c
t
io
n
f
o
r
be
s
t
pe
r
f
ormanc
e
an
d
energ
y
e
f
f
icienc
y
.
The incoming water temperature should
n
ot exceed 25
o
C.
2.Take note of the permitted water pressure extremes.
Lowest: 0.3 bar = 3 N/cm2 = 30kPa
Where pressure is below 1 bar, contact a
qualified plumber.
Highest: 10 bar = 100 N/cm2 = 1MPa
Where pressure is above 10 bar, a pres
s
ure reduction valve must be installed.
Contact a qualified plumber.
3.Connect the water inlet hose to an accessible water tap with a 3/4” BSP connector.
Ensure that there is no kink in the inlet hose that could restrict the flow of water. A
90o bend requires a minimum height of 200mm for a kink-free curve.
Ensure incoming water is clear. If the water pipes have not been used for a long period
o
f time, let the water run to make sure it is clear with no impurities. Not doing so may
result in the water inlet hose getting blocked and damaging the appliance.
If required, use a filter insert to filter out deposits from the piping. The filter insert is
available from your Authorised Service Centre or Customer Care.
4.Tighten the hose coupling a further half
t
urn after seal contact.
5.Check that the connection does not leak.
min.
10
m
m
3/4” BSP connector
Connect inlet hose to cold water
9
Installation instructions
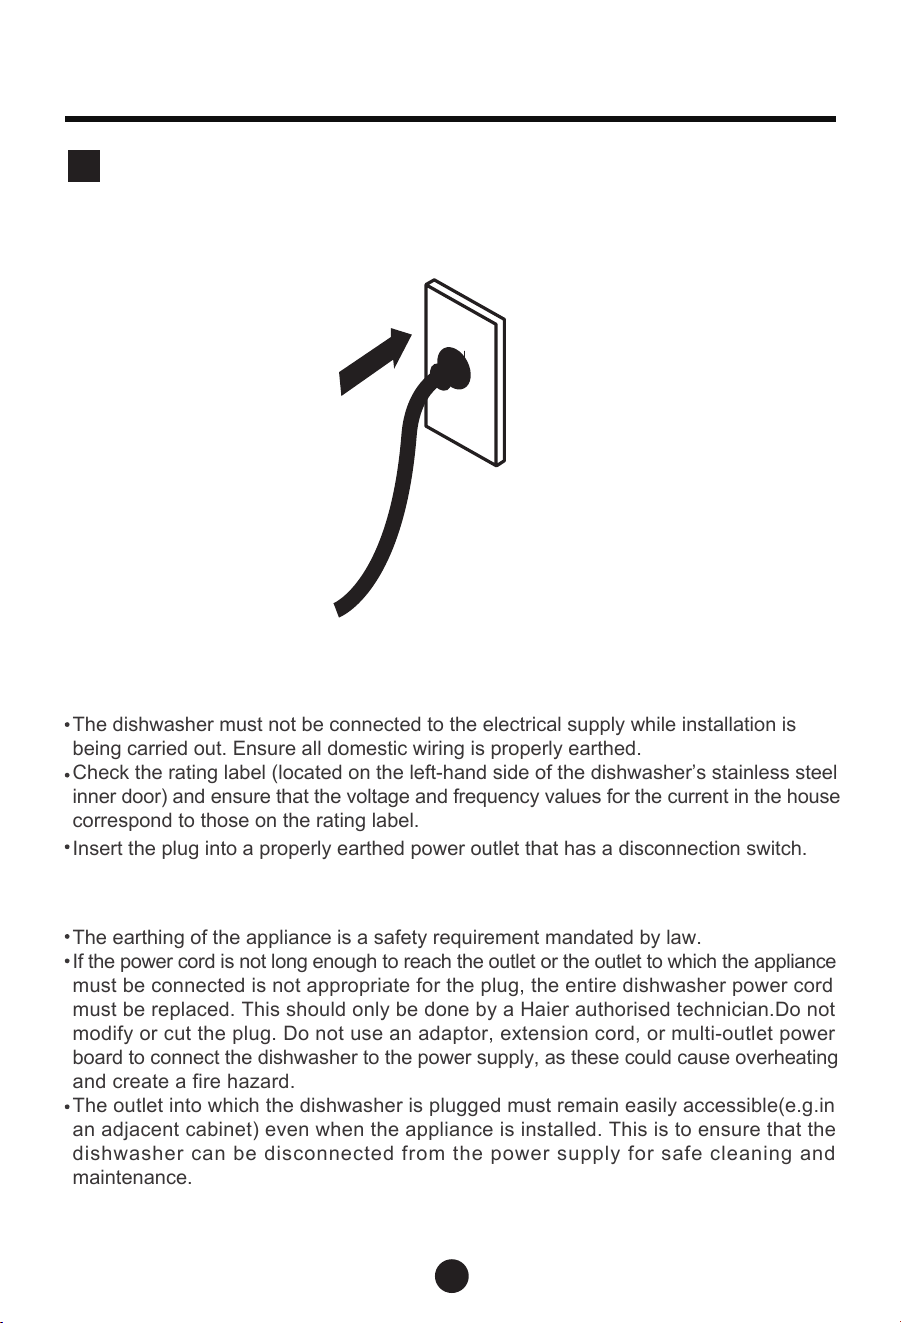
19
Plug product in
Electrical connection
The dishwasher must not be connected to the electrical supply while installation is
being carried out. Ensure all domestic wiring is properly earthed.
Check the rating label (located on the left-hand side of the dishwasher’s stainless steel
inner
door) and ensure that the voltage and frequency values for the current in the house
correspond to those on the rating label.
Insert the plug into a properly earthed power outlet that has a disconnection switch.
IMPORTANT!
The earthing of the appliance is a safety requirement mandated by law.
If the power cord is not long enough to reach the outlet or the outlet to which the appliance
mus
t be connected is not appropriate for the plug, the entire dishwasher power cord
must be replaced. This should only be done by a Haier authorised technician.Do not
modify or cut the plug. Do not use an adaptor, extension cord, or multi-outlet power
board to connect the dishwasher to the power supply, as these could cause overheating
and
create a fire hazard.
The outlet into which the dishwasher is plugged must remain easily accessible(e.g.in
an adjacent cabinet) even when the appliance is installed. This is to ensure that the
dishwasher can be disconnected from the power supply for safe cleaning and
maintenance.
5
Installation instructions
20
Final checklist
To be completed by the installer
Check all parts are installed.
Ensure that all panels and parts thereof are secure and final electrical tests have been
conducted in accordance with local electrical regulations.
Check that the dishwasher is level. If necessary, adjust the levelling feet slightly.
To ensure optimum performance, the dishwasher should not be inclined more than
1
o
. Check with a spirit level.
Ensure inlet hose to water supply has supplied rubber washer fitted, and that it’s tightened
a further half turn after seal contact.
Ensure any knockouts or plugs in drain connection have been drilled out and drain
connection has been made.
The drain hose joiner must not support the weight of excess hose material. Keep drain
ho
se as fully extended as possible to prevent sagging. Any excess length of drain hose
should be kept on the dishwasher side of the highloop.
I
f connecting the drain hose to the sink trap, ensure the Highloop is a minimum 150mm
higher than the drain hose joiner.
Ensure any packaging or tape securing the racks is removed from the dishwasher.
Check that the door opens and closes freely without resistance to adjacent cabinetry.
Check that the electrical outlet is accessible and located in an adjacent cupboard.
Check the operation of the dishwasher:
If a fault code appears, see the ‘Fault codes’ section of the User guide for advice.
Product Description
Ensure the installer has completed the ‘Final checklist’ in the Installation
ins
tructions.
Read this guide, taking special note of the 'Safety and warnings' section.
Remo
ve all internal and external packaging and dispose of it responsibly.
Recycle items that you can.
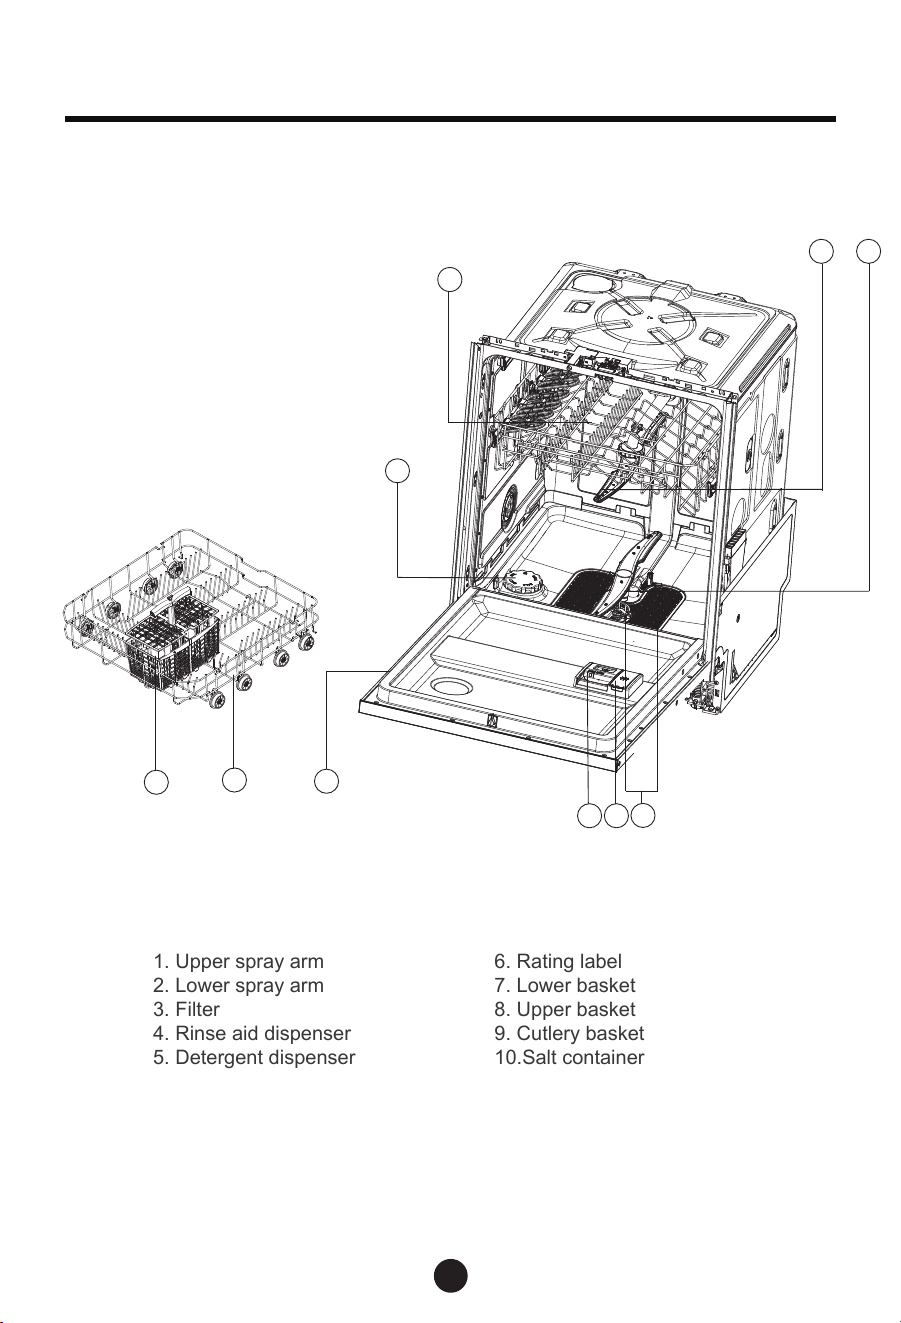
Dishwasher overview
1
3
45
6
8
2
1. Upper spray arm
2. Lower spray arm
3. Filter
4. Rinse aid dispenser
5. Detergent dispenser
6. Rating label
7. Lower basket
8. Upper basket
9. Cutlery basket
10.Salt container
21
7
Product Description
9
10
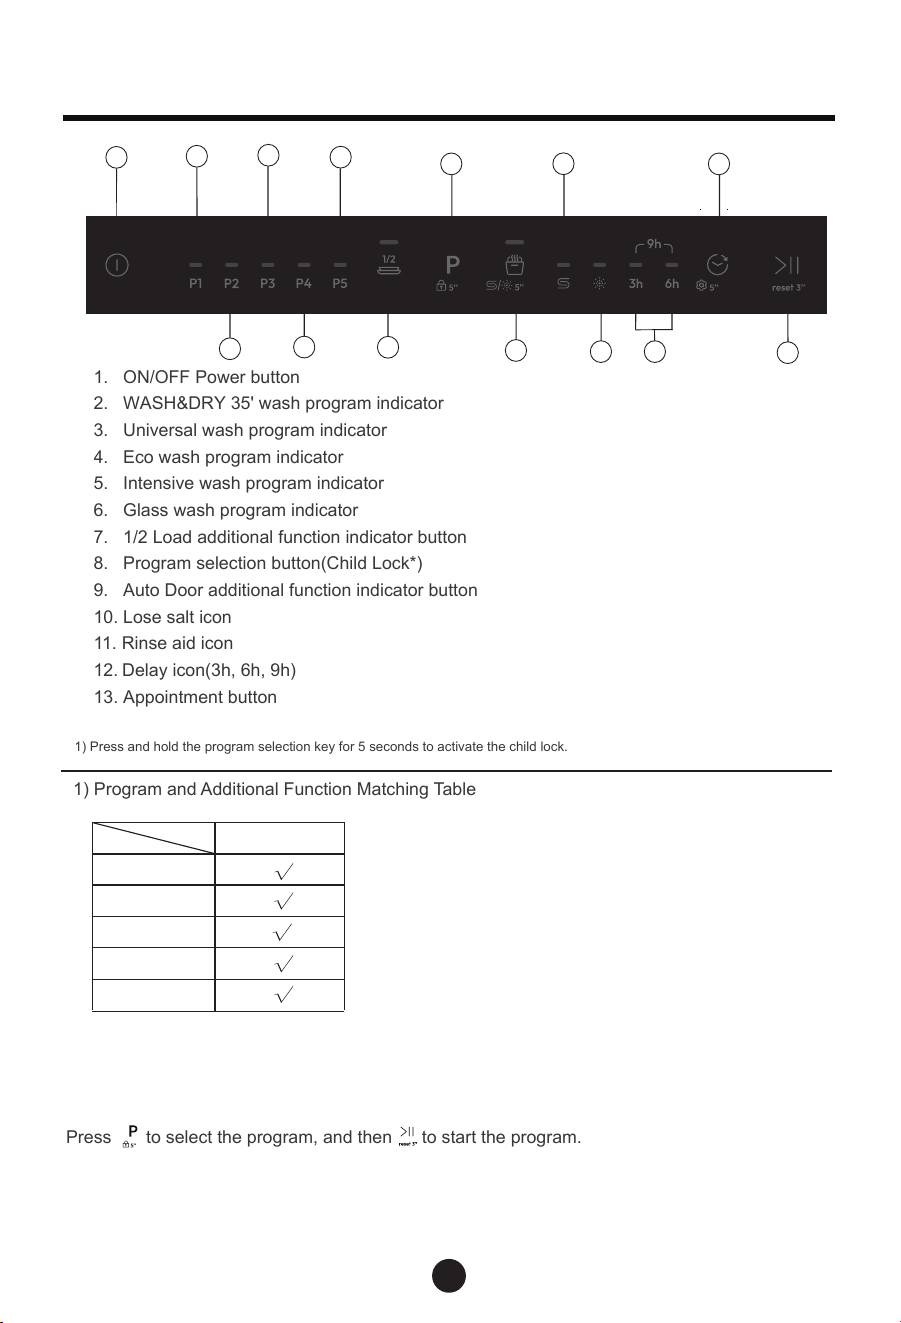
1. ON/OFF Power button
2. WASH&DRY 35' wash program indicator
3. Universal wash program indicator
4. Eco wash program indicator
5. Intensive wash program indicator
6. Glass wash program indicator
7. 1/2 Load additional function indicator button
8. Program selection button(Child Lock*)
9. Auto Door additional function indicator button
10. Lose salt icon
11. Rinse aid icon
12. Delay icon(3h, 6h, 9h)
13. Appointment button
1) Press and hold the program selection key for 5 seconds to activate the child lock.
1) Program and Additional Function Matching Table
Press to select the program, and then to start the program.
22
+1/2 Load
1
8
6
4
2
7
9
3
5
10
12
13
14
WASH&DRY 35'
UNIVERSAL
ECO
INTENSIVE
GLASS
Ocerview of programmes
11
14. Start/Reset button
23
Ocerview of programmes
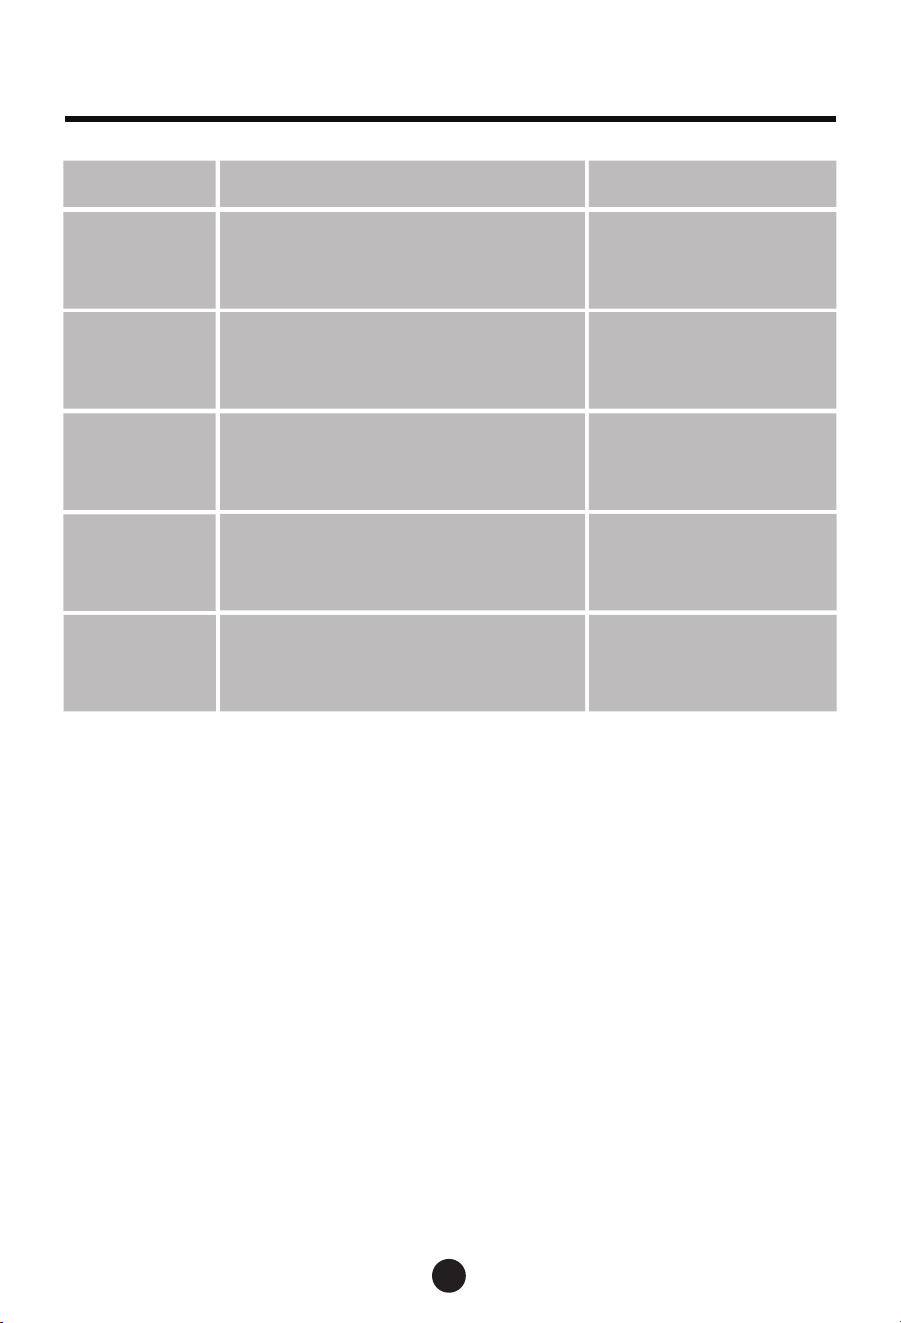
Programme
Light to heavy soil:
Soups , eggs, sauces, potatoes,
pasta, rice, roasted or fried food
Non-delicate:
Dinnerware,cutlery,
glassware
Non-delicate:
Dinnerware, cutlery,
pots and pans
Non-delicate:
Dinnerware, cutlery,
pots and pans
Delicate:
Glassware, dinnerware,
cutlery
Normal soil:
Casseroles,sauces, potatoes,
pasta, rice,roasted or fried food
Heavy soil:
Casseroles, sauces, potatoes ,
pasta, rice, roasted or fried food
Light soil:
Coffee, cake, milk, cold drinks,
salad, sausages
Type of loadType of food residue
P1
P2
P3
P4
P5
Non-delicate:
Dinnerware
cutlery, pots and pans
Light soil:
Casseroles, sauces, potatoes,
pasta, rice, roasted or fried food
24
To ensure good washing results,the dishwasher requires soft water.Hard water can be
de
trimental to the performance of your dishwasher. Over time,glassware washed in hard
wa
ter will become opaque and dishes will become spotted or covered in a white film.
U
sing very hard water can cause dishwasher parts to fail over time.Salt can improve the
situation.
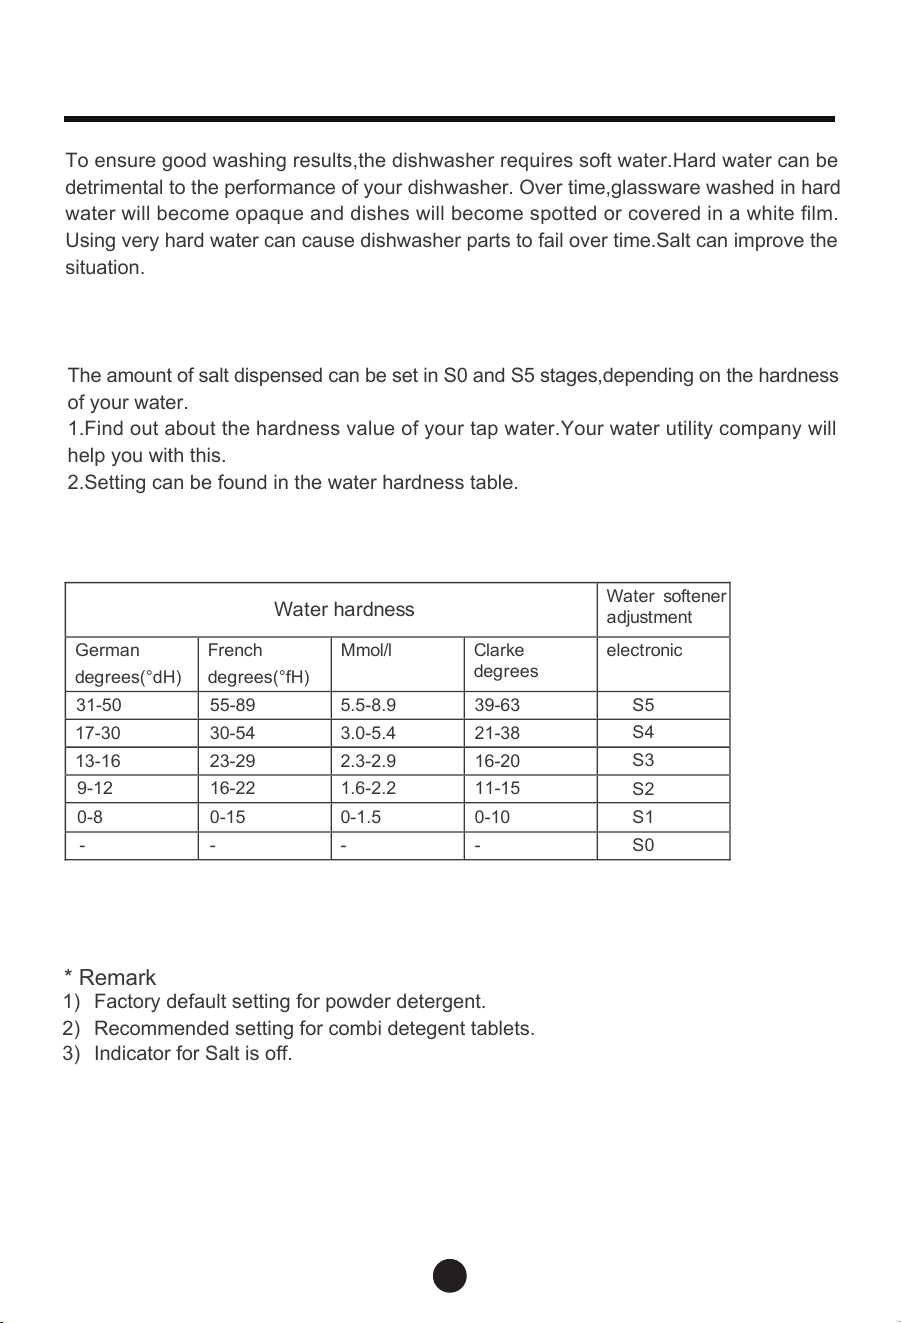
The amount of salt dispensed can be set in S0 and S5 stages,depending on the hardness
of your water.
1.
Find out about the hardness value of your tap water.Your water utility company will
help you with this.
2.Setting can be found in the water hardness table.
Adjusting the water softening system
Identify the local water hardness
* Remark
1
)
Factory default setting for powder de
t
ergent.
2
)
Recommended setting for combi det
e
gent tablets.
3
)
Indicator for Salt is off.
W
a
t
e
r
h
a
r
d
n
e
s
s
W
a
t
e
r
s
o
f
t
e
n
e
r
a
d
j
u
s
t
m
e
n
t
G
e
r
m
a
n
d
e
g
r
e
e
s
(°dH)
F
r
e
n
c
h
d
e
g
r
e
e
s
(°fH)
M
m
o
l
/
l
C
l
a
r
k
e
d
e
g
r
e
e
s
e
l
e
c
t
r
o
n
i
c
31-50
17-30
13-16
9-12
0-8
55-89
30-54
23-29
16-22
0-15
-
39-63
21-38
16-20
11-15
0-10
5.5-8.9
3.0-5.4
2.3-2.9
1.6-2.2
0-1.5
S
5
S
4
S
3
S
2
S
1
-
-
S
0
-
Water softening system
1) *
3) *
2) *
25
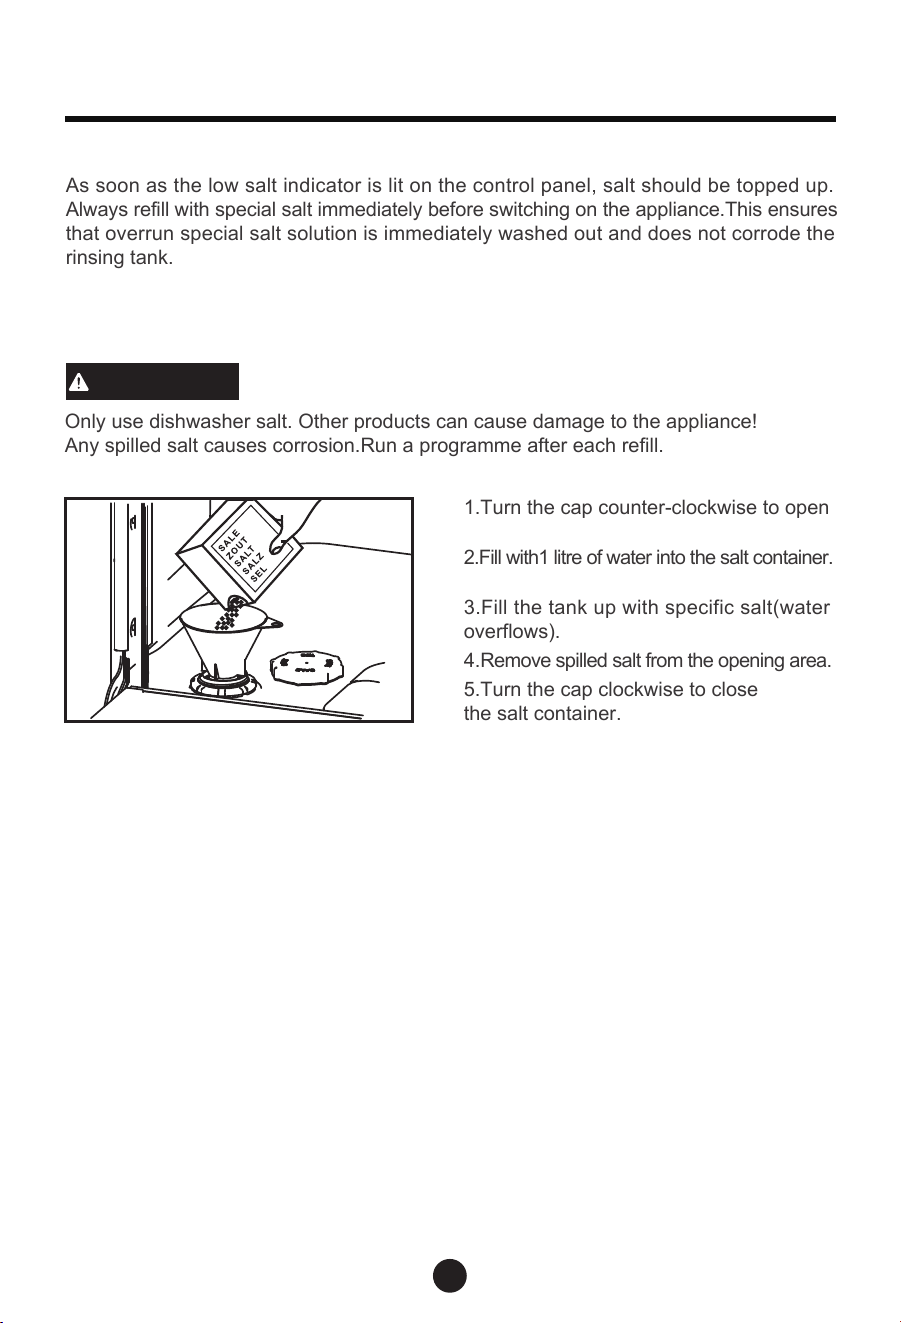
As soon as the low salt indicator is lit on the control panel, salt should be topped up.
A
lways refill with special salt immediately before switching on the appliance.This ensures
t
hat overrun special salt solution is immediately washed out and does not corrode the
rinsing tank.
Using special salt
Top up the salt as follows:
Only use dishwasher salt. Other products can cause damage to the appliance!
Any spilled salt causes corrosion.Run a p
r
ogramme after each refill.
1.Turn the cap counter-clockwise to open
2
.
F
i
l
l
w
i
t
h
1
l
i
t
r
e
o
f
w
a
t
e
r
i
n
t
o
t
h
e
s
a
l
t
c
o
n
t
a
i
n
e
r
.
3.Fill the tank up with specific salt(water
overflows).
4.
Re
m
o
v
e
spi
l
l
e
d
s
a
l
t
f
r
o
m
t
h
e
ope
n
i
n
g
a
r
e
a
.
5.Turn the cap clockwise to close
the salt container.
CAUTION
Water softening system
the salt container.
26
Adjusting the rinse aid dosage
The normal, factory-set dosage level is S3, but you may need to adjust this to suit
your water conditions.
If there is excessive foaming at the end of the wash,reduce the dosage.
If you live in a hard water area or if dishes are wet or streaky after drying, increase
the dosage.
To adjust the rinse aid setting: see the guidance in section “Before first use”.
If you are using tablets with built-in rinse aid, we recommend setting the rinse aid
dosage level to off (S0).
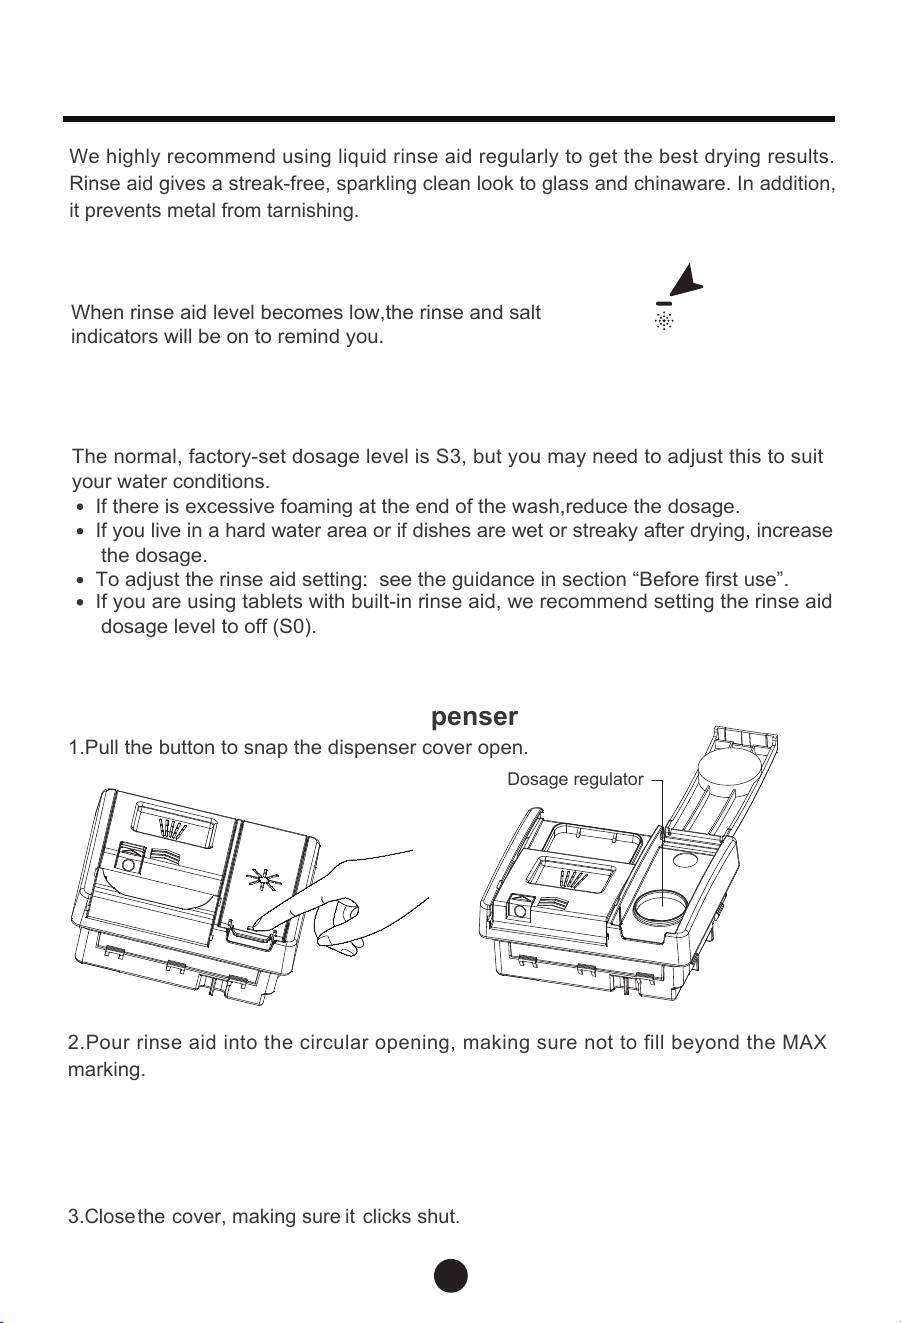
How to refill the rinse aid dis
p
enser
1.Pull the button to snap the dispenser cover open.
2.Pour rinse aid into the circular opening, making sure not to fill beyond the MAX
marking.
IMPORTANT!
Take care not to spill rinse aid into the dishwasher.Any spills must be wiped up
to prevent excess foaming. Failure to do so may result in a service call, which
will not be covered by warranty.
3.Close
the
cover, making sure
it
clicks
shut
.
Dosage regulator
When to refill the rinse aid dispenser
When rinse aid level becomes low,the rinse and salt
indicators will be on to remind you.
We highly recommend using liquid rinse aid regularly to get the best drying results.
Rinse aid gives a streak-free, sparkling clean look to glass and chinaware. In addition,
it prevents metal from tarnishing.
Using rinse aid
27
Never put highly absorbent materials, such as sponges and towels in your dishwasher.
Do
not put dishes or cutlery that have been soiled by tobacco ash, wax, lubricating
grease or paint in your dishwasher.
IMPORTANT!
Cutlery and silverware
All cutlery and silverware should be rinsed immediately after use to prevent tarnishing
cau
sed by some foods. Silver items should not come into contact with stainless steel,
e
.g. other cutlery. Mixing these items can cause staining. Remove silver cutlery from
the dishwasher and hand dry immediately after the programme has finished.
Aluminium
Aluminium can be dulled by dishwasher detergent. The degree of change depends on
the quality of the item.
Other metals
Iron and cast iron objects can rust and stain other items. Copper, pewter and brass tend
to stain. Wash these items by hand.
Woodware
Wooden items are generally sensitive to heat and water. Regular use in the dishwasher
may cause deterioration over time. If in doubt, wash by hand.
Glassware
Most everyday glassware is dishwasher safe. Crystal, very fine and antique glassware
may etch that is, become opaque. You may prefer to wash these items by hand.
Plastic
Some plastic may change shape or colour with hot water. Check the manufacturer’s
in
structions about washing plastic items. Washable plastic items should be weighted
down so they do not flip over and fill with water or fall through the basket during the wash.
Decorated items
Most modern china patterns are dishwasher safe. Antique items, those with a pattern
pain
ted over the glaze, gold rims or hand-painted china may be more sensitive to
machine washing. If in doubt, wash by hand.
Glued items
Certain adhesives are softened or dissolved in machine washing. If in doubt, wash by
hand.
Utensils
Upper rack
Foldable cup racks
The upper basket is designed to hold items
like glasses,cups,saucers, plates, small
bowls andshallow pans.
Adjust the height to suit or fold out of the way
to make space for other items. Use the
notches to support wine glass stems.
To adjust height
1. Fold up to unlock.
2. Adjust the height to suit by sliding up or down.
3. Fold back down to lock in position.
28
If the tableware or cookware rack is burnt, scorched,sticky, and other food which is very
difficult to removed, it is advisable to soak it for a period of time before washing it or pre
-
dispose it with a dish cloth or else it will be hard to clean.Remove any large food
par
ticles before placing dishes in the dishwasher. It is not necessary to prerinse utensils
under running water.
Loading utensils
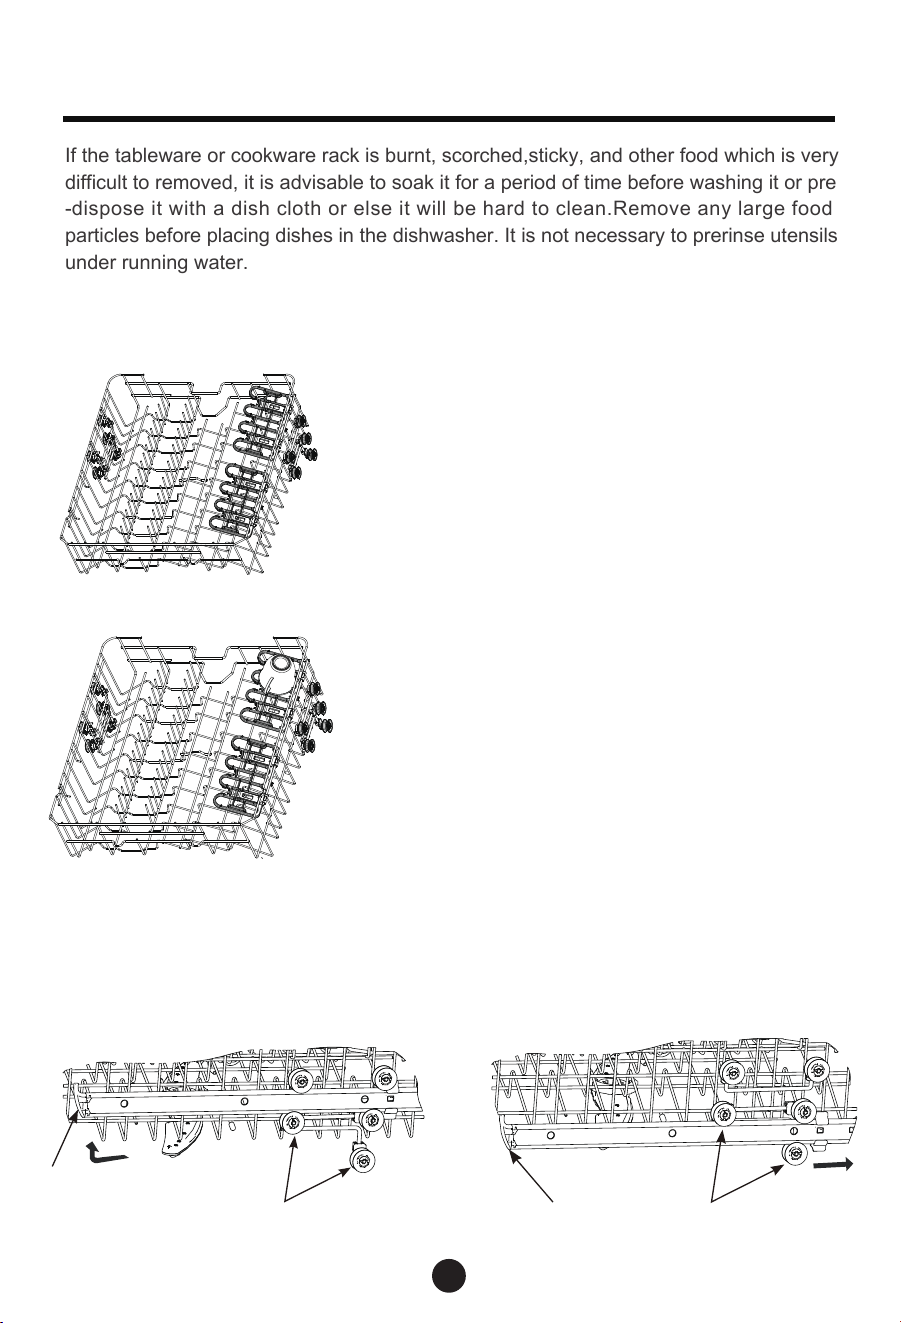
To adjust the upper basket.
Before you adjust its height, make sure the basket is empty.
Remove:
Replace:
Rail
Rollers
Stop Block
Rail
Rollers
Stop Block
Put sharp and pointed items with the blade pointing downward to keep them out of
harms way.
CAUTION
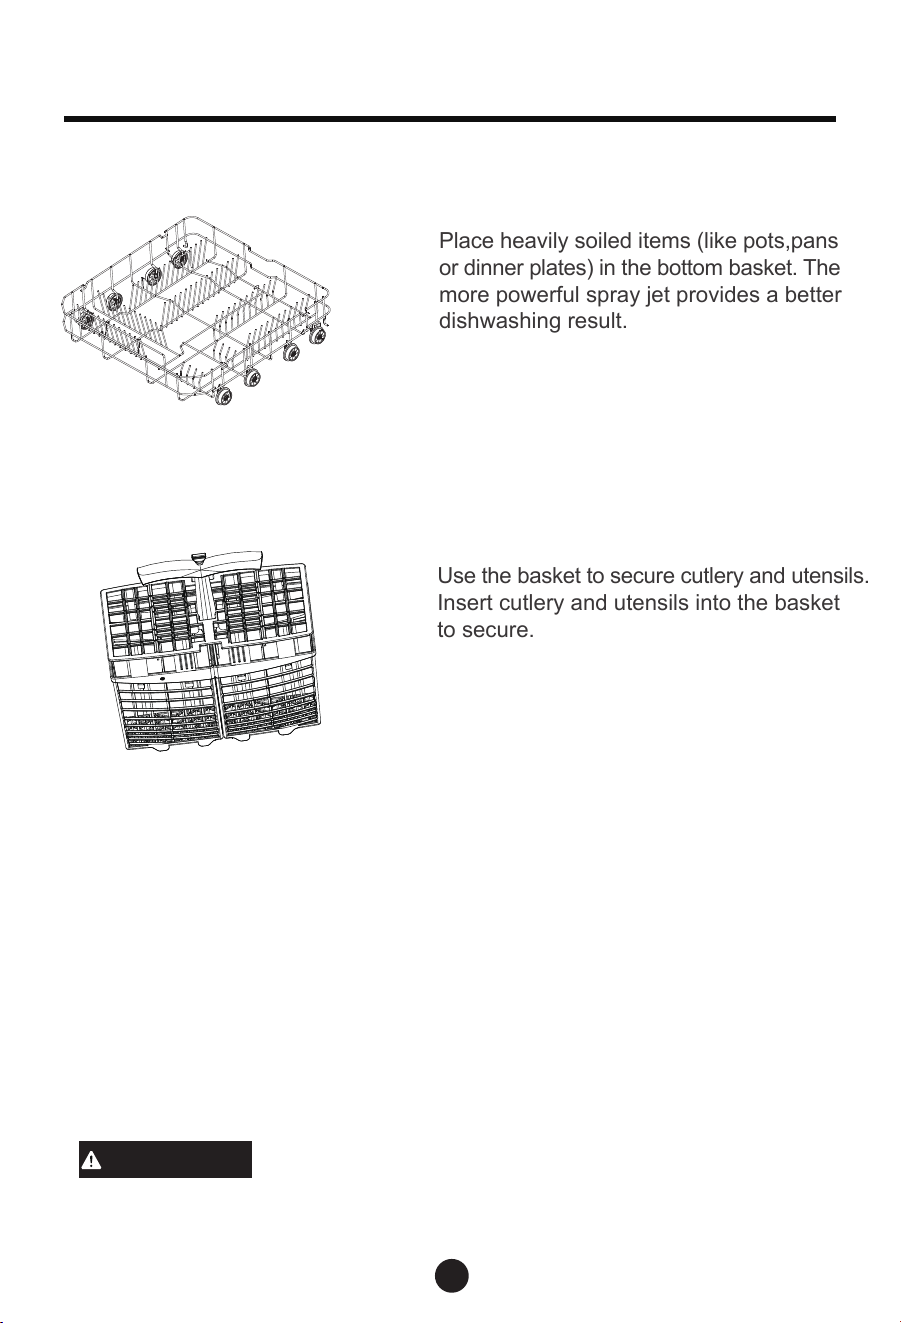
Lower rack
Place heavily soiled items (like pots,pans
or
dinner plates) in the bottom basket. The
more powerful spray jet provides a better
dishwashing result.
29
Loading utensils
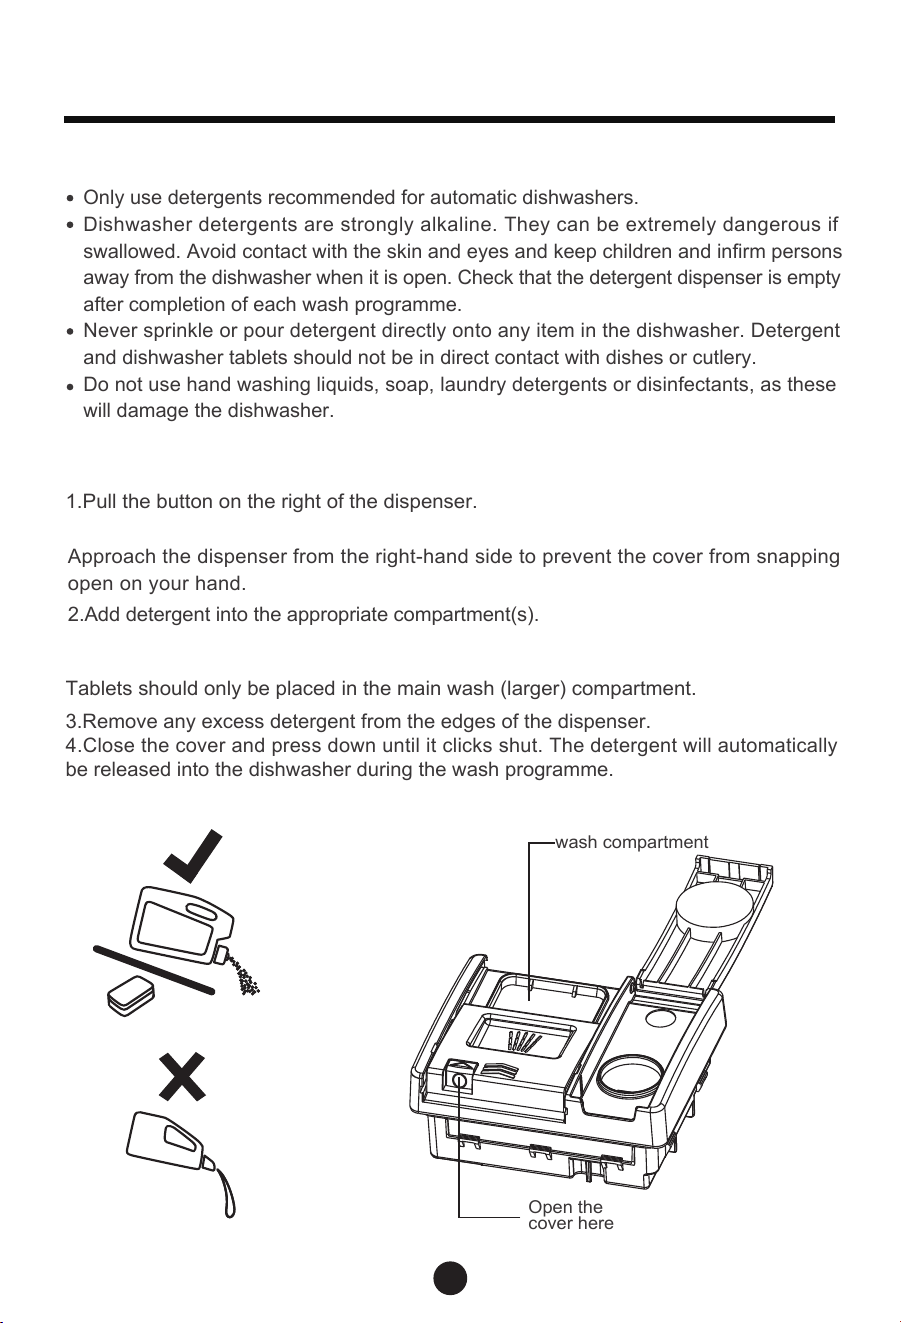
Cutlery/Utensil basket
Use the basket to secure cutlery and utensils.
Insert cutlery and utensils into the basket
to secure.
30
IMPORTANT!
Only use detergents recommended for automatic dishwashers.
Dishwasher
detergents are strongly alkaline. They can be extremely dangerous if
swallowed. Avoid contact with the skin and eyes and keep children and infirm persons
away
from the dishwasher when it is open. Check that the detergent dispenser is empty
after completion of each wash programme.
Ne
ver sprinkle or pour detergent directly onto any item in the dishwasher. Detergent
and dishwasher tablets should not be in direct contact with dishes or cutlery.
Do
not use hand washing liquids, soap, laundry detergents or disinfectants, as these
will damage the dishwasher.
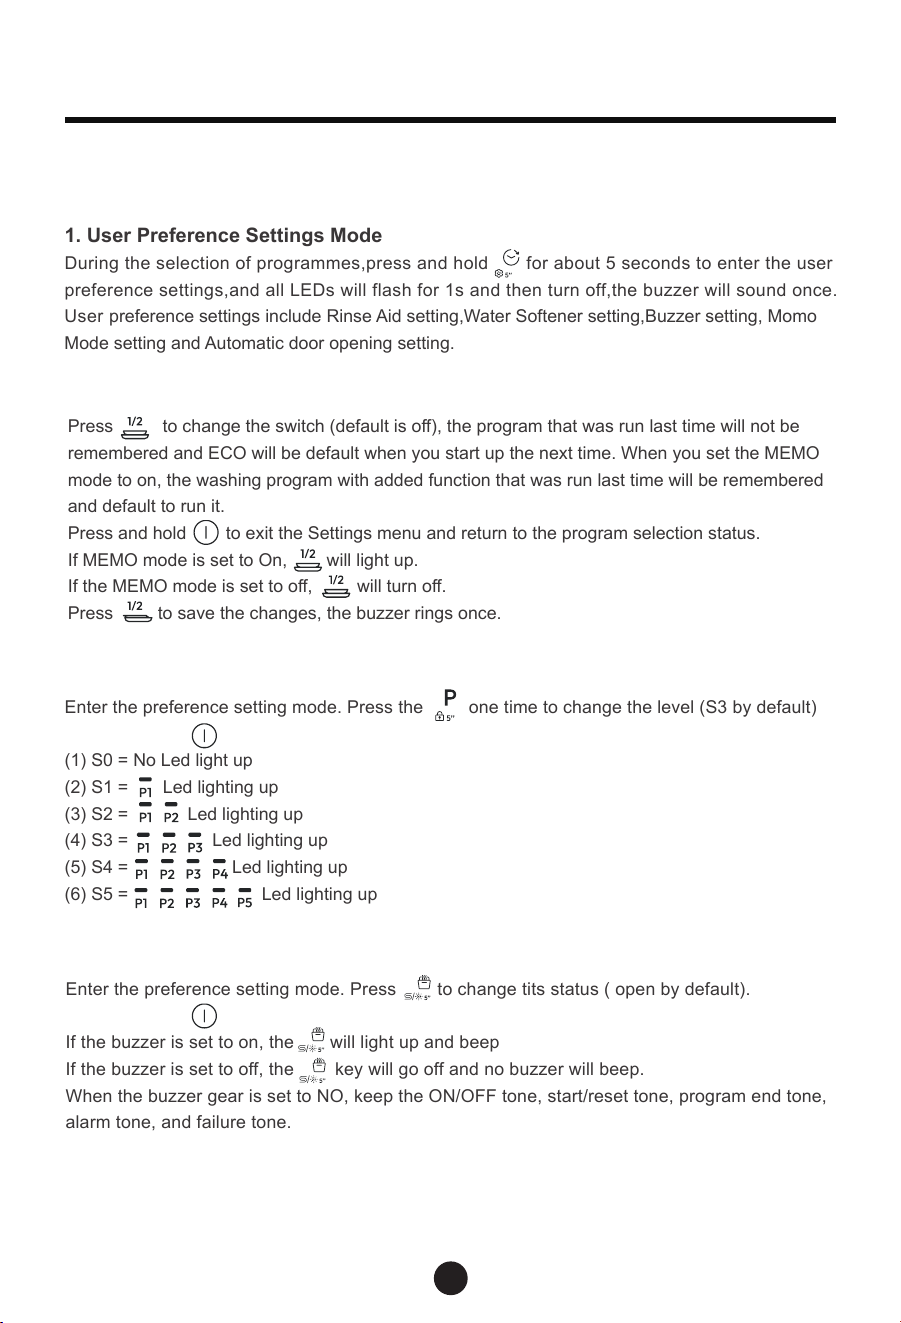
Filling the detergent dispenser
1.Pull the button on the right of the dispenser.
IMPORTANT!
Approach the dispenser from the right-hand side to prevent the cover from snapping
open on your hand.
2
.
A
d
d
d
e
t
erg
e
n
t
i
n
t
o
t
h
e
appropr
i
a
t
e
comp
a
r
t
m
e
n
t
(
s
)
.
IMPORTANT!
Tablets should only be placed in the main wash (larger) compartment.
3.Remove any excess detergent from the edges of the dispenser.
4.Close the cover and press down until it clicks shut. The detergent will automatically
be released into the dishwasher during the wash programme.
Open the
cover here
wash compartment
Adding detergent
How to Adjust User Preference Settings
1. User Preference Settings Mode
During the selection of programmes,press and hold for about 5 seconds to enter the user
preference settings,and all LEDs will flash for 1s and then turn off,the buzzer will sound once.
User preference settings include Rinse Aid setting,Water Softener setting,Buzzer setting, Momo
Mode setting and Automatic door opening setting.
Press to change the switch (default is off), the program that was run last time will not be
remembered and ECO will be default when you start up the next time. When you set the MEMO
mode to on, the washing program with added function that was run last time will be remembered
and default to run it.
Press and hold to exit the Settings menu and return to the program selection status.
If MEMO mode is set to On, will light up.
If the MEMO mode is set to off, will turn off.
Press to save the changes, the buzzer rings once.
Enter the preference setting mode. Press the one time to change the level (S3 by default)
(1) S0 = No Led light up
(2) S1 = Led lighting up
(3) S2 = Led lighting up
(4) S3 = Led lighting up
(5) S4 = Led lighting up
(6) S5 = Led lighting up
Enter the preference setting mode. Press to change tits status ( open by default).
If the buzzer is set to on, the will light up and beep
If the buzzer is set to off, the key will go off and no buzzer will beep.
When the buzzer gear is set to NO, keep the ON/OFF tone, start/reset tone, program end tone,
alarm tone, and failure tone.
31
Before first Use
2. Memo Mode Setting
3. Water Hardness Setting
4. Buzzer Setting
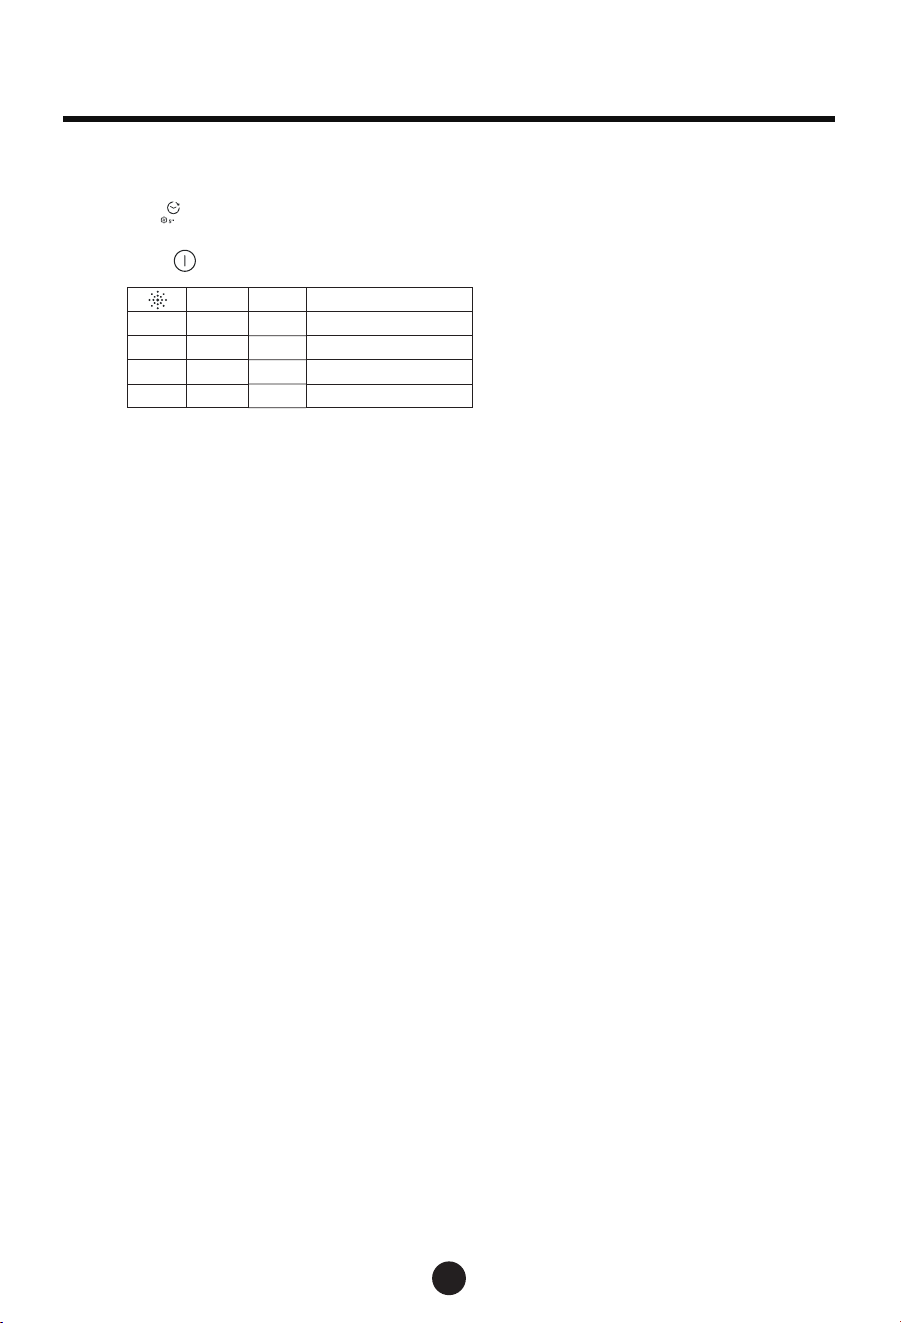
Press and hold to exit the Settings menu and return to the program selection status.
Press and hold to exit the Settings menu and return to the program selection status.
32
After entering the preference setting mode
Press the key to enter the brightener gear setting, R0-R3.
The default is R2 (5ml)
Hold down for 3s to exit setting mode
3h
6h
Rx level
0 0 0
R0 Empty
1 0 0
R1 3ml
1 1 0
R2 5ml default
1 1 1
R3 6ml
Before first Use
5. Rinse Aid Setting
33
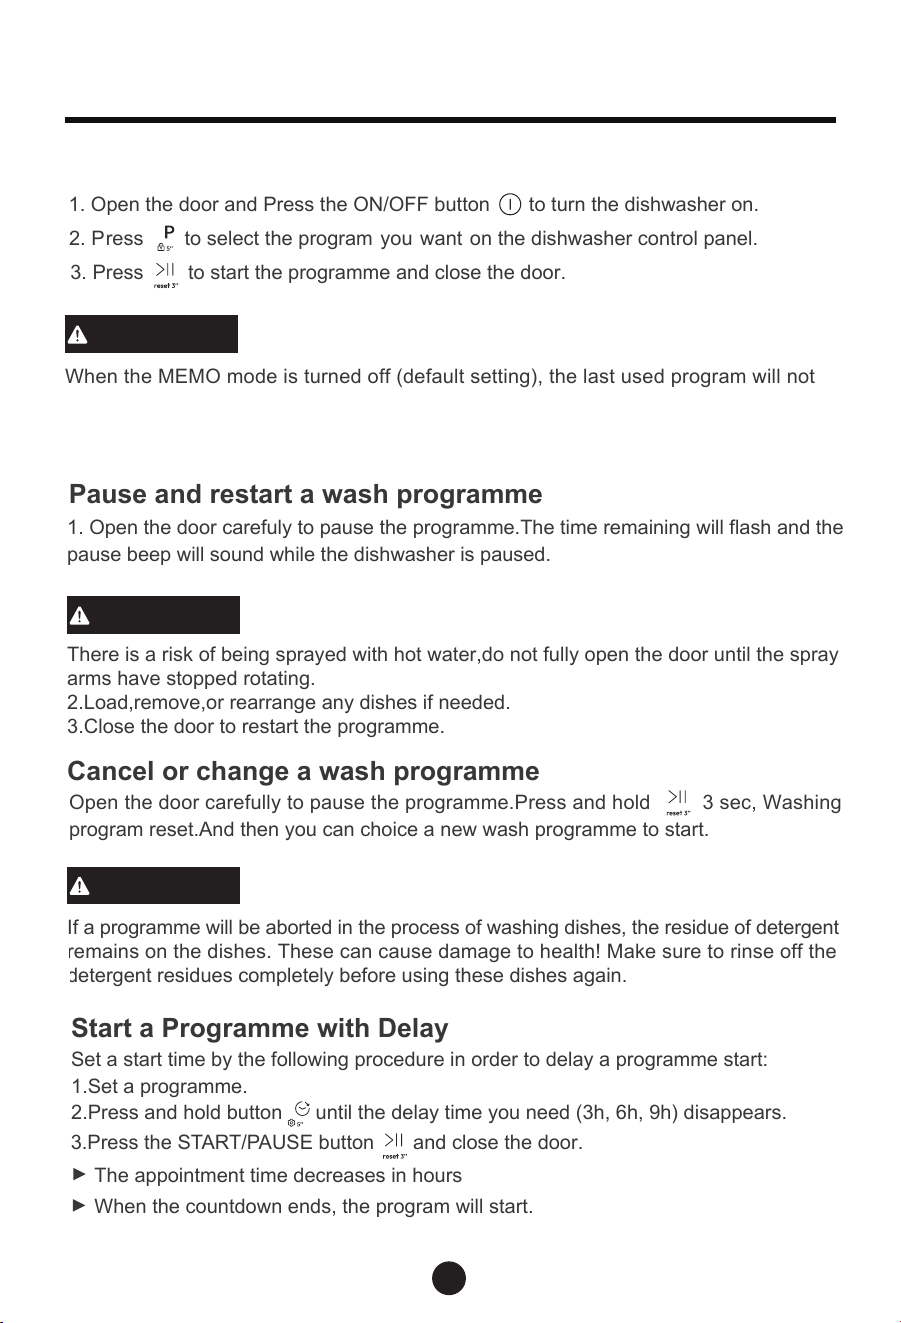
1. Open the door and Press the ON/OFF button to turn the dishwasher on.
3. Press to start the programme and c
l
ose the door.
2
.
P
re
s
s
t
o
s
ele
c
t
t
he
program
y
ou
want
on
t
he
di
s
hwa
s
her
c
on
t
rol
panel.
NOTICE
Start a Programme
When the MEMO mode is turned off (default setting), the last used program will not
Set a start time by the following procedure
in order to delay a programme start:
1.Set a programme.
2.Press and hold button until the delay time you need (3h, 6h, 9h) disappears.
3.Press the S
T
A
R
T/
P
AUSE button and close the door.
Start a Programme with Delay
Pause and restart a wash programme
1. Open the door carefuly to pause the programme.The time remaining will flash and the
pause beep will sound while the dishwasher is paused.
NOTICE
There is a risk of being sprayed with hot water,do not fully open the door until the spray
arms have stopped rotating.
2.Load,remove,or rearrange any dishes if
n
eeded.
3.Close the door to restart the programme.
Cancel or change a wash programme
Open the door carefully to pause the programme.Press and hold 3 sec, Washing
program reset.And then you can choice a new wash programme to start.
If a programme will be aborted in the process of washing dishes, the residue of detergent
remains on the dishes. These can cause damage to health! Make sure to rinse off the
detergent residues completely before using these dishes again.
CAUTION
The appointment time decreases in hours
When the countdown ends, the program will start.
Daily Use
be saved, and the washer will default to ECO mode at the next startup. When the MEMO
mode is turned on, the last used washing program will be saved, and the washer will
default to the previous program and additional functions at the next startup.
If a programme will be aborted in the process of washing dishes, the residue of detergent
remains on the dishes. These can cause damage to health! Make sure to rinse off the
detergent residues completely before using these dishes again.
34
End of Programme
When the programme is completed,
the buzzer rings for 3 times. After 1 minutes,the
will shut down without the need for button operation .
If the door will be opened immediately after the end of programme, hot steam can escape.
Danger of scalding! Open the door carefully!
Remove dishes:
Open the door slightly and leave it ajar (about 100 mm) to help the drying process.
Le
t the dishes become cold before removing them from the appliance. Hot dishes
damage more easily.
First remove the items from the lower basket, then from the upper basket.
CAUTION
CAUTION
1.Press for about 3 seconds to cancel the startup delay and enter the program
selection state.
Cancel a Delayed Start
2.Or press the power button to turn off the appliances and cancel the startup delay.
Daily use
appliance
35
Over time, food residue or limescale deposits may accumulate inside your dishwasher.
These may reduce efficiency, and food residue may produce a bad odour. Inspect and
clean your dishwasher regularly.
To clean exterior surfaces of the dishwasher, wipe with a clean, soft damp cloth and
dry with a clean, lint-free cloth.
F
or non-flush surfaces wipe along or around the surface. For example, to wipe down
the exterior control buttons, use a circular wiping motion around the button.
Take care not to cause excessive wetting of the control panel area.
Note: before cleaning the control panel, it is useful to disable the buttons by activating
Keylock.
Clean thoroughly with warm water on a soft, lint-free cloth. If the interior is heavily soiled,
use a dishwasher cleaner/descaler following the manufacturer’s instructions.
The filters prevent larger food particles in the wash water from reaching the pump.
T
hese particles may occasionally block the filters. We recommend cleaning the filters
whenever there is evidence of food particles.
Cleaning the dishwasher ext
e
rior
Cleaning the door seal and d
i
shwasher interior
IMPORTANT !
Before any cleaning or maintenance, always disconnect the dishwasher from the
power
supply, turn off the water supply, and wait until all parts of the dishwasher
have cooled.
Do not use the following cleaning aids,
a
s they may damage the surfaces:
-plastic or stainless steel scouring pads
-abrasive, solvent, household cleaners
-acid or alkaline cleaners
-laundry detergents or disinfectants
-stainless steel cleaners or polishes
-hand-washing liquids or soap
Where there is broken crockery or glass in the dishwasher, it must be carefully removed
to prevent personal injury or damage to the appliance.
After cleaning, always check that the spray arms and filters are all correctly in place.
Care and cleaning
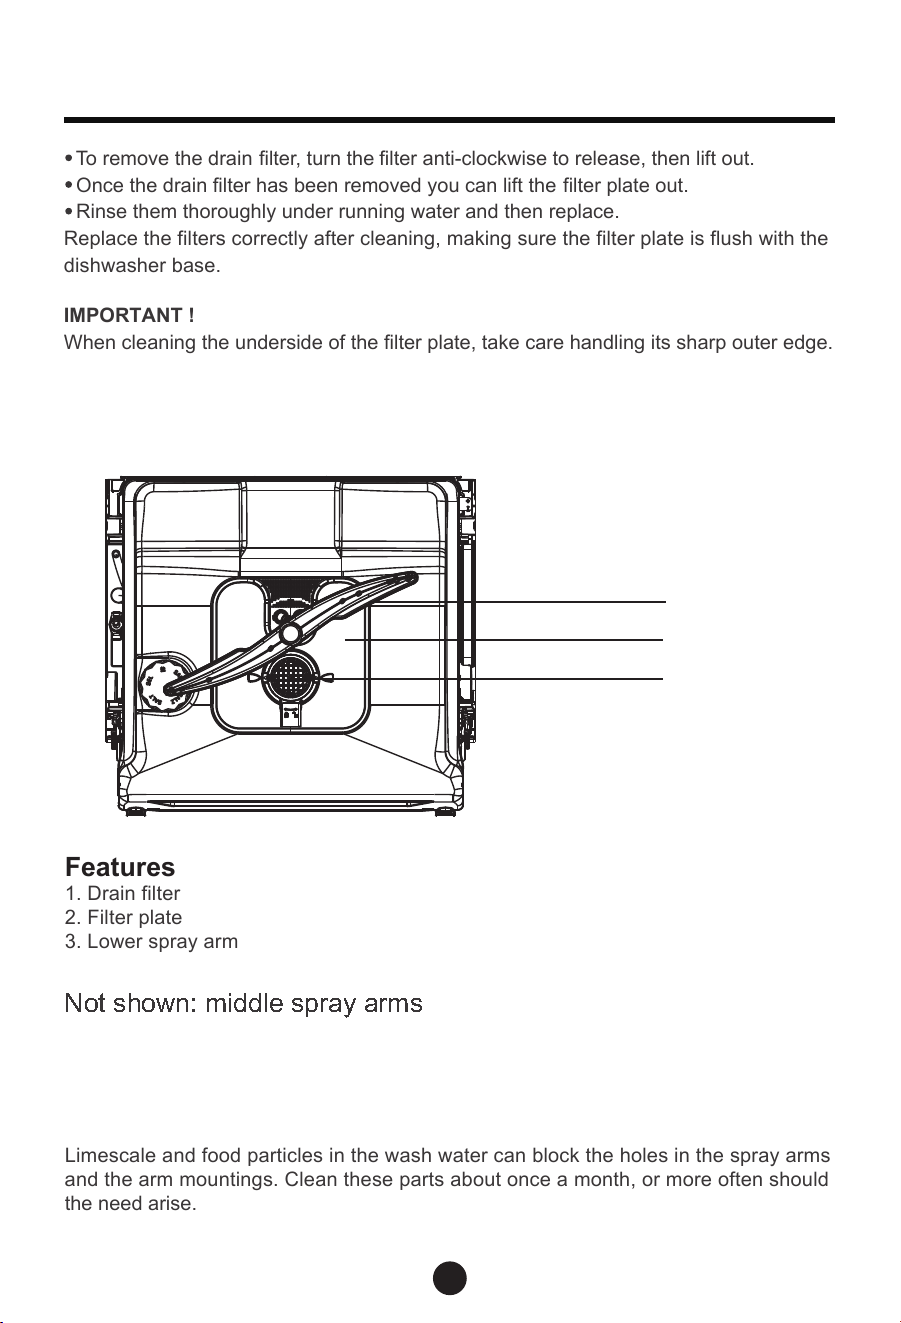
Features
1. Drain filter
2. Filter plate
3. Lower spray arm
Not shown: middle spray arms
1
3
2
36
Cleaning the spray arms
Limescale and food particles in the wash water can block the holes in the spray arms
and
the arm mountings. Clean these parts about once a month, or more often should
the need arise.
T
o remove the drain
filte
r
, turn the
filter anti-clockwise to release, then lift out.
Once the drain
filter has been removed you can lift the
filter plate out.
Rinse them thoroughly under running wa
t
er and then replace.
Replace the filters correctly after cleaning, making sure the filter plate is flush with the
dishwasher base.
IMPORTANT !
When cleaning the underside of the filter plate, take care handling its sharp outer edge.
Care and cleaning
37
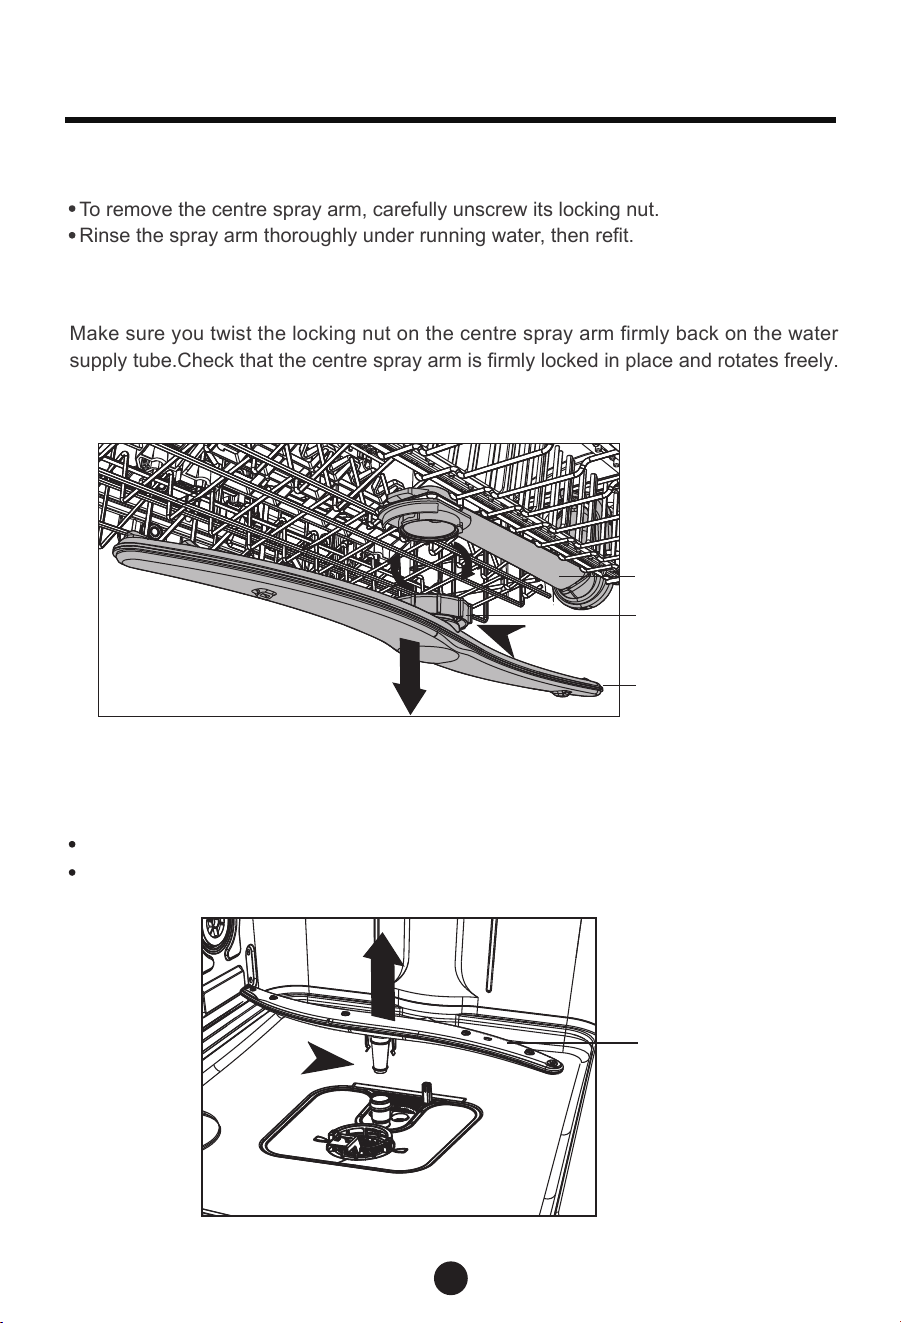
Cleaning the centre spray arm
T
o remove the centre spray arm, carefully
unscrew its locking nut.
Rinse the spray arm thoroughly under ru
n
ning wate
r
, then refit.
IMPORTANT !
Make sure you twist the locking nut on the centre spray arm firmly back on the water
supply tube.Check that the centre spray arm is firmly locked in place and rotates freely.
Cleaning the lower spray arm
To remove the lower spray arm, simply lift the spray arm off its mounting.
Rinse the spray arm thoroughly under running water, then refit it on its mounting.
Centre spray arm
Locking nut
Water supply tube
Lower spray arm
Care and cleaning
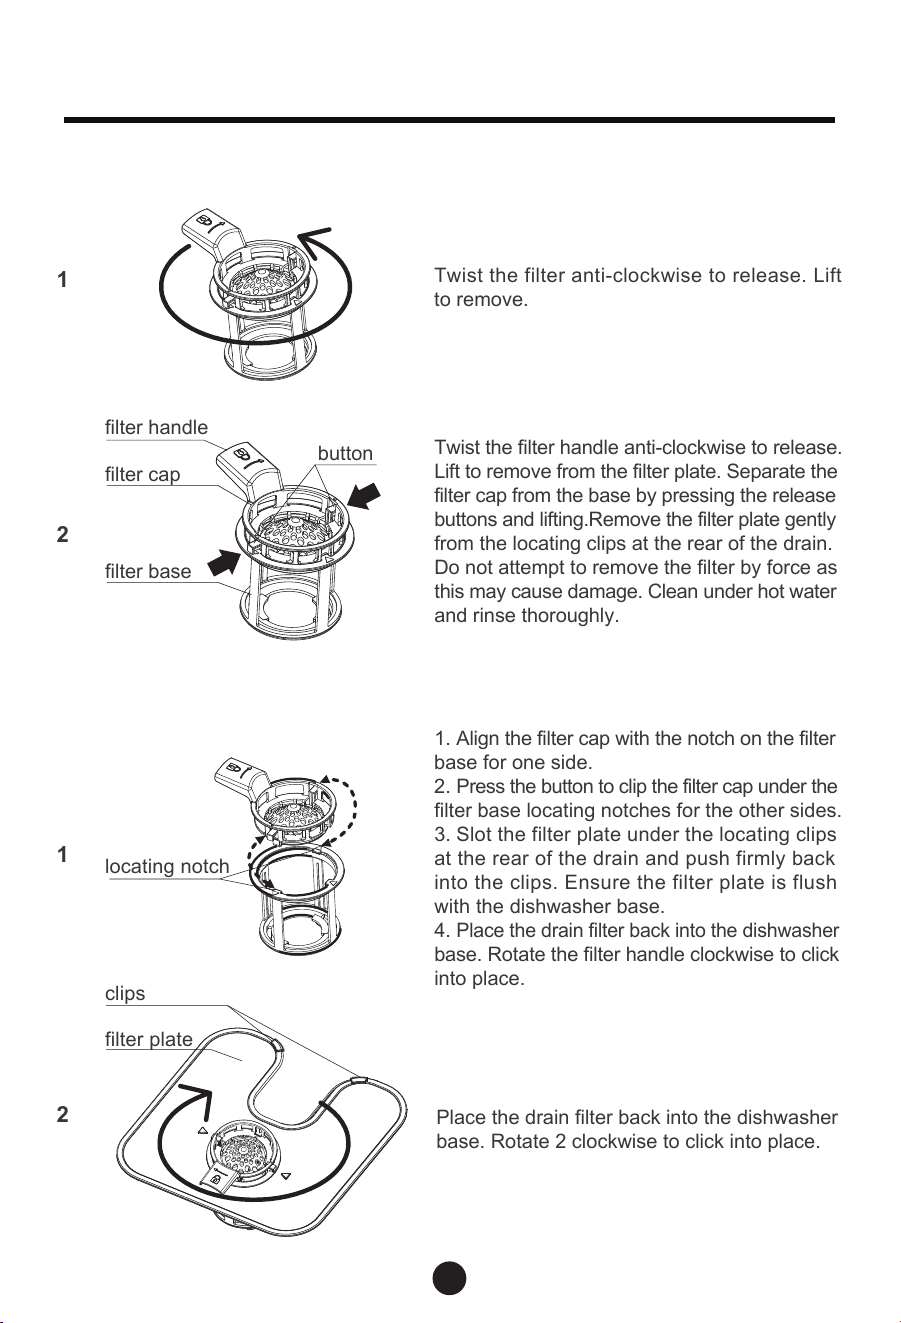
Removing and cleaning the filter
1
2
1
2
Twist the filter anti-clockwise to release. Lift
to remove.
Replacing the filters:
button
filter base
filter cap
Twist the filter handle anti-clockwise to release.
Li
ft to remove from the filter plate. Separate the
f
ilter cap from the base by pressing the release
bu
ttons and lifting.Remove the filter plate gently
f
rom the locating clips at the rear of the drain.
Do
not attempt to remove the filter by force as
t
his may cause damage. Clean under hot water
and rinse thoroughly.
1. Align the filter cap with the notch on the filter
base for one side.
2.
Press the button to clip the filter cap under the
filter base locating notches for the other sides.
3.
Slot the filter plate under the locating clips
a
t the rear of the drain and push firmly back
in
to the clips. Ensure the filter plate is flush
wi
th the dishwasher base.
4.
Place the drain filter back into the dishwasher
ba
se. Rotate the filter handle clockwise to click
into place.
clips
locating notch
filter plate
filter handle
Place the drain filter back into the dishwasher
base. Rotate 2 clockwise to click into place.
38
Care and cleaning
39
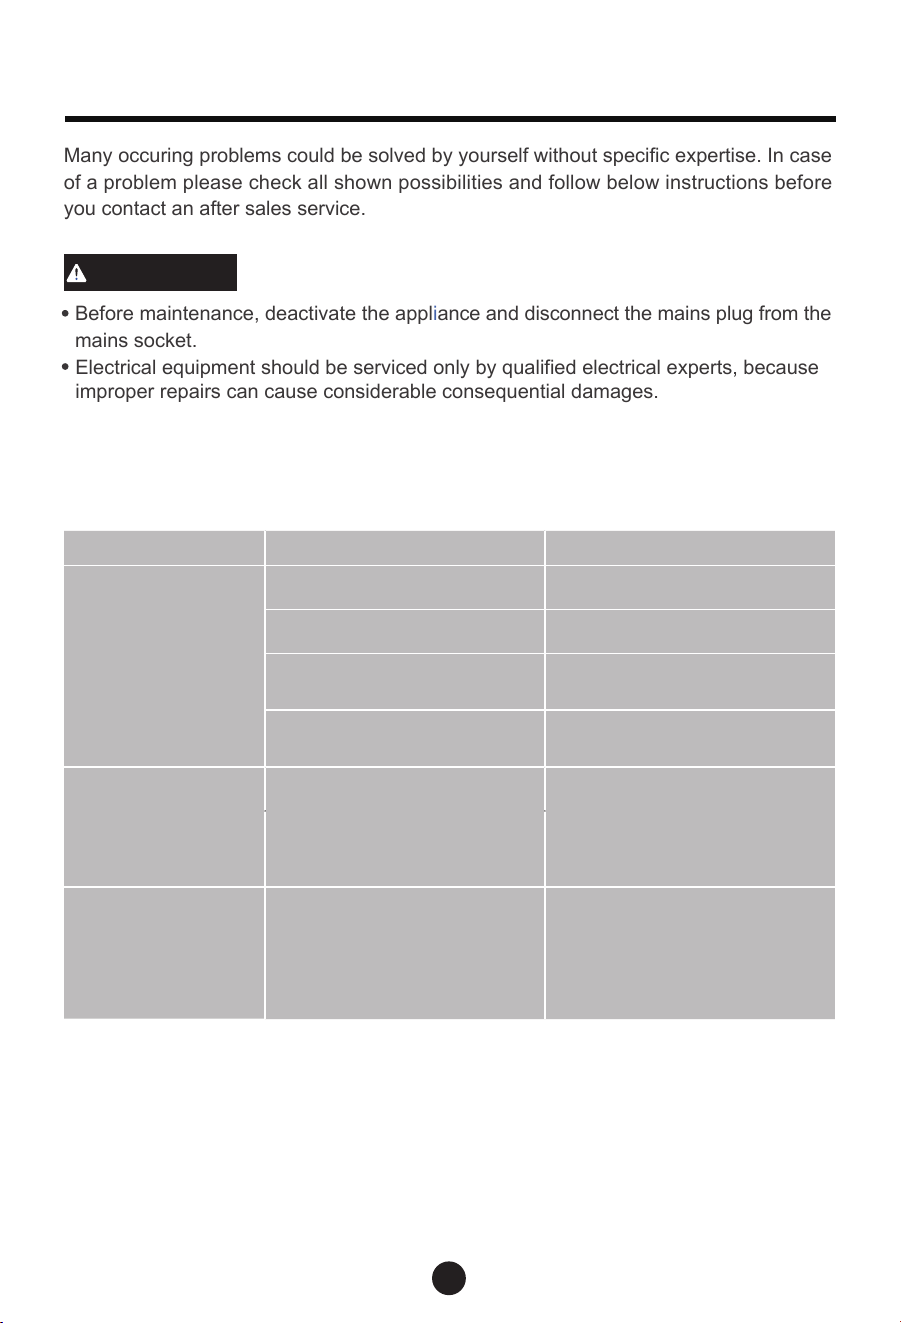
Before maintenance, deactivate the appl
i
ance and disconnect the mains plug from the
mains socket.
Electrical equipment should be serviced only by qualified electrical experts, because
improper repairs can cause considerable consequential damages.
Many occuring problems could be solved by yourself without specific expertise. In case
o
f a problem please check all shown possibilities and follow below instructions before
you contact an after sales service.
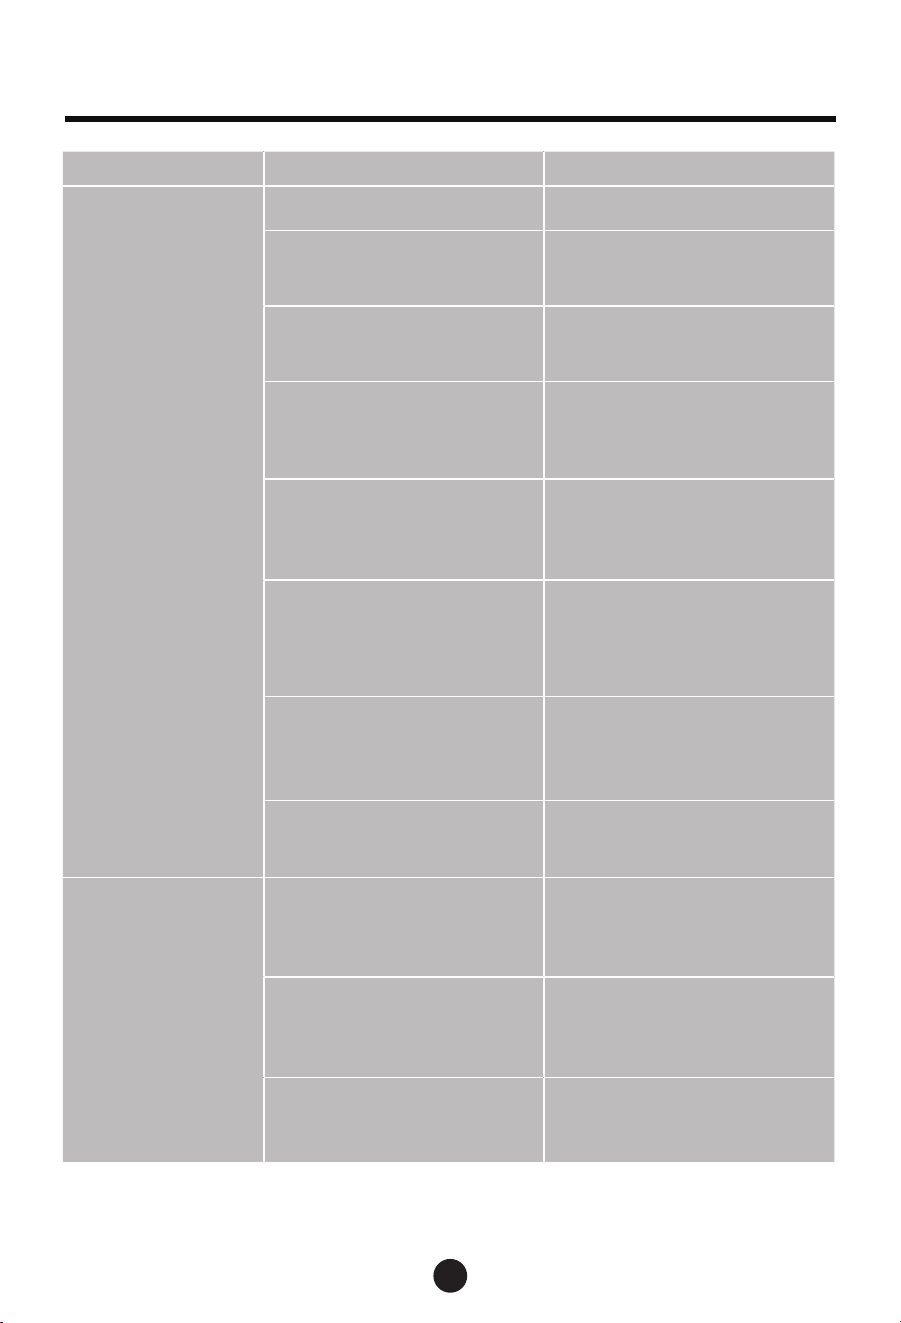
The appliance does not start, or it stops during operation or Indicator is lighted
Problem Possible cause Possible solution
The programme
does not start.
Appliance door is open. Close the appliance door.
Delay start is set. Refer to displayed time.
Mains plug is not connected
in the mains socket.
Connect the mains plug.
Fuse in the house circuit is
damaged.
Replace the fuse.
Rinse Aid Indicator
is lighted.
Rinse aid dispenser is empty
Refill Rinse aid until full.
CAUTION
Salt Aid Indicator
is lighted.
Softener salt is empty.
Fill the tank up with specific
salt until full.
Troubleshooting
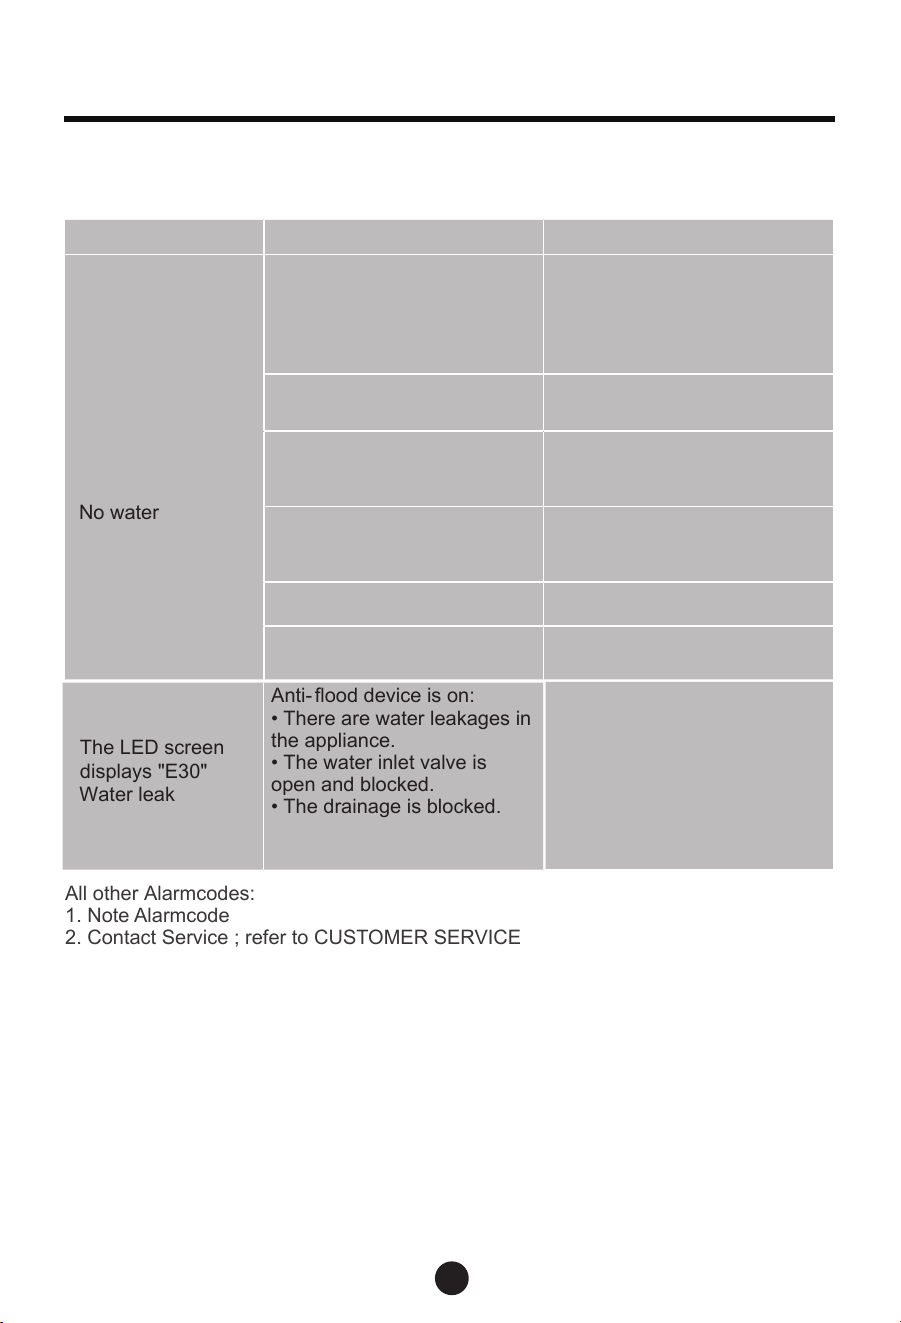
No water
Water leak
40
Problem Possible cause Possible solution
Water tap is closed.
Open the water tap.
Note: Whenever Error is
s o l v e d s w i t c h o f f t h e
appliance and restart the
programm.
Water inlet hose has a kink or
a bend.
Make sure that the position of
the hose is correct.
In case of aqua-stop system:
water protection is triggered;
the marker (C) is red.
The hose must be replaced.
Filter in the water inlet hose
is clogged.
Clean the filter at the inlet
hose connections at tap and
the rear of the appliance.
Water inlet is clogged. Check water flow from tap.
Water pressure is too low.
Contact your local water
authority.
Anti- flood device is on:
• There are water leakages in
the appliance.
• The water inlet valve is
open and blocked.
• The drainage is blocked.
1.Close the water tap.
2.Disconnect appliance from
power supply.
3.Contact Service.
Error codes on the display
1. Note
Alarmcode
2. Contact Service ; refer to CUS
T
OMER SE
R
VICE
The LED screen
displays "E10"
The LED screen
displays "E30"
All other Alarmcodes:
Troubleshooting
41
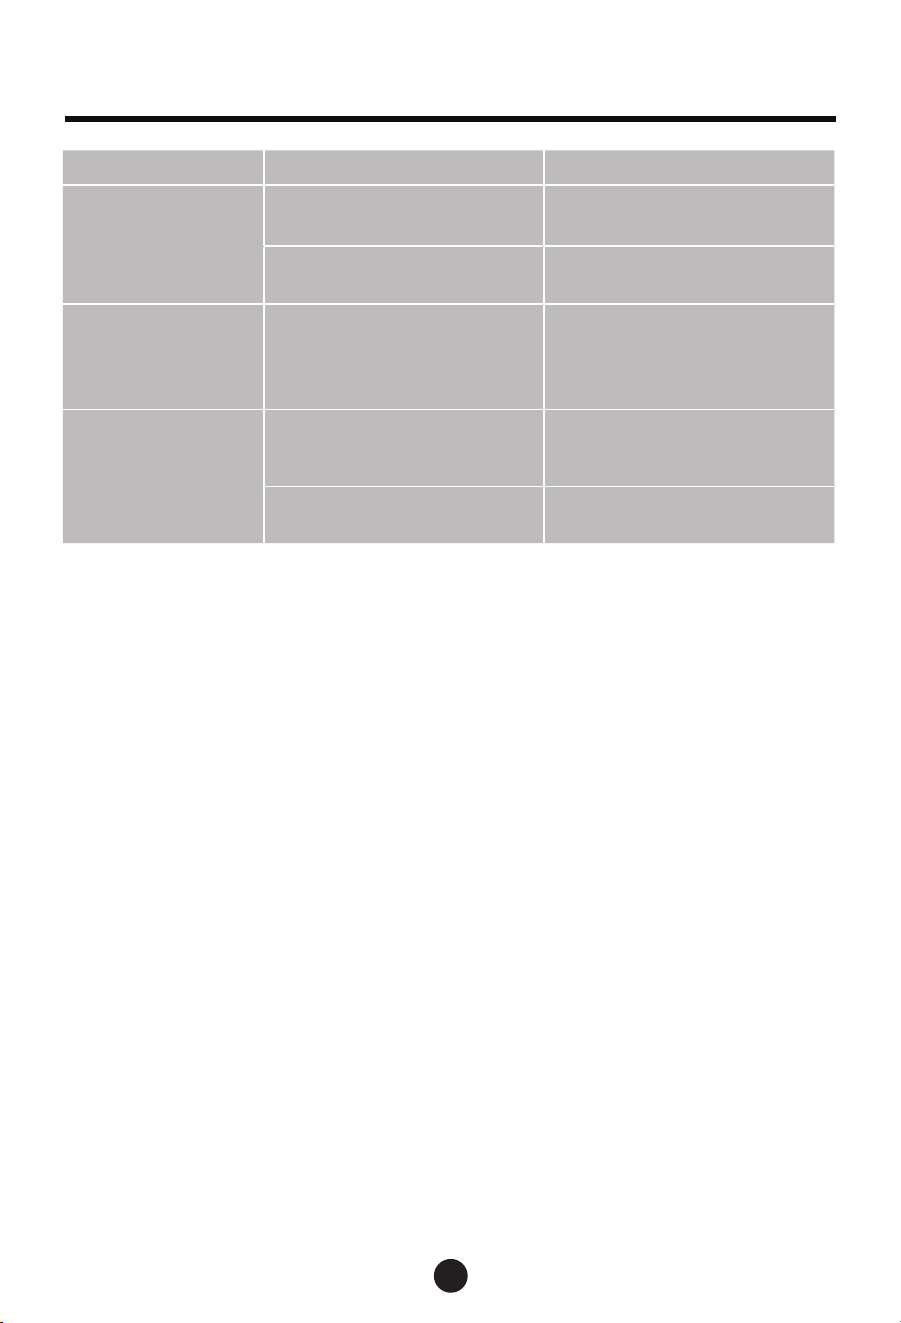
Problem Possible cause Possible solution
The dishes are not
clean.
Filters are clogged. Clean the filters.
Fi l te r s ar e n o t c orre c tl y
assembled and installed.
Make sure that the filters
are correctly assembled and
installed.
Spray arms are clogged.
Remo v e remaini n g f o o d
remnants with a thin pointed
object.
P rogram m e w a s n o t
applicable for the type of load
and food remnants.
M a k e s u r e t h a t t h e
programme is applicable for
the type of load and food
remnants.
Incorrect position of the items
in the baskets. Water could
not wash all items.
Make sure that the position
of the items in the baskets is
correct and that the water can
easily wash all items.
Spray arms could not turn
freely.
Make sure that the position
of the items in the baskets is
correct and does
not cause
the blockage of the spray
arms.
No detergent or insufficient
quantity of detergent in the
detergent dispenser.
Make sure that you add the
correct quantity detergent in
the dispenser before you start
a programme.
T h e w a s h c y c l e w a s
interrupted by a long break.
Do not open the door or cut
power supply during the wash
cycle.
Whitish streaks,
s t a i n s o r b l u i s h
layers on glasses
and dishes.
Released quantity of rinse aid
is too much.
D e c r e a s e t h e r e l e a s e d
quantity of rinse aid.
Quantity of detergent was too
much.
Make sure that you add the
correct quantity of detergent
in the dispenser before you
start a programme.
Multitab detergent tablets
used with a short
programme
might not fully dissolve.
Select a longer programme
when using Multitab detergent
tablets.
Troubleshooting
42
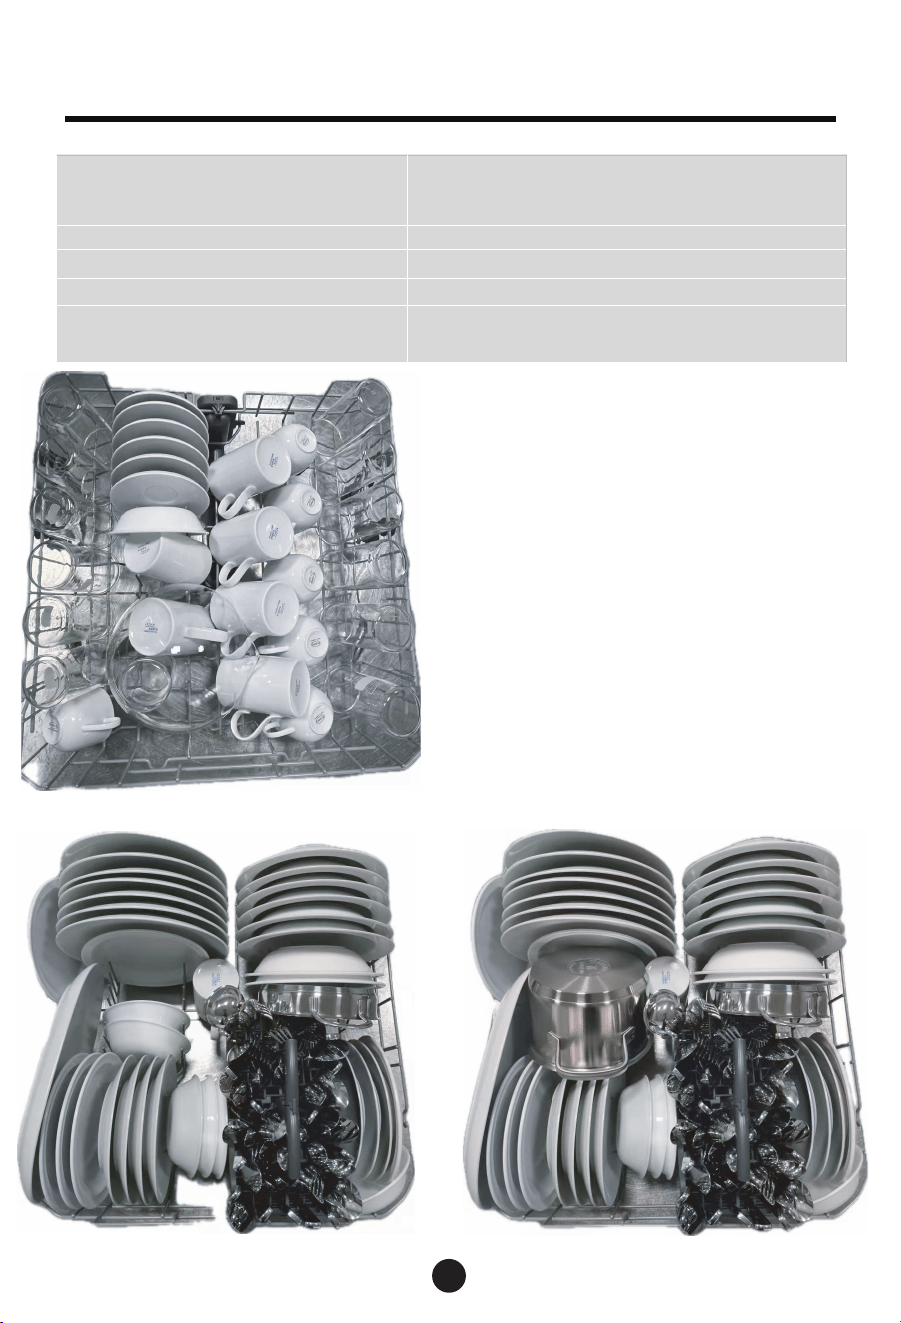
Problem Possible cause Possible solution
Dry water drop
stains on glasses
and dishes.
Rinse aid dosage is too low.
Increase the released quantity
of rinse aid.
Q u a l i t y o f r i n s e a i d o r
Multitab.stains on glasses
Cleaning product too old;
change the product.
The dishes are wet.
• Programme had no drying
phase.
• Programme had a low
temperature drying phase.
Open the door slightly and
leave it ajar (about 100 mm)
to help the drying process.
The dishes are
wet and matte.
Rinse aid dispenser is empty.
R e f il l r i n s e a i d i n t o t h e
dispenser and reset the rinse
aid indicator.
Quality of rinse aid or Multitab.
Cleaning product too old;
change the product.
Troubleshooting
43
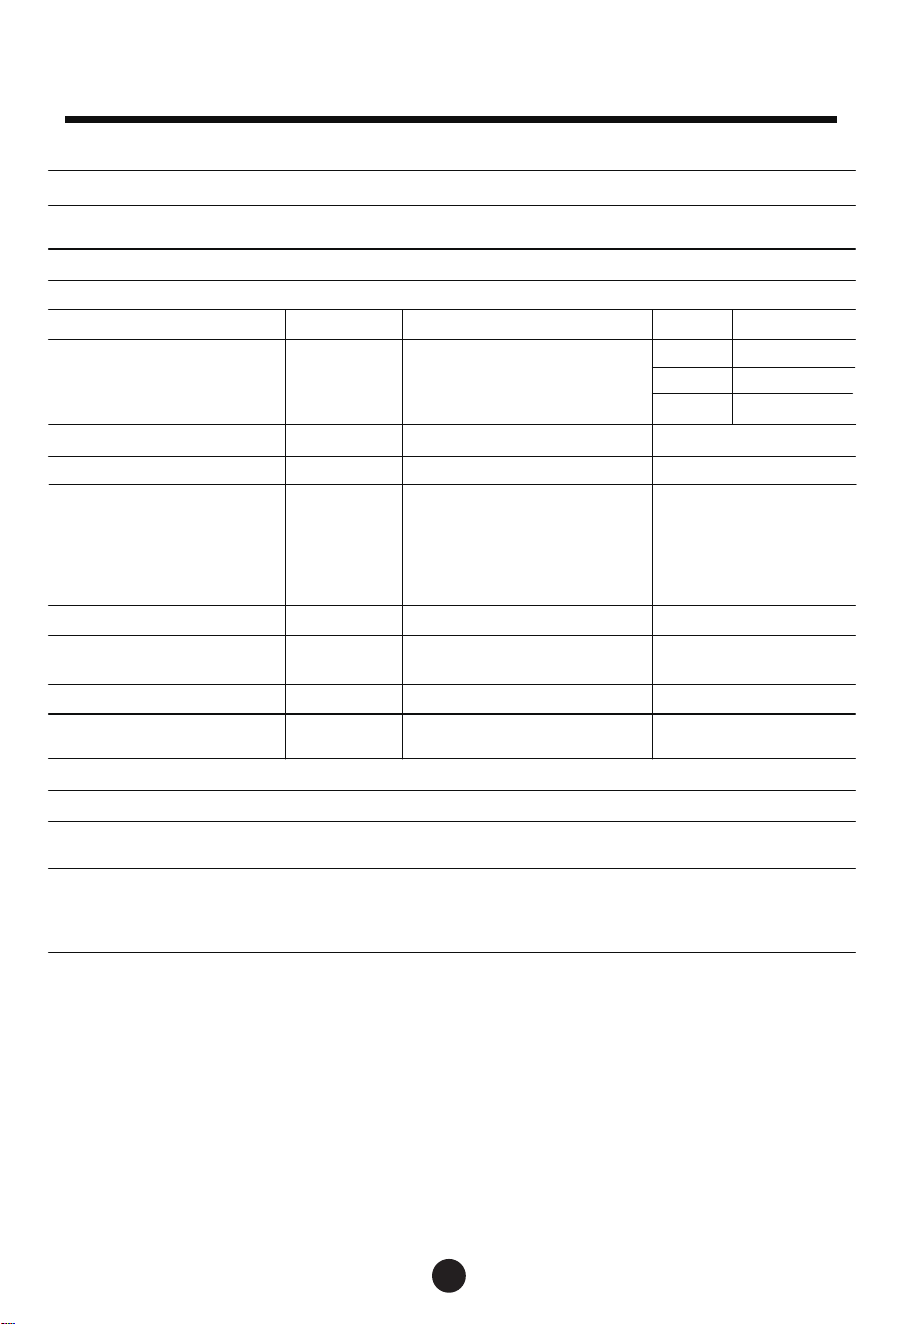
Recommended load
Recommended loading
Upper basket
Lower basket
Wash programme
Eco
The program has auto-door opening function by
default.
Powder detergent quantities 21g main wash
Rinse aid dosage level
Maximum number of place settings 13
R0-R3, R2(default)
Height adjustment of upper basket
Ensure the upper basket is in its high most
position
Lower basket
44
Technical Data
Supplier’s name or trade mark:
Supplier’s address
(b)
:
Model identifier:
General product parameters:
Parameter Value Parameter Value
Rated capacity
(a)
(ps)
13
Dimensions in cm
Height
82,0
Width
59,7
Depth
55,4
EEI
(a)
49,6
Energy efficiency class
(a)
[D]
(C)
Cleaning performance index
(a)
1,121
Drying performance index
(a)
1,061
Energy consumption in kWh
[per cycle], based on the eco
programme using cold water
fill. Actual energy consumption
will depend on how the
appliance is used.
0,830
Water consumption in litres
[per cycle], based on the eco
programme. Actual water con-
sumption will depend on how
the appliance is used and on
the hardness of the water.
11
Programme duration
(a)
(h:min)
4:05 Type [built-in]
Airborne acoustical noise
emissions
(a)
(dB(A) re 1 pW)
49
Airborne acoustical noise
emission class
(a)
[C]
(c)
Off-mode (W) 0,50 Standby mode (W) 0,50
Delay start (W) (if applicable) 4,00
Networked standby (W) (if
applicable)
-
Minimum duration of the guarantee offered by the supplier
(b)
:
Additional information:
Weblink to the supplier’s website, where the information in point 6 of Annex II to Commission
Regulation (EU)2019/2022
(1)
(b)
is found:
(
a
)
for the eco programme.
(
b
)
changes to these items shall not be considered relevant for the purposes of paragraph 4 of Article 4 of Regulation (EU)
2017/1369.
(
c
)
if the product database automatically generates the definitive content of this cell the supplier shall not enter these data.
24
-
Candy
CIP 3D9E0B-80
No. 236, Qianwangang Road, Huangdao District,
Qingdao, China
CIP 3D9E0B-80
45
Information to be included in the technical documentation
PARAMETER
UNIT
VALUE
Eco programme energy consumption (EPEC)
rounded to three decimal places
kWh/cycle
0
,830
Standard programme energy consumption (SPEC)
rounded to three decimal places
kWh/cycle
1
,675
Energy Efficiency Index (EEI)
—
49
,6
Eco programme water consumption (EPWC)
rounded to one decimal place
l/cycle
11
Cleaning performance index (I
C )
—
1
,121
Drying performance index (I
D ) —
1
,061
Duration of the eco programme (T
t ) rounded to
the nearest minute
h:min
4:05
Power consumption in off-mode (P
o ) rounded to
two decimal places
W
0
,50
Power consumption in standby mode (P
sm )
rounded to two decimal places
W
0
,50
Does standby mode include the display of
information?
—
No
W
Power consumption in delay start (P
ds )
(if applicable) rounded to two decimal places
4
,00
Airborne acoustical noise emissions dB(A) re 1 pW
49
Technical Data





0120507690
40*8mm