model
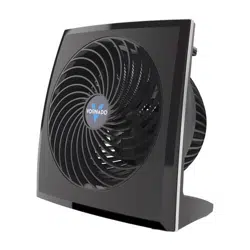
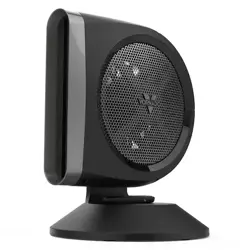
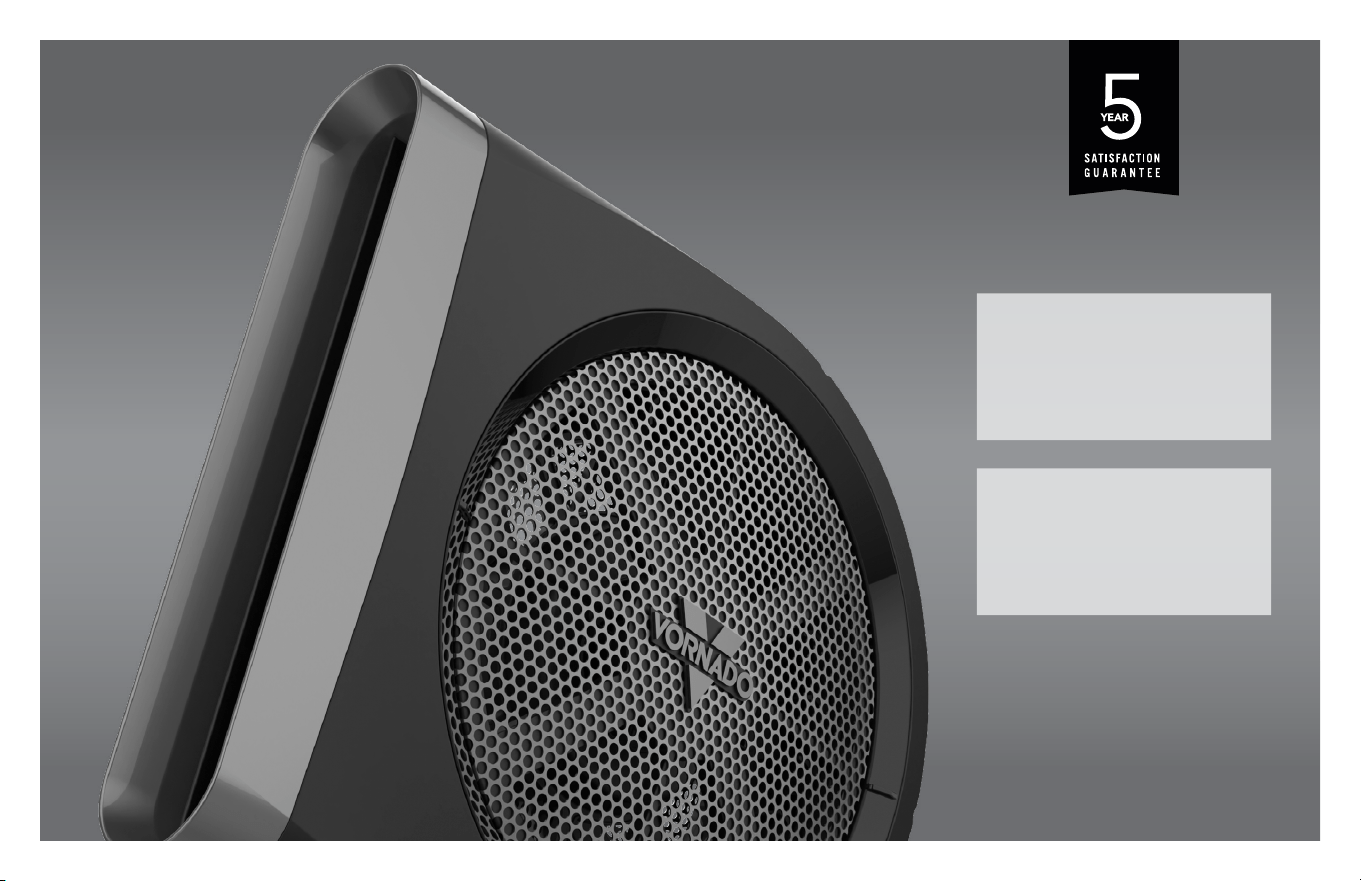
STRATA 8 OMNI
vornado.com
OSCILLATING CIRCULATOR
USE & CARE GUIDE
MANUAL DE USO Y CUIDADO
DEL VENTILADO OSCILANTE
READ AND SAVE
THESE INSTRUCTIONS
LEER Y GUARDAR ESTAS
INSTRUCCIONES

2 English
vornado.com
800-234-0604
help@vornado.com
We expect this
product to be
perfect.
If it is not, we
will make it
right.

3
English
Product Support ..................................................................................4
Features ..............................................................................................6
Getting Started ................................................................................... 7
How To Use ......................................................................................... 8
Remote Control .................................................................................10
Cleaning ............................................................................................11
Troubleshooting ............................................................................... 12
Warranty ............................................................................................13
Español p. 14
CONTENTS
4 English
PRODUCT SUPPORT FOR MODEL STRATA 8 OMNI
The Important Safety Instructions included with this product contain important information for multiple Vornado products. Specic instructions
are included for varied product types. Refer to the list below for product types that pertain to your specic model. Unless otherwise noted, all
non-specied content is considered important information for all Vornado models and should be referred to regardless of model. See
www.vornado.com to view, download and print the most current version of these instructions.
MOST CURRENT
IMPORTANT SAFETY
INSTRUCTIONS
READ AND SAVE ALL IMPORTANT SAFETY INSTRUCTIONS
MODEL STRATA 8 OMNI PRODUCT TYPE(S):
Product with Removable Grille
Polarized Plug Unit
Fused Plug (Overload Protection) Unit
Safety Device Unit
DIGITAL USE & CARE GUIDE
For further assistance, product support, or parts replacement, contact Vornado Consumer Service at:
800-234-0604 | [email protected] | vornado.com

5
English
FCC Compliance Statement
NOTE: This equipment has been tested and complies with Part 15 of the FCC Rules. Operation is subject to the following two conditions: (1)
This device may not cause harmful interference, and (2) this device must accept any interference received, including interference that may cause
undesired operation.
This equipment has been tested and found to comply with the limits for a Class B digital device, pursuant to Part 15 of the FCC Rules. These limits
are designed to provide reasonable protection against harmful interference in a residential installation. This product generates, uses and can radiate
radio frequency energy and, if not installed and used in accordance with the instructions, may cause harmful interference to radio communications.
However, there is no guarantee that interference will not occur in a particular installation. If this product does cause harmful interference to radio
or television reception, which can be determined by turning the product off and on, the user is encouraged to try to correct the interference by
one or more of the following measures:
- Reorient or relocate the receiving antenna.
- Increase the separation between the product and the receiver.
- Connect the product into an outlet on a circuit different from that to which the receiver is connected.
- Contact Vornado Consumer Service or dealer or an experienced radio/TV technician for help.
Changes or modications to this unit not expressly approved by the party responsible for compliance could void the user’s authority to operate
the product.
Supplier's FCC Declaration of Conformity
Unique Identier: Vornado Model STRATA 8 OMNI
Responsible Party: Vornado Air LLC
Mailing Address : 415 E. 13th St., Andover, KS 67002
Contact: www.vornado.com
RF Exposure Statement: This equipment complies with the FCC RF exposure limit set forth for an uncontrolled environment and is safe for
intended operation as described in this manual.
6 English
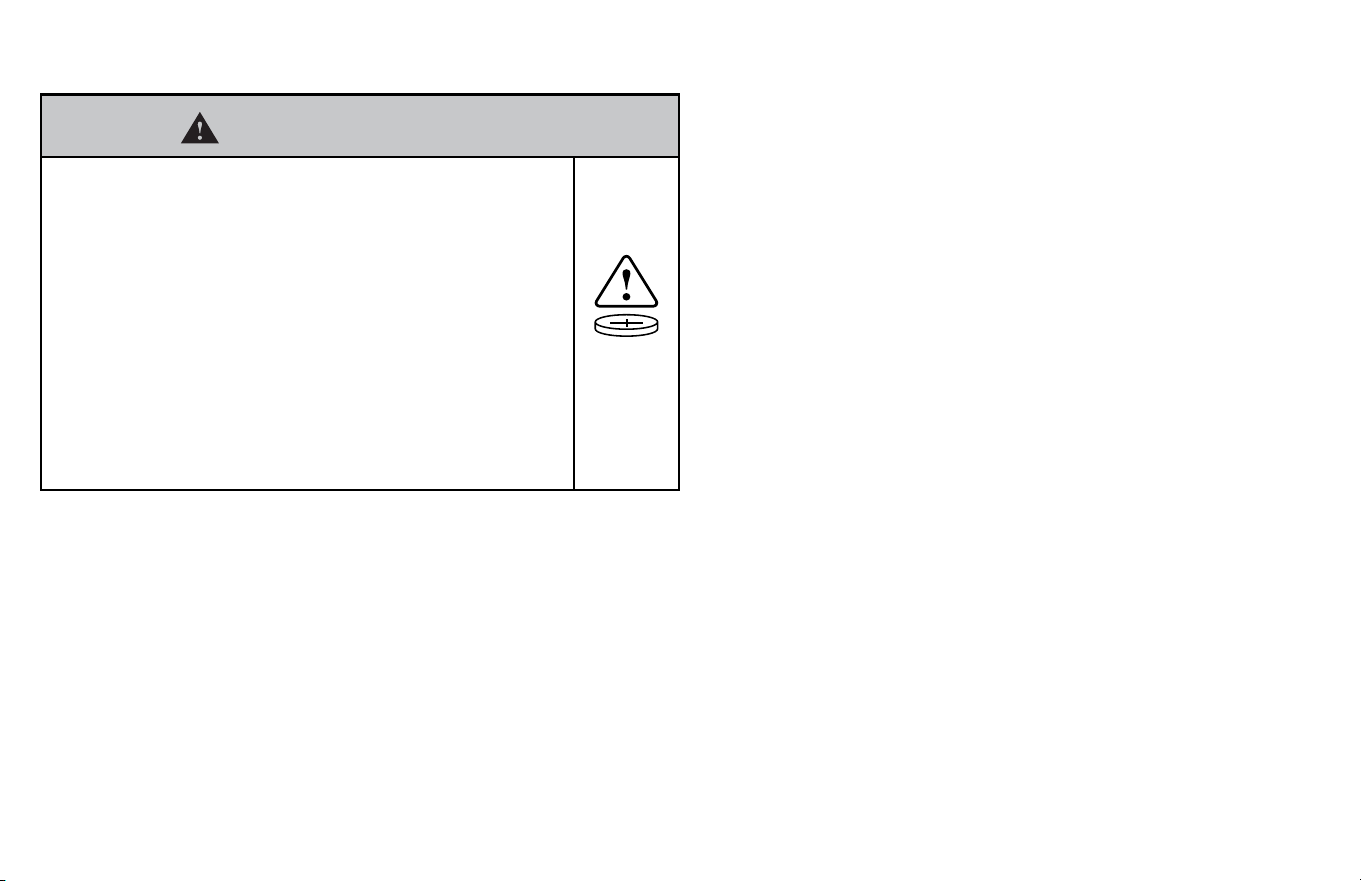
This Product includes a remote containing a replaceable
CR2032 Button Cell Battery (3V).
WARNING
• INGESTION HAZARD: This product contains a
button cell or coin battery.
• DEATH or serious injury can occur if ingested.
• A swallowed button cell or coin battery can
cause Internal Chemical Burns in as little as 2
hours.
• KEEP new and used batteries OUT OF REACH
of CHILDREN.
• Seek immediate medical attention if a battery
is suspected to be swallowed or inserted
inside any part of the body.
- Call a local poison control center for treatment information.
If you think batteries might have been swallowed or placed
inside any part of the body, seek immediate medical
attention. In the US call the National Poison Control Center at
1-800-222-1222 or 202-625-3333.
- Even used batteries may cause severe injury or death. New
and used batteries may cause injury. Keep new and used cells
(or batteries) away from children.
- Always completely secure the battery compartment. If the
battery compartment does not close securely, stop using the
product, remove the batteries, and keep them away from
children.
- Ensure the batteries are installed correctly according to
polarity (+ and -).
- Do not mix old and new batteries, different brands or types
of batteries, such as alkaline, carbon-zinc, or rechargeable
batteries.
- Do not force discharge, recharge, disassemble, heat above
104˚F / 40˚C or incinerate. Doing so may result in injury due to
venting, leakage or explosion resulting in chemical burns.
- Non-rechargeable batteries are not to be recharged.
- Remove and immediately recycle or dispose of used
batteries according to local regulations and keep away from
children. Do NOT dispose of batteries in household trash or
incinerate.
- BATTERY DISPOSAL: Please dispose of batteries according
to the local laws and regulations of your region, and while
keeping them away from children. Some batteries may be
recycled and accepted for disposal at your local recycling
center. DO NOT DISPOSE OF BATTERIES IN FIRE.
BATTERIES MAY EXPLODE OR LEAK.
- Remove and immediately recycle or dispose of batteries
from equipment not used for an extended period of time
according to local regulations.
SAVE THESE
INSTRUCTIONS
7
English
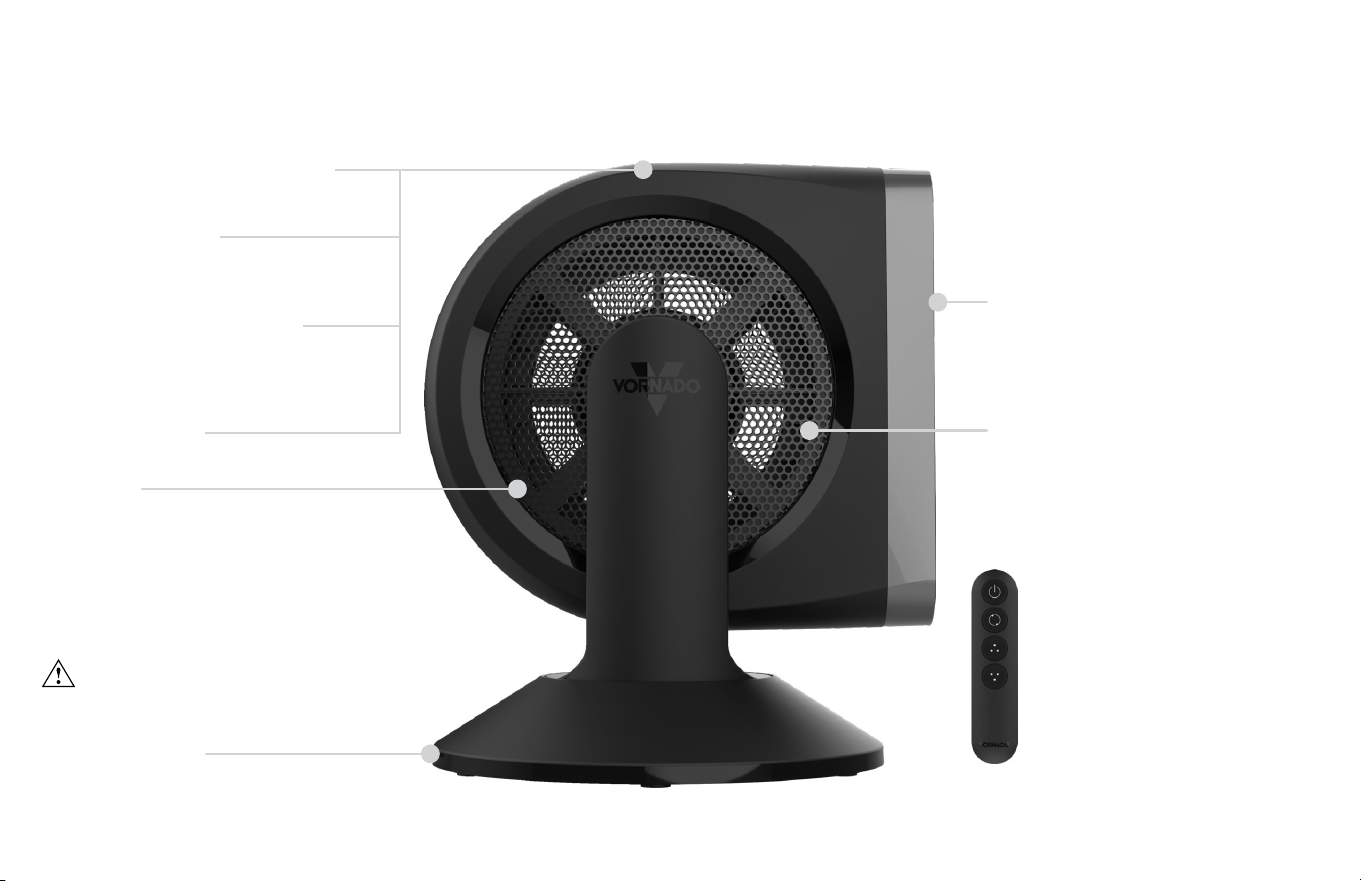
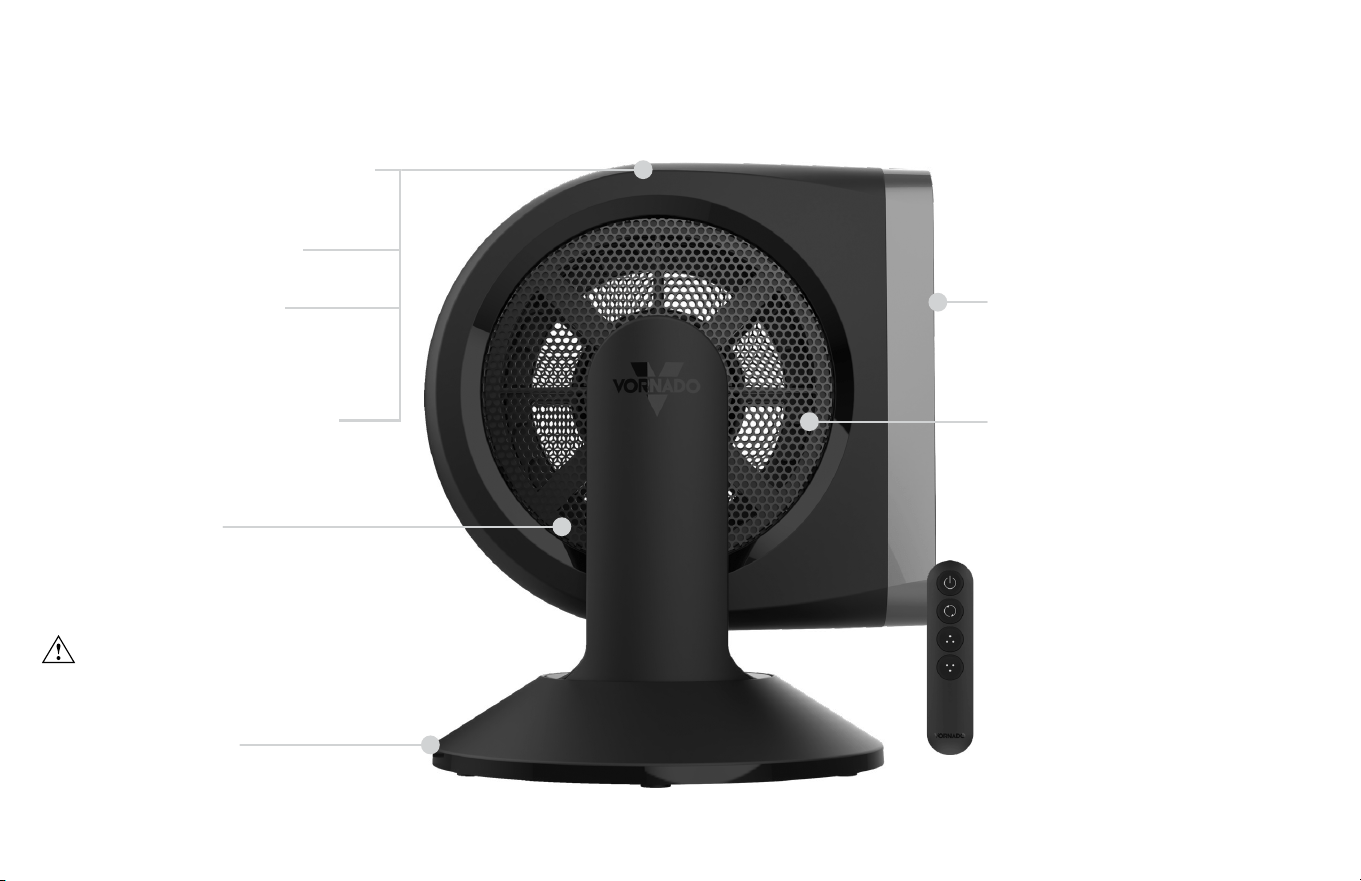
MULTIPLE SPEEDS
10 speed settings for every comfort level
AIR OUTLET
Finger-friendly design
AIR INLET
Finger-friendly design
SILICONE FEET
Non-marking feet added for stability
FEATURES
TOUCH-SENSITIVE CONTROLS
Simple controls with a sleek aesthetic
ADJUSTABLE OSCILLATION
90° or 180° Panoramic Oscillation
®
and
60° or 90° Vertical Oscillation Airow
12 HOUR TIMER
DC MOTOR
Quiet and energy efcient
REMOTE CONTROL
Convenience at your nger tips.
When not in use, remote can
be magnetically stored on the
metal side grilles.
WARNING - Choking hazard. Keep
small parts away from children and pets.
8 English
GETTING STARTED
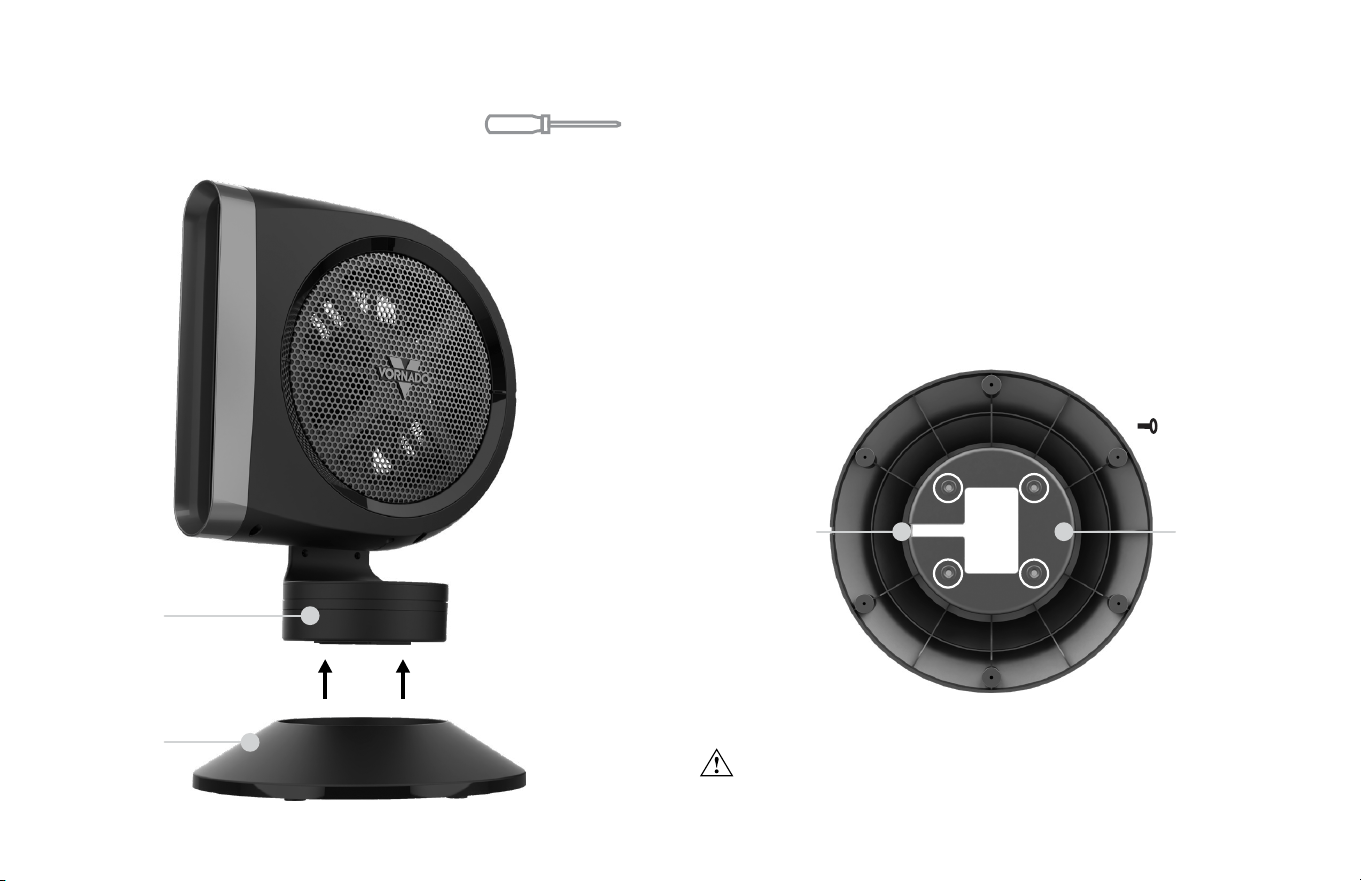
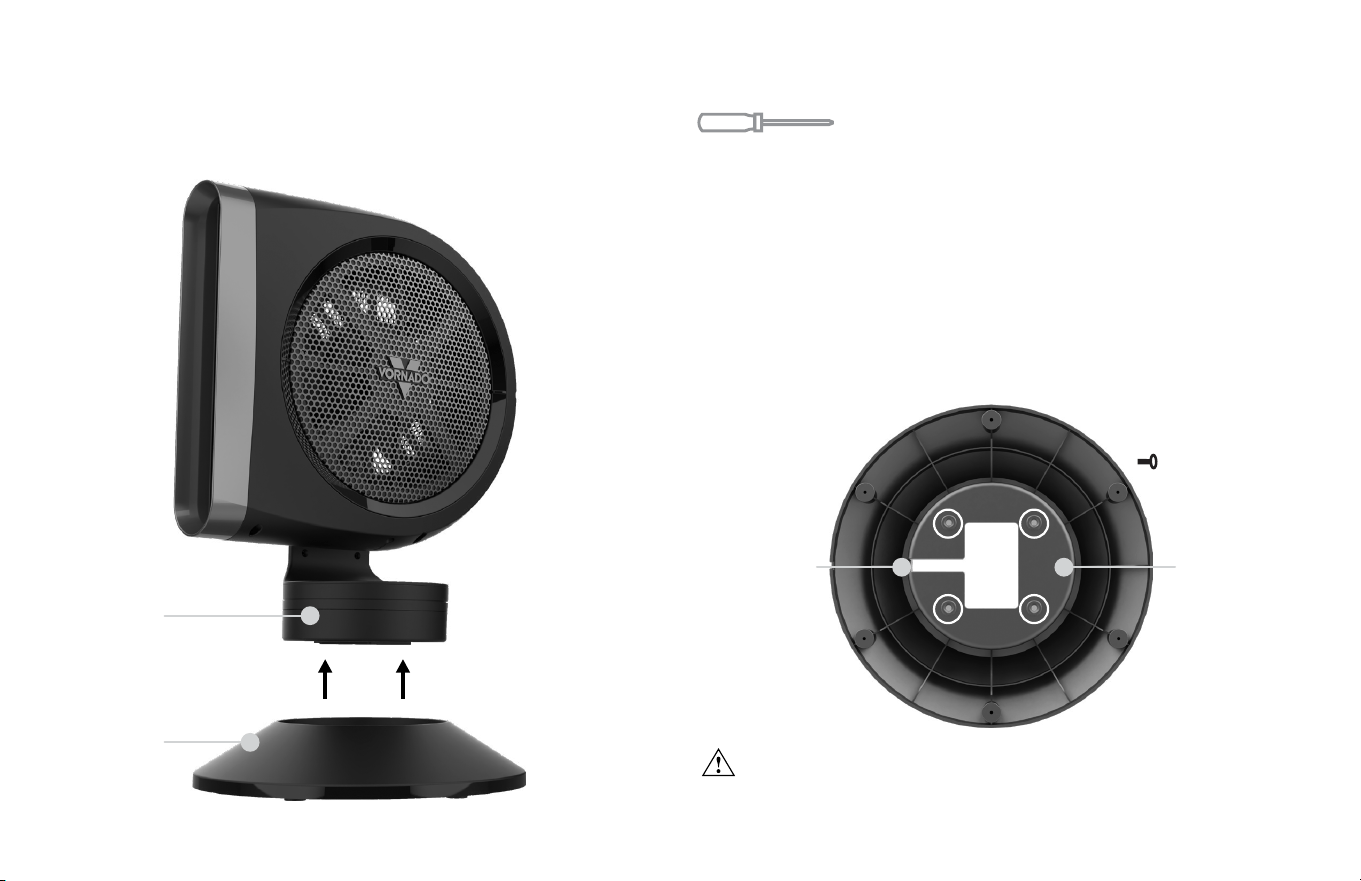
BASE ASSEMBLY Screwdriver required.
ALIGNMENT
PIN RECESS
POWER CORD
ROUTE
x4
1. Place unit horizontally on soft surface to avoid scratches.
2. Route the power cord through the smaller hole on the bottom of
the base. Align base to bottom of unit. There is an alignment pin
located on the bottom of the unit and an alignment pin recess on
the base plate.
3. Attach base to unit using four screws provided (included in bag
with this manual).
WARNING - Choking hazard. Keep small parts away from children
and pets.
BASE
UNIT
9
English
HOW TO USE
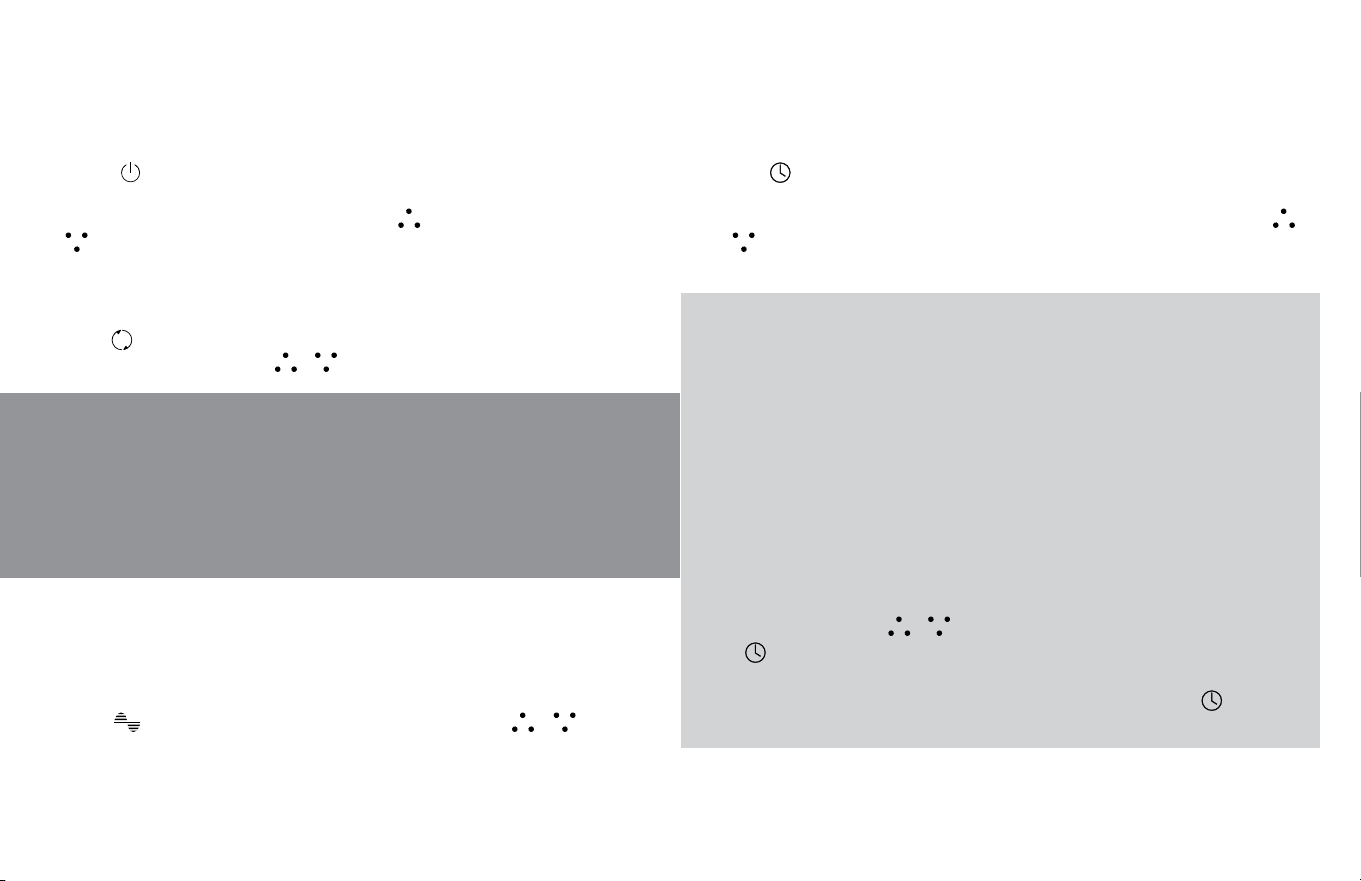
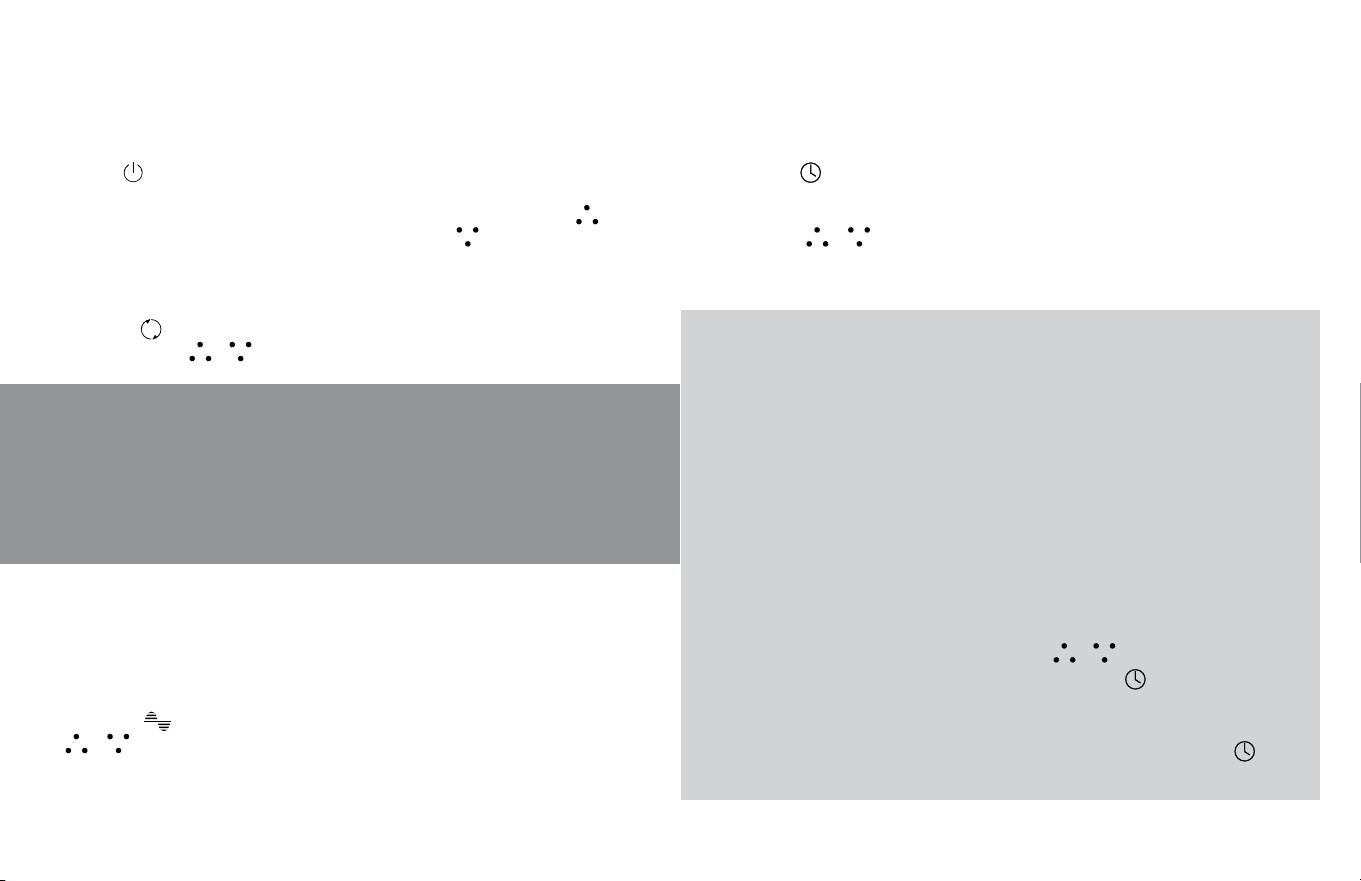
1. Touch to power on/off.
2. Select desired fan speed by pressing to increase fan speed or
to decrease fan speed.
The current fan speed will be shown on the display – there are 10
fan speeds.
3. Press
to turn oscillation on/off and cycle through to desired
oscillation option using / . Options are displayed as settings 0-6:
0: Oscillation Off
1: 90° Horizontal Oscillation
2: 180° Panoramic Oscillation®
3: 60° Vertical Oscillation
4: 90° Vertical Oscillation
5: Narrow Angle Oscillation (Settings 1 and 3 combined)
6: Wide Angle Oscillation (Setting 2 and 4 combined)
NOTE: Your unit comes equipped with Stall Detection. If your unit
detects something in the oscillation path, it will immediately reverse
and begin oscillating the other direction. Remove the obstacle, so unit
can continue typical oscillation path.
4. Press to turn Breeze Mode on/off. Then, press / to set the
max fan speed. This will be the highest speed the unit reaches while
uctuating fan speeds in Breeze Mode.
5. Press to activate Timer. The timer icon illuminates and the
Display ashes 0 to indicate Timer Adjustment Mode. While in this
mode, select amount of time in one-hour intervals by pressing
/ . After three seconds, display will revert back to showing fan
speed or Breeze Mode.
HELPFUL TIPS
When the unit is plugged in, it will oscillate until it locates its “default”
position as part of the setup process. Following this, standard
operation will begin.
Holding the timer or oscillation button for 3 seconds cancels the
respective button’s action.
If oscillation is on, the fan will pause movement when interacting with
the controls. This will allow you to know the product has registered the
control input.
To cancel timer, press / until 0 shows on the Display. Or, long
press for 3 seconds.
To see how many hours are remaining on the timer, press once and
remaining hours will show on the Display.
10 English
HOW TO USE
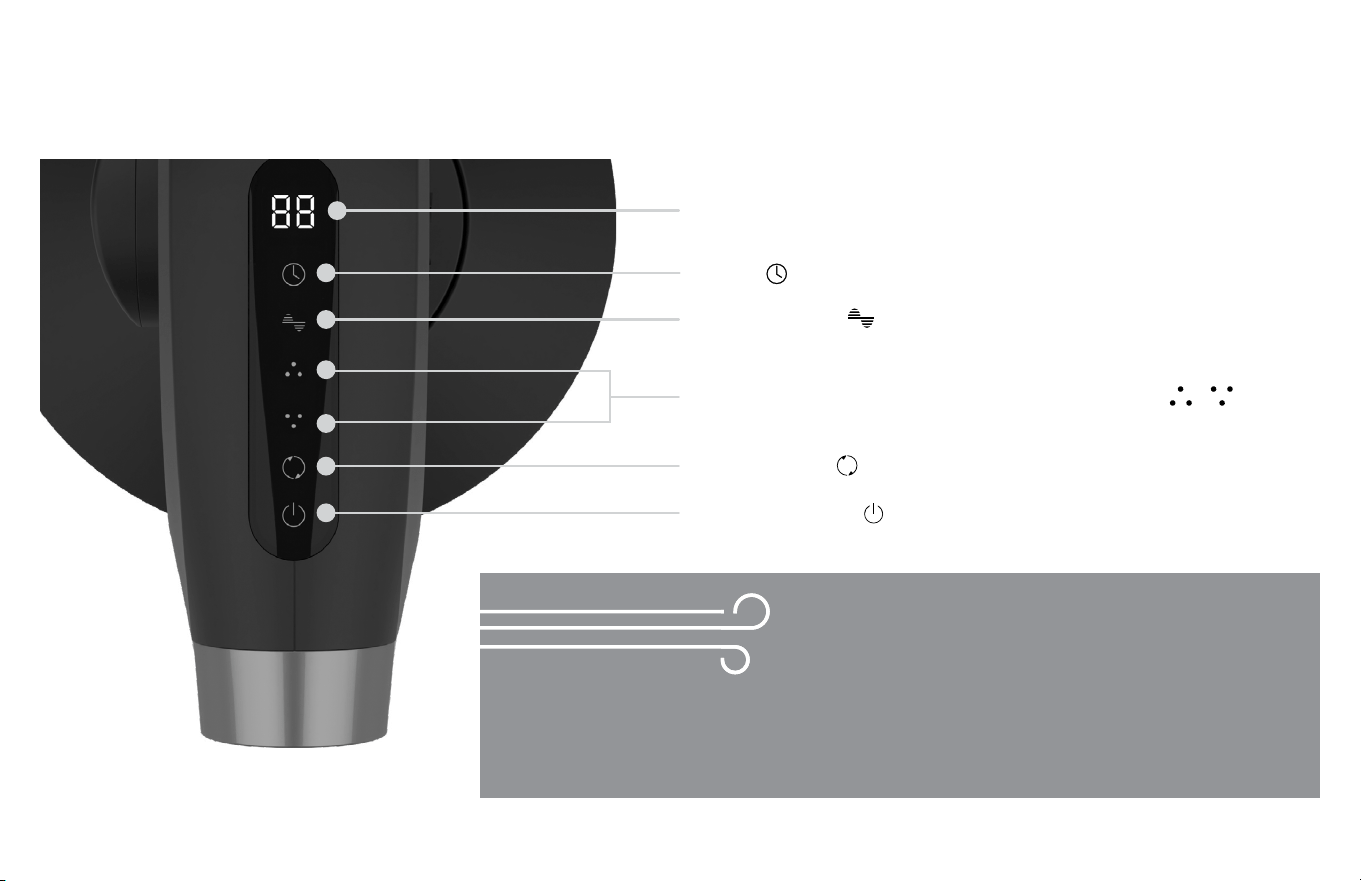
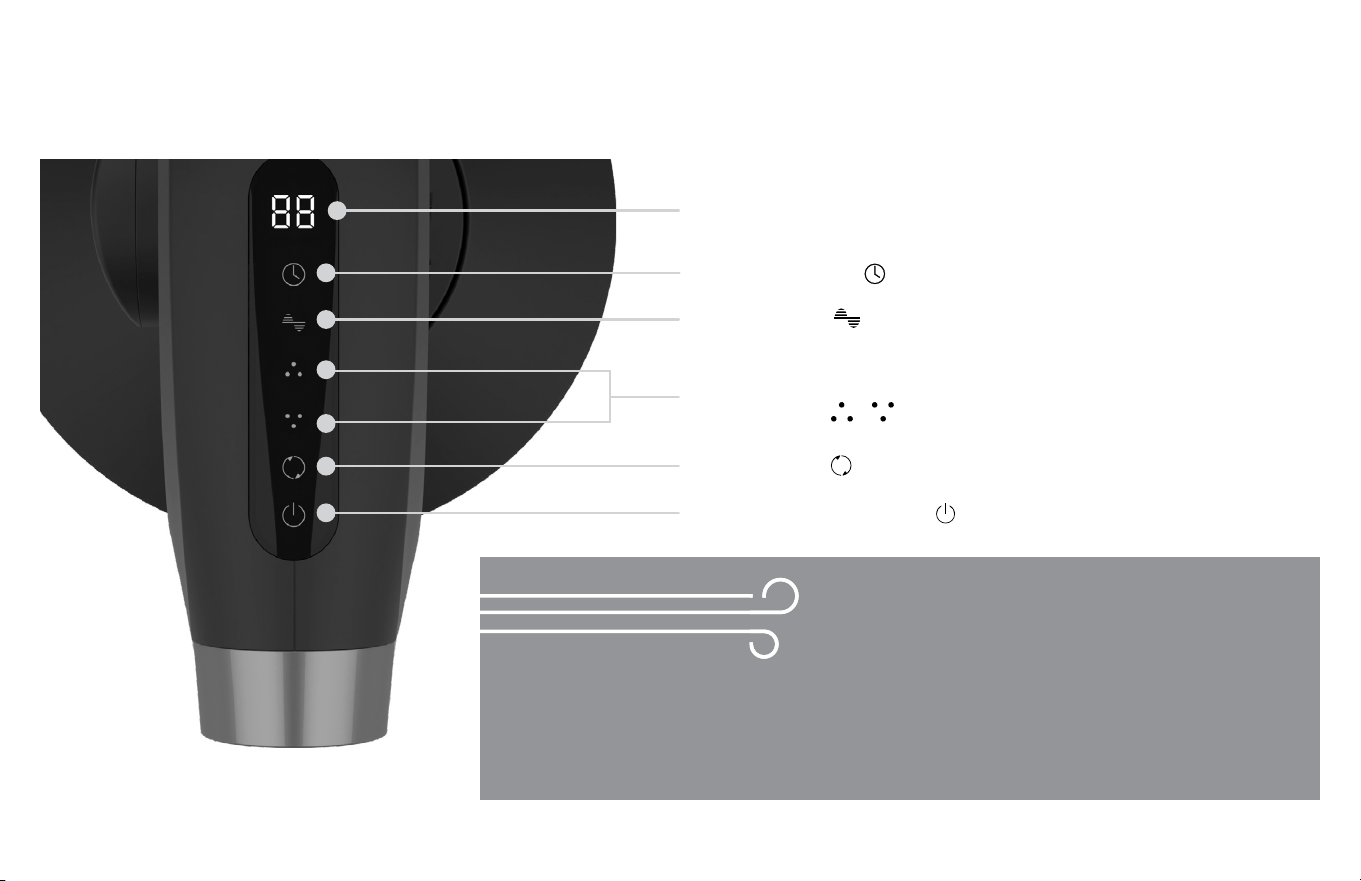
OSCILLATION
DISPLAY
POWER ON/OFF
BREEZE MODE
TIMER
SPEED, TIMER, AND OSCILLATION ADJUSTMENT /
Why Breeze Mode?
Breeze Mode simulates the natural movement of wind to help you relax, mimicking
the feeling of being outside enjoying a nice breeze. While in Breeze Mode, the fan
speed dynamically fluctuates, with the highest speed being your selected fan speed.
11
English
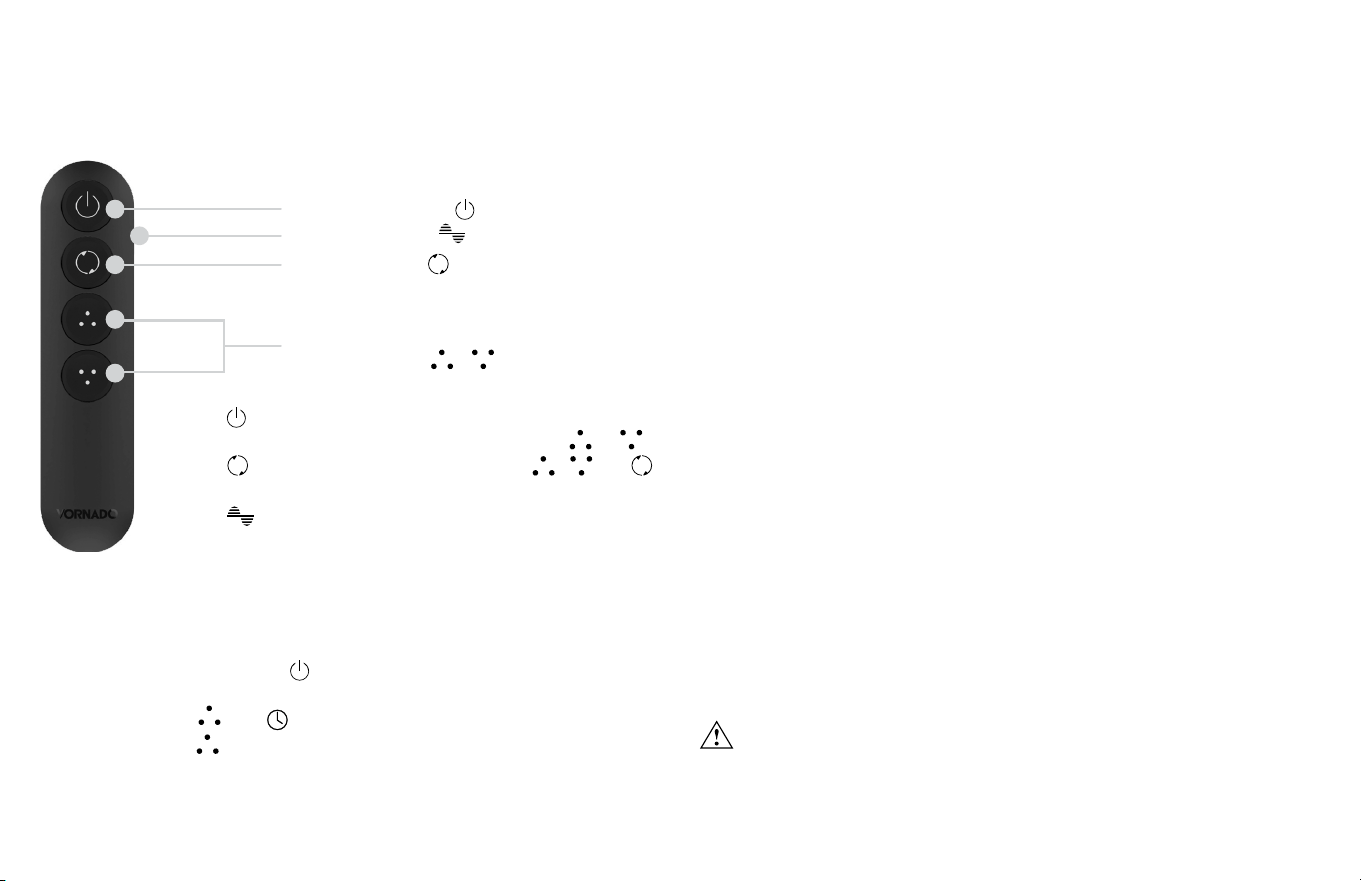
1. Plug the unit in and press
to turn unit on.
2. Remove pull tab completely from the remote.
3. Hold down the
and
on the unit. Display will ash “00”.
4. Press and hold on remote for 3 seconds.
5. Unit will power on once successfully paired.
1. Press
to power on/off.
2. Select desired fan speed setting by pressing or .
3.
Press to turn Oscillation on/off. Press , , or
to cycle through the different oscillation options.
4.
Press on
side of remote to activate Breeze Mode.
REMOTE CONTROL
REMOTE FUNCTIONS BATTERY REPLACEMENT
REMOTE SETUP
1. For battery replacement, the remote requires one coin style CR2032
3V battery. Always use the correct size and grade of battery for this
product.
2. To replace battery, open battery door on the back side of the
remote control (you will need to loosen the small screw on door
using a #1 Phillips screwdriver). If necessary, clean the battery
contacts and also those of the device prior to battery installation.
Remove any plastic protection from the battery and place it
in the remote with the + side facing out. Ensure the battery is
installed correctly with regard to polarity. Replace the battery door
and screw.
Note: Remove battery from the remote control when not in use for an
extended period of time and always remove dead battery immediately
and replace with fresh. Do not store dead battery in remote.
Your remote includes (1) coin style CR2032 3V battery. Battery comes
pre-installed. Remove battery pull tab before rst use. Pre-installed
battery has a one-year life expectancy (dependent on use) after pull
tab has been removed from remote.
The remote that comes with your unit is paired and ready to use out
of the box. If you need to pair a remote, follow these steps:
WARNING: This product contains a button battery. If swallowed,
it could cause severe injury or death in just 2 hours. Seek medical
attention immediately.
OSCILLATION
BREEZE MODE
POWER ON/OFF
SPEED AND OSCILLATION
ADJUSTMENT /
12 English
CLEANING
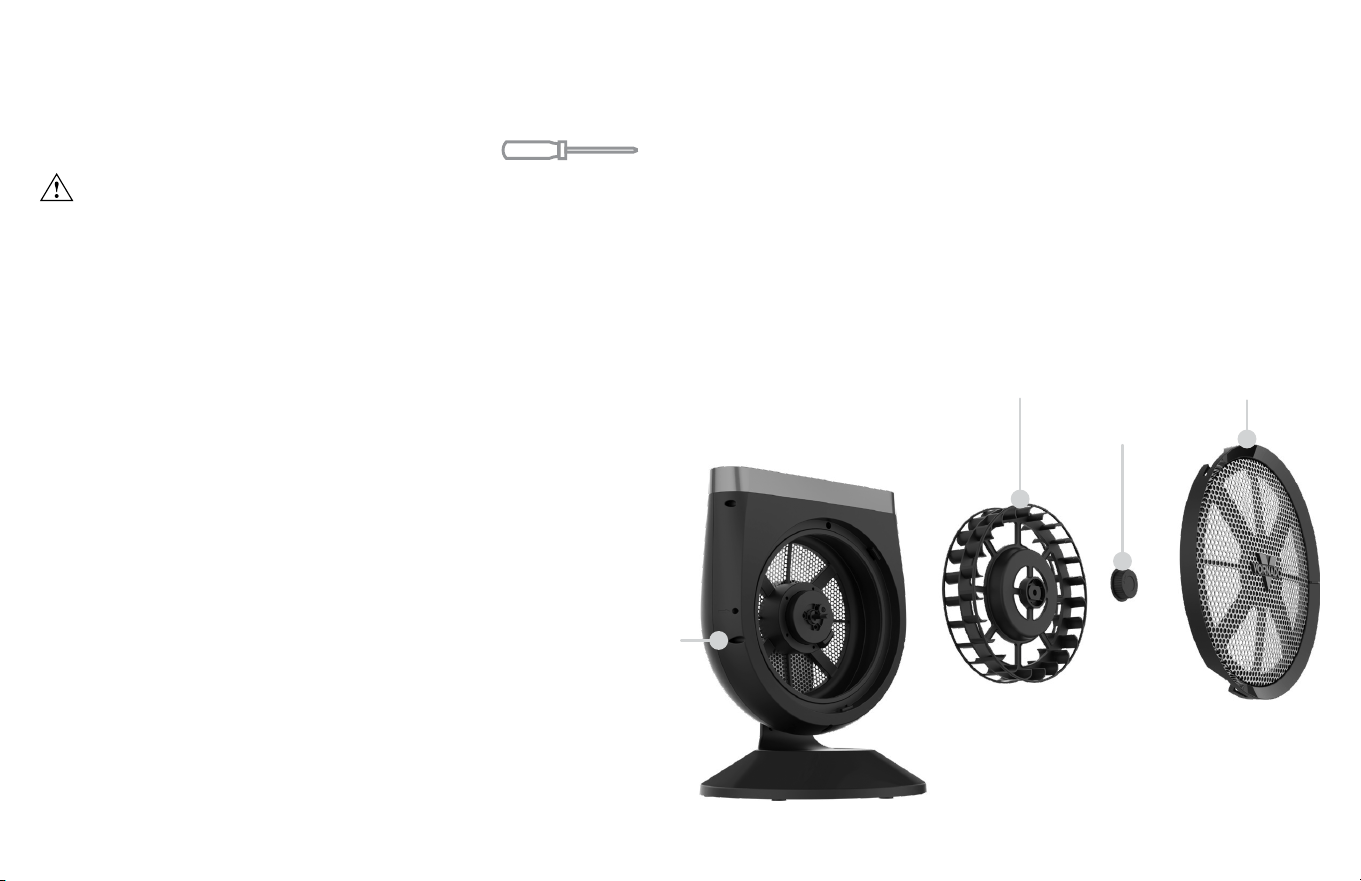
GRILLE REMOVAL Screwdriver required.
BLOWER WHEEL REMOVAL
WARNING: To reduce the risk of electrical shock and injury to persons, unplug the circulator before removing grille and blower wheel.
Note: Be sure to fully reassemble product before use.
1. Rotate the fan head up to locate the arrow on its underside.
2. Remove the screw indicated by the arrow.
3. Locate the notches on the inlet grille located at the 3 and 9 o’clock positions and rotate counter-clockwise to remove it.
4. Dust the inlet grille. Do not use water to clean and do not place in the dishwasher. The water and heat can distort the inlet grille.
5. To reattach, re-insert grille inlet and turn clockwise until it clicks into place.
6. Replace the screw.
1. Remove the release knob by rotating clockwise.
2. Pull blower wheel straight out.
3. Wipe blower wheel with dry cloth. Do not use water to
clean and do not place in dishwasher. The water and
heat can distort the blower wheel.
4. To reattach – make sure the side of blower wheel with
metal nut faces the product and align the at sides of
the shaft and socket.
5. Push blower wheel all the way on the shaft until it
bottoms out.
6. Reinstall release knob by rotating counter-clockwise.
SCREW
BLOWER WHEEL
RELEASE KNOB
INLET GRILLE
13
English
PROBLEM POSSIBLE CAUSE AND SOLUTION
Unit fails to power on. Unit is not plugged in. Plug Power Cord into electrical outlet.
Ensure power button has been pressed. Once the power button is pressed ALL buttons and displays should
light up.
Unit is damaged or in need of repair. Cease usage and unplug. Contact Consumer Service for assistance.
Fuse needs to be replaced. See IMPORTANT SAFETY INSTRUCTIONS for how to replace the fuse or contact
Consumer Service.
Unit is not producing
sufcient amount of air.
Unit is set to a low speed setting. Adjust to a higher speed setting.
Airow is blocked. Remove obstruction.
Adjust direction of airow toward the user.
GFCI has tripped. Under certain conditions, it is possible for a reset GFCI (Ground Fault Circuit Interrupter) outlet to trip when the
user is changing speeds on a Vornado circulator. In this event, change to an outlet that is not connected to a
GFCI device. It could also indicate a weak or defective GFCI outlet. Contact a qualied electrician to check the
GFCI outlet.
Remote Control is not
working.
The battery is dead. Replace with new CR2032 3V battery. Refer to REMOTE CONTROL - BATTERY
REPLACEMENT for instructions.
Remote has not been successfully paired. Refer to REMOTE SETUP for instructions.
TROUBLESHOOTING
14 English
Vornado Air LLC (“Vornado”) warrants to the original consumer or purchaser this Vornado®
Whole Room Circulator (“Product”) is free from defects in material or workmanship for a
period of ve (5) years from the date of acquisition. If any such defect is discovered within
the warranty period, Vornado, at its discretion, will repair or replace the Product at no cost.
For warranty service: Call 1-800-234-0604 or email [email protected] to obtain a Return
Authorization (“RA”). Please have or include your Product’s model number and serial
number, as well as your name, address, city, state, zip code, e-mail, and phone number
when contacting Vornado for warranty service. To le a contactless warranty claim, visit
vornado.com/contact-us.
This warranty does not apply to defects resulting from abuse of the Product, modication,
alteration, mishandling, improper maintenance, commercial use or repair or service of the
Product by anyone other than Vornado; damages which occur in shipment or are attributed
to acts of God. Improper product use, which includes using an external device that
alters or converts the voltage or frequency of electricity, or shipping a Vornado product
to a country not intended for use will void all warranties. Any unauthorized product
modication, repair by unauthorized repair center, or use of non-approved replacement
parts is not recommended and any consequences will not be covered by support services
or product warranties. The product warranty will be honored only on models that are being
used in the country intended. REPAIR OR REPLACEMENT AS PROVIDED UNDER THIS
WARRANTY IS THE EXCLUSIVE REMEDY OF THE CONSUMER. VORNADO SHALL NOT
BE LIABLE FOR ANY INCIDENTAL OR CONSEQUENTIAL DAMAGES FOR BREACH OF
ANY EXPRESS OR IMPLIED WARRANTY ON THIS PRODUCT. EXCEPT TO THE EXTENT
PROHIBITED BY APPLICABLE LAW, ANY IMPLIED WARRANTY OF MERCHANTABILITY
OR FITNESS FOR A PARTICULAR PURPOSE ON THIS PRODUCT IS LIMITED IN
DURATION TO THE DURATION OF THIS WARRANTY. Some states do not allow the
exclusion or limitation of incidental or consequential damages, or allow limitations on how
long an implied warranty lasts, so the above limitations or exclusions may not apply to you.
This warranty gives you specic legal rights, and you may have other rights that vary from
state to state. The manufacturer assumes no responsibility for damage caused by failure
to follow these instructions or improper product use. Any such actions will invalidate the
product warranty.
All company names and product names are trademarks of their respective owners. ©
All rights reserved. All technical information, data, and instructions for the installation,
connection, and operation contained in these instructions for use correspond to the latest
available information at time of printing. The contents of this manual may differ slightly
from the actual product. Observe any additional supplements.
WARRANTY
We expect this product to be perfect. If you’re not satised with this product, let us know.
We’re Here To Help
800.234.0604
vornado.com
© 2025 Vornado Air LLC Andover, KS 67002 Specifications subject to change without notice.
Vornado® is a trademark owned by Vornado Air LLC.
Designed, engineered and supported in Andover, KS

15
Español
vornado.com
800-234-0604
help@vornado.com
Esperamos que
este producto
sea perfecto.
Si no lo es,
ayúdenos a
corregirlo

16
Español
Soporte Del Producto ....................................................................... 16
Características ...................................................................................18
Primeros Pasos ..................................................................................19
Cómo Usar ........................................................................................20
Control Remoto ................................................................................22
Limpieza ............................................................................................23
Resolución De Problemas .................................................................24
Garantía .............................................................................................25
CONTENIDO
17
Español
SOPORTE DEL PRODUCTO PARA EL MODELO STRATA 8 OMNI
Las Instrucciones importantes de seguridad incluidas con este producto contienen información relevante para múltiples productos Vornado.
Se incluyen instrucciones especícas para varios tipos de productos. Consulte la lista a continuación para conocer los tipos de productos que
pertenecen a su modelo especíco. A menos que se indique lo contrario, todo el contenido no especicado se considera información
importante para todos los modelos Vornado y debe consultarse independientemente del modelo. Consulte www.vornado.com para ver,
descargar e imprimir la versión más reciente de estas instrucciones.
INSTRUCCIONES
IMPORTANTES DE
SEGURIDAD MÁS
ACTUALES
GUÍA DIGITAL DE USO Y
CUIDADO
LEA Y GUARDE TODAS LAS INSTRUCCIONES IMPORTANTES DE SEGURIDAD
TIPO(S) DE PRODUCTO(S) DEL MODELO STRATA 8 OMNI:
Producto con rejillas desmontables
Unidad con enchufe polarizado
Unidad con enchufe con fusible (protección contra sobrecarga)
Unidad con dispositivo de seguridad
Para obtener más ayuda, soporte del producto o reemplazo de piezas, póngase en contacto con el Servicio al Consumidor de Vornado:
800-234-0604 | [email protected] | vornado.com

18
Español
Declaración de cumplimiento de la FCC
NOTA: Este equipo ha sido evaluado y se determinó cumple con la Parte 15 de las Reglas de la FCC. El funcionamiento está sujeto a las
dos condiciones siguientes: (1) este dispositivo no puede causar interferencias perjudiciales, y (2) este dispositivo debe aceptar cualquier
interferencia recibida, incluidas las interferencias que pueden causar un funcionamiento no deseado.
Este equipo ha sido evaluado y se determinó que cumple con los límites de un dispositivo digital Clase B en virtud del Apartado 15 de las
Normas FCC. Estos límites están diseñados para proporcionar una protección razonable contra la interferencia nociva en una instalación
residencial. Este producto genera, utiliza y puede irradiar energía de radiofrecuencia y, si no se instala y utiliza de acuerdo con las instrucciones,
puede causarinterferencia nociva en las comunicaciones de radio.
Sin embargo, no se garantiza que la interferencia no se producirá en una instalación particular. Si este producto causa interferencia nociva en
la recepción de radio o televisión, lo que puede determinarse por el encendido y apagado del producto, se le aconseja al usuario que intente
corregir la interferencia de la siguiente forma:
- Reoriente o reubique la antena de recepción.
- Aumente la distancia entre el equipo y el receptor.
- Conecte el equipo en el tomacorriente de un circuito diferente al cual está conectado el receptor.
- Póngase en contacto con el Servicio al Cliente de Vornado o consulte al distribuidor o un técnico experimentado en radio/TV para recibir ayuda.
Cambios o modicaciones a esta unidad no aprobados por la parte responsable de cumplimiento podrían anular la autoridad del usuario para
operar el producto.
Declaración de conformidad de la FCC del proveedor
Identicador único: Vornado Modelo STRATA 8 OMNI
Parte responsable: Vornado Air LLC
Dirección postal: 415 E. 13th St., Andover, KS 67002
Contacto: www.vornado.com
Declaración de exposición a RF: Este producto cumple con el límite de exposición a RF de la FCC establecido para un entorno no controlado
y es seguro para la operación prevista como se describe en este manual.
19
Español
Este producto incluye un control remoto que contiene una
pila de botón CR2032 reemplazable (3V).
ADVERTENCIA
• PELIGRO DE INGESTIÓN: Este producto
contiene una pila de botón o una pila moneda.
• En caso de ingestión puede producirse la
MUERTE o lesiones graves.
• La ingestión de una pila de botón o pila
moneda puede provocar quemaduras
químicas internas en tan solo 2 horas.
• MANTENGA las pilas nuevas y usadas FUERA
DEL ALCANCE de los NIÑOS.
• Busque atención médica inmediata si se
sospecha que se ha tragado o insertado una
pila en cualquier parte del cuerpo.
- Llame a un centro local de control de intoxicaciones para
obtener información sobre el tratamiento. Si cree que las
pilas pueden haber sido ingeridas o colocadas dentro
de cualquier parte del cuerpo, busque atención médica
inmediata. En EE. UU., llame al Centro Nacional de Control
de Intoxicaciones al 1-800-222-1222 o al 202-625-3333.
- Incluso las pilas usadas pueden causar lesiones graves o la
muerte. Las pilas nuevas y usadas pueden causar lesiones.
Mantenga las pilas (o baterías) nuevas y usadas fuera del
alcance de los niños.
- Asegure siempre por completo el compartimento de
las pilas. Si el compartimento de las pilas no cierra de
forma segura, deje de utilizar el producto, retire las pilas y
manténgalas fuera del alcance de los niños.
- Asegúrese de que las pilas estén instaladas correctamente
según la polaridad (+ y -).
- No mezcle pilas viejas y nuevas, de diferentes marcas o tipos
de pilas, como alcalinas, de zinc-carbono o recargables.
- No fuerce la descarga, la recarga, el desmontaje, el
calentamiento por arriba de de 104˚F / 40˚C ni la incineración.
De lo contrario, podrían producirse lesiones debido a
descargas, fugas o explosiones que provoquen quemaduras
químicas.
- Las pilas no recargables no deben recargarse.
- Retire y recicle o deseche inmediatamente las pilas usadas
de acuerdo con la normativa local y manténgalas fuera del
alcance de los niños. NO deseche las pilas en la basura
doméstica ni las incinere.
- DESECHO DE LAS PILAS: Deseche las pilas de acuerdo
con las leyes y normas locales de su región y manténgalas
fuera del alcance de los niños. Algunas pilas pueden ser
recicladas y aceptadas para su desecho en un centro de
reciclaje local. NO ARROJE LAS PILAS AL FUEGO. LAS
PILAS PUEDEN EXPLOTAR O TENER FUGAS.
- Retire y recicle o deseche inmediatamente las pilas de los
equipos que no se utilicen durante un período prolongado
de acuerdo con la normativa local.
CONSERVE ESTAS
INSTRUCCIONES
20
Español
PATAS DE SILICONA
Se agregaron patas que no dejan
marca para una mayor estabilidad
CARACTERÍSTICAS
MOTOR DE CC
Silencioso y de bajo consumo
ENTRADA DE AIRE
Diseño de protección de dedos
CONTROL REMOTO
Comodidad al alcance de sus
manos.
Cuando no se utilice, el mando
a distancia puede guardarse
magnéticamente en las rejillas
metálicas laterales.
MÚLTIPLES VELOCIDADES
10 velocidades para cada nivel de confort
CONTROLES SENSIBLES AL TACTO
Controles simples con un diseño
impecable
OSCILACIÓN AJUSTABLE
90° o 180° ujo de Panoramic Oscillation
®
(Oscilación panorámica) y Oscilación
vertical de 60° o 90°
TEMPORIZADOR DE 12 HORAS
SALIDA DE AIRE
Diseño de protección de dedos
ADVERTENCIA - Peligro de asxia.
Mantenga las piezas pequeñas fuera del
alcance de los niños y las mascotas.
21
Español
PRIMEROS PASOS
ENSAMBLAJE DE LA BASE Se necesita un destornillador.
CAVIDAD DEL
PASADOR DE
ALINEACIÓN
RUTA DEL CABLE
DE ALIMENTACIÓN
x4
1. Coloque la unidad horizontalmente sobre una supercie suave para
evitar rayones.
2. Pase el cable de alimentación por el agujero más pequeño ubicado
en la parte inferior de la base. Pase el cable de alimentación por el
agujero más pequeño ubicado en la parte inferior de la base. Alinee
la base con la parte inferior del equipo. Hay un pasador de alineación
situado en la parte inferior del aparato y una cavidad para el pasador
en la placa base.
3. Sujete la base a la unidad con los cuatro tornillos suministrados
(incluidos en la bolsa con este manual).
ADVERTENCIA - Peligro de asxia. Mantenga las piezas
pequeñas fuera del alcance de los niños y las mascotas.
BASE
UNIDAD
22
Español
CÓMO USAR
1. Toque para encender.
2. Seleccione la velocidad deseada del ventilador pulsando
para aumentar la velocidad del ventilador o para disminuir la
velocidad del ventilador. La velocidad actual del ventilador se
mostrará en la pantalla. El equipo ofrece 10 niveles de velocidad.
3. Presione
para encender/apagar la oscilación y elija la opción que
desea usando / . Verá las opciones como ajustes del 0 al 6:
0: Apagado
1: Oscilación horizontal de 90 grados
2: Panoramic Oscillation® de 180 grados
3: Oscilación vertical de 60 grados
4: Oscilación vertical de 90 grados
5: Oscilación de ángulo estrecho (combinación de ajustes 1 y 3)
6: Oscilación de ángulo amplio (combinación de ajustes 2 y 4)
NOTA: Su unidad está equipada con un sistema de detección de
bloqueos. Si el equipo detecta algún objeto en su trayecto de
oscilación, invertirá su dirección de inmediato y comenzará a oscilar
en sentido contrario. Retire el obstáculo para que el equipo pueda
continuar su trayectoria de oscilación normal.
4. Presione para activar/desactivar el modo Brisa. Luego, presione
/ para ajustar la velocidad máxima del ventilador. Esta será
la velocidad más alta que alcanzará el equipo mientras uctúan las
velocidades en el modo Brisa.
5. Presione para activar el temporizador. El ícono del
temporizador se iluminará y la pantalla parpadeará 0 para indicar
el modo de Ajuste del temporizador. Mientras está en este modo,
presione / . para seleccionar la duración en intervalos de una
hora. Después de tres segundos, la pantalla volverá a mostrar la
velocidad del ventilador
CONSEJOS ÚTILES
Cuando el equipo está conectado, oscilará hasta encontrar su posición
“predeterminada” como parte del proceso de conguración. Después
de esto, comenzará la operación estándar.
Cuando la unidad está enchufada, oscilará hasta que localice su
posición “por defecto” como parte del proceso de conguración. A
continuación, comenzará el funcionamiento estándar.
Si la oscilación está activada, el ventilador pausará su movimiento
cuando interactúe con los controles. Esto le permitirá saber que el
producto ha registrado la entrada de control.
Para cancelar el temporizador, presione / hasta que en la
pantalla se muestre 0. O, mantenga presionado durante 3
segundos.
Para ver cuántas horas quedan en el temporizador, presione una
vez y el tiempo restante se mostrará en la pantalla.
23
Español
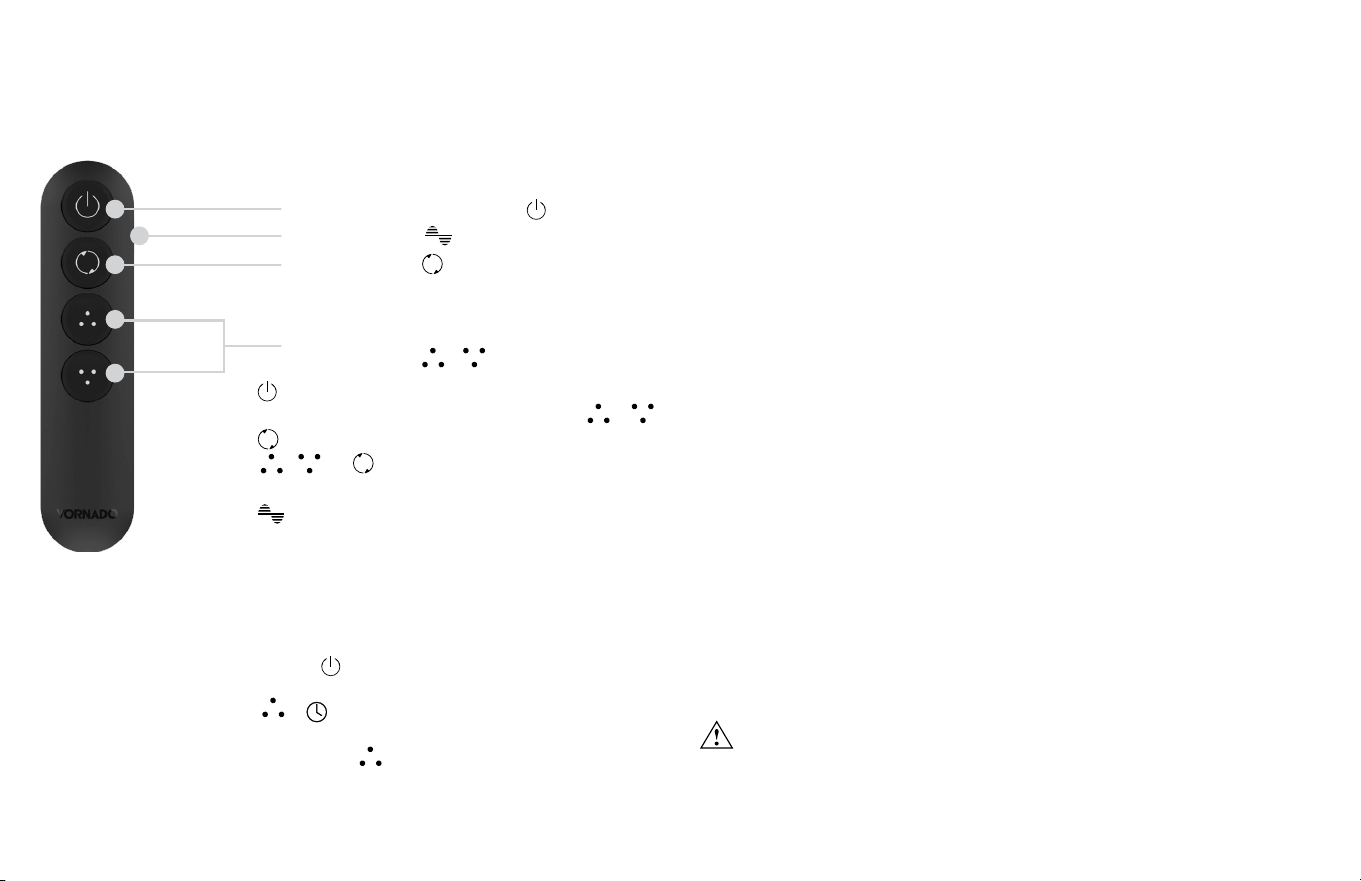
CÓMO USAR
OSCILACIÓN
PANTALLA
ENCENDIDO/APAGADO
MODO BRISA
TEMPORIZADOR
AJUSTE DE LA VELOCIDAD, EL TEMPORIZADOR Y LA
OSCILACIÓN /
¿Por qué el modo Brisa?
El modo Brisa simula el movimiento natural del viento para ayudarle a relajarse,
imitando la sensación de estar al aire libre disfrutando de una brisa agradable.
Cuando está en el modo Brisa, la velocidad del ventilador fluctuará de forma
dinámica, siendo la velocidad más alta la que haya seleccionado.
24
Español
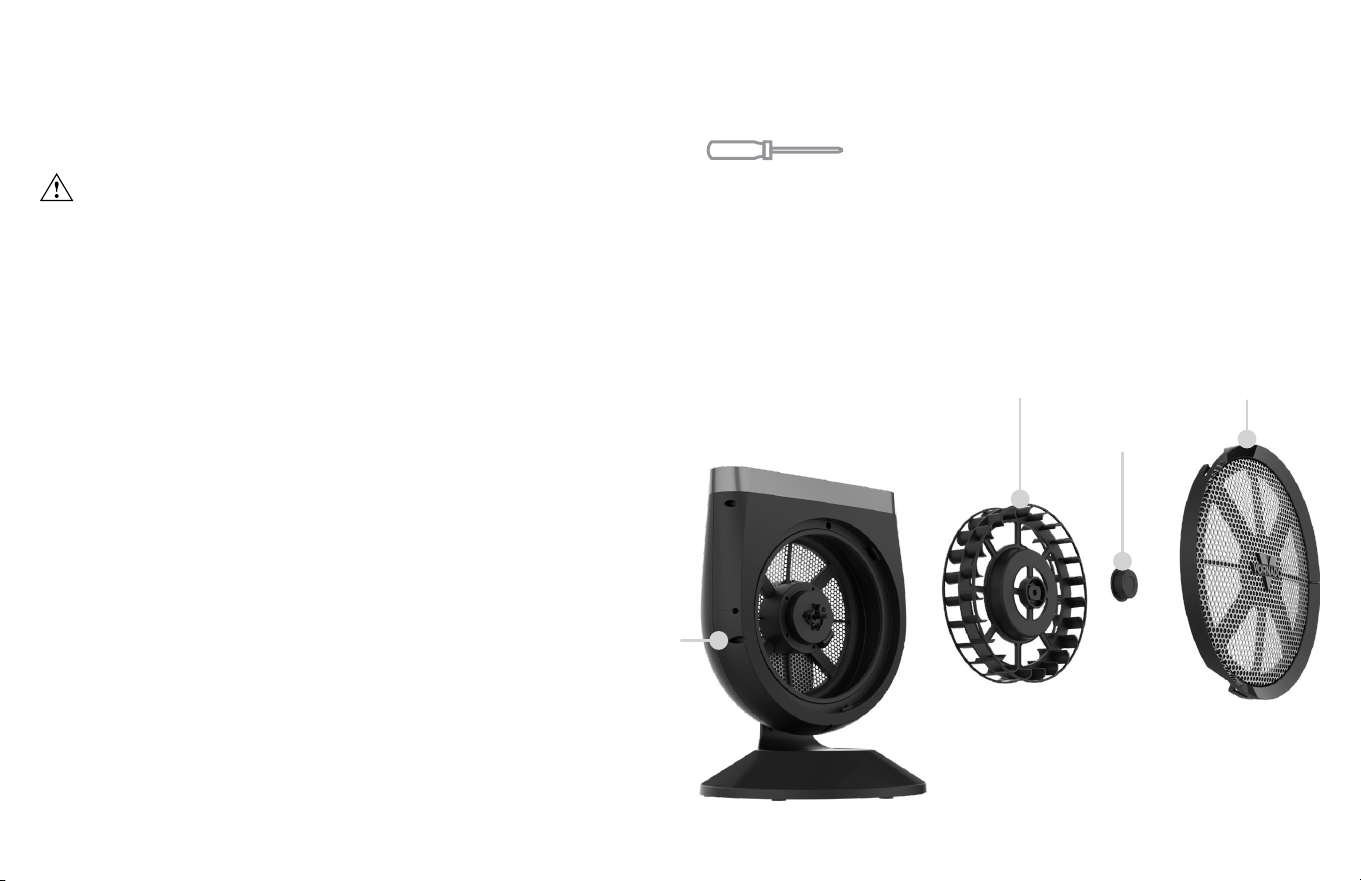
1.
Presione
para encender.
2.
Seleccione la velocidad deseada presionando
o .
3.
Presione para activar y desactivar Oscilación.
Presione , , o para alternar entre las
diferentes opciones de oscilación.
4.
Presione para activar/desactivar el modo Brisa.
CONTROL REMOTO
FUNCIONES REMOTAS CAMBIO DE BATERÍA
CONFIGURACIÓN DE CONTROL REMOTO
Su remoto incluye (1) moneda estilo CR2032 3V batería. La batería viene
preinstalada. Retire la lengüeta de la batería antes del primer uso.
Se espera que la batería preinstalada dure un año (según el uso)
después de quitar la lengüeta del control remoto.
1. Para cambiar la pila, el control remoto lleva una pila CR2032 3V de
tipo moneda. Siempre use el tamaño y la clasicación correctos de
pila para este producto.
2. Para cambiar la pila, abra la tapa del compartimiento de la pila en
la parte posterior del control remoto (deberá aojar el pequeño
tornillo de la tapa del compartimiento con un destornillador Phillips
N.º 1). Si fuese necesario, limpie los contactos de la pila y también
los del dispositivo antes de colocar la pila. Quite el protector
plástico de la pila y colóquela en el control remoto con el lado +
hacia afuera. Asegúrese de colocar correctamente la pila en relación
con la polaridad. Coloque la tapa del compartimiento de la pila
y atornille.
Nota: Quite la pila del control remoto cuando no lo usará durante
un periodo prolongado de tiempo y siempre quite la pila agotada
inmediatamente y reemplácela por una pila nueva. No guarde la pila
agotada en el control remoto.
El mando a distancia que viene con su unidad está emparejado y
listo para usar nada más sacarlo de la caja. Si necesita emparejar un
mando a distancia, siga estos pasos:
ADVERTENCIA: Este producto contiene una pila de botón. Si
se ingiere, podría causar lesiones graves o la muerte en solo 2 horas.
Busque atención médica de inmediato.
OSCILACIÓN
ENCENDIDO/APAGADO
AJUSTE DE LA VELOCIDAD Y LA
OSCILACIÓN /
1. Enchufe la unidad y presione
para encenderla.
2.
Retire completamente la lengüeta del control remoto.
3. Mantenga presionado
y
en la unidad.
La pantalla parpadeará
mostrando “00”.
4.
Presione y mantenga presionado en el control remoto durante 3
segundos.
5. El equipo se encenderá una vez que se haya emparejado
correctamente.
MODO BRISA
25
Español
CAMBIO DE BATERÍA
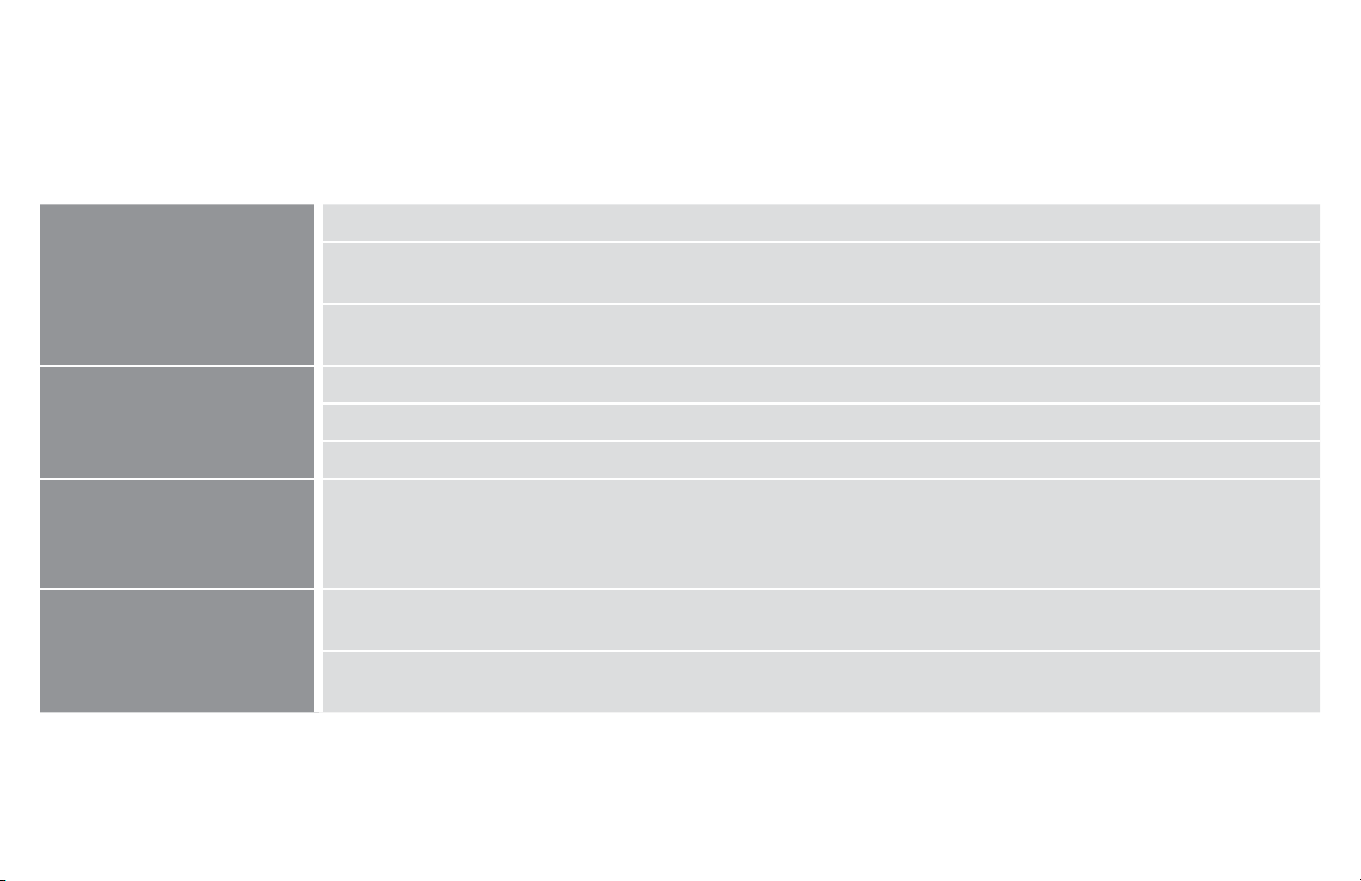
LIMPIEZA
REMOCIÓN DE LA REJILLA Se requiere un destornillador.
EXTRACCIÓN DE LA RUEDA DEL SOPLADOR
ADVERTENCIA: Para reducir el riesgo de descarga eléctrica o daños a personas, desenchufe el circulador antes de remover la rejilla y la
rueda del soplador.
1. Gire la cabeza del ventilador hacia arriba para localizar la echa en su parte inferior.
2. Retire el tornillo que indica la echa.
3. Localice las muescas en la rejilla de entrada, situadas en las posiciones de las 3 y las 9 del reloj, y gírela hacia la izquierda para retirarla.
4. Limpie el polvo que haya en la rejilla de entrada. No use agua para limpiarla ni la coloque en el lavavajillas. El agua y el calor pueden
deformarla.
5. Para volver a colocarla, insértela y gírela hacia la derecha hasta que encaje en su lugar.
6. Vuelva a colocar el tornillo.
1. Retire la perilla de liberación girándola hacia la derecha.
2. Extraiga la rueda del soplador tirando hacia afuera.
3. Limpie la rueda del soplador con un paño seco. No use
agua para limpiarla ni la coloque en el lavavajillas. El
agua y el calor pueden deformarla.
4. Para volver a colocarla, asegúrese de que el lado de
la rueda del soplador con la tuerca de metal quede
orientado hacia el aparato y alinee los lados planos del
eje y el zócalo.
5. Empuje la rueda del soplador hasta el fondo del eje.
6. Vuelva a instalar la perilla de liberación girándola hacia
la izquierda.
TORNILLO
RUEDA DEL
SOPLADOR
PERILLA DE
LIBERACIÓN
REJILLA DE
ENTRADA
Nota: Asegúrese de volver a armar el producto por completo antes
de usarlo.
26
Español
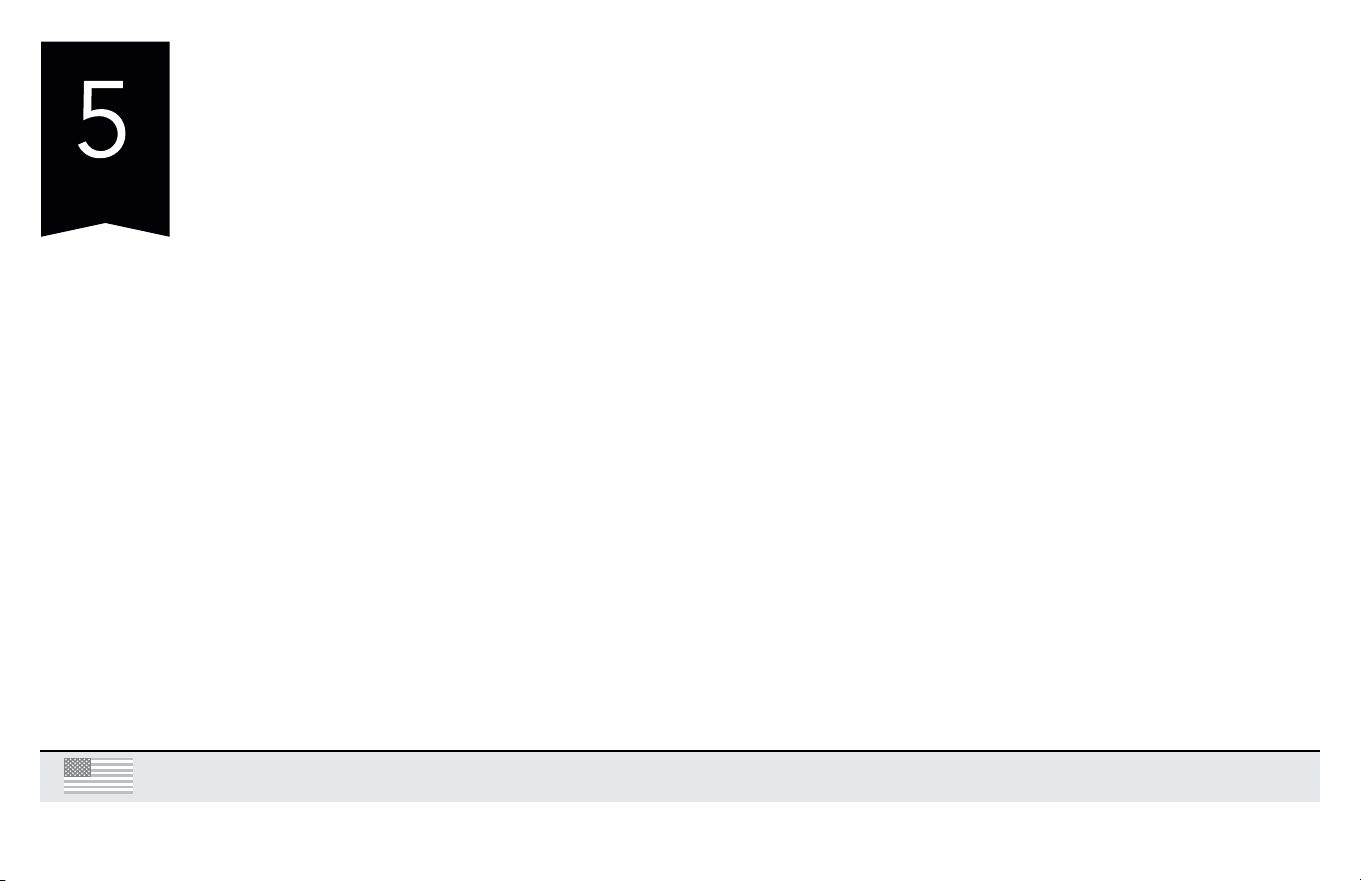
PROBLEMA POSIBLE CAUSA Y SOLUCIÓN
El artefacto no se enciende. La unidad no está enchufada. Enchufe el cable de alimentación en el tomacorriente eléctrico.
La unidad está dañada o necesita reparación. Suspenda el uso y desenchúfela. Comuníquese con el servicio
de atención al cliente para obtener asistencia.
Debe cambiarse el fusible. Consulte la sección INSTRUCCIONES DE SEGURIDAD IMPORTANTES para saber
cómo cambiar el fusible o comuníquese con el servicio de atención al cliente.
El ujo de aire es débil
olento.
La unidad está en un ajuste de velocidad baja. Ajuste a una conguración de velocidad más alta.
El ujo de aire está bloqueado. Retire la obstrucción.
Ajuste la dirección del ujo de aire hacia el usuario.
El GFCI se detiene. Bajo ciertas condiciones, es posible que un enchufe GFCI recolocado no funcione cuando el usuario
cambia la velocidad del circulador Vornado. En este caso, cambie a un enchufe que no esté conectado a un
artefacto GFCI. Asimismo, esto podría indicar que el enchufe GFCI se encuentra en mal estado o defectuoso.
Comuníquese con un electricista certicado para que verique el enchufe GFCI.
El control remoto no está
funcionando.
La batería está muerta. Cámbiela por una batería nueva CR2032 3V. Consulte la sección CONTROL REMOTO –
CAMBIO DE BATERÍA para recibir instrucciones.
El control no se ha emparejado correctamente. Consulte la sección CONFIGURACIÓN DE CONTROL
REMOTO para ver las instrucciones.
RESOLUCIÓN DE PROBLEMAS
27
Español
AÑOS
SATISFACCIÓN
GARANTIZADA
Vornado Air LLC (“Vornado”) garantiza al consumidor o comprador original que este Circulador
para todo el ambiente Vornado® (“Producto”) estará libre de defectos de materiales o
fabricación durante un periodo de cinco (5) años a partir de la fecha de adquisición. En caso de
detectarse algún defecto de este tipo dentro del periodo de garantía, Vornado, a su discreción,
reparará o reemplazará el Producto sin costo alguno.
Servicio de garantía, llame al 1-800-234-0604 o envíe un correo electrónico a help@vornado.
com para obtener un formulario de Autorización de Devolución (“RA” por sus siglas en inglés).
Cuando se comunique con Vornado por el servicio de garantía, tenga o incluya el número
de modelo y número de serie del Producto, como también su nombre, dirección, ciudad,
estado, código postal, e-mail, y número de teléfono. Para presentar un reclamo de garantía sin
contacto, visite vornado.com/contact-us.
Esta garantía no se aplica a defectos generados por abuso del Producto, modicación,
alteración, manipulación indebida, mantenimiento inadecuado, uso comercial o reparación o
servicio del Producto por parte de una persona externa a Vornado, daños producidos durante
el envío o atribuidos a hechos fortuitos. El uso inadecuado del producto, que incluye el uso
de un dispositivo externo que altera o convierte el voltaje o la frecuencia de la electricidad,
o el envío de un producto Vornado a un país donde su uso no está previsto invalidará todas
las garantías. No se recomienda la modicación no autorizada del producto, la reparación
realizada por un centro de reparaciones no autorizado, o el uso de repuestos no aprobados, y
sus consecuencias no serán cubiertas por los servicios de soporte o las garantías del producto.
La garantía del producto tendrá validez solo para los modelos que se usan en el país previsto.
LA REPARACIÓN O EL REEMPLAZO SEGÚN SE ESTABLECE EN VIRTUD DE ESTA GARANTÍA
ES UN RECURSO EXCLUSIVO DEL CONSUMIDOR. VORNADO NO SERÁ RESPONSABLE DE
LOS DAÑOS INCIDENTALES O INDIRECTOS PRODUCIDOS COMO CONSECUENCIA DEL
INCUMPLIMIENTO DE UNA GARANTÍA EXPLÍCITA O IMPLÍCITA SOBRE ESTE PRODUCTO.
SALVO QUE LA LEY APLICABLE LO PROHÍBA, LA VIGENCIA DE LA GARANTÍA IMPLÍCITA DE
APTITUD O IDONEIDAD PARA UN FIN ESPECÍFICO DE ESTE PRODUCTO ESTARÁ LIMITADA
A LA VIGENCIA DE ESTA GARANTÍA. Algunos estados no permiten la exclusión o limitación de
los daños incidentales o indirectos, o limitaciones sobre la vigencia de una garantía implícita.
Por ello, las limitaciones o exclusiones que se indican anteriormente pueden no aplicarse en su
caso. Esta garantía le otorga derechos legales especícos, y usted puede tener otros derechos
que varían entre un estado y otro. El fabricante no asume responsabilidad alguna por los daños
causados por la falta de cumplimiento de estas instrucciones o el uso inadecuado del producto.
Dichas acciones invalidarán la garantía del producto.
Los nombres de empresas y productos son marcas comerciales de sus respectivos propietarios.
© Todos los derechos reservados. La información técnica, los datos y las instrucciones para la
instalación, conexión y operación que contienen estas instrucciones de uso corresponden a la
última información disponible al momento de la impresión. El contenido de este manual puede
diferir ligeramente del producto real. Tenga en cuenta los suplementos adicionales.
GARANTÍA
Esperamos que este producto sea perfecto. Si no está satisfecho con este producto, háganoslo saber.
Estamos Aquí Para Ayudar
800.234.0604
vornado.com
© 2025 Vornado Air LLC Andover, KS 67002 Especificaciones del producto sujetas a cambio sin
previo aviso. Vornado® es marca registrado de Vornado Air LLC.
Pensado, diseñado y respaldado en U.S.A.

CL3-1136 R-, V00
Vornado Air, LLC
415 East 13th Street, Andover, Kansas 67002
800.234.0604 | vornado.com