OPERATOR'S MANUAL
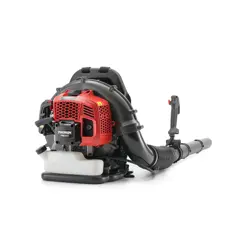
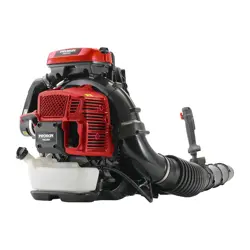
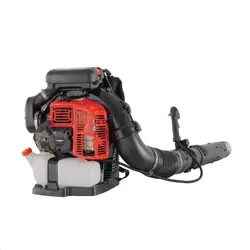
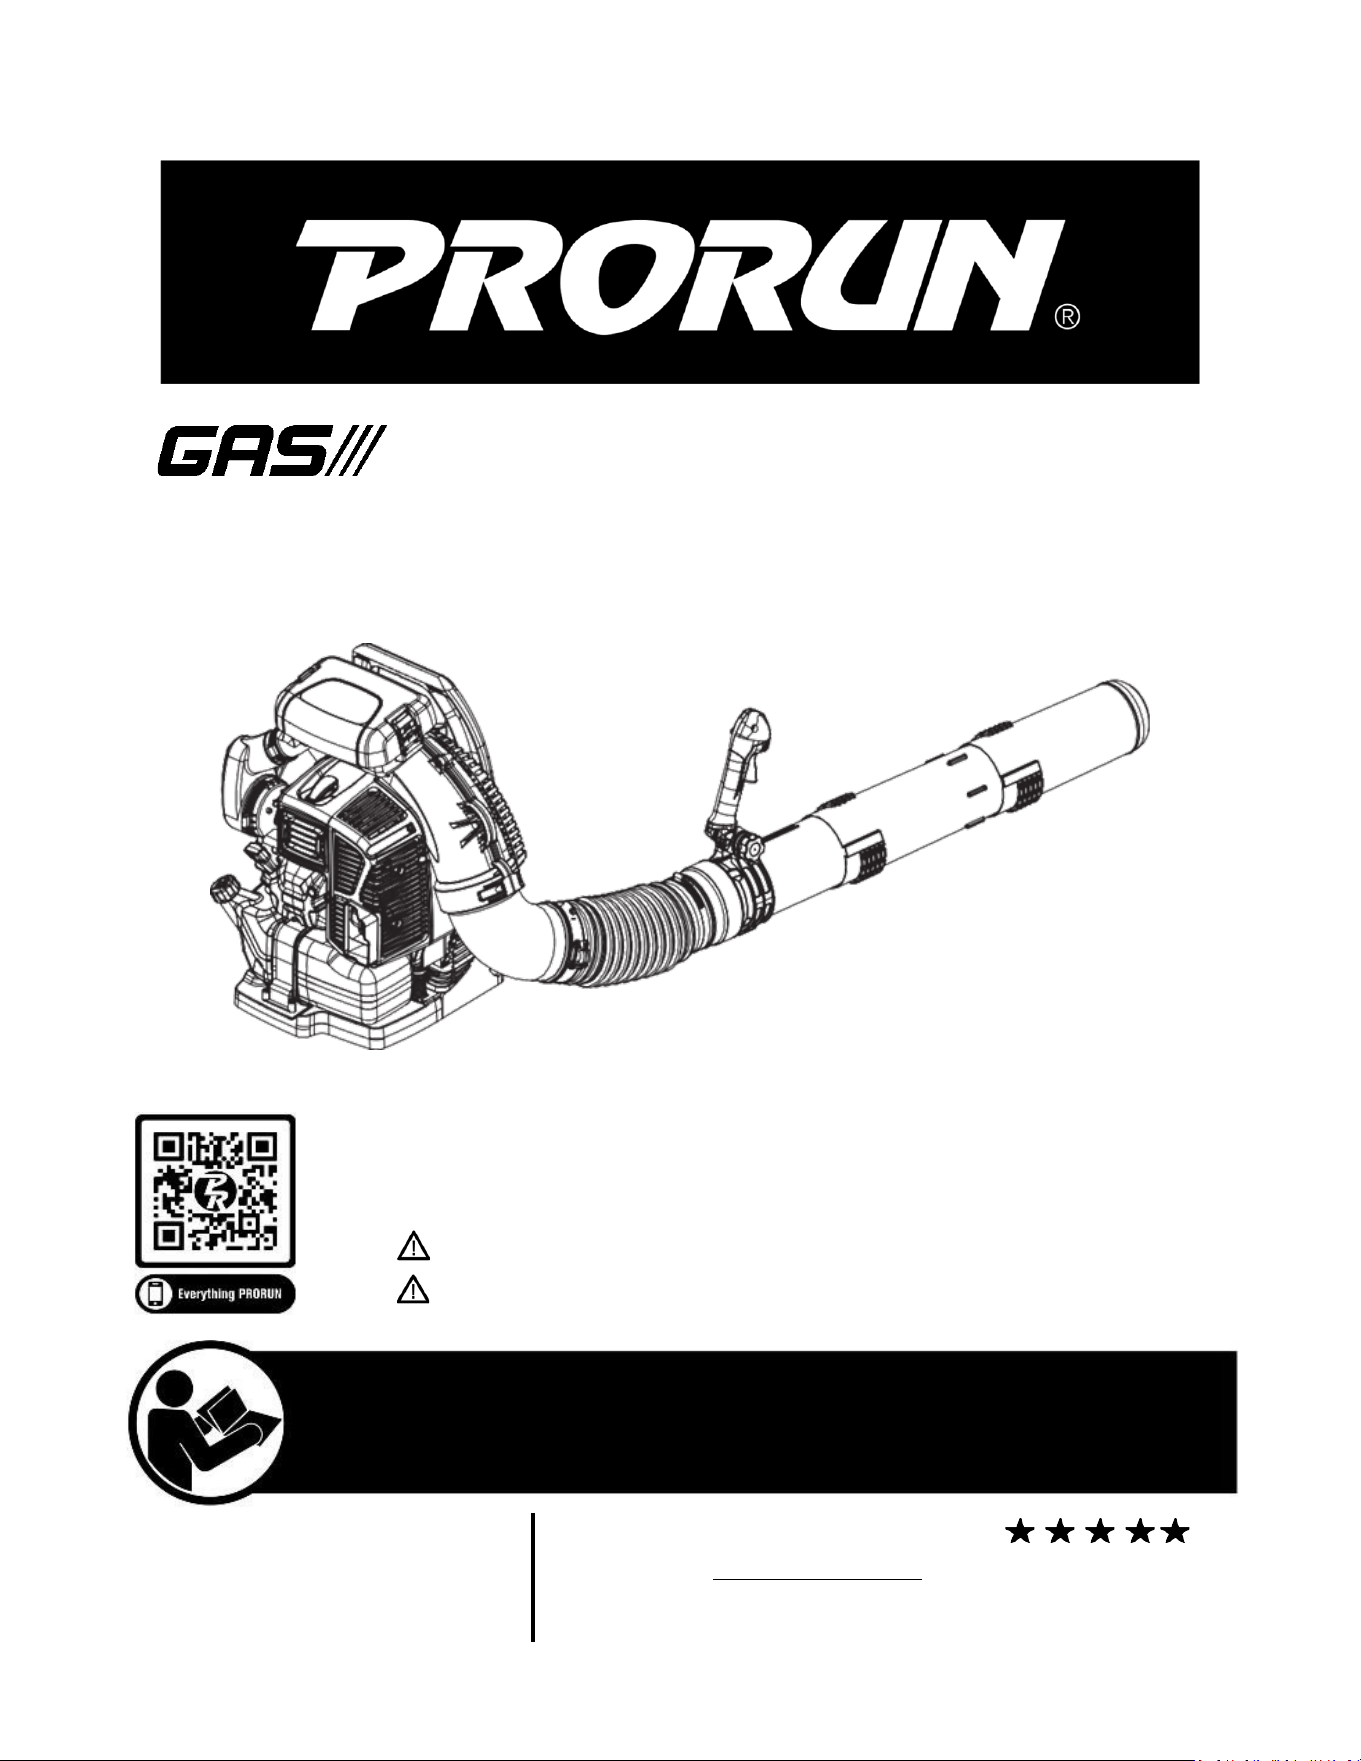
BACKPACK BLOWER
MODEL:
PBB3000
Before using, read the instrucons.
IMPORTANT – READ CAREFULLY BEFORE USE.
IMPORTANT SAFETY INSTRUCTIONS – SAVE THESE INSTRUCTIONS
WARNING: To reduce the risk of injury, the user must read and understand the
User manual before using this product. Keep these instrucons for future reference.
PRORUNTOOLS.COM
1-844-905-0882, info@proruntech.com
Version: A – Issue Date: 5/29/2025
Please let us know what
you think. To leave a comment and see our
complete product line,
Visit
:

2
PBB3000 GAS BACKPACK BLOWER
1. SPECIFICATION
Model
PBB3000
Displacement
79.8cc
Engine Type
Single Cylinder 2-stroke
Power Output
4.4kW
Cooling System
Forced air cooled
Fuel
Type
87+ octane stabilizer-treated
unleaded
gasoline containing no more than 10% ethanol
(E10)
with 2-Stroke oil (see below)
Capacity
115 fl. oz.
Oil
Type
2-Stroke oil must meet either JASO M345 FD or ISO-L-EGD
requirements
for air-cooled engines,
synthetic
Ratio
50:1 gasoline-to-oil ratio
2.6
oz oil per gallon of gasoline
Spark Plug
Type
Champion
®
RZ7C /
Bosch
®
USR7AC NGK
®
CMR7H
Gap
0.02"
Speed
Idle
3000 ± 400RPM
Maximum
8000 RPM
Rotation viewed from PTO
(power takeoff - the output shaft)
Anticlockwise
Sound Level at 50 feet
80 dB
Run Time @ full throttle
90 minutes

3
2. TABLE OF CONTENTS
1. SPECIFICATION 2
2. TABLE OF CONTENTS 3
3. SAFETY 4
4. SET UP 10
5. OPERATION 12
6. MAINTENANCE 16
7. TROUBLESHOOTING 22
8. PARTS LIST AND DIAGRAM 24
4
PBB3000 GAS BACKPACK BLOWER
3. SAFETY
WARNING SYMBOLS AND DEFINITIONS
This is the safety alert symbol. It is used to alert you to potenal personal injury
hazards. Obey all safety messages that follow this symbol to avoid possible injury or
death.
DANGER
Indicates a hazardous situaon which, if not avoided,
will result in death or serious injury.
WARNING
Indicates a hazardous situaon which, if not avoided, could result in death or
serious injury.
CAUTION
Indicates a hazardous situaon which, if not avoided, could result in minor or
moderate injury.
NOTICE
CAUTION
Addresses pracces not related to personal injury.
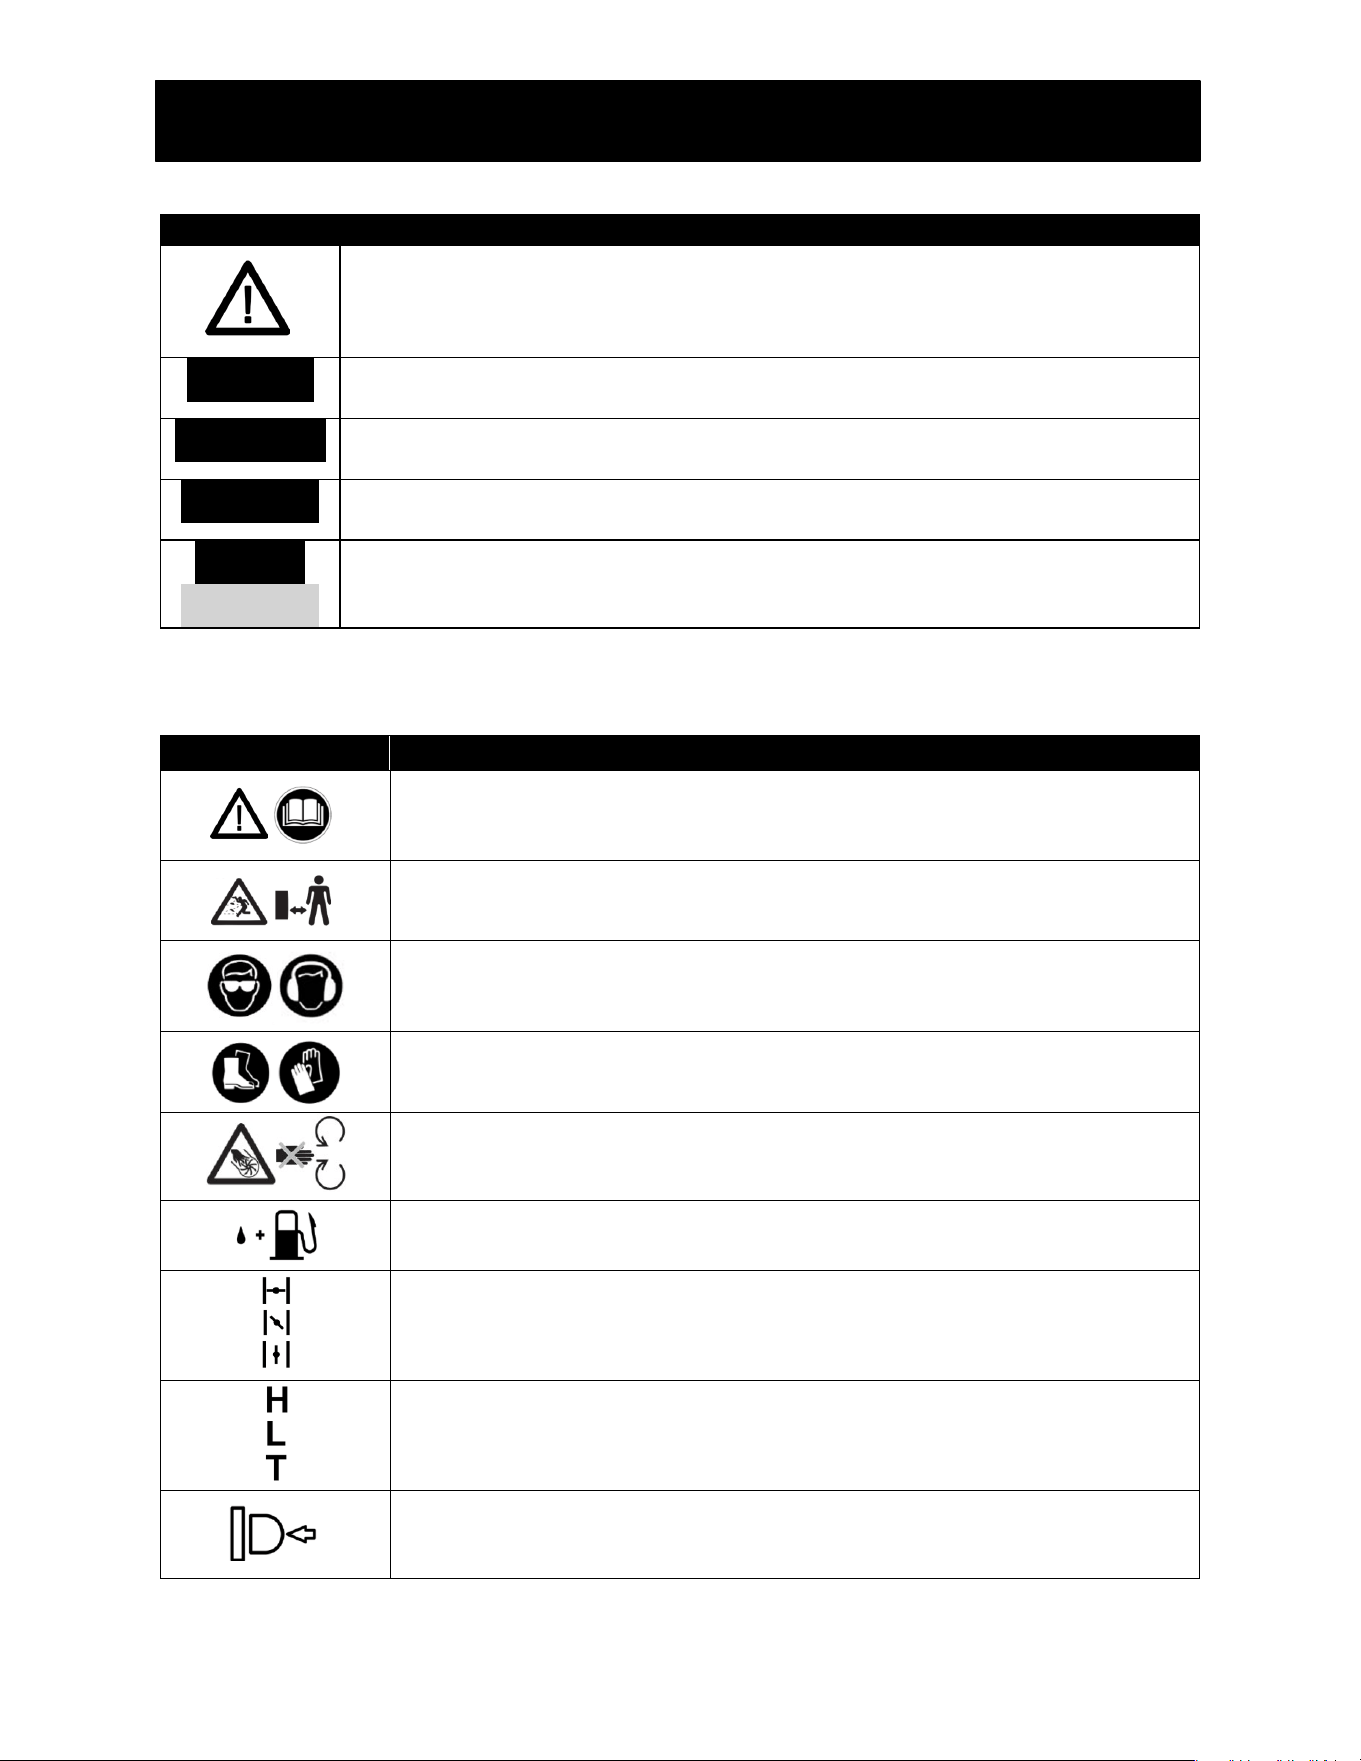
SYMBOL DEFINITIONS
Symbol
Property or Statement
WARNING! Read the operator’s manual(s) and follow all warnings and safety
instrucons.
Failure to do so can result in serious injury to the operator and/or by standers.
Beware of thrown or blown objects, dust or other debris. Keep all persons
away from the work area whilst using.
If you are using the machine every day in normal condions, you can be
exposed to a noise level of 85 dB
(A) or higher. Wear safety glasses and hearing protecon.
Wear gloves and protecve footwear!
Danger of dismemberment! Never use the machine with the grille open.
Don't put your hand into the volute or tube.
Fuel mixture tank
Close the choke
Half close the choke
Open the choke
The screw under the "H" stamp is The High-speed mixture adjustment screw.
The screw under the "L" stamp is The Low-speed mixture adjustment screw.
The screw up the "T" stamp is the idle speed adjustment screw.
Press the direcon of the Primer Bulb.

5
Turn the switch knob towards the "STOP" marking, immediately the engine
stops.
IMPORTANT SAFETY INSTRUCTIONS
SAVE THESE INSTRUCTIONS
This manual contains important instrucons that should be followed during setup, operaon
and maintenance of the Blower.
Set up Precauons
1. Gasoline fuel and fumes are flammable, and potenally explosive. Use proper fuel storage
and handling procedures. Do not store fuel or other flammable materials nearby.
2. Have mulple ABC class fire exnguishers nearby.
3. Operaon of this equipment may create sparks that can start fires around dry vegetaon.
A spark arrestor may be required. The operator should contact local fire agencies for laws
or regulaons relang to fire prevenon requirements
4. Set up and use only on a flat, level, well-venlated surface.
5. Wear goggles, heavy-duty work gloves, and dust mask/respirator during use.
6. Use only lubricants and fuel recommended in the Specificaons chart of this manual
General Safety Instrucons
WARNING!
To reduce the risk of fire, or injury:
1. Personal Protecve Equipment. To reduce the risk of hearing loss associated with sound
levels, hearing protecon is required. To reduce the risk of injury associated with thrown
objects, always wear eye protecon. Eye protecon should meet the requirement of ANSI
Z87.1. To reduce the risk of injury associated with the inhalaon of dust, use a face filter
mask in dusty condions.
2. Physical Condion of Operator. Do not operate this unit when red, ill, or under the
influence of alcohol, drugs, or medicaon.
3. Clothing Recommendaon. Always wear heavy, long pants, boots, gloves, and a long-
sleeve shirt. To reduce the risk of injury associated with objects being drawn into rotang
parts, do not wear loose clothing, scarves, jewelry, etc. Secure hair so it is above shoulder
level.
4. Condion of Unit before Use. Inspect unit before each use. Replace damaged parts. Check
for fuel leaks. Make sure all visible fasteners are in place and secure. Make sure
aachments are properly installed and securely fastened. Be sure guards are properly
aached and in the posion recommended by the manufacturer.
5. Proper Stance. Keep firm foong and balance. Do not over-reach. Keep all parts of your
body away from hot surfaces.
6. Exhaust Gases. Never start or run the unit inside a closed room or building; breathing
exhaust fumes can kill.
7. Fueling. Mix and pour fuel outdoors where there are no sparks or flames. Slowly remove
the fuel cap only aer stopping the engine. Do not smoke while fueling or mixing fuel.
Wipe spilled fuel from the unit. Move at least 3 m (10 ) away from the fueling source and

6
PBB3000 GAS BACKPACK BLOWER
site before starng engine. Always store gasoline in a container approved for flammable
liquids.
8. Work Area. Clear the area of children, bystanders, and pets. At a minimum, keep all
children, bystanders, and pets outside a 15 m (50 ) radius; outside the 15 m (50 ) zone,
there is sll a risk of injury from thrown objects. Bystanders should be encouraged to wear
eye protecon. If you are approached, stop the engine.
9. Work from Ladders or on High Surfaces. Work from ladders or high places (such as roofs)
is prohibited and could result in severe injury.
10. Transportaon and Storage of the Unit. The operator’s manual should provide
transportaon and long- and short-term storage instrucons.
11. Service Work. To reduce the risk of injury associated with contacng rotang parts, stop
the engine before installing or removing aachments. Do not operate without guards in
place. Always disconnect the spark plug before performing maintenance or accessing
movable parts.
12. Addional Operang Recommendaons for Blowers and Blower Vacuums. Operate
power equipment only at reasonable hours--not early in the morning or late at night when
people might be disturbed. Comply with mes listed in local ordinances. To reduce sound
levels, limit the number of pieces of equipment used at any one me. Operate blowers at
the lowest possible engine speed to do the job. Use rakes and brooms to loosen debris
before blowing. In dusty condions, slightly dampen surfaces or use mister aachment
when water is available. Conserve water by using blowers instead of hoses for many lawn
and garden applicaons, including areas such as guers, screens, paos, grills, porches,
and gardens. Avoid blowing debris towards people, pets, open windows, or cars when
using unit. Use the full blower nozzle extension when blowing.
13. Aer using blowers and other equipment, CLEAN UP! Dispose of debris in trash
receptacles.
14. Do not allow to be used as a toy. Close aenon is necessary when used by or near
children.
15. Use only as described in this manual. Use only manufacturerʹs recommended aachments.
16. If appliance is not working as it should, has been dropped, damaged, le outdoors, or
dropped into water, return it to a service center.
17. Do not handle appliance with wet hands.
18. Do not put any object into openings. Do not use with any opening blocked; keep free of
dust, lint, hair, and anything that may reduce air flow.
19. Keep hair, loose clothing, fingers, and all parts of body away from openings and moving
parts.
20. Use extra care when cleaning on stairs.
21. Do not use to pick up flammable or combusble liquids, such as gasoline, or use in areas
where they may be present.
22. Do Not Use In Rain.
23. Wear goggles, hard hat and heavy-duty rubber work gloves. Use face or dust mask if
operaon is mask if operaon is dusty.

7
24. Use Right Appliance - Do not use appliance for any job except that for which it is intended.
25. Do Not Force Appliance - It will do the job beer and with less likelihood of injury at the
rate for which it was designed.
26. Do not Overreach - Keep proper foong and balance at all mes.
27. Stay Alert - Watch what you are doing. Use common sense. Do not operate appliance when
you are red.
28. Store Idle Appliances Indoors - When not in use, appliances should be stored indoors in
dry, and high or locked-up place - out of reach of children.
29. Maintain Appliance With Care. Follow instrucons for lubricang and changing accessories.
Keep handles dry, clean, and free from oil and grease.
30. Check Damaged Parts - Before further use of the appliance, a guard or other part that is
damaged should be carefully checked to determine that it will operate properly and
perform its intended funcon. Check for alignment of moving parts, binding of moving
parts, breakage of parts, mounng, and any other condion that may affect its operaon.
A guard or other part that is damaged should be properly repaired or replaced by a
qualified technician unless indicated elsewhere in this manual.
31. Remove all hard objects from work area.
32. Do not blow debris in the direcon of people, animals or property.
33. Use only accessories provided. 33. Maintain labels and nameplates on the appliance. These
carry important safety informaon. If unreadable or missing, contact dealer for a
replacement.
34. 34.People with pacemakers should consult their physician(s) before use. Electromagnec
fields in close proximity to heart pacemakers could cause pacemaker interference or
pacemaker failure. The warnings, precauons, and instrucons discussed in this instrucon
manual cannot cover all possible condions and situaons that may occur.
It must be understood by the operator that common sense and cauon are factors which
cannot be built into this product but must be supplied by the operator.
Operang Precauons
1. Keep children away from the equipment, especially while it is in use.
2. Keep all spectators at least fieen feet from the Engine during operaon.
3. Fire Hazard! Do not fill fuel tank while engine is running. Do not operate if gasoline has
been spilled. Clean spilled gasoline before starng engine. Do not operate near pilot light
or open flame.
4. Do not touch engine during use. Allow engine to cool down aer use.
5. Never store fuel or other flammable materials near the engine.
6. Secure the equipment on transport vehicles to prevent it from rolling, slipping, and lng.
7. Industrial applicaons must follow OSHA requirements.
8. Do not leave the equipment unaended when it is running. Turn off the equipment before
leaving the work area.
9. The equipment can produce high noise levels. Prolonged exposure to noise levels above 85
dBA is hazardous to hearing. Wear ear protecon when operang or when working nearby
while it is operang.

8
PBB3000 GAS BACKPACK BLOWER
10. Wear glasses and hearing protecon during use.
11. People with pacemakers should consult their physician(s) before use. Electromagnec
fields in close proximity to a heart pacemaker could cause pacemaker interference or
pacemaker failure. Cauon is necessary when near the engine’s magneto or recoil starter.
12. Use only accessories that are recommended by manufacturer for your model. Accessories
that may be suitable for one piece of equipment may become hazardous when used on
another piece of equipment.
13. Do not operate in explosive atmospheres, such as in the presence of flammable liquids,
gases, or dust. Gasoline-powered engines may ignite the dust or fumes.
14. Stay alert, watch what you are doing and use common sense when operang this piece of
equipment. Do not use when red, ill, or under the influence of drugs, alcohol or
medicaon.
15. Do not overreach. Keep proper foong and balance at all mes. This enables beer control
of the equipment in unexpected situaons.
16. Dress properly. Do not wear loose clothing or jewelry. Keep hair, clothing and gloves away
from moving parts. Loose clothes, jewelry or long hair can be caught in moving parts.
17. Parts, especially exhaust system components, get very hot during use. Stay clear of hot
parts.
18. Do not cover the equipment during operaon.
19. Keep the equipment, engine, and surrounding area clean at all mes.
20. Do not smoke, or allow sparks, flames, or other sources of ignion around the equipment,
especially when refueling.
21. Use the equipment, accessories, etc., in accordance with these instrucons and in the
manner intended for the parcular type of equipment, taking into account the working
condions and the work to be performed. Use of the equipment for operaons different
from those intended could result in a hazardous situaon.
22. Do not operate the equipment with known leaks in the engine’s fuel system.
23. When spills of fuel or oil occur, they must be cleaned up immediately. Dispose of fluids and
cleaning materials as per any local, state, or federal codes and regulaons. Store oil rags in
a boom-venlated, covered, metal container.
24. Keep hands and feet away from moving parts. Do not reach over or across equipment
while operang.
25. Before use, check for misalignment or binding of moving parts, breakage of parts, and any
other condion that may affect the equipment’s operaon. If damaged, have the
equipment
26. serviced before using. Many accidents are caused by poorly maintained equipment.
27. Use the correct equipment for the applicaon. Do not modify the equipment and do not
use the equipment for a purpose for which it is not intended.
Service Precauons
1. Before service, maintenance, or cleaning:
a. Turn the engine switch to its “OFF” posion.
b. Allow the engine to completely cool.
c. Then, remove the spark plug cap from the spark plug.

9
2. Keep all safety guards in place and in proper working order. Safety guards include muffler,
air cleaner, mechanical guards, and heat shields, among other guards.
3. Do not alter or adjust any part of the equipment or its engine that is sealed by the
manufacturer or distributor. Only a qualified service technician may adjust parts that may
increase or decrease governed engine speed.
4. Wear goggles, heavy-duty work gloves, and dust mask/respirator during service.
5. Maintain labels and nameplates on the equipment.
These carry important informaon. If unreadable or missing, contact dealer for a
replacement.
6. Have the equipment serviced by a qualified repair person using only idencal replacement
parts. This will ensure that the safety of the equipment is maintained. Do not aempt any
service or maintenance procedures not explained in this manual or any procedures that
you are uncertain about your ability to perform safely or correctly.
7. Store equipment out of the reach of children.
8. Follow scheduled engine and equipment maintenance.
Refueling:
1. Do not refill the fuel tank while the engine is running or hot.
2. Do not smoke, or allow sparks, flames, or other sources of ignion around the equipment,
especially when refueling.
3. Do not fill fuel tank to the top. Leave a lile room for the fuel to expand as needed, at least
1ʺ from top of the neck. TO PREVENT FUEL LEAKAGE AND FIRE HAZARD, do not fill fuel
above the boom of the threads.
4. Refuel in a well-venlated area only.
5. Wipe up any spilled fuel and allow excess to evaporate before starng engine. To prevent
FIRE, do not start the engine while the smell of fuel hangs in the air.
10
PBB3000 GAS BACKPACK BLOWER
4. SET UP
Read the ENTIRE IMPORTANT SAFETY INFORMATION secon at the beginning of this
manual including all text under subheadings therein before set up or use of this product.
WARNING!
TO PREVENT SERIOUS INJURY:
Operate only with proper spark arrestor installed.
Operaon of this equipment may create sparks that can start fires around dry
vegetaon.
A spark arrestor may be required.
The operator should contact local fire agencies for laws or regulaons relang
to fire prevenon requirements.
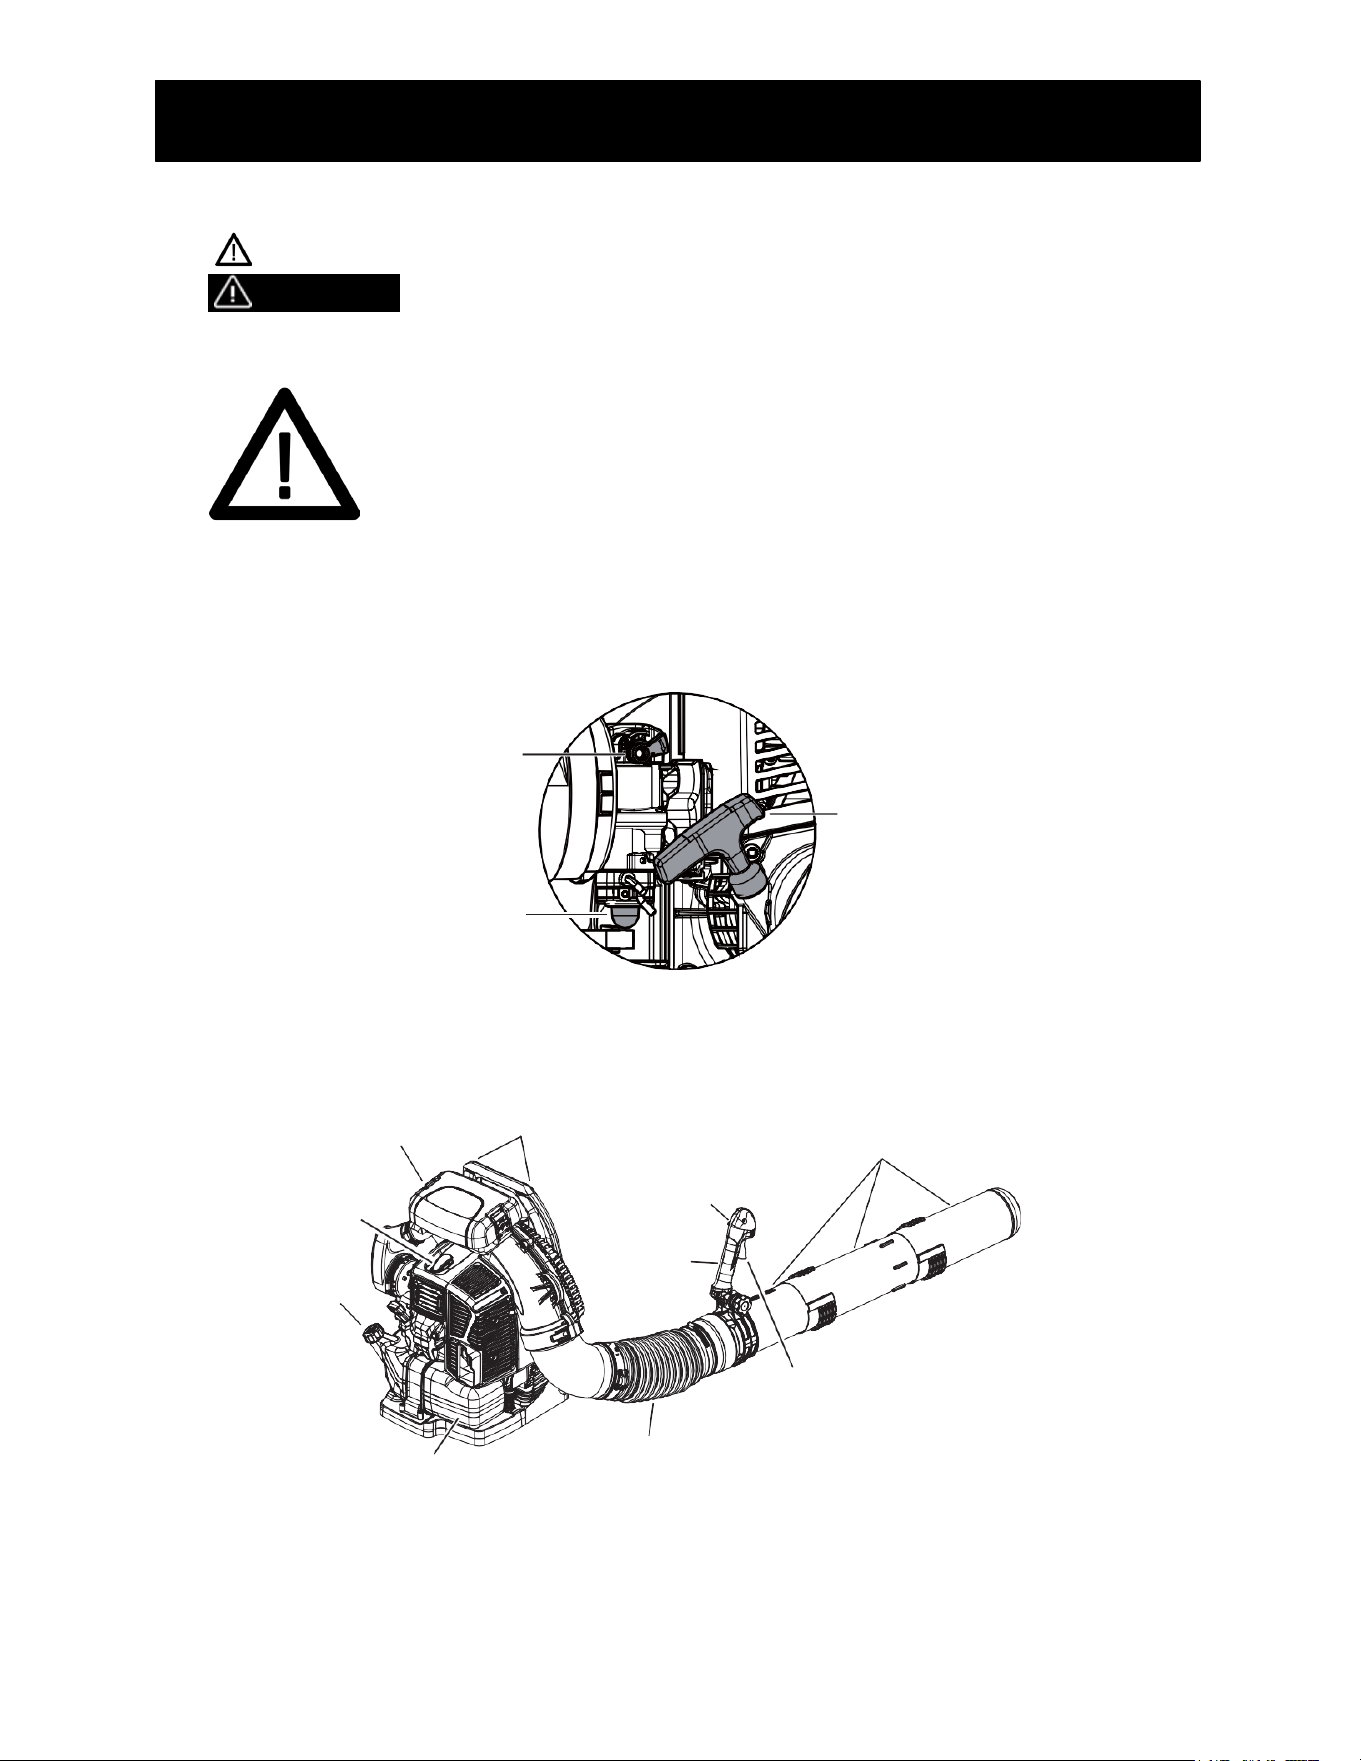
Components and Controls
Choke
Knob
Throttle
Purge Bulb
Starter
Handle
Shoulder
Harness
Air Cleaner
Spark
Plug
Fuel
Tank
Cap
Fuel
Tank
Flexible Pipe
Throttle Trigger
Blower Pipe
Handle
Engine Switch /
Throttle Position Lever
11
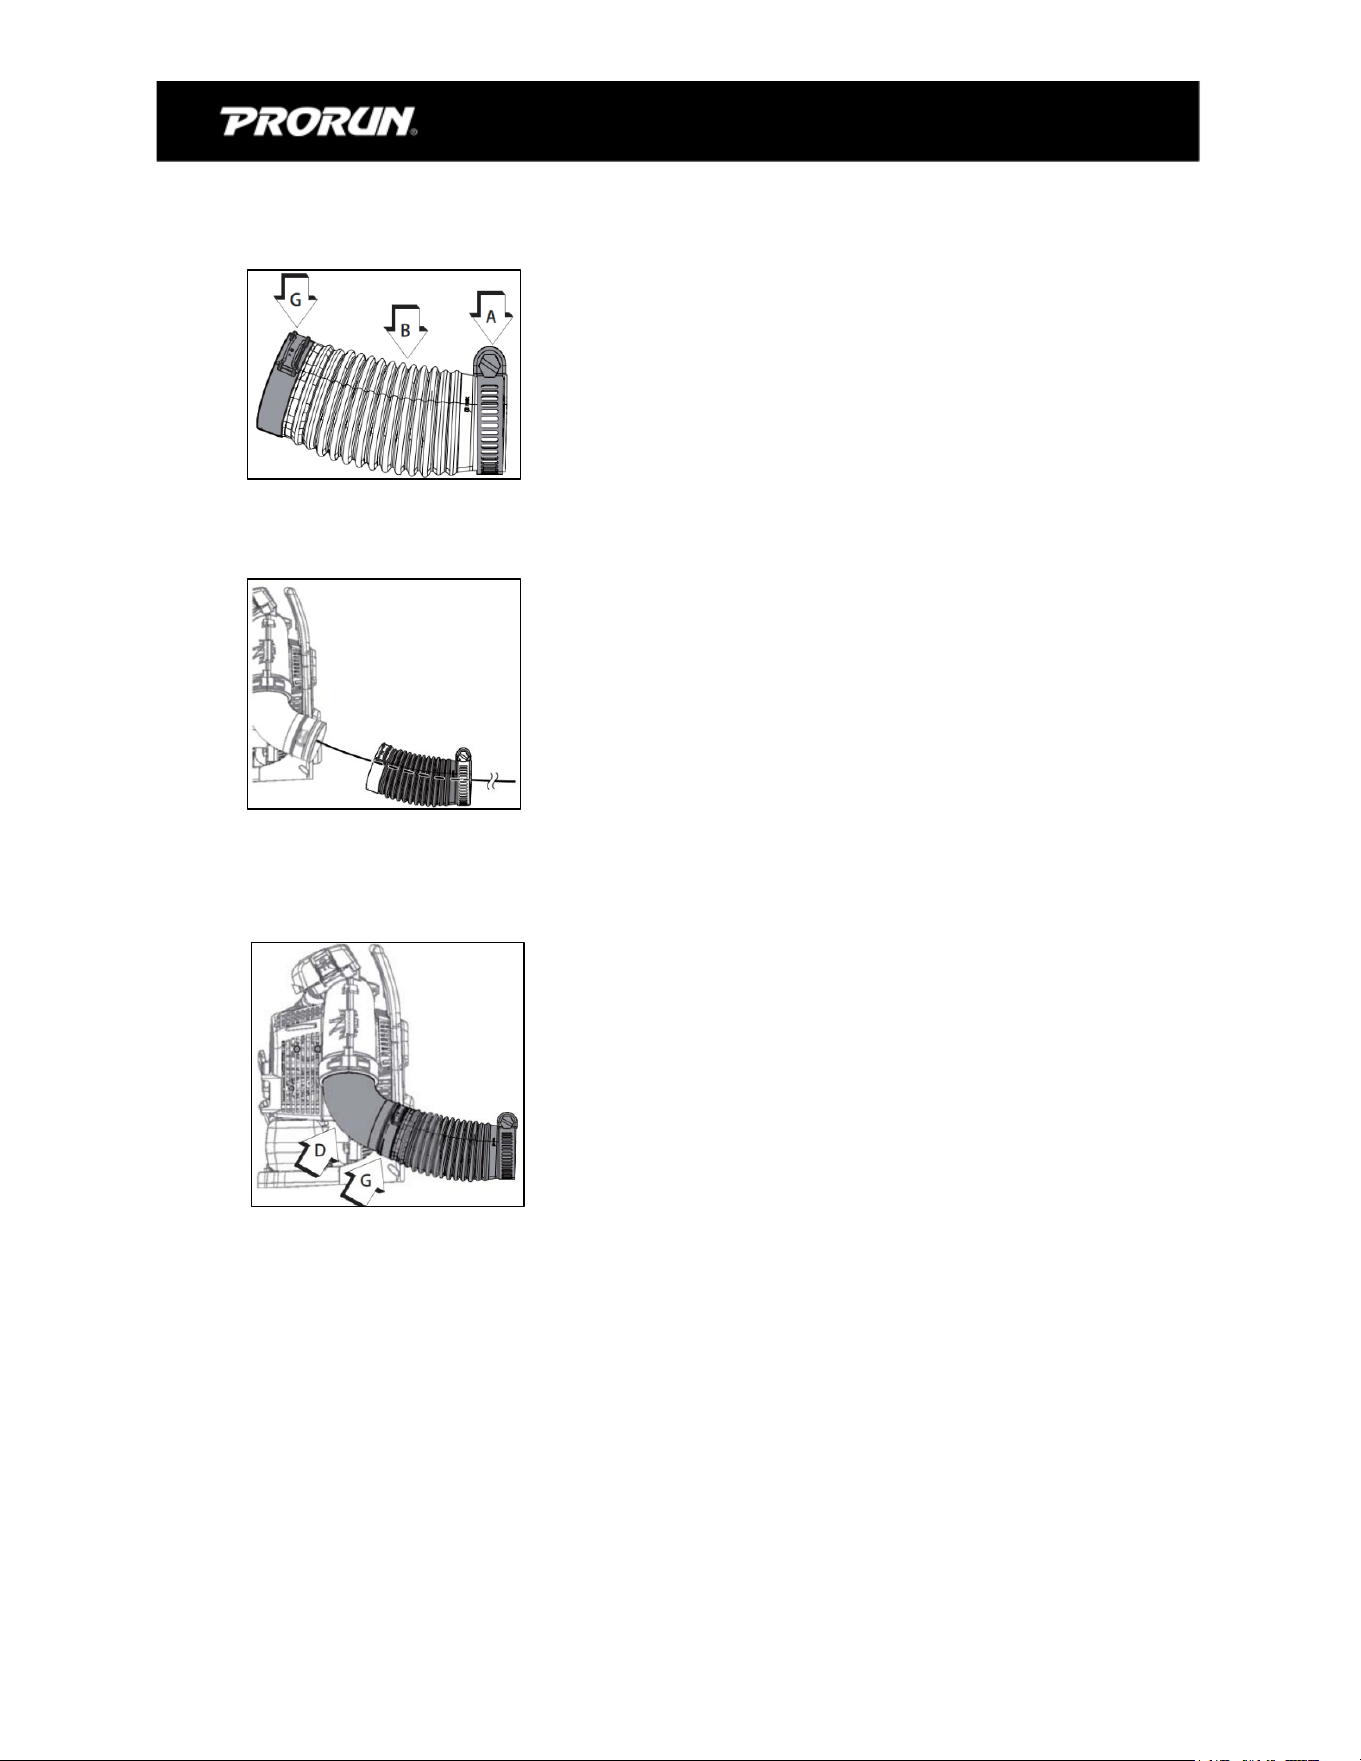
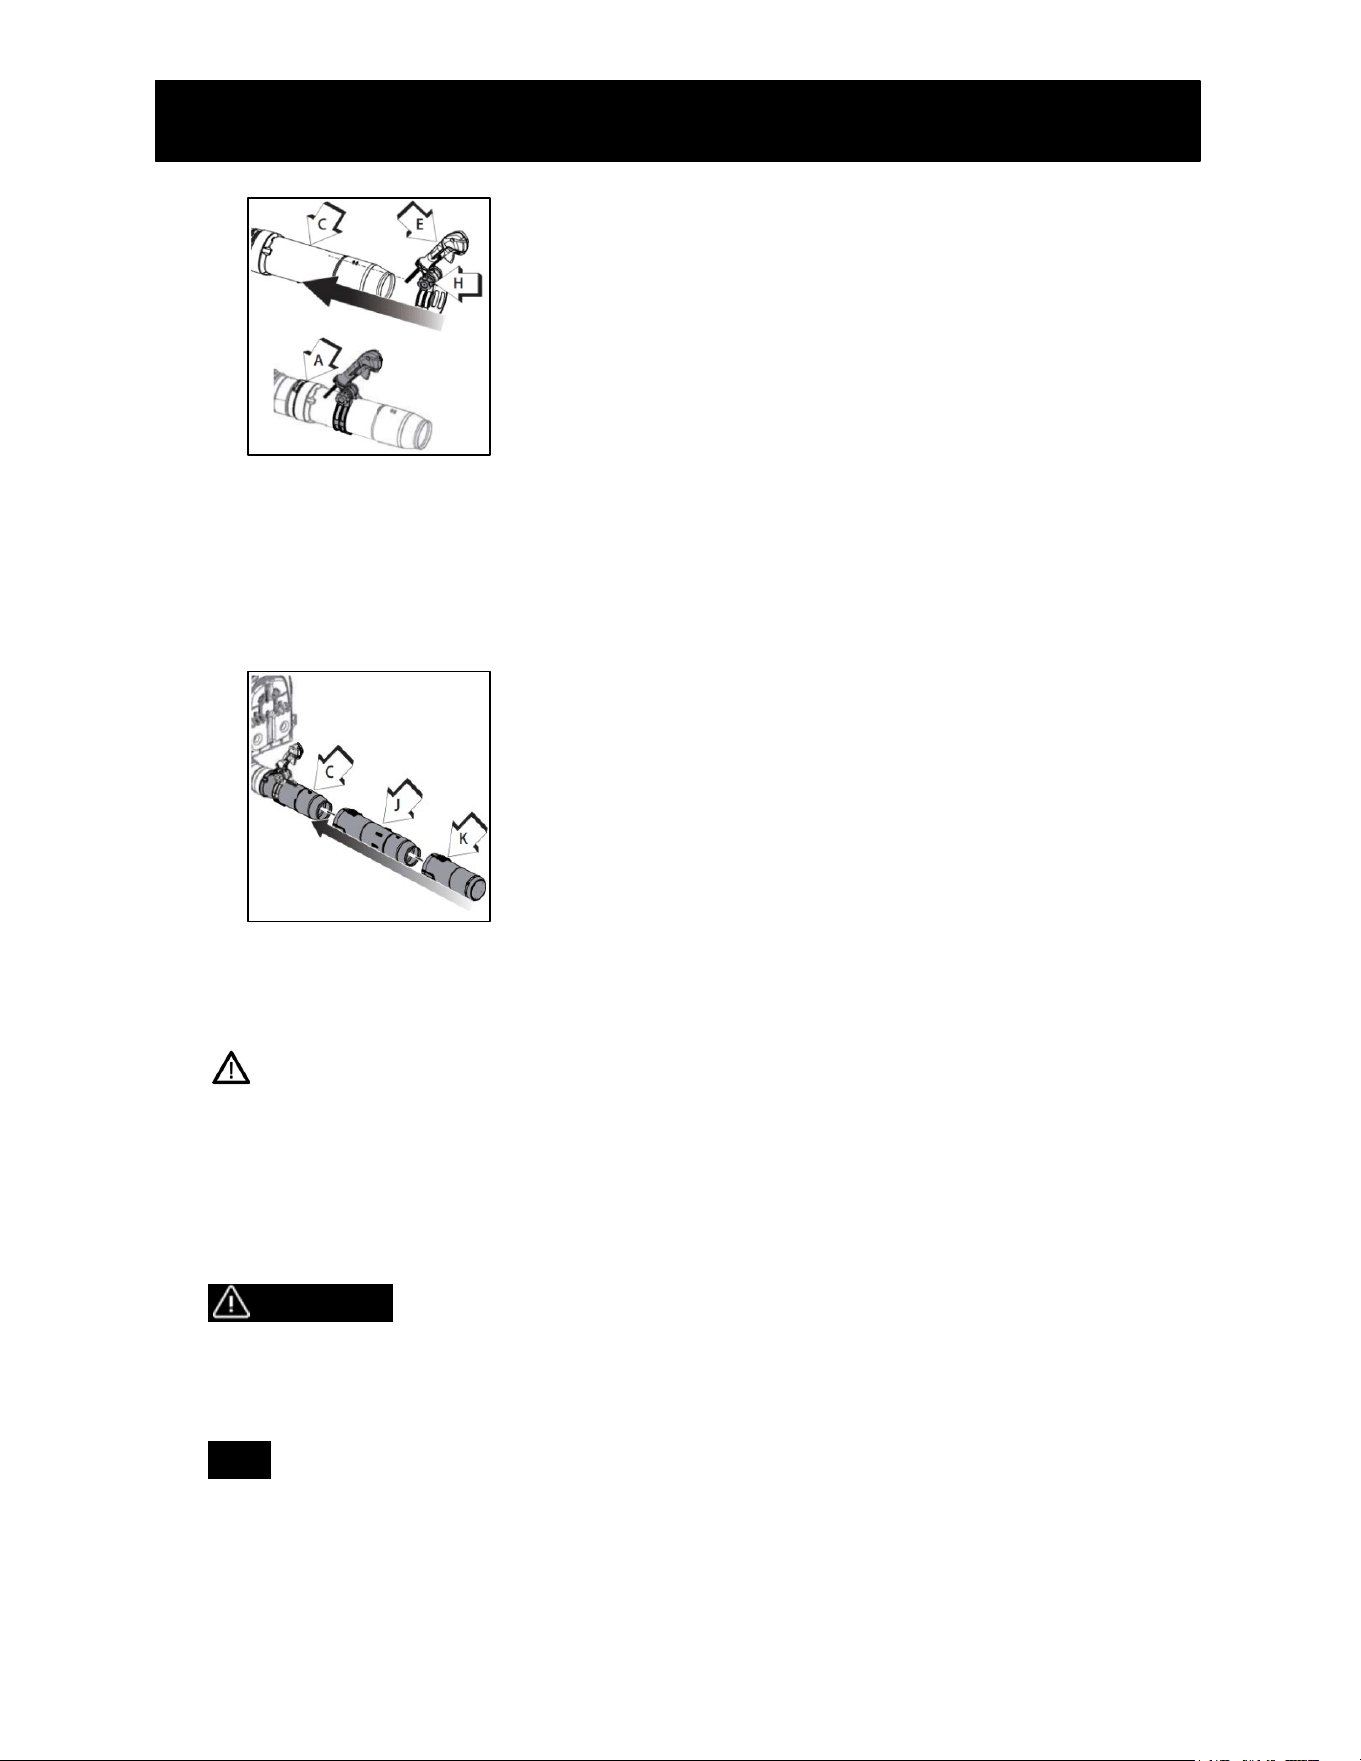
Assembling Blower Tube and Control Handle
1. Assemble clamps (A) and (G) onto both ends of flexible pipe (B). Note: Clamp with cable
guide loop (G) fits elbow end of flexible pipe.
2. Insert an-stac wire through flex tube. Note: A light lubricant may be used to ease
assembly of flexible pipe to blower elbow.
3. Assemble flexible pipe to elbow (D) on blower. Posion clamp with cable guide loop (G) on
outside of flexible pipe and ghten clamp. Note: Hang handle freely from blower to assure
throle cable is not twisted before installing handle (E).
4. Posion throle cable along the outside of elbow. Loosen knob (H) on handle (E). Install
onto swivel pipe (C).
5. Insert an-stac wire into swivel pipe.
6. Assemble swivel pipe into flexible pipe and ghten clamp (A).
7. Clip throle cable into throle cable guide loop.
12
PBB3000 GAS BACKPACK BLOWER
8. Move handle (E) to desired posion. Tighten knob (H).
9. Assemble straight pipe (J) onto swivel pipe, unl you feel light resistance. Hold swivel pipe
and turn straight pipe clockwise, engaging posive locking channels, unl connecon is
firm. Do not force connecon.
10. Assemble end pipe (K) to straight pipe as in step 9.
Note: Blower use will eventually loosen pipe connecons. Exclusive posive locking system
allows pipes to be ghtened. If loosening occurs, remove two straight pipes and install
according to steps 9 and 10.
5. OPERATION
Read the ENTIRE IMPORTANT SAFETY INFORMATION secon at the beginning of this
manual including all text under subheadings therein before set up or use of this product.
Checking before Starng
Inspect the engine and equipment looking for damaged, loose, and missing parts before set up
and starng. If any problems are found, do not use equipment unl fixed properly.
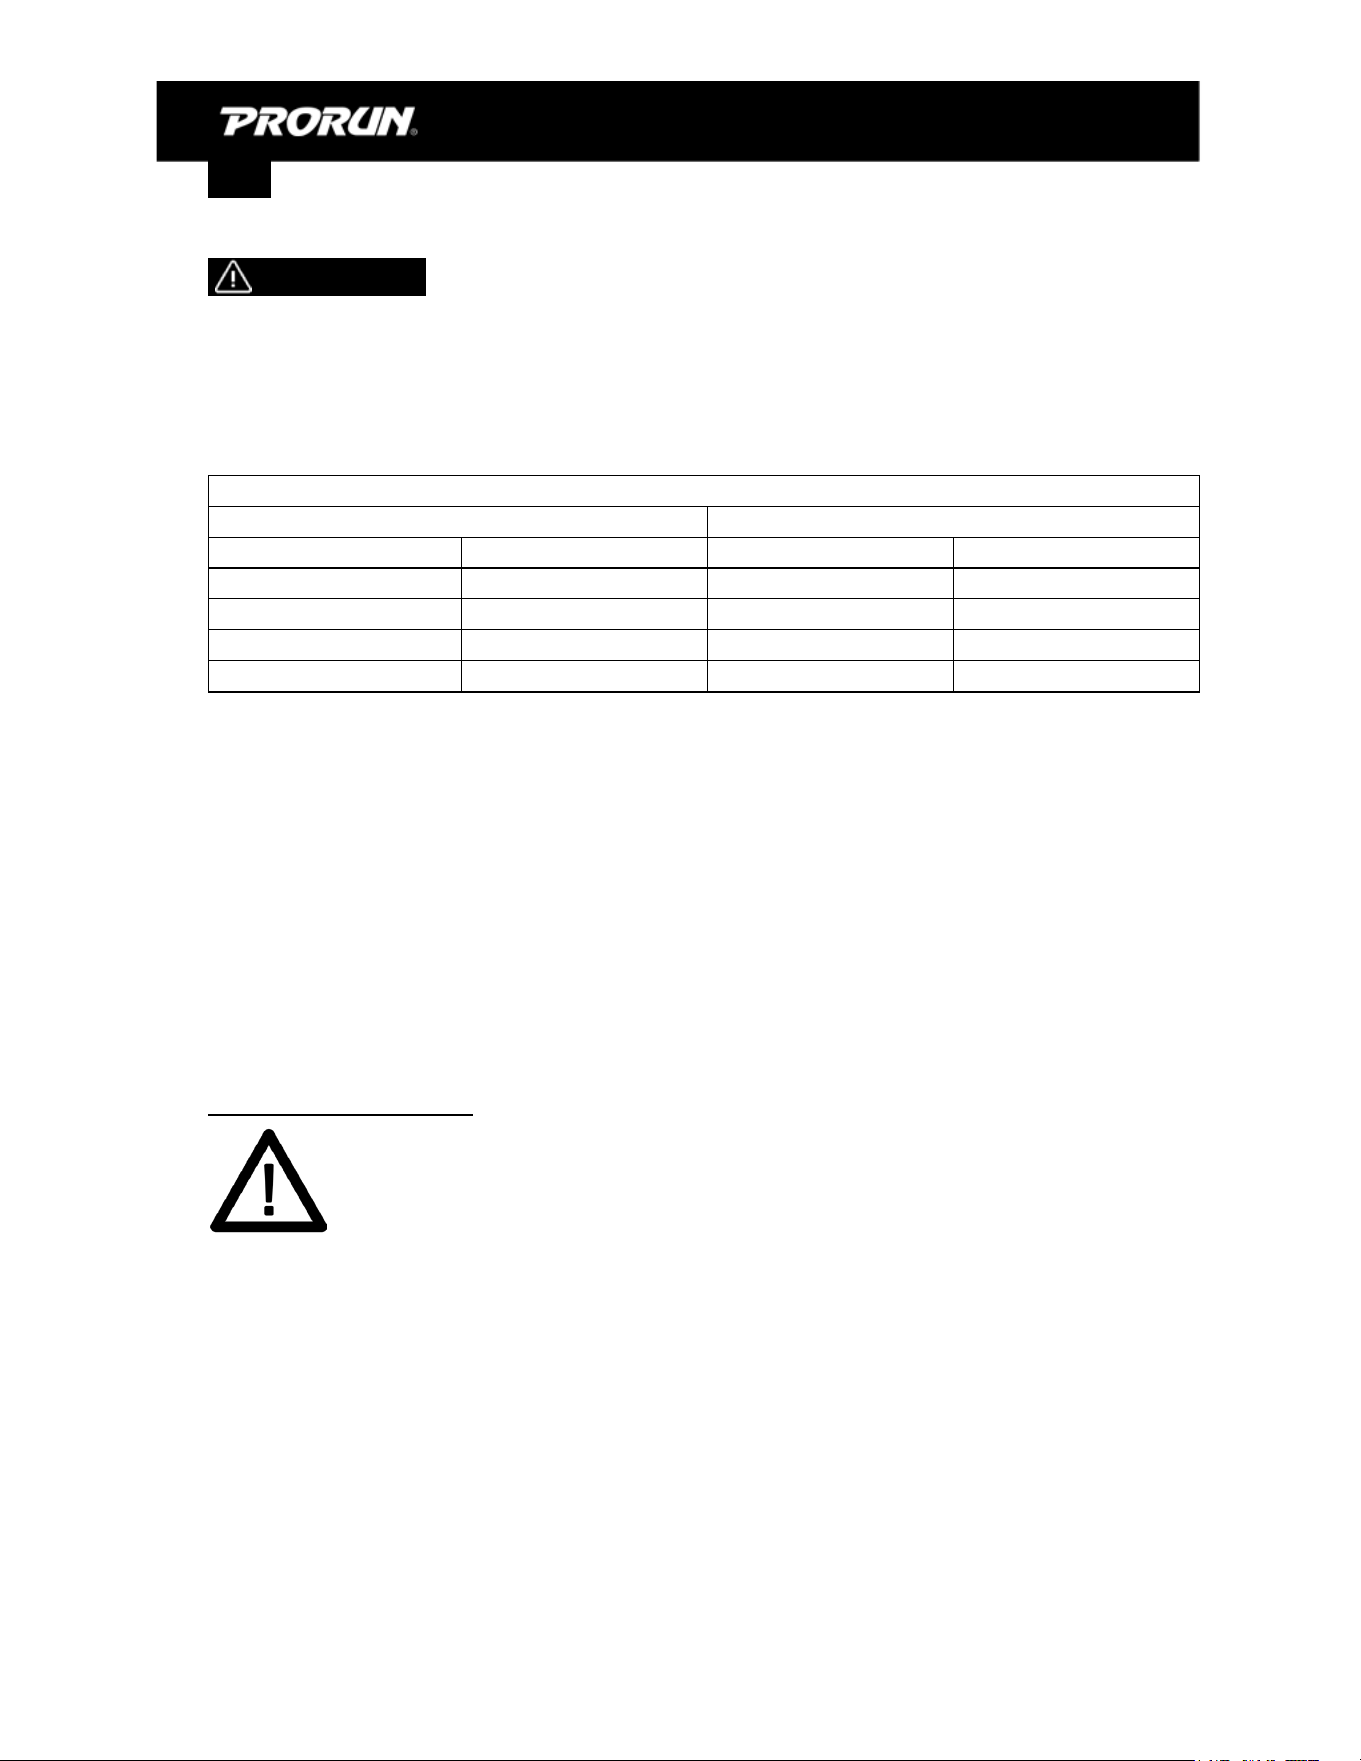
Checking and Filling Fuel
WARNING! TO PREVENT SERIOUS INJURY FROM FIRE:
Fill the fuel tank in a well-venlated area away from ignion sources. If the engine is hot from
use, shut the engine off and wait for it to cool before adding fuel. Do not smoke.
1. Clean the Fuel Tank Cap and the area around it.
2. Unscrew and remove the Fuel Tank Cap.
Note Do not use gasoline containing more than 10% ethanol (E10). Do not use E85 ethanol.
Add fuel stabilizer to the gasoline or the Warranty is VOID.
13
Note Do not use gasoline that has been stored in a metal fuel container or a dirty fuel
container. It can cause parcles to enter the carburetor, affecng engine performance and/or
causing damage.
IMPORTANT! Your Warranty is VOID if the Engine’s Fuel Tank is not filled with the proper
mixture
(50:1) of unleaded gasoline and 2-cycle oil before each use.
2-Stroke oil must meet either JASO M345 FD or ISO-L-EGD requirements for air-cooled engines,
synthec.
Before each use, check the fuel level. Do not run the Engine with an improper unleaded
gasoline/2-cycle oil mixture. Running the Engine with an improper mixture WILL permanently
damage the Engine
Fuel to Oil Mix – 50:1 Raon
US
Metric
Gas
Oil
Gas
Oil
Gal.
Fl.oz.
L
cc
1
2.6
5
100
2
5.2
10
200
5
13
25
500
3. Fill an approved fuel container with half of the required amount of gasoline. Add the
proper amount of 2-stroke oil to gasoline. Close container and shake to mix oil with
gasoline. Add the remaining gasoline, close fuel container, and remix.
4. If needed, fill the Fuel Tank to about 1 inch under the fill neck of the Fuel Tank with the
pre-mixed unleaded gasoline/2-cycle oil mixture.
5. Then replace the Fuel Tank Cap.
6. Wipe up any spilled fuel and allow excess to evaporate before starng engine. To prevent
FIRE, do not start the engine while the smell of fuel hangs in the air.
7. Use cauon when handling fuel. Move the blower at least 10 feet (3 m) from the fueling
point before starng the engine.
Starng the Engine
Before Starng the Engine
a. Inspect the equipment and engine.
b. Fill the engine with the proper amount and type of unleaded gasoline and
2-cycle oil mixture.
c. Fill the oil tank with the proper amount and type of bar and chain oil.
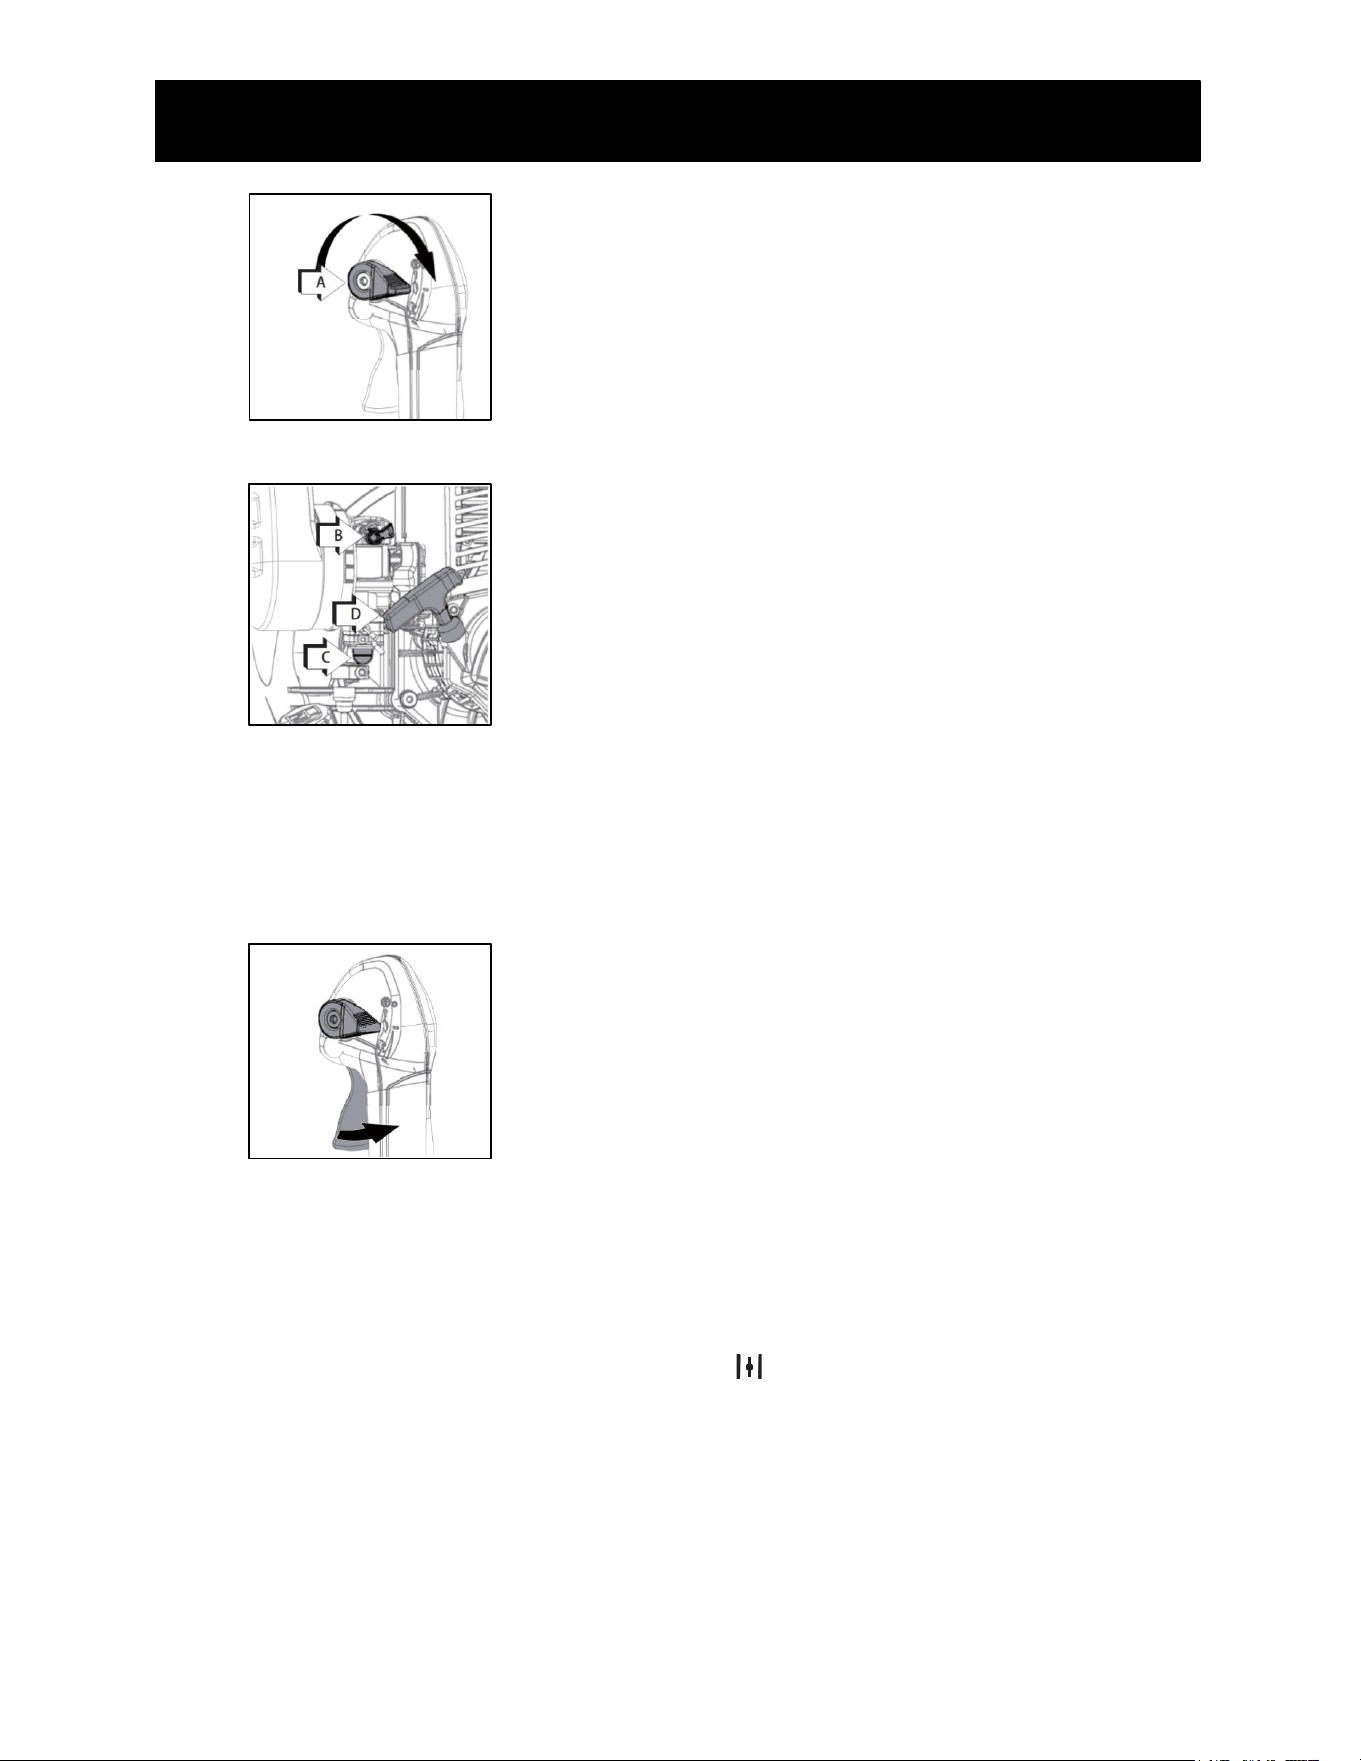
Manual Start
A “cold start” is when the engine is no longer hot to the touch, typically at least 30 minutes
aer it has last been run.
1. Throle Lever
Move throle lever (A) to IDLE posion.
2. Choke
Rotate choke (B) to COLD START posion.
3. Purge Bulb
14
PBB3000 GAS BACKPACK BLOWER
Pump purge bulb (C) unl fuel is visible. Pump bulb an addional 4 or 5 mes.
4. Recoil Starter
Pull recoil starter handle (D) unl engine fires, or a maximum of 5 pulls.
5. If engine fires and remains running, pull throle trigger to run posion, then proceed to
engine warm up. If the engine fires and dies, proceed to step 6.
6. Choke
Aer engine fires (or 5 pulls), move choke lever back to RUN posion, then pull starter
handle/rope unl engine starts and runs. Allow unit to warm up at idle for several minutes.
Note: If engine does not start with choke in “RUN” posion aer 5 pulls, move choke to
COLD START posion, and repeat steps 3- 6.
7. Throle Lever Aer engine warm-up, move throle lever gradually to increase engine RPM
to desired operang speed.
Hot Start
To iniate a Hot Start, move the Choke Knob to the posion, and follow the steps “1”,
“3”, “4” of “Cold start” procedure.
15
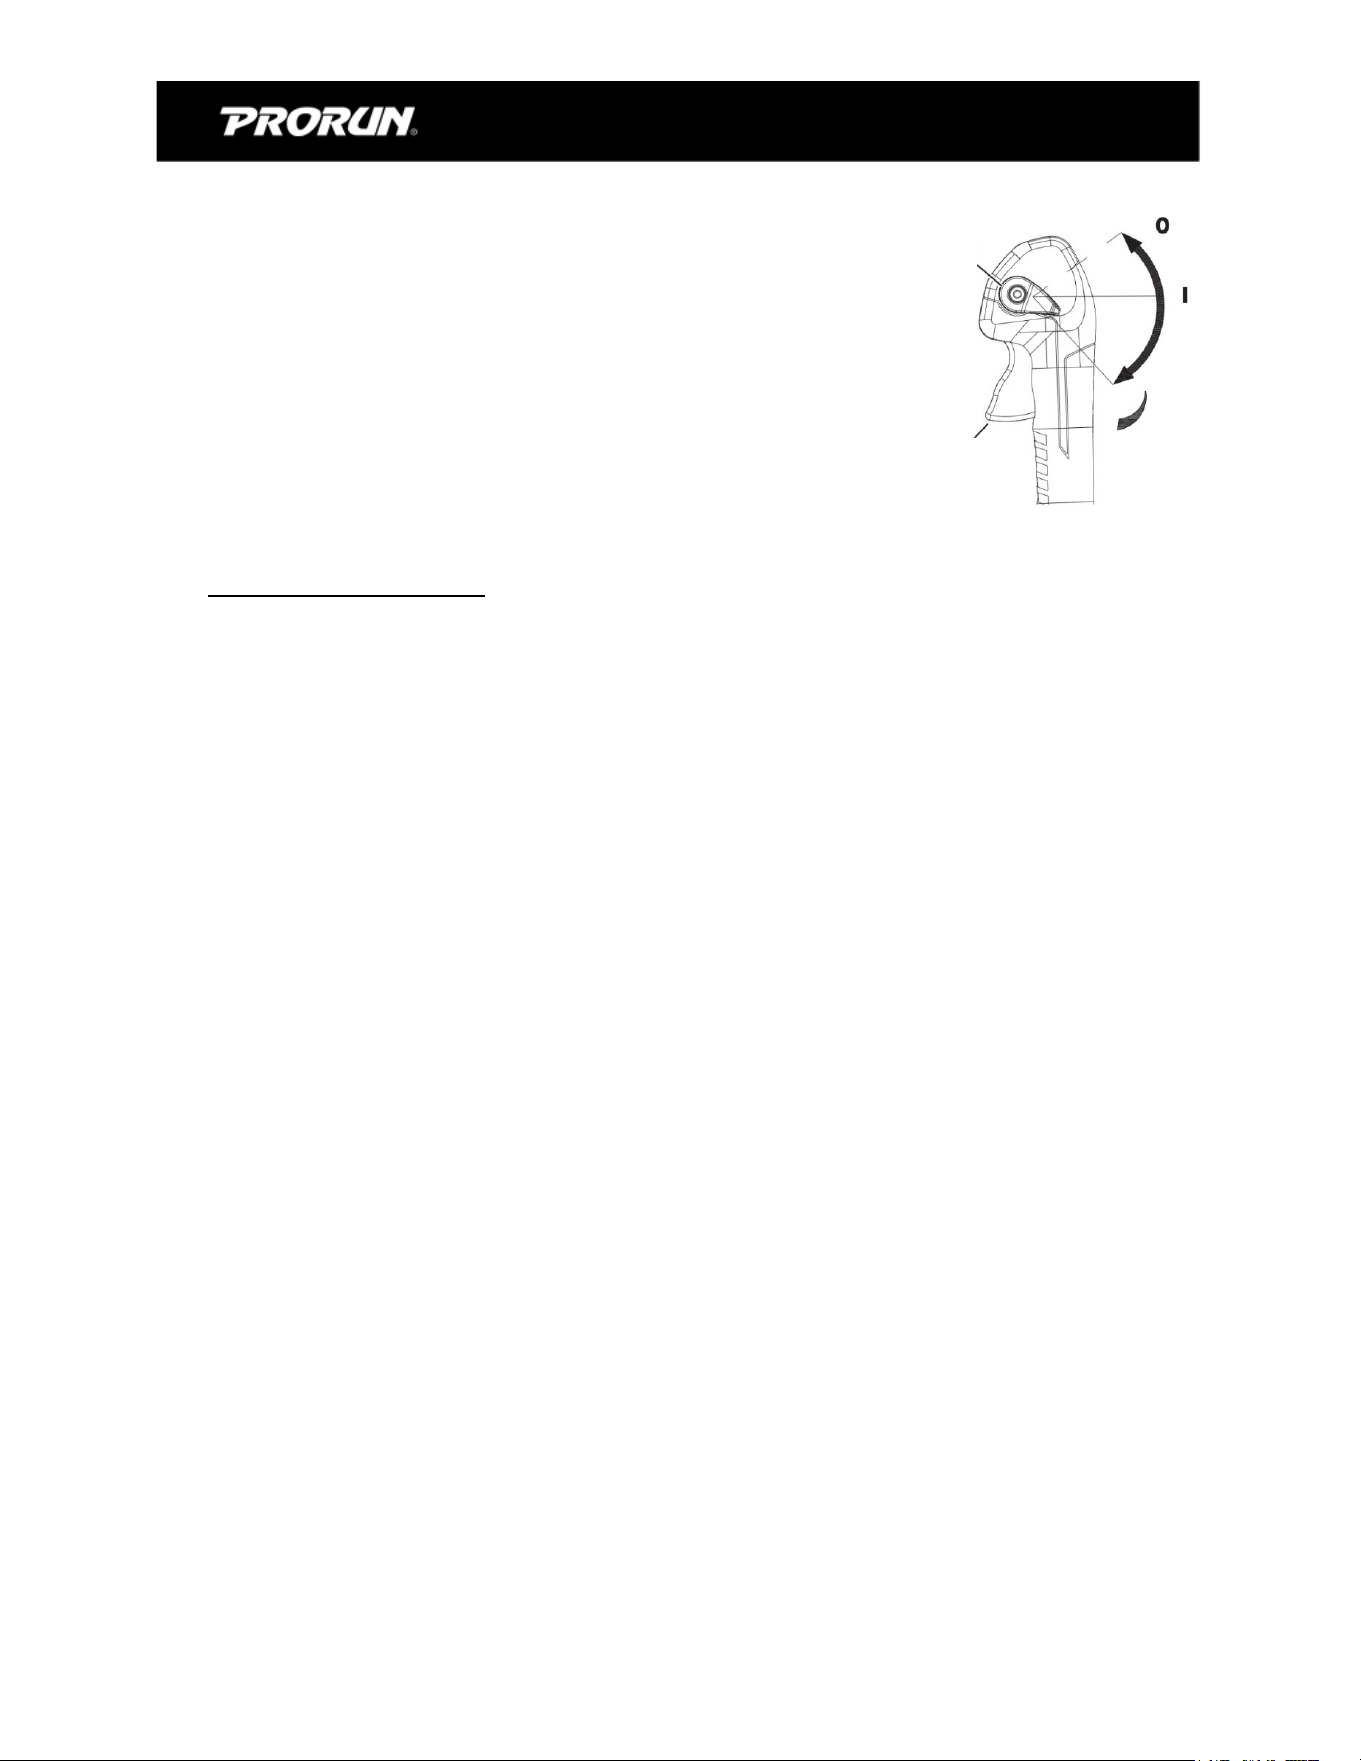
Stopping the Engine
1. To stop the engine in an emergency, rotate the engine switch
counterclockwise to shut the engine off immediately.
2. Under normal condions, use the following procedure:
a. Release the Throle and move cruise lever (engine switch)
back to idle posion.
b. Let Engine idle for 1 – 2 minutes.
c. Press the Stop Engine Switch.
General Operang Instrucons
Operang the Blower
1. The machine is carried as a backpack. Hold and control the blower tube with your right
hand on the control handle.
2. Use Cruise Lever to adjust speed depending on the type of work being done.
3. Operate Blower at low speed for light material.
4. Operate Blower at medium speed to move grass clippings and small leaves on pavement or
a solid surface.
5. Operate Blower at high speed for heavier materials like fresh snow or heavy dirt.
6. Hold the opening of the Blower as close to the ground as possible. Use the enre length of
the blower tube to keep the airflow close to the ground.
7. When finished, turn off the engine as indicated in ‘Stopping the Engine.’
Engine
Switch
Throle
16
PBB3000 GAS BACKPACK BLOWER
6. MAINTENANCE
WARNING!
TO PREVENT SERIOUS INJURY FROM ACCIDENTAL STARTING:
Turn the Power Switch of the equipment to its “OFF” posion, wait for the engine to cool, and
disconnect the spark plug cap before performing any inspecon, maintenance, or cleaning
procedures.
TO PREVENT SERIOUS INJURY FROM EQUIPMENT FAILURE:
Do not use damaged equipment. If abnormal noise, vibraon, or excess
smoking occurs, maintenance procedures, including any not detailed in this
manual, will need to be performed by a qualified technician for safety. If you
have any doubts about your ability to safely service the equipment or engine,
have a qualified technician service the equipment instead.
Cleaning, Maintenance, and Lubricaon
NOTE This maintenance schedule is intended solely as a general guide. If performance
decreases or if equipment operates unusually, check systems immediately. The maintenance
needs of each piece of equipment will differ depending on factors such as duty cycle,
temperature, air quality, fuel quality, and other factors. If you have doubts about your ability to
safely service this tool, have a qualified technician service the equipment instead.
NOTE The following procedures are in addion to the regular checks and maintenance
explained as part of the regular operaon of the engine and equipment.
Procedure
Before
Each
Use
Monthly
or every
10 hr. of
use
Every
3-mo.
Or 20
hr. of
use
Every 6
mo. or
50 hr. of
use
Yearly
or
every
100 hr.
of use
Every 2
Years
Brush off the outside of engine
X
Check engine fuel/oil mixture level
X
Change fuel filter
X
X
Clean air filter
X
X
X
X
Check and clean spark plug
X
X
X
Check/adjust idle speed
X
1. Clean fuel tank and carburetor
2. Clean carbon build-up from
combuson chamber
X**
X**
Replace fuel line if necessary.
X**
* Service more frequently when used in dusty areas.
** These items should be serviced by a qualified technician.
17
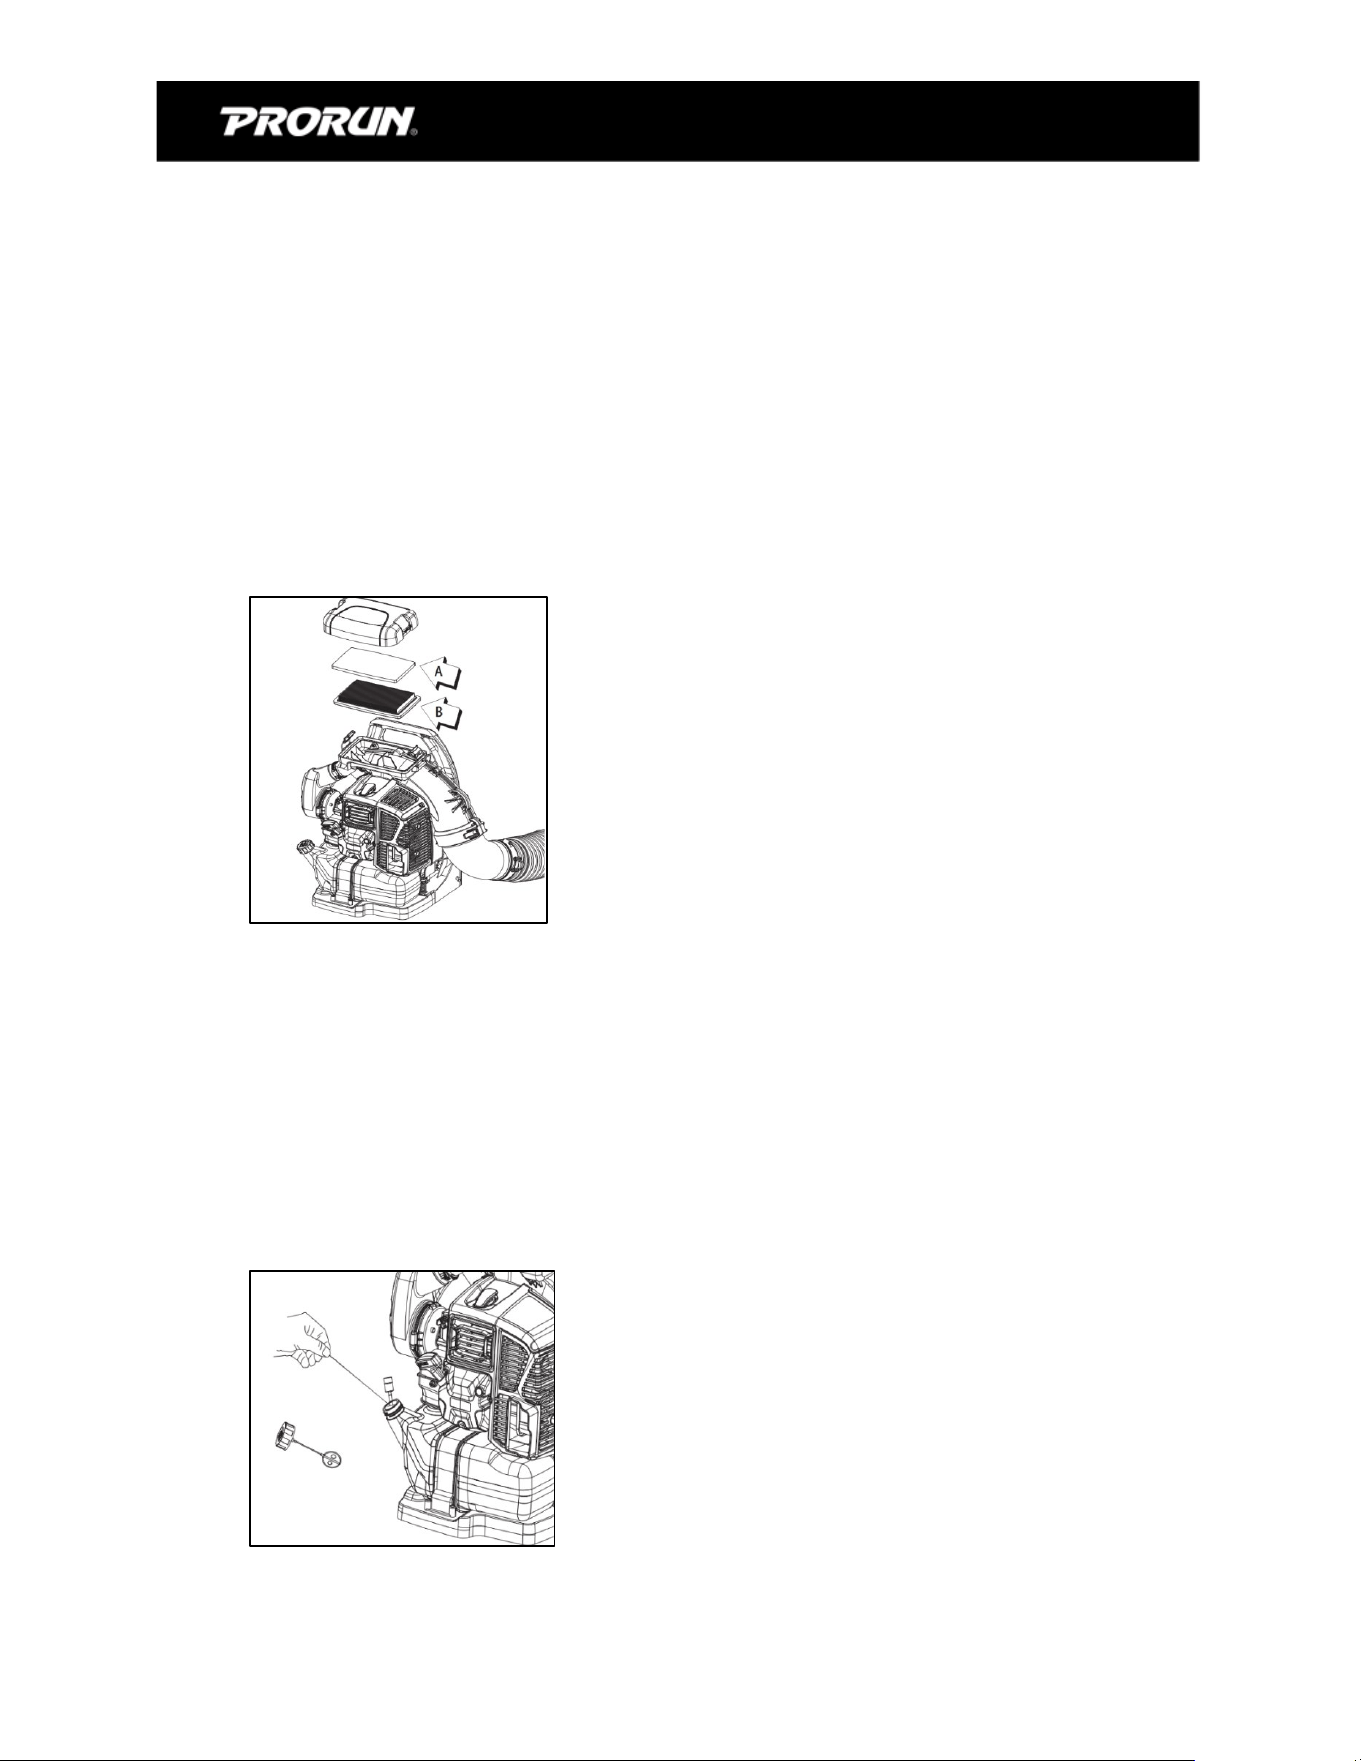
Air Filter
1. Close choke (COLD START posion). This prevents dirt from entering the carburetor throat
when the air filter is removed. Brush accumulated dirt from air cleaner area.
2. Remove air filter cover, foam pre-filter, and air filter. Brush dirt from inside cover..
Foam Pre-Filter
• Clean foam pre- filter (A) in water/detergent soluon and rinse with clean water.
• Wrap the foam pre-filter in a clean, dry cloth and squeeze (do not wring) dry. Allow to dry
completely before reuse. Do not oil.
Air Filter
• Lightly brush debris from air filter (B).
• Replace filter if it is damaged, very dirty, or the rubber sealing edges are deformed.
• If filter can be reused, be certain it fits ghtly in the air filter cavity, and is installed with the
original side out.
3. Assemble components in reverse order.
Fuel Filter Maintenance
1. Clean the Fuel Tank Cap and the area around it.
2. Remove the Fuel Tank Cap from the Fuel Tank.
3. Use a sucon pump (not included) to pump any fuel in the Tank into a proper gasoline
container.
4. Use a piece of wire with a hook on one end to carefully extract the Fuel Filter from the
Tank.
5. Remove used filter from fuel line. Aach a new filter to the fuel line and reinsert into the
Fuel Tank.
6. Replace Fuel Tank Cap and ghten securely.
18
PBB3000 GAS BACKPACK BLOWER
Spark plug Maintenance
1. Disconnect Spark Plug Cap from end of plug. Clean out debris from around Spark Plug.
2. Using a spark plug wrench, remove the Spark Plug.
3. Inspect the Spark Plug: If the electrode is oily, clean it using a clean, dry rag. If the
electrode has deposits on it, polish it using emery paper. If the white insulator is cracked or
chipped, the spark plug needs to be replaced.
Recommended Spark Plugs
Bosch
®
USR7AC
Champion
®
RZ7C
NGK
®
CMR7H
NOTICE Using an incorrect spark plug may damage the engine.
4. When installing a new spark plug, adjust the plug’s gap to the specificaon on the
Specificaons chart. Do not pry against the Specificaons chart. Do not pry against the
electrode, the spark plug can be damaged.
5. Install the new spark plug or the cleaned spark plug into the engine.
• Gasket-style:
Finger-ghten unl the gasket contacts the cylinder head, then ghten about 1/2-2/3 turn
more.
• Non-gasket-style:
Finger-ghten unl the plug contacts the cylinder head, then ghten about 1/16 turn more.
NOTICE Tighten the Spark Plug properly.
If loose, the Spark Plug will cause the engine to overheat.
If overghtened, the threads in the engine block will be damaged.
6. Apply dielectric spark plug boot protector (not included) to the end of the spark plug and
reaach the cap securely.
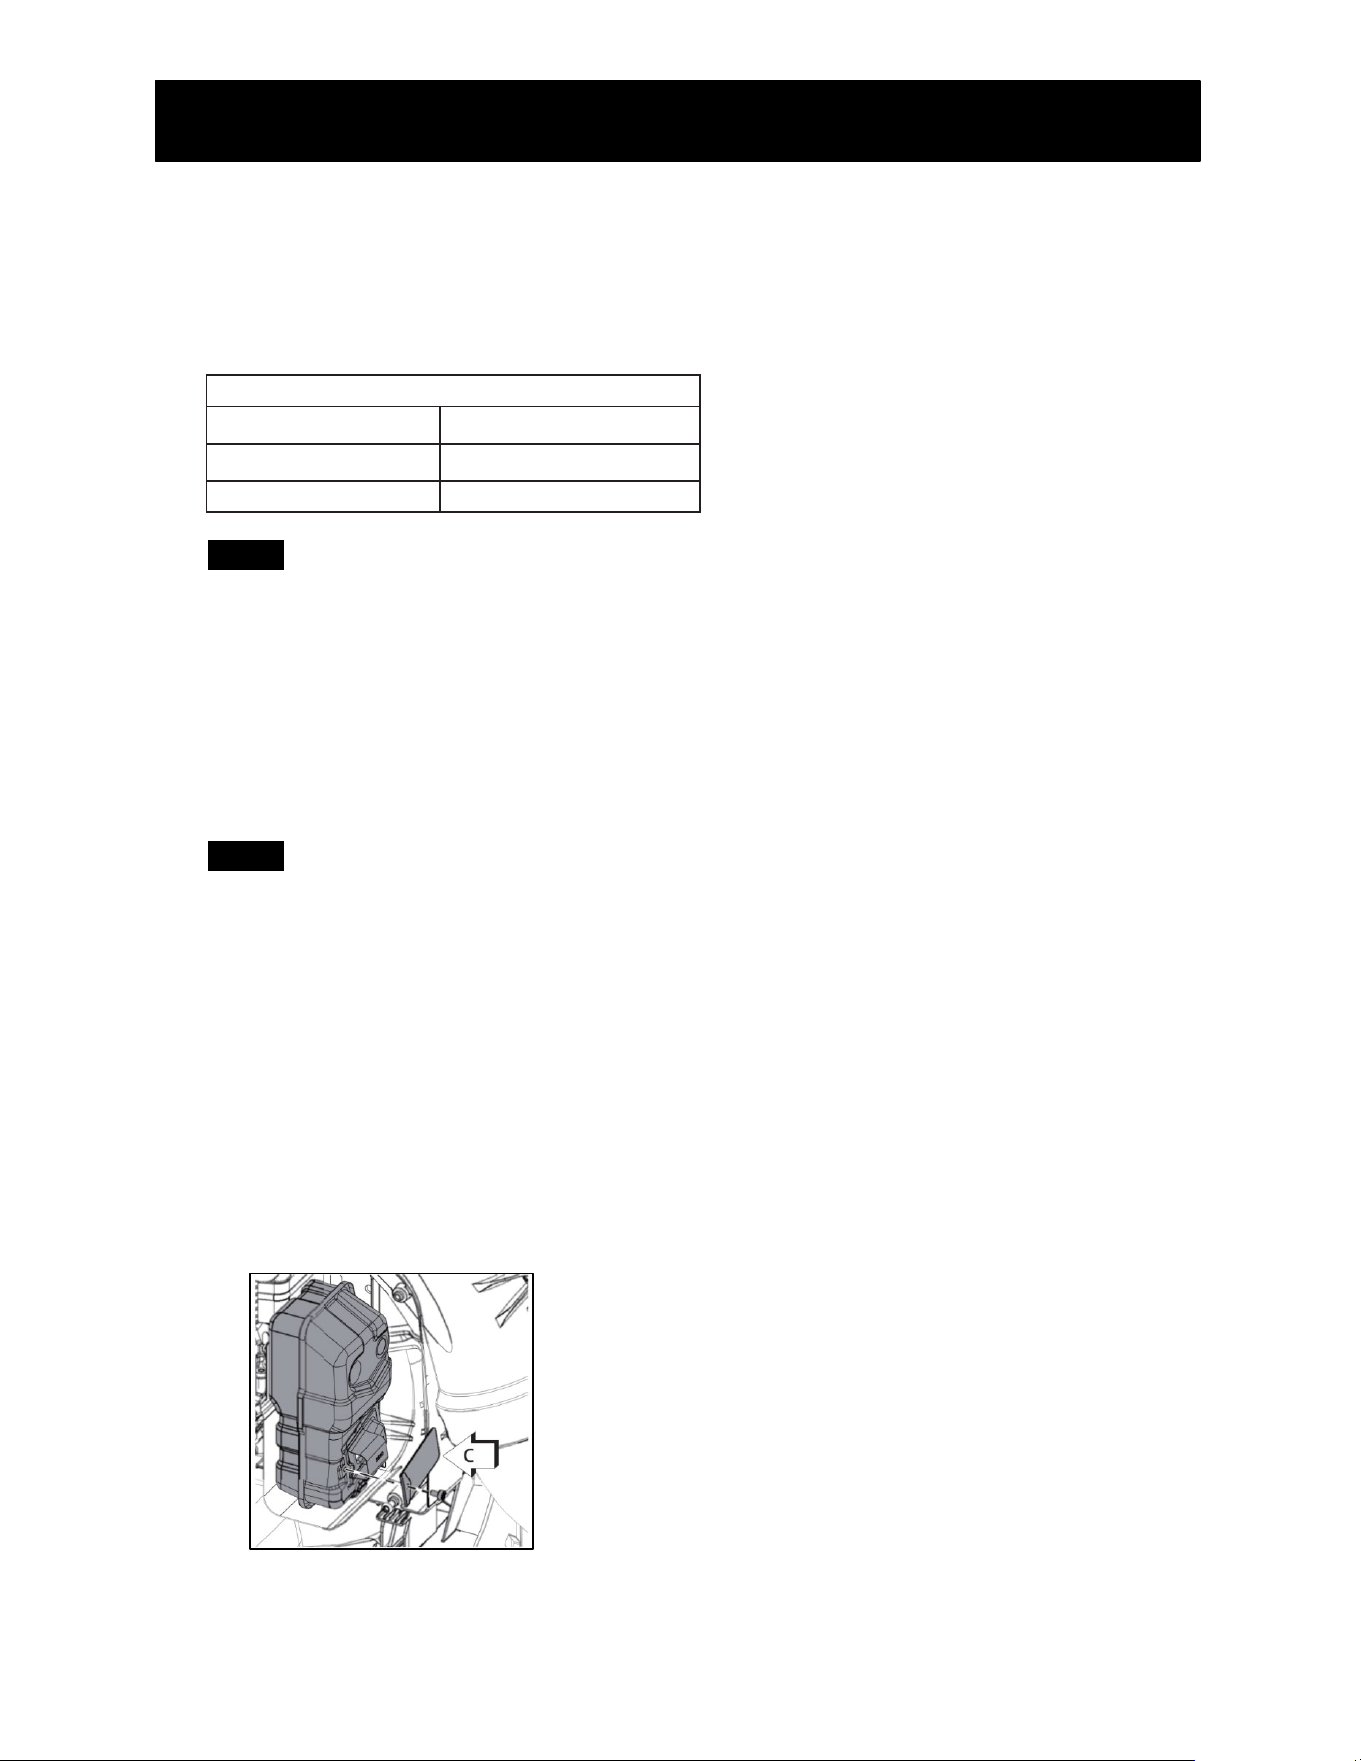
Spark Arrestor Screen
1. Disconnect spark plug lead from spark plug.
2. Remove engine cover.
3. Remove spark arrestor screen (C) from muffler. Replace screen if plugged with carbon
deposits. Note: When cleaning carbon deposits, be careful not to damage the catalyc
element inside muffler.
4. Install spark arrestor screen.
5. Install engine cover.
19
Carburetor Adjustment
Engine Break-In
New engines must be operated a minimum duraon of two tanks of fuel break-in before
carburetor adjustments can be made. During the break-in period your engine performance will
increase and exhaust emissions will stabilize. Idle speed can be adjusted as required.
High Altude Operaon
This engine has been factory adjusted to maintain sasfactory starng, emission, and durability
performance up to 1,100 . (335 m) above sea level. To maintain proper engine operaon and
emission compliance above 1,100 . (335 m) ASL the carburetor may need to be adjusted by
an authorized retailer service dealer.
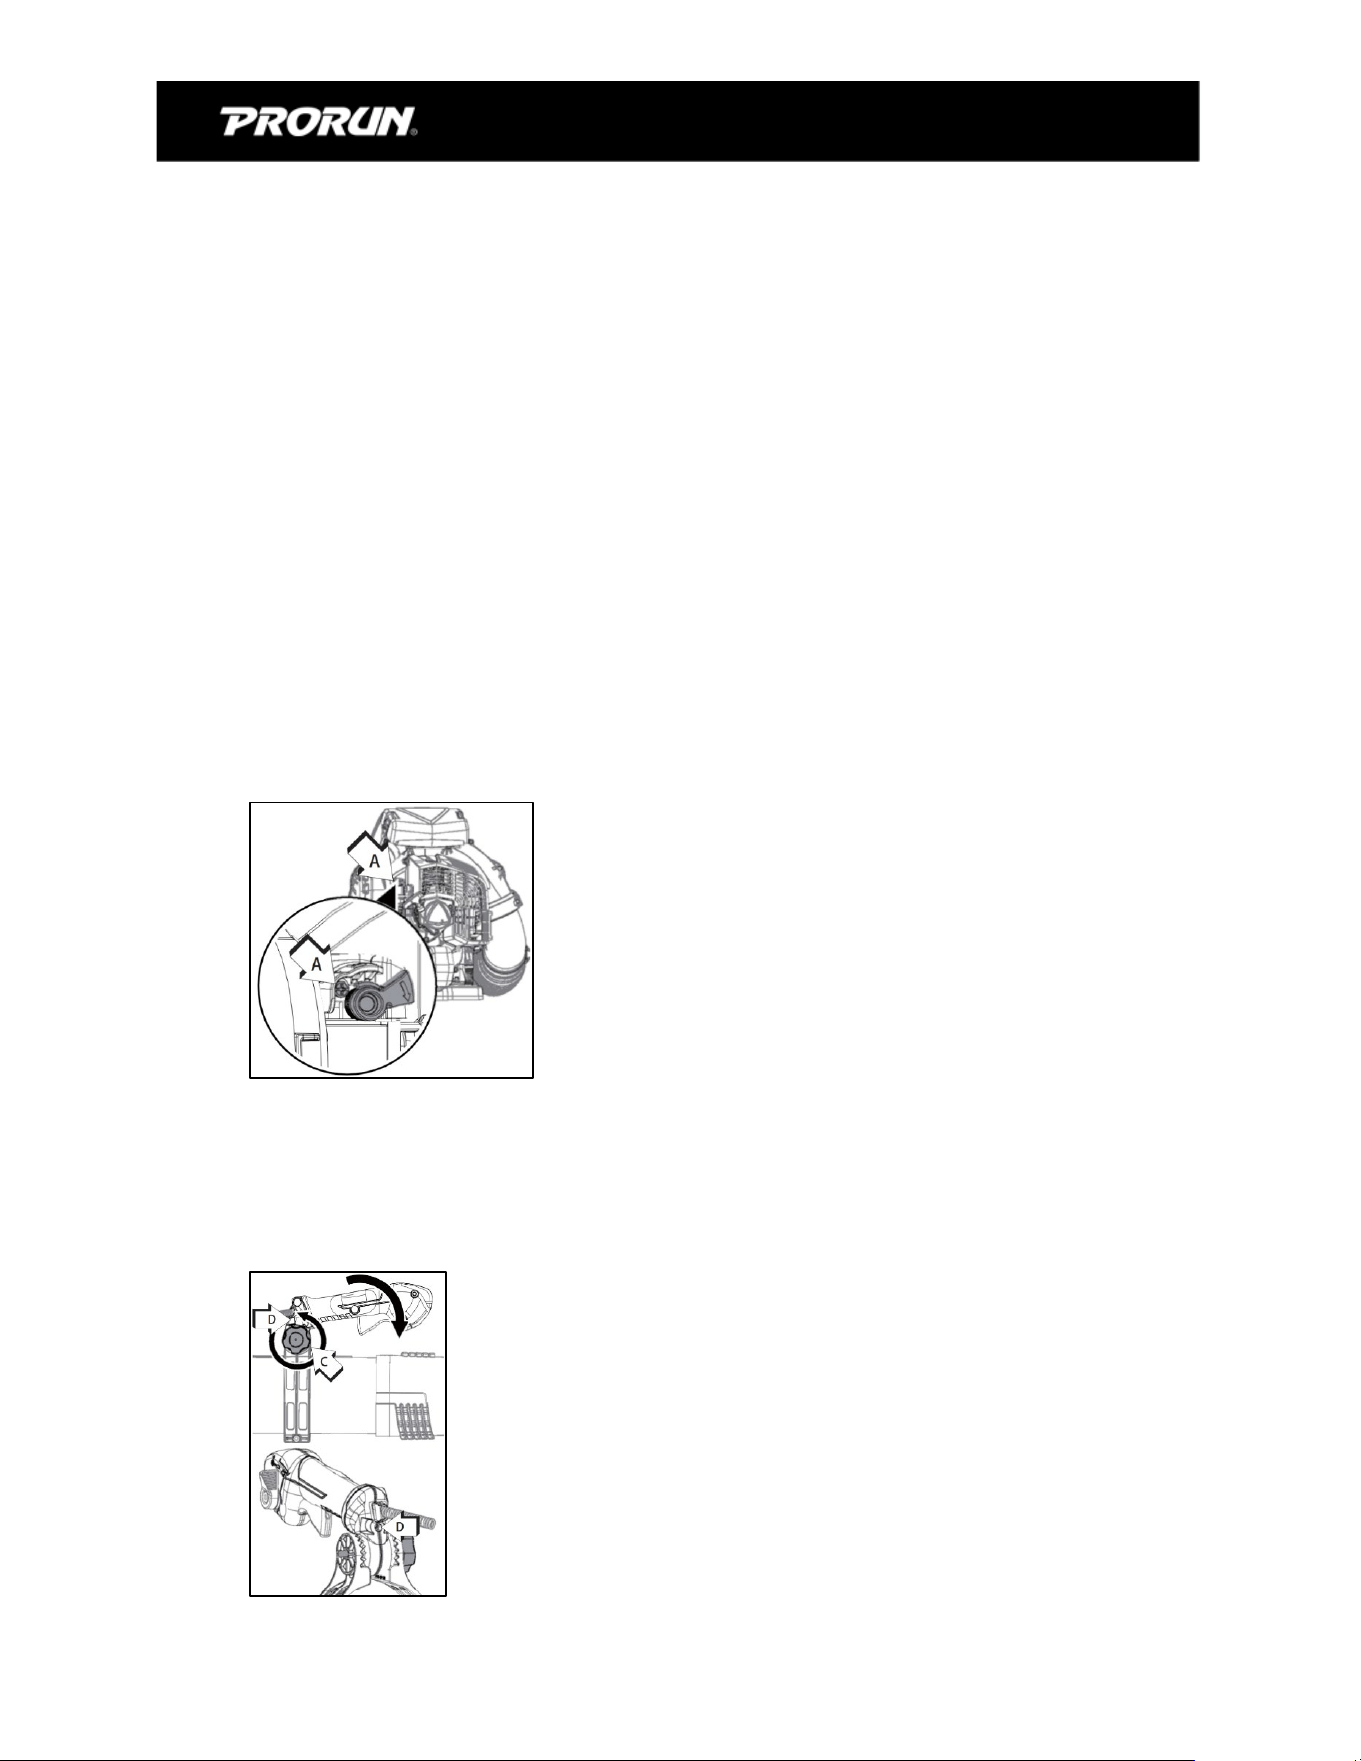
Idle Adjustment
Before adjustment make sure that:
•Air filter is clean and properly installed.
•Spark arrestor screen and muffler are free of carbon.
•Blower pipes are installed.
1. Start engine, run at idle for one minute.
2. Complete warm up by running at full throle for 5 minutes, operang choke twice to clear
air from carburetor chambers.
3. Check idle speed and reset if necessary. If a tachometer is available, idle speed screw (A)
should be set to the specificaons found on “Specificaons” Page of this manual. Turn idle
screw (A) clockwise to increase idle speed; counter clockwise to decrease idle speed.
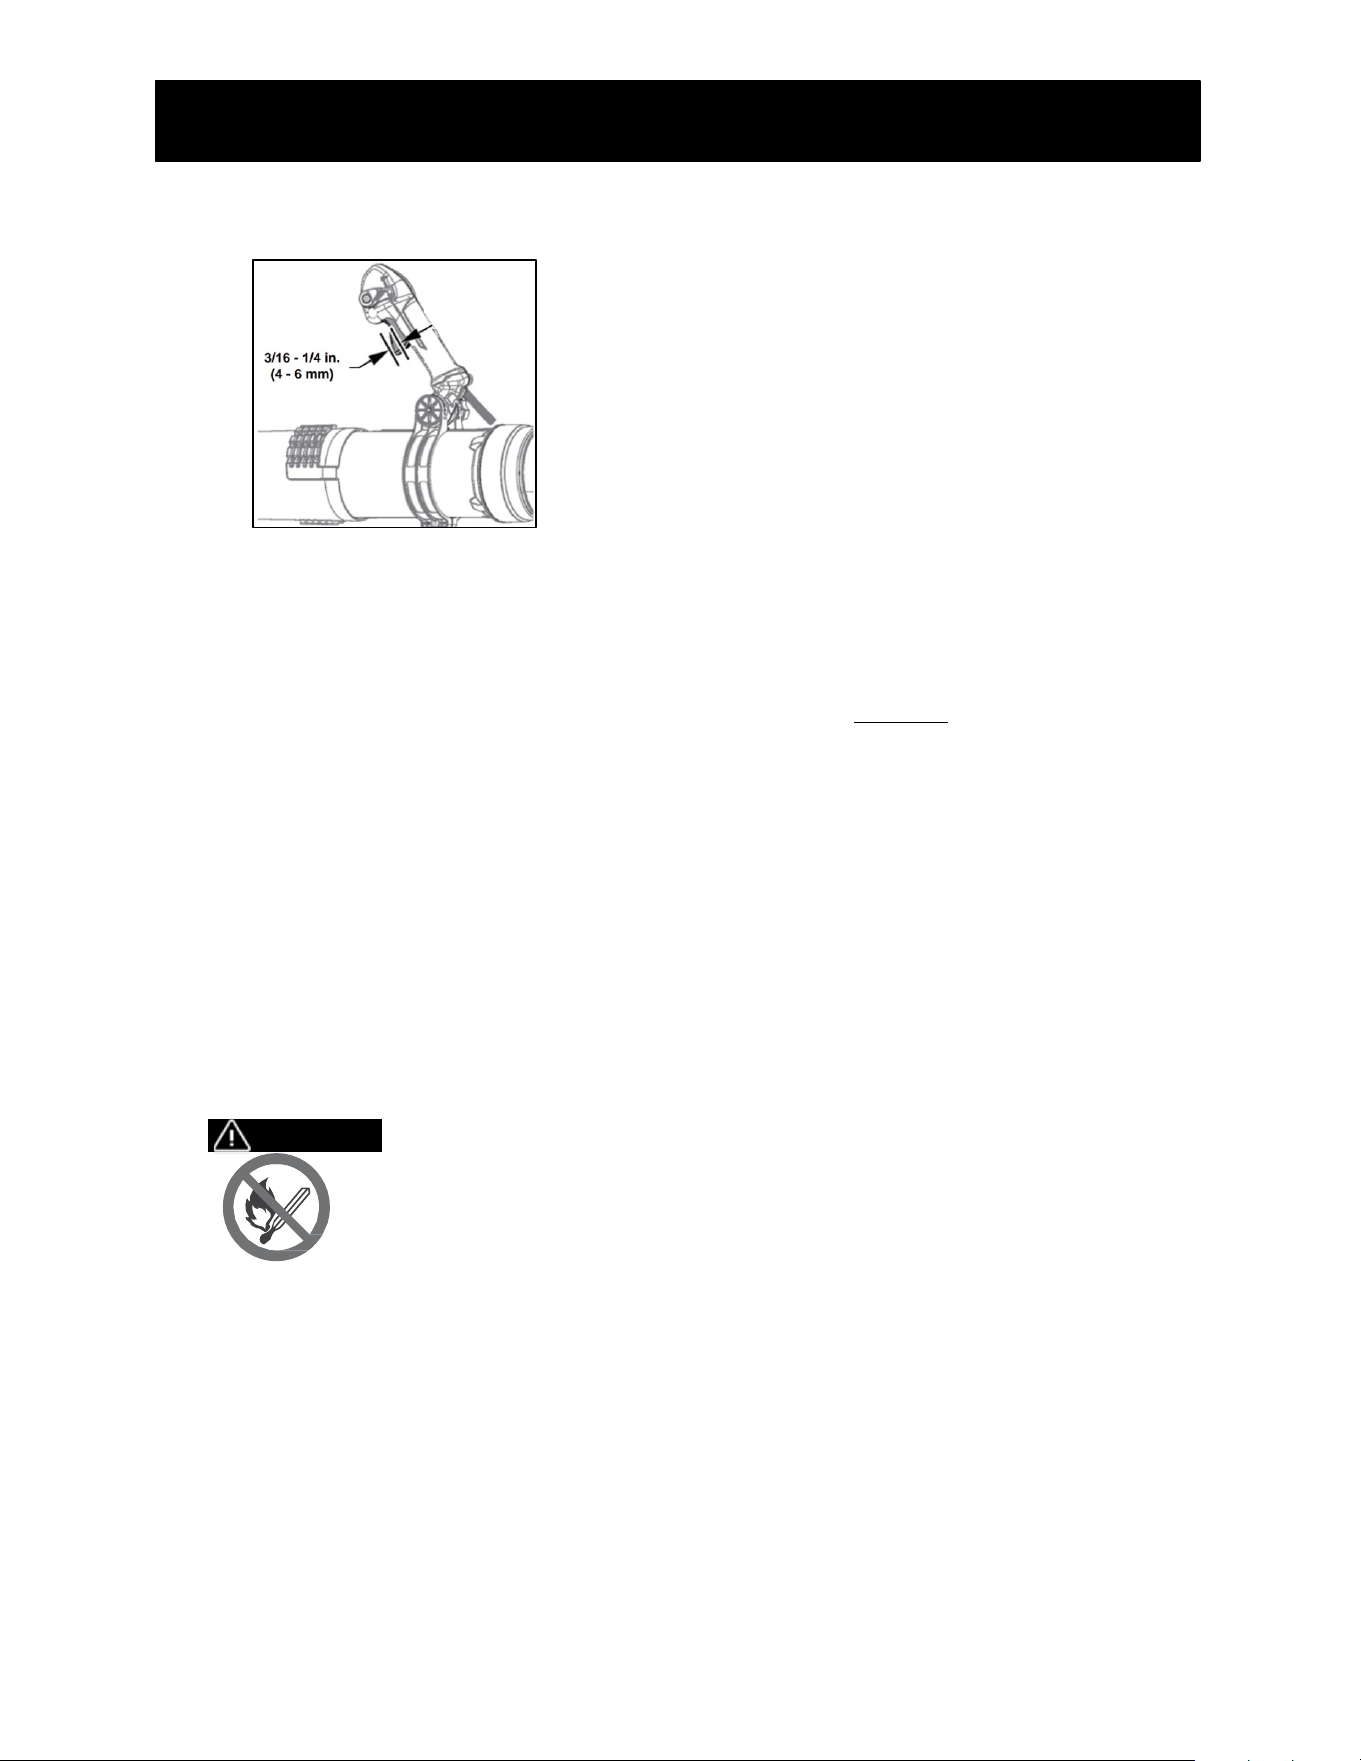
Throle Cable Adjustment
If engine idle speed changes when blower pipe is moved, or engine will not reach full wide
open throle speed, adjust throle cable.
1. Loosen handle adjustment knob (C) and lt Tube Throle handle forward to expose
Adjustment Screw (D).
20
PBB3000 GAS BACKPACK BLOWER
2. Turn Adjustment Screw unl Throle Trigger free play is 4-6mm (3/16-1/4 in.).3.Aer
adjustment, squeeze and release Throle Trigger several mes to verify Carburetor
Throle Sha has full range of movement from idle to wide open throle posions.
Long-Term Storage
When the equipment is to remain idle for longer than 20 days, prepare the Engine
for storage as follows:
1. CLEANING:
Wait for Engine to cool, then clean Engine with dry cloth. NOTICE: Do not clean
using water. The water will gradually enter the Engine and cause rust damage.
Apply a thin coat of rust preventive oil to all metal parts.
2. FUEL:
To protect the fuel system during storage, follow this procedure:
a. Carefully drain any remaining fuel in the fuel tank into an appropriate storage
container.
b. Press the Primer Bulb 10 times.
c. Drain any residual fuel into storage container.
d. Start the Blower.
e. Allow engine to run at idle until Blower stalls from lack of fuel.
f. Replace Fuel Cap and tighten.
WARNING! TO PREVENT SERIOUS INJURY FROM FIRE:
Drain the Fuel Tank in a well-ventilated area away from ignition
sources. If the Engine is hot from use, shut the Engine o and wait for
it to cool before draining fuel. Do not smoke.
3. LUBRICATION:
a. Clean out area around spark plug. Remove spark plug and pour 1/2 tablespoon
of 2-stroke engine oil into cylinder through spark plug hole.
b. Replace spark plug, but leave spark plug cap disconnected.
c. Pull Starter Handle to distribute oil in cylinder. Stop after one or two revolutions
when you feel the piston start the compression stroke (when you start to feel
resistance).
4. STORAGE AREA:

21
Cover and store in a dry, level, well-ventilated area out of reach of children. Storage
area should also be away from ignition sources, such as water heaters, clothes
dryers, and furnaces.
5. AFTER STORAGE:
Before starting the Engine during or after storage, keep in mind that untreated
gasoline will deteriorate quickly. Change to fresh fuel if untreated gasoline has
been sitting for a month, if treated gasoline has been sitting beyond the fuel
stabilizer’s recommended time period, or if the Engine does not start.

22
PBB3000 GAS BACKPACK BLOWER
7. TROUBLESHOOTING
Follow all safety precauons whenever diagnosing or servicing the
equipment or engine.
Problem
Possible Causes
Probable Soluons
Engine will
not start
FUEL RELATED:
1. No fuel in tank.
2. Choke not in START posion, cold
engine.
3. Gasoline with more than 10% ethanol
used. (E15, E20, E85, etc.)
4. Low quality or deteriorated, old
gasoline/oil mixture.
5. Carburetor not primed.
6. Dirty fuel passageways.
7. Carburetor is flooded.
8. Clogged Fuel Filter.
FUEL RELATED:
1. Fill fuel tank with fresh 87+ octane
stabilizer-treated unleaded gasoline/oil
mixture only.
Do not use gasoline with more than 10%
ethanol (E15, E20, E85, etc.).
2. Move Choke to START posion.
3. Clean out ethanol-rich gasoline from fuel
system. Replace components damaged by
ethanol. Use fresh 87+ octane stabilizer-
treated unleaded gasoline/oil mixture
only.
Do not use gasoline with more than 10%
ethanol (E15, E20, E85, etc.).
4. Use fresh 87+ octane stabilizer-treated
unleaded gasoline/oil mixture.
Do not use gasoline with more than 10%
ethanol (E15, E20, E85, etc.).
5. Press the Prime Bulb several mes to
prime.
6. Clean out passageways using fuel
addive. Heavy deposits may require
further cleaning.
7. Turn Choke Knob to RUN posion. Pull
Starter Handle 10-20 mes to clear out
Carburetor, then aempt to start with
normal process.
8. Clean or replace Fuel Filter.
IGNITION (SPARK) RELATED:
1. Spark plug cap not connected securely.
2. Spark plug electrode wet or dirty.
3. Incorrect spark plug gap.
4. Spark plug cap broken.
5. Incorrect spark ming or faulty ignion
system.
IGNITION (SPARK) RELATED:
1. Connect spark plug cap properly.
2. Clean spark plug.
3. Correct spark plug gap.
4. Replace spark plug cap.
5. Have qualified technician diagnose/repair
ignion system.
COMPRESSION RELATED:
1. Cylinder not lubricated. Problem aer
long storage periods.
2. Loose or broken spark plug. (Hissing
noise will occur
COMPRESSION RELATED:
1. Pour 1/2 tablespoon of oil into spark plug
hole. Crank engine a few mes and try to
start again.
2. Tighten spark plug.
If that does not work, replace spark plug.

23
Follow all safety precauons whenever diagnosing or servicing the
equipment or engine.
Problem
Possible Causes
Probable Soluons
Engine
misfires
1. Spark plug cap loose.
2. Incorrect spark plug gap or damaged
spark plug.
3. Defecve spark plug cap.
4. Old or low-quality gasoline/oil mixture.
5. Incorrect compression.
1. Check cap and wire connecons.
2. Re-gap or replace spark plug.
3. Replace spark plug cap.
4. Use only fresh 87+ octane stabilizer-
treated unleaded gasoline/oil mixture.
Do not use gasoline with more than 10%
ethanol (E15, E20, E85, etc.).
5. Diagnose and repair compression. (Use
Engine will not start: COMPRESSION
RELATED secon.)
Engine
stops
suddenly
1. Fuel tank empty or full of impure or
low-quality gasoline/oil mixture.
2. Defecve breather valve creang
vacuum, prevenng proper fuel flow.
3. Faulty magneto.
4. Disconnected or improperly connected
spark plug cap.
1. Fill fuel tank with fresh 87+ octane
stabilizer-treated unleaded gasoline/oil
mixture.
Do not use gasoline with more than 10%
ethanol (E15, E20, E85, etc.)
2. Test/replace breather valve.
3. Have qualified technician service
magneto.
4. Secure spark plug cap.
Engine
stops when
under
heavy load
1. Dirty air filter
2. Engine running cold.
1. Clean element.
2. Allow engine to warm up prior to
operang equipment.
Engine
knocks
1. Old or low quality gasoline/oil mixture.
2. Engine overloaded. 3.Incorrect spark
ming, deposit buildup, worn engine,
or other mechanical problems.
1. Fill fuel tank with fresh 87+ octane
stabilizer-treated unleaded gasoline/oil
mixture.
Do not use gasoline with more than 10%
ethanol (E15, E20, E85, etc.).
2. Do not exceed equipment’s load rang.
3. Have qualified technician diagnose and
service engine.
24
PBB3000 GAS BACKPACK BLOWER
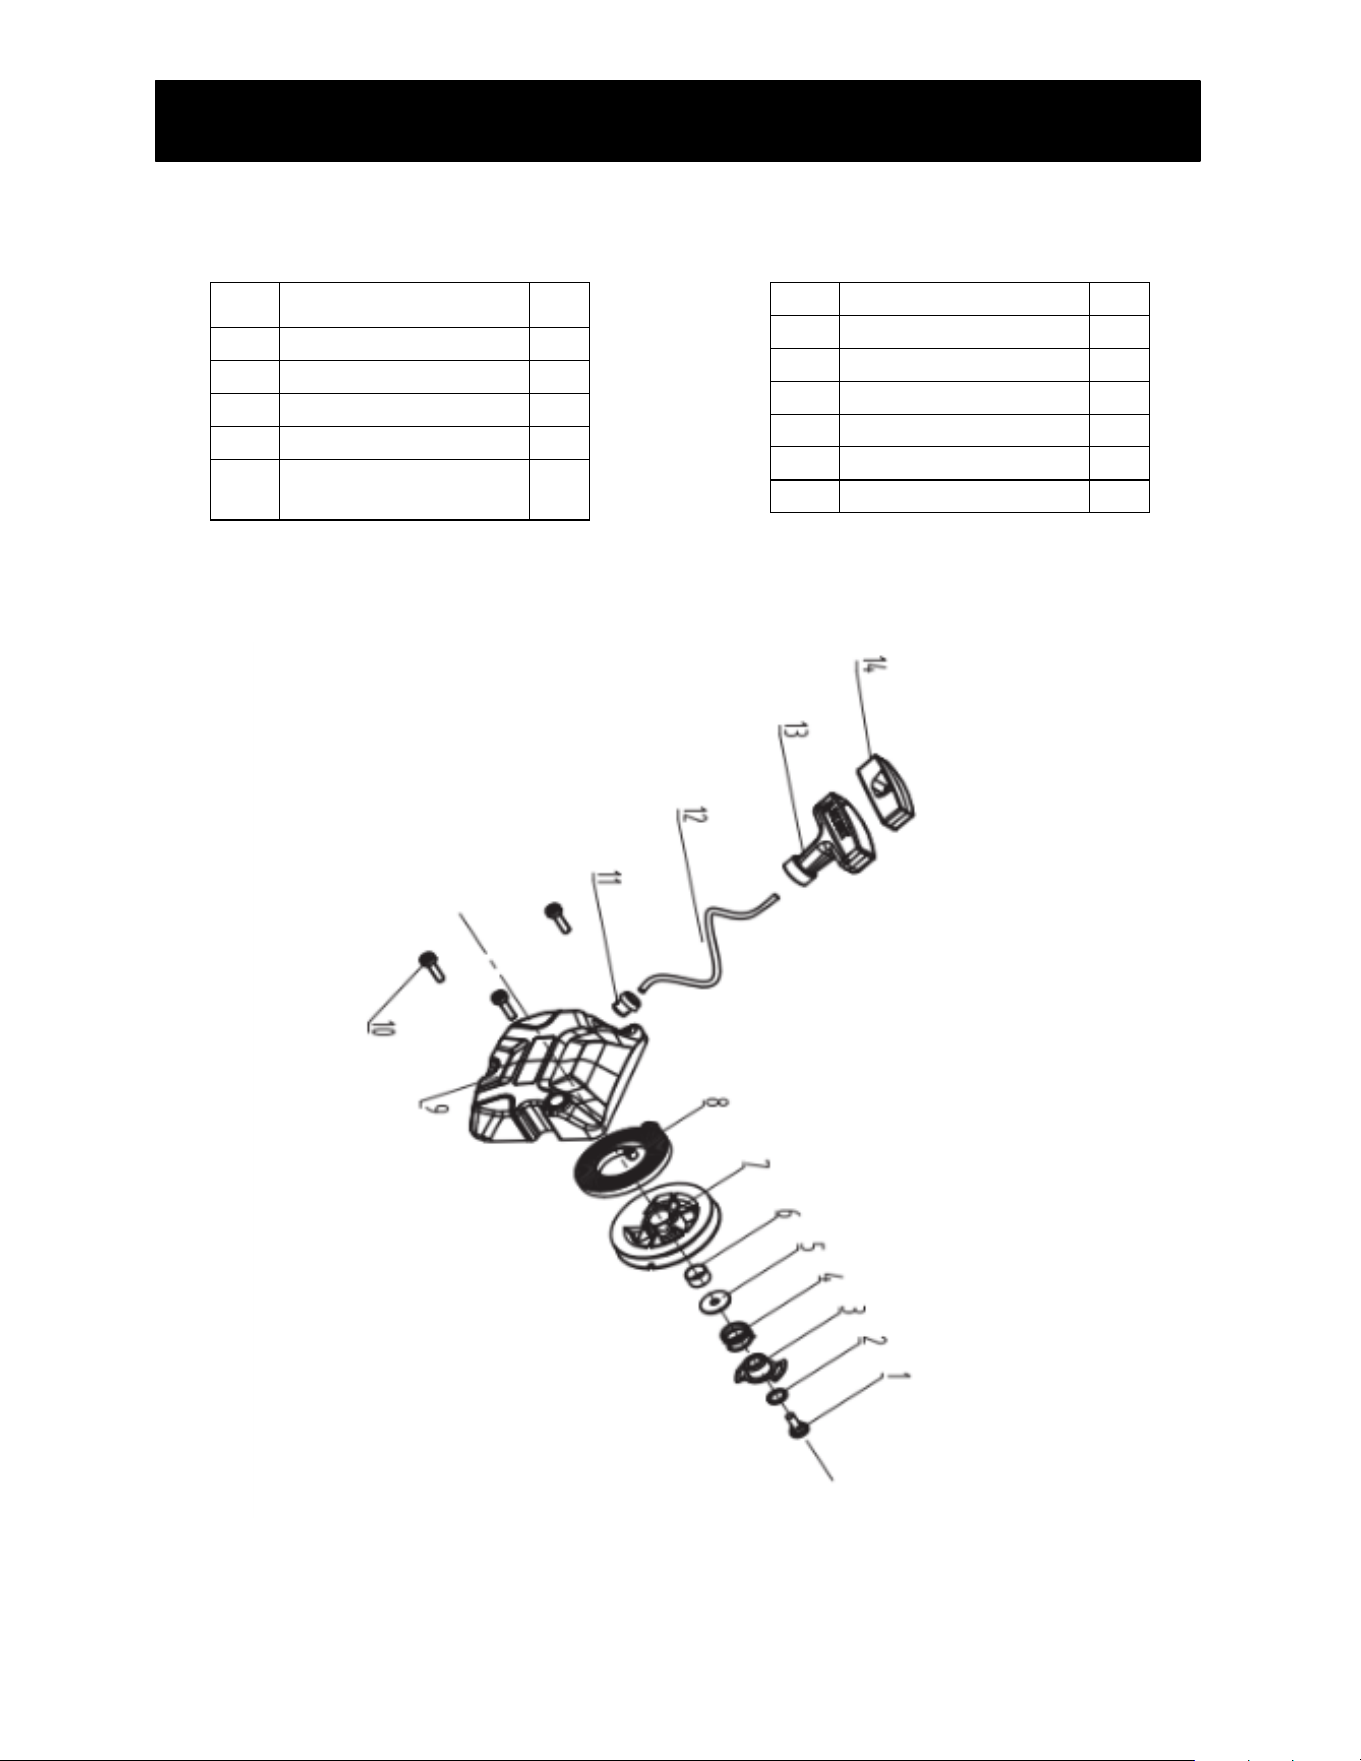
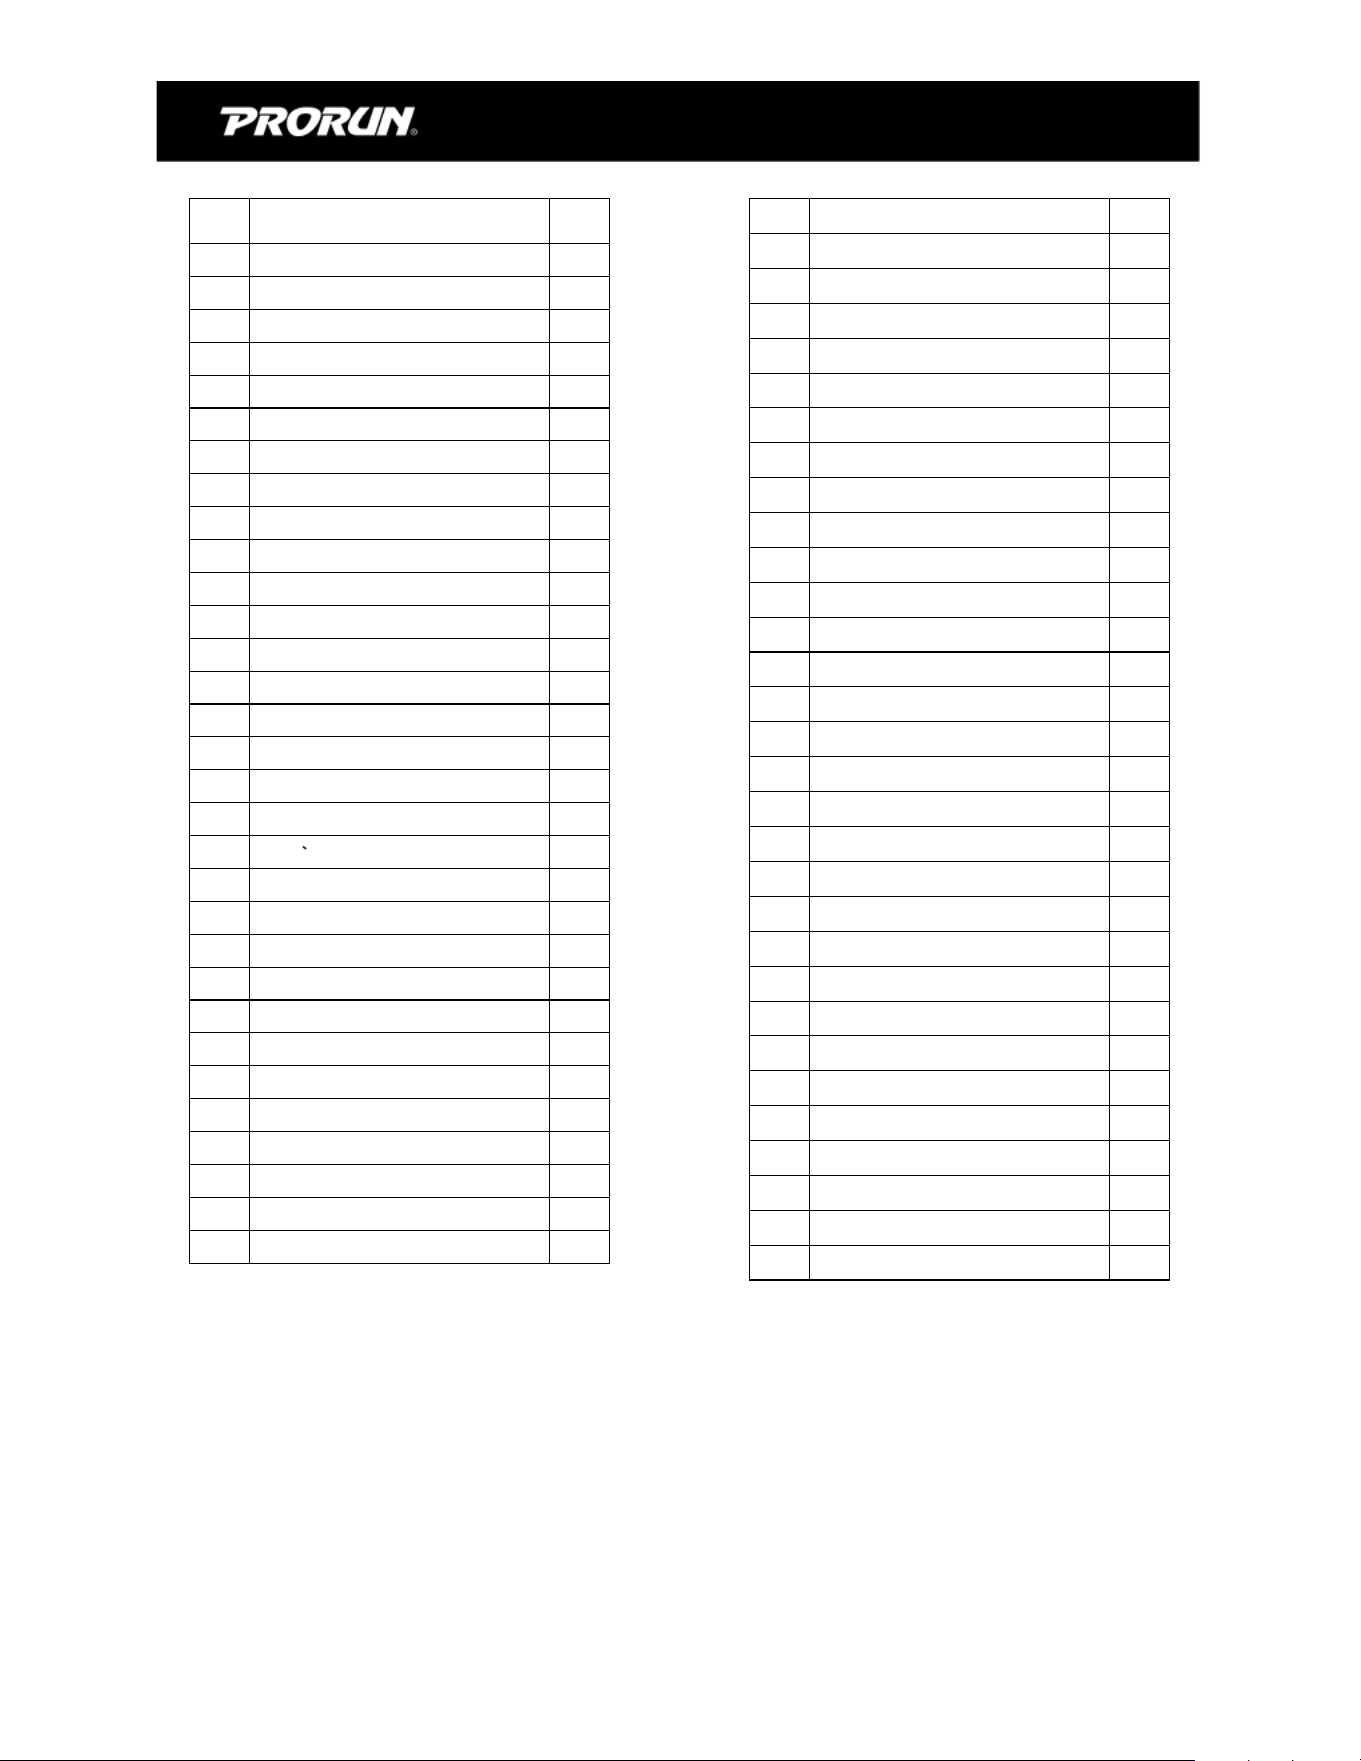
8. PARTS LIST AND DIAGRAM
Part List for Shell
NO.
Description
Qty
1
Starter screw
1
2
Wearing pad
1
3
Starting wheel gland
1
5
Flat washer 5.5x20x1
1
6
Starter wheel guide
bush
1
7
Starting wheel
1
8
Starting coil spring
1
9
Starter cover
1
10
Screw M5x20
3
12
Starting rope
1
13
starting handle
1
14
Starting handle cover
1
Assembly Diagram for Shell
25
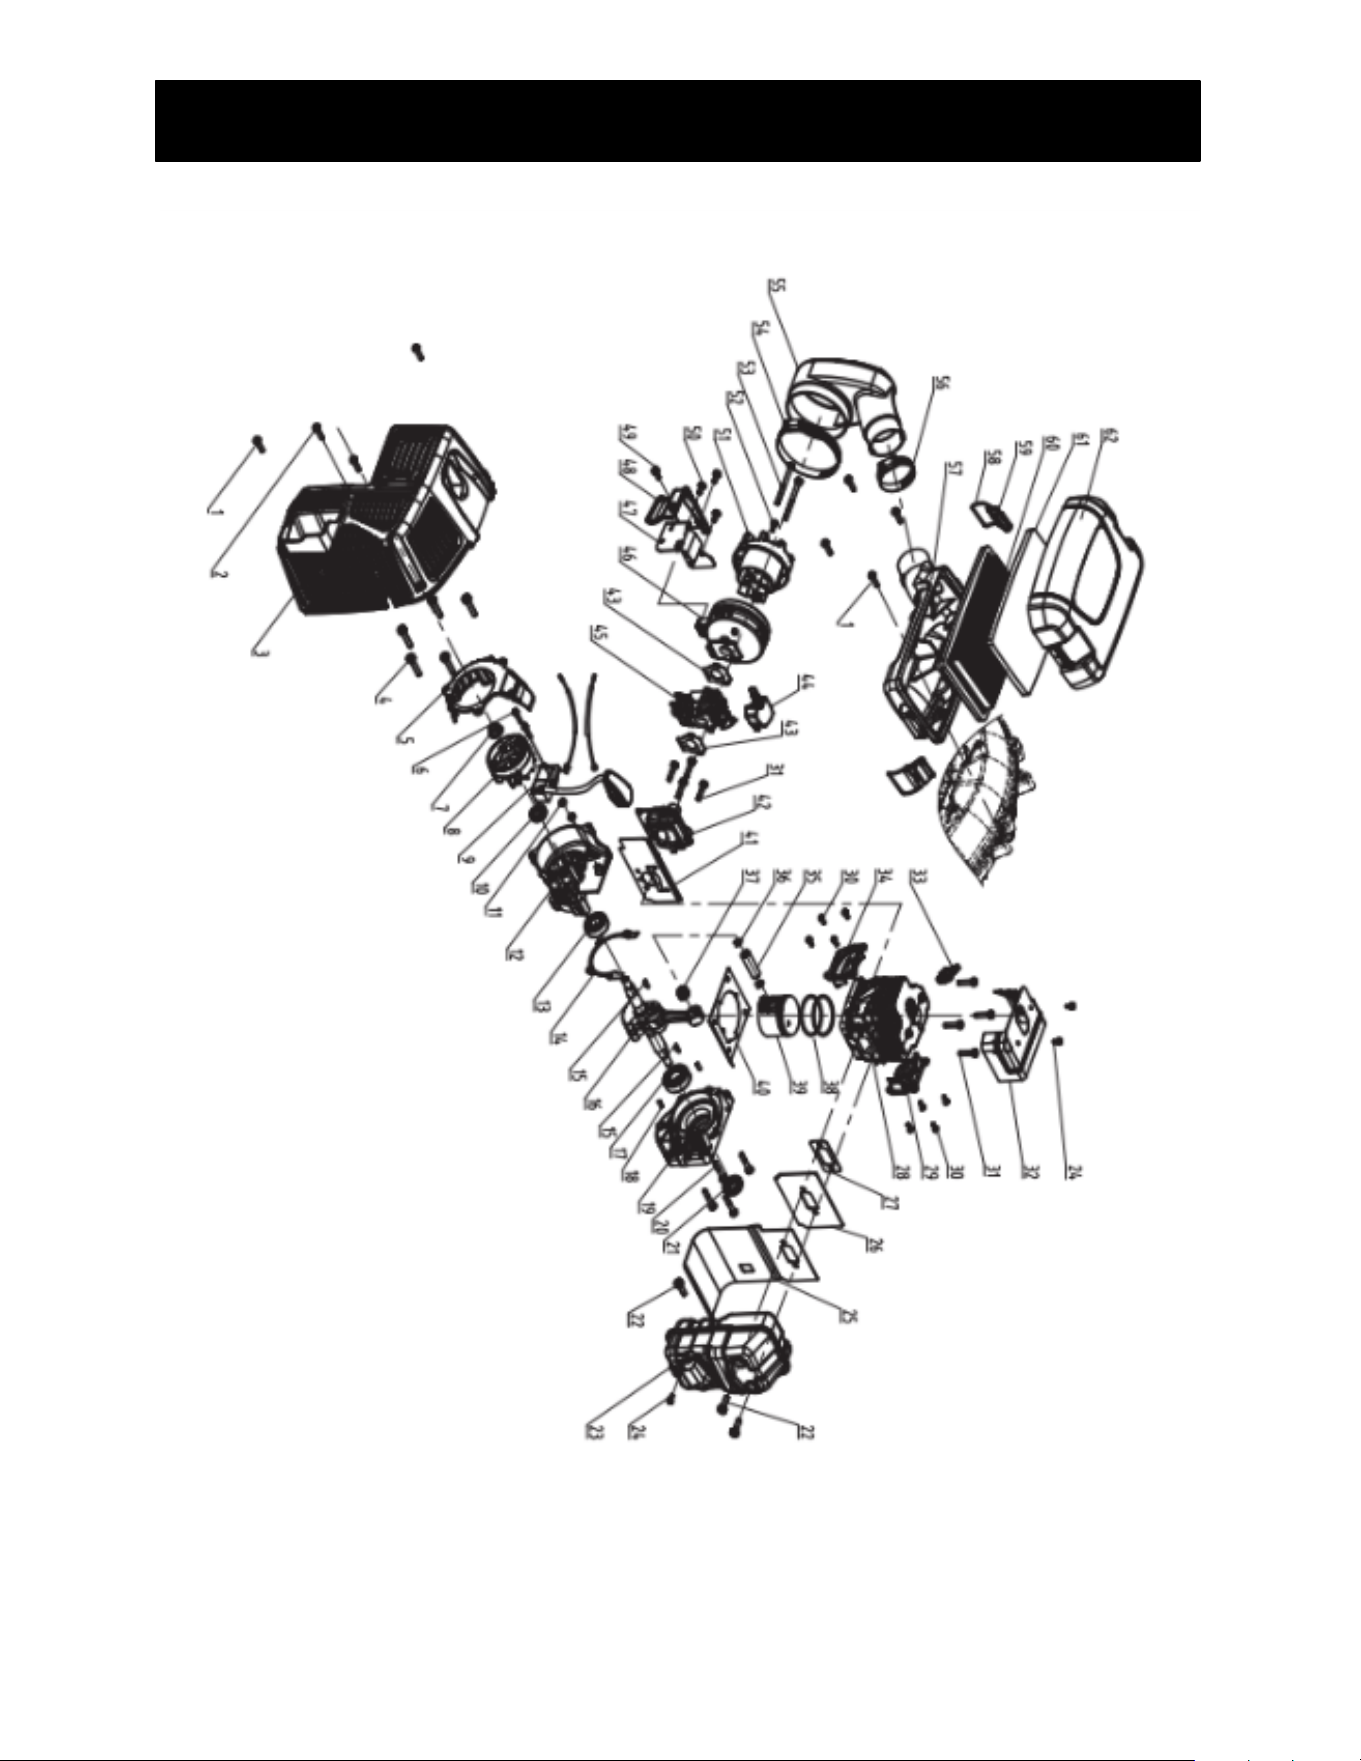
Part List for Engine
NO.
Description
Qty
1
Self-tapping screw ST5X20
7
2
Screw M5x20
1
3
cylinder jacket
1
4
Screw M6x30
5
5
wind scooper
1
6
Screw M4x20
2
7
Nut M10
1
8
Flywheel
1
9
igniter
1
10
Oil seal 15x25x7
1
11
Igniter washer
2
12
Right box
1
13
Bearing 6202
1
14
Housing gasket
1
15
key 3 x 5 x 13
2
16
Crank connecting rod
1
17
Bearing 6203
1
18
Pin B4x10
2
19
Left box
1
20
Screw M5x35
4
21
Oil seal 17x30x7
1
22
Screw M6x20
3
23
muffler
1
24
Screw M4x8
3
25
Muffler insulation pad
1
26
Muffler seal plate
1
27
Muffler gasket
1
28
cylinder
1
29
Left cylinder cover
1
30
Hex head screw M4x10
8
31
Hex head screw M5x25
8
32
Cylinder cover
1
33
Spark plug
1
34
Right cylinder cover
1
35
Piston pin
1
36
Piston pin stop ring
2
37
Needle roller bearing
1
38
Piston ring
2
39
piston
1
40
Cylinder gasket
1
41
Intake pipe gasket
1
42
Inlet pipe
1
43
Carburetor gasket
1
44
Carburetor protection cap
1
45
carburetor
1
46
Air filter seat
1
47
Tubing guard plate
1
48
Tubing guard
1
49
Hex head screw M5x12
2
50
Self-tapping screw ST5x12
2
51
Gas hood
1
52
Self-tapping screw ST4.2x12
1
53
Screw M5x65
2
54
stainless steel clamp
1
55
Air filter inlet pipe
1
56
stainless steel clamp
1
57
Air filter body
1
58
Buckle spring
2
59
Air filter latch
2
60
Paper filter element
1
61
Filter sponge
1
62
Air filter upper cover
1
26
PBB3000 GAS BACKPACK BLOWER
Assembly Diagram for Engine
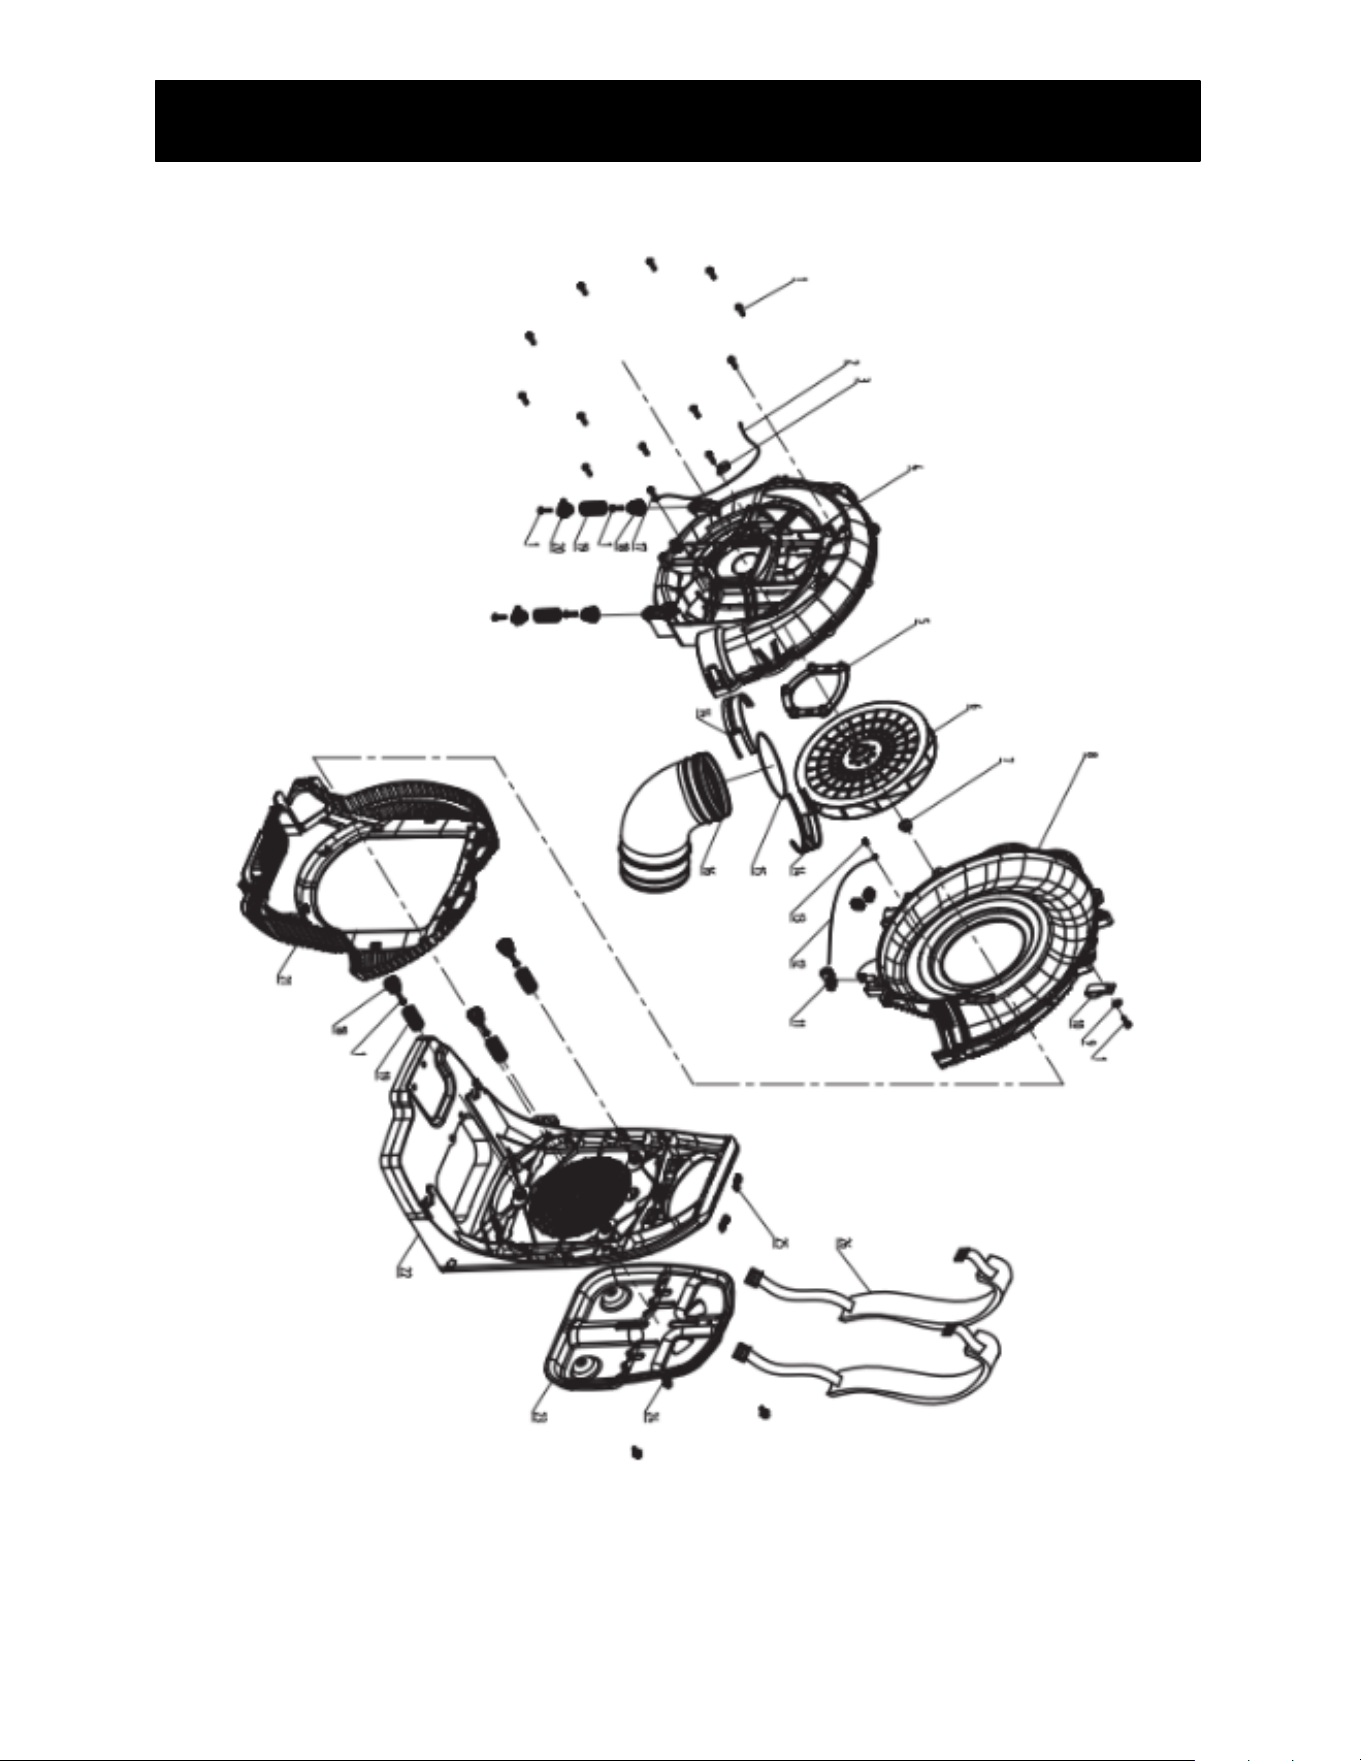
27
Part List for Shell
NO.
Description
Qty
1
Self-tapping screw ST5X20
20
2
Conducting wire
1
3
Valve wire clamp
1
4
Left half vortex shell
1
5
Housing seat
1
6
impeller
1
7
Hexagon flange nut M10
1
8
Right half vortexes
1
9
Flat washer 5 x 16 x 1.5
1
10
Locking tape
1
11
Back frame damping rubber
4
12
Esd cable
1
13
Conducting spring
1
14
hoop
2
15
O-ring 120×3.1
1
16
elbow
1
17
self-tapping screw ST5x12
1
18
Spring seat 2
5
19
Damping spring
5
20
Spring seat 1
2
21
Guard frame
1
22
Back bracket
1
23
Back frame pads
1
24
Expansion buckle
3
25
Harness buckle
2
26
Harness
1
28
PBB3000 GAS BACKPACK BLOWER
Assembly Diagram for Shell
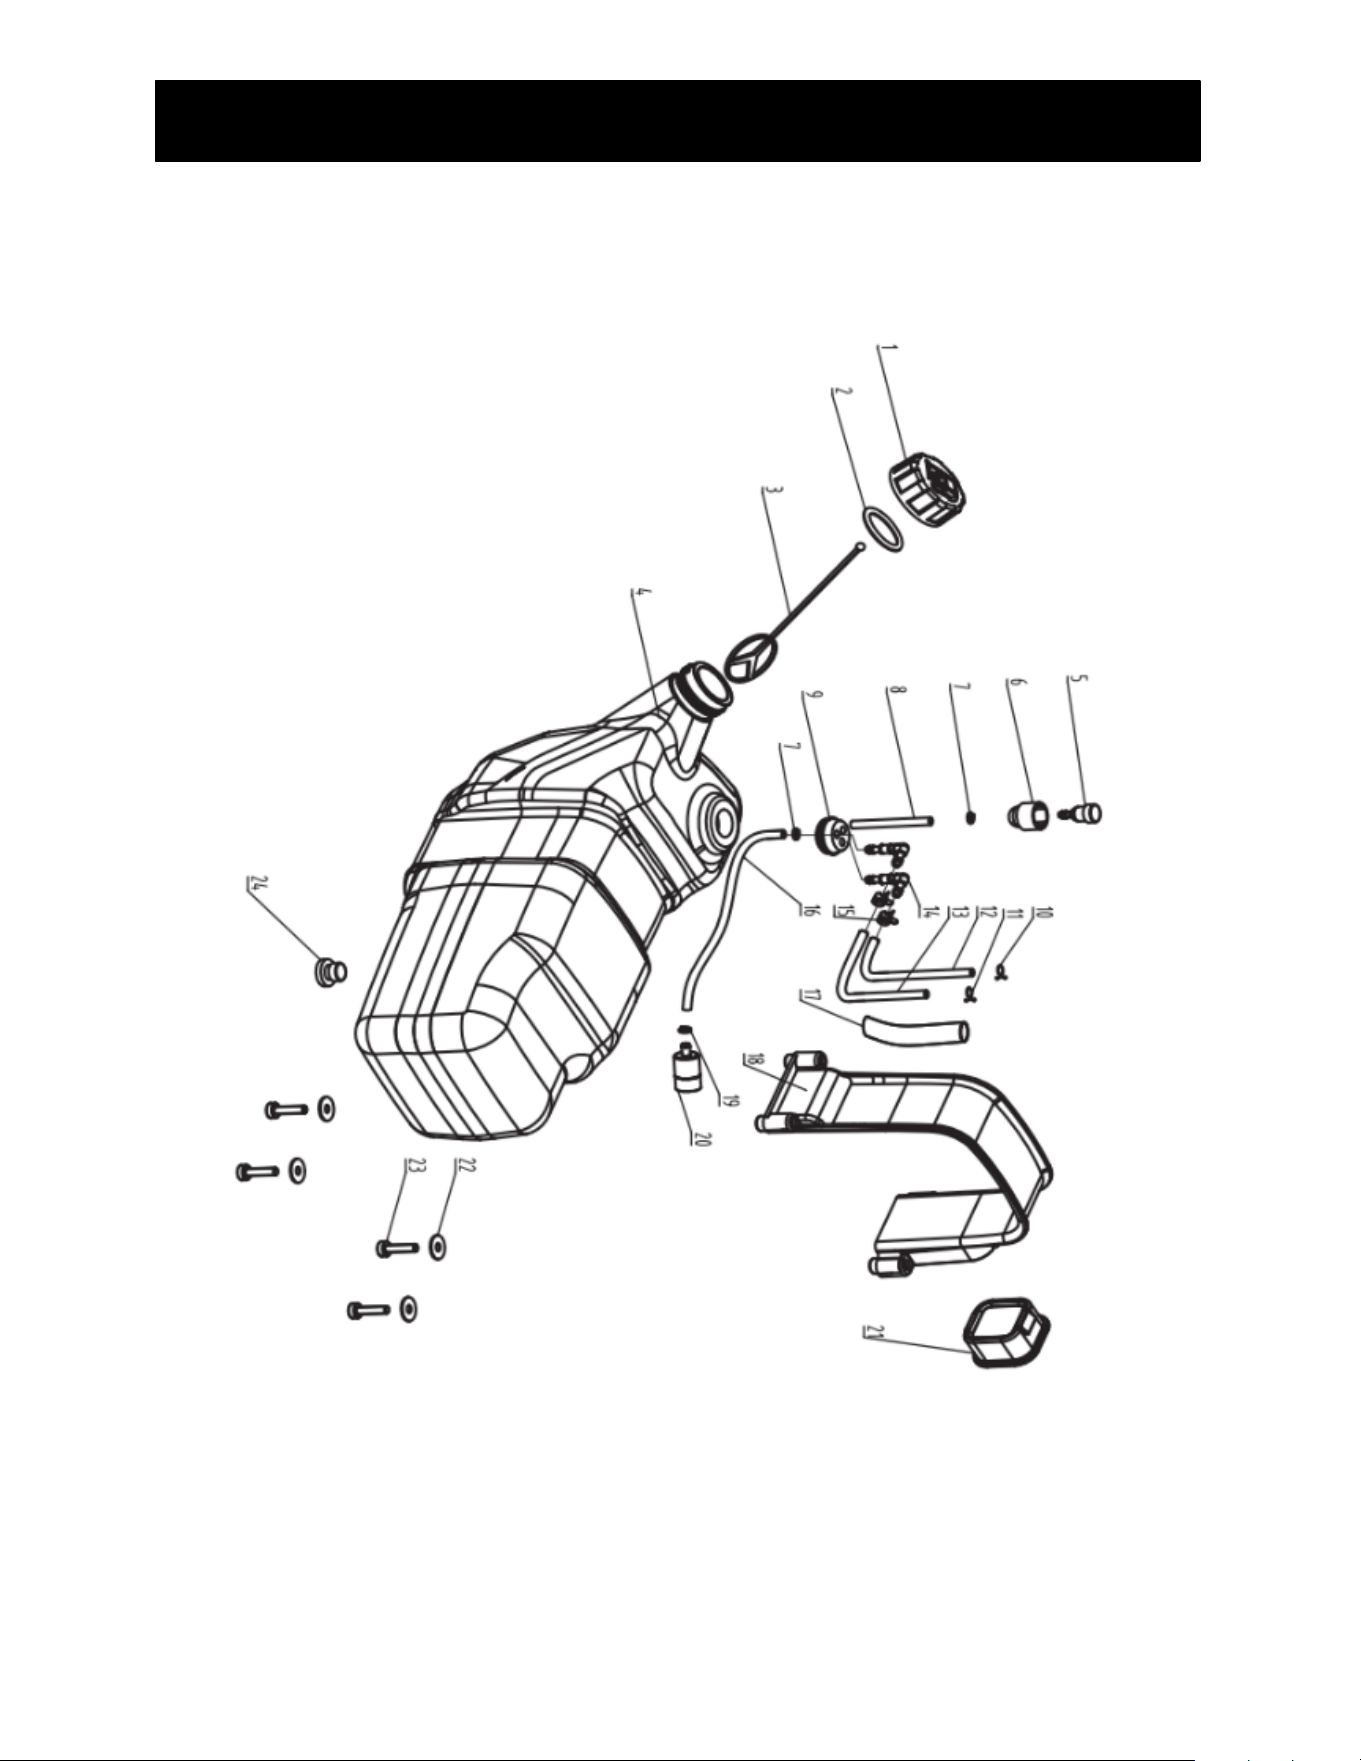
29
Part List for Shell
NO.
Description
Qty
1
fuel tank cap
1
2
seal washer
1
3
Drop guard
1
4
fuel tank
1
5
equalizer
1
6
protective casing
1
7
Tubing spring
2
8
breather pipe
1
9
Fuel line holder
1
10
Wire clamp 4.5
1
11
Wire clamp 5
1
12
Return pipe (φ3xφ6x170)
1
13
Fuel pipe (φ3xφ6x145)
1
14
oil pipe joint
2
15
spring buckle
2
16
Fuel pipe (φ3xφ5x200)
1
17
protection tube
1
18
Tank clamp
1
19
Tubing clamp spring φ7.5
1
20
Gasoline filter
1
21
Tank damping rubber
1
22
Flat washer 5 x 16 x 1.5
4
23
Screw M5x20
1
24
Rubber pad for base
1
30
PBB3000 GAS BACKPACK BLOWER
Assembly Diagram for Shell
31
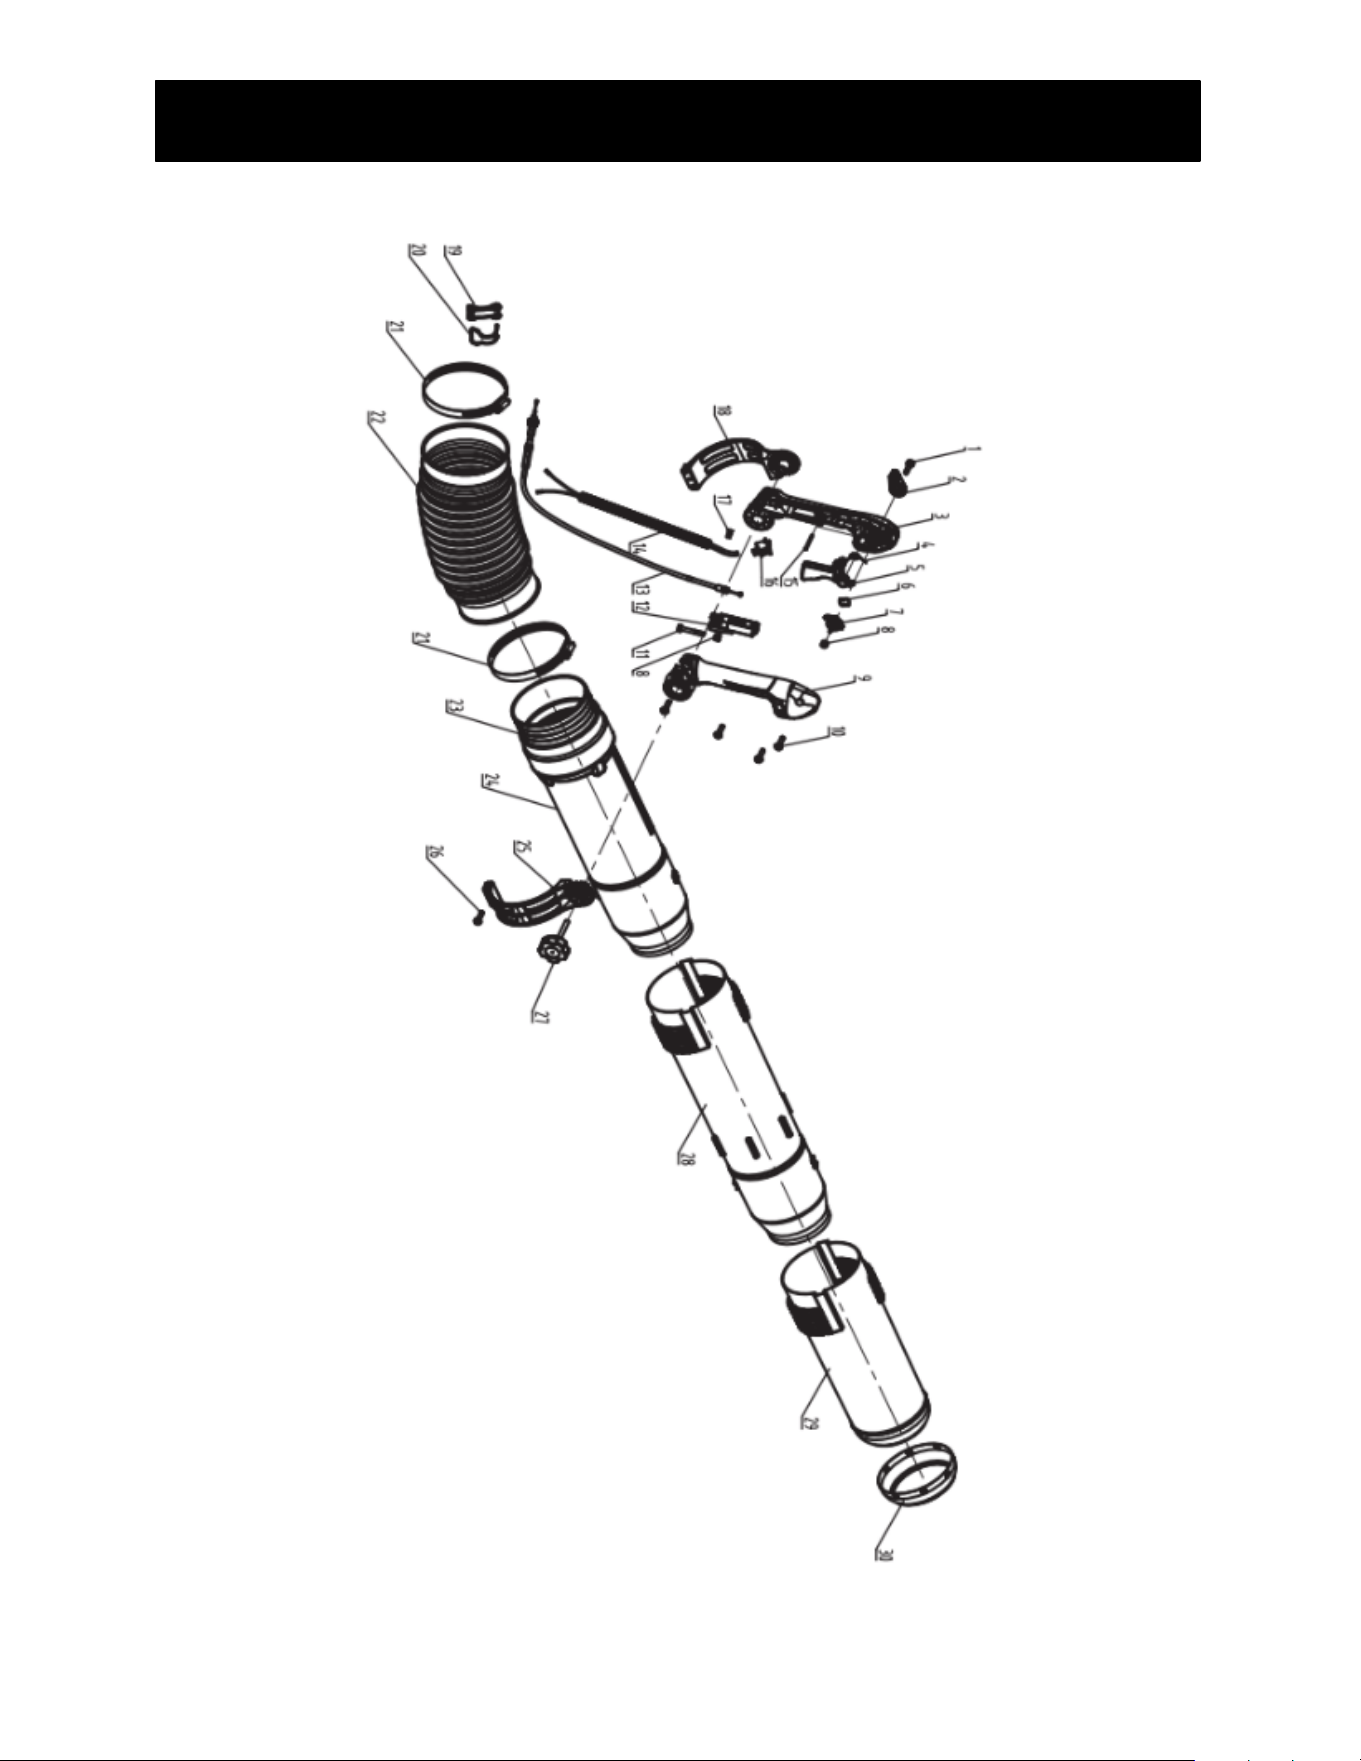
Part List for Shell
NO.
Description
Qty
1
Hex head screw M5x20
1
2
Speed control knob
1
3
Handle left cover
1
4
Trigger torsion spring
1
5
trigger
1
6
Wave type elastic washer
1
7
Constant speed lever
1
8
nut M5
2
9
Handle right cover
1
10
self-tapping screw ST5X16
4
11
Hex head screw M5x30
1
12
Valve line adjusting seat
1
13
Valve cable
1
14
Flameout wire group
1
15
Cylindrical pin 3x32
1
16
Flameout switch
1
17
Flameout line reed
1
18
Handle seat fixing ring left
1
19
Clamp holder
1
20
Wire clamp
1
21
Stainless steel clamp
2
22
Telescopic tube
1
23
Support tube
1
24
blowpipe
1
25
Handle seat fixed ring right
1
26
self-tapping screw ST5X20
1
27
Locking knob
1
28
Blowpipe (middle)
1
29
Blowpipe (front)
1
30
Air duct guard mouth
1
32
PBB3000 GAS BACKPACK BLOWER
Assembly Diagram for Shell

33
PRORUN regularly improves our products, and you may find slight differences between your
machine and the descripons contained within this operator’s manual. Modificaons can be
made to the machine without noce and without the obligaon to update the manual,
providing that the essenal safety and funconal characteriscs remain unaltered. Contact
PRORUN Customer Service with any quesons and for current specificaons.
PRORUN / TOPSUN USA
10130 Perimeter Parkway
Suite 140
Charloe, NC 28216
Customer Service: (844) 905-0882 Email: info@proruntech.com Website:
www.proruntools.com
Zhejiang Zhongjian Technology Co., Ltd Web: www.topsunpower.cc
E-mail: sales@topsunpower.cc
ADD: No.155 Mingyuan North AVE, Economic Development Zone, Yongkang, Zhejiang, 321300,
P.R. CHINA
Made in China