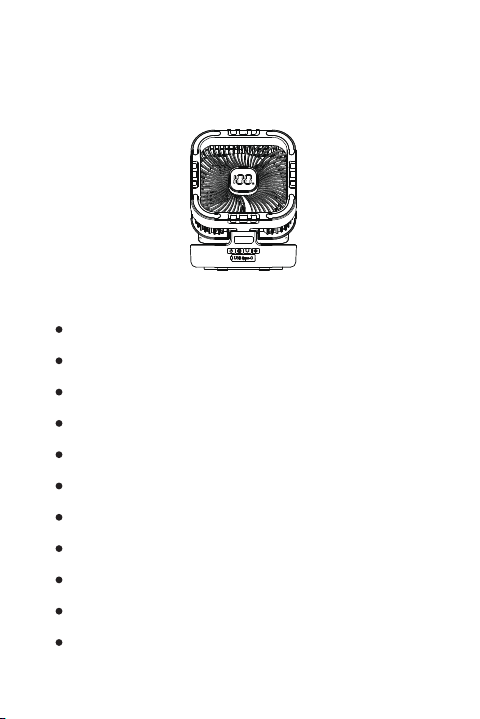
CONTENT
FAN MODES
LIGHT MODES
CHARGING AND USB OUTPUT
TIMER
SHAKE FUNCTION
POWER INDICATOR/TIMER DISPLAY
PRODUCT PARAMETERS
POWER PROTECTION
SAFETY INSTRUCTIONS
WARRANTY
PACKING LIST
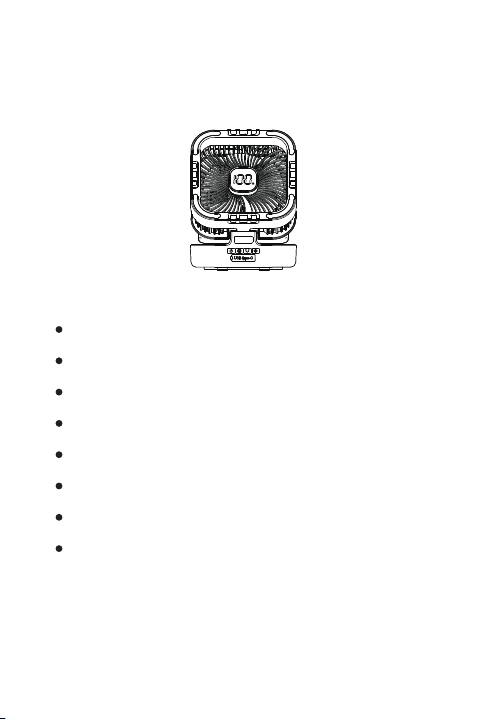
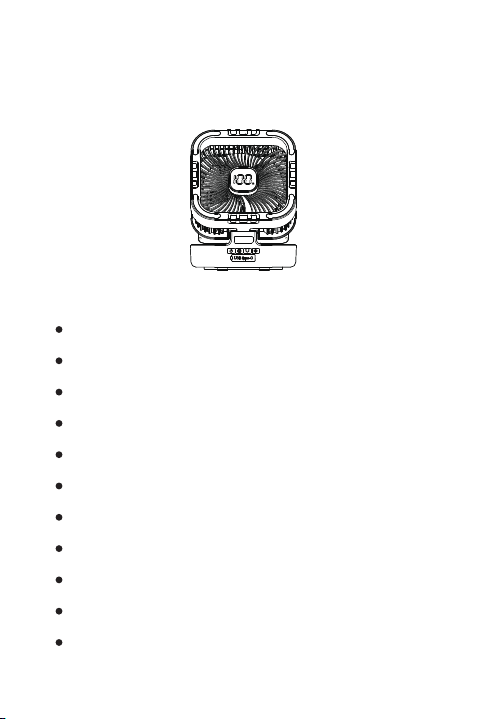
Raddy CF3
USER MANUAL
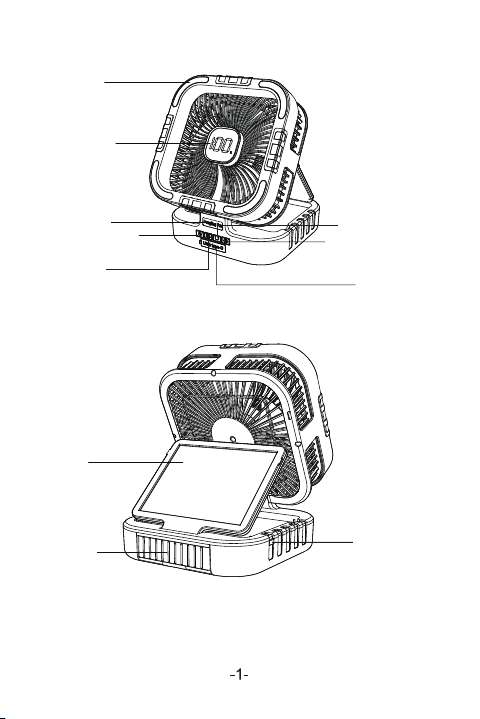
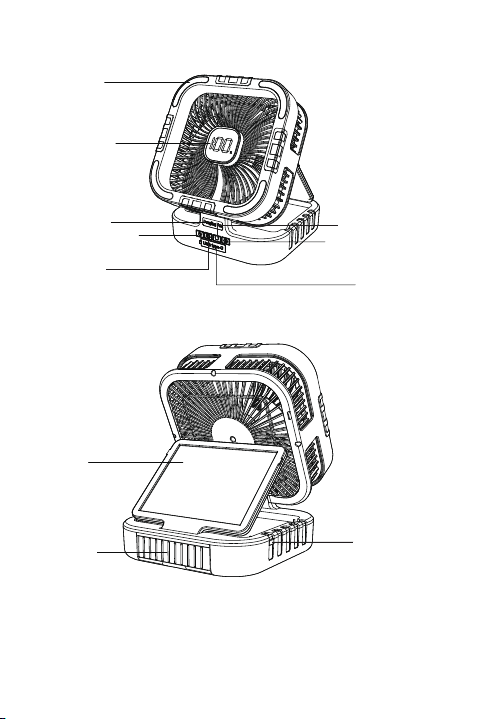
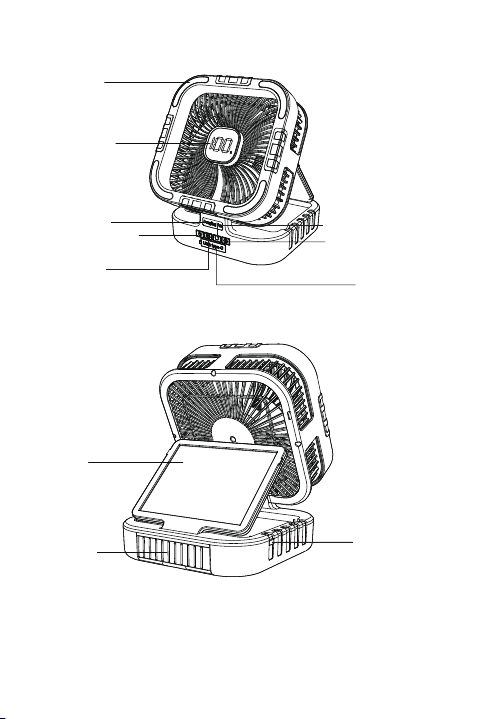
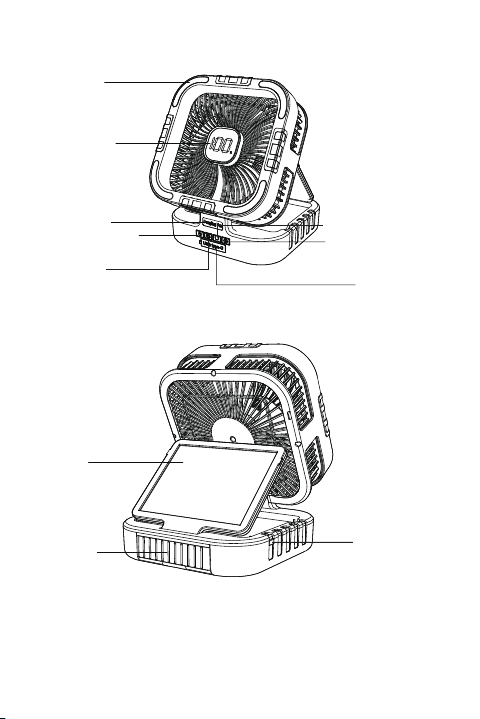
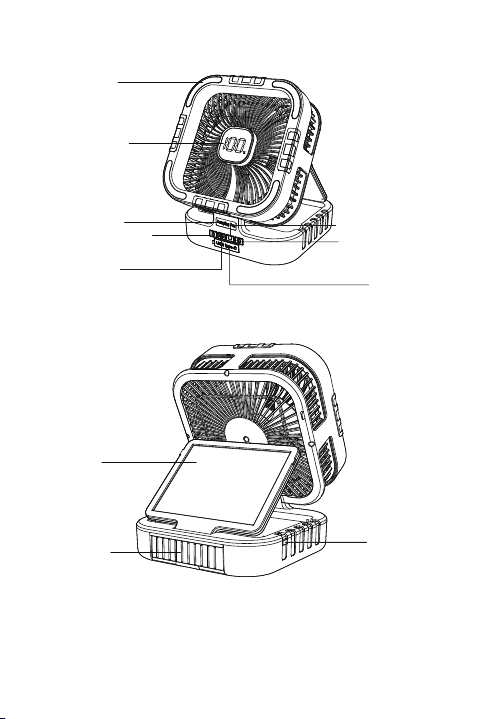
Lighting
Display
LOGO
Fan button
Light button
Shaking head
button
Timer button
Type-C charging port
USB output port
Solar panels
Handle
open

FAN MODES
LIGHT MODES
1. Press the fan gear button once to activate
the first gear.
2. Press it again for the second gear.
3. Press it a third time for the third gear.
4. Press it a fourth time for the fourth gear.
5. Press it a fifth time for the fifth gear.
6. Press it a sixth time for the sixth gear.
7. Press it a seventh time to turn off the fan.
1. Press the light button once to turn on the
white light.
2. Press it again to switch to yellow light.
3. Press a third time to activate yellow-white
light.
4. Press a fourth time to turn off the light.
5. Long-press to adjust the brightness.

A. TYPE-C CHARGING
1.Connect the included Type-C charging cable
to the fan’s charging port to begin charging.
2.The charging indicator will flash blue while
the battery is charging.
B . USB EMERGENCY CHARGING
1.The dust plug contains both a USB output port
and a Type-C charging port.
2.Plug the USB end of the supplied charging
cable into the USB port, and connect the other
end to the handset’s charging port.
C . SOLAR CHARGING
1.Position the solar panel towards the sun for
optimal charging efficiency.
2. The charging indicator will light up when the
solar panel is charging.
3. Note that the solar charging mode is primarily
intended for battery maintenance.
CHARGING AND USB PORT

1. Press the timing gear button once to set the
timer for 1 hour.
2. Press the button again to set the timer for
2 hours.
3. Press it a third time to set the timer for 4
hours.
4. Press it a fourth time to set the timer for 6
hours.
5. Press it a fifth time to turn off the timer.
SHAKE FUNCTION
1. Click the shake button to turn on the shake
function
2. Click again to turn off the shake function.
TIMER

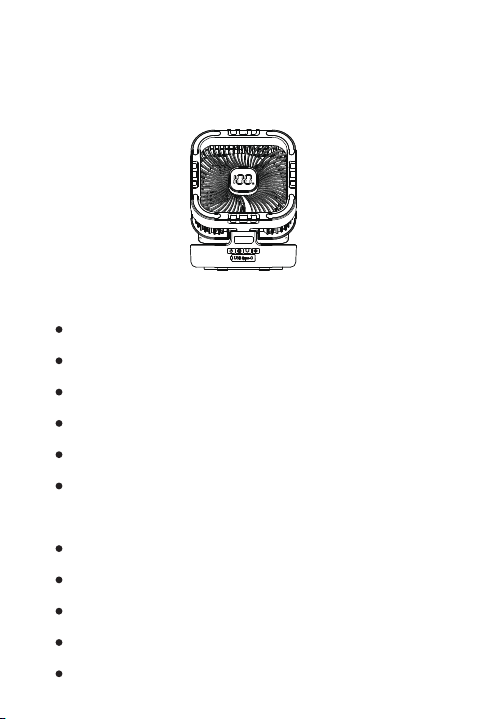
POWER INDICATOR/TIMER DISPLAY
1. The fan's power level is shown on the display
screen. When the power is at 100%, the
screen will display "100%", and so on.
2. When the timer is set to 1 hour, the display
will show "1H", and similarly for other time
settings.
Timing has 4 levels
1st gear: Displays 1H
2nd gear: Display 2H
3rd gear: Display 4H
4th gear: Display 6H
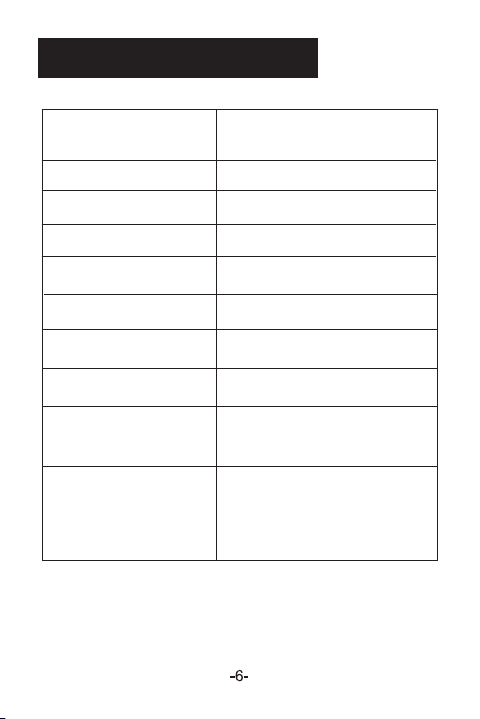
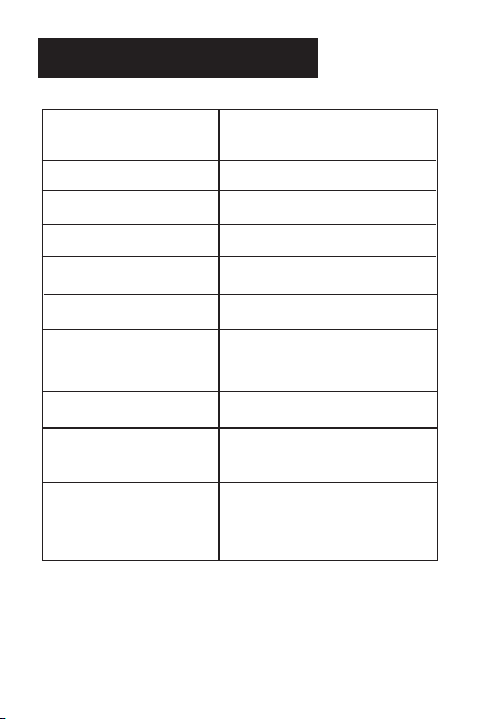
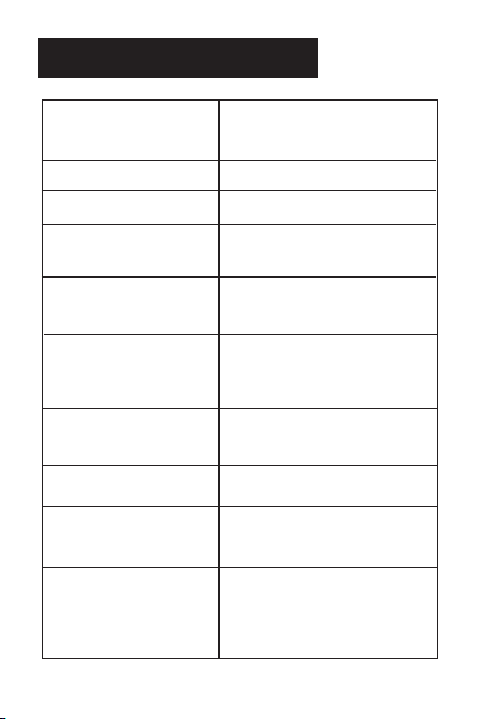
Product Size
Weight
Maximum Power
Operating Voltage
Battery Capacity
Charging Time
Waterproof Rating
Lighting Lumen
Endurance
208*208*130 mm
1395 g
12W
3.7 V
20000 mAh
14-16h
IPX3
80 lm
Power supply
parameters
5V 2A
Fully functional:7-8h
Fan:8-46h
Lighting lamp:30-48h
PRODUCT PARAMETERS

POWER PROTECTION
Overload/Short Circuit Protection: The
protection chip cuts off the power supply to
prevent battery damage in case of overload
or short circuit.
Low Voltage Protection: When the battery
voltage drops below 2.5V, the protection chip
cuts off the power supply to prevent
over-discharge damage.
Low Voltage Warning: If the battery voltage
falls below 3.0V during operation, the red
light flashes, and the machine shuts down
automatically..

SAFETY INSTRUCTIONS
1. Do not insert your hands or foreign objects
into the air inlet and outlet.
3. Do not disassemble, alter or repair the
product by yourself.
4. Only charge the product with an adapter that
matches the specified voltage.
6. Do not charge or use the product on
Flamm -able surfaces such as carpets.
7. If the product is used for the first time or has
been unused for over 60 days, please recharge
the battery before use.
5. Do not use the product in or near a fire.
2. Do not use the product in a humid environment.
8. Avoid over-discharging the battery during use,
as this may shorten its lifespan or damage
the rechargeable batter.
-8-

-9-
9. Do not use alcohol or any corrosive liquids to
clean the product.
10. Do not direct the flashlight beam into your
eyes.
1.This multifunctional fan comes with a
12-month warranty against manufacturing
defects.
2.The warranty period starts from the date of
purchase.
WARRANTY
PACKING LIST
Fan x 1
User Manual x 1
Type-C Cable x1
INHALT
LÜFTERMODI LICHTMODI
AUFLADUNG UND USB-AUSGANG
TIMER
SHAKE FUNTION
PRODUKTPARAMETER
STROMSCHUTZ
GARANTIE
VERPACKUNGSLISTE
Raddy CF3
BENUTZERHANDBU
Beleucht
Anzeige
LOGO
Lüftertaste
Lichttaste
Taste zum
Kopfschütteln
Timer-Taste
Typ-C-Ladeanschluss
USB-Ausgangsanschluss
Sonnenkollektor
Handgriff
öffnen
-10-

LÜFTERMO
LICHT-MODEN
1. Drücken Sie die Taste für den Lüftergang einmal,
um den ersten Gang zu aktivieren.
2. Drücken Sie die Taste erneut, um den zweiten
Gang einzulegen.
3. Drücken Sie die Taste ein drittes Mal, um den
dritten Gang einzulegen.
4. Drücken Sie die Taste ein viertes Mal, um den
vierten Gang einzulegen.
5. Drücken Sie die Taste ein fünftes Mal, um den
fünften Gang einzulegen.
6. Drücken Sie die Taste ein sechstes Mal, um
den sechsten Gang einzulegen.
7. Drücken Sie die Taste ein siebtes Mal, um das
Gebläse auszuschalten.
1. Drücken Sie die Lichttaste einmal, um das
weiße Licht einzuschalten.
2. Drücken Sie die Taste erneut, um auf gelbes
Licht umzuschalten.
3. Ein drittes Mal drücken, um das gelb-weiße
Licht zu aktivieren.
4. Drücken Sie ein viertes Mal, um das Licht
auszuschalten.
5. Drücken Sie lange, um die Helligkeit einzustellen.
-11-

A. TYP-C-LADUNG
Schließen Sie das mitgelieferte Typ-C-Ladekabel
an den Ladeanschluss des Lüfters an, um den
Ladevorgang zu starten.
2. die Ladeanzeige blinkt blau, während der Akku
geladen wird.
B . USB-NOTLADUNG
1. der Staubstecker enthält sowohl einen
USB-Ausgangsanschluss als auch einen
Typ-C-Ladeanschluss.
2. Stecken Sie das USB-Ende des mitgelieferten
Ladekabels in den USB-Anschluss, und
verbinden Sie das andere Ende mit dem
Ladeanschluss des Mobilteils.
C . SOLARES LADEN
1. das Solarmodul in Richtung der Sonne
ausrichten, um eine optimale Ladeleistung zu
erzielen.
2. Die Ladeanzeige leuchtet auf, wenn das
Solarmodul aufgeladen wird.
LADE- UND USB-ANSCHLUSS
-12-

1. Drücken Sie einmal auf die Taste des
Zeitmessgeräts, um den Timer auf 1 Stunde
einzustellen.
2. Drücken Sie die Taste erneut, um den Timer
auf 2 Stunden einzustellen.
3. Drücken Sie die Taste ein drittes Mal, um den
Timer auf 4 Stunden einzustellen.
4. Drücken Sie die Taste ein viertes Mal, um den
Timer auf 6 Stunden einzustellen.
5. Drücken Sie die Taste ein fünftes Mal, um den
Timer auszuschalten.
SHAKE FUNTION
1. Klicken Sie auf die Schaltfläche "Schütteln",
um die Schüttelfunktion zu aktivieren.
2. Klicken Sie erneut, um die Schüttelfunktion
auszuschalten.
TIMER
3. Beachten Sie, dass der Solarlademodus in
erster Linie für die Batteriewartung gedacht ist.
-13-

STROMANZEIGE/ZEITANZEIGE
1. Die Leistungsstufe des Lüfters wird auf dem
Display angezeigt. Wenn die Leistung bei 100%
liegt, wird auf dem Bildschirm "100 %"
angezeigt, usw.
2. Wenn der Timer auf 1 Stunde eingestellt ist,
zeigt das Display "1H" an, und ähnlich verhält
es sich bei anderen Zeiteinstellungen.
Die Zeitmessung hat 4 Stufen
1. Gang: Anzeige 1H
2. Gang: Anzeige
3. Gang: Anzeige 4H
4. Gang: Anzeige 6H
-14-
Größe des Produkts
Gewicht
Maximale Leistung
Betriebsspannung
Batteriekapazität
Aufladezeit
Wasserdichte
Bewertung
Beleuchtung Lumen
Ausdauer
208*208*130 mm
1395 g
12W
3.7 V
20000 mAh
14-16h
IPX3
80 lm
Stromversorgung
5V 2A
Vollständig funktionsfähig:7-8h
Lüfter:8-46h
Beleuchtung Lampe:30-48h
PRODUCT PARAMETERS
-15-

ENERGIESCHUTZ
Überlast/Kurzschluss-Schutz: Der Schutzchip
unterbricht die Stromzufuhr, um eine
Beschädigung der Batterie im Falle einer
Überlastung oder eines Kurzschlusses zu
verhindern.
Schutz vor Unterspannung: Wenn die
Batteriespannung unter 2,5 V fällt, unterbricht
der Schutzchip die Stromversorgung, um
Schäden durch Tiefentladung zu verhindern.
Warnung bei Unterspannung: Wenn die
Batteriespannung während des Betriebs unter
3,0 V fällt, blinkt das rote Licht, und das Gerät
schaltet sich automatisch ab.
SICHERHEITSHINWEISE
1. Stecken Sie nicht Ihre Hände oder Fremdkörper
in den Luftein- und -auslass.
2. Verwenden Sie das Produkt nicht in einer feuchten
Umgebung.
-16-

3. Zerlegen, verändern oder reparieren Sie das
Produkt nicht selbst.
4. Laden Sie das Produkt nur mit einem Adapter
auf, der der angegebenen Spannung entspricht.
6. Laden Sie das Gerät nicht auf brennbaren
Oberflächen wie Teppichen auf und verwenden
Sie es nicht dort.
7. Wenn das Produkt zum ersten Mal verwendet
wird oder länger als 60 Tage nicht benutzt
wurde,laden Sie bitte den Akku vor der
Verwendung auf.
5. Verwenden Sie das Produkt nicht in oder in der
Nähe eines Feuers.
8. Vermeiden Sie eine Überentladung des Akkus
während des Gebrauchs, da dies seine
Lebensdauer verkürzen oder den Akku
beschädigen kann.
9. Verwenden Sie zur Reinigung des Geräts keinen
Alkohol oder andere ätzende Flüssigkeiten.
-17-

10. Richten Sie den Lichtstrahl der Taschenlampe
nicht in Ihre Augen.
1.Dieser Multifunktionsventilator wird mit einer
12-monatigen Garantie gegen Herstellungsfehler
geliefert.
2.Die Garantiezeit beginnt mit dem Kaufdatum.
GARANTIE
VERPACKUNGSLISTE
Ventilator x 1
Benutzerhandbuch x 1
Typ-C-Kabel x 1
-18-
CONTENIDO
MODOS VENTILADOR
MODOS LUZ
CARGA Y SALIDA USB
TEMPORIZADOR
FUNCIÓN SHAKE
INDICADOR DE ENCENDIDO
/TEMPORIZADOR
PARÁMETROS DEL PRODUCTO
PROTECCIÓN DE ENERGÍA
SEGURIDAD
GARANTÍA
LISTA DE EMBALAJES
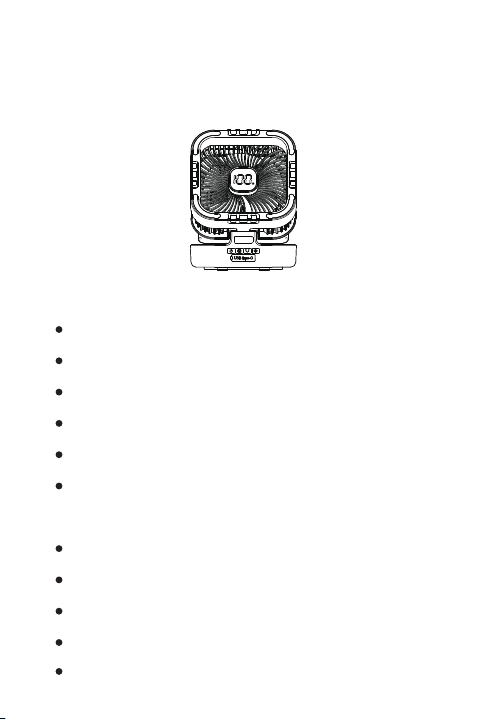
Raddy CF3
MANUAL DEL
Iluminac
Mostrar
LOGO
Botón del
ventilador
Botón de agitar la
Botón del
temporizador
Puerto de carga Tipo
Panel solar
Mango
abra
-19-

MODOS DE VENTILADOR
MODOS DE ILUMINACIÓN
1. Pulse una vez el botón de marcha del ventilador
para activar la primera marcha.
2. Púlselo de nuevo para la segunda marcha.
3. Púlselo una tercera vez para la tercera marcha.
4. Púlselo una cuarta vez para la cuarta marcha.
5. Púlselo una quinta vez para la quinta marcha.
6. Púlselo una sexta vez para la sexta marcha.
7. Púlselo una séptima vez para apagar el
ventilador.
1. Pulse el botón de luz una vez para encender la
luz blanca.
2. Púlselo de nuevo para cambiar a la luz amarilla.
3. Pulse una tercera vez para activar la luz
amarilla-blanca.
4. Pulse una cuarta vez para apagar la luz.
5. Pulse prolongadamente para ajustar el brillo.
-20-

A. CARGA TIPO C
1.Conecta el cable de carga Type-C incluido al
puerto de carga del ventilador para iniciar la
carga.
2. El indicador de carga parpadeará en azul
mientras se carga la batería.
B . CARGA DE EMERGENCIA POR USB
1. El conector antipolvo contiene un puerto de
salida USB y un puerto de carga Type-C.
2. Enchufa el extremo USB del cable de carga
suministrado en el puerto USB y conecta el
otro extremo al puerto de carga del teléfono.
C . CARGA SOLAR
1. Coloca el panel solar orientado hacia el sol
para conseguir una eficacia de carga óptima.
2. El indicador de carga se iluminará cuando el
panel solar se esté cargando.
CARGA Y PUERTO USB
-21-

1. Pulse una vez el botón del engranaje
temporizador para ajustar el temporizador a
1 hora.
2. Pulse de nuevo el botón para ajustar el
temporizador a 2 horas.
3. Púlselo una tercera vez para ajustar el
temporizador a 4 horas.
4. Púlselo una cuarta vez para ajustar el
temporizador a 6 horas.
5. Púlselo una quinta vez para apagar el
temporizador.
FUNCIÓN SHAKE
1.Pulse el botón de agitación para activar la
función de agitación
2. Pulse de nuevo para desactivar la función de
agitación.
TEMPORIZADOR
3. Tenga en cuenta que el modo de carga solar
está pensado principalmente para el
mantenimiento de la batería.
-22-

INDICADOR DE
1. El nivel de potencia del ventilador se muestra
en la pantalla. Cuando la potencia esté al 100%,
la pantalla mostrará "100%", y así sucesivamente.
2. Cuando el temporizador está ajustado a 1 hora,
la pantalla mostrará "1H", y de forma similar
para otros ajustes de tiempo.
El cronometraje tiene 4 niveles
1ª marcha: Muestra 1H
2ª marcha: Mostrar
3ª marcha: Mostrar 4H
4ª marcha: Mostrar 6H
-23-
Tamaño del
producto
Peso
Potencia máxima
Tensión de
funcionamiento
Capacité de la
batterie
Capacidad de la
batería
Grado de
impermeabilidad
Iluminación Lumen
Endurance
208*208*130 mm
1395 g
12W
3.7 V
20000 mAh
14-16h
IPX3
80 lm
Parámetros de
alimentación
5V 2A
Entièrement fonctionnel : 7-8 h
Ventilateur : 8-46 h
Lampe d'éclairage : 30-48 h
PRODUCT PARAMETERS
-24-

PROTECCIÓN DE ENERGÍA
Protección contra sobrecarga/cortocircuito:
El chip de protección corta la alimentación
para evitar daños en la batería en caso de
sobrecarga o cortocircuito.
Protección contra baja tensión: Cuando el
voltaje de la batería cae por debajo de 2,5 V,
el chip de protección corta la alimentación
para evitar daños por sobredescarga.
Advertencia de baja tensión: Si el voltaje de la
batería cae por debajo de 3,0 V durante el
funcionamiento, la luz roja parpadea y la
máquina se apaga automáticamente....
-25-

INSTRUCCIONES DE SEGURIDAD
1. No introduzca las manos ni extraños en la
entrada y salida de aire.
3. No desmonte, modifique ni repare el producto
por su cuenta.
4. Cargue el producto únicamente con un
adaptador que coincida con el voltaje
especificado.
6. No cargue ni utilice el producto sobre
superficies inflamables como alfombras.
7. Si el producto se utiliza por primera vez o no
se ha utilizado durante más de 60 días,
recargue la batería antes de utilizarlo.
5. No utilice el producto cerca del fuego.
2. No utilice el producto en un ambiente húmedo.
8. Evite descargar excesivamente la batería
durante su uso, ya que podría acortar su vida
útil o dañar la batería recargable.
-26-

9. No utilice alcohol ni líquidos corrosivos para
limpiar el producto.
10. No dirija el haz de la linterna a los ojos.
1.Este ventilador multifunción tiene una
garantía de 12 meses contra defectos de
fabricación.
2.El periodo de garantía comienza a partir de la
fecha de compra.
GARANTÍA
LISTA DE EMBALAJES
Ventilador x 1
Manual del usuario x 1
Cable tipo C x 1
-27-
CONTENU
MODES DE VENTILATION
MODES D'ÉCLAIRAGE
CHARGEMENT ET SORTIE USB
MINUTERIE
FONCTION SHAKE
INDICATEUR D'ALIMENTATION
/AFFICHAGE DE LA MINUTERIE
PARAMÈTRES DU PRODUIT
PROTECTION DE PUISSANCE
CONSIGNES DE SÉCURITÉ
GARANTIE
PACKING LIST
Raddy CF3
MANUEL D'UTILISATION
Éclairag
Afficher
LOGO
Bouton du
ventilateur
Bouton
lumineux
Bouton de
secouage de la
tête
Bouton de
minuterie
Port de chargement
Type-C Port de sortie USB
Panneau solaire
Poignée
ouvri
-28-

MODES DE VENTILATION
MODES D'ÉCLAIRAGE
1. Appuyez une fois sur le bouton de la vitesse du
ventilateur pour activer la première vitesse.
2. Appuyez à nouveau sur cette touche pour passer
à la deuxième vitesse.
3. Appuyez une troisième fois pour passer à la
troisième vitesse.
4. Appuyez une quatrième fois sur cette touche
pour passer à la quatrième vitesse.
5. Appuyez une cinquième fois sur la touche pour
passer à la cinquième vitesse.
6. Appuyez une sixième fois sur la touche pour
passer la sixième vitesse.
7. Appuyez une septième fois sur cette touche
pour éteindre le ventilateur.
1. Appuyez une fois sur le bouton d'éclairage pour
allumer la lumière blanche.
2. Appuyez à nouveau sur cette touche pour passer
à la lumière jaune.
3. Appuyer une troisième fois pour activer la
lumière jaune-blanche.
4. Appuyez une quatrième fois pour éteindre la
lumière.
5. Appuyez longuement pour régler la luminosité.
-29-

A. CHARGE DE TYPE C
1.Connectez le câble de charge Type-C inclus au
port de charge du ventilateur pour commencer
la charge.
2. l'indicateur de charge clignote en bleu lorsque
la batterie est en cours de chargement.
B . CHARGEMENT D'URGENCE PAR USB
1. Le bouchon anti-poussière contient à la fois un
port de sortie USB et un port de charge de type C.
2. Branchez l'extrémité USB du câble de
chargement fourni sur le port USB et connectez
l'autre extrémité au port de chargement du
combiné.
C . CHARGE SOLAIRE
1. positionner le panneau solaire vers le soleil
pour une efficacité de charge optimale.
2. L'indicateur de charge s'allume lorsque le
panneau solaire est en cours de chargement.
PORT DE CHARGE ET PORT USB
-30-

1. Drücken Sie einmal auf die Taste des
Zeitmessgeräts, um den Timer auf 1 Stunde
einzustellen.
2. Drücken Sie die Taste erneut, um den Timer
auf 2 Stunden einzustellen.
3. Drücken Sie die Taste ein drittes Mal, um den
Timer auf 4 Stunden einzustellen.
4. Drücken Sie die Taste ein viertes Mal, um den
Timer auf 6 Stunden einzustellen.
5. Drücken Sie die Taste ein fünftes Mal, um den
Timer auszuschalten.
FONCTION SHAKE
1.Cliquez sur le bouton d'agitation pour activer
la fonction d'agitation.
2. Cliquez à nouveau pour désactiver la fonction
de secousse
MINUTERIE
3. Notez que le mode de charge solaire est
principalement destiné à l'entretien de la
batterie.
-31-

INDICATEUR
D'ALIMENTATION/AFFICHAGE DE LA
MINUTERIE
1. The fan's power level is shown on the display
screen. When the power is at 100%, the screen
will display "100%", and so on.
2. When the timer is set to 1 hour, the display
will show "1H", and similarly for other time
settings.
Timing has 4 levels
1st gear: Displays 1H
2nd gear: Display 2H
3rd gear: Display 4H
4th gear: Display 6H
-32-
Taille du produit
Poids
Puissance maximal
Tension de
fonctionnement
Capacité de la
batterie
Temps de charge
Indice d'étanchéité
Lumen d'éclairage
Endurance
208*208*130 mm
1395 g
12W
3.7 V
20000 mAh
14-16h
IPX3
80 lm
Alimentation
5V 2A
Entièrement fonctionnel : 7-8 h
Ventilateur : 8-46 h
Lampe d'éclairage : 30-48 h-48h
PRODUCT PARAMETERS
-33-

PROTECTION DE PUISSANCE
Protection contre les surcharges et les
courts-circuits : La puce de protection coupe
l'alimentation électrique pour éviter
d'endommager la batterie en cas de surcharge
ou de court-circuit.
Protection contre les baisses de tension :
Lorsque la tension de la batterie descend en
dessous de 2,5 V, la puce de protection coupe
l'alimentation pour éviter les dommages dus
à la surcharge.
Avertissement de basse tension : Si la tension
de la batterie tombe en dessous de 3,0 V
pendant le fonctionnement, le voyant rouge
clignote et la machine s'arrête
automatiquement.
CONSIGNES DE SÉCURITÉ
1. N'introduisez pas vos mains ou des objets
étrangers dans l'entrée et la sortie d'air.
-34-

3. Ne démontez pas, ne modifiez pas et ne
réparez pas vous-même le produit .
4. Ne chargez le produit qu'avec un adaptateur
correspondant à la tension spécifiée.
6. Ne chargez pas et n'utilisez pas l'appareil sur
des surfaces inflammables telles que les tapis.
7. Si le produit est utilisé pour la première fois
ou s'il n'a pas été utilisé pendant plus de 60
jours, veuillez recharger la batterie avant de
l'utiliser.
5. Ne pas utiliser le produit dans ou à proximité
d'un feu.
2. Ne pas utiliser le produit dans un environnement
humide.
8. Évitez de trop décharger la batterie en cours
d'utilisation, car cela pourrait réduire sa durée
de vie ou endommager la batterie rechargeable.
-35-

9. N'utilisez pas d'alcool ou de liquides corrosifs
pour nettoyer le produit.
10. ne pas diriger le faisceau de la lampe de
poche vers les yeux.
1.Ce ventilateur multifonctionnel est assorti
d'une garantie de 12 mois contre les défauts
de fabrication.
2.la période de garantie commence à la date
d'achat.
GARANTIE
LISTE D'EMBALLAGE
Ventilateur x 1
Manuel de l'utilisateur x 1
Câble Type-C x 1
-36-
CONTENUTO
MODALITÀ VENTILATORE
MODALITÀ LUCE
RICARICA E USCITA USB
TIMER
FUNZIONE SHAKE
INDICATORE DI DEL TIMER
PARAMETRI DEL PRODOTTO
PROTEZIONE DELL'ALIMENTAZIONE
DI SICUREZZA
GARANZIA
L'ELENCO DEGLI IMBALLAGGI
Raddy CF3
MANUALE UTENTE
Illumina
Display
LOGO
Pulsante della
ventola
Pulsante per
scuotere la
Pulsante
del timer
Porta di ricarica
Type-C Porta di
Pannello
Maniglia
aperto
-37-

MODALITÀ DI VENTILAZIONE
MODES D'ÉCLAIRAGE
1. Premere una volta il pulsante della marcia a
ventola per attivare la prima marcia.
2. Premere nuovamente per la seconda marcia.
3. Premere una terza volta per la terza marcia.
4. Premere una quarta volta per la quarta marcia.
5. Premere una quinta volta per la quinta marcia.
6. Premere una sesta volta per ottenere la sesta
marcia.
7. Premere una settima volta per spegnere la
ventola.
1. Premere una volta il pulsante della luce per
accendere la luce bianca.
2. Premere nuovamente per passare alla luce
gialla.
3. Premere una terza volta per attivare la luce
giallo-bianca.
4. Premere una quarta volta per spegnere la luce.
5. Premere a lungo per regolare la luminosità.
-38-

A. CARICA DI TIPO-C
1.Collegare il cavo di ricarica Type-C in dotazione
alla porta di ricarica del ventilatore per iniziare
la ricarica.
2. L'indicatore di carica lampeggia in blu mentre
la batteria è in carica.
B . RICARICA DI EMERGENZA USB
1. La spina contiene sia una porta di uscita USB che
una porta di ricarica Type-C.
2. Inserire l'estremità USB del cavo di ricarica in
dotazione nella porta USB e collegare l'altra
estremità alla porta di ricarica del portatile.
C . CARICA SOLARE
1. Posizionare il pannello solare verso il sole per
ottenere un'efficienza di carica ottimale.
2. L'indicatore di carica si accende quando il
pannello solare è in carica.
3. Si noti che la modalità di carica solare è
destinata principalmente alla manutenzione
della batteria.
RICARICA E PORTA USB
-39-

1. Premere una volta il pulsante del cronometro
per impostare il timer per 1 ora.
2. Premere nuovamente il pulsante per
impostare il timer per 2 ore.
3. Premere una terza volta per impostare il timer
per 4 ore.
4. Premere una quarta volta per impostare il
timer per 6 ore.
5. Premere una quinta volta per spegnere il timer.
FUNZIONE SHAKE
1.Fare clic sul pulsante di scuotimento per
attivare la funzione di scuotimento.
2. Fare nuovamente clic per disattivare la
funzione di scuotimento.
TIMER
-40-

INDICATORE DI
POTENZA/VISUALIZZAZINE DEL
1. Il livello di potenza del ventilatore viene
visualizzato sul display. Quando la potenza è
al 100%, lo schermo visualizza "100%" e così
via.
2. Quando il timer è impostato su 1 ora, il display
visualizza "1H" e lo stesso vale per le altre
impostazioni di tempo.
La tempistica ha 4 livelli
1a marcia: Visualizza 1H
2a marcia: Display
Terza marcia: Display 4H
4a marcia: Display 6H
-41-
Dimensione del
prodotto
Peso
Potenza massima
Tensione di
esercizio
Capacità della
batteria
Tempo di ricarica
Valutazione di
impermeabilità
Illuminazione Lumen
Resistenza
208*208*130 mm
1395 g
12W
3.7 V
20000 mAh
14-16h
IPX3
80 lm
Parametri di
alimentazione
5V 2A
Completamente funzionale: 7-8h
Ventola: 8-46h
Lampada di illuminazione: 30-48h
PRODUCT PARAMETERS
-42-

PROTEZIONE
DELL'ALIMENTAZIONE
Protezione da sovraccarico/corto circuito: Il
chip di protezione interrompe l'alimentazione
per evitare danni alla batteria in caso di
sovraccarico o cortocircuito.
Protezione da bassa tensione: Quando la
tensione della batteria scende sotto i 2,5 V, il
chip di protezione interrompe l'alimentazione
per evitare danni da scarica eccessiva.
Avviso di bassa tensione: Se la tensione della
batteria scende sotto i 3,0 V durante il
funzionamento, la spia rossa lampeggia e la
macchina si spegne automaticamente.
ISTRUZIONI DI SICUREZZA
1. Non inserire le mani o oggetti estranei
nell'ingresso e nell'uscita dell'aria.
2. Non utilizzare il prodotto in un ambiente umido.
-43-

3. Non smontare, alterare o riparare da soli il
prodotto.
4. Caricare il prodotto solo con un adattatore
che corrisponda alla tensione specificata.
6. Non caricare o utilizzare il prodotto su
superfici infiammabili come i tappeti.
7. Se il prodotto viene utilizzato per la prima
volta o è rimasto inutilizzato per oltre 60
giorni, si prega di ricaricare la batteria prima
dell'uso.
5. Non utilizzare il prodotto all'interno o in
prossimità di un fuoco.
8. Evitare di scaricare eccessivamente la batteria
durante l'uso, in quanto ciò potrebbe ridurne
la durata o danneggiare la batteria ricaricabile.
9. Non utilizzare alcol o liquidi corrosivi per
pulire il prodotto.
10. Non dirigere il raggio della torcia negli occhi.
-44-

1.Questo ventilatore multifunzionale viene
fornito con una garanzia di 12 mesi contro i
difetti di fabbricazione.
2.Il periodo di garanzia decorre dalla data di
acquisto.
GARANZIA
ELENCO IMBALLAGGI
Ventilatore x 1
Manuale d'uso x 1
Cavo tipo-C x 1
-45-