www.lg.com
OWNER’S MANUAL
AIR CONDITIONER
Copyright © 2024 - 2025 LG Electronics Inc. All Rights Reserved.
TYPE: PORTABLE AIR CONDITIONER
Rev.00
Read this owner’s manual thoroughly before operating the
appliance and keep it handy for reference at all times.
EN ENGLISH
FR FRANÇAIS
LP0825WSB
LP1025WSSM
A2L
REFRIGERANT

TABLE OF CONTENTS
2 TABLE OF CONTENTS
3
SAFETY INSTRUCTIONS
8 PRODUCT OVERVIEW
8 Key Parts and Components
9
INSTALLATION
9 Electrical Information
10 Before Installing the Air Conditioner
10 Wireless Remote Control
11 Preparing for Installation
12 Selection of Installation Location
12 Attaching the Flexible Vent Hose Set
14 Window Vent Panel and Extensions(LP0825WSB)
15 Installing Vent Panels
17 Garden Hose Installation for Dehumidifying (Dry Mode Only)
18 OPERATION
18 Control Panel and Remote Control
21
SMART FUNCTIONS
21 LG ThinQ Application
23 MAINTENANCE
23 Emptying the Water Collection Tank
23 Cleaning the Case
23 Cleaning the Air Filter
24 TROUBLESHOOTING
24 Before Calling for Service
27
WARRANTY
13 Window Vent Panel and Extensions(LP1025WSSM)
TABLE OF CONTENTS
2
S
R
I
T
SAFETY INSTRUCTIONS
3
SAFETY INSTRUCTIONS
READ ALL INSTRUCTIONS BEFORE USE
IMPORTANT SAFETY INSTRUCTIONS
Your safety and the safety of others are very important.
We have provided many important safety messages in this manual and on your appliance.
Always read and follow all safety messages.
!
This is the safety alert symbol.
This symbol alerts you to potential hazards that can kill or injure you and others.
All safety messages will follow the safety alert symbol and either the word WARNING or
CAUTION.
These words mean:
WARNING
You may be killed or seriously injured if you do not follow instructions.
CAUTION
You may be injured or cause damage to the product if you do not follow instructions.
All safety messages will tell you what the potential hazard is, tell you how to reduce the chance
of injury, and tell you what may happen if the instructions are not followed.
!
!
WARNING
To reduce the risk of explosion, fire, death, electric shock, scalding or
injury to persons when using this product, follow basic precautions,
including the following:
INSTALLATION
• Before use, the appliance must be properly installed as described in this manual.
• Contact the authorized service technician for repair or maintenance of this unit.
• Contact the installer for installation of this unit.
!
This symbol indicates that this appliance uses a flammable refrigerant.
If the refrigerant is is leaked and exposure to an external ignition source, there is a risk of
fire.
This symbol indicates that the Operation Manual should be read carefully.
This symbol indicates that a service personnel should be handling this equipment with
reference to the Installation Manual.
This symbol indicates that information is available such as the Operating Manual or
Installation Manual.
The following symbols are displayed on units.

SAFETY INSTRUCTIONS
4
• When the power cord is to be replaced, replacement work shall be performed by authorized
personnel only using only genuine replacement parts.
• Installation work must be performed in accordance with the National Electric Code by qualified
and authorized personnel only.
• Connect to a properly rated, protected, and sized power circuit to avoid electrical overload.
• Always plug into a grounded outlet.
• Do not under any circumstances, cut or remove the third (ground) prong from the power cord.
• When installing or moving the appliance, be careful not to pinch, crush, or damage the power
cord.
• Plug in the power plug properly.
• Do not modify or extend the power cord.
• Do not start/stop operation by plugging/unplugging the power cord.
• If the cord/plug is damaged, have it replaced by an authorized service person using authorized
replacement parts.
• Use a dedicated circuit.
• Do not disassemble or modify the product.
• Adhere to all industry recommended safety procedures including the use of long-sleeved gloves
and safety glasses.
• Use care when unpacking and installing. The edges of the product may be sharp.
• Disconnect the power cord or circuit breaker before installing or servicing the appliance.
• Keep packaging materials out of the reach of children. These materials can pose a suffocation
risk to children.
• Store and install the product where it will not be exposed to temperatures below freezing or
exposed to outdoor weather conditions.
• Do not store or use gasoline or other flammable vapors and liquids in the vicinity of this or any
other appliance.
• Do not install the unit in potentially explosive atmospheres.
OPERATION
• Use this appliance only for its intended purpose.
• Never attempt to operate this appliance if it is damaged, malfunctioning, partially disassembled,
or has missing or broken parts, including a damaged cord or plug.
• Repair or immediately replace all power cords that have become frayed or otherwise damaged.
Do not use a cord that shows cracks or abrasion damage along its length or at either end.
• Do not run cord under carpets or mats where it could be stepped on and damaged.
• Keep the cord out from under heavy objects like tables or chairs.
• Do not place the power cord near a heat source.
• Do not use an adaptor or plug the product into a shared outlet.
• Do not tamper with controls.
• If you detect a strange sound, a chemical or burning smell, or smoke coming from the appliance,
unplug it immediately, and contact an LG Electronics Customer Information Center.
• Never unplug the appliance by pulling on the power cord. Always grip the plug firmly and pull
straight out from the outlet.
• Do not grasp the power cord or touch the appliance controls with wet hands.
• The air conditioner is not intended for use by young children or invalids without supervision.
• Young children should be supervised to ensure that they do not play with the air conditioner.

SAFETY INSTRUCTIONS
5
• If water enters the product, turn off the power at the main circuit, then unplug the product and call
for service.
• If the product has been submerged, contact the LG Electronics Customer Information Center for
instructions before resuming use.
• Unplug the product if it will not be used for long periods.
• Unplug the product before cleaning.
• In the event of a gas leak (propane gas, etc.) do not operate this or any other appliance. Open a
window or door to ventilate the area immediately.
• This appliance is not intended for use by persons (including children) with reduced physical,
sensory or mental capabilities, or lack of experience and knowledge, unless they have been
given supervision or instruction concerning the use of the appliance by a person responsible for
their safety.
• To clean the interior, contact the LG Electronics Customer Information Center or dealer.
Using harsh detergents may cause corrosion or damage to the unit.
• Do not use solvent-based detergent on the product. Doing so can cause corrosion or damage,
product failure, electrical shock, or fire.
• If the supply cord is damaged, it must be replaced by the manufacturer, its service agent or
similarly qualified persons in order to avoid a hazard.
GROUNDING INSTRUCTIONS
• The power cord of this appliance is equipped with a three-prong (grounding) plug. Use this with a
standard three-slot (grounding) wall power outlet to minimize the hazard of electric shock. The
customer should have the wall receptacle and circuit checked by a qualified electrician to make
sure the receptacle is properly grounded. DO NOT CUT OR REMOVE THE THIRD (GROUND)
PRONG FROM THE POWER PLUG.
- Situations when the appliance will be disconnected occasionally; Because of potential safety
hazards, we strongly discourage the use of an adapter plug. However, if you wish to use an
adapter, a TEMPORARY CONNECTION may be made. Use UL-listed adapter, available from
most local hardware stores.
The large slot in the adapter must be aligned with the large slot in the receptacle to assure a
proper polarity connection.
• Attaching the adapter ground terminal to the wall receptacle cover screw does not ground the
appliance unless the cover screw is metal, and not insulated, and the wall receptacle is grounded
through the house wiring. The customer should have the circuit checked by a qualified electrician
to make sure the receptacle is properly grounded.
• Disconnect the power cord from the adapter, using one hand on each. Otherwise, the adapter
ground terminal might break. Do not use the appliance with a broken adapter plug.
- Situations when the appliance will be disconnected often; Do not use an adapter plug in these
situations. Unplugging the power cord frequently can lead to an eventual breakage of the
ground terminal. The wall power outlet should be replaced by a three-slot (grounding) outlet
instead.
SAFETY INSTRUCTIONS
6
CAUTION
To reduce the risk of minor or moderate injury to persons, malfunction,
or damage to the product or property when using this product, follow
basic precautions, including the following:
INSTALLATION
• Take care when installing the product that exhaust or condensation does not damage nearby
property.
• Follow installation instructions exactly to avoid excessive vibration or water leakage.
• Do not install the unit in potentially explosive atmospheres.
OPERATION
• This appliance is not intended for use as a precision refrigeration system. Do not use it for special
purposes such as maintaining pets, food, precision machinery, or art objects.
• When installing or moving the appliance, be careful not to pinch, crush, or damage the power
cord.
• Make sure the air inlet and outlet are free from obstructions.
• Use a soft cloth to clean the appliance. Do not use waxes, thinners, or harsh detergents.
• Do not step on or place heavy objects on top of the appliance.
• Do not operate the appliance without the filter securely installed.
• Do not drink water drained from the appliance.
• Be sure to ventilate sufficiently when the air conditioner and a heating appliance such as a heater
are used simultaneously.
• Being exposed to direct airflow for an extended period of time could be hazardous to your health.
• Remove the batteries if the remote control is not to be used for an extended period of time.
• Never mix different types of batteries, or old and new batteries for the remote control.
• Stop using the remote control if there is a fluid leak in the battery. If your clothes or skin are
exposed to the leaking battery fluid, wash off with clean water.
• If the leaking battery fluid has been swallowed, rinse the inside of the mouth thoroughly and
consult a doctor.
• Do not recharge or disassemble the batteries.
MAINTENANCE
• Clean the filter every two weeks.
• Never touch the metal parts of the air conditioner when removing the air filter.
• Never spray the product with water or use strong cleaning agents or solvents when cleaning the
air conditioner. Use a soft cloth to avoid scratching the exterior.
• To clean the interior, contact the LG Electronics Customer Information Center or a dealer.
Using harsh detergents may cause corrosion or damage to the unit.
!
R
SAFETY INSTRUCTIONS
7
REFRIGERANT (FOR R32 ONLY)
WARNING
• Do not use means to accelerate the defrosting process or to clean, other than those
recommended by the manufacturer.
• The appliance shall be stored in a room without continuously operating ignition sources
(for example: open flames, an operating gas appliance or an operating electric heater).
• Do not pierce or burn. Be aware that flammable refrigerants may not contain an odor.
• The appliance shall be stored in a well-ventilated area where the room size corresponds to the
room area as specified for operation.
• The appliance shall be stored so as to prevent mechanical damage from occurring.
•
Any person who is involved with working on or breaking into a refrigerant circuit should hold a current
valid certificate from an industry-accredited assessment authority, which authorises their competence
to handle refrigerants safely in accordance with an industry recognised assessment specification.
• Servicing shall only be performed as recommended by the equipment manufacturer.
• Maintenance and repair requiring the assistance of other skilled personnel shall be carried out
under the supervision of the person competent in the use of flammable refrigerants.
• Keep any required ventilation openings clear of obstruction.
CAUTION
• This unit contains flammable refrigerant and has special safety precautions not normally
associated with older units. Please follow all precautions and advisories.
- Use caution while handling and prevent damage to unit. Do not put any holes into product for
any reason. This can cause damage to product and prevent unit from cooling.
- Maintenance and cleaning of unit should be performed by trained personnel. Failure to properly
clean unit can result in damage to the refrigeration systern and or the electrical system.
- Make certain that all the air circulation/ventilation openings are free from obstruction.
-
Service should only be performed by technicians properly trained and certified in the use of flammable
refrigerants. Any service performed by unauthorized servicers/individuals will void all warranties.
- When storing the appliance, do not put in a room with any open flame appliances, such as gas
water heaters or furnaces. Also keep away from electric heaters. Damaged units should be
repaired before Storage.
- The maximum refrigerant charge amount. (Refer to nameplate marking refrigerant amount.)
- The appliance shall be suitable stored to prevent mechanical damage from occurring.
- Information for handling, installation, cleaning, servicing and disposal of refrigerant.
- A notice that servicing shall be performed only as recommended by the manufacturer.
-
A warning that the appliance shall be stored in a room without continuously operating open flames (for
example an operating gas appliance) and ignition sources (for example an operating electric heater).
- The manufacturer should specify other potential continuously operating sources known to cause
ignition of the refrigerant used. The appliance shall be stored so as to prevent mechanical
damage from occurring.
- Any person who is involved with working on or breaking into a refrigerant circuit should hold a
current valid certificate from an industry-accredited assessment authority, which authorizes their
competence to handle refrigerants safely in accordance with an industry recognized
assessment specification.
- Servicing shall only be performed as recommended by the equipment manufacturer.
Maintenance and repair requiring the assistance of other skilled personnel shall be carried out
under the supervision of the person competent in the use of flammable refrigerants.
!
SAVE THESE INSTRUCTIONS
I
E
P
d
o
a
a
d
e
a
f
PRODUCT OVERVIEW
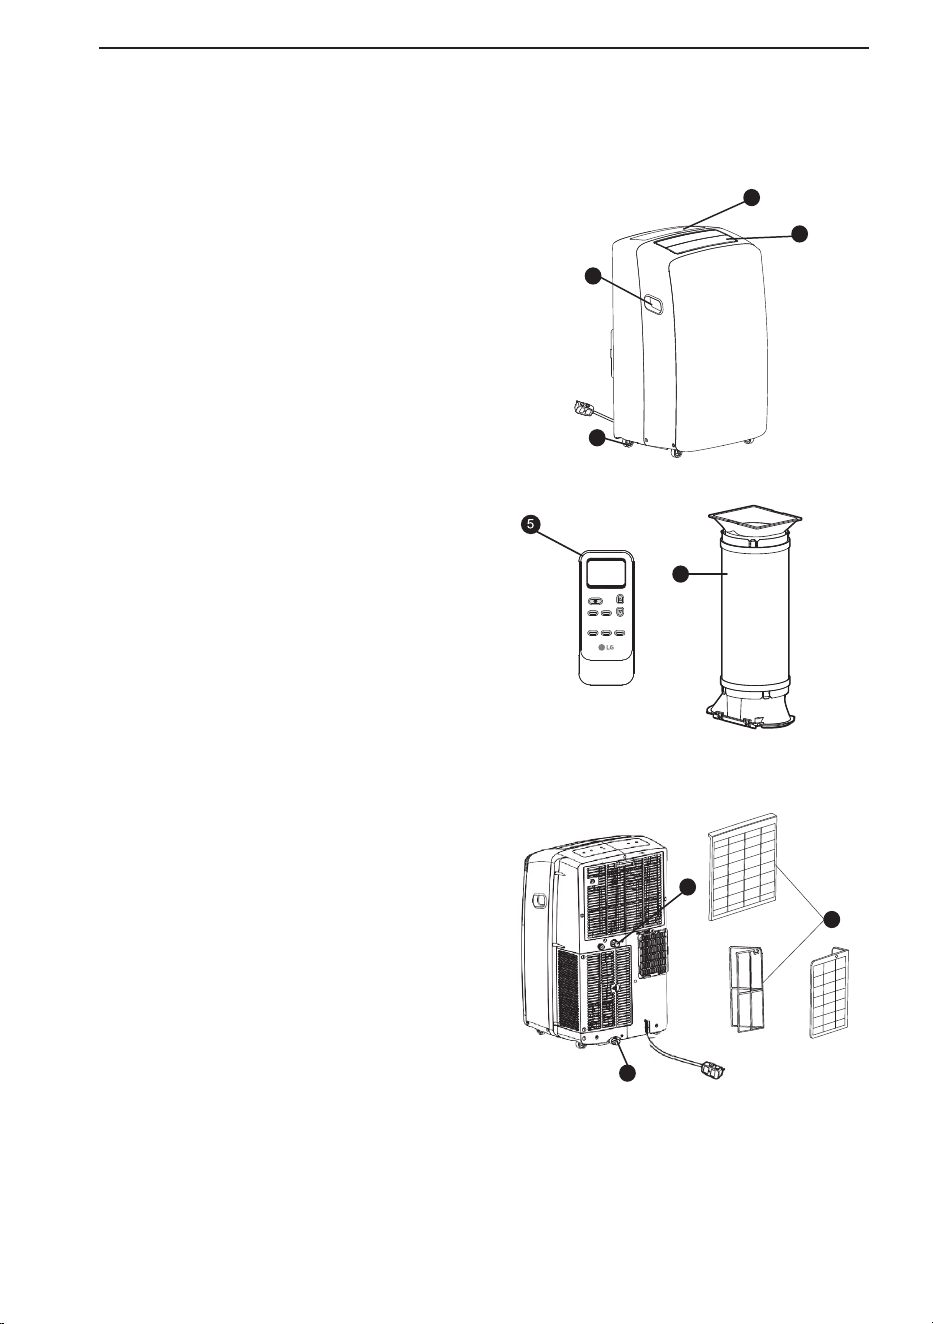
Key Parts and Components
ʈ AIR DISCHARGE
The adjustable louvered air discharge opens
automaticallywhen the air conditioner is
turned on, and closes when itis turned off. lt
can also be set to oscillate to distribute air
more evenly through the room.
ʉCONTROL PANEL AND DISPLAY
Easy-to-read digital display shows the set
temperature, and indicator lights show the
operating mode. Simple push buttonsmake
changing settings quick and easy.
ʊSWIVELING CASTERS
Swiveling casters allow you to move the air
conditioner easily on most floor surfaces.
ʋINTEGRATED HANDLES
Integrated handles provide a convenient grip
when lifting the air conditioner.
ʌWIRELESS REMOTE CONTROL
The remote control allows you to adjust the
temperature and operate most functions of the
air conditioner from across the room.
ʍBOTTOM DRAIN PORT
Before moving the air conditioner, drain the
intemal water in the collection tank completely
using the bottom drain port.
ʎCONTINUOUS DRAIN PORT
Connect a garden hose for continuous
drainage when running the air conditioner in
Dry mode.
ʏHOSE AND DIFFUSER
Use the diffuser and hose to connect the air
conditioner to the window installation kit to
vent exhaust air outside.
ʐAIR FILTER
9
8
Swing Timer Light
Mode Fan
↔ (5s)
Sleep(5s)
6
7
1
2
4
3
PRODUCT OVERVIEW
8
INSTALLATION
Electrical Information
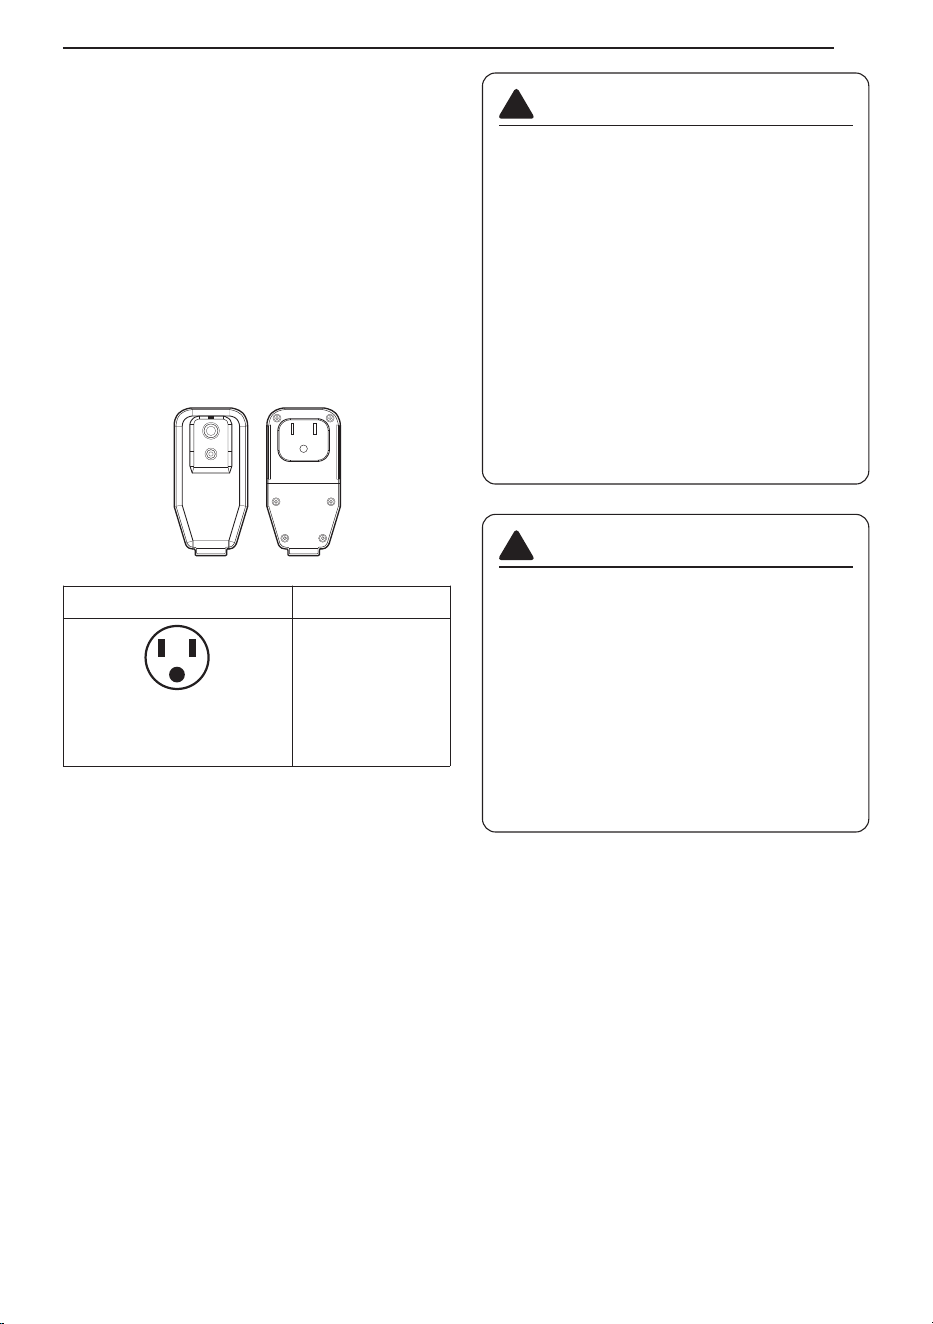
Power cord may include a current interrupter
device. TEST and RESET buttons are provided
on the plug case. The device should be tested on
a periodic basis by first pressing the TEST button
and then the RESET button. If the TEST button
does not trip or if the RESET button will not stay
engaged, discontinue use of the air conditioner
and contact a qualified service technician.
for 120 V~
Use Wall Receptacle Power Supply
Standard 120 V~, 3-wire
grounding receptacle rated
15A / 120 V~ / 60 Hz
Use 15 A,
timedelay fuse or
15 A circuit breaker.
WARNING
• This appliance should be installed in
accordance with the National Electrical
Code.
• Use of extension cords could cause
serious injury or death.
- Do not use an extension cord with this
portable air conditioner.
- Do not use surge protectors or multi-
outlet adapters with this portable air
conditioner.
• Never push the TEST button during
operation. Doing so can damage the plug.
- Do not remove, modify, or immerse this
plug. If this device trips, the cause should
be corrected before further use.
!
CAUTION
• The conductors inside this cord are
surrounded by shields, which monitor
leakage current. These shields are not
grounded. Periodically examine the cord
for any damage. Do not use this product in
the event the shields become exposed.
Avoid shock hazard. This unit cannot be
user-serviced. Do not open the
tamperresistant sealed portion. All
warranties and performance will be voided.
This unit is not intended to be used as an
ON/OFF switch.
!
RESET
TEST
INSTALLATION
9

P
B
L
L
I
Before Installing the Air
Conditioner
PREPARING FOR OPERATION
Refer to the Installaiton instructions included in
this manual before using the air conditioner.
Once the air conditioner has been properly
assembled and installed
ʈ Plug the power cord into its own dedicated
properly grounded outlet. Do not plug other
appliances into the same outlet. Doing so
could overload the outlet and create a fire
hazard.
ʉ Make sure the air conditioner and cord are
positioned where they do not create a tripping
hazard and will receive adequate Ventilation.
Do not place the appliance near furniture or
objects that could block the vbent openings.
ʊ Make sure that any items that could be blown
over or damaged by the airflow from the fan
are out of the airflow path.
IMPORTANT:
• Do not remain in the direct airflow from the air
conditioner for extended periods of time.
• When used at the same time as stoves,
fireplaces, and other combustion devices, make
sure there is a sufficient flow of fresh air into the
room. Do not use in tightly enclosed spaces
With these types of devices.
• This air conditioner is intended for household
use as a consumer comfort appliance. Do not
use it as a precision climate control system, or
for purposes such as cooling precision
equipment, food, pets, plants, artwork, etc.
Such items could be damaged.
• Do not bend the hose downward when Window
installation kit is not applied. lt may cause
failure of air conditioner or performance
deterioration.
UNPACKING THE AIR CONDITIONER
• Remove and store packing materials for reuse.
Remove any shipping tape before using the air
conditioner. lf the tape leaves behind any
adhesive, rub a small amount of liquid dish
soap onto it and Wipe With a damp cloth. Do
NOT use sharp instruments, alcohol, thinners,
or abrasive cleaners to remove adhesive. They
could damage the finish.
OPERATING TEMPERATURE
Cooling : 70 °F (21 °C) ~ 95 °F (35 °C),
45%RH ~ 78%RH
Wireless Remote Control
Inserting Batteries
If the display screen of the remote control begins
to fade, replace the batteries. Insert AAA (1.5 V)
batteries before using the remote control.
NOTE
• New batteries are supplied with the air
conditioner for use in the remote control.
• Do not use a rechargeable battery. Make sure
that the battery is new.
• In order to prevent discharge, remove the
battery from the remote control if the air
conditioner is not going to be used for an
extended period of time.
• Keep the remote control away from extremely
hot or humid places.
• To maintain optimal operation of the remote
control, the remote sensor should not be
exposed to direct sunlight.
• The remote control will not work properly if the
unit is exposed to direct light or there is any
obstacle between the unit and the remote
controller.
1
Remove the cover on the back of the
remote control.
Be sure to note
proper polarity!
2
Insert the new batteries and make sure that
the + and - terminals of the batteries are
installed correctly.
INSTALLATION
10
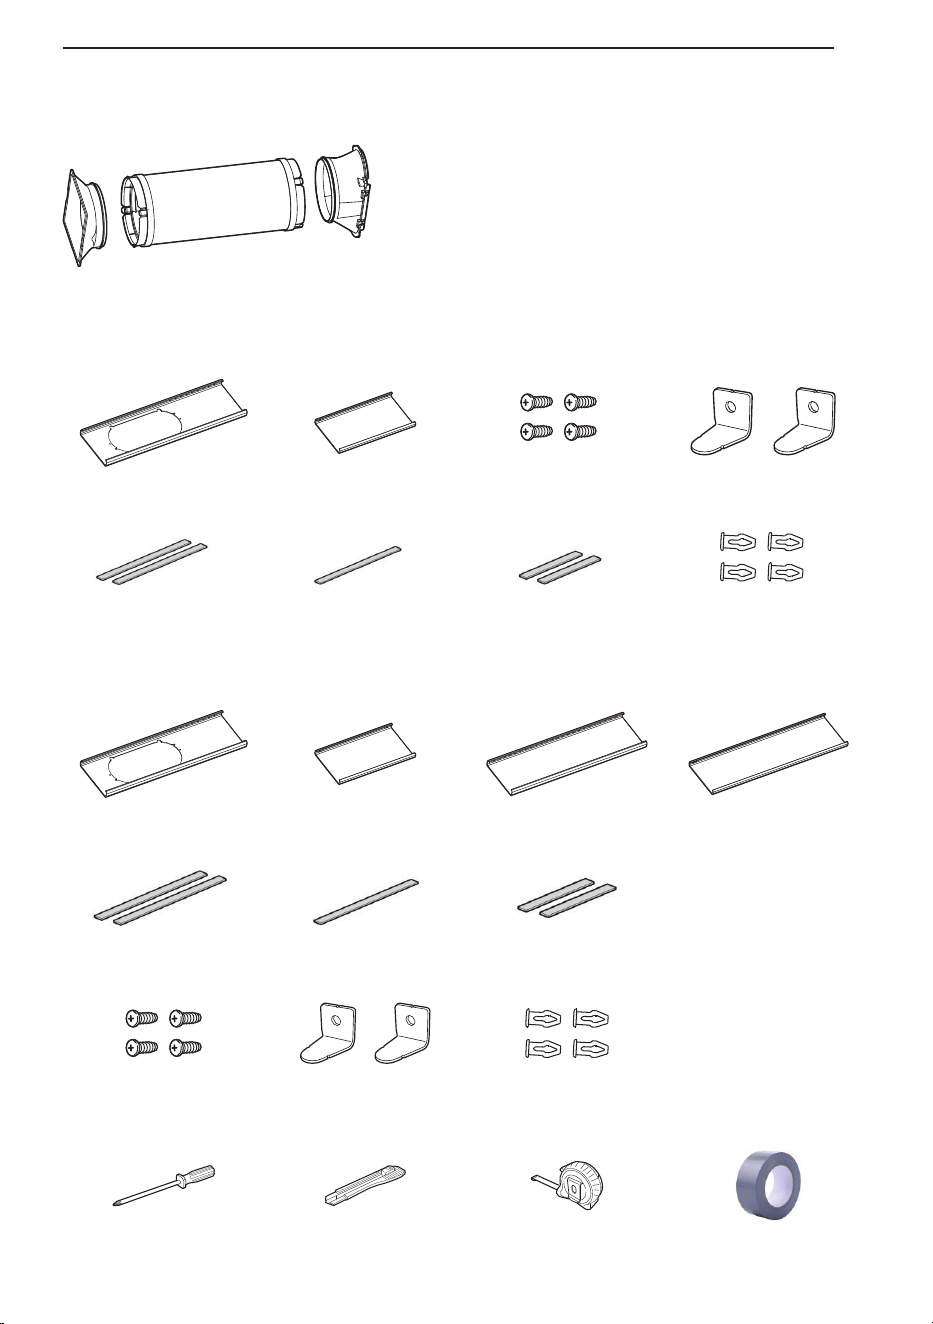
Preparing for Installation
Basic Installation Materials Supplie
LP1025WSSM
LP0825WSB
d
Mounting
Bracket
Flexible Vent
Hose
Diffuse
1 Panel H (18")
Window vent pane
1 Panel I (9 11/16")
Extension panel
1 Panel J (18")
Extension panel
1 Panel K (18")
Extension panel
2 Long adhesive
foam seals
1 Non-adhesive
foam seal
2 Short adhesive
foam seals
4 Screws 2 Security bracket 4 Rivets
Installation Tools
Phillips screwdriver Cutting knife Tape measure
“No residue”
duct tape
1 Panel A (25”)
Window vent panel
1 Panel B (25”)
Extension panel
4 Screws
2 Long adhesive
foam seals
1 Non-adhesive
foam seal
2 Short adhesive 4 Rivets
foam seals
2 Security bracket
t
INSTALLATION
11
W
T
t
1
2
F
p
F
w
P
Mounting
Bracket
Flexible Vent
Hose
Diffuser
LOCK UNLOCK
Selection of Installation
Location
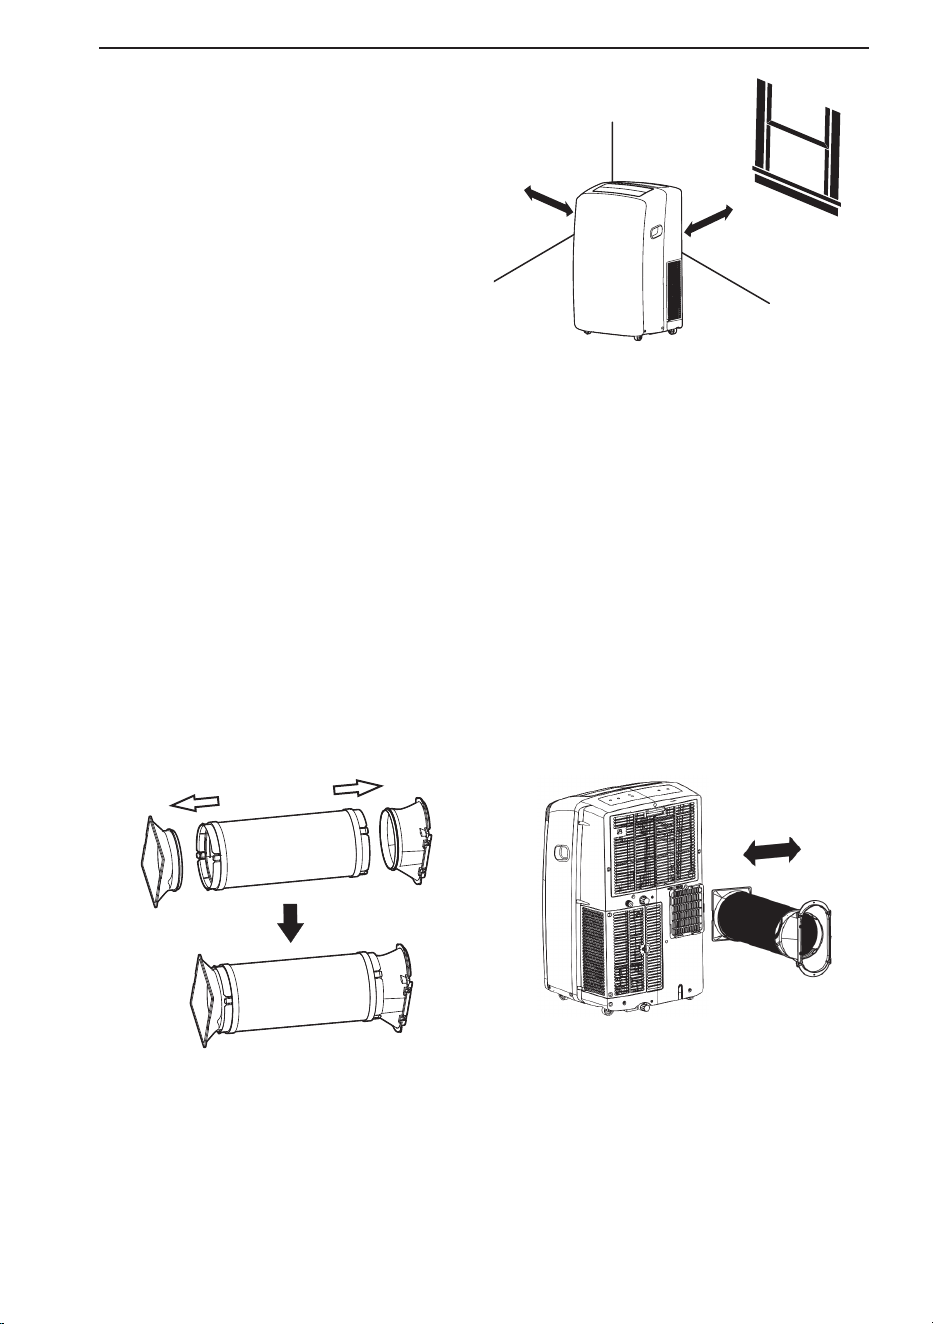
ʈ Place the unit on a level floor.
ʉ For best performance, allow at least 20" of air
Space on all Sides of the unit for good air
circulation.
ʊ Place the unit near a window. The hose and diffuser
will be used to connect the air conditioner to the
window installation kit to vent exhaust air outside.
NOTE
The length of the flexible vent hose is specially designed according to the specification of this product.
Do not replace or extend it with a hose that is not specifically designed for use with this product as this
could cause malfunction.
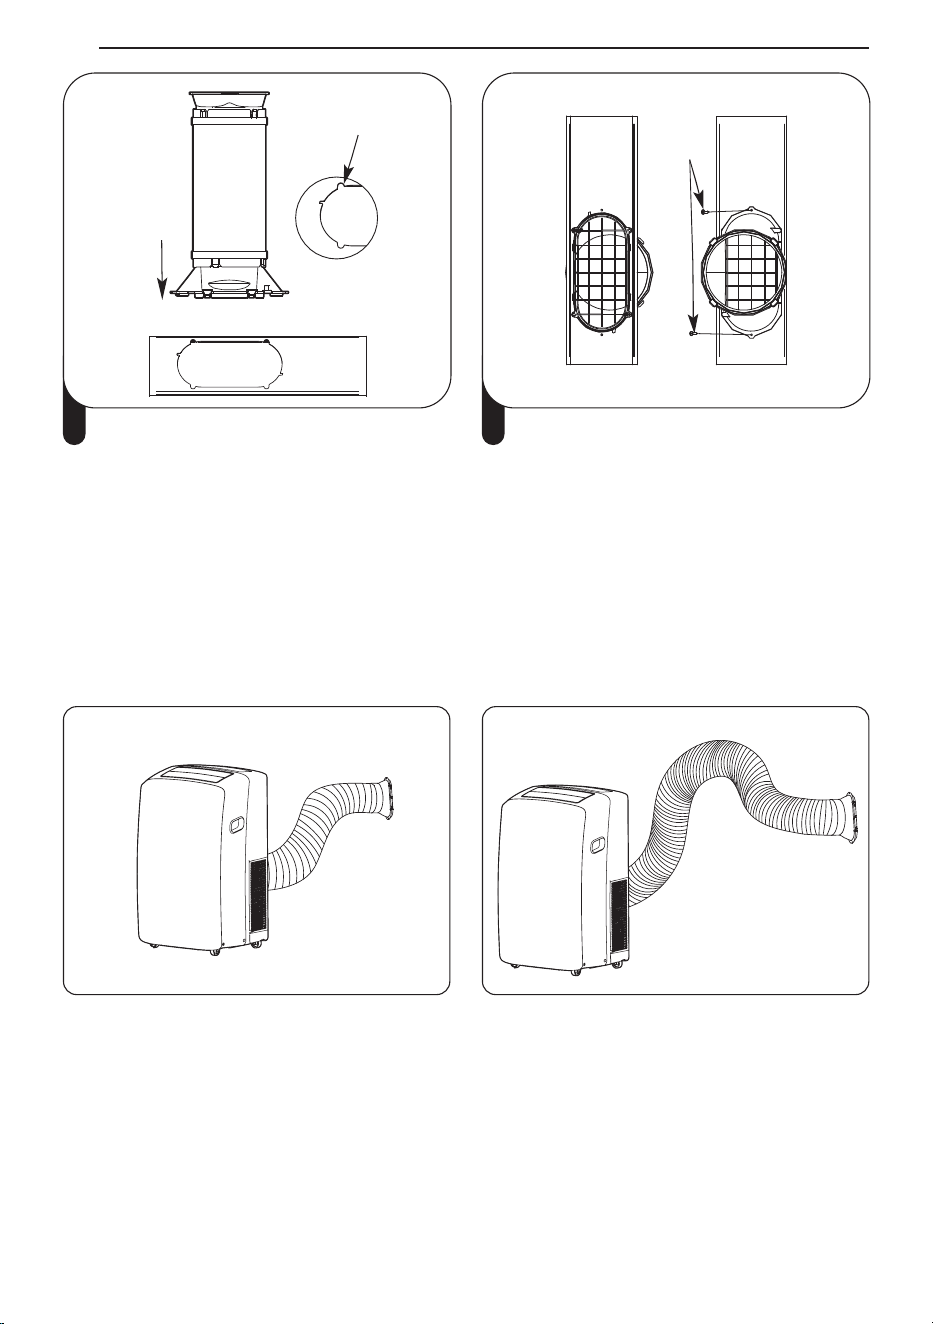
Attaching the Flexible Vent Hose Set
1. Preparing the exhaust hose assembly:
Press the mounting bracket and the diffuser into the flexible exhaust hose. Both mounting bracket
and diffuser have integral clips that snap onto the hose.
2. Insert the mounting bracket into the slot on the back of the air conditioner.
3. Slide down to lock the hose into place.
4. Confirm the hose is locked in place before operating.
20″
20″
Exhaust hose assembly
INSTALLATION
12
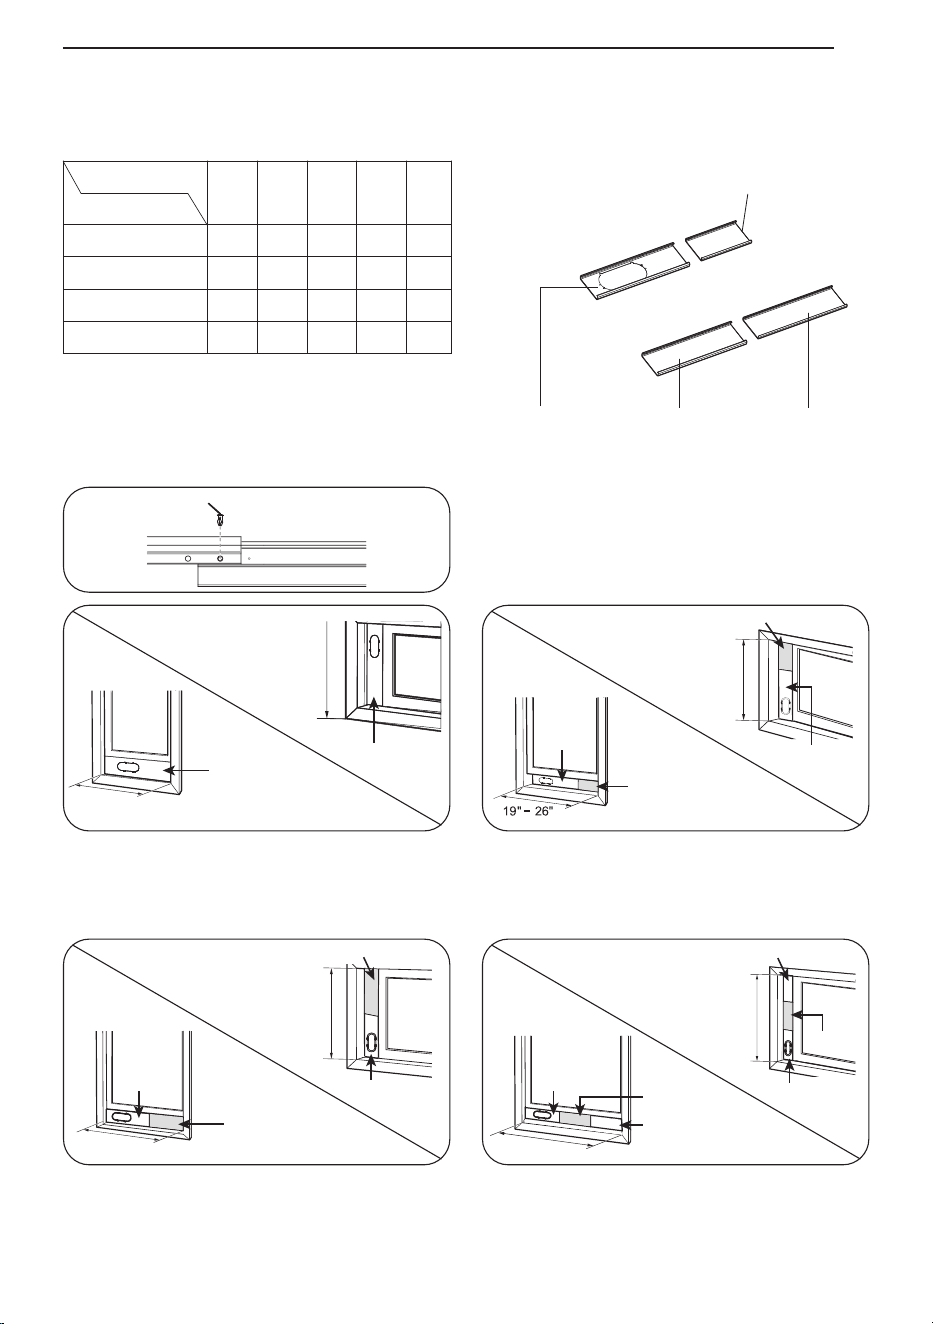
Window Vent Panel and Extensions(LP1025WSSM)
The window installation kit allows you to install the air conditioner in most vertical-sliding windows 18″
to 50″ wide, or horizontal-sliding windows from 18″ to 50″ high.
1. Please check your window size and choose
the fit from the above table.
2. lf your window size requires more than 2
panels, after adjusting the length, please
secure the panels with rivets, E.
Panel Length
Window Length
HIJK
Fig.
18ʺ 9
11
/
16
ʺ 18ʺ 18ʺ
18ʺ √ a
19ʺ - 26ʺ √ √ b
27ʺ - 34ʺ √ √ c
35ʺ - 50ʺ √ √ √ d
For an 18" window opening, use the window vent
panel (Panel H) by itself.
Fig. "a"
For window openings from 19" to 26", use the
window vent panel (Panel H) and extension
Panel I.
Fig. "b"
For window openings from 27" to 34", use the
window vent panel (Panel H) and extension
Panel J.
Fig. "c"
For window openings from 35" to 50", use the
window vent panel (Panel H) and extension
Panel J and Panel K.
Fig. "d"
Panel I (9
11
/16")
Panel H (18") Panel K (18")
Panel J (18")
Panel H
Panel H
18"
18"
Rivet E
Panel H
Panel I
Panel I
Panel H
19" - 26"
Panel J
Panel J
Panel H
Panel H
27" - 34"
27" - 34"
Panel K
Panel J
Panel H
Panel K
Panel J
Panel H
35" - 50"
35" - 50"
K
INSTALLATION
13
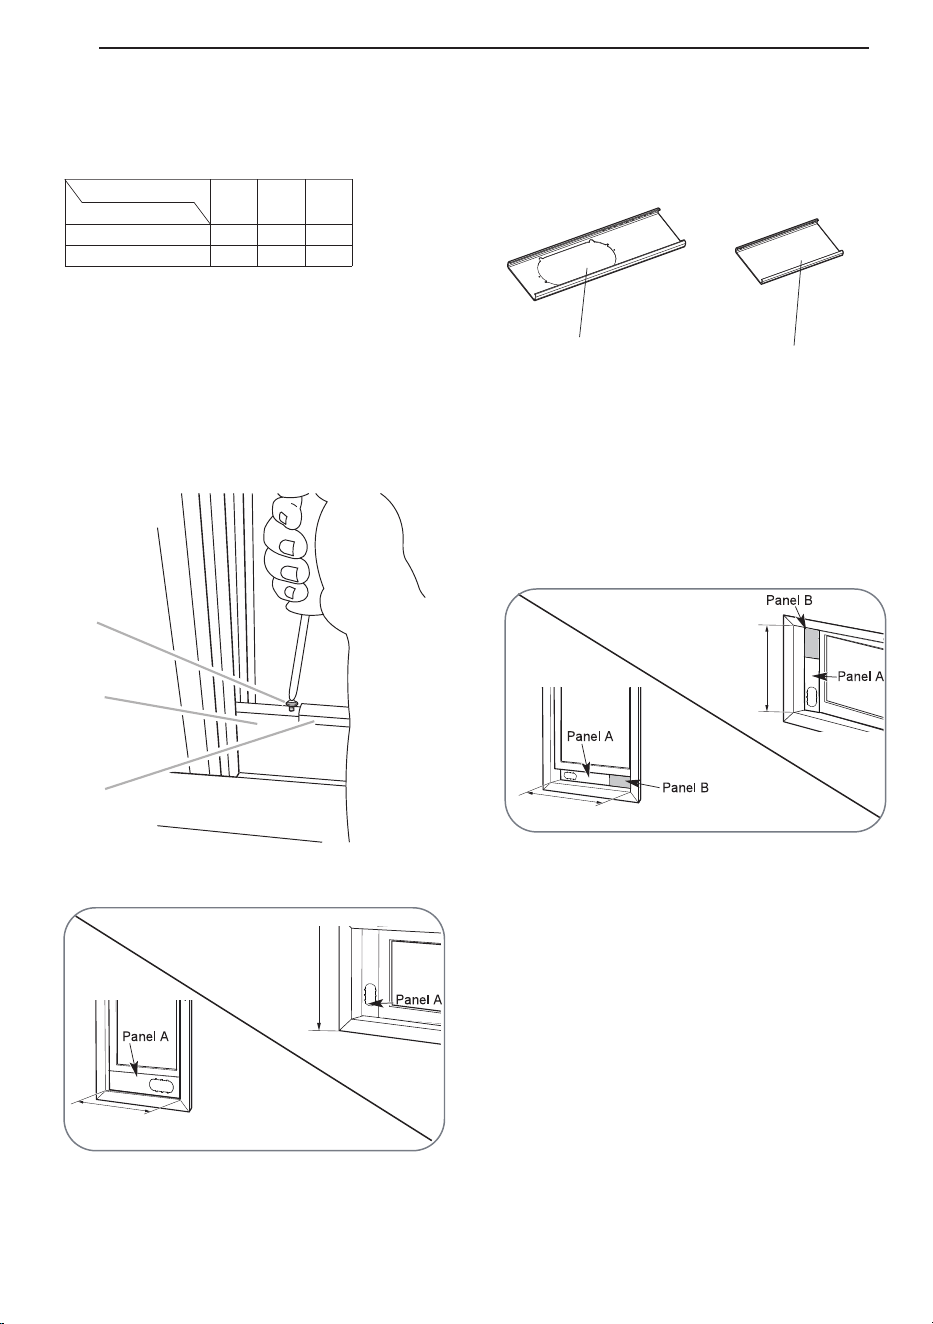
Window Vent Panel and Extensions(LP0825WSB)
The window installation kit allows you to install the air conditioner in most vertical-sliding windows
25″ to 47″ wide, or horizontal-sliding windows from 25″ to 47″ high.
Fig. b
Fig. a
Window Installation Kit
(Includes 1 window vent panel and 1 Extension Panel)
Panel A (25″)
Panel B (25″)
25″
25″
26″ – 47″
26″ – 47″
1 Extension Panel
1 Window Vent Panel
Panel
Window opening
A
25″
B
25″
Fig.
25″
√
26″ - 47″
√ √
1. Select the panels required based on the
window opening, as shown above.
2. For longer window openings, assemble and
adjust the panels to fit the window opening.
Use screws (included) to fix the panels
together at the proper length.
For window openings from 26″ to 47″, use the
window vent panel (Panel A) and extension
Panel B.
For an 25″ window opening, use the window
vent panel (Panel A) by itself.
a
b
C
B
A
INSTALLATION
14
I
e
INSTALLATION
15
Long adhesive foam seal
↓
Short adhesive
foam seal
↓
Short adhesive
foam seal
↓
↑
Long adhesive foam seal
1 Attach the long adhesive foam weather seals
to the top and bottom sides of the window
vent panel assembly. Attach the short foam
weather seals to the right and left sides of the
panel assembly. (Attaching the foam weather
seals to the panel assembly rather than the
window sash and frame makes for easier
cleanup when removing the panel assembly.)
Vent panel
Extension panel
(if required)
2 Insert the panel assembly in the bottom sash
channel. Use care when installing the
assembly, which will now fit very tightly in the
opening. Close the sash tightly against the
top of the panel assembly.
Security Bracket
Screw
3 If needed, install the included security
bracket with screws.
Non-adhesive
foam seal
4 Measure and cut the included non-adhesive
foam to fit the window opening. Stuff it
between the window sashes to prevent air
and insects from getting into the room.
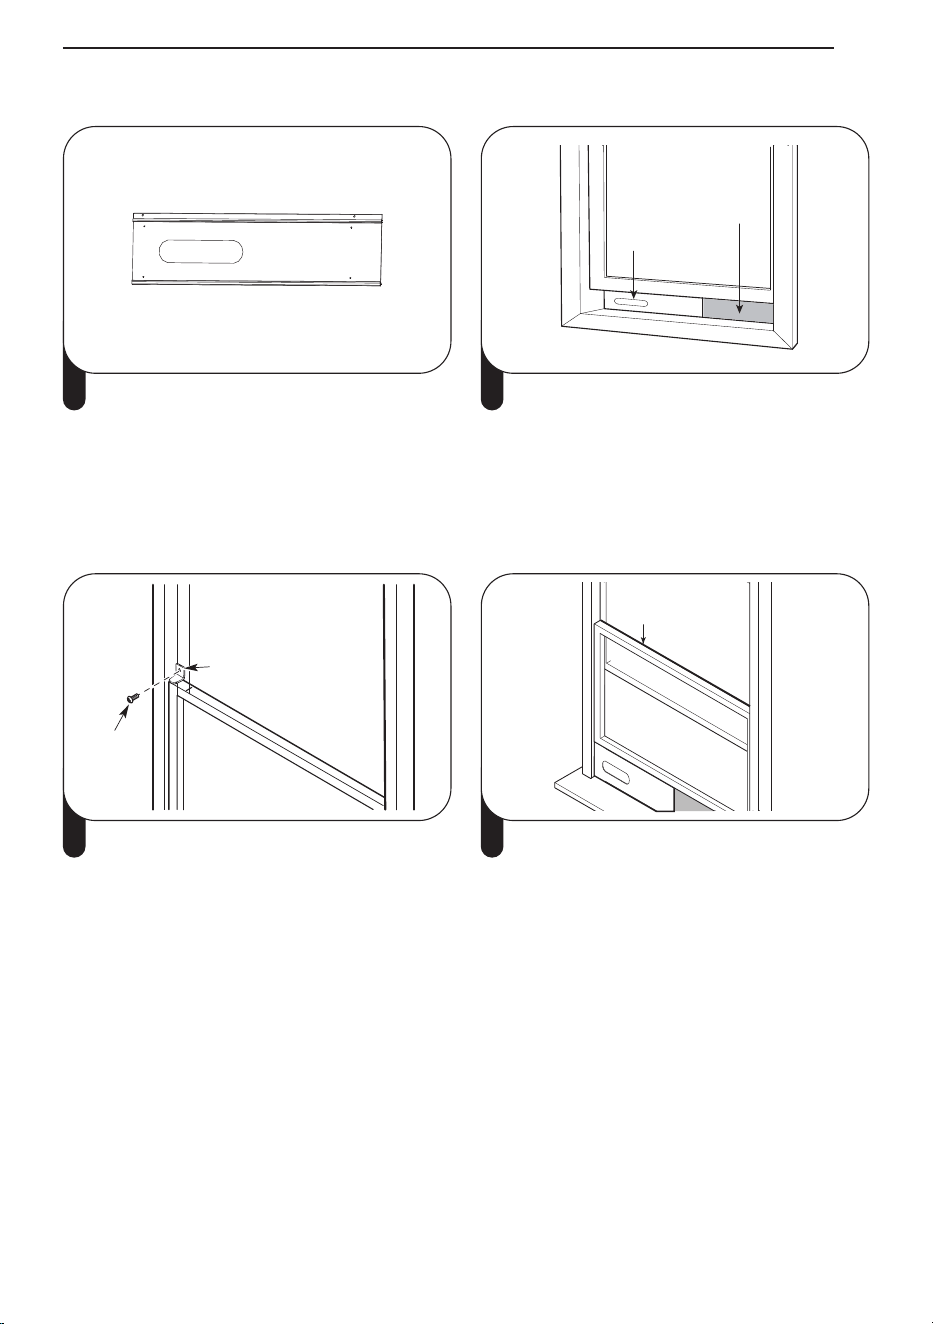
Installing Vent Panels
G
O
1
2
N
•
•
Slot
Insert
5 Align the tabs on the diffuser with slots in the
outer slide section. Insert the diffuser into the
opening in the vent panel.
Screw
6 Insert the screw in the hole in the diffuser to
prevent the diffuser from sliding out of the
vent opening.
NOTE
• For a tighter seal, use "no residue" duct tape (not provided) to seal any gaps around the installed
panel assembly, around the diffuser, and between the sashes.
• For best results, keep the vent hose as short and straight as possible. However, shape the diffuser
end of the vent hose into an inverted U shape just inside the window to allow any rain or
condensation to drain out the window.
Best positioning Inverted U shape
INSTALLATION
16

Garden Hose Installation for Dehumidifying (Dry Mode
Only)
1. Remove the drain plug when using the Dry (dehumidifying) mode.
2. Install a 5/8” (16 mm) inside diameter garden hose (not provided) into the continuous drain port and
place the open end of the hose over a floor drain or bucket.
NOTE
• Install the garden hose when you need dehumidification in high humidity.
• This product has a self-evaporative system. The condensing water will be recycled to cool the
condenser. This not only improves cooling efficiency, but also saves energy for you.
INSTALLATION
17

OPERATION
Control Panel and Remote Contro
1
5
2
6
7
3
4
8
1 2 6 7
1 2 6 9 7
3 4 5
8 3 4 5
OPERATION
18

1
Power (
t
)
Turns the air conditioner on and off.
A chime sounds to confirm you have turned it
on or off.
2
Mode
Press this button repeatedly to toggle
through and select the operating mode.
Modes include Cool, Dry (dehumidify), Fan.
An LED illuminates to indicate the selected
mode. The default mode is Cool.
Cool
Compressor runs and cools the room. Use
the Ʒ/Ƹ and Fan Speed buttons to set the
desired temperature and fan speed.
Dry
Use the Dry mode to remove humidity from
the room without additional cooling. The fan
speed is preset and cannot be adjusted.
Fan
Fan circulates air but compressor does not
run. Use the Fan Speed button to set the
desired fan speed to either High, Low.
3
Temperature Control Ʒ/Ƹ
In Cool, Dry mode, the Ʒ/Ƹ buttons adjust
the set temperature up to 86 °F (30 °C) or
down to 60 °F (16 °C), in one-degree
increments.
NOTE
• To switch the temperature units on the
display between Fahrenheit (°F) and
Celsius (°C), press and hold the Ʒ and Ƹ
buttons on the control panel at the same
time for 5 seconds.
4
Fan Speed
Press repeatedly to toggle the fan speed
between High and Low settings. An LED
illuminates to indicate the selected fan
speed. The fan speed can be changed in the
Cool, Fan modes. The fan speed is preset in
the Dry mode. After pressing the button,
there is a brief delay before the fan motor
changes speed.
5
Timer
Delay ON - When the air conditioner is off,
set it to automatically turn on
from 1 to 24 hours later, at its
previous mode and fan settings.
Delay OFF - When the air conditioner is on,
set it to automatically turn off
from 1 to 24 hours later.
NOTE
• When the Timer is selected, use theƷ/Ƹ
buttons to adjust time from 1 to 24 hours, in
one-hour increments.
• To cancel the Timer function, press the
Timer button on control panel.
OPERATION
19

S
L
T
T
T
c
s
L
C
s
S
A
a
N
•
•
•
B
2
6
Auto Swing
This function automatically moves the
louvers to adjust the direction of the air flow.
Press the Swing button on remote control
repeatedly to select the desired direction.
NOTE
• Press and hold the Ƹ button on the control
panel for 3 seconds to enter the Auto
Swing.
7
Light
Sets the display screen brightness:
On → Off
NOTE
• Press and hold the Timer button on the
control panel for 3 seconds to adjust the
brightness.
↑
8
Clean Filter
The Clean Filter LED lights up to notify you
that the filter needs to be cleaned.
After cleaning the filter, press and hold the
Mode button on the control panel for 3
seconds to turn off the Clean Filter light.
NOTE
• The filter reset must be done using th
NOTE
• This functions may not be supported,
depending on the model.
e
control panel, not the remote control.
• This feature is a reminder to clean the air
filter for more efficient operation. The LED
light turns on after 250 hours of operation.
9
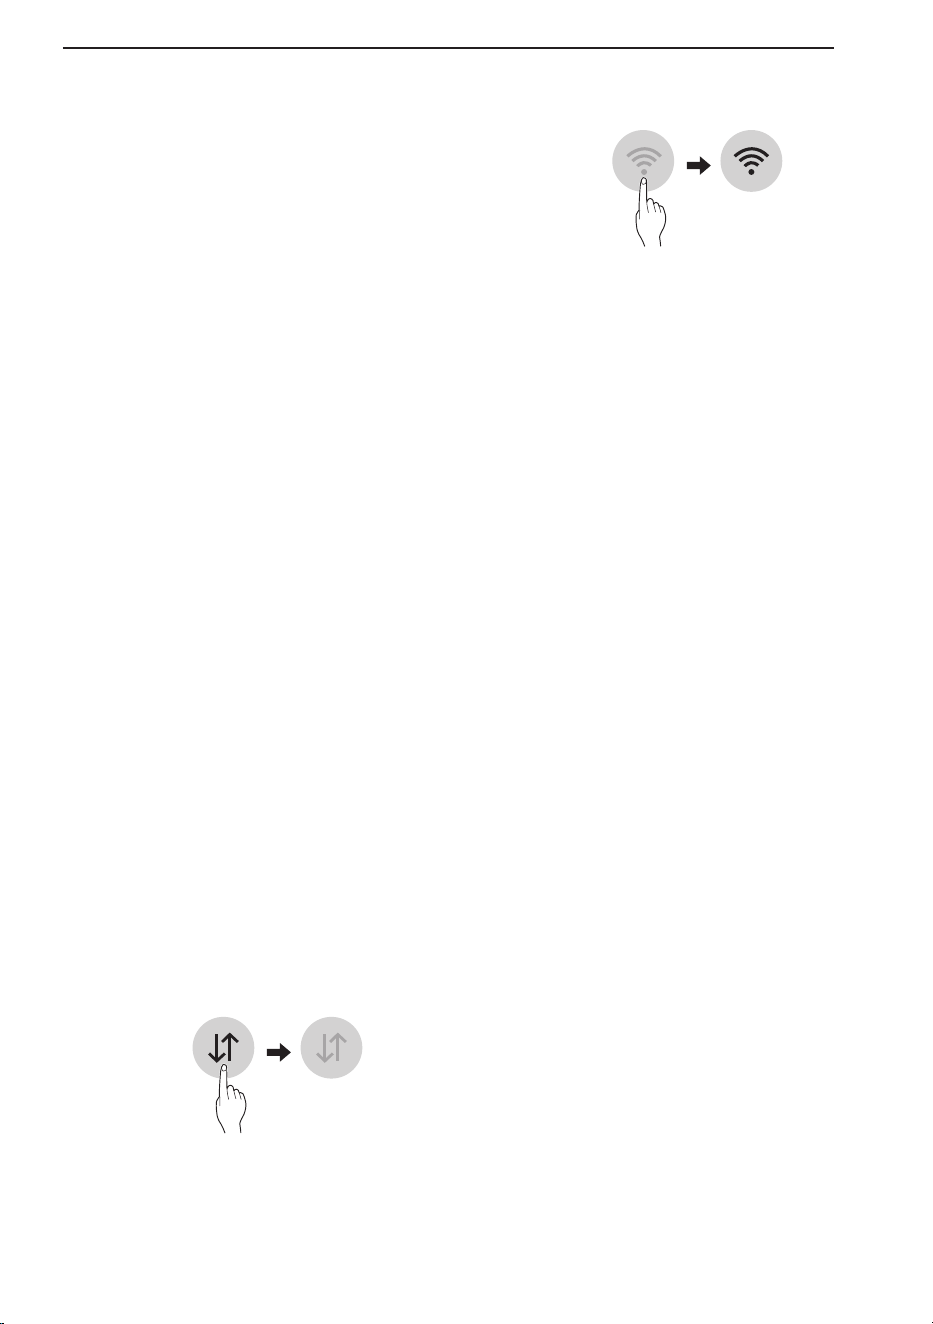
Wi-Fi
Enables connection of the air conditioner to
the home Wi-Fi.
To connect Wi-Fi, press the Fan Speed
button on the control panel for 3 seconds.
10
Removing Condensation Buildup
Condensation can build up inside the unit
when the Cool and Dry modes are used.
The fan can be set to run for a short period
after the product is turned off to help keep
the inside of the appliance dry. This option is
off by default.
Turning Condensation Fan On
1
Turn on the product, set it to Cool mode
and let it run for at least 10 seconds.
2
Press and hold the Mode and Fan Speed
buttons on control panel for 3 seconds
until On appears in the display.
3 The condensation fan is now turned on.
When the appliance is turned off, Co
appears in the display and the fan will
continue to run for 10 minutes. The
appliance will then shut down as normal.
Turning Condensation Fan Off
1 When the product is powered on, press
and hold the Mode and Fan Speed
buttons on control panel for 3 seconds
until OF appears in the display.
2 The condensation fan is now turned off.
The appliance will shut down immediately
when it is turned off.
NOTE
• Some functions cannot be used while this
option is turned on.
OPERATION
20
SMART FUNCTIONS
LG ThinQ Application
This feature is only available on models with the
ThinQ logo
The LG ThinQ application allows you to
communicate with the appliance using a
smartphone.
LG ThinQ Application Features
Communicate with the appliance from a
smartphone using the convenient smart features.
Settings
Allows you to set various options on the
appliance and in the application.
NOTE
• If you change your wireless router, internet
service provider, or password, delete the
registered appliance from the LG ThinQ
application and register it again.
• The application is subject to change for
appliance improvement purposes without notice
to users.
• Functions may vary by model.
Before Using LG ThinQ Application
1
Check the distance between the appliance
and the wireless router (Wi-Fi network).
• If the distance between the appliance and
the wireless router is too far, the signal
strength becomes weak. It may take a
long time to register or installation may
fail.
2
Turn off the Mobile data or Cellular Data
on your smartphone.
3
Connect your smartphone to the wireless
router.
NOTE
• To verify the Wi-Fi connection, check that
f
icon on the control panel is lit.
• The appliance supports 2.4 GHz Wi-Fi
networks only. To check your network
frequency, contact your Internet service
provider or refer to your wireless router manual.
• LG ThinQ is not responsible for any network
connection problems or any faults,
malfunctions, or errors caused by network
connection.
• If the appliance is having trouble connecting to
the Wi-Fi network, it may be too far from the
router. Purchase a Wi-Fi repeater (range
extender) to improve the Wi-Fi signal strength.
• The Wi-Fi connection may not connect or may
be interrupted because of the home network
environment.
• The network connection may not work properly
depending on the Internet service provider.
• The surrounding wireless environment can
make the wireless network service run slowly.
• The appliance cannot be registered due to
problems with the wireless signal transmission.
Unplug the appliance and wait about a minute
before trying again.
• If the firewall on your wireless router is enabled,
disable the firewall or add an exception to it.
• The wireless network name (SSID) should be a
combination of English letters and numbers.
(Do not use special characters.)
• Smartphone user interface (UI) may vary
depending on the mobile operating system
(OS) and the manufacturer.
• If the security protocol of the router is set to
WEP, you may fail to set up the network.
Please change it to other security protocols
(WPA2 is recommended) and register the
product again.
SMART FUNCTIONS
21
M
E
C
W
L
w
•
•
•
•
C
W
w
•
•
Installing the LG ThinQ Application
Search for the LG ThinQ application from the
Google Play Store or Apple App Store on a
smartphone. Follow instructions to download and
install the application.
Open Source Software Notice
Information
To obtain the source code under GPL, LGPL,
MPL, and other open source licenses, that is
contained in this product, please visit
https://opensource.lge.com.
In addition to the source code, all referred
license terms, warranty disclaimers and
copyright notices are available for download.
LG Electronics will also provide open source
code to you on CD-ROM for a charge covering
the cost of performing such distribution (such as
the cost of media, shipping, and handling) upon
email request to [email protected]. This
offer is valid for a period of three years after our
last shipment of this product. This offer is valid to
anyone in receipt of this information.
Industry Canada Statement
This device contains licence-exempt
transmitter(s)/ receiver(s) that comply with
Innovation, Science and Economic Development
Canada’s licence-exempt RSS(s). Operation is
subject to the following two conditions:
1) This device may not cause interference.
2) This device must accept any interference,
including interference that may cause
undesired operation of the device.
IC Radiation Exposure Statement
This equipment complies with IC radiation
exposure limits set forth for an uncontrolled
environment. This equipment should be installed
and operated with a minimum distance of 20 cm
(7.8 inches) between the antenna and your body.
NOTE
• THE MANUFACTURER IS NOT
RESPONSIBLE FOR ANY RADIO OR TV
INTERFERENCE CAUSED BY
UNAUTHORIZED MODIFICATIONS TO THIS
EQUIPMENT. SUCH MODIFICATIONS COULD
VOID THE USER’S AUTHORITY TO
OPERATE THE EQUIPMENT.
Wireless LAN Module Specifications
Frequency Range 2412 MHz - 2462 MHz
Output Power (Max) < 30 dBm
Bluetooth module Specifications
Frequency Range 2402 MHz - 2480 MHz
Output Power (Max) < 30 dBm
SMART FUNCTIONS
22
MAINTENANCE
Emptying the Water
Collection Tank
When the internal water collection tank is full, the
LED display will show FL and the air conditioner
will turn off until the tank is emptied.
• Unplug the air conditioner, disconnect the
exhaust hose from the back, and move the air
conditioner to a suitable drain location or
outdoors. You may also place a pan under the
drain that will hold up to 2 pints of water.
• Remove the drain cap from the bottom drain
outlet.
• Once the water collection tank is drained,
reinstall the drain cap, making sure it is on
securely.
• Place the air conditioner in the desired location,
reconnect the exhaust hose, and plug in the air
conditioner.
Cleaning the Case
Wipe the case with a slightly damp cloth, then
wipe dry with a dry cloth or towel.
• To prevent damage to the finish, do not use
gasoline, benzene, thinners or any abrasive
cleansers to clean the air conditioner.
• Never pour water onto or into the air
conditioner. It could damage internal
components and create a shock and fire
hazard.
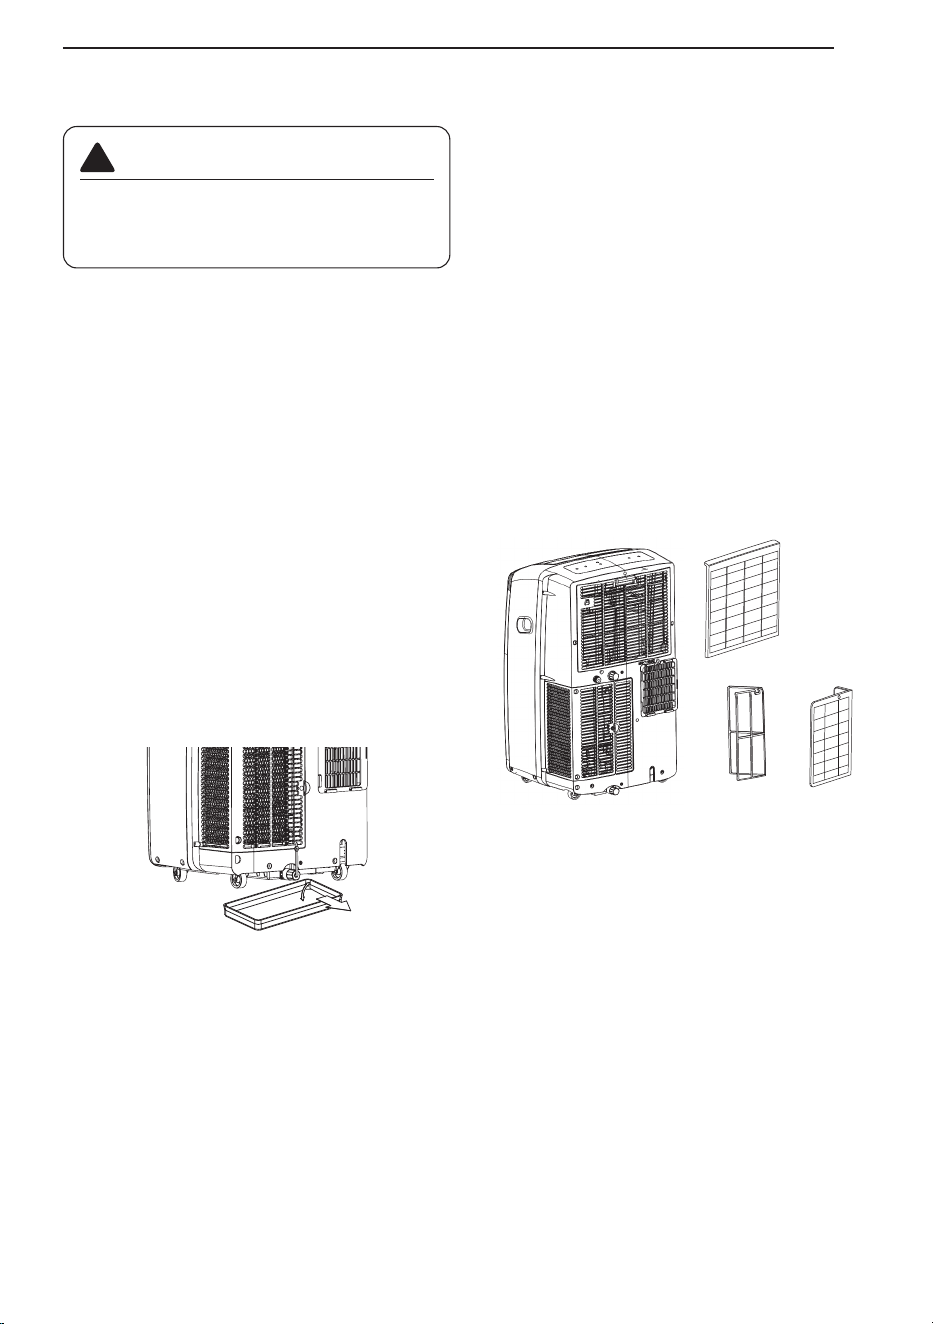
Cleaning the Air Filter
The air filters should be cleaned every two
weeks. Depending on indoor air quality, more
frequent cleaning may be needed. A dirty air filter
will decrease airflow and reduce efficiency.
1. Pull out each air filter by the handle.
2. Use a vacuum cleaner to clean the filters.
If the filters are heavily soiled, they can be
washed in warm water using a mild detergent.
• Do not use harsh cleaners or very hot water.
• Do not wash in a dishwasher.
3. Dry the filters in the shade.
4. Reinsert the filters.
NOTE
• Turn off the product and clean the filter after 30
minutes.
• Be careful as hot parts may come into contact
with the filter when the filter is removed.
WARNING
Before cleaning or performing maintenance,
unplug the product and wait until the fan
stops.
!
D
MAINTENANCE
23
TROUBLESHOOTING
Before Calling for Service
The appliance is equipped with an automatic error-monitoring system to detect and diagnose problems
at an early stage. If the appliance does not function properly or does not function at all, check the
following before you call for service.
Problem Possible Cause Solutions
Air conditioner
does not start.
The air conditioner is unplugged.
Make sure the air conditioner plug is
pushed completely into the outlet.
The fuse is blown/circuit breaker
is tripped.
Check the house fuse/circuit breaker
box and replace the fuse or reset the
breaker.
Power failure.
If power failure occurs, turn the mode
control to off. When power is
restored, wait 3 minutes to restart the
air conditioner to prevent tripping of
the compressor overload.
The current interrupter device is
tripped.
Press the RESET button located on
the power cord plug. If the RESET
button will not stay engaged,
discontinue use of the air conditioner
and contact a qualified service
technician.
FL appears in the display.
The water collection tank is full.
Drain the tank and reset your
settings.
Air conditioner
does not cool as it
should.
Airflow is restricted.
Make sure there are no curtains,
blinds, or furniture blocking the front
of the air conditioner.
The temp control may not be set
correctly.
Set the desired temperature to a
level lower than the current
temperature.
The air filter is dirty.
Clean the filter at least every 2
weeks. See the 'MAINTENANCE'
section.
The room may have been hot.
When the air conditioner is first
turned on, you need to allow time for
the room to cool down.
Cold air is escaping.
Check for open furnace floor
registers and cold air returns.
Cooling coils have iced up.
See 'Air conditioner freezing up'
below.
TROUBLESHOOTING
24
N
•
TROUBLESHOOTING
25
s
Problem Possible Cause Solutions
Air conditioner
freezing up.
The cooling coils are iced over.
Ice may block the air flow and
obstruct the air conditioner from
properly cooling the room. Set the
mode control at High Fan or High
Cool.
Water collects in
base pan.
Moisture removed from air and
drains into base pan.
This is normal for a short period in
areas with little humidity; normal for a
longer period in very humid areas.
Air conditioner
turns on and off
rapidly.
Dirty air filter - air restricted. Clean air filter.
Outside temperature extremely
hot.
Refer to installation instructions or
check with installer.
Noise when unit is
cooling.
Air movement sound.
This is normal. If too loud, adjust the
fan speed to low.
Remote sensing
deactivating
prematurely.
Remote control not located within
range.
Place remote control within 20 feet &
120° radius of the front of the unit.
Remote control signal obstructed. Remove obstruction.
Room too cold.
Set temperature too low. Increase set temperature.
NOTE
• If you see "CH" in the display, please call 1 888 542-2623.
TROUBLESHOOTING
26
Problem Possible Cause Solutions
Trouble
connecting
appliance and
smartphone to
Wi-Fi network.
The password for the Wi-Fi
network was entered incorrectly.
Delete your home \/Vi-Fi network and
begin the registration process again.
Mobile data for your smartphone
is turned on.
Turn off the Mobile data on your
smartphone before registering the
appliance.
The wireless network name (SSID)
is set incorrectly.
The wireless network name (SSID)
should be a combination of English
letters and numbers. (Do not use
special characters.)
The router frequency is not 2.4
GHz.
Only a 2.4 GHZ router frequency is
supported. Set the wireless router to
2.4 GHZ and connect the appliance
to the wireless router. To check the
router frequency, check with your
Internet service provider or the router
manufacturer.
The distance between the
appliance and the router is too far.
If the appliance is too far from the
router, the signal may be weak and
the connection may not be
configured correctly. Move the router
closer to the appliance or purchase
and install a Wi-Fi repeater.
Can't connect the
LG ThinQ App. to
the air conditioner.
Air conditioner is turned off. Turn the air conditioner on.
Wireless router is turned off. Turn the router on.
The air
conditioner is not
connecting to the
Wi-Fi.
The Wi-Fi router is too far from the
air conditioner.
Move the router closer to the air
conditioner or purchase and install a
Wi-Fi repeater (signal booster).
You do not have permission to
use the router or it is
incompatible.
Make sure you are selecting the
correct wireless router from the list.
The router must be set to 2.4 GHz.
Wi-Fi

WARRANTY
27
WARRANTY
WHAT THIS WARRANTY COVERS:
LG Electronics Canada, Inc. (“LG”) warrants your LG Room Air Conditioner (“product”) against defect in materials
or workmanship under normal household use, during the warranty period set forth below. This limited warranty
(except where otherwise prohibited) is valid only to the original retail purchaser of the product, is not assignable or
transferrable to any subsequent purchaser or user, and applies only when the product is purchased through an
LG authorized dealer or distributor and used within Canada for normal and usual household use.
NOTE
• Replacement products may be new or factory-remanufactured at LG’s option and are warranted for the
remaining portion of the original unit’s warranty period or ninety (90) days, whichever is longer. Please retain
dated receipt or delivery ticket as evidence of the date of purchase. If the date of purchase cannot be verified,
the warranty period will begin 15 months from the date of manufacture.
Warranty Period:
1 Year from the Date of Purchase.
HOW SERVICE IS HANDLED:
LG will provide a replacement product via an authorized service exchange through the distribution center you
originally purchased the product from.
THIS LIMITED WARRANTY DOES NOT COVER:
Service trips to deliver, pick up, or install or set up the Product; Instruction on Product use.
Adjustments of user controls.
Products that have had a serial number or any part thereof altered, defaced or removed.
Property damages, malfunction or failure of the product, or personal injury caused by or resulting from:
(a) accident, abuse, negligence or misuse;
(b) operating the Product in a corrosive or wet environment containing chlorine, fluorine or any other hazardous
chemicals;
(c) installation, alteration or service by anyone other than a licensed, authorized LG contractor
(d) improper matching of Product components;
(e) improper sizing or design of the Product;
(f) improper or deferred maintenance contrary to the manufacturer’s instructions;
(g) physical abuse to or misuse of the Product (including failure to perform any maintenance as
(h) Product used in other than normal use or in any manner contrary to the Operation Manual;
(i) freight damage or damage caused by force majeure or other factors such as power surge damage or other
than pursuant to the manufacturer’s instructions, including installation not in accordance described in the
Operation Manual such as air filter cleaning, or any Product damaged by caused by lightning and fluctuations
in or interruptions of electrical power.
(j) Usage of the product in other than normal and usual household use (including without limitation, commercial
use).

WARRANTY
28
D
i
b
“
c
t
L
N
n
L
a
n
s
t
r
b
o
d
A
d
c
p
c
y
y
e
a
c
m
b
y
T
a
a
A
T
O
T
T
I
T
P
E
O
R
G
I
P
C
THIS LIMITED WARRANTY SHALL NOT BE ENLARGED, EXTENDED OR AFFECTED BY, AND
NO OBLIGATION OR LIABILITY SHALL ARISE OR GROW OUT OF, LG PROVIDING, DIRECTLY
OR INDIRECTLY, ANY TECHNICAL ADVICE, INFORMATION AND/OR SERVICE TO OWNER IN
CONNECTION WITH THE PRODUCT. EXCEPT AS OTHERWISE PROVIDED IN THIS LIMITED
WARRANTY, LG MAKES NO OTHER WARRANTIES OR CONDITIONS OF ANY KIND
WHATSOEVER REGARDING THE PRODUCT. LG DISCLAIMS AND EXCLUDES ALL
WARRANTIES AND CONDITIONS NOT EXPRESSLY PROVIDED HEREIN AND ALL REMEDIES
WHICH, BUT FOR THIS PROVISION, MIGHT ARISE BY IMPLICATION OR OPERATION OF LAW,
INCLUDING, WITHOUT LIMITATION, THE IMPLIED WARRANTIES AND CONDITIONS OF
MERCHANTABILITY AND (EXCEPT IN QUEBEC AND WHERE OTHERWISE PROHIBITED) OF
FITNESS FOR ANY PARTICULAR PURPOSE. NO ONE IS AUTHORIZED TO CHANGE THIS
LIMITED WARRANTY IN ANY RESPECT OR TO CREATE ANY OTHER OBLIGATION OR
LIABILITY FOR LG IN CONNECTION WITH THE PRODUCT. LG DISCLAIMS ALL LIABILITY FOR
THE ACTS, OMISSIONS AND CONDUCT OF ALL THIRD PARTIES (INCLUDING, WITHOUT
LIMITATION, THE INSTALLING CONTRACTOR) IN CONNECTION WITH OR RELATED TO THE
PRODUCT.
UNDER NO CIRCUMSTANCES SHALL LG BE LIABLE FOR ANY INCIDENTAL, SPECIAL,
PUNITIVE, EXEMPLARY OR CONSEQUENTIAL DAMAGES INCLUDING, WITHOUT LIMITATION,
LOST GOODWILL, LOST REVENUES OR PROFITS, WORK STOPPAGE, PRODUCT FAILURE,
IMPAIRMENT OF OTHER GOODS, COSTS OF REMOVAL AND REINSTALLATION OF THE
PRODUCT, LOSS OF USE, INJURY TO PERSONS OR PROPERTY ARISING OUT OR RELATED
TO THE PRODUCT WHETHER BASED ON BREACH OF WARRANTY, BREACH OF CONTRACT,
TORT OR OTHERWISE, EVEN IF LG HAS BEEN ADVISED OF THE POSSIBILITY OF SUCH
DAMAGE. IN NO EVENT SHALL LG’S LIABILITY EXCEED THE ACTUAL PURCHASE PRICE OF
THE PRODUCT WITH RESPECT TO WHICH ANY CLAIM IS MADE.
SOME PROVINCES (INCLUDING QUEBEC) DO NOT ALLOW LIMITATIONS ON WARRANTIES OR
EXCLUSIONS OR LIMITATION OF DAMAGES, SO THE ABOVE LIMITATIONS OR EXCLUSIONS
MAY NOT APPLY. WHERE ANY TERM OF THIS WARRANTY IS PROHIBITED BY SUCH LAWS, IT
SHALL BE NULL AND VOID, BUT THE REMAINDER OF THIS WARRANTY SHALL REMAIN IN
EFFECT. THIS LIMITED WARRANTY GIVES THE OWNER SPECIFIC LEGAL RIGHTS AND THE
OWNER MAY ALSO HAVE OTHER RIGHTS THAT VARY FROM PROVINCE TO PROVINCE.
HOW TO OBTAIN WARRANTY SERVICE & ADDITIONAL INFORMATION:
Call 1-888-LG-CANADA (542 2623) or visit our website at www.lg.com.
Mail to: LG Electronics Canada Inc.
20 Norelco Drive
North York, ON M9L 2X6
FOR YOUR RECORDS
Write the model and serial numbers here:
Model No.
Serial No.
• You can find them on a label on the side of each unit.
Dealer's Name
Date Purchased
• Staple your receipt to this page in the event you need it to prove date of purchase or for warranty
issues.

WARRANTY
29
Definitions.
For the purposes of this section, references to “LG” mean LG Electronics Canada, Inc.,
its parents, subsidiaries and affiliates, and each of their officers, directors, employees, agents,
beneficiaries, predecessors in interest, successors, assigns and suppliers; references to “dispute” or
“claim” shall include any dispute, claim or controversy of any kind whatsoever (whether based in
contract, tort, statute, regulation, ordinance, fraud, misrepresentation or any other legal or equitable
theory) arising out of or relating in any way to the sale, condition or performance of the product or this
Limited Warranty.
Notice of Dispute. In the event you intend to commence an arbitration proceeding, you must first
notify LG in writing at least 30 days in advance of initiating the arbitration by sending a letter to LGECI
Legal Team at 20 Norelco Drive, North York, Ontario, Canada M9L 2X6 (the “Notice of Dispute”). You
and LG agree to engage in good faith discussions in an attempt to amicably resolve your claim. The
notice must provide your name, address, and telephone number; identify the product that is the
subject of the claim; and describe the nature of the claim and the relief being sought. If you are unable
to resolve the dispute within 30 days of LG’s receipt of the Notice of Dispute, the dispute shall be
resolved by binding arbitration in and LG accordance with the procedure set out herein. You and LG
both agree that, during the arbitration proceeding, the terms (including any amount) of any settlement
offer made by either you or LG will not be disclosed to the arbitrator until the arbitrator determines the
dispute.
Agreement to Binding Arbitration and Class Action Waiver.
Upon failure to resolve the dispute
during the 30 day period after LG’s receipt of the Notice of Dispute, you and LG agree to resolve any
claims between you and LG only by binding arbitration on an individual basis, unless you opt out as
provided below, or you reside in a jurisdiction that prevents full application of this clause in the
circumstances of the claims at issue (in which case if you are a consumer, this clause will only apply if
you expressly agree to the arbitration). To the extent permitted by applicable law, any dispute between
you and LG shall not be combined or consolidated with a dispute involving any other person’s or
entity’s product or claim. More specifically, without limitation of the foregoing, except to the extent such
a prohibition is not permitted at law, any dispute between you and LG shall not under any
circumstances proceed as part of a class or representative action. Instead of arbitration, either party
may bring an individual action in small claims court, but that small claims court action may not be
brought on a class or representative basis except to the extent this prohibition is not permitted at law in
your province or territory of jurisdiction as it relates to the claims at issue between you and LG
This does not apply to consumers in Ontario. In accordance with provincial legislation, the consumer
and LG may agree to resolve the dispute using any procedure available, including commencing the
action in the Superior Court of Justice.
.
ARBITRATION NOTICE: THIS LIMITED WARRANTY CONTAINS AN ARBITRATION PROVISION
THAT REQUIRES YOU AND LG TO RESOLVE DISPUTES BY BINDING ARBITRATION INSTEAD
OF IN COURT, UNLESS THE LAWS OF YOUR PROVINCE OR TERRITORY DO NOT PERMIT
THAT, OR, IN OTHER JURISDICTIONS, IF YOU CHOOSE TO OPT OUT. FOR FURTHER CLARITY,
THIS ARBITRATION PROVISION IS NOT APPLICABLE TO CUSTOMERS RESIDING IN ONTARIO.
IN ARBITRATION, CLASS ACTIONS AND JURY TRIALS ARE NOT PERMITTED. PLEASE SEE
THE SECTION TITLED “PROCEDURE FOR RESOLVING DISPUTES” BELOW.
PROCEDURE FOR RESOLVING DISPUTES:
EXCEPT WHERE PROHIBITED AT LAW, ALL DISPUTES BETWEEN YOU AND LG ARISING OUT
OF OR RELATING IN ANY WAY TO THIS LIMITED WARRANTY OR THE PRODUCT SHALL BE
RESOLVED EXCLUSIVELY THROUGH BINDING ARBITRATION, AND NOT IN A COURT OF
GENERAL JURISDICTION. EXCEPT WHERE PROHIBITED AT LAW, YOU AND LG BOTH
IRREVOCABLY AGREE TO WAIVE THE RIGHT TO A JURY TRIAL AND TO BRING OR
PARTICIPATE IN A CLASS ACTION. FOR CLARITY, THIS PROVISION DOES NOT APPLY TO
CONSUMERS RESIDING IN ONTARIO.
R

WARRANTY
30
Governing Law. The law of the province or territory of your purchase shall govern this Limited
Warranty and any disputes between you and LG except to the extent that such law is preempted by or
inconsistent with applicable federal or provincial/territorial law. Should arbitration not be permitted for
any claim, action, dispute or controversy between you and LG, you and LG attorn to the exclusive
jurisdiction of the courts of the province or territory of your purchase for the resolution of the claim,
action, dispute or controversy between you and LG.
Fees/Costs.
You do not need to pay any fee to begin an arbitration. Upon receipt of your written
demand for arbitration, LG will promptly pay all arbitration filing fees unless you seek more than
$25,000 in damages, in which case the payment of these fees will be governed by the applicable
arbitration rules. Except as otherwise provided for herein, LG will pay all filing, administration and
arbitrator fees for any arbitration initiated in accordance with the applicable arbitration rules and this
arbitration provision. If you prevail in the arbitration, LG will pay your attorneys’ fees and expenses as
long as they are reasonable, by considering factors including, but not limited to, the purchase amount
and claim amount. Notwithstanding the foregoing, if applicable law allows for an award of reasonable
attorneys’ fees and expenses, an arbitrator can award them to the same extent that a court would. If
the arbitrator finds either the substance of your claim or the relief sought in the demand is frivolous or
brought for an improper purpose (as measured by the applicable laws), then the payment of all
arbitration fees will be governed by the applicable arbitration rules. In such a situation, you agree to
reimburse LG for all monies previously disbursed by it that are otherwise your obligation to pay under
the applicable arbitration rules. Except as otherwise provided for, LG waives any rights it may have to
seek attorneys’ fees and expenses from you if LG prevails in the arbitration.
Hearings and Location. If your claim is for $25,000 or less, you may choose to have the arbitration
conducted solely (1) on the basis of documents submitted to the arbitrator, (2) through a telephonic
hearing, or (3) by an in-person hearing as established by the applicable arbitration rules. If your claim
exceeds $25,000, the right to a hearing will be determined by the applicable arbitration rules. Any in-
person arbitration hearings will be held at the nearest, most mutually-convenient arbitration location
available within the province or territory in which you reside unless you and LG both agree to another
location or agree to a telephonic arbitration.
Severability and Waiver.
If any portion of this Limited Warranty (including these arbitration
procedures) is unenforceable, the remaining provisions will continue in full force and effect to the
maximum extent permitted by applicable law. Should LG fail to enforce strict performance of any
provision of this Limited Warranty (including these arbitration procedures), it does not mean that LG
intends to waive or has waived any provision or part of this Limited Warranty.
Arbitration Rules and Procedures. To begin arbitration of a claim, either you or LG must make a
written demand for arbitration. The arbitration will be private and confidential, and conducted on a
simplified and expedited basis before a single arbitrator chosen by the parties under the provincial or
territorial commercial arbitration law and rules of the province or territory of your residence. You must
also send a copy of your written demand to LG at LG Electronics, Canada, Inc., Attn: Legal
Department- Arbitration, 20 Norelco Drive, North York, Ontario M9L 2X6. This arbitration provision is
governed by your applicable provincial or territorial commercial arbitration legislation. For consumers
in Ontario, the applicable arbitration legislation only applies if consumers agree to submit the dispute
to arbitration. Judgment may be entered on the arbitrator’s award in any court of competent jurisdic-
tion. All issues are for the arbitrator to decide, except that, issues relating to the scope and enforce-
ability of the arbitration provision and to the arbitrability of the dispute are for the court to decide. The
arbitrator is bound by the terms of this provision.
C
W
t
p
O
i
t
F
r
a
d
o
i
w
n
w
o
t
l
L
y
m
o
O
a
p
d

WARRANTY
31
Conflict of Terms.
In the event of a conflict or inconsistency between the terms of this Limited
Warranty and the End User License Agreement (“EULA”) in regards to dispute resolution, the terms of
this Limited Warranty shall control and govern the rights and obligations of the parties and shall take
precedence over the EULA.
Opt Out. The arbitration provision requires you and LG to resolve disputes by binding arbitration
instead of court, unless the laws of your province or territory do not permit that, or, in other jurisdic-
tions, if you choose to opt out. The arbitration provision does not apply to consumers in Ontario.
For individuals that fall within the binding arbitration provisions, You may opt out of this dispute
resolution procedure. If you opt out, neither you nor LG can require the other to participate in an
arbitration proceeding. To opt out, you must send notice to LG no later than 30 calendar days from the
date of the first consumer purchaser’s purchase of the product by either (i) sending an e-mail to
[email protected], with the subject line: “Arbitration Opt Out;” or (ii) calling 1-800-980-2973. You must
include in the opt out e-mail or provide by telephone: (a) your name and address; (b) the date on
which the product was purchased; (c) the product model name or model number; and (d) the serial
number (the serial number can be found (i) on the product; or (ii) online by accessing https://ww-
w.lg.com/ca_en/findmodel_serial/ ). In the event that you “Opt Out”, the law of the province or territory
of your residence shall govern this Limited Warranty and any disputes between you and LG except to
the extent that such law is preempted by or inconsistent with applicable federal or provincial/territorial
law. Should arbitration not be permitted for any claim, action, dispute or controversy between you and
LG, you and LG agree to attorn to the exclusive jurisdiction of the courts of the province or territory of
your residence for the resolution of the claim, action, dispute or controversy between you and LG. You
may only opt out of the dispute resolution procedure in the manner described above (that is, by e-mail
or telephone); no other form of notice will be effective to opt out of this dispute resolution procedure.
Opting out of this dispute resolution procedure will not affect the coverage of the Limited Warranty in
any way, and you will continue to enjoy the full benefits of the Limited Warranty. If you keep this
product and do not opt out, then you accept all terms and conditions of the arbitration provision
described above.

32

www.lg.com
MANUEL D’UTILISATION
CLIMATISEU
Copyright © 2024 - 2025 LG Electronics Inc. Tous droits réservés.
TYPE : CLIMATISEUR PORTABLE
Rev.00
Veuillez lire ce manuel attentivement avant d’utiliser l’appareil
et le garder à portée de main pour pouvoir le consulter en tout
temps.
FR FRANÇAIS
LP0825WSB
LP1025WSSM
A2L
RÉFRIGÉRANT

TABLE DES MATIÈRES
3 CONSIGNES DE SÉCURITÉ
8
APERÇU DU PRODUIT
8 Pièces et composants principaux
9
INSTALLATION
9 Données électriques
10 Avant d’installer le climatiseur
10 Télécommande sans fil
11 Préparation Pour L’installation
12 Choix de l’emplacement d’installatio
12 Fixation du jeu de tuyaux de ventilation flexibles
14
15 Installation des panneaux de ventilation
17 Installation de tuyau d'arrosage pour la déshumidification (Mode Sec uniquement)
18
FONCTIONNEMENT
18 Panneau de commande et télécommande
21
FONCTIONS INTELLIGENTES
21 Application LG ThinQ
23 ENTRETIEN
23 Vidange du réservoir d’eau
23 Nettoyage du boîtier
23 Nettoyage du filtre à air
24
DÉPANNAGE
24 Avant de faire un appel de service
27
GARANTIE
13 Panneau d’évacuation pour fenêtre et extensions(LP1025WSSM)
Panel de ventilación y extensiones de la ventana(LP0825WSB)
TABLE DES MATIÈRES
2
C
L
C
L
CONSIGNES DE SÉCURITÉ
3
CONSIGNES DE SÉCURITÉ
VEUILLEZ LIRE TOUTES LES CONSIGNES AVANT D’UTILISER
L’APPAREIL.
CONSIGNES DE SÉCURITÉ IMPORTANTES
Votre sécurité et la sécurité des autres sont très importantes.
Ce manuel et votre appareil comportent de nombreux messages relatifs à la sécurité.
Lisez et respectez toujours toutes les consignes relatives à la sécurité.
!
Ceci est le symbole d’alerte de sécurité.
Ce symbole vous alerte de dangers potentiels qui peuvent causer la mort ou des blessures.
Tous les messages de sécurité seront précédés du symbole d’alerte de sécurité et du terme
AVERTISSEMENT ou MISE EN GARDE.
Ces mots signifient :
AVERTISSEMENT
Vous pouvez être tué ou gravement blessé si vous ne suivez pas les consignes.
MISE EN GARDE
Vous pourriez vous blesser ou endommager le produit si vous ne suivez pas les consignes.
Tous les messages relatifs à la sécurité vous indiqueront la nature du danger potentiel, la procédure
pour réduire le risque de blessure et ce qui peut se produire si vous ne suivez pas les consignes.
!
!
AVERTISSEMENT
Pour réduire les risques d’explosion, d’incendie, de décès, de décharge
électrique, de brûlure ou de blessures corporelles lors de l’utilisation de
cet appareil, suivez les précautions de base, y compris ce qui suit :
INSTALLATION
• Avant d’être utilisé, l’appareil doit être installé correctement, conformément aux consignes
données dans ce manuel.
• Contactez un technicien autorisé pour la réparation ou l’entretien de cet appareil.
• Contactez un installateur pour procéder à l’installation de cet appareil.
!
Ce symbole indique que cet appareil utilise un réfrigérant inflammable. Si le réfrigérant
fuit et est exposé à une source d’allumage externe, cela présente un risque d’incendie.
Ce symbole indique que le manuel d’utilisation doit être lu attentivement.
Ce symbole indique qu’un technicien d’entretien devrait manipuler cet équipement en se
reportant au manuel d’installation.
Ce symbole indique que de l’information est disponible, par exemple le manuel
d’utilisation ou le manuel d’installation.
Les symboles sont affichés sur les unités.

CONSIGNES DE SÉCURITÉ
4
• Tout remplacement du cordon d’alimentation doit obligatoirement être effectué par un technicien
autorisé utilisant seulement des pièces de rechange d’origine.
• Les travaux d’installation doivent être effectués conformément au Code national de l’électricité
par des techniciens qualifiés et autorisés seulement.
• Branchez l’appareil sur un circuit d’alimentation de puissance nominale adéquate et correctement
protégé et dimensionné pour éviter une surcharge électrique.
• Branchez toujours l’appareil dans une prise électrique mise à la terre.
• Ne coupez ou n’enlevez jamais la troisième broche (mise à la terre) du cordon d’alimentation.
• Lorsque vous installez ou déplacez l’appareil, évitez de pincer, d’écraser ou d’endommager le
cordon d’alimentation.
• Branchez la fiche d’alimentation correctement.
• Ne modifiez pas ou ne prolongez pas le cordon d’alimentation.
• Ne démarrez pas ou n’arrêtez pas l’appareil en branchant ou en débranchant le cordon
d’alimentation.
• Si le cordon d’alimentation ou la fiche d’alimentation sont endommagés, faites-les remplacer par
un technicien autorisé utilisant des pièces de rechange autorisées.
• Utilisez un circuit dédié.
• N’essayez pas de démonter ou de modifier l’appareil.
• Veuillez suivre toutes les procédures de sécurité recommandées par l’industrie, ce qui inclut le
port de lunettes de sécurité et de gants longs.
• Soyez prudent lorsque vous déballez et que vous installez l’appareil. Ses arêtes peuvent être
tranchantes.
•
Débranchez le cordon d’alimentation ou coupez le disjoncteur avant l’installation ou l’entretien de l’appareil.
• Gardez les matériaux d’emballage hors de la portée des enfants. Ces matériaux peuvent
présenter un risque de suffocation pour les enfants.
•
Entreposez et installez l’appareil dans un endroit où il ne sera pas exposé au gel ou aux intempéries.
• N’entreposez pas et n’utilisez pas d’essence ou d’autres gaz et liquides inflammables à proximité
de cet appareil ou de tout autre électroménager.
• N'installez pas l'unite dans des atmospheres potentiellement explosives.
• Si le cordon d'alimentation est endommagé, il doit être remplacé par le fabricant, son agent de
service ou des personnes de qualification similaire afin d'éviter tout danger.
FONCTIONNEMENT
• N’utilisez cet appareil qu’aux fins prévues.
• N’essayez jamais de faire fonctionner cet appareil s’il est endommagé, défaillant, partiellement
démonté ou si des pièces sont manquantes ou brisées, notamment si le cordon d’alimentation ou
la fiche sont endommagés.
• Réparez ou remplacez immédiatement tout cordon d’alimentation qui s’effiloche ou qui est
autrement endommagé. N’utilisez pas un cordon qui présente des fissures ou des traces
d’abrasion sur sa longueur ou aux extrémités.
• Ne faites pas passer le cordon d’alimentation sous des tapis ou des matelas où on pourrait
marcher dessus et l’endommager.
• Évitez que le cordon d’alimentation se retrouve sous des objets lourds tels que des tables ou des
chaises.
• Ne placez pas le cordon d’alimentation près d’une source de chaleur.
• N’utilisez pas d’adaptateur et ne branchez pas l’appareil dans une prise de courant commune.
• Ne modifiez pas les commandes.

CONSIGNES DE SÉCURITÉ
5
• Si vous entendez un son étrange ou si vous détectez une odeur de produit chimique, de brûlé ou
de fumée provenant de l’appareil, débranchez-le immédiatement et communiquez avec le centre
d’information à la clientèle de LG Electronics.
• Ne débranchez jamais l’appareil en tirant sur le cordon d’alimentation. Tenez toujours la fiche
fermement pour la retirer de la prise.
• Ne saisissez pas le cordon d’alimentation ou ne touchez pas aux commandes de l’appareil si vos
mains sont mouillées.
• Le climatiseur n’est pas conçu pour être utilisé sans surveillance par de jeunes enfants ou des
personnes handicapées.
• Surveillez les jeunes enfants pour qu’ils ne jouent pas avec le climatiseur.
• En cas d’infiltration d’eau dans l’appareil, coupez l’alimentation du circuit principal, puis
débranchez l’appareil et communiquez avec un centre de service.
• Si le produit a été immergé, communiquez avec le centre d’information à la clientèle de LG
Electronics pour obtenir des instructions avant de reprendre l’utilisation.
• Débranchez l’appareil lorsqu’il n’est pas utilisé pendant de longues périodes.
• Débranchez l’appareil avant de le nettoyer.
• En cas de fuite de gaz (gaz propane, etc.), n’utilisez pas ce produit ni tout autre appareil.
Ouvrez une fenêtre ou une porte pour faire aérer la zone immédiatement.
• Cet appareil n’est pas destiné à être utilisé par des personnes (y compris des enfants) ayant des
capacités physiques, sensorielles ou mentales réduites, ou un manque d’expérience et de
connaissances, à moins d’être sous surveillance ou d’avoir reçu des instructions concernant
l’utilisation de l’appareil de la part d’une personne responsable de leur sécurité.
• Pour nettoyer l'intérieur, communiquer avec le centre d’information à la clientèle de LG ou un
détaillant agréé. L'utilisation de détergents agressifs peut provoquer de la corrosion ou des
dommages à l'unité.
•
N’utilisez pas de détergent à base de solvant sur le produit. L’utilisation d’un tel produit peut entraîner
des dommages ou de la corrosion, le bris de l’appareil, une décharge électrique ou un incendie.
INSTRUCTIONS DE MISE À LA TERRE
• Le cordon d’alimentation de cet appareil est doté d’une fiche à trois broches (mise à la terre).
Utilisez-le avec une prise murale standard à trois fentes (mise à la terre) afin de réduire les
risques de décharge électrique. Le client doit faire vérifier la prise murale et le circuit par un
électricien qualifié pour s’assurer que la prise murale est correctement mise à la terre.
NE COUPEZ PAS OU N’ENLEVEZ PAS LA TROISIÈME BROCHE (MISE À LA TERRE) DU
CORDON D’ALIMENTATION.
- Si l’appareil est débranché occasionnellement : en raison des risques potentiels pour la
sécurité, nous déconseillons fortement l’utilisation d’une fiche d’adaptation. Cependant, si vous
souhaitez utiliser un adaptateur, un BRANCHEMENT TEMPORAIRE peut être effectué.
Utilisez un adaptateur homologué UL, vendu dans la plupart des quincailleries locales. La
grande fente de l’adaptateur doit être alignée avec la grande fente de la prise murale pour
respecter la polarité lors du branchement.
• La fixation de la borne de mise à la terre de l’adaptateur à la vis du couvercle de la prise murale
ne met pas l’appareil à la terre, à moins que la vis du couvercle soit faite de métal, qu’elle ne soit
pas isolée et que la prise murale soit mise à la terre par l’entremise du câblage du domicile. Le
client doit faire vérifier le circuit par un électricien qualifié pour s’assurer que la prise murale est
correctement mise à la terre.
• Débranchez le cordon d’alimentation de l’adaptateur en les tenant chacun par une main. Sinon,
la borne de mise à la terre de l’adaptateur pourrait se briser. N’utilisez pas l’appareil si la fiche
d’adaptation est brisée.
-
Si l’appareil est souvent débranché : n’utilisez pas de fiche d’adaptation dans ces situations. Le fait de
débrancher le cordon d’alimentation fréquemment peut éventuellement entraîner la rupture de la borne
de mise à la terre. La prise murale doit plutôt être remplacée par une prise à trois fentes (mise à la terre).

CONSIGNES DE SÉCURITÉ
6
MISE EN GARDE
Afin de réduire les risques de blessures corporelles mineures ou
modérées, de dysfonctionnement ou de dommages au produit ou aux
biens lors de l’utilisation de cet appareil, respectez les précautions de
base qui suivent :
INSTALLATION
• Lorsque vous installez l’appareil, veillez à ce que l’air évacué ou la condensation n’endommagent
pas les biens se trouvant à proximité.
• Suivez les consignes d’installation à la lettre pour éviter les vibrations excessives ou les fuites
d’eau.
• N'installez pas l'unité dans des atmosphères potentiellement explosives.
FONCTIONNEMENT
• Cet appareil n’est pas destiné à être utilisé comme un système de réfrigération de précision. Ne
l’utilisez pas à des fins telles que pour prendre soin d’animaux domestiques, conserver des
aliments ou entretenir des machines de précision ou des oeuvres d’art.
• Lorsque vous installez ou déplacez l’appareil, évitez de pincer, d’écraser ou d’endommager le
cordon d’alimentation.
• Assurez-vous que l’entrée et la sortie d’air ne sont pas obstruées.
• Utilisez un chiffon doux pour nettoyer l’appareil. N’utilisez pas de cires, de diluants ou de
détergents puissants.
• Ne montez pas sur l’appareil et ne placez pas d’objets lourds sur le dessus de l’appareil.
• Ne faites pas fonctionner l’appareil si le filtre n’est pas correctement installé.
• Ne buvez pas l’eau vidangée de l’appareil.
• Assurez-vous d’avoir une ventilation suffisante lorsque le climatiseur et un appareil de chauffage
tel qu’un radiateur sont utilisés simultanément.
• Le fait d’être exposé à un débit d’air direct pendant une période prolongée peut être dangereux
pour votre santé.
• Retirez les piles de la télécommande si vous ne l’utilisez pas pendant une période prolongée.
• Ne mélangez jamais différents types de piles et n’utilisez pas conjointement des piles usées et
des piles neuves dans la télécommande.
• Cessez d’utiliser la télécommande s’il y a une fuite de liquide dans la pile. Si vos vêtements ou
votre peau sont exposés au liquide de la pile qui fuit, lavez-les avec de l’eau propre.
• Si le liquide de la pile qui fuit a été avalé, rincez soigneusement l’intérieur de la bouche et
consultez un médecin.
• Ne rechargez pas et ne démontez pas les piles.
ENTRETIEN
• Nettoyez le filtre toutes les deux semaines.
• Ne touchez jamais les pièces métalliques du climatiseur lorsque vous retirez le filtre à air.
• N’utilisez jamais de nettoyants ou de solvants puissants lors du nettoyage du climatiseur et ne
vaporisez pas d’eau. Utilisez un chiffon doux.
•
Pour nettoyer l'intérieur, contactez le centre d'information client de LG Electronics ou un revendeur.
L'utilisation de détergents agressifs peut provoquer de la corrosion ou endommager l'appareil.
!
R

CONSIGNES DE SÉCURITÉ
7
RÉFRIGÉRANT (DE TYPE R32 SEULEMENT)
AVERTISSEMENTS
• N’essayez jamais d’accélérer le processus de dégivrage ou de nettoyage d’une manière
différente de celles recommandées par le fabricant.
• L’appareil doit être entreposé dans une pièce qui ne renferme pas de sources d’inflammation
fonctionnant en continu (par exemple : flammes nues, appareil au gaz ou radiateur électrique).
• Veillez à ne pas percer ou brûler l’appareil. Gardez à l’esprit que les réfrigérants inflammables
n’ont pas forcément d’odeur.
• L'appareil doit être stocké dans une zone bien ventilée où la taille de la pièce correspond à la
surface de la pièce spécifiée pour le fonctionnement.
• L'appareil doit être stocké de manière à éviter tout dommage mécanique.
•
Toute personne impliquée dans des travaux ou des effractions dans un circuit de réfrigérant doit
détenir un certificat en cours de validité délivré par une autorité d'évaluation accréditée par l'industrie,
qui autorise sa compétence à manipuler les réfrigérants en toute sécurité conformément à une
spécification d'évaluation reconnue par l'industrie.
• L'entretien ne doit être effectué que selon les recommandations du fabricant de l'équipement.
•
L'entretien et les réparations nécessitant l'assistance d'autres personnes qualifiées doivent être
effectués sous la supervision de la personne compétente dans l'utilisation des réfrigérants inflammables.
• Gardez toutes les ouvertures de ventilation requises dégagées de toute obstruction.
MISES EN GARDE
• Cet appareil contient du réfrigérant inflammable et comporte des précautions de sécurité
spéciales qui ne sont normalement pas associées aux appareils plus anciens. Veuillez suivre
toutes les précautions et recommandations.
-
Soyez prudent lors de la manipulation et évitez d’endommager l’appareil. Ne percez aucun trou dans
l’appareil pour quelque raison que ce soit. Cela peut endommager l’appareil et empêcher le refroidissement.
-
L’entretien et le nettoyage de l’appareil doivent être effectués par du personnel qualifié. Le fait de ne pas
nettoyer correctement l’appareil peut endommager le système de réfrigération ou le système électrique.
-
Assurez-vous que toutes les ouvertures de circulation d’air et de ventilation ne sont pas obstruées.
-
L’entretien doit seulement être effectué par des techniciens correctement formés et certifiés
relativement à l’utilisation de réfrigérants inflammables.
- Tout entretien effectué par des réparateurs ou des particuliers non autorisés annulera toutes les
garanties. N’entreposez pas l’appareil dans une pièce où se trouvent des appareils à flamme
nue tels que des chauffe-eau au gaz ou des chaudières. Éloignez-le aussi des radiateurs
électriques. Les appareils endommagés doivent être réparés avant d’être entreposés.
- La quantité maximale de charge de réfrigérant. (Reportez-vous à la plaque signalétique
indiquant la quantité de réfrigérant.)
- L'appareil doit être stocké de manière appropriée pour éviter tout dommage mécanique.
-
Informations pour la manipulation, l'installation, le nettoyage, l'entretien et l'élimination du réfrigérant.
-
Un avis indiquant que l'entretien doit être effectué uniquement selon les recommandations du fabricant.
-
Un avertissement indiquant que l'appareil doit être stocké dans une pièce sans flammes nues en
fonctionnement continu(par exemple un appareil à gaz en fonctionnement) et des sources
d'inflammation (par exemple un radiateur électrique en fonctionnement).
- Le fabricant doit spécifier d'autres sources potentielles fonctionnant en continu connues pour
provoquer l'inflammation dele réfrigérant utilisé. L'appareil doit être stocké de manière à éviter
tout dommage mécanique.
-
Toute personne amenée à intervenir ou à s'introduire dans un circuit frigorifique doit détenir unecertificat
d'une autorité d'évaluation accréditée par l'industrie, qui autorise leur compétence à gérerréfrigérants en
toute sécurité conformément à une spécification d'évaluation reconnue par l'industrie.
-
L'entretien ne doit être effectué que selon les recommandations du fabricant de l'équipement. Entretien
etles réparations nécessitant l'assistance d'autres personnes qualifiées doivent être effectuées sous la
supervision dupersonne compétente dans l'utilisation de fluides frigorigènes inflammables.
!
CONSERVEZ CES CONSIGNES

I
D
L
d
T
l
p
b
(
d
(
d
q
P
APERÇU DU PRODUIT
Pièces et composants
principaux
ʈ SORTIE D’AIR
L’orifice de décharge d’air à lames ajustable
s’ouvre automatiquement lorsque le
climatiseur est mis sous tension et se ferme
lorsqu’il est mis hors tension. Il peut
également être réglé pour osciller et distribuer
l’air de façon plus uniforme dans la pièce.
ʉPANNEAU DE COMMANDE ET ÉCRAN
L’écran numérique facilement lisible affiche la
température réglée et les voyants lumineux
indiquent le mode de fonctionnement. Vous
n’avez qu’à appuyer sur les boutons pour
modifier les réglages rapidement et facilement.
ʊROULETTES PIVOTANTES
Les roulettes pivotantes vous permettent de
déplacer facilement le climatiseur sur la
plupart des surfaces de plancher.
ʋPOIGNÉES INTÉGRÉES
Les poignées intégrées offrent une prise
efficace lorsque vous soulevez le climatiseur.
ʌTÉLÉCOMMANDE
La télécommande vous permet de régler la
température et d’utiliser la plupart des
fonctionnalités du climatiseur à l’autre bout de
la pièce.
ʍORIFICE DE FUITE INFÉRIEUR
Avant de déplacer le climatiseur, vidangez
l’eau du réservoir interne à l’aide de l’orifice
de fuite.
ʎORIFICE DE VIDANGE CONTINU
Connectez un tuyau d'arrosage pour un
drainage continu lorsque le climatiseur
fonctionne en mode Sec.
ʏTUYAU ET DIFFUSEUR
Utilisez le diffuseur et le tuyau pour raccorder
le climatiseur à la trousse d’installation pour
fenêtre et évacuer l’air extrait à l’extérieur.
ʐFILTRE À AIR
9
8
6
7
1
2
4
3
APERÇU DU PRODUIT
8
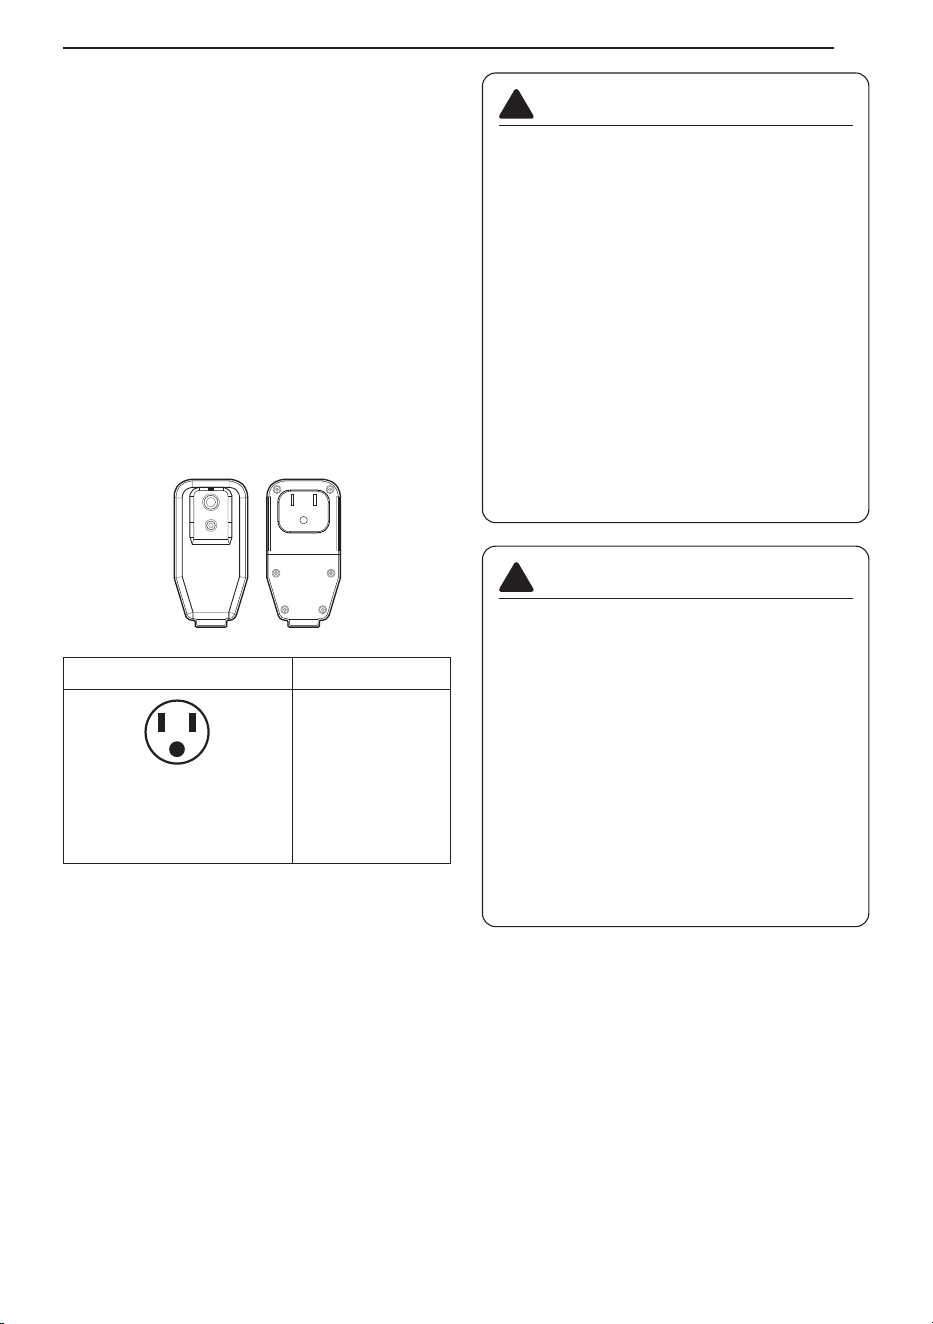
INSTALLATION
Données électriques
Le cordon d’alimentation peut être doté d’un
dispositif d’interruption du courant. Les boutons
TEST et RESET (réinitialisation) sont situés sur
le boîtier de la prise. L’appareil doit être testé
périodiquement en appuyant d’abord sur le
bouton TEST, puis sur le bouton RESET
(réinitialisation). Si le bouton TEST ne se
déclenche pas ou si le bouton RESET
(réinitialisation) ne reste pas enclenché, cessez
d’utiliser le climatiseur et contactez un technicien
qualifié.
Pour 120 V~
Utilisez une prise murale Alimentation
Prise mise à la terre
standard de 120 V~ à 3 fils
d’une valeur nominale de
15 A / 120 V~ c.a. / 60 Hz
Utilisez 15 A,
un fusible
temporisé ou un
disjoncteur de 15 A.
AVERTISSEMENTS
• Cet appareil doit être installé
conformément au Code national de
l’électricité.
• L’utilisation de rallonges pourrait entraîner
des blessures graves ou la mort.
- N’utilisez pas de rallonge avec ce
climatiseur portable.
- N’utilisez pas de parasurtenseurs ou
d’adaptateurs multiprises avec ce
climatiseur portable.
• N’appuyez jamais sur le bouton TEST
pendant le fonctionnement. Cela pourrait
endommager la fiche.
- Ne retirez pas, ne modifiez pas ou
n’immergez pas cette prise. Si l’appareil
se déclenche, la cause doit être corrigée
avant toute nouvelle utilisation.
!
MISE EN GARDE
• Les conducteurs à l’intérieur de ce cordon
sont entourés d’écrans de protection qui
surveillent le courant de fuite. Ces écrans
ne sont pas mis à la terre. Vérifiez
régulièrement si le cordon est endommagé.
N’utilisez pas cet appareil si les écrans
sont à découvert. Évitez tout risque de
décharge électrique. L'utilisateur ne peut
faire lui-même l'entretien de cet appareil.
N’ouvrez pas la partie scellée inviolable.
Cela aura pour effet d’annuler toutes les
garanties associées à l’appareil et à son
rendement. Ce dispositif n’est pas destiné
à être utilisé comme interrupteur
Marche/Arrêt.
!
RESET
TEST
INSTALLATION
9
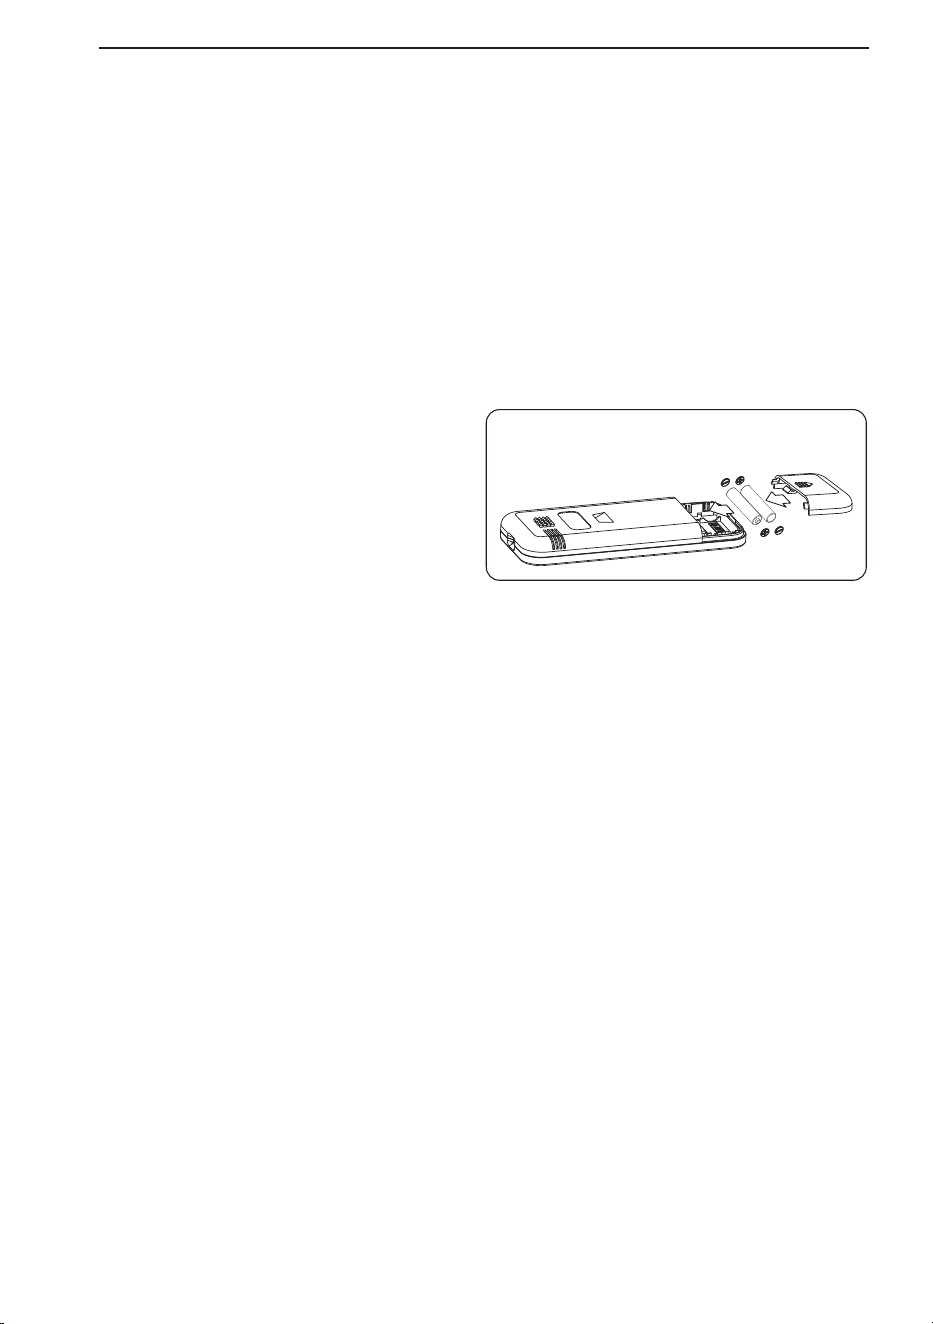
P
M
L
L
O
Avant d’installer le climatiseur
PRÉPARATION POUR LE FONCTIONNEMENT
Reportez-vous aux « Instructions d’installation »
fournies dans le présent manuel avant d’utiliser
le climatiseur. Une fois que le climatiseur est
correctement assemblé et installé :
ʈ
Branchez le cordon d’alimentation dans une
prise électrique dédiée et correctement mise à
la terre. Ne branchez pas d’autres appareils
dans la même prise, sans quoi vous pourriez
la surcharger et risquer de causer un incendie.
ʉ Assurez-vous que le climatiseur et le cordon
sont placés à un endroit où personne ne
risque d’y trébucher et où la ventilation est
adéquate. Ne placez pas l’appareil près de
meubles ou d’objets qui pourraient obstruer
les ouvertures de ventilation
ʊ Assurez-vous que tout objet pouvant être
soufflé ou endommagé par le débit d’air
provenant du ventilateur est hors de la
trajectoire du débit d’air.
IMPORTANT:
• Ne restez pas dans le débit d’air direct du
climatiseur pendant des périodes prolongées.
•
Lorsque l’appareil est utilisé en même temps
qu’un poêle, un foyer ou d’autres appareils de
combustion, assurez-vous que l’apport d’air frais
est suffisant dans la pièce. N’utilisez pas l’appareil
en même temps que de tels types de dispositifs si
vous vous trouvez dans un espace clos.
•
Ce climatiseur est destiné à une utilisation
domestique et vise à fournir une solution de
confort au consommateur. Ne l’utilisez pas
comme système de régulation climatique de
précision, ou à des fins telles que pour refroidir
des instruments de précision, conserver des
aliments, prendre soin d’animaux domestiques et
de plantes, conserver des oeuvres d’art, etc.
Ceux-ci pourraient être blessés ou endommagés.
• Ne pliez pas le tuyau vers le bas lorsque la
trousse d’installation pour fenêtre n’est pas
mise en place. Cela peut entraîner le
dysfonctionnement du climatiseur ou une
détérioration de son rendement.
DÉBALLAGE DU CLIMATISEUR
•
Retirez et rangez les matériaux d’emballage en
vue de les réutiliser. Retirez tous les rubans
adhésifs avant d’utiliser le climatiseur. Si le ruban
laisse des résidus de colle, appliquez une petite
quantité de savon à vaisselle liquide sur les
résidus et essuyez à l’aide d’un chiffon humide.
N’utilisez PAS d’instruments tranchants, d’alcool,
de diluants ou de nettoyants abrasifs pour
enlever les résidus de colle. De tels produits
pourraient endommager le fini de l’appareil.
TEMPÉRATURE DE FONCTIONNEMENT
Refroidissement : 70 °F (21 °C) ~ 95 °F (35 °C),
45%RH ~ 78%RH
Télécommande sans fil
Insertion des piles
Si l’écran d’affichage de la télécommande
commence à s’estomper, remplacez les piles.
Insérez les piles AAA (1,5 V) avant d’utiliser la
télécommande.
REMARQUE
• Des piles neuves pour la télécommande sont
fournies avec le climatiseur.
• N’utilisez pas de piles rechargeables. Assurez-
vous que les piles sont neuves.
• Pour éviter que les piles se déchargent, retirez-
les de latélécommande si le climatiseur n’est
pas utilisé pendant une période prolongée.
• Éloignez la télécommande des endroits
extrêmement chauds ou humides.
• Pour conserver un fonctionnement optimal de
latélécommande, le capteur de télécommande
ne doit pas être exposé directement à la
lumière du soleil.
• La télécommande ne fonctionnera pas
correctement si l’appareil est exposé
directement à la lumière ou s’il y a des
obstacles entre la télécommande et le
climatiseur.
1
Retirez le couvercle à l’arrière de la
télécommande.
Assurez-vous de
respecter la
bonne polarité.
2
Insérez les nouvelles piles et assurez-vous
que les bornes + et - des piles sont
correctement orientées.
INSTALLATION
10
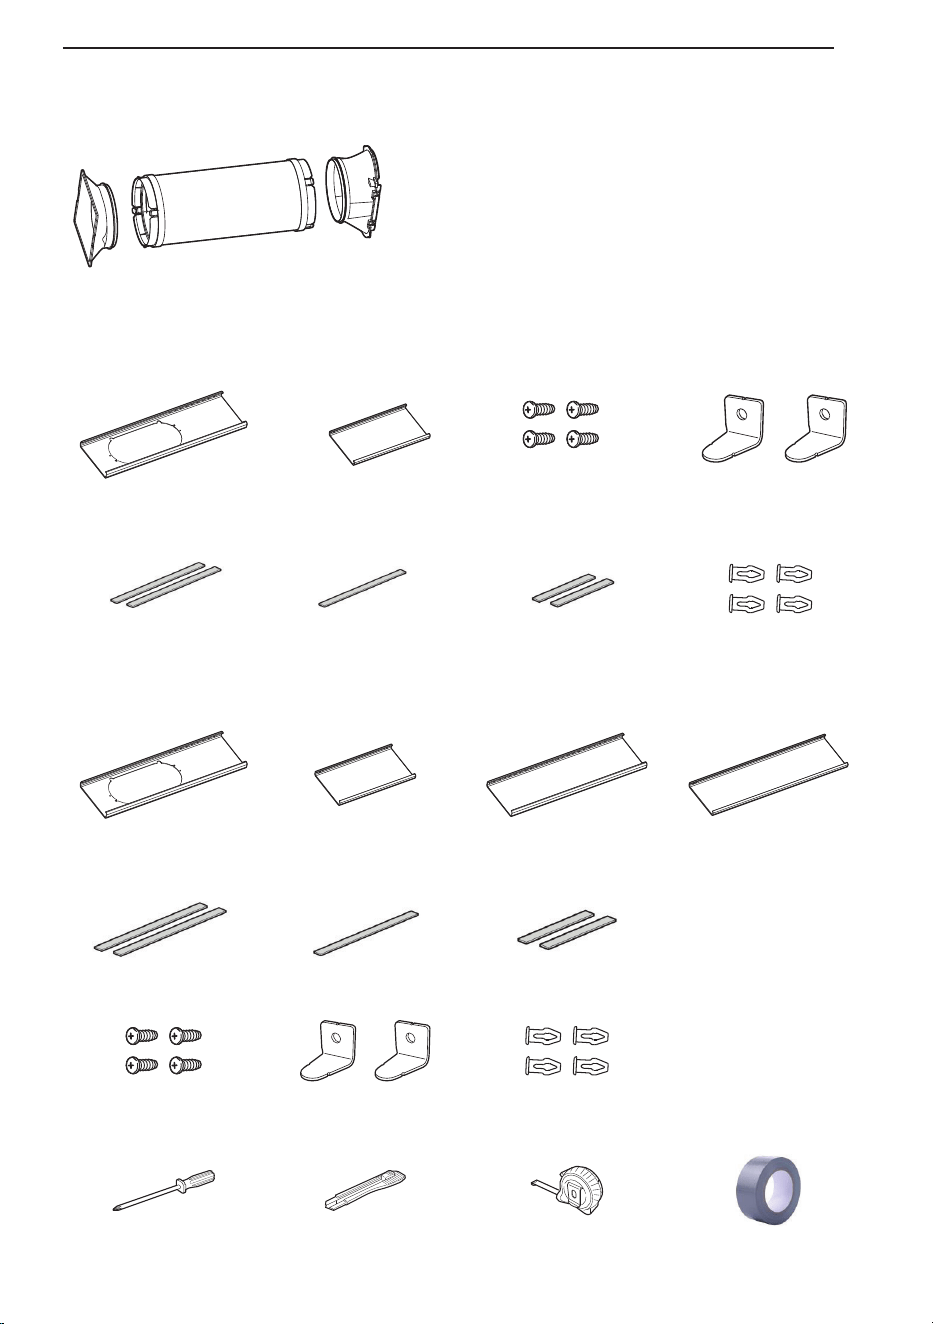
Préparation Pour L’installation
Matériel d'installation de base fourni
LP1025WSSM
LP0825WSB
Support
de montage
Tuyau d'aération
flexible
Diffuseur
1 Panneau H (18 po)
Volet d'aération de
fenêtre
1 Panneau I (9 11/16 po)
Panneau d'extension
1 Panneau J (18 po)
Panneau d'extension
1 Panneau K (18 po)
Panneau d'extension
2 longs joints mousse
adhésifs
1 joint mousse non
adhésif
2 joints courts en
mousse adhésive
4 vis 2 Support de sécurité 4 rivets
4 rivets
Outils d'installation
tournevis cruciforme Couteau de coupe Mètre à ruban
"Aucun résidu" ruban
adhésif
1 Panel A (25″)
Panel de ventilación
de ventana
1 Panel B (25″)
Panel de extensión
2 Sellos de espuma
adhesiva largos
1 sello de espuma
no adhesiva
2 sellos de espuma
adhesiva cortos
4 Tornillos
2 Soporte de seguridad
INSTALLATION
11

P
L
c
d
1
2
S
u
f
S
u
(
Support
de
montage
Tuyau d'aération
flexible
Diffuseur
Assemblage de
tuyau d’échappement
Verrouiller
Déverrouiller
Choix de l’emplacement d’installatio
ʈ Installez l’appareil sur un plancher de niveau.
ʉ Pour obtenir des résultats optimaux, laissez un
espace d’au moins 20 po de chaque côté de
l’appareil pour assurer une bonne circulation d’air.
ʊ Placez l’appareil près d’une fenêtre. Le tuyau et le
diffuseur serviront à raccorder le climatiseur à la
trousse d’installation pour fenêtre pour évacuer l’air
extrait à l’extérieur.
REMARQUE
La longueur du tuyau d'évent flexible est spécialement conçue selon les spécifications de ce
produit.Ne le remplacez pas ou ne le rallongez pas avec un tuyau qui n'est pas spécifiquement conçu
pour être utilisé avec ce produit car cela pourrait entraîner un dysfonctionnement.
Fixation du jeu de tuyaux de ventilation flexibles
1. Préparation de l’assemblage du tuyau d’échappement:
Appuyez sur le support de montage et le diffuseur dans le tuyau d’échappement flexible.
Le support de montage et le diffuseur ont des clips intégral qui s’accrochent sur le tuyau.
2. Insérez le support de montage dans la fente à l’arrière du climatiseur.
3. Glisser vers le bas pour verrouiller le tuyau en place.
4. Confirmez que le tuyau est verrouillé en place avant de fonctionner.
20 po
20 po
INSTALLATION
12
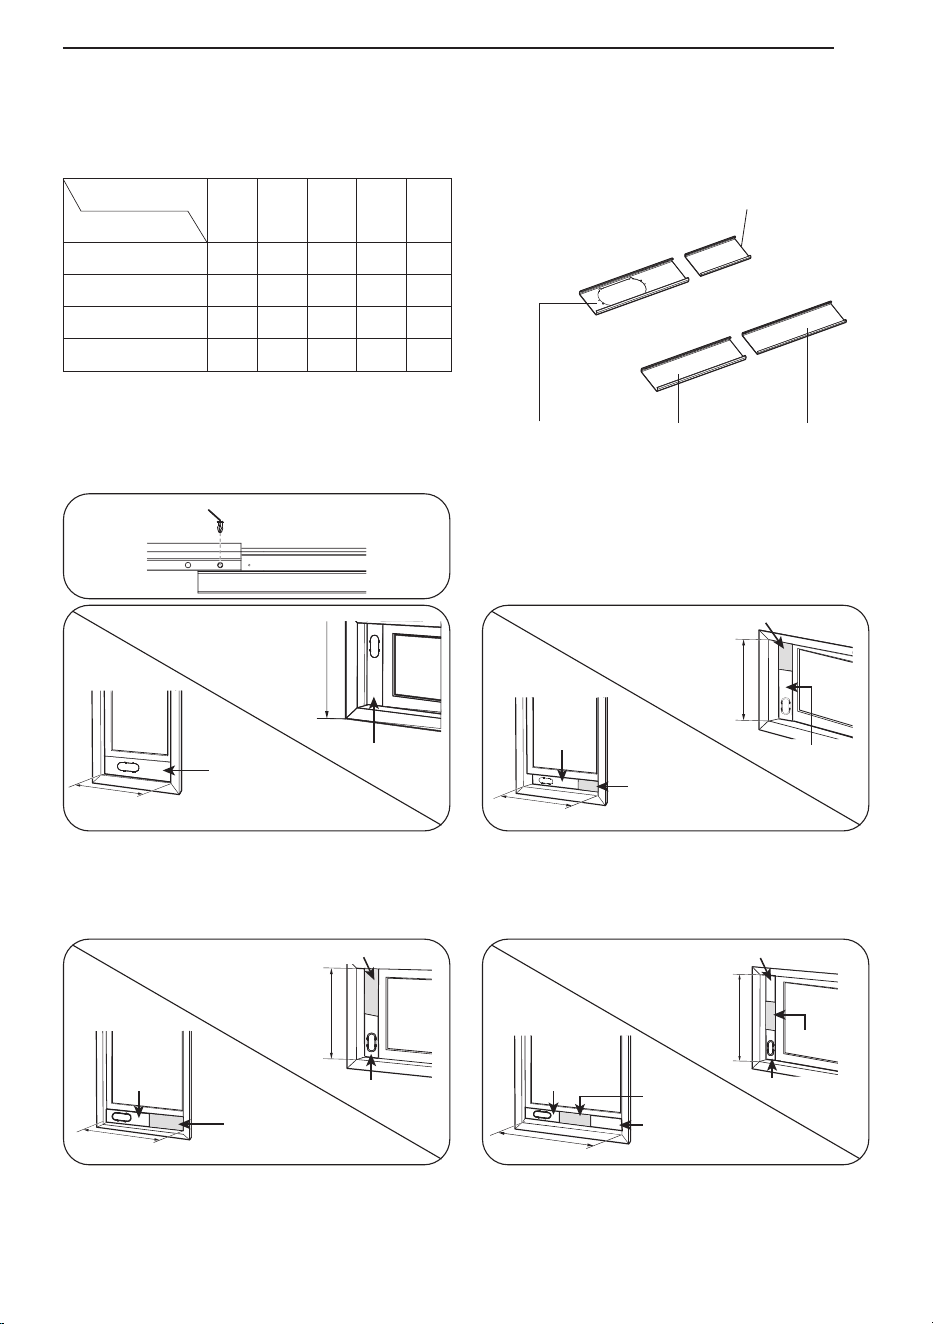
Panneau d’évacuation pour fenêtre et extensions(LP1025WSSM)
La trousse d’installation pour fenêtre vous permet d’installer le climatiseur dans la plupart des fenêtres
coulissantes verticales d’une largeur de 18 po à 50 po, ou dans les fenêtres coulissantes horizontales
d’une hauteur de 18 po à 50 po.
1. Veuillez vérifier la taille de votre fenêtre et
choisir l'ajustement dans le tableau ci-dessus.
2. Si la taille de votre fenêtre nécessite plus de 2
panneaux,après avoir ajusté la longueur,
veuillez fixer les panneauxavec rivets, E.
Longueur du panneau
Longueur du panneau
HIJK
Fig.
18ʺ 9
11
/
16
ʺ 18ʺ 18ʺ
18 po √ a
19 po - 26 po √ √ b
27 po - 34 po √ √ c
35 po - 50 po √ √ √ d
Si l’ouverture de fenêtre est de 18 po, utilisez
uniquement le panneau d’évacuation pour
fenetre (panneau H).
Fig. "a"
Si l’ouverture de fenêtre est de 19 po à 26 po,
utilisez le panneau d’évacuation pour fenêtre
(panneau H) et le panneau d’extension (panneau I)
Fig. "b"
Si l’ouverture de fenêtre est de 27 po à 34 po,
utilisez le panneau d’évacuation pour fenêtre
(panneau H) et le panneau d’extension (panneau J).
Fig. "c"
Si l’ouverture de fenêtre est de 35 po à 50 po,
utilisez le panneau d’évacuation pour fenêtre
(panneau H) et les deux panneaux d’extension
(panneaux J et K).
Fig. "d"
Panneau I (9
11
/
16
po)
Panneau H
(18 po)
Panneau K
(18 po)
Panneau J
(18 po)
Panneau H
Panneau H
18 po
18 po
Rivet E
19 po - 26 po
Panneau
H
Panneau I
Panneau I
Panneau H
19 po - 26 po
Panneau J
Panneau J
Panneau H
Panneau
H
27 po - 34 po
27" - 34"
Panneau K
Panneau J
Panneau H
Panneau K
Panneau J
Panneau H
35 po
- 50 po
35" - 50"
INSTALLATION
13

INSTALLATION
14
I
Panel de ventilación y extensiones de la ventana(LP0825WSB)
El kit de instalación de la ventana permite que usted instale los acondicionadores de aire en la mayoría
de las ventanas vertical-que resbalan 25″ to 47″de par en par, o las ventanas del marco-estilo a partir
del 25″ to 47″ arriba.
Fig. b
Fig. a
Equipo de instalación en ventanas
(incluye 1 panel de ventilación para ventanas y 1 panel de extensión)
25″
25″
26″ – 47″
26″ – 47″
1 Panel de extensión
1 Panel de ventilación de ventana
Panel
Longitud de la ventana.
A
25″
B
25″
Fig.
25″
√
26″ - 47″
√ √
1. Compruebe por favor su longitud de la ventana y
eligió los paneles aptos del tabel antedicho.
2. Para aberturas de ventanas más largas, ensamble y
ajuste los paneles para que quepan en la abertura
de la ventana. Utilice tornillos (incluidos) para
fijar los paneles a la longitud adecuada.
Para las aberturas de la ventana a partir de 26″
a 47″ utilice el panel de ventilación de ventana
(Panel A) y panel de extensión B.
Para 25″ la abertura de la ventana, utilice el
panel de ventilación de ventana (Panel A) por
sí mismo.
a
b
C
B
A
Panel A (25″)
Panel B (25″)
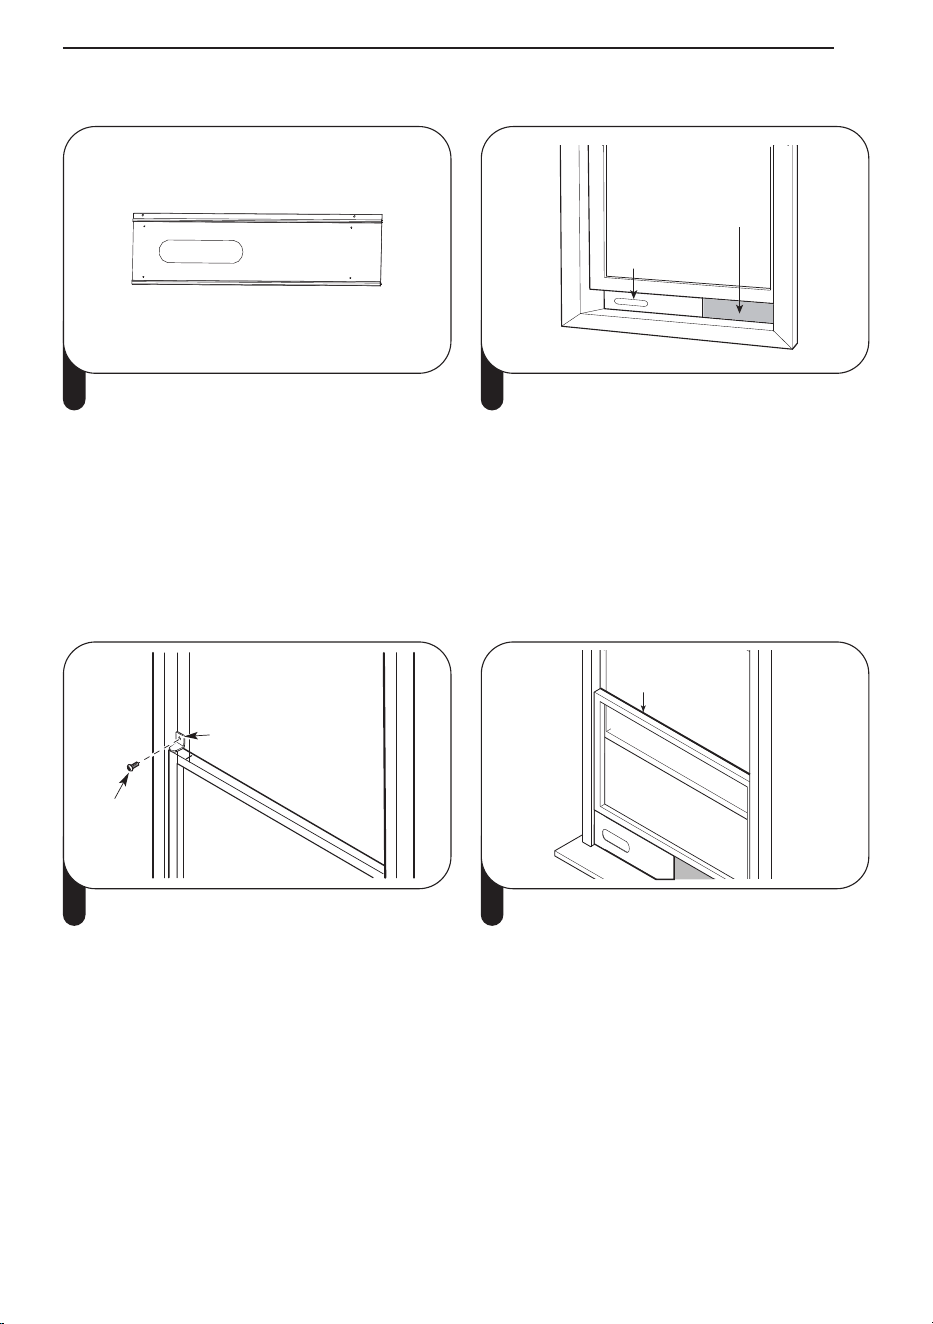
INSTALLATION
15
Joint long en mousse adhésive
↓
Joint court en
mousse adhésive
↓
Joint court en
mousse adhésive
↓
↑
Joint long en mousse adhésive
1 Fixez les longs joints d'étanchéité en mousse
adhésive sur les côtés supérieur et inférieur
de l'assemblage du panneau de ventilation
de la fenêtre. Fixez les joints d'étanchéité
courts en mousse sur les côtés droit et
gauche de l'assemblage du panneau. (Fixer
les joints d'étanchéité en mousse à
l'assemblage du panneau plutôt qu'au
châssis et au cadre de la fenêtre facilite le
nettoyage lors du retrait de l'assemblage du
panneau).
Panneau de
ventilation
Panneau
d'extension
(si nécessaire)
2 Insérez l'assemblage du panneau dans le
profilé inférieur du châssis. Soyez prudent
lors de l'installation de l'ensemble, qui
s'adaptera désormais très étroitement dans
l'ouverture. Fermez fermement le châssis
contre le haut de l'assemblage du panneau.
Support de sécurité
Vis
3 Si nécessaire, installez le support de sécurité
inclus avec des vis.
Joint en mousse
non adhésive
4 Mesurez et coupez la mousse non adhésive
incluse pour l'adapter à l'ouverture de la
fenêtre. Placez-le entre les châssis de la
fenêtre pour empêcher l'air et les insectes de
pénétrer dans la pièce.
Installation des panneaux de ventilation
a
extensión)
26″
ana

I
(
1
2
v
R
•
•
Fente
Insérer
5 Alignez les languettes du diffuseur avec les
fentes de la section coulissante extérieure.
Insérez le diffuseur dans l'ouverture du
panneau de ventilation.
Vis
6 Insérez la vis dans le trou du diffuseur pour
empêcher le diffuseur de glisser hors de
l'ouverture de ventilation.
REMARQUE
• Pour une meilleure étanchéité, utilisez du ruban adhésif « sans résidu » (non fourni) pour sceller tout
espace autour de l'ensemble de panneaux installé, autour du diffuseur et entre les châssis.
• Pour de meilleurs résultats, gardez le tuyau d'aération aussi court et droit que possible. Cependant,
formez l'extrémité du diffuseur du tuyau d'aération en forme de U inversé juste à l'intérieur de la
fenêtre pour permettre à la pluie ou à la condensation de s'écouler par la fenêtre.
Meilleur positionnement Forme en U inversé
INSTALLATION
16
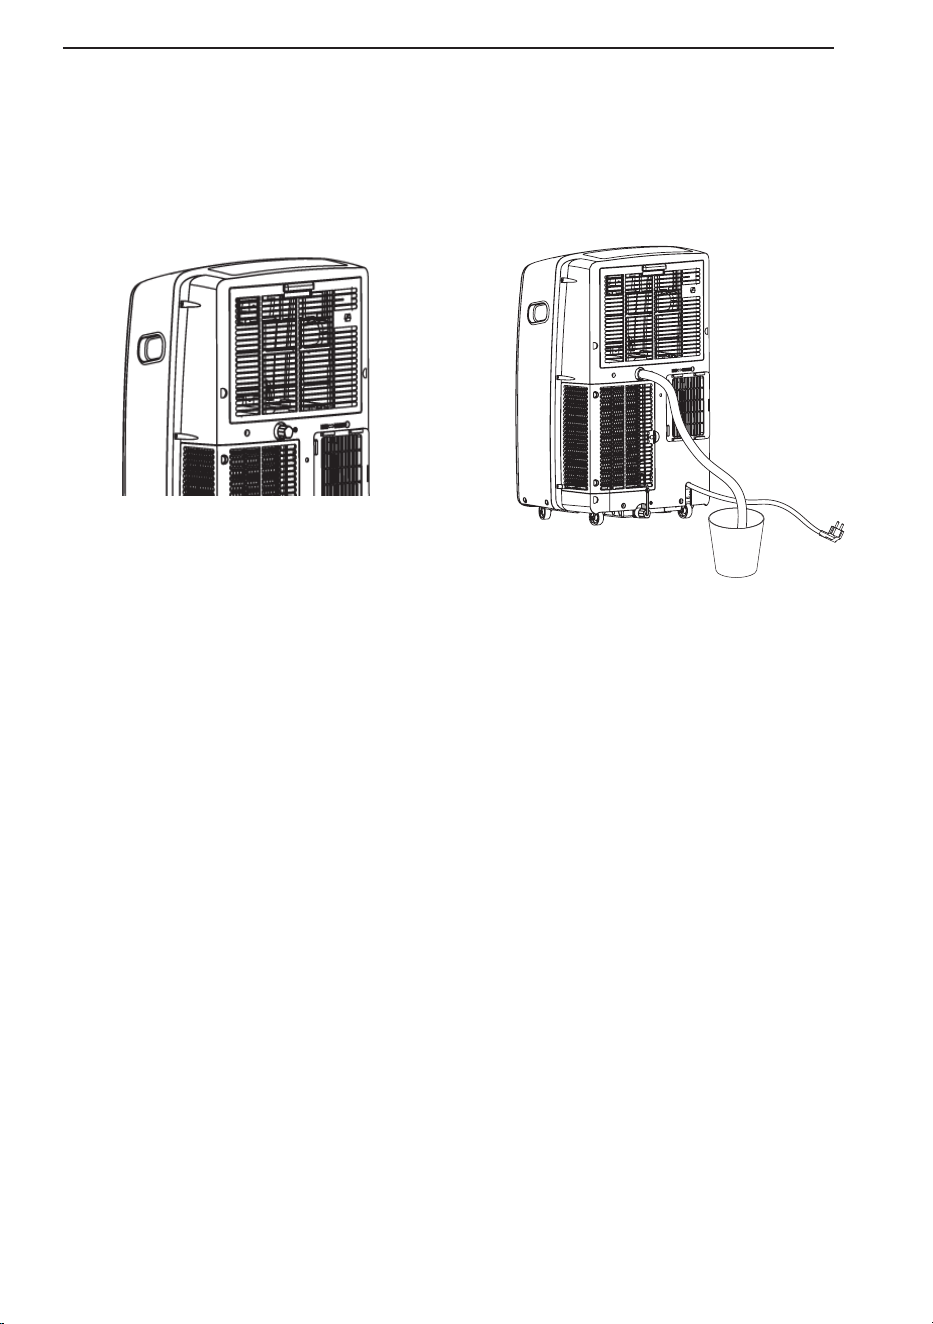
Installation de tuyau d'arrosage pour la déshumidification
(Mode Sec uniquement)
1. Retirez le bouchon de vidange lorsque vous utilisez le mode Sec (déshumidification).
2. Installez un tuyau d'arrosage de 5/8 po (16 mm) de diamètre intérieur (non fourni) dans l'orifice de
vidange continu et placez l'extrémité ouverte du tuyau sur un siphon de sol ou un seau.
Remarque
• Installez le tuyau d'arrosage lorsque vous avez besoin d'une déshumidification en cas d'humidité
élevée.
• Ce produit est doté d'un système d'auto-évaporation. L'eau de condensation sera recyclée pour
refroidircondenseur. Cela améliore non seulement l'efficacité du refroidissement, mais vous permet
également d'économiser de l'énergie.
INSTALLATION
17
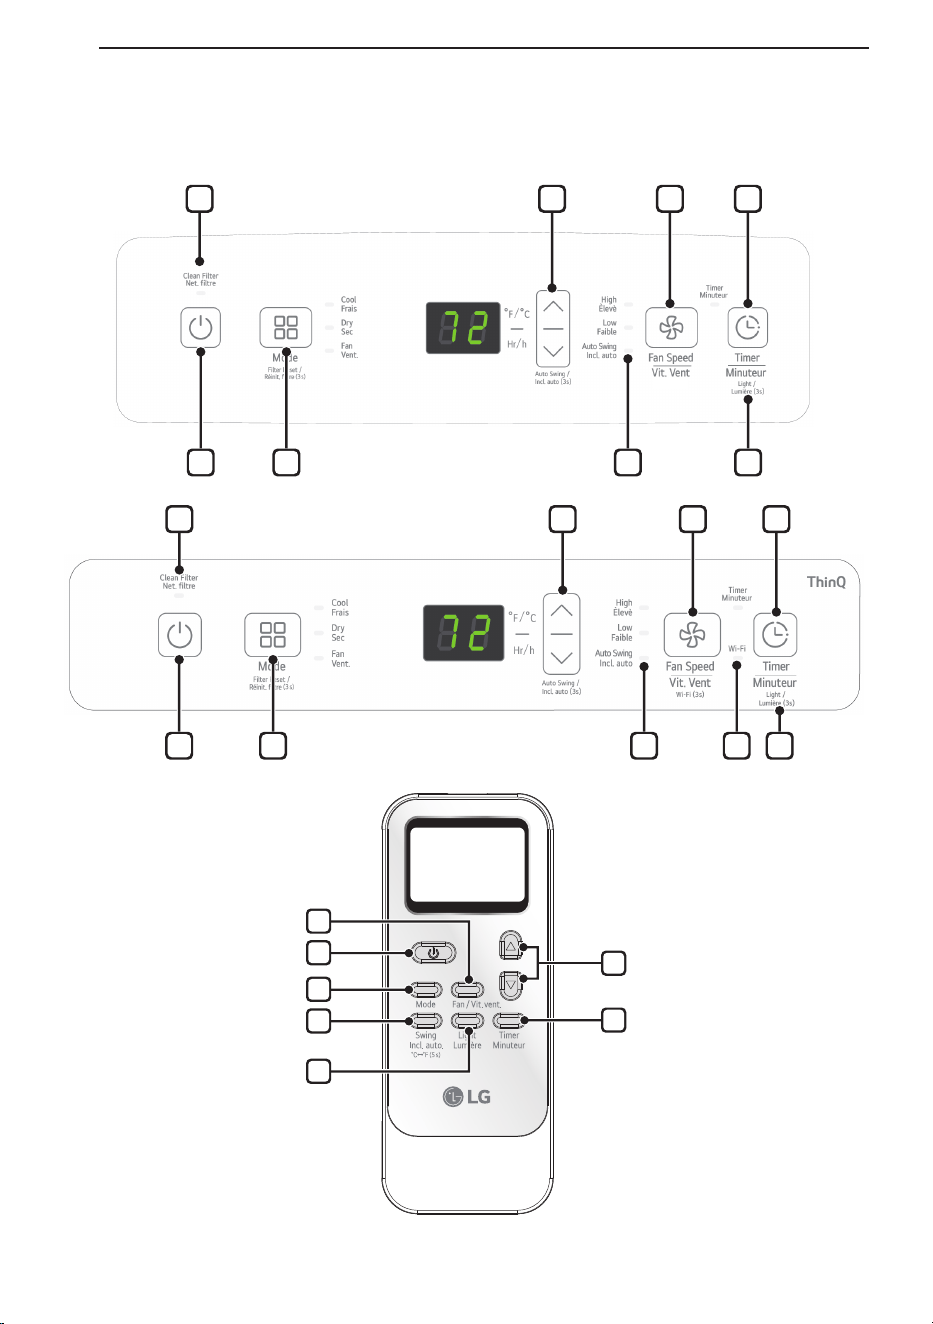
FONCTIONNEMENT
Panneau de commande et télécommande
1
5
2
6
7
3
4
8
1 2 6 7
1 2 6 9 7
3 4 5
8 3 4 5
FONCTIONNEMENT
18

1
Alimentation (
t
)
Allume et éteint le climatiseur.Un carillon
retentit pour confirmer que vous l'avez activé
ou désactivé.
2
Mode
Appuyez plusieurs fois sur ce bouton pour
parcourir et sélectionner le mode de
fonctionnement. Les modes incluent Frais,
Sec (déshumidifier), Ventilateur.Une LED
s'allume pour indiquer le mode sélectionné.
Le mode par défaut est Froid.
Frais (Cool)
Le compresseur fonctionne et refroidit la
pièce. Utilisez les boutons Ʒ/Ƹ et Fan
Speed pour régler la température et la
vitesse du ventilateur souhaitées.
Sec (Dry)
Utilisez le mode Séchage pour éliminer
l'humidité de la pièce sans refroidissement
supplémentaire. La vitesse du ventilateur est
prédéfinie et ne peut pas être ajustée.
Ventilateur (Fan)
Le ventilateur fait circuler l'air mais le
compresseur ne fonctionne pas. Utilisez le
bouton de vitesse du ventilateur pour régler
la vitesse du ventilateur souhaitée sur élevée
ou faible.
3
Contrôle de la température Ʒ/Ƹ
En mode Cool, Dry, les boutons ∧/∨ ajustent
la température réglée jusqu'à 86 °F (30 °C)
ou jusqu'à 60 °F (16 °C), par incréments d'un
degré.
REMARQUE
• Pour changer les unités de température sur
l'affichage entre Fahrenheit (°F) et Celsius
(°C), appuyez et maintenez les boutons Ʒ
et Ƹ sur le panneau de commande en
même temps pendant 5 secondes.
4
Vitesse du ventilateur (Fan speed)
Appuyez à plusieurs reprises pour basculer
la vitesse du ventilateur entre les réglages
Haut et Bas. Une LED s'allume pour indiquer
le ventilateur sélectionnéla rapidité. La
vitesse du ventilateur peut être modifiée
dans les modes Frais, Ventilateur. La vitesse
du ventilateur est préréglée en mode Sec.
Après avoir appuyé sur le bouton, il y a un
bref délai avant que le moteur du ventilateur
ne change de vitesse.
5
Minuteur (Timer)
Delay ON - Lorsque le climatiseur est éteint,
réglez-le pour qu'il s'allume
automatiquement de 1 à 24
heures plus tard, à son mode
précédent et aux réglages du
ventilateur.
Delay OFF - Lorsque le climatiseur est
allumé, réglez-le pour qu'il
s'éteigne automatiquement de
1 à 24 heures plus tard.
REMARQUE
• Lorsque la minuterie est sélectionnée,
utilisez les boutons Ʒ/Ƹ pour régler l'heure
de 1 à 24 heures, par incréments d'une
heure.
• Pour annuler la fonction Minuterie, appuyez
sur le bouton Minuteur du panneau de
commande.
FONCTIONNEMENT
19

F
I
A
C
l
L
c
t
C
T
C
t
i
R
C
d
R
•
•
•
A
2
6
Incl.auto (Auto swing)
Cette fonction déplace automatiquement les
volets pour ajuster la direction du flux d'air.
Appuyez plusieurs fois sur le bouton Swing
de la télécommande pour sélectionner la
direction souhaitée.
REMARQUE
• Appuyez sur le bouton Ƹ du panneau de
commande et maintenez-le enfoncé
pendant 3 secondes pour accéder à lncl.
auto(Auto swing).
7
Lumière (Light)
Définit la luminosité de l'écran d'affichage :
Marche → Arrêt
REMARQUE
• Appuyez et maintenez enfoncé le bouton
Minuterie sur le panneau de commande
pendant 3 secondes pour régler la
luminosité.
↑
8
Nettoyer le filtre (Clean Filter)
Le voyant Clean Filter s'allume pour vous
avertir que le filtre doit être nettoyé.
Après avoir nettoyé le filtre, appuyez sur le
bouton Mode du panneau de commande et
maintenez-le enfoncé pendant 3 secondes
pour éteindre le voyant Nettoyer le filtre.
REMARQUES
• La réinitialisation du filtre doit être ef
REMARQUES
• Ces fonctions peuvent ne pas être prises en
charge, selon le modèle.
fectuée
à partir du panneau de commande et non
de la télécommande.
• Cette fonctionnalité vous rappelle de
nettoyer le filtre à air pour un
fonctionnement plus efficace. Le témoin à
DEL s’allume après 250 heures de
fonctionnement.
9
Wi-Fi
Permet la connexion du climatiseur au Wi-Fi
domestique.
Pour connecter le Wi-Fi, appuyez sur le
bouton de vitesse du ventilateur sur le
panneau de commande pendant 3
secondes.
10
Élimination de l'accumulation de
condensation
La condensation peut s'accumuler à
l'intérieur de l'appareil lorsque les modes
Frais et Sec sont utilisés.
Le ventilateur peut être réglé pour
fonctionner pendant une courte période
après l'arrêt du produit pour aider à garder
l'intérieur de l'appareil sec. Cette option est
désactivée par défaut.
Mise en marche du ventilateur de
condensation
1
Allumez l'appareil, mettez-le en mode
Frais et laissez-le fonctionner pendant au
moins 10 secondes.
2
Appuyez sur le bouton Inclinaison
Automatique et maintenez-le enfonce
pendant 3 secondes jusqu'a ce que On
apparaisse sur l'affichage.
3 Le ventilateur de condensation est
maintenant en marche. Lorsque l'appareil
est eteint, Co apparait a l'ecran et le
ventilateur continue de fonctionner
pendant 10 minutes. L'appareil s'eteint
alors normalement.
Arrêt du ventilateur de condensation
1 Lorsque le produit est sous tension,
appuyez sur le bouton Inclinaison
Automatique et maintenez-le enfonce
pendant 3 secondes jusqu'a ce que OF
apparaisse sur l'affichage.
2 Le ventilatuer de condensation est
maintenant arrete. L'appareil s'eteint
immedi atement lorsque le ventilateur est
eteint.
REMARQUES
• Certaines fonctions ne peuvent pas etre
utilisees lorsque cette option est activee.
FONCTIONNEMENT
20
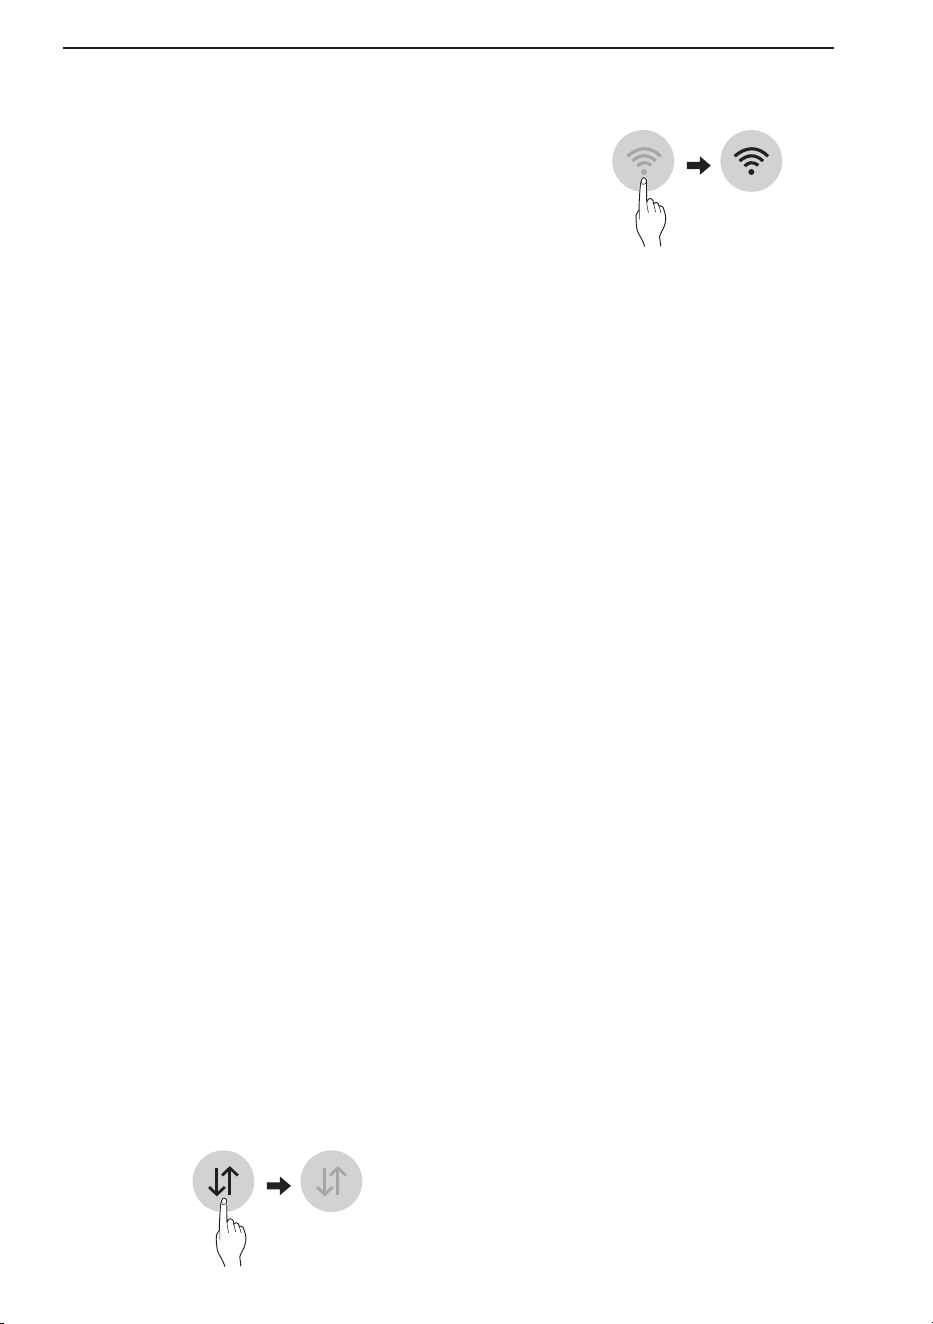
FONCTIONS
INTELLIGENTES
Application LG ThinQ
Cette fonctionnalité est offerte uniquement sur
les modèles portant le logo ThinQ.
L’application LG ThinQ vous permet de
communiquer avec l’appareil à l’aide d’un
téléphone intelligent.
Caractéristiques de l’application LG
ThinQ
Communiquez avec l’appareil depuis un
téléphone intelligent à l’aide des caractéristiques
intelligentes pratiques.
Réglages
Cette fonctionnalité vous permet de régler
diverses options de l’appareil et de l’application.
REMARQUE
• Si vous changez de routeur sans fil, de
fournisseur de services Internet ou de mot de
passe, supprimez l’appareil enregistré de
l’application LG ThinQ, puis enregistrez-le de
nouveau.
• L’application est susceptible d’être modifiée aux
fins d’amélioration de l’appareil, et ce, sans que
l’utilisateur en soit préalablement avisé.
• Les fonctionnalités offertes peuvent varier selon
le modèle.
Avant d’utiliser l’application LG ThinQ
1
Vérifiez la distance entre l’appareil et le
routeur sans fil (réseau Wi-Fi).
• S’il y a une trop grande distance entre
l’appareil et le routeur sans fil, l’intensité
du signal s’affaiblit. L’enregistrement peut
prendre du temps ou l’installation peut
échouer.
2
Désactivez les Données mobiles ou les
Données cellulaires sur votre téléphone
intelligent.
3
Connectez votre téléphone intelligent au
routeur sans fil.
REMARQUE
• Pour vérifier l’état de la connexion Wi-Fi,
assurezvous que l’icône f qui se trouve sur le
panneau de commande est allumée.
• L’appareil prend seulement en charge les
réseaux Wi-Fi de 2,4 GHz. Pour vérifier la
fréquence de votre réseau, contactez votre
fournisseur de services Internet ou référez
-vous au manuel de votre routeur sans fil.
• LG ThinQ n’est pas responsable des
problèmes de connexion au réseau ou des
défauts, dysfonctionnements ou erreurs causés
par la connexion au réseau.
• Si l’appareil a des difficultés à se connecter au
réseau Wi-Fi, il est peut-être trop loin du
routeur. Procurezvous un répéteur Wi-Fi
(rallonge de portée) pour améliorer la force du
signal Wi-Fi.
• La connexion Wi-Fi peut ne pas se faire ou être
interrompue à cause de l’environnement du
réseau domestique.
• La connexion réseau peut ne pas fonctionner
correctement selon le fournisseur de services
Internet.
• L’environnement sans fil peut causer un
ralentissement du fonctionnement du réseau
sans fil.
• L’appareil ne peut pas être enregistré en raison
de problèmes avec la transmission du signal
sans fil. Débranchez l’appareil et attendez
environ une minute avant de réessayer.
• Si le pare-feu de votre routeur sans fil est
activé, désactivez-le ou ajoutez-y une
exception.
• Le nom du réseau sans fil (SSID) doit être une
combinaison de lettres et de chiffres anglais.
(N’utilisez pas de caractères spéciaux.)
• L’interface utilisateur (IU) du téléphone
intelligent peut varier en fonction du système
d’exploitation (SE) mobile et du fabricant.
• Si le protocole de sécurité du routeur est
configuré sur WEP, la configuration du réseau
peut échouer. Veuillez changer le protocole de
sécurité (nous recommandons WPA2) et
enregistrer le produit à nouveau.
FONCTIONS INTELLIGENTES
21
E
V
L
D
s
•
•
•
•
N
N
h
o
•
•
Installation de l’application LG
ThinQ
À partir d’un téléphone intelligent, cherchez
l’application LG ThinQ dans la boutique Google
Play ou l’App Store d’Apple.
Suivez les directives pour télécharger et installer
l’application.
Informations sur les logiciels libres
Pour obtenir le code source conformément aux
dispositions de la licence publique générale, de
la licence publique générale limitée, de la licence
publique Mozilla et de toute autre licence
régissant les logiciels à code source libre
contenus dans cet appareil, visitez le site
http://opensource.lge.com.
En plus du code source, toutes les dispositions
de licence, les exonérations de garantie et les
avis de droits d’auteurs peuvent aussi être
téléchargés.
LG Electronics mettra également à votre
disposition le code source libre sur CD-ROM
pour un prix couvrant le coût de la distribution
(coût du support, de l’expédition et de la
manutention) sur simple demande par courriel à
l’adresse [email protected]. Cette offre est
valable pendant une période de trois ans à
compter de la date de la dernière distribution de
ce produit. Cette offre est valide pour quiconque
possède cette information.
Avis d’Industrie Canada
L’émetteur/récepteur exempt de licence
contenudans le présent appareil est conforme
aux CNR d’Innovation, Sciences et
Développement économique Canada applicables
aux appareils radio exempts de licence.
L’exploitation est autorisée aux deux conditions
suivantes :
1) Cet appareil ne doit pas provoquer
d’interférences.
2) Cet appareil doit accepter toutes les
interférences, y compris celles pouvant
entraîner son dysfonctionnement.
Énoncé d’IC concernant l’exposition
à la radiation
Cet appareil est conforme aux limites
d’exposition aux rayonnements d’Industrie
Canada pour un environnement non contrôlé.
Cet appareil doit être installé et utilisé de façon à
garder une distance minimale de 20 cm entre la
source de rayonnement et votre corps.
REMARQUE
• LE FABRICANT N’EST PAS RESPONSABLE
DES INTERFÉRENCES
RADIOÉLECTRIQUES CAUSÉES PAR DES
MODIFICATIONS NON AUTORISÉES
APPORTÉES À CET APPAREIL. DE TELLES
MODIFICATIONS POURRAIENT ANNULER
L’AUTORISATION ACCORDÉE À
L’UTILISATEUR DE FAIRE FONCTIONNER
L’APPAREIL.
Caractéristiques du module LAN
sans fil
Plage de fréquences 2412 MHz - 2462 MHz
Puissance de sortie
(max.)
< 30 dBm
Spécifications du module Bluetooth
Plage de fréquences 2402 MHz - 2480 MHz
Puissance de sortie
(max.)
< 30 dBm
FONCTIONS INTELLIGENTES
22
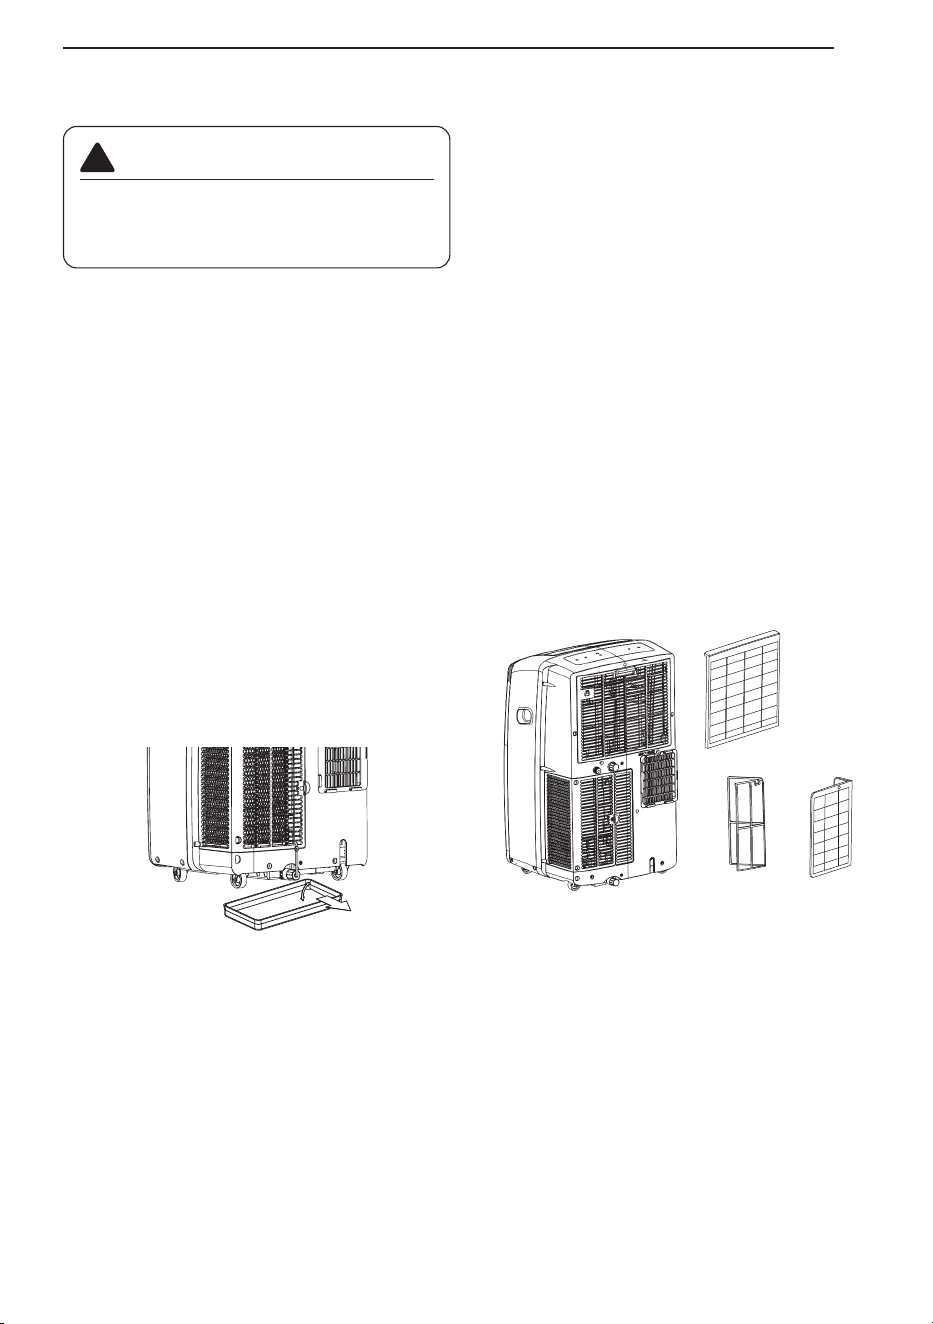
ENTRETIEN
Vidange du réservoir d’eau
Lorsque le réservoir interne est plein, l’écran à
DEL affiche le message FL, et le climatiseur
s’éteint, jusqu’à ce que le réservoir soit vidé.
• Débranchez le climatiseur, enlevez le tuyau
d’évacuation à l’arrière et déplacez le
climatiseur vers un endroit convenable pour
vidanger le réservoir ou à l’extérieur. Vous
pouvez également placer un bac d’une
capacité de 950 ml sous l’orifice de drainage.
• Retirez le bouchon de vidange de l’orifice de
vidange.
• Une fois le réservoir d’eau vidangé, remettez le
bouchon en place en vous assurant qu’il est
bien fixé.
• Replacez le climatiseur à l’endroit souhaité,
raccordez le tuyau d’évacuation et branchez le
climatiseur.
Nettoyage du boîtier
Nettoyez le boîtier avec un chiffon légèrement
humide, puis essuyez-le à l’aide d’un chiffon sec
ou d’une serviette.
• Pour éviter d’endommager le fini de l’appareil,
n’utilisez pas d’essence, de benzène, de
diluant, etc., ou tout autre nettoyant abrasif
pour nettoyer le climatiseur.
• Ne versez jamais d’eau sur le climatiseur ou à
l’intérieur de celui-ci. Cela pourrait
endommager les composants internes et
entraîner un risque de décharge électrique ou
d’incendie.
Nettoyage du filtre à air
Les filtres à air doivent être nettoyés toutes les
deux semaines. Selon la qualité de l’air intérieur,
un nettoyage plus fréquent pourrait être
nécessaire. Un filtre à air sale diminuera le débit
d’air et réduira l’efficacité de l’appareil.
1. Sortez chaque filtre à air en tirant sur la
poignée.
2. Utilisez un aspirateur pour nettoyer le filtre. Si
les filtres sont très sales, ils peuvent être
nettoyés à l’eau chaude à l’aide d’un détergent
doux.
• N’utilisez pas de nettoyants forts ni d'eau très
chaude.
• Ne lavez pas les filtres au lave-vaisselle.
3. Laissez sécher le filtre à l’ombre.
4. Réinsérez les filtres.
REMARQUE
• Éteignez le produit et nettoyez le filtre après 30
minutes.
• Soyez prudent car des pièces chaudes peuvent
entrer en contact avec le filtre lorsque le filtre
est retiré.
AVERTISSEMENT
Avant de nettoyer ou d’effectuer l’entretien
de cet appareil, débranchez l’alimentation et
attendez que le ventilateur s’arrête.
!
ENTRETIEN
23
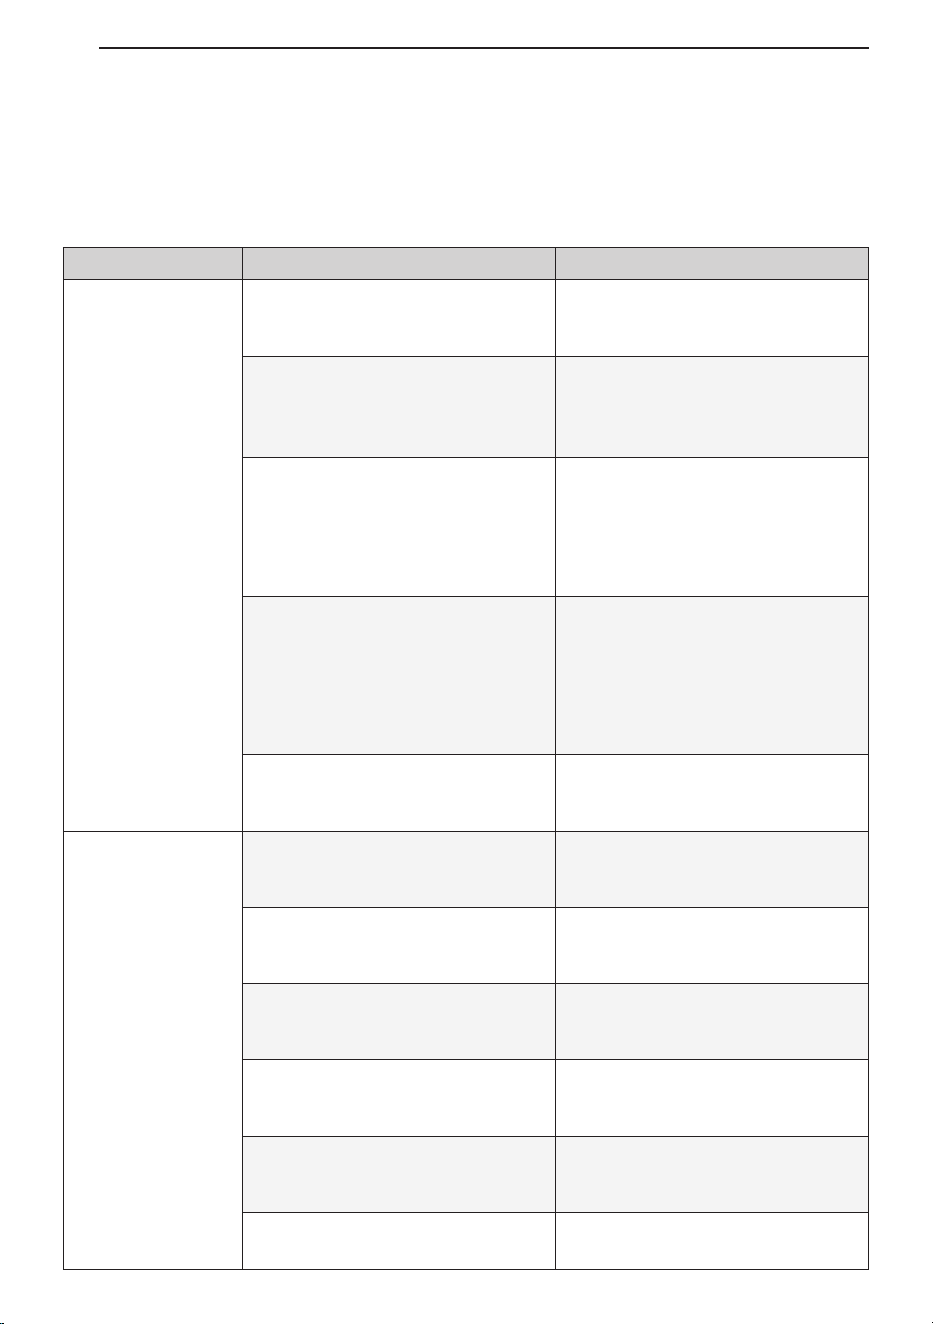
DÉPANNAGE
Avant de faire un appel de service
L’appareil est doté d’un système de surveillance automatique des erreurs qui détecte et diagnostique
très tôt les problèmes. Si l’appareil ne fonctionne pas correctement ou ne fonctionne pas du tout,
vérifiez ce qui suit avant de faire un appel de service :
Problème Cause possible Solutions
Le climatiseur ne
démarre pas.
Le climatiseur est débranché.
Assurez-vous que la fiche du
climatiseur est complètement
enfoncée dans la prise.
Le fusible est grillé ou le
disjoncteur s’est déclenché.
Vérifiez le boîtier de fusibles ou de
disjoncteurs de votre domicile et
remplacez le fusible ou réinitialisez le
disjoncteur.
Une panne de courant s’est
produite.
En cas de panne de courant, désactivez
le contrôle de mode. Lorsque le courant
est rétabli, attendez 3 minutes avant de
redémarrer le climatiseur afin d’éviter le
déclenchement de la surcharge du
compresseur.
Le dispositif d’interruption du
courant s’est déclenché.
Appuyez sur le bouton RESET
(réinitialisation) situé sur la fiche du
cordon d’alimentation. Si le bouton
RESET (réinitialisation) ne reste pas
enclenché, cessez d’utiliser le
climatiseur et contactez un
technicien qualifié.
Le message FL s’affiche à l’écran.
Le réservoir d’eau est plein.
Vidangez le réservoir et réinitialisez
les réglages.
Le climatiseur ne
refroidit pas
comme il le
devrait.
Le débit d’air est limité.
Assurez-vous qu’il n’y a pas de
rideaux, de stores ou de meubles
bloquant l’avant du climatiseur.
Le contrôle de température n’est
peut-être pas réglé correctement.
Réglez la température désirée à un
niveau inférieur à la température
actuelle.
Le filtre à air est sale.
Nettoyez le filtre à air au moins une
fois toutes les deux semaines.
Consultez la section « ENTRETIEN ».
La pièce a peut-être été trop
chaude.
Lorsque le climatiseur est allumé,
vous devez laisser le temps à la
pièce de refroidir.
De l’air froid s’échappe.
Vérifiez s’il y a des ouvertures dans
le plancher pour la chaudière et des
retours d’air froid.
Les serpentins de refroidissement
sont gelés.
Consultez la section « Le climatiseur
gèle » ci-dessous.
DÉPANNAGE
24
R
•
DÉPANNAGE
25
Problème Cause possible Solutions
Le climatiseur
gèle.
Les serpentins de refroidissement
sont gelés.
De la glace peut bloquer le débit d’air
et empêcher le climatiseur de
refroidir correctement la pièce.
Réglez le mode sur Ventilation
élevée ou Refroidissement élevé.
L’eau s’accumule
dans le bac de
condensation.
L’humidité est éliminée de l’air et
s’écoule dans le bac de
condensation.
Cela est normal pendant une courte
période dans les endroits peu
humides ou pendant une période
plus longue dans les endroits très
humides.
Le climatiseur
s’allume et s’éteint
rapidement.
Le filtre à air est sale et obstrue le
passage de l'air.
Nettoyez le filtre à air.
La température extérieure est
extrêmement chaude.
Reportez-vous aux consignes
d’installation ou consultez
l’installateur.
Un bruit se fait
entendre lorsque
l’appareil est en
train de refroidir.
Le bruit est causé par le
mouvement de l’air.
Ceci est tout a fait normal. Si le bruit
est trop fort, réglez la vitesse du
ventilateur sur faible.
La télédétection
se désactive
prématurément.
La télécommande n’est pas à
portée de l’appareil.
Placez la télécommande dans un
rayon de 20 pieds et 120° de l'avant
de l'appareil.
Le signal de la télécommande est
bloqué.
Enlevez ce qui bloque le signal de la
télécommande.
La pièce est trop
froide.
La température réglée est trop
basse.
Augmentez la température réglée.
REMARQUE
• Si le message « CH » apparaît à l’écran, veuillez composer le 1 888 542-2623.
DÉPANNAGE
26
Problème Cause possible Solutions
L’appareil et le
téléphone
intelligent
n’arrivent pas à se
connecter au
réseau Wi-Fi.
Le mot de passe du réseau Wi-Fi a
été mal saisi.
Supprimez votre réseau Wi-Fi
domestique et recommencez le
processus d’enregistrement.
Les données mobiles de votre
téléphone intelligent sont
activées.
Désactivez les données mobiles
sur votre téléphone intelligent avant
d’enregistrer l’appareil.
Le nom du réseau sans fil (SSID)
n’a pas été configuré
correctement.
Le nom du réseau sans fil (SSID)
doit être une combinaison de lettres
et de chiffres anglais. (N’utilisez pas
de caractères spéciaux.)
La fréquence du routeur n’est pas
de 2,4 GHz.
Seule une fréquence de routeur de
2,4 GHz est prise en charge. Réglez
le routeur sans fil sur 2,4 GHz et
connectez l’appareil au routeur sans
fil. Pour confirmer la fréquence du
routeur, vérifiez auprès de votre
fournisseur de services Internet ou
du fabricant du routeur.
La distance entre l’appareil et le
routeur est trop grande.
Si l’appareil est trop éloigné du
routeur, le signal peut être faible et la
connexion peut ne pas être
configurée correctement.
Placez le routeur plus près de
l’appareil ou achetez et installez un
répéteur Wi-Fi.
Impossible de
connecter
l’application LG
ThinQ au
climatiseur.
Le climatiseur est éteint. Allumez le climatiseur.
Le routeur sans fil est éteint. Allumez le routeur.
Le climatiseur ne
se connecte pas
au Wi-Fi.
L’eau s’accumule dans le bac de
condensation.
Placez le routeur plus près du
climatiseur ou achetez et installez un
répéteur Wi-Fi (amplificateur de
signal).
Vous n’êtes pas autorisé à utiliser
le routeur ou celui-ci est
incompatible.
Assurez-vous de sélectionner le bon
routeur sans fil dans la liste. Le
routeur doit être réglé sur 2,4 GHz.
Wi-Fi

GARANTIE
27
GARANTIE
CE QUE COUVRE CETTE GARANTIE :
LG Electronics Canada inc. (« LG ») garantit votre climatiseur de pièce de LG (le « produit ») contre tous vices de
matériaux ou de fabrication lors d’un usage domestique normal, au cours de la période de garantie énoncée ci-
dessous. Cette garantie limitée (sauf lorsque cela est interdit) n’est valide que pour l’acheteur original du produit,
ne peut être cédée ni transférée à un acheteur ou utilisateur ultérieur et s’applique uniquement lorsque l’appareil
est acheté auprès d’un détaillant ou d’un distributeur LG autorisé et utilisé au Canada pour un usage domestique
normal et habituel.
REMARQUE
• Les produits de remplacement peuvent être neufs ou réusinés, au choix de LG, et sont couverts par une
garantie qui s’étale sur le reste de la période de garantie initiale de l’appareil ou sur quatre-vingt-dix (90) jours,
selon la période la plus longue. Veuillez conserver un reçu daté ou un bon de livraison comme preuve de la date
d’achat. Dans le cas où la date d’achat ne peut pas être vérifiée, la garantie commence 15 mois après la date
de fabrication.
Période de garantie :
1 an à compter de la date d’achat du produit.
PRESTATION DU SERVICE :
LG fournira un produit de remplacement par l’entremise d’un échange de service autorisé avec le centre de
distribution auprès duquel vous avez initialement acheté le produit.
CETTE GARANTIE LIMITÉE NE COUVRE PAS LES ASPECTS SUIVANTS :
Les déplacements du technicien d’entretien pour livrer, ramasser ou installer le produit, ou pour donner des
directives sur son utilisation.
L’ajustement des commandes d’utilisation.
Les produits dont le numéro de série a été modifié, dégradé ou supprimé en tout ou en partie.
Les dommages matériels, le dysfonctionnement ou la défaillance du produit, ou les dommages corporels causés
par les situations suivantes, ou résultant de celles-ci :
(a) un accident, un abus, une négligence ou une mauvaise utilisation;
(b) l’utilisation du produit dans un environnement corrosif ou humide contenant du chlore, du fluor ou tout autre
produit chimique dangereux;
(c) l’installation, la modification ou l’entretien par toute personne autre qu’un entrepreneur de LG autorisé;
(d) une combinaison inadéquate de tout composant du produit;
(e) un mauvais dimensionnement ou une mauvaise conception du produit;
(f) un entretien incorrect ou différé, à l’encontre des instructions du fabricant;
(g) les dommages physiques ou la mauvaise utilisation du produit (y compris le fait de ne pas effectuer l’entretien
comme prévu);
(h) l’utilisation du produit autrement que dans des conditions normales ou d’une manière contraire au manuel
d’utilisation;
(i) les dommages survenus pendant le transport ou les dommages causés par des cas de force majeure ou
d’autres facteurs tels que les surtensions ou les situations de non-conformité aux instructions du fabricant, y
compris une installation non conforme aux instructions du manuel d’utilisation, telle que le nettoyage du filtre à
air, ou tout produit endommagé par la foudre et les fluctuations ou les interruptions de l’alimentation électrique;
(j) l’utilisation du produit à des fins autres qu’un usage domestique normal et habituel (y compris, mais sans s’y
limiter, un usage commercial).

GARANTIE
28
A
L
A
O
C
A
T
S
P
S
R
S
T
C
R
M
D
f
s
t
f
j
o
A
d
l
a
r
f
S
l
d
c
j
A
d
a
i
r
c
s
t
p
p
e
l
c
r
l
d
c
c
CETTE GARANTIE LIMITÉE NE PEUT PAS ÊTRE AUGMENTÉE, PROLONGÉE OU AFFECTÉE NI
ENGENDRER D’OBLIGATION OU DE RESPONSABILITÉ PAR LG À LA SUITE DE LA
PRESTATION DIRECTE OU INDIRECTE DE CONSEILS TECHNIQUES, DE RENSEIGNEMENTS
ET/OU D’UN SERVICE AU PROPRIÉTAIRE EN RAPPORT AVEC LE PRODUIT. SAUF COMME
PRÉVU DANS CETTE GARANTIE, LG N’OFFRE AUCUNE AUTRE GARANTIE OU CONDITION
QUE CE SOIT CONCERNANT LE PRODUIT. LG DÉCLINE ET EXCLUT TOUTE GARANTIE ET
CONDITION NON EXPRESSÉMENT PRÉVUE DANS LA PRÉSENTE, AINSI QUE TOUS LES
REMÈDES QUI, HORS DE CETTE PROVISION, POURRAIENT ÊTRE SOULEVÉS PAR
IMPLICATION OU APPLICATION D’UNE LOI, Y COMPRIS, MAIS NON DE FAÇON LIMITATIVE,
LES GARANTIES ET CONDITIONS IMPLICITES DE BONNE VENTE ET (SAUF AU QUÉBEC ET
LÀ OÙ ELLE EST INTERDITE) L’APTITUDE À FOURNIR UNE TÂCHE PARTICULIÈRE.
PERSONNE N’EST AUTORISÉ À MODIFIER CETTE GARANTIE LIMITÉE DE QUELQUE FAÇON
QUE CE SOIT OU À CRÉER QUELQUE OBLIGATION OU RESPONSABILITÉ QUE CE SOIT AU
NOM DE LG EN RAPPORT AVEC LE PRODUIT. LG DÉCLINE TOUTE RESPONSABILITÉ POUR
LES ACTES, LES OMISSIONS ET LA CONDUITE DE TIERS (Y COMPRIS, MAIS NON DE FAÇON
LIMITATIVE, L’ENTREPRENEUR INSTALLATEUR) CONCERNANT OU EN RAPPORT AVEC LE
PRODUIT.
EN AUCUN CAS LG NE PEUT ÊTRE TENU RESPONSABLE DES DOMMAGES INDIRECTS,
SPÉCIAUX, PUNITIFS, EXEMPLAIRES OU FORTUITS, Y COMPRIS, MAIS NON DE FAÇON
LIMITATIVE, LA PERTE D’ACHALANDAGE, LA PERTE DE REVENUS OU DE PROFITS, LES
ARRÊTS DE TRAVAIL, LES PANNES DE PRODUIT, LA DÉGRADATION D’AUTRES PRODUITS,
LES COÛTS DE RETRAIT ET DE RÉINSTALLATION DU PRODUIT, LA PERTE D’UTILISATION,
LES BLESSURES OU LES DOMMAGES À LA PROPRIÉTÉ LIÉS AU PRODUIT, QU’ILS SOIENT
FONDÉS SUR UN BRIS DE GARANTIE, BRIS DE CONTRAT, TORT OU AUTRE, MÊME SI LG A
ÉTÉ AVISÉ DE LA POSSIBILITÉ DE TELS DOMMAGES. EN AUCUN CAS LA RESPONSABILITÉ
DE LG NE PEUT ÊTRE SUPÉRIEURE AU PRIX D’ACHAT DU PRODUIT EN CE QUI A TRAIT À
UNE RÉCLAMATION QUELCONQUE.
CERTAINES PROVINCES (Y COMPRIS LE QUÉBEC) NE PERMETTENT PAS LA LIMITE DE
GARANTIE OU L’EXCLUSION OU LA LIMITE DES DOMMAGES; CES LIMITES OU EXCLUSIONS
PEUVENT NE PAS S’APPLIQUER. SI UNE CONDITION DE CETTE GARANTIE EST INTERDITE
PAR DE TELLES LOIS, ELLE SERA CONSIDÉRÉE NUL ET SANS EFFET, MAIS LE RESTE DE LA
GARANTIE RESTERA EN VIGUEUR. CETTE GARANTIE ACCORDE AUX PROPRIÉTAIRES DES
DROITS PARTICULIERS AINSI QUE D’AUTRES DROITS QUI PEUVENT VARIER D’UNE
PROVINCE À L’AUTRE.
POUR OBTENIR UN SERVICE AU TITRE DE LA GARANTIE OU DES RENSEIGNEMENTS
ADDITIONNELS:
Composez le 1 888 LG-CANADA (542-2623) ou consultez notre site Web www.lg.com
Poste : Centre de service à la clientèle LG (a/s du : CIC)
20 Norelco Drive
North York, ON M9L 2X6
POUR VOS DOSSIERS
Inscrivez le numéro du modèle et le numéro de série ici :
N° de modèle
N° de série
• Vous trouverez ces numéros sur une étiquette située sur le côté de chaque appareil.
Nom du détaillant
Date d’achat
• Agrafez votre reçu à cette page au cas où vous en auriez besoin pour prouver la date d’achat ou
pour les besoins de la garantie.

GARANTIE
29
AVIS D’ARBITRAGE : LA PRÉSENTE GARANTIE LIMITÉE CONTIENT UNE DISPOSITION RELATIVE À
L’ARBITRAGE STIPULANT QUE VOUS ET LG DEVEZ RÉSOUDRE TOUT DIFFÉREND PAR
ARBITRAGE PLUTÔT QUE DEVANT UN TRIBUNAL, À MOINS QUE LES LOIS DE VOTRE PROVINCE
OU TERRITOIRE NE LE PERMETTENT PAS OU, DANS LE CAS D’AUTRES JURIDICTIONS, SI VOUS
CHOISISSEZ DE VOUS RETIRER. PRÉCISONS QUE CETTE DISPOSITION D’ARBITRAGE N’EST PAS
APPLICABLE AUX CLIENTS QUI RÉSIDENT EN ONTARIO. EN ARBITRAGE, LES RECOURS COLLEC-
TIFS ET LES PROCÈS DEVANT JURY NE SONT PAS AUTORISÉS. VEUILLEZ CONSULTER LA
SECTION INTITULÉE « PROCÉDURE DE RÈGLEMENT DES DIFFÉRENDS » CI-DESSOUS.
PROCÉDURE DE RÈGLEMENT DE DIFFÉREND:
SAUF LÀ OÙ LA LOI L’INTERDIT, TOUS LES DIFFÉRENDS ENTRE VOUS ET LG DÉCOULANT OU SE
RAPPORTANT DE QUELQUE MANIÈRE QUE CE SOIT À CETTE GARANTIE LIMITÉE OU AU PRODUIT
SERONT RÉSOLUS EXCLUSIVEMENT PAR ARBITRAGE EXÉCUTOIRE, ET NON DEVANT UN
TRIBUNAL DE DROIT COMMUN. SAUF LÀ OÙ LA LOI L’INTERDIT, VOUS ET LG RENONCEZ IRRÉVO-
CABLEMENT AU DROIT À UN PROCÈS DEVANT JURY ET À INTENTER OU À PARTICIPER À UN
RECOURS COLLECTIF. PRÉCISONS QUE CETTE DISPOSITION NE S’APPLIQUE PAS AUX CONSOM-
MATEURS QUI RÉSIDENT EN ONTARIO.
Définitions. Aux fins du présent article, « LG » désigne LG Electronics Canada inc., ses sociétés mères,
filiales et sociétés affiliées, et leurs dirigeants, employés, administrateurs, agents, bénéficiaires, prédéces-
seurs titulaires des mêmes droits, successeurs, cessionnaires et fournisseurs; « différend » ou « réclama-
tion » désignent tout différend ou litige ou toute réclamation de quelque nature que ce soit (qu’elle soit
fondée sur un contrat, délit, statut, règlement, ordonnance, fraude, fausse déclaration ou toute autre théorie
juridique ou équitable) liés de quelque manière que ce soit à la vente, à l’état ou au rendement du produit
ou à la présente garantie limitée, ou découlant de ceux-ci.
Avis de différend. Dans l’éventualité où vous avez l’intention d’engager une procédure d’arbitrage, vous
devez d’abord aviser LG par écrit au moins 30 jours avant le début de l’arbitrage en envoyant une lettre à
l’attention de l’équipe juridique de LGECI au 20, Norelco Drive, North York (Ontario), Canada, M9L 2X6 (l’«
avis de différend »). Vous et LG acceptez de discuter en toute bonne foi dans le but de régler votre
réclamation à l’amiable. L’avis doit indiquer votre nom, adresse et numéro de téléphone, identifier le produit
faisant l’objet de la réclamation et décrire la nature de la réclamation ainsi que le redressement demandé.
Si vous et LG ne parvenez pas à résoudre le différend dans les 30 jours suivant la réception par LG de
l’avis de différend, le différend sera résolu par un arbitrage exécutoire conformément à la procédure décrite
dans les présentes. Vous et LG convenez tous deux que, pendant la procédure d’arbitrage, les modalités (y
compris tout montant) de toute offre de règlement faite par vous ou LG ne seront pas divulguées à l’arbitre
jusqu’à ce que l’arbitre tranche le différend.
Accord sur l’arbitrage exécutoire et renonciation à un recours collectif. À défaut de résoudre le
différend au cours de la période de 30 jours suivant la réception par LG de l’avis de différend, vous et LG
acceptez de résoudre toute réclamation entre vous et LG uniquement par arbitrage exécutoire sur une base
individuelle, à moins que vous choisissiez de vous retirer, comme il est indiqué ci-dessous, ou que vous
résidiez dans une province ou un territoire qui empêche la pleine application de cette clause dans les
circonstances des réclamations en question (dans ce cas, si vous êtes un consommateur, cette clause ne
s’appliquera que si vous acceptez expressément l’arbitrage). Dans la mesure permise par la loi applicable,
tout différend entre vous et LG ne doit pas être combiné ou consolidé avec un différend impliquant le
produit ou la réclamation de toute autre personne ou entité. Plus précisément, sans limitation de ce qui
précède, sauf dans la mesure où une telle interdiction n’est pas permise par la loi, tout différend entre vous
et LG ne pourra en aucun cas se poursuivre sous forme de recours collectif ou d’action dérivée. Au lieu de
l’arbitrage, l’une ou l’autre des parties peut intenter une demande en justice auprès de la Cour des petites
créances, mais cette demande auprès de la Cour des petites créances ne peut être intentée sous forme de
recours collectif ou d’action dérivée, sauf dans la mesure où une telle interdiction n’est pas autorisée par la
loi dans votre province ou territoire de compétence pour une réclamation en cause entre vous et LG. Cette
disposition ne s’applique pas aux consommateurs de l’Ontario. Conformément à la législation provinciale, le
consommateur et LG peuvent convenir de résoudre le litige en utilisant toute procédure disponible, y
compris l’amorce d’une action devant la Cour supérieure de justice.

GARANTIE
30
Règles et procédures d’arbitrage. Pour engager l’arbitrage d’une réclamation, une demande écrite
d’arbitrage doit être soumise par vous ou LG. L’arbitrage sera privé et confidentiel, et se déroulera sur une
base simplifiée et accélérée devant un arbitre unique choisi par les parties en vertu de la loi et des règles
provinciales ou territoriales sur l’arbitrage commercial de la province ou du territoire où vous résidez. Vous
devez également envoyer une copie de votre demande écrite à LG à l’adresse LG Electronics, Canada,
Inc., Attn: Legal Department- Arbitration, 20, Norelco Drive, North York (Ontario), M9L 2X6. Cette disposi-
tion relative à l’arbitrage est régie par la législation provinciale ou territoriale applicable en matière
d’arbitrage commercial. Pour les consommateurs de l’Ontario, la législation applicable en matière
d’arbitrage ne s’applique que si les consommateurs acceptent de soumettre le litige à l’arbitrage. Un
jugement peut être rendu sur décision de l’arbitre devant tout tribunal compétent. Toute question doit être
tranchée par l’arbitre, à l’exception des questions relatives à la portée et à l’applicabilité de la disposition
relative à l’arbitrage et à l’arbitrabilité du différend, qui doivent être tranchées par la cour. L’arbitre est lié par
les modalités de cette disposition.
Loi applicable. La loi de votre province ou territoire d’achat régira cette garantie limitée et tout différend
entre vous et LG, sauf dans la mesure où cette loi est remplacée ou qu’elle entre en conflit avec la loi
fédérale, provinciale ou territoriale applicable. Si l’arbitrage n’est pas autorisé pour régler une réclamation,
une poursuite, un différend ou un litige vous opposant à LG, les deux parties s’en remettront à la
compétence exclusive des tribunaux de votre province ou territoire d’achat pour le règlement de la
réclamation, de la poursuite, du différend ou du litige qui vous oppose.
Coûts/frais. Vous n’avez pas besoin de payer des frais pour engager l’arbitrage. Dès réception de votre
demande écrite d’arbitrage, LG réglera rapidement tous les frais de dépôt à l’arbitrage, à moins que vous
réclamiez plus de 25 000 $ en dommages-intérêts, et dans ce cas, le paiement de ces frais sera régi par les
règles d’arbitrage applicables. Sauf indication contraire aux présentes, LG paiera tous les frais de dépôt,
d’administration et d’arbitrage pour tout arbitrage engagé conformément aux règles d’arbitrage applicables
et de cette disposition relative à l’arbitrage. Si vous obtenez gain de cause dans l’arbitrage, LG paiera les
frais et honoraires de vos avocats, dans la mesure où ils sont raisonnables, en tenant compte de certains
facteurs, y compris, mais sans s’y limiter, le montant de l’achat et de la réclamation. Nonobstant ce qui
précède, si la loi applicable permet d’accorder une indemnité raisonnable de frais et d’honoraires d’avocats,
l’arbitre peut l’accorder dans la même mesure qu’un tribunal. Si l’arbitre estime que votre réclamation ou
que la mesure réparatoire demandée dans la réclamation est frivole ou qu’elle se base sur des motifs
déplacés (déterminés par les normes énoncées dans les lois applicables), alors le paiement de tous les
frais d’arbitrage sera régi par les règles d’arbitrage applicables. Dans un tel cas, vous convenez de
rembourser LG pour toutes les sommes déjà versées par l’entreprise, sommes que vous seriez autrement
dans l’obligation de payer en vertu des règles d’arbitrage applicables. Sauf indication contraire, LG renonce
à tous les droits qu’elle pourrait avoir relativement à la réclamation de frais et honoraires d’avocats si LG
prévaut lors de l’arbitrage.
Audiences et emplacement. Si votre réclamation est de 25 000 $ ou moins, vous pouvez choisir que
l’arbitrage soit mené seulement (1) sur la base des documents soumis à l’arbitre, (2) par l’intermédiaire
d’une audience téléphonique, ou (3) par l’intermédiaire d’une audience en personne, tel qu’il est établi par
les règles d’arbitrage applicables. Si votre réclamation est supérieure à 25 000 $, le droit à une audience
sera déterminé par les règles d’arbitrage applicables. Toute audience d’arbitrage en personne se tiendra au
lieu d’arbitrage le plus proche et le plus pratique pour les deux parties, dans la province ou le territoire où
vous résidez, à moins que vous et LG conveniez d’un autre lieu ou d’un arbitrage téléphonique.
Divisibilité et renonciation. Si une partie de la présente garantie limitée (y compris les présentes
procédures d’arbitrage) est inapplicable, les autres dispositions resteront pleinement en vigueur dans la
mesure maximale autorisée par la loi applicable. Si LG ne parvient pas à faire respecter strictement toute
disposition de la présente garantie limitée (y compris les présentes procédures d’arbitrage), cela ne signifie
pas que LG a l’intention de renoncer ou a renoncé à toute disposition ou partie de la présente garantie
limitée.
O
a
p
d
d
p
l
d
c
9
a
m
r
l
s
t
d
e
l
p
t
d
c
v
d
C
l
l
o

GARANTIE
31
r
s
Option de retrait. La disposition d’arbitrage stipule que vous et LG devez résoudre tout différend par
arbitrage exécutoire plutôt que devant un tribunal, à moins que les lois de votre province ou territoire ne le
permettent pas, ou, dans le cas d’autres systèmes juridiques, si vous choisissez de vous retirer. Cette
disposition d’arbitrage ne s’applique pas aux consommateurs de l’Ontario. Pour les personnes qui relèvent
des dispositions relatives à l’arbitrage obligatoire, vous pouvez choisir de vous retirer de la présente
procédure de résolution des différends. Si vous choisissez de vous retirer, ni vous ni LG ne pouvez obliger
l’autre partie à participer à une procédure d’arbitrage. Pour vous retirer, vous devez envoyer un avis à LG
dans les 30 jours civils à compter de la date d’achat du produit par le premier acheteur (i) en envoyant un
courriel à [email protected] avec pour objet : « Retrait de l’arbitrage » ou (ii) en composant le 1 800
980-2973. Vous devez indiquer dans le courriel de retrait ou fournir par téléphone : (a) votre nom et
adresse; (b) la date à laquelle le produit a été acheté; (c) le nom de modèle du produit ou le numéro de
modèle; et (d) le numéro de série (le numéro de série se trouve (i) sur le produit ou (ii) en ligne en vous
rendant au https://www.lg.com/ca_fr/trouvermodele_serie/ ). Si vous vous prévalez de l’option de retrait, la
loi de votre province ou territoire de résidence régira cette garantie limitée et tout litige entre vous et LG,
sauf dans la mesure où cette loi est remplacée ou qu’elle entre en conflit avec la loi fédérale, provinciale ou
territoriale applicable. Si l’arbitrage n’est pas autorisé pour régler une réclamation, une poursuite, un
différend ou un litige vous opposant à LG, les deux parties acceptent de s’en remettre à la compétence
exclusive des tribunaux de votre province ou territoire de résidence pour le règlement de la réclamation, de
la poursuite, du différend ou du litige qui vous oppose. Vous pouvez uniquement vous retirer de la
procédure de résolution des différends de la manière décrite ci-dessus (c’est-àdire par courriel ou par
téléphone); aucune autre forme d’avis ne sera valable pour vous retirer de la procédure de résolution des
différends. Le retrait de cette procédure de résolution des différends n’aura aucune incidence sur la
couverture de la garantie limitée, et vous continuerez de profiter de tous les avantages de cette dernière. Si
vous conservez ce produit et ne vous retirez pas de la procédure, vous acceptez toutes les conditions de la
disposition relative à l’arbitrage décrites ci-dessus.
Conflit de modalités. En cas de conflit ou d’incompatibilité entre les modalités de la présente garantie
limitée et du contrat de licence d’utilisateur final (« CLUF ») en ce qui concerne le règlement des différends,
les modalités de la présente garantie limitée contrôlent et régissent les droits et obligations des parties et
ont préséance sur le CLUF.

LG ELECTRONICS CANADA INC.
20 Norelco Drive
North York, ON M9L 2X6