User Guide
Quality, Design and Innovation
home.liebherr.com/fridge-manuals
Contents
1 General safety instructions.......................... 3
2 The appliance at a glance............................. 4
2.1 Delivered contents.............................................. 4
2.2 Overview of appliances and equipment.......... 4
2.3 SmartDevice......................................................... 5
2.4 Range of appliance use...................................... 5
2.5 Conformity............................................................ 5
2.6 Spare parts........................................................... 5
3 Functionality of the Touch display............... 5
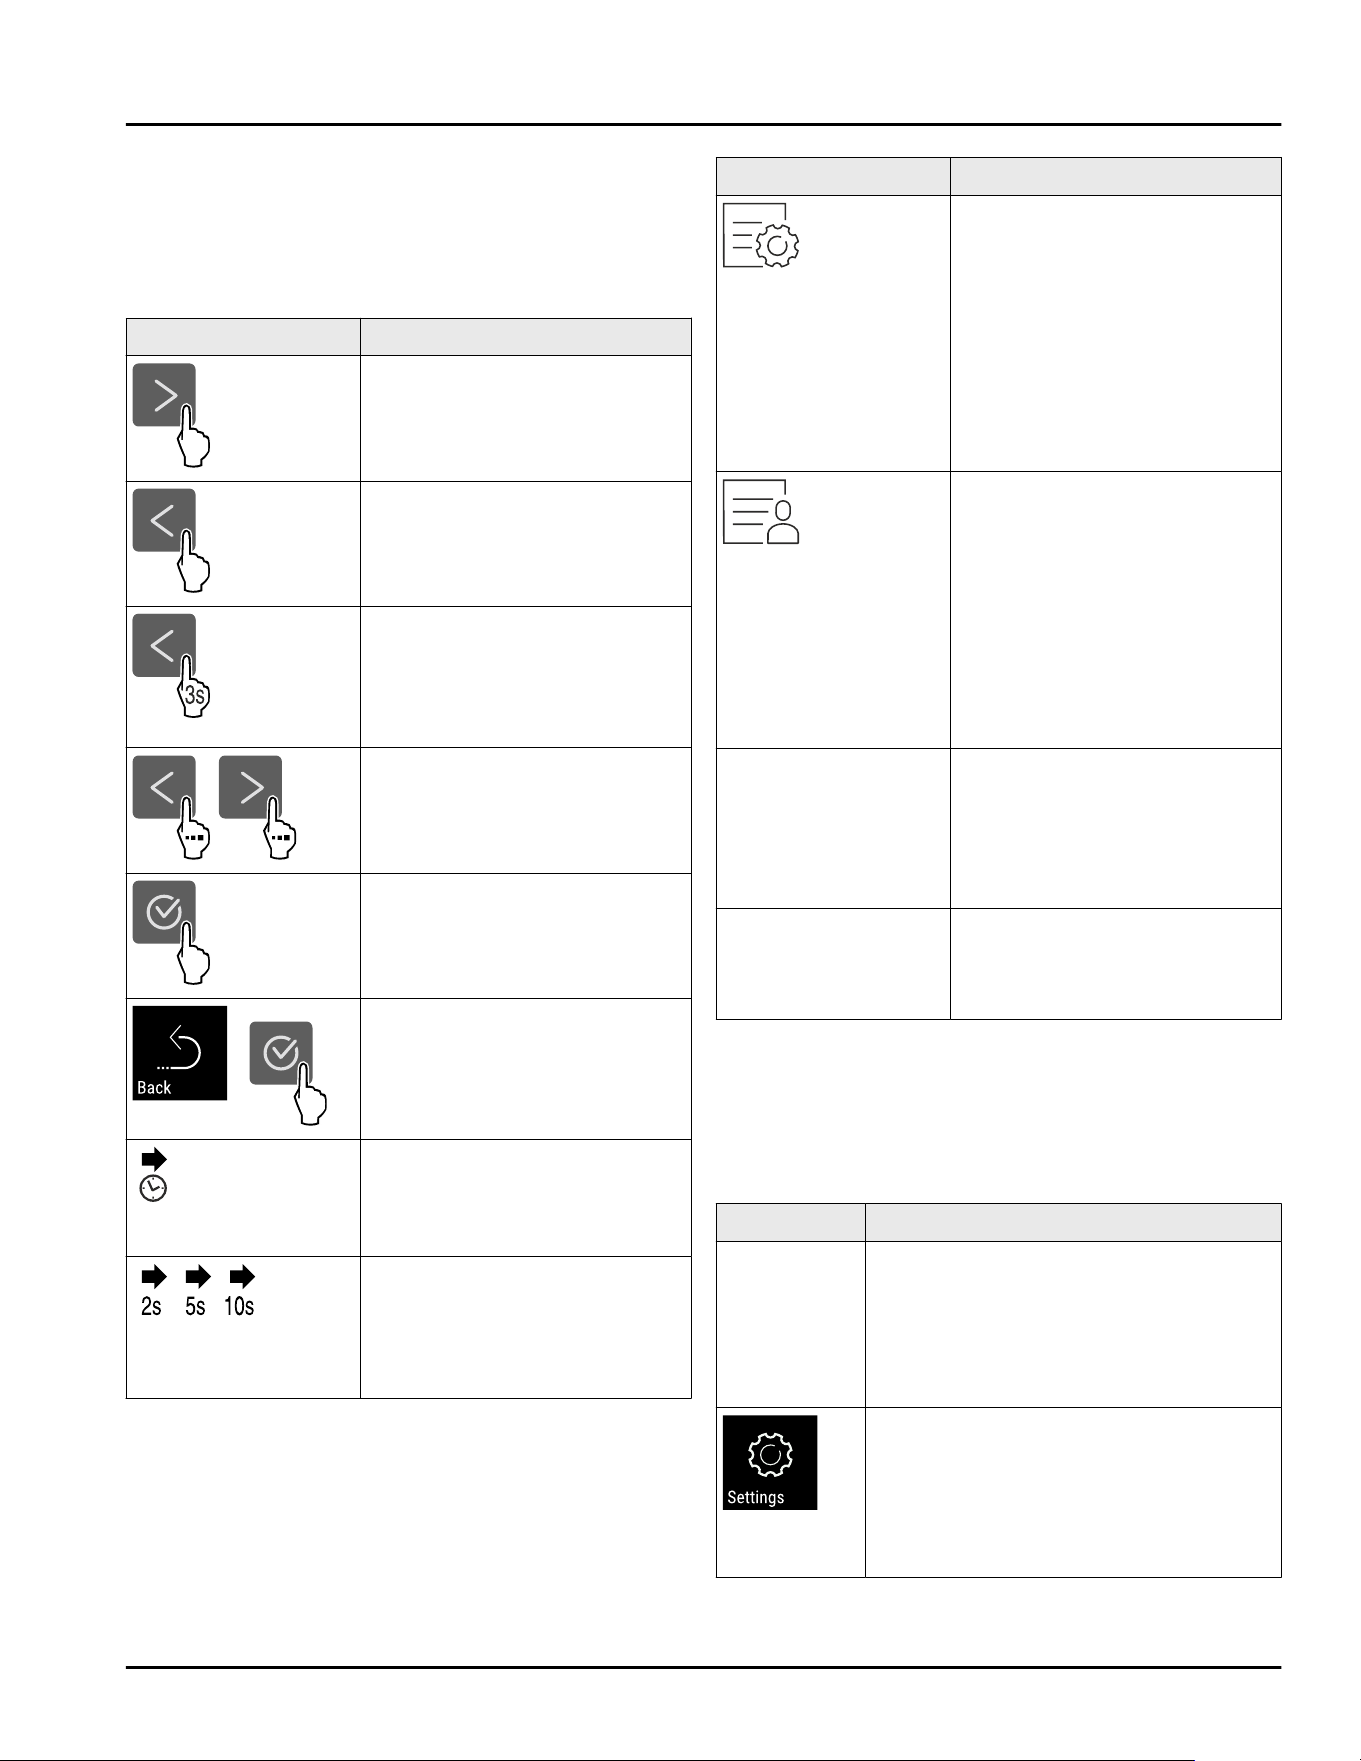
3.1 Navigation and symbol explanation................ 6
3.2 Menus.................................................................... 6
3.3 Sleep mode.......................................................... 7
4 Start-up......................................................... 7
4.1 Switching on appliance (first use)................... 7
5 Storage.......................................................... 8
5.1 Information regarding storage.......................... 8
5.2 Storage sketches................................................ 8
6 Energy saving................................................ 9
7 Use................................................................. 9
7.1 Control and display elements........................... 9
7.1.1 Status display.....................................................9
7.1.2 Display symbols............................................... 10
7.1.3 Acoustic signals...............................................10
7.2 Appliance functions............................................ 10
7.2.1 Notes on the appliance functions.................10
7.2.2 Switching appliance on and off ....................10
7.2.3 WiFi.................................................................... 11
7.2.4 Temperature .....................................................12
7.2.5 Temperature unit.............................................12
7.2.6 SabbathMode...................................................13
7.2.7 HumiditySelect................................................ 13
7.2.8 Lighting intensity ............................................ 14
7.2.9 Display Brightness .........................................14
7.2.10 Door alarm .......................................................15
7.2.11 Alarm Sound......................................................15
7.2.12 Display lock ......................................................15
7.2.13 Display PIN....................................................... 16
7.2.14 Language .......................................................... 17
7.2.15 Appliance information ................................... 17
7.2.16 Software .......................................................... 17
7.2.17 Demo mode.......................................................17
7.2.18 Resetting to factory settings .......................18
7.3 Messages.............................................................. 19
7.3.1 Warnings............................................................19
7.3.2 Reminders.........................................................20
8 Equipment...................................................... 20
8.1 Safety lock........................................................... 20
8.2 Wooden grid shelf............................................... 21
8.3 Description labels............................................... 22
9 Maintenance.................................................. 22
9.1 FreshAir activated charcoal filter..................... 22
9.2 Cleaning the appliance...................................... 23
10 Customer support......................................... 23
10.1 Technical specifications.................................... 23
10.2 Operating noises................................................. 24
10.3 Technical faults................................................... 24
10.4 Customer Service................................................ 25
10.5 Rating plate.......................................................... 26
11 Decommissioning.......................................... 26
12 Disposal......................................................... 26
12.1 Preparing the appliance for disposal............... 26
12.2 Disposing of the appliance in an
environmentally friendly manner..................... 26
Congratulations on the purchase of your new appli‐
ance. With this purchase, you have chosen all the
advantages of the latest refrigeration technology, guar‐
anteeing you a high-quality appliance with a long life
span and high operating safety.
The equipment of your appliance gives you the highest
level of day-to-day ease of operation.
Together we are making an active contribution to the
conservation of our environment by purchasing this
appliance which is manufactured in an environmentally
friendly process with the use of recyclable materials.
We hope you enjoy your new appliance.
The manufacturer is constantly working to improve all
types and models. Therefore, please be aware that we
reserve the right to make changes to the shape, equip‐
ment and technology.
Symbol
Explanation
Read instructions
Please read the information in these
instructions carefully to understand all of
the benefits of your new appliance.
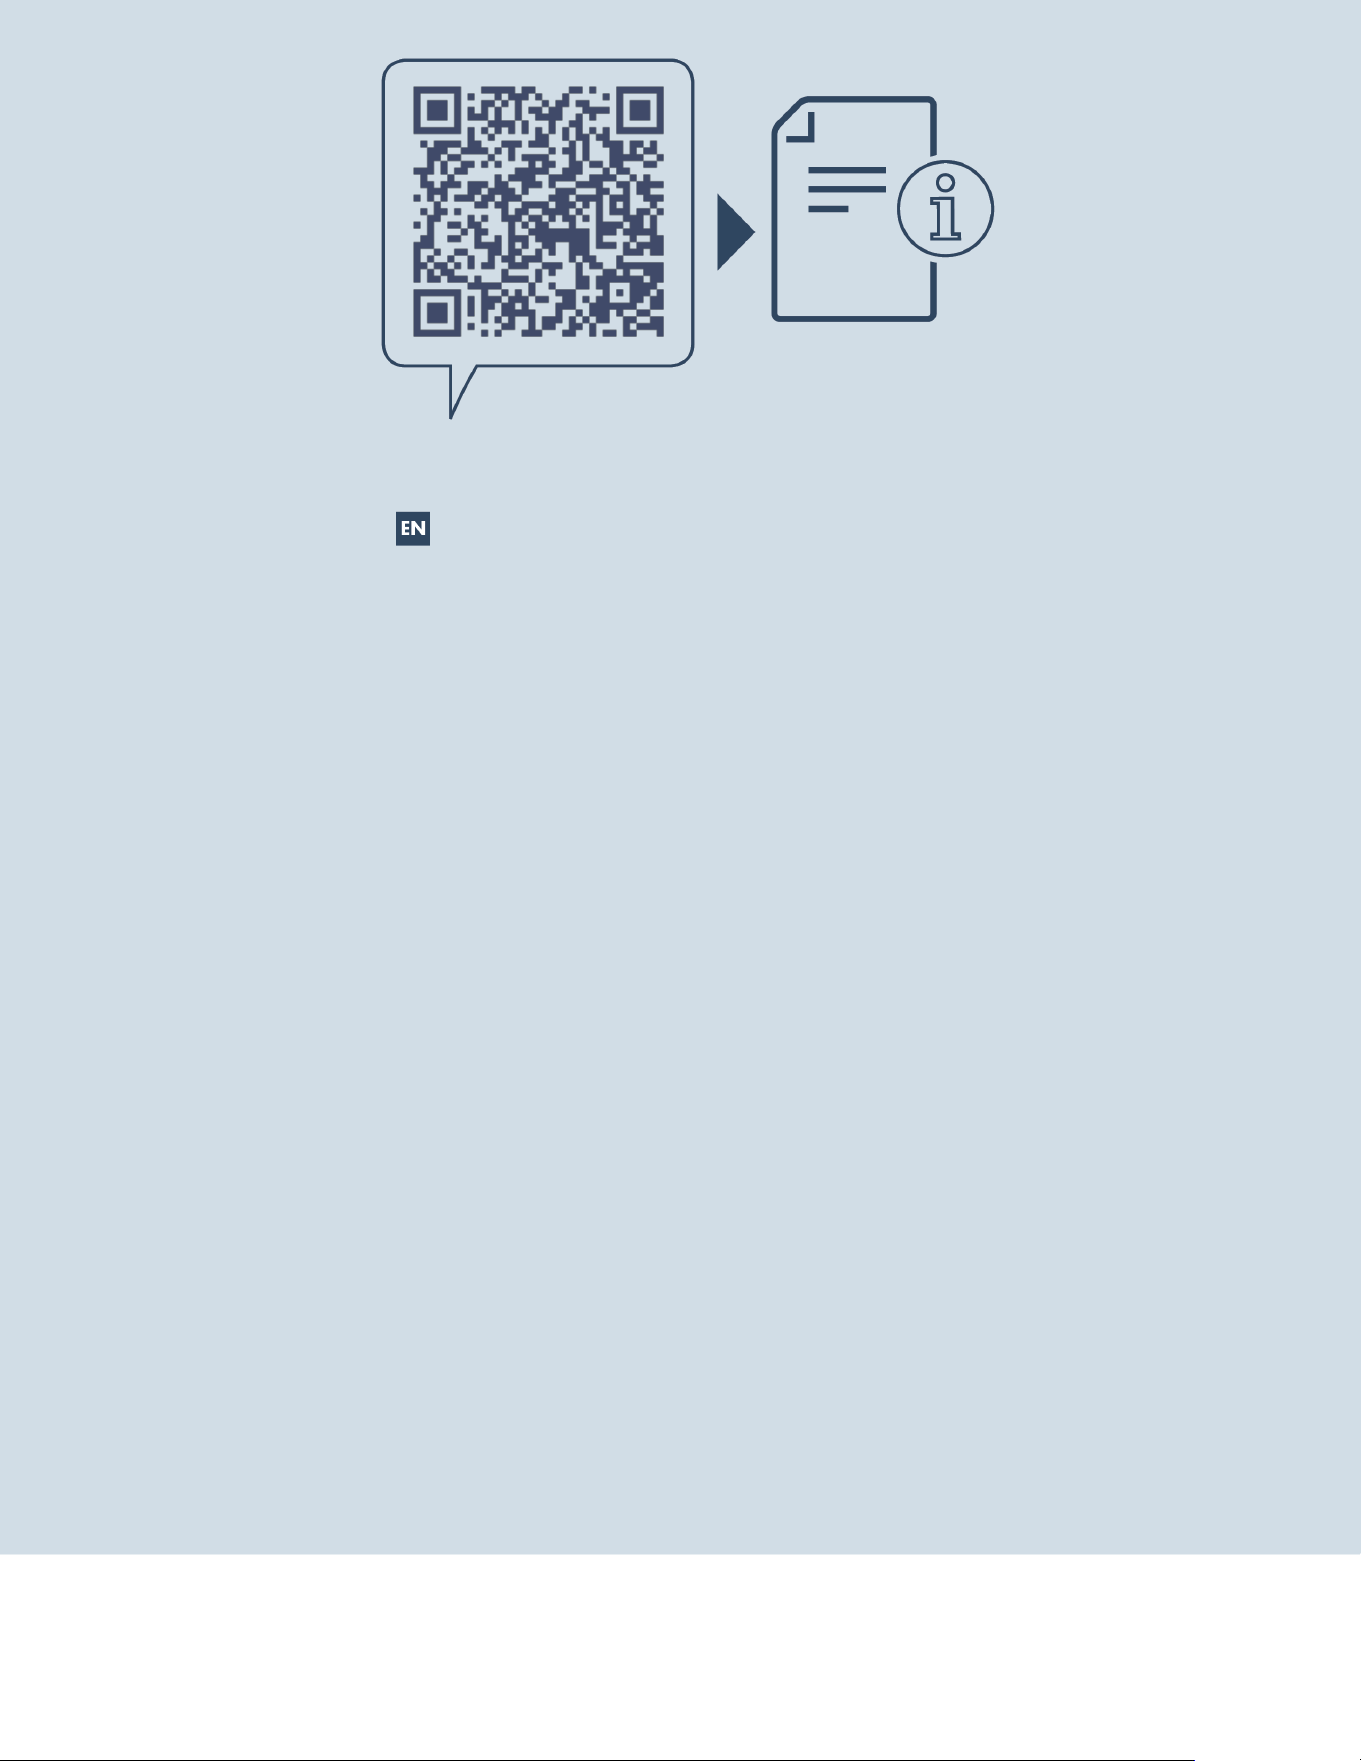
Additional information online
The digital manual with supplemental
information can be found online by scan‐
ning the QR code on the front page of this
manual or by entering the service number
at home.liebherr.com/fridge-manuals.
Check appliance
Check all parts for transport damage. If you
have any complaints, please contact your
agent or customer service.
Differences
These instructions apply to a range of
models, so there may be differences.
Sections that apply to certain models only
are indicated by an asterisk (*).
Instructions and results
Instructions are marked with a
.
Results are marked with a
.
2 * Depending on model and options

Symbol Explanation
Videos
Videos about the appliances are available
on the YouTube channel of Liebherr-Hausg‐
eräte.
Open-source licenses:
The appliance includes software components that
make use of open-source licenses. You can find
information on the open-source licenses to be used
here: home.liebherr.com/open-source-licenses
These operating instructions apply to:
W5250
1 General safety instructions
Please keep these operating instructions in a safe
place so you can refer back to them at any time.
If you pass the appliance on, please hand these oper‐
ating instructions to the new owner.
Read and follow these instructions. They contain
safety information which is important for safe and
problem-free installation and operation. Always read
and follow the safety information.
Dangers for the user:
-
This appliance is not intended for use by persons
(including children) with reduced physical, sensory
or mental capabilities, or lack of experience and
knowledge, unless they have been given supervision
or instruction concerning use of the appliance by a
person responsible for their safety. Children should
be supervised to ensure that they do not play with
the appliance. Cleaning and user maintenance must
not be performed by children unless they are super‐
vised. Children between the ages of 3 and 8 may
load and unload the appliance. Children under the
age of 3 must be kept away from the appliance
unless they are constantly supervised.
-
IMPORTANT: The power plug must be easily acces‐
sible so that the appliance can be disconnected
from the mains quickly in an emergency. It must not
be behind the back of the appliance.
-
The socket must be easily accessible so that the
appliance can be disconnected quickly from the
electricity in an emergency. It must not be located in
the area behind the appliance.
-
Always hold the appliance at the plug when discon‐
necting it from the household power. Do not pull on
the cable.
-
Disconnect the power plug or fuse if there is a
malfunction.
-
Do not damage the power cable. Do not operate the
appliance with a faulty power cable. If the supply
cord is damaged, it must be replaced by the manu‐
facturer, its service agent or similarly qualified
persons in order to avoid a hazard. For Plug and Play
connections, the change may be carried out by the
customer.
-
Repairs and work on the appliance may only be
carried out by Customer Service or other specifically
trained qualified personnel.
-
Always follow the instructions when assembling,
connecting and disposing of the appliance.
Risk of fire:
-
The refrigerant contained within the appliance
(specifications on the identification plate) is environ‐
mentally friendly, but flammable. Leaking refrigerant
can ignite.
•
WARNING: Do not damage the refrigerant circuit.
•
Do not handle ignition sources inside the appli‐
ance.
•
WARNING: Do not use electrical appliances inside
the food storage compartments of the appliance,
unless they are of the type recommended by the
manufacturer (e.g. steam cleaning appliances,
heating appliances, ice cream makers).
•
If refrigerant leaks: Remove naked flames or igni‐
tion sources located near the area of the leak.
Ventilate the room well. Contact Customer
Service.
-
Do not operate the appliance near explosive gases.
-
Do not store or use gasoline or other flammable
gases and liquids near the appliance.
-
Do not store explosive substances such as aerosol
cans with a flammable propellant in this appliance.
You can recognize such spray cans by the printed list
of contents or by a flame symbol. Any leaking gases
can be ignited by electrical components.
-
Keep lit candles, lamps and other objects with naked
flames away from the appliance so they do not
cause a fire.
-
Alcoholic beverages or other containers holding
alcohol must always be tightly sealed for storage
purposes. Any leaking alcohol can be ignited by elec‐
trical components.
Risk of falling or toppling over:
-
WARNING: To avoid a hazard due to instability of the
appliance, it must be fixed in accordance with the
instructions.
-
Do not stand on the base, drawers, doors etc. or use
them as improper supports. This applies in particular
to children.
Danger of poisoning:
-
Do not consume spoiled food.
Danger of frostbite, feeling of numbness and pain:
-
Avoid prolonged skin contact with cold surfaces or
chilled/frozen food or take protective measures, e.g.
wear gloves.
Risk of injury and damage:
-
Hot steam may cause injuries. Do not use any elec‐
trical heating or steam cleaning equipment, naked
flames or defrosting sprays for defrosting measures.
General safety instructions
* Depending on model and options 3
-
WARNING: Do not use mechanical devices or other
means to accelerate the defrosting process, other
than those recommended by the manufacturer.
-
Do not remove ice using sharp objects.
-
WARNING: Keep clear of obstruction all ventilation
openings in the appliance enclosure or in the struc‐
ture for building-in.
-
WARNING: Risk of child entrapment. Before you
throw away your old refrigerator or freezer:
•
Take off the doors.
•
Leave the shelves in place so that children may
not easily climb inside.
Risk of crushing:
-
Do not hold onto the hinge when opening and
closing the door. Fingers may become trapped.
California Proposition 65
-
WARNING: This product can expose you to chemi‐
cals including Diisononyl Phthalate (DINP), which is
known to the State of California to cause cancer,
and Di-isodecyl Phthalate (DIDP), which is known to
the State of California to cause birth defects or
other reproductive harm. For more information, go to
www.P65Warnings.ca.gov
Symbols on the device:
The symbol may be located on the
compressor. It refers to the oil in the
compressor and refers to the following
danger: Can be fatal if swallowed or
inhaled. This notice only applies for
recycling. There is no danger during
normal operation.
WARNING: Risk of fire / flammable
materials. The symbol is located on the
compressor and indicates the danger
from flammable materials. Do not
remove the label.
This label or a similar one may be
located on the rear of the appliance.
This label indicates that there are
vacuum insulation panels (VIP) or perlite
panels in the door and/or housing. This
notice only applies for recycling. Do not
remove the label.
Observe the warning messages and other detailed
information in the other sections:
DANGER
Indicates an immediately
hazardous situation, which if
not avoided, will result in death
or serious injury.
WARNING Indicates a hazardous situa‐
tion, which if not avoided,
could result in death or serious
injury.
CAUTION Indicates a hazardous situa‐
tion, which if not avoided,
could result in minor or
moderate injury.
NOTICE Indicates a hazardous situa‐
tion, which if not avoided,
could result in damage to prop‐
erty.
Note Indicates useful advice and
tips.
2 The appliance at a glance
2.1 Delivered contents
Check all parts for transport damage. If you have any
complaints, please contact the retailer or customer
service. (see 10.4 Customer Service)
Delivery contains the following parts:
-
Standalone appliance
-
Equipment (depending on your model)
-
Installation parts (depending on your model)
-
User Guide
-
Installation Guide
-
Warranty documents
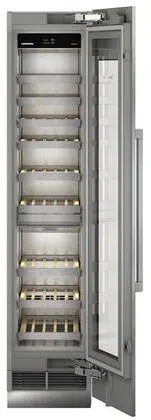
2.2 Overview of appliances and equip‐
ment
3
3
5
6
7
2
4
1
2
2
2
2
2
Fig. 1 WP.. 4652 /5252 / W5250
(1)
Type plate (5) Lock*
The appliance at a glance
4 * Depending on model and options
(2) Grid shelves (6) Control elements and
temperature display
(3) Adjustable feet (7) Activated charcoal
filter
(4) Interior lighting
2.3 SmartDevice
SmartDevice is the networking solution for your wine
storage cabinet.
If your appliance is SmartDevice-enabled or compat‐
ible, you can quickly and easily connect your appliance
to your WiFi. With the SmartDevice app, you can
operate your appliance from a mobile device. Addi‐
tional functions and setting options are available in the
SmartDevice app.
SmartDevice-
compatible
appliance:
Your appliance is compatible for
use with the SmartDeviceBox. You
must first purchase and install the
SmartDeviceBox. In order to
connect your appliance to the WiFi,
you need to download the Smart‐
Device app.
More information
about SmartDe‐
vice:
smartdevice.liebherr.com
The SmartDeviceBox is available from the Liebherr
Service Center. The address for your respective
country can be found on the back of the instructions.
Downloading the
SmartDevice
app:
After installing and configuring the
SmartDevice app, you can connect
your appliance to the WiFi using
the SmartDevice app and the WiFi
appliance function
(see 7.2.3WiFi) .
2.4 Range of appliance use
Normal use
-
staff kitchen areas in shops, offices and other
working environments;
-
farm houses and by clients in hotels, motels and
other residential type environments;
-
bed and breakfast type environments;
-
catering and similar non-retail applications.
The appliance is not suitable for freezing food;
The appliance is not suitable as a built-in unit;
All other types of uses are not permitted.
Foreseeable misuse
The following uses are specifically prohibited:
-
Storage and cooling of medication, blood plasma,
laboratory preparations or similar substances and
products in accordance with the CMDCAS and FDA
510(k)
-
Use outdoors
-
Use in moist areas exposed to the rain
-
Use in areas at risk of explosion
Incorrect appliance use can cause damage to the
stored products or cause them to spoil.
Climate ratings
The appliance is set to operate within specific ambient
temperature limits according to its climate rating The
climate rating for your appliance is printed on the
rating plate
Note
► To guarantee trouble-free operation, comply with the
indicated ambient temperatures.
Climate
rating
for ambient temperatures from
SN 10°C(50°F) to 32°C(90°F)
N 16°C(61°F) to 32°C(90°F)
ST 16°C(61°F) to 38°C(100°F)
T 16°C(61°F) to 43°C(109°F)
SN-ST 10°C(50°F) to 38°C(100°F)
SN-T 10°C(50°F) to 43°C(109°F)
2.5 Conformity
The refrigerant circuit has been tested for leaks. The
appliance complies with the applicable safety regula‐
tions and with the corresponding directives.
2.6 Spare parts
Spare parts for functional and storable parts of the
equipment are available for 15 years.
3 Functionality of the Touch
display
You operate your appliance using the Touch display.
You select appliance functions in the Touch display
(hereafter referred to as display) by tapping them. If
you do not perform any action on the display for
10 seconds, the display either jumps back to the
higher-level menu or directly to the status display.
Functionality of the Touch display
* Depending on model and options 5
3.1 Navigation and symbol explana‐
tion
In the illustrations, different symbols are used to navi‐
gate the display. The following table describes these
symbols.
Symbol Description
Press the Next navigation
arrow:
Navigates to the next option in
the menu.
Press the Back navigation
arrow:
Jumps back one option in the
menu.
Press and hold the Back navi‐
gation arrow for 3seconds:
Jumps back to the status
display in the main menu or
from the Settings menu.
Press the navigation arrow
several times in succession:
Navigates in the menu to the
desired function.
Press the Confirm symbol:
Activates/deactivates func‐
tion.
Opens submenu.
Press the Confirm symbol
together with the back icon:
Jumps back one menu level.
Arrow with clock:
It takes more than 10 seconds
for the following message to
appear in the display.
Arrow with a time indication:
It takes the specified amount
of time until the following
message appears in the
display.
Symbol Description
“Open Settings menu”
symbol:
Navigates to the Settings
menu and opens the settings
menu.
If necessary: Navigate to the
desired function in the
Settings menu.
(see 3.2.1 Opening the Settings
menu)
“Open Advanced menu”
symbol:
Navigates to the Advanced
menu and opens the advanced
menu.
If necessary: Navigate to the
desired function in the
Advanced menu.
(see 3.2.2 Opening the
Advanced menu)
No action for
10seconds
If you do not perform any
action on the display for
10 seconds, the display either
jumps back to the higher-level
menu or directly to the status
display.
Opening door and
closing it again
If you open the door and
immediately close it again, the
display jumps directly back to
the status display.
Note: Illustrations of the display are shown in the English
version.
3.2 Menus
The appliance functions can be found in various
menus.
Menu
Description
Main menu When you switch the appliance on, you
are automatically in the main menu.
From here you can navigate to the
most important appliance functions, to
the Settings menu and to the
Advanced menu.
Settings
menu
The Settings menu contains additional
appliance functions for setting up your
appliance.
(see 3.2.1 Opening the Settings menu)
Functionality of the Touch display
6 * Depending on model and options
Menu Description
Advanced
menu
The advanced menu contains special
appliance functions for setting up your
appliance. Access to the Advanced
menu is protected by the numerical
code 151.
(see 3.2.2 Opening the Advanced menu)
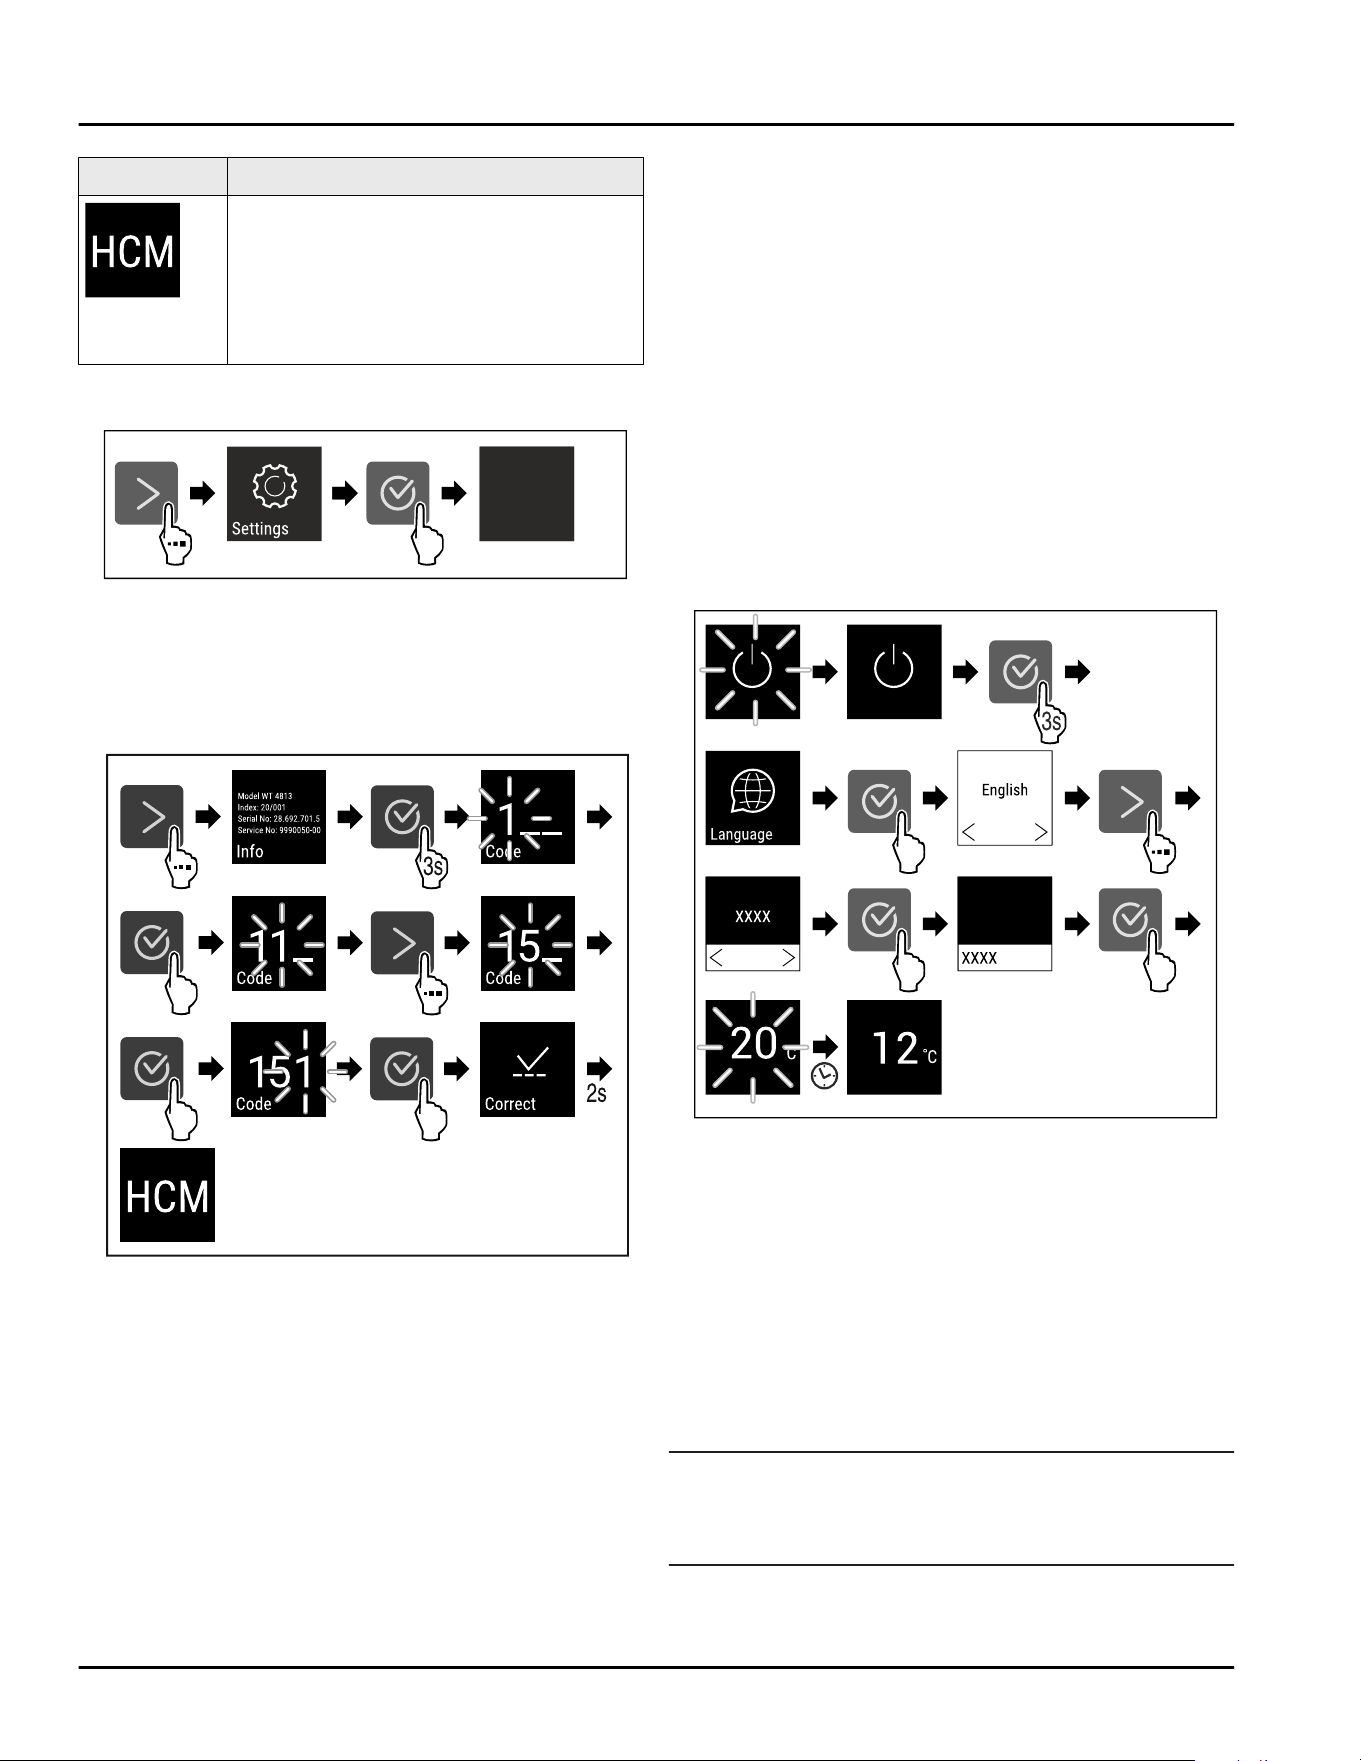
3.2.1 Opening the Settings menu
Fig. 2 Example illustration
► Carry out action steps according to the illustration.
▷ Settings menu is open.
► If necessary: Navigate to the desired function.
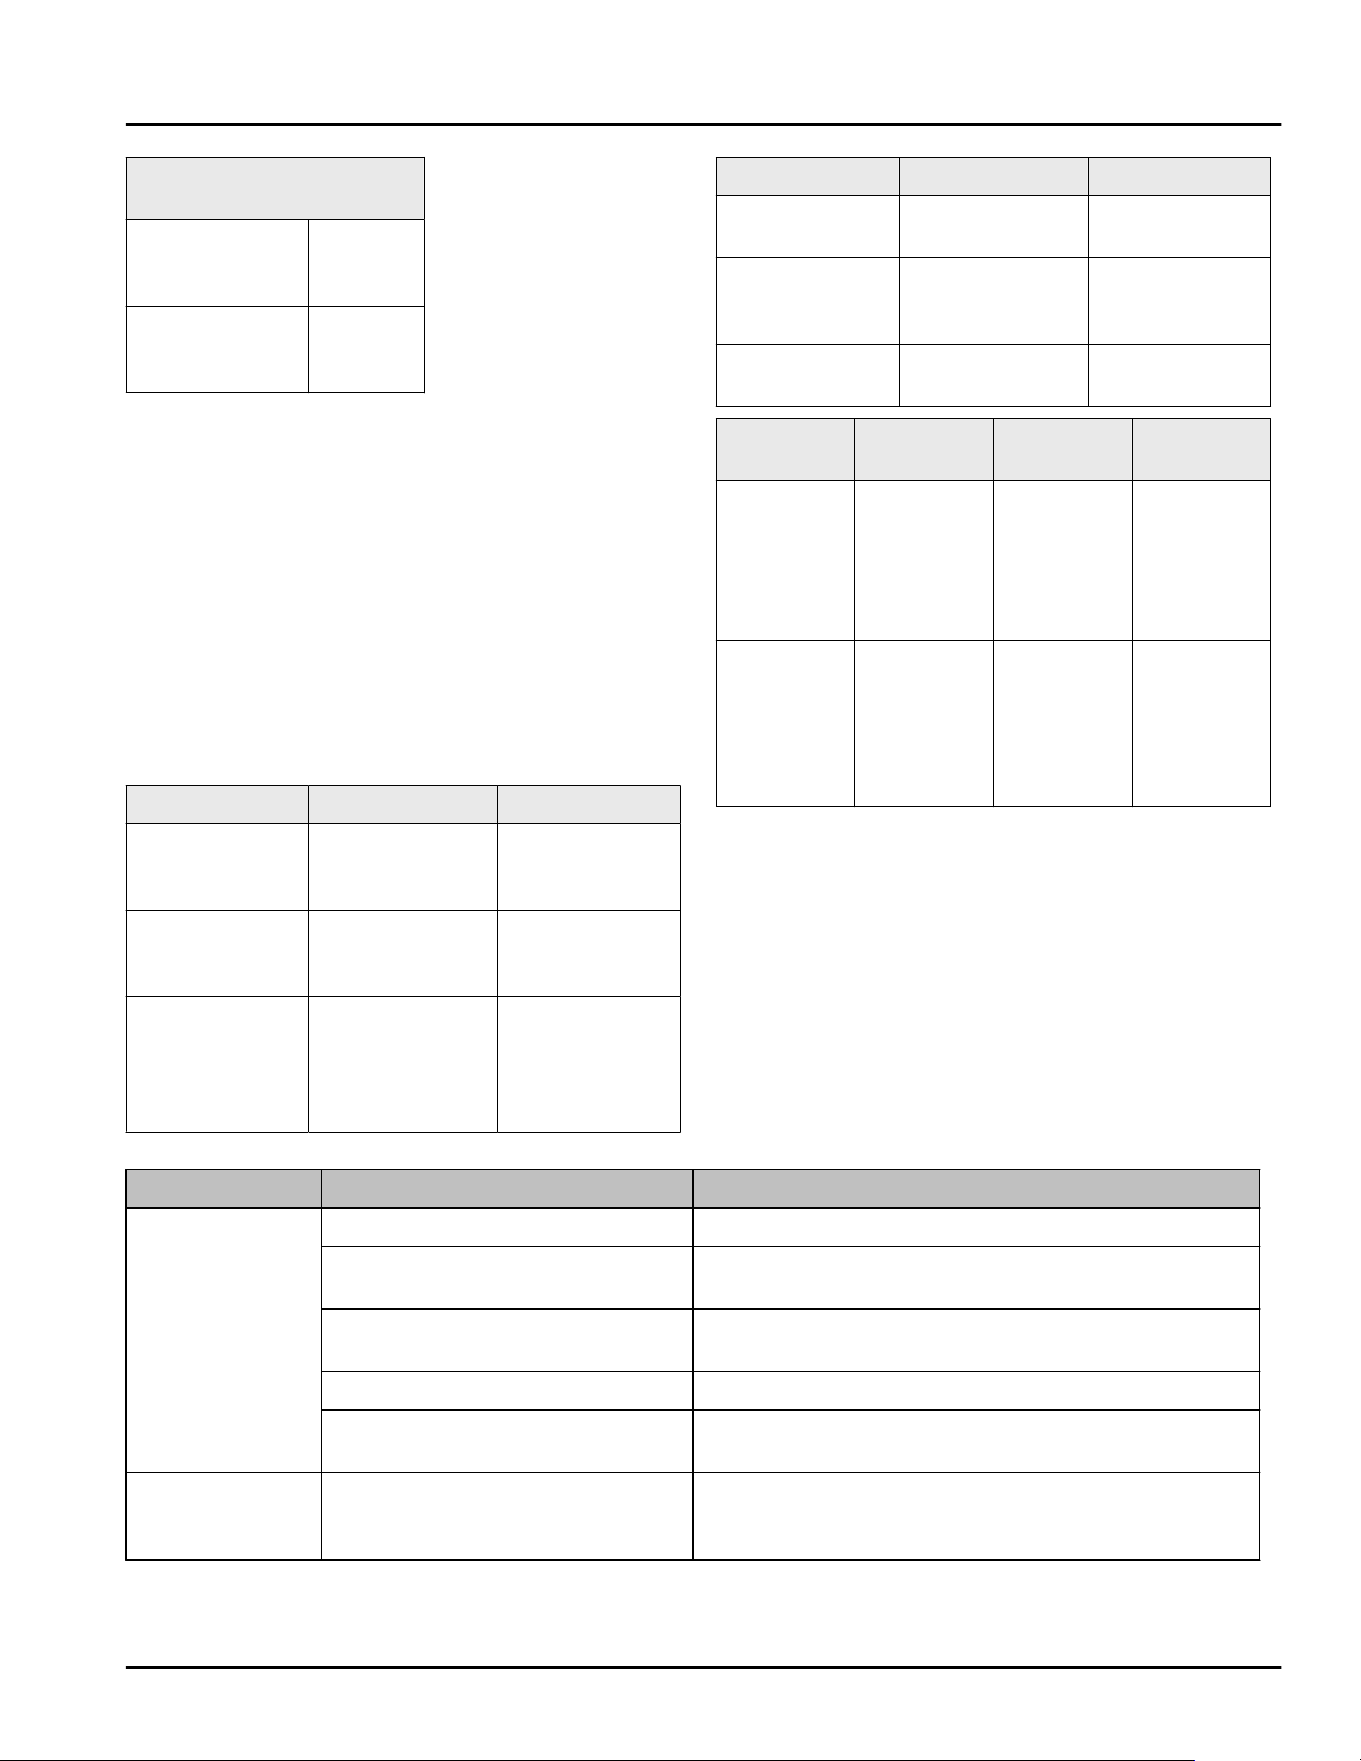
3.2.2 Opening the Advanced menu
Fig.3Access with numerical code 151
► Carry out action steps according to the illustration.
▷ Expanded menu is open.
► If necessary: Navigate to the desired function.
3.3 Sleep mode
If you do not touch the display for 1 minute, the display
switches to sleep mode. In sleep mode, the display
brightness is dimmed.
3.3.1 Ending sleep mode
► Press any navigation key.
▷ Sleep mode is ended.
4 Start-up
4.1 Switching on appliance (first use)
Make sure that the following requirements are fulfilled:
❑
The appliance has been installed and connected in
accordance with the installation instructions.
❑
All adhesive strips, adhesive and protective films
and transport locks are removed from inside and on
the appliance.
❑
All marketing leaflets are removed from the drawers.
❑
You are familiar with the functionality of the Touch
display. (see3 Functionality of the Touch display)
Switch on the appliance using the Touch display.
► If the display is in sleep mode: Press the Confirm
symbol.
► Carry out action steps according to the illustration.
Fig. 4 Example illustration
▷ The status display appears. (see 7.1 Control and
display elements)
▷ The appliance cools to the temperature set at the
factory.
▷ The appliance starts in demo mode (status display
with DEMO appears): If the appliance starts in demo
mode, you can deactivate demo mode within the
next 5 minutes. (see 7.2.17Demo mode)
More information:
-
Start the SmartDevice for the first time.
(see 2.3 SmartDevice) and (see 7.2.3WiFi)
Note
Accessories can be purchased from the Liebherr
Service Center. The address for your respective country
can be found on the back of the instructions.
Start-up
* Depending on model and options 7
5 Storage
5.1 Information regarding storage
WARNING
Risk of fire from electrical appliances!
If you use electrical devices in the food area of your
appliance, they may case a fire.
► Do not use electrical devices in the food area of the
appliance if they have not been recommended by the
manufacturer.
Note
Insufficient ventilation results in an increase in energy
consumption and reduction of the refrigerating
performance
► Always keep the air slots unobstructed.
Observe the following specifications for storage:
-
Keep the air vents on the fan free.
-
Keep liquids in closed containers.
-
Position storage shelves according to the height
required.
-
Observe maximum load weight. (see 10.1 Technical
specifications)
5.2 Storage sketches
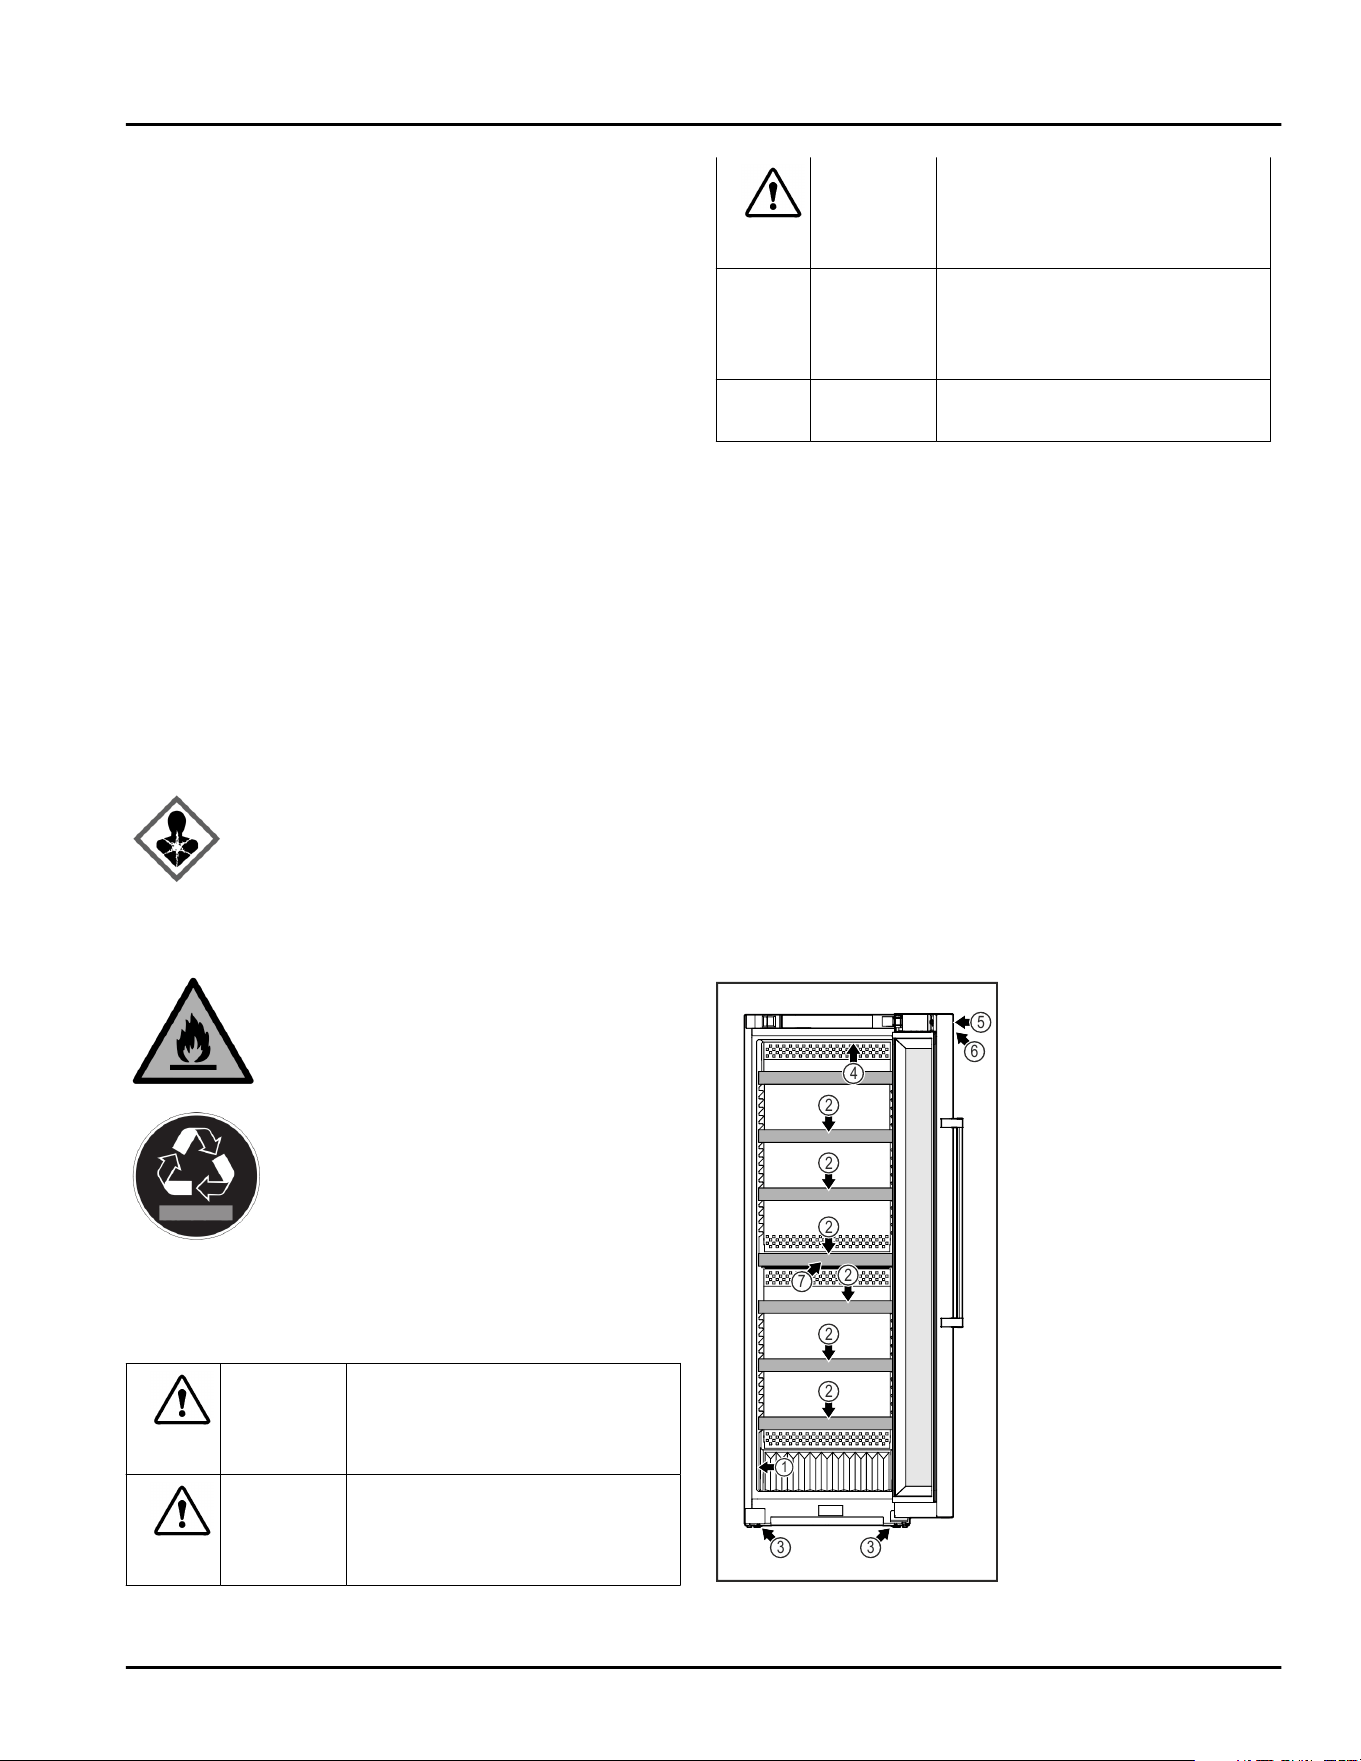
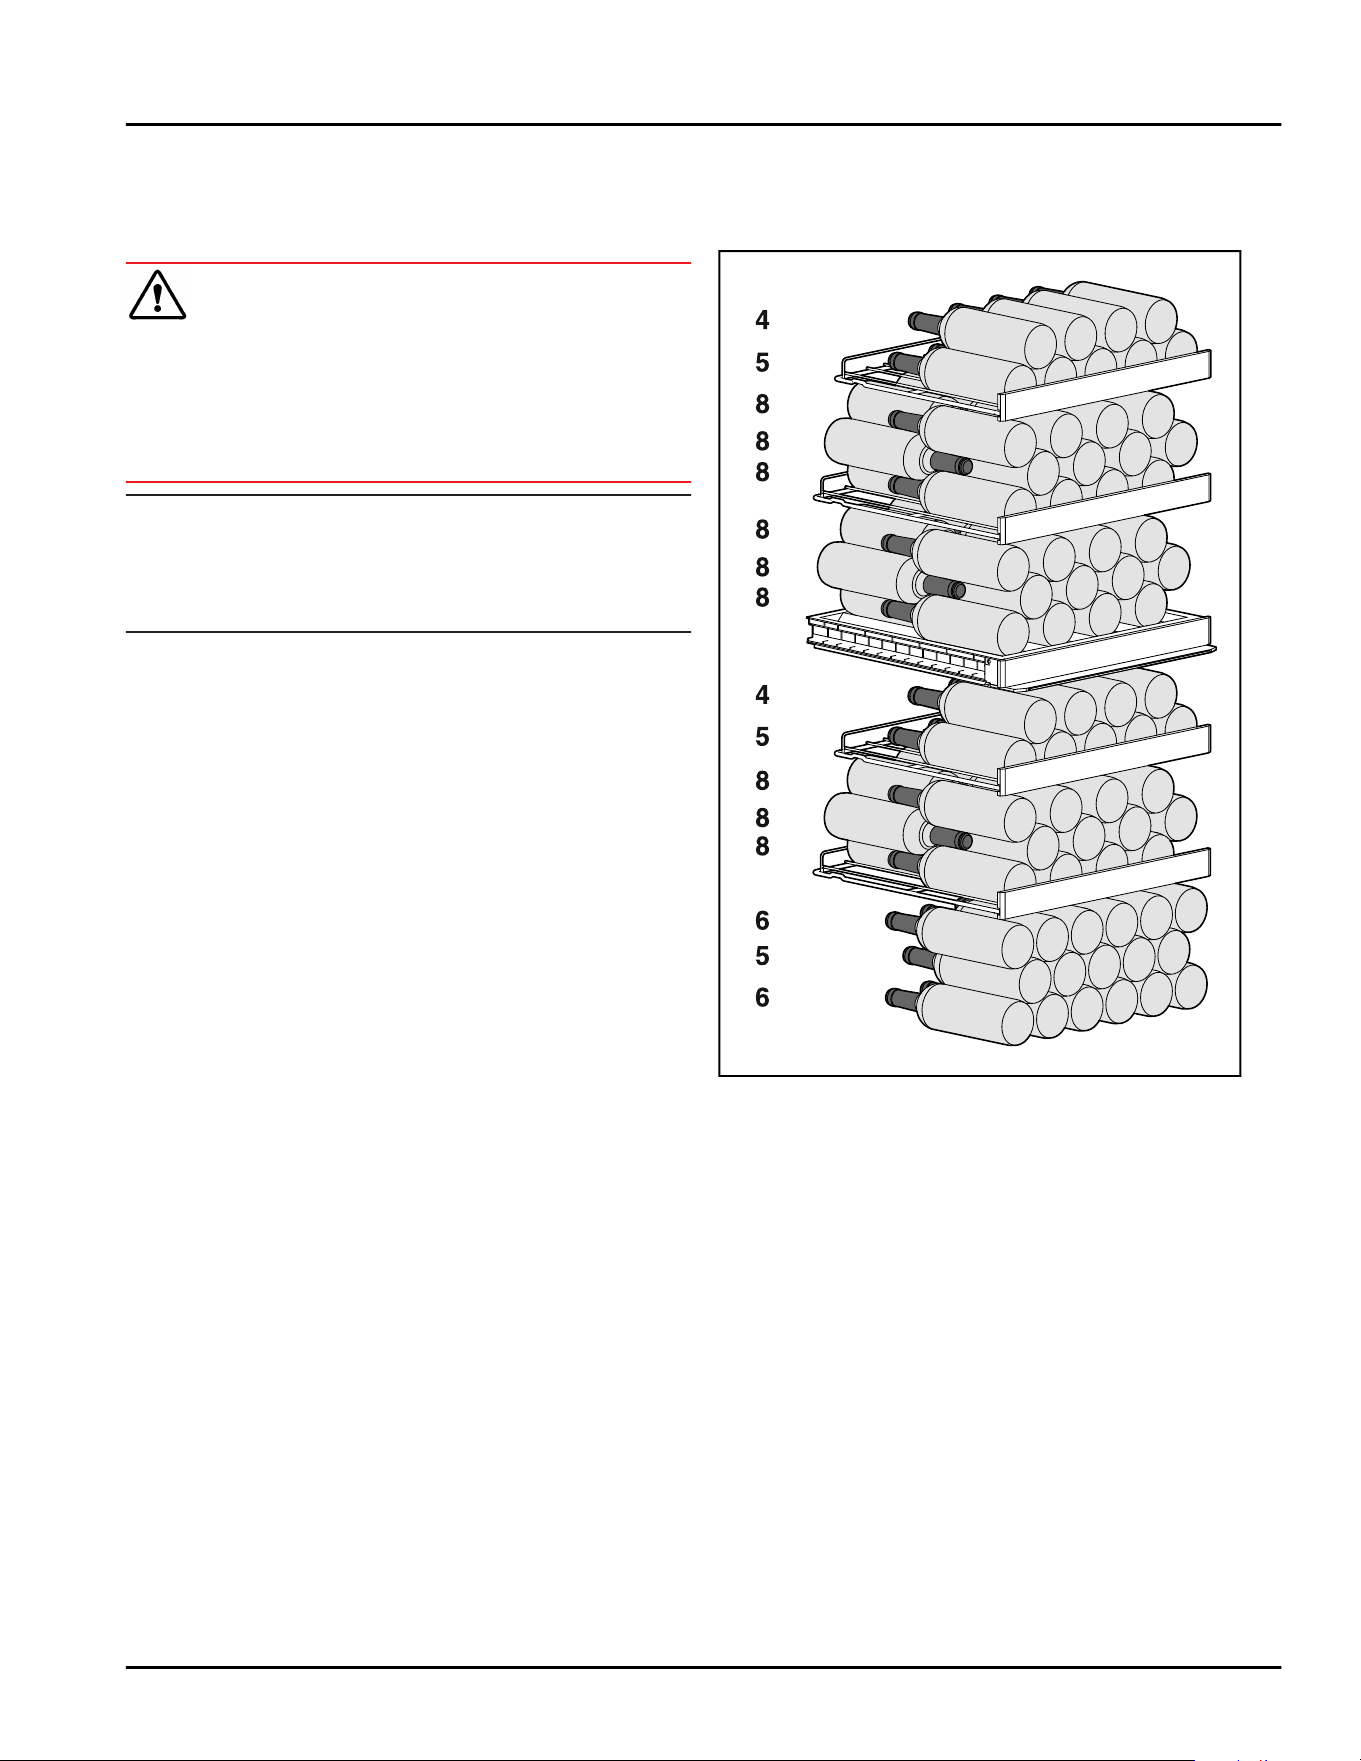
5.2.1 WP.. 4652
Fig. 5 107 bottles in total (for 0.75 l Bordeaux bottles)
Storage
8 * Depending on model and options
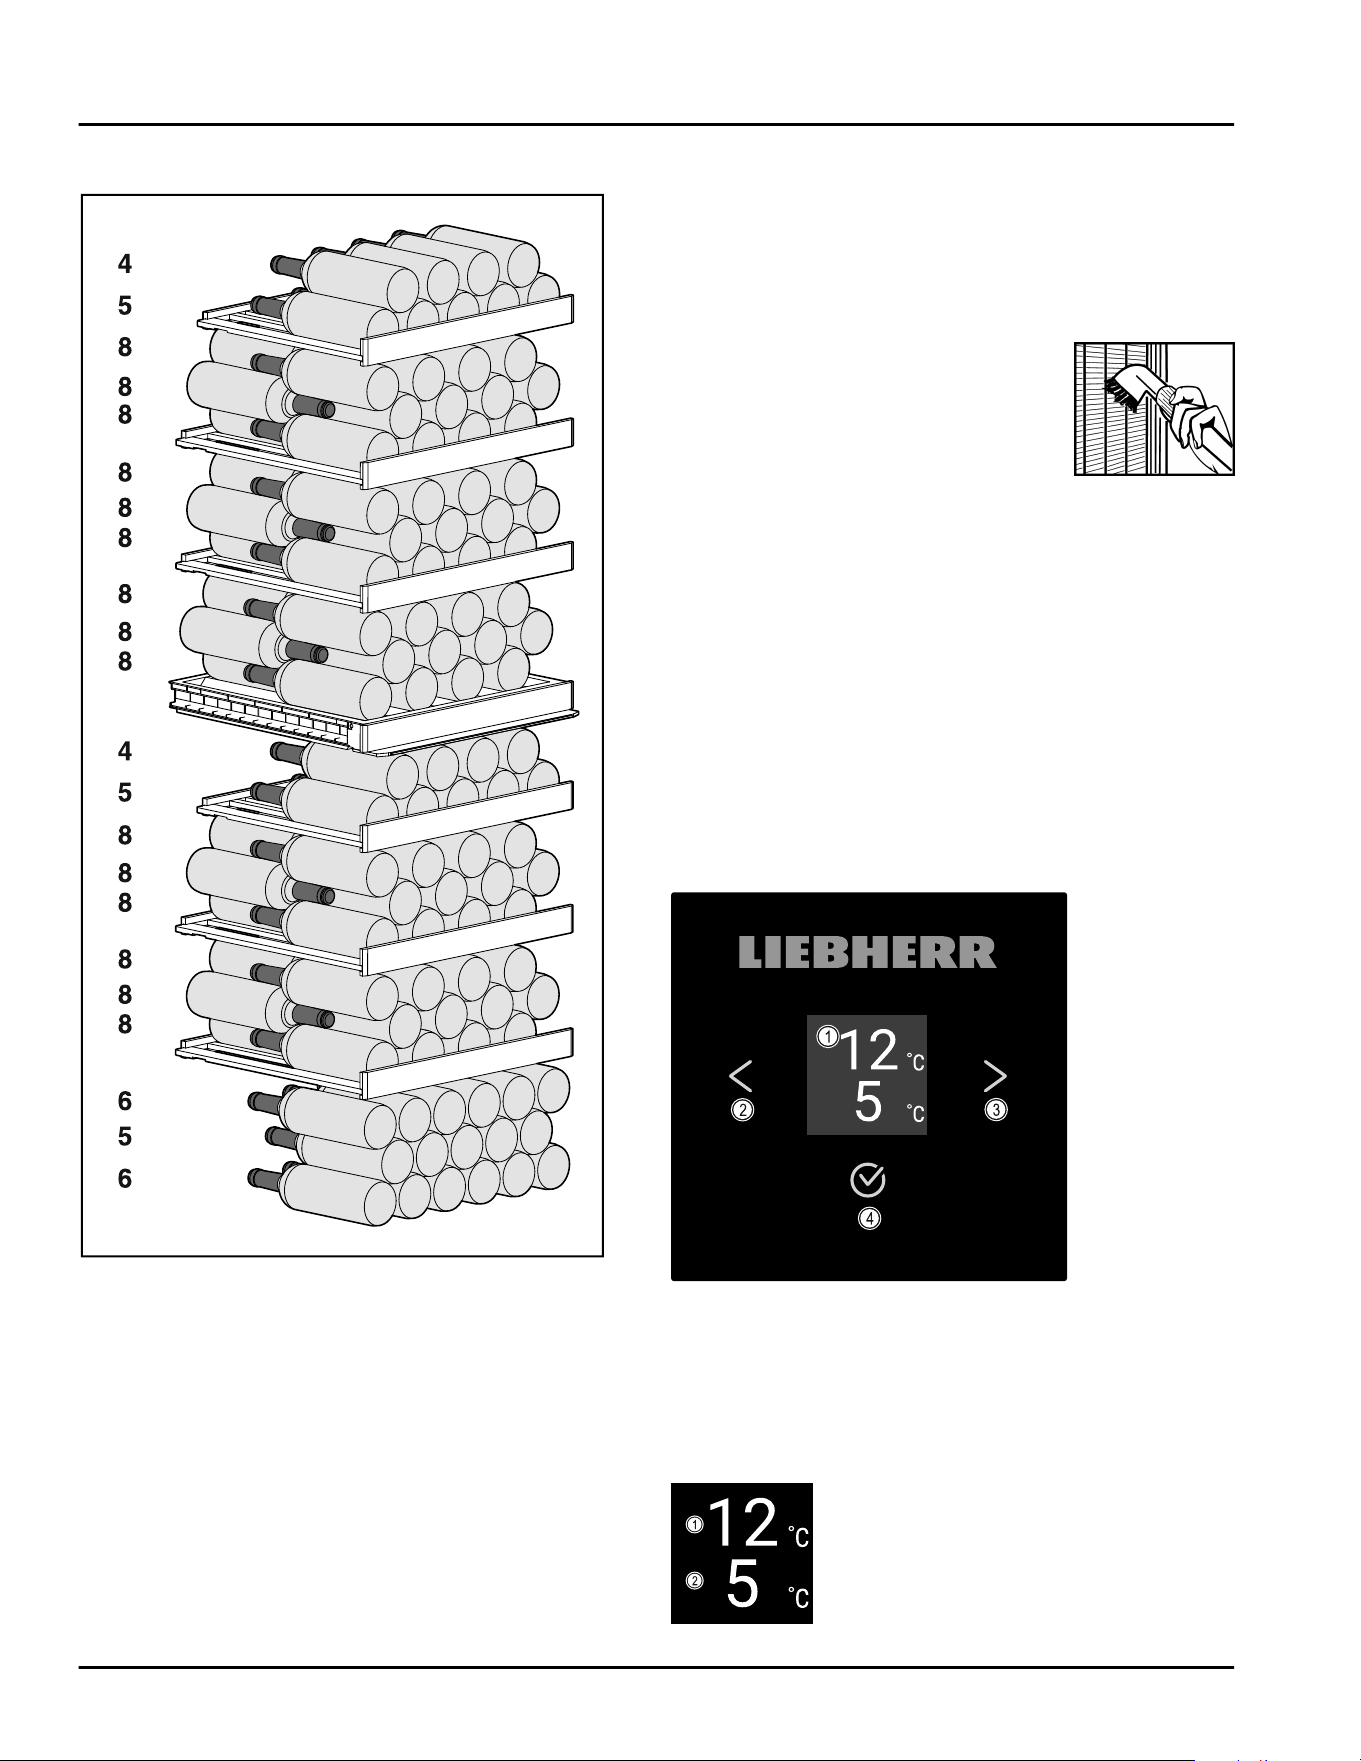
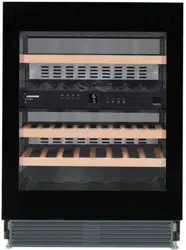
5.2.2 WP.. 5252 / W5250
Fig. 6 155 bottles in total (for 0.75 l Bordeaux bottles)
6 Energy saving
-
Always ensure good ventilation. Keep clear of
obstruction all ventilation openings in the appliance
enclosure or in the structure for building-in.
-
Never block air slits in the fan.
-
Do no set up the appliance in an area with direct
sunlight, next to a heating unit or similar.
-
If you set up the appliance directly next to an oven,
its energy consumption may increase slightly. This
depends on the service life and how often the oven
is used.
-
Energy consumption depends on installation condi‐
tions such as the ambient temperature
(see2.4 Range of appliance use) . A warmer ambient
temperature can increase the energy consumption.
-
Avoid opening the appliance door for any longer then
necessary
-
The lower the temperature is set the higher the
energy consumption.
Dust deposits increase energy
consumption:
-
Once a year the dust should be
removed from the refrigerating
machine and the heat exchanger
metal grid at the back of the appli‐
ance
7 Use
7.1 Control and display elements
The display provides a quick overview of the current
appliance status, the temperature setting, the status
of functions and settings as well as alarm and error
messages.
It is operated using the navigation arrows and confir‐
mation symbol.
Functions can be activated or deactivated and settings
values can be changed.
Fig.7Display
(1)
Status display (3) Forward navigation
arrow
(2) Backward navigation
arrow
(4) Confirm
7.1.1 Status display
Energy saving
* Depending on model and options 9
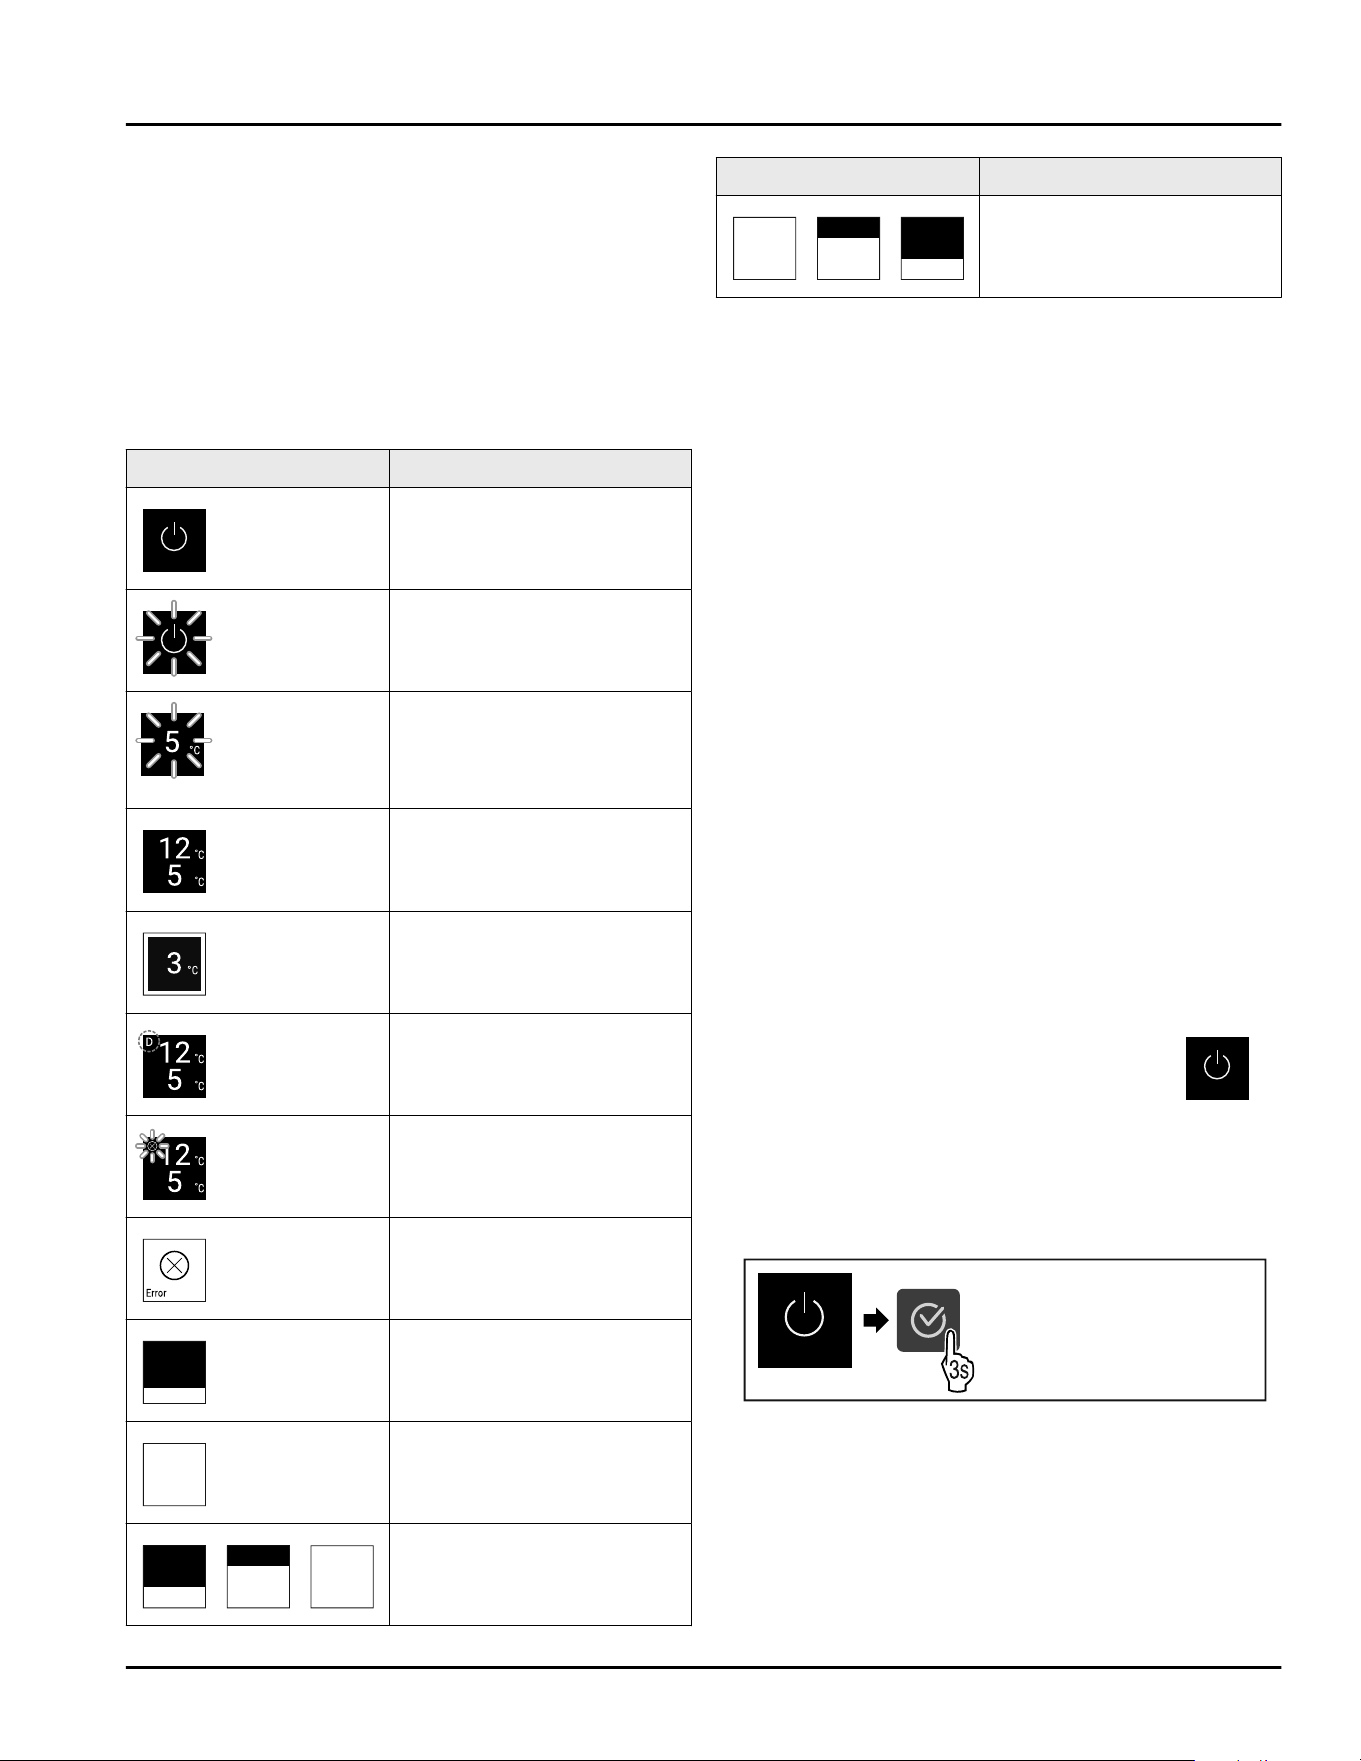
Fig. 8 Status display
(1) Temperature, upper
zone
(2) Temperature, lower
zone
The status display shows the temperature and is the
home display. You navigate from here to the other
functions and settings. The status display may show a
range of display symbols.
7.1.2 Display symbols
The display symbols provide information about the
current status of the appliance.
Symbol Appliance status
Standby
Appliance is switched off.
Flashing standby symbol
Appliance is starting up.
Flashing temperature
Target temperature not yet
reached. Appliance cooling
to set temperature.
Temperature display
*
Status display with white
border*
Appliance is locked.*
D in the display
Appliance is in DemoMode.
Flashing symbol
A fault is still present.
Error symbol
Appliance is still malfunc‐
tioning.
White bar at the bottom
Submenu
White background
Default, active setting or
active value.
Increasing bar
Press button for 3 seconds
to activate setting.
Symbol Appliance status
Decreasing bar
Press button for 3 seconds
to deactivate setting.
Status display symbols
7.1.3 Acoustic signals
A signal sounds in the following cases:
-
If a function or a value is confirmed.
-
If a function or a value can neither be activated nor
deactivated.
-
As soon as a fault occurs.
-
If there is an alarm message.
The alarms can be switched on and off in the customer
menu.
7.2 Appliance functions
7.2.1 Notes on the appliance functions
The appliance functions are set at the factory so that
your appliance is fully functional.
Before you alter, activate or deactivate the appliance
functions, make sure that the following requirements
are met:
❑
You have read and understood the descriptions of
how the display works. (see 3 Functionality of the
Touch display)
❑
You have familiarized yourself with the operating
and display elements of your appliance.
(see 7.1 Control and display elements)
7.2.2 Switching appliance on and off
Using this setting the entire appliance can be switched
on and off.
Switching on the appliance
Without activated DemoMode:
Fig.9
► Carry out action steps according to the illustration.
With activated DemoMode:
Use
10 * Depending on model and options

Fig. 10
► Carry out action steps according to the illustration.
Note
Deactivate DemoMode before the countdown finishes.
Fig.11
▷ The temperature appears on the display.
Switching off the appliance
Fig.12
Fig.13
► Carry out action steps according to the illustration.
▷ Standby symbol is shown in the display.
▷ Display switches off after approximately 10 minutes.
7.2.3 WiFi
Use this function to connect your appliance to WiFi.
You can then operate it via the SmartDevice app on a
mobile device. You can also use this function to
disconnect or reset the WiFi connection.
To connect your device to WiFi, you need the SmartDe‐
viceBox.
More information on the SmartDevice: (see 2.3 Smart‐
Device)
Note
The SmartDevice function is not available in the
following countries: Russia, Belarus, Kazakhstan.
You cannot use the SmartDeviceBox.
Establishing the WiFi connection for the first time
Make sure that the following requirements are fulfilled:
❑
You have purchased and inserted a SmartDeviceBox.
(see 2.3 SmartDevice)
❑
You have installed the SmartDevice app (see
apps.home.liebherr.com).
❑
Registration in the SmartDevice app is completed.
Fig. 14
Fig. 15
► Carry out action steps according to the illustration.
▷ Connection is established.
Disconnecting from the WiFi
Fig. 16
WiFi
WiFi
Fig.17
► Carry out action steps according to the illustration.
▷ There is no connection.
Resetting the WiFi connection
Fig. 18
Use
* Depending on model and options 11
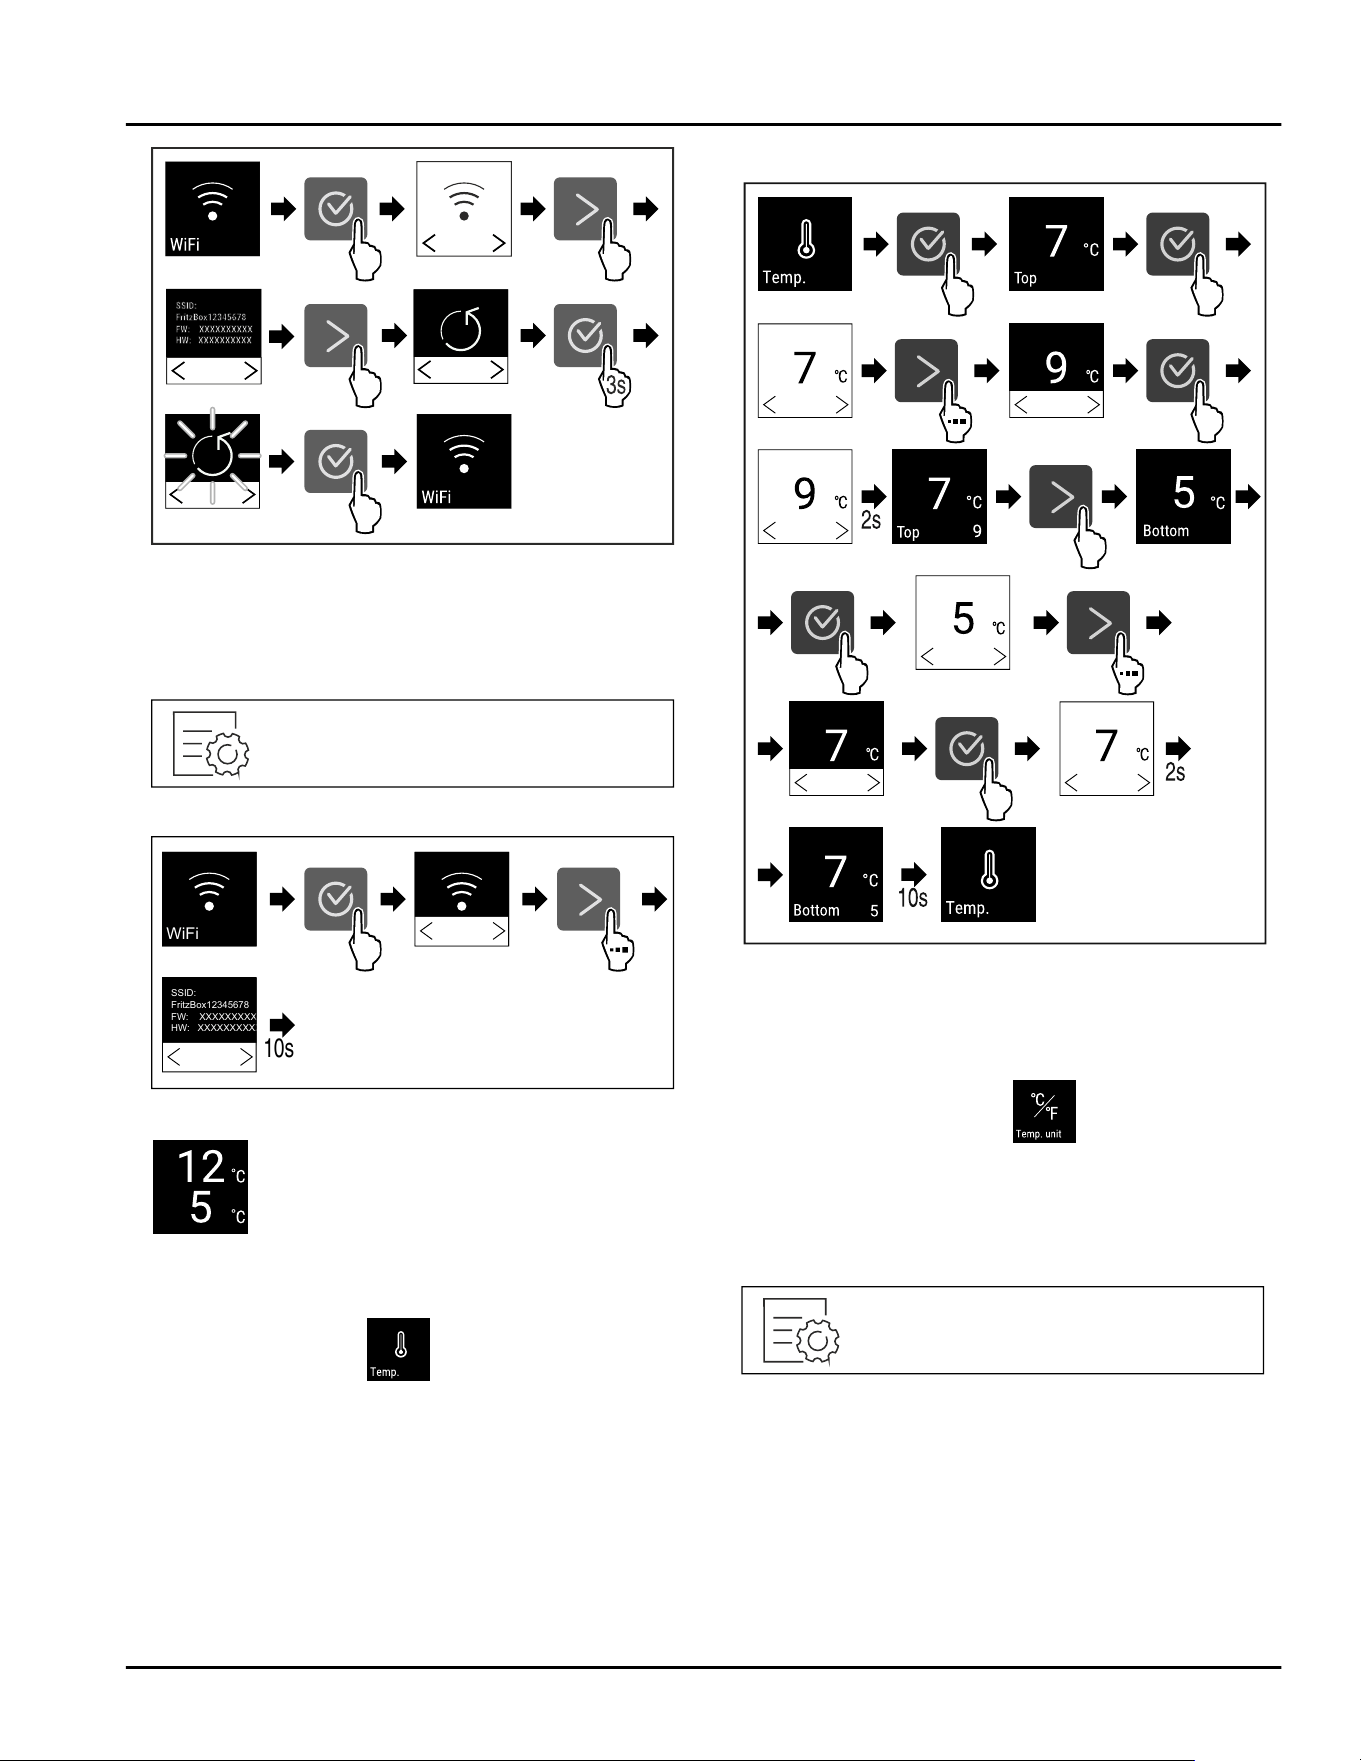
Fig. 19
► Carry out action steps according to the illustration.
▷ WiFi connection and other WiFi settings are reset to
factory settings.
Showing information about the WiFi connection
Fig.20
WiFi
SSID:
FritzBox12345678
FW: XXXXXXXXXX
HW: XXXXXXXXXX
10s
Fig.21
Fig. 22 Status display
► Carry out action steps according to the illustration.
7.2.4 Temperature
The temperature depends on the following factors:
-
How often the door is opened
-
How long the door is open for
-
The room temperature of the installation site
-
The type, temperature and amount of refrigerated
items
Setting the temperature
Fig. 23 Changing temperature from 7°C(45°F) to
9°C(48°F) and from 5°C(41°F) to 7°C(45°F)
► Carry out action steps according to the illustration.
▷ Temperature is set.
7.2.5 Temperature unit
Use this function to set the temperature unit. You can
set the temperature unit in either degrees Celsius or
degrees Fahrenheit.
Setting the temperature unit
Fig. 24
Use
12 * Depending on model and options
Fig. 25 Example illustration: Switching between
degrees Celsius or degrees Fahrenheit.
► Carry out action steps according to the illustration.
▷ Temperature unit is set.
7.2.6 SabbathMode
This function activates and deactivates SabbathMode.
If you activate this function, some electronic functions
are switched off. Your appliance thereby meets the reli‐
gious requirements of Jewish holidays such as the
Sabbath and complies with STAR-K Kosher certifica‐
tion.
Appliance status with active SabbathMode
The status display continuously shows SabbathMode.
All functions in the display except the Deactivating
SabbathMode function are disabled.
Active functions remain active.
The display remains bright when you close the door.
The interior lighting is deactivated.
Memories are not listed. The set time interval is
stopped.
Memories and warnings are not displayed.
There is no door alarm.
There is no temperature alarm.
After a power failure, the device returns to
SabbathMode.
Appliance status
Note
This appliance has certification from the “Institute for
Science and Halacha”. (www.machonhalacha.co.il)
You can find a list of STAR-K-certified appliances at
www.star-k.org/appliances.
Activating SabbathMode
Fig. 26
Fig.27
► Carry out action steps according to the illustration.
▷ SabbathMode is activated.
▷ Status display continuously shows SabbathMode.
Deactivating SabbathMode
SabbathMode is automatically deactivated after
80 hours. However, you can also manually deactivate
SabbathMode at any time:
Fig.28
► Carry out action steps according to the illustration.
▷ SabbathMode is deactivated.
▷ Doors locks automatically.
7.2.7 HumiditySelect
Use this function to set the humidity inside your appli‐
ance. Setting the humidity correctly will have a positive
effect on the structure of the corks during long-term
storage and prevent them from drying out.
Note
The frequency and duration for which the door is open
influence the humidity in the appliance.
You can choose between two humidity settings:
Humidity‐
Select
function
Temperature setting
on the appliance
Application/
energy consump‐
tion
Standard
(preset)
10(50)-12°C(54°F) average humidity
in the environ‐
ment between
50-80%
low energy
consumption of
the appliance
High 10(50)-12°C(54°F) average humidity
in the environ‐
ment < 50%
energy consump‐
tion of the appli‐
ance increases
Use
* Depending on model and options 13
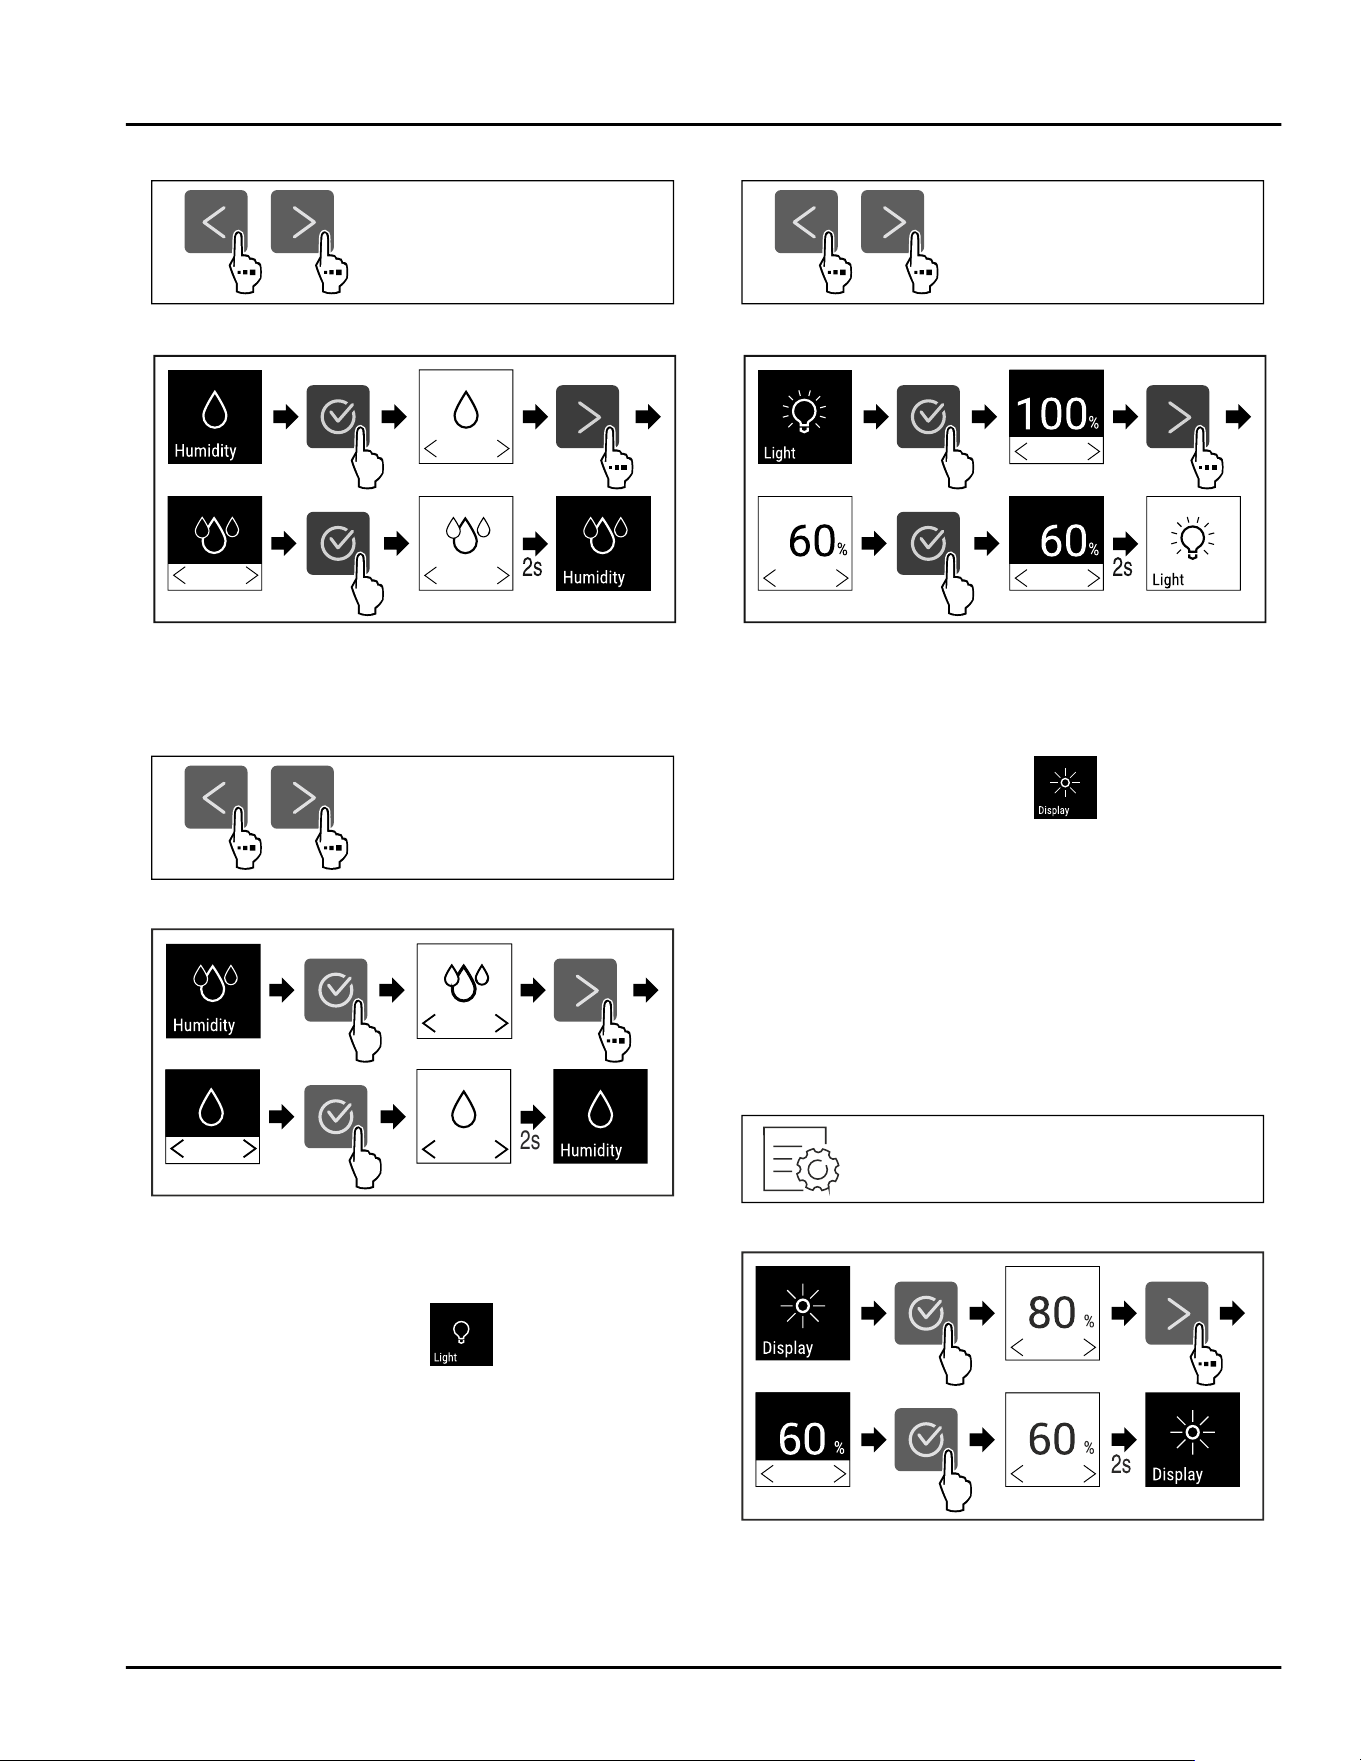
Increasing humidity in the appliance
Fig.29
Fig.30
► Carry out action steps according to the illustration.
▷ Humidity in the appliance increases.
Setting humidity in the appliance to standard
Fig.31
2s
Fig.32
► Carry out action steps according to the illustration.
▷ Humidity in the appliance decreases.
7.2.8 Lighting intensity
This setting allows the interior brightness to be
adjusted incrementally.
The following brightness values can be set:
-
Off
-
20%
-
40%
-
60%
-
80%
-
100% (default)
Setting lighting intensity
Fig.33
Fig.34
► Carry out action steps according to the illustration.
▷ The lighting intensity increases or decreases accord‐
ingly.
7.2.9 Display Brightness
Use this function to set the brightness of the display
gradually.
You can set the following brightness levels:
-
20%
-
40%
-
60%
-
80%
-
100% (default setting)
Setting the brightness
Fig.35
Fig. 36 Example illustration: Switching from 80% to 60%.
► Carry out action steps according to the illustration.
▷ Brightness is set.
Use
14 * Depending on model and options
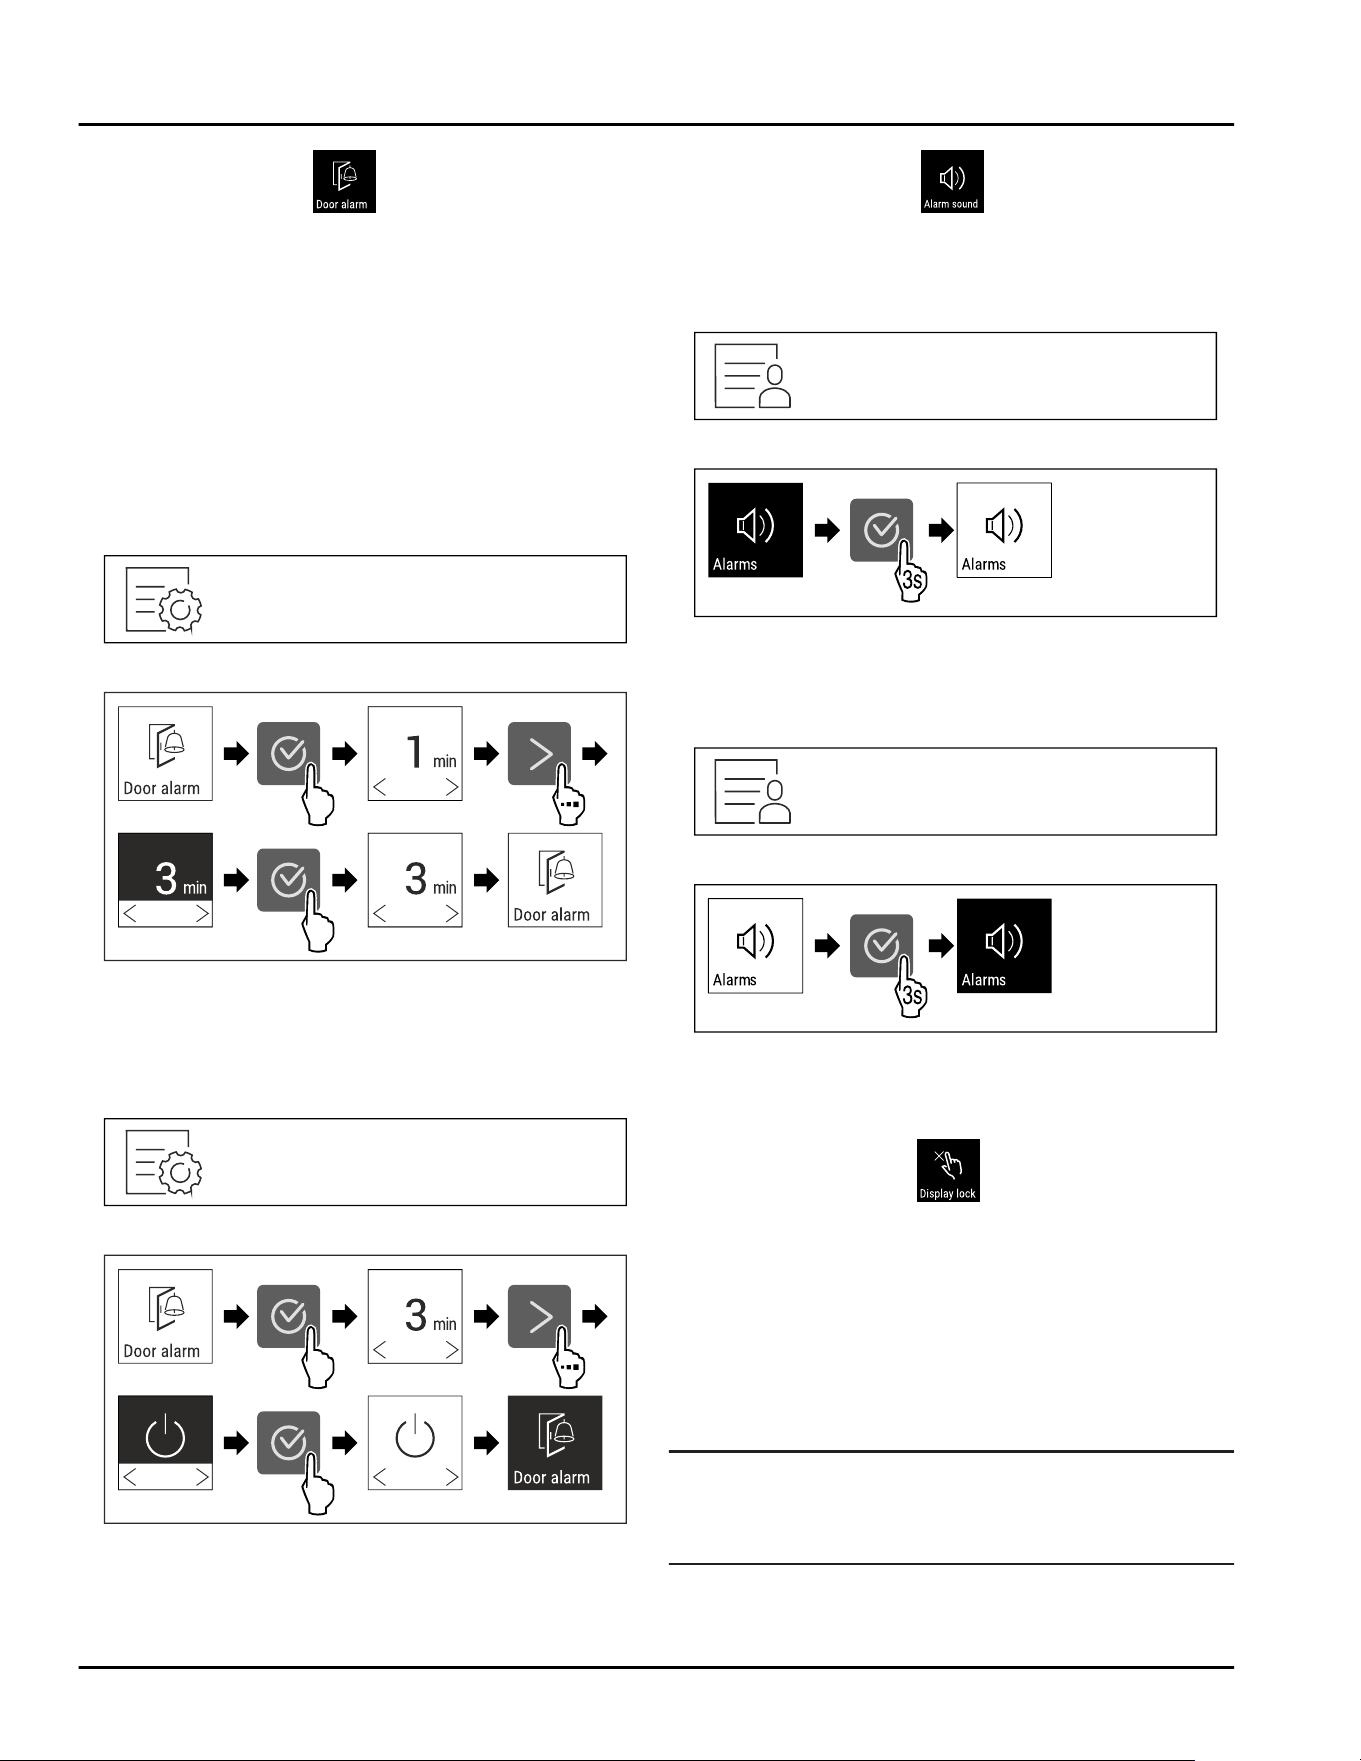
7.2.10 Door alarm
Use this function to activate or deactivate the door
alarm. The door alarm sounds if the door is open for
too long. The door alarm is activated upon delivery. You
can set how long to door can remain open until the
door alarm sounds.
You can set the following values:
-
1 minute
-
2 minutes
-
3 minutes
-
Off
Setting the door alarm
Fig.37
Fig. 38 Example illustration: Changing the door alarm from
1 minute to 3 minutes.
► Carry out action steps according to the illustration.
▷ Door alarm is set.
Deactivating door alarm
Fig.40
Fig. 41
► Carry out action steps according to the illustration.
▷ Door alarm is deactivated.
7.2.11 Alarm Sound
This function enables all alarm sounds, such as the
door alarm, to be switched on and off.
Activating Alarm Sound
Fig. 42
Fig.43
► Carry out action steps according to the illustration.
▷ Alarm Sound is activated.
Deactivating Alarm Sound
Fig.44
Fig.45
► Carry out action steps according to the illustration.
▷ Alarm Sound is deactivated.
7.2.12 Display lock
This setting avoids accidental use of the appliance.
Application:
-
Prevent settings and functions being changed unin‐
tentionally.
-
Prevent the appliance from being switched off unin‐
tentionally.
-
Prevent the temperature from being adjusted unin‐
tentionally.
Note
Despite the display lock being activated, the door lock
can be opened and locked at any time using the PIN
code (see 7.2.13Display PIN) .*
Use
* Depending on model and options 15
Activating display lock
Fig.46
Fig. 47 The example uses the preset display code 1 1 1.
► Carry out action steps according to the illustration.
▷ The display lock is activated.
▷ The status display appears.
Temporarily unlocking the display lock
Fig.48
► Carry out action steps according to the illustration.
▷ The display lock is deactivated.
▷ The status display appears.
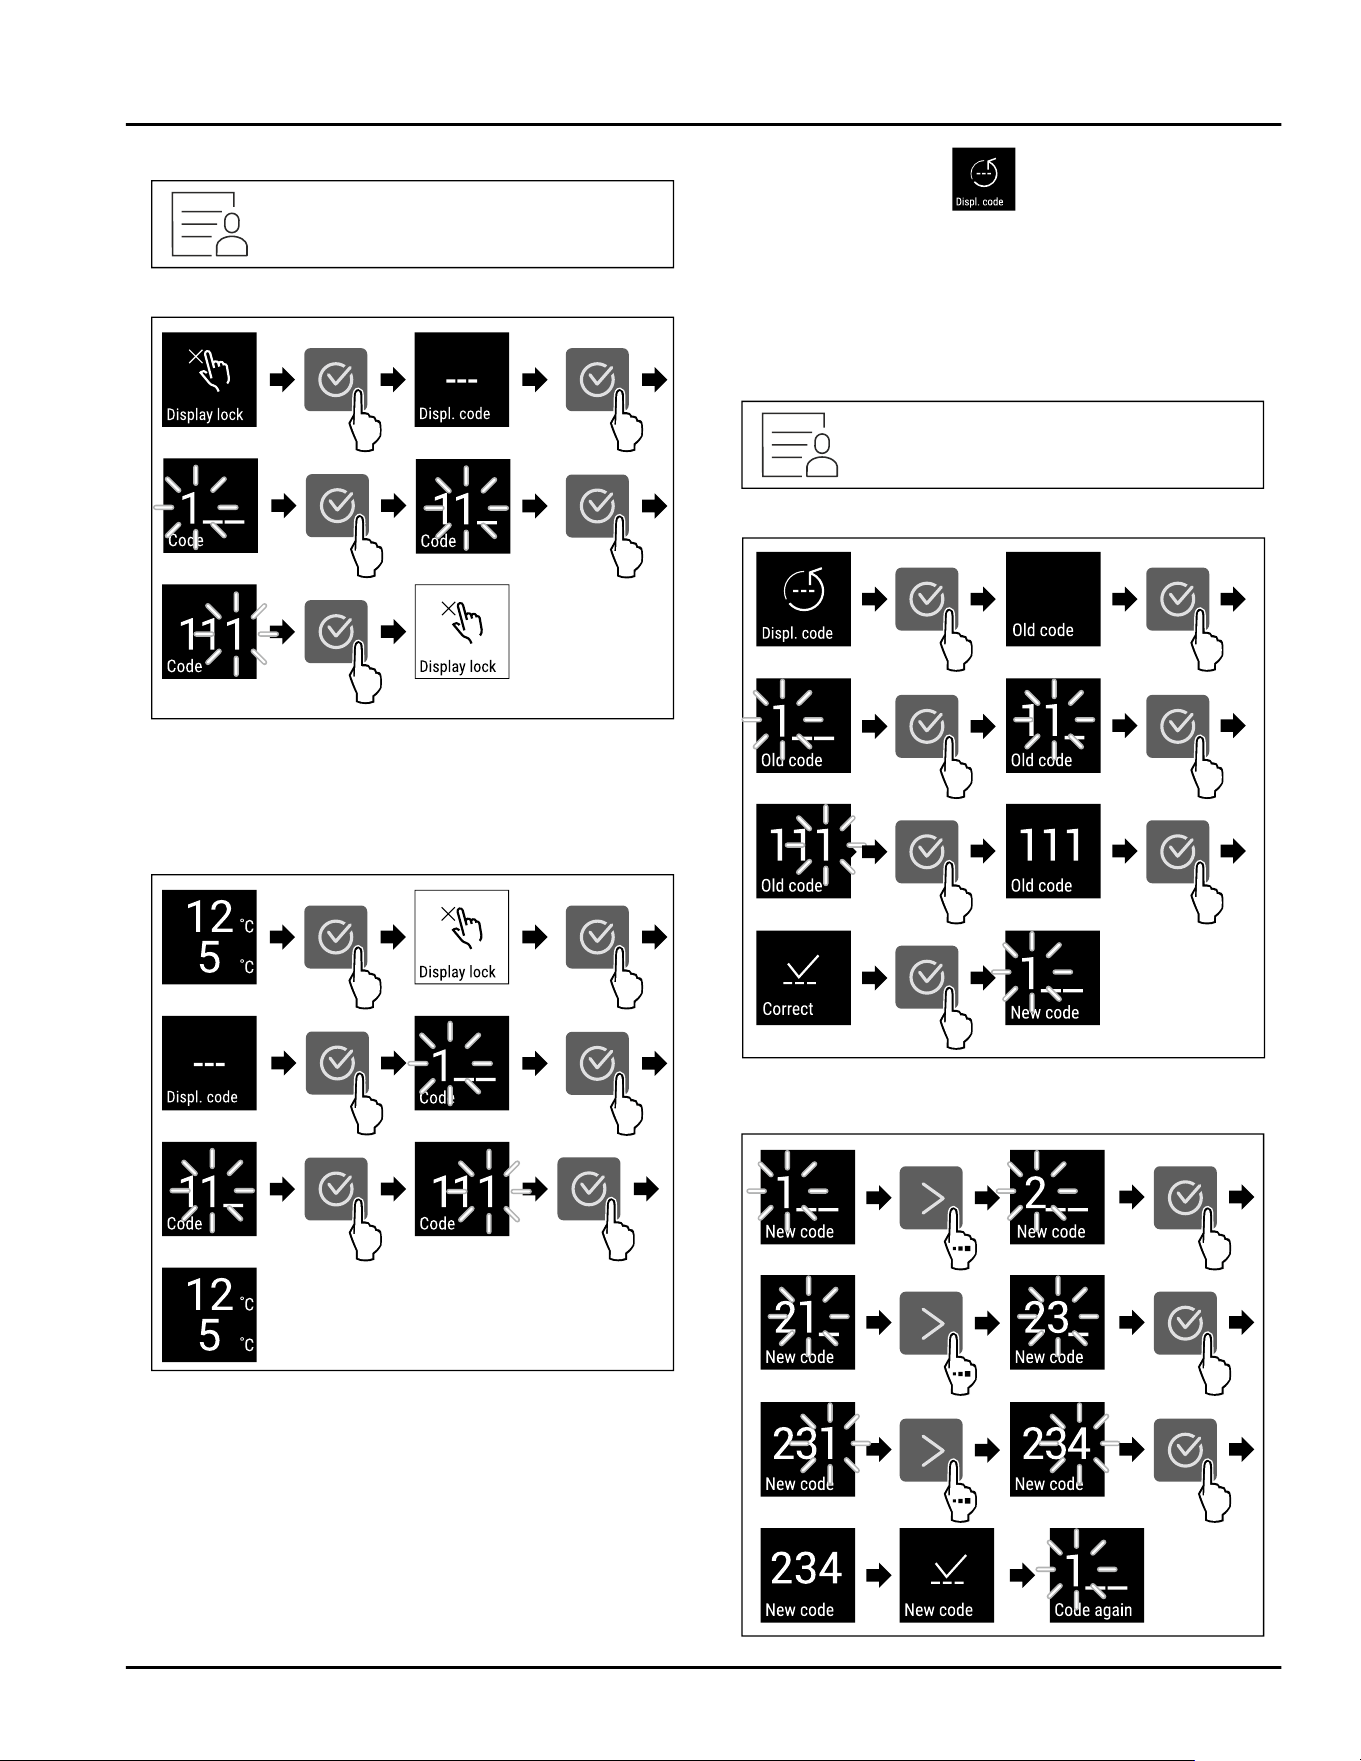
7.2.13 Display PIN
Use this function to change the display PIN. The
display PIN is set to 1 1 1 upon delivery. If you have
forgotten the display PIN, you can reset the display PIN
by resetting the appliance to the factory settings.
(see 7.2.18 Resetting to factory settings )
Changing the display PIN
Fig. 49
Fig. 50 Example illustration: Changing the display PIN from
the factory setting 1 1 1 to 234
Use
16 * Depending on model and options
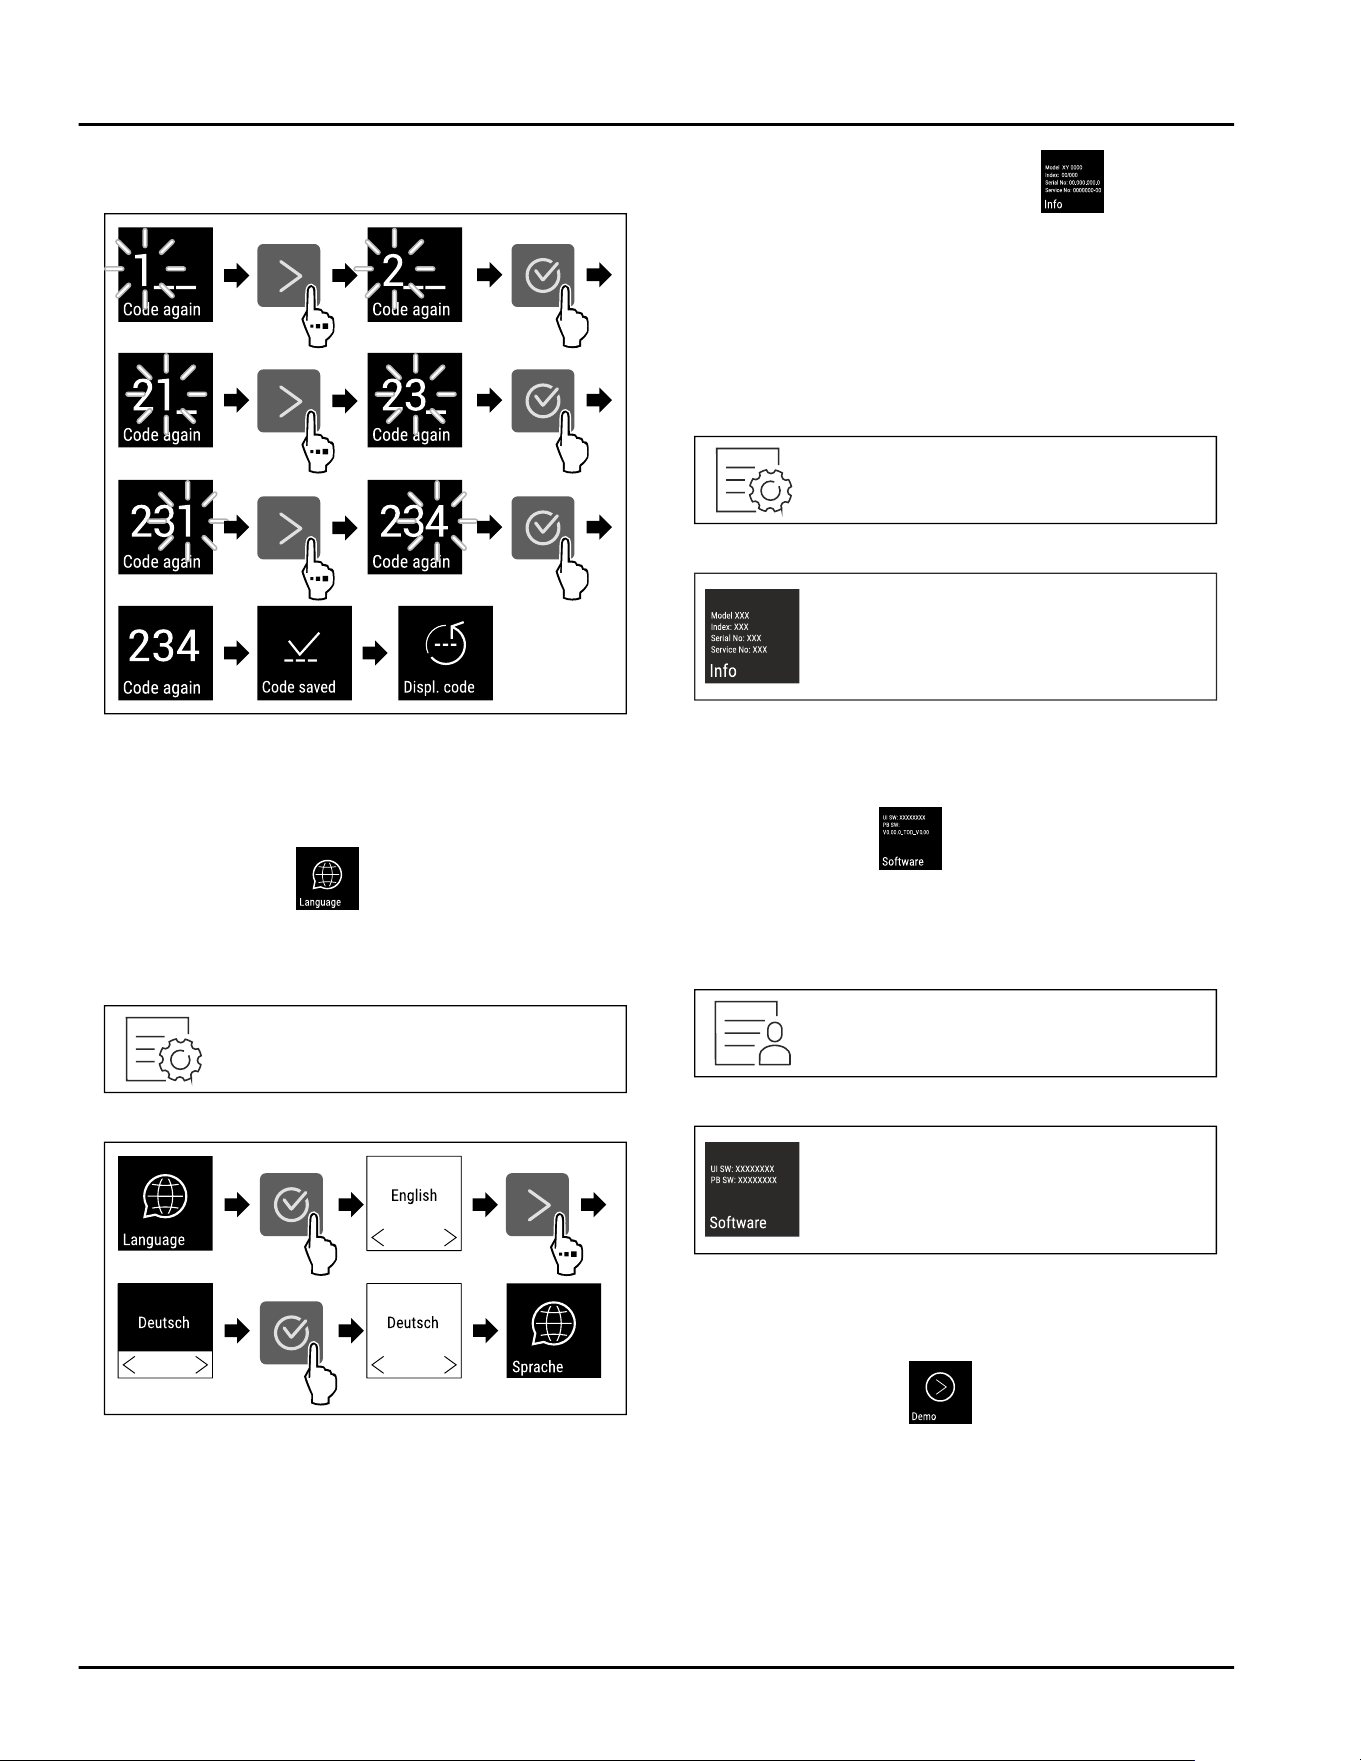
Fig. 50 Example illustration: Changing the display PIN from
the factory setting 1 1 1 to 234
Fig. 50 Example illustration: Changing the display PIN from
the factory setting 1 1 1 to 234
► Carry out action steps according to the illustration.
▷ The display PIN has been changed.
7.2.14 Language
This setting allows the display language to be set.
Setting the language
Fig.51
Fig.52
► Carry out action steps according to the illustration.
▷ The selected language is set.
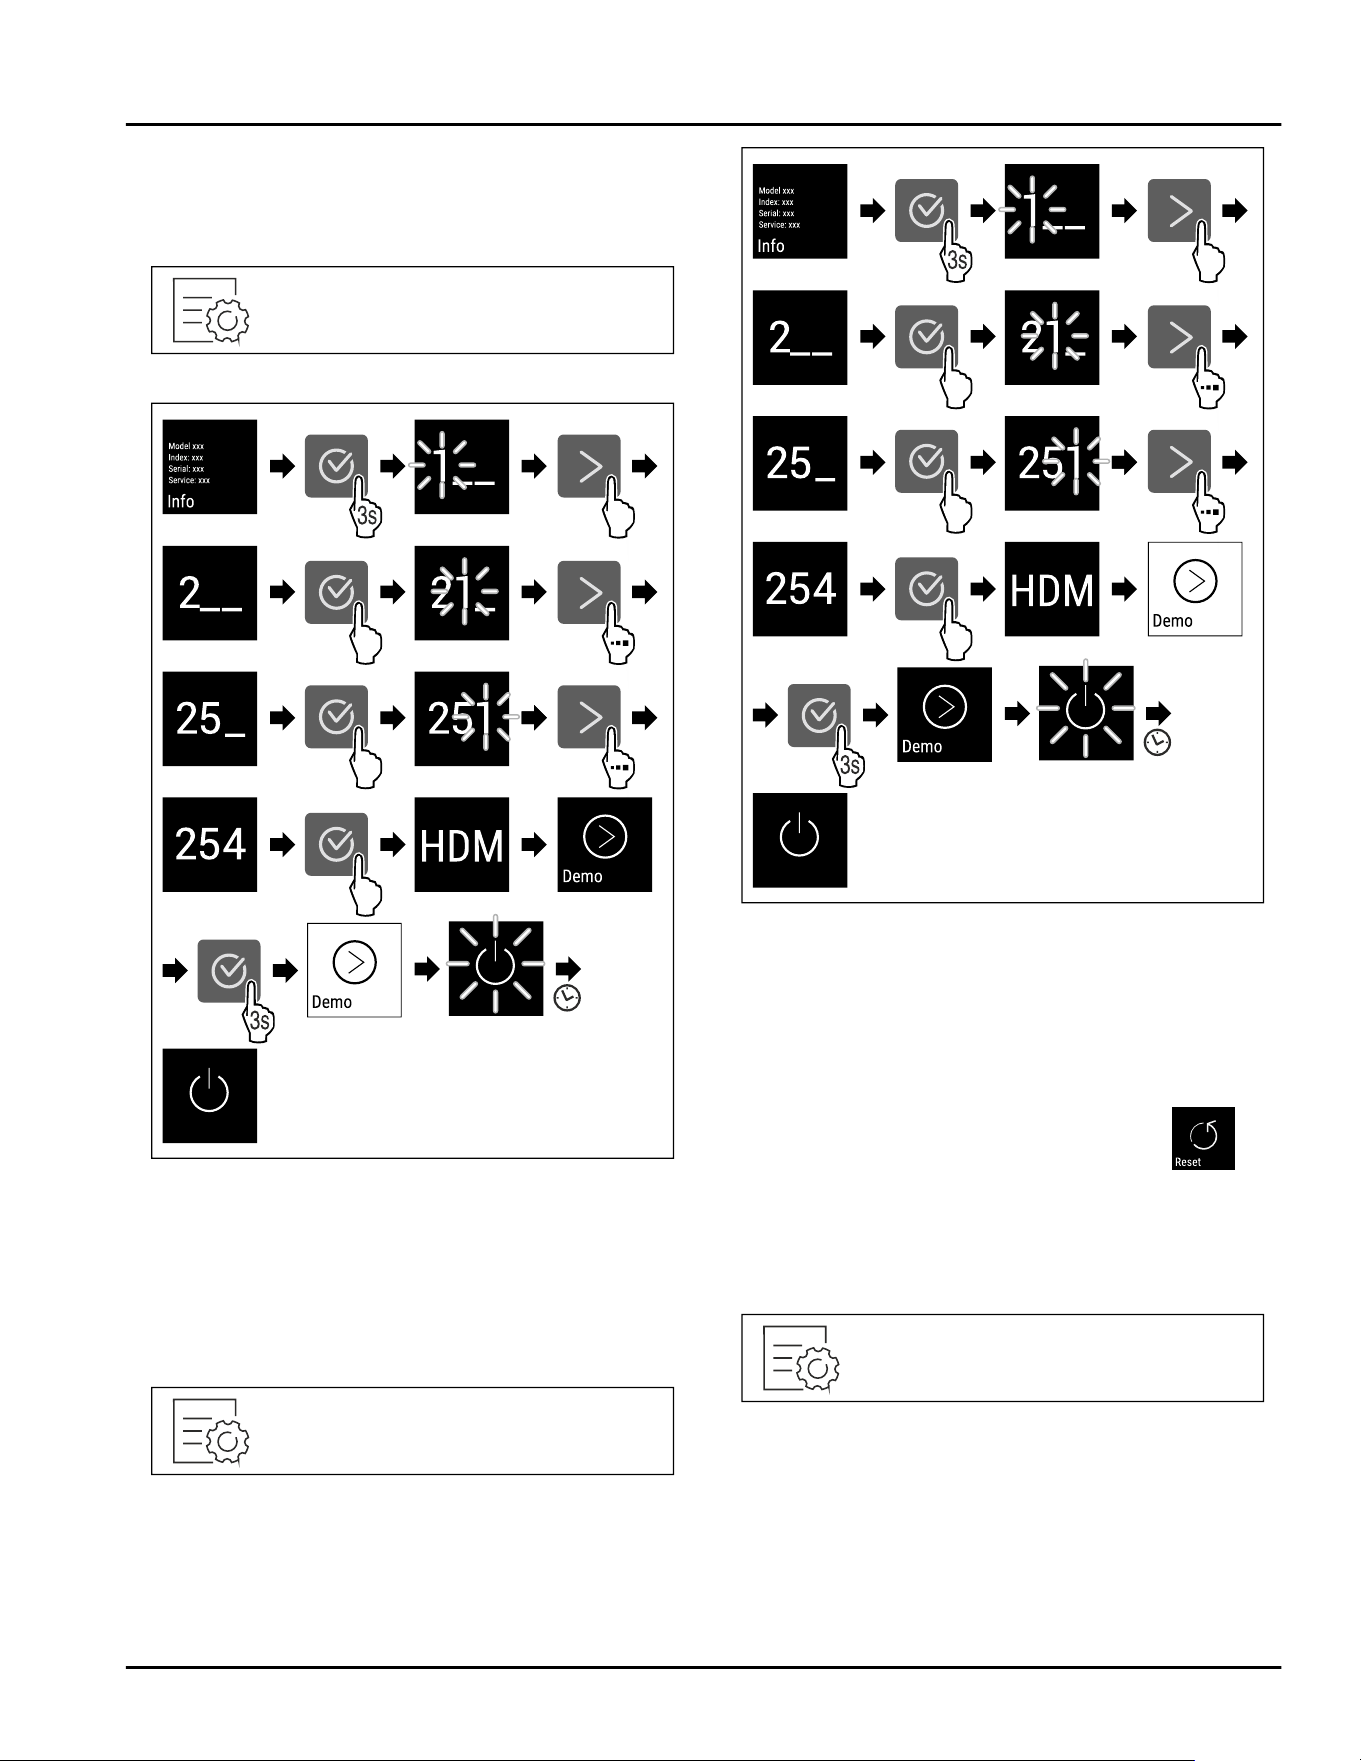
7.2.15 Appliance information
Use this function to display the model name, index,
serial number and service number of your appliance.
You will need the appliance information when you
contact customer service. (see 10.4 Customer Service)
You also use this function to open the expanded menu.
(see3 Functionality of the Touch display)
Display appliance information
Fig.53
Fig.54
► Carry out action steps according to the illustration.
▷ Display shows the appliance information.
7.2.16 Software
Use this function to display the software version of
your appliance.
Display software version
Fig.55
Fig.56
► Carry out action steps according to the illustration.
▷ Display indicates the software version.
7.2.17 Demo mode
Demo mode is a special feature for dealers who want
to demonstrate appliance features. If you activate
demo mode, all refrigeration functions are deactivated.
If you switch on your appliance and a “D” appears on
the status display, demo mode is already activated.
Use
* Depending on model and options 17
If you activate and then deactivate demo mode, the
appliance will be reset to factory defaults.
(see 7.2.18 Resetting to factory settings )
Activating demo mode
Fig.57
Fig.58
► Carry out action steps according to the illustration.
▷ Demo mode is activated.
▷ Appliance is switched off.
► Switch on the appliance. (see4.1 Switching on appli‐
ance (first use))
▷ “D” appears in the status display.
Deactivating demo mode
Fig. 59
Fig.60
► Carry out action steps according to the illustration.
▷ Demo mode is deactivated.
▷ Appliance is switched off.
► Switch on the appliance. (see4.1 Switching on appli‐
ance (first use))
▷ Appliance is reset to factory settings.
7.2.18 Resetting to factory settings
Use this function to reset all settings to factory
settings. All settings you have made so far are reset to
their original settings.
Performing a reset
Fig.61
Use
18 * Depending on model and options
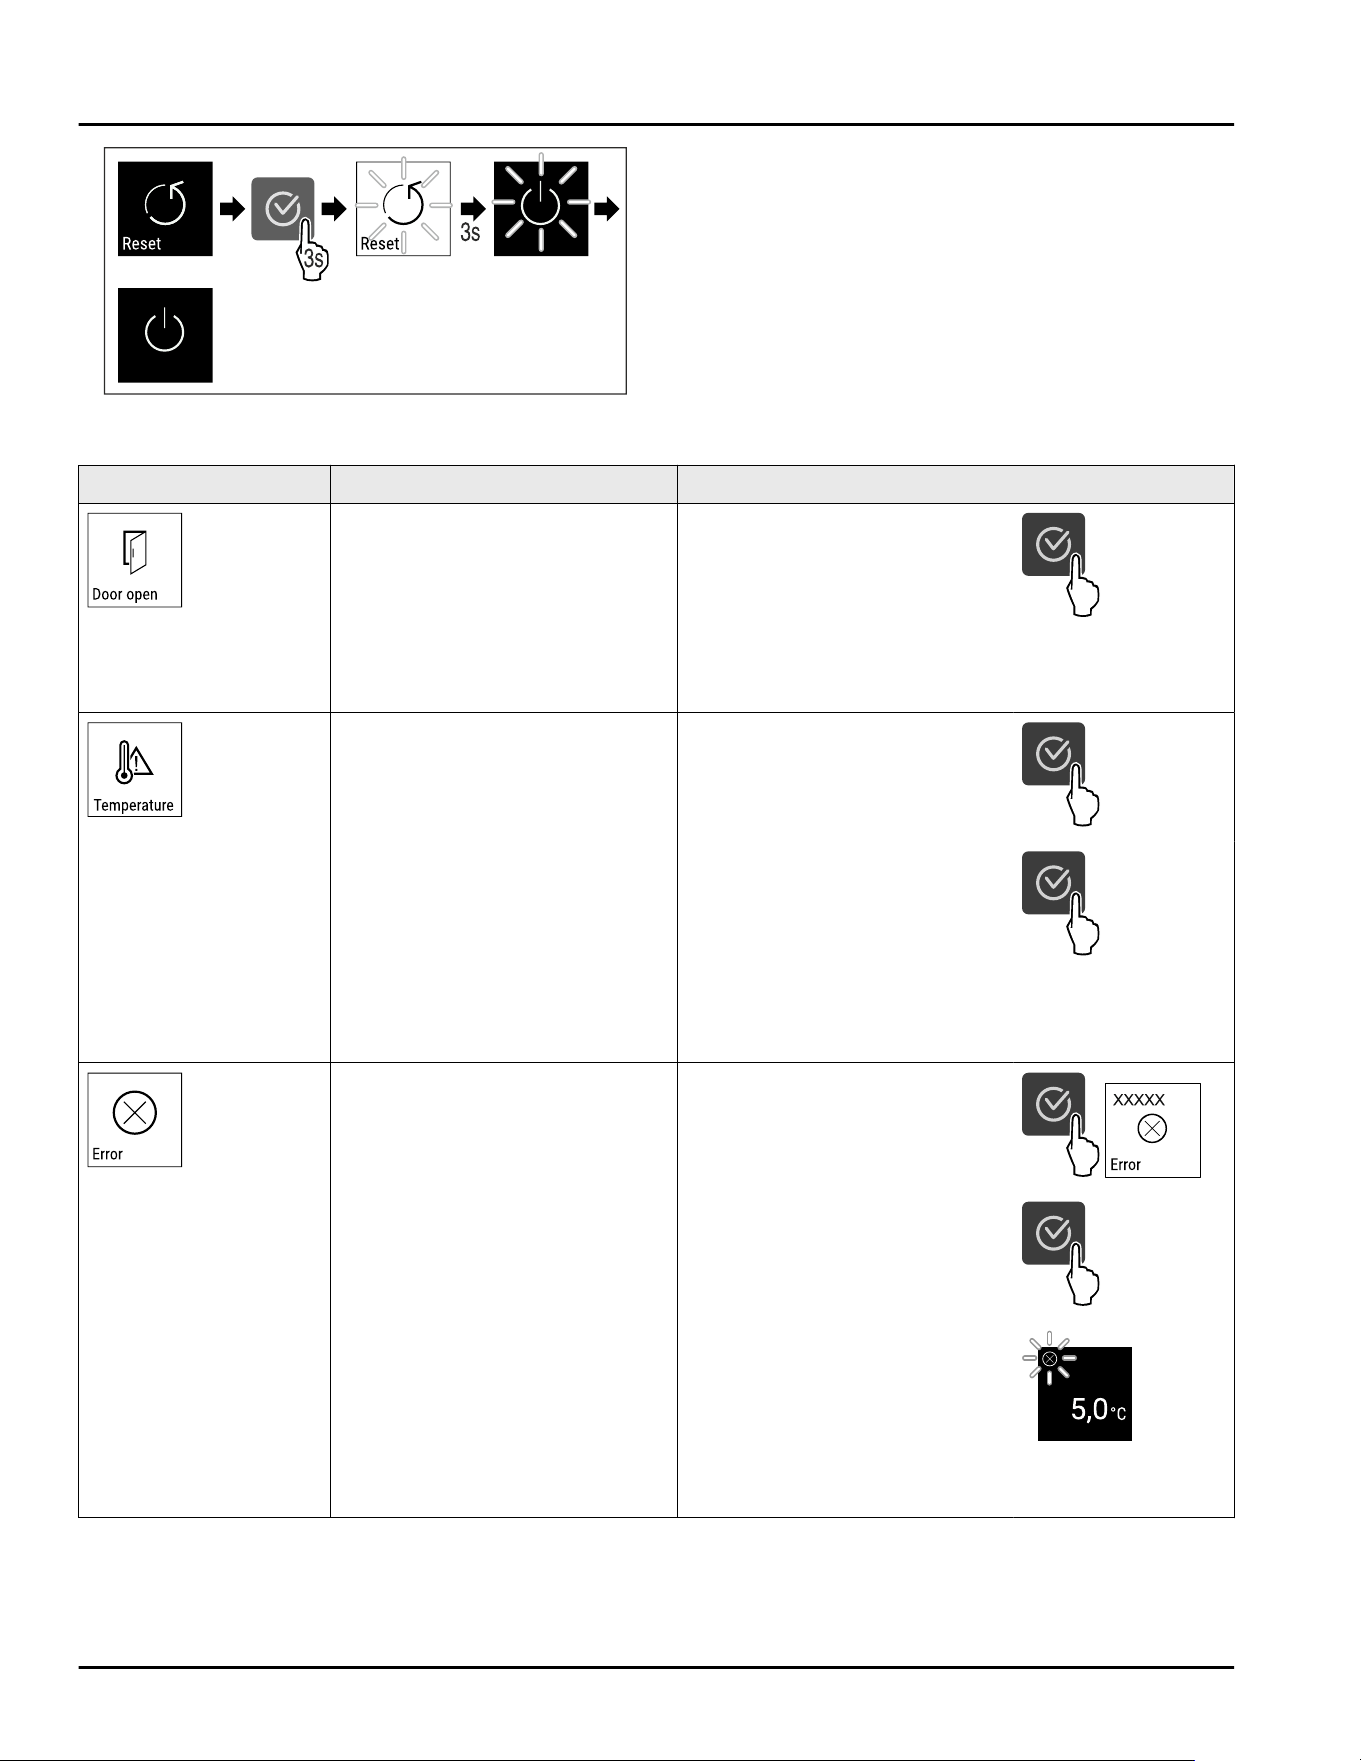
Fig. 62
► Carry out action steps according to the illustration.
▷ Appliance is reset.
▷ Appliance is switched off.
► Restart the appliance. (see 4.1 Switching on appli‐
ance (first use))
7.3 Messages
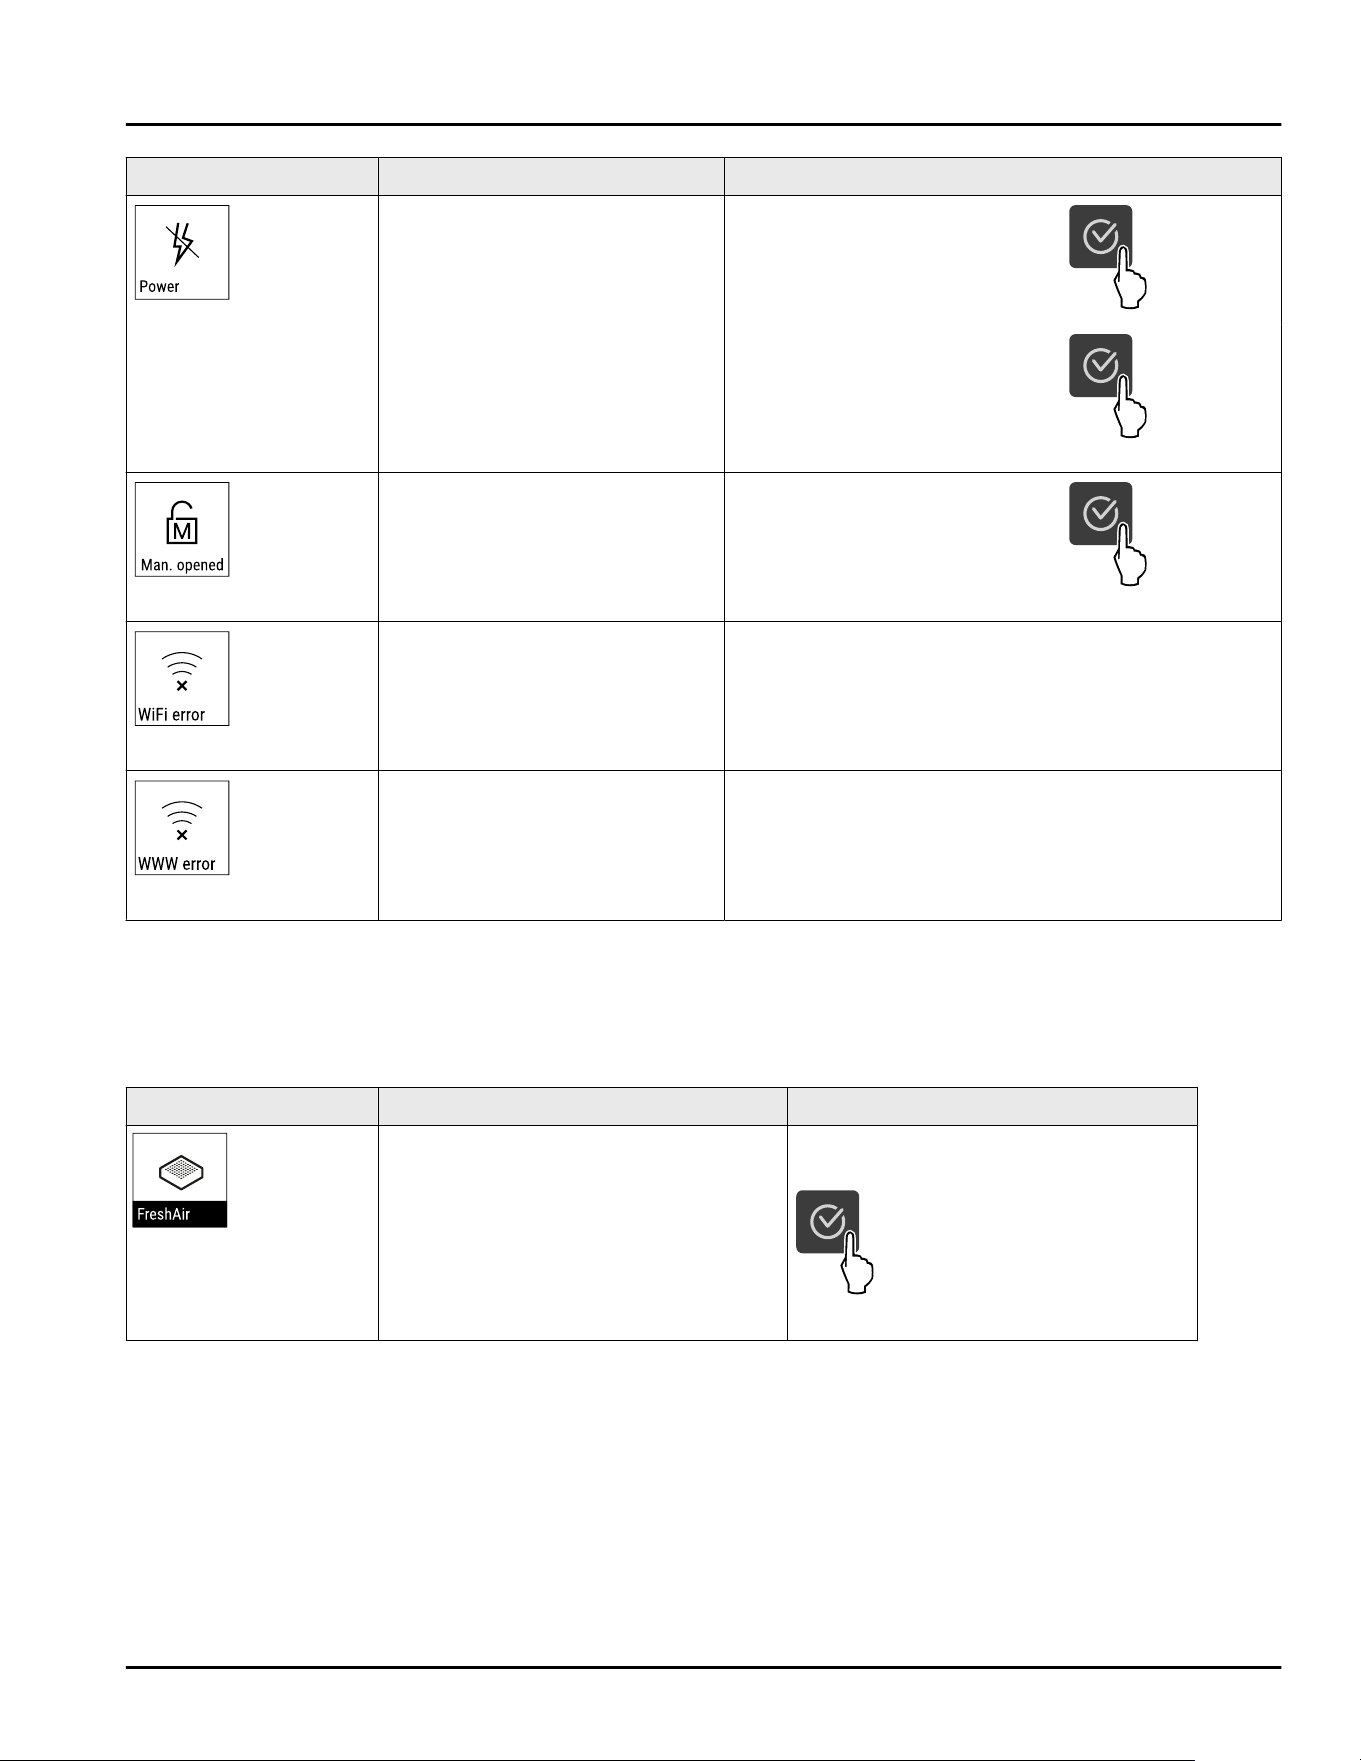
7.3.1 Warnings
Warnings are issued by means of an audio signal and
visually via a symbol on the display. The signal gets
louder until the warning is acknowledged.
Message Cause Remedy
Door open
The message appears if the
door is open for too long.
Close the door.
Press the confirmation button.
Alarm is ended.
Note
You can set how long it takes
for this message to appear
(see 7.2.10Door alarm ) .
Temperature alarm
This message appears if the
temperature does not match the
set temperature. Reasons for
the differences in temperature
can be:
⁃ Warm items for refrigeration
have been placed inside.
⁃ Too much warm room air
flowed in when rearranging and
removing refrigerated products.
⁃ The power was cut off for a
prolonged period.
Press the confirmation button.
The warmest temperature is
displayed.
Press the confirmation button.
The current temperature
flashes and the display alter‐
nates with the temperature
alarm symbol until the set
temperature is reached.
Check the quality of the chilled
goods.
Error
The appliance is defective, there
is an appliance error or an appli‐
ance module indicates an error.
Relocate the chilled goods.
Press the confirmation button.
Error code is displayed.
Press the confirmation button.
If present, another error code is
displayed.
or
Status screen with flashing
error symbol is displayed.
Pressing the navigation
buttons displays error code(s)
again.
Note error code(s) and contact
customer service.
Use
* Depending on model and options 19
Message Cause Remedy
Power failure
The message appears after an
interruption in the power supply
if the temperature is above the
alarm limit when the power
returns.
Press the confirmation button.
The warmest temperature is
displayed.
Press the confirmation button.
Alarm is ended and the current
temperature is displayed.
Check the quality of the chilled
goods.
Manually opened
The message appears if the
electronically closed door has
been opened manually.
Close the door.
Press the confirmation button.
Alarm is ended.
WLAN error
WLAN connection is interrupted. Check the connection.
Press the confirmation button.
Alarm is ended.
WLAN WWW error
The message appears if there is
no Internet connection via
WLAN.
Check the connection.
Press the confirmation button.
Alarm is ended.
7.3.2 Reminders
Reminders appear when you are prompted to take
action. They are issued by means of an audio signal
and visually via a symbol on the display. Acknowledge
the message by pressing the confirmation button.
Message Cause Remedy
Replace FreshAir acti‐
vated charcoal filter
The message appears every 6 months. Replace FreshAir activated charcoal
filter.
Reminder is closed.
8 Equipment
8.1 Safety lock
The appliance door is fitted with an electronic lock.
Application:
-
Lock and unlock with the door code.
-
The door locks automatically after a power outage
(cannot be deactivated).
8.1.1 Emergency unlocking
You can open the door can with the emergency release
key if there is a power failure.
Equipment
20 * Depending on model and options
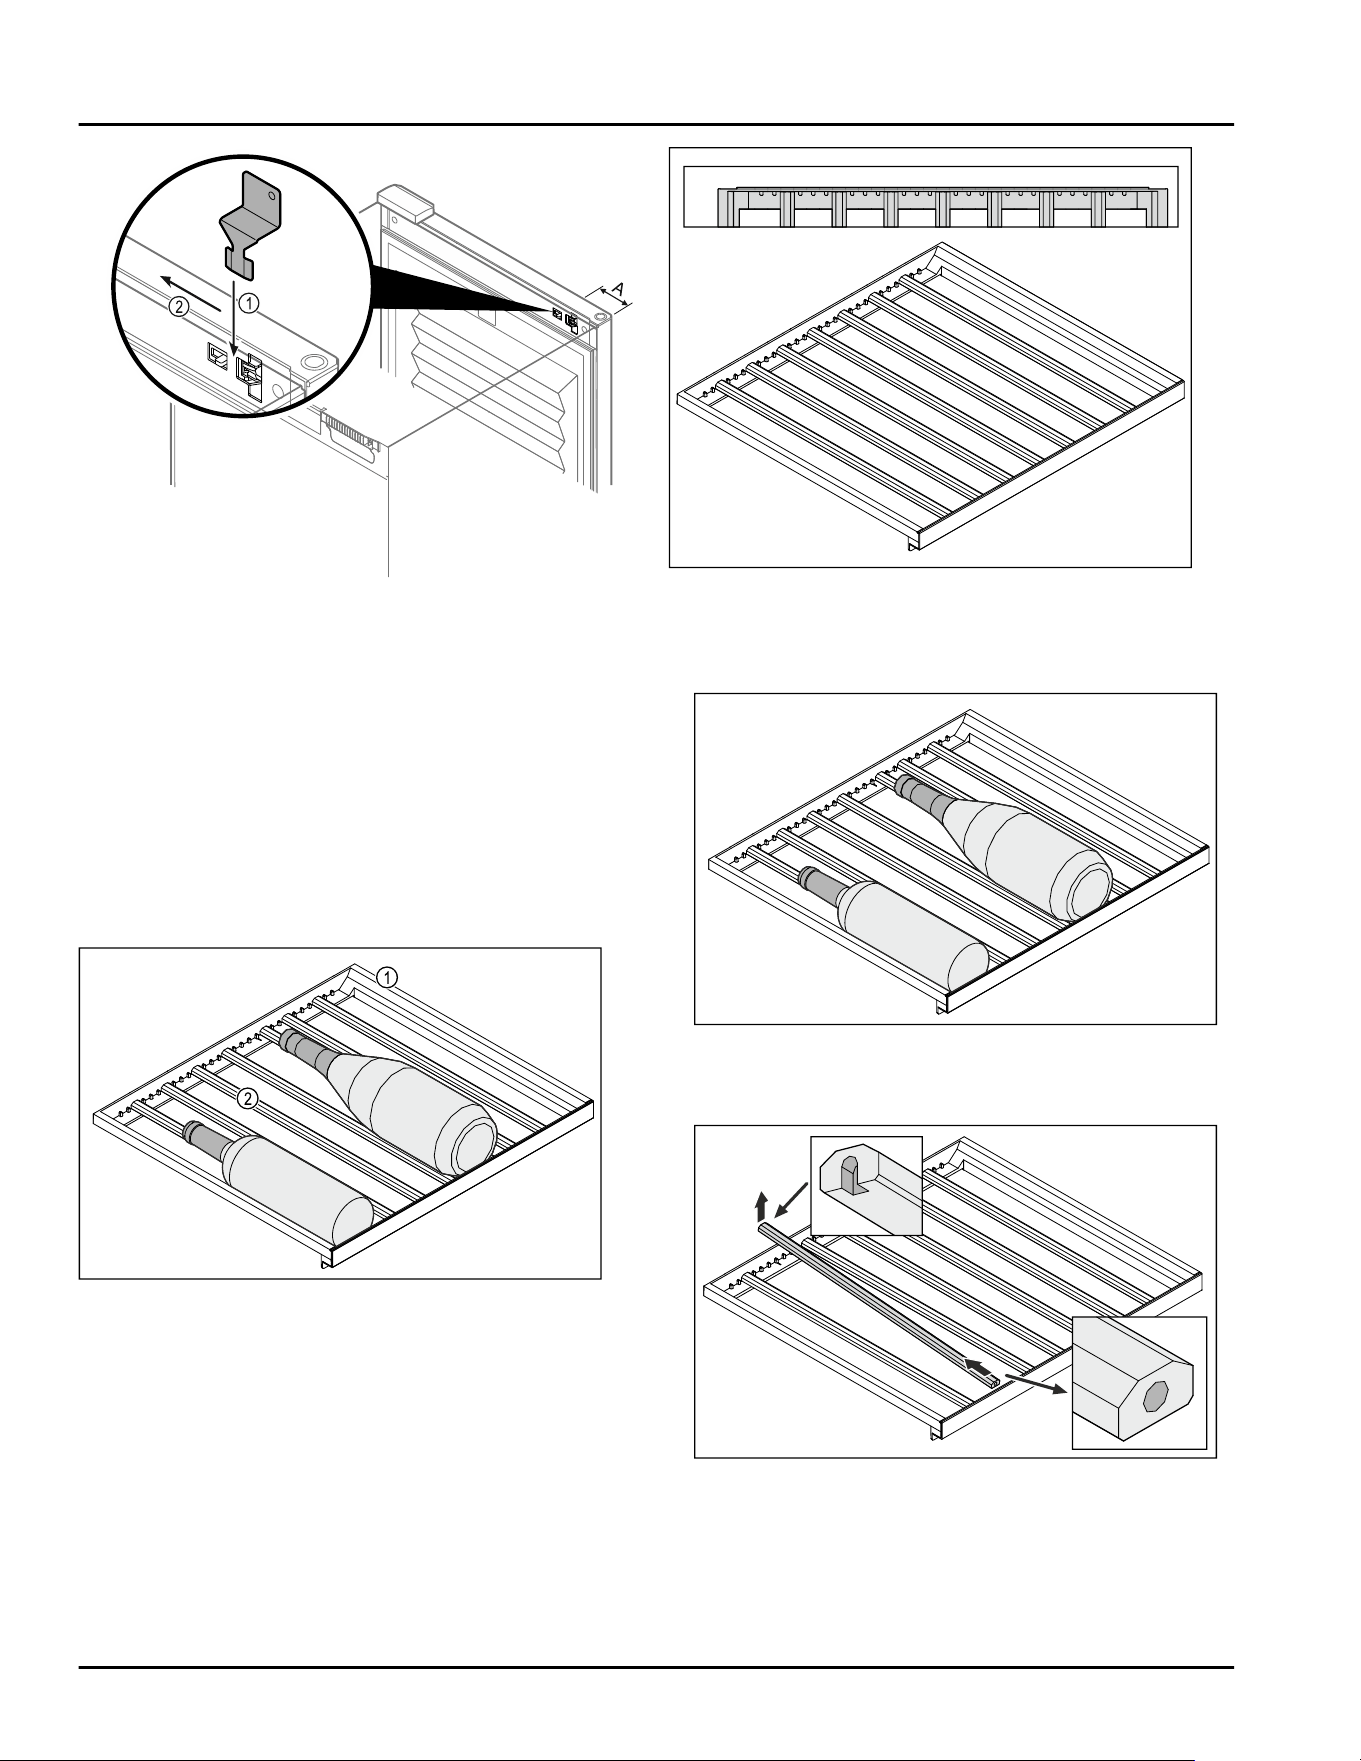
Fig.63
► Insert the emergency release key in the specified
position Fig.63(A) ≈ 100mm(3 15/16in).
► Insert the emergency release key Fig. 63 (1) from the
top between the door and device body until it
reaches the stop.
► Pull the emergency release key in the direction of
the hinge. Fig.63(2)
▷ The lock is released. You can open the door.
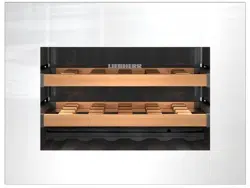
8.2 Wooden grid shelf
Appliances are equipped with a wooden grid shelf for
wine storage.
Fig. 64 Example illustration
(1)
Wooden grid shelf (2) Rail
The standard positions for the rails are indicated with
notches. If you use these, you can store the maximum
number of bottles. (see 5.2 Storage sketches)
Fig. 65 Arrangement of rails for the maximum number of
bottles.
8.2.1 Moving the rail
Fig. 66 Example illustration
To store larger or smaller bottles, you can remove the
rails in the wooden grid shelf.
Fig. 67 Example illustration
► Lift the back of the rail up and pull it out.
Equipment
* Depending on model and options 21
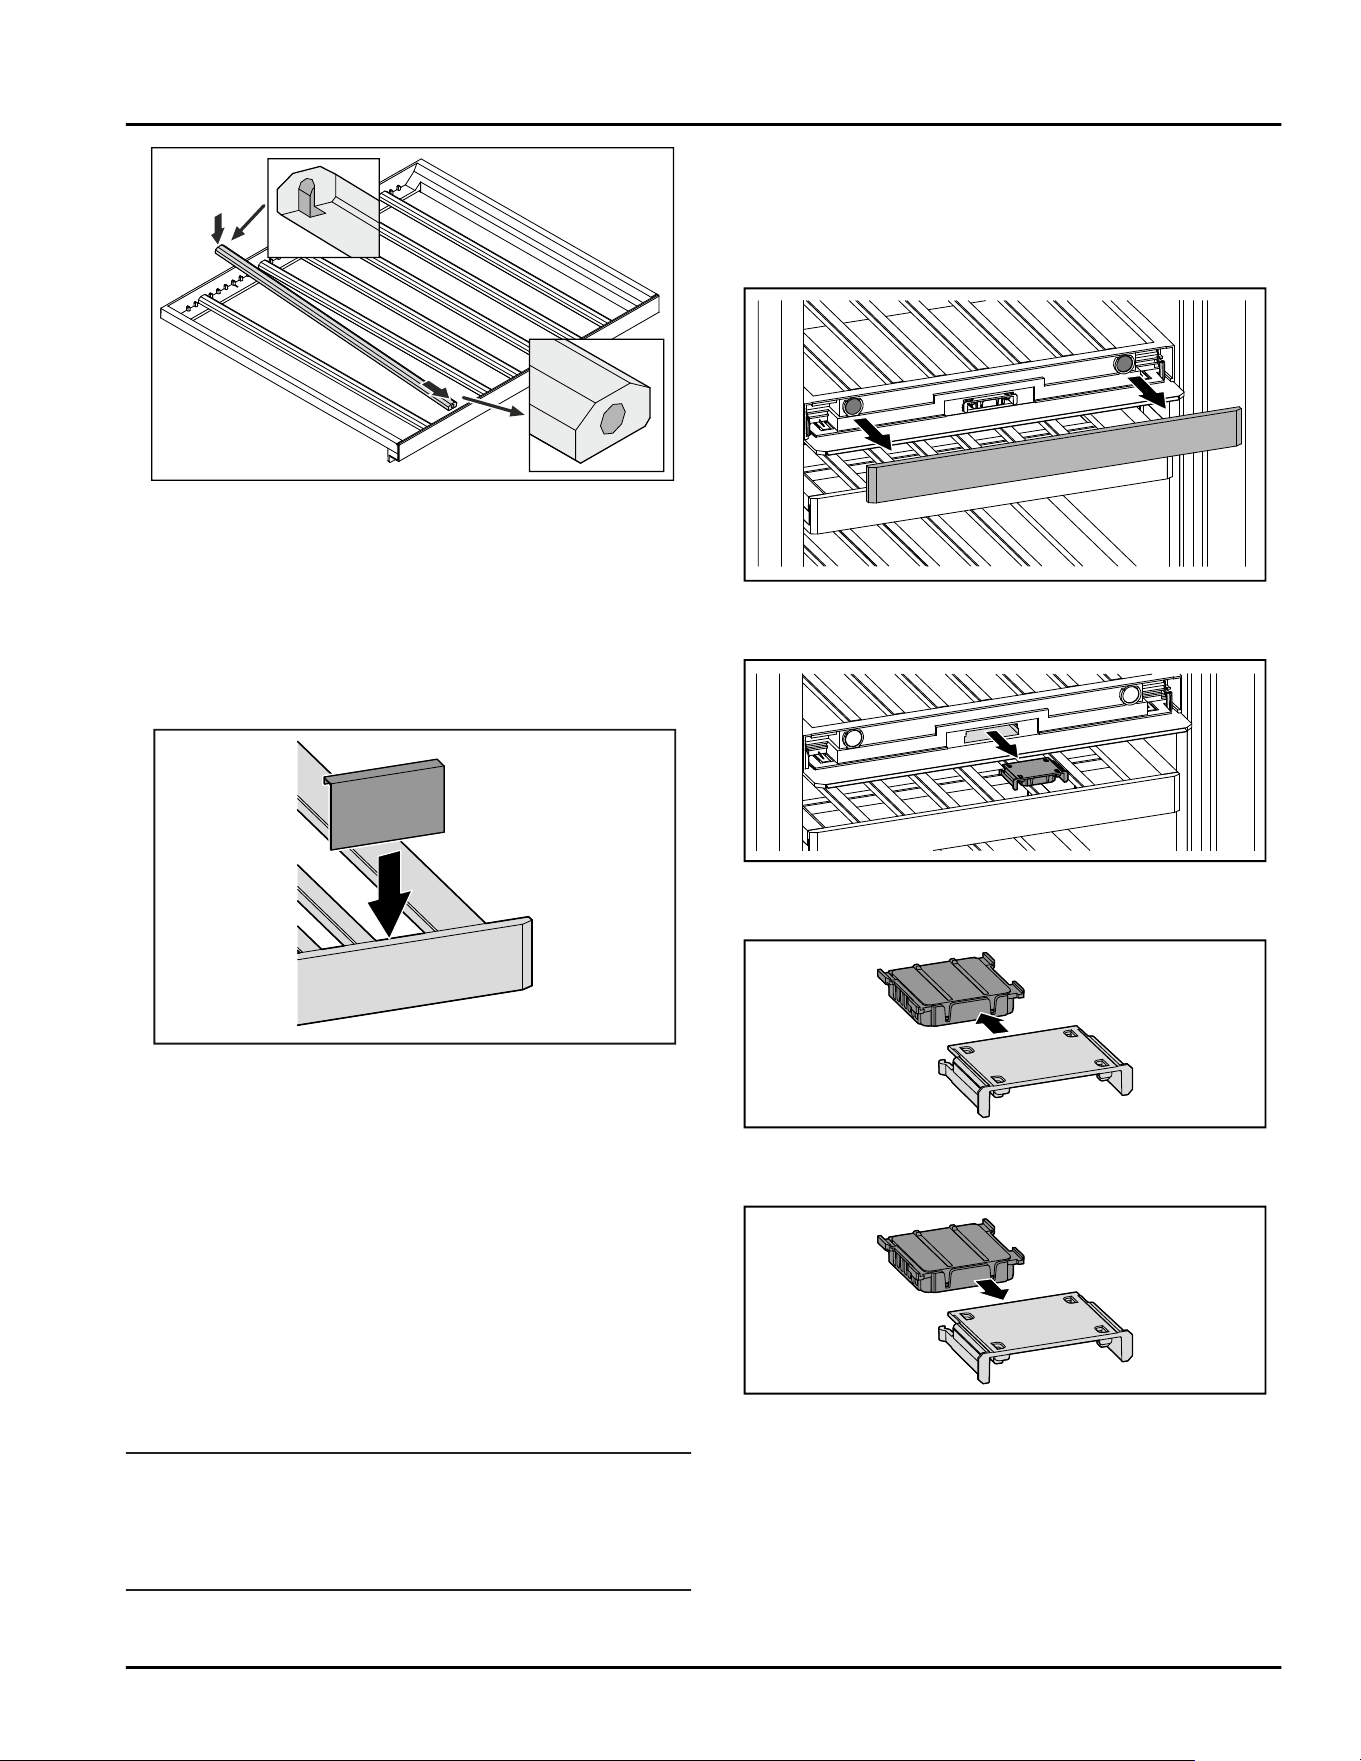
Fig. 68 Example illustration
► Insert the rail in the desired position.
8.3 Description labels
Description labels as accessories can be purchased
from your specialist dealer. You can use these to note
the types of wine that are stored in the respective
compartment.
Fig. 69
► Attach the description label from above.
9 Maintenance
9.1 FreshAir activated charcoal filter
Wine is constantly developing according to its ambient
conditions, so air quality is essential for preservation.
The FreshAir activated charcoal filter guarantees
optimal air quality.
❑
Change the activated charcoal filter every 6 months.
❑
Dispose of the activated charcoal filter with regular
household waste.
Note
FreshAir activated charcoal filters can be purchased
from the Liebherr Service Center. The address for your
respective country can be found on the back of the
instructions.
9.1.1 Replacing the FreshAir activated char‐
coal filter
Must be carried out multiple times depending on the
equipment.
Fig.70
► Remove the panel.
Fig.71
► Pull the drawer out.
Fig.72
► Pull out the filter.
Fig.73
► Insert the new filter.
Maintenance
22 * Depending on model and options
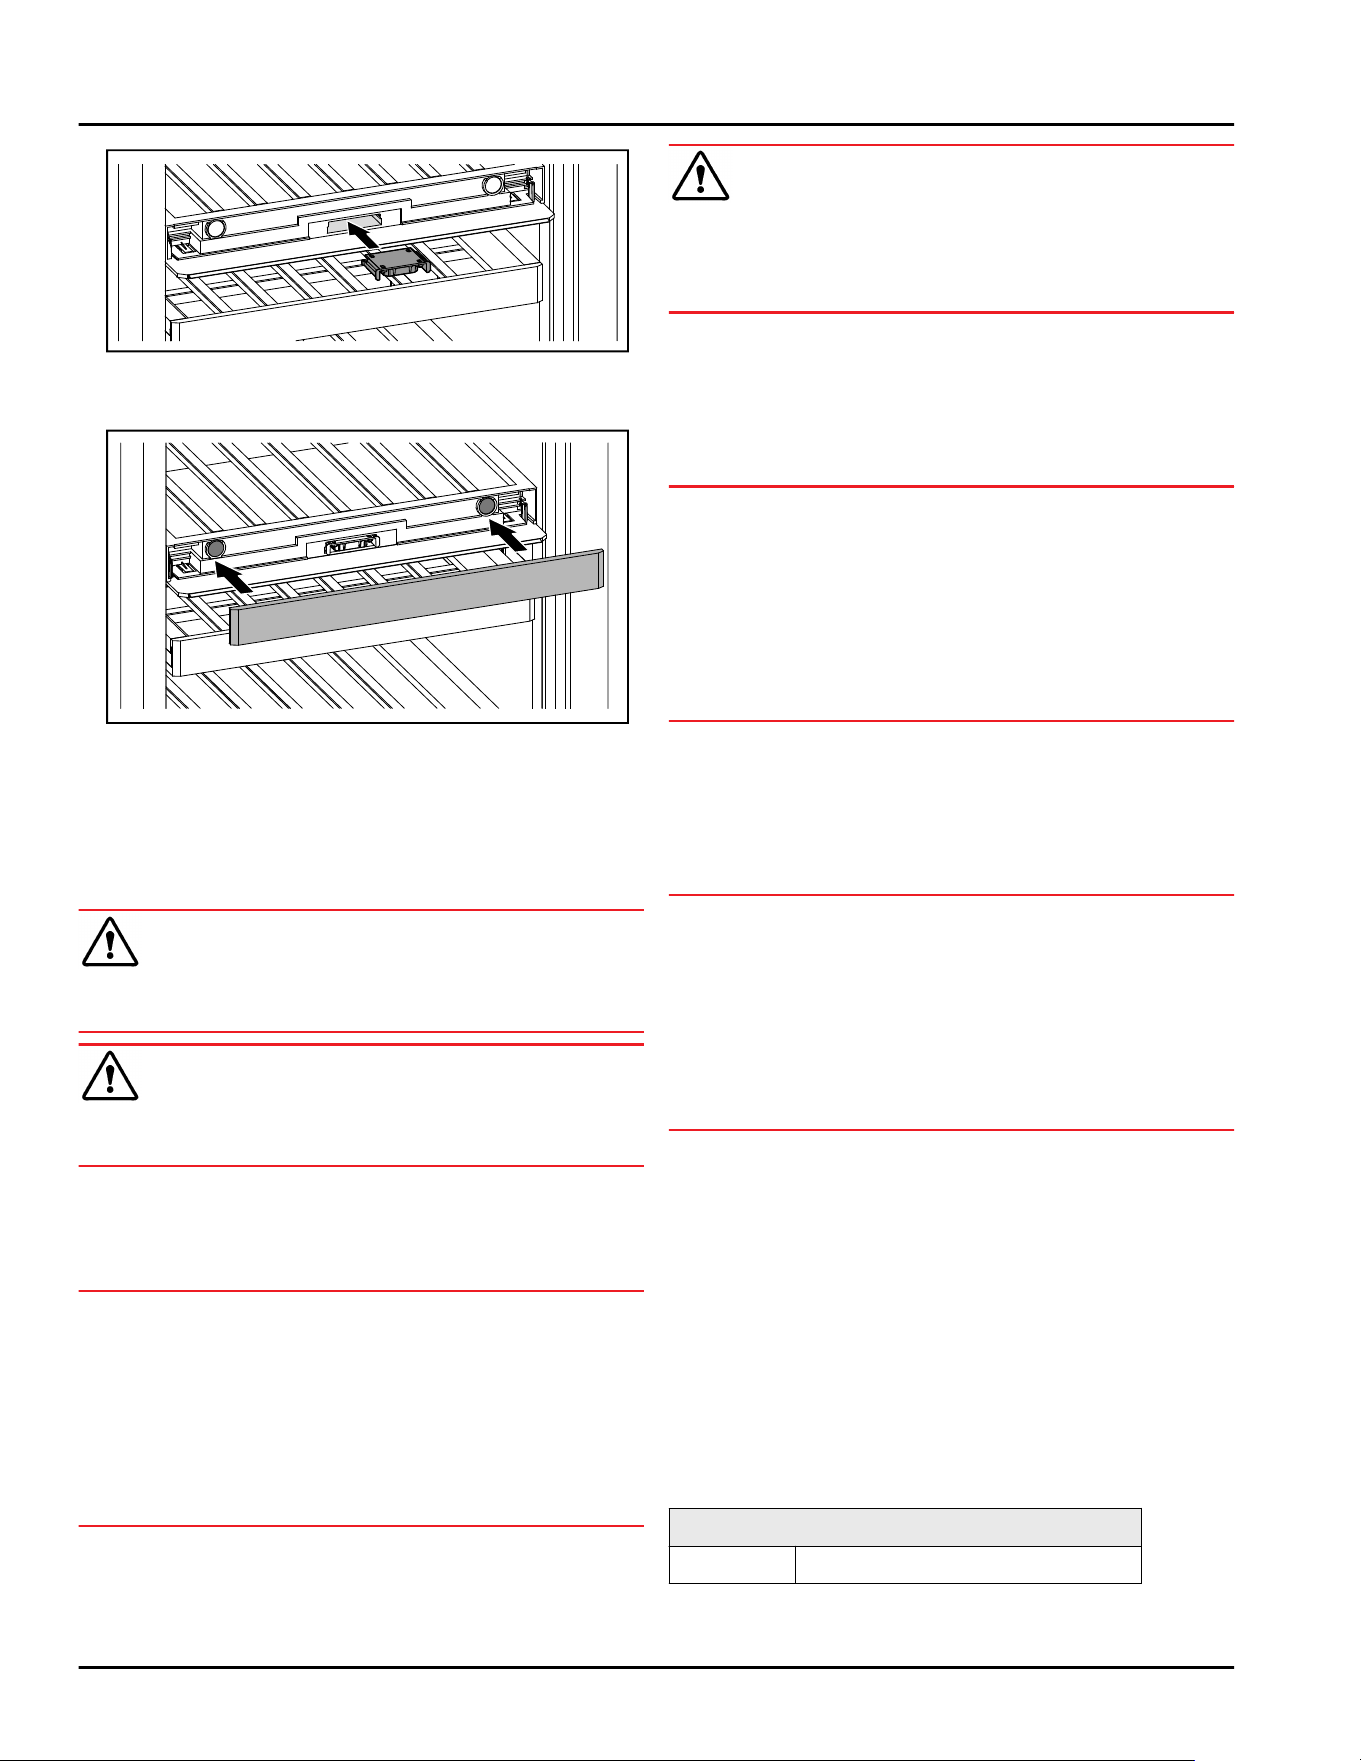
Fig. 74
► Push the drawer in.
Fig.75
► Set the panel back in place.
9.2 Cleaning the appliance
9.2.1 Preparation
WARNING
Danger of electric shock.
► Unplug refrigerator or disconnect power.
WARNING
Danger of fire
► Do not damage the refrigerant circuit.
► Empty appliance.
► Pull out the power plug.
9.2.2 Cleaning the housing
NOTICE
Improper cleaning!
Damage to the appliance.
► Only use soft cleaning cloths and ph-neutral all-
purpose cleaners.
► Do not use steel wool or sponges that scour or
scratch.
► Do not use caustic or abrasive cleaning materials or
those containing sand, chloride, or acids.
WARNING
Risk of injury or damage due to hot steam.
Hot steam can cause scalding/burns and damage to
surfaces.
► Do not use steam cleaners.
► Wipe the housing down with soft, clean cloth. If very
dirty, use lukewarm water with a neutral cleaner.
Glass surfaces can also be cleaned with glass
cleaner.
9.2.3 Cleaning the interior
NOTICE
Improper cleaning!
Damage to the appliance.
► Only use soft cleaning cloths and ph-neutral all-
purpose cleaners.
► Do not use steel wool or sponges that scour or
scratch.
► Do not use caustic or abrasive cleaning materials or
those containing sand, chloride, or acids.
► Plastic surfaces: clean by hand with a soft clean
cloth, lukewarm water and a little detergent.
► Metal surfaces: clean by hand with a soft clean
cloth, lukewarm water and a little detergent.
9.2.4 Cleaning the equipment
NOTICE
Improper cleaning!
Damage to the appliance.
► Only use soft cleaning cloths and ph-neutral all-
purpose cleaners.
► Do not use steel wool or sponges that scour or
scratch.
► Do not use caustic or abrasive cleaning materials or
those containing sand, chloride, or acids.
Clean with a damp, lint-free cloth:
- Bottle shelf
► Clean the equipment.
9.2.5 After cleaning
► Wipe dry the appliance and items of equipment
► Connect and switch on the appliance.
► Repeat cleaning regularly.
10 Customer support
10.1 Technical specifications
Temperature zone
Cool: 5°C(41°F) to 20°C(68°F)
Customer support
* Depending on model and options 23
Maximum loading weight of
the bottle rack
Bottle shelf
60 kg
(132lb)
Bottle rack with
telescopic rails
25 kg
(55.11lb)
10.2 Operating noises
The appliance makes noises while in operation.
-
At less cooling output the appliance saves energy
but takes longer to cool items. The volume is lower.
-
At a higher cooling output the food cools more
quickly. The volume is higher.
Examples:
•
Activated functions (see 7.2Appliance functions)
•
Running fan
•
Freshly sorted food
•
High ambient temperature
•
Door opened for long periods
Noise
Possible cause Type of noise
Bubbling and
splashing
Coolant is
flowing into the
cooling circuit.
Normal noise
Spitting and
hissing
Coolant is
spraying into the
cooling circuit.
Normal noise
Humming The appliance
cools. The
volume depends
on the cooling
output.
Normal noise
Noise Possible cause Type of noise
Whirring and
murmuring
The fan is
running.
Normal oper‐
ating noise
Clicking Components are
being switched
on and off.
Normal
switching noise
Rattling or
humming
Valves are
active.
Normal
switching noise
Noise Possible
cause
Type of
noise
How to
resolve
Vibration Unsuitable
setup
Error noise Adjust the
feet to
make sure
the appli‐
ance is
horizontal.
Clattering Equipment,
Objects
inside the
appliance
Error noise Secure
equipment
parts.
Leave a gap
between
items.
10.3 Technical faults
Your appliance is designed and manufactured for reli‐
able operation and a long service life. If a malfunction
nonetheless occurs during operation, please check
whether the malfunction is due to an operating error. In
this case, you will have to be charged for the costs
incurred, even during the warranty period.
You may be able to rectify the following faults yourself.
10.3.1 Appliance function
Defect
Cause Remedy
The appliance
does not work.
The appliance is not switched on. ► Switch on the appliance.
The power plug is not properly
inserted in the wall socket.
► Check the power plug.
The powerfuse in the wall socket
is not OK.
► Check the fuse.
Power failure. ► Keep the appliance closed.
The IEC socket is not correctly
plugged into the appliance.
► Check the IEC socket.
The temperature
is not cold
enough
This means that the door of the
appliance is not closed properly
► Close the appliance door
Customer support
24 * Depending on model and options
Defect Cause Remedy
The ambient temperature is too
high
► Problem solution: (see2.4 Range of appliance use)
The appliance was opened too
frequently or for too long
► Wait to see if the required temperature corrects
itself. If not, contact Customer Service.
(see 10.4 Customer Service)
The temperature is incorrectly set ► Set to a colder temperature and check after 24
hours.
The appliance is too near to a heat
source (stove, heater etc).
► Change location of appliance or the heat source.
The door seal is
defective or
should be
replaced for
other reasons.
The door seal is interchangeable.
You can replace it without the use
of any special tools.
► Contact Customer Service. (see 10.4 Customer
Service)
The appliance is
iced up or
condensation is
building.
The door seal may have slipped
out of its groove.
► Check the door seal is well placed in the groove.
The appliance is
warm on the
exterior
surfaces.*
The heat of the refrigerant circuit
is used to prevent condensate
from forming
► This is normal.
10.3.2 Equipment
Defect Cause Remedy
Mold on wine
bottles
As encountered with other forms
of storage, a little mold may form
depending on the type of label
adhesive
► Remove adhesive residues
The interior light
does not turn on.
The appliance is not switched on. ► Switch on the appliance.
The door was open for more than
15 minutes.
► If the door is open, the interior lighting switches
off automatically after about 15 minutes.
The LED interior light is faulty or
the lid is damaged.
► Contact Customer Service. (see 10.4 Customer
Service)
10.4 Customer Service
First check whether you can rectify the fault yourself
(see 10 Customer support) . If you cannot rectify the
problem, contact Customer Service.
You can find the address in the enclosed brochure
“Liebherr-Service” or at home.liebherr.com/service.
WARNING
Unprofessional repair!
Injuries.
► A damaged power cable may only be replaced by the
manufacturer, the manufacturer’s Customer Service
or a similarly qualified person.
► For appliances with plug and play connection cables,
the change can be made by the customer.
Customer support
* Depending on model and options 25
10.4.1 Contacting Customer Service
Make sure that the following appliance information is
available:
❑
Appliance name (model and index)
❑
Service no. (service)
❑
Serial no. (S no.)
► Call up the appliance information via the display.
-or-
► Refer to the type plate for appliance information.
(see 10.5 Rating plate)
► Take note of the appliance information.
► Notify customer service: Report errors and the appli‐
ance information.
▷ This will help us give you fast and accurate support.
► Follow further instructions from Customer Service.
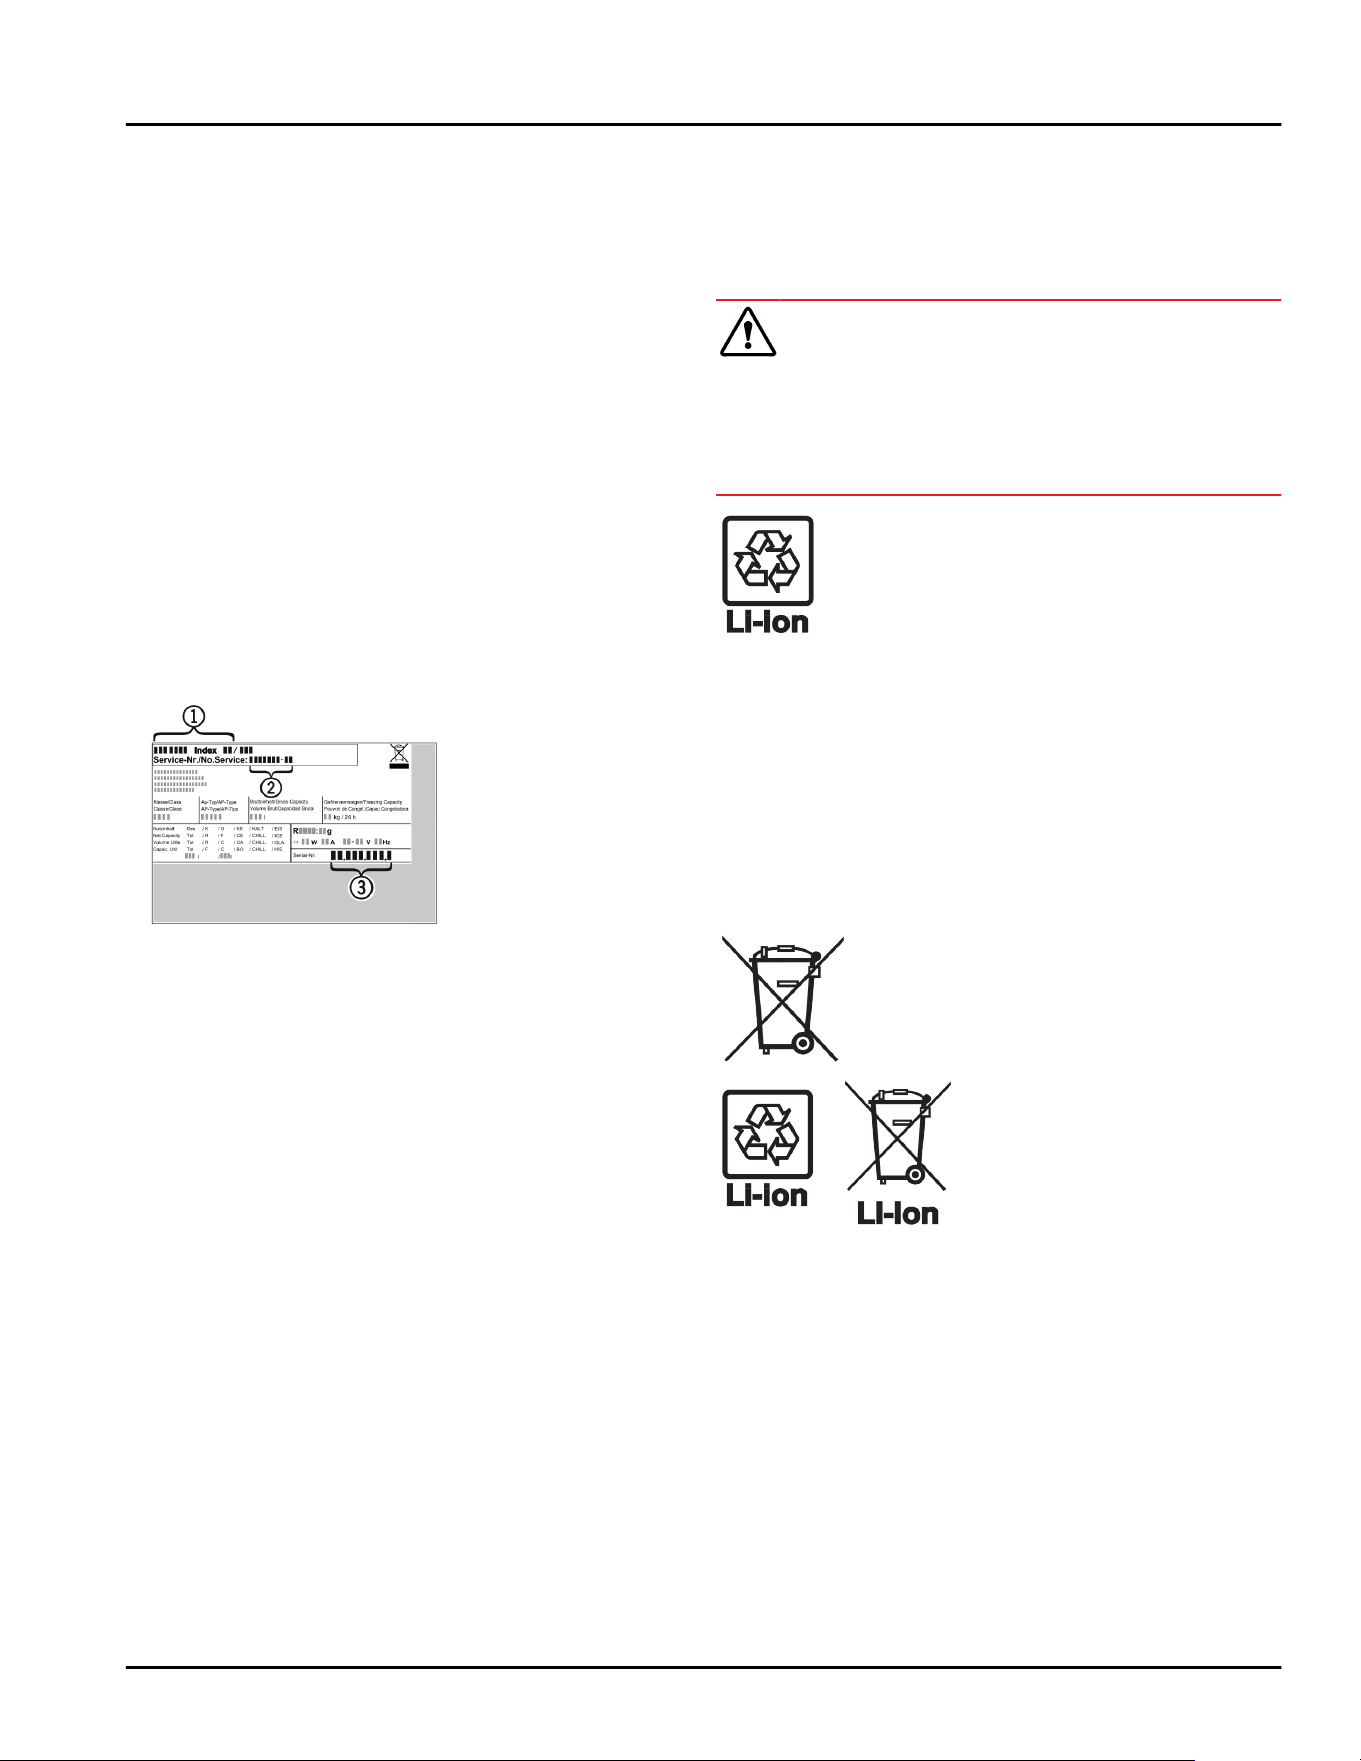
10.5 Rating plate
The type plate is located on the bottom left of the
inside of the appliance.
Fig. 76
(1)
Appliance name (3) Serial no.
(2) Service no.
► Information from the nameplate.
11 Decommissioning
► Empty appliance.
► Switch off appliance. (see 7.2.2 Switching appliance
on and off )
► Pull the power plug from the outlet.
► If necessary, remove the IEC socket: Pull the IEC
socket out of the appliance plug while turning it to
the left and right at the same time.
► Clean appliance. (see 9.2Cleaning the appliance)
► Leave the door open to prevent unpleasant odors.
12 Disposal
12.1 Preparing the appliance for
disposal
WARNING
Risk of child entrapment!
Before you throw away your old refrigerator or freezer:
► Take off the doors.
► Leave the shelves in place so that children may not
easily climb inside.
Liebherr uses batteries in some of its appli‐
ances. You should remove these before
disposal of the old appliance for environ‐
mental reasons. If your appliance contains
batteries, a corresponding notice is
attached to the appliance.
Lamps If you can remove the lamps yourself
without destroying them, also remove these
before disposal.
► Take the appliance out of operation.
► If possible: Remove lamps without destroying them.
12.2 Disposing of the appliance in an
environmentally friendly manner
The appliance still contains
valuable materials and must
be collected separately from
unsorted municipal waste so
it can be recycled.
Dispose of batteries sepa‐
rately from the old appliance.
Certain batteries should NOT
go in household garbage or
recycling bins. Waste
batteries can always be recy‐
cled or taken to household
hazardous waste collection
points. To prevent fires from
lithium-ion batteries, tape
battery terminals and/or
place batteries in separate
plastic bags and never put
these batteries in household
garbage or recycling bins.
Lamps
Dispose of removed lamps via
the respective collection
systems.
Decommissioning
26 * Depending on model and options
For USA: Check the Responsible Appli‐
ance Disposal (RAD) program
to find a RAD partner near
you.
For Canada: Follow your local guidance
about recycling and disposal
capabilities near you.
WARNING
Leaking refrigerant and oil!
Fire. The refrigerant contained within the appliance is
environmentally friendly, but flammable. The oil
contained within the appliance is flammable. Escaping
refrigerant and oil can ignite if they are of high enough
concentration and are exposed to an external heat
source.
► Do not damage the pipelines of the coolant circuit
and the compressor.
► Observe the notes on appliance transport.
► Transport the appliance away without damaging it.
► Dispose of batteries, lamps, and the appliance
according to the above specifications.
Disposal
* Depending on model and options 27
home.liebherr.com/fridge-manuals
Multi-temperature wine cabinet
Issue date:20250707
Part number index:7083590-00
For Service in the U.S.: Liebherr Service Center
Toll Free: 1-866-LIEBHER or 1-866-543-2437
Service-appliances.us@liebherr.com
PlusOne Solutions, Inc.
3501 Quadrangle Blvd, Suite 120
Orlando, FL 32817
For Service in Canada: Liebherr Service Center
Toll Free: 1-888-LIEBHER or 1-888-543-2437
www.euro-parts.ca
EURO-PARTS CANADA
39822 Belgrave Road, Belgrave, Ontario, N0G 1E0
Phone: (519) 357-3320 | Fax: (519) 357-1326