
QUICK START GUIDE
THE FOLLOWING DOCUMENT MUST BE READ
BEFORE OPERATING YOUR MGI ZIP BUGGY /
TROLLEY / CADDY FOR THE FIRST TIME.
Reading this information will ensure you get the most positive
experience first time. You are also strongly advised to properly
read the User Manual which is located inside the carton that
your buggy / trolley / caddy came in.
1. HOW BEST TO UNFOLD YOUR BUGGY
7: Push the top bag support down to move it into position.
1: Ensure both rear
wheels are attached.
PLEASE NOTE: For X1 and X3, there is a left wheel and
right wheel. Look inside wheel for description markings
“L” and “R”. The left and right side is determined from
behind the buggy / trolley / caddy.
2: Release fold lever.
4: The handle is now
free to pull upwards.
The handle will
naturally unfold as
you continue to pull
until the handle is
completely open.
5: Ensure that the
latch at the bottom of
the handle clicks into
place.
6: Close the fold lever
to lock the handle into
place in one of three
positions.
3: Move the top bag
support away from
front wheel assembly
until you hear it click.
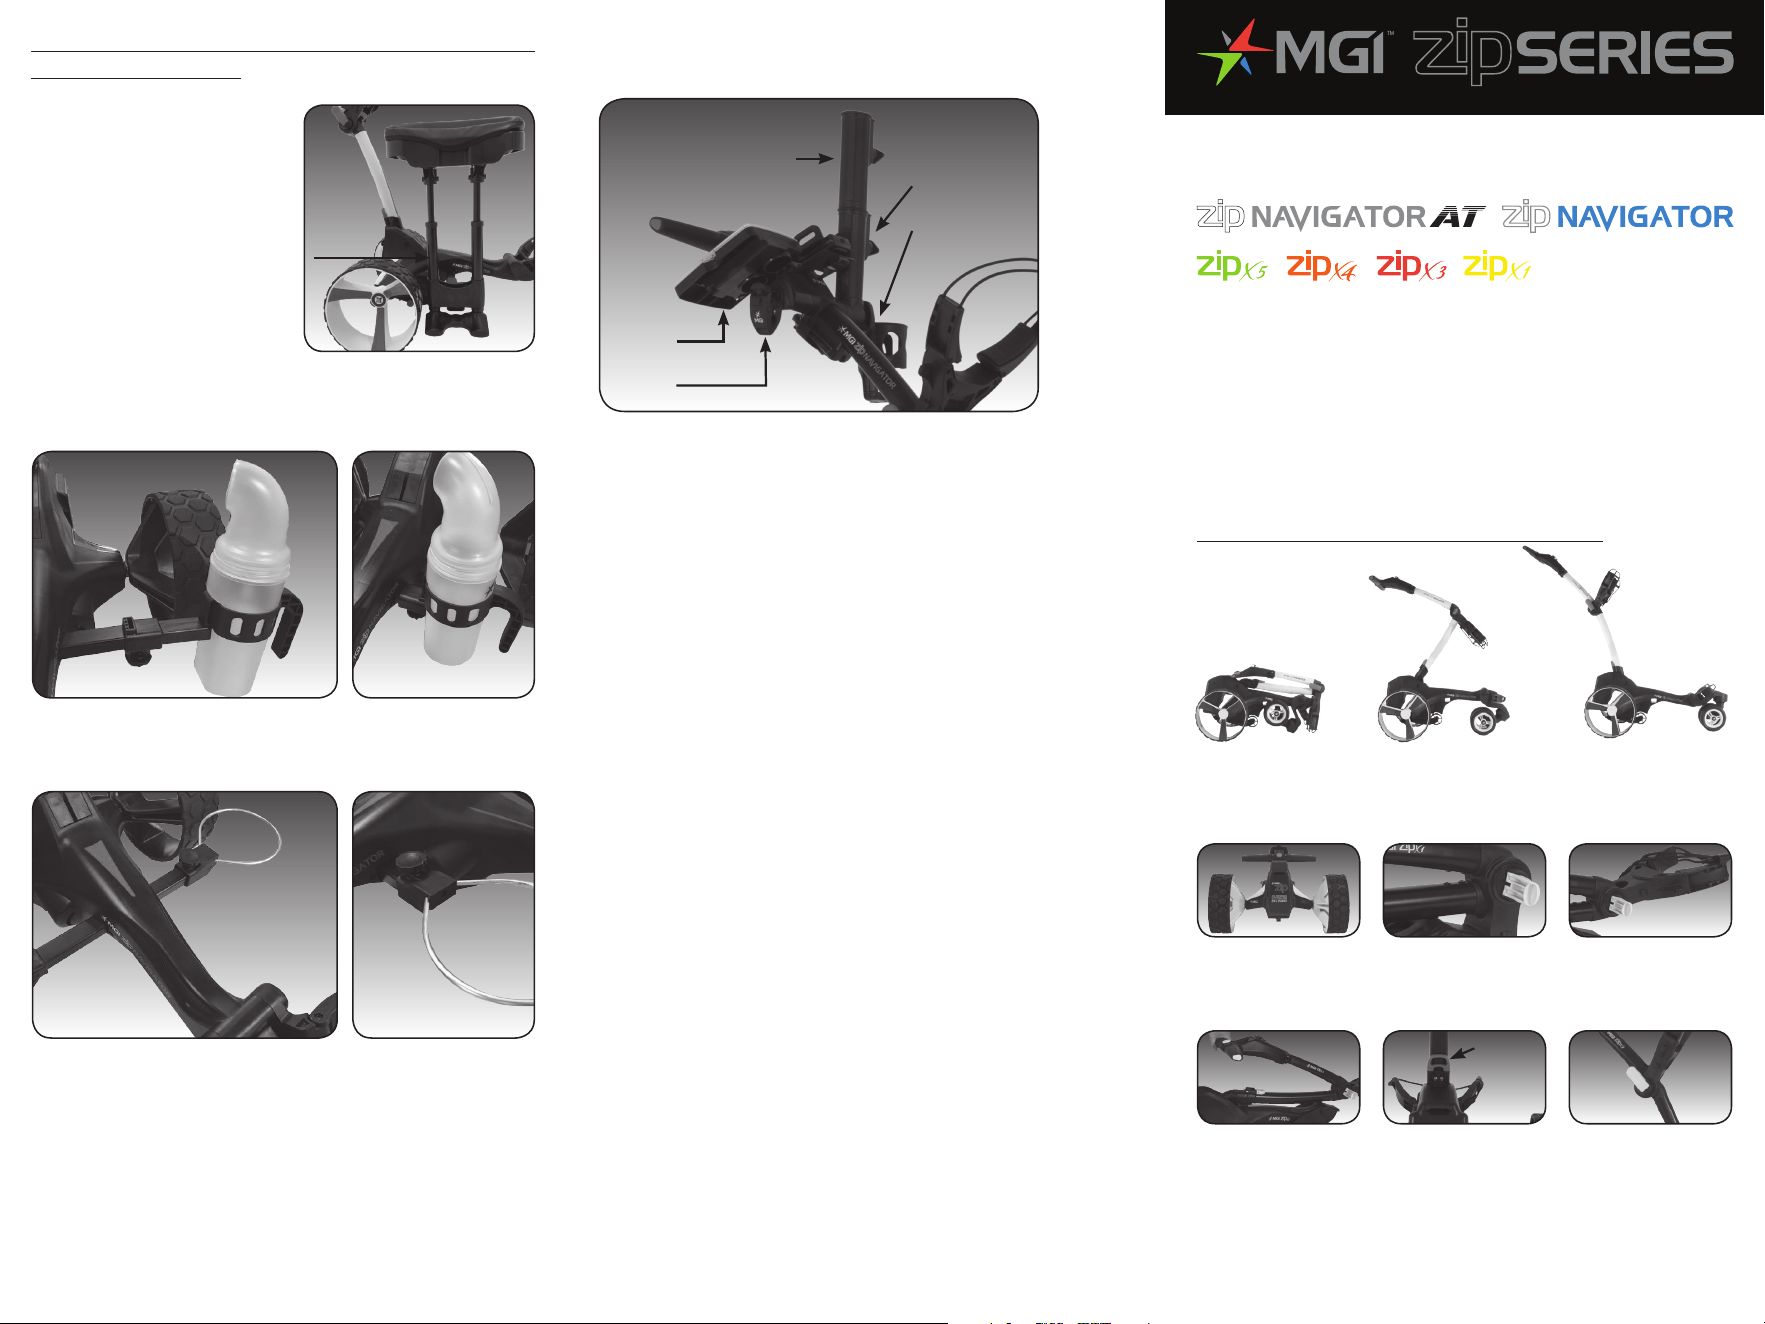
Top Handle
For accessories that are attached to the top handle please
follow carefully the image below for correct placement.
PLEASE NOTE: The multi-purpose clip and the drink holder
can be attached with or without the scorecard holder and
umbrella holder.
Golf Bag Size
If you have a short in length bag where you find it difficult
to secure your bag properly to the upper bag support an
attachment can be purchased from www.mgigolf.com
Scorecard
Holder
Umbrella
Extender
Umbrella
Holder
Drink Holder
Multi-purpose
Clip
FOR MORE INFORMATION, PLEASE READ
THE USER MANUAL BEFORE OPERATING
YOUR MGI ZIP BUGGY / TROLLEY / CADDY.
UP-TO-DATE USER MANUALS CAN BE
FOUND AT WWW.MGIGOLF.COM/QSG
Clicks into
place
6. THE USE OF ACCESSORIES WITH YOUR BUGGY
/ TROLLEY / CADDY
The Seat
Assemble seat with the
opening on the same side
as the feet. Release the
leaver located underneath
the chassis. Insert cross bar
ensuring the plastic is flush
with the bar and positioned
on the right hand side, when
standing behind the buggy /
trolley / caddy. Lock the
leaver and insert seat.
The Sand Bottle
Can be attached to the seat crossbar
or their own crossbar.
The Sand Bucket Loop
Can be attached to the seat crossbar or their own
crossbar.
Right
hand
side
LITHIUM BATTERY CARE
Your lithium battery leads, casing and connections should
be regularly inspected for damage and wear. If your leads
or connections are in need of repair or replacement,
please contact your local MGI repair centre for assistance
immediately. Under no circumstances should a Lithium Battery
that has been dropped, damaged or immersed in water be
connected to a buggy or charger. By doing so you may create
a fire hazard or risk the battery catching fire. Please contact the
MGI Service Centre to arrange a replacement.
WATER DAMAGE – STRONG WARNING
If your buggy battery becomes immersed in water even for the
shortest time, you are never to use the battery again. It is not
covered under warranty and you will need to purchase another
battery.
If the buggy is also immersed in water, do not attempt to dry
it out. Contact MGI or its distributor in your territory for further
information.
4. NAVIGATOR AT AND NAVIGATOR OWNERS ONLY –
Charging Your Remote Control
Before you start using your Zip Navigator you must fully charge
the remote control internal lithium ion battery for approximately
6 hours or overnight using the USB cord provided. The top left
UNLOCK button will flash while charging. When a full charge is
complete, the green light will stay on and stop flashing.
To charge the remote, plug the
USB cord into the USB port at the
base of the remote as pictured
in the diagram. The cable then
needs to be plugged into your
PC or Laptop for charging.
Alternatively you can plug the
cable into an AC adapter [not
provided].
Charge the battery again after each round.
If your Buggy Stops for No Reason During a Round of Golf,
it Could Have Done so for the Following Reasons:
• It becomes out of range of the remote.
• If there is more than 2 minutes between commands
from the remote.
• If the speed control is not operated after 30 minutes.
5. REAR WHEEL POSITIONS
The MGI Zip buggy is designed to allow the rear wheels
to be in two positions. The position is determined by
where the wheel is locked on the axle in either of the two
grooves [see picture]. The drive position is used during the
normal operation of the buggy. The free wheel position
is used to freely push the buggy should you experience
battery or buggy issues on the course.
Free wheel position
Drive position
i. Drive position – Lock the wheel onto the groove closest
to the battery base. To do this, press the grey release
button on the wheel hub, push the wheel on to the axle as
far as possible. To test for drive position try rolling the wheel
backwards. If you feel resistance then the wheel is now in
drive position and ready to use. Repeat for both wheels.
ii. Free wheel – Lock the wheel into the groove closest
to the end of the axle. To do this, press the grey release
button on the wheel hub, push the wheel on to the axle
and push the release button onto the groove. To test for
free wheel position try rolling the wheel backwards. The
wheel should spin freely with no resistance. Repeat for
both wheels.
Remote
Control
PLEASE NOTE: Your remote
control is located in a bracket
on the back of the frame just
below the T Bar Handle. Use
two fingers to dislodge remote
control from bracket.
2. THE 4TH REAR WHEEL
Your Zip Series buggy / trolley / caddy comes standard with a
4th foldable and extendable rear wheel (please see images
above to unfold your 4th wheel). The 4th wheel MUST be
unfolded and in use on all models and further extended on the
Navigator AT and Navigator models. If you do not engage the
standard 4th wheel or not fully extend your Zip Navigator AT 4th
wheel / Zip Navigator 4th wheel, your buggy may tip back and
cause damage. Any damage is not covered under warranty.
The 4th wheel should be cleaned regularly with a cloth to ensure
it can be folded and retracted as required for storage.
3. BATTERY CHARGING
Before using your MGI Zip buggy for the first time you must fully
charge the battery overnight. Keep on charge in between use.
• Plug the charger AC lead
into a power point – the green
LED illuminates to indicate the
charger is on.
• To correctly charge
your battery, ensure
the semi-circle on the
end of your charger
lead is facing down as
per the second image
below.This will ensure
that your battery and
charger connections
are correctly aligned.
• Plug the charger output connection into the connector on
the front of the battery – the red LED illuminates to indicate it
is charging.
Once the charging LED indicator has turned green, the battery
is fully charged and ready for use.
When the battery is put on the buggy, ensure that the battery
handle is pushed down all the way so that the handle is level
with the battery case. If not done it will cause damage to the
connections which will not be covered by warranty.
Do not leave the battery connected to the buggy during
transport as it will flatten the battery.
Button to extendButton to unfold
CORRECT INCORRECT
06/19