DESCENT
™
X50i
Owner’s Manual

© 2024 Garmin Ltd. or its subsidiaries
All rights reserved. Under the copyright laws, this manual may not be copied, in whole or in part, without the written consent of Garmin. Garmin reserves the right to change
or improve its products and to make changes in the content of this manual without obligation to notify any person or organization of such changes or improvements. Go to
www.garmin.com for current updates and supplemental information concerning the use of this product.
Garmin
®
, the Garmin logo, ANT
®
, ANT+
®
, and inReach
®
are trademarks of Garmin Ltd. or its subsidiaries, registered in the USA and other countries. Descent
™
, Garmin Connect
™
,
Garmin Dive
™
, Garmin Explore
™
and SubWave
™
are trademarks of Garmin Ltd. or its subsidiaries. These trademarks may not be used without the express permission of Garmin.
The BLUETOOTH
®
word mark and logos are owned by the Bluetooth SIG, Inc. and any use of such marks by Garmin is under license. Wi‑Fi
®
is a registered mark of Wi-Fi Alliance
Corporation. Other trademarks and trade names are those of their respective owners.
M/N: A04666

Table of Contents
Introduction......................................1
Getting Started........................................ 1
Device Overview...................................... 1
Controls................................................... 2
Using the Torch................................... 2
Diving............................................... 2
Warning................................................0
Dive Warnings...................................... 3
Caution................................................ 0
Dive Cautions....................................... 4
Dive Modes.............................................. 4
Using the Pool Dive Mode................... 4
Dive Setup................................................ 5
Dive Mode Advanced Settings............5
Setting Up Your Breathing Gases....... 6
Setting a Custom Dive Alert................ 6
Setting PO2 Thresholds...................... 7
Setting CCR Setpoints......................... 7
Customizing the Data Screens........... 8
No-Fly Time.......................................... 8
Dive Shortcuts..................................... 8
Air Integration.......................................... 9
Waking the Transceiver from Low
Power Mode......................................... 9
Pairing a Transceiver with a Descent
Dive Computer..................................... 9
Dive Network and Air Integration
Settings.............................................. 10
Sending Diver Messages.................. 11
Requesting Diver Assistance............ 12
Updating the Transceiver Software
Using Your Dive Computer................12
Descent S1 Buoy................................... 12
Navigating to the Buoy...................... 13
Dive Data Screens................................. 14
Single-Gas and Multi-Gas Data
Screens.............................................. 14
CCR Data Screens............................. 15
Gauge Data Screens..........................16
Going Diving.......................................... 16
Navigating with the Dive Compass.. 17
Using the Gauge Dive Stopwatch..... 17
Viewing Transceiver Data During a
Dive.....................................................18
Switching Gases During a Dive.........19
Switching Between CC and OC Diving
for a Bailout Procedure..................... 19
Performing a Safety Stop..................19
Performing a Decompression Stop..20
Viewing Your Dynamic Depth........... 21
Viewing the Map During a Dive.........21
Marking a Dive Event.........................21
Viewing the Surface Interval App......... 22
Viewing the Dive Log App..................... 23
Dive Planning......................................... 23
Calculating NDL Time....................... 23
Calculating Your Breathing Gas....... 24
Creating a Decompression Plan....... 24
Using Decompression Plans............ 24
Altitude Diving....................................... 24
Dive Alerts..............................................25
Transceiver Alerts................................. 27
Buoy Alerts............................................ 27
Enabling Lost Dive Accessory Alerts... 28
Dive Product and Feature
Compatibility......................................... 28
About SubWave Technology................ 29
Dive Terminology.................................. 29
Map................................................29
Viewing the Map....................................30
Saving or Navigating to a Location on
the Map.................................................. 30
Editing a Saved Location.................. 30
Navigating to a Saved Location....... 30
Map Settings......................................... 30
Advanced Map Settings.................... 31
Marine Map Settings......................... 31
Routing Settings................................ 31
Compass........................................ 32
Setting the Compass Heading............. 32
Setting the North Reference................. 32
Calibrating the Compass...................... 32
Connectivity................................... 32
Phone Connectivity Features............... 32
Pairing Your Phone............................33
Garmin Dive App................................33
Wi‑Fi Connectivity Features.................. 33
Connecting to a Wi‑Fi Network......... 33
Table of Contents i

Wireless Sensors...................................33
inReach® Remote............................. 33
Settings..........................................34
Display and Brightness Settings.......... 34
System Settings.................................... 34
Satellite Settings............................... 35
Resetting All Default Settings........... 35
Device Information......................... 36
Charging the Device.............................. 36
Wearing the Device............................... 36
Changing the Bands.......................... 37
Installing Bungee Cords.................... 38
Specifications........................................40
Battery Information........................... 40
Device Care............................................40
Cleaning the Device...........................41
Data Fields............................................. 41
Troubleshooting............................. 43
Product Updates................................... 43
Getting More Information..................... 44
My device is in the wrong language.....44
Is my smartphone compatible with my
device?................................................... 44
My phone will not connect to the
device..................................................... 44
Diving..................................................... 44
Resetting Your Tissue Load..............44
Resetting the Surface Pressure........44
Acquiring Satellite Signals.................... 45
Improving GPS Satellite Reception.. 45
ii Table of Contents
Introduction
WARNING
See the Important Safety and Product Information guide in the product box for product warnings and other
important information.
Getting Started
When using your dive computer for the first time, you should complete these tasks to set it up and get to know
the basic features.
1 Hold PWR for at least one second to turn on the dive computer (Device Overview, page1).
2 Follow the on-screen instructions to complete the initial setup.
During the initial setup, you can pair your phone with your dive computer to receive notifications, sync your
data, and more (Pairing Your Phone, page33).
3 Charge the dive computer (Charging the Device, page36).
4 Start a dive (Going Diving, page16).
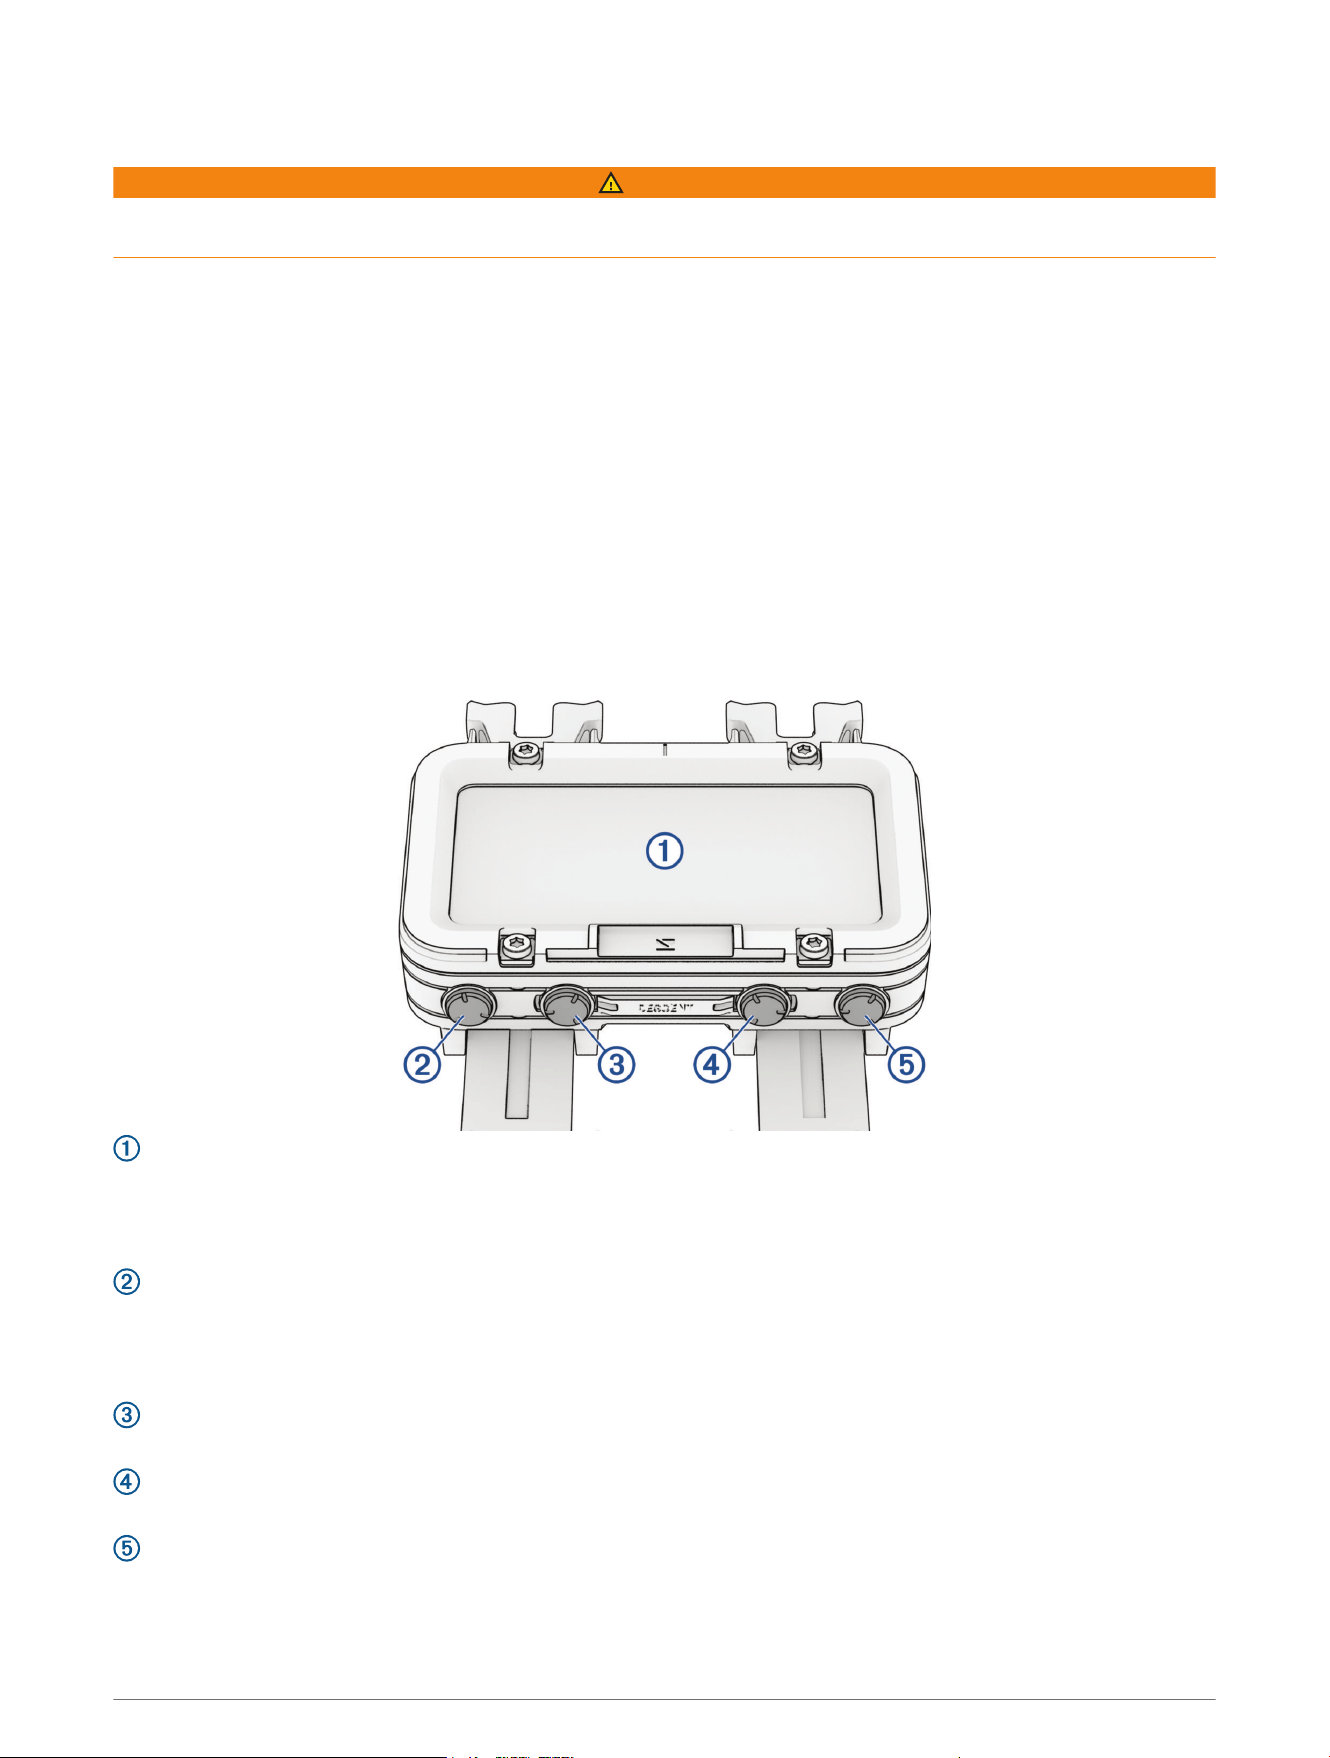
Device Overview
NOTE: There are also customizable hold functions assigned to individual buttons and button combinations
during a dive
(Dive Shortcuts, page8).
Touchscreen
• Tap to choose an option in a menu.
• Swipe up or down to scroll through menus.
• Swipe right to return to the previous screen.
BACK / PWR
• Press to return to the previous screen.
• Hold to turn on the dive computer.
• Hold to view the controls menu (Controls, page2).
PREV
• Press to scroll through menus.
NEXT
• Press to scroll through menus.
ENTER / TORCH
• Press to choose an option in a menu.
• Hold to turn on the torch (Using the Torch, page2).
Introduction 1
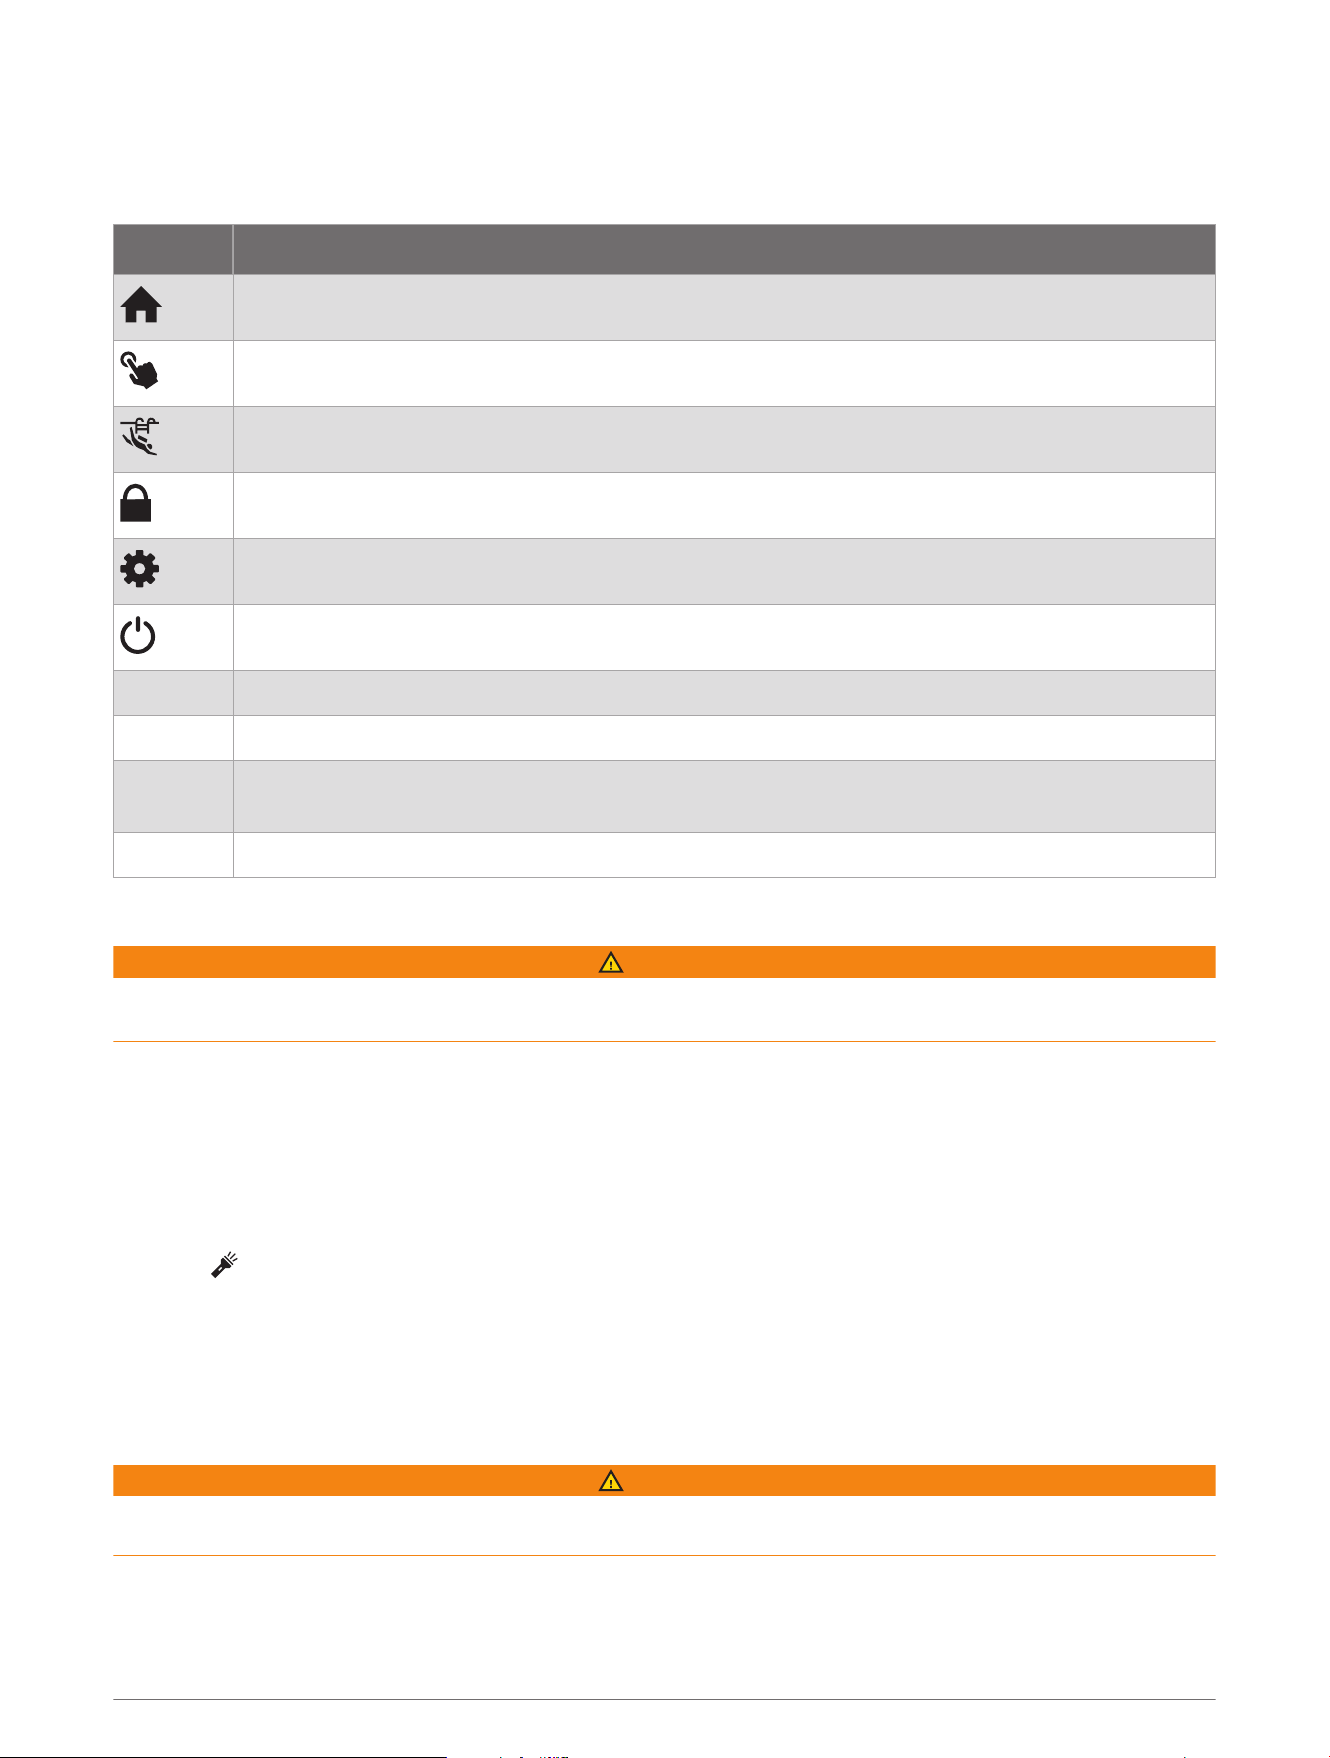
Controls
The controls menu lets you quickly access device features and options.
From any screen, hold BACK.
Control Description
Select to return to the home screen.
Select to enable touchscreen controls.
Select to enable pool dive mode (Using the Pool Dive Mode, page4).
Select to lock the buttons and the touchscreen to prevent inadvertent presses and swipes.
Select to open the settings menu (Settings, page34).
Select to turn off the dive computer.
Brightness Select to adjust the brightness and display settings.
Torch Select to turn on the torch and select the torch mode (Using the Torch, page2).
Bluetooth
Select to enable Bluetooth
®
technology and your connection to your paired phone (Pairing Your
Phone, page33).
Wi-Fi Select to enable Wi‑Fi
®
connectivity (Connecting to a Wi‑Fi Network, page33).
Using the Torch
WARNING
This device has a torch (flashlight) that can be programmed to flash at various intervals. Consult your physician
if you have epilepsy or are sensitive to bright or flashing lights.
You can set the torch to display in a low or bright mode, or to flash in a selected pattern.
NOTE: Using the torch can reduce battery life. You can reduce the brightness to extend the life of the battery.
1 Select an option:
• From the home screen, scroll down to the extended app list.
• From any screen, hold BACK.
2 Select Torch.
3 Select to turn on the torch.
4 Select a torch mode.
TIP: From any screen, you can hold TORCH to turn on the torch. For the first three seconds, you can press
PREV or NEXT to adjust the torch mode.
Diving
WARNING
Failure to heed the following warnings could result in an accident or medical event resulting in death or serious
injury.
2 Diving

Dive Warnings
• The diving features of this device are for use by certified divers only. This device should not be used as a sole
dive computer. Failure to input the appropriate dive-related information into the device can lead to serious
personal injury or death.
• Do not exceed the maximum dive depth rating for the device (Specifications, page40).
• Make sure that you fully understand the use, displays, and limitations of your device. If you have questions
about this manual or the device, always resolve any discrepancies or confusion before diving with the device.
Always remember that you are responsible for your own safety.
• There is always a risk of decompression illness (DCI) for any dive profile even if you follow the dive plan
provided by the dive tables or a diving device. No procedure, diving device, or dive table will eliminate the
possibility of DCI or oxygen toxicity. An individual's physiological make up can vary from day to day. This
device cannot account for these variations. You are strongly advised to remain well within the limits provided
by this device to minimize the risk of DCI. You should consult a physician regarding your fitness before
diving.
• The dive computer can calculate your surface air consumption rate (SAC) and air time remaining (ATR).
These calculations are an estimate and should not be relied on as the only source of information.
• Always use backup instruments, including a depth gauge, submersible pressure gauge, and timer or watch.
You should have access to decompression tables when diving with this device.
• Perform pre-dive safety checks, such as checking proper device function and settings, display function,
battery level, tank pressure, and bubble checks to check hoses and connections for leaks.
• If a tank pressure warning or battery warning appears on the dive computer, terminate the dive immediately
and safely return to the surface. Disregarding the alarm may result in serious injury or death.
• This device should not be shared between multiple users for diving purposes. Diver profiles are user specific,
and using another diver's profile can result in misleading information that could lead to injury or death.
• For safety reasons, you should never dive alone. Dive with a designated buddy, even if you have someone
monitoring your dive from the surface. You should also stay with others for an extended time after a dive,
because the potential onset of decompression illness (DCI) may be delayed or triggered by surface activities.
• This device is not intended for commercial or professional dive activities. It is for recreational purposes only.
Commercial or professional dive activities can expose the user to extreme depths or conditions that increase
the risk of DCI.
• Do not dive with a gas if you have not personally verified its contents and input the analyzed value to
the device. Failure to verify tank contents and input the appropriate gas values to the device will result in
incorrect dive planning information and could result in serious injury or death.
• Diving with more than one gas mixture presents a much greater risk than diving with a single gas mixture.
Mistakes related to the use of multiple gas mixtures may lead to serious injury or death.
• The transceiver is not an oxygen cleaned product. Do not use the transceiver with anything greater than 40%
oxygen.
• Always ensure a safe ascent. A rapid ascent increases the risk of DCI.
• Disabling the deco lockout feature on the device can result in an increased risk of DCI, which can result in
personal injury or death. Disable this feature at your own risk.
• Violating a required decompression stop may result in serious injury or death. Never ascend above the
displayed decompression stop depth.
• Always perform a safety stop between 3 and 5 meters (9.8 and 16.4 feet) for 3 minutes, even if no
decompression stop is required.
CAUTION
Failure to heed the following cautions could result in minor or moderate injury, or property damage.
Diving 3

Dive Cautions
• Dive messaging and navigation requires line of sight between two compatible receivers with the latest
compatible software versions. Obstructions and other environmental factors may affect receiver connectivity
and may delay or prevent the sending and receiving of messages. With good connectivity, data can be
successfully sent between divers in under 20 seconds. If connectivity is poor, devices will attempt to send
data for up to two minutes. This is a supplemental feature that should not be relied upon as a method to
receive emergency assistance and should not replace traditional dive safety tools and procedures.
• The device range and availability of messaging and/or location tracking depends on the type of compatible
devices to which this device is communicating (Dive Product and Feature Compatibility, page28).
Dive Modes
The Descent
™
X50i dive computer supports four dive modes. Each dive mode has four phases: dive pre-check,
surface display, in-dive, and post-dive. During the pre-dive check, you can confirm the dive settings and the
connection to a paired Descent accessory before you start diving (Dive Setup, page5). The surface phase
shows the data screens for the dive mode (Dive Data Screens, page14). The in-dive phase shows data about
the dive in progress, and other device features, such as GPS, are disabled (Going Diving, page16). During the
post-dive review, you can view a summary of the completed dive (Viewing the Dive Log App, page23).
Single-Gas: This mode allows you to dive with a single gas blend. You can set up to 11 additional gases as
backup gases.
Multi-Gas: This mode allows you to configure multiple gas blends and switch gases during your dive. You can
set the oxygen content from 5–100%. This mode supports one bottom gas, and up to 11 additional gases as
decompression or backup gases.
NOTE: Backup gases are not used in no-decompression limit (NDL) and time to surface (TTS)
decompression calculations until you activate them during a dive.
CCR: This mode for closed-circuit rebreather (CCR) diving allows you to configure two partial pressure of
oxygen (PO2) setpoints, closed-circuit (CC) diluent gases, and open-circuit (OC) decompression and backup
gases.
Gauge: This mode allows you to dive with basic bottom timer features.
NOTE: After diving in gauge mode, the dive computer can only be used in gauge mode for 24 hours.
Using the Pool Dive Mode
When the device is in pool dive mode, the tissue load and decompression lockout features function normally,
but dives are not saved to the dive log.
1 Hold BACK to view the controls menu.
2 Select .
The pool dive mode turns off automatically at midnight.
4 Diving

Dive Setup
You can customize the dive settings based on your needs. Not all settings are applicable for all dive modes. You
can also edit the settings before you start a dive.
Select Dive Setup.
Gases: Sets the gas blends used in the gas dive modes (Setting Up Your Breathing Gases, page6). You can
have up to twelve gases for each gas dive mode.
Dive Network & Air Integration: Pairs Descent transceivers and configures the data screens (Air Integration,
page9).
Conservatism: Sets the level of conservatism for decompression calculations. Higher conservatism provides a
shorter bottom time and a longer ascent time. The Custom option sets a custom gradient factor.
NOTE: Make sure you understand gradient factors before entering a custom level of conservatism.
Water Type: Sets the water type.
PO2: Sets the partial pressure of oxygen (PO2) thresholds, in bar, for the maximum operating depth (MOD),
decompression, warnings, and critical alerts (Setting PO2 Thresholds, page7).
Scuba Alerts: Sets custom alerts for gas dives (Setting a Custom Dive Alert, page6).
Display Settings: Customizes the data screens for each dive mode (Dive Data Screens, page14).
Safety Stop: Changes the safety stop duration.
Last Deco Stop: Sets the depth of the final decompression stop.
End Dive Delay: Sets the length of time before the device ends and saves a dive after surfacing.
CCR Setpoints: Sets high and low PO2 setpoints for closed-circuit rebreather (CCR) dives (Setting CCR
Setpoints, page7).
Dive Shortcuts: Assigns button shortcuts for use during dives (Dive Shortcuts, page8).
Advanced Settings: Customizes advanced dive mode settings (Dive Mode Advanced Settings, page5).
Dive Mode Advanced Settings
Select Dive Setup > Advanced Settings.
Double Tap to Scroll: Enables a double-tap on the dive computer to scroll through the dive data screens. If you
notice accidental scrolling, you can use the Sensitivity option to adjust the responsiveness.
Silent Diving: Disables all tones and vibrations for alerts during dive activities.
Compass: Calibrates and set the north reference of the dive compass (Calibrating the Compass, page32).
No-Fly Time: Sets the no-fly countdown timer mode (No-Fly Time, page8).
Units: Sets the distance, depth, temperature, and tank pressure units of measure for diving.
Deco Lockout: Disables the decompression lockout feature. This feature prevents single-gas, multi-gas, and
CCR dives for 24 hours if you violate a decompression ceiling for more than three minutes.
NOTE: You can still disable the decompression lockout feature after violating a decompression ceiling.
Diving 5

Setting Up Your Breathing Gases
You can enter up to twelve gases for each gas dive mode. Decompression calculations include your
decompression gases, but do not include your backup gases.
1 Select Dive Setup > Gases.
2 Select a dive mode.
3 Select the first gas in the list.
For single-gas or multi-gas dive modes, this is the bottom gas. For the closed-circuit rebreather (CCR) dive
mode, this is the diluent gas.
4 Select Oxygen, and enter the oxygen percentage of the gas blend.
5 Select Helium, and enter the helium percentage of the gas blend.
The dive computer calculates the remaining percentage as the nitrogen content.
6 Press BACK.
7 Select an option:
NOTE: Not all options are available for all dive modes.
• Select Add Backup, and enter the oxygen and helium percentage for your backup gas.
• Select Add New, enter the oxygen and helium percentage, and select Mode to set the intended use for the
gas, such as decompression or backup.
NOTE: For the multi-gas dive mode, you can select Set as Travel Gas to set your intended gas for
descending.
Setting a Custom Dive Alert
1 Select Dive Setup > Scuba Alerts
2 Select an option:
• Select Add Alert to add a new alert.
• Select the alert name to edit an existing alert.
3 If necessary, enable the alert.
4 Select an option:
NOTE: Not all options are available for all alert types.
• Select Depth to specify the depth that should trigger the alert.
• Select Label to enter a name for the alert.
• Select Time to specify the time interval that should trigger the alert.
• Select Interval to specify if the alert should trigger once or at a repeat interval.
• Select Direction to specify if the alert should be enabled for ascending, descending, or both.
• Select Dive Types to specify which dive modes should allow the alert to trigger.
• Select Sound and Vibe to set the alert tone, vibration, or neither.
• Select Pop-up to enable a pop-up notification for the alert.
• Select Preview Alert to see how the alert appears and sounds during a dive.
6 Diving

Setting PO2 Thresholds
You can configure the partial pressure of oxygen (PO2) alert message thresholds, in bar.
1 Select Dive Setup > PO2.
2 Select an option:
• Select MOD/Deco PO2 to set the maximum operating depth (MOD) and decompression PO2 threshold for
your planned bottom gas before you should begin your ascent and switch to the decompression gas with
the highest percentage of oxygen.
NOTE: The dive computer does not switch gases for you automatically. You must select the gas.
• Select PO2 Warning to set the threshold for the highest oxygen concentration level that you are
comfortable reaching.
• Select PO2 Critical to set the threshold for the maximum oxygen concentration level that you should
reach.
3 Enter a value.
If you reach the PO2 Critical threshold value during a dive, the dive computer displays an alert message (Dive
Alerts, page25).
Setting CCR Setpoints
You can configure the high and low partial pressure of oxygen (PO2) setpoints for closed-circuit rebreather
(CCR) dives.
1 Select Dive Setup > CCR Setpoints.
2 Select an option:
• To configure the lower PO2 setpoint, select Low Setpoint.
• To configure the upper PO2 setpoint, select High Setpoint.
3 Select Mode.
4 Select an option:
• To automatically change the setpoint based on your current depth, select Auto.
NOTE: For example, if you descend through the high setpoint depth or ascend through the low setpoint
depth, the PO2 threshold switches to the high or low setpoint, respectively. Automatic setpoint depths
must be at least 6.1 m (20 ft.) apart.
• To manually change setpoints during a dive, select Manual.
NOTE: If you manually change setpoints within 1.8 m (6 ft.) of an automatic switch depth, then automatic
setpoint switching is disabled until you are more than 1.8 m (6 ft.) above or below the automatic switch
depth. This prevents unintended setpoint switching.
5 Select PO2, and enter a value.
6 If necessary, select Depth, and enter a depth value for the automatic setpoint change.
Diving 7
Customizing the Data Screens
You can show, hide, and change the layout and content of data screens for each dive mode.
1 Select Dive Setup > Display Settings.
2 Select a dive mode to customize.
3 Select Data Screens.
4 Select a data screen to customize.
5 Select .
6 Select an option:
• Select Layout to adjust the number of data fields on the data screen.
• Select Data Fields, and select a field to change the data that appears in the field.
TIP: For a list of all the available data fields, go to Data Fields, page41.
• Select Reorder to change the location of the data screen in the loop.
• Select Remove to remove the data screen from the loop.
NOTE: Not all options are available for each data screen.
7 If necessary, select Add New to add a data screen to the loop.
You can add a custom data screen, or select one of the predefined data screens.
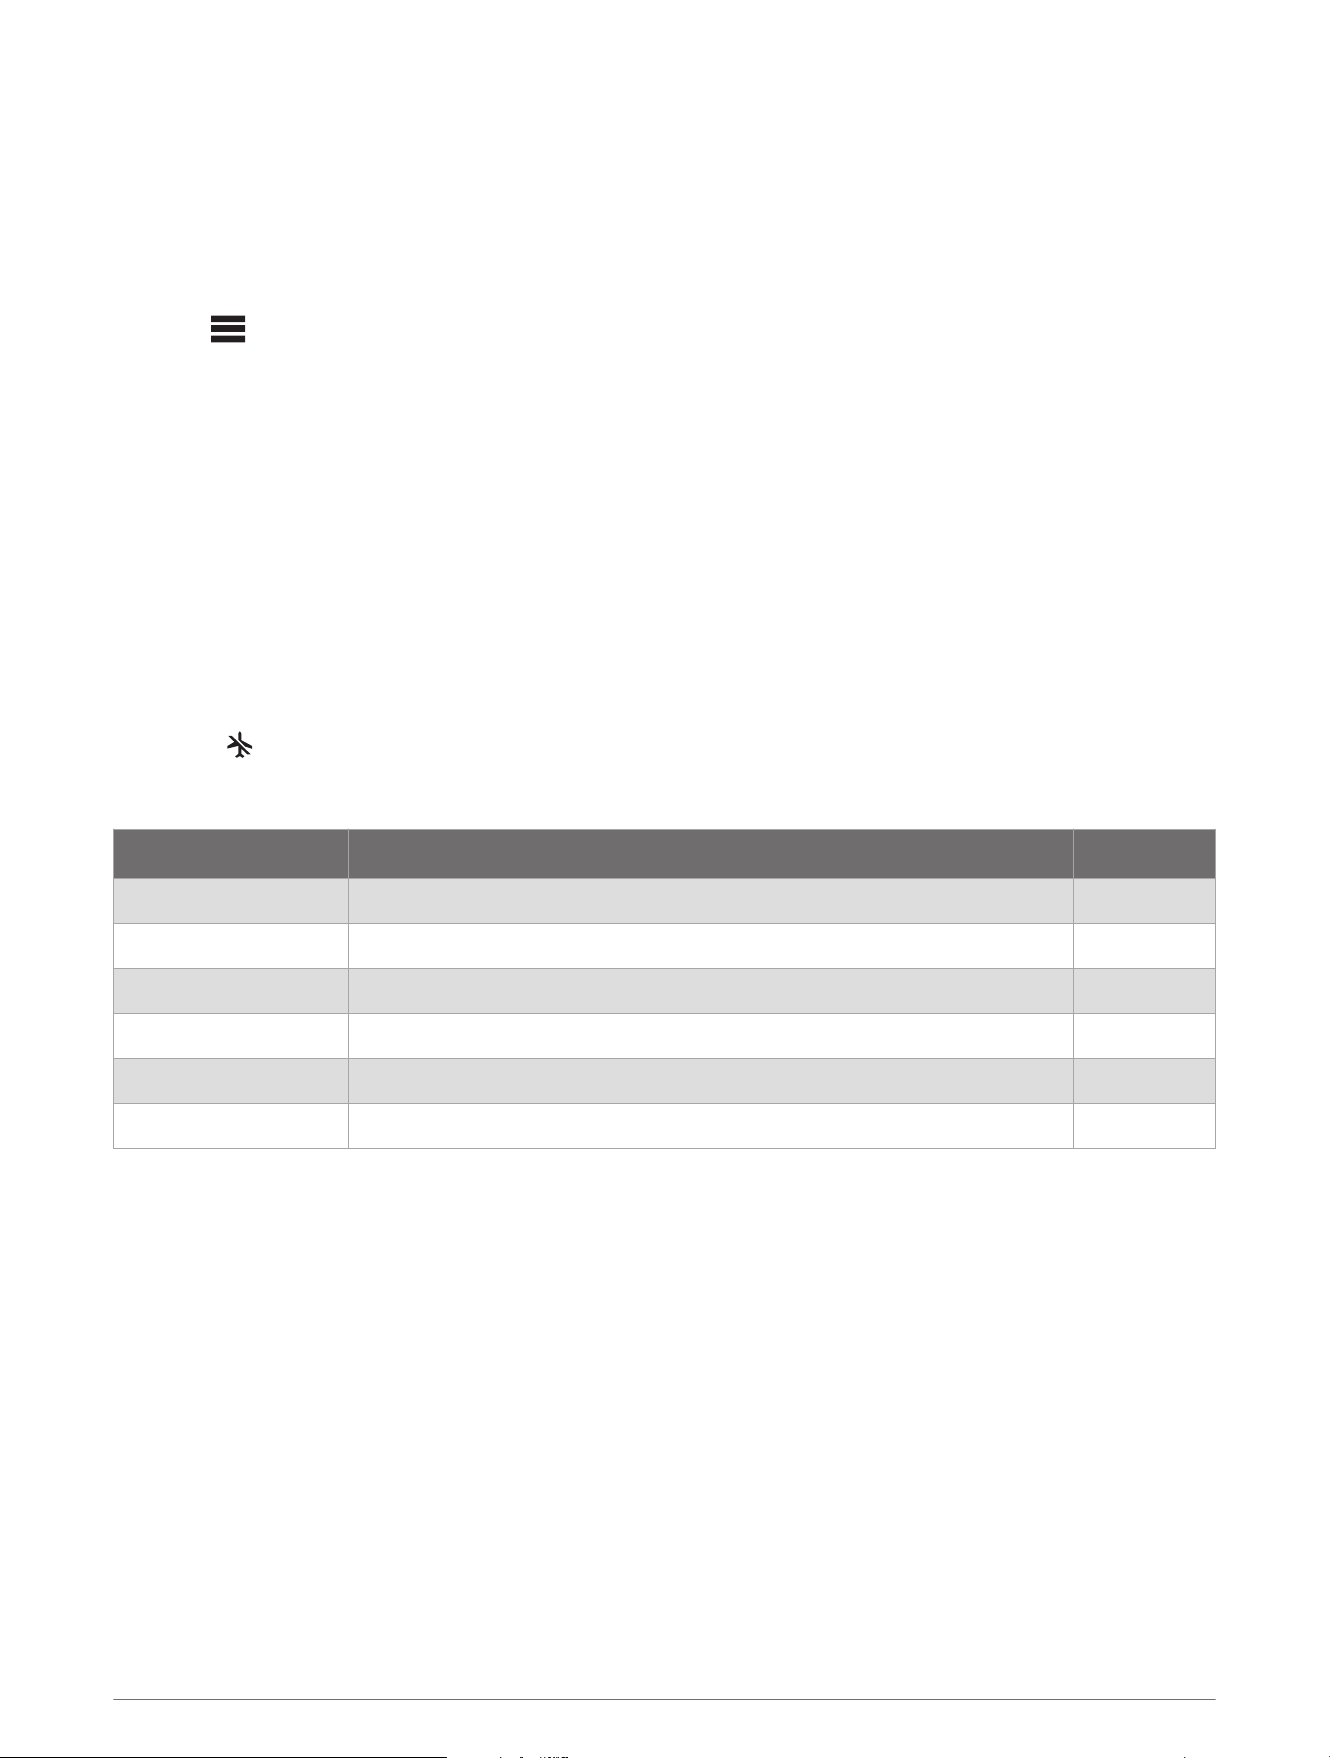
No-Fly Time
After a dive, you may need to wait several hours before it is safe to fly on an airplane. To indicate your remaining
no-fly time, appears on the home screen. You can view more details in the surface interval app (Viewing the
Surface Interval App, page22).
Select Dive Setup > Advanced Settings > No-Fly Time.
No-Fly Time Mode Dive Type No-Fly Time
Standard or 24 Hours Dive duration of 3 minutes or less or depth of 5 m (15 ft.) or less. 0 hours
Standard Non-decompression dive more than 48 hours since the previous dive. 12 hours
Standard Multiple non-decompression dives within 48 hours. 18 hours
Standard Dive with a completed decompression stop. 24 hours
24 Hours Non-gauge dive that did not violate the decompression plan. 24 hours
Standard or 24 Hours Gauge dive or a dive that violated the decompression plan. 48 hours
Dive Shortcuts
Hold functions are assigned to individual buttons and button combinations during a dive. You can customize
the hold functions for most of the shortcuts (Dive Setup, page5).
TORCH: Turns the torch on or off (Using the Torch, page2).
BACK: Returns to the home screen.
PREV: Displays the divers in your network.
NEXT: Selects a diver message to send (Sending Diver Messages, page11).
NEXT + ENTER: Sets the compass heading (Navigating with the Dive Compass, page17).
BACK + PREV: Opens the breathing gas setup menu (Setting Up Your Breathing Gases, page6).
8 Diving

Air Integration
The Descent X50i dive computer can be used with a paired Descent transceiver to view your tank pressure,
estimated air time remaining, and estimated gas consumption. When you pair your dive computer with another
diver's transceiver, you can view their depth, distance, and tank pressure. Compatible devices can send and/or
receive diver messages within your dive network (Dive Product and Feature Compatibility, page28). For more
information about the Descent transceiver, see the owner's manual for your device.
Waking the Transceiver from Low Power Mode
Out of the box, the transceiver is in low power mode. You must wake the transceiver from low power mode to
pair and connect to it.
Select an option:
• Install the transceiver on the first-stage regulator, and gradually open the tank valve to pressurize the
regulator.
NOTE: This option is not available for Bluetooth pairing. Bluetooth technology is disabled when the
transceiver is pressurized.
• Twist the battery cover counter-clockwise 270 degrees, wait 30 seconds, then twist the battery cover
clockwise until it is secure.
NOTE: The transceiver remains awake for two minutes before returning to low power mode.
The transceiver plays a tone when it wakes from low power mode and is ready to connect to your Descent
dive computer (Pairing a Transceiver with a Descent Dive Computer, page9) or phone.
Pairing a Transceiver with a Descent Dive Computer
Before you use the transceiver for the first time, you must pair it with a compatible Descent dive computer using
ANT
®
technology.
1 Wake the transceiver from low power mode (Waking the Transceiver from Low Power Mode, page9).
2 On your Descent dive computer, select Dive Setup > Dive Network & Air Integration > Transmitters.
3 Select an option:
• To add your own transceiver, select Add Your Tank, select your transceiver from the list, enter your
transceiver ID, and select an option for gas consumption calculations.
NOTE: The transceiver ID is printed on the housing.
• To add another diver's transceiver, select Add Other Divers, select at least one transceiver from the list,
and select Add.
When the pairing process is complete, the transceiver begins sending data, and it is ready to use on a dive. The
next time the transceiver and dive computer are turned on and within wireless range, they connect automatically
when you start a dive.
If you are diving with a group, you can pair up to 8 transceivers with the dive computer.
Diving 9

Dive Network and Air Integration Settings
Select Dive Setup > Dive Network & Air Integration.
NOTE: Some settings are available only for your own transceiver or another diver's transceiver.
Transmitters: Customizes the settings for paired transceivers (Transceiver Settings, page10).
Buoys: Pairs with a Descent S1 buoy (Descent S1 Buoy, page12). After pairing, you can manually sync the buoy
with your dive computer, and view information about the buoy, such as its connection status and software
version.
SubWave Features: Enables SubWave
™
features, such as messaging (Sending Diver Messages, page11) and
location tracking.
NOTE: SubWave features are only available when you are paired to a Descent T2 transceiver (Dive Product
and Feature Compatibility, page28). Location tracking is only available when you are paired to a Descent S1
buoy (Descent S1 Buoy, page12).
Quick Access Messages: Customizes which preset diver messages appear at the top of the message list
(Sending Diver Messages, page11).
Gas Consumption Rate: Changes the gas consumption rate for your transceiver (Selecting the Gas Consumption
Rate Metric, page11).
Connection Alert: Enables alerts when paired transceivers connect and disconnect.
Transceiver Settings
You can customize the settings for paired transceivers prior to a dive.
Select Dive Setup > Dive Network & Air Integration > Transmitters, and select a transceiver.
NOTE: Some settings are available only for your own transceiver or another diver's transceiver.
Status: Enables a connection to the transceiver, and shows the current connection status. Connected
transceivers show data during a dive and can send or receive messages.
Placement: Sets the transceiver location as either your own tank or that of another diver.
Public Tank Name: Associates a name with your transceiver, which will be visible to your dive network the next
time you connect to your transceiver.
NOTE: If you customize this name, another option appears in the list to clear the name.
SubWave Status: Displays what SubWave features are currently available based on the devices present, along
with the current software version, hardware version, or configuration settings. For help troubleshooting
issues with the status of your SubWave features, go to garmin.com/SubWaveSupport.
Nickname: Associates a nickname with another diver's transceiver, which will be visible on your dive data
screens. This setting does not change the name that appears for other divers.
NOTE: If you customize this name, another option appears in the list to clear the name.
Identify: Plays a tone on the selected paired transceiver. This helps you to identify the transceiver without
needing to look at the transceiver ID printed on the transceiver housing.
Working Pressure: Sets how much pressure the tank has when full. This value is used to determine the upper
end of the pressure gauge, and to calculate respiratory minute volume (RMV) for tanks using psi units.
Reserve Pressure: Sets the threshold values for reserve pressure and critical pressure alerts to appear on the
dive computer.
Volume: Sets the air volume of the tank. You can use the Reset Volume option if you move the transceiver to a
different size tank.
NOTE: This value is required to calculate volumetric surface air consumption (SAC) and respiratory minute
volume (RMV) (Selecting the Gas Consumption Rate Metric, page11).
SAC/RMV/ATR: Enables calculations for volumetric surface air consumption (SAC), respiratory minute volume
(RMV), and air time remaining (ATR) estimates for your transceiver.
Set Transmit Power: Adjusts the power setting if your transceiver is losing connection with the paired dive
computer underwater.
About: Displays the transceiver ID, software version, and battery status.
Remove: Removes a paired transceiver.
10 Diving

Software Update: If an update is available, updates the transceiver software using your dive computer (Updating
the Transceiver Software Using Your Dive Computer, page12).
Selecting the Gas Consumption Rate Metric
1 Select Dive Setup > Dive Network & Air Integration > Gas Consumption Rate.
2 Select an option.
NOTE: The dive computer can estimate volumetric surface air consumption (SAC) or respiratory minute
volume (RMV) only if the air volume of the tank is entered in the dive computer (Transceiver Settings,
page10). The dive computer can estimate pressure-based surface air consumption (PSAC) with or without
the air volume of the tank.
Selecting Transceivers to View During a Dive
You can view three paired transceivers at-a-glance on the transceiver data screen. You can customize which
paired transceivers appear on the screen. By default, the first three transceivers that you pair appear (Viewing
Transceiver Data During a Dive, page18).
1 Select Dive Setup > Dive Network & Air Integration > Transmitters > Pinned Tanks.
2 Select up to three transceivers.
Sending Diver Messages
CAUTION
Dive messaging and navigation requires line of sight between two compatible receivers with the latest
compatible software versions. Obstructions and other environmental factors may affect receiver connectivity
and may delay or prevent the sending and receiving of messages. With good connectivity, data can be
successfully sent between divers in under 20 seconds. If connectivity is poor, devices will attempt to send
data for up to two minutes. This is a supplemental feature that should not be relied upon as a method to receive
emergency assistance and should not replace traditional dive safety tools and procedures.
When paired to your compatible Descent transceiver, you can send preset messages to other members of your
dive network up to 30 m (98 ft.) away. When also paired to a Descent S1 buoy and within 100 m (328ft.) of it,
you can send preset messages to members of your dive network on the surface.
1 During a dive, press ENTER.
2 Select Divers.
3 Select an option:
• To view all of the recent messages from your diver network, select All Messages.
• To view the recent messages from one diver in your network, select the diver.
4 Press NEXT.
TIP: You can press PREV to scroll through your recent messages.
5 If necessary, select a recipient.
6 Select a message.
Diving 11

Requesting Diver Assistance
WARNING
Assistance is a supplemental feature and should not be relied upon as a primary method to obtain emergency
assistance. Your device cannot contact emergency services on your behalf.
If your are in distress during a dive, you can send a message requesting help to the other members of your dive
network.
1 Hold BACK until you are prompted to release it for assistance.
NOTE: If you do not release BACK soon after the prompt, the dive computer will restart.
After a brief countdown, a request for help will be sent every two minutes. The flashlight on your dive
computer will also flash in a distress pattern.
2 If necessary, hold BACK to cancel the request for help.
A message indicating you are okay is sent to the other members of your dive network.
Updating the Transceiver Software Using Your Dive Computer
Before you can update the software, you must pair your Descent transceiver with a Descent X50i dive computer.
1 Select an option to sync your dive computer:
• Sync your dive computer with the Garmin Dive
™
app.
• Connect the dive computer to your computer using the USB cable, and sync with the Garmin Express
™
application.
The Garmin Dive app and Garmin Express application automatically look for software updates. When you
sync with the Garmin Dive app, you will be prompted to apply the update at a later time. When you sync with
the Garmin Express application, the update is applied immediately to your dive computer.
2 Wake the transceiver from low power mode (Waking the Transceiver from Low Power Mode, page9).
3 On the paired Descent dive computer, select Dive Setup > Dive Network & Air Integration > Transmitters, and
select your transceiver.
4 Wait for the transceiver to connect to your dive computer.
Connected appears on the dive computer screen.
5 Select Software Update, press ENTER, and select Install Now.
NOTE: The Software Update option may take up to a minute to appear while the dive computer determines
the transceiver's software version and battery status. If the battery status is low or critically low, you must
replace the battery before you can install the update.
6 Keep the dive computer near the transceiver until the software update is complete.
Descent S1 Buoy
Your Descent X50i dive computer is compatible with the Descent S1 buoy accessory. When you pair your
devices, your Descent S1 buoy creates a dive network that connects the surface users using the Garmin Dive
app with divers below the surface using both a Descent X50i dive computer and Descent T2 transceiver. Divers
can send and receive messages from users on the surface, and can also receive guidance for navigating back
to the buoy (Navigating to the Buoy, page13). Users on the surface can track the location of the divers in the
network. At the end of a dive, the buoy syncs with your dive computer, and you can view underwater heat maps
for approximate location information in the Garmin Dive app.
See the owner's manual for your Descent S1 buoy accessory for more information.
12 Diving
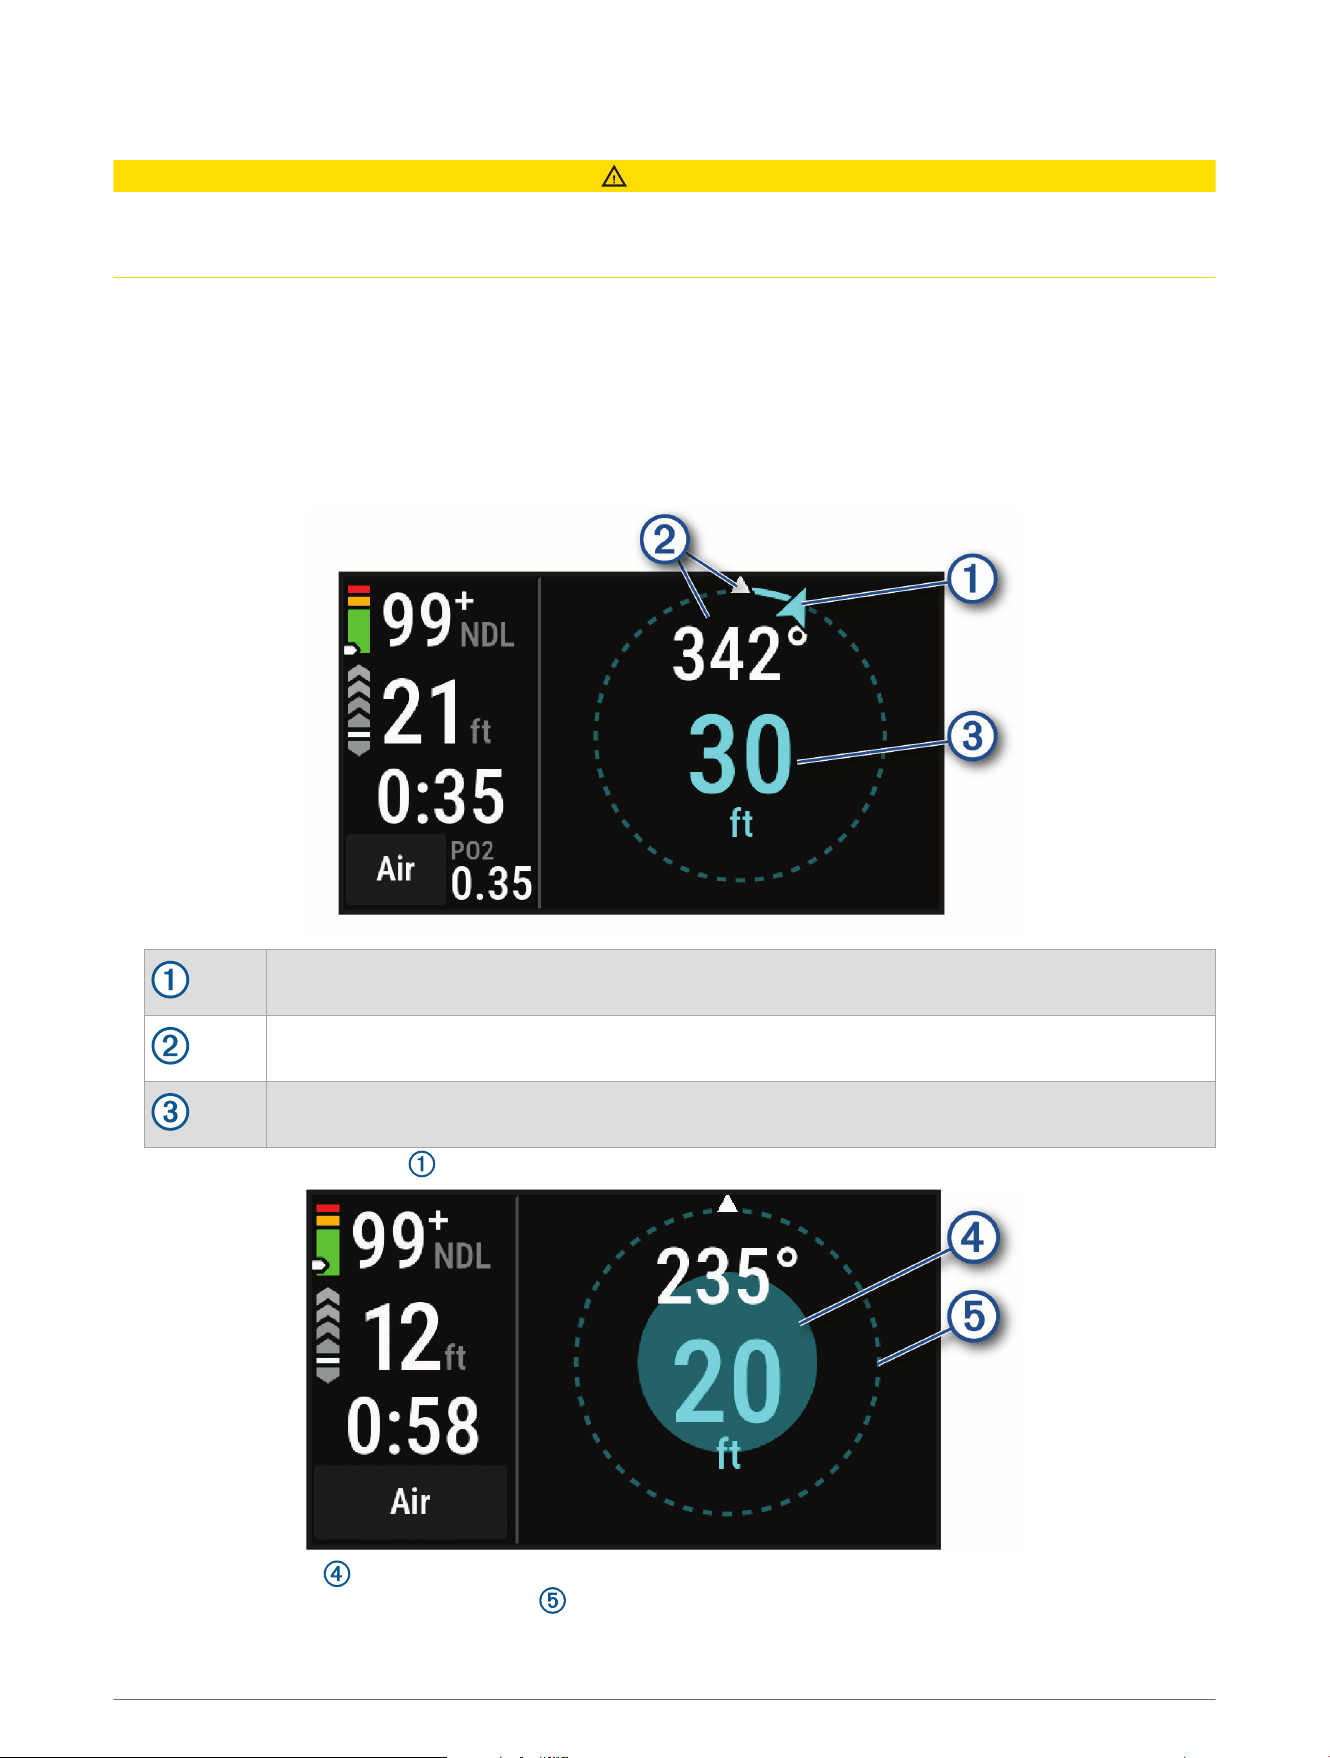
Navigating to the Buoy
CAUTION
You should not rely solely on the buoy for underwater navigation. The navigate to buoy feature requires line of
sight with the buoy. Location and distance information from the buoy is not precise, and should be used as a
supplement, and not a replacement, for diver training in navigation, search, and positioning.
When paired to a Descent S1 buoy (Descent S1 Buoy, page12) and Descent T2 transceiver (Pairing a Transceiver
with a Descent Dive Computer, page9), you can view your horizontal distance and direction back to the buoy
during a dive.
NOTE: The buoy data screen is automatically added for each dive activity when you pair your dive computer to a
Descent S1 buoy.
1 During a Single-Gas, Multi-Gas, CCR, or Gauge dive, scroll to the buoy data screen.
NOTE: The buoy data fields turn yellow if your dive computer loses communication with the buoy.
The current direction to the buoy.
Your current heading.
Your horizontal distance from the buoy.
2 Use the direction indicator to navigate to the buoy.
A solid blue circle appears to indicate your distance from the buoy. It increases in size as you get closer
to the buoy, and meets the dotted circle once you reach it.
Diving 13
NOTE: When you are near the buoy, the dive computer is no longer able to update direction information. The
direction indicator turns black and displays the last known direction for thirty seconds. After thirty seconds,
the direction indicator is removed, but the horizontal distance is still updated. For more information, go to
garmin.com/subwave.
Dive Data Screens
You can press NEXT or double-tap the device to scroll through the data screens.
In the activity settings, you can reorder the default data screens, add a dive stopwatch, and add custom data
screens (Customizing the Data Screens, page8). You can customize the data fields on some of the data
screens.
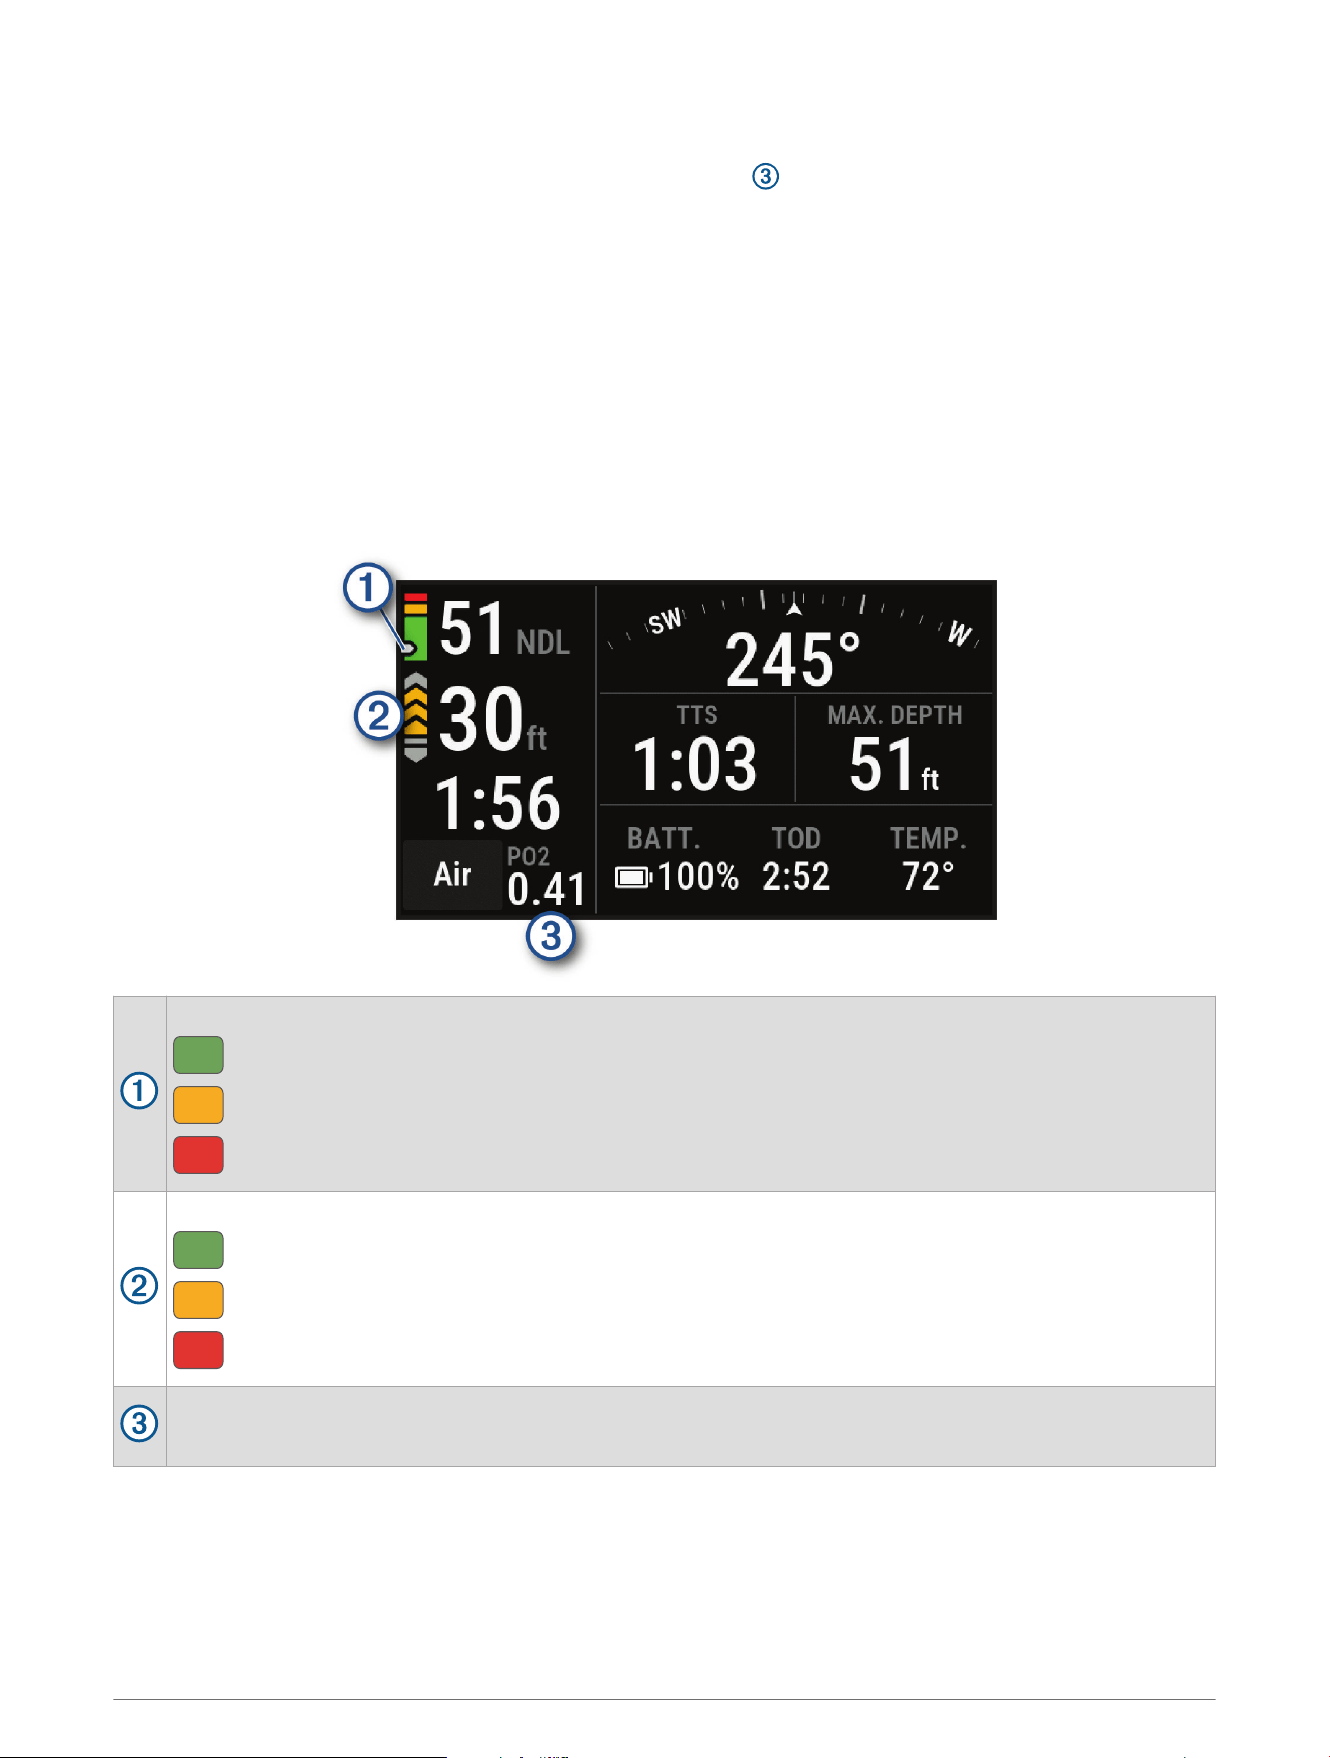
Single-Gas and Multi-Gas Data Screens
The primary data screen for single-gas and multi-gas dive modes displays the main dive data, including your
breathing gas, rate of ascent or descent, maximum depth, time to surface (TTS), the time of day, and the current
temperature. You can press NEXT to view the dive compass (Navigating with the Dive Compass, page17).
Your nitrogen (N2) and helium (He) tissue load level.
Green: 0 to 79% tissue load.
Yellow: 80 to 99% tissue load.
Red: 100% or greater tissue load.
Your rate of ascent.
Green: Good. Ascent is less than 7.9 m (26 ft.) per minute.
Yellow: Moderately high. Ascent is between 7.9 and 10.1 m (26 and 33 ft.) per minute.
Red: Too high. Ascent is greater than 10.1 m (33 ft.) per minute.
Your partial pressure of oxygen (PO2) level.
NOTE: In the single-gas dive mode, this field does not appear if you are using air for your breathing gas.
14 Diving
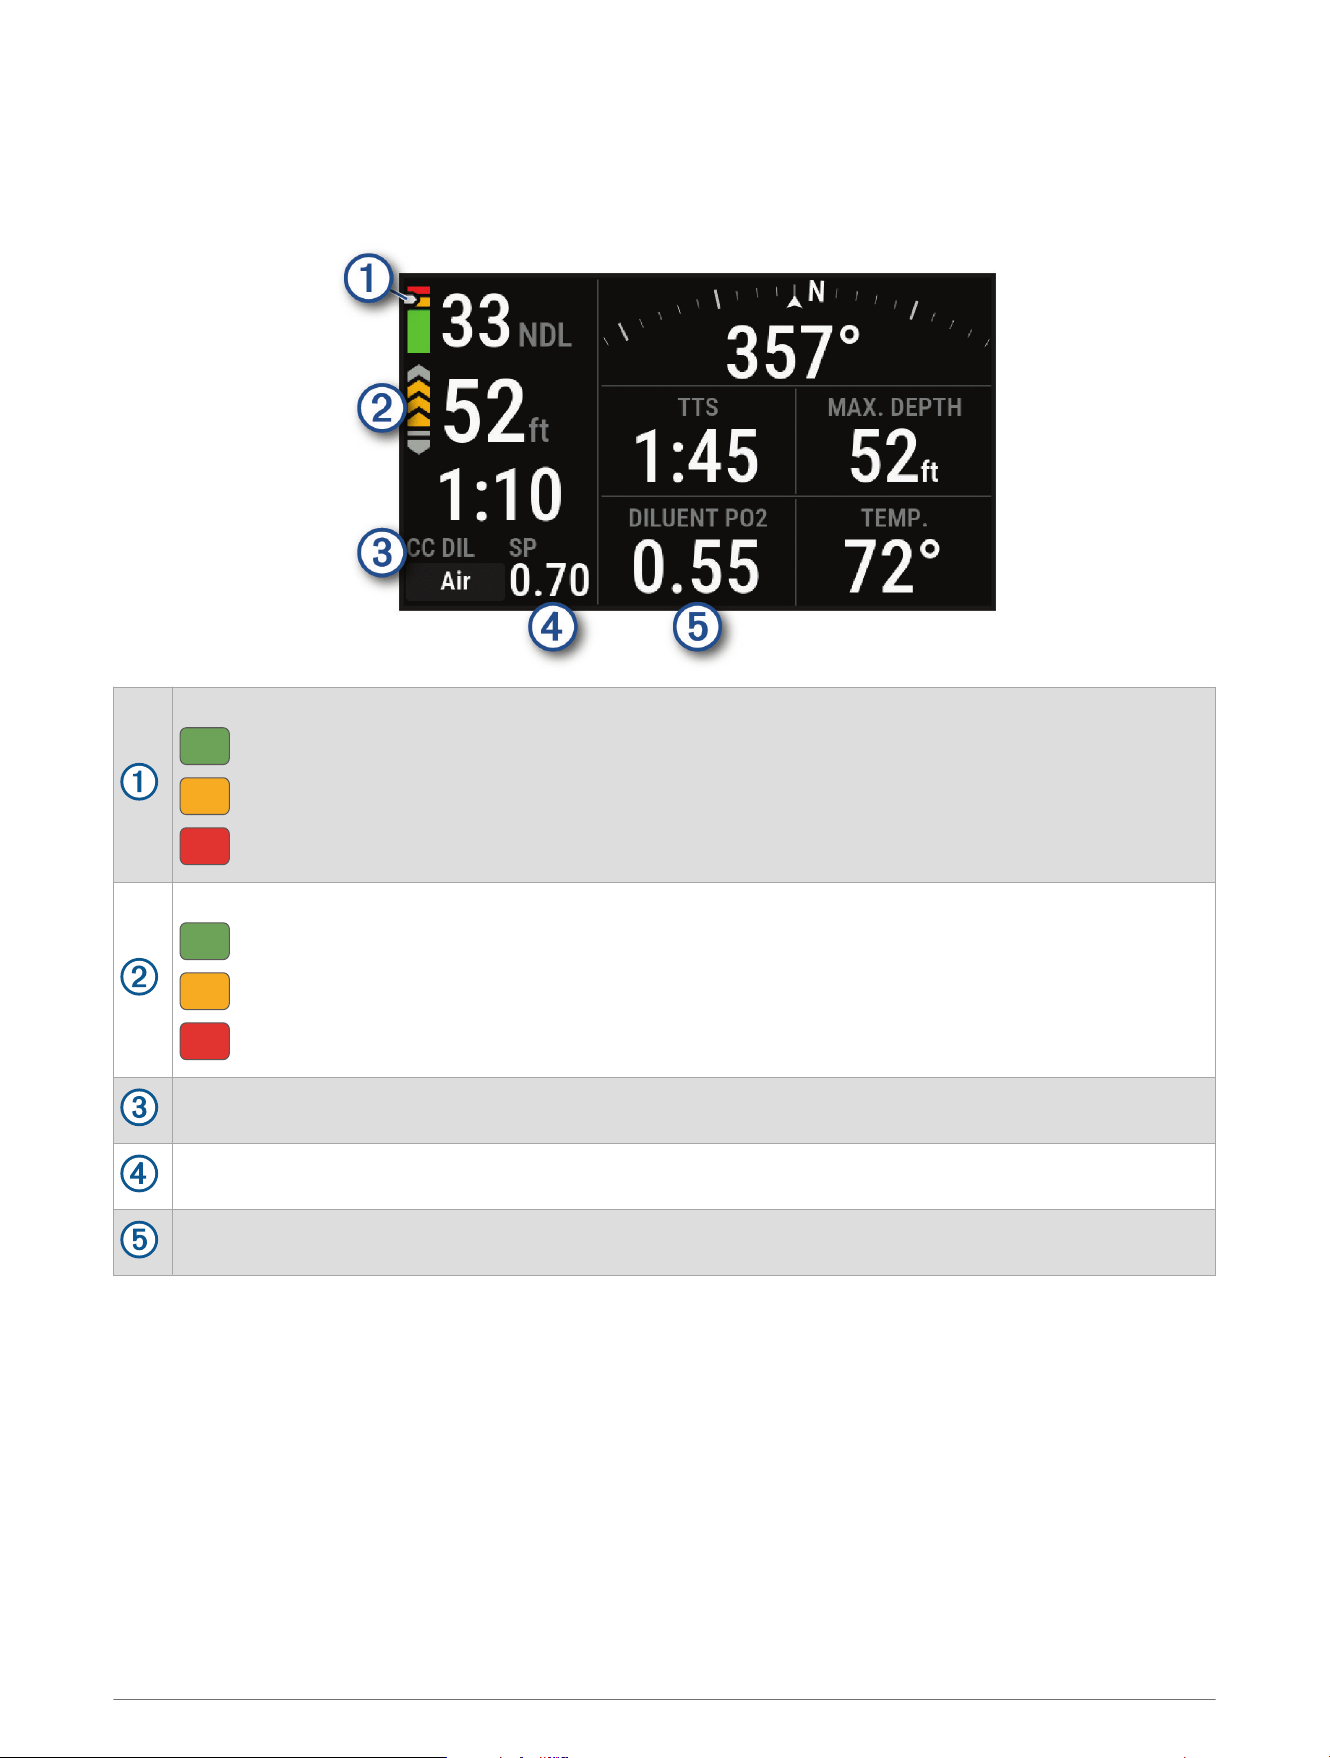
CCR Data Screens
The primary data screen for the CCR dive mode displays the main dive data, including your breathing gas, rate of
ascent or descent, maximum depth, time to surface (TTS), and the current temperature. You can press NEXT to
view the dive compass (Navigating with the Dive Compass, page17).
Your nitrogen (N2) and helium (He) tissue load level.
Green: 0 to 79% tissue load.
Yellow: 80 to 99% tissue load.
Red: 100% or greater tissue load.
Your rate of ascent.
Green: Good. Ascent is less than 7.9 m (26 ft.) per minute.
Yellow: Moderately high. Ascent is between 7.9 and 10.1 m (26 and 33 ft.) per minute.
Red: Too high. Ascent is greater than 10.1 m (33 ft.) per minute.
Indicates whether closed-circuit (CC) or open-circuit (OC) diving is active.
Your low partial pressure of oxygen (PO2) setpoint.
Your partial pressure of oxygen level of your diluent gas.
Diving 15
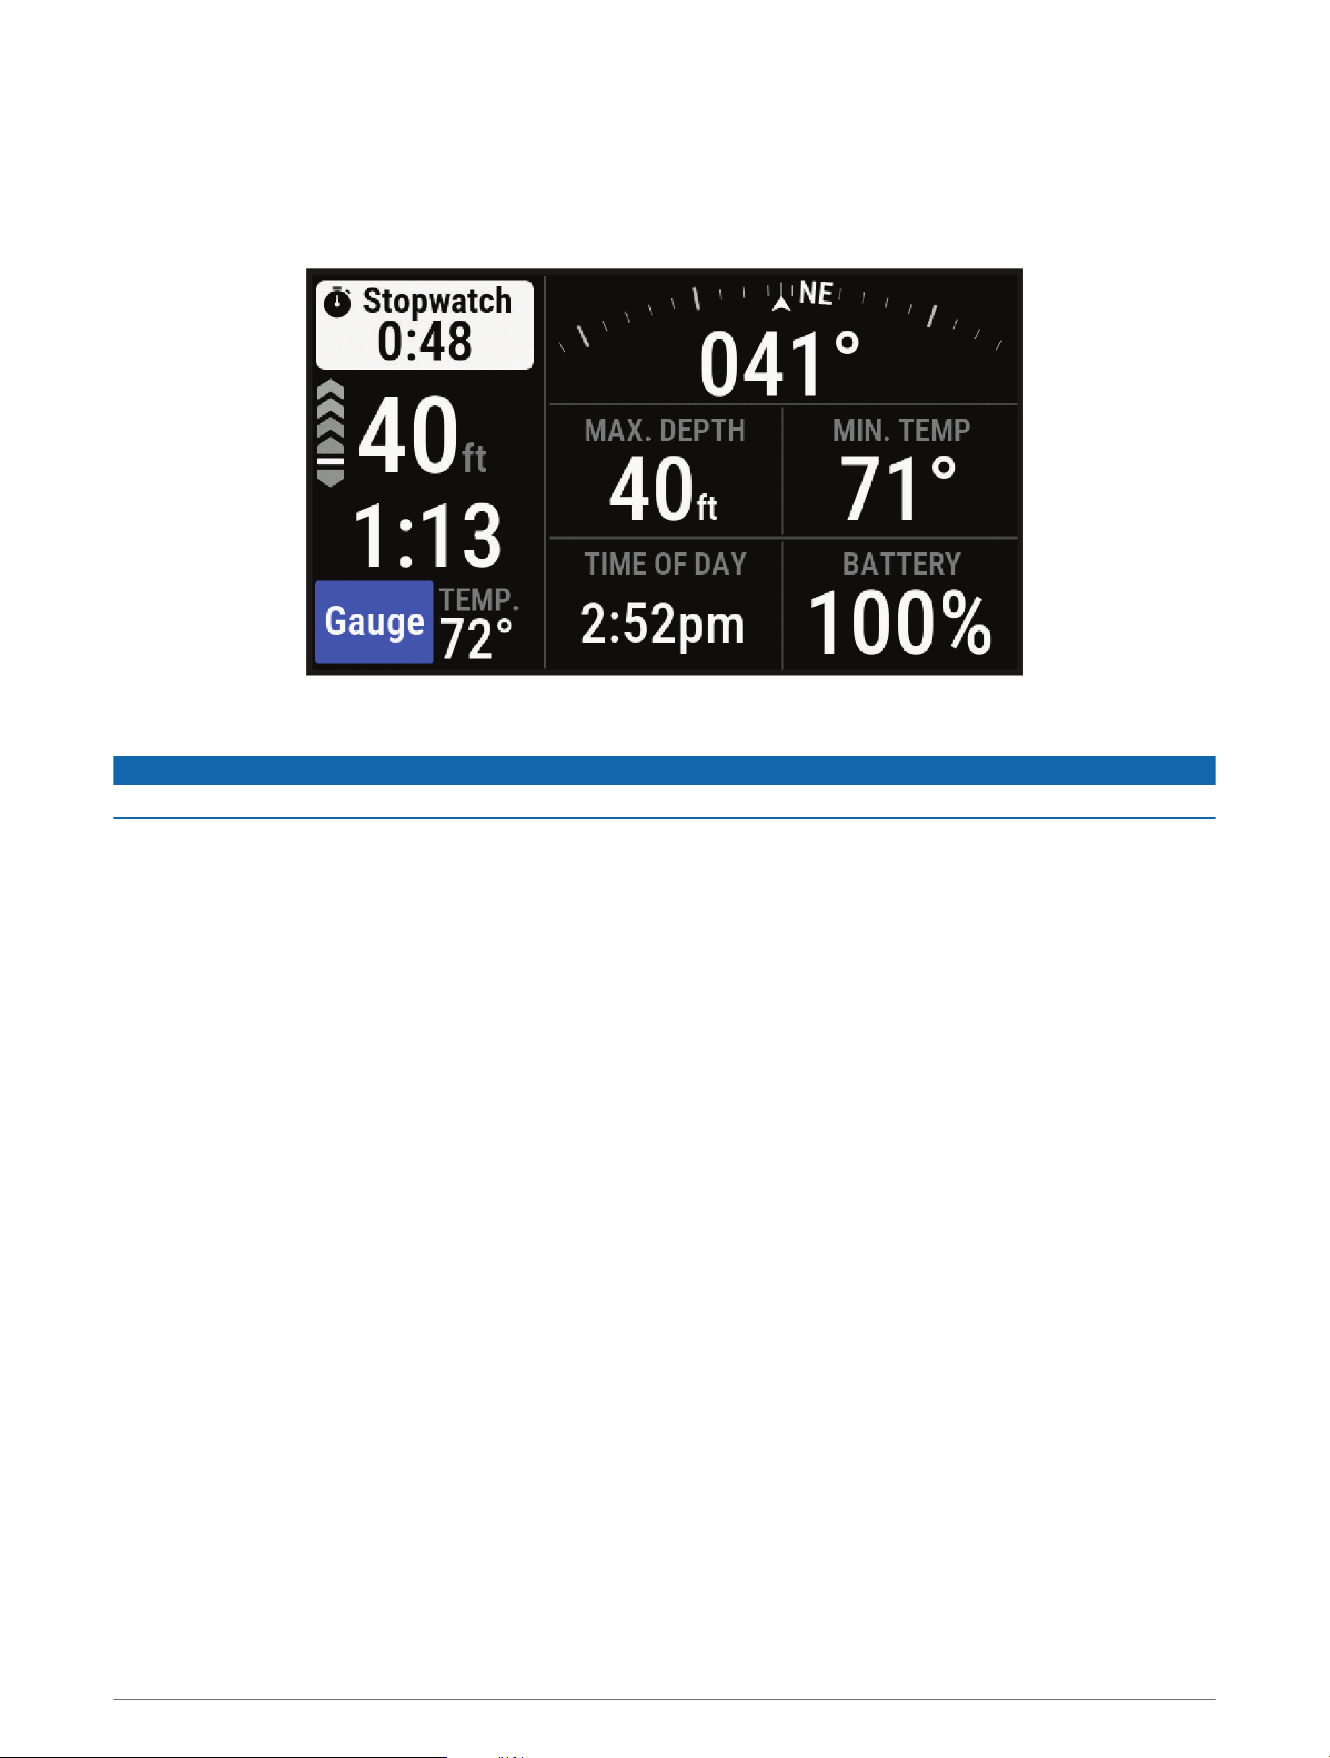
Gauge Data Screens
The primary data screen for the gauge dive mode displays data for the current dive, including your maximum
depth, the lowest temperature during the dive, the time of day, and the stopwatch (Using the Gauge Dive
Stopwatch, page17). You can press NEXT to view the full screen dive compass (Navigating with the Dive
Compass, page17).
Going Diving
NOTICE
If you store the dive computer while it is still wet, it may inadvertently turn on and drain the battery.
NOTE: The dive computer turns on automatically when it detects water. If you start a dive without turning on
your dive computer, the dive computer uses the most recent surface pressure to determine depth. For the most
accurate depth information, turn on your dive computer manually, especially after traveling.
1 If necessary, select Dive Mode, and select a dive mode.
2 Select Start Dive With.
3 Review the dive setup options, and if necessary, select View All Setup to edit the dive settings (Dive Setup,
page5).
4 Wait with your arm out of the water until the dive computer acquires GPS signals and GPS turns green
(optional).
The dive computer requires GPS signals to save your dive entry location.
5 Select Confirm.
6 Descend to start your dive.
The activity timer starts automatically when you reach a depth of 1.2 m (4 ft.).
NOTE: If you start a dive without selecting a dive mode, the dive computer uses the most recently used dive
mode and settings, and your dive entry location is not saved.
7 Select an option:
• Press NEXT to scroll through the data screens and dive compass.
TIP: You can also double tap the device to scroll through the data screens.
• Press ENTER to view the in-dive menu.
8 When you are ready to end the dive, ascend to the surface.
16 Diving
9 Keep your arm out of the water so the dive computer can acquire GPS signals and save your dive exit
location (optional).
10 Wait for the DIVE END timer to count down.
NOTE: When you ascend to 1 m (3.3 ft.), the DIVE END timer begins counting down (Dive Setup, page5). You
can press ENTER, and select Stop Dive to stop the dive before the timer elapses.
The dive computer saves the dive activity.
TIP: You can view your diving history in the dive log app (Viewing the Dive Log App, page23).
Dry off the dive computer.
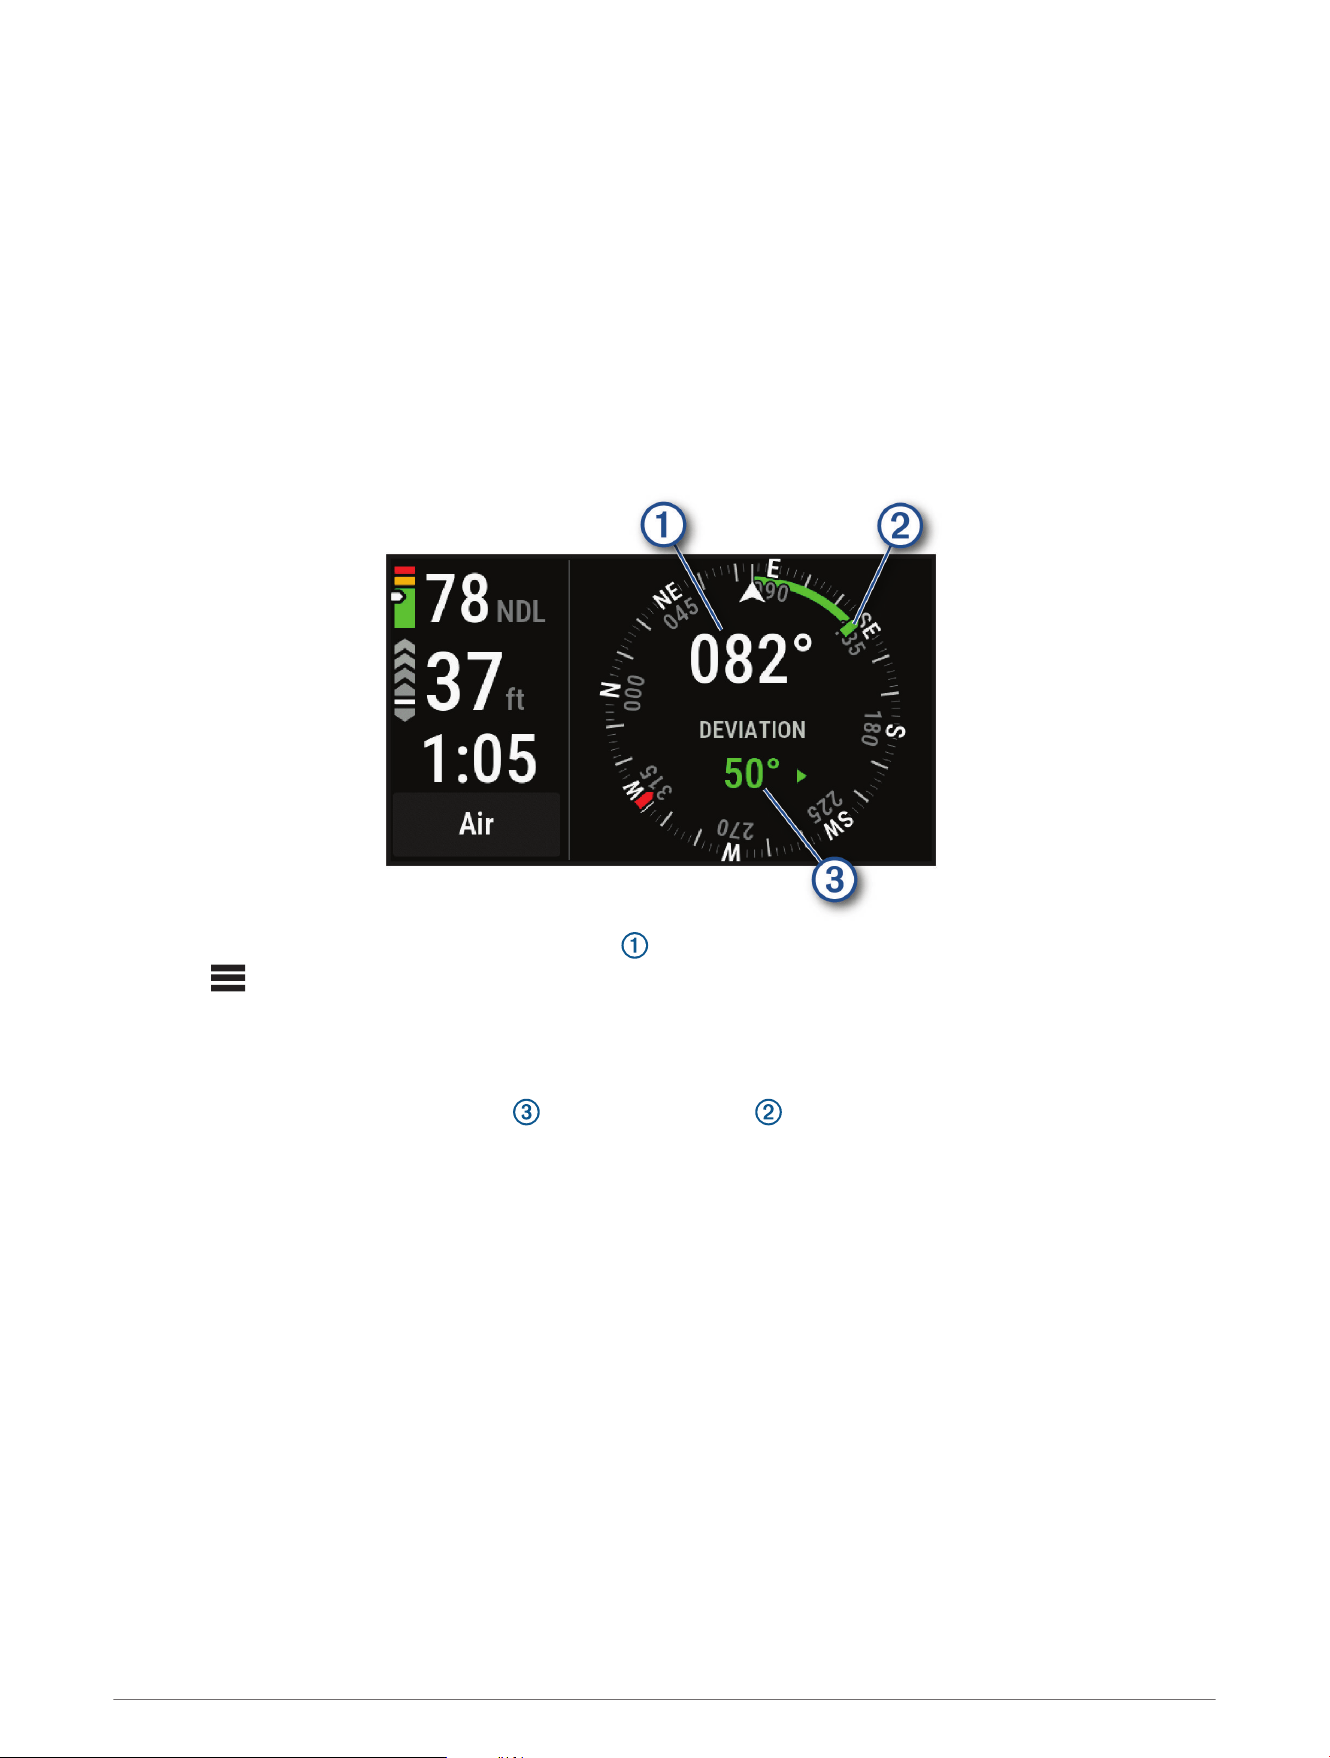
Navigating with the Dive Compass
1 During a dive, scroll to the dive compass.
NOTE: The appearance of the dive compass may vary if you view it in a data field.
The compass indicates your directional heading .
2 Select > Compass.
3 Select an option:
• To set the heading, select Set Heading.
TIP: You can also set the heading by holding NEXT and ENTER (Dive Shortcuts, page8).
The compass indicates deviations from the set heading .
• To set the heading again, select Change Heading.
• To change the heading by 180 degrees, select Set to Recip..
NOTE: The compass indicates the reciprocal heading with a red mark.
• To set to a 90-degree heading left or right, select Set to 90L or Set to 90R.
• To delete the heading, select Clear Heading.
Using the Gauge Dive Stopwatch
1 Start a Gauge dive.
2 Press ENTER.
3 Select Start Stopwatch.
4 Select an option:
• To stop using the stopwatch, press ENTER, and select Stop Stopwatch.
• To restart the stopwatch, press ENTER, and select Reset Stopwatch.
Diving 17

Viewing Transceiver Data During a Dive
1 Press NEXT to view the data screen.
TIP: You can customize the dive data screens to view the transceiver and diver dashboard data on dedicated
data screens (Customizing the Data Screens, page8).
The gas consumption estimate for your transceiver (Selecting the Gas Consumption Rate Metric,
page11).
The air time remaining (ATR) estimate for your transceiver.
Your pinned transceivers and their tank pressure values.
NOTE: You can customize which transceivers are displayed (Selecting Transceivers to View During a
Dive, page11).
2 Press ENTER, and select Divers to view the tank pressure values, approximate depths, and approximate
distances of the paired Descent transceivers in the network.
NOTE: Not all features are available for older devices (Dive Product and Feature Compatibility, page28).
18 Diving
Switching Gases During a Dive
1 Start a single-gas, multi-gas, or closed-circuit rebreather (CCR) dive.
2 Select an option:
• Press ENTER, select Gas, and select a backup or decompression gas.
NOTE: If necessary, you can select Add New and enter a new gas.
• Dive until you reach the MOD/Deco PO2 threshold (Setting PO2 Thresholds, page7).
The device prompts you to switch to the gas with the highest percentage of oxygen.
NOTE: The device does not switch gases for you automatically. You must select the gas.
Switching Between CC and OC Diving for a Bailout Procedure
During a closed-circuit rebreather (CCR) dive, you can switch between closed-circuit (CC) and open-circuit (OC)
diving while you perform a bailout procedure.
1 Start a CCR dive.
2 Press ENTER.
3 Select Switch to OC.
The gas name turns red, and the device switches the active breathing gas to your OC decompression gas.
NOTE: If you have not set up an OC decompression gas, the device switches to your diluent gas.
4 If necessary, press ENTER, and select Gas to manually switch to a backup gas.
5 Press ENTER, and select Switch to CC to switch back to CC diving.
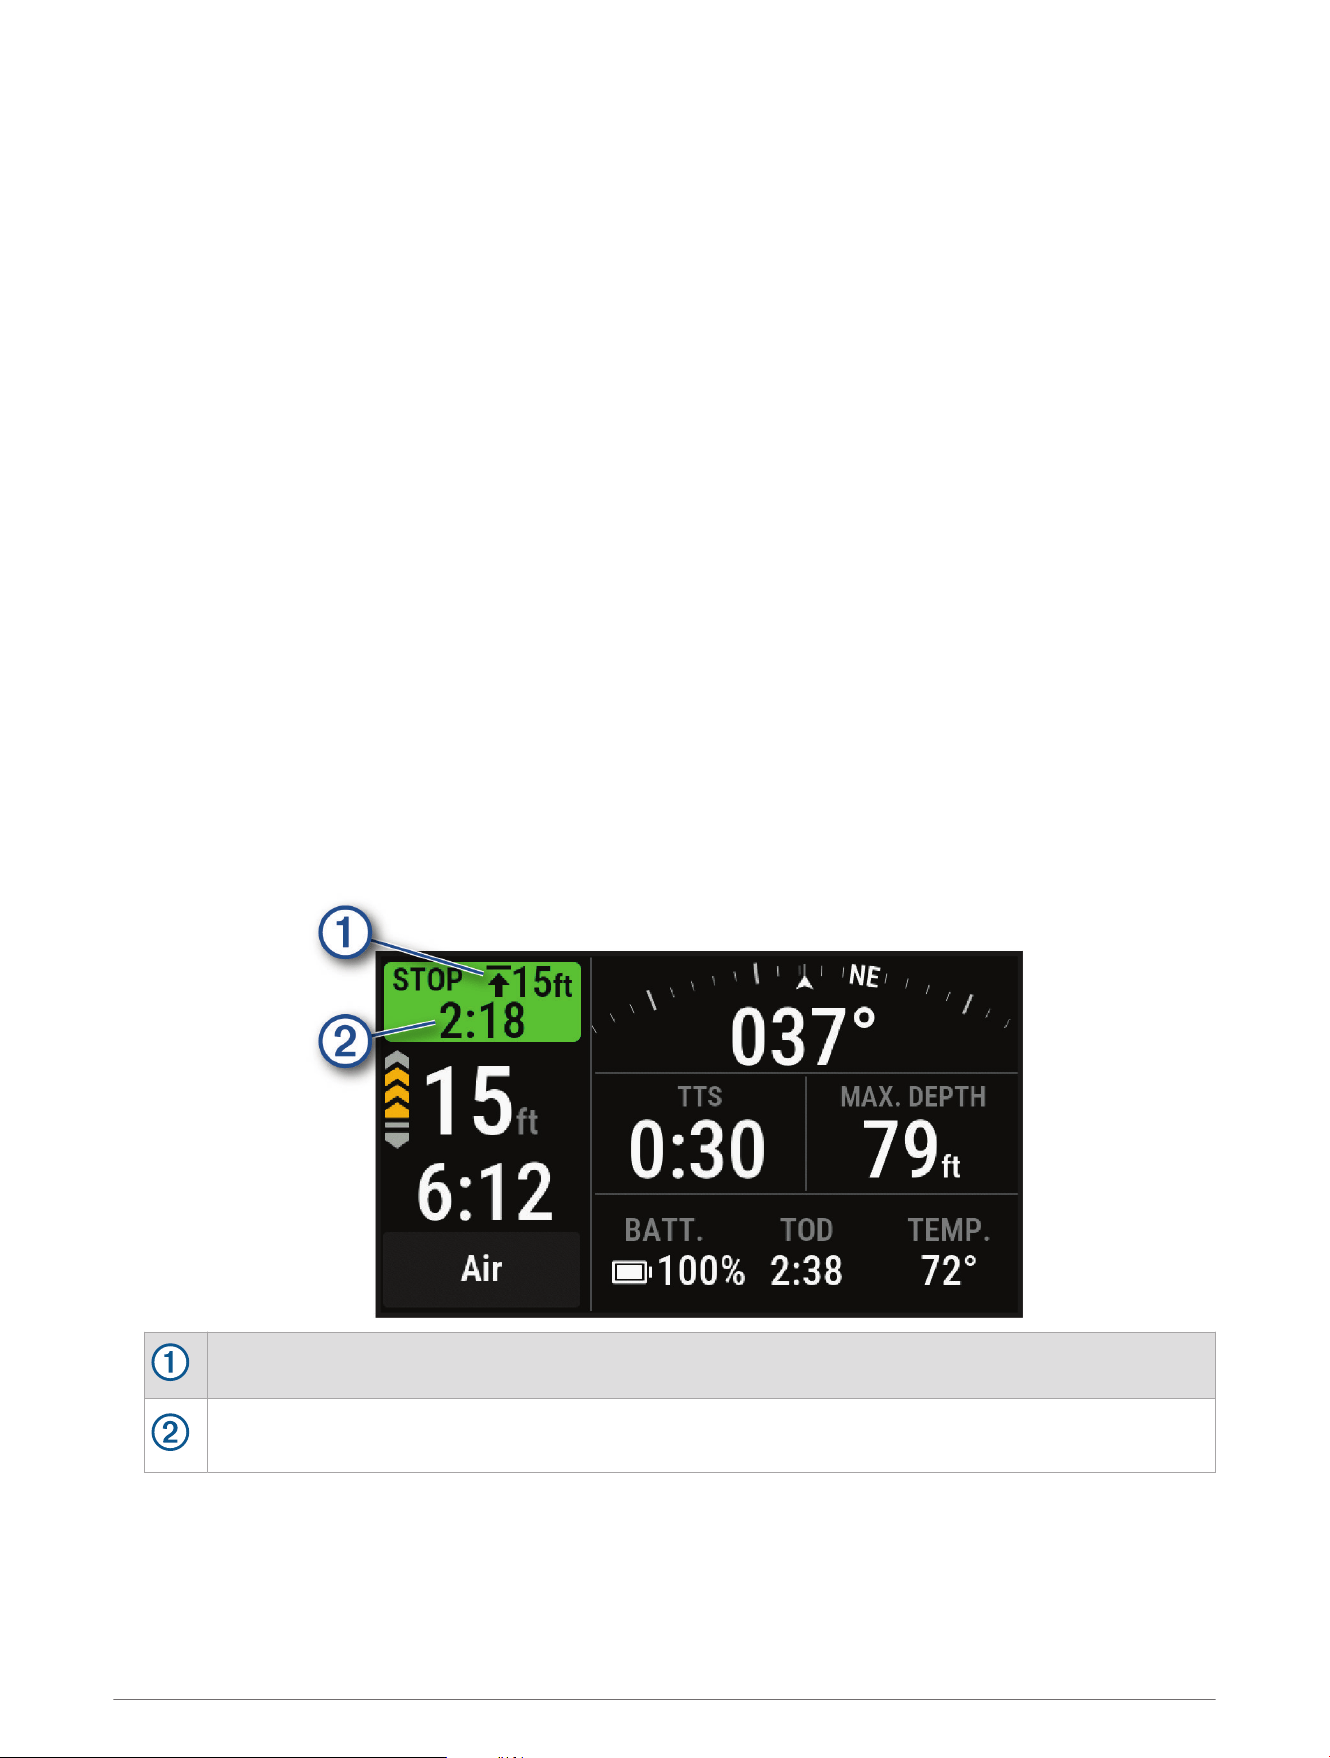
Performing a Safety Stop
You should perform a safety stop during every dive to help reduce the risk of decompression sickness.
1 After a dive of at least 11 m (35 ft.), ascend to 5 m (15 ft.).
Safety stop information appears on the data screens.
The safety stop ceiling depth.
The safety stop timer.
When you are within 1 m (5 ft.) of the ceiling depth, the timer starts counting down.
2 Stay within 2 m (8 ft.) of the safety stop ceiling depth until the safety stop timer reaches zero.
NOTE: If you ascend more than 3 m (8 ft.) above the safety stop ceiling depth, the safety stop timer pauses,
and the device alerts you to descend below the ceiling depth. If you descend below 11 m (35 ft.), the safety
stop timer resets.
3 Continue ascending to the surface.
Diving 19
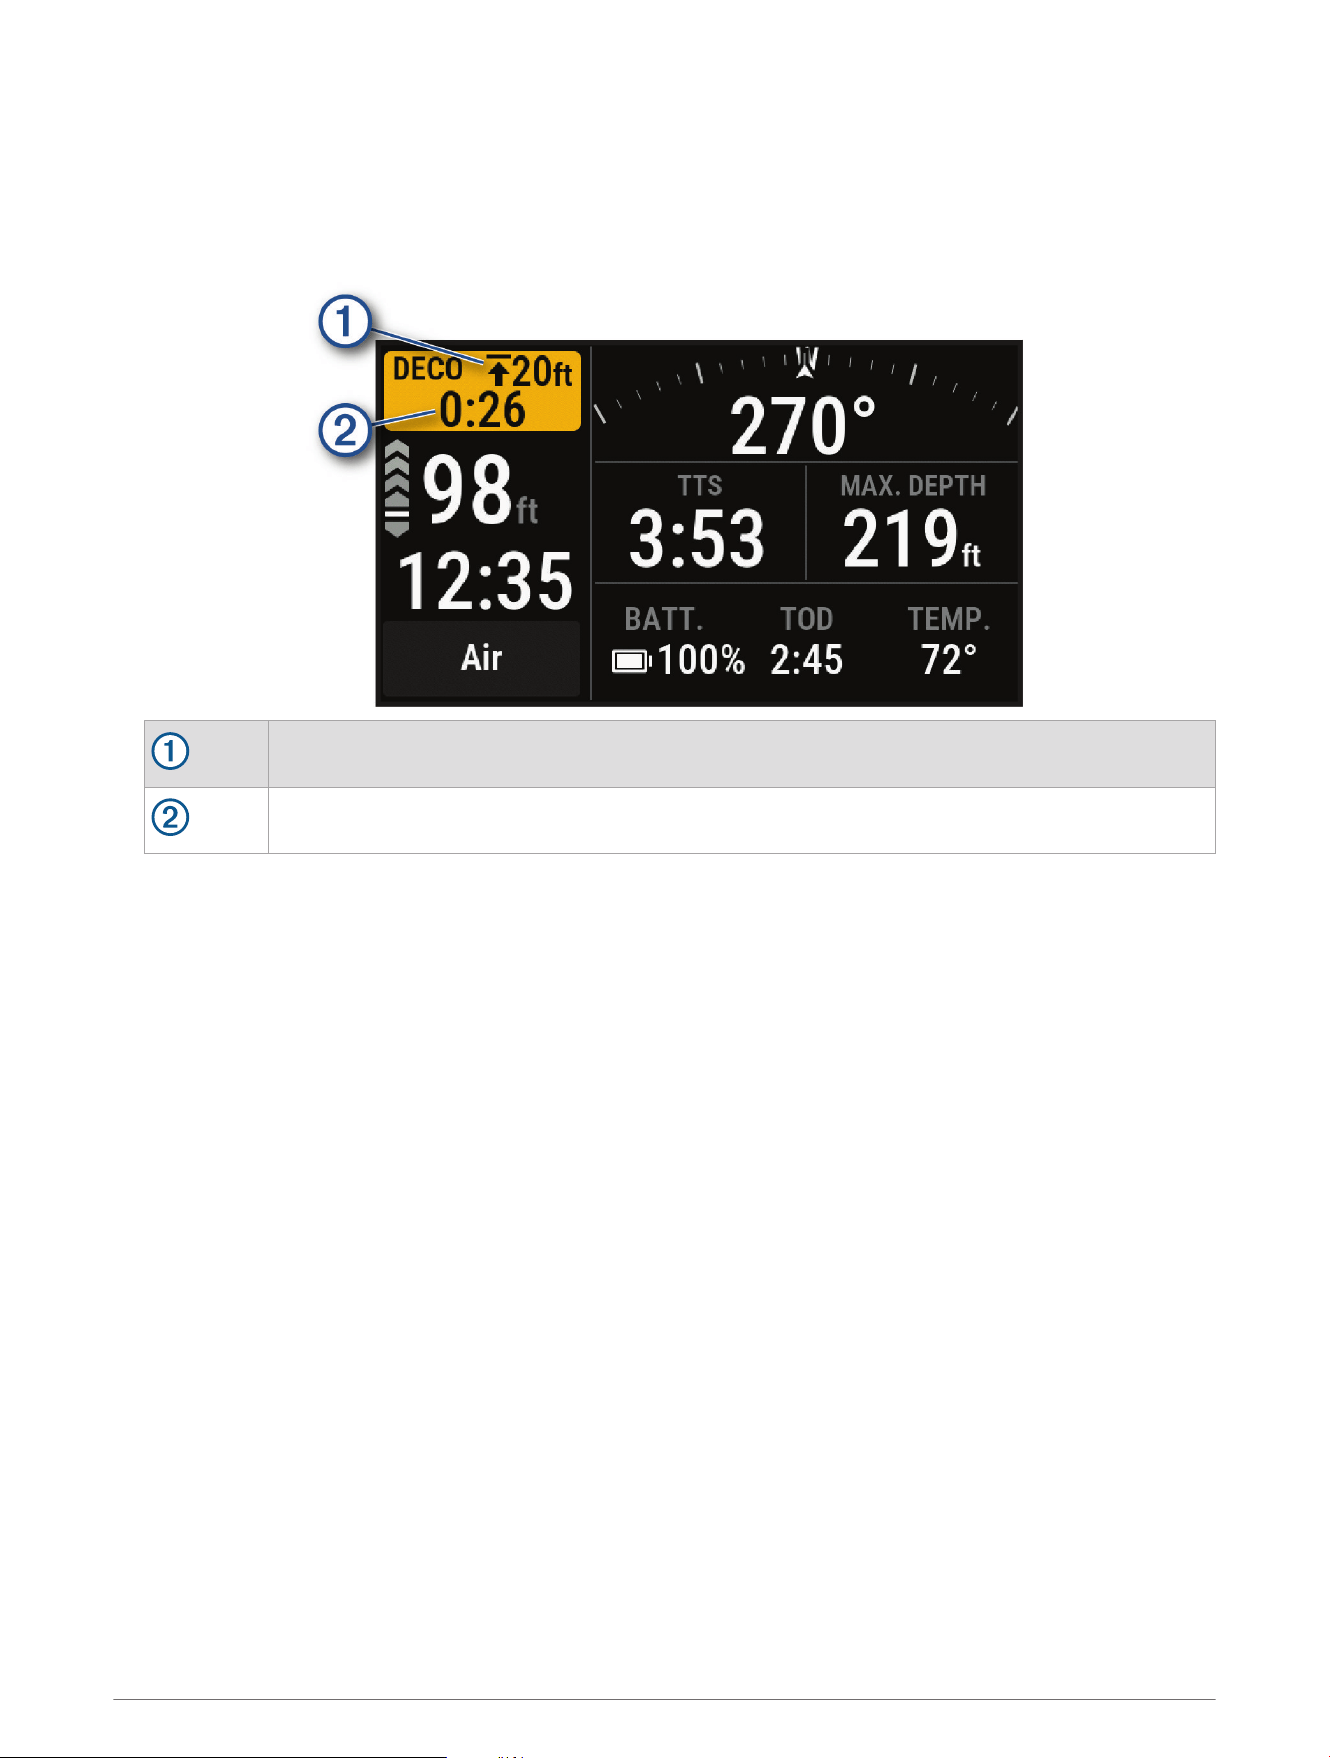
Performing a Decompression Stop
You should always perform all the required decompression stops during a dive to help reduce the risk of
decompression sickness. Missing a decompression stop adds significant risk.
1 When you exceed the no-decompression limit (NDL) time, begin your ascent.
Decompression stop information appears on the data screens.
The decompression stop ceiling depth.
The decompression stop timer.
2 Stay within 0.6 m (2 ft.) of the decompression stop ceiling depth until the decompression stop timer reaches
zero.
NOTE: If you ascend more than 0.6 m (2 ft.) above the decompression stop ceiling depth, the decompression
stop timer pauses, and the device alerts you to descend below the ceiling depth. The depth and ceiling depth
flash red until you are within the safe margin.
3 Continue ascending to the surface or the next decompression stop.
20 Diving
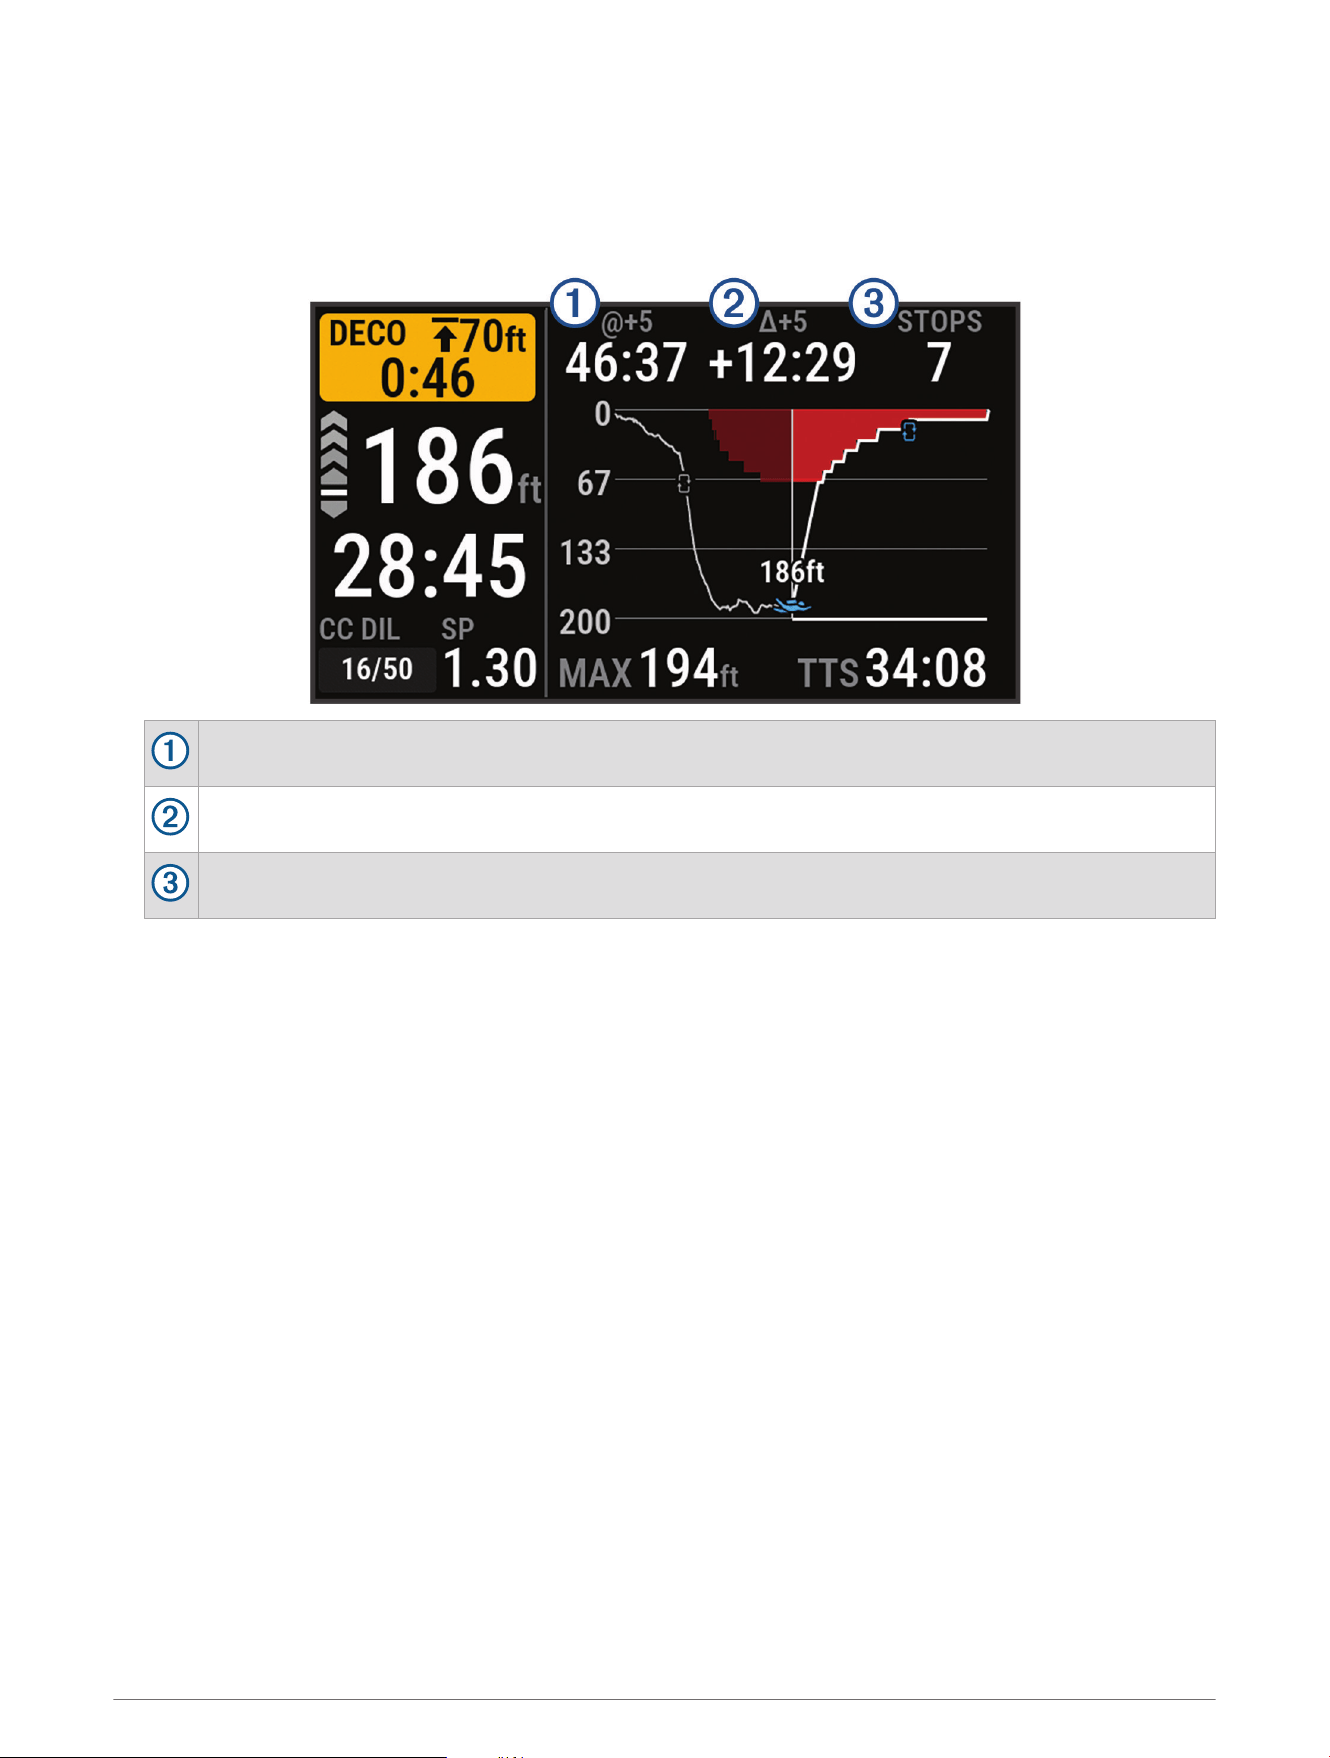
Viewing Your Dynamic Depth
During a gas dive, the dynamic depth data screen displays your depth profile for the dive so far, along with the
projected ascent plan to the surface. The ascent plan shows required decompression steps or the safety stop
(if configured), as well as upcoming gas switches and automatic set point switches.
During a gas dive, press NEXT to view the dynamic depth data screen.
Your time to surface (TTS) if you remain at the current depth for five minutes.
The difference between your TTS, and your TTS if you remain at the current depth for five minutes.
Your upcoming stops.
Viewing the Map During a Dive
1 During a dive, press ENTER.
2 Select Map.
3 Press ENTER.
4 Press PREV or NEXT to zoom in or out.
NOTE: You can press ENTER to toggle between panning up and down, panning left and right, or zooming.
Location information appears at the top of the map.
Marking a Dive Event
You can use the bookmark shortcut to mark an event during your dive. For example, you can use it to mark when
you see a point of interest or reach a specific point in the dive.
1 Customize a button combination for the bookmark feature (Dive Shortcuts, page8).
2 During a dive, hold the button combination you customized to bookmark an event.
A log is created, and the bookmark appears as an event for the dive in the dive log app (Viewing the Dive Log
App, page23).
Diving 21
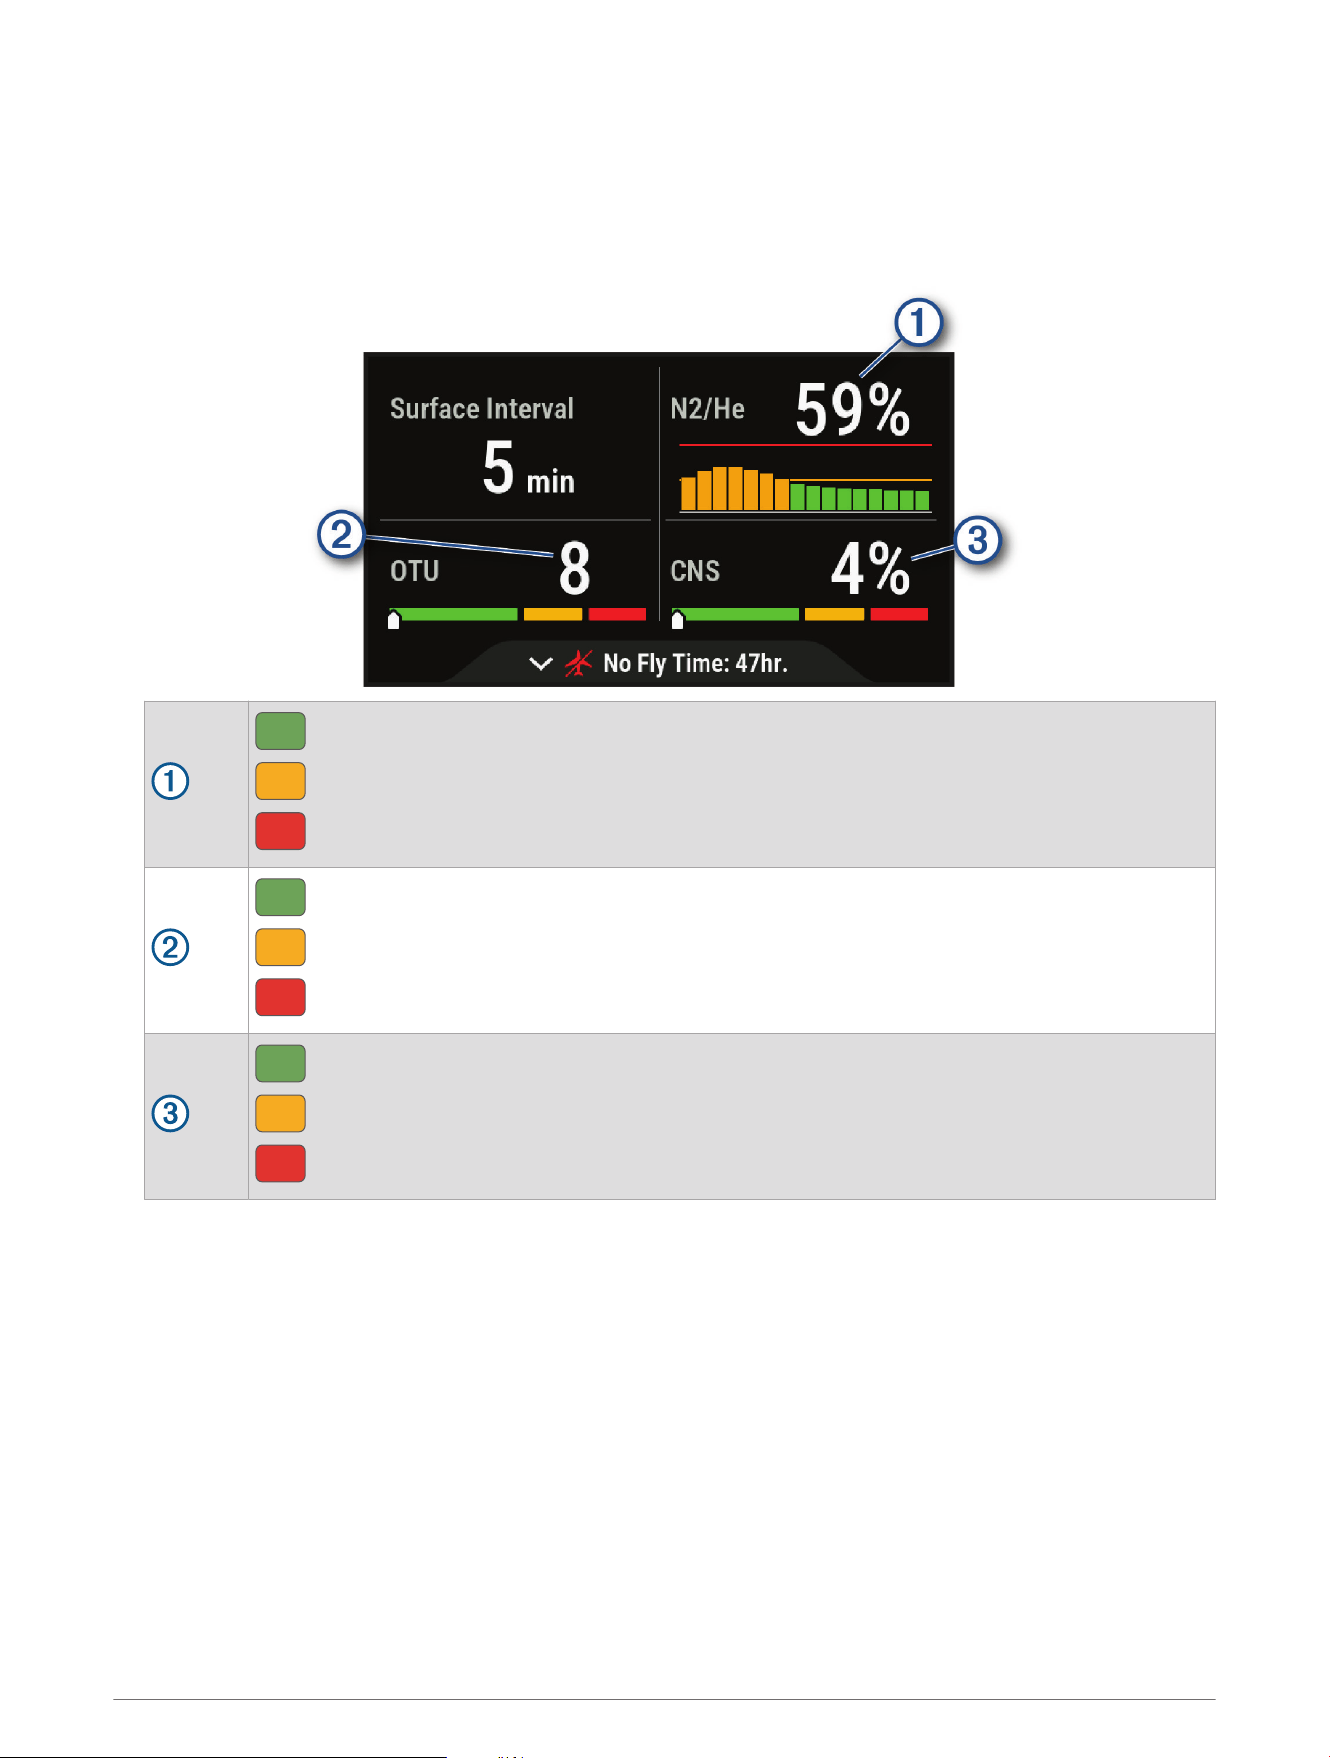
Viewing the Surface Interval App
The surface interval app shows your nitrogen (N2) and helium (He) tissue load level, current oxygen toxicity
units (OTU), and central nervous system (CNS) percentage.
NOTE: The OTU accumulated during a dive expire after 24 hours.
1 Select SI.
Green: 0 to 79% tissue load.
Yellow: 80 to 99% tissue load.
Red: 100% or greater tissue load.
Green: 0 to 249 OTU.
Yellow: 250 to 299 OTU.
Red: 300 or greater OTU.
Green: 0 to 79% CNS oxygen toxicity.
Yellow: 80 to 99% CNS oxygen toxicity.
Red: 100% or greater CNS oxygen toxicity.
2 Press NEXT to view your no-fly time remaining and the time of day the no-fly period ends.
22 Diving

Viewing the Dive Log App
The dive log app displays summaries of your recently recorded dives.
1 Select Dive Log to view your most recent dive.
2 If necessary, press NEXT to select a different dive.
3 Press ENTER to view an overview and depth graph of the activity.
4 Select an option:
• To view a timeline of significant events for the dive, such as when you reached your maximum depth and
when a decompression stop began, select Events.
• To view a temperature graph for the dive, select Temperature.
• To view the activity on a map, select Map.
NOTE: The dive computer shows your entry and exit locations if you waited for GPS signals before and
after the dive.
• To view additional information for the dive, select All Stats.
• To remove the activity from your dive computer, select Menu > Delete.
NOTE: Deleting an activity from the dive log app does not impact tissue loading calculations.
Dive Planning
You can plan for future dives using your dive computer, such as calculating your breathing gas or no-
decompression limit (NDL) times.
Calculating NDL Time
You can calculate the no-decompression limit (NDL) time or maximum depth for a future dive. These
calculations are not saved or applied to your next dive.
1 Select Plan Dive > Compute NDL.
2 Select an option:
• To calculate NDL based on your current tissue load, select Diving Now.
• To calculate NDL based on your tissue load at a future time, select Enter Surf. Interval, and enter your
surface interval time.
3 Enter an oxygen percentage.
4 Select an option:
• To calculate the NDL time, select Enter Depth, and enter the planned depth for your dive.
• To calculate the maximum depth, select Enter Time, and enter your planned dive time.
The NDL countdown clock, depth, and maximum operating depth (MOD) appear.
NOTE: If the planned depth exceeds the MOD of the dive computer or the breathing gas, the planned depth
appears in red.
5 Press ENTER.
6 Select an option:
• To exit, select Done.
• To add intervals to your dive, select Add Repeat Dive, and follow the on-screen instructions.
Diving 23

Calculating Your Breathing Gas
You can calculate the PO2 value, oxygen percentage, or maximum depth for a dive by adjusting two of the three
values. The calculations are affected by the water type setting in the Dive Setup menu (Dive Setup, page5).
1 Select Plan Dive > Calculate Gas.
2 Press PREV or NEXT, and select an option to calculate:
• Select PO2.
• Select O2%.
• Select Depth.
3 Press PREV or NEXT to edit the first value.
4 Press ENTER, then press PREV or NEXT to edit the second value.
As you edit the values, the device calculates an adjusted value for the highlighted option.
5 If necessary, press BACK to calculate the value for a different option.
Creating a Decompression Plan
You can create open-circuit decompression plans and save them for future dives.
1 Select Plan Dive > Deco Plans > Add New.
2 Enter a name for the decompression plan.
3 Select an option:
• To enter the maximum partial pressure of oxygen in bars, select PO2.
NOTE: The dive computer uses the PO2 value for gas switching.
• To enter your level of conservatism for decompression calculations, select Conservatism.
• To enter your gas blends, select Gases.
• To enter the depth of your last decompression stop, select Last Deco Stop.
• To enter the maximum dive depth, select Bottom Depth.
• To enter the time at the bottom depth, select Bottom Time.
4 Select Save.
Using Decompression Plans
1 Select Plan Dive > Deco Plans.
2 Select a decompression plan.
3 Select an option:
• To view the decompression plan, select View.
• To use the decompression plan settings for a dive mode, select Apply.
• To change the decompression plan details, select Edit.
• To edit the name of the decompression plan, select Rename.
• To remove the decompression plan, select Delete > Yes.
Altitude Diving
At higher altitudes, the atmospheric pressure is lower, and your body contains a larger amount of nitrogen than
it would at the start of a dive at sea level. The dive computer accounts for altitude changes automatically using
the barometric pressure sensor. The absolute pressure value used by the decompression model is not affected
by the altitude or the gauge pressure displayed on the dive computer.
24 Diving

Dive Alerts
Alert Message Cause Dive Computer Action
None You completed the decompression stop.
The decompression stop depth and
time flash.
None
Your partial pressure of oxygen (PO2)
value is above the specified warning value.
Your PO2 value flashes yellow.
%1 OTU accumulated.
Your oxygen toxicity units are above the
safe limit. During a dive, "%1" is replaced
with the number of units accumulated.
The alert appears every two minutes,
up to three times.
250 OTU accumulated.
Your oxygen toxicity units (OTU) are at
250 units, and you are nearing the safe
limit of 300 units.
None
5 minutes to NDL.
You have 5 minutes of no decompression
limit (NDL) time remaining.
10 minutes to NDL.
You have 10 minutes of no decompres
sion limit (NDL) time remaining.
Approaching deco stop.
You are within one stop interval (3m or
9.8ft.) of the decompression stop depth.
None
ASCEND OR SWITCH GAS
PO2 is high.
Your PO2 value is above the specified
critical value.
Your PO2 value flashes red. The alert
appears every 30 seconds, up to three
times, until you ascend to a safe level.
Battery is low. Less than 20% battery power remains.
The alert appears when the dive
computer is below 20% battery power.
Continuing on %1. Switch
at any time.
You selected Not Now when prompted
to switch to a higher-oxygen gas, or you
ignored the prompt.
The gas does not change. You will be
prompted again in two minutes.
CNS toxicity at 80%.
Your central nervous system (CNS)
oxygen toxicity is at 80% of the safe limit.
The alert appears during a dive and on
the dive pre-check screen for your next
dive.
CNS toxicity at %1%.
Your CNS oxygen toxicity is too high.
During a dive, "%1" is replaced with your
current CNS percentage.
The alert appears every two minutes,
up to three times.
Decompression cleared. You completed all decompression stops. None
DESCEND OR SWITCH
GAS
PO2 is low.
Your PO2 value is below 0.18 bar.
If you are within the first two minutes
of your dive, your PO2 value flashes
yellow. Otherwise, your PO2 value
flashes red.
The alert appears every 30 seconds,
up to three times, until you descend to
a safe level or switch gases.
DESCEND TO %1
You are above your deco
ceiling.
You are more than 0.6m (2ft.) above the
decompression ceiling.
The current depth and stop depth
flash red. If you remain above the
decompression ceiling for more than
three minutes, the decompression
lockout feature goes into effect.
Diving 25

Alert Message Cause Dive Computer Action
Descend to complete
safety stop.
You are more than 2 m (8 ft.) above the
safety stop ceiling.
The current depth and stop depth turn
yellow.
Diluent PO2 is low.
Flushing may be
dangerous.
In a CCR dive, your diluent's PO2 value is
below 0.18 bar.
Your PO2 value flashes yellow.
Dive will end in %1
seconds.
The dive computer will automatically end
and save the dive. During a dive, "%1" is
replaced by the number of seconds.
None
Do not dive. Failed to read
depth sensor.
The dive computer has invalid or missing
depth sensor data before you start a dive
activity.
Do not start a dive. Call Garmin
®
Product Support.
EVALUATE DIVE CONDI
TIONS
Dive computer was
rebooted.
The dive computer rebooted during the
dive.
The dive computer simulates the
dive for the time it was rebooting.
Since other alerts may not have been
triggered, evaluate your current depth
and dive conditions.
Hold BACK to end assis
tance.
Diver assistance is still active.
The alert appears every two minutes
while diver assistance is still active.
NDL exceeded. Deco
required.
You have exceeded your NDL time.
The dive computer begins providing
decompression stop guidance.
Reminder: Torch is still
on.
The dive torch has been on for 5 minutes.
The alert appears every five minutes
while the torch is still on.
SAFELY END DIVE
Battery critically low.
Less than 10% battery power remains.
The alert appears when the dive
computer is below 10% battery power.
SAFELY END DIVE
Dive computer error.
The computer encountered an issue that it
could not recover from.
Use a backup dive computer or dive
plan and end your dive. Residual
tissue loading was cleared. If the
issue continues, call Garmin Product
Support.
SAFELY END DIVE
Failed to read depth
sensor.
The dive computer has invalid or missing
depth sensor data after you have started a
dive activity.
Use a backup dive computer or dive
plan and end your dive. Call Garmin
Product Support.
Safety stop cleared. You completed the safety stop. None
Safety stop started.
You ascended above 6 m (20 ft.) without
other decompression guidance.
The safety stop countdown timer
begins, if configured.
SLOW YOUR ASCENT
Ascending too fast.
You are ascending faster than 9.1m/min.
(30ft./min.) for more than 5 seconds.
None
Switch to %1 now?
In a multi-gas dive, a gas with a higher
oxygen content is now safe to breathe.
During a dive, "%1" is replaced with the
name of the gas.
You can switch gases now, or wait
to switch gases later in the dive. A
confirmation message for your choice
appears.
Switched to high setpoint.
The dive computer automatically switched
to your specified CCR high setpoint.
None
26 Diving

Alert Message Cause Dive Computer Action
Switched to low setpoint.
The dive computer automatically switched
to your specified CCR low setpoint.
None
This pool dive will not be
saved to the dive log.
The dive computer is in pool dive mode.
The dive computer will not save the
current dive to the dive log.
Transceiver Alerts
Alert Message Cause Device Action
None
Your paired dive computer has lost
communication with the transceiver for 30
seconds.
The tank pressure value flashes yellow.
%1 is below reserve
pressure.
Your tank pressure is below the reserve
pressure level. "%1" is replaced with the
transceiver name.
The tank pressure value turns yellow.
The paired dive computer vibrates and
plays a warning tone.
PRESSURE CRITICAL
%1 pressure is criti
cally low.
Your tank pressure is below the critical
pressure level. "%1" is replaced with the
transceiver name.
The tank pressure value flashes red.
The paired dive computer vibrates and
plays a warning tone.
TANK BATTERY
CRITICAL
%1 battery critically
low.
Fewer than 20 hours of dive time remain.
"%1" is replaced with the transceiver
name.
The transceiver name flashes BATT. LOW
when the battery is critically low.
The paired dive computer vibrates and
plays a warning tone.
Lost communication
with %1.
Your paired dive computer has lost
communication with the transceiver for 60
seconds.
The transceiver name flashes NO COMMS,
dashed lines replace the tank pressure
value, and the tank pressure value flashes
red.
The paired dive computer vibrates and
plays a warning tone if connection alerts
are enabled.
Transmitter %1 failed
to connect.
Your paired dive computer cannot
connect to the transceiver. You should
update both devices to the latest software
version. "%1" is replaced with the trans
ceiver name.
The paired dive computer vibrates and
plays a warning tone.
Buoy Alerts
Alert Message Cause Device Action
Buoy synced.
The buoy synced with the paired
dive computer after a dive.
The buoy sends location heat maps for the
dive to the Garmin Dive app.
Buoy sync failed. Go
to buoy settings to
manually sync.
The buoy failed to sync with the
paired dive computer after a dive.
The buoy will not send location heat maps for
the dive until it is manually synced with the
paired dive computer.
Leaving SubWave buoy
communication range.
You are more than 100 m (328 ft.)
away from the buoy.
The dive computer loses connection with the
buoy.
Nearing SubWave buoy.
Distance guidance only.
You are close to the buoy.
The direction to the buoy will no longer be
updated on your dive computer.
Diving 27
Enabling Lost Dive Accessory Alerts
Your paired dive computer can lose communication with the transceiver or buoy when it is out of range, when
its signal is blocked by your body or that of another diver, and when it loses battery power. You can enable an
alert that notifies you when your paired dive computer has lost communication with the transceiver or buoy for
60 seconds.
Select Dive Setup > Dive Network & Air Integration > Connection Alert.
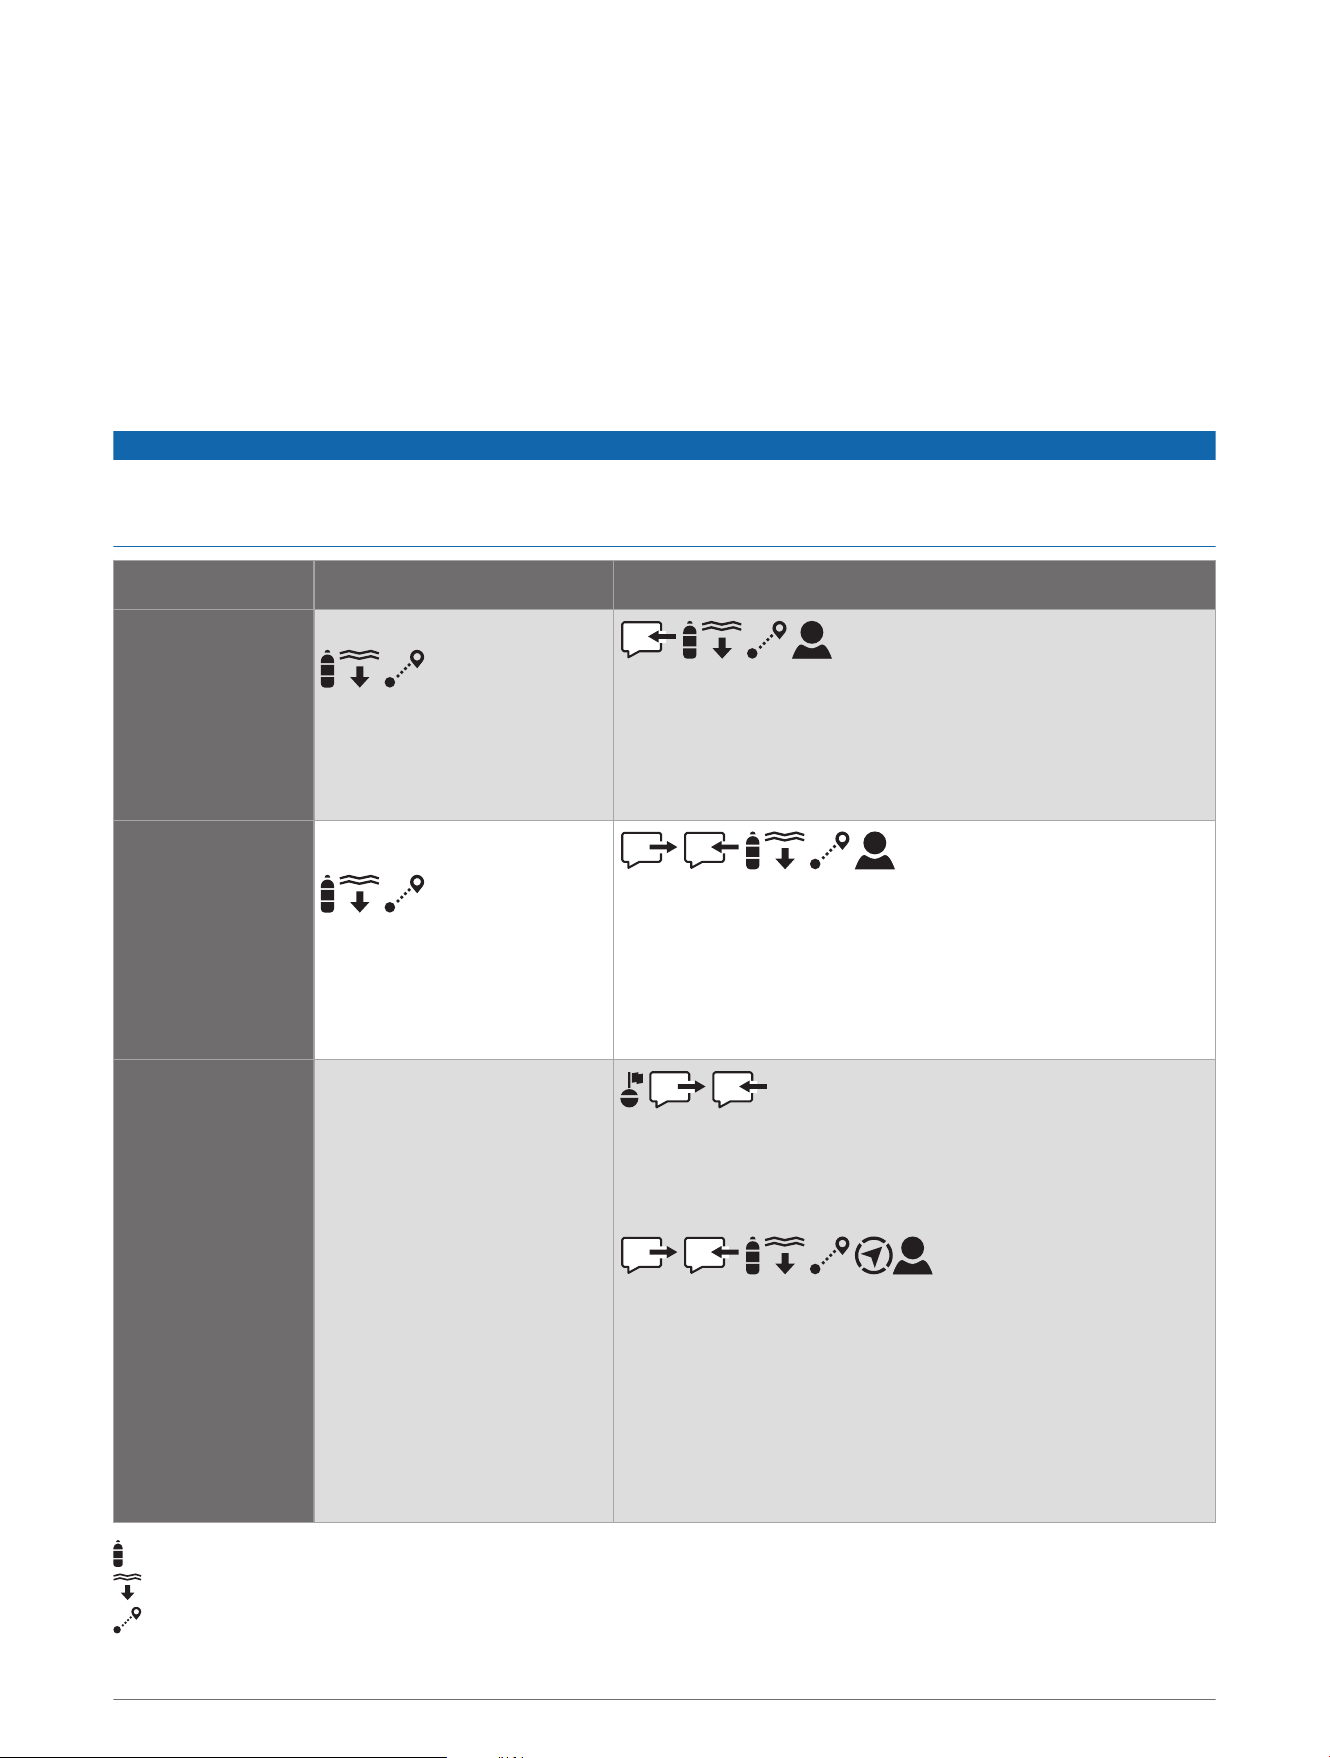
Dive Product and Feature Compatibility
You can pair multiple Descent devices to form a dive network for you and your fellow divers. Not all features are
available for older devices. See your Descent device owner's manual for more information.
NOTICE
You should update your devices to the latest software versions to access all features and improvements. If the
software versions are incompatible, the following alert appears on the dive computer: Transmitter %1 failed to
connect.. "%1" is replaced with the transceiver name.
Descent T1 Descent T2
Descent Mk2i
• View tank pressure
• View diver depth
• View diver distance
• Receive messages
• View tank pressure
• View diver depth
• View diver distance
• View public tank name
Descent Mk3i
Descent X50i
• View tank pressure
• View diver depth
• View diver distance
• Send messages
• Receive messages
• View tank pressure
• View diver depth
• View diver distance
• View public tank name
Descent S1 Not compatible
Using a paired dive computer during a dive:
• Navigate to buoy
• Send messages to the surface
• Receive messages from the surface
Using the Garmin Dive app from the surface:
• Send messages to underwater divers
• Receive messages from underwater divers
• View tank pressure
• View diver depth
• View diver distance
• View diver direction
• View public tank name
: View tank pressure for yourself and connected divers.
: View diver depth for connected divers.
: View diver distance for connected divers.
28 Diving

: View the direction to connected divers.
: View the public transceiver names for yourself and connected divers.
: Send pre-defined in-dive messages to divers with a Descent T2 transceiver, or to users on the surface with
a Descent S1 buoy.
: Receive in-dive messages from divers with a paired Descent T2 transceiver, or from users on the surface
with a Descent S1 buoy.
: View distance and direction information to navigate back to the Descent S1 buoy.
About SubWave Technology
Compatible Descent devices use SubWave sonar technology to communicate with other compatible Descent
devices. There are many factors that can affect device-to-device communication. For more information, go to
garmin.com/subwave.
Dive Terminology
Air time remaining (ATR): The time you may remain at the current depth until an ascent at 9 m/min. (30
ft./min.) would result in surfacing with reserve pressure remaining.
NOTE: If multiple tanks are included in gas consumption calculations, air time remaining is calculated using
the combined pressure and reserve pressure of all tanks.
CAUTION
Decompression stops are included in the calculations, but safety stops are not.
Central nervous system (CNS): A measure of central nervous system oxygen toxicity caused by exposure to
increased partial pressure of oxygen (PO2) while diving.
Closed-circuit rebreather (CCR): A diving mode used for dives performed with a rebreather that recirculates
exhaled gas and removes carbon dioxide.
Maximum operating depth (MOD): The greatest depth at which a breathing gas can be used before the partial
pressure of oxygen (PO2) exceeds the safe limit.
No decompression limit (NDL): A dive that does not require decompression time while ascending to the
surface.
Oxygen toxicity units (OTU): A measure of pulmonary oxygen toxicity caused by exposure to increased partial
pressure of oxygen (PO2) while diving. One OTU is equivalent to breathing 100% oxygen at 1 ATM for 1
minute.
Partial pressure of oxygen (PO2): The pressure of the oxygen in the breathing gas, based on depth and oxygen
percentage.
Pressure-based surface air consumption (PSAC): The change in pressure over time, normalized to 1 ATM.
Respiratory minute volume (RMV): The change in gas volume at ambient pressure over time.
Surface interval (SI): The amount of time that has elapsed since the completion of the last dive.
Time to surface (TTS): The estimated amount of time required to safely ascend to the surface.
CAUTION
Decompression stops are included in the calculations, but safety stops are not.
Volumetric surface air consumption (SAC): The change in gas volume over time, normalized to 1 ATM.
Map
Your device comes preloaded with maps and can display several types of Garmin map data, including
topographical contours and nearby points of interest. To purchase additional map data and view compatibility
information, go to garmin.com/maps.
represents your location on the map. When you are navigating to a destination, your route is marked with a
line on the map.
Map 29

Viewing the Map
1 From the home screen, scroll down to the extended app list, and select Map.
2 If necessary, wait while the dive computer locates satellites.
3 Select an option to pan and zoom the map:
• To use the touchscreen, tap the map, tap and drag to position the crosshairs, and press PREV or NEXT to
zoom in or out.
• To use the buttons, press ENTER, select Pan/Zoom, and press PREV or NEXT to zoom in or out.
NOTE: You can press ENTER to toggle between panning up and down, panning left and right, or zooming.
Location information appears at the top of the map.
Saving or Navigating to a Location on the Map
You can select any location on the map. You can save the location or start navigating to it.
1 From the home screen, scroll down to the extended app list, and select Map.
2 Select an option:
• To use the touchscreen, tap the map, tap and drag to position the crosshairs, and press PREV or NEXT to
zoom in or out.
• To use the buttons, press ENTER, select Pan/Zoom, and press PREV or NEXT to zoom in or out.
NOTE: You can press ENTER to toggle between panning up and down, panning left and right, or zooming.
Location information appears at the top of the map.
3 Select an option:
• To start navigating to the location, select the location information, and select Go.
• To save the location, press ENTER, and select Save Location.
Editing a Saved Location
You can view, edit, and delete saved locations.
1 From the home screen, scroll down to the extended app list, and select Map > > Saved Locations.
2 Select a location.
3 Select > Edit Location.
4 Select an option to edit.
Navigating to a Saved Location
1 From the home screen, scroll down to the extended app list, and select Map > > Saved Locations.
2 Select a location.
3 Select > Navigate To.
Map Settings
From the home screen, scroll down to the extended app list, select Map > > Map Setup.
Orientation: Sets the orientation of the map. The North Up option shows north at the top of the screen. The
Track Up option shows your current direction of travel at the top of the screen. Automotive Mode shows an
automotive perspective with the direction of travel at the top.
Guidance Text: Sets when the guidance text is shown on the map.
Marine Setup: Customizes the marine map settings (Marine Map Settings, page31).
Advanced Setup: Customizes the advanced map settings (Advanced Map Settings, page31).
30 Map

Advanced Map Settings
From the home screen, scroll down to the extended app list, select Map > > Map Setup > Advanced Setup.
Auto Zoom: Automatically selects the zoom level for optimal use of the map. When disabled, you must zoom in
or out manually.
Detail: Sets the amount of detail shown on the map. Showing more detail may cause the map to redraw more
slowly.
Shaded Relief: Shows or hides relief shading for a three-dimensional view of the map topography.
Vehicle: Changes the icon that represents your position on the map.
Zoom Levels: Adjusts the zoom level at which map items will appear. The map items will not appear when the
map zoom level is higher than the selected level.
Text Size: Sets the text size for map items, such as labels and waypoints.
Marine Map Settings
From the home screen, scroll down to the extended app list, and select Map > > Map Setup > Marine Setup.
Marine Chart Mode: Sets the type of chart the dive computer uses. Nautical displays various map features in
different colors so the marine POIs are more readable and so the map reflects the drawing scheme of paper
charts. Fishing displays a simplified map presentation for optimal use while fishing.
NOTE: Some features require marine maps (Downloading Marine Maps and Charts, page31).
Appearance: Sets the appearance of marine navigation aids on the map.
Downloading Marine Maps and Charts
1 Go to garmin.com/c/wearables-mapping to search for and purchase a marine map or chart.
2 Download Garmin Express.
3 Follow the on-screen instructions to install purchased maps and charts on your device.
Routing Settings
The available routing settings vary based on whether Direct Routing is enabled or disabled.
From the home screen, scroll down to the extended app list, and select Map > > Routing.
Direct Routing: Enables or disables direct routing. Direct routing calculates the most direct route possible to the
destination.
Activity: Sets an activity while routing. The dive computer calculates routes optimized for the type of activity you
are doing.
Route Transitions: Sets how the dive computer routes from one point on the route to the next. The Distance
option routes you to the next point on the route when you are within a specified distance of your current
point.
Lock On Road: Locks the blue triangle, which represents your position on the map, onto the nearest road. This is
most useful when driving or navigating on roads.
Advanced Setup: Customizes additional routing settings (Advanced Routing Settings, page31).
Advanced Routing Settings
From the home screen, scroll down to the extended app list, and select Map > > Routing > Advanced Setup.
Calculation Method: Sets the method used to calculate your route.
Off Route Recalculation: Sets recalculation preferences when navigating away from an active route.
Avoidance Setup: Sets the types of roads, terrain, and transportation methods to avoid while navigating.
Map 31
Compass
Setting the Compass Heading
1 From the home screen, scroll down to the extended app list.
2 Select Compass.
3 Point the top of the dive computer toward your heading.
4 Select > Set Heading.
When you deviate from the heading, the compass displays the direction from the heading and degree of
deviation. If you begin a dive, the compass heading is retained.
Setting the North Reference
You can set the directional reference used in calculating heading information.
1 From the home screen, scroll down to the extended app list.
2 Select Compass > > Heading Setup > North Reference.
3 Select an option:
• To set magnetic north as the heading without declination, select Magnetic.
• To set grid north (000º) as the heading reference, select Grid.
• To set the magnetic variation value manually, select User > Enter Magnetic Variation, and enter the
magnetic variation.
• To set geographic north as the heading reference, select True.
Calibrating the Compass
NOTICE
Calibrate the electronic compass outdoors. To improve heading accuracy, do not stand near objects that
influence magnetic fields, such as vehicles, buildings, and overhead power lines.
If you experience irregular compass behavior, for example, after moving long distances or after extreme
temperature changes, you can manually calibrate the compass.
1 From the home screen, scroll down to the extended app list.
2 Select Compass > > Calibrate Compass.
3 Follow the on-screen instructions.
Connectivity
Connectivity features are available for your dive computer when you pair with your compatible phone (Pairing
Your Phone, page33). Additional features are available when you connect your dive computer to a Wi‑Fi
network (Connecting to a Wi‑Fi Network, page33).
Phone Connectivity Features
Phone connectivity features are available for your Descent dive computer when you pair it using the Garmin Dive
app (Pairing Your Phone, page33).
Data uploads to the Garmin Dive app: Automatically syncs your data with the Garmin Dive app and your Garmin
Connect
™
account.
Software updates: Downloads and installs the latest software.
Notifications: Alerts you to notifications from your phone, including calls, texts, and apps, based on your phone
notification settings.
32 Compass

Pairing Your Phone
To use the connected features on your dive computer, you must pair it directly through the Garmin Dive app,
instead of from the Bluetooth settings on your phone.
1 Select an option:
• During the initial setup on your dive computer, scan the QR code with your phone.
• If you previously skipped the pairing process, scroll down from the home screen to view the extended app
list, select Settings > Connectivity > Phone > Pair Phone, and scan the QR code with your phone.
2 Follow the on-screen instructions to complete the pairing and setup process.
Garmin Dive App
The Garmin Dive app allows you to upload your dive logs from your compatible Garmin device. You can
add more detailed information about your dives, including environmental conditions, photos, notes, and dive
buddies. You can use the map to browse for new dive locations, and view the location details and photos
shared by other users. When you dive with a Garmin buoy and compatible Garmin devices, you can view your
underwater heat maps for approximate location information.
The Garmin Dive app syncs your data with your Garmin Connect account. You can download the Garmin Dive
app from the app store on your phone (garmin.com/diveapp).
Wi‑Fi Connectivity Features
Activity uploads to your Garmin Connect account: Automatically sends your activity to your Garmin Connect
account as soon as you finish recording the activity.
Software updates: Downloads and installs the latest software.
Connecting to a Wi‑Fi Network
1 From the home screen, scroll down to the extended app list.
2 Select Settings > Connectivity > Wi-Fi > My Networks > Add Network.
The dive computer displays a list of nearby Wi‑Fi networks.
3 Select a network.
4 If necessary, enter the password for the network.
The dive computer connects to the network, and the network is added to the list of saved networks. The dive
computer reconnects to this network automatically when it is within range.
Wireless Sensors
Your dive computer can be paired and used with compatible wireless sensors using ANT+
®
or Bluetooth
technology.
For information about specific Garmin sensor compatibility, purchasing, or to view the owner's manual, go to
buy.garmin.com for that sensor.
inReach
®
Remote
The inReach remote function allows you to control your inReach device using your Descent device. Go to
buy.garmin.com to purchase a compatible inReach device.
Connectivity 33

Using the inReach Remote
1 Turn on the inReach satellite communicator.
2 From the home screen on your dive computer, scroll down to the extended app list.
3 Select inReach Remote > Yes.
The dive computer searches for your inReach satellite communicator.
4 Select your inReach satellite communicator.
5 Once your inReach satellite communicator is paired, select an option:
• To send an SOS message, select SOS > Initiate SOS.
NOTE: You should only use the SOS function in a real emergency situation.
• To send a text message, select Messages > Type Message, select the message contacts, and enter the
message text or select a quick text option.
• To send a preset message, select Messages > Send Preset, and select a message from the list.
• To view the timer and distance traveled during an activity, select Tracking.
Settings
From the home screen, scroll down to the extended app list, and select Settings.
Dive Setup: Customizes the dive settings (Dive Setup, page5).
Notifications & Alerts: Sets your preferences for notifications from your paired phone.
Sound and Vibe: Sets the dive computer sounds, such as button tones, alerts, and vibrations.
Display & Brightness: Adjusts the screen settings (Display and Brightness Settings, page34).
Connectivity: Pairs your dive computer to a phone, wireless network, or wireless sensor (Connectivity, page32).
System: Sets the system settings, such as device language, satellite preferences, and time format (System
Settings, page34).
Display and Brightness Settings
From the home screen, scroll down to the extended app list, and select Settings > Display & Brightness.
Brightness: Sets the brightness level of the screen.
Auto Backlight: Automatically adjusts the backlight brightness based on the ambient light.
Surface Screen Timeout: Sets the length of time before the screen turns off when not in dive mode.
NOTE: The dive computer turns off entirely when there are no button presses for 30 minutes outside of a
dive.
Touch: Enables the touchscreen.
System Settings
From the home screen, scroll down to the extended app list, and select Settings > System.
Text Language: Sets the language displayed on the dive computer (My device is in the wrong language,
page44).
Shortcuts: Assigns button shortcuts for use on the surface.
Compass: Calibrates the compass and sets the north reference of the compass (Compass, page32).
Satellites: Sets the default satellite system (Satellite Settings, page35).
Time: Sets the time format and time zone.
Advanced: Sets the unit and position format preferences, and sets the dive computer to use MTP (media
transfer protocol) or Garmin mode when connected to a computer.
Reset: Resets tissues, deletes data, and resets settings (Resetting All Default Settings, page35).
Check for Updates: Downloads and installs software updates when your dive computer is paired to your phone
or connected to a Wi‑Fi network.
About: Displays device, software, license, and regulatory information.
34 Settings

Satellite Settings
You can change the satellite systems used by the dive computer. For more information about satellite systems,
go to garmin.com/aboutGPS.
From the home screen, scroll down to the extended app list, and select Settings > System > Satellites.
Off: Disables satellite systems.
GPS Only: Enables the GPS satellite system.
All Systems: Enables multiple satellite systems. Using multiple satellite systems together offers increased
performance in challenging environments and faster position acquisition than using GPS only. However,
using multiple systems can reduce battery life more quickly than using GPS only.
Resetting All Default Settings
Before you reset all default settings, you should sync the dive computer with the Garmin Dive app to upload your
dive data.
You can reset all of the device settings to the factory default values.
1 From the home screen, scroll down to the extended app list.
2 Select Settings > System > Reset.
3 Select an option:
• To reset all of the device settings to the factory default values and save all user-entered information and
activity history, select Reset Default Settings.
• To delete your tissue load data for scuba diving, select Reset Tissues.
NOTE: You should reset your tissue load only if you do not plan to use the dive computer again in the
future. This can be useful for dive shops that provide dive computers for rent.
• To reset all of the device settings to the factory default values and delete all user-entered information and
activity history, select Delete Data and Reset Settings.
Settings 35
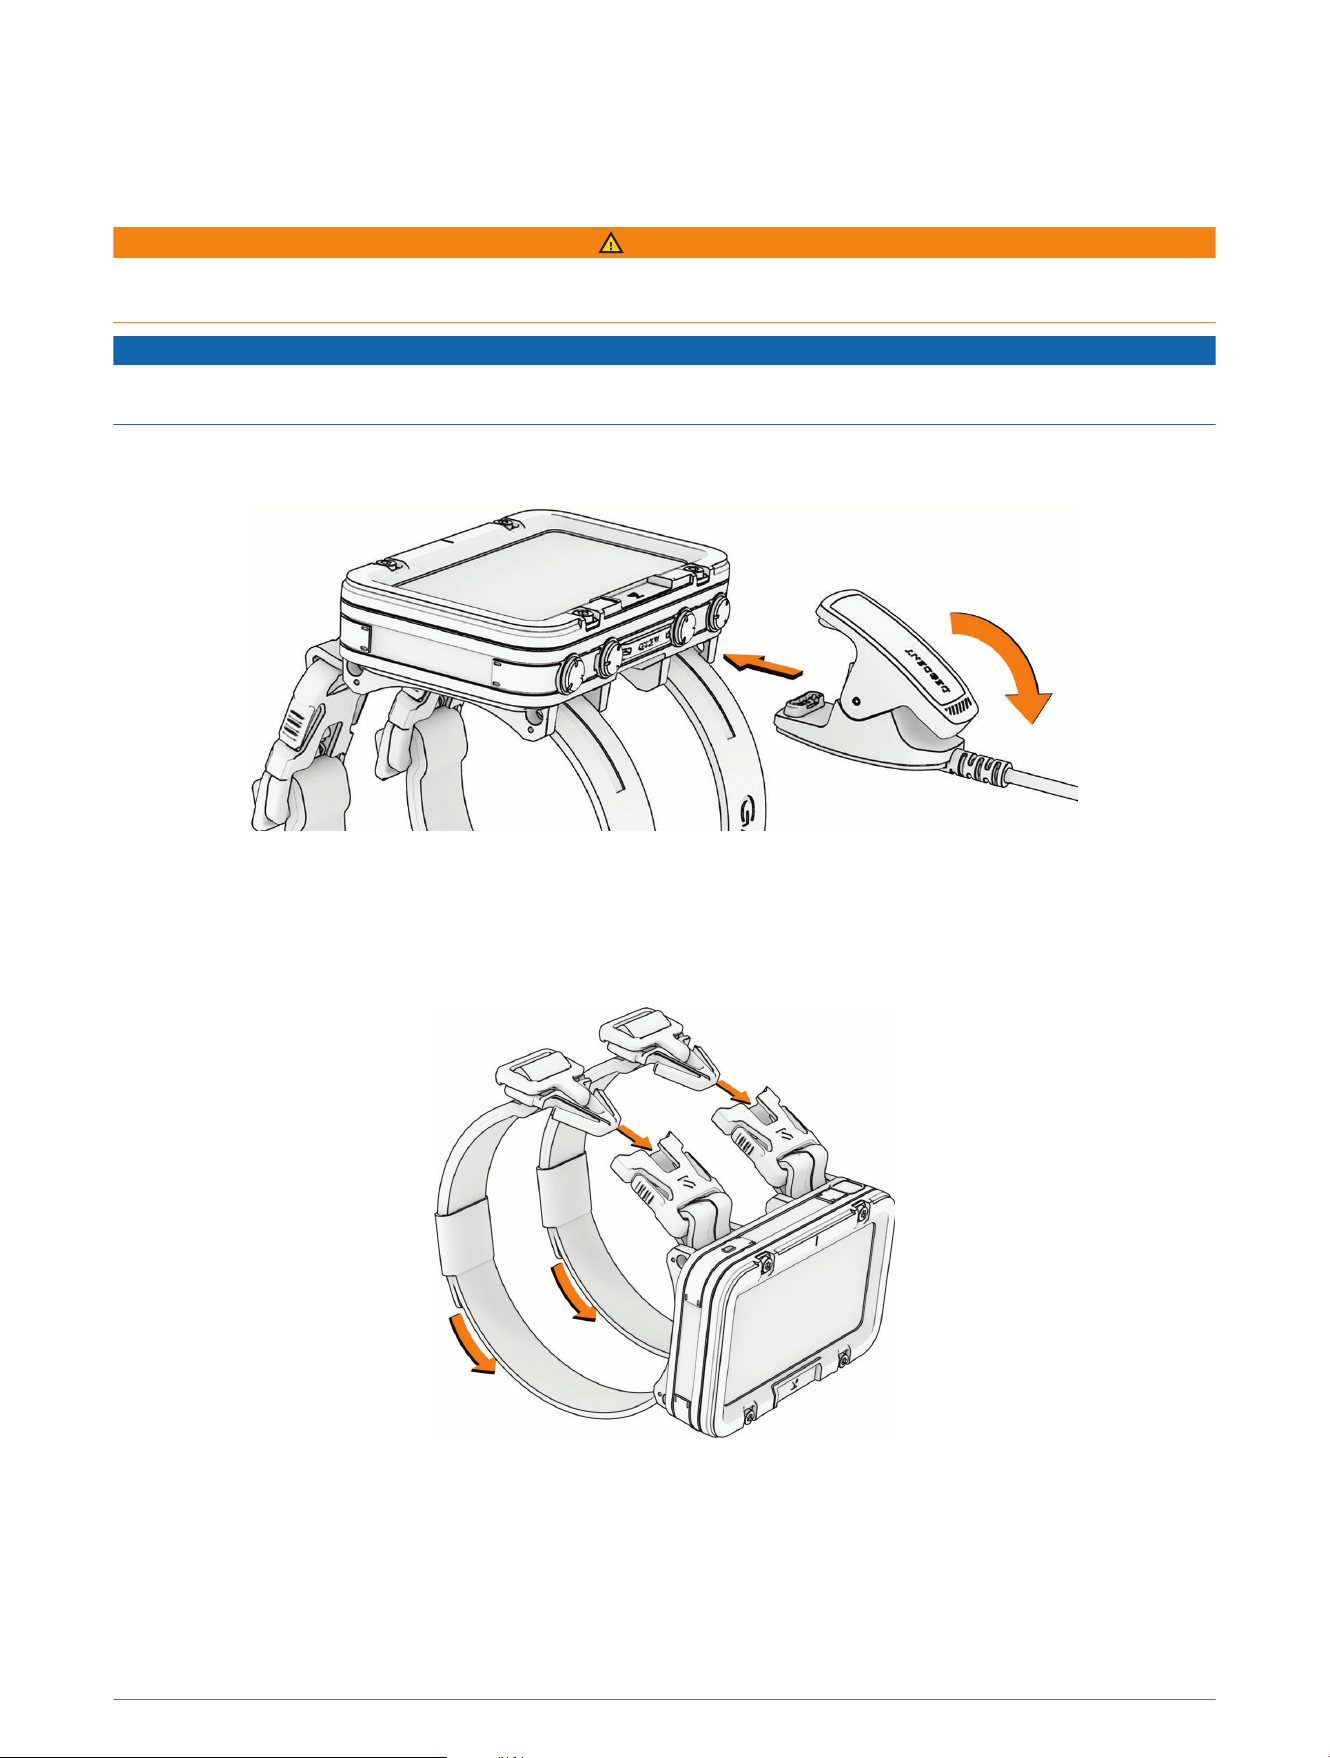
Device Information
Charging the Device
WARNING
This device contains a lithium-ion battery. See the Important Safety and Product Information guide in the product
box for product warnings and other important information.
NOTICE
To prevent corrosion, thoroughly clean and dry the contacts and the surrounding area before charging or
connecting to a computer. Refer to the cleaning instructions (Device Care, page40).
1 Pinch the sides of the charging clip.
2 Align the clip with the contacts on the back of the device, and release the clip.
3 Plug the USB cable into a USB charging port.
Wearing the Device
The dive computer can be worn at any location on your arm.
1 Fasten both buckles on the bands around your arm.
2 If necessary, pull the ends of the bands to tighten them.
36 Device Information
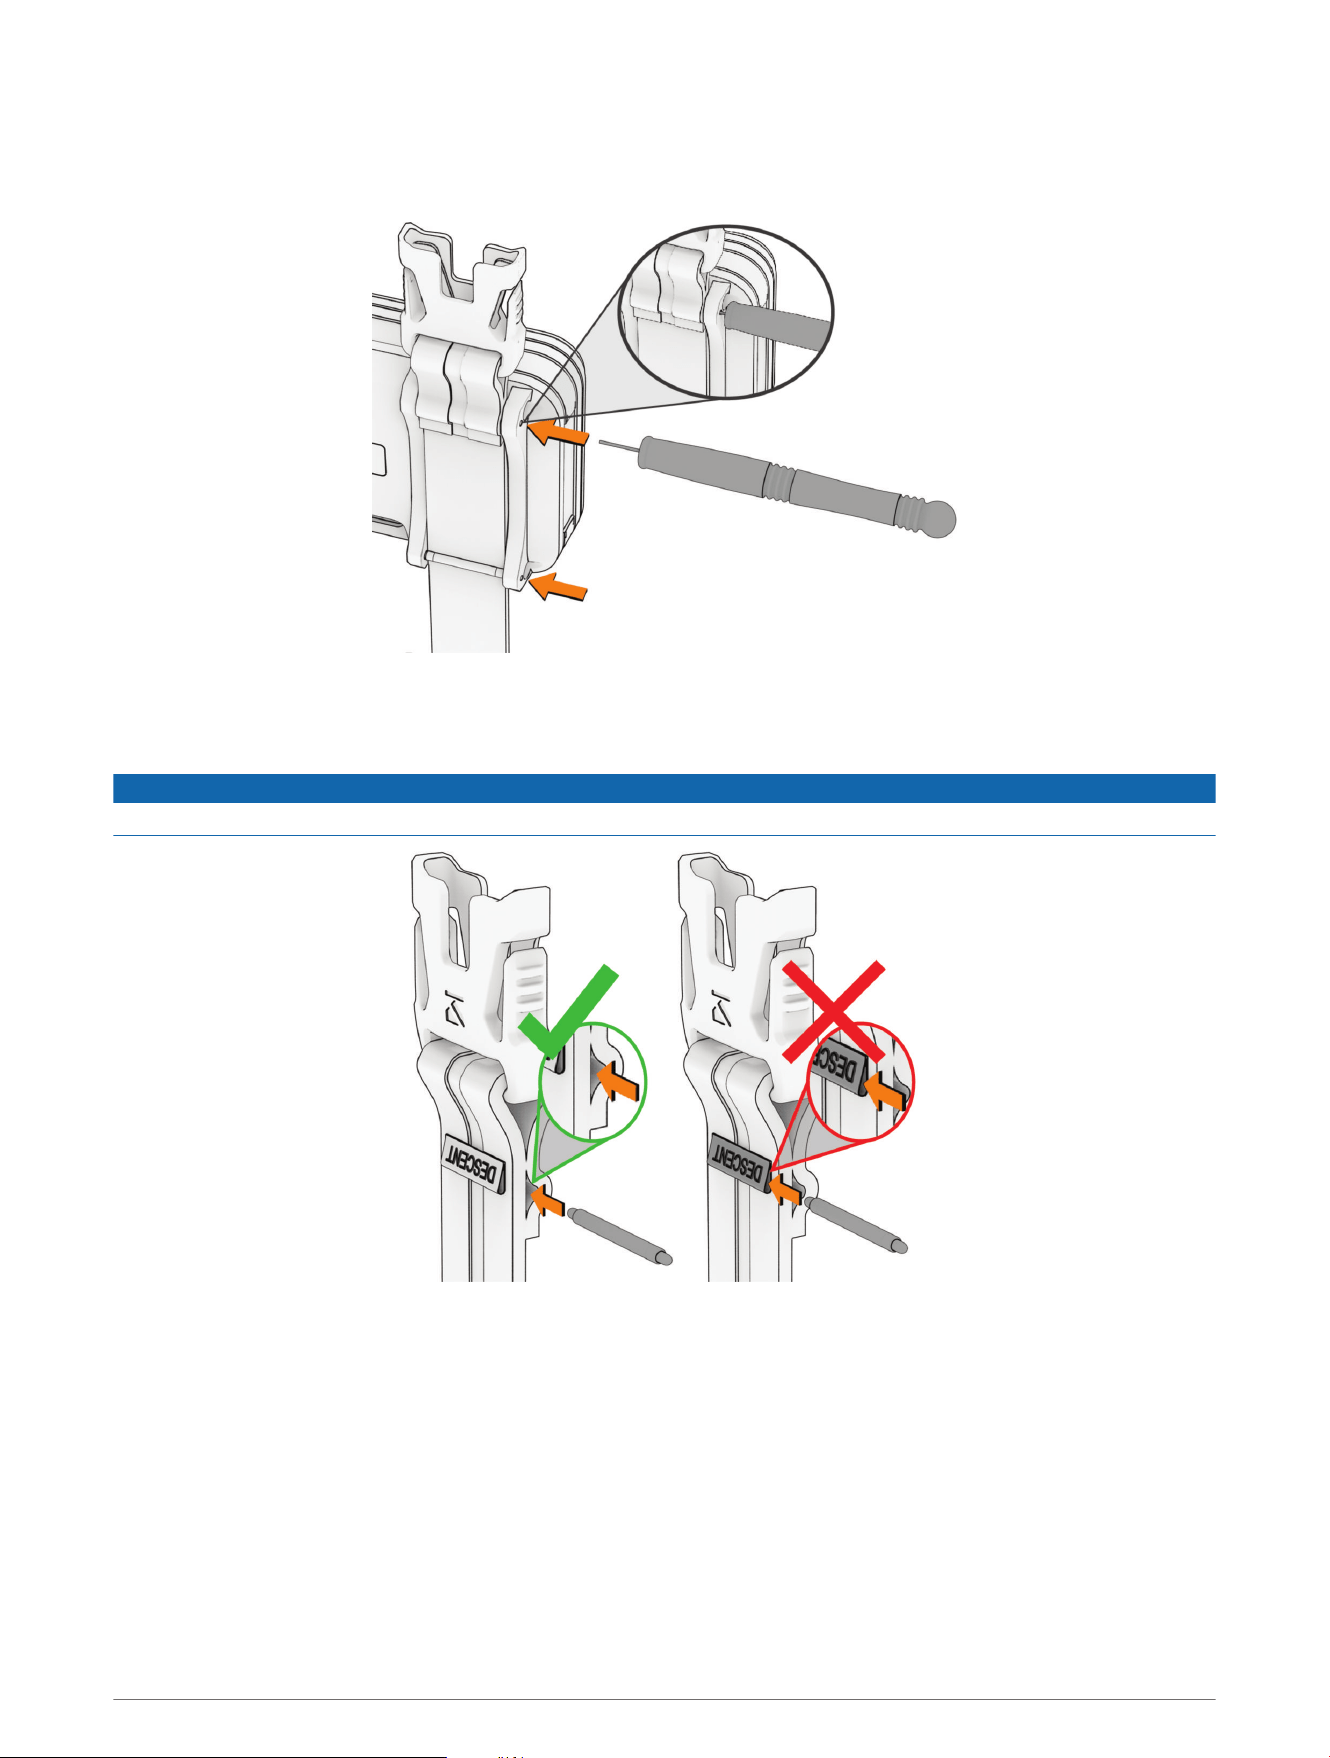
Changing the Bands
You can replace the bands with new Descent X50i bands.
1 Use the included pin removal tool to push in the pin on one of the bands, and remove the pin.
2 Repeat step 1 on the second pin.
3 Remove the band.
4 Insert a pin through the double-stitched loop on the new band.
NOTICE
Do not insert the pin through the product tag. This may cause the tag to tear.
5 Install one end of the pin into the corresponding hole on the dive computer.
6 Push in the exposed pin, and press it into place.
Device Information 37
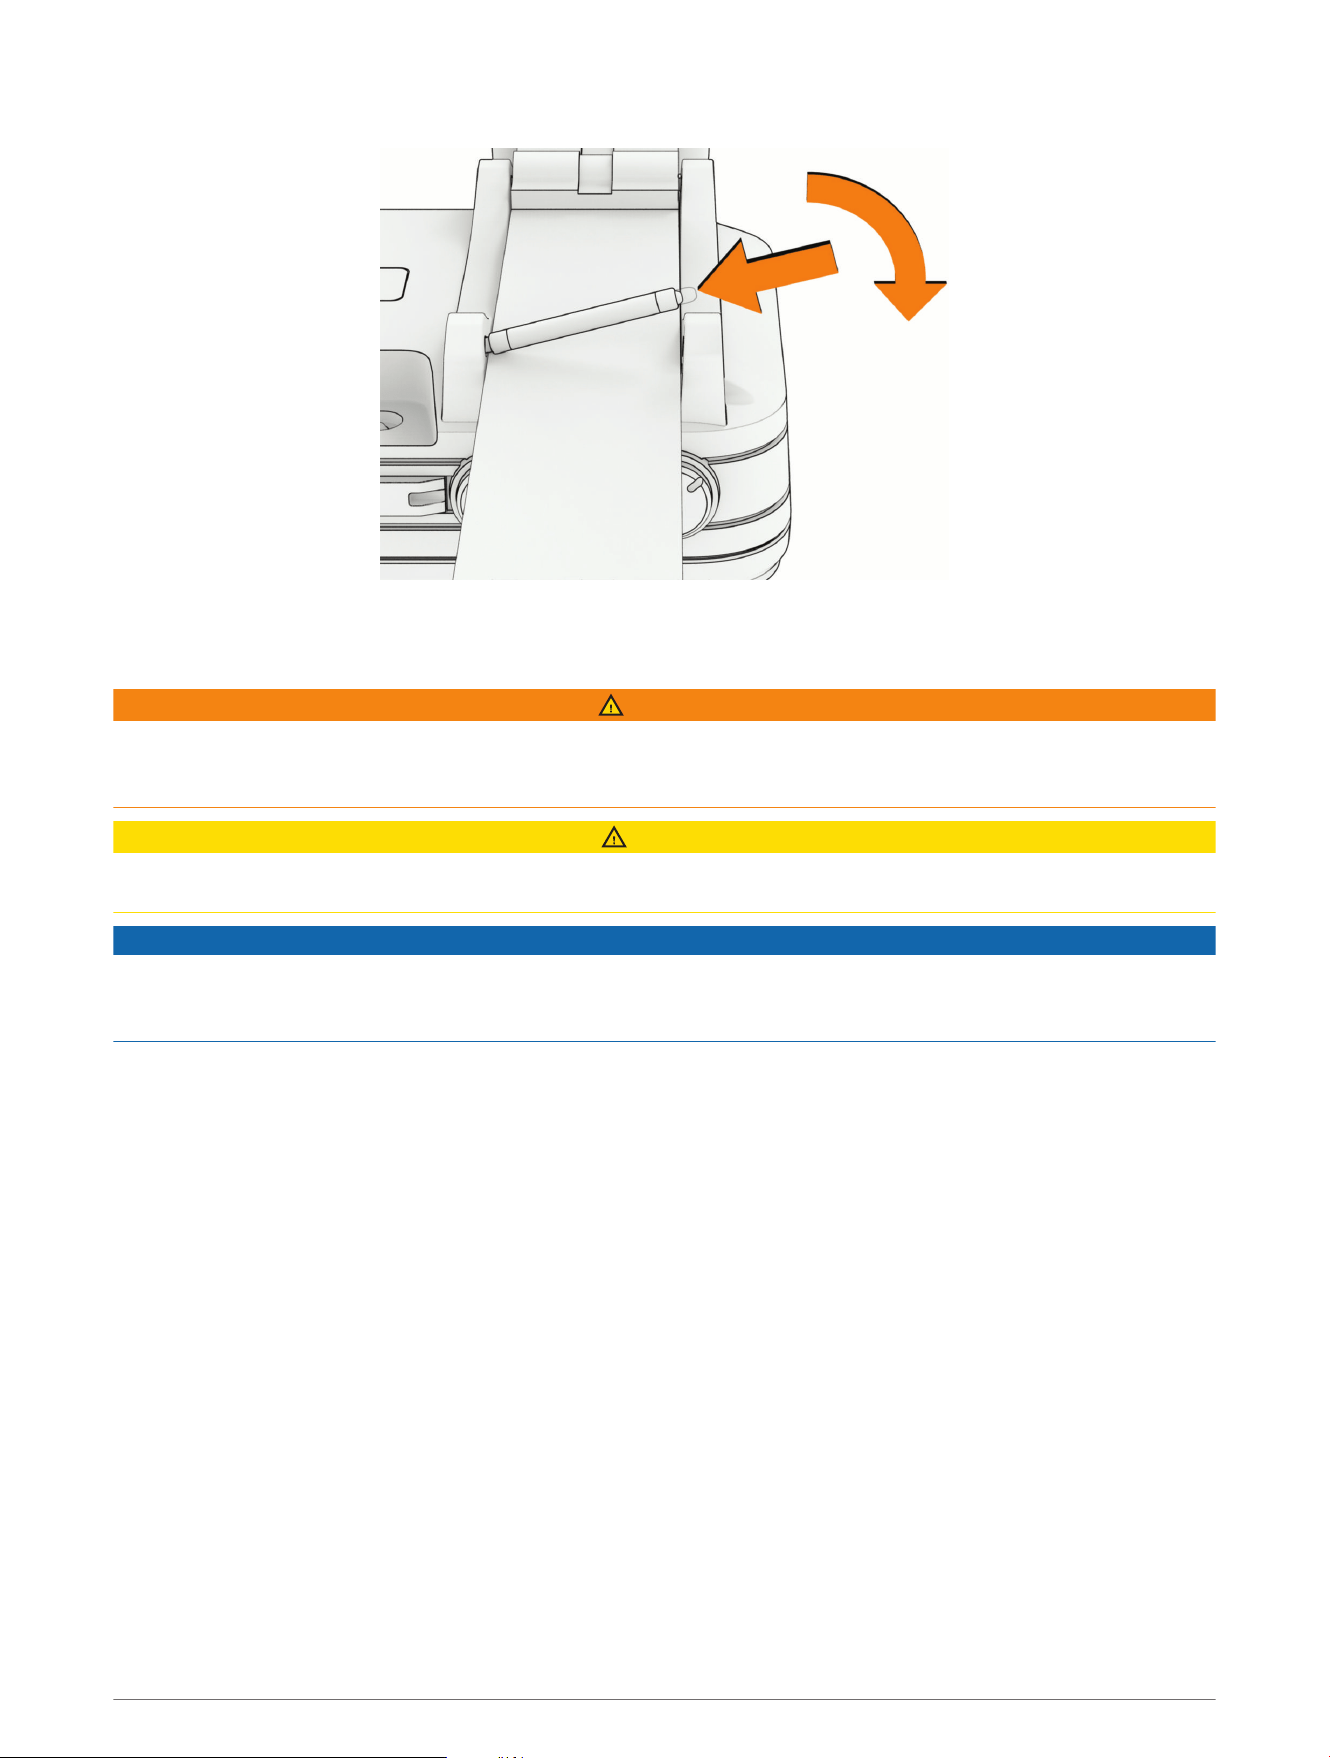
7 Install the second pin above the band.
8 Repeat the steps to change the other band.
Installing Bungee Cords
WARNING
You can fuse the ends of the bungee cord by melting it or by using heat shrink in a well-ventilated area. Do not
use open flame to fuse the ends of the cord, and do not fuse the ends of the cord near clothing or bare skin, as
doing so could result in property damage or serious personal injury.
CAUTION
The user should never cut the bungee cord while it is on the user's arm, as this could result in property damage
or personal injury.
NOTICE
It is the user's responsibility to ensure the bungee cord straps are cut to the appropriate length and that an
appropriate knot is tied to ensure the dive computer remains attached to the arm. Garmin is not responsible for
any loss or damage to a dive computer resulting from the dive computer coming off the arm.
The dive computer is compatible with 3 mm (1/8 in.) bungee cords (not included).
1 Remove the existing bands from the dive computer (Changing the Bands, page37).
2 Cut a piece of bungee cord that is long enough to wrap around your wrist, plus approximately 5 cm (2 in.) to
allow for tying the knots.
38 Device Information
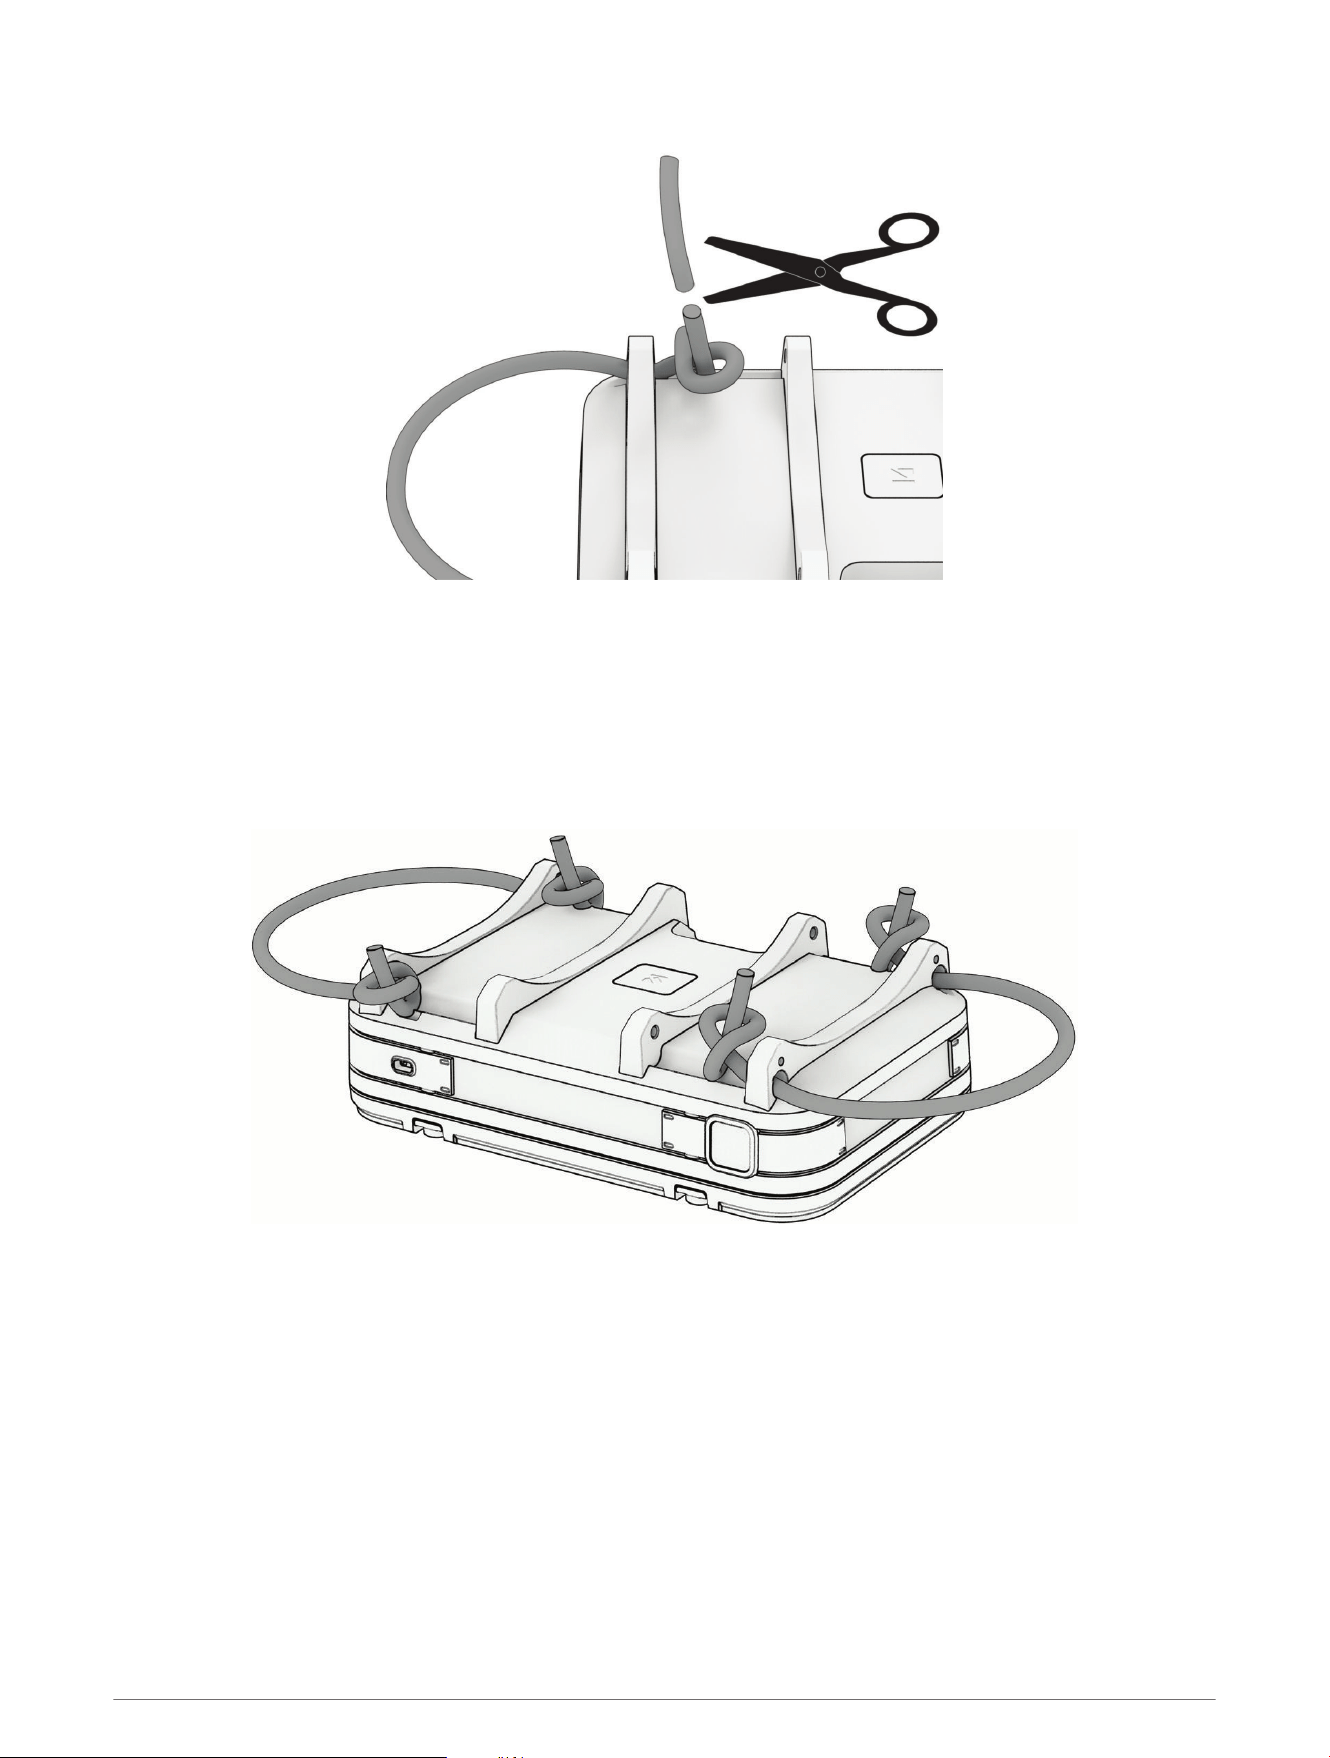
3 Thread the cord through the outside of one of the large holes in the dive computer's lug.
4 Tie an overhand knot, and tighten the knot by applying tension to both ends.
The finished knot should prevent the cord from slipping through the hole.
TIP: If preferred, you can tie a figure eight knot instead.
5 Route the remaining end of the band through the large hole at the opposite end of the lug.
6 Hold the cord to your wrist, examine the fit, and determine where to tie the second knot.
7 Repeat steps 2 through 6 for the second bungee cord.
8 Cut off the excess cord, and leave at least 6 mm (0.25 in.) at the end of each knot.
Device Information 39
Specifications
Battery type Rechargeable, built-in lithium-ion battery
Water rating
20ATM
1
Dive (EN 13319)
2
Decompression model Bühlmann ZHL-16C
Operating and storage temperature
range
From -20º to 45ºC (from -4º to 113ºF)
Underwater operating temperature
range
From 0° to 40°C (from 32° to 104°F)
USB charging temperature range From 0º to 45ºC (from 32º to 113ºF)
European Union (EU) wireless frequen
cies (power)
2.4 GHz @ 15 dBm maximum
EU SAR values 0.006 W/kg limb, 0.006 W/kg torso
Depth sensor
Accurate from 0 m to 200 m (0 ft. to 656 ft.) complying with EN 13319
Resolution (m): 0.1 m until 99.9 m, 1 m at 100 m
Resolution (ft.): 1 ft.
Inspection interval Inspect parts before each use for damage. Replace parts as needed.
3
Battery Information
The actual battery life depends on how much you use GPS, optional wireless sensors, the torch (flashlight), and
the backlight.
Mode Battery Life
Dive mode with display brightness set to High Up to 13 hours
Dive mode with display brightness set to Medium Up to 16 hours
Dive mode with display brightness set to Night Dive Up to 20 hours
Device Care
NOTICE
Do not use a sharp object to clean the device.
Avoid chemical cleaners, solvents, and insect repellents that can damage plastic components and finishes.
Thoroughly rinse the device with fresh water after exposure to chlorine, salt water, sunscreen, cosmetics,
alcohol, or other harsh chemicals. Prolonged exposure to these substances can damage the case.
Do not wash the device under high pressure, because jets of water or air may cause damage to the depth
sensor or barometer.
Avoid extreme shock and harsh treatment, because it can degrade the life of the product.
Do not store the device where prolonged exposure to extreme temperatures can occur, because it can cause
permanent damage.
Discontinue use if the device is damaged or if it is stored at a temperature outside the specified storage
temperature range.
1
The device withstands pressure equivalent to a depth of 200m. For more information, go to www.garmin.com/waterrating.
2
Designed to comply with CSN EN 13319.
3
Aside from normal wear and tear, performance is not affected by aging.
40 Device Information

Cleaning the Device
CAUTION
Some users may experience skin irritation after prolonged use of the dive computer, especially if the user has
sensitive skin or allergies. If you notice any skin irritation, remove the dive computer and give your skin time to
heal. To help prevent skin irritation, ensure the dive computer is clean and dry, and do not overtighten the dive
computer on your arm.
NOTICE
Even small amounts of sweat or moisture can cause corrosion of the electrical contacts when connected to a
charger. Corrosion can prevent charging and data transfer.
If you store the dive computer while it is still wet, it may inadvertently turn on and drain the battery.
TIP: For more information, go to garmin.com/fitandcare.
1 Rinse with water, or use a damp lint-free cloth.
2 Allow the dive computer to dry completely.
Data Fields
NOTE: Not all data fields are available for all activity types. Some data fields require a paired transceiver to
display data. Some data fields appear in more than one category on the dive computer.
Device Information 41

Name Description
Air Time Remaining
The amount of time you can remain at the current depth before a 9 m/min. (30 ft./
min.) ascent to the surface would result in surfacing with reserve pressure remaining.
If multiple tanks are included in gas consumption calculations, air time remaining is
calculated using the combined pressure and reserve pressure of all tanks.
Approximate Depth The current depth of the paired transceiver.
Approximate Distance Your current distance from the paired transceiver.
Ascent Rate The current rate of ascent toward the surface.
Average Depth The average depth descended during a dive.
Avg Temperature The average temperature during the dive.
Bailout TTS
The amount of time required to reach the surface if you switch to an open-circuit
bailout gas.
Battery Percentage The percentage of the battery power remaining.
Battery, Time, & Temp.
The percentage of the battery power remaining, the time of day based on your current
location and time settings (format, time zone, daylight saving time), and the tempera
ture of the air.
Buoy Navigation The horizontal distance and direction to a paired Descent buoy accessory.
Compass A visual representation of the direction in which the device is pointing.
Compass Heading The direction you are moving based on the compass.
Conservatism The level of conservatism for decompression calculations.
CNS Your current central nervous system (CNS) oxygen toxicity percentage.
Current Gas PO2
The partial pressure of oxygen (PO2) of the current gas during a closed-circuit
rebreather (CCR) dive.
Diluent PO2
The partial pressure of oxygen (PO2) of the diluent gas during a closed-circuit
rebreather (CCR) dive, even if you are bailed out to an open-circuit gas.
FiO2 The percentage composition of oxygen in the current gas.
Gas Consumption Rate
The gas consumption rate for your transceiver, calculated using the pressure change
over the last two minutes.
Gas Density
The density of the selected gas at the current depth and temperature. It displays in
yellow when over 5.2 g/L, and in red when over 6.2 g/L, indicating it is difficult to fully
exhale accumulated CO2 due to the density of the gas blends.
GF99
The current gradient factor. If you follow the dive computer's guidance, the selected
low gradient factor should display when you approach your first decompression stop,
and the selected high gradient factor value should display when you approach the
surface. On-Gassing displays when you take on additional tissue load.
Maximum Depth The maximum depth descended during a dive.
Max Temperature The maximum temperature during the activity.
Min Temperature The minimum temperature during the activity.
N2/He% The nitrogen/helium tissue loading percentage.
42 Device Information

Name Description
None This is a blank data field.
OTU Your current oxygen toxicity units (OTU).
Pinned Tanks The paired transceivers that appear on the transceiver data screen.
Raw Ceiling The unrounded depth the diver should not ascend past.
Stopwatch The stopwatch time for the current dive.
Sunrise The time of sunrise based on your GPS position.
Sunset The time of sunset based on your GPS position.
Surface Gradient
Factor
The expected gradient factor if the diver were to instantaneously surface.
Tank Combo
The current tank pressure and depth of the paired transceiver, and your distance from
it.
Tank Pressure The current tank pressure of the paired transceiver.
Temperature The temperature of the water. Your body temperature affects the temperature sensor.
Time of Day
The time of day based on your current location and time settings (format, time zone,
daylight saving time).
Time of Day (Seconds) The time of day including seconds.
Time to Surface
The amount of time required to safely ascend to the surface, including decompres
sion stops.
Tissue Graph (GF)
A bar chart displaying simulated values for nitrogen and helium in the body, with the
y-axis of the field adjusted to your conservatism.
Tissue Graph (Raw) A bar chart displaying simulated values for nitrogen and helium in the body.
TTS @ +5 min.
The amount of time required to safely ascend to the surface if you remain at your
current depth for five minutes.
TTS Δ +5 min.
The difference between the amount of time required to safely ascend to the surface,
and the amount of time required to safely ascend to the surface if you remain at your
current depth for five minutes.
Troubleshooting
Product Updates
On your computer, install Garmin Express (www.garmin.com/express).
This provides easy access to these services for Garmin devices:
• Software updates
• Map updates
• Product registration
Troubleshooting 43

Getting More Information
You can find more information about this product on the Garmin website.
• Go to support.garmin.com for additional manuals, articles, and software updates.
• Go to buy.garmin.com, or contact your Garmin dealer for information about optional accessories and
replacement parts.
My device is in the wrong language
You can change the device language selection if you have accidently selected the wrong language on the dive
computer.
1 From the home screen, scroll down to the extended app list.
2 Select .
3 Scroll down to the last item in the list, and press ENTER.
4 Press ENTER.
5 Select your language.
Is my smartphone compatible with my device?
The Descent X50i device is compatible with smartphones using Bluetooth technology.
Go to garmin.com/ble for compatibility information.
My phone will not connect to the device
If your phone will not connect to the device, you can try these tips.
• Turn off your phone and your device, and turn them back on again.
• Enable Bluetooth technology on your phone.
• Update the Garmin Dive app to the latest version.
• Remove your device from the Garmin Dive app and the Bluetooth settings on your phone to retry the pairing
process.
• If you bought a new phone, remove your device from the Garmin Dive app on the phone you intend to stop
using.
• Bring your phone within 10m (33ft.) of the device.
• On your phone, open the Garmin Dive app, select , and select Garmin Devices > Add Device to enter
pairing mode.
Diving
Resetting Your Tissue Load
You can reset your current tissue load saved on the dive computer. You should reset your tissue load only if you
do not plan to use the dive computer again in the near future. This can be useful for dive shops that provide dive
computers for rent.
1 From the home screen, scroll down to the extended app list.
2 Select Settings > System > Reset > Reset Tissues.
Resetting the Surface Pressure
The device automatically determines the surface pressure using the barometric altimeter. Large pressure
changes, such as during a flight, can cause the dive computer to automatically start a dive activity. If the dive
computer starts a dive activity incorrectly, you can reset the surface pressure by connecting the dive computer
to a computer. If you do not have access to a computer, you can reset the surface pressure manually.
1 Hold PWR until the dive computer turns off.
2 Hold PWR to turn on the dive computer.
3 When the product logo appears, hold NEXT until you are prompted to reset the surface pressure.
44 Troubleshooting

Acquiring Satellite Signals
The device may need a clear view of the sky to acquire satellite signals. The time and date are set automatically
based on the GPS position.
TIP: For more information about GPS, go to garmin.com/aboutGPS.
1 Go outdoors to an open area.
The front of the device should be oriented toward the sky.
2 Wait while the device locates satellites.
It may take 30–60 seconds to locate satellite signals.
Improving GPS Satellite Reception
• Frequently sync the device to your Garmin account:
◦ Connect your device to a computer using the USB cable and the Garmin Express application.
◦ Connect your device to your Garmin account using a Wi‑Fi wireless network.
While connected to your Garmin account, the device downloads several days of satellite data, allowing it to
quickly locate satellite signals.
• Take your device outside to an open area away from tall buildings and trees.
• Remain stationary for a few minutes.
Troubleshooting 45

support.garmin.com
GUID-D6BA1847-E20D-4241-B08C-DF0D8B052B28
v3
July 2025