


1
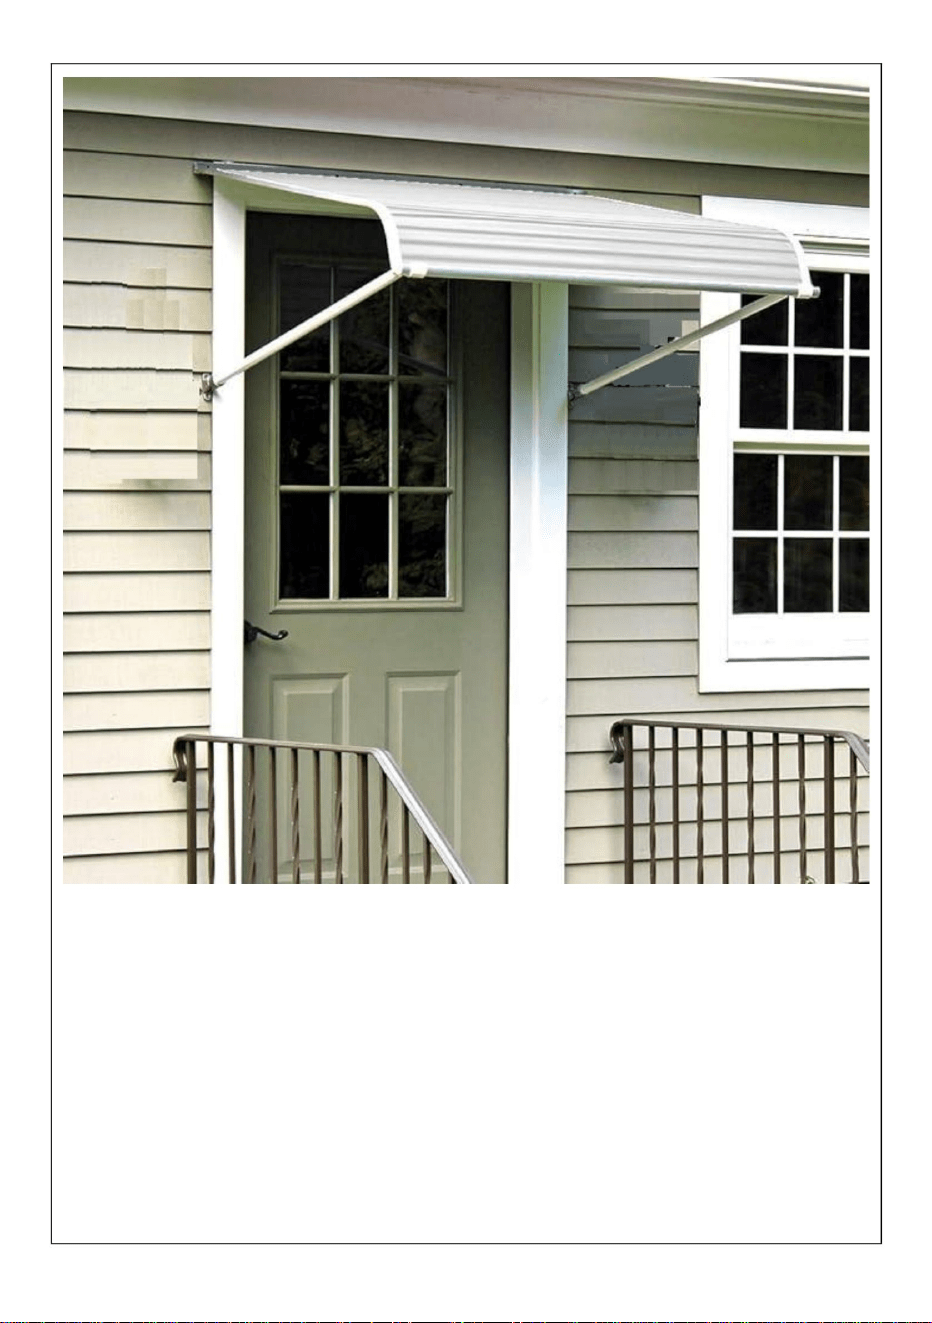
MODEL:QL-40INCH
This is the original instruction, please read all manual instructions carefully
before operating. VEVOR reserves a clear interpretation of our user
manual. The appearance of the product shall be subject to the product you
received. Please forgive us that we won't inform you again if there are any
technology or software updates on our product.
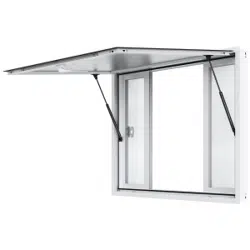
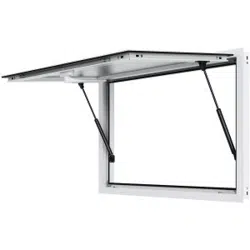
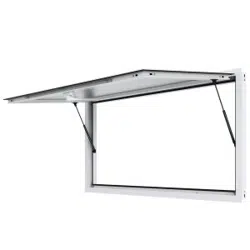
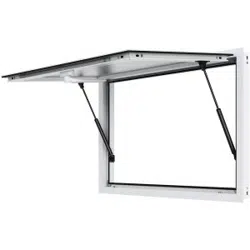
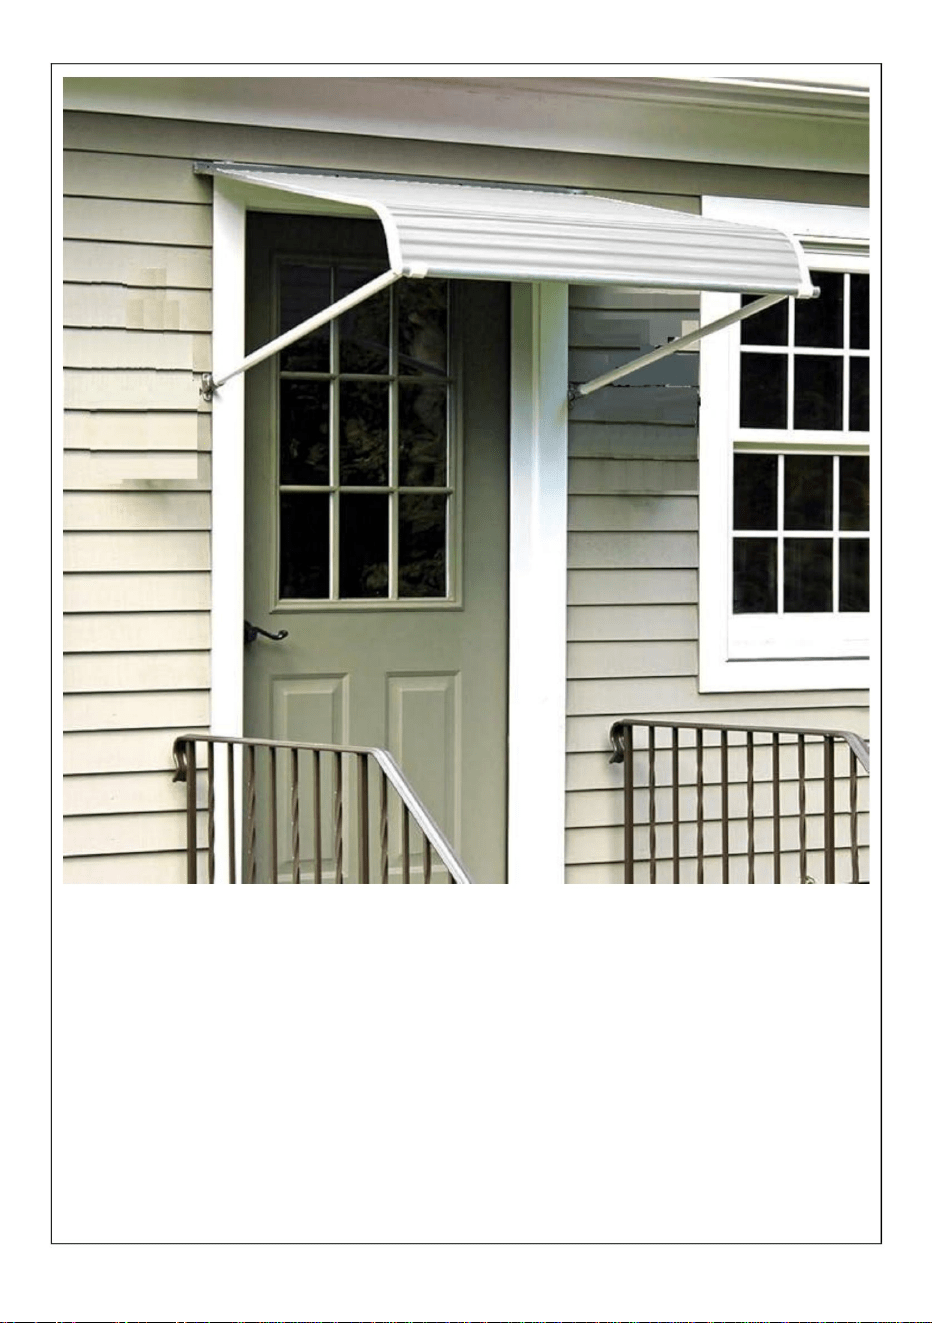
METAL DOOR AWNING

2
SAFETY INSTRUCTIONS
WARNING:
Read this material before using this product. Failure to do so can
result in serious injury.
Assembly precautions
1. Assemble only according to these instructions. Improper assembly can
create hazards.
2. Wear ANSI-approved safety goggles and heavy-duty work gloves
during assembly.
3. Keep the assembly area clean and well-lit.
4. Keep bystanders out of the area during assembly.
5. Do not assemble if tired or when under the influence of alcohol, drugs
or medication.
6. The product capabilities apply to properly and completely assembled
products only.
7. Assemble on a flat, level, hard and smooth surface capable of safely
supporting the Metal Door Awning.
8. For additional information regarding the parts listed in the following
pages, please refer to the Assembly Diagram of this manual. Unwrap
and separate all parts in a clean work area.
Use precautions
1. DO NOT SIT OR STAND ON THIS ITEM.
2. This product is not a toy. Do not allow children to play with or near this
item.
3. Do not exceed specified weight capacities.
4. Use only on a flat, level, hard, and smooth surface that can safely
support a fully loaded Metal Door Awning.
5. Use as intended only.
6. Do not use if parts are loose or damaged.
7. Spare parts such as screws are available.
SAVE THIS MANUAL
3
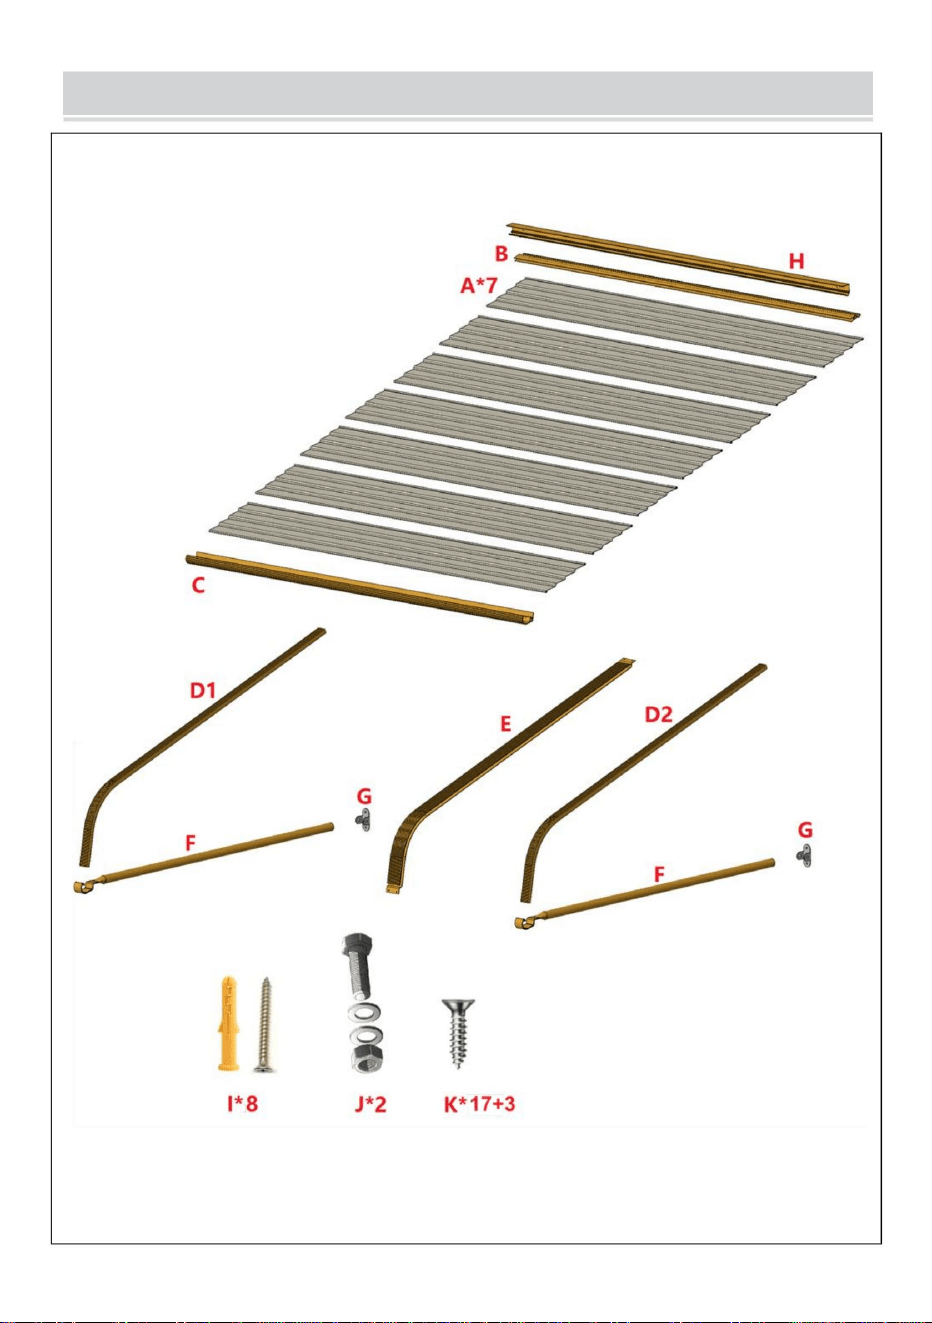
PARTS LIST
4
Serial number
Quantity
Part picture
A
7
B
1
C
1
D1
1
D1
1
E
1
F
2
G
2
H
1
I
8
J
2
K
17+3

5
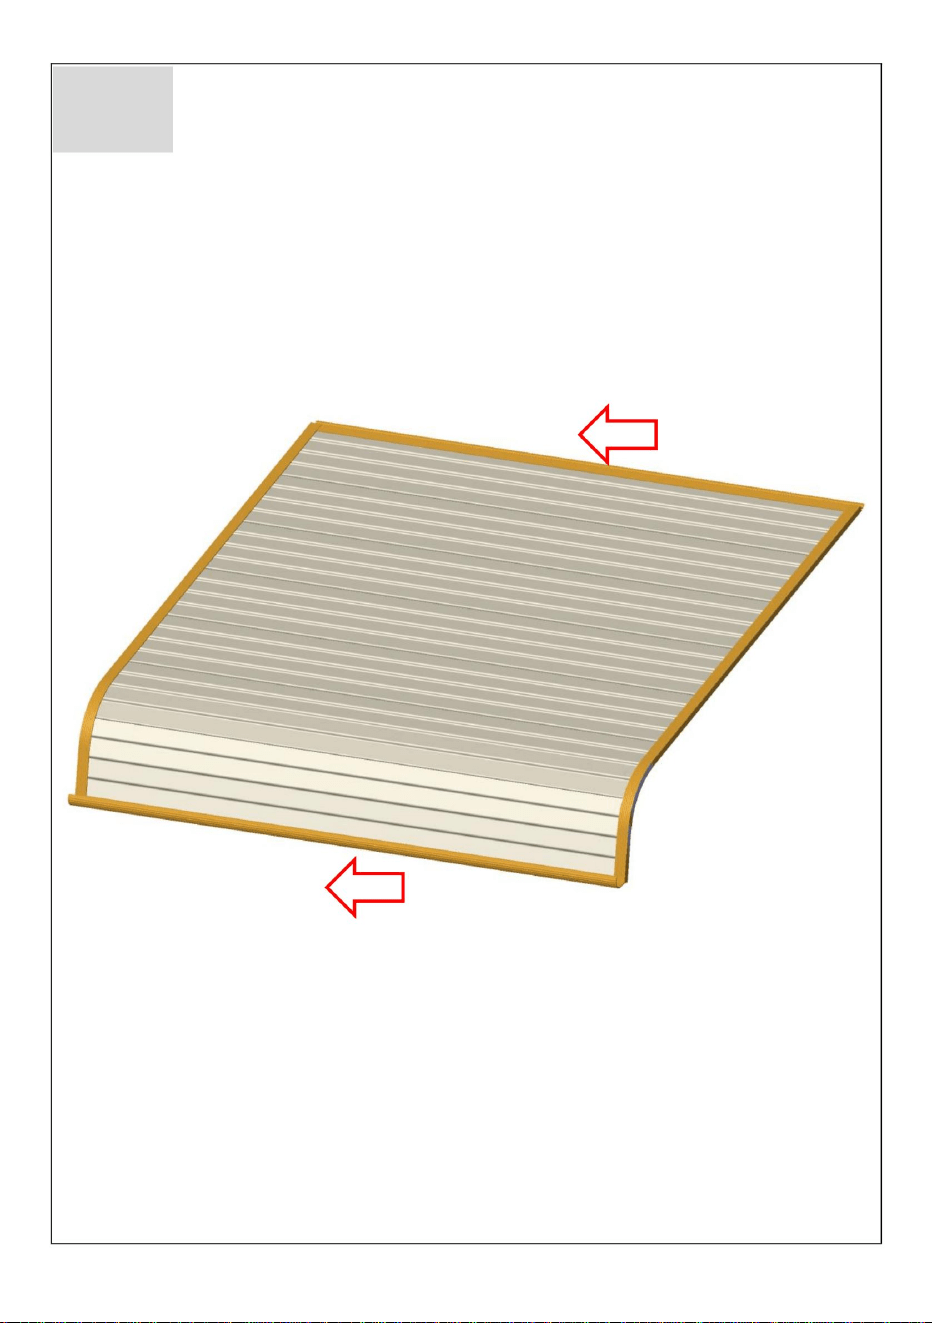
ASSEMBLY STEP
Use screw(J*2) to fasten the tube(F*2) and the fixing part(G*2) together.
G*2
F*2
J*2
1
Fasten the tube.

6
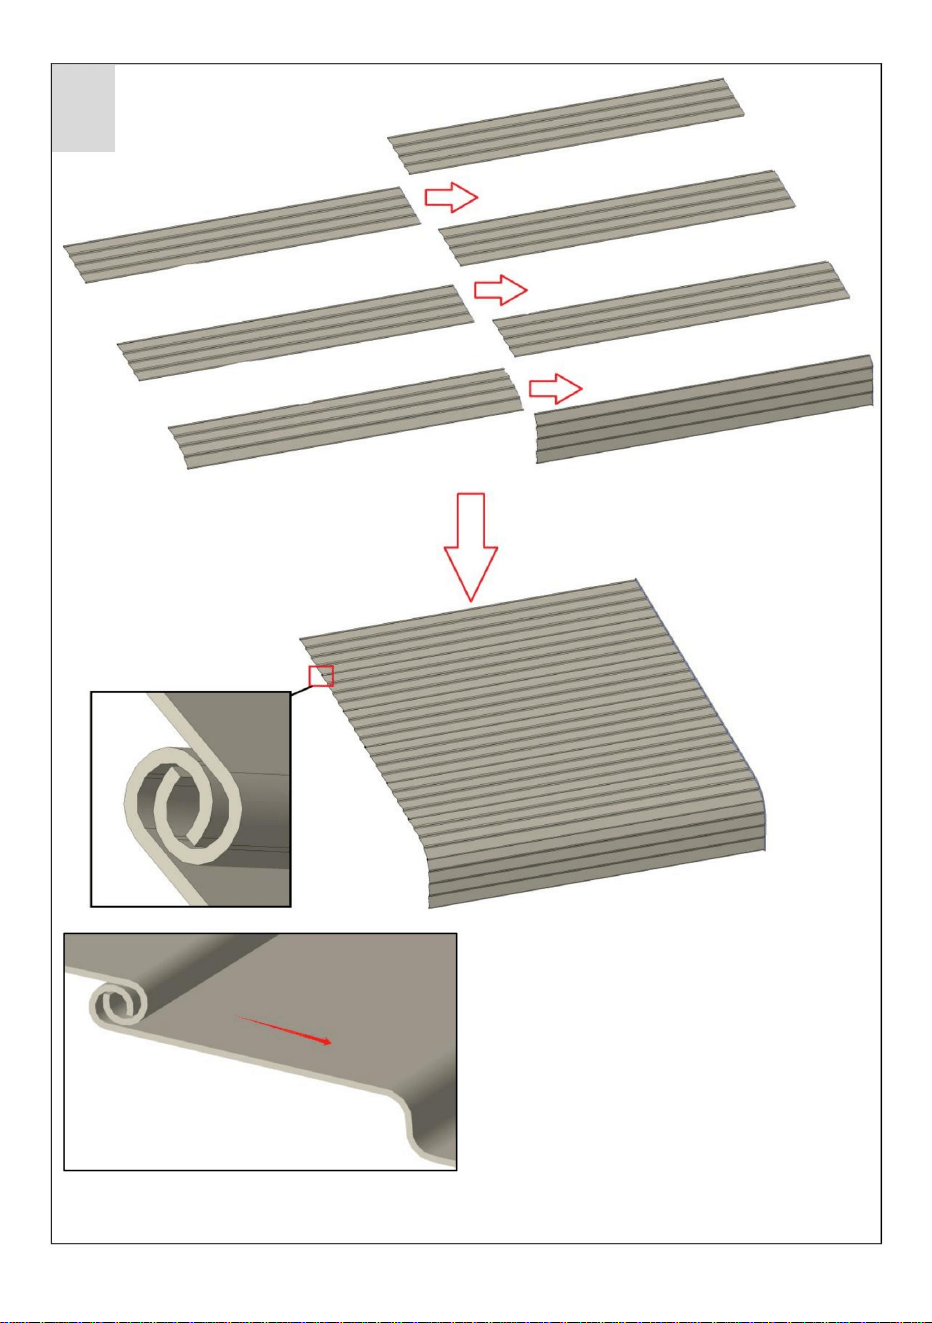
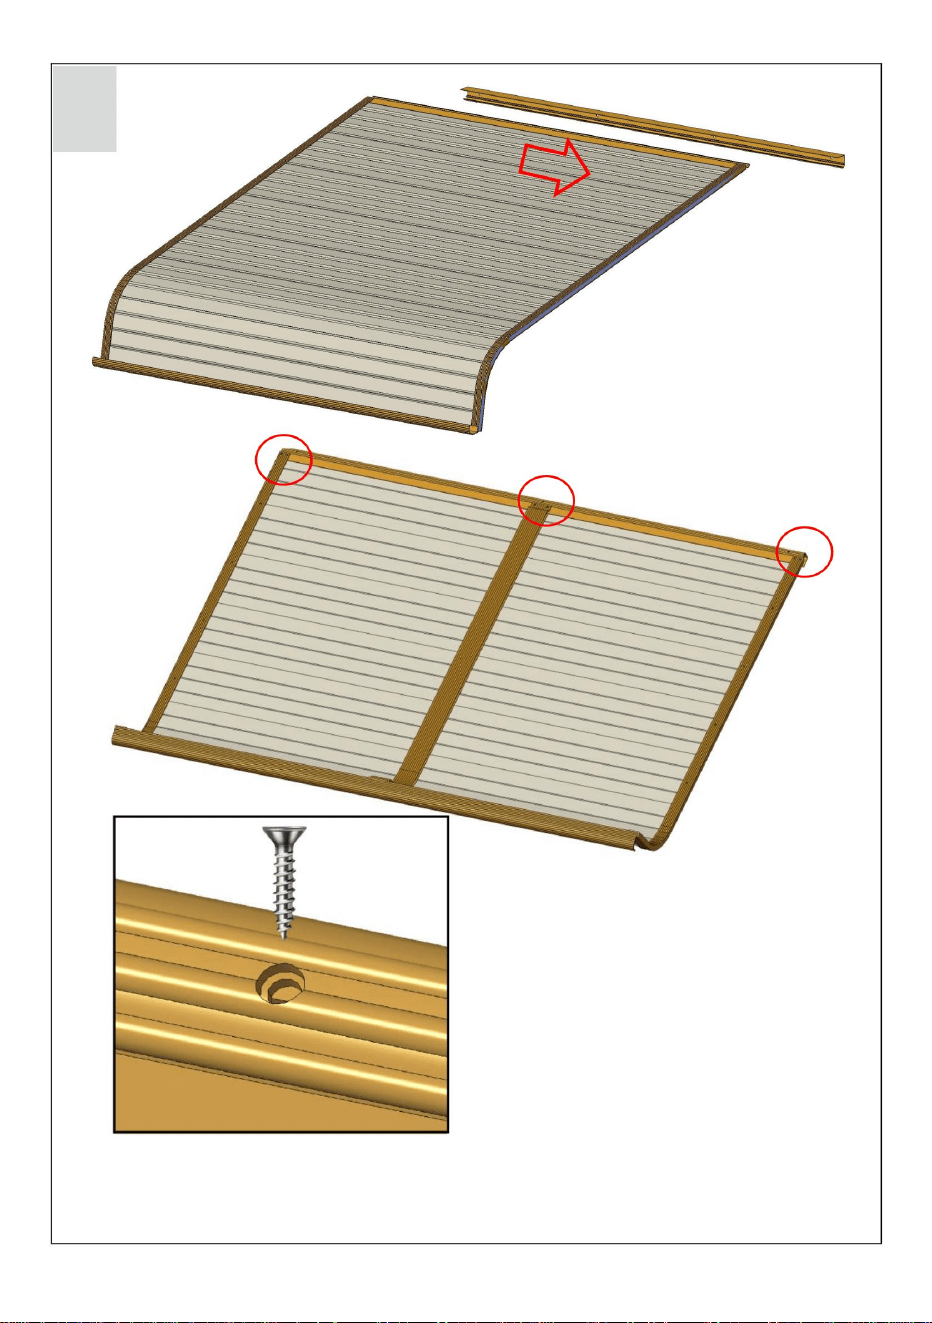
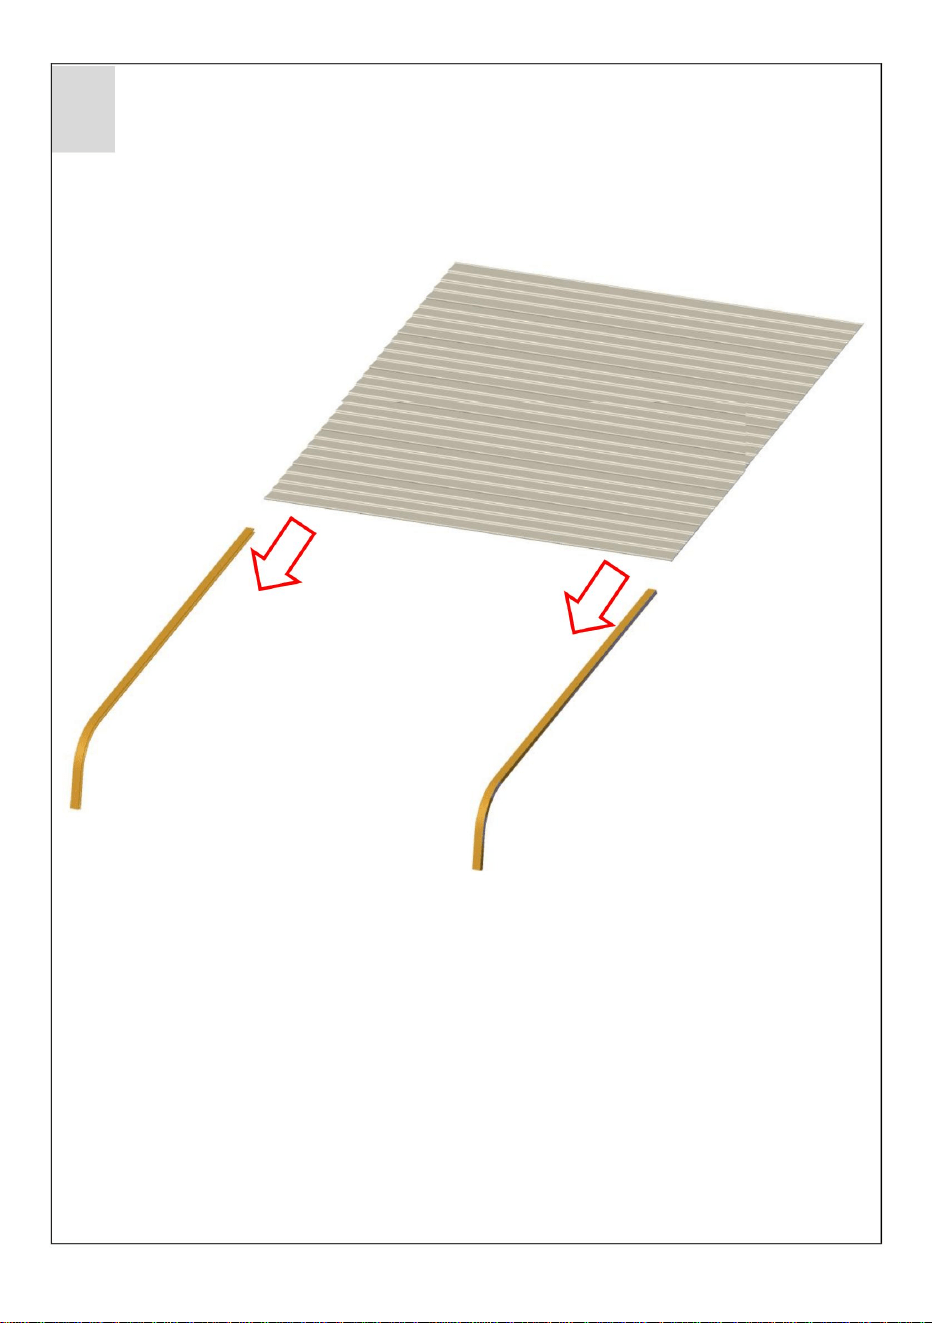
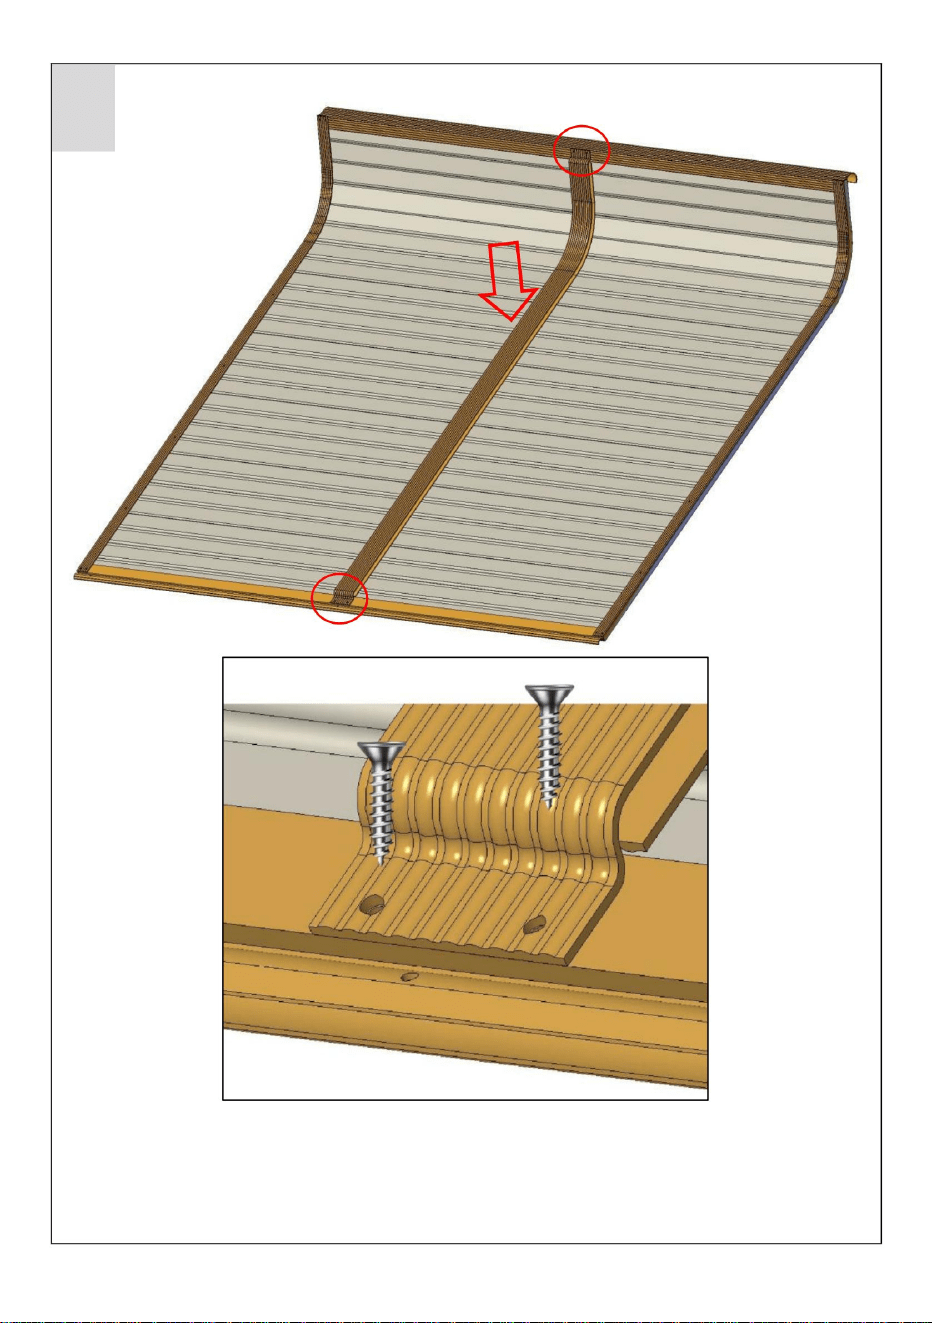
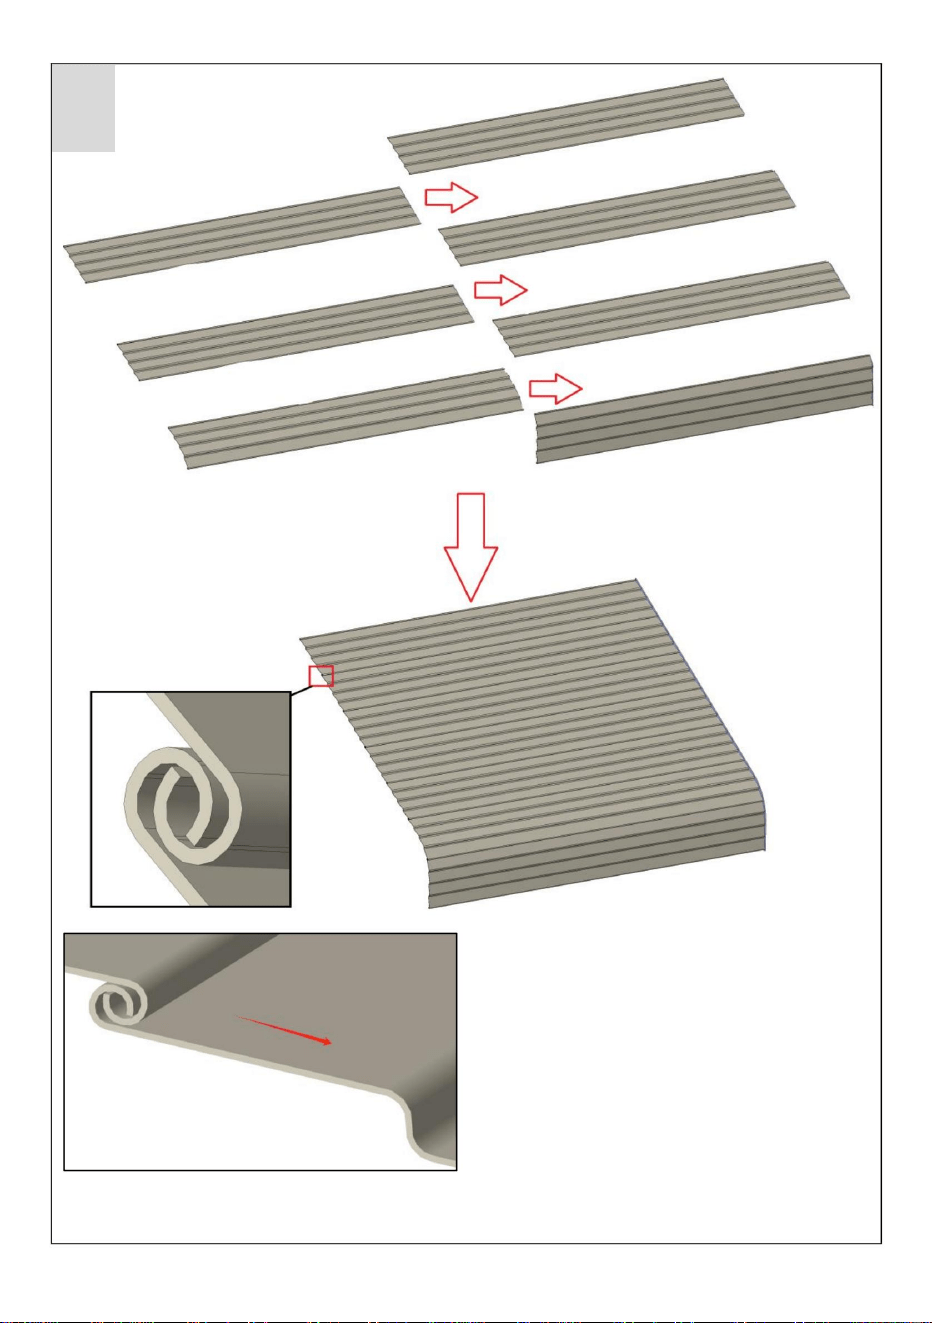
Insert the aluminum alloy sheets(A*7) into each other in the direction of the arrow.
A*7
2
Assemble the aluminum alloy sheets.
7
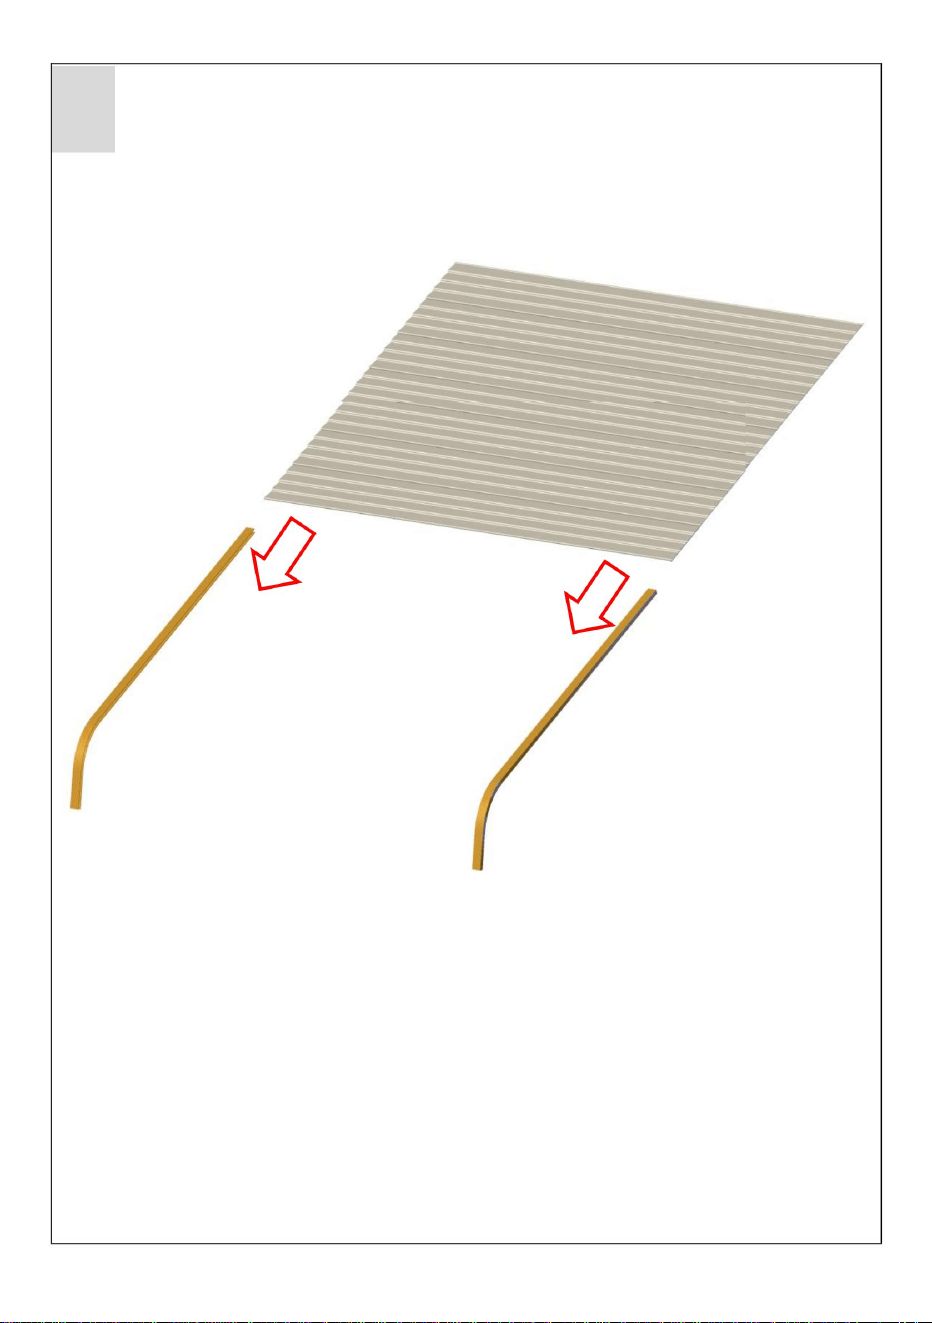
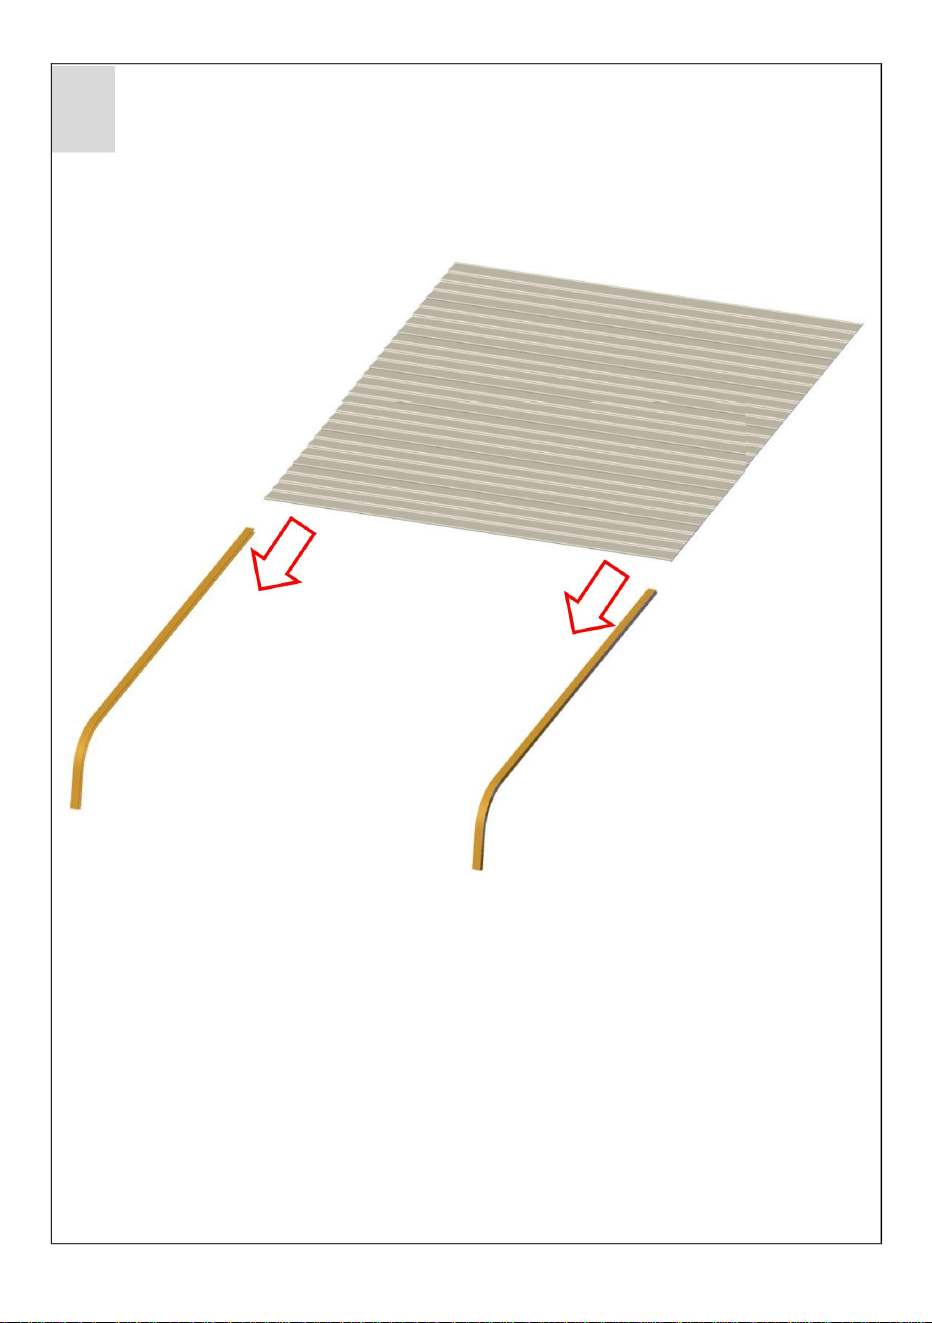
Insert the aluminum alloy sheet(A) into D1 and D2 in the direction of the arrow.
D1
D2
3
Assemble the aluminum alloy sheets.

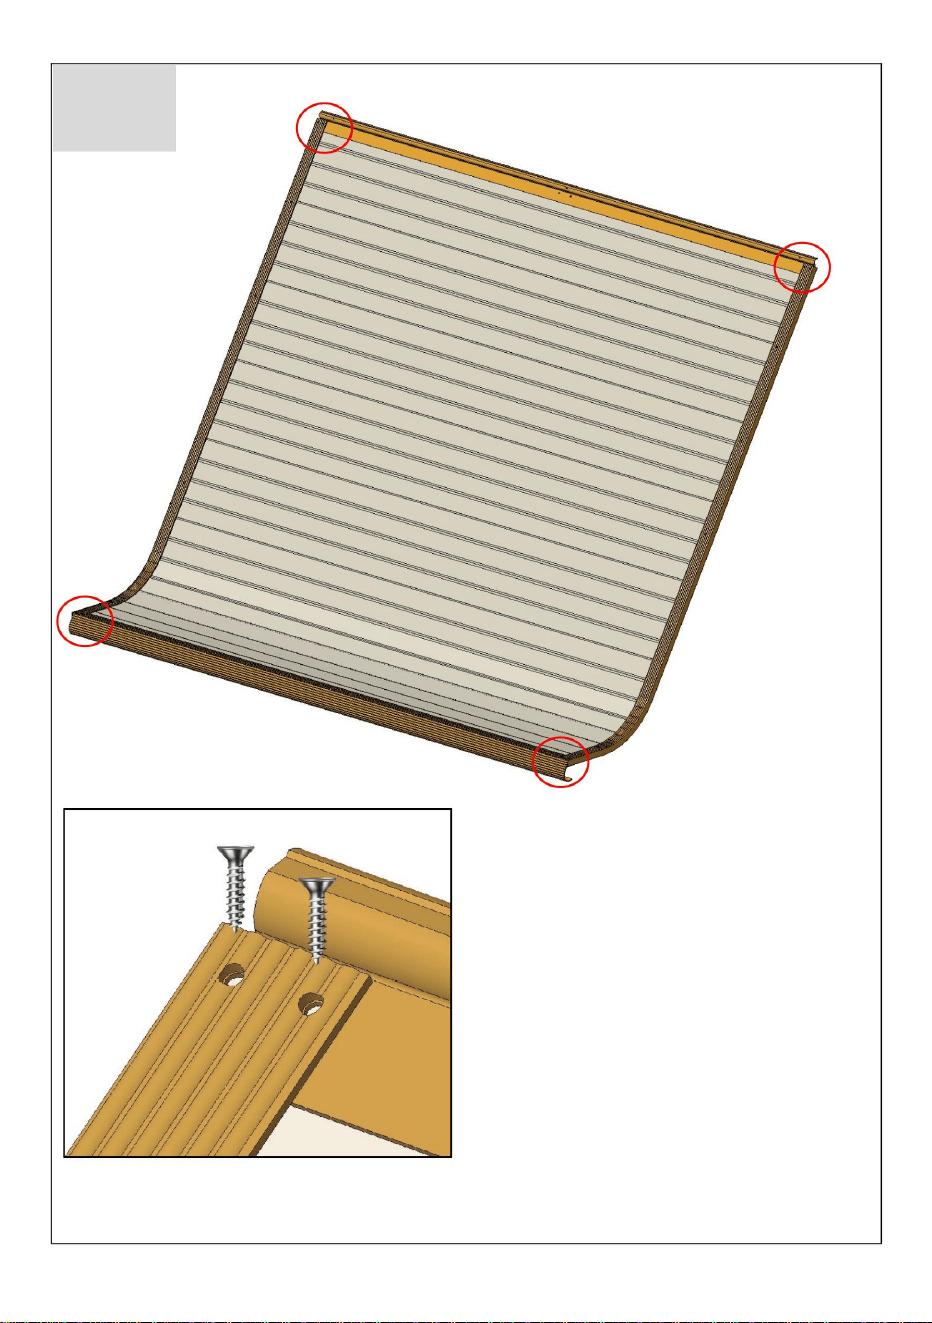
8
Insert parts B and C into the aluminum alloy sheet(A).
B
C
4-1
Assemble the aluminum alloy sheets.

9
1.Turn the whole product over; 2.Fix it with screws(K*8).
K
4-2
Assemble the aluminum alloy sheets.
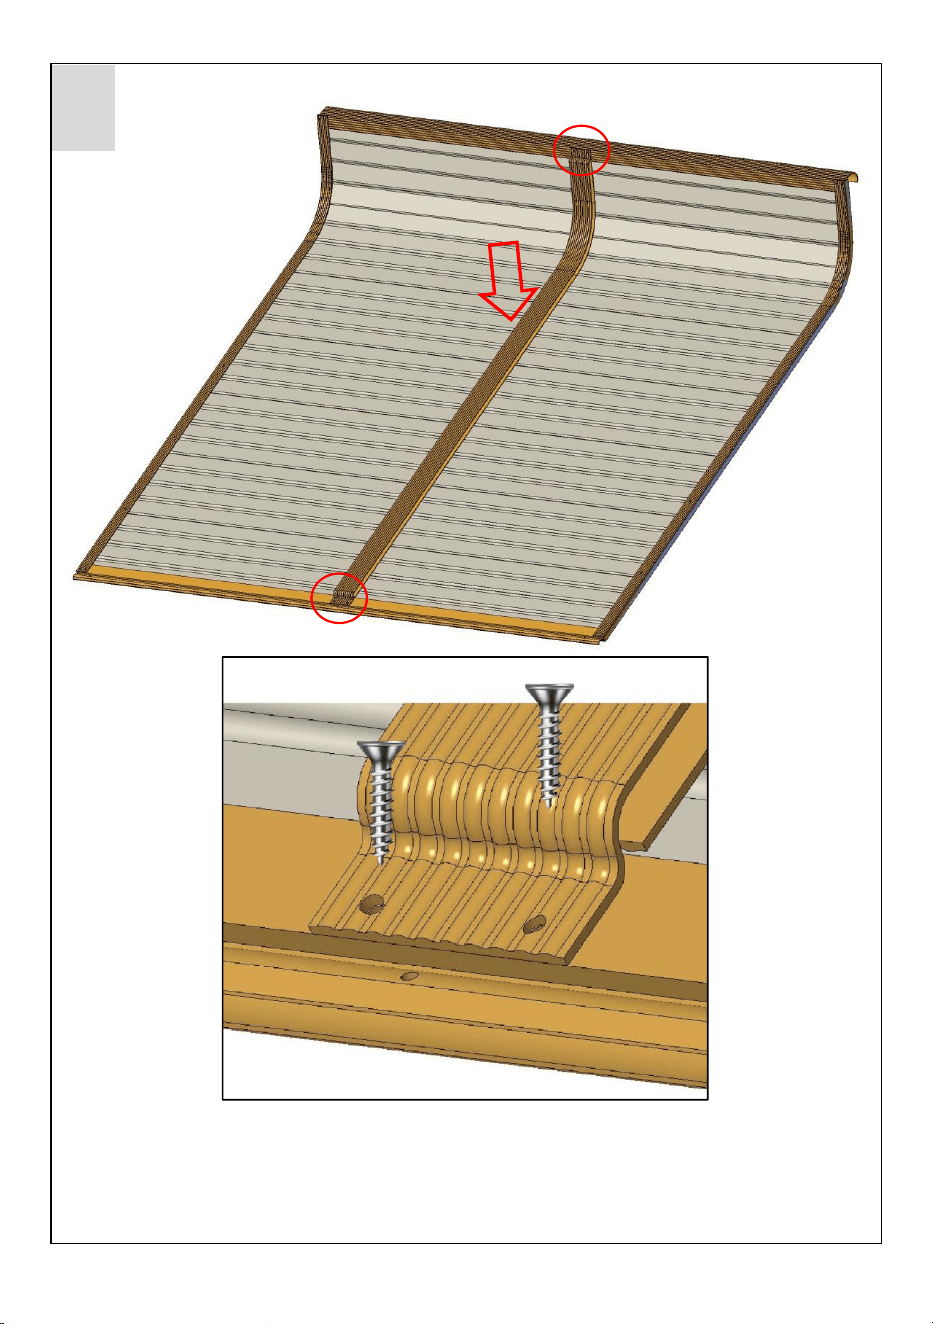
10
Install part E in the middle position of the aluminum alloy sheet and fix it with
screws(K*4).
K
K
E
5
Insert the aluminum alloy sheets.
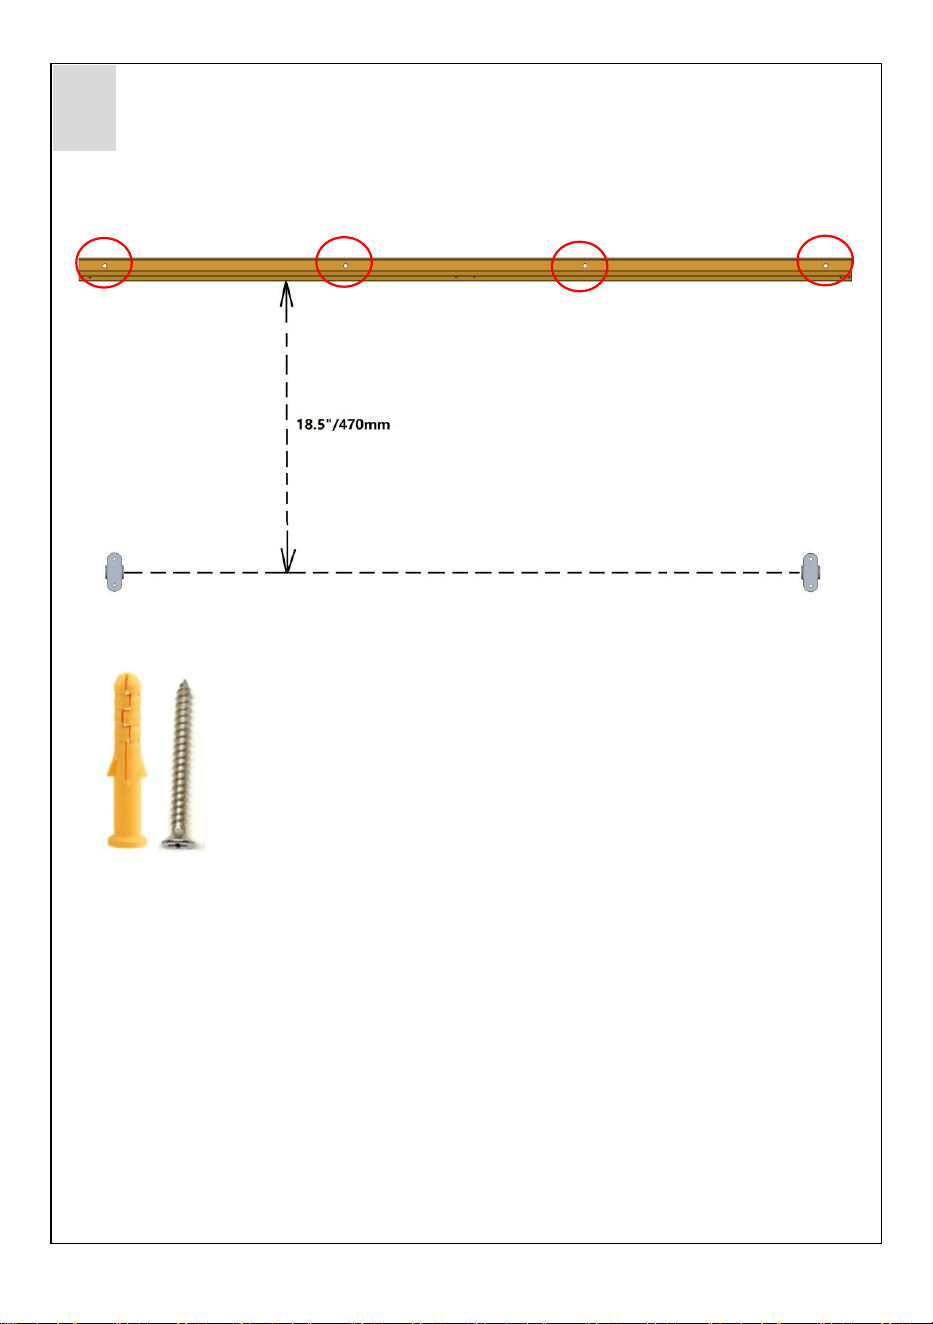
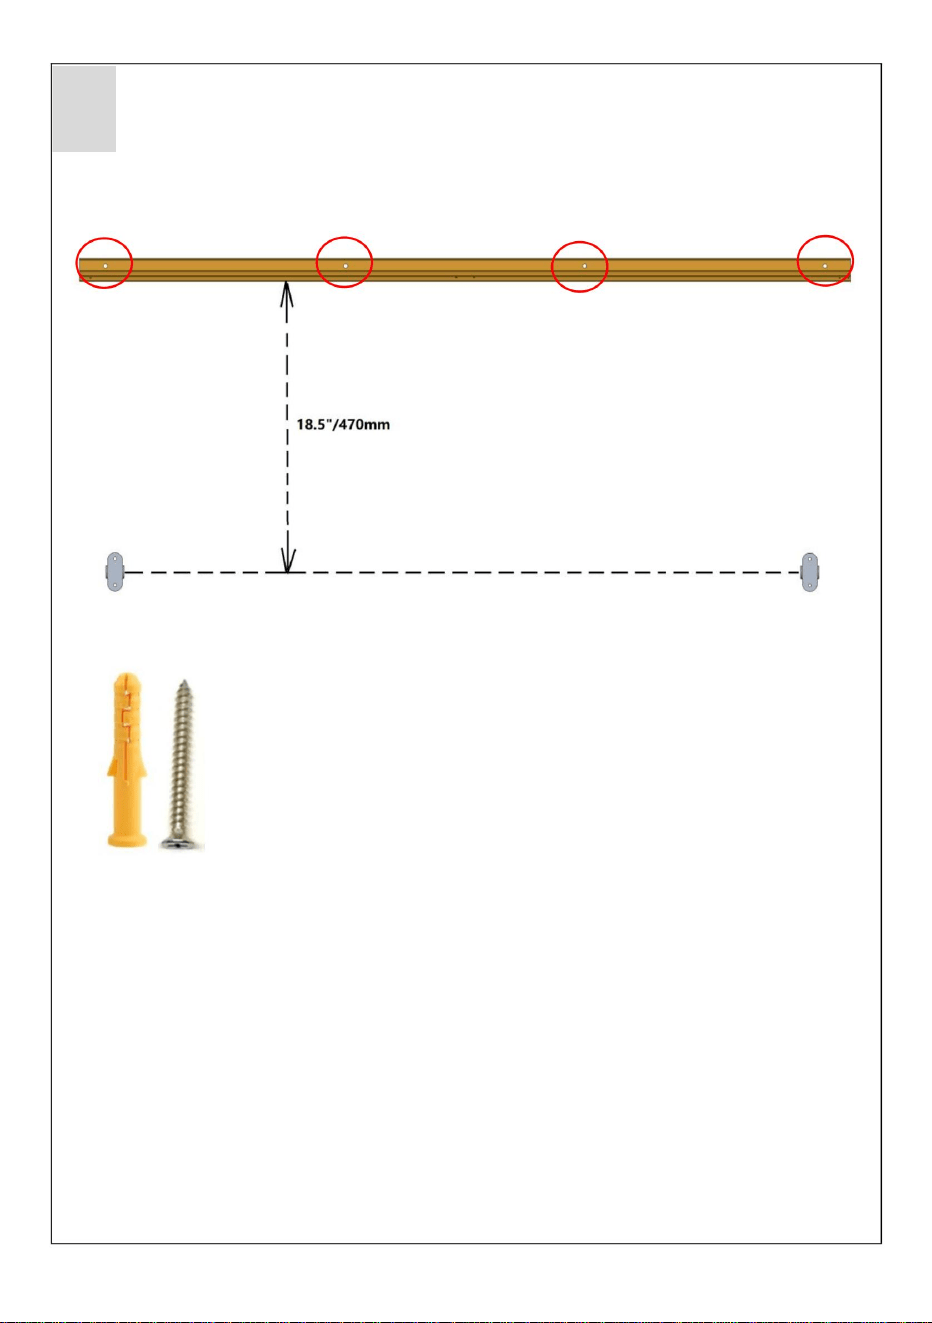
11
First, mark the positioning holes on the wall for part H according to the above -
recommended dimensions. Then, drill holes in the wall using a ø6~ø8mm drill bit.
Next, insert plastic plugs into the holes. Finally, install part H on the wall using wall
- floor nails(I*4).
H
I*4
6
Drill holes in the wall.

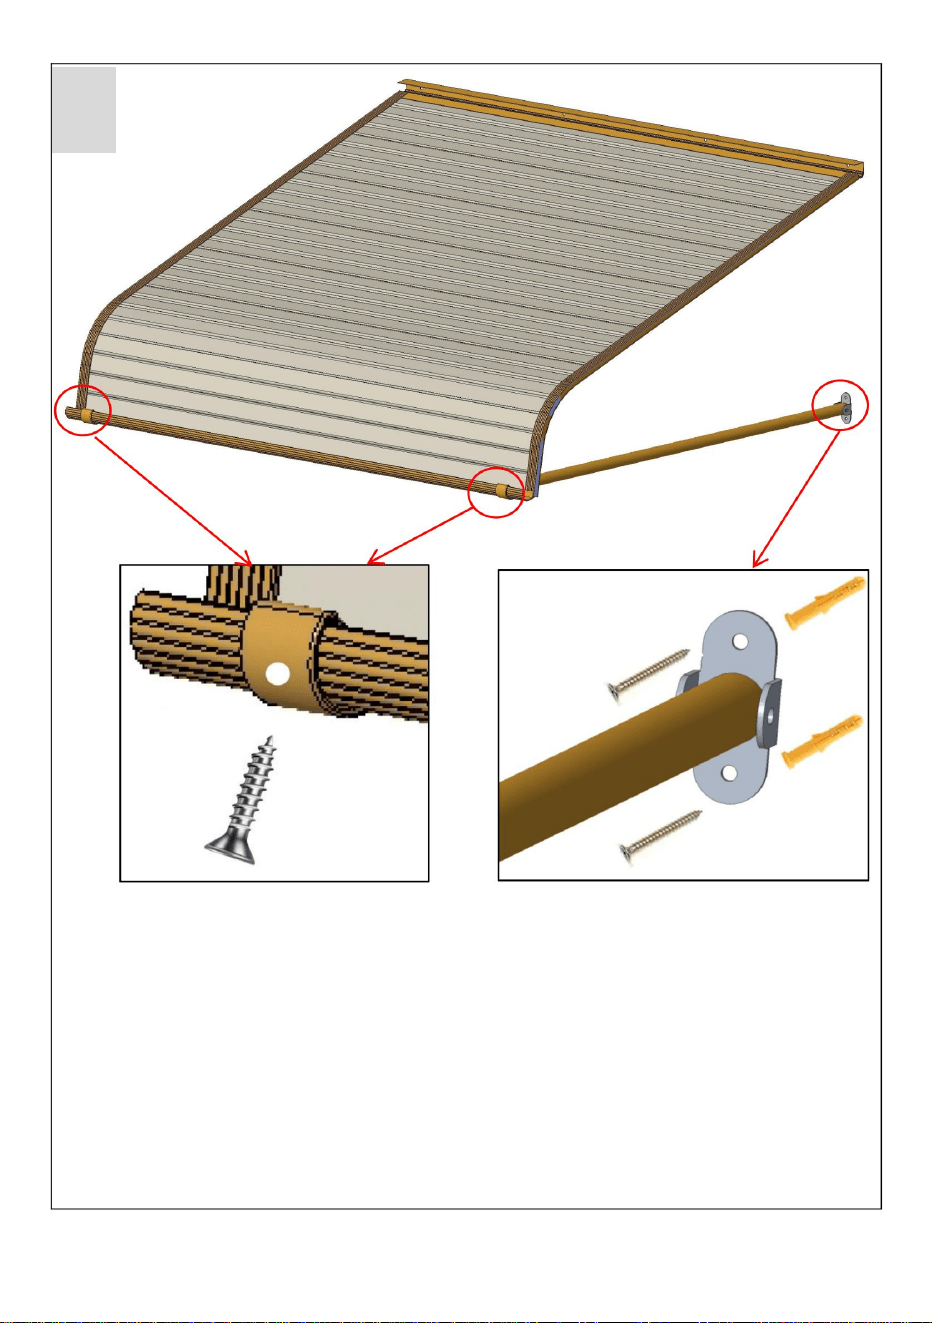
12
Insert the aluminum alloy sheet into part H.
Lock the parts with screw(K*3).
Note: There are 3 screw holes here, and you only need to fasten 2 of them.
H
7
Install the Metal Door Awning on the wall.
K*3
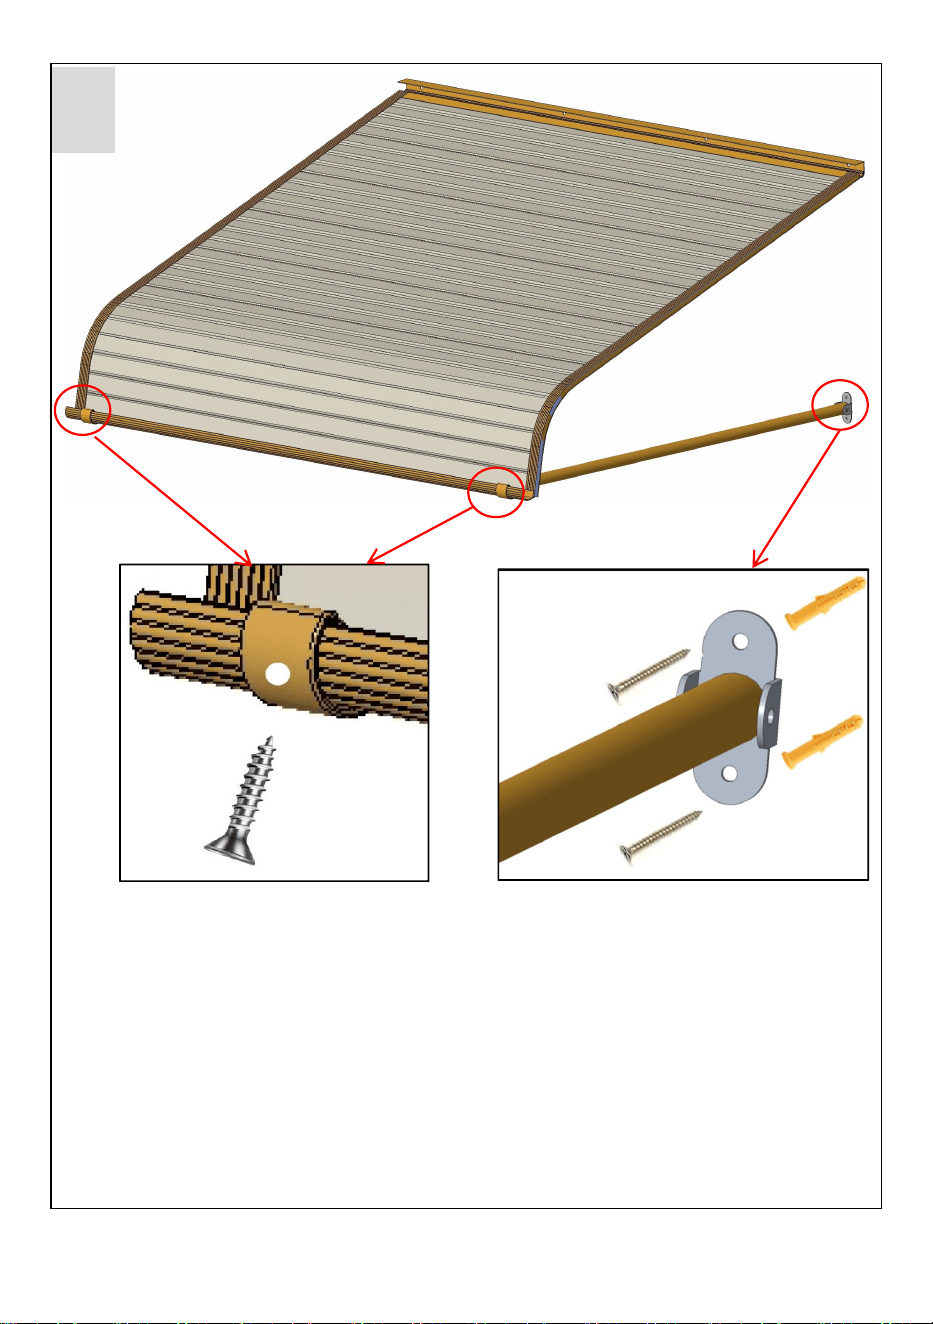
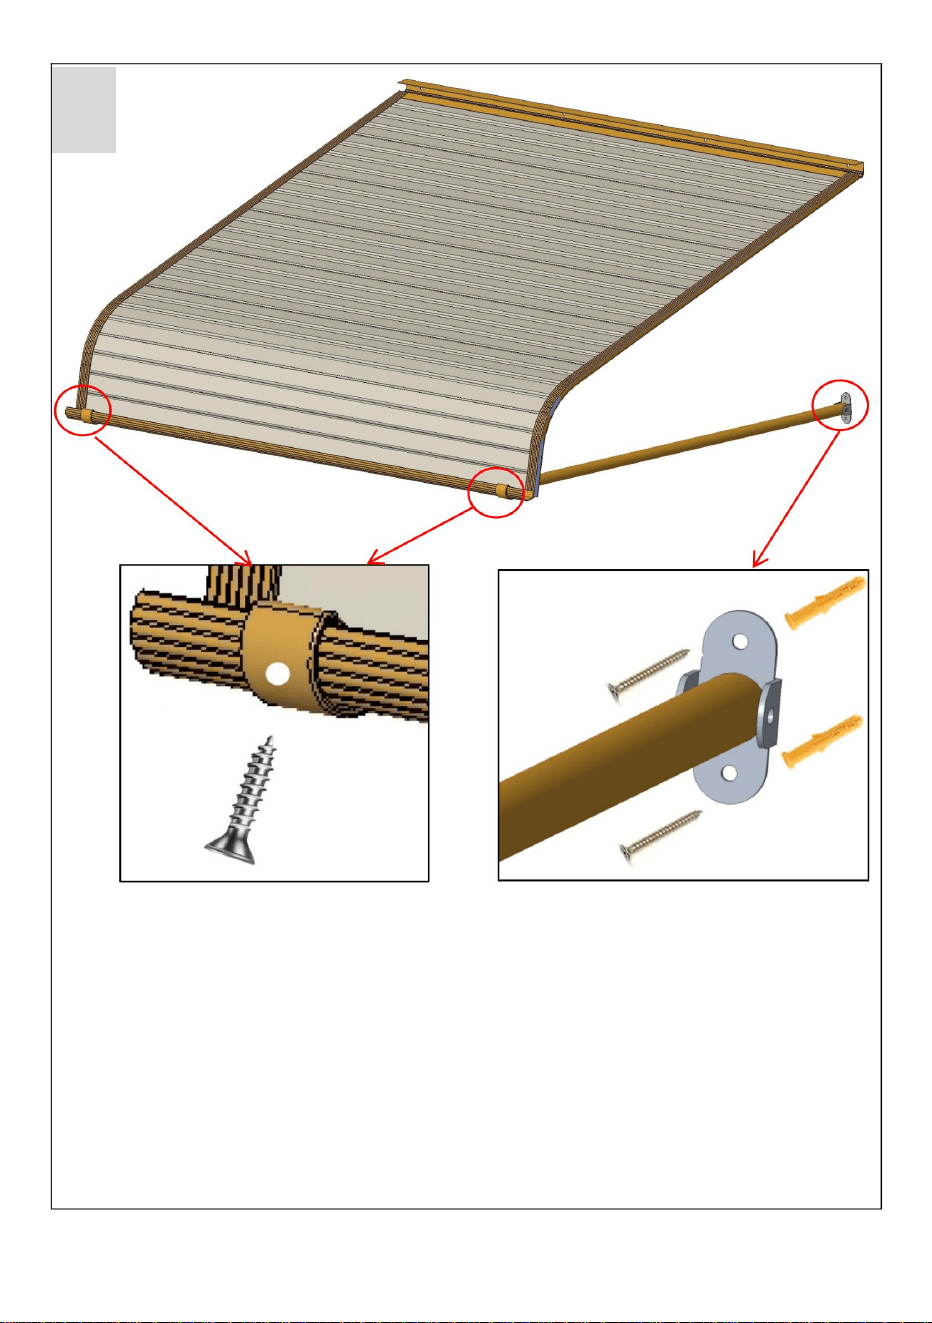
13
1.Attach part(F*2) to the product.
2.Determine a suitable position by taking into account the actual sizes of the
product and the door. Then, mark the positions of the fixing holes of part G on the
wall.
3.Drill holes in the wall, insert plastic components, and then use screws to fix the
product to the wall.
F
K*2
I*4
8
Install the Metal Door Awning on the wall.

14

15
Snow Loads
The aluminum door canopies are manufactured
from the highest - quality components available
on the market today. They are designed to
withstand normal weather conditions, including
rain, sleet, snow, and wind. However, they are
not designed to endure winds exceeding 30
miles per hour, snow loads of more than 12
inches of heavy, wet snow, or 24 inches of light
snow. Additionally, they cannot withstand the
impact force of snow and ice falling from an
upper roof or piling up. This product will deliver
excellent performance as long as it is installed
correctly and used within its designed load -
bearing limits.
Please remove snow promptly during use.

16
PRODUCT PARAMETER
Model
QL-40INCH
Material
Aluminum alloy
Colour
Silver
Shading area
40*42inch(1016*1066mm)
Maximum suitable width for
doors/windows
27.5inch/700mm
Manufacturer:Shanghaimuxinmuyeyouxiangongsi
Address:Shuangchenglu803nong11hao1602A-1609shi,baoshanqu,
shanghai200000CN.
ECREP:E-CrossStuGmbH. MainzerLandstr.69,60329FrankfurtamMain.
UKREP:YHCONSULTINGLIMITED. C/OYHConsultingLimitedOffice147,
CenturionHouse, LondonRoad, Staines-upon-Thames, Surrey, TW184AX
ImportedtoAUS:SIHAOPTYLTD.
1ROKEVASTREETEASTWOODNSW2122Australia
ImportedtoUSA:SanvenTechnologyLtd.
Suite250,9166AnaheimPlace,RanchoCucamonga,CA91730


Technical Support and E-Warranty Certificate
www.vevor.com/support


Machine Translated by Google

MODELLO:QL-40 POLLICI
Questa è l'istruzione originale, si prega di leggere attentamente tutte le istruzioni del manuale
prima di utilizzare. VEVOR si riserva una chiara interpretazione del nostro manuale
utente. L'aspetto del prodotto sarà soggetto al prodotto ricevuto. Vi preghiamo di perdonarci se
non vi informeremo di nuovo se ci sono aggiornamenti tecnologici o software sul nostro prodotto.
TENDA PER PORTA METALLICA
1
Machine Translated by Google

supportare una tenda da sole in metallo completamente carica.
1. NON SEDERSI O STARE IN PIEDI SU QUESTO OGGETTO.
provocare lesioni gravi.
o farmaci.
6. Non utilizzare se alcune parti sono allentate o danneggiate.
SALVA QUESTO MANUALE
1. Montare solo secondo queste istruzioni. Un montaggio improprio può
solo prodotti.
articolo.
a sostegno della pensilina in metallo.
2. Indossare occhiali di sicurezza approvati ANSI e guanti da lavoro resistenti
4. Utilizzare solo su una superficie piana, livellata, dura e liscia che possa essere utilizzata in sicurezza
pagine, fare riferimento allo schema di montaggio di questo manuale. Disimballare
5. Utilizzare solo come previsto.
3. Mantenere l'area di assemblaggio pulita e ben illuminata.
5. Non riunirsi se si è stanchi o sotto l'effetto di alcol, droghe
Leggere questo materiale prima di utilizzare questo prodotto. La mancata osservanza di questa norma può
Usare precauzioni
7. Sono disponibili pezzi di ricambio come viti.
Precauzioni di montaggio
6. Le capacità del prodotto si applicano a prodotti correttamente e completamente assemblati
2. Questo prodotto non è un giocattolo. Non permettere ai bambini di giocare con o vicino a questo
creare pericoli.
7. Montare su una superficie piana, livellata, dura e liscia in grado di sostenere in modo sicuro
3. Non superare le capacità di peso specificate.
AVVERTIMENTO:
4. Tenere gli astanti fuori dall'area durante l'assemblea.
e separare tutte le parti in un'area di lavoro pulita.
durante l'assemblaggio.
8. Per ulteriori informazioni sulle parti elencate di seguito
ISTRUZIONI DI SICUREZZA
2
Machine Translated by Google

3
ELENCO DELLE PARTI
Machine Translated by Google

1
1
G
J
C
2
17+3
E
H
La 1a
1
La 1a 1
2
8
7
E
1
UN
1
F
IO
2
B
Immagine parziale
Numero di serie Quantità
4
Machine Translated by Google

Sol*2
E*2
E*2
5
1 Fissare il tubo.
FASE DI MONTAGGIO
Utilizzare la vite (J*2) per fissare insieme il tubo (F*2) e la parte di fissaggio (G*2).
Machine Translated by Google
Un*7
Inserire i fogli di lega di alluminio (A*7) l'uno nell'altro nella direzione della freccia.
2
Assemblare i fogli di lega di alluminio.
6
Machine Translated by Google

La D2
La 1a
Inserire il foglio di lega di alluminio (A) in D1 e D2 nella direzione della freccia.
3
Assemblare i fogli di lega di alluminio.
7
Machine Translated by Google

B
C
Inserire le parti B e C nel foglio di lega di alluminio (A).
4-1
Assemblare i fogli di lega di alluminio.
8
Machine Translated by Google

E
1. Capovolgere l'intero prodotto; 2. Fissarlo con le viti (K*8).
4-2
Assemblare i fogli di lega di alluminio.
9
Machine Translated by Google

E
E
E
Installare la parte E nella posizione centrale della lamiera di lega di alluminio e fissarla
con le viti (K*4).
5
Inserire i fogli di lega di alluminio.
10
Machine Translated by Google

H
Io*4
dimensioni consigliate. Quindi, praticare dei fori nel muro utilizzando una punta da trapano da ø6~ø8mm.
Per prima cosa, segnare i fori di posizionamento sul muro per la parte H secondo quanto sopra -
Quindi, inserisci i tasselli di plastica nei fori. Infine, installa la parte H sul muro usando chiodi da parete e
pavimento (I*4).
6
Praticare dei fori nel muro.
11
Machine Translated by Google
H
Il*3
Bloccare le parti con la vite (K*3).
Inserire il foglio di lega di alluminio nella parte H.
Nota: qui ci sono 3 fori per le viti e devi fissarne solo 2.
7
Installare la pensilina in metallo sulla parete.
12
Machine Translated by Google

Io*4
F
K*2
parete.
3. Praticare dei fori nel muro, inserire i componenti in plastica, quindi utilizzare le viti per fissare il
prodotto al muro.
2. Determinare una posizione adatta tenendo conto delle dimensioni effettive del prodotto e
della porta. Quindi, contrassegnare le posizioni dei fori di fissaggio della parte G sulla
1. Fissare la parte (F*2) al prodotto.
8
Installare la pensilina in metallo sulla parete.
13
Machine Translated by Google

14
Machine Translated by Google

correttamente e utilizzato entro il carico previsto -
miglia orarie, carichi di neve superiori a 12
non progettato per resistere a venti superiori a 30
Si prega di rimuovere tempestivamente la neve durante l'uso.
Le pensiline delle porte in alluminio sono realizzate
forza d'impatto della neve e del ghiaccio che cadono da un
pollici di neve pesante e bagnata, o 24 pollici di neve leggera
neve. Inoltre, non possono sopportare la
sul mercato oggi. Sono progettati per
prestazioni eccellenti fintanto che è installato
tetto superiore o accatastamento. Questo prodotto consegnerà
dai componenti di altissima qualità disponibili
pioggia, nevischio, neve e vento. Tuttavia, sono
limiti di portata.
resistere alle normali condizioni meteorologiche, comprese
Carichi di neve
15
Machine Translated by Google

QL-40 POLLICI
16
Indirizzo: Shuangchenglu803nong11hao1602A-1609shi,baoshanqu, shanghai200000CN.
Importato in AUS:SIHAOPTYLTD.
porte/finestre
UKREP:YHCONSULTINGLIMITED. C/OYHConsultingLimitedOffice147, CenturionHouse,
LondonRoad, Staines-upon-Thames, Surrey, TW184AX
Importato negli Stati Uniti: SanvenTechnologyLtd.
Modello
40*42 pollici (1016*1066 mm)
Suite250,9166AnaheimPlace,RanchoCucamonga,CA91730
Lega di alluminio
Argento
1ROKEVASTREETWOODNSW2122Australia
Colore
Produttore: Shanghaimuxinmuyeyouxiangongsi
27,5 pollici/700 mm
Materiale
Larghezza massima adatta per
ECREP:E-CrossStuGmbH. MainzerLandstr.69,60329FrancoforteMain.
Zona d'ombra
PARAMETRO PRODOTTO
Machine Translated by Google

Machine Translated by Google

Supporto tecnico e certificato di garanzia
elettronica www.vevor.com/support
Machine Translated by Google


Machine Translated by Google

To jest oryginalna instrukcja, przed użyciem należy uważnie przeczytać wszystkie
instrukcje. VEVOR zastrzega sobie jasną interpretację naszej instrukcji obsługi.
Wygląd produktu będzie zależał od produktu, który otrzymałeś. Prosimy o
wybaczenie, że nie poinformujemy Cię ponownie, jeśli w naszym produkcie pojawią
się jakiekolwiek aktualizacje technologiczne lub oprogramowania.
MODEL:QL-40 CALI
MARKIZA METALOWA DO DRZWI
1
Machine Translated by Google

Środki ostrożności podczas montażu
6. Możliwości produktu odnoszą się do produktu prawidłowo i całkowicie zmontowanego
2. Ten produkt nie jest zabawką. Nie pozwalaj dzieciom bawić się nim ani przebywać w jego pobliżu.
Stosuj środki ostrożności
Przeczytaj ten materiał przed użyciem tego produktu. Nieprzestrzeganie tego może
5. Nie wchodź na zebranie, jeśli jesteś zmęczony lub znajdujesz się pod wpływem alkoholu, narkotyków lub narkotyków.
7. Dostępne są części zamienne, np. śruby.
OSTRZEŻENIE:
4. Podczas montażu nie dopuszczaj osób postronnych na teren montażu.
i oddziel wszystkie części w czystym miejscu pracy.
w trakcie montażu.
8. Aby uzyskać dodatkowe informacje dotyczące części wymienionych poniżej,
podtrzymuje w pełni załadowaną markizę drzwiową metalową.
stwarzać zagrożenia.
7. Montaż należy wykonać na płaskiej, równej, twardej i gładkiej powierzchni, która będzie bezpieczna.
3. Nie przekraczać określonego limitu obciążenia.
1. Montaż należy wykonywać wyłącznie zgodnie z niniejszą instrukcją. Nieprawidłowy montaż może
tylko produkty.
przedmiot.
1. NIE SIADAJ ANI NIE STAWAJ NA TYM PRZEDMIOCIE.
spowodować poważne obrażenia.
lub leków.
6. Nie używać, jeśli jakieś części są luźne lub uszkodzone.
ZAPISZ TĘ INSTRUKCJĘ
strony, zapoznaj się ze schematem montażu w tym podręczniku. Rozpakuj
5. Używać wyłącznie zgodnie z przeznaczeniem.
3. Utrzymuj miejsce zgromadzenia w czystości i zapewnij dobre oświetlenie.
podtrzymujący markizę drzwi metalowych.
2. Noś okulary ochronne zatwierdzone przez ANSI i wytrzymałe rękawice robocze.
4. Używać wyłącznie na płaskiej, równej, twardej i gładkiej powierzchni, która może być bezpiecznie używana.
INSTRUKCJE BEZPIECZEŃSTWA
2
Machine Translated by Google

3
LISTA CZĘŚCI
Machine Translated by Google

A
H
D1
1
I
D1 1
2
G
1
K
C
2
17+3
1
F
2
B
1
J
8
7
mi
1
Część zdjęcia
Numer seryjny Ilość
4
Machine Translated by Google
G*2
F*2
J*2
5
1 Zamocuj rurkę.
KROK MONTAŻU
Za pomocą śruby (J*2) połącz rurkę (F*2) z częścią mocującą (G*2).
Machine Translated by Google

2
Włóż arkusze stopu aluminium (A*7) jedna w drugą zgodnie z kierunkiem strzałki.
A*7
Złóż arkusze stopu aluminium.
6
Machine Translated by Google
3
Włóż arkusz stopu aluminium (A) do otworów D1 i D2 zgodnie z kierunkiem strzałki.
D2
D1
Złóż arkusze stopu aluminium.
7
Machine Translated by Google

C
B
Włóż części B i C do arkusza stopu aluminium (A).
4-1
Złóż arkusze stopu aluminium.
8
Machine Translated by Google
4-2
1. Odwróć cały produkt; 2. Przymocuj go za pomocą śrub (K*8).
K
Złóż arkusze stopu aluminium.
9
Machine Translated by Google
5
Zamontuj część E w środkowej części arkusza stopu aluminium i przymocuj ją
śrubami (K*4).
K
mi
K
Włóż arkusze stopu aluminium.
10
Machine Translated by Google

6
zalecane wymiary. Następnie wywierć otwory w ścianie za pomocą wiertła ø6~ø8mm.
Najpierw zaznacz na ścianie otwory pozycjonujące dla części H zgodnie z powyższym -
Następnie włóż plastikowe kołki do otworów. Na koniec zamontuj część H na ścianie za pomocą gwoździ ściennych
i podłogowych (I*4).
Ja*4
H
Wywierć otwory w ścianie.
11
Machine Translated by Google

K*3
H
Zablokuj części śrubą (K*3).
Włóż arkusz stopu aluminium do części H.
Uwaga: Znajdują się tutaj 3 otwory na śruby, a Ty musisz przykręcić tylko 2 z nich.
7
Zamontuj markizę metalową na ścianie.
12
Machine Translated by Google

Ja*4
F
K*2
ściana.
3. Wywierć otwory w ścianie, włóż plastikowe elementy, a następnie za pomocą śrub
przymocuj produkt do ściany.
2. Określ odpowiednią pozycję, biorąc pod uwagę rzeczywiste rozmiary produktu i drzwi.
Następnie zaznacz pozycje otworów mocujących części G na
1. Przymocuj część (F*2) do produktu.
8
Zamontuj markizę metalową na ścianie.
13
Machine Translated by Google

14
Machine Translated by Google

z najwyższej jakości dostępnych komponentów
siła uderzenia śniegu i lodu spadającego z
Zadaszenia drzwi aluminiowych są produkowane
cali ciężkiego, mokrego śniegu lub 24 cali lekkiego śniegu
śniegu. Ponadto nie są w stanie wytrzymać
mil na godzinę, obciążenie śniegiem powyżej 12
nie jest przeznaczony do wytrzymywania wiatru o prędkości przekraczającej 30
Prosimy o bezzwłoczne usuwanie śniegu w trakcie użytkowania.
deszcz, śnieg z deszczem, śnieg i wiatr. Jednak są
granice nośności.
wytrzymać normalne warunki atmosferyczne, w tym
prawidłowo i zgodnie z przeznaczeniem -
na rynku dzisiaj. Są zaprojektowane, aby
doskonała wydajność, o ile jest zainstalowany
górny dach lub spiętrzanie. Ten produkt dostarczy
Obciążenia śniegiem
15
Machine Translated by Google

QL-40 CALI
16
Tworzywo
Import do USA: SanvenTechnology Ltd.
40*42 cale (1016*1066 mm)
Model
Suite250,9166AnaheimPlace,RanchoCucamonga,CA91730
Stop aluminium
Srebrny
1ROKEVASTREETEASTWOODNSW2122Australia
Importowane doAUS:SIHAOPTYLTD.
drzwi/okna
UKREP:YHCONSULTINGLIMITED. C/OYHConsultingLimitedOffice147, CenturionHouse,
LondonRoad, Staines-upon-Thames, Surrey, TW184AX
Maksymalna odpowiednia szerokość dla
ECREP:E-CrossStuGmbH. MainzerLandstr.69,60329FrankfurtamMain.
Obszar zacienienia
Adres:Shuangchenglu803nong11hao1602A-1609shi,baoshanqu, szanghaj200000CN.
Kolor
Producent:Shanghaimuxinmuyeyouxiangongsi
27,5 cala/700 mm
PARAMETR PRODUKTU
Machine Translated by Google

Machine Translated by Google

Wsparcie techniczne i certyfikat gwarancji
elektronicznej www.vevor.com/support
Machine Translated by Google


Machine Translated by Google
Dies ist die Originalanleitung. Bitte lesen Sie alle Anweisungen sorgfältig durch, bevor
Sie das Gerät in Betrieb nehmen. VEVOR behält sich das Recht vor, die
Bedienungsanleitung klar und deutlich zu interpretieren. Das Aussehen des Produkts
hängt vom gelieferten Produkt ab. Bitte haben Sie Verständnis dafür, dass wir Sie
nicht erneut über Technologie- oder Software-Updates informieren.
MODELL: QL-40INCH
METALL-TÜRMARKISE
1
Machine Translated by Google

während der Montage.
8. Weitere Informationen zu den im Folgenden aufgeführten Teilen finden Sie
1. Setzen oder stellen Sie sich nicht auf diesen Gegenstand.
unterstützt eine voll beladene Markise aus Metall.
zu schweren Verletzungen führen.
BEWAHREN SIE DIESES HANDBUCH AUF
WARNUNG:
4. Halten Sie während der Montage unbeteiligte Personen vom Bereich fern.
Gefahren schaffen.
7. Auf einer flachen, ebenen, harten und glatten Oberfläche montieren, die sicher
und trennen Sie alle Teile in einem sauberen Arbeitsbereich.
3. Überschreiten Sie nicht die angegebene Gewichtskapazität.
Vorsichtsmaßnahmen bei der Montage
6. Die Produkteigenschaften gelten für ordnungsgemäß und vollständig montierte
2. Dieses Produkt ist kein Spielzeug. Erlauben Sie Kindern nicht, mit diesem Produkt oder in seiner Nähe zu spielen.
Lesen Sie dieses Material, bevor Sie dieses Produkt verwenden. Die Nichtbeachtung kann
5. Montieren Sie nicht, wenn Sie müde sind oder unter dem Einfluss von Alkohol, Drogen oder
Vorsichtsmaßnahmen treffen
7. Ersatzteile wie Schrauben sind verfügbar.
3. Halten Sie den Versammlungsbereich sauber und gut beleuchtet.
Seiten finden Sie im Montagediagramm dieses Handbuchs. Auspacken
5. Nur bestimmungsgemäß verwenden.
2. Tragen Sie eine ANSI-zugelassene Schutzbrille und robuste Arbeitshandschuhe
Unterstützung der Metalltürmarkise.
4. Nur auf einer flachen, ebenen, harten und glatten Oberfläche verwenden, die sicher
1. Die Montage muss gemäß dieser Anleitung erfolgen. Eine unsachgemäße Montage kann
nur Produkte.
Artikel.
6. Nicht verwenden, wenn Teile lose oder beschädigt sind.
oder Medikamente.
SICHERHEITSHINWEISE
2
Machine Translated by Google

3
TEILELISTE
Machine Translated by Google

D1
E
2
1
H
8
D1
1
C
2
17+3
1
G
K
B
1
J
1
F
2
A
1
ICH
7
Teilbild
Seriennummer Menge
4
Machine Translated by Google

G*2
F*2
J*2
Befestigen Sie das Rohr (F*2) und das Befestigungsteil (G*2) mit der Schraube (J*2) aneinander.
1 Befestigen Sie das Rohr.
MONTAGESTRITT
5
Machine Translated by Google

A*7
6
2
Montieren Sie die Aluminiumlegierungsbleche.
Stecken Sie die Aluminiumlegierungsbleche (A*7) in Pfeilrichtung ineinander.
Machine Translated by Google
D2
D1
7
3
Montieren Sie die Aluminiumlegierungsbleche.
Führen Sie das Aluminiumlegierungsblech (A) in Pfeilrichtung in D1 und D2 ein.
Machine Translated by Google

C
B
8
4-1
Montieren Sie die Aluminiumlegierungsbleche.
Setzen Sie die Teile B und C in das Aluminiumlegierungsblech (A) ein.
Machine Translated by Google

K
9
4-2
Montieren Sie die Aluminiumlegierungsbleche.
1. Drehen Sie das gesamte Produkt um. 2. Befestigen Sie es mit Schrauben (K*8).
Machine Translated by Google

K
E
K
10
5
Legen Sie die Aluminiumlegierungsbleche ein.
Installieren Sie Teil E in der mittleren Position des Aluminiumlegierungsblechs und befestigen Sie es mit
Schrauben (K*4).
Machine Translated by Google

Ich*4
H
empfohlenen Abmessungen. Bohren Sie dann mit einem Bohrer mit 6–8 mm Durchmesser Löcher in die Wand.
Markieren Sie zunächst die Positionierungslöcher für Teil H an der Wand gemäß der obigen Anleitung -
Stecken Sie anschließend Kunststoffdübel in die Löcher. Befestigen Sie Teil H abschließend mit Wand- und
Bodennägeln (I*4) an der Wand.
6
Bohren Sie Löcher in die Wand.
11
Machine Translated by Google

K*3
H
Verriegeln Sie die Teile mit der Schraube (K*3).
Legen Sie das Aluminiumlegierungsblech in Teil H ein.
Hinweis: Hier gibt es 3 Schraubenlöcher und Sie müssen nur 2 davon befestigen.
7
Installieren Sie die Metalltürmarkise an der Wand.
12
Machine Translated by Google
Ich*4
F
K*2
2. Bestimmen Sie eine geeignete Position unter Berücksichtigung der tatsächlichen Abmessungen des Produkts
und der Tür. Markieren Sie dann die Positionen der Befestigungslöcher von Teil G auf dem
3. Bohren Sie Löcher in die Wand, setzen Sie Kunststoffkomponenten ein und befestigen Sie das Produkt anschließend
mit Schrauben an der Wand.
Wand.
1. Befestigen Sie Teil (F*2) am Produkt.
8
Installieren Sie die Metalltürmarkise an der Wand.
13
Machine Translated by Google
14
Machine Translated by Google

auf dem Markt. Sie sind so konzipiert,
hervorragende Leistung, solange es installiert ist
Schnee. Darüber hinaus können sie nicht widerstehen,
Zoll schweren, nassen Schnee oder 24 Zoll leichten
Die Aluminium-Türvordächer werden hergestellt
Aufprallkraft von Schnee und Eis, die von einem
nicht dafür ausgelegt, Windgeschwindigkeiten über 30 standzuhalten
Bitte entfernen Sie Schnee während der Nutzung umgehend.
Meilen pro Stunde, Schneelasten von mehr als 12
normalen Witterungsbedingungen standhalten, einschließlich
ordnungsgemäß und innerhalb der vorgesehenen Belastung verwendet -
Regen, Schneeregen, Schnee und Wind. Sie sind jedoch
Traggrenzen.
Dach oder Stapelung. Dieses Produkt liefert
aus den hochwertigsten verfügbaren Komponenten
Schneelasten
15
Machine Translated by Google

QL-40INCH
16
Farbe
Aluminiumlegierung
Silber
Hersteller: Shanghaimuxinmuyeyouxiangongsi
1ROKEVASTREETEASTWOODNSW2122Australien
Importiert in die USA: SanvenTechnologyLtd.
Modell
40*42 Zoll (1016*1066 mm)
Türen/Fenster
UKREP:YHCONSULTINGLIMITED. C/OYHConsultingLimitedOffice147, CenturionHouse,
LondonRoad, Staines-upon-Thames, Surrey, TW184AX
Suite250,9166AnaheimPlace,RanchoCucamonga,CA91730
Nach AUS importiert: SIHAOPTYLTD.
Schattierungsbereich
Adresse: Shuangchenglu803nong11hao1602A-1609shi, baoshanqu,
shanghai200000CN.
Maximal geeignete Breite für
ECREP:E-CrossStuGmbH. MainzerLandstr.69,60329FrankfurtamMain.
27,5 Zoll/700 mm
Material
PRODUKTPARAMETER
Machine Translated by Google

Machine Translated by Google

Technischer Support und E-Garantie-Zertifikat
www.vevor.com/support
Machine Translated by Google


Machine Translated by Google

1
AUVENTDEPORTEENMÉTAL
Ceciestlemoded'emploid'origine.Veuillezlireattentivementl'intégralitédumanuel
avantutilisation.VEVORseréserveledroitd'interpréterclairementcemanuel
d'utilisation.L'apparenceduproduitdépendduproduitquevousavezreçu.Veuillez
nousexcuserpourleséventuellesmisesàjourtechnologiquesoulogicielles.
MODÈLE:QL40INCH
Machine Translated by Google

2
CONSIGNESDESÉCURITÉ
supportantl'auventdeporteenmétal.
6.Lescapacitésduproduits'appliquentàunproduitcorrectementetcomplètementassemblé.
2.Ceproduitn'estpasunjouet.Nelaissezpaslesenfantsjoueravecouàproximité.
4.Utiliseruniquementsurunesurfaceplane,nivelée,dureetlissequipeutêtreutiliséeentoutesécurité
Précautionsdemontage
7.Despiècesderechangetellesquedesvissontdisponibles.
Veuillezlirecedocumentavantd'utiliserceproduit.Lenonrespectdecetteconsignepeutentraîner
5.Nevousrassemblezpassivousêtesfatiguéousousl'influencedel'alcool,dedrogues
Précautionsd'emploi
pendantlemontage.
8.Pourplusd'informationssurlespiècesrépertoriéescidessous
soutenirunauventdeporteenmétalentièrementchargé.
AVERTISSEMENT:
4.Gardezlesspectateurshorsdelazonependantlemontage.
etséparertouteslespiècesdansunezonedetravailpropre.
créerdesdangers.
7.Assemblezsurunesurfaceplane,deniveau,dureetlisse,capabledesupporterentoutesécurité
3.Nepasdépasserlescapacitésdepoidsspécifiées.
CONSERVEZCEMANUEL
article.
6.Nepasutilisersidespiècessontdesserréesouendommagées.
1.Assemblezuniquementseloncesinstructions.Unassemblageincorrectpeut
produitsuniquement.
entraînerdesblessuresgraves.
oudesmédicaments.
1.NEPASS'ASSEOIRNISETENIRDEBOUTSURCETARTICLE.
3.Gardezlazonedemontagepropreetbienéclairée.
pages,veuillezvousréférerauschémad'assemblagedecemanuel.Déballer
5.Utiliseruniquementcommeprévu.
2.Portezdeslunettesdesécuritéapprouvéesparl'ANSIetdesgantsdetravailrobustes
Machine Translated by Google
LISTEDESPIÈCES
3
Machine Translated by Google

4
Imagepartielle
NumérodesérieQuantité
1D1
2
D1
H 1
C
2
17+3
1
G
1
J
K
B
2
1
UN
F
1
je
7
E
8
Machine Translated by Google

1Fixezletube.
Utilisezlavis(J*2)pourfixerletube(F*2)etlapartiedefixation(G*2)ensemble.
J*2
F*2
G*2
ÉTAPED'ASSEMBLAGE
5
Machine Translated by Google
A*7
2
Assemblerlesfeuillesd’alliaged’aluminium.
Insérezlesfeuillesd'alliaged'aluminium(A*7)lesunesdanslesautresdanslesensdelaflèche.
6
Machine Translated by Google

D1
D2
3
Assemblerlesfeuillesd’alliaged’aluminium.
Insérezlafeuilled'alliaged'aluminium(A)dansD1etD2danslesensdelaflèche.
7
Machine Translated by Google

C
B
41
Assemblerlesfeuillesd’alliaged’aluminium.
InsérezlespiècesBetCdanslafeuilled'alliaged'aluminium(A).
8
Machine Translated by Google

42
K
Assemblerlesfeuillesd’alliaged’aluminium.
1.Retournezl'ensembleduproduit;2.Fixezleavecdesvis(K*8).
9
Machine Translated by Google

K
E
K
5
Insérezlesfeuillesd'alliaged'aluminium.
InstallezlapièceEdanslapositionmédianedelafeuilleenalliaged'aluminiumetfixezla
avecdesvis(K*4).
10
Machine Translated by Google

H
Moi*4
6
Percezdestrousdanslemur.
Dimensionsrecommandées.Percezensuitedestrousdanslemuràl'aided'unforetdeø6àø8mm.
Toutd'abord,marquezlestrousdepositionnementsurlemurpourlapartieHseloncequiprécède
Insérezensuiteleschevillesenplastiquedanslestrous.Enfin,fixezlapartieHaumuràl'aidedeclous
pourmursol(I*4).
11
Machine Translated by Google

7
H
K*3
Installezl'auventdeporteenmétalsurlemur.
Verrouillezlespiècesaveclavis(K*3).
Insérezlafeuilled’alliaged’aluminiumdanslapartieH.
Remarque:ilya3trousdevisici,etvousn'avezbesoind'enfixerque2.
12
Machine Translated by Google

Moi*4
F
K*2
8
Installezl'auventdeporteenmétalsurlemur.
mur.
2.Déterminezl'emplacementappropriéentenantcomptedesdimensionsréellesdu
produitetdelaporte.Marquezensuitel'emplacementdestrousdefixationdelapièceGsurle
1.Fixezlapièce(F*2)auproduit.
3.Percezdestrousdanslemur,insérezlescomposantsenplastique,puisutilisezdesvispour
fixerleproduitaumur.
13
Machine Translated by Google

14
Machine Translated by Google

neige.Deplus,ilsnepeuventpasrésisteràla
poucesdeneigelourdeethumideou24poucesdeneigelégère
Lesauventsdeporteenaluminiumsontfabriqués
forced'impactdelaneigeetdelaglacetombantd'un
nonconçupoursupporterdesventsdépassant30
Veuillezretirerlaneigerapidementpendantl'utilisation.
milesparheure,chargesdeneigedeplusde12
correctementetutilisédanslalimitedesachargeprévue
résisteràdesconditionsmétéorologiquesnormales,ycompris
pluie,grésil,neigeetvent.Cependant,ilssont
àpartirdescomposantsdelaplushautequalitédisponibles
toitsupérieurouempilement.Ceproduitvousoffrira
limitesderoulement.
excellentesperformancesàconditionqu'ilsoitinstallé
actuellementsurlemarché.Ilssontconçuspour
Chargesdeneige
15
Machine Translated by Google

Argent
alliaged'aluminium
1ROKEVASTREETEASTWOODNSW2122Australie
Modèle
40*42pouces(1016*1066mm)
ImportéauxÉtatsUnis:SanvenTechnologyLtd.
Suite250,9166AnaheimPlace,RanchoCucamonga,CA91730
portes/fenêtres
Représentantbritannique:YHConsultingLimited.C/OYHConsultingLimited,bureau147,
CenturionHouse,LondonRoad,StainesuponThames,Surrey,TW184AX
ImportéversAUS:SIHAOPTYLTD.
Adresse:Shuangchenglu803nong11hao1602A1609shi,baoshanqu,
shanghai200000CN.
Zoned'ombrage
Largeurmaximaleappropriéepour
Matériel
27,5pouces/700mm
ECREP:ECrossStuGmbH.MainzerLandstr.69,60329FrancfortMain.
Fabricant:Shanghaimuxinmuyeyouxiangongsi
Couleur
QL40pouces
PARAMÈTREDUPRODUIT
16
Machine Translated by Google

Machine Translated by Google

Assistancetechniqueetcertificatdegarantie
électroniquewww.vevor.com/support
Machine Translated by Google


Machine Translated by Google

MODEL:QL-40INCH
Dit is de originele instructie, lees alle handleidingen zorgvuldig door voordat u het
product gebruikt. VEVOR behoudt zich een duidelijke interpretatie van onze
gebruikershandleiding voor. Het uiterlijk van het product is afhankelijk van het
product dat u hebt ontvangen. Vergeef ons dat we u niet opnieuw zullen informeren
als er technologie- of software-updates voor ons product zijn.
METALEN DEURLUIFEL
1
Machine Translated by Google

Voorzorgsmaatregelen bij de montage
6. De producteigenschappen gelden voor correct en volledig gemonteerde producten.
2. Dit product is geen speelgoed. Laat kinderen niet met of in de buurt van dit product spelen.
Neem voorzorgsmaatregelen
Lees dit materiaal voordat u dit product gebruikt. Als u dit niet doet, kan dit leiden tot:
5. Kom niet bijeen als u moe bent of onder invloed van alcohol of drugs.
7. Reserveonderdelen zoals schroeven zijn verkrijgbaar.
WAARSCHUWING:
4. Houd omstanders uit de buurt tijdens de montage.
en scheid alle onderdelen in een schone werkruimte.
tijdens de montage.
8. Voor aanvullende informatie over de onderdelen die in de volgende lijst staan vermeld,
ondersteunt een volledig geladen metalen deurluifel.
gevaren creëren.
7. Monteer op een vlak, egaal, hard en glad oppervlak dat veilig kan worden gebruikt
3. Overschrijd het aangegeven draagvermogen niet.
1. Monteer alleen volgens deze instructies. Onjuiste montage kan
alleen producten.
item.
1. NIET OP DIT ITEM ZITTEN OF STAAN.
ernstig letsel tot gevolg hebben.
of medicatie.
6. Niet gebruiken als er onderdelen loszitten of beschadigd zijn.
BEWAAR DEZE HANDLEIDING
pagina's, raadpleeg dan het montageschema van deze handleiding. Uitpakken
5. Gebruik het product alleen zoals bedoeld.
3. Zorg ervoor dat de verzamelplaats schoon en goed verlicht is.
ter ondersteuning van de Metalen Deurluifel.
2. Draag een door ANSI goedgekeurde veiligheidsbril en stevige werkhandschoenen
4. Gebruik het alleen op een vlak, egaal, hard en glad oppervlak dat veilig kan worden gebruikt.
VEILIGHEIDSINSTRUCTIES
2
Machine Translated by Google

3
ONDERDELENLIJST
Machine Translated by Google

A
H
D1
1
I
D1 1
2
G
1
Ik
C
2
17+3
1
F
2
B
1
J
8
Ik
7
1
Deel foto
Serienummer Hoeveelheid
4
Machine Translated by Google

G*2
V*2
J*2
5
1 Maak de buis vast.
MONTAGESTAP
Gebruik de schroef (J*2) om de buis (F*2) en het bevestigingsdeel (G*2) aan elkaar te bevestigen.
Machine Translated by Google

Een*7
Plaats de aluminiumlegeringplaten (A*7) in elkaar in de richting van de pijl.
2
Monteer de aluminiumlegeringplaten.
6
Machine Translated by Google
D1
D2
Plaats de aluminiumlegeringplaat (A) in D1 en D2 in de richting van de pijl.
3
Monteer de aluminiumlegeringplaten.
7
Machine Translated by Google
B
C
Plaats de onderdelen B en C in de aluminiumlegeringplaat (A).
4-1
Monteer de aluminiumlegeringplaten.
8
Machine Translated by Google

Ik
1. Draai het hele product om; 2. Bevestig het met schroeven (K*8).
4-2
Monteer de aluminiumlegeringplaten.
9
Machine Translated by Google

Ik
Ik
Ik
Plaats onderdeel E in de middelste positie van de aluminiumlegeringplaat en bevestig het met
schroeven (K*4).
5
Plaats de aluminiumlegeringplaten.
10
Machine Translated by Google
H
Ik*4
Plaats vervolgens plastic pluggen in de gaten. Installeer ten slotte deel H op de muur met behulp van
muur-vloerspijkers (I*4).
Markeer eerst de positioneringsgaten op de muur voor onderdeel H volgens het bovenstaande -
aanbevolen afmetingen. Boor vervolgens gaten in de muur met een boor van ø6~ø8mm.
6
Boor gaten in de muur.
11
Machine Translated by Google

7
Zet de onderdelen vast met de schroef (K*3).
Plaats de aluminiumlegeringsplaat in onderdeel H.
Let op: Er zitten 3 schroefgaten, waarvan u er maar 2 hoeft vast te draaien.
H
K*3
Bevestig de metalen deurluifel aan de muur.
12
Machine Translated by Google
Ik*4
F
K*2
muur.
2. Bepaal een geschikte positie door rekening te houden met de werkelijke afmetingen van het product
en de deur. Markeer vervolgens de posities van de bevestigingsgaten van onderdeel G op de
1. Bevestig onderdeel (F*2) aan het product.
3. Boor gaten in de muur, plaats de kunststof onderdelen en bevestig het product vervolgens met schroeven
aan de muur.
8
Bevestig de metalen deurluifel aan de muur.
13
Machine Translated by Google

14
Machine Translated by Google

van de hoogst beschikbare kwaliteitscomponenten
De aluminium deurluifels worden vervaardigd
impactkracht van sneeuw en ijs die van een
inches zware, natte sneeuw, of 24 inches lichte
sneeuw. Bovendien kunnen ze niet tegen de
mijl per uur, sneeuwlasten van meer dan 12
niet ontworpen om windstoten van meer dan 30 te weerstaan
Verwijder sneeuw direct tijdens gebruik.
regen, ijzel, sneeuw en wind. Ze zijn echter
draaggrenzen.
bestand zijn tegen normale weersomstandigheden, waaronder
correct en binnen de daarvoor bestemde belasting gebruikt -
op de markt vandaag. Ze zijn ontworpen om
uitstekende prestaties zolang het is geïnstalleerd
bovenste dak of opstapelen. Dit product zal leveren
Sneeuwlasten
15
Machine Translated by Google

QL-40INCH
16
Materiaal
Geïmporteerd naar de VS: SanvenTechnology Ltd.
Model
40*42 inch (1016*1066 mm)
Suite250,9166AnaheimPlace,RanchoCucamonga,CA91730
Aluminiumlegering
Zilver
1ROKEVASTREETEASTWOODNSW2122Australië
Geïmporteerd naar AUS: SIHAOPTYLTD.
deuren/ramen
UKREP:YHCONSULTINGLIMITED. C/OYHConsultingLimitedKantoor147, CenturionHouse,
LondonRoad, Staines-upon-Thames, Surrey, TW184AX
Maximale geschikte breedte voor
ECREP:E-CrossStuGmbH. MainzerLandstr.69,60329FrankfurtamMain.
Schaduwgebied
Adres:Shuangchenglu803nong11hao1602A-1609shi,baoshanqu, shanghai200000CN.
Kleur
Fabrikant: Shanghaiimuxinmuyeyouxiangongsi
27,5 inch/700 mm
PRODUCTPARAMETER
Machine Translated by Google

Machine Translated by Google

Technische ondersteuning en e-
garantiecertificaat www.vevor.com/support
Machine Translated by Google


Machine Translated by Google

MODELL:QL-40INCH
Detta är den ursprungliga instruktionen, läs alla instruktioner noggrant innan
du använder den. VEVOR reserverar sig för en tydlig tolkning av vår
användarmanual. Utseendet på produkten är beroende av den produkt du
fått. Ursäkta oss att vi inte kommer att informera dig igen om det finns någon
teknik eller mjukvaruuppdateringar på vår produkt.
MARKIS I METALLDÖRR
1
Machine Translated by Google

5. Sätt dig inte ihop om du är trött eller påverkad av alkohol, droger
Läs detta material innan du använder denna produkt. Underlåtenhet att göra det kan
Använd försiktighetsåtgärder
7. Reservdelar som skruvar finns tillgängliga.
Försiktighetsåtgärder vid montering
6. Produktens egenskaper gäller för korrekt och fullständigt monterade
2. Denna produkt är inte en leksak. Låt inte barn leka med eller i närheten av detta
skapa faror.
7. Montera på en plan, jämn, hård och slät yta som kan säkert
3. Överskrid inte specificerade viktkapaciteter.
stödja en fullastad metalldörrmarkis.
under monteringen.
8. För ytterligare information om delarna som anges nedan
VARNING:
4. Håll åskådare borta från området under monteringen.
och separera alla delar i ett rent arbetsområde.
6. Använd inte om delar är lösa eller skadade.
1. SIT ELLER STÅ INTE PÅ DETTA FÖREMÅL.
resultera i allvarlig skada.
eller medicinering.
SPARA DENNA MANUAL
1. Montera endast enligt dessa instruktioner. Felaktig montering kan
endast produkter.
punkt.
stöder metalldörrmarkisen.
2. Bär ANSI-godkända skyddsglasögon och kraftiga arbetshandskar
4. Använd endast på en plan, jämn, hård och slät yta som kan säkert
3. Håll monteringsområdet rent och väl upplyst.
sidorna, se monteringsdiagrammet i denna manual. Packa upp
5. Använd endast på avsett sätt.
SÄKERHETSINSTRUKTIONER
2
Machine Translated by Google

3
DELLISTA
Machine Translated by Google

1
1
G
J
C
2
17+3
K
H
D1
1
D1 1
2
8
7
E
1
A
1
F
jag
2
B
Delbild
Serienummer Kvantitet
4
Machine Translated by Google

G*2
F*2
J*2
5
1 Fäst röret.
MONTERINGSTEG
Använd skruv (J*2) för att fästa röret (F*2) och fästdelen (G*2) tillsammans.
Machine Translated by Google

A*7
Sätt i aluminiumplåtarna (A*7) i varandra i pilens riktning.
2
Sätt ihop aluminiumplåtarna.
6
Machine Translated by Google

D2
D1
Sätt in aluminiumplåten (A) i D1 och D2 i pilens riktning.
3
Sätt ihop aluminiumplåtarna.
7
Machine Translated by Google

B
C
Sätt in delarna B och C i aluminiumplåten (A).
4-1
Sätt ihop aluminiumplåtarna.
8
Machine Translated by Google

K
1. Vänd hela produkten; 2. Fäst den med skruvar (K*8).
4-2
Sätt ihop aluminiumplåtarna.
9
Machine Translated by Google

K
E
K
Montera del E i mitten av aluminiumplåten och fixera den med skruvar (K*4).
5
Sätt i aluminiumplåtarna.
10
Machine Translated by Google

I*4
H
rekommenderade mått. Borra sedan hål i väggen med en ø6~ø8mm borr.
Markera först placeringshålen på väggen för del H enligt ovanstående -
Sätt sedan in plastpluggar i hålen. Slutligen, montera del H på väggen med vägg-
golvspik(I*4).
6
Borra hål i väggen.
11
Machine Translated by Google

H
K*3
Lås delarna med skruv (K*3).
Sätt i aluminiumplåten i del H.
Obs: Det finns 3 skruvhål här, och du behöver bara fästa 2 av dem.
7
Installera metalldörrmarkisen på väggen.
12
Machine Translated by Google

K*2
F
I*4
vägg.
3. Borra hål i väggen, sätt i plastkomponenter och använd sedan skruvar för att fästa produkten på
väggen.
2. Bestäm en lämplig position genom att ta hänsyn till de faktiska storlekarna på produkten och
dörren. Markera sedan positionerna för fästhålen för del G på
1. Fäst delen (F*2) på produkten.
8
Installera metalldörrmarkisen på väggen.
13
Machine Translated by Google
14
Machine Translated by Google

korrekt och används inom dess designade belastning -
miles per timme, snölast på mer än 12
inte konstruerad för att tåla vindar som överstiger 30
Ta bort snö omgående under användning.
Dörrtaken i aluminium tillverkas
slagkraften från snö och is som faller från en
tum tung, blöt snö eller 24 tum ljus
snö. Dessutom tål de inte
på marknaden idag. De är designade för att
utmärkt prestanda så länge den är installerad
övre tak eller pålar. Denna produkt kommer att leverera
från komponenter av högsta kvalitet som finns tillgängliga
regn, snö, snö och blåst. Det är de dock
lagergränser.
tål normala väderförhållanden, inklusive
Snöbelastningar
15
Machine Translated by Google

QL-40INCH
16
Adress: Shuangchenglu803nong11hao1602A-1609shi,baoshanqu, shanghai200000CN.
Importerad till AUS:SIHAOPTYLTD.
dörrar/fönster
UKREP:YHCONSULTINGLIMITED. C/OYHConsultingLimitedOffice147, CenturionHouse,
LondonRoad, Staines-upon-Thames, Surrey, TW184AX
Importerad till USA: SanvenTechnologyLtd.
Modell
40*42 tum (1016*1066 mm)
Suite250,9166AnaheimPlace,RanchoCucamonga,CA91730
Aluminiumlegering
Silver
1ROKEVASTREETEASTWOODNSW2122Australien
Tillverkare:Shanghaimuxinmuyeyouxiangongsi
Färg
27,5 tum/700 mm
Material
Maximal lämplig bredd för
ECREP:E-CrossStuGmbH. MainzerLandstr.69,60329FrankfurtamMain.
Skuggningsområde
PRODUKTPARAMETER
Machine Translated by Google

Machine Translated by Google

Teknisk support och e-garanticertifikat
www.vevor.com/support
Machine Translated by Google


Machine Translated by Google

Estassonlasinstruccionesoriginales;leaatentamentetodaslasinstruccionesdelmanualantesdeutilizarlo.
VEVORsereservaelderechodeinterpretarsumanualdeusuario.Laaparienciadelproducto
dependerádelproductoquehayarecibido.Lerogamosquenosdisculpesinoleinformamosdenuevosi
hayactualizacionestecnológicasodesoftwareennuestroproducto.
MODELO:QL40PULGADAS
TOLDOPARAPUERTAMETÁLICA
1
Machine Translated by Google

1.Ensambleúnicamentedeacuerdoconestasinstrucciones.Unmontajeincorrectopuede...
Sóloproductos.
artículo.
6.Noloutilicesilaspiezasestánsueltasodañadas.
1.NOSESIENTANISEPARESOBREESTEARTÍCULO.
provocarlesionesgraves.
omedicación.
GUARDEESTEMANUAL
3.Mantengaeláreadereuniónlimpiaybieniluminada.
páginas,consulteeldiagramademontajedeestemanual.Desenvuelva
5.Úseloúnicamentesegúnloprevisto.
Soporteparaeltoldodepuertademetal.
2.UsegafasdeseguridadaprobadasporANSIyguantesdetrabajoresistentes.
4.Úseloúnicamentesobreunasuperficieplana,nivelada,duraylisaquepueda
Precaucionesdemontaje
6.Lascapacidadesdelproductoseaplicanaproductosensambladoscorrectamenteycompletamente.
2.Esteproductonoesunjuguete.Nopermitaquelosniñosjueguenconélnicercadeél.
5.Nosereúnasiestácansadoobajolainfluenciadelalcoholodrogas.
Precaucionesdeuso
Leaestematerialantesdeusaresteproducto.Delocontrario,puede...
7.Haydisponiblesrepuestoscomotornillos.
soportaruntoldodepuertademetalcompletamentecargado.
Duranteelmontaje.
8.Paraobtenerinformaciónadicionalsobrelaspiezasenumeradasacontinuación,
ADVERTENCIA:
4.Mantengaalostranseúntesfueradeláreaduranteelmontaje.
yseparetodaslaspiezasenunáreadetrabajolimpia.
crearpeligros.
7.Montarsobreunasuperficieplana,nivelada,duraylisacapazdesoportarcondicionesdeseguridad.
3.Noexcedalascapacidadesdepesoespecificadas.
INSTRUCCIONESDESEGURIDAD
2
Machine Translated by Google

3
LISTADEPIEZAS
Machine Translated by Google

1
H
I
D1
D1
2
1
1
1
GRAMO
K
do
2
17+3
1
F
2
B
1
Yo
7
mi
8
A
Imagenparcial
NúmerodeserieCantidad
4
Machine Translated by Google

G*2
F*2
J*2
5
1Fijeeltubo.
PASODEMONTAJE
Utiliceeltornillo(J*2)parafijareltubo(F*2)ylapiezadefijación(G*2)juntos.
Machine Translated by Google

A*7
Insertelasláminasdealeacióndealuminio(A*7)unadentrodeotraenladireccióndelaflecha.
2
Ensamblarlasláminasdealeacióndealuminio.
6
Machine Translated by Google
D2
D1
Insertelaláminadealeacióndealuminio(A)enD1yD2enladireccióndelaflecha.
3
Ensamblarlasláminasdealeacióndealuminio.
7
Machine Translated by Google

do
B
InsertelaspiezasByCenlaláminadealeacióndealuminio(A).
41
Ensamblarlasláminasdealeacióndealuminio.
8
Machine Translated by Google

K
1.Délavueltaatodoelproducto;2.Fíjelocontornillos(K*8).
42
Ensamblarlasláminasdealeacióndealuminio.
9
Machine Translated by Google

K
mi
K
InstalelaparteEenlaposiciónmediadelaláminadealeacióndealuminioyfíjelacon
tornillos(K*4).
5
Insertelasláminasdealeacióndealuminio.
10
Machine Translated by Google

Yo*4
H
Dimensionesrecomendadas.Luego,taladreagujerosenlaparedconunabrocadeø6~ø8mm.
Enprimerlugar,marquelosagujerosdeposicionamientoenlaparedparalapiezaHdeacuerdoconloanterior.
Acontinuación,insertelostaponesdeplásticoenlosagujeros.Finalmente,fijelapiezaHalaparedconclavosde
paredasuelo(I*4).
6
Perforaragujerosenlapared.
11
Machine Translated by Google

K*3
H
Nota:Aquíhay3orificiosparatornillosysoloesnecesariofijar2deellos.
InsertelaláminadealeacióndealuminioenlapiezaH.
Bloqueelaspiezasconeltornillo(K*3).
7
Instaleeltoldodepuertademetalenlapared.
12
Machine Translated by Google
Yo*4
F
K*2
2.Determineunaposiciónadecuadateniendoencuentalasdimensionesrealesdelproductoy
lapuerta.Acontinuación,marquelaposicióndelosorificiosdefijacióndelapiezaGenel...
3.Taladreagujerosenlapared,inserteloscomponentesdeplásticoyluegousetornillosparafijarel
productoalapared.
muro.
1.Coloquelapieza(F*2)enelproducto.
8
Instaleeltoldodepuertademetalenlapared.
13
Machine Translated by Google

14
Machine Translated by Google

techosuperioroapilamiento.Esteproductoentregará
Lasmarquesinasdepuertasdealuminiosefabrican
fuerzadeimpactodelanieveyelhieloquecaendeun
pulgadasdenievepesadayhúmeda,o24pulgadasdenieveligera
nieve.Además,nopuedensoportarla
millasporhora,cargasdenievedemásde12
Nodiseñadoparasoportarvientossuperioresa30
Retirelanieverápidamenteduranteeluso.
lluvia,aguanieve,nieveyviento.Sinembargo,son
límitesderodamientos.
soportarcondicionesclimáticasnormales,incluidas
correctamenteyutilizadodentrodesucargadiseñada
Excelenterendimientosiemprequeestéinstalado
enelmercadohoyendía.Estándiseñadospara
Deloscomponentesdemásaltacalidaddisponibles
Cargasdenieve
15
Machine Translated by Google

QL40PULGADAS
16
27,5pulgadas/700mm
ImportadoaEE.UU.:SanvenTechnologyLtd.
Modelo
aleacióndealuminio
40x42pulgadas(1016x1066mm)
1ROKEVASTREET,EASTWOOD,NSW2122,Australia
Plata
Suite250,9166AnaheimPlace,RanchoCucamonga,CA91730
ImportadoaAUS:SIHAOPTYLTD.
puertas/ventanas
REPRESENTANTEDELREINOUNIDO:YHCONSULTINGLIMITED.C/OYHConsultingLimited.
Oficina:147,CenturionHouse,LondonRoad,StainesuponThames,Surrey,TW184AX
Anchomáximoadecuadopara
ECREP:ECrossStuGmbH.MainzerLandstr.69,60329FrankfurtamMain.
Áreadesombreado
Dirección:Shuangchenglu803nong11hao1602A1609shi,baoshanqu,shanghai200000CN.
Fabricante:Shanghaimuxinmuyeyouxiangongsi
Color
Material
PARÁMETRODELPRODUCTO
Machine Translated by Google

Machine Translated by Google

Soportetécnicoycertificadodegarantía
electrónicawww.vevor.com/support
Machine Translated by Google