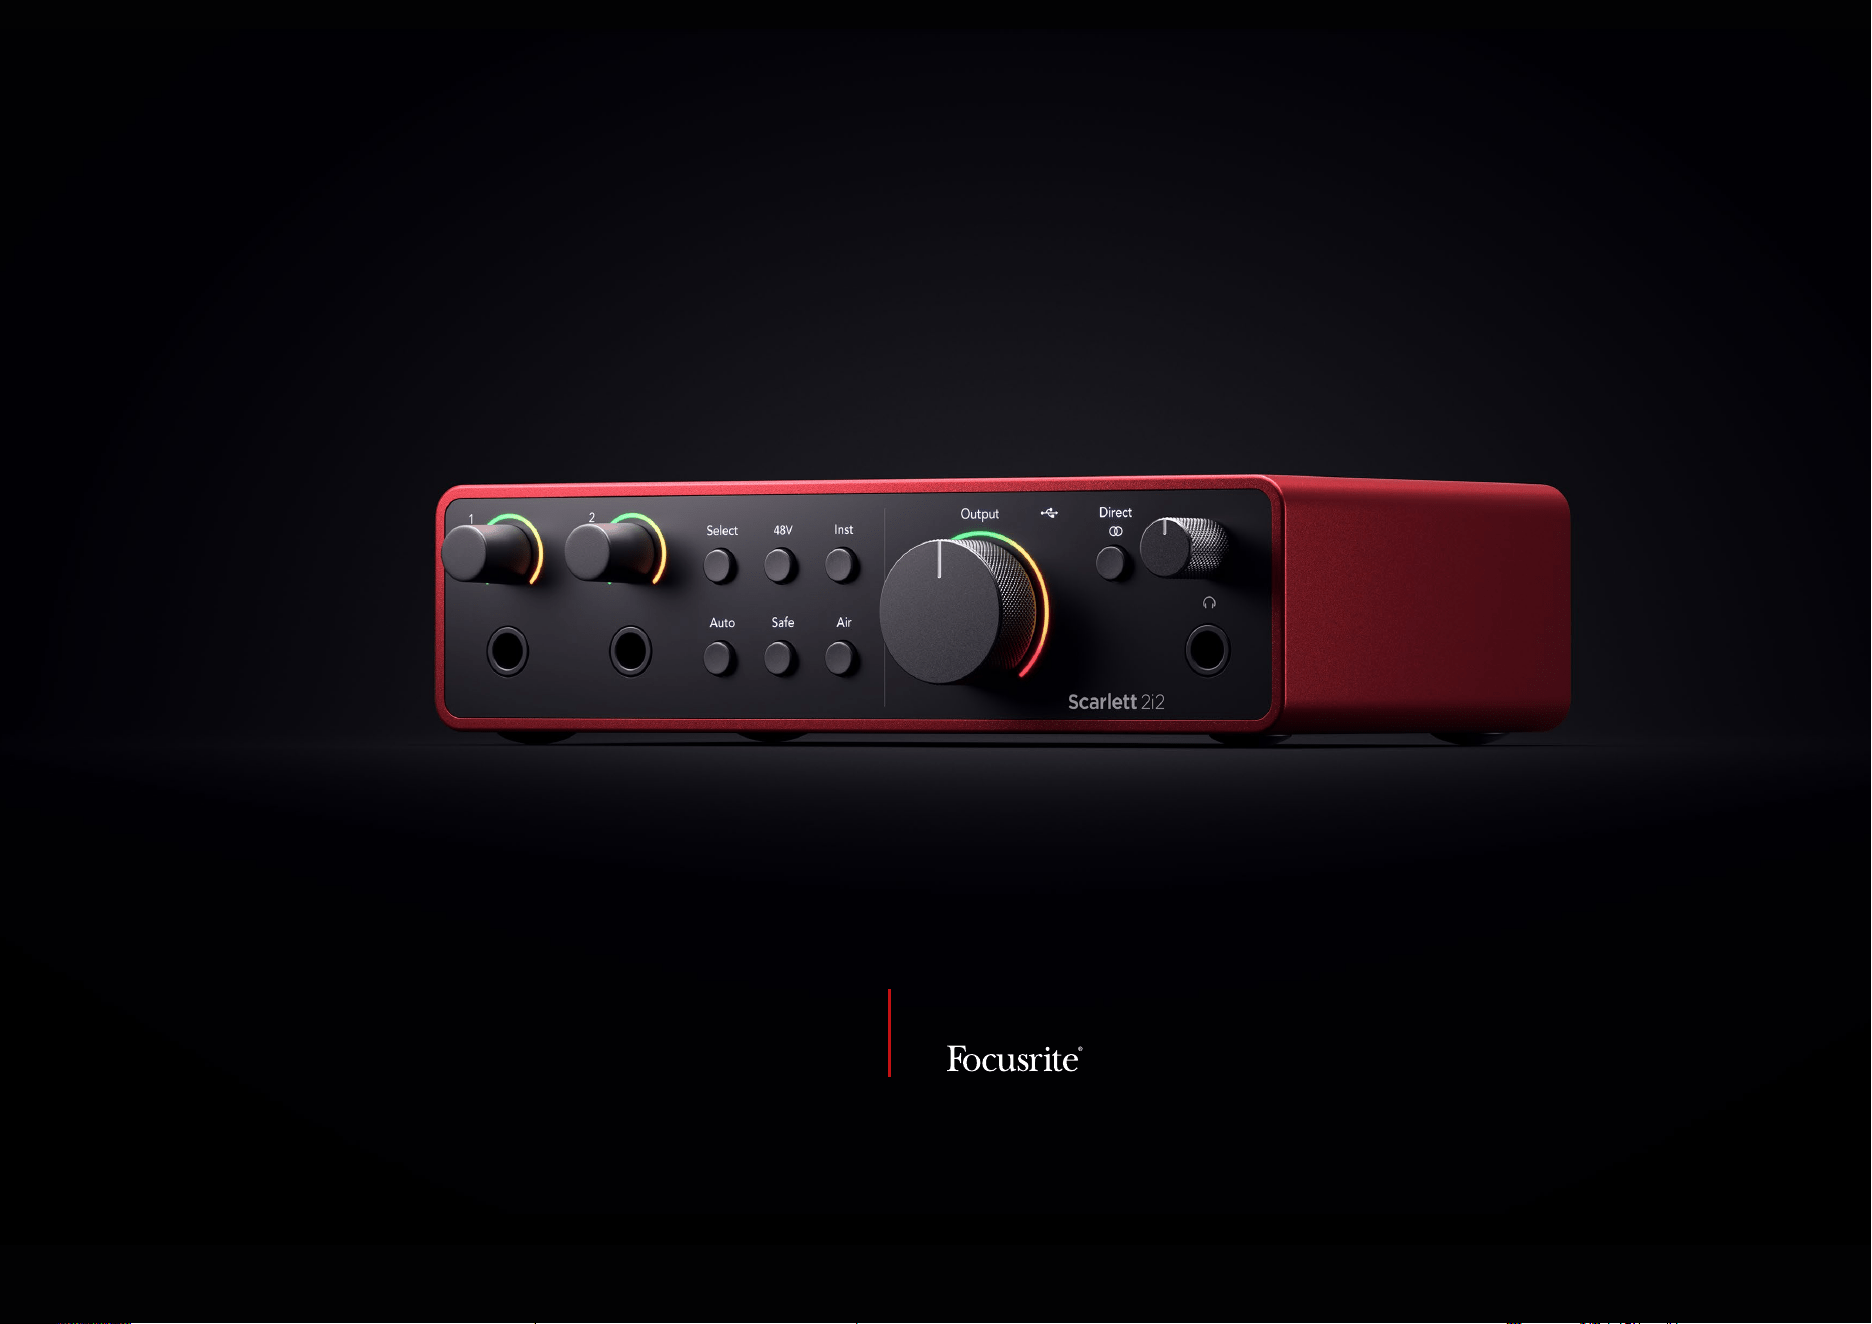
Scarlett 2i2 4
th
Gen
User Guide
The artist’s 2-in, 2-out interface
Scarlett 2i2 4th GenUser Guide
Version 4.0

Table of Contents
Overview ..................................................................................................................................................................................................................... 4
Introduction .......................................................................................................................................................................................................... 4
What's in the Box? .................................................................................................................................................................................................... 4
System Requirements ................................................................................................................................................................................................ 4
Soware System Requirements ............................................................................................................................................................................. 4
Getting Started ............................................................................................................................................................................................................... 5
Powering On your Scarlett ........................................................................................................................................................................................... 5
Easy Start ............................................................................................................................................................................................................. 5
Windows ...................................................................................................................................................................................................... 5
Mac ........................................................................................................................................................................................................... 6
All Users ...................................................................................................................................................................................................... 6
What isFocusrite Control 2? ......................................................................................................................................................................................... 7
Installing Focusrite Control 2 ................................................................................................................................................................................ 7
Manual Registration .................................................................................................................................................................................................. 8
Disabling Easy Start .......................................................................................................................................................................................... 8
Hardware Features ........................................................................................................................................................................................................... 9
Front Panel In Depth ................................................................................................................................................................................................ 11
Setting Preamp Input Gain .................................................................................................................................................................................. 11
Select Button ................................................................................................................................................................................................ 13
48V Button (Phantom Power) ............................................................................................................................................................................... 14
Inst (Instrument) Button and Line Level Inputs ............................................................................................................................................................ 15
Auto Gain .................................................................................................................................................................................................... 15
Multichannel Auto Gain ..................................................................................................................................................................................... 17
Clip Safe Button ............................................................................................................................................................................................. 17
Air Modes .................................................................................................................................................................................................... 18
Output Control and Level Meter ............................................................................................................................................................................ 19
Direct Monitor Button ....................................................................................................................................................................................... 19
Headphone Output ......................................................................................................................................................................................... 21
Back Panel In Depth ................................................................................................................................................................................................. 22
USB Connections ............................................................................................................................................................................................ 22
Speaker Outputs ............................................................................................................................................................................................ 22
Microphone Inputs .......................................................................................................................................................................................... 22
DAW (Recording Soware) Setup ........................................................................................................................................................................................... 23
Logic and GarageBand ........................................................................................................................................................................................ 24
Ableton Live ...................................................................................................................................................................................................... 25
Pro Tools ......................................................................................................................................................................................................... 28
Reaper ............................................................................................................................................................................................................ 29
FL Studio ......................................................................................................................................................................................................... 31
Cubase ............................................................................................................................................................................................................ 32
Examples of Use ............................................................................................................................................................................................................. 34
Connecting Inputs and Outputs .................................................................................................................................................................................... 34
Connecting Line-Level Devices ..................................................................................................................................................................................... 35
Scarlett 2i2 4th Gen User Guide
2

Loopback ............................................................................................................................................................................................................ 36
Record your Direct Monitor Mix using Loopback ........................................................................................................................................................... 36
Standalone Mode .................................................................................................................................................................................................... 36
Focusrite Control 2 .......................................................................................................................................................................................................... 37
Using Presets in Focusrite Control 2 ................................................................................................................................................................................ 37
Saving a Preset .............................................................................................................................................................................................. 37
Loading a Preset ............................................................................................................................................................................................. 38
Renaming a Preset .......................................................................................................................................................................................... 38
Focusrite Control 2 Preferences .................................................................................................................................................................................... 40
Device tab ................................................................................................................................................................................................... 40
Sample rate tab ............................................................................................................................................................................................. 40
Application tab .............................................................................................................................................................................................. 40
Updating ..................................................................................................................................................................................................................... 41
Updating Focusrite Control 2 ....................................................................................................................................................................................... 41
Updating your Scarlett .............................................................................................................................................................................................. 42
Specifications ............................................................................................................................................................................................................... 43
Performance Specifications ........................................................................................................................................................................................ 43
Physical and Electrical Characteristics ............................................................................................................................................................................. 44
Channel Order ....................................................................................................................................................................................................... 44
Notices ....................................................................................................................................................................................................................... 45
Troubleshooting ..................................................................................................................................................................................................... 45
Copyright & Legal Notices ........................................................................................................................................................................................... 45
Credits ....................................................................................................................................................................................................................... 46
Scarlett 2i2 4th Gen User Guide
3

Overview
Introduction
Welcome to the Scarlett 2i2 4th generation.
We've designed the Scarlett 2i2 for the artist who never stops creating. Get studio-quality sound
wherever you are with the latest generation of Scarlett:
•
Make the most of any mic or guitar with +69dBof gain on each input.
•
Set your levels in seconds, and never lose a great take again with Auto Gain and Clip
Safe.
•
Re-engineered Air mode with Presence and Harmonic Drive.
•
Remote control your preamps using our Focusrite Control 2 soware.
•
Record straight out of the box with Easy Start and a complete suite of studio soware
included.
What's in the Box?
The box for your Scarlett 2i2 includes:
•
Scarlett 2i2
•
USB-C to A cable
•
Getting Started Information (printed inside the box lid)
•
Important Safety Information sheet
System Requirements
The easiest way to check your computer’s operating system (OS) is compatible with your Scarlett
2i2 is to use our Help Centre’s compatibility articles:
Focusrite Help Centre: Compatibility
As new OS versions become available, you can check for further compatibility information by
searching our Help Centre at:
support.focusrite.com
Soware System Requirements
To checkFocusrite Control 2is supported on your operating system (OS) please use our Help
Centre’s compatibility articles:
Focusrite Help Centre: Compatibility
As newFocusrite Control 2or OS versions become available, you can check compatibility
information by searching our Help Centre at:
support.focusrite.com
Scarlett 2i2 4th Gen User Guide
4
Getting Started
Powering On your Scarlett
To power on yourScarlett 2i2, connect a USB cable from your computer to the USB port on the
back panel.
For a few seconds, the Scarlett goes through its start-up procedure, then the USB icon lights
green.
Important
If your Scarlett powers on but isn't recognised by your computer, the USB icon
lights white. If this happens:
•
Make sure you have installedFocusrite Control 2on your computer
•
Check your Scarlett's USB cable is connected to the correct port (USB) on the
back of the Scarlett.
•
Test a dierent USB port on your computer.
•
Test a dierent USB cable.
If the USB icon flashes red, your Scarlett is not getting enough power.
To power on your Scarlett 2i2 without a computer, see Standalone Mode [36].
Easy Start
Easy Start gives you a step-by-step guide to setting up your Scarlett and creates personalised
tutorials based on how you plan to use your Scarlett. This online tool also guides you through
your Scarlett’s registration process and accessing the soware bundle.
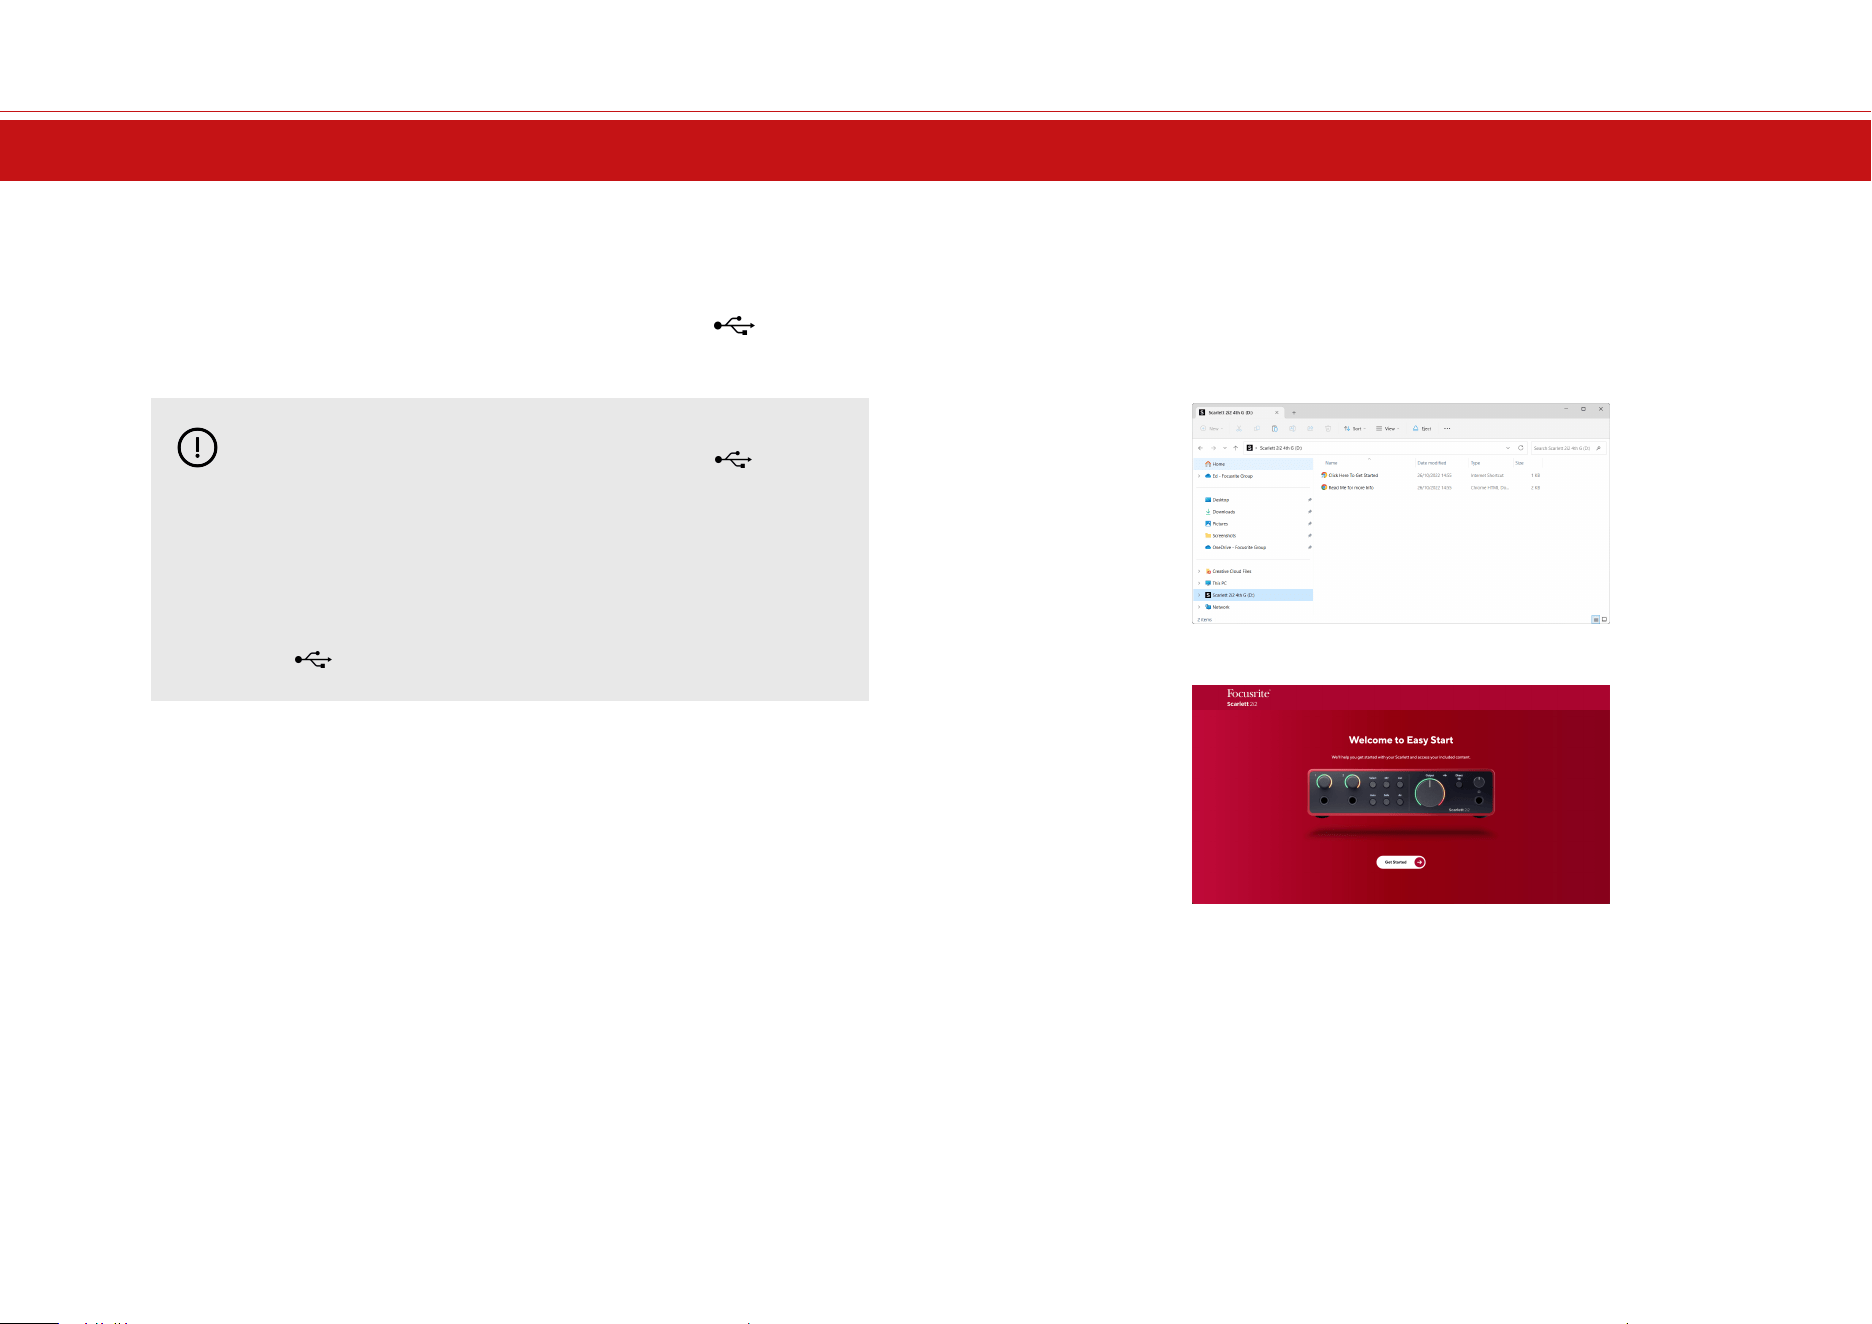
On both Windows and Mac computers, when you connect your Scarlett to your computer, it first
appears as a Mass Storage Device, like a USB drive. Open the drive and double click ‘Click Here To
Get Started.url’. Click ‘Get Started’ to open Easy Start in your web browser.
Aer you’ve opened Easy Start, please follow the step-by-step guide, to install and use your
Scarlett.
Windows
Aer you connect your Scarlett 2i2 to your computer, a device appears in File Explorer called
Scarlett 2i2 4th Gen, this allows you to access Easy Start.
To access Easy Start:
1. Open File Explorer.
2. Click on Scarlett 2i2 4th Gen (D:). The letter may be dierent.
3. Double-clickClick Here to Get Started. This redirects you to the Focusrite website,
where we recommend you register your device:
4. ClickGet Started, and we'll take you through a step-by-step setup guide based on how
you want to use your Scarlett.
During Easy Start, you'll install Focusrite Control 2 . Aer you install and openFocusrite Control
2, click 'UpdateScarlett 2i2'. Do not disconnect your Scarlett whileFocusrite Control 2 updates it.
Aer theFocusrite Control 2 update is complete, the Scarlett no longer appears as a Mass Storage
Device on your computer.
Your operating system should change the computer’s default audio inputs and outputs to the
Scarlett.
To verify this, right-click the speaker icon on the Windows taskbar, and make sure Scarlett is your
Sound output.
Scarlett 2i2 4th Gen User Guide
5
Mac
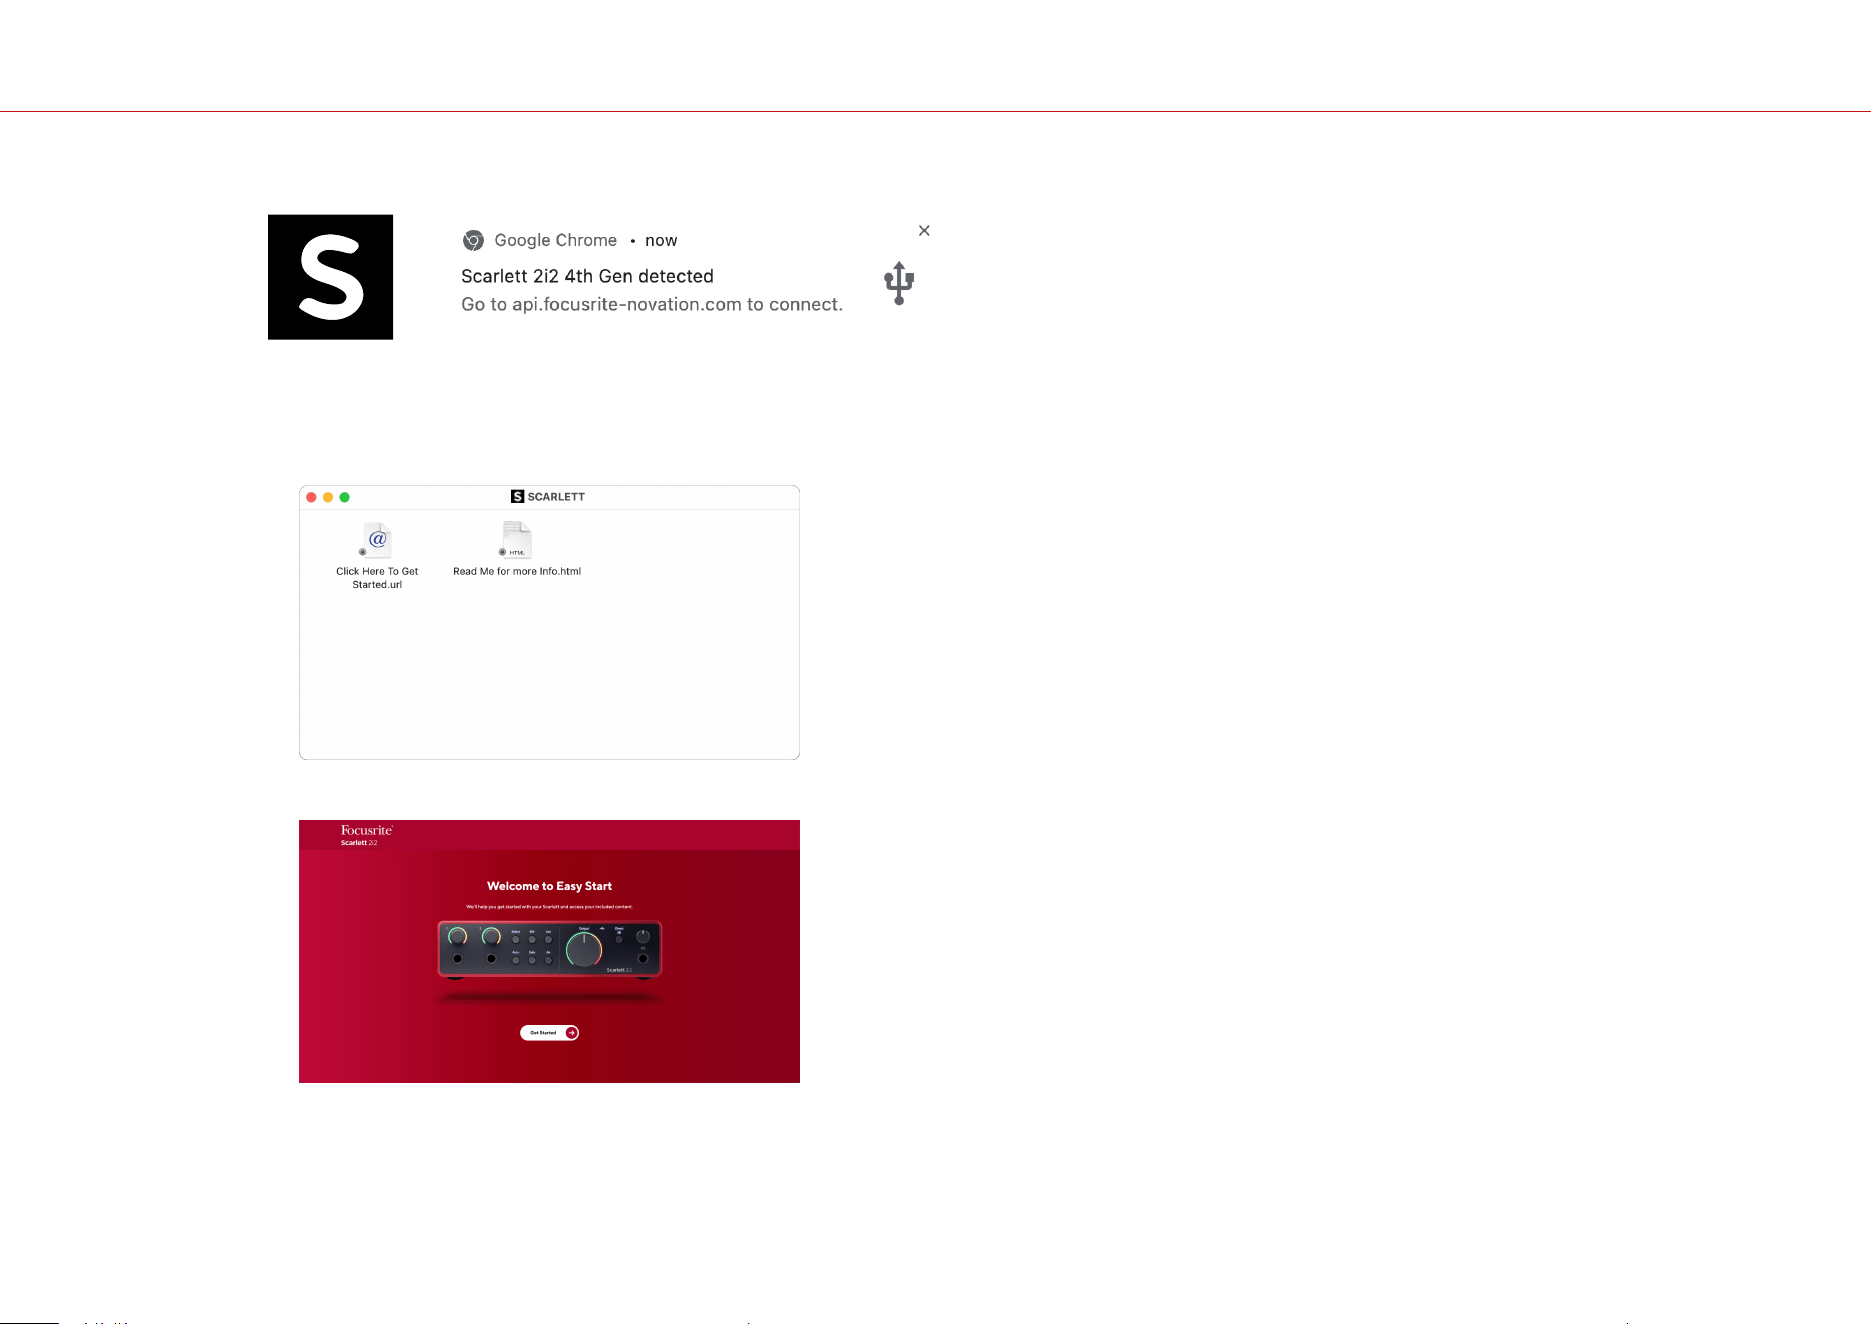
Aer you connect your Scarlett 2i2 to your computer, a Scarlett icon appears on the desktop or, if
you use Chrome, you'll see a pop-up:
Scarlett Easy Start icon: Double click and start from step 1
below.
Chrome pop-up: Click and start from step 2 below.
To access Easy Start:
1. Double-click on the icon to open the Finder window shown below:
2. Double-clickClick Here to Get Started. This redirects you to the Focusrite website,
where we recommend you register your device:
3. ClickGet Started, and we'll take you through a step-by-step setup guide based on how
you want to use your Scarlett.
During Easy Start, you'll install Focusrite Control 2 . Aer you install and openFocusrite Control
2, click 'UpdateScarlett 2i2'. Do not disconnect your Scarlett whileFocusrite Control 2 updates it.
Aer theFocusrite Control 2 update is complete, the Scarlett no longer appears as a Mass Storage
Device on your computer.
Your operating system should change the computer’s default audio inputs and outputs to the
Scarlett.
To verify this, go to System Settings > Sound, and ensure the input and output are set toScarlett
2i2.
All Users
The second file - 'More Info and FAQs' - is also available during the setup process. This file
contains some additional information about Easy Start, which you may find helpful if you have
any issues with the setup.
Once registered, you have immediate access to the following resources:
•
Focusrite Control 2 (Mac and Windows versions available) - see note below.
•
Multi-language User Guides - also always available from downloads.focusrite.com.
•
Licence codes and links for the optional bundled soware in your Focusrite account. To
find out what bundled soware is included withScarlett 2i2, please visit our website:
focusrite.com/scarlett.
Scarlett 2i2 4th Gen User Guide
6
What isFocusrite Control 2?
Focusrite Control 2is the soware application you use to control yourScarlettinterface.
The Focusrite Control 2 icon
We occasionally update your Scarlett 2i2's firmware with new features and improvements, to
make sure you are getting the most from your Scarlett. Your Scarlett 2i2 is updated through
Focusrite Control 2.
Depending on your modelFocusrite Control 2allows you to control various features of
yourScarlettfrom your computer.
Note
Focusrite Control 2 is compatible with most major screen reader soware, allowing you
to control the features on your Scarlett.
Installing Focusrite Control 2
You can install Focusrite Control 2 on Windows and Mac. To download and install Focusrite
Control 2:
1. Go to the Focusrite downloads website:
focusrite.com/downloads
2. Find your Scarlett on the Downloads website.
3. Download Focusrite Control 2 for your operating system (Windows or Mac).
4. Open the Downloads folder on your computer and double-click the Focusrite Control
2 installer.
5. Follow the on-screen instructions to install Focusrite Control 2.
6. If it’s not already, connect your Scarlett interface to your computer with the USB cable.
7. Open Focusrite Control 2 and it detects your Scarlett automatically.
Note
On Windows, installingFocusrite Control 2also installs the driver. You can
downloadFocusrite Control 2at any time, even without registering from
downloads.focusrite.com. On macOS, you don't need a driver, you only need to install
Focusrite Control 2.
Scarlett 2i2 4th Gen User Guide
7
Manual Registration
If you decide to register your Scarlett at a later date, you can at: customer.focusrite.com/register
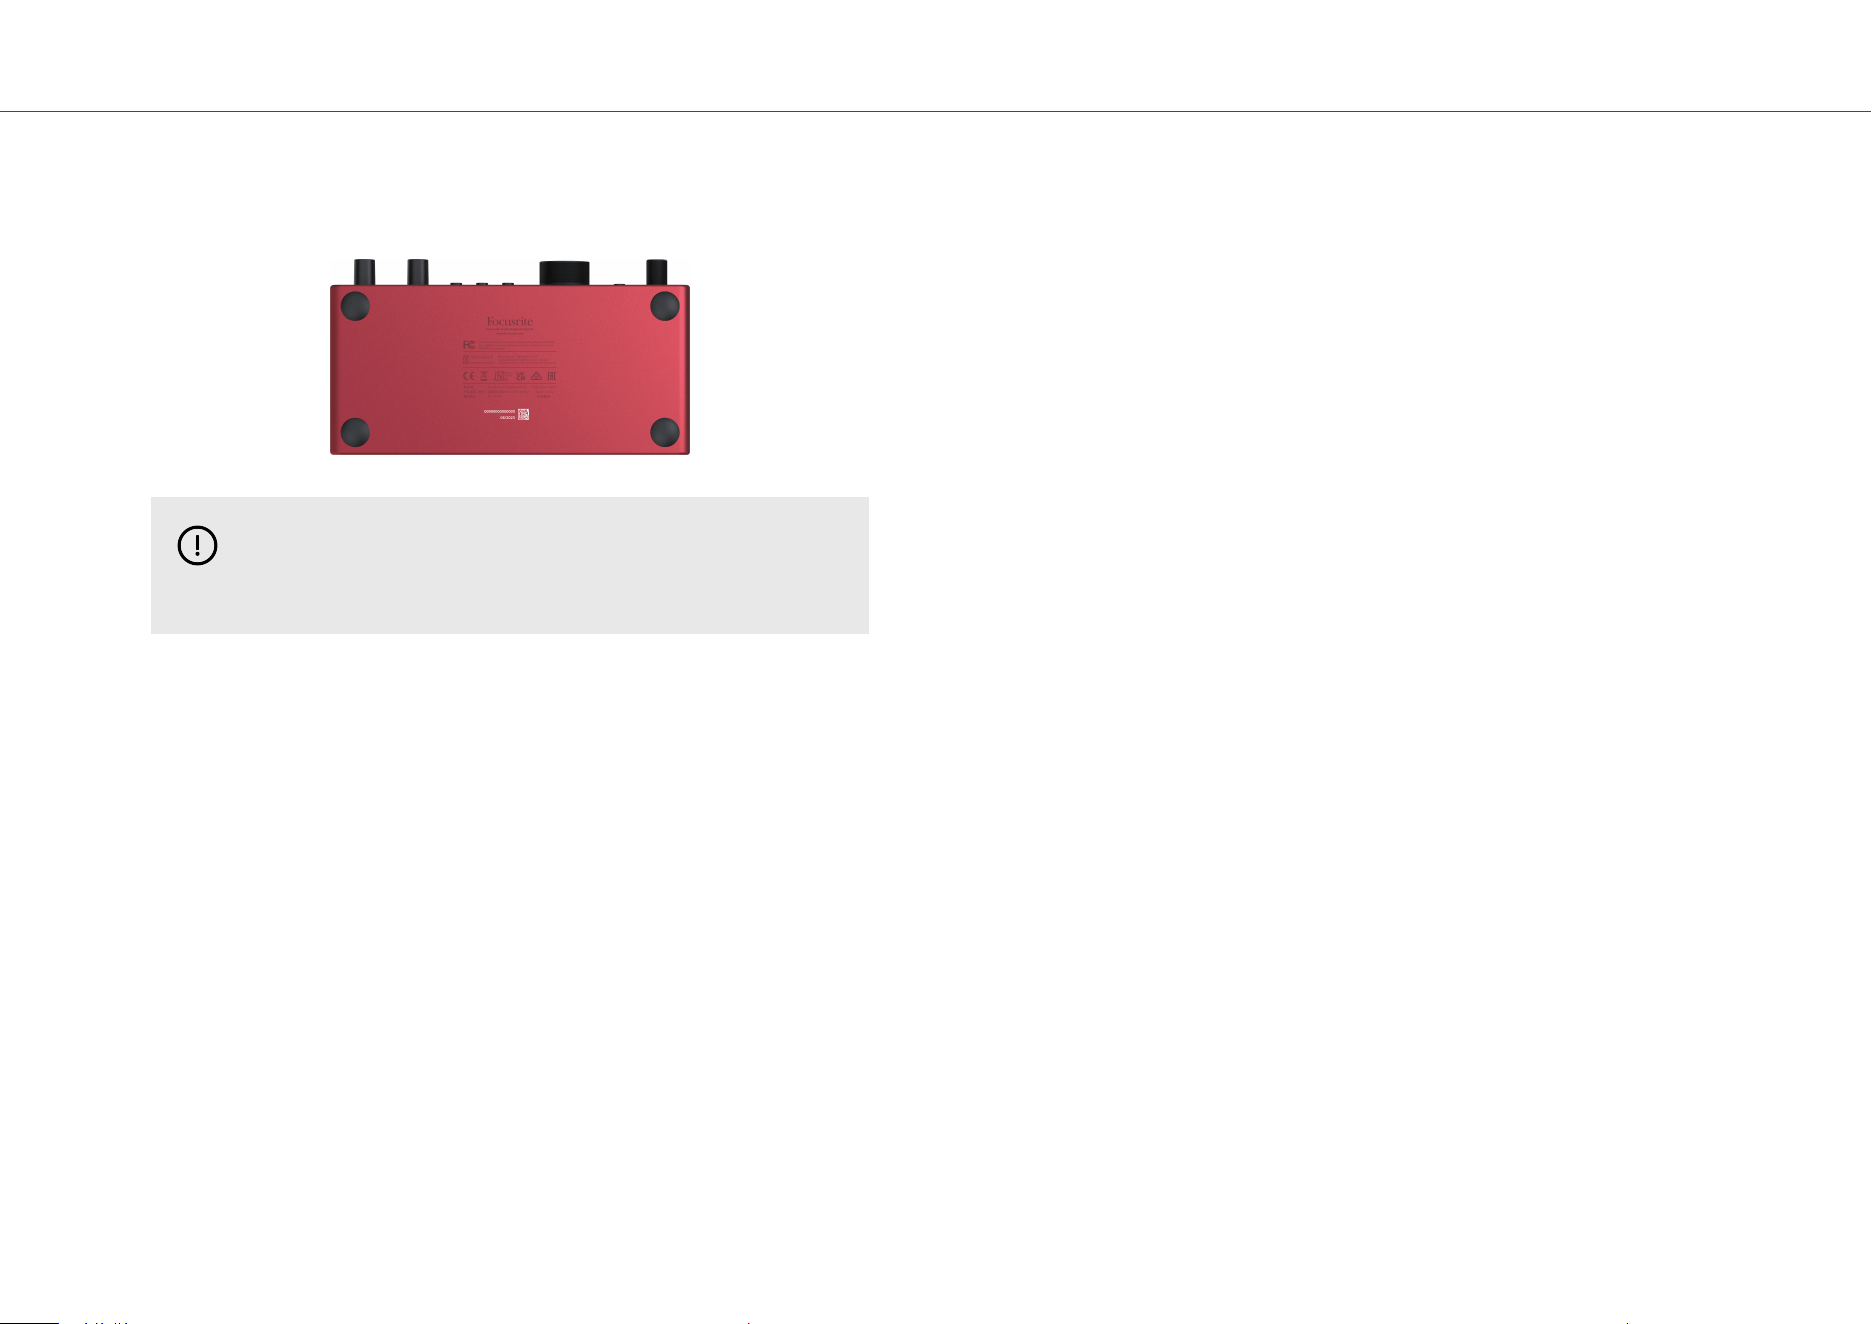
You need to enter the Serial Number manually: you can find this number on the interface's base
(the white number below) or the barcode label on the gibox.
Important
Make sure you download and installFocusrite Control 2. Opening Focusrite Control 2
disables Easy Start, updates your Scarlett 2i2 's firmware, and unlocks your Scarlett
2i2's full feature set.
In Easy Start mode, the interface functions at up to 48 kHz sample rate; once you installFocusrite
Control 2, you can work at sample rates up to 192 kHz.
If you don't installFocusrite Control 2immediately, you can download it at any time from:
downloads.focusrite.com
Disabling Easy Start
Aer you've been through Easy Start, installed and opened Focusrite Control 2, your Scarlett is no
longer in Easy Start mode.
If yourScarlett 2i2is still in Easy Start mode, or you have chosen not to install Focusrite Control 2
to disable Easy Start Mode:
1. Turn o yourScarlett 2i2.
2. Press and hold the 48V button.
3. Keeping the 48V button held, power on yourScarlett 2i2.
4. Wait for the front panel to light up, then release the 48V button.
5. Restart (power o and power on) yourScarlett 2i2.
Your Scarlett powers on with Easy Start disabled.
Scarlett 2i2 4th Gen User Guide
8
Hardware Features
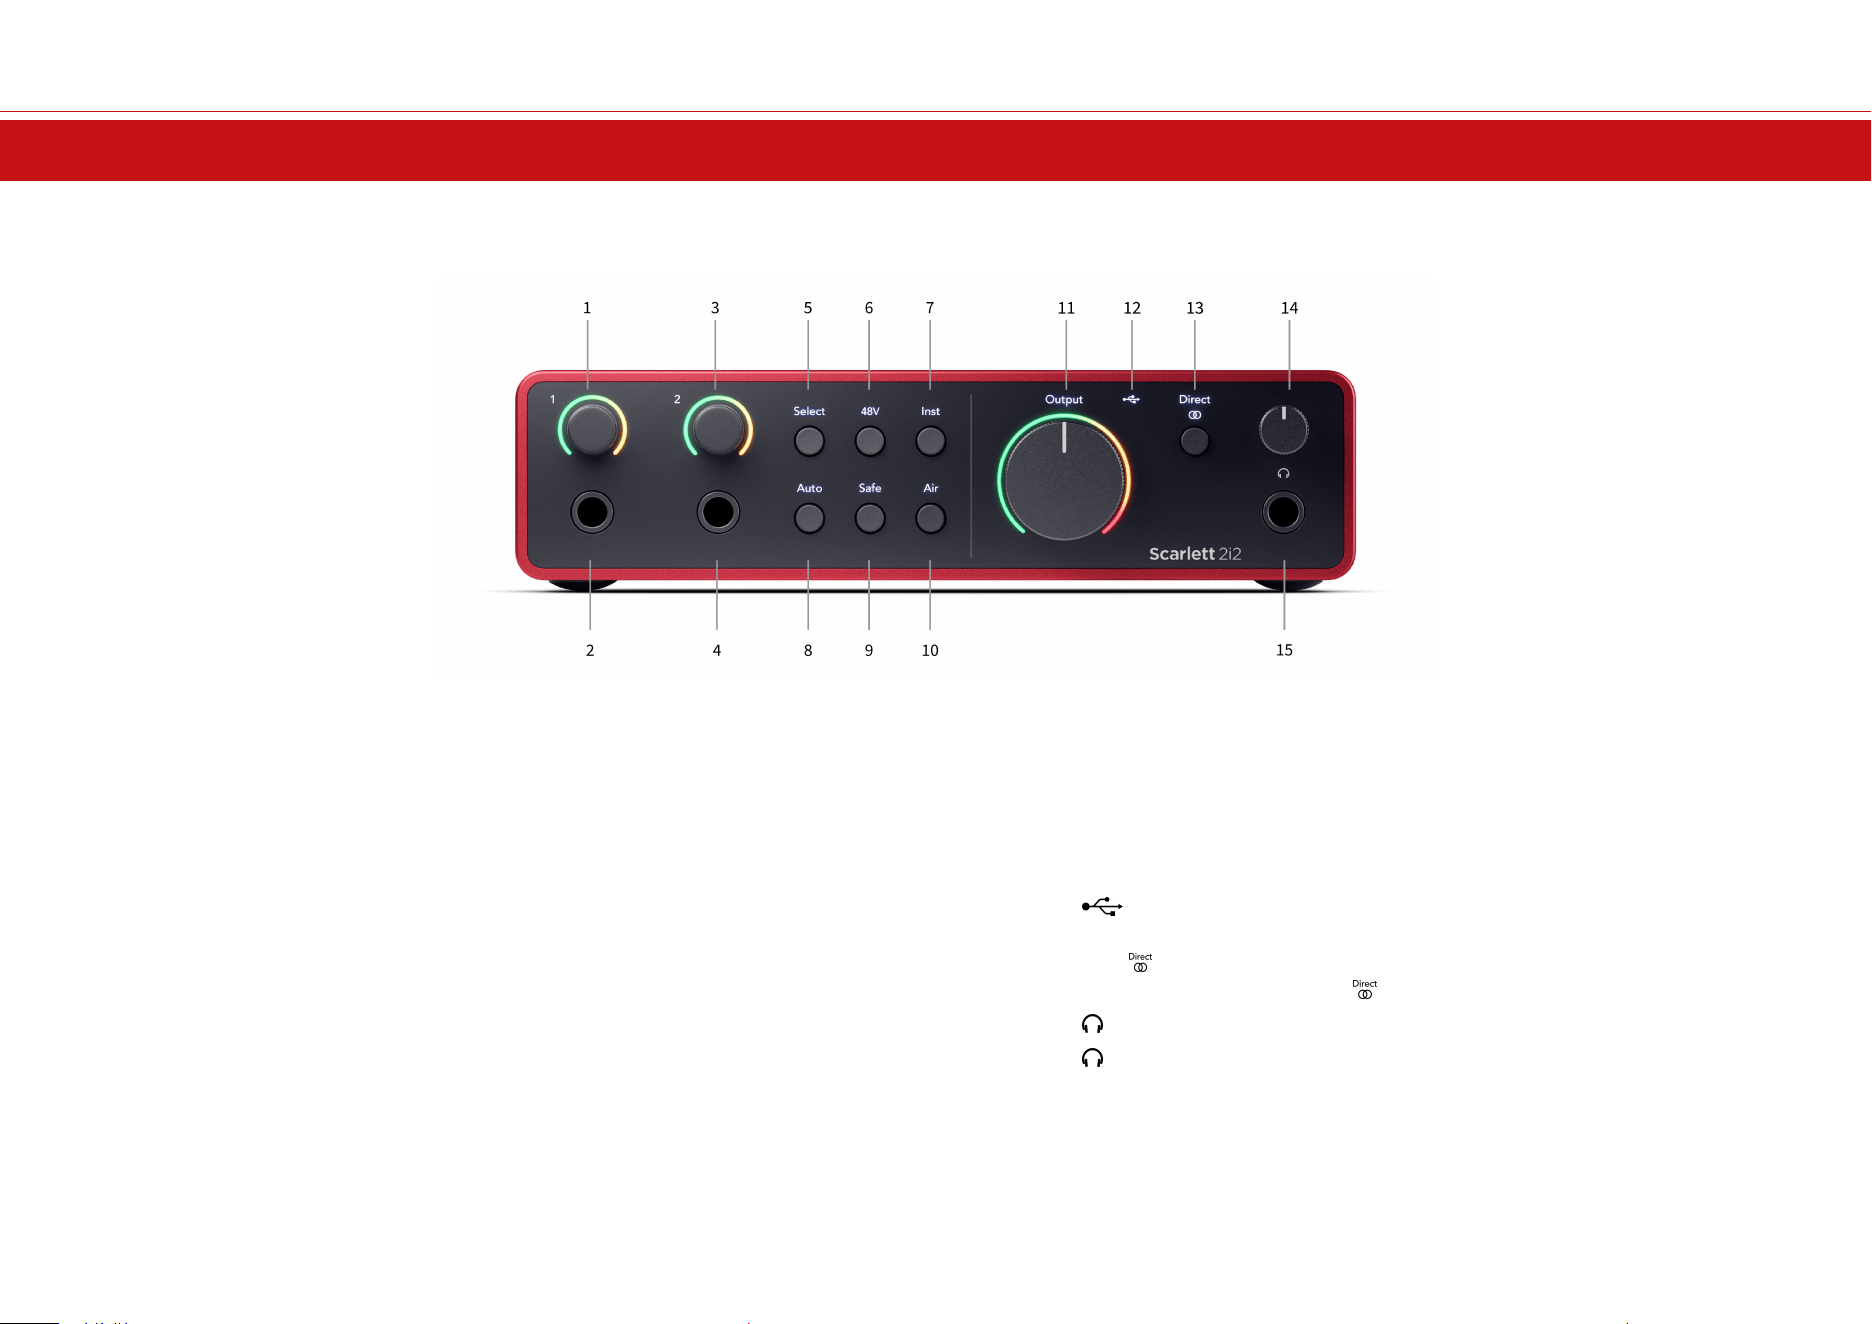
Front Panel
1. Input 1 Gain Control and Gain Halo - The Gain control sets the input level and the Gain
Halo shows you the input and preamp gain levels for either the jack or XLR Mic input 1.
2. Input 1 Neutrik® 6.35mm (1/4”) jack socket - Accepts both unbalanced mono (TS) and
balanced Mono (TRS) jack cables at line or instrument-level. Connecting a cable here
disables the corresponding XLR input.
3. Input 2 Gain Control and Gain Halo - The Gain control sets the input level and the Gain
Halo shows you the input and preamp gain levels for either the jack or XLR Mic input 2.
4. Input 2 Neutrik® 6.35mm (1/4”) jack socket - Accepts both unbalanced mono (TS) and
balanced Mono (TRS) jack cables at line or instrument-level. Connecting a cable here
disables the corresponding XLR input.
5. Select button - Press to move the selection to the next preamp. The other buttons
change to control the input you select. The currently selected channel's number lights
green.
6. 48V button - Press to turn on 48V phantom power at the XLR mic input to power
condenser microphones.
When 48V is on, theScarlett 2i2 applies 48V phantom power to both inputs.
7. Inst button - Press to toggle the selected 6.35mm (1/4") input between Line or
Instrument level.
8. Auto button - Press to start the Auto Gain feature (see Auto Gain [15]).
9. Safe button - Press to turn on the Clip Safe feature for your input (see Safe [17]).
10. Air button - Press to turn on AIR mode (see AIR [18]).
11. Main Speaker Output Control and Output Level meter - Control the level going to
Outputs R and L, the meter shows you the level being sent out.
12. USB LED - Lights green when the interface is recognised by your computer, white
if it is connected but not recognised and o if it is not connected.
13. Direct Monitor Button - Press to toggle between three settings, O (white), On
Mono (Direct green), and On Stereo ( green).
14. Headphone Level Control - Control the level sent to your headphones.
15. Headphone Output Socket - Connect your headphones here using a TRS 6.35mm
(1/4") jack connector.
Scarlett 2i2 4th Gen User Guide
9
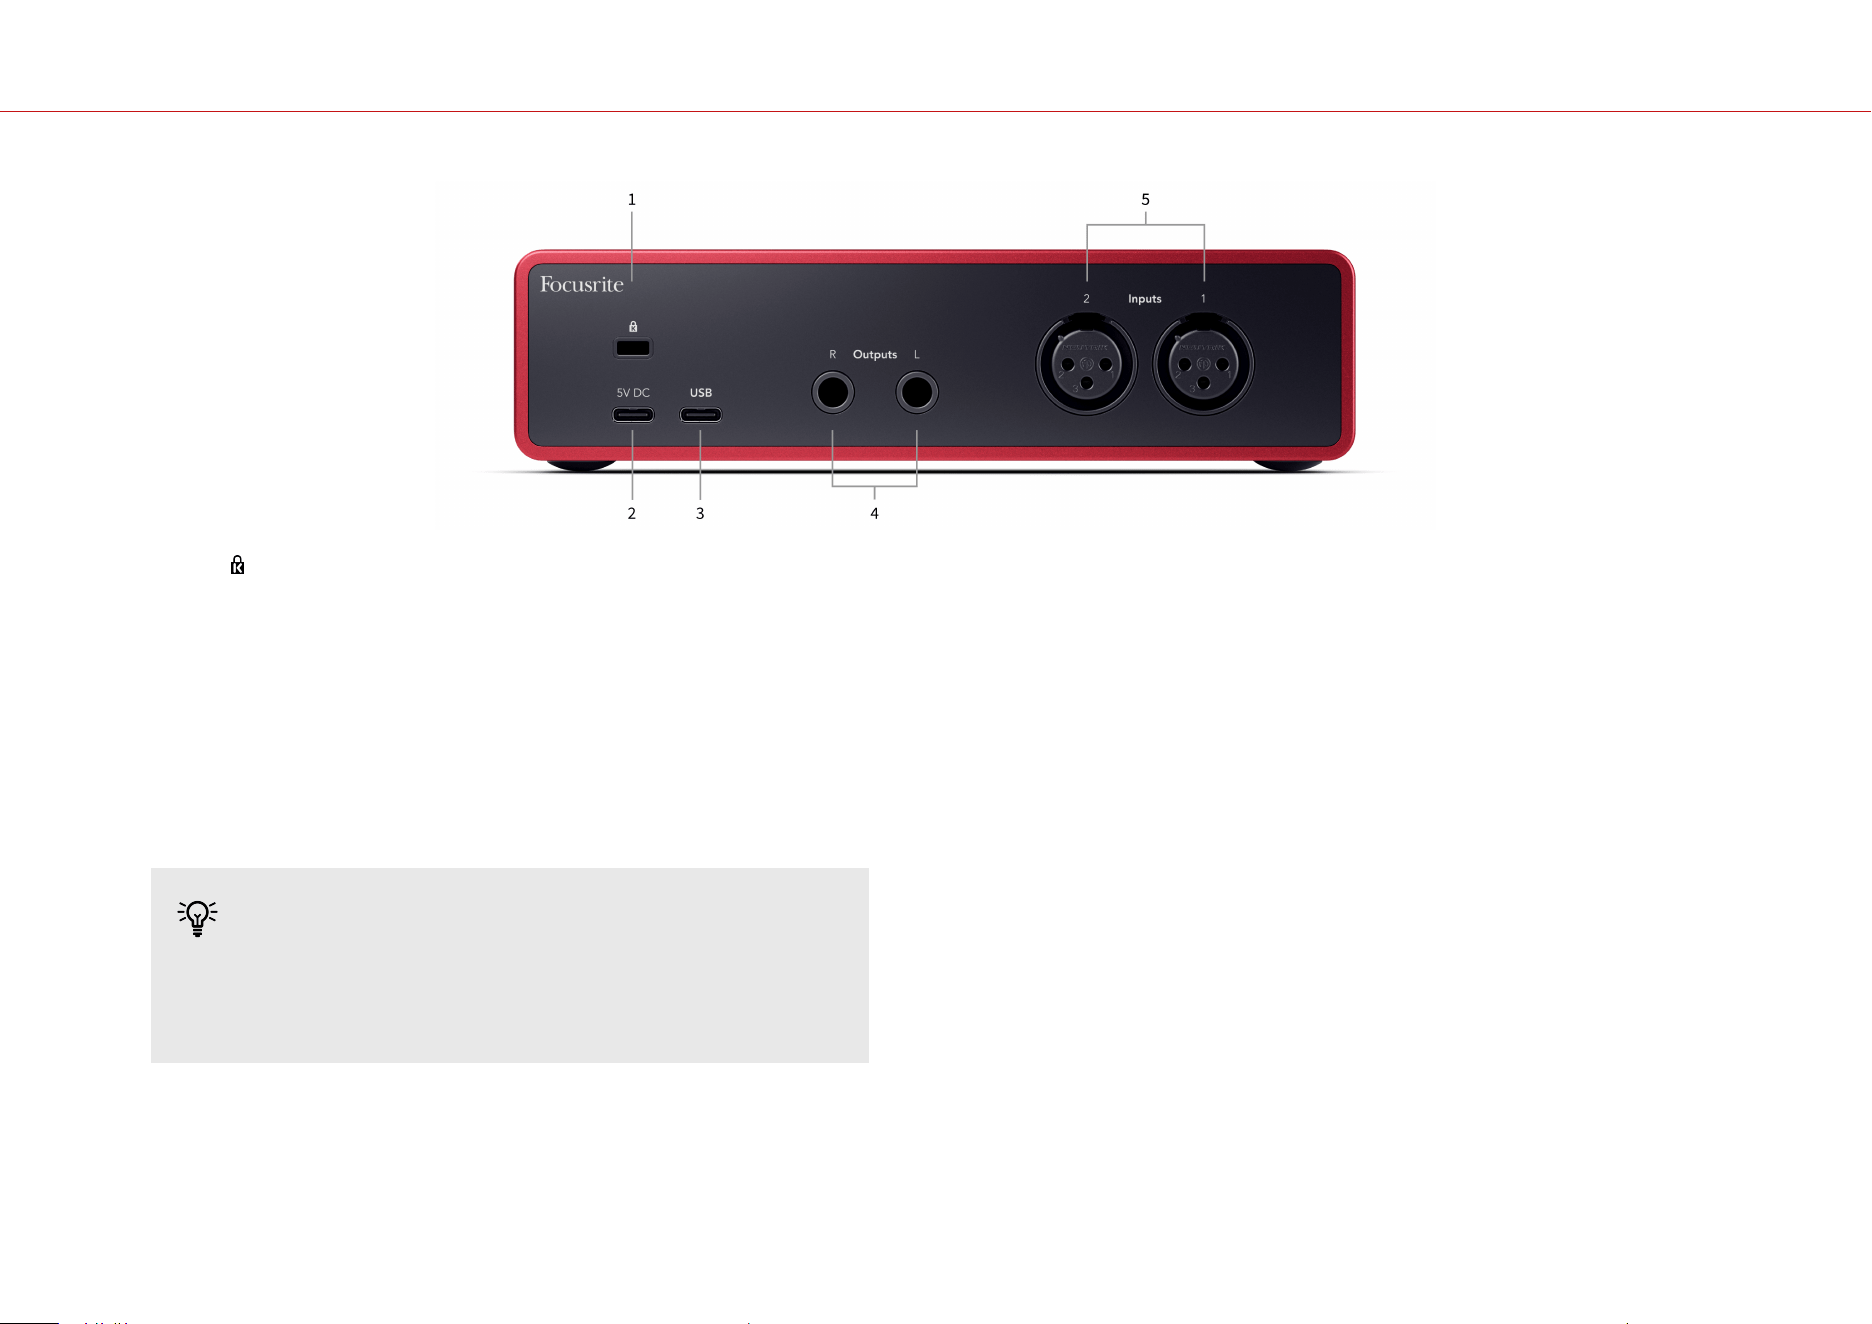
Back Panel
1. - Kensington Lock, use a lock to secure your Scarlett and deter the.
2. 5V DC - an optional USB-C connector to supply power to your Scarlett 2i2 if your
computer can't supply 1.5A USB-C power to your Scarlett 2i2
3. USB - USB-C connector to connect your Scarlett to your computer.
With most computers, you can transfer data and power the Scarlett using only this
USB port.
4. Speaker Outputs R and L - 6.35mm (1/4") jack (TS or TRS) sockets to connect your
Scarlett to speakers or an amplifier. We recommend you use 6.35mm (1/4") TRS jack
cables for balanced connections.
5. Inputs 2 and 1 - 3-pin - 3-pin Neutrik® XLR connectors to connect your microphones.
Connecting something to the corresponding line-level input disables the XLR input.
Tip
The Scarlett 2i2 has XLR inputs at the back for microphones and 6.35mm (1/4") jack
inputs on the front for instruments or line-level devices.
Using the front panel jack input(s) disables the XLR mic input. If you're not getting
sound from your XLR input(s), ensure nothing is connected to the front panel jack
inputs.
Scarlett 2i2 4th Gen User Guide
10
Front Panel In Depth
This section covers all the features on your Scarlett 2i2's front panel, what they do, how you
might use them and how they work in Focusrite Control 2.
Setting Preamp Input Gain
The preamp input gain controls how much signal you are sending into your computer and
recording soware.
It's essential to set a good level for the preamp input gain so you get the best quality recording. If
the preamp input gain is too low your signal will be too quiet and when you try and boost its level
later you may hear noise in the recording; if the preamp input gain is too high you might 'clip' the
input and hear harsh distortion in your recording.
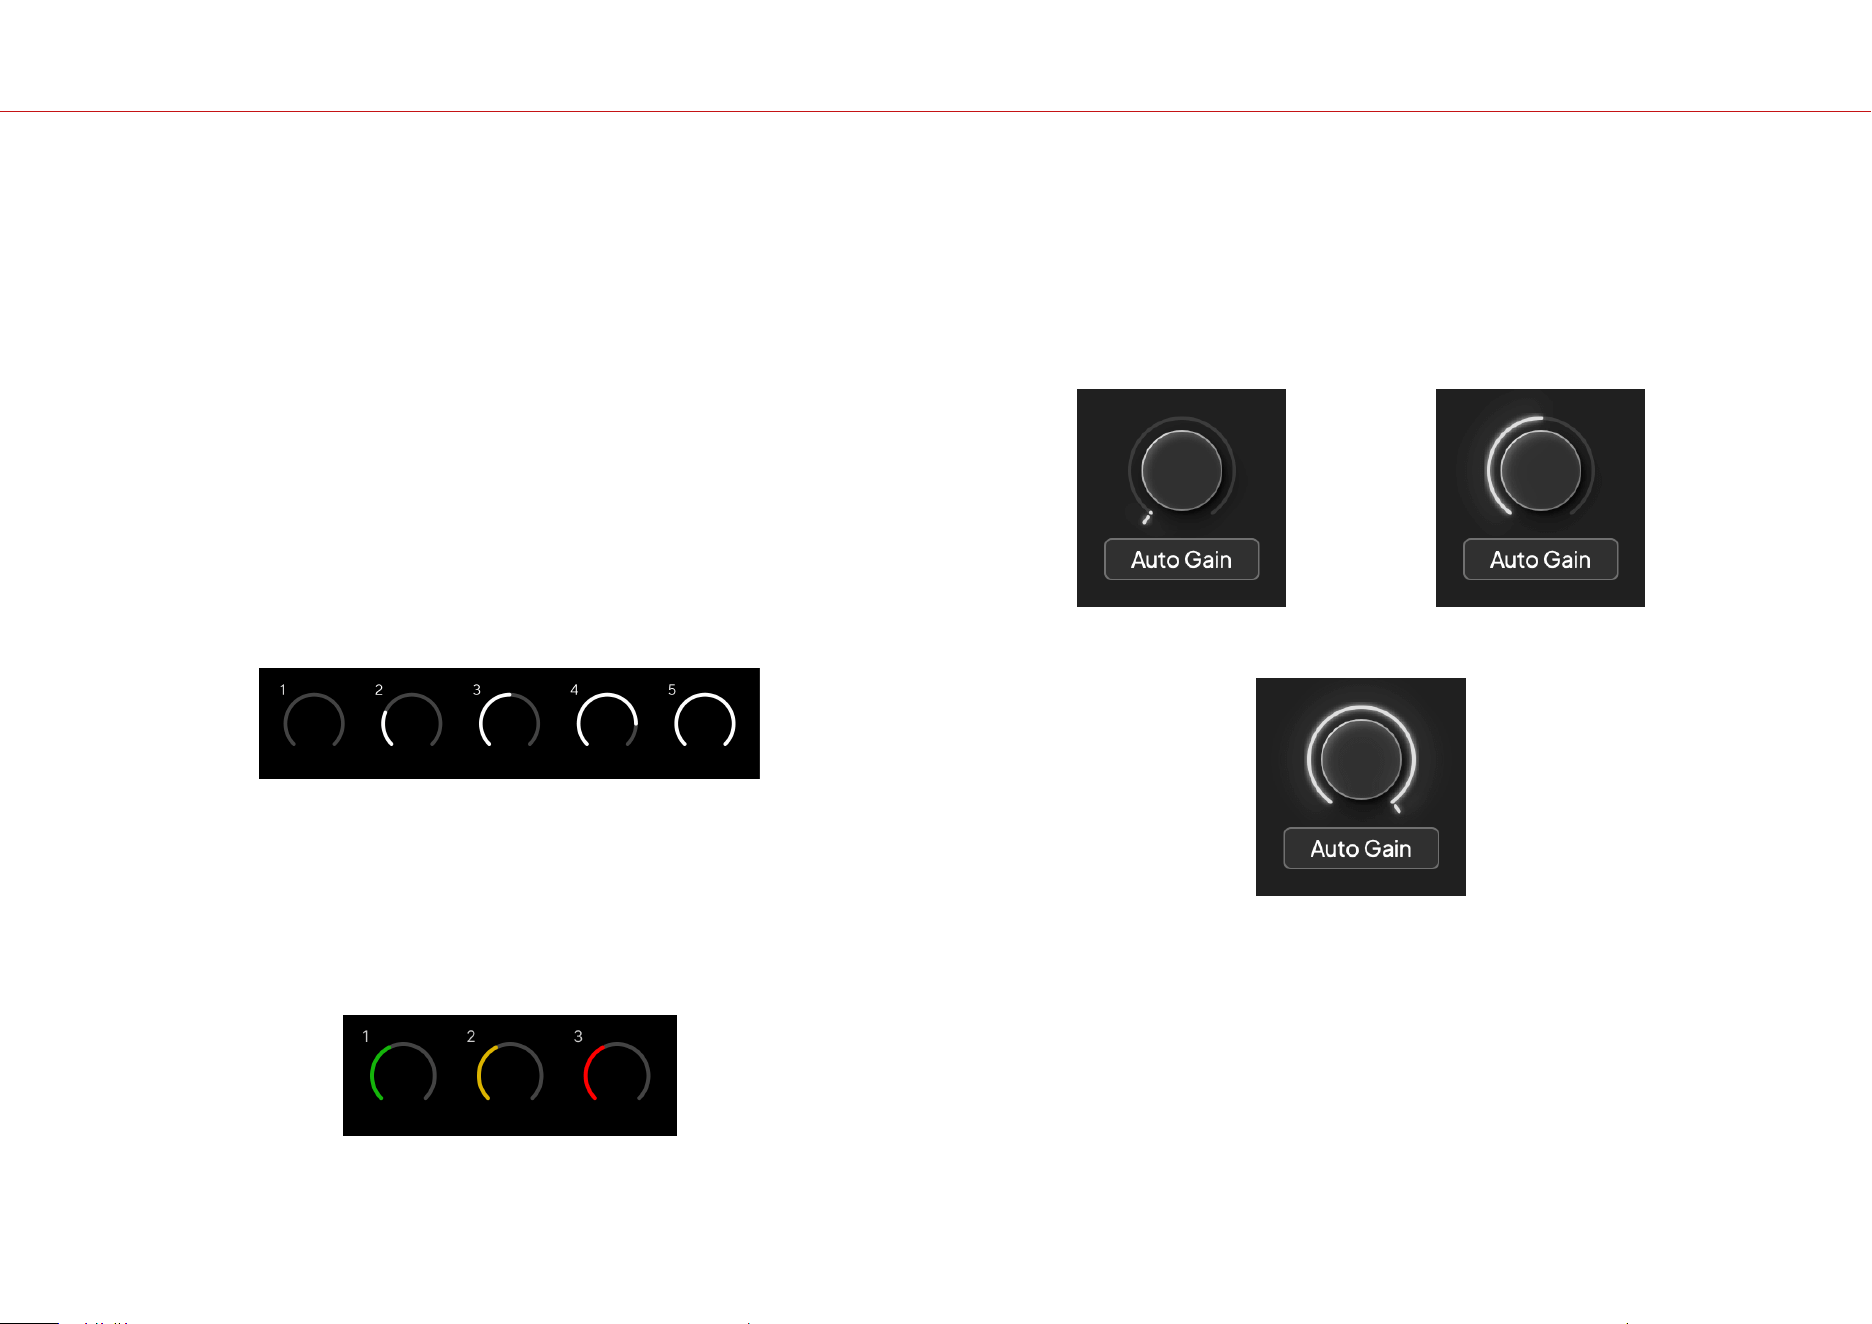
To increase the input gain move the gain control clockwise, as you move the gain control the Gain
Halo gradually lights clockwise to show you the gain level. This diagram shows the gain at various
levels:
1. No input gain
2. 25% input gain
3. 50% input gain
4. 75% input gain
5. 100% input gain
When you adjust your input gain while you send a signal into your preamp, the ring lights the
same way as above but a colour, green, amber or red, shows how much level is going into your
computer. Shortly aer you stop adjusting the gain the meters revert to input meters (see Input
Metering).
1. Gain at 40%, signal good.
2. Gain at 40%, signal pre-clip.
3. Gain at 40%, signal clipping.
1. Green shows your signal level is good.
2. Amber shows your signal is pre-clip, any higher and you are likely to clip the input
3. Red shows your signal has clipped, you should reduce the gain.
Soware Gain Control
You can also control the preamp gain remotely using Focusrite Control 2.
To adjust the preamp gain in Focusrite Control 2:
1. Click the virtual knob for the channel you'd like to adjust or use the tab key to select
the preamp gain control.
2. Move your mouse up and down or use the arrow keys to increase or decrease the gain
(in ±1dB increments).
The following images show the preamp gain at minimum, medium and maximum gain.
No input gain 50% Gain
100% Gain
Scarlett 2i2 4th Gen User Guide
11
Input Metering
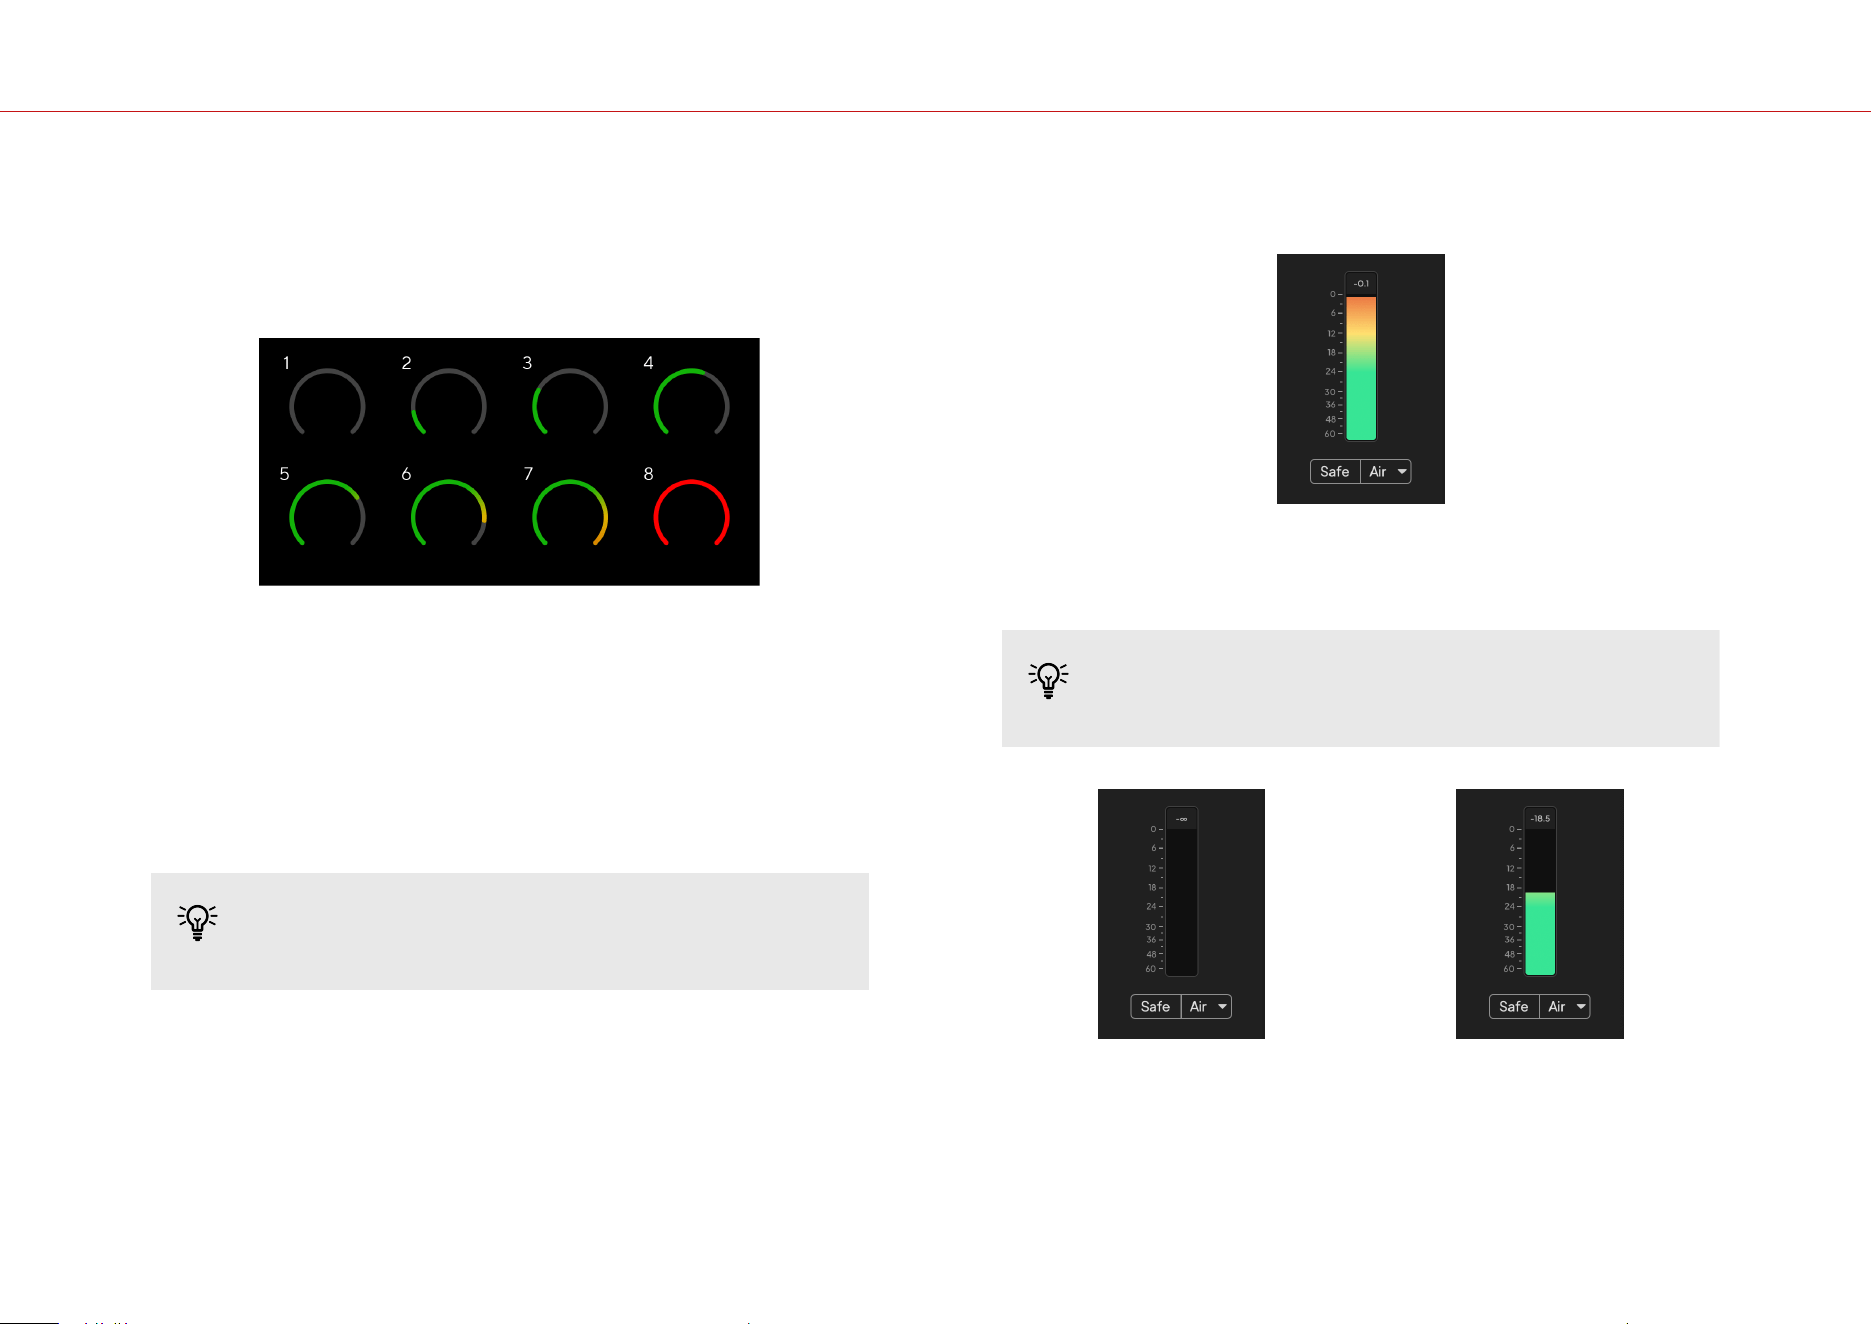
When you're not moving the input gain control the input metering uses the entire Gain Halo. As
the incoming signal gets louder (for example with a higher input gain setting) the Gain Halo lights
from green through to amber before the entire Gain Halo flashes red to show you the input has
clipped.
This diagram shows the meters at dierent levels to show the input signal level:
1. No input signal
2. -42 dBFS
3. -36 dBFS
4. -24 dBFS
5. -18 dBFS
6. -12 dBFS
7. -6 dBFS
8. 0 dBFS, clipping - turn down the input gain to avoid distortion and clipping.
Tip
If your signal clips the clip indicator at the top of the meter lights red. If this happens,
select that channel and reduce the gain.
Soware Metering
In the same way as the input meters on your Scarlett 2i2's front panel, you can see the incoming
signal on the meters in Focusrite Control 2 to set the correct preamp gain.
As the signal gets louder the meter in Focusrite Control 2 lights from green to amber (pre-clip).
The indicator above the meter shows you the peak level (in -dBFS), the highest level on this track
since you started monitoring the input. When you hover over the Peak level Meter you can click to
Reset the value.
Tip
When you're recording, it's a good idea to aim for a -12dBFS peak level. This ensures you
have enough headroom when you've recorded all your tracks.
Waiting for an input signal. The input signal has reached -18dB.
Scarlett 2i2 4th Gen User Guide
12
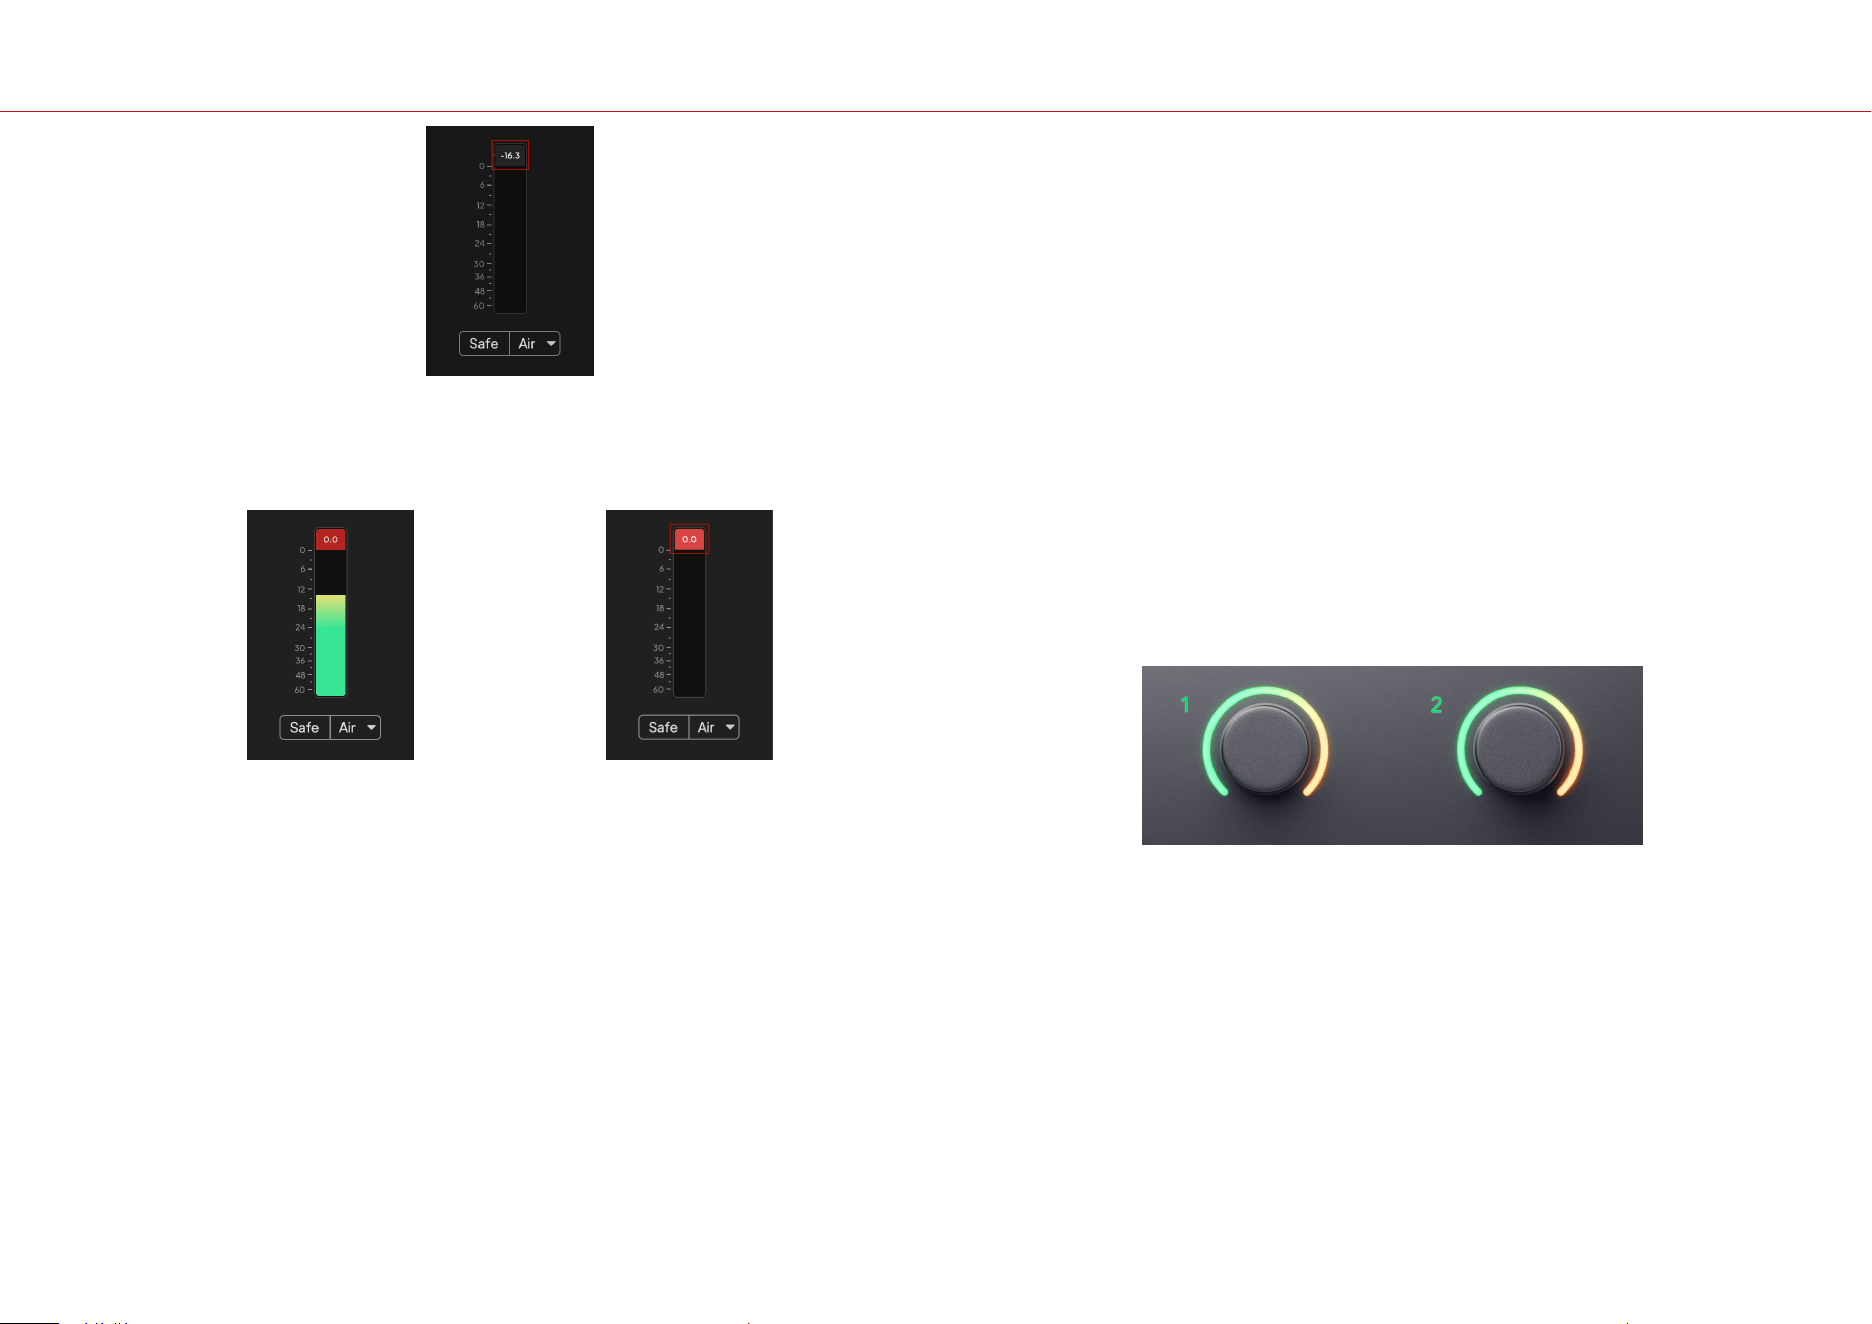
Click to Reset the Peak Level meter.
When you overload the preamp, with too much input signal, or by adding too much gain, the
Peak Level Meter lights red. Hover over the Peak Level Meter and click to Reset the value.
The Input has clipped. Click to Reset the Peak Level Meter aer clipping.
Select Button
Many front panel controls on yourScarlett 2i2 are shared across the preamp inputs. The Select
button moves the preamp controls to dierent inputs.
At least one preamp is always selected, to change which preamp(s) the controls are aecting,
press the Select button. When you do this the newly selected preamp's number lights green and
the preamp setting lights change to match the new preamp.
When you turn on yourScarlett 2i2 the last selected preamp before you turned it o remains the
selected preamp.
Linking Preamps
Linking preamps allows you to control two preamps simultaneously using one set of preamp
controls. You can match gain controls for two preamps and enable other preamp controls. This is
useful for stereo recording, for example, a microphone pair, stereo synthesiser, or keyboard.
To link preamps:
• Press and hold the Select button for one second.
When you've made the Preamp Link :
• Both preamp numbers light green and the Gain Halos light temporarily to their preamp
level.
• The preamp gain level is set to the lowest value of the newly linked pair.
• The preamp settings are inherited from the currently selected preamp, e.g. preamp 1 is
selected, therefore Preamp 2 inherits, Air, Safe and Inst settings from Preamp 1.
• Changing any preamp setting changes the state for both preamps.
• Adjusting either gain control changes the gain level for both preamps and is shown on
both Gain Halos.
• 48V disables for both preamps.
Unlinking Preamps
To unlink preamps, hold the Select button for one second. When you unlink a pair:
• The first preamp of the previously linked pair becomes selected and lights green.
• Gain levels and preamp settings stay the same, but you can now change them
independently.
Scarlett 2i2 4th Gen User Guide
13
Linking Preamps in Focusrite Control 2
Linking Preamps
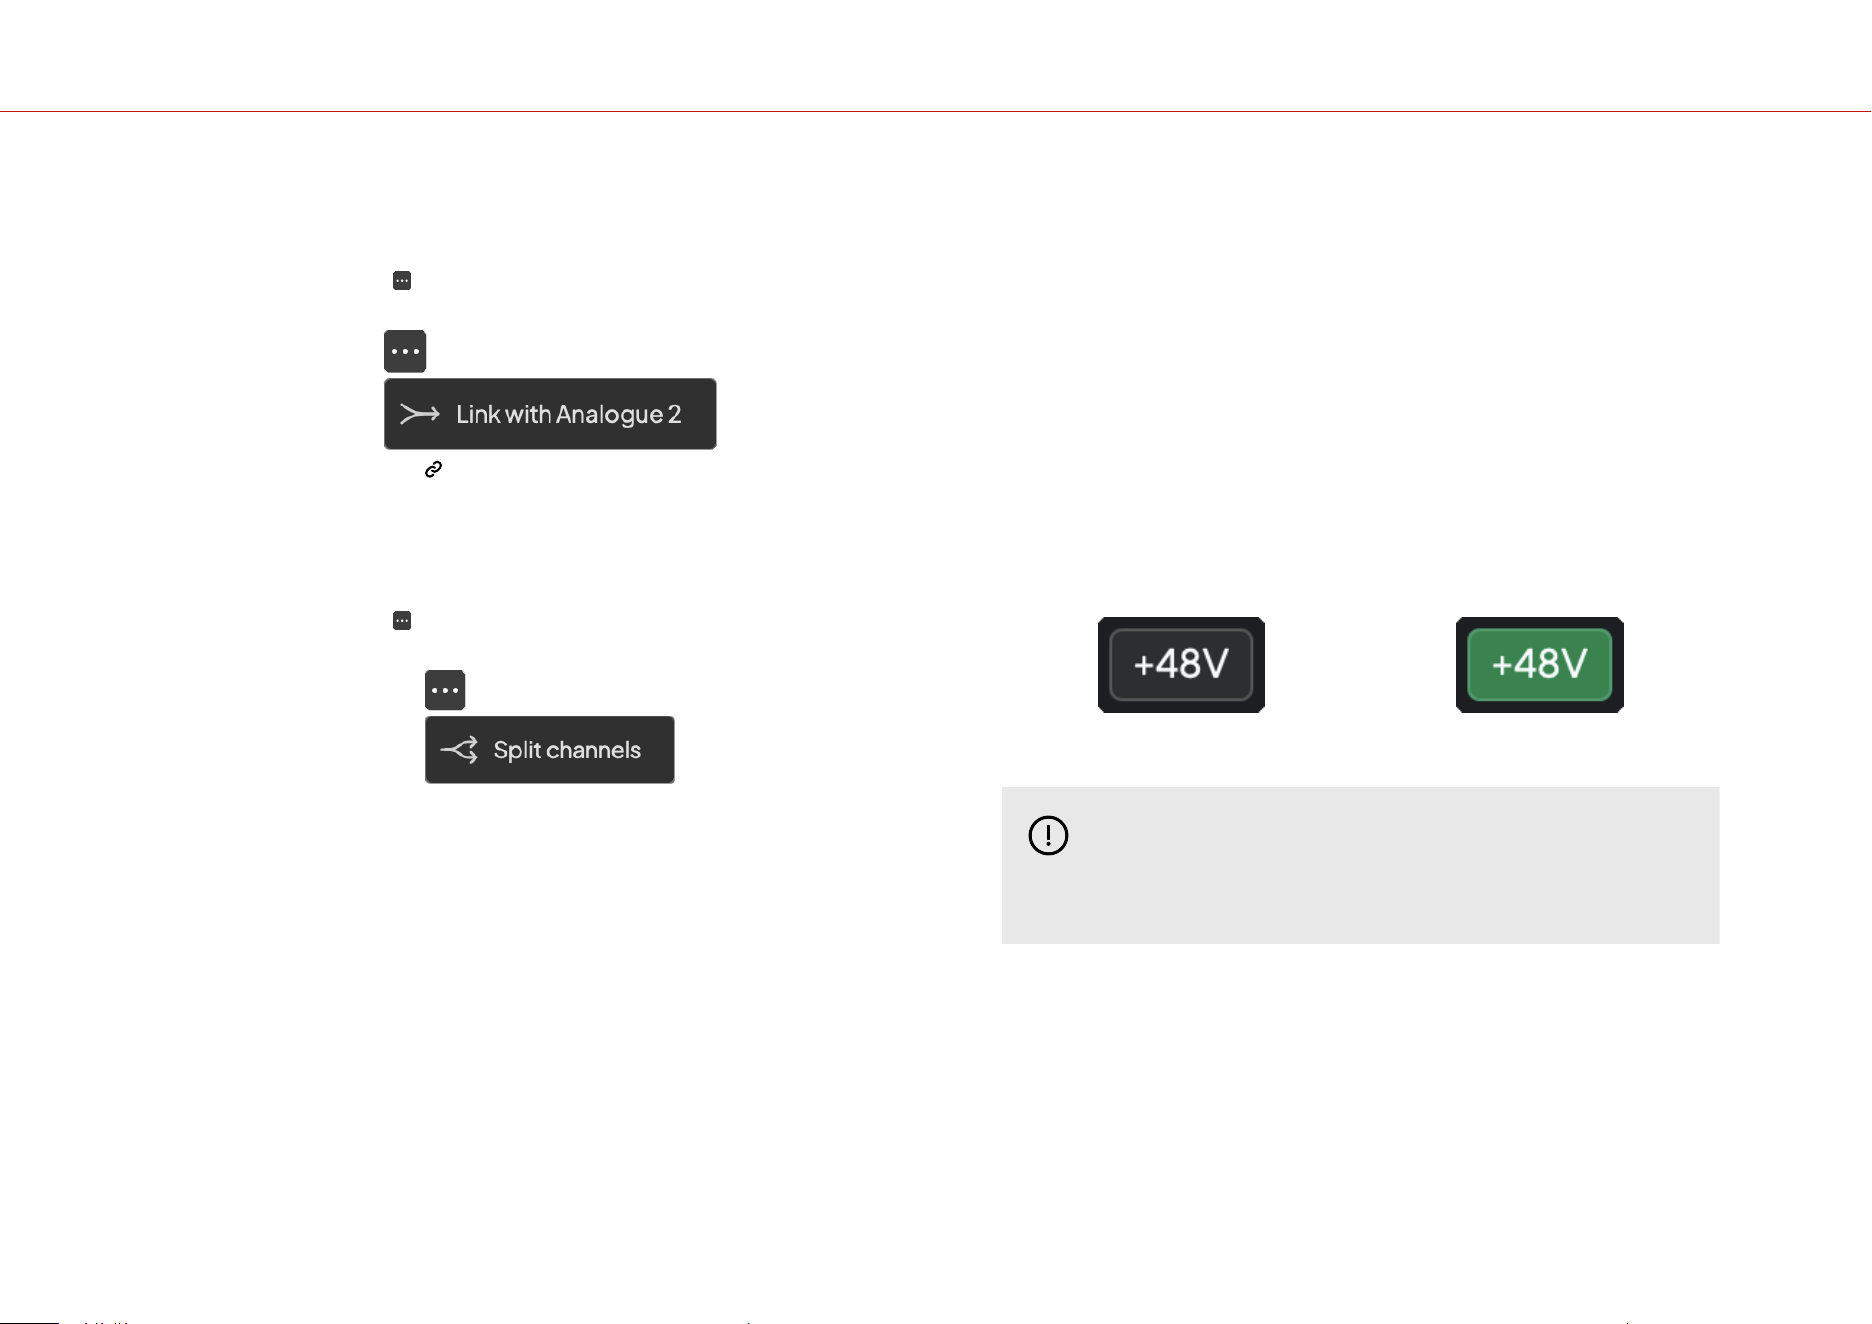
To link preamps from Focusrite Control 2:
1. Hover over the preamp you want to link.
2. Click the ellipses icon .
3. Click Link with Analogue 2 (or similar depending on the preamp).
Linked preamps show the icon next to their name.
Unlinking Preamps
To unlink preamps from Focusrite Control 2:
1. Hover over the preamp you want to unlink.
2. Click the ellipses icon .
3. Click Split channels.
•
The first preamp of the previously linked pair becomes selected and lights green.
•
Gain levels and preamp settings stay the same, but you can now change them
independently.
48V Button (Phantom Power)
48V, also commonly referred to as 'Phantom Power', sends 48 Volts from your interface's XLR
connector to devices needing power to work. The most common use is sending power to
condenser microphones, but you may also need 48V for inline mic preamps, active dynamic
microphones and active DI boxes.
To turn on 48V:
1. Connect your microphone, or another powered device, to an XLR input on your
interface using an XLR cable. 48V is not sent to the 6.35mm (1/4") jack inputs.
2. Turn down that preamp's gain control to avoid any unwanted pops and clicks.
3. Press the 48V button (or the corresponding soware button)
The 48V icon lights green to show it is enabled.
48V phantom power is now being sent to both XLR inputs on your Scarlett 2i2 and to any devices
connected to the XLR inputs.
48V (Phantom Power) Soware Control
To enable 48V (Phantom Power) from Focusrite Control 2 click the +48V button. This is the same
as pressing the 48V button on the Scarlett 2i2 hardware.
+48V Phantom Power o +48V Phantom Power on
Important
If you accidentally send 48V phantom power to the wrong input, most modern
microphones of other types, e.g., dynamic or ribbon, will not be damaged, but some
older microphones may be. If you're unsure, please check your microphone's user guide
to ensure it is safe to use with 48V phantom power.
Scarlett 2i2 4th Gen User Guide
14
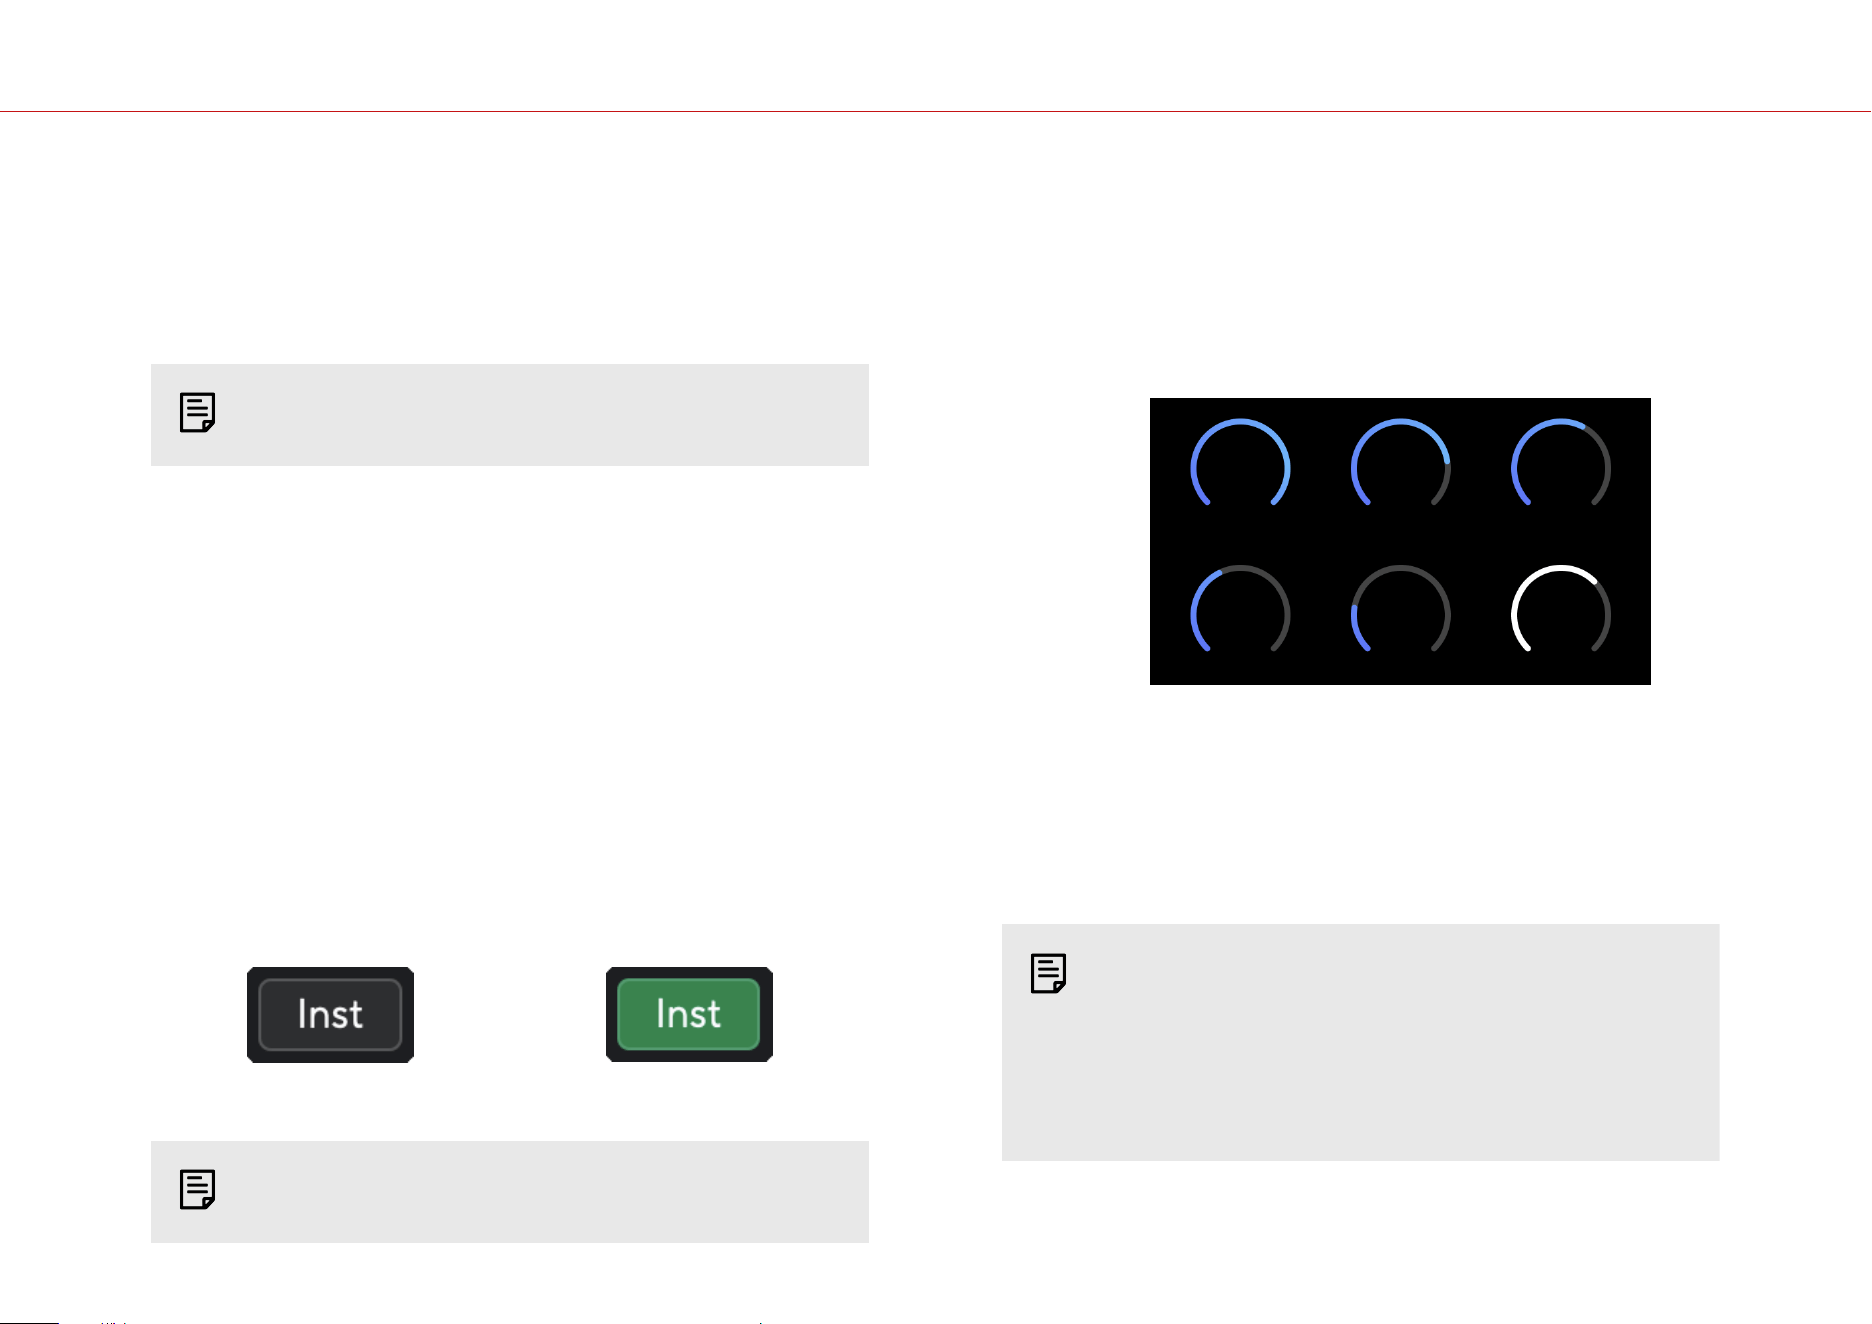
Inst (Instrument) Button and Line Level Inputs
The Inst (Instrument) button only aects the 6.35mm (1/4") line input for the selected channel,
either input 1 or input 2. It changes it from an input suitable forline-leveldevices to an input
better suited for instrument-level devices.
To enable, or disable, instrument mode for the 6.35mm (1/4") jack input, select the channel and
press the Inst button once. Green shows Inst is enabled, and white shows Inst is disabled. When
you enable Inst and connect a jack to your Scarlett, the minimum gain for the input is changed to
+7dB.
Note
When the Inst light is white, the 6.35mm jack input is at line level.
When Inst is enabled (green) you can connect instrument-level devices to the 1/4" inputs such as,
but not limited to:
• Electric or electro-acoustic guitars directly and via eects pedals.
• Electric basses
• Acoustic instruments with pick-ups such as violins, double-basses etc.
When Inst is disabled (white) you can connect line-level devices to the 6.35mm (1/4") inputs such
as, but not limited to:
• Synthesisers
• Keyboards
• Drum Machines
• External Microphone Preamps
Instrument/Line Soware Control
To change inputs 1 or 2 between instrument and line from Focusrite Control 2 click
theInstbutton once.
Line
Instrument
Note
When you switch between Inst and Line, the gain remains at the last level you set.
Auto Gain
Auto Gain allows you to send a signal into your Scarlett 2i2 (for example singing, or playing your
instrument) for 10 seconds and let the Scarlett set a good level for your preamps. If you find
the levels aren't right, you can adjust the gain controls manually to fine-tune the levels before
recording.
To use Auto Gain:
1. Press the Select button to move your preamp controls to the correct preamp.
2. Press the white Auto button on your Scarlett, or the corresponding soware button.
The Auto icon lights green for ten seconds. The corresponding Gain Halo turns into a
ten-second countdown timer.
3. Speak or sing into the microphone, or play your instrument during the Auto Gain
countdown. Perform as you would while you're recording to make sure Auto Gain sets
a good level.
If the Auto Gain was successful, the Gain Halo lights green before the gain value is shown on the
Gain Halo for a second. The gain is now set at a good level for your recording.
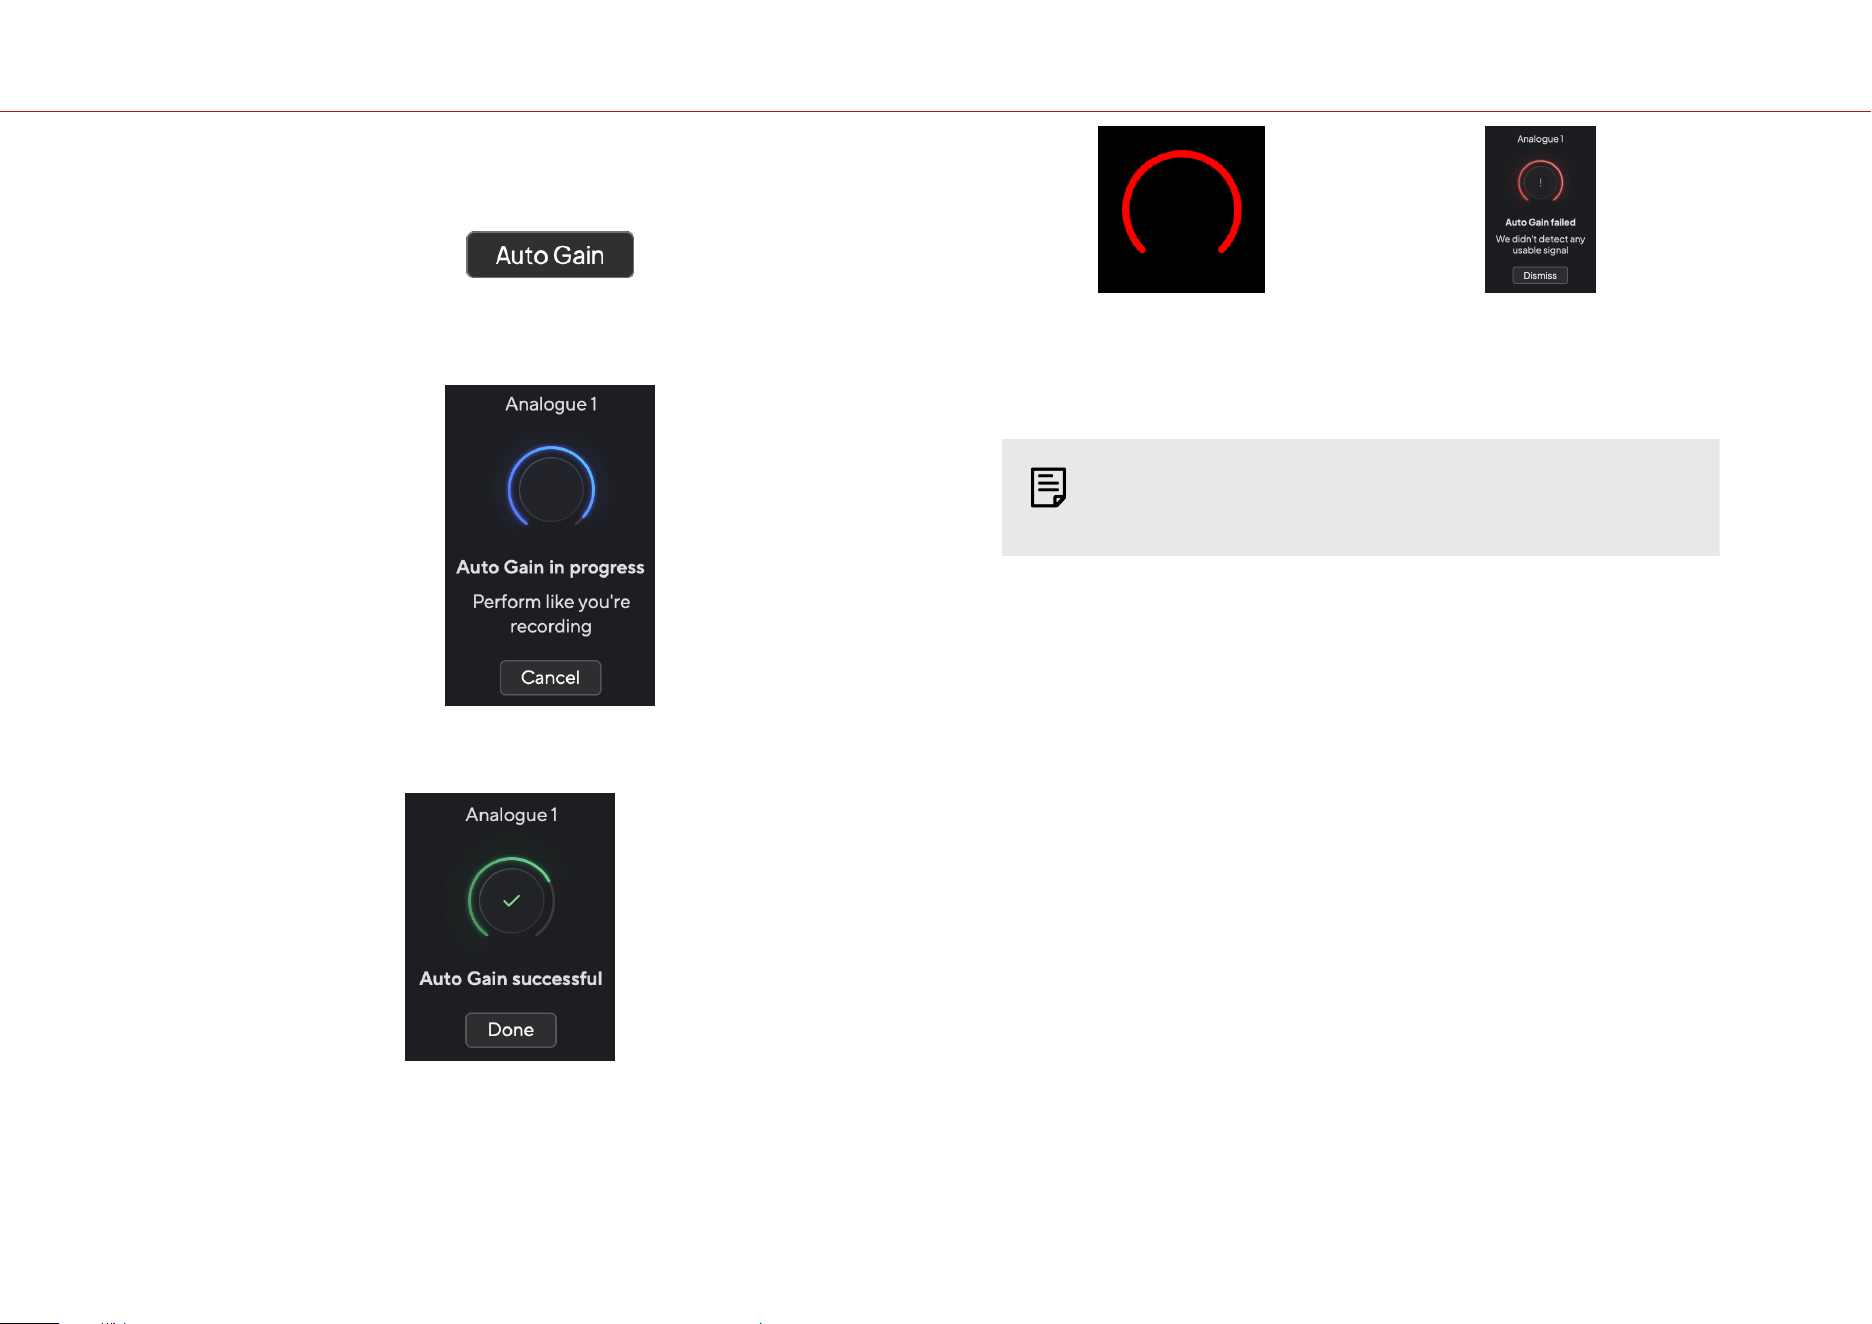
If Auto Gain fails the Gain Halo lights red. Please see the section, The Gain Halo turned Red [16],
for more information.
Note
Scarlett's Auto Gain makes sure your levels are set right not only using the input signal
but also factors in:
•
The preamp's noise floor.
•
Digital silence.
•
Inter-channel crosstalk.
•
Unwanted knocks or bumps on your microphones.
Scarlett 2i2 4th Gen User Guide
15
Auto Gain Soware Control
To use Auto Gain in Focusrite Control 2:
1. Click the Auto Gain button in Focusrite Control 2.
2. Speak or sing into the microphone, or play your instrument during the Auto Gain
countdown. Perform as you would while you're recording to make sure Auto Gain sets
a good level.
The Auto Gain process starts and the soware Gain halo turns into a countdown timer.
If the Auto Gain was successful, the Gain Halo lights green before the gain value is shown on the
Gain Halo for a second. The gain is now set at a good level for your recording.
The Gain Halo turned red during Auto Gain
If the input signal is unsuitable for Auto Gain (for example no signal), aer ten seconds, Auto
Gain stops and the Gain Halo lights red for a second. The gain returns to the value you set before
starting Auto Gain.
Hardware Gain Halo Focusrite Control 2 Auto Gain unsuccessful
Before running Auto Gain again, make sure your input has something connected to it correctly, if
you're using a condenser microphone, 48V is on, and you are making sound while Auto Gain runs.
Note
To cancel Auto Gain, press the Auto Gain button again at any time during the process.
The gain returns to the value you set before starting Auto Gain.
Scarlett 2i2 4th Gen User Guide
16
Multichannel Auto Gain
Auto Gain allows you to send a signal into your Scarlett 2i2 (for example singing, or playing your
instrument) for 10 seconds and let the Scarlett set a good level for your preamps. If you find
the levels aren't right, you can adjust the gain controls manually to fine-tune the levels before
recording.
Multichannel Auto Gain starts the Auto Gain process for all the preamp channels on your
interface. This is particularly useful for quickly setting levels for situations where you are using
multiple channels simultaneously, for example:
•
Setting levels for yourself if you're playing guitar and singing simultaneously.
•
Setting levels for a drummer when you have multiple microphones on the drum kit.
•
Setting levels for a band recording 'live' together.
To start the multichannel Auto Gain process:
1. Hold the Auto button for two seconds.
The Auto icon fades between o and Green for ten seconds, and the Gain Halos for all
channels turn into ten-second countdown timers.
2. Speak or sing into the microphone, or play your instrument during the Auto Gain
countdown. Perform as you would while you're recording to make sure Auto Gain sets
a good level.
If the Auto Gain was successful, the Gain Halos light green before the gain value is shown on the
Gain Halos for a second. The gain is now set at a good level for your recording.
Note
To cancel Auto Gain, press the Auto Gain button again at any time during the process.
The gain returns to the value you set before starting Auto Gain.
Clip Safe Button
The Safe button applies Clip Safe which automatically adjusts your preamp gain if you're at risk
of clipping.
Clipping happens when your gain is set too high for the sound being recorded and your input
overloads the preamp. A clipping symptom is preamp distortion, which is oen unpleasant and
can ruin a recording. Clip Safe helps you avoid this so if your input gets near to clipping, Clip Safe
reduces the preamp gain, so you won't have to re-record your take.
Note
Clip Safe is only available at up to 96kHz, you cannot use it at quad-band (176.4kHz and
192 kHz) sample rates. The Safe LED lights red to show when it's unavailable.
To enable Clip Safe:
1. Press the Select button to move your preamp controls to the correct preamp.
2. Press the Safe button on the interface or the corresponding soware button.
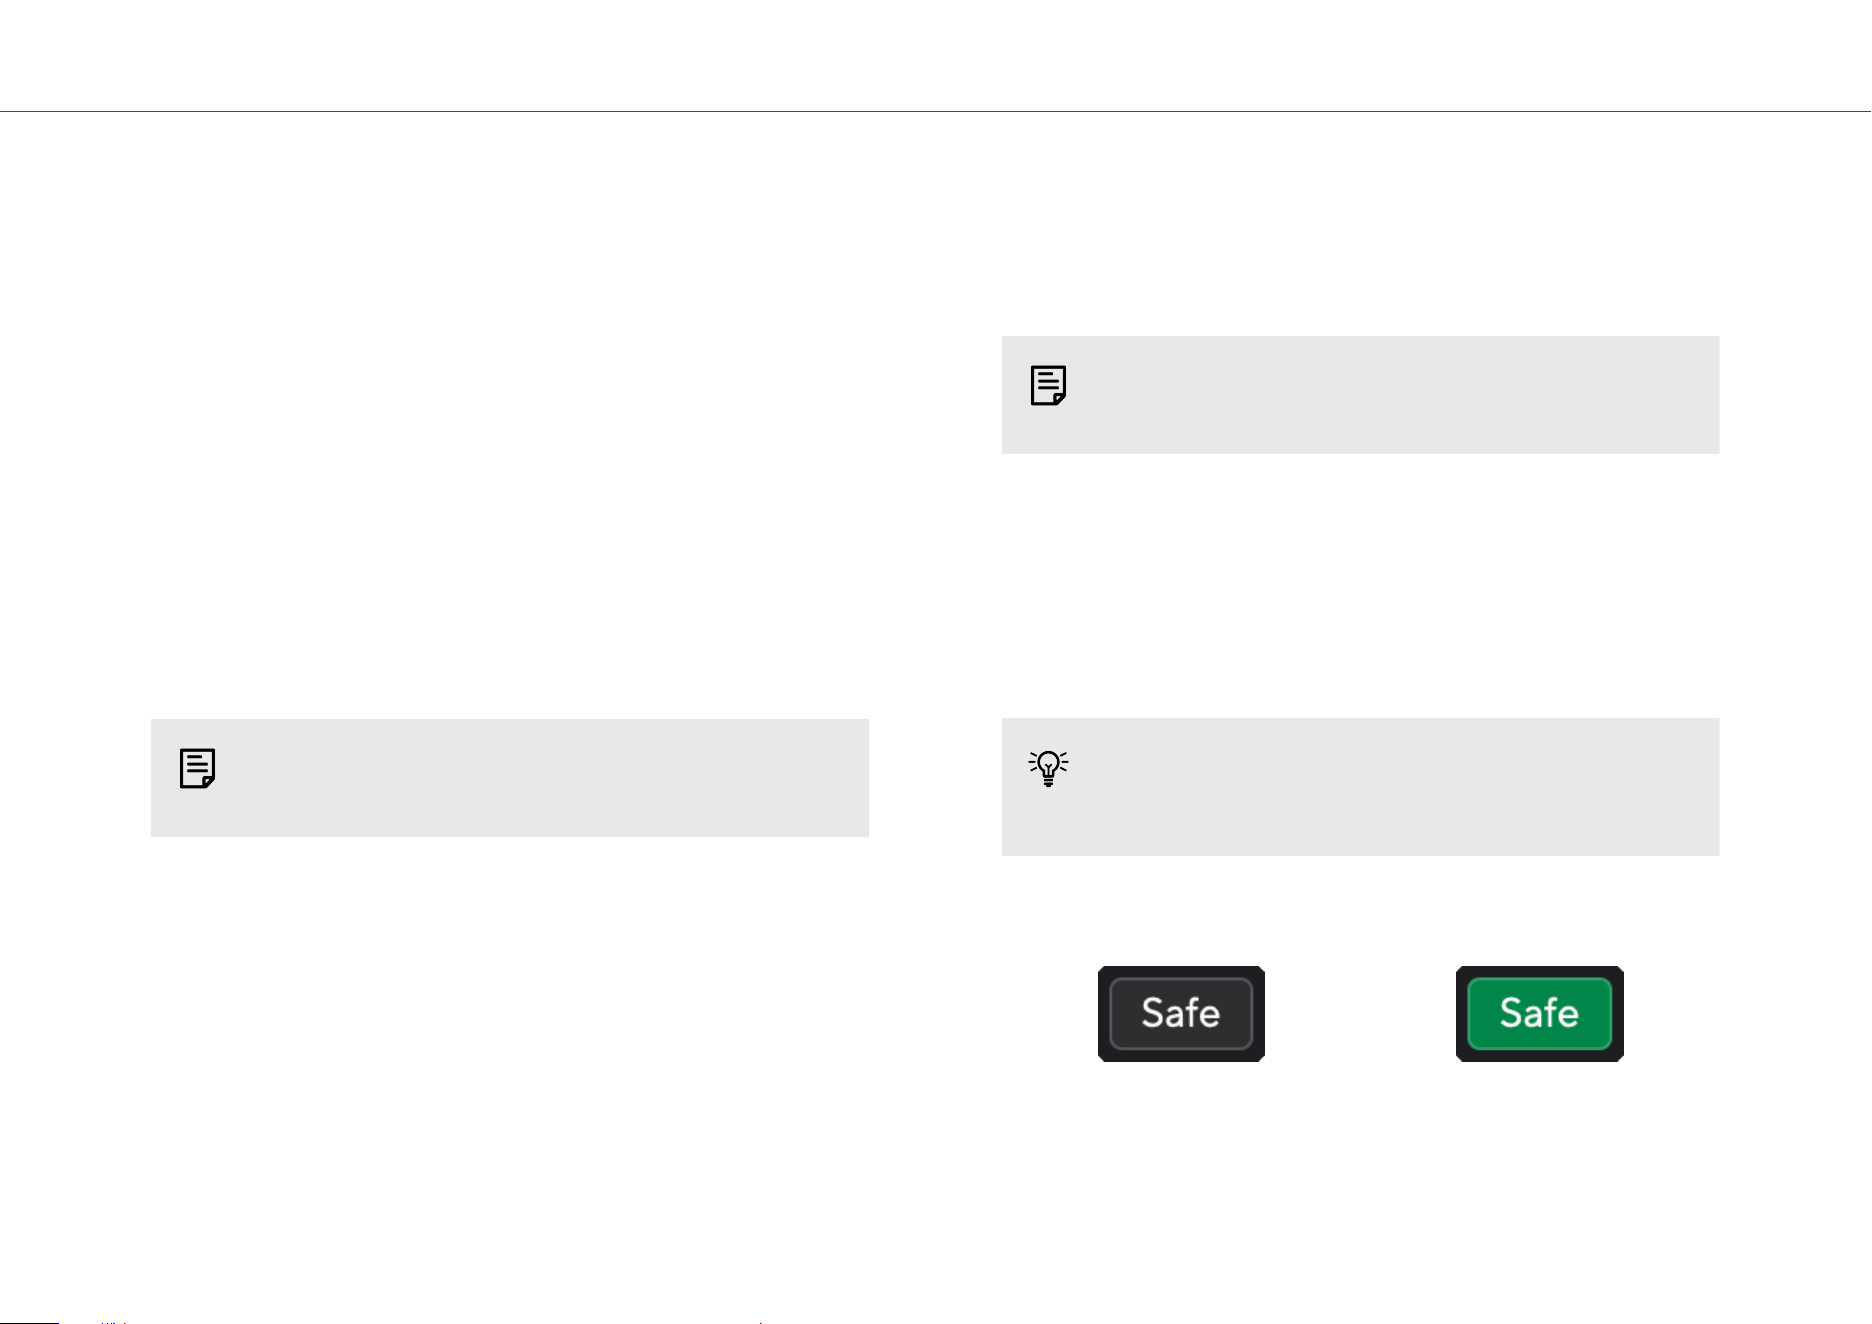
When you enable Safe, the Safe icon lights green. The Safe icon lights white when it is disabled
and available.
When you have two inputs selected using Preamp Link, Safe is applied to both preamps.
Tip
When you enable Clip Safe, your Scarlett continuously monitors your input signals, up
to 96,000 times a second, and through a combination of analogue preamp adjustment
and DSP, Clip Safe significantly reduces the risk of clipping.
Clip Safe Focusrite Control 2
To enable Clip Safe from Focusrite Control 2, click the Safe button:
Safe
o Safe on
Scarlett 2i2 4th Gen User Guide
17
Air Modes
Air lets you change your Scarlett's preamp sound with two dierent modes; Air Presence or Air
Presence and Harmonic Drive.
Air aects the mic, line and instrument inputs.
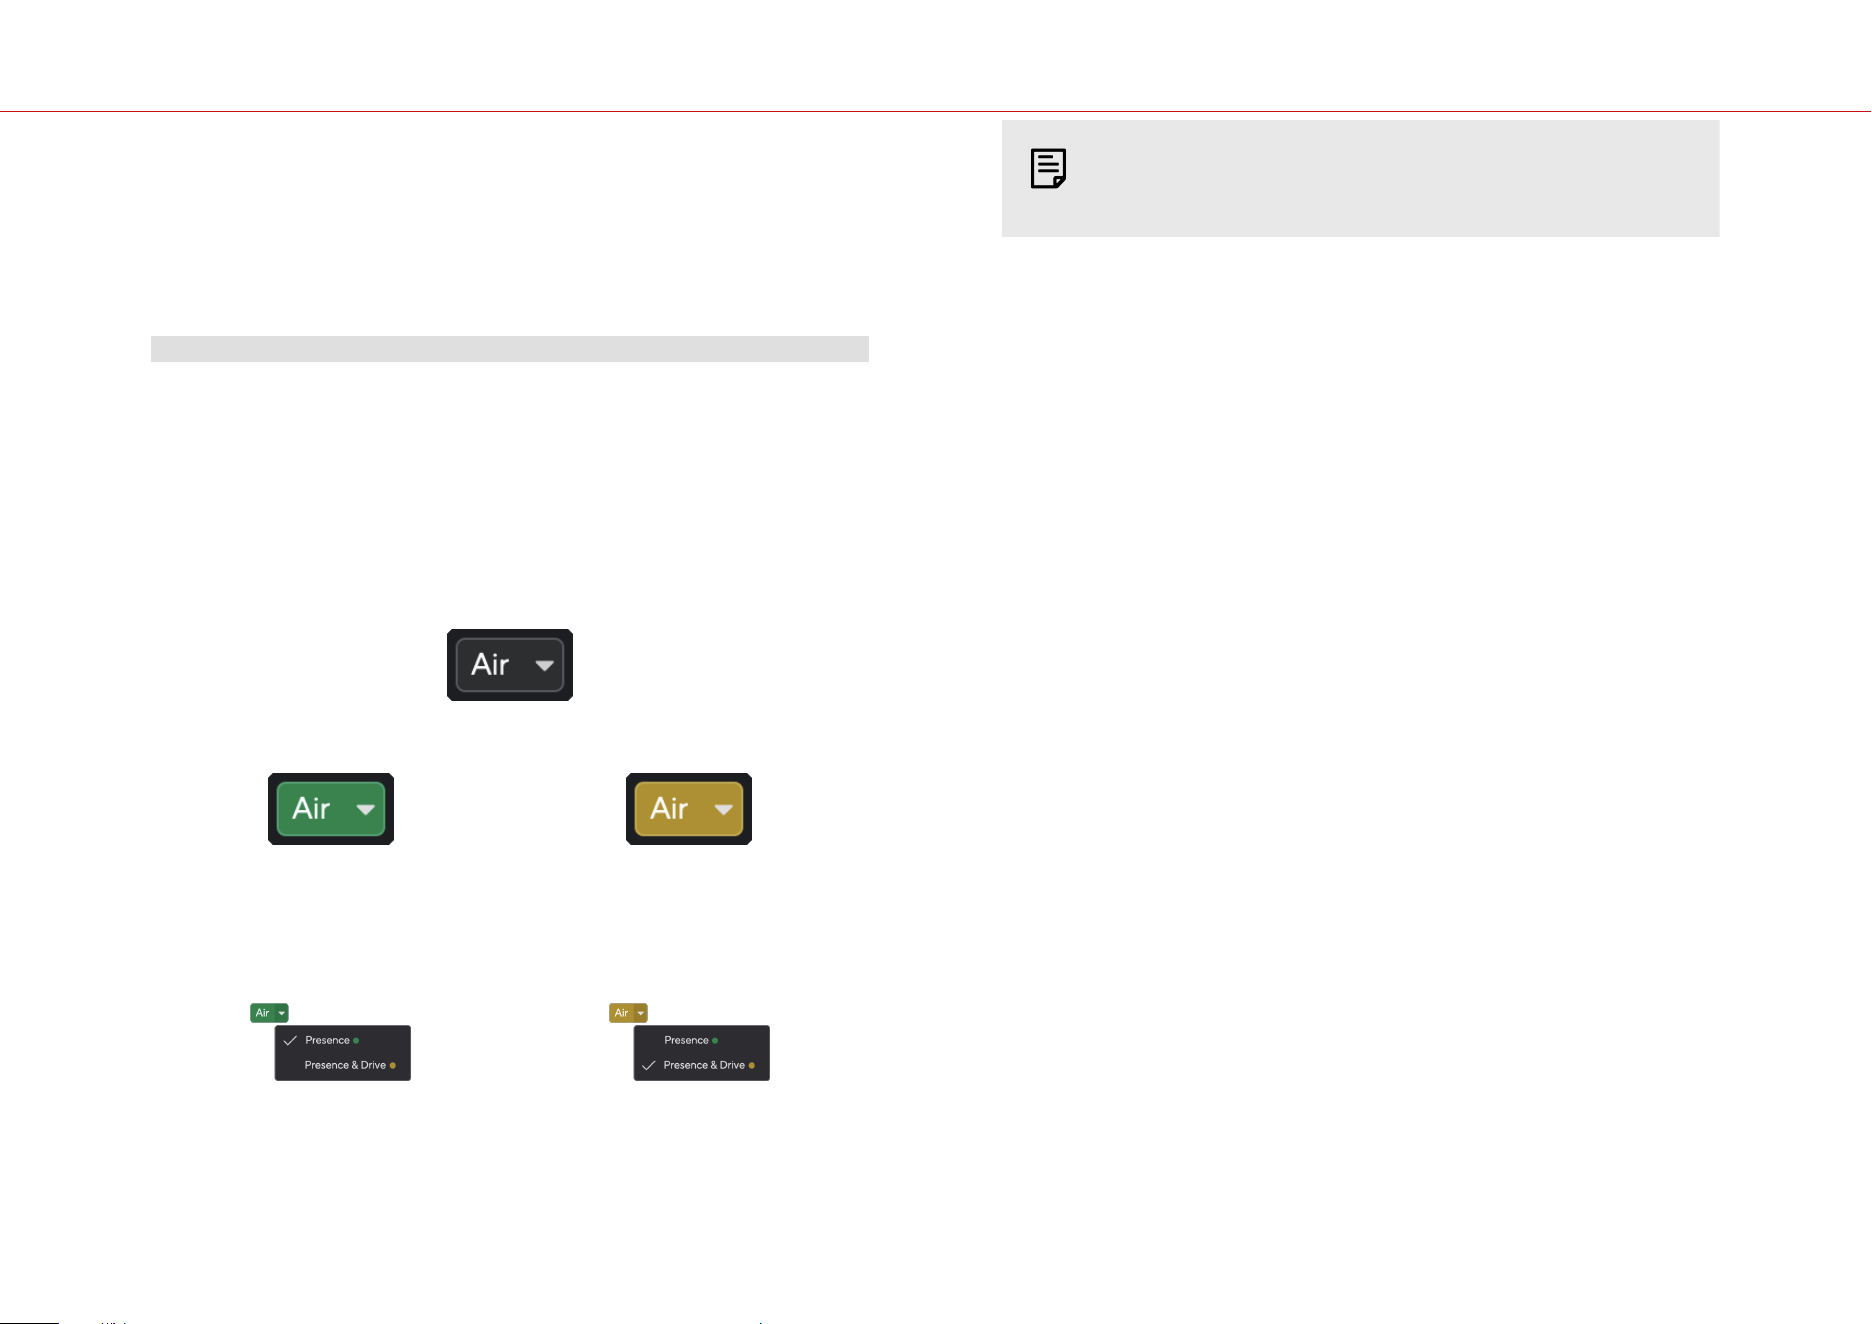
To enable Air, select your input, press the Air button once for Air Presence, again for Air Presence
and Harmonic drive and again to turn o. The Air LED changes colour to show which mode you
have selected:
Mode Description AIR LED Notes
O The preamp is clean White
Air Presence An analogue circuit gives
a presence boost to your
sources.
Green
Air Presence and
Harmonic Drive
Adds harmonics, in
addition to the analogue
Air circuit.
Amber Only available at up to
96kHz
Air Soware Control
To enable AIR from Focusrite Control 2 click the Air button. This is the same as pressing the Air
button on the Scarlett 2i2 hardware.
Air
O
Air Presence selected Air Presence and Drive selected
When you click Focusrite Control 2's Air button the last selected Air mode becomes activated.
To change the selected Air mode (Presence or Presence and Drive) click the arrow to show the
dropdown menu.
Air Presence selected
Air Presence and Drive selected
Note
Air Presence & Drive is only available at up to 96kHz, you cannot use it at quad-band
(176.4kHz and 192 kHz) sample rates.
Scarlett 2i2 4th Gen User Guide
18
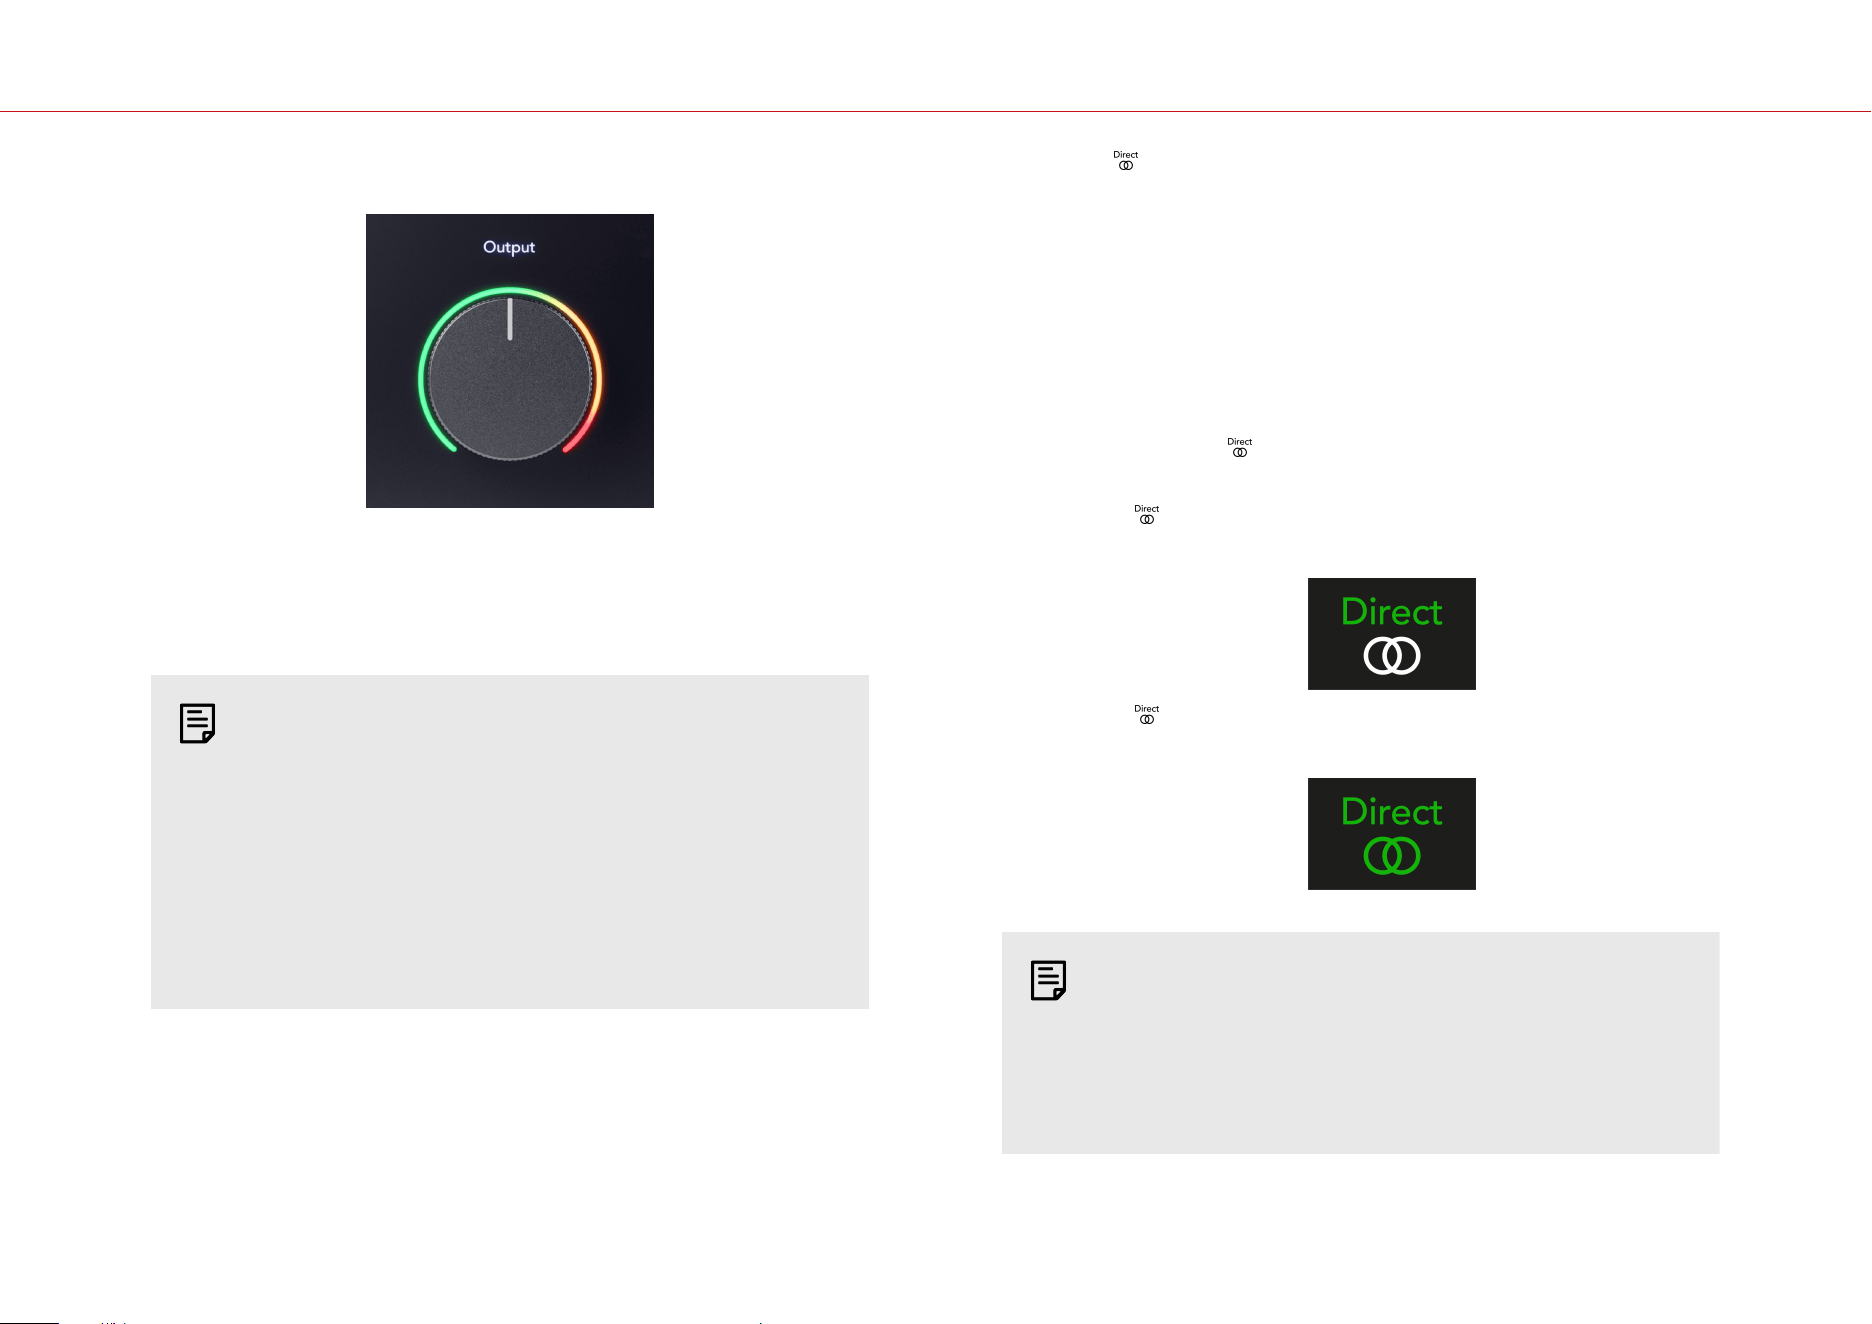
Output Control and Level Meter
The Output control and Output level meter are related to the signals going to Outputs 1 and 2 on
the back of your Scarlett 2i2, the outputs you'd most oen connect to monitor speakers.
The Output control sets the level at the outputs from nothing (fully anti-clockwise) to full-scale
output (fully clockwise).
The Output Level meter around the Output level control is a pre-fade meter (it is not aected by
the control's position) showing you the signal level coming from your computer.
Note
On some occasions you may still hear sound from your monitors when the Output
control is fully anti-clockwise, you can adjust your monitor levels to resolve this:
1. Turn down your interface's Output control and your monitors' level control.
2. Turn the Output control to maximum (or just below maximum).
3. Play sound from your system.
4. Turn up your monitors' level controls until the level is the loudest you need.
You should no longer hear sound when the Output control is at its minimum. You also
have more control over the level with the full range of the Output control. By setting it
at just below the maximum, you also have a little extra volume if you need it, or want to
listen to sounds at a louder-than-normal level.
Direct Monitor Button
Direct Monitor allows you to hear the signals coming into your interface's inputs without
them going through your computer. This means you hear the inputs without any latency and
without eects.
You might want to use Direct Monitoring for two reasons:
1. You're experiencing latency or a delay between making a sound and hearing it back
from your soware. By muting your soware inputs and turning on Direct Monitor, you
no longer hear latency.
2. You want to hear the clean unaected signal going into your Scarlett, instead of
listening to the soware output, which may have eects and plugins changing the way
your source sounds.
When Direct Monitor is o, the icon lights white. The Scarlett 2i2 has two dierent Direct
Monitor settings, mono, and stereo, to enable Direct Monitor:
• Press the button once for mono direct monitoring, signals present at input 1 and
input 2 will both be in the centre of the stereo image. This is useful for recording two
mono sources, for example, a guitar and a voice.
• Press the button for a second time for stereo direct monitoring, input 1 is panned le,
input 2 is panned right. This is useful for recording a stereo device, for example, a stereo
microphone pair, a stereo synthesiser, or a keyboard.
Note
If you're hearing your signal twice or getting a doubling or slightly phased sound, it's
likely you've got Direct Monitor switched on, and you're hearing the sound back from
soware. You can either:
•
Mute the track you're recording to in your DAW soware.
•
Turn o Direct Monitor and only listen to the sound coming from your DAW
soware.
Scarlett 2i2 4th Gen User Guide
19
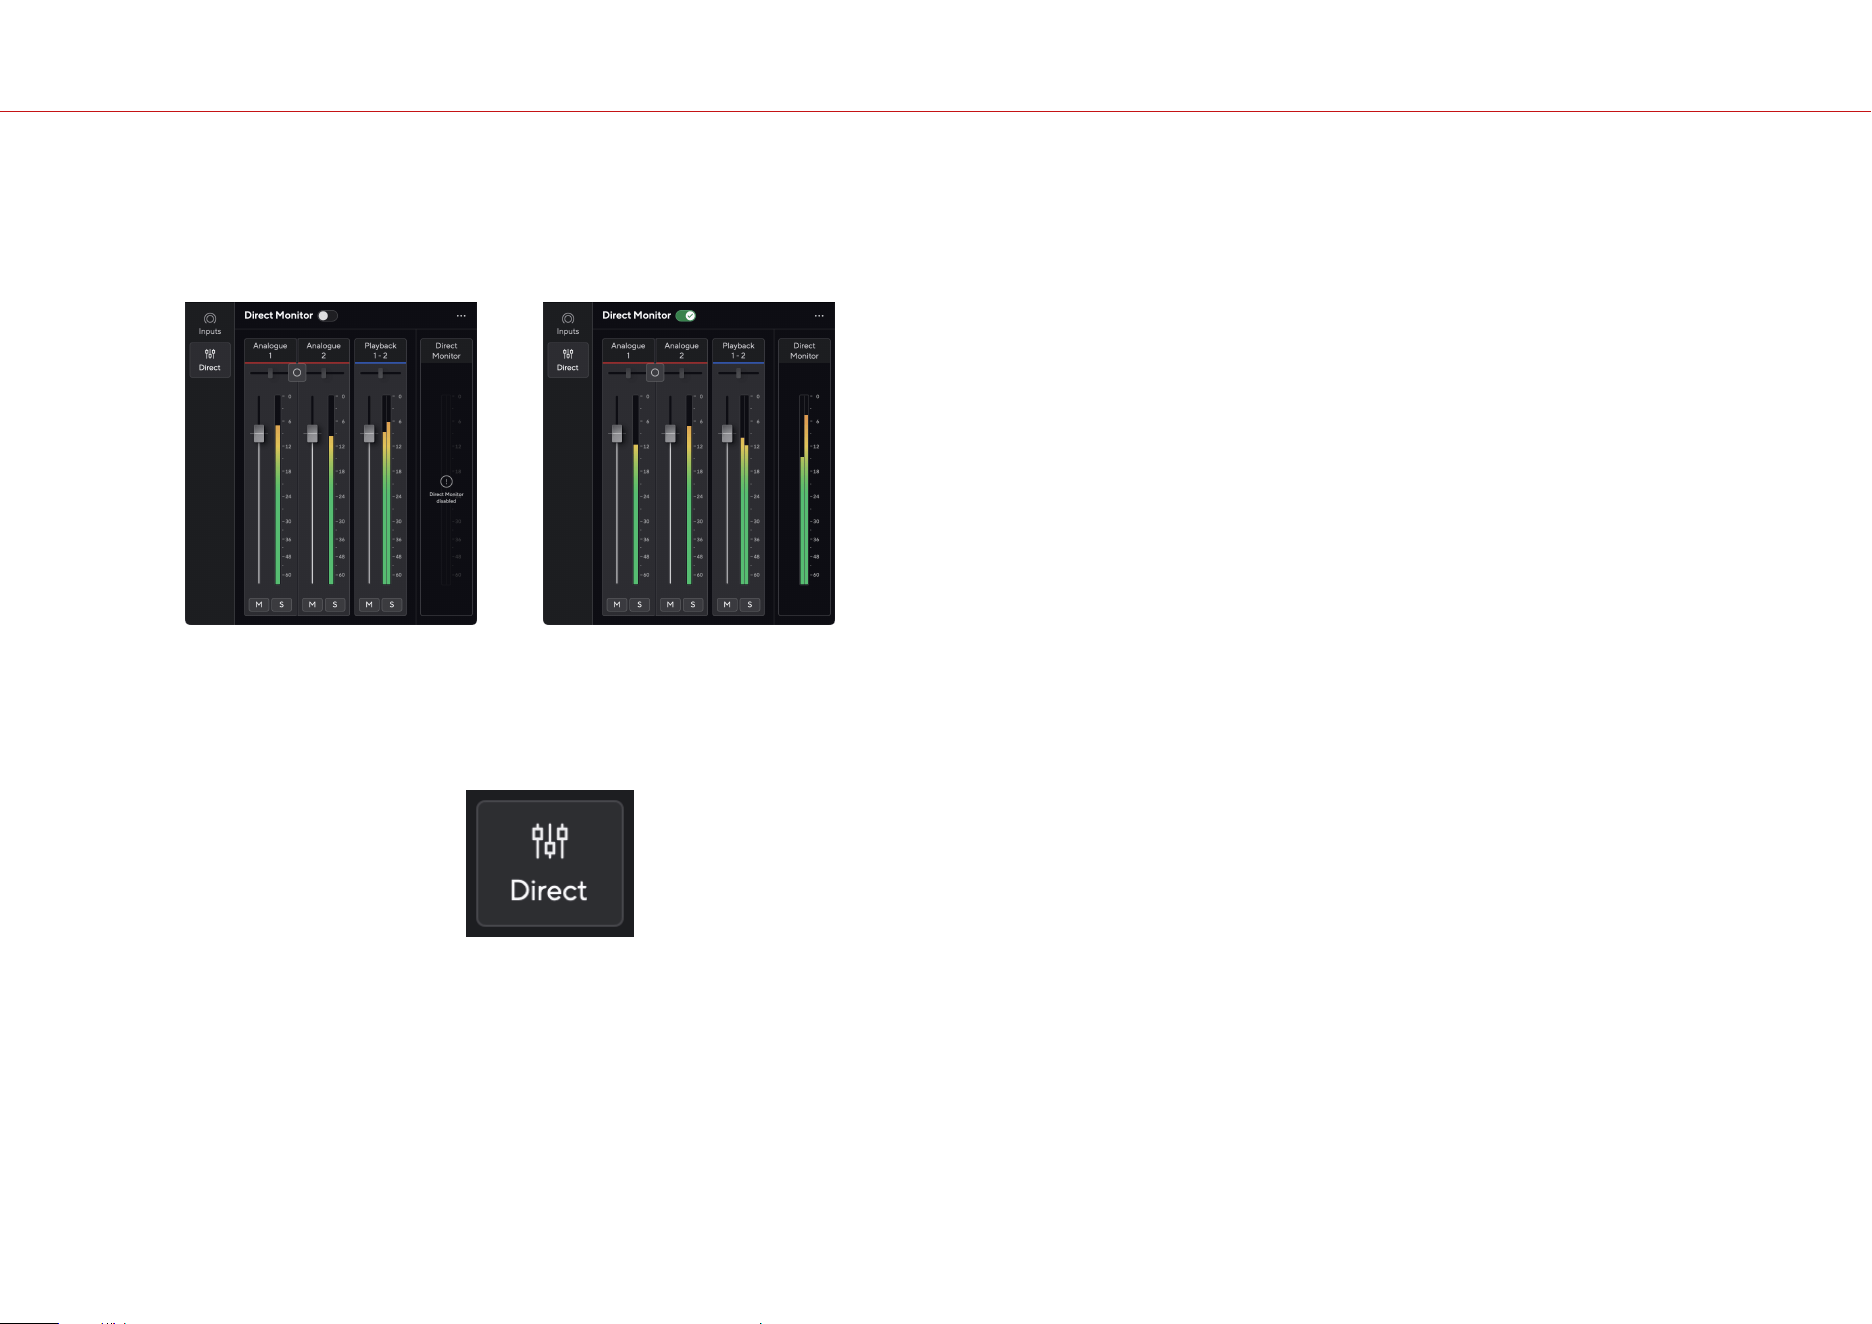
Direct Monitor Adjustment
From Focusrite Control 2 you can enable and adjust the Direct Monitor mix to balance your inputs
with the Playback channels from your soware.
To enable Direct Monitor click on the Direct tab in Focusrite Control 2 and click the Direct Monitor
soware switch at the top of the tab. The switch lights green and Direct lights green on your
Scarlett 2i2's front panel.
Direct Monitor O Direct Monitor on
To adjust your Direct Monitor mix:
1. Open Focusrite Control 2.
2. Click on the Direct tab.
3. Use the Mixer Channels, (faders, Mute and Solo buttons) to adjust the levels for
Analogue 1, Analogue 2 and Playback 1-2.
The final meter under Direct Monitor shows the combined level going to your monitor
and headphone outputs.
Scarlett 2i2 4th Gen User Guide
20
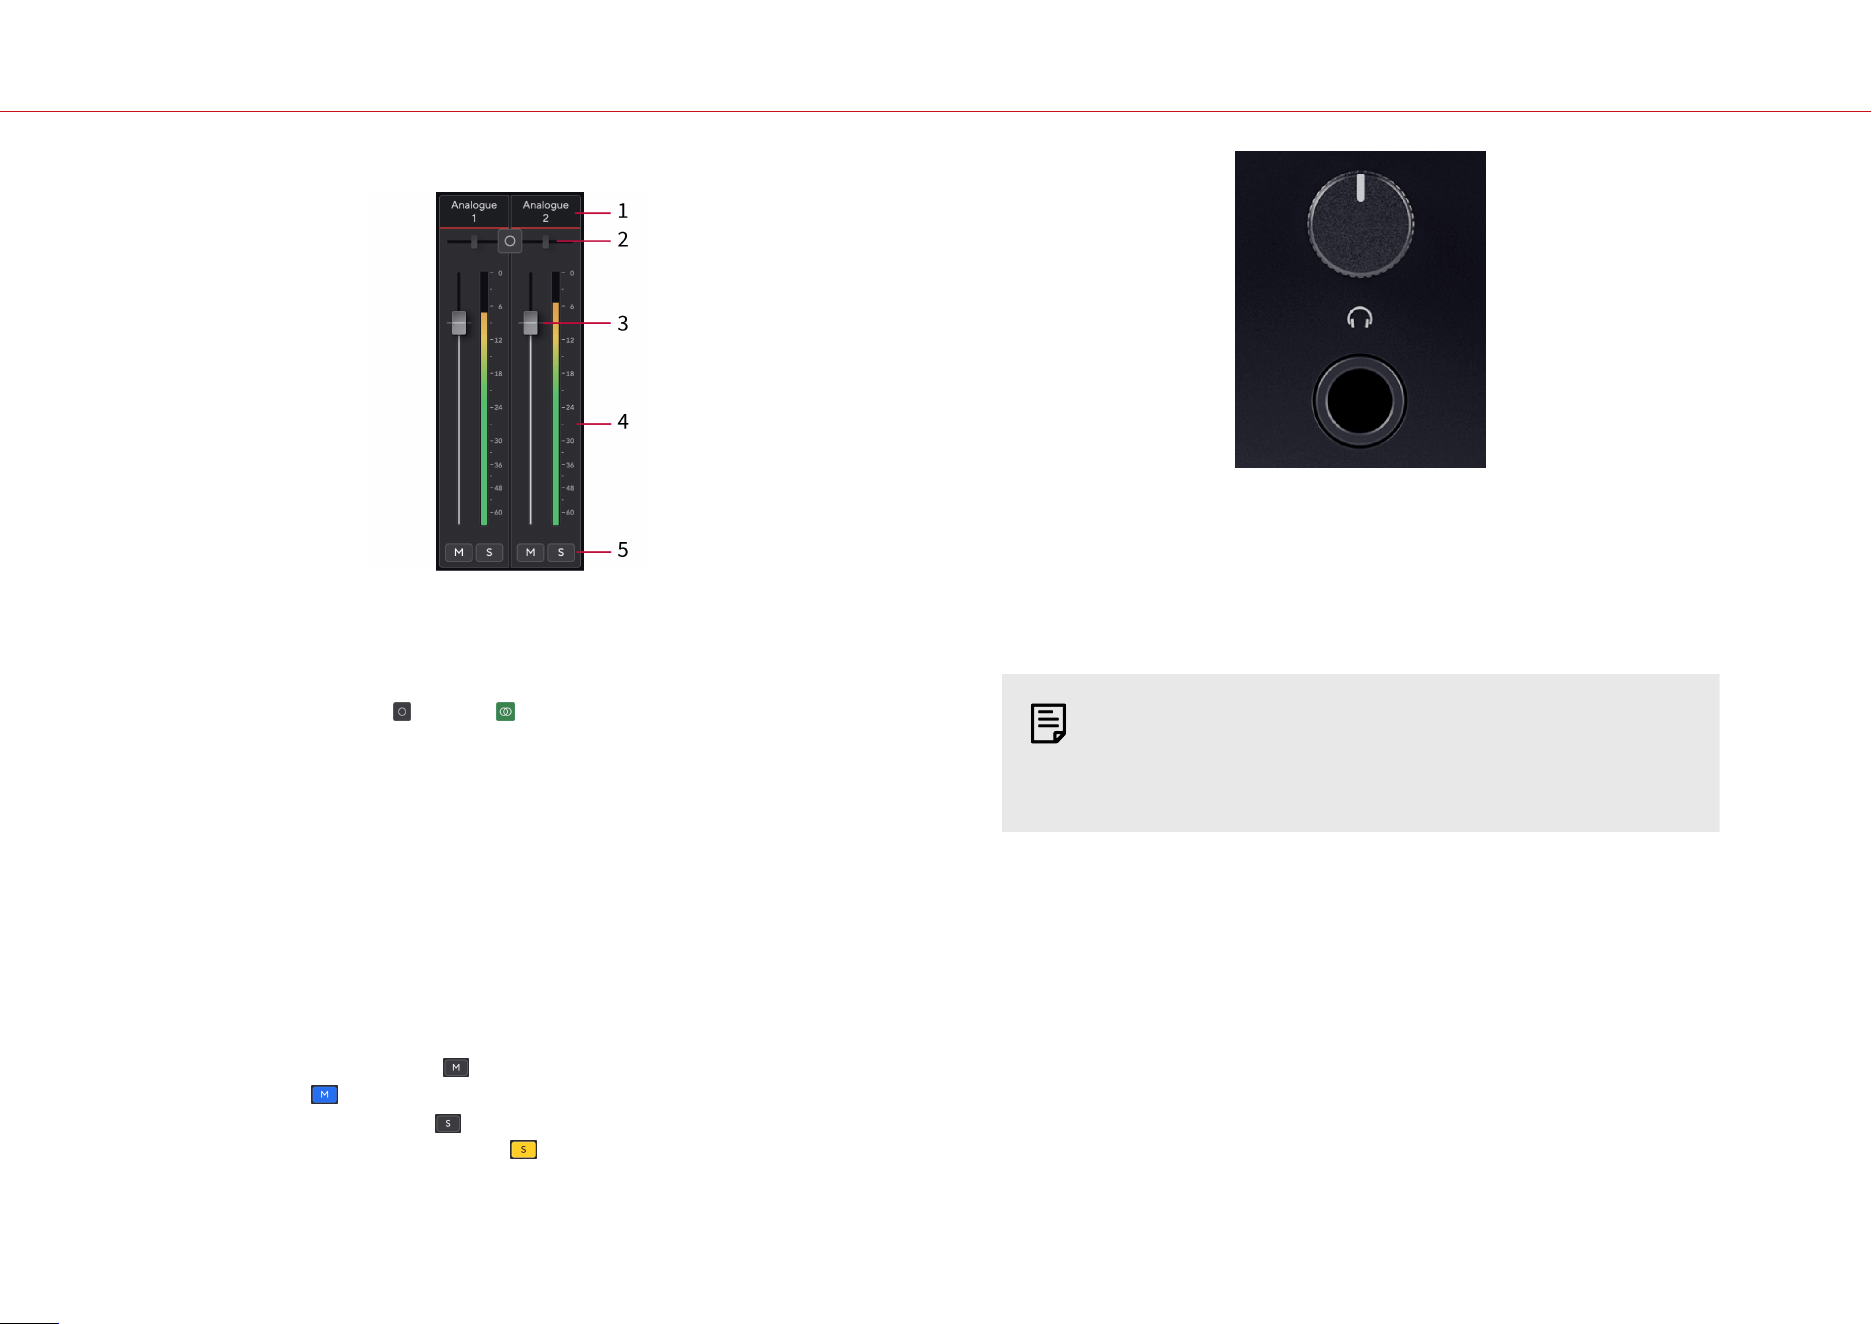
Using the Mixer Channels
Each mixer channel has a number of functions.
1. Mix Channel Name
This shows the name of the mixer input.
2. Stereo/Mono Switch and Pan
The Direct Monitor Mode button between the channels changes the direct monitor
mode between mono and stereo .
The Pan indicators on either side show where that channel is panned in the direct
monitor mix. The pan is not editable and has two states depending on the Direct
Monitor you select, centre (mono) hard-le and hard-right (stereo).
3. Fader
The Fader adjusts the level going to your Mix destination. Alt, option ⌥ or double-
click to reset.
The faders have no eect on the sources you are currently recording.
4. Meter
This shows you the channel's level, in dBFS. Green shows a good level and amber
means the level is very high.
You'll see two meters for stereo channels, one for each le and right side.
The meter shows the level post-fader, the fader setting will aect the meter.
5. Mute and Solo
Mute - Click the Mute button to silence the channel in the Mix. The Mute button
lights blue when enabled. You can Mute multiple channels simultaneously.
Solo - Click the Solo button to solo the track by silencing all other channels in
the Mix. The Solo button lights yellow when enabled. Enabling Solo on multiple
channels silences any channels without Solo enabled, i.e. you will hear all the Solo'd
channels.
If you enable both Mute and Solo, the last clicked option takes priority.
Headphone Output
The headphone output is a 6.35mm (¼”) TRS jack. Many headphones have a 3.5mm TRS jack, to
connect them to your Scarlett 2i2 you must use a TRS 6.35mm to 3.5mm adaptor.
The control above the headphone output controls the level going to your headphones.
Some higher impedance headphones may be quiet using them with a Scarlett 2i2, we
recommend using headphones with an impedance up to 300Ω.
Note
Some headphones and jack adaptors may have TS or TRRS connectors, for example,
if they have a microphone or volume control built into the cable. It's unlikely these
headphones will work properly. If you're having issues, use headphones and a jack
adaptor with TRS jack connectors.
Scarlett 2i2 4th Gen User Guide
21
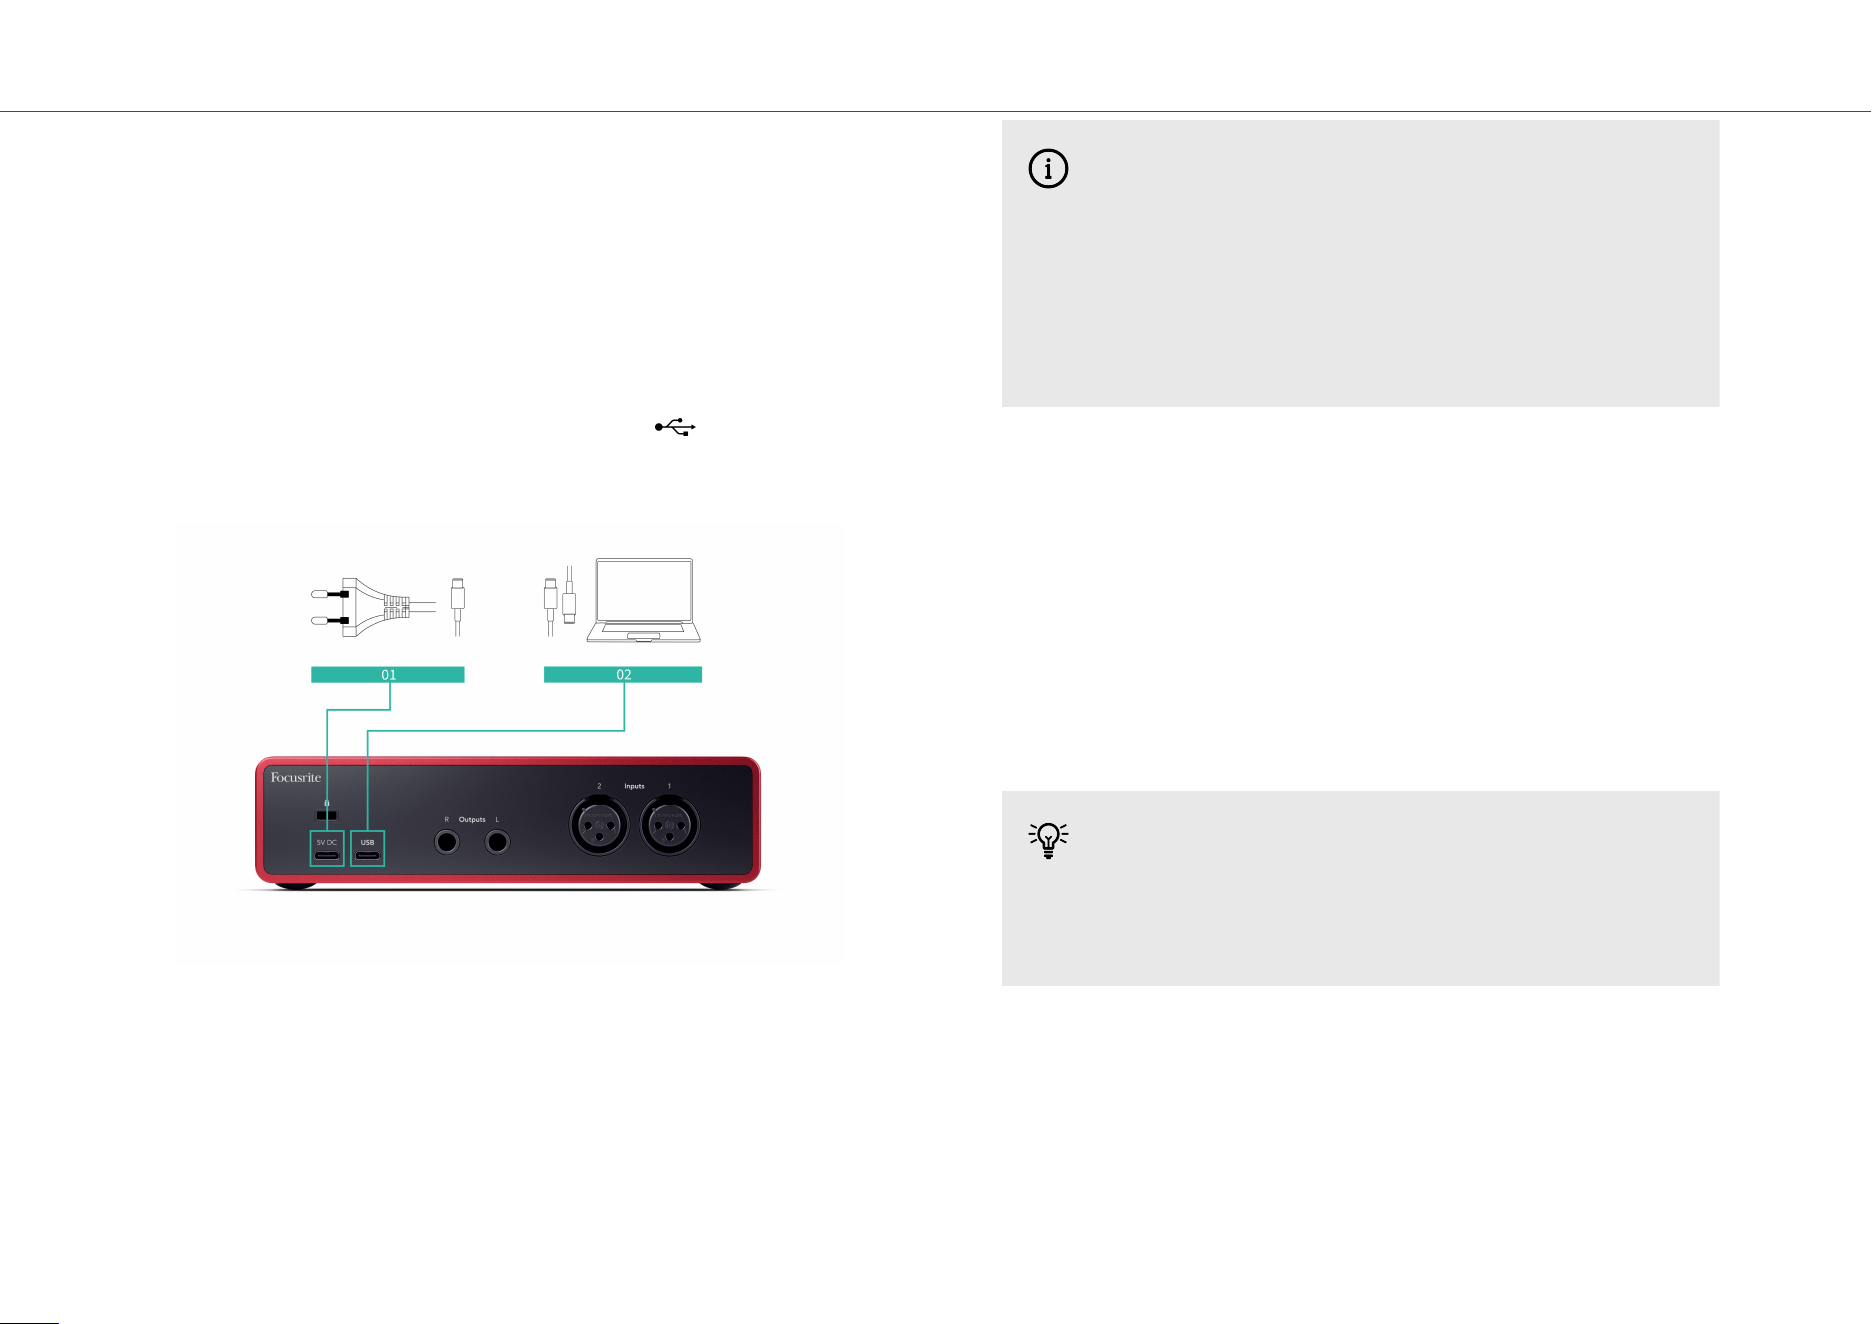
Back Panel In Depth
This section covers all the features on your Scarlett 2i2's back panel, what they do, how you
might use them and how they work in Focusrite Control 2.
USB Connections
5V DC Port
With most computers, you won't need to use the 5V DC port. However, if your computer's USB
ports can't provide 900mA, we've included a 5V DC port so your Scarlett can be powered from the
mains using a USB PSU.
The Scarlett 2i2 consumes a large amount of power. In some high-power situations, such as
playing headphones at a high volume, some computers' USB ports may not be able to provide
enough power and your Scarlett 2i2 may disconnect or the USB icon flashes red.
If you experience this behaviour, we recommend you use a mains PSU to power your Scarlett via
the 5V DC port.
USB Port
The USB Type-C port labelled USB is to connect your Scarlett to your computer.
The connection to your computer provides USB power, two-way audio communication, and a
connection to Focusrite Control 2.
The USB Icon Flashes Red
If the USB icon flashes red this means your Scarlett 2i2 isn't getting enough power.
To resolve this issue:
•
Make sure you are using the original USB cable provided with your Scarlett.
•
Test a dierent USB port on your computer, make sure you're connecting
directly to your computer and not via a USB hub.
•
If needed use the second 5V DC port on the back of the Scarlett 2i2. Connect a
second USB cable from a separate USB PSU. Make sure you don't connect the
power adaptor while you're playing audio.
Speaker Outputs
Outputs 1 and 2 are line-level outputs to connect your Scarlett 2i2 to an amplifier or active
monitors. The outputs are balanced 1/4" TRS jack outputs, you can use them with either
unbalanced TS or balanced TRS jack cables.
Your Scarlett 2i2's front panel Output dial controls the level sent to Outputs 1 and 2.
Microphone Inputs
The 3-pin XLR connector Inputs are at microphone level and designed for you to connect your
microphones.
You can control your microphone level using the corresponding input gain control on the front
panel. 48V phantom power is also available if you are using a condenser mic, you can enable
phantom power using the front panel 48V button.
Tip
The Scarlett 2i2 has XLR inputs at the back for microphones and 6.35mm (1/4") jack
inputs on the front for instruments or line-level devices.
Using the front panel jack input(s) disables the XLR mic input. If you're not getting
sound from your XLR input(s), ensure nothing is connected to the front panel jack
inputs.
Scarlett 2i2 4th Gen User Guide
22

DAW (Recording Soware) Setup
TheScarlett is compatible with any ASIO-supported DAW on Windows and any Core Audio-
supported DAW on macOS.
To help you get started, we've put together steps to set up your interface and start recording in
the most common DAWs. If you need any more information, please see the user guide for your
DAW.
If you don't already have a DAW installed on your computer to help get you started, theScarlett
comes with Ableton Live Lite and a version of Pro Tools. You can access these in Easy Start [5] , or
from your Focusrite account.
Tip
What is a DAW?
DAW stands for 'Digital Audio Workstation' and is the term given to any soware you use
to record arrange or make music.
Scarlett 2i2 4th Gen User Guide
23
Logic and GarageBand
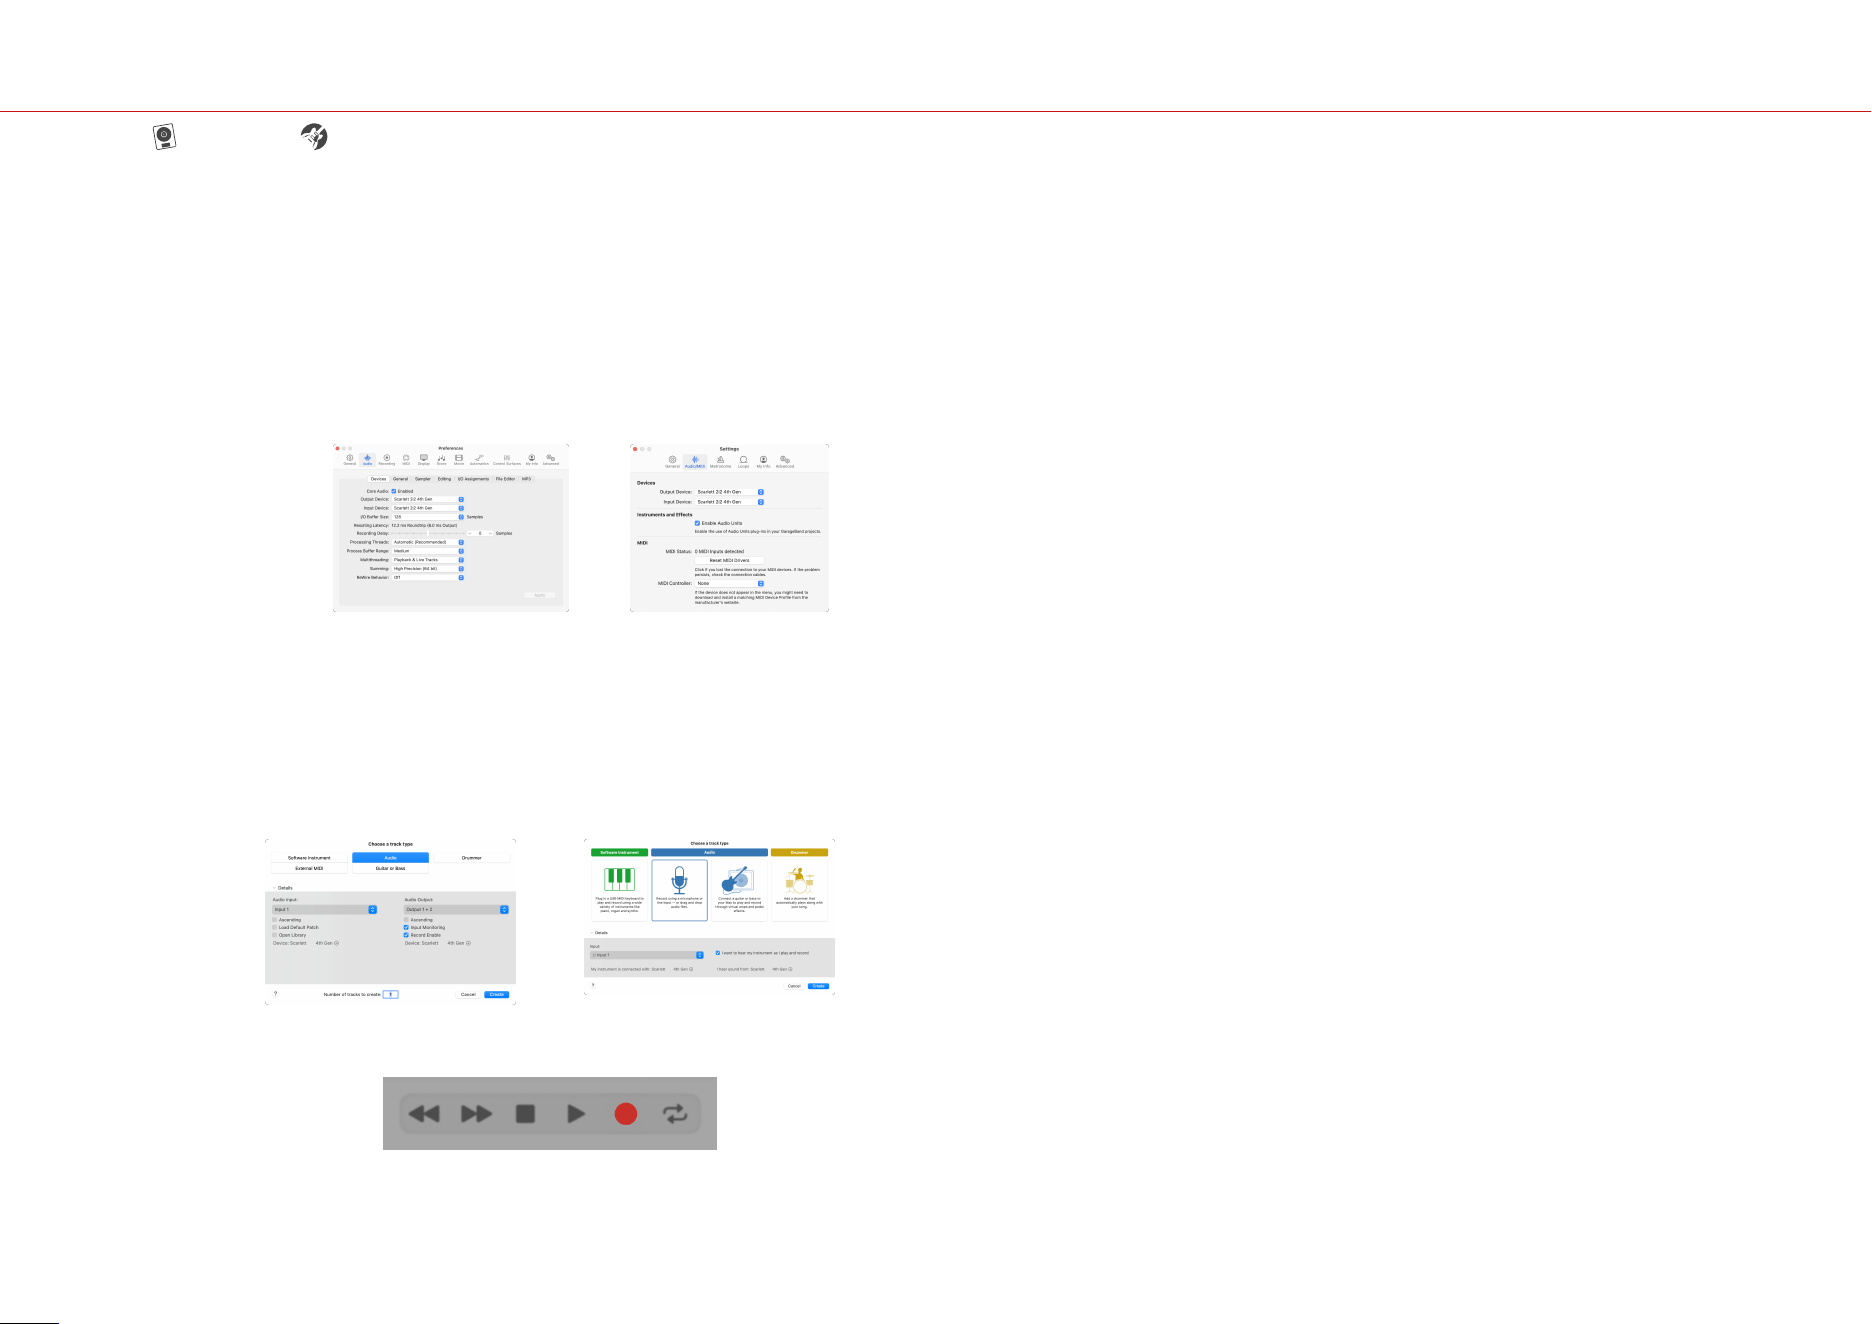
To get set up in Logic Pro and GarageBand follow these steps:
1. Open Logic Pro or GarageBand on your computer (you may be prompted to Choose a
project, you can choose an Empty Project or use a template).
2. Select Audio in the Choose a track type window.
3. Set the Audio Input to Input 1.
If you don't see any inputs, make sure the Device: is set to your Scarlett 2i2.
a. Click the arrow to the right of the Device section.
b. In the preferences window, set the Output Device and Input Device to
Scarlett 2i2 4th Gen.
Logic Pro X GarageBand
c. Click Apply (Logic Pro only).
d. Close the Preferences or Settings window.
4. Logic Pro: Tick Input Monitoring and Record Enable .
GarageBand: Tick I want to hear my instrument as I play and record.
This allows you to hear sound coming in from your Scarlett's input.
5. Click Create.
Logic Pro
GarageBand
6. When you're ready to record, click the record button at the top of Logic/GarageBand.
Scarlett 2i2 4th Gen User Guide
24
Ableton Live
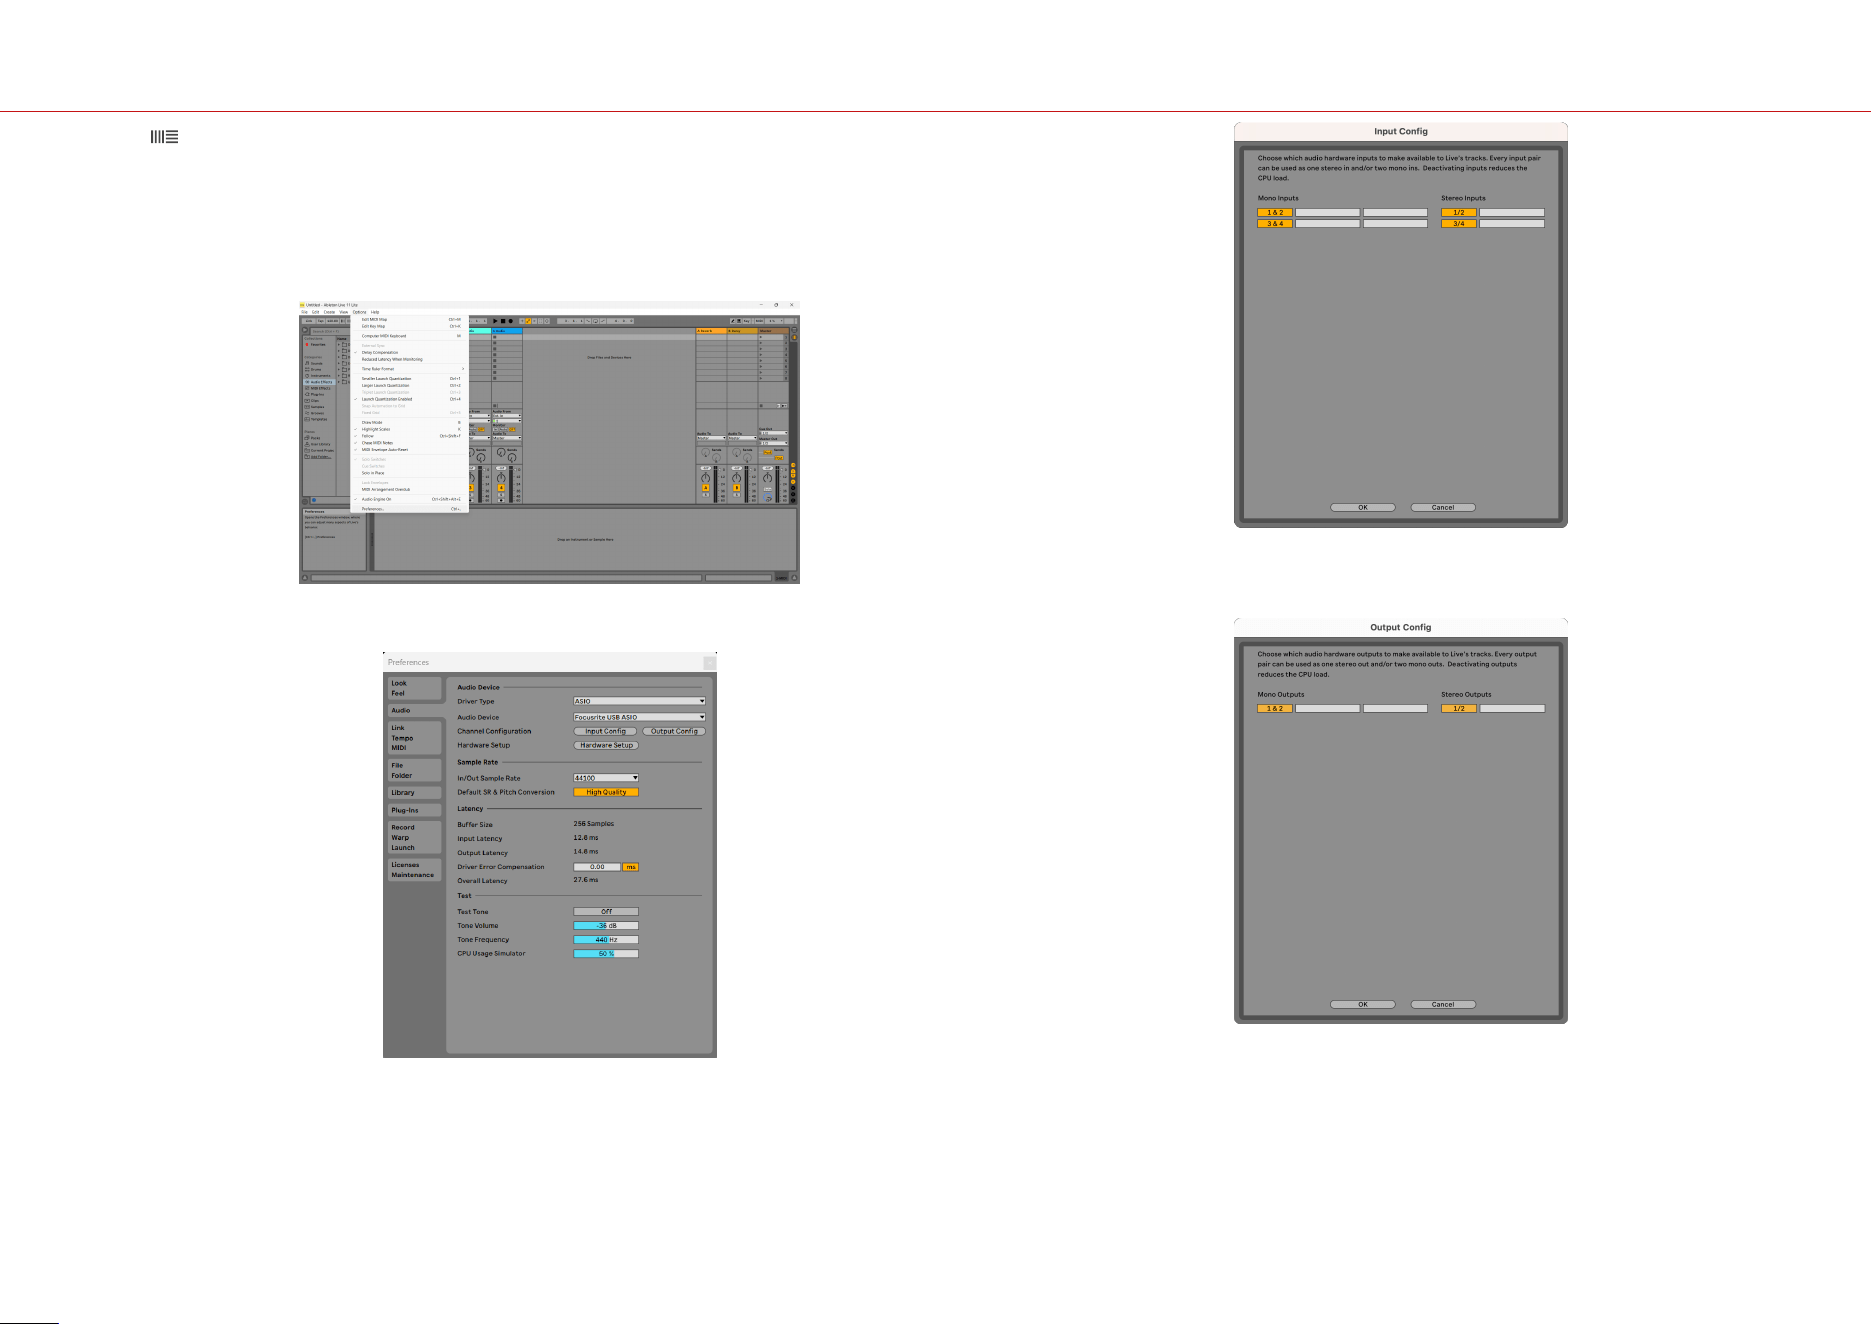
To get set up in Ableton Live follow these steps:
Windows
1. Open Ableton Live on your computer.
2. Click Options > Preferences....
3. Go to the Audio tab on the le-hand side of the Preferences window.
4. Set the Driver Type to ASIO, and Audio Device to Focusrite USB ASIO.
5. Click Input Config.
The next step is to make all the inputs on your device appear as input options in
Ableton.
6. Click to highlight each set of Mono and Stereo Inputs to make sure they appear as
selectable in Live.
7. Click OK.
8. Do the same for the Output Config, if you are using multiple outputs from your
Scarlett 2i2.
9. Close the Preferences Window.
Mac
1. Open Ableton Live on your computer.
2. Click Live in the top menu bar.
Scarlett 2i2 4th Gen User Guide
25
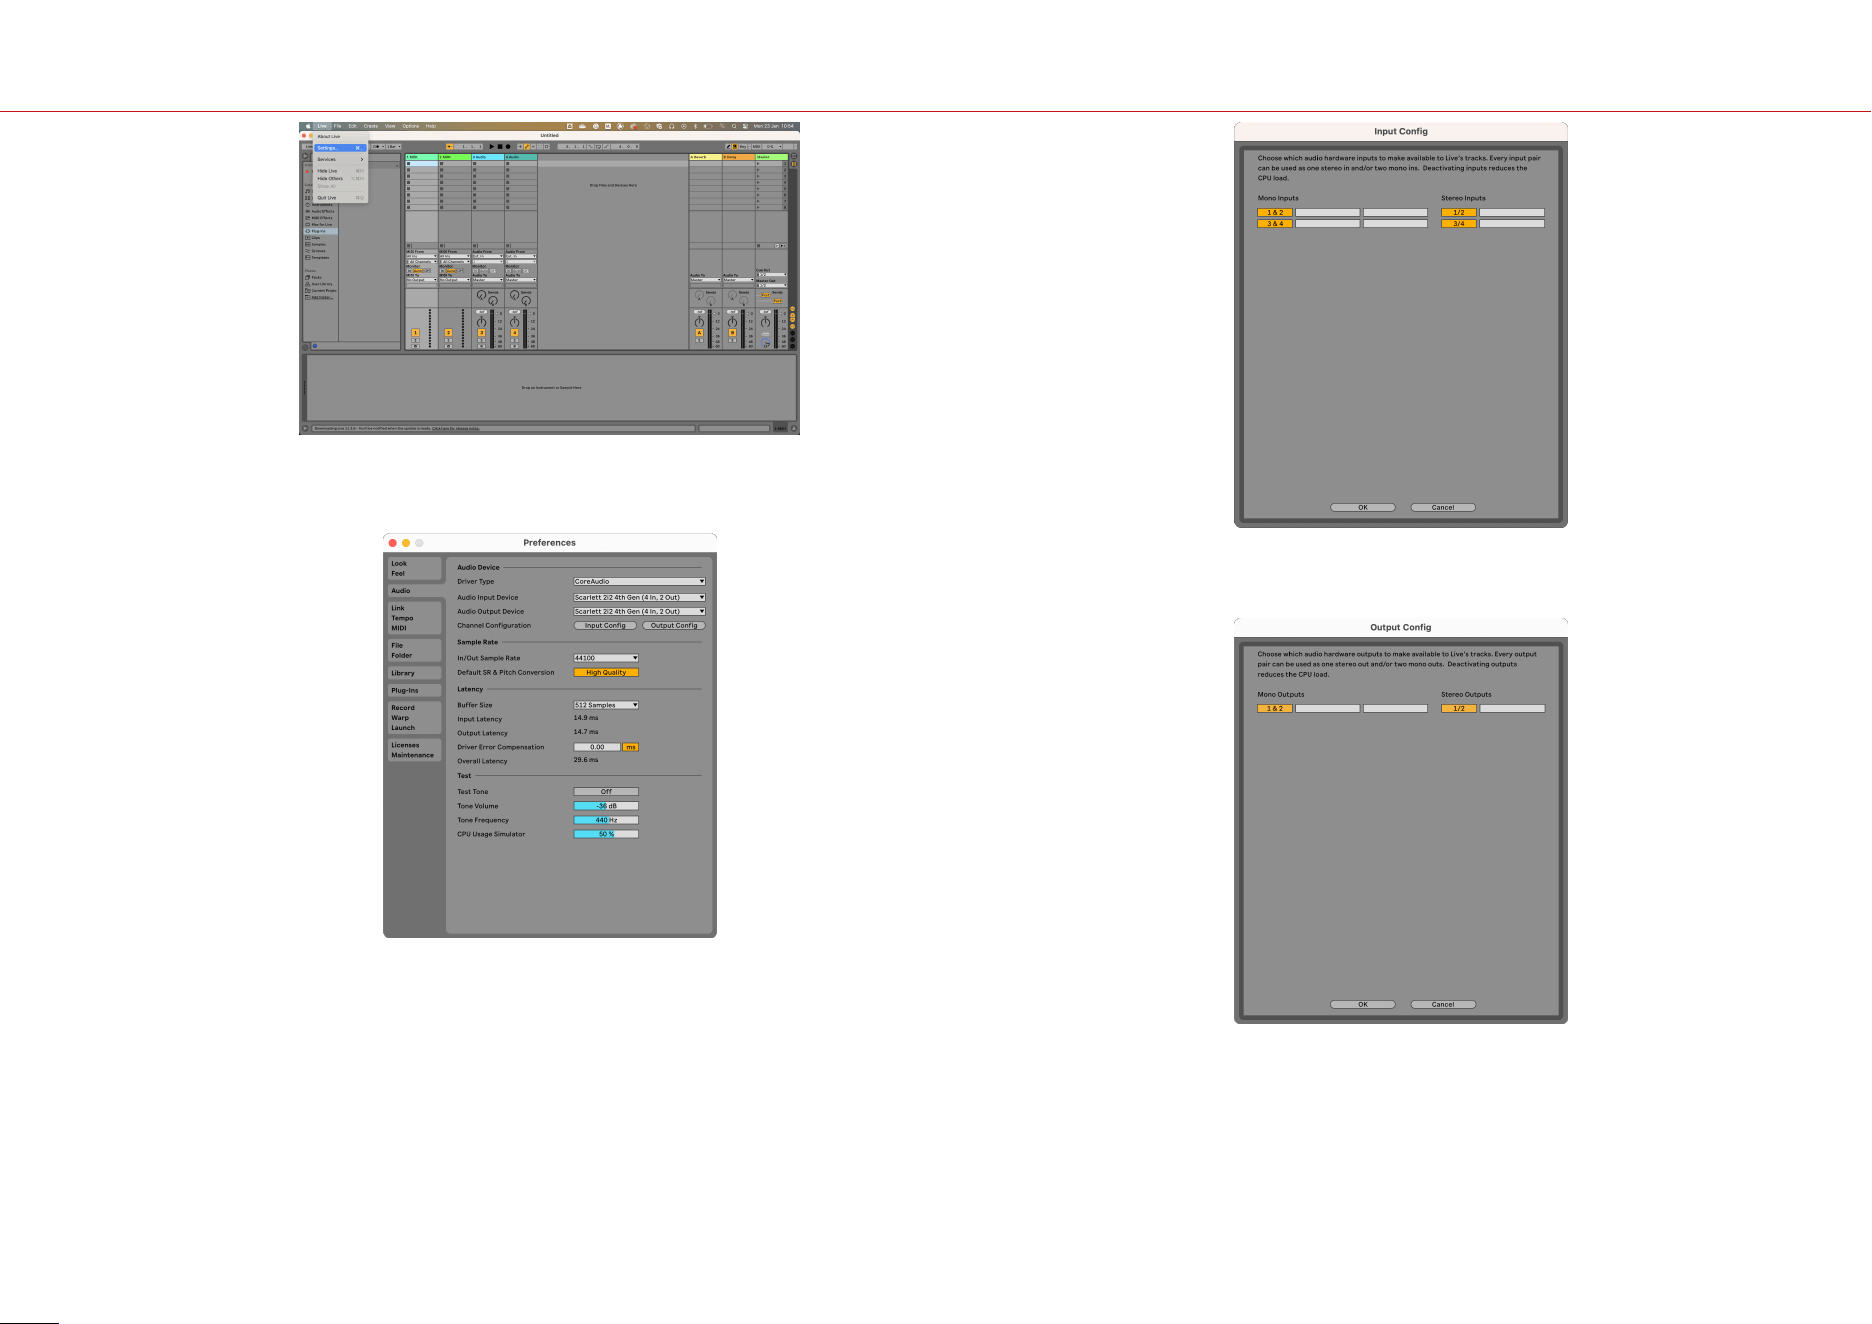
3. Click Settings.
4. Go to the Audio tab on the le-hand side of the Preferences window.
5. Set the Audio Input Device and Audio Output Device to Scarlett 2i2 4th Gen.
6. Click Input Config.
The next step is to make all the inputs on your device appear as input options in
Ableton.
7. Click to highlight each set of Mono and Stereo Inputs to make sure they appear as
selectable in Live. You will see up to four channels.
8. Click OK.
9. Do the same for the Output Config, if you are using multiple outputs from your
Scarlett 2i2.
10. Close the Preferences Window.
Scarlett 2i2 4th Gen User Guide
26
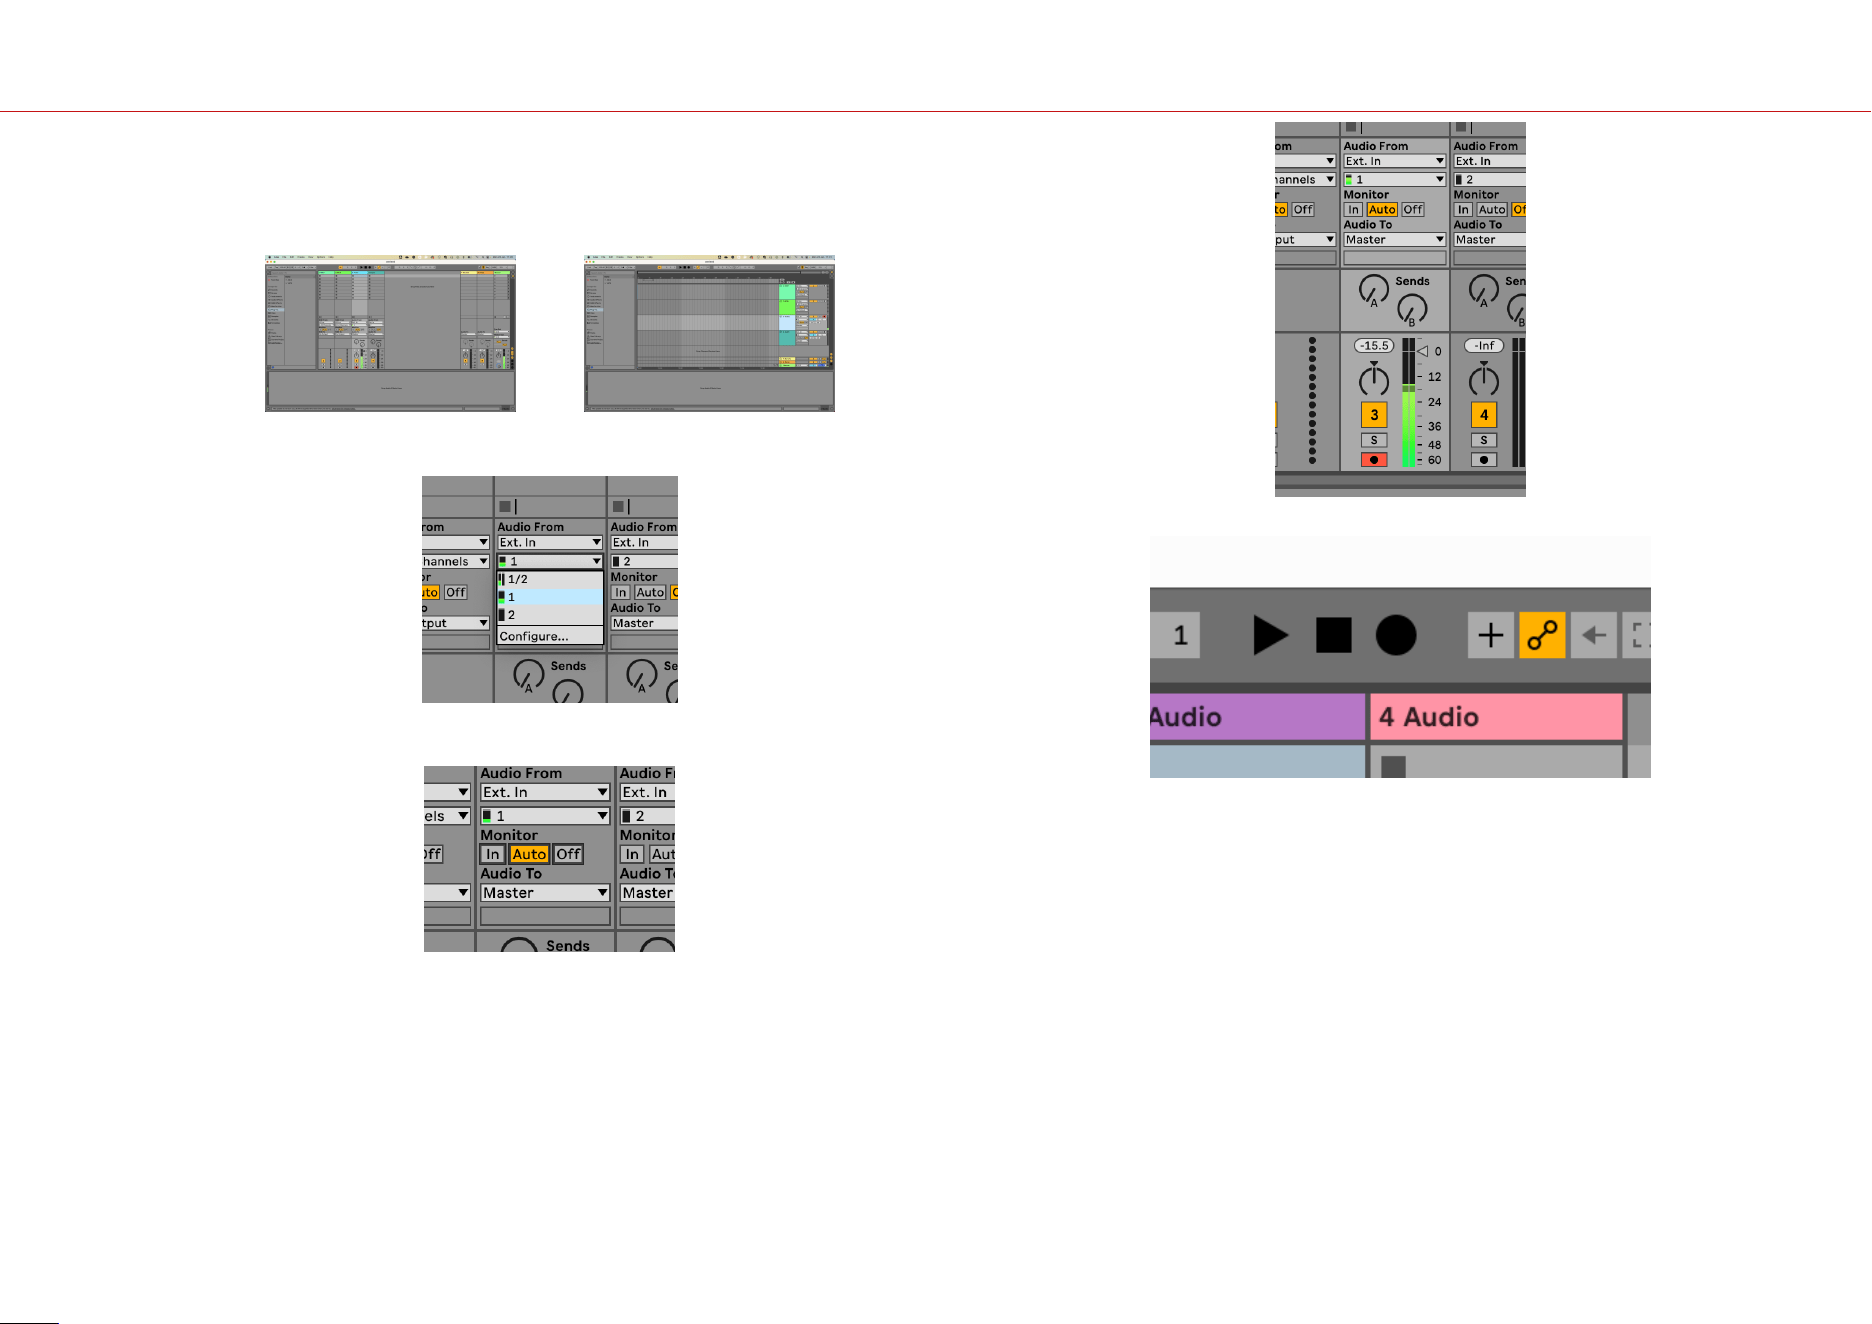
Getting sound into Ableton
1. Click to highlight an Audio Track in Live's main window. Live had two views (Session
and Arrangement), so depending on which view you are in, please see the following
screenshots.
2. Set the Audio From to Ext. In and the input drop-down to the interface input you are
using, e.g. 1.
3. Set the Monitor to Auto.
This allows you to hear sound coming in from your Scarlett's input.
4. Click the record arm button beneath the track. It lights red when record arm is on.
Send a signal to the input on your Scarlett and you should see the meter in Ableton
move.
5. When you're ready to record, click the record ⏺ button in Ableton's transport bar.
Scarlett 2i2 4th Gen User Guide
27
Pro Tools
To get set up in Pro Tools, follow these steps:
Mac and Windows
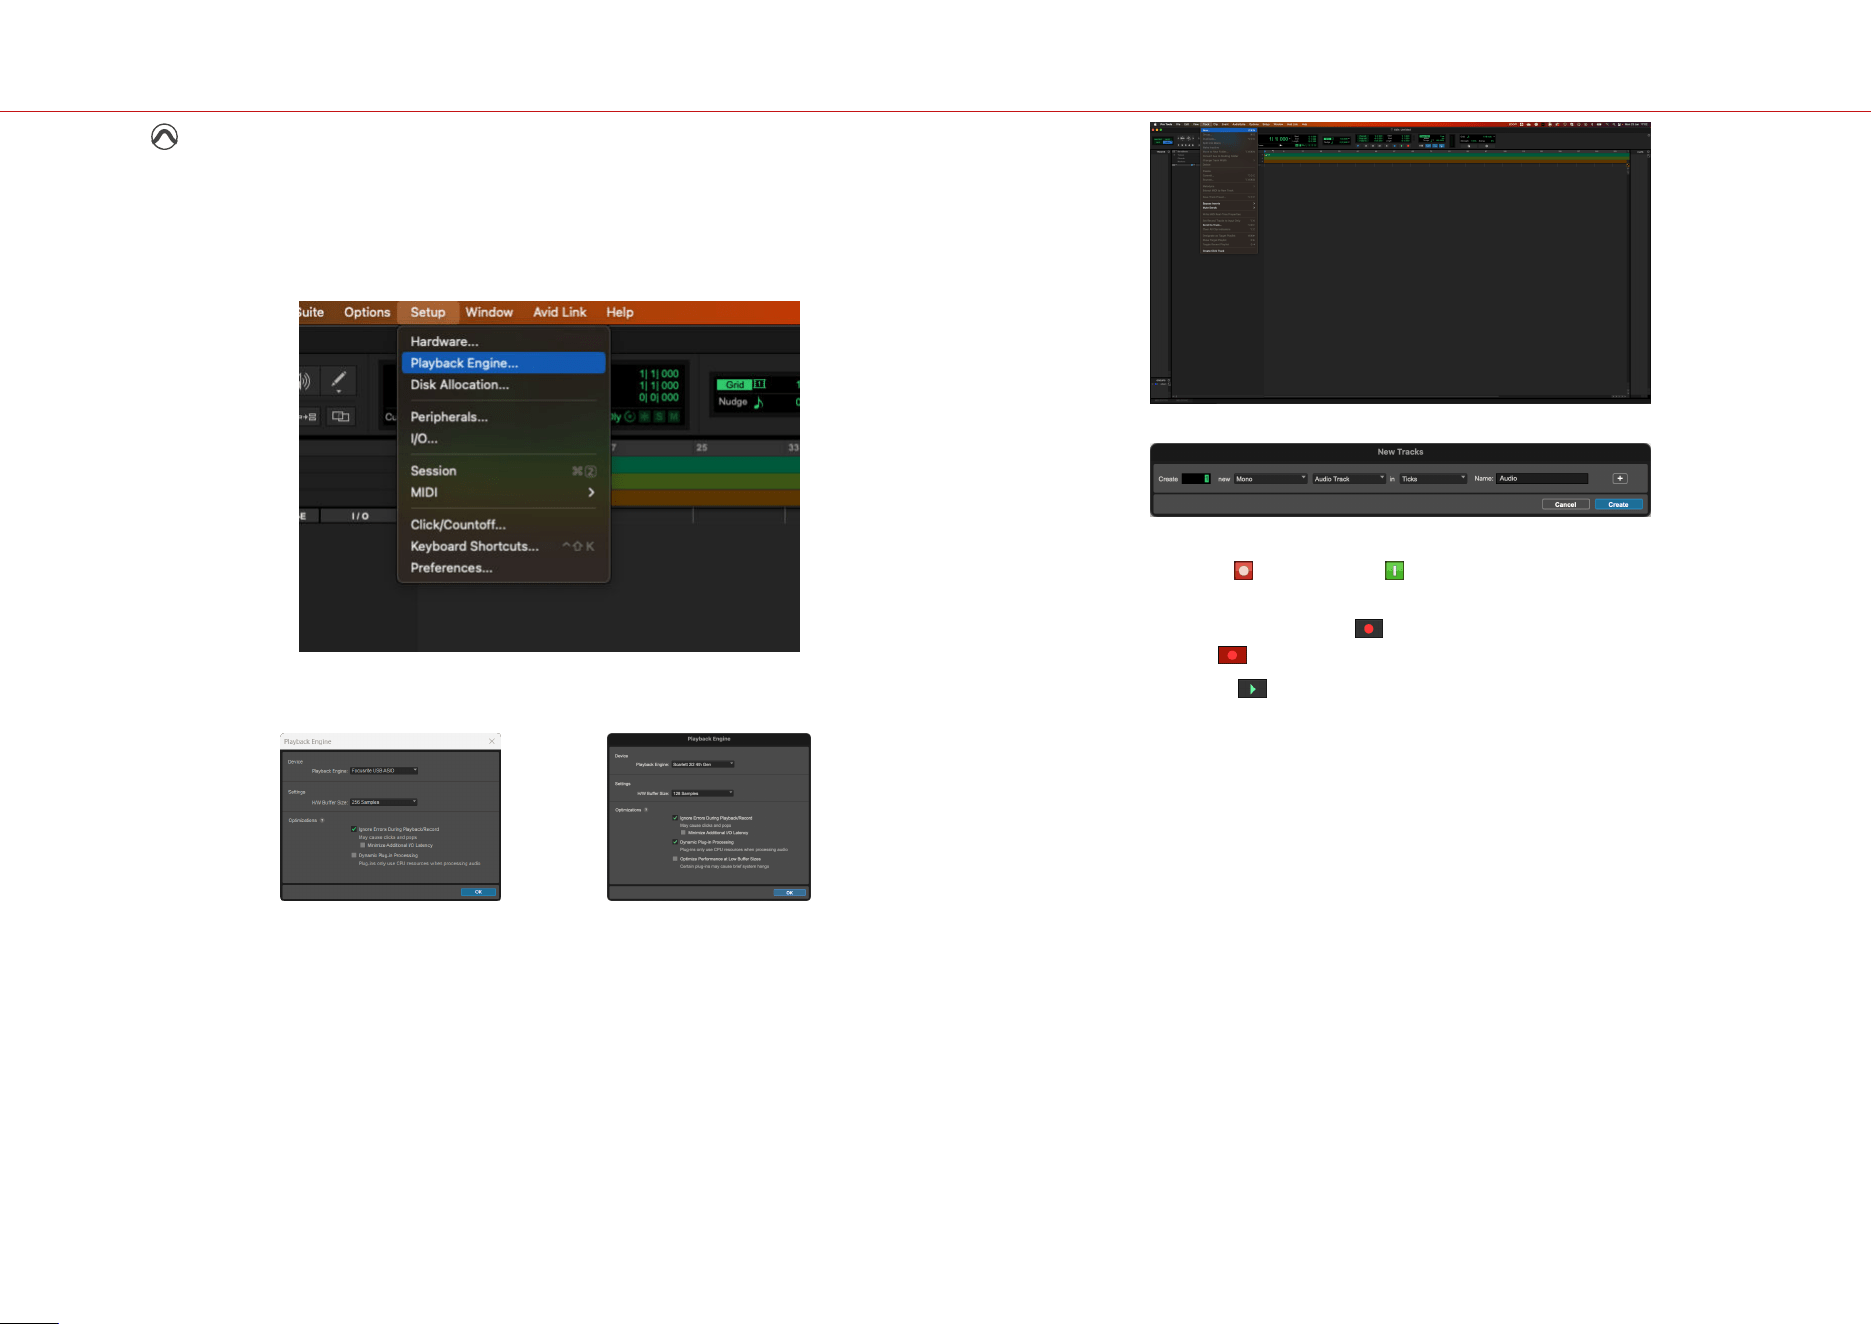
1. Open Pro Tools on your computer.
2. Click Setup > Playback Engine in the top menu bar.
3. Select Focusrite USB ASIO (Windows) or Scarlett 2i2 4th Gen in the Playback Engine
dropdown.
Windows Mac
4. Click Track > New in the top menu bar.
5. Set the number of tracks you need and set the type to Audio Track.
6. Click Create
7. Click the record arm and input enable buttons on the track.
This allows you to hear sound coming in from your Scarlett's input.
8. Click the main Record Enable button at the top of the Pro Tools window, it turns
red when enabled .
9. Click the Play button to begin recording.
Scarlett 2i2 4th Gen User Guide
28
Reaper
To get set up in Reaper, follow these steps:
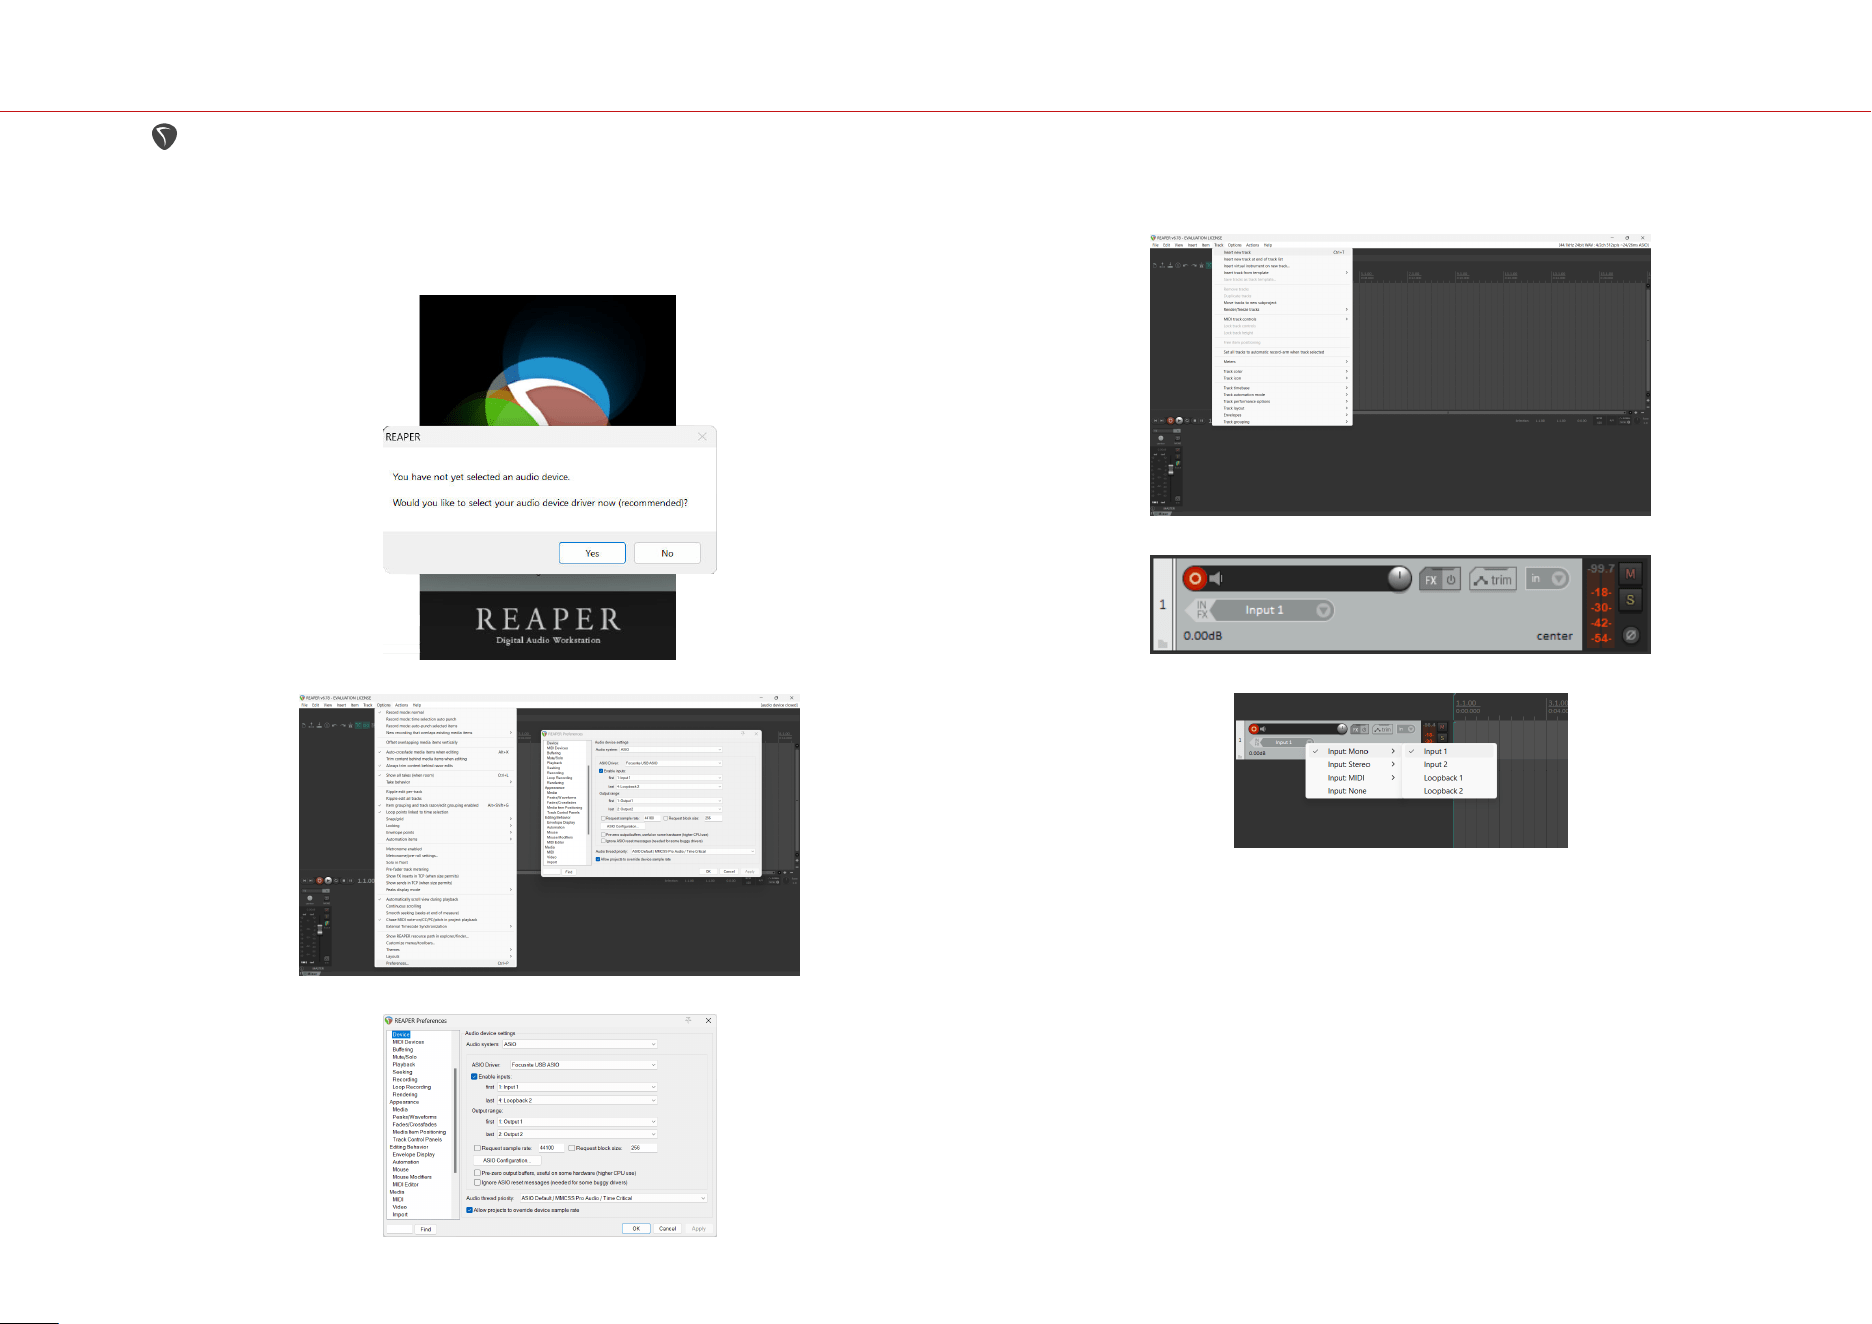
Windows
1. Open Reaper on your computer.
2. If you see a pop-up window, asking you to select your audio device driver, click Yes
If you don't see the pop-up, go to Options (top menu) > Preferences > Device
3. In the Audio device settings.
a. Select ASIO in the Audio system: dropdown.
b. Select Focusrite USB ASIO in the ASIO Driver: dropdown.
4. Click OK.
5. Click Track (top menu) > Insert New Track.
6. Click the red record-armed button.
7. Click the Input 1 box to select your input on your Scarlett 2i2.
8. When you're ready to record, click the record button in the bottom section of Reaper.
Mac
1. Open Reaper on your computer.
2. If you see a pop-up window, asking you to select your audio device driver, click Yes
Scarlett 2i2 4th Gen User Guide
29
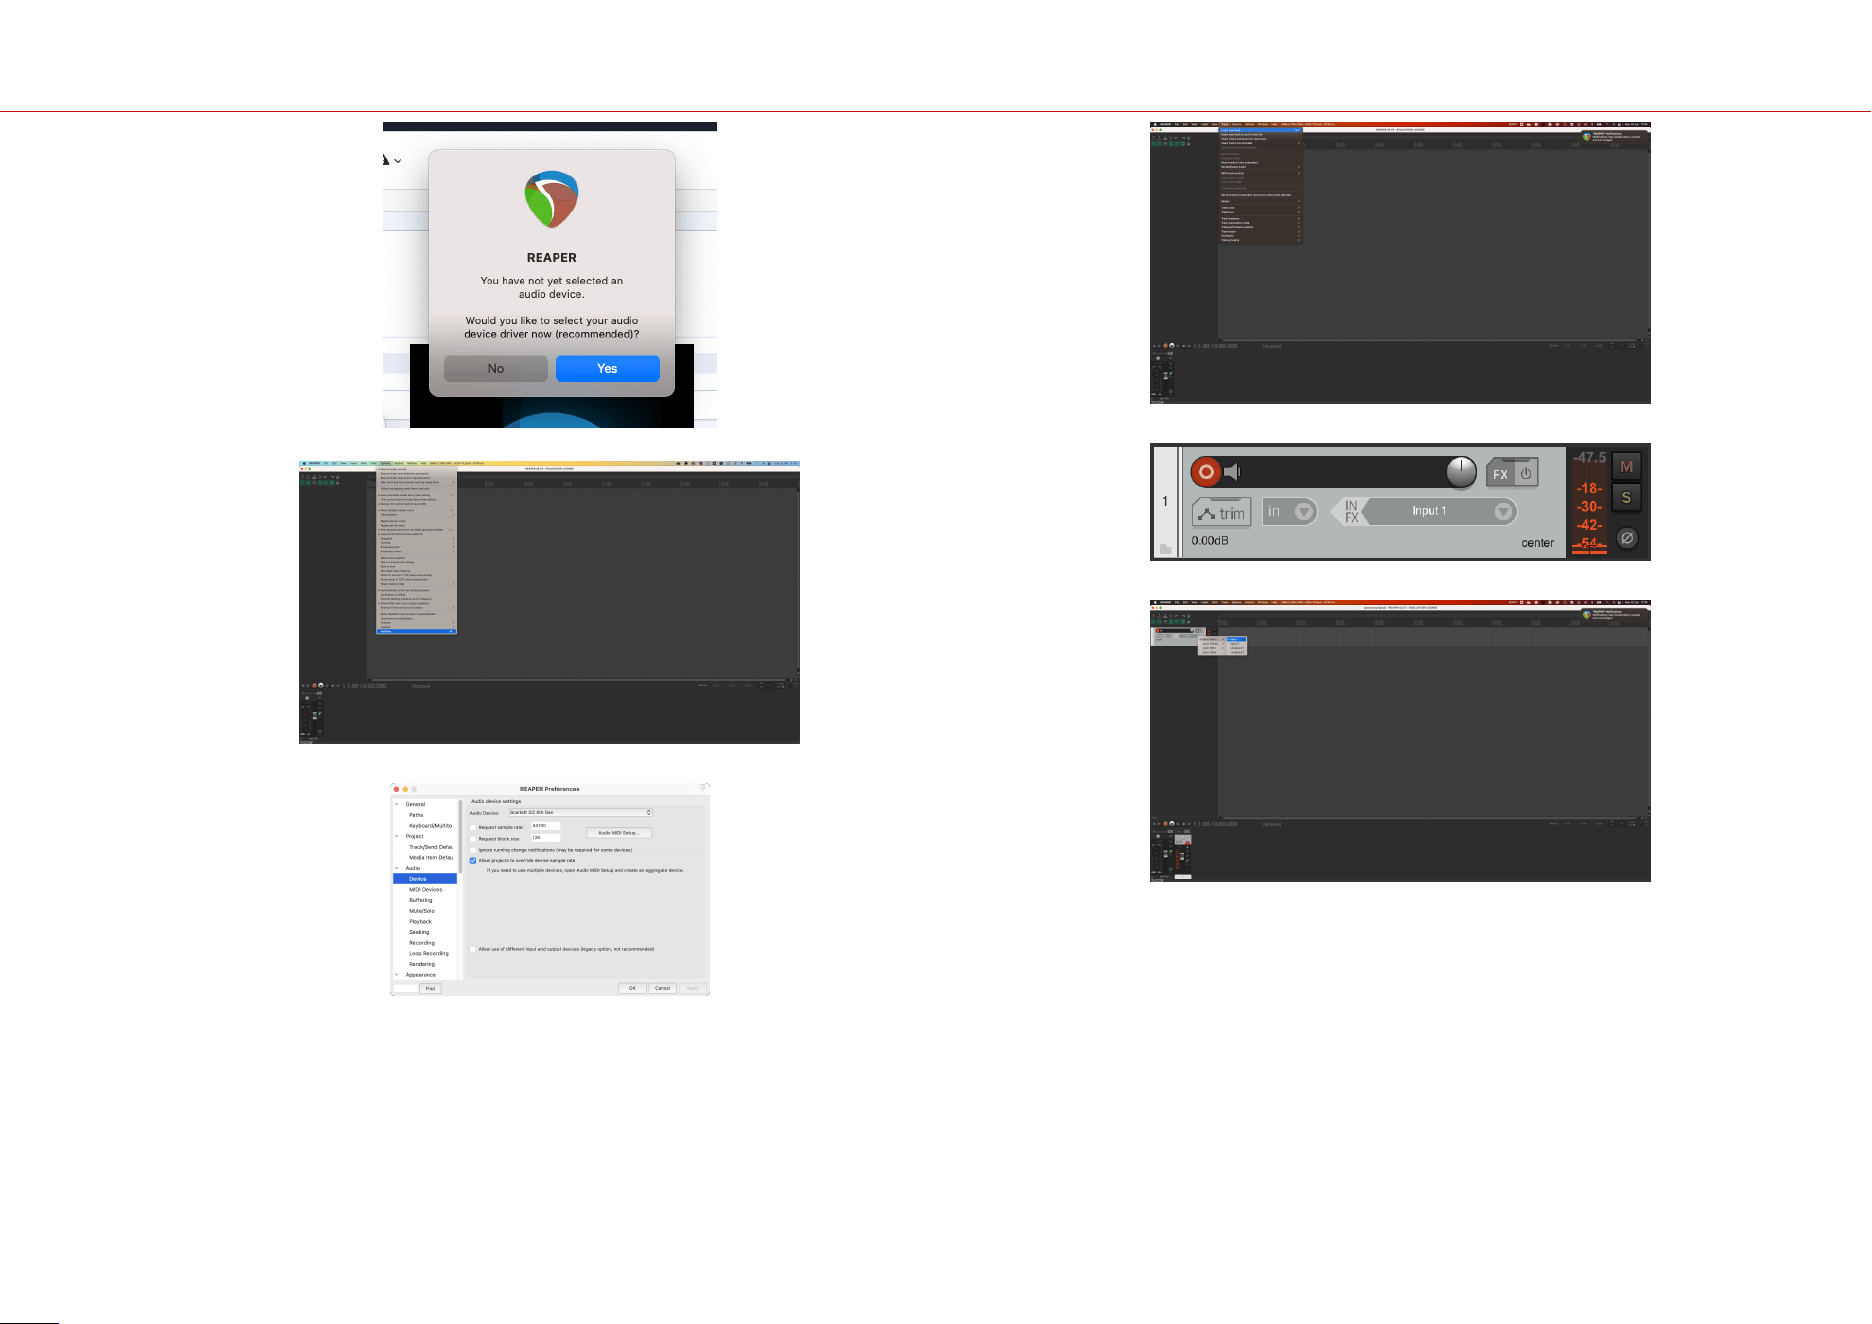
If you don't see the pop-up, go to Options (top menu) > Settings > Device
3. Choose Scarlett 2i2 in the Audio Device dropdown menu.
4. Click OK.
5. Click Track (top menu) > Insert New Track.
6.
Click the red record-armed button.
7. Click the Input 1 box to select your input on your Scarlett 2i2.
8. When you're ready to record, click the record button in the bottom section of Reaper.
Scarlett 2i2 4th Gen User Guide
30
FL Studio
To get set up in FL Studio follow these steps:
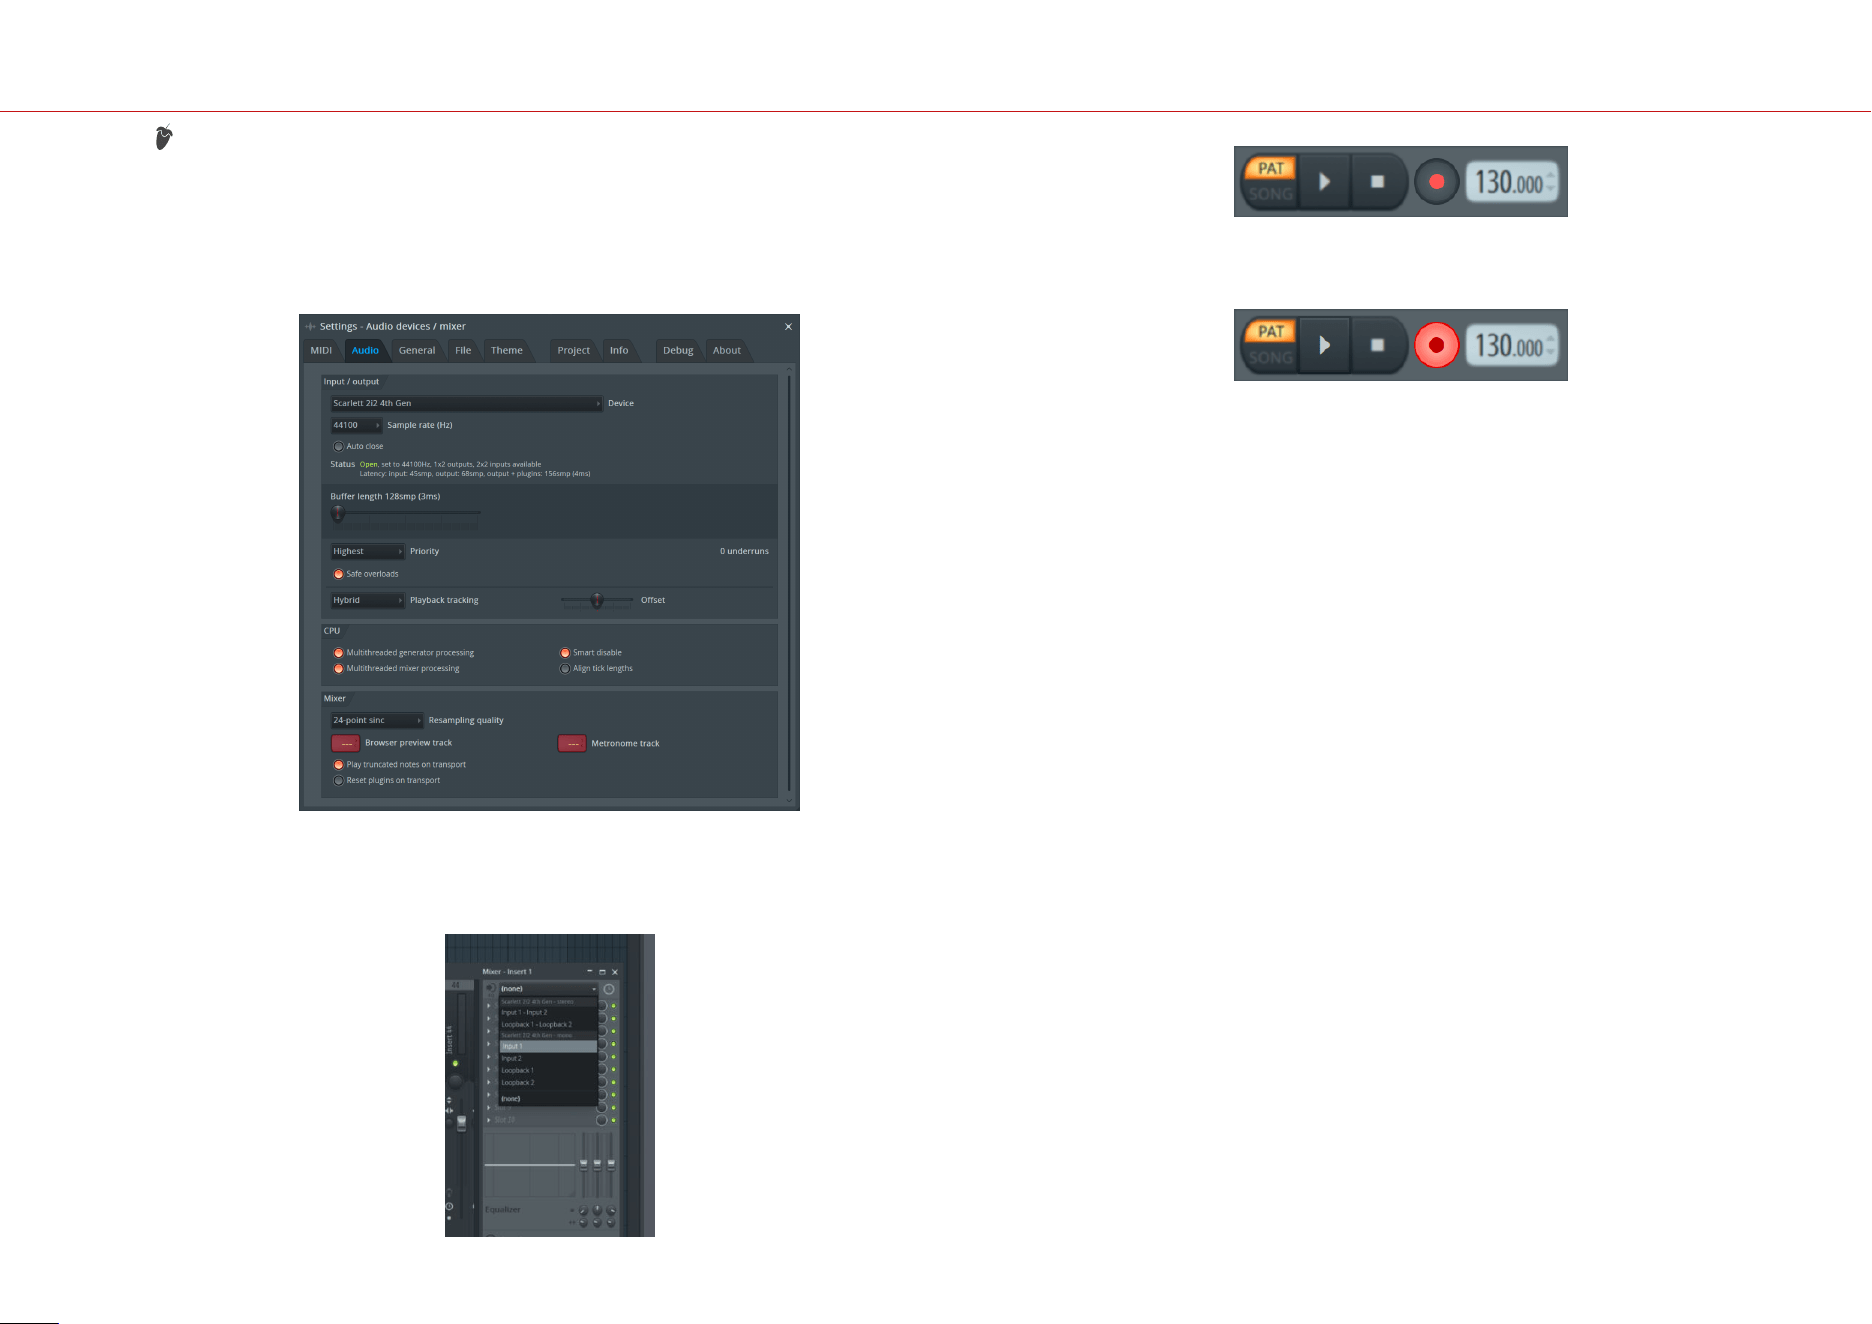
1. Open FL Studio on your computer.
2. Go to Options > Audio Settings.
3. Set the Device to Scarlett 2i2 4th Gen (or Focusrite USB ASIO on Windows) in the
Input / output section.
4. Close the Settings window.
5. In the Mixer click on the insert you want to record in to.
6. Set the external input drop-down from (none) to the interface input you are using, e.g.
Input 1 for input mono, or Input 1 - Input 2 for both inputs 1 and 2 in stereo.
7. Click the main record button in the transport section.
• Choose an option in the What would you like to record? window.
If you're not sure which option to choose, please see FL Studio's help files.
8. When you're ready to record, press the play button in the transport section.
Scarlett 2i2 4th Gen User Guide
31
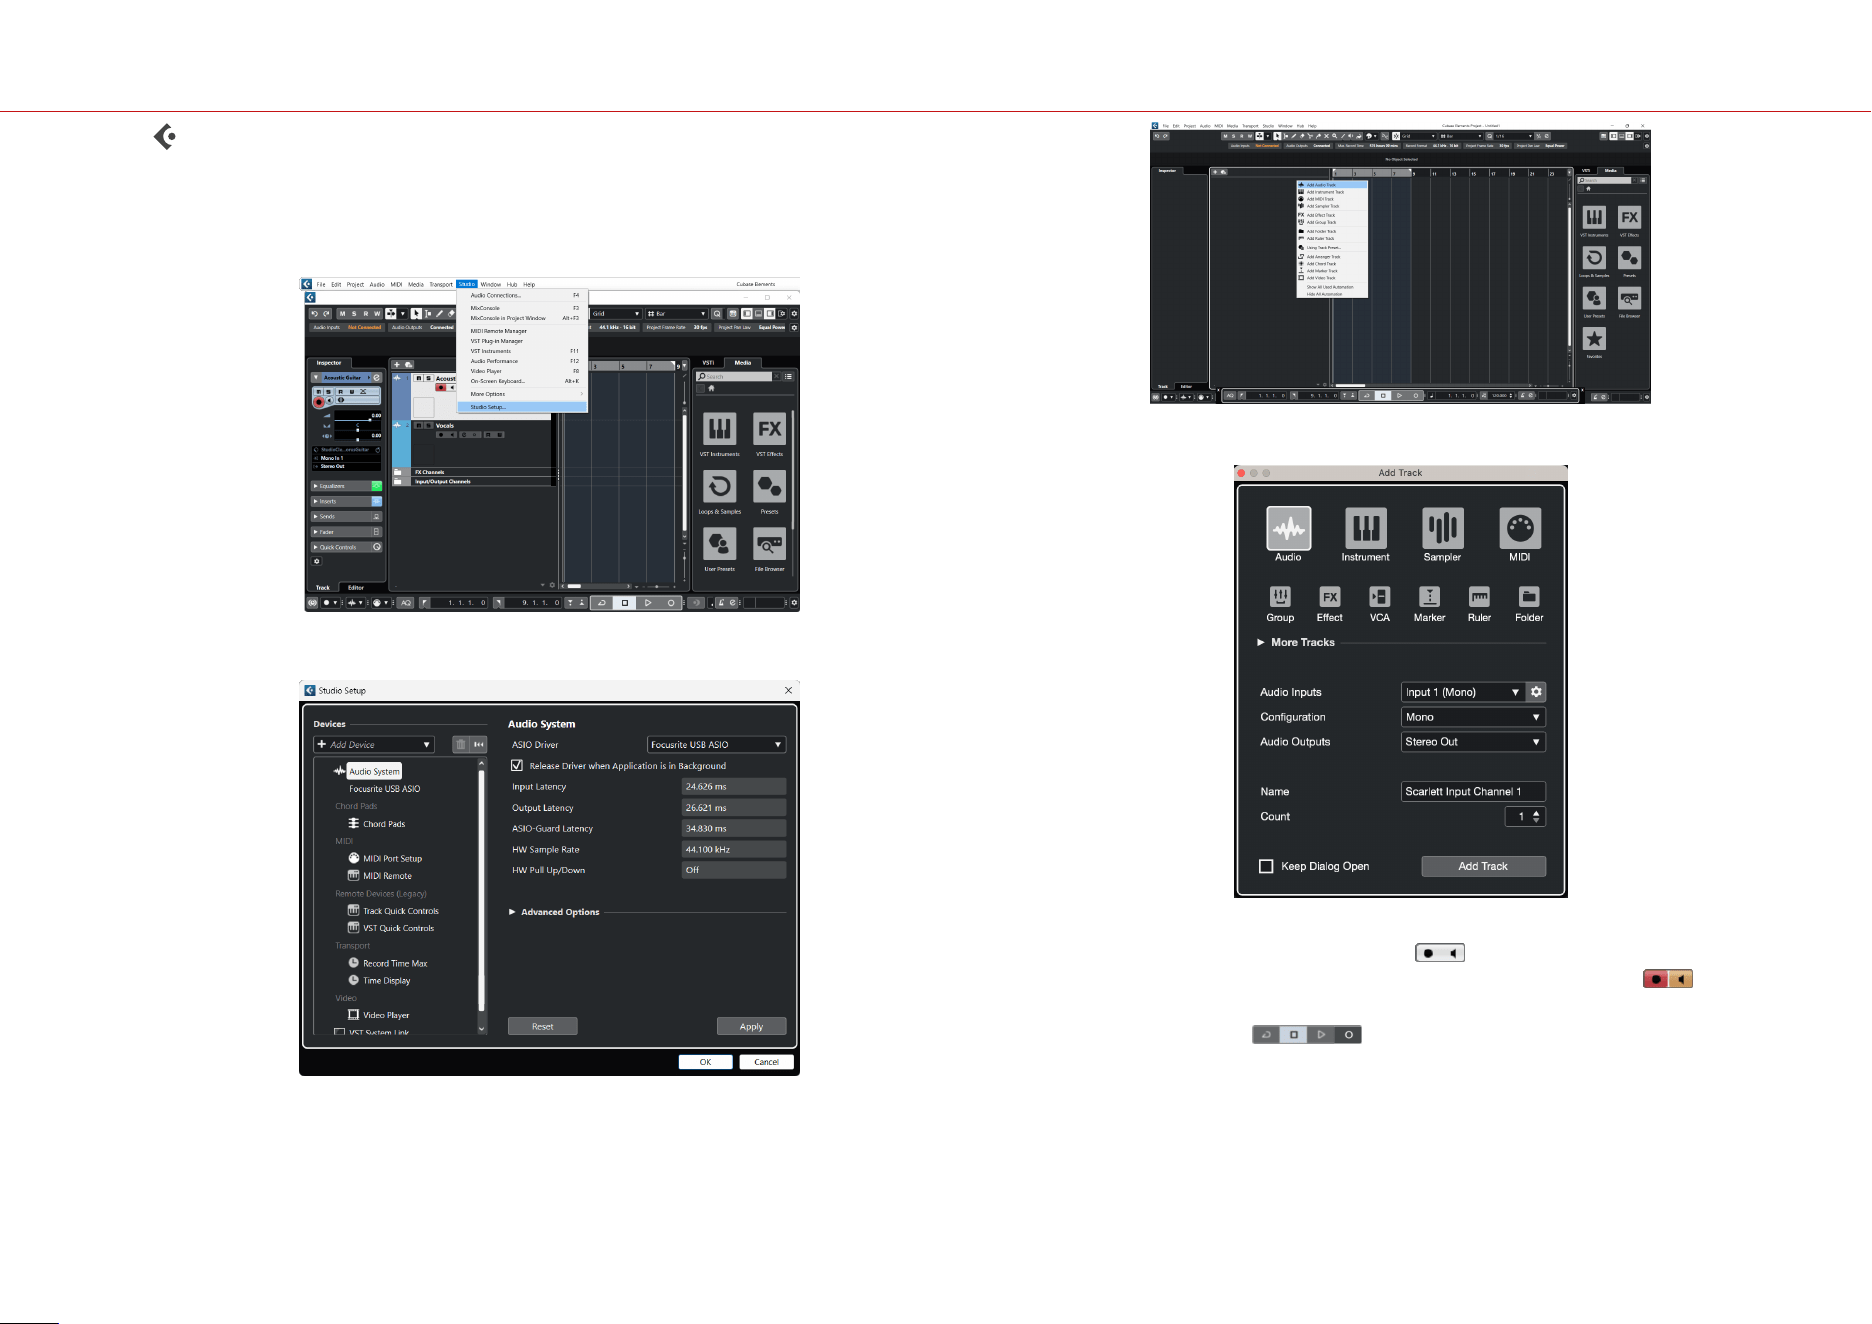
Cubase
Windows
1. Open Cubase on your computer.
2. In the top menu bar click Studio > Studio Setup...
3.
Click Audio System on the le-hand side.
4. Set the ASIO Driver to Focusrite USB ASIO.
5. Click OK.
6. Right-click in the MixConsole.
7. Click Add Audio Track.
8.
Configure the track type as Audio and set the Audio Input to the channel you're using
on your interface.
9. Click Add Track.
10. Click the Record Enable and Monitor buttons (o) on the Cubase channel to
enable the track for recording and so you can hear it using input monitoring
(on).
11. Click Transport Record in Cubase's transport to start recording.
Scarlett 2i2 4th Gen User Guide
32
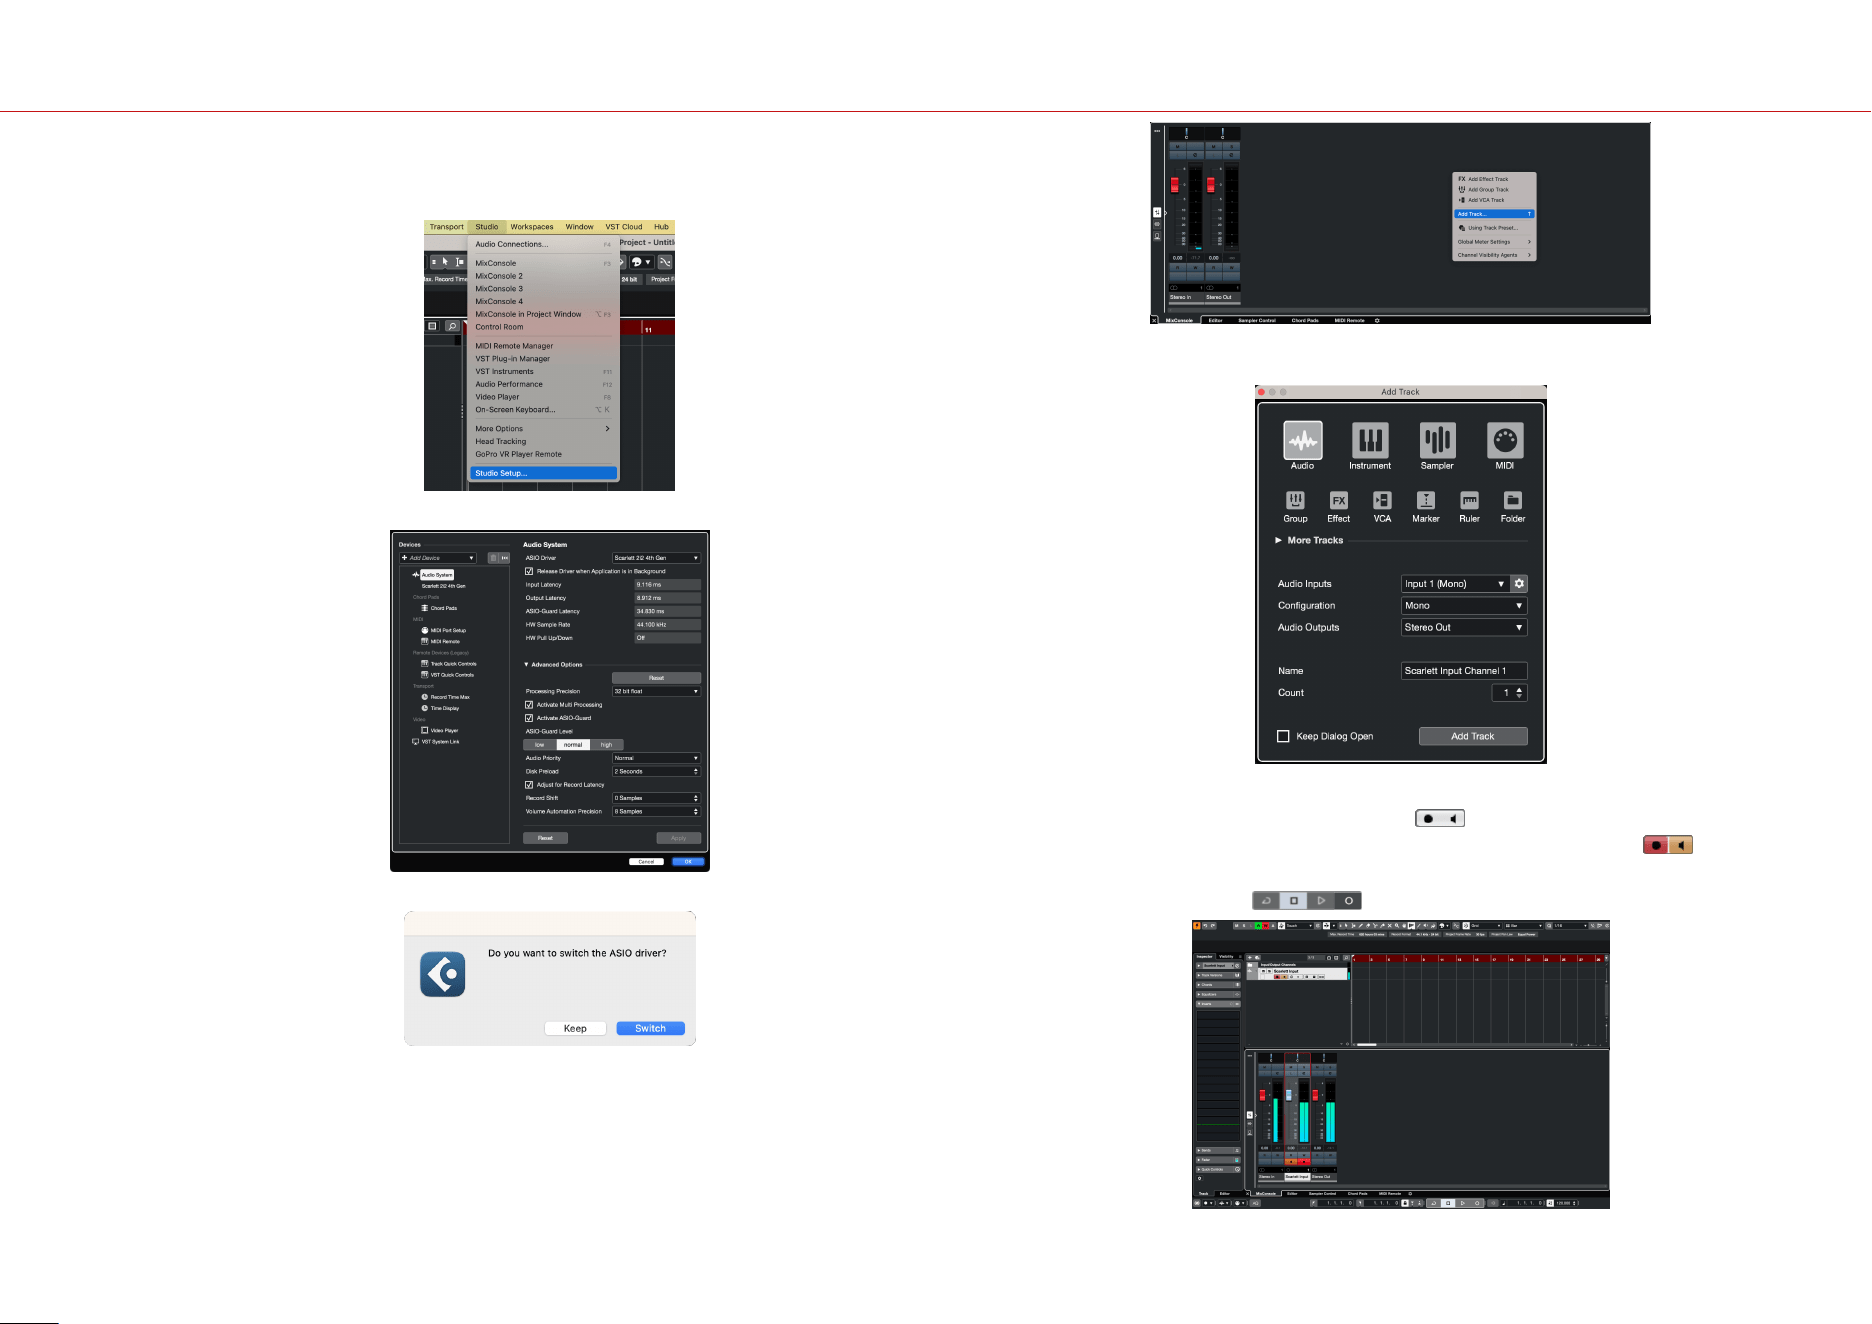
Mac
1. Open Cubase on your computer.
2. In the top menu bar click Studio > Studio Setup...
3. Change the ASIO Driver to Scarlett 2i2 4th Gen.
4. Click Switch.
5. Click OK.
6. Right-click in the MixConsole.
7. Click Add Track.
8.
Configure the track type as Audio and set the Audio Input to the channel you're using
on your interface.
9. Click Add Track.
10. Click the Record Enable and Monitor buttons (o) on the Cubase channel to
enable the track for recording and so you can hear it using input monitoring
(on).
11. Click Transport Record in Cubase's transport to start recording.
Scarlett 2i2 4th Gen User Guide
33
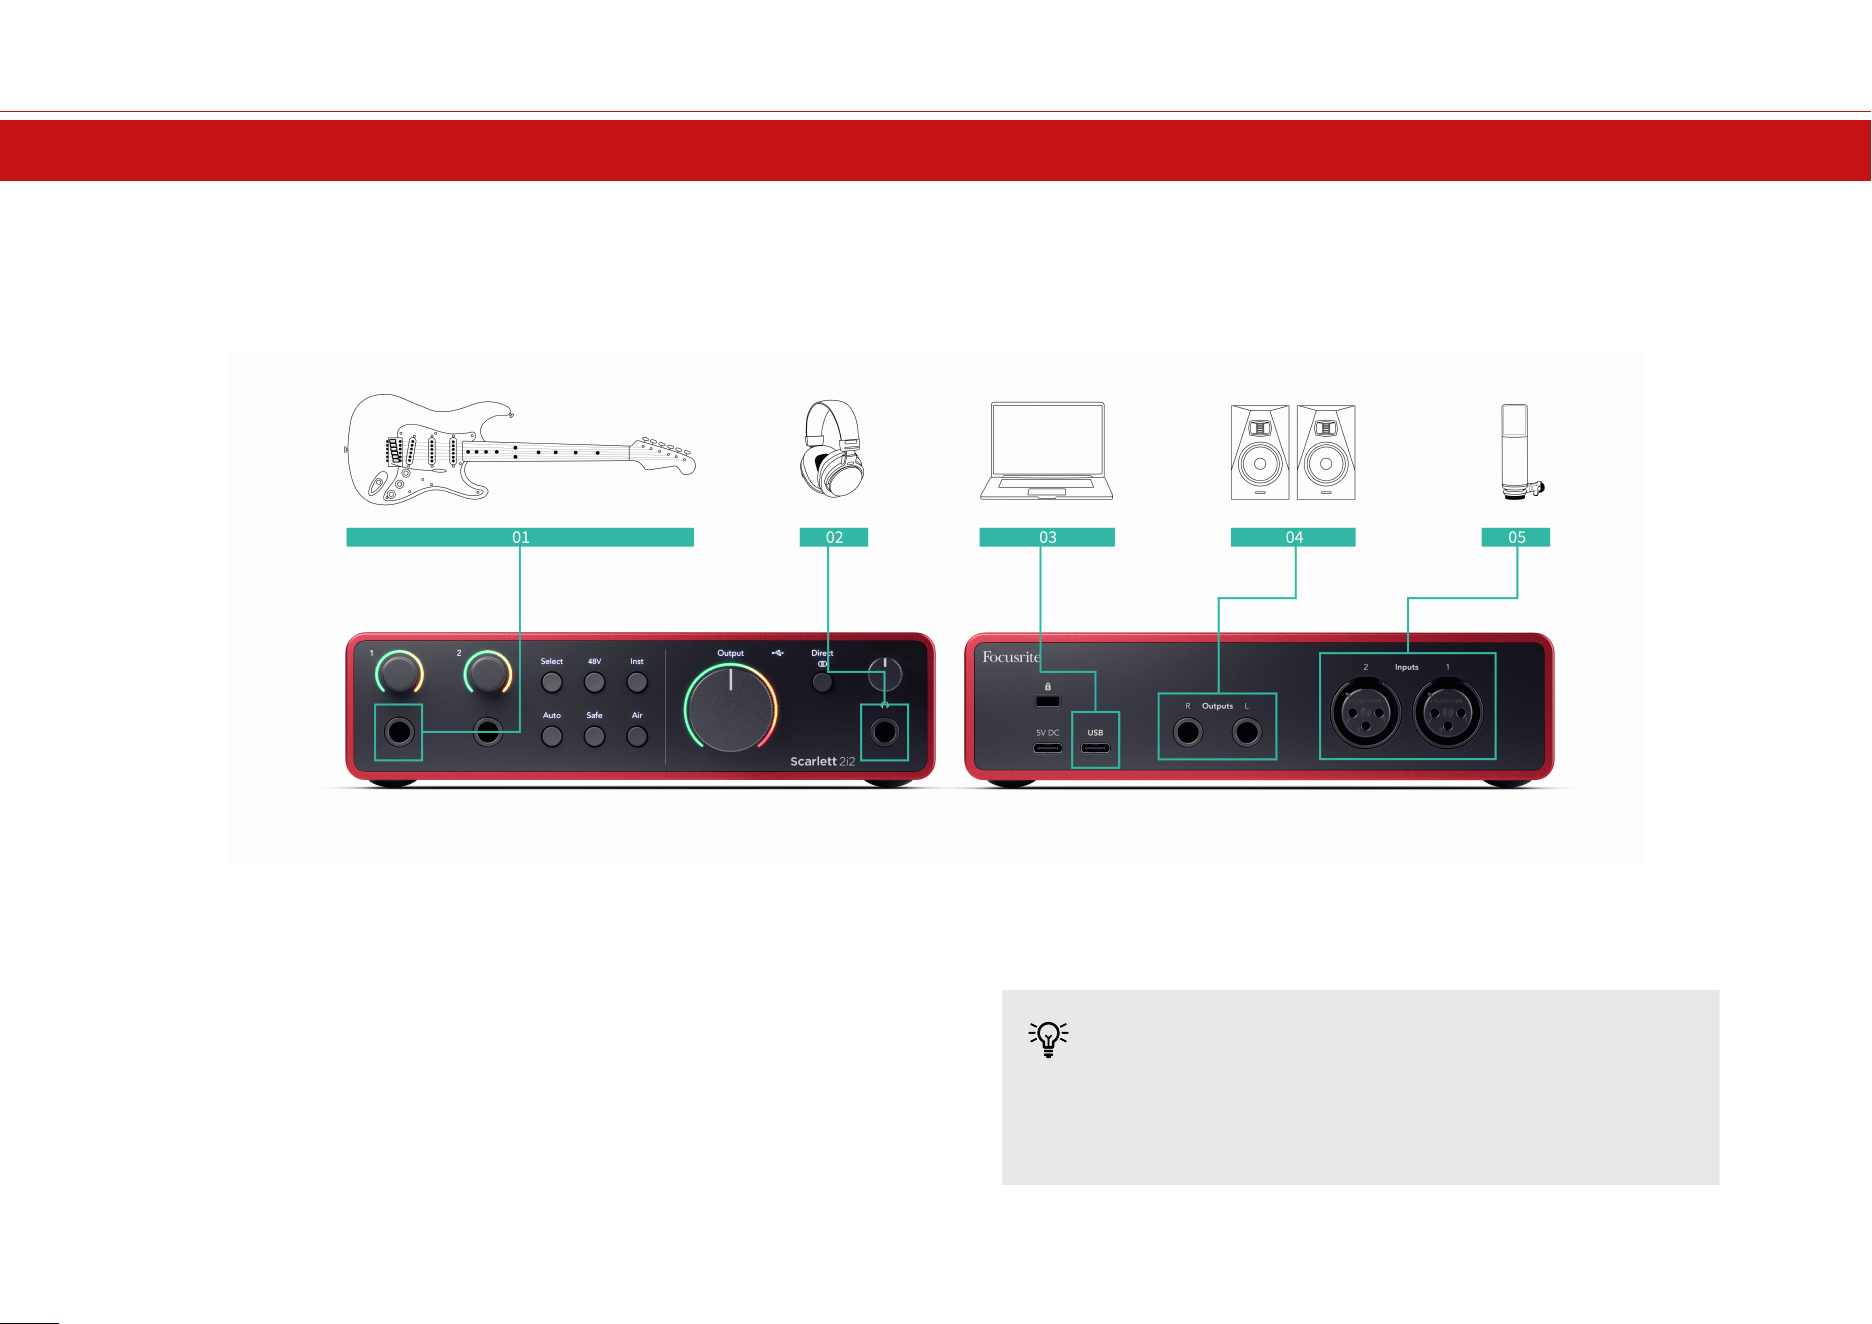
Examples of Use
Connecting Inputs and Outputs
The following diagram shows how to connect a range of inputs and outputs to the Scarlett 2i2.
To connect external processors, synthesisers or keyboards see Connecting Line-Level Devices [35].
1. Connect instruments such as guitars, bass, electro-acoustic guitars and other
instruments with pickups to Input 1 or 2 the 6.35mm jack input on the front panel.
When you connect an instrument use a 6.35mm to 6.35mm TS mono jack cable and
set the input to 'instrument' using the Inst button.
2. Connect your headphones (e.g. the Scarlett SH-450 headphones) via a 6.35mm jack to
the headphone output. You must use a 6.35mm TRS jack connector to connect your
headphones. If your headphone jack connector is smaller you need a headphone jack
adaptor.
3. Connect the Scarlett to your computer using a USB cable.
4. Connect monitor speakers (also called Monitors) to Outputs R and L (right and le).
Use 6.35mm balanced TRS jack cables to connect monitors. If your monitors have
dierent connections please see the monitor's user guide.
5. Connect a microphone (e.g. the CM25 MkIII) to Input 1 or 2 using an XLR to XLR cable.
You must connect a microphone via an XLR cable, other microphones may not work,
or you may have problems. Enable 48V if your microphone needs it.
Tip
The Scarlett 2i2 has XLR inputs at the back for microphones and 6.35mm (1/4") jack
inputs on the front for instruments or line-level devices.
Using the front panel jack input(s) disables the XLR mic input. If you're not getting
sound from your XLR input(s), ensure nothing is connected to the front panel jack
inputs.
Scarlett 2i2 4th Gen User Guide
34
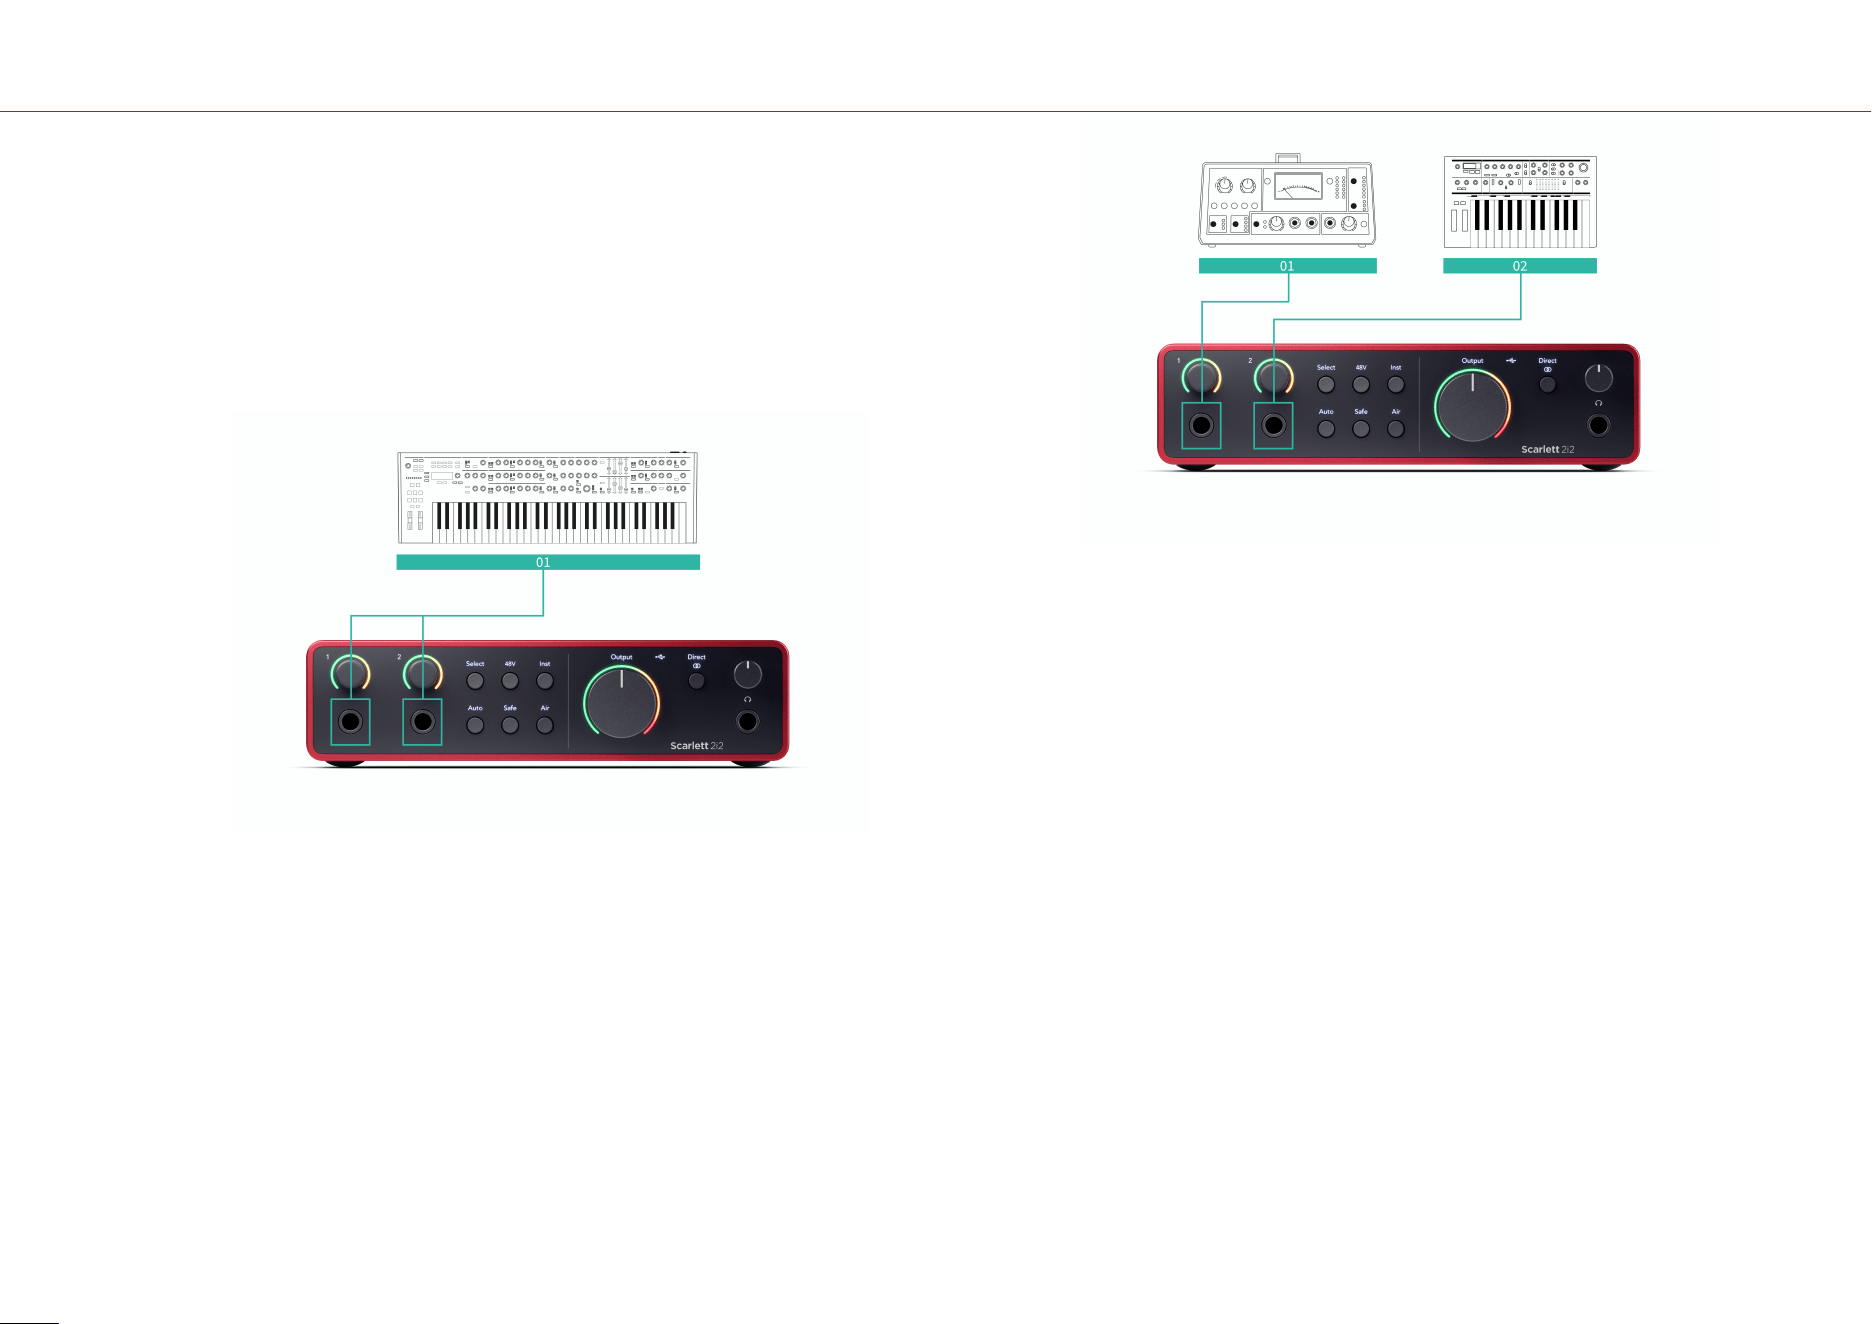
Connecting Line-Level Devices
The following diagram shows how to connect a line-level device to the line input on the Scarlett
2i2.
Connect line-level devices such as synthesisers, keyboards or mic preamps to either input using a
6.35mm jack input on the front panel.
When you connect a line-level device use a 6.35mm to 6.35mm TRS jack cable but note each
6.35mm input is a mono input. Turn o Inst when you connect line-level devices to the Scarlett
2i2.
1. This shows a stereo synthesiser connected using two 6.35mm TRS jack cables going
from the synthesiser's le and right outputs to the Scarlett 2i2's inputs 1 and 2.
2. This shows two mono sources connected to each input on the Scarlett 2i2. Input 1 has
a microphone preamp connected, the microphone preamp boosts the signal level to
line level, if your microphone preamp has an XLR (M) output you still need to go into
the Scarlett using a 6.35mm TRS jack, for example using an XLR (F) to 6.35mm TRS jack
cable. Input 2 has a mono synthesiser connected using a 6.35mm TRS jack cable.
Scarlett 2i2 4th Gen User Guide
35
Loopback
The loopback feature on your Scarlett 2i2 allows you to send the sound produced by your
computer and route it back into your Scarlett for recording or streaming, without using physical
cables. This can be particularly useful in various scenarios, such as sampling,podcasting, live-
streaming, or recording screen tutorials:
• Sampling: You can record sounds back into your soware to use as samples in your
music.
• Podcasting: You can use loopback to record online interviews or discussions, where you
want to capture both your voice and the voices of remote participants.
• Live Streaming: It's useful for streaming content with accompanying audio from your
computer, such as gameplay, presentations, or tutorials.
• Screen Recording: When creating video tutorials or screencasts, loopback allows you to
include the sound produced by your computer along with your narration..
To use Loopback, with your Scarlett:
1. Open your DAW or recording soware.
2. Create a new recording channel in your DAW and either mute, or set the output to
'none' for this channel. It's important to do this so you don't cause a feedback loop.
3. Set your recording input of the muted channel to the Loopback channels of your
Scarlett 2i2,channels 3-4.
4. Start recording.
The channels in your recording soware receive the output of your Scarlett. You can use other
channels in your recording soware to record anything connected to the inputs on your Scarlett
alongside the Loopback feed. Alternatively, if your recording soware only has one input, or a
stereo input you can record your Direct Monitor Mix as the Loopback input. See Record your
Direct Monitor Mix using Loopback [36].
Important
When you're using Loopback, mute the channels in your recording soware so you
don't cause a feedback loop.
Record your Direct Monitor Mix using Loopback
Your Direct Monitor Mix is a combination of your Scarlett's inputs and the soware playback
channels. You can set this mix in Focusrite Control 2. To record this mix via your Loopback
channels:
1. Open Focusrite Control 2.
2. Click the elipses in the top right corner.
3. Click Preferences .
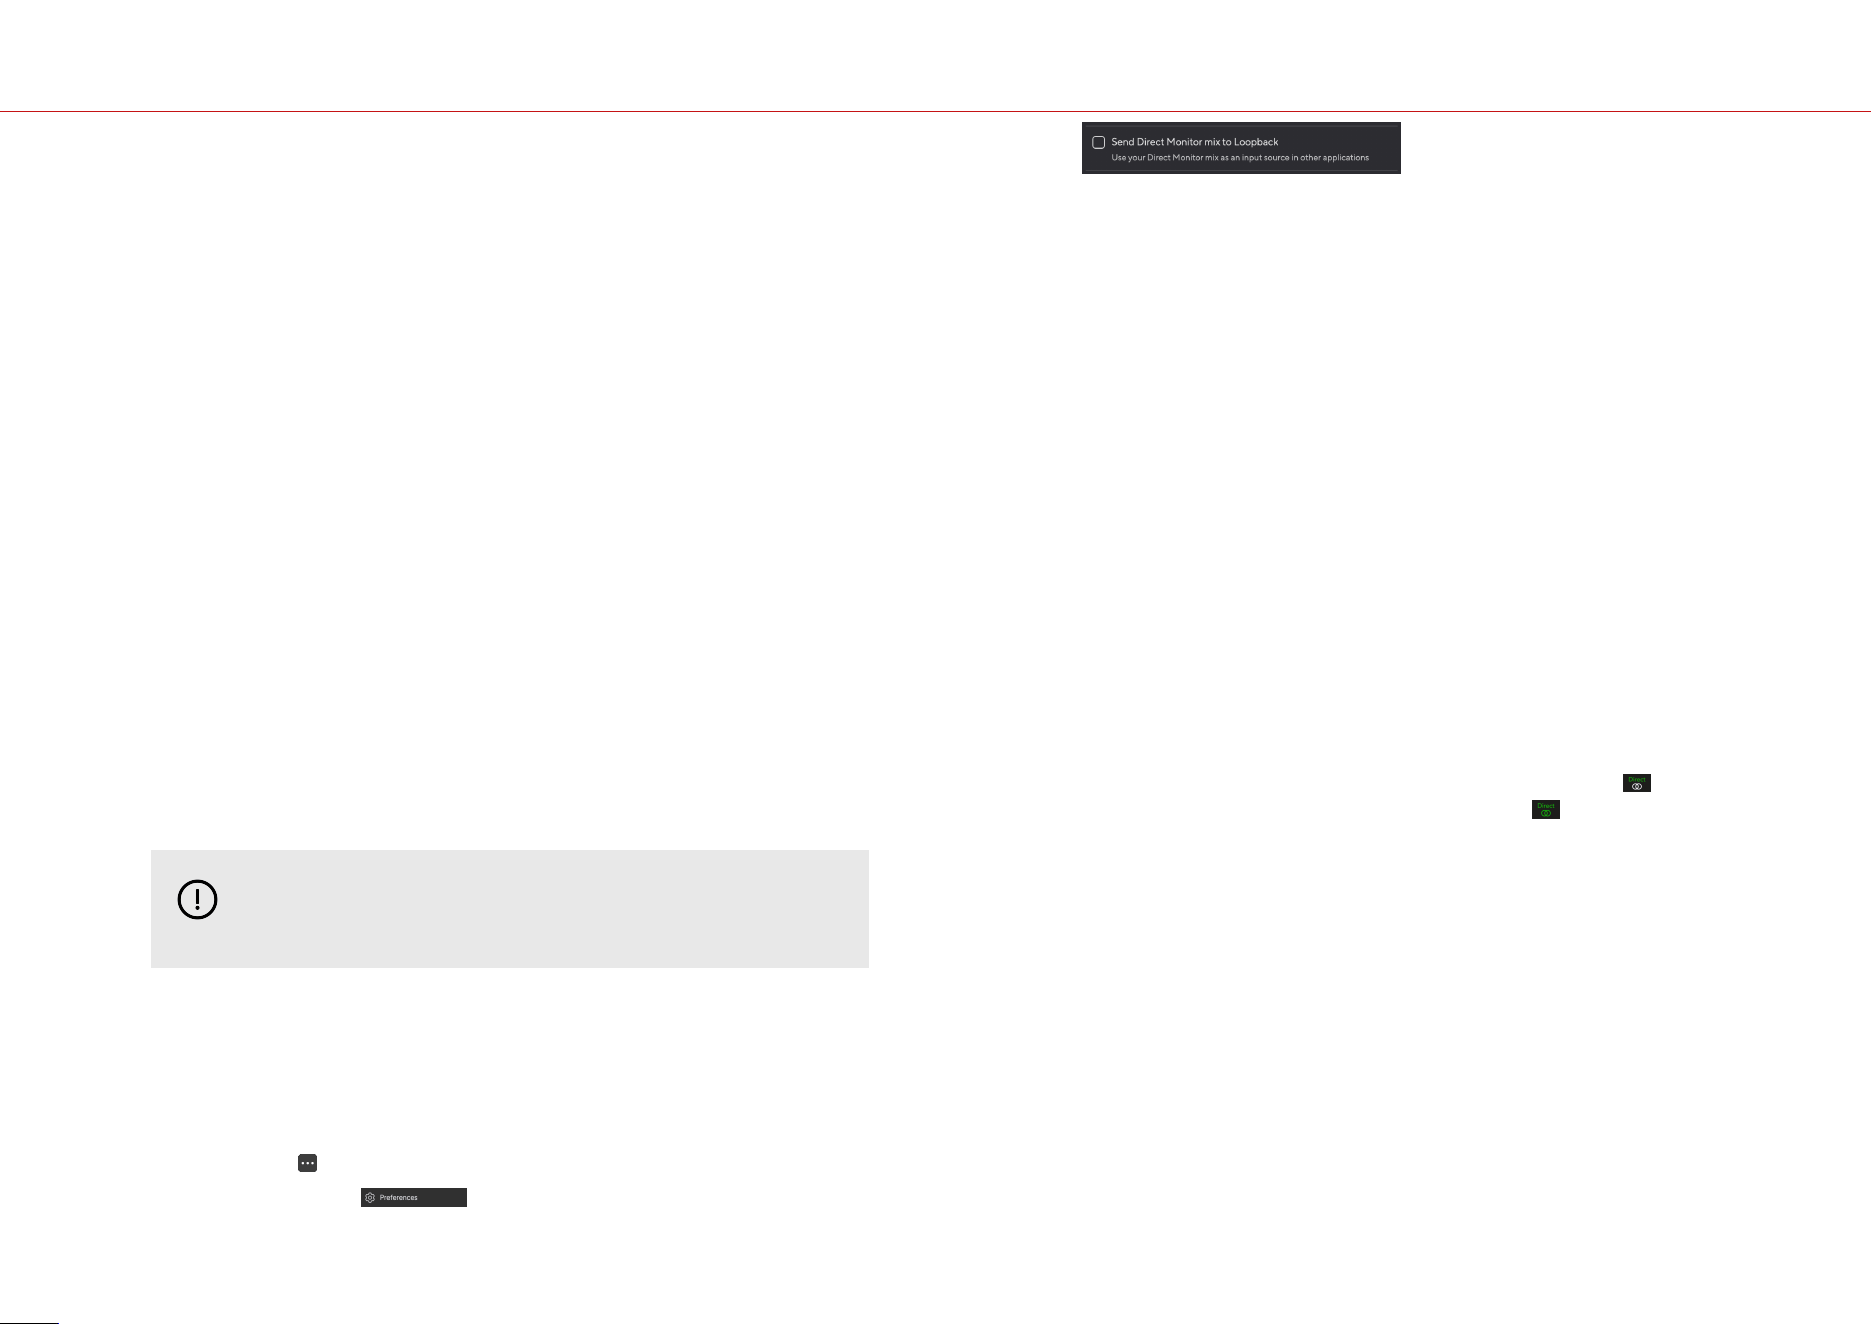
4. Tick 'Send Direct Monitor mix to Loopback'.
5.
Close the Preferences window.
6. Set up your Direct Monitor Mix in the Focusrite Control 2's Direct tab.
Now, when you record the Loopback input you'll be recording the Direct Monitor mix which can
be a combination of the hardware inputs and soware playback.
Standalone Mode
The Scarlett 2i2 has a standalone mode; this mode allows your interface to pass audio when it's
not connected to a computer. This can be useful for:
•
Increasing the number of preamps on another interface or mixer that only has line-level
inputs le.
•
To use your studio setup without having your computer turned on or plugged in, for
example, to use your guitar through your speakers, or any electronic music equipment
connected.
To setup Standalone mode:
1. Connect your Scarlett's power socket to mains power.
This can be a USB wall plug, similar to what you may use to charge your phone.
You can use either the USB or the 5V DC connection to use your Scarlett in standalone
mode.
2. Connect your inputs and outputs to your interface as usual (see Examples of Use).
3. Turn on Direct Monitor to make sure the input signals are being sent to the outputs
(headphones and line).
If you're using one, or two, mono sources make sure Direct is set to mono , or if
you're using a stereo source, make sure Direct is set to stereo (see Direct Monitor
Button [19]).
Scarlett 2i2 4th Gen User Guide
36
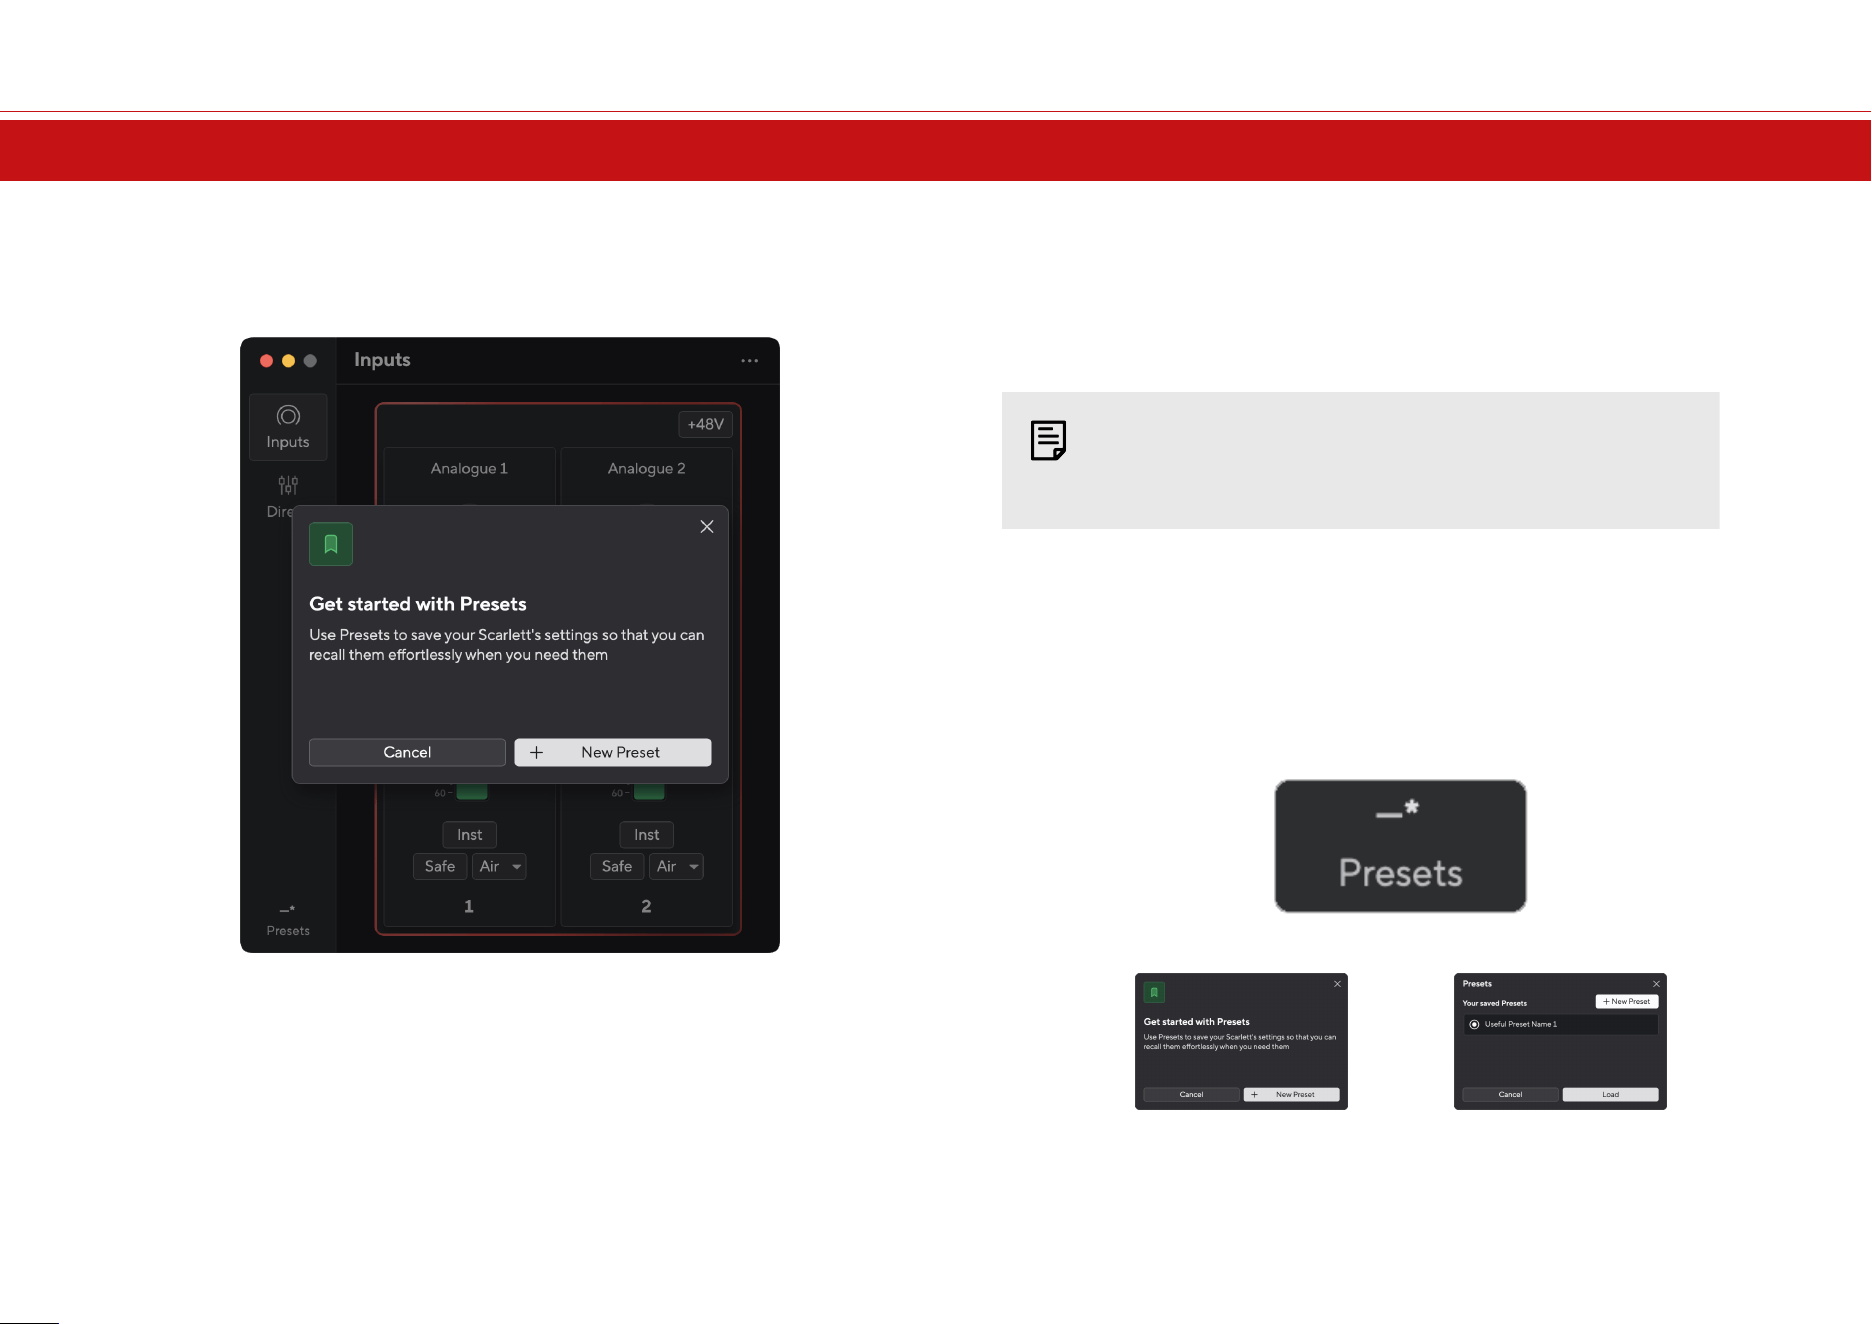
Focusrite Control 2
Using Presets in Focusrite Control 2
Presets give you a way to quickly restore settings for your Scarlett. You can change the settings
to suit a particular session or set up and save this as a nameable preset. Next time you need to
recall those settings, you can Load the preset.
Presets contain the following settings:
• Input settings per channel:
• Input Gain
• +48V
• Inst
• Safe mode
• Air mode.
• Mixer settings
• Mix destination (Routed to →)
•
Pan and balance
•
Fader levels
•
Mute and Solo states.
•
Device Settings
•
Send Direct Monitor mix to Loopback
Note
Focusrite Control 2 saves presets to the computer you're using when you save it.
However, your Scarlett retains its settings for use with a dierent computer or in
standalone mode.
Saving a Preset
The first step of using Presets in Focusrite Control 2 is changing some settings. Once you've set up
Focusrite Control 2 with some settings you want to recall in future, you can save a preset. There
are two ways to save a preset: saving a New Preset or Overwrite an existing preset.
Saving a New Preset
1. Tweak the settings for your Scarlett in Focusrite Control 2.
2. Click the Presets button in the bottom le of Focusrite Control 2.
3. Click the New Preset button.
4. Type the name of your preset in the Preset Name field. Make sure the name is useful so
you can find and reuse it later.
Scarlett 2i2 4th Gen User Guide
37
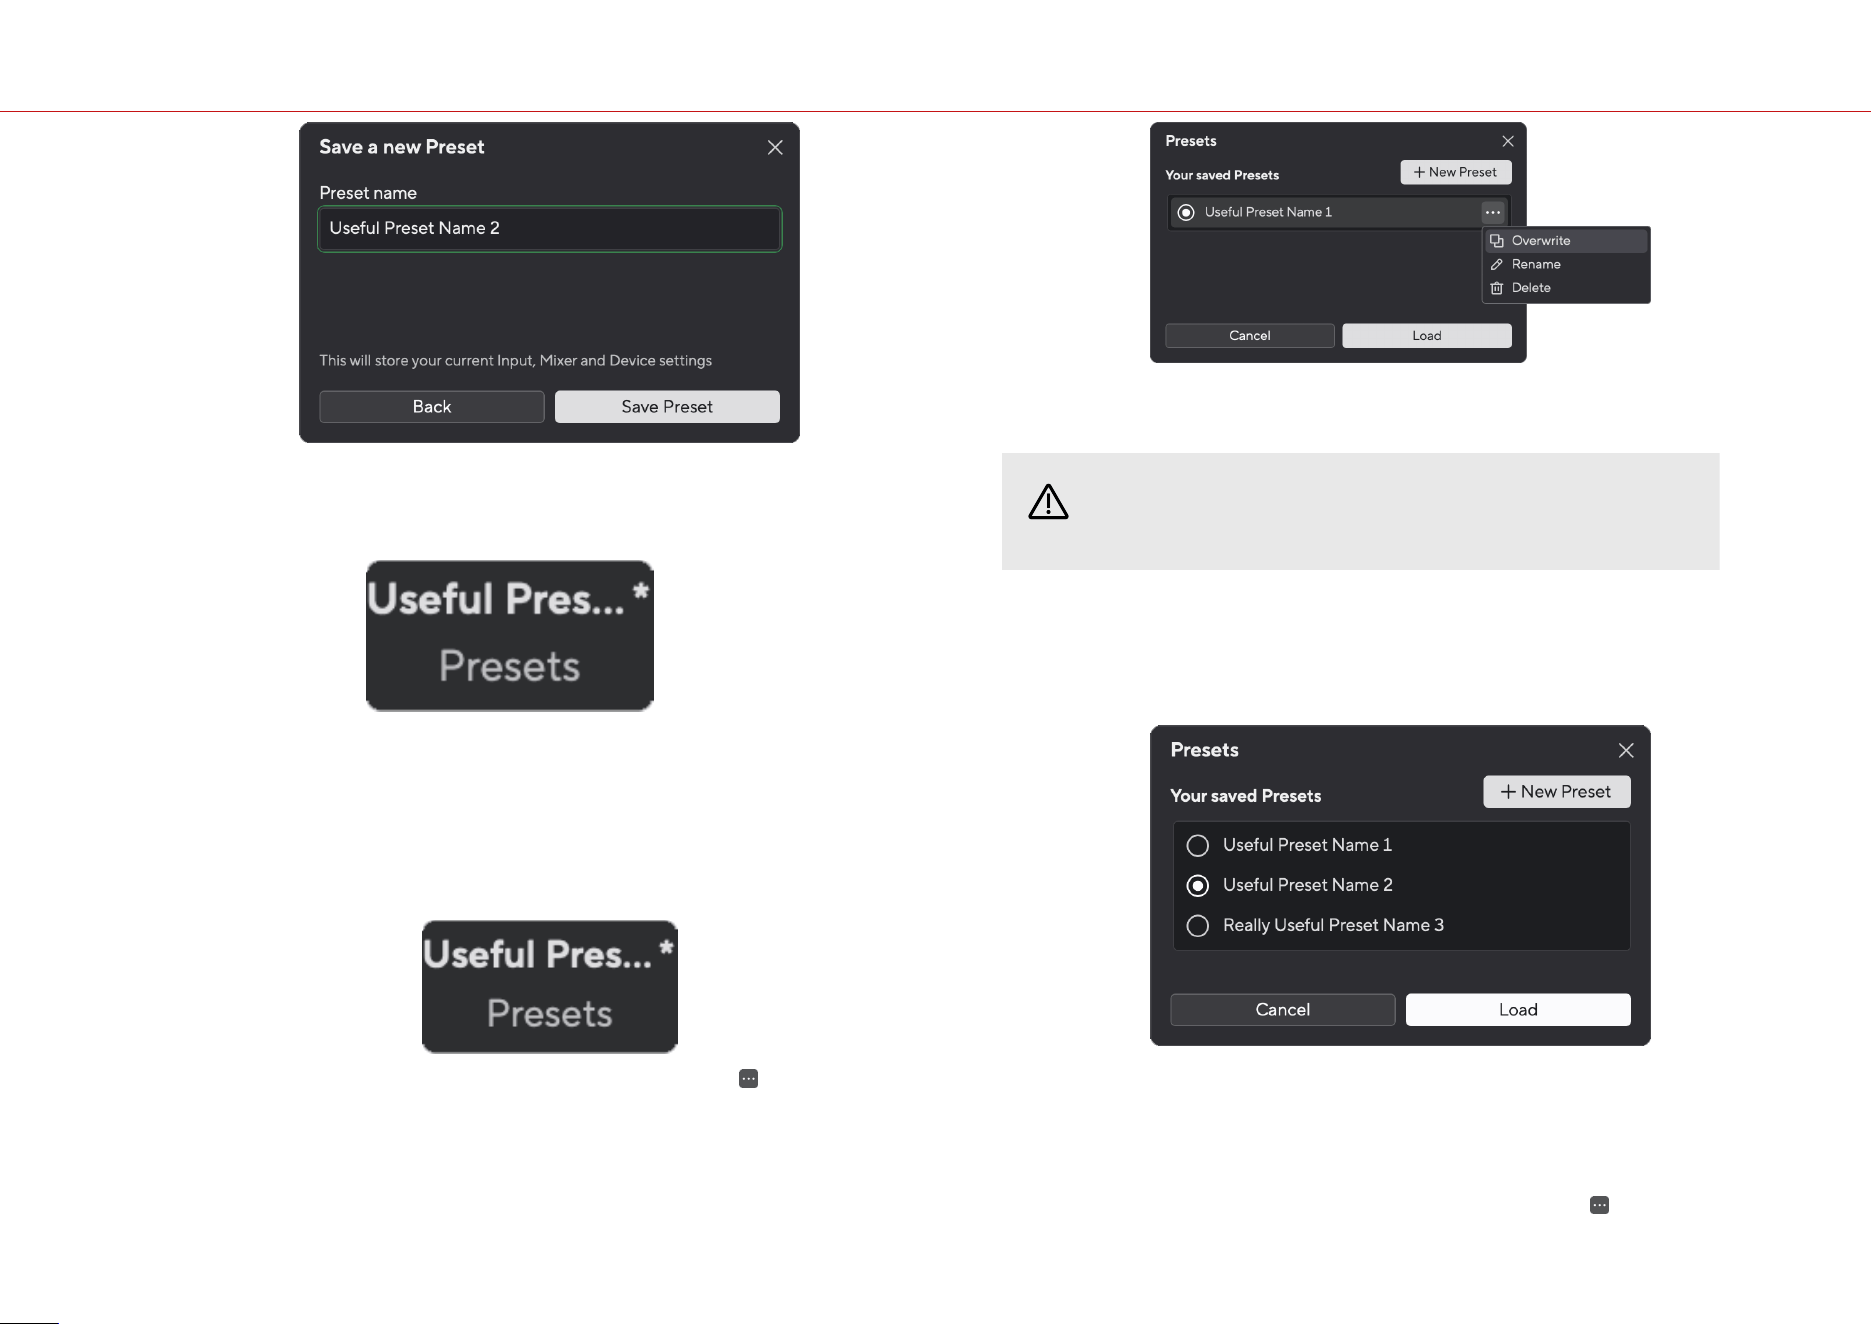
5. Click Save Preset.
Once you've saved the preset, the name of the preset shows in the bottom le corner of Focusrite
Control 2. If you change any setting while you're in that preset, the name shows an asterisk *.
When the name shows an asterisk * you can either create a new preset using the steps above, or
you can overwrite the preset with the new changes.
Overwriting a Preset
1. Tweak the settings of an existing preset so an asterisk * appears next to the Preset
name.
2. Click the Presets button in the bottom le of Focusrite Control 2.
3. Hover your mouse over an existing preset and click on the three dots to the right of
the name.
4. Click Overwrite.
5. Before committing to overwriting a Preset, read the warning pop-up and click the
Overwrite button to confirm overwriting the existing preset.
Caution
Overwriting a preset replaces the stored preset's settings with your current settings. You
can't undo this change.
Loading a Preset
Loading a preset recalls a set of settings you've saved previously.
1. Click the Presets button in the bottom le of Focusrite Control 2.
2. Click the preset you want to load.
3. Click the Load button.
Renaming a Preset
Renaming allows you to change the name of a preset without changing any of its settings.
1. Click the Presets button in the bottom le of Focusrite Control 2.
2. Hover your mouse over an existing preset and click on the three dots to the right of
the name.
Scarlett 2i2 4th Gen User Guide
38
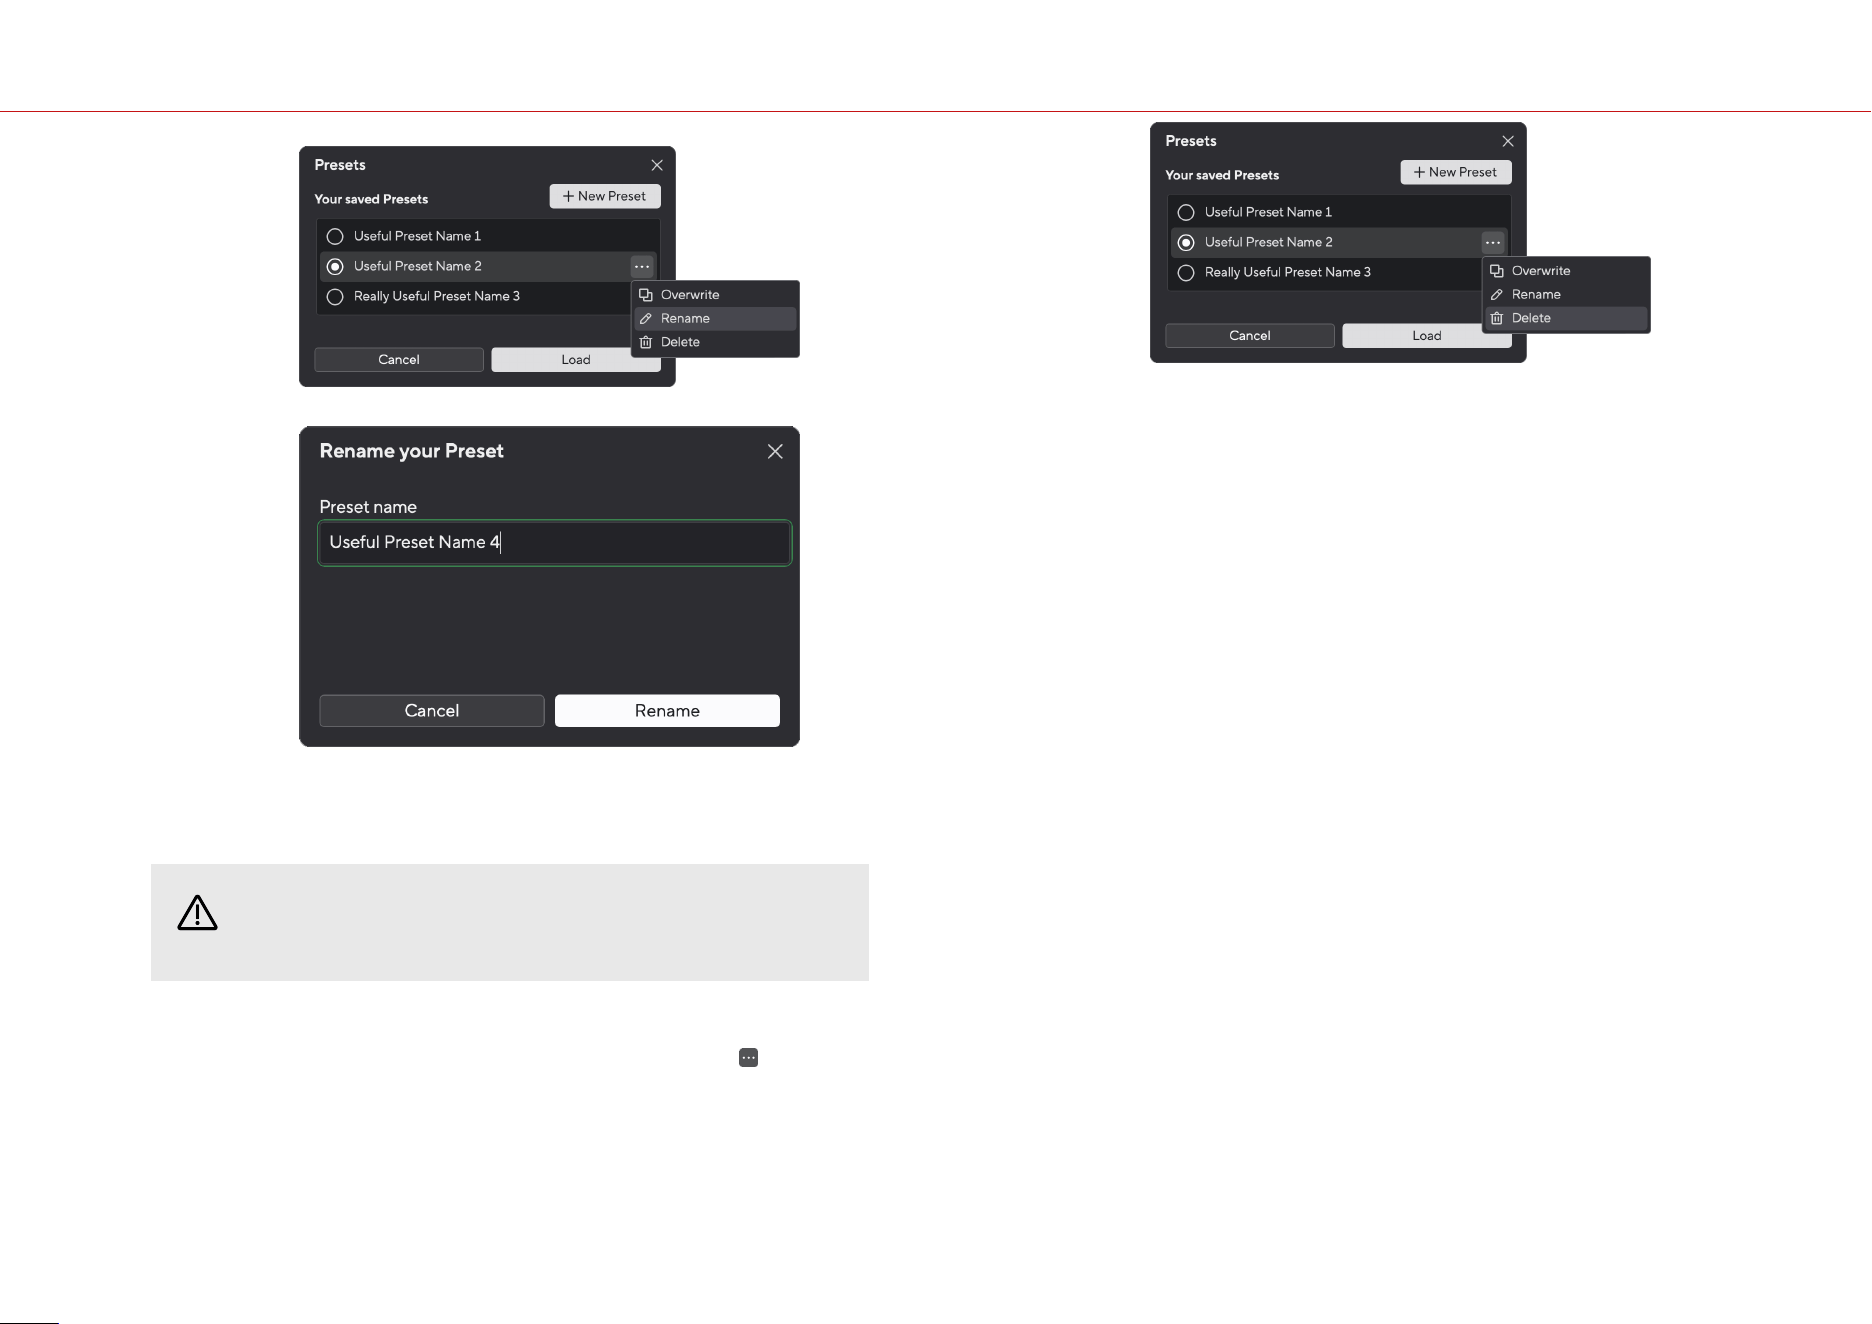
3. Click Rename.
4. Type the new name for the Preset in the Preset Name field.
5. Click Rename Preset.
Deleting a Preset
Caution
Deleting a Preset removes the preset from Focusrite Control 2. You cannot get it back
and you can't undo this action. Deleting a Preset won't change your interface's settings.
1. Click the Presets button in the bottom le of Focusrite Control 2.
2. Hover your mouse over an existing preset and click on the three dots to the right of
the name.
3. Click Delete.
4.
Before committing to deleting a Preset, read the warning pop-up and click the Delete
button to confirm deleting the preset.
Scarlett 2i2 4th Gen User Guide
39
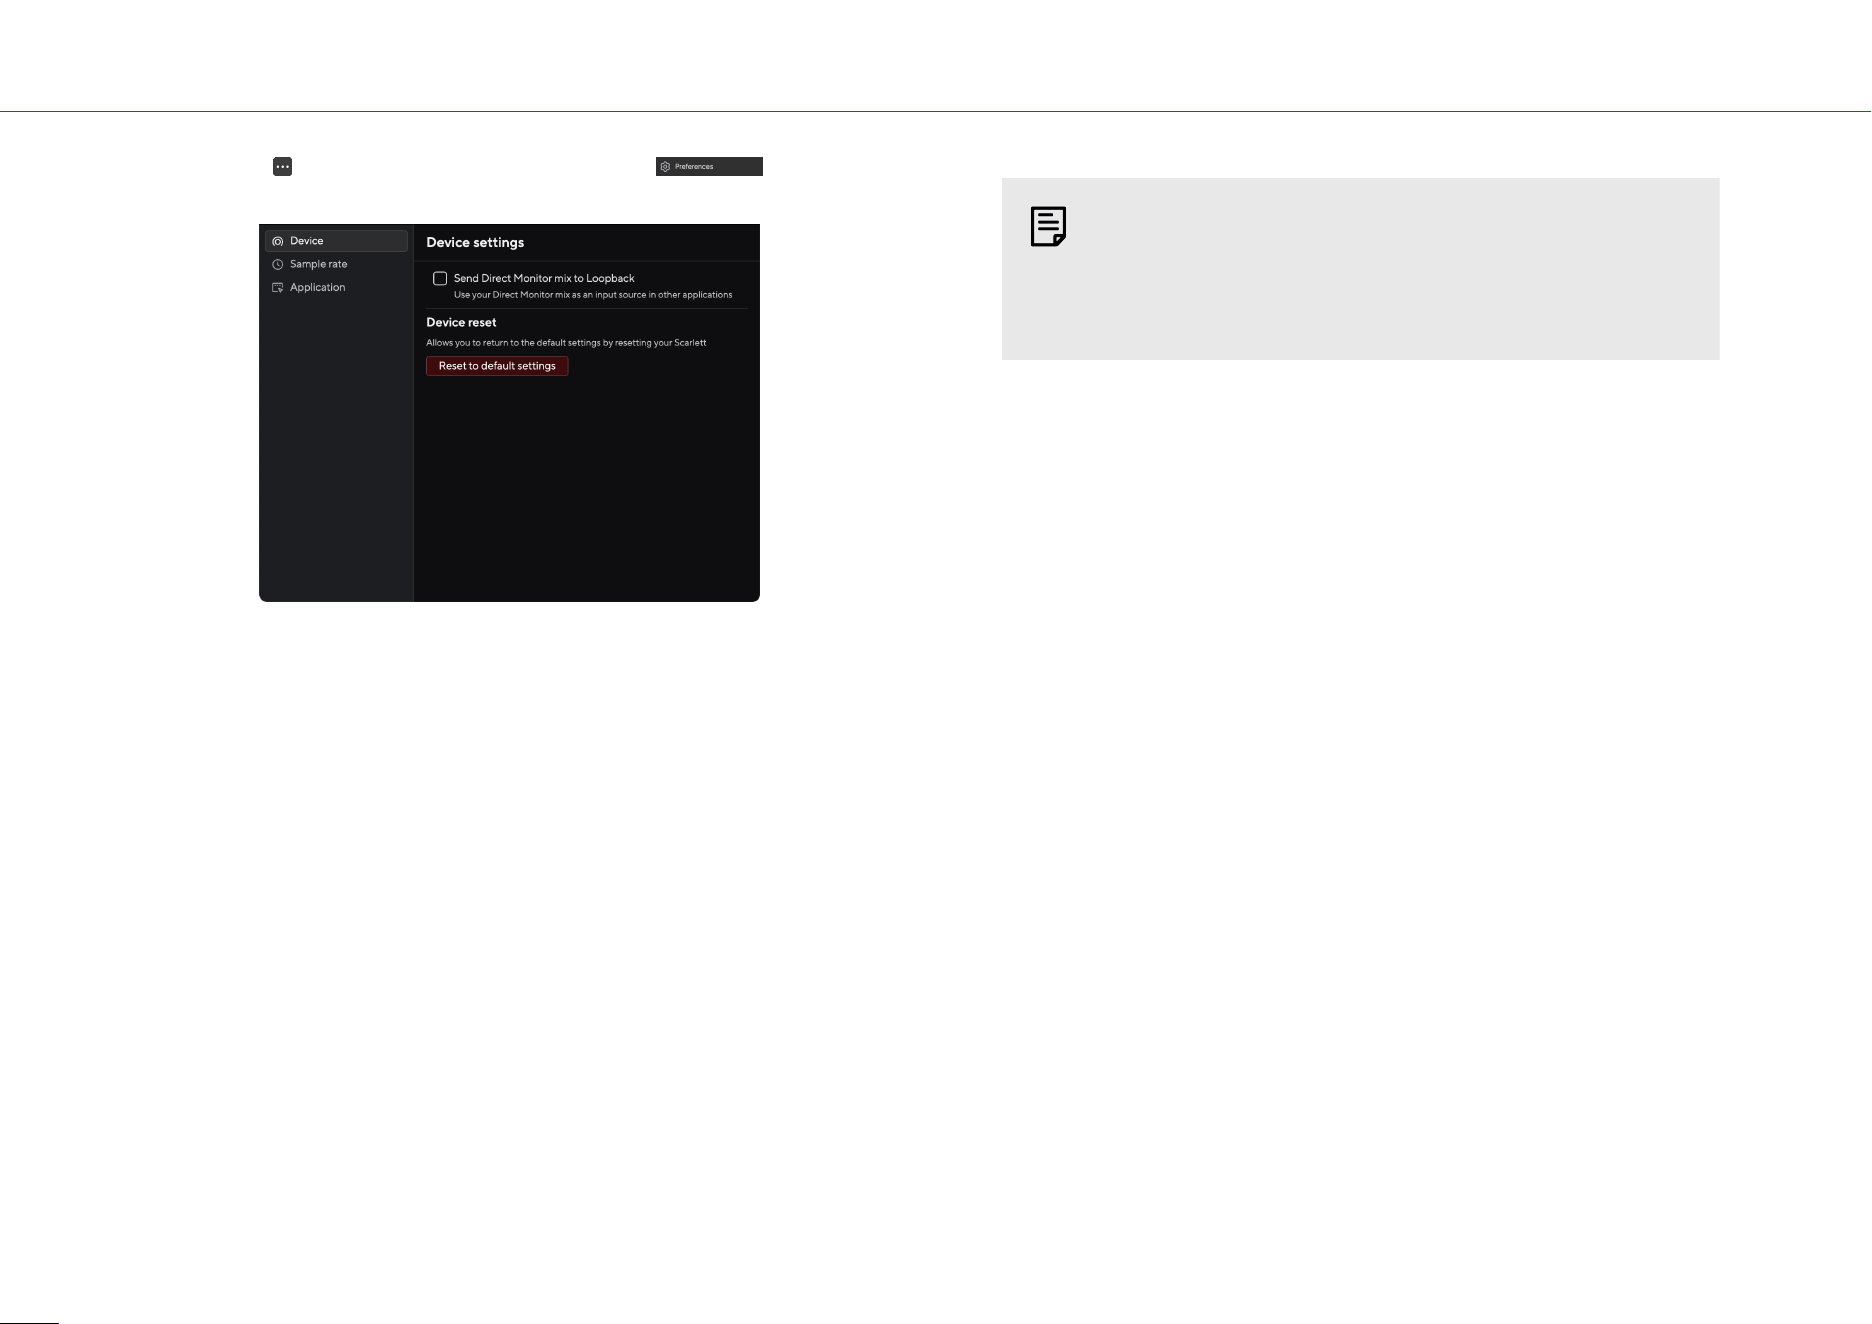
Focusrite Control 2 Preferences
Click the ellipsis in Focusrite Control 2's top right corner and click to open the
Preferences page.
In the Preferences page, you have three tabs:
• Device
• Sample rate
• Application
Device tab
Send Direct Monitor mix to Loopback
Your Direct Monitor Mix is a combination of your Scarlett's inputs and the soware playback
channels. You can set this mix in Focusrite Control 2 and record this mix via your Loopback
channels. For more information, see Loopback [36].
Device reset
To do a device reset:
1. Click Reset to default settings.
2. Read the “Are you sure?” pop-up to make sure you want to Reset your Scarlett.
3. Click Reset.
Sample rate tab
Sample Rate (kHz)
Sample rate refers to the samples per second your computer is recording. The higher the value,
the higher the quality; however, the higher the value, the more hard drive space your recordings
take up.
Oen, using 44.1kHz is more than enough for recording.
Note
Some features, listed below, are not available at quad-band sample rates (176.4 and
192kHz).
•
Air Harmonic Drive
•
Clip Safe
Application tab
Share usage data with Focusrite
Use this tick box to opt into usage analytics to help us make Focusrite Control 2 better. Please see
our Privacy Policy for more information.
Scarlett 2i2 4th Gen User Guide
40
Updating
Updating Focusrite Control 2
We update Focusrite Control 2 occasionally with new features and improvements to make sure
you are getting the most from your Scarlett 2i2.
There are two ways to make sure you have the latest Focusrite Control 2 version:
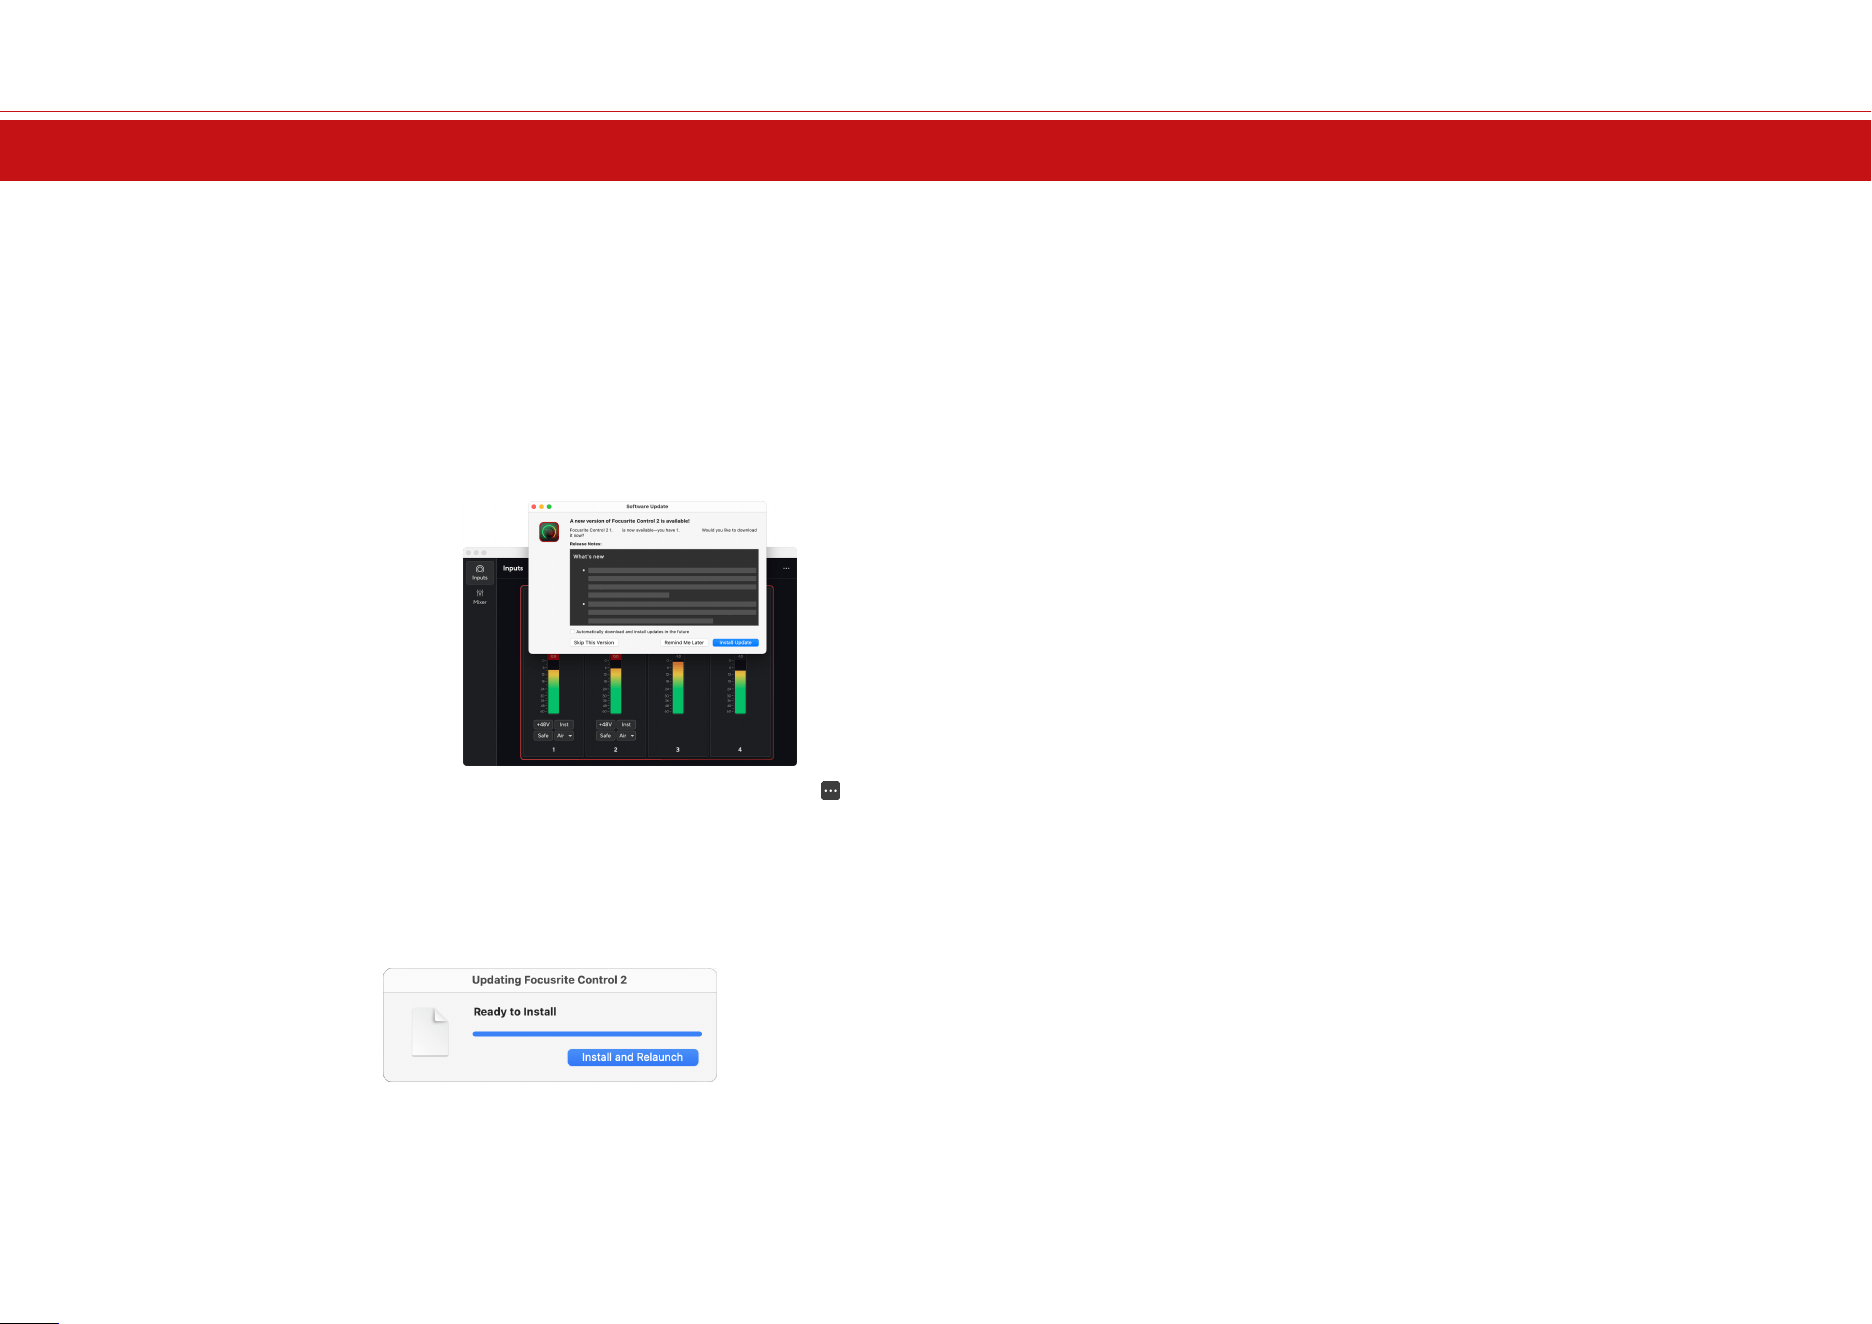
1. Use the updater in Focusrite Control 2:
1. Open Focusrite Control 2.
2. There are two options in the Focusrite Control 2.
a. If an update is available, a dialogue window automatically
appears. Click Install Update to start the update.
b. To check you are using the latest version, click the ellipses
in Focusrite Control 2's top right corner and click Check for
updates.
3. Click Install and Relaunch in the prompt that appears aer the update has
been downloaded.
Focusrite Control 2 updates, the following update screen shows before the soware
resets.
2. Install Focusrite Control 2 from our Downloads page:
1. Go to the Focusrite downloads website:
focusrite.com/downloads
2. Find your Scarlett on the Downloads website.
3. Download Focusrite Control 2 for your operating system (Windows or Mac).
4. Open the Downloads folder on your computer and double-click the
Focusrite Control 2 installer.
5. Follow the on-screen instructions to install Focusrite Control 2.
6. If it’s not already, connect your Scarlett interface to your computer with the
USB cable.
7. Open Focusrite Control 2 and it detects your Scarlett automatically.
Scarlett 2i2 4th Gen User Guide
41
Updating your Scarlett
We occasionally update your Scarlett 2i2's firmware with new features and improvements, to
make sure you are getting the most from your Scarlett. Your Scarlett 2i2 is updated through
Focusrite Control 2.
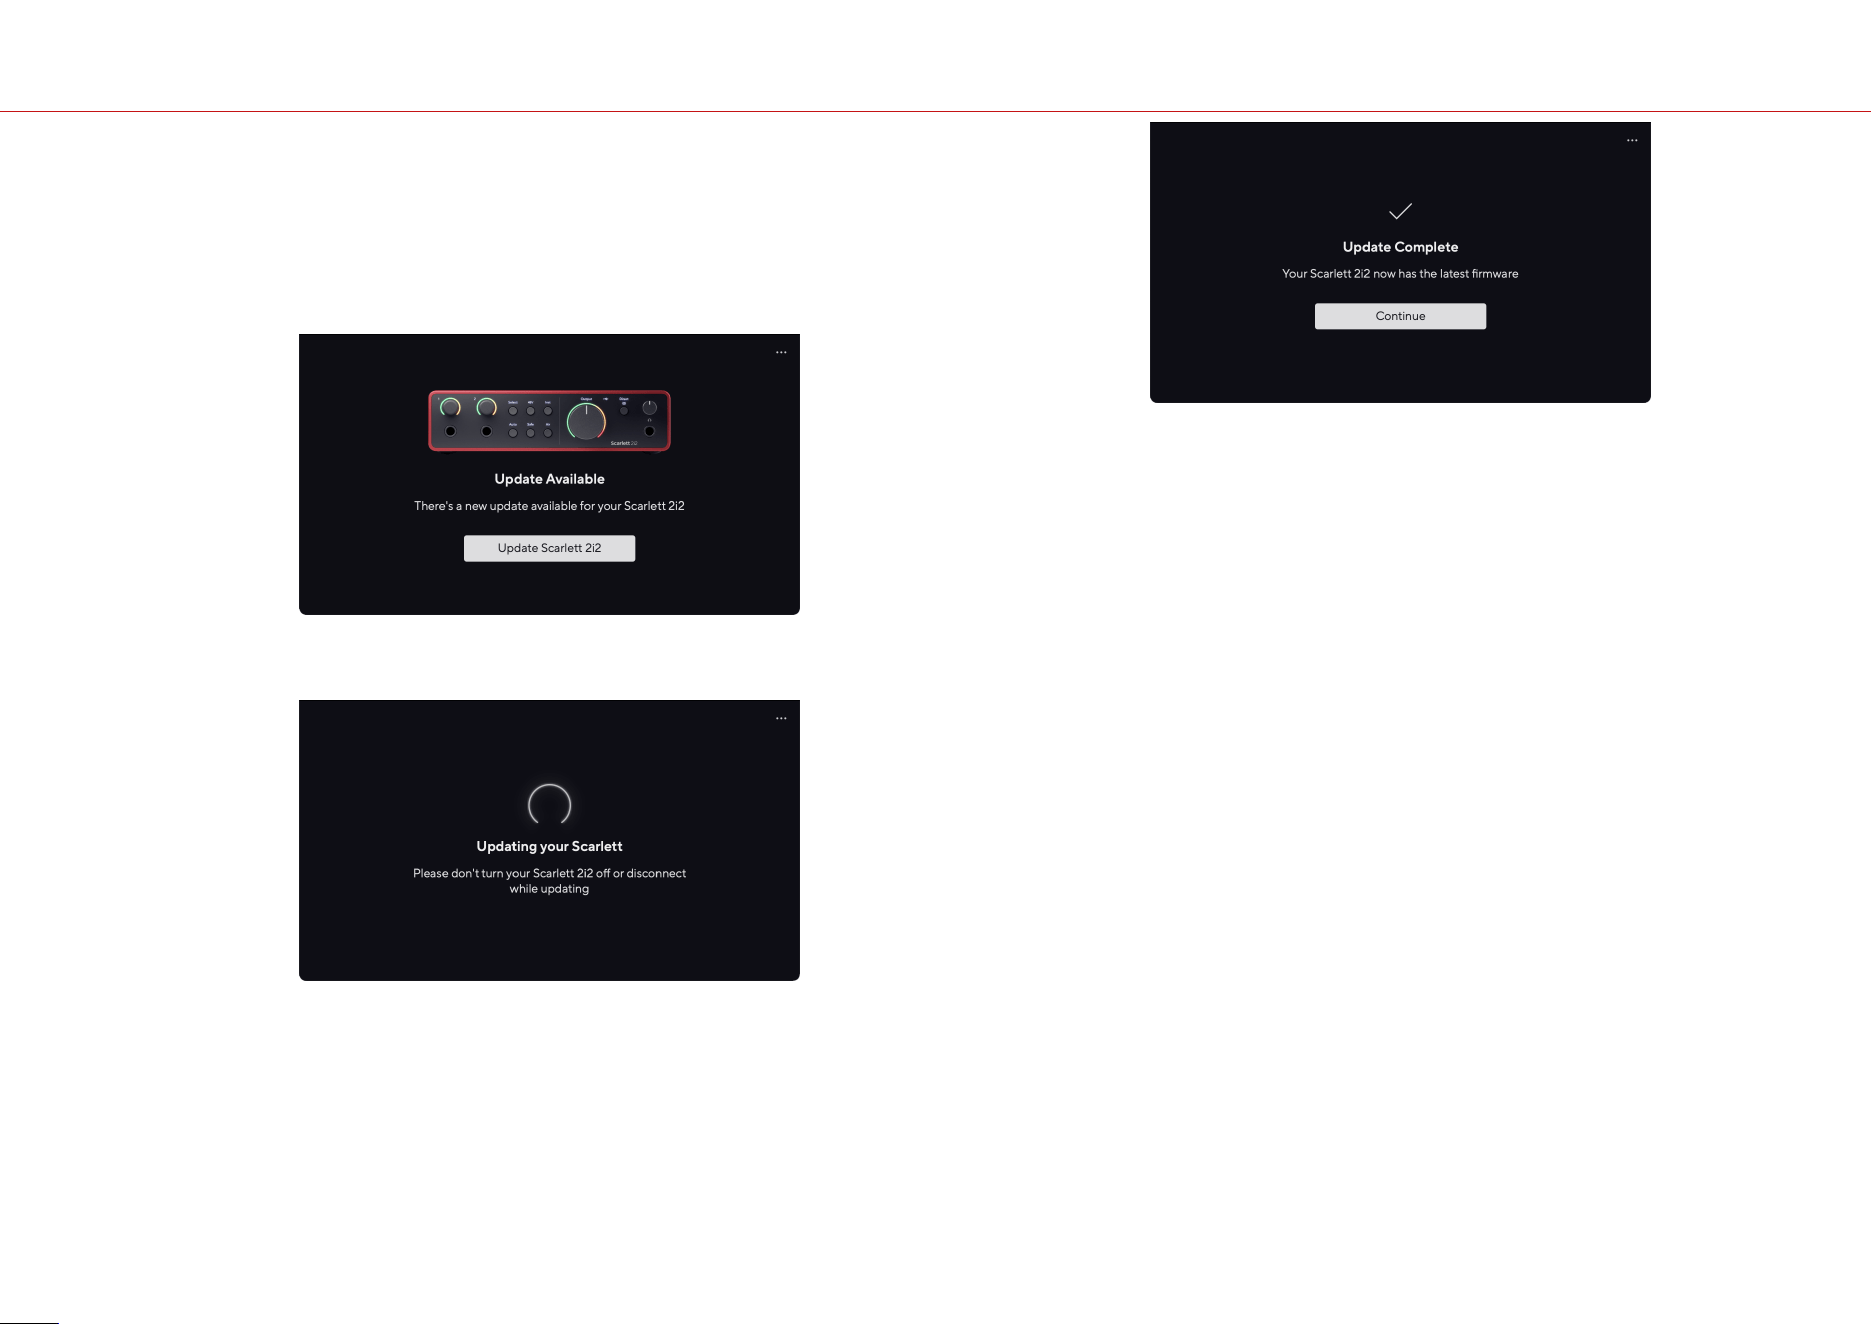
To update your Scarlett:
1. Open Focusrite Control 2.
If there is an update available, Focusrite Control 2 tells you when you open it.
2.
Click Update Scarlett 2i2.
Focusrite Control 2 starts the update, do not disconnect your Scarlett 2i2 while the
update is in progress.
3. Click Continue aer the update has finished.
Your Scarlett 2i2 is now up to date and you can continue to use it as normal.
Scarlett 2i2 4th Gen User Guide
42

Specifications
These specifications allow you to compare your Scarlett 2i2 with other devices and make sure
they’ll work together. If you’re not familiar with these specifications, don’t worry you don’t need
to know this information to use your Scarlett 2i2 with most devices
Performance Specifications
Where possible we measure all performance figures following AES17.
Recording
Supported Sample Rates 44.1 kHz, 48 kHz, 88.2 kHz, 96 kHz, 176.4 kHz, 192 kHz
Bit Depth 24-bit
Microphone Inputs
Frequency Response 20Hz - 20kHz ± 0.06dB
Dynamic Range (A-
weighted)
116dB
THD+N -100dB (-1dBFS @ 8dB Gain)
Noise EIN (A-Weighted) -127dBu
Maximum Input Level (at
minimum gain)
16dBu
Gain Range 69dB
Input Impedance 3kΩ
Line Inputs
Frequency Response 20Hz - 20kHz ± 0.05dB
Dynamic Range (A-
weighted)
115.5dB
THD+N -100dB (-1dBFS @ 8dB Gain)
Maximum Input Level (at
minimum gain)
22dBu
Gain Range 69dB
Input Impedance 60kΩ
Instrument Inputs
Frequency Response 20Hz - 20kHz ± 0.15dB
Dynamic Range (A-
weighted)
113dB
THD+N -80dB (-1dBFS @ 8dB Gain)
Maximum Input Level (at
minimum gain)
12dBu
Gain Range 62dB
Input Impedance 1MΩ
Line Outputs 1 and 2 (balanced)
Frequency Response 20Hz - 20kHz ± 0.02dB
Dynamic Range (A-
weighted)
120dB
THD+N -109dB
Maximum Output Level 16dBu
Output impedance 100Ω
Headphone Outputs
Frequency Response 20Hz - 20kHz ± 0.1dB @ 33Ω / 300Ω
Dynamic Range (A-
weighted)
112dB @ 33Ω
115dB @ 300Ω
Maximum Output Level 2.5dBu into 33Ω
10dBu into 300Ω
Maximum Output Power 32mW into 33Ω
22mW into 300Ω
THD+N -99dB @ 33Ω (Minimum)
-108dB @ 300Ω (Minimum)
Output impedance 50Ω
Scarlett 2i2 4th Gen User Guide
43
Physical and Electrical Characteristics
Analogue Inputs
Connectors Two rear panel Neutrik® XLR connectors
Two front panel Neutrik® 6.35mm (1/4”) jack sockets
Mic/Line switching Automatic
Connecting a 6.35mm jack to the front panel disables microphone input.
Phantom Power (48v) Front panel 48V (phantom power) button or switch in soware
Line/Instrument
switching
Front panel Inst button or switch in soware
Auto Gain Front panel Auto button or switch in soware
Clip Safe Front panel Safe button.
AIR function Front panel Air button or switch in soware
Analogue Outputs
Balanced Outputs Two rear-panel Neutrik®6.35mm (1.4") TRS jack sockets
Headphone Output Front panel stereo 6.35mm (1.4") TRS jack socket
Main Output Level
Control
Front panel analogue control with pre-fade output level meter
Headphones Level
Control
Front panel analogue control
Other I/O
USB
One USB 2.0 Type-C connector for data and power -
900mA
One USB Type-C power connector - 5V DC
4.5W
Front Panel Indicators
Channel Selection White/Green LEDs for channels 1 and 2
Select button White/Green Select LED
48V White/Green 48V LED (depending on the selected channel)
Inst White/Green Inst LED (depending on the selected channel)
Auto White Auto LED to initiate Auto Gain
Clip Safe White/Green Safe LED (depending on the selected channel)
Air Mode White, green, amber Air LED (depending on the selected channel and selected Air mode)
Output Level Meter Three-colour LED ring around Output control.
USB
USB LED
Direct Monitor
Three-state LED
Weight and Dimensions
Weight 595g (1.31lbs)
Height 47.5mm (1.87")
Weight and Dimensions
Width 180mm (7.09")
Depth 117mm (4.60")
Environmental
Operating Temperature 40°C / 104°F Maximum ambient operating temperature
Channel Order
Input Channels
Input Channel
1 Input 1 (Mic/Line/Inst)
2 Input 2 (Mic/Line/Inst)
3 Loopback 1
4 Loopback 2
Output Channels
Output Channel
1 Output Le (Headphones Le)
2 Output Right (Headphones Right)
Note
Outputs 1 and 2 share the same feed as the Headphone Output. Whatever signal is
present at the line outputs you will also hear from the headphone output.
Scarlett 2i2 4th Gen User Guide
44

Notices
Troubleshooting
For all troubleshooting queries, please visit the Focusrite Help Centre at support.focusrite.com.
Copyright & Legal Notices
Focusrite is a registered trademark and Scarlett is a trademark of Focusrite Group PLC.
All other trademarks and trade names are the property of their respective owners.
2024 © Focusrite Audio Engineering Limited. All rights reserved.
Scarlett 2i2 4th Gen User Guide
45

Credits
Focusrite would like to thank the following Scarlett 4th Gen team members for their hard work in
bringing you this product:
Aarron Beveridge, Adam Watson,Adrian Dyer,Adrien Fauconnet, Alex Middleton-Dalby,Alice
Rizzo,Alistair Smith,Andy Normington, Andy Poole, Andy West, Arne Gödeke, Bailey Dayson,
Bamber Haworth, Bash Ahmed, Ben Bates, Ben Cochrane, Ben Dandy, Benjamin Dunn, Bran
Searle, Callum Denton, Carey Chen, Cerys Williams, Chris Graves, Dan Clarke, Dan Stephens,
Dan Weston, Daniel Hughley, Daniel Johnson, Danny Nugent, Dave Curtis, David Marston, Derek
Orr, Ed Fry, Ed Reason, Eddie Judd, Ellen Dawes, Emma Davies, Flavia Ferreira, Greg Westall,
Greg Zielinski, Guillem Allepuz, Hannah Williams, Harry Morley, Ian Hadaway, Isaac Harding,
Jack Cole, Jake Wignall, James Hallowell, James Otter, Jason Cheung, Jed Fulwell, Jerome Noel,
Jesse Mancia, Joe Crook, Joe Deller, Josh Wilkinson, Joe Munday, Joe Noel, Jon Jannaway, Julia
Laeger, Kai Van Dongen, Keith Burton, Kiara Holm, Kieran Rigby, Krischa Tobias, Lars Henning,
Laurence Clarke, Loz Jackson, Luke Piotrak, Luke Mason, Marc Smith, Mark Greenwood, Martin
Dewhirst, Martin Haynes, Mary Browning, Massimo Bottaro, Matt Morton, Matt Richardson, Max
Bailey, Michalis Fragkiadakis, Mick Gilbert, Mike Richardson, Nicholas Howlett, Nick Lyon, Nick
Thomson, Oliver Tapley, Olly Stephenson, Paul Chana, Paul Shulebotham, Pete Carss, Pierre
Ruiz, Richard Carvalho, Richard Walters, Robert Blaauboer, Robert Mitsakov, Ross Chisholm, Sam
Lewis, Samuel Price, Sandor Zsuga, Sebastian Heinz, Simon Burges, Stefan Archer, Stefan Elmes,
Steve Bush, Stratis Sofianos, Taavi Bonny, Taren Gopinathan, Tom Carter, Tom Haines, Tony Pow,
Valeria Cirillo, Will Hoult, Will Munn, Will Thomas, Vidur Dahiya, Wade Dawson, Zih-Syuan Yang.
Authored by Ed Fry.
Scarlett 2i2 4th Gen User Guide
46