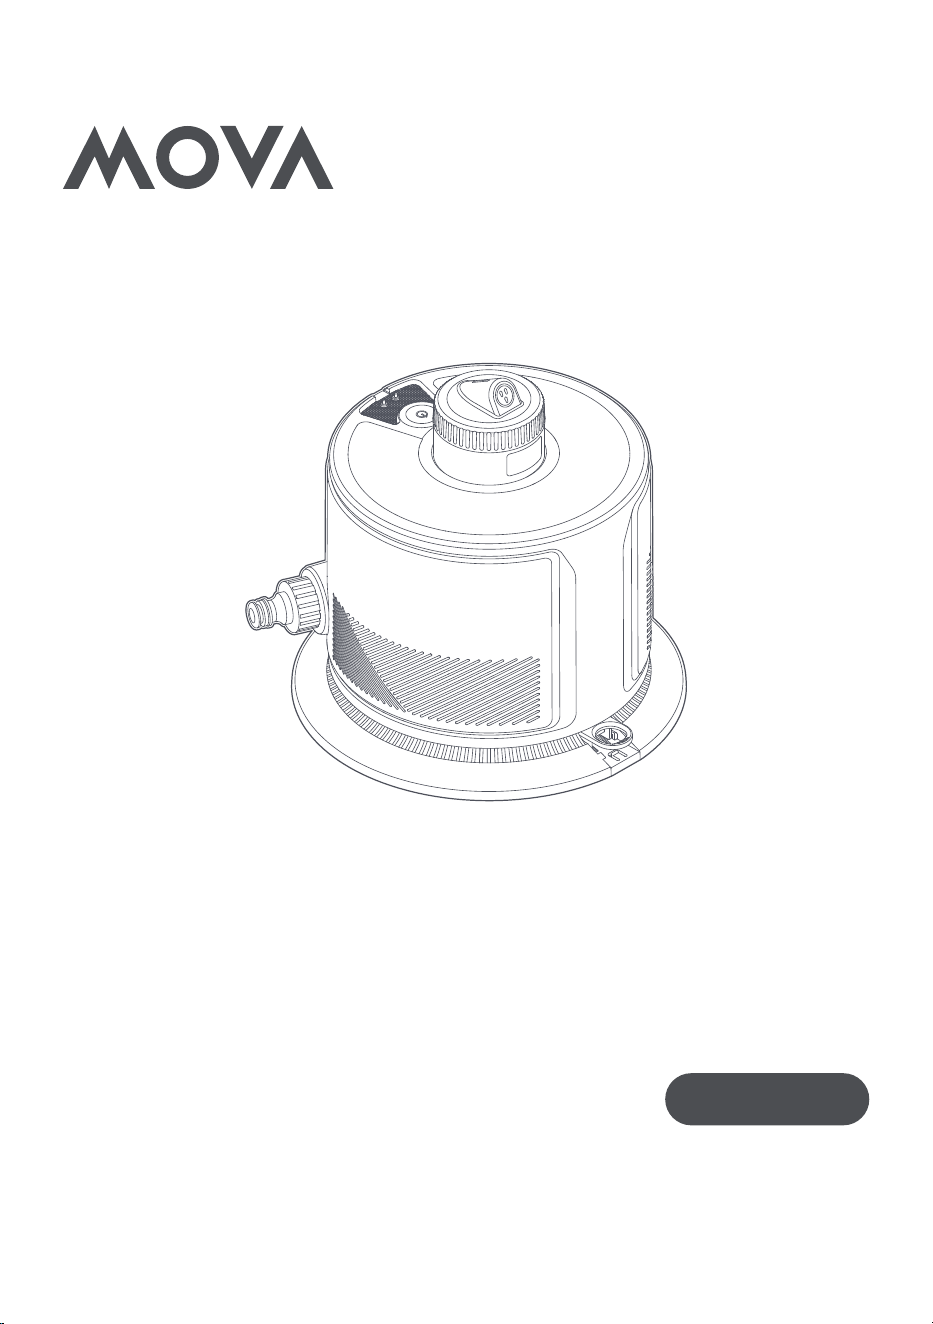
MOVA L10
User Manual
Smart Lawn Sprinkler
The illustrations in this manual are for reference only. Please refer to the actual product for accuracy.

2
EN
Table of Contents
1. Safety Instructions
..................................................................... P03
2. Product Introduction
................................................................. P09
3. Operations
.............................................................................. P11
4. Maintenance
............................................................................ P17
5. Troubleshooting
....................................................................... P19
6. Specifications
.......................................................................... P20
Original Instructions

3
EN
1. Safety Instructions
1.1 Safety Regulations
•
READ AND FOLLOW ALL INSTRUCTIONS.
•
SAVE THESE INSTRUCTIONS.
•This device can be used by children aged from 8 years and
above and persons with reduced physical, sensory or mental
capabilities or lack of experience and knowledge if they have
been given supervision or instruction concerning use of the
device in a safe way and understand the hazards involved.
•This device is not intended for use by persons (including
children) with reduced physical, sensory or mental capabilities,
or lack of experience and knowledge, unless they have been
given supervision or instruction concerning use of the device
by a person responsible for their safety.
•Children shall not play with the device. This device shall not be
used by children. Cleaning and user maintenance shall not be
carried out by children.
•Ensure that children do not attempt to touch the device while it
is operating.
•Don't allow children to ride the device under any circumstance.
•Do not operate the device with people or animals on the lawns.
•While in operation, do not place your hands into any part of the
device as this may result in injury.
•Do not leave or operate the device in freezing temperatures.
•Before connecting the charger to the device, make sure both
connectors are completely dry. Moisture between connectors
during charging can cause pin corrosion and breakage.
•Keep the charging port cover closed when not in use. Leaving
the pins exposed to water may cause irreversible power
damage. The device must only be supplied at MOVA.
•WARNING: To reduce the risk of electric shock, replace the
damaged cord immediately.

4
EN
•If the power cord is damaged, it must be replaced or repaired
by a qualified electrician or the official customer care to avoid
any hazards. The power supply is not to be repaired or used
any longer if it is damaged or defective.
•Use only brass or plastic couplings. Do not connect the device
to aluminium or steel hose ends (will cause corrosion).
•The new hose-sets supplied with the device are to be used and
the old hose-sets should not be reused.
•A pressurised hose may burst in high heat. Do not leave your
hose pressurised and exposed to the sun.
•Only certified professionals should disassemble the sealed
drive kit of your device.
•Always secure the device with the provided locator to prevent
it from tipping over or causing inaccuracies in the designated
map. Please note that any damage caused by dropping the
device is not covered by warranty.
•Do not drop, pierce the shell, or intentionally damage the
device in any way, as this may void your warranty.
•To prevent RF exposure, a separation of 20 cm/7.87 in or more
is recommended between the persons operating the device
and the device itself. Operation at closer distances is not
recommended. The antenna used for this device's transmission
must not be co-located with any other antenna or transmitter.
•When not using the charging cable for a long period of time,
please unplug it.
•
To prevent contamination of your drinking water, ensure that the
faucet connected to the device is equipped with a check valve.
•Government regulations determine the specific type and
maintenance requirements of the check valve needed when
connecting a device like MOVA to the water supply. Regulations
may vary by municipality, so it's essential to install and maintain
the appropriate check valve for your area. MOVA is not liable
for any damage or harm resulting from failure to comply with
these requirements.

5
EN
•Ensure the device is turned off while not in use or while
performing maintenance.
•When not in use, store the device indoors, in a cool, well-
ventilated area.
•CAUTION:
1.FOR USE WITH LAWNS ONLY.
2.FOR OUTDOOR USE ONLY.
3.KEEP FROM FREEZING.
4.ONLY USE BRASS OR PLASTIC HOSE-ENDS. OTHER METALS
WILL CORRODE AND FUSE TO DEVICE.
5.FOR USE ONLY WITH AUTHORIZED MOVA CHARGING
CABLE.
1.2 Battery Safety Instructions
•The device has a lithium-ion battery, which is automatically
charged via an integrated solar cell. Check that the solar cell is
not dirty. This will ensure that the battery charges continuously.
•Irrigation cannot take place if the battery has run out of charge.
•If the device is operated with an upstream valve/controller and
is only used for irrigation, the valve will close as soon as the
battery has run out of charge.
•To operate independently, the location should be exposed
to about 1-2 hours of direct sunlight (trickle charging).
Alternatively, the battery can also be charged via the USB port.
•Fully charge the battery before storing it for winter. The battery
should be charged via the USB port every six months (spring
and autumn).
•Fully charge the battery before storing it for winter. The battery
should be charged via the USB port every six months (spring
and autumn).
•Close the USB port cover after charging via the USB port.
Otherwise water may enter the device.

6
EN
•Only charge the device indoors. This protects the USB port
from moisture.
•Charge the battery on a fireproof surface. The battery may
become hot during charging and cause a fire hazard.
•Only use original MOVA spare parts. Spare parts that have not
been tested by MOVA may cause an increased risk of fire or
defective products.
•Do not charge the battery outside of the device. This reduces
the risk of fire.
•When replacing the battery, handle the spare battery with
care and have the replacement performed by a qualified
professional. A damaged battery may cause a fire hazard.
7
EN
This marking indicates that this product should not be disposed
of with other household waste throughout the EU. To prevent
possible harm to the environment or human health from
uncontrolled waste disposal, recycle it responsibly to promote
the sustainable reuse of material resources. To recycle your used
device, please use the return and collection systems or contact
the retailer where the product was purchased. They can safely
recycle this product.
The remote surveillance is for the absolute private use of non-
public, privately owned places for pure self-protection and
single control intended only. Please be aware of the local data
protection based legal obligations in case of use. No surveillance
of public places, especially with clandestine intent and on the
part of the employer without justified reasons. Such not justified
use is in the risk and responsibility of the user only.
1.3 Correct Disposal of this Product
8
EN
6
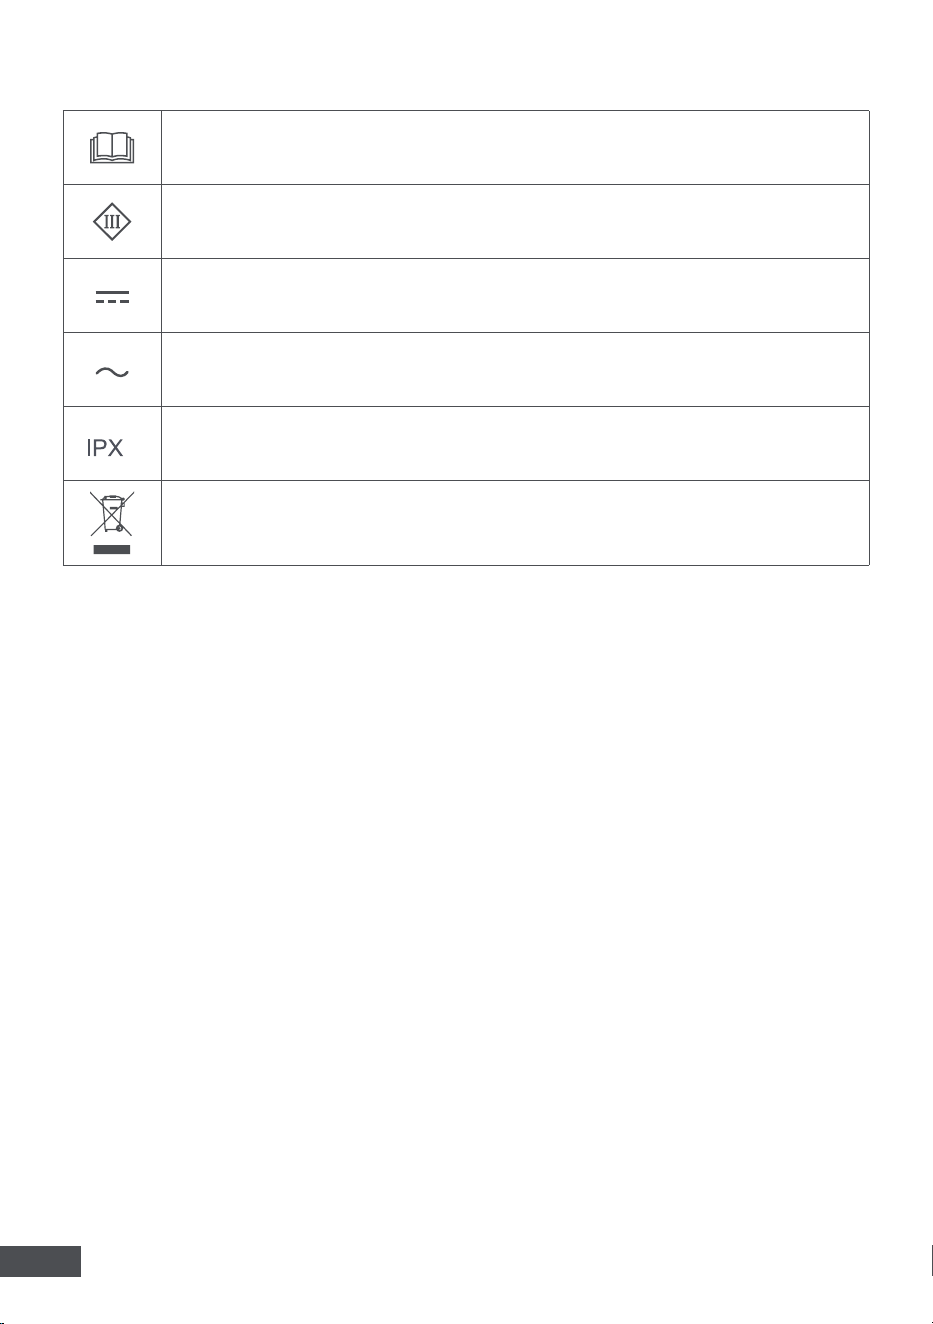
Before charging, read the instructions.
Class Ⅲ
Direct current
Alternating current
Ingress Protection
WARNING –
It is not permitted to dispose of this product as normal household waste. Ensure
that the product is recycled in accordance with local legal requirements.
1.4
Symbols and Decals
9
EN
2. Product Introduction
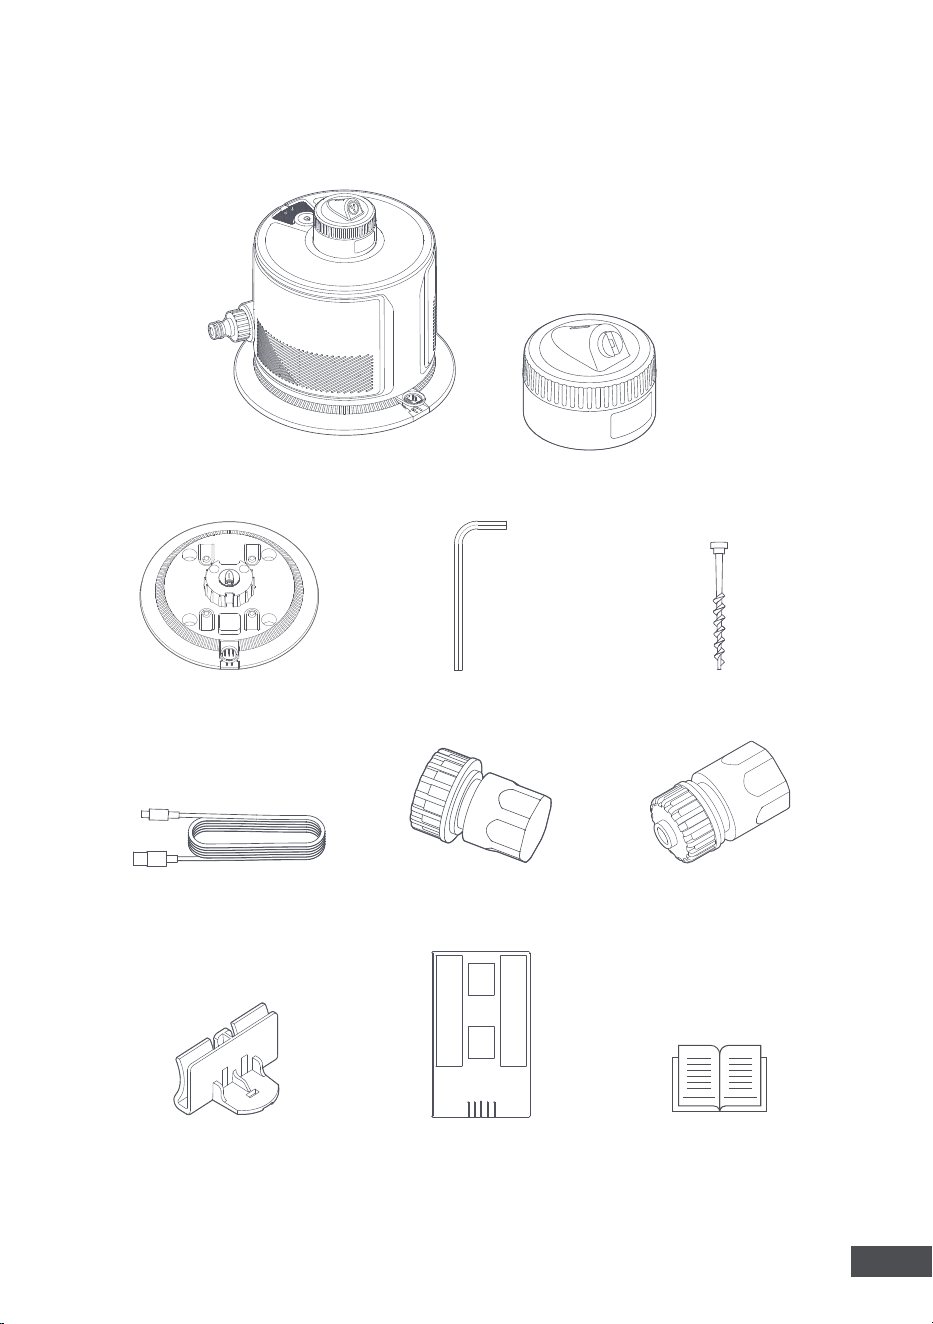
2.1 What’s in the Box
L10 Sprinkler
QR Code
Positioning Board
User Manual &
Quick Start Guide
Garden Peg * 8
× 8
12.7 mm (1/2 in) GHT19 mm (3/4 in) GHT
Misting Sprinkler Head
Positioning Board
Holder
USB-C Cable
Base Plate Hex Key
10
EN
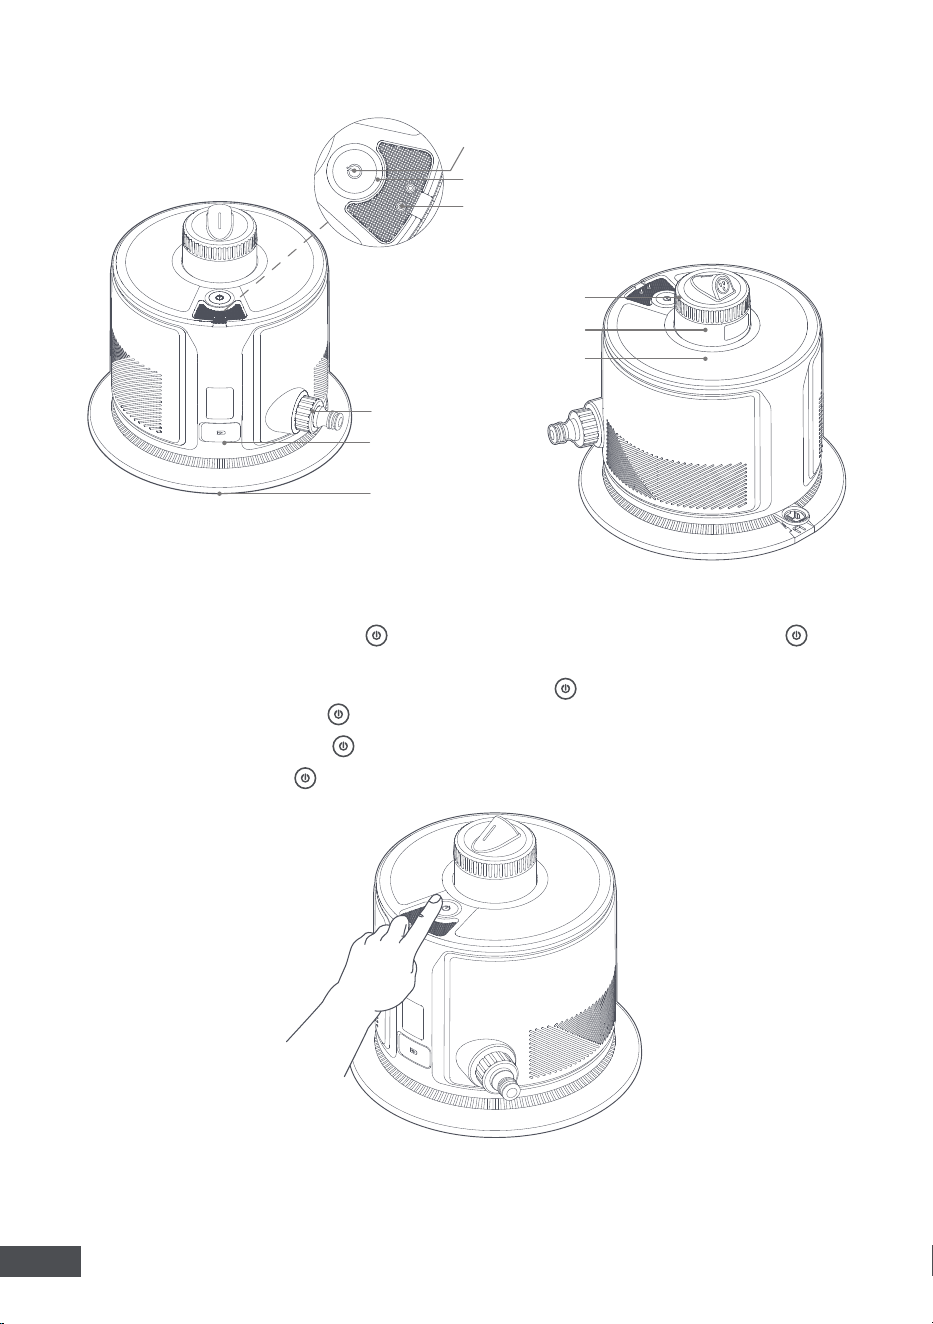
2.2 Product Structure
2.3 Button Description
Turn on/off the device:
Long-press for 3s to turn the device on, and long-press the for
about 10s to turn the device off.
Start/end irrigation:
After turning the device on, press the twice to start irrigation. When the
device is in operation, press the twice to end the current task.
Network setup:
Long-press the for about 5s to connect the device to the App.
Factory reset:
Quick-press 5 times to restore factory settings.
Nozzle Cover
Solar Panel
Function Button
LED Indicator
Rain Sensor
Hose Connector
Charging Port
Base Plate
Long-range Sprinkler Head
11
EN
2.4 LED Status Indicator
Light Effect Device Status
Green Light Sufficient battery level.
Orange Light Low battery level.
Blinking Blue Network setup.
Blinking Red An error has occurred.
Blinking White Restoring factory settings.
Blinking Purple OTA update in progress.
3. Operations
3.1 Operating Conditions
The smart lawn sprinkler is designed for outdoor garden irrigation only. Damage resulting from
use outside the conditions will not be covered under warranty.
Hose
Use a high-quality hose with an inner diameter of 19 mm (3/4
in) or 12.7 mm (1/2 in). Do not use telescopic pipes.
Input Water Pressure
3-6 bar(44-87 psi).
3.2 Charging
It is recommended to fully charge the device before use.
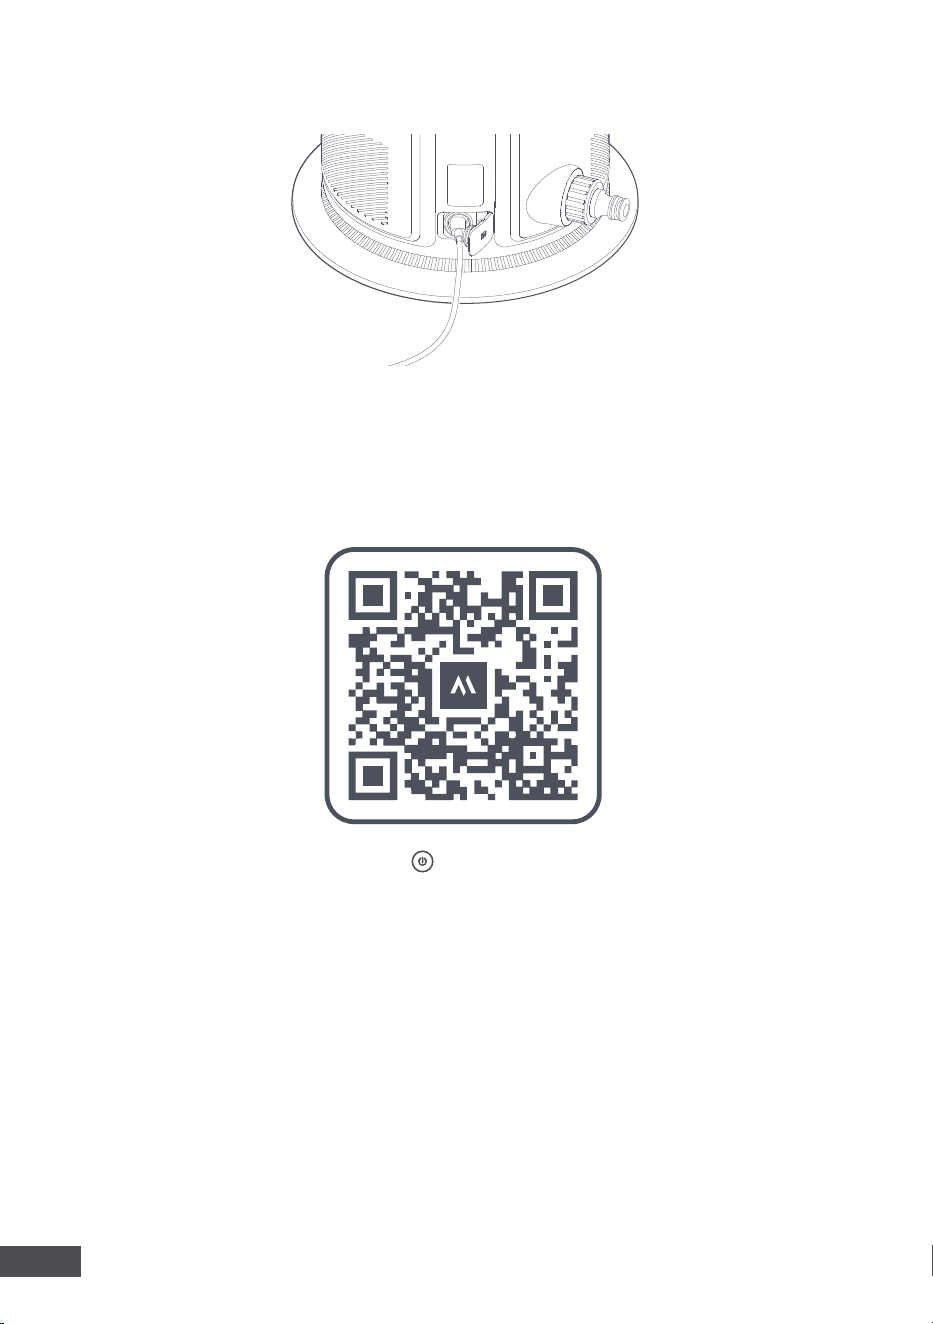
1. Open the cover from the charging port. Connect the charging cable to the charging port and
plug the charger (not included) into an electrical outlet.
2. After the charging is complete, firmly close the charging port cover. Irrigation is not possible
while charging via the USB-C cable, and the programmed watering cycles are skipped.
Notes:
•Avoid using the device in a windy environment, as this can reduce the irrigation efficiency.
•Avoid exposing the device or the hose to freezing temperatures.
12
EN
Caution:
Before charging, check if there is any residual water in the charging port. If so, wipe
the charging port dry first.
3.3 Connect to the MOVAhome App
The MOVAhome App is more than a remote control. There are many things you can do via the
App: reviewing work logs, editing the irrigation map freely and adjusting irrigation schedules.
1. Scan the QR code to download the App, or search for "MOVAhome" in the App Store or Google
Play. After installation is complete, please create an account and log in.
2. Turn on the device, then long-press the for 5s to start the network setup. A blinking blue
light indicates that the device is ready for connection.
3. Before setting up the network, please check the following:
•Ensure that both your mobile phone and the device are within the same Wi-Fi network coverage
range with a strong signal.
•Ensure the current Wi-Fi network is a single-band network of 2.4 GHz frequency or 5 GHz
frequency.
•Ensure the Bluetooth function on your mobile device is enabled.
•Bring the phone close to the device (within 1m / 3ft).
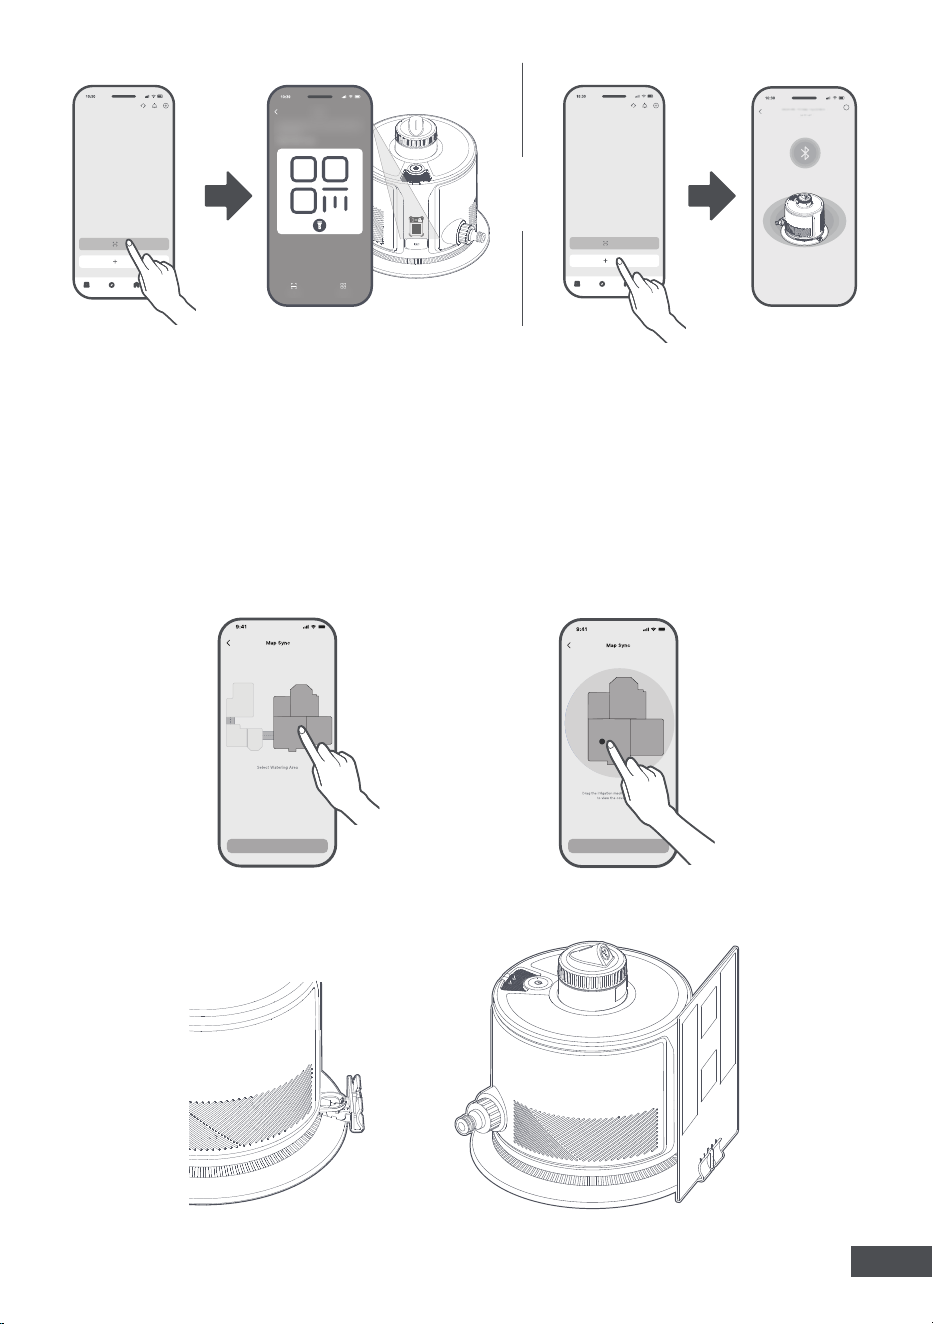
4. Open the App. You can add your device in one of the following ways:
•
Scan QR code to connect:
Navigate to the
Device
page and tap
Scan to connect.
Scan the
QR code on the device. Follow the onscreen instructions to complete the connection.
•
Add manually:
Go to the
Device
page and tap
Add
. Select your device model. Follow the
onscreen instructions to complete the connection.
13
EN
3.4 Mower-assisted Locating and Mapping
If you are a user of the MOVA robotic lawn mower and there is a lawn map, it is recommended to
use the mower to help with the location selection and the mapping:
1. Open the App to start synchronizing the lawn map from the mower.
2. Follow the App instructions to place the device and adjust the irrigation direction.
Note:
The App development team will continuously conduct OTA (over-the-air) updates and
maintenance on the firmware and App. Please check for update notifications to keep the firmware
and App up-to-date to enjoy more features.
OR
?
3. Install the positioning board holder and the positioning board as illustrated.
Next
Done
Next
Done
14
EN
If you are not one of the users of the MOVA robotic lawn mower, please follow the instructions
below to set up your device manually.
3.5 Select the Location
1. You should first select the right location for maximum coverage. The maximum spray distance is
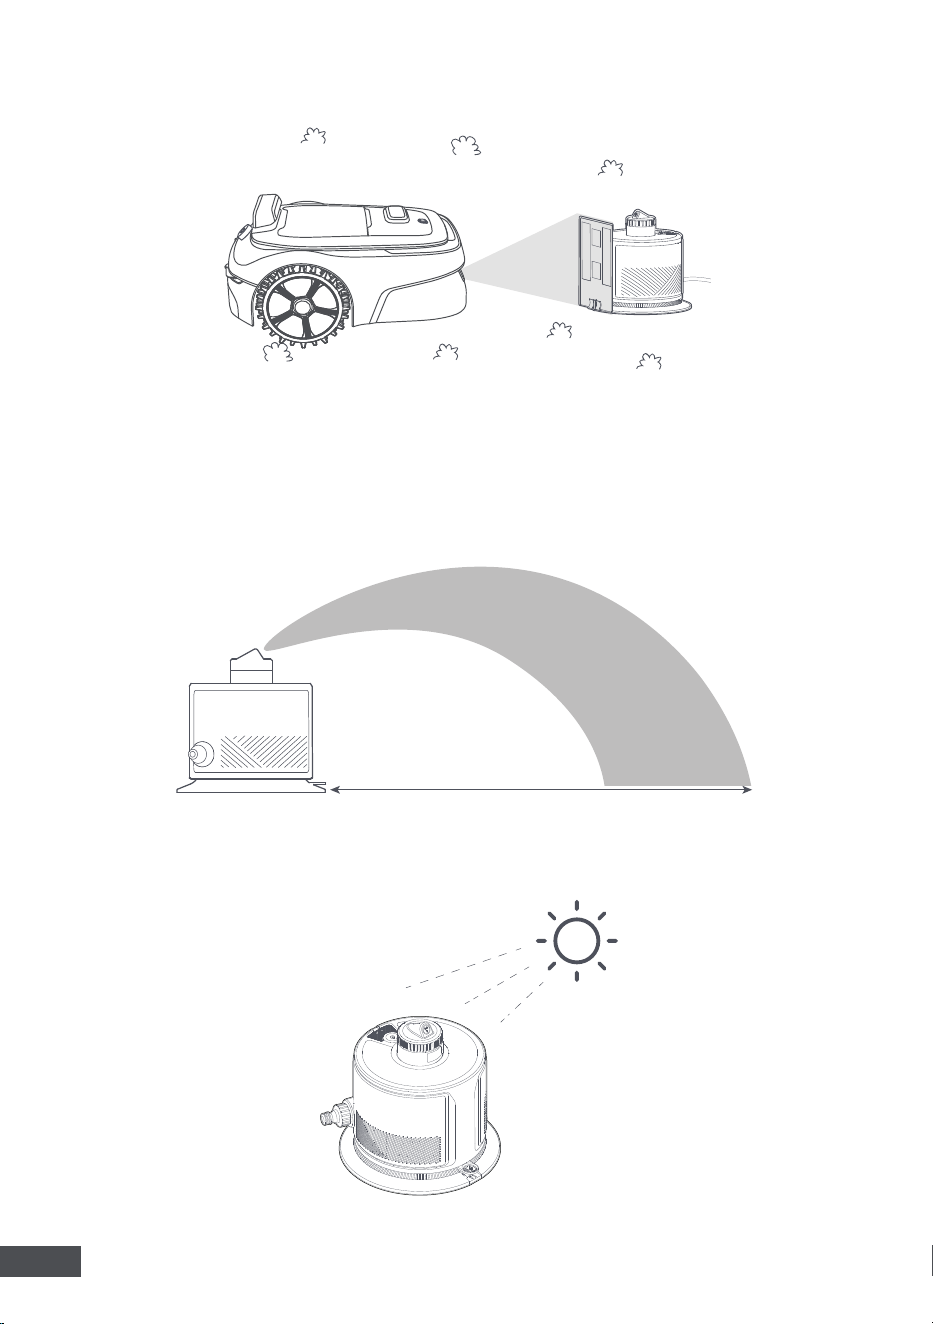
13 m (43 ft). Therefore, no contour point may be further than 13 m (43 ft) away from the device.
13m (43ft)
4. Once the mower detects the irrigation device, it will synchronize the lawn map to the irrigation
device.
2. Place the device in direct sunlight, and it will automatically begin charging. The solar cell must
receive enough direct sunlight. Obstacles (e.g. trees) must not block out sunlight.
15
EN
3.6 Install the Device
Install the base plate:
After the location is selected, place the base plate at the selected position.
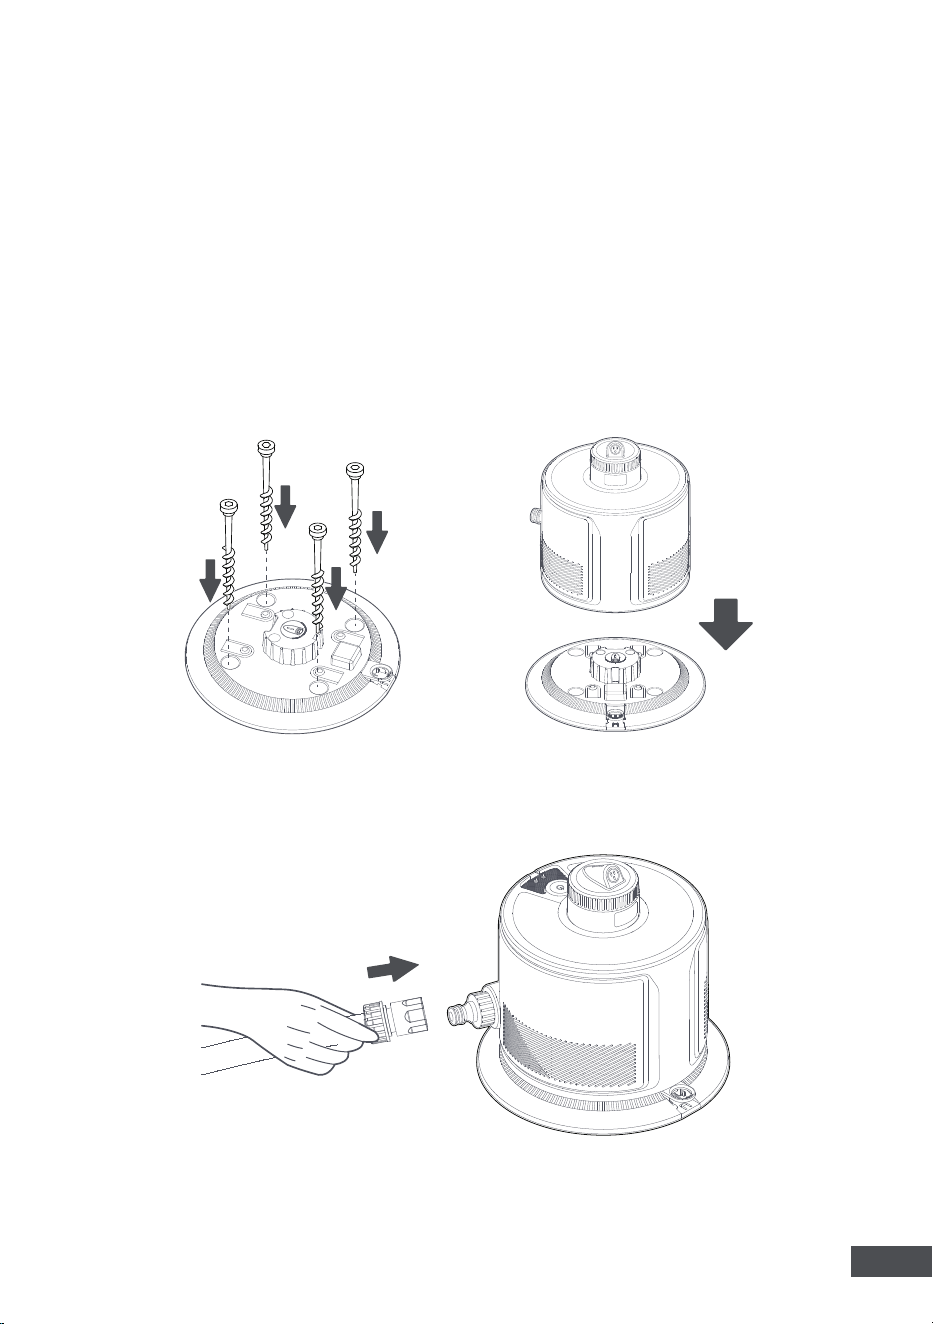
Then, insert the 4 garden pegs in the holes of the base plate and screw them into the ground.
Place the device:
Place the device on the base plate to secure it. You'll hear a "click" when the
device is secured in place.
For better irrigation results, please check the following:
•Use as short a hose as possible for maximum spray distance.
•Ensure the installation surface is flat and stable so the device is firmly secured and does not
wobble.
•Ensure there are no direct obstructions (walls or plants) between the device and the areas that
need to be watered.
•Place the device in an area with good Wi-Fi signals to keep a stable connection between the
device and the App.
Connect the hose:
Connect the device to a hose with the included quick connectors.
Note:
After the connection, turn on the tap to its maximum flow to ensure that the hose is
connected smoothly without leakage.
16
EN
3.7 Map Your Lawn
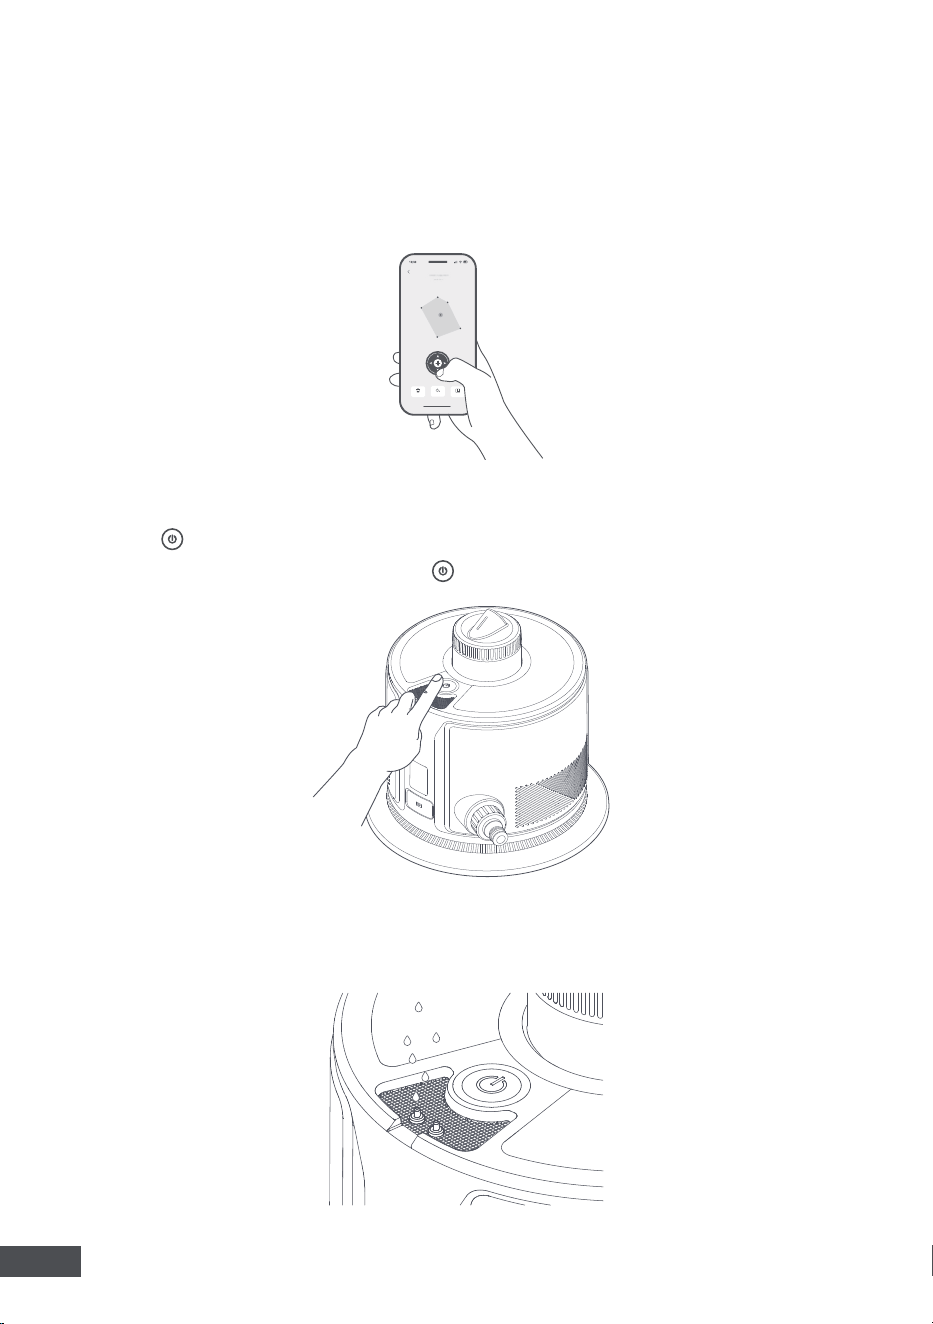
After the device is connected to the App, follow the App's instructions to create the map.
Notes:
•Avoid abrupt changes between the contour points, as gentle and large angles describe the
contour more accurately.
•Irrigation tasks can only be performed when an irrigation map is created.
3.8 Start Irrigation
1. Press the twice to start irrigation. Alternatively, you can start the irrigation task via the App.
2. When the device is in operation, press the twice to stop the current irrigation task.
Delete
Undo
Save
3.9 Weather Adaptation
The device will automatically end the irrigation task when the rain sensor detects rainfall.
17
EN
3.10 Misting Sprinkler Head
The device comes with a misting sprinkler head, which is designed to produce a soft, ultra-
fine mist, ideal for watering delicate plants, seedlings, and shaded garden areas. Follow the
instructions below to change the spray head:
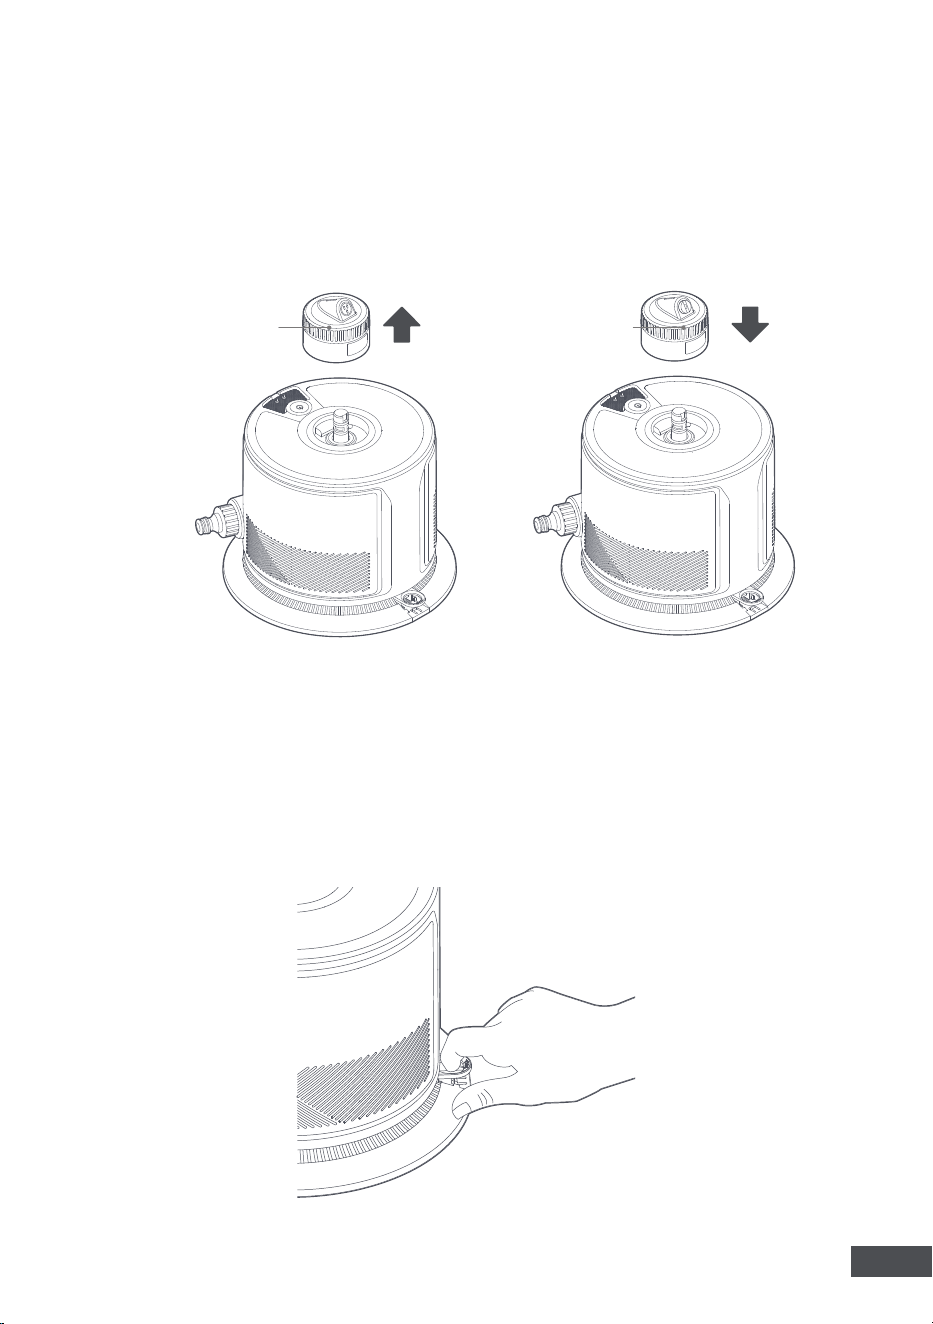
1. Press the release button on the original sprinkler head and pull the sprinkler head upwards at
the same time to detach it.
2. Attach the misting sprinkler head by placing it on the device and pressing the release button at
the same time.
Original Sprinkler
Head
Misting Sprinkler
Head
4. Maintenance
Warning:
Please turn the device off before maintenance to prevent injury.
4.1 Remove the Device
Pull the locking mechanism on the base plate outward to release the device, then remove the
device from the base plate.
18
EN
4.2 Clean the Sprinkler Head
It is recommended to clean the sprinkler head on a regular basis to ensure an even irrigation
pattern.
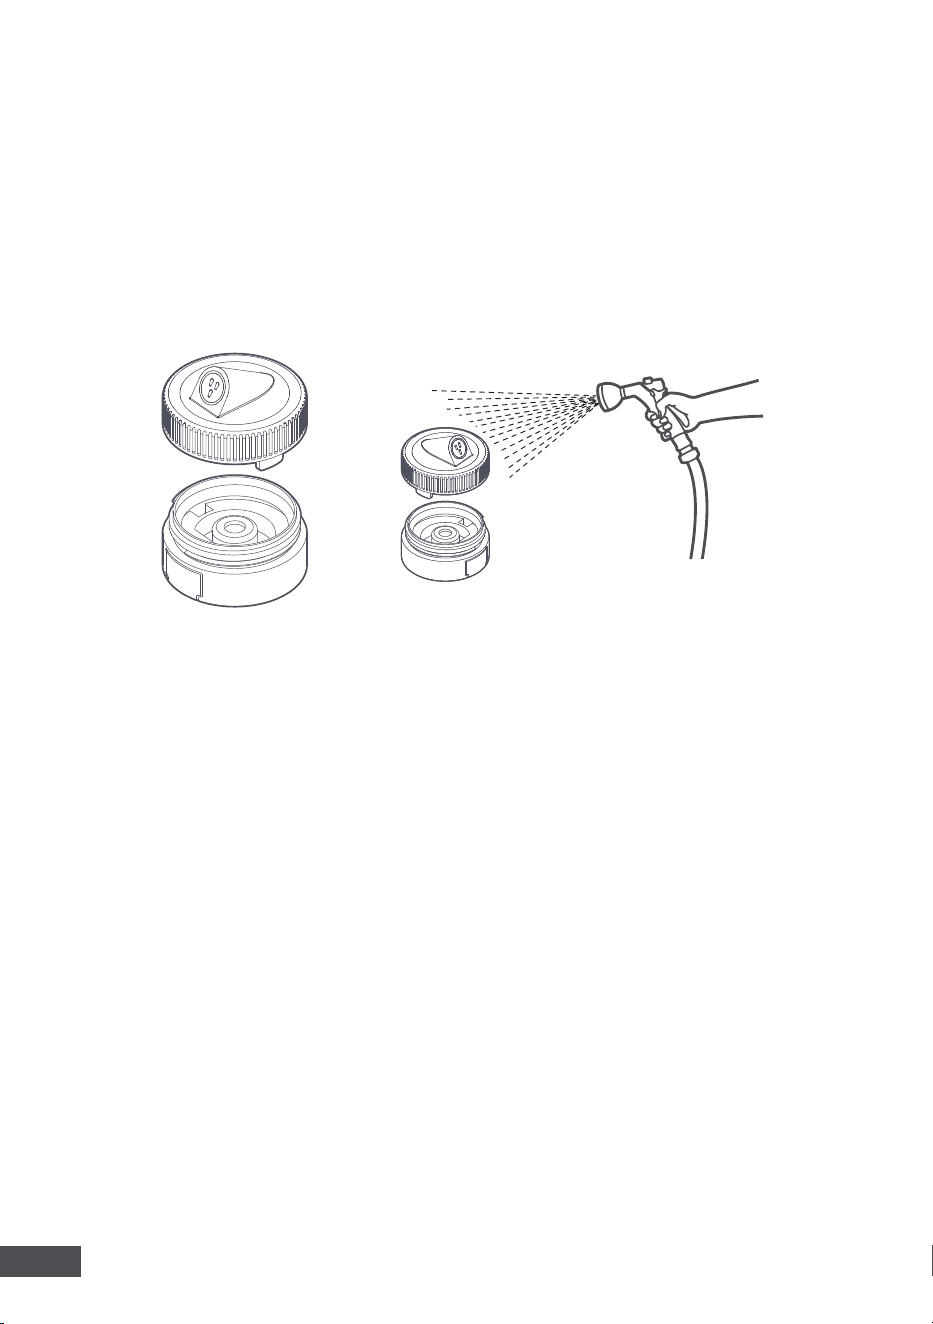
1. Press the release button on the sprinkler head and pull the sprinkler head upwards at the same
time to detach it.
2. Unscrew the nozzle cover from the sprinkler head.
3. Rinse the nozzle cover and the sprinkler head with water.
4. Reinstall the nozzle cover and the sprinkler head by following the above steps in reverse order.
Caution:
Do not remove the nozzle cover while the sprinkler head is attached to the device, as this
may damage the sprinkler head and the device.
4.3 Storage
1. Turn the device off and unplug the charging cable before storage.
2. Disconnect the hose and all the connectors from the device.
3. Remove the device from the base plate.
4. Store the device at room temperature. For long-term storage, ensure the following conditions
are met:
•Store the device indoors in a cool, dry location, protected away from frost.
•Keep the device away from extreme temperatures, flames, and areas accessible to children.
•Recharge the device at least every six months to maintain battery health.
19
EN
5. Troubleshooting
Problem Possible Causes Solutions
The device doesn't turn on.
1. The battery is depleted.
2. The protective panel of the
solar cell is dirty or covered.
1. Charge the battery via the
USB port.
2. Clean the protective panel or
ensure sufficient sunlight.
The device can't reach the
maximum irrigation distance.
1. Water pressure is too low.
2. Insufficient inner diameter
of the hose.
3. The sprinkler head is dirty.
4. Multiple devices share
the same tap and are set to
operate at the same time.
5. The filter is clogged.
1. Increase the water pressure/
water supply.
2. Use a 19 mm (3/4 in) garden
hose. Ensure that there are no
foreign objects in the hose.
3. Clean the sprinkler head.
4. Stagger the operating times
for devices sharing the same
tap.
5. Unscrew the hose connector
and wash the filter.
Irrigation pattern is uneven.
The sprinkler head is dirty or
damaged.
1. Remove and clean the
sprinkler head.
2. If the issue persists, contact
the after-sales service.
Water leakage.
Galvanic corrosion from using
galvanized connectors.
Use brass or plastic connectors
instead.
Irrigation deviates from the
irrigation map.
1. Weather conditions vary
widely.
2. Fluctuating water pressure
from the water source.
3. The sprinkler head is
clogged or worn out.
4. The device has been moved.
5. The contour points are
insufficient.
1. Complete the map setting in a
windless environment.
2. Reset the map when the water
pressure is relatively steady.
3. Clean or replace the sprinkler
head.
4. Reinstall the device and set
the map.
5. Reset the map and add more
contour points.
No irrigation, the schedule is
not being carried out.
1. The battery is depleted.
2. No water is flowing.
1. Charge the battery via the
USB port.
2. Turn on the water flow.
20
EN
6. Specifications
Product Name
Smart Lawn Sprinkler
Product Model
LIX1511
Water Pressure Range
3-6 bar(44-87 psi)
Irrigation Range at 3 bar
13 m (43 ft)
Irrigation Area at 3 bar
500 m² (5400 sq.ft)
Lithium-ion battery
7800 mAh
Rated Input
5 V 2 A
Ingress Protection
IPX6
Working Temperature
5-50 ℃ (41–122 °F)
Bluetooth Frequency Range
2402 MHz-2480 MHz
Wi-Fi Frequency Range
2412-2484 MHz; 5180-5885 MHz
*The specifications are subject to change as we continually improve the product. For the latest
information, please visit our website at https://www.mova.tech

Manufacturer:
Wavefuture Robotics Technology (Suzhou) Co., Ltd.
Address:
1/F, Building B, No. 7 Qian Zhu Road, Taihu Street,
Wuzhong District, Suzhou, Jiangsu Province, P.R.China
MADE IN CHINA