
USE + CARE
MANUAL
REV.042026
GORDON RAMSAY COLLECTION BY
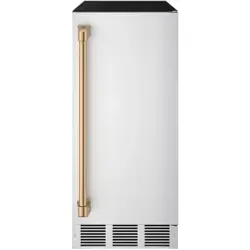
THOR KITCHEN 15 INCH BUILT-IN
ICE MAKER
RIM1501
GORDON RAMSAY BY THOR KITCHEN
15 INCH BUILT-IN ICE MAKER
RIM1501

1
TABLE OF CONTENTS
IMPORTANT SAFETY INSTRUCTIONS . . . . . . . . . . . . . . . . . . . . . . . . . . . . . . . . . . . . . . . . . . . . . . . . . . . . . . . . . . . . . 2-4
1.1 Ice maker Safety . . . . . . . . . . . . . . . . . . . . . . . . . . . . . . . . . . . . . . . . . . . . . . . . . . . . . . . . . . . . . . . . . . . . . . . . 2
1.2 Important Safeguards . . . . . . . . . . . . . . . . . . . . . . . . . . . . . . . . . . . . . . . . . . . . . . . . . . . . . . . . . . . . . . . . . . . 3-4
TECHNICAL INFORMATION . . . . . . . . . . . . . . . . . . . . . . . . . . . . . . . . . . . . . . . . . . . . . . . . . . . . . . . . . . . . . . . . . . 5-6
2.1 Component Locations . . . . . . . . . . . . . . . . . . . . . . . . . . . . . . . . . . . . . . . . . . . . . . . . . . . . . . . . . . . . . . . . . . . . . . 6
OPERATION . . . . . . . . . . . . . . . . . . . . . . . . . . . . . . . . . . . . . . . . . . . . . . . . . . . . . . . . . . . . . . . . . . . . . . . . . . . . . 7-13
3.2 Operating Method . . . . . . . . . . . . . . . . . . . . . . . . . . . . . . . . . . . . . . . . . . . . . . . . . . . . . . . . . . . . . . . . . . . . . . 7-8
3.7 Preparing The Ice Maker For Long Storage . . . .. . . . . . . . . . . . . . . . . . . . . . . . . . . . . . . . . . . . . . . . . . . . . . . .11
3.1 Final Check List Before Operation . . . . . . . . . . . . . . . . . . . . . . . . . . . . . . . . . . . . . . . . . . . . . . . . . . . . . . . . . . . . 7
3.4 How The Machine Uses The Water . . . . . . . . . . . . . . . . . . . . . . . . . . . . . . . . . . . . . . . . . . . . . . . . . . . . . . . . . . . .9
3.3 How The Machine Makes Ice . . . . . . . . . . . . . . . . . . . . . . . . . . . . . . . . . . . . . . . . . . . . . . . . . . . . . . . . . . . . . . . 8
3.6 Normal Sounds . . . . . . . . . . . . . . . . . . . . . . . . . . . . . . . . . . . . . . . . . . . . . . . . . . . . . . . . . . . . . . . . . . . . . . . . . . . 11
3.5 How The Pump Out Water Drain System Operates . . . . . . . . . . . . . . . . . . . . . . . . . . . . . . . . . . . . . . . . . . . . 9-10
CLEANING AND MAINTENANCE. . . . . . . . . . . . . . . . . . . . . . . . . . . . . . . . . . . . . . . . . . . . . . . . . . . . . . . . . . . . . 14-18
4.1 Exterior Cleaning . . . . . . . . . . . . . . . . . . . . . . . . . . . . . . . . . . . . . . . . . . . . . . . . . . . . . . . . . . . . . . . . . . . . . . . . .14
3.11 Major Functions . . . .. . . . . . . . . . . . . . . . . . . . . . . . . . . . . . . . . . . . . . . . . . . . . . . . . . . . . . . . . . . . . . . . . . . . .13
4.2 Interior Cleaning . . . . . . . . . . . . . . . . . . . . . . . . . . . . . . . . . . . . . . . . . . . . . . . . . . . . . . . . . . . . . . . . . . . . . . . . . 15
3.9 Indicator Notification. . . . . . . . . . . . . . . . . . . . . .. . .. . . . . . . . . . . . . . . . . . . . . . . . . . . . . . . . . . . . . . . . . . . . . . . .12
3.8 Control Panel . . . . . . . . . . . . . . . . . . . . . . . . . . . . . . . . . . . . . . . . . . . . . . . . . . . . . . . . . . . . . . . . . . . . . . . . . 12
3.10 System Fault Notification . . . . . . . . . . . . . . . . . . . . . . . . . . . . . . . . . . . . . . . . . . . . . . . . . . . .. . . . . . . . . . . . . . 13
TROUBLESHOOTING. . . . . . . . . . . . . . . . . . . . . . . . . . . . . . . . . . . . . . . . . . . . . . . . . . . . . . . . . . . . . . . . . . . . . . .19-20
4.3 Condenser Cleaning . . . . . . . . . . . . . . . . . . . . . . . . . . . . . . . . . . . . . . . . . . . . . . . . . . . . . . . . . . . . . . . . . . . . . . 15
4.5 Ice-making System Cleaning . . . . . . . . . . . . . . . . . . . . . . . . . . . . . . . . . . . . . . . . . . . . . . . . . . . . . . . . . . . . 16-17
4.4 Water Distribution Tube Cleaning . . . . . . . . . . . . . . . . . . . . . . . . . . . . . . . . . . . . . . . . . . . . . . . . . . . . . . . . . . . 16
4.6 Extended Periods Of Non-Use. . . . . . . . . . . . . . . . . . . . . . . . . . . . . . . . . . . . . . . . . . . . . . . . . . . . . . . . . . . . . . 17
4.8 Starting Up The Unit. . . . . . . . . . . . . . . . . . . . . . . . . . . . . . . . . . . . . . . . . . . . . . . . . . . . . . . . . . . . . . . . . . . . . . . 18
4.7 Recommissioning The Unit. . . . . . . . . . . . . . . . . . . . . . . . . . . . . . . . . . . . . . . . . . . . . . . . . . . . . . . . . . . . . . . . . 18
WARRANYY. . . . . . . . . . . . . . . . . . . . . . . . . . . . . . . . . . . . . . . . . . . . . . . . . . . . . . . . . . . . . . . . . . . . . . . . . . . . . . . . 21
2
IMPORTANT SAFETY INSTRUCTIONS
1.1 Ice maker Safety
Your safety and the safety of others are very important.
We have provided many important safety messages in this manual and on your appliance. Always
read and obey all safety messages.
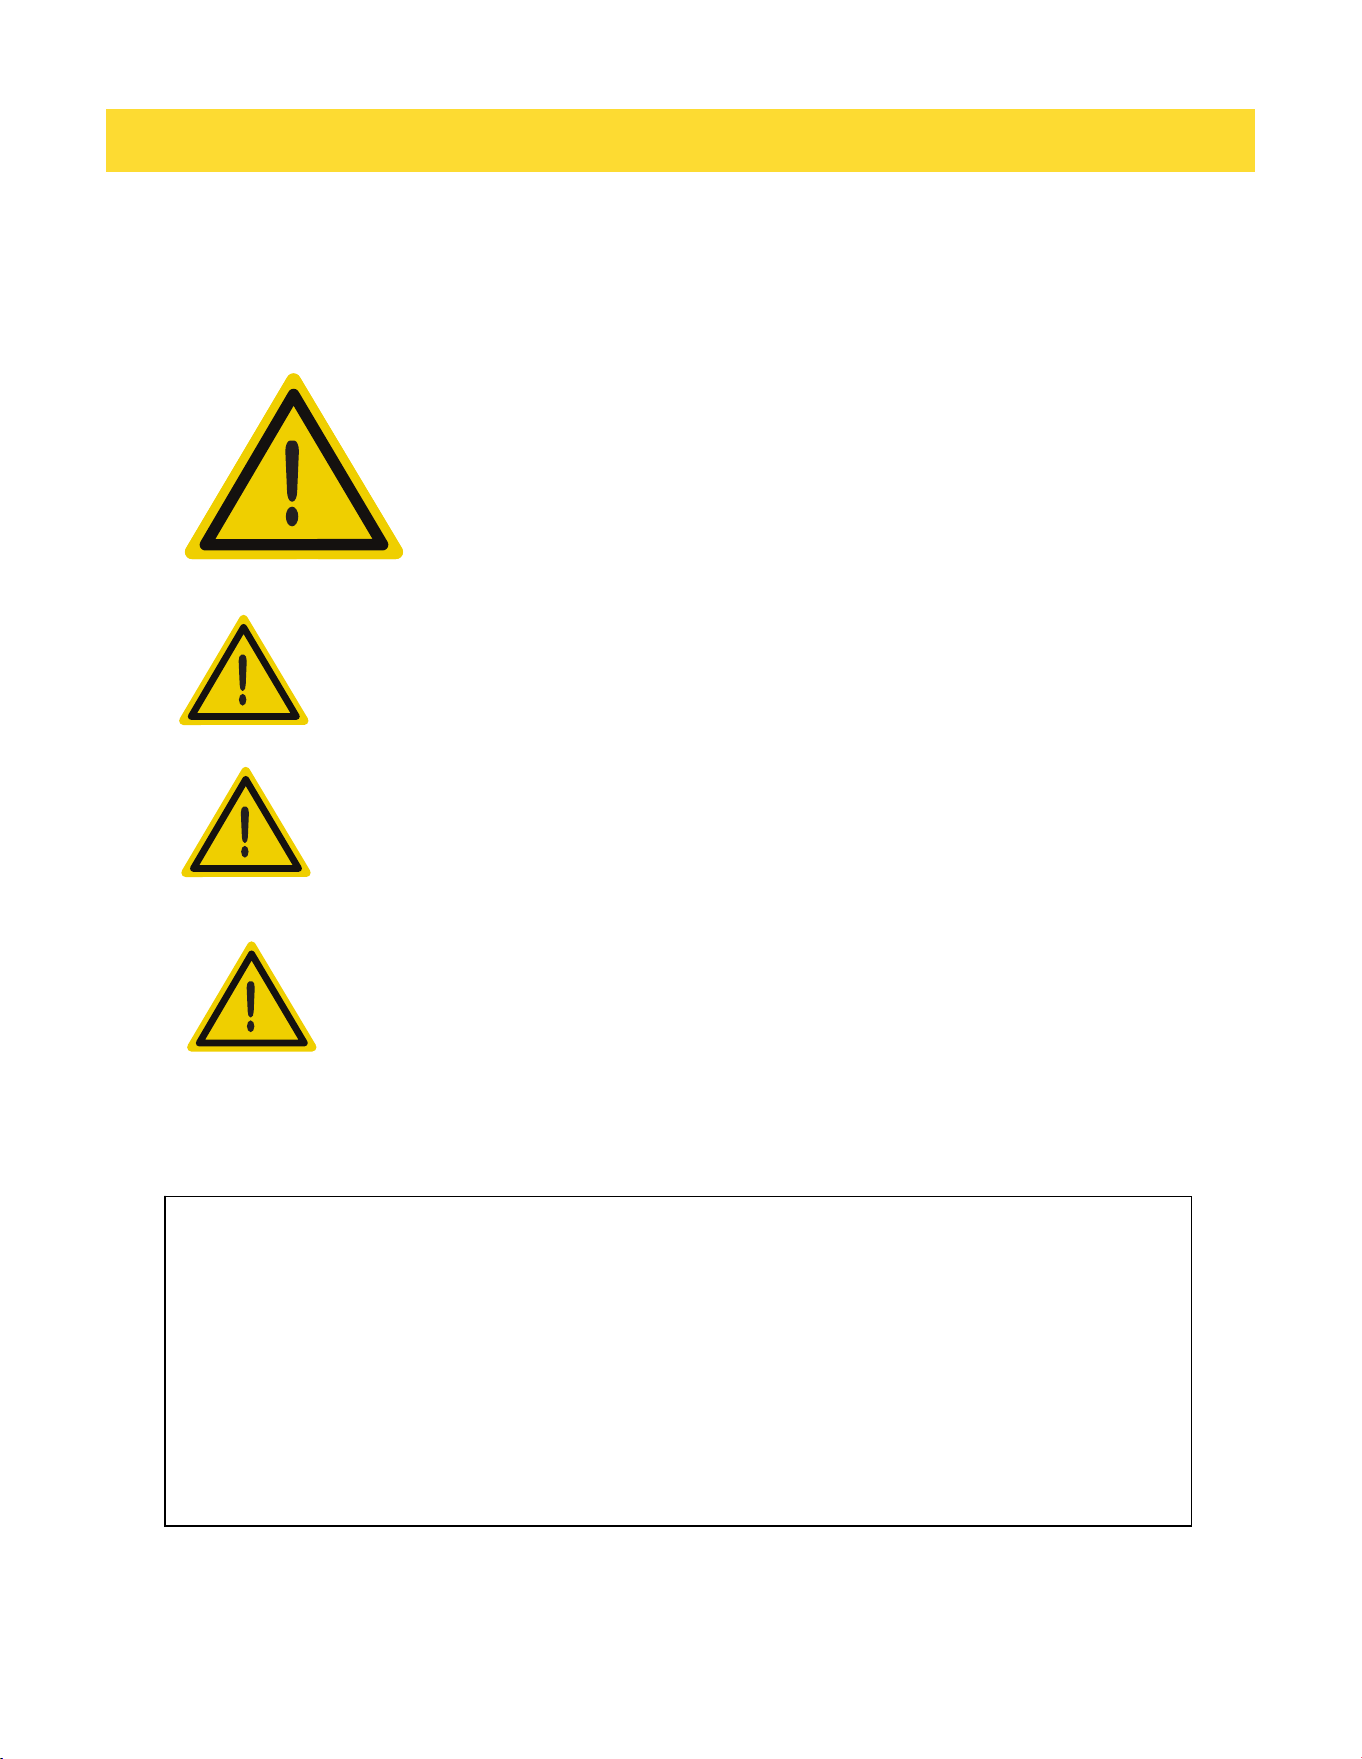
This is the Safety Alert Symbol. This symbol alerts you to potential hazards
that can injure or kill you and others. All safety messages will follow the
Safety Alert Symbol and either the words"DANGER", "WARNING" OR
"CAUTION".
DANGER means that failure to heed this safety
statement may result in severe personal injury or
death.
WARNING means that failure to heed this safety
statement may result in extensive product
damage, serious personal injury or death.
CAUTION means that failure to heed this safety
statement may result in minor or moderate
personal injury, or property or equipment damage.
CAUTION
All safety messages will alert you to what the potential hazard is, tell you how to reduce the chance of
injury, and let you know what can happen if the instructions are not followed.
IMPORTANT SAFETY INSTRUCTIONS
WARNING: To reduce the risk of fire, electric shock or injury when using your ice maker, follows
these basic precautions:
· Plug into grounded 3-prong outlet.
· Do not remove grounding prong.
· Do not use an adapter.
· Do not use an extension cord.
· Disconnect power before cleaning.
· Disconnect power before servicing.
· Replace all panels before operating.
· Use two or more people to move & install ice maker.
SAVE THESE INSTRUCTIONS
DANGER
WARNING
3
IMPORTANT SAFETY INSTRUCTIONS
1.2 Important Safeguards
• Plug into a grounded 3-prong outlet; do not remove grounding prong, do not use an adapter, and
do not use an extension cord.
• It is recommended that a separate circuit, serving only your ice maker, be provided. Use
receptacles that cannot be turned off by a switch or pull chain.
• Do not connect or disconnect the electric plug when your hands are wet.
• Never unplug the ice maker by pulling on the power cord. Always grip the plug firmly and pull
straight out from the outlet.
• Never clean ice maker parts with flammable fluids. Do not store or use gasoline or other
flammable vapors and liquids in the vicinity of this or any other appliances. The fumes can create
a fire hazard or explosion.
• Before proceeding with cleaning and maintenance operations, make sure the power line of the
unit is disconnected and the water line is shut off.
• Before operating, pull all panels back into place.
• Never allow children to operate, play with or crawl inside the ice maker.
• Do not touch the evaporator with your hand when the machine is operating.
• Unplug the ice maker or disconnect power before cleaning or servicing. Failure to do so can
result in electrical shock or death.
• Do not attempt to repair or replace any part of your ice maker unless it is specifically
recommended in this manual. All other servicing should be referred to a qualified technician.
• Use two or more people to move and install the ice maker. Failure to do so can result in back or
other injury.
• To ensure proper ventilation for your ice maker, the front of the unit must be completely
unobstructed. Choose a well-ventilated area with temperatures above 50°F (10°C) and below
100°F (38°C).
• The ice maker should not be located next to ovens, grills or other sources of high heat.
• The ice maker must be installed with all electrical and water connections in accordance with
state and local codes. A standard electrical supply (115 V AC, 60 Hz, 15 A), properly grounded in
accordance with the National Electrical Code and local codes and ordinances, is required.
• Do not kink or pinch the power supply cord between the ice maker and cabinet.
Before the ice maker is used, it must be properly positioned and installed as described
in this manual, so read the manual carefully. We strongly recommend that you have a
professional install your new machine. The warranty may be affected or voided by an
incorrect installation. To reduce the risk of fire, electrical shock or injury when using
the ice maker, follow basic precautions, including the following:
DANGER
WARNING

4
IMPORTANT SAFETY INSTRUCTIONS
• The fuse (or circuit breaker) size should be 15 amperes.
• It is important for the ice maker to be leveled in order to work properly. Otherwise water may not flow
properly through the evaporator (ice mold). The ice production will be less than normal. You may
need to make several adjustments to level it.
• All installations must be in accordance with local plumbing code requirements.
• Make certain that hoses are not pinched, kinked or damaged during installation.
• Check for leaks after water line is connected.
• Although the unit has been tested and cleaned at the factory, due to long-term transit and storage,
the first batch of cubes must be discarded.
• Remove the packing materials and clean the ice maker before using.
• Turn on the water supply tap before switching on the ice maker. Never turn the water supply tap off
when the ice maker is working.
• Except to take ice from the unit, keep the door closed in order to reduce ice melting and to promote
proper ice formation.
• If the ice maker will not be used for a long time, before the next use it must be thoroughly cleaned.
Follow carefully any instructions provided for cleaning or use of sanitizing solution. Do not leave any
solution inside the ice maker after cleaning.
• DO NOT use solvent-based cleaning agents or abrasives on the interior. These cleaners may transmit
taste to the ice cubes, or damage or discolor the interior.
• The ice machine cleaner contains acids. Do not use or mix with any other solvent-based cleaning
products. Use rubber gloves to protect hands. Carefully read the safety instructions on the container
of the ice machine cleaner.
• Do not use the apparatus other than for its intended purpose.
SAVE THESE INSTRUCTIONS
Electrical Connection
Do not, under any circumstances, cut or remove the third (ground prong from the power cord. For
personal safety, this appliance must be properly grounded. The power cord of this appliance is equipped
with a 3-prong grounding plug that mates with a standard 3-prong grounding wall outlet to minimize the
possibility of electric shock hazard from the appliance. Have the wall outlet and circuit checked by a
qualified electrician to make sure the outlet is properly grounded. When a standard 2-prong wall outlet
is encountered, it is your responsibility and obligation to have it replaced with a properly grounded 3-
prong wall outlet. The ice maker should always be plugged into its own individual electrical outlet which
has a voltage rating that matches the rating label on the appliance. This provides the best performance
and also prevents overloading house wiring circuits which could cause a fire hazard from overheated
wires. Never unplug your ice maker by pulling on the power cord. Always grip the plug firmly and pull
straight out from the outlet. Repair or replace immediately all power cords that have become frayed or
otherwise damaged. Do not use a cord that shows cracks or abrasion damage along its length or at
either end. When moving the ice maker, be careful not to damage the power cord.
Extension Cord
Because of potential safety hazards under certain conditions, it is strongly recommended that you do
not use an extension cord with this ice maker.
5
TECHNICAL INFORMATION
Model: RIM1501
Electrical power:
115VAC ~ 60Hz
Power consumption:
Ice-making /-harvest rated current:
2.5A/1.9A
Refrigerant:
R290 1.87 oz
High/Low side pressure:
286 psig/110 psig
Width x depth x height:
14.6" x 24.4" x 33.6"
Unit weight: 79 lbs
Maximum ice storage: 25 lbs
Ice-making capacity:
58 lbs/day*
Cube
Ice shape:
Ice cube dimensions:
The technical data and performance index listed above should be used for
reference only. They are subject to change.
*The actual quantity of ice produced per day can vary with environment and
water conditions.
7/8″ x 7/8″ x 7/8″
6
TECHNICAL INFORMATION
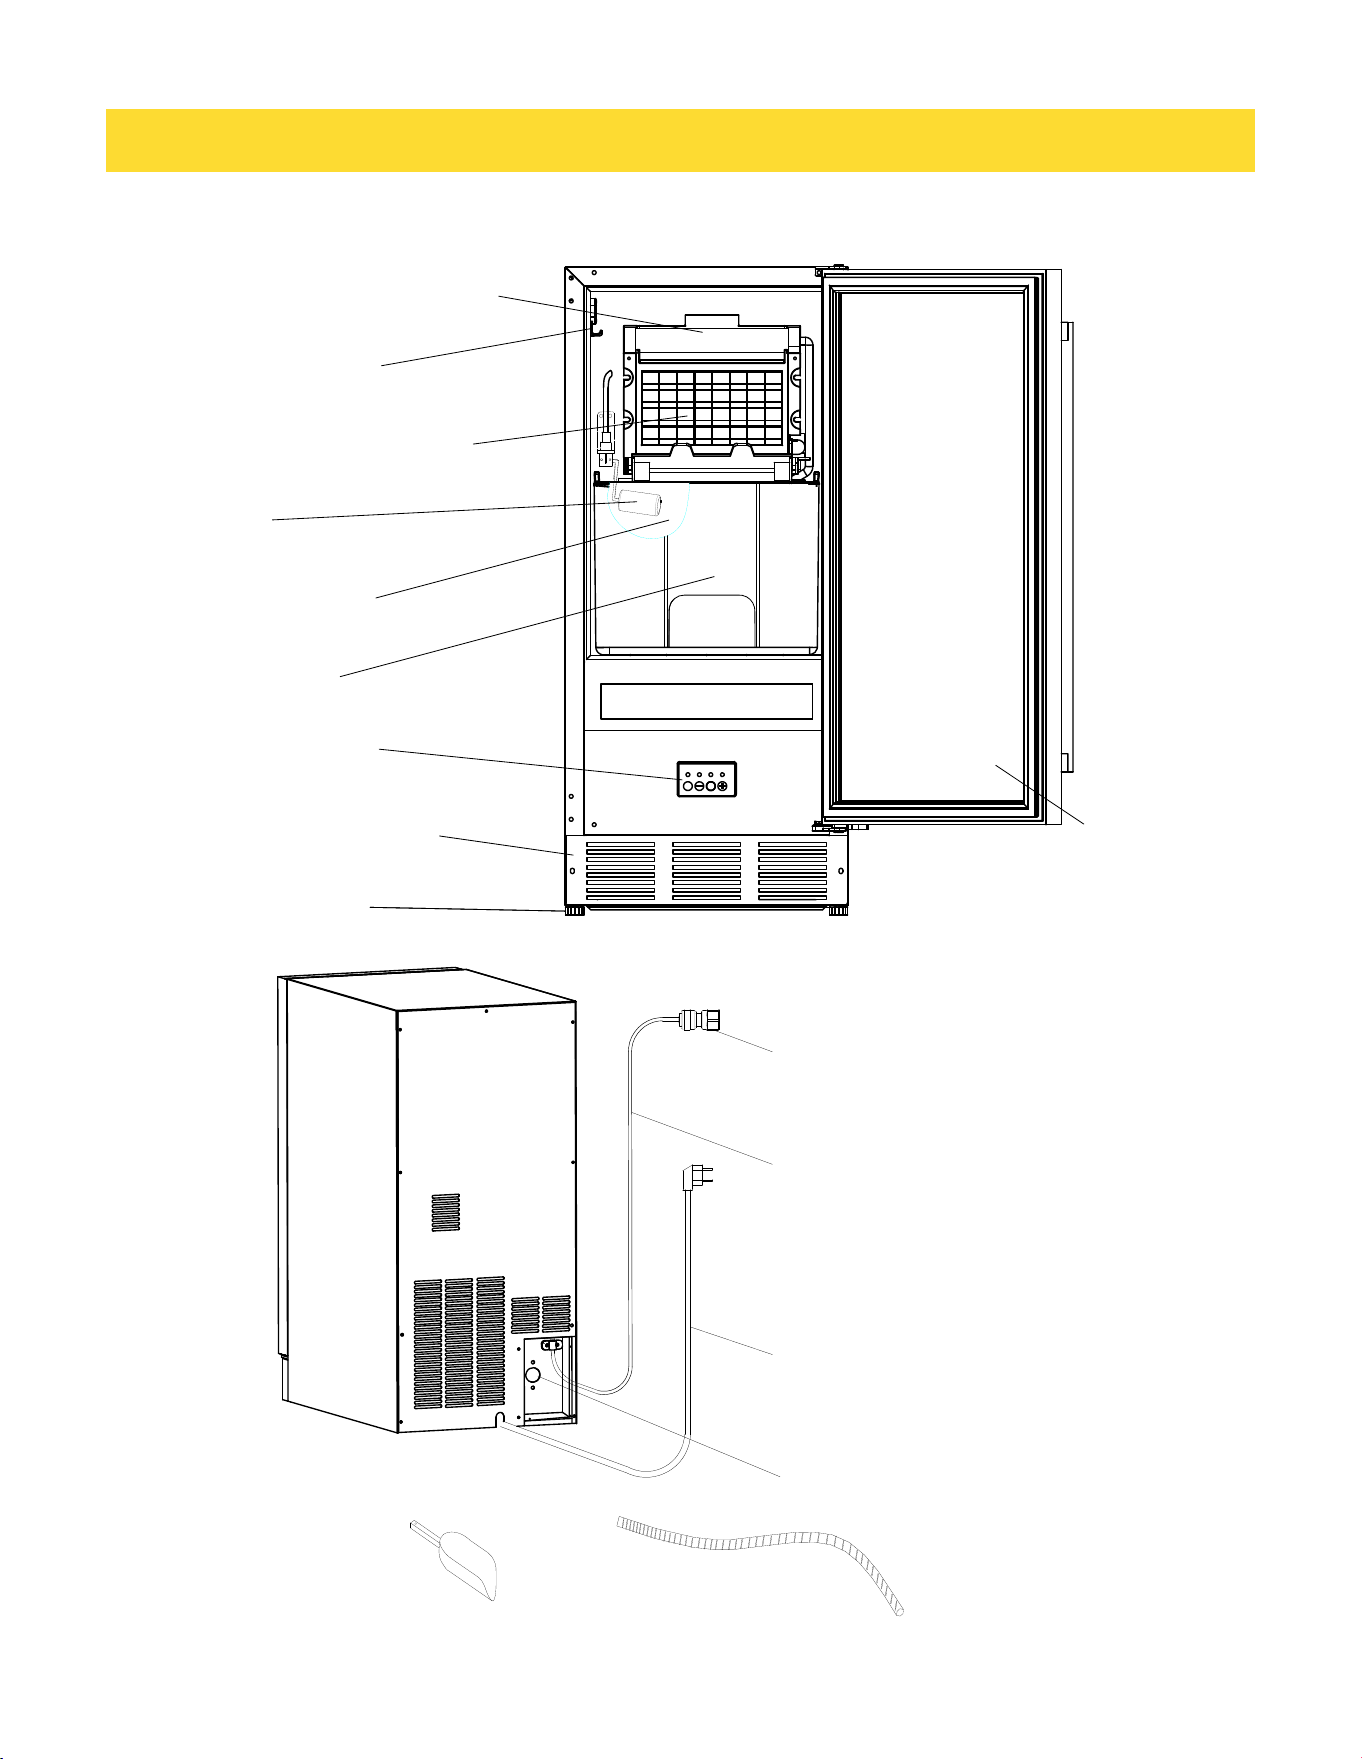
Ice scoop
Drain hose
2.1 Component Locations
Water Distribution Tube
Scoop Holder
Evaporator (Ice Mold)
Float
Water Trough
Ice Bucket
Control Panel
Front Louver Panel
Leveling Leg
Door
1/4”compression quick fitting
Water supply hose
Power cord
Drain outlet
OPERATION
7
3.1 Final Check List Before Operation
1. Have all packing materials and tape been removed from the interior and exterior of the ice maker?
2. Did you clean the ice storage bin?
3. Have the installation instructions been followed, including connecting the machine to water and
electricity?
4. Has the machine been leveled?
5. Is the ice maker in a site where the ambient temperature is between 50°F (10°C) and 100°F (38°C)
and the water temperature between 50°F (10°C) and 90°F (32°C) all year- round?
6. Has the water supply pressure been checked to ensure a minimum of 15 psig with a static pressure not
to exceed 80 psig?
7. Is there a clearance of at least 4” (102mm) at the rear, and 1” (25 mm) at top and sides for proper
air circulation?
8. Has the power supply voltage been checked or tested against the nameplate rating?And has proper
grounding been installed in the ice maker?
9. Is the ice maker plugged in?
10. Have you turned on the main water supply and tap?
11. Have you checked for leaks at all water supply connections?
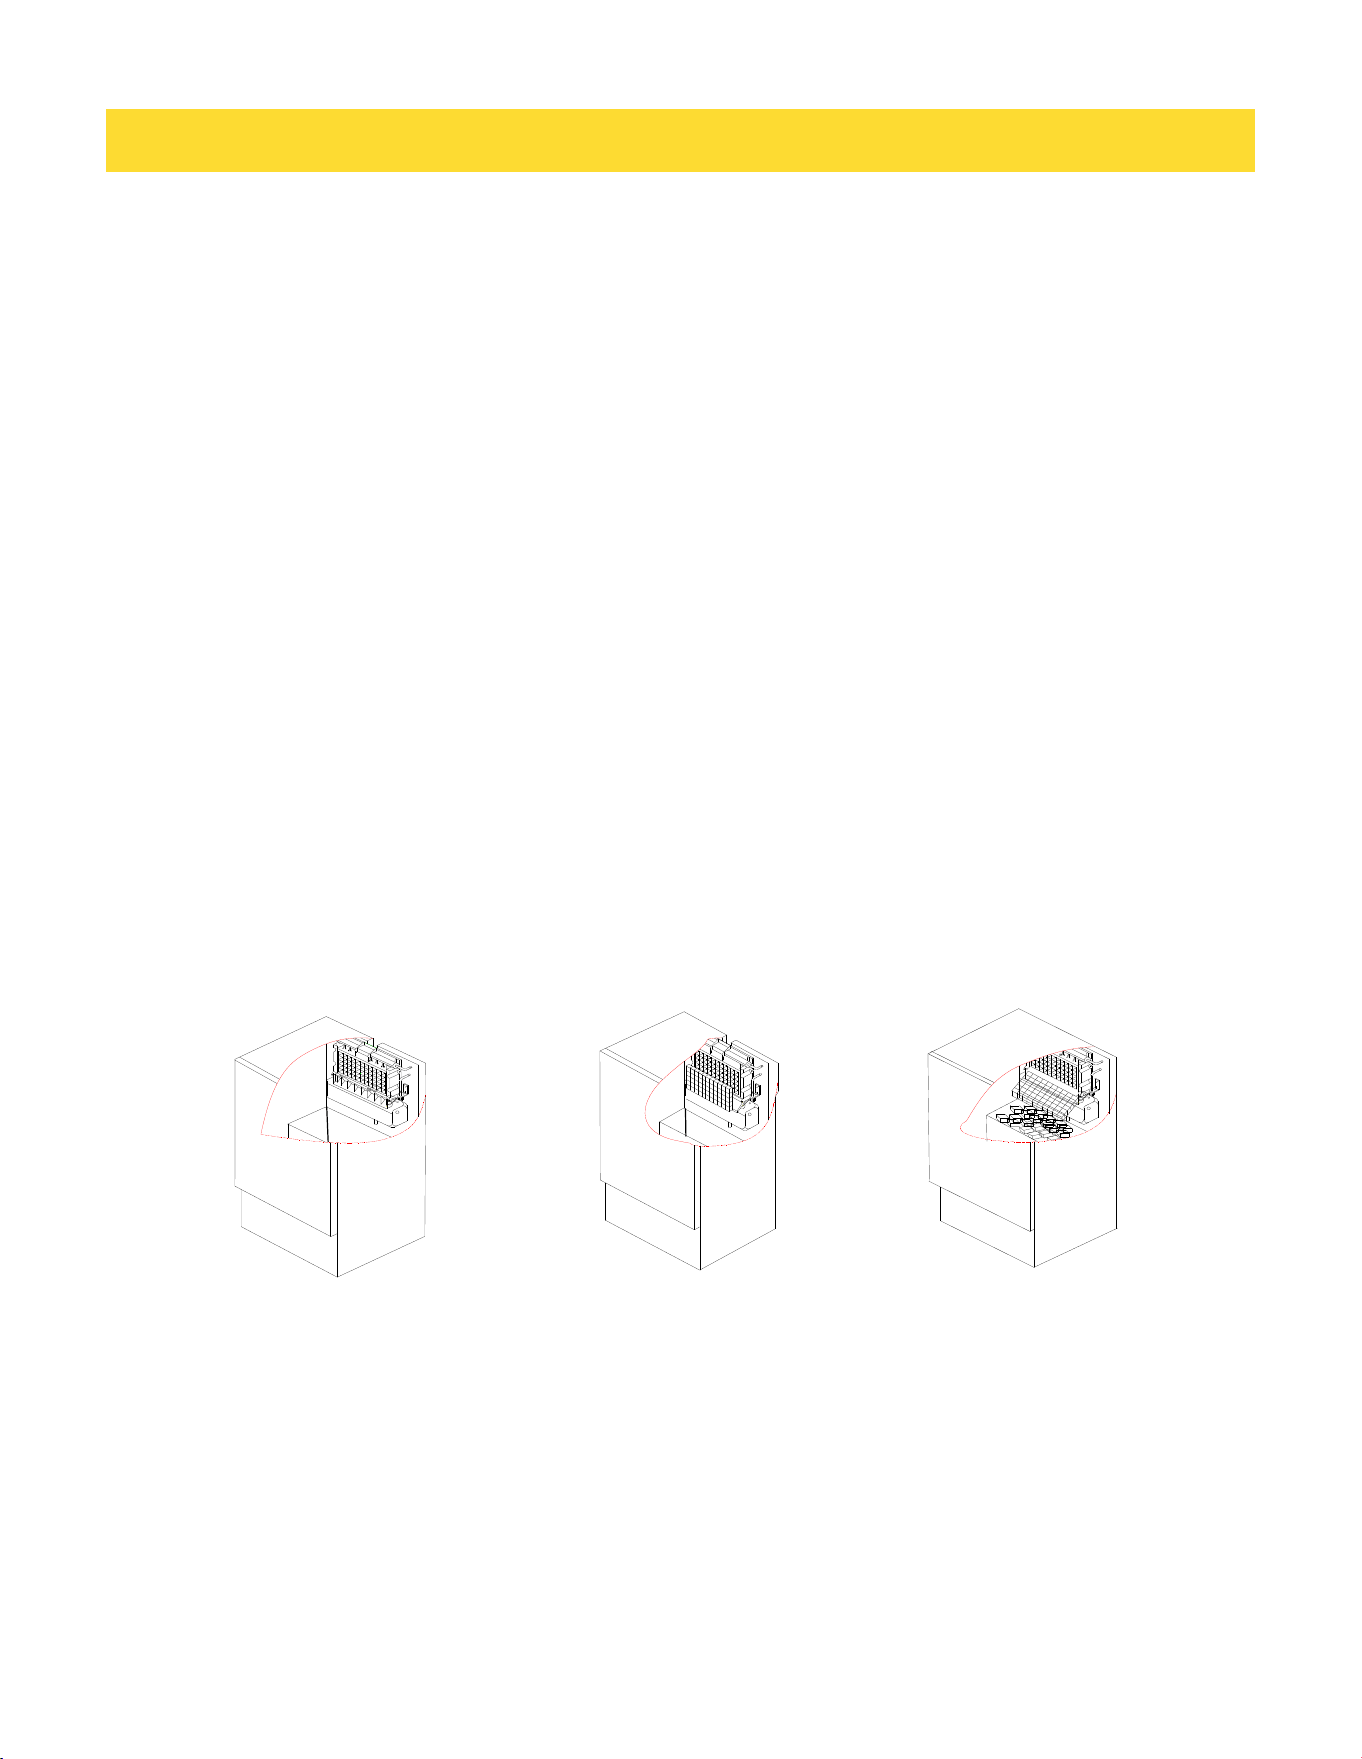
1. Turn on the water tap, let the water trough fill, then press the ON/OFF button on the front panel. The ice
maker will start working automatically.
2. After 3 minutes, the machine will automatically go to the ice-making stage, and the sound of water
flowing will be heard.
3. When the batch of ice has been fully formed, ice will automatically be harvested to the ice storage bin.
Bin full stage
Ice making stage
Ice harvest stage
3.2 Operating Method

OPERATION
8
4. When the ice storage bin is full, the sheet of cubes will not fall completely and will hold the bin-full
probe open. The machine stops making ice automatically.
5. The unit will start making ice again after the ice cubes are removed. Then the bin-full probe swings
back to operating position.
6. Bin light (If present): The bin light will be controlled by magnetic reed switch that has been installed in
the inner of the door. It can be Turn On or Off automatically with the door opening or closing.
7. Pump Water Drain system (If use): as soon as the ice melt water or other surplus overflow water into the
water reservoir reaches the maximum level, the water lever switch close and transmit a low voltage
current to PC board. The PC board energizes the water drain pump for 20 seconds pumping out most of
the water contained into the water reservoir.
IMPORTANT:
•
Although the unit has been tested and cleaned at the factory, due to longterm transit and storage, the
first batch of cubes must be discarded.
•
Never turn the water supply tap off when the ice maker is working.
•
Never touch evaporator when unit is running!
•
Except to take ice from the unit, keep the door closed to reduce melting and insure proper ice formation.
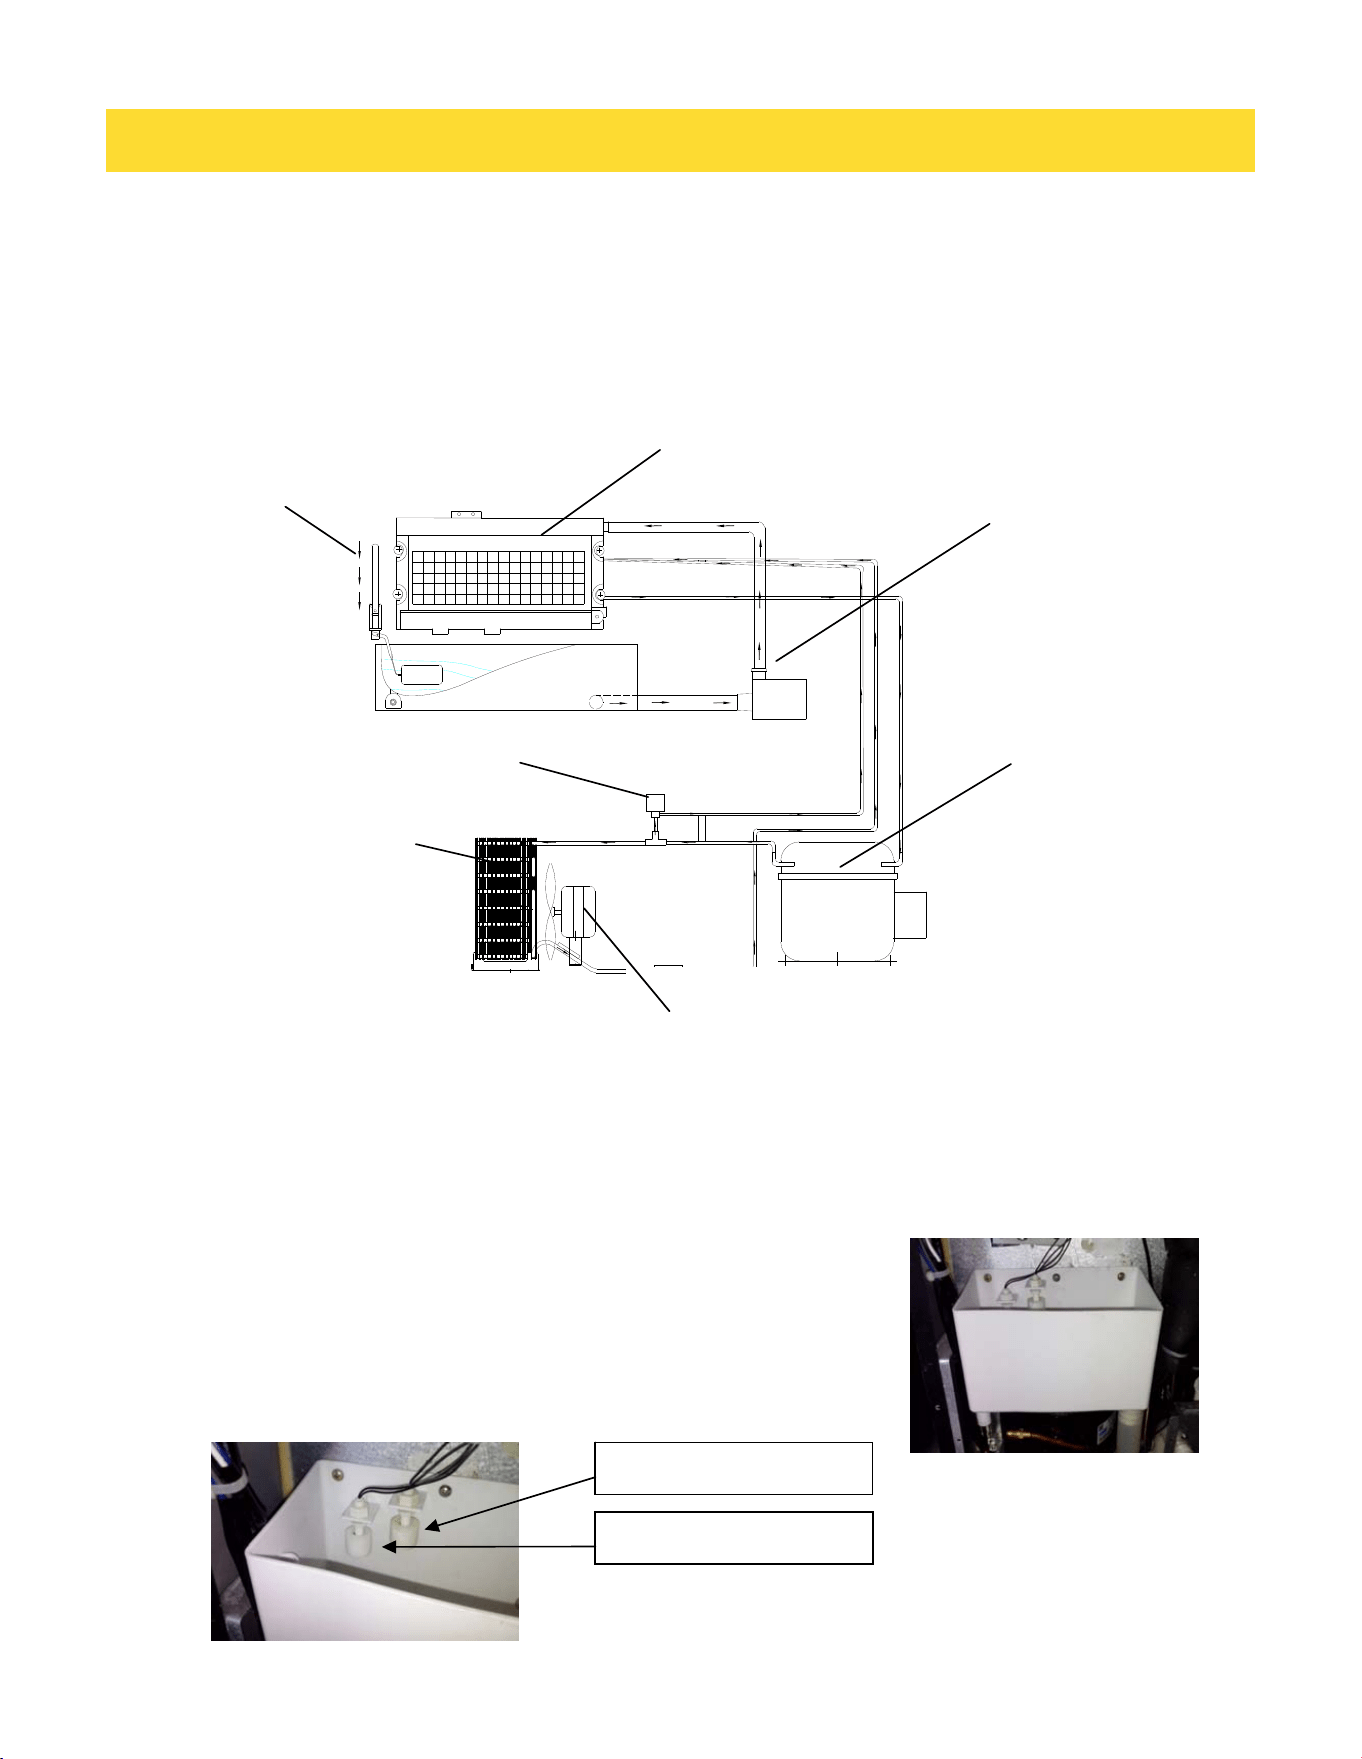
Set the ON/OFF button to the ON position. The machine will automatically go to the ice making stage. There
are two distinct cycles: ice freeze and harvest. The freeze cycle happens when water flows to the evaporator
surface. The harvest cycle is when the ice is released and water enters the machine. A complete cycle takes
about 20 minutes, but it depends on temperature and operating conditions.
Freeze: During the freeze cycle the compressor is pumping refrigerant, the fan motor is blowing air, and
the water pump is circulating water. When the batch of ice has been fully formed, the ice maker stops the
freeze cycle and the harvest cycle begins.
Harvest: During the harvest cycle the compressor is still operating, but the water pump has stopped. The
hot gas valve opens, diverting hot refrigerant gas into the evaporator. The hot refrigerant gas warms the
evaporator, causing the cubes to slide as a unit off the evaporator and into the storage bin. The freeze cycle
will restart when all the cubes have been harvested.
3.3 How The Machine Makes Ice
OPERATION
9
The ice maker begins with a fixed charge of water that is contained in the water trough. As the water flows
to the freezing evaporator surface, the portion of water that does not contain mineral impurities freezes
and sticks to the ice cube molds. The water containing impurities falls back into the water trough. During
the ice making process, fresh water enters into the water trough continuously as the water in the trough
freezes continuously in the evaporator.
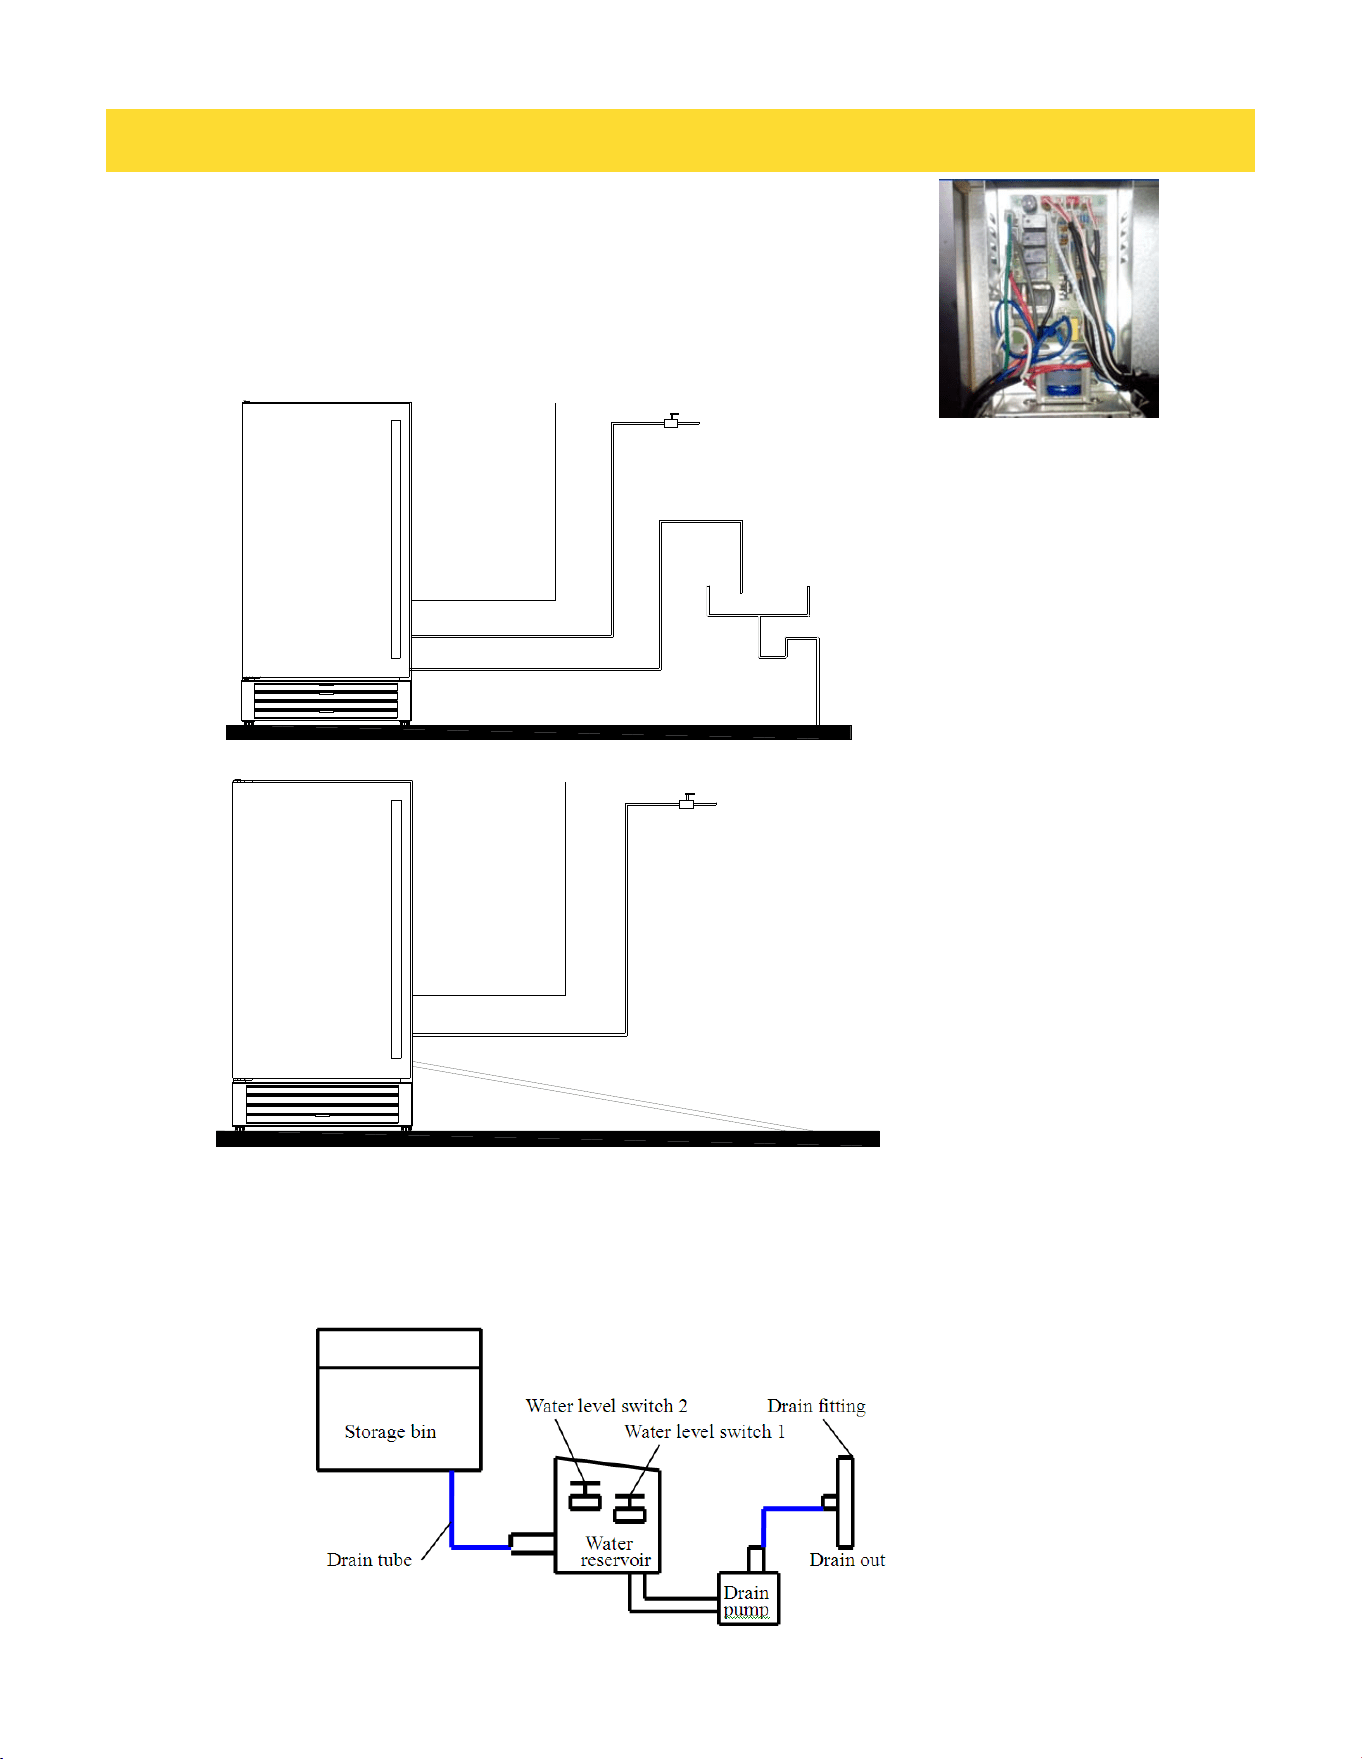
The components of the Pump Out Water Drain System are:
• Water reservoir
• PC Board & Water level switch 1, 2
• Water Drain Pump
OPERATION
• All water coming from the overflow, and from the melted ice is collected
inside the water reservoir.
• As soon as the water into the water reservoir reches the maximum level,
the water lever switch 1 close, transmitting a low voltage current to PC
Board
Water pump
Compressor
Water inlet pipe
Evaporator
Fan motor
Condenser
Hot gas valve
Water lever switch 2
Water lever switch 1
3.4 How The Machine Uses The Water
3.
5
How The Pump Out Water Drain System Operates
OPERATION
10
• The PC board activates the water drain pump for 20 seconds pumping out
most of the water contained into the water reservoir.
• The water can be pumped out up to 1.5m rise or to 1.5m on horizontal length.
• If the the water lever switch 2 close, transmitting a low voltage current to PC board. The
PC board activates the buzzer alarm, informing that the drain pump, water lever switch
and drain tube may malfunction.
SCHEMATIC SYSTEM
WATER VALVE
POWER
WATER INLET
WATER DRAIN
WATER VALVE
POWER
WATER INLET
WATER DRAIN

OPERATION
11
Your new ice maker may make sounds that are not familiar to you. Most of the new sounds are
normal. Hard surfaces like the floor and walls can make the sounds louder than they actually are.
The following list describes the sounds that might be new to you and what may be causing them.
• Rattling noises may come from the flow of the refrigerant or the water line. Items stored on
top of the ice maker can also make noises.
• The high efficiency compressor may make a pulsating or high-pitched sound.
• Water running may make a splashing sound.
• You may hear air being forced over the condenser by the condenser fan.
• During the harvest cycle, you may hear the sound of ice cubes falling into the ice storage
bin.
If the ice maker will not be used for a long time, or is to be moved to another place, it will be necessary
to drain the system of water.
1. Shut off the water supply at the main water source.
2. Disconnect the water supply line from the water inlet.
3. Shut off the electric supply at the main electrical power source.
4. Take out the ice storage bin to remove any remaining ice and water. Dry the bin.
5. Pull off the drainage tube of the water trough to drain off all water.
6. Leave the door open to allow for circulation and to prevent mold and mildew.
7. Leave water supply line and power cord disconnected until ready to reuse.
•
Do not touch the power plug when your hands are wet.
•
Never unplug the
unit by pulling on the
cord. Grasp the plug and pull out firmly.
IMPORTANT:
3.
6 Normal Sounds
3.
7 Preparing The Ice Maker For Long Storage
OPERATION
12
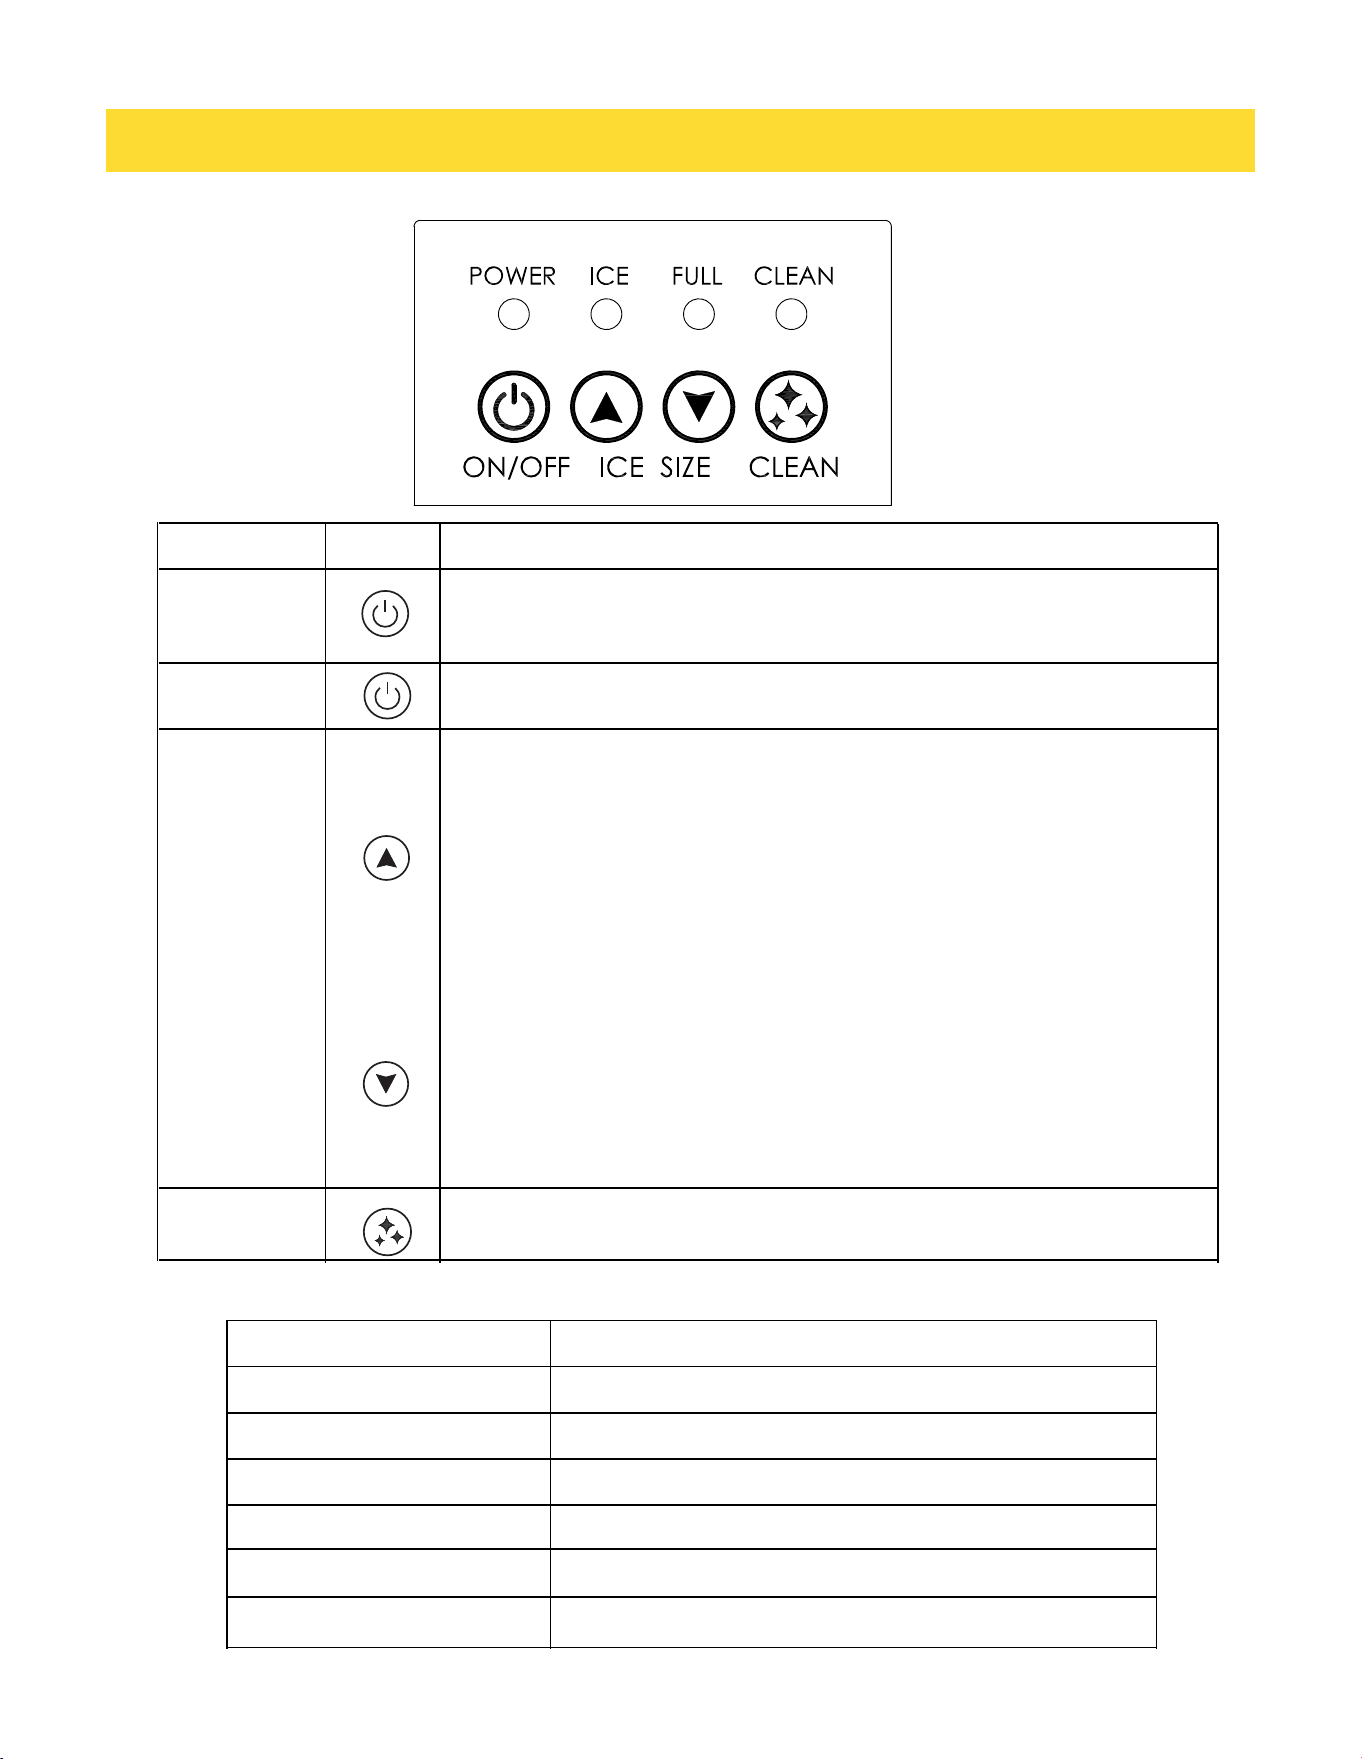
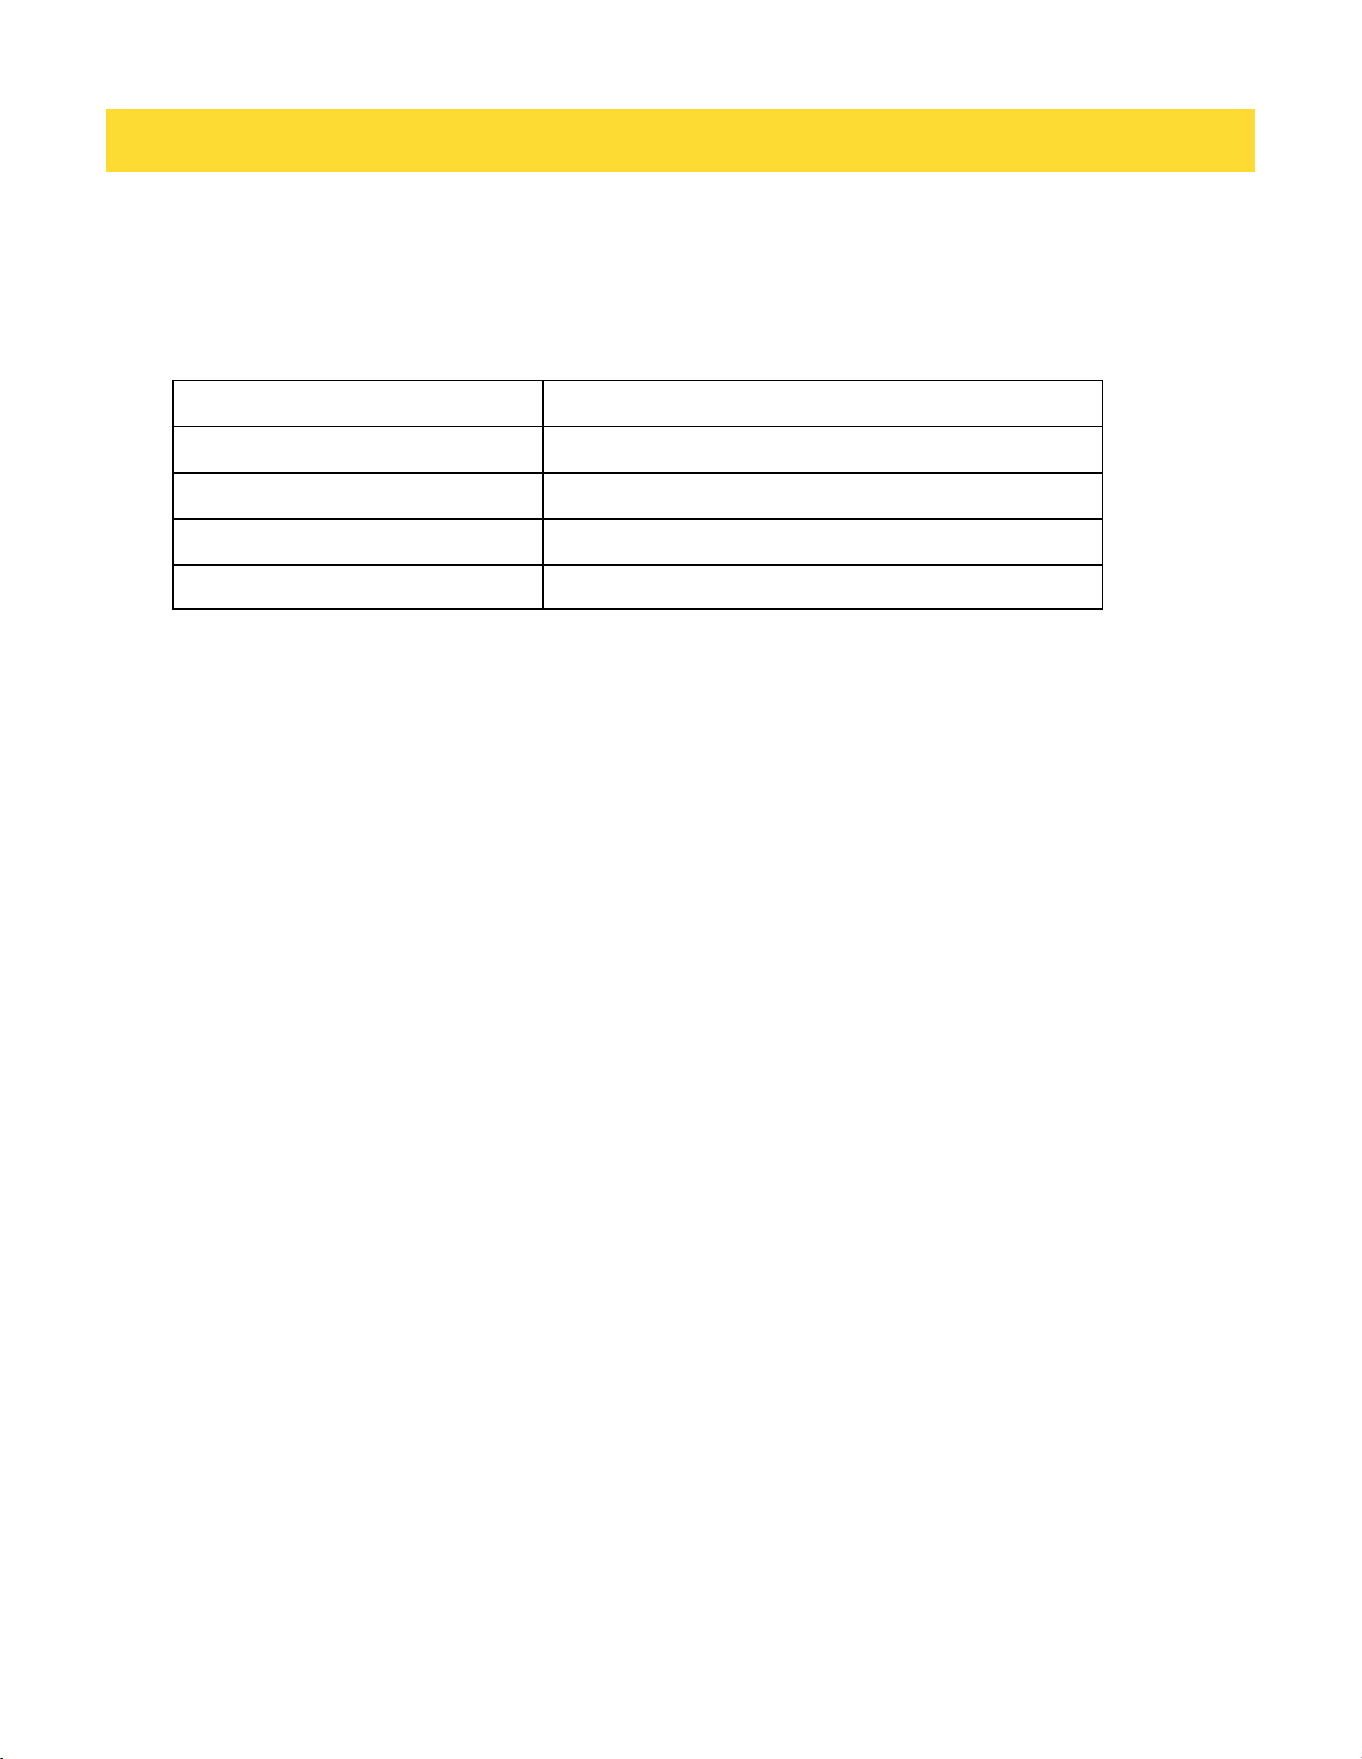
FUNCTION
OPERATING
ON
Press ON to start automatic ice making, the ICE indicator lights. Note: All
indicators lights for 3 minutes on initial running, and then switch to ice
making automatically.
OFF
Press OFF to turn off and standby.Only POWER indicator lights.
Ice Size
Adjustment
Press UP or DOWN to enter Ice Size Adjustment, beeper will sounds when
operating. By press UP or DOWN,the ice size setting can be toggle from
automatic default 0 position to +4 or -4. Each represents bigger or smaller
ice size.
CLEAN indicator blinks = +4
CLEAN indicator lights = +3
BIN FULL indicator lights = +2
ICE indicator lights = +1
ALL indicators lights = 0 (default)
CLEAN indicator blinks = -1
BIN FULL indicator blinks = -2
ICE indicator blinks = -3
ICE indicator lights = -4
The setting will be saved and then automatically exit after 6 seconds.
Note: Ice Size Adjustment not available on Cleaning and Standby.
Cleaning
Press and hold CLEAN for 3 seconds to run the clean program, this program
will run for 30 minutes and standby.
POWER lights
Unit is powered on.
ICE lights
Ice making.
ICE blinks
Ice harvesting.
BIN FULL lights
Bin is full, and ice making has stopped.
BIN FULL blinks
Counting down to switch to ice making.
CLEAN lights
The cleaning program is running.
CLEAN blinks
Clean Reminder: ice making system cleaning is required.
3.
8 Control Panel:
3.9 Indicator Notification
OPERATION
13
1. The operating procedure is completely automatic.
2. When the ice storage bin is full of ice cubes, the machine stops making ice automatically. It
starts making ice again after ice cubes are removed.
3. The different colors of the LED display indicate various work modes.
4. A sensitive probe and accurate timer enhance the performance of the ice maker.
5. A compressor protection system is built in.
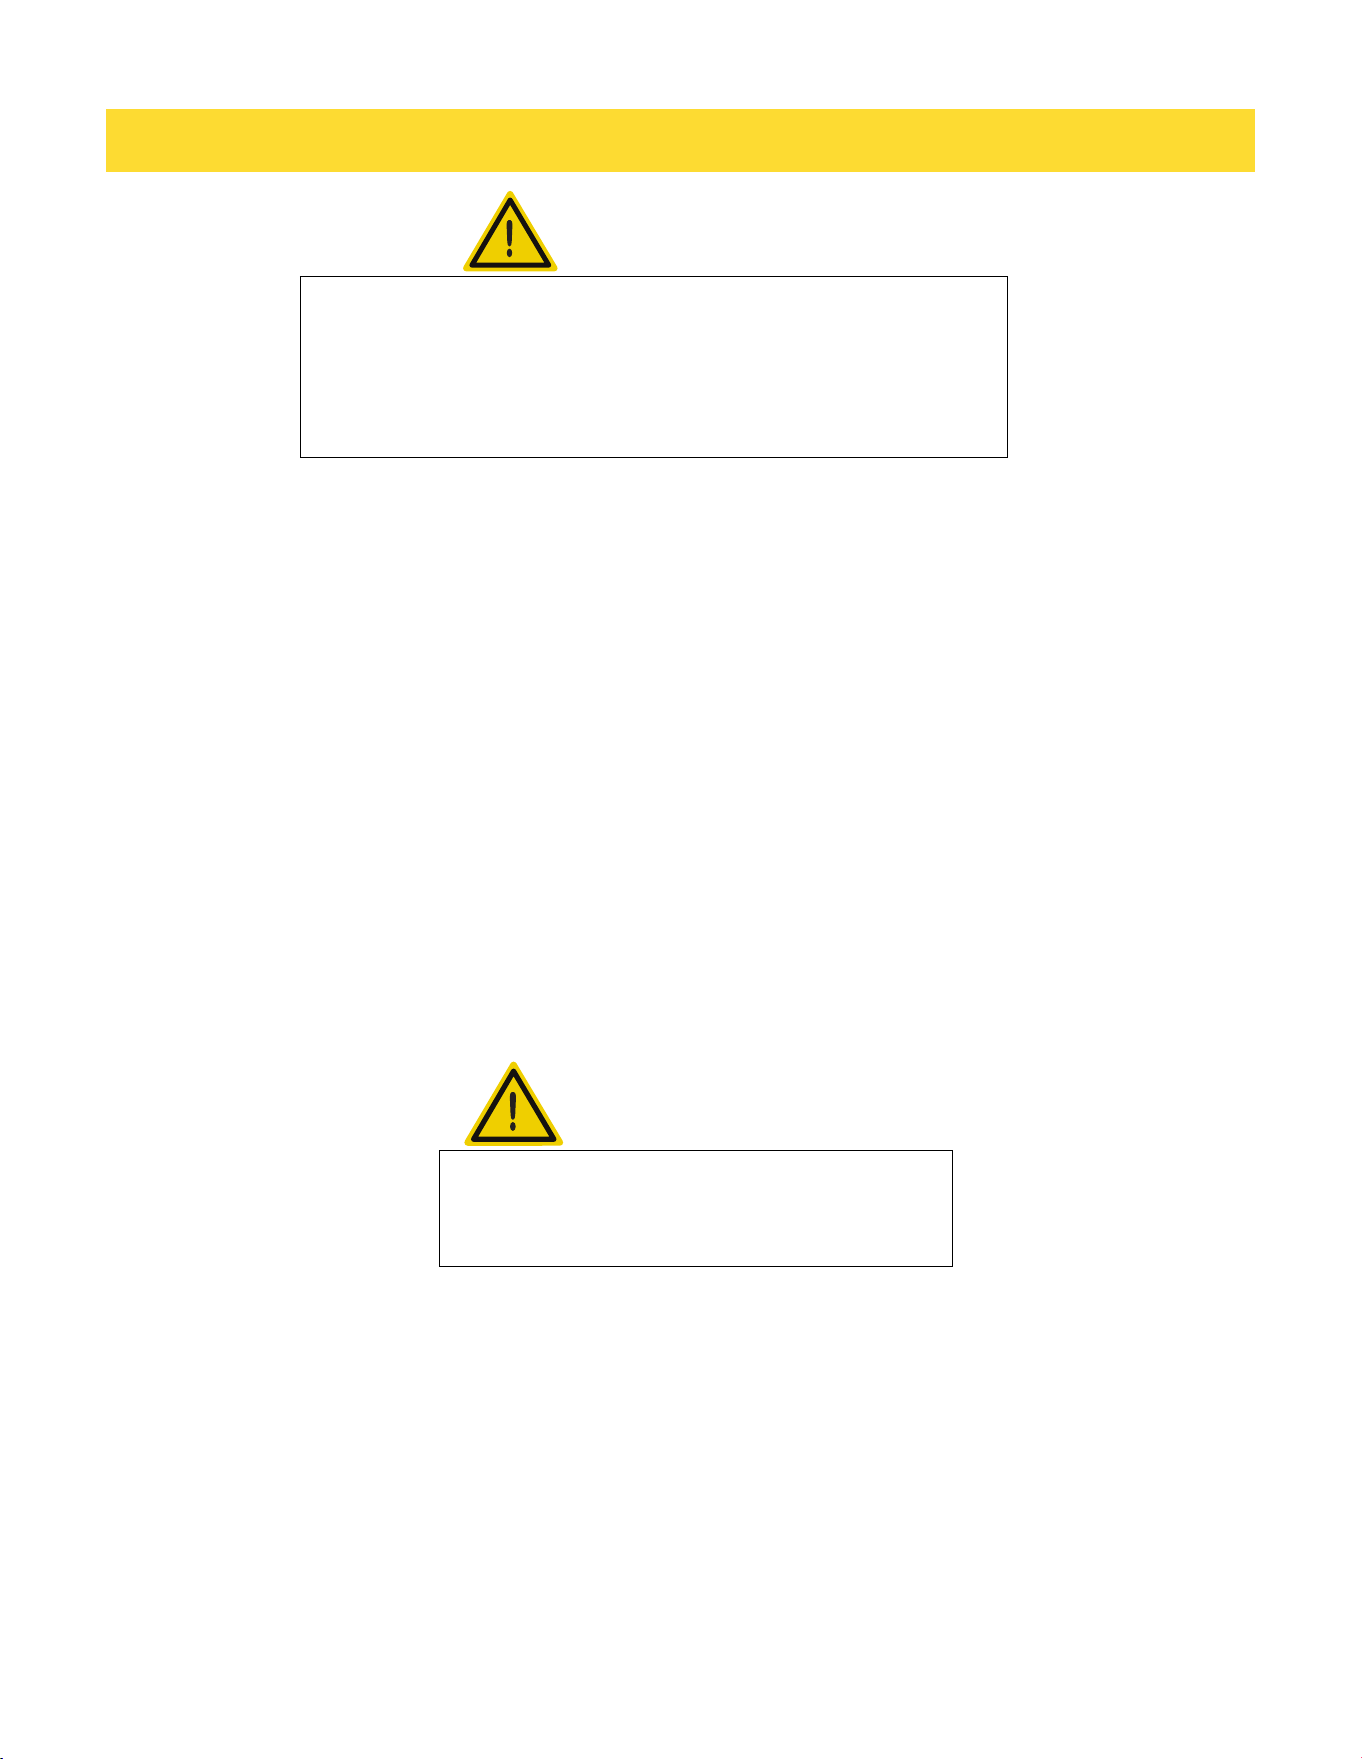
EVP temperature sensor failure
ICE indicator fast blinks
CDN temperature sensor failure
CLEAN indicator fast blinks
High temperature
CLEAN indicator fastest blinks
Ice harvesting failure
ICE and BIN FULL indicators blinks together
Lack of water
BIN FULL and CLEAN indicators blinks together
3.10 System Fault Notification
When the unit detects an error, indicator flashing. Please provide the error codes when contacting service.
3.11 Major Functions
CLEANING AND MAINTENANCE
14
Periodic cleaning and proper maintenance will ensure efficiency, top performance, and long life.
The maintenance intervals listed are based on normal conditions. You may want to shorten the
intervals if you have pets, or there are other special considerations.
What shouldn’t be done
Never keep anything in the ice storage bin that is not ice: objects like wine and beer bottles are not
only unsanitary, but the labels may slip off and plug up the drain.
What parts should be kept clean
There are 5 things to keep clean:
The door and cabinet may be cleaned with a mild detergent and warm water solution such as 1 oz.
of dish-washing liquid mixed with 2 gall ons of warm water. Do not use solvent-based or abrasive
cleaners. Use a soft sponge and rinse with clean water. Wipe with a soft clean towel to prevent
water spotting. Stainless steel can discolor when exposed to chlorine gas and moisture. Clean
stainless steel with a mild detergent and warm water solution and a damp cloth. Never use an
abrasive cleaning agent.
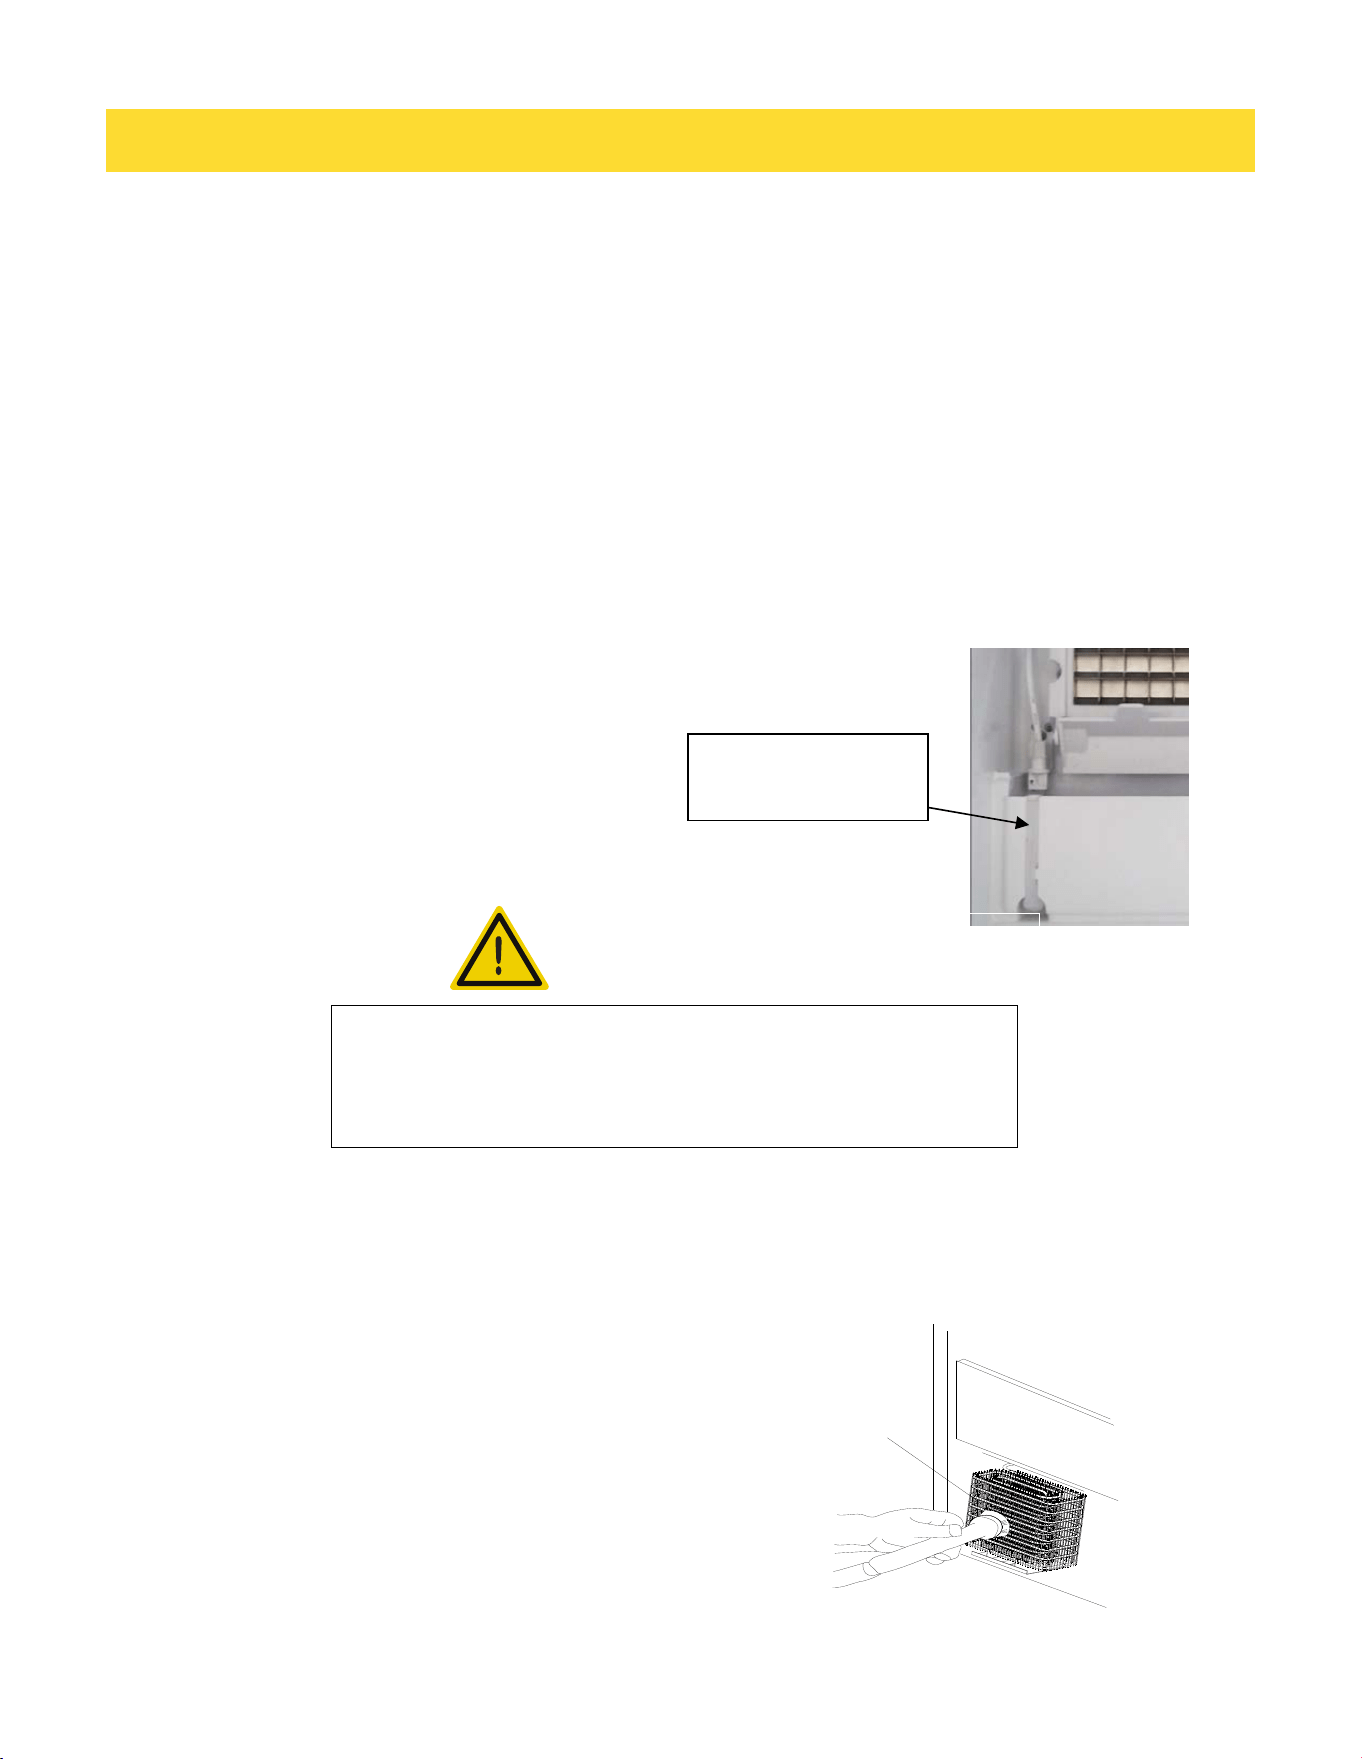
If the ice maker is left unused for a long time, before the next use it
must be thoroughly cleaned. Follow carefully any instructions
provided for cleaning or use of sanitizing solutions. Do not leave any
solution inside the ice maker after cleaning.
Before proceeding with cleaning and maintenance
operations, make sure the power line of the unit is
disconnected and the water line is shut off.
WARNING
CAUTION
1. The exterior
2. The interior
3. The condenser
4. Water distribution tube
5. The ice-making system
4.1 Exterior Cleaning
CLEANING AND MAINTENANCE
15
The ice storage bin should be sanitized occasionally. Clean the water trough before the ice maker is
used first time and reused after stopping for an extended period of time. It is usually convenient to
sanitize the trough after the ice making system has been cleaned, and the ice storage bin is empty.
1. Disconnect the power to the unit.
2. Open the door and take out the removable ice storage bin. With a clean cloth, wipe down the
interior of unit and ice bin with a sanitizing solution made of 1 ounce of household bleach or
chlorine and 2 gallons of hot (95ºF-115ºF) water.
3. Pull off the drain hose of the water trough to drain off all water.
4. Rinse thoroughly with clear water.
5. After draining off all water, put back the drain hose of the water trough into the original location.
6. Put the ice storage bin inside the unit.
A dirty or clogged condenser prevents proper airflow, reduces ice making capacity, and causes
higher than recommended operating temperatures that may lead to component failure. Have the
condenser cleaned at least once every six months.
2.
3.
Unplug the ice maker or disconnect power.
Gently pull off the lower front louver.
Remove dirt and lint from the condenser and the unit
compartment with the brush attachment of a vacuum cleaner.
Reassemble the lower front louver.
Plug in the ice maker or reconnect power.
Condenser
Surface
DO NOT use solvent-based cleaning agents or abrasives on the
interior. These cleaners may transmit taste to the ice cubes and
damage or discolor the interior.
7. Reconnect power to the unit.
The ice scoop should be washed regularly. Wash it just like any other food container.
Correct location of
the drain hose
1.
4.
5.
WARNING
4.2 Interior Cleaning
4.3 Condenser Cleaning

CLEANING AND MAINTENANCE
16
When you find the ice cubes are incompletely formed or the output is low, the water distribution tube
may be blocked. Turn off the power button, gently take out the water distribution tube, locate the holes
in the distribution tube and use a pointed object such as a toothpick to dredge the holes. Then put the
water distribution tube back to its original position. If the tube is badly blocked, clean it as follows:
1. Shut off the water supply
2. Disconnect the water hose from the distribution tube.
3. Gently take out the distribution tube.
4. With a brush, clean the tube with a dilute solution of warm water and a mild detergent such as dish-
washing liquid. After removing the dirt and lint from the surface, rinse the tube with clean water.
5. Replace the distribution tube.
6. Reconnect the water supply.
1. Make sure that all the ice is off the evaporator. If ice is being formed, wait until the cycle is
completed, then press the machine’s ON/OFF switch on the control panel.
2. Remove all ice from the storage bin.
3. Keep the ice maker connected to the water supply. Pour 8 oz. of Nickel-Safe Ice Maker Cleaner
Solution into the water trough. Then press the ON/OFF switch and the CLEAN button, initiating the
wash cycle. The machine will run in the Automatic Clean Mode.
4. Allow 30 minutes for proper cleaning. After cleaning, press the ON/OFF switch again. Use a drain
hose on the front of the water trough to drain off the waste water to a convenient container.
NOTE: Don’t drain off the waste water to the inside of the cabinet.
5. Repeat steps 3 and 4 (without Ice Maker Cleaning Solution) three times to rinse the ice making
system thoroughly.
• NOTE: Ice Maker Cleaner Solution in the water bin during the rinse is not needed.
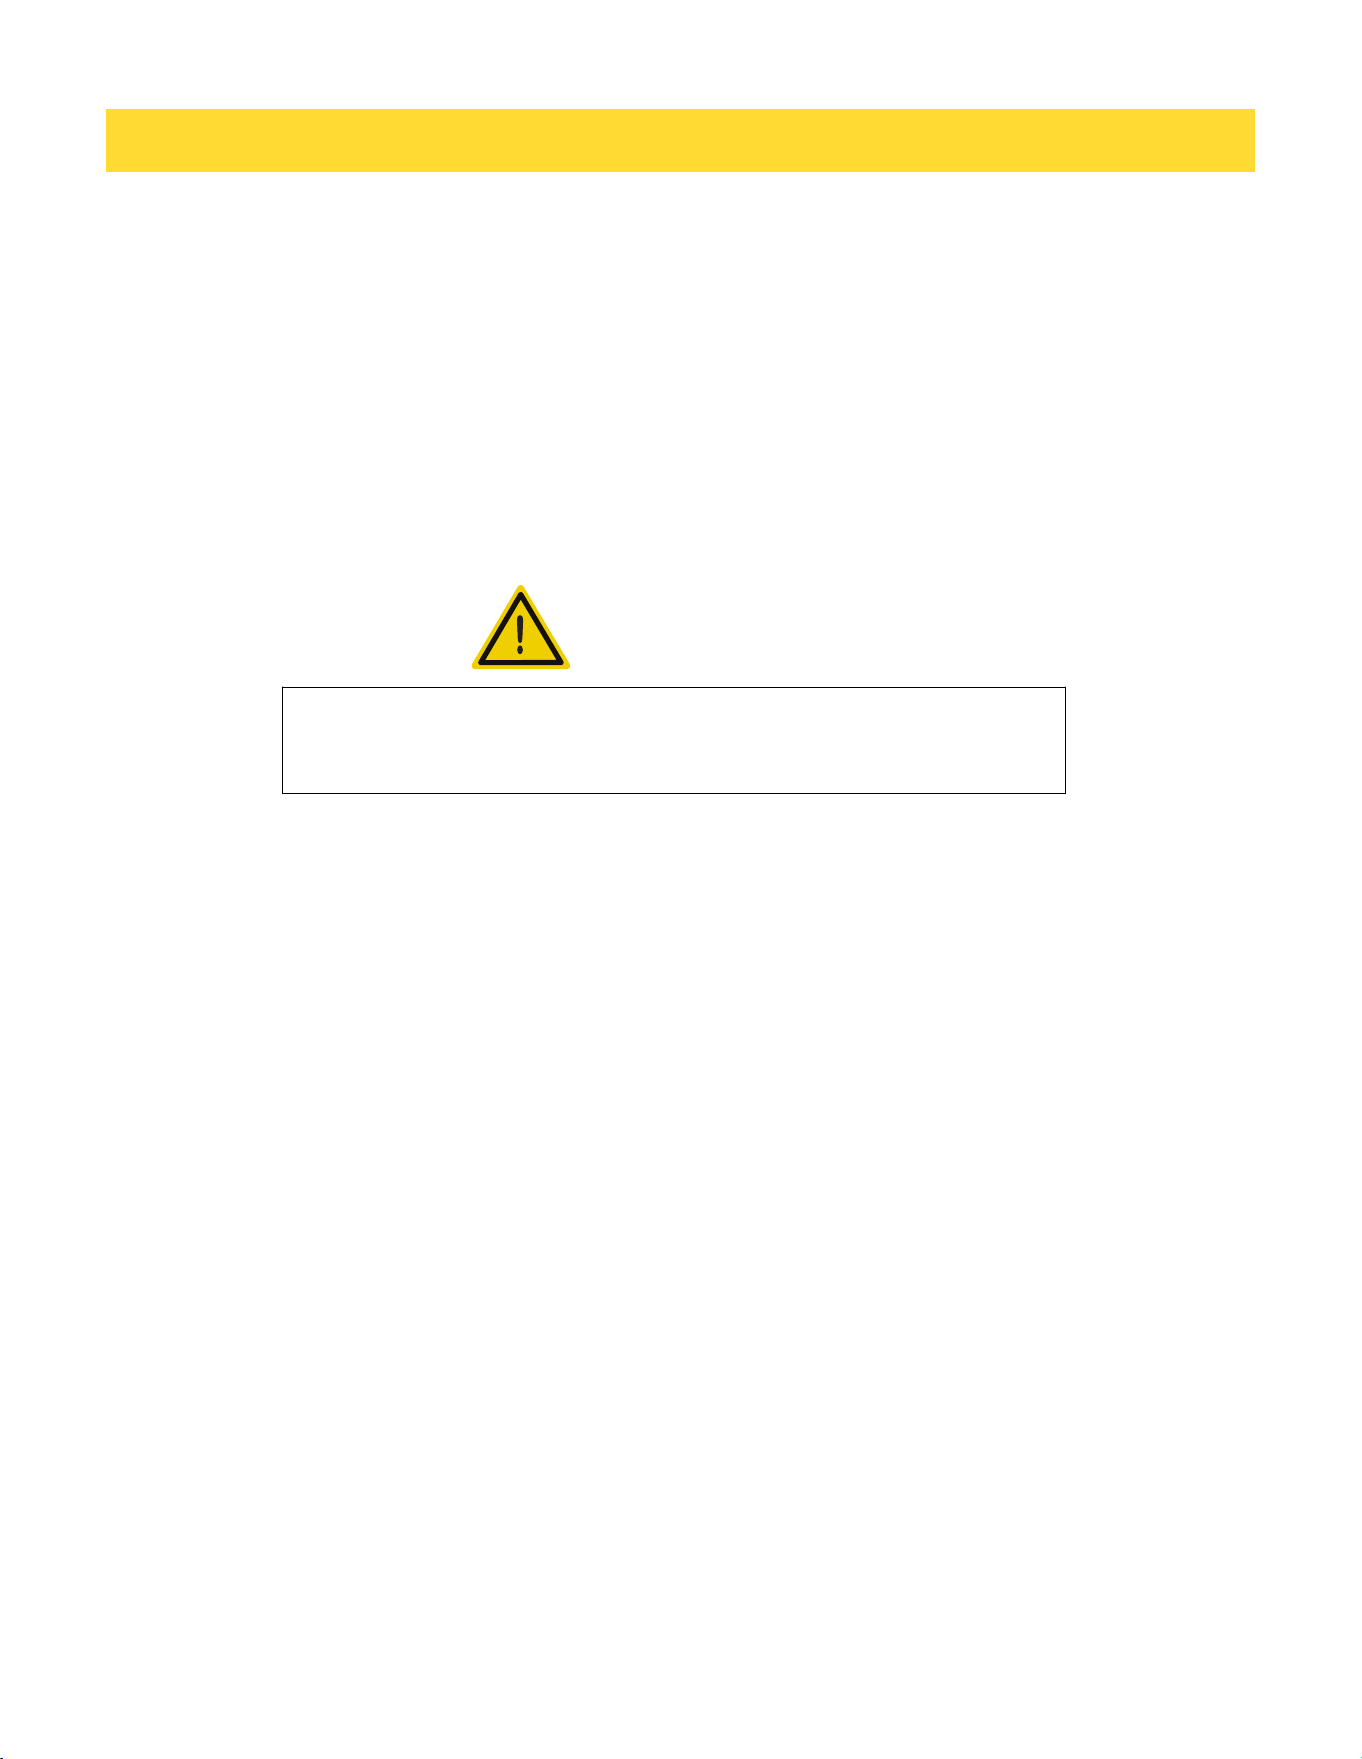
The ice machine cleaner contains acids.
DO NOT use or mix with any other solvent-based cleaner products. Use rubber
gloves to protect hands. Carefully read the material safety instructions on
the container of the ice machine cleaner. Discard the first batch of ice produced
after cleaning.
Minerals that are removed from the water during the freezing cycle will eventually form a hard, scaly
deposit in the water system. Cleaning the system regularly helps remove the mineral scale buildup.
How often to clean the system depends upon how hard your water is or how effective your filtration
may be. With hard water of 15 to 20 grains/gal. (4 to 5 grains/ liter, you may need to clean the system
as often as once every 6 months.
WARNING
4.4 Water Distribution Tube Cleaning
4.5 Ice-making System Cleaning
CLEANING AND MAINTENANCE
17
Note: Do not winterize this unit with ANY type of anti-freeze; damage to the mold coating will occur,
invalidating product’s Limited Warranty and creating potential health hazard.
1. Turn off the water at the main water supply.
2. Disconnect the water supply line from the water inlet of the ice machine.
3. Remove any remaining ice from the storage bin.
4. Unclip and lower the drain tube of the water trough to drain the water into the bin, then let the
remaining water drain out through the drain hole on the bottom of the bin. Reinstall the drain tube.
Listen for the pump to turn on and run, draining the remaining water. If you do not hear the
drain pump run, pour some more water into the ice bin to trigger the pump to turn on. Once the
pump has turned on, run, and then turned off, the water is sufficiently drained.
5. Turn the unit off and unplug the power cord.
6. Leave the door propped open to allow for circulation to prevent mold and mildew.
7. Leave the water supply line disconnected, and the power cord unplugged until ready for use.
NOTICE: Never pull on the power cord to unplug the appliance form the electrical outlet. Grasp the plug
of the power cord and pull out firmly.
Electrical Shock Hazard
Always disconnect power at the source before working on the unit.
6. Prepare a sanitizing solution made of 1 ounce of household bleach and 2 gallons of hot water
(95ºF to 115ºF). Wipe the entire bin inside and outside, covering the entire surface of the
walls.
7. Fill a spray bottle with the sanitizing solution and spray all corners and edges, making sure to
cover all surfaces with the solution.
8. Allow the solution to be in contact for at least 3 minutes, then dry.
9. Repeat step 5 to rinse the ice making system one more time.
10. Press the ON/OFF button again. The machine will return to the regular ice making mode.
Discard the first batch of ice.
WARNING
4.6 Extended Periods Of Non-Use

CLEANING AND MAINTENANCE
18
4.7 Recommissioning The Unit
1. If stored outside, it is recommended that the unit be thoroughly inspected to remove any dirt or
debris as well as for animals/insects.
2. Connect the water supply line, turn on the water, check for leaks, and then restore power to the unit.
It is recommended to clean the unit after long-term storage by following the instructions on pages
14-15
4.8 Starting Up The Unit
1. Turn on the water, check for leaks, and then turn on power.
2. Turn on the unit by pressing the power button.
3. The water inlet valve will turn on immediately to supply water to the unit. The water pump and
compressor will turn on later (approximately 5 minutes) to initiate the ice making cycle. If the
machine was shut-off while in the ice-harvesting cycle, make sure the ice is harvested before
starting up the unit.
4. The first harvest of ice should occur within 60 minutes of start-up.
5. After the unit purges air from the lines, normal harvesting and refilling occur every 40 minutes
or less, under normal conditions.
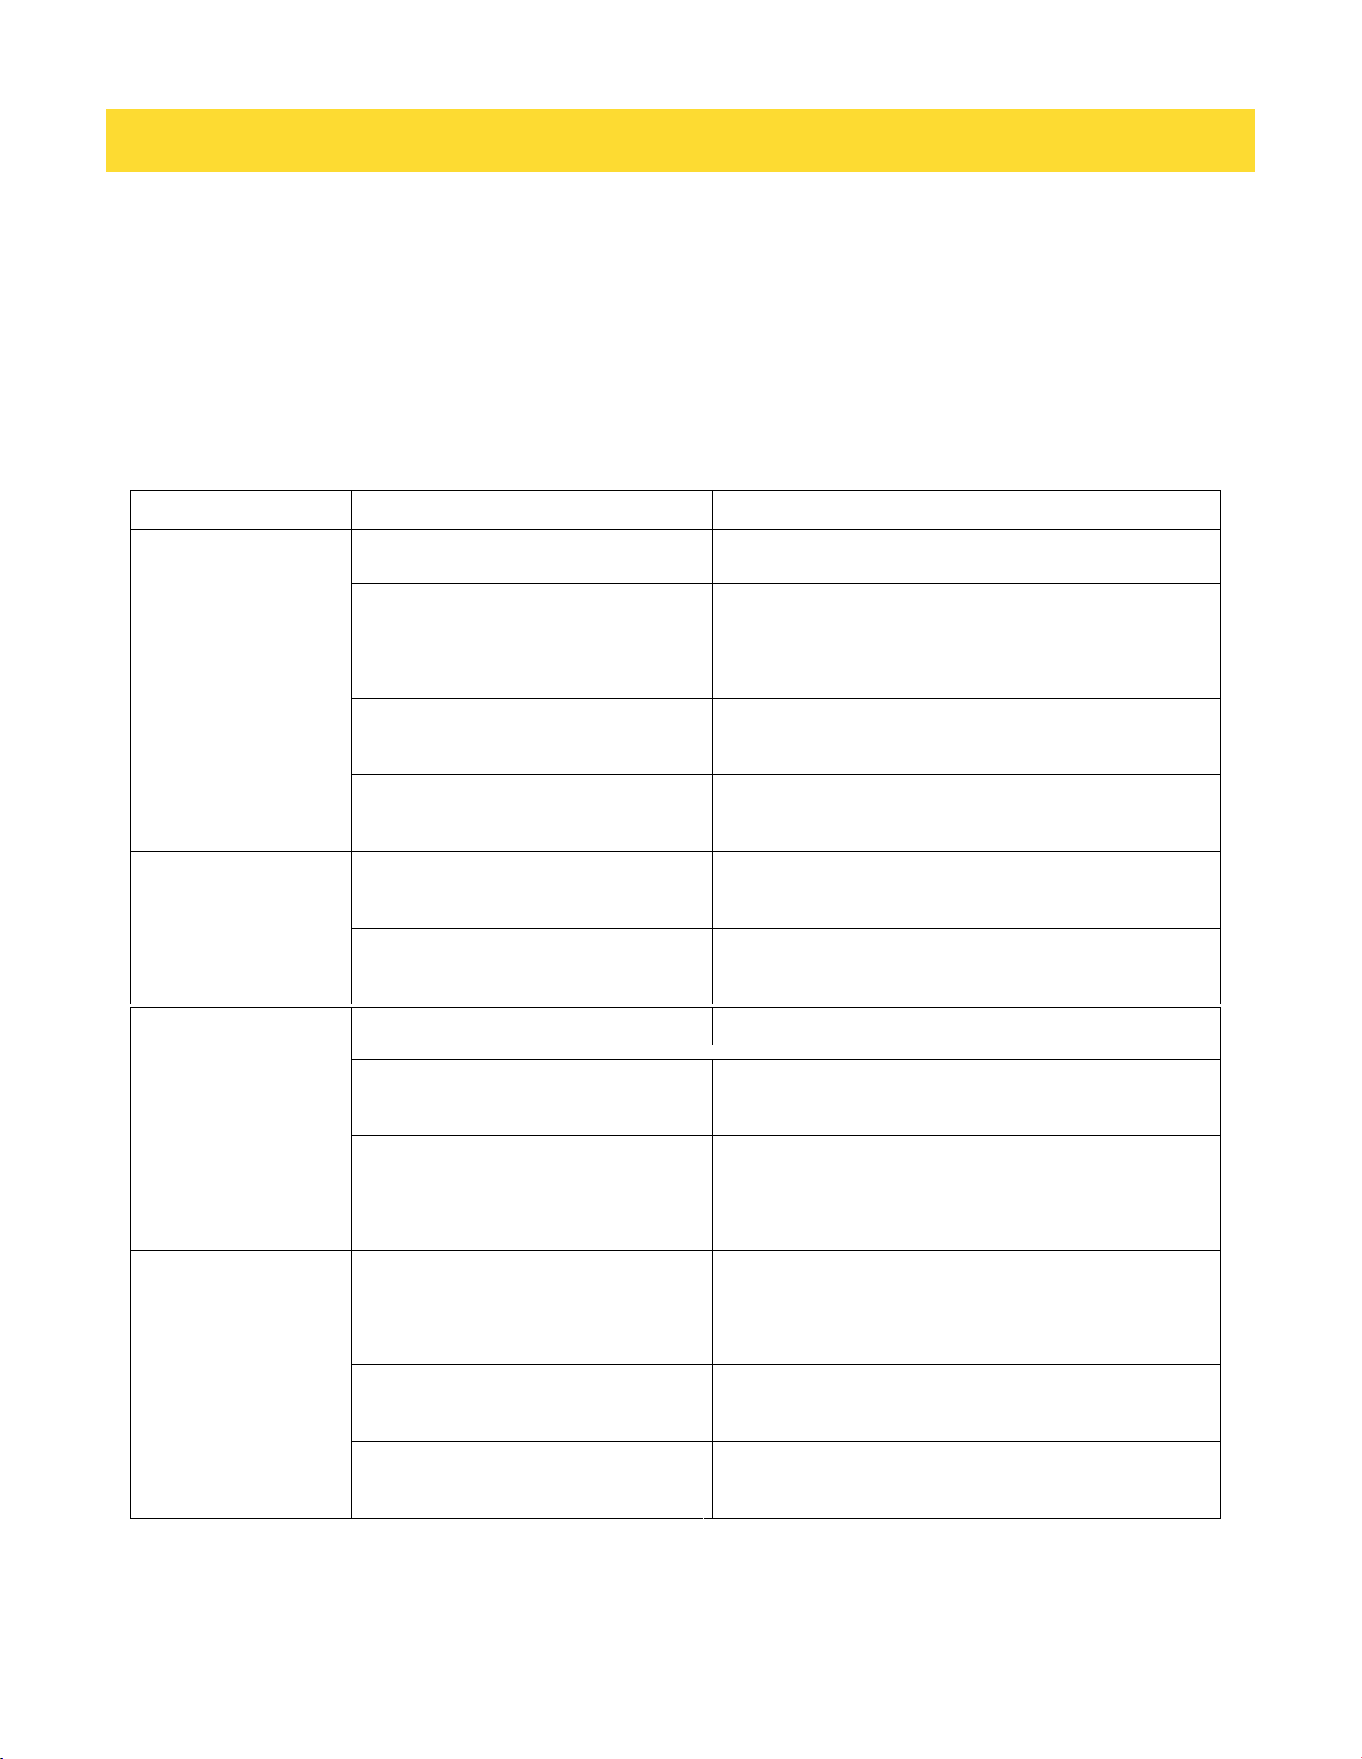
TROUBLESHOOTING
19
If the unit appears to be malfunctioning, read through the OPERATION section of this manual first. If the
problem persists, check the Troubleshooting Guide on the following pages. Some of the problems mentioned
in the Guide can be solved easily without a service call.
Problem Possible Cause Probable Correction
The ice maker is unplugged. Plug the ice maker in.
The fuse is blown.
Replace fuse. If it happens again, call for service
to check for a short circuit in the unit.
The ice maker power button is set
at OFF.
Switch the ice maker power button to ON.
The machine
doesn’t operate.
The ice storage bin is full of ice.
Remove some ice cubes.
Be sure the ice-full probe is free of ice.
The water supply tap is turned off.
Turn on the water supply tap.
The water supply pipe is not
properly connected.
Reconnect the water supply pipe.
The condenser may be dirty.
Clean the condenser.
The air flow to the ice maker may
be obstructed.
Check the installation.
The water doesn't
feed in after the
machine starts.
Machine makes
ice, but bin does
not fill up with ice.
The ambient temperature and
water temperature are high, or
unit is near some heat source.
Check the installation.
Normal condensation on the door or some water
together with ice. Take care when you take out
ice.
Tighten fitting. See Connecting the water line.
Water is leaking
out of the unit.
Drain pipe higher than drain
outlet.
Lower drain pipe.
Some water falls to the floor when
you open the door to remove ice
from storage bin.
Water supply connection is leaking.
Before Calling for Service
Troubleshooting Guide
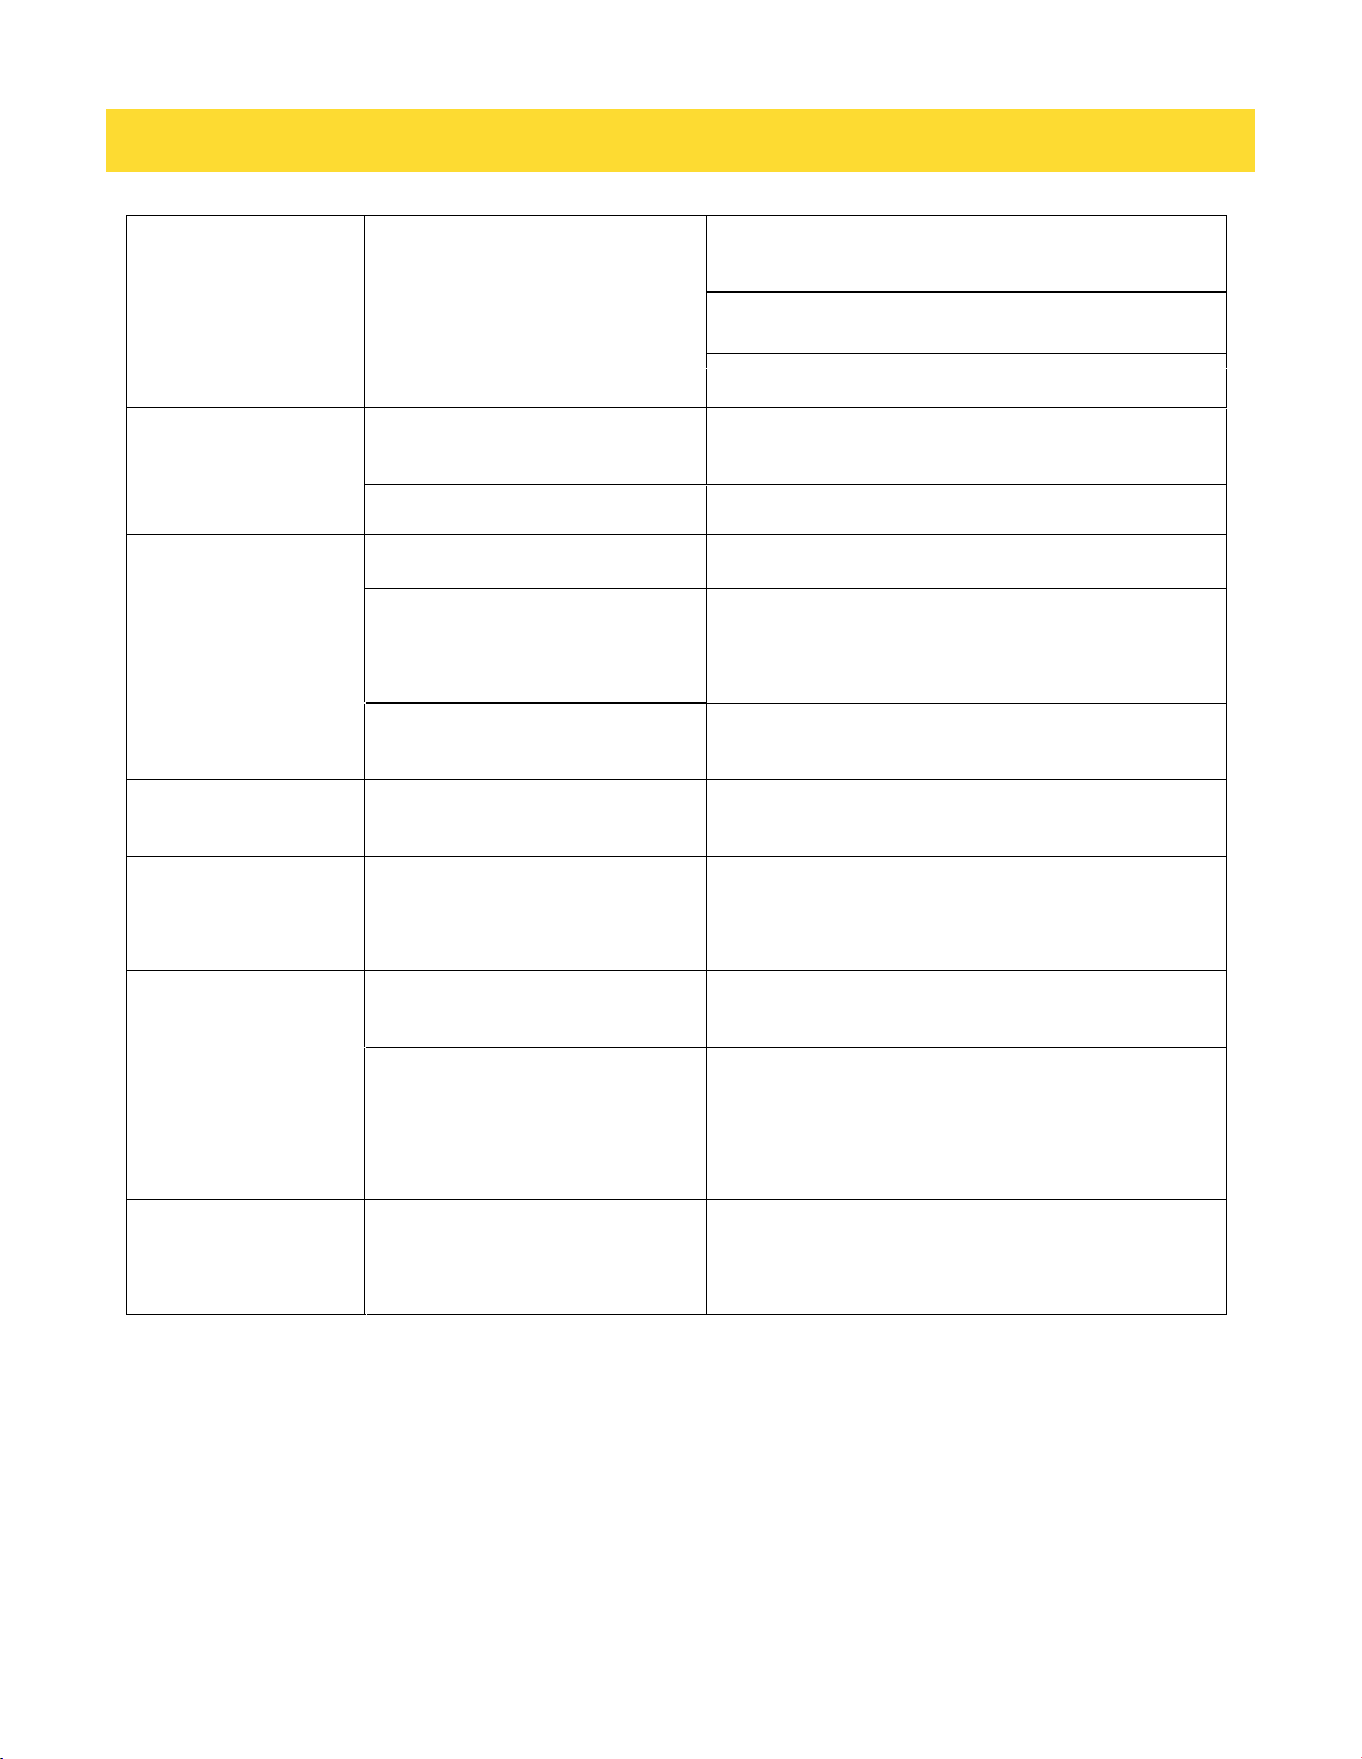
TROUBLESHOOTING
20
Check if the water supply pressure is below 15
psig.
Check water supply or filter may be restricted.
Cubes are partially
formed or are white
on the bottom.
Not enough water in the water
trough.
Check for a water leak at the water trough.
The feet are not leveled and
locked.
Level and lock the feet. See Leveling the Ice Maker.
Noise during
operation.
Certain sounds are normal.
See Normal Sounds.
The electricity is off.
Reconnect the power supply line.
The environment temperature
is out of the stated range.
The ice maker stops
suddenly while
making ice.
The ice storage bin is full of ice.
The ground line isn't in the
socket.
Use a socket meeting the grounding
requirements.
The hardness level of the water
is too high.
Install a water-softening device in front of the
water inlet.
Remove the ice storage bin and clean the
drainhole.
Water leaks from
the ice storage bin.
Check the drain hose to be sure water can be
drained out unhindered.
Buzzer alarm
Problem in pumping out water.
Check for correct operation of pumping out
water pump, water lever switch and drain tube .
Cut off the electricity and leave the ice maker
disconnected until the temperature returns to
within the stated range.
Remove some ice cubes; make sure the ice-full
probe is free of ice.
The body of the ice
maker is electrified.
Scaling occurs
frequently inside the
machine.
The drainhole below the ice
storage bin is blocked.
The drain hose is kinked or
improperly placed higher than
the floor of the ice storage bin.
PN:1866844500
21
Warranty&Service
This appliance has been manufactured by Thor International, 10830 Ada Ave Montclair, CA 91763
United States.
For Customer Service, please call (877) 288 - 8099
For the most up to date warranty and service policy, please refer to our website
WWW.THORKITCHEN.COM/WARRANTY-REGISTRATION
For in-warranty service requests, please visit our website at
WWW.THORKITCHEN.COM/SERVICE
Please Note: You must provide proof of purchase or installation date for any in-warranty service
requests
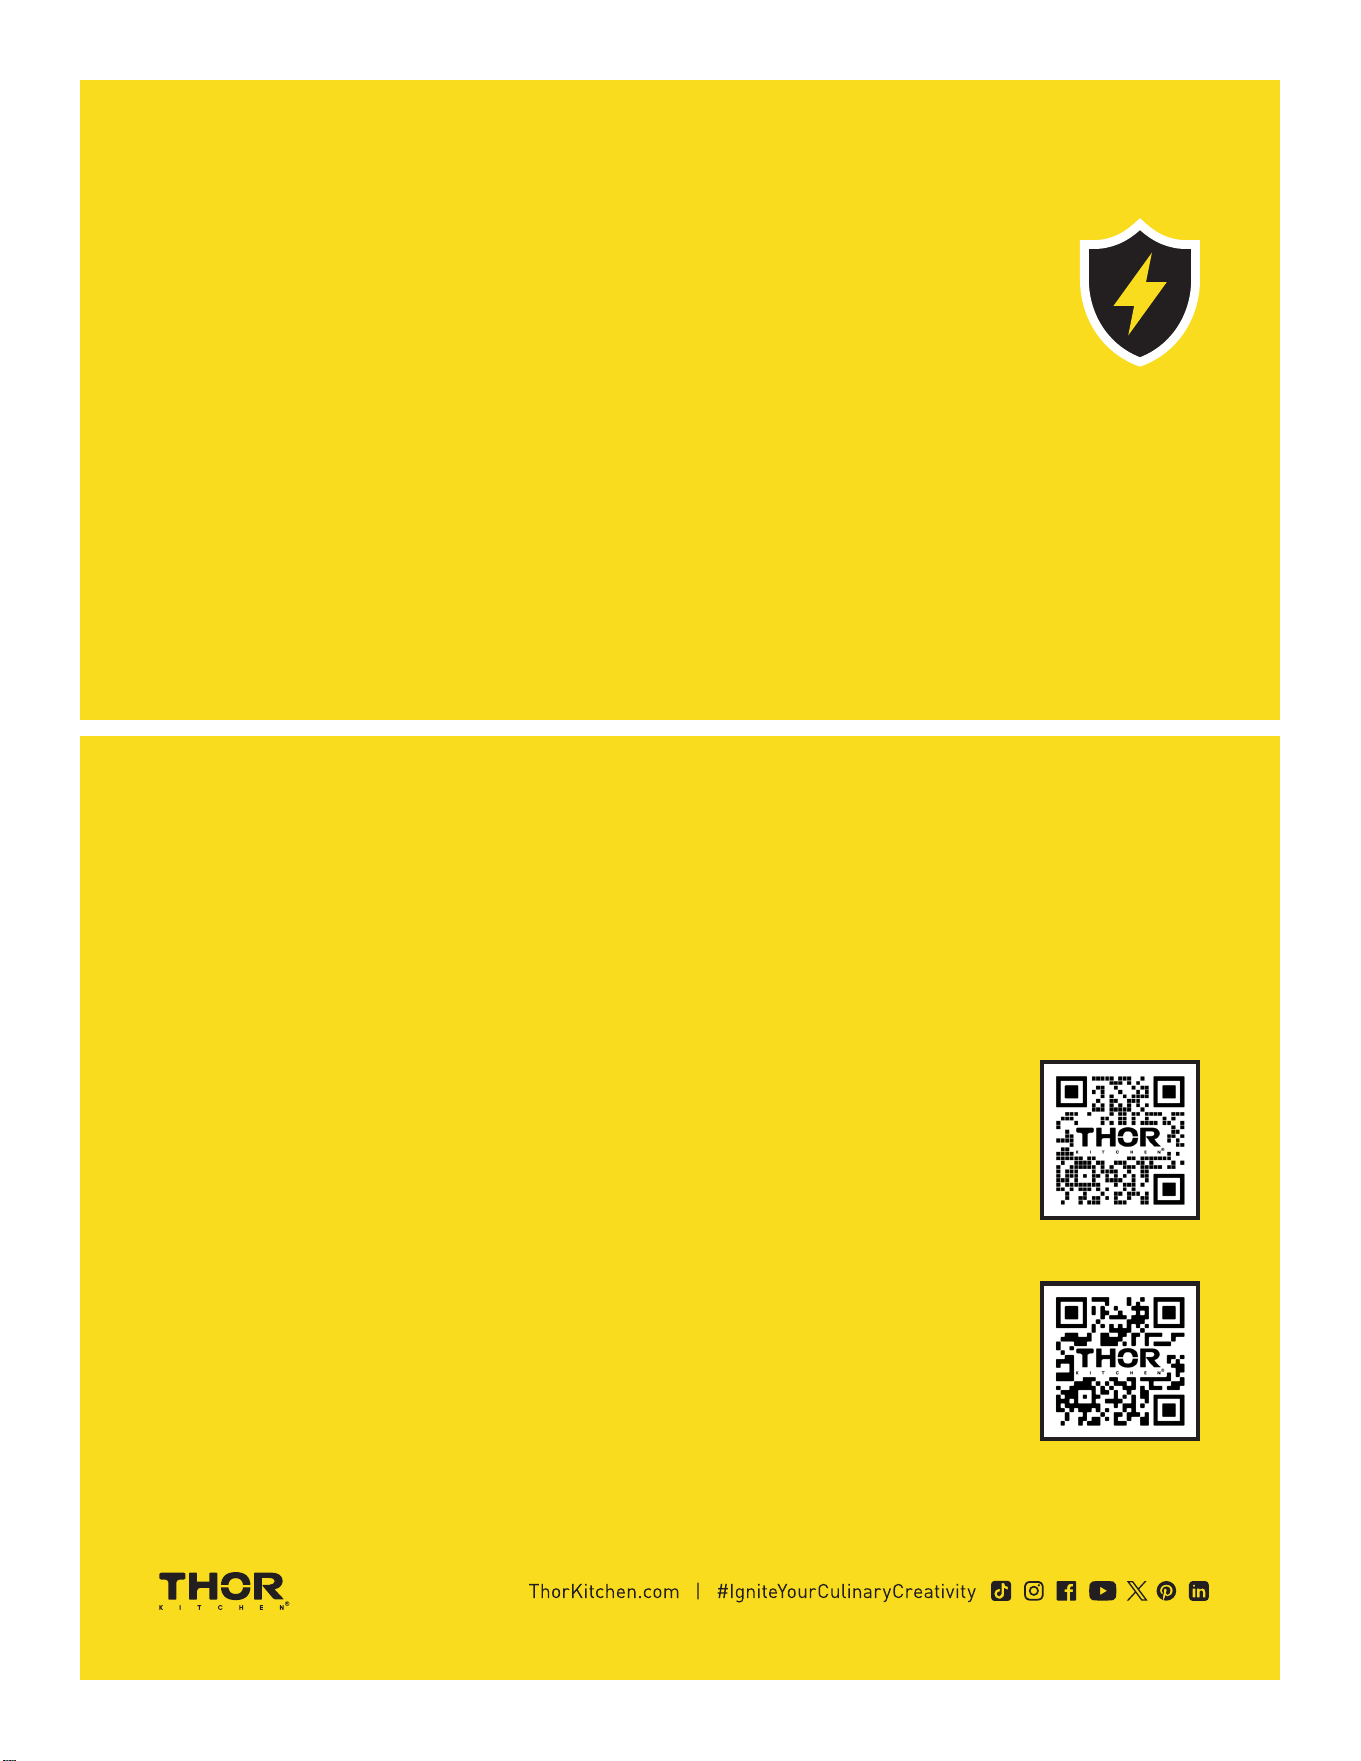
Warranty Registration
Made Easy.
We Stand Behind
the Quality of Our
Appliances.
Reliability and customer satisfaction are our top priorities. We offer a
solid two-year warranty on both parts and labor. Enjoy professional-grade
performance with the condence that we’ve got you covered.
01
02
03
Scan the QR Code or visit thorkitchen.
com/register-your-product.
Input your purchase and product
information and select register.
That’s it. You’re all set.
Enjoy!
WARRANTY
PARTS
Questions: [email protected]