遥控器按键名称及其功能
NOTICE
Before using the projector, please
read this user manual carefully and
keep it for future use.
Thank you very much for your support!
You can learn how to use this projector by
reading this manual.
If you have any questions about this product,
please contact our after-sales department. we
are happy to be on serve of you.
Opening Remarks
Important safety precautions
For best effects, it is recommended that you
use this product in a dark room.
1. DO NOT install the machine where directly blown by the air conditioner, the
water condensed or high temperature may cause machine failure.
2. Make sure that there is sufficient ventilation and the ventilation is not blocked,
so as to avoid the accumulation of hot air in the machine
3. Prevent clips or paper falling into the machine, and do not put any metal
objects into machine. If accidentally happens, please turn off the power
immediately and let qualified personnel fix it.
4. Due to avoid the risk of leakage, do not place any liquid on the machine.
5. When transporting the projector, please use soft packaging materials to
protect the lens from scratches Please install the lens protection cover, non
violent during transporting.
6. During or after the projection, the vicinity of the exhaust vent will become
hot, non touch with your hands.
7. DO NOT look into the lens while the machine is powered on, it may cause
serious damage to your eyes.
NOTICE
DO NOT open the case. Please entrust qualified
professional maintenance personnel to perform
maintenance.
This mark warns there is an uninsulated voltage in the
unit, which may cause electric shock due to the surface
magnetic field. It is very dangerous to touch any parts
inside the machine.
To prevent fire or electric shock, do not expose this
machine to rain or moisture.
NOTICE
Safety notice
Do not install in non
ventilated places.
Do not install in high
temperature or humid places.
Do not block the ventilation
holes (intake or exhaust)
Do not install in dusty
or smoky places.
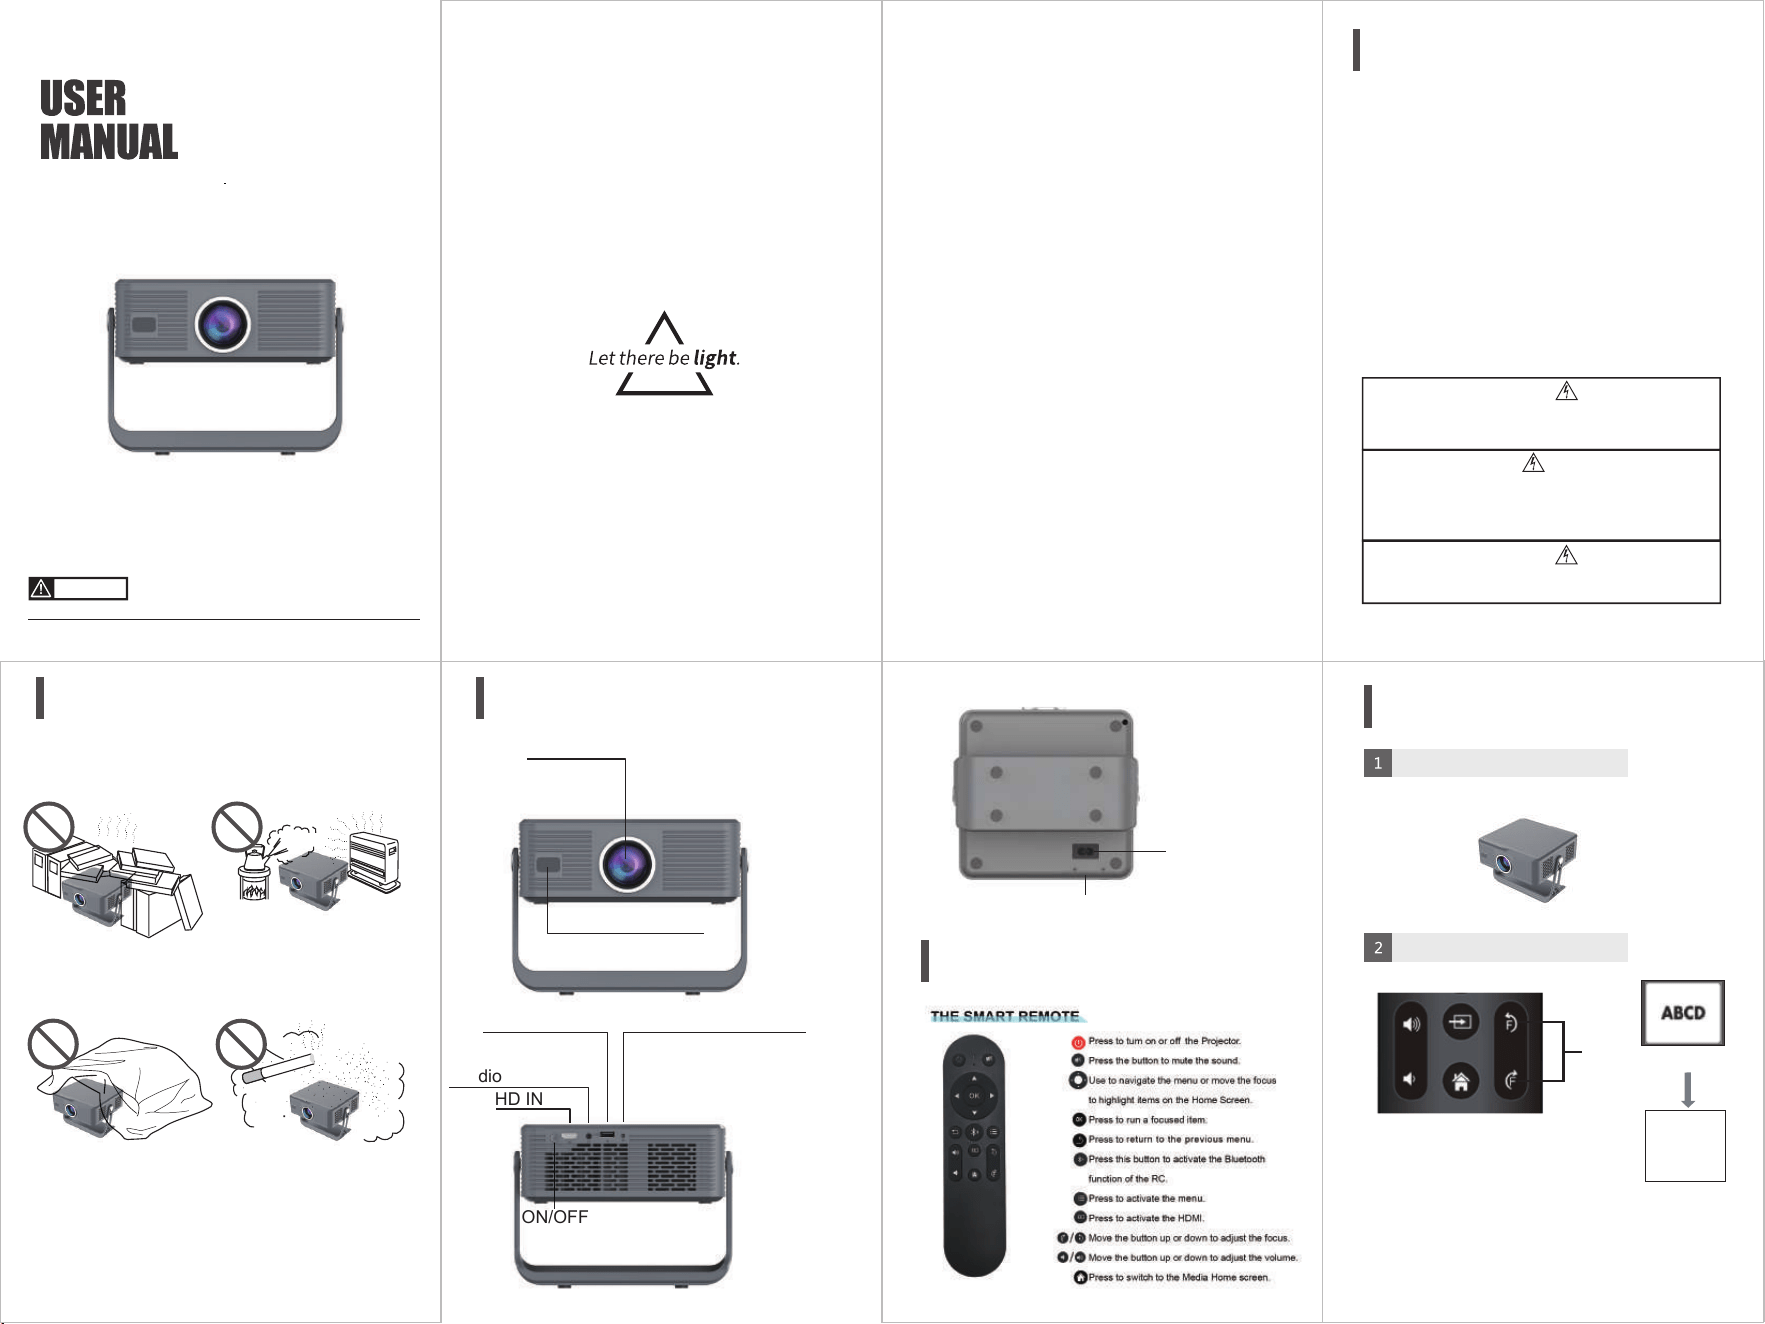
Projector component and functions
Lens
IR&Camera
Remote control button and functions
USB
ON/OFF
IR
HD IN
Audio
This handheld projection device has
powerful features, portable and easy to use. It
is specifically designed for home entertain-
ment, business and other application environ-
ments.This projector will let you enjoy the fun
of the big screen reality in anytime and
anywhere, and you are also welcome to share
your fun and opinions with us.
ABCD
Installation and Adjustment
Projector installation
You can choose horizontal placement
choose horizontal placement
Adjust the focus
blur Image
Focus: When the image is
blurry (as shown in the right
image), please use the "F+"
and "F-" buttons on the remote control to
adjust it to obtain a satisfactory image. If a
clear image is still not obtained after adjustment,
please move the product forward or backward.
(Auto focusing)
Focus
Power connector
Dust removal port
Home page
Bluetooth remote control link
Installation and Adjustment
Projection Distance Reference
Projection distance
Projection size
(inch)
Projection size
H*W
(m)
Projection distance
(m)
40 inch
60 inch
80 inch
180 inch
100 inch
120 inch
H0.51m W0.89m
H0.78m W1.35m
H1.05m W1.82m
H1.38m W2.54m
H1.30m W2.26m
H2.24m W3.99m
1.10m
1.62m
2.13m
2.65m
3.17m
4.70m
Safety Power Off
Press the " " button on operation panel
or the remote control " ", turn off the
device according to the system
prompts.
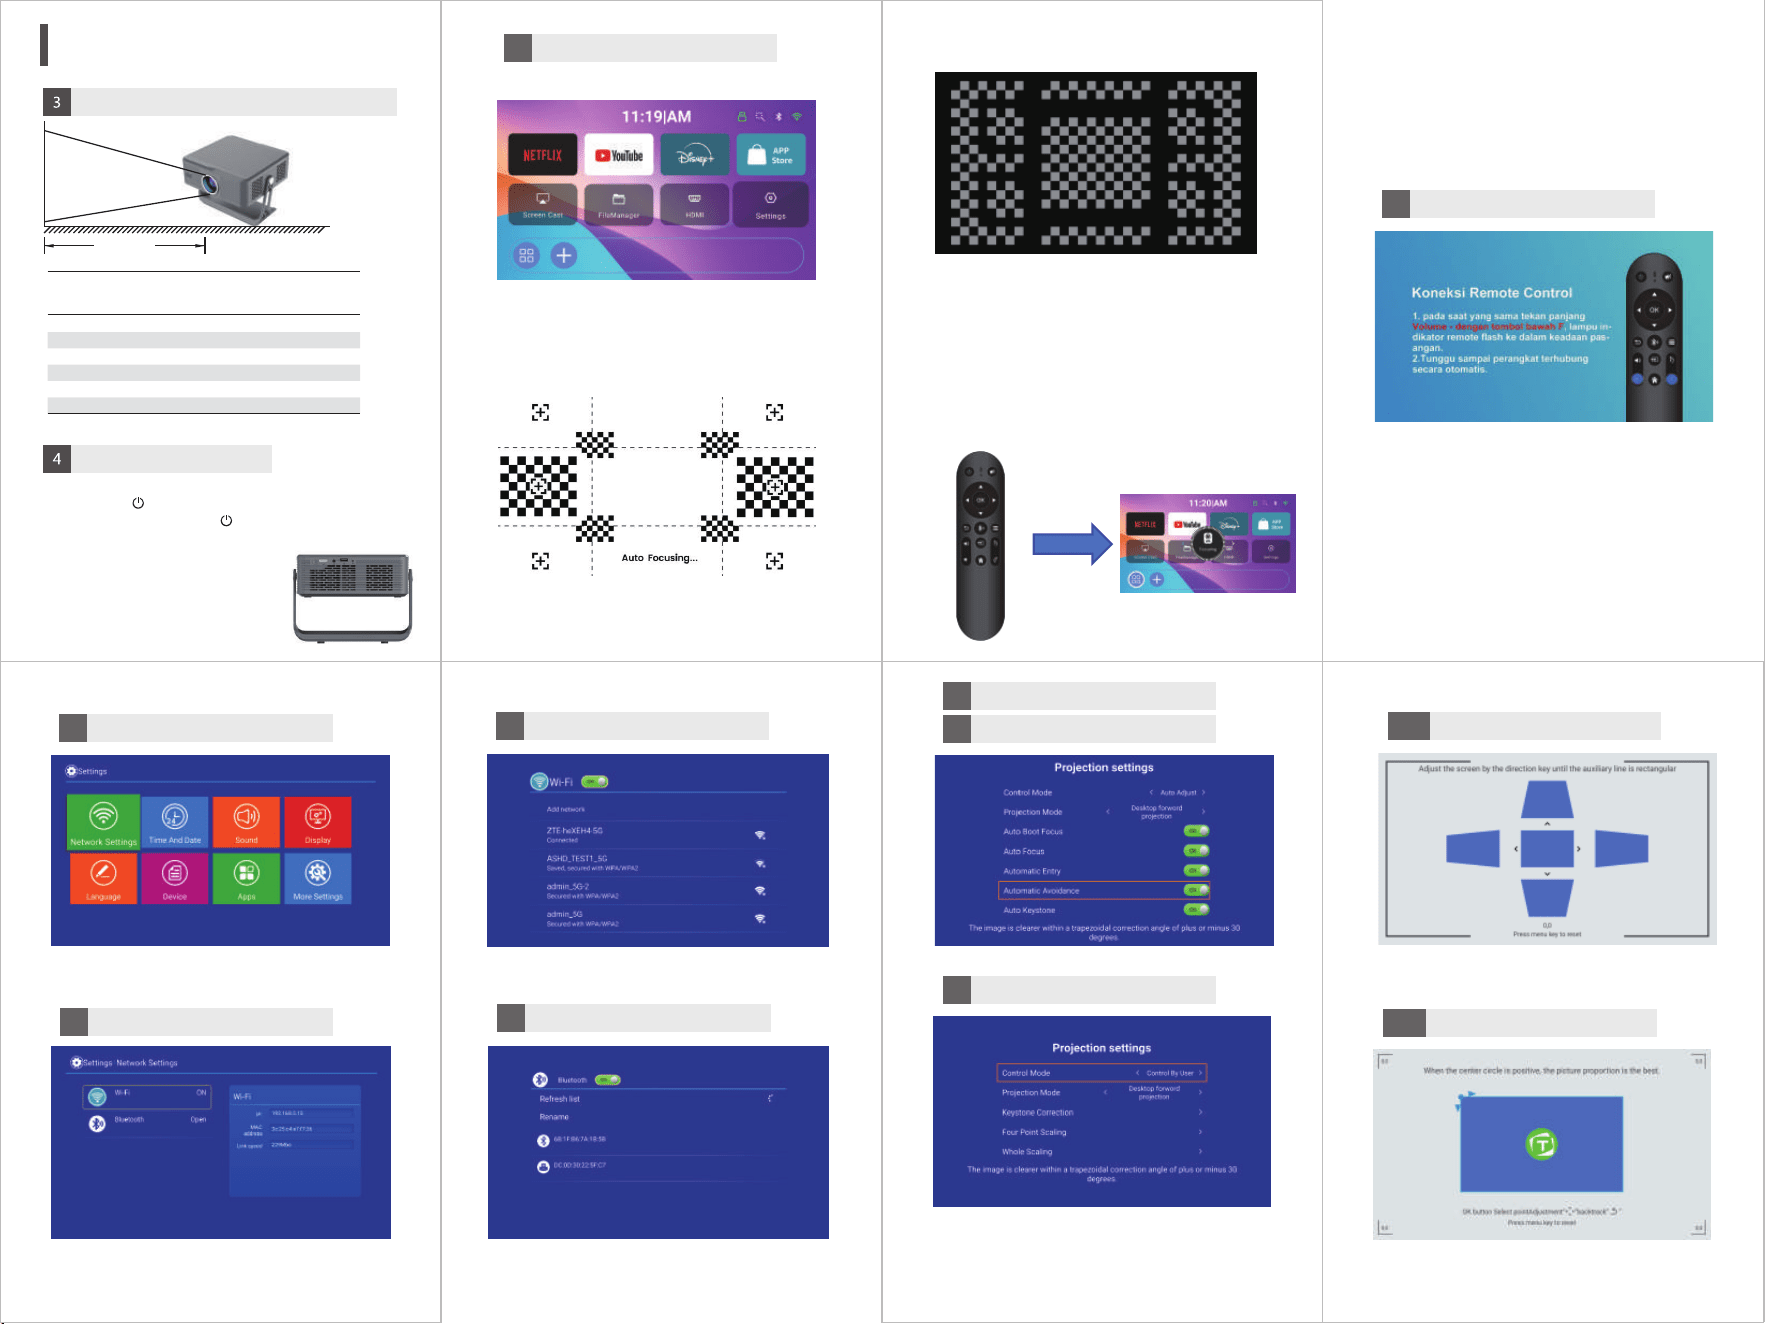
Auto focusing
Automatic Somatotype
Remote control focusing
After entering the home page, all
software will be ready and start
auto-focusing. Once the auto-focusing is
completed, the trapezoid, obstacle
avoidance, and screen entry will be
automatically adjusted.
If you are not satisfied with the autofo-
cus, you can use the F+ or F- function on
the remote control to fine-tune it, so that
the picture can achieve a satisfactory
clarity.
After installing the AA battery on the
remote control, press the Bluetooth key
towards the projector. When the pairing
interface shown in the picture comes out,
follow the instructions in the picture to
operate. The remote control can
automatically connect to the projector,
making the usage smoother.
In the projector's settings menu, the second
tab pertains to the projection mode, which
can be customized according to individual
requirements on the desktop.
6
5
Settings
Setting》Network&BT
8.1
WiFi
8.2
Bluetooth
8.3
7
Auto Adjust
Projection Settings
9.1
9
Control By User
9.2
Keystone correction
9.2.1
Four-corner correction
9.2.2
Cleaning Method
Before cleaning, you must make sure that you have
unplugged the power plug.
Do not use insecticides or other volatile chemicals on
the projector or lens. Do not use rubber or vinyl products
to touch the projector. This can damage or cause coating
peel off.
Clean the Projector
Wipe with a soft dry cotton cloth. use a soft cloth dipped
in a diluted neutral detergent to wipe it, then with a dry cloth.
If you use chemical fiber cloth, please follow the precautions.
Do not use thinner, benzene or other solvents to avoid
quality degradation or peeling of the spray coating.
When cleaning the dirt, you can insert a brush in the front
of the vacuum cleaner, avoid directly use the vacuum
cleaner without any connectors or the nozzle, avoid
scratches.
Dust cleaning of lens
Use the same method to clean the camera lens, use the
professional hair dryer for the camera or the cleaning paper
for the glasses lens. Be careful not to scratch the lens.
Dust cleaning at suction and outlet
The dust in the air inlet and outlet prevents ventilation,
which will increase the internal temperature and cause
malfunctions. Cleaning guidelines: at least clean once use
every 10,000 hours.
Turn off the projector, disconnect the power.
Clean the exterior with an electric vacuum cleaner, and
install a brush head adapter on the vacuum cleaner. Please
be careful not to use a vacuum cleaner without an adapter
or brush head.
Thanks for reading!
Enjoy your time with this projector!
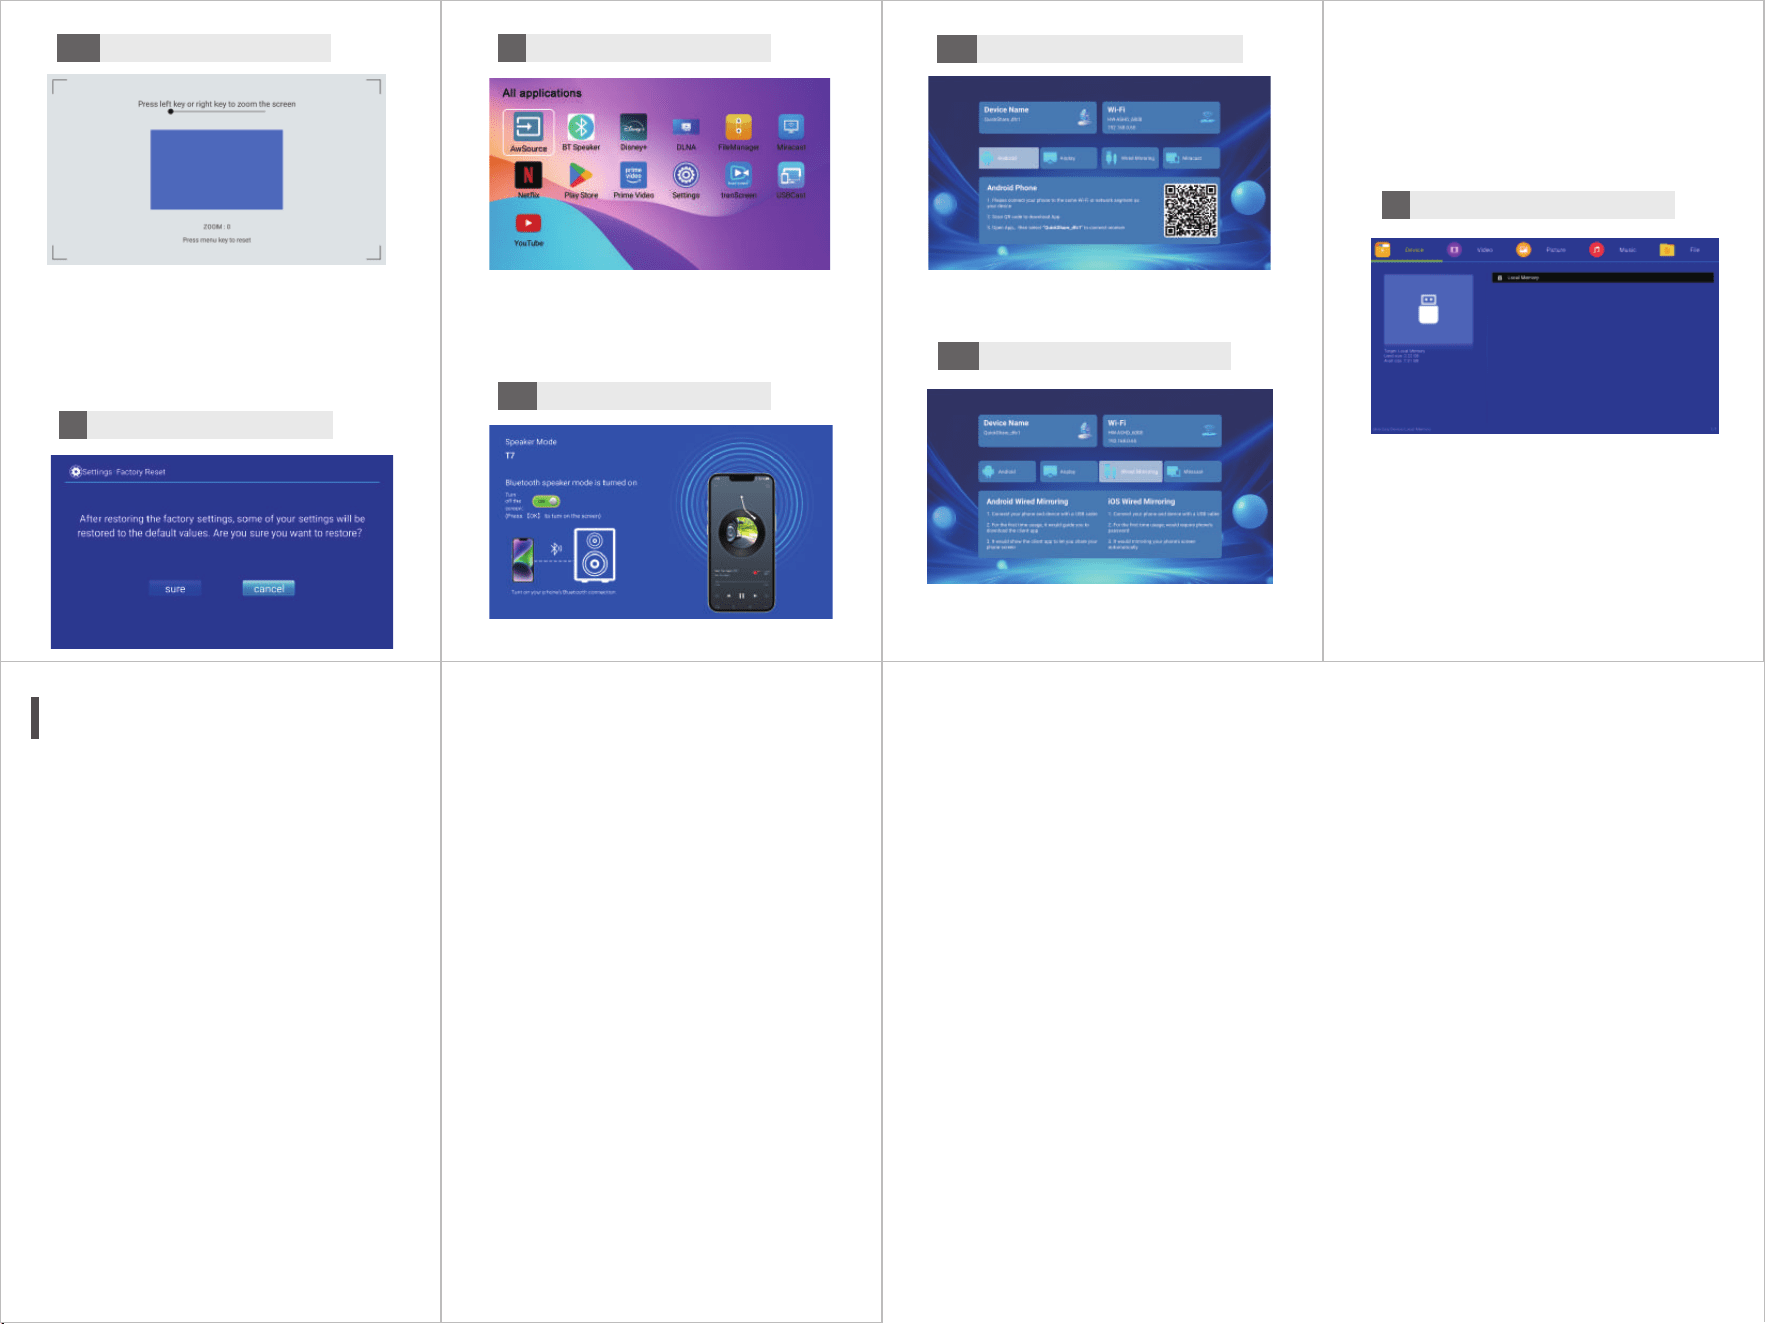
After performing trapezoidal correction,
corner adjustment, and zoom configura-
tion through user controls, the menu key
can be used to restore all settings to their
default values with a single click.
After entering Applications, you can open
and find the apps you need. The apps you
frequently use can also be added to the
desktop through add.
When there is an Internet connection,
Transcreen can be used for screen
mirroring or projection. In the absence of an
Internet connection or when the network is
unstable, USB cast can be used.
It is recommended to use the FAT32 format
and plug it into the USB interface, which
can play files more smoothly.
Setting》Factory Reset
10
Zoom
9.2.3
Applications
11
BT Speaker
11.1
Screen projection & Co-screen
11.2
Wired screen sharing
11.3
Files
12
FCC Caution:
This device complies with part 15 of the FCC Rules. Operation is subject to the following two
conditions: (1) this device may not cause harmful interference, and (2) this device must accept any
interference received, including interference that may cause undesired operation.
Any changes or modifications not expressly approved by the party responsible for compliance could
void the user's authority to operate the equipment.
NOTE: This equipment has been tested and found to comply with the limits for a Class B digital
device, pursuant to Part 15 of the FCC Rules. These limits are designed to provide reasonable
protection against harmful interference in a residential installation. This equipment generates, uses
and can radiate radio frequency energy and, if not installed and used in accordance with the
instructions, may cause harmful interference to radio communications. However, there is no
guarantee that interference will not occur in a particular installation.
If this equipment does cause harmful interference to radio or television reception,which can be
determined by turning the equipment off and on, the user is encouraged to try to correct the
interference by one or more of the following measures:
-- Reorient or relocate the receiving antenna.
-- Increase the separation between the equipment and receiver.
-- Connect the equipment into an outlet on a circuit different
from that to which the receiver is connected.
-- Consult the dealer or an experienced radio/TV technician for help.
To maintain compliance with FCC’s RF Exposure guidelines, This equipment should be installed and
operated with minimum distance between 20cm the radiator your body: Use only the supplied
antenna.