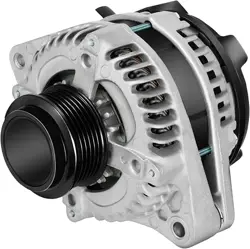

High-Quality Auto Parts | Your Ideal Auto Upgrade | Trusted and Outstanding
CAR ALTERNATOR INSTALLATION GUIDE
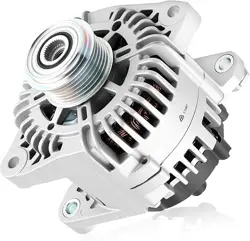
Designed for Precision — Engineered for Reliability
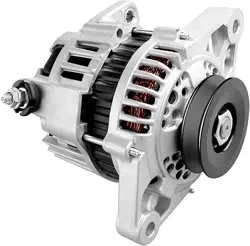
�️ Alternator Installation Procedures
★★ Professional installation recommended ★★
Pre-installation checks(very important)
1. Ensure that the power supply is off(installation without turning off the power supply may
be a safety hazard)
2. Check that wiring harness is undamaged and corrosion-free
3. To ensure that the battery is compatible, a small number of users have found that some
batteries and generators do not match the situation
4. Verify mounting bearings are level and bolts are properly fitted
5. Please pay attention to the interface safety when connecting, poor contact may lead to
unstable voltage
6. Please pay attention to the elasticity of the pulley and the synchronous belt when
installing and pay attention to the number of grooves of the synchronous belt to match the
number of pulley axes
7. To ensure compatibility, you can check its suitability by VIN code or via the page content
and the AMZ suitability checker
8. Ensure battery is fully charged (weak battery = most common cause of "new alternator
failure")
Part 1 — Alternator Removal
Step 1: Disconnect Battery
1. Turn off engine and remove key
2. Disconnect negative (-) battery cable FIRST
3. Secure cable away from all metal surfaces
⚠ WARNING: Failure to disconnect battery may result in electrical damage to ECU
⚠
Step 2: Mark & Document Wiring
1. Identify, tag, or mark each wire to ensure proper reconnection
2. Take photos of wire routing for reference
3. Note connector orientation
WARNING: Use masking tape and marker to label each connector
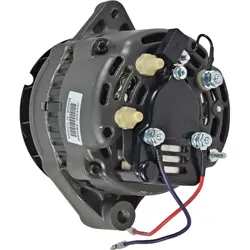
Step 3: Disconnect All Wiring
1. Disconnect B+ power cable (usually red wire with nut)
2. Unplug all connectors and signal wires
3. Never pull by wire—only by connector body
⚠ WARNING: Corroded terminals can cause alternator failure. Clean with electronic contact
cleaner
Step 4: Release Belt Tension
1. Locate belt tensioner bolt
2. Use serpentine belt tool to rotate tensioner
3. Slip drive belt off alternator pulley
4. Inspect belt for cracks or glazing
⚠ WARNING: Replace belt if cracked. Do NOT pry belt with screwdriver
Step 5: Remove Mounting Bolts
1. Loosen alternator pivot bolt
2. Remove all attaching bolts (typically 2-4 bolts depending on vehicle)
3. Support alternator weight to prevent dropping
HAYIAUTO © All Rights Reserve
⚠ WARNING: Do not hit cooling fins—damage may occur
d
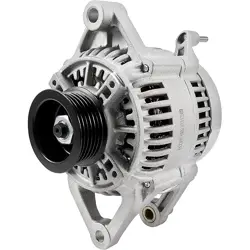
Part 2 —Alternator Installation
Step 1: Prepare Replacement Unit
IMPORTANT: Some units may require reusing pulley, fan and/or condenser from original unit.
If required:
Step 6: Remove Old Alternator
1. Carefully tilt and pull alternator from mounting bracket
2. In tight spaces, may need to remove additional components
1. Remove fan, pulley, hardware and/or condenser from original unit.
2. Install fan, pulley, hardware and/or condenser on replacement unit. Torque pulley nut to
vehicle manufacturer’s specification. WARNING: Inspect pulley, fan mounting and spacing
carefully. Incorrect installation may result in personal injury and/or vehicle damage.
NOTE: Replacement unit may not be supplied with rotor shaft key way–KEY WAYS ARE NOT
CRITICAL. For proper pulley & fan performance, PROPER TORQUE ON PULLEY NUT IS CRITICAL.
Step 2: Pre-Installation Battery & System Check
1. Charge battery fully
2. Clean both battery terminals
3. Inspect and clean battery cables
4. Inspect alternator drive belt for cracking or glazing 5
. Replace any worn parts if necessary
⚠ WARNING: Failure to follow above steps leads to the MOST COMMON CAUSE of alternator
failure and charging system malfunction
Step 3: Mount New Alternator
1. Position alternator in mounting bracket
2. Align bolt holes carefully
3. Hand-start all mounting bolts first
4. Loosely install mounting bolts (do not tighten yet)
⚠ WARNING: If not aligned, inspect bracket for damage
Step 4: Install Belt
1. Place alternator drive belt on alternator pulley 2
. Follow belt routing diagram (if available)
3. Check to ensure proper drive belt alignment
4. Verify pulley alignment with belt tensioner
⚠ WARNING: Pay attention to groove count matching pulley axes
⚠
Step 5: Adjust Belt Tension & Torque Bolts
1. Adjust belt to correct tension
2. Follow manufacturer specifications for belt tension
3. Tighten alternator mounting bolts to manufacturer torque specifications (typically 35-55 4 .
Use torque wrench for proper torque
WARNING:
Too loose → slip, low charge
Too tight → noise, bearing wear
Step 6: Reconnect Wiring
1. Reconnect all electrical connections to proper terminals 2
. Ensure connectors fully seat and lock
3. Tighten B+ terminal nut securely
4. Verify no loose wires
⚠ WARNING: Some replacement units may require wiring connector adapter. Loose wires cause
warning light / no charge

H
igh-Quality Auto Parts | Your Ideal Auto Upgrade | Trusted and Outstandin
Important Fitment Reminders
Check
Meaning
Provide the 17-digit VIN to confirm exact vehicle com
VIN Verification
patibility
Pulley Specifications
Ensure pulley grooves, diameter, and clutch (one-way or fi
xed) match your original part
Troubleshooting Guide
Connector Plug Match
✔️Do not jump-start repeatedly
� Tips to Avoid Issues
✔️Use a fully-charged battery
✔️Clean & tighten ground wires
✔️
Verify plug shape, pin count & pin layout match your ori
Symptom
ginal connector
Never mix pulley types
✔️
Possible Cause
Engine & Model Confirmation
Match engine code, trim, and model year to avoid mis-fit
Solution
issues
Battery light on
OE / Part Number Comparison Cross-check with your original OE/Part Number for gua
Loose connector / bad
ground
ranteed fitment
Recheck wiring & clean
ground
terminal
Low charging voltage Loose belt / weak battery
Adjust belt tension or
replace battery
Overcharging Voltage regulator fault Replace alternator
Noise from alternator Misaligned pulley Check belt alignment
No start Battery dead / loose cable
Charge battery / tighten
terminals
After install, clear any fault codes
� Customer Promise
We are a professional automotive alternator supplier with factory testing & strict quality
We help you:
Avoid wrong fitment
Install correctly
Solve charging issues
Your satisfaction is our first priority.
g
Nm)
HAYIAUTO © All Rights Reserved
Step 7: Reconnect Battery
1. Reconnect negative battery cable
2. Ensure terminal is tight
⚠ WARNING: Loose terminal = intermittent charging
Step 8: Test Charging System
1. Start engine
2. Check for abnormal noises
3. Verify battery warning light is OFF
4. Use multimeter to test voltage at battery terminals
5. Normal charging voltage: 13.5-14.8V
On Mobile (Amazon App or Browser):
1. Scroll down the product page until you see “Your Garage” or “Check Fit”.
2 . Tap “Add a Vehicle” choose Year, Make, Model, Engine.
3 .
Use
“
Amazon Confirmed Fit
”
Tool
Amazon provides a built-in compatibility checker to make sure the
alternator fits your vehicle.
On Desktop:
1. Go to the product page.
2 . Above the bullet points or “Buy Now” button, find the “Check Vehicle Fit” box
.
3 . Enter your Vehicle Type, Year, Make, Model, Engine.
4 . Click “Confirm Fit”.
Once saved, Amazon will automatically show whether the item fits your car.
If it shows “This fits your vehicle”, the alternator is compatible.
If it shows “Does not fit your vehicle”, please contact us with your VIN before
purchasing.