In the box
Getting started
The LCD screen
Alerts
Download the MyDyson™ app
Getting started on the MyDyson™ app
Caring for your floors
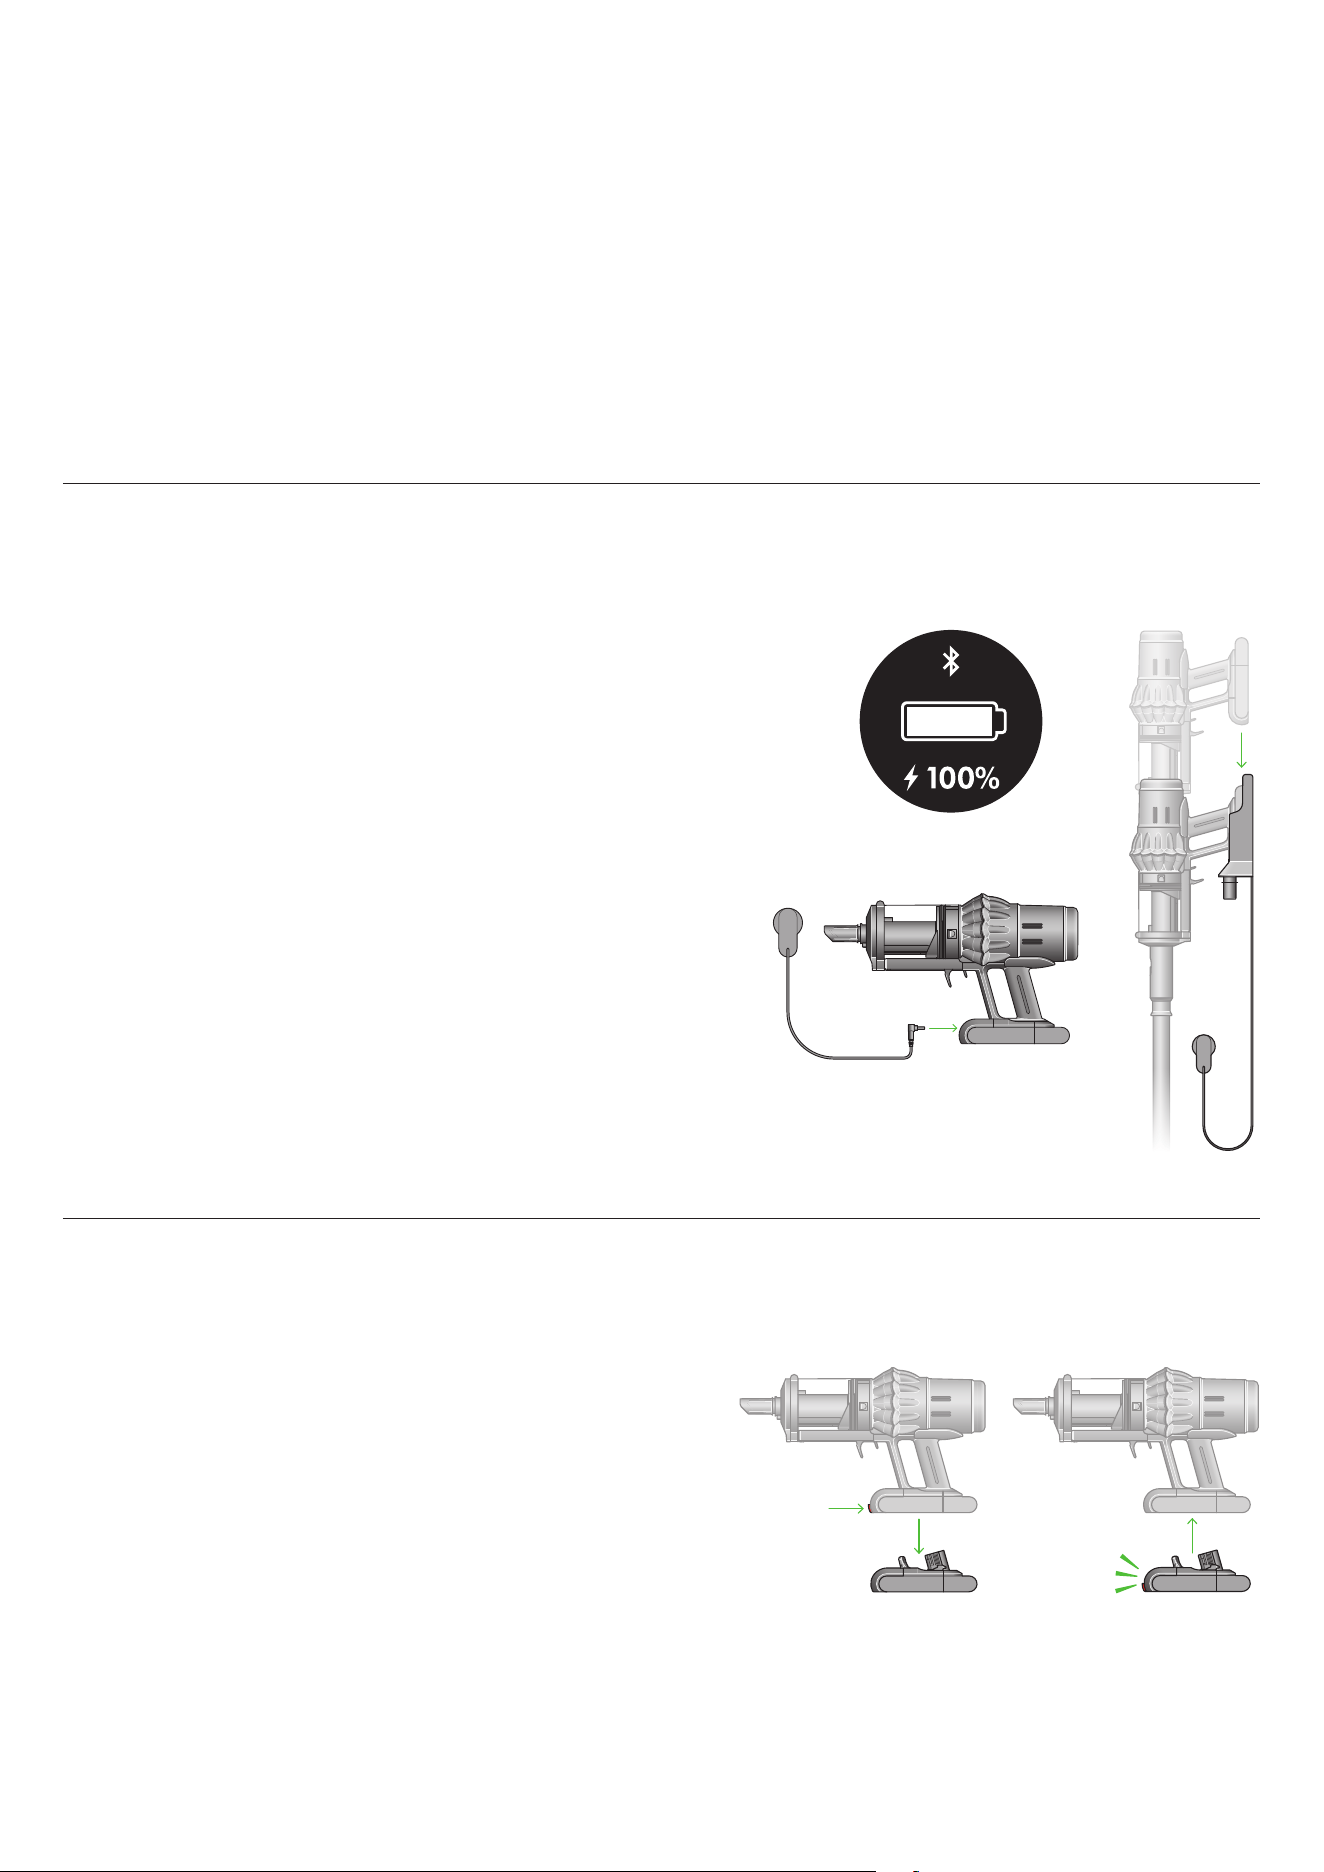
Charging your machine
Charging your click-in battery
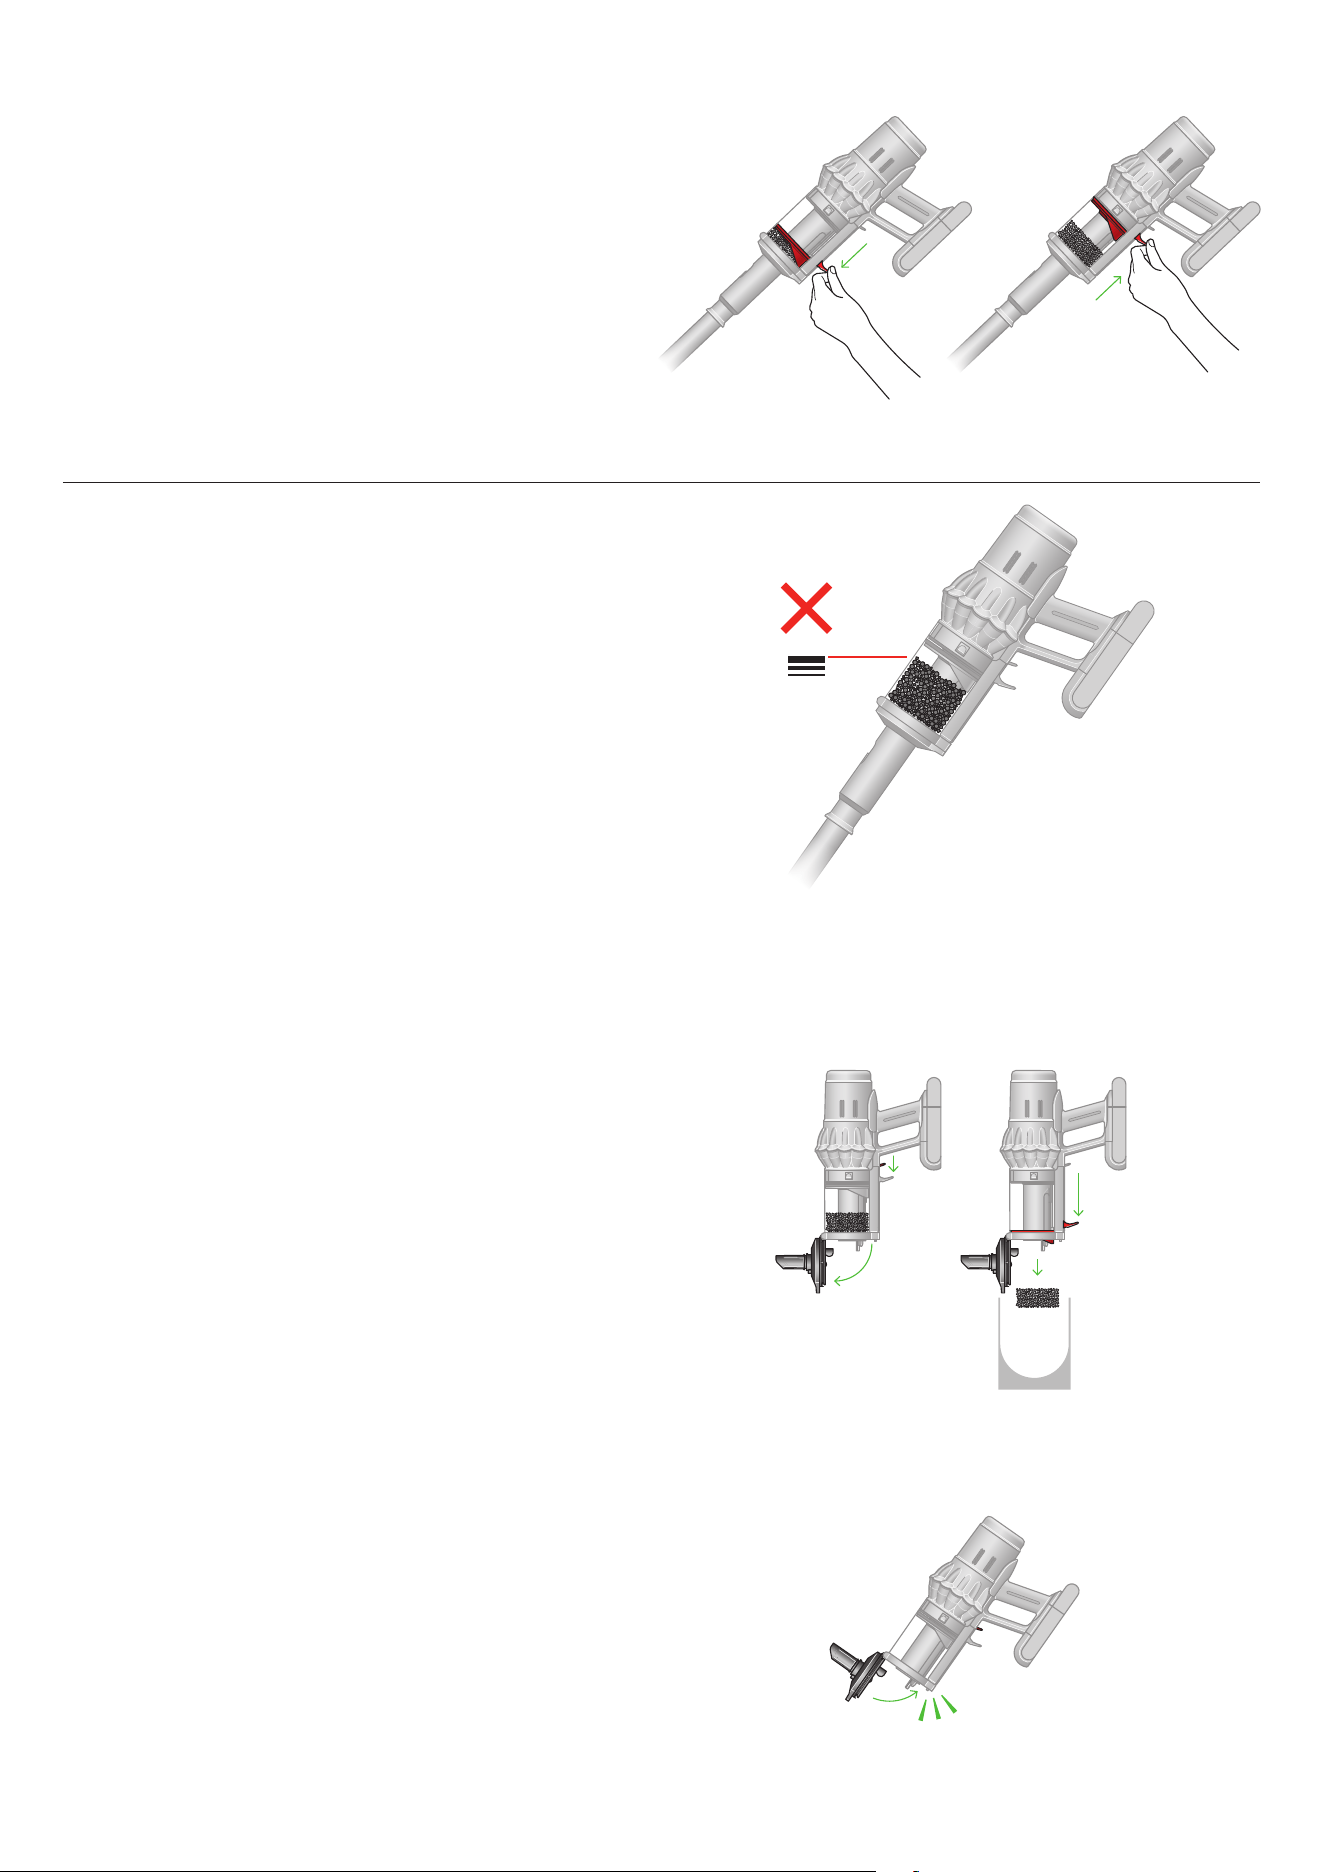
Compressing dust
Emptying your bin
Cleaning your bin
Clearing blockages
Clearing obstructions from your
All Floor Cones™ Sense cleaner head
Clearing blockages from your
Hair screw tool 2.0
How to use your Dyson
Submarine™ 2.0 wet roller head
How to clean your Dyson
Submarine™ 2.0 wet roller head
Washing your filter
Washing your All Floor
Cones™ Sense brush bars
Cleaning your tools
Contents
User manual
9010703 05.29.25 ©2025 DYSON
Dyson logo
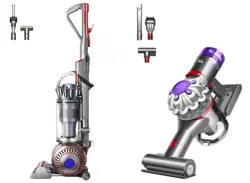
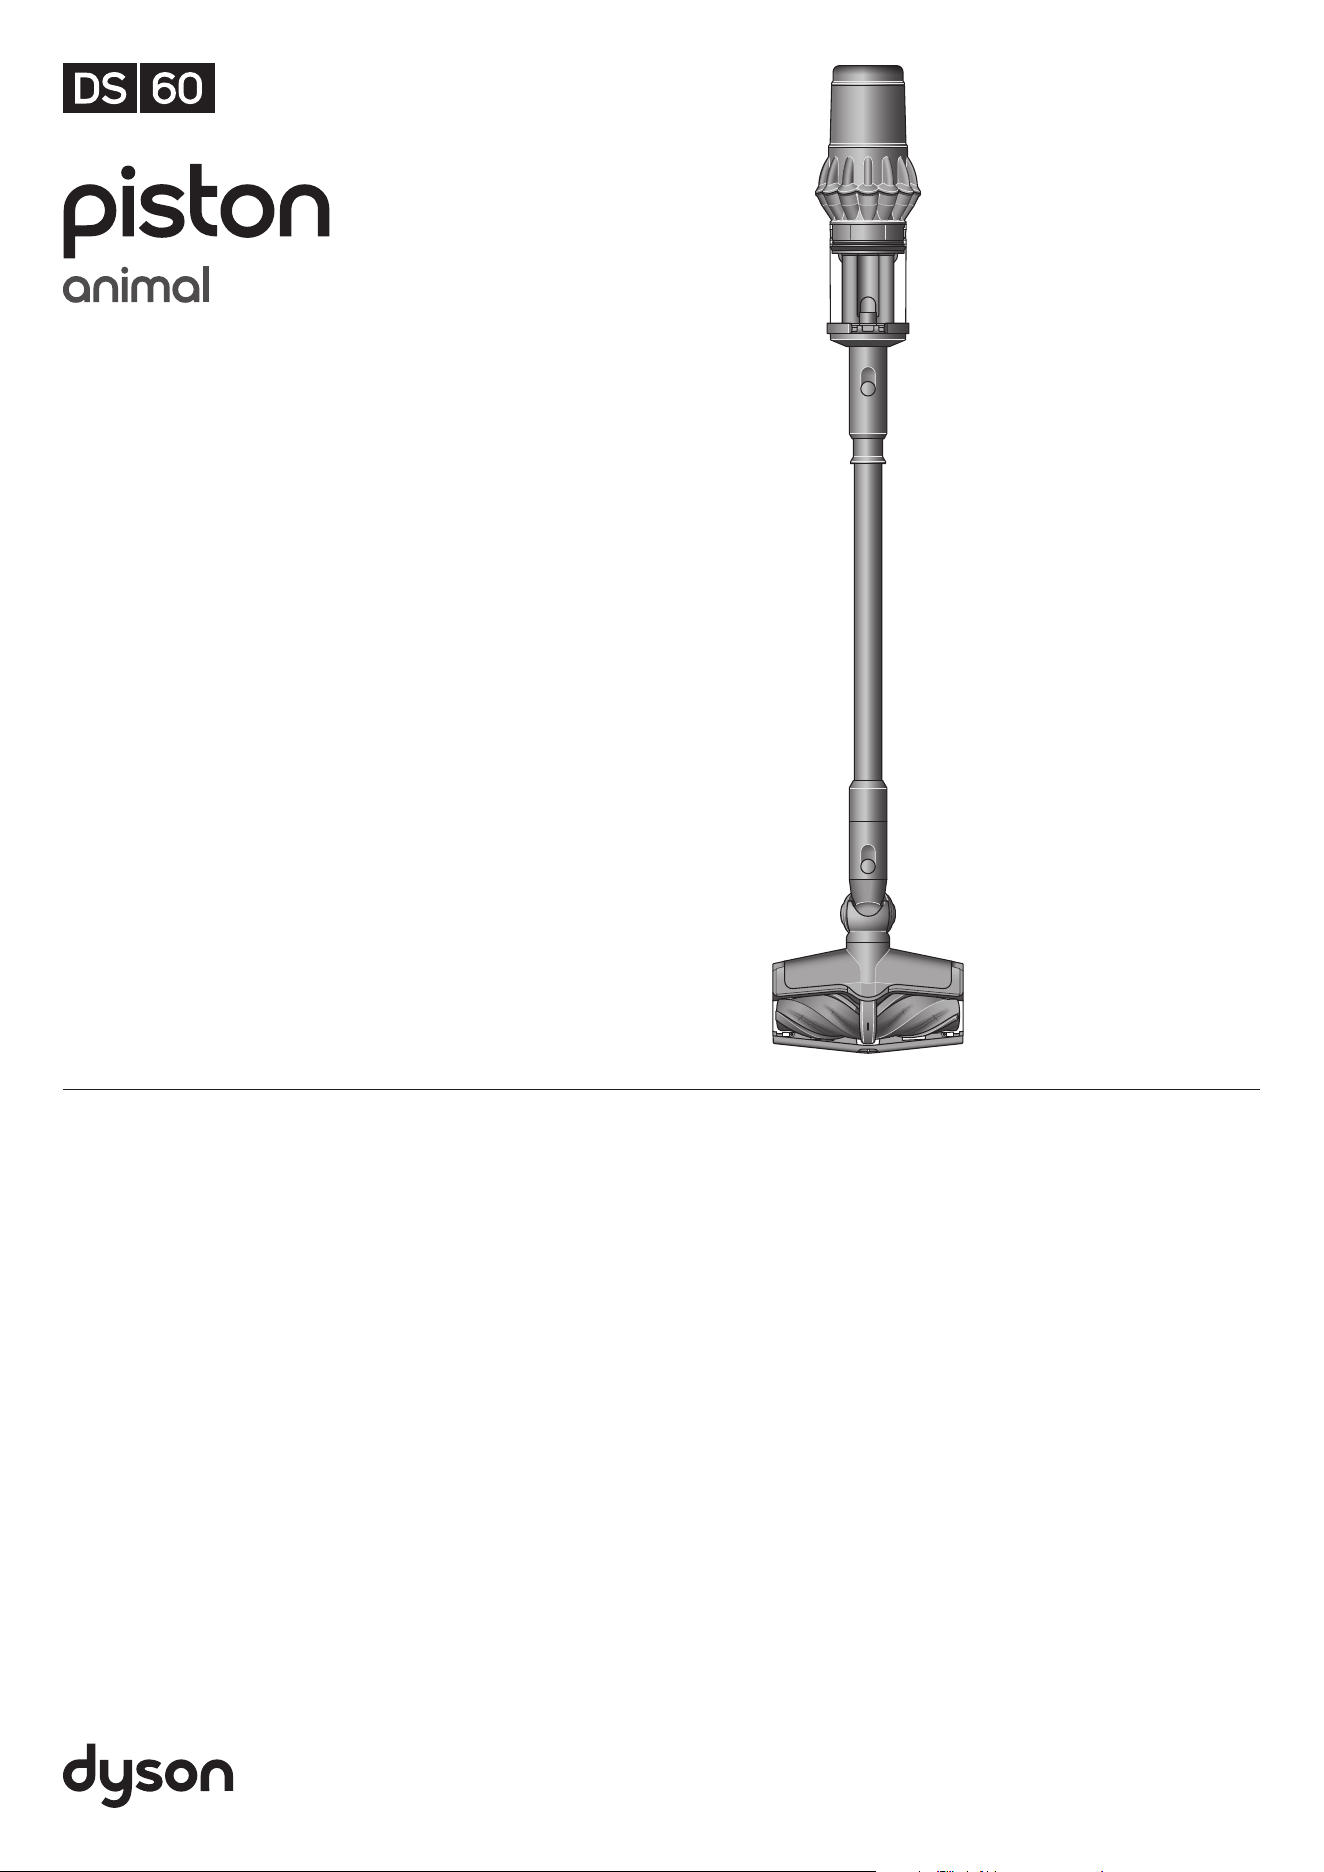
Dyson DS60 Piston Animal logo.
Top view of the Dyson DS60 Piston
Animal machine showing cleaner
head, wand, bin and main body.
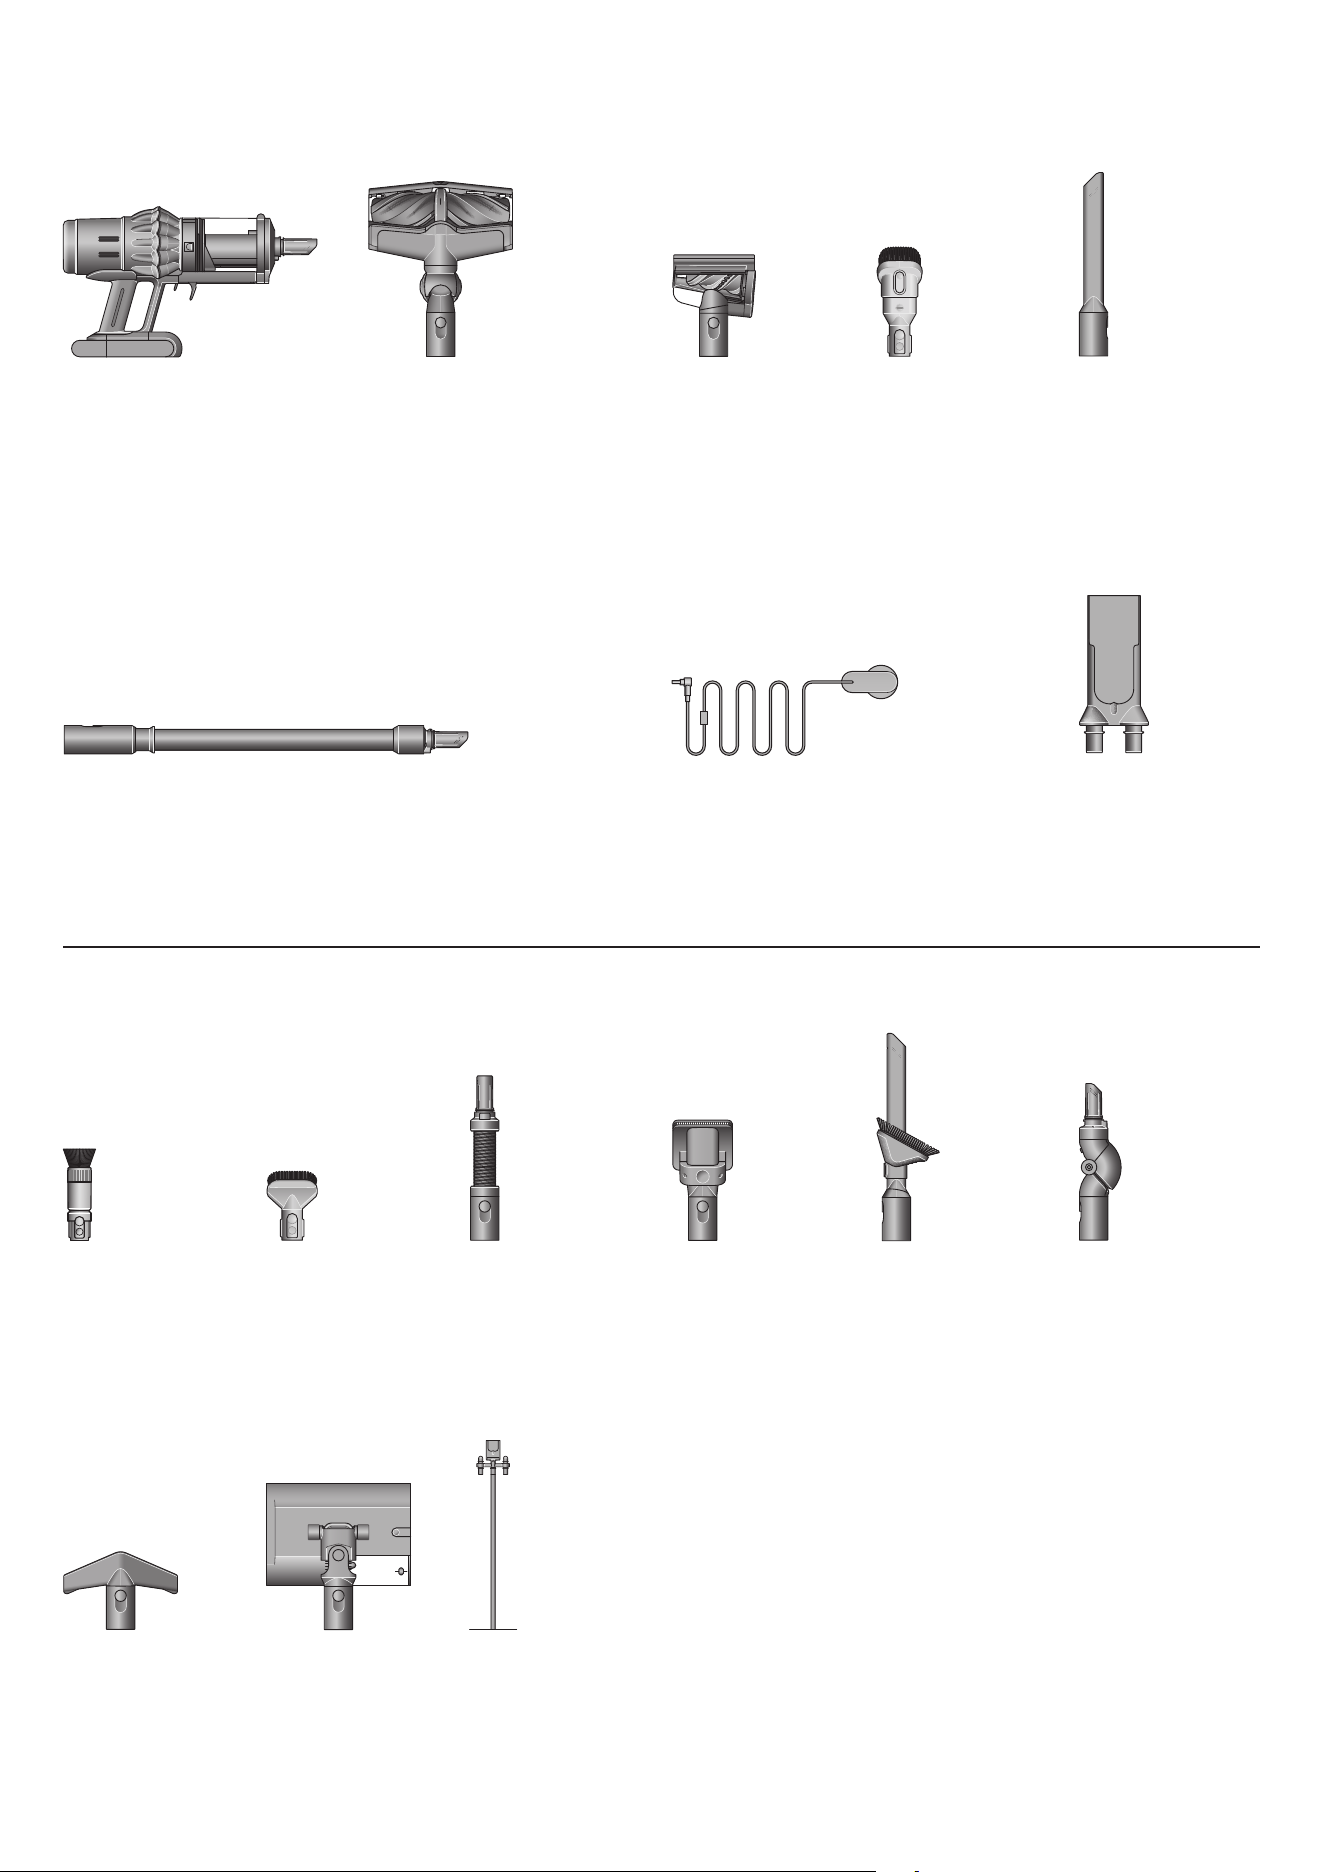
In the box
Additional tools can be purchased in a range of tool kits at www.dyson.com
Combi tool
Two-tools-in-one –
wide nozzle and brush,
for quick switching
between cleaning and
dusting tasks around
your home or car.
Crevice tool
Engineered for
precise cleaning
around tricky edges
and into hard-to-reach
narrow spaces.
Charger
Charges your vacuum
with or without a dock.
Sub ma rin e™ 2.0
wet roller head
Remove spills and
stains from hard floors
with the next generation
Su bma rine™ w et
roller head. Now with
hydration level control.
Floor Dok™
A free-standing grab-
and-go charging
dock designed to hold
the vacuum and five
attachments.
Hair screw tool 2.0
Anti-tangle conical
brush bar spirals hair
off and into the bin.
Motor-driven cleaning
for smaller spaces.
Mattress tool 2.0
Re-engineered to
remove hair and
dust from mattresses
and upholstery.
Wall dock
The Dyson cordless
vacuum drops into the
wall-mounted charging
dock and hold two
attachments, ready for
your next clean.
9,927,641
1.1M
450K
1.6K
10m 60 180 500
55:37
Wand with remote release and built-in-tool
Quickly change tools to switch tasks. Press the red
button to release the wand easily and discover the
built-in handheld tool.
All Floor Cones™
Sense cleaner head
Intelligently detects
your floor type to adjust
performance and adapt
for deep cleans on
carpets and delicate
cleaning on hard floors.
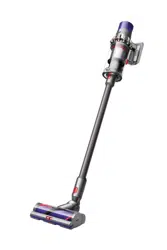
Vacuum cleaner
With built-in tool,
battery and bin
attached.
Pet groom tool
Removes hair as you
groom, so it doesn’t
drop and spread
around your home.
Angled bristles self-
clean in an instant.
Flexi hose tool
Adds up to 29 inches
(75cm) of flexible
reach, with a built-in
tool to clean up high
or down low in your
home or car.
Scratch-free
dusting brush
Gentle on delicate
surfaces. Self-clean-
ing – a rotating cuff
keeps the soft bristles
clear of dust.
Awkward gap tool 2.0
The Awkward gap tool
is a long and slim, with
a 22° twist, for cleaning
tight gaps and hard-to-
reach places.
Stubborn dirt brush
Stiff nylon bristles
dislodge ground-in dirt
from coarse carpets,
high traffic areas and
car interiors.
Low-reach adaptor tool
Engineered to clean
further under low
furniture by adjusting the
wand angle up to 90°.
Now with a built-in tool
for quicker cleans.
Brush bars located inside the cleaner
head and a suction control slider
located on the front.
A rectangular
dock that needs
to be fixed to a
wall with screws.
The charger in a one
piece unit with the plug,
connector end and cable.
The Scratch-free
dusting brush has a
head made of soft
bristles for cleaning
delicate surfaces.
The Awkward
gap tool is
long and
slim, with a
22 degree
twist, for
cleaning tight
gaps and
hard-to-
reach places.
This tool has a
combination of brush
head and crevice tool,
the brush head slides
down the crevice tool
when needed.
A small cleaner head
with an angled body
housing the motor and
an electrical connector
to attach to the wand or
directly to the machine.
This tool is long and
narrow with an angled
cleaner head.
A small cleaner head
with a red outer casing
that pushes down to
eject pet hair.
A short nozzle with
stiff bristles on the
underside.
A wide, arrow-
shaped tool.
Cleaner head with a
water dispenser and
wet roller head.
A free-standing display
for your vacuum and
three attachments.
A flexible hose
engineered from
tough wire and
durable plastic.
Main body showing the bin and
battery attached.
Main body with a built-in tool for handheld
cleaning and a built-in tool on the end of the
wand for cleaning up high and down low.
With an
elbow joint
fitted between
the bin and
the tool.
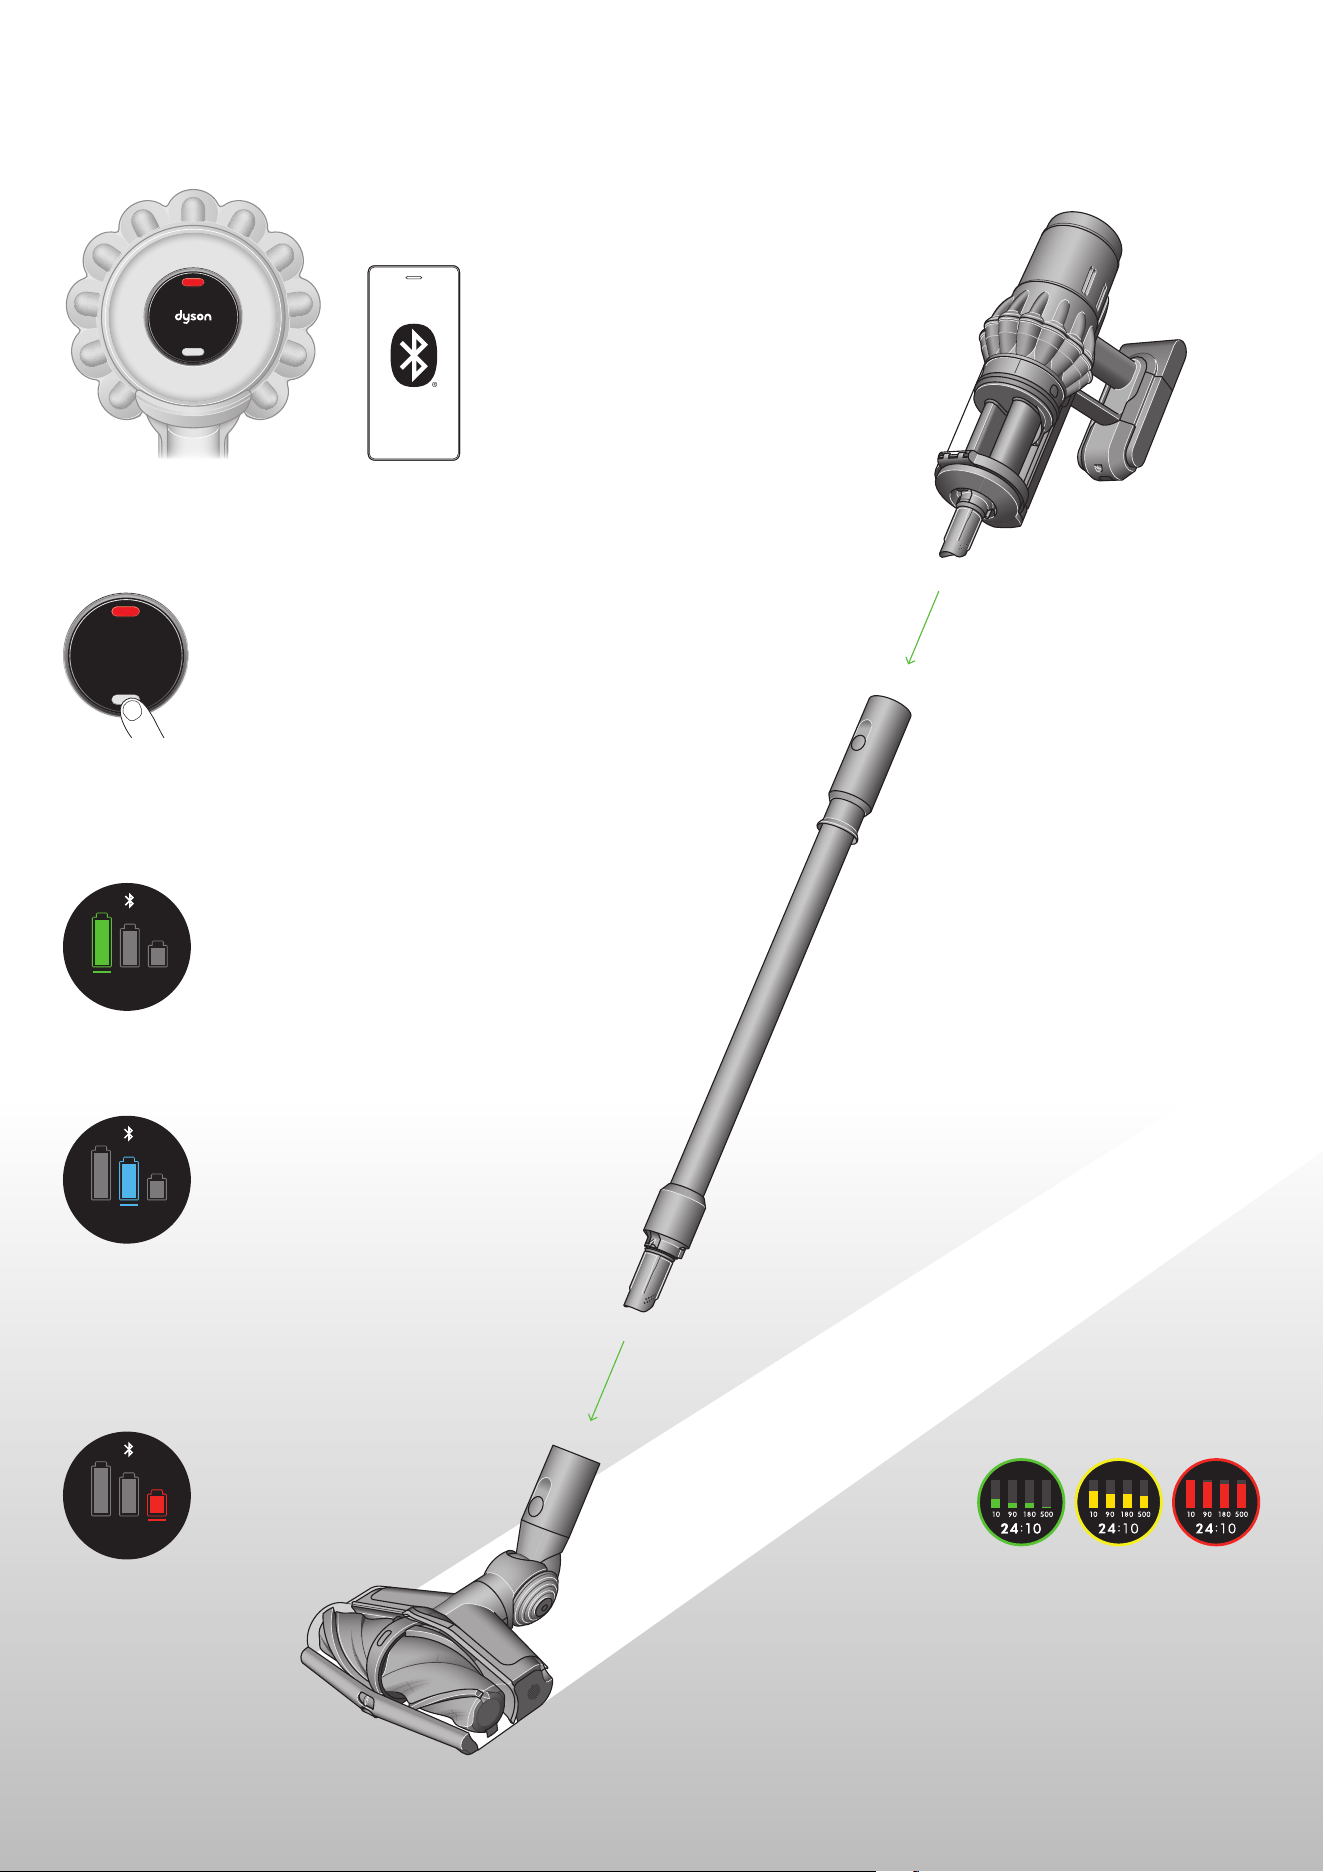
Getting started
Shows you when your floor is clean
A piezo sensor continuously sizes
and counts dust particles. Bars
will rise and fall depending on the
amount of debris and dust detected.
Red indicates high dust, Amber
medium, and Green a relatively
clean area.
Using the LCD screen
Press the red button on the LCD
screen to start the machine.
Connect your machine
Connect using Bluetooth or the QR
code on the box, or LCD on screen.
Power modes
Your machine has three power
modes for different tasks.
Change power modes quickly
using the silver Selection button.
Eco mode
Maximum run time for longer
cleans all around your home.
Auto mode
Auto mode for the optimum
balance of power and run time.
Suction power automatically
ramps up for higher dust levels.
Boost mode
Designed for momentary
intensive spot cleaning of
ground-in dirt.
Remote release
Quickly change tools to switch tasks.
Press the red collar to release easily,
without bending down. For convenient
whole-home cleaning.
Built-in tools
Instant access to built-
in-tools hidden in the
wand, for multi-purpose
cleaning up high or
down low.
Boost
Eco
Auto
The screen showing the machine set to
Eco mode with a full battery in green
to show that this will give the longest
battery life of the three modes.
The screen showing the
machine set to Boost mode with
a red battery to show that this
will give the shortest battery life
of the three modes.
Three screens showing a graph of
the sizing and counting of the dust
particles in Red, Amber and Green.
The screen showing the
machine set to Auto mode with
a blue battery showing that this
will give a medium length of
battery life.
Screen on the filter
end of the machine.
Illustration of a
mobile phone with
a Bluetooth icon.
Bin and battery separate
from the wand with
an arrow pointing to
connect together.
Cleaner head separate
from the wand with
an arrow pointing to
connect the two.
Finger pressing the
selection button on
the screen to move
between power modes.
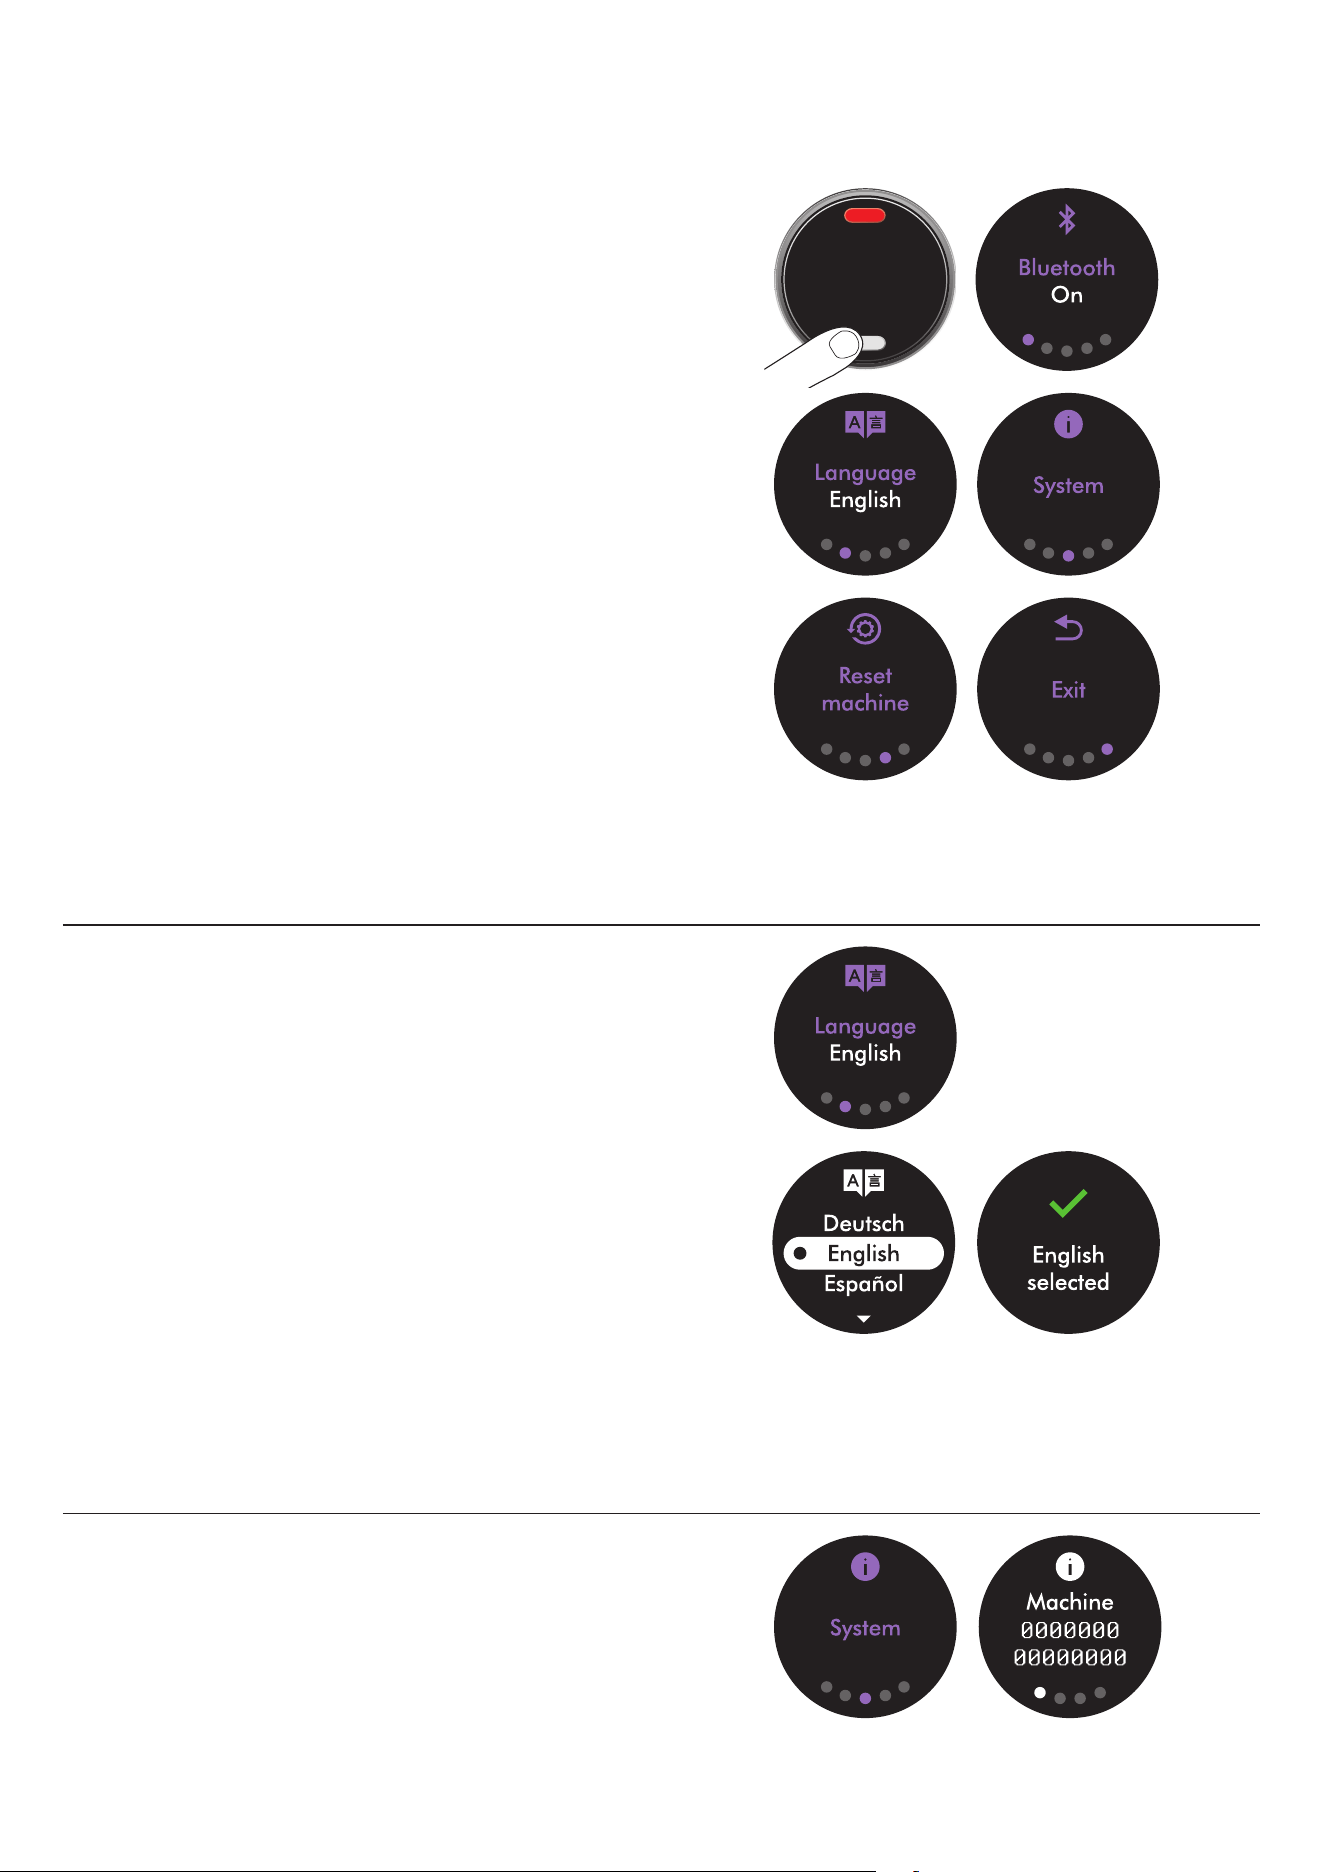
The LCD screen
Settings menu
Control the settings on your machine using the Selection button.
To enter the settings menu, press and hold the button until the
menu screen appears. Press the button to move through the
options within the settings menu.
Hold the button to open an option.
– Bluetooth
®
wireless technology
– Language
– System
– Reset machine
For more information and support for your machine go online:
www.dyson.com/support
The Bluetooth
®
word mark and logos are registered trademarks owned by the
Bluetooth SIG, Inc. and any use of such marks by Dyson is under license.
Change language
To change the language on your screen, press the ‘Selection’ button
and hold it until the language list appears. Release the button.
Tap the ‘Selection’ button to scroll through the language list to your
preferred choice.
Press and hold the button until the countdown ends. A green tick will
appear on the screen to show your language selection is complete.
To cancel your selection, release the button during the countdown.
Find your serial number
You can find your serial numbers in the settings menu.
Press the ‘Selection’ button to move through the settings
sequence until you reach ‘System’.
Press and hold the button to select this option.
The first screen will display your serial number information.
Press the
‘Selection’
button at the
bottom of the
menu screen.
In the settings
menu, the first
screen option
allows you to set
Bluetooth to On
or Off.
Two screens, the first
with the language
list and then the tick
screen to show that the
language has been
successfully changed.
In settings, the
‘Language’
option allows
you to select
your screen’s
language
preference.
In settings, the
second screen
option allows
you to select
your screens
language
preference.
In settings, the
third screen
option allows
you to view
system settings.
In settings, the
fourth screen
option allows
you to reset your
machine.
The Exit menu
screen is the
final options on
settings.
The System
menu screen.
The machine’s
Serial number
menu screen.
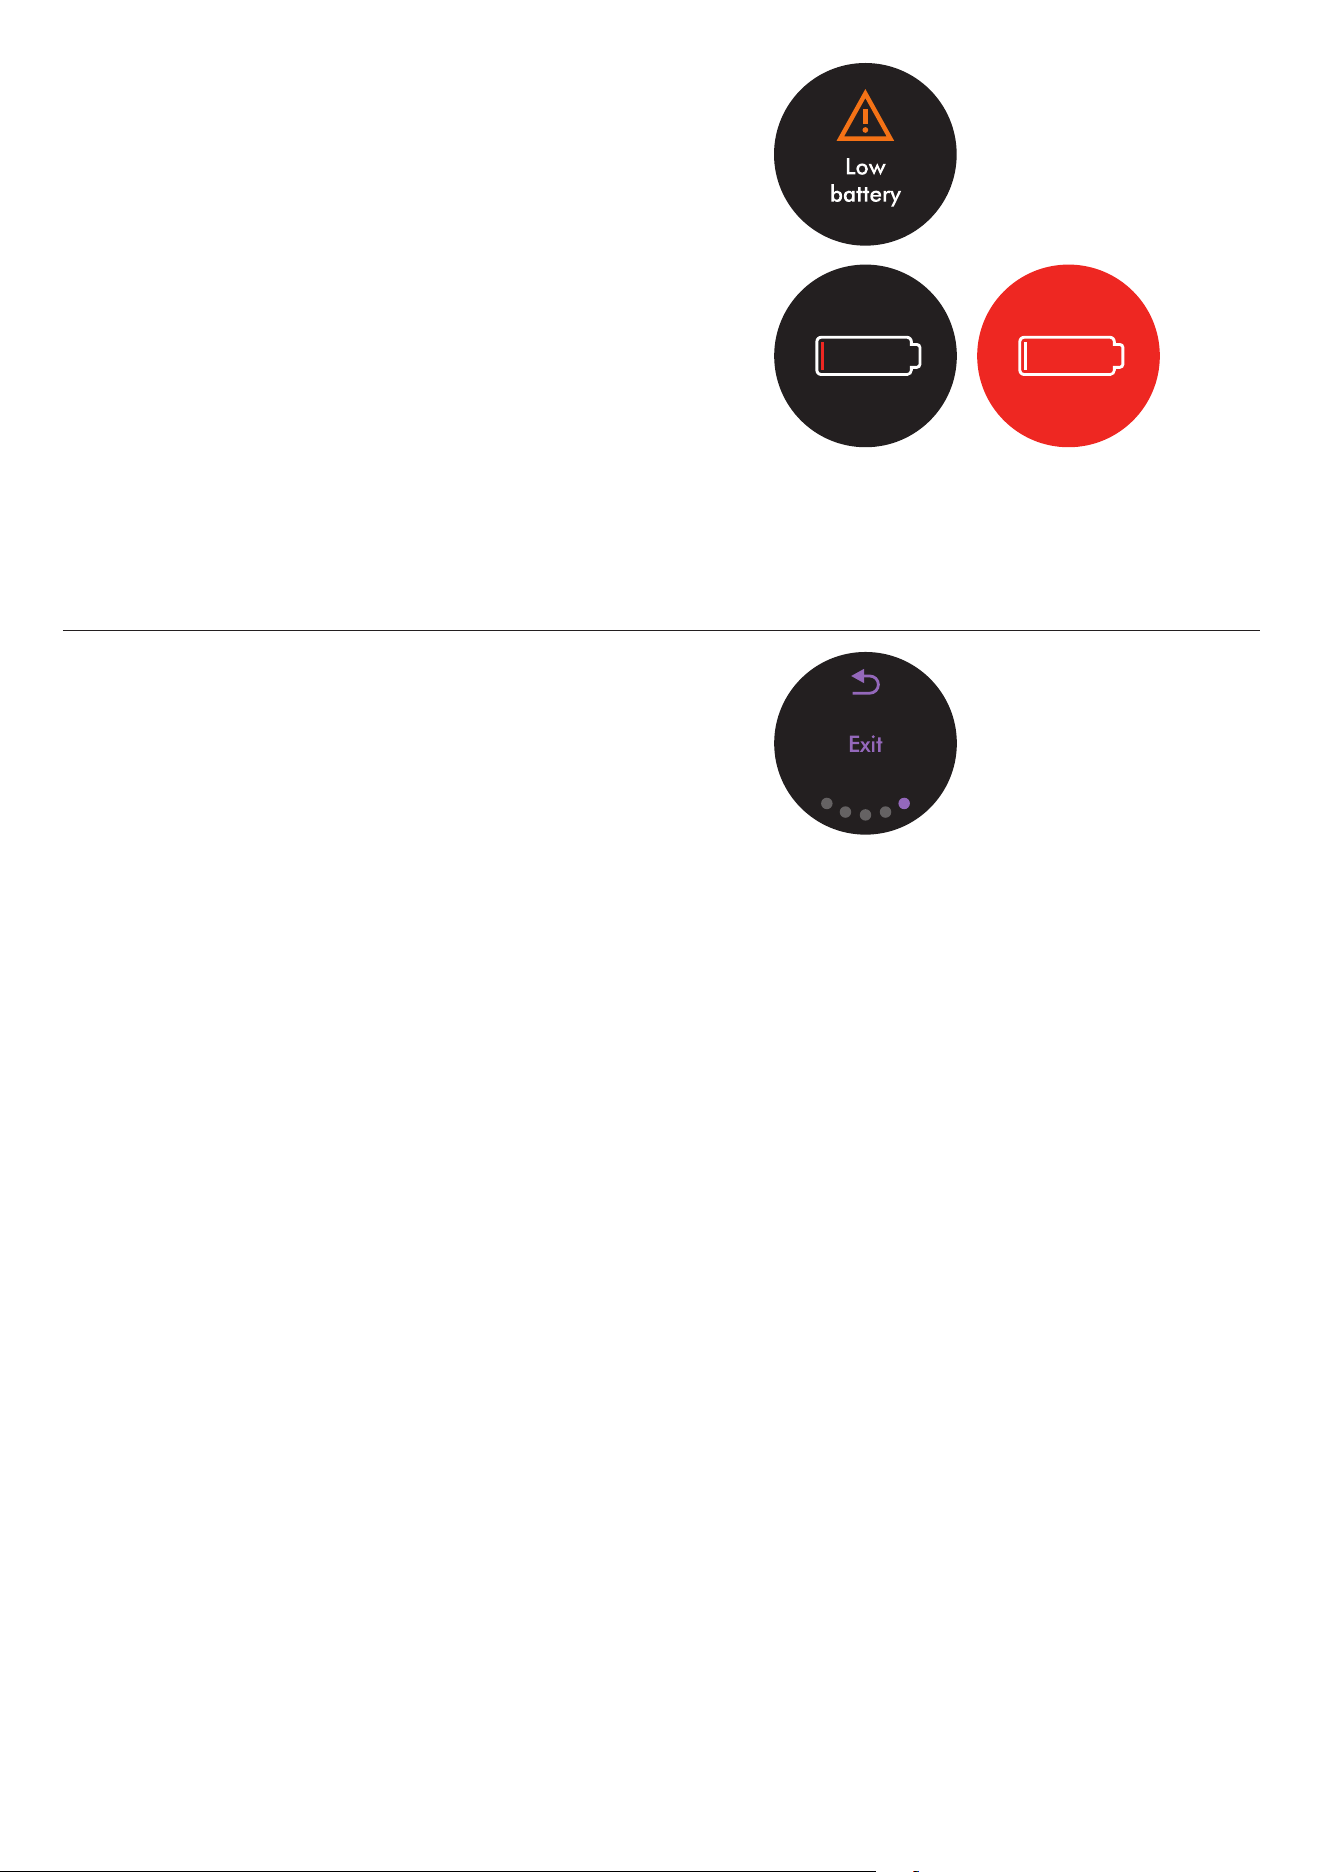
Run time countdown
When the battery needs charging, your machine will pulse three times
and a ‘Low battery’ icon will appear on the screen.
When your battery is empty, a red warning icon will appear on the screen.
Exit settings menu
The screen will
read ‘Low run
time’ surrounded
by an amber circle
when the battery
needs changing.
The red screen
with an icon with
a plug being
connected to the
power supply
demonstrates
the battery is
empty and needs
charging.
The screen reads
‘Low run time’
surrounded by
a red circle if the
battery runs low
while in Boost
mode.
Screen with ‘Exit
menu’ wording
and return icon.
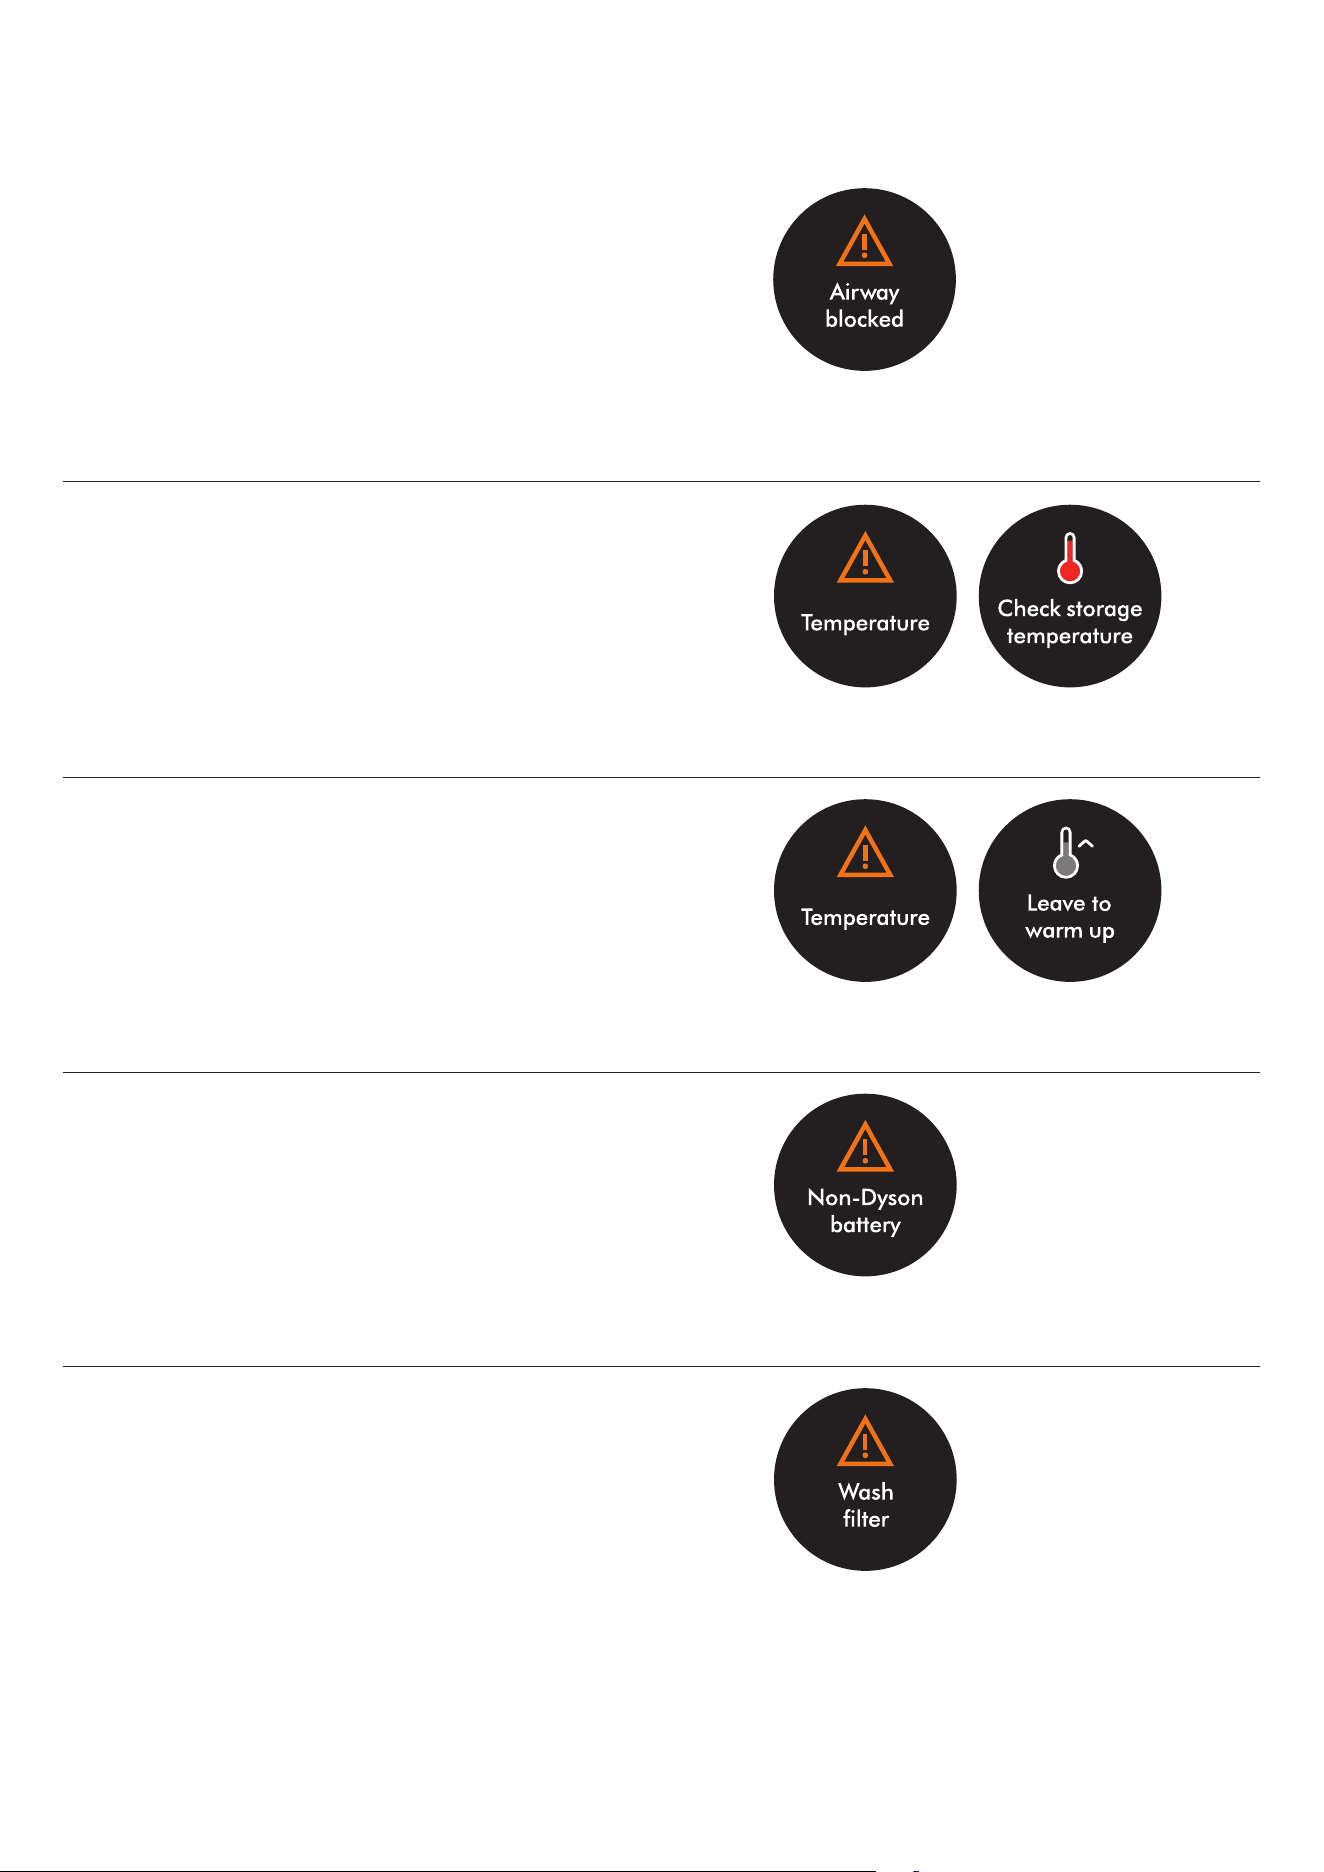
The alerts you might see are:
Airway blockage
Your machine has a blockage that needs removing. Watch the animation
to see which airways to check. Make sure your machine is turned off before
removing a blockage.
High storage temperature
Your machine is being stored in a place where the temperature is too high.
Move your vacuum to a cooler place.
Cold temperature
Your machine is too cold. Move your vacuum into a
warmer environment and leave to warm up.
Non-Dyson battery
A non-Dyson battery has been detected. If you are not aware that you are
using a third party battery for your machine, this may be counterfeit.
Alerts
Clean filter
Your filter needs cleaning. Please refer to ‘Washing your filter’.
Follow the animation to watch how to wash the filter.
After cleaning, leave to dry for at least 24 hours before reattaching
it to your machine.
Alert icon with
‘Airway blocked’
notification.
Alert icon with
‘Temperature’
wording.
Alert icon with
‘Temperature’
wording.
Alert icon with
‘Non-Dyson
battery’ wording.
Alert icon with
‘Leave to warm
up’ wording.
Alert icon with
‘Check storage
temperature’
wording.
Alert icon with
‘Wash filter’
wording.
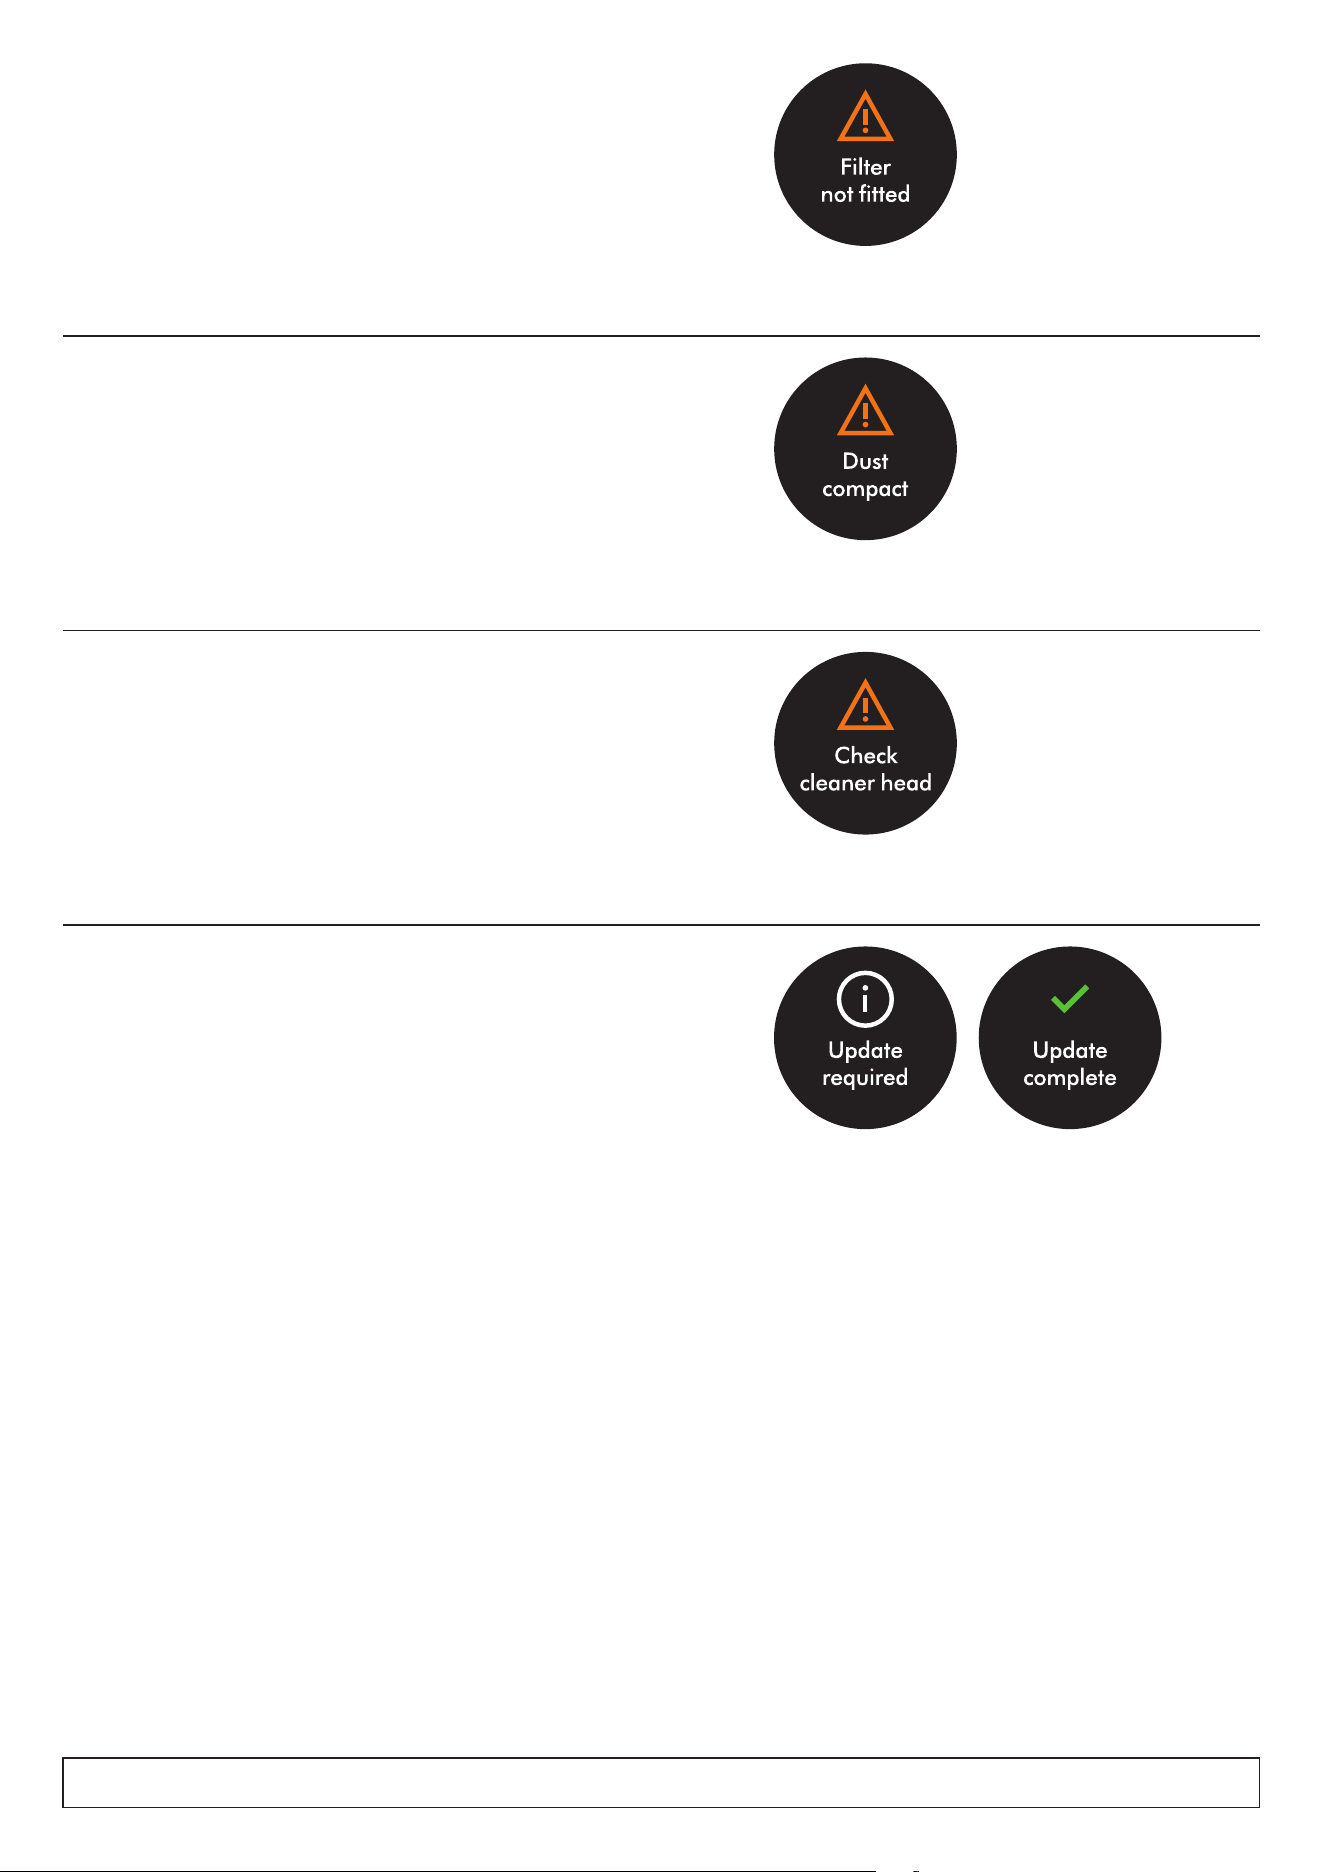
Filter not fitted
Your filter isn’t properly fitted. Twist your filter counter-clockwise and pull it
away from your machine. Reattach to your machine, twisting it clockwise
until it locks into place.
Learn more about your LCD screen. View video on your owner’s page.
CleanCompaktor™ mechanism not fitted
Move back the CleanCompaktor™ compression mechanism back into
position at the top of the bin and ensure the lever is pulled all the way to the
top before it rotates back into the correct position. Restart the machine using
the red power button.
Note that if the lever is rotated or knocked out of place, the motor will cut out.
Update required
Update your machine on the MyDyson™ app to ensure
optimal use with new cleaner head fitted.
Brush bar has stalled
The brush bars or cleaner head may be experiencing a blockage and
therefore stalled. Move the machine off the surface and restart to see if the
stall persists. If so, check for blockages in the airway, and debris build around
the brush bar cones. Remove the outer cover and check for blockages.
The cones can be removed to check for dust or debris, also. Once clear,
refit the cleaner head and restart the machine.
Alert icon with
‘Filter not fitted’
wording.
Alert icon with
‘Dust compact’
wording
Alert icon with
‘Check cleaner
head’ wording.
Alert icon
with ‘Update
required’
wording
Alert icon
with ‘Update
complete’
wording.
Download the MyDyson™ app from the App Store or Google Play.
Open the app and follow the on-screen instructions to create a new account.
Apple, the Apple logo, and Siri are trademarks of Apple Inc. App Store is a service mark of Apple Inc.
Google Play, the Google Play logo, Google Assistant are trademarks of Google LLC.
Download the
M y D y s on™ ap p
Download the MyDyson™ app from the App Store or Google Play.
Open the app and follow the on-screen instructions to create a new account.
Connecting your machine
Scan the QR code on the LCD screen of your machine or find your machine
through the MyDyson™ app.
Hold your mobile device next to your machine. Press the power button to
activate pairing mode.
Once paired, follow the instructions within the app to set your language
and activate your warranty. Setup is now complete.
Getting started on
the MyD yson™ app
Drawing of owner holding their
smart phone with the MyDyson app.
MyDyson app logo
next to the Apple
app store logo and
Google play logo.
Charging your machine
Caring for your floors
Check that the underside of the cleaner head or tool is clean and free from
any objects that may cause damage.
Before vacuuming your flooring, rugs, and carpets, check the manufacturer’s
recommended cleaning instructions.
The brush bar on your machine can damage certain carpet types and floors.
Some carpets will fuzz if a rotating brush bar is used when vacuuming. If this
happens, we recommend vacuuming without the motorized floor tool and
consulting with your flooring manufacturer.
You can use your machine immediately, or charge it partially,
without the need to fully charge before first use.
Connect to the charger, either directly or in the dock.
The blue LEDs on both side of the battery will flash during charging.
When the battery is fully charged, both LEDs will light for five seconds.
Your battery is fully charged when the display shows 100%.
Your machine won’t operate or charge if the ambient temperature is
below 5°C (41°F). This is designed to protect both the motor and battery.
Changing your click-in battery
If you have additional click-in batteries, we recommend that
you alternate the batteries to maintain even performance.
Removing your battery
Press down the release button then detach the battery.
Charge the battery.
Refitting your battery
Align your battery with the handle and slide it in.
Push firmly until it clicks into place.
clik
clik
clik
clik
The battery and bin of the vacuum is
on charge at the Wall Dok.
The charger connected from
the power supply directly
into the front of the battery.
Icon of a battery with ‘100%’
labeled underneath in a circle.
Bin of vacuum is being shown how
to separate from battery unit.
Bin of vacuum is being shown how
to connect with the battery unit and
click into place.
MAX
MAX
clik
Minimize dust contact
Cover your bin tightly in a dustproof bag while you empty. Press the silver
button to open the bin base. Remove your bin carefully and seal the bag
tightly and dispose.
Empty as soon as the dirt reaches the MAX level – don’t overfill. Using your
machine when the dirt is above the MAX line may affect the performance
and require more frequent filter washing.
Overfilling your bin could result in inaccurate readings on the particle graph.
Make sure your machine power is turned off before removing your wand or
releasing the bin.
Emptying your bin
Release the dirt
First compress the contents of the bin then hold the machine over the bin,
pointing downwards.
Push the silver bin release lever to open bin base.
Then firmly push the red compression lever. The bin will slide down,
cleaning the inside of the bin as it goes.
The bin base won’t open if the silver bin release lever isn’t pushed down
all the way.
Close the bin
Push the bin base upwards until your bin and bin base click into place.
Remove your wand
Press the red wand release button on the top of the wand and pull the wand
away from the bin.
Compressing dust
To compress dust, push the red compression lever down then move back up
to its original position. The machine power will cut out when you compress.
MAX
MAX
clik
MAX
MAX
clik
MAX
MAX
clik
Diagram of the lid
open after emptying
with an arrow and
a ‘Click’ sound to
demonstrate how
to close.
Diagram of bin
lid opening.
Diagram of
bin emptying.
Diagram of contents
reaching the ‘MAX’ line
in the bin.
Image of owner compressing the dust in
the bin with the Dyson CleanCompaktor.
Image of owner pulling the
CleanCompaktor back.
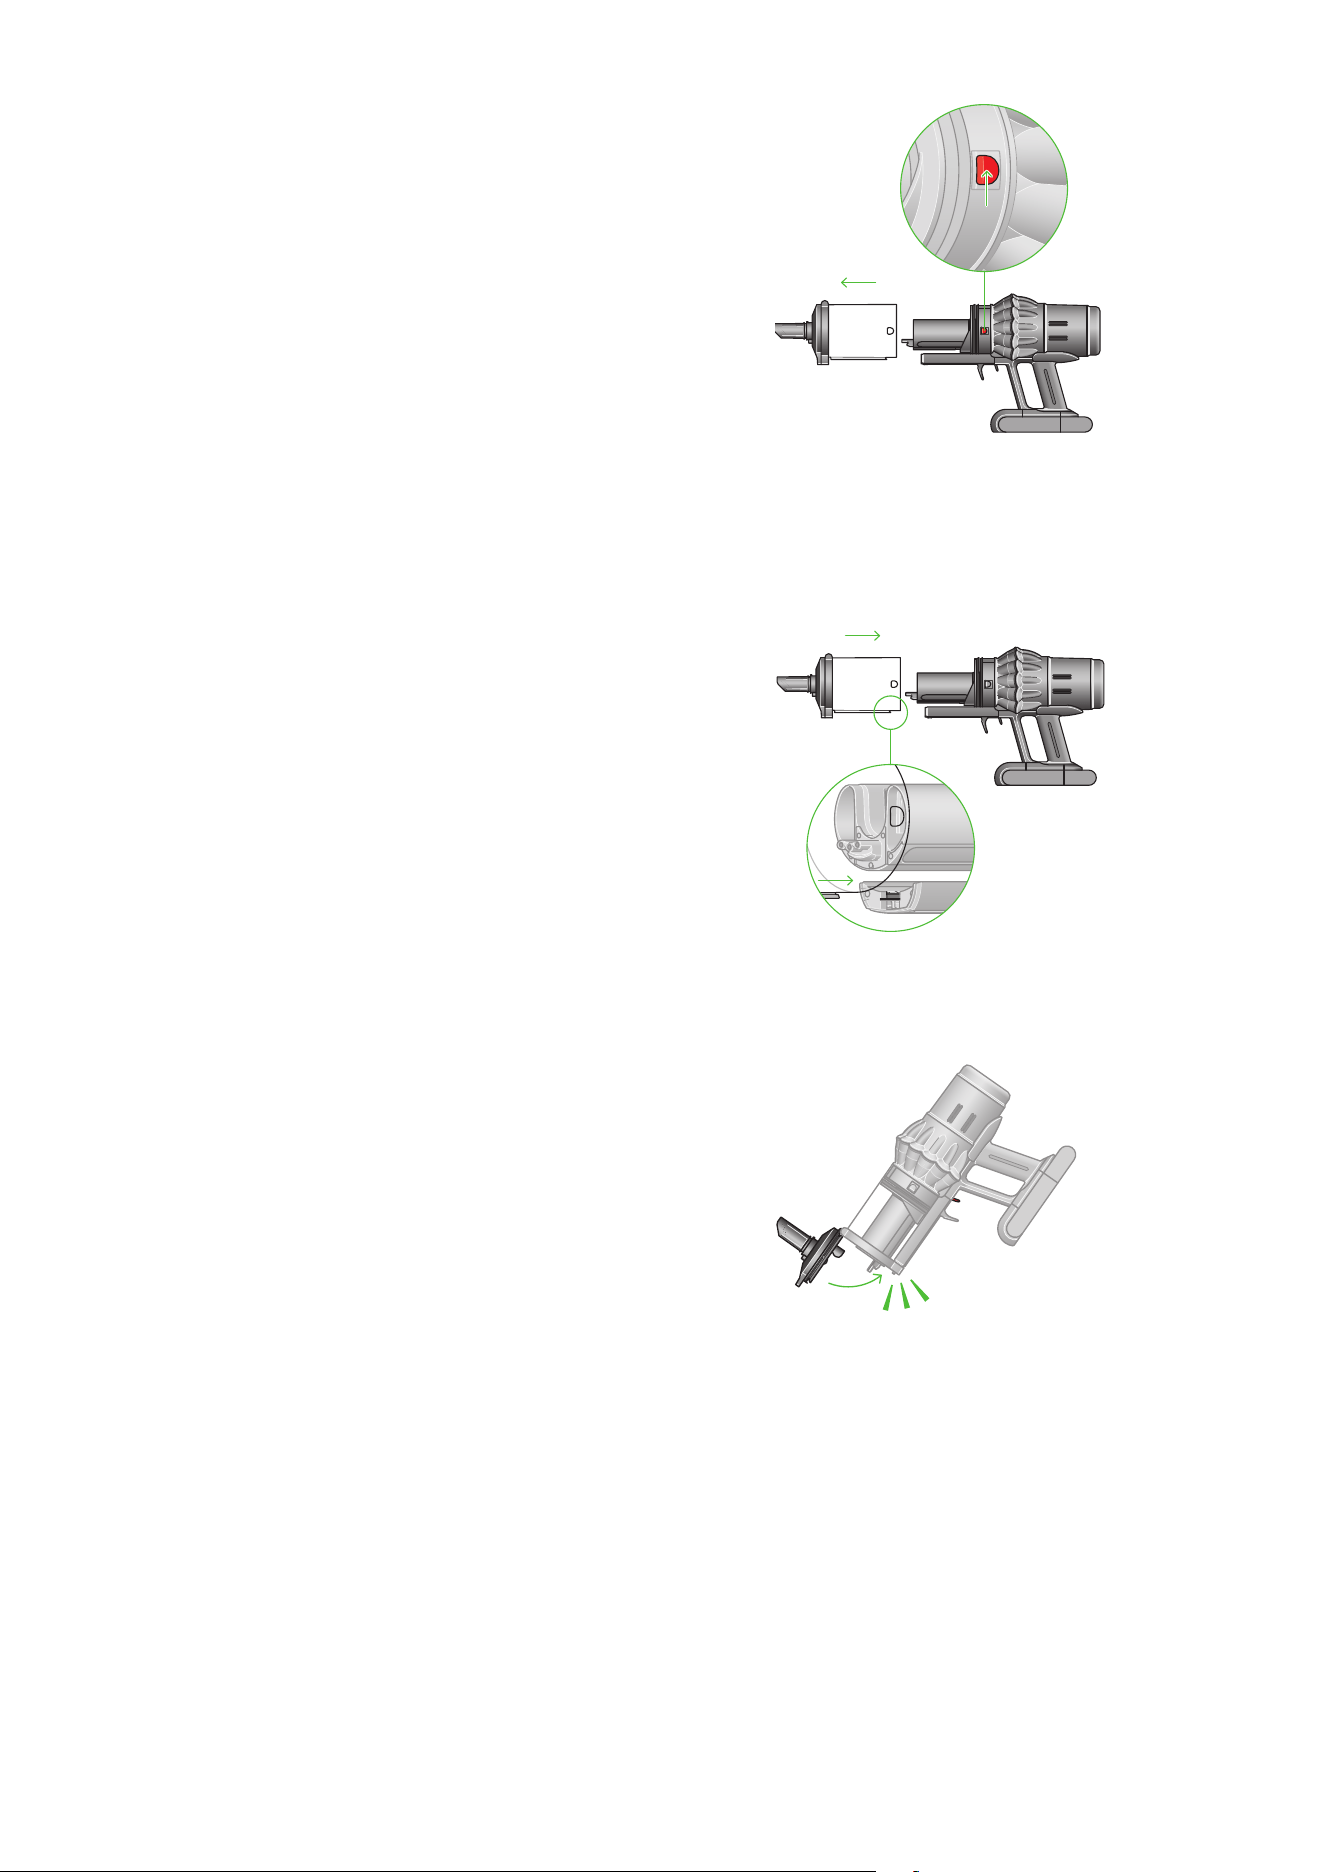
Cleaning your bin
Remove your bin
Open the bin base first then press the buttons located on either side of the
bin to release the bin and slide off the runner.
Refit your bin
Insert the spine on to the bin runner.
Close the bin by pushing the bin base upwards until the bin and bin base
click into place.
MAX
MAX
clik
Bin being removed off
the runner.
The bin being pushed
back into position on
the bin runner.
Diagram of the lid
open after emptying
with an arrow and
a ‘Click’ sound to
demonstrate how
to close.
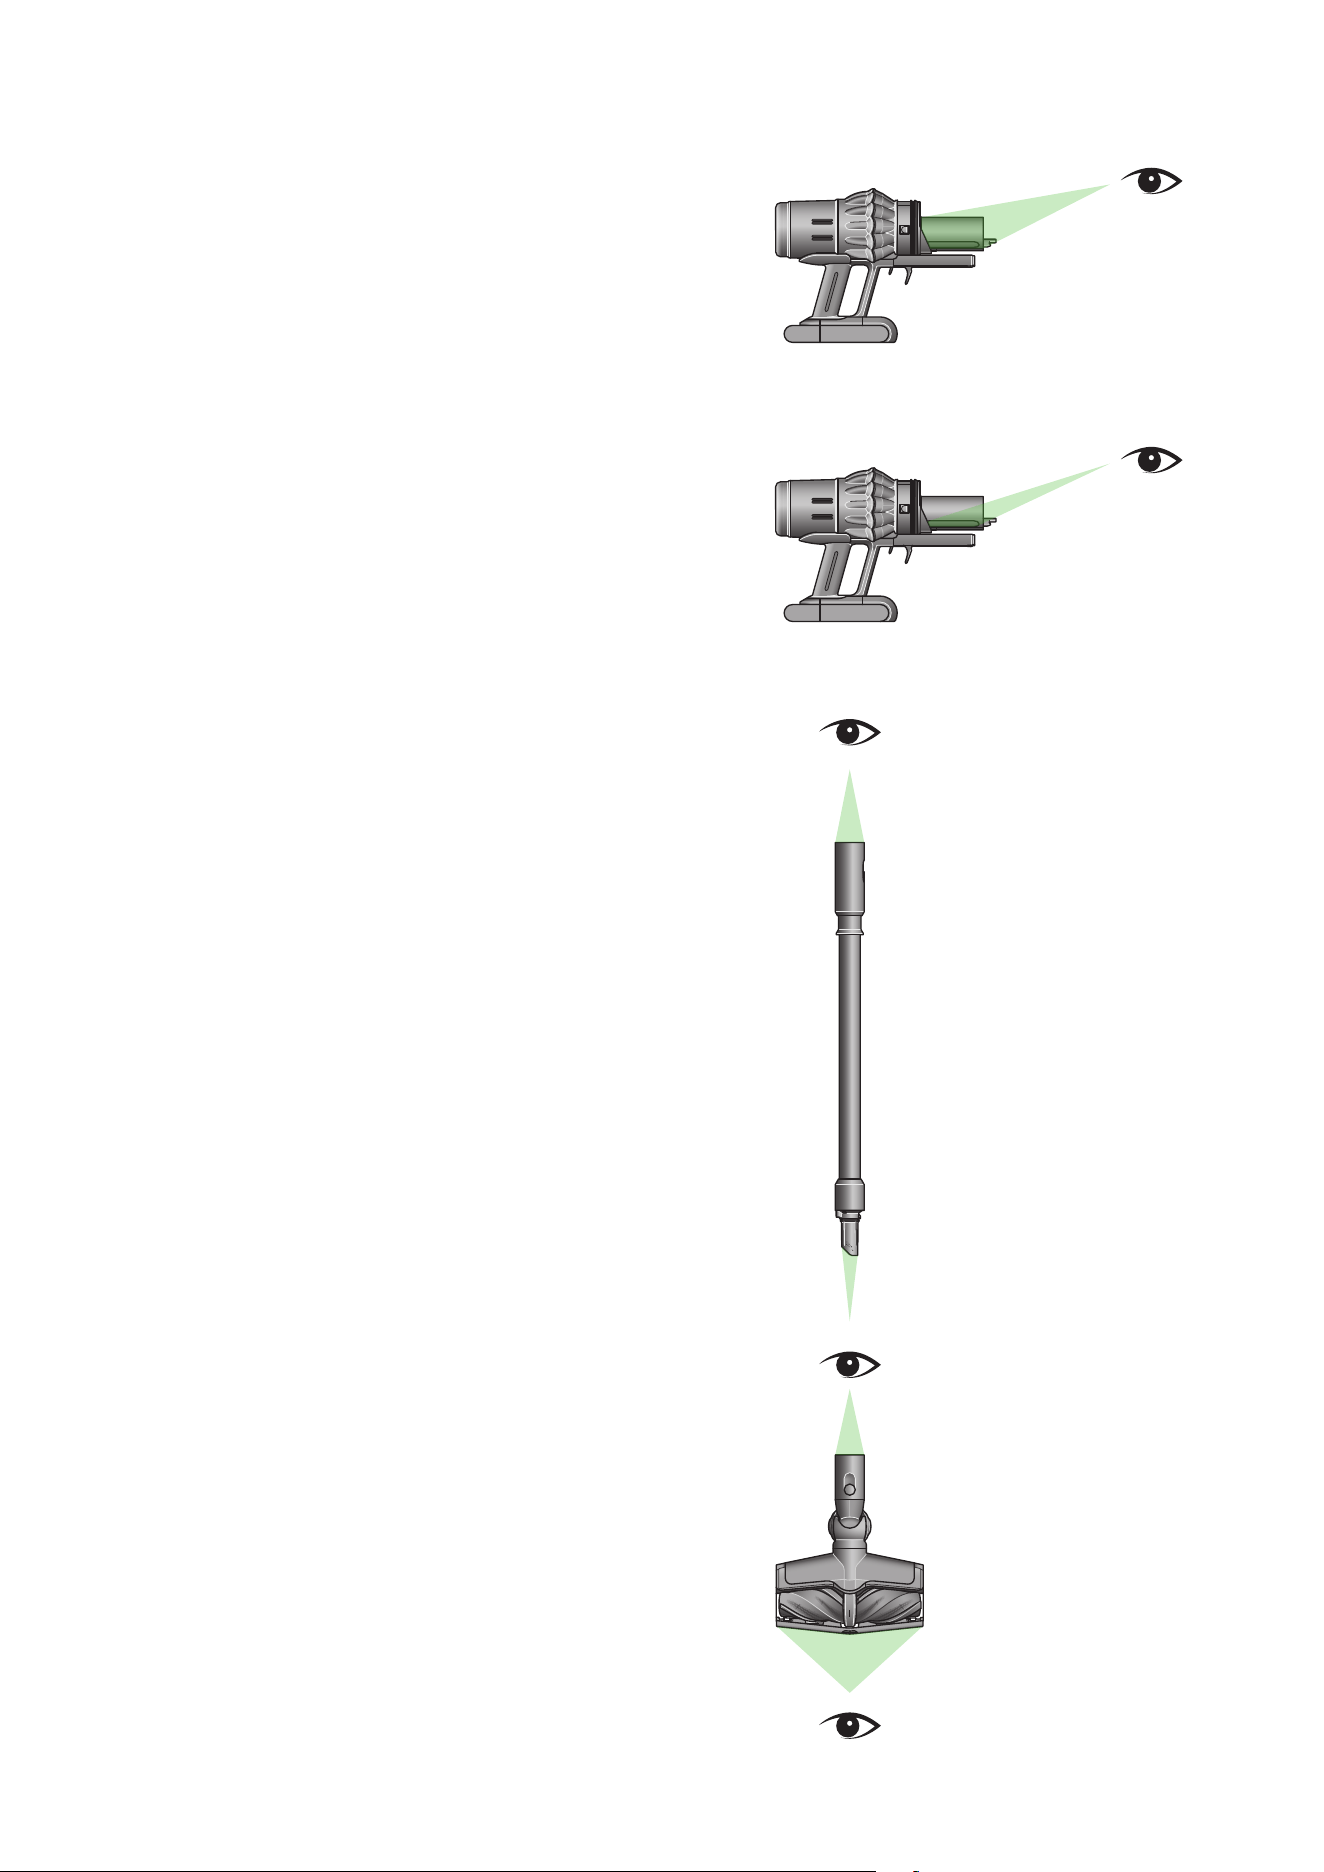
Clearing blockages
Check the main body
Remove the bin and check for blockages in the main body of your machine
Make sure any blockages are completely cleared and all parts are fitted
before using your machine.
Check the wand and cleaner head
Check the wand for blockages.
Check your cleaner head for blockages, following the instructions to remove
the brush bar, where necessary.
Re-assemble your machine
Refit all parts securely before using your machine.
Clearing blockages isn’t covered by your warranty.
Disconnect your machine from the charger before looking for blockages.
Make sure your machine power is turned off and be aware of sharp objects.
Leave your machine to cool down before looking for blockages.
Don’t use your machine when looking for blockages as this could cause injury.
If your machine detects a blockage, the motor will pulse and you won’t be able
to use your machine until the blockage has been cleared.
If you try to use your machine when the motor is pulsing,
it will automatically cut out.
Diagram of the
owner’s eye looking
through the wand.
Diagram of the
owner’s eye looking
through and over the
cleaner head.
Diagram of the wand
removed from the
machine, being checked
for blockages at both
ends of the wand.
Diagram of the cleaner
head being checked
over to check for
obstructions on the
brush bar and air intel.
Diagram of the owner’s
eye looking at the bin
and searching for
blockages.
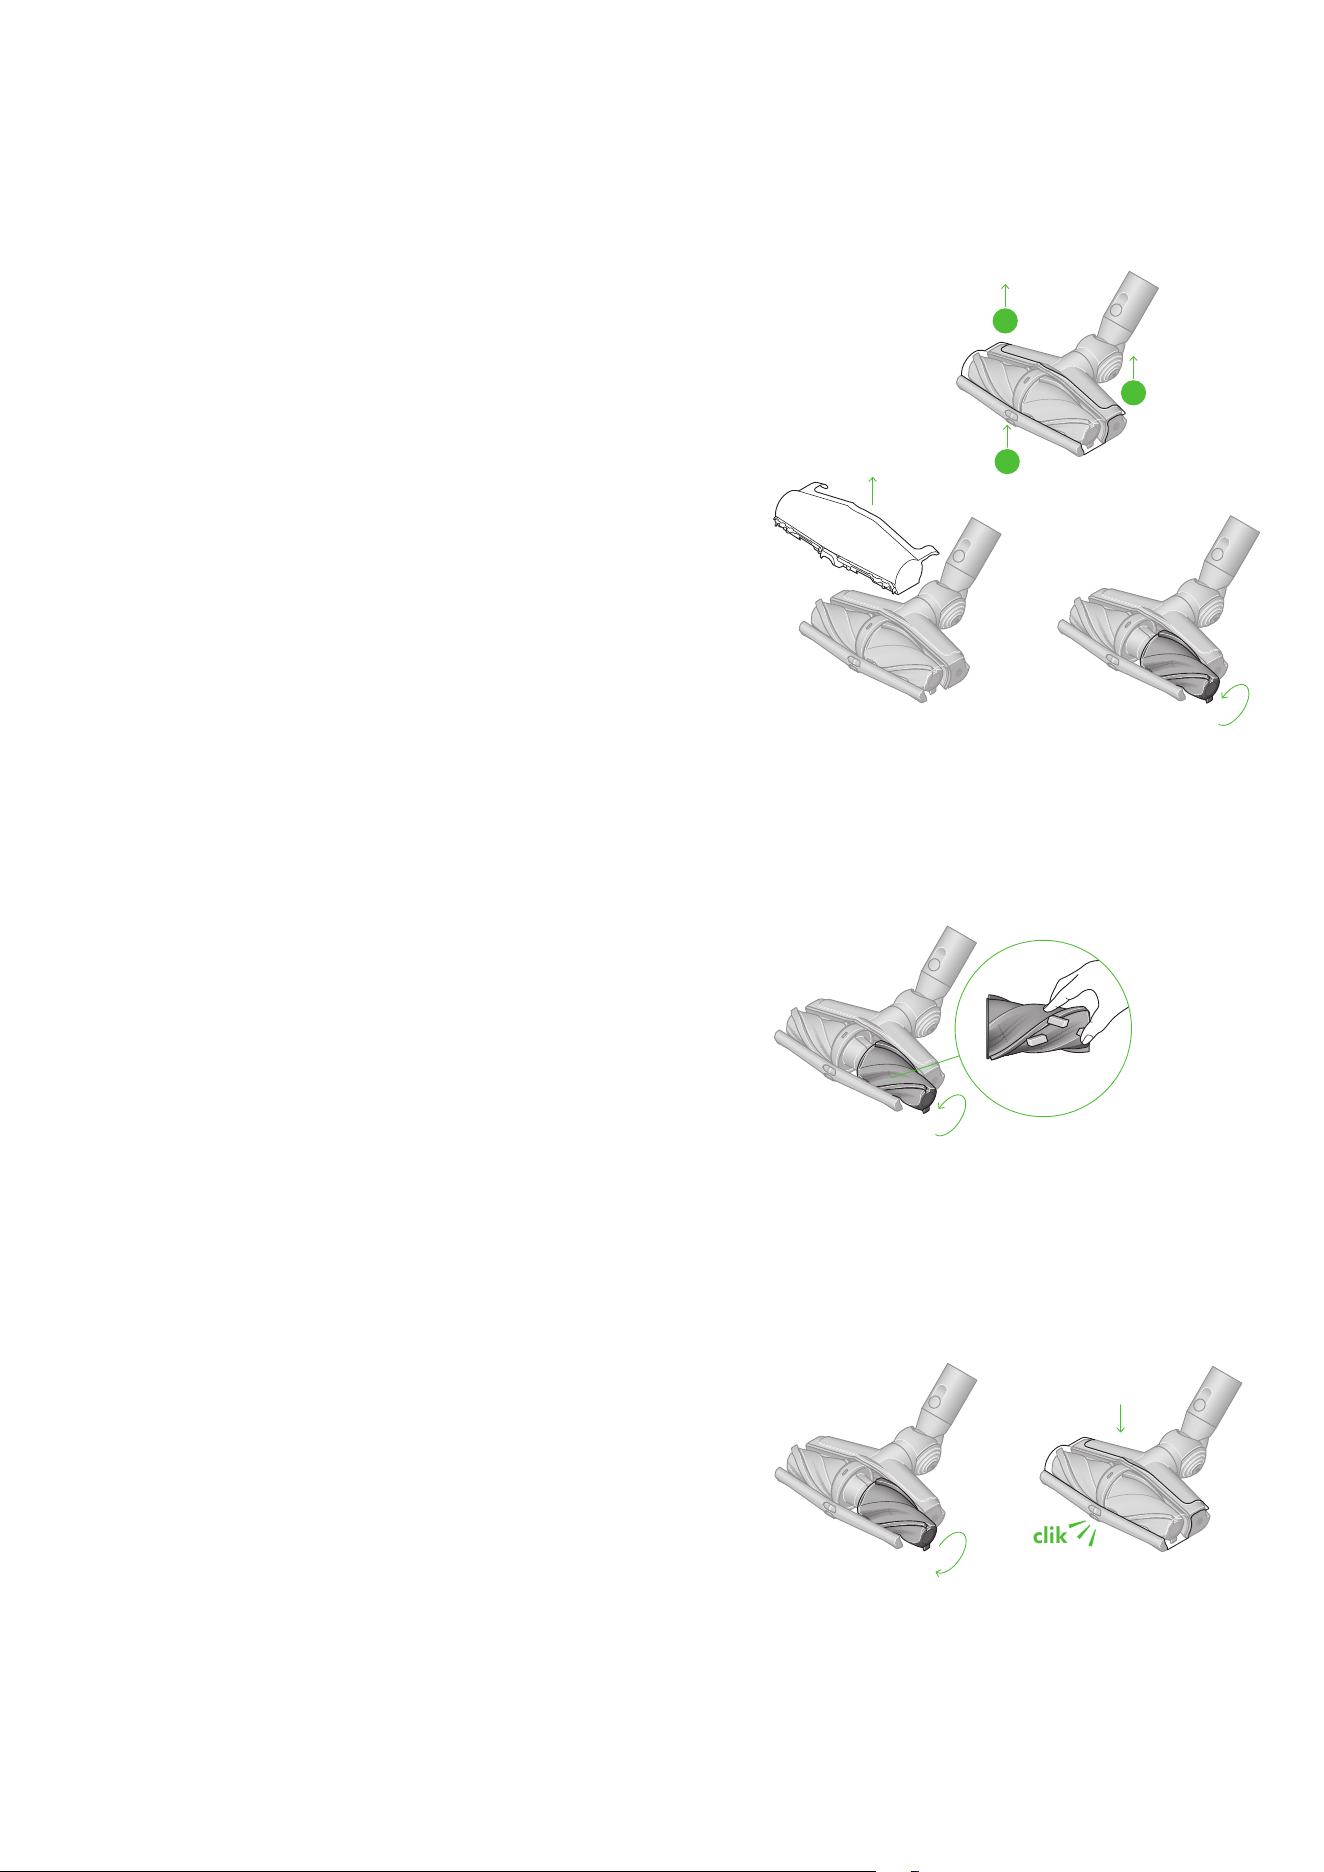
Remove the cover and brush bars
Lift the plastic clips at the back of the cleaner head on the left and
right to release the cover.
Twist and pull each brush bar to remove.
Look for obstructions
Clear any debris from your brush bar.
Check inside the cleaner head and remove any debris or blockages.
Your All Floor Cones™ Sense cleaner head and brush bar aren’t washable.
Wipe over with a damp lint-free cloth.
Clearing obstructions from your
All Floor Cones™ Sense cleaner head
Your All Floor Cones™ Sense cleaner head doesn’t have a washable
brush bar. To maintain optimum performance, check your brush bars
regularly and clear obstructions.
Make sure your machine is disconnected from the charger and your
machine power is turned off.
Don’t put any part of your machine in a dishwasher or use detergents,
polishes or air fresheners.
Re-assemble the All Floor Cones™ Sense cleaner head
Reattach each brush bar by matching the color of the plastic fitting
on the cone to the same color of the cleaner head.
Refit the cover by gently slotting back into place and snap the clips
back into place.
1
1
2
1
1
2
clik
1
1
2
clik
1
1
2
clik
1
1
2
clik
1
1
2
clik
Diagram of owner
removing the brush bar to
check for any blockages.
The plastic fitting being
screwed back onto the
brush bar.
Plastic cover clicked
back in place.
Diagram of the
plastic cover
with numbers
indicating to first
lift the plastic
clips then release
the cover.
Diagram showing
plastic cover being
removed.
Diagram showing
a brush bar being
twisted to remove.
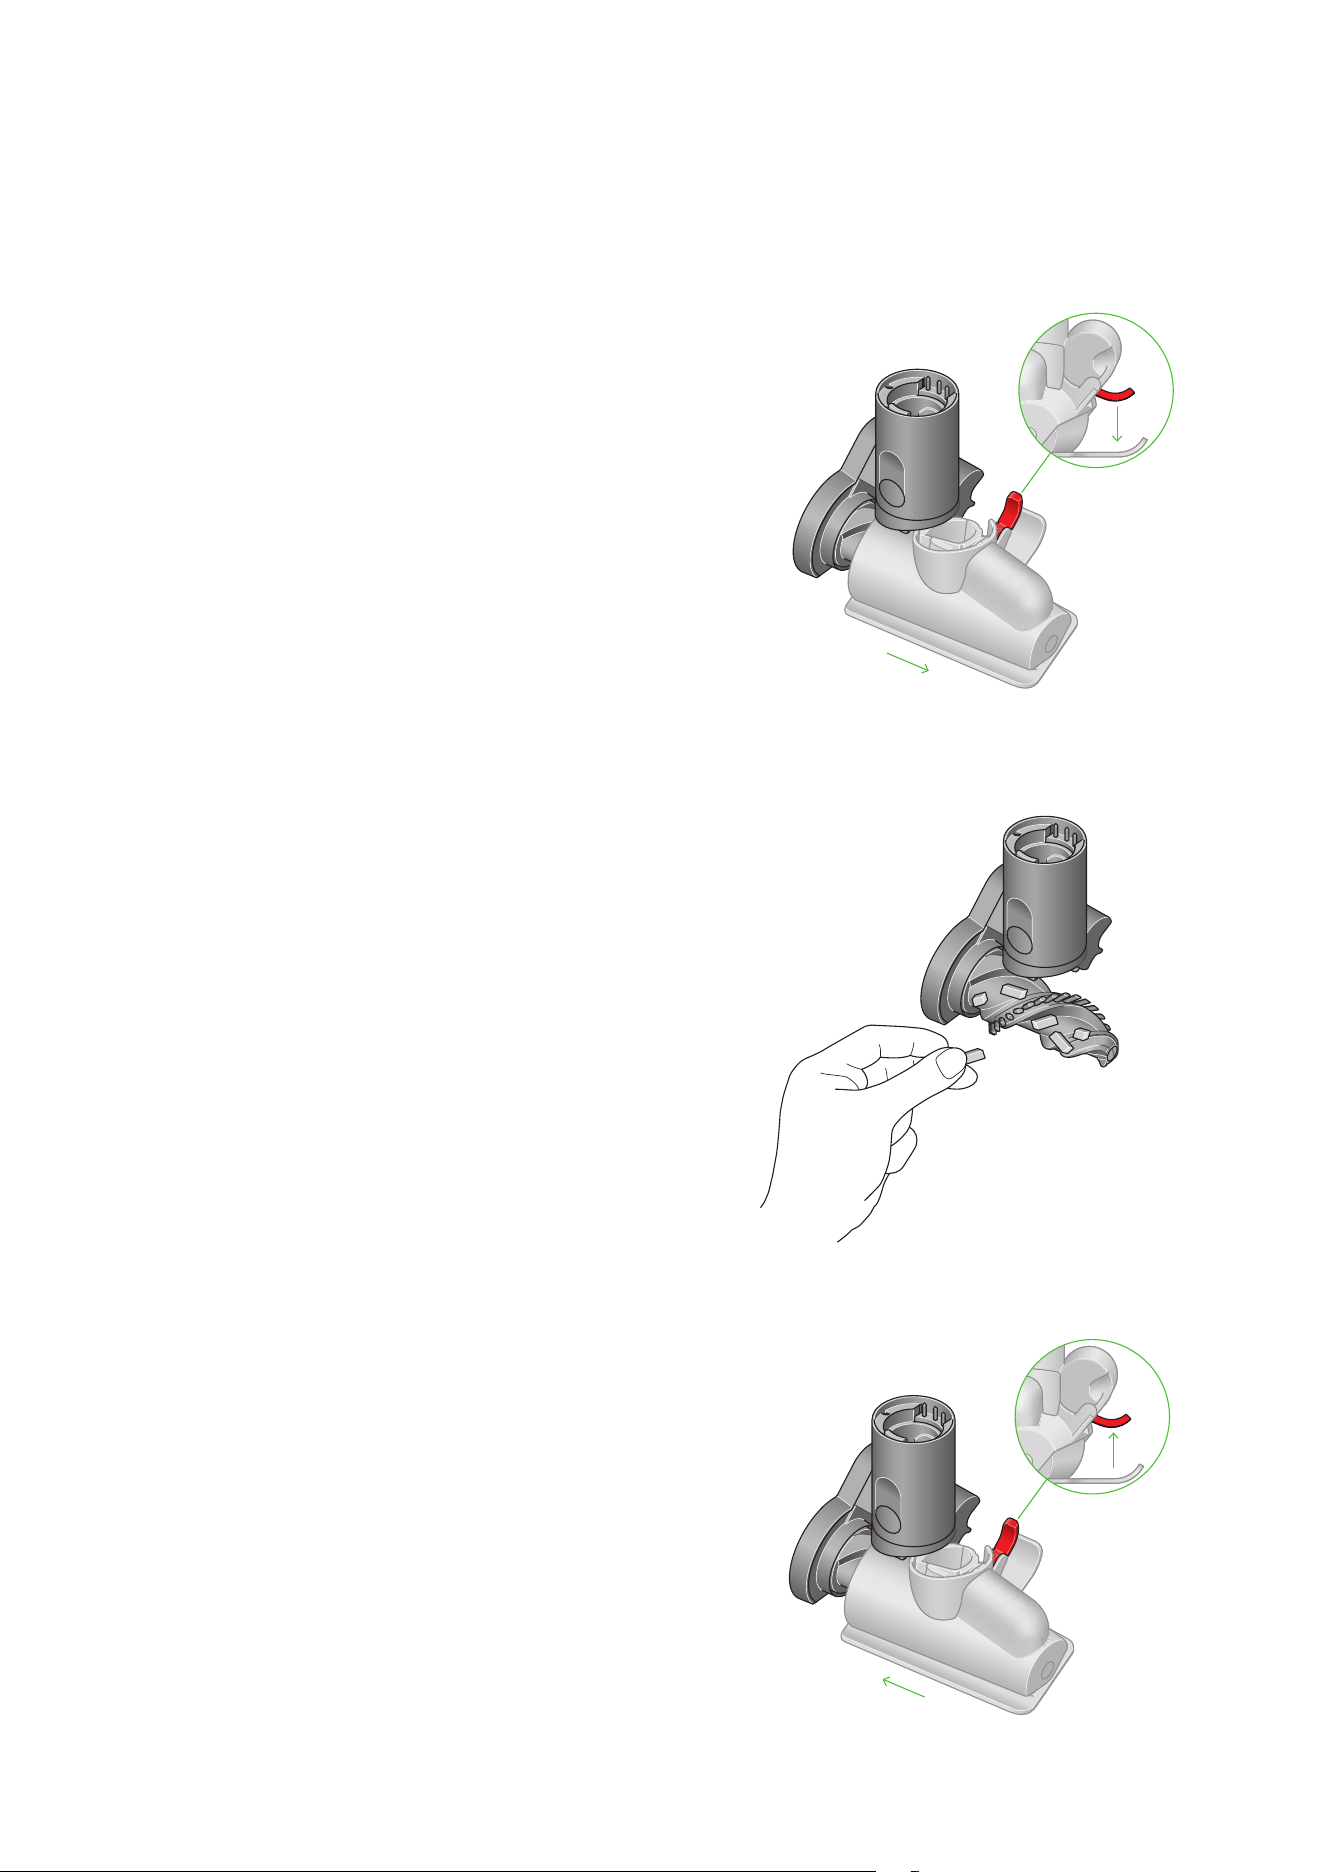
Remove the cover and brush bars
Remove the Hair screw tool 2.0 from the wand or machine.
Push the base plate open. Press the red lever down to release the
cleaner head cover.
Pull the cleaner head cover off the main body of the tool.
Clearing blockages from
your Hair screw tool 2.0
Your Hair screw tool 2.0 doesn’t have a washable brush bar.
To maintain optimum performance, check your brush bar regularly
and clear any obstructions.
Make sure your machine is disconnected from the charger and your
machine power is turned off.
Don’t put any part of your machine in the dishwasher or use detergents,
polishes or air fresheners.
Look for obstructions
Pull your brush bar firmly to remove it from the main body.
Check and remove any obstructions from all three parts of your
Hair screw tool.
Your Hair screw tool 2.0 isn’t washable. Wipe over with a damp
lint-free cloth.
Re-assemble the Hair screw tool 2.0
Put your brush bar back into position and press firmly until it clicks back
into position.
Check the red locking lever is in the unlocked position. Align the cleaner
head cover with the guide on the main body. Push it down until it clicks
into position.
Push the red locking lever up until it clicks into position and push the base
plate back into place.
Slide the housing
back on to the
brush bar and
push the lever on
the back of the
Hair screw tool
upwards to lock.
Diagram of
owner removing
obstruction from
Hair screw tool 2.0.
Diagram of plastic
fitting being
removed from Hair
screw tool 2.0.
The lever to release
the brush bar is
located at the back
of the Hair screw
tool 2.0.
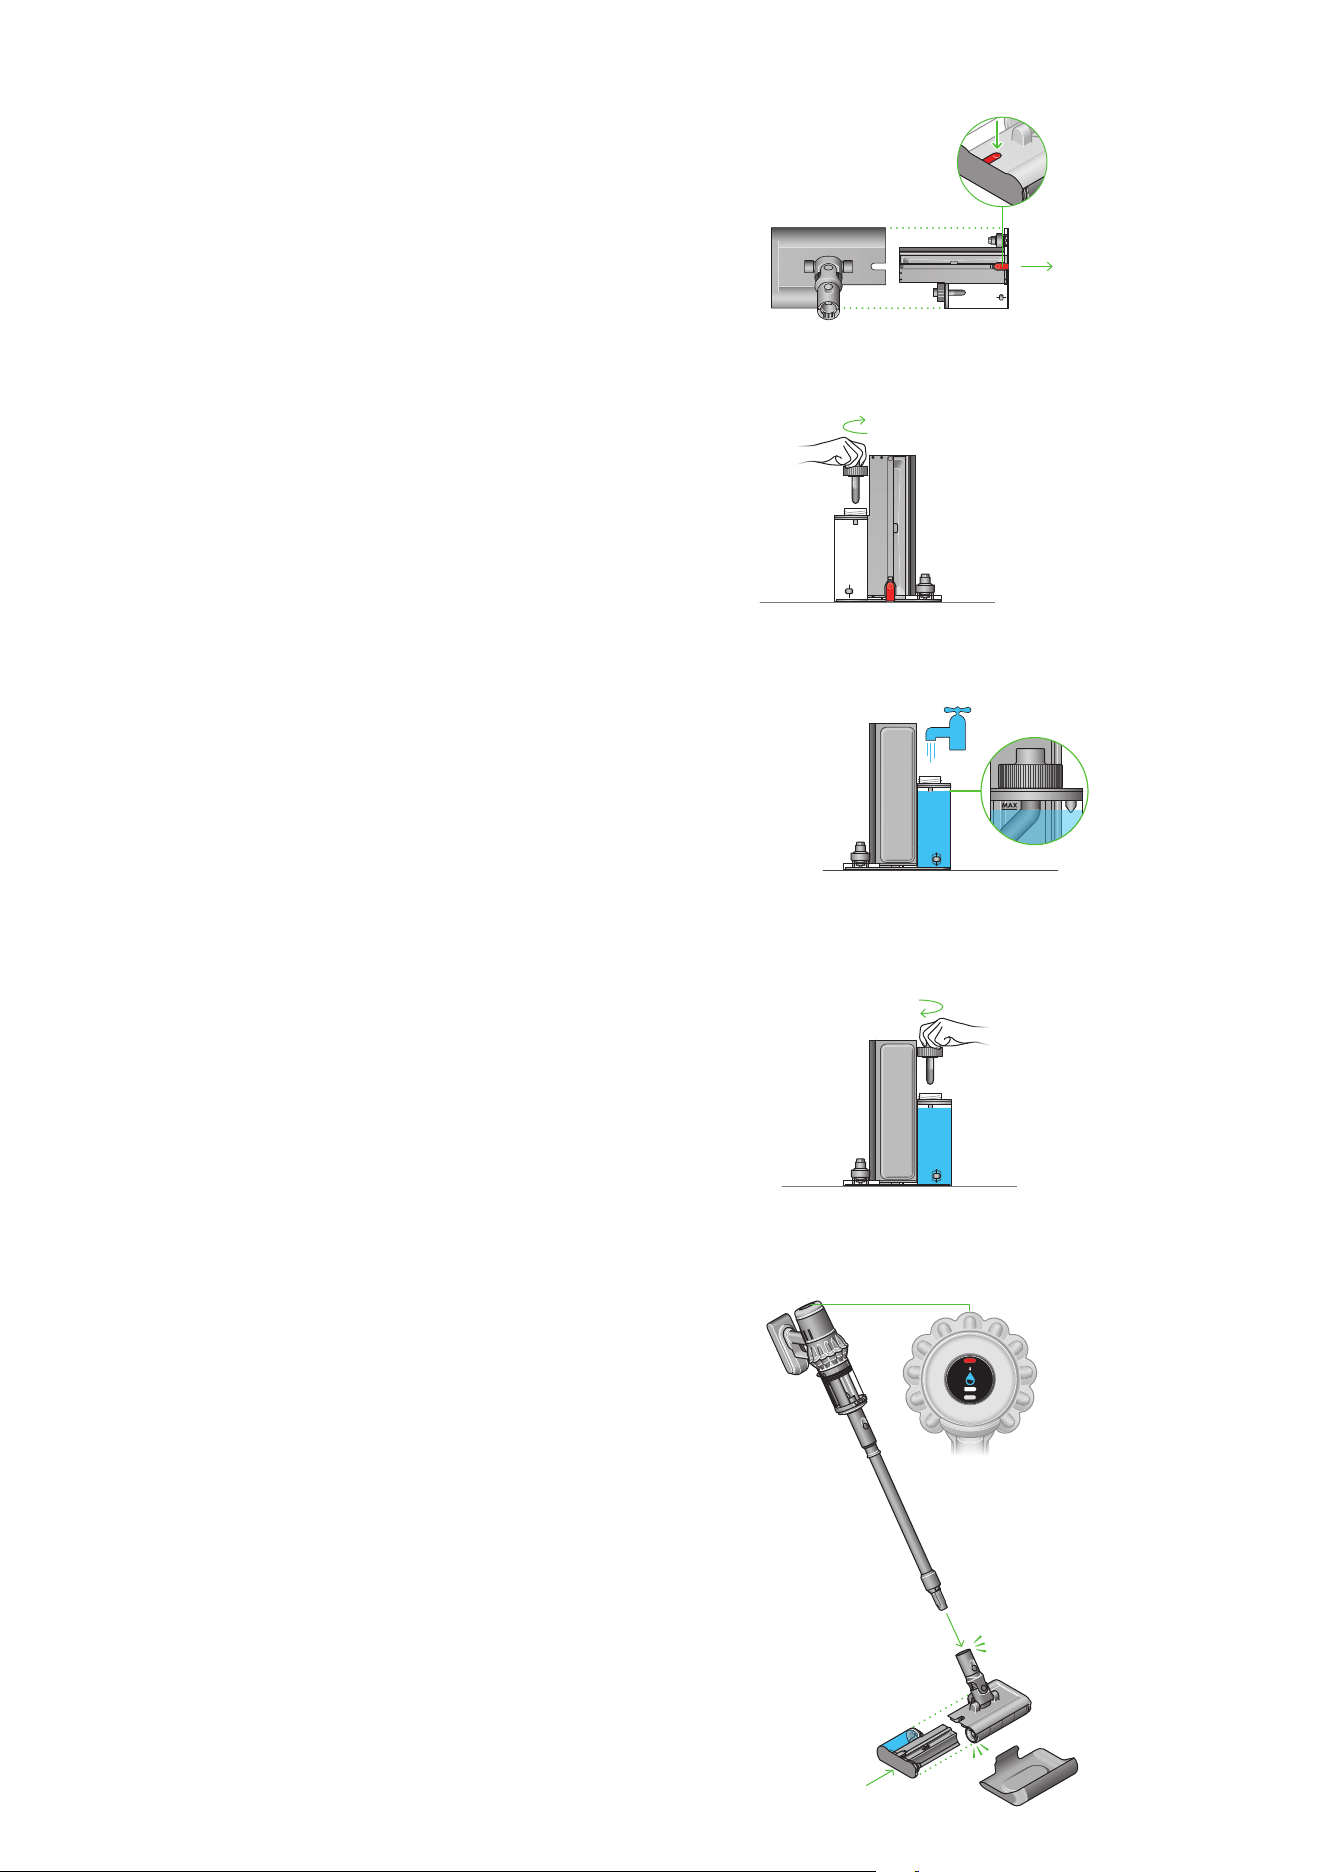
How to use your Dyson
Submarine™ 2.0 wet roller head
clik
clik
50%
Step 1
Hold the wet roller head on the edges, press the red Quick-release button
and slide out the removable cassette from the main roller head.
Step 2
Remove the cap on the water reservoir.
Step 3
Fill the water reservoir with clean water to the ‘MAX’ line.
Step 4
Fit the cap securely on the water reservoir.
Step 5
Slide the waste extraction tray and water reservoir back into the main
roller head until you hear a click. Attach the main wet roller head to your
vacuum’s wand.
Remaining battery life will be displayed as a percentage on your LCD screen.
You can wet clean until the water in the water reservoir is running low or until
the battery runs out. To continue cleaning, simply empty the waste extraction
tray, refill your water reservoir, and resume cleaning.
Do not wet clean with an empty water reservoir to prevent
the motor overheating.
clik
clik
50%
clik
clik
50%
clik
clik
50%
clik
clik
50%
A close-up
detail shows
the red quick-
release button
on the main
roller head.
A close-up
detail of the
LCD screen
with the battery
level indicator.
A hand removes the cap
from the water reservoir with
a counter-clockwise icon.
The water reservoir
is being filled with
tap water.
A hand replaces the
cap on the water
reservoir with a
clockwise icon.
Arrows show the
wand moving towards
the wet roller head
with a click icon.
Arrows show the waste
extraction tray and
water reservoir sliding
towards the main roller
head with a click icon.
Top down image of the water
reservoir with an arrow as it slides
apart from the main roller head.
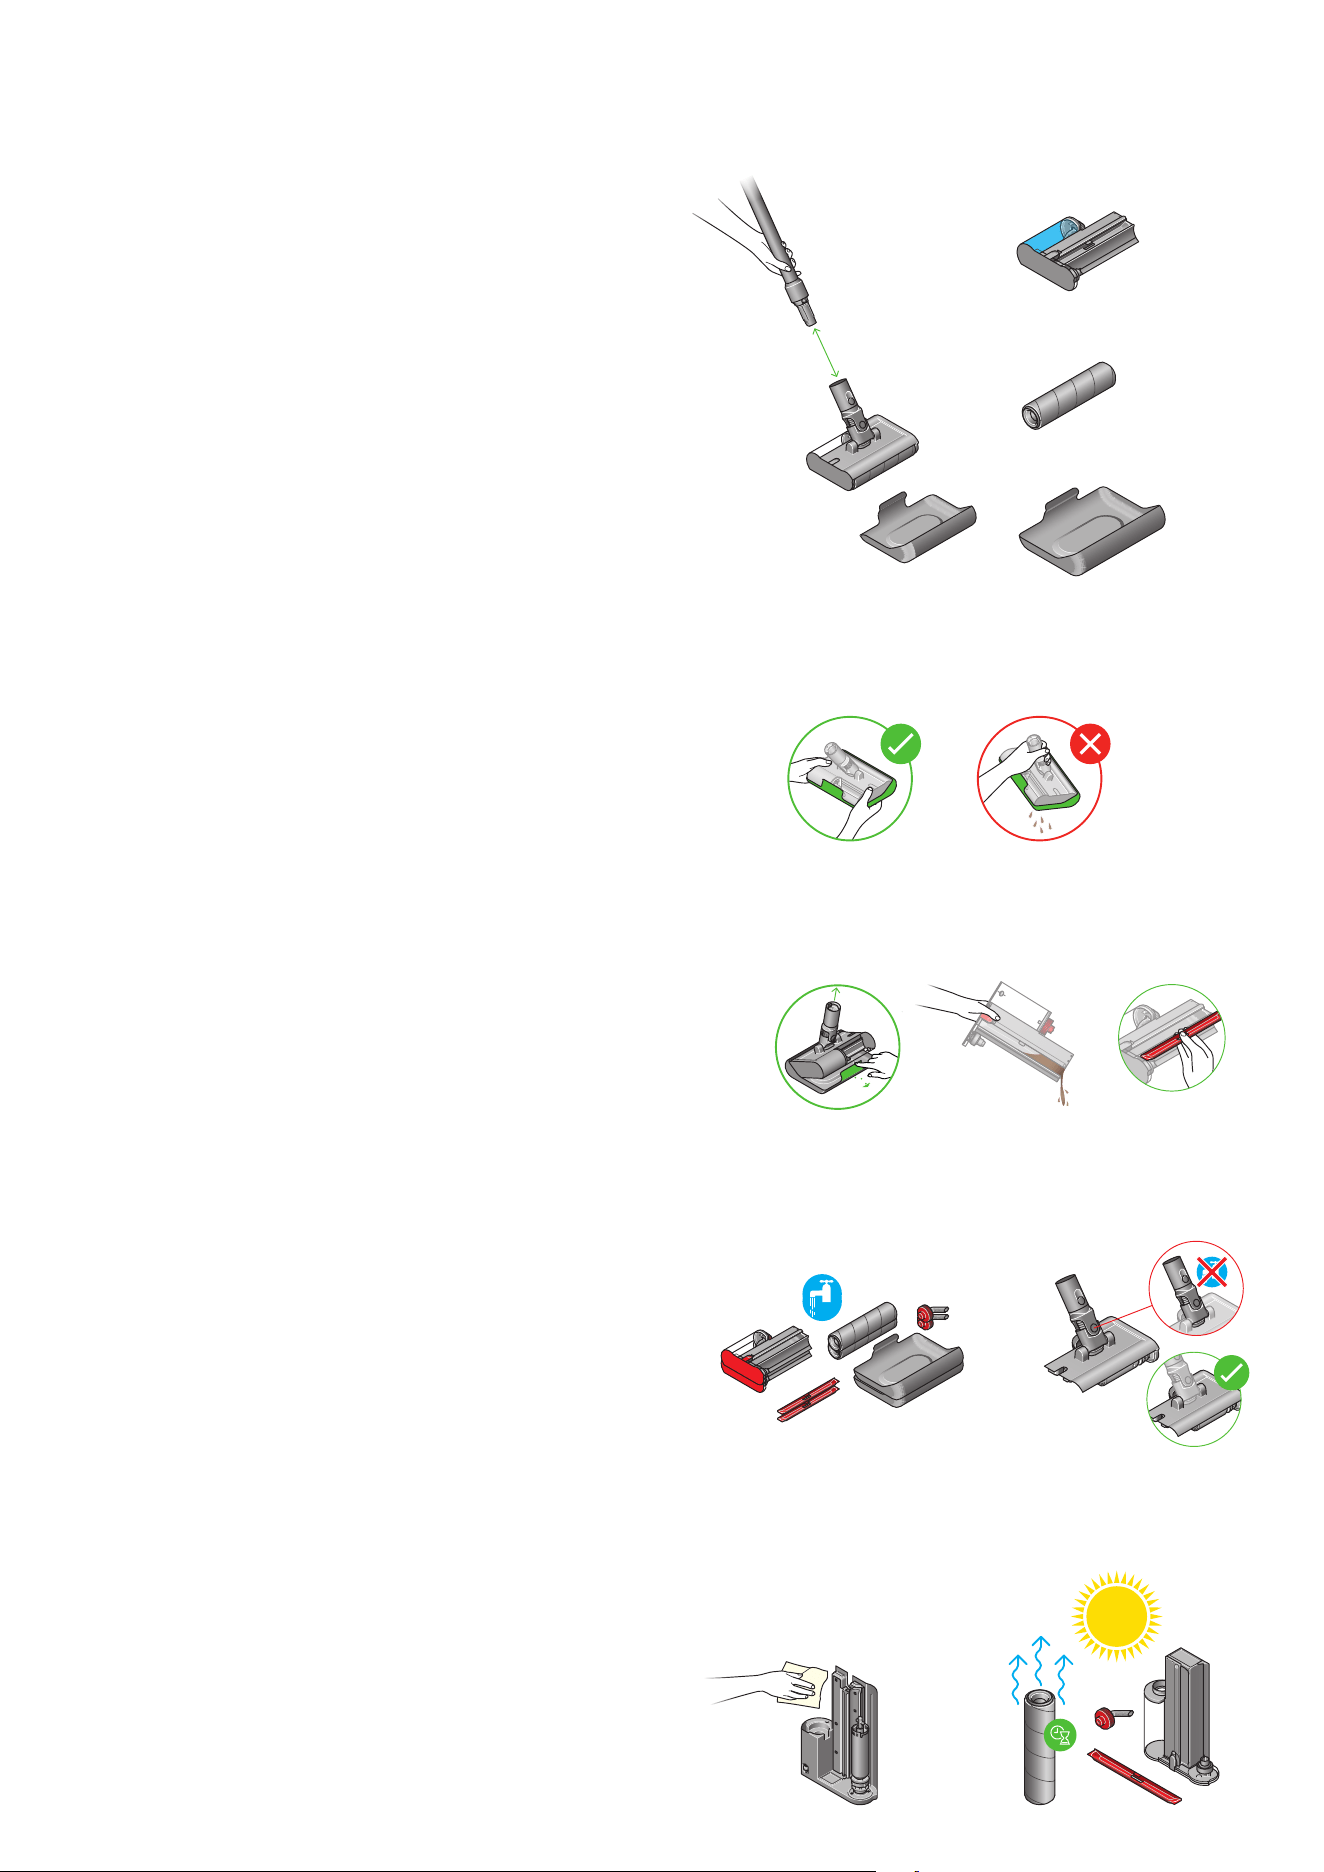
How to clean your Dyson
Submarine™ 2.0 wet roller head
Step 2
Hold the wet roller head level in the drip tray.
Step 3
Hold the wet roller head over a sink. Remove it from the drip tray.
Hold the wet roller head at the edges, press the red Quick-release button
and slide out the removable cassette from the main roller head.
Remove the red dirty water tank cap to empty the waste extraction tray.
Step 4
Don’t get the water on the neck of the water roller head, as it may damage
the connection to the wand.
Disassemble the Submarine™ 2.0 wet roller head. Every part of the wet roller
head can be washed with water and a household anti-bacterial solution
diluted according to the manufacturer’s recommended ratio.
Empty any leftover water from the water reservoir.
Step 5
Leave the wet roller to air dry in a warm, well-ventilated space.
Use a cloth to wipe away any dirt or excess water from the main roller head,
waste extraction tray and water reservoir.
We recommend replacing the wet roller every six months, depending on
how often you use your machine, to help maintain performance.
Step 1
Turn off your machine and detach the Dyson Submarine™ 2.0 wet roller
head from the wand. Place it in the drip tray immediately to prevent
dirty water spillage.
A green arrow
indicates how
the wand
detaches from
the Dyson
Submarine 2.0
wet roller head,
and how to put
the wet roller
head into the
drip tray after
wet cleaning.
The water
reservoir and
waste extraction
tray without wet
roller brush bar
or drip tray.
The wet roller
brush bar.
The drip tray.
The wet
roller head is
placed in the
drip tray, held
on the slides
with a green
tick to indicate
correct usage.
The wet roller
head held by the
neck without the
drip tray. Water is
shown dripping
from the roller
head. A red cross
icon indicates
incorrect usage.
A hand removing the red
dirty water tray cap and
emptying the dirty water
and waste.
A hand removing the
wet roller head from
the drip tray.
The waste extraction tray, water
reservoir, wet roller and drip tray
accompanied by the blue tap icons.
Red cross indicates the neck
cannot be exposed to water.
The main roller head is in a green
circle with water tap means it can
be washed with water.
A hand holding a cloth next
to the main roller head, roller,
waste extraction tray and water
reservoir, with sun, ventilation
and hourglass icons.
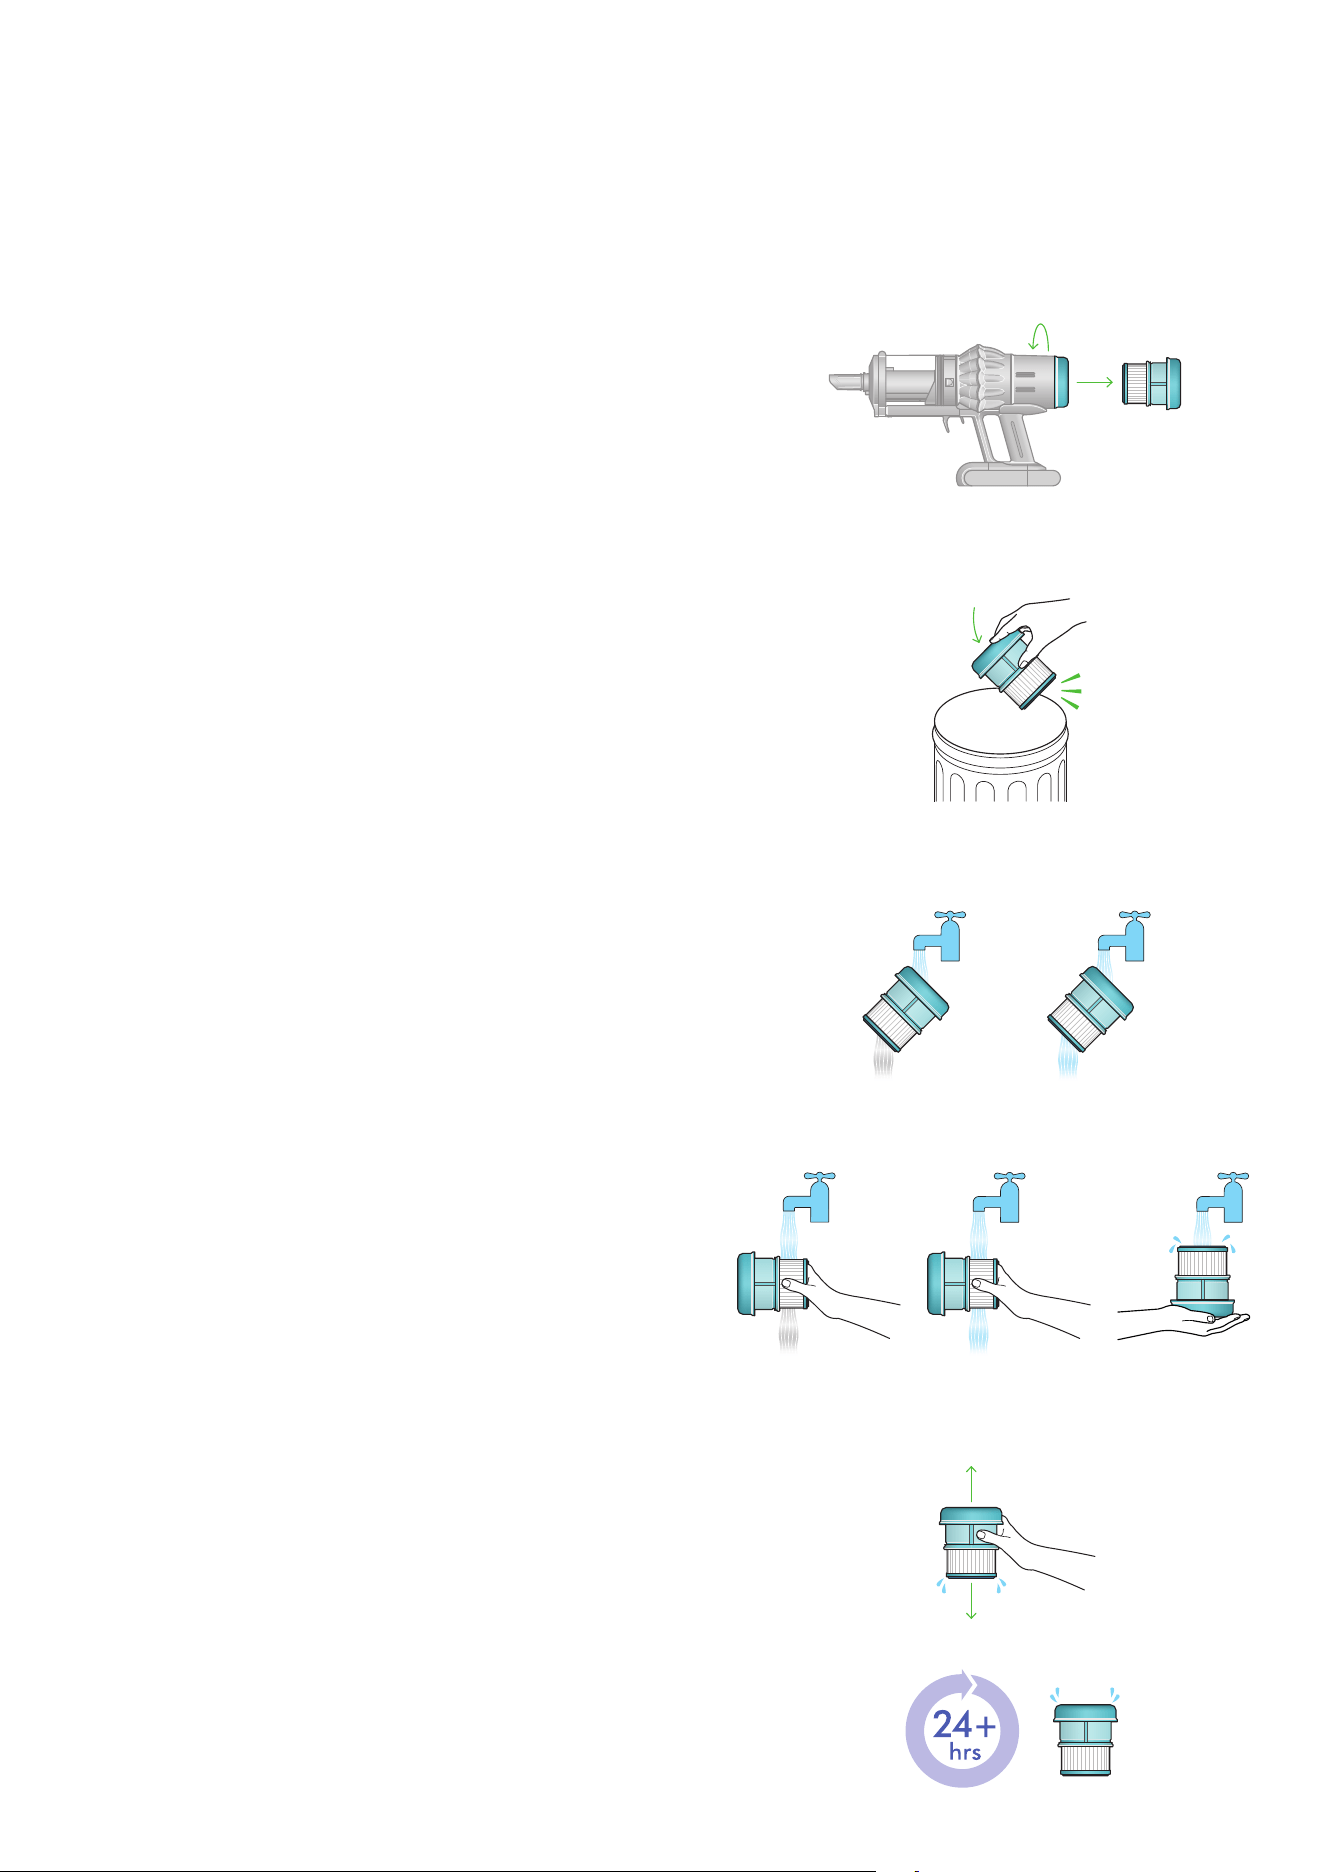
Washing your filter
Shake and dry
Empty the filter and shake it firmly to remove excess water.
Keep shaking until there’s no water coming from the filter.
Place the filter on its end and leave to dry for at least 24 hours
in a well-ventilated, warm place.
After cleaning your filter, thoroughly wash your hands using
anti-bacterial soap.
Check that filter unit is completely dry.
To refit, position the filter unit in place on the main body and twist
clockwise until it clicks into place.
Don’t dry your filter in a dishwasher, washing machine, tumble dryer,
oven, microwave or near a naked flame.
Important: Your filter must be completely dry before you put it back into
the machine. Your machine could be damaged if used with a damp filter.
Wash your filter at least once a month to maintain optimum suction power.
Important: Your filter must be completely dry before putting it back into
your machine. Your machine could be damaged if used with a damp filter.
For more information and support videos for your machine visit:
www.dyson.com/support
Twist
Twist your filter anti-clockwise and pull it away from your machine.
Tap
Before washing your filter, tap it gently over a bin to remove any loose
dust and debris.
Wash
Wash the pleated paper element of your filter first, under warm, running
tap water, with the foam element facing downwards.
Next, wash the foam element of your filter with the foam element still
pointing downwards.
Holding your filter on its side, run warm water over the outside of the foam
element, gently rubbing your filter to remove the dirt.
Repeat washing until the water runs clear.
Diagram of
owner tapping
the filter over the
bin to remove
any excess dust
and debris.
Diagram of filter being
removed from battery
and bin.
Diagram of
filter being
shaken up
and down.
Diagram of
filter at an angle
under the tap.
Diagram of
filter on its side
under the tap.
Alert graphic with ‘24+hrs’
reminds you to leave your
filter to dry for 24 hours
after washing and the filter
with the pleated end facing
downwards to dry.
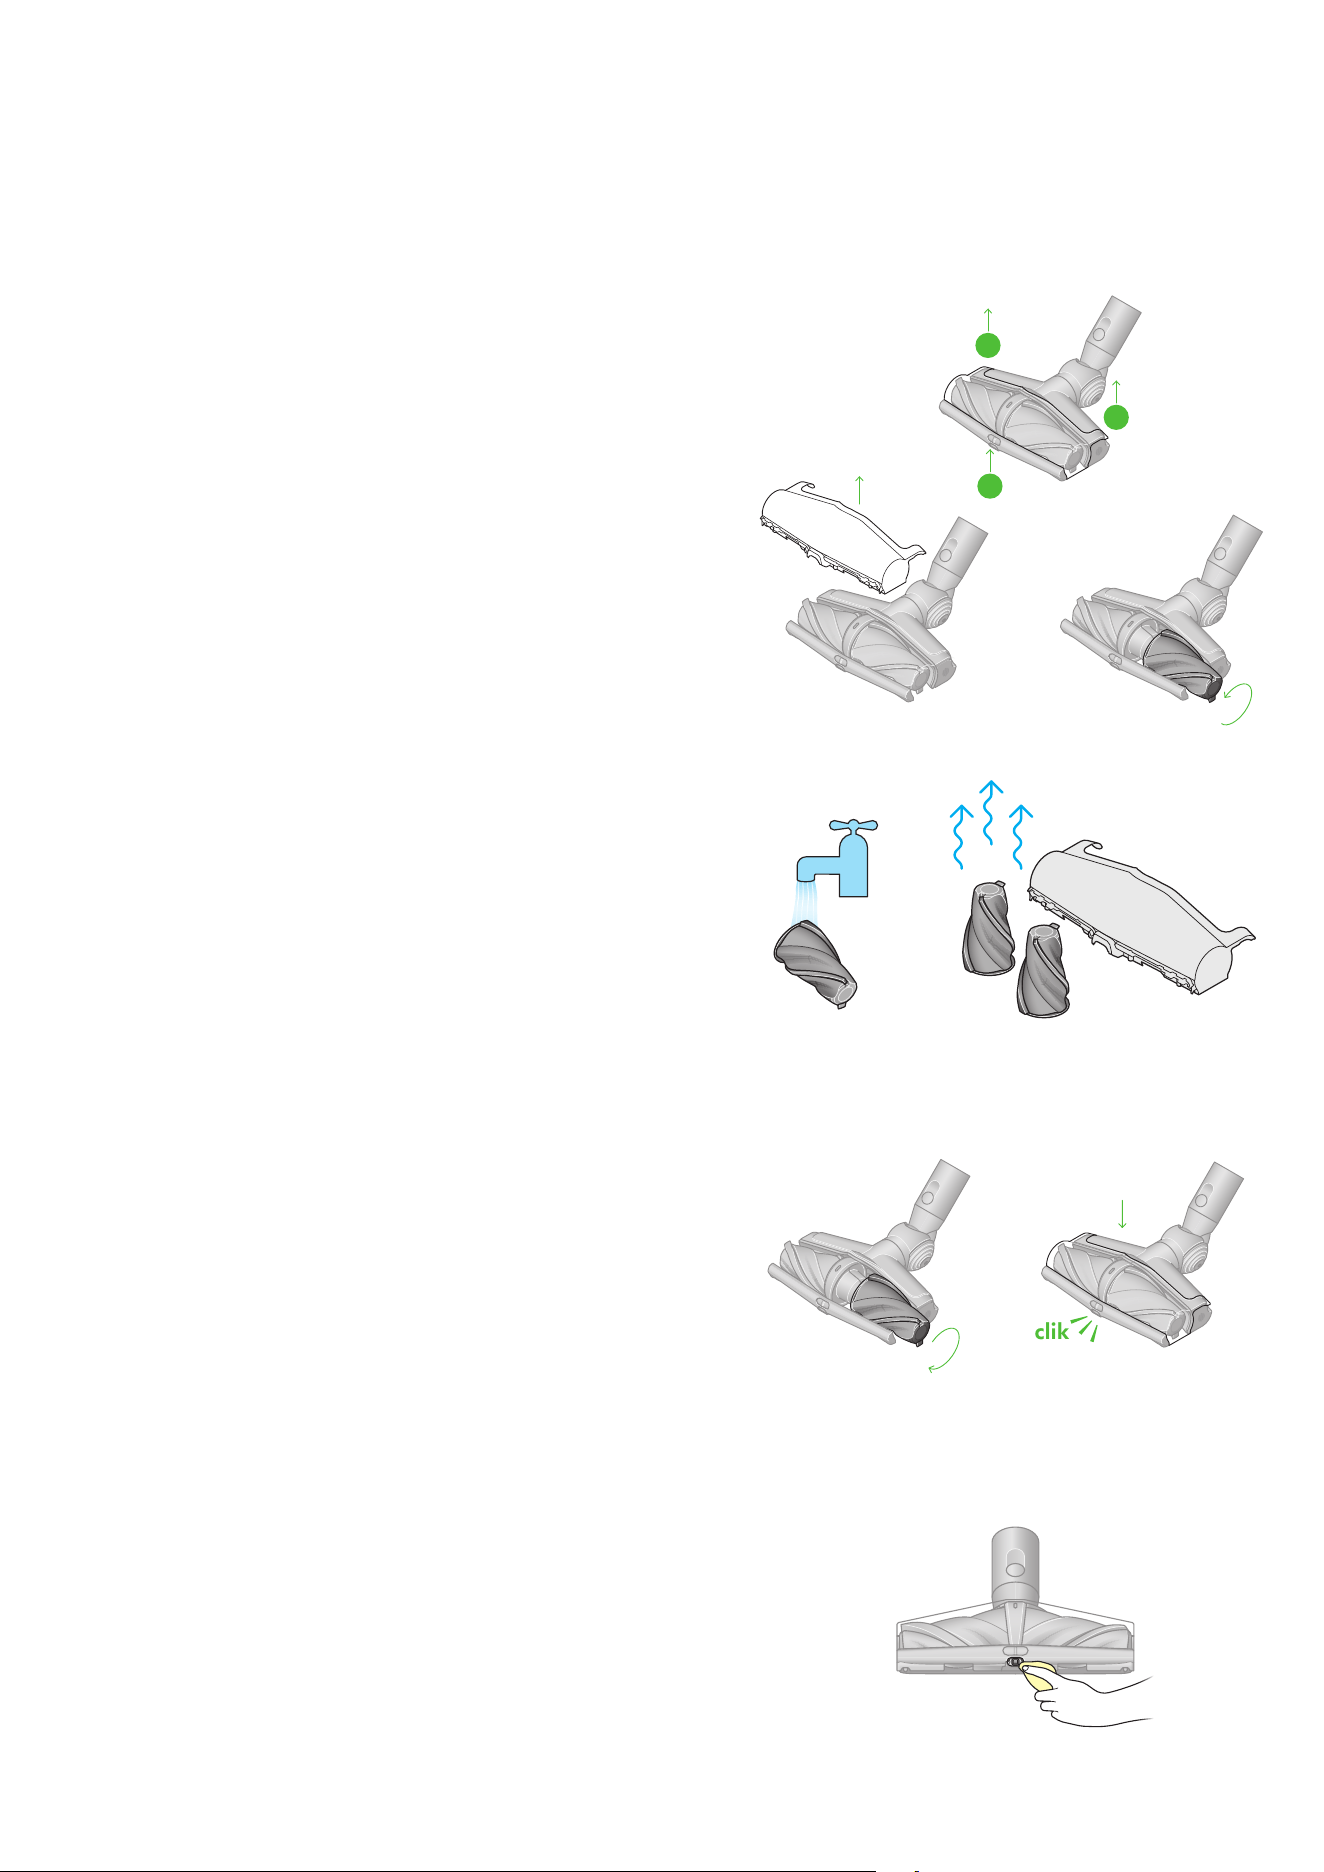
Washing your All Floor
Cones™ Sense brush bars
Your All Floor Cones™ Sense cleaner head has washable brush bars.
To maintain optimum performance, check and wash your brush bar regularly.
Make sure your machine is disconnected from the charger and your machine
power is turned off.
Don’t put any part of your machine in a dishwasher or use detergents,
polishes or air fresheners.
Cleaning your optic lens
To maintain optimum performance, keep your lens clean. Only clean
the lens when the cleaner head is not attached to your machine.
Use a soft, dry, lint-free cloth to wipe the lens.
Remove the cover and brush bars
Lift the plastic caps at the back of the cleaner head on the left and right to
release the cover.
Unscrew each brush bar to remove.
1
1
2
clik
1
1
2
clik
1
1
2
clik
1
1
2
clik
1
1
2
clik
1
1
2
clik
Wash and dry your brush bars
Hold each brush bar under running water and gently rub to remove any
lint or dirt.
Stand your brush bars upright as shown. Leave to dry completely for at
least 24 hours.
Refit your brush bars
Before refitting, check that each brush bar is completely dry.
Reattach each brush bars for matching the color of the plastic fitting
on the cone to the same color of the cleaner head.
Refit the cover by gently slotting back into place.
1
1
2
clik
1
1
2
clik
Owner wipes the optic
lens with a cloth.
Diagram of tap washing
the brush bars before
standing upright on
surface to dry.
Brush bar is screwed back on
before the plastic cover clicks
back into place.
Diagram of the
plastic cover with
numbers indicating
to first lift the
plastic clips then
release the cover.
Diagram showing
plastic cover being
removed.
Diagram showing
a brush bar being
twisted to remove.
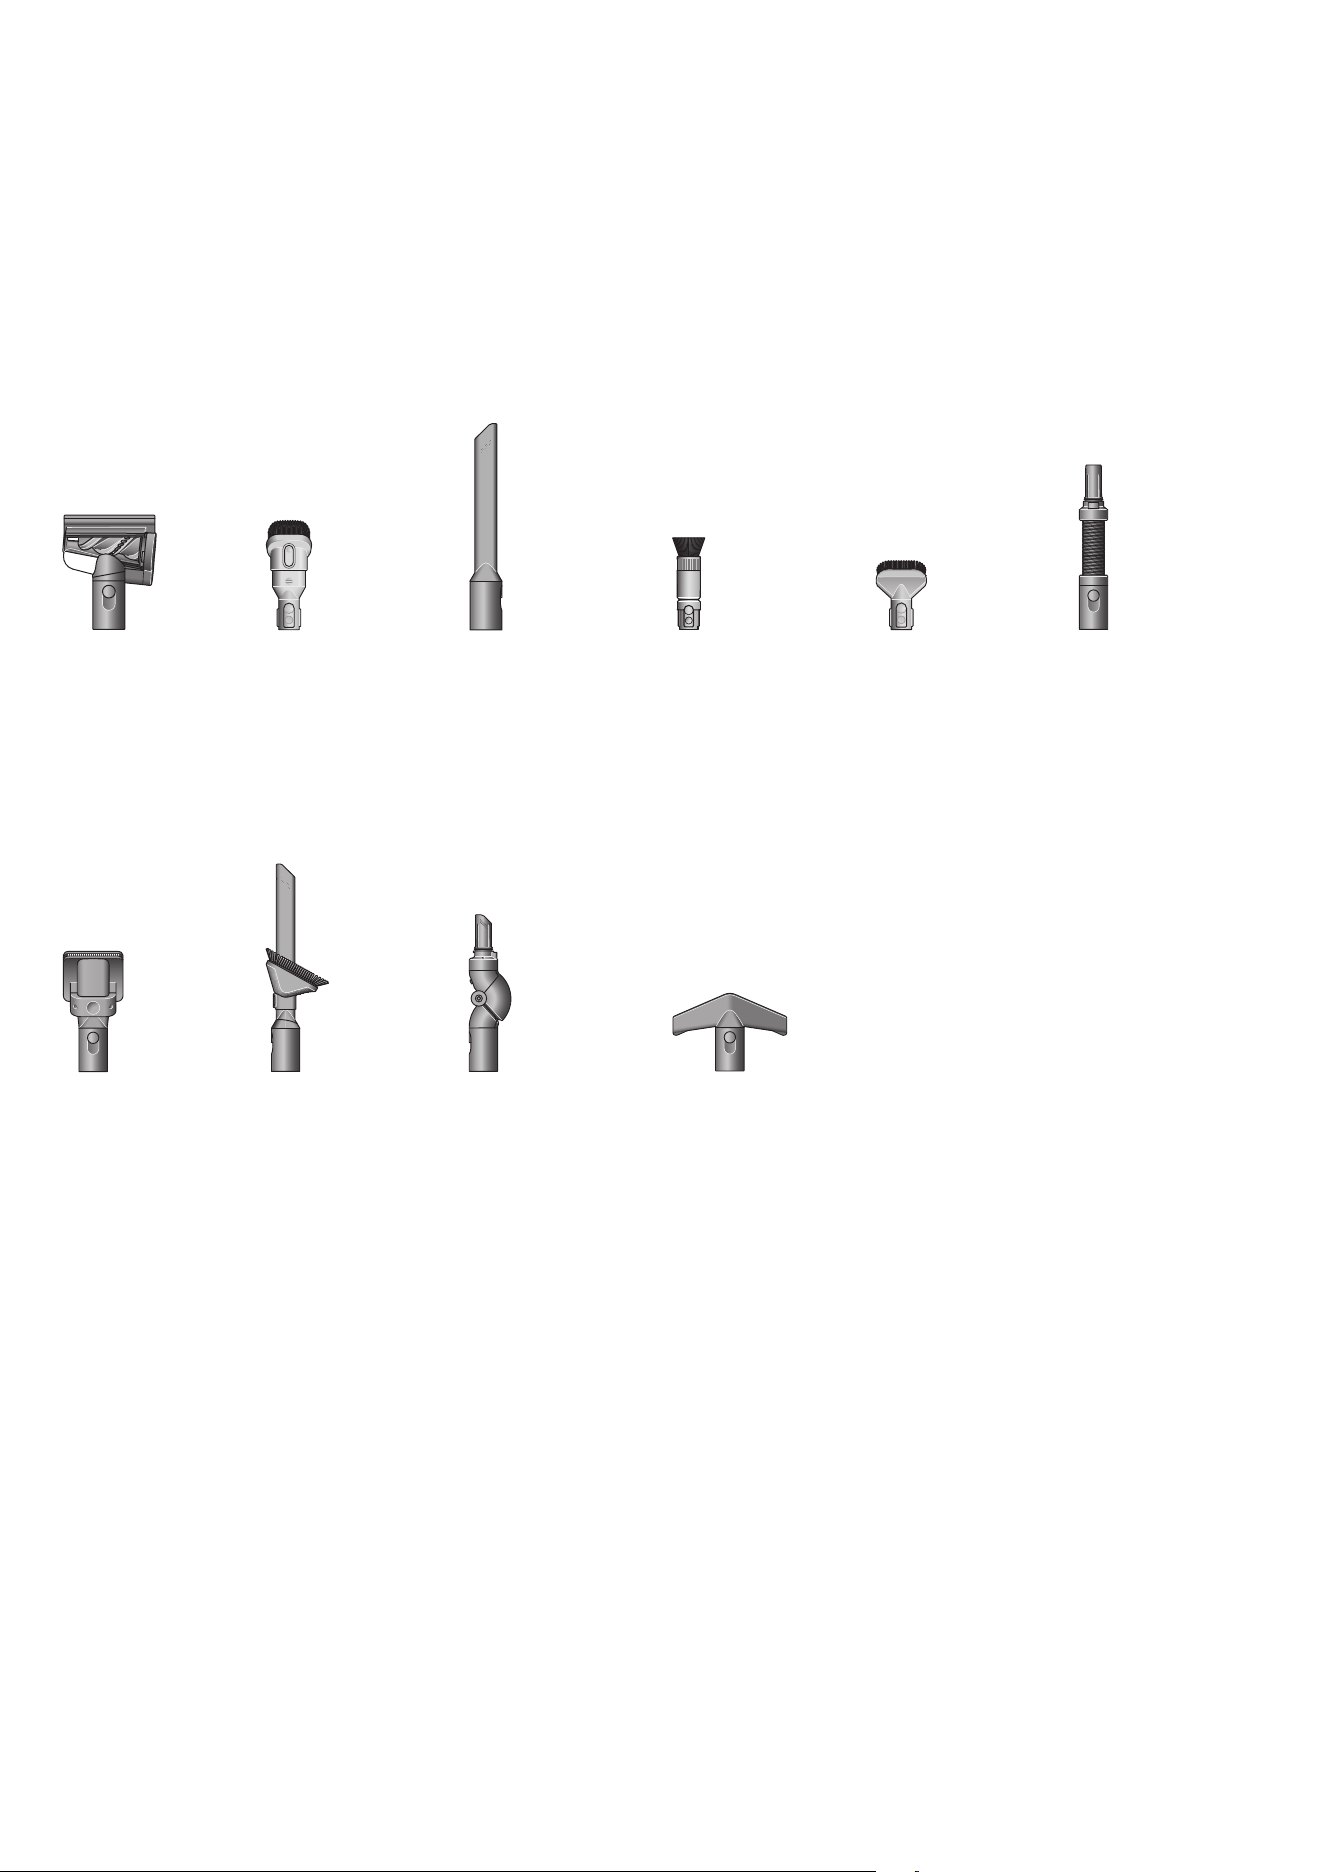
Cleaning your tools
Don’t put any part of your machine in a dishwasher or use detergents,
polishes or air fresheners.
Wipe with a damp, lint-free cloth, without touching the connector end.
Make sure your tools are completely dry before using.
Crevice tool
Engineered for precise
cleaning around tricky
edges, narrow spaces
and into hard-to-reach
corners.
Pet groom tool
Removes hair as you
groom, so it doesn’t
drop and spread
around your home.
Angled bristles self-
clean in an instant.
Combi tool
Two tools in one –
wide nozzle and brush.
Simple switching
between cleaning and
dusting tasks around
your home or car.
Flexi hose tool
Adds up to 29 inches
(75cm) of flexible
reach, with a built-in
tool to clean up high
or down low in your
home or car.
Hair screw tool 2.0
Increased front edge
cleaning to remove
even longer hair.
Additional rug strips to
reduce stalling on soft
furnishings.
Scratch-free
dusting brush
Gentle on delicate
surfaces. The Scratch-
free dusting brush has
a head made of soft
bristles for cleaning
delicate surfaces.
Low-reach
adaptor tool
Built-in tool for quicker
cleans. Engineered
to clean further under
low furniture by
adjusting the wand
angle up to 90°.
Awkward gap
tool 2.0
The Awkward gap
tool is a long and slim,
with a 22° twist, for
cleaning tight gaps and
hard-to-reach places.
Features all the benefits
of Soft dusting brush
and Awkward gap tool
in one.
Mattress tool 2.0
Re-engineered to
remove more dust,
hair, allergens and dust
mites from mattresses
and upholstery.
Stubborn
dirt brush
Stiff nylon bristles
dislodge ground-in dirt.
From coarse carpets
and most-used areas
to car interiors.
9,927,641
1.1M
450K
1.6K
10m 60 180 500
55:37
The Scratch-free
dusting brush has a
head made of soft
bristles for cleaning
delicate surfaces.
The Awkward
gap tool is long
and slim, with a
22 degree twist,
for cleaning tight
gaps and hard-
to-reach places.
This tool has a
combination of brush
head and crevice tool,
the brush head slides
down the crevice tool
when needed.
A small cleaner head
with an angled body
housing the motor and
an electrical connector
to attach to the wand or
directly to the machine.
This tool is long
and narrow with an
angled cleaner head.
A small cleaner head
with a red outer casing
that pushes down to
eject pet hair.
A short nozzle with
stiff bristles on the
underside.
With an elbow joint
fitted between the
bin and the tool.
A wide, arrow-
shaped tool.
A flexible hose
engineered from
tough wire and
durable plastic.