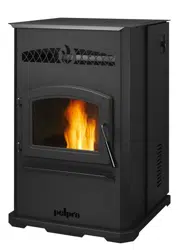
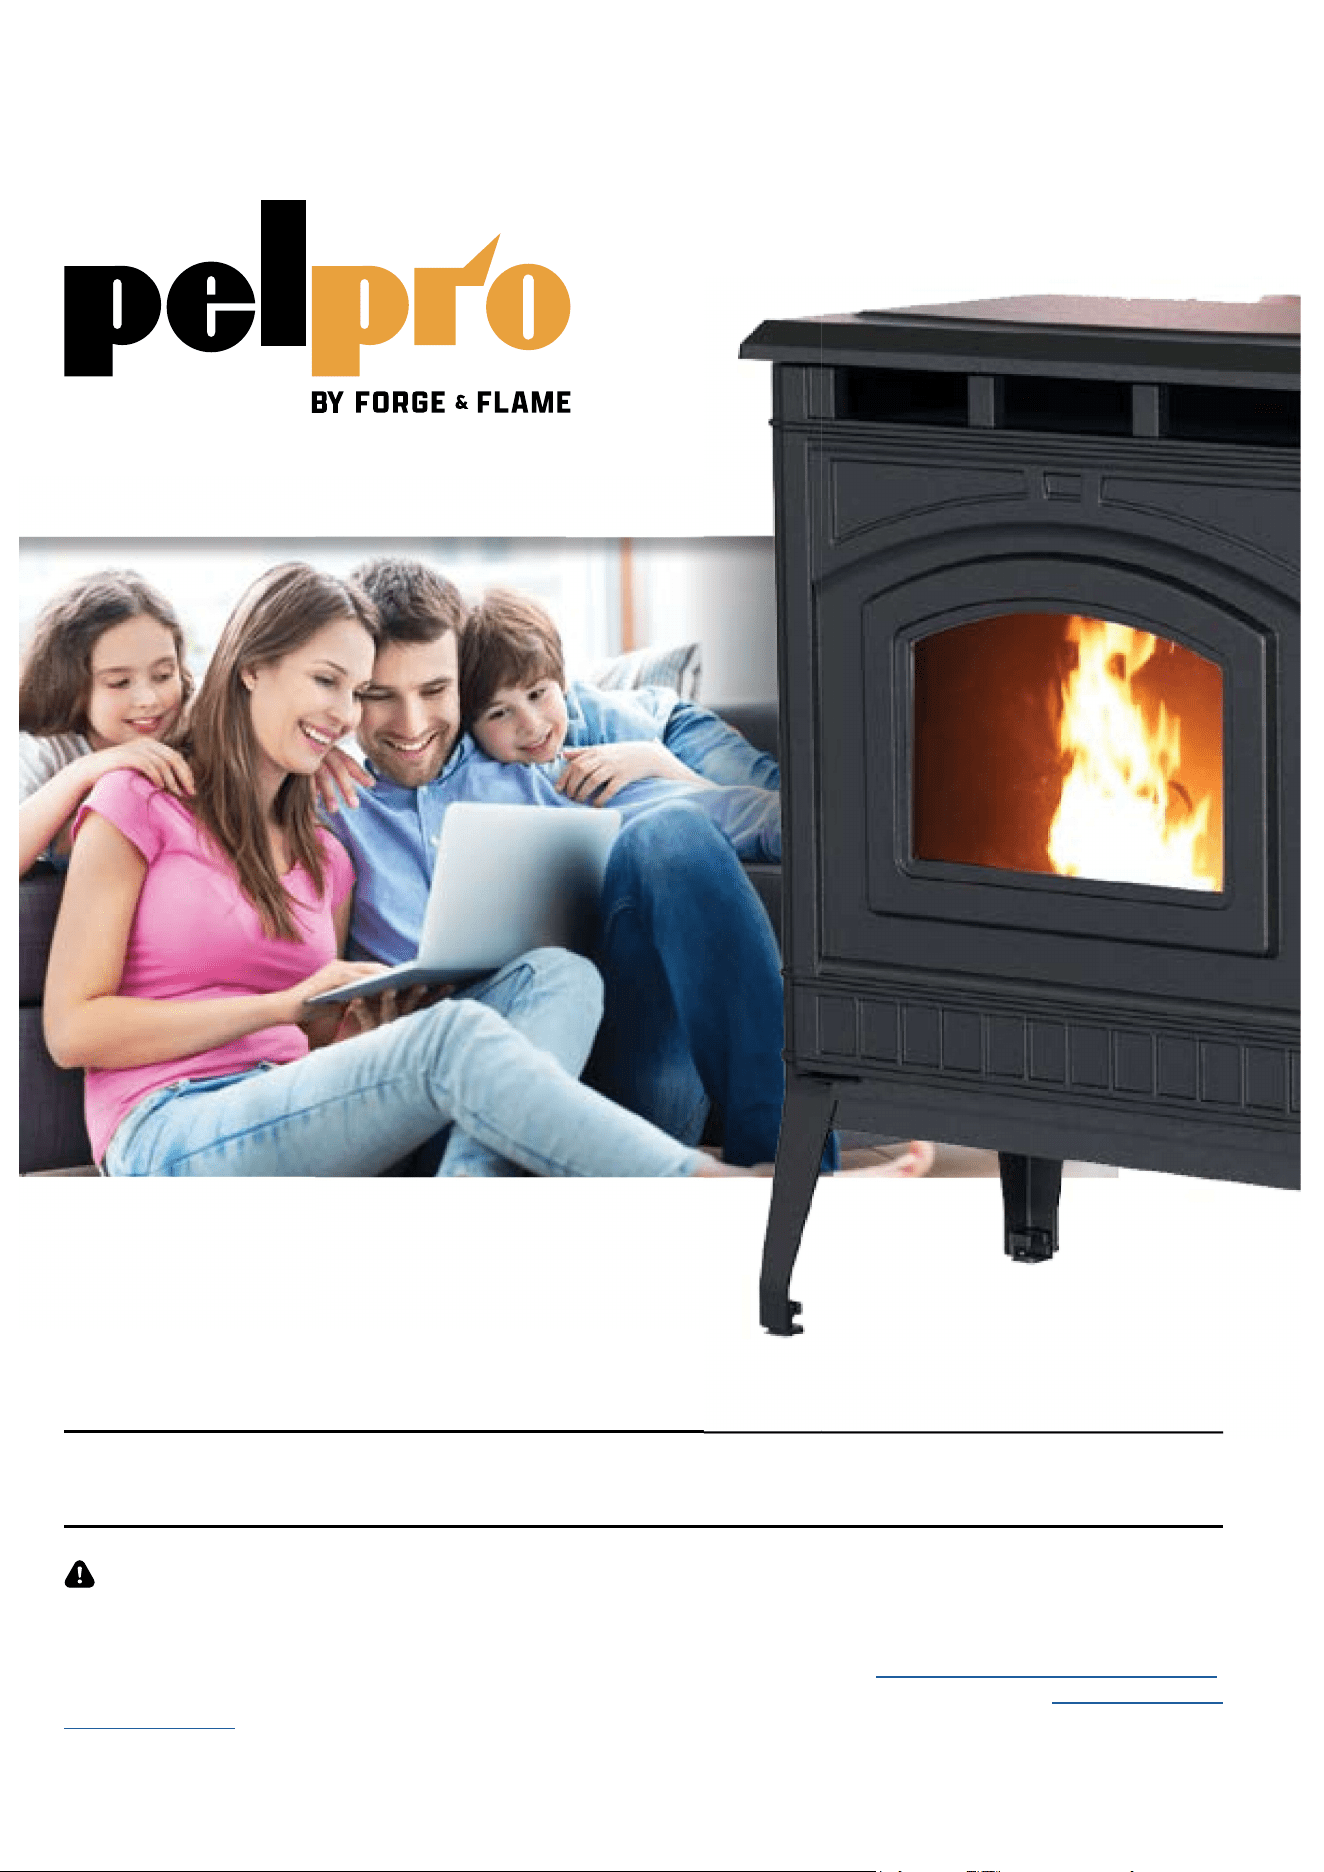
PelPro Cast Iron Pellet Stove
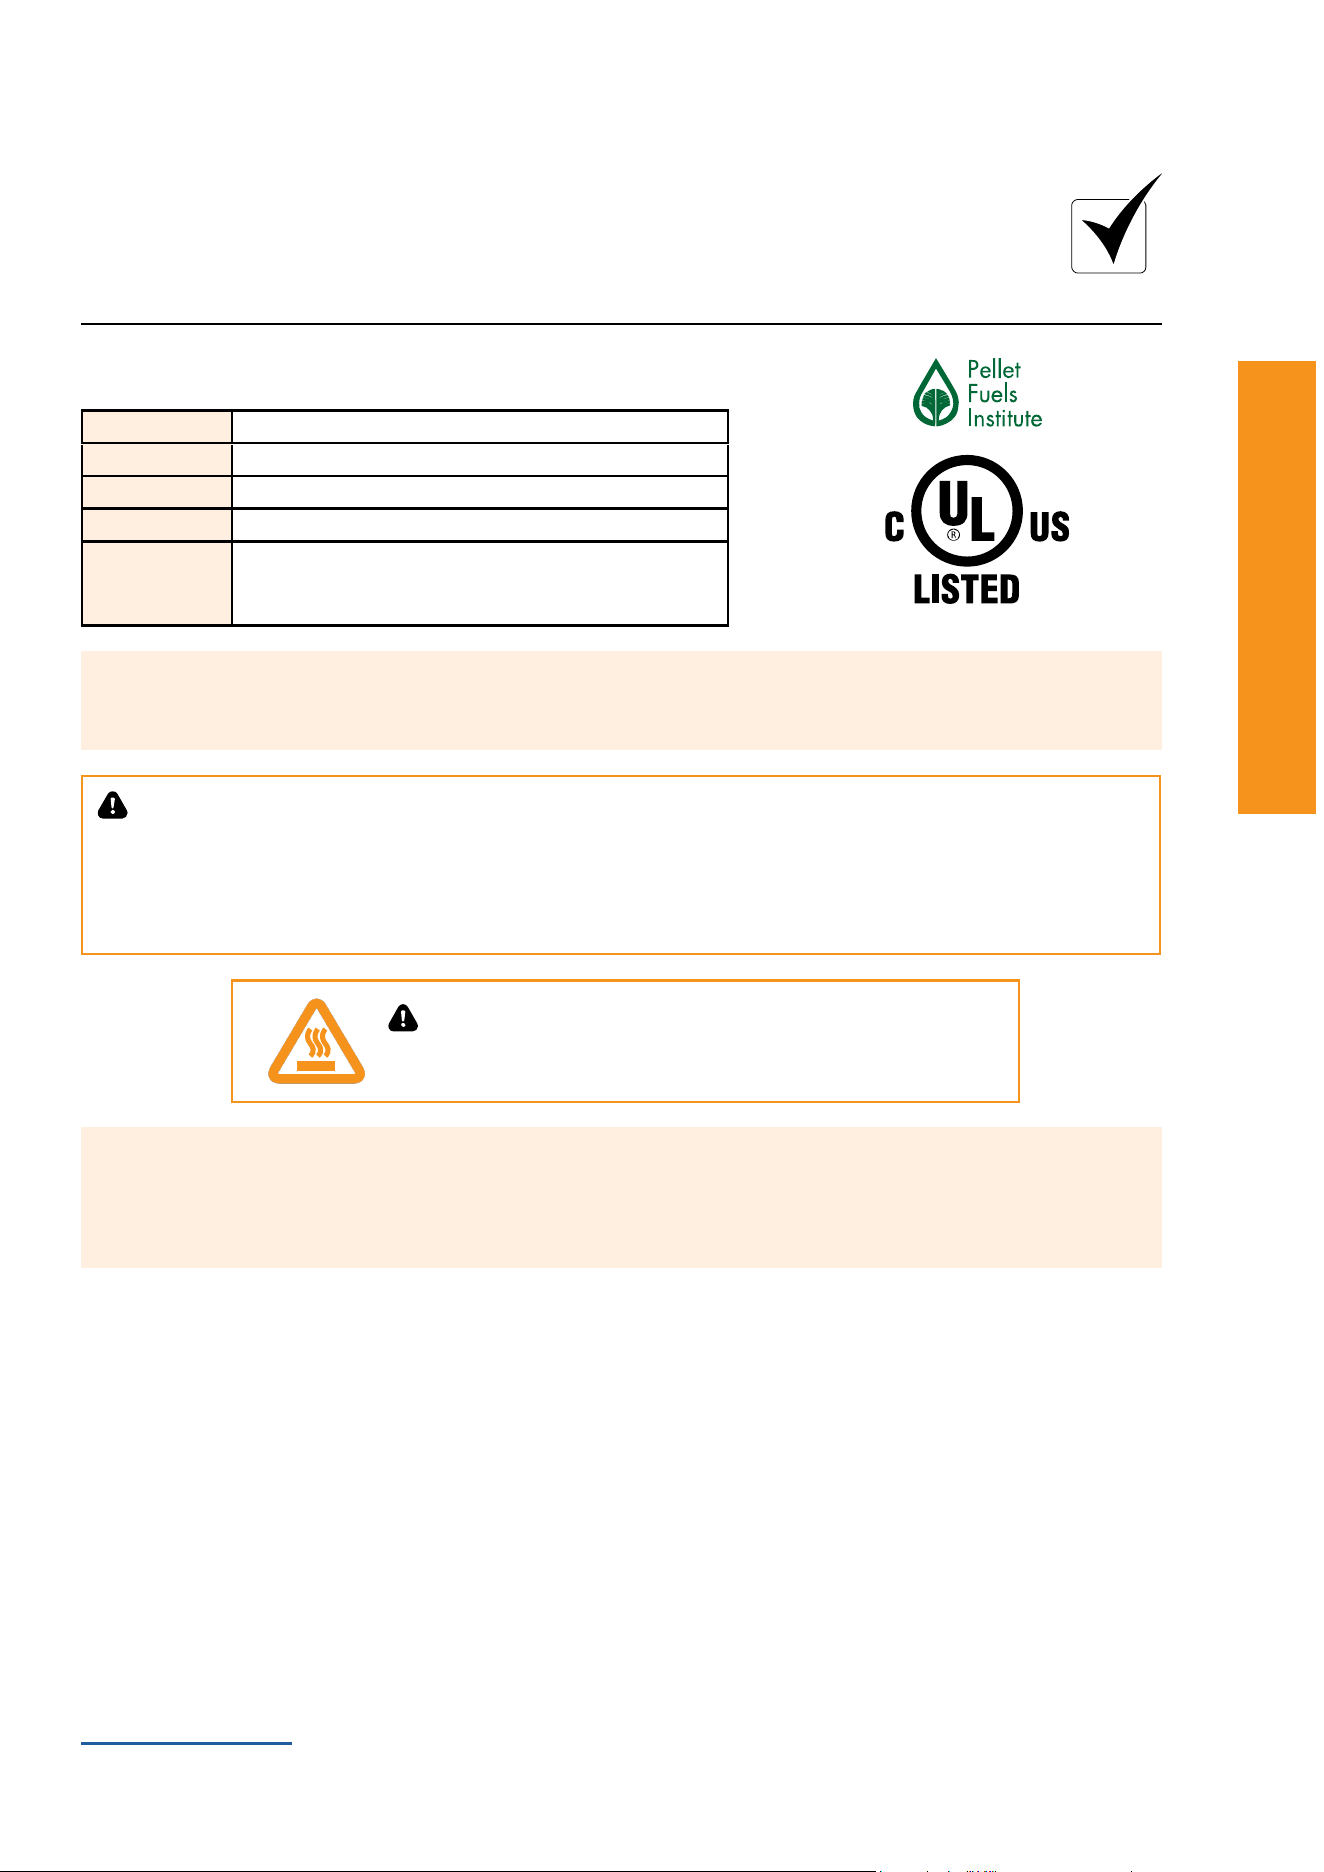
. WARNING! Please read this entire manual before installation and use of this pellet fuel-burning room heater, and save
for future reference. Failure to follow these instructions could result in property damage, bodily injury or even death. Contact
localbuildingorreofcialsaboutrestrictionsandinstallationinspectionrequirementsinyourarea.
Note: To obtain a French translation of this manual, please contact your dealer or visit www.forgename.com/pages/pelpro.
Pour obtenir une traduction francaise de ce manuel, s’il vous plait contracter votre revendeur ou visitez www.forgename.
com/pages/pelpro
PelPro Cast Pellet Stove • 7093-60X • 04/26 PelPro Cast Pellet Stove • 7093-60X • 04/26
www.forgename.com
2 3
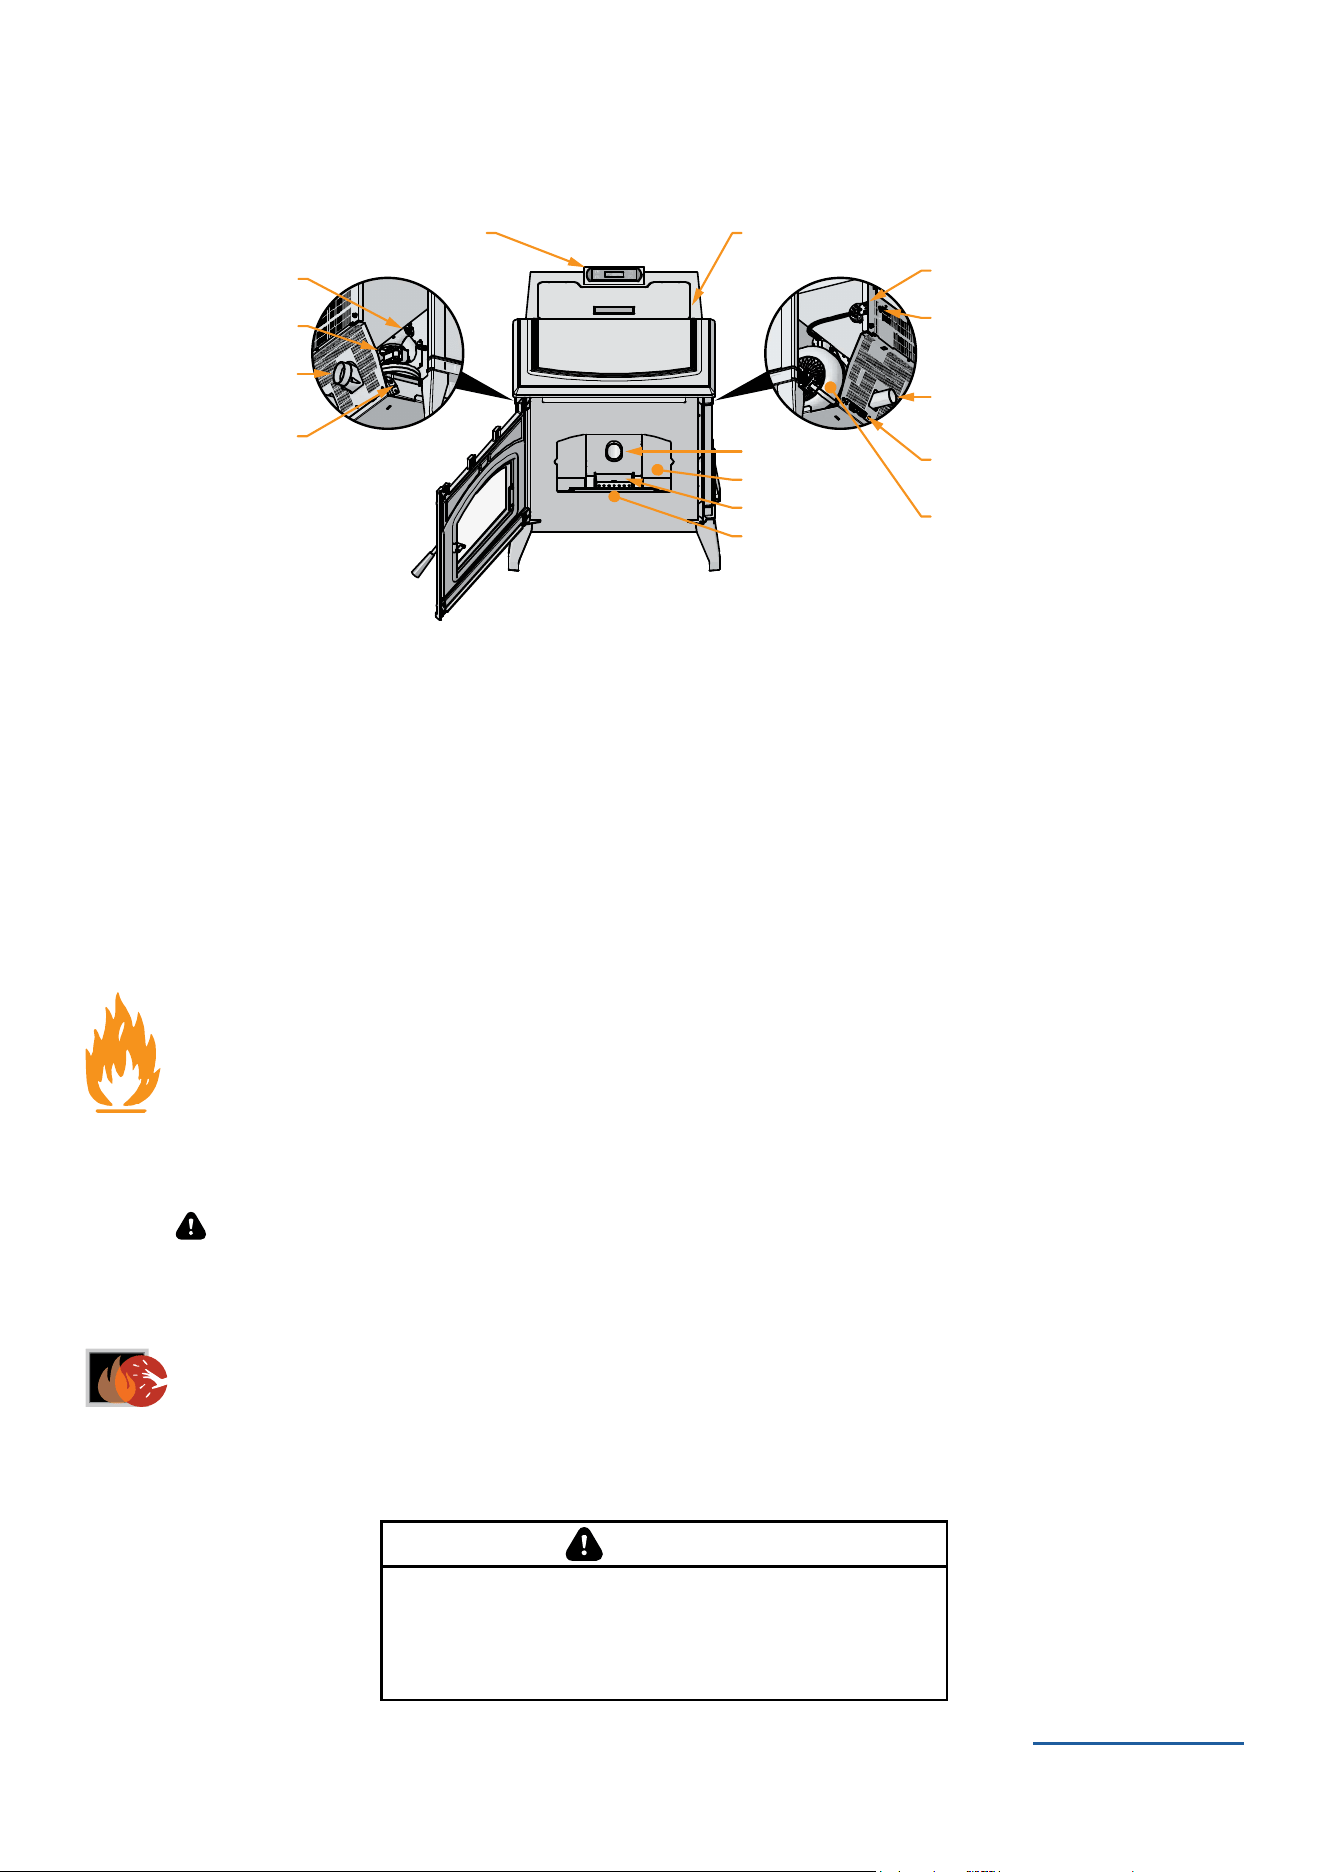
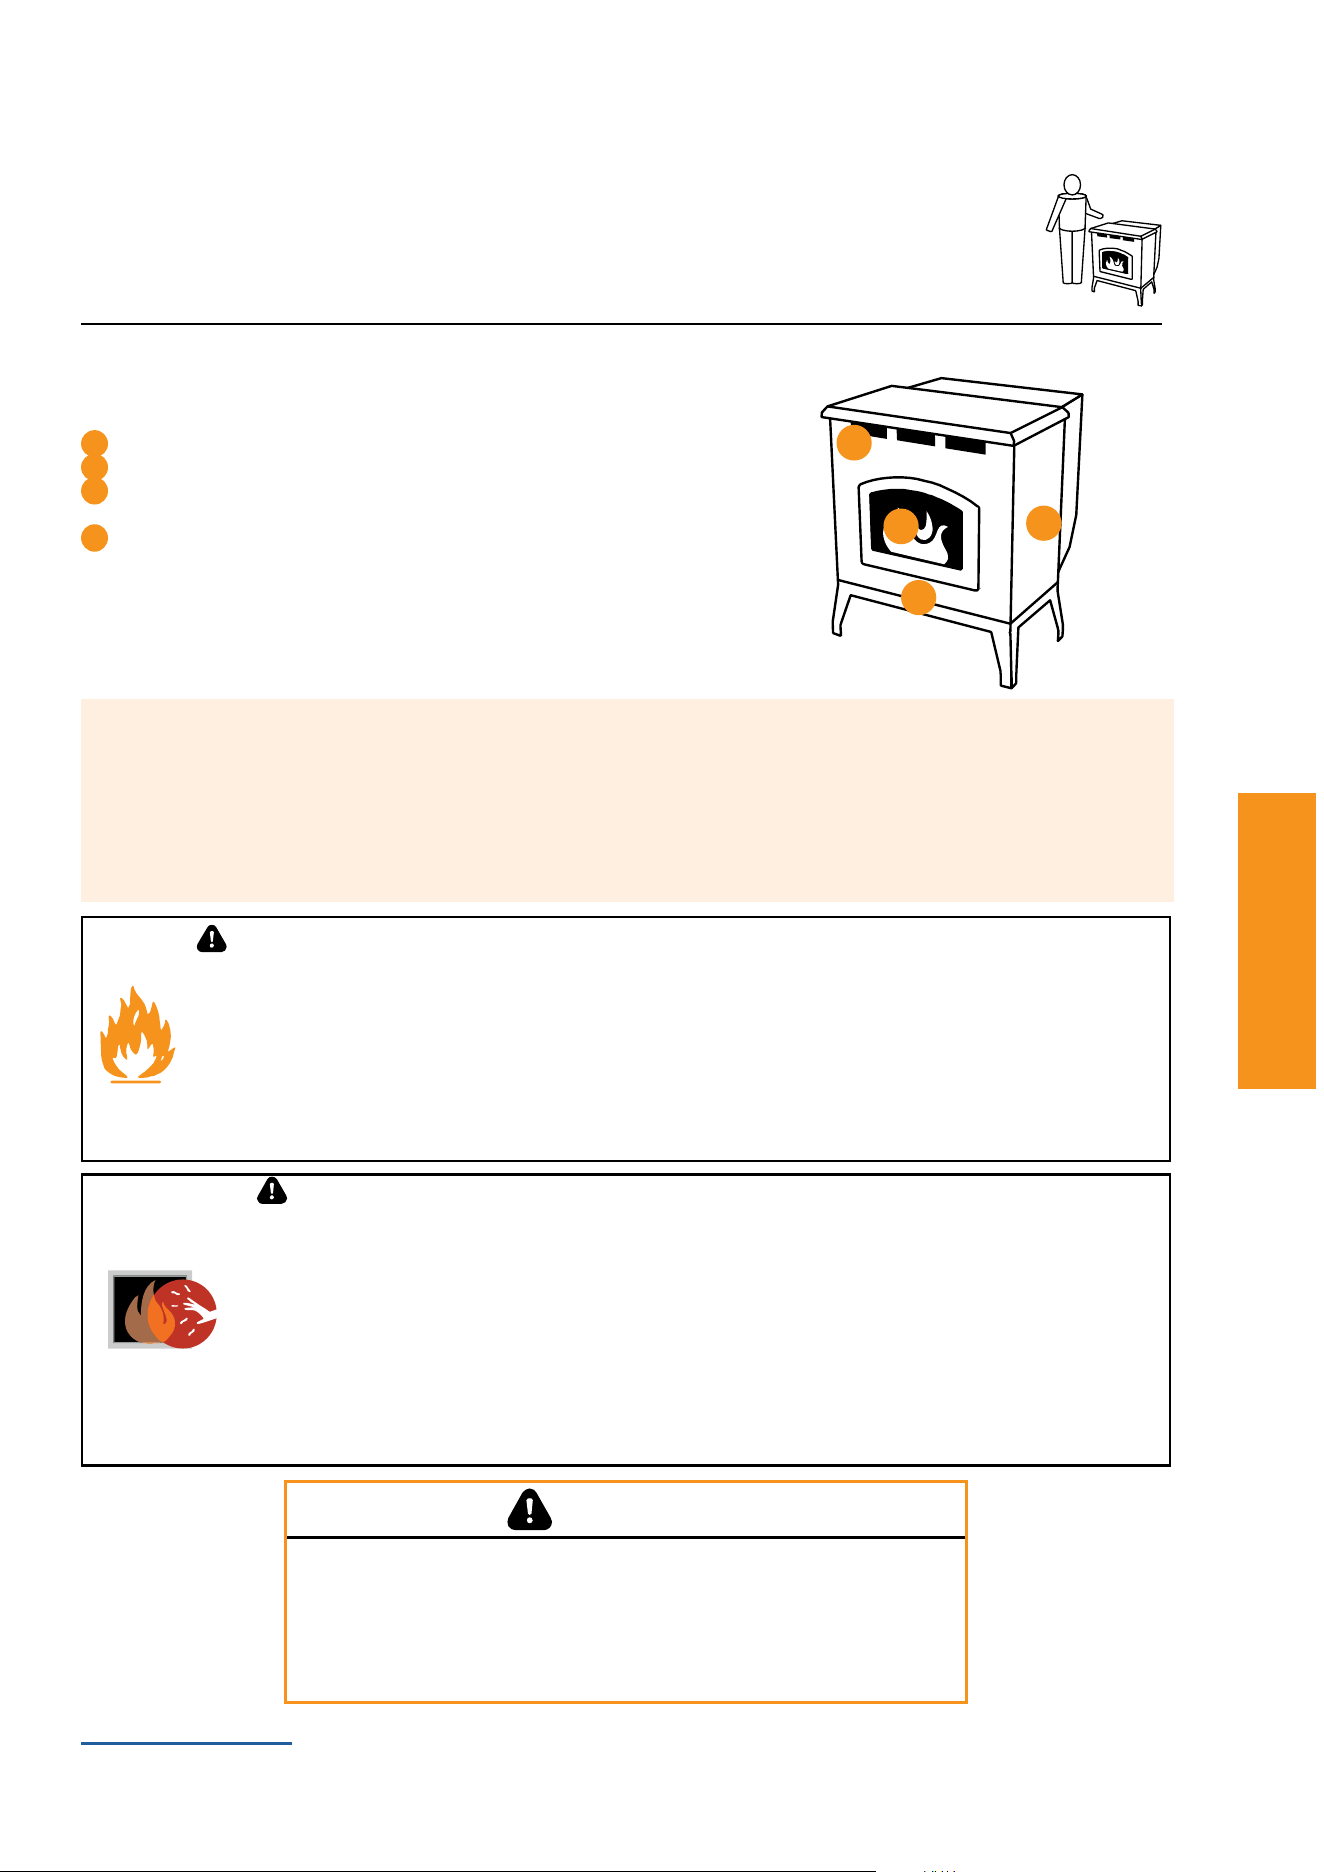
Vacuum SwitchDigital Control
Ambient Probe
Convection Blower
Outside Air
Connection
Optional External
Thermonstat Connection
Vacuum Switch
Exhaust Blower
Exhaust Probe
Exhaust
Connection
Snap Disc
Drop Tube
Firepot
Igniter
(Behind Firepot)
Baffles (3)
This product and the fuels used to operate this product (wood), and the
products of combustion of such fuels, can expose you to chemicals
including carbon black, which is known to the State of California to
cause cancer, and carbon monoxide, which is known to the State of
California to cause birth defects or other reproductive harm. For more
information go to: WWW.P65Warnings.ca.gov
WARNING
Safety First!
Safety Alert Key: It is important to pay attention to alerts you will see throughout this manual to ensure your safety.
• DANGER!
Indicates a hazardous situation which, if not avoided will result in death or serious injury.
• WARNING!
Indicates a hazardous situation which, if not avoided could result in death or serious injury.
• CAUTION!
Indicates a hazardous situation which, if not avoided, could result in minor or moderate injury.
• NOTICE:
Indicates practices which may cause damage to the Stove or to property.
• Pro Tip:
Indicates additional information to help you better understand your Stove and optimize its performance.
California - Prop65
NOTICE:
Fire Risk
Pelpro disclaims any responsibility, and the warranty and agency listing will be voided, by the below actions.
DO NOT:
- Install or operate damaged Stove
- Modify Stove
- Install other than as instructed by the manufacturer
- Operate the Stove without fully assembling all components
- Overre(burningathighertemperaturesthanrecommendedcausingpermanentdamagetotheStove)
- Install any component not approved by the manufacturer
- Install parts or components not listed or approved
- Disable safety switches
Improper installation, adjustment, alteration, service or maintenance can cause injury or property damage. For assistance
oradditionalinformation,consultaqualiedinstaller,serviceagencyoryourdealer.
DANGER!
HOT SURFACES!
Glass and other surfaces are hot during operation AND cool down.
Hot glass will cause burns.
- Do not touch glass until it is cooled
- NEVER allow children to touch glass
- Keep children away; if you expect that children may come into contact with this Stove, we recommend a barrier
suchasadecorativescreen(seeyourretailerforsuggestions)
- CAREFULLY SUPERVISE children in same room as Stove
- Alert children and adults to hazards of high temperatures
Hightemperaturesmayigniteclothingorotherammablematerials.
- Keepclothing,furniture,draperiesandotherammablematerialsaway
Get to Know Your StoveGet to Know Your PelPro
®
Stove
PelPro Cast Pellet Stove • 7093-60X • 04/26 PelPro Cast Pellet Stove • 7093-60X • 04/26
www.forgename.com
2 3
Table of Contents
• Get to Know Your Stove
• California - Prop65
Getting Started .............................................4
• Pallet Removal
• What’s Included
• What You’ll Need
Installing Your Stove ...................................6
• Getting Ready
• Vent Termination Clearances
• Placing Your Stove
• Venting Your Stove
Using Your Stove .........................................14
• Fuel Tips
•StartingyourStovethersttime
• Starting your Stove from an empty hopper
• Trim Adjustment
• Turning Your Stove Off
Maintaining Your Stove ...............................18
• Cleaning & Maintenance
• What You’ll Need
• Where, When and How
Replacement Parts ......................................23
Troubleshooting ..........................................27
• Power Related
• Blockage Related
• Warranty
Support .........................................................32
• Contact information
• Ordering Parts
ListingsandCertications .........................33
•StoveCertication
• Mobile Home Approved
•GlassSpecications
•ElectricalRating(OnHigh)
•BTU&EfciencySpecications
• Stove dimensions
• Warranty
Rference Materials.......................................36
• Service Part List
• Tips & Maintenance
• Maintenance Log
Register your product online to stay informed with important
updates and essential product information.
https://myhht.my.site.com/registration/forge-n-ame
PelPro Cast Pellet Stove • 7093-60X • 04/26 PelPro Cast Pellet Stove • 7093-60X • 04/26
www.forgename.com
4 5
Getting Started
Getting Started Getting Started
Getting Started
WARNING!
Inspect Stove and components for damage.
Damaged parts may impair safe operation.
• Do NOT install damaged components.
• Do NOT install incomplete components.
• Do NOT install substitute components.
Report damaged parts to consumer care.
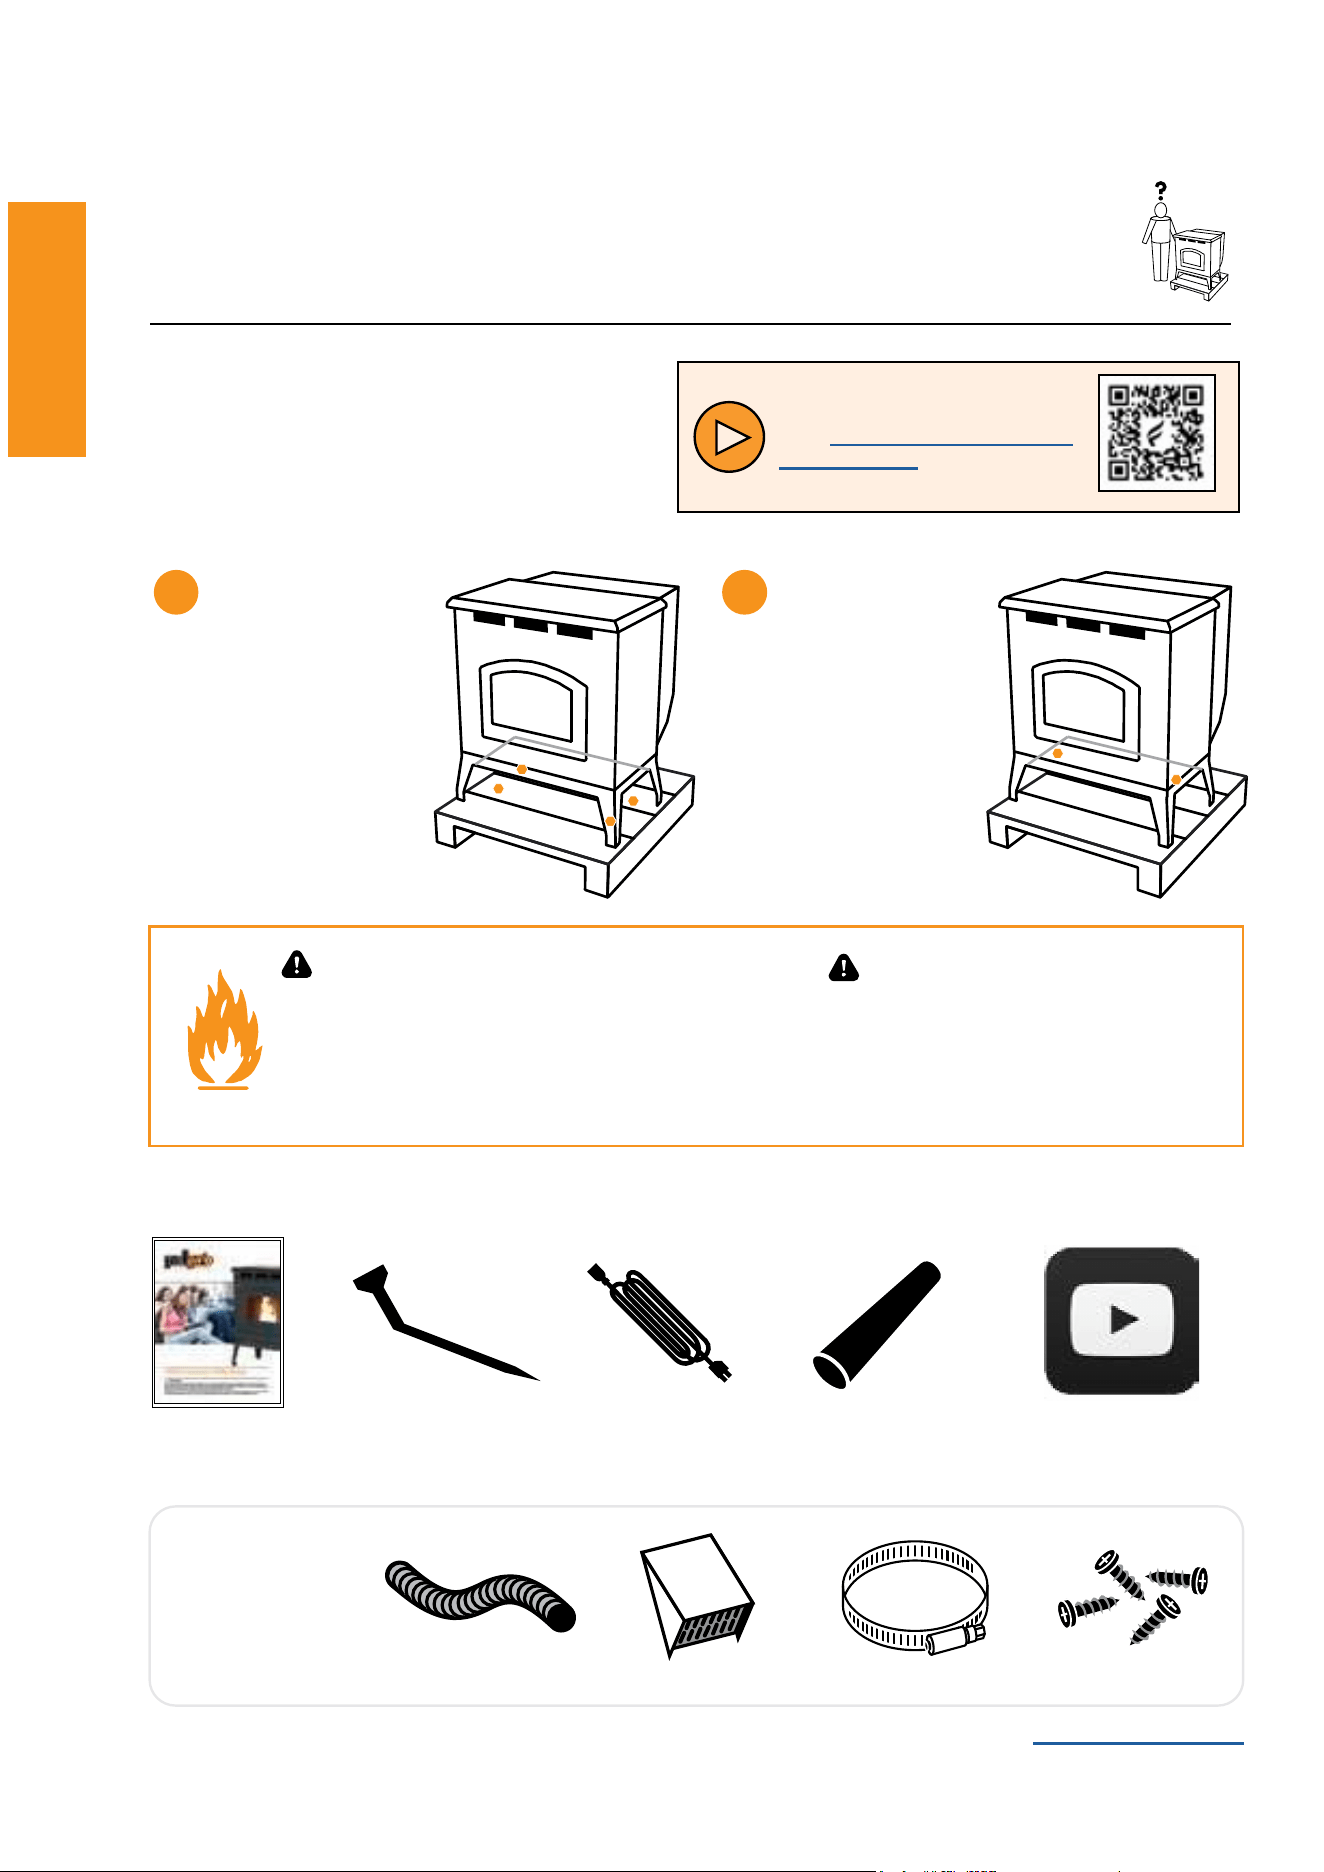
Pallet Removal
There are bolts holding your PelPro Stove in place
on the pallet. To remove your Stove from the pallet:
What’s Included
1 2
Usinga3/8”wrench,re-
move each bolt by reach-
ing under your Stove. Tip
your Stove to opposite
side and push bracket in-
ward; set Stove down and
repeat on other side.
Usinga7/16”wrench,re-
move all four bolts attach-
ing the shipping bracket to
pallet.
Owner’s
manual
Door handleCleaning tool Power cord
Outside air kit
components:
2”Flexhose Termination Cap Hose clamp Screws(4)
CAUTION!
Riskofcuts,abrasionsoryingdebris.Wear
protective gloves & safety glasses during install.
Metal edges are sharp.
Online Installation &
Trouble Shooting Videos
Pallet Removal
Visit www.forgename.com/
pages/pelpro
or scan the code:
PelPro Cast Pellet Stove • 7093-60X • 04/26 PelPro Cast Pellet Stove • 7093-60X • 04/26
www.forgename.com
4 5
Getting Started
Getting Started Getting Started
What You’ll Need
Tools & Supplies
• High temperature silicone
(500°F+)
• Level
• Phillips screwdriver
• Plumb line
• Tape measure
• Framingsquare
• Reciprocating saw
• Electric drill & bits
• Caulking gun
• Studnder
• Utility knife
• Pliers
• Flashlight
• Hammer
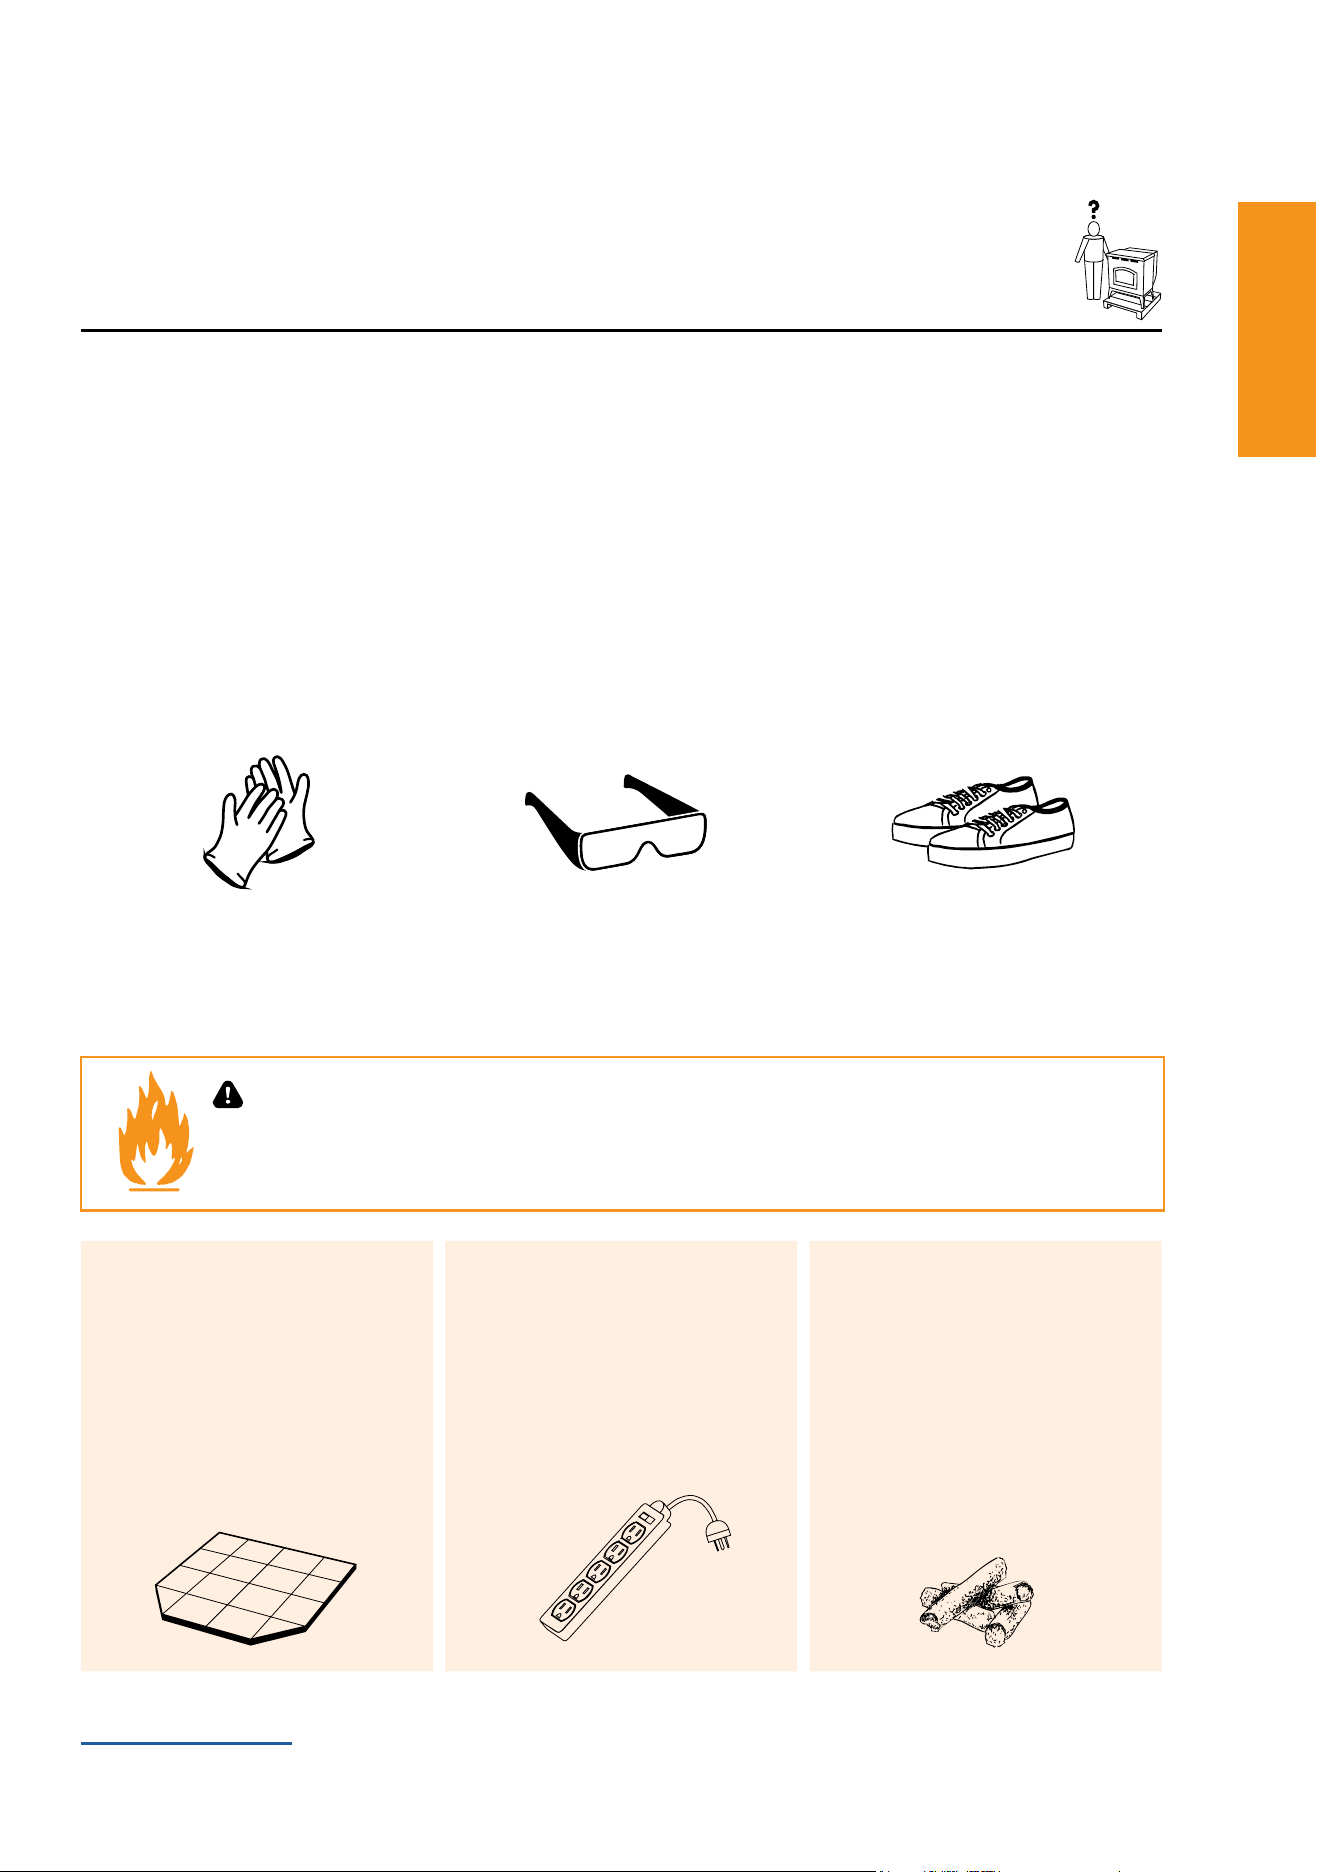
Safety Equipment
Recommended for all installation and maintenance steps.
Pellet Vent Pipe
Mustbeanapproved3”or4”diameterType“L”or“PL”vent.Use4”diameterventifueheightisover15’orif
installationisover3,000ft.abovesealevel.
Floor Protection
Non-combustible material
(suchasahearthpad)isre-
quiredunderneathyourStove.
Surge Protector
Protect the electrical compo-
nents of your Stove by using a
surge protector.
Pellet Fuel
Use only wood pellets in your
Stove. For best performance,
use premium, low-ash pellets
(<1%)lessthan1.5”inlength
and avoid the dusty bits and
pieces of pellets in the bottom
of the bag.
WARNING!
Fire Risk. NO OTHER vent components may be used. Substitute or damaged vent components may
impair safe operation.
Gloves Safety Glasses Close-toed shoes
PelPro Cast Pellet Stove • 7093-60X • 04/26 PelPro Cast Pellet Stove • 7093-60X • 04/26
www.forgename.com
6 7
Installing Your Stove
Installing Your Stove Installing Your Stove
Using Your Stove
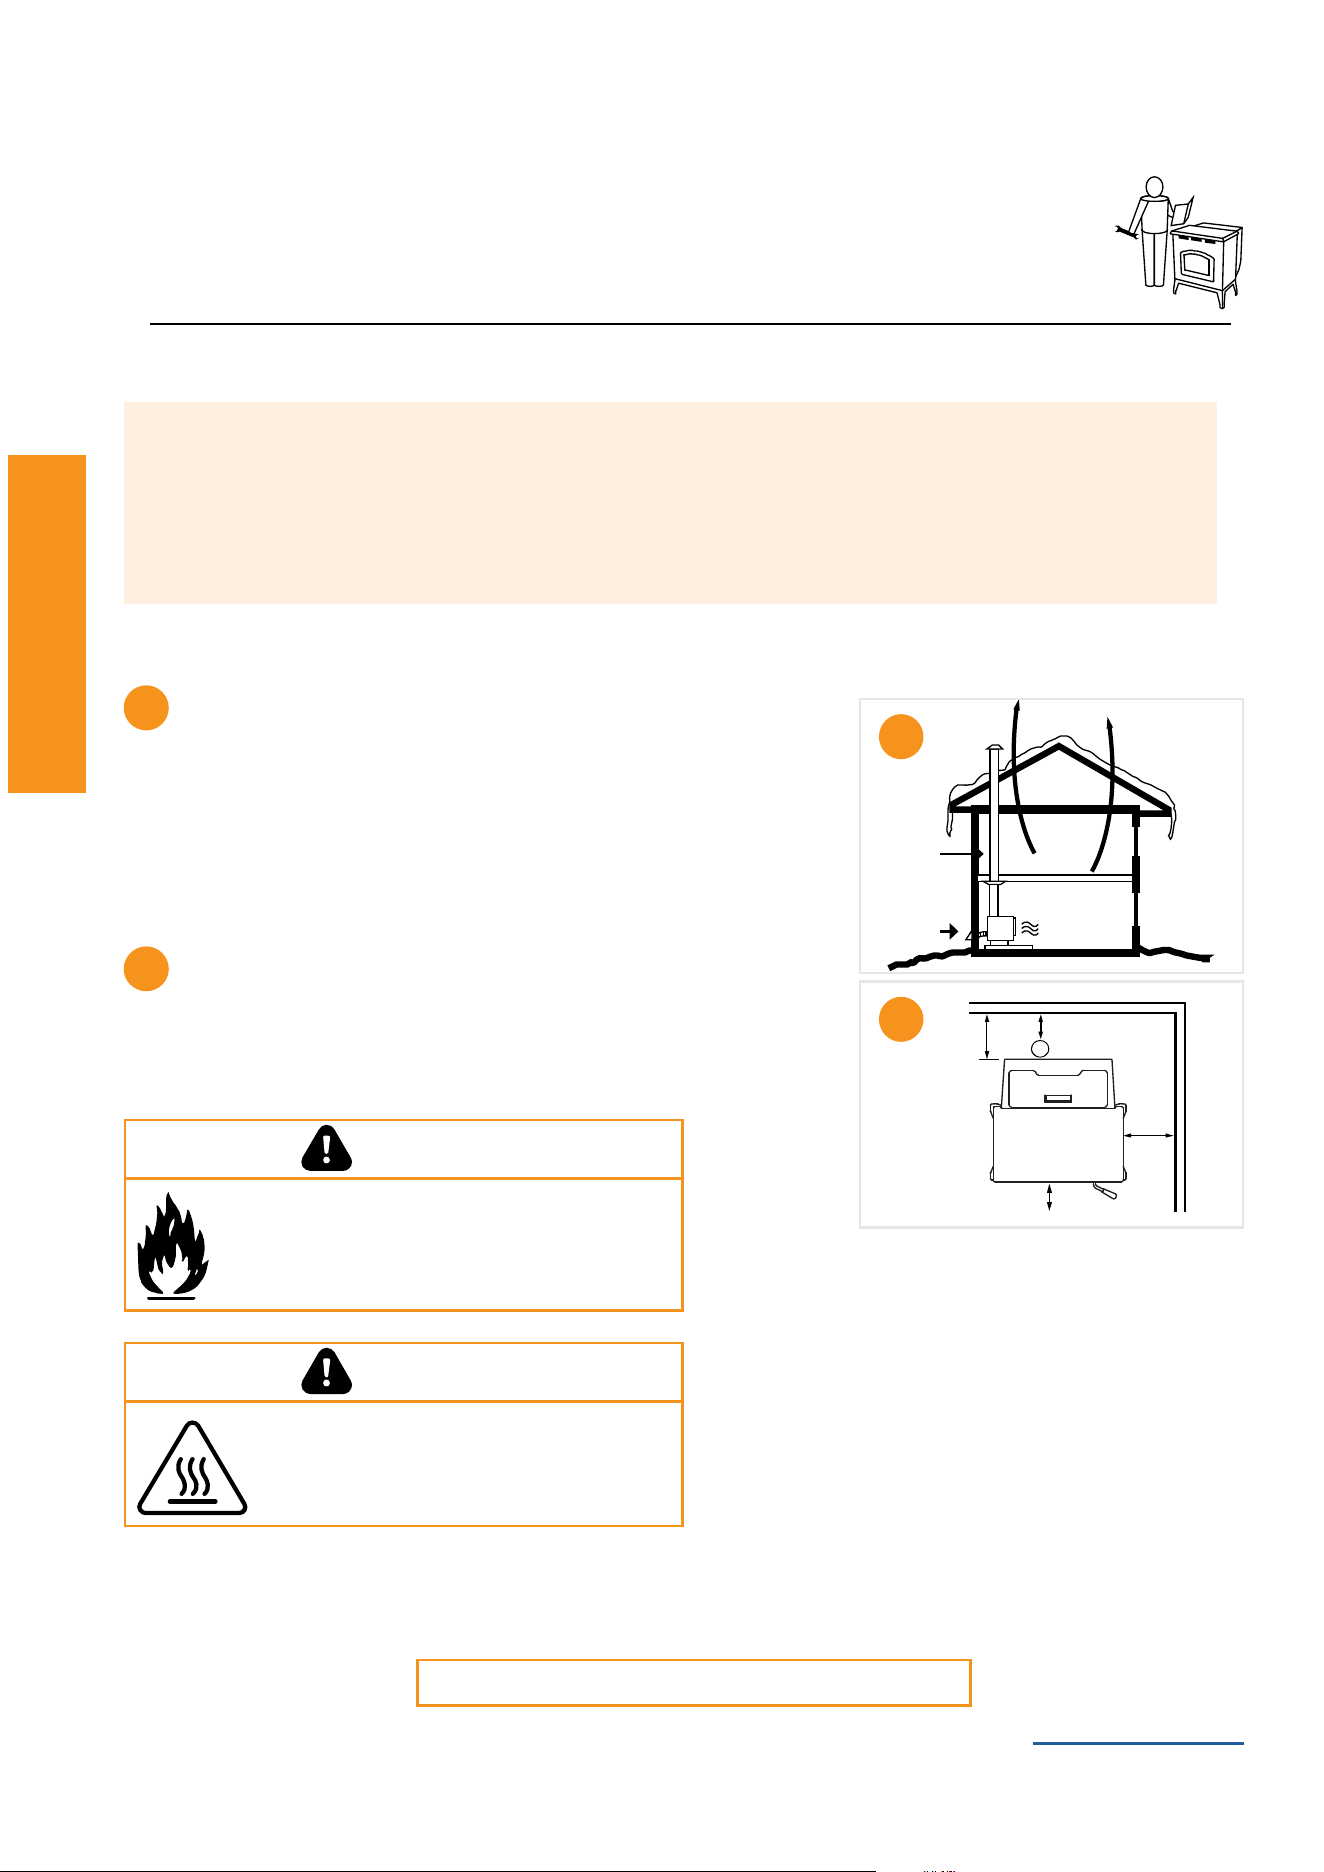
Your Home Acts Like a Chimney
We recommend that you help your home by:
1. Using a minimum of 5 feet of vertical venting
2. Use the supplied outside air kit
3. InstallyourStoveonamainoorlocation
This will:
• Help your Stove breathe
• Minimize smoke leakage in the house
• Enhance performance
Clearance to Combustibles
The space between your Stove and the items in your
home that could burn. Materials such as:
• Wood
• Sheetrock(drywall)
• Carpet
A
B
Pro Tip
We highly recommend your Stove and pellet vent pipe be installed by a professional installer. Your
retailer can make recommendations for you.
Installation MUST comply with local, regional, state and national codes and regulations.
Consultinsurancecarrier,localbuildinginspector,reofcialsorauthoritieshavingjurisdic-
tion over restrictions, installation inspection and permits.
A
B
G
E
D
J
1
2
3
ForCanada,theinstallationmustconformtoCAN/CSA-B365
Placement
WhereyouplaceyourStovecansignicantlyaffectitsperformanceandsafety.
Getting Ready
CAUTION
This room heater shall not be installed into a
Factory-Built Fireplace.
Asphyxiation Risk
DO NOT INSTALL IN A SLEEPING ROOM.
Consumes oxygen in the room.
WARNING
PelPro Cast Pellet Stove • 7093-60X • 04/26 PelPro Cast Pellet Stove • 7093-60X • 04/26
www.forgename.com
6 7
Installing Your Stove
Installing Your Stove Installing Your Stove
REQUIRED:
Useonly3”or4”type“L”or“PL”pelletpipe.
CAUTION
• Do not connect to any air distribution duct or system
• DonotinstallauedamperintheexhaustventingsystemofthisStove
• DonotconnectthisStovetoachimneyueservinganotherStove
• Thestructuralintegrityofthemanufacturedhomeoor,wallandceiling/
roof must be maintained
C
C
Installation Video
Getting Ready (Continued)
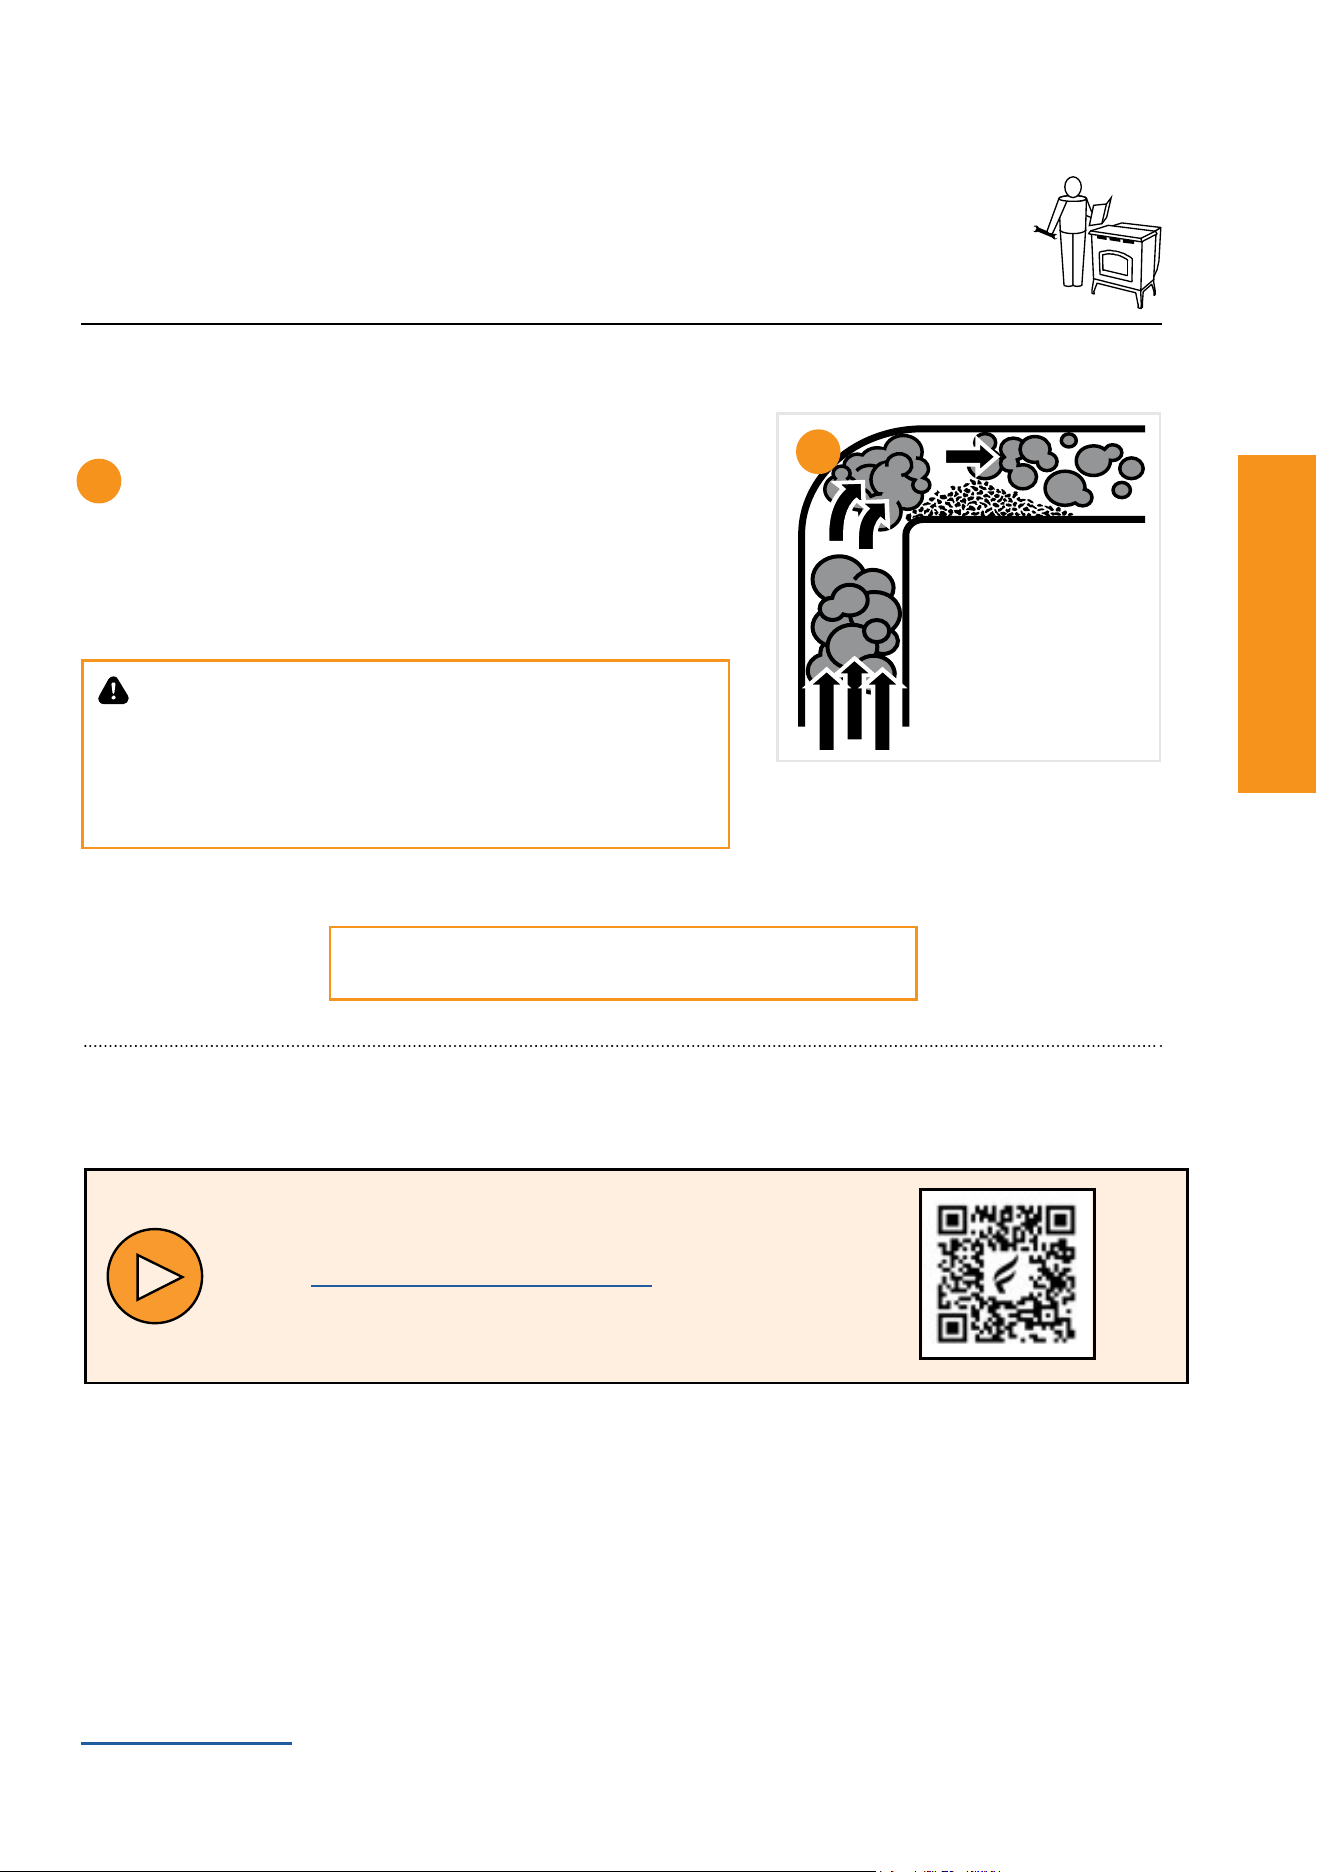
Pellet Venting
Addingbendsintheexhaustpathrestrictsairow,reduces
performance and provides a collection point for ash deposits
requiringmorefrequentcleaning.
Visit www.forgename.com/pages/pelpro or scan this code:
PelPro Cast Pellet Stove • 7093-60X • 04/26 PelPro Cast Pellet Stove • 7093-60X • 04/26
www.forgename.com8
Installing Your Stove
Installing Your Stove Installing Your Stove
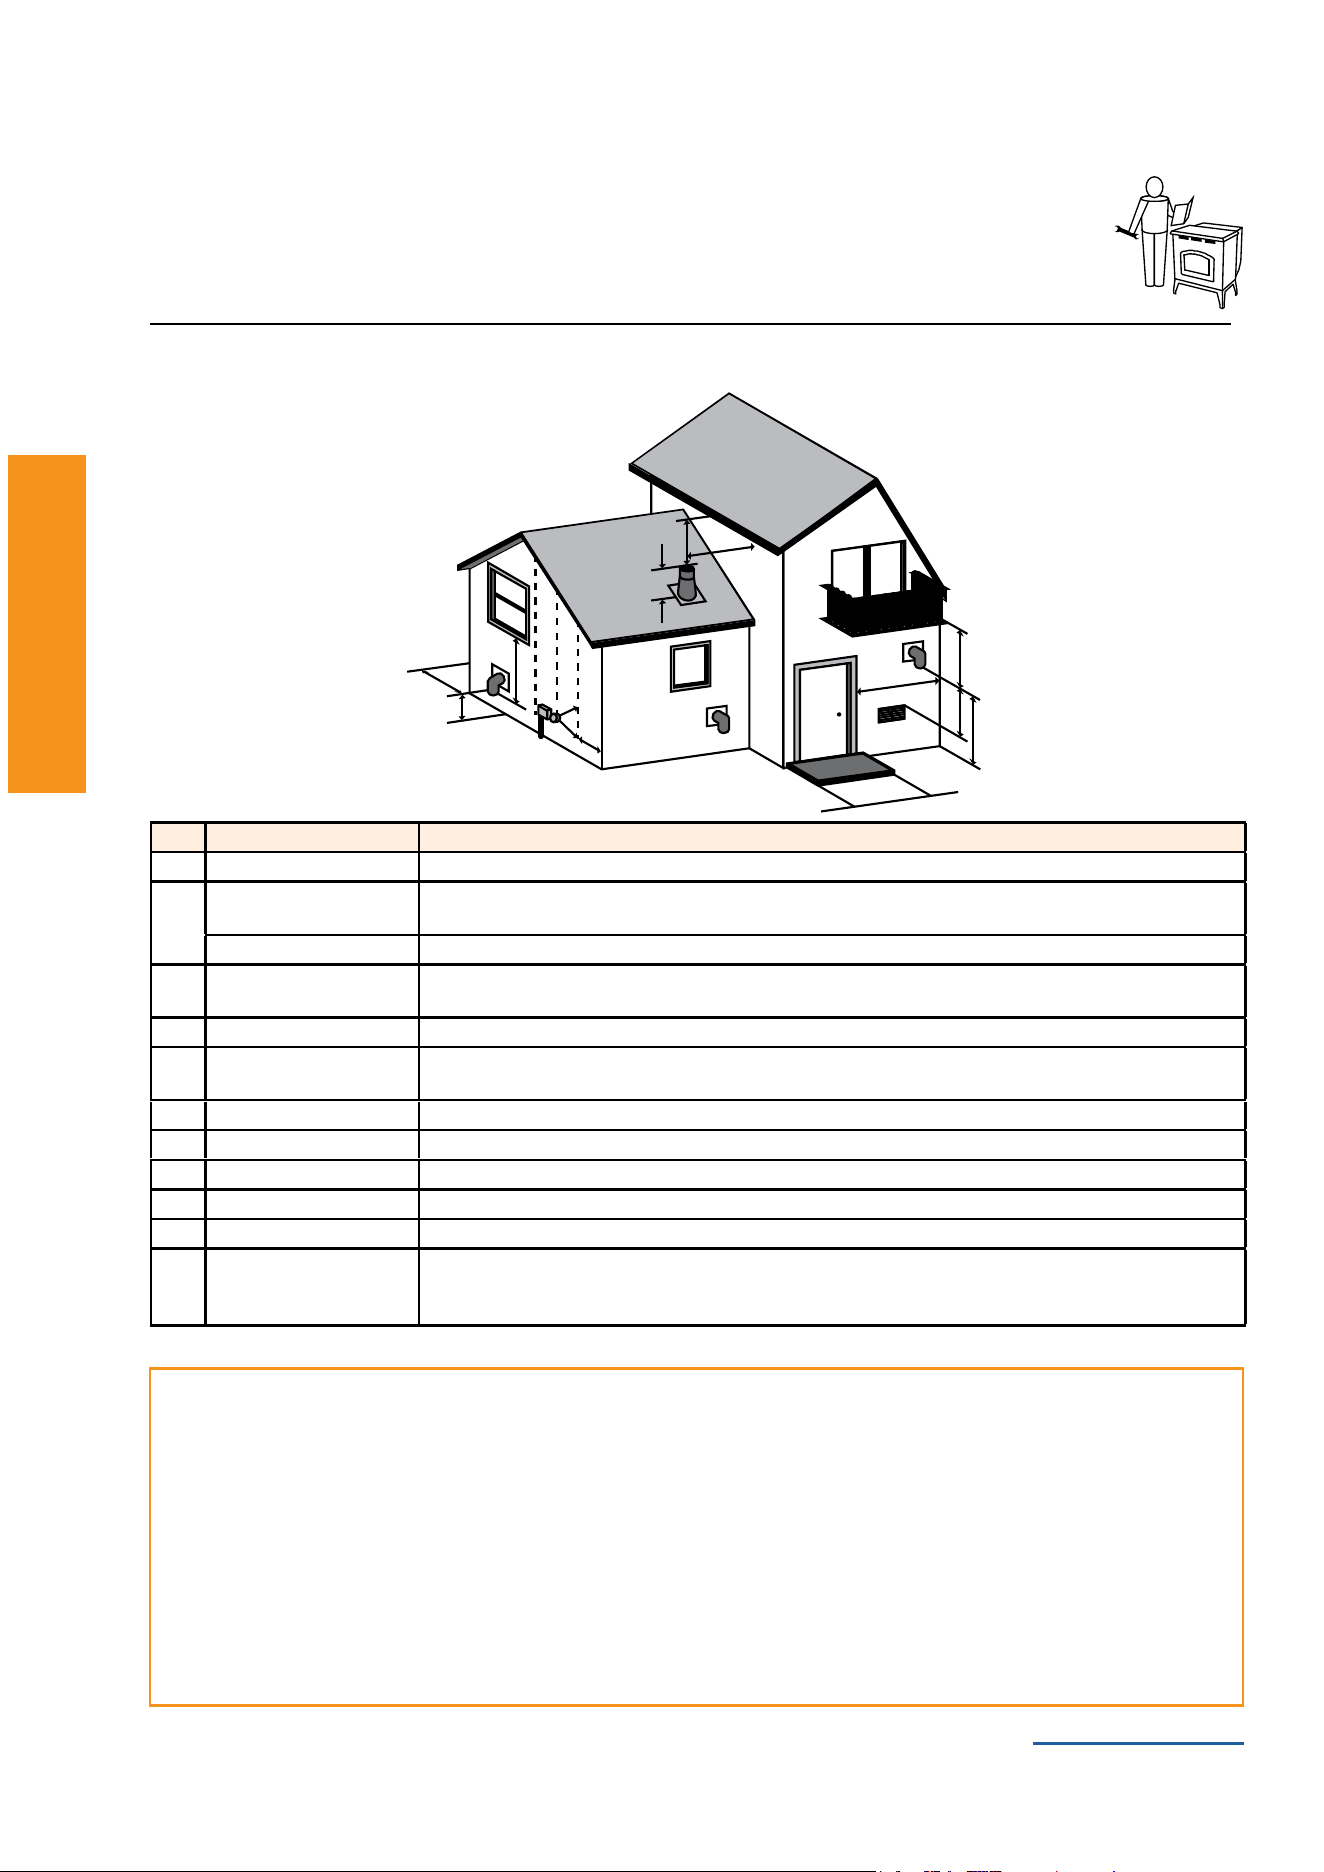
Vent Termination Clearances
A
D
B
L
C
K
J
B
I
H
G
F
Clearances
A 12” Clearanceabovegrade,verandaporch,deckorbalcony(Includingvegetationandmulch)
B
12”withoutsideairkit
48”nooutsideairkit
Clearance beside or below any windows or doors that open
12”* Clearance above any window or door that opens
C 18”
Verticalclearancetoventilatedsoftlocatedabovetheterminalwithinahorizontaldistanceof2feetfrom
the center line of the terminal
D 12” Clearance to an outside corner wall
F
12”withoutsideairkit
48”nooutsideairkit
Clearance to a non-mechanical air supply inlet to the building or a combustion air inlet to any other Stove
G 36” Clearance to a mechanical air supply inlet
H 84”** Clearance above a paved sidewalk or paved driveway located on public property
I 12”** Clearance under a veranda, porch, deck or balcony
J 12” Clearance above the roof
K 24” Clearance from an adjacent wall including neighboring buildings
L
36”withinaheightof15
feetabovethemeter/
regulator assembly
Clearancetoeachsideofcenterlineextendedabovenaturalgasorpropanemeter/regulatorassembly
or mechanical vent
Notice:
Do NOT terminate vent:
• Inanylocationthatwillallowuegasesorsootfrom
entering or staining the building
• In any location which could create a nuisance or hazard
• In any enclosed or semi-enclosed area such as a
carport, garage, attic, crawl space, under a sun deck or
porch or narrow walkway
• Closely fenced area, or any location that can build up
a concentration of fumes such as a stairwell, covered
breezeway, etc.
Notice:
Do NOT terminate below an air inlet.
• Itisrecommendedthatatleast60”(1.52m)ofvertical
pipe be installed when Stove is vented directly through
a wall—this will create a natural draft, which will help
prevent the possibility of smoke or odor venting into the
home during a power outage
• It will also keep exhaust from causing a nuisance or
hazard by exposing people or shrubs to high tempera-
tures
• The safest and preferred venting method is to extend
the vent vertically through the roof or above the roof
*Recommendedtopreventcondensationonwindowsandthermalbreakage.**Thisisarecommendeddistance.Foradditionalrequirementschecklocalcodes.
PelPro Cast Pellet Stove • 7093-60X • 04/26 PelPro Cast Pellet Stove • 7093-60X • 04/26
www.forgename.com 9
Installing Your Stove
Installing Your Stove Installing Your Stove
Notice: BecarefultoprotectthebottomoftheStoveandoorsurfaceswhenmovingtheStove.Bottomedges
of Stove are sharp and can scratch surfaces.
1
1
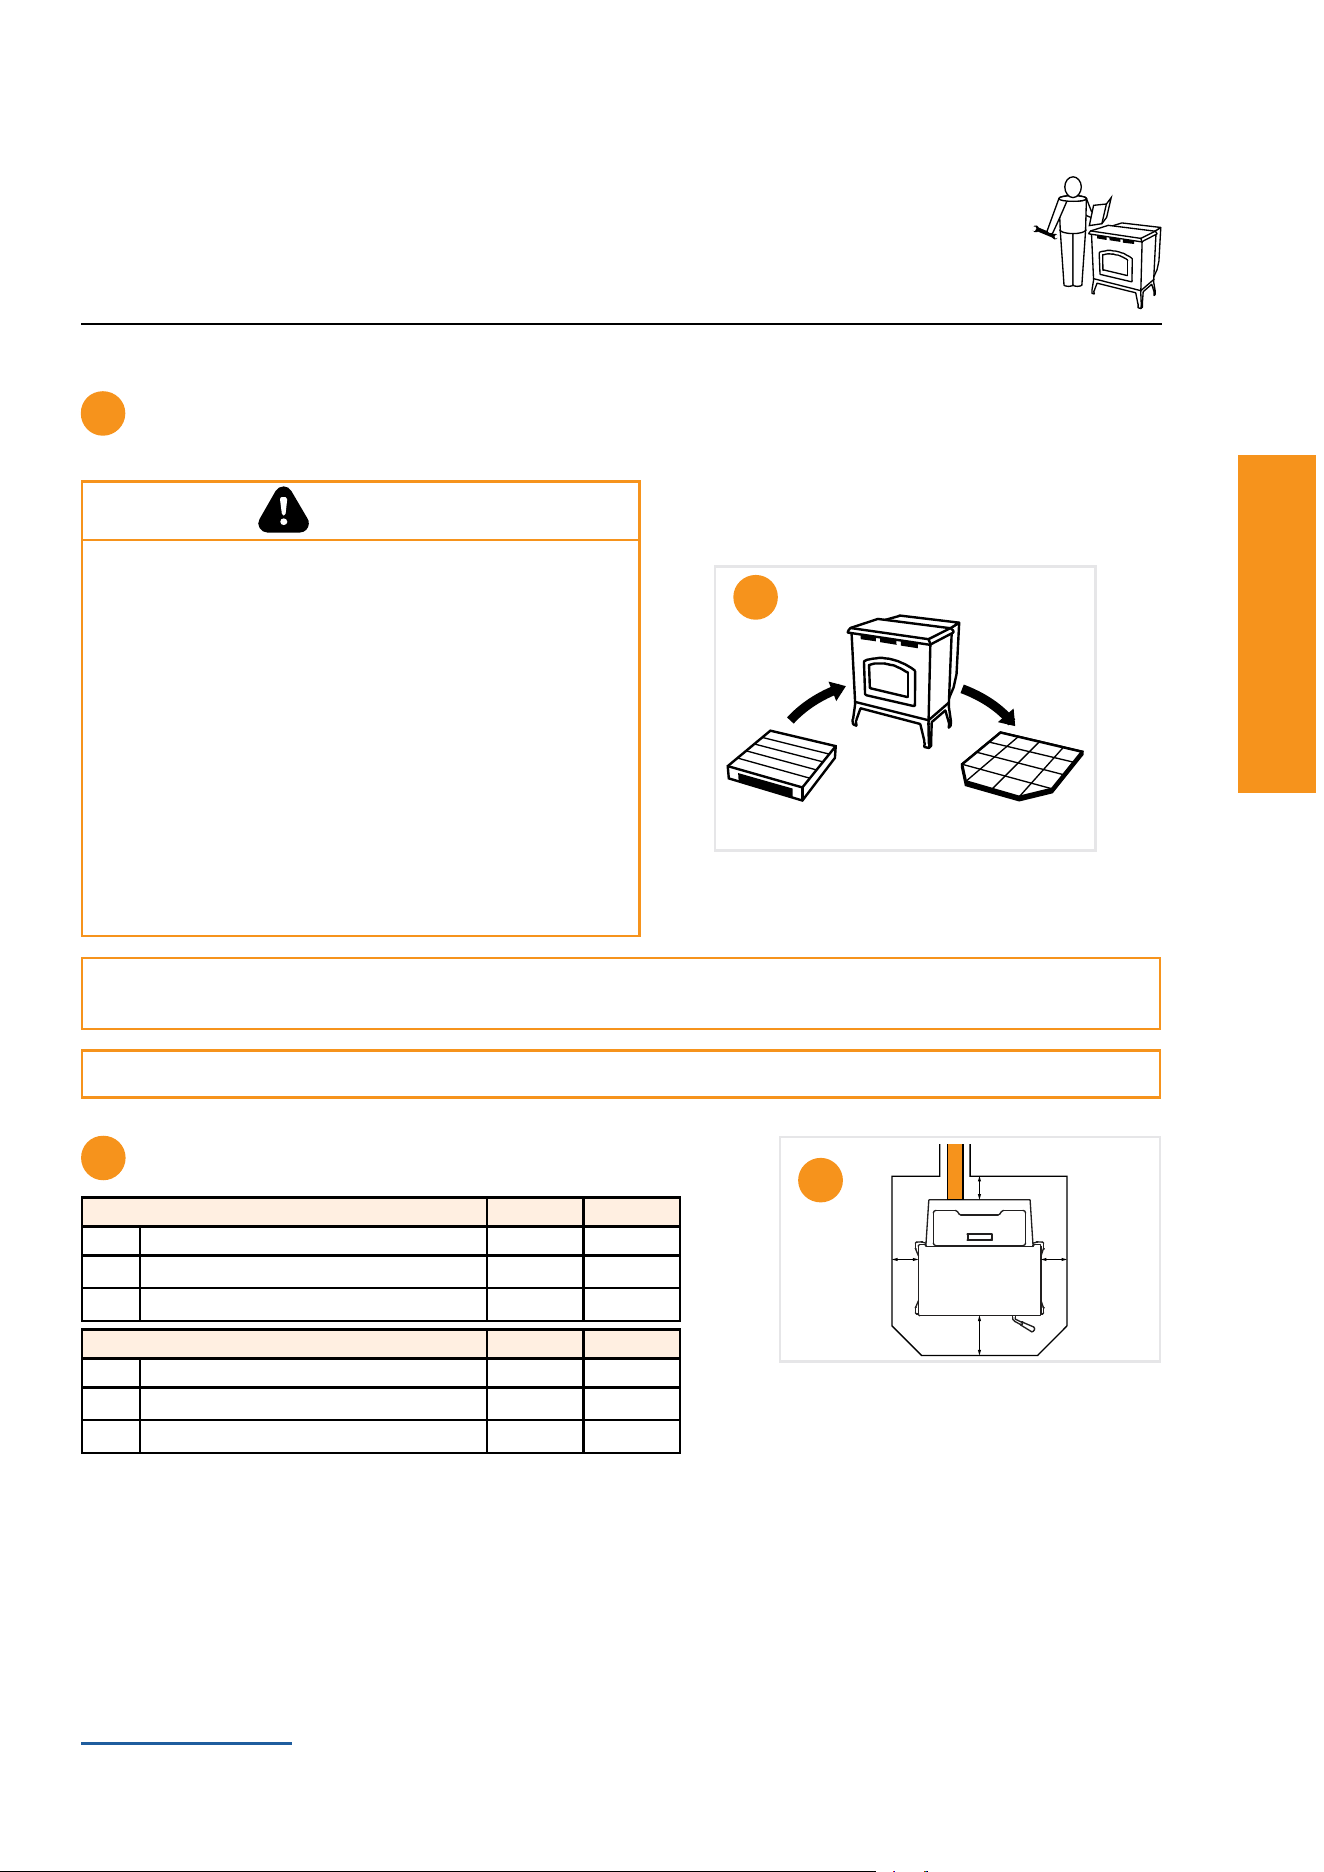
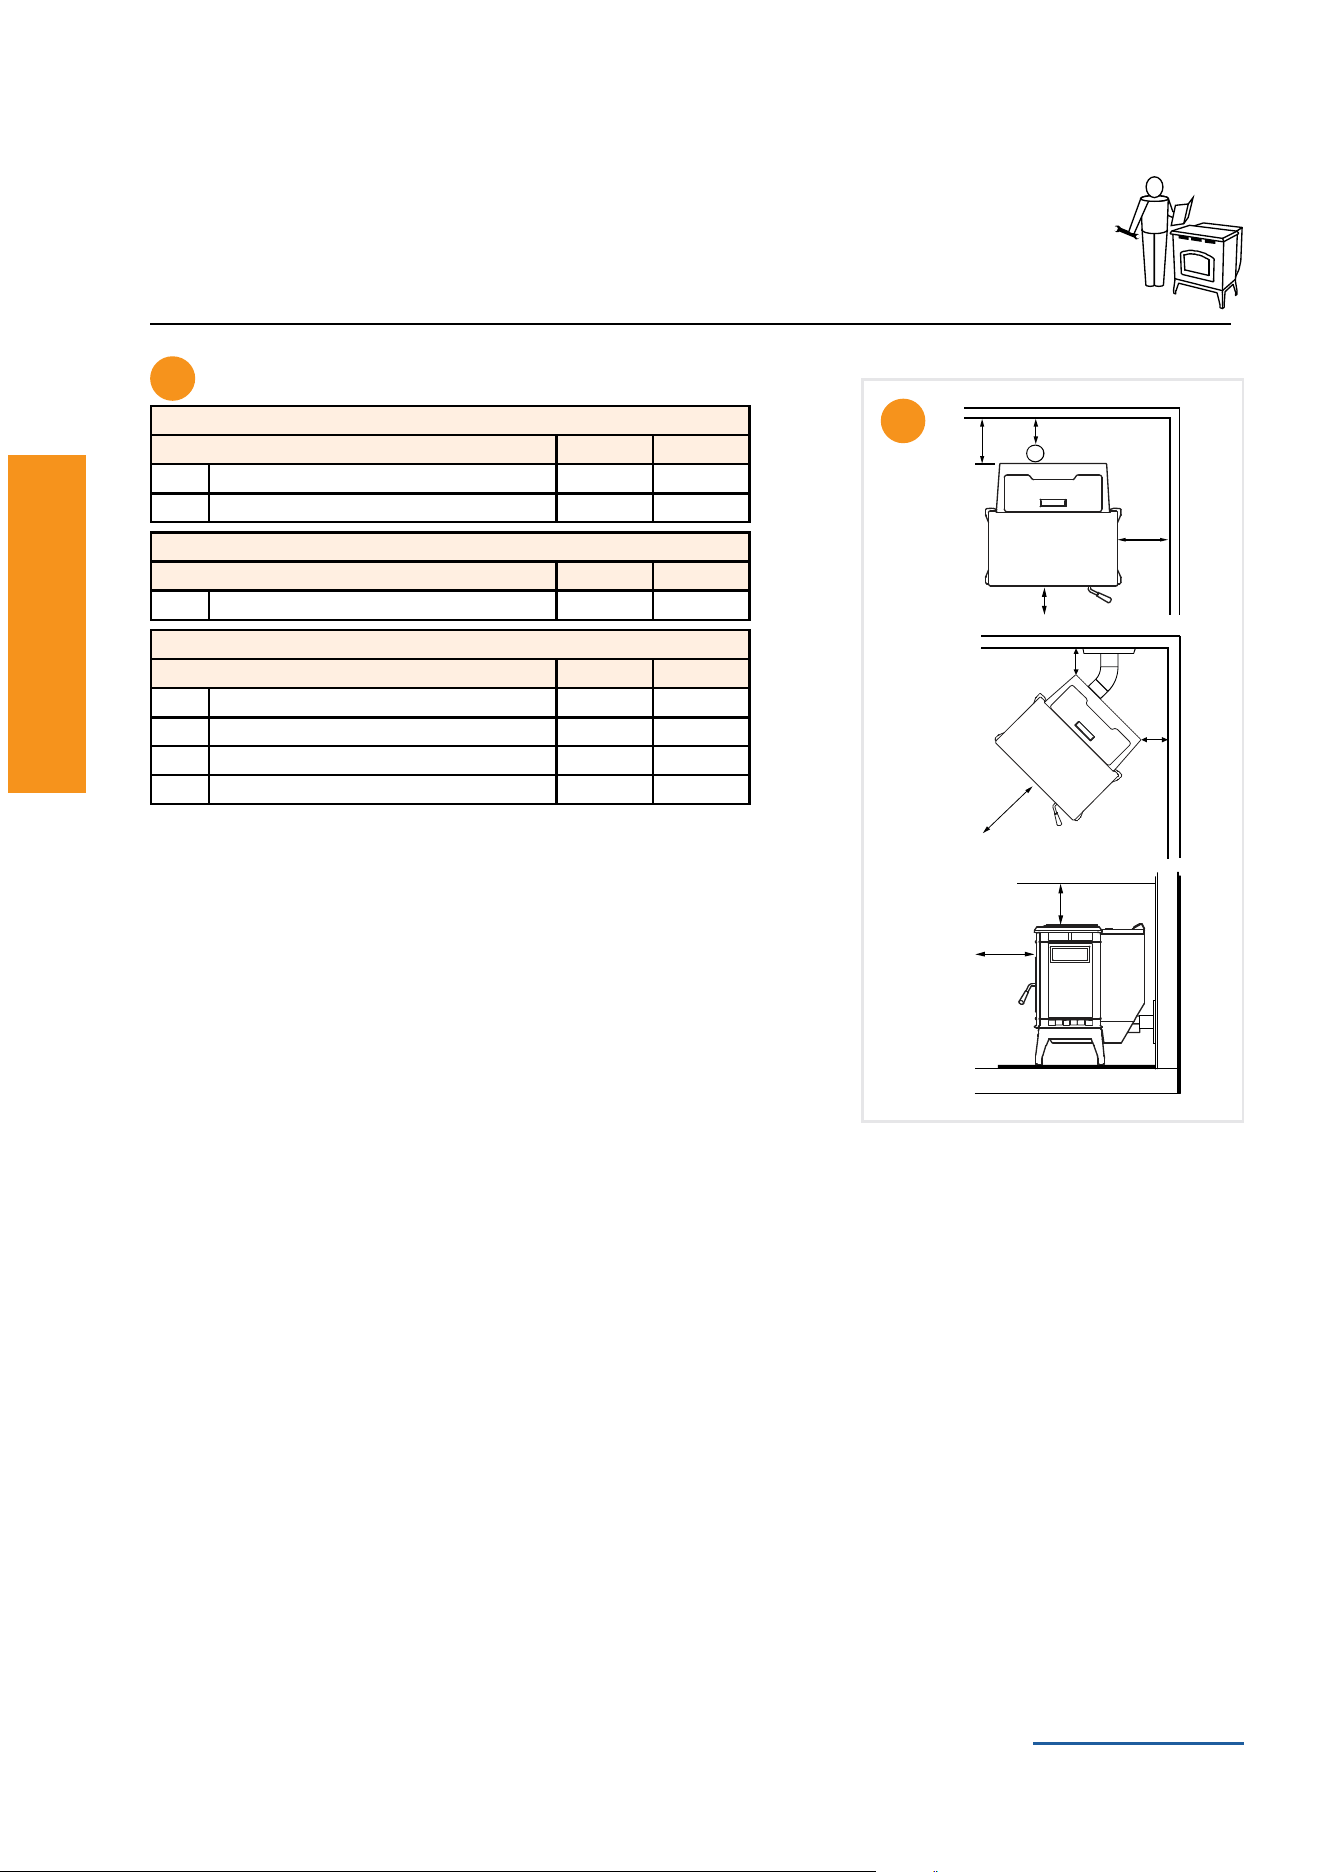
Placing Your Stove
Stovemustbeinstalledonanon-combustibleoor.Ifneeded,placeoorprotection(suchasahearthpad)
beneath the Stove. Move Stove from pallet onto your non-combustible surface. Do not operate the Stove while
it sits on the pallet.
Notice: Clearances may only be reduced by means approved by the regulatory authority having jurisdiction.
CAUTION
Hearth and Home Technologies does not recommend adhesive
based vinyl ooring due to thermal expansion. Floating-style
ooring(LVP-luxuryvinylplankorLVT–luxuryvinyltile)canbe
used,butitwillreachtemperaturesupto110°Finaroomwith
ambienttemperatureof70°F.Consultooringspecicationsto
ensure compatibility.
HHT recommends wood stoves and inserts have 29 inches of
alternativeooringinfrontofthestovebeforeusingLVP/LVT
regardless if they sit ush on the oor or are elevated on a
raised hearth.
Forallotherooring,continuetofollowclearancetocombustible
requirementsintheinstallationmanual.
NOTICE: Clearances that do not meet the minimum guidelines
couldresultindamageorbucklingtothevinylooringandis
done at the installer’s or homeowner’s risk.
USA Hearth Pad Requirements Inches mm
A Sides 2 51
B Back 2 51
C Front 6 152
2
B*
A
C
A
2 Hearthpadminimumrequirements:
Canada Hearth Pad Requirements Inches mm
A Sides 8 203
B Back 2 51
C Front 6 152
Non-combustibleoorprotectionextendingbeneaththeuepipeisrequiredwithhorizontalventingwithverticalinstallation.
*Non-combustibleoorprotectionmustextend2inches(51mm)beneaththeuepipewheninstalledhorizontalventingwith
vertical installation. CANADA REQUIRED, USA RECOMMENDED.
PelPro Cast Pellet Stove • 7093-60X • 04/26 PelPro Cast Pellet Stove • 7093-60X • 04/26
www.forgename.com
10 11
Installing Your Stove
Installing Your Stove Installing Your Stove
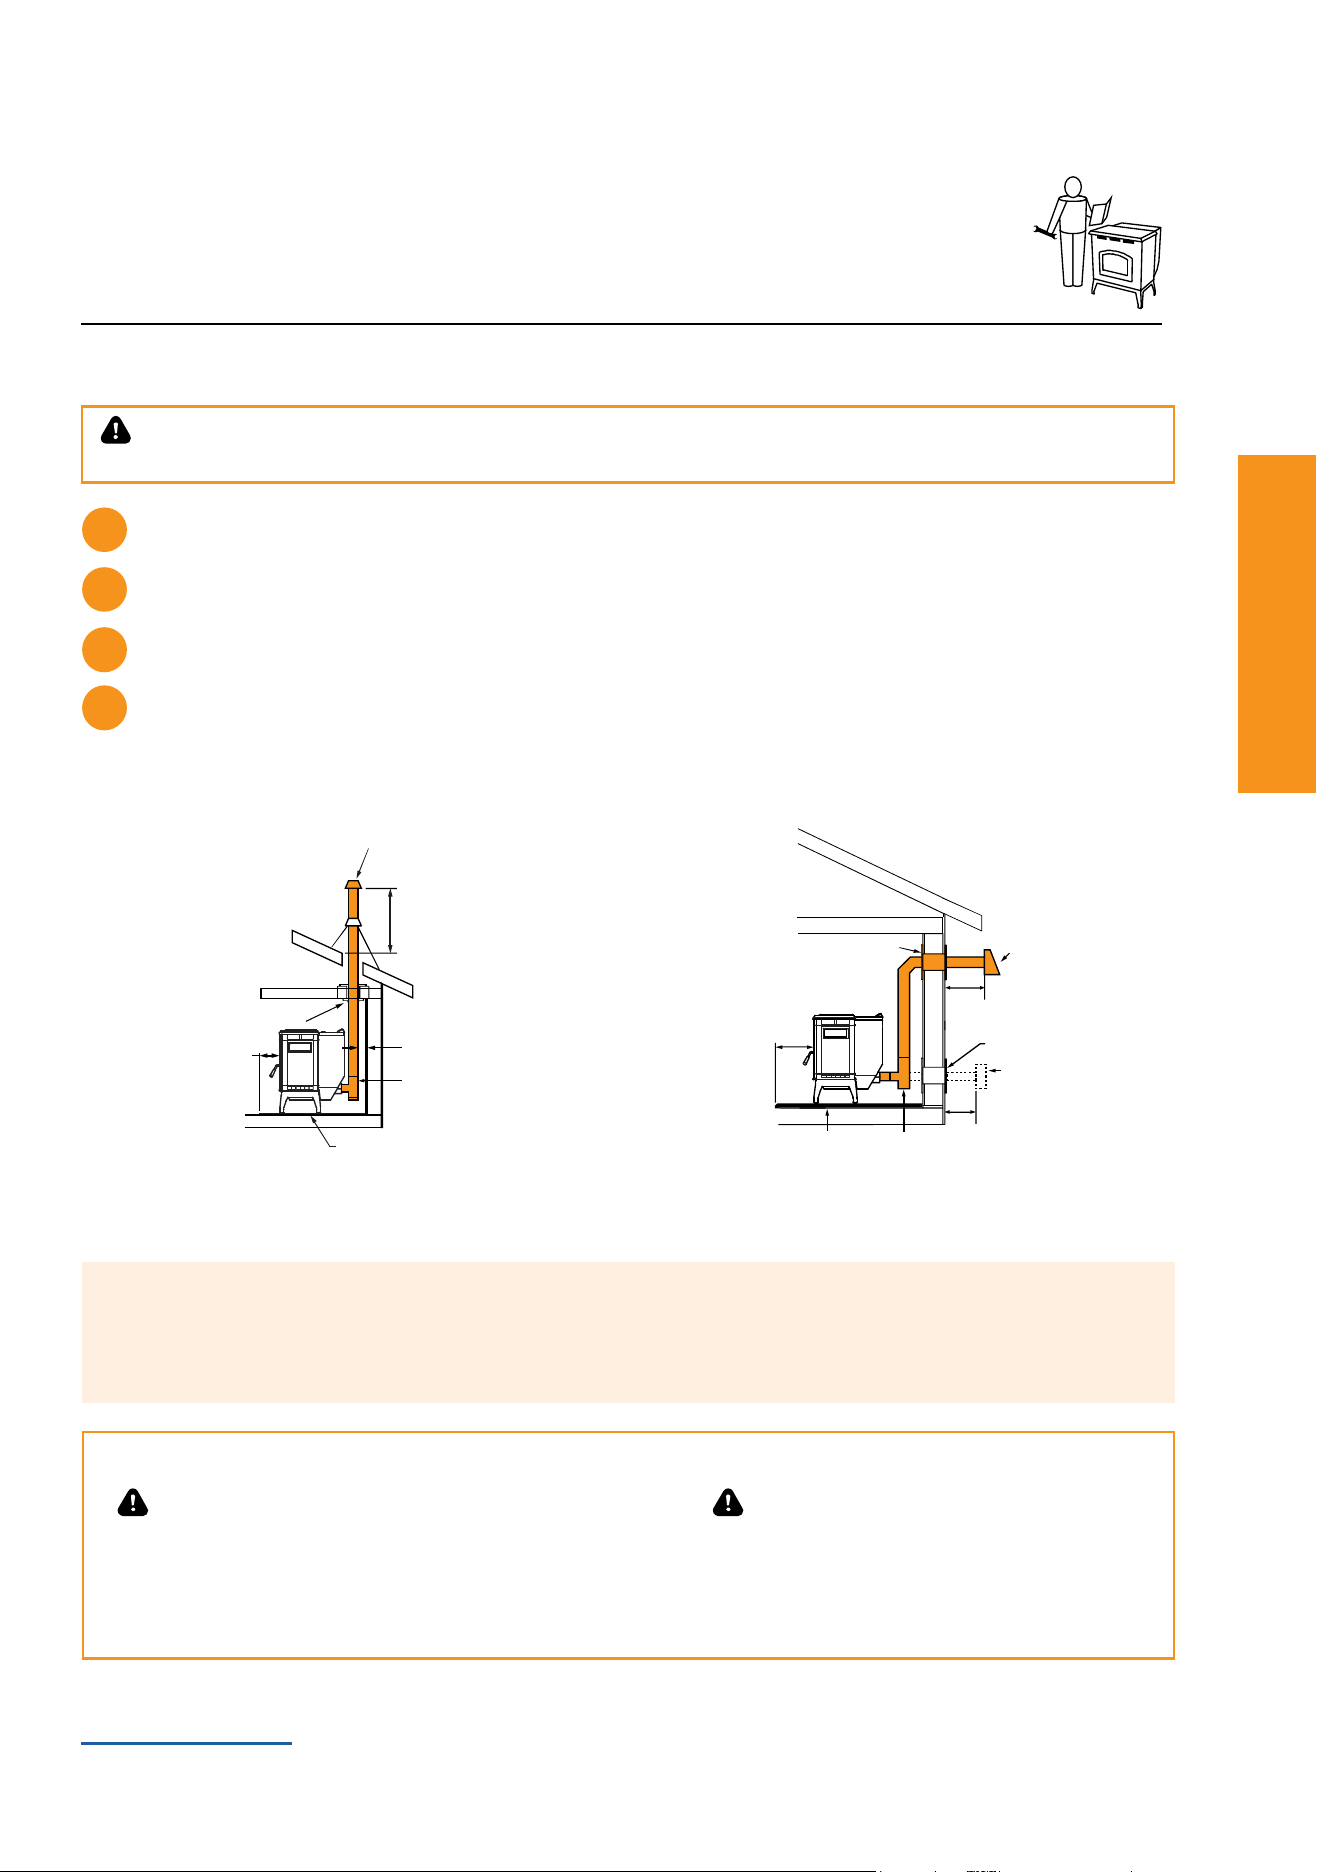
Conrmrequiredclearancestocombustibles:3
Vertical Installations (Interior Flue)
Straight back against wall Inches mm
D Back wall to pellet pipe 3 76
E Side wall to Stove 13 330
Horizontal Installations
Straight back against wall Inches mm
G Back wall to Stove 2 51
E Side wall to Stove 13 330
H Clearance to top of Stove 7 178
J Clearance to front of Stove 48 1219
Corner Installation
Straight back against wall Inches mm
F Walls to Stove 3 76
3
G
E
D
J
F
F
J
H
J
PelPro Cast Pellet Stove • 7093-60X • 04/26 PelPro Cast Pellet Stove • 7093-60X • 04/26
www.forgename.com
10 11
Installing Your Stove
Installing Your Stove Installing Your Stove
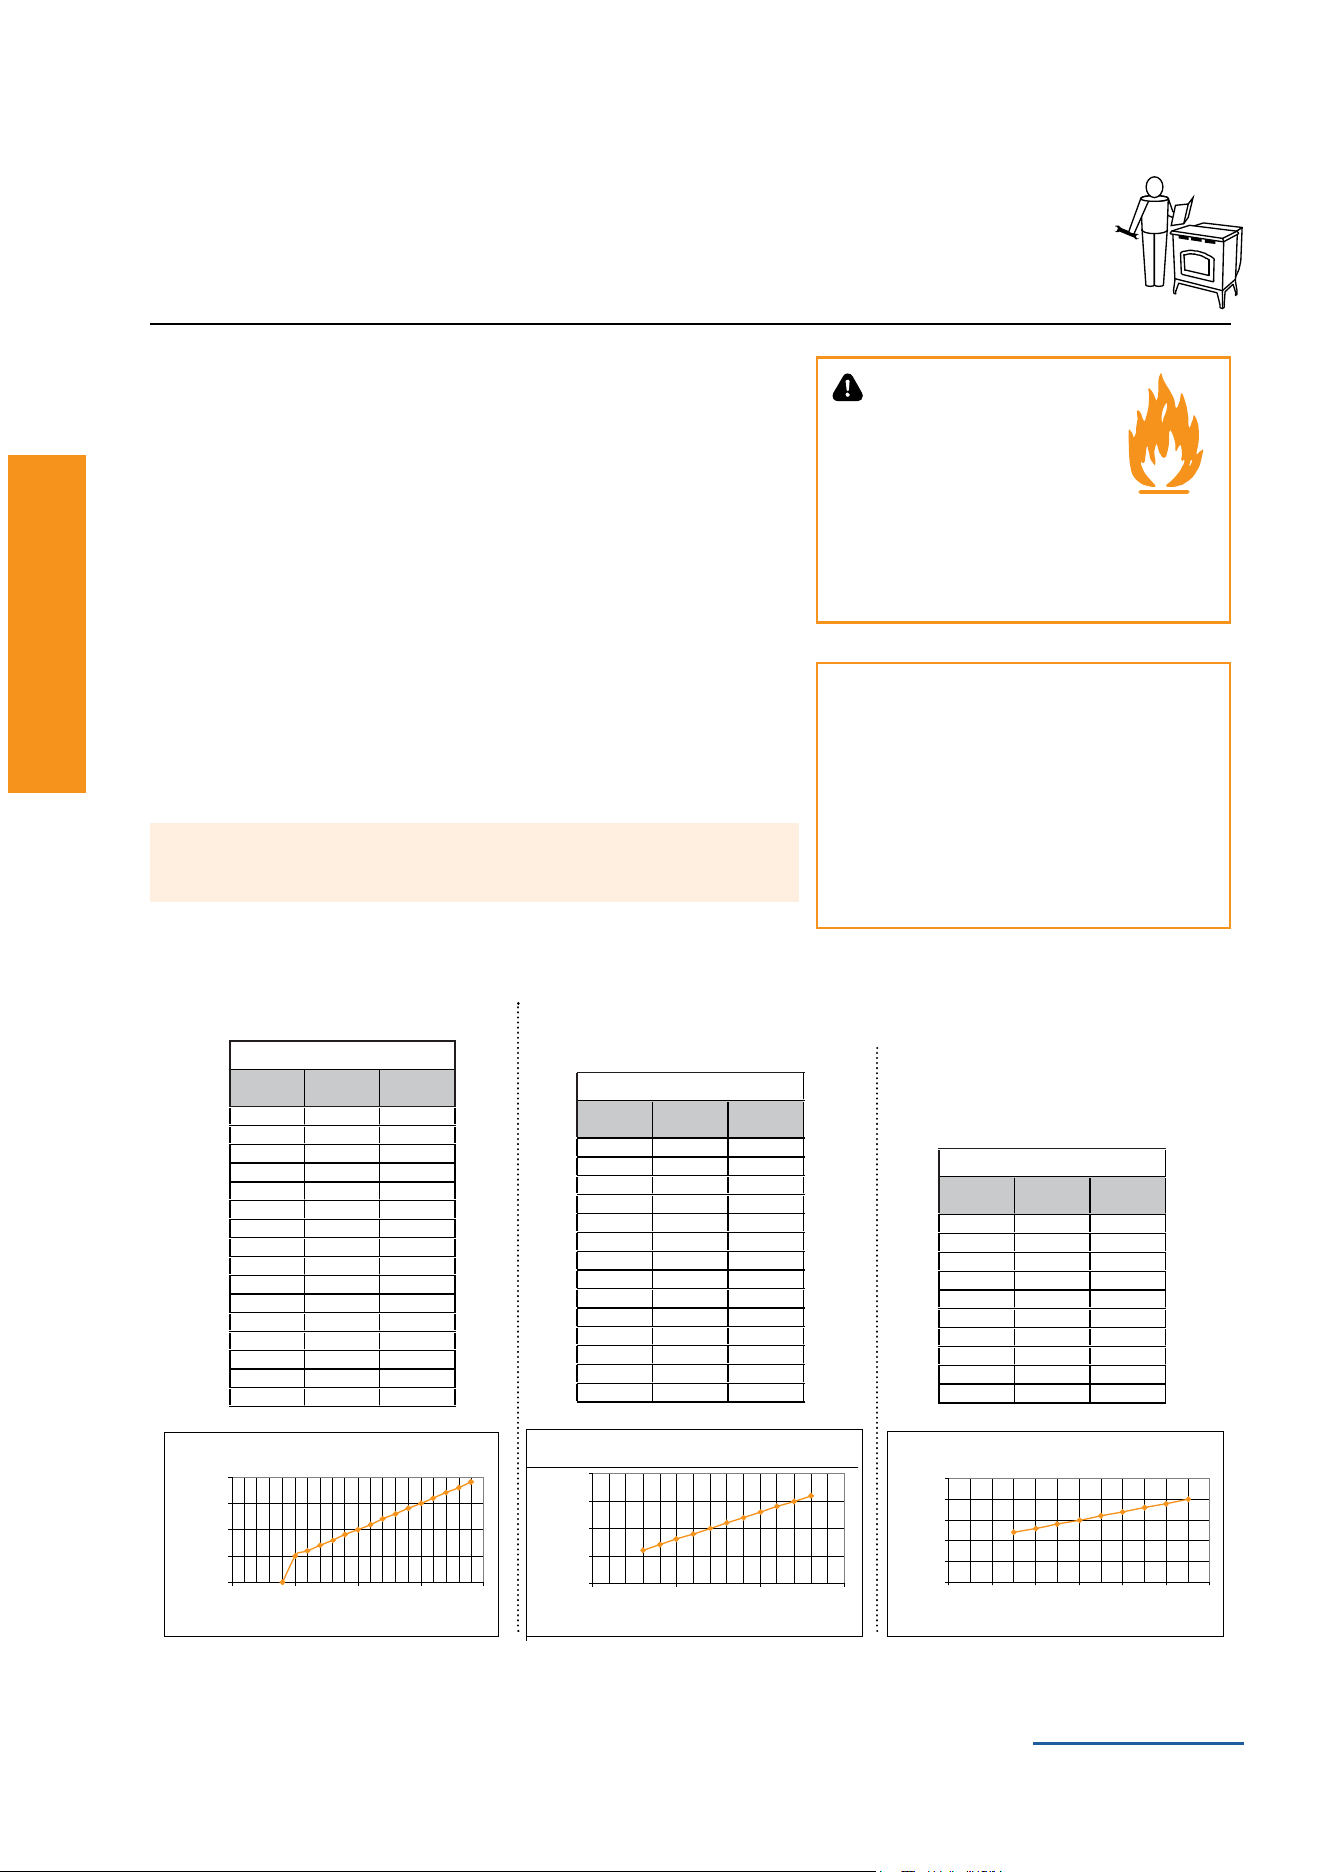
Pro Tips
• Seeventingmanufacturer’srequiredclearancestocombustibles
• Forhorizontalinstallations,theminimumclearancefromexteriortoterminationcapis6”—you
maywanttoincreaseto18”clearancetominimizesootblowbackonhomeexterior.
Install venting. (For additional installation options visit pelprostoves.com)
3
Install wall thimble (sold separately) per manufacturer requirements.
2
Vertical - Interior, Preferred Installation
6 in.
(152mm)
Min.
Clean-out T
Firestop
Flashing
Rain Cap
Non-combustible Hearth Pad
12 in. (305mm) Minimum
Ceiling Support
Follow pipe manufacturer
listed clearance
Exterior - Optional Installations
Non-combustible
Hearth Pad
Wall Thimble
Horizontal
Termination Cap
Termination
Cap
6 in. (152 mm)
Minimum
6 in.
(152 mm)
Minimum
Clean Out T
Wall Thimble
6 in.
(152 mm)
Minimum
Venting Your Stove
CAUTION!
Take appropriate precautions to locate utilities within the wall and avoid contact.
WARNING!
Do not terminate venting in any enclosed or semi-enclosed area
such as: a carport, garage, attic, crawl space, under a sun deck
or porch, narrow walkway or closely fenced area, or any location
that can build up a concentration of fumes such as a stairwell,
covered breezeway, etc.
CAUTION!
Ensure that your Stove venting terminates above
your Stove. The following may occur:
• Your Stove Stove will not draft properly
• Smoke may seep in your house
• Excessive sooting
Installventatclearancesspeciedbythemanufacturer
Use silicone to create an effective vapor barrier at the location where the chimney or other compo-
nent penetrates to the exterior of the structure.
4
NOTE:InCanadawhenusingafactory-builtchimneyitmustbesafetylisted,TypeUL103HT(2100
o
F)CLASS“A”or
conformingtoCAN/ULC-S629M,STANDARDFOR650
o
C FACTORY-BUILT CHIMNEYS.
Mark and cut wall for venting penetration on exterior wall (if needed).
1
PelPro Cast Pellet Stove • 7093-60X • 04/26 PelPro Cast Pellet Stove • 7093-60X • 04/26
www.forgename.com
12 13
Installing Your Stove
Installing Your Stove Installing Your Stove
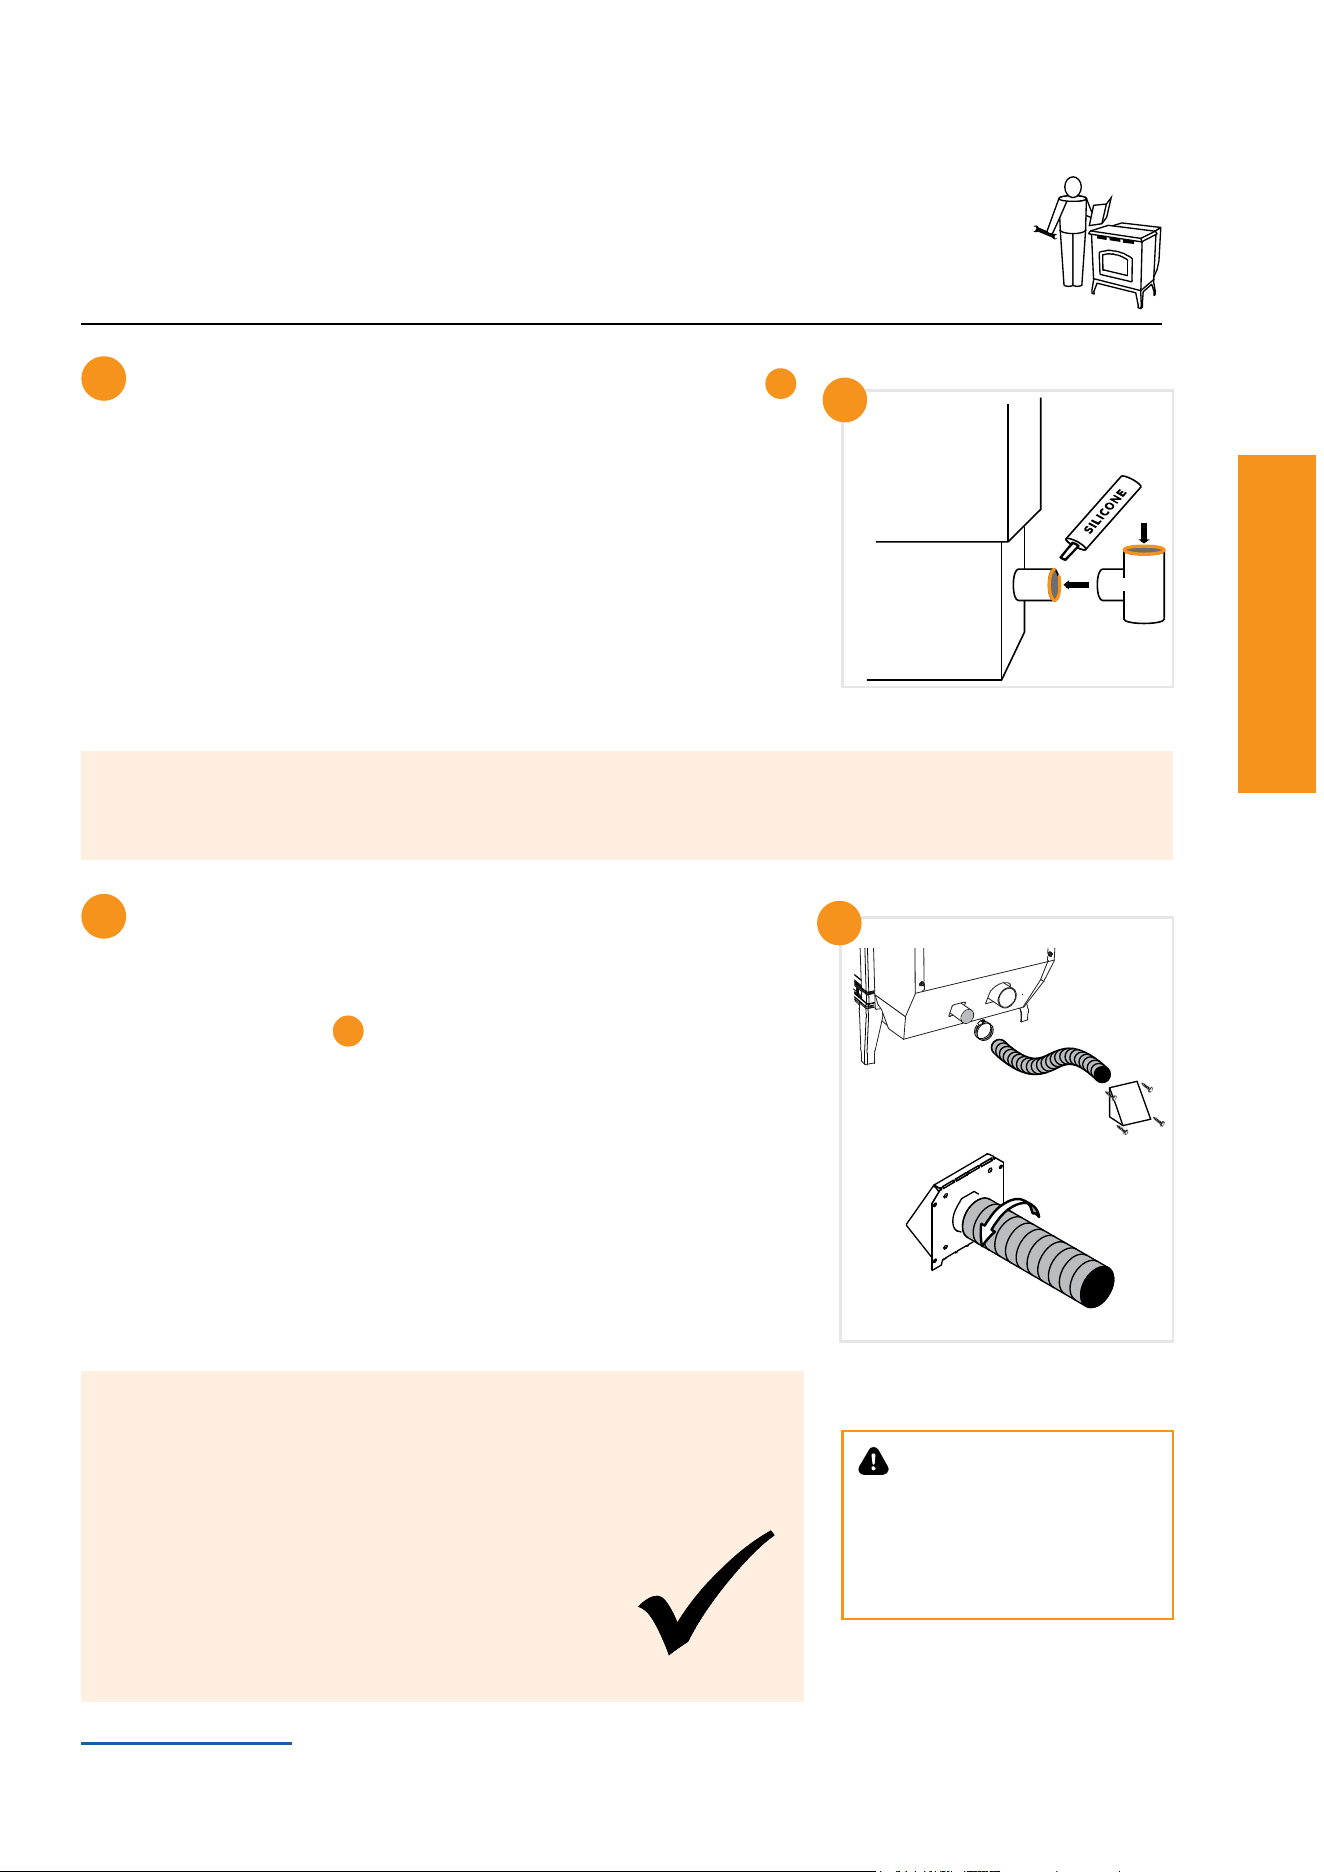
• 45° elbow is equivalent to 1 foot of straight pipe
• 90° elbow is equivalent to 3 feet of straight pipe
Notice:
These are guidelines for successful
venting of your pellet Stove. The more
vertical rise you can obtain in your sys-
tem, the better it will perform. Horizontal
vent runs can accumulate ash and will
need to be cleaned more often. Try to
keep them as short as possible.
Venting Your Stove
The maximum horizontal venting allowed with no vertical venting
attachedis48inchesincludingone90°elbowortwo45°elbows.
Additionofanyhorizontalventingbeyond48inchesrequiresa
minimum60inchesofadditionalverticalvent.Horizontalsections
ofventpipeshouldhavea1/4inchriseperfoot.Werecommend
using the shortest venting and fewest elbows possible when venting
horizontal.
Werecommendtheuseof4inchventwithanyinstallationrequiring
morethantwo90°elbows,ormorethan15feetofventing.
Minimum Vertical Vent for One Elbow
0
5
10
15
20
0 5 10 15 20
Horizontal Run, (ft)
Minimum Vertical Rise
(ft)
Horizontal Run (FT)
Minimum Vertical Vent for One Elbow
0
5
10
15
20
0 5 10 15
Minimum Vertical
Rise, (ft)
Minimum Vertical Vent for Two Elbows
Length of Horizontal Sections (FT)
0
5
10
15
20
25
0 2 4 6 8 10 12
Minimum Vertical Rise
(ft)
Minimum Vertical Vent for Three Elbows
Length of Horizontal Sections (FT)
ONE 90° ELBOW
Total
Horizontal
Minimum
Vertical
Vent
Diameter
4 0 3
5 5 3
6 6 3
7 7 3
8 8 4
9 9 4
10 10 4
11 11 4
12 12 4
13 13 4
14 14 4
15 15 4
16 16 4
17 17 4
18 18 4
19 19 4
TWO 90° ELBOWS
Total
Horizontal
Minimum
Vertical
Vent
Diameter
2 5 3
3 6 3
4 7 3
5 8 3
6 9 3
7 10 4
8 11 4
9 12 4
10 13 4
11 14 4
12 15 4
13 16 4
14 17 4
15 18 4
THREE 90° ELBOWS
Total
Horizontal
Minimum
Vertical
Vent
Diameter
2 11 4
3 12 4
4 13 4
5 14 4
6 15 4
7 16 4
8 17 4
9 18 4
10 19 4
11 20 4
WARNING!
Fire Risk.
• Only LISTED
venting components
may be used
• NO OTHER vent components may
be used. Substitute or damaged
vent components may impair safe
operation.
PelPro Cast Pellet Stove • 7093-60X • 04/26 PelPro Cast Pellet Stove • 7093-60X • 04/26
www.forgename.com
12 13
Installing Your Stove
Installing Your Stove Installing Your Stove
Pro Tip
Installingaclean-out“T”(soldseparately)totherear
of your Stove, when venting vertically can save time during cleaning.
Install outside air kit (included)
For optimal performance, PelPro recommends the outside air kit
forallinstallations.Outsideairkitisrequiredforallmobile/manu-
factured home installations.
Install through wall
B
• Maintain clearances from exhaust
- AttachexpipetooutsideairconnectiononStove
- Use hose clamp
- Route tube outside the structure
- Attach cap
- Secure to outside wall with appropriate fasteners
6
B
CAUTION!
Never draw outside combustion
air from:
• Wall,oororceilingcavity
• Enclosed space such as an
attic, garage or crawl space.
Installpelletventingthroughwallandconnectvent/pipetoStove
A
• Some venting manufacturers offer pellet Stove adapters for their
venting for easier installation
• Sealallpipejointsusinghigh-tempsilicone(500°+)
• Secure exhaust venting system to the Stove with at least 3 screws
or rivets per the pipe manufacturer’s instructions. Also secure all
connector pipe joints with at least 3 screws through each joint.
• Install termination cap
• ConrmallrequiredStoveclearancestocombustibles
A
5
Take a Break
Inspect your work:
_____Conrmclearancestocombustiblesaremaintained
_____ Pipe joints are secure and properly sealed
_____ Outside air kit installed properly
_____Conrmterminationclearances

PelPro Cast Pellet Stove • 7093-60X • 04/26 PelPro Cast Pellet Stove • 7093-60X • 04/26
www.forgename.com
14 15
Using Your Stove
Using Your Stove Using Your Stove
Fuel Material and Fuel Storage
Pelletfuelqualitycangreatlyuctuate.Werecommendthatyoubuyfuelinmulti-tonlotswheneverpossible.
However, we do recommend trying various brands before purchasing multi-ton lots to ensure your satisfac-
tion. Store fuel in dry location not within clearances to combustibles of your Stove.
Fuel Material
• Made from sawdust or wood by-products
• Depending on the source material it may have a high or low ash content.
Higher Ash Content Material
• Hardwoods with a high mineral content
• Fuel that contains bark
• Standard grade pellets or high ash pellets
Lower Ash Content Material
• Most softwoods
• Fuels with low mineral content
• Most premium grade pellets
Fuel Tips
Pro Tip
WerecommendtheuseofPelletFuelsInstitutecertiedpelletfuelwiththisproduct.
Your Stove has a manufacture-set minimum low burn rate that must not be altered. It is
against federal regulations to alter this setting or otherwise operate your Stove in a manner
inconsistent with operation instructions in this manual.
PelPro Cast Pellet Stove • 7093-60X • 04/26 PelPro Cast Pellet Stove • 7093-60X • 04/26
www.forgename.com
14 15
Using Your Stove
Using Your Stove Using Your Stove
1
2
4
3
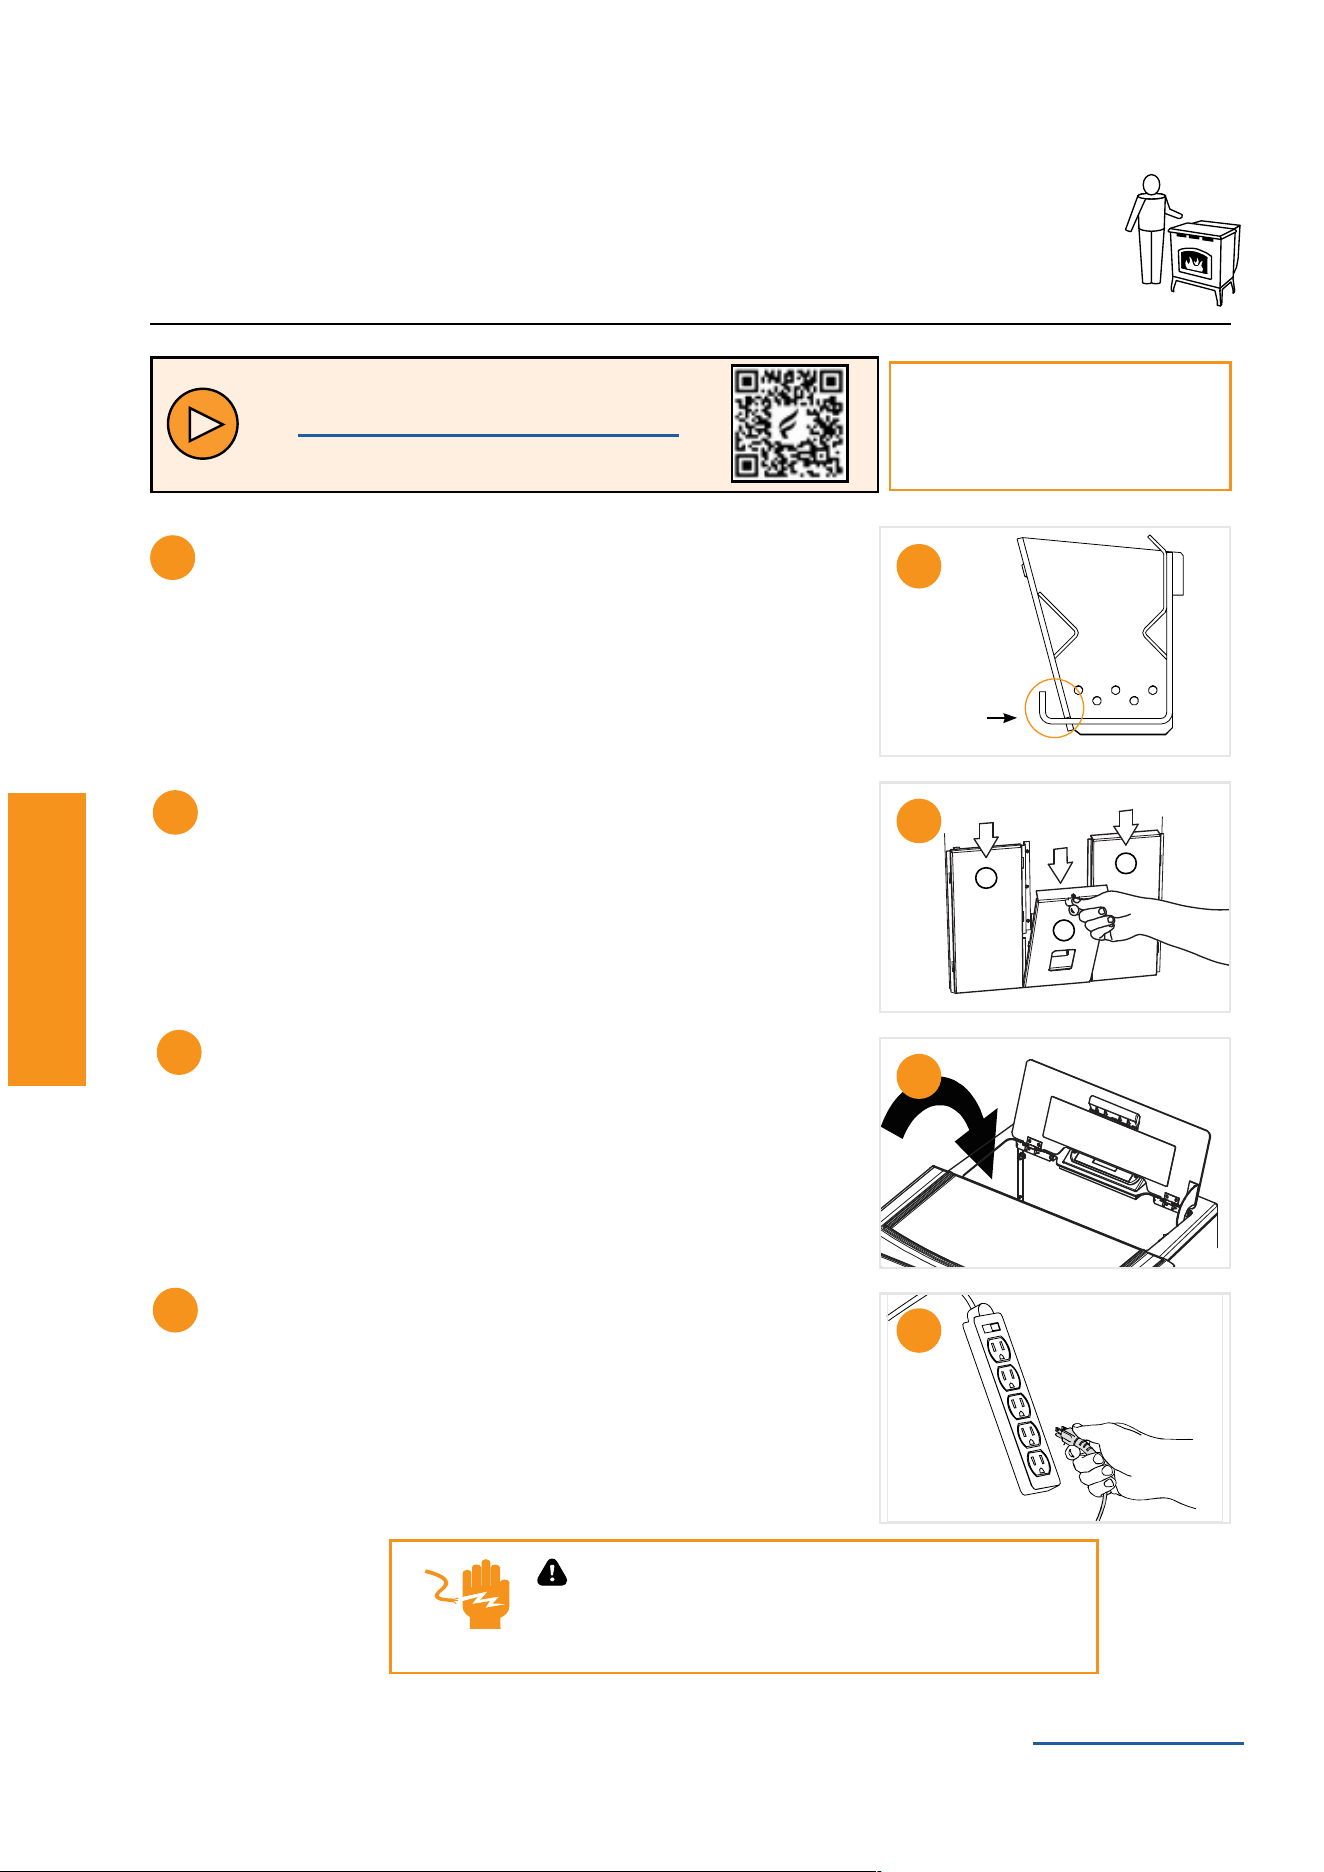
What to Expect
1
Combustion blower will turn on
2
Igniter will turn on
3
Pelletswilldrop,smokemayoccurinreboxbutwillevacuate,
andamewillappearinrepot.
4
Convection blower will automatically turn on after the Stove
heats up. Convection blower will continue to run even after your
Stove has been shut down.
Pro Tips
• Odors and vapors are released during initial startup after purchase; burning your Stove on
HIfor30minuteswillallowthepainttocure.Openwindowsordoorsforaircirculationuntil
burn off is complete.
• During start up and normal operation your Stove’s front door must be closed
• PrimingisonlyrequiredthersttimeyourStoveislit,orafteraFUELFEEDALARM.
StartingyourStovethersttime
WARNING!
Fire Risk
Keepcombustiblematerials,gasolineandotherammablevaporsandliquidsclearofStove.
• Do NOT operate Stove with door open
• DoNOToperateStovewithrepotooropen
• DoNOTstoreammablematerialsintheStove’svicinity
• DoNOTusegasoline,lanternfuel,kerosene,charcoallighteruidorsimilarliquidsorgelstostartor
“freshenup”areinthisStove
KeepallsuchliquidswellawayfromtheStovewhileitisinuseascombustiblematerialsmayignite.
This product and the fuels used to operate this product (wood), and the
products of combustion of such fuels, can expose you to chemicals
including carbon black, which is known to the State of California to
cause cancer, and carbon monoxide, which is known to the State of
California to cause birth defects or other reproductive harm. For more
information go to: WWW.P65Warnings.ca.gov
WARNING
WARNING!
HOT SURFACES!
Glass and other surfaces are hot during operation AND cool down.
Hot glass will cause burns.
• Do not touch glass until it is cooled
• NEVER allow children to touch glass
• Keep children away
• CAREFULLYSUPERVISEchildreninsameroomasreplace
• Alert children and adults to hazards of high temperatures
• Hightemperaturesmayigniteclothingorotherammablematerials
• Keepclothing,furniture,draperiesandotherammablematerialsaway
PelPro Cast Pellet Stove • 7093-60X • 04/26 PelPro Cast Pellet Stove • 7093-60X • 04/26
www.forgename.com
16 17
Using Your Stove
Using Your Stove Using Your Stove
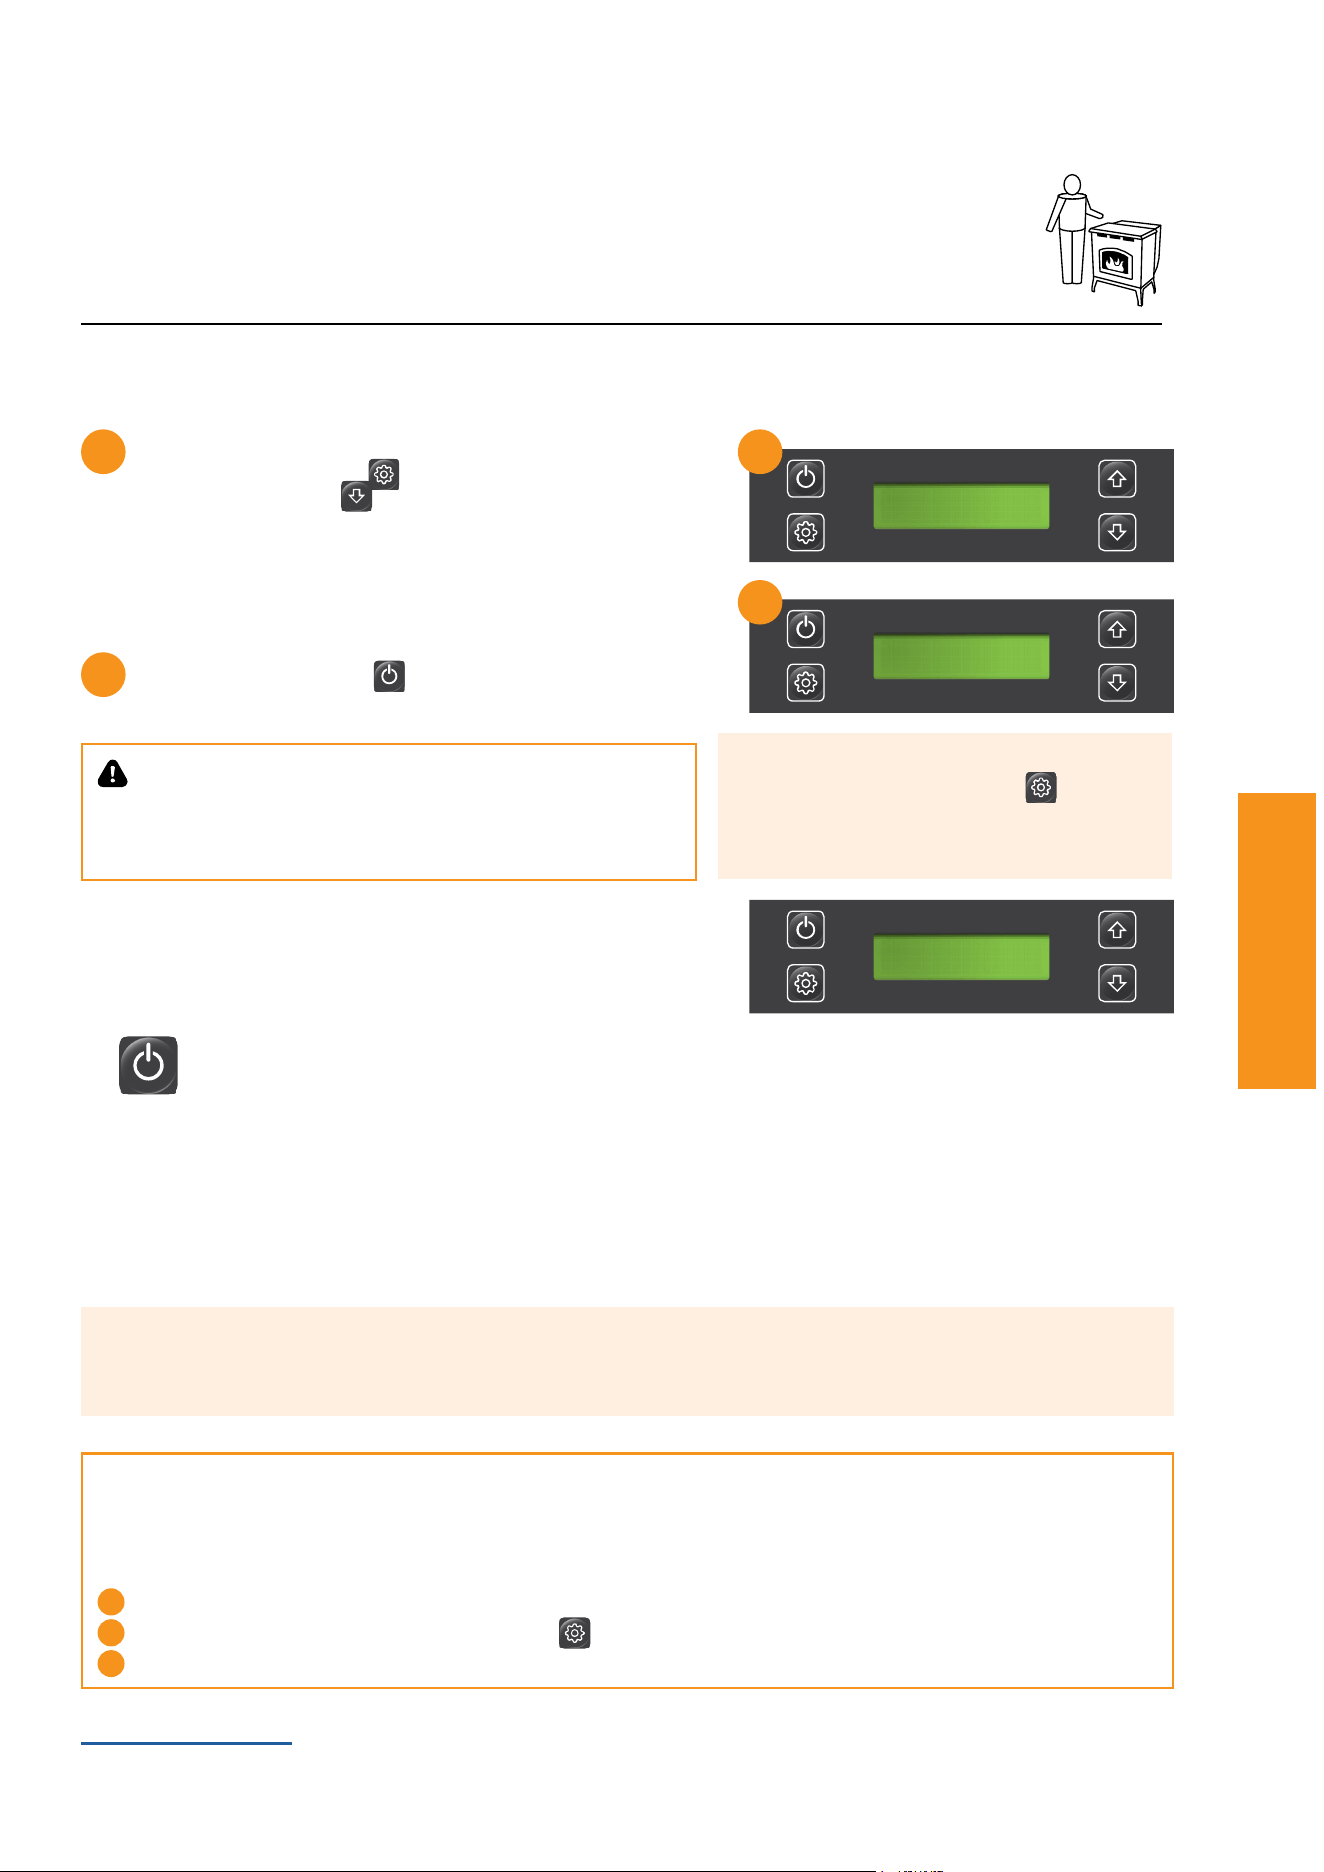
FRONT
Important:
Allowupto20minutesforyour
Stove to start.
1
1
Plu
g in your Stove
WARNING!
Shock hazard.
• Plug directly into properly grounded 3 prong receptacle
• Do NOT route cord under or in front of Stove
• Recommend the use of a surge protector
33
11
22
4
4
2
2
3
3
Conrmthreebafesinsidereboxaresecure,placingtheside
bafesbeforethecenter
Add some pellets to hopper and fully close lid
Conrmrepotisproperlypositioned
Use and Care
Visit www.forgename.com/pages/pelpro or
scan this code:
PelPro Cast Pellet Stove • 7093-60X • 04/26 PelPro Cast Pellet Stove • 7093-60X • 04/26
www.forgename.com
16 17
Using Your Stove
Using Your Stove Using Your Stove
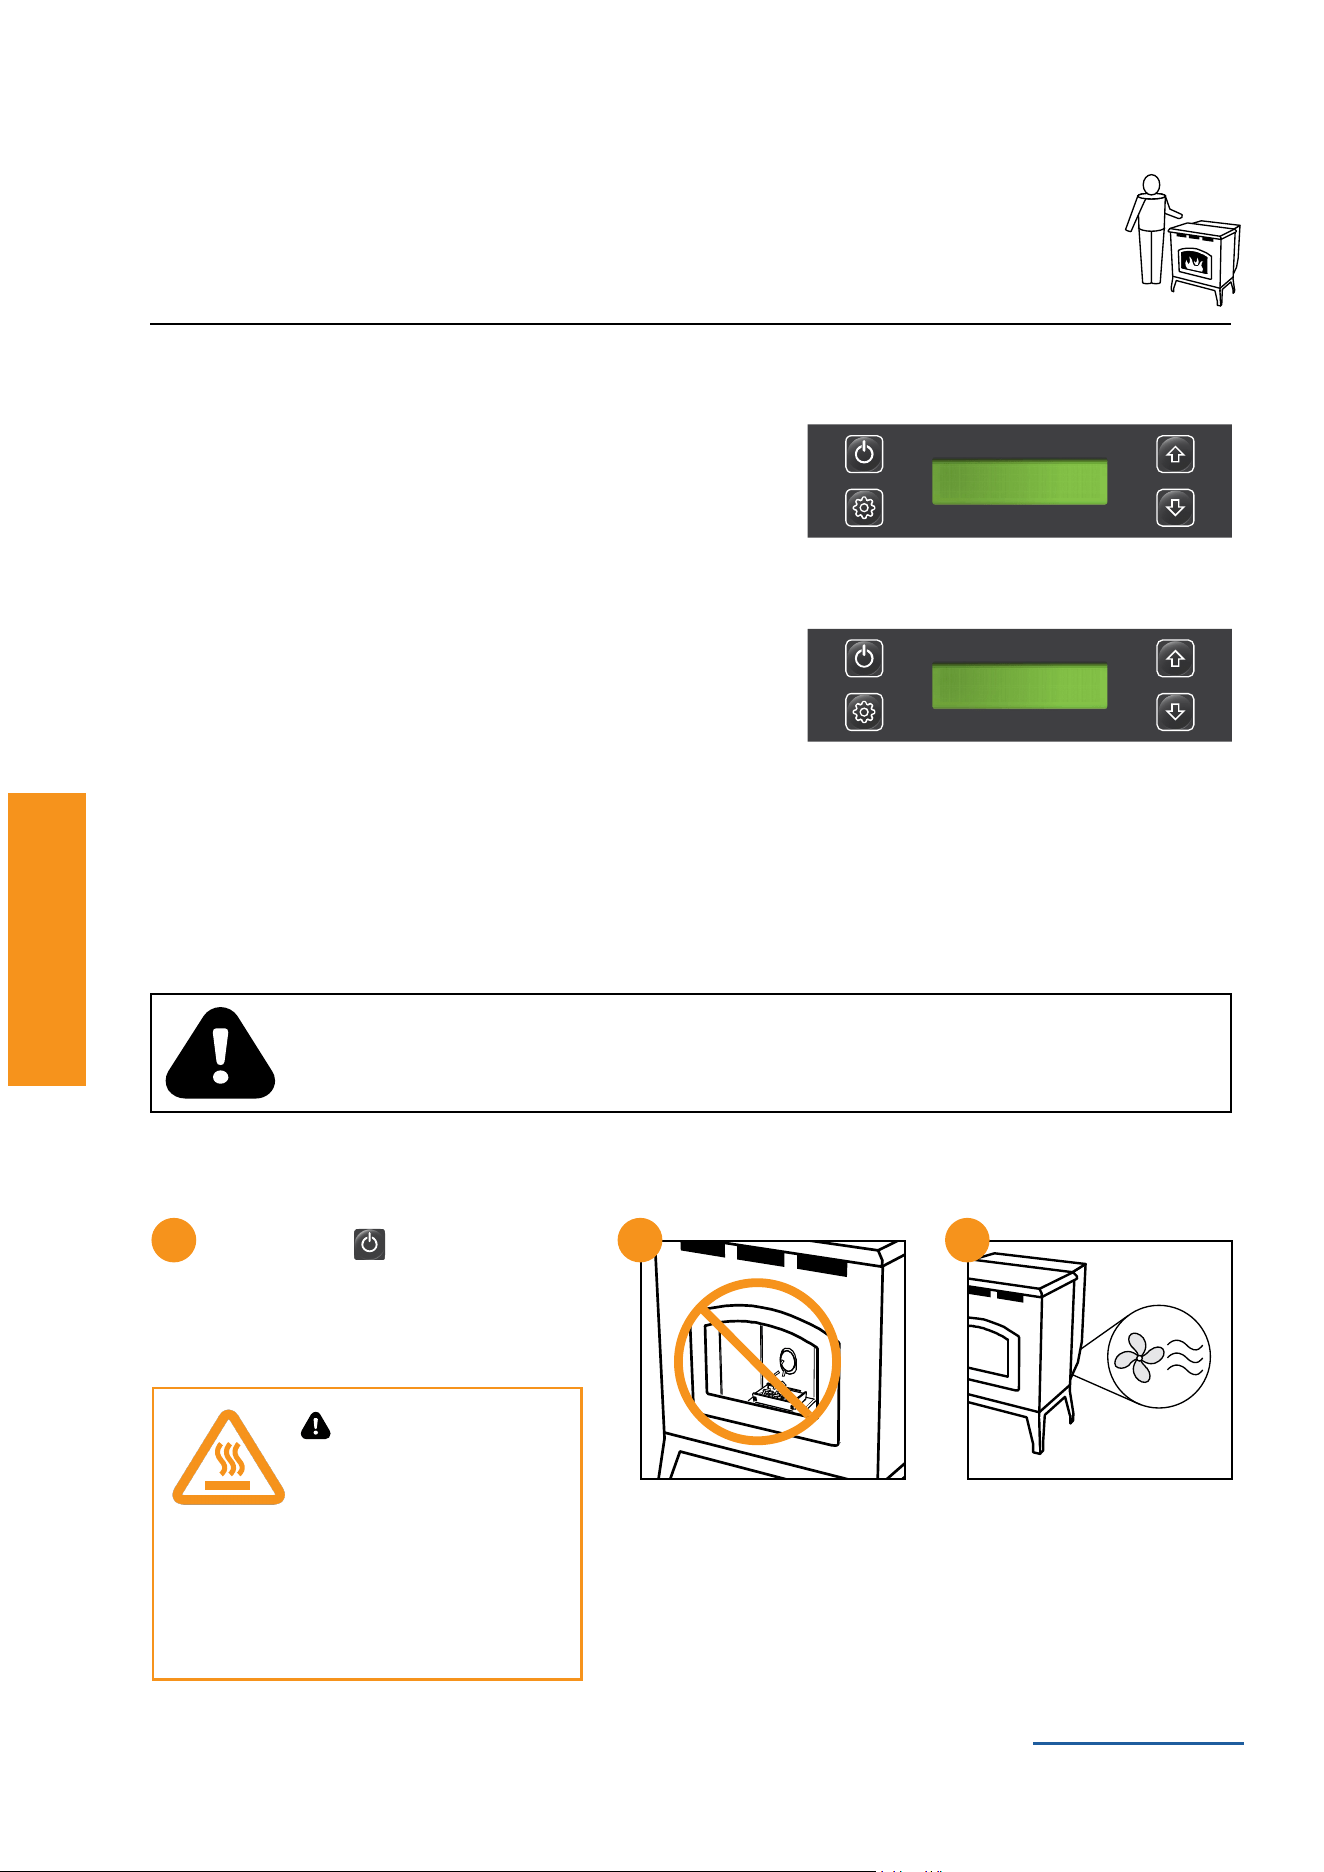
DOWN BUTTON
PRIME
55
Prime your Stove:
1) From“OFF”press
2) Press and hold untildisplayreads“FEEDING.”
The feed motor will run about 2 minutes.
Comfort Settings
Control your comfort:
• POWER button - Used to turn your Stove on, off and to reset.
• Adjust temperature–Settoyourdesiredtemperaturelevel.Oncethedesiredtemperaturelevelisachievedthe
Stove will automatically shut down. When the temperature in the room drops below the desired temperature level,
your Stove will automatically restart.
• LO setting–YourStovewillcontinuetorunonlowregardlessofroomtemperature.
• HI setting - Your Stove will continue to run on high regardless of room temperature.
Starting your Stove from an empty hopper
ROOM:68 SET: 72
HEATING @%
Pro Tip
If your Stove is turned to the off position and then back on, even if by mistake, your Stove
willgothroughtheshutdownprocess(approximately15minutes)andrestart.
Thermostat
Your PelPro Stove comes with a built-in thermostat system that provides easy temperature
adjustments.Anexternalthermostatisavailableasanoption(soldseparately).Tousean
external thermostat:
1
Install according to the manufacturer’s instructions and connect to the back of your Stove.
2
Set THERMOSTAT to EXTERNAL in settings menu on the digital display.
3
Turn Stove on and set desired power setting.
6
Once feeding stops press power button.
ROOM:68 SET: HI
START UP 11:59
6
CAUTION:
During this process DO NOT:
• Try to restart, manually add pellets or use any type of
accelerant
Pro Tip
For all menu items press after
making your selection to store
value.
PelPro Cast Pellet Stove • 7093-60X • 04/26 PelPro Cast Pellet Stove • 7093-60X • 04/26
www.forgename.com
18 19
Using Your Stove
Using Your Stove
If your Stove tries to start but fails on the initial burn, it will display MISSED IGNI-
TION.
1. Turn your Stove to off, remove and clean
therepot
2. Conrmrepotisproperlypositioned
3. Ensure there are enough pellets in the hopper.
4. Prime your Stove per previous instructions
PWR TO RESET
MISSED IGN
Trim Adjustment
Trim adjustment is located in the menu. This feature will adjust the
air/fuelratioandbelowareexamplesofwhentouseit:
WARNING!
This wood heater needs periodic inspection and repair for proper operation. It is against federal regulations to
operate this wood heater in a manner inconsistent with operating instructions in this manual.
• Ifthereistoolarge,lazyorproducingblacksoot,adjusttrimdownonelevelatatimeandallow15minutes
for stabilization before making another adjustment
• Ifyourreistoosmallandsometimesgoesoutwhentherearepelletsinthehopper,adjustthetrimuponelevelat
atimeandallow15minutesforstabilizationbeforemakinganotheradjustment.
Turning Your Stove Off
3
Auger stops feeding pellets. Blowers continue to run until
after the exhaust temperature
has cooled.
1
CAUTION!
Smoke Hazard
• Press power button on display to OFF,
let Stove completely cool and exhaust
blower must be off. Now you can unplug
Stove before servicing
• Smoke spillage into room can occur if
Stove is not cool before unplugging
Press and hold power button for 3
seconds
2
-2
TRIM
PelPro Cast Pellet Stove • 7093-60X • 04/26 PelPro Cast Pellet Stove • 7093-60X • 04/26
www.forgename.com
18 19
Maintaining Your Stove
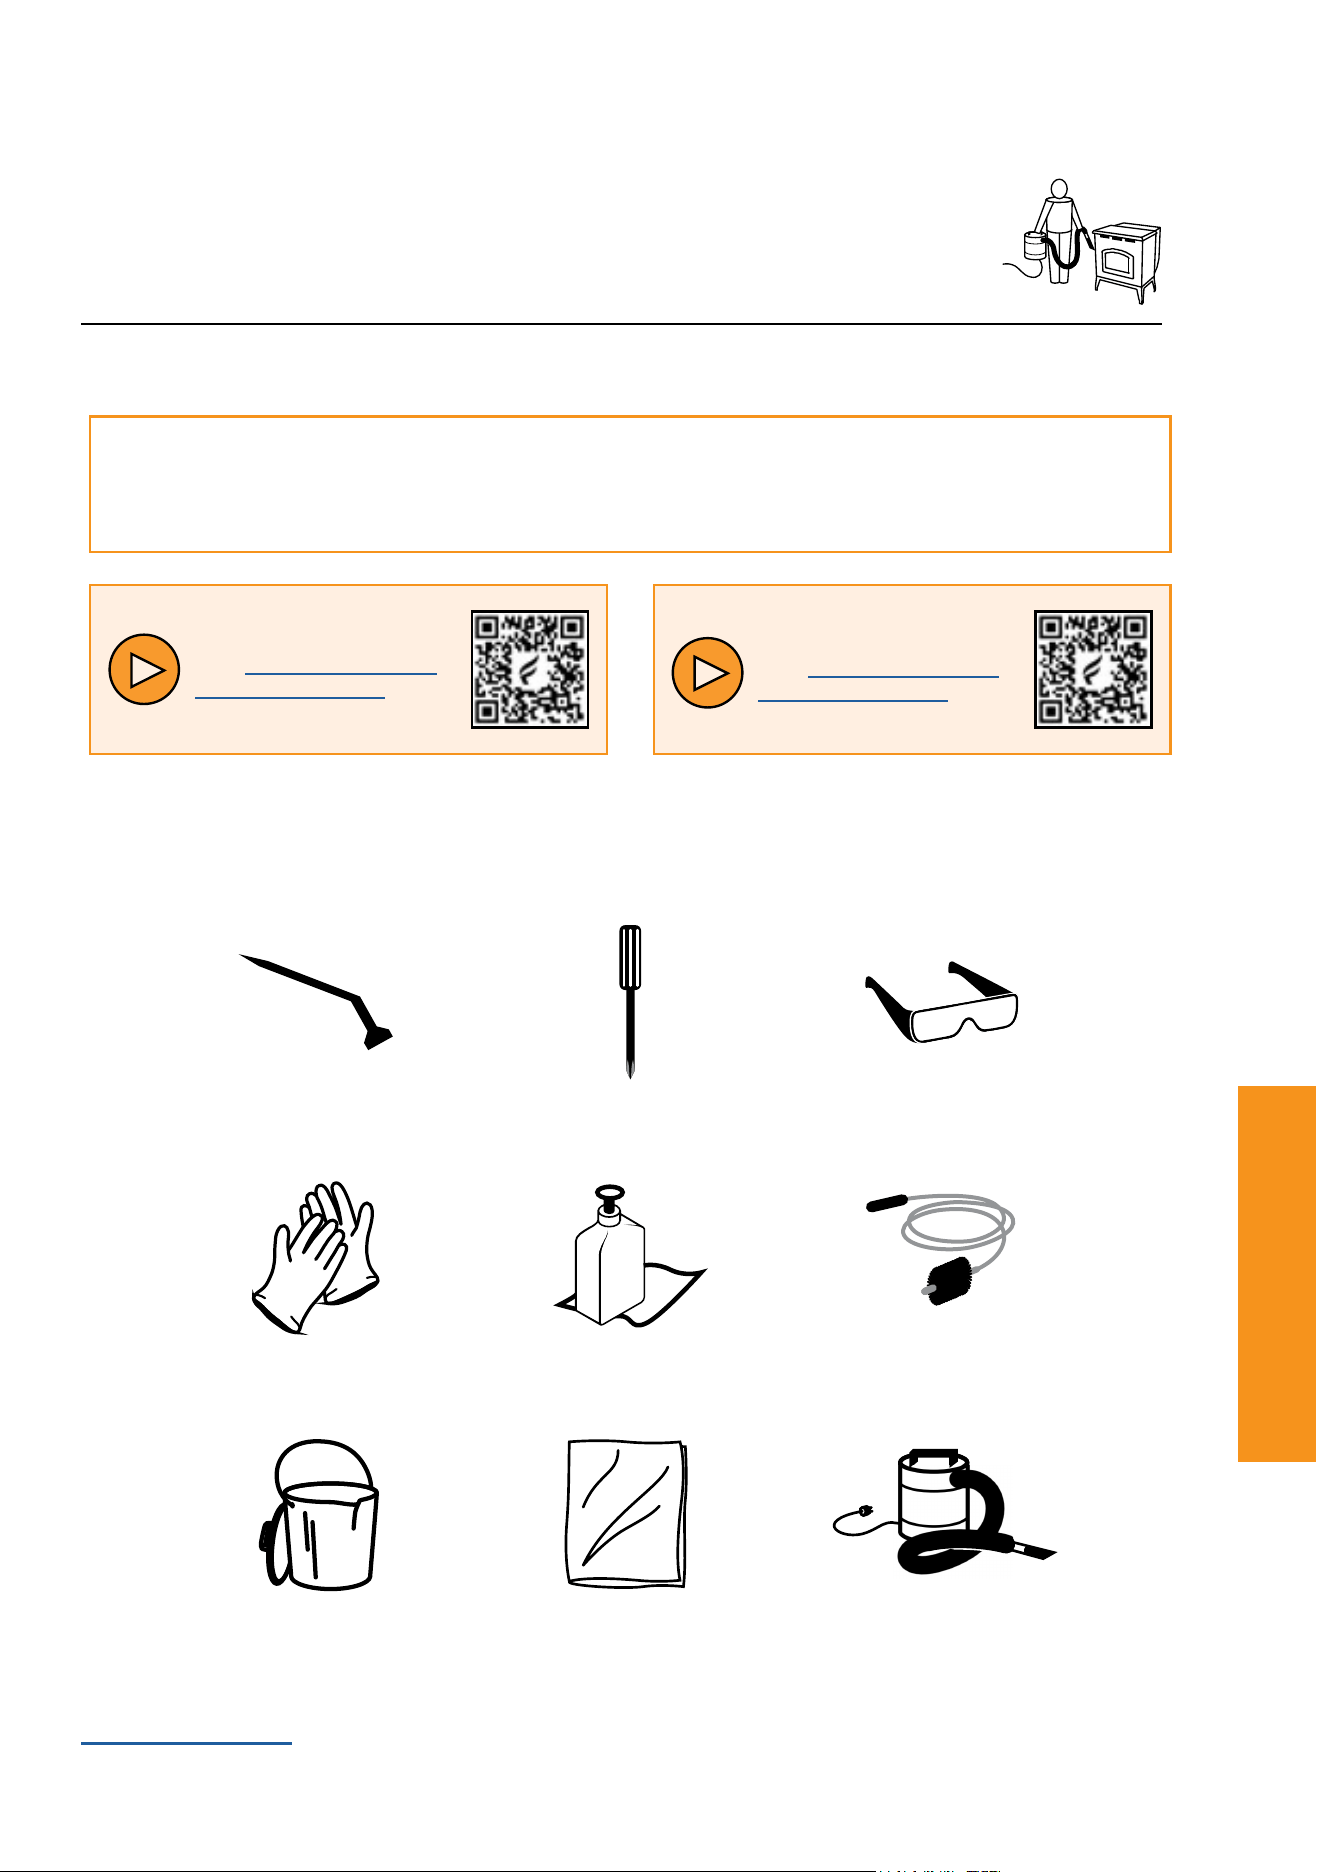
Maintaining Your Stove
What You’ll Need
Metal container
with lid
Flue cleaning
brush
Ceramic glass cleaner &
non-abrasive cloth
Ash vacuumDrop cloth
Gloves
Safety glassesCleaning tool
Cleaning & Maintenance
Important:
Regular cleaning helps to assure optimal performance of your Stove. Please refer to page 29 to log your
maintenance and cleaning.
Phillips head
screwdriver
Cleaning your Stove
Visit www.forgename.
com/pages/pelpro or
scan this code:
Maintaining your Stove
Visit www.forgename.
com/pages/pelpro or
scan this code:
PelPro Cast Pellet Stove • 7093-60X • 04/26 PelPro Cast Pellet Stove • 7093-60X • 04/26
www.forgename.com
20 21
Maintaining Your Stove
Maintaining Your Stove Maintaining Your Stove
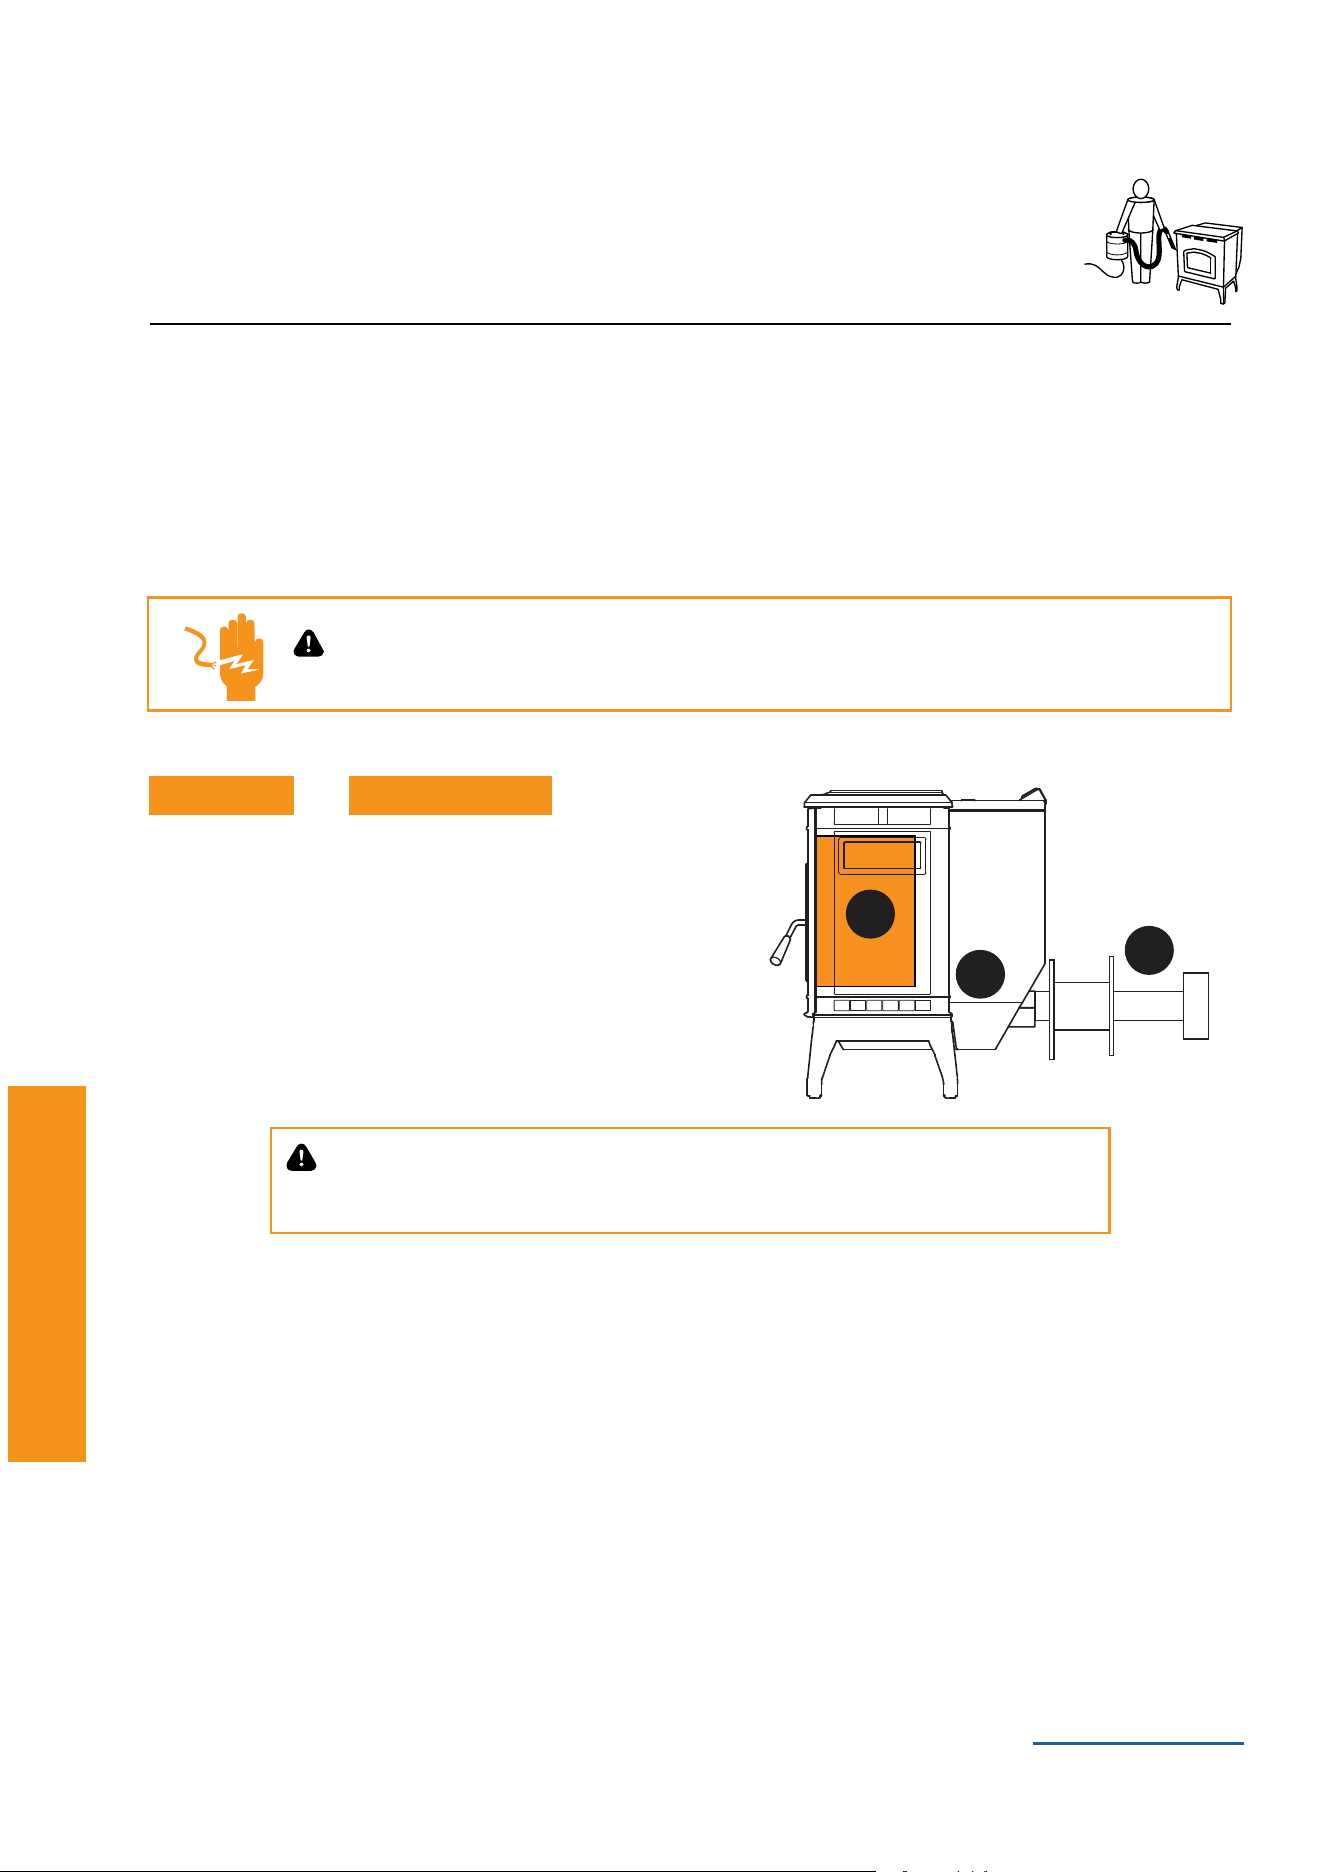
Where, When and How
Zone 1 - Firebox
WARNING!
Disconnect Stove from power supply before servicing
Disposal of Ashes
Ashesshouldbeplacedinametalcontainerwithatightttinglid.Theclosedcontainerofashesshould
be placed on a non-combustible surface or on the ground, well away from all combustible materials,
pendingnaldisposal.Iftheashesaretobedisposedofbyburialinsoilorotherwiselocallydispersed,
they should be retained in the closed container until all embers have been thoroughly cooled.
WEEKLY AS NEEDEDOR
Door Inspection
• Thegasketbetweentheglassandreboxshouldbeinspectedperiodicallytomakesurethereisagoodseal.
1
Zone
1
Zone
2
Zone
2
Zone
3
Zone
3
Zone
WARNING!
IfusingavacuumtocleanStove,besureembersarethoroughlycooledtopreventareinthe
vacuum.
Glass
• Apply ceramic glass cleaner
• Use non-abrasive cloth to remove residue
Fire pot
• Removetherepot
• Scrape clean and remove ashes
• Replacerepot
Firebox
• Removebafesandvacuumresidualash
• Removeashesfromreboxoor
PelPro Cast Pellet Stove • 7093-60X • 04/26 PelPro Cast Pellet Stove • 7093-60X • 04/26
www.forgename.com
20 21
Maintaining Your Stove
Maintaining Your Stove Maintaining Your Stove
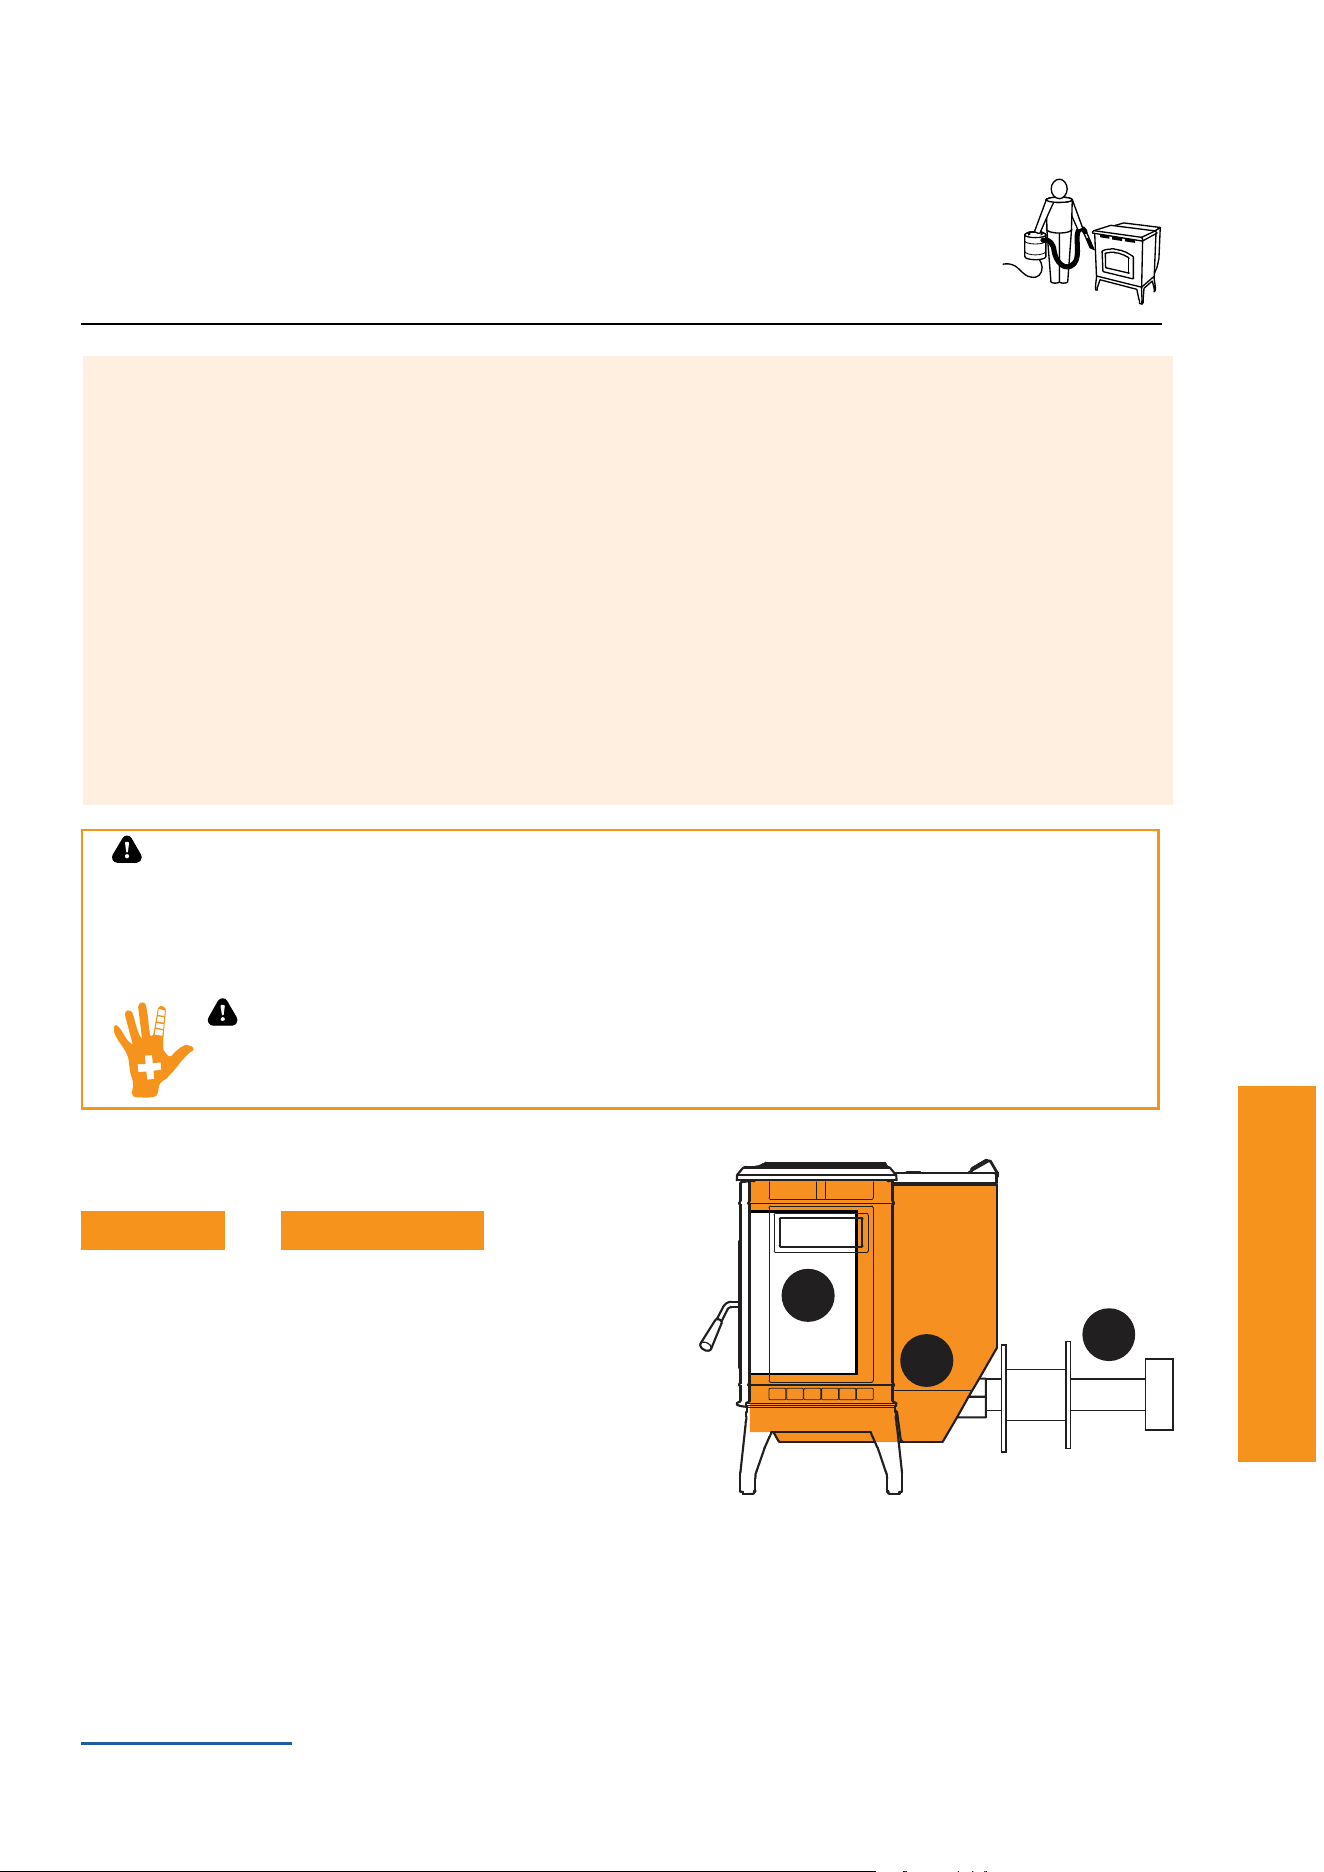
Zone 2 - Stove Body
MONTHLY AS NEEDEDOR
WARNING!
Glass is 5mm thick high temperature heat resistant ceramic glass.
• DO NOT REPLACE with any other material
• Alternate material may shatter and cause injury
CAUTION!
Handle glass assembly with care and refer to maintenance instructions. When cleaning glass:
• Avoid striking, scratching or slamming glass.
• Do NOT clean glass when hot
• Do NOT use abrasive cleaners
• Do NOT operate with glass cracked, broken or scratched
Pro Tip
Thetypeoffuelyouareburningwilldictatehowoftenyouhavetocleanyourrepot.
If the fuel you are burning has a high dirt or ash content, it may be necessary to clean the
repotmorethanonceaday.
Poorqualityfuelwillcauseclinkerstoformintherepot.Clinkersareformedwhendirt,ash
oranon-burnablesubstanceisheatedto2000deg.F(1093deg.C)andbecomesglass-
like.
Always burn dry fuel. Burning fuel with high moisture content take heat from the fuel and
tends to cool the Stove, robbing heat from your home.
Damp pellet fuel can clog the feed system.
1
Zone
1
Zone
2
Zone
2
Zone
3
Zone
3
Zone
Convection Blower
• Remove right side panel to access and remove convection
blower
• Vacuum any debris from the fan blades and blower housing
Hopper
• Empty hopper of any pellets
• Vacuumanyremainingpellets/debrisfromthehopper
PelPro Cast Pellet Stove • 7093-60X • 04/26 PelPro Cast Pellet Stove • 7093-60X • 04/26
www.forgename.com
22 23
Maintaining Your Stove
Maintaining Your Stove
Electrical Components
• Identify and remove any debris
• Verify all connections are secure
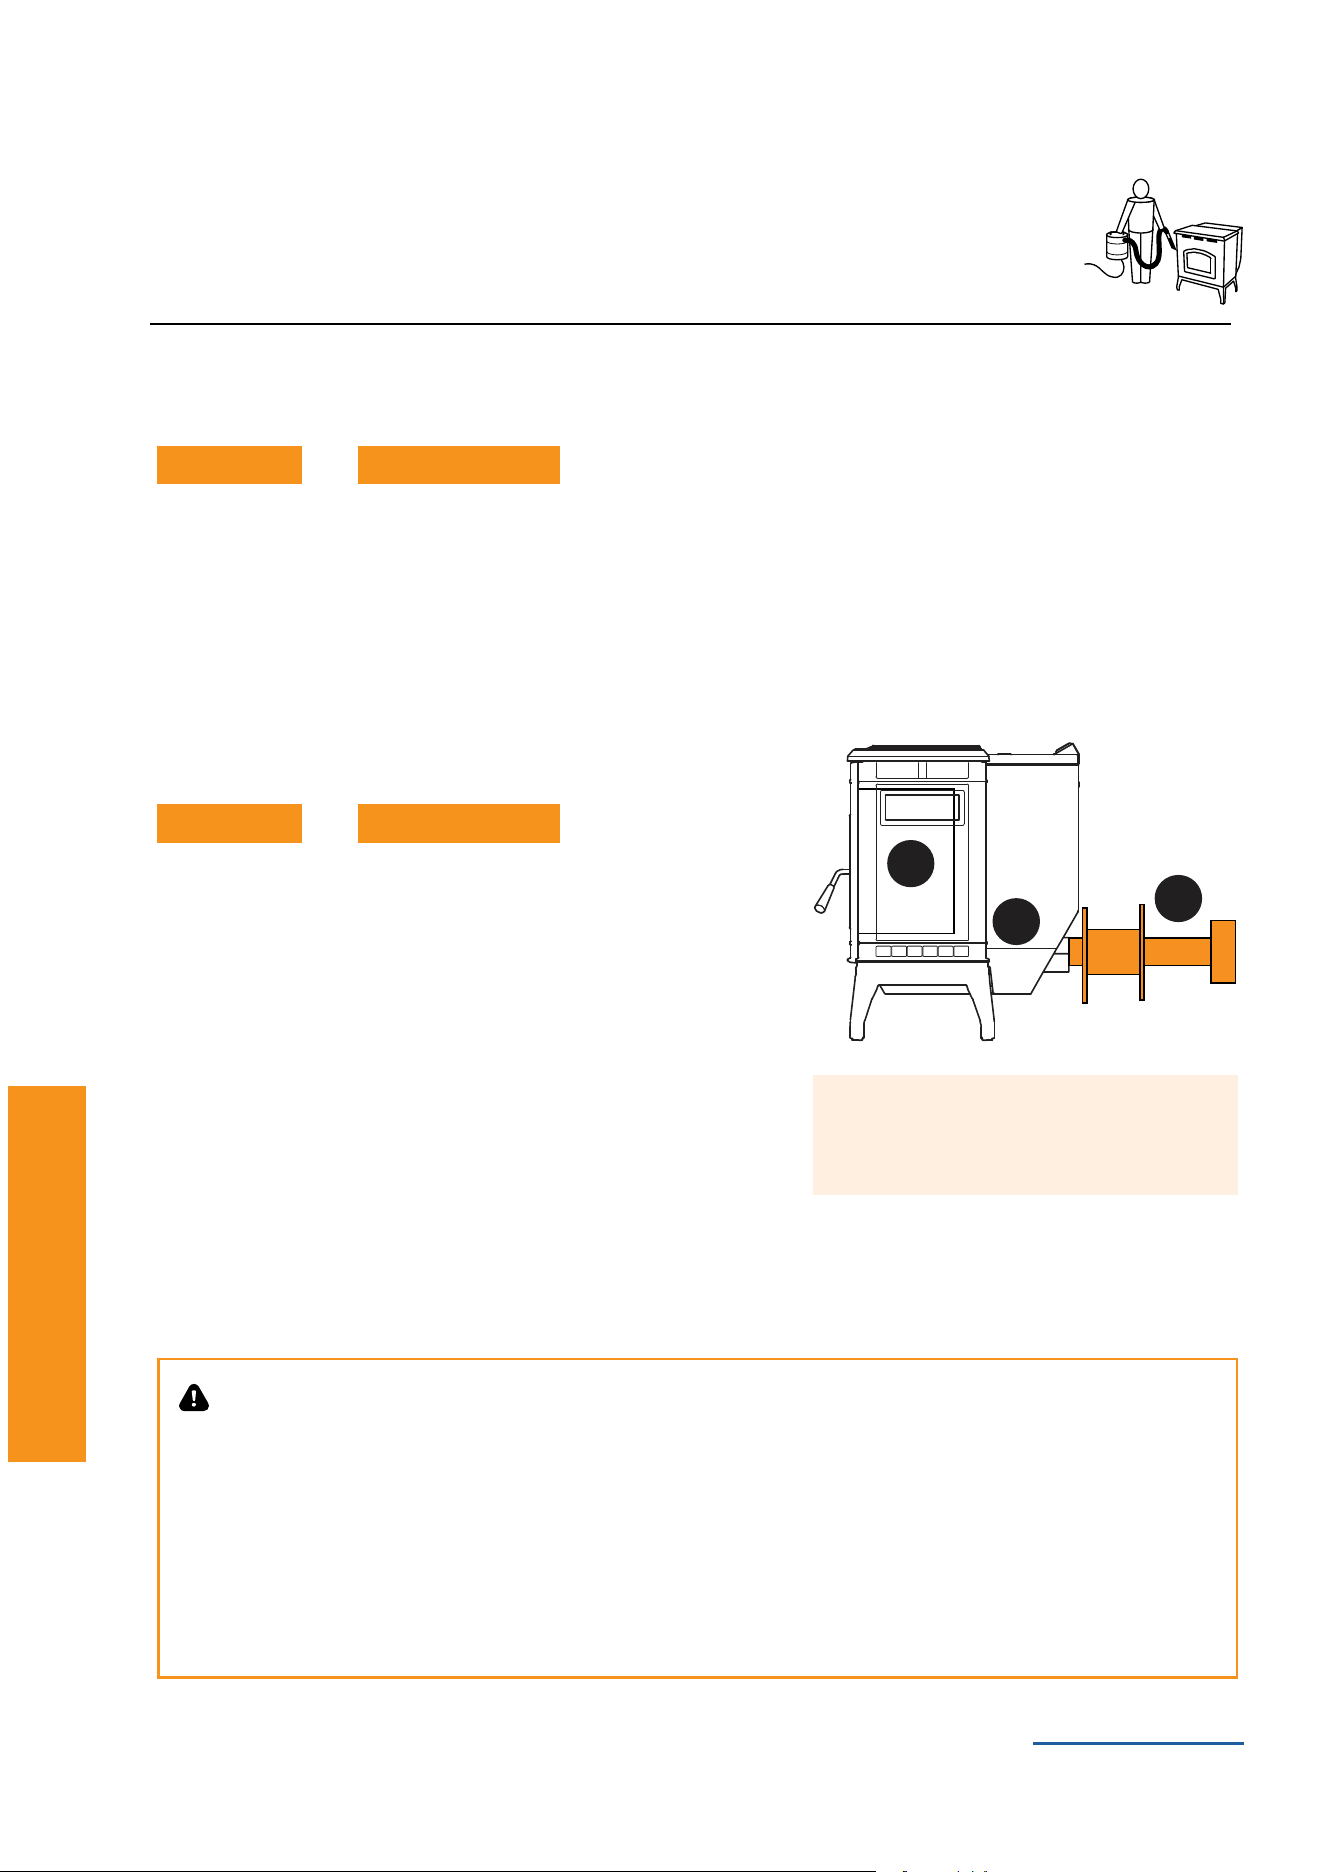
Zone 3 - Venting
Having Trouble?
Visit the Troubleshooting section
of this manual.
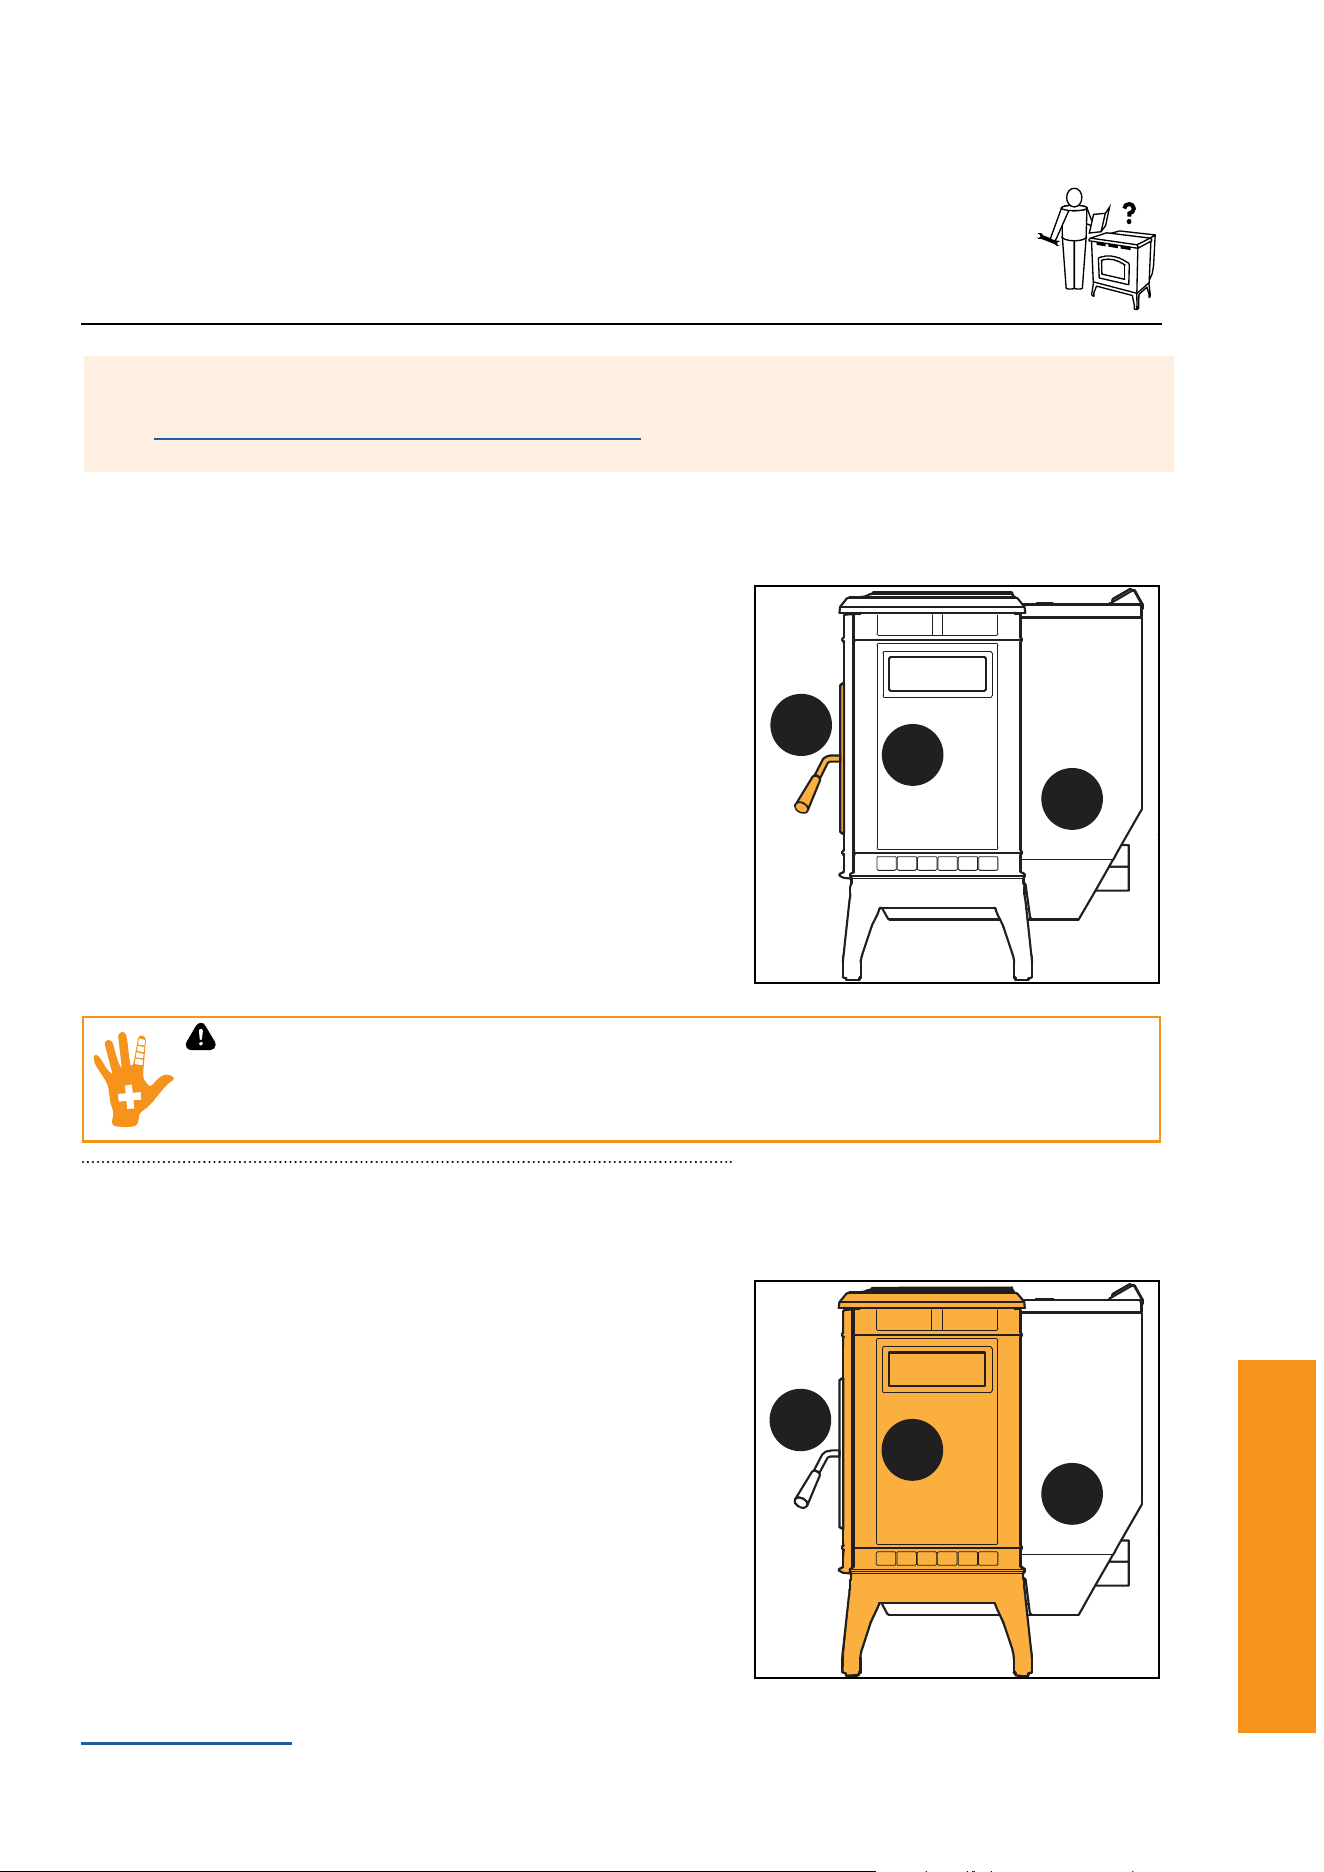
1
Zone
1
Zone
2
Zone
2
Zone
3
Zone
3
Zone
Caution!
When wood pellets are burned at a low temperature, they produces organic vapors which combine with mois-
ture to form creosote vapors.
Creosotevaporscondenseintherelativelycoolchimneyueofanewly-startedoralow-temperaturere.As
aresult,creosoteresidueaccumulatesontheuelining.Whenmore heatiscalledfor,thisresiduecanbe
ignited,whichcreatesanextremelyhotreinthechimneyue;thismaydamagethechimneyorevendestroy
your home.
Your chimney should be inspected once every few months during the heating season to determine if a creosote
or soot buildup has occurred. If creosote or soot has accumulated, it should be removed to reduce the risk of
achimneyre.
ANNUALLY AS NEEDEDOR
ANNUALLY AS NEEDEDOR
Termination Cap
• Remove termination cap
• Brush out to remove dust and hard buildup
Vent Components
• Soot,creosote,andyashwillcollectintheexhaustventing
systemandrestricttheowoftheuegases.Thisbuildupwill
occurmorequicklyinhorizontalsectionsandelbows.
• Use the appropriate sized chimney brush to remove ash and
buildup from the venting
Outside Air Kit
• Ensure there are no obstructions in the outside air kit cap
Exhaust Blower
• Remove left side panel to access and remove exhaust blower
• Vacuum any debris from the fan blades and blower housing
PelPro Cast Pellet Stove • 7093-60X • 04/26 PelPro Cast Pellet Stove • 7093-60X • 04/26
www.forgename.com
22 23
Replacement Parts
Replacement Parts
Replacement part for your Stove
Visit www.forgename.com/collections/pelpro-parts
1
Zone
1
Zone
2
Zone
2
Zone
3
Zone
3
Zone
1
Zone
1
Zone
2
Zone
2
Zone
3
Zone
3
Zone
Glass
1. Open the door from the appliance by lifting door off of hinge pins
andlayonaatsurfacefacedown.
2. Using a Phillips head screwdriver, remove the 3 brackets and
set aside.
3. Remove old glass and gasket from door.
4. Replace gasket to door and add glass.
5. Re-install the brackets using the same screws.
Glass replacement kit: SRV7081-173
Door assembly replacement kit: SRV7086-021
Bafes
1. Turn the dial control to the off position. Make sure the appliance
is cool.
2. Removethecenterbaferstbyusingthehandleatthetopof
thebafeandpullupandthentowardsyou.Thehooksonthe
bafewillslideoutoftheslotsinthebracket.
3. Removetheleftbafeandthentherightbafebypullingupand
thentowardsyou.Theleftandrightbafeshavesimilarhooks
andslotsasthecenterbafe.
Replacement kit: SRV7079-006
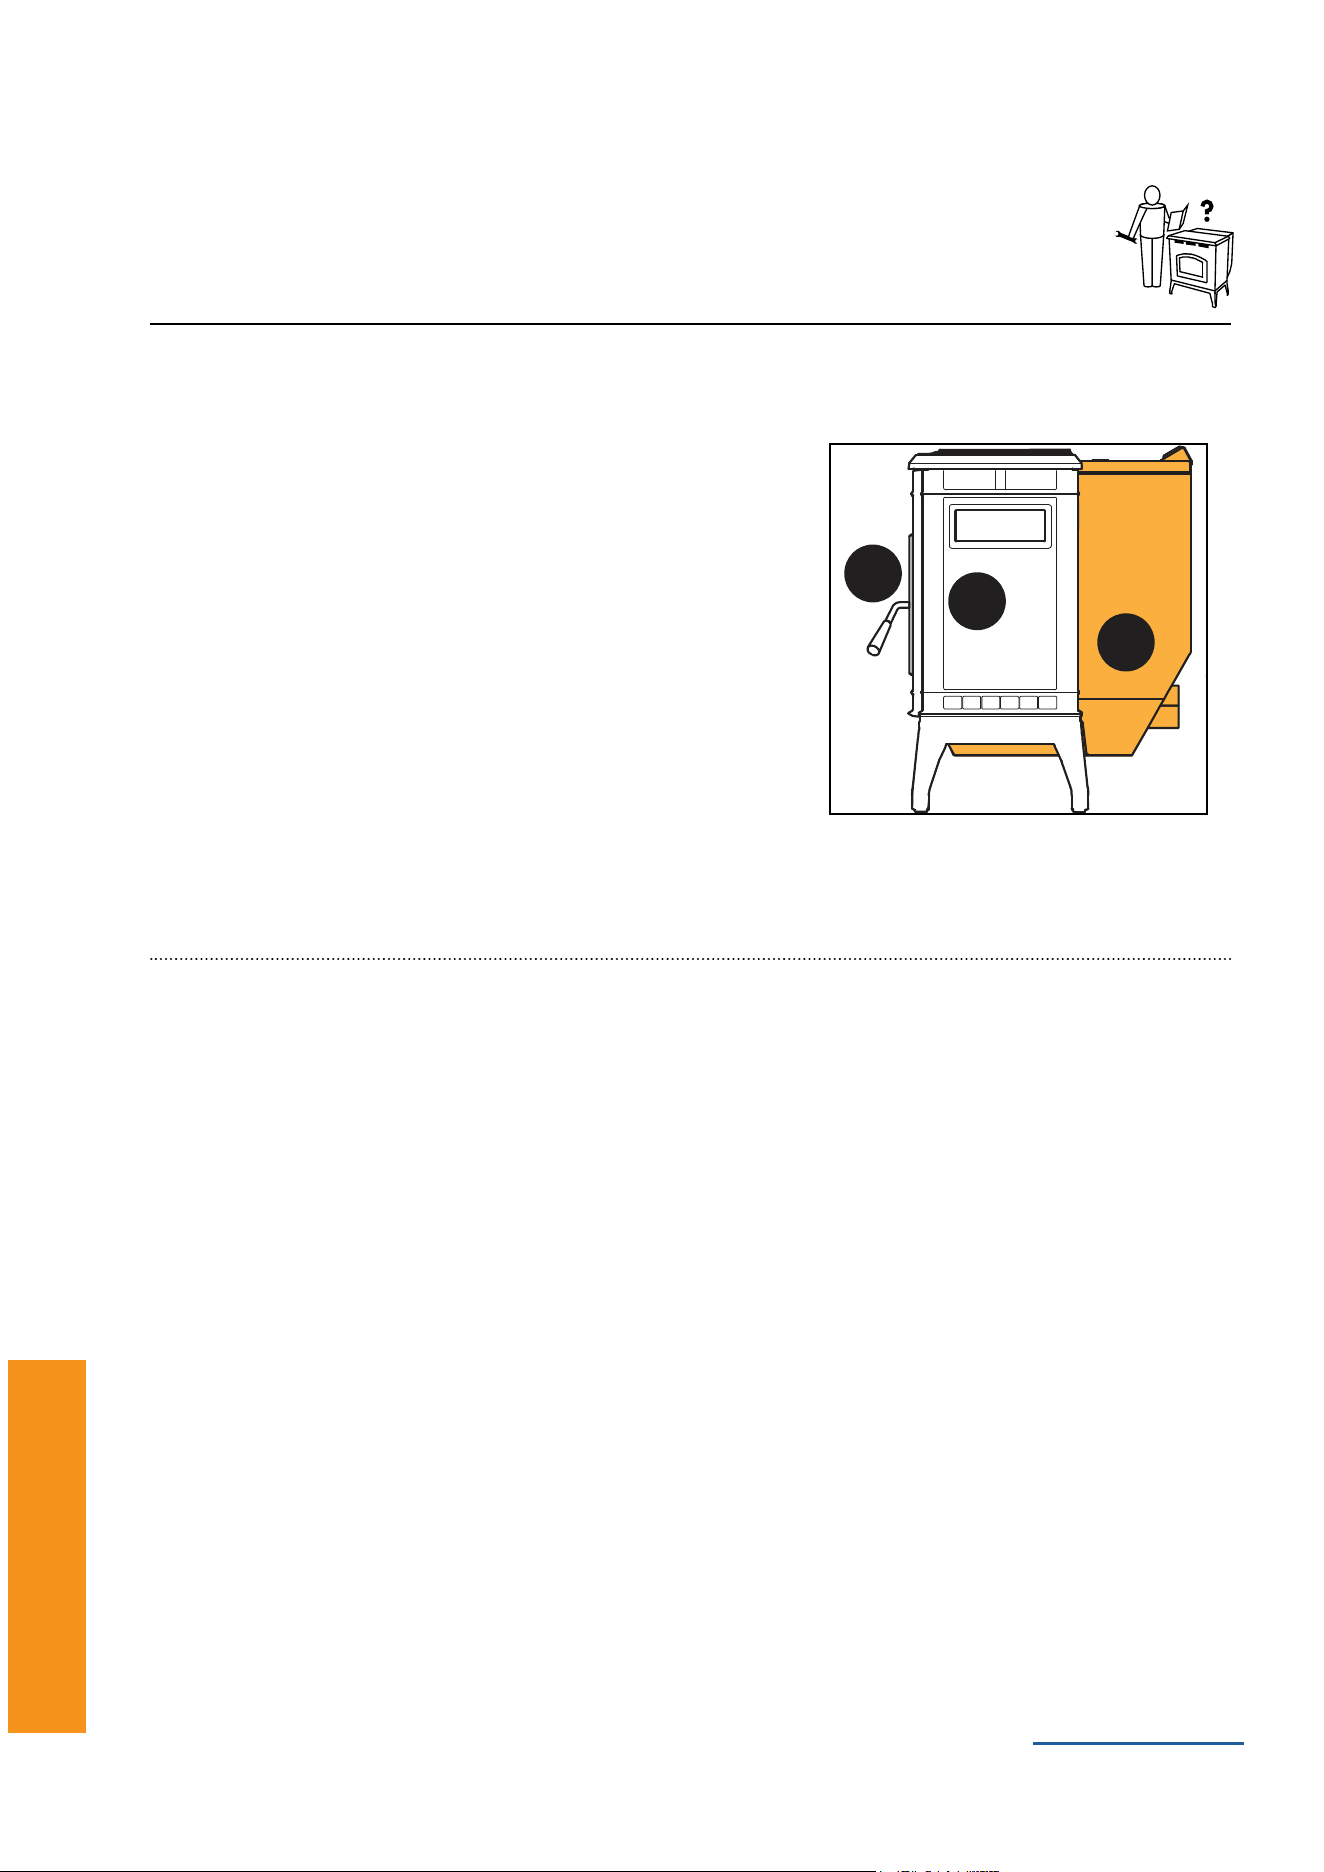
Zone 1 - Front of Stove
Zone 2 - Firebox
WARNING!
Glass is 5mm thick high temperature heat resistant ceramic glass.
• DO NOT REPLACE with any other material
• Alternate material may shatter and cause injury
PelPro Cast Pellet Stove • 7093-60X • 04/26 PelPro Cast Pellet Stove • 7093-60X • 04/26
www.forgename.com
24 25
Replacement Parts
Replacement Parts Replacement Parts
1
Zone
1
Zone
2
Zone
2
Zone
3
Zone
3
Zone
Convection Blower
1. Turn the dial control to the off position. Unplug the power to the
appliance.
2. The convection blower is located in the rear of the appliance.
3. Using a Phillips head screwdriver, loosen the bolts on the rear
of the appliance holding on the side panels. You do not need to
remove the screws. Removed side panels by lifting up and out.
4. Remove the two screws holding the convection blower housing
to the sheet metal plenum. Using a slight twisting motion, rotate
the blower back and it will release.
Replacement kit: KS-5020-1052
Exhaust Blower
1. Turn the dial control to the off position. Unplug the power to the appliance.
2. Remove the left side panel by loosening the three screws attaching it to the back of the appliance.
3. Disconnect 2 white wires from the white and blue wires of the exhaust blower.
4. Remove the blower motor attached to a removable plate to the exhaust blower. Depending on the model,
usea1/4inchsocket,or1/4inchnutdriverorPhillipsheadscrewdrivertoloosenthe6screwsinthekeyhole
shaped holes and rotate the plate. It is only necessary to loosen screws.
5. Remove the exhaust blower and gasket.
6. Check for degradation on the gasket and replace if necessary using the gasket included in the kit.
7. Re-install in reverse order.
Replacement kit: 812-4400
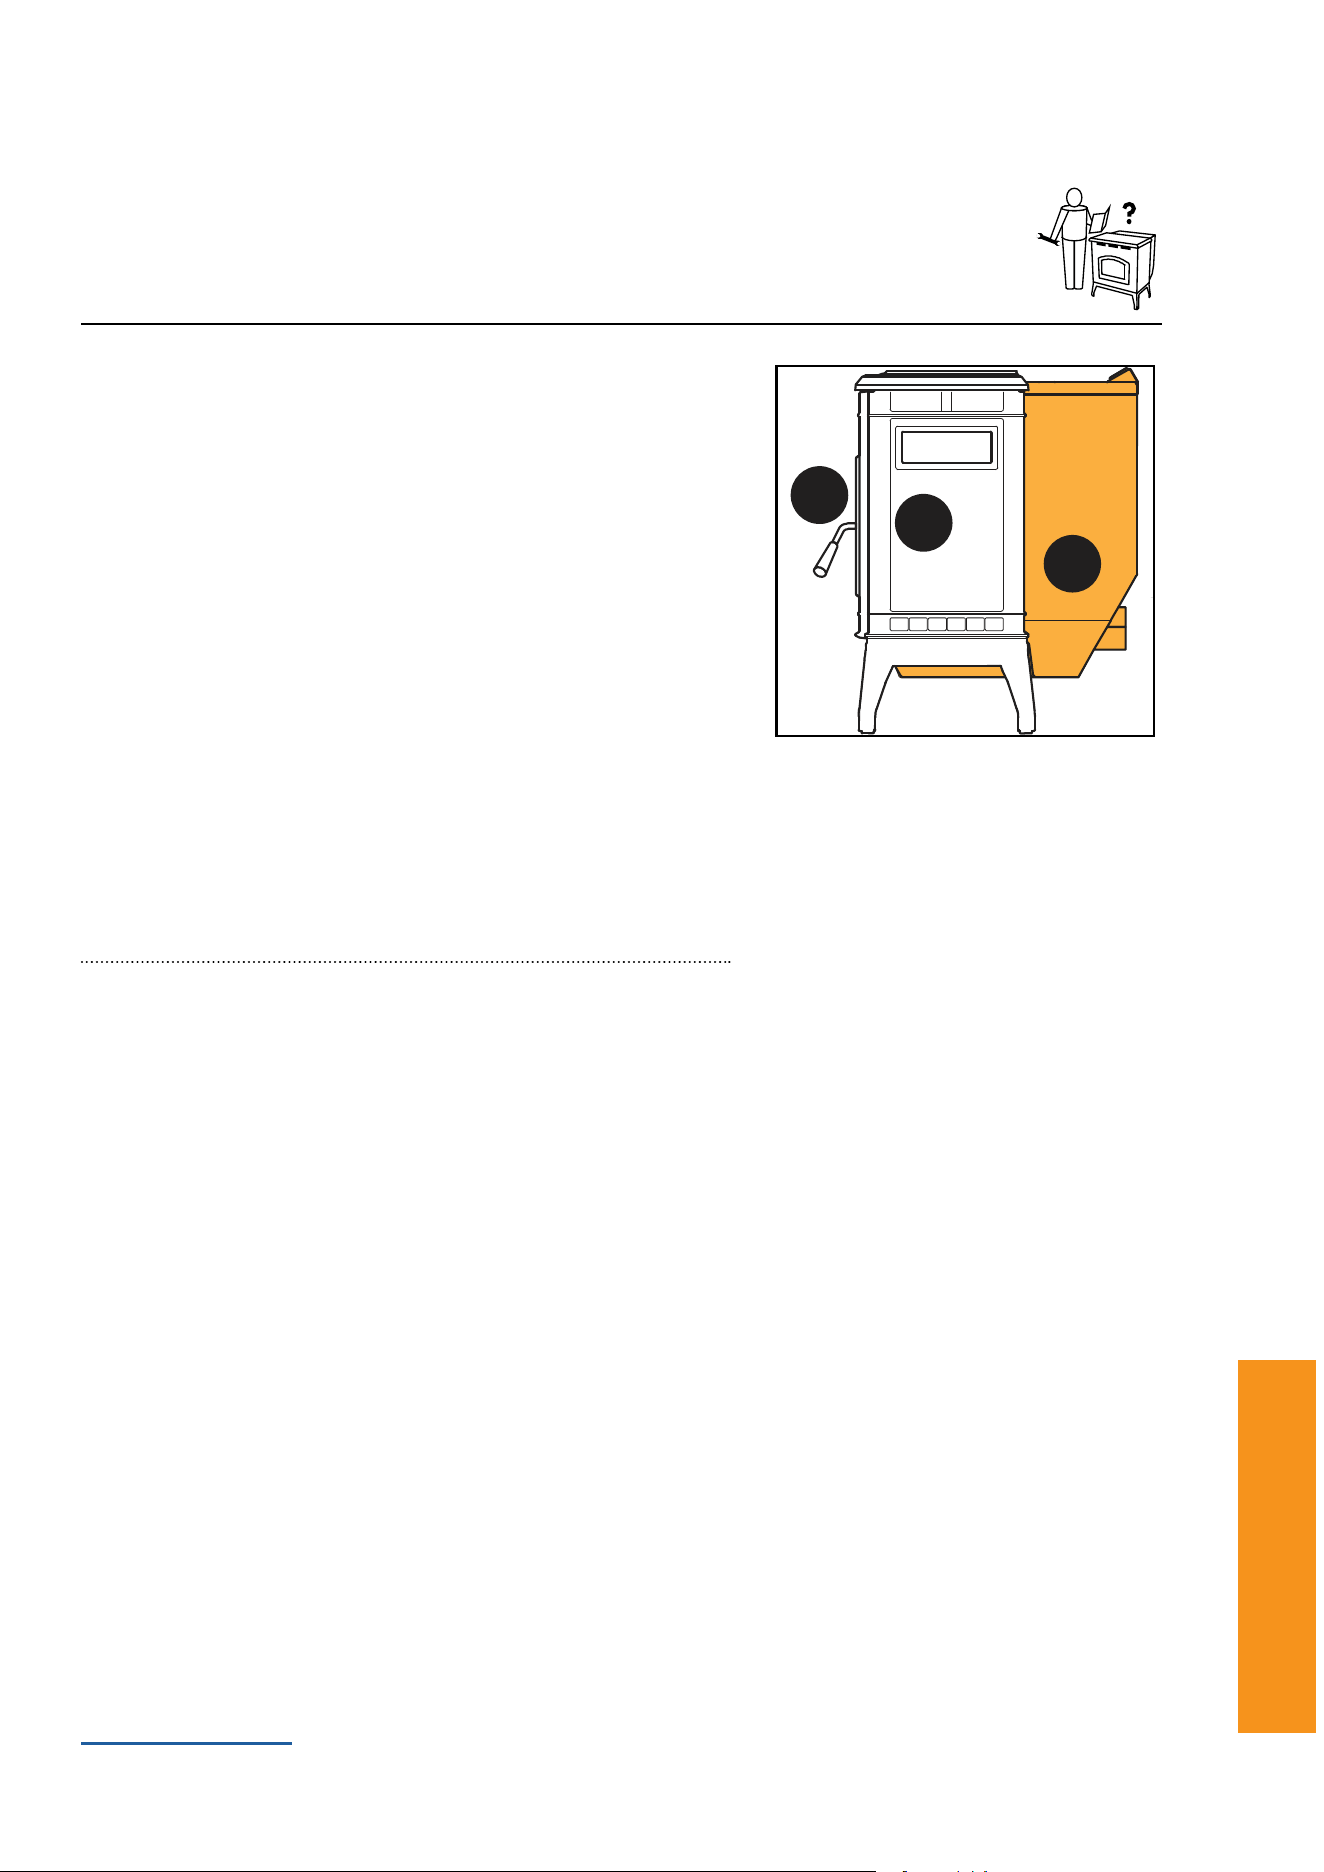
Zone 3 - Back of Stove Snap Disc
PelPro Cast Pellet Stove • 7093-60X • 04/26 PelPro Cast Pellet Stove • 7093-60X • 04/26
www.forgename.com
24 25
Replacement Parts
Replacement Parts Replacement Parts
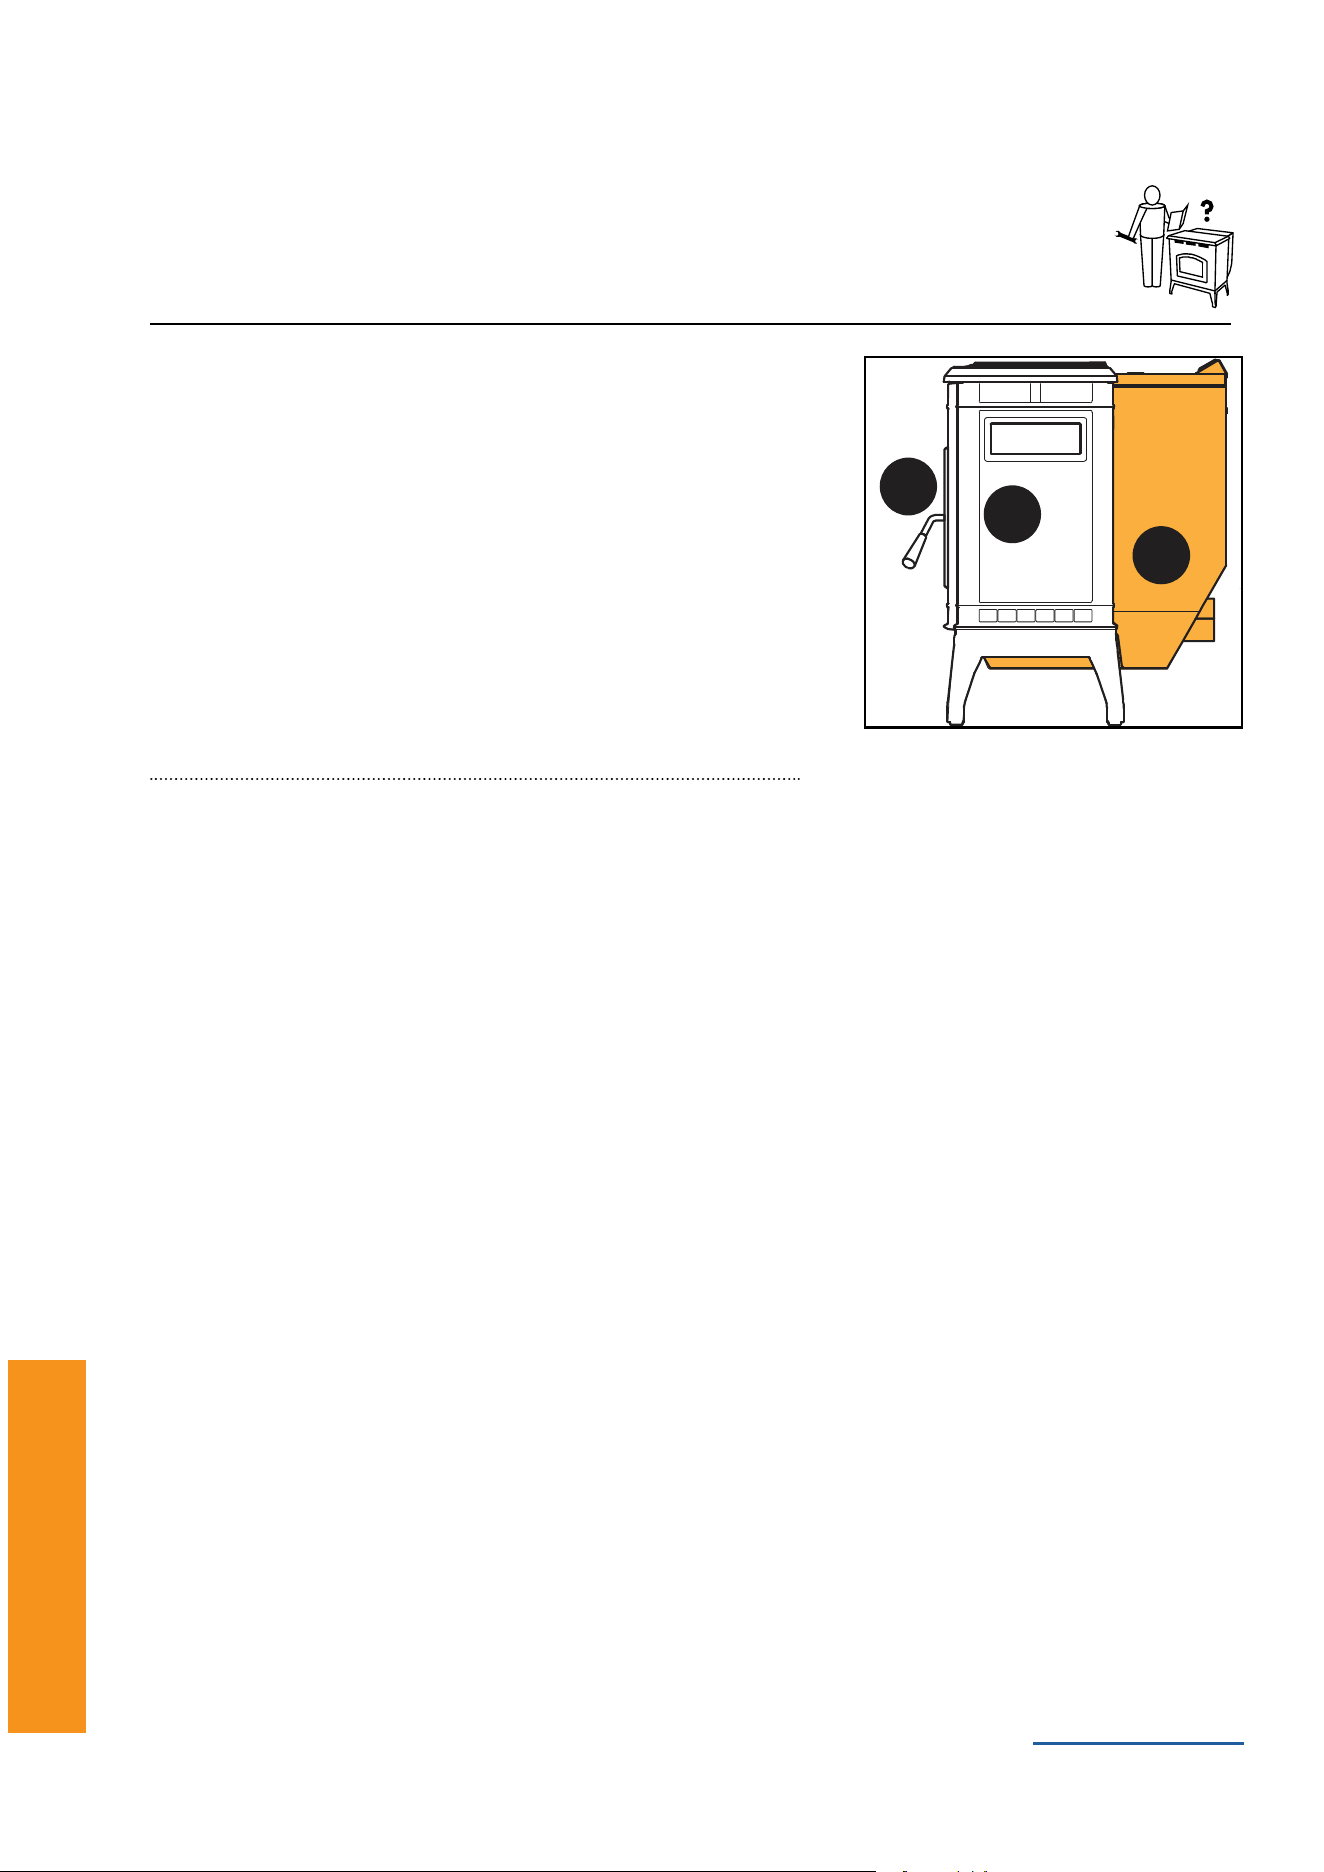
Zone 3 - Back of Stove Snap Disc
1. Turn the dial control to the off position. Unplug the power to the
appliance.
2. Using Phillips head screwdriver, loosen the bolts on the rear of
theapplianceholdingontheleftsidepanel(youdonotneedto
removethescrews).Removesidepanelsbyliftingupandout.
3. Locate the snap disc on the top side of the feed tube where it
meets to the hopper. Disconnect the wire leads from the snap
disc.
4. Using a Phillips head screwdriver, remove two screws retaining
the snap disc on the side of the feed tube.
5. Using the same screws, attach the new snap disc; attach wire
leads.
6. Restore power.
Replacement kit: SRV230-0080
Igniter
1. Turn the dial control to the off position. Unplug the power to the appliance.
2. Unplug the wire leads to the igniter.
3. Remove the screw in the side of the igniter chamber. Pinch the ends of the bracket together and pull the ignit-
er straight out of the igniter chamber.
4. Ifthereisdifcultyinremovingtheigniterfromthechamber,thechambercanberemovedfromtherearofthe
reboxbyremovingthe1/4-20bolts.
5. Re-install the new igniter into the chamber using the bracket.
6. Inspecttheigniterfromthefrontoftheappliancebyremovingtherepotandlookingintotheendofthe
chamber(MAKESURETheIGNITERISCENTEREDINTHECHAMBER).
Replacement kit: SRV7000-660
1
Zone
1
Zone
2
Zone
2
Zone
3
Zone
3
Zone
PelPro Cast Pellet Stove • 7093-60X • 04/26 PelPro Cast Pellet Stove • 7093-60X • 04/26
www.forgename.com
26 27
Replacement Parts
Replacement Parts
Control Board
1. Turn the dial control to the off position. Unplug the power to the
appliance.
2. Unplug the wires from the control board. The connectors are
locking connectors. Pinch the release tab on each connector
and gently tug and rock loose.
3. Pinch the 4 plastic pins from the rear of the appliance to release
the control board connectors.
4. Install new board following the steps in reverse.
Replacement kit: SRV7093-050
Feed Motor Assembly
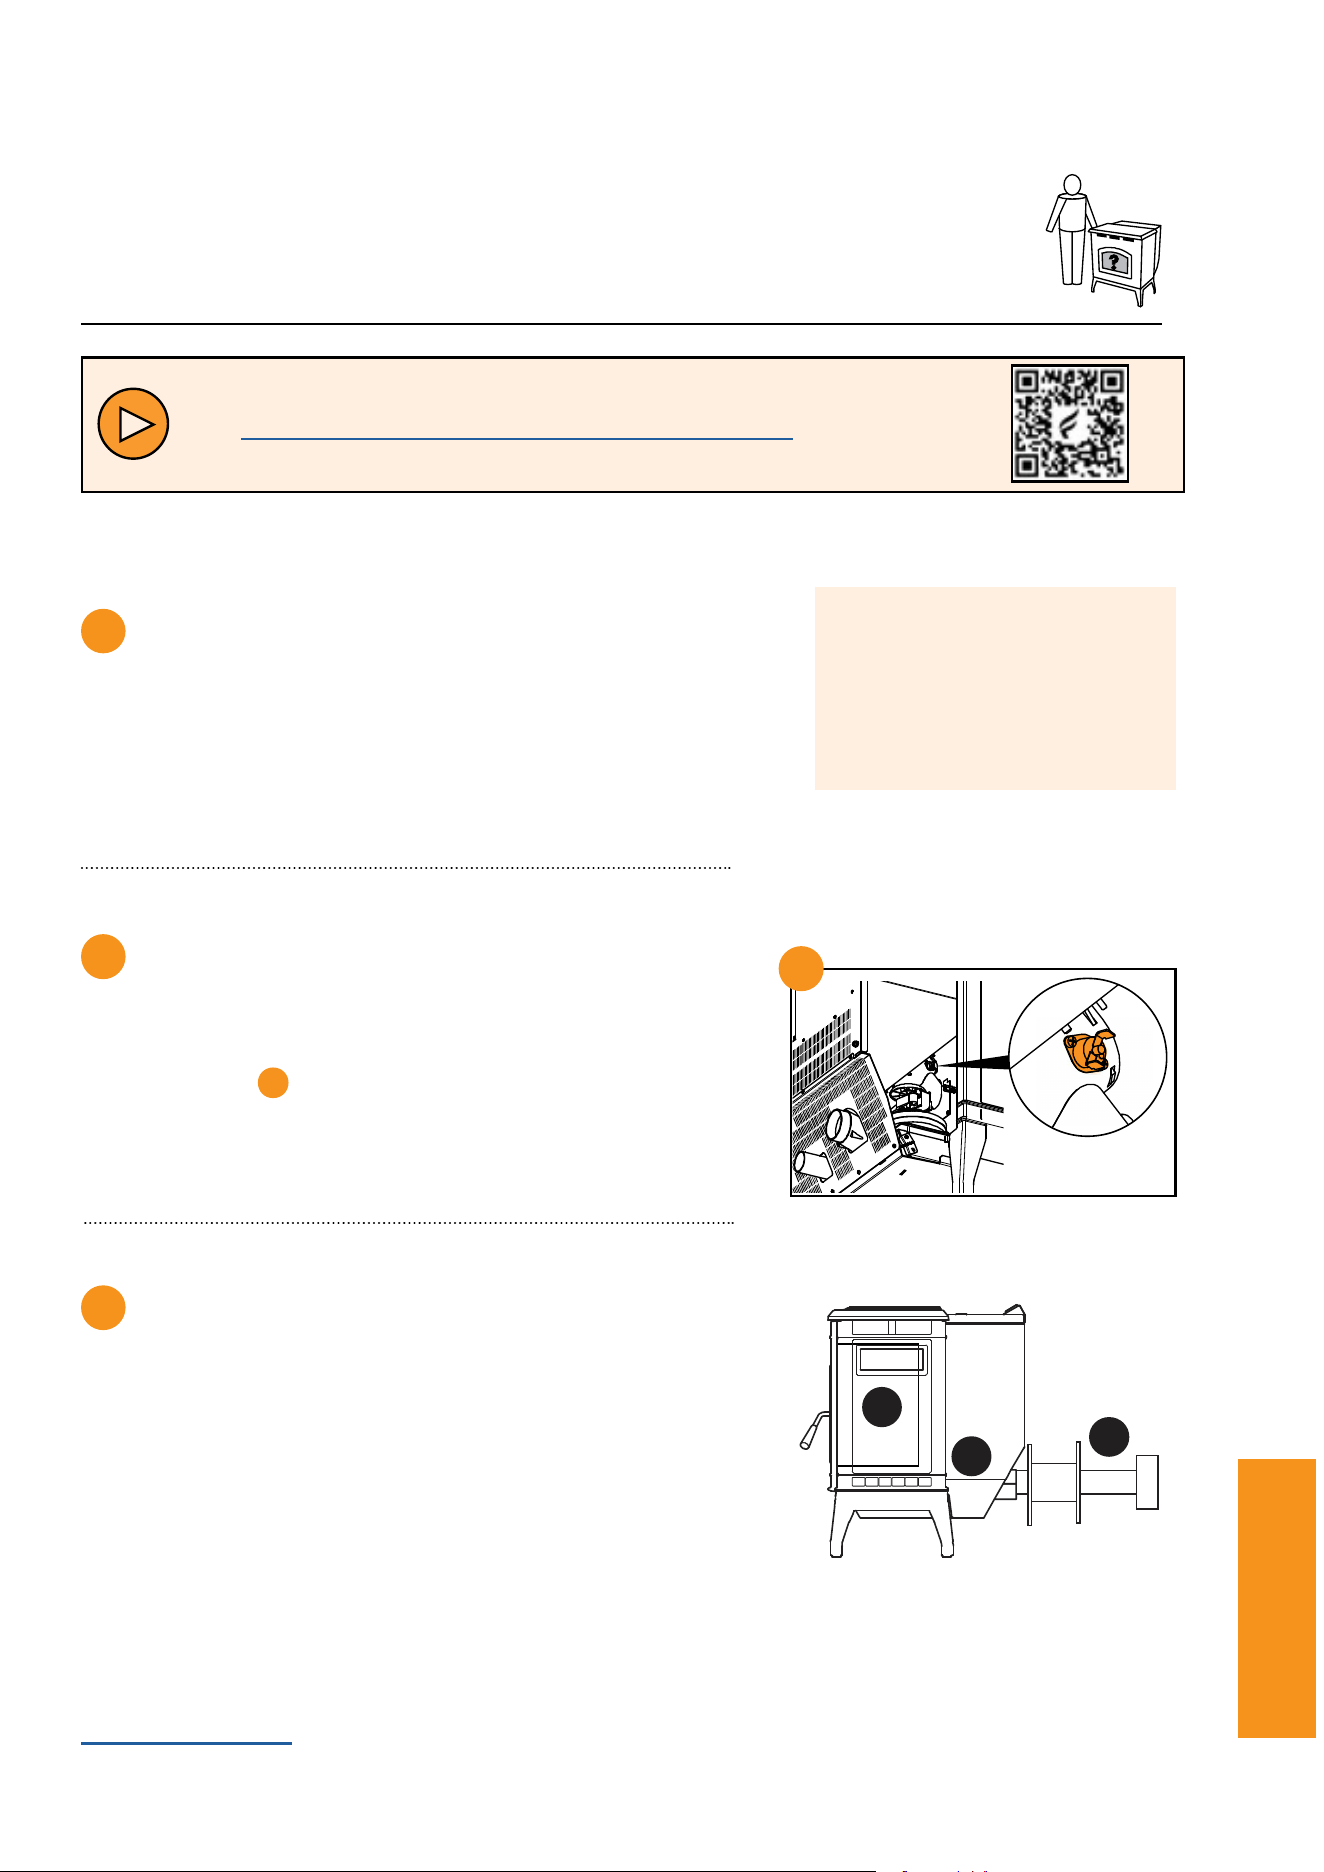
1. Turn the dial control to the off position and unplug the appliance. Remove the right side panel and feed motor
cover plate in the rear of the appliance.
2. Remove the 4 screws and cover plate.
3. Remove remaining pellets in feed assembly.
4. Unplug feed motor from wire harness.
5. Remove silicone from around busing end cap. Using Phillips head screwdriver remove 2 screws retaining the
end cap to the feed tube.
6. From inside the hopper, lightly tap on the end cap alternating side to side to remove feed assembly from feed
tube.
7. Re-install new feed assembly in reverse order; ensuring that the top of the feed bushing is in place and the
busingendcapissymmetricalinthefeedtubechamberpriortonaltighteningoftheretainingscrews.Silicone
the end cap to the feed tube.
8. Plug the feed motor leads back in and restore power.
Replacement kit: SRV7077-014
1
Zone
1
Zone
2
Zone
2
Zone
3
Zone
3
Zone
PelPro Cast Pellet Stove • 7093-60X • 04/26 PelPro Cast Pellet Stove • 7093-60X • 04/26
www.forgename.com
26 27
Troubleshooting
Troubleshooting
Power Related
Pro Tip
Check passages to assure
they are clear of ash and
obstructions.Poorairow
leads to poor performance
of your Stove.
A
A
1
Zone
1
Zone
2
Zone
2
Zone
3
Zone
3
Zone
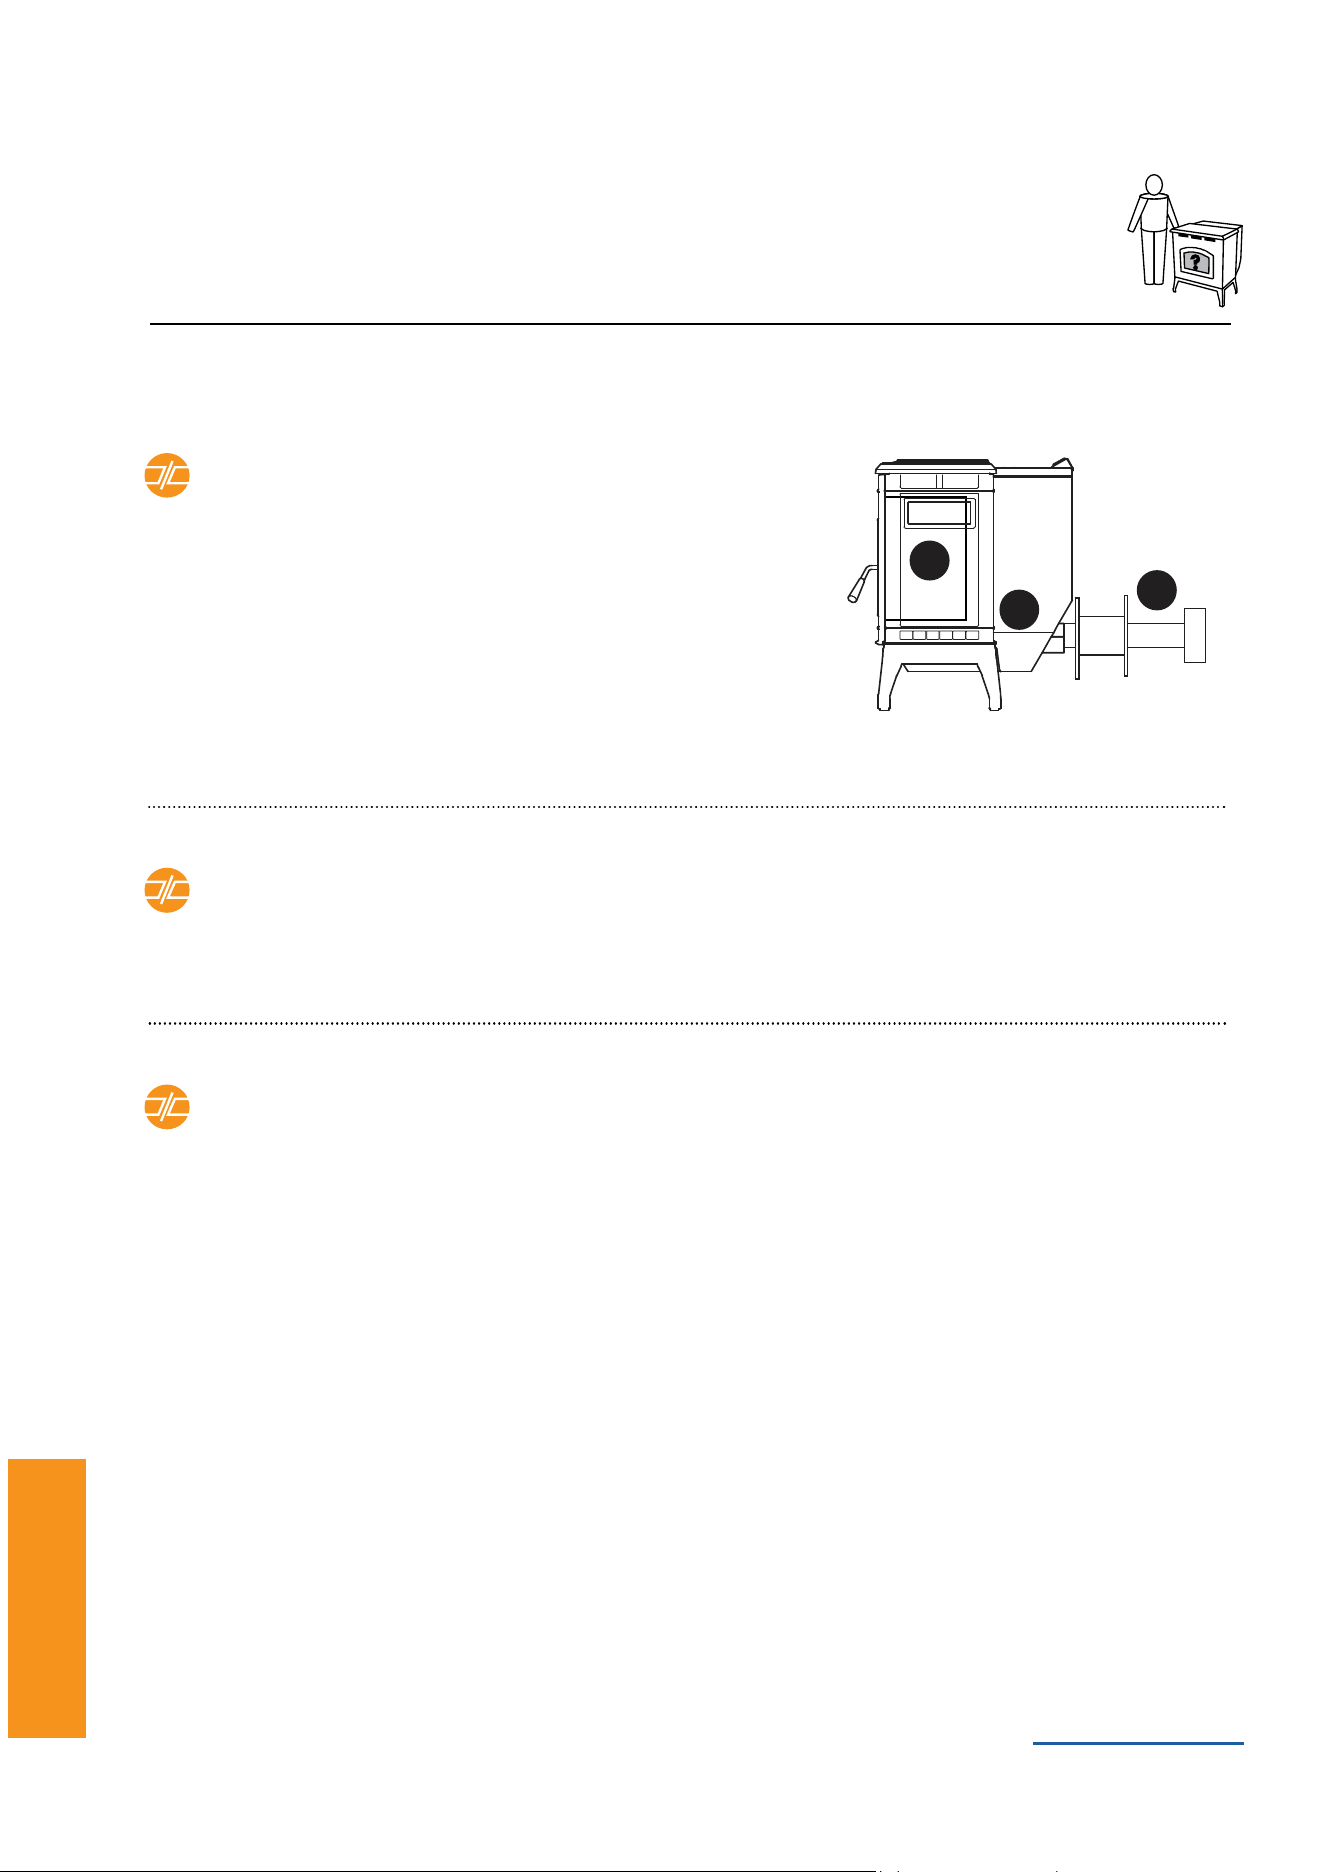
Stove plugged in but no response
• Check your home’s circuit breaker
• Resetsnapdisc(locatedbetweendroptubeandhopper
(Zone2)
• Visually inspect wires, blowers and power cord for breaks
orweartondcauseofpossibleshortcircuit(Zone2)
Component (i.e. blower) fails to start or fails to turn off
• Check all connections and power plugs are secure
• Visuallyinspectwires,blowersandpowercordtond
cause of possible short circuit
In the event of a power outage:
• If using a generator, Pelpro recommends a steady state
generator for best Stove performance.
• ThisStoveneeds110vtorunproperly.ThisStovehasnot
been tested for use with a third party battery backup.
Troubleshooting your Stove
Visit www.forgename.com/pages/pelpro-troubleshooting
or scan the code:
PelPro Cast Pellet Stove • 7093-60X • 04/26 PelPro Cast Pellet Stove • 7093-60X • 04/26
www.forgename.com28
Troubleshooting
Troubleshooting Troubleshooting
Blockage Related
1
Zone
1
Zone
2
Zone
2
Zone
3
Zone
3
Zone
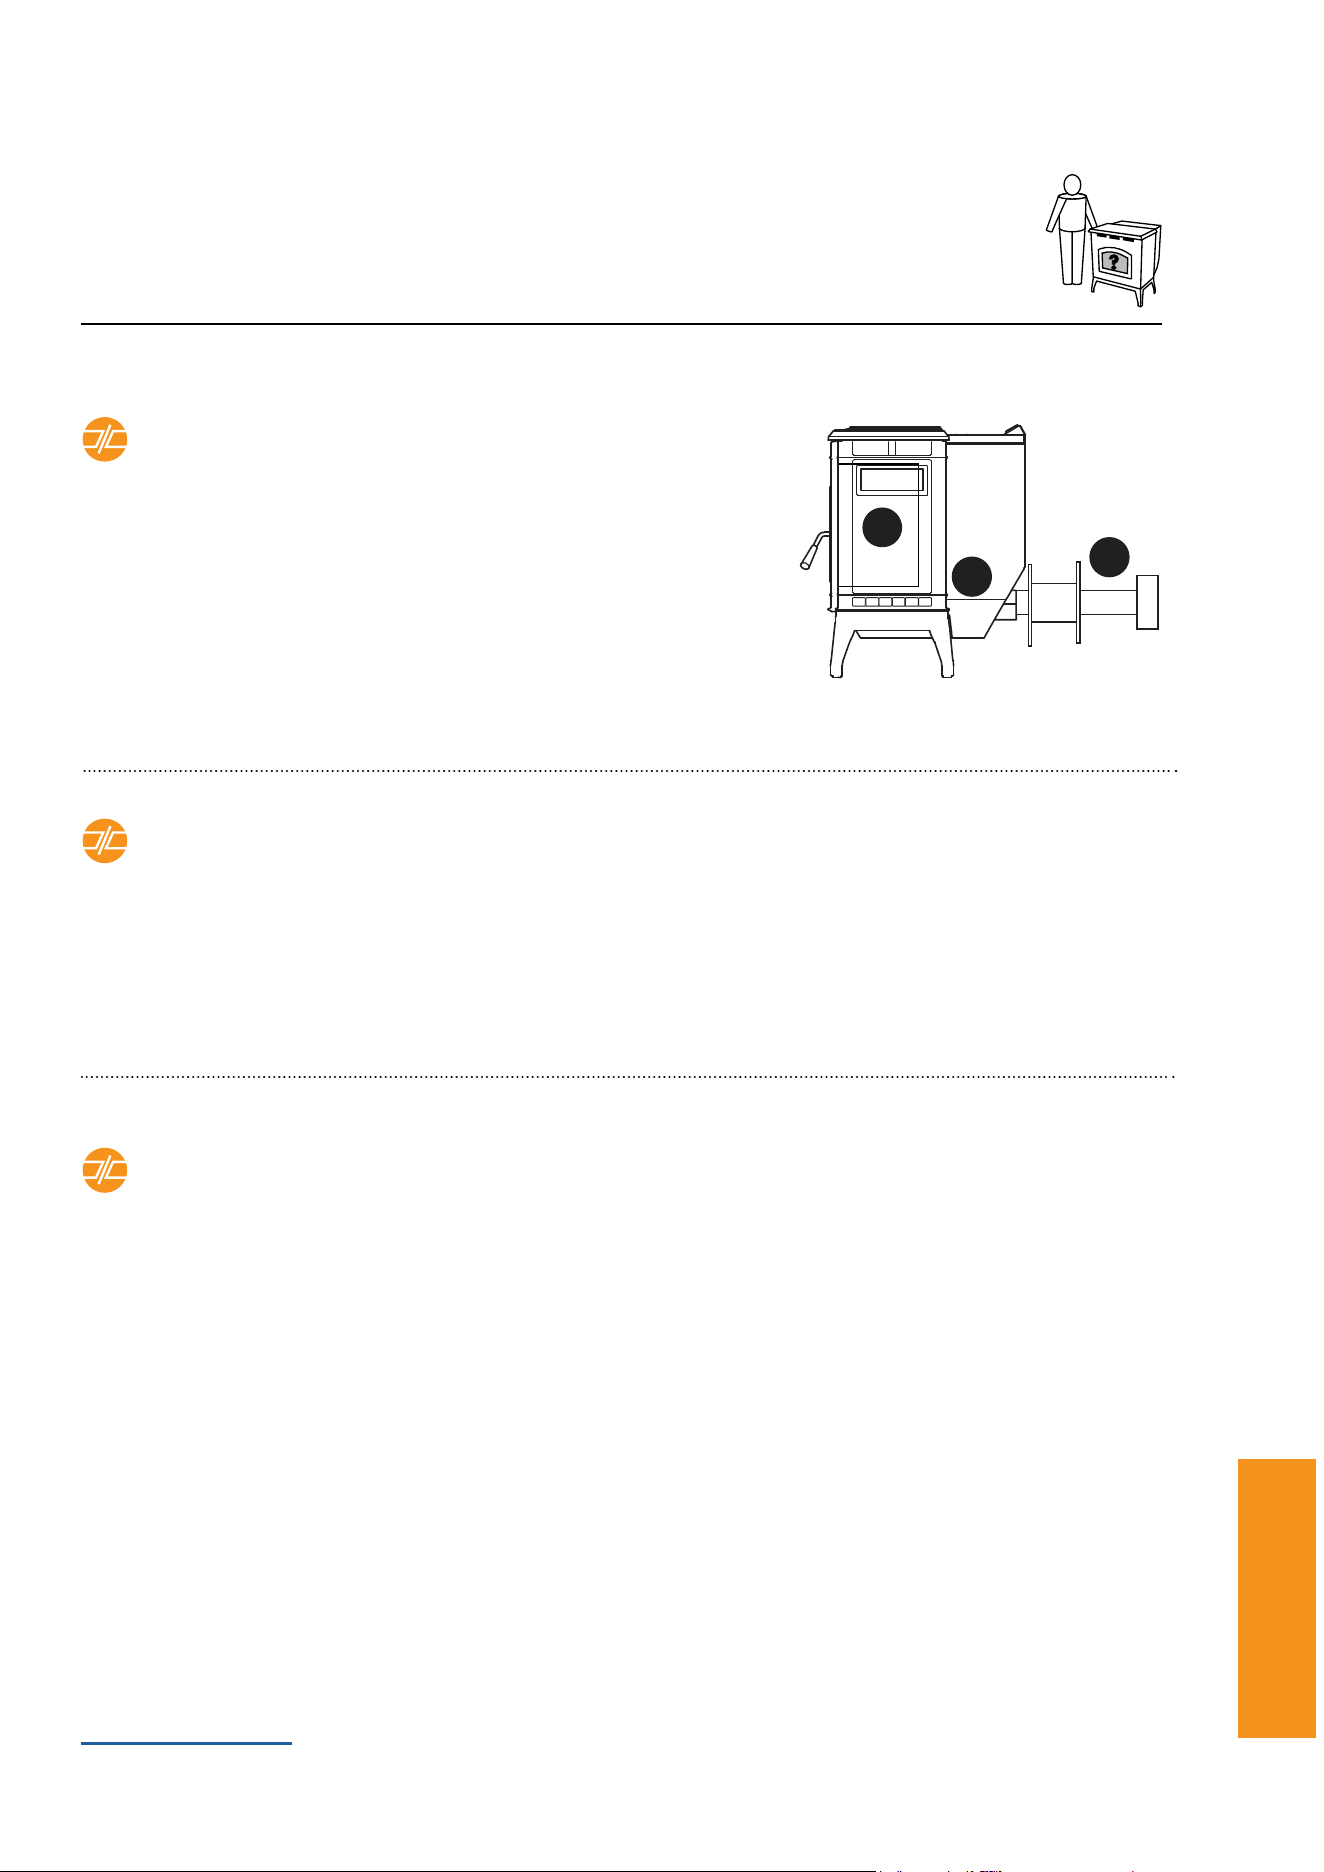
Rumbling/whistling noise during operation
• Conrmexhaustpathiscleanandclear(Zone3)
- Adjustair/fuelratiousingtrimadjustmentdial(Seepage17fortrimadjustmentinstructions)
Stove will not light
• Conrmrepotholesarecleanandclear(Zone1)
- Igniterisgettinghot(glowsorange)
• InspectStovebody(Zone2)
- Conrmfuelisinhopper,closelidsecurely
- Removerightsidepaneltoaccessandconrmvacuumswitchisclearandconnectedatbothends
- Conrmallexhaustblowerconnectionssecure
- Conrmthefeedassemblyandmotorarecleanandclearofdebris
• Conrmexhaustpathiscleanandclear(Zone3)
Black soot on outside of house
• Conrmexhaustpathiscleanandclear(Zone3)
- Adjustair/fuelratiousingtrimadjustmentdial(Seepage21for
trimadjustmentinstructions)
• Ensureterminationcaphasatleast18”clearancetoreduce
theeffectsofsootblow-backonhomeexterior(ie.siding)—
ifnotable,refertopage10foralternateinstallationoptions
PelPro Cast Pellet Stove • 7093-60X • 04/26 PelPro Cast Pellet Stove • 7093-60X • 04/26
www.forgename.com 29
Troubleshooting
Troubleshooting Troubleshooting
Blockage Related
1
Zone
1
Zone
2
Zone
2
Zone
3
Zone
3
Zone
Starts and stops frequently in automatic mode
• Determineifyourroomisexperiencingvaryingtemperaturesduetorepeatedopening/closingofdoorsor
windows—correct if necessary
• ExamineStovebody(Zone2)
- Inspectambientprobeandconrmthatatleast2”isexposedoutsideofStovebody
Sloworsmokystart-upand/orlazyame
• Conrmexhaustpathiscleanandclear;cleanyourrepotandbehindyourbafesinsideyourrebox
(Zone3)
• ExamineStovebody(Zone2)
- Align igniter so it is properly placed and centered
- Reviewfuelquality(seePelletFuelinformationonpage13)
Fire starts but goes out
• Conrmreboxiscleanandclear(Zone1)
- Ensurerepotholesareclear
• InspectStovebody(Zone2)
- Conrmexhaustprobeisconnected
- Inspect and clean the exhaust outlet
• Conrmexhaustpathiscleanandclear(Zone3)

PelPro Cast Pellet Stove • 7093-60X • 04/26 PelPro Cast Pellet Stove • 7093-60X • 04/26
www.forgename.com
30 31
Troubleshooting
Troubleshooting Troubleshooting
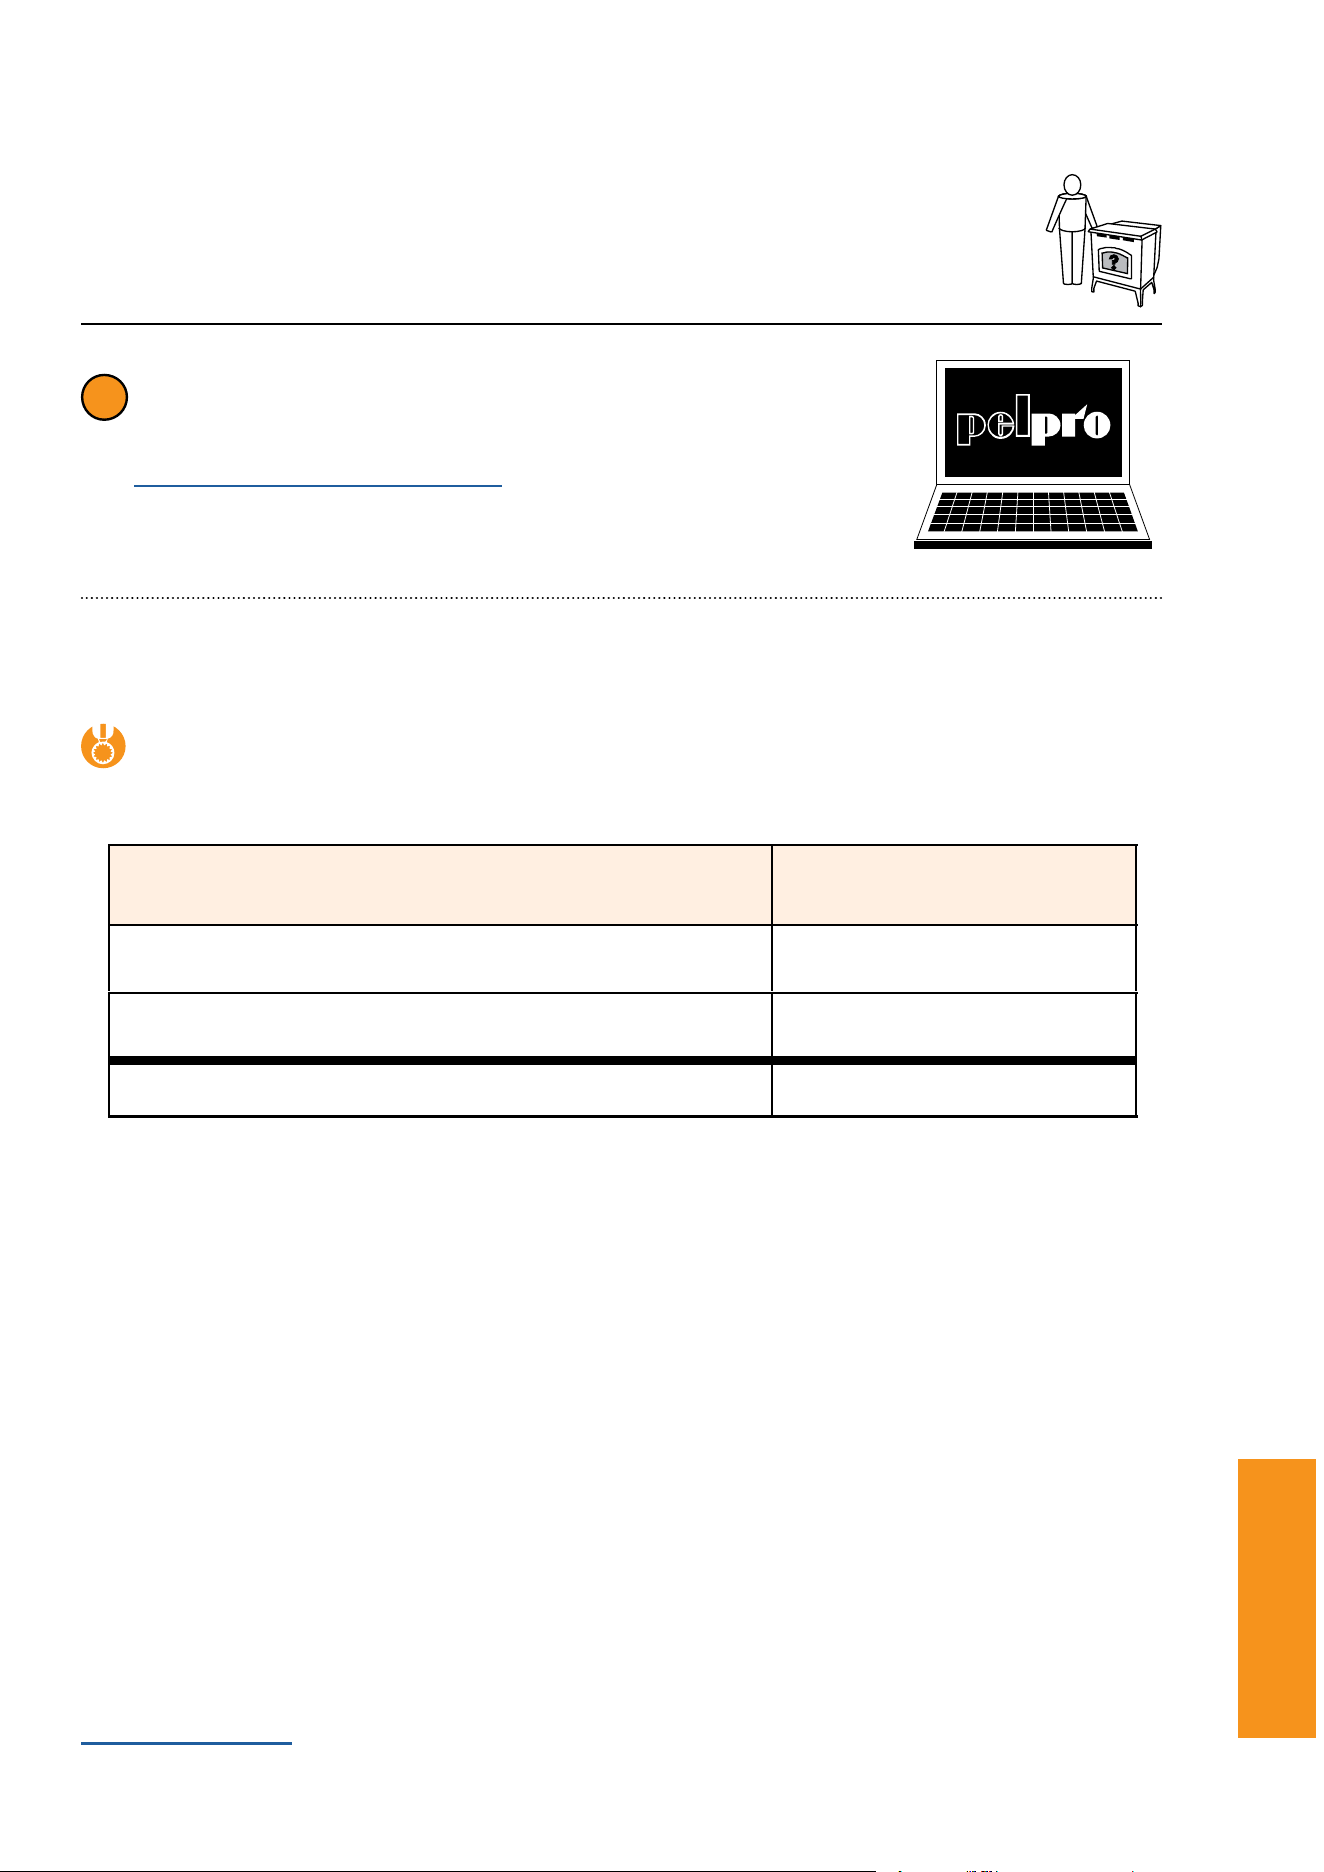
Alarm Possible Cause Corrective Action
Fuel Feed Alarm
Error Number 1
Nofuelisdeliveredtotherepottosustain
ame
Hopperempty(mostlikely)
AugerJam(nextlikely)
No vacuum
Hopper lid open
Flame is evident but the exhaust probe is not
able to recognize the hot exhaust temperature
Exhaust probe not attached to outlet
Exhaust path is dirty
Fill the hopper, inspect the feed tube for jams,
inspecttheventingandreboxforobstructionsand
clean if necessary, inspect the exhaust blower to
make sure it runs, or close the hopper lid.
Inspectandcleantheexhaustoutlet,rebox,re
pot,andbehindthebafes.Inspecttheexhaust
probe to see if it is securely attached to the side of
the exhaust outlet.
Error Number 2
The exhaust
probe senses
an abnormal
temperature.
The exhaust temperature is above or below the
acceptable range.
Exhaust Probe Failure
Not plugged in
Failed component
Plug the probe into the board.
Replace the component.
Error Number 3
The ambient
probe senses
an abnormal
temperature.
The ambient temperature is above or below the
acceptable range.
Ambient Probe Failure
Not plugged in
Failed component
Plug the probe into the board.
Replace the component.
Missed Ignition
Error Number 4
During the ignition
sequence the load
does not ignite.
The unit will auto-
matically retry once
fromtherstfailed
attempt.
Fuel
No fuel
Hopper Empty
Feed Jam
Feed doesn’t turn
Feed motor disconnected or failed
Fire pot
Fire pot Dirty so fuel is not near ignition hole
intherepot
Igniter
No power
Debris in the end of the igniter chamber
Fill the hopper
Inspect and clear jam in the feed tube
Inspectthefeedmotorcircuit(hopperlidmustbe
closed,vacuumswitchmustbeclosed(ieexhaust
bloweron),andfeedmotormustbepluggedin.
Cleantherepot.
Check leads and see if the igniter works.
Clean the end of the igniter chamber from inside
therebox(removaloftherepotrequiredforthis
step).
Error Number 5
Communication
Error
The Digital Display is not communicating
correctly with the Stove control board.
Inspect the cable for breaks or cuts and check the
connection between the Digital Control and Control
board.
Replace the component.
Error Number 7
Exhaust Over
Temperature
The exhaust
temperature
has exceeded
the allowable
temperature.
Fuel
Feed Motor Locked On
Non-approved fuel used
Convection blower
Dirty
Failed
Installation
Installationcongurationistightallowingfor
limited air circulation around the unit.
If the feed motor does not turn off, replace the
control board.
Review the fuel being used.
Clean
Replace
Review the installation and move if necessary.
Following correction of any alarm, press power button to clear the alarm, wait 10 seconds and
turn the Stove back ON.
PelPro Cast Pellet Stove • 7093-60X • 04/26 PelPro Cast Pellet Stove • 7093-60X • 04/26
www.forgename.com
30 31
Troubleshooting
Troubleshooting Troubleshooting
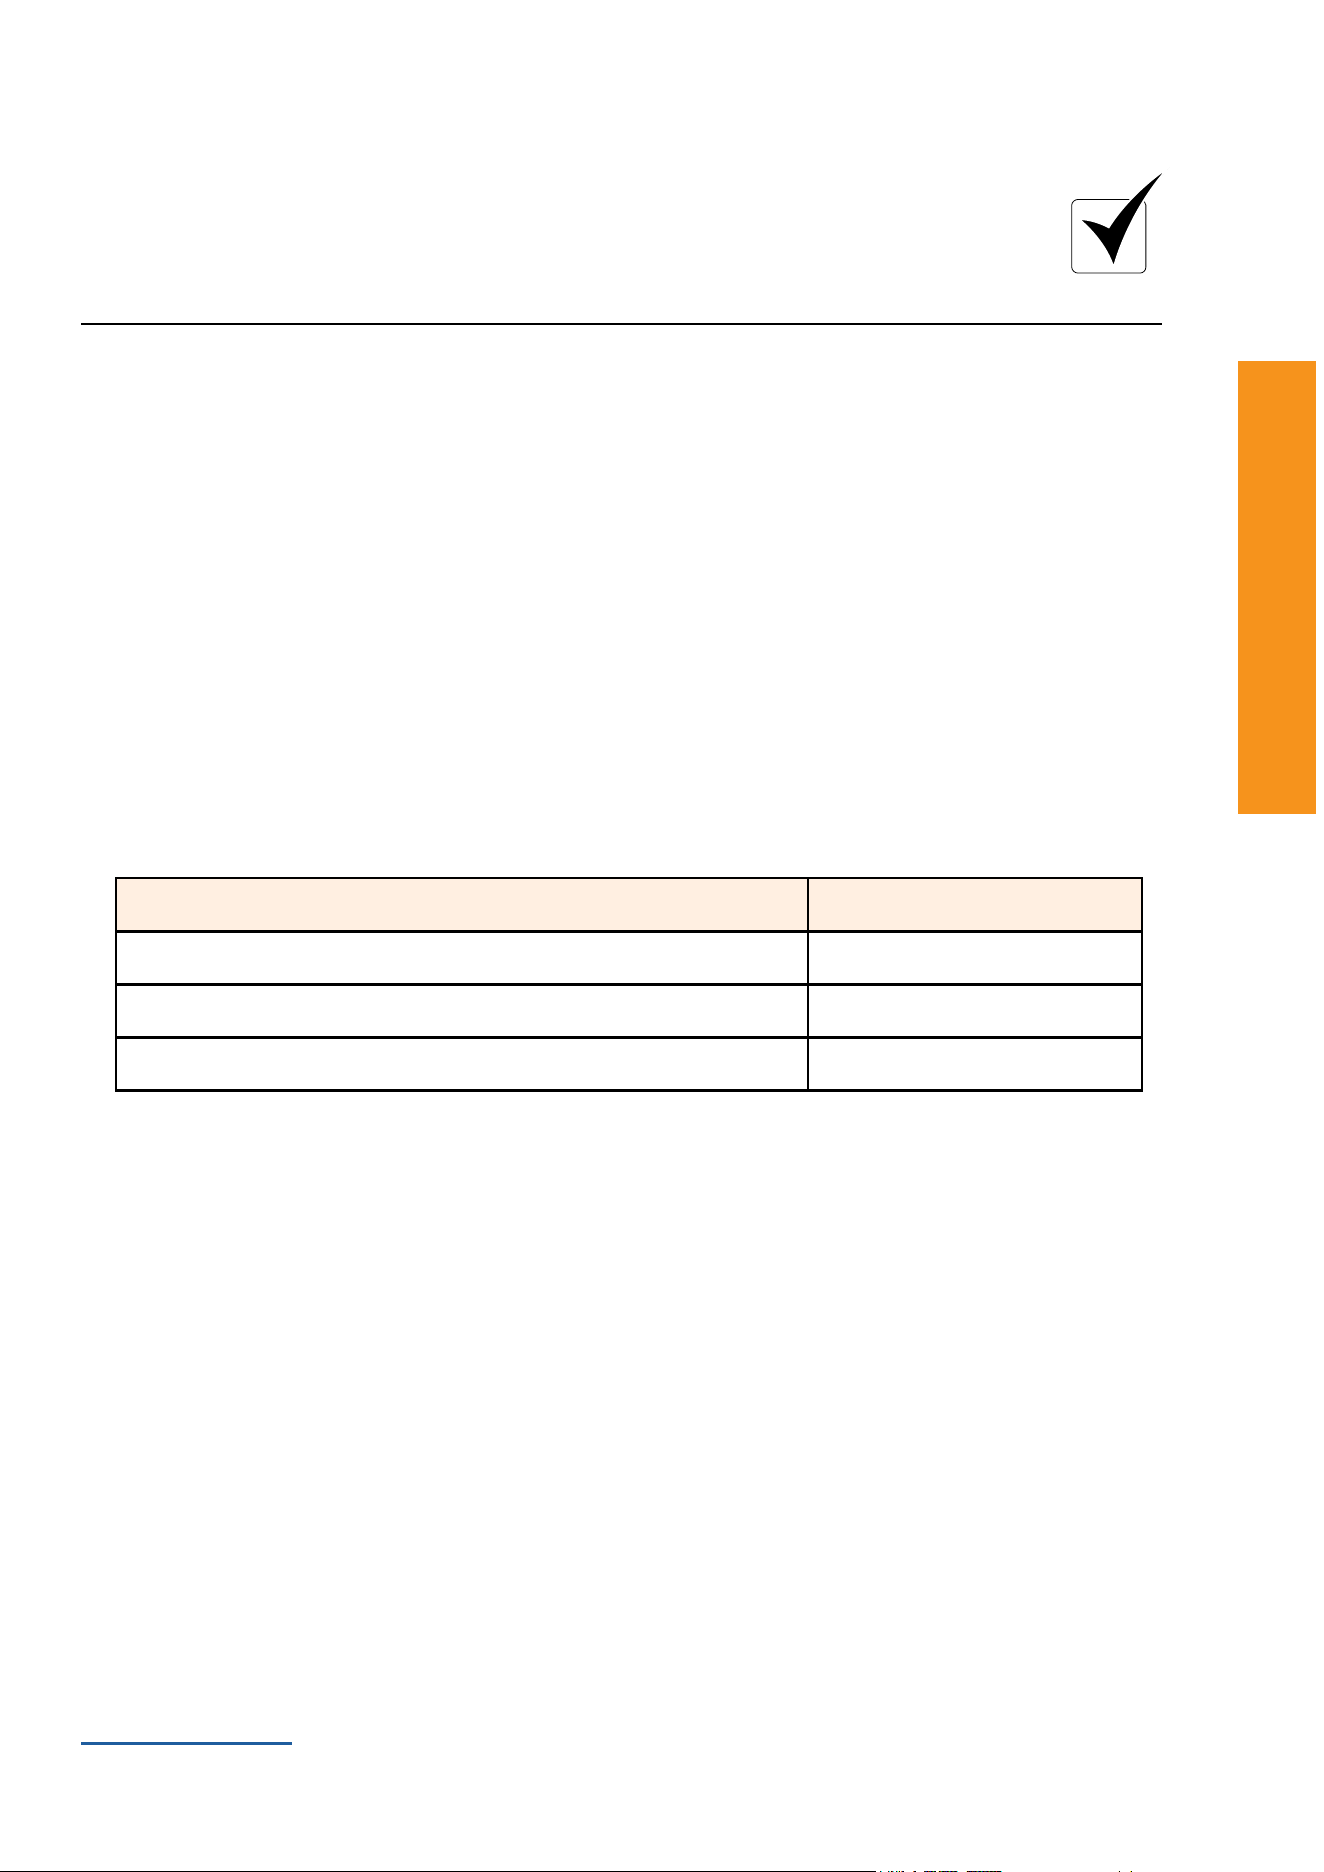
Warranty
If replacement parts are needed, please note warranty coverage begins on the date of purchase. Retain your
original receipt as proof of purchase. The warranty period for covered components is as follows:
Additionaltermsandlimitationsapply.Seepage30forcompletewarrantyinformation.
Components Covered
Warranty Period
(Partsonly,
Labornotincluded)
Electrical 1Year
SteelParts(excludingrepot) 5 Years
All replacement parts are covered for remainder of original warranty
periodor90days,whicheverislonger
90Days
Still having trouble?
Access additional resources at:
www.forgename.com/pages/pelpro
?

PelPro Cast Pellet Stove • 7093-60X • 04/26 PelPro Cast Pellet Stove • 7093-60X • 04/26
www.forgename.com
32 33
Support
Support
Visit www.forgename.com/pages/pelpro to
access:
• Order replacement parts
• Installation videos
• Troubleshooting videos
• Use and care videos
• Manuals and more
Please review the “Maintaining Your Stove”
and “Troubleshooting” sections in this
manual.
Questions?
Troubleshooting?
Don’t return your stove to the retailer.
Contact PelPro’s Customer Support.
Our experts are trained to answer questions and
troubleshoot issues quickly.
PelPro Customer Support
877-427-3316
by email: info_pelpro@hearthnhome.com
PPA -1012-0226
www.forgenflame.com
PelPro Cast Pellet Stove • 7093-60X • 04/26 PelPro Cast Pellet Stove • 7093-60X • 04/26
www.forgename.com
32 33
Listing and Code Approvals
ListingsandCertications
Mobile Home Approved
This Stove is approved for mobile home
Installations when not installed in a sleeping room and when an outside combustion air inlet is provided.
• Thestructuralintegrityofthemobilehomeoor,ceiling,andwallsmustbemaintained
• TheStovemustbeproperlygroundedtotheframeofthemobilehomewith#8coppergroundwire,anduseonly
listed double-wall connector pipe
• Outside Air Kit provided with each Stove must be installed in a mobile home installation and must remain clear
ofleaves,debris,iceand/orsnow.ItmustbeunrestrictedwhiletheStoveisinusetopreventroomairstarvation
which causes smoke spillage.
• TheStovemust besecuredto themobile home structureby boltingittotheoorthrough holesprovidedat
bottom of your cast legs on your Stove.
WARNING! Asphyxiation Risk.
DO NOT INSTALL IN A SLEEPING ROOM. Your Stove consumes
oxygen in the room.
Note
This installation must conform with local codes.
In the absence of local codes you must comply with ASTM E1509-12, ULC S627-00, (UM) 84-HUD
WARNING!
• It is critical to have a working smoke detector installed in the home of unit operation.
• Smokealarmsthatareproperlyinstalledandmaintainedplayavitalroleinreducingredeathsandinjuries.Havinga
workingsmokealarmreducesthechanceofrerelatedinjuries.
• Installatleastonecarbonmonoxidedetectoroneachoorofyourhome.
StoveCertication
Series PPC90/TSC90
Laboratory OMNI-Test Laboratories, Inc.
Report No. 0061PS093S
Type SolidFuelRoomHeater/PelletFuelBurningType
Standard
ASTME2779-10,ASTME1509-12andULC
S627-00,RoomHeaterPelletFuelBurningtype
and(UM)84-HUD,MobileHomeApproved.
Note
This wood stove needs periodic inspection and repair for proper operation. It is against federal
regulations to operate this wood heater in a manner inconsistent with operating instructions
in this manual.
PelPro Cast Pellet Stove • 7093-60X • 04/26 PelPro Cast Pellet Stove • 7093-60X • 04/26
www.forgename.com
34 35
Listing and Code Approvals
ListingsandCerti
cations Listings
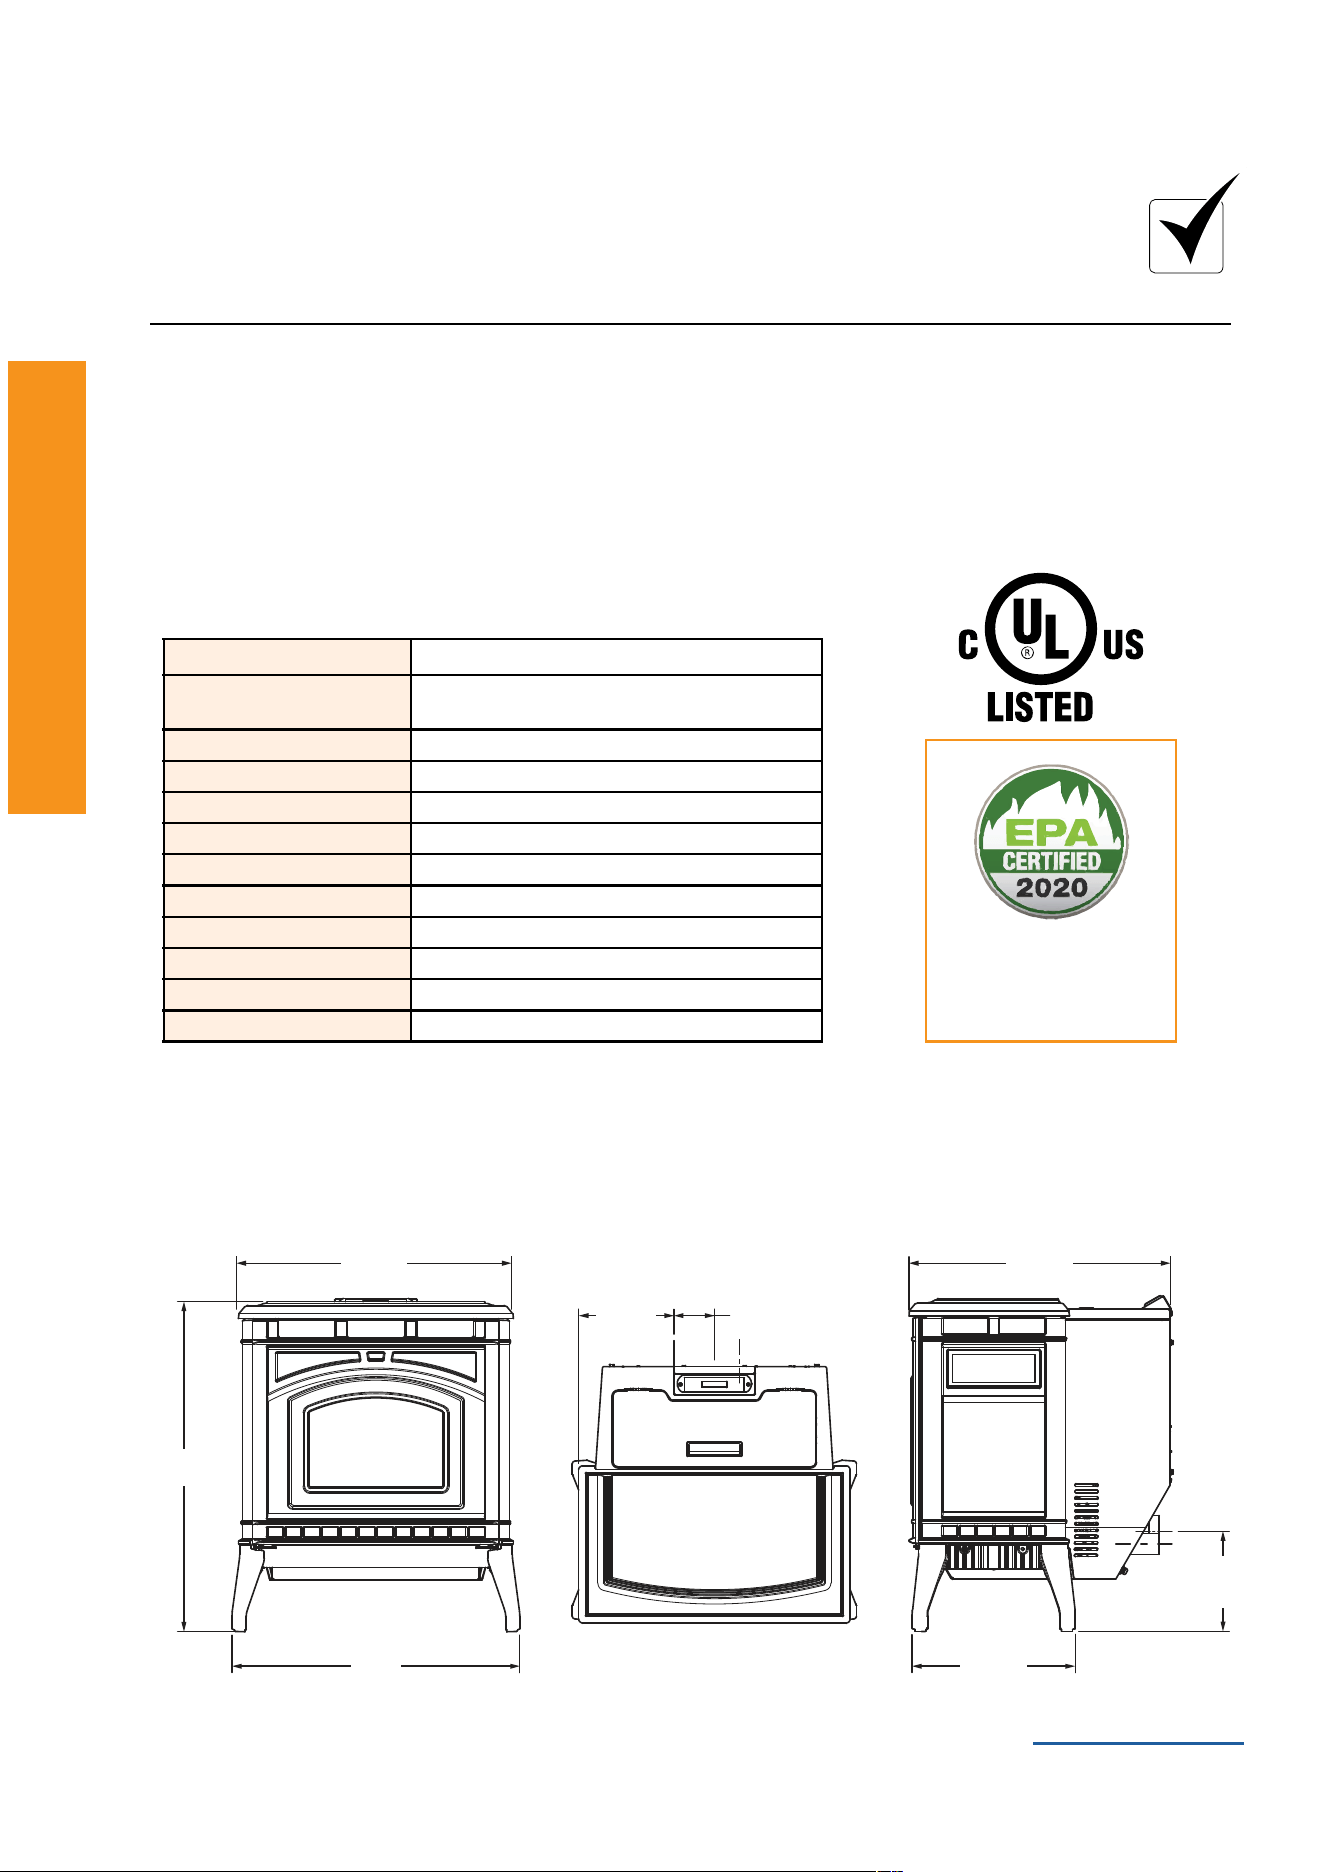
GlassSpecications
ThisStoveisequippedwith5mmceramicglass.
Replace glass only with 5mm ceramic glass. Please contact PelPro for replacement glass.
Electrical Rating (On High)
PPC90/TSC90Series:115VAC,60Hz,Start2.6Amps,
Run0.9Amps
Report Number: 0061PS093E
EPACertication
Number:
Number:52-16
EPACertiedEmissions: 1.11gramsperhour
*LHVTestedEfciency: 88.0%
**HHVTestEfciency: 82.3%
***EPA BTU Output: 8,500to39,500/hr
****BTU Input: 11,100to47,400/hr
*****Heating Capacity: Upto2,200sq.ft.dependingonclimatezone
Vent Size: 3”or4”LorPL
Hopper Capacity: 90lbs(Approximate)
Fuel: Wood pellets
Shipping Weight: 340lbs
Stove Dimensions
BTU&EfciencySpecications
9-3/8 [238]9-3/8 [238] 4 [102]
26-3/4 [679]
28 [711]
32-1/8
[816]
25-1/4 [642]
9-5/8
[246]
FLUE
15-3/4 [400]
*WeightedaverageLHVefciencyusingdatacollectedduringEPAemissionstest.
**WeightedaverageHHVefciencyusingdatacollectedduringEPAemissionstest.
***MaximumBTUoutputbasedonHHVefciencyandthehighburnsectionoftheEPAemissionstest.
****MaximumBTUinputbasedonthehighburnsectionoftheEPAemissionstest.
*****Heatingcapacitydepencsonclimatezone,structurelayout,insulation,windows,etc.
ThePPC90/TSC90
isCertiedtocomply
with2020particulate
emission standards.
PelPro Cast Pellet Stove • 7093-60X • 04/26 PelPro Cast Pellet Stove • 7093-60X • 04/26
www.forgename.com
34 35
Listing and Code Approvals
cations Listings
andCertications
Warranty
Components Covered
Warranty Period
(Parts only, Labor not included)
Electrical 1 Year
SteelParts(excludingrepot) 5 Years
Allreplacementpartsarecoveredforremainderoforiginalwarrantyperiodor
90days,whicheverislonger
90 Days
Hearth & Home Technologies, Inc. - PelPro Limited Warranty
Hearth&HomeTechnologies,Inc.(HHT),onbehalf ofitsPelProbrand,extendsthefollowing warrantyforPelPro
Stovespurchasedfromanauthorizedretailer.
If you experience issues with your PelPro Stove, Consumer Care is available to assist you with troubleshooting
technicalissues.
ThiswarrantycoverscomponentsofthePelProStovesaslistedinthetablebelow.
Warranty Coverage:
Subjecttothetablebelow,HHTwarrantstotheownerofthePelProStovethattheStovewillbefreefromdefects
inmaterialsandworkmanshipatthetimeofmanufacture.Afterinstallation,ifcoveredcomponentsarefoundtobe
defectiveinmaterialsorworkmanshipduringtheapplicablewarrantyperiod,HHTwillreplacethecoveredcomponents.
HHT,atitsowndiscretion,mayfullydischargeallofitsobligationsundersuchwarrantiesbyreplacingtheproductitself
orrefundingtheveriedpurchasepriceoftheproductitself.Themaximumamountrecoverableunderthiswarranty
islimitedtothepurchasepriceoftheproduct.Thiswarrantyissubjecttoconditions,exclusions,andlimitationsas
describedbelow.
Warranty Period:
Warrantycoveragebeginsonthedateoforiginalpurchase.Thewarrantyperiodforcoveredcomponentsisasfollows:
Parts Service & Returns:
HHTisproudtooerthebesttechnicalandsalessupportintheindustry.Ifyouhaveanyquestionsabouthow to
operateyourStoveorifyouneedserviceparts,pleasevisitPelProstoves.com.
Warranty Exclusions:
Warrantydoesnotcoverdamageorbreakageduetomisuse,improperhandlingormodications.Thereisnowarranty
onthepaint,glass,repot,rebrick,oranygaskets,oragainstdamagecausedfromcorrosion.Thereisnoexpressed
orimplied performancewarrantyonPelProunits asHHThasnocontrol overtheinstallation, operation,cleaning,
maintenance,ortypeoffuelburned.
Somestates do not allow exclusion or limitation of incidental or consequential damages, or limitations of implied
warranties,sothelimitationsorexclusionssetforthinthislimitedwarrantymaynotapplytoyou.Thislimitedwarranty
givesyouspeciclegalrightsandyoumayhaveotherrights,whichvaryfromstatetostate.Warrantyisvoidifthe
PelProStovehasnotbeeninstalled,operated,cleanedandmaintainedinstrictaccordancewithHHT’sinstructions.
NEITHER HHT NOR THE RETAILER FROM WHO YOU PURCHASED YOUR PELPRO UNIT SHALL BE
RESPONSIBLE, LEGALLY OR OTHERWISE, FOR THE INCIDENTAL OR CONSEQUENTIAL DAMAGE TO
PROPERTYORPERSONSRESULTINGFROMTHEUSEOFTHISPRODUCT.ANYWARRANTYIMPLIEDBYLAW,
INCLUDINGBUTNOTLIMITEDTOIMPLIEDWARRANTIESOFTHEMERCHANTABILITYORFITNESS,SHALLBE
LIMITEDTOONE(1)YEARONTHEBREACHOFTHISWARRANTYORANYTYPEOFWARRANTYEXPRESSED
ORIMPLIEDBYLAW.HHTSHALLINNOEVENTBELIABLEFORANYSPECIAL,INDIRECT,CONSEQUENTIAL
OROTHER DAMAGESOFANY NATUREWHATSOEVER IN EXCESSOFTHEORIGINALPURCHASEPRICE
OFTHISPRODUCT.ALL WARRANTIESBY HHTARESETFORTHHEREINANDNOCLAIMSHALLBEMADE
AGAINSTHHTONANYORALWARRANTYORREPRESENTATION.
PelPro Cast Pellet Stove • 7093-60X • 04/26 PelPro Cast Pellet Stove • 7093-60X • 04/26
www.forgename.com
36 37
Listing and Code Approvals
ListingsandCerti
cations Listings
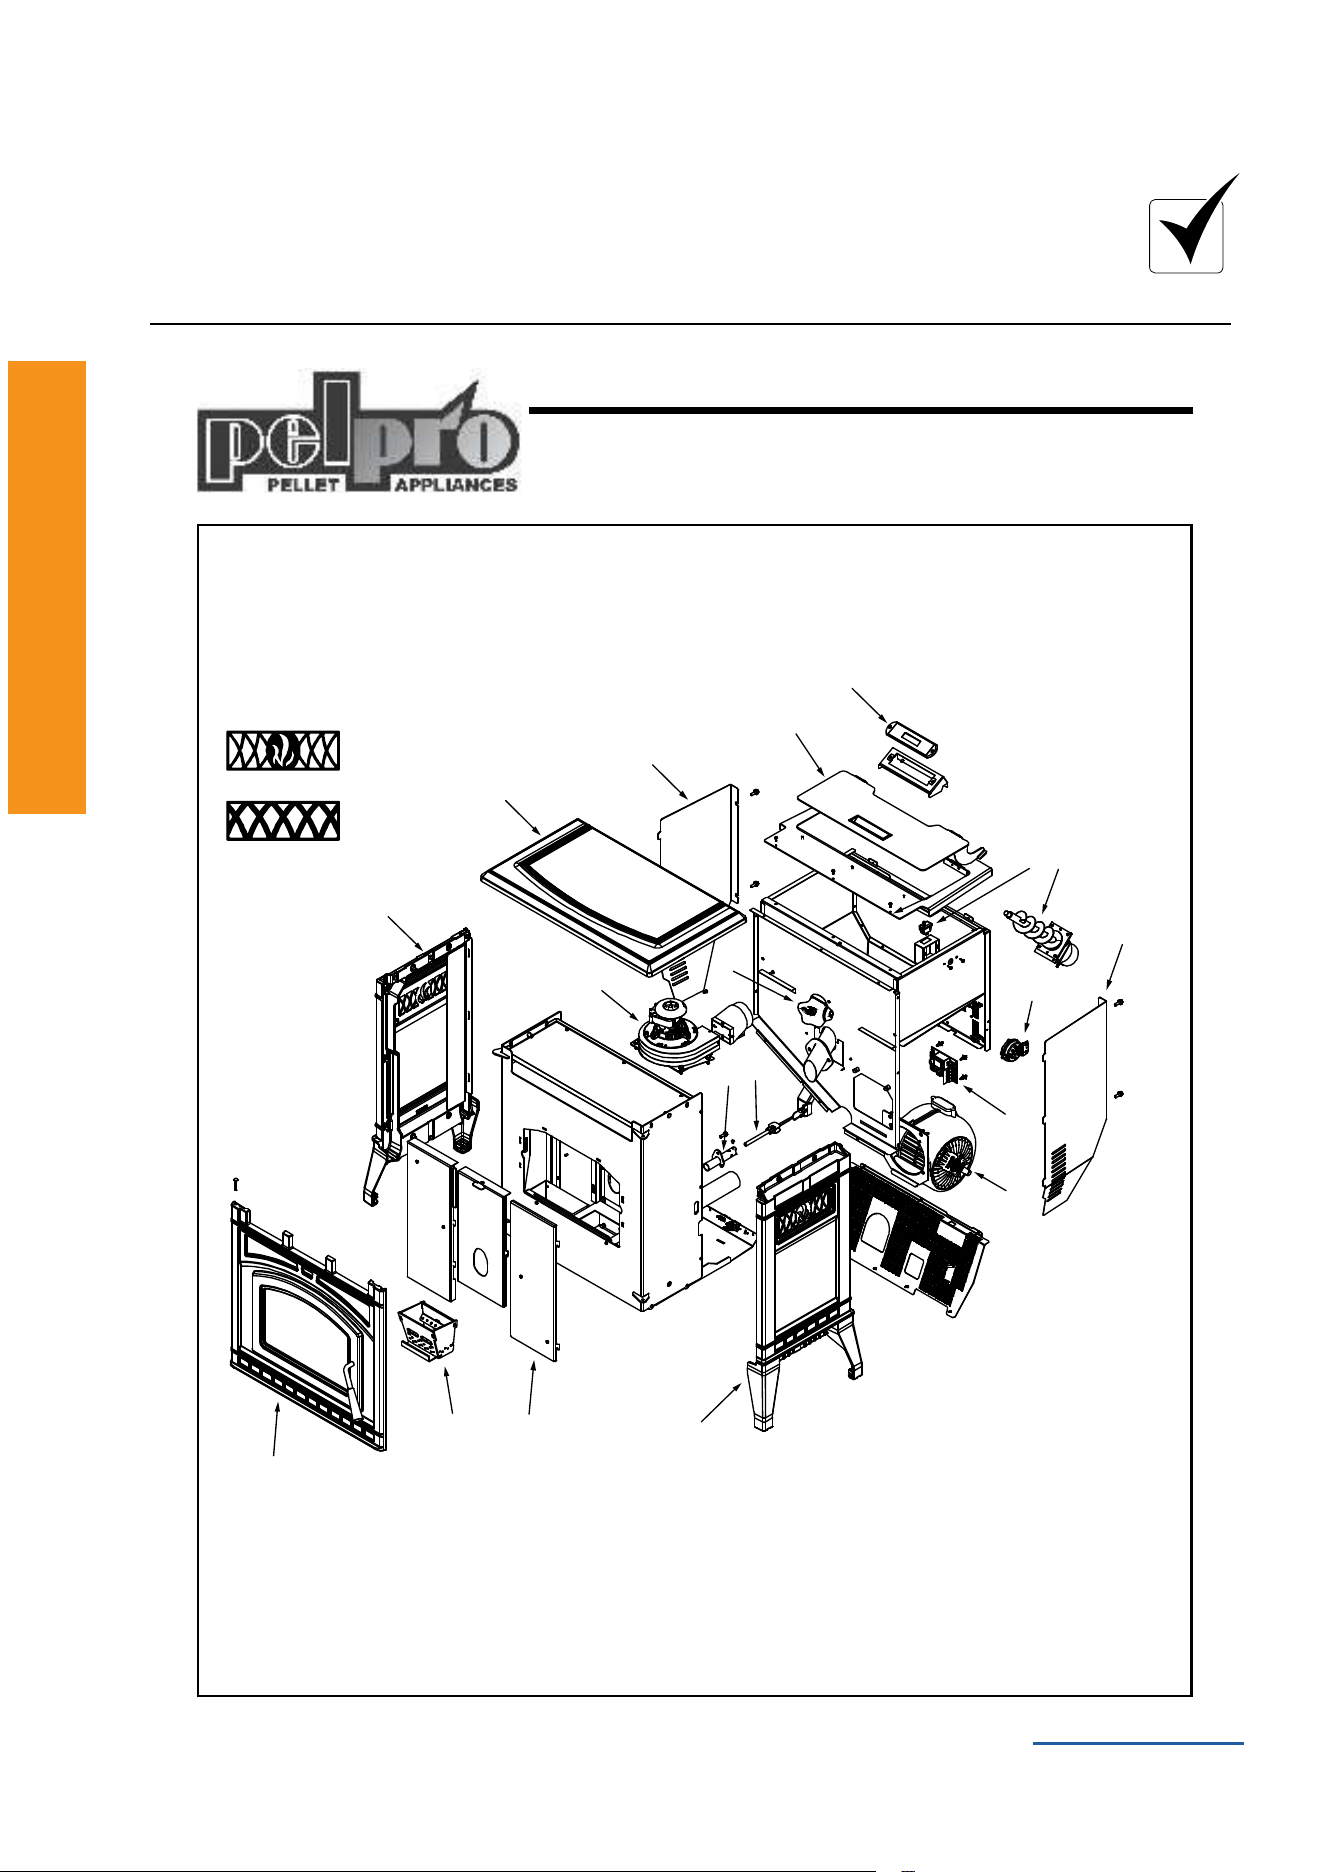
Service Parts
Beginning Manufacturing Date: July 2016
Ending Manufacturing Date: Active
PPC90/TSC90
Part number list on following page.
PPC90
TSC90
1
2
3
4
5
6
7
8
9
10
11 12
13
14
15
16
17
18
19
PPC90 Ending Manufacturing Date: May 2021
Serial #HF1878154
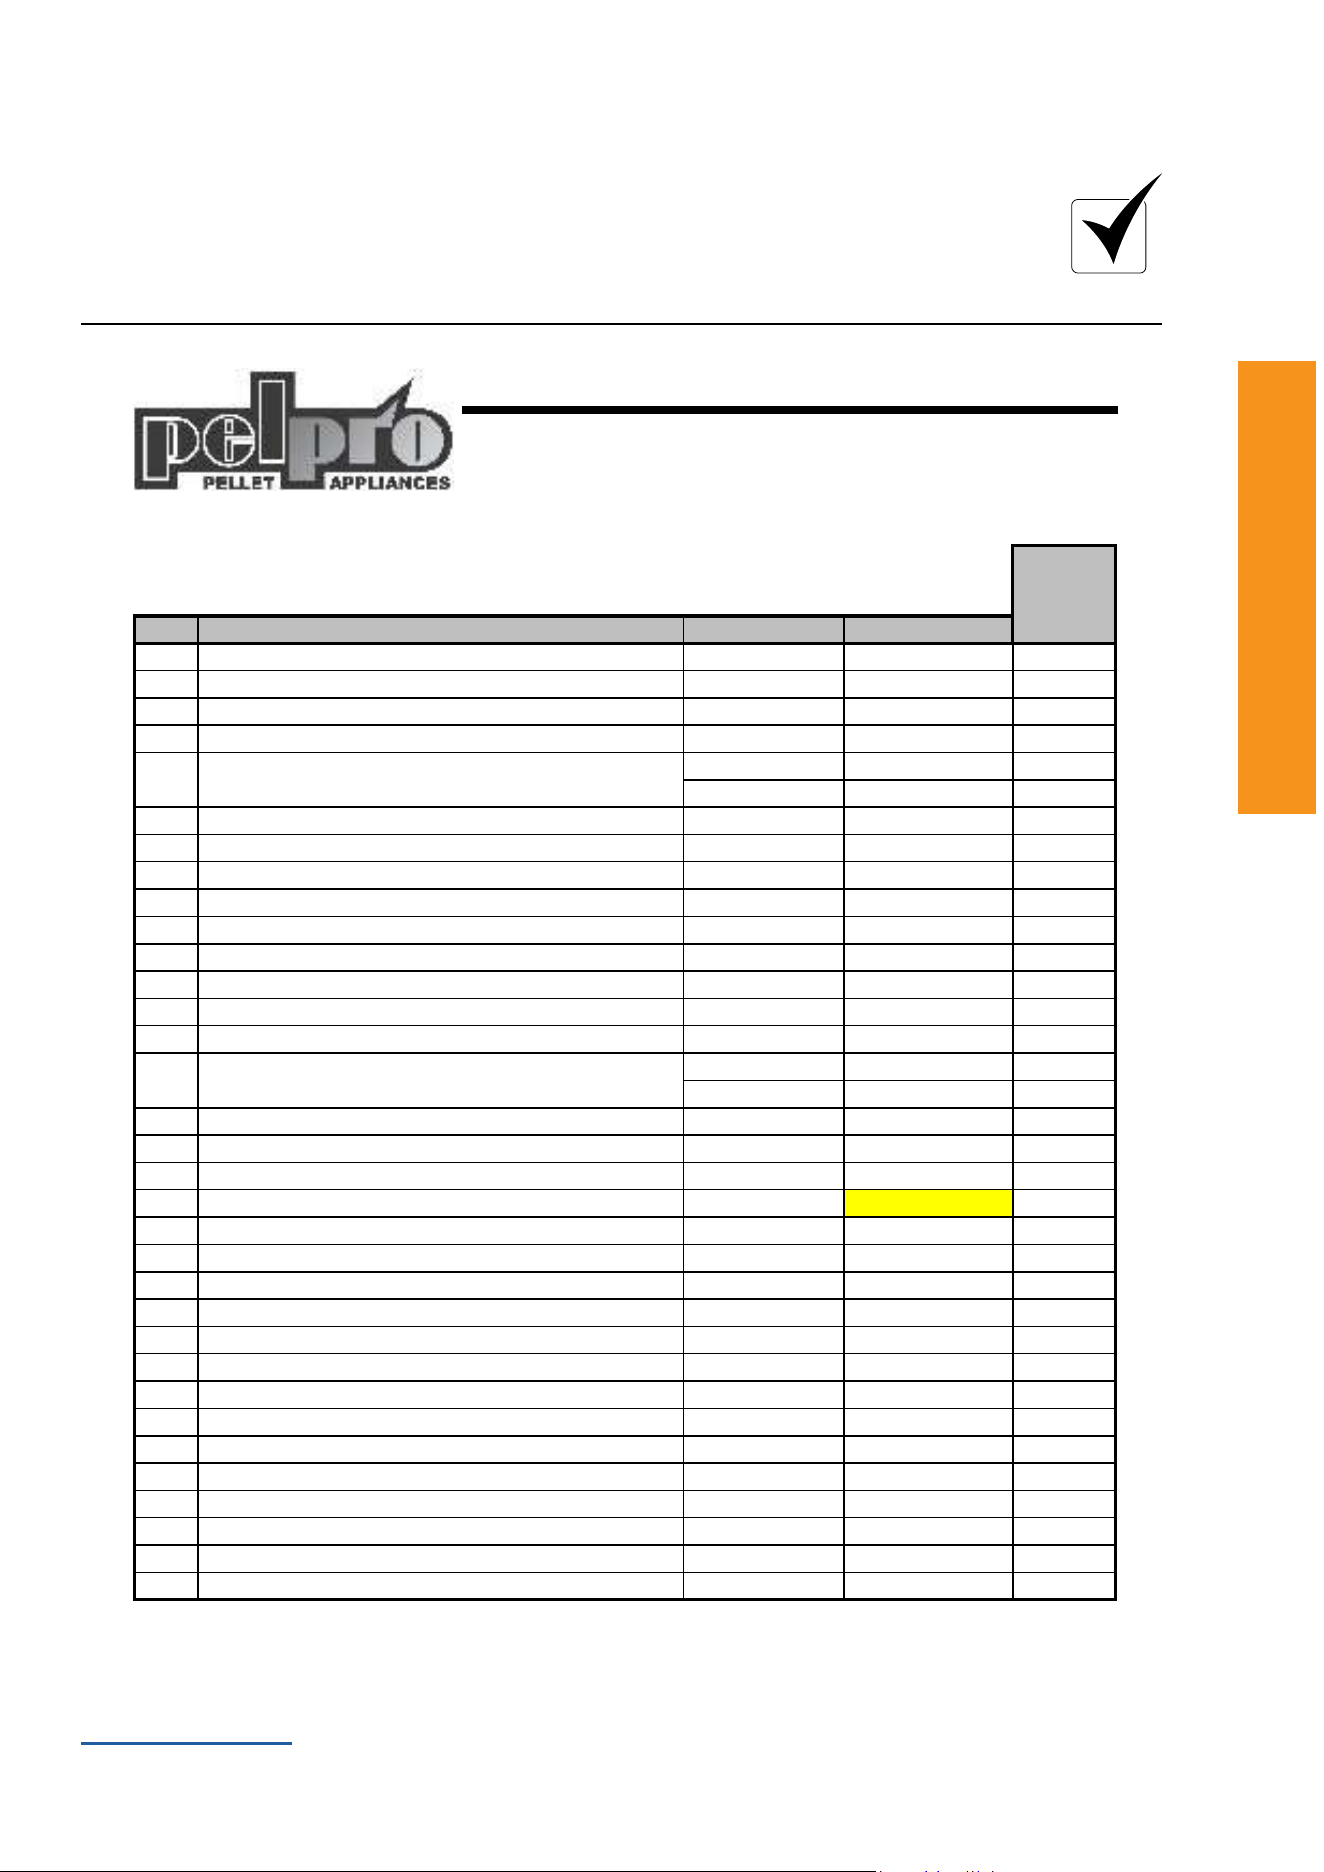
PelPro Cast Pellet Stove • 7093-60X • 04/26 PelPro Cast Pellet Stove • 7093-60X • 04/26
www.forgename.com
36 37
Listing and Code Approvals
cations Listings
andCertications
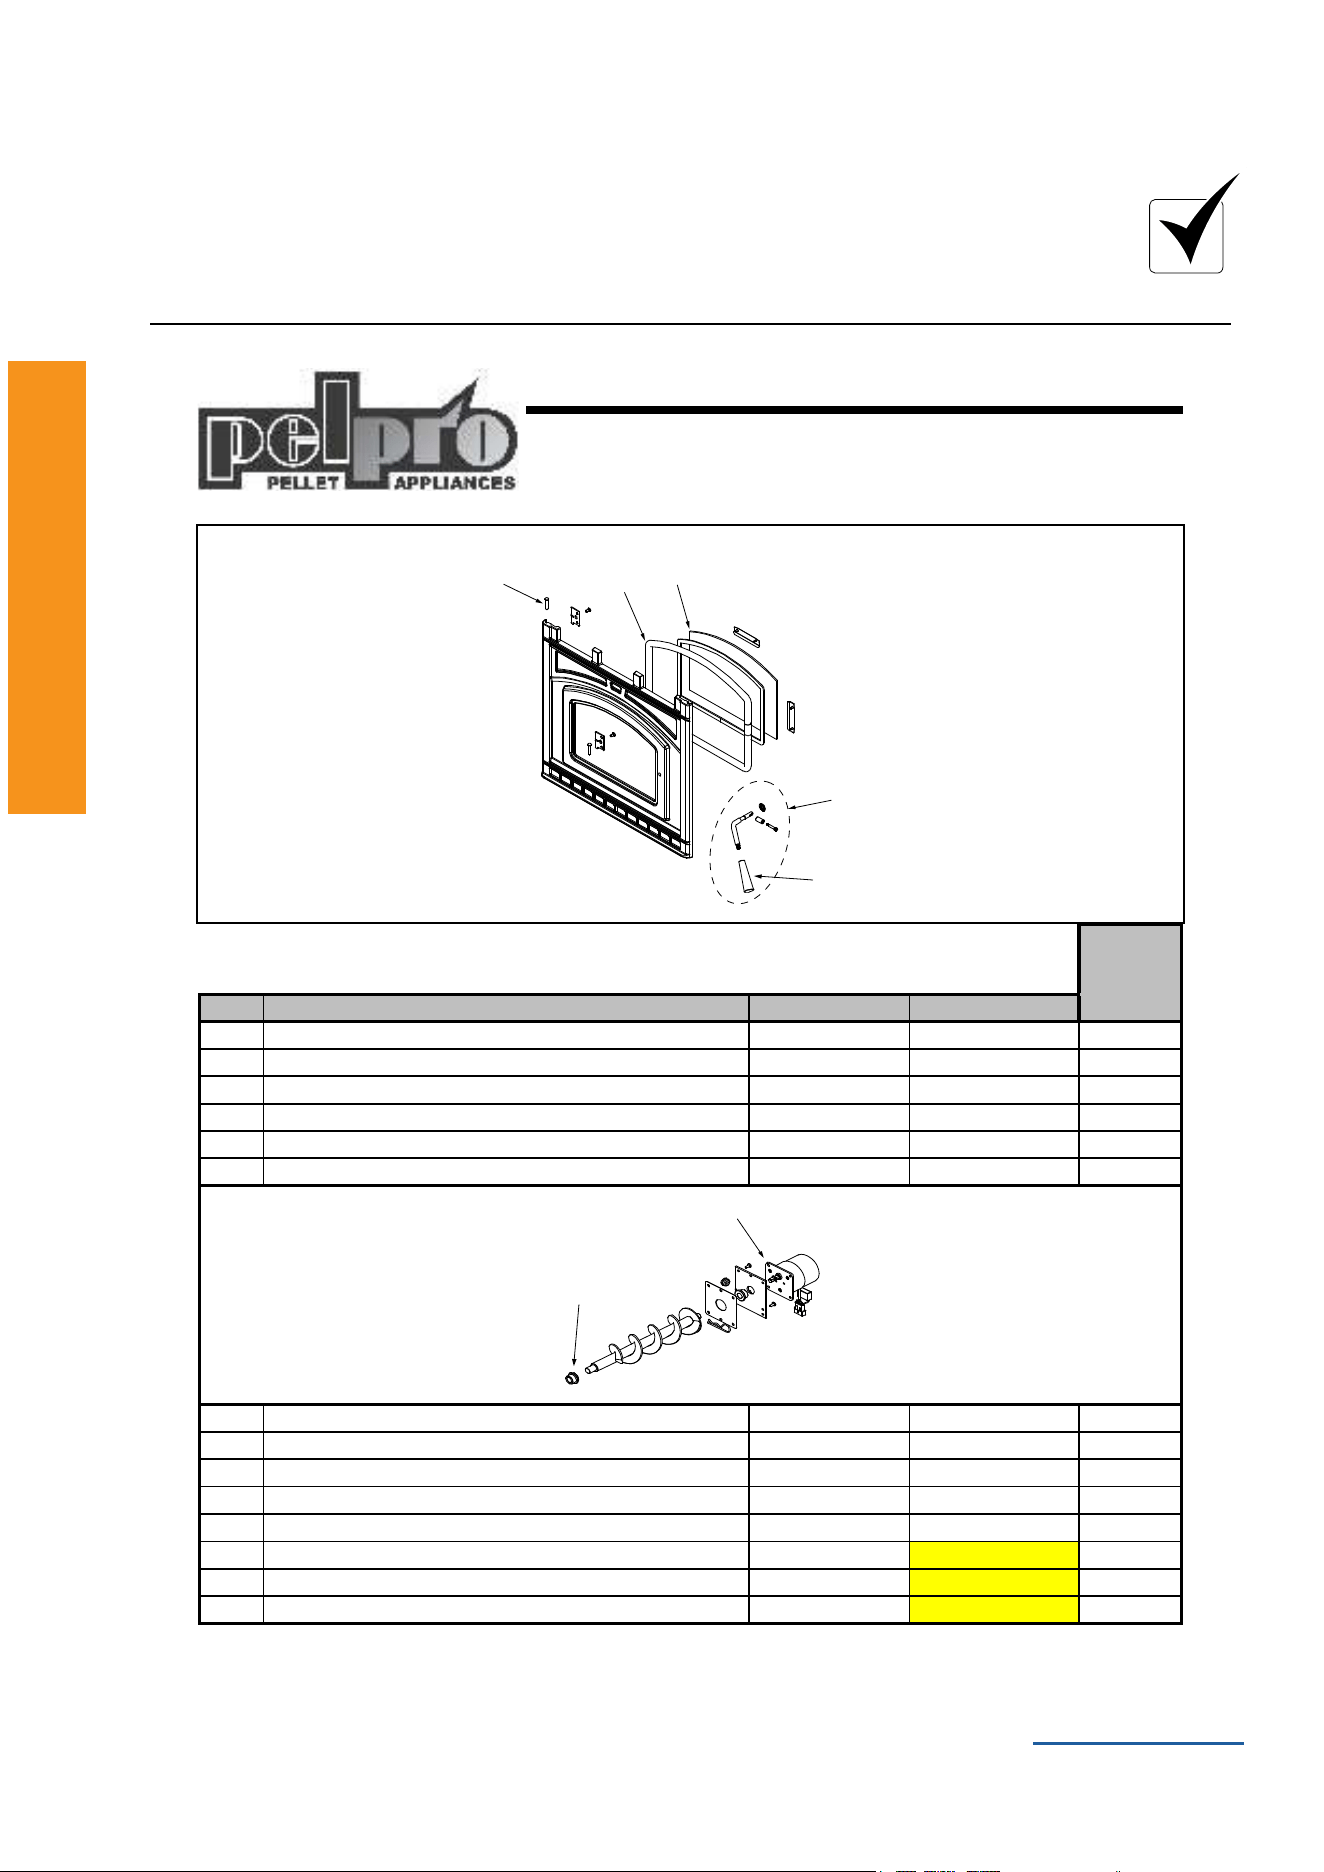
Service Parts
Beginning Manufacturing Date: July 2016
Ending Manufacturing Date: Active
PPC90/TSC90
IMPORTANT: THIS IS DATED INFORMATION. When requesting service or replacement parts for your appliance please
provide model number and serial number.
Stocked
at Depot
ITEM DESCRIPTION COMMENTS PART NUMBER
1 Digital Control Includes cable SRV7093-036
Y
2 Hopper Lid Assembly SRV7093-019-1
3 Side Curtain, Left Hand SRV7093-154
4 Cast Top 7093-201MBK
5 Cast Side Assembly, Left Hand
PPC90 7093-046-1MBK
TSC90 7093-046-3MBK
6 Exhaust Combustion Blower 812-4400
Y
Gasket, Between Blower Housing and Motor 812-4710
Y
Gasket, Between Blower Housing and Stove SRV240-0812
Y
7 Snap Disc Manual Reset SRV230-0080
Y
8 Igniter Kit SRV7000-660
9 Igniter Chamber Kit SRV7103-034
10 Face Assembly See following Pages
11 Firepot SRV7077-003
12 BaeKit SRV7077-006
13 Cast Side Assembly, Right Hand
PPC90 7093-045-1MBK
TSC90 7093-045-3MBK
14 Convection Blower KS-5020-1052
Convection Blower Brakcet SRV7081-210
Convection Blower Gasket SRV7081-195
15 Control Board** SRV7093-052
Y
Wire Harness SRV7093-184
Y
16 Side Curtain, Right Hand SRV7093-153
17 Vacuum Switch SRV7000-531
Y
18 Feed Assembly Kit See following Pages
19 Hopper Switch SRV7000-612
Y
Ambiant Probe SRV7000-668
Ash Bucket Assembly Pkg of 2 SRV7093-034
Exhaust Probe SRV7000-669
Hose, Barb Assembly SRV229-0920
Hose, Vacuum, 5/32 Id 3 Ft SRV240-0450
Y
Wire Clip Pkg of 10 7000-400/10
Y
Wire Harness SRV7093-184
Wire Harness Thermostat Block SRV7080-152
**Fuse for the control board can be sourced locally, not a warranty item. Specs are 250V, 5A fuse, 20mm long x 5mm dia.
See Following page for additional servcie parts
Pellet Stove
PelPro Cast Pellet Stove • 7093-60X • 04/26 PelPro Cast Pellet Stove • 7093-60X • 04/26
www.forgename.com38
Listing and Code Approvals
ListingsandCerti
cations Listings
Service Parts
Beginning Manufacturing Date: July 2016
Ending Manufacturing Date: Active
PPC90/TSC90
#10 Door Assembly
#18 Feeder Assembly
18.1
18.2
10.1
10.2
10.3
10.4
10.5
IMPORTANT: THIS IS DATED INFORMATION. When requesting service or replacement parts for your appliance please
provide model number and serial number.
Stocked
at Depot
ITEM DESCRIPTION COMMENTS PART NUMBER
10 Face Assembly 7093-041-1MBK
10.1 Glass Assembly SRV7093-023
Y
10.2 Rope, Door, 3/4” x 84” 832-1680
Y
10.3 Hinge Pin Pkg of 2 433-1590/2
10.4 Door Handle Kit
Includes Black Handle
SRV7093-024D
Y
10.5 Handle, Black Phenolic Kit KS-5140-1442
Y
18 Feed Assembly Kit SRV7077-014
Y
18.1 Feed Motor SRV7000-670
Y
18.2 Feed Shaft Bushing Pkg of 2 7000-600/2
Component Pack SRV7083-062
Power Cord 812-1180
Y
Hose, Alum Flex, 2” x 3’ SRV200-0860
Firepot Cleaning Tool SRV7077-185
Black Handle Phenolic Kit KS-5140-1442
Y

PelPro Cast Pellet Stove • 7093-60X • 04/26 PelPro Cast Pellet Stove • 7093-60X • 04/26
www.forgename.com 39
Listing and Code Approvals
cations Listings
andCertications
TIPS & MAINTENANCE
Frequency Cleaning Procedure Safety Measures Tips
Daily or as needed
Fire Pot-Removetherepot
/Scrapecleanandremove
ashes/Replacerepot
Stove must be turned off and
cold.
Use provided scraper. Vigorous
strongscapingspecicallynear
neck of burn pot. Scrape every
time pellets are added or every
3rd bag of fuel
Weekly or as needed
Ash Removal - Remove
bafesandvacuumresidual
ash/Removeashesfrom
reboxoor
Stove must be turned off and
cold. Do NOT vacuum hot
embers.
Clean glass - Apply ceramic
glass cleaner. Use non-
abrasive cloth to remove
residue
Stove must be turned off and
cold. Do NOT clean glass
when hot.
Monthly or as needed
Hopper - Empty hopper of
pellets
Vacuumremainingpellets/
debris from hopper
Stove must be turned off and
unplugged from power supply.
Door inspection - Check for
loose or frayed gasket
Stove must be turned off and
cold.
Replace gasketing if frays,
tears or other visible damage
to gasket.
Annual or as needed
Electrical Components -
Identify and remove any debris
/Verifyallconnectionsare
secure
Stove must be turned off and
unplugged from power supply.
Convection Blower - Remove
right and left side panel to
access and remove convection
blower/
Vacuum any debris from the
fan blades and blower housing
Stove must be turned off and
unplugged from power supply.
Exhaust Blower - Remove
left side panel to access and
removeexhaustblower/
Vacuum any debris from the
fan blades and blower housing
Stove must be turned off and
unplugged from power supply.
Venting - Remove termination
cap/Inspectfordebrisand
blockageandremove/Brush
out to remove dust and hard
buildup/
Use the appropriate sized
chimney brush to remove ash
and buildup from the venting
(mayrequiredisassembly
of venting to ensure proper
cleaning.)/Ensurethereare
no obstructions in the outside
air kit cap
Wear protective gloves.
Put ashes into a steel non-
combustible container with
tightttinglidoutside.
Soot,creosote,andyashwill
collect in the exhaust venting
systemandrestricttheow
oftheuegases.Thisbuild
upwilloccurmorequickly
in horizontal sections and
elbows. Blocked venting may
result in unit not feeding, poor
ameperformanceorunitnot
lighting.

PelPro Cast Pellet Stove • 7093-60X • 04/26 PelPro Cast Pellet Stove • 7093-60X • 04/26
www.forgename.com
40 41
Reference Materials
Reference Materials Reference Materials
Maintenance Log
We recommend that you record the following information for your heating stove:
Date Purchased / installed: ____________________________________________________
(Attach Proof of Purchase)
Serial Number: ________________________ Location on Stove: _____________________
Store Purchased From: _______________________________________________________
Store Location: _____________________________________________________________
Maintenance Log:

PelPro Cast Pellet Stove • 7093-60X • 04/26 PelPro Cast Pellet Stove • 7093-60X • 04/26
www.forgename.com
40 41
Reference Materials
Reference Materials Reference Materials
Maintenance Log:

PelPro Cast Pellet Stove • 7093-60X • 04/26 www.forgename.com42
Hearth & Home Technologies® | 352 Mountain House Road | Halifax, PA 17032