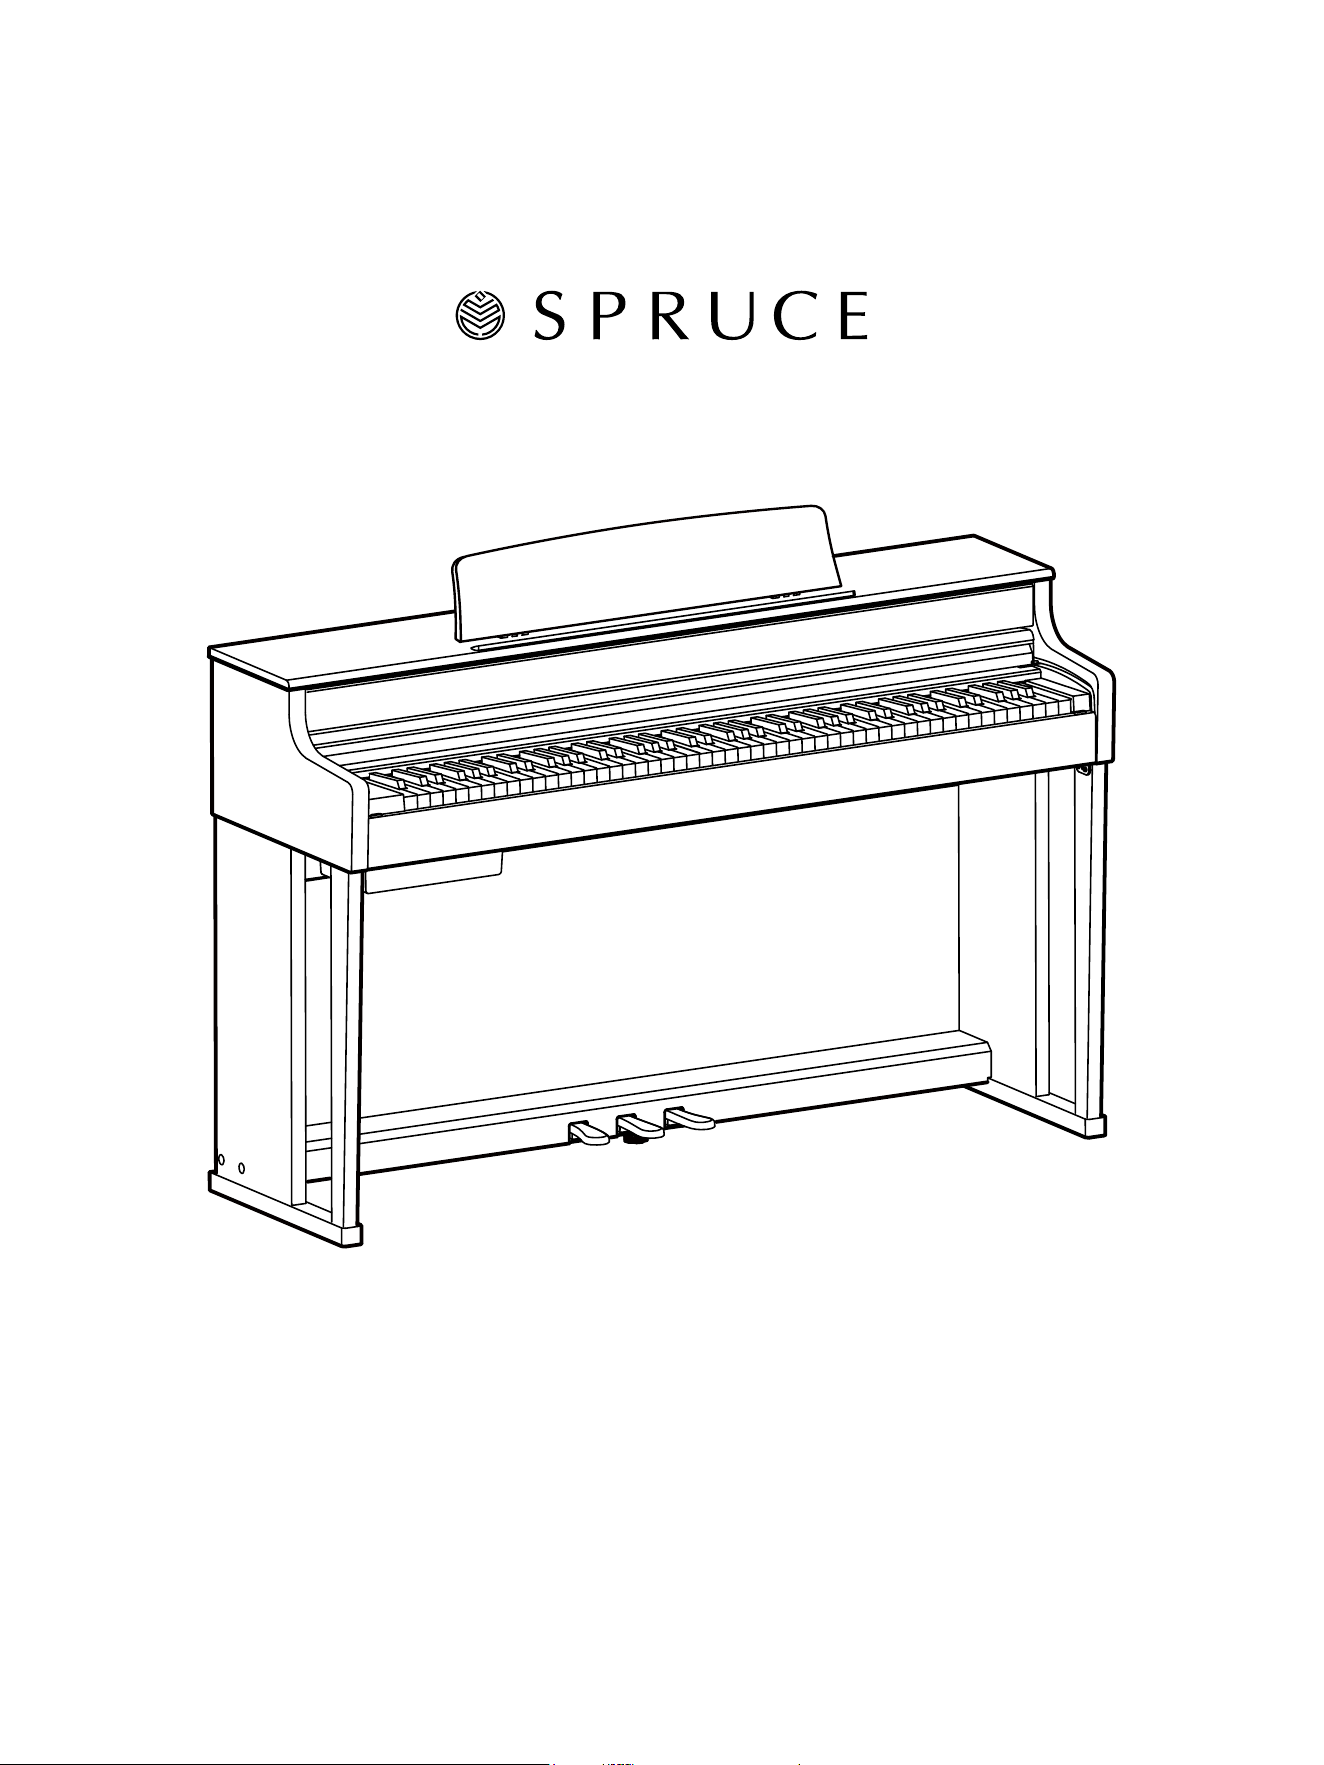
SC401
UPRIGHT PIANO
OWNER’S MANUAL

2
Important Messages
Please read this page carefully before operating and
keep this manual properly for convenient reference in
the future.
THE FCC REGULATION WARNING (for USA)
This equipment has been tested and found to comply with
the limits for a Class B digital device, pursuant to Part 15
of the FCC Rules.
These limits are designed to provide reasonable
protection against harmful interference in a residential
installation. This equipment generates, uses, and can
radiate radio frequency energy and, if not installed and
used in accordance with the instructions, may cause
harmful interference to radio communications. However,
there is no guarantee that interference will not occur in a
particular installation. If this equipment does cause harmful
interference to radio or television reception, which can be
determined by turning the equipment o and on, the user
is encouraged to try to correct the interference by one or
more of the following measures:
▘
Reorient or relocate the receiving antenna.
▘
Increase the separation between the equipment and
receiver.
▘
Connect the equipment into an outlet on a circuit
dierent from that to which the receiver is connected.
▘
Consult the dealer or an experienced radio/TV
technician for help.
Unauthorized changes or modication to this system can
void the user’s authority to operate this equipment.
CAUTION
The normal function of this product may be subject
to strong electromagnetic interference. Should the
circumstances arise, please follow the relevant instructions
in this manual to restore the product to its default settings.
Otherwise, try moving the product to another location.
Power supply
Please connect the power adapter provided in the
package to a power socket with the correct voltage. DO
NOT connect to power sources with unmatched voltages.
Unplug this device during thunderstorms or when the
device is not in active use.
Connections
Power o all devices before making connections. This will
eectively prevent potential malfunctioning & damage.
Precautions
To avoid deformation, discoloration or other more serious
damages, DO NOT place this instrument in:
▘
direct sunlight
▘
extremely hot environments or too close to a heat
source (such as a heater)
▘
severe cold such as snowy and icy outdoors
▘
dusty environments, or places with high temperatures,
high humidity, or unstable locations where strong
vibrations or displacements may occur
▘
proximity of strong electromagnetic elds
Interference
To avoid unwanted interference, please keep this
instrument at a proper distance from televisions, radios,
and cell phones.
Maintenance
Use only soft, dry cloth for cleaning. DO NOT use thinners,
solvents, detergents, or wipes soaked with chemicals.
DO NOT apply excessive force when handling switches &
knobs.
This instrument is safe for use in tropical climates with a
maximum operating temperature of 45°C.
The maximum operating altitude is determined by the
selected model of the power adapter.
Handling
Please avoid getting scraps of paper, metal, or other
materials inside this instrument. If this happens, unplug
this unit and have it checked by a qualied maintenance
personnel.
Also, unplug this unit before moving it to another location.

3
Important Messages 2
Overview 4
Control Panel 5
Display 5
Interface 6
Connecting Power 7
Preparing to Play 7
Opening and Closing the Keyboard Cover 7
Powering On/O 8
The Music Stand 8
Adjust the Master Volume 8
Connecting Headphones 8
Using Pedals 9
Using the Control Panel 10
Entering Modes 10
Accessing Function Settings 10
Activating/Deactivating Functions 11
Quick Accessing Function Settings 11
Other Operations 12
Piano Mode 13
Piano Mode 13
Piano Eects 13
Sound Mode 16
Select and Play Your Sound 16
Play Two Sounds Simultaneously (Layered
Mode) 16
Play Dierent Sounds with Each Hand (Keyboard
Split) 17
Combine Layered Mode and Keyboard Split 17
Adjust the Overall Brilliance 18
Turn the Metronome On/Off and Adjust Tempo 18
Using Transpose 19
Twinova Mode 20
Activate via the Function Selection Menu 20
Switch to Twinova from Piano Mode 21
Pedals in Twinova Mode 21
Twinova Octave 21
Song Mode 22
Demos for Grand Piano Sounds 22
Demos for Other Instrumental Sounds 22
Classical & Lesson 23
Playing One Hand at a Time 23
Play to Search Feature 24
Playback via USB Drive 25
Recording Performances 26
Recording MIDI Sessions to This Instrument 26
Recording MIDI Sessions to an External USB
Drive 27
Recording Audio Sessions 28
Other Solutions for Recording Audio/Videos 29
Miscellaneous Settings 29
Part Settings—Part Volume
29
Song Settings—Volume and Loop Mode
29
Metronome Settings
30
Recording Format Settings
30
USB Format
31
Function Menus 31
Performance Settings
32
An Introduction to Classical Temperaments
33
Global Effect Settings
34
Display Settings
35
Power Settings
36
MIDI I/O Settings
36
System Settings
37
Bluetooth Pairing 38
Troubleshooting 39
Specications 40
Appendices
Sound List 42
Sound Demo List
43
Classic List
44
Lesson List
46
MIDI Implementation List
47
Contents
4
Overview
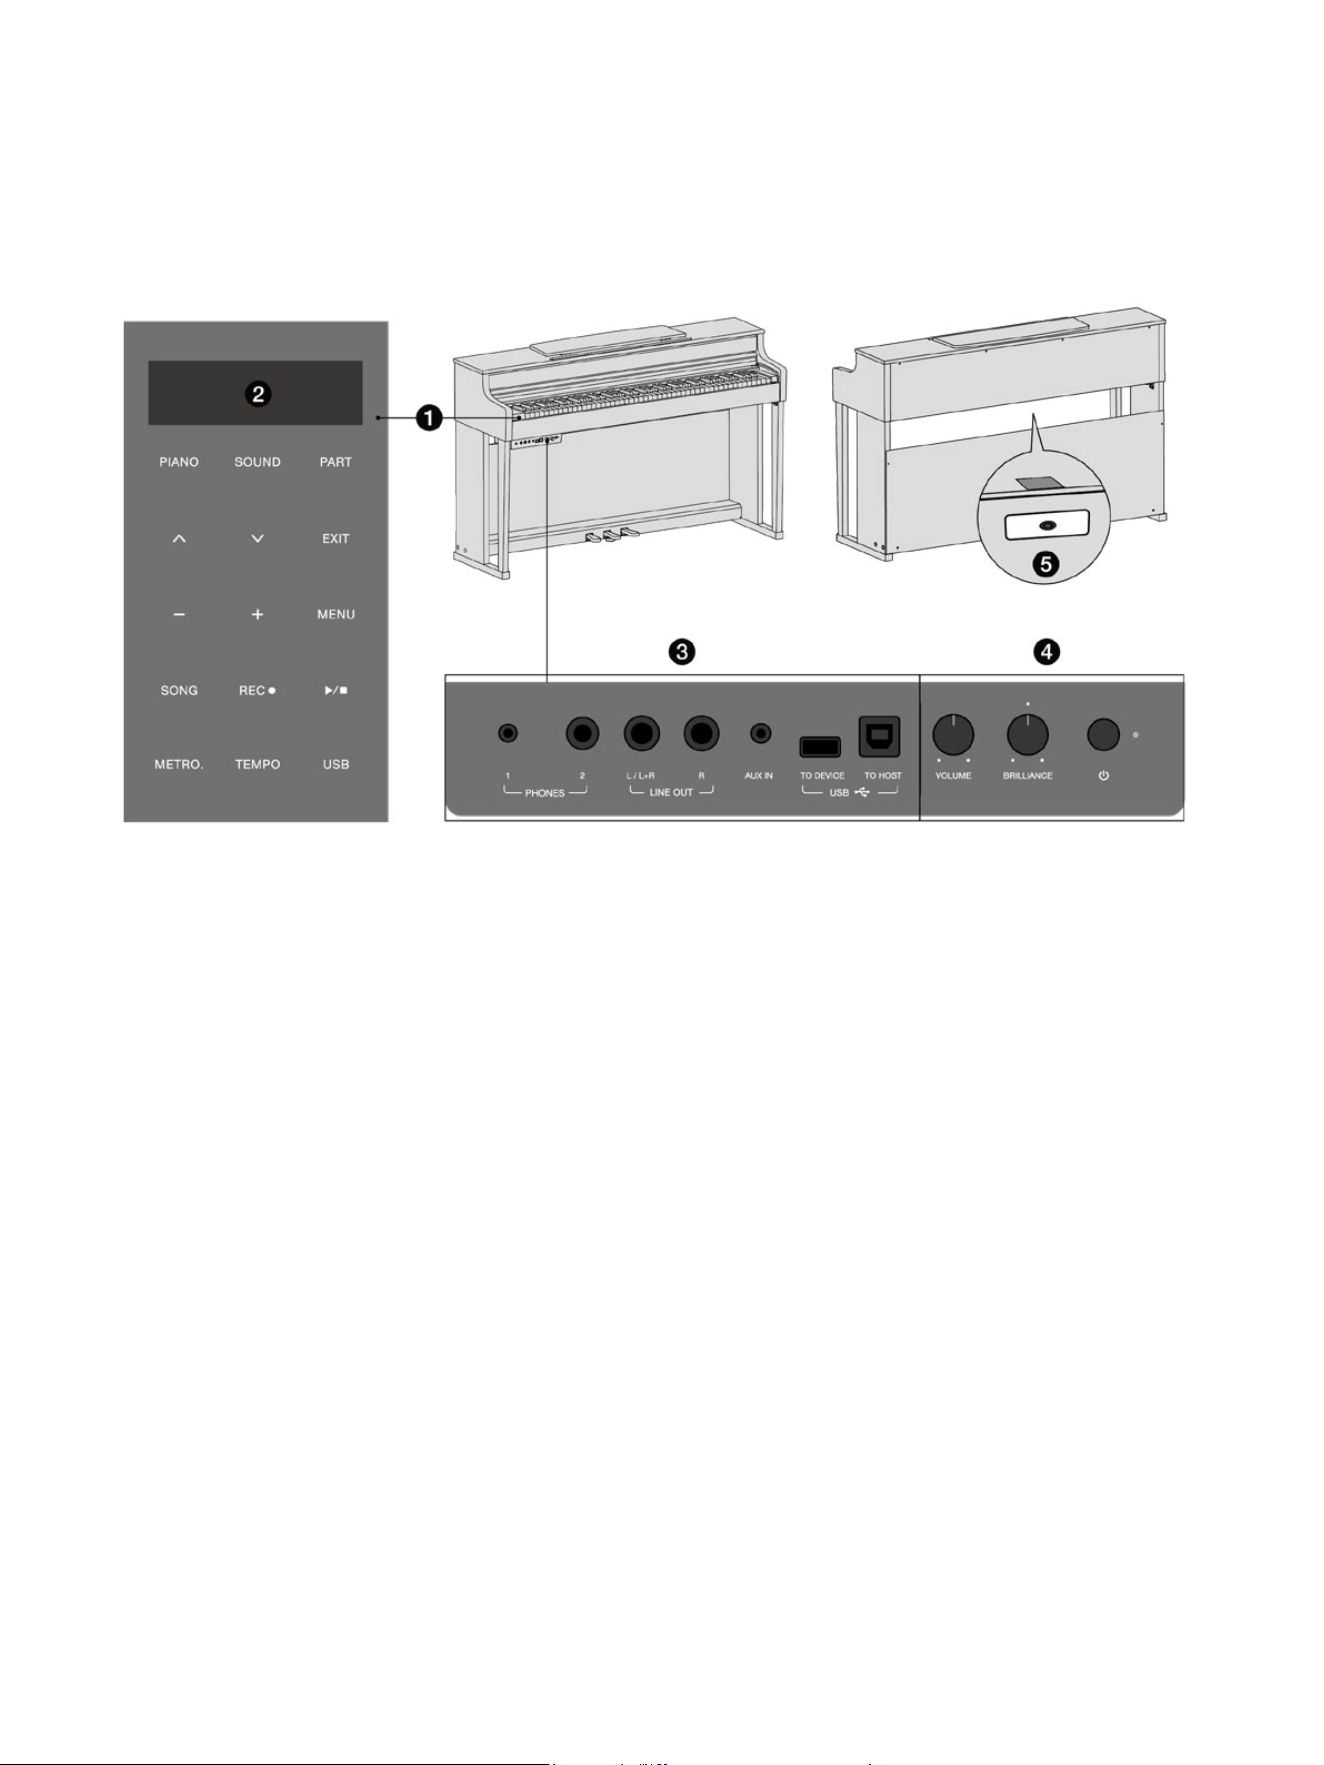
1. Control Panel
For accessing sub-menus, adjusting settings and
changing parameters.
2. OLED Screen
For displaying the current sound, playback title,
modes, status of connections and other relevant
information.
3. I/O (Input/Output) Interface
For connecting external devices.
4. Global Control Interface
Include the [POWER] button, the [BRILLIANCE]
knob and the [VOLUME] knob.
5. DC-In
For connecting the power adapter.
5
Control Panel
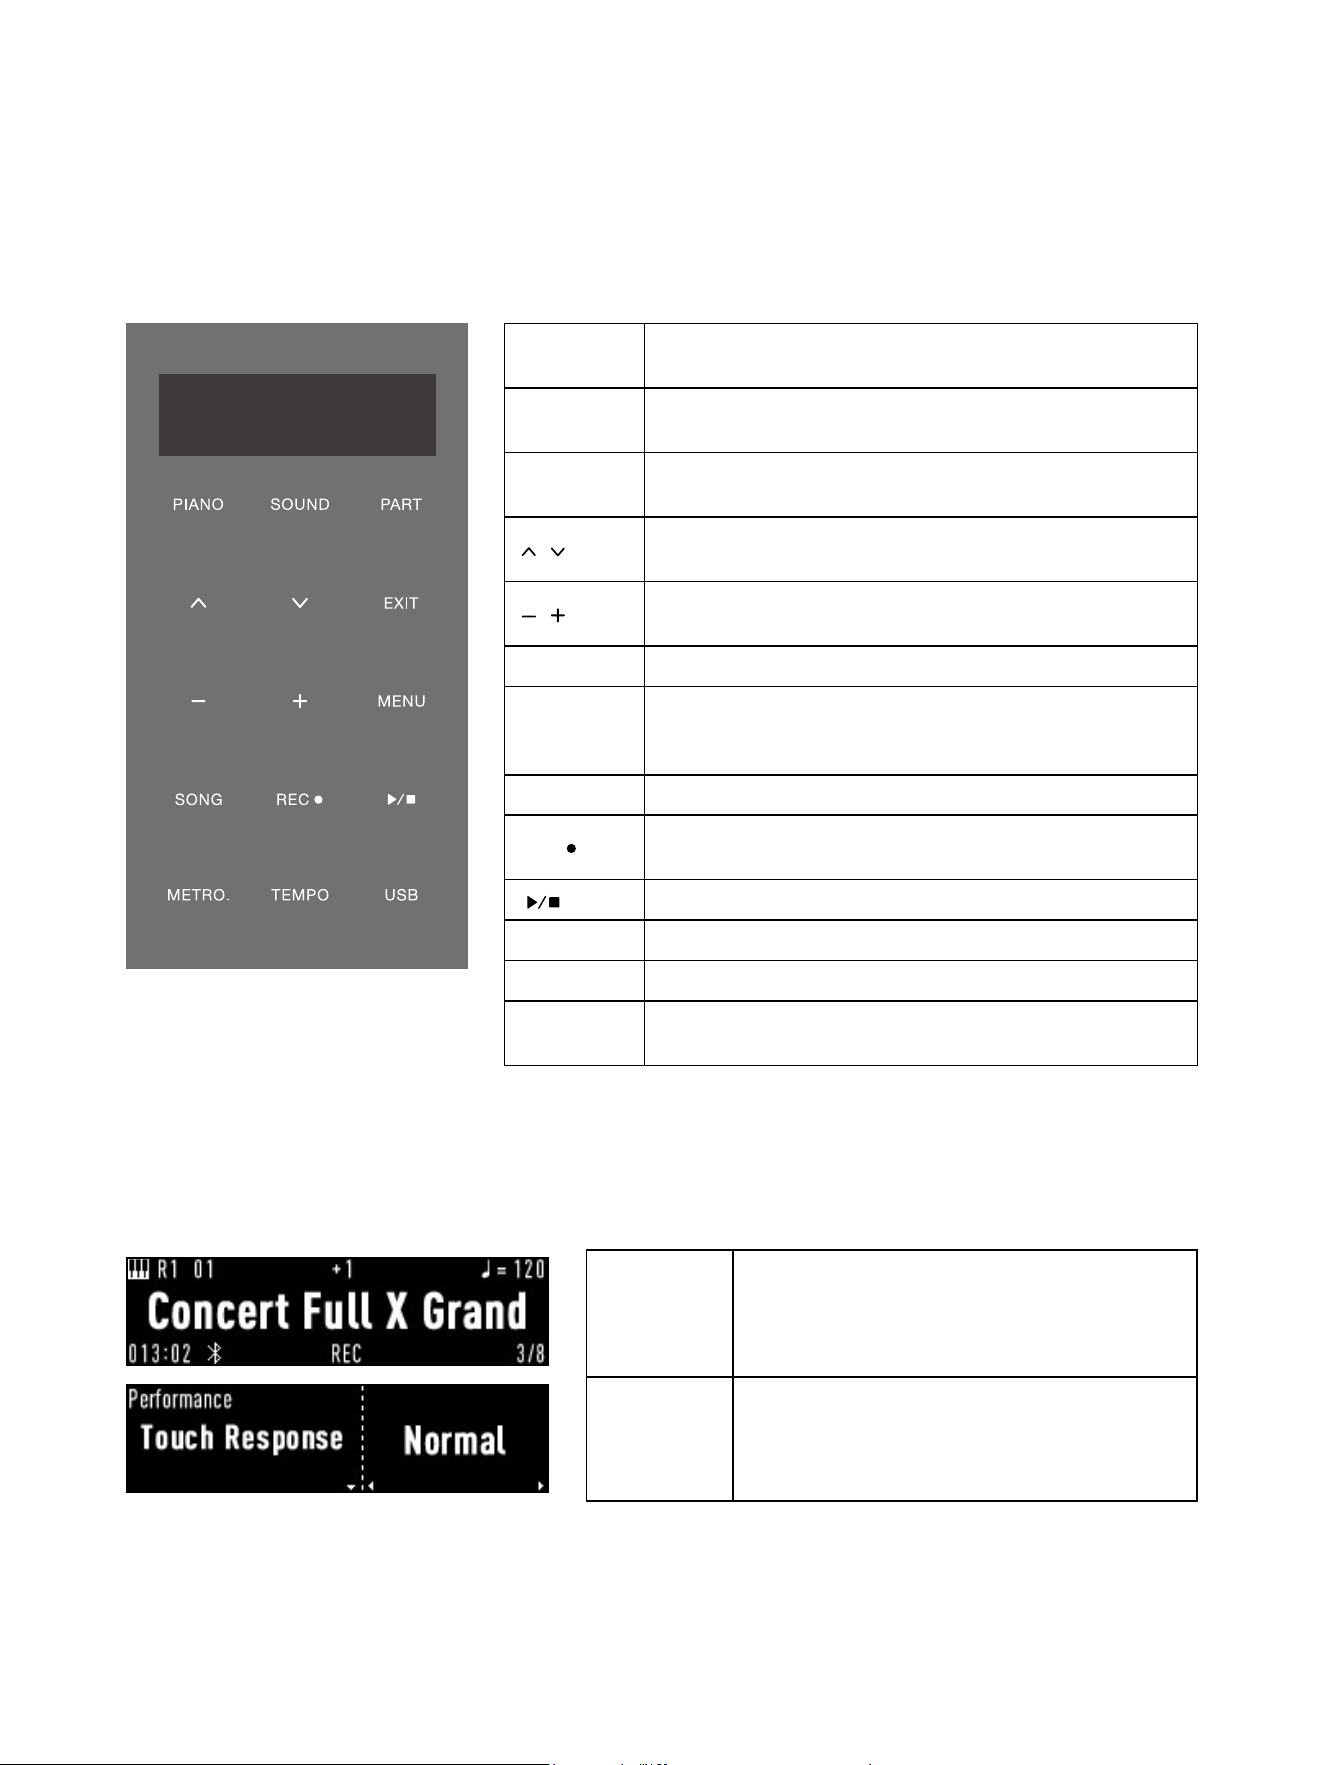
This instrument features a capacitive touch panel that illuminates when the instrument is powered on. This touch panel
allows you to perform various operations by pressing the touch buttons.
Display
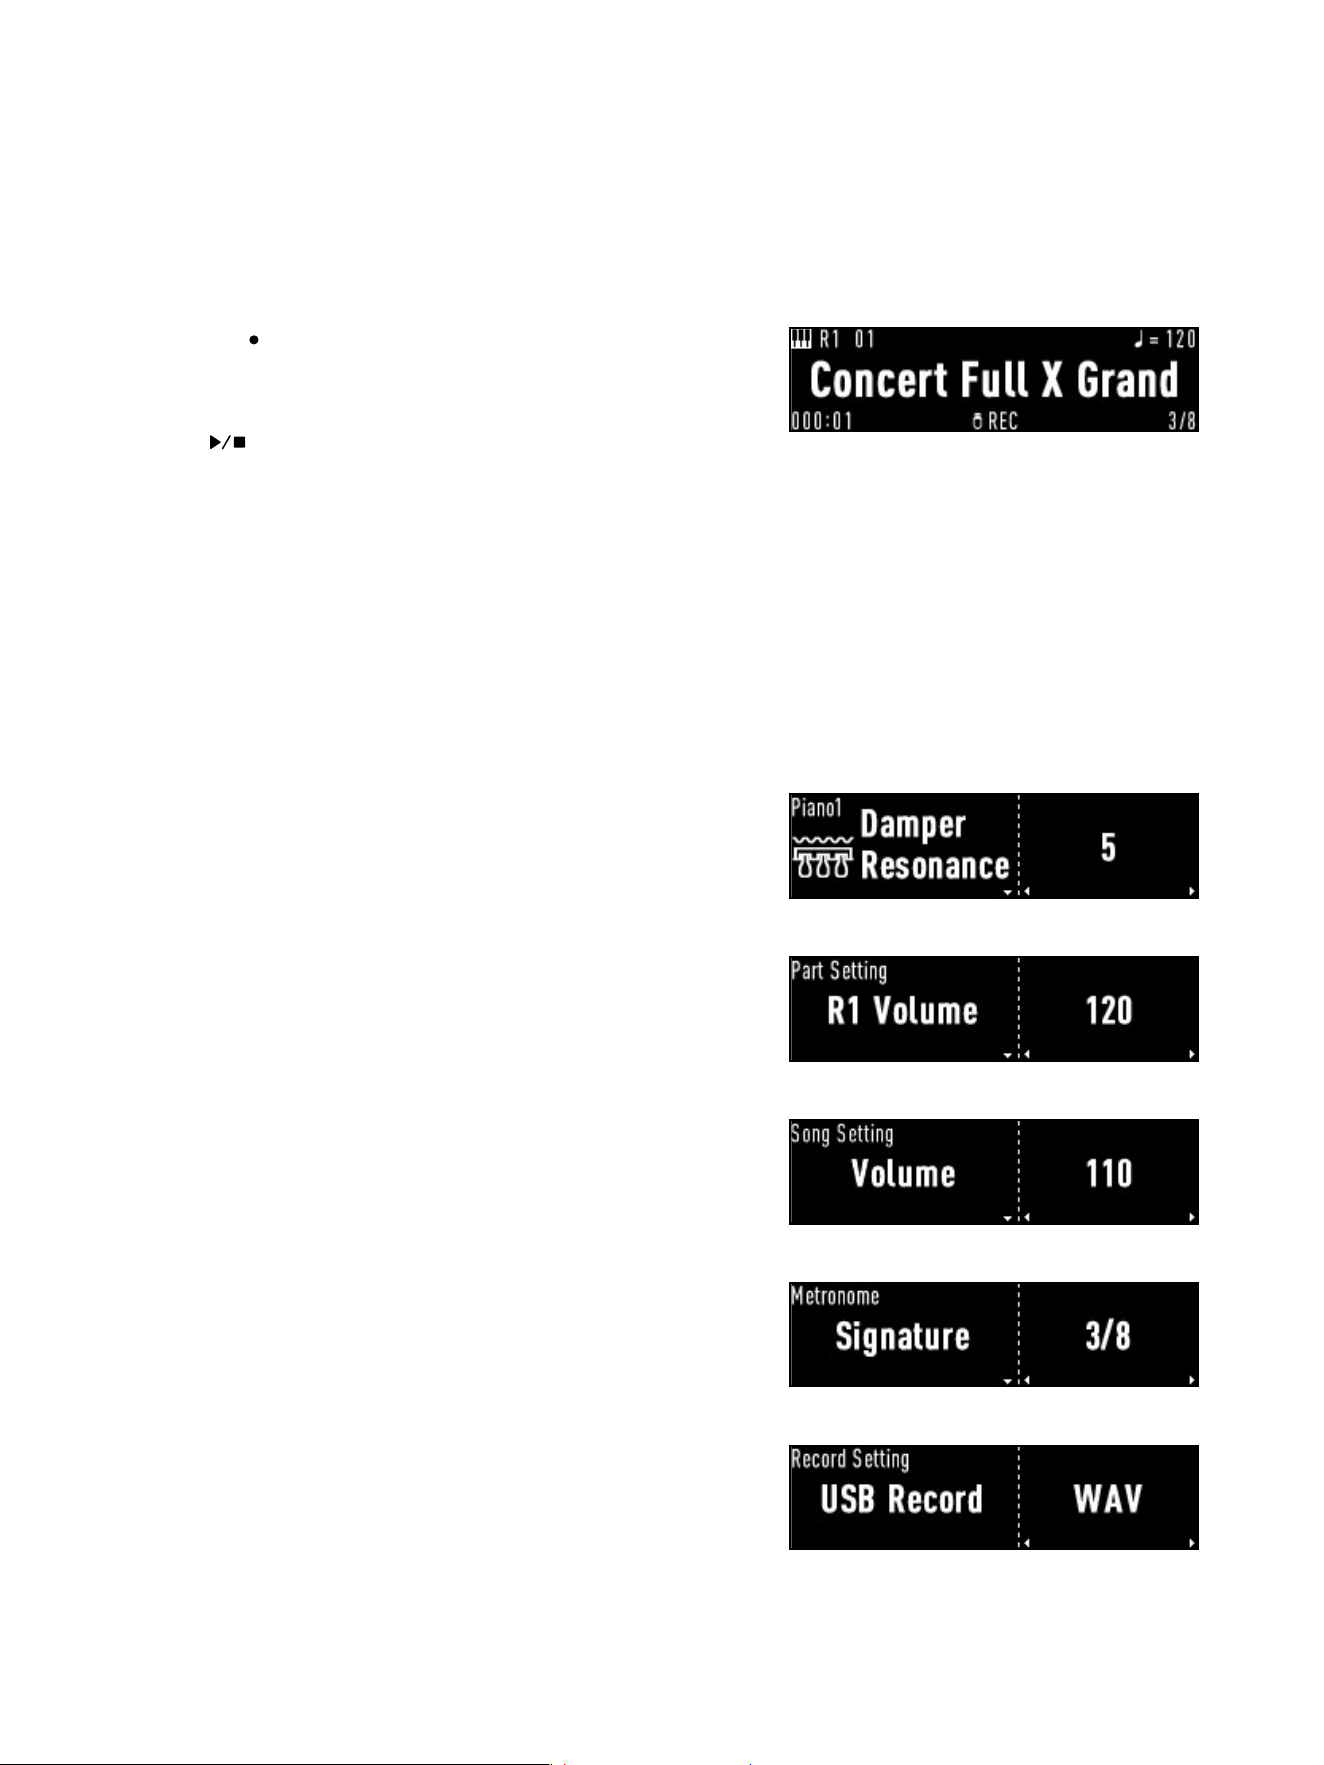
The OLED display is located above the touch panel and shows various information relevant to the current mode or function,
including the current sound, current song, mode, function, parameter, and connection status. Here are some examples:
For more detailed information on the displays for each mode and function, please refer to their respective sections.
Mode page
Top: current sound part, sound number, transpose,
tempo
Middle: current sound name
Bottom: bar & beat number, recording status,
Bluetooth status, time signature
Function
menu
Top left: function category
Left: current function
Right: option or parameter value
[PIANO]
Enter Piano mode with two grand piano sounds
Press to switch between the sounds
[SOUND]
Enter Sound mode
Press to switch between available sounds
[PART]
Enter Twinova mode from Piano mode
Access the part combination menu in Sound mode
[
] [ ]
Switch song categories, sound part combinations, function
items, etc.
[
] [ ]
Switch between sounds/songs
Adjust function options/parameters
[EXIT] Exit current mode or return to the previous menu
[MENU]
Access the function selection menu
Hold down and press other buttons to access specied sub-
menus
[SONG] Enter Song mode
[REC
]
Enter/quit the recording preparation state when recording as
MIDI (page 26, 27), or start recording as audio (page 28)
[
] Start, pause/stop, or start recording as MIDI
[METRO.] Turn the metronome on or o
[TEMPO] Enter the tempo/tempo marking setting to adjust tempo
[USB]
Enter the USB directory to play les stored on a connected
USB dirve
6
Interface
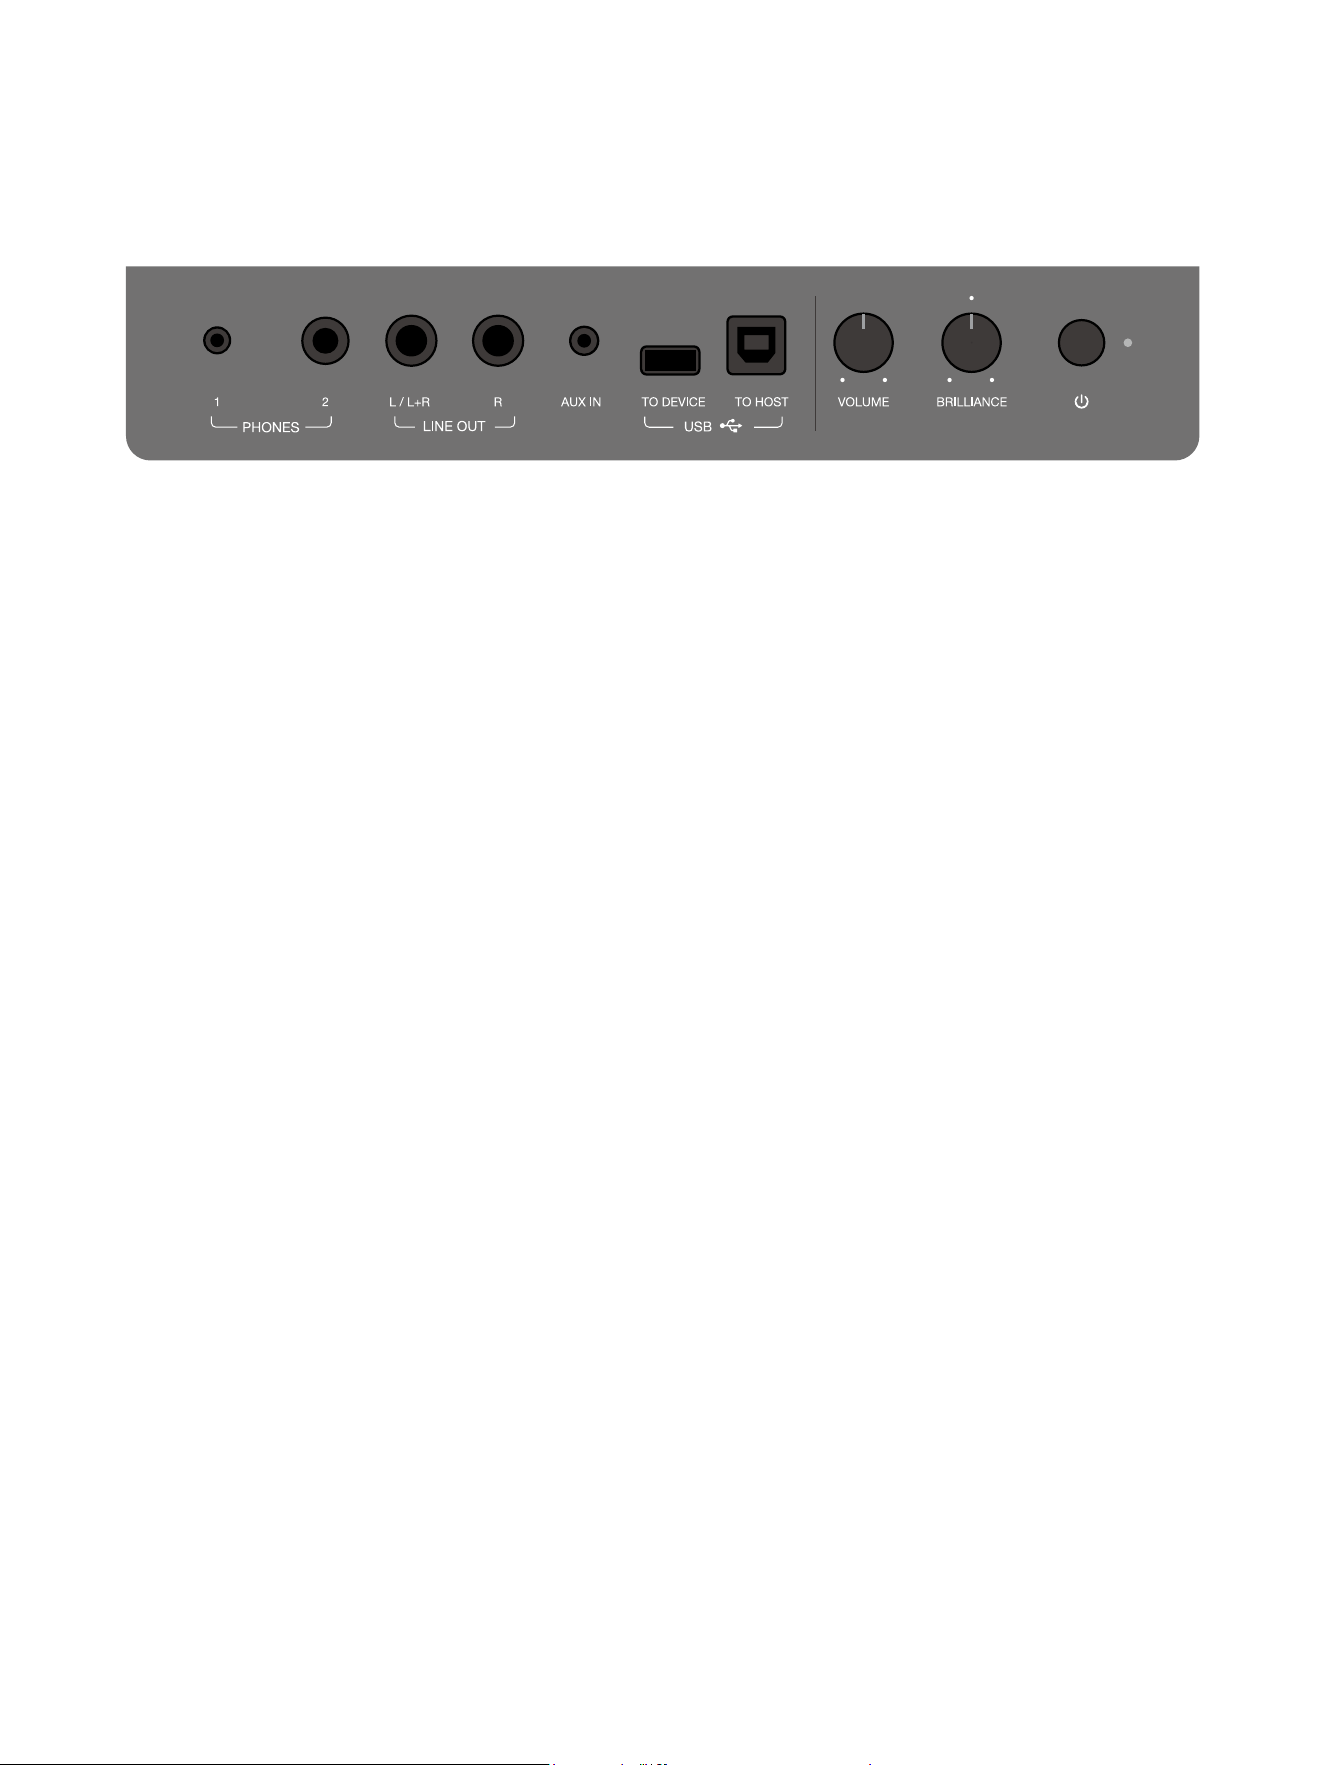
1. [PHONES] (1&2)
For connecting headphones. (Page 8)
Attention: Avoid high volume for long periods to prevent fatigue or hearing damage. When connected, the instrument’s
built-in speakers will be muted.
2. [LINE OUT] (L/L+R, R)
For connecting to external devices such as stereo speakers, stage monitors, mixing consoles, recording interfaces, etc.
Additional audio cables are required to connect to aux/line-out jacks on such devices. Avoid connecting [LINE OUT] jacks
to the [AUX IN] jack on this interface, as this will create a feedback loop that may potentially damage the instrument.
3. [AUX IN]
For connecting an external playback device such as an MP3 player. Additional audio cables are required to connect to
aux/line-out jacks on such devices. External audio will be played through built-in speakers along with the sound of the
instrument itself.
4. [USB TO DEVICE]
For connecting a USB drive to store recorded sessions in real-time and to play backing MIDI or audio les. MP3, WAV,
and SMF formats are supported for both recording and playback. (M4A format supports playback only)
Recorded sessions will be saved in the root directory of your USB drive.
5. [USB TO HOST]
For connecting to a PC or a mobile device (converter may be required for the latter).
Supports two-way data transmission for playing back audio les through the instrument’s speakers and recording
performance without external sound cards.
6. [VOLUME] Knob
For adjusting the instrument’s overall volume.
7. [BRILLIANCE] Knob
For adjusting the level of Brilliance, a tonal characteristic that aects the brightness or darkness of the piano sound. (Page
18)
Turn clockwise for a brighter, more luminous tone, and counter-clockwise for a darker and mellower tone.
8. [POWER] Button
Push to turn the instrument on and o.
7
Connecting Power
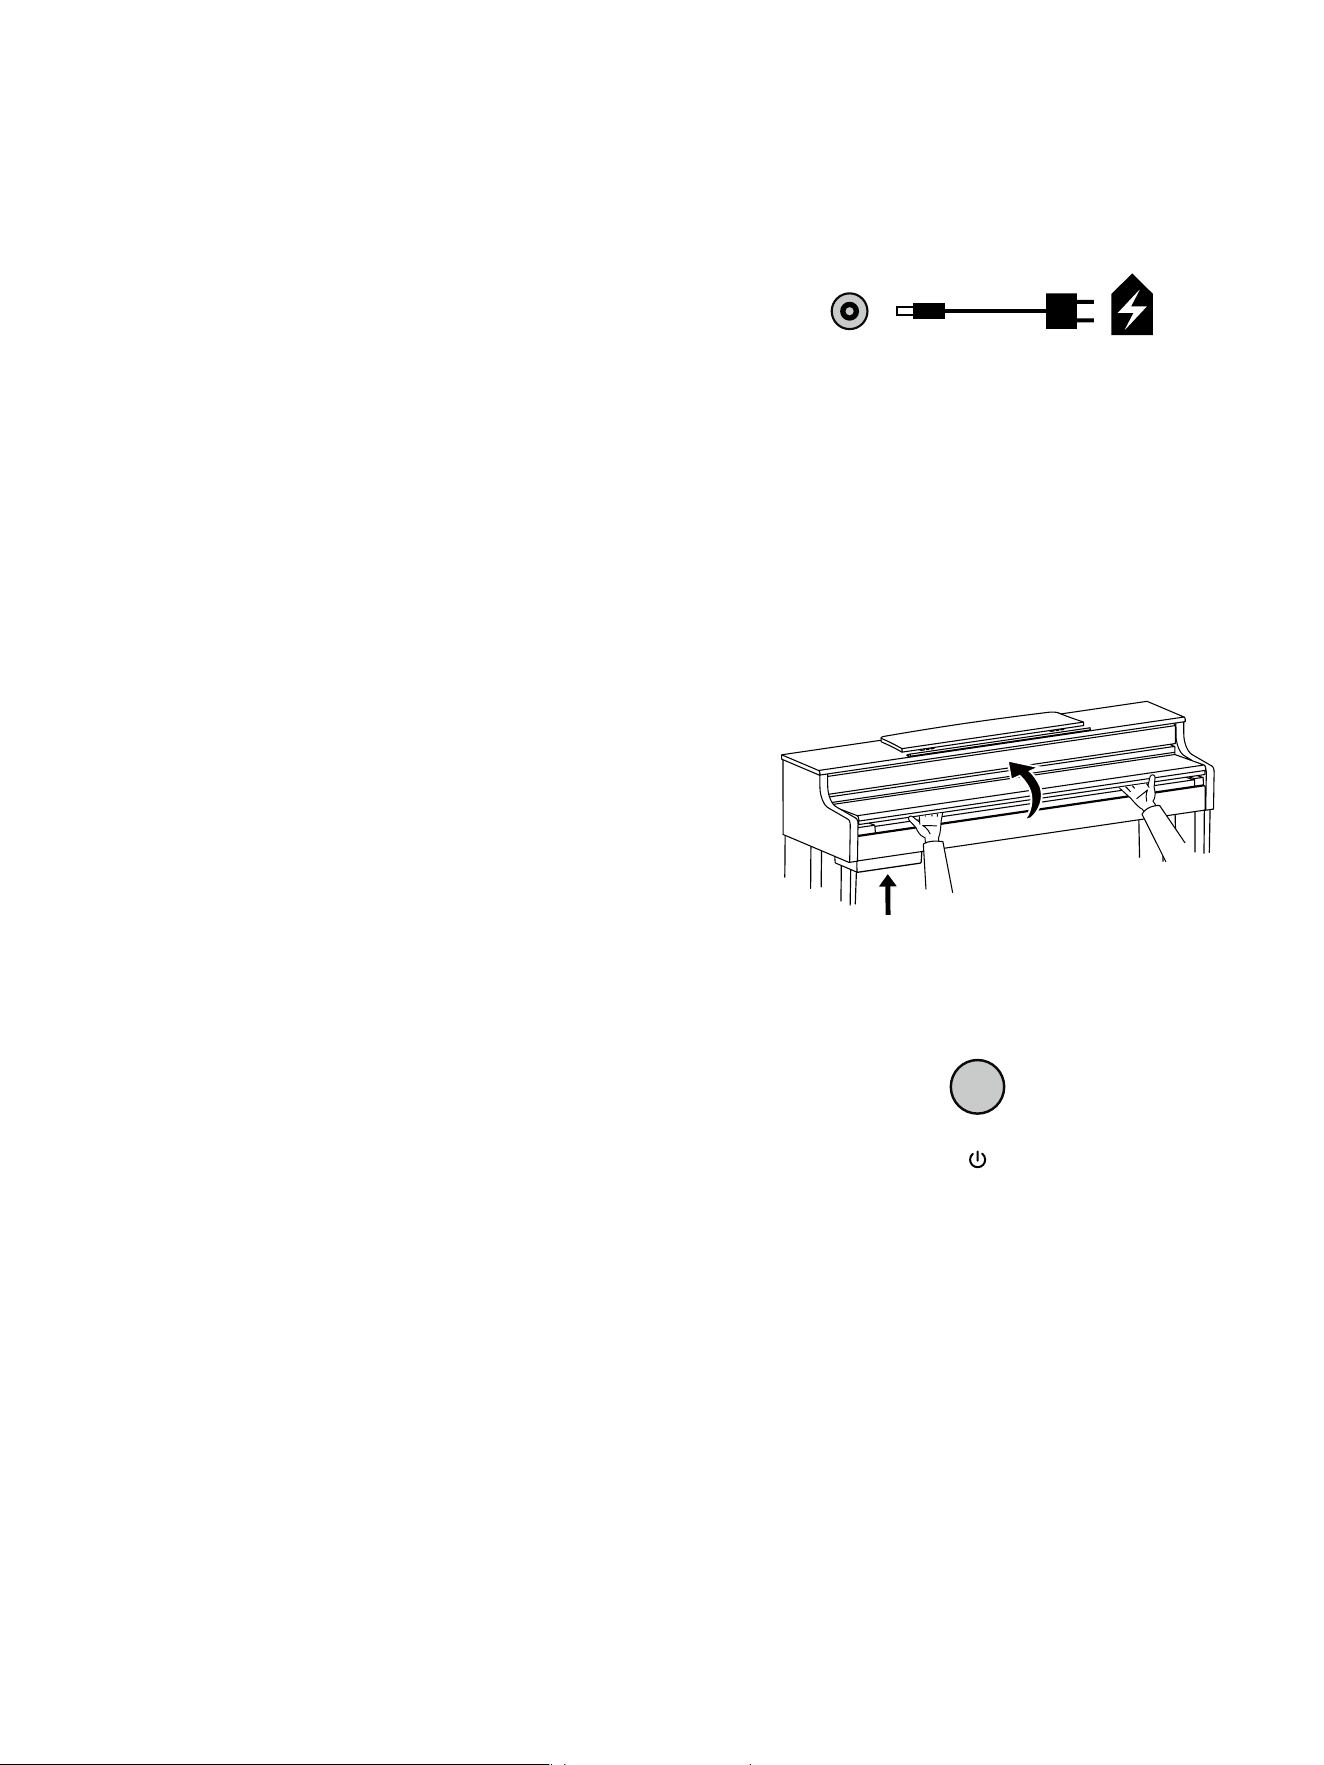
The DC-IN jack is located on the back of the instrument’s main body and
can be identied by this sticker.
Plug the DC adapter into the DC-IN jack on the rear panel of the
instrument before connecting it to a power socket with the appropriate
voltage.
Attention,
Please be sure to use the standard adapter that comes with the
package! Using a non-standard adapter may cause malfunctions or
permanent damage to this unit, or even pose safety hazards.
Preparing to Play
Opening and Closing the Keyboard Cover
Gently lift the keyboard cover, then push and slide it to the end.
Caution!
Be careful not to injure your ngers.
Please avoid using excessive force when lifting the keyboard cover, as
this may cause deformation or scratch.
Do not place small objects, such as paper or pens, on top of the
keyboard cover. Small objects placed on the keyboard cover may fall
inside the instrument when the cover is opened.
Powering On/O
1. Before powering on the instrument, ensure that the standard power
adapter is properly connected. Set the volume of the instrument and
all connected devices to 0.
2. Press and hold the [POWER] button until the power indicator lights up
to power on the instrument. To power o, follow the same procedure
until the power indicator goes out.
▘
Auto Power O
To conserve energy, the instrument is designed to automatically turn
o after 15 minutes of inactivity.
You can customize this function or turn it o entirely in the Power
settings (page 36).
Please note that the instrument may consume more power when this
function is disabled.
When the instrument automatically turns o, you can turn the power
back on.
Power consumption after the instrument automatically turns o (OFF
mode): < 0.3W (less than 0.3W).
Note,
Only use the standard adapter provided with the product to avoid any
damage to the unit or safety hazards. Do not use the instrument in
thunderstorms or similar environments for safe use of electricity.
8
The Music Stand
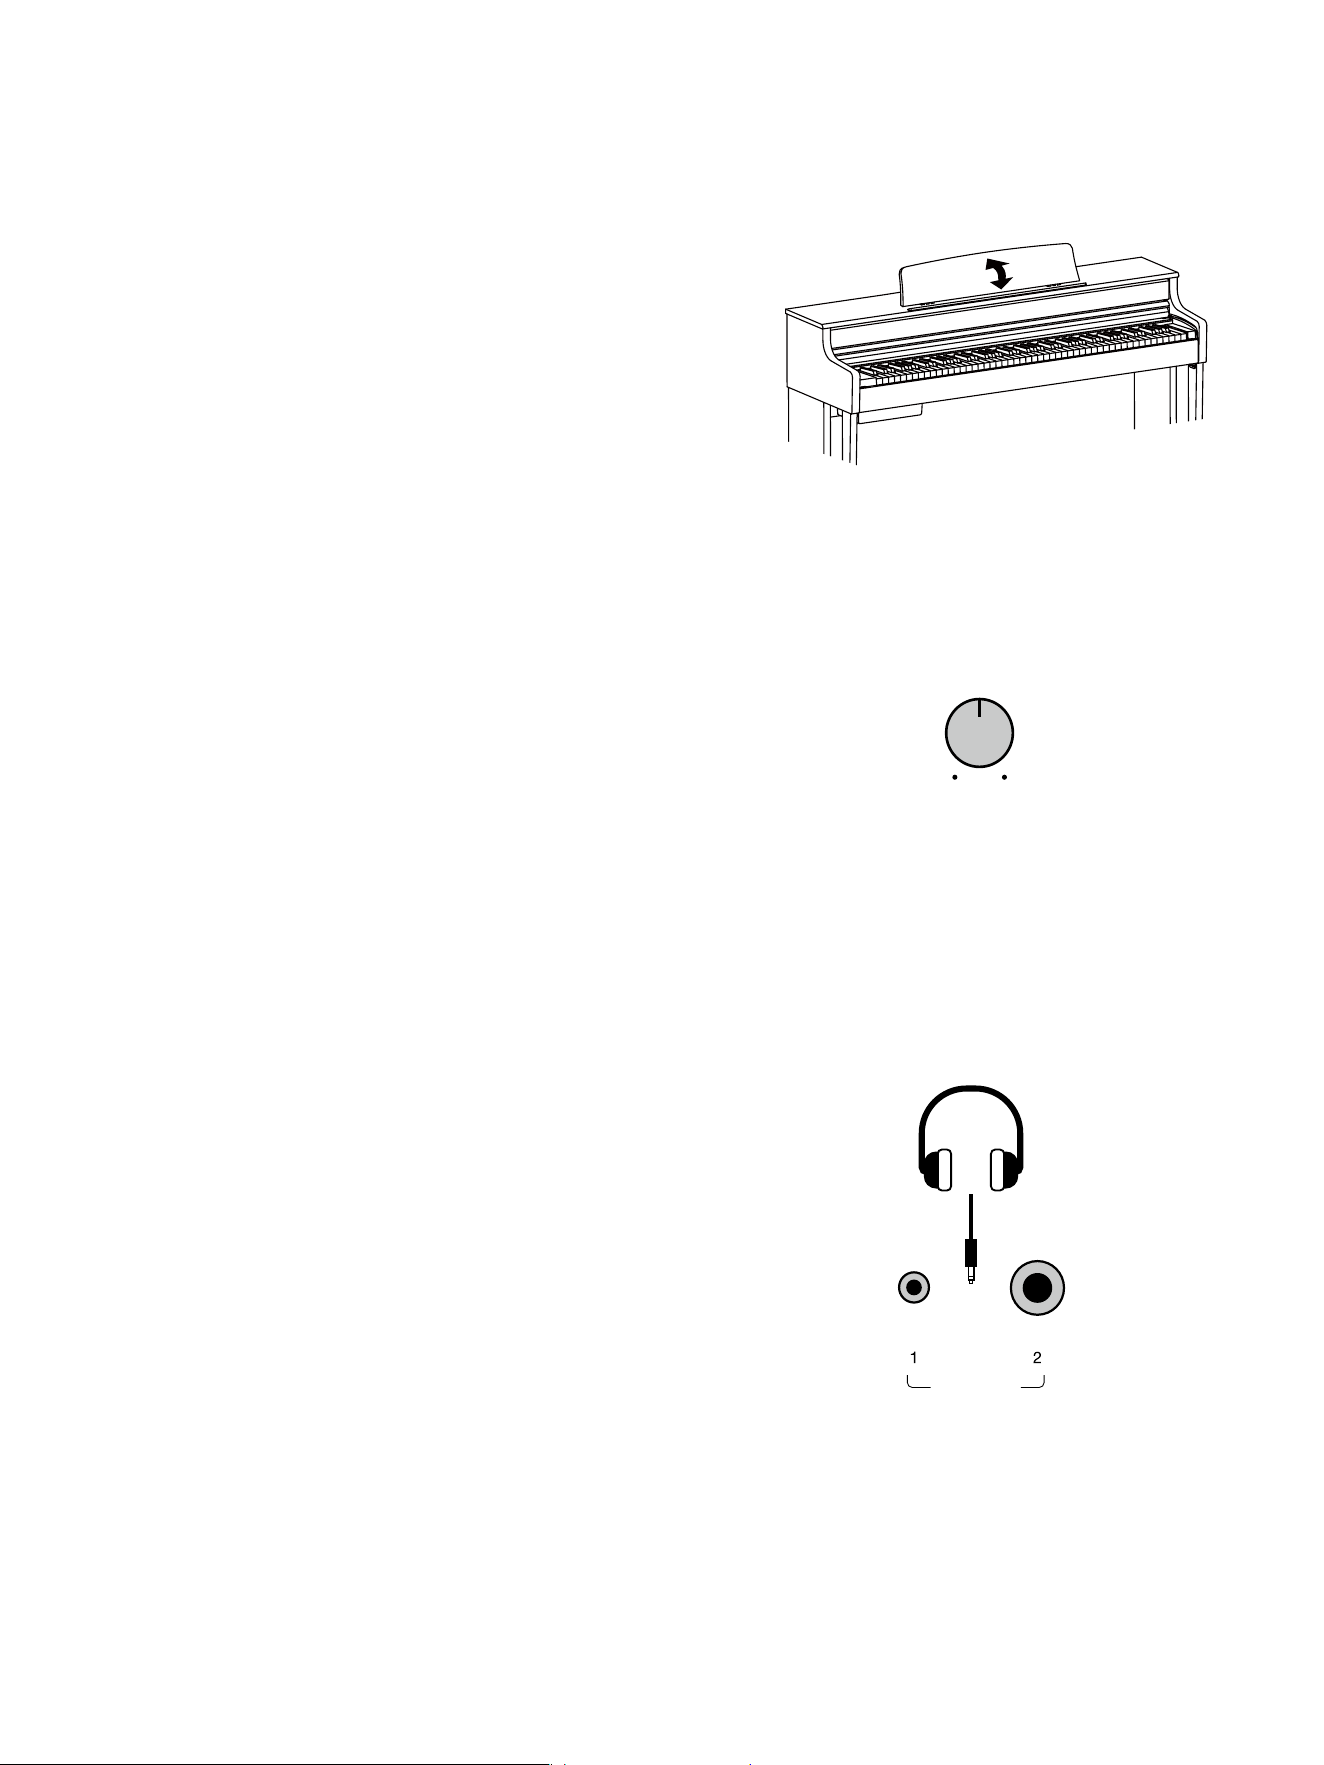
Gently raise the music stand toward the keyboard, to allow the metal
support at the back to naturally pop out. Now you can use the music
stand to place sheet music or tablet on it.
When you wish to close the music stand, fold back the metal support,
then gently lower the music stand all the way down.
Attention,
Please avoid placing objects on the stand that are too long, too wide, or
too heavy for extended periods of time, as this could cause irreversible
damage.
Please avoid placing heavy objects on the closed stand for extended
periods of time.
Adjust the Master Volume
You can adjust the master volume of the instrument by turning the
[VOLUME] knob: Turn counter-clockwise to decrease, turn clockwise to
increase.
▘
Dynamic Acoustic System (D.A.S.)
This instrument is imbued with a powerful dynamic eect called the
Dynamic Acoustic System (D.A.S.), which equalizes higher and lower
frequency bands in loud and quiet sessions, respectively, creating
balanced auditory experience in general.
The D.A.S. eect is enabled by default, but you can turn it o in the
Global Eect settings (page 35).
Connecting Headphones
The instrument has 2 headphone jacks (page 6) available, allowing you to
connect two pairs of headphones at the same time. Once headphones
are plugged in, built-in speakers will be automatically muted, and you will
hear only through the headphones.
Attention,
You may need additional adapters to connect your headphones, and the
built-in speakers will stay muted even if adapters are plugged in without
headphones.
VOLUME
PHONES
9
Using Pedals
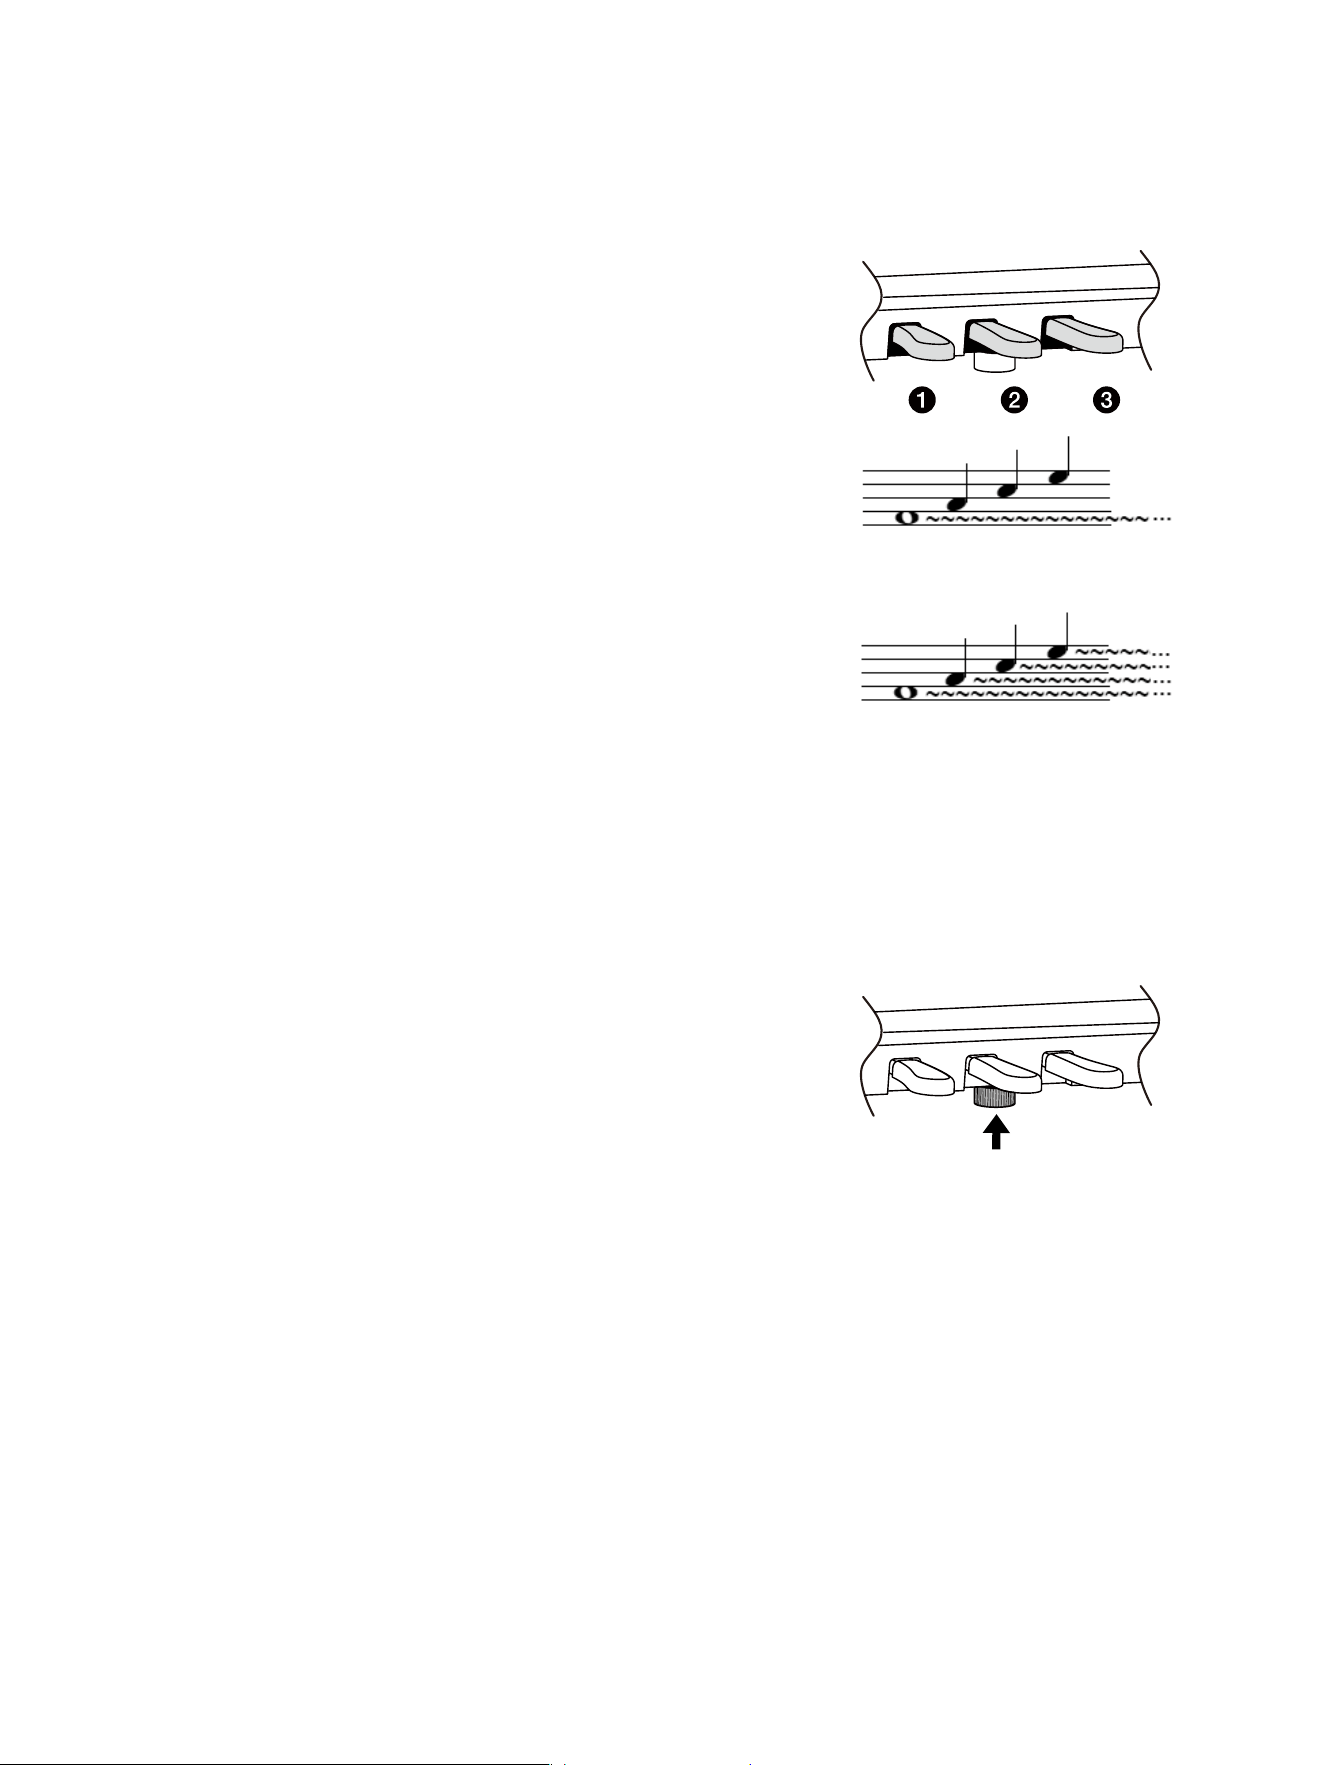
1. Left/Soft Pedal
This pedal produces a soft eect on notes played after pressing it
down, with a slight decrease in volume and a subtle change in tone. It
does not aect notes played before the pedal is pressed down.
The function of this pedal varies depending on the selected
instrumental sound. For instance, when playing an organ-based
sound, it switches rotary speaker speeds.
2. Mid/Sostenuto Pedal
Press and hold this pedal while holding notes down to sustain those
notes. The sustain will last until you release the pedal.
Notes played after pressing down this pedal are NOT aected.
3. Right/Damper Pedal
Press and hold this pedal to add a sustain eect to all notes.
▘
Progressive Response Grand Piano Pedals
By detecting and responding to pedaling pressure and depth, the
instrument’s pedals replicate the acoustics of grand pianos to reect
the length of sustain and various other eects associated with the
pedal system, hence naturally enhancing your performance.
The damper pedal is also designed to be a half-damper pedal to the
likeness of grand pianos. In other words, there is a damping structure
that renders the point of half-pedaling more easily felt while pressing
down. There are multiple dampening levels as well, which make pedaling
feel more natural and comfortable.
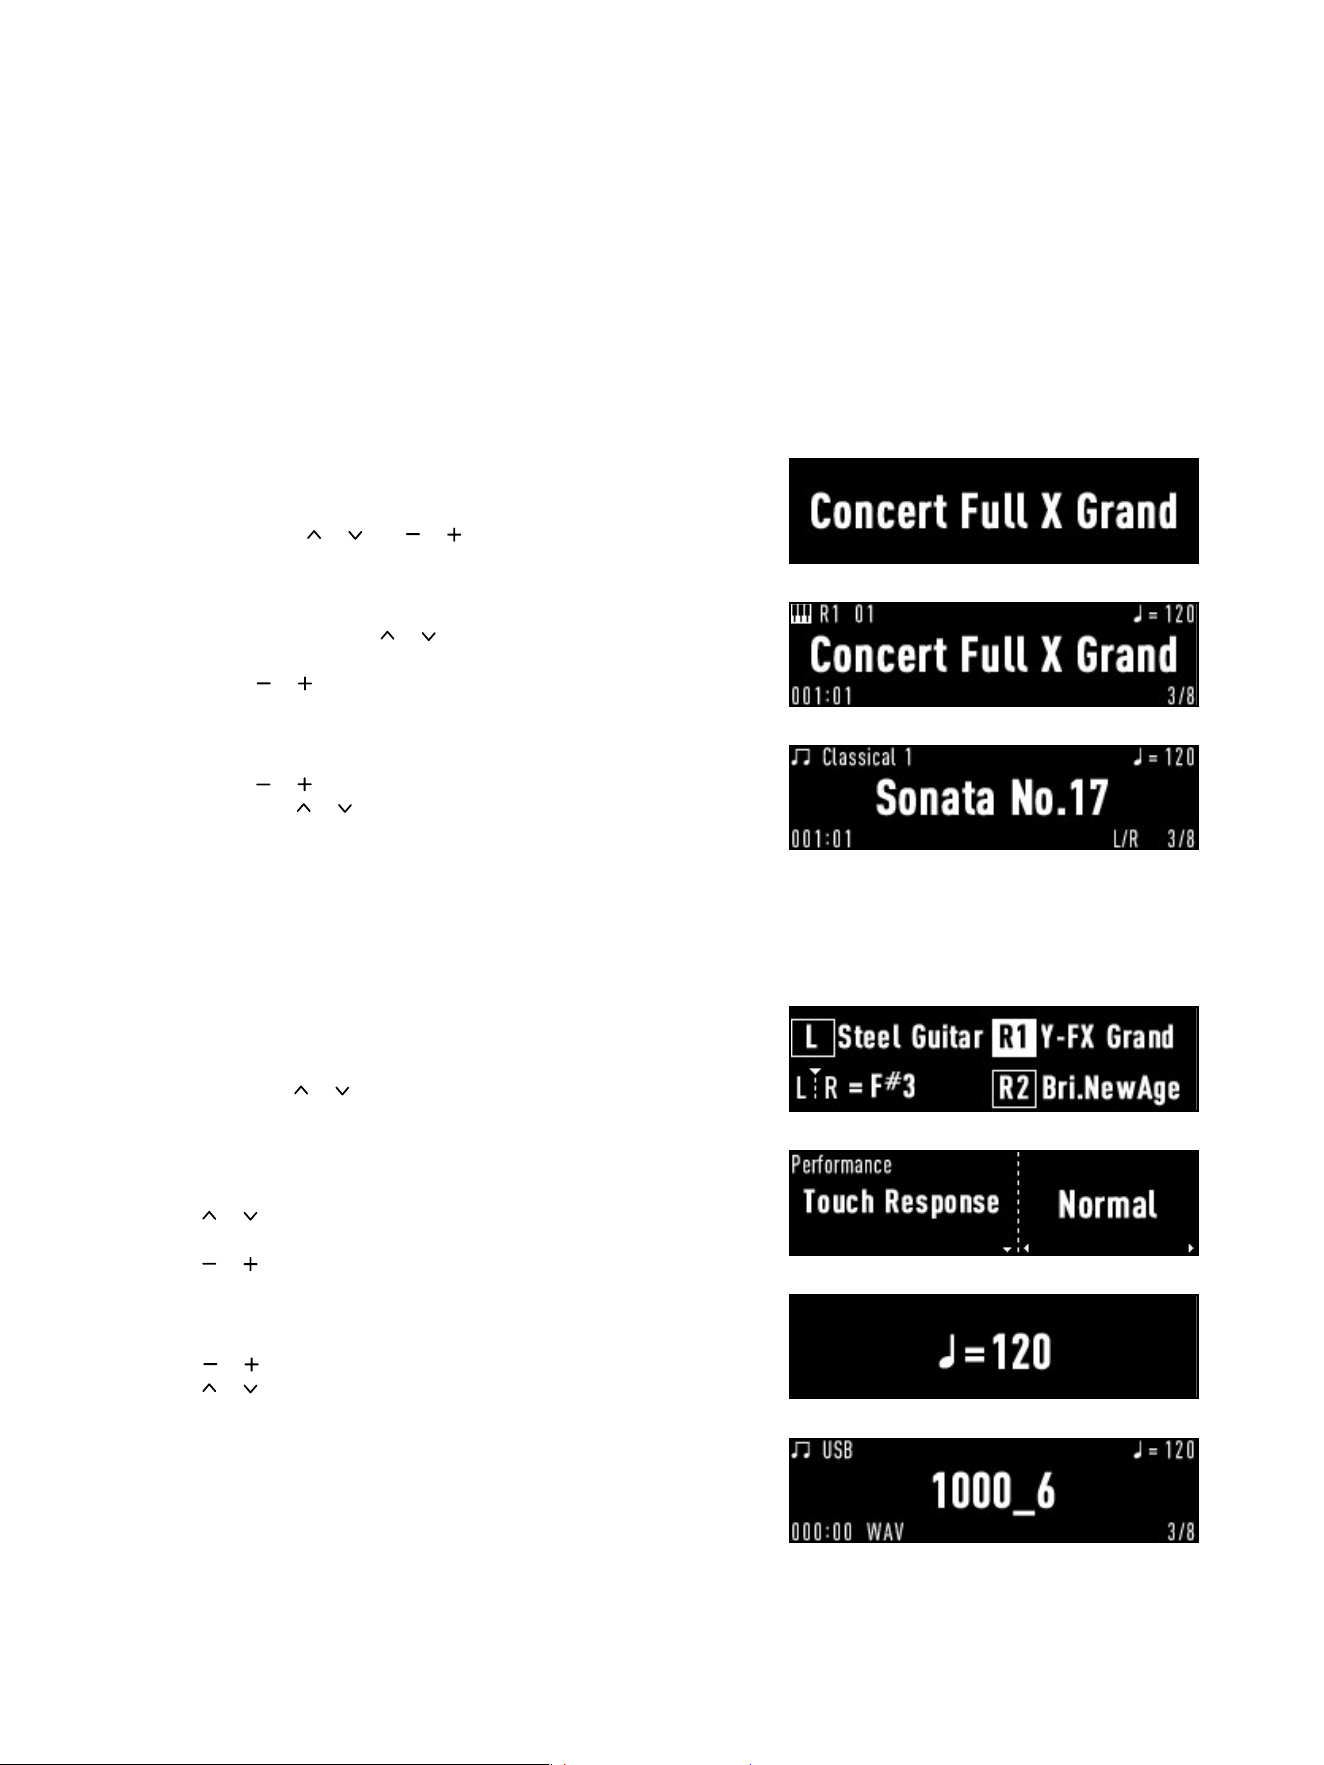
▘
Adjusting Support Bolts
Before playing for the rst time, adjust the support bolts under the
pedals to ensure that the bottom ends of these bolts are fully attached
to the ground, so that each pedal can properly withstand the force
of pedaling. Leaving support bolts mid-air can make pedaling feel
unsteady and may even cause damage to pedal bases.
Press the right/damper pedal here to gain
sustain for the F note and all that follows.
Press the mid/sostenuto here to sustain
the F note. Notes played afterwards are
not aected.
10
This instrument features a touch panel for easy operation. By pressing a
single button or a combination of two buttons, you can access most of
the commonly used functions.
For more advanced operations and detailed settings, please refer to later
sections of this manual.
Entering Modes
You can enter/switch to certain modes by pressing specic buttons:
▘
Press the [PIANO] button to enter the Piano mode.
Once you are in, you can switch between two grand piano sounds by
pressing [PIANO], [
] / [ ], or [ ] / [ ].
▘
Press [SOUND] to enter the Sound mode.
From there, you can press [
] / [ ] to switch between sound parts.
Then switch the sound for the current sound part by pressing
[SOUND] or [ ] / [ ].
▘
Press [SONG] to enter Song mode.
Then, press [
] / [ ] to switch between songs in the current category;
press [SONG] or [ ] / [ ] to switch the song category.
Hold down [SONG] to activate the Play to Search feature (page 24).
Accessing Function Settings
You can access certain functions by pressing specic buttons.
▘
In Sound mode, press [PART] to access the sound part combination
menu. Then use [
] / [ ] to switch between combinations.
▘
Press [MENU] to enter the function selection menu.
Then press [MENU] to switch function category;
press [
] / [ ] to switch between function items in the current
category;
press [ ] / [ ] to adjust the selected item’s option or parameter.
▘
Press [TEMPO] to enter the tempo/tempo marking setting.
Press [
] / [ ] to adjust the speed;
press [ ] / [ ] to switch between BPM and tempo marking. (Page 18)
▘
Press [USB] to access the USB directory page.
Using the Control Panel
11
Activating/Deactivating Functions
You can instantly activate/deactivate certain operations or features using
these buttons:
▘
Press [REC
] to enter/quit the recording preparation state when
recording as MIDI (page 26, 27). Press to start or stop recording when
recording as audio (page 28).
▘
Press [
] to start, pause/stop playback; to start recording as MIDI
while in the recording preparation state.
▘
Press [METRO.] to activate/stop the metronome.
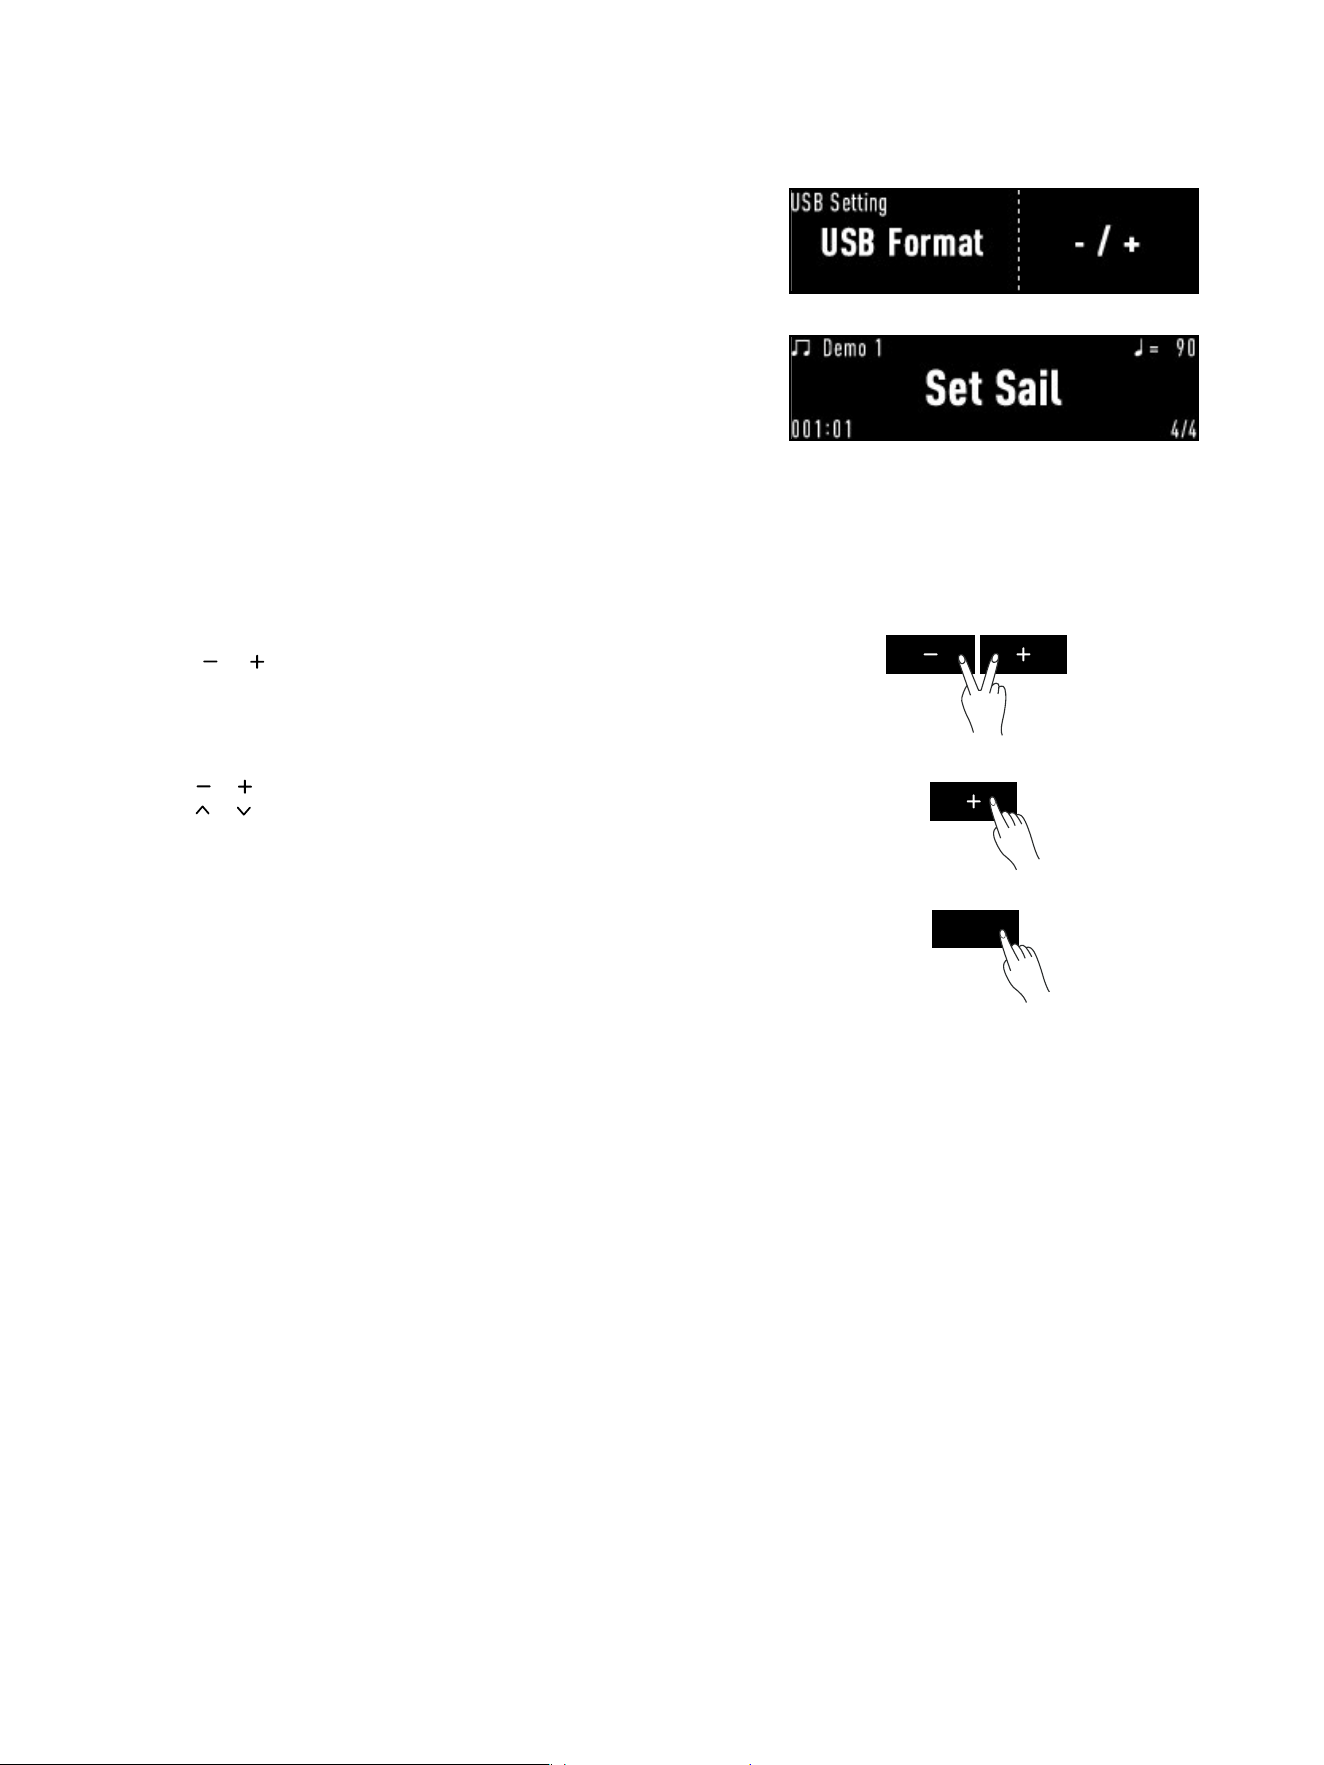
Quick Accessing Function Settings with
Button Combinations
You can quickly access certain function or mode settings by holding
down [MENU] and pressing another button.
▘
[MENU] + [PIANO]: Piano Eects Setting
▘
[MENU] + [PART]: Part Setting
▘
[MENU] + [SONG]: Song Setting
▘
[MENU] + [METRO.]: Metronome Setting
▘
[MENU] + [REC]: Record Setting
12
▘
[MENU]+[USB]: USB Setting (le system format)
You can also hold down [SONG] and press other buttons to put on
specied playbacks.
▘
[SONG]+[SOUND] to put the demo of the current sound on playback.
Other Operations
▘
Reset
Press [
] & [ ] simultaneously to reset the current function’s option or
parameter to default.
▘
Hold [
] / [ ] to speed up adjustment.
Hold [ ] / [ ] to speed up switching between categories or functions.
▘
Exit
Press [EXIT] to exit modes, menus or sub-menus.
Attention,
The touch panel will automatically shut down and turn o all button lights
after being idle for a certain period of time. Simply touch anywhere on the
panel to regain control.
The instrument features a slight feedback sound upon pressing any
active buttons. This can be turned o in the System settings (page 37).
EXIT
13
This instrument features two concert grand piano sounds, enabling you
to select based on your personal preference or to best complement the
style of the piece you wish to perform.
In the Piano mode, which we highly recommend, the two grand piano
sounds are brought to full with realistic piano eects and ambience
simulations, providing a more immersive and authentic experience as you
play.
Piano Mode
1. Press [PIANO] to enter the Piano mode.
2. Now you can play!
Note that the spectrum of your performance is automatically animated
and displayed on the screen. This is done to help extend the lifespan
of the screen by preventing static images from being displayed for
extended periods of time.
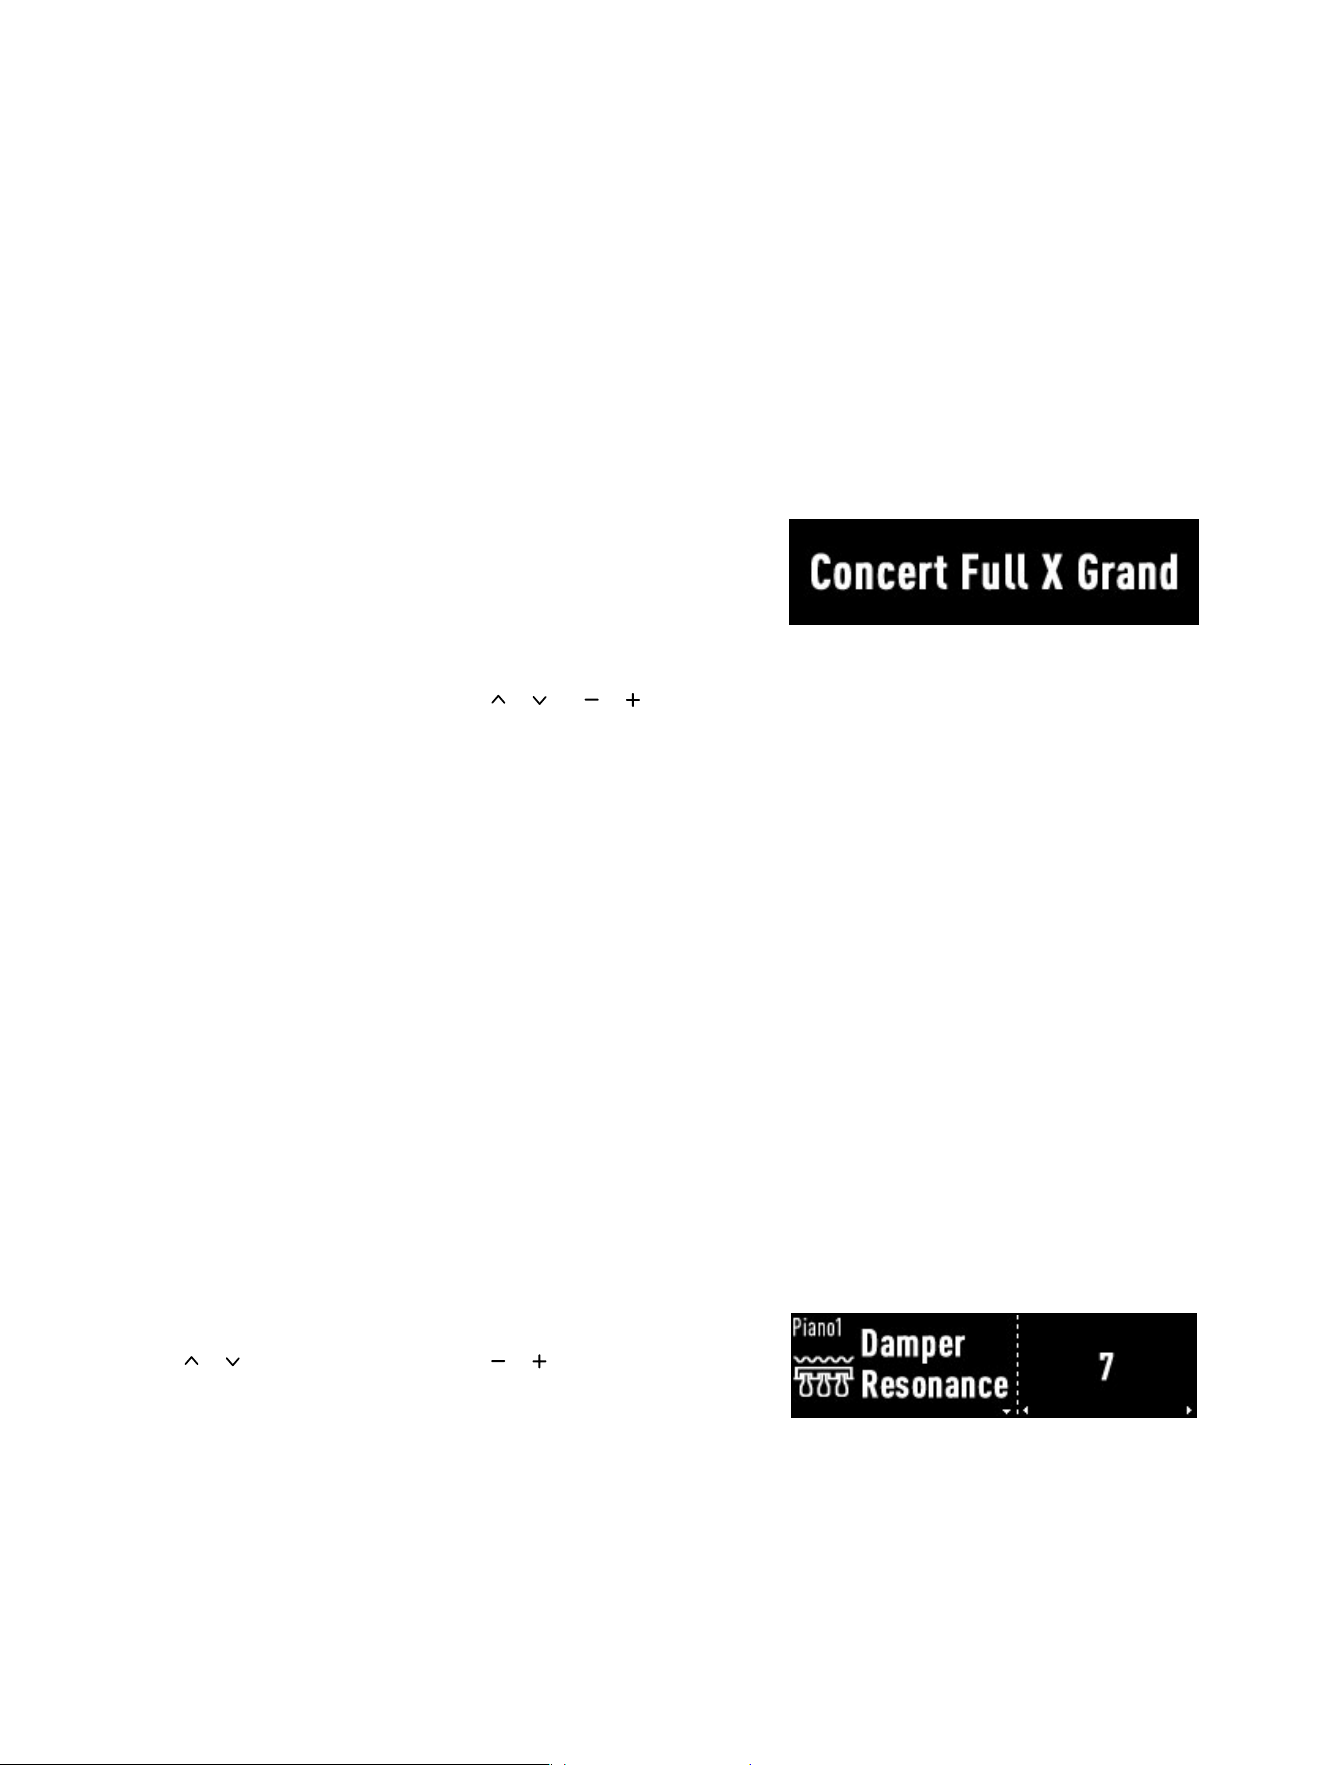
The instrument’s default sound is “Concert Full X Grand”. To switch to
the other piano sound, press [PIANO] , [ ] / [ ] or [ ] / [ ].
Press [EXIT] to quit the Piano mode.
Piano Eects
This instrument uses advanced digital technology based on sample
modeling called FSM (Free Strings Modeling) to simulate natural and
realistic piano eects.
For acoustic pianos, pressing down key(s) will raise the damper(s) from
the string(s), allowing them to vibrate freely and resonate with each other.
And when the damper pedal is pressed down, all the dampers are raised
from the strings, causing even the strings that have not been struck by
the hammer to resonate with those that have.
The FSM technology simulates this eect by allowing the free strings to
vibrate naturally and extend to a full overtone resonance when additional
notes are played, or the damper pedal is pressed down while holding
down notes. This creates subtle and/or glorious sounds.
You can switch options or adjust parameters of the FSM and ambience
eects to obtain rich and unique sounds for your piano performance.
Hold down [MENU] and press [PIANO] to enter the Piano eects settings.
Press [ ] / [ ] to switch eects and press [ ] / [ ] to change options or
adjust parameters. Press [EXIT] to quit.
Note that each grand piano sound has its own set of eects. Changing
settings of one sound does not aect the other sound.
Piano Mode
14
Eect List
▘
Damper Resonance
Simulate the string resonance eect when playing additional notes after
pressing down the damper pedal.
Adjust to set the degree of resonance.
▘
Damper Noise
Simulate the physical noise generated by the movement of the damper
pedal and string dampers while pedaling.
Adjust to set the audibility of the noise.
▘
String Resonance
Simulate the strings’ overtone resonance produced by pressing keys
successively.
Adjust to set the degree of overtone resonance.
▘
Lid Angle
Simulate the dierent angles of the top lid.
Change the option for a more closed or open sound.
▘
Open String Resonance
Simulate the open string resonance in the treble range area which is
always unrestrained.
Adjust to set the degree of resonance.
▘
Key O Eect
Simulate the sound eect of the damper gradually lowering back onto
the strings as the keys are released.
Adjust to set the audibility of the sound eect.
▘
Soft Pedal
Adjust to set the depth of the left/soft pedal’s eect.
Parameter Default
0~10 7
Parameter Default
Close / Half / Open Half
Parameter Default
0~10 5
Parameter Default
0~10 5
Parameter Default
OFF,Low,Normal,High Normal
Parameter Default
0~10 5
Parameter Default
0~10 0
15
Option Default
Room / Saloon /
Chamber / Symphony
hall / Church / Club
Chamber
Parameter Default
0~10 5
Parameter Default
0~10 5
▘
Ambience
This instrument oers several simulated ambience types with unique
reverbs for live performances:
Room: Simulates a smaller, intimate domestic indoor space with no
special acoustic treatments. The restrained, soft reverb is ideal for
creating a warm and personal sound.
Saloon: Simulates a larger indoor space with no special acoustic
treatments. The clear and elegant reverb is suited for a wide range of
musical styles and genres.
Chamber: Simulates medium-sized halls used for public performances
of chamber music, art song, and solo. The full and bright ambience
type can enhance the clarity and projection of your playing.
Symphony hall: Simulates large concert halls for symphonic music. The
thick, brilliant, and long reverb can add depth and resonance to your
playing.
Church: Simulates cathedrals with high roofs. The ethereal and solemn
reverb can create a majestic and reverential atmosphere.
Club: Simulates clubs with clean and tight reverb best suited for indoor
live performances.
▘
Ambience Depth
This eect simulates the size of space in which you are performing.
Adjust to set the size of the currently selected environment to obtain
dierent depths and characteristics for your sound.
▘
Body Resonance
Simulate the slight resonance generated from within the piano’s
cabinet.
Adjust to set the degree of resonance.
16
In Sound mode, you have access to a variety of other instrument sounds
besides the generic piano sounds. For more information about all the
available sounds, please refer to the Appendix section (page 42).
Select and Play Your Sound
1. Press [SOUND] to enter Sound mode.
2. Press [SOUND] again or [ ] / [ ] to switch between sounds.
You can also hold down [SONG] and press [SOUND] to display the
demo of your current sound, then press [ ] to put it on playback.
When playing dierent sounds, the function of the left/soft pedal adapts
to the characteristics of the instrument to which your sound corresponds.
Check the list in the Appendix section (page 42) for more information.
You might notice that certain sounds are not touch-responsive, as their
corresponding instruments are not touch-responsive in the rst place.
Play Two Sounds Simultaneously (Layered
Mode)
You can layer two dierent sounds simultaneously allowing for a wide
range of timbral combinations and creative possibilities.
1. Press [PART] to enter the part combination menu.
Use [ ] / [ ] buttons to switch the combination to “R1-ON, R2-ON”.
Note that “R1” will always be “ON” regardless of your choice.
Now play a note and you should hear two instrument sounds.
2. To select sound for “R2”, press [EXIT] to return to Sound mode.
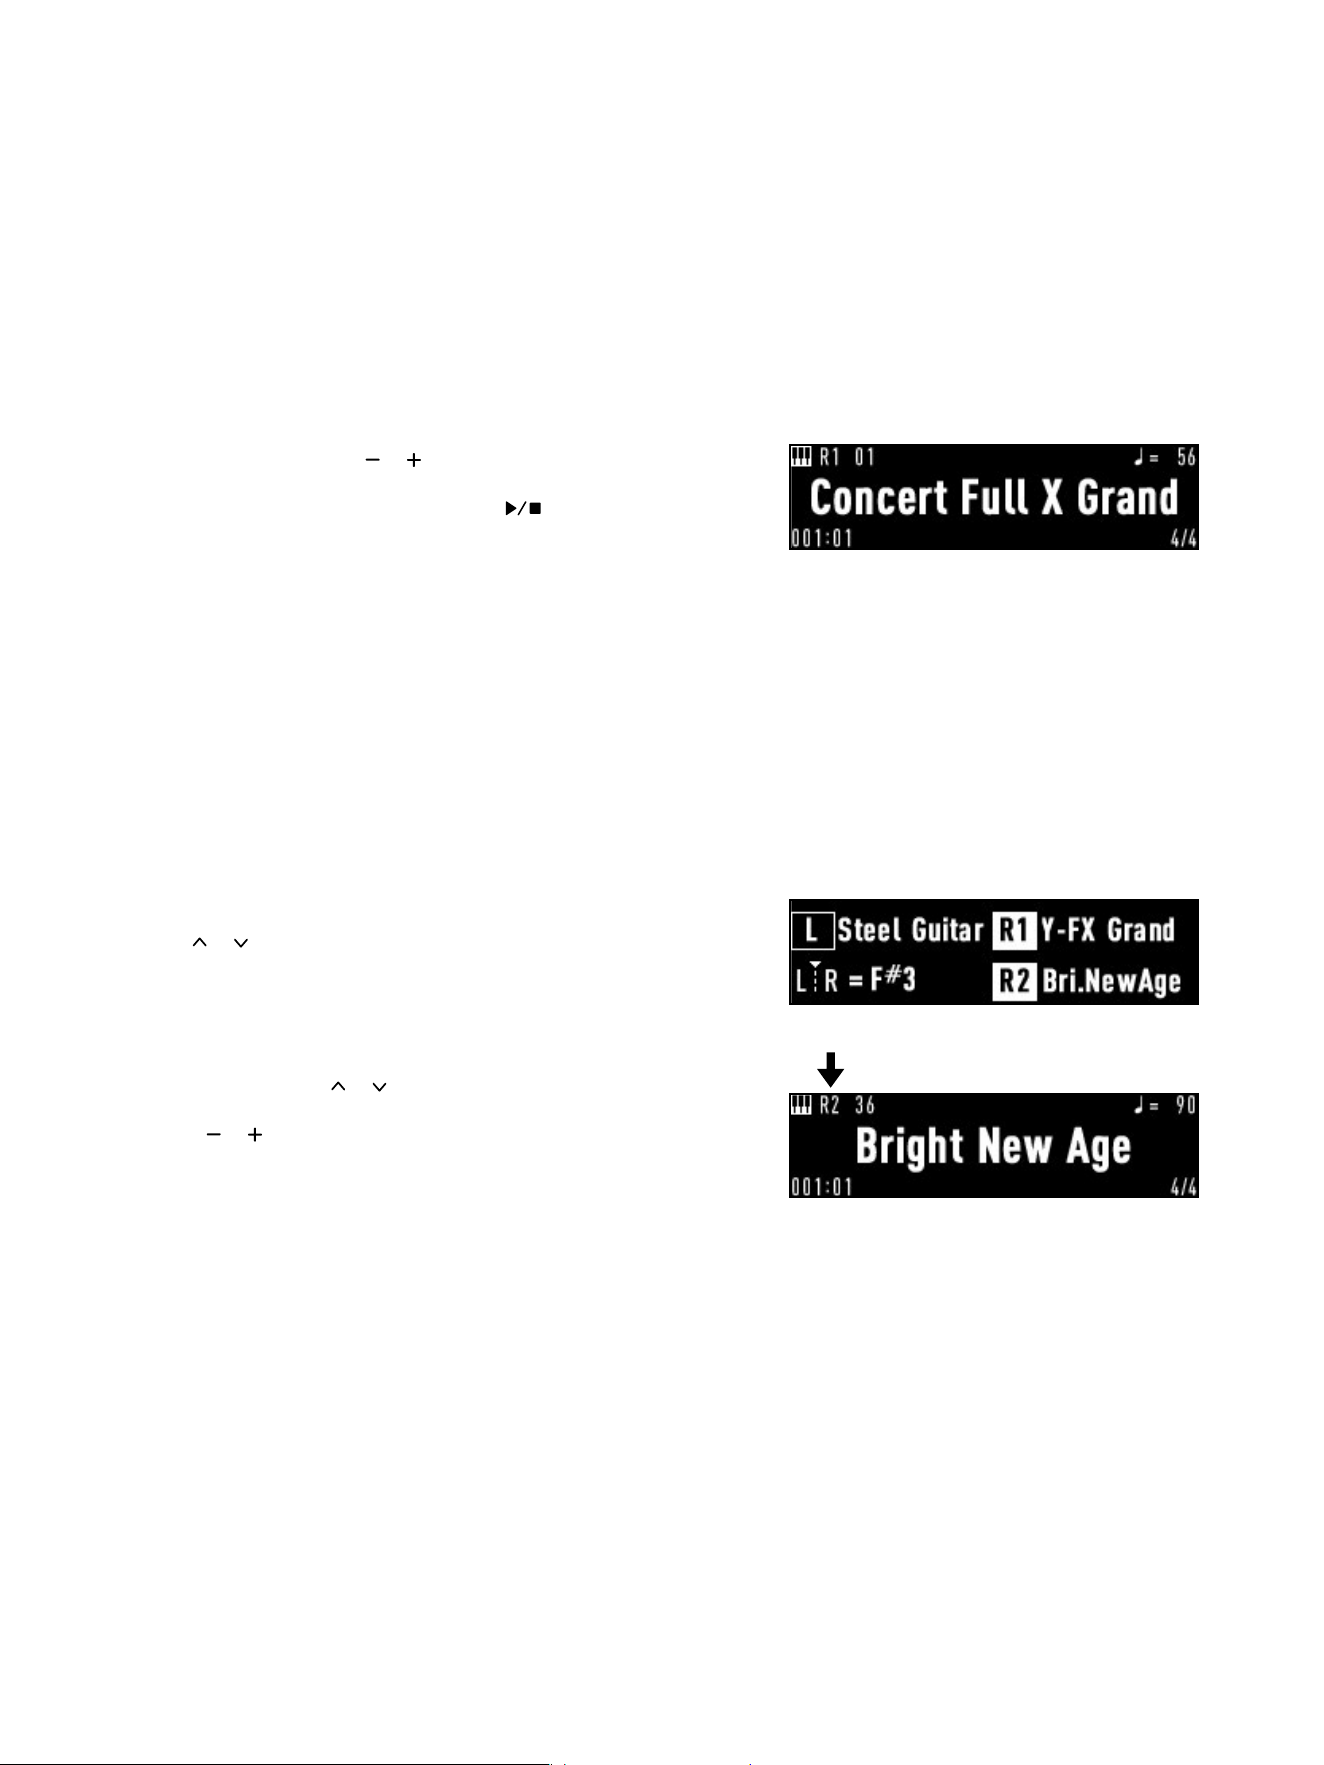
3. Here, you can press [ ] / [ ] to switch to “R2”.
4. Press [ ] / [ ] buttons to select a desired sound for “R2”.
Then switch back to “R1” and repeat the same.
If you need to adjust the volume for each sound part, you can hold down
[MENU] and press [PART] to access Part Setting (page 29) where you
can set the volume for “R1” and for “R2”.
Sound Mode
17
Play Dierent Sounds with Each Hand
(Keyboard Split)
You can split the keyboard into two separate sections, left and right. The
key where the keyboard splits is called the “split point”. Dierent sounds
can be assigned to each section, allowing you to play one sound with
one hand, and another sound with the other hand.
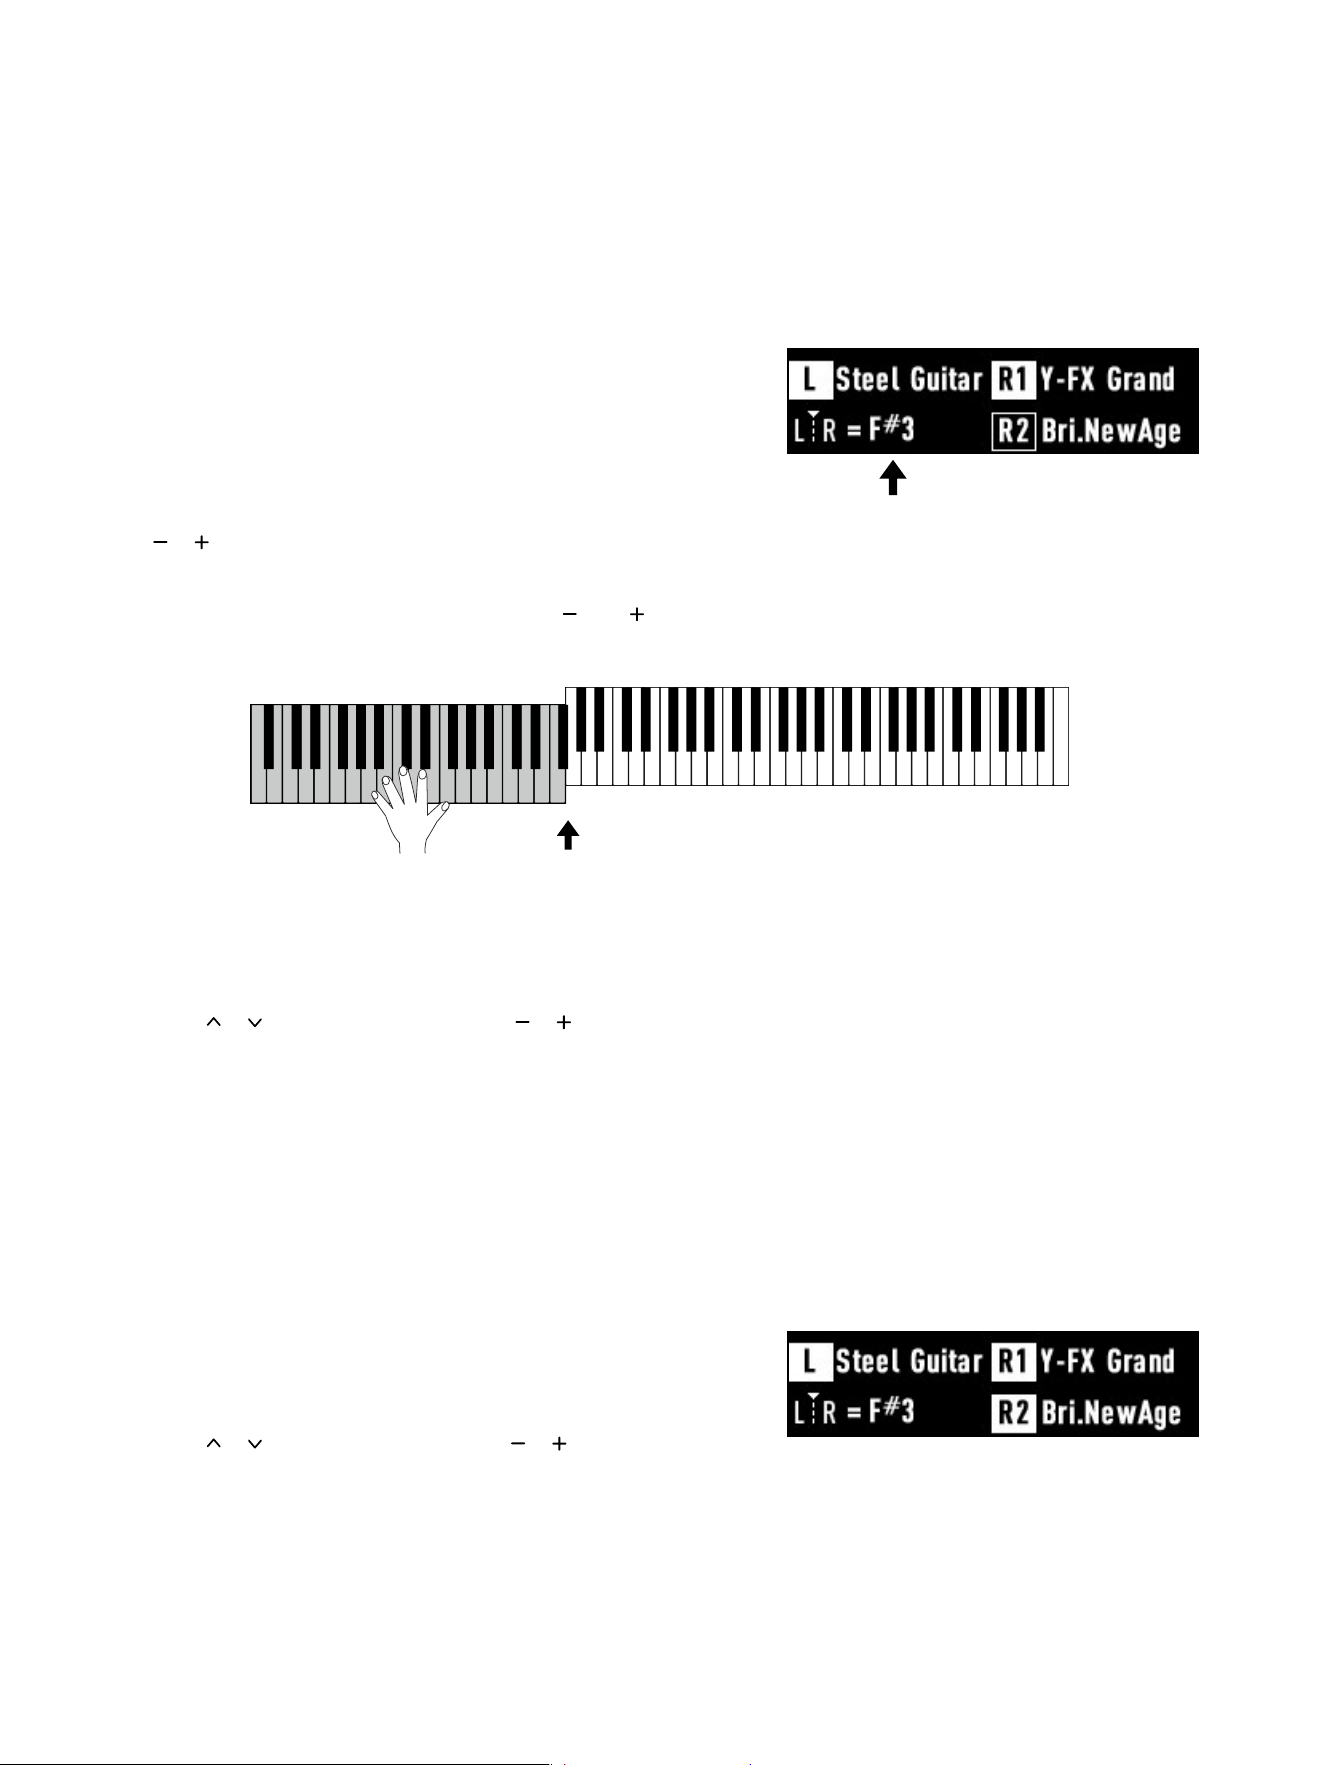
1. To split the keyboard, go to the part combination menu and switch to
“R1-ON, L-ON”.
2. You can manually set the split point which is the highest note of part
“L” (the left/lower-octave area). In the part combination menu, press
[
] / [ ] to adjust the split point’s location. Or you can hold down the
[PART] button, then press a desired key to designate it as the new
“split point”.
You can reset the split point to F#3 by pressing [ ] and [ ]
simultaneously.
3. To select a desired sound for “L”, press [EXIT] button to return to
Sound mode.
4. Press [ ] / [ ] to switch to “L”, then press [ ] / [ ] to select the sound
you want. Repeat the same for “R1”.
As mentioned, you can access the Part Setting (page 29) and adjust
the volume for each part as you see t.
Combine Layered Mode and Keyboard Split
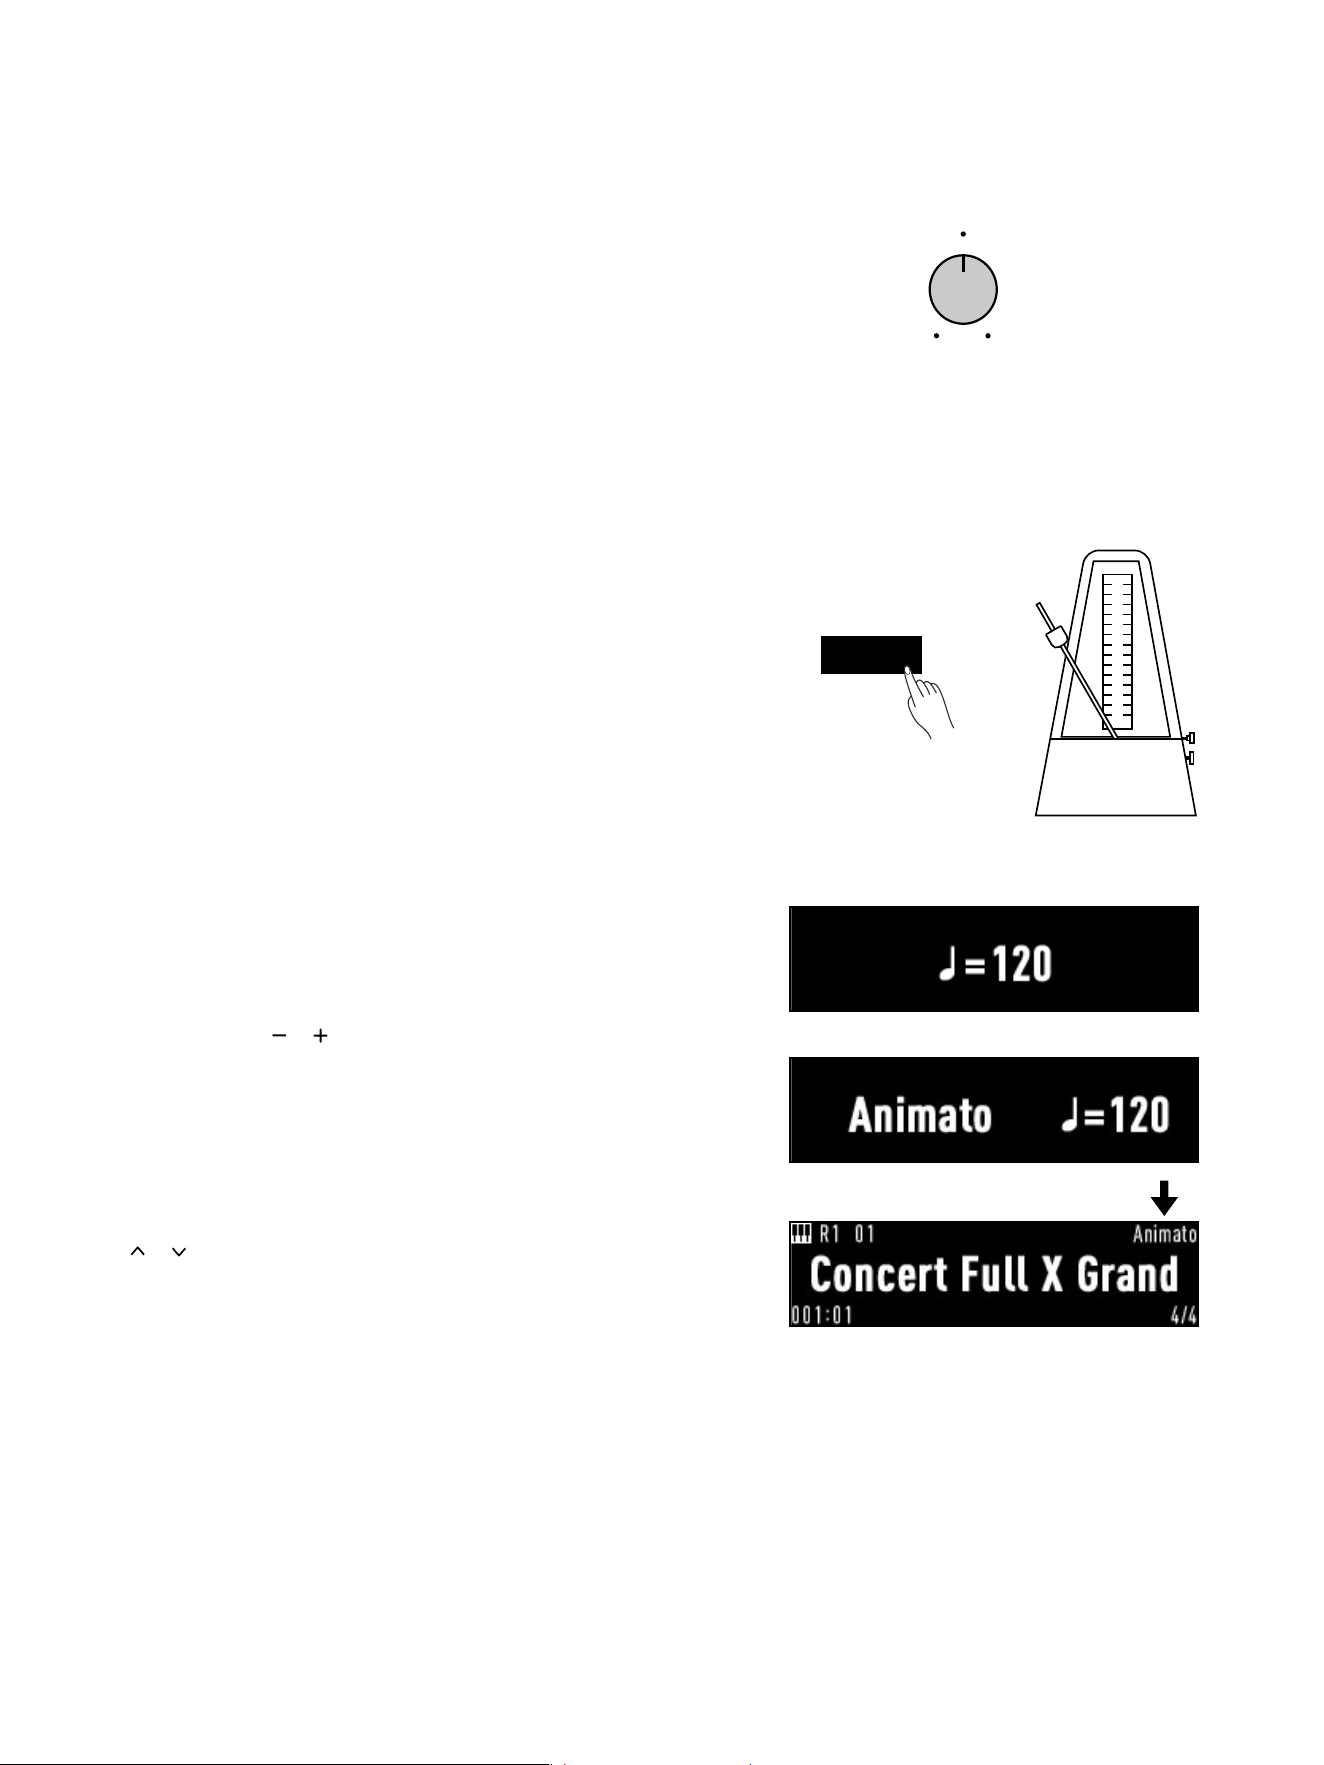
You can enable Layered mode and keyboard split simultaneously by
enabling all three sound parts: Part “R1” and “R2” for the right-hand
area, and the low-octave part “L” for the left-hand area. To do so:
1. Switch the part combination to “R1-ON, R2-ON, L-ON”.
2. Press [EXIT] to return to Sound mode.
3. Press [
] / [ ] to switch parts, then press [ ] / [ ] to select a desired
sound for each of them.
As mentioned, you can access Part Setting (page 29) to adjust the
volume of each part.
Default Split Point
18
Adjust the Overall Brilliance
You can use the knob on the I/O interface to adjust the overall degree of
Brilliance.
Turn clockwise to emphasize treble, giving the sound a brighter, more
luminous tone.
Turn counter-clockwise to emphasize bass for a darker and mellower
tone.
Turn the Metronome On/O and Adjust
Tempo
The metronome can help you improve rhythm during practice and keep
steady while recording.
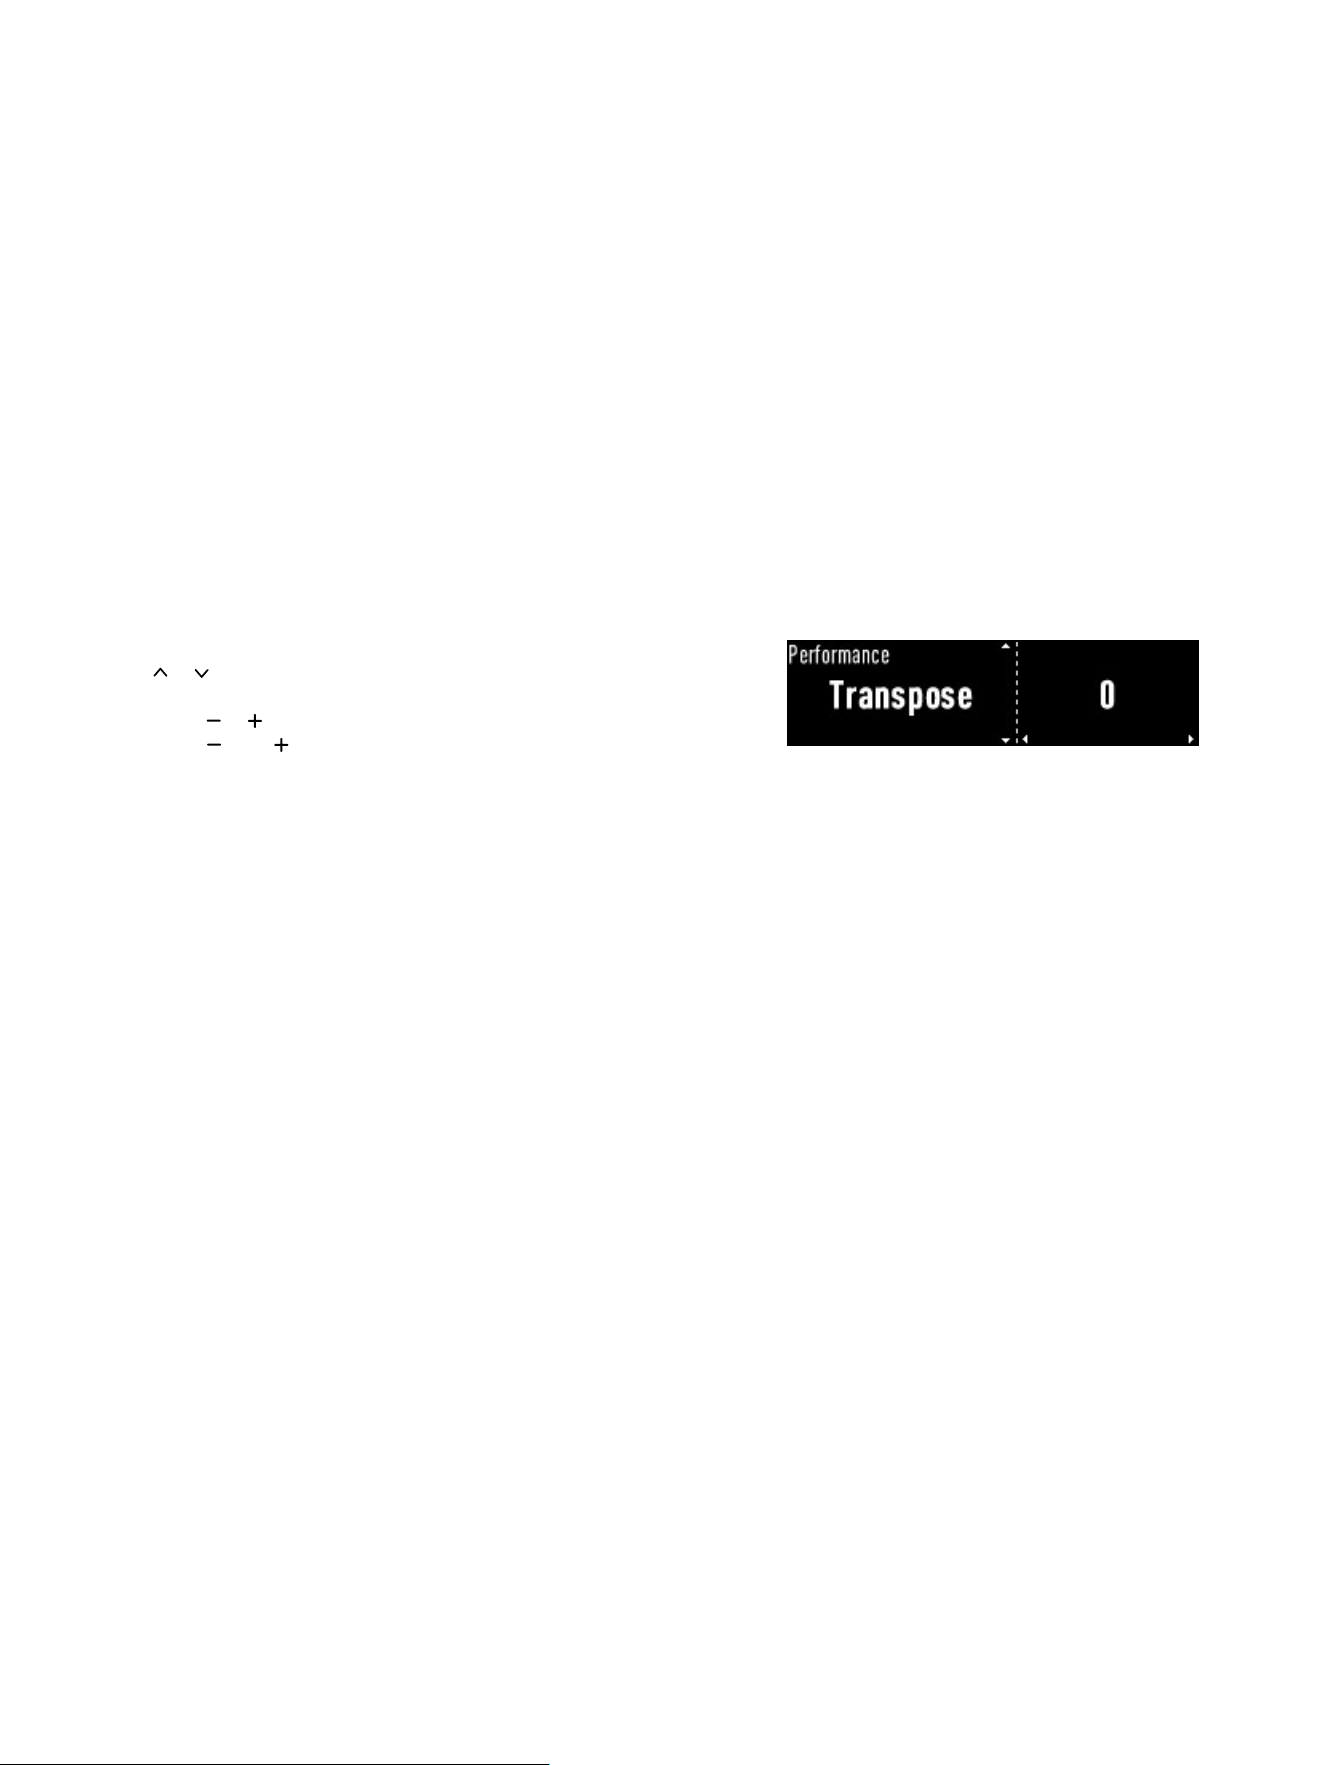
To turn the metronome on or o, simply press the [METRO.] button on
the touch panel.
By default, the metronome does NOT sound the bell that stresses the
rst beat of every bar. You can go to the Metronome settings (page 30)
to turn the bell on or o, select time signatures or adjust metronome
volume.
Once activated, the metronome will produce a clicking sound at a preset
tempo. To adjust it:
1. Press [TEMPO] to enter Tempo/Tempo Marking setting.
2. Press or hold [
] / [ ] to adjust the speed.
The instrument also includes a helpful cross-reference tool that matches
dierent tempos to tempo markings. If you come across a marking in
your score but are unsure of its tempo range, this tool can provide a
general reference to help you better understand the intended tempo.
To access this feature, go to the tempo/tempo marking setting and press
[
] / [ ] to switch to the tempo marking that corresponds to for the
current tempo. Then press the [EXIT] button to return to Sound mode,
and you should see the marking at the top-right corner, replacing the
BPM.
Attention,
Tempo marking provides only a general reference. The actual tempo
should be adjusted to suit the unique ow of the score being played.
Also, the beats will NOT be recorded, so you can always have the
metronome on or o as you see t.
METRO.
BRILLIANCE
19
Using Transpose
Transposing allows you to shift the pitch of the entire keyboard in
semitones. By doing so, you can sound like you are in a dierent
key without actually changing your nger placement. This feature is
particularly handy for accompanying a singer or playing with other tonal
instruments.
For instance, setting the transpose value to “1” will raise any notes
played on C by a semitone to C#. Alternatively, if you need to play in the
key of G but are unfamiliar with its scales, you can set the transpose to
“-5” or “7” to be able to sound like you are in the key of G by actually
playing scales in the key of C.
The device supports ±12 semitones range for transposing, which
applies only to notes played on keyboard and does NOT aect built-in
songs.
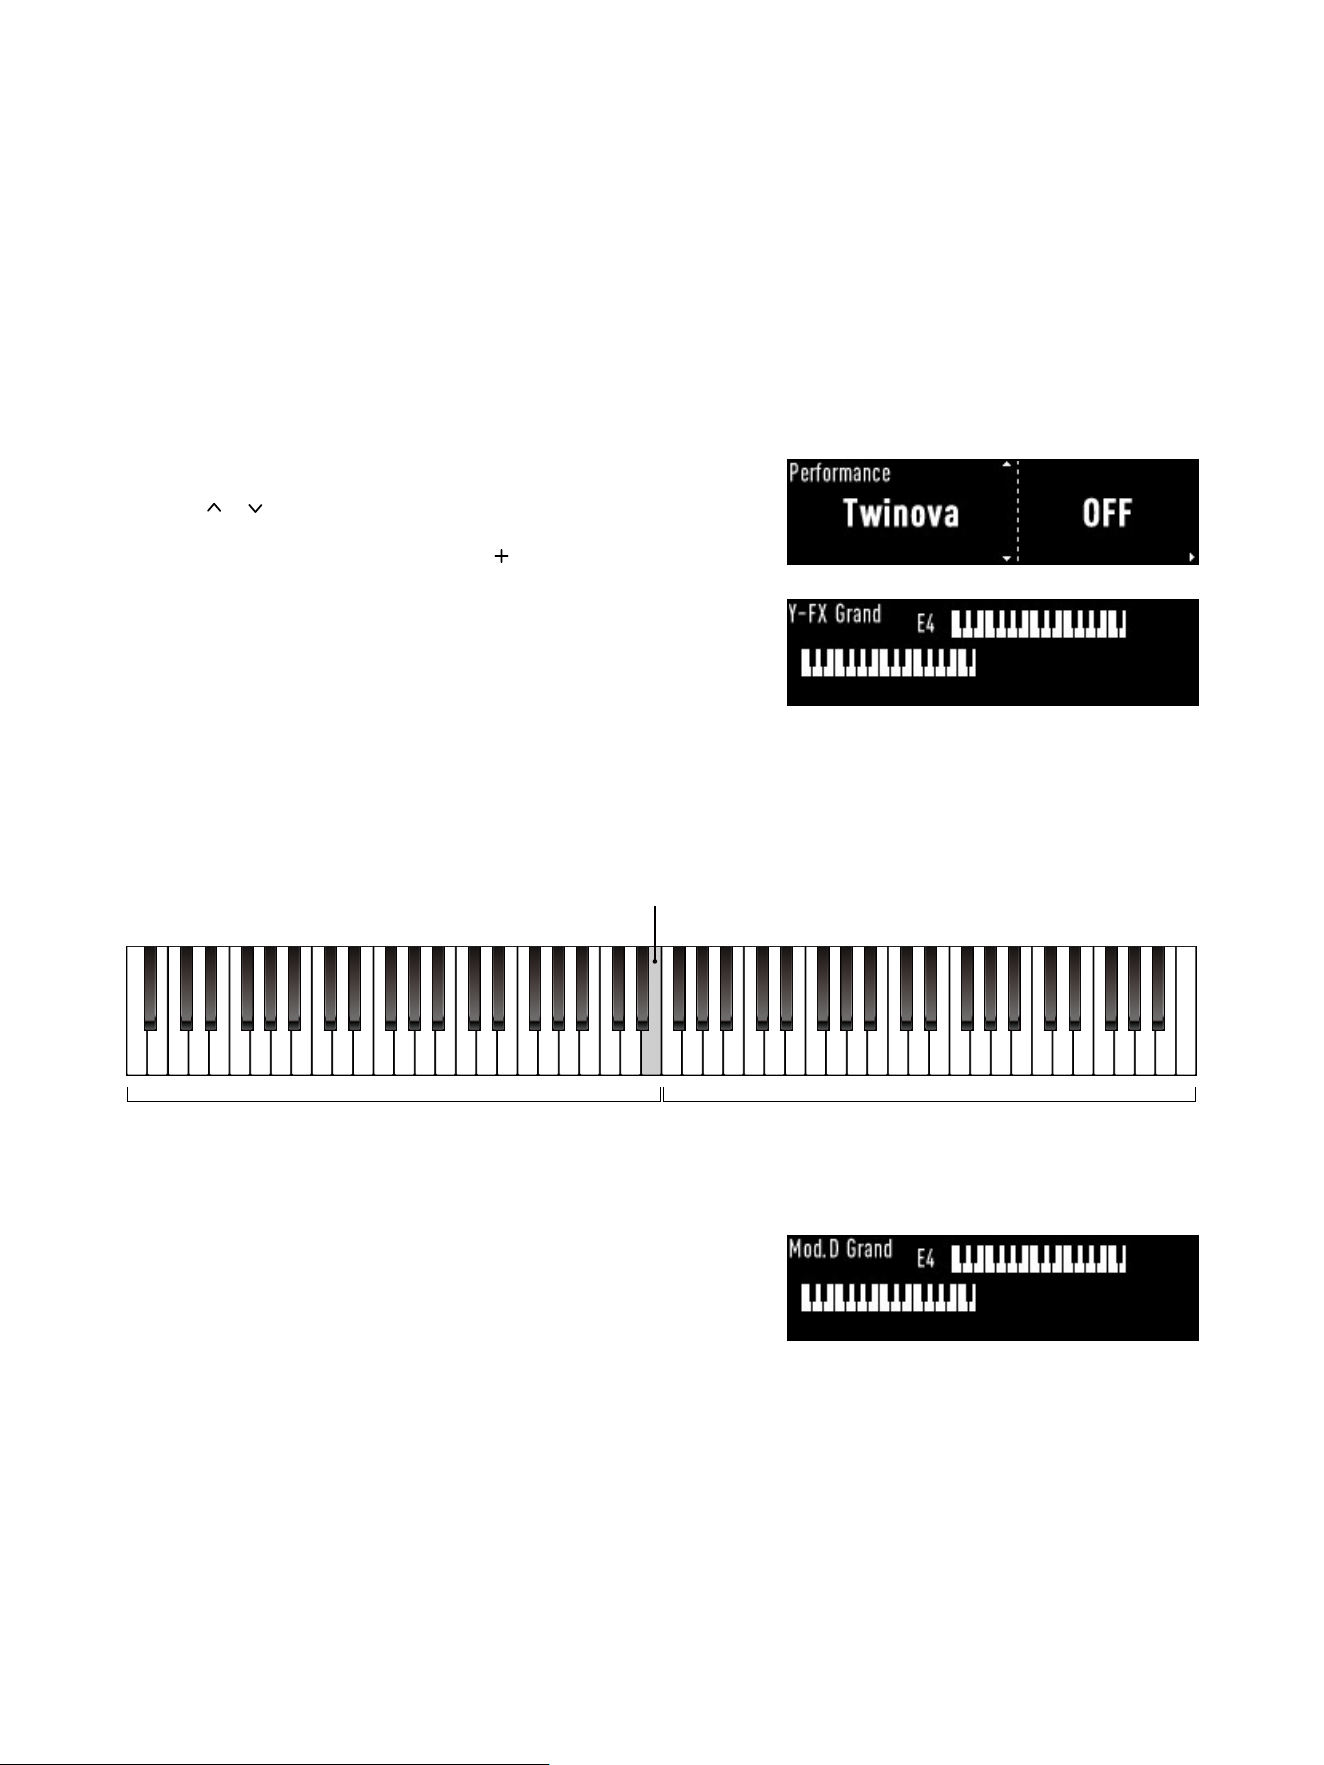
1. Press [MENU] to go to the function selection menu, then press
[ ] / [ ] to switch to “Transpose”.
2. Press [
] / [ ] to shift down/up the entire keyboard by semitones.
Press [
] and [ ] simultaneously to reset to 0.
3. Press [EXIT] to quit the function selection menu.
Attention,
Certain sounds may sound unusual at the maximum transpose level
(“+12/-12”) since their range has been signicantly increased or
decreased beyond the range of their corresponding instruments.
20
In this section, we would like to show you the Twinova mode, in which
the entire keyboard is divided into two equal areas, left and right, with
the same pitch and sound for both. This feature is particularly useful for
elementary level one-on-one instruction, as well as for practicing and
performing simple duets that require two pianos.
You can activate Twinova mode in two ways.
Activate via the Function Selection Menu
1. Press the [MENU] button to enter/display the function selection menu.
Press [ ] / [ ] to switch to “Twinova”
2. This mode is disabled by default. Press [ ] to switch it on.
3. Press [EXIT] to quit the function selection menu.
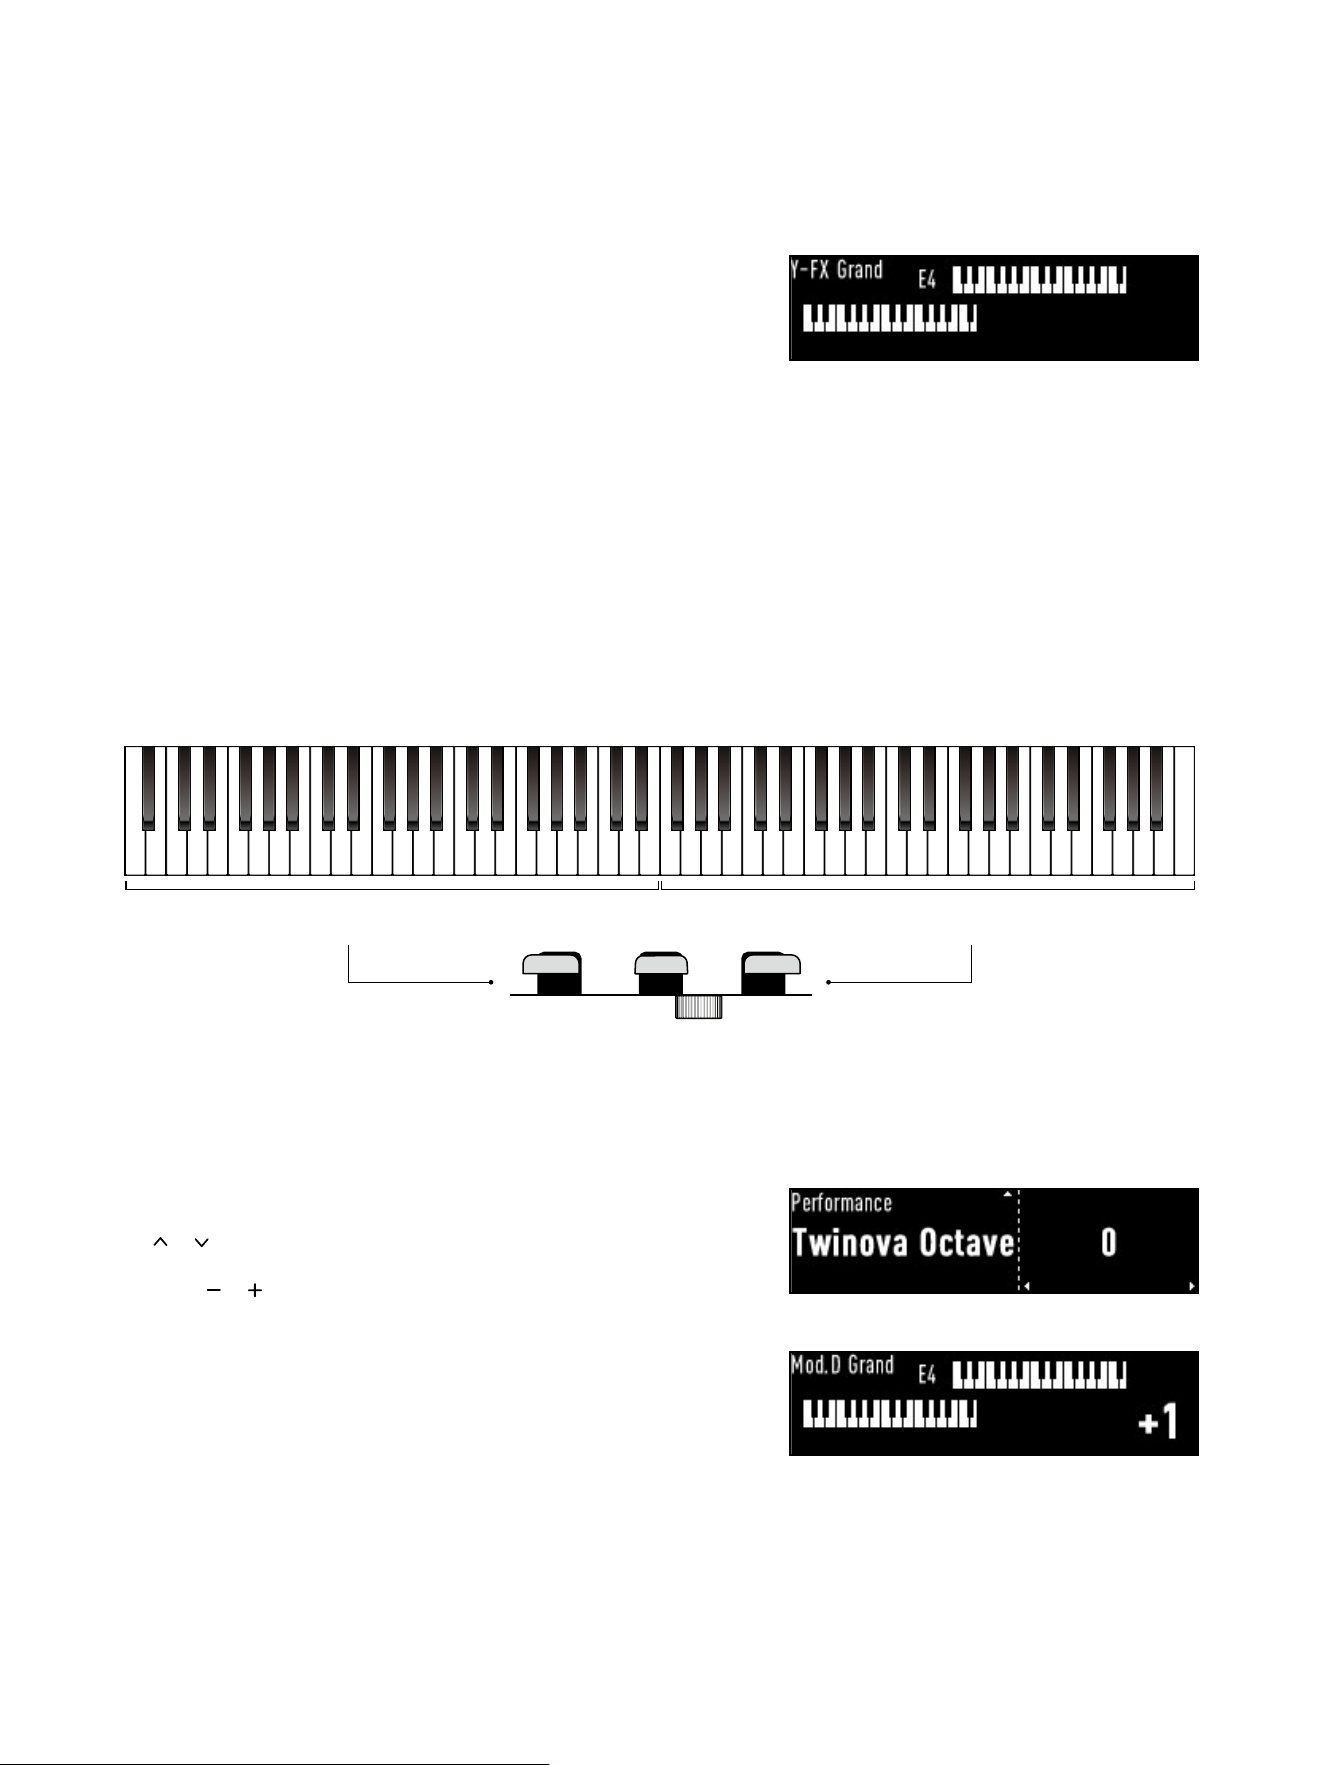
Now you are in Twinova mode, and the screen should display a duo
piano interface as well.
You can quit the Twinova mode by pressing [EXIT] or [SOUND].
The split point for this mode is at E4 (which is the highest note in the left
area). And the entire keyboard’s pitch has shifted as follows:
▘
The left area (originally A0~E4) is now A2-E6
▘
The right area (originally F4~C8) is now F2-C6
The mode only supports the two grand piano sounds, and the name of
the current sound is displayed at the top left-hand corner. Press [PIANO]
to switch to the other one if needed.
To quit the mode, you can either go to the function selection menu,
switch to Twinova and turn it o. Or you can simply press [PART] while
in Twinova mode: This will take you back to Piano mode where you can
immediately perform full-keyboard solos.
Twinova Mode
Left area Right area
Splits at E4
21
Switch to Twinova from Piano Mode
1. To switch to Twinova from Piano mode, simply press the [PART]
button.
Note that the sound you previously selected for Piano mode will also
be carried over to Twinova mode.
2. Once in Twinova mode, you can switch between the two piano
sounds by pressing [PIANO]. To return to Piano mode, press [PART]
again.
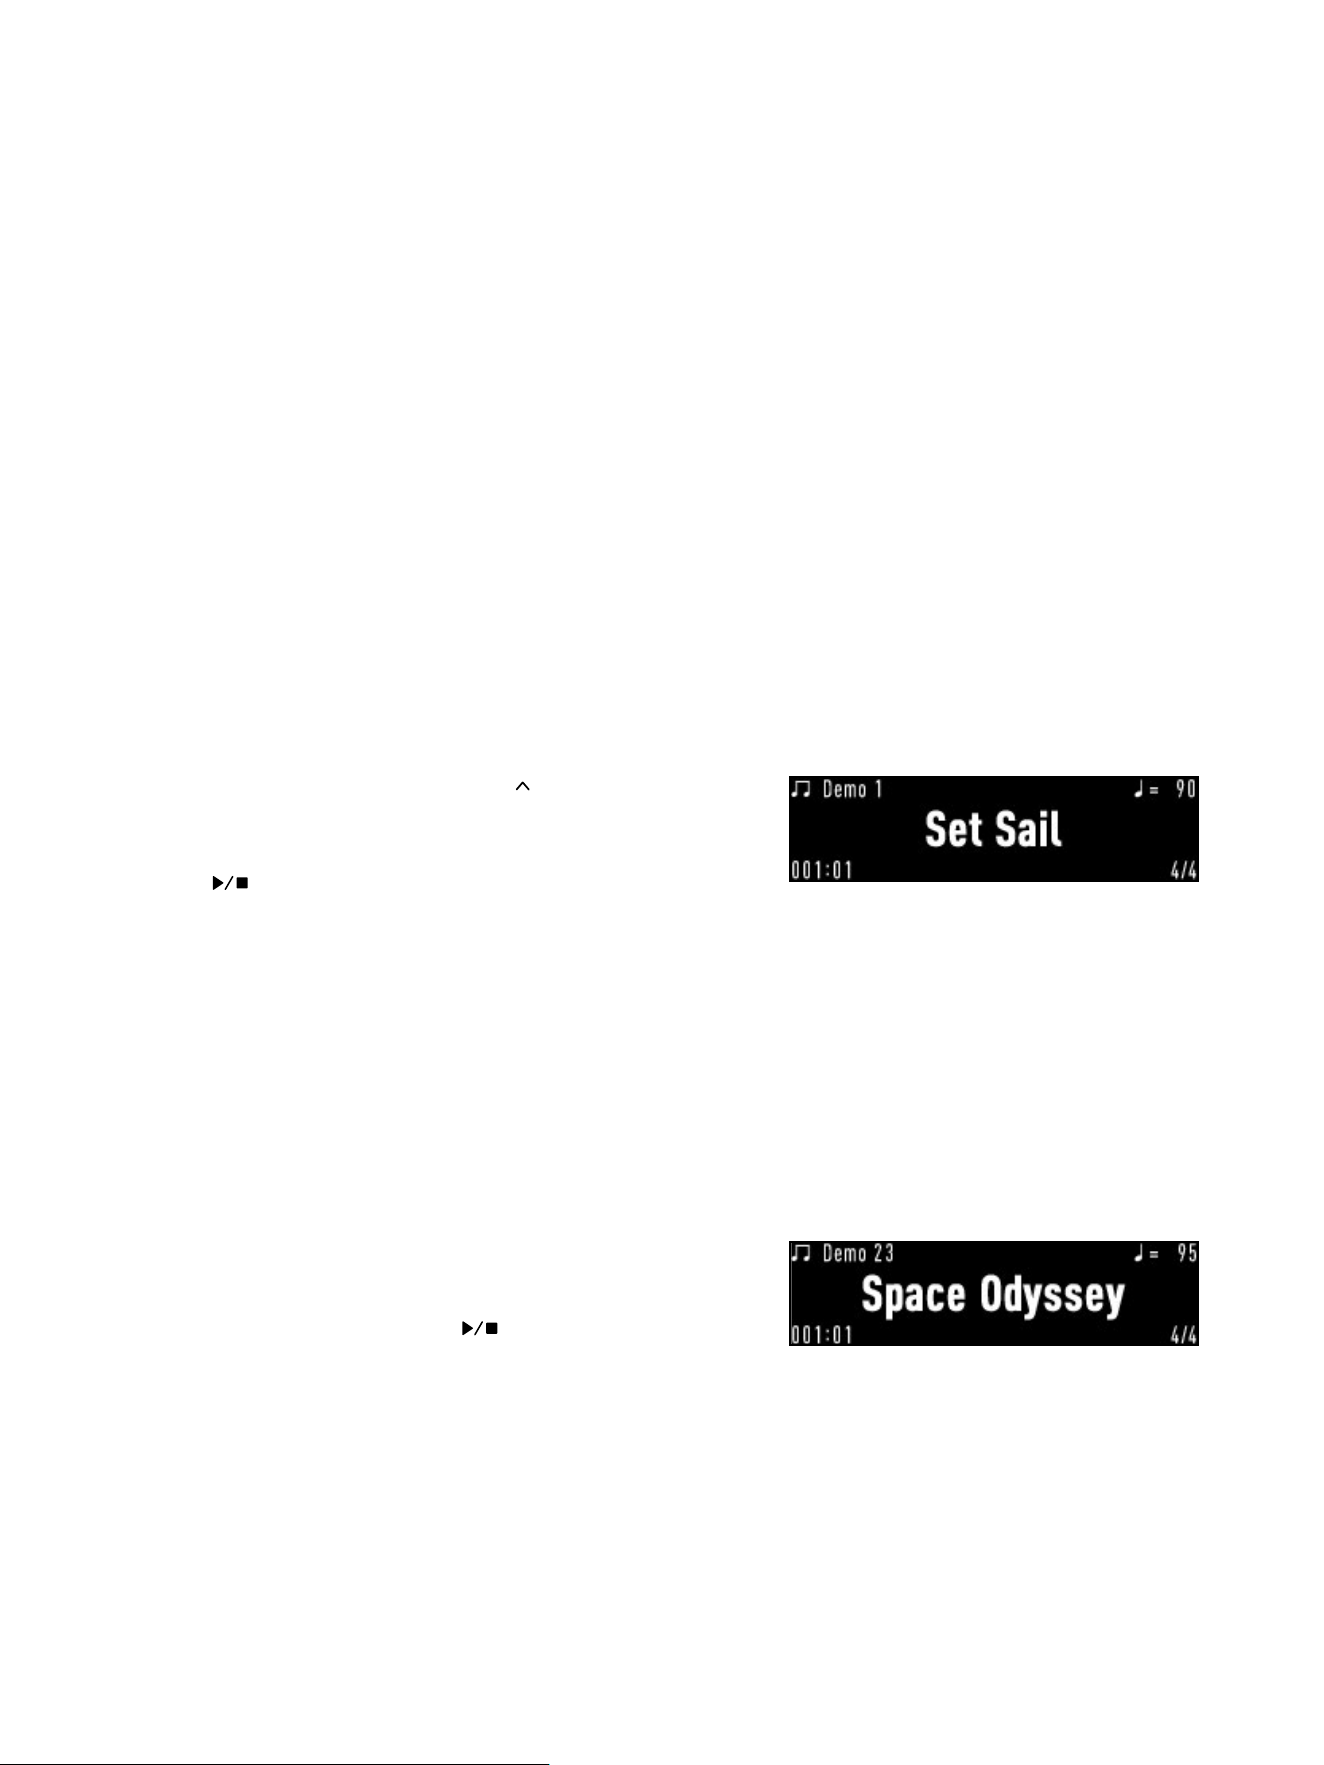
Pedals in Twinova Mode
In Twinova mode, all three pedals function as damper pedals, each
controlling a dierent keyboard area:
▘
The left pedal controls the lower-octave area
▘
The right pedal controls the higher-octave area
▘
The middle pedal controls the full keyboard
Twinova Octave
You have the option to transpose one octave up or down in Twinova
mode. To do so:
1. Press [MENU] to enter the function selection menu,then press
[
] / [ ] to switch to Twinova Octave.
2. Press [ ] / [ ] to transpose one octave down or up. Note that only
one full-octave is allowed for transposing, as in “-1” ~ “+1”.
3. Press [EXIT] to return to Twinova mode where you will see a number
indicating the octave you just set.
This feature is eective ONLY for Twinova mode.
Attention,
Upon switching to Twinova mode, any semitone- transpose value
previously applied in other modes will be reset to 0. If you wish to
transpose semitones in Twinova mode, you can do so via the function
selection menu (page 19), and the transposing value you set will be
carried over to other modes.
Lower-octave area Full keyboard Higher-octave area
22
This instrument comes with a large selection of built-in tracks, mainly
classical piano masterpieces and tutorial lessons suitable for learning and
practicing. For full lists of tracks, please refer to the Appendix section
(page 44). You also have the option to mute the left or the right-hand part
for certain tracks, allowing you to focus on performing or practicing one
hand at a time.
In addition, audio playback in various formats is available by connecting
an external USB drive.
There are three categories of tracks:
▘
Demo (contains 1 group of tracks for grand pianos and other
instrumental sounds)
▘
Classical (contains 1 group of tracks)
▘
Lesson (contains 5 group of tracks)
Demos for Grand Piano Sounds
You can access and listen to demos of the two grand piano sounds to
study their characteristics and nuances.
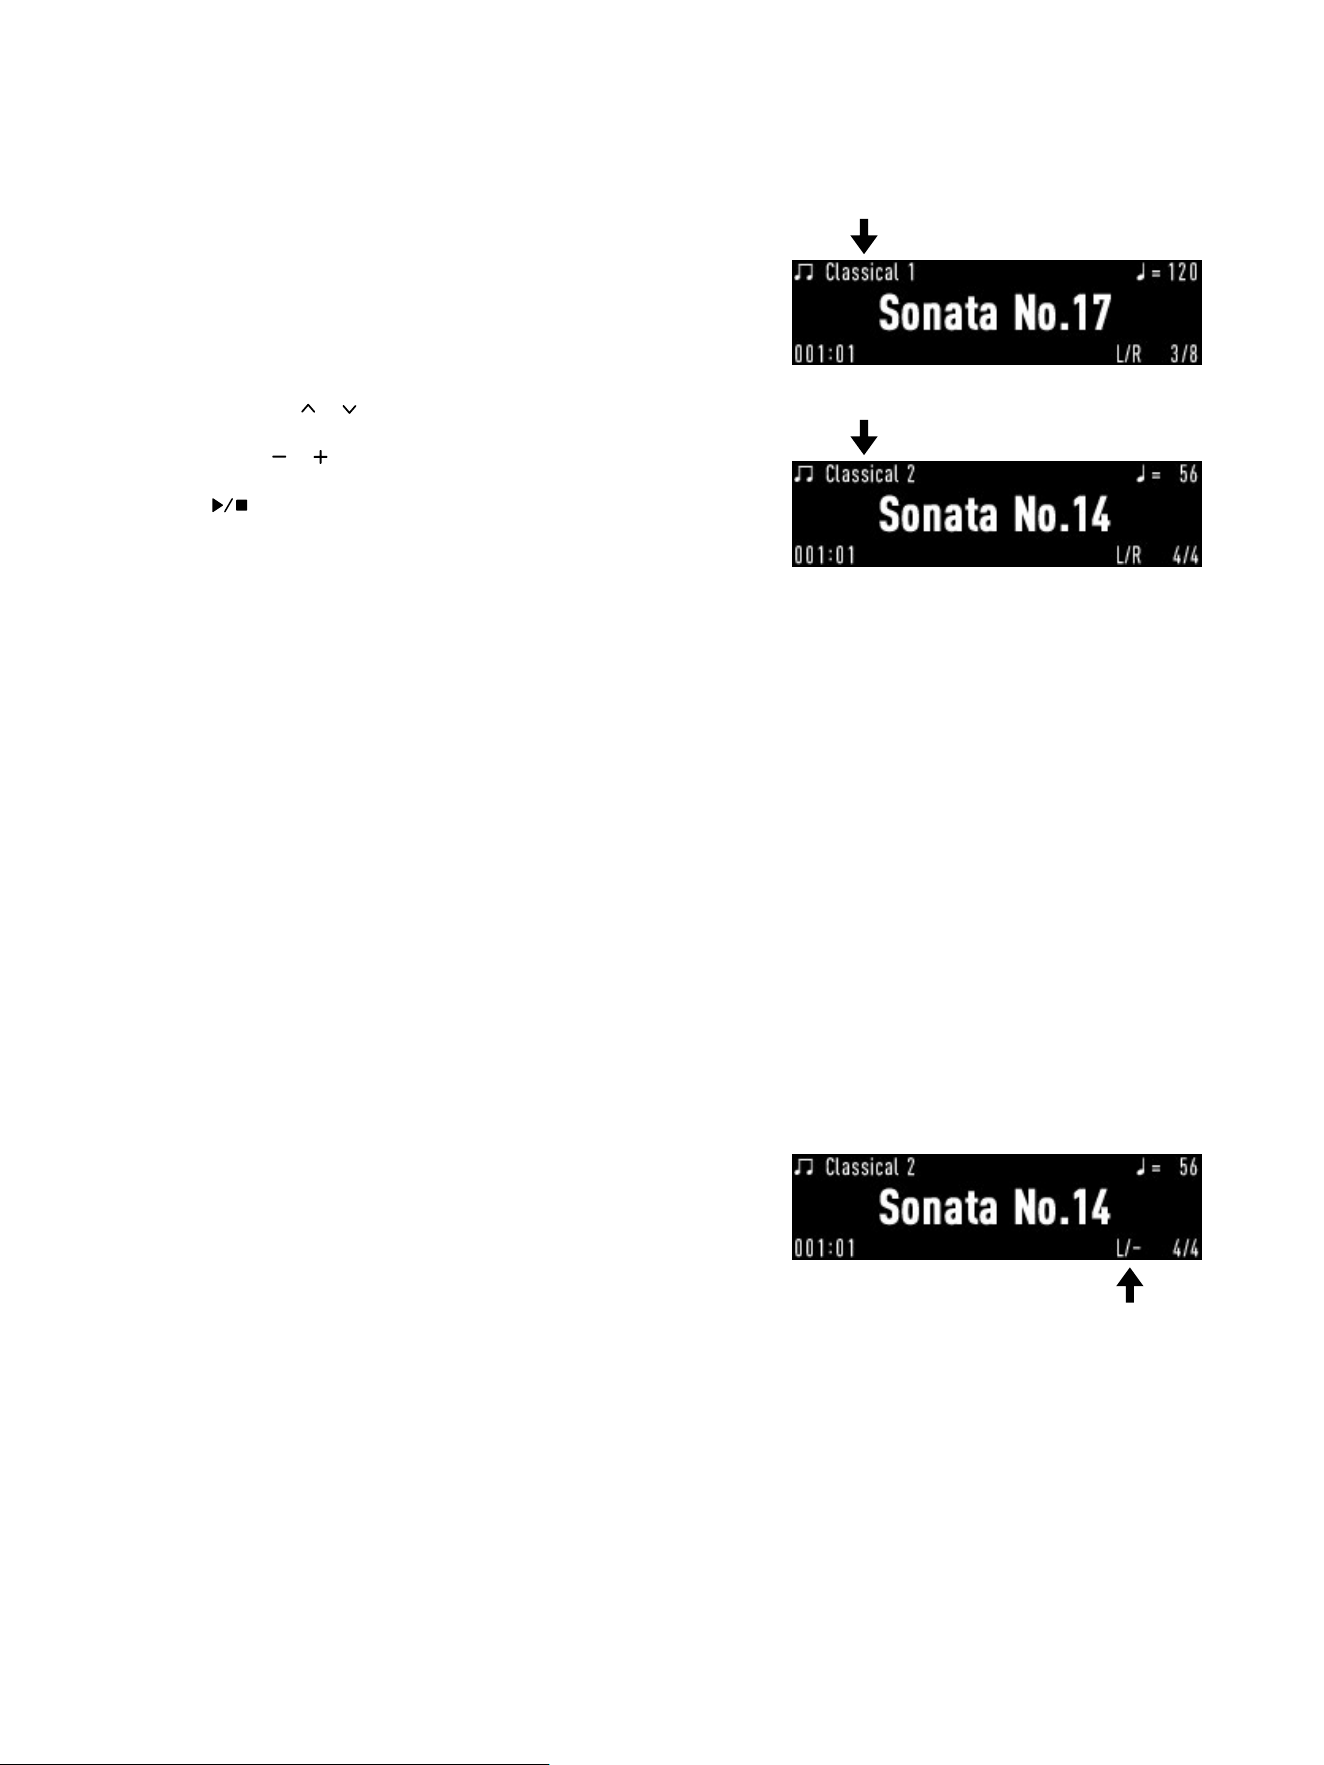
1. Press [SONG] to enter Song mode. Press [ ] to switch to the “Demo”
category.
2. Track 1 and 2 are the demos for grand piano sounds.
Press [ ] to start or pause the demo.
There are dierent loop modes as in what order the tracks will loop.
Please refer to the Miscellaneous Settings section (page 30) if you want
to change the mode.
Demos for Other Instrumental Sounds
All the other instrumental sounds have demos as well. These demos are
accompanied by other instruments rather than solos. You can listen to
them to get a sense of how these sounds play out in dierent styles of
music.
1. Hold down [SONG] and press [SOUND] to display your current
sound’s demo.
2. Once the demo is displayed, press [ ] to start or pause its
playback.
And as mentioned, you can also press [SONG] to enter Song mode and
then switch to the “Demo” category from which you can select a demo
and put it on playback.
Song Mode
23
Classical & Lesson
The classical category oers a wide range of classical piano pieces
by famous composers from various eras. These tracks are great for
appreciating and practicing classical repertoires.
1. Press [SONG] to enter Song mode.
2. Press [SONG] or [ ] / [ ] to switch the category to “Classical”.
3. Press or hold [ ] / [ ] to switch tracks.
4. Press [ ] to play or pause the selected track.
This instrument comes with ve sets of lesson tracks as well. These are
tracks with simpler melodies, moderate tempos and steady rhythms
suitable for beginners. Simply switch to the “Lesson” category to access
them.
In Song mode, the bpm, time signature and the bar & beat number of the
current track are displayed.
You can change the tempo (page 18) during playback.
You can also switch playback loop modes via the Song Setting menu
(page 30).
And note that switching to another category will stop the ongoing
playback.
Playing One Hand at a Time
All built-in piano songs (demos not included) feature left and right-hand
parts.
You can mute the part you wish to practice and keep the other part
audible as accompaniment. For instance, to focus on playing or
practicing the right-hand part:
1. First, select the song you want to practice from the “Classical” or
“Lesson” category.
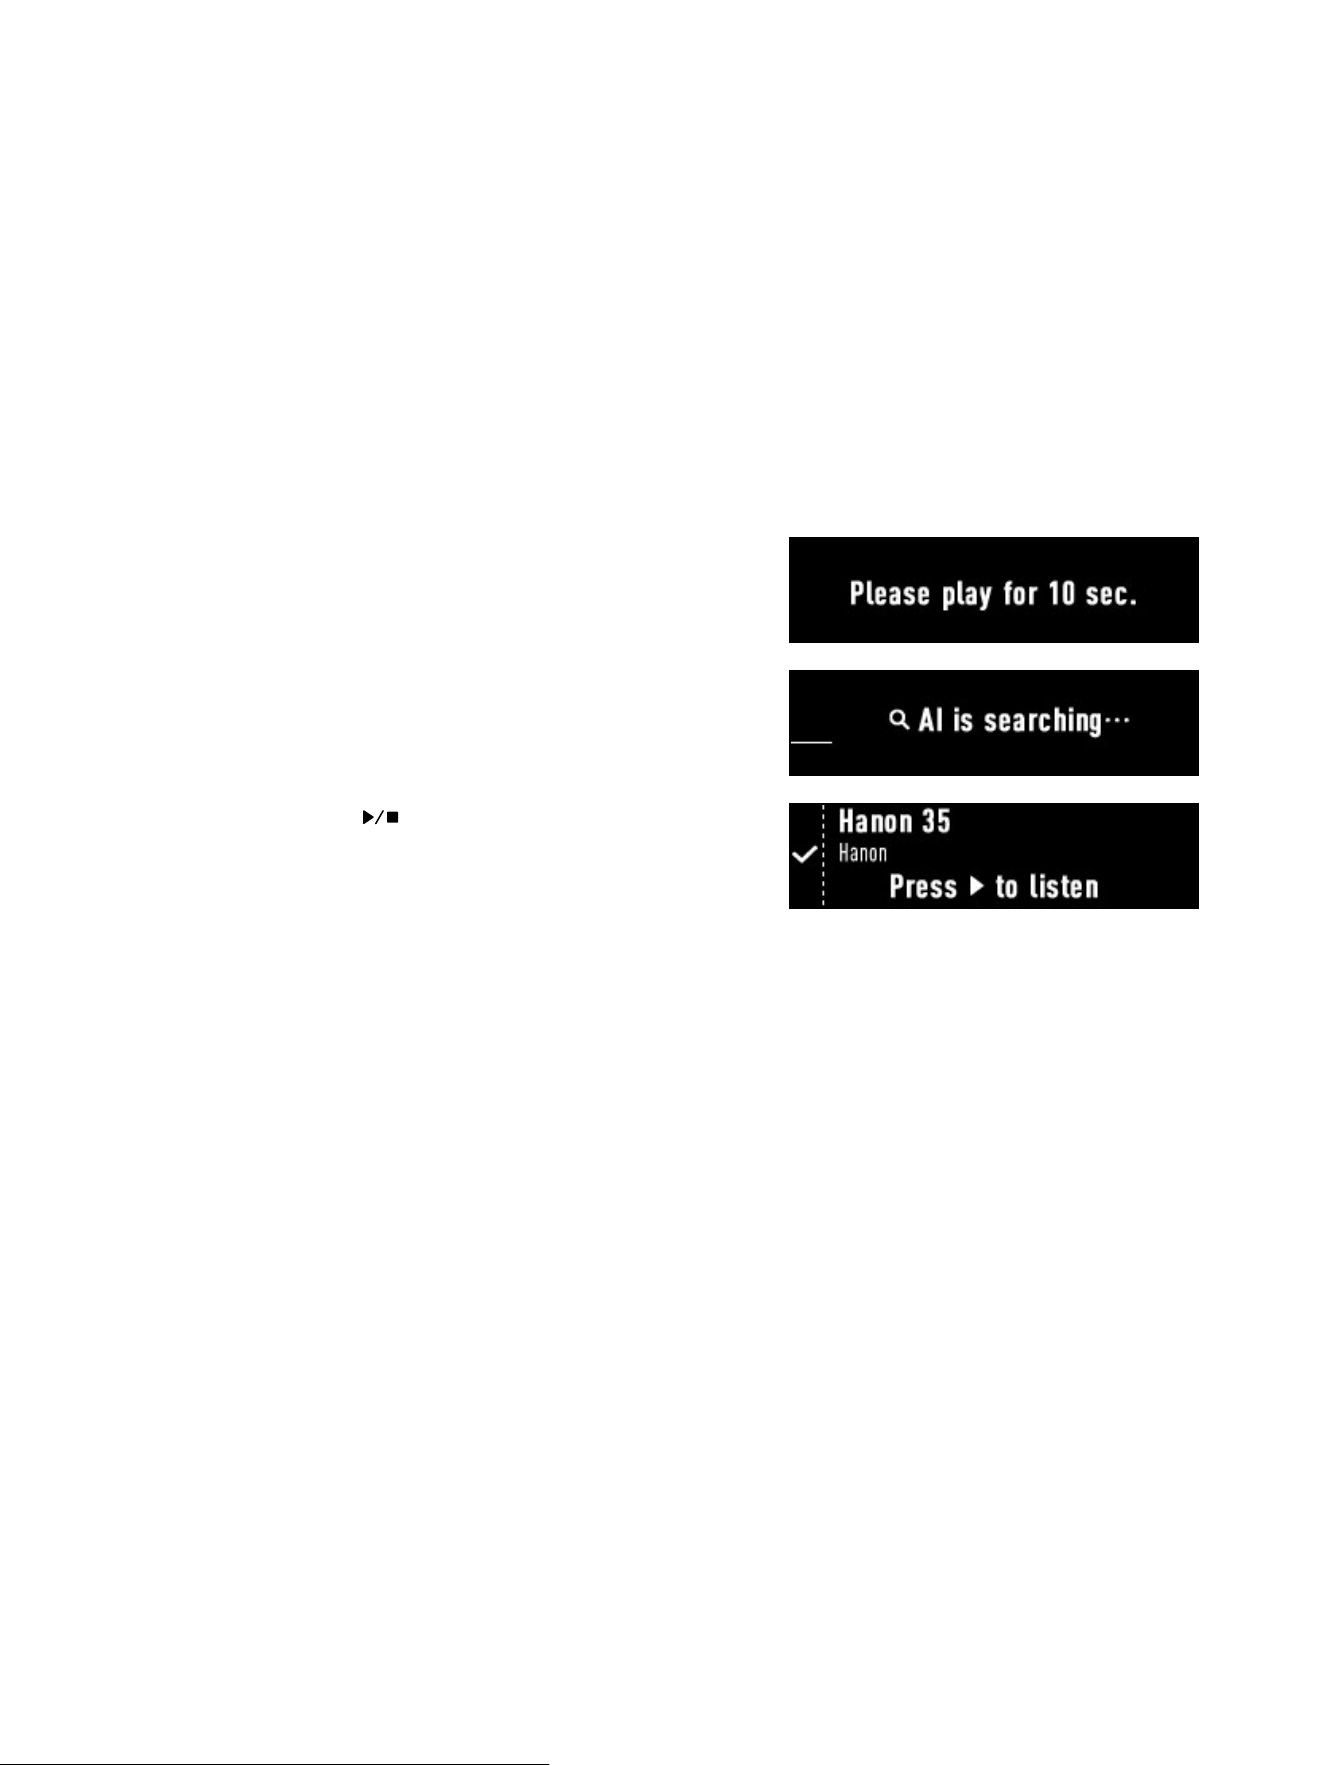
2. Hold down [SONG] and press [PART] repeatedly until “L/-” is displayed
on screen.
This means that the right-hand part is muted and the left-hand part is
audible. Now start the playback and you can practice the right-hand
part.
To switch sides, hold down [SONG] and press [PART] repeatedly to:
▘
Mute right, keep the left-hand part (“L/-”)
▘
Mute left, keep the right-hand part (“-/R”)
▘
Cancel muting and keep both parts (“L/R”)
Note that this operation only applies to tracks from the Classical and
Lesson categories.
Some particularly simpler tracks in the Lesson category may have
additional accompanying parts that can NOT be muted.
This operation can be done during playback.
24
Play to Search Feature
With such a vast library of tracks, you may nd yourself spending a lot
of time ipping through menus for a song you are already familiar with,
which can be time-consuming and inecient. Fortunately, this instrument
oers an innovative play-recognition feature using AI technology.
With this feature, you can play a short melody on the keyboard to locate
and bring up the corresponding piece within 10 seconds, whether you
play the left-hand, right-hand, or both at the same time.
Even if the melody you play is not perfect, the AI will still be able to nd
the most matching piece accurately.
1. Press and hold the [SONG] button until you hear a beep, which means
the feature is now activated. You then have 10 seconds to play a short
melody on the keyboard. You can play the left-hand, right-hand, or
both during which the instrument detects, analyzes, and remembers
your performance.
2. The system will automatically search for the piece you just played from
its library.
3. The search result will be displayed shortly.
If successful, the title and composer of the original piece would pop
up. You can then press [
] to display the piece and play it back.
Note that the AI will not be able to nd a result if you play melodies
that are NOT from the built-in library in which case you will be
prompted that the search has failed.
It is recommended that you play a clip from the beginning of a piece so
that the AI is more likely to come up with an accurate result.
If you come across bits and pieces from classics of which you cannot
remember the titles, it is also recommended that you try playing them on
this instrument: The AI might have just the answer for you.
Attention,
For accurate Play to Search results, ensure only the “R1” sound part is
active. The system will not recognize played melodies with “R2” or “L”
enabled.
“Classical 101” at the end of the Classical category is reserved as the
user track, which by default is empty. The MIDI sessions you have
recorded on this instrument will be saved to this location.
25
Playback via USB Drive
In addition to tracks from the built-in library, you can also play back les
from an external USB drive. The instrument supports FAT32 format USB
drives with a storage capacity up to 128 gigabytes. Formats supported
include:
▘
SMF (Standard MIDI Format)
▘
WAV, MP3, M4A
Follow these steps:
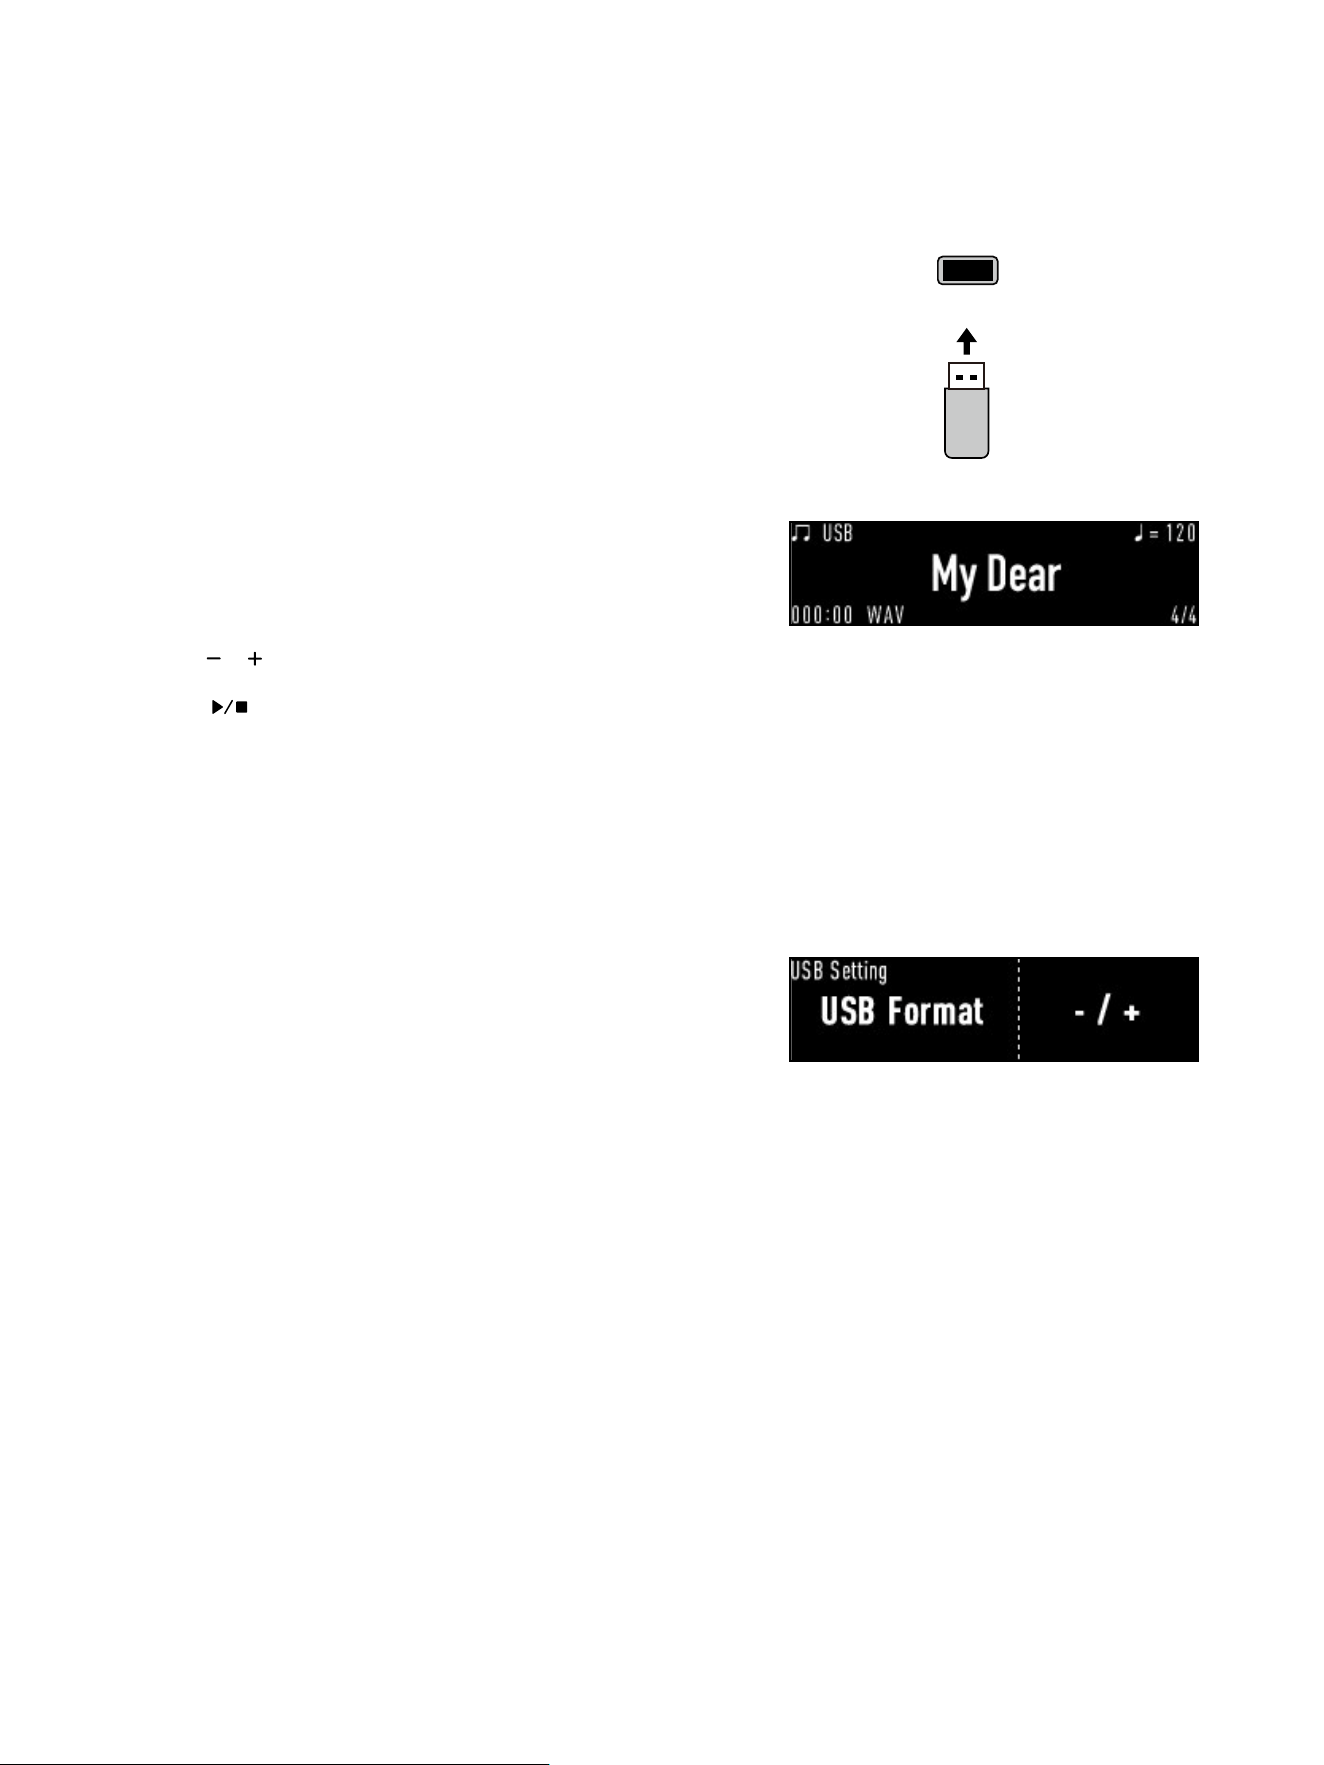
1. Insert a compatible USB drive into the [USB TO DEVICE] jack (page 6)
on the I/O interface.
2. Press [USB] to enter/display the USB directory menu.
The screen will show information of the rst playable MIDI or audio le
on the drive.
3. Press [
] / [ ] to switch between les.
4. Press [ ] to play/pause the selected le.
While playing back les from external drives, you can still play the
keyboard and access general functions such as switching sounds. If you
want to adjust the volume of the playback to match your performance,
hold down [MENU] and press [SONG] to access the “Song Setting”
menu (page 30).
If the system fails to detect any playable formats on the inserted drive, it
will prompt you on screen.
If your USB ash drive does not function properly, it may be because its
le system format of the drive itself is not supported. In this case, you
can hold down [MENU] and press [USB] to access the USB formatting
feature (page 31) and press [+] to format the drive to the supported
FAT32 format. Please note that this process may take some time to
complete, and you will be prompted when it is nished.
Attention,
Formatting the drive will wipe all les and contents completely, so please
be sure to check beforehand if there is any content worth keeping to
avoid loss of useful data.
TO DEVICE
26
This section will show you how to record performances for you to
playback or share.
The instrument supports MIDI les (SMF) and audio les (WAV, MP3) for
recording. If you do not have an external USB drive connected, you can
only record MIDI sessions and save them to the user track slot (“Classical
101”). If you are connected to an external USB drive, your recorded MIDI
les will be saved to the drive, which you can later export to host devices
such as a computer for further editing or other creative purposes.
To record audio les, you must connect an external USB drive.
The device supports high-quality recording in stereo WAV format
(44.1kHz/16-bit) and MP3 format (320Kbps), with up to 90 minutes of
recording time per session if sucient storage space is available on the
USB drive.
Recording keyboard performances is not the only option. You can also
record external audio from the [AUX IN] jack, [USB TO HOST] jack (page
6), or even Bluetooth (page 38).
Recording MIDI Sessions to This Instrument
“Classical 101” is reserved as the user track. If you need to record MIDI
les directly to this instrument, make sure that NOTHING, including USB
converters, is connected to the [USB TO DEVICE] jack, as the recorded
le will go straight to this port if connected.
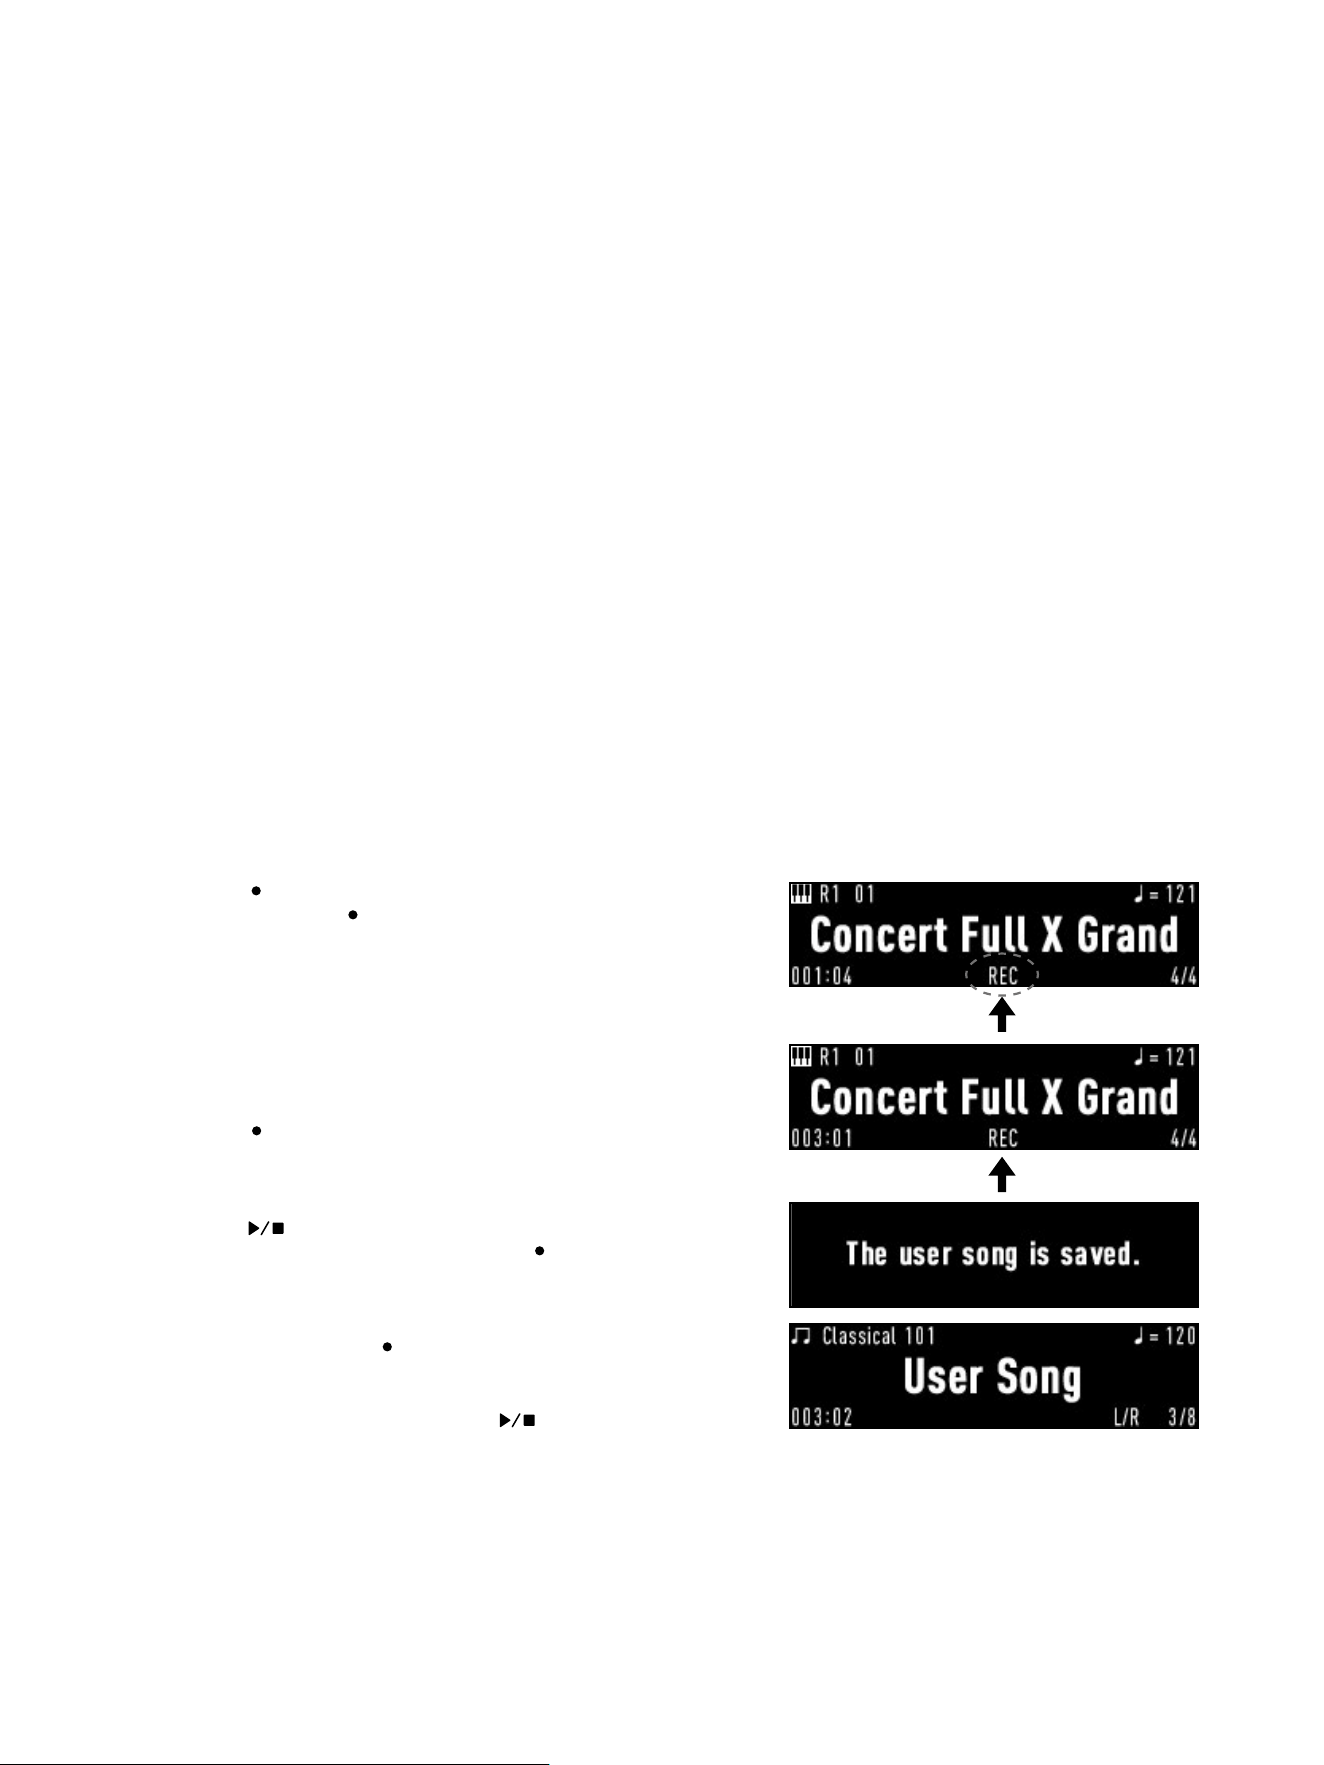
1. Press [REC ] to enter the recording preparation state.
This is where the [REC ] button starts to blink and a “REC” sign (also
blinking) is displayed. The metronome automatically starts clicking at
this point as well. If you do not need the clicks, press the [METRO.]
button to turn it o. Note that you can turn it back on any time, and
the clicking sounds will NOT be recorded in any circumstances.
In the recording preparation state, you can perform various
preparations such as switching sounds, conguring part combinations,
adjusting tempo, etc.
Press [REC ] once more to quit the recording preparation state.
2. After you have done all necessary preparations, the system would
automatically start recording as you start playing the keyboard, or you
can press [ ] to start recording manually.
You will notice right away that both the [REC ] button and the “REC”
sign stop blinking and remain lit instead, indicating that the recording is
now in progress.
3. When nished, press [REC ] to immediately stop recording and save
the session as the user track (“Classical 101”).
The screen would automatically display the saved session upon
nishing, so you can immediately press [ ] to put it on playback
and have a listen.
Recording Performances
27
You can record MIDI sessions in Piano mode, Twinova mode and Sound
mode whenever you want by following the above procedures.
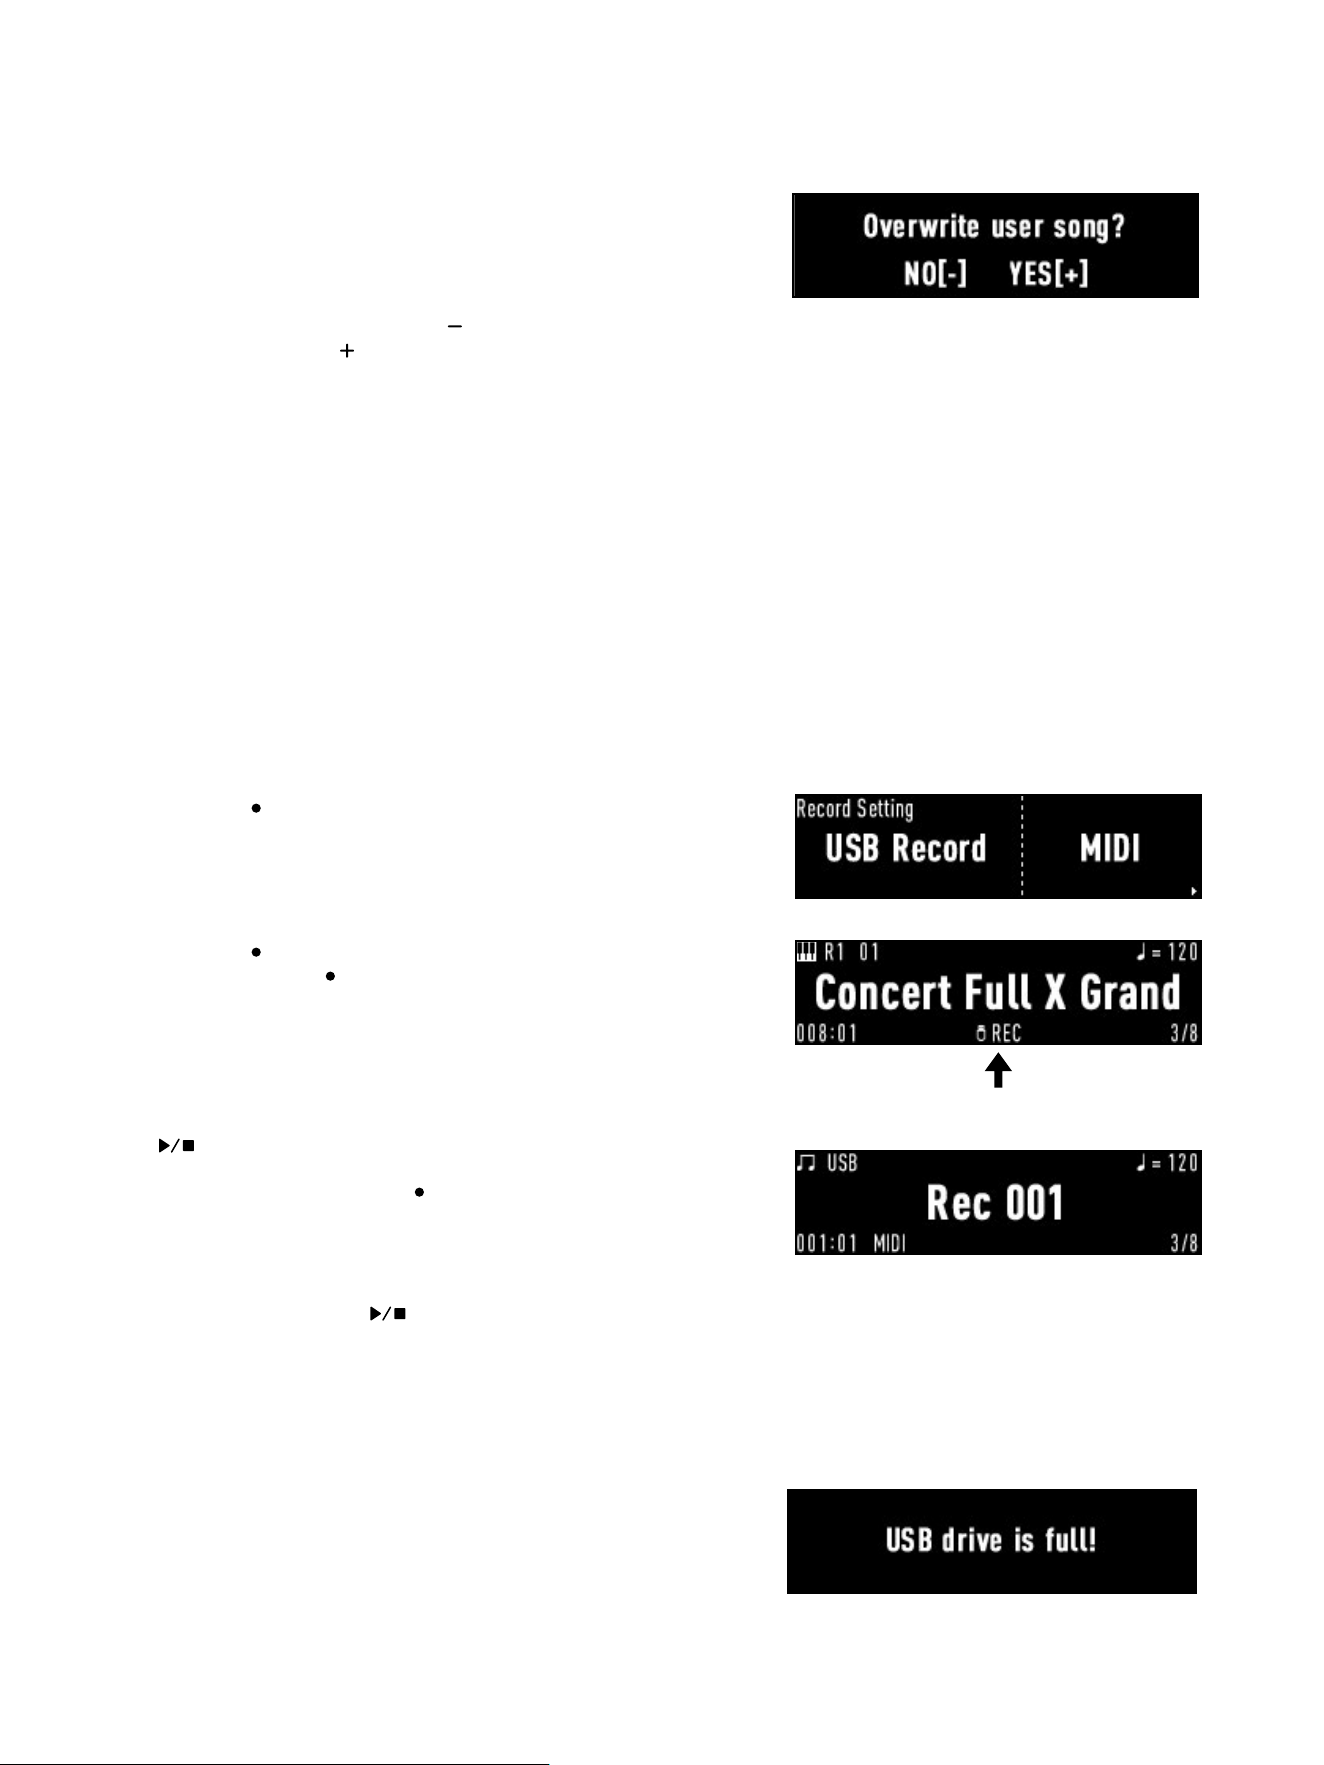
If there is a previously recorded session stored in “Classical 101”, you
will be asked if you want to overwrite it when you try to record a new
session. To abort the process, press [
] . To continue to the recording
preparation state, press [
] . Your new session will overwrite the previous
one should you choose to proceed.
If you do not wish to overwrite your saved session, you can connect a
USB Drive to record directly to the external storage.
Due to limited built-in storage space, the recording process will terminate
once the le size exceeds a certain point.
Recording MIDI Sessions to an External USB
Drive
When connected to a USB drive, your sessions will be saved to it by
default. To get started, connect the USB drive to the [USB TO DEVICE]
jack (page 6) on the I/O interface and make sure it works properly.
1. Press [REC ] while holding [MENU] to access the “Record Setting”
menu.
2. Press [-] / [+] to set the recording format to MIDI and press [EXIT] to
quit.
3. Press [REC ] to enter the recording preparation state.
You can press [REC ] again to quit this preparation state.
Note: Since your recording will go straight to the USB drive later, a
USB icon is prompted next to the “ REC ” sign. If the icon is NOT
displayed, it means that the system has NOT detected the USB drive
and will save your session to “Classical 101”.
4. When you are done with all preparations, play the keyboard or press
[ ] to start recording.
5. When nished, press the [REC ] button to stop recording immediately.
This will save the session you just played directly onto the USB drive.
All recorded sessions will be saved in the root directory of your drive. The
screen would automatically display the recorded track upon nishing, so
you can immediately press [ ] to have a listen.
If a USB drive is connected, newly recorded MIDI les will NOT overwrite
the previous ones. Instead, they will be saved as new les on the drive
with incrementally numbered lenames.
Note that if the connected USB drive runs out of space during a
recording session, the system will prompt you and proceed to terminate
and save the current session. We recommend reserving enough space
on the drive before starting long recording sessions.
28
Playback for MIDI les from the drive however, is possible: You can
record audio sessions of yourself performing the keyboard accompanied
by MIDI playbacks.
If you need to record rather long audio sessions, we recommend
reserving enough space on the drive before you start.
Also, when you are using the 2-way USB audio transfer function (see
below) to play back audio from an external PC or smart device, you can
record it as audio les to your connected USB drive as well.
If your MIDI session is recorded in Piano mode, you might notice a loss of
certain piano eects. This is because certain eect simulations can only
be achieved through the instrument’s hardware technology and are not
meant to be compiled to MIDI signals. To obtain the best recording result
in Piano mode, we recommend you record as audio.
Recording Audio Sessions
If you wish to record keyboard performance as audio les such as WAV/
MP3, you can only do so by connecting a USB drive to the [USB TO
DEVICE] jack (page 6). Note that you can also record your performance
along with inputs from the [AUX IN] jack, [USB TO HOST] jack (page 6) or
even Bluetooth (page 38).
Before you start, connect a USB drive to the [USB TO DEVICE] jack
(page 6) and make sure it works properly.
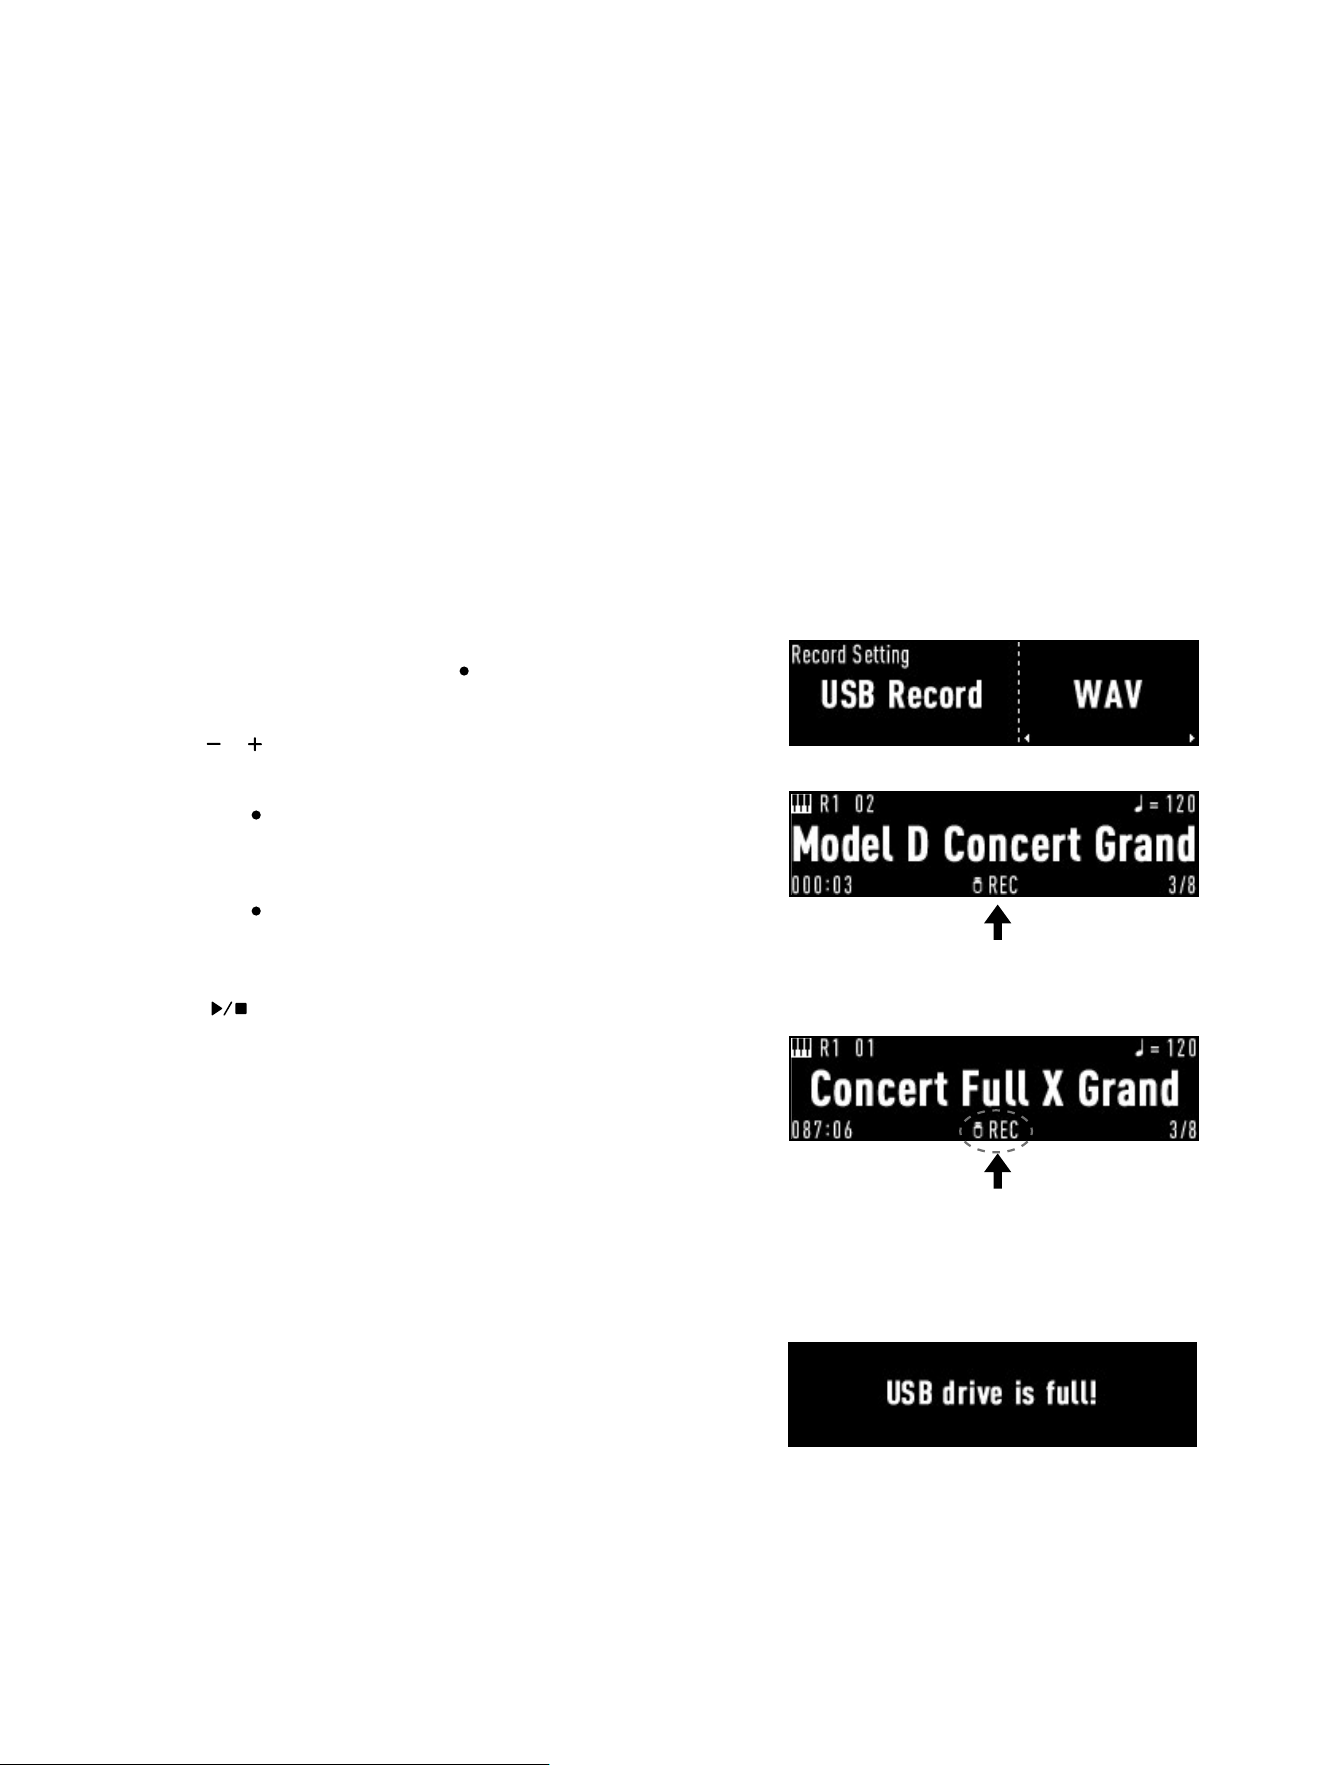
1. Hold down [MENU] and press [REC ] to enter the “Record Setting”
menu.
2. Press [ ] / [ ] to set the format to WAV or MP3. Press [EXIT] to quit
the menu.
3. Press [REC ] to start recording immediately.
All sounds made by this instrument (excluding the metronome clicks)
will be captured as audio.
4. Press [REC ] when nished to stop recording and save the session to
the connected USB drive.
All recorded sessions are saved in the root directory of your drive. The
screen would automatically display the recorded audio le, so you can
press [ ] to play it back instantly.
The instrument supports a maximum of 90 minutes per session, provided
that the connected USB drive has sucient storage space. When the
recording reaches 3 minutes remaining, the “REC” sign will blink rapidly
until the maximum limit is reached. The system will then automatically
terminate the recording and save it to the USB drive.
During audio recording, playback of audio les from the connected drive
is not possible.
29
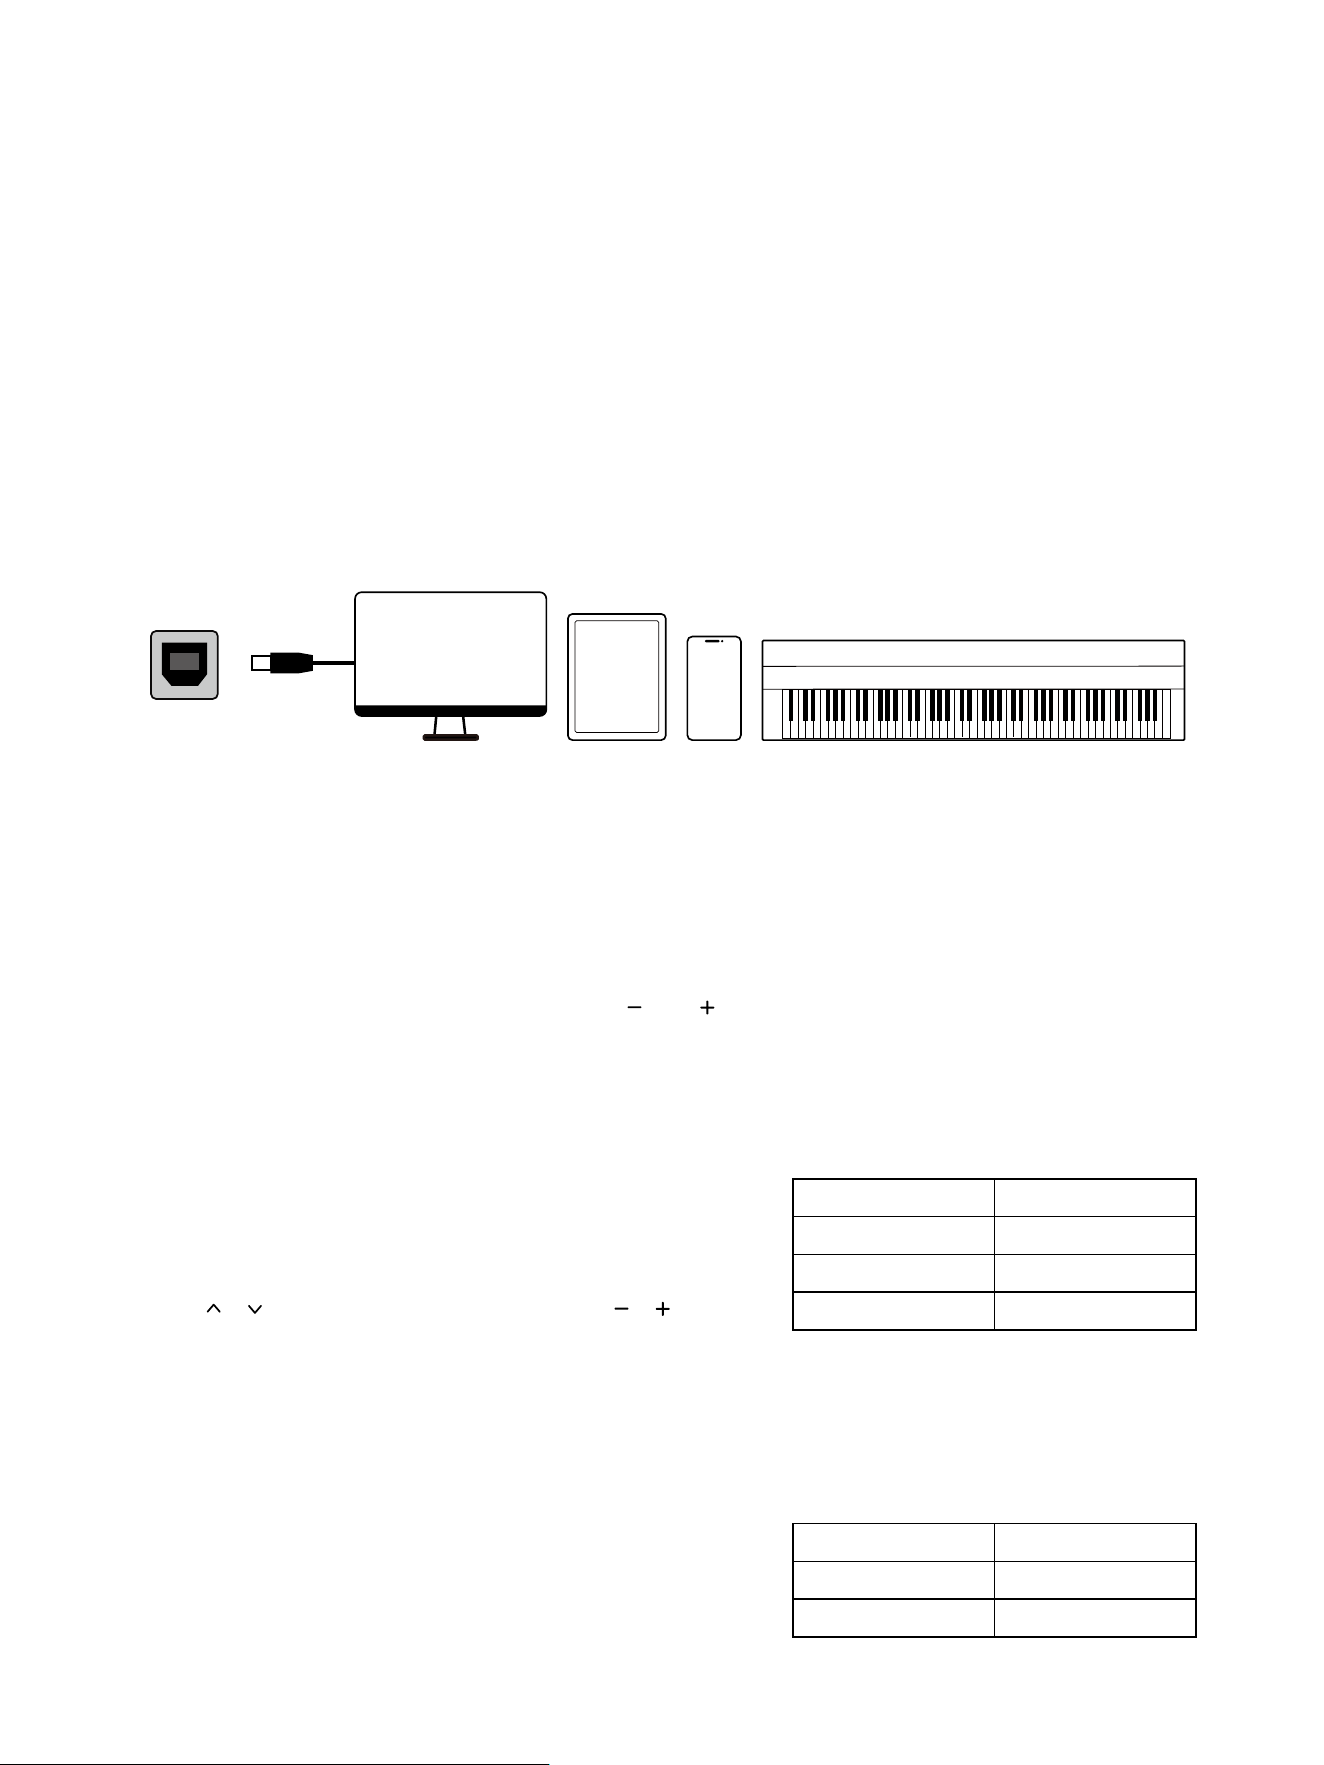
TO HOST
Other Solutions for Recording Audio/Videos
This instrument supports 2-way USB audio transfer.
It can function as a playback device when connected to a computer,
smartphone, or other external device via the [USB TO HOST] jack (page
6). This means that audio from external devices can be played through
the instrument’s speakers.
Additionally, you can use the external device to directly record
performances without additional audio interface.
If your external device, such as a smart phone, supports video and audio
recording, you can achieve instant video and audio recording using a
specied app.
You can access settings for certain functions by pressing specic buttons
while holding down [MENU].
To reset a function’s option or parameter to default, press [
] and [ ]
simultaneously.
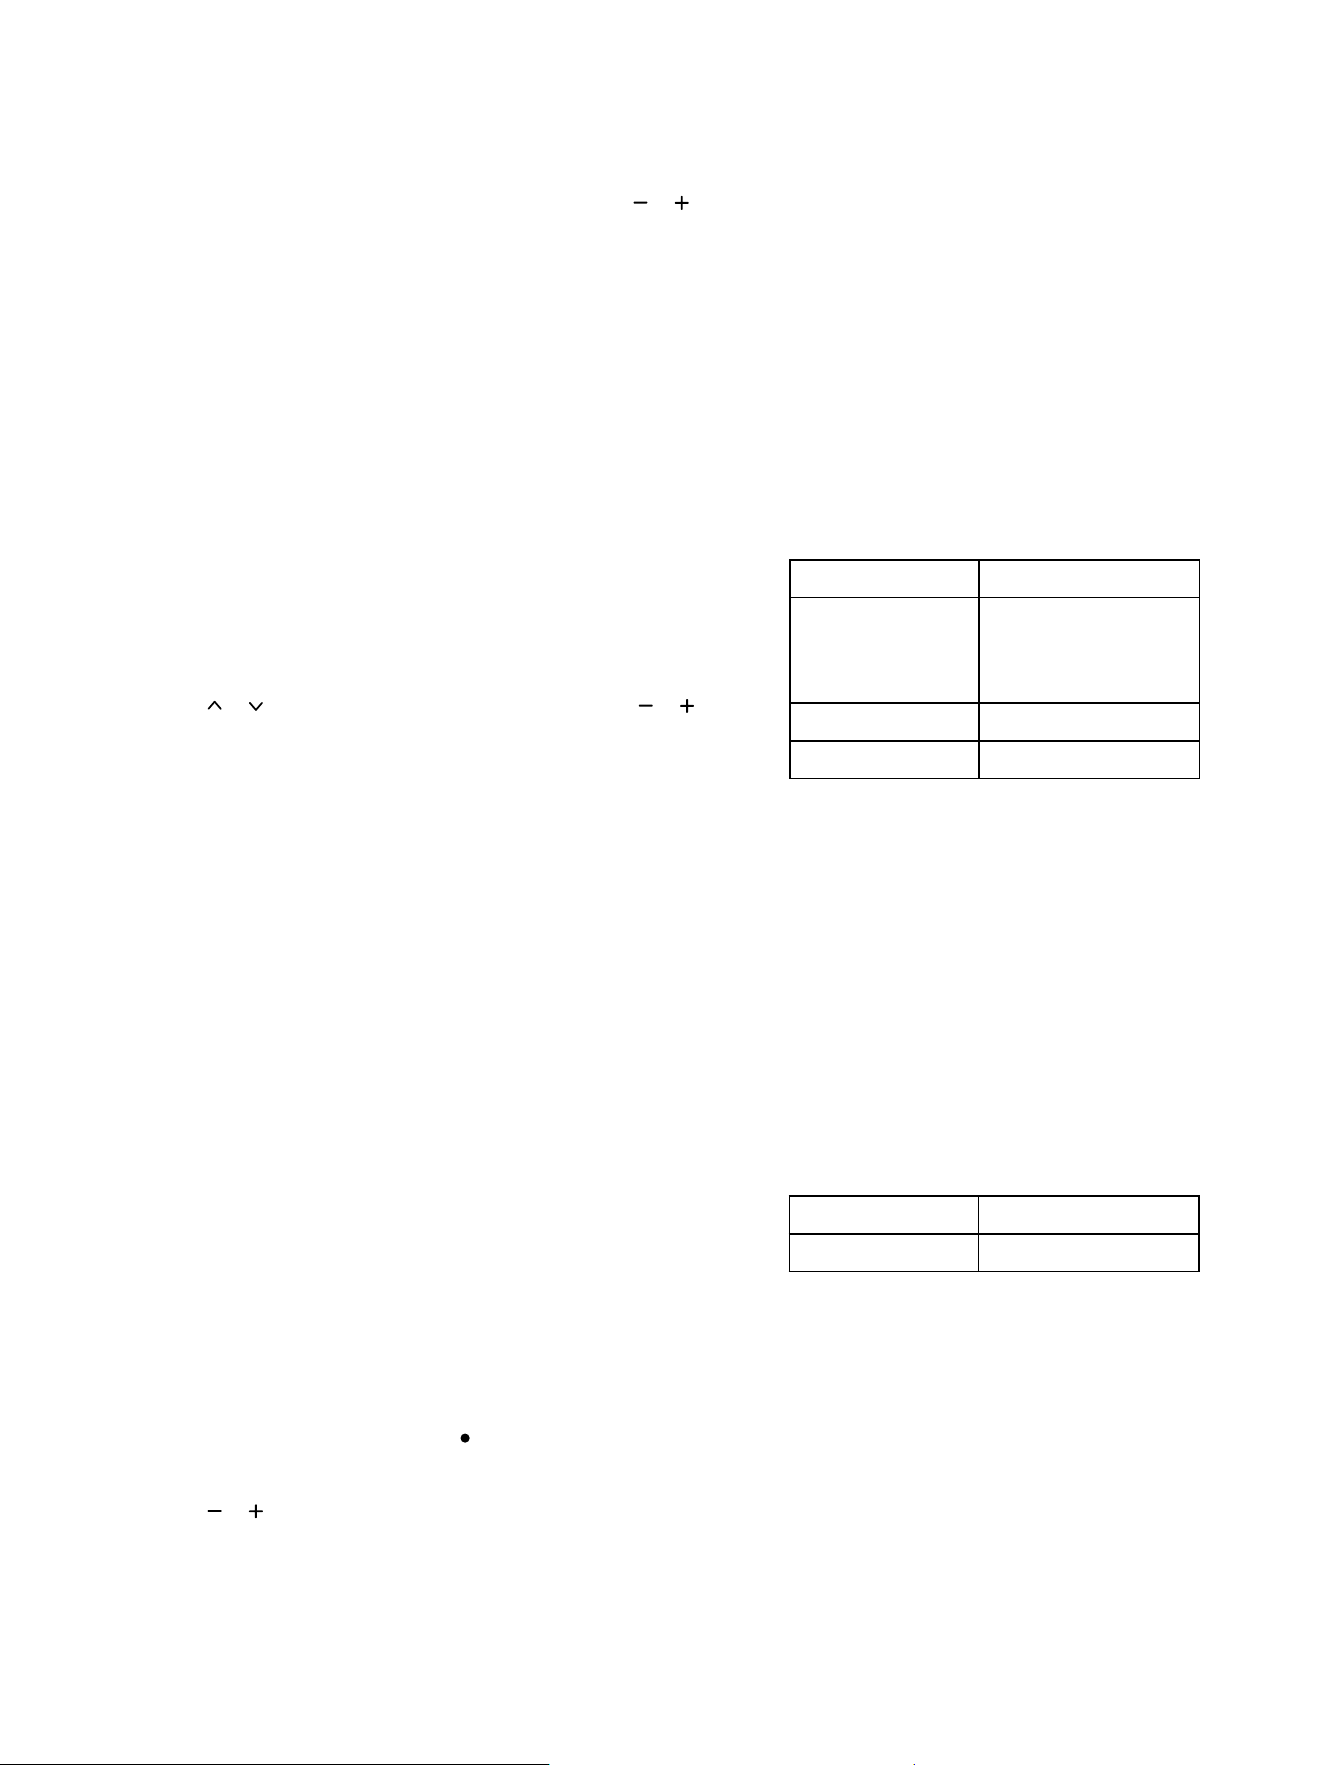
Part Settings—Part Volume
The instrument has a maximum of three sound parts (“R1”, “R2”, and
“L”) and you can adjust the volume for each separately.
1. Hold down [MENU] and press [PART] to enter the Part Setting menu.
2. Press [ ] / [ ] to switch to the desired part and press [ ] / [ ] to
adjust its volume.
3. Press [EXIT] to exit the menu when nished.
Song Settings—Volume and Loop Mode
You can access the “Song Setting” menu to adjust playback volume or
change the loop mode.
1. Hold down [MENU] and press [SONG] to access the Song Setting
menu.
Setting Parameter
R1 Volume 0~127
R2 Volume 0~127
L Volume 0~127
Miscellaneous Settings
Setting Option/Parameter
Volume 0~127
Loop Mode Single / All
30
Metronome Settings
In this menu, you can select dierent time signatures, turn on/o the
accent bell, and adjust the metronome’s volume.
1. Hold down [MENU] and press [METRO.] to enter the Metronome
setting menu.
2. Press [ ] / [ ] to switch to the desired setting and press [ ] / [ ] to
select time signatures, turn the accent bell on or o, or adjust the
metronome’s volume.
3. Press [EXIT] to quit when nished.
For time signatures, the numerator represents the number of notes per
bar, and the denominator represents the length of each note. Once set,
turn on the metronome and you will hear it clicking in the selected time
signature.
Please note that the time signature is subject to change as the system
applies corresponding time signatures to dierent built-in songs. Also,
when the time signature shifts within a song, the metronome will
correspond accordingly.
Recording Format Settings
The recording format settings depend on whether you are recording
directly to the instrument or to an external USB drive.
If you are recording directly to the instrument, the only available format
is MIDI. However, if you have an external USB drive connected, you can
record both MIDI and audio formats, and all sessions will be saved to
your drive.
To select the desired recording format:
1. Hold down [MENU] and press [REC ] to enter the “Record Setting”
menu.
2. Press [ ] / [ ] to select the format you need.
3. Press [EXIT] to quit when nished.
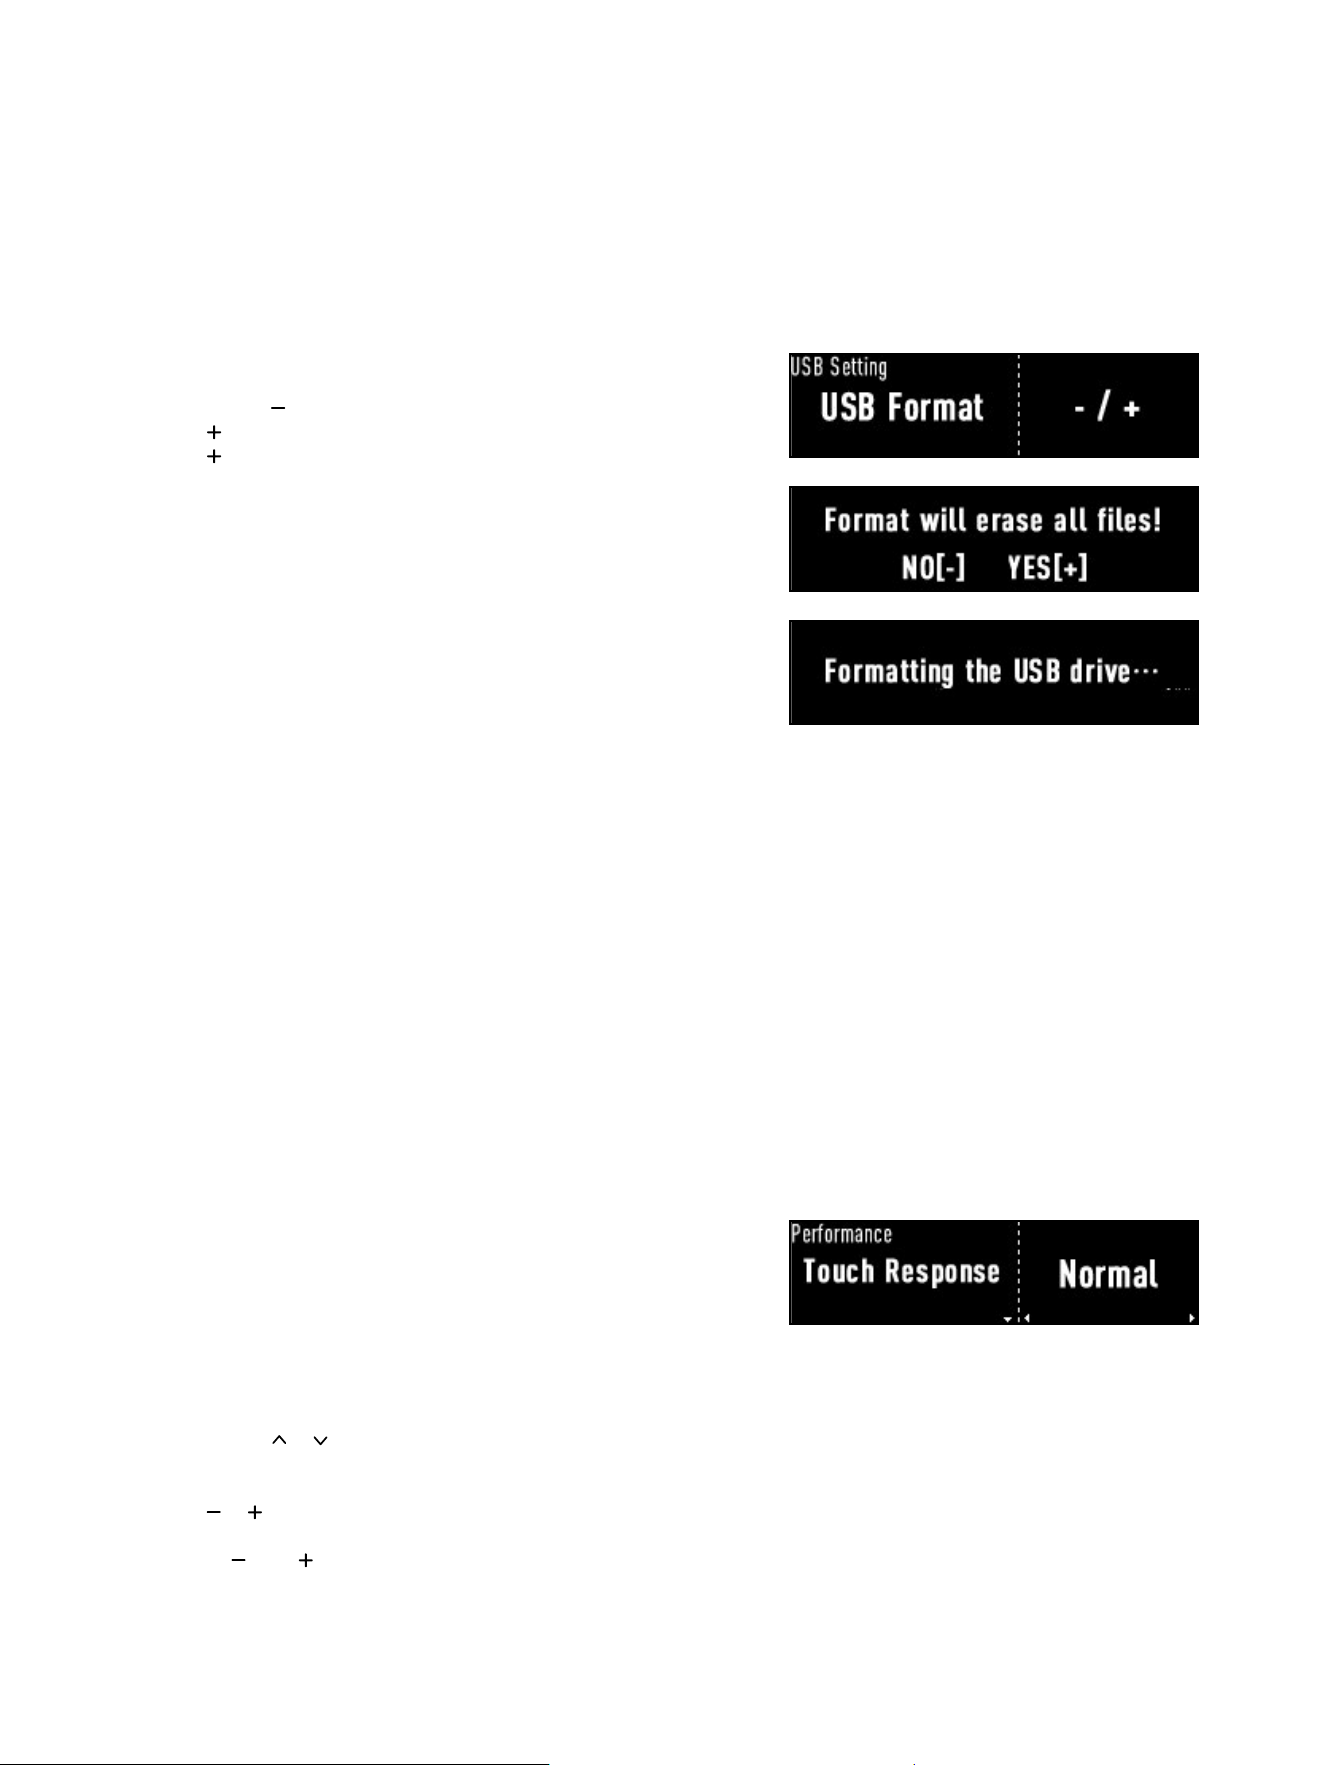
Setting Option
USB Record MP3 / WAV / MIDI
Setting Option/Parameter
Signature
2/2,2/4,3/4,4/4
5/4,6/4,7/4,8/4
9/4,3/8,6/8,9/8
12/8,12/16
Bell ON / OFF
Volume 0~127
2. Press [∧] / [∨] to select the desired setting, then press [
] / [ ] to
adjust playback volume or change the loop mode.
3. Press [EXIT] to quit when nished.
To loop the current track, choose “Single”. To loop all tracks in the
current category, choose “All”.
The volume setting also aects playbacks from Bluetooth and Aux-In.
31
USB Format
The instrument supports USB drives in FAT32 format with up to 128G
storage space. If your connected drive is not working properly, check if it
is compatible or try formatting it in the “USB setting” menu.
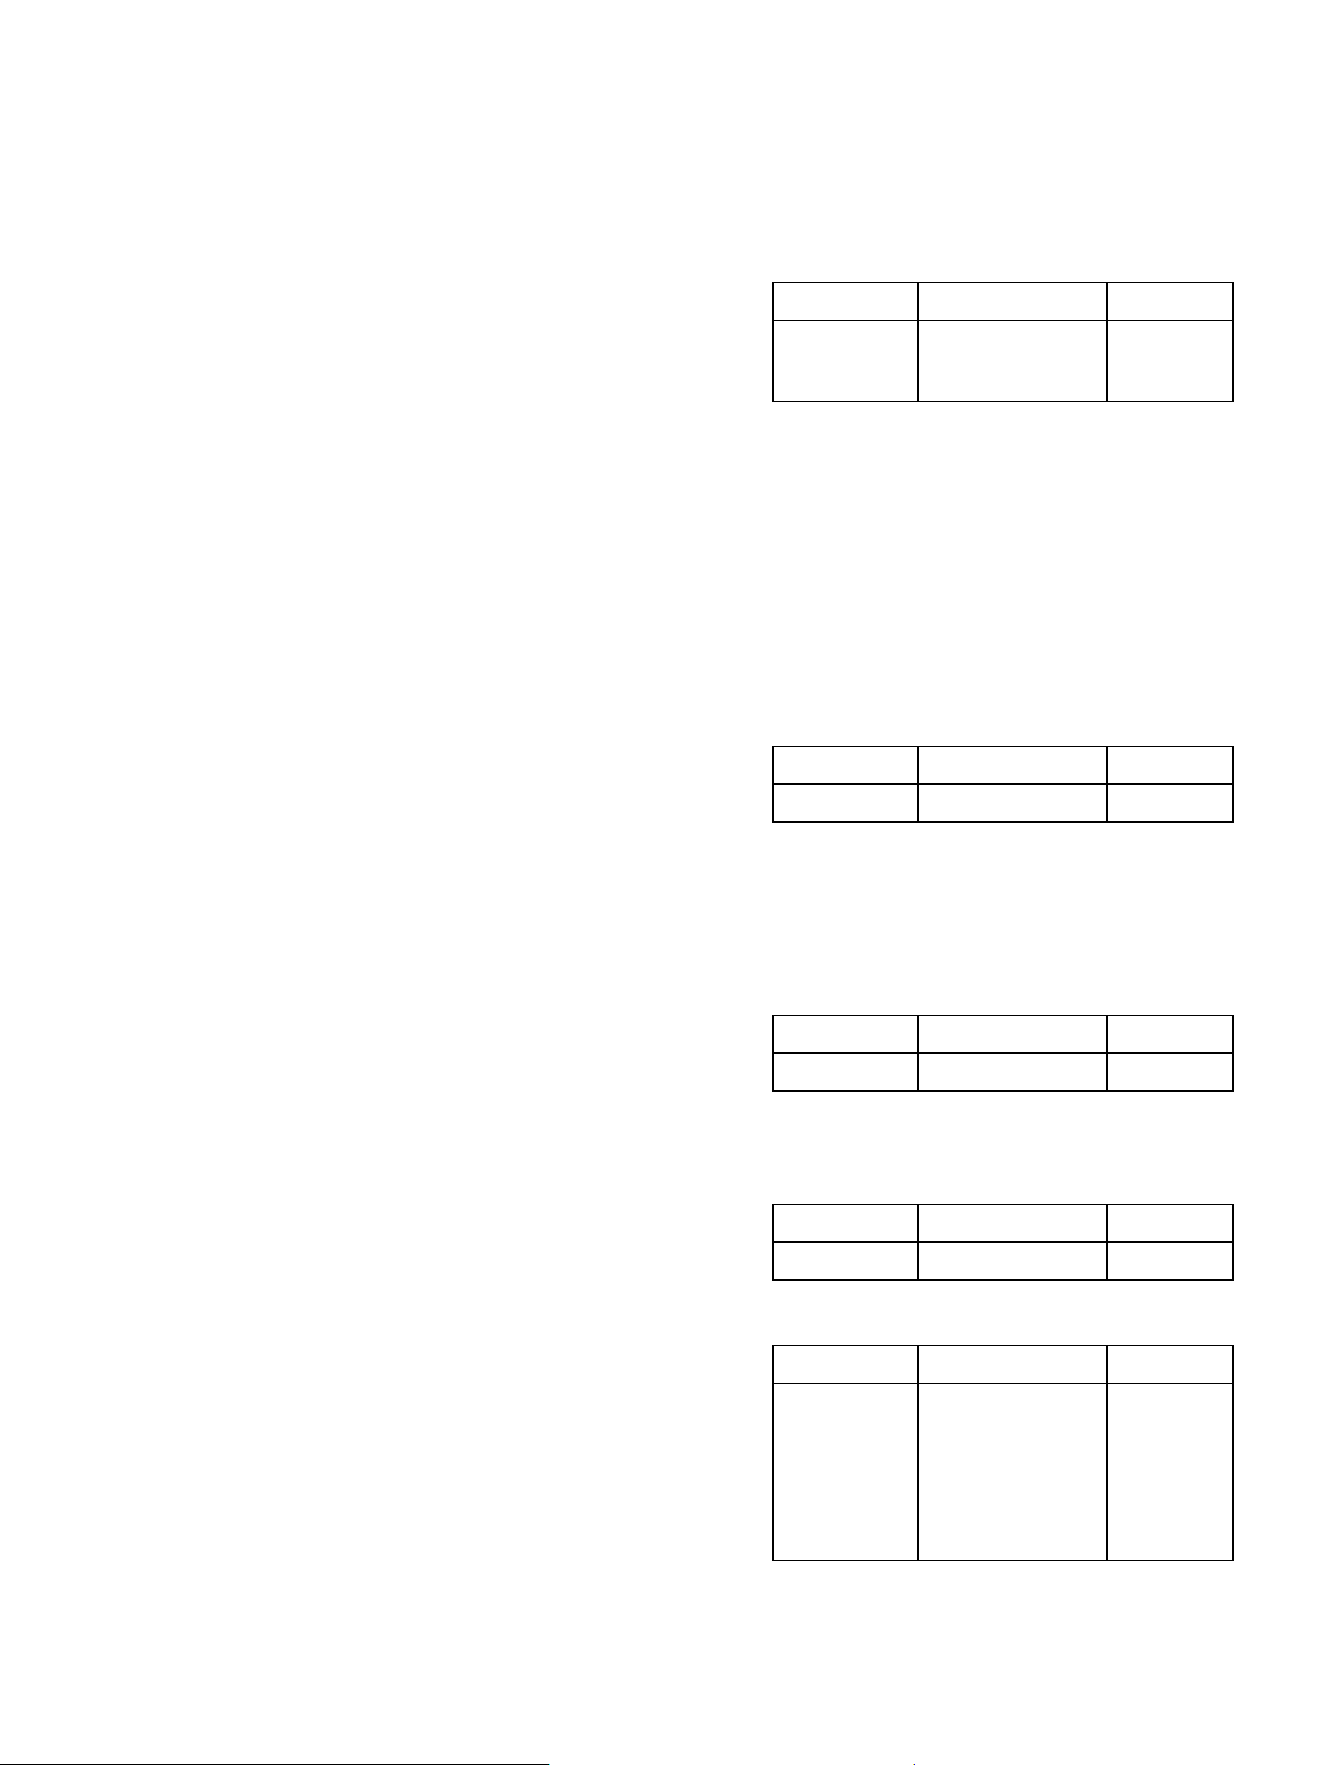
1. Hold down [MENU] and press [USB] to enter the “USB Setting” menu.
2. Note that the [
] button is unresponsive in this menu.
Press [ ] to proceed and the system will show a warning message.
Press [ ] again to begin formatting the drive.
3. Please be patient as Initialization usually takes some
time. The screen will show that the drive is being formatted. Wait until
the process is complete and the screen displays a message that the
drive has been formatted successfully. If the procedure failed, it is
possible that your drive was corrupted in the rst place.
After successful formatting, the drive’s directory menu will be displayed,
which will be empty since the formatting has just wiped everything.
Attention,
Please be sure to check if there is any content worth keeping on the drive
to avoid loss of useful data before the operation.
DO NOT disconnect the USB while formatting is in progress as this may
damage the drive!
Function Menus
You can set options and adjust the parameters of various functions
in detail by accessing their corresponding sub-menus in the function
selection menu.
There are 6 categories of functions: “Performance”, “Global Eect”,
“Display”, “Power”, “MIDI I/O” and “System”. To access:
1. Press [MENU] to enter/display the function selection menu.
2. Then press [MENU] repeatedly to cycle through the six function
categories.
When you rst enter the function selection menu after turning on the
instrument, the rst function of the “Performance” category will be
displayed. To quickly switch to the rst function of the next category,
which is the “Global Eect” category, press the [MENU] button again.
3. Press or hold [ ] / [ ] to switch through functions within each
category.
4. Press [ ] / [ ] to set options or adjust parameter of the selected
function. Note that you can reset a function’s settings to default by
pressing [ ] and [ ] simultaneously.
5. Press [EXIT] to quit the function selection menu.
32
Performance Settings
▘
Touch Response
When playing the piano, the dynamics, tone changes, and other
eects of the notes are controlled by the force of your touch. The
touch response feature is enabled by default to ensure your emotional
expressions are well reected.
You have the option to disable it, resulting in the same volume
produced no matter how much force you use.
This instrument comes with 5 levels of touch response curves from
which you can choose to best suit your style.
Should you choose “Soft”, you will nd it easier to play louder notes;
choose “Hard” and you will be needing extra force.
Note that certain sounds, such as harpsichords, are not touch-
responsive even with this feature enabled, due to their inherent
characteristics.
▘
Fixed Velocity
When the touch response is set to “OFF”, you can set a consistent
velocity for the entire keyboard.
Please note that this setting is only applicable when the touch
response is o. When using any of the ve available touch response
curves, the instrument will respond to varying levels of velocity, and
the xed velocity parameter will be displayed as “-” and will not be
adjustable.
▘
Transpose
Transposing (page 19) allows you to move the pitch of the entire
keyboard in semitones. This means you can shift to a dierent key
without changing how you play. This is a very handy feature when you
need to accompany a singer or play with other instruments that are in
a dierent key. The feature has NO eects on built-in playbacks.
▘
Master Tune
Master Tune can globally adjust the pitch of the entire instrument
in cents. This function can be used to match the tuning of other
instruments when needed.
▘
Classical Temperaments
Temperament is a tuning system that precisely regulates the pitch of
each key in the scale. This instrument is pre-set with some classical
temperaments that are useful when playing older music, such as from
the Renaissance period.
Please note that “Temperament” setting has NO eects on built-in
songs and percussion sounds.
Function Option Default
Touch
Response
OFF / Soft 2 /
Soft 1 / Normal /
Hard 1 / Hard 2
Normal
Function Parameter Default
Transpose -12 ~ +12 0
Function Parameter Default
Fixed Velocity 1 ~ 127 ---
Function Parameter Default
Master Tune 415.4Hz ~ 466.2Hz 440.0Hz
Function Option Default
Temperaments
Equal / Pure Major
/ Pure Minor /
Pythagorean /
Meantone /
Werckmeister /
Kirnberger /
Arabic 1 / Arabic 2
Equal

33
An Introduction to Classical Temperaments
▘
Twelve-Tone Equal Temperament (12-TET)
12-TET is a tuning system that divides the octave into 12 equal intervals. This tuning system only has one type
of half-tone and one type of whole-tone, making it easy to transpose. Most keyboard instruments worldwide are
tuned in 12-TET.
▘
Just Intonation Major and Minor (Pure Major and Minor)
Just Intonation is a tuning system that generates all other intervals using natural fths and thirds. It works best for
harmonies such as choral singing or solo singing.
However, due to the existence of two types of whole tones and half-tones, it is not suitable for keyboard
instruments’ design and performance.
▘
Pythagorean Tuning (or 5-limit tuning)
Pythagorean Tuning is the earliest known tuning system in history, also known as the “cycle of fths”. It is named
after Pythagoras, who developed this system based on the pure fth interval. Compared to 12-TET, Pythagorean
Tuning has larger whole tones and smaller half-tones.
▘
Meantone Temperament
Mean-Tone Temperament was created to practically apply Just Intonation on keyboard instruments. One feature
of this temperament is that it can produce consonant sounds that are very close to Just Intonation when forming
triads. It was prevalent in Europe for hundreds of years, for its simpler construction compared to Just Intonation.
▘
Werckmeister Temperament
Werckmeister Temperament is an improvement on the Pythagorean tuning system, proposed by the German
organ craftsman and music theorist Andreas Werckmeister.
Its fth interval preserves the essence of natural tuning and can play twelve dierent keys without the need for
retuning. It was therefore praised by Bach as a temperament close to equal temperament.
Each key has a distinct color, which is an important basis for classical and romantic music’s use of key names in
titles, and the underlying reason for the revival of classical music scales.
▘
Kirnberger Temperament
Kirnberger Temperament is a tuning system proposed by Johann Philipp Kirnberger, a student of Johann
Sebastian Bach. After studying Bach’s “Well-Tempered Clavier,” Kirnberger developed a tuning system that is
somewhat a combination of Mean-Tone Temperament and Just Intonation, and an improvement to the Mean-
Tone Temperament.
▘
Arabic Scale 1 and Arabic Scale 2
Two special Arabic-style scales with distinct regional characteristics.
34
▘
Temperament Key
Establishing a standard key is crucial while using classical tunings
other than 12-TET (“Equal”).
Temperament is based on the standard key that is used as a reference
point for tuning the other keys. Changing the standard key will alter
the foundation for tuning, resulting in dierent pitches across dierent
keys and scales. To ensure proper tonality, it is recommended to set a
standard pitch in accordance with the current piece when using non-
12-TET temperaments.
Please note that the “Temperament Key” adjustment is only available
when “Temperament” is set to non-”Equal”. When the default option of
“Equal” is selected, adjustments are not possible.
▘
Twinova
Twinova is a featured mode in which the entire keyboard is divided
into two areas, left and right, with the same pitch and sound for both.
This feature is particularly useful for elementary-level one-on-one
instruction, and convenient for practicing and playing simple two-piano
duets.
When set to “ON”, the Twinova mode is activated. For more details
about Twinova mode, please refer to the Twinova Mode section (page
20).
▘
Twinova Octave
You have the option to transpose the pitch one octave down or up
in Twinova mode. It is important to note that this feature only works
in Twinova mode. For more details, please refer to the Twinova mode
section (page 21).
Function Option Default
Temperament
Key
C / C# / D /
Eb / E / F / F#
/ G / Ab / A /
Bb / B
- or C
Function Option Default
Twinova ON / OFF OFF
Function Parameter Default
Twinova
Octave
-1 ~ +1 0
Global Eect Settings
▘
Reverb Type
This simulates auditory experiences in spaces of dierent sizes and
types. Choose the type that best suits your needs. Note that this
aects all sounds, including performances, built-in songs, and MIDI
playbacks.
▘
Reverb Level
This adjusts the intensity of the selected reverb eect. Higher levels
create a stronger sense of space, while lower levels reduce the eect.
The instrument automatically selects a recommended reverb type and
level when switching between sounds, but you can adjust the level to
your preference. If set to 0, there will be no reverb eect applied.
▘
Chorus Type
The chorus eect can enhance the depth and richness of your sound,
and can also simulate unique eects found in certain instruments.
Choose the chorus type that best suits your needs. Note that this
aects all sounds.
Function Option Default
Reverb Type
Room / Saloon /
Chamber /
Symphony Hall /
Church / Club
Chamber
Function Parameter Default
Reverb Level 0 ~ 127 64
Function Option Default
Chorus Type
Chorus 1 /
Chorus 2 /
Flanger /
Rotary /
Tremolo / Delay
Chorus 1
35
Display Settings
▘
Display Mode
To extend the lifespan of the screen and maintain optimal display
quality, the OLED screen of the instrument automatically turns o or
puts on a screen saver if the control panel is not in active use for a
certain period of time depending on setting.
When set to the default option of “Auto”, the screen will begin looping
an animated screen saver after a certain period of standby.
When set to “ES”, the screen will turn o after standby to save energy.
The touch panel on the instrument features backlit buttons for
operation. However, if you nd the lights distracting during longer play
sessions or dim environments, the panel will go full dark after a certain
period of inactivity, blending in with its surroundings.
To regain control, simply tap anywhere on the panel to wake it up.
Function Option Default
Display
Mode
ES / Auto Auto
Function Option Default
Speaker EQ
Piano /
Classical /
Jazz / Pop /
Rock / R&B
Piano
Function Parameter Default
Chorus Level 0 ~ 127 0
Function Option Default
D.A.S. ON / OFF ON
▘
Chorus Level
Increasing the chorus level will make the eect of the corresponding
chorus type more prominent. The instrument automatically selects an
ideal chorus type with a recommended level when switching between
sounds. You can adjust the depth yourself to suit your needs. Note
that setting the chorus level to 0 will disable the chorus eect entirely.
▘
D.A.S. (Dynamic Acoustic System)
This instrument features a powerful dynamic eect that equalizes
higher and lower frequency bands during loud and quiet sessions,
boosting balanced auditory experiences in general.
D.A.S. is enabled by default.
▘
Speaker EQ
This instrument oers a range of EQ (Equalizer) presets for dierent
musical styles. You can choose a preset to better suit the piece you are
performing or the song you are playing back.
The default Speaker EQ is “Piano”, which is ideal for piano
performance.
36
Function Option Default
Language
Chinese /
English
English
▘
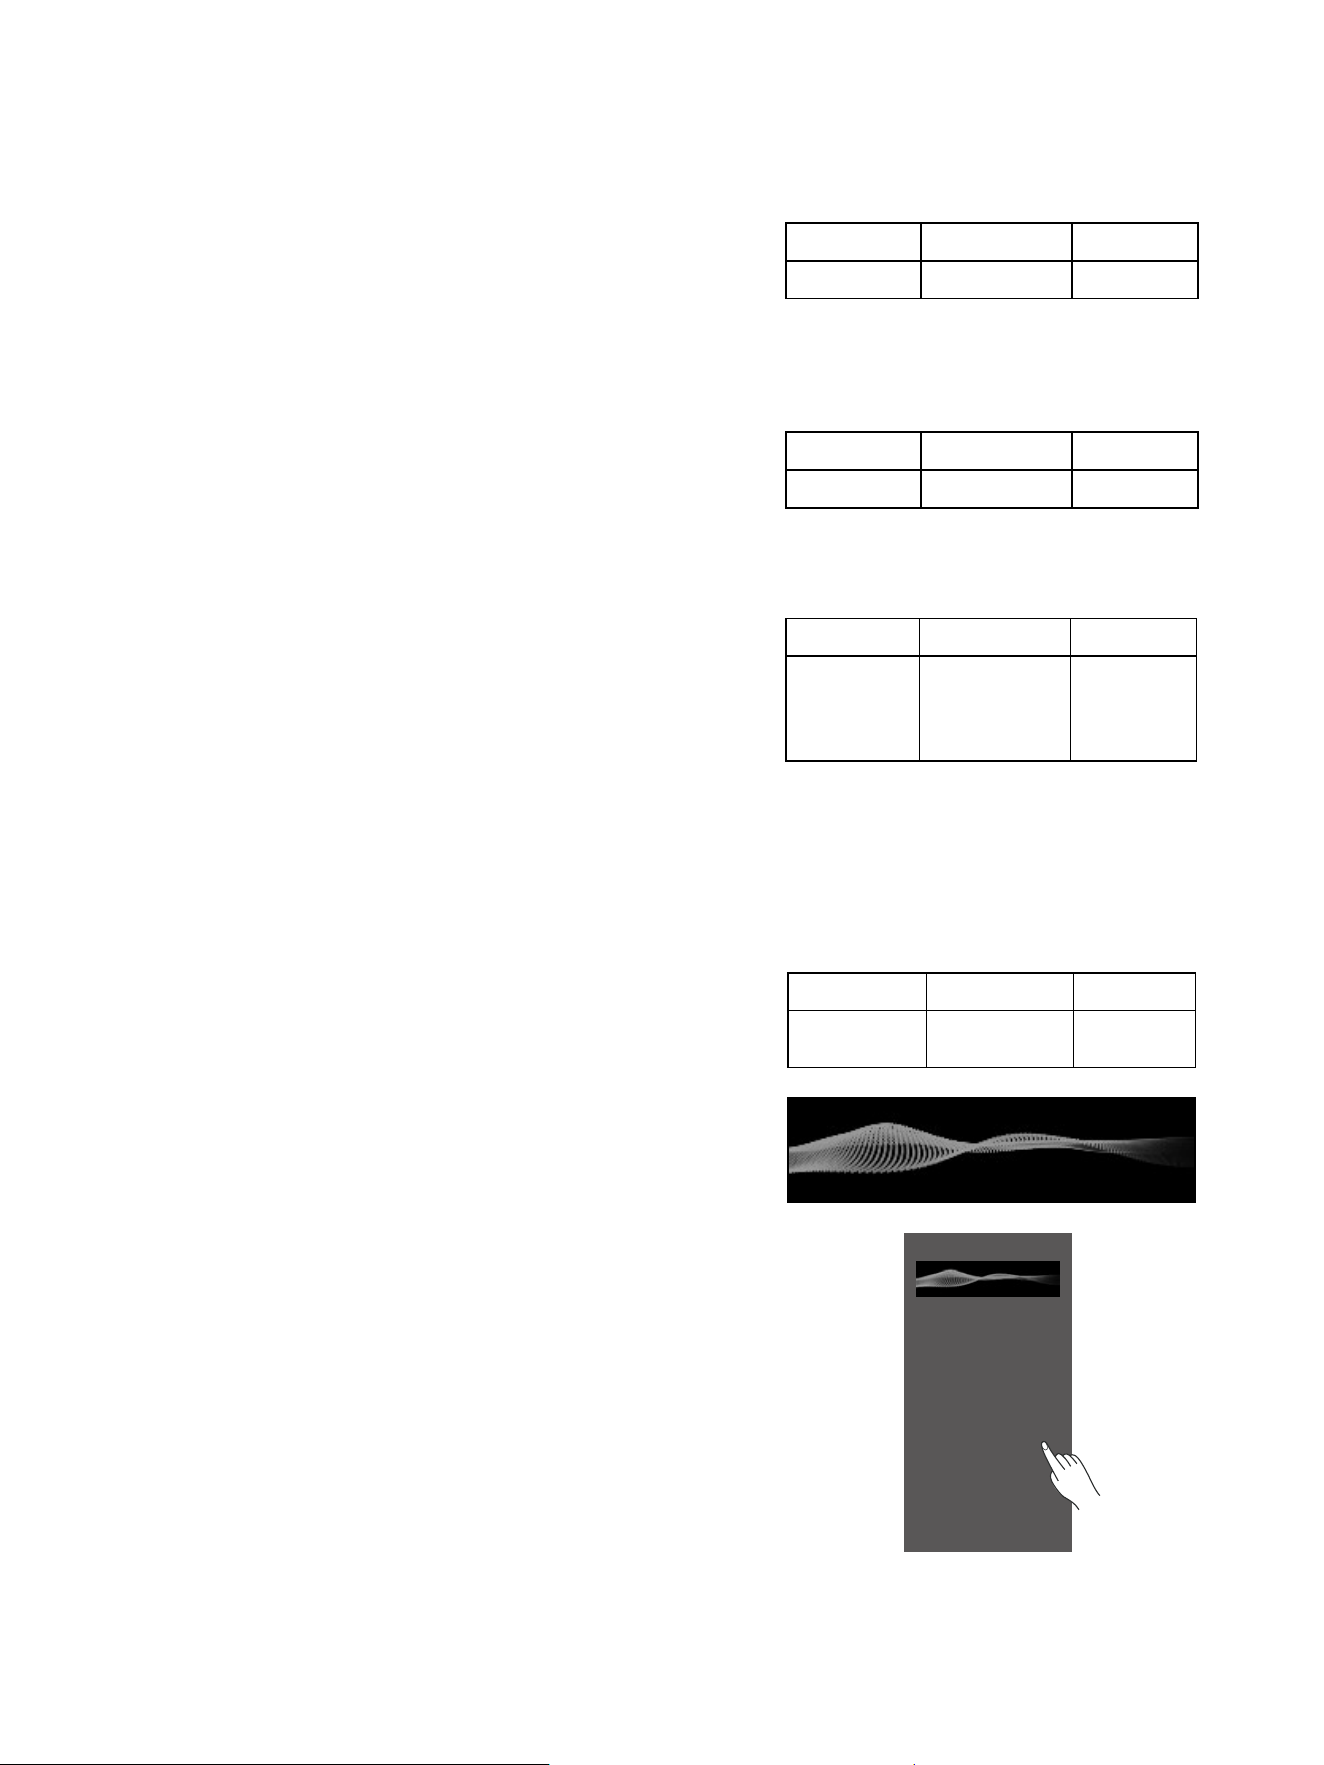
Dynamic Screen Saver in Piano Mode
If the Display mode is set to “Auto”, the system will display an
animated spectrum of your performance in real time.
If set to “ES”, the screen will turn o after a certain amount of time with
no keyboard and panel operation.
▘
Display Language
This instrument supports Chinese and English for display.
The default language is determined by your country/region.
Power Settings
▘
Auto Power O
For energy conservation and safety, the piano includes an automatic
power-o function that activates after a specied period of standby
time. You can choose to set the time to either 15 or 60 minutes, or
disable the function entirely by selecting the “Never” option.
MIDI I/O Settings
▘
R1 out CH
This determines the MIDI output channel for the signals produced by
playing the “R1” part. The default setting is “1,” and selecting “OFF” will
prevent signals from being transmitted.
▘
R2 out CH
This determines the MIDI output channel for the signals produced by
playing the “R2” part. The default setting is “2,” and selecting “OFF” will
prevent signals from being transmitted.
▘
L out CH
This setting determines the MIDI output channel for the signals
produced by playing the “L” part. The default setting is “3,” and
selecting “OFF” will prevent signals from being transmitted.
▘
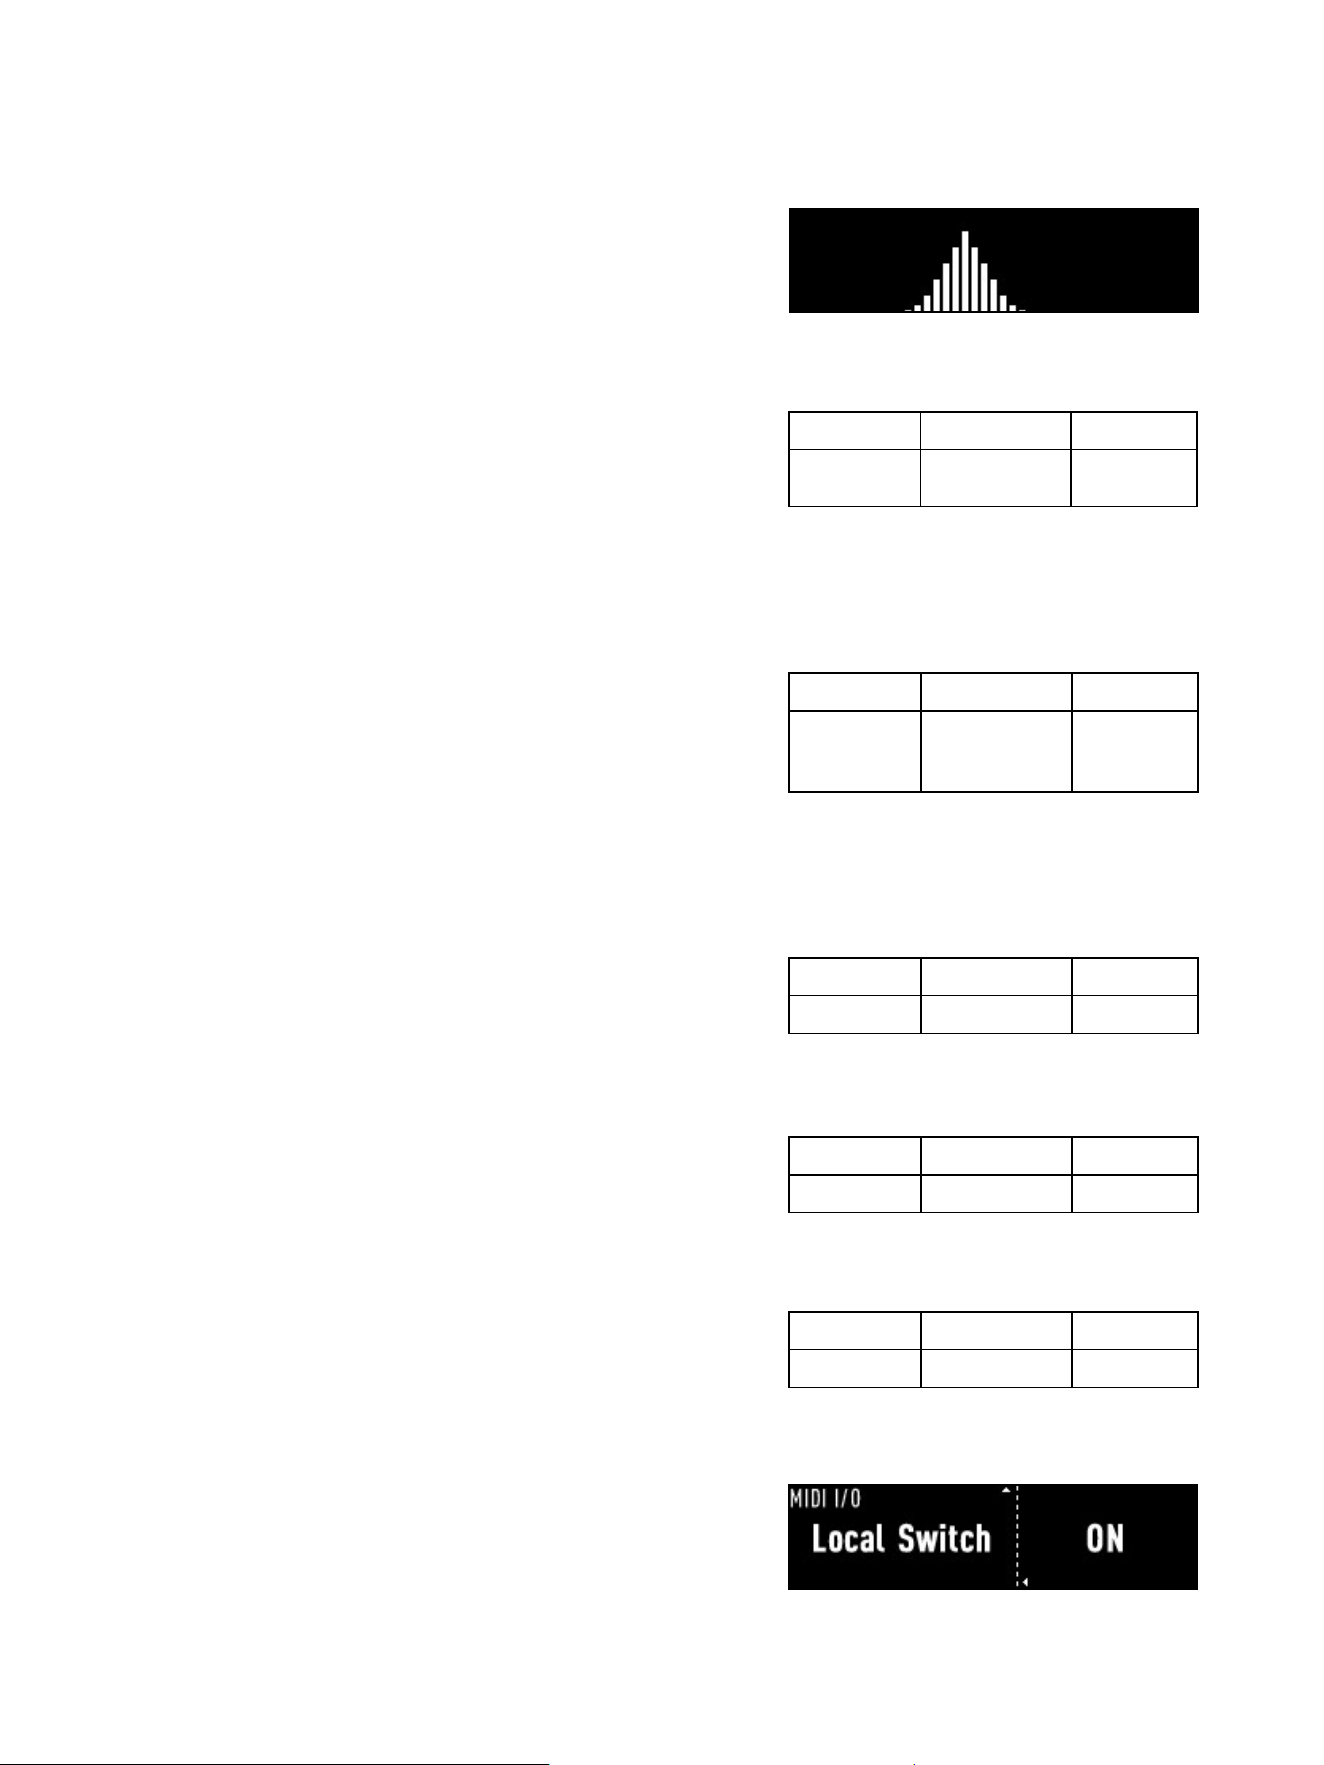
Local Switch
When this is set to “ON” (by default), the keyboard will produce sound
using its built-in sound sources. Switching it to “OFF” will disable the
instrument’s internal sound sources and allow it to function solely as a
MIDI controller for triggering external sound sources.
Function Option Default
Auto Power
O
Never /
15min /
60min
15min
Function Option Default
R1 out CH 1~16 / OFF 1
Function Option Default
R2 out CH 1~16 / OFF 2
Function Option Default
L out CH 1~16 / OFF 3
37
System Settings
The instrument has a built-in clock that allows you to set the date and
time.
▘
Date-Year
Set the year.
▘
Date-Month
Set the month.
▘
Date-Day
Set the day.
Function Option Default
Speaker
Mode
Always ON /
Always OFF / Auto
Auto
▘
Time-Hour
Set the hour.
▘
Time-Minute.
Set the minute.
▘
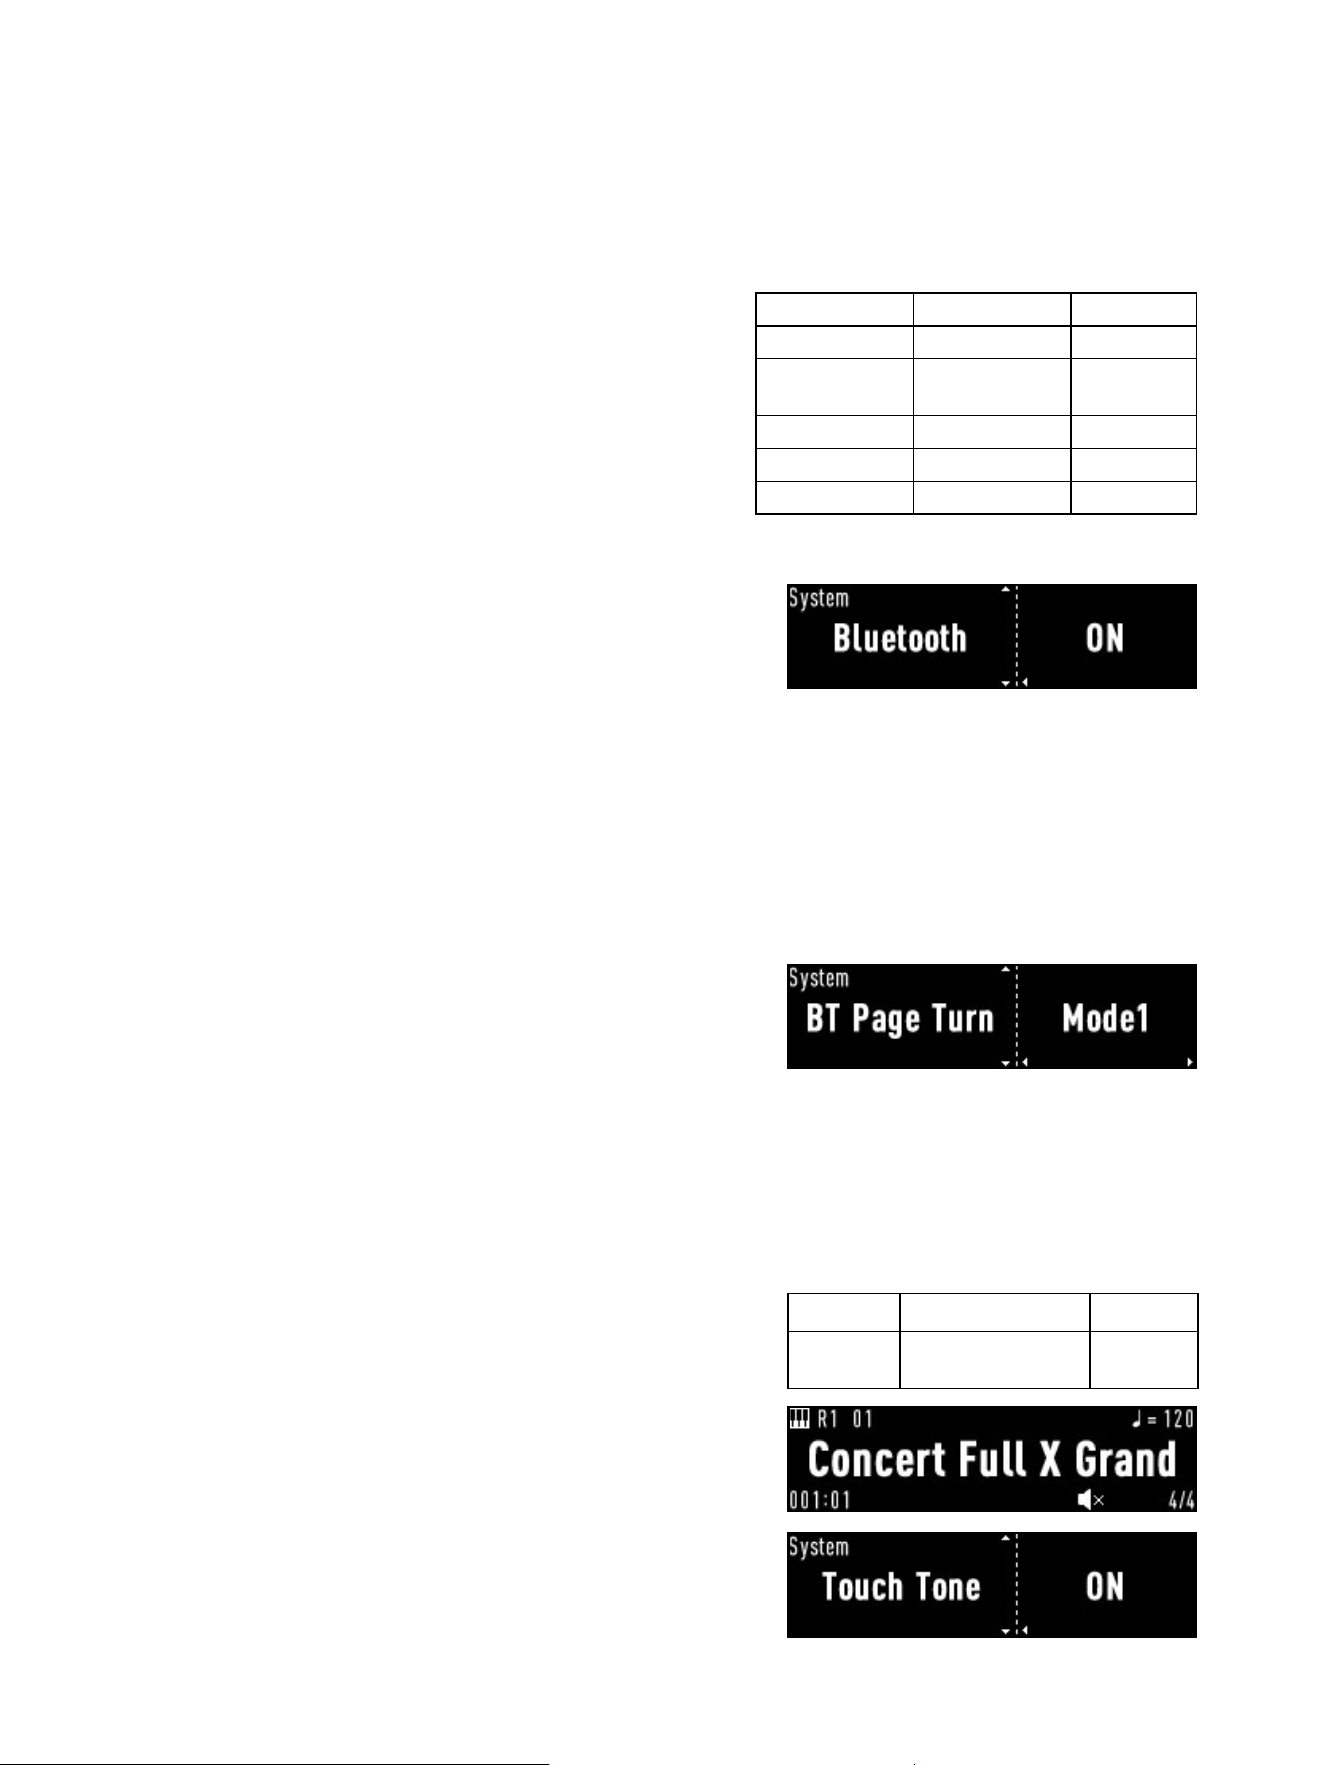
Bluetooth Function
This instrument is equipped with Bluetooth functionality. When the
Bluetooth function is on, it can be paired with external devices via
Bluetooth MIDI and Bluetooth Audio, enabling interaction with Apps/
Software on the external device and playback of sounds from the
external device through the instrument’s speakers.
If you turn o the Bluetooth function, the instrument will immediately
disconnect all connected devices, and external devices will not be able
to pair with it via Bluetooth.
Note: The BT Page Turn function is not available when the Bluetooth
function is turned o.
▘
BT Page Turn
When connected to a mobile device such as a smartphone or tablet,
you can use the Pedal to Turn Pages on a Music Score App.
If the BT Page Turn function is on, pressing the mid pedal turns to the
next page, and pressing the left pedal turns to the preceding page.
The mid pedal and left pedal cannot be used as the sostenuto pedal
and soft pedal.
This function oers three modes, switch to another mode if the app
makes no response.
Please note that BT Page Turn cannot be used in Twinova Mode.
▘
Speaker Mode
You can set the speaker mode so that the built-in speakers will
produce sound when you are using headphones or Line output. This
feature is very useful when the instrument’s speakers are being used
for onstage monitoring.
The current speaker mode icon will appear on the bottom of the main
screen.
▘
Touch Tone
The Touch Tone feature is on by default, providing feedback sound
when you press a button. If you prefer, you can turn it o.
Function Parameter Default
Date-Year 2020~2050 ...
Date-Month
January ~
December
...
Date-Day 1~31 ...
Time-Hour 0~23 ...
Time-Minute 0~59 ...
38
▘
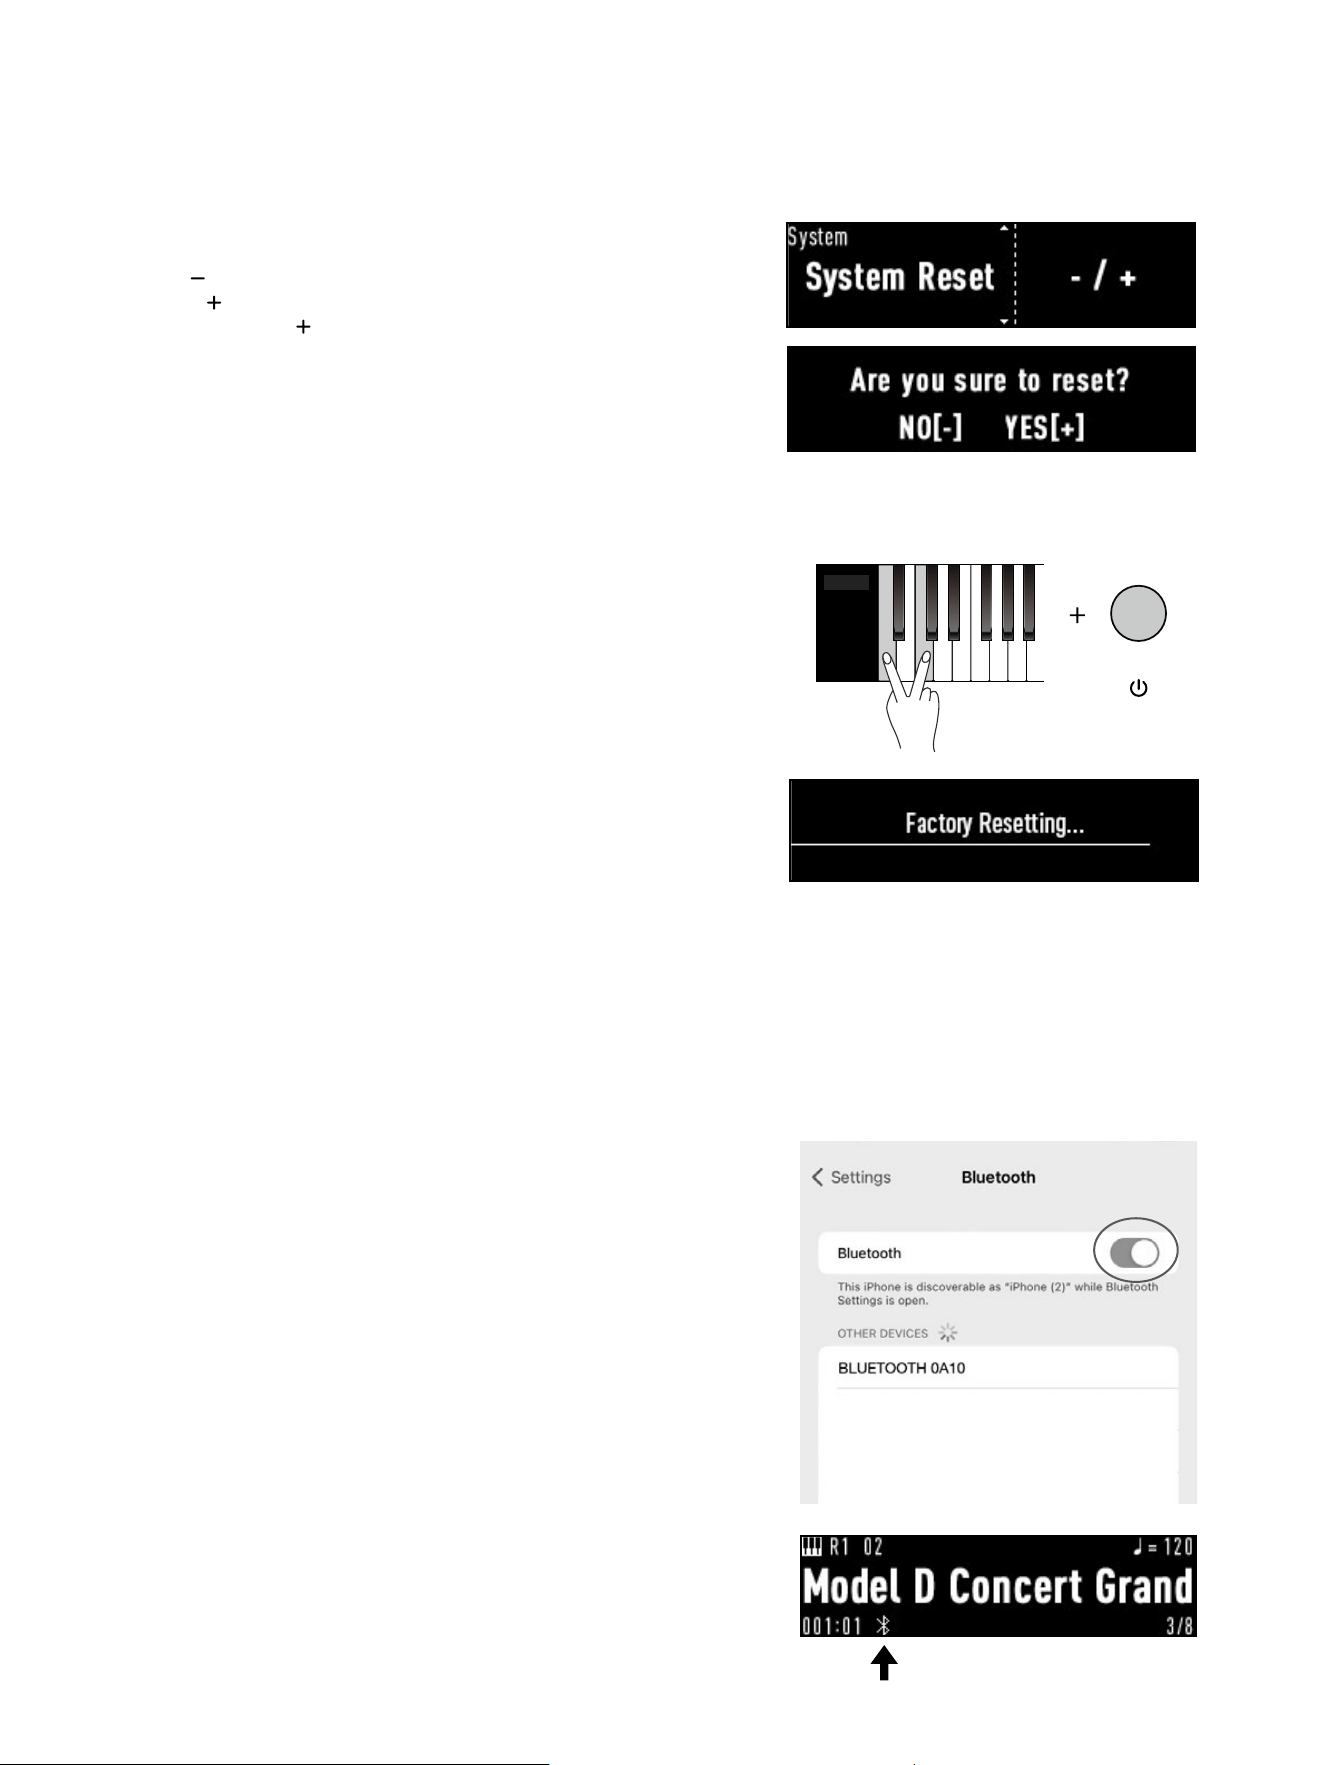
System Reset
You can choose to restore all settings to default.
1. The [
] button is unresponsive in this menu.
Press [ ] to proceed and the system will show a conrmation
message. Press [ ] once more to initiate the reset.
2. Selecting “No” will take you straight back to one of the modes (such
as the Piano mode).
Note that this operation will not aect the user track.
DO NOT cut o the power during the reset process as this may damage
the instrument’s system data.
You also have the option to perform a full factory reset.
To do so, follow these steps with the unit turned o:
1. Press and hold the rst and third white keys from the left of the
keyboard, then press the [POWER] button.
2. The screen should start up and prompt that the unit is now undergoing
“Factory Resetting”.
This might take some time so please be patient and DO NOT cut o
power until the unit starts up properly.
Please note that a factory reset will not only reset all settings but will also
permanently delete any saved content in the user track. It is
recommended to double-check before proceeding.
▘
System Version
Displays the instrument’s current rmware version.
This instrument allows for MIDI and audio transmission via Bluetooth.
Pairing external devices such as smartphones, tablets, or PCs is required
to access these features.
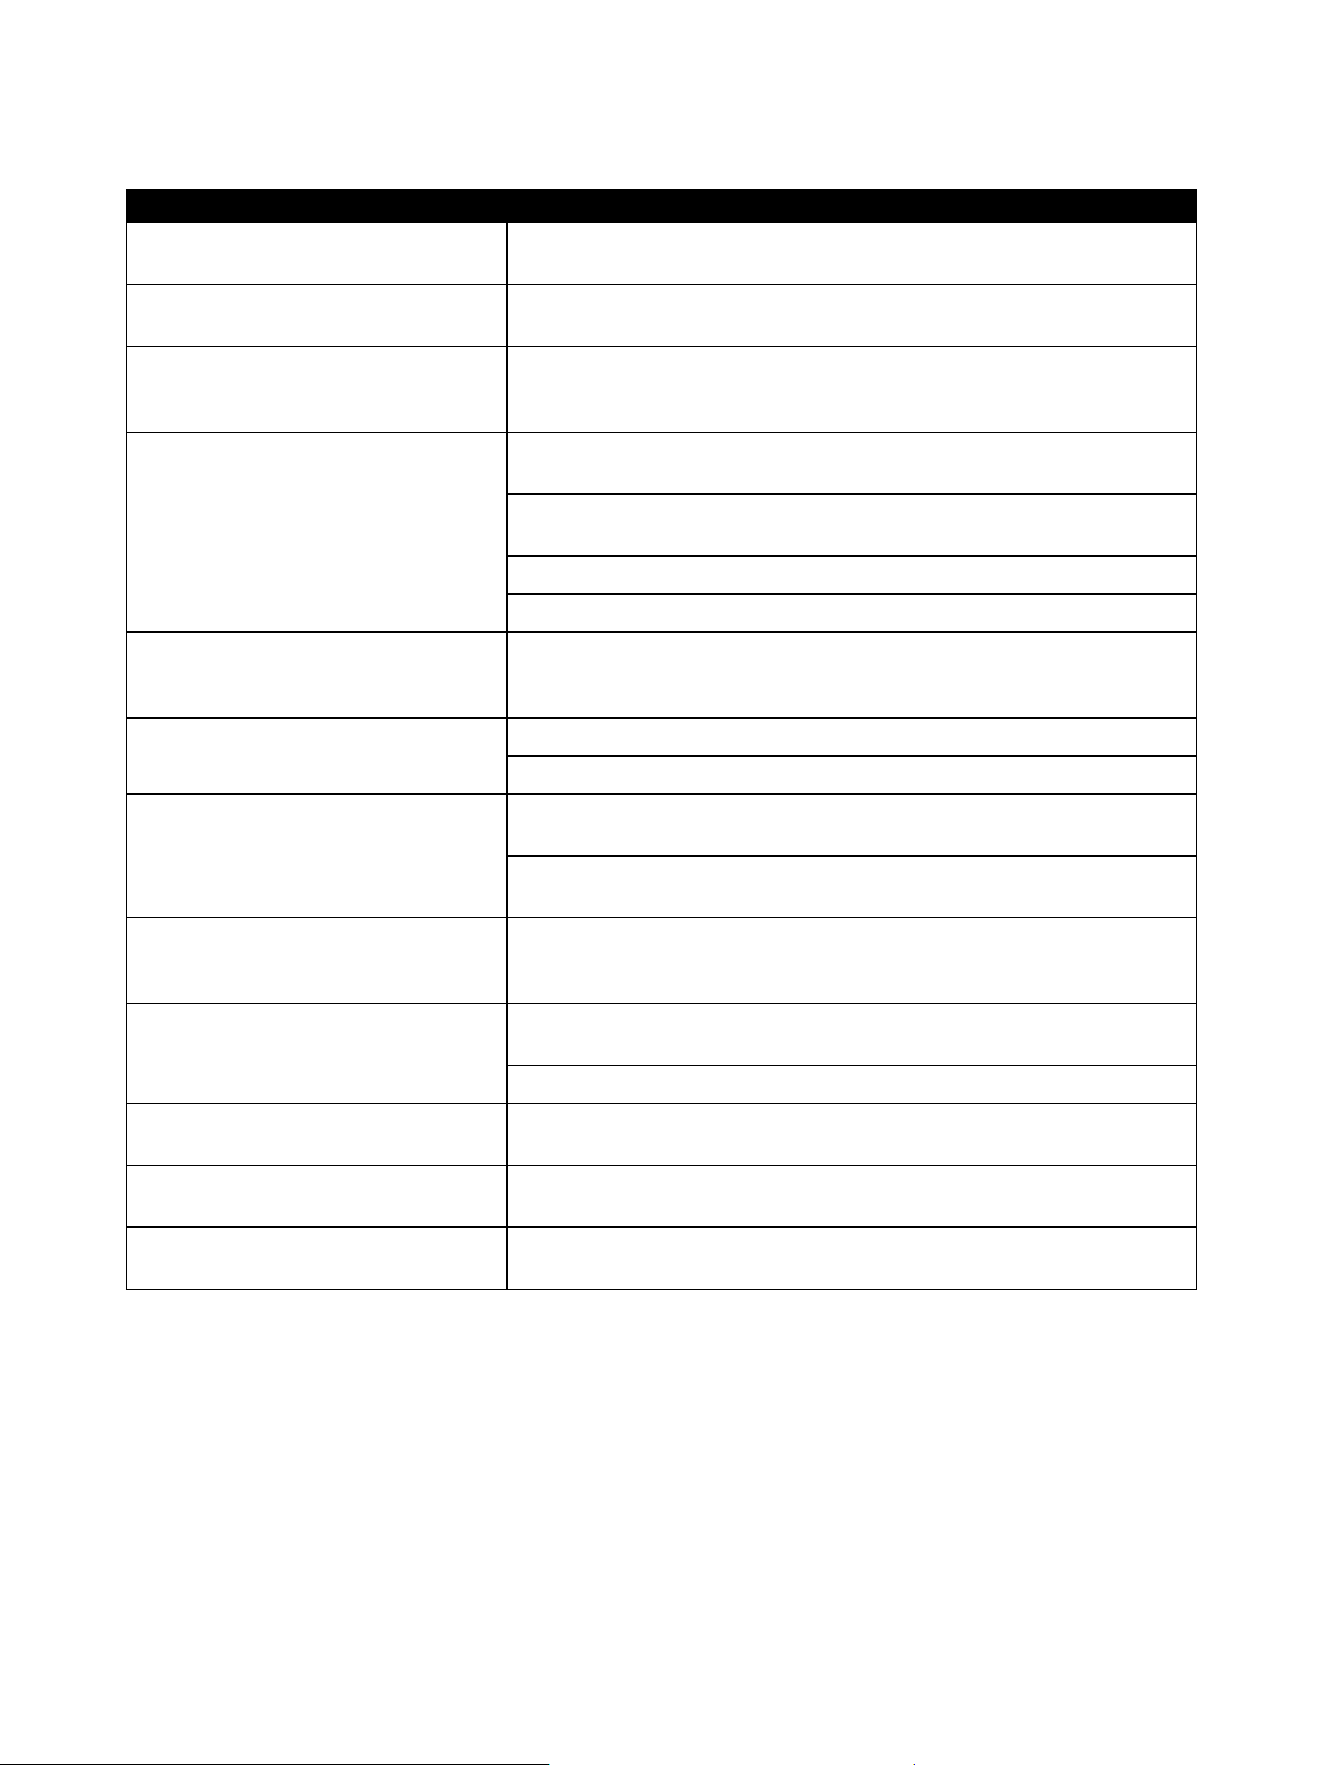
To pair the devices:
1. Make sure the Bluetooth function is turned on for the smart device.
Make sure that the instrument is powered on and its Bluetooth
Function is turned on.
2. Search for the instrument’s Bluetooth IDs. There are two available:
one for MIDI and one for audio. Note that the IDs vary with specic
models.
3. Pair up via the [Bluetooth MIDI] ID to interact with external devices
using pre-installed Apps/Software. Pair up via the [Bluetooth Audio]
ID to play sounds from the external device through the instrument’s
speakers.
Please note that the Bluetooth connection may be unstable if there are
too many obstacles between devices or if the distance is too far. Ensure
that the external device is not too far away from the instrument.
Once paired, a Bluetooth icon will appear to conrm successful pairing.
Bluetooth Pairing
39
Troubleshooting
Issues Possible Cause and Solution
The instrument will not turn on, or it
shuts down immediately after turning on
IMPORTANT! Make sure you are using the standard power adapter provided
with the instrument, and check that the plugs are securely connected.
There is a slight noise when powering on
or o
This is normal and not a cause for concern.
Buttons do not respond
Some buttons on the panel are disabled in certain menus. When the touch
tone feature (page 37) is on, you can check if the button is currently disabled
by whether there’s a feedback sound.
The speakers of the instrument do not
sound when playing keyboards or rolling
playbacks
Check if the [VOLUME] knob is set too low. If so, turn clockwise to increase
the volume.
Check if the volume for each sound part or playback is set too low. If so,
adjust accordingly. (page 29)
Unplug headphones or convertors from [PHONES] jacks.
The speaker mode may be set as “Always OFF”. (page 37)
The instrument makes noise
When using a mobile phone nearby (especially when receiving calls), the
instrument might make noise due to interference.
Move the mobile phone slightly away from the instrument.
The keyboard is not touch sensitive
Certain sounds are NOT touch-sensitive due to their characteristics.
Check if the touch response (page 32) is turned o. If so, turn it on.
The pitch is not accurate
Check if the classical temperament (page 32) is set to non-"Equal". If so, set
it to back to "Equal".
Check if pitch shift functions (page 19, 32) are set to non-"0". If so, reset to
"0".
The le name in the USB drive is not
displayed properly
The instrument supports Chinese and English displays. If the le name
contains characters & symbols unrecognized by the system, it may be
displayed improperly.
Bluetooth pairing is not successful
Make sure that the external device supports Bluetooth and has the Bluetooth
function turned on.
Check if the pairing has been successful.
When connecting to a PC, the PC does
not recognize it
This unit does not require a driver to be able to connect to a PC. Check if the
USB cable is rmly plugged or try switching to another USB port on the PC.
Pedaling feels unstable
Make sure that the support bolts at the bottom of each pedal is fully attached
to the ground and not hanging.
Some menus are not displayed in English
This is caused by the limited memory during the initialization of the system's
language resources, which is normal.
* If you encounter any malfunction that you cannot resolve on your own, please refer to our company’s product warranty
regulations and contact the supplier or designated maintenance station.
40
Specications
Display
Screen 256 × 64 OLED
Mode ES (Energy Saving) / Auto
Language English / Chinese
Physical
Controls
Control Panel Capacitive touch panel with backlit buttons
Keyboard
Specs G3P: Progressively weighted, three-contact keyboard with escapement
Touch Response OFF / Soft 2 / Soft 1 / Normal / Hard 1 / Hard 2
Sounds
Piano Sounds PurePiano
Polyphony 256
Number of Sounds 40
Number of Sound Demos 26
Sound Parts L (Left), R1 (Right 1), R2 (Right 2)
Performance
Piano Mode Yes
Sound Mode Yes
Twinova Mode Yes (transposing -1 / +1 octave supported)
Part Combinations R1, R2 (Layered); R1, L (Split); R1, R2 and L (Layered and Split)
Brilliance Adjustment Yes
Piano Effects
Damper Resonance 0~10
Damper Noise 0~10
String Resonance 0~10
Lid Angle Open / Half / Close
Open String Resonance 0~10
Key Off Effect OFF / Low / Normal / High
Soft Pedal 0~10
Ambience 6 types
Ambience Depth 0~10
Body Resonance 0~10
Global Eects
Reverb Settings 6 types and 0~127 depth adjustment
Chorus Settings 6 types and 0~127 depth adjustment
D.A.S ON / OFF
Speaker EQ Type 6 types
Songs &
Lessons
Classical Category 100 wolrd-famous piano pieces
MIDI Recording
1 local recording supported
Multiple recordings via USB drive supported, with the total number of
recordings depending on the storage capacity of the connected drive
Audio Playback Formats .wav (44.1kHz, 16bit) / .mp3 (320kbps) / .m4a
Audio Recording Formats
.wav (44.1kHz, 16bit) / .mp3 (320kbps)
(Maximum recording time per le is 90 minutes, with the total number of
recordings depending on the storage capacity of the connected drive)
41
Songs &
Lessons
Lesson Collections
1 - Vorschule Im Klavierspiel, Op.101 (Beyer)
2 - Practical Exercises for Beginners, Op.599 (Czerny)
3 - 30 Études de Mécanisme, Op.849 (Czerny)
4 - 25 Études faciles et progressives, Op.100 (Burgmuller)
5 - 16 Selections from The Virtuoso Pianist (Hanon)
Number of Lesson Tracks 320
Part Muting Left / right-hand part
Play to search via AI AI recognition through playing single/both-hand parts of built-in piano tracks
Functions
Auto Power O 15min / 60min / Never
Tempo 5~320 BPM, tempos / tempo markings cross-referencing supported
Transpose (semitone) -12 ~ +12 Semitone
Master Tune 415.4Hz~466.2 Hz
Classical Temperaments 9 classical temperaments with standard key adjustment
Metronome. Accent Bell ON / OFF, 14 time signatures
Touch Tone ON / OFF
Local Keyboard Sound ON / OFF
System Reset Yes
Time Year, Month, Day, Hour, Minute
BT Page Turn OFF / MODE1 / MODE2 / MODE3
Spearker Mode Always ON / Always OFF / Auto
Connectivity
Pedals 3 Progressive Response Grand Piano Pedals
USB TO HOST MIDI recording via software / two-way audio transmission supported
USB TO DEVICE Compatible with FAT32 format USB drive up to 128gb storage space
PHONES Stereo phone jack (3.5mm x 1 & 6.5mm x 1)
AUX IN Mini stereo jack (3.5mm x 1)
LINE OUT Stereo jack [L / L+R, R] (6.5mm x 2)
Bluetooth
MIDI / audio transmission via 2 seperate Bluetooth IDs supported (Bluetooth
Version 5.0)
Digital
Contents
Recording App
Supports audio and video recording, compatible with iOS and Android
devices
Maximum recording time is 20 minutes per audio or 10 minutes per video
Digital Score 100 classical piano score PDF collection
Sound System
Amplier Wattage 25W×2 + 25W×2
Speaker Wattage 25Wx2 + 8W× 2
Speaker Size 12cm×2 + 5cm×2
Power Usage DC 15V / 2500mA
Weight 55kg
Dimensions (L x W x H) 1408 × 448 × 913mm
42
Sound List
No Bank MSB Bank LSB Program Sound Name Left Pedal Function
Piano
1 121 12 0 Concert Full X Grand
2 121 11 0 Model D Concert Grand
3 121 10 0 Pop Piano
4 121 11 1 Real Bright Piano
5 121 11 3 Real Honky Tonk
6 121 10 1 Upright Piano
7 121 16 1 Piano & EP
8 121 10 6 Real Harpsichord
9 121 11 6 Harpsichord 8+4
E.Piano
10 121 11 5 Dream Electric Piano Modulation ON / OFF
11 121 10 4 MK Electric Piano Modulation ON / OFF
12 121 10 5 DX7 Electric Piano Modulation ON / OFF
13 121 11 4 WLZ Electric Piano Modulation ON / OFF
14 121 10 7 Clavi D6
15 121 11 7 Clavi D6 Amp
Organ & Accordion
16 121 0 16 Stereo Drawbar Organ Rotary Speed (Fast, Slow)
17 121 13 18 Stereo Rock Organ Rotary Speed (Fast, Slow)
18 121 0 19 Real Church Organ
19 121 1 19 Octave Church Organ
20 121 10 21 Musette
21 121 11 21 Real Accordion
Guitar & Bass
22 121 10 24 Real Nylon Guitar Guitar Sound Eect
23 121 10 25 Real Steel Guitar Guitar Sound Eect
24 121 12 27 Slide Clean Guitar Guitar Sound Eect
25 121 12 33 Real Finger Bass Bass Sound Eect
26 121 11 32 Real Acoustic Bass Bass Sound Eect
Strings
27 121 10 48 Real Strings
28 121 0 48 Classic Strings
29 121 1 48 Orchestra Tutti
30 121 11 48 Concert Strings
31 121 0 46 Real Harp
32 121 0 50 Cool Synth Strings
Lead & Pad
33 121 10 80 Wire Lead Portamento ON / OFF
34 121 16 84 Dance Lead Portamento ON / OFF
35 121 15 91 Dream New Age
36 121 12 88 Bright New Age
Perc. & Drums
37 121 1 11 Cool Vibraphone Modulation ON / OFF
38 121 1 12 Real Marimba
39 121 10 8 Real Celesta
40 120 0 0 Standard Set

43
No Title Composer
1 Set Sail Original
2 Valse in A Minor Chopin
3 Latin Piano Original
4 Latin Bar Original
5 Neo-Baroque 1 Original
6 Neo-Baroque 2 Original
7 Heart of Youth Original
8 Smooth Flow Original
9 Sweet Dream 1 Original
10 Sweet Dream 2 Original
11 Magic EP Original
12 Funk Beat 1 Original
13 Funk Beat 2 Original
14 Fusion Band Original
15 Rock of Ages Original
16 Toccata and Fugue in D Minor J.S.Bach
17 Variations BWV.769 Part J.S.Bach
18 Encounter in Paris Original
19 Accordion & Tango Original
20 Unplugged Original
21 Acoustic Dance Original
22 Sunrise Time Original
23 Space Odyssey Original
24 The Smell of Spring Original
25 The Mystery Room 1 Original
26 The Mystery Room 2 Original
Sound Demo List

44
Classic List
No Title Composer
1
Sonata No.17 in D Minor, Op.31 No.2 3rd Mov. Beethoven
2
Sonata No.14 in C-Sharp Minor, Op.27-2 1st Mov. Beethoven
3
Sonata No.8 in C Minor, Op.13 2nd Mov. Beethoven
4
Sonata No.25 in G Major, Op.79 1st Mov. Beethoven
5
Sonata No.20 in G Major, Op.49 No.2 1st Mov. Beethoven
6
Bagatelle No.25 in A Minor, WoO 59, 'Fur Elise' Beethoven
7
Menuett G-Dur 4 Beethoven
8
Prelude and Fugue No.1 in C Major, BWV.846 J.S.Bach
9
Suite No.2 in A Minor, BWV.807, Prelude J.S.Bach
10
Suite No.5 in G Major, BWV.816, Gavotte J.S.Bach
11
Minuet in G Major, BWV Anh.114 J.S.Bach
12
Prelude in C-Sharp Major, BWV.848 J.S.Bach
13
Prelude in E Major J.S.Bach
14
Prelude in C Minor J.S.Bach
15
Two-Part Invention No.13 in A Minor, BWV.784 J.S.Bach
16
Two-Part Invention No.1 in C Major, BWV.772 J.S.Bach
17
Sonata No.15 in C Major, K.545 1st Mov. Mozart
18
Sonata in B-Flat Major, K.333 1st Mov. Mozart
19
Sonata in B-Flat Major, K.333 3rd Mov. Mozart
20
Sonata No.11 in A Major, K.331 3rd Mov., 'Rondo alla Turca' Mozart
21
12 Variations on 'Ah, Vous Dirai-je, Maman', KV.265 Mozart
22
Perpetuum Mobile Weber
23
Impromptu Op.90 No.2 in E-Flat Major, D.899 Schubert
24
Moments Musicaux Op.94 No.3 Schubert
25
Serenade Schubert
26
Sonatina No.1 in C Major, Op.36 1st Mov. Clementi
27
Sonatina No.2 in G Major, Op.36 1st Mov. Clementi
28
Sonatina No.3 in C Major, Op.36 1st Mov. Clementi
29
Sonatina No.4 in F Major, Op.36 1st Mov. Clementi
30
Etude Op.10 No.1 in C Major Chopin
31
Etude Op.10 No.3 in E Major, 'Chanson de l'adieu' Chopin
32
Etude Op.10 No.5 in G-Flat, 'Black Keys' Chopin
33
Etude Op.10 No.12 in C Minor, 'Revolutionary' Chopin
34
Etude Op.25 No.1 in A-Flat Major Chopin
35
Etude Op.25 No.2 in F Minor Chopin
36
Nocturne in B-Flat Minor, Op.9 No.1 Chopin
37
Nocturne in E-Flat Major, Op.9 No.2 Chopin
38
Nocturne in F Minor, Op.55 No.1 Chopin
39
Impromptu No.1 in A-Flat Major, Op.29 Chopin
40
Fantaisie-Impromptu, Op.66 Chopin
41
Prelude No.15 in D-Flat Major, Op.28, 'Raindrop' Chopin
42
Preludes No.20 in C Minor, Op.28 Chopin
43
Waltz in E-Flat Major, Op.18, 'Grande Valse Brillante' Chopin
44
Waltz in C-Sharp Minor, Op.64 No.2 Chopin
45
Waltz in D-Flat Major, Op.64 No.1, 'Minute' Chopin
46
Mazurkas in F Major, Op.68 No.3 Chopin
47
Nocturne in C-Sharp Minor, Op.Posth., B.49 Chopin
48
Song Without Words, Op.19b No.1 in E Major, 'Sweet Remembrance' Mendelssohn
49
Song Without Words, Op.62 No.1 in G Major, 'May Breezes' Mendelssohn
50
Song Without Words, Op.62 No.6 in A Major, 'Spring Song' Mendelssohn

45
No Title Composer
51
Song Without Words, Op.30 No.6 in F-Sharp Minor, 'Venetianisches Gondellied' Mendelssohn
52
Song Without Words, Op.67 No.2 in F-Sharp Minor, 'Lost Illusions' Mendelssohn
53
The Seasons No.6, June-Barcarolle Tchaikovsky
54
The Seasons No.10, October-Autumn Song
Tchaikovsky
55
The Seasons No.12, December-Christmas
Tchaikovsky
56
Neapolitan Song
Tchaikovsky
57
Kinderszenen Op.15 No.7, 'Traumerei'
Schumann
58
Album for the Young, Op.68 No.1, 'Melody'
Schumann
59
Album for the Young, Op.68 No.10, 'The Happy Farmer'
Schumann
60
Album for the Young, Op.68 No.13, 'May, Sweet May'
Schumann
61
Album for the Young, Op.68 No.38, 'Winter Time I'
Schumann
62
Scenes from Childhood, Op.15 No.1, 'About Strange Lands and People'
Schumann
63
Intermezzo No.2 in A Major, Op.118
Brahms
64
Waltz No.15 in A-Flat Major, Op.39
Brahms
65
Arabesques No.1, 'Andantino Con Moto'
Debussy
66
Deux Arabesques No.2
Debussy
67
Suite Bergamasque No.3, L.75, 'Clair De Lune'
Debussy
68
Perludes No.8, 'La Fille Aux Cheveux De Lin'
Debussy
69
Children's Corner, 'Doctor Gradus Ad Parnassum'
Debussy
70
Reverie, L.68
Debussy
71
Golliwog's Cakewalk
Debussy
72
Lyric Pieces Op.12 No.1, 'Arietta'
Grieg
73
Lyric Pieces Op.43 No.1, 'Buttery'
Grieg
74
Gymnopedies No.1, 'Lent Et Doloreux'
Satie
75
Je Te Veux
Satie
76
Romanian Folk Dances, No.6, Fast Dance
Bartok
77
Sonata in F Major, Hob. XVI 23, I. Allegro
Haydn
78
Gypsy Rondo
Haydn
79
Liebestraum No.3 in A-Flat, S.541 No.3
Liszt
80
The Sapin, Op.75 No.5
Sibelius
81
Etudes-tableaux Op.33, No.7 in G Minor
Rachmanino
82
Lyric Rondo
C.P.E.Bach
83
Solfeggio
C.P.E.Bach
84
Humoresque
Dvorak
85
La Priere D'une Vierge
Badarzewska
86
To A Wild Rose
MacDowell
87
Fontaine, La
Karl Bohm
88
Blumenlied
Gustav Lange
89
Le Coucou
Claude Daquin
90
Minuet
Boccherini
91
Warblings At Eve
Richards
92
Gavotte
Gossec
93
Dance Steps
Scarlatti
94
Salut D' Amour
Elgar
95
Le Cygne
Saens
96
Paloma, La
Yradier
97
Rialto Ripples
Gershwin
98
Maple Leaf Rag
Joplin
99
The Entertainer
Joplin
100
Peacherine Rag
Joplin
46
Lesson List
Lesson No Collection/Song Composer
1 1~129 Vorschule Im Klavierspiel, Op.101 Beyer
2 130~229 Practical Exercises for Beginners, Op.599 Czerny
3 230~259 30 Études de Mécanisme, Op.849 Czerny
4 260~284 25 Études faciles et progressives, Op.100 Burgmüller
260 No.1 in C Major, La candeur
261 No.2 in A Minor, L'arabesque
262 No.3 in G Major, La pastoral
263 No.4 in C Major, La petite reunion
264 No.5 in F Major, Innocence
265 No.6 in C Major, Progres
266 No.7 in G Major, Le courant limpide
267 No.8 in F Major, La gracieus
268 No.9 in C Major, La chasse
269 No.10 in D Major, Tendre eur
270 No.11 in C Major, La bergeronnette
271 No.12 in A Major, L'adieu
272 No.13 in C Major, Consolation
273 No.14 in G Major, La styrienne
274 No.15 in C Minor, Ballade
275 No.16 in G Minor, Douce plainte
276 No.17 in F Major, La babillarde
277 No.18 in E Minor, Inquiétude
278 No.19 in A Major, Ave Maria
279 No.20 in D Minor, La tarentelle
280 No.21 in G Major, L'harmonie des anges
281 No.22 in A-Flat Major, Barcarolle
282 No.23 in E-Flat Major, Le retour
283 No.24 in G Major, L'hirondelle
284 No.25 in C Major, La chevaleresque
5 285~320 16 Selections from The Virtuoso Pianist Hanon
47
MIDI Implementation List
Function Transmitted Recognized Remarks
Basic
Channel
Default
Changed
1ch
×
1-16ch
×
Mode Default
Messages
Altered
×
×
********
×
×
×
Note
Number True sound
0-127
********
0-127
0-127
Velocity Note on
Note o
○ 99H,V=1-127
○ 99H,V=0
○ 9nH,V=1-127
○ 9nH,V=0;8nH,V=0-127
After Touch Key’s
Channel
×
×
○
×
Pitch Bend
× ○
Control
Change
0
1
5
6
7
10
11
64
65
66
67
80
81
91
93
120
121
123
○
×
×
×
○
×
×
○
×
○
○
×
×
×
×
×
×
×
○
○
○
○
○
○
○
○
○
○
○
○
○
○
○
○
○
○
Bank Select
Modulation
Portamento Time
Data Entry
Volume
Pan
Expression
Sustain Pedal
Portamento On/O
Sostenuto Pedal
Soft Pedal
Reverb Program
Chorus Program
Reverb Level
Chorus Level
All Sound O
Reset All Controllers
All Notes O
Program
Change True Number
×
********
○
System Exclusive
× ○
System
Common
Song Position
Song Select
Tune Request
×
×
×
×
×
×
System
Real Time
Clock
Commands
×
○
×
×
Aux
Messages
Local ON/OFF
All Notes O
Active Sensing
System Reset
×
×
×
×
×
×
×
×
Notes
Mode 1: OMNI ON, POLY Mode 2: OMNI ON, MONO ○ : YES
Mode 3: OMNI OFF, POLY Mode 4: OMNI OFF, MONO × : NO

SC401