1
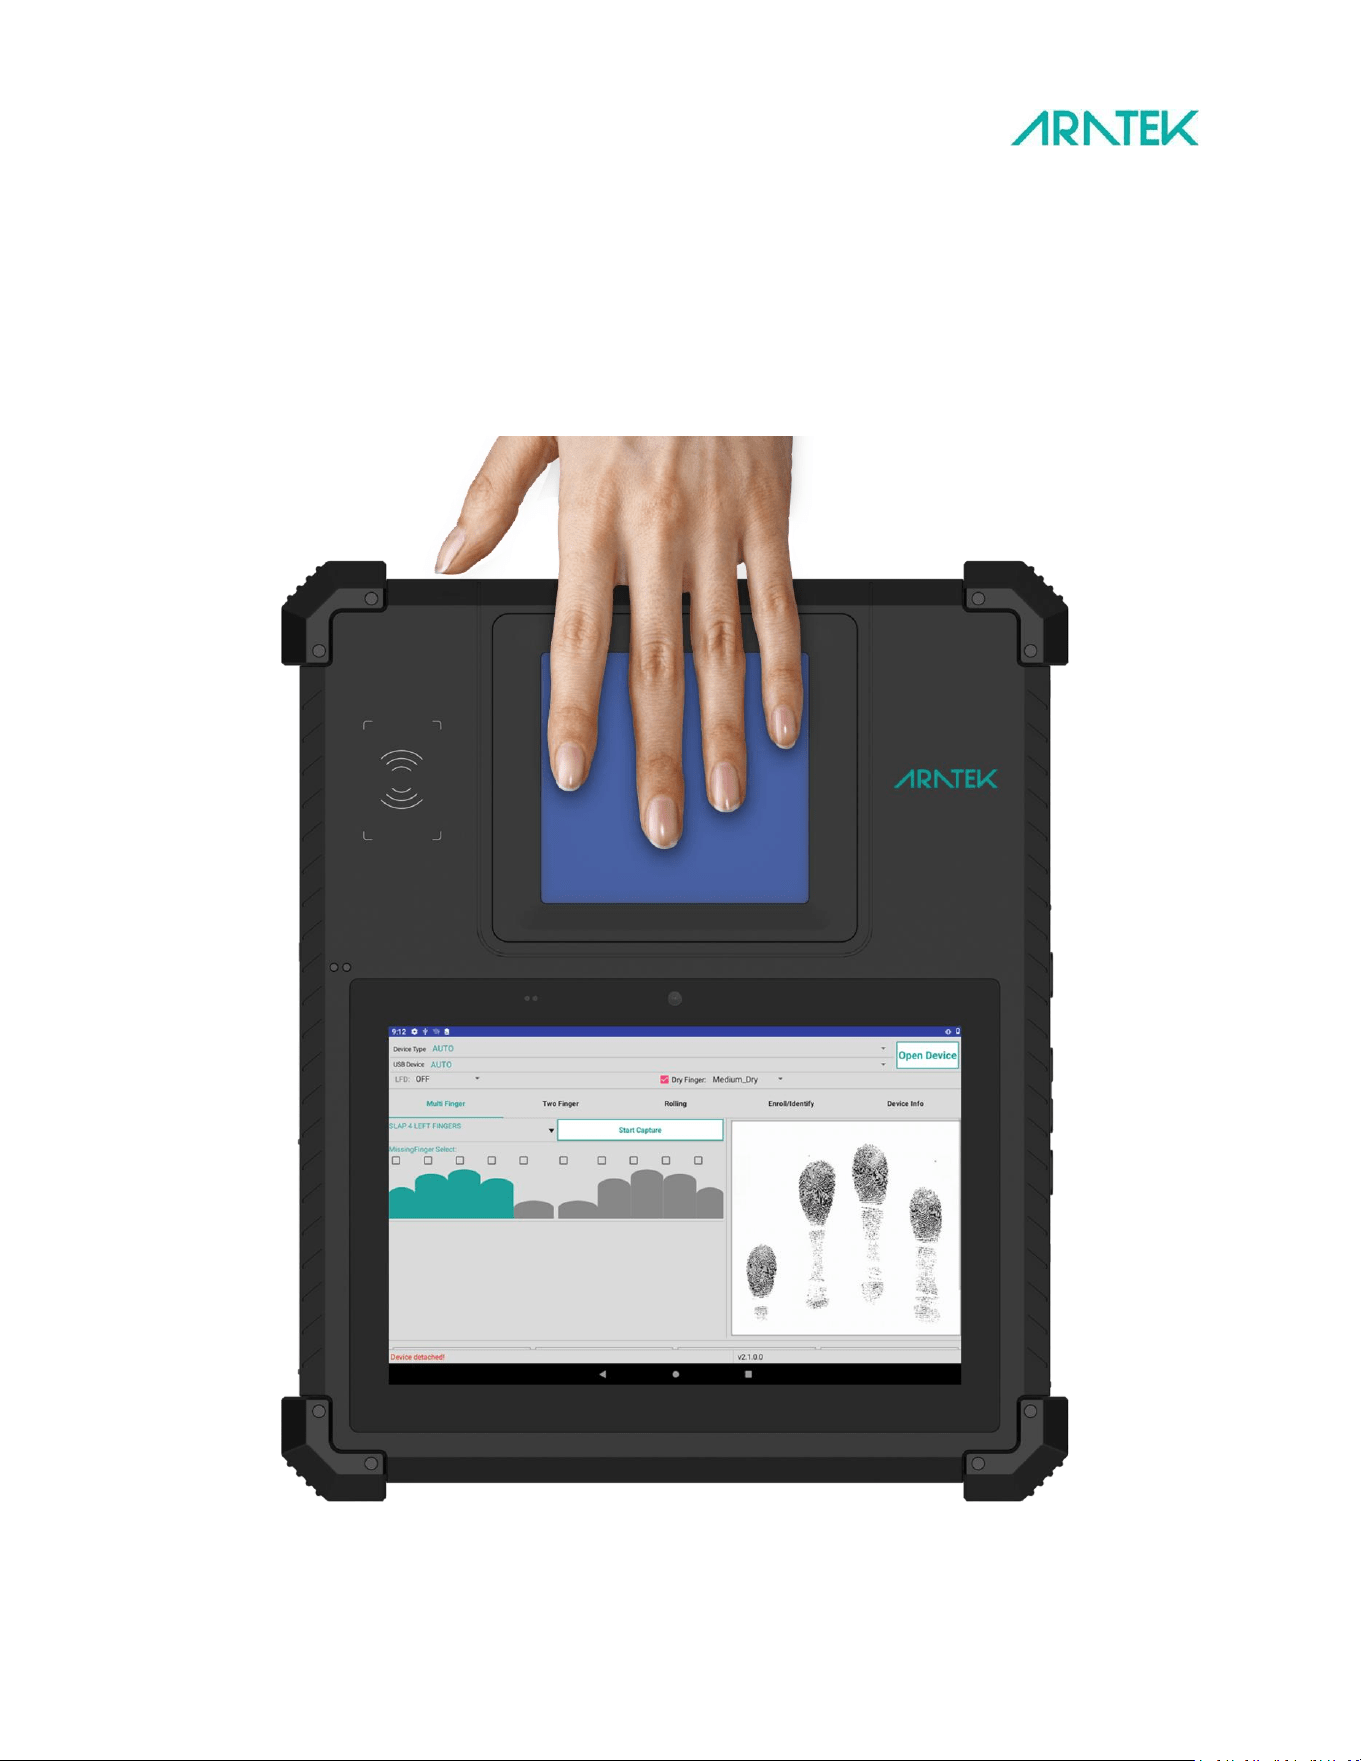
Marshall 8R Plus User Manual

2
Contents
Notice ........................................................................................................................................................3
Important Statement................................................................................................................................ 4
General safety information.......................................................................................................................5
Product Introduction................................................................................................................................ 6
Product Outlook................................................................................................................................7
Product main components location................................................................................................. 8
SIM / PASM / TF card Ports ...............................................................................................................9
Earphone jack /USB Type A /Type C ............................................................................................... 10
Power button/Volume buttons/Quick function button ................................................................. 11
Contact Card Reader .......................................................................................................................12
Contact-less card reader(NFC)........................................................................................................13
Barcode Scanner............................................................................................................................. 14
Screen............................................................................................................................................. 15
Fingerprint Scanner.........................................................................................................................16
Camera............................................................................................................................................17
IRIS moudle ..................................................................................................................................... 18
Battery............................................................................................................................................ 19
Technical Specification................................................................................................................... 20
Operations.............................................................................................................................................. 21
On/Off operation............................................................................................................................ 21
Install /Remove SIM / TF Cards.......................................................................................................22
Replace / Install battery ..................................................................................................................23
Charging device...............................................................................................................................24
Charging LED indicator behaviour .................................................................................................. 24
Cleaning device............................................................................................................................... 25
Troubleshooting......................................................................................................................................26
FAQ ..........................................................................................................................................................27

3
Notice
This user manual provides a summary of basic product specifications and features. before use for each
product, please read this user manual carefully. Pay special attention and adhere to safety information in
this manual.
Some of the instructions in this manual are based on the Android 13 operating platform. if you are using
another Operating system, some operations may vary.
Do not touch the LCD panel with sharp or hard objects. Do not use abrasive cleaners, waxes or solvents
When cleaning, only use a dry or damp soft cloth. Use only specified batteries, power supplies and
accessories by the manufacturer.
Due to our continuous research and improvement, the content in this catalog may change without notice.
The printed illustrations in this manual may differ from the actual product. This The functions and
operations described in this guide are common to most (but not all) models.
This manual contains proprietary information protected by copyright. all rights reserved.
Aratek biometric company to be exempted liability for any loss or damage caused by the use (or misuse)
of this product.

4
Important Statement
The following documents contain private information of Aratek Biometric Co., Ltd. (hereinafter referred
to as ARATEK). This information is accurate and reliable, and is not allowed to be used or disclosed by
third parties without the permission of the company's management. Any unauthorized copying, special
conditions, limitations or modifications of this information with knowledge are infringing.
Aratek reserves the right to make changes, additions, deletions, improvements and any other changes to
the company's products and services at any time without notice to any party. In the process of using the
company's products, third parties shall not infringe any patents or other intellectual property rights..
Except for the Aratek logo design, all other trademarks or registered trademarks belong to their
respective owners.
Contact US:http://www.aratek.co/
Address:2F,T2-A #Building Software park, South Area, Hi-tech Park,Nanshan
District Shenzhen, Guangdong, China
Postcode:518057
Telephone:0755-26719975

5
General safety information
Use the following safety guidelines to help protect your equipment from potential damage, in addition to
observing and heeding any other precautions and safety warnings in this manual.
WARNING: TO REDUCE THE RISK OF FIRE OR ELECTRIC SHOCK, DO NOT
EXPOSE THIS EQUIPMENT TO EXTREME HEAT, RAIN OR MOISTURE.
Make sure the power cord is unplugged from the outlet during thunderstorms or when it is not in use for
a long time. Do not open the device or remove any internal parts. If service is required, please contact
qualified personnel. Please observe all handling precautions when using this product.
Operating Environment
Remember to follow any special regulations enforced in any area, and always switch your device off
whenever it is forbidden to use it, or when it may cause interference or danger. Do not use your device in
restricted areas. Switch your device off in any facility where posted notices require you to do so. When
connecting the device or any accessory to another device, read the user’s guide for detailed safety
instructions. Do not connect incompatible products.
Cautions
Any changes or modifications to Marshall 8R plus equipment not expressly approved in this document
could void your warranty on this product and void your authority to operate this equipment. Although
your device is very solid, it is a complex device and can be damaged. Avoid dropping, bumping, bending
or sitting on it. Keep your device away from any liquids. Precipitation, moisture, and liquids contain
minerals that corrode electronic circuits.
Other Important Safety Information
Only qualified personnel should service this equipment. Defective service may be dangerous and may
void any warranty applicable to the device. When transporting the device in a moving vehicle, make sure
that any electronic or related equipment used in the vehicle is securely installed. Turn off your device
before boarding the plane. The use of wireless mobile devices on board an aircraft is illegal and may be
dangerous to the operation of the aircraft. Keep the device and all its parts out of the reach of children.

6
Product Introduction
Key featur
Powerful. Packed with Features. The ARATEK Marshall 8R plus ushers in a new age in biometric
identification and authentication. From fingerprint to facial recognition, barcode to contact and contact-
less card reading with tamper-protection, all the way to a large 8- inch display, ARATEK Marshall 8R plus
integrates everything needed to get the job done.
Extremely sturdy, the IP65 rated ARATEK Marshall 8R plus enables users to securely manage enrollments
and is suited for national ID, voter registration, SIM card activation, border control, law enforcement,
financial services, and census campaigns. The ARATEK Marshall 8R plus has got everything covered.
e
FAB 60 FBI-Approved Fingerprint Scanner
Removable Long-Life Battery
Mobile 4G, Wi-Fi, Bluetooth & GPS Connectivity
Contact-less card reader(NFC)
Contact Smart Card-Reader
1D/2D Barcode Scanner
Android 13 OS or above
Memory: 4GB RAM & 64GB ROM
8” Scratch Resistant Touch Screen
Dual SIM Ports
TF card Port, PSAM card Port, Earphone jack port.
Purpose of this user manual
This manual has been designed to introduce the user to the device features and components to be used
as a step-by-step guide to achieve optimal device performance. The manual is intended to inform the
user about proper operating procedures and provide relevant technical information related to the device.
Warranty
The standard warranty period for the hardware and parts, as well as workmanship is 12 (twelve) months.
Packaging
Marshall 8R plus device is neatly and securely packaged inside a custom EVA hard shell box.
7
Product Outlook
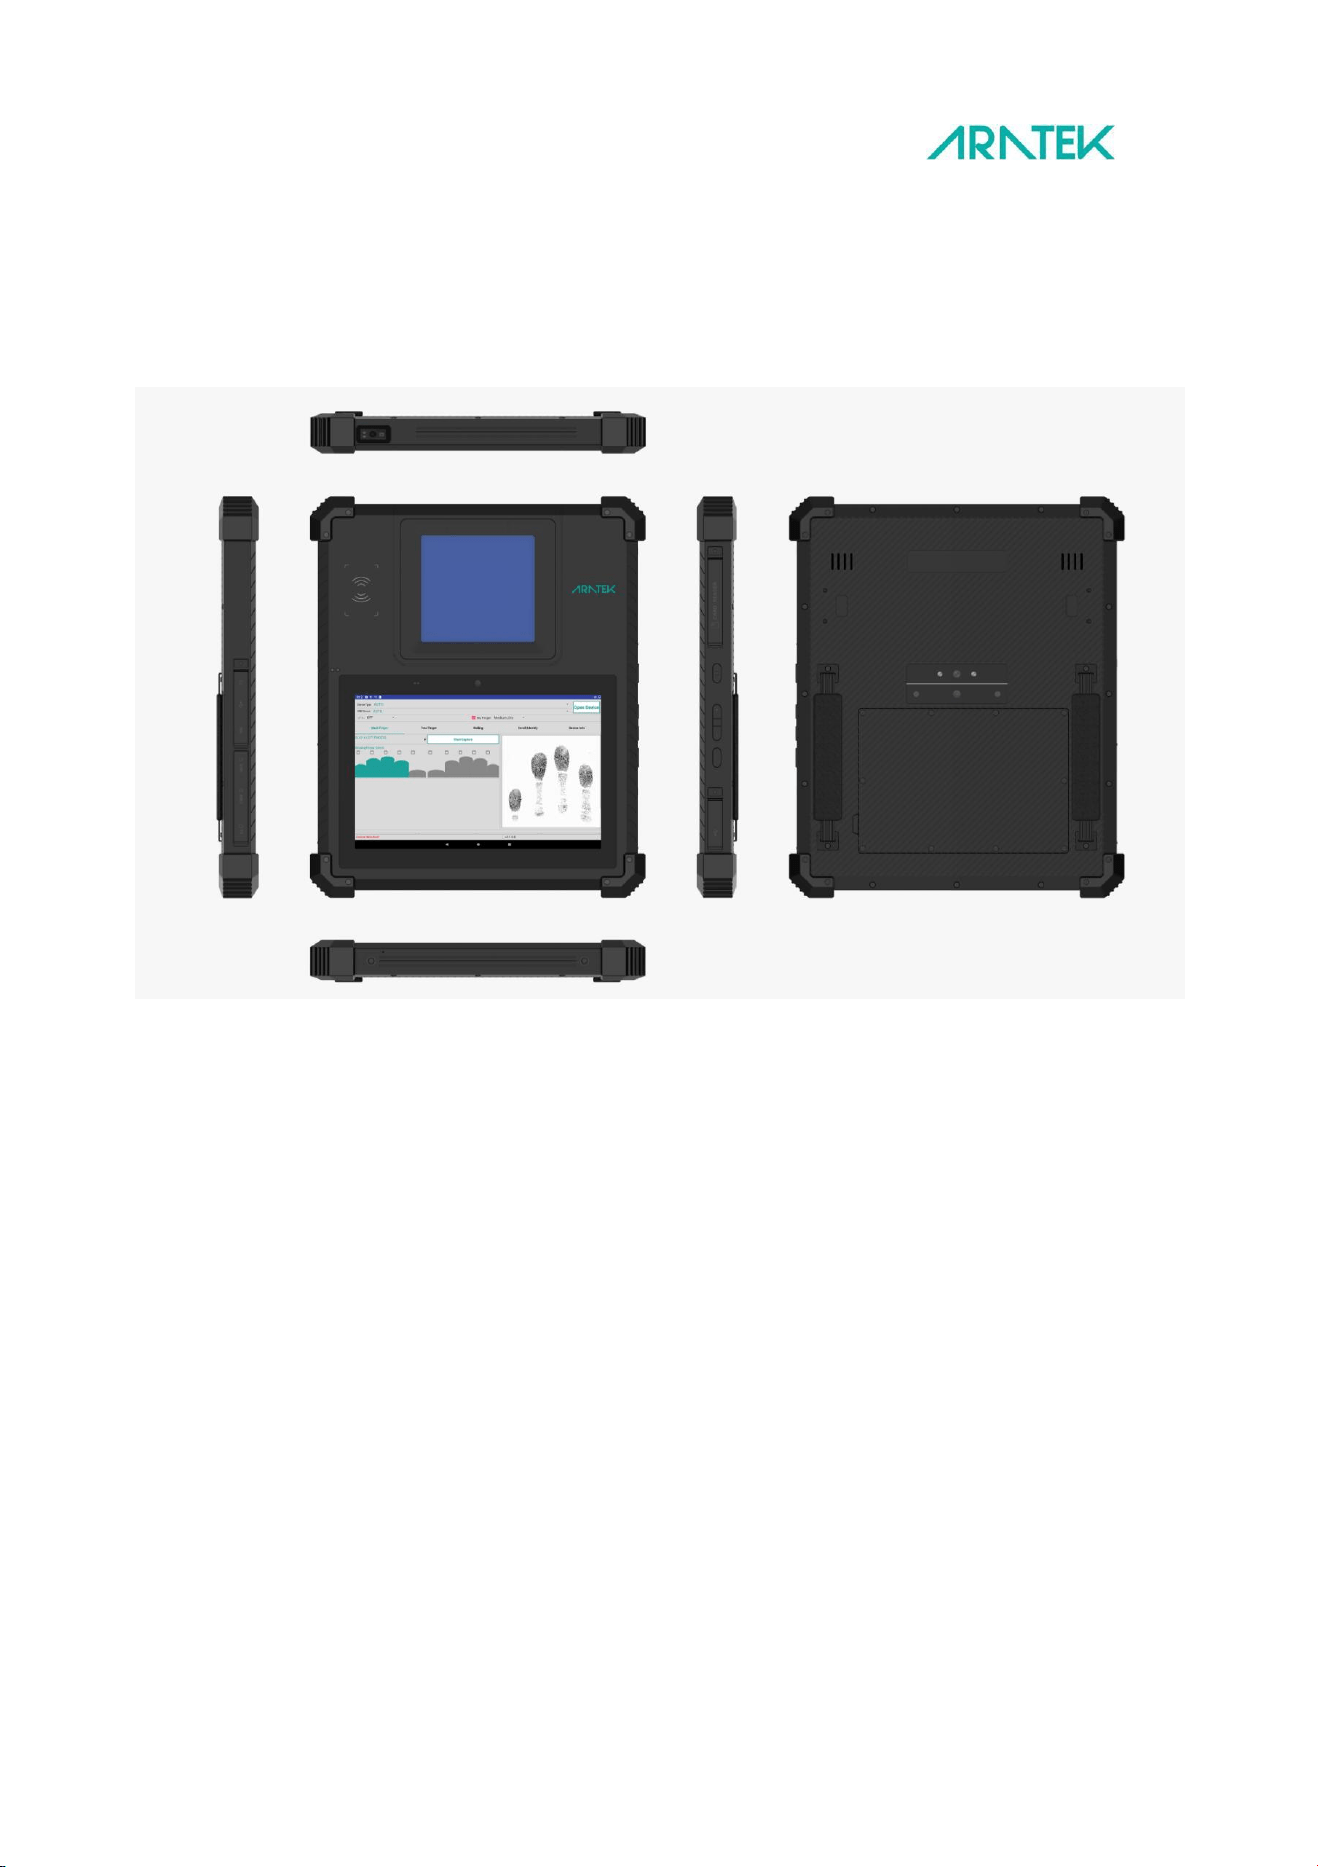
Product View:
Dimensions (L*W*H): 286*239*28.5 mm Weight: 1.3 kg
8
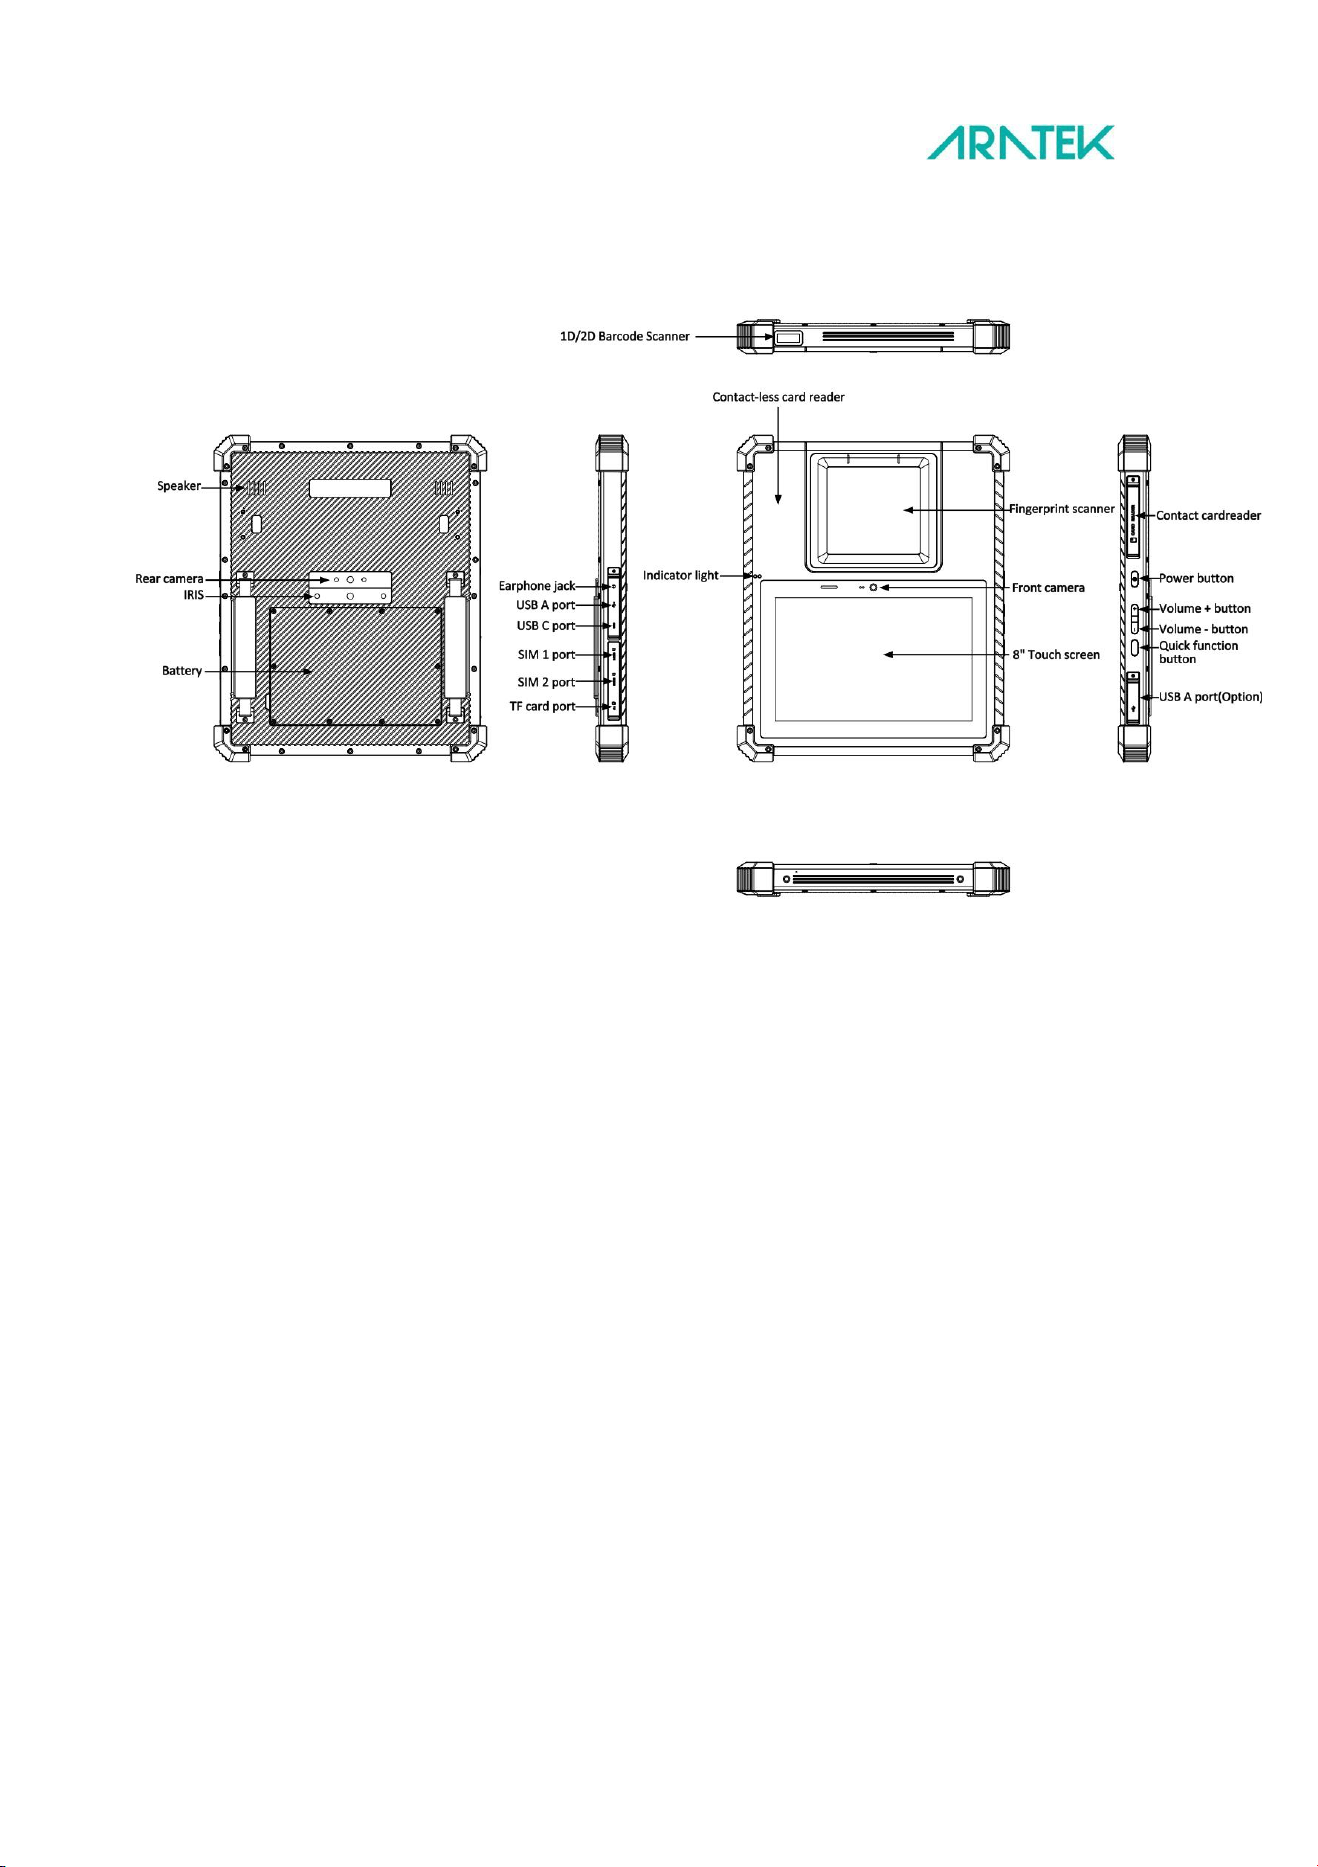
Product main components location
Please note that if the Iris and the right side USB A port cant not exist at same time.
9
SIM / PASM / TF card Ports
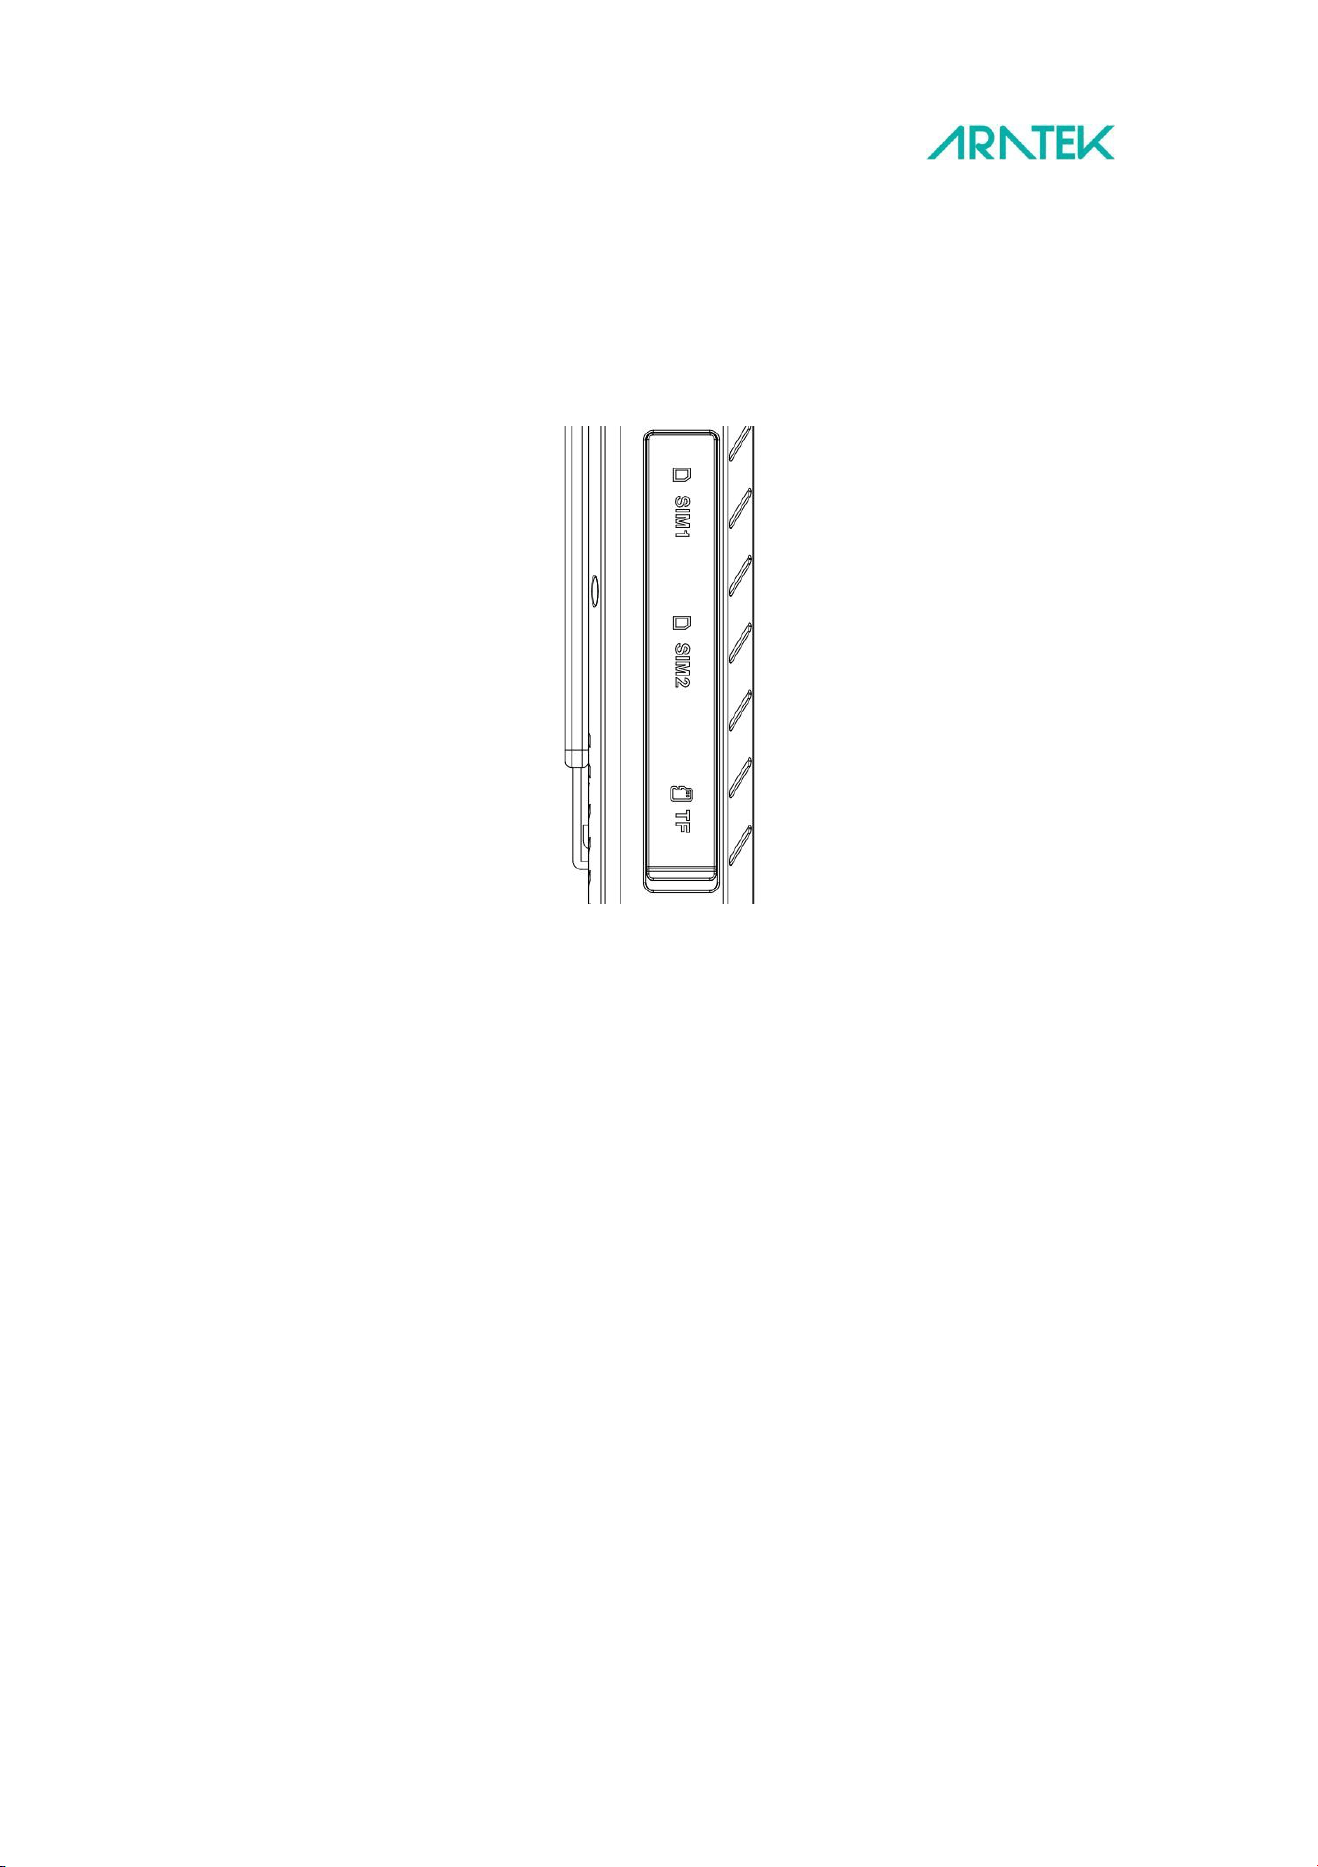
The SIM /TF card panel can only be accessed with the left side ports under rubber cover. Open the rubber cover to insert cards to
the device.
The PASM card ports are under the battery(not showed in the below image).
Insert T-Flash card (micro SD) memory card into slot in correct
orientation as shown above. The device can accommodate a TF
card with memory of up to 256GB.
Insert the 2 x micro SIM (Subscriber Identity Module) cards into slots
in correct orientation as shown above.
Insert the 1x PSAM (Purchase Security Application Module) cards into
the slot under battery socket.
10
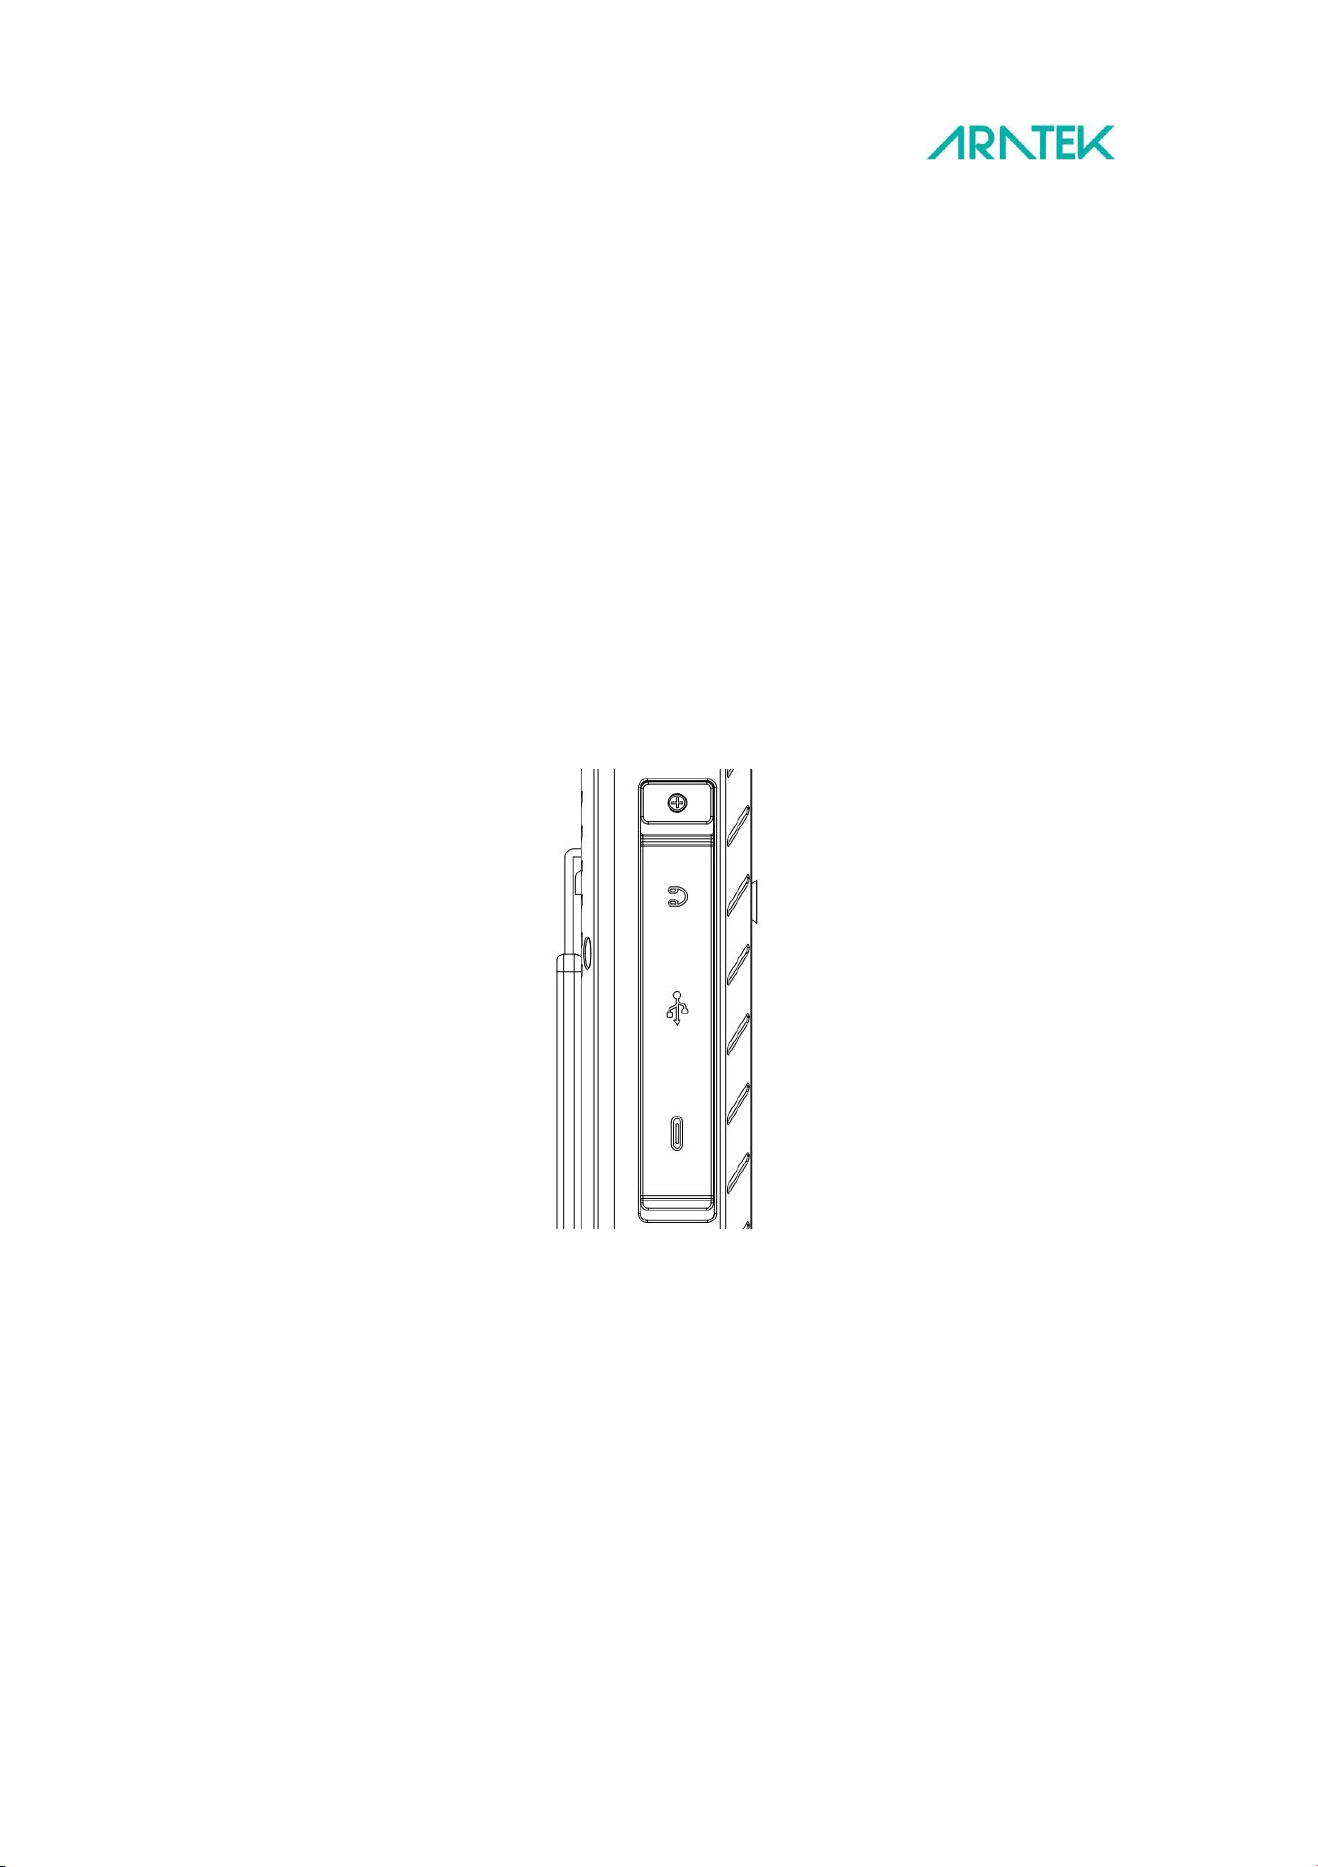
Earphone jack /USB Type A /Type C
Ear phone jack Port
Ear phone jack port is allowed user to insert headphone sets while listening the instructions to do the
voting process.
USB type A Port
USB type A is a specification that allows USB devices, such as tablets or, to act as a host, allowing other
USB devices, such as USB flash drives, digital cameras, mice or keyboards, to be attached to them.
USB type C Port
This USB type C port is a specification that allows Marshall 8R plus connected with PC and another host
device to do data transfer, such as firmware upgrade, file transfer and more.
11
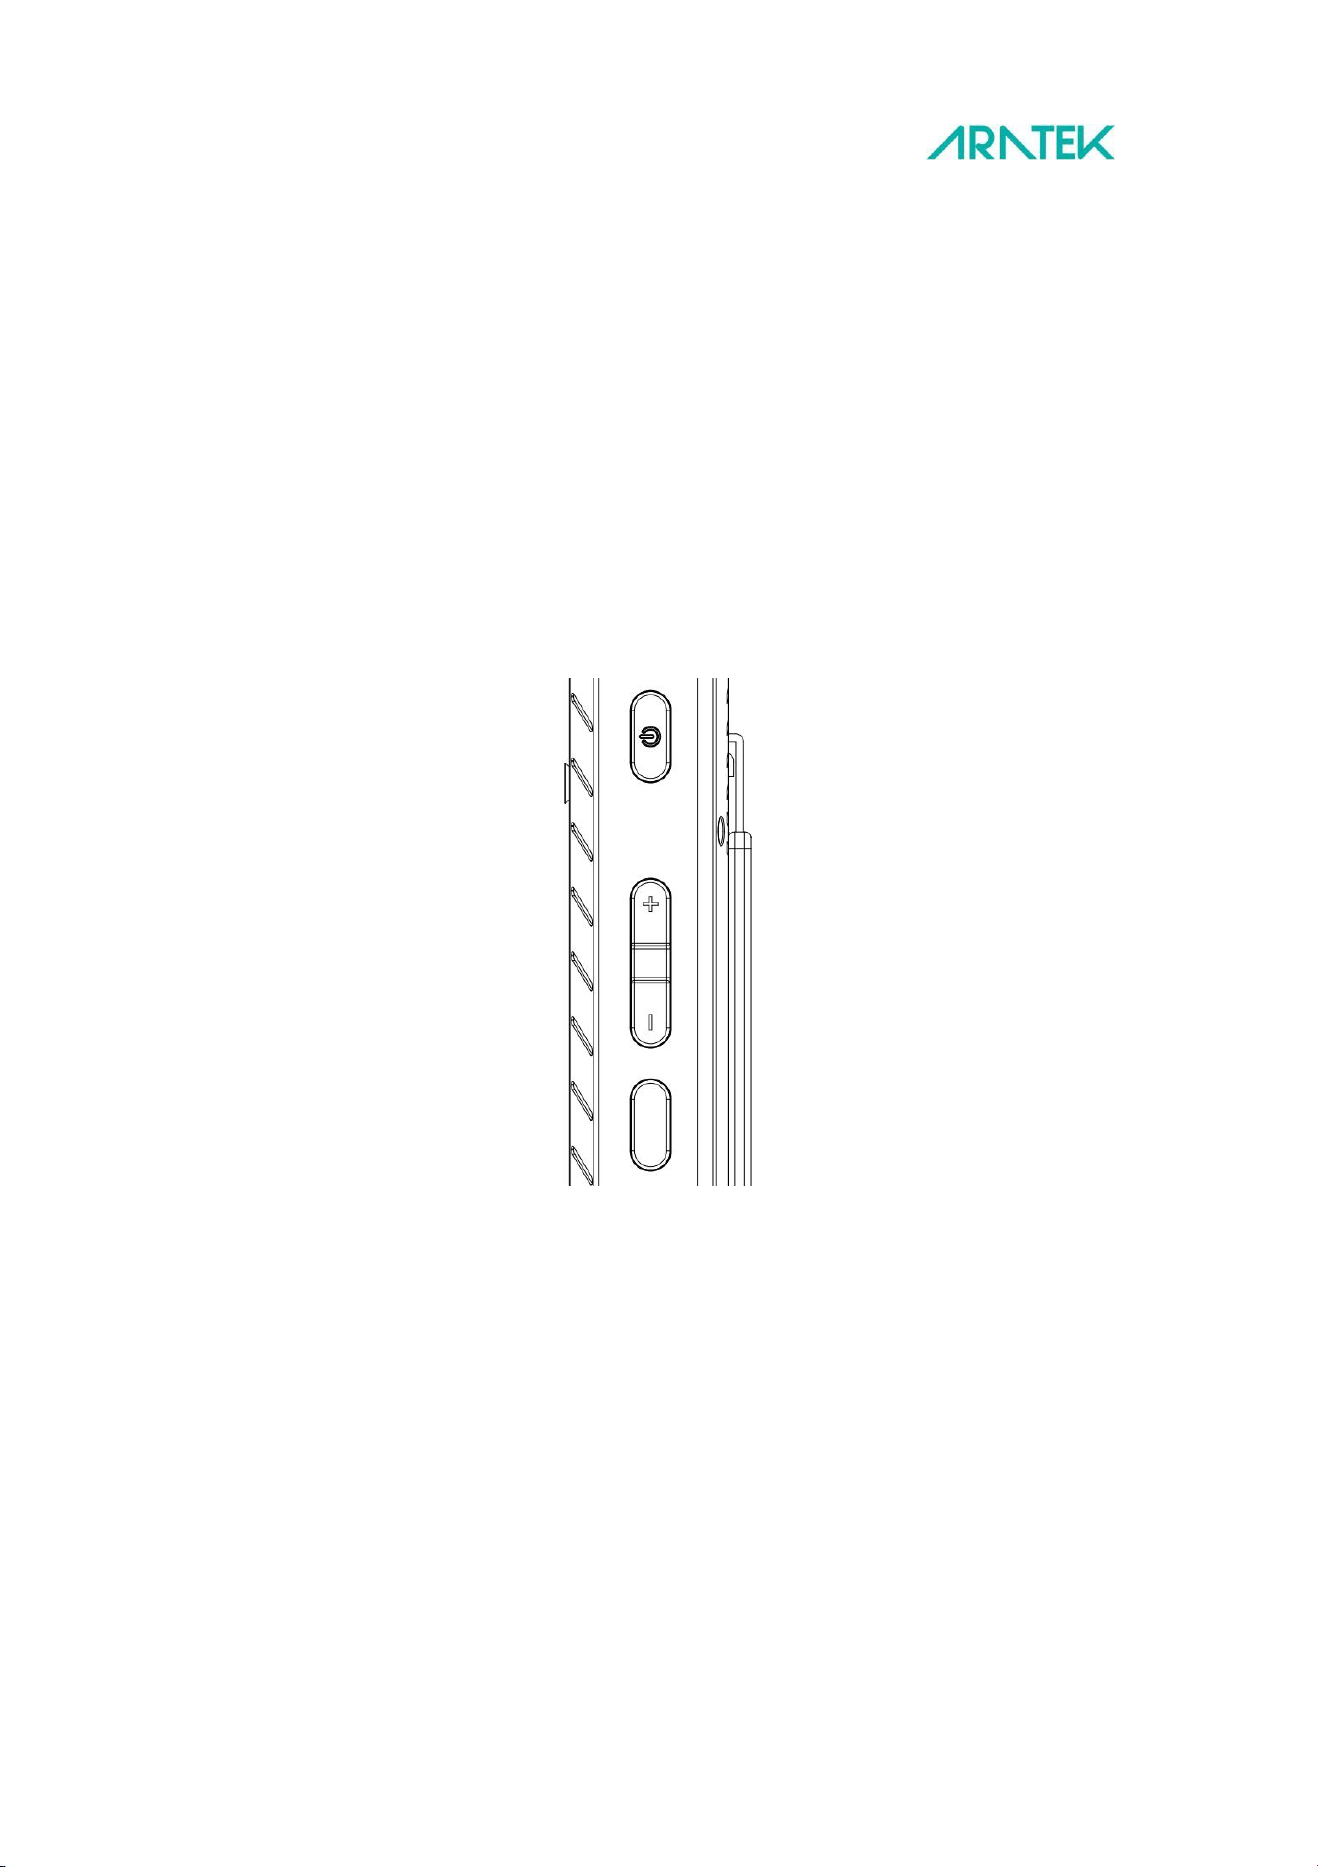
Power button/Volume buttons/Quick function button
Power button
Power button is allowed user to turn on and shut done the device.
Volume buttons
Volume buttons are allowed user to adjustment device volume from low to loud.
Quick function button
Quick function button is a customize button that allowed user to set this button as a shortcut function
button, the default function of this button is used as “return” function.
12
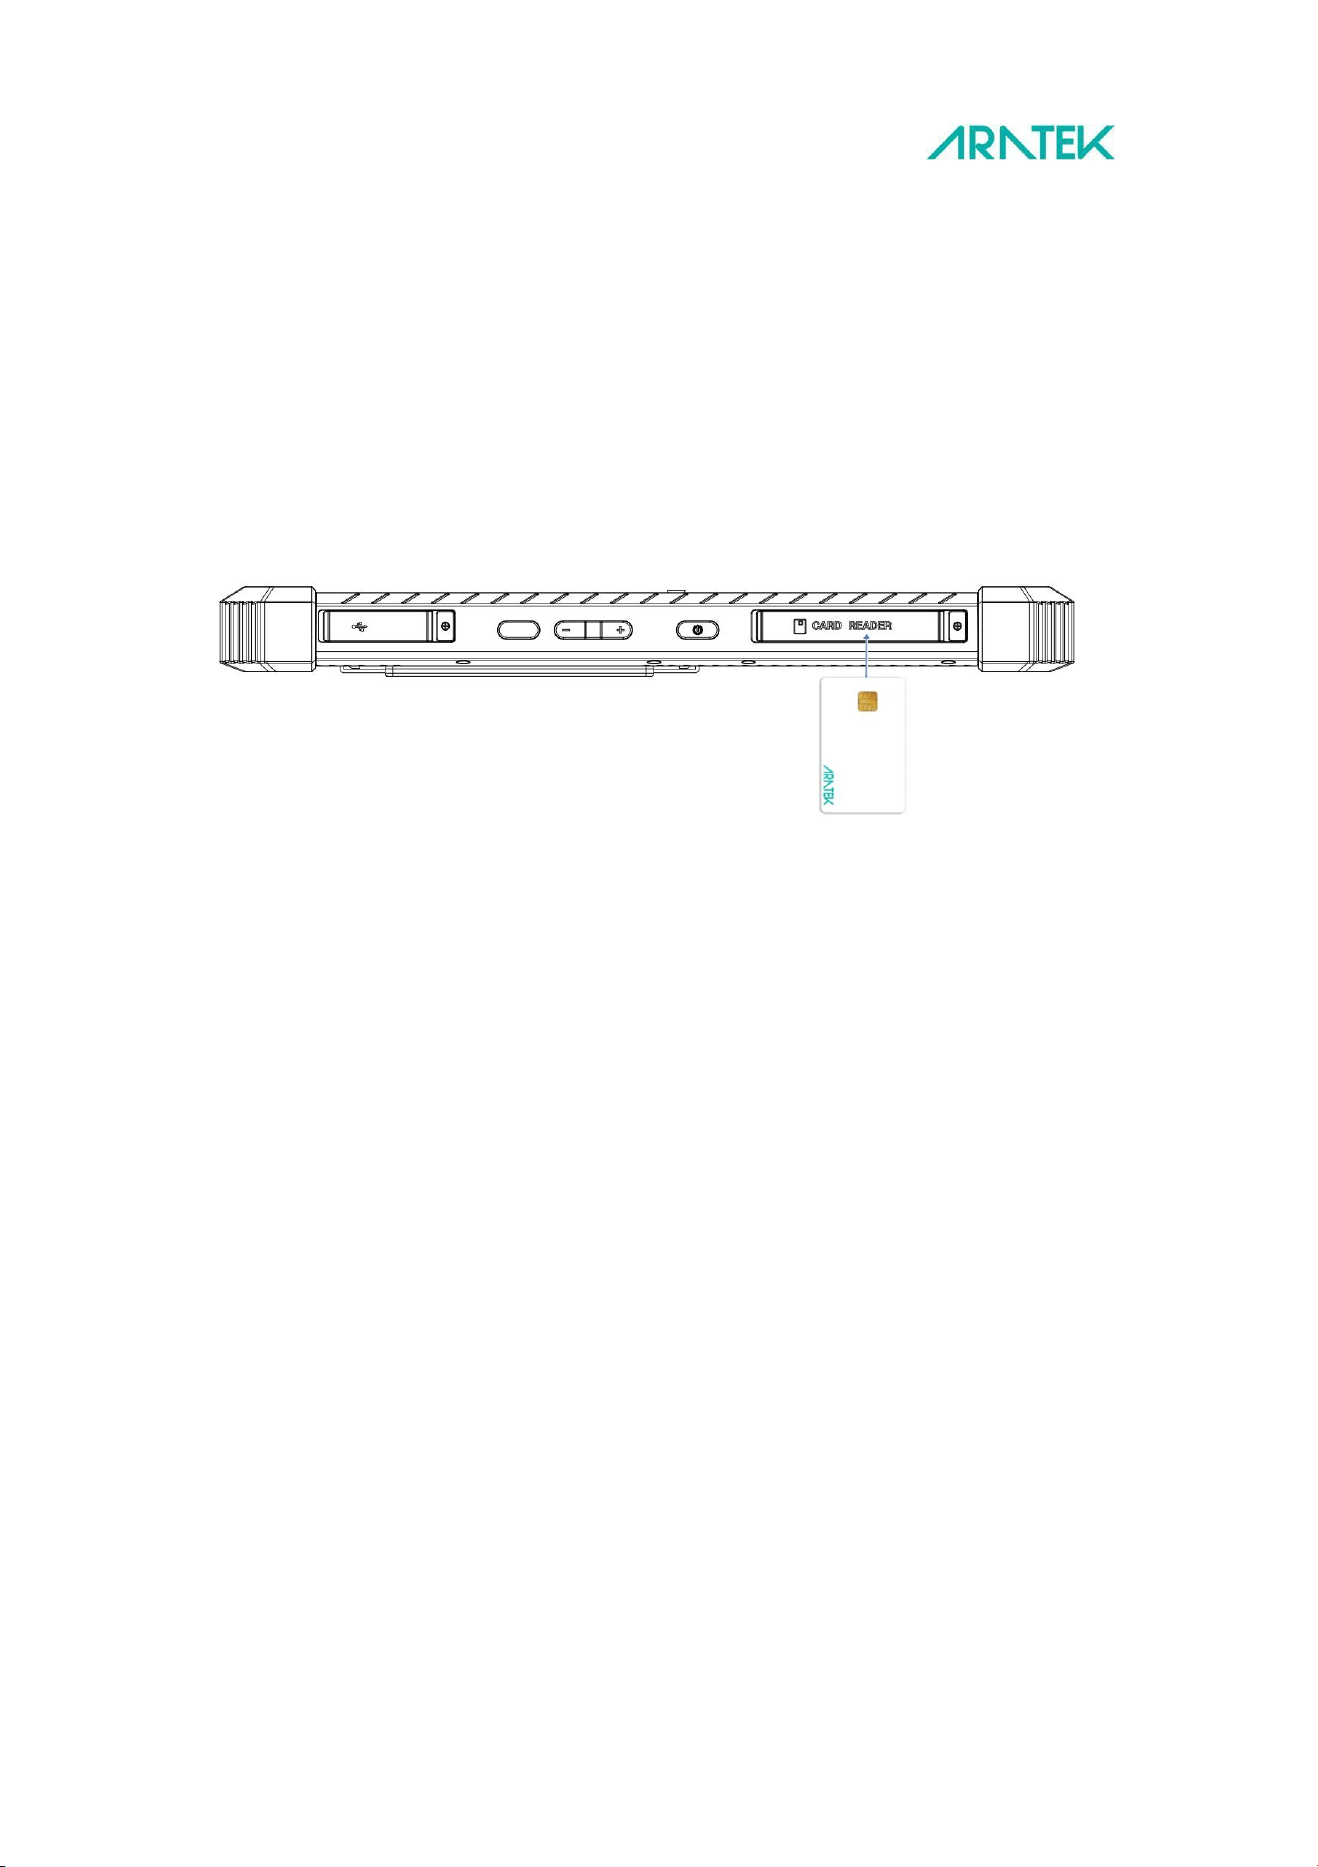
Contact Card Reader
Contact Card Reader is on the right-side of Marshall 8R plus.
Always make sure that the smart chip on your card is facing you (visible to you) when you inserting to the
slot.
Always insert smart chip side first (as indicated with arrow direction). See the picture below.
Smart chip face up!
13
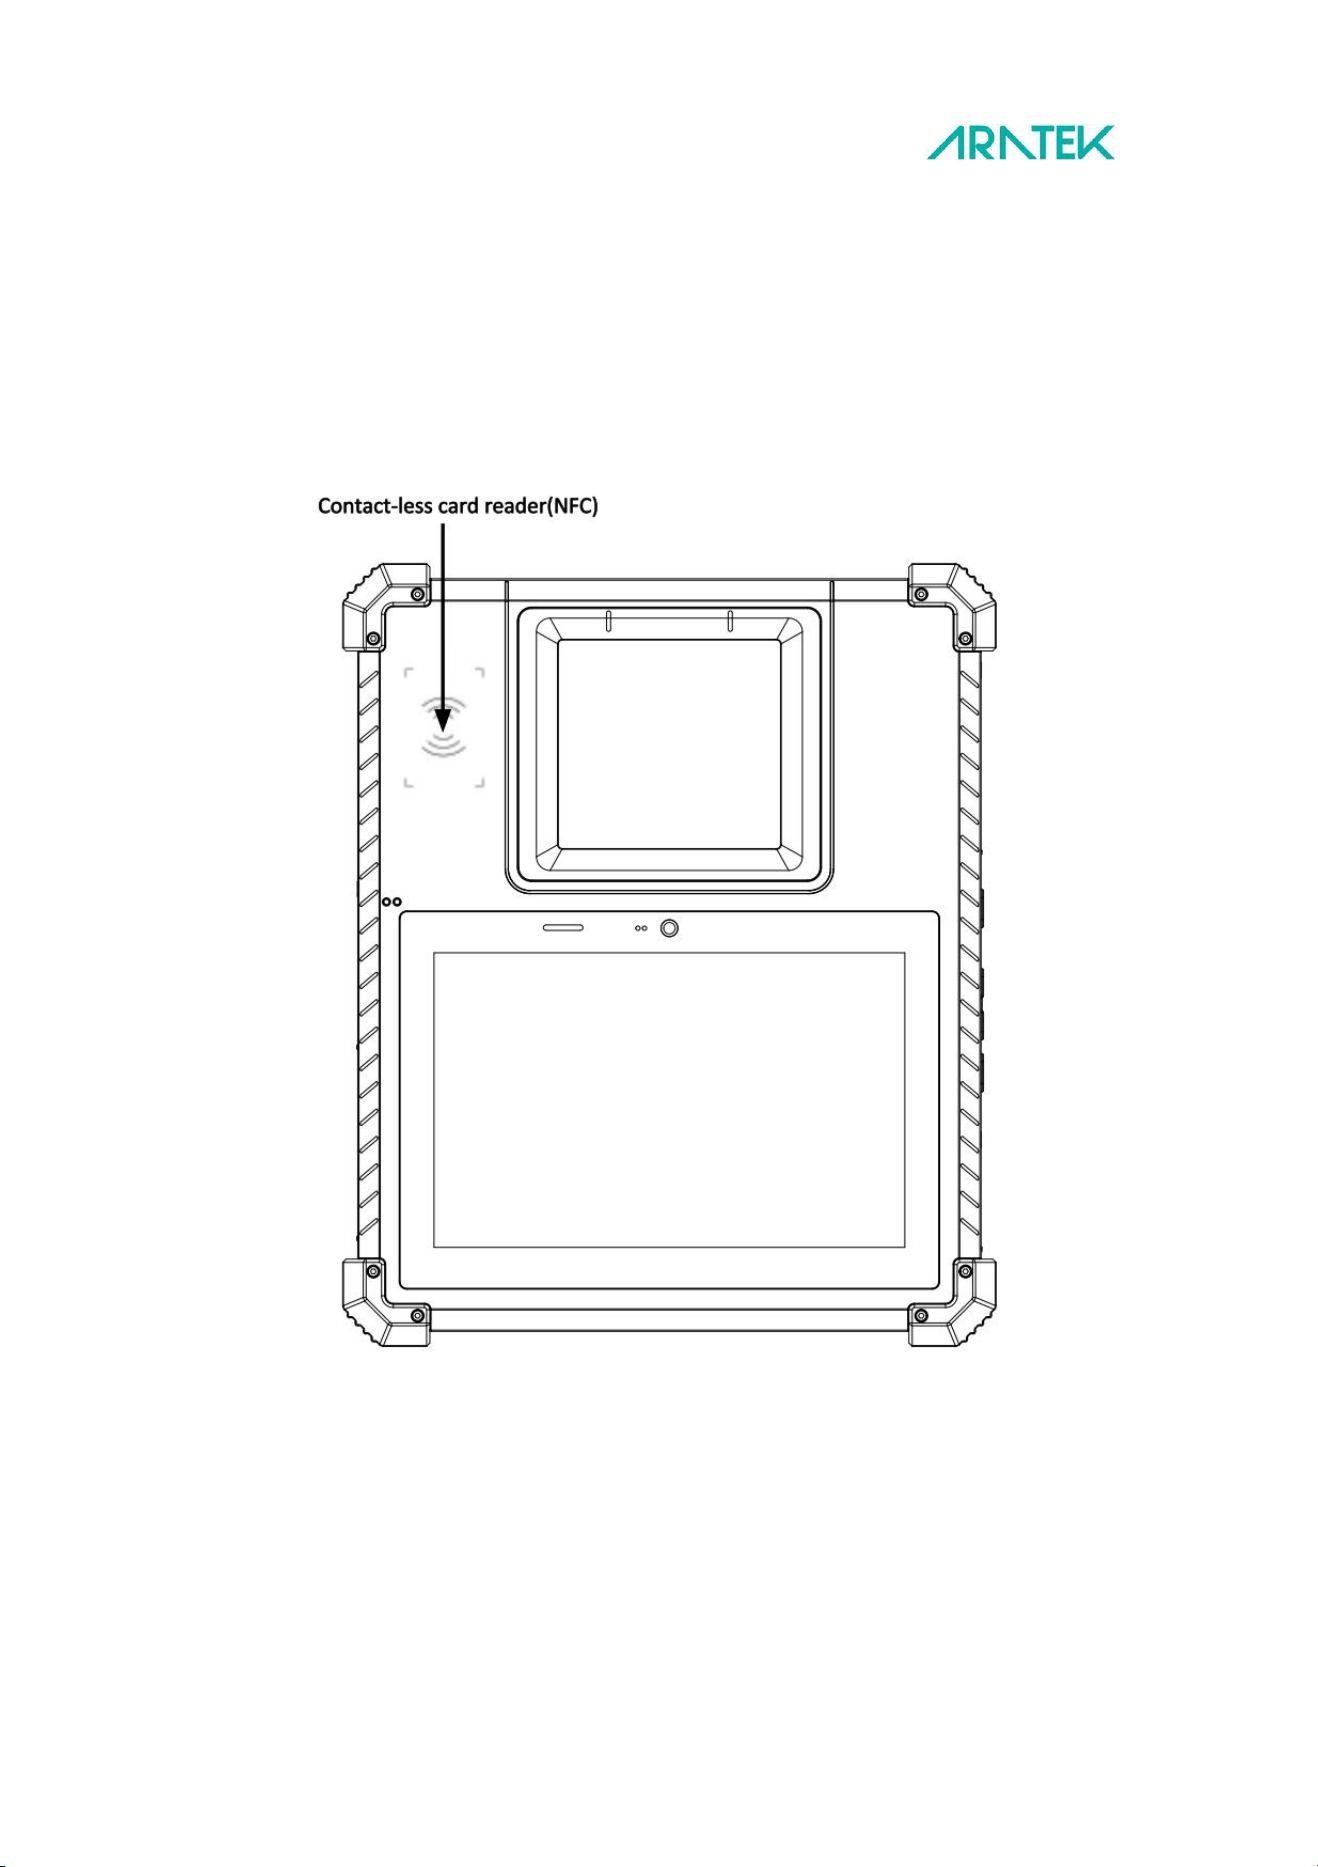
Contact-less card reader(NFC)
Near field communication (also known as NFC) enables two electronic devices to communicate with each
other. For example, a NFC card and a card reader will engage with each other, with a read range of
around 4cm offering more flexibility in the field than a contact card. The NFC contact area is in the device
upper center.
14
Barcode Scanner
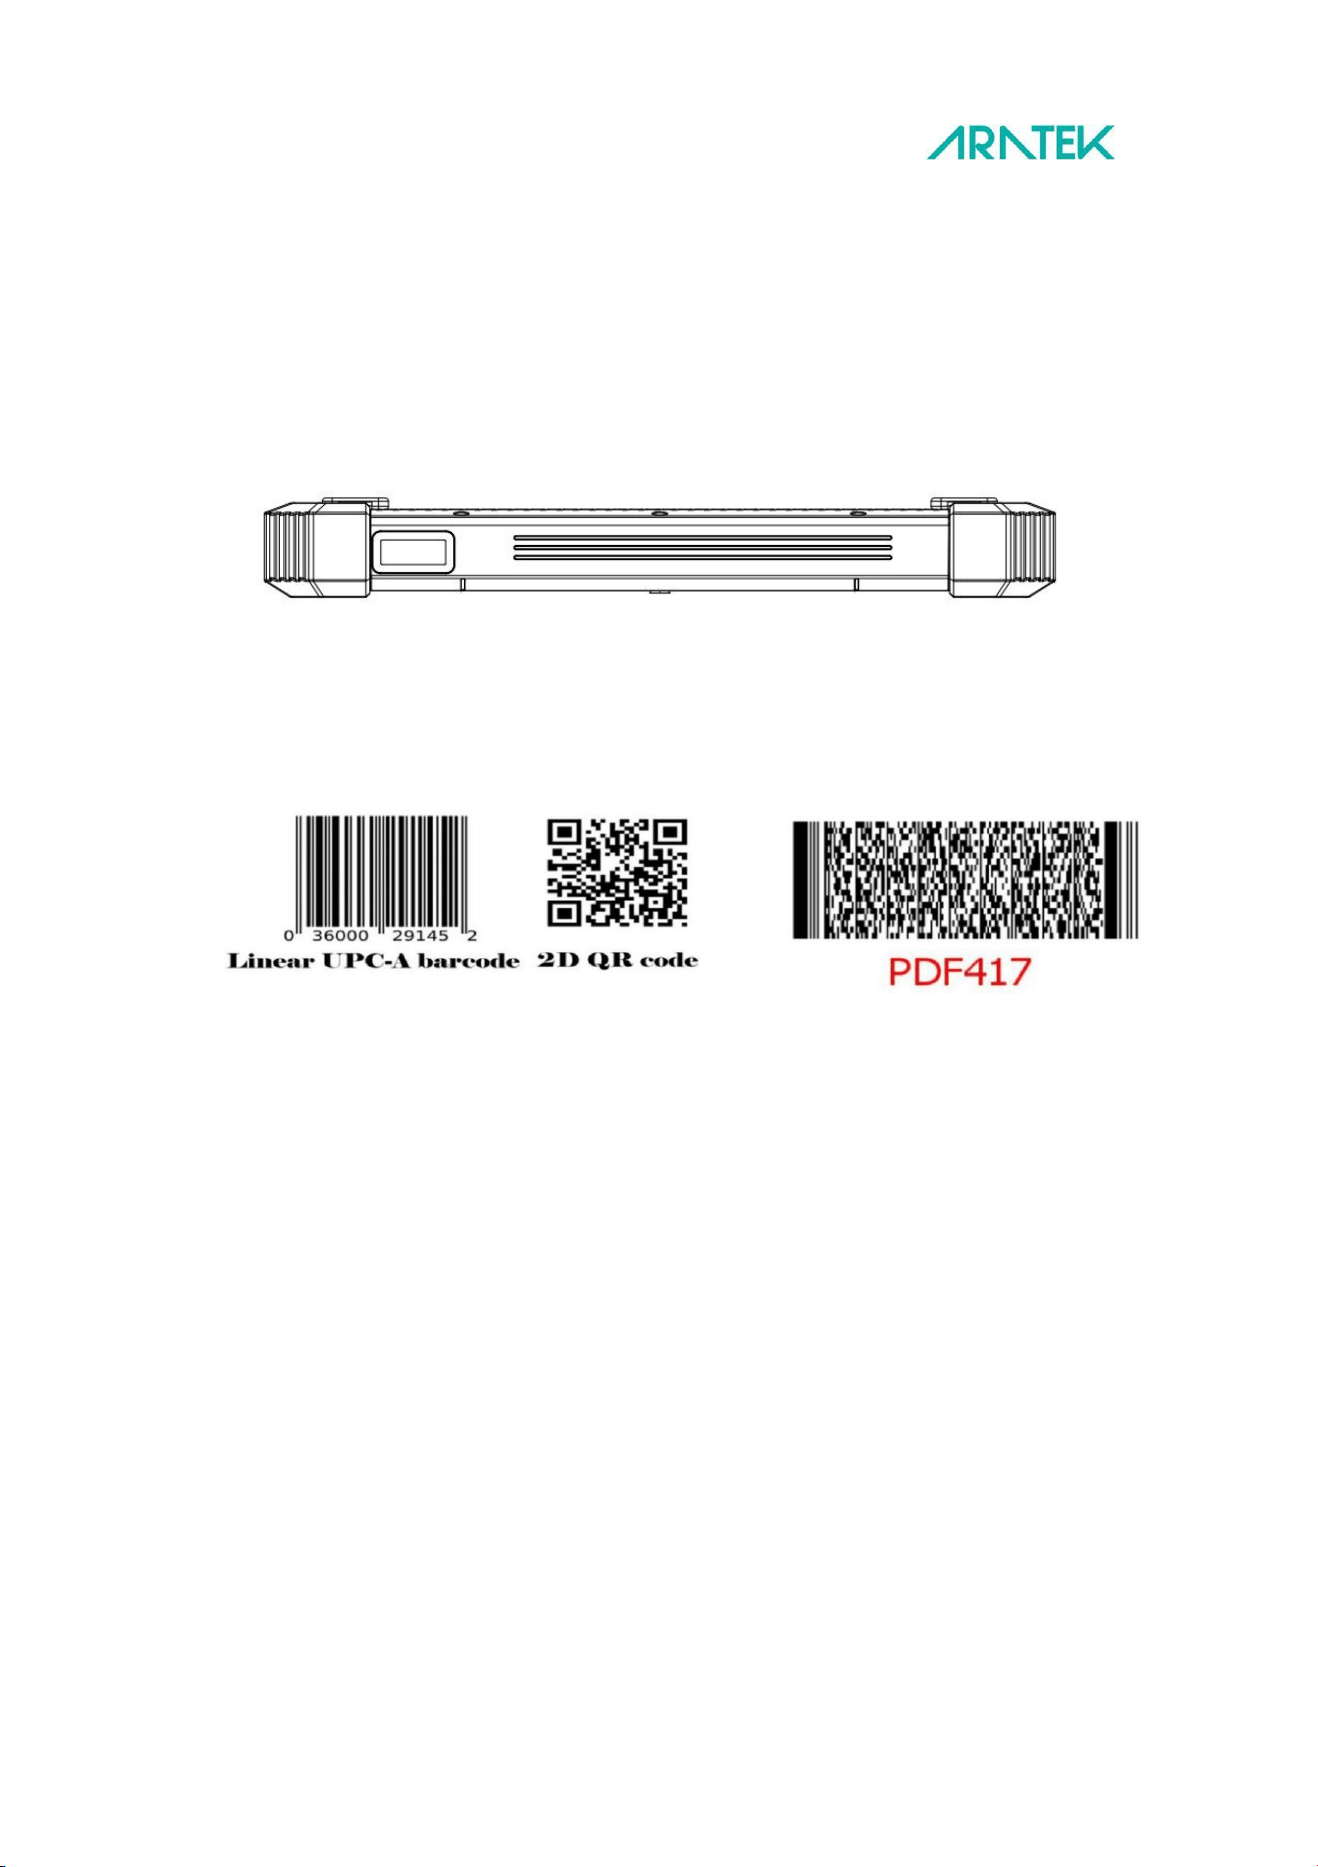
The barcode scanner is a sub-miniature area image engine optimized for barcode reading. The engine
captures digital images of a barcode for transmission to a decoder to decode a 1D or 2D barcode of any
format supported by the decoding software. The scanner includes an LED illumination system. Please
select your preferred image capture preferences and parameters.
Barcode Scanner
15
Screen
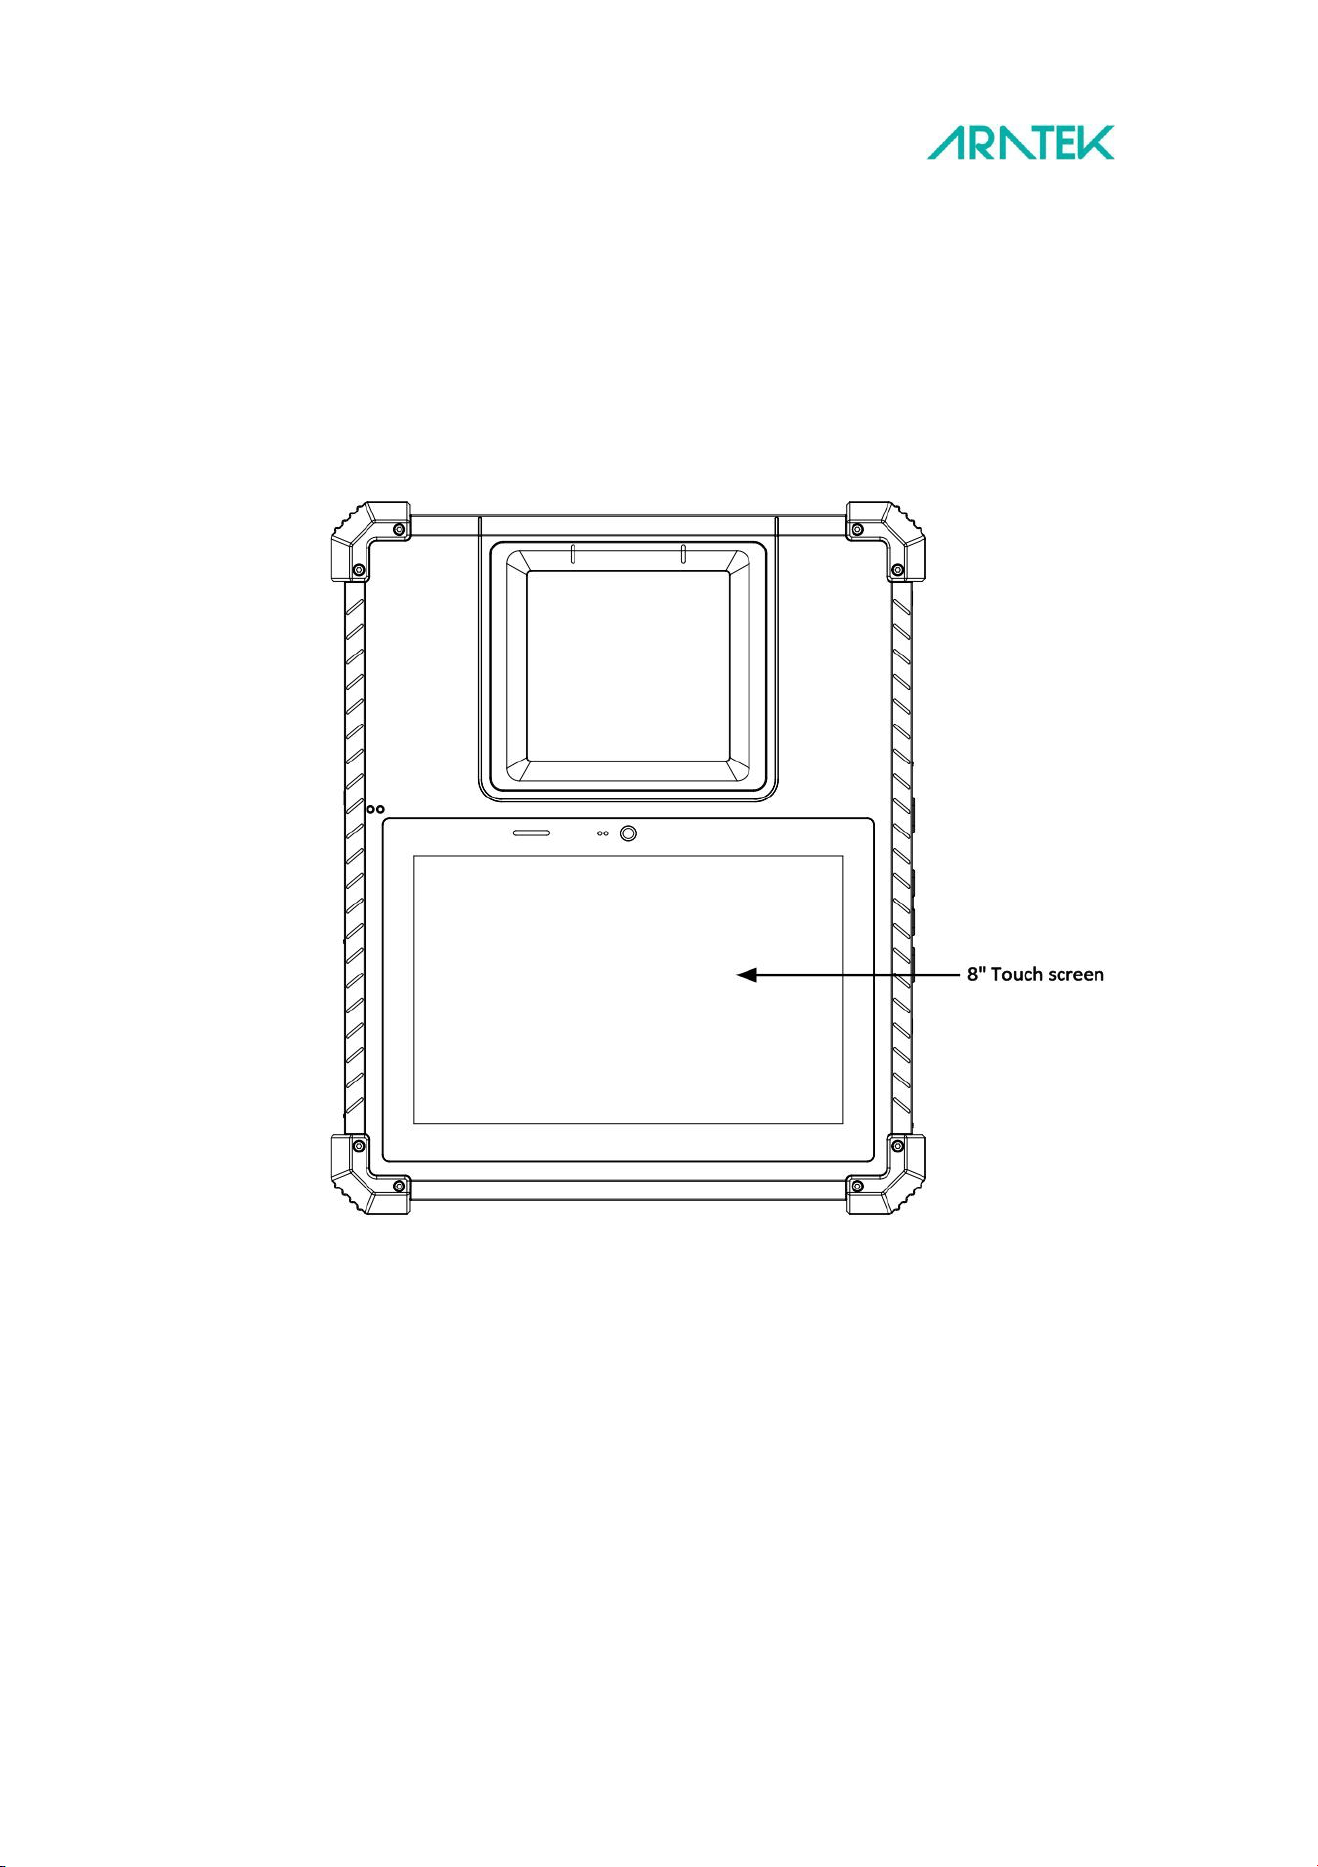
The Marshall 8R plus display panel with high brightness and high contrast is visible under strong sunlight
or outdoor environments. Avoid direct sunlight when possible to avoid overheating. Your tablet screen is
tough and scratch resistant, but direct impact of sharp objects and abrasive materials could cause
damage and leave marks. Always handle with care.
Keep your tablet display clean by using a soft, lint-free cloth. Use a damp
microfiber cloth to take care of fingerprints, grime, and stubborn stains.
Once all the stains are removed, wipe the screen again with a dry
microfiber cloth. Always turn your device off before cleaning it. Never
spray or drip cleaning liquid directly on screen. Never use harsh chemicals.
Never use abrasive cloths or paper towels. Use a cotton swab to pick up
dust and grime from the rim of your Marshall 8R plus screen.
16
Fingerprint Scanner
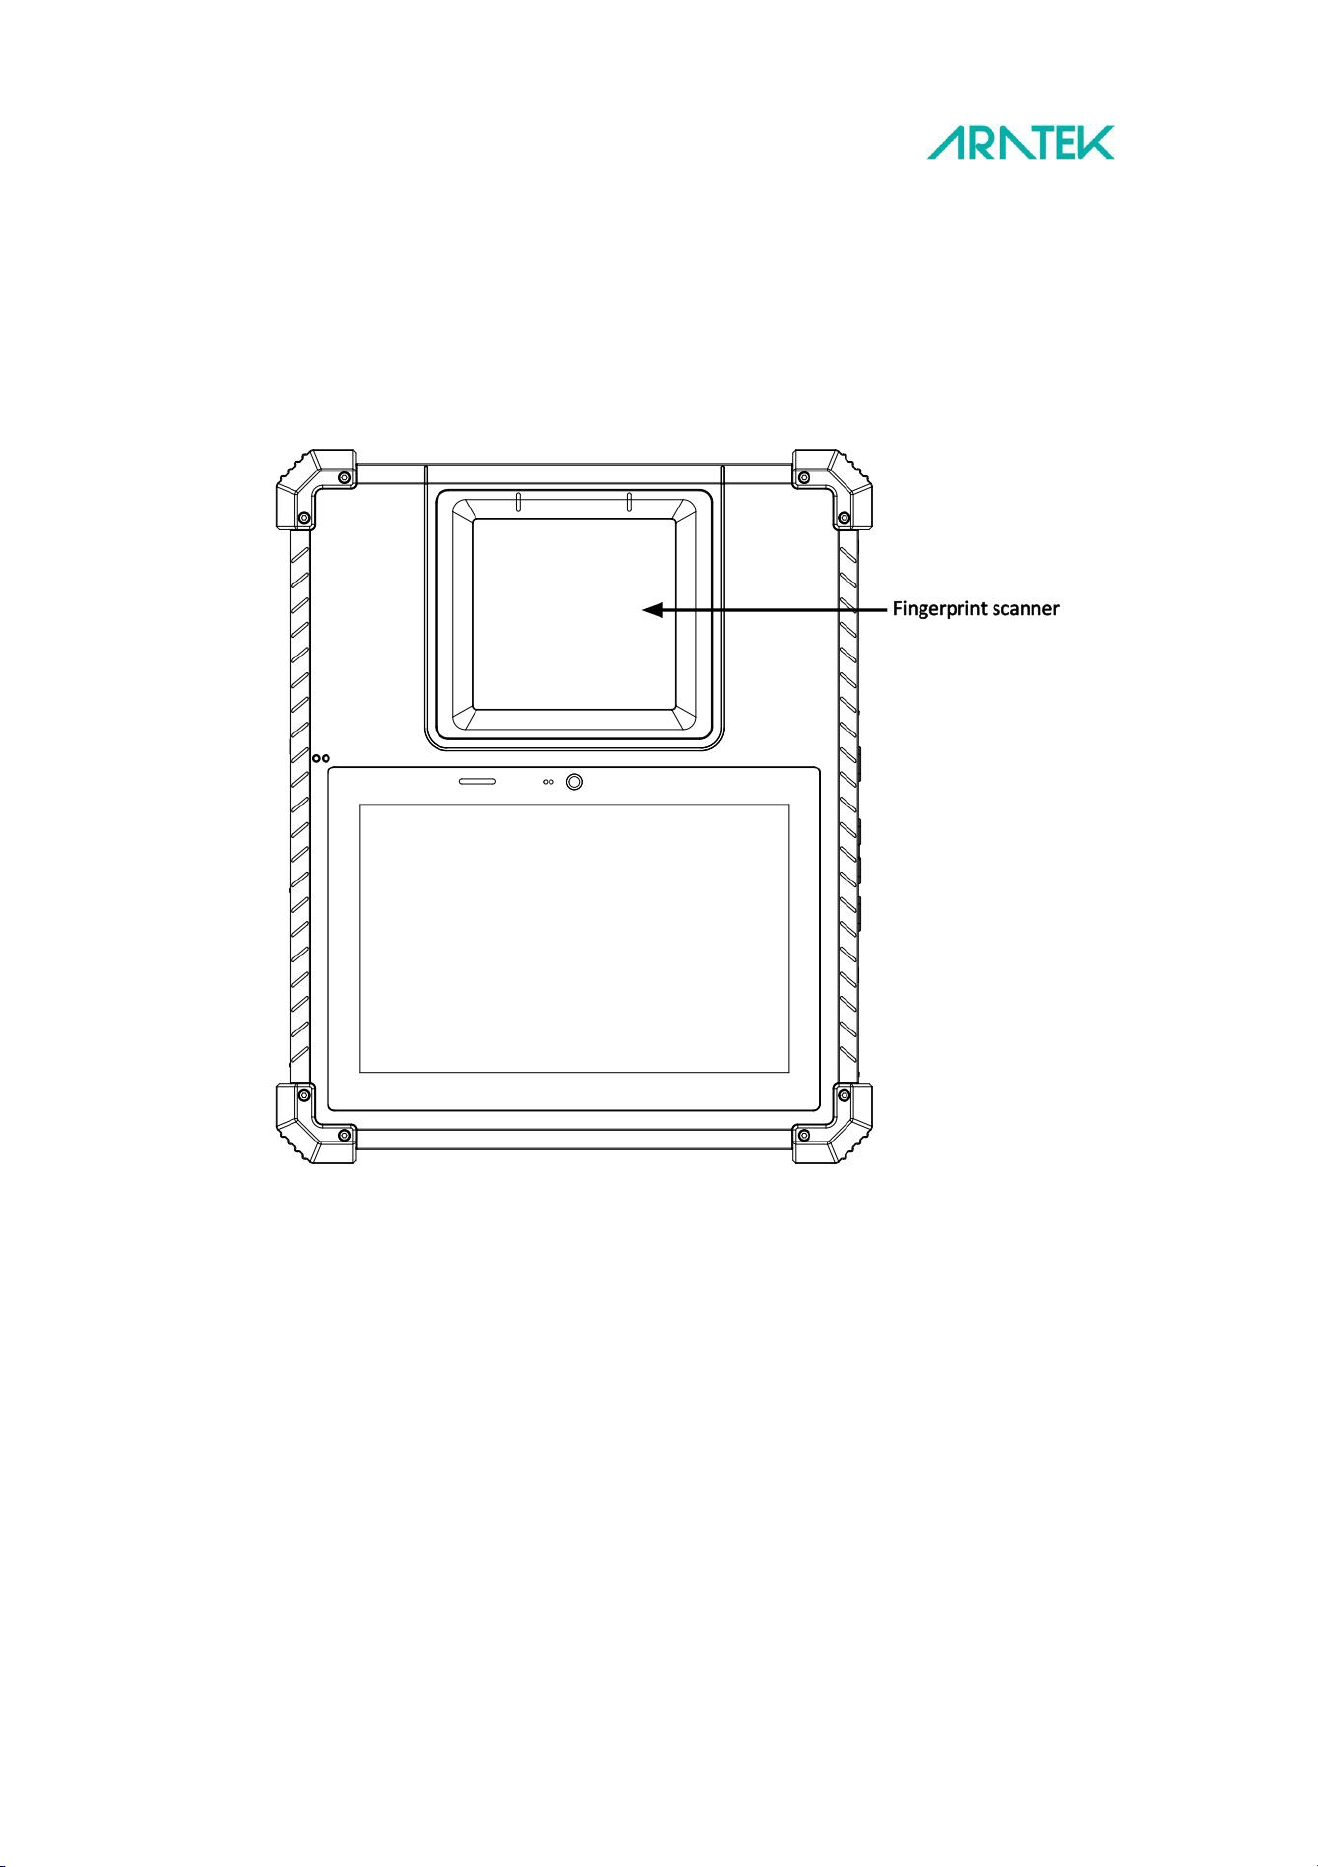
The Marshall 8R plus can accommodate a FAP60 optical fingerprint scanner. Each fingerprint scanner is
FBI certified to ensures fast high quality image capture. The fingerprint sensor is software activated.
Simply push down finger on the capture window. Do not use excessive force. Always keep the capture
window clean.
Fingerprint Scanner
17
Camera
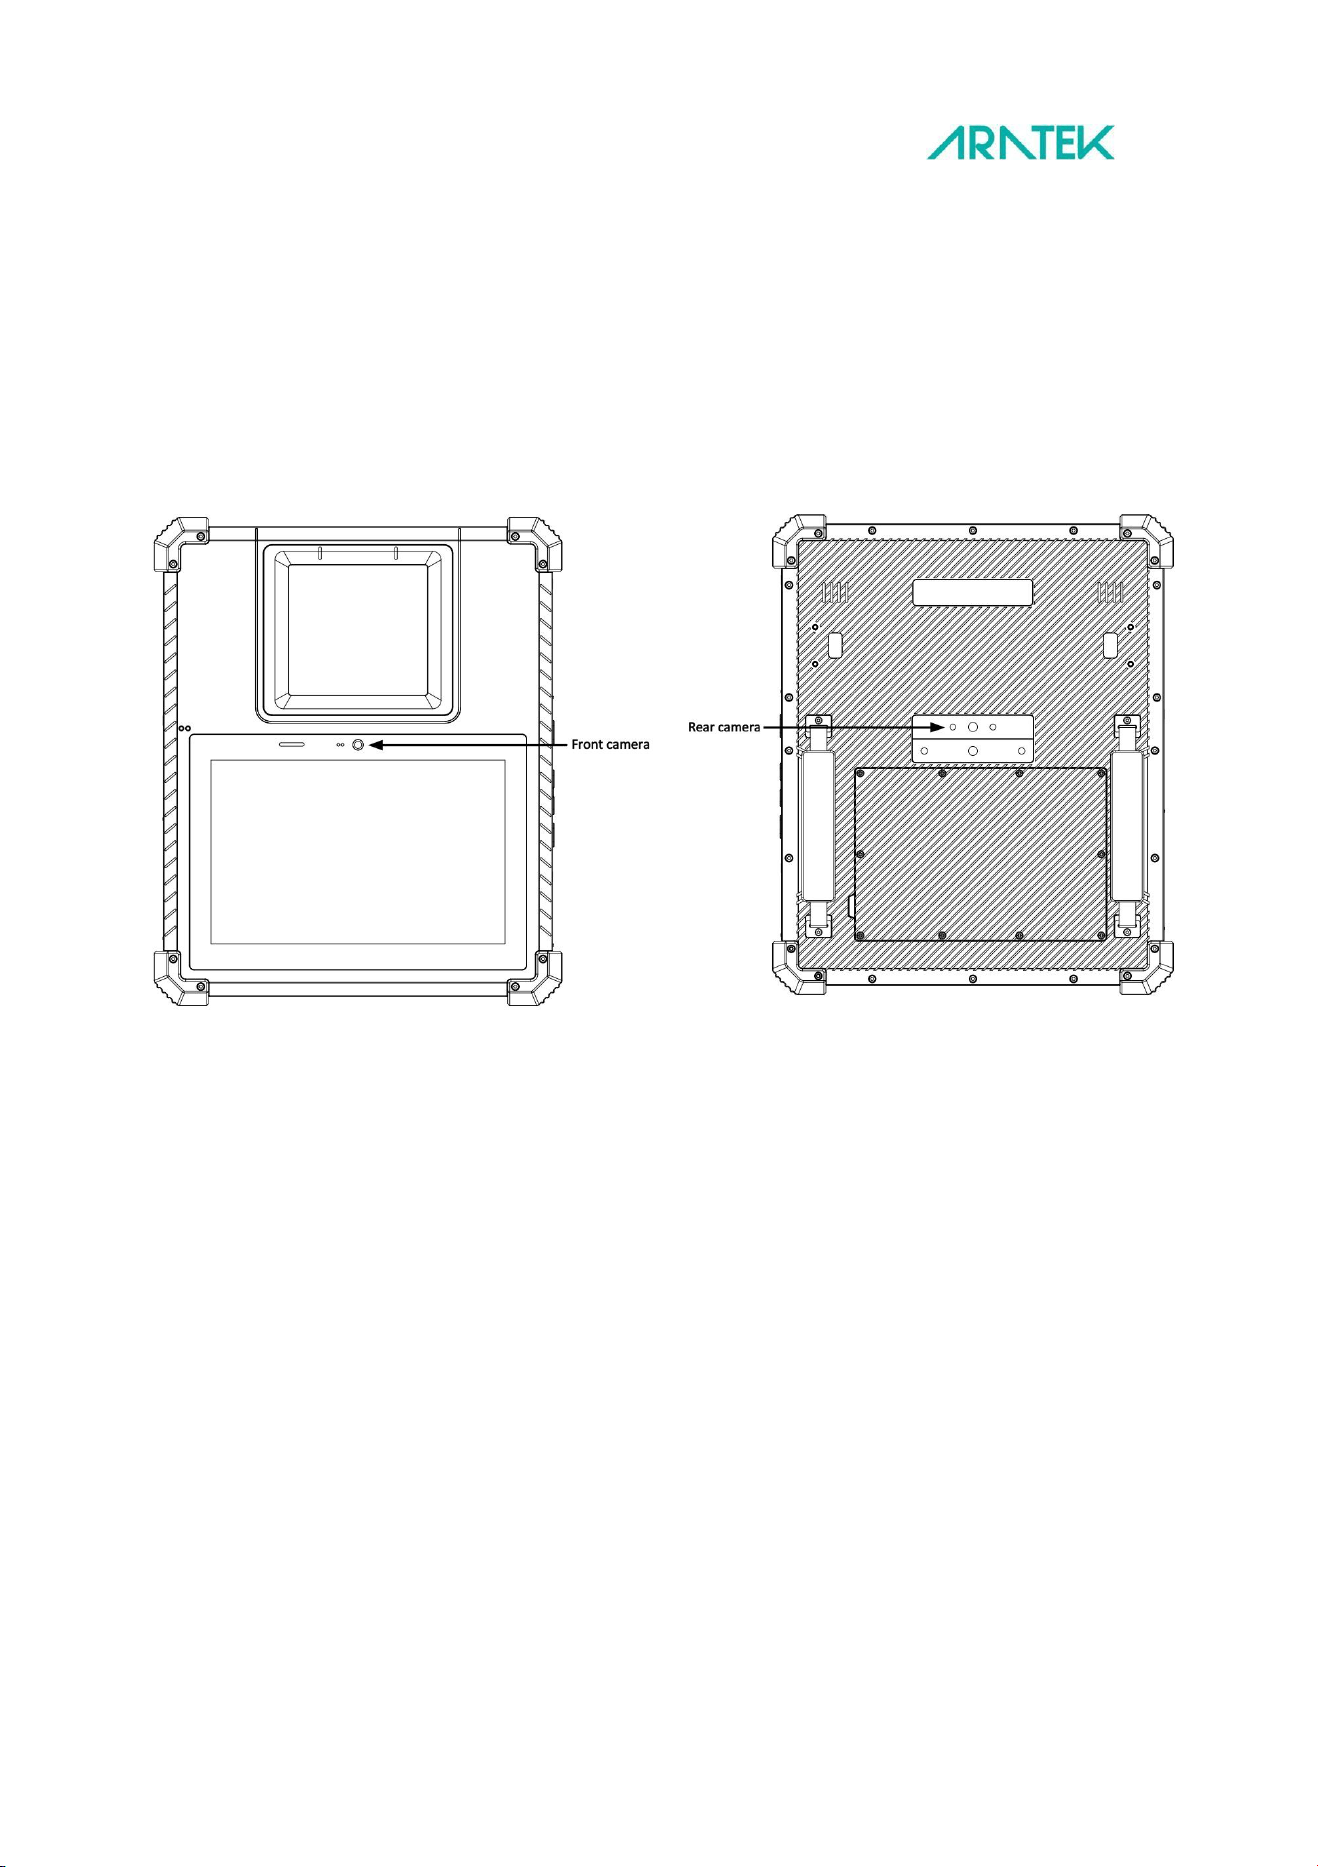
The Marshall 8R plus is equipped with a front camera and a rear camera. The front camera is 8MP fixed
focus, and the rear camera is 13MP autofocus with two LED flashes. The high-definition image quality
provides customers with a good photo-taking experience and also enables the Marshall 8R plus to
perform excellently in face recognition.
18
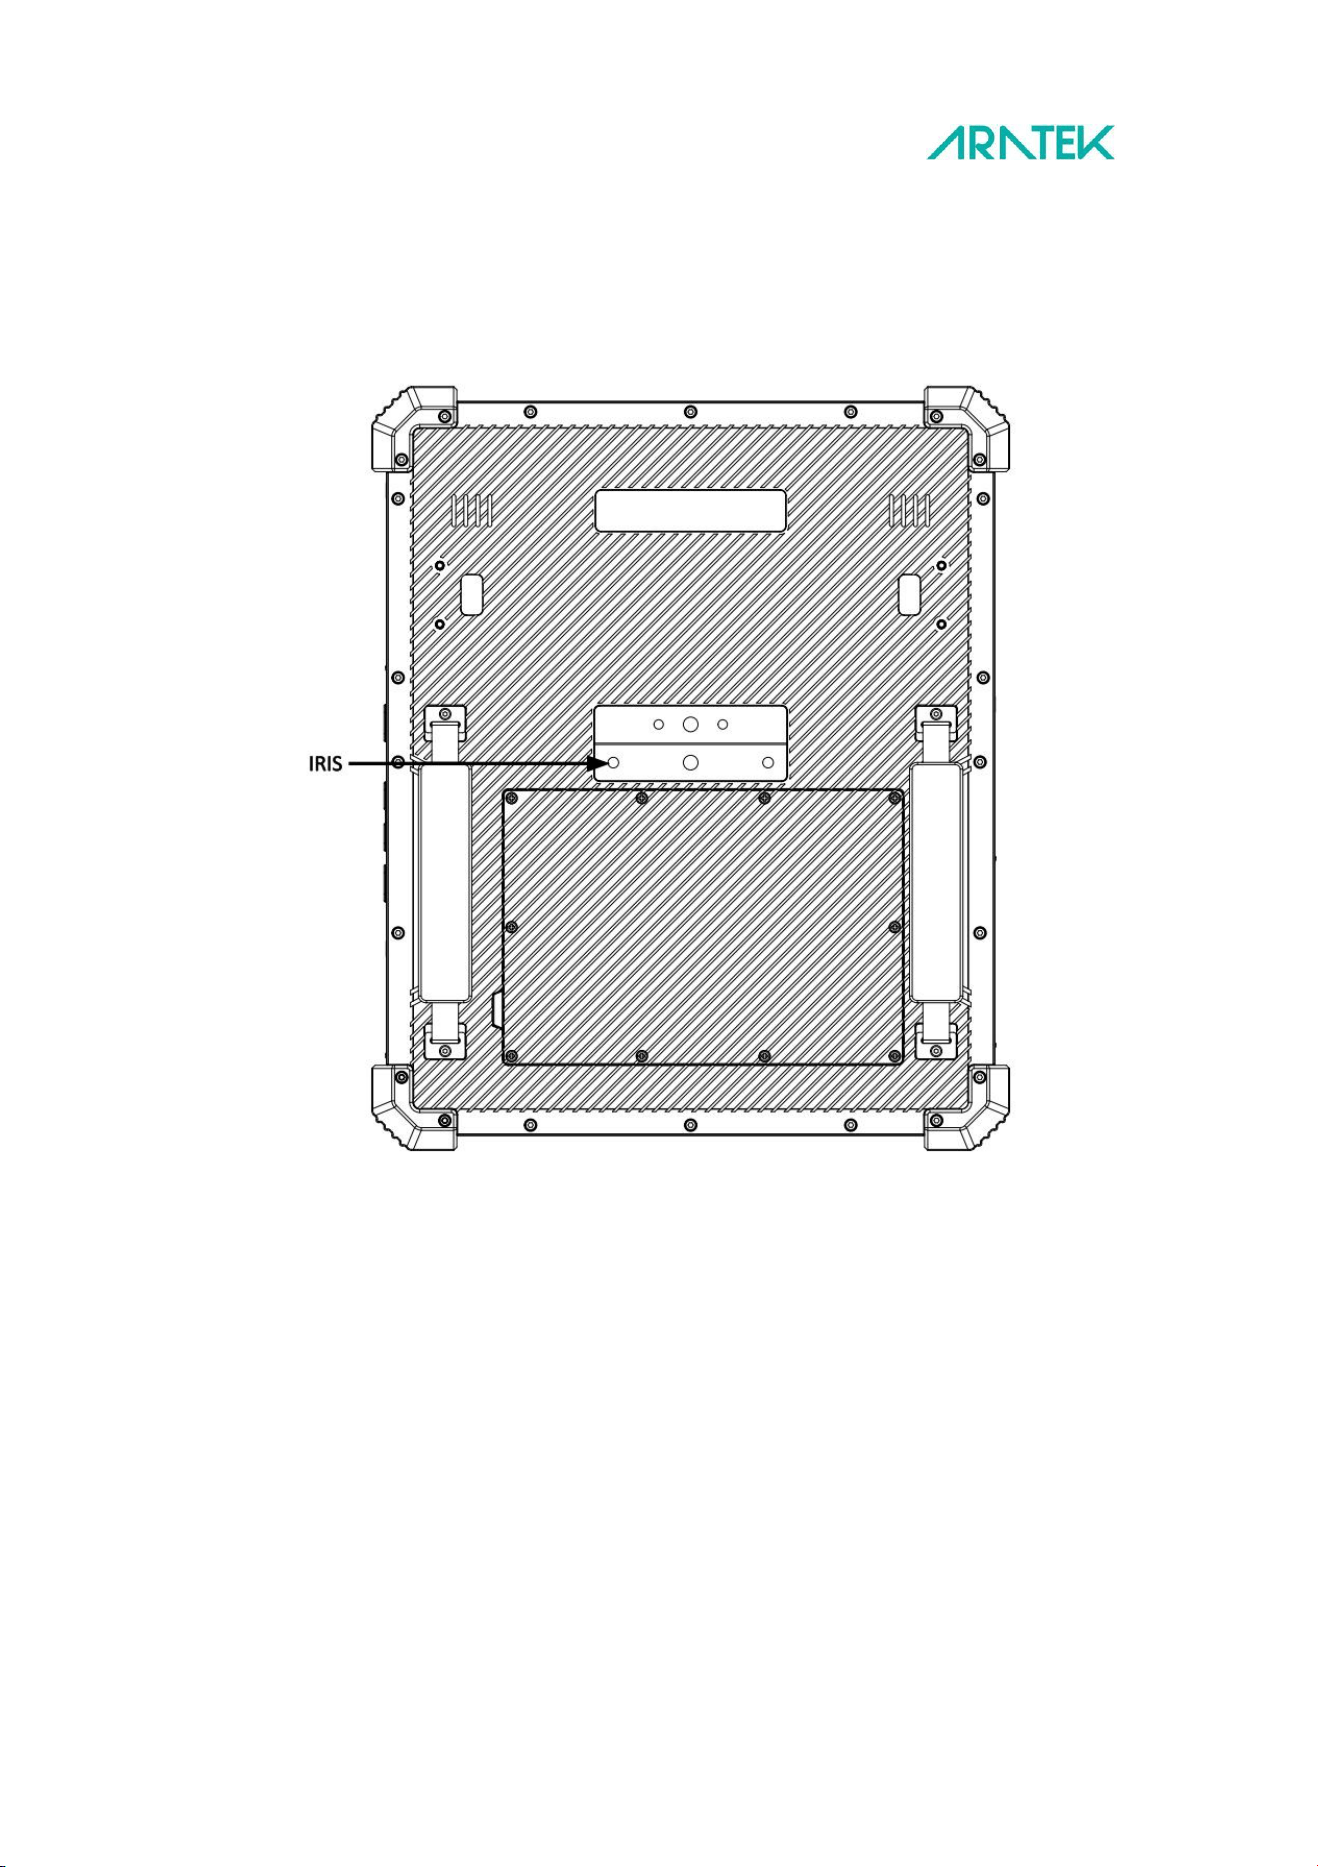
IRIS moudle
The Marshall 8R plus is equipped with binocular IRIS module, and optimal acquisition distance is 27 cm.
19
Battery
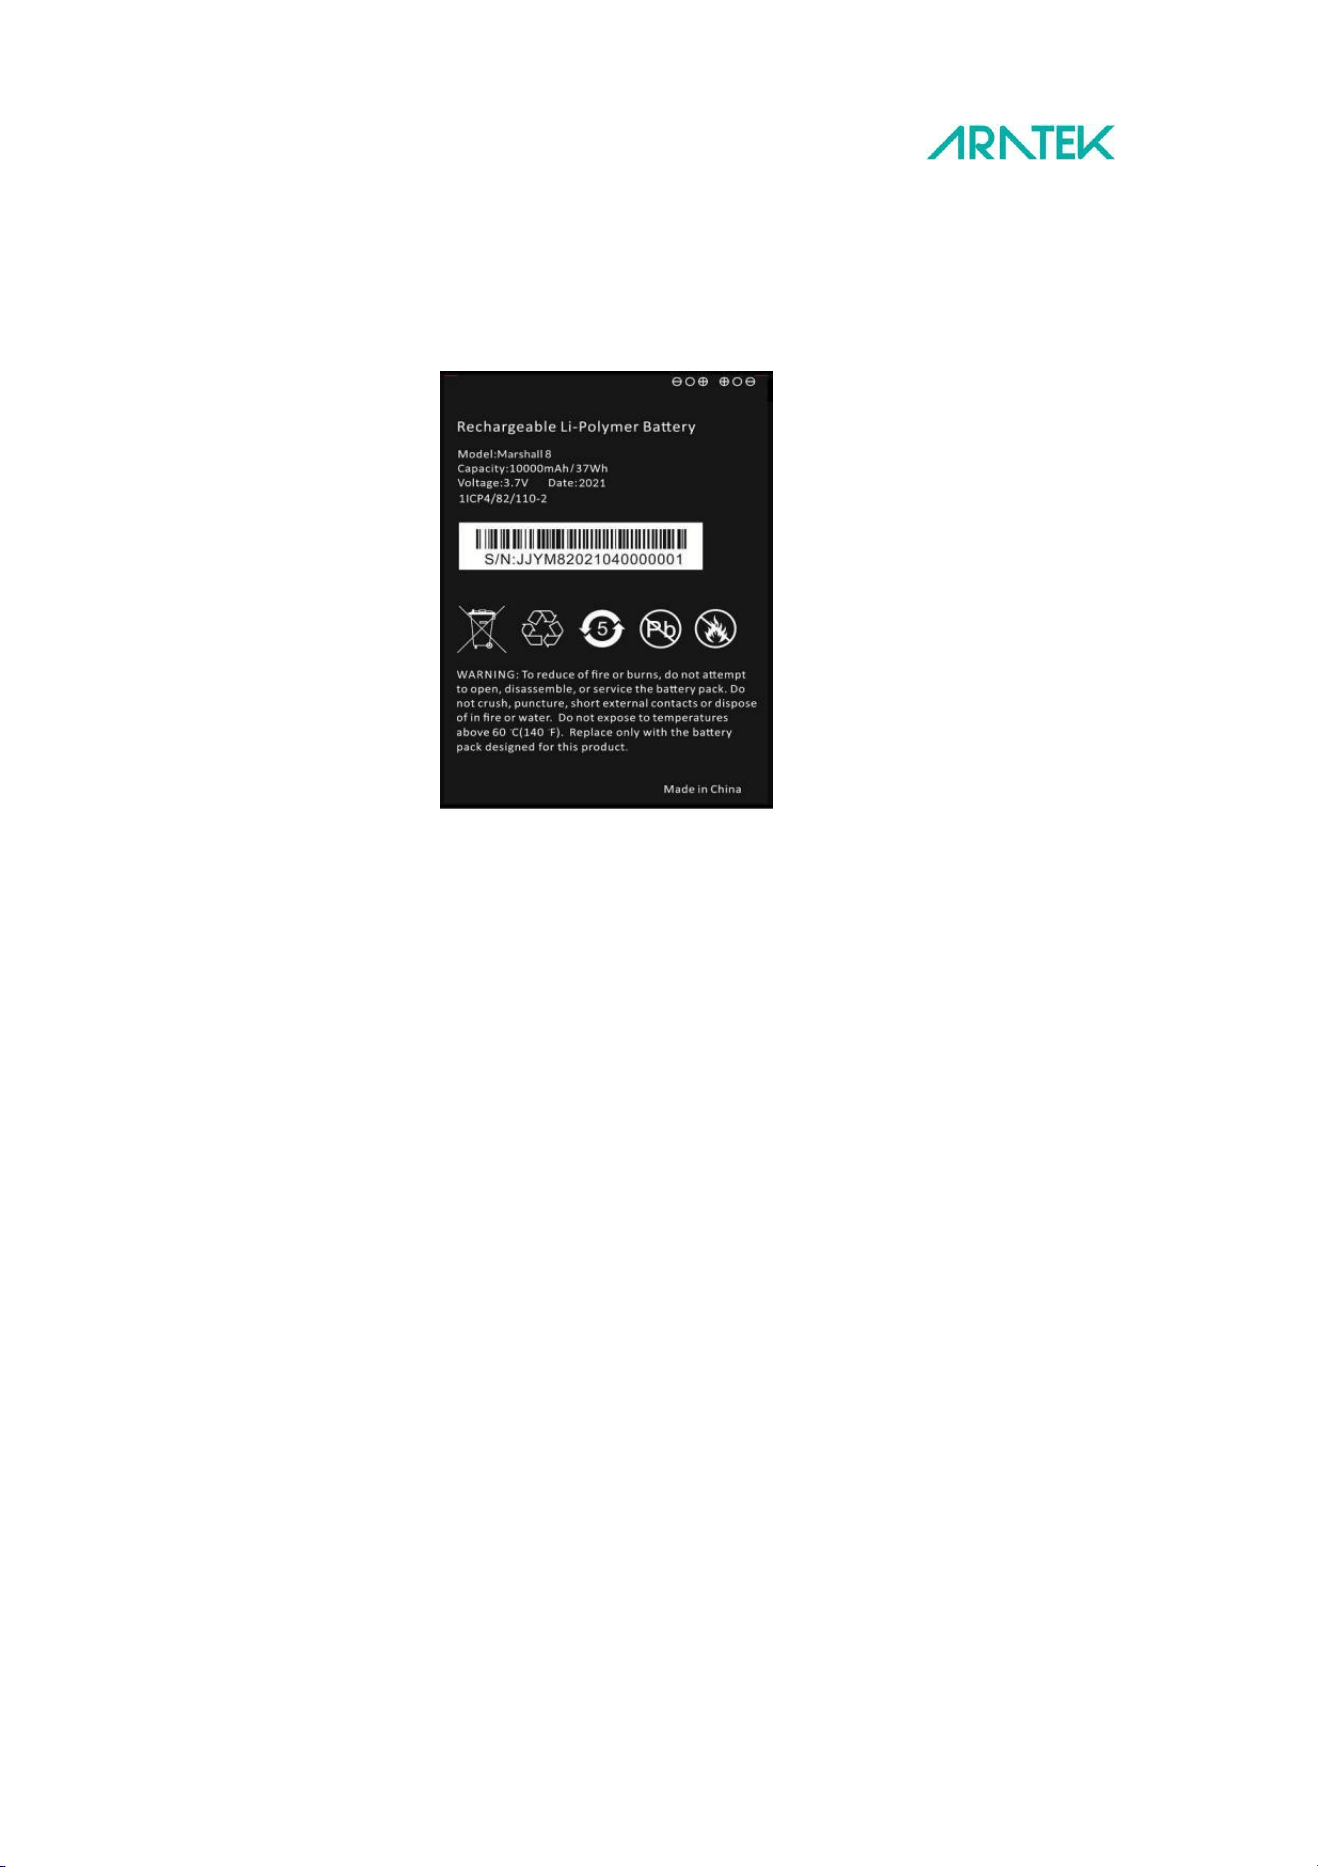
The Marshall 8R plus battery is a 10000mah removable Li-Polymer battery.
General battery safety information:
Only use the specified battery and power supply provided. Use of any other batteries or power supplies
may result in fire, or damage to the device, battery, or operator. If the tablet is going to be stored for
more than three months, remove the battery from the device to avoid battery damage or self-discharge.
Do not disassemble the battery pack. There are no user-serviceable parts inside. Doing so may present
risk of exposure to harmful chemicals, explosion or fire.
Contact your local waste disposal service provider regarding the disposal or recycling of used batteries.
Please adhere to local laws and regulations when it comes to recycling the battery.
20
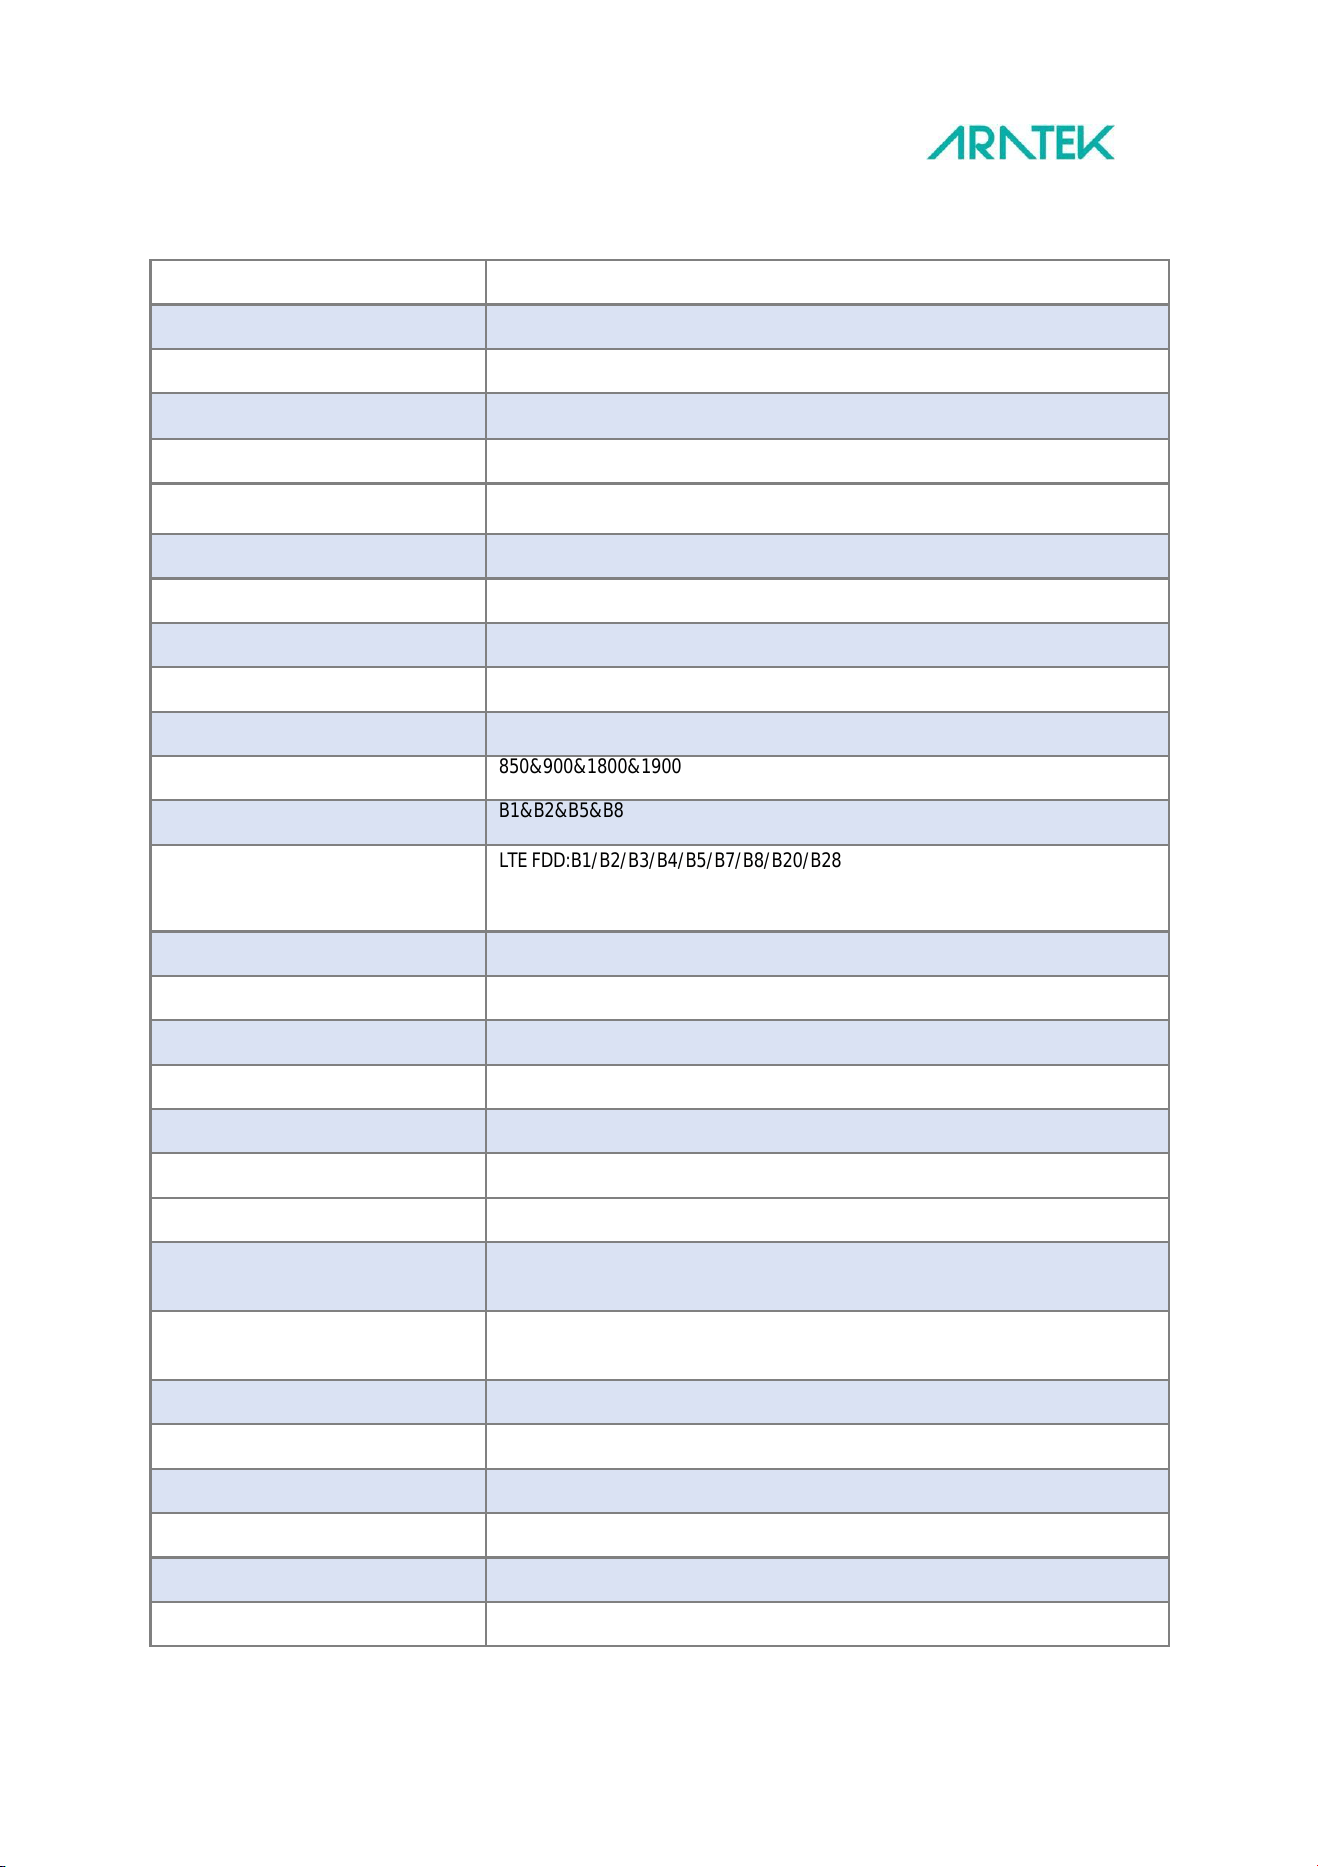
Technical Specification
Key Parts Specification
Operating System Android 13 or above
Processor Octa (8) Core, 2.0GHz
Memory (RAM+ROM)
DDR4, 4G+64G(Optional 6G+128G, 8G+256G)
Touch Screen 8 Inch capacitive touch screen ,scratch resistant
LCD screen 1280*800 Pixels 8 inch IPS
Rear Camera 13MP AF + LED Flash
Front Camera 8MP FF
USB Ports USB type C*1, USB2.0 type A*1+USB 2.0 type A*1(optional),
Battery 10000 mAh 3.7v* 1pcs, removable
RTC Support
2G
850&900&1800&1900
3G
4
B1&B2&B5&B8
G
LTE FDD:B1/B2/B3/B4/B5/B7/B8/B20/B28
SIM Card Micro SIM Card *2
PSAM PSAM*1
Location GPS + GLONASS + Galileo + Beidou
WI-FI IEEE 802.11 a/b/g/n/ac
Bluetooth Bluetooth 5.0
Fingerprint FAB 60 FBI-Approved, 4-4-2 fingerprint sensor, Aratek A910
IRIS
Dual iris capture
Barcode
1D, 2D, PDF417, QR code, Code 39, Code 128, MRZ/OCR
DataMatrix, UPC-A, etc.
Contact card reader
ISO 7816 Parts 1-3, Class A, B, C (5V, 3V, 1.8V),
Support Micro Processor cards with T=0, T =1
Contactless card reader(NFC) ISO 14443A/B, ISO15693
Weight 1.3 kg
Dimension (L*W*H) 286*239*28.5 mm
Certification CE, FCC, RoHS, UN38.3
Charger Input: 100-240V, 50/60hz; Output: 9V/2A, Fast charging ability
USB cable USB Type C cable
21
Operations
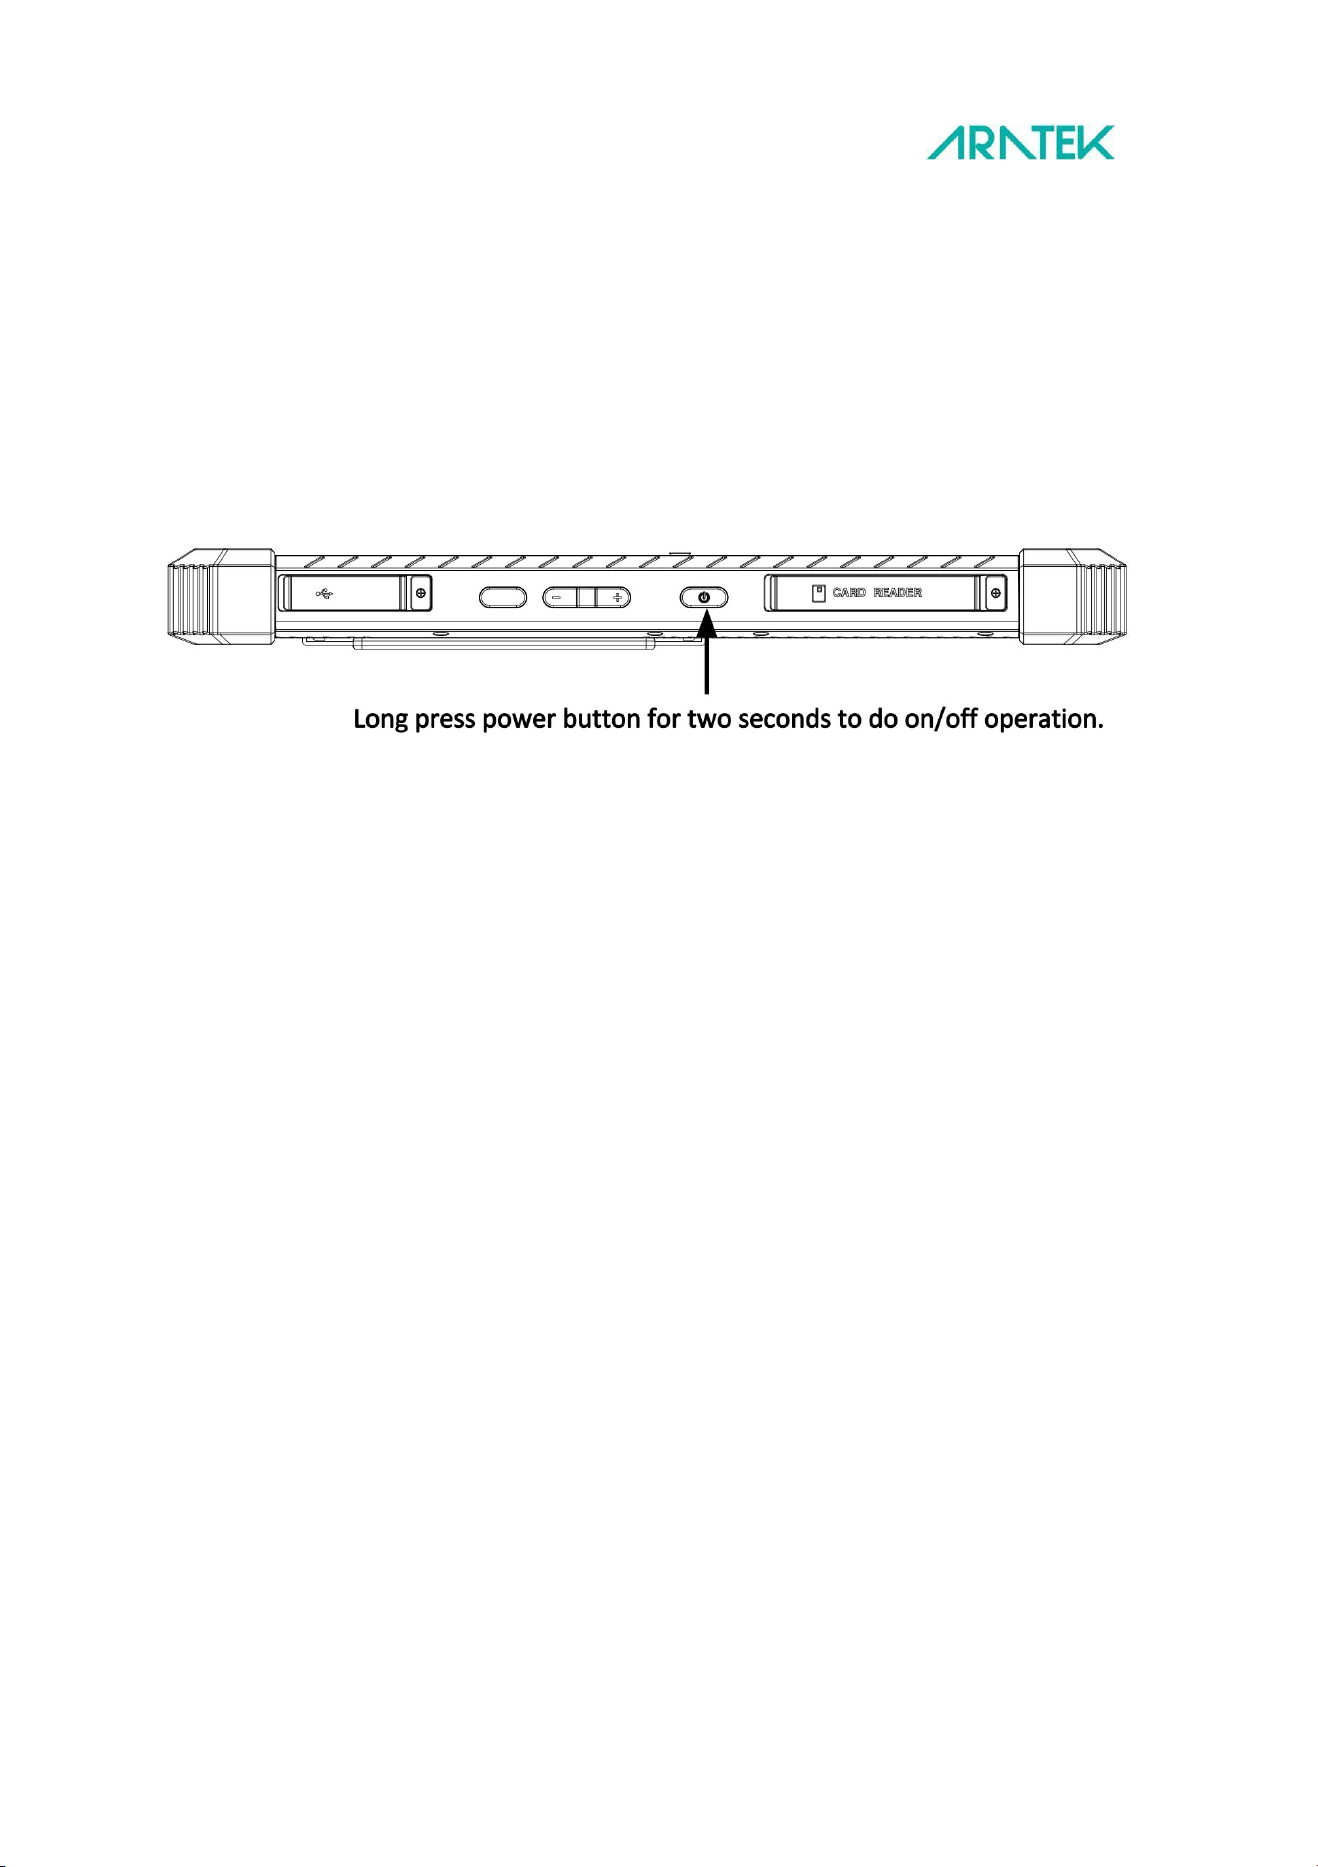
On/Off operation
Long Press the power button two seconds to do on/off operation.
22
Install /Remove SIM / TF Cards
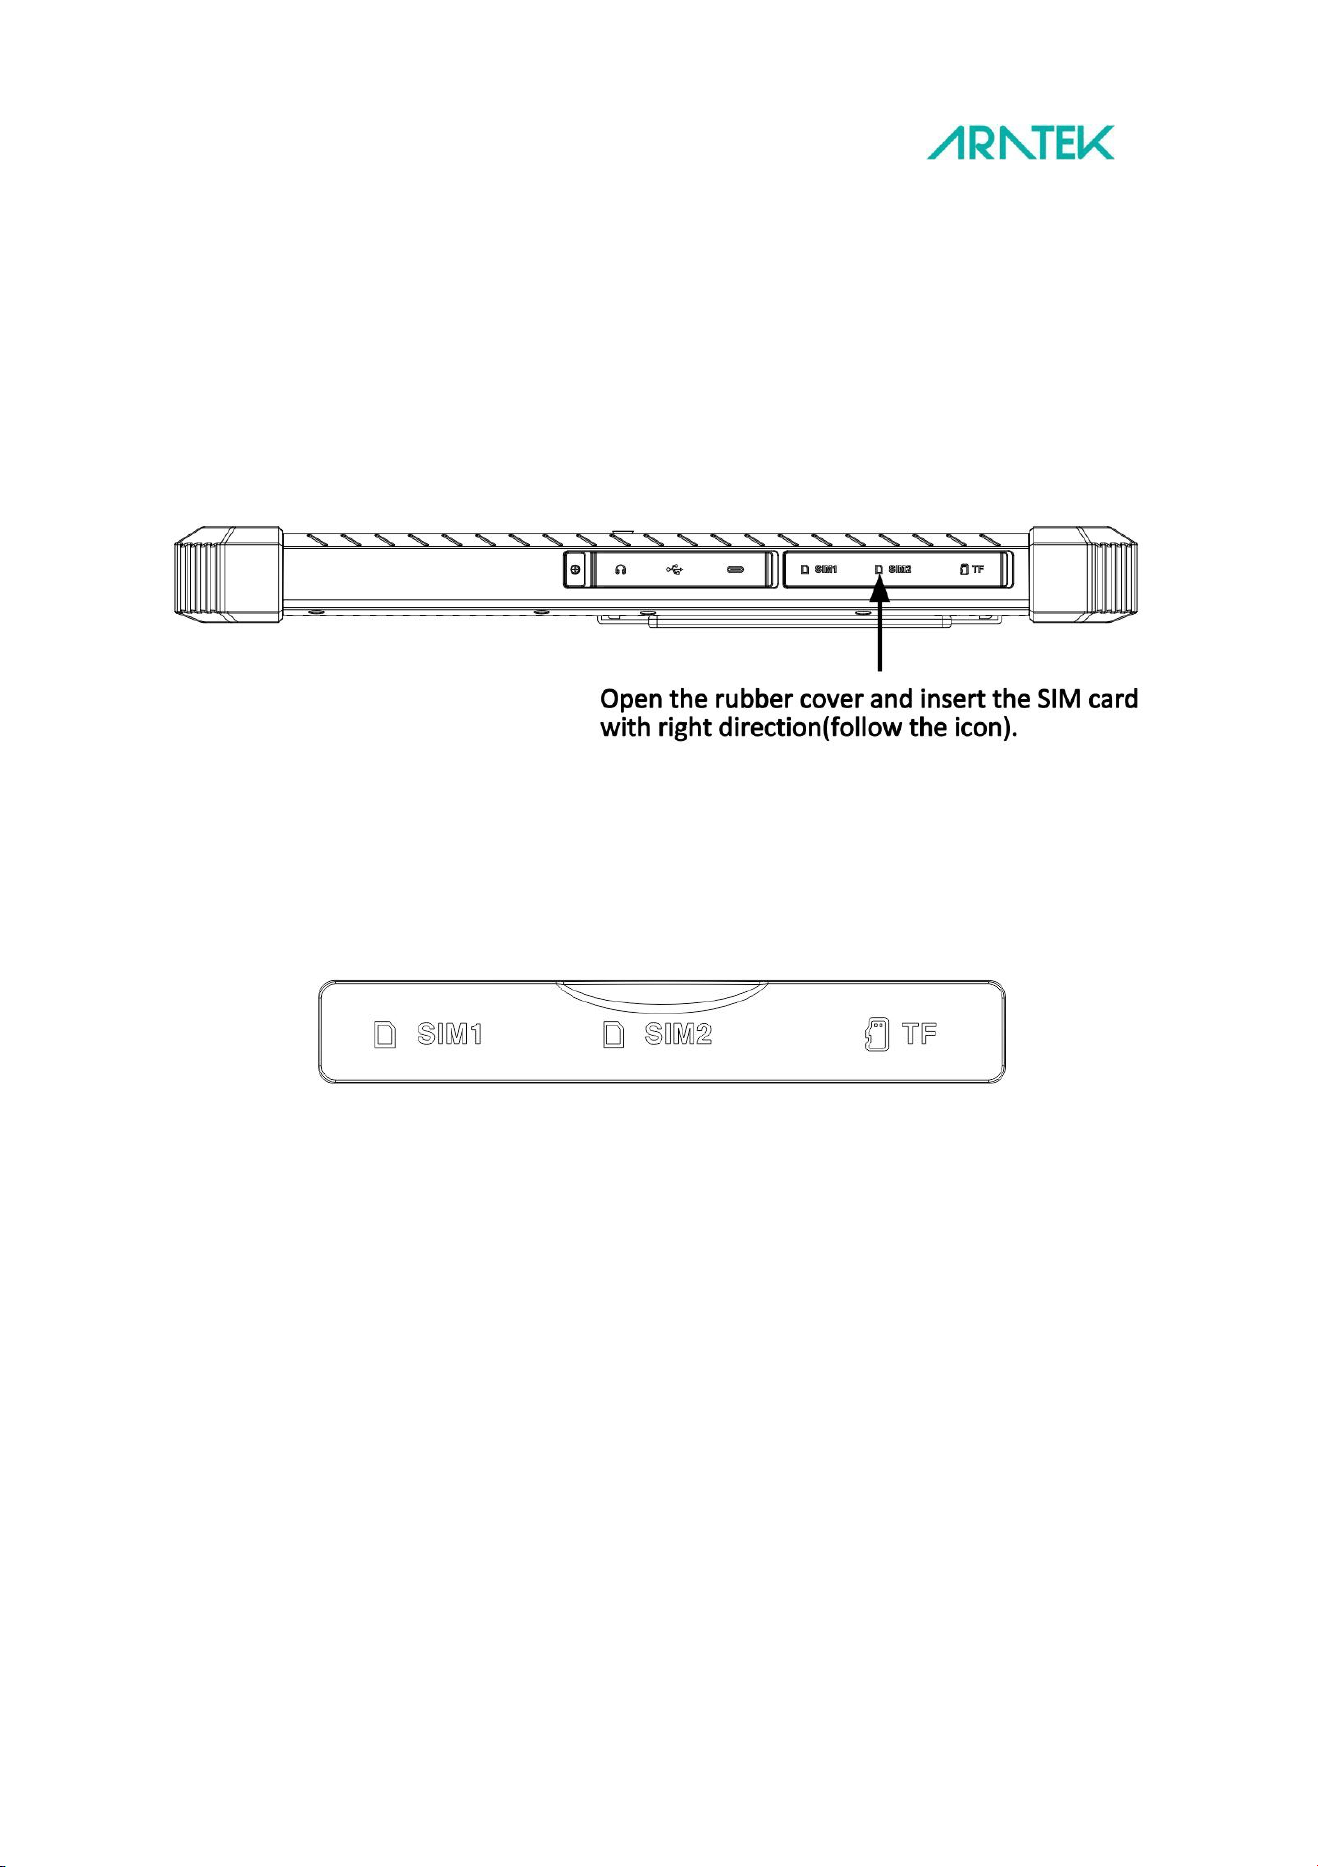
Open the rubber rover to insert the SIM card with the right direction. There are two SIM slots, you can
insert a maximum of two sim cards. Ensure the device is turned OFF before inserting or removing a SIM
card.
The icon on rubber cover
23
Replace / Install battery
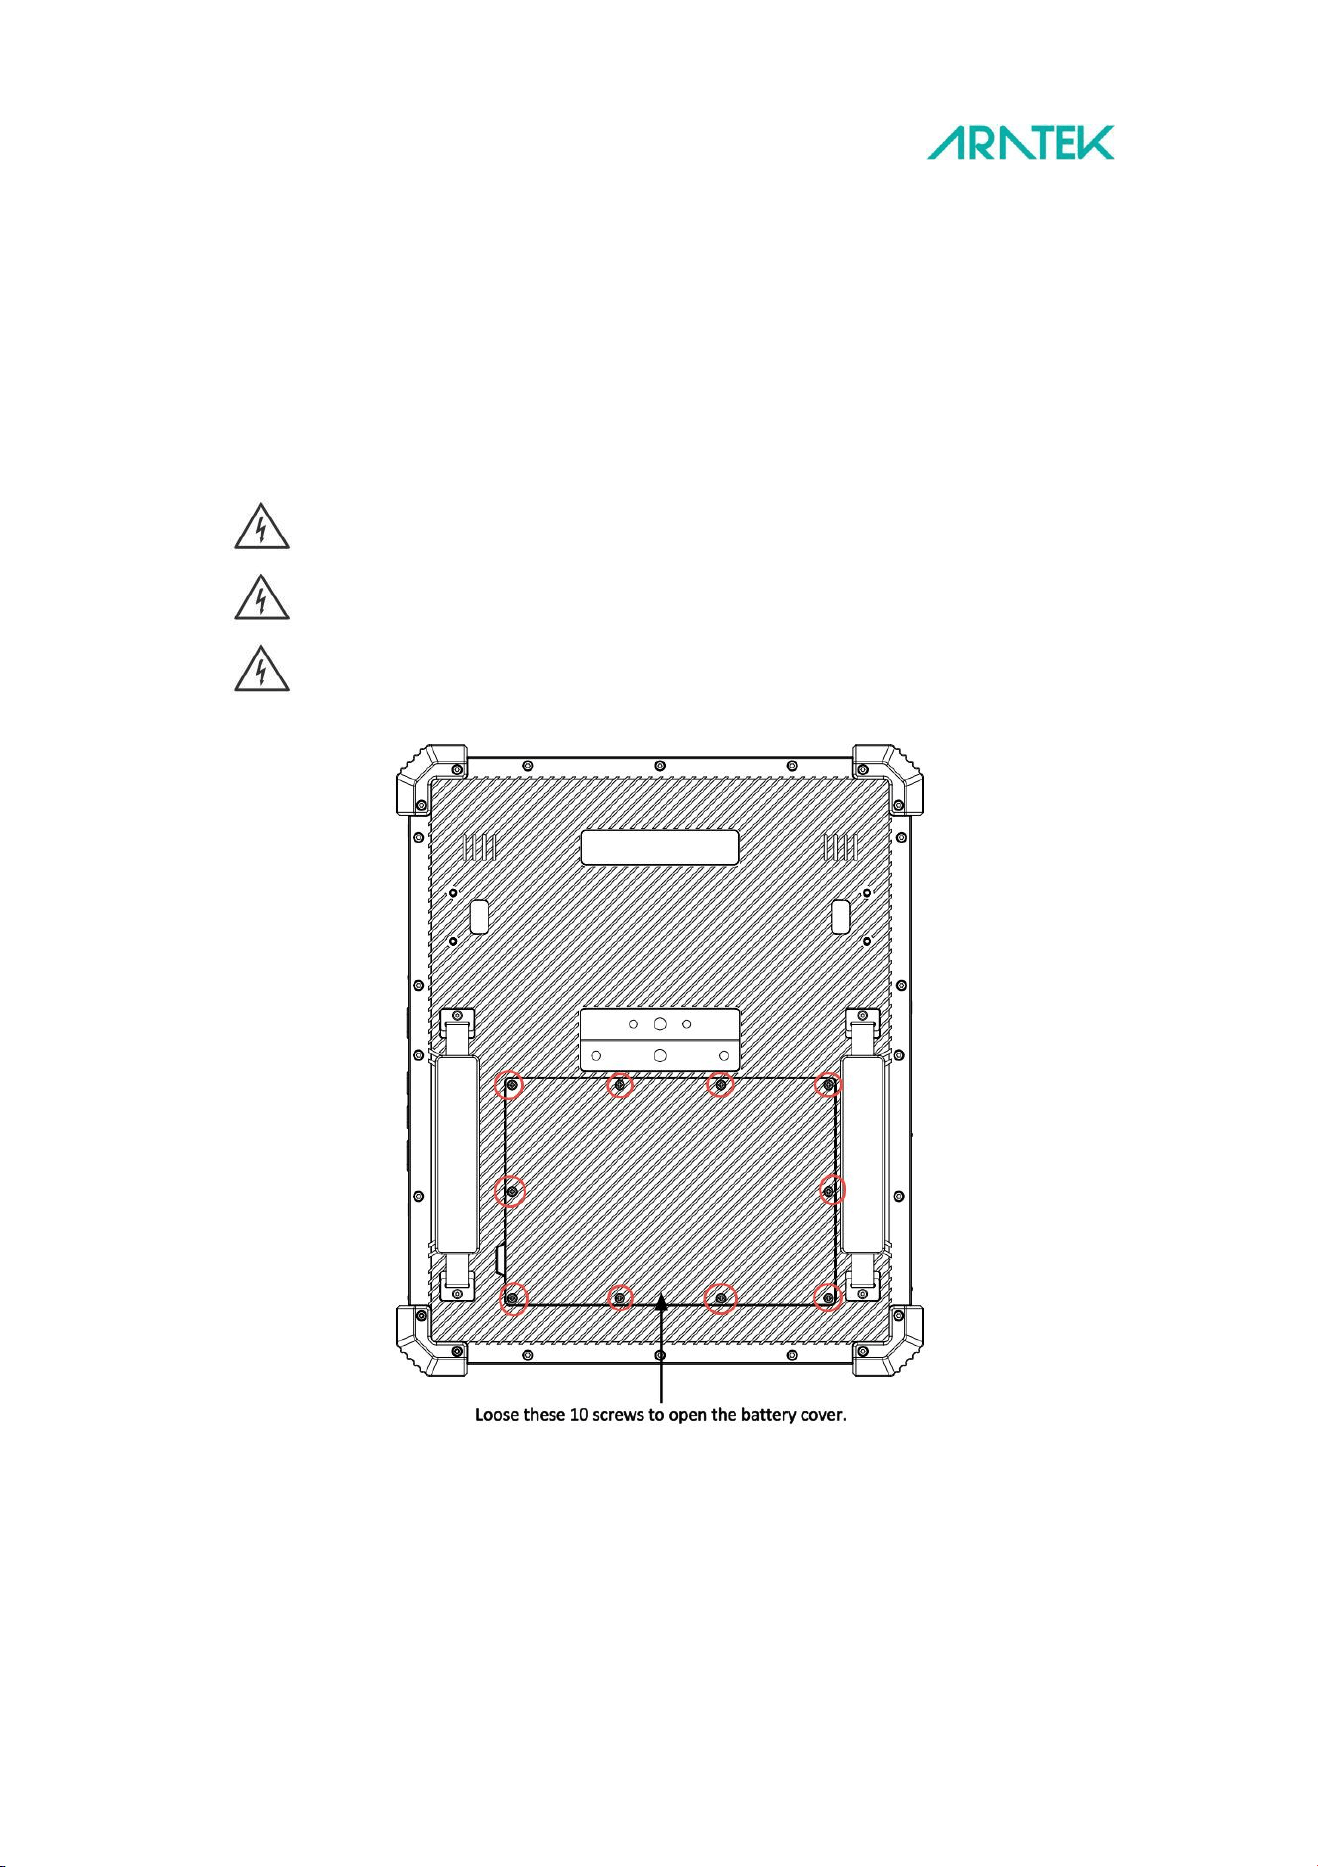
• Use a Phillips screwdriver;
• Loosen below six screws;
• Open the battery cover through the slot ;
• Remove the battery;
WARNING: Using an incompatible battery increases the risk of fire or explosion. Replace the battery only
with a compatible battery purchased from the manufacturer. The battery is designed to work with your
Marshall 8R plus device. Do not use a battery from any other device.
WARNING: Before removing or replacing the battery, turn off the device, disconnect the AC adapter from the
electrical outlet and remove any other external cables from the device. WARNING: Not for use in hazardous
locations
Conditioning a new battery
Before you use a new battery for the first time, below conditioning process is suggested :
1. Connect the AC adapter and fully charge the battery.
2. Turn on the device and complete setting up the operating system.
3. Disconnect the AC adapter.
4. Operate the device using battery power.
5. Reconnect the AC adapter and fully charge the battery again.
6. Follow these steps again until the battery has been charged and discharged three times.
Use this conditioning process for all new batteries, or if a battery hasn't been used for a long time.
24
The battery conditioning process ensures your battery accepts the maximum possible charge. Failure to follow this procedure
will prevent you from obtaining the maximum battery charge, and will also shorten the effective lifespan of the battery.
Charging device
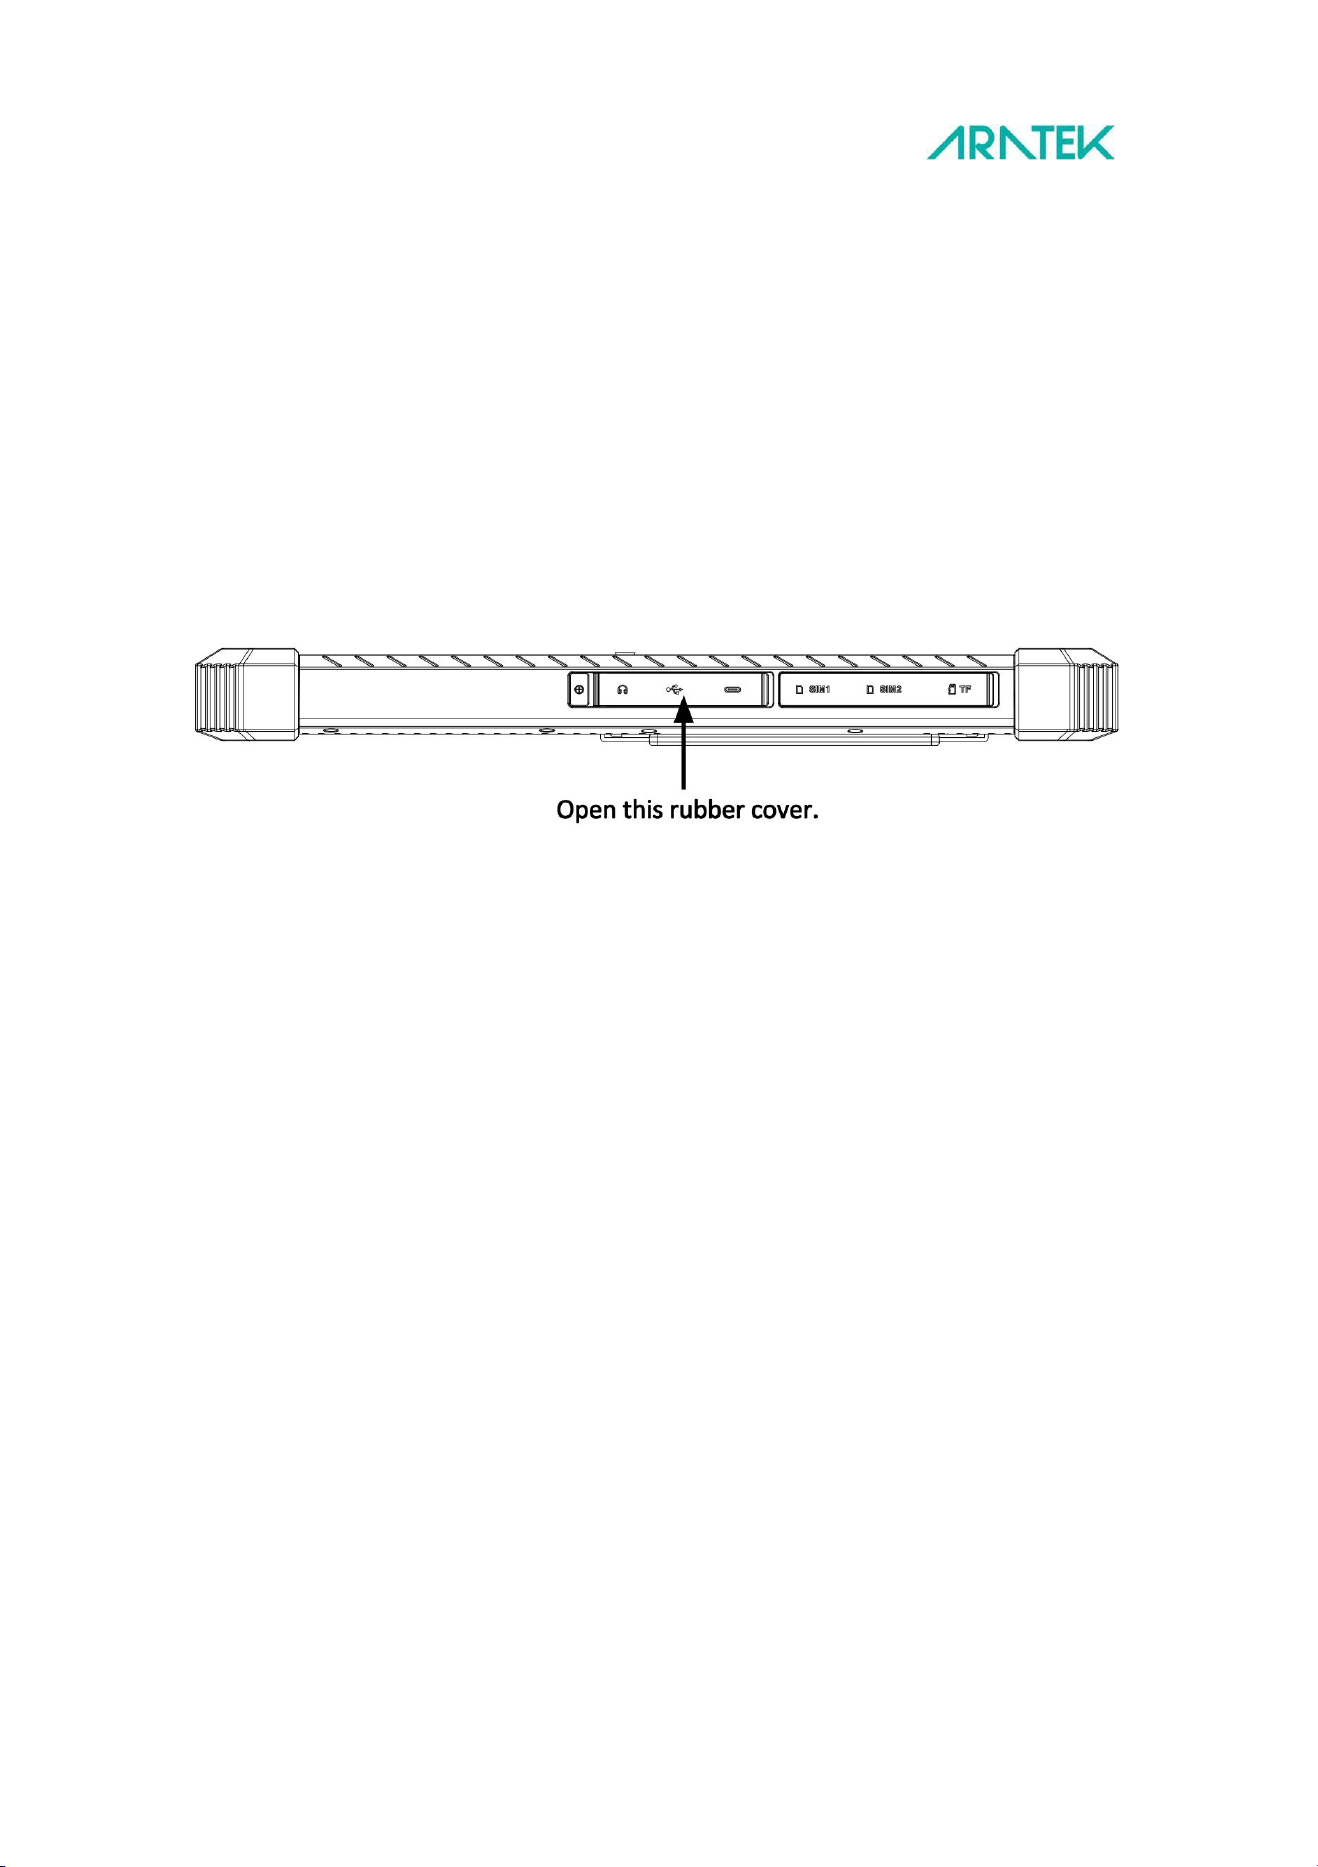
• Open the first rubber cover on the left side of the device. Find type C, the Type C
USB port is used to charge the battery
• When charge the device, plug in the USB cable in the device and the power adaptor.
Charging LED indicator behaviour
Red light when power charging is less than 95%;
Green light when power charging is greater than or equal to 95%.

25
Cleaning device
Turn off your device. Disconnect any attached devices, headphones, speakers, and keyboard dock from
the tablet and from their electrical outlets.
Use a soft microfiber cloth moistened with water or a non-alkaline detergent to wipe the exterior of the
tablet. Do not allow water from the cloth to seep down to the tablet ports when covers are open.
Gently wipe the display with a soft, lint-free microfiber cloth. Do not use alcohol or detergent on the
display.

26
Troubleshooting
Problem 1: Charge failure
Solution: Check if the plug is inserted correctly, ensure that USB type C port has good contact.
Problem 2: Heating
Solution: Avoid using the device under too hot environment. Stop device operation for a while.
Problem 3: Crash
Solution:
a. Long press power button to turn off, then turn on.
b. Press reset button to restart device.
c. Contact Aratek support team.
Problem 4: Other problems
Solution: Contact Aratek for support, website: www.aratek.co
27
FAQ
1. How to enable USB device mode?
Go to: Settings---Connected Devices menu, then manually enable USB Device Mode option.
2. Why I can’t use fingerprint after I transfer files between device and PC?
1). When you copy the files between the device and the PC, you need to enable the USB device mode.
2). After file transfer, you have to disable the USB device mode unless your fingerprint can’t work..
3). Go to: Settings---Connected Devices--- USB Device Mode to disable the USB device mode
3. How to transfer files between Marshall 8R plus and PC, why Marshall 8R plus can’t be
found in my PC?
Please follow below steps:
1). Enable USB device mode.
2). Connect a PC by a USB type C cable.
3). Click and open the notification message(Android system.Charging this device via USB).
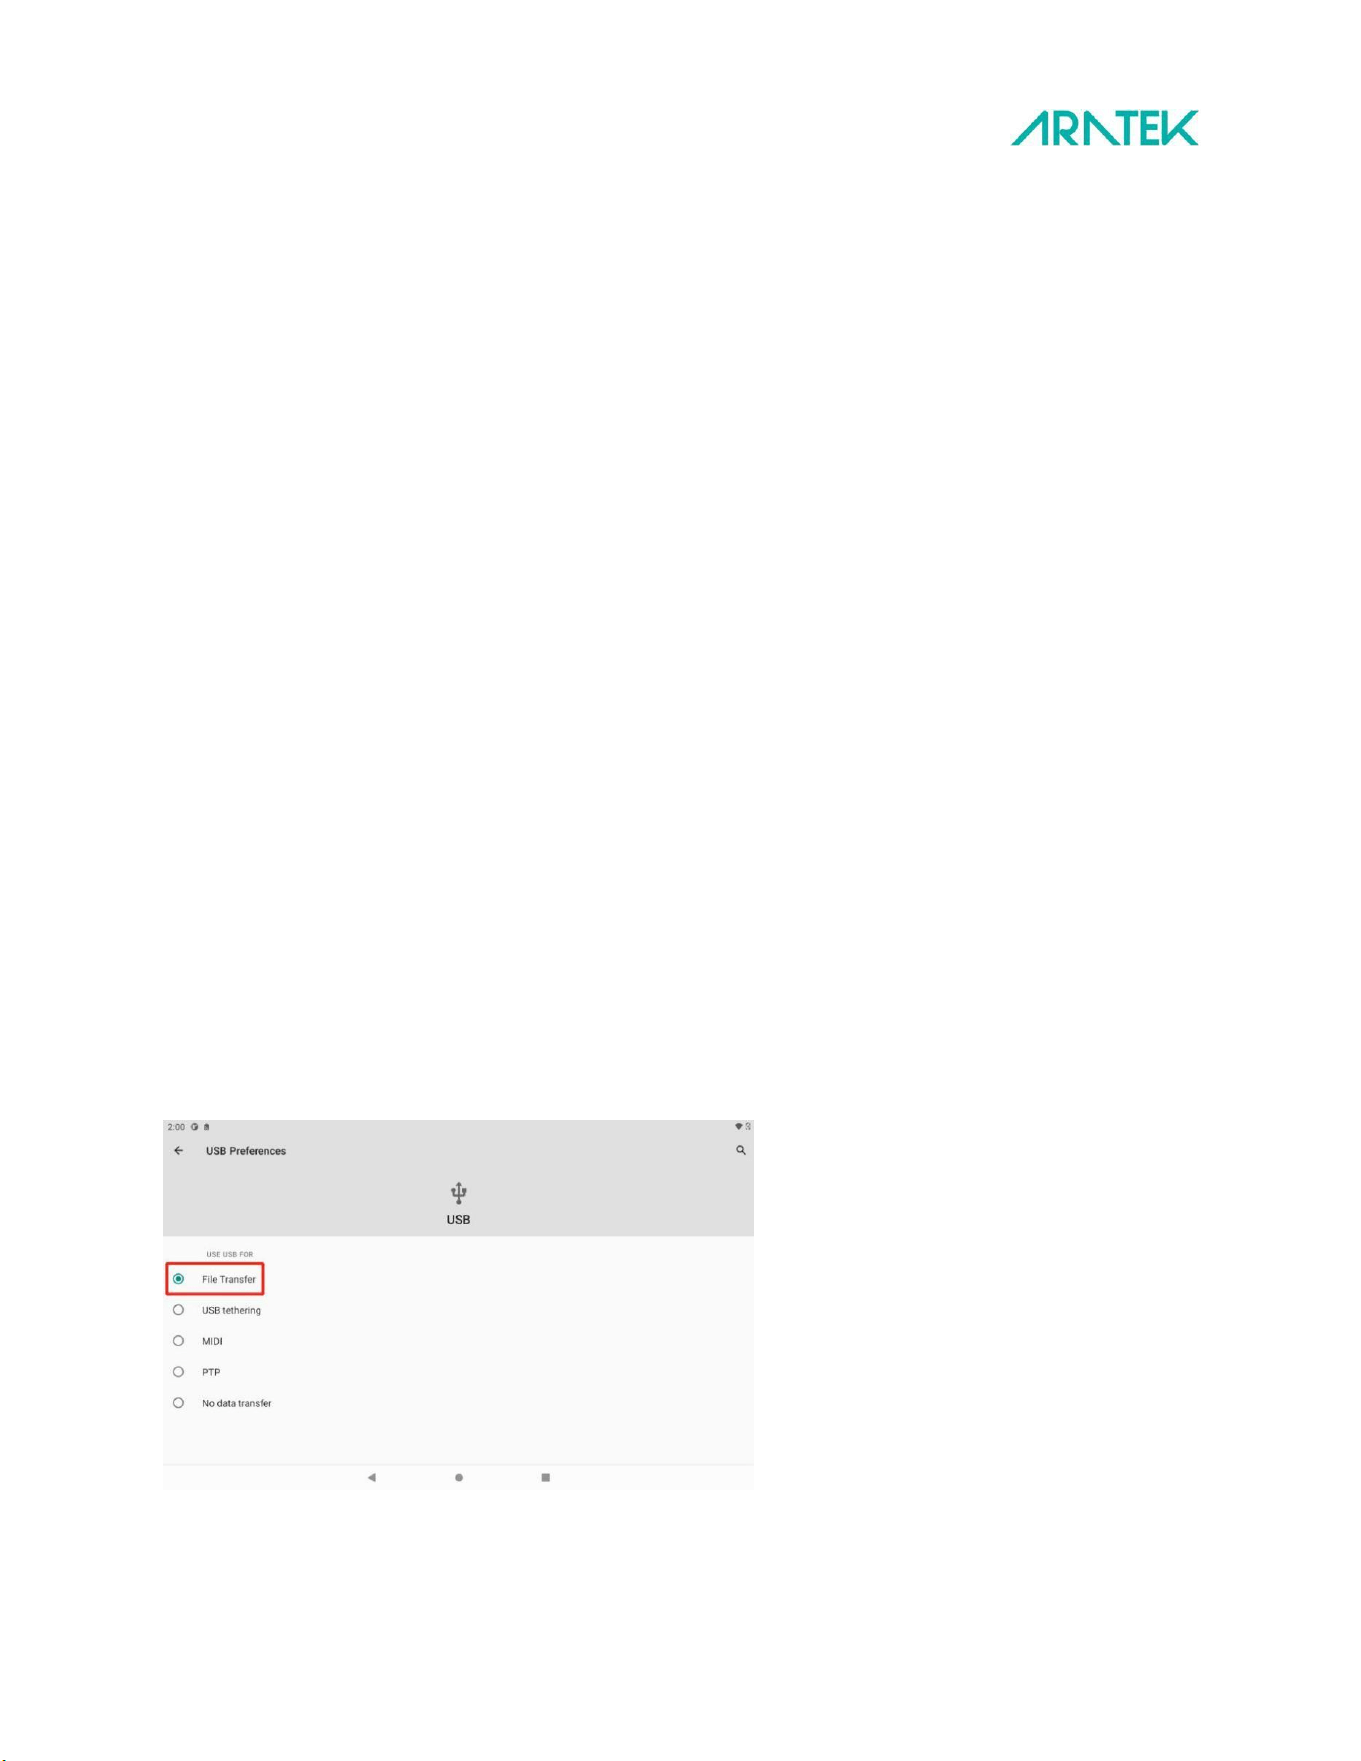
4). Choose file transfer by this path: Settings---Connected Devices---USB Preferences.
5). Open your PC, you can find Marshall 8R plus is in your PC and you can transfer file between Marshall
8R plus and your PC.
6). After file transfer, unplug the type C cable and disable the USB device mode.

28
4. Is there a way we could do to debug from PC while keeping the fingerprint on?
Please use WI-FI-debugging. Detailed steps were shown in Q5.
5. Why and how to do Wi-Fi Debug?
Due to one USB port design in motherboard, fingerprint and TYPE C port cannot be used at the same time.
Steps for Wi-Fi debug:
1)
Turn on Android device USB Debugging and enable USB device mode , then connect device with PC.
2)
Turn on Wi-Fi and connect the device to local area network, make sure your Android device and PC can
communicate with each other in local area network.
3)
Open command line and enter command like below:
adb tcpip 5555
adb shell netcfg
4)
Find your Android device IP address, (such as 192.168.XXX.XXX),then disconnect the device, and enter
command on PC:
adb connect 192.168.xxx.xxx
5)
Disable the USB device mode (in Settings---Connected Devices---USB Device Mode).
6)
Then, you can debug through Wi-Fi.

FCC Statement
Thi
s device complies with part 15 of the FCC Rules. Operation is subject to the following two
co
nditions: (1) This device may not cause harmful interference, and (2) this device must accept any interference received
, including interference that may cause undesired operation. This equipment has been tested and found to comply with
the limits for a Class B digital device, pursuant to part 15 of the FCC Rules. These limits are designed to provide
reasonable protection against harmful interference in a residential installation. This equipment generates, uses and can
radiate radio frequency energy and, if not installed and used in accordance with the instructions, may cause harmful
interference to radio communications. However, there is no guarantee that interference will not occur in a particular
installation. If this equipment does cause harmful interference to radio or television reception, which can be determined
by turning the equipment off and on, the user is encouraged to try to correct the interference by one or more of the
following measures:
•Reorient or relocate the receiving antenna.
•Increase the separation between the equipment and receiver.
•Connect the equipment into an outlet on a circuit different from that to which the receiver is connected.
•Consult the dealer or an experienced radio/TV technician for help.
Caution: Any changes or modifications to this device not explicitly approved by manufacturer could void your authority to
operate this equipment.
RF Exposure Information
The device has been evaluated to meet general RF exposure requirement. This equipment should be installed and
operated with minimum distance 20cm between the radiator and your body.
