User Manual
AM3110-2
Before use, please read this user manual carefully and store it in a place
where you can easily access it. Version C-1
Wearable Breast Pump
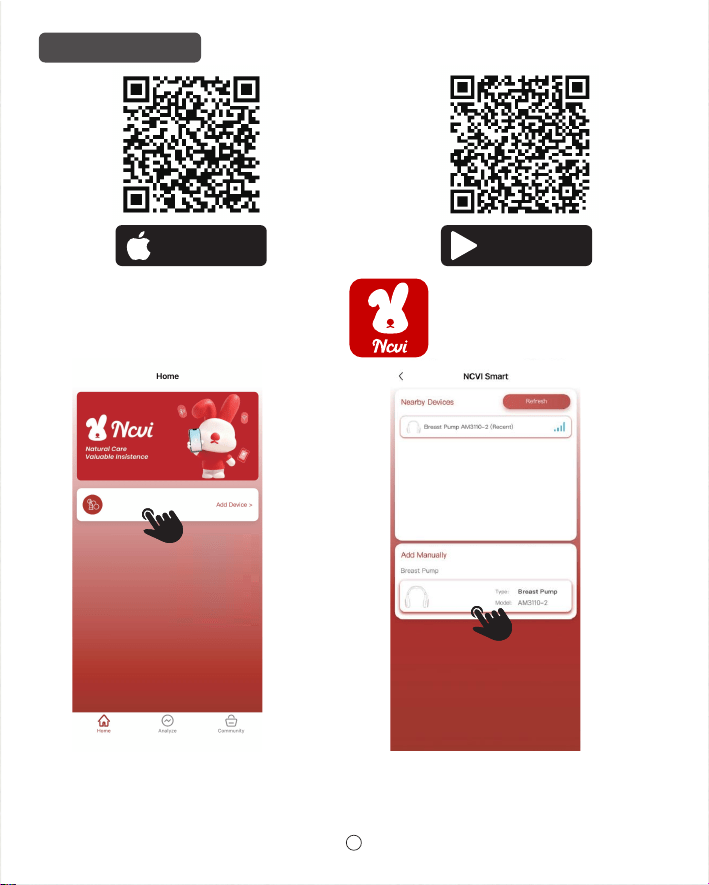
1. Download and install the NCVI Smart app.
HOW TO USE APP
Download on the
Apple store
GET IT ON
Google Play
2. Click “Add Device”. 3. Long press ON/OFF Button on the pump motor to
start the device, then add it manually or by searching
nearby device.
1
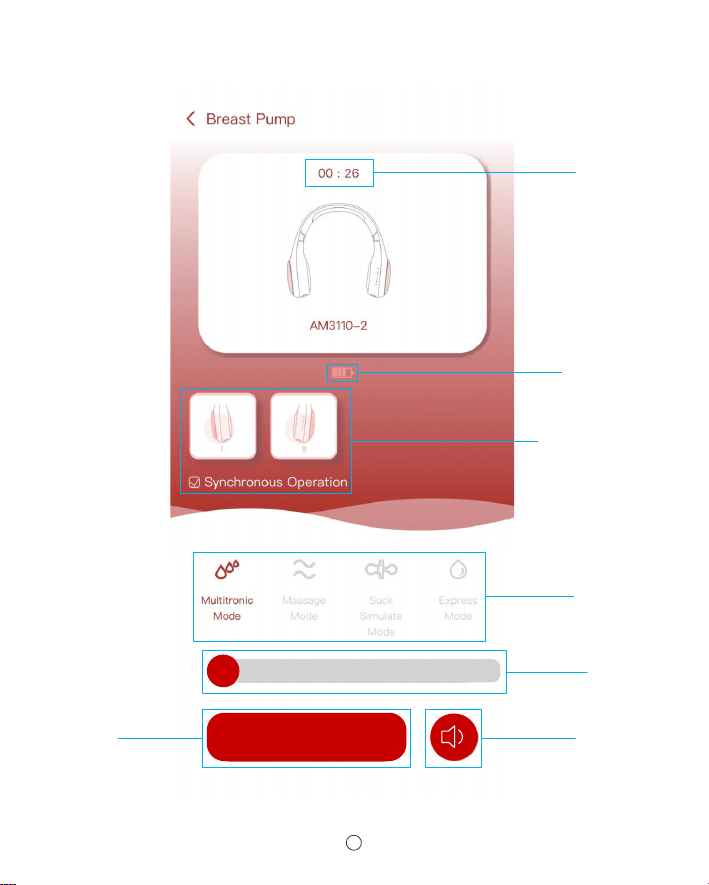
Suction level
indicator
Time display
Battery indicator
Switch single side/
Synchronous double
sides operation
Start/Pause
Start
1
Mode indicator
Volume On/Off
2
Silicone
-20℃/-4℉~200℃/392℉
c
d
e
f
g
j
h
i
Rinse in water/Not suitable for
prolonged sterilization
Rinse in water/Not suitable for
prolonged sterilization
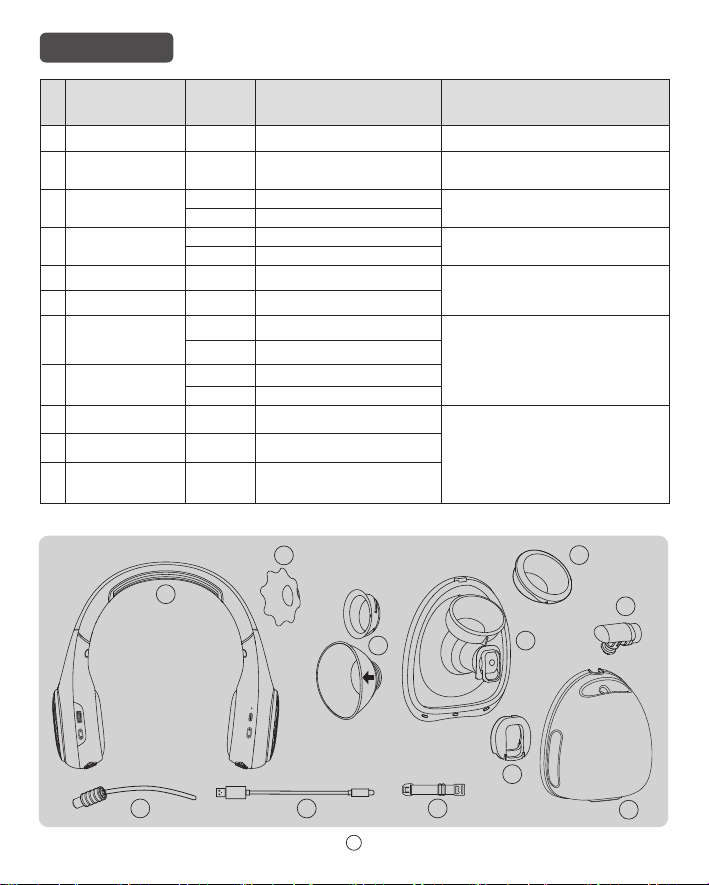
Please check the following accessories before use, if there are
missing or damaged pieces, please contact the supplier.
COMPONENTS
Diaphragm
Valve
Motor
Silicone
PP
Silicone
PP
/ /
/ /
/ /
Materials
Component
Name
Operating
Temperature
Sterilization Instruction
Wipe with soft duster
Wipe with soft duster
Boiling water/Microwave/
Dishwasher/UV safe
Boiling water/Microwave/
Dishwasher/UV safe
-20℃/-4℉~200℃/392℉
-20℃/-4℉~120℃/248℉
PS -20℃/-4℉~149℃/300.2℉
-20℃/-4℉~149℃/300.2℉PS
-20℃/-4℉~200℃/392℉
Silicone -20℃/-4℉~200℃/392℉
Silicone -20℃/-4℉~200℃/392℉
-20℃/-4℉~120℃/248℉
PP
-20℃/-4℉~120℃/248℉
Charging cable
k
/ /
Rinse in water/Not suitable for
prolonged sterilization
Cover
Small Flange
Big Flange
Breast shield
PP -20℃/-4℉~120℃/248℉
Flange (27mm)
Collection cup
(180mL/6oz)
Flange Insert
(17/19/21/24mm)
Air tube
Please clean and disinfect the parts used for food contact before and after each use.
27mm
b
c
d
e
f
g
h
i
j
k
a
a
b
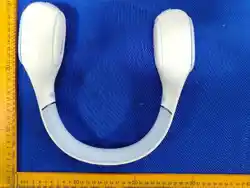
Bra Adjustment
Buckle
3
HOW TO ASSEMBLE
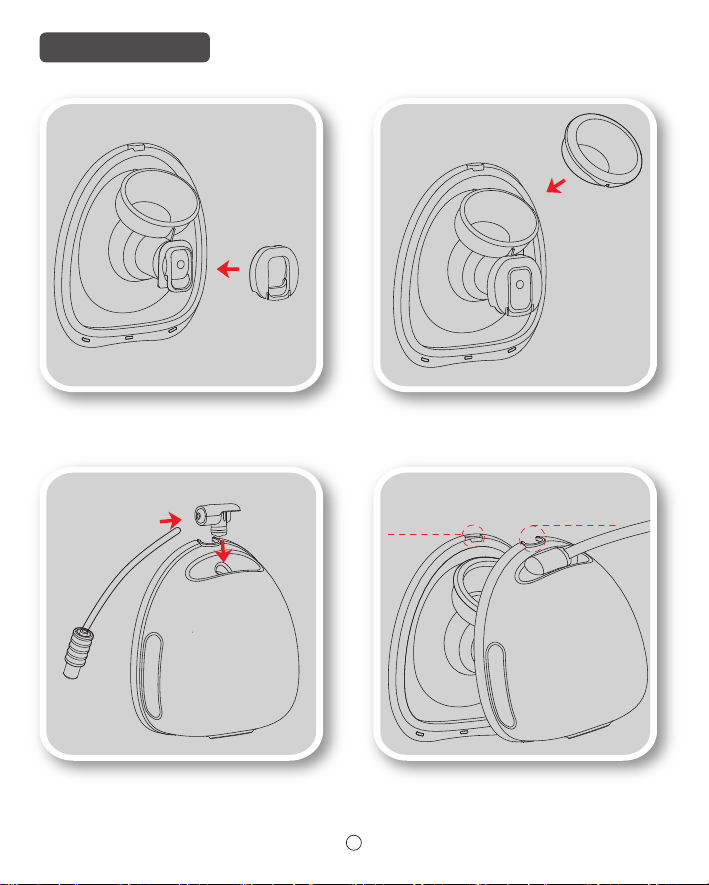
Before use ensure your hands and all breast pump parts are cleaned and dried.
4. Buckle up breast shield and collection
cup on the top, then push collection cup
into breast shield.
3. Insert the connector of the
air tube into the collection cup.
1. Push the silicone valve onto the
breast shield.
2. Put the diaphragm into the breast shield.
Collection cup
buckle
Breast shield
buckle
Connector
4
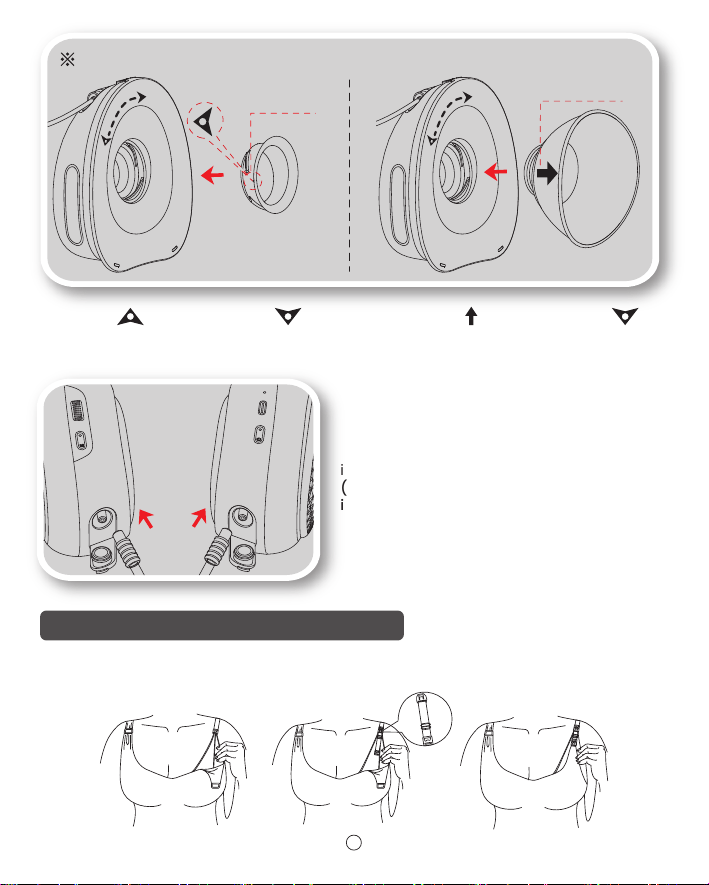
5(2). Align " " on Flange with " " on
the breast shield, then screw Flange into
breast shield.
6. Insert the motor connectors of the air tubes
into the jacks of the two motors respectively.
(Note: Make sure the motor connector is fully
inserted into the motor jack.)
5(1). Align " " on Flange with " "on
the breast shield, then screw Flange into
breast shield.
INSTRUCTIONS FOR BRA ADJUSTING BUCKLE
Adjust the length of bra straps, make pumping more comfortable. One end of the bra
adjustment buckle hung on the inside buckle of nursing bra. Tight bra buckle on the
other end of bra adjustment buckle.
27mm
Align mark
Align mark
There are two types of flange. Use Small flange with bra, use Big flange without bra.
5
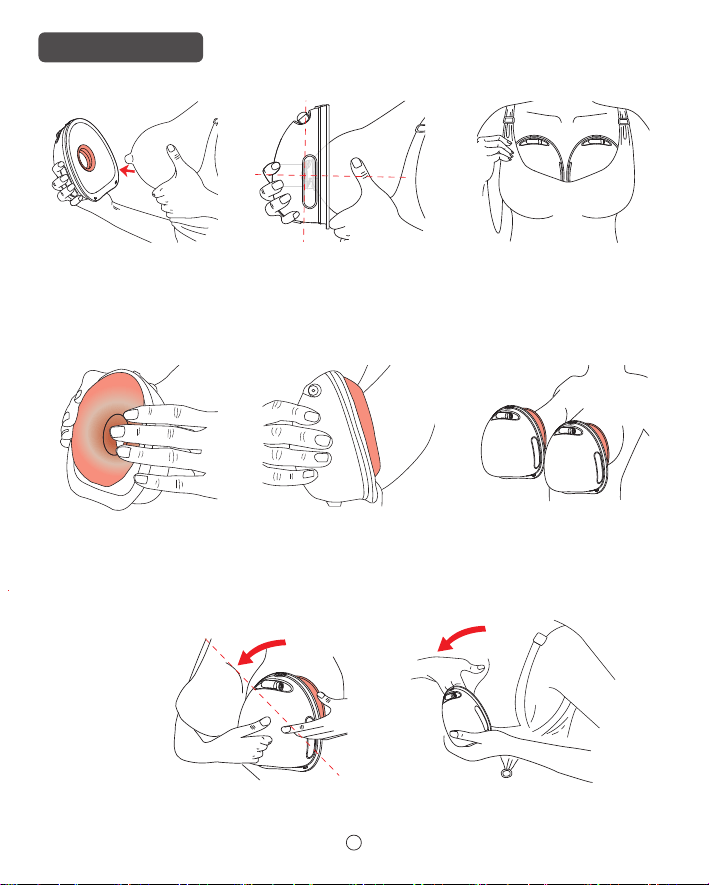
DIRECTION TO USE
Use your finger to break the seal between the flange and your skin. Lean slightly forward
to remove the pump from the breast after your pumping session.
Use Small Flange with Bra
Use Big Flange without Bra
1. Use both hands to fold the
outer edge of the Big Flange
outwards to the maximum
extent.
3. If you feel the pump moves
during use, please tighten your
bra strap to adjust the pump
again.
1. Press the flange firmly
against your skin without
a gap.
2. Make sure your nipple is
centered. Keep it upright.
2.
Press the flange firmly against
your skin without a gap, make
sure your nipple is centered.
Unfold the outer edge of the
Big Flange back to your skin.
Remove The Pump
3. Press gently to release any
trapped air, the pump will
hang on your breast.
6
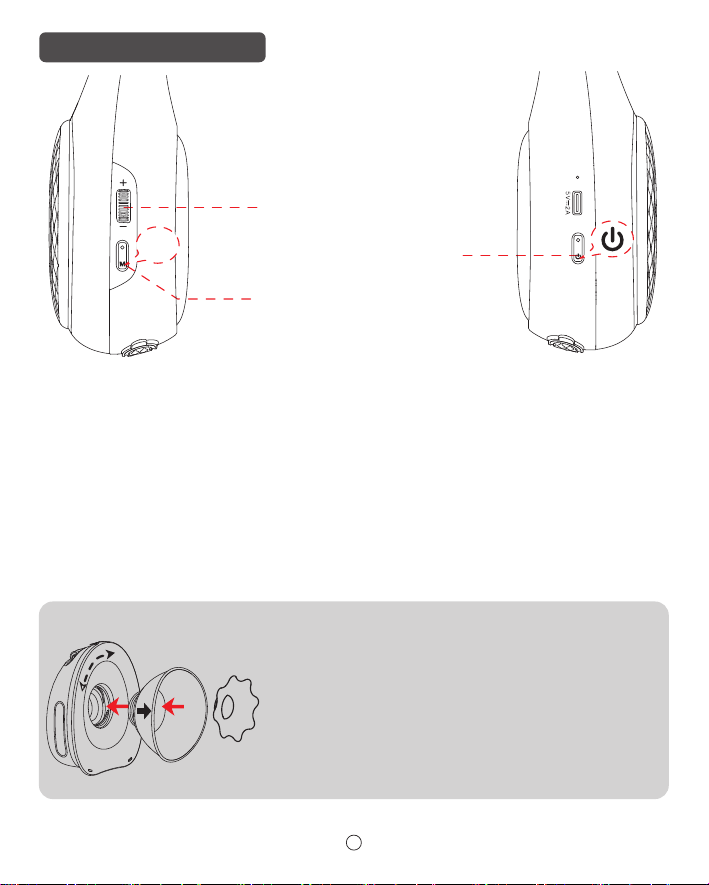
On/Off Button:
Long press to turn on/ down. Short press to pause/continue. The pump will automatically
shut down after pause over 10 minutes.
Mode Switch:
Short press to switch modes. Added built-in memory function, the pump will automatically
enter the mode and suction level you used last time when the motor every time turned on.
Suction Power Switch:
There are 9 levels in each mode. Rotate the “Knob Button” to adjust the suction level.
BUTTONS AND FUNCTIONS
Knob Button
Mode Button
On/Off Button
17/19/21mm
Measure your nipple size and choose
the right flange size suit you the best.
17/19/21mm flange inserts are
included in the box. Original pump
body is 27mm.
27mm
M
7
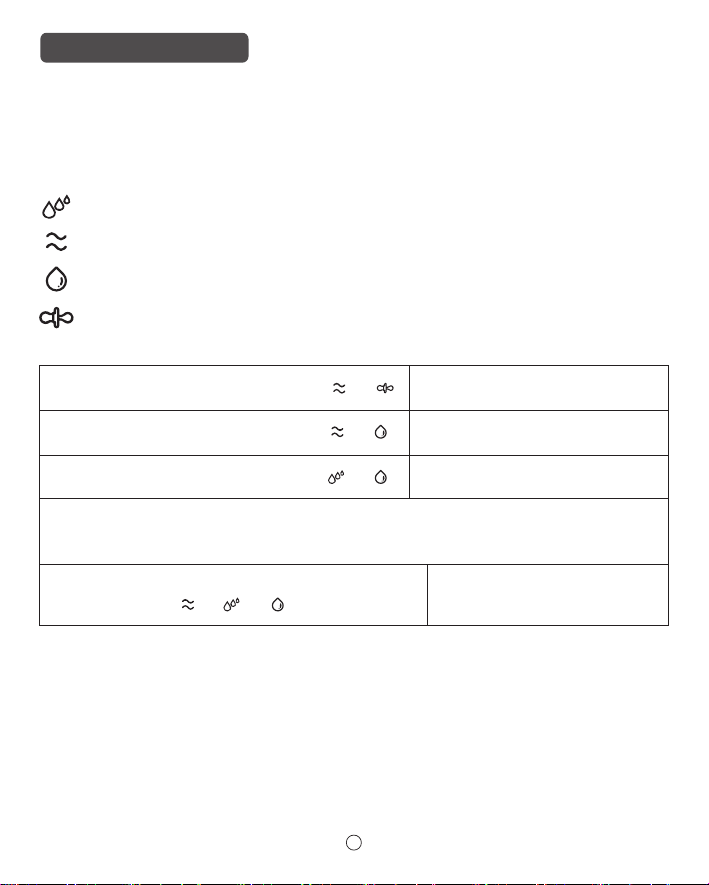
Based on professional research and study, NCVI electric breast pump uses two-stage
milk suction mode to stimulate the true rhythm that is closest to the baby’s suction.
There are four different modes and nine levels of suction. The intensity of suction
increases with eachlevel increasing.
HOW TO CHOOSE MODE
* Tips:
We suggest moms to try different modes and suction according to your actual
breastfeeding situation.
“ ” → “ ”
“ ” → “ ”1 Min Massage Mode → Suck Simulate Mode
“ ” → “ ”
1 Min Massage Mode → Express Mode
1 Min Multitronic Mode → Express Mode
↓↓↓There is a SPECIAL INGREDIENT for new moms who cannot produce much breastmilk at the
beginning. Please relax yourself then try this combination below.↓↓↓
1 Min Massage Mode → 1 Min Multitronic Mode → Express Mode
Painless Pumping for Daily Use
Express Pumping for A Rush Schedule
Exclusive Combination for Oversupplyer
Try it with a comfortable suction level
Multitronic Mode: Variable frequency to get MORE milk.
Massage Mode: Gentle STIMULATION to get milk flow.
Express Mode: Slow and deep sucking to EMPTY OUT.
Suck Simulate Mode: Simulate NATURAL SUCKING of baby.
“ ” → “ ” → “ ”
8
CAUTIONS
1. Please read the manual carefully before use.
2. Please fully charge the product before first use. Do not charge the battery pack for
long time. Lithium batteries can only be replaced by NCVI or authorized service
providers, and replacing the wrong model battery will have explosion dangers. Dispose
the waste battery packs under local laws and regulations.
3. If the product is not used for a long time, the battery will run out of power. It needs to
be plugged in for reactivation. After plugging in the power, wait for ten minutes for the
screen to light up to indicate that it has been activated. Then continue charge the
product till fully charged. If it is not activated for more than half an hour, please consult
customer service.
4. The pump motor and other electric parts CAN NOT be washed in water or sterilized
into steam sterilizer.
5. Please use the charging cable provided with this product. Do not plug the charging
cable of any other manufacturer into the motor for use, so as not to cause damage to
the motor.
6. Please use adapter, select the adapter with input voltage AC100~240V and output DC
5V and 2A.
TROUBLE SHOOTING
Too little or no suction
A. Check whether valve and diaphragm are installed correctly.
B. Check whether breast shield and collection cup are installed in place.
C. Check whether the connection parts between Air tube and motor have been installed.
D. Check whether the Air tube is twisted or pressed and whether it is loose at both ends
with the main connector.
Note: This breast pump will automatic turn off after working
30 minutes.
Friendly reminder:
Clean and dry other breast pump parts (flanges, valves,
diaphragms) to avoid milk stains. If you do not need
to feed baby immediately, please storage breast milk
in the fridge.
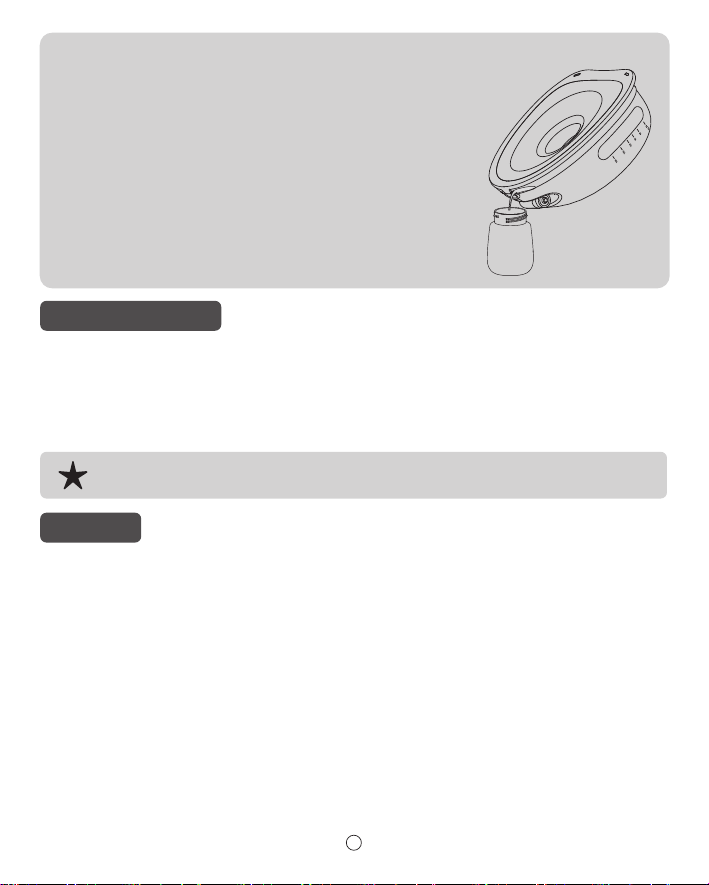
Tips: We recommend the user to stop the pumping
session once the expressed milk volume of the milk
collector approaches 180mL/6oz to avoid overflow.
When pumping, you should keep right posture, please do not lie on
side in case of milk flows back.
9
19℃/66.2℉~26℃/78.8℉
<4℃/39.2℉
-15℃/5℉
-18℃/-0.4℉
-20℃/-4℉
Breast milk should be sealed and stored in refrigerator
for long time storage.
STORING BREAST MILK
Storage TemperatureStorage Ways
4~6 Hours
3~8 Days
14 Days
3~6 Months
3~6 Months
Room
Refrigerator
Freezer
Longest Storage Time
TO WARM MILK
1. In order to preserve the nutrition
of the breast milk, you can warm
the breast milk with 40°C/104℉
warm water or use a bottle warmer.
2. Do not thaw frozen breast milk in
the microwave oven or the boiling
water (will damage the nutrition of
breast milk).
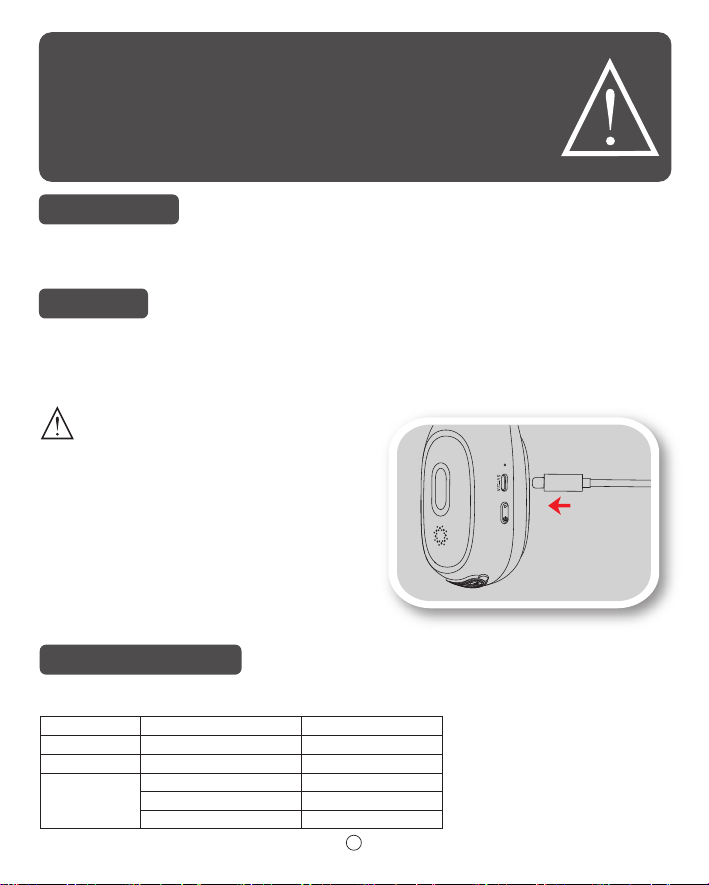
When charging, pump should be turned off first. It will not be charging when turned on.
Please plug adapter into the power socket.During the charging, the battery symbol light
will be flashing. When the battery symbol is stably bright, the battery is full.
Lithium battery: This product has a lithium battery inside.When using it, long press power
button to turn it on, choose mode and suction level. Long press power button to turn it off.
Warning:
Please keep diaphragm, tube connector, tubing
adaptor, air tube and other components dry to
prevent the motor damaged from inhaling water!
Charging
Connect the charging cable to the USB port on
the pump motor.
NCVI breast pump includes an USB cable and
can be charged by following ways:
1. Computer USB Ports (output: DC5V/2A);
2. Electric AC Adapter (input: AC100-240V/
50Hz-60Hz; Output: DC5V/2A);
3. USB Power Bank (Output: DC5V/2A).
POWER SUPPLY
CHARGING
10
WORKING CONDITION
Rated temperature range: 5℃/41℉ to 40℃/104℉
Rated relative humidity: 20% ~ 80%
Rated atmospheric Pressure: 850Hpa ~ 1060Hpa
Long-term storage should be kept in a dry and cool place
TRANSPORT & STORAGE CONDITION
Temperature: -20℃/-4℉ to 55℃/131℉
Humidity: 20% ~ 80%
Atmospheric pressure: 850Hpa ~ 1060Hpa
Name
Model
Voltage
Power
1pc
China
Battery
Specification
Quantity
Place of Origin Warranty Time
Wearable Breast
Pump
AM3110-2
1 year
PRODUCT SPECIFICATIONS
12W
3.7 V
1930 mAh
5V
SAFETY CLASSIFICATION
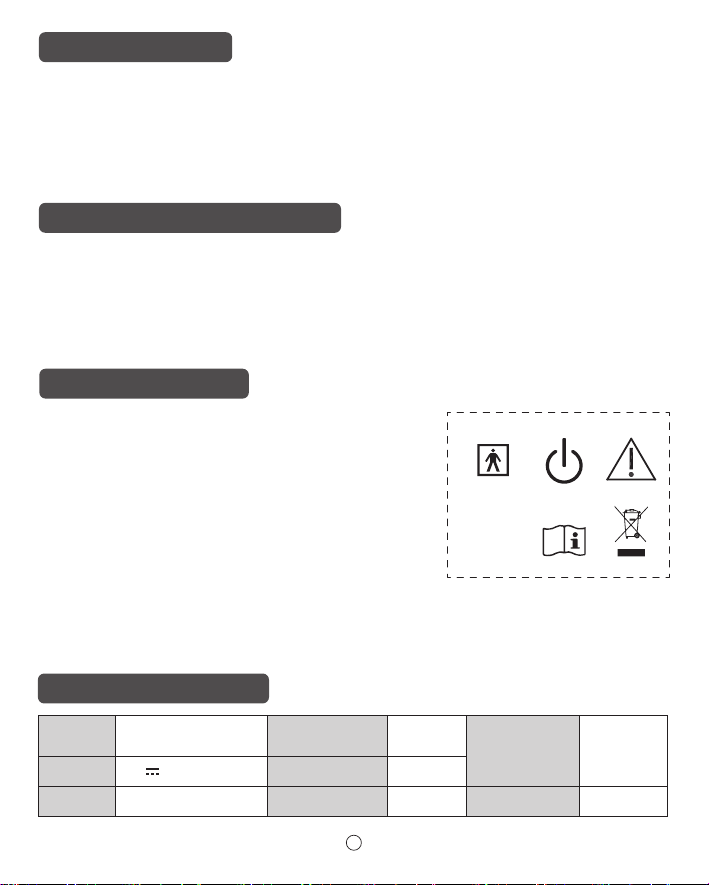
Symbol
Stand by
Caution
Type BF
applied part
WEEE
Manual
Properly dispose of the device in accordance with
local,state and federal regulations Safety Classification.
—Type of protection against electric shock: Internally
powered equipment.
—Degree of protection against electric shock: Type BF
applied part.
—Safety degree of using in flammable anesthetic gas
blending with air, oxygen or nitrous oxide: Non-AP/APG.
—Continuous or Non-continuous operation: Continuous.
—Classification of sterilization methods:
No need for sterilization.
11
NOTICE
Add:No. 115 Xinjin Road, Xinwu District, Wuxi City, Jiangsu Province, China.
Tel: +1(818)291-3826
Https: //www.ncvi.co
E-MAIL: [email protected]
Please read the manual carefully before use.
Please store the product where children can not reach.
1. This product comes with 1 YEAR warranty. Please contact the MANUFACTURER for
warranty claims.
2. This warranty does not cover defects caused by: misuse, abuse, improper storage/
alteration of the product, use of improper components, failure to comply with the
operating instructions using the accessories supplied with the product, or normal
wear and tear.
3. The user of this product assumes all responsibility and risk for the use of this product.
4. WARNING: No modification of this equipment is allowed.
WARRANTY CARD
Thank you for purchasing our product. Please keep your
receipt as proof of purchase for any warranty claim.
Battery and motor can only be replaced by authorirized party.
For repair or replacement of battery and motor, please scan QR code.
You can also visit our website
Https: //www.ncvi.co for more information.
If you have any question,
please email us at [email protected].
Manufacturer: Jiangsu Xinbei Electrical Appliances Co., Ltd.
12

•WWW.NCVI.CO•

FCC Caution.
This device complies with part 15 of the FCC Rules. Operation is subject to the following two
conditions:
(1) This device may not cause harmful interference, and
(2) this device must accept any interference received, including interference that may cause
undesired operation.
Any Changes or modifications not expressly approved by the party responsible for compliance
could void the user's authority to operate the equipment.
Note: This equipment has been tested and found to comply with the limits for a Class B digital
device, pursuant to part 15 of the FCC Rules. These limits are designed to provide reasonable
protection against harmful interference in a residential installation. This equipment generates
uses and can radiate radio frequency energy and, if not installed and used in accordance with the
instructions, may cause harmful interference to radio communications. However, there is no
guarantee that interference will not occur in a particular installation. If this equipment does
cause harmful interference to radio or television reception, which can be determined by turning
the equipment off and on, the user is encouraged to try to correct the interference by one or
more of the following measures:
-Reorient or relocate the receiving antenna.
-Increase the separation between the equipment and receiver.
-Connect the equipment into an outlet on a circuit different from that to which the receiver is
connected.
-Consult the dealer or an experienced radio/TV technician for help.
* RF warning for Portable device:
The device has been evaluated to meet general RF exposure requirement. The device can be used
in portable exposure condition without restriction.