7 Inch Car Multimedia System
Model: CMR-710HD

1
2
5
4
3
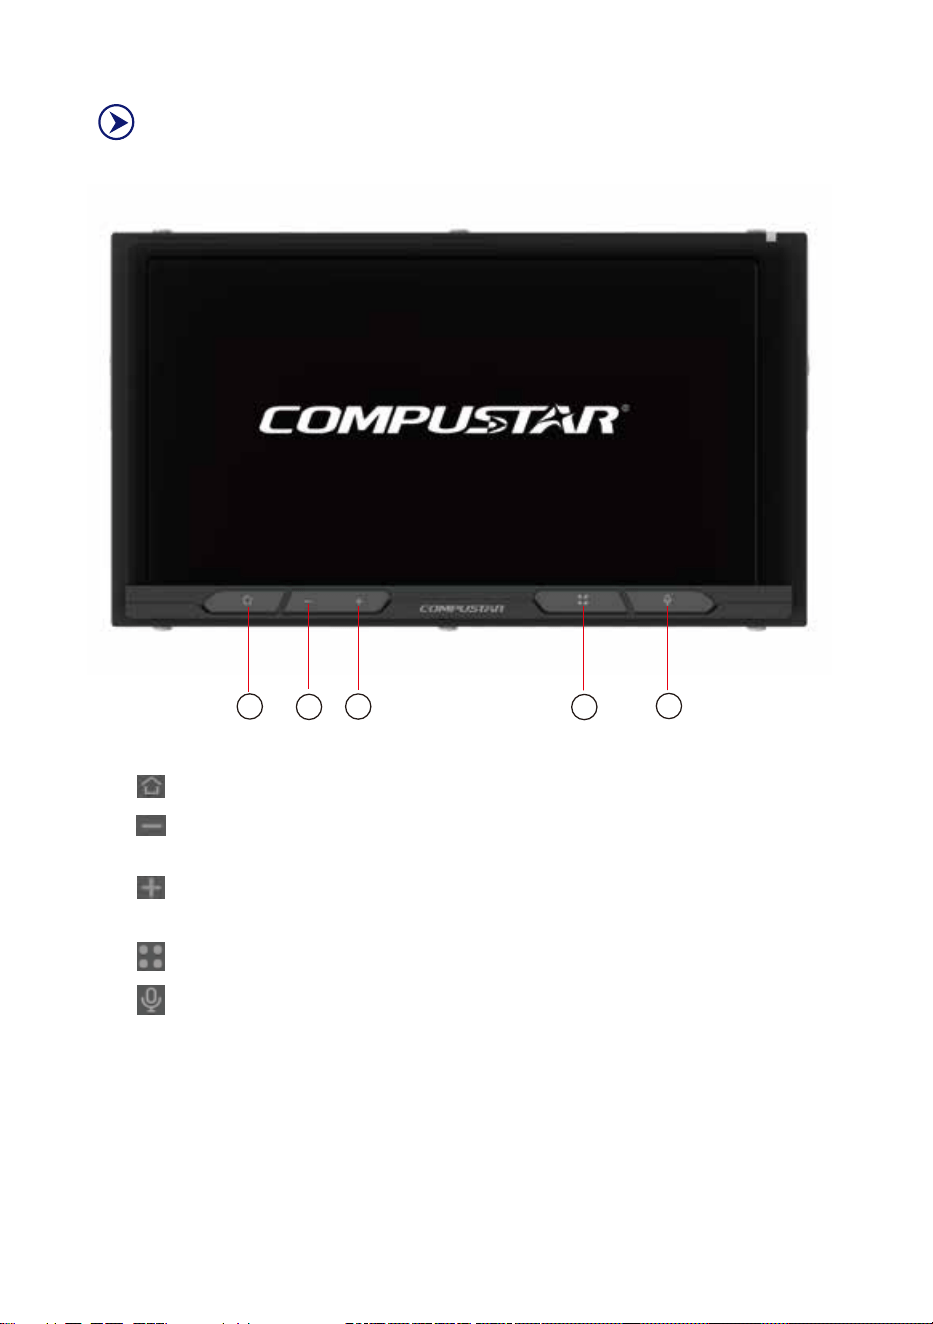
1.【 】Back to home page
2.【 】Short press to step 1 to decrease volume, long press to step 5 to
decrease volume
3.【 】Short press to step 1 to increase volume, long press to step 5 to
increase volume
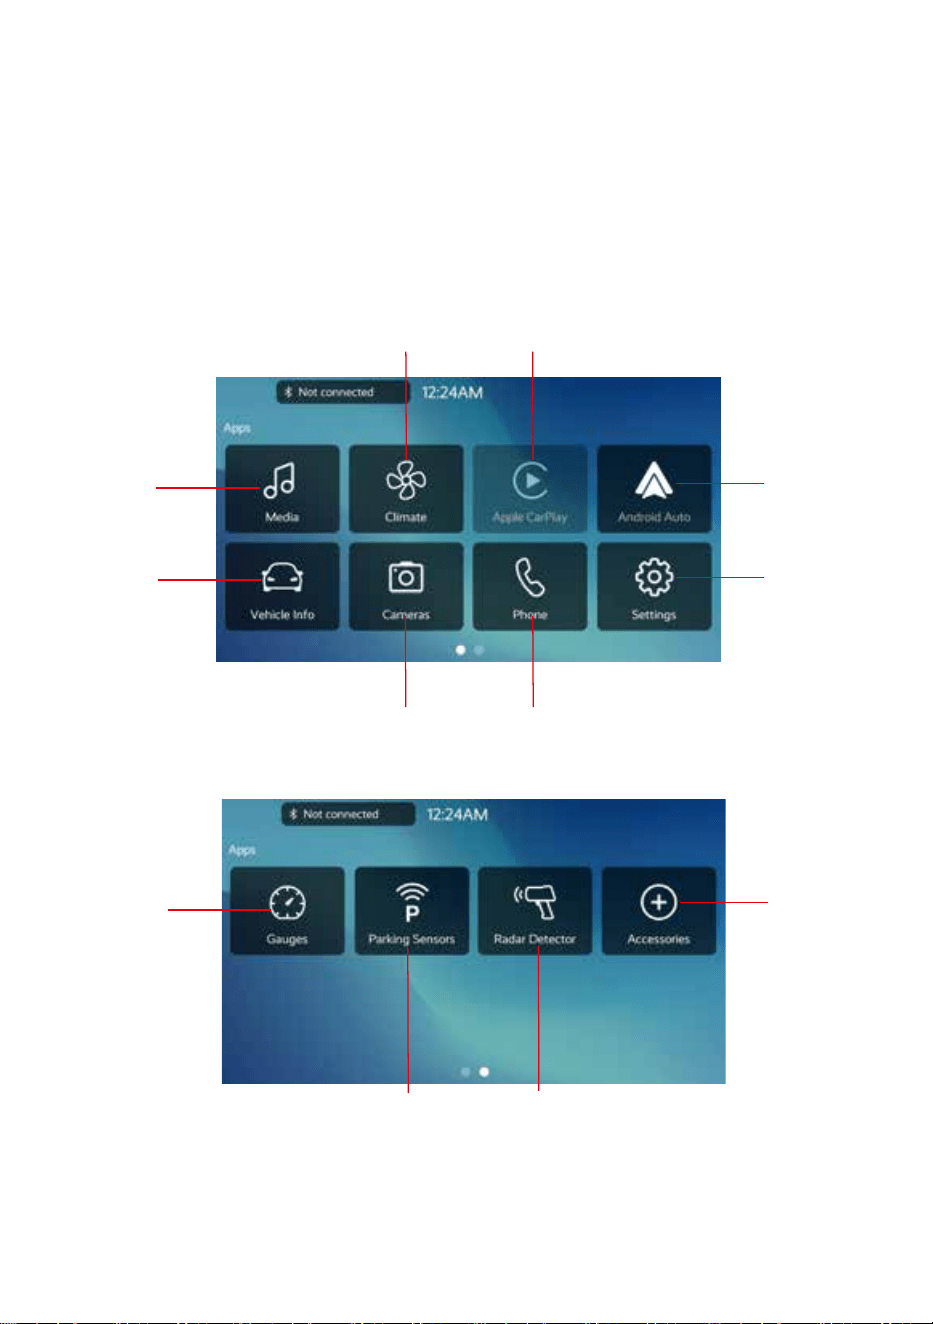
4.【 】Click to enter the APP interface
5.【 】The language assistant button is available on the Carplay interface
and Android Auto interface. Click on other interfaces to enter the
Bluetooth pairing interface
Touch button function
Click the[+- ]volume button on the panel to adjust the volume.The adjustment
range is 0-39
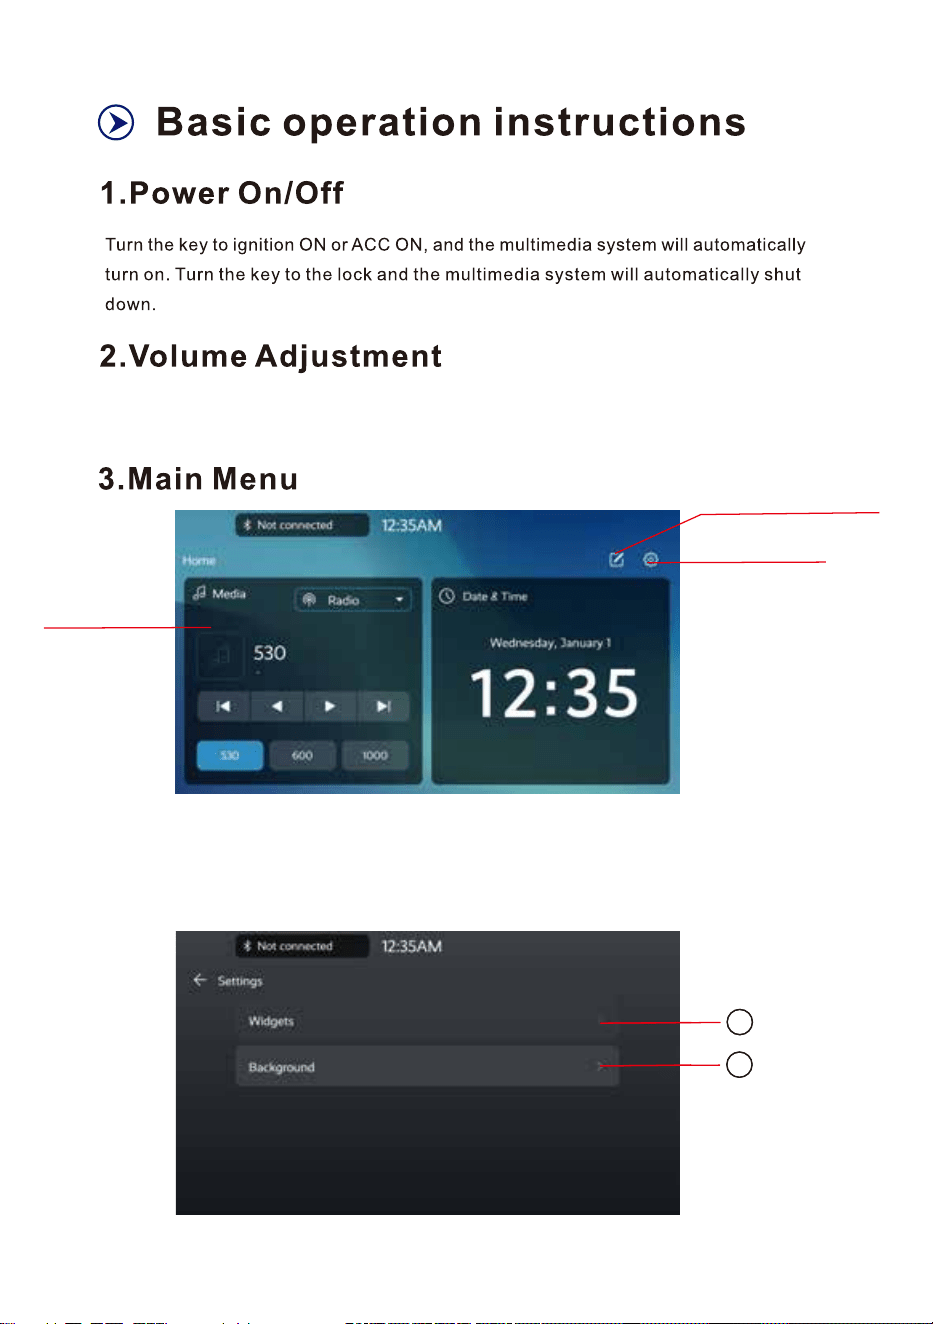
Enter the current
media source
Enter the system
settings interface
Click to enter the home
widget settings interface
3.1 Widget Settings Interface
1
2
4.APP Menu
Android Auto
Apple Carplay
Enter Settings
Enter Bluetooth
Phone
Enter Cameras
Enter Media
Enter Vehicle Info
Enter Climate
Enter Accessories
Enter Gauges
Enter
Parking Sensors
Enter
Radar Detector
1.Widgets: Main interface widget setting interface, which can set the interface
displayed by the two widgets on the left and right sides of the main interface
2.Background: set background
5.Media Menu
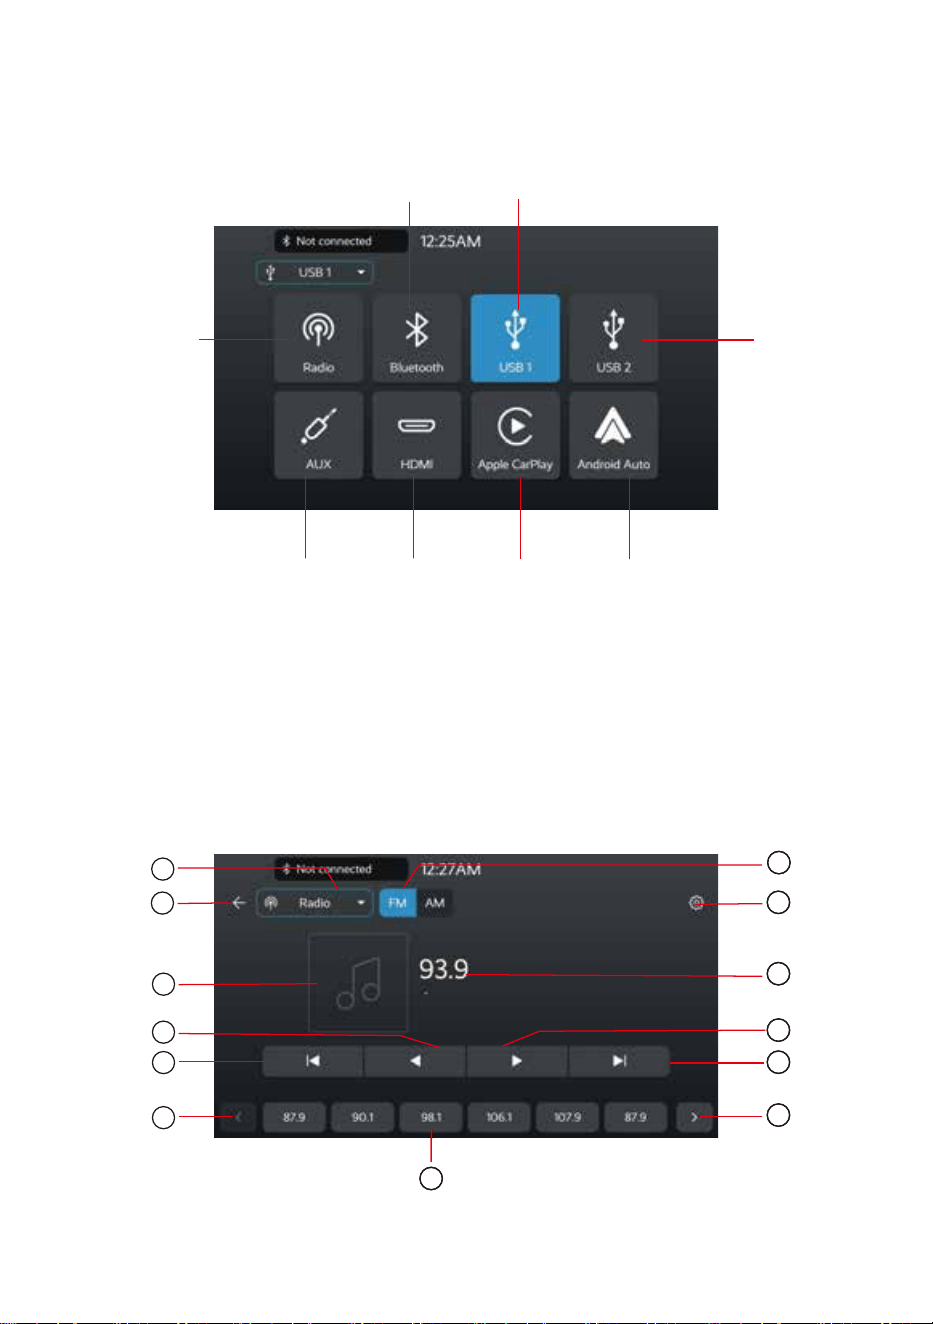
Enter the Radio
interface
Click the [Media] icon on the APP interface to enter the media interface,
or click the current media source on the main interface to enter the media
interface, and then click to enter the media source selection interface.
Enter the USB2
interface
Enter AUX
Enter HDMI
Enter
Apple CarPlay
Enter
Android Auto
Enter Bluetooth
Enter USB1
5.1 Radio Mode
Click the [Radio] icon on the audio source selection interface to enter the
recording interface
1
2
3
4
5
6
7
8
9
10
11
12
13
7
8
9
10
11
12
13
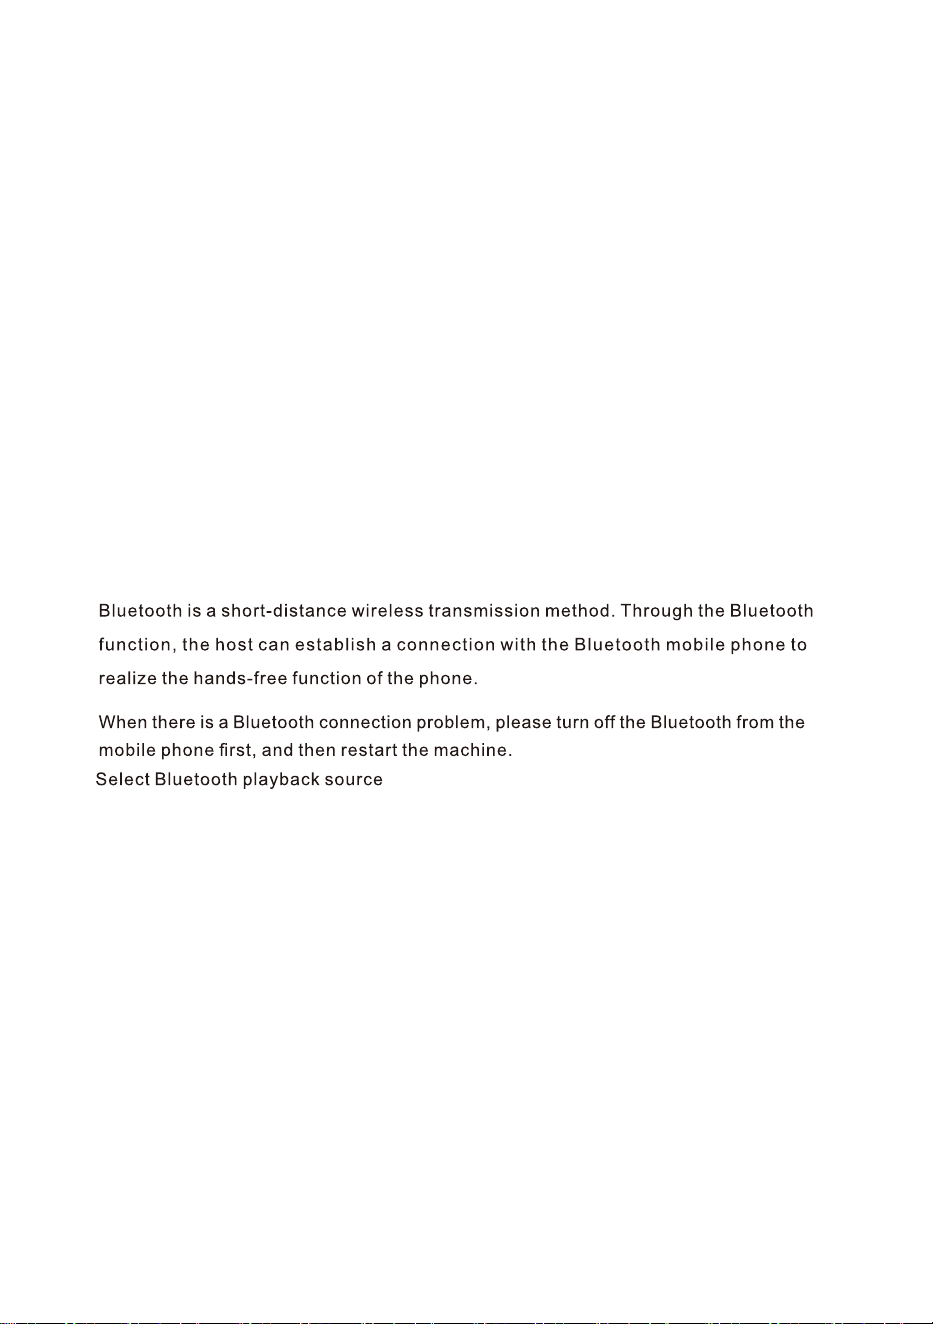
1.Enter the media audio source selection interface
2.Return to the previous interface
3.HDRadio album cover
10.Step down
9.Currently playing radio station
8.Enter the media settings interface
7.FM/AM switching
6.Flip up the list
5.Scan up the table
4.Step up
13.PlayList
12.Scroll down the list
11.Scan down the table
Click on the 【Bluetooth 】 icon on the audio source selection interface to enter the
Bluetooth music interface
5.2 Bluetooth Mode
1.1. On the main menu interface, click [Phone] or click the [Bluetooth] icon on the audio
source selection interface to enter the Bluetooth pairing interface, or press the [Voice Key]
on the panel to enter the Bluetooth pairing interface.
1.2. Users can initiate connection requests to paired remote devices through the car's
infotainment system. If the remote device has pairing information with the car machine,
it can also initiate a connection request to the car machine through the remote device.
At this time, the car machine must be in a connectable state, o
therwise it cannot be
connected. You can search for Bluetooth devices within the valid range by operating the
search device.
5.2.1 Bluetooth Operation
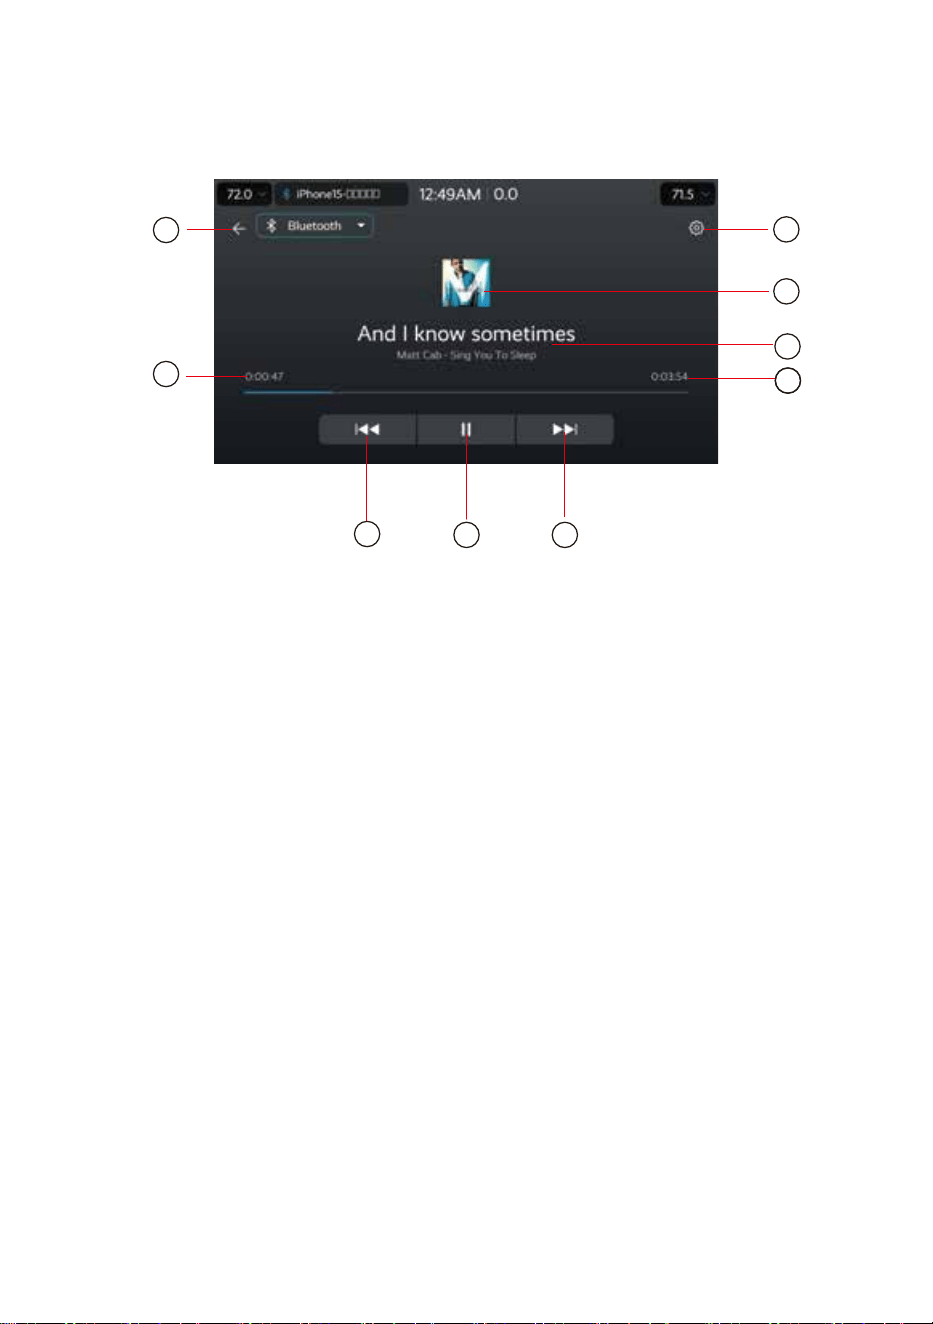
5.2.2 Bluetooth Music
3
4
5
6
1
2
7
8 9
1.Return to the previous interface
3.Enter the media settings interface
9.Next song
8.Play/Pause button
7.Previous song
6.Total duration of music playback
5.Music Information
4.CD Covers
2.Music played time
5.3 USB Mode
Insert the USB device correctly into the USB port, and the system will automatically
play music files from the USB.
Click on the 'USB' icon on the audio source selection interface to enter the USB
interface. If the USB device is not connected, a prompt "No USB" will pop up
USB1(Type-A):
Supports USB1.1/USB2.0
Support CarPlay Android Auto Connection
Supports USB DRD
Support USB firmware upgrade.
USB2(Type-C):
Supports USB1.1/USB2.0
Support mobile fast charging 2.5A (depending on the charging protocol of the phone)
Support USB firmware upgrade
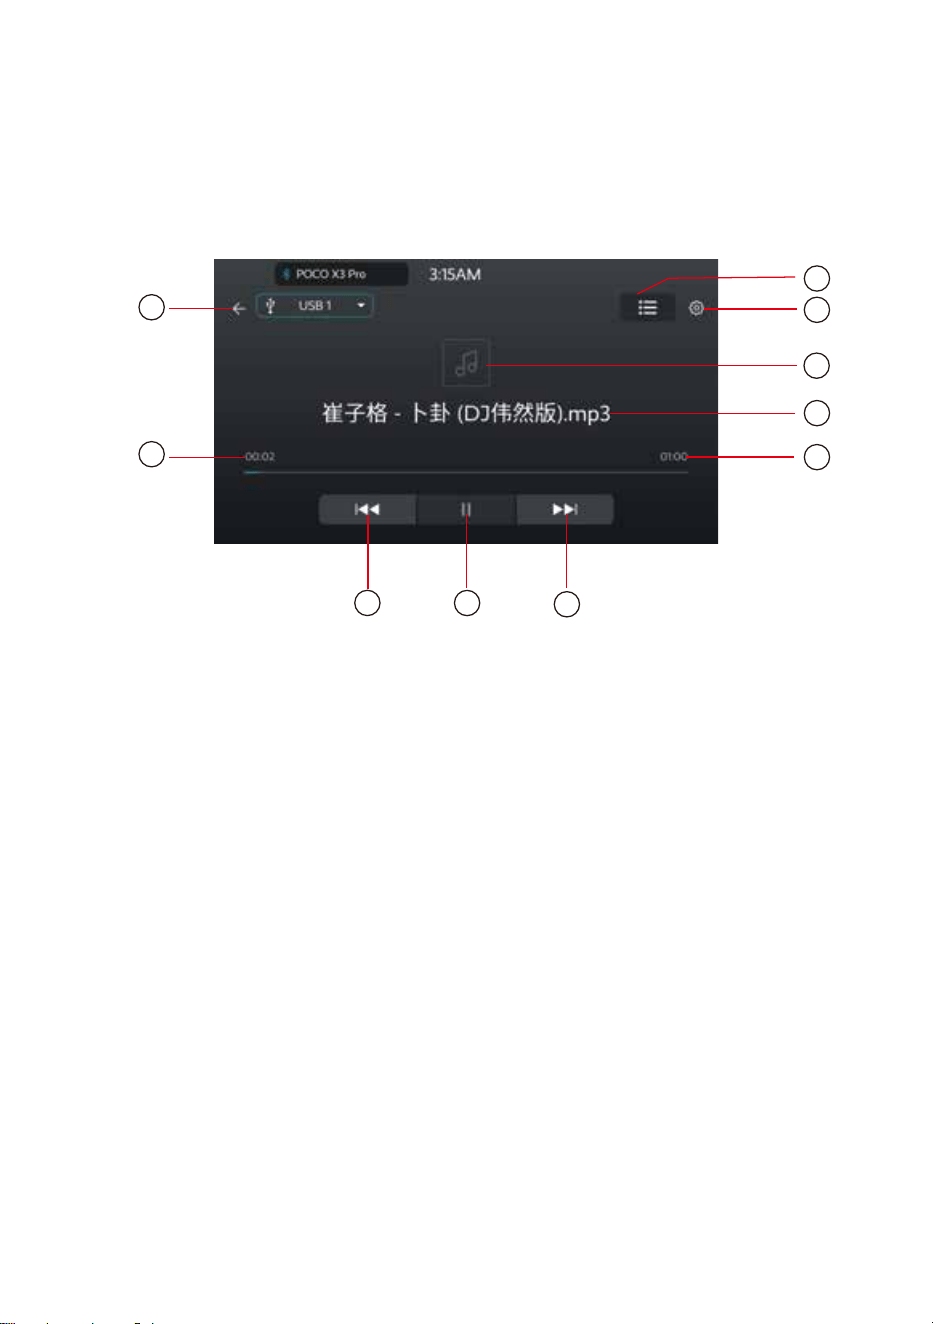
4
3
2
8
9
10
6
5
7
3.Enter the list interface
5
.CD Covers
4
.Enter the media settings interface
5.3.1 USB MUSIC Mode
1
1.Return to the previous interface
2
.Music played time
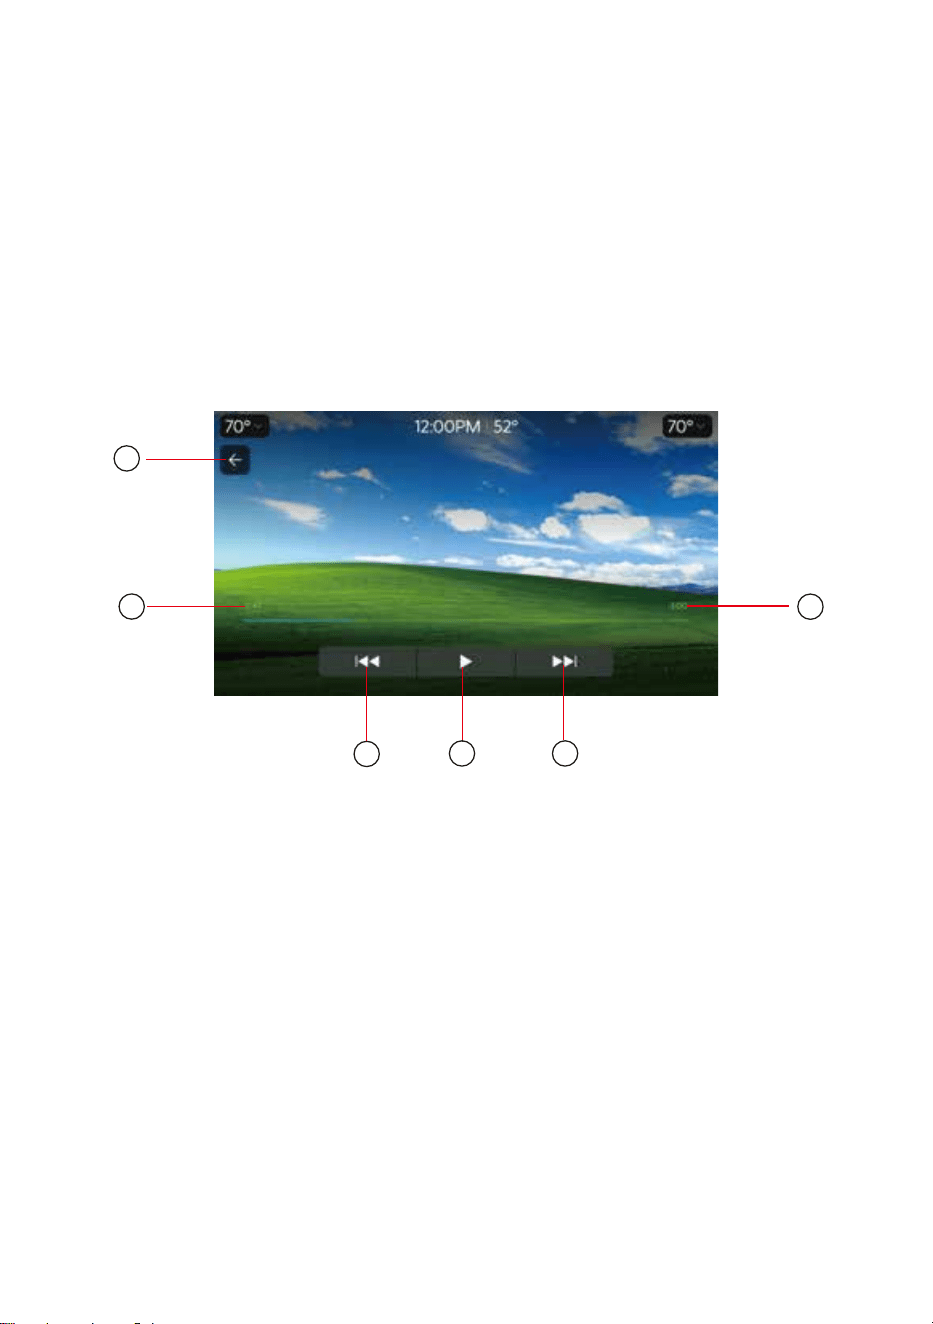
5.3.2 USB Video Mode
In the USB mode interface, click on the list to enter the media source selection
interface, click on the video, a list of video files will appear, and click on the video
file to enter the playback mode.
1
2
4
5
6
3
3.Total video duration
1.Return to the previous interface
2.Video playback time
6.Next song
5.Play/Pause button
4.Previous song
7.Total duration of music playback
6.Music Information
10.Next song
9.Play/Pause button
8.Previous song
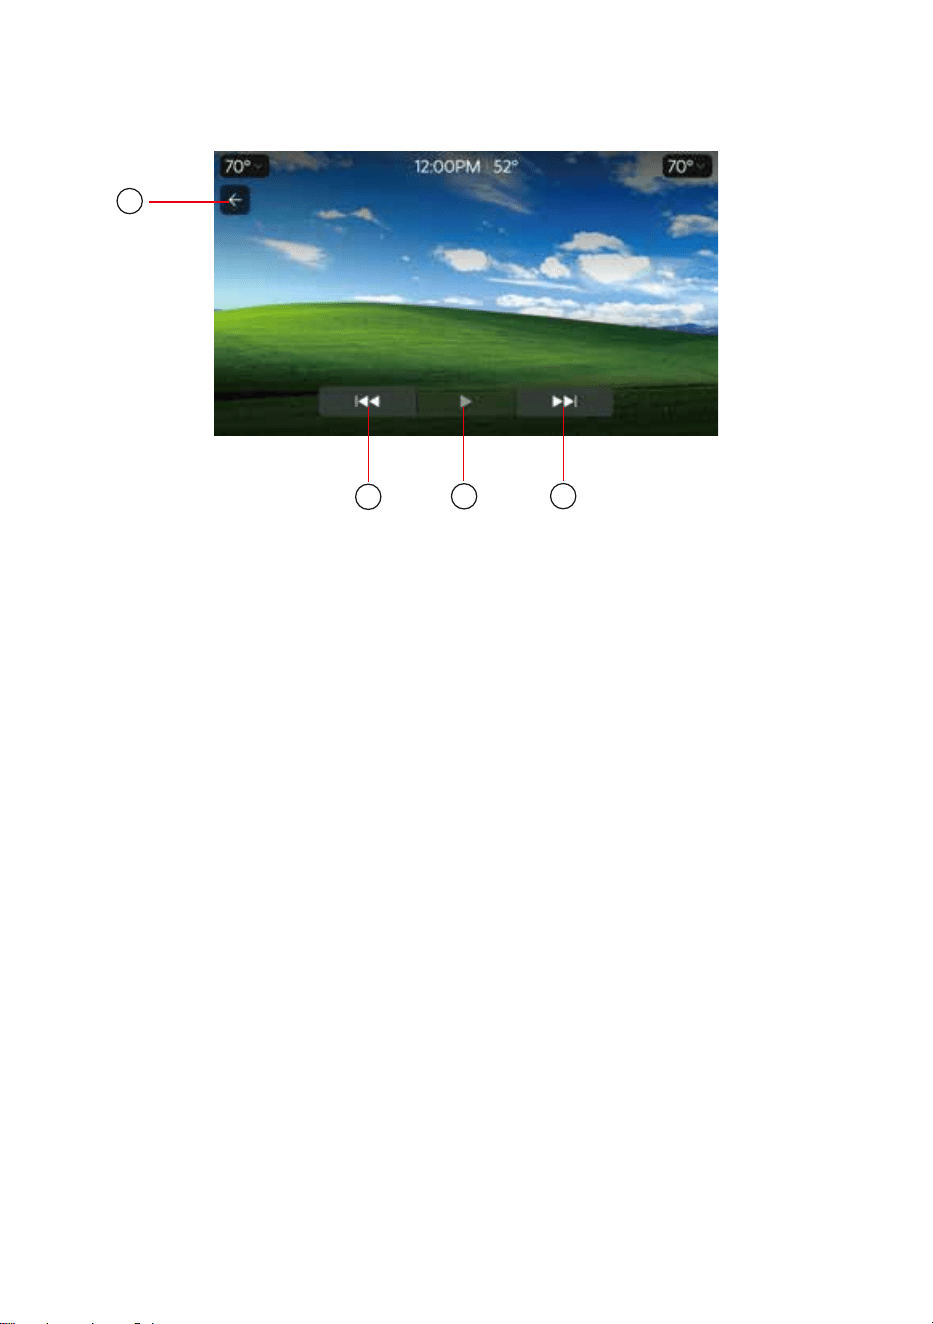
5.3.3 USB Picture Mode
In the USB mode interface, click on the list to enter the media source selection
interface, click on the image, a list of image files will appear, and click on the
image file to enter the playback mode.
1
2
3
4
1.Return to the previous interface
4.Next picture
3.Play/Pause button
2.Previous picture
The supported formats of USB files are as follows:
Audio:MP3, MP2. WMA, AAC, FLAC, WVA, OGG
Video:MPEG4, AVI, 3GP, FLV. RM/RMVB, VOB, MKV, TS
Photo:JPEG, BMP, PNG
It supports FAT32///Support USB/SD format FAT32
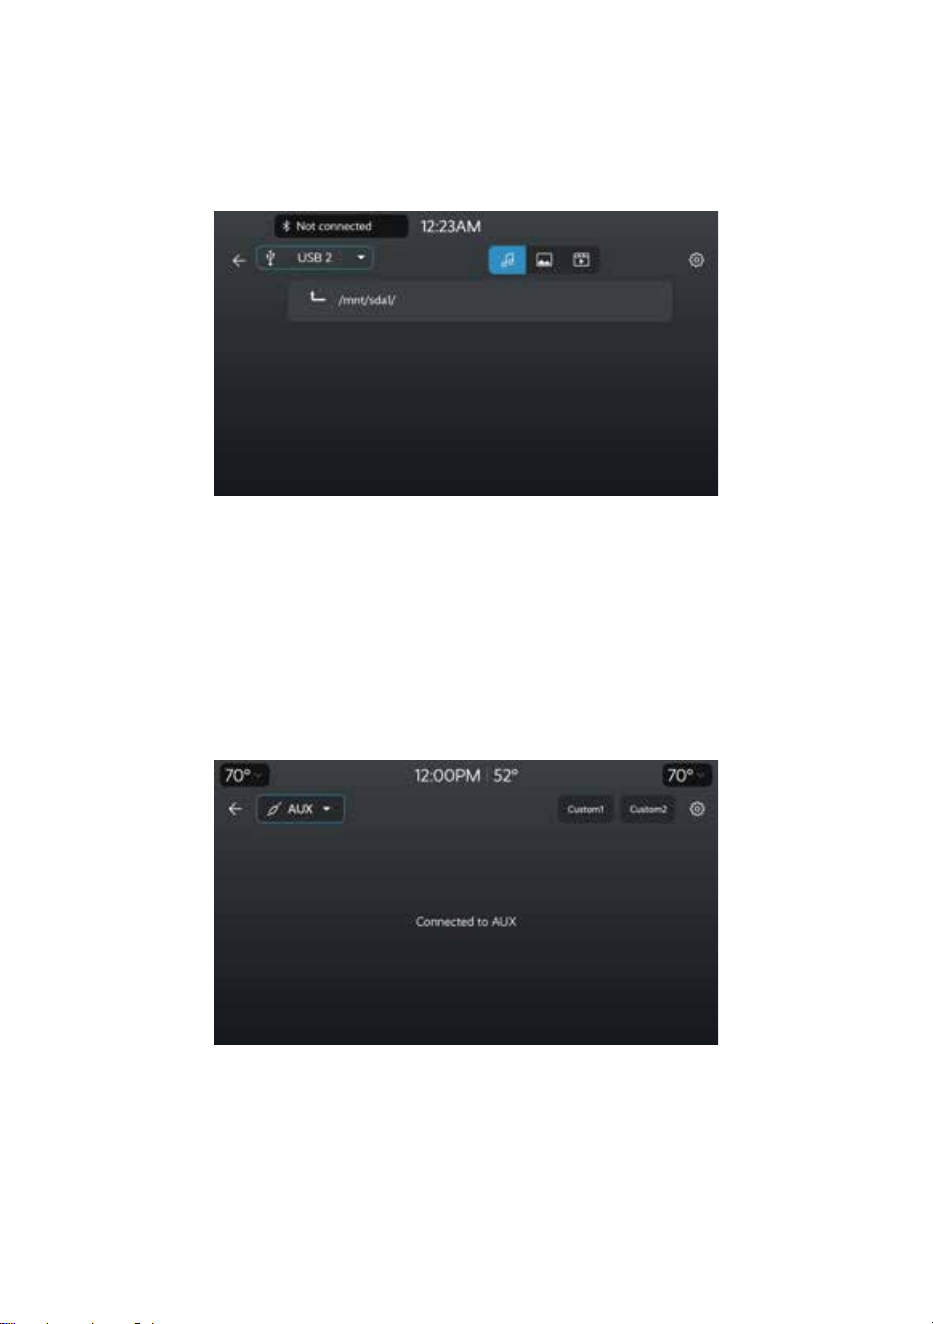
5.3.4 USB List Menu
USB List Interface:
This interface allows you to choose to play music, videos, or pictures from USB
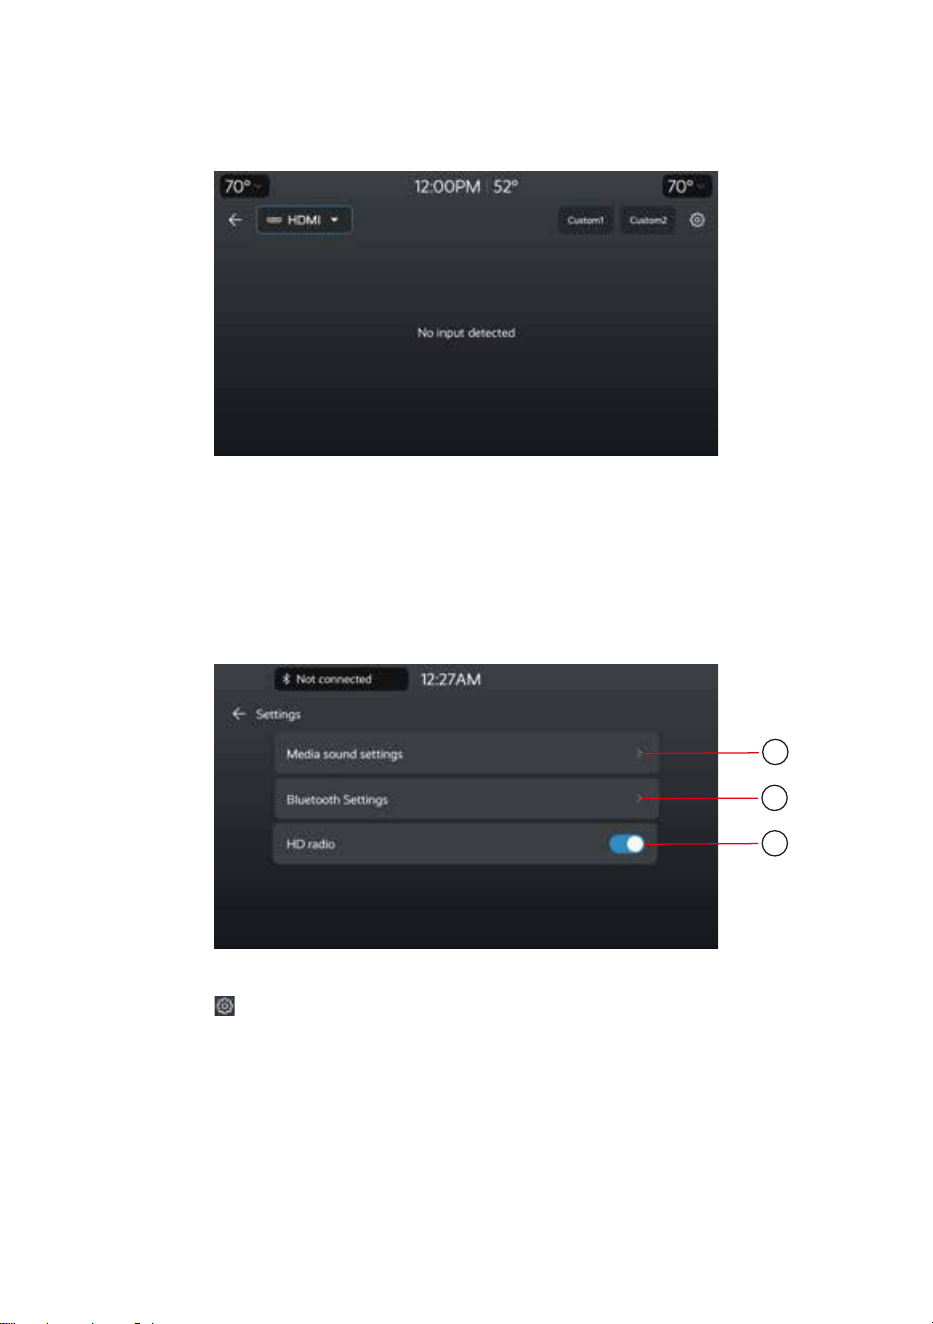
5.4 AUX Menu
Click on the 'AUX' icon on the audio source selection interface to enter the AUX interface
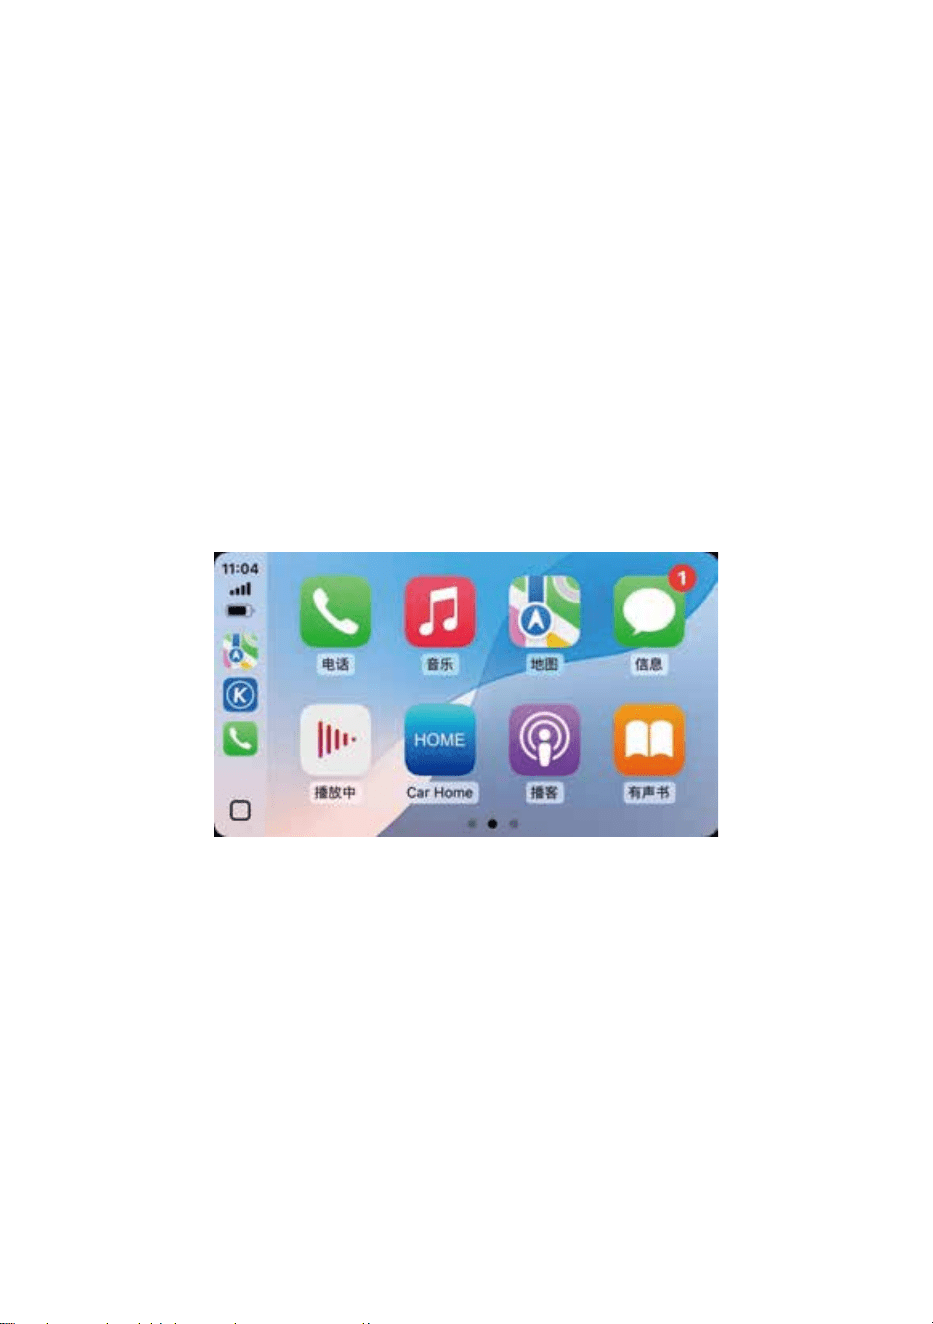
5.5 HDMI Menu
Click on the 'HDMI' icon on the audio source selection interface to enter the
HDMI interface
Click on the icon on the media interface to enter the media
settings interface
1
2
3
1.Media sound settings: Click to jump to the sound settings interface.
2.Bluetooth Settings: Click to jump to Bluetooth settings interface
3.HD radio switch: ON/OFF
5.6 Media settings interface
5.7 Apple Carplay Menu
wired connection:
The IOS phone is connected to this machine through a data cable, tap the
Carplay icon on the main menu to enter into Carplay interface.
wireless connection:
In the Bluetooth connection interface, after connecting the phone to the car's
Blu e too t h, the pho ne will au toma t ical l y conn e ct to the car 's WiFi . A f ter
completing the Bluetooth and WIFI connection, click on the "Carplay" icon to
enter the Carplay interface
Support entering Carplay through USB cable or WIFI connection (wired and
wireless)
Note: Whe
n Carplay interface requires data usage, it is using mobile data.
5.8 Android Auto Menu
wired connection:
The android phone is connected to this machine through a data cable, tap the Android
Auto icon on the main menu to enter into Android Auto interface.
Support entering Android Auto through USB cable or WIFI connection (wired and
wireless)
wireless connection:
In the Bluetooth connection interface, after connecting the phone to the car's
Bluetooth, the phone will automatically connect to the car's WiFi. After completing
the Bluetooth and WIFI connection, click on the "Carplay" icon to enter the Carplay
interface
Note: When Android Auto interface requires data usage, it is using mobile data.
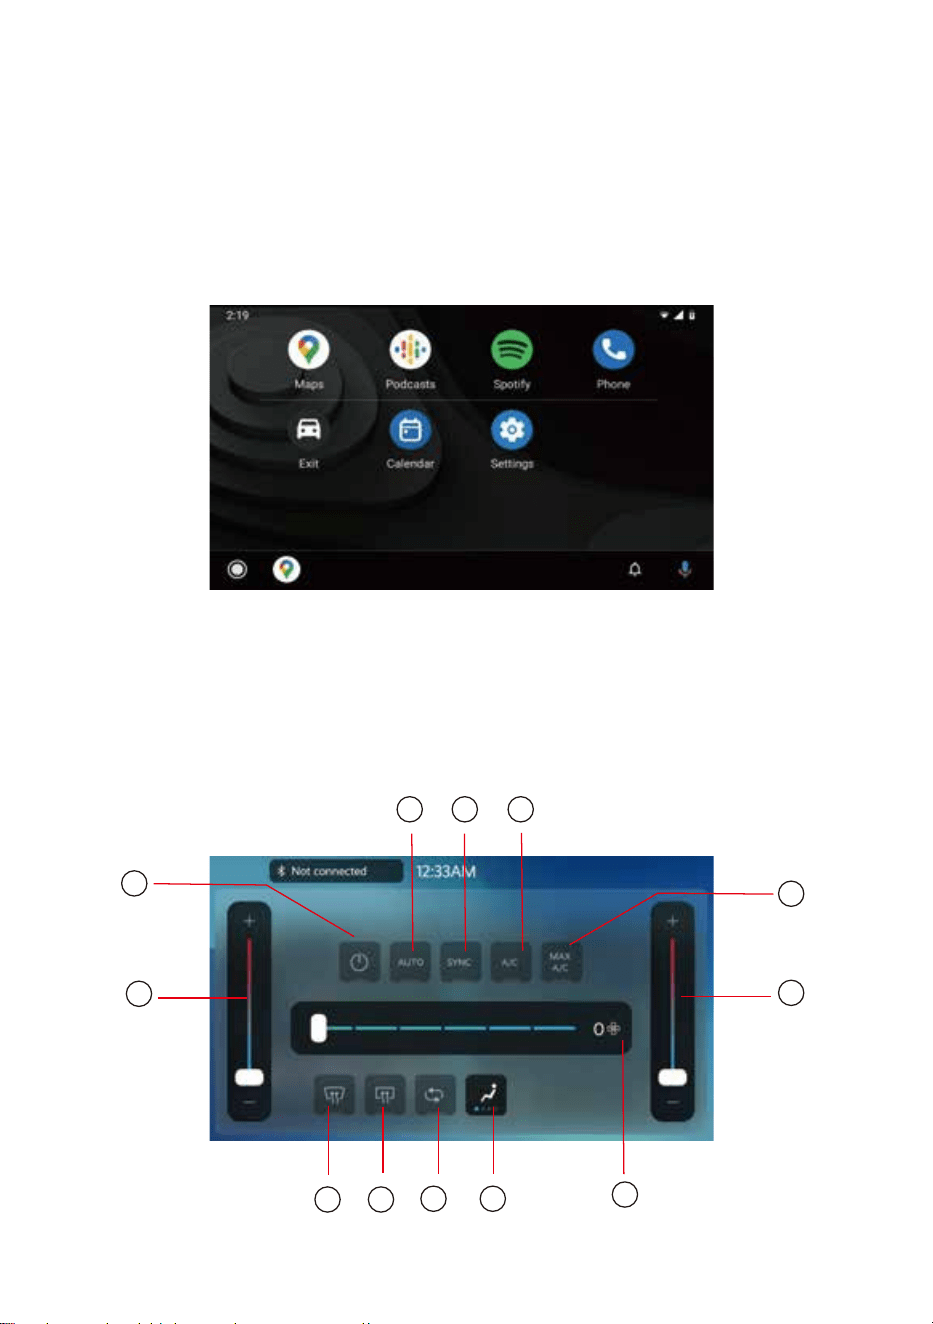
6.Climate Menu
1 2
3
4
5
6
7
8 9
10 11
12
3.Air conditioning cooling switch
1.Automatic mode switch
2.Synchronized switch for air conditioning outlet temperature
6.Maximum cooling mode switch for vehicle air conditioning
5.Temperature control switch
4.Air conditioning switch
7.Temperature control switch
8.Front windshield defogging switch
9.Rear windshield defogging switch
10.Air circulation switch
11.Wind blowing mode adjustment
12.Air volume adjustment switch
7.Vehicle Info Menu
1
2
3
4
5
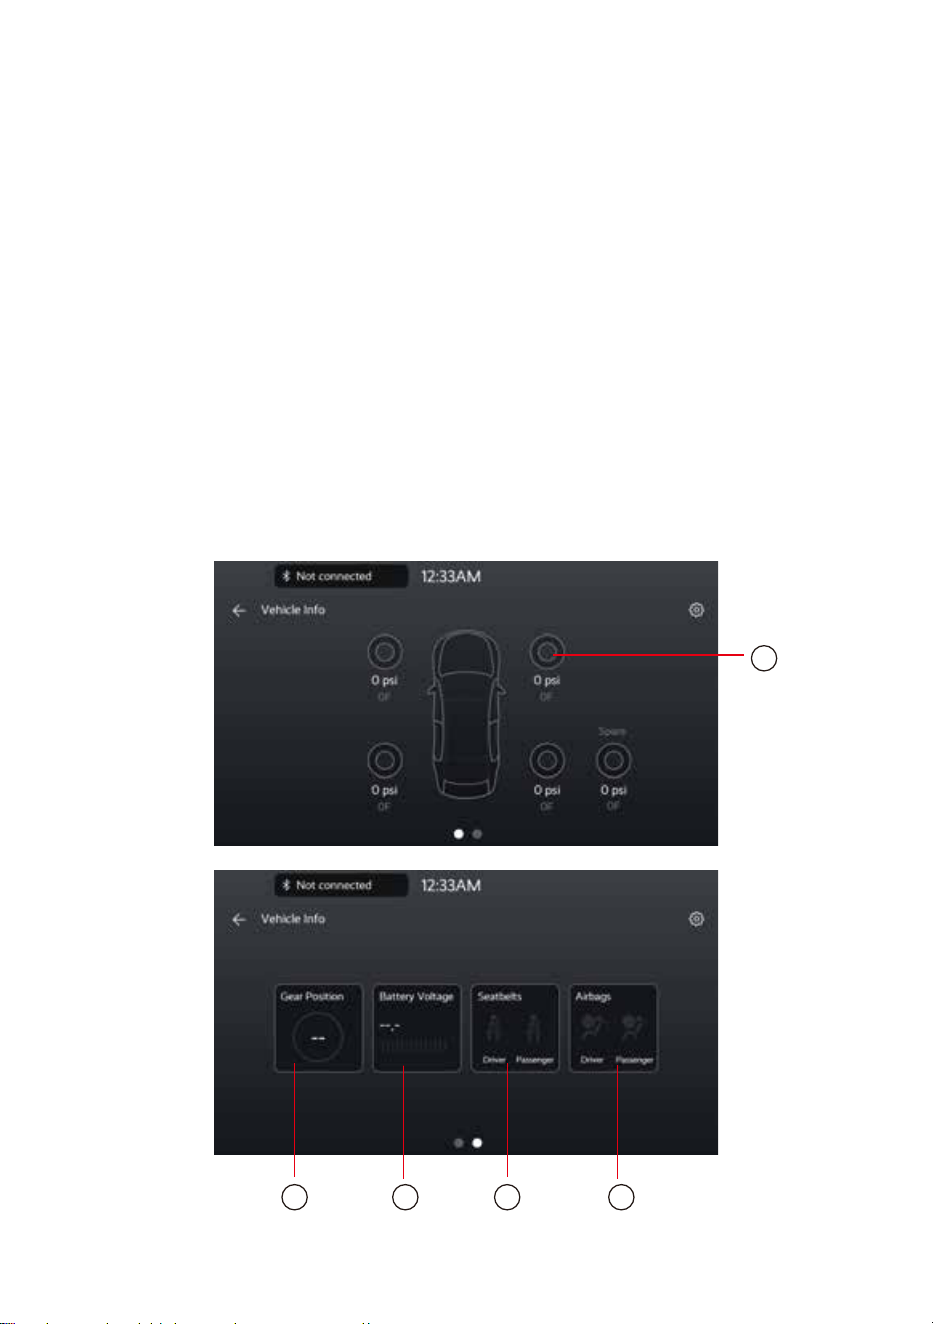
1.M o n ito rin g car tire pre ssu re
2.M o n ito rin g Gear Position
3.Monitoring car Battery Voltage
4.Monitoring car Seatbelts
5.Monitoring car Airbags
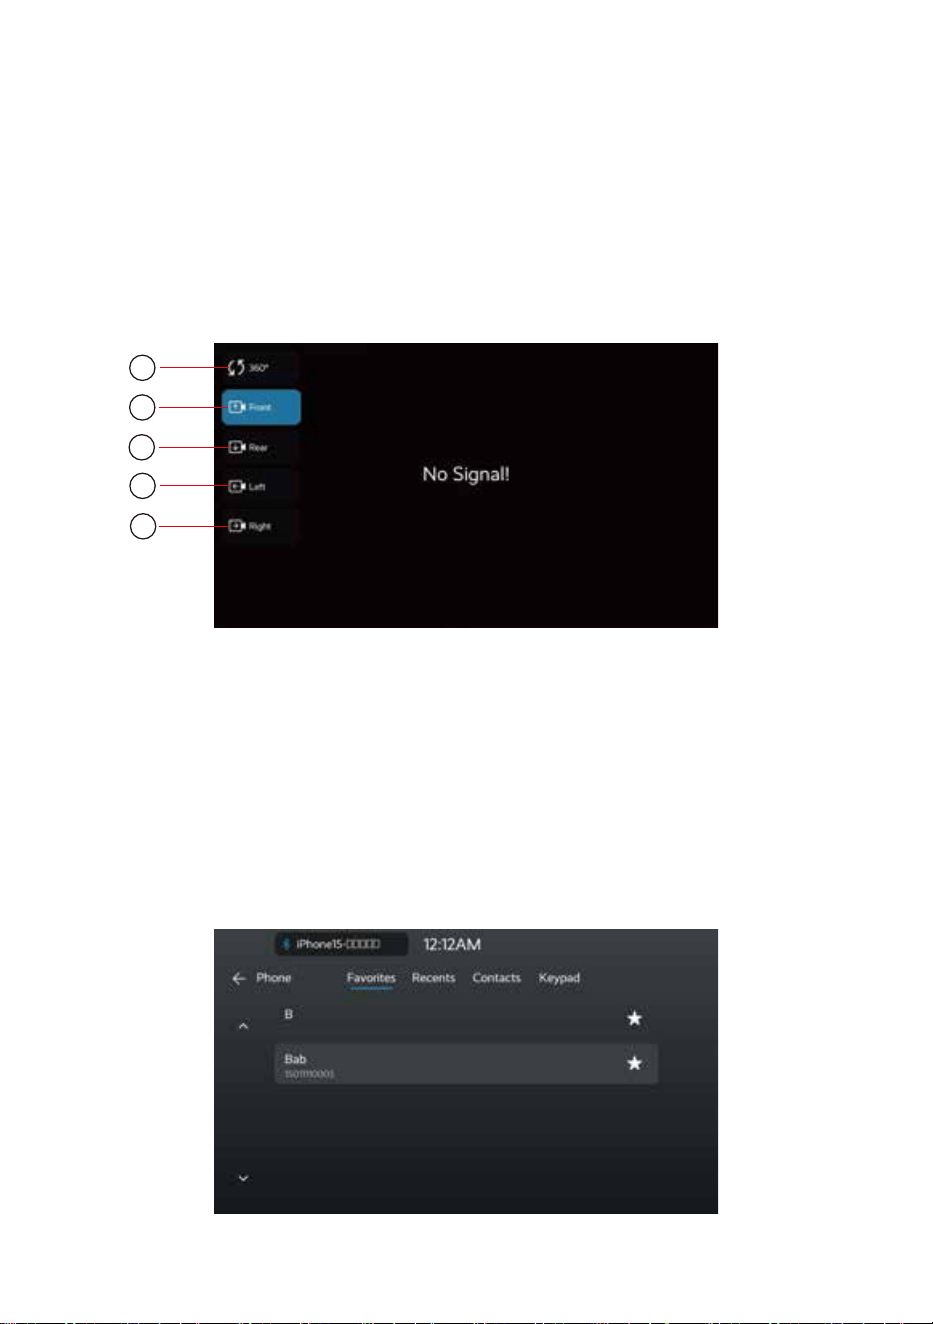
8.Cameras Menu
2. Click to display the front camera image
3.Click to display the camera image after clicking
4.Click to display the left camera image
5.Click to display the right camera image
1. Click to display the front camera image
1
2
3
4
5
9.Bluetooth Phone Menu
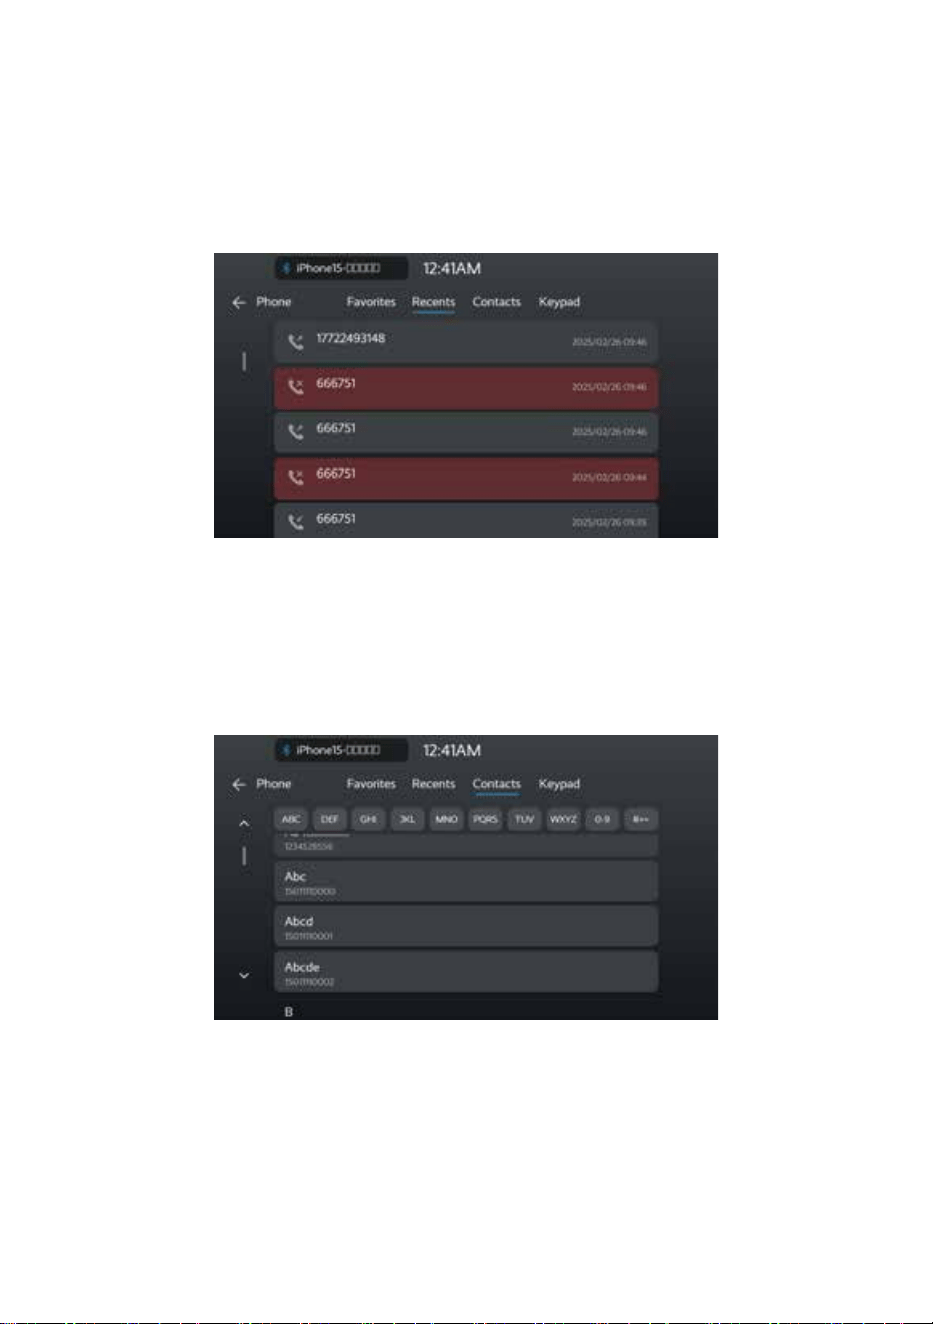
9.1Contact Favorites
9.2 Call Records
Click the ‘Recent’ button to query the records of "Received Calls", "Dialed Calls",
and"Missed Calls"
Click the ‘Favorites’ button to enter contacts Favorites.
Click the ‘contacts’ button, the screen will display the phone book list of the mobile
phone. Swipe up and down to view contacts.
Click on the English letters above to blur the search for contacts
9.3 Contacts
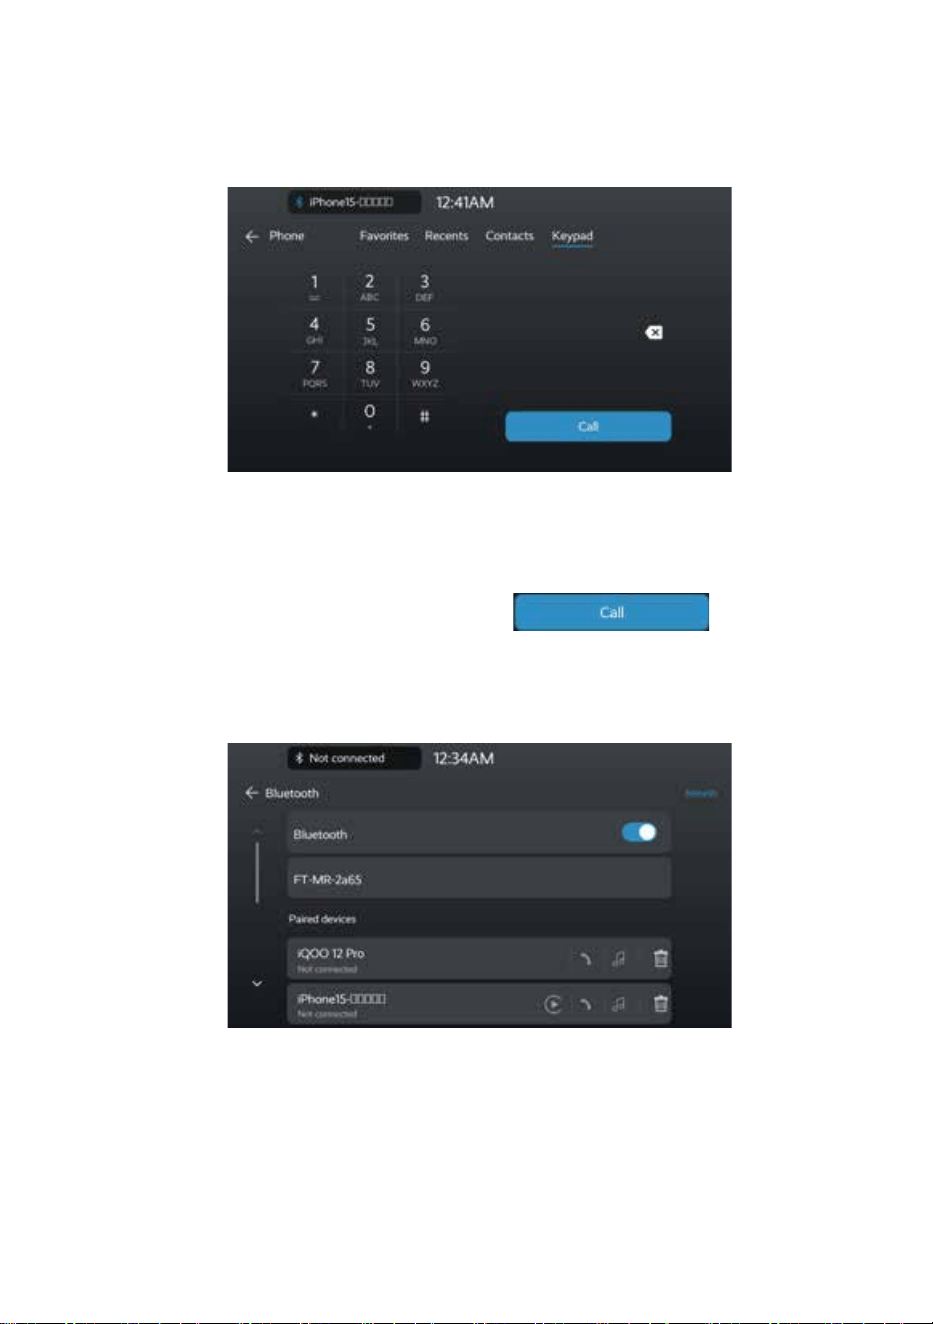
1.Dialing from phone
Once you made dialing, the interface displays the prompt message "Dial ... "
2.Dialing from device
Dial the number from menu, then press to continue dialing
9.4 Dial Number
9.5 Bluetooth Settings
Click on the 'Bluetooth' icon on the Settings interface to enter the
Bluetooth Settings interface; Or click on Bluetooth music or Bluetooth
phone when Bluetooth is not connected to jump to the Bluetooth
settings interface
Bluetooth:ON/OFF
The Bluetooth switch is turned off by default
10.Settings Menu
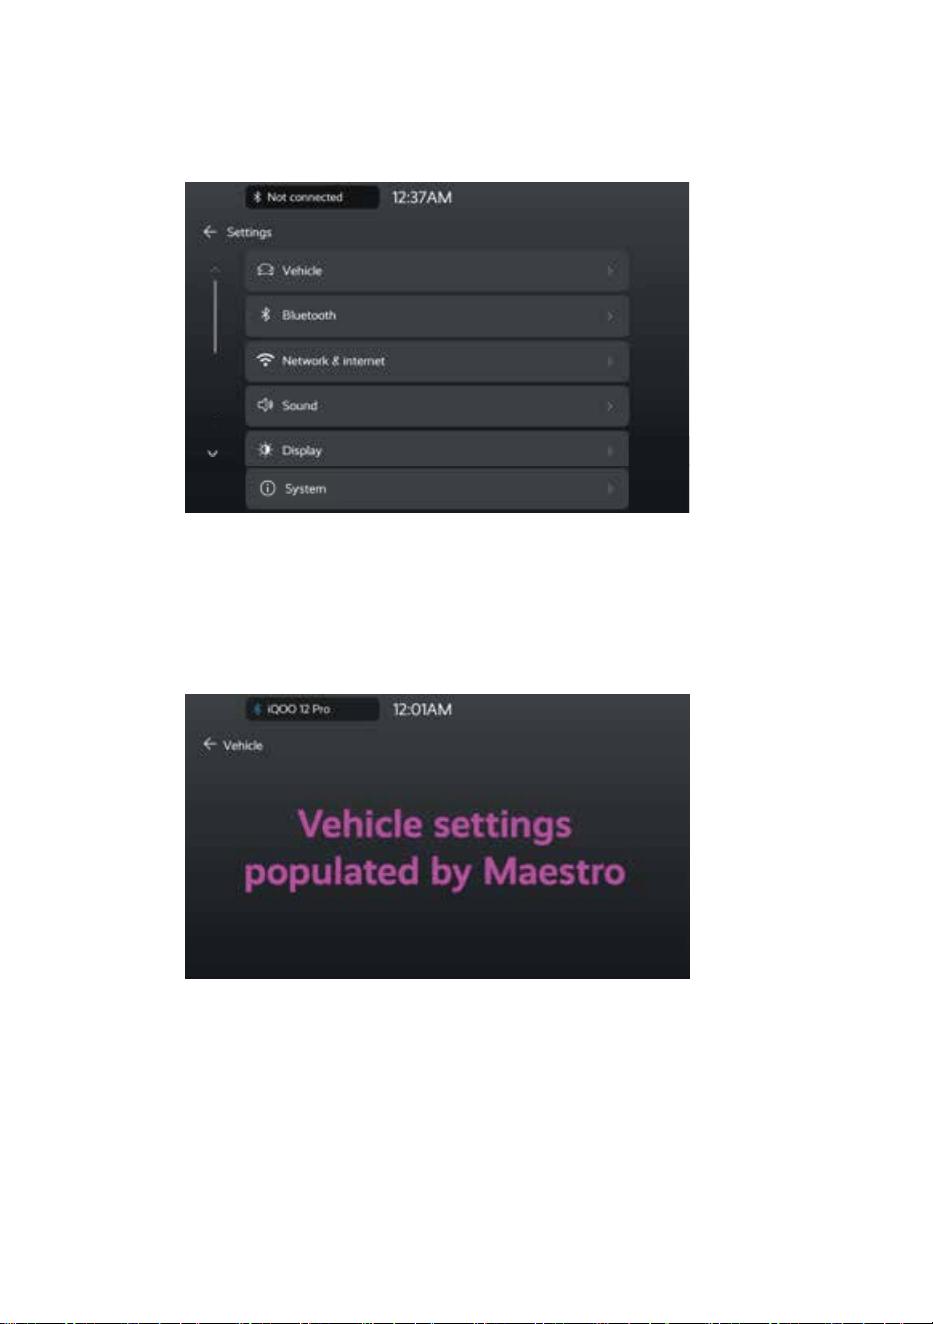
Click on the 'Settings' icon on the app interface to enter the Settings interface
10.1 Vehicle Settings
Vehicle settings populated by Maestro.
Click on the 'Vehicle Settin g s' ico n on th e se ttin g s in terface to en te r th e
Vehicle Se ttin g s in te rfa ce .
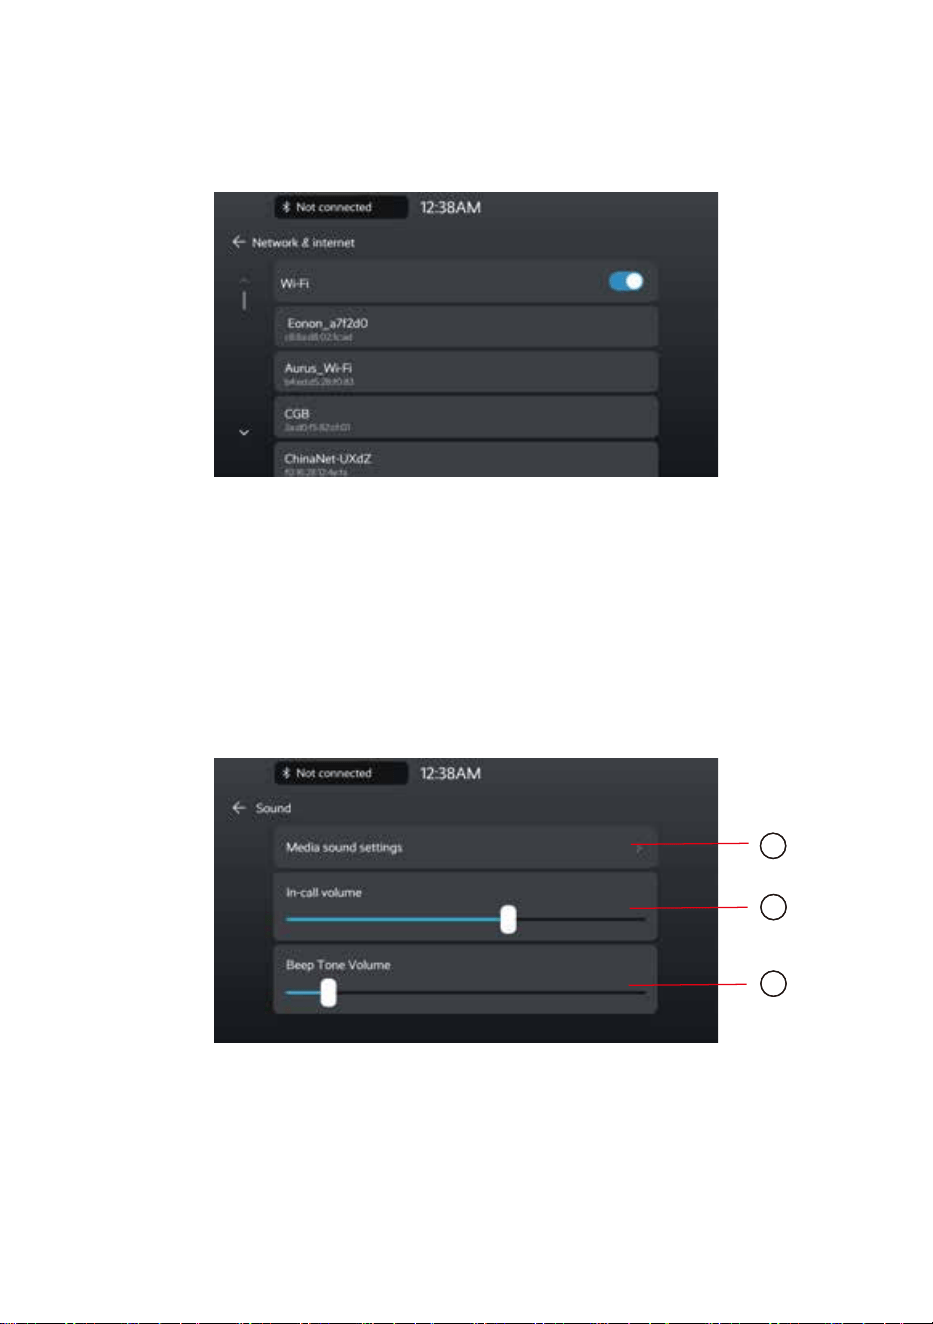
Click on the 'Network&internet' icon on the Settings interface to enter the
Network&internet Settings interface.After connecting the phone to the
car's Bluetooth, the phone will automatically connect to the car's WiFi.
Used to connect Apple Carplay, Android Auto, FOTA upgrade.
WIFI:ON/OFF , switch is on by default.
10.2 Ne t work & inter n et Settings
10.3 Sound Settings
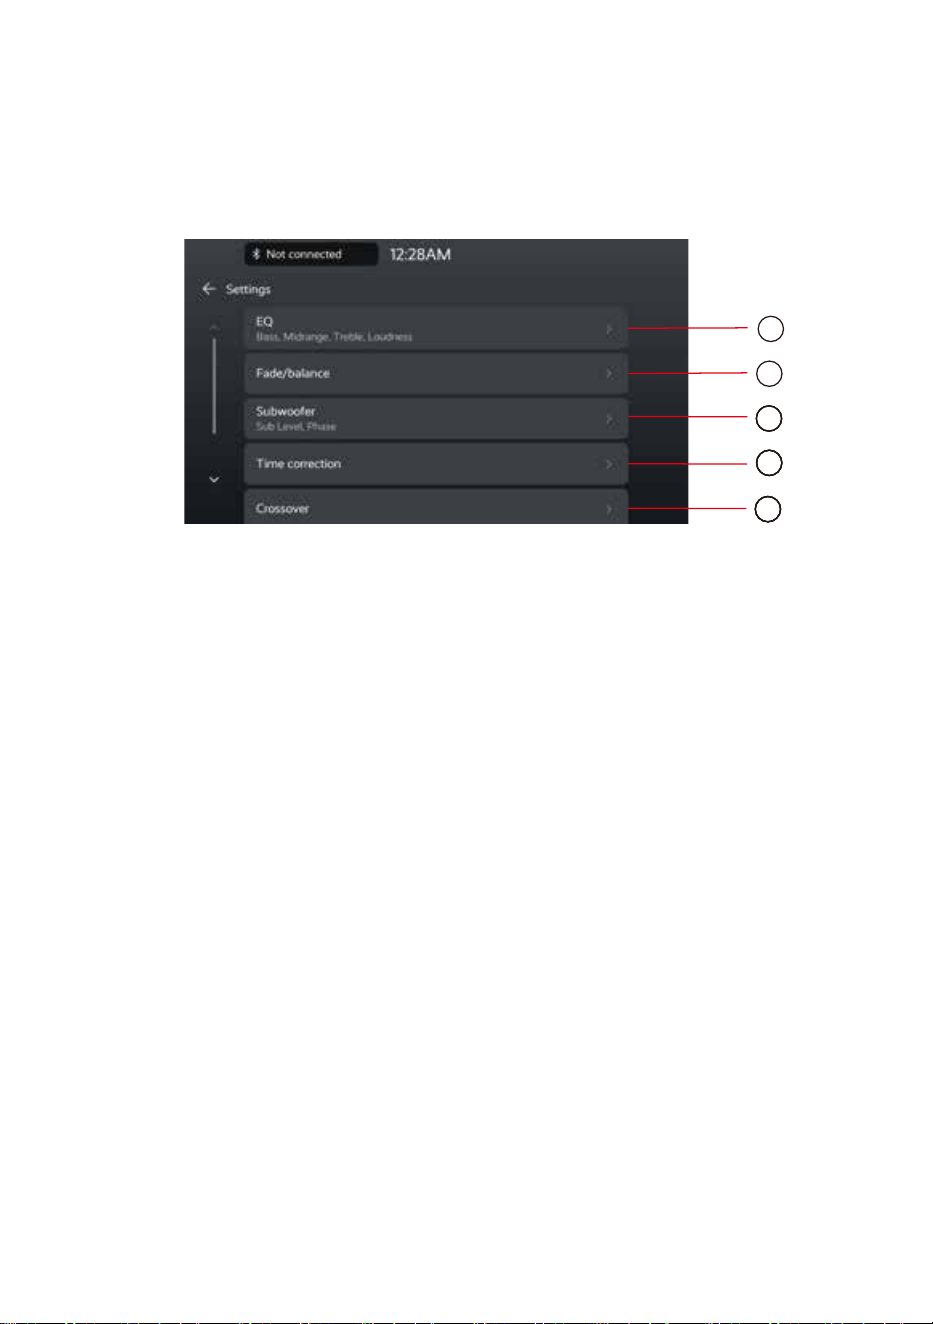
Click on the 'Sound Settings' icon on the settings interface to enter the Sound
Settings interface.
1
2
3
1
2
3
1.Media sound settings : Media volume adjustment
2.In-call volume : Call volume adjustment
3.Beep Tone Volume: Button tone adjustment
Click on the 'Media So u n d Se ttin g s' ico n on th e se ttin g s in te rface to en te r
th e Media So u n d Se ttin g s in te rface .
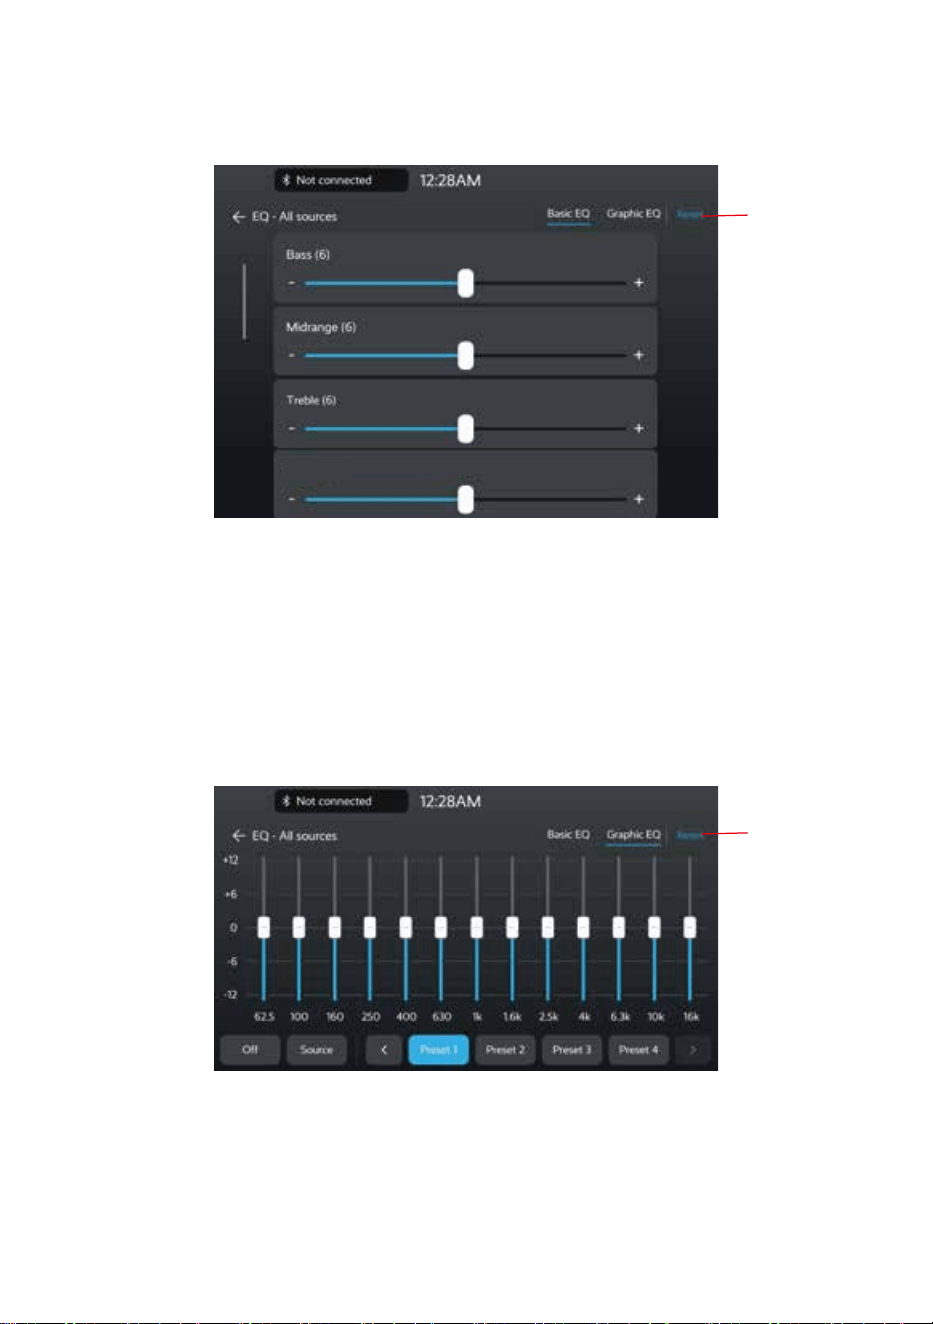
1.EQ: Used to adjust the gain of different frequency bands to optimize the clarity,
thickness, and overall performance of sound.
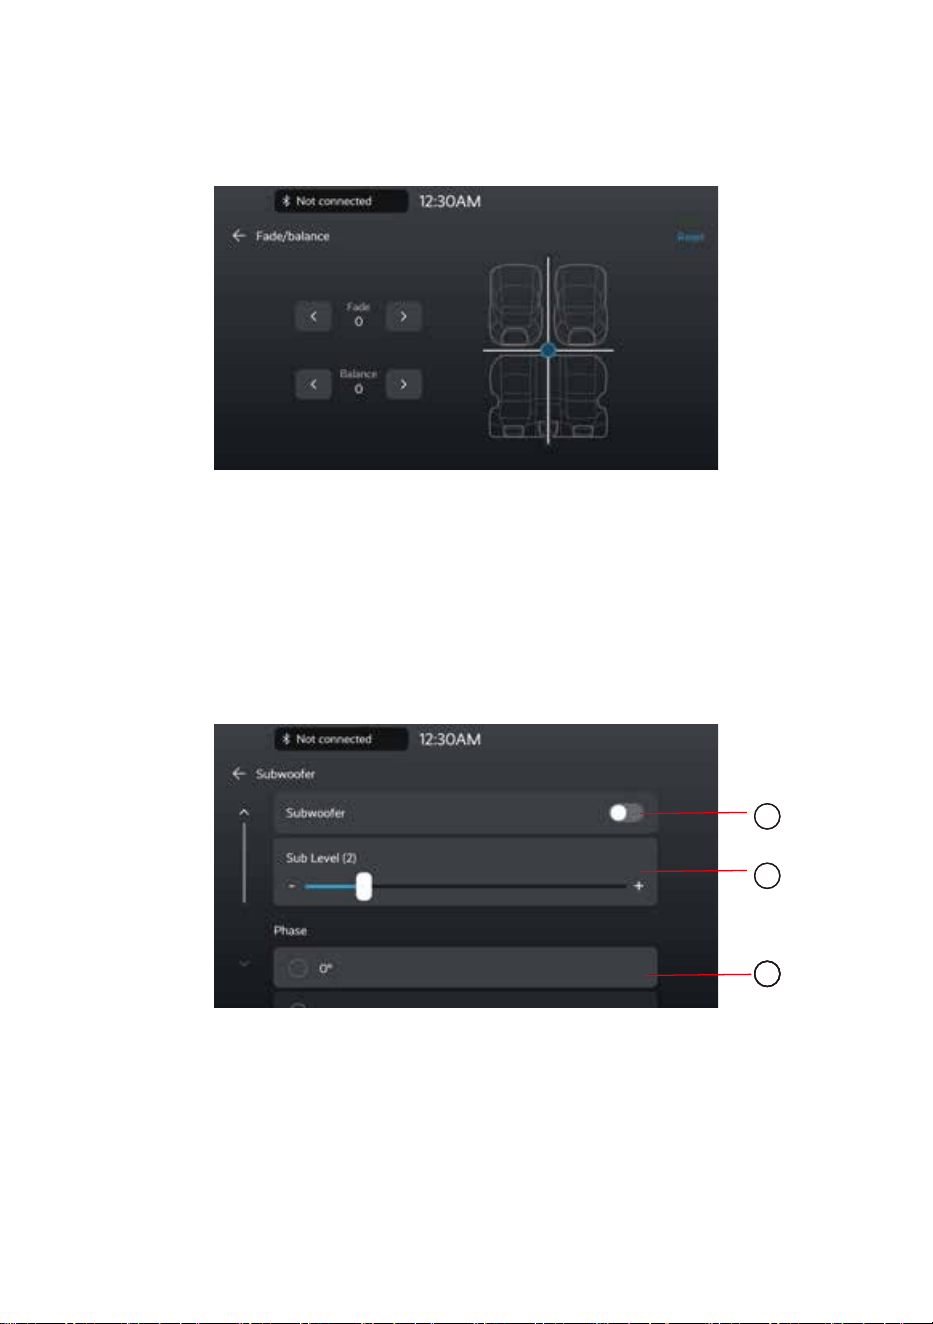
2.Fade/balance: Adjust sound balance by dragging the slider or touch options
as needed
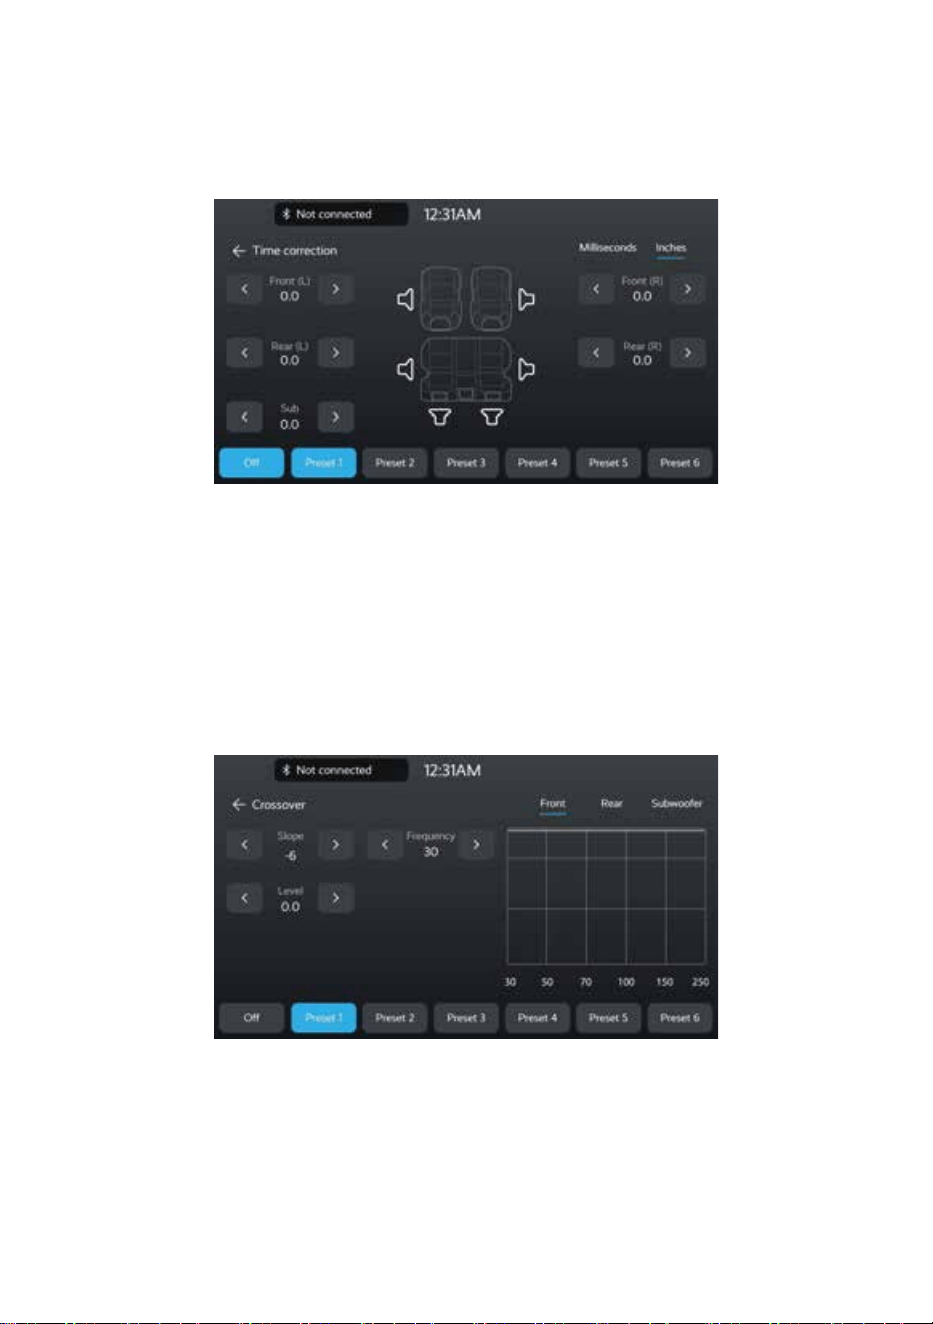
3.Subwoofer: By adjusting the low-frequency part of the car audio system, the bass
effect can be enhanced or weakened.
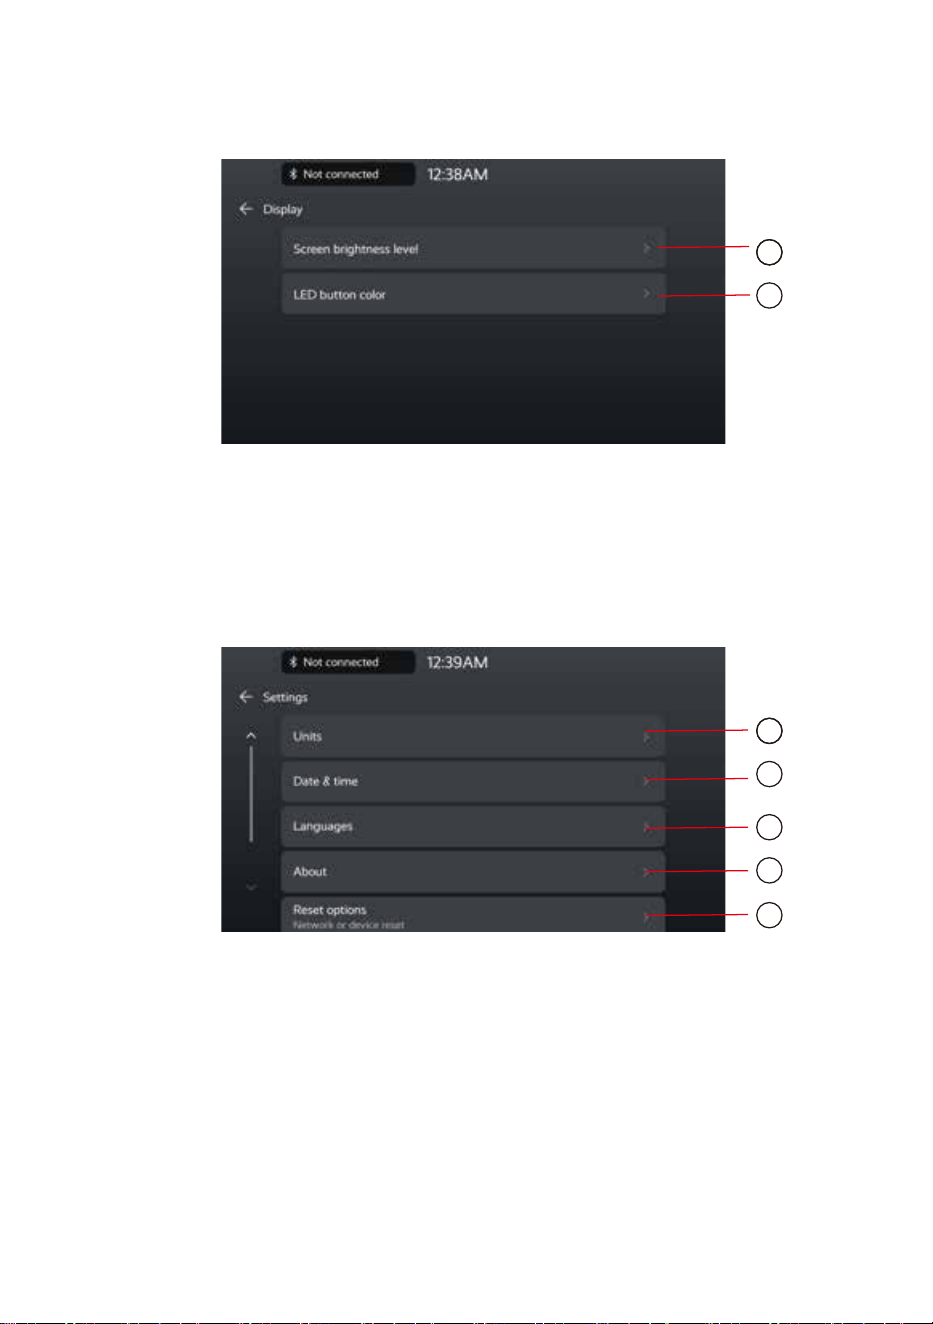
4.Time correction: By adjusting the distance between the driver's seat and each horn,
the sound reaches the driver's s
eat at the same time, making the driver's seat the
best listening position.
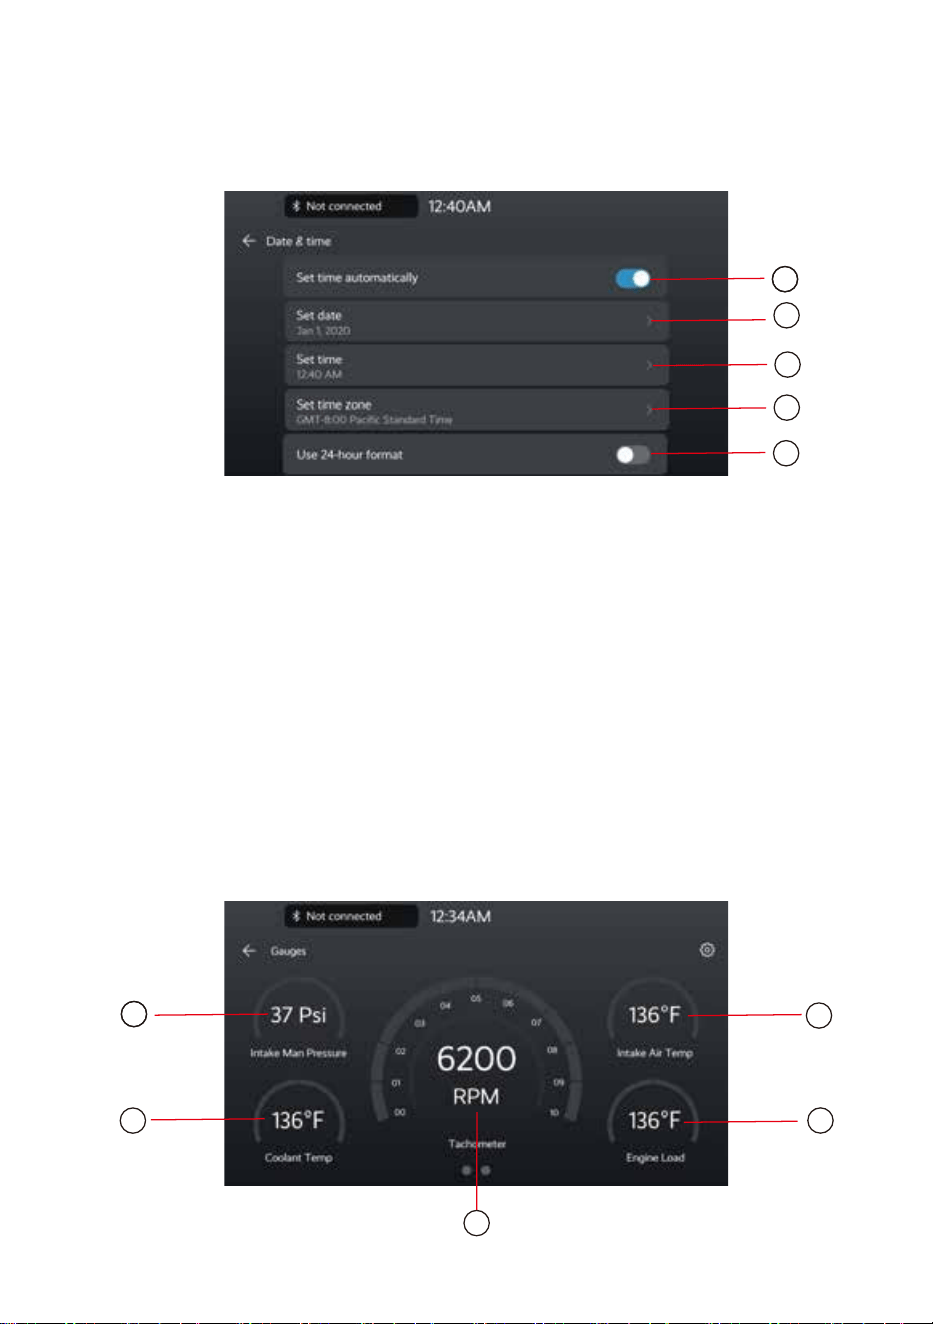
5.Crossover:
1
2
333
4
5
10.4 EQ Settings
10.4.2 Graphic EQ Settings
Click on the ‘Graphic EQ’ icon on the EQ Settings interface to enter the
Graphic EQ Settings interface.
EQ (Basic EQ) :
13 adjustable frequencies, adjust the gain of different frequency bands through EQ,
making the sound more colorful and enhancing the tension of
the instrument
10.4.1 Basic EQ Settings
Click on the ‘EQ’ icon on the Media Sound Settings interface to enter the EQ
Settings interface.
Loudness(6)
EQ (Basic EQ) :Is used to adjust the gain of four frequency bands, including
Bass、Midrange、Treble and Loudness, in order to optimize the clarity,
thickness, and overall performance of sound.
reset settings
reset settings
10.4.3 Fade/balance Settings
10.4.4 Subwoofer Settings
Click on the ‘Fade/balance’ icon on the Media Sound Settings interface
to enter the Fade/balanceSettings interface.
Change the sound field position according to your preferences
1
2
3
1
2
333
1.Subwoofer switch: ON/OFF
2.Sub Level: 0-12
3.Phase:0°/180°
10.4.5 Time correction Settings
10.4.6 Crossover Settings
Click on the ‘Time correction’ icon on the Media Sound Settings interface to enter
the Time correction Settings interface.
Adjust the car audio system to achieve the best listening effect.
Click on the ‘Crossover
’ ico n o n t he Media S ound S e t t ings in t e rf ace to e n t e r the
Time Crossover S e t ting s i n t erfa c e .
10.5 Display Settings
Click on the ‘Display Settings’ icon on the settings interface to enter the Display
Settings interface.
1
2
1.Screen brightness leve: Can set background color.
2.LED button color: Can set button light color.
10.6 System Settings
Click on the ‘System Set t i n gs’ ico n o n t he s etti n g s i nter f a c e to ente r t h e System
Set t i ng s inte r f a ce.
1
2
3
4
5
1.Units: Unit switching:
Distance unit : km/m
Temperature unit:°F-Fahrenheit / °C-Celsius
2.Date & Time: time setting.
3.Language: Switchable between English, French, Spanish, and Portuguese.
4.About: View OS, MCU, and APP version information.
5.Reset options: Restore factory settings.
10.6.1 Date & time Settings
Click on the 'Date & time Settings' icon on the System settings interface to enter
the Date & time Settings interface.
1
2
3
4
5
1.Set time automatically : ON/OFF.
2.Set Date : Date setting
4.Set time zone : Provide 8 time zone settings.
5.Use 24-hour format : ON/OFF
3.Set Time : time setting
11.Gauges Menu
1
2
3
4
5
1.Display the intake Man pressure of the car
3.Display the intake Air Temp of the car
2.Display the Coolant Temp of the car
4.Display the Engine Load of the car
Click on the 'Gauges' icon on the app interface to enter the Gauges interface.
5.Display the speed information of the car
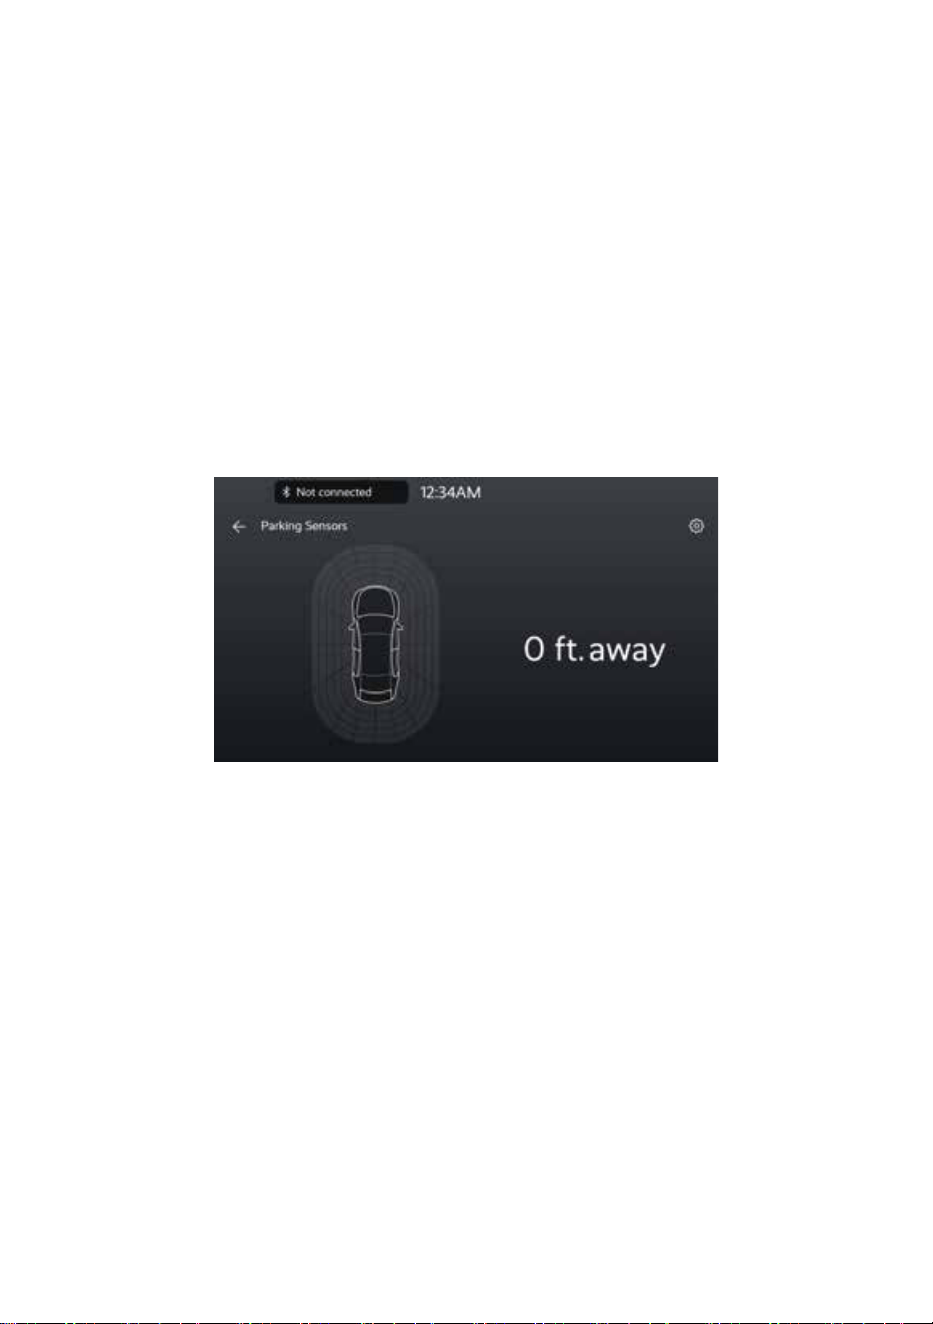
12.Parking Sensors Menu
Click on the ‘Parking Sensors ' icon on the app interface to enter the Parking
Sensors interface.
Obstacle detection: Radar can detect the distance between the vehicle body
and obstacles, as well as other vehicles. Common parking radars can prevent
collisions when reversing or moving
Front obstacle detection: The front radar can detect obstacles in the front area
of the vehicle, helping the driver determine the distance and ensure safety
Obstacle detection: Radar can detect the distance between the vehicle body and
obstacles, as well as other vehicles. Common p
arking radars can prevent collisions
when reversing or moving
Front obstacle detection: The front radar can detect obstacles in the front area of
the vehicle, helping the driver determine the distance and ensure safety
13.Radar Detector Menu
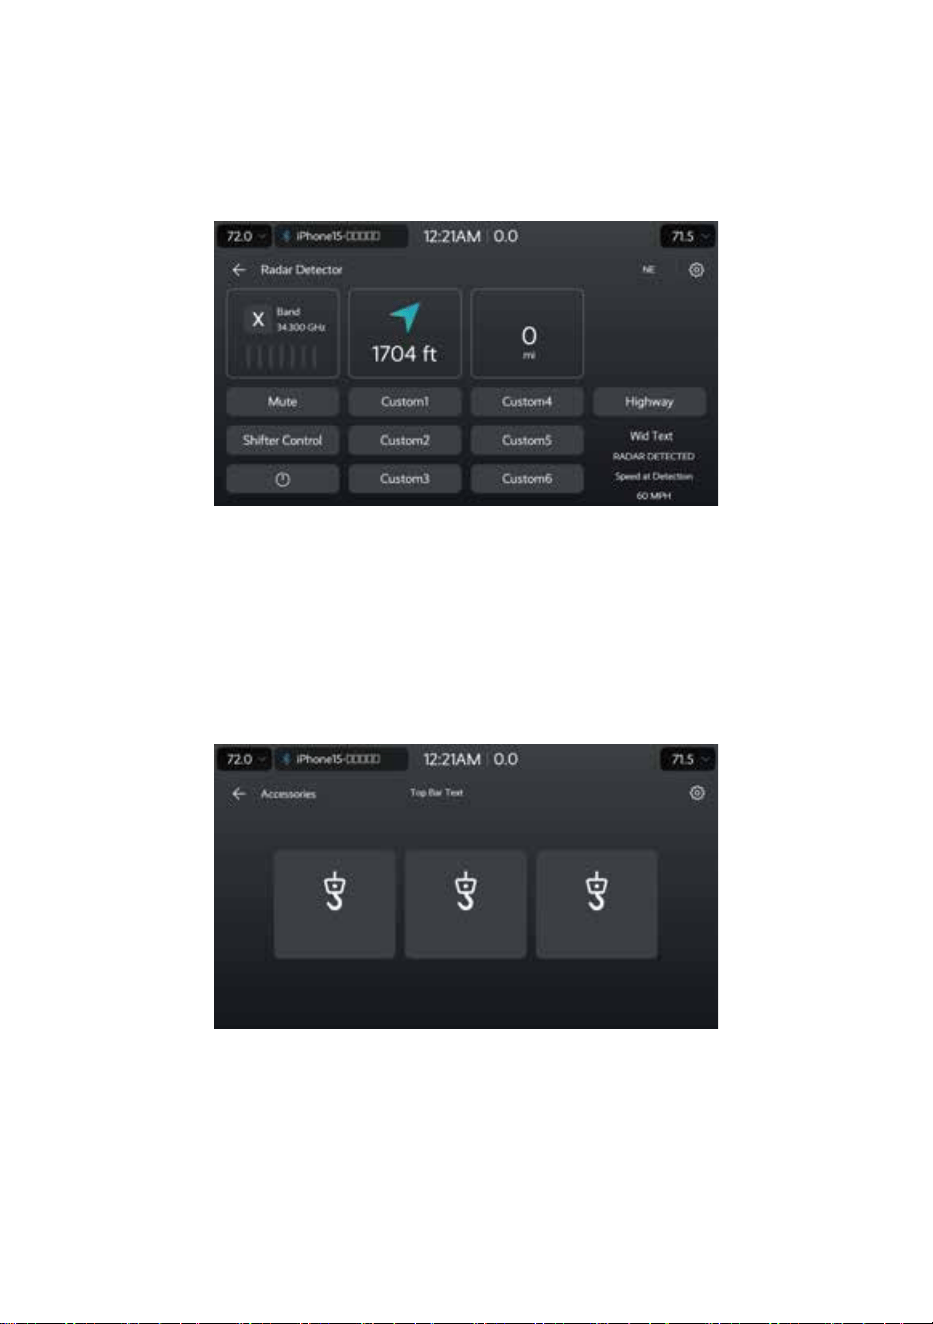
Click on the ‘Radar Detector ' icon on the app interface to enter the Radar
Detector interface.
Display radar information.
14.Accessories Menu
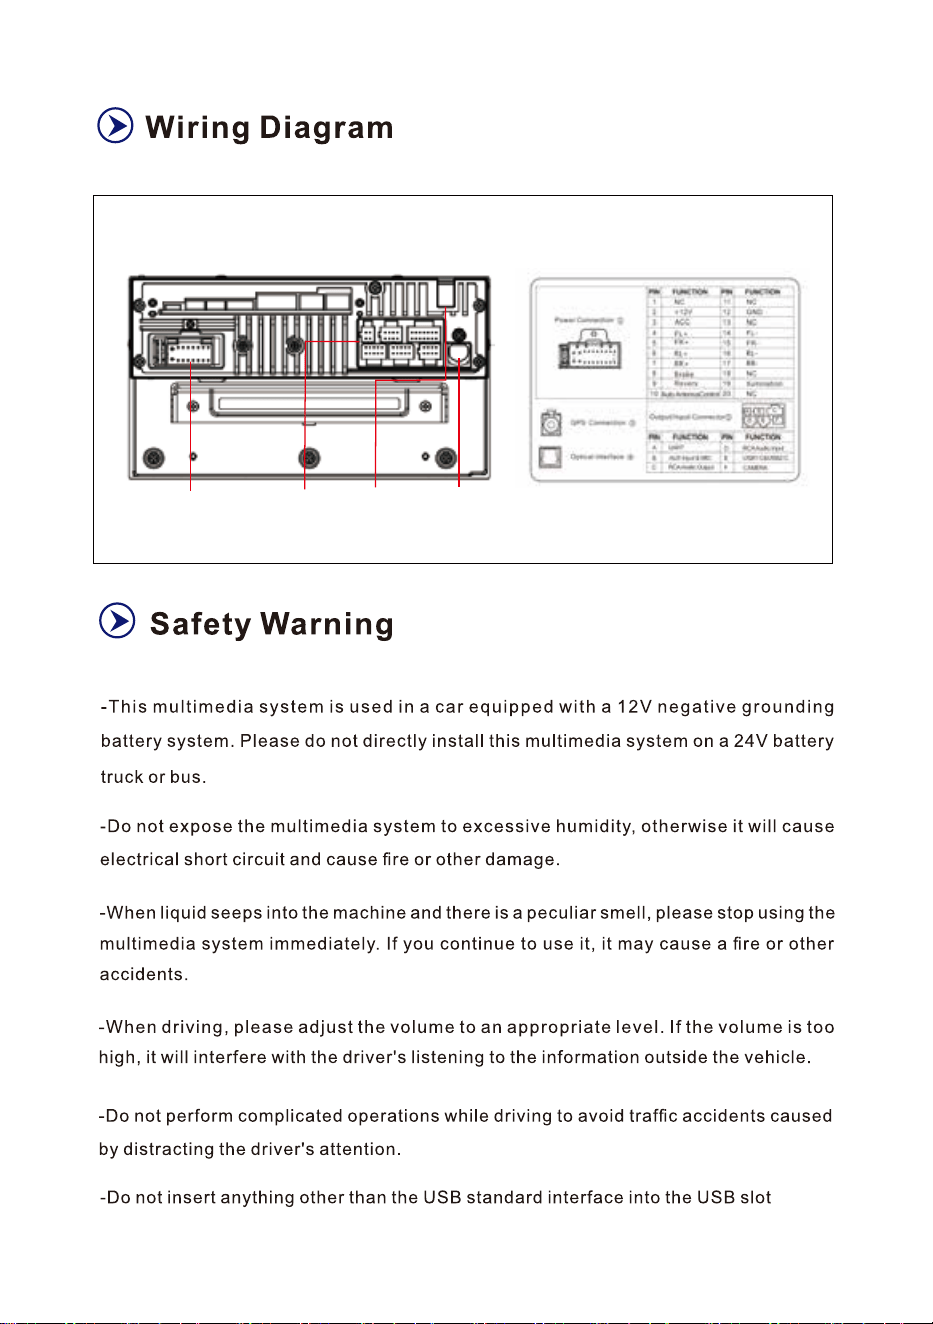
Click on the ‘Accessories ' icon on the app interface to enter the Accessories
interface.
Power
Connection
Optical
interface
GPS
connection
Output/Input
Connector

This device has been tested and found to comply with the limits for a Class
B digital device, pursuant to Part 15 of the FCC Rules. These limits are
designed to provide reasonable protection against harmful interference in
a residential installation. This device generates, uses and can radiate radio
frequency energy and, if not installed and used in accordance with the
instructions, may cause harmful interference to radio communications.
However, there is no guarantee that interference will not occur in a particular
installation. If this device does cause harmful interference to radio or television
reception, which can be determined by turning the device off and on, the user
is encouraged to try to correct the interference by one or more of the following
measures:
--Reorient or relocate the receiving antenna.
--Increase the separation between the device and receiver.
--Connect the device into an outlet on a circuit different from that to which the
receiver is connected.
--Consult the dealer or an experienced radio/TV technician for help
Changes or modifications not expressly approved by the party responsible for
compliance could void the user's authority to operate the equipment
Radiation Exposure Statement
The antennas used for this transmitter must be installed to provide a separation

distance of at least 20 cm from all persons and must not be co-located for
operating in conjunction with any other antenna or transmitter.
This device contains licence-exempt transmitter(s)/receiver(s) that comply
with Innovation, Science and Economic Development Canada’s licence-
exempt RSS(s). Operation is subject to the following two conditions: (1) This
device may not cause interference. (2) This device must accept any
interference, including interference that may cause undesired operation of
the device
Cet appareil contient des émetteurs / récepteurs exemptés de licence
conformes aux RSS (RSS) d'Innovation, Sciences et Développement
économique Canada. Le fonctionnement est soumis aux deux conditions
suivantes : (1) Cet appareil ne doit pas causer d'interférences. (2) Cet
appareil doit accepter toutes les interférences, y compris celles susceptibles
de provoquer un fonctionnement indésirable de l'appareil