Welcome to the TOSOT Direct Family!
We’re extremely happy to welcome you as a new member of our family! Please
read the tips below before using your product for the first time.
1. The split-type air conditioner is a heavy object, which needs two or more people
to lift and install. Failure to do so could result in injury or other accidents.
2. Allow the unit to sit upright for at least 3-4 hours before powering on. Shipping
carriers may set the unit on its side, which causes the refrigerant to pool in
certain areas. Standing the unit upright for 3-4 hours allows the refrigerant to
move freely within the coils.
3. Some parts with sharp edges may cause injury, so gloves are highly
recommended for unpacking and installing.
4. Run the unit continuously for 24 hours after installation. This allows the unit to
work out any “kinks” that may have resulted during shipping from our factory to
your
doorstep.
5. If you have any problems with your product, please send us an email before
submitting a return request, as there might be a simple solution for your issue.
Tips for First-Time Use

Table of Contents
------------------------------------------------
--------------------------------------------------------------
------------------------------------------------------------
------------------------------------------------------------
--------------------------------------
------------------------------------
-------------------------------------------
-------------------------------------------------------
-------------------------------------------------------
---------------------------------------
----------------------------------
----------------------------------------
----------------------------------------
-----------------------------------------------------
--------------------------------------------------
----------------------------------------------------
----------------------------------------------------
--------------------------------------------
Safety Precautions
Warning
Caution
Electrical Safety Warning
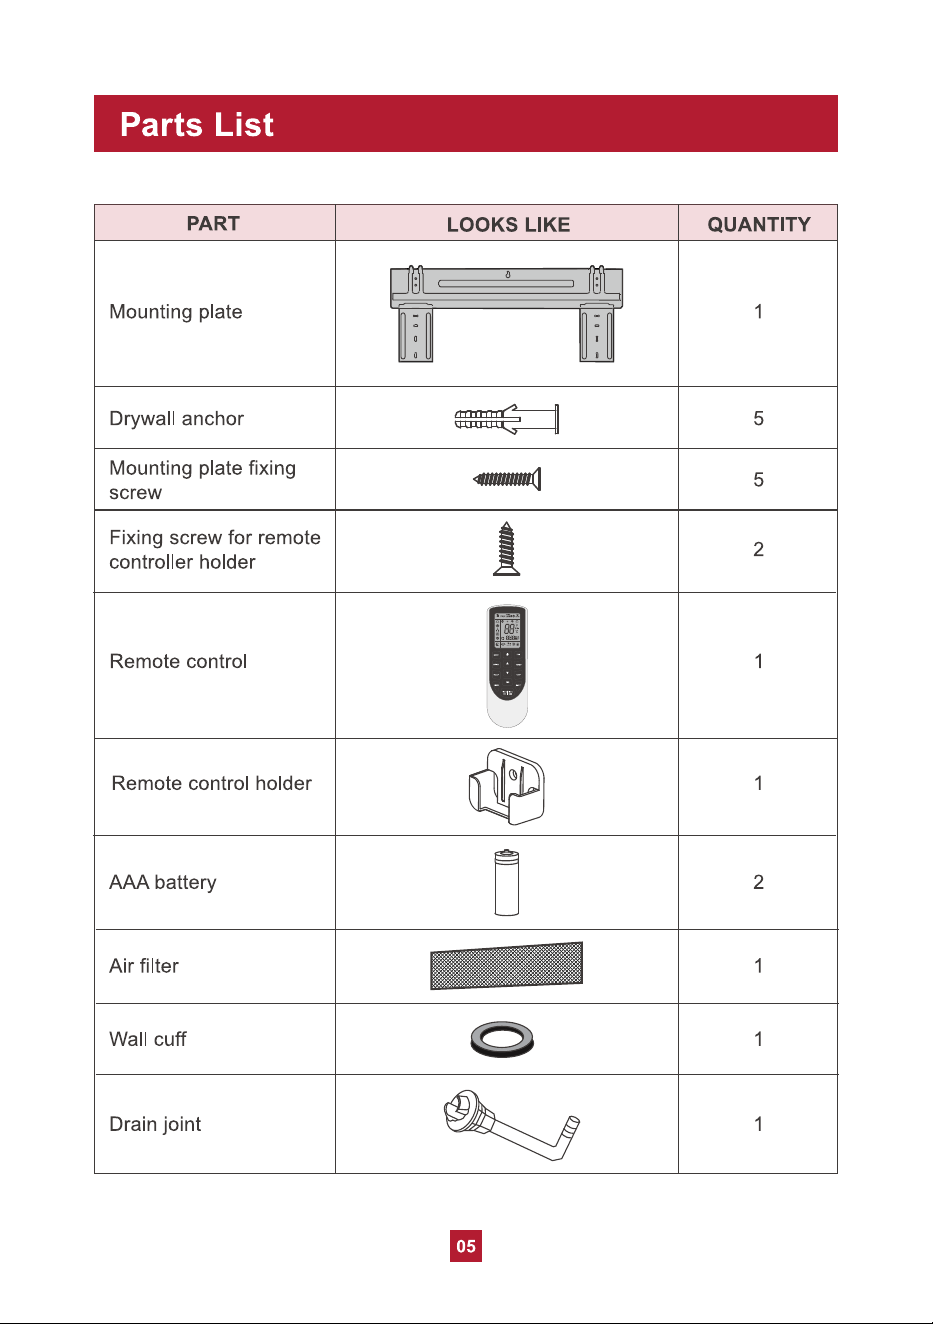
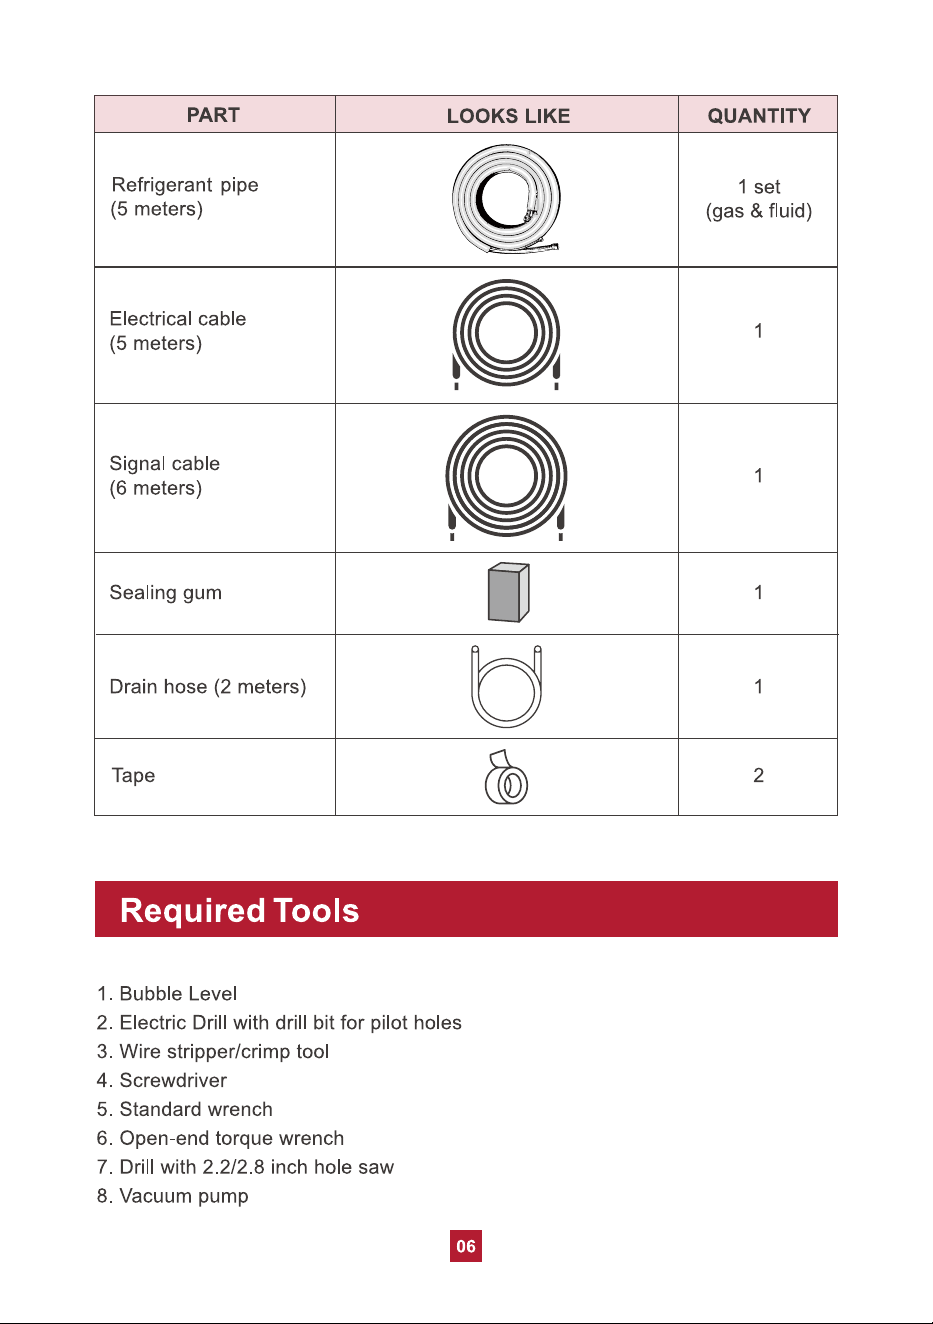
Part List
Required Tools
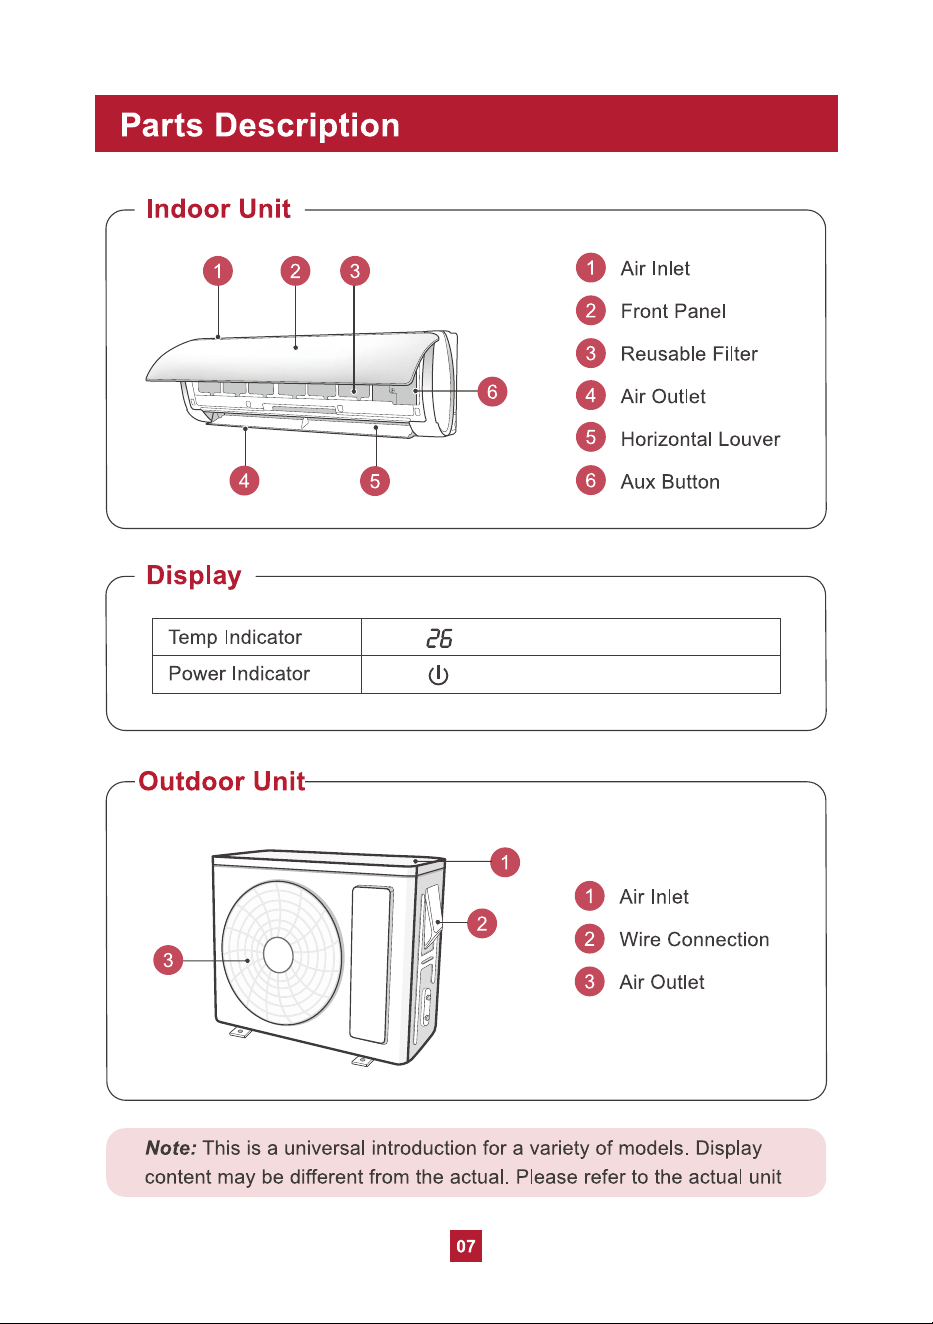
Parts Description
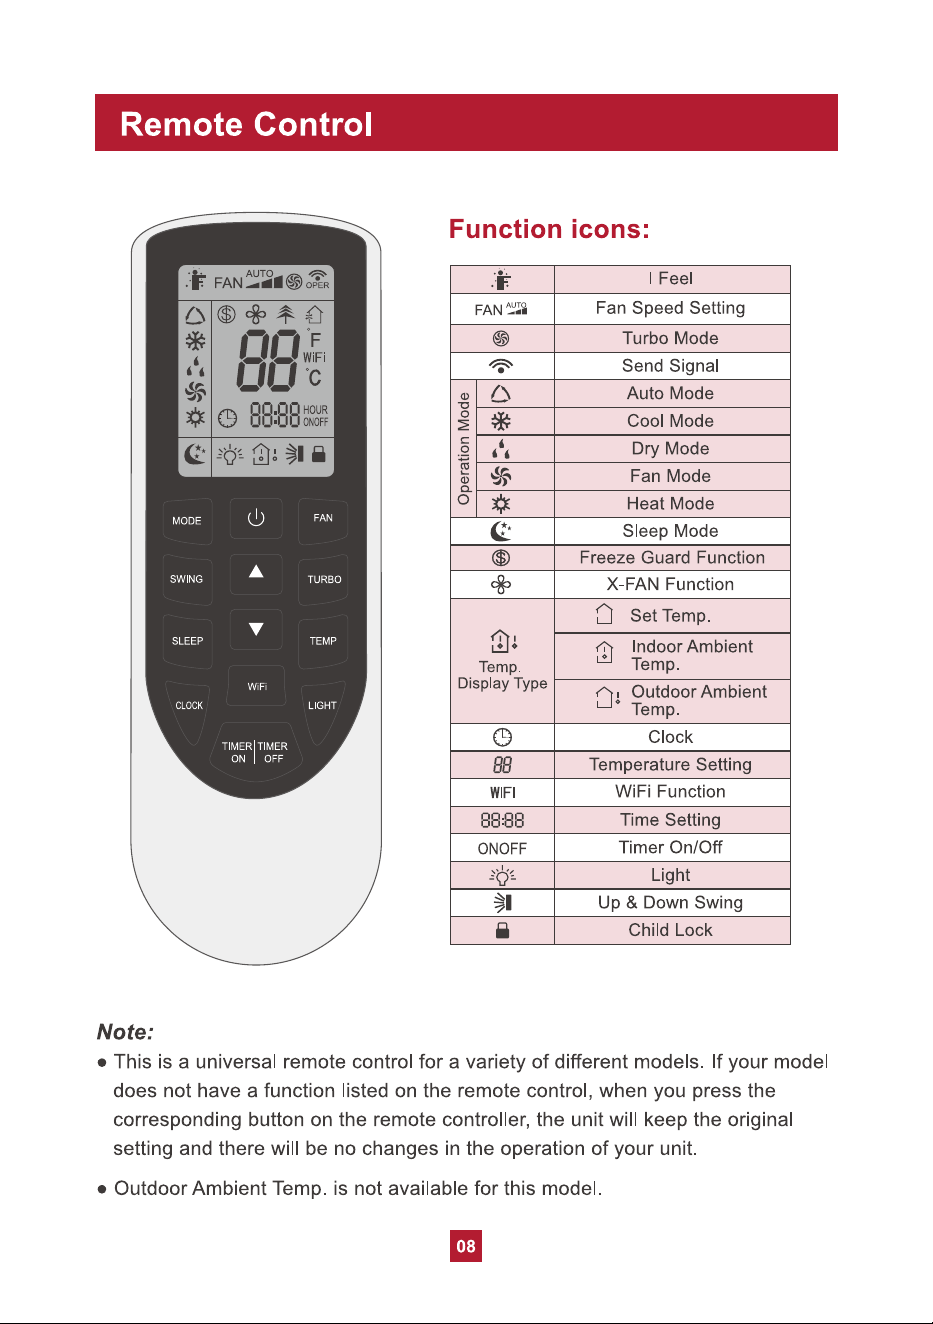
Remote Control
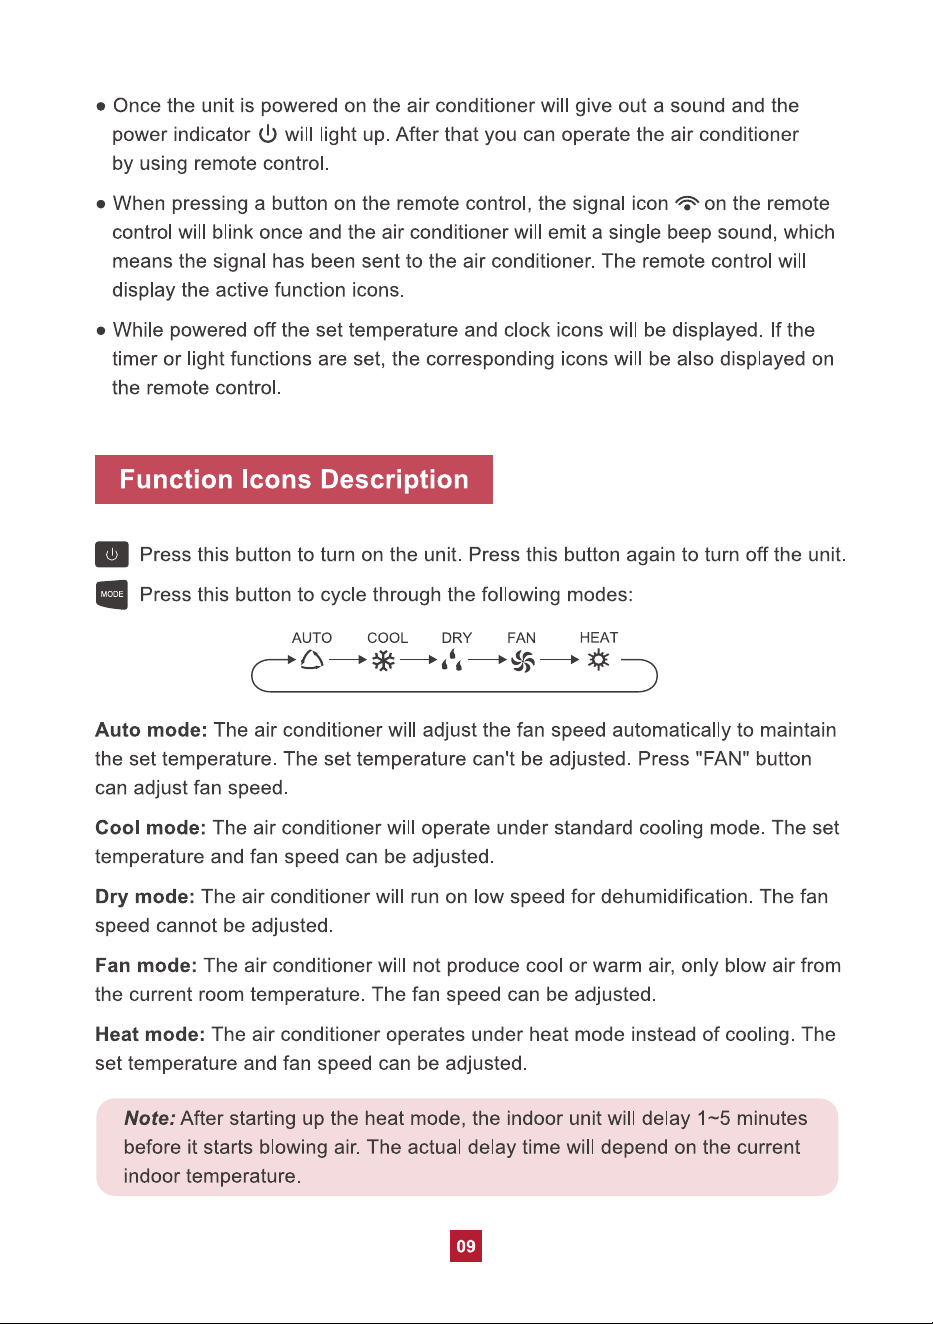
Function Icons Description
Combination Buttons
App Control
Care and Maintenance
Precautions
Cleaning the Indoor Unit
Cleaning the Reusable Filter
Offseason Maintenance
Preseason Maintenance
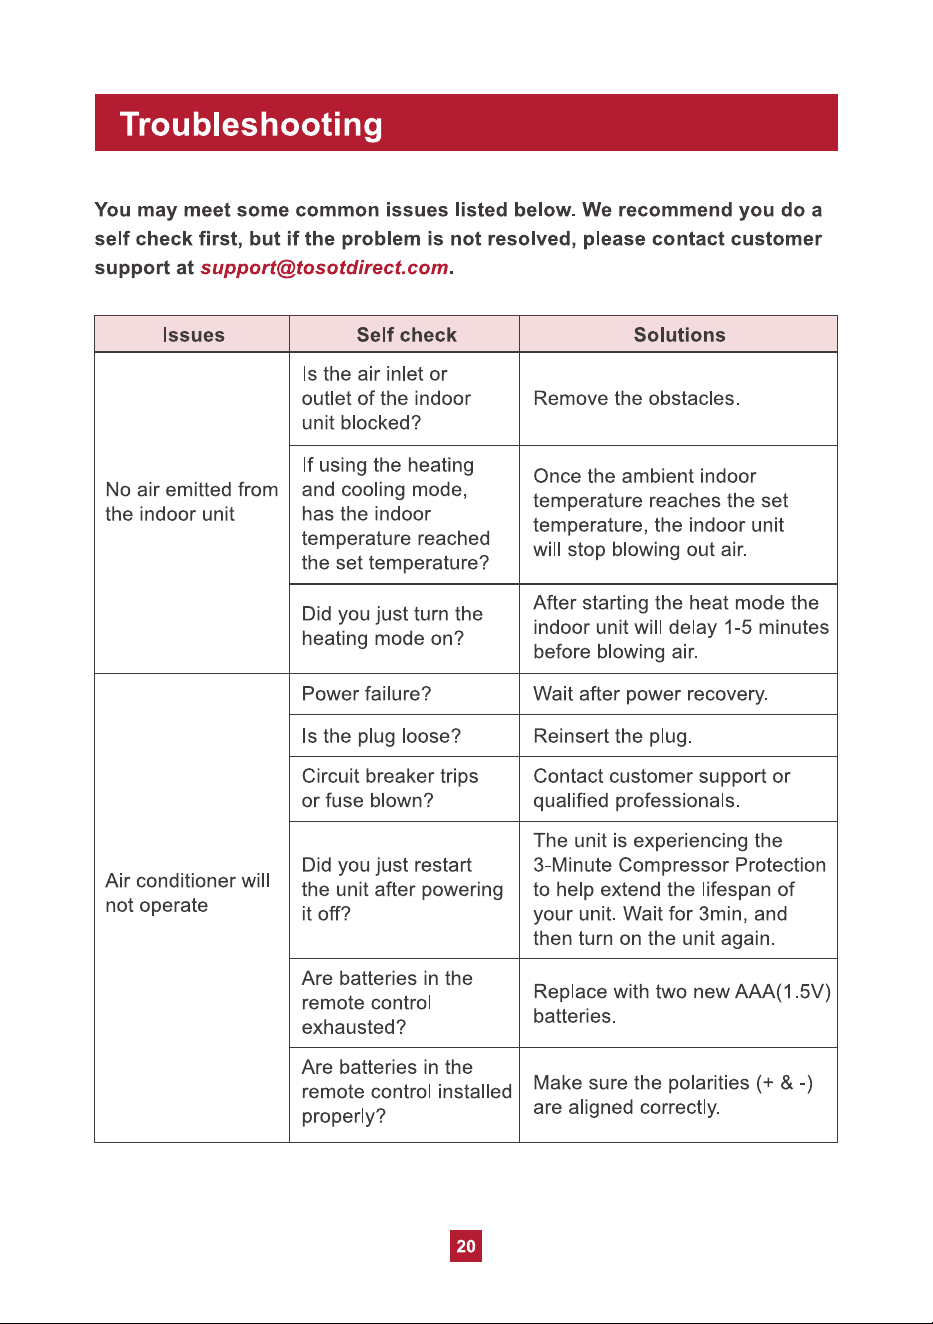
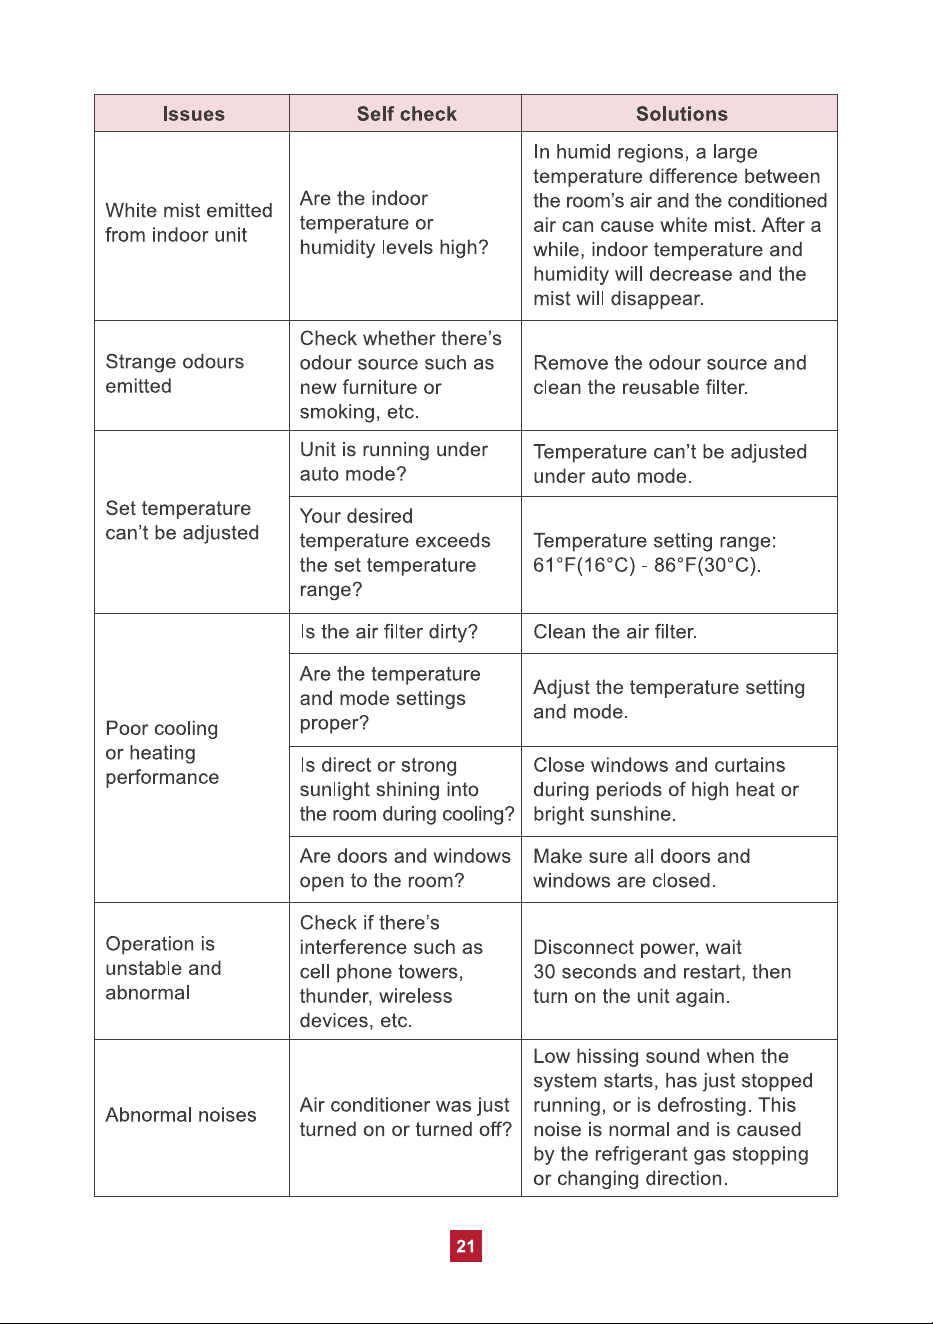
Troubleshooting
01
01
02
03
05
06
07
08
09
13
15
----------------------------------------
Replacing the Batteries
16
17
17
17
17
19
19
20
------------------------------------------------
--------------------------------------
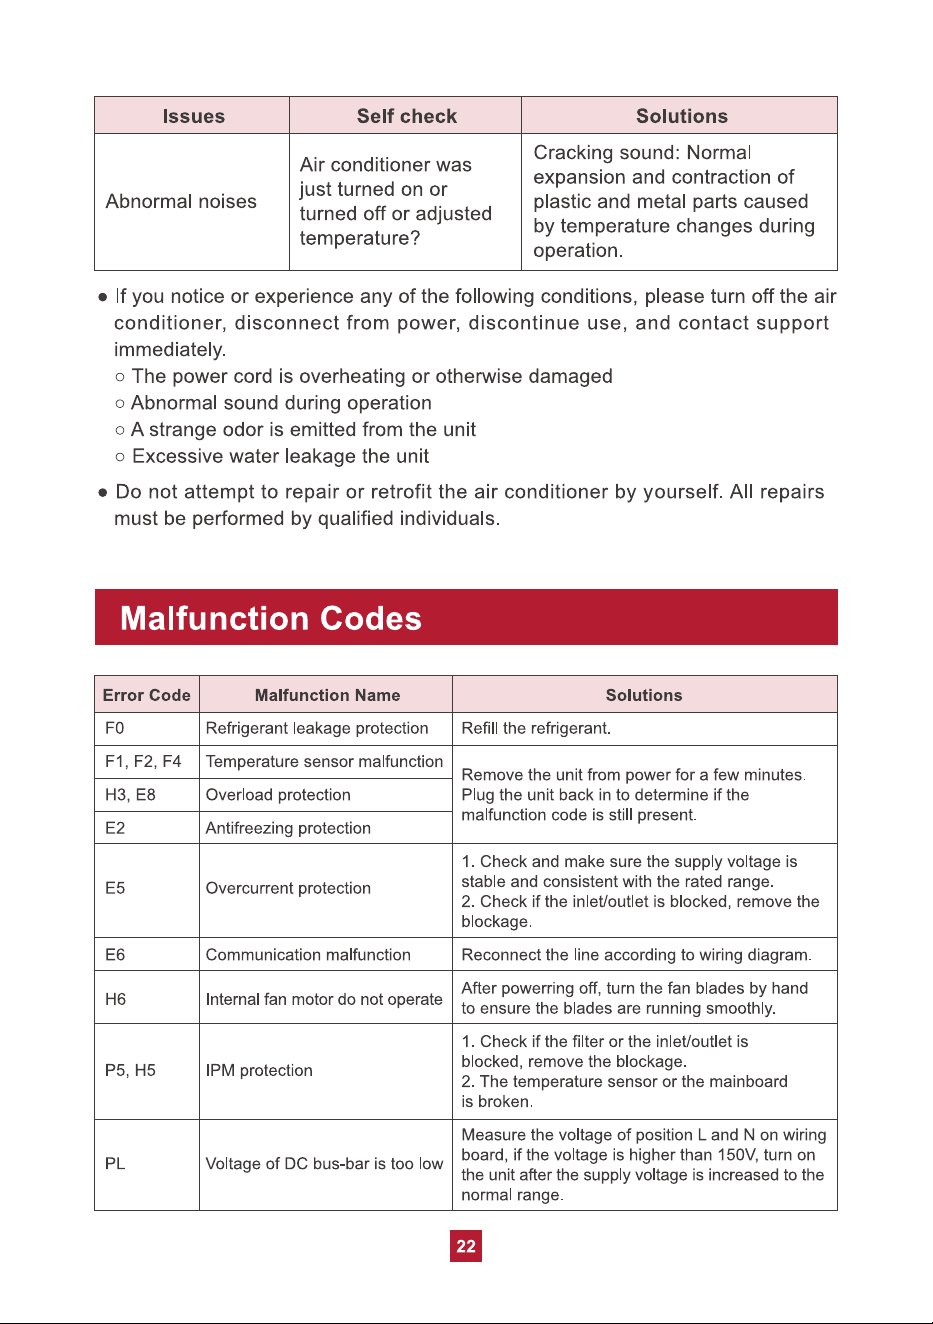
Malfunction Codes
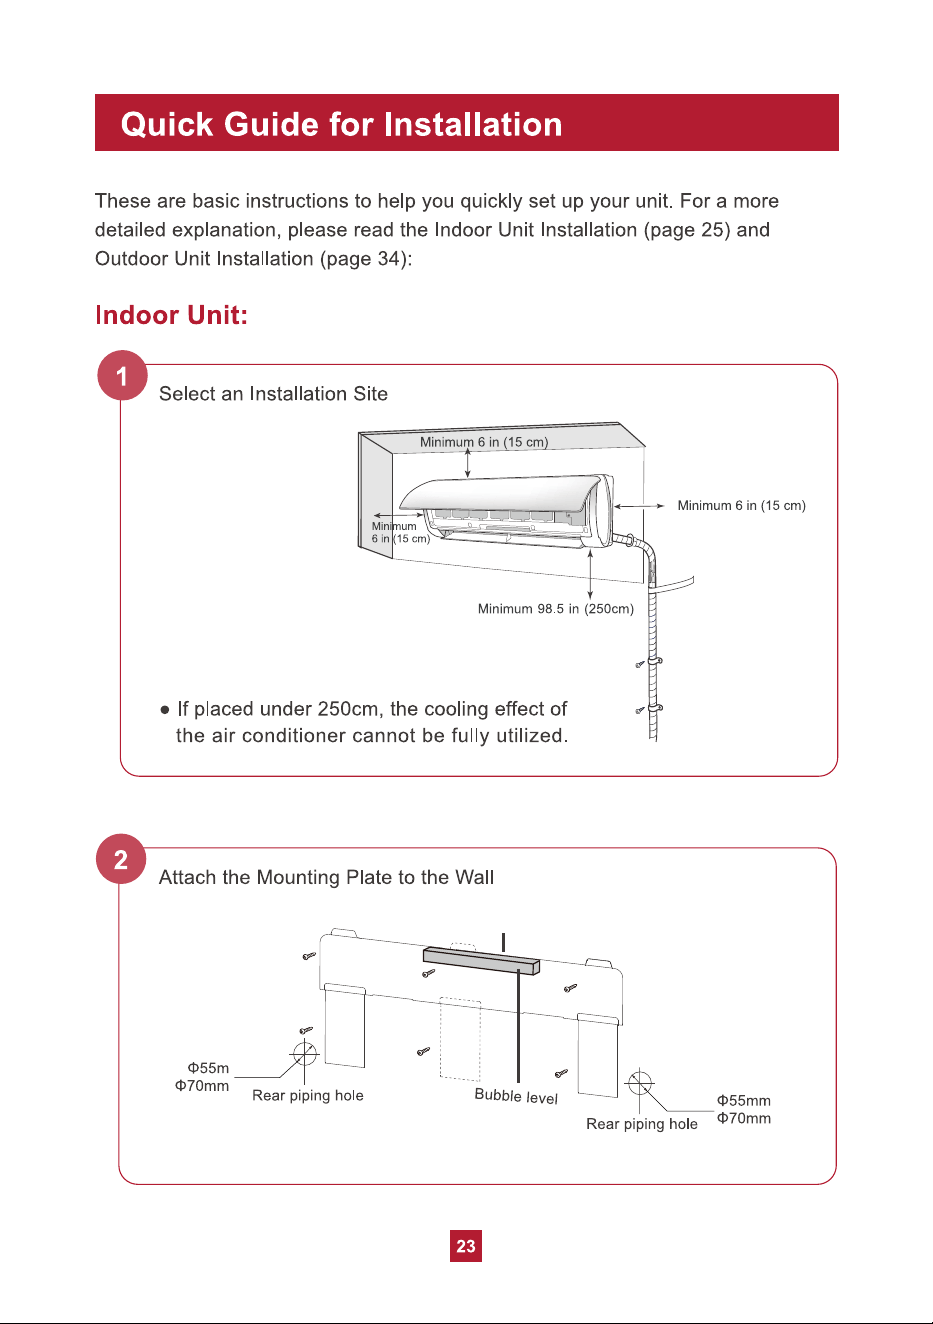
Quick Guide for Installation
22
23
Safety Precautions
01
Your safety and the safety of others are very important to us. Please read the
following safety precautions before use and installation. A digital version can be
obtained from customer support.
Warning
Failed to do the following instructions might cause the possibility of death or
serious injury.
1. Do not connect the power before finishing installation.
2. Do not spray or wash the air conditioner with water to avoid electric shock or
malfunction.
3. Do not insert fingers or objects into the air inlet or air outlet. It may cause
personal injury or damage.
4. Do not block the air outlet or air inlet. It may cause malfunction.
5. Installation must be performed according to installation instructions and in
accordance with the requirement of NEC and CEC by authorized personnel only.
Improper installation may cause water leakage, electrical shock, fire, or may
void the warranty.
6. Service or maintenance must be performed by authorized and qualified
professionals. Otherwise, it may cause serious damage or personal injury or death.
7. Make sure the power supply is cut off before proceeding with any work related
to electri
city or general maintenance.
8. If the refrigerant leaks or requires discharge during installation, maintenance,
or disassembly, it should be handled by certified professionals or otherwise in
compliance with local laws and regulations.
9. The air conditioner must be properly grounded. The grounding resistance should
comply with national electric safety regulations. Incorrect grounding may cause
electric shock.
10. This appliance is not intended for use by persons (including children) with
reduced physical, sensory or mental capabilities or lack of experience and
knowledge, unless they have been given supervision or instruction concerning
use of the appliance by a person responsible for their safety.
02
Caution
1. Please follow the instructions for installation and use of this product in this user
manual.
2. The indoor unit should be installed close to the wall.
3. The appliance must be positioned so that the plug is accessible. The plug should
be able to reach a properly-grounded wall outlet after finishing installation.
Extension cords, power strips, or similar devices should not be used with this
product.
4. The yellow-green wire in the air conditioner is grounding wire, which cannot be
used for other purposes.
5. The temperature of the refrigerant circuit will be hot. Please keep wires and
cables away from the copper refrigerant tube.
6. Do not spill water on the remote controller, otherwise the remote controller may
be broken.
7. Do not use a hair dryer to dry the filter after washing to avoid deformation or fire
hazard.
8. Do not step or
put heavy objects on the top panel of the outdoor unit. It may
cause damage or personal injury.
9. If any of the below issues occur, please turn off the air conditioner and disconnect
power immediately. Contact the dealer or qualified professionals for service.
a. Power cord is overheating or damaged.
b. There are abnormal sounds during operation.
c. Circuit breakers trips frequently.
d. Air conditioner gives off a burning smell.
e. Indoor unit is leaking.
11. This appliance can be used by children ages 8 and above and persons with
reduced physical, sensory or mental capabilities, or lack of experience and
knowledge, if they have been given supervision or instruction concerning use
of the appliance in a safe way and understand the hazards involved. Children
shall not play with the appliance. Cleaning and user maintenance shall not be
made by children without supervision.
12. After removing the filter, do not touch the metal fins in order to avoid injury.
03
Electrical Safety Warning
1. Do not share the same electrical socket with other appliances as this may create
a fire hazard.
2. Do not cover the power cord with a rug or carpeting.
3. Do not rest hot or heavy objects on the appliance and power cord.
4. Never plug or unplug the appliance with wet hands.
5. Never unplug the appliance by pulling on the power cord.
6. According to the local safety regulations, use a qualified power supply circuit and
circuit breaker and make sure the power supply matches with the requirement of
the air conditioner. Unstable power supply may result in electric shock, fire hazard
or malfunction.
7. All wires of indoor unit and outdoor unit should be in accordance with national
wiring regulations.
8. If the power cord is damaged, it must be replaced by the manufacturer or an
authorized technical service center.
9. Make sure the power supply is cut off when cleaning the air conditioner.
Otherwise, it may cause electric shock.
(1) this device may not cause harmful interference, and (2) this device must accept
any interference received, including interference that may cause undesired operation.
NOTE: This equipment has been tested and found to comply with the limits for a
Class B digital device, pursuant to part 15 of the FCC Rules. These limits are
designed to provide reasonable protection against harmful interference in a
residential installation. This equipment generates, uses, and can radiate radio
FCC WARNING
WARNING: Changes or modifications to this unit not expressly approved by the
party responsible for compliance could void the user’s authority to operate the
equipment.
FCC STATEMENT
This device complies with Part 15 of the FCC Rules. Operation is subject to the
following two conditions :
04
frequency energy and, if not installed and used in accordance with the instructions,
may cause harmful interference to radio communications. However, there is no
guarantee that interference will not occur in a particular installation. If this equipment
does cause harmful interference to radio or television reception, which can be
determined by turning the equipment off and on, the user is encouraged to try to
correct the interference by one or more of the following measures:
IC STATEMENT
This device complies with Industry Canada licence exempt RSS standard(s).
Operation is subject to the following two conditions: (1) this device may not cause
interference, and (2) this device must accept any interference, including interference
that may cause undesired operation of the device.
Cet appareil est conforme aux limites d’exposition au rayonnement RF stipulées par
la FCC et l’IC pour une utilisation dans un environnement non contrôlé. Les antennes
utilisées pour cet émetteur doivent être installées et doivent fonctionner à au moins
20 cm de distance des utilisateurs et ne doivent pas être placées près d’autres
antennes ou émetteurs ou fonctionner avec ceux-ci. Les installateurs doivent s’assurer
qu’une distance de 20 cm sépare l’appareil (à l’exception du combiné) des utilisateurs.
This equipment complies with FCC’s and IC’s RF radiation exposure limits set forth
for an uncontrolled environment. The antenna(s) used for this transmitter must be
installed and operated to provide a separation distance of at least 20 cm from all
persons and must not be collocated or operating in conjunction with any other
antenna or transmitter. Installers must ensure that a 20cm separation distance will
be maintained between the device (excluding its handset) and users.
Le présent appareil est conforme aux CNR d'Industrie Canada applicables aux
appareils radio exempts de licence. L'exploitation est autorisée aux deux conditions
suivantes : (1) l'appareil ne doit pas produire de brouillage, et (2) l'utilisateur de
l'appareil doit accepter tout brouillage radioélectrique subi, même si le brouillage est
susceptible d'en compromettre le fonctionnement.
Ɣ Reorient or relocate the receiving antenna.
Ɣ Increase the separation between the equipment and receiver.
Ɣ Consult the dealer or an experienced radio/TV technician for help.
Ɣ&RQQHFWWKHHTXLSPHQWWRDQRXWOHWRQDFLUFXLWGLIIHUHQWIURPWKDWWRZKLFKWKH
receiver is connected.
11
SLEEP
Ɣ Pressing theŸorźbutton will increase/decrease the set temperature by
1°F. Holding the button for 2 seconds will cause the temperature to change
rapidly. Release the button once your desired temperature is reached.
Ɣ After pressing the Timer or Clock button, press theŸorźbutton to adjust
the time.
Ɣ Under cool or heat mode,press this button to enter the sleep operation
mode. The icon will display on remote control. Press the button again to
exit sleep mode. Sleep mode is only available in cooling or heating modes,
as explained in detail below.
Ɣ During sleep, the set temperature of the air conditioner may no longer be
suitable to the human body’s optimal sleeping needs. By activating the
sleep function with the remote control, the air conditioner will automatically
adjust the set temperature to meet the optimal sleeping needs of the human
body.
Sleep Mode Under
Cooling Mode
1. If the temp is set to 61-74°F (16-23°C), the temp will increase 2°F per hour
for 3 hours. Four (4) hours later the temp will decrease by 2°F and remain
at this temp.
2. If the temp is set to 75-81°F (24-27°C), the temp will increase 2°F per hour
for 2 hours. Five (5) hours later the temp will decrease by 2°F and remain
at this temp.
3. If the temp is set to 82-84°F (28-29°C), the temp will increase 2°F per hour
for 1 hour. Six (6) hours later the temp will decrease by 2°F and remain at
this temp.
4. If the temp is set to 85°F (30°C), the temp will not increase. Seven (7) hours
later the temp will decrease by 2°F and remain at this temp.
Sleep Mode Under Heating Mode
1. If the temp is set to 61°F (16°C), it will run at this temp with no change.
2. If the temp is set to 62-68°F (17-20°C), the temp will decrease 2°F per hour
for 1 hour and remain at this temp
.
3. If the temp is set to 69-81°F (21-27°C), the temp will decrease 2°F per hour
for 2 hours and remain at this temp.
4. If the temp is set to 82-86°F (28-30°C), the temp will decrease 2°F per hour
for 3 hours and remain at this temp.
Under the Freeze Guard Heating Function, fan speed and temperature settings
can’t be adjusted and the "TURBO" mode is not available. The sleep mode and
the Freeze Guard Heating Function can’t operate at the same time.
This function is typically used when away for vacation or holiday and is intended
to save energy and protect pipes or plants from freezing when the building is
unoccupied.
14
Ɣ Child lock
PressŸandźsimultaneously to turn the child lock function on or off. While in
this mode the remote control will display a LOCK symbol and will not send any
signal to the air conditioner.
Ɣ Change Between °F and °C
With the unit powered off, press the MODE andźbuttons simultaneously to switch
between Fahrenheit and Celsius displays.
Ɣ I FEEL
Press theŸand MODE buttons simultaneously to activate I FEEL mode. The
icon will be displayed on the remote control. In this mode your unit will use a
sensor located in the remote control to determine the temperature setting of your
air conditioner.
Please put the remote control near the user when using this function. Do not put
the remote control near any place with too high or too low temperature in order to
avoid inaccurate temperature readings. When I FEEL is turned on, the remote
control should be put within 20 ft of the indoor unit so the unit can receive the
signal from the remote control.
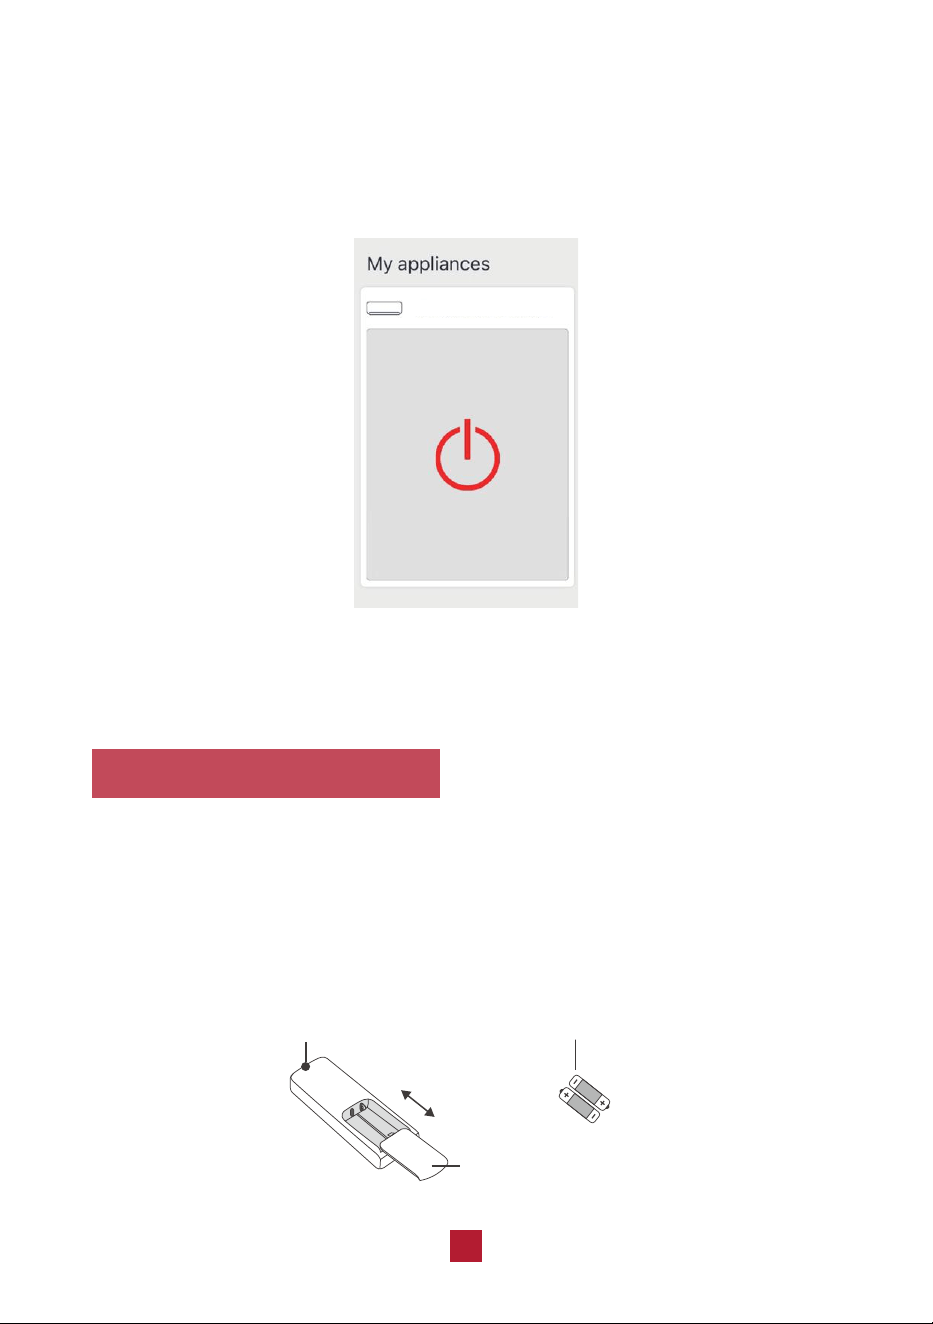
Replacing the Batteries
Ɣ Press the back side of the remote control battery cover and slide out following
the engraved arrow.
Ɣ Replace with two new AAA(1.5V) batteries of the same make and model. Make
sure the polarities (+ & -) are aligned correctly.
Ɣ Reinstall the battery cover box.
Signal Sender
Battery
Reinstall
Remove
Cover of Battery Box
16
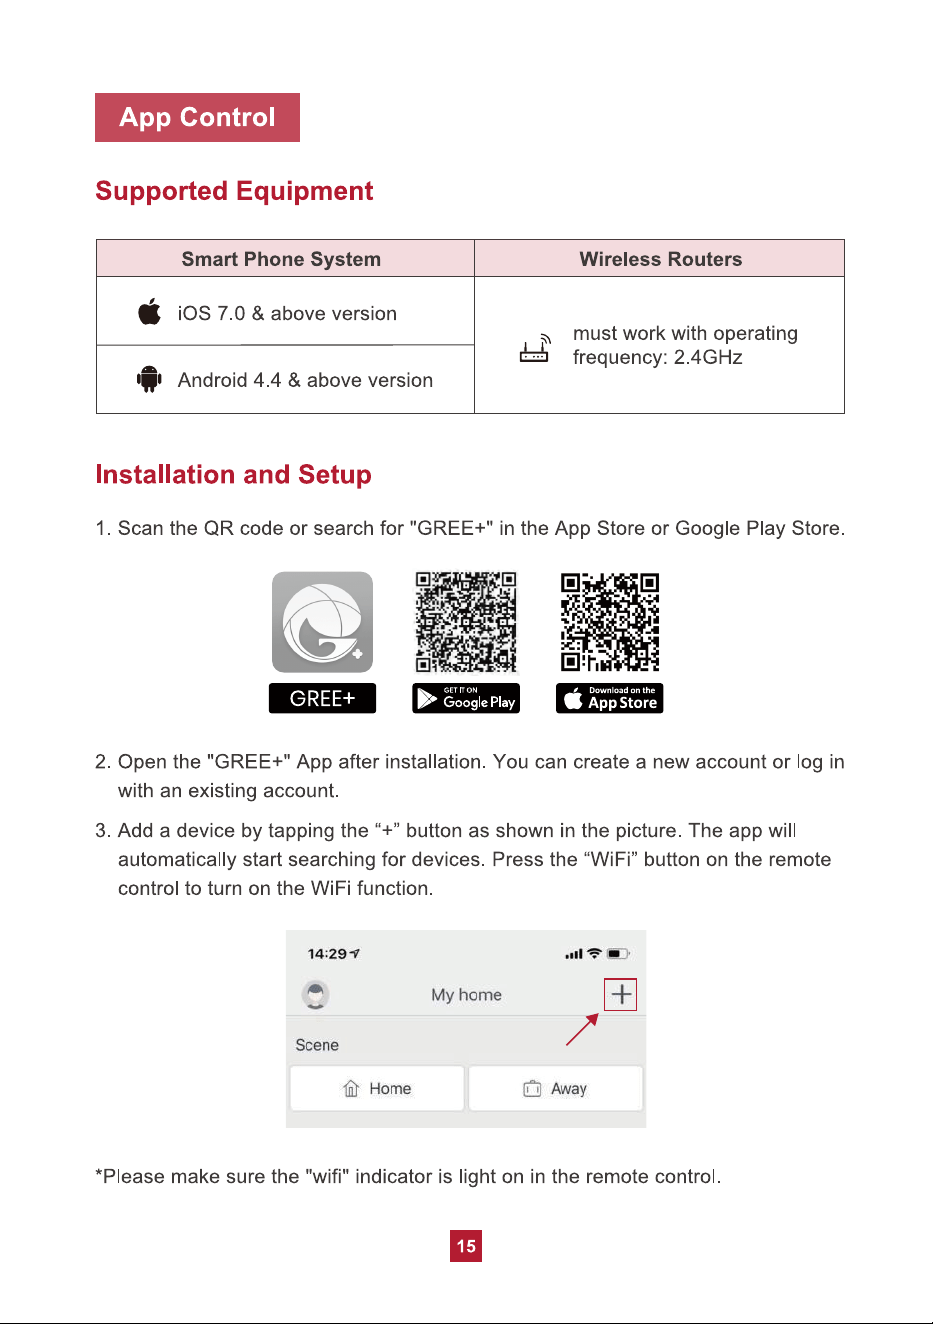
4. Tap the available device icon and select your Wi-Fi network. Enter your WiFi
password, then tap the “Next” button.
5. Once the device is added successfully, you will return back to the “My home”
page. Select your appliance to start app control.
If you have problems,
please refer to "Help" in the app or contact our support team.
AC
17
Care and Maintenance
Precautions
Ɣ Disconnect from power before cleaning and servicing. Failure to do so may
cause electric shock.
Ɣ Do not wash the air conditioner with water as this may cause electric shock.
Ɣ Do not use volatile liquids (such as paint thinner or gas) to clean the air
conditioner. This may damage the appearance of the air conditioner or cause
parts to deteriorate.
Ɣ Do not use liquid or corrosive detergent to clean the appliance and do not
splash water or other liquid onto it as this may damage plastic components
or cause electric shock.
Cleaning the Indoor Unit
If there's dust on the surface of the outer case please use a soft cloth to wipe it
clean. You might need to use mild detergent for cleaning.
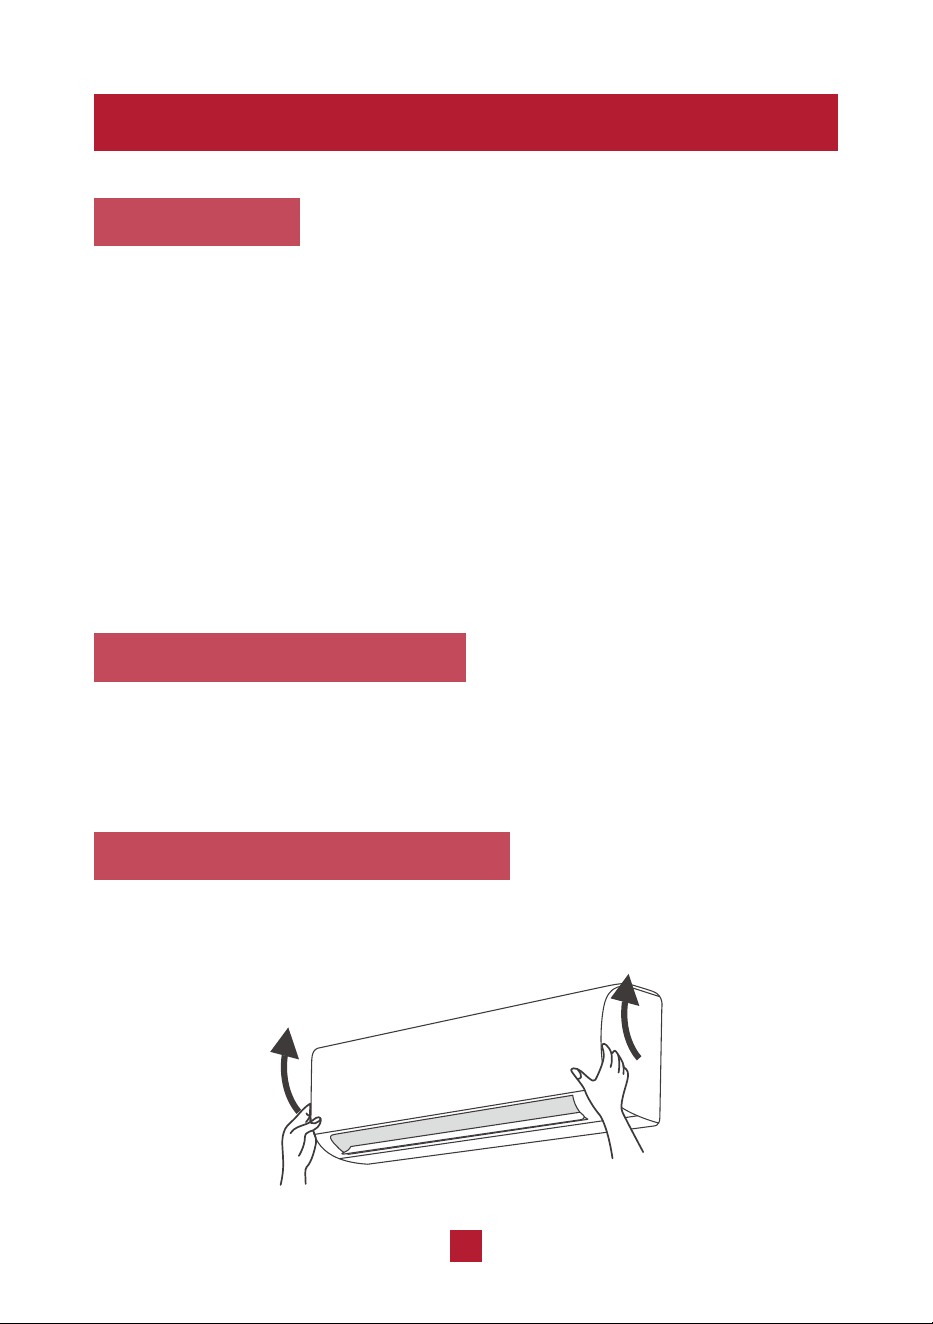
Cleaning the Reusable Filter
1. Lift the front panel up towards the ceiling.


19
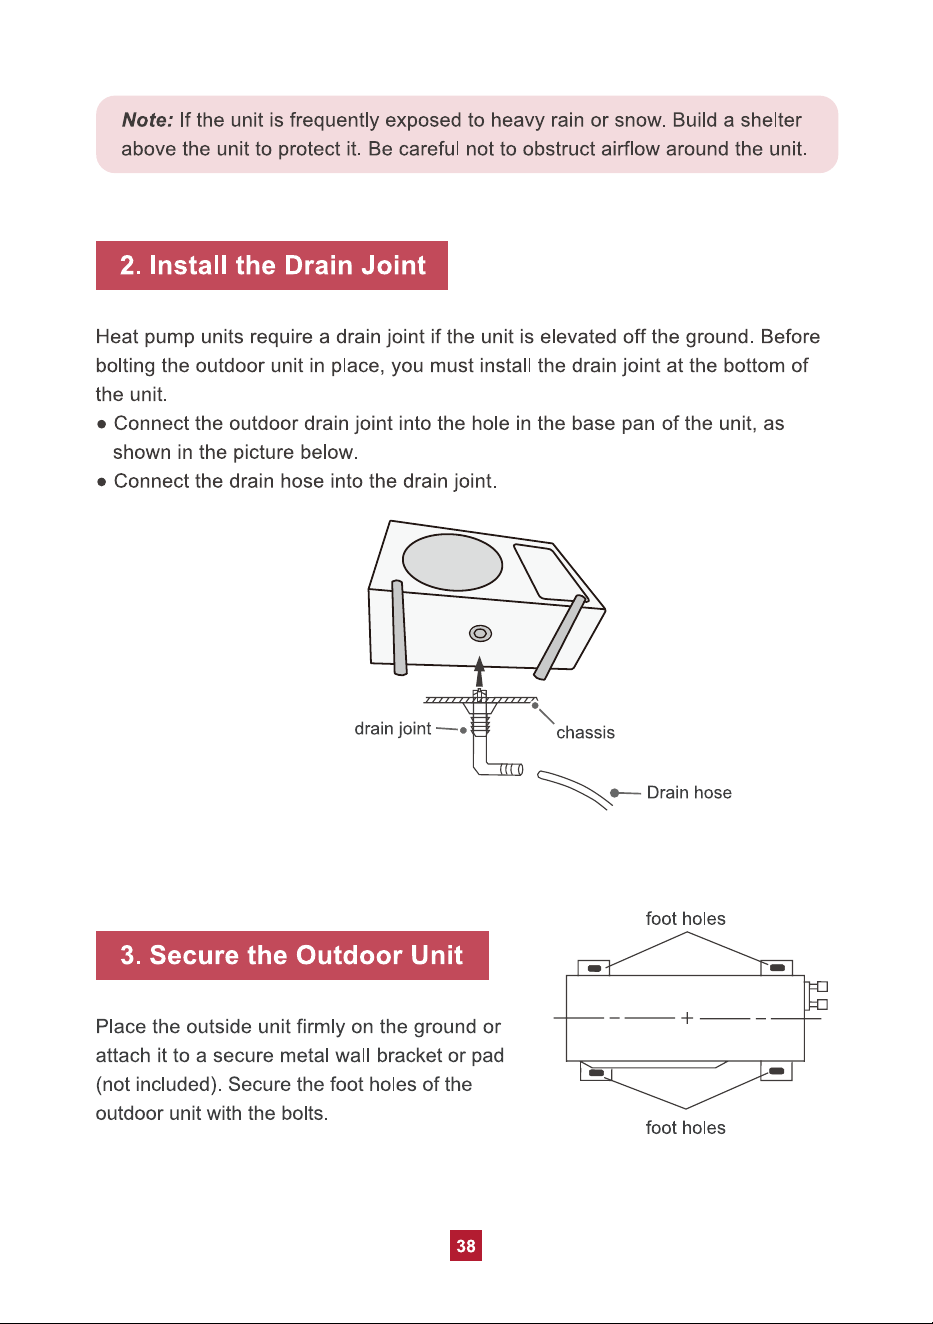
Offseason Maintenance
If you are going to put the unit into long-term storage, please do the following:
1. Disconnect from power supply.
2. Clean filter and outer case.
3. Remove dust and debris on the air conditioner.
4. Turn on the FAN mode for at least 8 hours to dry the indoor unit out completely.
Preseason Maintenance
If you are going to use the unit again after a long period of non-use, please
do the following:
1. Check whether air inlets and air outlets are blocked.
2. Check whether plug and socket are in good condition.
3. Check whether the filter is clean.
4. Check whether batteries are installed in the remote control.
5. Check whether the unit is leaking any refrigerant or water.
27
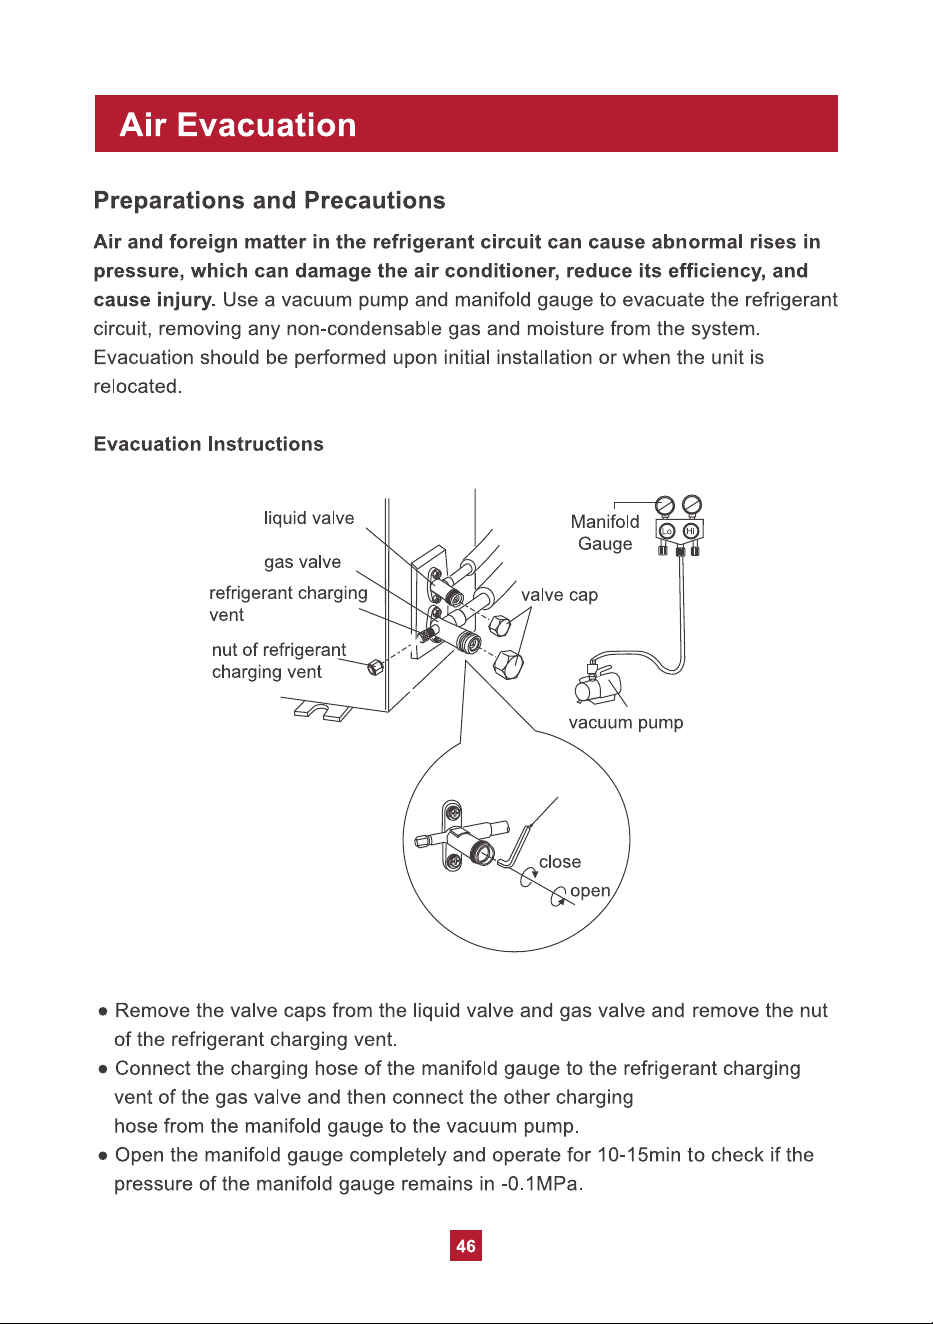
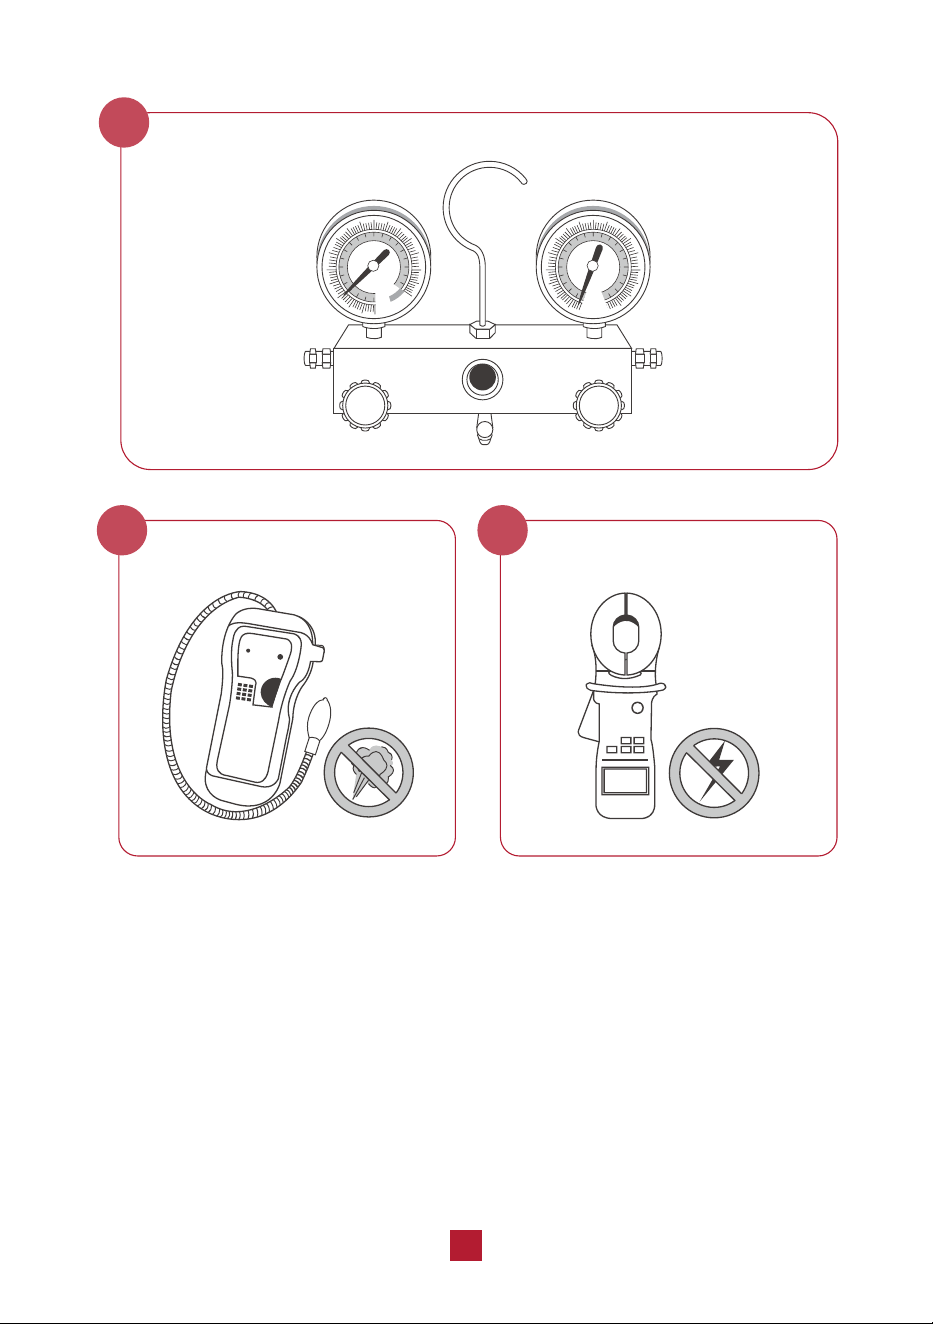
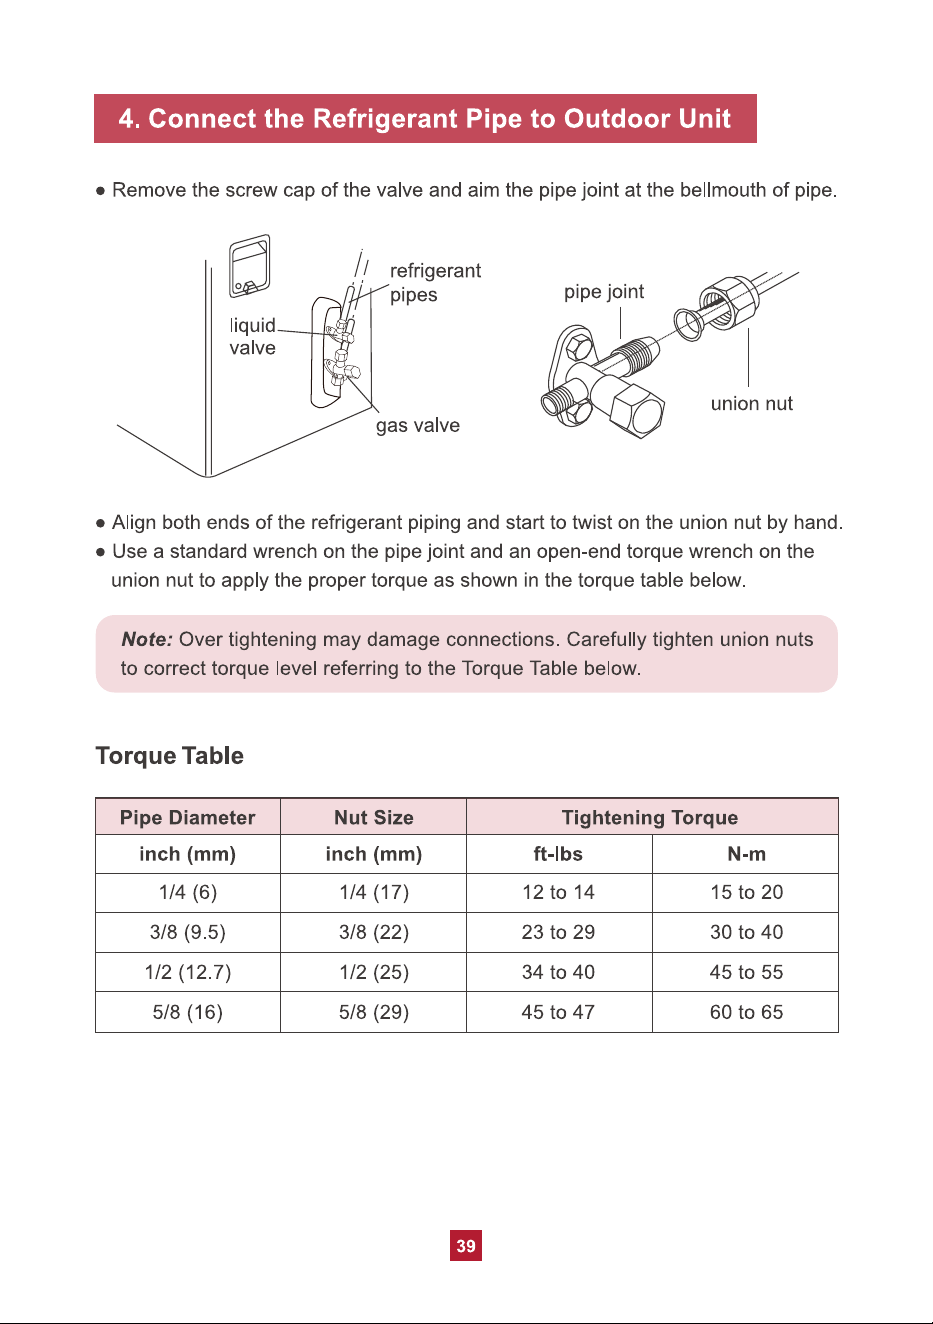
Air Evacuation
6
Electrical Safety Checks
8
Gas Leak Checks
7
28
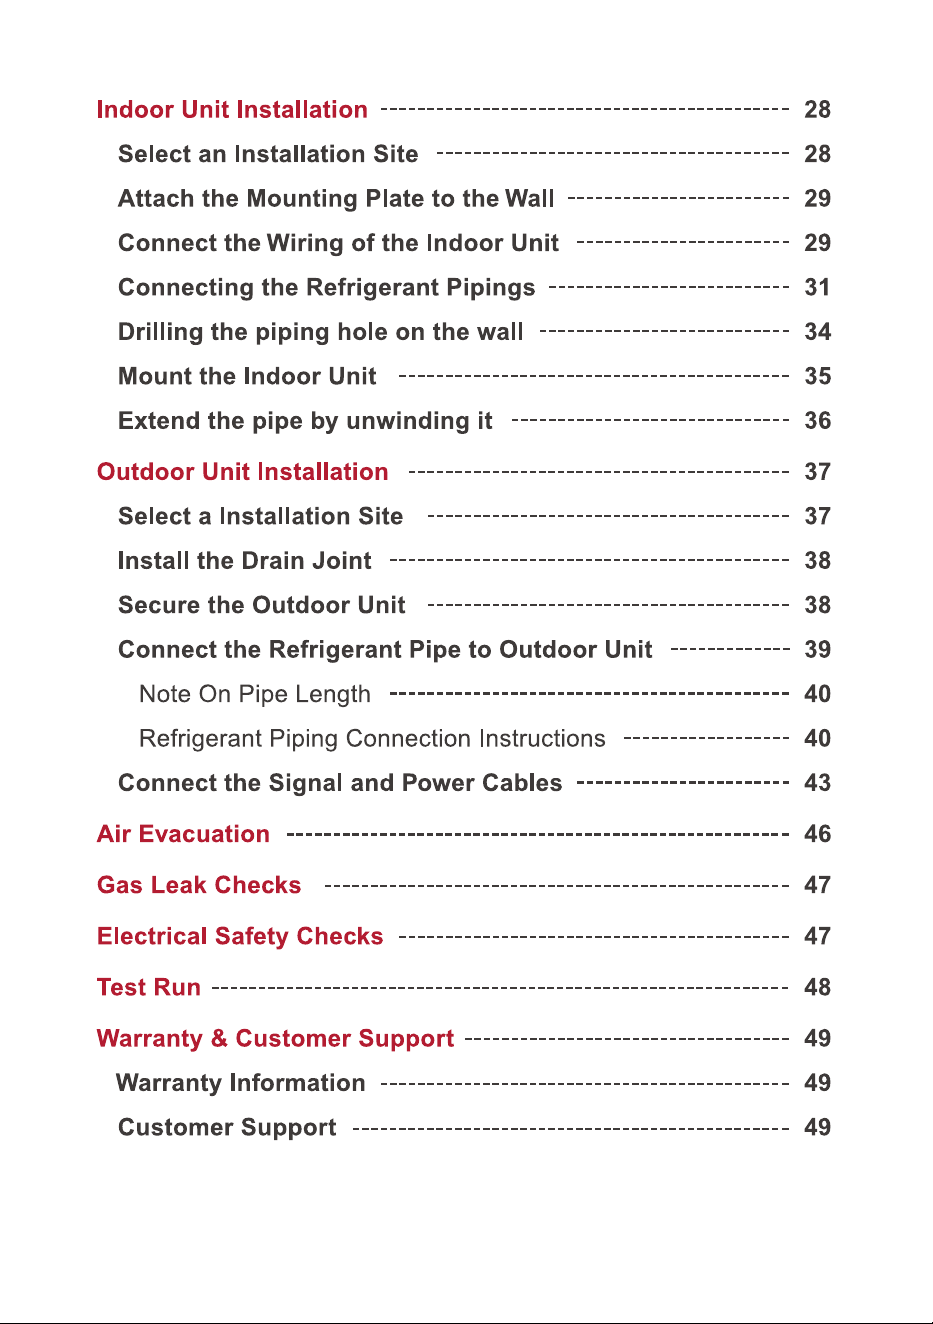
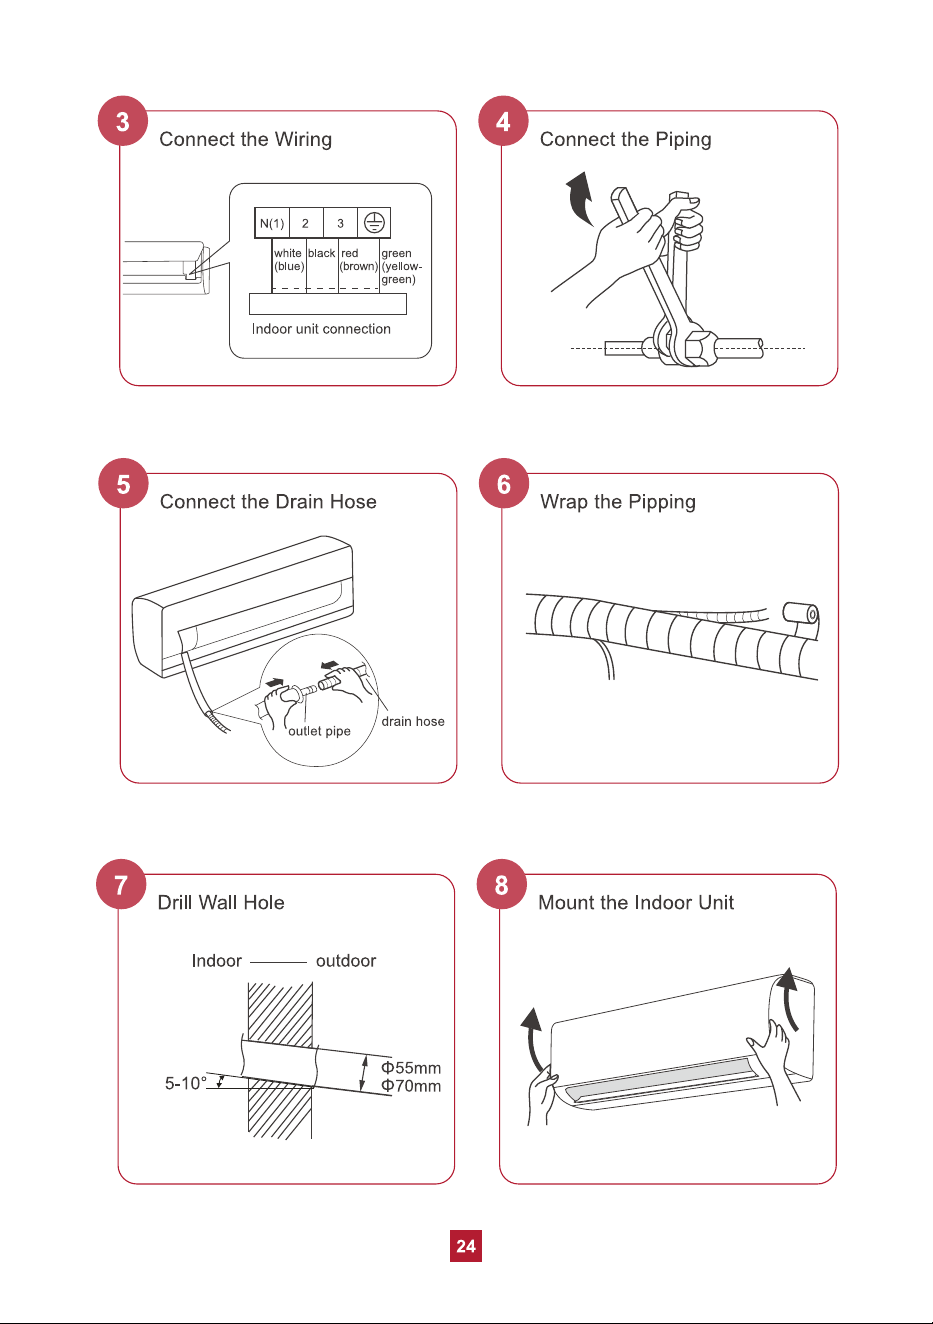
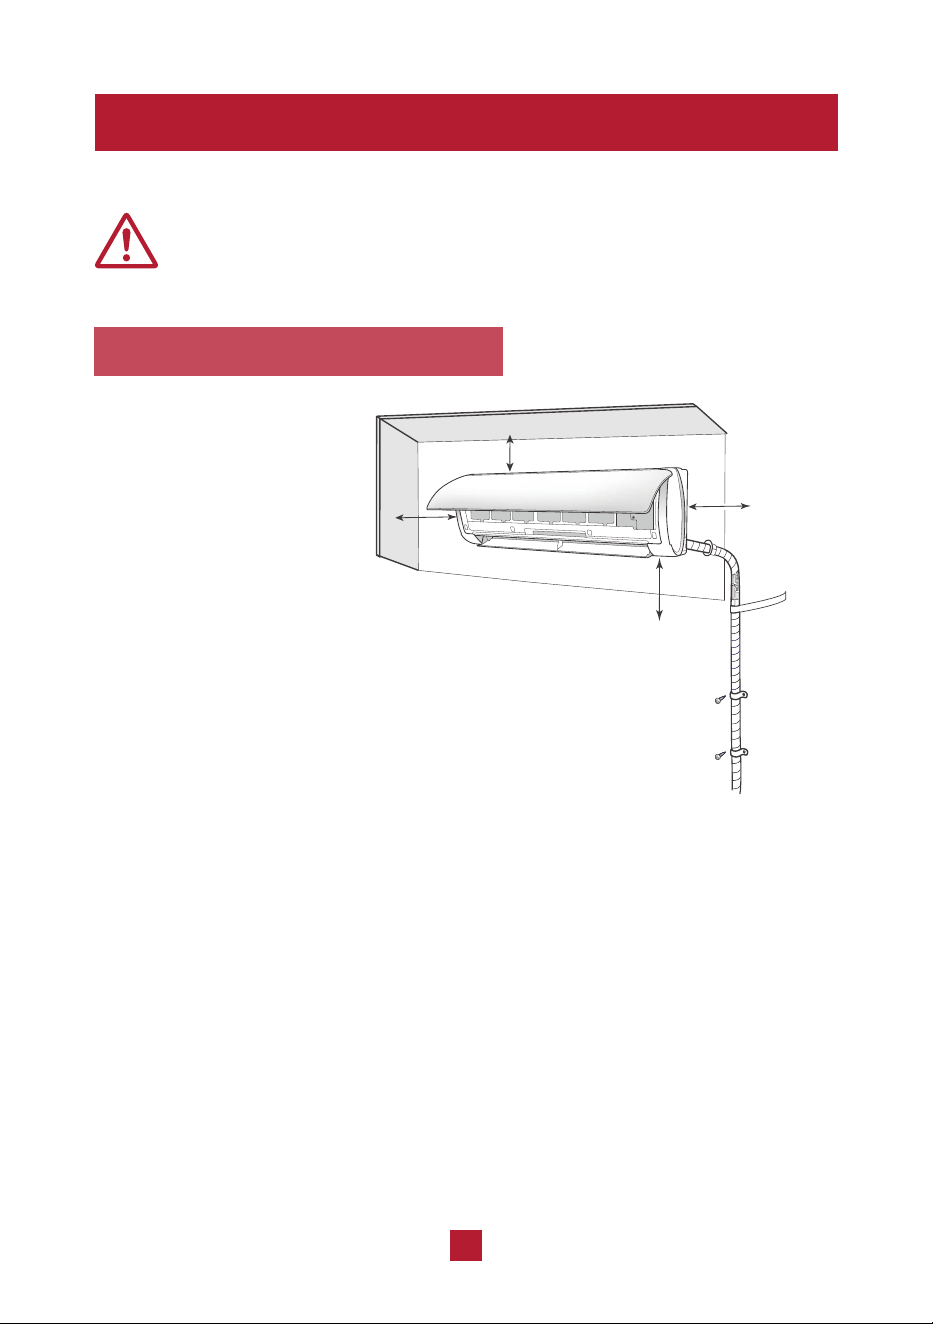
Indoor Unit Installation
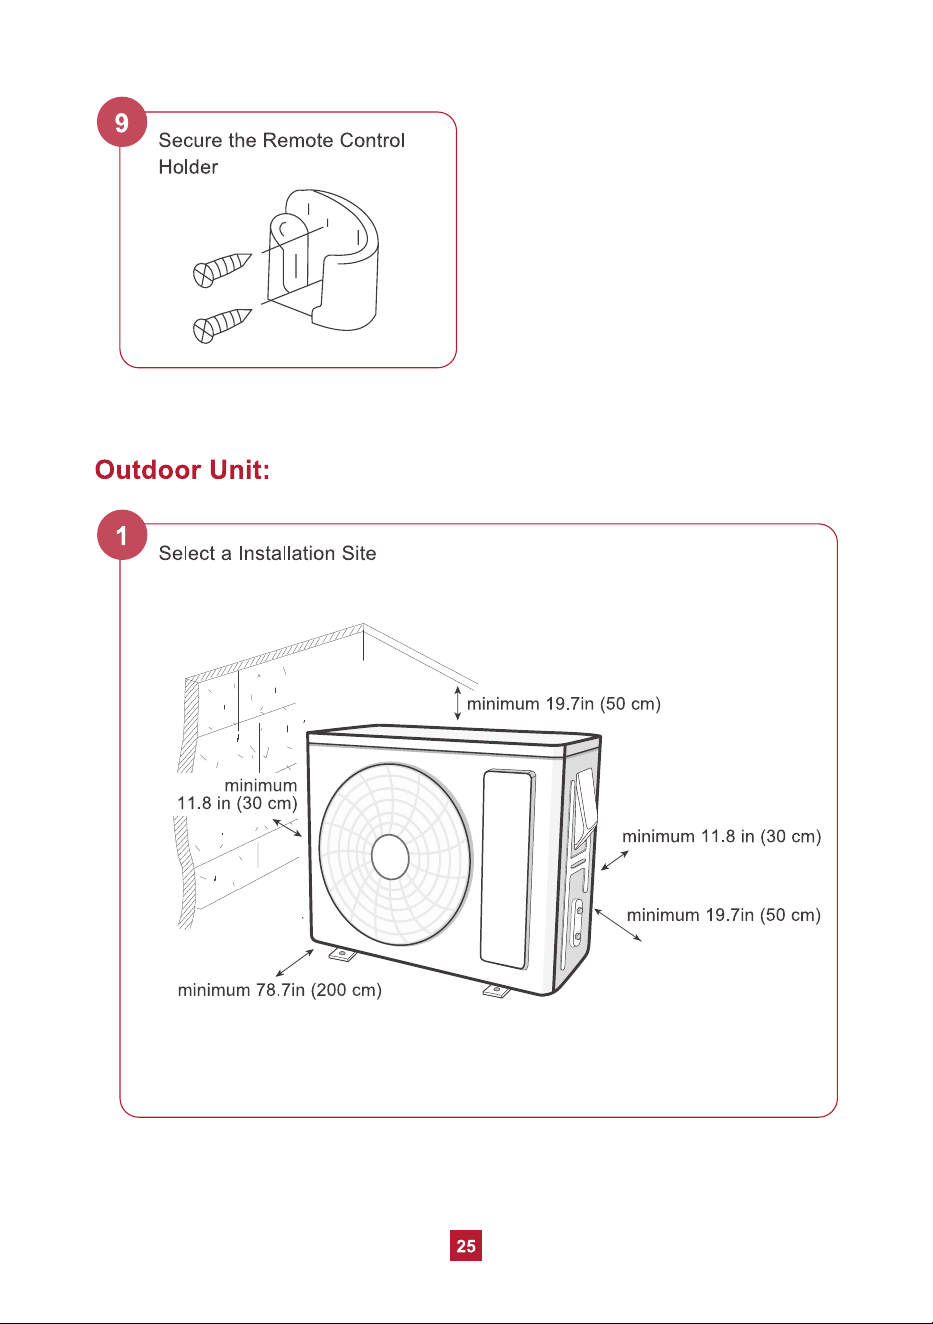
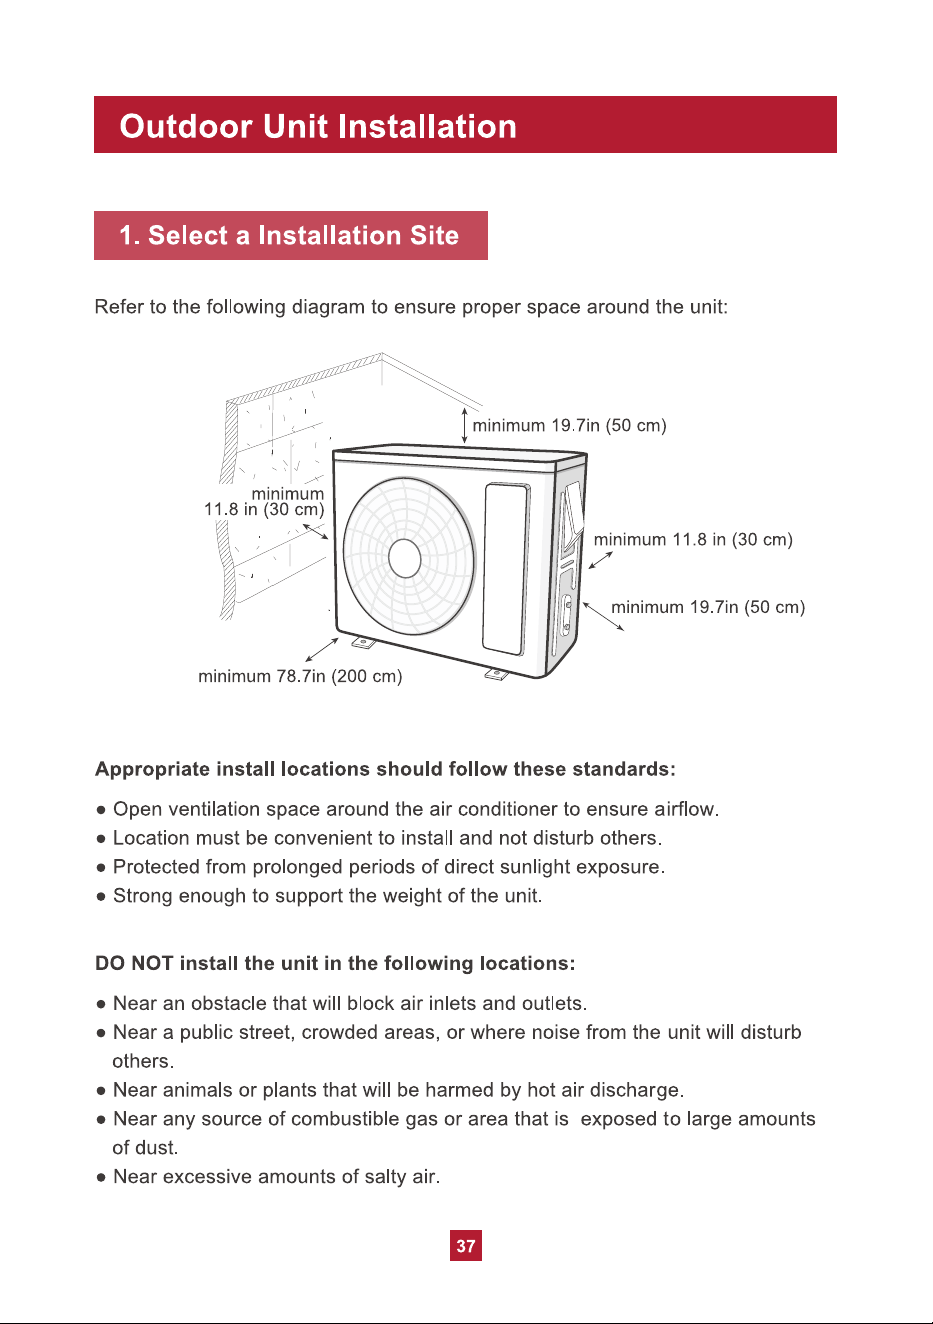
1. Select an Installation Site
Refer to the following
diagram to ensure proper
distance from walls and
ceiling:
Minimum 6 in (15 cm)
Minimum
6 in (15 cm)
Minimum 98.5 in (250cm)
Minimum
6 in (15 cm)
Before installing the indoor unit, you need to check the label on the
product box and make sure that the model number of the indoor unit
matches the model number of the outdoor unit.
An appropriate install location should follow
these standards:
Ɣ Convenient drainage for water condensation.
Ɣ Convenient to connect the outdoor unit
Ɣ Near a properly-grounded wall outlet
Ɣ Not easily accessible for children.
Ɣ Strong enough to support the weight of the unit.
Ɣ Away from other electric appliances (e.g. TV, radio, computer, etc.)
Ɣ Not near fluorescent lamps.
DO NOT install the unit in the following locations:
Ɣ Near strong heat sources or where vapors, flammable or explosive gas,
or volatile objects can be spread in the air.
Ɣ Near high-frequency devices such as welding machines or medical equipment.
Ɣ Corrosive environments such as the laundry room or swimming pool.
Ɣ Any filled with oil,
sulfurated gas or fumes in the air.
Ɣ If placed under 250cm, the cooling
effect of the air conditioner cannot
be fully utilized.
30
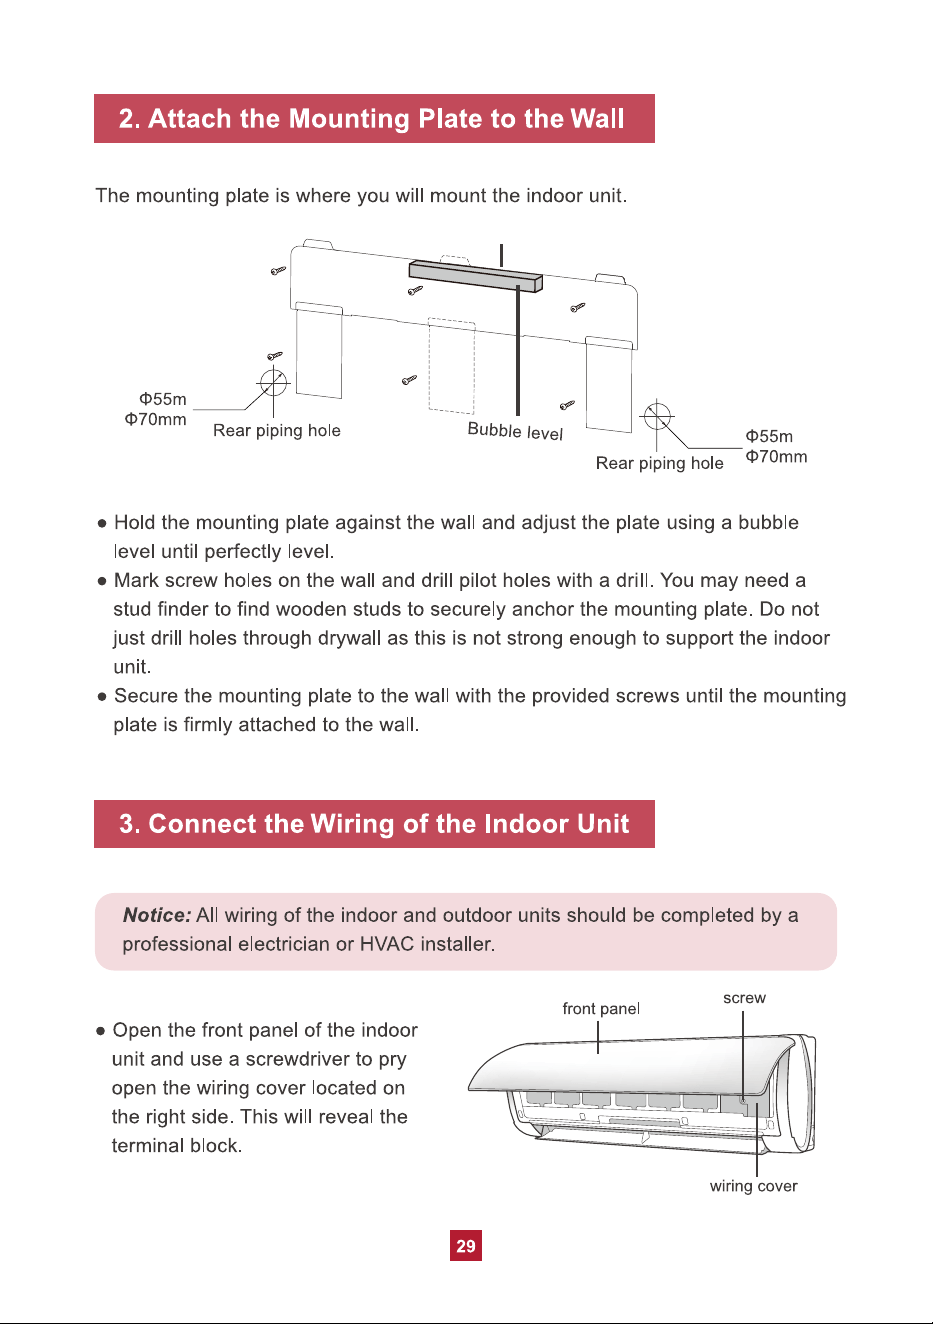
Ɣ Using wire strippers, remove the rubber insulation from both ends of the signal
cable in the lineet to reveal approx. 6 inches (15cm) of wiring.
Ɣ Using a crimp tool, crimp U-Type lugs (not included) on both ends of the wires.
Ɣ Feed the power connection wire from the rear right of the unit though the cable
cross hole and pull it through from the front of the unit.
hole
power connection
wire
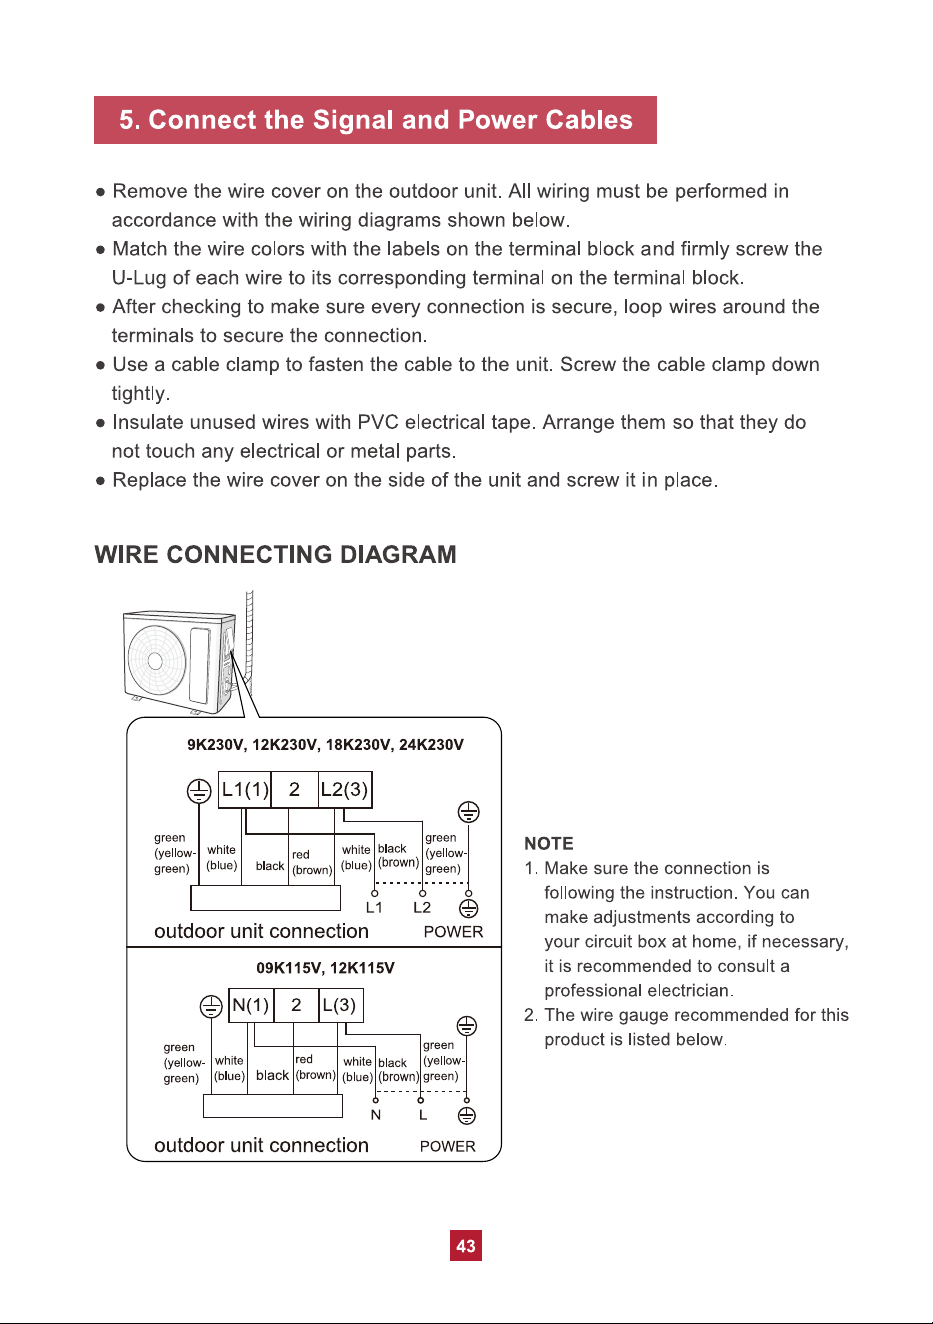
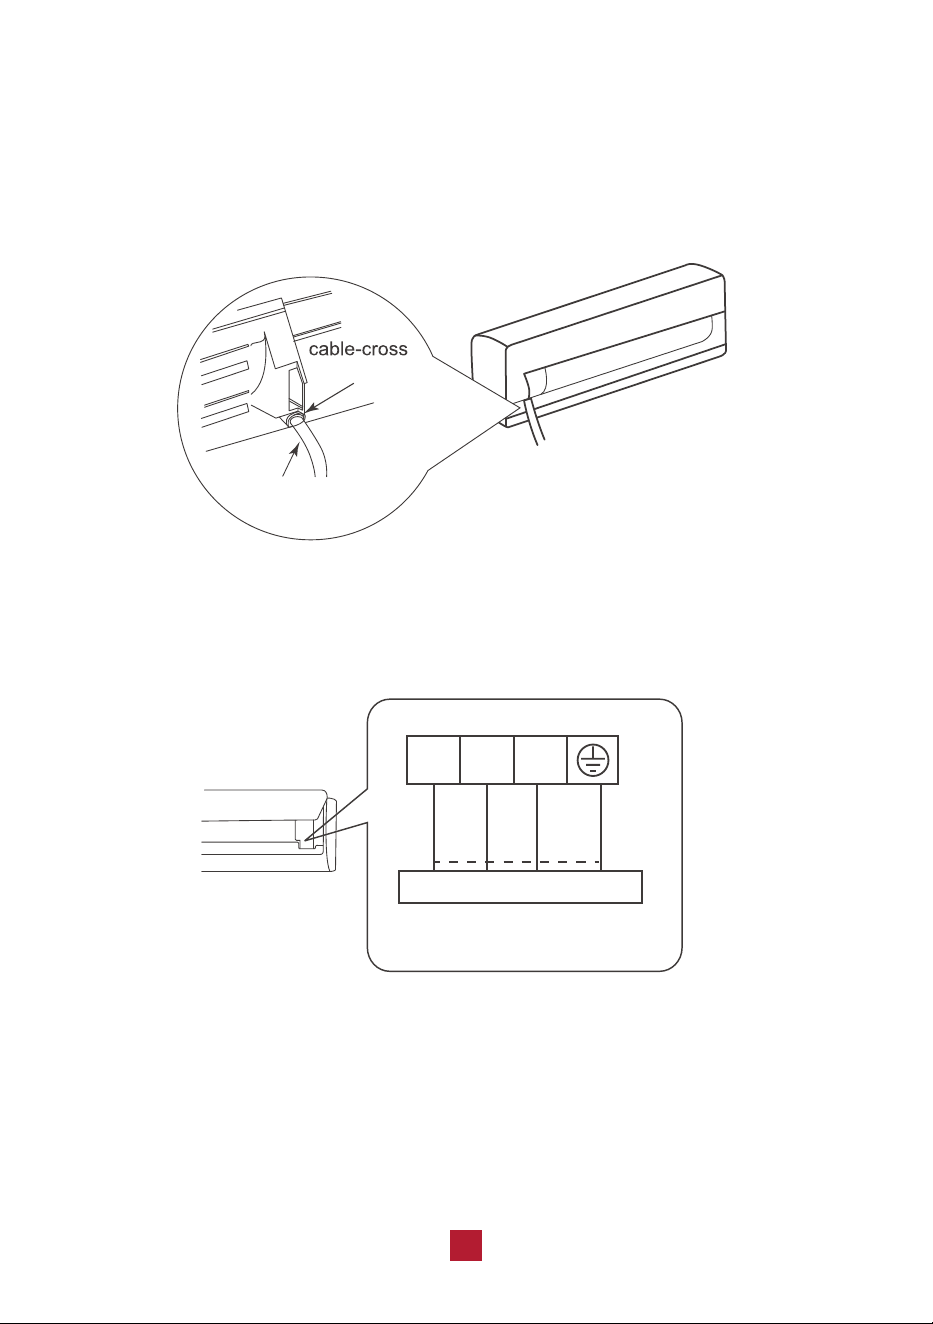
Ɣ Match the colored wires to the correct labels on the terminal block. Connect the
power connection wire and firmly screw each wire to its corresponding terminal.
black
N(1) 2 3
Indoor unit connection
green
(yellow-
green)
white
(blue)
red
(brown)
Ɣ After ensuring that each connection is secure, tightly screw down the cable clamp.
Ɣ Snap the wiring cover back into place and shut the front panel.
NOTE: Make sure the connection is following the instruction.
36
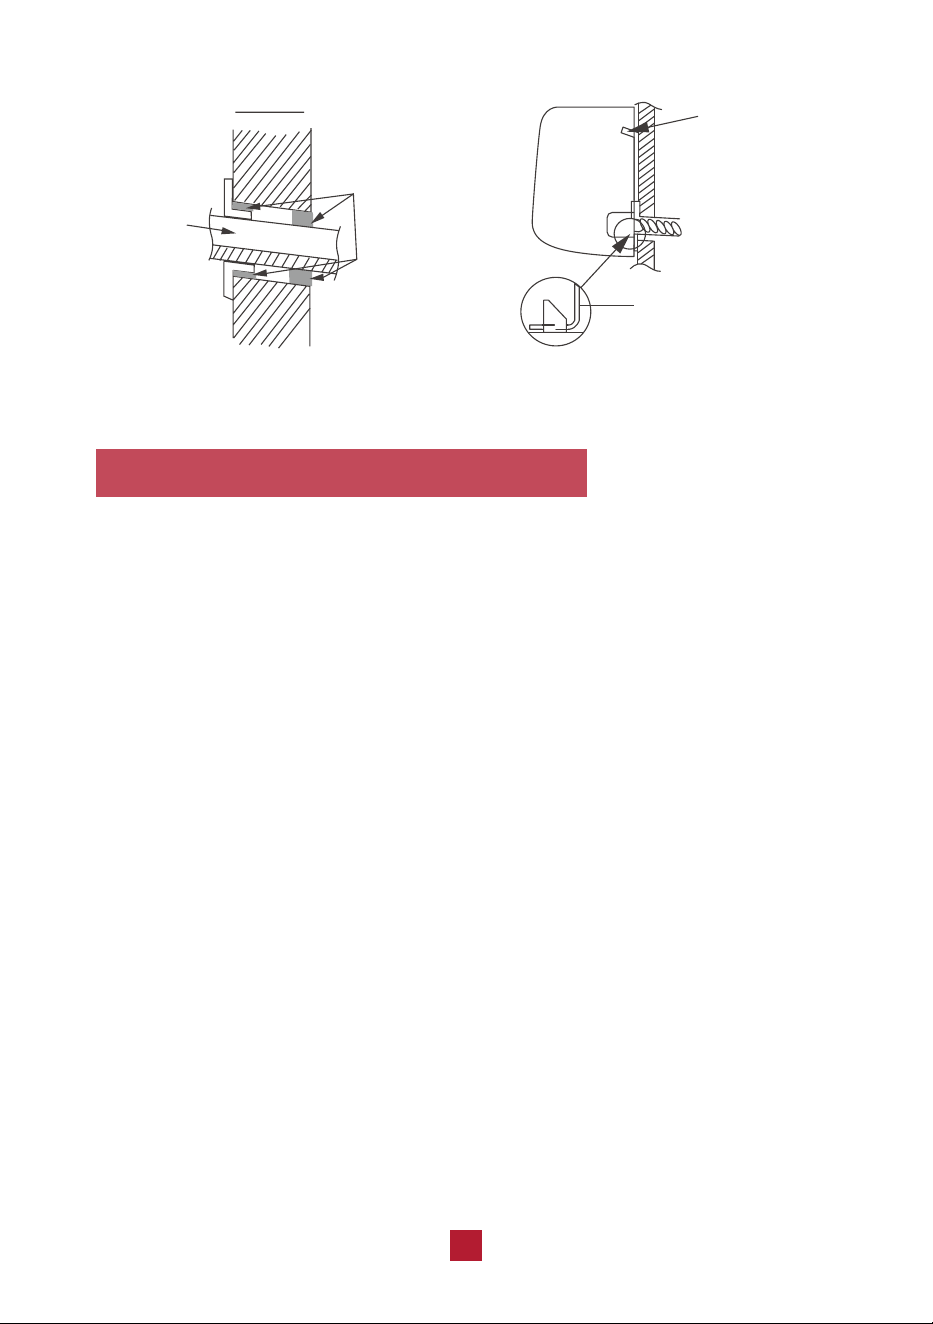
7. Extend the pipe by unwinding it
Ɣ Extending the pipes should be clung to the wall, bent slowly. The minimum
radius of bending the pipe should not exceed 4 in (10 cm).
Ɣ If the pipe is repeatedly bent or extended, it will become hard and difficult to
manipulate. Avoid bending or extending the pipe for more than 3 times.
Ɣ Make sure the pipe connector is protected from dirt and debris when the pipe
passes through the wall. Covering the connections with tape could do the trick.
indoor
bundle
of pipes
outdoor
sealing gum
upper hook
lower hook of
wall-mounting frame

41
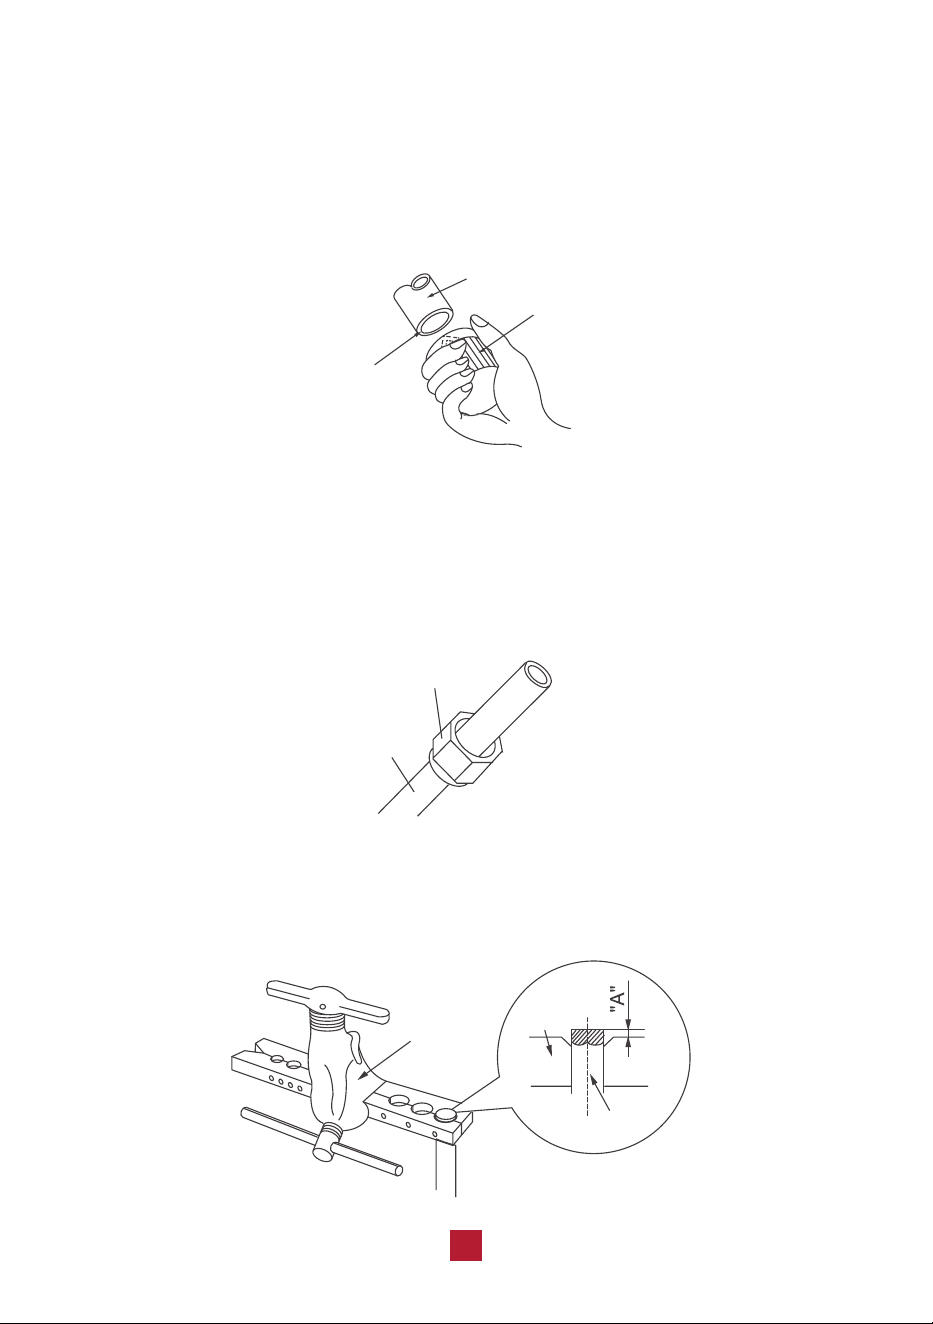
b. Remove burrs
Burrs can affect the air-tight seal of refrigerant piping connection. They must be
completely removed.
Ɣ Hold the pipe at a downward angle to prevent burrs from falling into the pipe.
Ɣ Using a reamer or deburring tool, remove all burrs from the cut section of the pipe.
shaper
downwards
pipe
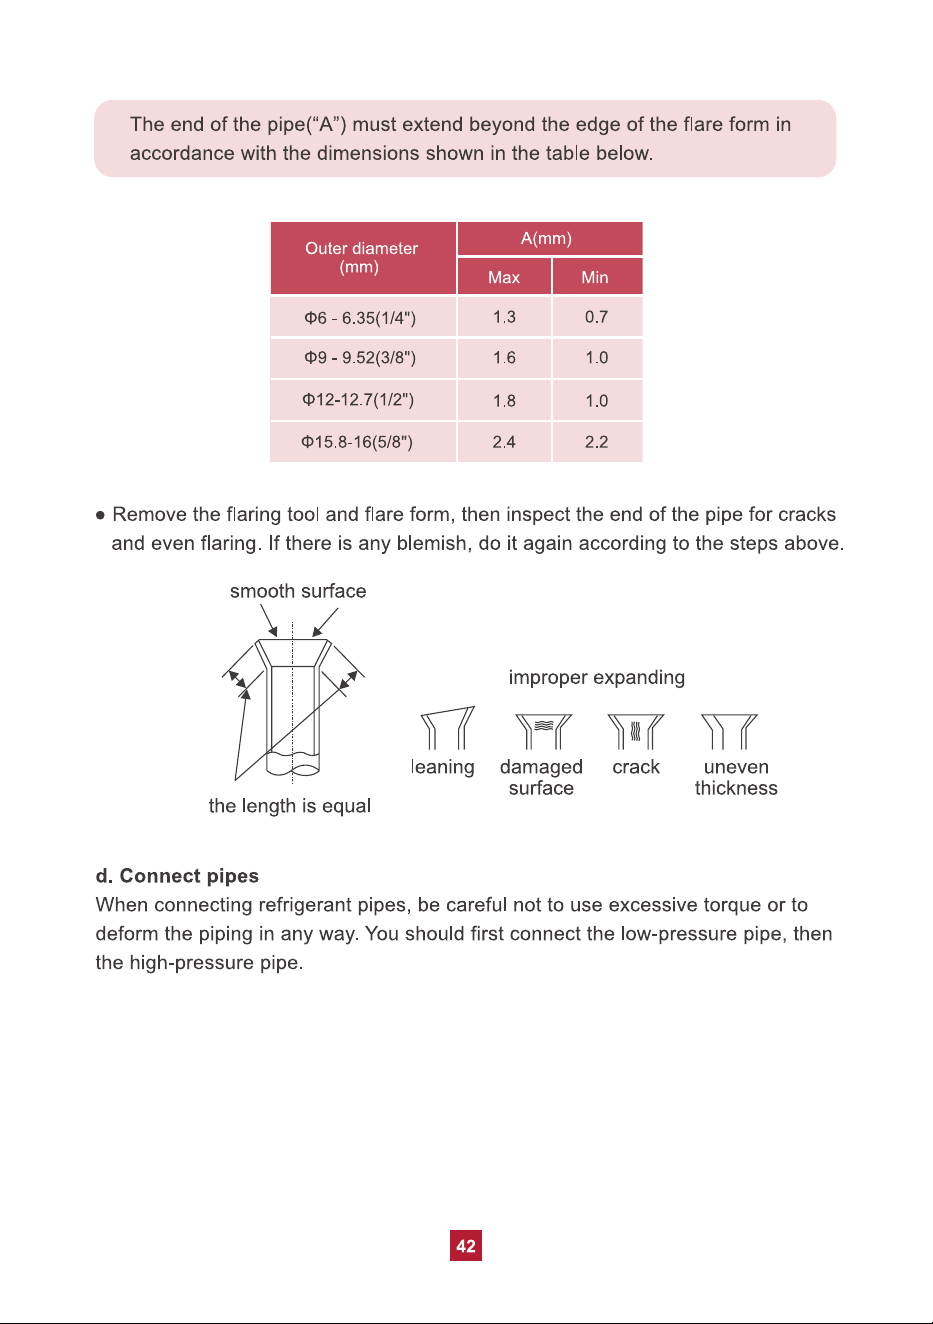
c. Flare pipe ends
Ɣ After removing burrs from the cut pipe, seal the ends with tape to prevent foreign
materials from entering the pipe.
Ɣ Sheath the pipe with insulating material.
Ɣ Place flare nuts on both ends of the pipe. Make sure they are facing in the right
direction, because you can’t put them on or change their direction after flaring.
flare nuts
pipe
Ɣ Remove the tape from ends of pipe when ready to perform flaring work.
Ɣ Clamp flare form on the end of the pipe. Place flaring tool onto the form.
Turn the handle of the flaring tool clockwise until the pipe is fully flared.
expander
pipe
hard
mold